Casper Suite Administrator's Guide v9.31
484
Casper Suite Administrator’s Guide Version 9.31
-
Upload
khangminh22 -
Category
Documents
-
view
0 -
download
0
Transcript of Casper Suite Administrator's Guide v9.31

Casper Suite Administrator’s Guide Version 9.31

JAMF Software, LLC© 2014 JAMF Software, LLC. All rights reserved.
JAMF Software has made all efforts to ensure that this guide is accurate.
JAMF Software301 4th Ave S Suite 1075Minneapolis, MN 55415-1039(612) 605-6625
Under the copyright laws, this publication may not be copied, in whole or in part, without the written consent of JAMF Software, LLC.
Active Directory and Windows are either registered trademarks or trademarks of Microsoft Corporation in the United States and/or other countries.
ADmitMac is a registered trademark of Thursby Software Systems, Inc.
Adobe and Adobe Creative Suite are trademarks of Adobe Systems Incorporated.
Apple, the Apple logo, Apple Remote Desktop, Finder, FileVault, FireWire, iPhone, iTunes, Mac OS, MacBook, and Safari are trademarks of Apple Inc., registered in the United States and other countries. iPad is a trademark of Apple Inc. App Store is a service mark of Apple Inc., registered in the United States and other countries.
Casper Admin, Casper Focus, Casper Imaging, Casper Remote, the Casper Suite logo, Composer, jamf, the JAMF Software logo, the JAMF Software Server (JSS), Recon, Recon.exe, and Self Service are trademarks of JAMF Software, LLC in the United States and other countries. Centrify is a registered trademark of Centrify Corporation in the United States and/or other countries.
Chrome is a trademark of Google, Inc.
Firefox is a registered trademark of the Mozilla Foundation.
eDirectory is a trademark of Novell, Inc. in the United States and other countries. iOS is a trademark or registered trademark of Cisco in the United States and other countries.
Likewise is a trademark of Likewise Software.
Linux is a registered trademark of Linus Torvalds in the United States and other countries.
Maker’s Mark is a registered trademark of Beam Global Spirits & Wine, Inc.
Java is a registered trademark of Oracle and/or its affiliates. Other names may be trademarks of their respective owners.
Tomcat is a trademark of the Apache Software Foundation.
All other product and service names mentioned are the trademarks of their respective companies.

Contents
9 Preface10 About This Guide11 Additional Resources
12 Overview of Technologies13 Applications and Utilities Casper AdminCasper FocusCasper ImagingCasper RemoteComposerjamf agentjamf binaryJAMF HelperJAMF Software ServerJDS InstallersManagement ActionReconRecon.exeSelf ServiceSelf Service Web Clip
16 Ports18 Security PasswordsCommunication ProtocolsPublic Key InfrastructureSigned Applications
20 Requirements JAMF Software ServerInventoryImagingRemote ManagementSelf ServiceManaging Mobile DevicesCasper FocusJDS Installer for MacJDS Installer for Linux
25 Mobile Device Management Capabilities
27 Before You Begin28 Setting Up the JSS 29 Viewing the JSS on Different Types of Devices Computer DisplayTablet DisplaySmartphone and iPod touch Display
32 The JSS Dashboard Adding Items to the JSS Dashboard
34 JSS Objects Cloning a JSS ObjectEditing a JSS ObjectDeleting a JSS ObjectViewing the History of a JSS Object
36 JSS System Settings37 JSS User Accounts and Groups RequirementsCreating a JSS User GroupCreating a JSS User AccountConfiguring Account PreferencesCloning, Editing, or Deleting a JSS User Account or GroupRelated Information
40 Integrating with LDAP Directory Services Adding an LDAP Server Using the LDAP Server AssistantManually Adding an LDAP Server Testing LDAP Attribute MappingsCloning, Editing, or Deleting an LDAP ServerRelated Information
43 Integrating with an SMTP Server Configuring the SMTP Server SettingsTesting the SMTP Server SettingsRelated Information
45 Email Notifications RequirementsEnabling Email Notifications
46 Activation Code Updating the Activation Code
47 Change Management RequirementsConfiguring the Change Management SettingsRelated Information
48 SSL Certificate RequirementsCreating or Uploading an SSL CertificateRelated Information
49 Flushing Logs Scheduling Log FlushingManually Flushing LogsRelated Information
51 JSS Summary RequirementsViewing the JSS SummarySending the JSS Summary to JAMF SoftwareRelated Information
53 Global Management Settings54 Push Certificates RequirementsCreating a Push CertificateUploading a Push Certificate (.p12)Renewing the Push CertificateDeleting the Push CertificateRelated Information
57 Integrating with GSX RequirementsConfiguring the GSX Connection SettingsTesting the GSX ConnectionRelated Information
59 Integrating with the Device Enrollment Program RequirementsConfiguring an Instance of the Device Enrollment ProgramRefreshing Device Enrollment Program Instance InformationEditing and Deleting an Instance of the Device Enrollment ProgramDisowning a Device from the Device Enrollment ProgramRelated Information
62 JSS URL Viewing or Configuring the JSS URLsRelated Information
63 Public Key Infrastructure Downloading the CA CertificateViewing or Revoking CertificatesManually Creating a Certificate from a CSRCreating a Backup of the CA CertificateIntegrating with an External CARelated Information
68 Integrating with VPP RequirementsAdding a VPP AccountEditing or Deleting a VPP AccountRelated Information
3

70 Server Infrastructure71 About Distribution Points Related Information
74 File Share Distribution Points Adding a File Share Distribution PointCloning, Editing, or Deleting a File Share Distribution PointReplicating Files to a File Share Distribution PointRelated Information
76 Cloud Distribution Point RequirementsConfiguring the Cloud Distribution PointTesting the Cloud Distribution PointReplicating Files to the Cloud Distribution PointRelated Information
78 JAMF Distribution Server Instances RequirementsInstalling a JDS Instance on OS XInstalling a JDS Instance on LinuxConfiguring a JDS InstanceReplicating Files to the Root JDS InstanceViewing the Progress of File ReplicationViewing Inventory Information for a JDS InstanceRelated Information
82 Software Update Servers Adding a Software Update ServerCloning, Editing, or Deleting a Software Update ServerRelated Information
84 NetBoot Servers Adding a NetBoot ServerCloning, Editing, or Deleting a NetBoot ServerRelated Information
86 Organizing Your Network87 Buildings and Departments Adding a Building or DepartmentCloning, Editing, or Deleting a Building or DepartmentRelated Information
89 Network Segments Adding a Network SegmentCloning, Editing, or Deleting a Network SegmentRelated Information
91 Sites Adding a SiteCloning, Editing, or Deleting a SiteAdding Items to a SiteRelated Information
94 Scope Configuring Scope
98 Managing Computers
99 Building the Framework for Managing Computers99 Recurring Check-in Frequency Configuring the Recurring Check-in FrequencyRelated Information
101 Startup Script Configuring the Startup ScriptRelated Information
102 Login and Logout Hooks Configuring Login and Logout HooksRelated Information
103 Security Settings RequirementsConfiguring Security SettingsRelated Information
105 Categories Adding a Category to Casper AdminAdding a Category to the JSSEditing or Deleting a Category in Casper AdminCloning, Editing, or Deleting a Category in the JSSRelated Information
107 Enrollment107 About Computer Enrollment Related Information
109 User-Initiated Enrollment Settings for Computers Signing the QuickAdd PackageConfiguring the User-Initiated Enrollment Settings for ComputersRelated Information
111 User-Initiated Enrollment for Computers RequirementsSending a Computer Enrollment InvitationViewing Computer Enrollment Invitation UsageDeleting a Computer Enrollment Invitation
113 QuickAdd Packages Created Using Recon Signing a QuickAdd PackageRequirementsCreating a QuickAdd Package Using ReconRelated Information
115 Network Scanner RequirementsEnrolling Computers Using the Network Scanner
118 Remote Enrollment Using Recon RequirementsEnrolling a Computer by Running Recon Remotely
121 Local Enrollment Using Recon Enrolling a Computer by Running Recon Locally
123 Computer PreStage Enrollments Configuring a Computer PreStage EnrollmentRefreshing PreStage Enrollment InformationCloning, Editing, or Deleting a PreStage EnrollmentRelated Information
126 QuickAdd Packages Created Using Recon.exe Creating a QuickAdd Package Using Recon.exe
127 Local Enrollment Using Recon.exe Enrolling a Windows Computer by Running Recon.exe Locally
129 Composer129 About Composer Related Information
130 Creating Package Sources Taking SnapshotsMonitoring the File SystemCreating Package Sources From Pre-Installed Software Creating Package Sources from the User Environment SettingsCreating Package Sources by Dragging Contents from the FinderCreating Package Sources from Existing PackagesRelated Information
138 Package Manifests Creating Package ManifestsUpdating Package ManifestsImporting Package Manifests
141 Viewing and Editing the Contents of Package Sources Deleting Files or Folders from a Package SourceAdding Files to a Package SourceChanging Privileges on Files or Folders in a Package SourceRestoring Deleted Files or Folders to a Package SourceViewing Files or Folders in a Package Source Using the FinderViewing Files or Folders in a Package Source Using Quick Look
143 Adding Scripts to Package Sources Adding a Postflight Script that Removes Deleted Files from Computers
146 Localizations Adding Localizations to Package SourcesAdding and Editing Files for a Localization
148 Building Packages from Package Sources Building a PKGBuilding a DMG
150 Building OS Packages Installing and Configuring the OSPackaging the OS
152 Composer Preferences Toolbar PreferencesPackage PreferencesExclusion ListAdvanced Preferences
4

156 Inventory156 Computer Inventory Collection Related Information
157 Computer Inventory Collection Settings Time and Traffic Estimates for Collecting Additional ItemsSearch Paths for Collecting Applications, Fonts, and Plug-insConfiguring the Computer Inventory Collection SettingsRelated Information
160 Computer Extension Attributes Computer Extension Attribute Input TypesRequirementsManually Creating a Computer Extension AttributeCreating a Computer Extension Attribute From a TemplateUploading a Template for Computer Extension AttributeCloning, Editing, or Deleting a Computer Extension AttributeRelated Information
164 Computer Inventory Display Settings Configuring the Computer Inventory Display SettingsRelated Information
165 Peripherals Creating a Peripheral TypeAdding a PeripheralCloning, Editing, or Deleting a Peripheral TypeCloning, Editing, or Deleting a PeripheralRelated Information
168 Simple Computer Searches Search SyntaxPerforming a Simple Computer SearchRelated Information
171 Advanced Computer Searches Creating an Advanced Computer SearchCloning, Editing, or Deleting a Saved Advanced Computer SearchViewing Advanced Computer Search ResultsRelated Information
174 Computer Reports Creating Computer Reports
175 Performing Mass Actions for Computers Mass Editing the Building or Department for Computers Mass Editing the Site for ComputersMass Editing the Management Account for ComputersMass Looking up and Populating Purchasing Information for ComputersSending a Mass Email to Computer UsersMass Editing Autorun DataMass Deleting Autorun DataMass Deleting ComputersMass Sending Remote Commands to ComputersRelated Information
181 Viewing and Editing Inventory Information for a Computer Viewing Inventory Information for a ComputerEditing Inventory Information for a Computer
185 Viewing Management Information for a Computer RequirementsViewing the Pending Management Commands for a ComputerViewing Policies for a ComputerViewing Configuration Profiles for a ComputerViewing Managed Preferences for a ComputerViewing Restricted Software for a ComputerViewing the FileVault 2 Recovery Key for a ComputerViewing Group Memberships for a ComputerRelated Information
190 Viewing the History for a Computer Viewing Application Usage Logs for a ComputerViewing Computer Usage Logs for a ComputerViewing and Flushing Policy Logs for a ComputerViewing Casper Remote Logs for a ComputerViewing Screen Sharing Logs for a ComputerViewing Casper Imaging Logs for a ComputerViewing Management History for a ComputerViewing Hardware/Software History for a ComputerViewing User and Location History for a ComputerRelated Information
196 Deleting a Computer from the JSS Related Information
197 Computer Groups197 About Computer Groups Related Information
198 Smart Computer Groups Creating a Smart Computer GroupCloning, Editing, or Deleting a Smart Computer GroupViewing Smart Computer Group MembershipsRelated Information
201 Static Computer Groups Creating a Static Computer GroupCloning, Editing, or Deleting a Static Computer GroupViewing Static Computer Group Memberships Related Information
203 Policies203 About Policies Related Information
204 Managing Policies Creating a PolicyCloning, Editing, or Deleting a PolicyViewing the Plan for a PolicyViewing the Status of a PolicyViewing and Flushing Logs for a PolicyRelated Information
208 Policy Payload Reference General PayloadPackages PayloadSoftware Updates PayloadScripts PayloadPrinters PayloadDisk Encryption PayloadDock Items PayloadLocal Accounts PayloadManagement Account PayloadDirectory Bindings PayloadEFI Password PayloadRestart Options PayloadMaintenance PayloadFiles and Processes Payload
213 User Interaction MessagesDeferralConfiguring User Interaction for a Policy
215 Self Service215 About Self Service Related Information
216 Installing Self Service Installing Self Service AutomaticallyInstalling Self Service Using a Policy
217 Self Service User Login Setting RequirementsConfiguring the User Login Setting for Self Service
218 Self Service Policies Creating a Self Service Policy Related Information
220 Self Service Plug-ins Adding a Self Service Plug-inCloning, Editing, or Deleting a Self Service Plug-inRelated Information
222 Self Service User Experience Logging in to Self ServiceRunning Self Service PoliciesUsing Self Service Plug-insRelated Information
225 Software Distribution225 Managing Packages RequirementsAdding a Package to Casper AdminUploading a Package to the JSSManually Adding a Package to a Distribution Point and the JSSEditing or Deleting a Package Using Casper Admin Editing or Deleting a Package Using the JSSIndexing a PackageViewing the Contents of an Indexed PackageCalculating a ChecksumRelated Information
231 Managing OS X Installers RequirementsAdding a .app File for OS X to Casper AdminAdding a DMG of an OS X Installer to Casper AdminCreating a Custom OS X InstallationRelated Information
236 Administering Adobe CS3 and CS4 RequirementsAdding a DMG of an Adobe CS3/CS4 Updater or Installer to Casper AdminCreating a CS3/CS4 Adobe Installation
240 Installing Packages RequirementsInstalling a Package Using a PolicyInstalling a Package Using Casper RemoteRelated Information
244 Caching Packages RequirementsCaching a Package Using a PolicyCaching a Package Using Casper RemoteRelated Information
248 Installing Cached Packages RequirementsInstalling a Cached Package Using a PolicyInstalling a Cached Package Using Casper RemoteInstalling All Cached Packages Using a PolicyInstalling All Cached Packages Using Casper RemoteRelated Information
254 Uninstalling Packages RequirementsUninstalling a Package Using a PolicyUninstalling a Package Using Casper RemoteRelated Information
258 Patch Management258 Running Software Update RequirementsRunning Software Update Using a PolicyRunning Software Update Using Casper RemoteRelated Information
5

262 Remote Control262 Screen Sharing How Screen Sharing WorksRequirementsSharing the Screen of Another Computer
264 Settings and Security Management264 Managed Preferences Levels for Managed PreferencesCompatibility with Third-Party ProvidersRequirementsCreating a Managed Preference ProfileCloning, Editing, or Deleting a Managed Preference ProfileRelated Information
267 OS X Configuration Profiles Payload Variables for OS X Configuration ProfilesRequirementsManually Creating an OS X Configuration ProfileUploading an OS X Configuration ProfileCloning, Editing, or Deleting an OS X Configuration ProfileDownloading an OS X Configuration ProfileRelated Information
271 OS X Remote Commands RequirementsSending an OS X Remote CommandViewing the Status of OS X Remote CommandsCanceling an OS X Remote Command
274 Managing Scripts RequirementsAdding a Script to Casper AdminAdding a Script to the JSSEditing or Deleting a Script Using Casper AdminCloning, Editing, Deleting a Script Using the JSSRelated Information
278 Running Scripts RequirementsRunning a Script Using a PolicyRunning a Script Using Casper RemoteRelated Information
281 Managing Printers Adding a Printer to Casper AdminAdding a Printer to the JSSEditing or Deleting a Printer in Casper Admin Cloning, Editing, or Deleting a Printer in the JSSRelated Information
284 Administering Printers RequirementsMapping or Unmapping a Printer Using a PolicyMapping or Unmapping a Printer Using Casper RemoteRelated Information
288 Managing Dock Items Adding a Dock Item to Casper AdminAdding a Dock Item to the JSSDeleting a Dock Item in Casper AdminCloning, Editing, or Deleting a Dock Item in the JSSRelated Information
290 Administering Dock Items RequirementsAdding or Removing a Dock Item Using a PolicyAdding or Removing a Dock Item Using Casper RemoteRelated Information
293 Administering Local Accounts RequirementsAdministering Local Accounts Using a PolicyAdministering Local Accounts Using Casper RemoteRelated Information
297 Administering the Management Account RequirementsResetting the Management Account Password Using a PolicyResetting the Management Account Password Using Casper RemoteEnabling or Disabling the Management Account for FileVault 2Related Information
301 Managing Directory Bindings Adding a Directory BindingCloning, Editing, or Deleting a Directory BindingRelated Information
303 Binding to Directory Services RequirementsBinding to a Directory Service Using a PolicyBinding to a Directory Service Using Casper RemoteRelated Information
306 Managing Disk Encryption Configurations RequirementsCreating a Disk Encryption ConfigurationCloning, Editing, or Deleting a Disk Encryption ConfigurationRelated Information
308 Deploying Disk Encryption Configurations RequirementsDeploying a Disk Encryption Configuration Using a PolicyDeploying a Disk Encryption Configuration Using Casper RemoteRelated Information
311 Issuing a New FileVault 2 Recovery Key RequirementsIssuing a New FileVault 2 Recovery KeyRelated Information
313 Administering Open Firmware/EFI Passwords RequirementsSetting or Removing an Open Firmware/EFI Password Using a PolicySetting or Removing an Open Firmware/EFI Password Using Casper RemoteRelated Information
317 Imaging317 About Imaging Related Information
319 Configurations Standard and Smart ConfigurationsCompiled ConfigurationsConfigurations with PartitionsCreating a Configuration Using Casper AdminCreating a Configuration Using the JSSCompiling a ConfigurationEditing or Deleting a Configuration Using Casper AdminCloning, Editing, or Deleting a Configuration Using the JSSRelated Information
324 Booting Computers to NetBoot Images RequirementsBooting Computers to a NetBoot Image Using a PolicyBoot Computers to a NetBoot Image Using Casper RemoteRelated Information
327 Standard Imaging RequirementsUsing Standard ImagingRelated Information
329 PreStage Imaging RequirementsCreating an Imaging PreStageCloning, Editing, or Deleting an Imaging PreStageImaging a Computer Using an Imaging PreStageBypassing PreStage ImagingViewing Imaging PreStage Logs
333 Autorun Imaging Settings Configuring the Autorun Imaging SettingsRelated Information
334 Autorun Imaging RequirementsCreating Autorun Data Using the JSSStoring or Editing Autorun Data Using Casper ImagingEditing or Deleting Autorun Data Using the JSSImaging a Computer Using Autorun ImagingBypassing Autorun ImagingViewing Autorun LogsRelated Information
340 Target Mode Imaging RequirementsUsing TMIRelated Information
343 Customizing the Imaging Process PackagesScriptsPrintersAccountsNetworkAdvanced
346 Removable MAC Addresses Adding a Removable MAC AddressCloning, Editing, or Deleting a Removable MAC Address
347 License Management347 About Licensed Software Related Information
348 Licensed Software Records RequirementsManually Creating a Licensed Software RecordCreating a Licensed Software Record From a TemplateUploading a Licensed Software TemplateCloning, Editing, or Deleting a Licensed Software RecordRelated Information
352 License Compliance Evaluating License Compliance
353 Viewing License Usage Viewing License Usage MatchesRelated Information
354 Application Usage for Licensed Software RequirementsViewing Application Usage Logs for a Licensed Software Record
355 Usage Management355 Application Usage RequirementsViewing Application Usage Logs for a ComputerViewing Application Usage Logs for a Licensed Software RecordRelated Information
357 Computer Usage RequirementsViewing Computer Usage Logs for a ComputerRelated Information
358 Restricted Software Creating a Restricted Software RecordCloning, Editing, or Deleting a Restricted Software RecordRelated Information
6

360 Managing Mobile Devices
361 Enrollment361 About Mobile Device Enrollment Related Information
363 Components Installed on Mobile Devices364 User-Initiated Enrollment Settings for Mobile Devices Configuring the User-Initiated Enrollment Settings for Mobile DevicesRelated Information
366 User-Initiated Enrollment for Mobile Devices RequirementsSending a Mobile Device Enrollment InvitationViewing Mobile Device Enrollment Invitation UsageDeleting a Mobile Device Enrollment InvitationRelated Information
369 User-Initiated Enrollment Experience for Mobile Devices375 Apple Configurator Enrollment Settings RequirementsEnabling Apple Configurator EnrollmentRelated Information
377 Enrollment Profiles Tools for Installing Enrollment ProfilesCreating an Enrollment Profile for Use with Apple ConfiguratorCreating an Enrollment Profile for Use with iPCUCloning, Editing, or Deleting an Enrollment ProfileDownloading an Enrollment ProfileDownloading a Trust ProfileRelated Information
381 Mobile Device PreStage Enrollments RequirementsConfiguring a Mobile Device PreStage EnrollmentRefreshing PreStage Enrollment InformationCloning, Editing, or Deleting a PreStage EnrollmentRelated Information
384 Inventory384 Mobile Device Inventory Collection Settings Configuring the Mobile Device Inventory Collection SettingsRelated Information
385 Mobile Device Extension Attributes Mobile Device Extension Attribute Input TypesRequirementsCreating a Mobile Device Extension AttributeCloning, Editing, or Deleting a Mobile Device Extension AttributeRelated Information
387 Mobile Device Inventory Display Settings Configuring the Mobile Device Inventory Display SettingsRelated Information
388 Simple Mobile Device Searches Search SyntaxPerforming a Simple Mobile Device SearchRelated Information
391 Advanced Mobile Device Searches Creating an Advanced Mobile Device SearchCloning, Editing, or Deleting a Saved Advanced Mobile Device SearchViewing Advanced Mobile Device Search ResultsRelated Information
394 Mobile Device Reports Creating Mobile Device Reports
395 Performing Mass Actions for Mobile Devices Mass Editing the Site for Mobile DevicesMass Looking up and Populating Purchasing Information for Mobile DevicesSending a Mass Email to Mobile Device UsersMass Deleting Mobile DevicesMass Sending Remote Commands to Mobile DevicesRelated Information
399 Viewing and Editing Inventory Information for a Mobile Device Viewing Inventory Information for a Mobile DeviceEditing Inventory Information for a Mobile Device
402 Viewing Management Information for a Mobile Device Viewing the Pending Management Commands for a Mobile DeviceViewing Configuration Profiles for a Mobile DeviceViewing the Activation Lock Bypass Code for a Mobile DeviceViewing Apps for a Mobile DeviceViewing eBooks for a Mobile DeviceViewing Group Memberships for a Mobile DeviceRelated Information
406 Viewing the History for a Mobile Device Viewing Management History for a Mobile DeviceViewing User and Location History for a Mobile DeviceViewing App Installations for a Mobile Device
408 Deleting a Mobile Device from the JSS Related Information
409 Mobile Device Groups409 About Mobile Device Groups Related Information
410 Smart Mobile Device Groups Creating a Smart Mobile Device GroupCloning, Editing, or Deleting a Smart Mobile Device GroupViewing Smart Mobile Device Group MembershipsRelated Information
413 Static Mobile Device Groups Creating a Static Mobile Device GroupCloning, Editing, or Deleting a Static Mobile Device GroupViewing Static Mobile Device Group MembershipsRelated Information
415 Configuration415 iOS Configuration Profiles Payload Variables for iOS Configuration ProfilesManually Creating an iOS Configuration ProfileUploading an iOS Configuration ProfileCloning, Editing, or Deleting an iOS Configuration ProfileDownloading an iOS Configuration ProfileRelated Information
419 Payload Capabilities for iOS Configuration Profiles Related Information
421 Security Management421 iOS Remote Commands Sending an iOS Remote CommandViewing the Status of iOS Remote CommandsCanceling an iOS Remote Command
424 Self Service424 Self Service Web Clip Configuring the Self Service Web Clip SettingsRelated Information
426 App Distribution426 Understanding Managed Apps Managed App Requirements
428 Understanding App Distribution Methods Install Automatically/Prompt Users to InstallMake Available in Self Service Web ClipRelated Information
429 Provisioning Profiles Uploading a Provisioning ProfileEditing or Deleting a Provisioning ProfileDownloading a Provisioning ProfileRelated Information
431 In-House Apps Managed App ConfigurationRequirementsDistributing an In-House AppCloning, Editing, or Deleting an In-House AppDistributing an In-House App UpdateRemoving an In-House App from Mobile DevicesRelated Information
436 App Store Apps VPP CodesManaged App ConfigurationRequirementsDistributing an App Store AppCloning, Editing, or Deleting an App Store AppDistributing an App Store App UpdateRemoving an App Store App from Mobile DevicesRelated Information
7

441 eBook Distribution441 In-House eBooks RequirementsDistributing an In-House eBookCloning, Editing, or Deleting an In-House eBookRelated Information
444 eBooks Available in the iBookstore VPP CodesRequirementsDistributing an eBook Available in the iBookstoreCloning, Editing, or Deleting an eBook Available in the iBookstoreRelated Information
447 Casper Focus447 About Casper Focus Related Information
448 Preparing to Use Casper Focus Device RequirementsBefore Using Casper Focus
450 Classes Creating a ClassCloning, Editing, or Deleting a ClassRelated Information
452 Managing Users
453 Inventory453 User Assignments Assigning a User to a Computer or Mobile DeviceAssigning a User to a PeripheralRemoving a User Assignment from a Computer or Mobile DeviceRemoving a User Assignment from a Peripheral
456 Simple User Searches Search SyntaxPerforming a Simple User SearchRelated Information
458 Advanced User Searches Creating an Advanced User SearchCloning, Editing, or Deleting a Saved Advanced User SearchViewing Advanced User Search ResultsRelated Information
461 User Reports Creating User Reports
462 Simple Content Searches Search SyntaxPerforming a Simple Content SearchRelated Information
464 Advanced Content Searches Creating an Advanced Content SearchCloning, Editing, or Deleting a Saved Advanced Content SearchViewing Advanced Content Search ResultsRelated Information
467 Content Reports Creating Content Reports
468 Viewing and Editing Inventory Information for a User Viewing Inventory Information from the Users TabEditing Inventory Information from the Users TabRelated Information
470 Manually Adding a User to the JSS Related Information
471 Deleting a User from the JSS
472 User Groups472 About User Groups Related Information
473 Smart User Groups Creating a Smart User GroupCloning, Editing, or Deleting a Smart User GroupViewing Smart User Group MembershipsRelated Information
476 Static User Groups Creating a Static User GroupCloning, Editing, or Deleting a Static User GroupRelated Information
478 VPP-Managed Distribution478 VPP Registration RequirementsViewing VPP Invitation UsageResending a VPP InvitationCloning, Editing, or Deleting a VPP InvitationRelated Information
481 VPP Registration Experience482 VPP Assignments RequirementsCreating a VPP AssignmentCloning, Editing, or Deleting a VPP AssignmentRevoking Apps from UsersRevoking All Apps from UsersRelated Information
8

Preface
9

About This Guide
This guide contains overviews about Casper Suite features and instructions for performing administrative tasks using the Casper Suite. It does not prescribe administrative workflows or strategies but is intended to be used as a reference.
Before using the instructions in this guide, the JAMF Software Server (JSS) must be installed.
To learn about the other Casper Suite-related documentation, including documentation about installing and configuring the JSS, see the following section in this guide:
Additional Resources
10

Additional Resources
For more information on Casper Suite-related topics, see the following resources:
�� Casper Suite Release Notes
The release notes include a list of new features, bug fixes, and known issues. They also explain how to upgrade the JSS, and what you need to do to take advantage of new features. Release notes for the most recent version of the Casper Suite are available in the Casper Suite DMG, and at:
http://www.jamfsoftware.com/product-documentation/release-notes
�� JAMF Software Server installation and configuration guides
These guides provide information on installing and setting up the JSS on supported Mac, Linux, and Windows platforms. They also explain how to perform advanced configuration and troubleshooting tasks. They are available at:
http://www.jamfsoftware.com/product-documentation/installation-guides
�� Manually Installing the JAMF Software Server
This technical paper explains how to manually install the JSS on Linux and Windows platforms. You can download it from:
http://www.jamfsoftware.com/product-documentation/installation-guides
�� QuickStart Guides
The QuickStart Guide for Managing Computers and the QuickStart Guide for Managing Mobile Devices serve as a starting point for new Casper Suite administrators. They provide simplified workflows for performing basic administrative tasks, such as inventory and software distribution, and they reference related sections in the Casper Suite Administrator’s Guide. Both QuickStart Guides are available in the Casper Suite DMG, and at:
http://www.jamfsoftware.com/product-documentation/quickstart-guides
�� Technical papers
JAMF Software technical papers provide best-practice, step-by-step workflows for using the Casper Suite to administer third-party software, such as Adobe Creative Suite or FileVault 2. They are available at:
http://www.jamfsoftware.com/technical-papers
�� JAMF Nation
The JAMF Nation community website contains several different types of resources related to the Casper Suite. It allows you communicate with other Casper Suite administrators via discussions, submit feature requests, and access the Knowledge Base. The Knowledge Base contains hundreds of articles that address frequently asked questions and common issues. You can access JAMF Nation at:
https://jamfnation.jamfsoftware.com
11

Overview of Technologies
12

Applications and Utilities
This section provides an overview of the applications and utilities that make up the Casper Suite.
Casper AdminThe Casper Admin application is a repository that allows you to add and manage packages, scripts, printers, and Dock items. It also allows you to create configurations (images) using these items and replicate files to distribution points.
Casper FocusThe Casper Focus app is designed to be used by teachers in the classroom. It gives teachers control over the devices used during class time by allowing the teacher to “focus” the devices on a single app or website. Focusing a device locks it on the app or website, preventing students from accessing any other screens or content on the device. In addition to focusing student devices, teachers can also perform the following actions in Casper Focus:
�� Clear passcodes on student devices.
�� Use AirPlay Mirroring to show the screen of a student device on Apple TV.
�� Distribute eBooks (ePub format only) so that students can install the eBooks on their devices from the Self Service web clip.
Casper Focus is available for free from the App Store.
Casper ImagingThe Casper Imaging application allows you to image computers by deploying configurations to them.
Casper RemoteThe Casper Remote application allows you to immediately perform remote management tasks on computers, such as installing packages, running scripts, and binding to directory services. While policies allow you to automate these tasks so that they run on a schedule, Casper Remote allows you to perform them immediately over a Secure Shell (SSH) connection.
ComposerThe Composer application allows you to build packages (PKG or DMG) of software, applications, preference files, or documents. Composer also allows you to build a DMG of an operating system.
13

jamf agentThe jamf agent collects application usage data and restricts software on managed computers.
The jamf agent is installed and updated on managed computers automatically. It is installed in the following location:
/usr/sbin/jamfAgent
jamf binaryMost tasks in the Casper Suite are executed using the “jamf” command-line application (also known as the jamf binary). Although you are free to use this application at will, it is installed, updated, and run on managed computers automatically. It is stored in the following location on managed computers:
/usr/sbin/jamf
JAMF HelperThe JAMF Helper displays messages to users. It is stored in the following location on managed computers:
/Library/Application Support/JAMF/bin/
JAMF Software ServerThe JAMF Software Server (JSS) is a web application that functions as the administrative core of the Casper Suite. The JSS allows you to perform inventory and remote management and configuration tasks on managed computers and mobile devices. All other administrative applications in the Casper Suite communicate with the JSS.
JDS InstallersThe JDS Installer for Mac (.pkg) and the JDS Installer for Linux (.run) allow you to install JDS instances on OS X or supported Linux operating systems.
A JDS instance is a distribution point that is managed by the JSS, similar to a computer or mobile device. For more information on JDS instances, see JAMF Distribution Server Instances.
To obtain the JDS Installers, log in to JAMF Nation and go to the following page:
https://jamfnation.jamfsoftware.com/myAssets.html
14

Management ActionThe Management Action application displays User Interaction messages in the OS X Notification Center. It is stored in the following location on managed computers:
/Library/Application Support/JAMF/bin/
ReconThe Recon application allows you to enroll OS X computers. Enrollment is the process of adding computers to the JSS. When OS X computers are enrolled, inventory information for the computers is submitted to the JSS, and the computers are managed.
Recon.exeThe Recon.exe application allows you to enroll Windows computers. Enrollment is the process of adding computers to the JSS. Enrolling Windows computers allows you to search and report on the computers as part of your inventory. Windows computers cannot be managed by the JSS.
Self ServiceThe Self Service application allows users to browse and run policies, access webpages, and utilize plug-ins developed with the Self Service API. Users can point-and-click their way through Self Service using an intuitive interface similar to iTunes.
You can make any policy available in Self Service and customize how it is displayed to users. You can also make two types of plug-ins available in Self Service: URL plug-ins and Self Service Plug-in bundles. URL plug-ins give users easy access to webpages right from the application. Self Service Plug-in bundles are custom plug-ins developed with the Self Service API.
Self Service Web Clip The Self Service web clip allows you to distribute iOS configuration profiles, apps, eBooks, and updated MDM profiles to mobile devices for users to install. Users tap the web clip to browse and install items using an interface similar to the App Store.
By default, the Self Service web clip is installed on all managed mobile devices.
15

Ports
The following table describes the main ports used to host communication between computers, distribution points, and the JAMF Software Server (JSS):
Port Used for Direction
22 The standard port for SSH (known as remote login in OS X). Default port used by Casper Remote and Recon to connect to computers.
Outbound from Casper Remote and Recon, and inbound to computers
80 The standard port for HTTP. When you use HTTP to deploy files, they are downloaded on this port.
Inbound to the distribution point, and outbound from computers
443 The standard port for HTTPS. When you use HTTPS to deploy files, they are downloaded on this port.
Inbound to the distribution point, and outbound from computers and mobile devices
548 The standard port for Apple File Protocol (AFP). If you use an AFP share to deploy files, computers mount the AFP share on this port.
Inbound to the share, and outbound from computers
3306 The default port used by the JSS to connect to MySQL. Outbound from the JSS, and inbound to MySQL
8443 The SSL port for the JSS. Default port used by applications and computers and mobile devices to connect to the JSS.
Inbound to the JSS, and outbound from computers and mobile devices
The following table describes other commonly used ports:
Port Used for Direction
25 The standard port for SMTP. The JSS connects to an SMTP server to send email notifications to JSS users.
Outbound from the JSS, and inbound to the SMTP server
139 If you use an SMB share to deploy files, computers mount the SMB share on this port.
Inbound to the share, and outbound from computers
389 The standard port for LDAP. Any LDAP connections—even those coming from other applications—go through the JSS. This means that only the JSS connects to your LDAP server.
Outbound from the JSS, and inbound to the LDAP server
636 The standard port for LDAPS. Any LDAP connections—even those coming from other applications—go through the JSS. This means that only the JSS connects to your LDAP server.
Outbound from the JSS, and inbound to the LDAP server
445 If you have an SMB client, such as “DAVE”, installed on computers, they may mount the SMB share on this port.
Inbound to the share, and outbound from computers
514 The default port used by the JSS to write to Syslog servers.
Outbound from the JSS, and inbound to Syslog servers
16

Port Used for Direction
2195 The port used to send messages from the JSS to Apple Push Notification service (APNs).
Outbound from the JSS, and inbound to the APNs server
2196 The port used by the JSS to connect to APNs for feedback.
Outbound from the JSS, and inbound to the APNs server
5223 The port used to send messages from APNs to the mobile devices and computers in your network.
Outbound from computers and mobile devices, and inbound to the APNs server
8080 The HTTP port for the JSS on Linux and Windows platforms. Although it is available, applications do not connect to this port unless the defaults are overridden.
N/A
9006 The HTTP port for the JSS on the Mac platform. Although it is available, applications do not connect to this port unless the defaults are overridden.
N/A
On the Mac platform, the JSS runs on ports 8443 and 9006 by default. On Windows and Linux platforms, the JSS runs on 8443 and 8080 by default. If you decide to change these ports, you must change the port information in Tomcat’s server.xml file and in the Preferences window for each Casper Suite application.
You cannot change the default ports for SSH or SMB with the Casper Suite.
17

Security
This section explains the primary security measures in the Casper Suite:
�� Passwords
�� Communication protocols
�� Public key infrastructure
�� Signed applications
PasswordsThe Casper Suite allows you to store individual accounts for managed computers and reset the passwords if necessary.
Passwords stored in the database are encrypted using a standard 256-bit AES encryption algorithm.
Communication ProtocolsThe Casper Suite has security built into its design. Connections between the JAMF Software Server (JSS), the other applications in the Casper Suite, and mobile devices take place over Secure Sockets Layer (SSL). The Casper Remote application and the network scanner in the Recon application connect to computers over Secure Shell (SSH), or Remote Login.
Secure Shell (SSH)
SSH is a network security protocol built into OS X. For more information, go to:
http://openssh.com/
Secure Sockets Layer (SSL)
SSL is a security protocol for Internet communication. For more information, go to:
https://www.openssl.org/
Public Key InfrastructureA public key infrastructure (PKI) is the design by which digital certificates are obtained, managed, stored, and distributed to ensure a secure exchange of data over a public network.
Certificate Authority
A certificate authority (CA) is a trusted entity that signs and issues the certificates required for certificate-based authentication. It is the central component of the PKI.
18

The JSS includes a preconfigured PKI that uses a built-in CA. The built-in CA is used by default to issue certificates to both computers and mobile devices. You can also configure your own PKI if you have access to an external CA that supports SCEP. The external CA can be a CA hosted by your organization or by a trusted third-party vendor. If you integrate an external CA with the JSS, this CA will be used to issue certificates to mobile devices.
Simple Certificate Enrollment Protocol
Simple Certificate Enrollment Protocol (SCEP) obtains certificates from the CA and distributes them to managed mobile devices, providing a simplified way of handling large-scale certificate distribution. The CA hosted by the JSS (the “built-in CA”) supports SCEP. If you plan to use an external CA hosted by your organization or by a third-party vendor, this CA must support SCEP as well.
Certificates
The Casper Suite uses the following certificates to ensure security:
�� SSL Certificate—The JSS requires a valid SSL certificate to ensure that computers and mobile devices communicate with the JSS and not an imposter server. The SSL certificate that you can create from the built-in CA secures communication using a 2048-bit RSA encryption.
�� Device Certificates—Device certificates allow the JSS to verify the identity of OS X computers and mobile devices each time they communicate with the JSS.
�� CA Certificate—This certificate establishes trust between the CA and OS X computers, and between the CA and mobile devices.
�� Signing Certificate—This certificate is used to sign messages passed between the JSS and OS X computers, and between the JSS and mobile devices.
�� Push Certificate—The JSS requires a valid push certificate to communicate with Apple Push Notification service (APNs).
�� Anchor Certificate—This certificate allows mobile devices and computers to trust the SSL certificate.
Signed ApplicationsThe following applications are signed by JAMF Software:
�� Casper Admin
�� Casper Imaging
�� Casper Remote
�� Composer
�� jamf binary
�� JAMF Helper
�� JDS Installer for Mac
�� Recon
�� Recon.exe
�� Self Service
19

Requirements
This section lists requirements for the following components and functions of the Casper Suite:
�� JAMF Software Server (JSS)
�� Package building
�� Inventory
�� Imaging
�� Remote management
�� Self Service
�� Managing mobile devices
�� Casper Focus
�� JDS Installers
JAMF Software ServerYou can host the JSS on any server that meets the following minimum requirements:
�� Java 1.6 or later
�� MySQL 5.1 or later
�� Apache Tomcat 6.0 or later
Tested operating systems include:
�� OS X Server v10.7
�� OS X Server v10.8
�� OS X Server v10.9
�� Ubuntu 10.04 LTS Server
�� Ubuntu 12.04 LTS Server
�� Red Hat Enterprise Linux (RHEL) 6.4 or later
�� Windows Server 2008 R2
�� Windows Server 2012
Although you can install the JSS on any server that meets the minimum requirements, the JSS Installers for Mac, Linux, and Windows have additional requirements. For more information, see the JSS installation and configuration guide for your platform. These guides are available at:
http://www.jamfsoftware.com/product-documentation/installation-guides
20

Browser requirements for the JSS are as follows:
�� Safari
�� Mozilla Firefox
�� Google Chrome
�� Microsoft Internet Explorer 9 or later
Package BuildingComposer can run on the following operating systems:
�� OS X v10.5.x
�� OS X v10.6.x
�� OS X v10.7.x
�� OS X v10.8.x
�� OS X v10.9.x
InventoryRecon can run locally on the following operating systems:
�� OS X v10.5.x
�� OS X v10.6.x
�� OS X v10.7.x
�� OS X v10.8.x
�� OS X v10.9.x
�� Windows 2000
�� Windows XP
�� Windows Server 2003
�� Windows Vista
�� Windows Server 2008
�� Windows 7 Recon can enroll computers with the following operating systems:
�� OS X v10.5.x
�� OS X v10.6.x
�� OS X v10.7.x
�� OS X v10.8.x
�� OS X v10.9.x
21

Older versions of Recon (available by contacting JAMF Software Support) can enroll computers with the following operating systems:
�� OS v8.6
�� OS v9.x
�� OS X v10.1.x
�� OS X v10.2.x
�� OS X v10.3.x
�� OS X v10.4.x
�� Windows NT4
�� Windows ME
ImagingCasper Imaging can image computers with OS X v10.5.x, OS X v10.6.x, OS X v10.7.x, or OS X v10.8.x that do not have PowerPC processors.
Remote ManagementPolicies can be used to manage computers with the following operating systems:
�� OS X v10.5.x
�� OS X v10.6.x
�� OS X v10.7.x
�� OS X v10.8.x
�� OS X v10.9.x Casper Remote can be used to manage computers with OS X v10.5.x, OS X v10.6.x, OS X v10.7.x, OS X v10.8.x, or v10.9.x that do not have PowerPC processors.
Self ServiceSelf Service can run on the following operating systems:
�� OS X v10.5.x
�� OS X v10.6.x
�� OS X v10.7.x
�� OS X v10.8.x
�� OS X v10.9.x
22

Managing Mobile DevicesThe Casper Suite can be used to enroll and manage the following types of mobile devices:
�� iPads with iOS 4 or later
�� iPhones with iOS 4 or later
�� iPod touches with iOS 4 or later
�� Apple TV devices with iOS 7 or later For information on the mobile device management capabilities available by device type and iOS version, see Mobile Device Management Capabilities.
Casper FocusCasper Focus can run on teacher mobile devices with iOS 6 or later. Student mobile devices that are assigned to classes in Casper Focus must have iOS 5.1.1 or later and must be managed by the Casper Suite v8.7 or later. For information on feature-specific Casper Focus requirements for student mobile devices, see Preparing to Use Casper Focus.
JDS Installer for MacThe JDS Installer for Mac requires a computer with:
�� An Intel processor
�� 2 GB of RAM
�� 100 GB of disk space available
�� OS X Server v10.7 or later
�� Server.app 1.4.3 or later
23

JDS Installer for LinuxThe JDS Installer for Linux requires a computer with:
�� An Intel processor
�� 2 GB of RAM
�� 100 GB of disk space available
�� One of the following operating systems:
• Ubuntu 10.04 LTS Server
• Ubuntu 12.04 LTS Server
• Red Hat Enterprise Linux (RHEL) 6.4 or later
To install a JDS instance on a Linux operating system that is running on a virtual machine, you need a virtualization platform that provides SMBIOS information.
24

Mobile Device Management Capabilities
The Casper Suite can be used to enroll and manage the following types of mobile devices:
�� iPads with iOS 4 or later
�� iPhones with iOS 4 or later
�� iPod touches with iOS 4 or later
�� Apple TV devices with iOS 7 or later The following table provides an overview of the mobile device management capabilities available with the Casper Suite by device type and iOS version:
Device Type iPad iPhone iPod touch Apple TViOS Version 4 5 6 7 4 5 6 7 4 5 6 7 7
Enrollment
Via user-initiated enrollment 3 3 3 3 3 3 3 3 3 3 3 3 3
Via an enrollment profile and Apple Configurator
3 3 3 3 3 3 3 3 3 3 3 3 3
Via an enrollment profile and Apple’s iPCU
3 3 3 3 3 3 3 3 3
Via Apple’s Device Enrollment Program
3 3 3
Via Apple Configurator enrollment
3 3 3
Inventory
Submit inventory to the JSS 3 3 3 3 3 3 3 3 3 3 3 3 3
Mobile Device Groups
Static groups 3 3 3 3 3 3 3 3 3 3 3 3 3
Smart groups 3 3 3 3 3 3 3 3 3 3 3 3 3
Configuration
iOS configuration profiles 3 3 3 3 3 3 3 3 3 3 3 3 3 1
iOS Remote Commands
Update inventory 3 3 3 3 3 3 3 3 3 3 3 3 3
Lock device 3 3 3 3 3 3 3 3 3 3 3 3
Clear passcode 3 3 3 3 3 3 3 3 3 3 3 3
Wipe device 3 3 3 3 3 3 3 3 3 3 3 3
Unmanage device 3 3 3 3 3 3 3 3 3 3 3 3 3
Send blank push 3 3 3 3 3 3 3 3 3 3 3 3 3
Enable/disable voice or data roaming2
3 3 3 3 3 3
25

Device Type iPad iPhone iPod touch Apple TViOS Version 4 5 6 7 4 5 6 7 4 5 6 7 7
Self Service
Self Service web clip 3 3 3 3 3 3 3 3 3 3 3 3
App Distribution
Managed apps 3 3 3 3 3 3 3 3 3
VPP-managed distribution 3 3 3
In-house apps 3 3 3 3 3 3 3 3 3 3 3 3
App Store apps 3 3 3 3 3 3 3 3 3 3 3 3
eBook Distribution
VPP-managed distribution 3 3 3
Install ePub file 3 3 3 3 3 3 3 3 3 3 3 3
Install iBooks file 3 3 3
Install PDF 3 3 3 3 3 3 3 3 3 3 3 3
Casper Focus3
Focus on app 3 3 3 3 3 3
Focus on website 3 3 3
Clear passcodes 3 3 3 3 3 3 3 3 3
Mirror device on Apple TV 3 3 3
Notes:1. Wi-Fi, Certificate, SCEP, and Global HTTP Proxy are the only iOS configuration profile payloads that
work on Apple TV devices.2. iOS remote commands for voice or data roaming are only available for devices with cellular capability.3. Management capabilities available for Casper Focus apply only to student mobile devices, not teacher
devices.
26

Before You Begin
27
Setting Up the JSS
The first time you connect to the JAMF Software Server (JSS), the JSS Setup Assistant guides you through the following setup tasks:
�� Accept the license agreement.
�� Enter your activation code.
�� Create your first JSS user account.
�� Enter your JSS URL.
The JSS URL is the URL that client applications, computers, and mobile devices will connect to when communicating with the JSS.
After you complete the JSS Setup Assistant, you can click the setup tips that are displayed onscreen to start configuring commonly used settings. You may also want to make changes to the following preconfigured settings to ensure they meet the needs of your organization. These settings are important because over time, they can significantly affect the size of your database and your levels of network traffic:
�� “Update Inventory” policy—Determines how often computers submit inventory to the JSS.
For more information, see Computer Inventory Collection.
�� Recurring check-in frequency—Determines the interval at which computers check in with the JSS for available policies.
For more information, see Recurring Check-in Frequency.
�� Mobile device inventory collection frequency—Determines how often mobile devices submit inventory to the JSS.
For more information, see Mobile Device Inventory Collection Settings.
28

Viewing the JSS on Different Types of Devices
The JAMF Software Server (JSS) interface automatically adjusts to the width of your web browser to provide the best possible display for the device on which it is viewed. This allows you to seamlessly transition between devices—all providing an optimal viewing experience so you can navigate the JSS with minimal scrolling and panning. The screen shots below show examples of how navigational elements in the JSS are displayed when viewed on the following types of devices:
�� Computer
�� Tablet
�� Smartphone or iPod touch
Computer Display
Note: When viewing the JSS on a computer, navigational elements display differently if the web browser is resized.
JSS Dashboard button
Computers, Mobile Devices, and Users tabs
Site menu
User menu
Settings button
Main navigation in sidebar
29

Tablet DisplayThe screen shot below shows the JSS displayed on a tablet in portrait orientation. For landscape orientation, the navigational elements display the same as they do in the computer view. (For more information, see Computer Display.)
JSS Dashboard button
Computers, Mobile Devices, and Users tabs
Site menu
User menu
Settings button
Main navigation in tabbed menu
30

Smartphone and iPod touch DisplayOn a smartphone or iPod touch, the JSS navigational elements display the same for both landscape and portrait orientation.
JSS Dashboard button
Computers, Mobile Devices, and Users tabs
Site menu Settings button
Main navigation in pop-up menu
User menu
31

The JSS Dashboard
The JSS Dashboard allows you to monitor the status of commonly viewed items in the JAMF Software Server (JSS), such as smart groups, policies, configuration profiles, and licensed software—all in one central location. You can access the JSS Dashboard while using the JSS by clicking the JSS Dashboard button in the top-left corner of the page.
Note: Until you add one or more items to the JSS Dashboard, it displays setup tips that you can use to configure commonly used settings.
JSS Dashboard button
JSS Dashboard
32

Adding Items to the JSS DashboardYou can add the following types of items to the JSS Dashboard:
�� Smart computer groups
�� Smart mobile device groups
�� Policies
�� OS X configuration profiles
�� iOS configuration profiles
�� Licensed software To add an item to the JSS Dashboard, select the Show in JSS Dashboard checkbox in the upper-right corner of the pane when viewing the item in the JSS.
Show in JSS Dashboard checkbox
33

JSS Objects
JSS objects provide the foundation for performing administrative and management tasks using the JAMF Software Server (JSS). Examples of JSS objects include policies, configuration profiles, and network segments.
For detailed information about a specific JSS object, including instructions for navigating to the JSS object, see the appropriate section in this guide. Common actions that can be taken on JSS objects are cloning, editing, deleting, and viewing history.
Note: Available actions are dependent on the particular JSS object. (For example, a package cannot be cloned, so the Clone button is not displayed for the Packages object.) In addition, an action will not be available if the required privileges have not been granted for that JSS object.
Cloning a JSS Object
1. Log in to the JSS with a web browser.
2. Navigate to the JSS object you want to clone.
3. Click Clone and make changes as needed.
4. Click Save.
Editing a JSS Object
1. Log in to the JSS with a web browser.
2. Navigate to the JSS object you want to edit.
3. Click Edit and make changes as needed.
4. Click Save.
Deleting a JSS Object
1. Log in to the JSS with a web browser.
2. Navigate to the JSS object you want to delete.
3. Click Delete.
4. Click Delete again to confirm.
34

Viewing the History of a JSS ObjectThe JSS allows you to view the history of each JSS object. The information you can view includes:
�� The date/time the JSS object was created or edited
�� The username of the administrator who made the change
�� Notes associated with the changes
Note: This information is displayed for any JSS object changes made using v9.31 or later.
1. Log in to the JSS with a web browser.
2. Navigate to the JSS object you want to view the history of.
3. Click History.
4. (Optional) Click Add Note to add a note to the history record.
35

JSS System Settings
36

JSS User Accounts and Groups
The JAMF Software Server (JSS) is a multi-user application. JSS user accounts and groups allow you to grant different privileges and levels of access to each user.
When configuring a JSS user account or group, you can grant access to the full JSS or to a specific site. You can grant privileges by choosing one of the following privilege sets:
�� Administrator—Grants all privileges.
�� Auditor—Grants all read privileges.
�� Enrollment Only—Grants all privileges required to enroll computers and mobile devices.
�� Custom—Requires you to grant privileges manually.
If there are multiple users that should have the same access level and privileges, you can create a group with the desired access level and privileges and add accounts to it. Members of a group inherit the access level and privileges from the group. Adding an account to multiple groups allows you to grant a user access to multiple sites.
There are two ways to create JSS user accounts and groups: you can create standard accounts or groups, or you can add them from an LDAP directory service.
Important: It is recommended that you have at least one account that is not from an LDAP directory service in case the connection between the JSS and the LDAP server is interrupted.
RequirementsTo add accounts or groups from an LDAP directory service, you need an LDAP server set up in the JSS. (For more information, see Integrating with LDAP Directory Services.)
Creating a JSS User Group
1. Log in to the JSS with a web browser.
2. In the top-right corner of the page, click Settings .
3. Click System Settings.
On a smartphone or iPod touch, this option is in the pop-up menu.
4. Click JSS User Accounts & Groups .
5. Click New .
6. Do one of the following:
�� To create a standard JSS user group, select Create Standard Group and click Next.
�� To add a JSS user group from an LDAP directory service, select Add LDAP Group and click Next. Then follow the onscreen instructions to search for and add the group.
37

7. Use the Group pane to configure basic settings for the group.
8. If you chose “Custom” from the Privilege Set pop-up menu, click the Privileges tab and select the checkbox for each privilege that you want to grant the group.
9. Click Save.
Creating a JSS User Account
1. Log in to the JSS with a web browser.
2. In the top-right corner of the page, click Settings .
3. Click System Settings.
On a smartphone or iPod touch, this option is in the pop-up menu.
4. Click JSS User Accounts & Groups .
5. Click New .
6. Do one of the following:
�� To create a standard JSS user account, select Create Standard Account and click Next.
�� To add a JSS user account from an LDAP directory service, select Add LDAP Account and click Next. Then follow the onscreen instructions to search for and add the account.
7. On the Account pane, enter information about the account as needed.
8. Choose an access level from the Access Level pop-up menu:
�� To grant full access to the JSS, choose “Full Access”.
�� To grant access to a site, choose “Site Access”.
Note: The “Site Access” option is only displayed if there are sites in the JSS. For more information on adding sites to the JSS, see Sites.
�� To add the account to a standard group, choose “Group Access”.
Note: The “Group Access” option is only displayed if there are standard groups in the JSS. For more information on creating groups, see Creating a JSS User Group.
9. Do one of the following:
�� If you granted the account full access or site access, choose a privilege set from the Privilege Set pop-up menu. Then, if you chose “Custom”, click the Privileges tab and select the checkbox for each privilege that you want to grant the account.
�� If you added the account to a group, click the Group Membership tab and select the group(s) you want to add the account to.
10. Click Save.
38

Configuring Account PreferencesLanguage, date format, and search preferences can be configured for each JSS account.
1. Log in to the JSS with a web browser.
2. At the top of the page, click the disclosure triangle next to your username and then click Preferences.
3. Use the pop-up menus to choose account preferences.
Note: The default search preference is “Exact Match”. For most items, the option can be changed to either “Starts with” or “Contains”.
4. Click Save.
Cloning, Editing, or Deleting a JSS User Account or Group
1. Log in to the JSS with a web browser.
2. In the top-right corner of the page, click Settings .
3. Click System Settings.
On a smartphone or iPod touch, this option is in the pop-up menu.
4. Click JSS User Accounts & Groups .
5. Click the JSS user account or group you want to clone, edit, or delete.
6. Do one of the following:
�� To clone the account or group, click Clone and make changes as needed. Then click Save.
�� To edit the account or group, click Edit and make changes as needed. Then click Save.
�� To delete the account or group, click Delete and then click Delete again to confirm.
Related InformationFor related information, see the following section in this guide:
SitesLearn about sites and how to add them to the JSS.
39

Integrating with LDAP Directory Services
Integrating with an LDAP directory service allows you to do the following:
�� Look up and populate user information from the directory service for inventory purposes.
�� Add JSS user accounts or groups from the directory service.
�� Require users to log in to Self Service or the enrollment portal using their LDAP directory accounts.
�� Require users to log in during mobile device setup using their LDAP directory accounts.
�� Base the scope of remote management tasks on users or groups from the directory service. To integrate with an LDAP directory service, you need to add the LDAP server to the JAMF Software Server (JSS). There are two ways to add LDAP servers to the JSS: using the LDAP Server Assistant or manually.
The LDAP Server Assistant guides you through the process of entering information about the LDAP server and ensuring that LDAP attributes are mapped properly. It allows you to integrate with the following directory services:
�� Apple’s Open Directory
�� Microsoft’s Active Directory
�� Novell’s eDirectory Manually adding an LDAP server involves entering detailed information about the LDAP server and manually configure attribute mappings. This allows you to integrate with LDAP additional directory services.
Adding an LDAP Server Using the LDAP Server Assistant
1. Log in to the JSS with a web browser.
2. In the top-right corner of the page, click Settings .
3. Click System Settings.
On a smartphone or iPod touch, this option is in the pop-up menu.
4. Click LDAP Servers .
5. Click New .
6. Follow the onscreen instructions to add the LDAP server.
40

Manually Adding an LDAP Server Before manually adding an LDAP server, it is important that you are familiar with search bases, object classes, and attributes. If you are not familiar with these concepts, use the LDAP Server Assistant to ensure that attributes are mapped correctly.
1. Log in to the JSS with a web browser.
2. In the top-right corner of the page, click Settings .
3. Click System Settings.
On a smartphone or iPod touch, this option is in the pop-up menu.
4. Click LDAP Servers .
5. Click New .
6. Select Configure Manually and click Next.
7. Use the Connection pane to configure how the JSS connects to the LDAP server.
8. Use the Mappings pane to specify object class and search base data, and map attributes.
9. Click Save.
Testing LDAP Attribute MappingsYou can test the following LDAP attribute mappings:
�� User mappings
�� User group mappings
�� User group membership mappings
If the JSS returns the appropriate information, the attributes are mapped correctly.
1. Log in to the JSS with a web browser.
2. In the top-right corner of the page, click Settings .
3. Click System Settings.
On a smartphone or iPod touch, this option is in the pop-up menu.
4. Click LDAP Servers .
5. Click the LDAP server you want to test.
6. Click Test.
7. Click the appropriate tab and enter information in the field(s) provided.
8. Click Test again.
41

Cloning, Editing, or Deleting an LDAP Server
1. Log in to the JSS with a web browser.
2. In the top-right corner of the page, click Settings .
3. Click System Settings.
On a smartphone or iPod touch, this option is in the pop-up menu.
4. Click LDAP Servers .
5. Click the LDAP server you want to clone, edit, or delete.
6. Do one of the following:
�� To clone the LDAP server, click Clone and make changes as needed. Then click Save.
�� To edit the LDAP server, click Edit and make changes as needed. Then click Save.
�� To delete the LDAP server, click Delete and then click Delete again to confirm.
Related Information
For related information, see the following sections in this guide:
�� JSS User Accounts and Groups
Find out how to add JSS user accounts or groups from an LDAP directory service.
�� Self Service User Login Setting
Find out how to require users to log in to the Self Service application using their LDAP directory accounts.
�� Self Service Web Clip
Find out how to require users to log in to the Self Service web clip using their LDAP directory accounts.
�� User-Initiated Enrollment for Computers
Find out how to require users to log in to the enrollment portal using their LDAP directory accounts before enrolling their computers.
�� User-Initiated Enrollment for Mobile Devices
Find out how to require users to log in to the enrollment portal using their LDAP directory accounts before enrolling their mobile devices.
�� Mobile Device PreStage Enrollments
Find out how to require users to log in during mobile device setup using their LDAP directory accounts before enrolling their mobile devices using a PreStage enrollment.
�� Scope
Learn how to configure scope based on users or groups from an LDAP directory service. For related information, see the following Knowledge Base article:
Configuring the JSS to Use LDAP Over SSL When Authenticating with Active DirectoryFind out how to configure the JSS to perform authentication with Active Directory using LDAP over SSL (LDAPS).
42

Integrating with an SMTP Server
Integrating with an SMTP server allows you to do the following:
�� Send email notifications to JAMF Software Server (JSS) users when certain events occur.
�� Send enrollment invitations via email.
�� Send mass emails to end users.
To integrate with an SMTP server, you need to configure the SMTP Server settings in the JSS.
Configuring the SMTP Server Settings
1. Log in to the JSS with a web browser.
2. In the top-right corner of the page, click Settings .
3. Click System Settings.
On a smartphone or iPod touch, this option is in the pop-up menu.
4. Click SMTP Server .
5. Click Edit.
6. Configure the settings on the pane.
7. Click Save.
Testing the SMTP Server SettingsOnce the SMTP Server settings are configured, you can send a test email from the JSS.
1. Log in to the JSS with a web browser.
2. In the top-right corner of the page, click Settings .
3. Click System Settings.
On a smartphone or iPod touch, this option is in the pop-up menu.
4. Click SMTP Server .
5. Click Test.
6. Enter a test email address and click Test again. A message displays, reporting whether or not the email was sent successfully.
43

Related InformationFor related information, see the following sections in this guide:
�� Email Notifications
Learn about the different email notifications that can be sent JSS users.
�� User-Initiated Enrollment for Computers
Find out how to send computer enrollment invitations via email.
�� User-Initiated Enrollment for Mobile Devices
Find out how to send mobile device enrollment invitations via email.
�� Sending a Mass Email to Computer Users
Find out how to send a mass email to computer users.
�� Sending a Mass Email to Mobile Device Users
Find out how to send a mass email to mobile device users.
44

Email Notifications
Email notifications can be sent from the JAMF Software Server (JSS) to JSS users when the following events occur:
�� A computer is enrolled using an Imaging PreStage.
�� An error occurs during imaging.
�� An error occurs while a policy is running.
�� A restricted software violation occurs.
Note: For this to work, email notifications must also be enabled for the individual restricted software records. (For more information, see Restricted Software.)
�� The license limit for a licensed software record is exceeded.
Note: For this to work, email notifications must also be enabled for the individual licensed software records. (For more information, see Licensed Software Records.)
�� Smart computer group membership changes.
�� Smart mobile device group membership changes.
�� Smart user group membership changes.
�� Tomcat is started or stopped.
�� The database is backed up successfully.
�� A database backup fails.
�� The JSS fails to add a file to a JDS instance or the cloud distribution point. Each JSS user can choose which email notifications they want to receive.
RequirementsTo enable email notifications, you need:
�� An SMTP server set up in the JSS (For more information, see Integrating with an SMTP Server.)
�� An email address specified for the JSS user account you want to enable email notifications for (For more information, see JSS User Accounts and Groups.)
Enabling Email Notifications
1. Log in to the JSS with a web browser.
2. At the top of the page, click the disclosure triangle next to your username and then click Email Notifications.
3. Select the checkbox for each event that you want to receive email notifications for.
4. Click Save.
45

Activation Code
The Activation Code settings in the JAMF Software Server (JSS) allow you to update the activation code for your license. You can also change the organization name associated with the license and view licensing information.
Updating the Activation CodeEvery time you receive a new activation code, it must be updated in the JSS.
1. Log in to the JSS with a web browser.
2. In the top-right corner of the page, click Settings .
3. Click System Settings.
On a smartphone or iPod touch, this option is in the pop-up menu.
4. Click Activation Code .
5. Click Edit.
6. Enter the new activation code.
7. Click Save.
46

Change Management
Change Management allows you to track the following information:
�� Changes made to computers on the network
�� Computers from which the changes were made
�� Accounts that initiated the changes The Change Management settings in the JAMF Software Server (JSS) allow you to log this information to a log file on the JSS host server and/or to a syslog server. Logging changes to a log file stores them in a file named jamfChangeManagement.log on the JSS host server.
RequirementsTo log changes to a log file, the account used to run Tomcat must have write permissions for the directory where the jamfChangeManagement.log file is located.
Configuring the Change Management Settings
1. Log in to the JSS with a web browser.
2. In the top-right corner of the page, click Settings .
3. Click System Settings.
On a smartphone or iPod touch, this option is in the pop-up menu.
4. Click Change Management .
5. Click Edit.
6. Configure the settings on the pane.
7. Click Save.
Related InformationFor related information, see the following Knowledge Base article:
Change Management with the Casper Suite: Mac OS X Setup GuideIf you are hosting the JSS on OS X Server, learn about setting up the syslogd utility so you can log changes to a syslog server.
47

SSL Certificate
The JAMF Software Server (JSS) requires a valid SSL certificate to ensure that computers and mobile devices communicate with the JSS and not an imposter server.
The Apache Tomcat settings in the JSS allow you to create an SSL certificate from the CA that is built into the JSS. You can also upload the certificate keystore for an SSL certificate that was obtained from an internal certificate authority (CA) or a trusted third-party vendor.
RequirementsTo create or upload an SSL certificate, the JSS must be installed as the “ROOT” web application, and the user running the Tomcat process must have read/write access to Tomcat’s server.xml file.
Creating or Uploading an SSL Certificate
1. Log in to the JSS with a web browser.
2. In the top-right corner of the page, click Settings .
3. Click System Settings.
On a smartphone or iPod touch, this option is in the pop-up menu.
4. Click Apache Tomcat Settings .
5. Click Edit.
6. Select Change the SSL certificate used for HTTPS and click Next.
7. Follow the onscreen instructions to upload or create an SSL certificate.
8. Restart Tomcat for the changes to take effect.
For instructions on how to restart Tomcat, see the following Knowledge Base article:
Starting and Stopping Tomcat
Related InformationFor related information, see the following Knowledge Base article:
Using OpenSSL to Create a Certificate Keystore for TomcatFind out how to use OpenSSL to create a certificate keystore that you can upload to the JSS.
48

Flushing Logs
Flushing logs reduces the size of the database and can speed up searches. You can flush the following types of logs:
�� Application Usage logs
�� Computer Usage logs
�� Policy logs
�� Casper Remote logs
�� Screen sharing logs
�� Casper Imaging logs
�� Computer and mobile device management history
�� JDS management history
�� Computer inventory reports (computer inventory information from past inventory submissions)
�� Mobile device inventory reports (mobile device inventory information from past inventory submissions)
You can schedule log flushing to take place daily, or you can manually flush logs as needed. You can also choose to flush logs that are older than a certain number of days, weeks, or months.
Scheduling Log Flushing
1. Log in to the JSS with a web browser.
2. In the top-right corner of the page, click Settings .
3. Click System Settings.
On a smartphone or iPod touch, this option is in the pop-up menu.
4. Click Log Flushing .
5. Click Edit.
6. Use the pop-up menus to choose the number of days, weeks, or months after which each type of log should be flushed.
7. Choose a time of day from the Time to Flush Logs Each Day pop-up menu.
8. Click Save.
Manually Flushing Logs
1. Log in to any of the JSS web applications with a web browser.
2. In the top-right corner of the page, click Settings .
49

3. Click System Settings.
On a smartphone or iPod touch, this option is in the pop-up menu.
4. Click Log Flushing .
5. Click Flush Manually.
6. Select the checkbox for each type of log you want to flush.
7. From the Flush Logs Older Than pop-up menu, choose the choose the number of days, weeks, or months after which logs should be flushed.
8. Click Flush. A message displays, reporting the success or failure of the flush.
Related InformationFor related information, see the following sections in this guide:
�� Viewing and Flushing Policy Logs for a Computer
Find out how to view and flush policy logs for a computer.
�� Viewing and Flushing Logs for a Policy
Find out how to view and flush logs for a policy.
�� Viewing the History for a Computer
Find out how to view the logs and the management history for a computer.
�� Viewing Management History for a Mobile Device
Find out how to view the management history for a mobile device.
50

JSS Summary
The JSS Summary is a custom report that allows you to view information about your JAMF Software Server (JSS). The JSS Summary can be useful for troubleshooting JSS issues, and for providing information to JAMF Software for purposes of support or license renewal. By default, the JSS Summary includes the following information about the JSS:
�� Number of managed and unmanaged computers
�� Number of managed mobile devices
�� Operating system on the JSS host server
�� Path to the JSS web application
�� Apache Tomcat version
�� Information about the version of Java installed on the JSS host server
�� Information about the MySQL connection and configuration You can also add information to the JSS Summary from the following categories as needed:
�� Computers
�� Mobile Devices
�� Users
�� System Settings
�� Global Management
�� Computer Management
�� Computer Management–Server Infrastructure
�� Computer Management–Management Framework
�� Mobile Device Management
�� Network Organization
�� Database
You can view the JSS Summary in a browser window or send the JSS Summary to JAMF Software.
RequirementsTo send the JSS Summary to JAMF Software, you need a valid JAMF Nation account.
To create a JAMF Nation account, go to:
https://jamfnation.jamfsoftware.com/createAccount.html
Viewing the JSS Summary
1. Log in to the JSS with a web browser.
2. In the top-right corner of the page, click Settings .
3. Click JSS Information.
On a smartphone or iPod touch, this option is in the pop-up menu.
4. Click JSS Summary .
51

5. Select the checkboxes next to the items you want to include.
6. Click Create.
The JSS Summary displays in a browser window.
7. Click the Back button in the web browser to return to the JSS Summary pane in the JSS.
Sending the JSS Summary to JAMF Software
1. Log in to the JSS with a web browser.
2. In the top-right corner of the page, click Settings .
3. Click JSS Information.
On a smartphone or iPod touch, this option is in the pop-up menu.
4. Click JSS Summary .
5. Select the checkboxes next to the items you want to include.
6. Click Send Summary to JAMF Software.
7. Enter your JAMF Nation credentials, and then click Send. The JSS Summary is sent to JAMF Software via JAMF Nation.
Related Information
For information about Customer Experience Metrics (CEM), see the following Knowledge Base article:
Customer Experience Metrics
Learn about Customer Experience Metrics and how to enable the setting in your JSS environment.
For additional information about Customer Experience Metrics, visit the following webpage:
http://www.jamfsoftware.com/products/casper-suite/customer-experience-metrics/
52
Global Management Settings
53

Push Certificates
The JAMF Software Server (JSS) requires a valid push certificate to communicate with Apple Push Notification service (APNs). This communication is required do the following:
�� Send OS X configuration profiles and OS X remote commands to computers.
�� Enroll and manage mobile devices. An assistant in the JSS guides you through the following steps to create a new push certificate (.pem) and upload it to the JSS:
1. Obtain a signed certificate request (CSR) from JAMF Nation.
2. Create the push certificate in Apple’s Push Certificates Portal by logging into the portal, uploading the signed CSR obtained from JAMF nation, and downloading the resulting push certificate.
3. Upload the push certificate to the JSS.
If you have a push certificate in .p12 format, you do not have to create a new one. You can simply upload the .p12 file to the JSS.
You can also use the JSS to renew your push certificate when needed.
RequirementsTo create or renew a push certificate, you need:
�� A valid JAMF Nation account
To create a JAMF Nation account, go to:
https://jamfnation.jamfsoftware.com/createAccount.html
�� A valid Apple ID (A corporate Apple ID is recommended.)
If you are renewing a push certificate that was originally obtained from Apple’s iOS Developer Program (iDEP), you must use the Apple ID for the iDEP Agent account used to obtain the certificate.
Creating a Push Certificate
1. Log in to the JSS with a web browser.
2. In the top-right corner of the page, click Settings .
3. Click Global Management.
On a smartphone or iPod touch, this option is in the pop-up menu.
4. Click Push Certificates .
54

5. Click New and do one of the following:
�� If the server hosting the JSS has an outbound connection, select Download signed CSR from JAMF Nation.
The JSS connects to JAMF Nation over port 443 and obtains the signed CSR.
�� If the server hosting the JSS does not have an outbound connection, select Download CSR and sign later using JAMF Nation.
6. Follow the onscreen instructions to create and upload the push certificate (.pem).
Uploading a Push Certificate (.p12)If you have a push certificate that’s in .p12 format, you can upload it to the JSS.
Note: You will only have a push certificate in .p12 format if the CSR used to create the certificate was not issued by the JSS.
1. Log in to the JSS with a web browser.
2. In the top-right corner of the page, click Settings .
3. Click Global Management.
On a smartphone or iPod touch, this option is in the pop-up menu.
4. Click Push Certificates .
5. Click New .
6. Select Upload push certificate (.p12).
7. Follow the onscreen instructions to upload the push certificate.
Renewing the Push Certificate
Important: It is recommended that you do not delete the existing push certificate from the JSS when renewing a push certificate.
1. Log in to the JSS with a web browser.
2. In the top-right corner of the page, click Settings .
3. Click Global Management.
On a smartphone or iPod touch, this option is in the pop-up menu.
4. Click Push Certificates .
55

5. Click the push certificate and then click Renew.
6. Choose a method for renewing the push certificate:
�� If the server hosting the JSS has an outbound connection, select Download signed CSR from JAMF Nation.
The JSS connects to JAMF Nation over port 443 and obtains the signed CSR.
�� If the server hosting the JSS does not have an outbound connection, select Download CSR and sign later using JAMF Nation.
�� If you have a new push certificate in .p12 format, select Upload push certificate (.p12).
7. Follow the onscreen instructions to renew the push certificate.
Deleting the Push CertificateDeleting the push certificate from the JSS disables communication between the JSS and APNs. This prevents the JSS from sending OS X configuration profiles and OS X remote commands to computers and managing mobile devices. To restore these capabilities, you must create a new push certificate, and then re-enroll your computers and mobile devices with the JSS.
1. Log in to the JSS with a web browser.
2. In the top-right corner of the page, click Settings .
3. Click Global Management.
On a smartphone or iPod touch, this option is in the pop-up menu.
4. Click Push Certificates .
5. Click the push certificate and click Delete. Then click Delete again to confirm.
Related InformationFor related information, see the following sections in this guide:
�� Security Settings
Find out how to enable certificate-based authentication and push notifications so you can send OS X configuration profiles and OS X remote commands to managed computers.
�� Public Key Infrastructure
Learn how to configure the public key infrastructure (PKI) to ensure secure communication with APNs.
�� Ports
Find out which ports the JSS uses to communicate with APNs.
56

Integrating with GSX
Integrating with Apple’s Global Service Exchange (GSX) allows you to look up and populate the following purchasing information for computers and mobile devices:
�� Purchase date
�� Warranty expiration date
�� Apple Care ID (warranty reference number)
Note: GSX may not always return complete purchasing information. Only the information found in GSX is returned. To integrate with GSX, you need to configure the GSX Connection settings in the JSS.
RequirementsTo configure the GSX Connection settings, you need a GSX account with the “Manager” role and access to Web Services. (For information, see the Integrating with Apple’s Global Service Exchange (GSX) Knowledge Base article.)
Configuring the GSX Connection Settings
1. Log in to the JSS with a web browser.
2. In the top-right corner of the page, click Settings .
3. Click Global Management.
On a smartphone or iPod touch, this option is in the pop-up menu.
4. Click GSX Connection .
5. Click Edit.
6. Configure the settings on the pane.
7. Click Save.
Testing the GSX ConnectionOnce the GSX Connection settings are configured, you can test the connection.
1. Log in to the JSS with a web browser.
2. In the top-right corner of the page, click Settings .
57

3. Click Global Management.
On a smartphone or iPod touch, this option is in the pop-up menu.
4. Click GSX Connection .
5. Click Test.
6. Click Test again. A message displays, reporting the success or failure of the connection.
Related InformationFor related information, see the following sections in this guide:
�� Mass Looking up and Populating Purchasing Information for Computers
Find out how to mass look up and populate purchasing information for computers from GSX.
�� Mass Looking up and Populating Purchasing Information for Mobile Devices
Find out how to mass look up and populate purchasing information for mobile devices from GSX.
�� Viewing and Editing Inventory Information for a Computer
You can look up and populate purchasing information for a single computer by editing the computer’s inventory information in the JSS.
�� Viewing and Editing Inventory Information for a Mobile Device
You can look up and populate purchasing information for a single mobile device by editing the device’s inventory information in the JSS.
�� Local Enrollment Using Recon
Find out how to look up and populate purchasing information when enrolling a computer by running Recon locally.
�� Remote Enrollment Using Recon
Find out how to look up and populate purchasing information when enrolling a computer by running Recon remotely.
58

Integrating with the Device Enrollment Program
The Device Enrollment Program settings allow you to integrate with Apple’s Device Enrollment Program, part of Apple’s Volume Services. Integrating with the program is the first step to enrolling a device with the JAMF Software Server (JSS) using a PreStage enrollment. After the JSS is integrated with the Device Enrollment Program, you can use the JSS to configure enrollment and device setup settings. To integrate with the Device Enrollment Program, you need to upload the server token file (.p7m) you received from Apple. This process creates one instance of the program in the JSS. To meet the needs of your organization, you can repeat the process to create multiple instances of the program.
RequirementsTo configure an instance of the Device Enrollment Program, you need a server token file from Apple, which requires an account in Apple’s Volume Services Portal. (For information, see the Integrating with Apple’s Device Enrollment Program Knowledge Base article.)
Configuring an Instance of the Device Enrollment Program
1. Log in to the JSS with a web browser.
2. In the top-right corner of the page, click Settings .
3. Click Global Management.
On a smartphone or iPod touch, this option is in the pop-up menu.
4. Click Device Enrollment Program .
5. Click New .
6. Enter a display name for the instance of the program.
7. Click Upload Server Token File to upload the server token file you downloaded from Apple. This creates one instance of the program in the JSS.
The information contained in the server token file is displayed.
8. Click Save.
9. To configure another instance of the program, repeat steps 5-8.
59

Refreshing Device Enrollment Program Instance InformationThe JSS allows you to manually refresh information in the program instance as needed.
1. Log in to the JSS with a web browser.
2. In the top-right corner of the page, click Settings .
3. Click Global Management.
On a smartphone or iPod touch, this option is in the pop-up menu.
4. Click Device Enrollment Program .
A list of program instances is displayed.
5. Click the program instance you want to refresh.
6. Click Refresh. If there is updated information in the Device Enrollment Program, this information is displayed in the JSS.
Editing and Deleting an Instance of the Device Enrollment Program
1. Log in to the JSS with a web browser.
2. In the top-right corner of the page, click Settings .
3. Click Global Management.
On a smartphone or iPod touch, this option is in the pop-up menu.
4. Click Device Enrollment .
A list of program instances is displayed.
5. Click the program instance you want to edit or delete.
6. Do one of the following:
�� To edit the program instance, click Edit and make changes as needed. Then click Save.
If you want to replace the server token file, click Upload Server Token File.
Note: If you are uploading a new server token file to renew an expired program instance, it is recommended that you do not delete the expired instance from the JSS before uploading the new server token file.
The changes are applied the next time the JSS contacts the Device Enrollment Program.
�� To delete the program instance, click Delete and then click Delete again to confirm.
Deleting a program instance removes the instance from the JSS but does not delete the settings in the Device Enrollment Program.
60
Disowning a Device from the Device Enrollment ProgramYou can remove a device from the Device Enrollment Program by disowning it in the JSS.
Warning: Disowning a device permanently removes the device from the Device Enrollment Program. A disowned device cannot be re-enrolled in the program.
1. Log in to the JSS with a web browser.
2. In the top-right corner of the page, click Settings .
3. Click Global Management.
On a smartphone or iPod touch, this option is in the pop-up menu.
4. Click Device Enrollment Program .
A list of program instances is displayed.
5. Click the program instance of which the device is a member.
6. Click Devices.
7. Click Disown across from the device you want to disown from the program, and then click Yes. The device is permanently removed from the Device Enrollment Program and is not displayed on the Devices pane. Disowning a device that is currently enrolled with the JSS does not remove the device from the JSS.
Related InformationFor related information, see the following sections in this guide:
�� Mobile Device PreStage Enrollments
Find out how to enroll mobile devices using a mobile device PreStage enrollment.
�� Computer PreStage Enrollments
Find out how to enroll OS X computers using a computer PreStage enrollment.
61

JSS URL
The JSS URL is the URL that client applications, computers, and mobile devices connect to when communicating with the JAMF Software Server (JSS). You can view and configure the JSS URL in the JSS.
Important: In general, you should not change the JSS URL in a production environment with managed computers and mobile devices. If the JSS URL is incorrect or not specified, client applications, computers, and mobile devices are unable to connect to the server. You can also view or configure the JSS URL that’s used for enrolling mobile devices with an enrollment profile and Apple’s iPhone Configuration Utility (iPCU).
Viewing or Configuring the JSS URLs
1. Log in to the JSS with a web browser.
2. In the top-right corner of the page, click Settings .
3. Click Global Management.
On a smartphone or iPod touch, this option is in the pop-up menu.
4. Click JSS URL .
The JSS URLs are displayed on the pane.
5. To configure the JSS URLs:
a. Click Edit.
b. Enter the new URLs in the fields on the pane.
c. Click Save.
Related InformationFor related information, see the following section in this guide:
Enrollment ProfilesFind out how to create and download enrollment profiles so you can enroll mobile devices by connecting them to a computer via USB.
62

Public Key Infrastructure
To ensure secure communication with the Apple Push Notification service (APNs), the JAMF Software Server (JSS) requires a public key infrastructure (PKI) that supports certificate-based authentication. The PKI must include the following components:
�� A certificate authority (CA) that supports Simple Certificate Enrollment Protocol (SCEP)
�� A signing certificate
�� A CA certificate For more information on the PKI and its components, see Security. The JSS includes a preconfigured PKI that uses a built-in CA with support for SCEP. There is no configuration necessary to use the built-in CA—the signing and CA certificates are created and stored for you. The built-in CA is used by default to issue certificates to both computers and mobile devices. You can use the PKI settings in the JSS to perform the following tasks related to the built-in CA:
�� Download the CA certificate.
�� View and revoke certificates issued by the built-in CA.
�� Create a certificate using a Certificate Signing Request (CSR).
�� Create a backup of the CA certificate. You can also configure your own PKI if you have access to an external CA that supports SCEP. The external CA can be a CA hosted by your organization or by a trusted third-party vendor. If you integrate an external CA with the JSS, this CA will be used to issue certificates to mobile devices.
Downloading the CA CertificateYou can use the PKI settings in the JSS to download the CA certificate issued by the built-in CA.
Note: The CA certificate issued by the built-in CA is also stored in the System keychain in Keychain Access.
1. Log in to the JSS with a web browser.
2. In the top-right corner of the page, click Settings .
3. Click Global Management.
On a smartphone or iPod touch, this option is in the pop-up menu.
4. Click PKI .
5. On the Built-in CA pane, click Download CA Certificate. The certificate (.pem) downloads immediately.
63

Viewing or Revoking CertificatesYou can view the following information for a certificate issued by the built-in CA:
�� Serial number
�� Subject name
�� Date/time issued
�� Expiration date/time
�� Status
�� Date/time revoked (if applicable) You can also revoke a certificate issued by the built-in CA.
Warning: Revoking a certificate stops communication between the JSS and the computer or mobile device that the certificate was issued to. You will need to re-enroll the computer or device to restore communication.
1. Log in to the JSS with a web browser.
2. In the top-right corner of the page, click Settings .
3. Click Global Management.
On a smartphone or iPod touch, this option is in the pop-up menu.
4. Click PKI .
5. On the Built-in CA pane, click Issued Certificates.
A list of certificates issued by the built-in CA is displayed.
6. Click the serial number of the certificate you want to view or revoke.
Information about the certificate is displayed.
7. To revoke the certificate, click Revoke.
The status of the certificate is changed to Revoked.
8. Click Done twice to return to the Built-in CA pane.
Manually Creating a Certificate from a CSRDepending on your environment, you may need to manually create a certificate from a certificate signing request (CSR). For example, you may need to do this if you have a clustered environment with Tomcat configured for working behind a load balancer. You can create this certificate using the PKI settings in the JSS.
Note: The certificate created from the CSR is intended solely for purposes of communication between the JSS and a managed computer or mobile device.
64

To create a certificate from a CSR, you need a request in Base64-encoded PEM format.
1. Log in to the JSS with a web browser.
2. In the top-right corner of the page, click Settings .
3. Click Global Management.
On a smartphone or iPod touch, this option is in the pop-up menu.
4. Click PKI .
5. On the Built-in CA pane, click Create Certificate from CSR.
6. In the CSR field, paste the CSR.
The request must begin with
----BEGIN CERTIFICATE REQUEST----
and end with
----END CERTIFICATE REQUEST----
7. Click Create.
The certificate (.pem) is downloaded immediately.
8. Click Back to return to the Built-in CA pane.
Creating a Backup of the CA CertificateIt is recommended that you create a password-protected backup of the CA certificate issued by the built-in CA and store it in a secure location.
1. Log in to the JSS with a web browser.
2. In the top-right corner of the page, click Settings .
3. Click Global Management.
On a smartphone or iPod touch, this option is in the pop-up menu.
4. Click PKI .
5. On the Built-in CA pane, click Create CA Backup.
6. Create and verify a password to secure the backup CA certificate.
You will need to enter this password to restore the certificate backup.
7. Click Create Backup.
The backup file (.p12) is downloaded immediately.
8. Click Back to return to the Built-in CA pane.
65

Integrating with an External CAIf you are using an organizational or third-party CA that supports SCEP, you can use it to issue management certificates to mobile devices.
Note: The external CA will be used for issuing certificates to mobile devices only. The built-in CA will be used to issue certificates to computers. Integrating an external CA with the JSS involves the following steps:
�� Specify SCEP parameters for the external CA.
�� Upload a signing certificate and CA certificate for the external CA.
Specifying SCEP Parameters for an External CA
1. Log in to the JSS with a web browser.
2. In the top-right corner of the page, click Settings .
3. Click Global Management.
On a smartphone or iPod touch, this option is in the pop-up menu.
4. Click PKI .
5. Click the External CA tab.
6. Click Edit.
7. Select the Use External Certificate Authority checkbox.
8. Use the External CA pane to specify SCEP parameters.
9. Choose the type of challenge password to use from the Challenge Type pop-up menu:
�� If you want all mobile devices to use the same challenge password, choose “Static” and specify a challenge password.
The challenge password will be used as the pre-shared secret for automatic enrollment.
�� If you are using a non-Microsoft CA and you want each mobile device to use a unique challenge password, choose “Dynamic”.
The Dynamic challenge type requires use of the JSS API and membership in the JAMF Software Developer Program. Before selecting this option, contact your Account Manager to learn more about the JAMF Software Developer Program and the additional steps you need to take to use this option.
�� If you are using a Microsoft CA and you want each mobile device to use a unique challenge password, choose “Dynamic-Microsoft CA”.
Note: If you choose the “Dynamic” or “Dynamic-Microsoft CA” challenge type, you must use user-initiated enrollment to enroll mobile devices so that a unique challenge password is used for each device. For more information, see User-Initiated Enrollment for Mobile Devices.
10. Click Save.
66
Uploading Signing and CA Certificates for an External CA
To integrate an external CA with the JSS, you need to provide the signing and CA certificates for the external CA. This is done by uploading a signing certificate keystore (.jks or .p12) to the JSS that contains both certificates.
Note: By default, the JSS uses the signing and CA certificates for the JSS’s built-in CA. You must replace these certificates with the ones for the external CA when you initially set up the integration. An assistant guides you through the process of uploading the keystore that contains the signing and CA certificates.
1. Log in to the JSS with a web browser.
2. In the top-right corner of the page, click Settings .
3. Click Global Management.
On a smartphone or iPod touch, this option is in the pop-up menu.
4. Click PKI .
5. Click the External CA tab.
6. At the bottom of the External CA pane, click Change Signing and CA Certificates.
7. Follow the onscreen instructions to upload the signing and CA certificates for the external CA.
Related InformationFor related information, see the following section in this guide:
Push CertificatesLearn how to create a push certificate and upload it to the JSS so the JSS can communicate with Apple Push Notification service (APNs). For related information, see the following Knowledge Base articles:
�� Certificate-Based Authentication for OS X Computers
Learn how the JSS uses certificate-based authentication to verify the identity of OS X computers.
�� Using OpenSSL to Create a Certificate Keystore for Tomcat
Find out how to use OpenSSL to create a certificate keystore that you can upload to the JSS.
67

Integrating with VPP
Integrating with Apple’s Volume Purchase Program (VPP) is the first step to utilizing VPP-managed distribution. To integrate with VPP, you need to add one or more VPP accounts to the JAMF Software Server (JSS).
When you add a VPP account to the JSS, you upload the service token that you obtained from Apple, and specify the country associated with the VPP account. You can also specify other information about the account, such as the contact person and Apple ID.
For more information on VPP and VPP-managed distribution, visit one of the following websites:
�� Volume Purchase Program for Business
https://www.apple.com/business/vpp/
�� Volume Purchase Program for Education
https://www.apple.com/education/volume-purchase-program/
RequirementsTo add a VPP account to the JSS, you need a service token (.vpptoken) from Apple's VPP store.
Adding a VPP Account
1. Log in to the JSS with a web browser.
2. In the top-right corner of the page, click Settings .
3. Click Global Management.
On a smartphone or iPod touch, this option is in the pop-up menu.
4. Click VPP Accounts .
5. Click New .
6. Enter a display name for the account.
7. Click Upload Service Token and upload the service token (.vpptoken) for the account.
8. Choose the country that is associated with the account.
9. (Optional) Enter additional information about the account, including the contact person and Apple ID.
10. Click Save.
68

Editing or Deleting a VPP Account
1. Log in to the JSS with a web browser.
2. In the top-right corner of the page, click Settings .
3. Click Global Management.
On a smartphone or iPod touch, this option is in the pop-up menu.
4. Click VPP Accounts .
5. Click the VPP account you want to edit or delete.
6. Do one of the following:
�� To edit the VPP account, click Edit and make changes as needed. Then click Save.
�� To delete the VPP account, click Delete and then click Delete again to confirm.
Related InformationFor related information, see the following sections in this guide:
�� VPP Registration
Find out how to register users with VPP so that you can assign content to users for VPP-managed distribution.
�� VPP Assignments
Find out how to assign content to users for VPP-managed distribution.
69

Server Infrastructure
70

About Distribution Points
Distribution points are servers used to host files for distribution to computers and mobile devices. The following types of files can be distributed from a distribution point using the Casper Suite:
�� Packages
�� Scripts
�� In-house apps
�� In-house eBooks
The Casper Suite supports three types of distribution points:
�� File share distribution points
�� A cloud distribution point
�� JAMF Distribution Server (JDS) instances
You can use any combination of these types of distribution points.
By default, the first distribution point you add to the JAMF Software Server (JSS) is the master distribution point. The master distribution point is used by all other distribution points as the authoritative source for all files during replication. You can change the master distribution point at any time.
When planning your distribution point infrastructure, it is important to understand the differences between each type of distribution point. The following table explains the key differences:
File Share Distribution Point
Cloud Distribution Point JDS Instance
Description Standard server that is configured to be a distribution point
Distribution point that uses one of the following cloud services to host files:
• Rackspace Cloud Files
• Amazon Web Services (S3 and CloudFront)
• Akamai
Distribution point that is managed by the JSS, similar to a computer or mobile device
Maximum Number per JSS
Unlimited One Unlimited
Server/Platform Requirements
Any server with an Apple Filing Protocol (AFP) or Server Message Block (SMB) share
None OS X or Linux
Protocol AFP, SMB, HTTP, or HTTPS HTTPS HTTPSPorts • AFP: 548
• SMB: 139
• HTTP: 80
• HTTPS: 443
443 443
71

File Share Distribution Point
Cloud Distribution Point JDS Instance
Authentication Options
• AFP or SMB:
• No authentication
• Username and password
• HTTP or HTTPS:
• No authentication
• Username and password
• Certificate-based authentication
None • No authentication
• Certificate-based authentication
Files that Can Be Hosted
• Packages
• Scripts
• Packages
• In-house apps
• In-house eBooks
Note: If you use the cloud distribution point, scripts are stored in the jamfsoftware database.
• Packages
• In-house apps
• In-house eBooks Note: If you use one or more JDS instances, scripts are stored in the jamfsoftware database.
Parent-Child Capabilities
No No Yes
File Replication Method
Replication to file share distribution points must be initiated from Casper Admin.
Replication to file share distribution points must be initiated from Casper Admin.
Replication to root JDS instances must be initiated from Casper Admin.
Replication to non-root JDS instances happens automatically and immediately.
Selective Replication
Not available when replicating to file share distribution points.
Not available when replicating to file share distribution points.
Not available when replicating to root JDS instances.
Available when replicating to non-root JDS instances.
72

Related InformationFor related information, see the following sections in this guide:
�� File Share Distribution Points
Find out how to manage file share distribution points in the JSS.
�� Cloud Distribution Point
Find out how to manage the cloud distribution point.
�� JAMF Distribution Server Instances
Find out how to install and manage JDS instances.
73

File Share Distribution Points
Any server with an AFP or SMB share can be used as a file share distribution point. Before you can use a file share distribution point with the Casper Suite, you must set up the distribution point and add it to the JAMF Software Server (JSS).
For information on setting up a file share distribution point, see the following Knowledge Base article:
Setting Up a File Share Distribution Point
When you add a file share distribution point to the JSS, you can do the following:
�� Make it the master distribution point.
�� Choose a failover distribution point.
�� Configure HTTP downloads.
Adding a File Share Distribution Point
1. Log in to the JSS with a web browser.
2. In the top-right corner of the page, click Settings .
3. Click Computer Management.
On a smartphone or iPod touch, this option is in the pop-up menu.
4. In the “Computer Management–Server Infrastructure” section, click File Share Distribution Points .
5. Click New .
6. Use the General pane to configure basic settings for the distribution point.
7. Click the File Sharing tab and enter information about the AFP or SMB share.
8. (Optional) Click the HTTP tab and configure HTTP downloads.
9. Click Save.
Cloning, Editing, or Deleting a File Share Distribution Point
1. Log in to the JSS with a web browser.
2. In the top-right corner of the page, click Settings .
3. Click Computer Management.
On a smartphone or iPod touch, this option is in the pop-up menu.
4. In the “Computer Management–Server Infrastructure” section, click File Share Distribution Points .
74

5. Click the distribution point you want to clone, edit, or delete.
6. Do one of the following:
�� To clone the distribution point, click Clone and make changes as needed. Then click Save.
�� To edit the distribution point, click Edit and make changes as needed. Then click Save.
�� To delete the distribution point, click Delete and then click Delete again to confirm.
Replicating Files to a File Share Distribution PointDuring replication, all files on the master distribution point are replicated to the file share distribution point that you choose.
1. Open Casper Admin and authenticate to the JSS.
2. In the sidebar, select the file share distribution point you want to replicate files to.
3. Click Replicate.
Related InformationFor related information, see the following section in this guide:
Network SegmentsYou can use network segments to ensure that computers and mobile devices use the closest distribution point by default.
For related information, see the following Knowledge Base articles:
�� Setting Up a File Share Distribution Point on Linux Using Samba
Find out how to use Samba to set up a file share distribution point with an SMB share on a Linux server.
�� Using Apache HTTP Server to Enable HTTP Downloads on a Linux File Share Distribution Point
Find out how to use Apache HTTP Server to enable HTTP downloads on a Linux file share distribution point.
�� Using IIS to Enable HTTP Downloads on a Windows Server 2008 File Share Distribution Point
Find out how to activate Internet Information Services (IIS) and use it to enable HTTP downloads on a Windows Server 2008 file share distribution point.
75

Cloud Distribution Point
The cloud distribution point uses a cloud service to host packages, in-house apps, and in-house eBooks. The JAMF Software Server (JSS) supports the following cloud services:
�� Rackspace Cloud Files
For more information on this service, go to http://www.rackspace.com/cloud/public/files/.
�� Amazon Web Services (S3 and CloudFront)
For more information on these services, go to http://aws.amazon.com.
�� Akamai cloud services
For more information on Akamai cloud services, go to http://www.akamai.com.
When you configure the cloud distribution point in the JSS, you can choose to make it the master. You can also choose whether to replicate specific files or the entire contents of the master distribution point.
RequirementsIf you plan to use Akamai for your cloud distribution point, Akamai must be configured to use File Transfer Protocol (FTP).
Note: If you have upgraded from the Casper Suite v8.x, you must migrate the scripts and packages on your master distribution point before configuring the cloud distribution point. (For more information, see the Migrating Packages and Scripts Knowledge Base article.)
Configuring the Cloud Distribution Point
1. Log in to the JSS with a web browser.
2. In the top-right corner of the page, click Settings .
3. Click Computer Management.
On a smartphone or iPod touch, this option is in the pop-up menu.
4. In the “Computer Management–Server Infrastructure” section, click Cloud Distribution Point .
5. Click Edit.
6. Choose a service from the Cloud Service pop-up menu.
7. Configure the settings on the pane.
8. Click Save.
76

Testing the Cloud Distribution PointOnce the cloud distribution point is configured, you can test the connection to the cloud service.
1. Log in to the JSS with a web browser.
2. In the top-right corner of the page, click Settings .
3. Click Computer Management.
On a smartphone or iPod touch, this option is in the pop-up menu.
4. In the “Computer Management–Server Infrastructure” section, click Cloud Distribution Point .
5. Click Test.
6. Click Test again. A message displays, reporting the success or failure of the connection.
Replicating Files to the Cloud Distribution PointDuring replication, files on the master distribution point are replicated to the cloud distribution point. The files that are replicated depend on whether the cloud distribution point is configured to replicate specific files or the entire contents of the master.
1. Open Casper Admin and authenticate to the JSS.
2. In the sidebar, select the cloud distribution point you want to replicate files to.
3. Click Replicate.
Related InformationFor related information, see the following section in this guide:
Network SegmentsYou can use network segments to ensure that computers and mobile devices use the closest distribution point by default.
77

JAMF Distribution Server Instances
A JAMF Distribution Server (JDS) instance is a distribution point that is managed by the JAMF Software Server (JSS), similar to a computer or mobile device. It can be used to host packages, in-house apps, and in-house eBooks.
Before using a JDS instance, you must install it and configure it. JDS instances can be installed on OS X or Linux. When you install a JDS instance, it is enrolled with the JSS. You can install as many instances as your organization requires.
By default, the first JDS instance you install is the root. The root instance is used by other instances as the authoritative source for all files. The root instance can also be used as the master distribution point. You can make a different instance the root at any time.
You can define parent-child relationships between non-root JDS instances, making selective file replication more manageable.
When you configure a JDS instance, you can do the following:
�� Make it the master distribution point.
�� Choose a parent JDS instance (non-root JDS instances only).
�� Enable certificate-based authentication.
�� Limit the rate at which the JDS instance downloads files.
�� Specify WebDAV accounts.
�� Choose whether to replicate specific files or the entire contents of the parent JDS instance (non-root JDS instances only).
You can also view the progress of file replication and view inventory information for each JDS instance.
RequirementsThe JDS Installer for Mac requires a computer with:
�� An Intel processor
�� 2 GB of RAM
�� 100 GB of disk space available
�� OS X Server v10.7 or later
�� Server.app 1.4.3 or later The JDS Installer for Linux requires a computer with:
�� An Intel processor
�� 2 GB of RAM
78

�� 100 GB of disk space available
�� One of the following operating systems:
• Ubuntu 10.04 LTS Server
• Ubuntu 12.04 LTS Server
• Red Hat Enterprise Linux (RHEL) 6.4 or later
Note: To install a JDS instance on a Linux operating system that is running on a virtual machine, you need a virtualization platform that provides SMBIOS information.
To manage JDS instances in the JSS, you need a valid SSL certificate on the JSS host server. (For more information, see SSL Certificate.)
Note: If you have upgraded from the Casper Suite v8.x, you must migrate the scripts and packages on your master distribution point before configuring JDS instances. (For more information, see the Migrating Packages and Scripts Knowledge Base article.)
Installing a JDS Instance on OS XThere are two ways to install a JDS instance on OS X: during a fresh installation of the JSS using the JSS Installer for Mac, or at any time using the JDS Installer for Mac.
For more information on installing a JDS instance using the JSS Installer for Mac, see the “Installing the JSS” section in the JAMF Software Server Installation and Configuration Guide for OS X.
To install a JDS instance using the JDS Installer for Mac (JDS Installer.pkg), copy the installer to the server. Then double-click the installer and follow the onscreen instructions.
Note: To obtain the JDS Installer for Mac, log in to JAMF Nation and go to the following page:
https://jamfnation.jamfsoftware.com/myAssets.html
Installing a JDS Instance on Linux
1. Copy the JDS Installer for Linux (JDS Installer.run) to the server on which you plan to install a JDS instance.
Note: To obtain the JDS Installer for Linux, log in to JAMF Nation and go to the following page:
https://jamfnation.jamfsoftware.com/myAssets.html
2. Log in to the server as a user with superuser privileges.
3. Initiate the installer by executing a command similar to the following: sudo /path/to/JDS Installer.run
4. When prompted, enter the JDS hostname. For example, “jds.mycompany.com”.
5. When prompted, enter the JSS URL. For example, “https://jss.mycompany.com:8443/”.
79

6. When prompted, enter credentials for a JSS user account with the “JDS” privilege.
7. Follow the onscreen instructions to complete the installation.
Configuring a JDS Instance
1. Log in to the JSS with a web browser.
2. In the top-right corner of the page, click Settings .
3. Click Computer Management.
On a smartphone or iPod touch, this option is in the pop-up menu.
4. In the “Computer Management–Server Infrastructure” section, click JDS Instances .
5. Click the JDS instance you want to configure.
6. Click Edit.
7. Use the General pane to configure basic settings for the JDS instance.
8. Click the Distribution Point tab and configure distribution settings.
9. Click Save.
Replicating Files to the Root JDS InstanceDuring replication, all files on the master distribution point are replicated to the root JDS instance. Then, files are automatically and immediately replicated to non-root JDS instances. The files that are replicated to non-root JDS instances depend on whether each instance is configured to replicate specific files or the entire contents of their parent JDS instance.
1. Open Casper Admin and authenticate to the JSS.
2. In the sidebar, select the root JDS instance.
3. Click Replicate.
Viewing the Progress of File Replication
1. Log in to the JSS with a web browser.
2. In the top-right corner of the page, click Settings .
3. Click Computer Management.
On a smartphone or iPod touch, this option is in the pop-up menu.
80

4. In the “Computer Management–Server Infrastructure” section, click JDS Instances .
5. Click Grid View at the top of the list. The progress of file replication for each JDS instance is displayed. If your master distribution point is a JDS instance, it is marked with two asterisks (**). If your master distribution point is a different type of distribution point, the root instance is marked with a single asterisk (*).
Viewing Inventory Information for a JDS InstanceThe JSS displays the following inventory information for each JDS instance:
�� Whether or not it is the master distribution point
�� Whether or not it is the root instance
�� Hostname
�� URL
�� Reported IP address
�� jamfds binary version
�� Operating system
�� Operating system version
�� Total memory
�� Available memory
�� Hard drive size
�� Hard drive used space
1. Log in to the JSS with a web browser.
2. In the top-right corner of the page, click Settings .
3. Click Computer Management.
On a smartphone or iPod touch, this option is in the pop-up menu.
4. In the “Computer Management–Server Infrastructure” section, click JDS Instances .
5. Click the JDS instance you want to view inventory information for.
Related InformationFor related information, see the following section in this guide:
Network SegmentsYou can use network segments to ensure that computers and mobile devices use the closest distribution point by default.
For related information, see the following Knowledge Base articles:
�� Components Installed on JDS Instances
Find out what items are installed on JDS instances.
�� Changing JDS Hierarchy
Learn about the implications of changing your JDS hierarchy.
�� Uninstalling a JDS Instance
Find out how to uninstall a JDS instance.
81

Software Update Servers
Adding an internal software update server to the JAMF Software Server (JSS) is the first step to running Software Update from an internal software update server using a policy or Casper Remote.
Using an internal software update server allows you to reduce the amount of bandwidth used when distributing software updates from Apple. Instead of each computer downloading updates from Apple’s Software Update server, updates are only downloaded from Apple once per server.
Using an internal software update server also allows you to control and approve updates before you make them available.
Adding a Software Update Server
1. Log in to the JSS with a web browser.
2. In the top-right corner of the page, click Settings .
3. Click Computer Management.
On a smartphone or iPod touch, this option is in the pop-up menu.
4. In the “Computer Management–Server Infrastructure” section, click Software Update Servers .
5. Click New .
6. Configure the settings on the pane.
7. Click Save.
Cloning, Editing, or Deleting a Software Update Server
1. Log in to the JSS with a web browser.
2. In the top-right corner of the page, click Settings .
3. Click Computer Management.
On a smartphone or iPod touch, this option is in the pop-up menu.
4. In the “Computer Management–Server Infrastructure” section, click Software Update Servers .
5. Click the software update server you want to clone, edit, or delete.
6. Do one of the following:
�� To clone the software update server, click Clone and make changes as needed. Then click Save.
�� To edit the software update server, click Edit and make changes as needed. Then click Save.
�� To delete the software update server, click Delete and then click Delete again to confirm.
82

Related InformationFor related information, see the following sections in this guide:
Running Software UpdateFind out how to run Software Update using a policy or Casper Remote. For related information, see the following document:
NetBoot/SUS Server User GuideFind out how to host an internal software update server on Linux.
83

NetBoot Servers
Adding a NetBoot server to the JAMF Software Server (JSS) is the first step to booting computers to a NetBoot image using a policy or Casper Remote. NetBoot images are commonly used in place of recovery partitions or external drives when imaging.
Adding a NetBoot Server
1. Log in to the JSS with a web browser.
2. In the top-right corner of the page, click Settings .
3. Click Computer Management.
On a smartphone or iPod touch, this option is in the pop-up menu.
4. In the “Computer Management–Server Infrastructure” section, click NetBoot Servers .
5. Click New .
6. Configure the settings on the pane.
7. Click Save.
Cloning, Editing, or Deleting a NetBoot Server
1. Log in to the JSS with a web browser.
2. In the top-right corner of the page, click Settings .
3. Click Computer Management.
On a smartphone or iPod touch, this option is in the pop-up menu.
4. In the “Computer Management–Server Infrastructure” section, click NetBoot Servers .
5. Click the NetBoot server you want to clone, edit, or delete.
6. Do one of the following:
�� To clone the NetBoot server, click Clone and make changes as needed. Then click Save.
�� To edit the NetBoot server, click Edit and make changes as needed. Then click Save.
�� To delete the NetBoot server, click Delete and then click Delete again to confirm.
84

Related InformationFor related information, see the following sections in this guide:
�� Booting Computers to NetBoot Images
Find out how to boot computers to a NetBoot image using a policy or Casper Remote.
�� Network Segments
You can use network segments to ensure that computers use the closest NetBoot server by default. For related information, see the following Knowledge Base article:
Creating a NetBoot Image and Setting Up a NetBoot ServerFind out how to host a NetBoot server on OS X Server.
For related information, see the following document:
NetBoot/SUS Server User GuideFind out how to host a NetBoot server on Linux.
85

Organizing Your Network
86

Buildings and Departments
Buildings and departments are organizational components that allow you to group computers and mobile devices by physical location and organizational infrastructure. You can use them to perform inventory searches, create smart groups, and configure the scope of remote management tasks.
Adding a Building or Department
1. Log in to the JSS with a web browser.
2. In the top-right corner of the page, click Settings .
3. Click Network Organization.
On a smartphone or iPod touch, this option is in the pop-up menu.
4. Click Buildings or Departments .
5. Click New .
6. Enter a display name for the building or department.
7. Click Save.
Cloning, Editing, or Deleting a Building or Department
1. Log in to the JSS with a web browser.
2. In the top-right corner of the page, click Settings .
3. Click Network Organization.
On a smartphone or iPod touch, this option is in the pop-up menu.
4. Click Buildings or Departments .
5. Click the building or department you want to clone, edit, or delete.
6. Do one of the following:
�� To clone the building or department, click Clone and change the display name. Then click Save.
�� To edit the building or department, click Edit and change the display name. Then click Save.
�� To delete the building or department, click Delete and then click Delete again to confirm.
87

Related InformationFor related information, see the following sections in this guide:
�� Viewing and Editing Inventory Information for a Computer
You can add a computer to a building or department by editing the computer’s inventory information in the JSS.
�� Viewing and Editing Inventory Information for a Mobile Device
You can add a mobile device to a building or department by editing the mobile device’s inventory information in the JSS.
�� Mass Editing the Building or Department for Computers
Find out how to use the mass edit function to add mutiple computers to a building or department.
�� Network Segments
You can use a network segment to update the building or department to which computers and mobile devices belong.
�� Smart Computer Groups
You can create smart computer groups based on buildings or departments.
�� Smart Mobile Device Groups
You can create smart mobile device groups based on buildings or departments.
�� Simple Computer Searches
You can perform simple computer searches based on buildings or departments.
�� Simple Mobile Device Searches
You can perform simple mobile device searches based on buildings or departments.
�� Advanced Computer Searches
You can create advanced computer searches based on buildings or departments.
�� Advanced Mobile Device Searches
You can create advanced mobile device searches based on buildings or departments.
�� Scope
Learn how to configure scope based on buildings or departments.
88

Network Segments
A network segment is a range of IP addresses that can be used to group computers and mobile devices based on their network location. Network segments can be class B or class C subnets, or any IP range therein.
Adding network segments to the JSS allows you to do the following:
�� Ensure that computers and mobile devices use the closest distribution point by default.
�� Ensure that computers use the closest NetBoot server by default.
�� Specify a software update server for computers to use by default.
�� Automatically update the building and department to which computers and mobile devices belong.
�� Base the scope of remote management tasks on network segments.
If a computer belongs to multiple network segments, the JSS uses the network segment with the fewest IP addresses. If the number of IP addresses in each network segment is equal, the JSS uses the network segment with the lowest starting IP address.
Adding a Network Segment
1. Log in to the JSS with a web browser.
2. In the top-right corner of the page, click Settings .
3. Click Network Organization.
On a smartphone or iPod touch, this option is in the pop-up menu.
4. Click Network Segments .
5. Click New .
6. Configure the network segment using the settings on the pane.
7. Click Save.
Cloning, Editing, or Deleting a Network Segment
1. Log in to the JSS with a web browser.
2. In the top-right corner of the page, click Settings .
3. Click Network Organization.
On a smartphone or iPod touch, this option is in the pop-up menu.
4. Click Network Segments .
89

5. Click the network segment you want to clone, edit, or delete.
6. Do one of the following:
�� To clone the network segment, click Clone and make changes as needed. Then click Save.
�� To edit the network segment, click Edit and make changes as needed. Then click Save.
�� To delete the network segment, click Delete and then click Delete again to confirm.
Related InformationFor related information, see the following section in this guide:
ScopeLearn how to configure scope based on network segments.
For related information, see the following Knowledge Base article:
Using the JSS Subnet ImporterFind out how to use the JSS Subnet Importer to import a CSV file that contains network segment information into the JSS.
90

Sites
Sites are organizational components that allow you to control which items each JSS user can manage. Implementing sites in your environment involves adding sites to the JSS, granting JSS users access to sites, and adding items to sites.
When a user logs in to the JSS with an account that has access to a site, the user sees only the items that belong to that site. If the user has access to multiple sites, a pop-up menu is displayed at the top of the page, allowing the user to switch between sites.
There are three ways to add sites to the JSS:
�� Add each site manually
�� Automatically create a site for each existing building
�� Automatically create a site for each existing department
Note: You can only create sites from buildings or departments if you are adding sites for the first time and have buildings or departments set up in the JSS. Creating sites from buildings or departments automatically adds computers and mobile devices to the site that corresponds with the building or department they belong to.
Adding a Site
1. Log in to the JSS with a web browser.
2. In the top-right corner of the page, click Settings .
3. Click Network Organization.
On a smartphone or iPod touch, this option is in the pop-up menu.
4. Click Sites .
5. Click New .
6. If prompted, choose a method for adding sites:
�� To add sites manually, select Add sites manually and click Next.
�� To create a site for each existing building, select Create sites from buildings and click Next.
�� To create a site for each existing department, select Create sites from departments and click Next.
7. If prompted, enter a display name for the site and click Save.
91

Cloning, Editing, or Deleting a Site
1. Log in to the JSS with a web browser.
2. In the top-right corner of the page, click Settings .
3. Click Network Organization.
On a smartphone or iPod touch, this option is in the pop-up menu.
4. Click Sites .
5. Click the site you want to clone, edit, or delete.
6. Do one of the following:
�� To clone the site, click Clone and change the display name. Then click Save.
�� To edit the site, click Edit and change the display name. Then click Save.
�� To delete the site, click Delete and then click Delete again to confirm.
Adding Items to a SiteThe following items can be added to a site:
�� Computers
�� Mobile devices
�� Peripherals
�� Enrollment invitations
�� Enrollment profiles
�� Advanced searches
�� Smart groups
�� Static groups
�� Policies
�� Configuration profiles
�� Managed Preference profiles
�� PreStages
�� Restricted software records
�� Licensed software records
�� Classes
�� Apps
�� eBooks
�� Device Enrollment Program instances
�� PreStage enrollments
�� VPP accounts
There are several ways to add computers to a site:
�� Create sites from existing buildings and departments. This automatically adds computers to the site that corresponds with the building or department they belong to.
�� Enroll computers using one of the following methods:
• Send computer enrollment invitations. (For more information, see User-Initiated Enrollment for Computers.)
• Use a Recon QuickAdd package. (For more information, see QuickAdd Packages Created Using Recon.)
92

• Use the network scanner. (For more information, see Network Scanner.)
• Run Recon remotely on a single computer. (For more information, see Remote Enrollment Using Recon.)
• Run Recon locally. (For more information, see Local Enrollment Using Recon.)
�� Mass edit Site field for computers that are already enrolled with the JSS. (For more information, see Mass Editing the Site for Computers.)
�� Manually edit the Site field for individual computers that are already enrolled with the JSS. (For more information, see Viewing and Editing Inventory Information for a Computer.)
There are several ways to add mobile devices to a site:
�� Create sites from existing buildings and departments. This automatically adds mobile devices to the site that corresponds with the building or department they belong to.
�� Enroll mobile devices using one of the following methods:
• Send mobile device enrollment invitations. (For more information, see User-Initiated Enrollment for Mobile Devices.)
• Enroll mobile devices that are connected to a computer by USB. (For more information, see Enrollment Profiles.)
�� Mass edit Site field for mobile devices that are already enrolled with the JSS. (For more information, see Mass Editing the Site for Mobile Devices.)
�� Manually edit the Site field for individual mobile devices that are already enrolled with the JSS. (For more information, see Viewing and Editing Inventory Information for a Mobile Device.)
To add other items to a site, you choose a site from the Site pop-up menu when configuring the items in the JSS.
Related InformationFor related information, see the following section in this guide:
JSS User Accounts and GroupsFind out how to grant site access to JSS user accounts and groups.
93

Scope
Scope gives you granular control over which computers, mobile devices, and users receive remote management tasks. For example, you can use scope to ensure that a policy to install desktop publishing software only runs on computers in the Design department, or that an eBook is only distributed to students in a particular class. Scope can be based on the following items:
�� Individual computers, mobile devices, or users
�� Computer, mobile device, or user groups
�� Departments
�� Buildings
�� LDAP or local users
�� LDAP user groups
�� Network segments
�� Classes The items available vary depending on the remote management task you are configuring the scope for. For example, only eBook scope can be based on classes.
Configuring ScopeFor most remote management tasks, configuring the scope involves adding targets, limitations, and exclusions. (The process varies depending on the remote management task you are configuring the scope for).
Adding Targets
Targets make up the initial pool of computers, mobile devices, or users that receive the remote management task. You can add all computers, mobile devices, or users, or you can add a combination of specific items (e.g. computers, groups, buildings).
1. On the Targets pane, choose an option from the pop-up menu.
94

2. If you chose to add specific items:
a. Click Add .b. On each tab, click Add for the items you want to add.
c. Click Done.
The items you added are displayed in a list on the Targets pane.
Adding Limitations
Adding limitations to the scope of a remote management task allows you to limit the task to specific users in the target. For example, if you want a certain application to open at login for specific users regardless of the computer they use, you can use all computers as the target and add specific users as limitations. Adding limitations also allows you to limit the task to specific network segments in the target. For example, if you want each computer in a department to install a package but only while on the company’s production network, you can use the department as the target and add a specific network segment as a limitation.
1. On the Limitations pane, click Add .
95

2. On each tab, add items as needed.
To add a network segment, click the Network Segments tab and then click Add for the network segment.
To add an LDAP or local user, click the LDAP/Local Users tab. Then enter the username in the search field and click Add.
To add an LDAP user group, click the LDAP User Groups tab, enter the name of the group in the search field, and click Search. Then click Add for the group you want to add.
3. Click Done. The items you added are displayed in a list on the Limitations pane.
96

Adding Exclusions
Adding exclusions to the scope of a remote management task allows you to exclude specific computers or mobile devices, groups, buildings, departments, users, user groups, or network segments. For example, if you want to restrict an application for everyone except the head of the department, you can add them as an exclusion.
1. On the exclusions pane, click Add .
2. On each tab, add items as needed.
To add an LDAP or local user, click the LDAP/Local Users tab. Then enter the username in the search field and click Add.
To add an LDAP user group, click the LDAP User Groups tab, enter the name of the group in the search field, and click Search. Then click Add for the group you want to add.
To add another type of item, click the appropriate tab and then click Add for the item you want to add.
3. Click Done. The items you added are displayed in a list on the Exclusions pane.
97

Managing Computers
98

Building the Framework for Managing Computers
Recurring Check-in Frequency
The recurring check-in frequency is the interval at which computers check in with the JSS for available policies.
By default, the recurring check-in frequency is set to “Every 15 Minutes”.
Configuring the Recurring Check-in Frequency
1. Log in to the JSS with a web browser.
2. In the top-right corner of the page, click Settings .
3. Click Computer Management.
On a smartphone or iPod touch, this option is in the pop-up menu.
4. In the “Computer Management–Management Framework” section, click Check-In .
5. Click Edit.
6. Configure the recurring check-in frequency using the pop-up menu on the pane.
7. Click Save.
Each computer checks in at the specified interval, starting at the time the setting is applied to the computer. This means that check-in times will vary across computers.
Related InformationFor related information, see the following section in this guide:
Managing PoliciesYou can create policies that are triggered at the recurring check-in frequency.
99

For related information, see the following Knowledge Base article:
Components Installed on Managed ComputersFind out where the files that control the recurring check-in frequency are stored on computers.
100

Startup Script
The Startup Script settings in the JAMF Software Server (JSS) allow you to create a startup script on computers and use it to perform the following actions at startup:
�� Log Computer Usage information (date/time of startup).
�� Check for policies triggered at startup.
�� Enable computer-level Managed Preferences.
�� Ensure SSH (Remote Login) is enabled on computers.
Configuring the Startup Script
1. Log in to the JSS with a web browser.
2. In the top-right corner of the page, click Settings .
3. Click Computer Management.
On a smartphone or iPod touch, this option is in the pop-up menu.
4. In the “Computer Management–Management Framework” section, click Check-In .
5. Click the Startup Script tab.
6. Click Edit.
7. Configure the settings on the pane.
8. Click Save.
Related InformationFor related information, see the following sections in this guide:
�� Computer Usage
Find out how to view Computer Usage information logged at startup.
�� Managing Policies
You can create policies that are triggered at startup.
�� Managed Preferences
Learn about computer-level Managed Preferences and how to create Managed Preferences, in general.
For related information, see the following Knowledge Base article:
Components Installed on Managed ComputersFind out where the startup script is stored on computers.
101

Login and Logout Hooks
The Login/Logout Hooks settings in the JAMF Software Server (JSS) allow you to create login and logout hooks on computers and use them to perform the following actions:
�� Log Computer Usage information (username and date/time) at login and logout.
�� Check for policies triggered at login or logout.
�� Enable user-level and user-level enforced Managed Preferences at login.
�� Hide the Restore partition at login.
Warning: Creating login and logout hooks with the Casper Suite can disable existing login and logout hooks.
Configuring Login and Logout Hooks
1. Log in to the JSS with a web browser.
2. In the top-right corner of the page, click Settings .
3. Click Computer Management.
On a smartphone or iPod touch, this option is in the pop-up menu.
4. In the “Computer Management–Management Framework” section, click Check-In .
5. Click the Login/Logout Hooks tab.
6. Click Edit.
7. Configure the settings on the pane.
8. Click Save.
Related InformationFor related information, see the following sections in this guide:
�� Computer Usage
Find out how to view Computer Usage information logged at login and logout.
�� Managing Policies
You can create policies that are triggered at login or logout.
�� Managed Preferences
Learn about user-level Managed Preferences and how to create Managed Preferences, in general.
For related information, see the following Knowledge Base article:
Components Installed on Managed ComputersFind out where login/logout hooks are stored on computers.
102

Security Settings
The Security settings in the JAMF Software Server (JSS) allow you to do the following:
�� Enable certificate-based authentication.
�� Enable push notifications.
�� Enable SSL certificate verification.
�� Specify the condition under which the checksum will be used to validate packages.
�� Specify a maximum clock skew between managed computers and the JSS host server. When an OS X computer attempts to communicate with the JSS and the security requirements specified in the JSS are not met, communication is blocked.
RequirementsTo enable push notifications, you must have a push certificate in the JSS. (For more information, see Push Certificates.)
Configuring Security Settings
1. Log in to the JSS with a web browser.
2. In the top-right corner of the page, click Settings .
3. Click Computer Management.
On a smartphone or iPod touch, this option is in the pop-up menu.
4. In the ”Computer Management–Management Framework” section, click Security .
5. Click Edit.
6. Configure the settings on the pane.
7. Click Save.
Related InformationFor related information, see the following sections in this guide:
�� Certificates
Learn about device certificates and the SSL certificate.
103

�� SSL Certificate
Find out how to create or upload an SSL certificate that OS X computers can use to verify the identity of the JSS.
�� Calculating a Checksum
Learn about using the checksum to validate a package and how to manually calculate the value. For related information, see the following Knowledge Base article:
Certificate-Based Authentication for OS X ComputersLearn how the JSS uses certificate-based authentication to verify the identity of OS X computers.
104

Categories
Categories are organizational components that allow you to group policies, packages, scripts, and printers in Casper Admin and the JAMF Software Server (JSS). You can also use categories to group policies in Self Service. This makes these items easier to locate.
You can add categories to Casper Admin or the JSS. When you add, edit, or delete a category in Casper Admin, the changes are reflected in the JSS and vice versa.
After you add a category to Casper Admin or the JSS, you can add items to the category when configuring them in Casper Admin or the JSS.
Adding a Category to Casper Admin
1. Open Casper Admin and authenticate to the JSS.
2. Click New Category .
3. Enter a display name for the category.
4. Click OK.
Adding a Category to the JSS
1. Log in to the JSS with a web browser.
2. In the top-right corner of the page, click Settings .
3. Click Computer Management.
On a smartphone or iPod touch, this option is in the pop-up menu.
4. In the “Computer Management” section, click Categories .
5. Click New .
6. Enter a display name for the category.
7. Click Save.
105

Editing or Deleting a Category in Casper Admin
1. Open Casper Admin and authenticate to the JSS.
2. In the "Categories" list above the main repository, select the category you want to edit or delete.
3. Do one of the following:
�� To edit the category, double-click it and make changes as needed. Then click OK.
�� To delete the category, click Delete and then click Delete again to confirm.
Cloning, Editing, or Deleting a Category in the JSS
1. Log in to the JSS with a web browser.
2. In the top-right corner of the page, click Settings .
3. Click Computer Management.
On a smartphone or iPod touch, this option is in the pop-up menu.
4. In the “Computer Management” section, click Categories .
5. Click the category you want to clone, edit, or delete.
6. Do one of the following:
�� To clone the category, click Clone and change the display name. Then click Save.
�� To edit the category, click Edit and change the display name. Then click Save.
�� To delete the category, click Delete and then click Delete again to confirm.
Related InformationFor related information, see the following sections in this guide:
�� Managing Packages
You can add packages to a category.
�� Managing Scripts
You can add scripts to a category.
�� Managing Printers
You can add printers to a category.
�� Managing Policies
You can add policies to a category.
�� Self Service Policies
Find out how to display or feature policies in one or more categories in Self Service.
106
Enrollment
About Computer Enrollment
Enrollment is the process of adding OS X or Windows computers to the JAMF Software Server (JSS). When computers are enrolled, inventory information for the computers is submitted to the JSS.
Enrolling OS X computers makes them managed by the JSS. This allows you to perform inventory tasks and remote management and configuration tasks on the computers. When you enroll OS X computers, you specify a local administrator account that you want to use to manage them (called the “management account”).
Note: Enrolling OS X computers using a PreStage enrollment allows you to search and report on the computers as part of your inventory; however, this process alone does not make the computers managed by the JSS.
Enrolling Windows computers allows you to search and report on the computers as part of your inventory. Windows computers cannot be managed by the JSS.
There are several ways to enroll OS X computers with the JSS:
�� User-initiated enrollment—You can allow users to enroll their own OS X computers by having them log in to an enrollment portal where they follow the onscreen instructions to download and install a QuickAdd package.
�� Use a QuickAdd package created with Recon—You can use Recon to create a QuickAdd package that enrolls OS X computers when it is installed. This type of QuickAdd package can be deployed using almost any deployment tool, such as Apple Remote Desktop or the Casper Suite. You can also give the QuickAdd package to users to install.
�� Use the network scanner—You can remotely enroll multiple OS X computers in specified IP ranges by using the network scanner in Recon. Recon scans the specified IP ranges and enrolls any computers that it can connect to over SSH (Remote Login).
�� Run Recon remotely on a single computer—If you know the IP address of the OS X computer that you want to enroll and SSH (Remote Login) is enabled on the computer, you can enroll the computer by running Recon remotely.
�� Run Recon locally—If you have physical access to the OS X computer that you want to enroll, you can run Recon locally on the computer.
�� Image computers—You can enroll OS X computers by imaging them with a configuration that is associated with a management account.
107

�� Use a PreStage enrollment—A PreStage enrollment allows you to store enrollment and OS X computer setup settings in the JSS and use them to enroll new OS X computers with the JSS. In addition to reducing the amount of time and interaction it takes to prepare new OS X computers for use, this enrollment method makes the computers MDM capable.
This enrollment method requires an account in Apple’s Volume Services Portal. For more information, see the Integrating with Apple’s Device Enrollment Program Knowledge Base article.
There are two ways to enroll Windows computers with the JSS:
�� Use a Recon.exe QuickAdd package—You can use Recon.exe to create a QuickAdd package that enrolls Windows computers when it is installed. This type of QuickAdd package can be deployed using almost any deployment tool. You can also give the QuickAdd package to users to install.
�� Run Recon.exe locally—If you have physical access to the Windows computer that you want to enroll, you can run Recon.exe locally on the computer.
Related InformationFor more information, see the following sections in this guide:
�� User-Initiated Enrollment for Computers
Find out how to allow users to enroll their own computers by having them log in to an enrollment portal.
�� QuickAdd Packages Created Using Recon
Find out how to use Recon to create a QuickAdd package that enrolls computers.
�� Network Scanner
Find out how to use the network scanner to remotely enroll multiple computers.
�� Remote Enrollment Using Recon
Find out how to enroll an OS X computer by running Recon remotely.
�� Local Enrollment Using Recon
Find out how to enroll an OS X computer by running Recon locally on the computer.
�� About Imaging
You can enroll computers by imaging them with a configuration associated with a management account. Learn about imaging and the different imaging methods.
�� Computer PreStage Enrollments
Find out how to enroll OS X computers using a PreStage enrollment.
�� QuickAdd Packages Created Using Recon.exe
Find out how to use Recon.exe to create a QuickAdd package that enrolls Windows computers.
�� Local Enrollment Using Recon.exe
Find out how to enroll a Windows computer by running Recon.exe locally on the computer.
For related information, see the following Knowledge Base articles:
�� Components Installed on Managed Computers
See a list of the components installed on managed computers.
�� Removing JAMF Software Components from Computers
Find out how to remove all Casper Suite-related components from computers that have been managed by the JSS. 108

User-Initiated Enrollment Settings for Computers
The User-Initiated Enrollment settings for computers allow you to enable user-initiated enrollment and configure the QuickAdd package used for user-initiated enrollment. When configuring the QuickAdd package, you can do the following:
�� Specify a management account for computers.
�� Ensure that SSH (Remote Login) is enabled on computers.
�� Ensure that computers launch Self Service after they are enrolled.
�� Customize the enrollment portal.
�� Sign the QuickAdd package. You can also restrict re-enrollment so that a user is only allowed to re-enroll a computer if one of the following conditions is met:
�� The user is a JSS user with the “Computers” privilege.
�� The username of the user re-enrolling the computer matches the Username field in the User and Location category in inventory information.
�� The Username field in the User and Location category in inventory information is blank.
Signing the QuickAdd Package
Signing the QuickAdd package for user-initiated enrollment ensures that it appears as verified to users that install it. It also allows users to install the QuickAdd package on computers that have Apple’s Gatekeeper feature set to only allow applications downloaded from the Mac App Store and identified developers.
If you choose to sign the QuickAdd package, you need to upload an installer certificate (.p12) from Apple. For instructions on how to obtain an installer certificate, see the following Knowledge Base article:
Obtaining an Installer Certificate from Apple
Configuring the User-Initiated Enrollment Settings for Computers
1. Log in to the JSS with a web browser.
2. In the top-right corner of the page, click Settings .
3. Click Computer Management.
On a smartphone or iPod touch, this option is in the pop-up menu.
109

4. In the ”Computer Management–Management Framework” section, click User-Initiated Enrollment .
5. Click Edit.
6. Configure the settings on the pane.
7. Click Save.
Related InformationFor related information, see the following section in this guide:
User-Initiated Enrollment for ComputersFind out how to allow users to enroll their own computers by having them log in to an enrollment portal.
110

User-Initiated Enrollment for Computers
You can allow users to enroll their own computers by having them log in to an enrollment portal where they follow the onscreen instructions to download and install a QuickAdd package.
To direct users to the enrollment portal, you need to provide them with the enrollment URL. This is the full URL for the JAMF Software Server (JSS) followed by “/enroll”. For example:
https://jss.mycompany.com:8443/enroll
You can provide this URL by sending it in an email invitation from the JSS, or through any other means that fit your environment. Sending an invitation from the JSS allows you to add computers to a site during enrollment. Users can log in to the enrollment portal using an LDAP directory account or a JSS user account. If users log in to the enrollment portal with an LDAP directory account, user and location information is submitted during enrollment.
RequirementsTo send a computer enrollment invitation, you need:
�� An SMTP server set up in the JSS (For more information, see Integrating with an SMTP Server.)
�� User-initiated enrollment enabled and the QuickAdd package configured in the JSS (For more information, see User-Initiated Enrollment Settings for Computers.)
If the QuickAdd package is signed, computers must have a Certification Authority intermediate certificate from Apple in the System keychain in Keychain Access. For instructions on how to obtain this certificate and import it to the System keychain, see the following Knowledge Base article:
Importing a Certification Authority Intermediate Certificate from Apple to the System Keychain For users to log in to the enrollment portal with their LDAP directory account, you need an LDAP server set up in the JSS. (For more information, see Integrating with LDAP Directory Services.)
Sending a Computer Enrollment InvitationBefore you configure the invitation, make sure you have the email addresses of the users you want to send the invitation to.
1. Log in to the JSS with a web browser.
2. Click Computers at the top of the page.
3. Click Enrollment Invitations.
On a smartphone or iPod touch, this option is in the pop-up menu.
111

4. Click New .
5. Follow the onscreen instructions to send the enrollment invitation. An enrollment invitation is immediately sent to email addresses you specified. You can view the status of the enrollment invitation in the list of invitations.
Viewing Computer Enrollment Invitation UsageYou can view a list of computers that were enrolled with a single enrollment invitation.
1. Log in to the JSS with a web browser.
2. Click Computers at the top of the page.
3. Click Enrollment Invitations.
On a smartphone or iPod touch, this option is in the pop-up menu.
4. Click the enrollment invitation you want to view usage for.
5. Click View Enrolled Computers. A list of computers enrolled with the invitation is displayed.
Deleting a Computer Enrollment Invitation
1. Log in to the JSS with a web browser.
2. Click Computers at the top of the page.
3. Click Enrollment Invitations.
On a smartphone or iPod touch, this option is in the pop-up menu.
4. Click the enrollment invitation you want to delete.
5. Click Delete, and then click Delete again to confirm.
112

QuickAdd Packages Created Using Recon
You can use Recon to create a QuickAdd package that enrolls OS X computers when it is installed. This type of QuickAdd package can be deployed using almost any deployment tool, such as Apple Remote Desktop or the Casper Suite. You can also give the QuickAdd package to users to install.
When you create a QuickAdd package using Recon, you can do the following:
�� Ensure that SSH (Remote Login) gets enabled on computers that have it disabled.
�� Ensure that computers launch Self Service after they are enrolled.
�� Sign the QuickAdd package.
�� Choose a site to add computers to during enrollment. To install a QuickAdd package, you double-click it and then follow the onscreen instructions.
Signing a QuickAdd Package
Signing a QuickAdd package ensures that it appears as verified to users that install it. It also allows users to install the QuickAdd package on computers that have Apple’s Gatekeeper feature set to only allow applications downloaded from the Mac App Store and identified developers.
There are some additional requirements for signing a QuickAdd package and installing a signed QuickAdd package. For more information, see the “Requirements” section below.
Requirements
To sign a QuickAdd package, the computer running Recon must have:
�� OS X v10.7 or later
�� An installer certificate (.p12) from Apple in the System keychain in Keychain Access (For more information, see the Obtaining an Installer Certificate from Apple Knowledge Base article.)
To install a signed QuickAdd package, computers must have a Certification Authority intermediate certificate from Apple in the System keychain in Keychain Access. For instructions on how to obtain this certificate and import it to the System keychain, see the following Knowledge Base article:
Importing a Certification Authority Intermediate Certificate from Apple to the System Keychain
Creating a QuickAdd Package Using Recon
1. Open Recon and authenticate to the JSS.
2. Select QuickAdd Package in the sidebar.
113

3. Enter credentials for a local administrator account.
This account is used as the management account.
4. If the management account you specified is a new account, select the Create management account if it does not exist checkbox and configure additional settings for the management account as needed.
5. To enable SSH on computers that have it disabled, select the Ensure SSH is enabled checkbox.
6. To launch Self Service on computers immediately after they are enrolled, select the Launch Self Service when done checkbox.
7. To sign the QuickAdd package, select the Sign with checkbox and choose an installer certificate from the pop-up menu.
Installer certificates that are located in the login keychain in Keychain Access are displayed in the pop-up menu.
Note: The pop-up menu also displays application certificates that are located in the login keychain in Keychain Access. It is important that you choose an installer certificate, not an application certificate, to sign QuickAdd packages.
8. Click Create and save the package.
After creating the QuickAdd package, you can deploy it using a deployment tool or give the package to users to install. When the QuickAdd package is installed on computers, they are enrolled with the JSS.
Related InformationFor related information, see the following section in this guide:
Installing PackagesFind out how to install a QuickAdd package using a policy or Casper Remote.
114

Network Scanner
The network scanner in Recon allows you to remotely enroll multiple OS X computers. It scans specified IP ranges and enrolls any computers that it can connect to over SSH (Remote Login).
There are two ways to specify the IP ranges you want to scan: choose network segments that are set up in the JSS, or manually specify IP ranges. If you manually specify the IP ranges, you can choose a building, department, and site to add computers to during enrollment.
RequirementsTo enroll computers using the network scanner, SSH must be enabled on the computers.
Enrolling Computers Using the Network Scanner
1. Open Recon and authenticate to the JSS.
2. Select Network Scanner in the sidebar.
3. Specify the IP ranges you want to scan:
�� To choose network segments that are set up in the JSS, click Network Segments below the list of IP ranges and select the network segment you want to scan. Repeat as needed.
115

�� To specify IP ranges manually, click Add (+) below the list of IP ranges and specify information about the IP range you want to scan. Click OK and repeat as needed.
4. Specify one or more local administrator accounts that have SSH access to computers in the IP range.
When the network scanner finds a computer on the network, it tries each account until it finds one that can be used to connect to the computer over SSH. The first valid account is used as the management account.
a. Click Add (+) below the list of accounts.
b. Enter credentials for a local administrator account that has SSH access to computers.
c. Click OK.
d. If there is more than one administrator account in the specified IP ranges, repeat steps a through c as needed.
5. To ignore computers that are already enrolled with the JSS, select the Ignore IP addresses of computers already in the JSS checkbox.
116

6. To continuously scan for new computers, use the Rescan IP Ranges pop-up menu to specify how often Recon should rescan.
7. To create a .recon file that contains the network scanner settings you just configured, click Save As. Then specify a name and location for the file.
Double-clicking the file opens Recon (if it is not already open) and populates the network scanner settings.
You can open the file at any time to have Recon automatically configure the network scanner settings.
8. Click Scan. Recon scans the specified IP ranges and enrolls any computers that it can connect to over SSH. The progress of the scan is displayed on the Current Activity pane. The results of the scan are displayed on the Enrolled, Not Found, and Problems panes.
117

Remote Enrollment Using Recon
If you know the IP address of the OS X computer you want to enroll and SSH (Remote Login) is enabled on the computer, you can enroll the computer by running Recon remotely. This allows you to submit detailed inventory information for the computer. It also allows you to add computers to a site during enrollment.
RequirementsTo enroll a computer by running Recon remotely, you need:
�� The IP address of the computer
�� SSH (Remote Login) enabled on the computer
Enrolling a Computer by Running Recon Remotely
1. Open Recon and authenticate to the JSS.
2. Select Remote Enrollment in the sidebar.
3. Enter the IP address of the computer you want to enroll.
118

4. Enter credentials for a local administrator account that has SSH access.
This account is used as the management account.
5. (Optional) Select User and Location and specify user and location information for the computer.
If an LDAP server is set up in the JSS, click Search to populate information from the LDAP server. This assigns the user to the computer during enrollment. (For more information on setting up an LDAP server, see Integrating with LDAP Directory Services.)
If you specified a username that matches an existing username in the JSS, the user is assigned to the computer during enrollment. If you specified a username that does not match an existing username in the JSS, the user is created and assigned to the computer during enrollment.
119

6. (Optional) Select Purchasing and specify purchasing information for the computer.
If a GSX connection is set up in the JSS, click Search to populate information from Apple’s Global Service Exchange (GSX). (For more information on setting up a GSX connection, see Integrating with GSX.)
7. (Optional) Select Extension Attributes and specify information as needed.
8. (Optional) Select Peripherals and add peripherals as needed.
9. Click Enroll.
120

Local Enrollment Using Recon
If you have physical access to the OS X computer that you want to enroll, you can run Recon locally on the computer. This allows you to submit detailed inventory information for the computer. It also allows you to add computers to a site during enrollment.
Enrolling a Computer by Running Recon Locally
1. On the computer you want to enroll, open Recon and authenticate to the JSS.
2. (Optional) Enter an asset tag and/or use a bar code scanner to enter bar codes.
The computer name is populated by default.
3. Enter credentials for a local administrator account that you want to use to manage computers.
This can be an existing or new account. If the account does not already exist, Recon creates it.
Note: If the account you specify does not have SSH (Remote Login) access to the computer, Recon enables SSH during enrollment.
121

4. (Optional) Select User and Location and specify user and location information for the computer.
If an LDAP server is set up in the JSS, click Search to populate information from the LDAP server. This assigns the user to the computer during enrollment. (For more information on setting up an LDAP server, see Integrating with LDAP Directory Services.)
If you specified a username that matches an existing username in the JSS, the user is assigned to the computer during enrollment. If you specified a username that does not match an existing username in the JSS, the user is created and assigned to the computer during enrollment.
5. (Optional) Select Purchasing and specify purchasing information for the computer.
If a GSX connection is set up in the JSS, click Search to populate information from Apple’s Global Service Exchange (GSX). (For more information on setting up a GSX connection, see Integrating with GSX.)
6. (Optional) Select Extension Attributes and specify information as needed.
7. (Optional) Select Peripherals and add peripherals as needed.
8. Click Enroll.
122

Computer PreStage Enrollments
A PreStage enrollment allows you to store enrollment and OS X computer setup settings in the JAMF Software Server (JSS) and use them to enroll new OS X computers with the JSS. This reduces the amount of time and interaction it takes to prepare OS X computers for use.
Before you can use a PreStage enrollment, you need to create it in the JSS. This allows you to configure the enrollment settings and specify the computers that should be enrolled using the PreStage enrollment. You can also customize the user experience of the Setup Assistant.
After OS X computers are added to the JSS using a PreStage enrollment, they can be managed using one of the following methods:
�� Remote Enrollment Using Recon
�� QuickAdd Packages Created Using Recon
�� User-Initiated Enrollment for Computers
Configuring a Computer PreStage Enrollment
1. Log in to the JSS with a web browser.
2. Click Computers at the top of the page.
3. Click PreStage Enrollments.
On a smartphone or iPod touch, this option is in the pop-up menu.
4. Click New .
5. Use the General payload to configure basic settings for the PreStage enrollment and customize the user experience of the Setup Assistant.
To customize the user experience of the Setup Assistant, select which steps you want to skip in the Setup Assistant. If you choose to skip steps, the user can enable these settings after the computer is configured unless otherwise restricted.
6. (Optional) Use the User and Location payload to specify user and location information for the computers.
This information is stored in the JSS for each computer enrolled using a PreStage enrollment.
Note: The User and Location Information payload is only displayed if the Authentication checkbox is not selected.
7. (Optional) Use the Purchasing payload to specify purchasing information for the computers.
This information is stored in the JSS for each computer enrolled using a PreStage enrollment.
8. (Optional) Use the Attachments payload to upload attachments to store for computers.
This information is stored in the JSS for each computer enrolled using a PreStage enrollment.
123

9. If the SSL certificate you are using is signed by an external CA (your organization's CA or a trusted third-party CA), use the Certificates payload to upload a certificate for the CA that you want computers to trust at enrollment.
Note: The anchor certificate is only displayed if the SSL certificate you are using is signed by the JSS’s built-in CA.
10. Click the Scope tab and configure the scope of the PreStage enrollment by selecting the checkbox next to each computer you want to add to the scope.
Note: The computers listed on the Scope tab are the computers that are associated with the Device Enrollment Program via the server token file (.p7m) you downloaded from Apple's Volume Services Portal.
11. Click Save.
Refreshing PreStage Enrollment InformationThe JSS allows you to manually refresh information about the computers in the PreStage enrollment as needed.
1. Log in to the JSS with a web browser.
2. Click Computers at the top of the page.
3. Click PreStage Enrollments.
On a smartphone or iPod touch, this option is in the pop-up menu.
4. Click the PreStage enrollment you want to refresh.
5. Click Refresh. If there is updated information about the computers in the Device Enrollment Program, this information is displayed in the JSS.
Cloning, Editing, or Deleting a PreStage Enrollment
1. Log in to the JSS with a web browser.
2. Click Computers at the top of the page.
3. Click PreStage Enrollments.
On a smartphone or iPod touch, this option is in the pop-up menu.
4. Click the PreStage enrollment you want to clone, edit, or delete.
5. Do one of the following:
�� To clone the PreStage enrollment, click Clone and make changes as needed. Then click Save.
Note: Computers added to the scope of a PreStage enrollment are not cloned when cloning the PreStage enrollment.
�� To edit the PreStage enrollment, click Edit and make changes as needed. Then click Save.
�� To delete the PreStage enrollment, click Delete. Then click Delete again to confirm.
124

Related InformationFor related information, see the following section in this guide:
Integrating with the Device Enrollment ProgramFind out how to configure an instance of the Device Enrollment Program.
125

QuickAdd Packages Created Using Recon.exe
You can use Recon.exe to create a QuickAdd package (.mist) that enrolls Windows computers when it is installed. This type of QuickAdd package can be deployed using almost any deployment tool. You can also give the QuickAdd package created using Recon.exe to users to install.
When you create a QuickAdd package using Recon.exe, you can change the account that the QuickAdd package uses to authenticate to the JSS. You can also create a schedule for collecting inventory from Windows computers enrolled using the QuickAdd package.
Creating a QuickAdd Package Using Recon.exe
1. Open Recon.exe and authenticate to the JSS.
2. Click QuickAdd Package .
3. To change the account that the QuickAdd package uses to authenticate to the JSS, click Change and enter credentials for the account. Then click OK.
4. To create a schedule for collecting inventory, click Schedule ongoing inventory updates. Configure the schedule and click Save.
5. Click Create and save the package. After creating the QuickAdd package, you can deploy it or give it to users to install. When the QuickAdd package is installed on computers, they are enrolled with the JSS.
126
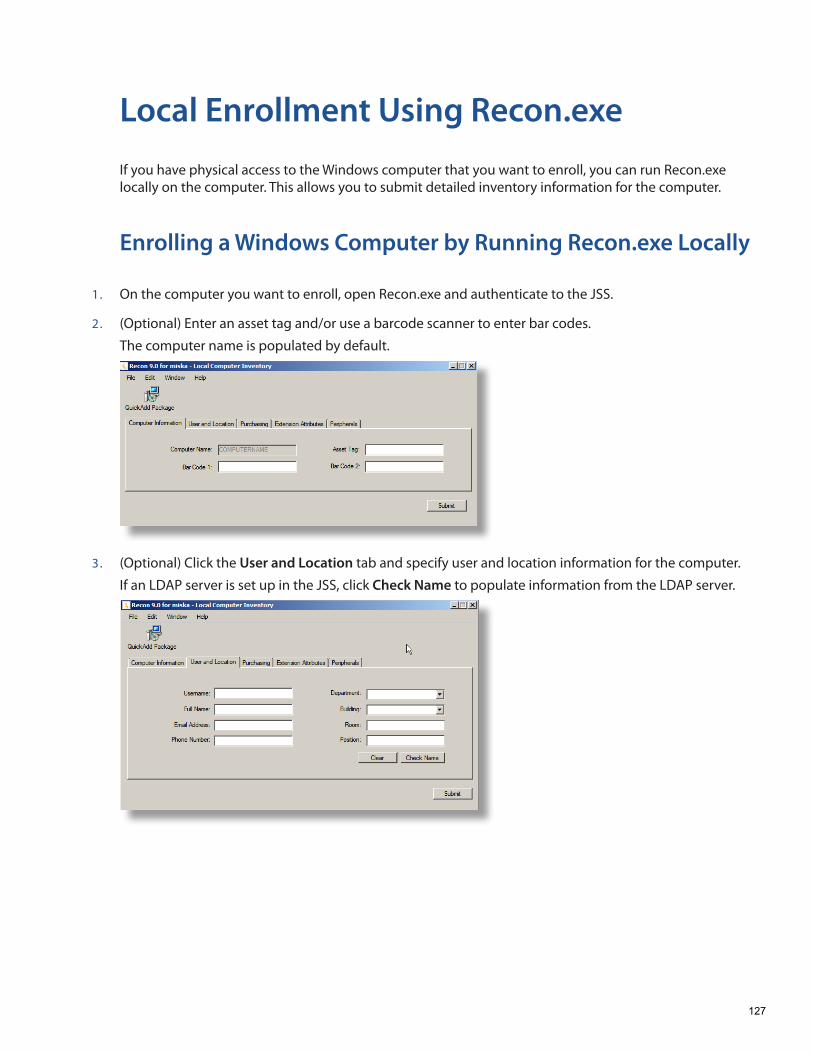
Local Enrollment Using Recon.exe
If you have physical access to the Windows computer that you want to enroll, you can run Recon.exe locally on the computer. This allows you to submit detailed inventory information for the computer.
Enrolling a Windows Computer by Running Recon.exe Locally
1. On the computer you want to enroll, open Recon.exe and authenticate to the JSS.
2. (Optional) Enter an asset tag and/or use a barcode scanner to enter bar codes.
The computer name is populated by default.
3. (Optional) Click the User and Location tab and specify user and location information for the computer.
If an LDAP server is set up in the JSS, click Check Name to populate information from the LDAP server.
127

4. (Optional) Click the Purchasing tab and specify purchasing information for the computer.
5. (Optional) Click the Extension Attributes tab and specify information as needed.
6. (Optional) Click the Peripherals tab and add peripherals as needed.
7. Click Submit.
128

Composer
About Composer
Composer allows you to build packages of software, applications, preference files, or documents. A package is a self-contained group of files that can be deployed to remote computers or as part of the imaging process.
The first step to building a package is creating a package source. Depending on the files you want to package, Composer allows you to monitor the installation of your software or use files that already exist on the drive to create the package source.
After you create a package source, you can build a PKG or a DMG from the package source. Composer also allows you to build a DMG of an operating system.
Related InformationFor related information, see the following sections in this guide:
�� Creating Package Sources
Find out how to create a package source using several different methods.
�� Building Packages from Package Sources
Find out how to build a PKG or DMG from a package source.
�� Building OS Packages
Find out how to build a DMG of an operating system.
129

Creating Package Sources
A package source allows you to view and edit attributes of a package (such as files, scripts, privileges, and localizations) before it is built. Once a package source exists for a group of files, you can make modifications and build the package as many times as necessary.
There are several ways to create a package source:
�� Take snapshots—Composer takes before and after snapshots of the file system and creates a package source based on the changes. This method allows you to monitor installations in all locations on the drive. If necessary, you can also quit Composer or log out/reboot during the installation process.
�� Monitor the file system—Composer uses the File System Events (FSEvents) framework to monitor any changes that are made to the file system during the installation process. Next, Composer creates a package source based on the changes. This method does not allow you to quit Composer or log in/reboot during the installation process. In addition, an excess of file system activity can cause FSEvents to miss changes.
�� Use pre-installed software—You can use software that is pre-installed on your computer to create a package source based on package manifests. This method allows you to create package sources without monitoring the installation process.
�� Use user environment settings—Package manifests can also be used to capture settings configured on your computer, such as Dashboard, Display, and Global Preference settings.
�� Drag contents from the Finder—A simple drag-and-drop process allows you to create a package source from files already installed on your computer.
�� Use an existing package—Composer allows you to make modifications to an existing package or convert between the PKG and DMG package formats.
Taking SnapshotsIf the files you want to package are not already installed on the drive, Composer can take a snapshot of the file system before and after the files have been installed and create a package source based on the changes. Composer can take two kinds of snapshots:
�� Normal snapshots—These snapshots capture any new files on the drive. These snapshots can take anywhere from ten seconds to several minutes depending on your hardware and the number of files on the drive.
�� New and modified snapshots—These snapshots capture any new files on the drive, as well as any files that have been modified. These snapshots can take longer than normal snapshots, since Composer records the modifications date of each file while performing the snapshot.
130

There are several benefits to using the snapshot approach:
�� Composer monitors installations in all locations on the drive.
�� You can quit Composer during the installation process.
�� You can log out or reboot during the installation process.
�� If you delete a file while making modifications to a package source, it may be possible to restore the deleted file. For more information about restoring deleted files, see Adding Scripts to Package Sources.
1. Open Composer and authenticate locally.
2. In the toolbar, click New .
3. Under the Monitor Installation heading in the sidebar, select Snapshot.
4. Select Normal Snapshot or New & Modified Snapshot and click Next.
5. Enter a name for the package and click Next.
131

6. Install and configure your software, and then click Create Package Source to initiate the “after” snapshot.
Monitoring the File SystemWhen creating a package source using file system monitoring, Composer uses the File System Events (FSEvents) framework that is built into OS X to monitor any changes that are made to the file system. Each time a change is made, FSEvents receives a notification. After your software is installed, Composer analyzes the changes and creates a package source based on the results. The following limitations should be taken into consideration when monitoring the file system to create a package source:
�� You cannot quit Composer during the installation process.
�� You cannot log in or restart during the installation process.
�� It is possible for FSEvents to miss events if there is too much file system activity.
1. Open Composer and authenticate locally.
2. In the toolbar, click New .
3. Under the Monitor Installation heading in the sidebar, select Snapshot.
132

4. Select Monitor File System Changes and click Next.
5. Enter a name for the package and click Next.
6. Install and configure your software, and then click Create Package Source.
133

Creating Package Sources From Pre-Installed Software You can create a package source from software that is currently installed on your computer if Composer contains a package manifest for the software.
Note: If there is software you would like added to the package manifest options in Composer, email your recommendations to [email protected].
1. Open Composer and authenticate locally.
2. In the toolbar, click New .
3. Under the Package Manifests heading in the sidebar, select Pre-Installed Software.
Composer scans the file system and displays icons for the software it can package.
Note: To view package manifests for software that is not installed on the computer, click the disclosure triangle next to Pre-Installed Software and select Not Installed.
4. Select the item(s) you want to create a package source from and click Next.
Creating Package Sources from the User Environment SettingsYou can create a package source that captures the look and feel of your computer’s interface, such as Dashboard, Display, and Global Preference settings. If Composer contains a package manifest for the setting you want to capture, you can create a package source from it.
To determine which of your current settings Composer can package, select User Environment under the Package Manifests heading. Composer scans the file system and displays icons for the settings that it has package manifests for.
Note: If there is a setting you would like added to the package manifest options in Composer, email your recommendations to [email protected].
134

1. Open Composer and authenticate locally.
2. In the toolbar, click New .
3. Under the Package Manifests heading in the sidebar, select User Environment.
4. Select the item(s) you want to create a package source from and click Next.
Creating Package Sources by Dragging Contents from the FinderIf you already know which item you want to package, you can bypass the snapshot or monitoring process by dragging items from the Finder to the Sources list in Composer. There are a few ways Composer handles these items:
�� If the item is a package (DMG, PKG, or MPKG), it is listed in the sidebar under the Packages heading.
�� If the item is a folder, the root of the folder is used as the root of the package if it is one of the following directories:
/Applications//Developer//Library//System//Users//bin//private//sbin//usr/
�� Any other items are copied to their current location.
Note: This is the equivalent of a PreBuilt package in earlier versions of Composer.
135

Creating Package Sources from Existing PackagesComposer allows you to rebuild an existing package (PKG, DMG, or MPKG) by converting it to a package source. After converting it to a package source, you can make changes to its contents and save a new copy of the package.
1. Open Composer and authenticate locally.
2. Drag the package you want to convert from the Finder to the sidebar in Composer.
The package appears under the Packages heading.
3. Select the package and click Convert to Source.
When the conversion is complete, a new package source is listed in the sidebar under the Sources heading.
136

Related InformationFor related information, see the following sections in this guide:
�� Package Manifests
Find out how to create package manifests, update the package manifests available, and import package manifests.
�� Building Packages from Package Sources
Find out how to build a PKG or DMG from a package source.
137

Package Manifests
Package manifests are .composer files that can be used to create package sources from the software installed on your computer. They can also be used to capture settings configured on your computer, such as Dashboard, Display, and Global Preference settings. Composer comes with over 100 package manifests. You can use the update feature in Composer to add new package manifests as they become available. You can also create your own package manifests and import package manifests that are stored on your computer.
Creating Package Manifests
1. Open Composer and authenticate locally.
2. Click the disclosure triangle next to an existing package source.
3. Click the disclosure triangle next to Snapshots.
4. Control-click (or right-click) Files For Package and select Export Package Manifest.
138

5. Enter a name for the package manifest.
6. Enter a description of the package manifest and the name of the person who is creating it.
7. Select the checkbox next to each file that must be present on a computer for the package manifest to appear under the Pre-Installed Software heading or the User Environment heading in Composer.
8. If desired, select the Custom Icon checkbox and choose an icon for the package manifest.
The icon is displayed when viewing the package manifest in Composer.
9. If you want to upload the package manifest to JAMF Nation:
a. Click Upload to JAMF Nation.
b. Enter the username and password for your JAMF Nation account.
c. Choose a third-party product to associate the package manifest with. For example, if you are creating a package manifest for Adobe Reader 10, associate it with the "Adobe Reader" third-party product.
d. Click Upload.
10. Click Save As.
11. Choose a location to save the package manifest and click Save.
139

Updating Package ManifestsPeriodically, new package manifests become available for Composer. To ensure that you have the latest package manifests, choose File > Update Package Manifests from the menu bar in Composer.
Composer downloads the latest package manifests from JAMF Nation and any new package manifests that JAMF Software has added to the application, and stores them in the following location:
/Library/Application Support/JAMF/Composer/ImportedPackageManifests/
Importing Package ManifestsIf you do not want to add all package manifests from JAMF Nation to Composer, you can download one or more specific package manifests from JAMF Nation and import them to Composer. You can also import package manifests that you created.
To import package manifests that are saved to your computer, choose File > Import Package Manifests from the menu bar in Composer and then choose the package manifest you want to import.
Composer imports the package manifests and stores them in the following location:
/Library/Application Support/JAMF/Composer/ImportedPackageManifests/
140

Viewing and Editing the Contents of Package Sources
Once a package source exists for the files you want to package, Composer allows you to do the following:
�� Delete files that should not be included in the package.
�� Add files by dragging them into Composer from the Finder.
�� Change privileges on a file or folder.
�� Restore files that were deleted from the package source.
In addition to viewing files or folders through the Composer interface, you can view this information in the Finder or using Quick Look.
Deleting Files or Folders from a Package SourceIn the Package Contents pane, select the item(s) you want to delete from the package source and choose File > Delete from the menu bar.
Adding Files to a Package SourceDrag the file(s) you want to add to your package source from the Finder into the Package Contents pane in Composer.
Changing Privileges on Files or Folders in a Package SourceSelect a file or folder in the Package Contents pane in Composer to display its privileges in the bottom of the window. You can change the privileges using this display. Changes are saved automatically. If the selected item is a folder, you can apply the privileges that exist on the folder to each enclosed item by clicking the Action button to the right of the X-column.
Restoring Deleted Files or Folders to a Package SourceIf you delete a file or folder from the Package Contents pane, it may be possible to restore the item. When you restore a deleted file or folder, Composer copies the item from its original location on the drive.
Note: Deleted files and folders can only be restored if a snapshot was used to create the package source.
1. Open Composer and authenticate locally.
2. Click the disclosure triangle next to the package source in the sidebar.
3. Click the disclosure triangle next to Snapshots.
141

4. Select Files for Package to display a list of files, folders, and directories from the snapshot.
5. Select the item you want to restore.
6. Control-click (or right-click) the selected item and choose Restore.
Viewing Files or Folders in a Package Source Using the FinderIn the Package Contents pane, select the item(s) you want to preview, and then choose File > Reveal in Finder from the menu bar.
Viewing Files or Folders in a Package Source Using Quick Look In the Package Contents pane, select the item(s) you want to preview, and then choose File > Quick Look from the menu bar or press the Space bar.
142

Adding Scripts to Package Sources
Composer allows you to manage scripts for PKGs. The following default scripts are available in shell and perl:
�� InstallationCheck
�� Postflight
�� Postinstall
�� Postupgrade
�� Preflight
�� Preinstall
�� Preupgrade
�� VolumeCheck
Note: Flat PKGs support Preinstall and Postinstall scripts only. To build a PKG that contains other scripts, you can deselect the Build Flat PKGs option in Composer preferences, or you can disable this preference for a single package. For information on how to disable this preference for a single package, see Building a PKG. For more information on flat PKGs, see Composer Preferences.
These scripts read in the available parameters that are received from the installer and give descriptions for the supported exit codes. Composer also attempts to verify that the script syntax is valid. If a script appears to have invalid syntax, a warning icon appears.
To view the error that occurred while Composer was verifying the script, Control-click (or right-click) the script and choose Compile Script.
Note: InstallationCheck and VolumeCheck scripts have warning and failure messages that can be localized according to the needs of the user. To localize these messages, the corresponding .strings file (InstallationCheck.strings or VolumeCheck.strings) must be created for each localization.
Adding a postflight script to a package source allows you to remove deprecated or unneeded files from computers as they install the package.
1. Open Composer and authenticate locally.
2. Click the disclosure triangle next to the package source in the sidebar.
143

3. Do one of the following:
�� To add a postflight script that removes deleted files from computers, click the disclosure triangle next to Snapshots. Then Control-click (or right-click) the Deleted Files heading and choose Add postflight Shell Script.
Note: This function is only available if a snapshot was used to create the package source.
�� To add another type of script, Control-click (or right-click) Scripts and choose the script you want to add.
The script is displayed under the Scripts heading in the sidebar.
4. (Optional) Select the script in the sidebar to view or change its contents.
Adding a Postflight Script that Removes Deleted Files from ComputersAdding a postflight script to a package source allows you to remove deprecated or unneeded files from computers as they install the package.
Note: This function is only available if a snapshot was used to create the package source.
1. Open Composer and authenticate locally.
2. Click the disclosure triangle next to the package source in the sidebar.
3. Click the disclosure triangle next to Snapshots.
144

4. Select the Deleted Files heading to view the deleted files captured by the snapshot.
5. Control-click (or right-click) the Deleted Files heading and choose Add postflight Shell Script.
The script is displayed under the Scripts heading in the sidebar.
6. (Optional) Select the script in the sidebar to view or change its contents.
145
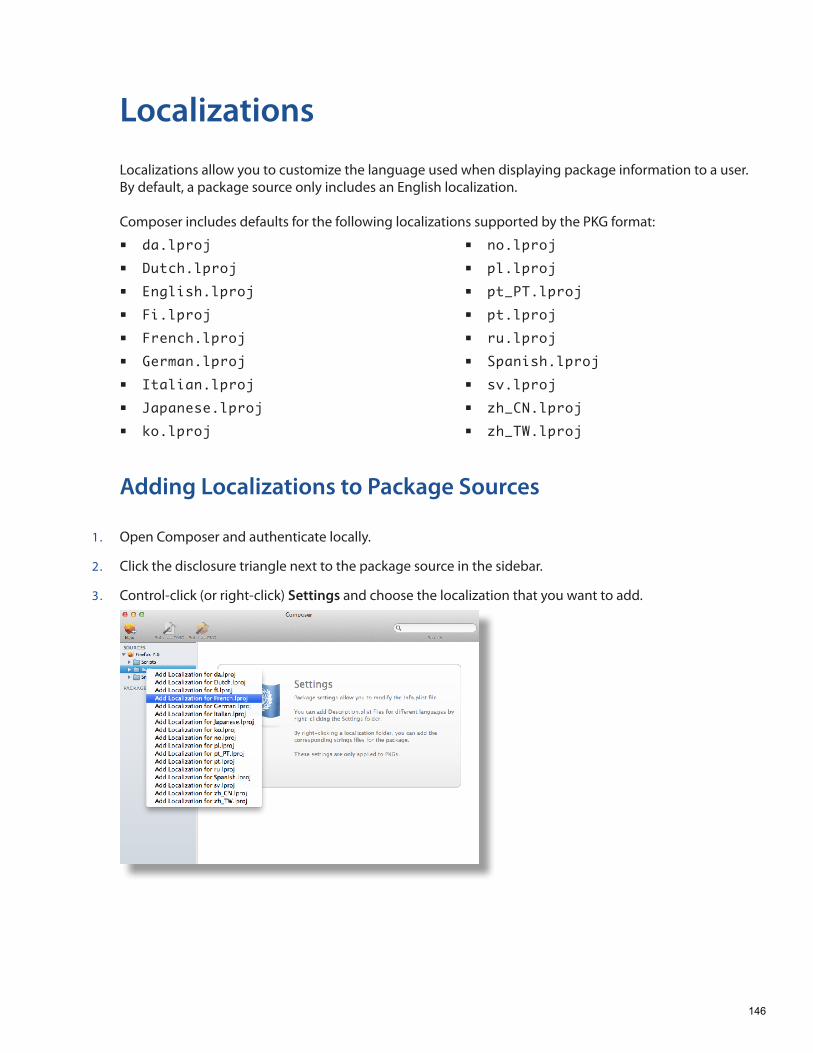
Localizations
Localizations allow you to customize the language used when displaying package information to a user. By default, a package source only includes an English localization.
Composer includes defaults for the following localizations supported by the PKG format:
�� da.lproj
�� Dutch.lproj
�� English.lproj
�� Fi.lproj
�� French.lproj
�� German.lproj
�� Italian.lproj
�� Japanese.lproj
�� ko.lproj
�� no.lproj
�� pl.lproj
�� pt_PT.lproj
�� pt.lproj
�� ru.lproj
�� Spanish.lproj
�� sv.lproj
�� zh_CN.lproj
�� zh_TW.lproj
Adding Localizations to Package Sources
1. Open Composer and authenticate locally.
2. Click the disclosure triangle next to the package source in the sidebar.
3. Control-click (or right-click) Settings and choose the localization that you want to add.
146

Adding and Editing Files for a LocalizationYou can include two kinds of files in a localization:
�� Description.plist files—These files display the title of a package and its description in the Installer application. Each localization contains a description.plist file by default. For instructions on how to edit these files, see Editing PLIST Files in Package Sources.
�� Strings files—VolumeCheck.strings and InstallationCheck.strings files are used to localize warning and error messages. These files are only effective when used in conjunction with their corresponding scripts (VolumeCheck and InstallationCheck). For instructions on how to add VolumeCheck and InstallationCheck scripts to a package source, see Adding Scripts to Package Sources.
1. Open Composer and authenticate locally.
2. Click the disclosure triangle next to the package source in the sidebar.
3. Click the disclosure triangle next to Settings.
4. Control-click (or right-click) the language folder you want to add the .strings file to, and select Create InstallationCheck.strings or Create VolumeCheck.strings.
5. Click the .strings file to change its contents in the Package Contents pane.
147

Building Packages from Package Sources
After you have verified the contents of a package source, Composer allows you to build two different kinds of packages: PKGs and DMGs. Each format has advantages depending on the intended use of the package and the tool you use to deploy it.
Once a package source exists in Composer, you can build a PKG or DMG package from the source at any time. You also have the ability to convert from one format to another after a package has been built. For more information about converting between the PKG and DMG formats, see Creating Package Sources from Existing Packages.
Building a PKGPKGs can be deployed using almost any deployment tool, such as Apple Remote Desktop (ARD), the Casper Suite, and other client management systems.
The PKG format allows for easy installation by the user. Double-clicking the package opens the Installer application and guides the user through the installation process.
Note: PKGs cannot dynamically deploy files in the user’s home directory to user templates when used with the Casper Suite. By default, Composer builds flat PKGs. For more information on flat PKGs, see Composer Preferences.
1. Open Composer and authenticate locally.
2. Select the package source you want to build as a PKG from the Sources list in the sidebar.
3. In the toolbar, click Build as PKG .
Note: If the Build flat PKGs preference is enabled and the package source contains scripts that are not supported by flat PKGs, a dialog will appear. To disable this preference for this package only, click Build as non-flat PKG. To build a flat PKG that ignores unsupported scripts, click Build as flat PKG. For more information on which scripts are supported by flat PKGs, see Adding Scripts to Package Sources.
4. Select a location to save the package and click Save.
148

Building a DMGWhen used in conjunction with the Casper Suite, the DMG format allows you to dynamically deploy files and folders to each user that has an account on a computer, as well as the network home directories of currently logged-in users. There is also an option to deploy files and folders to the user template directories, ensuring that any new user receives the correct default environment.
1. Open Composer and authenticate locally.
2. Select the package source you want to build as a DMG from the Sources list in the sidebar.
3. In the toolbar, click Build as DMG .
4. Select a location to save the package and click Save.
149

Building OS Packages
In addition to building deployable packages of applications and other files, Composer allows you to build DMGs of preconfigured operating systems. OS packages can save you time and enhance consistency across your network. While building an OS package with Composer is similar to building one with the Disk Utility application, Composer allows you to clean up the OS by removing unnecessary files before building the DMG. Composer allows you to manage the following cleanup options for an OS package:
Compress Disk Image This option compresses the OS package DMG.
Delete Temp Files This option ensures the files in /private/tmp are deleted before building an OS package. These files are usually deleted during the startup process.
Delete Virtual Memory Files This option ensures that Virtual Memory files are deleted before building an OS package, including the potentially large sleepfile. These files are usually deleted and recreated during the startup process.
Delete Special Files Apple recommends deleting the following files before building an OS package:
/private/var/db/BootCache.playlist/private/var/db/volinfo.database This option ensures that these files are deleted.
Delete Caches This option removes files in the /Library/Caches directory before building an OS package.
Remove System Keychain This option removes the System keychain from the OS to ensure that a new System keychain is created. This can prevent the “This computer already exists” error when binding a computer to a directory service.
Ensure Trashes are Empty This option empties the Trash for any user with items in the ~/.Trash folder. It also updates a user’s com.apple.dock.plist file to reflect that the Trash is empty.
150

Installing and Configuring the OSFor instructions on how to install and configure the OS before building an OS package, see the following Knowledge Base article:
Creating a Minimal Base OS Image
Packaging the OSWhen you’re finished configuring the OS, boot to another startup disk to build the DMG.
1. Open Composer and authenticate locally.
2. In the toolbar, click New .
3. Under the Operating System heading in the sidebar, select Build OS Package.
4. Select the drive you want to package and click Next.
5. Choose options for removing unnecessary files from the package and click Next.
6. Enter a package name and select a location to save the package, and then click Build.
151

Composer Preferences
Composer allows you to manage the following settings:
�� Toolbar preferences
�� Package preferences
�� Cleanup options for OS packages
�� Excluded files
�� Location of the work directory
�� Default bundle identifier
You can access Composer preferences by choosing Composer > Preferences from the menu bar.
This section provides a detailed explanation of Composer preferences.
Toolbar PreferencesComposer allows you to customize the toolbar by adding and removing items.
To add items to the toolbar, Control-click (or right-click) the toolbar and select Customize toolbar, and then drag desired items to the toolbar. To remove an item from the toolbar, simply drag the item off of the toolbar.
152

Package PreferencesComposer allows you to manage Package preferences from the pane in the screen shot below.
This pane includes the following preference settings: Build flat PKGs By default, Composer builds flat PKGs. Flat PKGs consist of a single file and allow for easier and more reliable deployment than non-flat PKGs. You cannot view or change the contents of a flat PKG after it is built. Sign flat PKGs This option allows you to sign flat PKGs with an installer certificate (.p12) obtained from Apple. Signing PKGs with an installer certificate makes it possible to verify that the PKG was created by an identified developer. It also allows users to install PKGs on computers that have Apple’s Gatekeeper feature set to only allow applications downloaded from the Mac App Store and identified developers.
To sign flat PKGs, Composer must be running on OS X v10.7 or later.
Select the Sign with option and choose an installer certificate from the pop-up menu. Installer certificates that are located in the login keychain in Keychain Access are displayed in the pop-up menu.
Note: The pop-up menu also displays application certificates that are located in the login keychain in Keychain Access. It is important that you use an installer certificate, not an application certificate, to sign flat PKGs.
For instructions on how to obtain an installer certificate from Apple, see the following Knowledge Base article:
Obtaining an Installer Certificate from Apple
To install a signed PKG, computers must have a Certification Authority intermediate certificate from Apple in the System keychain in Keychain Access. For instructions on how to obtain this certificate and import it to the System keychain on managed computers, see the following Knowledge Base article:
Importing a Certification Authority Intermediate Certificate from Apple to the System Keychain
153

Remove .DS_Store Files in Common Locations Enabling this option ensures the removal of any files that disturb the way Finder windows are presented on a user’s computer. Any .DS_Store files necessary to configure views of deployed files and folders will not be removed.
This feature removes .DS_Store files in the following locations:
/.DS_Store/Applications/.DS_Store/Applications/Utilities/.DS_Store/Developer/.DS_Store/Library/.DS_Store/System/.DS_Store/Users/.DS_Store/Users/<username>/.DS_Store/Users/<username>/<first_level_directory>/.DS_Store Scan Images When Building DMGs Scanning images when building a DMG calculates the checksum and stores it in the DMG.
The checksum is used to ensure proper installation of the DMG package. Play Sounds Composer plays a sound each time a package source is created or deleted. Reveal in Finder when doneWhen this option is enabled, Composer reveals newly built packages in a Finder window.
Exclusion ListThe exclusion list allows you to specify files and folders that should be ignored when creating a package using a snapshot or file system monitoring.
To view the exclusion list, click Exclusion List in the toolbar. A list of common files and folders is specified by default.
154

To add and remove files, use the Add (+) and Delete (–) buttons at the bottom of the list.
Advanced PreferencesComposer allows you to manage some advanced preferences from the pane in the screen shot below.
This pane includes the following preference settings: Work Directory When Composer creates a package source, it copies files to a work directory. This work directory must have privileges enabled.
To change this directory, click Change, or hold down the Option key when you open Composer. Default Bundle Identifier The default bundle identifier is used when creating the info.plist file for a new package source. For example, if the default bundle identifier is “com.jamfsoftware”, and you create a package source named “Composer”, the bundle identifier for the package source is “com.jamfsoftware.composer”.
155

Inventory
Computer Inventory Collection
By default, inventory is collected from computers using the “Update Inventory” policy that is created automatically when you install the JAMF Software Server (JSS). This policy collects inventory from all computers once every week.
You can make changes to the default inventory collection policy at any time. In addition, if you want more control over inventory collection, you can create additional inventory collection policies as needed.
Related InformationFor related information, see the following sections in this guide:
�� Managing Policies
Find out how to create and edit policies.
�� Policy Payload Reference
Learn about each payload in the policy interface.
156

Computer Inventory Collection Settings
Computers can submit many types of inventory information to the JAMF Software Server (JSS). Basic inventory information—such as hardware, operating system, user and location information, storage, and applications—is collected automatically. The Computer Inventory Collection settings in the JSS allow you to collect the following additional items:
�� Local user accounts, with the option to include home directory sizes and/or hidden system accounts
�� Printers
�� Active services
�� Last backup date/time for managed mobile devices that are synced to computers
�� User and location from an LDAP directory service (only available if an LDAP server is set up in the JSS)
�� Package receipts
�� Available software updates
�� Application Usage information
�� Fonts
�� Plug-ins You can also use the Computer Inventory Collection settings to specify custom search paths to use when collecting applications, fonts, and plug-ins. For descriptions of the information collected for each of these items, as well as information on the items that are collected automatically, see Viewing and Editing Inventory Information for a Computer.
Time and Traffic Estimates for Collecting Additional ItemsCollecting additional inventory items may add reporting time and network traffic to the inventory process. The following table provides estimates of how much time and traffic may be added when collecting user home directory sizes, available software updates, fonts, and plug-ins. These estimates are based on a MacBook Pro with approximately 300 GB of user home directories, 100 applications, 300 fonts, and 900 plug-ins.
Additional Inventory Item Time (Seconds) Traffic (KB)
(No additional items) 9 102
Home directory sizes 25 104
Available software updates 110 104
Fonts 10 128
Plug-ins 13 248
157

The following table provides estimates of how much time and traffic may be added when collecting Application Usage information. These estimates are based on a MacBook Pro with eight applications used per day, one week between inventory reports, and one computer user.
Additional Inventory Item Time (Seconds) Traffic (KB)
(No additional items) 16 24
Application Usage information 17 48
Search Paths for Collecting Applications, Fonts, and Plug-insThe following table lists the default search paths that are used when collecting applications, fonts, and plug-ins from computers on the Mac and Windows platforms.
Collected Item Mac Platform Default Search Paths
Windows Platform Default Search Paths
Applications (and Application Usage information, if collecting)
/Applications/ C:\Program Files\
Fonts /Library/Fonts//System/Library/Fonts//Library/Application Support/Adobe/Fonts/~/Library/Fonts/ (collected at the user level for each account)
C:\Windows\Fonts\
Plug-ins /Library/Internet Plug-Ins/ -- If you store these items in locations not listed in the table, you can use the Computer Inventory Collection settings to specify custom search paths for those locations.
Configuring the Computer Inventory Collection Settings
1. Log in to the JSS with a web browser.
2. In the top-right corner of the page, click Settings .
3. Click Computer Management.
On a smartphone or iPod touch, this option is in the pop-up menu.
4. In the ”Computer Management–Management Framework” section, click Inventory Collection .
5. Click Edit.
6. On the General pane, select the checkbox for each inventory item you want to collect.
158

7. To collect Application Usage information or add custom paths in which to search for applications, do the following:
a. Click the Software tab, and then click Applications.
b. To collect Application Usage information, select the Collect Application Usage Information checkbox.
c. To add a custom search path, click Add . Then enter the full path for the location you want to search and the platform to which it applies.
d. Repeat step c to specify additional custom search paths as needed.
8. To collect fonts and add custom paths in which to search for fonts, do the following:
a. Click the Software tab, and then click Fonts.
b. Select the Collect Fonts checkbox.
c. To add a custom search path, click Add . Then enter the full path for the location you want to search and the platform to which it applies.
d. Repeat step c to specify additional custom search paths as needed.
9. To collect plug-ins and add custom paths in which to search for plug-ins, do the following:
a. Click the Software tab, and then click Plug-ins.
b. Select the Collect Plug-ins checkbox.
c. To add a custom search path, click Add . Then enter the full path for the location you want to search and the platform to which it applies.
d. Repeat step c to specify additional custom search paths as needed.
10. Click Save.
Related InformationFor related information, see the following sections in this guide:
�� Extension Attributes
Find out how to create extension attributes that allow you to collect almost any type of data from computers.
�� Simple Computer Searches
Learn how to quickly search the items in your inventory for a general range of results.
�� Advanced Computer Searches
Learn how to create and save an advanced computer search.
�� Viewing and Editing Inventory Information for a Computer
Find out how to view and edit inventory information for a computer.
�� Viewing Application Usage Logs for a Computer
Find out how to view Application Usage logs for a computer.
159

Computer Extension Attributes
Computer extension attributes are custom fields that you can create to collect almost any type of data from a computer. For example, you can create an extension attribute to collect the host name of a computer or collect data about the activity of the company’s antivirus software. There are several ways to create a computer extension attribute in the JAMF Software Server (JSS). You can manually create the extension attribute, use an extension attribute template available in the JSS, or upload an extension attribute template obtained from JAMF Nation. When you create a computer extension attribute, you specify the following information:
�� Type of data being collected, such as string, integer, or date
�� Inventory category in which to display the extension attribute in the JSS, such as Hardware or Operating System
�� Input type, which determines how the extension attribute is populated with data
�� Pane on which to display the extension attribute in Recon (text field and pop-up menu input types only)
�� Script to use to collect data from computers (script input type only) Extension attributes can add time and network traffic to the inventory process depending on the type of data you choose to collect and the input type used to collect it.
Computer Extension Attribute Input TypesYou can choose to populate the value of a computer extension attribute using any of the following input types:
�� Text field—This displays a text field in Recon and in computer inventory information. You can enter a value in the field when enrolling a computer using Recon, or at any time using the JSS. Only extension attributes created manually can be populated using a text field.
�� Pop-up menu—This displays a pop-up menu in Recon and in computer inventory information. You can choose a value from the pop-up menu when enrolling a computer using Recon, or at any time using the JSS. Only extension attributes created manually can be populated using a pop-up menu.
�� Script—This allows you to run a script that populates the extension attribute each time a computer submits inventory to the JSS. Extension attributes created manually can be populated by a script. Extension attributes created from a template are always populated by a script.
�� LDAP Attribute Mapping—This populates the extension attribute with the value for an LDAP attribute. It also generates a variable that can be used to populate configuration profile settings with values for the LDAP attribute. The variable is $EXTENSIONATTRIBUTE_<#>, where <#> is the extension attribute ID. For more information on payload variables for configuration profiles, see OS X Configuration Profiles.
160

Computer Extension Attributes Populated by a Script
When an extension attribute is populated by a script, the text between the <result></result> tag is stored in the JSS. For OS X computers, scripts can be written in any language that has an interpreter installed. The most common interpreters are:
/bin/bash/bin/sh/usr/bin/perl/usr/bin/python All scripts must start with a shebang (#!) followed by the absolute path to the interpreter. For example, the script for an extension attribute that collects the host name from OS X computers looks like this:
#!/bin/shecho "<result>`hostname 2>&1`</result>" For Windows computers, scripts can be written in VBScript, Batch file, and PowerShell.
Note: PowerShell scripts only run on computers that have the components necessary to run the script.
RequirementsTo create a computer extension attribute with the “LDAP Attribute Mapping” input type, you need:
�� An LDAP server set up in the JSS (For more information, see Integrating with LDAP Directory Services.)
�� The Computer Inventory Collection settings configured to collect user and location information from LDAP (For more information, see Computer Inventory Collection Settings.)
Manually Creating a Computer Extension Attribute
1. Log in to the JSS with a web browser.
2. In the top-right corner of the page, click Settings .
3. Click Computer Management.
On a smartphone or iPod touch, this option is in the pop-up menu.
4. In the ”Computer Management–Management Framework” section, click Extension Attributes .
5. Click New .
6. Configure the settings on the pane.
7. Click Save. If the extension attribute has the “LDAP Attribute Mapping” input type, the LDAP attribute variable is displayed on the pane.
161

Creating a Computer Extension Attribute From a TemplateThe JSS has built-in templates for many commonly used extension attributes.
1. Log in to the JSS with a web browser.
2. In the top-right corner of the page, click Settings .
3. Click Computer Management.
On a smartphone or iPod touch, this option is in the pop-up menu.
4. In the ”Computer Management–Management Framework” section, click Extension Attributes .
5. Click New From Template .
6. Click the extension attribute template you want to use.
7. Make changes to the settings as needed.
8. Click Save.
Uploading a Template for Computer Extension AttributeYou can create an extension attribute by uploading an extension attribute template obtained from JAMF Nation. Extension attribute templates are available in JAMF Nation at:
https://jamfnation.jamfsoftware.com/extensionAttributes.html
1. Log in to the JSS with a web browser.
2. In the top-right corner of the page, click Settings .
3. Click Computer Management.
On a smartphone or iPod touch, this option is in the pop-up menu.
4. In the ”Computer Management–Management Framework” section, click Extension Attributes .
5. Click Upload and upload the extension attribute template.
6. Make changes to the settings as needed.
7. Click Save.
Cloning, Editing, or Deleting a Computer Extension Attribute
1. Log in to the JSS with a web browser.
2. In the top-right corner of the page, click Settings .
162

3. Click Computer Management.
On a smartphone or iPod touch, this option is in the pop-up menu.
4. In the ”Computer Management–Management Framework” section, click Extension Attributes .
5. Click the extension attribute you want to clone, edit, or delete.
6. Do one of the following:
�� To clone the extension attribute, click Clone and make changes as needed. Then click Save.
�� To edit the extension attribute, click Edit and make changes as needed. Then click Save.
�� To delete the extension attribute, click Delete and then click Delete again to confirm.
Related InformationFor related information, see the following sections in this guide:
�� Computer Inventory Display Settings
You can display extension attributes in the results of a simple computer search.
�� Viewing and Editing Inventory Information for a Computer
You can view the extension attributes collected from a computer and edit non-script extension attribute values for that computer.
�� Smart Computer Groups
You can create smart computer groups based on extension attributes.
163

Computer Inventory Display Settings
The Computer Inventory Display settings allow you to choose which attribute fields to display in the results of a simple computer search.
Configuring the Computer Inventory Display Settings
1. Log in to the JSS with a web browser.
2. In the top-right corner of the page, click Settings .
3. Click Computer Management.
On a smartphone or iPod touch, this option is in the pop-up menu.
4. In the “Computer Management–Management Framework” section, click Inventory Display .
5. On each pane, select or deselect the checkbox for each attribute field you want to display or remove.
6. Click Save.
Related InformationFor related information, see the following section in this guide:
Simple Computer SearchesFind out how to quickly search the items in your inventory for a general range of results.
164

Peripherals
Peripherals are miscellaneous items, such as keyboards or scanners, for which you can store information in the JAMF Software Server (JSS).
The first step to storing peripheral information is to create one or more peripheral types. You can add custom text fields and pop-up menus to each peripheral type, allowing you to customize the information that is stored. For example, if you plan to store the serial numbers of keyboards, you can create a peripheral type called “Keyboard” and add a “Serial Number” text field. Peripheral types also serve as categories that allow you to group peripherals in inventory.
After creating one or more peripheral types, you can add peripherals to the JSS. When you add a peripheral, you specify the type of peripheral you are adding. Then you can do the following:
�� Assign the peripheral to a computer and populate information about the user assigned to the computer
�� Assign a user to the peripheral and populate information about the user. (For information on assigning a user to a peripheral or removing a user assignment, see User Assignments.)
�� Enter purchasing information
�� Attach files
Creating a Peripheral Type
1. Log in to the JSS with a web browser.
2. In the top-right corner of the page, click Settings .
3. Click Computer Management.
On a smartphone or iPod touch, this option is in the pop-up menu.
4. In the “Computer Management - Management Framework” section, click Peripheral Types .
5. Click New .
6. Enter a display name for the peripheral type.
7. Add one or more custom fields:
a. Click Add .b. Enter a label for the field.
c. Choose “Text” or “Menu” from the Type pop-up menu.
If you chose “Menu”, click Edit Menu and configure pop-up menu options as needed.
d. Choose a position number from the Order pop-up menu.
A field with a position number of “1” is displayed first when adding or viewing a peripheral.
e. Repeat steps a through d as needed.
8. Click Save.
165

Adding a Peripheral
1. Log in to the JSS with a web browser.
2. Click Computers at the top of the page.
3. Click Search Inventory.
On a smartphone or iPod touch, this option is in the pop-up menu.
4. Choose “Peripherals” from the Search pop-up menu and press the Enter key.
5. Click New .
6. Choose a peripheral type and click Next.
7. Use the General payload to specify basic information about the peripheral.
8. (Optional) Use the User and Location payload to assign the peripheral to a computer or assign a user to the peripheral by specifying user and location information. (For information on assigning a user to a peripheral or removing a user assignment, see User Assignments.)
This information is stored in the JSS for each peripheral.
9. (Optional) Use the Purchasing payload to specify purchasing information for the peripheral.
This information is stored in the JSS for each peripheral.
10. (Optional) Use the Attachments payload to upload attachments to store for the peripheral.
Attachments are stored in the JSS for each peripheral.
11. Click Save.
Cloning, Editing, or Deleting a Peripheral Type
1. Log in to the JSS with a web browser.
2. In the top-right corner of the page, click Settings .
3. Click Computer Management.
On a smartphone or iPod touch, this option is in the pop-up menu.
4. In the “Computer Management - Management Framework” section, click Peripheral Types .
5. Click the peripheral type you want to clone, edit, or delete.
6. Do one of the following:
�� To clone the peripheral type, click Clone and make changes as needed. Then click Save.
�� To edit the peripheral type, click Edit and make changes as needed. Then click Save.
�� To delete peripheral type, click Delete and then click Delete again to confirm.
166

Cloning, Editing, or Deleting a Peripheral
1. Log in to the JSS with a web browser.
2. Click Computers at the top of the page.
3. Click Search Inventory.
On a smartphone or iPod touch, this option is in the pop-up menu.
4. Choose “Peripherals” from the Search pop-up menu.
5. Enter one or more search terms in the field provided.
You can base peripheral searches on peripheral type, customizable peripheral fields, or bar code.
For information on the syntax to use to refine your search, see Search Syntax.
6. Press the Enter key.
The list of search results is displayed.
7. Click the peripheral you want to clone, edit, or delete.
Note: Peripherals assigned to a computer automatically receive user and location information from the computer they are assigned to. To make changes to user and location information for a peripheral assigned to a computer, you must make changes to the computer’s user and location information.
8. Do one of the following:
�� To clone the peripheral, click Clone and make changes as needed. Then click Save.
�� To edit the peripheral, click Edit and make changes as needed. Then click Save.
�� To delete peripheral, click Delete and then click Delete again to confirm.
Related InformationFor related information, see the following section in this guide:
�� Simple Computer Searches
Learn how to quickly search the peripherals in your inventory for a general range of results.
�� Viewing and Editing Inventory Information for a Computer
You can view the peripherals associated with a computer.
�� User Assignments
Learn how to assign users to periperhals and remove user assignments from peripherals.
167

Simple Computer Searches
A simple computer search functions like a search engine, allowing you to quickly search the items in your inventory for a general range of results. The following table shows the items that you can search by and the attributes on which you can base each search:
Inventory Item Searchable Attributes
Computers
(This includes both managed and unmanaged computers.)
Computer name
MAC address
Bar code
IP address
Asset tag
Serial number
Username
Full name
Email address
Phone number
Position
Department
Building
Room
Peripherals Peripheral type
Customizable peripheral fields
Bar code
Applications Application name
Local User Accounts Username
Application Usage Application name
Fonts Font name
Package Receipts Package receipt name
Plug-ins Plug-in name
Printers Printer name
Services Service name
Software Updates Software update name
Software update version
Note: Computers, peripherals, and applications are searchable by default. The other items are searchable if the JSS is configured to collect them as inventory. For more information, see Computer Inventory Collection Settings.
168

Search SyntaxThis section explains the syntax to use for the following search functions:
�� Wildcard searches
�� Including multiple search terms
�� Excluding a search term
�� Returning all results In general, searches are not case-sensitive.
Note: The default search preference is “Exact Match”. For most items, the option can be changed to either “Starts with” or “Contains”. (For more information, see Configuring Account Preferences.)
Wildcard Searches
Asterisks (*) function as wildcard characters in simple searches. The following table explains the different ways asterisks can be used to refine a search:
Usage Example
Use an asterisk after a search term to return all results with attributes that begin with that term.
Perform an application search for “Adobe*” to return all applications that begin with “Adobe”.
Use an asterisk before a search term to return all results with attributes that end with that term.
Perform a computer search for “*@mycompany.com” to return all computers with email addresses that end with “@mycompany.com”.
Use an asterisk before and after a search term to return all results that include that term.
Perform an application search for “*Word*” to return all applications that include “Word”.
Use an asterisk without any other terms to return all results for the item you are searching.
Perform a peripheral search for “*” to return all peripherals.
Including Multiple Search Terms
Use multiple search terms separated by a comma (,) to return all results that include those search terms. For example, perform an application search for “Adobe*, *.app” to return all applications that begin with “Adobe” and end with “.app”.
Excluding a Search Term
Use a hyphen (-) before a search term to exclude results that include the term.
For example, perform a printer search for “abc*, -*West” to return all printers that begin with “abc” except for those that end with “West”.
169

Returning All Results
There are two ways to return all results: use an asterisk (*) without any other characters or terms, or perform a blank search.
Performing a Simple Computer Search
1. Log in to the JSS with a web browser.
2. Click Computers at the top of the page.
3. Click Search Inventory.
On a smartphone or iPod touch, this option is in the pop-up menu.
4. Choose an item from the Search pop-up menu.
5. Enter one or more search terms in the field(s) provided.
For information on the syntax to use to refine your search, see Search Syntax.
6. Press the Enter key. The list of search results is displayed. If you searched for an item other than computers or peripherals, you can view the computers associated with a result by clicking Expand next to the result. You can also change the item on which the results are based by choosing an item from the pop-up menu at the top of the page.
Related InformationFor related information, see the following sections in this guide:
�� Viewing and Editing Inventory Information for a Computer
Find out how to view and edit inventory information for a computer.
�� Computer Reports
Find out how to export the data in your search results to different file formats.
�� Performing Mass Actions for Computers
Find out how to perform actions on the results of a computer search.
�� Advanced Computer Searches
Find out how to create and save an advanced computer search.
�� Computer Inventory Display Settings
Find out how to change the attribute fields displayed in the results of a simple computer search.
170

Advanced Computer Searches
Advanced computer searches allow you to use detailed search criteria to search the managed and unmanaged computers in the JAMF Software Server (JSS). These types of searches give you more control over your search by allowing you to do the following:
�� Generate specific search results.
�� Specify which attribute fields to display in the search results.
�� Save the search.
Creating an Advanced Computer Search
1. Log in to the JSS with a web browser.
2. Click Computers at the top of the page.
3. Click Search Inventory.
On a smartphone or iPod touch, this option is in the pop-up menu.
4. Click New .
5. Use the Search pane to configure basic settings for the search.
To save the search, select the Save this Search checkbox.
6. Click the Criteria tab and add criteria for the search: a. Click Add .
b. Click Choose for the criteria you want to add.
To display additional criteria, click Choose for "Other Criteria".
c. Choose an operator from the Operator pop-up menu.
d. Enter a value in the Value field or browse for a value by clicking Browse .
e. Repeat steps a through d to add criteria as needed.
7. Choose an operator from the And/Or pop-up menu(s) to specify the relationships between criteria.
8. To group criteria and join multiple operations, choose parentheses from the pop-up menus around the criteria you want to group.
171

9. Click the Display tab and select the attribute fields you want to display in your search results.
10. Click Save. Operations in the search take place in the order they are listed (top to bottom).
The results of a saved search are updated each time computers check in with the JSS and meet or fail to meet the specified search criteria.
To view the search results, click View.
Cloning, Editing, or Deleting a Saved Advanced Computer Search
1. Log in to the JSS with a web browser.
2. Click Computers at the top of the page.
3. Click Search Inventory.
On a smartphone or iPod touch, this option is in the pop-up menu.
4. Click the advanced computer search you want to clone, edit, or delete.
5. Do one of the following:
�� To clone the search, click Clone and make changes as needed. Then click Save.
�� To edit the search, click Edit and make changes as needed. Then click Save.
�� To delete the search, click Delete. Then click Delete again to confirm.
Viewing Advanced Computer Search Results
1. Log in to the JSS with a web browser.
2. Click Computers at the top of the page.
3. Click Search Inventory.
On a smartphone or iPod touch, this option is in the pop-up menu.
4. Click the advanced computer search you want to view the results for.
5. Click View. The list of search results is displayed.
172

Related InformationFor related information, see the following sections in this guide:
�� Computer Reports
Find out how to export the data in your search results to different file formats.
�� Performing Mass Actions for Computers
Find out how to perform actions on the results of a computer search.
�� Viewing and Editing Inventory Information for a Computer
Find out how to view and edit inventory information for a computer.
�� Simple Computer Searches
Learn how to quickly search the items in your inventory for a general range of results.
173

Computer Reports
The data displayed in smart or static group membership lists, computer search results, or lists of license usage matches can be exported from the JAMF Software Server (JSS) to the following file formats:
�� Comma-separated values file (.csv)
�� Tab delimited text file (.txt)
�� XML file
You can change the way the data is organized by basing the export on any of the following inventory items:
�� Computers
�� Applications
�� Fonts
�� Plug-ins
�� Packages installed by the Casper Suite
�� Packages installed by Installer.app/Software Update
�� Cached packages
�� Local user accounts
�� Mapped printers
�� Available software updates
�� Running services
�� Computer groups
�� Licensed software The data is displayed in alphanumeric order by the selected inventory item.
Creating Computer Reports
1. Log in to the JSS with a web browser.
2. Click Computers at the top of the page.
3. Do one of the following:
�� View computer group memberships. (For more information, see Smart Computer Groups or Static Computer Groups.)
�� View simple or advanced computer search results. (For more information, see Simple Computer Searches or Advanced Computer Searches.)
Note: You can only create a report from a simple computer search if you searched by computers.
�� View license usage matches. (For more information, see Viewing License Usage.)
4. At the bottom of the list, click Export.
5. Follow the onscreen instructions to export the data. The report downloads immediately.
174

Performing Mass Actions for Computers
Mass actions allow you to perform potentially tedious tasks for multiple computers at the same time. You can use the JSS to perform the following mass actions:
�� Edit the building or department.
�� Edit the site.
�� Edit the management account.
�� Look up and populate purchasing information from Apple's Global Service Exchange (GSX).
�� Send a mass email to users.
�� Edit Autorun data.
�� Delete Autorun data.
�� Delete the computers from the JSS.
�� Send remote commands.
Mass actions can be performed on smart or static group membership lists, computer search results, or lists of license usage matches.
Mass Editing the Building or Department for Computers Mass editing the building or department for computers allows you to add the computers to a building or department or change the building or department they belong to.
1. Log in to the JSS with a web browser.
2. Click Computers at the top of the page.
3. Do one of the following:
�� View computer group memberships. (For more information, see Smart Computer Groups or Static Computer Groups.)
�� View simple or advanced computer search results. (For more information, see Simple Computer Searches or Advanced Computer Searches.)
Note: You can only perform mass actions from a simple computer search if you searched by computers.
�� View license usage matches. (For more information, see Viewing License Usage.)
4. At the bottom of the list, click Action.
5. Select Edit the Building and Department.
This option is only displayed if there are one or more buildings or departments in the JSS. (For more information, see Buildings and Departments.)
6. Follow the onscreen instructions to edit the building or department.
175

Mass Editing the Site for ComputersMass editing the site for computers allows you to add the computers to a site or change the site they belong to.
1. Log in to the JSS with a web browser.
2. Click Computers at the top of the page.
3. Do one of the following:
�� View computer group memberships. (For more information, see Smart Computer Groups or Static Computer Groups.)
�� View simple or advanced computer search results. (For more information, see Simple Computer Searches or Advanced Computer Searches.)
Note: You can only perform mass actions from a simple computer search if you searched by computers.
�� View license usage matches. (For more information, see Viewing License Usage.)
4. At the bottom of the list, click Action.
5. Select Edit the Site.
This option is only displayed if there are one or more sites in the JSS. (For more information, see Sites.)
6. Follow the onscreen instructions to edit the site.
Mass Editing the Management Account for ComputersMass editing the management account for computers allows you to change the username and password for the computers’ management accounts. This can be useful when the management account is from a directory service and has been changed.
Mass editing the management account updates the username and password in the JSS, not on the computers.
1. Log in to the JSS with a web browser.
2. Click Computers at the top of the page.
3. Do one of the following:
�� View computer group memberships. (For more information, see Smart Computer Groups or Static Computer Groups.)
�� View simple or advanced computer search results. (For more information, see Simple Computer Searches or Advanced Computer Searches.)
Note: You can only perform mass actions from a simple computer search if you searched by computers.
�� View license usage matches. (For more information, see Viewing License Usage.)
176

4. At the bottom of the list, click Action.
5. Select Edit the Management Account Information.
6. Follow the onscreen instructions to edit the management account.
Mass Looking up and Populating Purchasing Information for ComputersYou can mass look up purchasing information from Apple’s Global Service Exchange (GSX) and populate the information in the JSS if desired.
This requires a GSX connection set up in the JSS. (For more information, see Integrating with GSX.)
Note: You can only perform mass actions from a simple computer search if you searched by computers.
1. Log in to the JSS with a web browser.
2. Click Computers at the top of the page.
3. Do one of the following:
�� View computer group memberships. (For more information, see Smart Computer Groups or Static Computer Groups.)
�� View simple or advanced computer search results. (For more information, see Simple Computer Searches or Advanced Computer Searches.)
Note: You can only perform mass actions from a simple computer search if you searched by computers.
�� View license usage matches. (For more information, see Viewing License Usage.)
4. At the bottom of the list, click Action.
5. Select Look up Purchasing Information from GSX.
This option is only displayed if there is a GSX connection set up in the JSS.
6. Follow the onscreen instructions to look up and populate the purchasing information.
Sending a Mass Email to Computer UsersYou can send a mass email to users associated with the computers in the JSS. The email is sent to the email address associated with each computer.
This requires an SMTP server set up in the JSS. (For more information, see Integrating with an SMTP Server.)
1. Log in to the JSS with a web browser.
2. Click Computers at the top of the page.
177

3. Do one of the following:
�� View computer group memberships. (For more information, see Smart Computer Groups or Static Computer Groups.)
�� View simple or advanced computer search results. (For more information, see Simple Computer Searches or Advanced Computer Searches.)
Note: You can only perform mass actions from a simple computer search if you searched by computers.
�� View license usage matches. (For more information, see Viewing License Usage.)
4. At the bottom of the list, click Action.
5. Select Send Email.This option is only displayed if there is an SMTP server set up in the JSS.
6. Follow the onscreen instructions to create and send the email.
Mass Editing Autorun DataYou can mass edit Autorun data for computers.
1. Log in to the JSS with a web browser.
2. Click Computers at the top of the page.
3. Do one of the following:
�� View computer group memberships. (For more information, see Smart Computer Groups or Static Computer Groups.)
�� View simple or advanced computer search results. (For more information, see Simple Computer Searches or Advanced Computer Searches.)
Note: You can only perform mass actions from a simple computer search if you searched by computers.
�� View license usage matches. (For more information, see Viewing License Usage.)
4. At the bottom of the list, click Action.
5. Select Edit Autorun Data.
6. Follow the onscreen instructions to edit the Autorun data.
Mass Deleting Autorun DataYou can mass delete Autorun data for computers.
1. Log in to the JSS with a web browser.
2. Click Computers at the top of the page.
178

3. Do one of the following:
�� View computer group memberships. (For more information, see Smart Computer Groups or Static Computer Groups.)
�� View simple or advanced computer search results. (For more information, see Simple Computer Searches or Advanced Computer Searches.)
Note: You can only perform mass actions from a simple computer search if you searched by computers.
�� View license usage matches. (For more information, see Viewing License Usage.)
4. At the bottom of the list, click Action.
5. Select Delete Autorun Data.
This option is only displayed if there is Autorun data in the JSS.
6. Follow the onscreen instructions to delete the Autorun data.
Mass Deleting ComputersYou can mass delete computers from the JSS.
1. Log in to the JSS with a web browser.
2. Click Computers at the top of the page.
3. Do one of the following:
�� View computer group memberships. (For more information, see Smart Computer Groups or Static Computer Groups.)
�� View simple or advanced computer search results. (For more information, see Simple Computer Searches or Advanced Computer Searches.)
Note: You can only perform mass actions from a simple computer search if you searched by computers.
�� View license usage matches. (For more information, see Viewing License Usage.)
4. At the bottom of the list, click Action.
5. Select Delete Computers.
6. Follow the onscreen instructions to delete the computers.
Mass Sending Remote Commands to ComputersYou can mass send the Lock Device remote command to computers.
1. Log in to the JSS with a web browser.
2. Click Computers at the top of the page.
179

3. Do one of the following:
�� View computer group memberships. (For more information, see Smart Computer Groups or Static Computer Groups.)
�� View simple or advanced computer search results. (For more information, see Simple Computer Searches or Advanced Computer Searches.)
Note: You can only perform mass actions from a simple computer search if you searched by computers.
�� View license usage matches. (For more information, see Viewing License Usage.)
4. At the bottom of the list, click Action.
5. Select Send Commands.
6. Select the remote command to send to computers.
7. Follow the onscreen instructions to send the remote command.
Related InformationFor related information, see the following sections in this guide:
�� Viewing and Editing Inventory Information for a Computer
Find out how to edit the building, department, site, purchasing information, or management account for a single computer.
�� Autorun Imaging
Find out how to create, edit, or delete Autorun data for a single computer. For related information, see the following Knowledge Base article:
Removing JAMF Software Components from ComputersFind out how to remove all Casper Suite-related components from computers that have been deleted from the JSS.
180

Viewing and Editing Inventory Information for a Computer
The JAMF Software Server (JSS) stores detailed inventory information for each computer. You can view and edit this information right from the JSS. The following table describes the information that you can view and edit for each computer:
Category Description Editable Fields
General View general information about the computer, including computer name, IP address, and management account.
Disable management tasks for the computer.
Computer name
Site
Asset tag
Bar code 1
Bar code 2
IP address
Username and password for the management account
Hardware View hardware information, including make, model, and MAC address(es).
UDID
Primary MAC address
Secondary MAC address
Operating System View information about the operating system, including version number and build number.
--
User and Location View information about the user assigned to the computer, and the computer’s physical location.
Assign a user to the computer and populate user information from the Users tab. (For more information, see User Assignments.)
Username
Full name
Email address
Phone number
Department
Building
Room
Position
181

Category Description Editable Fields
Purchasing View purchasing information, including PO details, warranty information, and purchasing contact.
Look up and populate purchasing information from Apple’s Global Service Exchange (GSX). (This requires a GSX connection set up in the JSS. For more information see Integrating with GSX.)
Purchased or leased
PO number
PO date
Vendor
Warranty expiration
AppleCare ID
Lease expiration
Purchase price
Life expectancy
Purchasing account
Purchasing contact
Extension Attributes
View custom data collected using extension attributes.
Non-script extension attributes
Storage View storage information, including model, serial number, drive capacity, and number of partitions.
View information about each partition, including size, percent used, and the FileVault 2 encryption state.
--
Disk Encryption View FileVault 2 information for the boot partition, including the encryption state, the disk encryption configuration used, and the FileVault 2 enabled users.
View the FileVault 2 encryption state for any non-boot partitions.
--
Peripherals View a list of peripherals associated with the computer.
View information about a peripheral.
Delete a peripheral.
--
Licensed Software View a list of licensed software titles installed on the computer.
--
Applications View a list of applications installed on the computer.
--
Fonts View a list of fonts installed on the computer.
--
Plug-ins View a list of plug-ins installed on the computer.
--
Profiles View a list of profiles installed on the computer.
--
182

Category Description Editable Fields
Certificates View a list of certificates installed on the computer.
--
Package Receipts View a list of packages installed by Installer.app or Software Update.
View a list of packages installed or cached by the Casper Suite.
--
Software Updates View a list of software updates available for the computer.
--
Local User Accounts
View a list of local user accounts and information about them, including username, UID, home directory, and the Legacy FileVault or FileVault 2 enabled status.
--
Printers View a list of printers mapped to the computer and information about those printers, including model, location, and URI.
--
Services View a list of active services. --
Attachments View a list of files attached to the inventory record.
Upload attachments.
Delete attachments.
--
Viewing Inventory Information for a Computer
1. Log in to the JSS with a web browser.
2. Click Computers at the top of the page.
3. Perform a simple or advanced computer search.
For more information, see Simple Computer Searches or Advanced Computer Searches.
4. Click the computer you want to view information for.
If you performed a simple search for an item other than computers, you must click Expand next to an item to view the computers related to that item.
The computer's inventory information is displayed.
5. Use the categories to view information for the computer.
183

Editing Inventory Information for a Computer
1. Log in to the JSS with a web browser.
2. Click Computers at the top of the page.
3. Perform a simple or advanced computer search.
For more information, see Simple Computer Searches or Advanced Computer Searches.
4. Click the computer you want to edit information for.
If you performed a simple search for an item other than computers, you must click Expand next to an item name to view the computers related to that item.
The computer's inventory information is displayed.
5. Select the category that contains the information you want to edit and click Edit.
6. Make changes as needed.
If you are editing purchasing information, you can click Search to look up and populate information from Apple's Global Service Exchange (GSX).
Note: This button is only displayed if you have a GSX connection set up in the JSS.
If you are editing user and location information, the changes are applied in the Users tab. This specified information is also applied in the inventory information for mobile devices, peripherals, and other computers that the user is assigned to. (For information on assigning a user to a computer or removing a user assignment, see User Assignments.)
7. Click Save.
184

Viewing Management Information for a Computer
The JAMF Software Server (JSS) allows you to view the following management information for each computer:
�� Pending management commands
�� Policies
�� OS X configuration profiles
�� Managed Preferences
�� Restricted software
�� FileVault 2 recovery key(s)
�� Group memberships
RequirementsTo view pending management commands for a computer, the computer and the JSS must meet the requirements for sending an OS X remote command or installing an OS X configuration profile. (For more information, see OS X Remote Commands or OS X Configuration Profiles.)
Viewing the Pending Management Commands for a ComputerWhen viewing management information for a computer, you can view a list of pending management commands for the computer. The list includes all pending actions related to sending an OS X remote command and installing or removing an OS X configuration profile. You can also cancel a pending management command.
1. Log in to the JSS with a web browser.
2. Click Computers at the top of the page.
3. Perform a simple or advanced computer search.
For more information, see Simple Computer Searches or Advanced Computer Searches.
4. Click the computer you want to view pending management commands for.
If you performed a simple search for an item other than computers, you must click Expand next to an item to view the computers related to that item.
185

5. Click the Management tab.
A list of pending management commands for the computer is displayed.
Note: You cannot view pending management commands if the MDM profile has been removed from the computer.
6. To cancel a pending management command, click Cancel for the command.
Viewing Policies for a ComputerWhen viewing management information for a computer, you can view a list of policies that have the computer in the scope. You can also view a list of policies for a specific user on that computer.
1. Log in to the JSS with a web browser.
2. Click Computers at the top of the page.
3. Perform a simple or advanced computer search.
For more information, see Simple Computer Searches or Advanced Computer Searches.
4. Click the computer you want to view policies for.
If you performed a simple search for an item other than computers, you must click Expand next to an item to view the computers related to that item.
5. Click the Management tab, and then click the Policies category.
A list of policies for the computer is displayed.
6. To view policies for a specific user, enter the username in the Username field and click Update.
A list of policies for the user is displayed.
Viewing Configuration Profiles for a ComputerWhen viewing management information for a computer, you can view a list of OS X configuration profiles that have the computer in the scope. You can also view a list of configuration profiles for a specific user on that computer.
1. Log in to the JSS with a web browser.
2. Click Computers at the top of the page.
3. Perform a simple or advanced computer search.
For more information, see Simple Computer Searches or Advanced Computer Searches.
4. Click the computer you want to view configuration profiles for.
If you performed a simple search for an item other than computers, you must click Expand next to an item to view the computers related to that item.
186

5. Click the Management tab, and then click the Configuration Profiles category.
A list of configuration profiles for the computer is displayed.
6. To view configuration profiles for a specific user, enter the username in the Username field and click Update.
A list of configuration profiles for the user is displayed.
Viewing Managed Preferences for a ComputerWhen viewing management information for a computer, you can view a list of Managed Preference profiles that have the computer in the scope. You can also view a list of profiles for a specific user on that computer.
1. Log in to the JSS with a web browser.
2. Click Computers at the top of the page.
3. Perform a simple or advanced computer search.
For more information, see Simple Computer Searches or Advanced Computer Searches.
4. Click the computer you want to view Managed Preferences for.
If you performed a simple search for an item other than computers, you must click Expand next to an item to view the computers related to that item.
5. Click the Management tab, and then click the Managed Preferences category.
A list of Managed Preference profiles for the computer is displayed.
6. To view a list of Managed Preference profiles for a specific user, enter the username in the Username field and click Update.
A list of Managed Preference profiles for the user is displayed.
Viewing Restricted Software for a ComputerWhen viewing management information for a computer, you can view a list of restricted software that has the computer in the scope. You can also view a list of restricted software for a specific user on that computer.
1. Log in to the JSS with a web browser.
2. Click Computers at the top of the page.
3. Perform a simple or advanced computer search.
For more information, see Simple Computer Searches or Advanced Computer Searches.
4. Click the computer you want to view restricted software for.
If you performed a simple search for an item other than computers, you must click Expand next to an item to view the computers related to that item.
187

5. Click the Management tab, and then click the Restricted Software category.
A list of restricted software for the computer is displayed.
6. To view restricted software for a specific user, enter the username in the Username field and click Update.
A list of restricted software for the user is displayed.
Viewing the FileVault 2 Recovery Key for a ComputerWhen viewing management information for a computer, you can view the File Vault 2 recovery key for the computer if FileVault 2 disk encryption has been activated using the Casper Suite. (For information on creating and deploying disk encryption configurations, see Managing Disk Encryption Configurations and Deploying Disk Encryption Configurations.)
1. Log in to the JSS with a web browser.
2. Click Computers at the top of the page.
3. Perform a simple or advanced computer search.
For more information, see Simple Computer Searches or Advanced Computer Searches.
4. Click the computer you want to view the FileVault 2 recovery key for.
If you performed a simple search for an item other than computers, you must click Expand next to an item to view the computers related to that item.
5. Click the Management tab, and then click the FileVault 2 category.
6. Click Get FileVault 2 Recovery Key.
�� If the key is an institutional recovery key, a Download link is displayed. Click the link to download the recovery key.
�� If the key is an individual recovery key, the recovery key is displayed on the pane.
Viewing Group Memberships for a ComputerWhen viewing management information for a computer, you can view the smart and static group memberships for the computer.
1. Log in to the JSS with a web browser.
2. Click Computers at the top of the page.
3. Perform a simple or advanced computer search.
For more information, see Simple Computer Searches or Advanced Computer Searches.
4. Click the computer you want to view group memberships for.
If you performed a simple search for an item other than computers, you must click Expand next to an item to view the computers related to that item.
188

5. Click the Management tab, and then click the Computer Groups category.
A list of smart computer group memberships is displayed.
6. To view the static computer group memberships, click Static Groups.
A list of static computer group memberships is displayed.
Related InformationFor related information, see the following sections in this guide:
�� Viewing Smart Computer Group Memberships
Find out how to view all group memberships for a smart group.
�� Viewing Static Computer Group Memberships
Find out how to view all group memberships for a static group.
189

Viewing the History for a Computer
The JAMF Software Server (JSS) allows you to view the history for each computer. The information you can view includes:
�� Application Usage logs
�� Computer Usage logs
�� Policy logs
�� Casper Remote logs
�� Screen sharing logs
�� Casper Imaging logs
�� Management history (completed, pending, and failed management commands)
�� Hardware/software history
�� User and location history You can also flush policy logs for a computer.
Viewing Application Usage Logs for a ComputerThe Application Usage logs for a computer allow you to view a pie chart that shows the amount of time each application was in the foreground during a specified date range.
Note: You can only view Application Usage logs for a computer if the Computer Inventory Collection settings are configured to collect Application Usage information. For more information, see Computer Inventory Collection Settings.
1. Log in to the JSS with a web browser.
2. Click Computers at the top of the page.
3. Perform a simple or advanced computer search.
For more information, see Simple Computer Searches or Advanced Computer Searches.
4. Click the computer you want to view Application Usage logs for.
If you performed a simple search for an item other than computers, you must click Expand next to an item to view the computers related to that item.
5. Click the History tab.
Application Usage logs for the computer are displayed.
6. To view Application Usage logs for a different date range, specify the starting and ending dates using the Date Range pop-up menus. Then click Update.
190

Viewing Computer Usage Logs for a ComputerThe Computer Usage logs for a computer allow you to view the following information:
�� Startup dates/times
�� Login and logout dates/times
�� Usernames used to log in and out of the computer
Note: You can only view Computer Usage logs for a computer if a startup script or login/logout hooks are configured to log Computer Usage information. (For more information, see Startup Script and Login and Logout Hooks.)
1. Log in to the JSS with a web browser.
2. Click Computers at the top of the page.
3. Perform a simple or advanced computer search.
For more information, see Simple Computer Searches or Advanced Computer Searches.
4. Click the computer you want to view Computer Usage logs for.
If you performed a simple search for an item other than computers, you must click Expand next to an item to view the computers related to that item.
5. Click the History tab, and then click the Computer Usage Logs category.
Computer Usage logs for the computer are displayed.
Viewing and Flushing Policy Logs for a ComputerThe policy logs for a computer include a list of the policies that have run on the computer and the following information for each policy:
�� The date/time that the policy ran on the computer
�� The status of the policy
�� The actions logged for the policy
1. Log in to the JSS with a web browser.
2. Click Computers at the top of the page.
3. Perform a simple or advanced computer search.
For more information, see Simple Computer Searches or Advanced Computer Searches.
4. Click the computer you want to view policy logs for.
If you performed a simple search for an item other than computers, you must click Expand next to an item to view the computers related to that item.
5. Click the History tab, and then click the Policy Logs category.
Policy logs for the computer are displayed.
191

6. To view the actions logged for a policy, click Show for the policy.
To hide the information when you are done viewing it, click Hide.
7. To flush a policy log, click Flush for the policy.
8. To flush all policies for the computer, click Flush All at the top of the pane.
Viewing Casper Remote Logs for a ComputerThe Casper Remote logs for a computer allow you to view the following information:
�� The date/time that the Casper Remote event took place on the computer
�� The status of the Casper Remote event
�� The actions logged for the Casper Remote event
1. Log in to the JSS with a web browser.
2. Click Computers at the top of the page.
3. Perform a simple or advanced computer search.
For more information, see Simple Computer Searches or Advanced Computer Searches.
4. Click the computer you want to view Casper Remote logs for.
If you performed a simple search for an item other than computers, you must click Expand next to an item to view the computers related to that item.
5. Click the History tab, and then click the Casper Remote Logs category.
Casper Remote logs for the computer are displayed.
6. To view the actions logged for a Casper Remote event, click Show for the event.
To hide the information when you are done viewing it, click Hide.
Viewing Screen Sharing Logs for a ComputerThe screen sharing logs for a computer allow you to view the following information:
�� The date/time that the screen sharing session took place
�� The status of the screen sharing session
�� Details of the screen sharing session
1. Log in to the JSS with a web browser.
2. Click Computers at the top of the page.
3. Perform a simple or advanced computer search.
For more information, see Simple Computer Searches or Advanced Computer Searches.
192

4. Click the computer you want to view screen sharing logs for.
If you performed a simple search for an item other than computers, you must click Expand next to an item to view the computers related to that item.
5. Click the History tab, and then click the Screen Sharing Logs category.
Screen sharing logs for the computer are displayed.
Viewing Casper Imaging Logs for a ComputerThe Casper Imaging logs for a computer allow you to view the following information:
�� The date/time that the computer was imaged
�� The status of the imaging event
�� The actions that took place during the imaging event
1. Log in to the JSS with a web browser.
2. Click Computers at the top of the page.
3. Perform a simple or advanced computer search.
For more information, see Simple Computer Searches or Advanced Computer Searches.
4. Click the computer you want to view screen sharing logs for.
If you performed a simple search for an item other than computers, you must click Expand next to an item to view the computers related to that item.
5. Click the History tab, and then click the Casper Imaging Logs category.
Casper Imaging logs for the computer are displayed.
6. To view the actions logged for a Casper Imaging event, click Show for the event.
To hide the information when you are done viewing it, click Hide.
Viewing Management History for a ComputerThe management history for a computer allows you to view lists of completed, pending, and failed management commands for the computer. The lists include all actions related to sending an OS X remote command and installing or removing an OS X configuration profile. You can also cancel a pending management command.
1. Log in to the JSS with a web browser.
2. Click Computers at the top of the page.
3. Perform a simple or advanced computer search.
For more information, see Simple Computer Searches or Advanced Computer Searches.
193

4. Click the computer you want to view group memberships for.
If you performed a simple search for an item other than computers, you must click Expand next to an item to view the computers related to that item.
5. Click the History tab, and then click the Management History category.
A list of completed management commands for the computer is displayed.
6. To view pending management commands, click Pending Commands.
You can cancel a pending management command by clicking Cancel for the command.
7. To view failed management commands, click Failed Commands.
Viewing Hardware/Software History for a ComputerThe hardware/software history for a computer allows you to view a list of inventory reports submitted for the computer during a specified date range. Each inventory report includes hardware information for the computer, such as the operating system, make, model, and serial number, and information about any software changes that occurred since the previous inventory report. Inventory report listings that show a change in a computer’s hardware are displayed in red.
Note: You can only view software history for a computer if the Computer Inventory Collection settings are configured to collect applications, fonts, or plug-ins. For more information, see Computer Inventory Collection Settings.
1. Log in to the JSS with a web browser.
2. Click Computers at the top of the page.
3. Perform a simple or advanced computer search.
For more information, see Simple Computer Searches or Advanced Computer Searches.
4. Click the computer you want to view hardware/software history for.
If you performed a simple search for an item other than computers, you must click Expand next to an item to view the computers related to that item.
5. Click the History tab, and then click the Hardware/Software History category.
The hardware/software history for the computer is displayed.
6. To view hardware/software history for a different date range, specify the starting and ending dates using the Date Range pop-up menus on the pane. Then click Update.
194

Viewing User and Location History for a ComputerThe user and location history for a computer allows you to view a list of the user and location information associated with the computer over time. A record of the current information is added to the list whenever changes are made to the User and Location category in the computer’s inventory information.
1. Log in to the JSS with a web browser.
2. Click Computers at the top of the page.
3. Perform a simple or advanced computer search.
For more information, see Simple Computer Searches or Advanced Computer Searches.
4. Click the computer you want to view user and location history for.
If you performed a simple search for an item other than computers, you must click Expand next to an item to view the computers related to that item.
5. Click the History tab, and then click the User and Location History category.
The user and location history for the computer is displayed.
Related InformationFor related information, see the following section in this guide:
Flushing LogsFind out how to schedule automatic log flushing or manually flush logs.
195

Deleting a Computer from the JSS
You can remove a computer from your inventory by deleting it from the JAMF Software Server (JSS). The files and folders installed during enrollment are not removed from the computer when it is deleted from the JSS. For instructions on how to remove these components, see the Removing JAMF Software Components from Computers Knowledge Base article.
1. Log in to the JSS with a web browser.
2. Click Computers at the top of the page.
3. Click Search Inventory.
On a smartphone or iPod touch, this option is in the pop-up menu.
4. Perform a simple or advanced computer search.
For more information, see Simple Computer Searches or Advanced Computer Searches.
5. Click the computer you want to delete.
If you performed a simple search for an item other than computers, such as computer applications, you must click Expand next to an item name to view the computers related to that item.
6. Click Delete, and then click Delete again to confirm.
Related InformationFor related information, see the following section in this guide:
Mass Deleting ComputersFind out how to mass delete computers from the JSS.
196

Computer Groups
About Computer Groups
Computer groups allow you to organize computers that share similar attributes. You can use these groups as a basis for performing advanced inventory searches, configuring the scope of remote management tasks, and viewing Application Usage logs.
There are two kinds of computer groups: smart computer groups and static computer groups. Smart computer groups are based on criteria and have dynamic memberships. Static computer groups have fixed memberships that you manually assign.
Related InformationFor related information, see the following sections in this guide:
�� Smart Computer Groups
Learn how to create computer groups that are based on criteria and have dynamic memberships.
�� Static Computer Groups
Learn how to create computer groups that have fixed memberships.
197

Smart Computer Groups
Smart computer groups give you a way to organize managed computers based on one or more attributes, such as building, model, and operating system. These groups have dynamic memberships that are updated each time computers check in with the JAMF Software Server (JSS).
If there is an SMTP server set up in the JSS, you can enable email notifications for the group. This allows email notifications to be sent to JSS users each time the group membership changes. (For information on setting up an SMTP server and enabling email notifications for JSS user accounts, see Integrating with an SMTP Server and Email Notifications.) After creating a smart computer group, you can view its memberships.
Creating a Smart Computer Group
1. Log in to the JSS with a web browser.
2. Click Computers at the top of the page.
3. Click Smart Computer Groups.
On a smartphone or iPod touch, this option is in the pop-up menu.
4. Click New .
5. Use the Computer Group pane to configure basic settings for the group.
To enable email notifications, select the Send email notification on membership change checkbox.
6. Click the Criteria tab and add criteria to the group: a. Click Add .
b. Click Choose for the criteria you want to add.
To display additional criteria, click Choose for "Other Criteria".
c. Choose an operator from the Operator pop-up menu.
d. Enter a value in the Value field or browse for a value by clicking Browse .
e. Repeat steps a through d to add criteria as needed.
7. Choose an operator from the And/Or pop-up menu(s) to specify the relationships between criteria.
198

8. To group criteria and join multiple operations, choose parentheses from the pop-up menus around the criteria you want to group.
9. Click Save. Operations in the group take place in the order they are listed (top to bottom).
Group memberships are updated each time computers check in with the JSS and meet or fail to meet the specified criteria.
To view the group memberships, click View.
Cloning, Editing, or Deleting a Smart Computer Group
1. Log in to the JSS with a web browser.
2. Click Computers at the top of the page.
3. Click Smart Computer Groups.
On a smartphone or iPod touch, this option is in the pop-up menu.
4. Click the smart computer group you want to clone, edit, or delete.
5. Do one of the following:
�� To clone the group, click Clone and make changes as needed. Then click Save.
�� To edit the group, click Edit and make changes as needed. Then click Save.
�� To delete the group, click Delete. Then click Delete again to confirm. The clone, edit, or delete action is applied to computers the next time they check in with the JSS.
Viewing Smart Computer Group Memberships
1. Log in to the JSS with a web browser.
2. Click Computers at the top of the page.
3. Click Smart Computer Groups.
On a smartphone or iPod touch, this option is in the pop-up menu.
199

4. Click the smart computer group you want to view memberships for.
5. Click View. A list of group memberships is displayed.
Related InformationFor related information, see the following sections in this guide:
�� Computer Reports
Find out how to export the data in group membership lists to different file formats.
�� Performing Mass Actions for Computers
Find out how to perform mass actions on group memberships.
�� Scope
Learn how to configure scope based on computer groups.
200

Static Computer Groups
Static computer groups give you a way to organize computers by assigning them to a group. These groups have fixed memberships that must be changed manually.
After creating a static computer group, you can view its memberships.
Creating a Static Computer Group
1. Log in to the JSS with a web browser.
2. Click Computers at the top of the page.
3. Click Static Computer Groups.
On a smartphone or iPod touch, this option is in the pop-up menu.
4. Click New .
5. Use the Computer Group pane to configure basic settings for the group.
6. Click the Assignments tab and select the checkbox for each computer you want to add.
7. Click Save. Computers become members of the group the next time they check in with the JSS.
To view the group memberships, click View.
Cloning, Editing, or Deleting a Static Computer Group
1. Log in to the JSS with a web browser.
2. Click Computers at the top of the page.
3. Click Static Computer Groups.
On a smartphone or iPod touch, this option is in the pop-up menu.
4. Click the group you want to clone, edit, or delete.
5. Do one of the following:
�� To clone the group, click Clone and make changes as needed. Then click Save.
�� To edit the group, click Edit and make changes as needed. Then click Save.
�� To delete the group, click Delete. Then click Delete again to confirm. The clone, edit, or delete action is applied to computers the next time they check in with the JSS.
201

Viewing Static Computer Group Memberships
1. Log in to the JSS with a web browser.
2. Click Computers at the top of the page.
3. Click Static Computer Groups.
On a smartphone or iPod touch, this option is in the pop-up menu.
4. Click the computer group you want to view memberships for.
5. Click View. A list of group memberships is displayed.
Related InformationFor related information, see the following sections in this guide:
�� Computer Reports
Find out how to export the data in group membership lists to different file formats.
�� Performing Mass Actions for Computers
Find out how to perform mass actions on group memberships.
�� Scope
Learn how to configure scope based on computer groups.
202

Policies
About Policies
Policies allow you to remotely perform common management tasks on managed computers. For example, you can run scripts, manage accounts, and distribute software using a policy. While Casper Remote allows you to perform management tasks immediately, policies allow you to automate these tasks so that they run on a schedule. When you create a policy, you specify the tasks you want to automate, when the policy should run (called “trigger”), how often it should run (called “execution frequency”), and the users and computers for which it should run (called “scope”).
You can also make policies available in Self Service for users to run on their computers.
Related InformationFor related information, see the following sections in this guide:
�� Managing Policies
Find out how to create policies, view the plan and status for a policy, and view and flush policy logs.
�� Policy Payload Reference
Learn about each payload in the policy interface.
�� Self Service Policies
Find out how to make policies available in the Self Service.
203

Managing Policies
When you create a policy, you use a payload-based interface to configure settings for the policy and add tasks to it. For more information on the settings you can configure, see the following section in this guide:
Policy Payload Reference
After you create a policy, you can view the plan, status, and logs for the policy. You can also flush policy logs.
Creating a Policy
1. Log in to the JSS with a web browser.
2. Click Computers at the top of the page.
3. Click Policies.
On a smartphone or iPod touch, this option is in the pop-up menu.
4. Click New .
5. Use the General payload to configure basic settings for the policy, including the trigger and execution frequency.
For an overview of the settings in the General payload, see General Payload.
6. Use the rest of the payloads to configure the tasks you want to perform.
For an overview of each payload, see Policy Payload Reference.
7. Click the Scope tab and configure the scope of the policy.
For more information, see Scope.
8. (Optional) Click the Self Service tab and make the policy available in Self Service.
For more information, see Self Service Policies.
9. (Optional) Click the User Interaction tab and enter messages to display to users or allow users to defer the policy.
For more information, see User Interaction.
10. Click Save. The policy runs on computers in the scope the next time they check in with the JSS and meet the criteria in the General payload.
204
Cloning, Editing, or Deleting a Policy
1. Log in to the JSS with a web browser.
2. Click Computers at the top of the page.
3. Click Policies.
On a smartphone or iPod touch, this option is in the pop-up menu.
4. Click the policy you want to clone, edit, or delete.
5. Do one of the following:
�� To clone the policy, click Clone and make changes as needed. Then click Save.
�� To edit the policy, click Edit and make changes as needed. Then click Save.
�� To delete the policy, click Delete and then click Delete again to confirm. The clone, edit, or delete action is applied to computers in the scope the next time they check in with the JSS.
Viewing the Plan for a PolicyThe plan for a policy includes the following information:
�� An indicator light that shows whether the policy is enabled
�� The execution frequency for the policy
�� The trigger(s) for the policy
�� The scope of the policy
�� The site that the policy belongs to
�� A list of actions for the policy
1. Log in to the JSS with a web browser.
2. Click Computers at the top of the page.
3. Click Policies.
On a smartphone or iPod touch, this option is in the pop-up menu.
A list of policies and their plans are displayed.
4. To view the actions for a policy, click Expand for the policy.
205

Viewing the Status of a PolicyFor each policy, you can view a pie chart that shows the number of computers for which the policy has completed, failed, and is still remaining.
1. Log in to the JSS with a web browser.
2. Click Computers at the top of the page.
3. Click Policies.
On a smartphone or iPod touch, this option is in the pop-up menu.
4. Click Grid View at the top of the list.
Viewing and Flushing Logs for a PolicyThe logs for a policy include a list of computers that have run the policy and the following information for each computer:
�� The date/time that the policy ran on the computer
�� The status of the policy
�� The actions logged for the policy
Flushing logs for a policy with an execution frequency of “Once per computer” or “Once per user”
1. Log in to the JSS with a web browser.
2. Click Computers at the top of the page.
3. Click Policies.
On a smartphone or iPod touch, this option is in the pop-up menu.
4. Click the policy you want to view logs for.
5. Click Logs.
6. To view the actions logged for a computer, click Show for the computer.
To hide the information when you are done viewing it, click Hide.
7. To flush a policy log for a single computer, click Flush for the computer.
8. To flush all logs for the policy, click Flush All at the top of the pane.
206

Related InformationFor related information, see the following sections in this guide:
�� Viewing and Flushing Policy Logs for a Computer
Find out how to view and flush policy logs for a single computer.
�� Flushing Logs
Find out how to flush all policy logs.
207

Policy Payload Reference
When creating or editing a policy, you use a payload-based interface to configure settings for the policy and add tasks to it. This section provides an overview of each payload.
General PayloadThis payload allows you to do the following:
�� Enable or disable the policy. (For example, if you need to take the policy out of production temporarily, you may want to disable it.)
�� Add the policy to a site. (For more information, see Sites.)
�� Add the policy to a category. (For more information, see Categories.)
�� Choose one or more events to use to initiate the policy (called "trigger").
�� Choose how often the policy should run (called "execution frequency").
�� Make the policy available offline. (This only works with the "Ongoing" execution frequency.)
�� Specify the drive on which to run the policy.
�� Specify server-side and client-side limitations for the policy. (For example, you can specify an expiration date/time for the policy, or ensure that the policy does not run on weekends.)
Packages PayloadThis payload allows you to perform the following software distribution tasks:
�� Install packages.
�� Cache packages.
�� Install cached packages.
Note: To install all cached packages, use the Maintenance payload. For more information, see the following section in this guide:
Maintenance Payload
�� Uninstall packages.
This payload also allows you to do the following when installing packages:
�� Specify the distribution point computers should download the packages from.
�� Add the packages to the Autorun data of each computer in the scope.
For complete instructions on creating a policy to perform software distribution tasks, see one of the following sections in this guide:
�� Installing Packages
�� Caching Packages
�� Installing Cached Packages
�� Uninstalling Packages
208

Software Updates PayloadThis payload allows you to run Apple’s Software Update and choose the software update server that you want computers to install updates from.
For complete instructions on creating a policy to run Software Update, see the following section in this guide:
Running Software Update
Scripts PayloadThis payload allows you to run scripts and choose when they run in relation to other tasks in the policy. You can also enter values for script parameters.
For complete instructions on running scripts using a policy, see the following section in this guide:
Running Scripts
Printers PayloadThis payload allows you to map and unmap printers. You can also make a printer the default.
For complete instructions on administering printers using a policy, see the following section in this guide:
Administering Printers
Disk Encryption PayloadThis payload allows you to enable FileVault 2 on computers with OS X v10.8 or later by distributing disk encryption configurations.
For complete instructions on enabling FileVault 2, see the following section in this guide:
Deploying Disk Encryption Configurations This payload also allows you to issue a new FileVault 2 recovery key for computers with OS X v10.9 or later.
For complete instructions on issuing a new recovery key, see the following section in this guide:
Issuing a New FileVault 2 Recovery Key
209

Dock Items PayloadThis payload allows you to add and remove Dock items. When you add Dock items, you can also choose to add them to the beginning or end of the Dock.
For complete instructions on administering Dock items, see the following section in this guide:
Administering Dock Items
Local Accounts PayloadThis payload allows you to create and delete local accounts, and reset local account passwords. When you create an account, you can do the following:
�� Specify a location for the home directory.
�� Configure the account picture.
�� Allow the user to administer the computer.
�� Enable the account for FileVault 2 on computers with OS X v10.9 or later. This payload also allows you to disable an existing local account for FileVault 2 on computers with OS X v10.9 or later. For complete instructions on administering local accounts, see the following section in this guide:
Administering Local Accounts
Management Account PayloadThis payload allows you to reset the management account password. You can choose to specify the new password or randomly generate it. This payload also allows you to enable or disable the management account for FileVault 2 on computers with OS X v10.9 or later. For complete instructions on administering the management account, see the following section in this guide:
Administering the Management Account
Directory Bindings PayloadThis payload allows you to bind computers to a directory service.
For complete instructions on binding to a directory service, see the following section in this guide:
Binding to Directory Services
210

EFI Password PayloadThis payload allows you to set or remove an Open Firmware or EFI password. For complete instructions on administering Open Firmware and EFI passwords, see the following section in this guide:
Administering Open Firmware/EFI Passwords
Restart Options PayloadThis payload allows you to restart computers after the policy runs. It also allows you to do the following:
�� Specify the disk to restart computers from, such as a NetBoot image.
�� Specify criteria for the restart depending on whether or not a user is logged in.
�� Configure a restart delay.
Note: You can also display a message to users before a policy restarts computers. For more information, see the following section in this guide:
User Interaction For complete instructions on booting computers to a NetBoot image, see the following section in this guide:
Booting Computers to NetBoot Images
Maintenance PayloadThis payload allows you to perform the following maintenance tasks:
�� Update inventory.
�� Reset computer names.
�� Install all cached packages.
�� Fix disk permissions.
�� Fix ByHost files.
�� Flush caches.
�� Verify the startup disk.
For complete instructions on installing all cached packages, see the following section in this guide:
Installing Cached Packages
211

Files and Processes PayloadThis payload allows you to search computers for specific files and processes, and use policy logs to log when they are found. You can kill processes that are found and delete files that are found when searching by path.
This payload also allows you to execute commands.
212

User Interaction
User Interaction allows you to display custom messages to users about the policies that run on their computers. You can also use it to allow users to defer policies.
Note: User Interaction messages and deferrals cannot be used with Self Service policies since users have control over when the policy starts.
MessagesYou can display User Interaction messages to users at the following times:
�� Before a policy runs
�� After a policy runs
�� Before a policy restarts computers
This allows you to communicate with users about the policies that run on their computers. For example, you can let users know that software is about to be installed or that a new printer is available.
In OS X v10.8 and later, most User Interaction messages are displayed in the OS X Notification Center in a category called “Management”. Otherwise, messages are displayed using the JAMF Helper utility.
DeferralYou can allow users to defer a policy, and you can specify a date and time at which to prohibit further deferral (called the “deferral limit”). This allows you to give users more control over when the policy runs while ensuring that the policy eventually runs.
Before a policy runs on a computer, the user is prompted to choose to have the policy run immediately or to defer the policy for one of the following amounts of time:
�� 1 hour
�� 2 hours
�� 4 hours
�� 1 day
�� The amount of time until the deferral limit is reached
If the user chooses to defer the policy, they are prompted with the same message after the chosen amount of time. When the deferral limit is reached, a message is displayed to notify the user, and the policy runs immediately.
213

Configuring User Interaction for a Policy
1. Log in to the JSS with a web browser.
2. Create or edit a policy.
For more information, see Managing Policies.
3. Click the User Interaction tab.
4. Configure the settings on the pane.
5. When you are done configuring the policy, click Save.
214

Self Service
About Self Service
The Self Service application allows users to browse and run policies, access webpages, and utilize plug-ins developed with the Self Service API. Users can point-and-click their way through Self Service using an intuitive interface similar to iTunes.
The JAMF Software Server (JSS) allows you to manage every aspect of Self Service, including its installation, authentication, and the items available to users.
You can make any policy available in Self Service and customize how it is displayed to users. This includes displaying an icon and description, featuring the policy on the main page, and displaying it in relevant categories. You can also specify which computers display the policy in Self Service and which users can access it.
In addition, you can make plug-ins available in Self Service to extend the functionality of the application. There are two types of plug-ins you can make available: URL plug-ins and Self Service Plug-in bundles. URL plug-ins give users easy access to webpages right from the application. Self Service Plug-in bundles are custom plug-ins developed with the Self Service API.
Related InformationFor related information, see the following sections in this guide:
�� Installing Self Service
Find out how to install Self Service on managed computers.
�� Self Service User Login Setting
Find out how to require users to log in to Self Service using their LDAP directory accounts.
�� Self Service Policies
Find out how to make policies available in Self Service.
�� Self Service Plug-ins
Find out how to add plug-ins to Self Service.
�� Self Service User Experience
Learn how users run policies and use plug-ins in Self Service.
215

Installing Self Service
There are two ways to install Self Service on managed computers. You can install Self Service automatically on all managed computers using the Self Service settings in the JAMF Software Server (JSS), or you can install Self Service using a policy. Installing Self Service using a policy gives you more control over the installation.
Installing Self Service Automatically
1. Log in to the JSS with a web browser.
2. In the top-right corner of the page, click Settings .
3. Click Computer Management.
On a smartphone or iPod touch, this option is in the pop-up menu.
4. Click Self Service .
5. Click Edit.
6. Select the Install Automatically checkbox.
7. (Optional) Configure the installation location for Self Service.
8. Click Save. Self Service is installed on all managed computers the next time they check in with the JSS. It is also installed on computers as they are newly enrolled.
Installing Self Service Using a PolicyThis method involves the following steps:
1. Download a copy of Self Service from the JSS.
2. Package Self Service using Composer or a third-party package building tool.
3. Deploy Self Service using a policy.
For complete instructions on installing Self Service using this method, see the following Knowledge Base article:
Installing Self Service Using a Policy
216

Self Service User Login Setting
The User Login setting for Self Service allows you to configure the method for logging in to Self Service.
RequirementsTo require or allow users to log in to Self Service, you need an LDAP server set up in the JSS. (For more information, see Integrating with LDAP Directory Services.)
Configuring the User Login Setting for Self Service
1. Log in to the JSS with a web browser.
2. In the top-right corner of the page, click Settings .
3. Click Computer Management.
On a smartphone or iPod touch, this option is in the pop-up menu.
4. In the "Computer Management–Management Framework" section, click Self Service .
5. Click Edit.
6. Click the Login tab.
7. Configure the User Login setting.
8. Click Save. The change is applied the next time computers check in with the JSS.
217

Self Service Policies
You can make any policy available in Self Service, but it is up to you to determine which policies are appropriate.
When you make a policy available in Self Service, you can specify which computers display it in Self Service and which users can access it (called “scope”).
You can also customize how Self Service policies are displayed to users by doing the following:
�� Entering a description
�� Uploading an icon
�� Featuring the policy on the main page
�� Displaying or featuring the policy in one or more categories
Creating a Self Service Policy
1. Log in to the JSS with a web browser.
2. Click Computers at the top of the page.
3. Click Policies.
On a smartphone or iPod touch, this option is in the pop-up menu.
4. Click New .
5. Use the General payload to configure basic settings for the policy, including the trigger and execution frequency.
For an overview of the settings in the General payload, see General Payload
6. Use the rest of the payloads to configure the tasks you want to perform.
For an overview of each payload, see Policy Payload Reference.
7. Click the Scope tab and configure the scope of the policy.
For more information, see Scope.
8. Click the Self Service tab.
9. Select Make the policy available in Self Service.
10. Configure how the policy is displayed in Self Service using the settings on the pane.
11. (Optional) Click the User Interaction tab and configure messaging and deferral options.
For more information, see User Interaction.
12. Click Save. The policy runs on computers in the scope the next time they check in with the JSS and meet the criteria in the General payload.
218

Related InformationFor related information, see the following sections in this guide:
�� Running Self Service Policies
Learn how users run the policies available in Self Service.
�� About Policies
Learn the basics about policies.
�� Managing Policies
Find out how to create policies, view the plan and status for a policy, and view and flush policy logs.
219

Self Service Plug-ins
There are two types of plug-ins that you can make available in Self Service: URL plug-ins and Self Service Plug-in bundles. URL plug-ins give users easy access to webpages right from the application. Self Service Plug-in bundles are custom plug-ins developed with the Self Service API.
When you make a URL plug-in available in Self Service, you can customize how the plug-in is displayed to users. This includes uploading an icon for the plug-in, and specifying whether the plug-in opens in Self Service or in a web browser.
By default, Self Service plug-ins are available on all managed computers and to all users.
Adding a Self Service Plug-in
1. Log in to the JSS with a web browser.
2. In the top-right corner of the page, click Settings .
3. Click Computer Management.
On a smartphone or iPod touch, this option is in the pop-up menu.
4. In the "Computer Management - Management Framework" section, click Self Service Plug-ins .
5. Click New .
6. Enter a display name and description, and choose a priority for the plug-in.
7. Choose "Self Service Plug-in Bundle" or "URL Plug-in" from the Plug-in Type pop-up menu.
8. Configure the plug-in using the options on the pane.
9. Click Save. The plug-in is available in Self Service the next time computers check in with the JSS.
Cloning, Editing, or Deleting a Self Service Plug-in
1. Log in to the JSS with a web browser.
2. In the top-right corner of the page, click Settings .
3. Click Computer Management.
On a smartphone or iPod touch, this option is in the pop-up menu.
4. In the "Computer Management–Management Framework" section, click Self Service Plug-ins .
5. Click the plug-in you want to clone, edit, or delete.
220

6. Do one of the following:
�� To clone the plug-in, click Clone and make changes as needed. Then click Save.
�� To edit the plug-in, click Edit and make changes as needed. Then click Save.
�� To delete the plug-in, click Delete and then click Delete again to confirm.
The changes are applied the next time computers check in with the JSS.
Related InformationFor more information on the Self Service API, download the Casper Suite SDK from:
http://www.jamfsoftware.com/developer-resources/
For related information, see the following section in this guide:
Using Self Service Plug-insLearn how users use the plug-ins available in Self Service. For related information, see the following Knowledge Base article:
Scope of Self Service Plug-insFind out how to distribute a Self Service plug-in using a policy so you can control which users have access to the plug-in.
221

Self Service User Experience
This section provides an overview of what users do to run policies and use plug-ins available in Self Service.
Logging in to Self ServiceAfter opening Self Service, users may need to log in using their LDAP directory accounts. The login pane is only displayed if the User Login setting for Self Service is configured to require or allow login. (For more information, see Self Service User Login Setting.)
222

Running Self Service PoliciesUsers can browse policies from the “Featured” section or the list of categories on the main page. Policies are only displayed in the “Featured” section if you configured the policy to do so. (For more information, see Self Service Policies.)
To run a policy, users click the button next to it.
Using Self Service Plug-insSelf Service plug-ins are displayed in the sidebar. Users click a plug-in to access a webpage or utilize a plug-in developed with the Self Service API.
223

Related InformationFor related information, see the following sections in this guide:
�� Self Service Policies
Find out how to make policies available in Self Service.
�� Self Service Plug-ins
Find out how to add plug-ins to Self Service.
224
Software Distribution
Managing Packages
Packages in the following formats can be administered using the Casper Suite:
�� DMG
�� PKG
�� MPKG
Note: There are special instructions for managing OS X Installers, and Adobe Updaters and Installers for CS3 or CS4. For more information, see Managing OS X Installers or Administering Adobe CS3 and CS4. Before you can deploy a package, it must exist on the distribution point you plan to deploy it from and in the JAMF Software Server (JSS). There are three ways to achieve this:
�� Add the package to Casper Admin—This method adds the package to the master distribution point and the JSS. You can then add the package to other distribution points via replication.
�� Upload the package directly to the JSS—This method is only available if your master distribution point is the cloud distribution point or a JDS instance. It adds the package to the master distribution point and the JSS. You can then add the package to other distribution points via replication.
�� Manually—This method is only available if your master distribution point is a file share distribution point. It involves manually copying the package to the distribution point and then entering information about the package in the JSS.
Each of these methods also involves configuring settings for the package. When you configure settings for a package, you can do the following:
�� Add the package to a category. (For more information, see Categories.)
�� Choose a priority for deploying or uninstalling the package.
�� Fill user templates with the contents of the home directory in the package’s Users folder.
�� Fill existing user home directories with the contents of the home directory in the package’s Users folder.
�� Allow the package to be uninstalled.
�� Specify whether computers must be restarted after installing the package.
�� Choose whether the package must be installed on the boot drive after imaging.
�� Specify operating system and architecture type requirements for deploying the package.
�� Only allow the package to be installed if it is available in Software Update.
225

You can also index packages. Indexing creates a log of all the files contained within a package. This allows you to uninstall the package and view the contents of the package from the JSS. Packages can only be indexed using Casper Admin.
In addition, you can validate packages using the checksum. (For more information, see Calculating a Checksum.)
When you add, edit, or delete a package in Casper Admin, the changes are reflected in the JSS and vice versa.
RequirementsTo manage packages, you need a distribution point set up in the JSS. (For more information, see About Distribution Points.)
Adding a Package to Casper AdminAdding a package to Casper Admin adds the package to the master distribution point and the JSS.
1. Open Casper Admin and authenticate to the JSS.
2. Drag the package to the main repository in Casper Admin.
The package is displayed in blue text in the Unknown category until you add it to a category.
3. Double-click the package in the main repository.
4. Click the General tab and configure basic settings for the package, including the display name and category.
226

5. Click the Options tab and configure additional settings for the package, including the priority, and operating system and architecture type requirements.
6. Click OK.
Uploading a Package to the JSSIf your master distribution point is the cloud distribution or a JDS instance, you can upload the package directly to the JSS. This adds the package to the master distribution point and the JSS.
1. Log in to the JSS with a web browser.
2. In the top-right corner of the page, click Settings .
3. Click Computer Management.
On a smartphone or iPod touch, this option is in the pop-up menu.
4. In the “Computer Management” section, click Packages .
5. Click New .
6. Use the General pane to configure basic settings for the package, including the display name and category.
Note: If you do not add the package to a category, Casper Admin displays the package in blue text in the Unknown category.
7. Click Upload Package and upload the package.
8. Click the Options tab and configure additional settings for the package, including the priority.
9. (Optional) Click the Limitations tab and configure limitations for the package, including operating system and architecture type requirements.
10. Click Save.
227

Manually Adding a Package to a Distribution Point and the JSSIf your master distribution point is a file share distribution point, you can manually copy a package to the distribution point and then enter information about the package in the JSS.
1. Copy the package to the Packages folder at the root of the file share on the distribution point.
2. Log in to the JSS with a web browser.
3. In the top-right corner of the page, click Settings .
4. Click Computer Management.
On a smartphone or iPod touch, this option is in the pop-up menu.
5. In the “Computer Management” section, click Packages .
6. Click New .
7. Use the General pane to configure basic settings for the package, including the display name, category, and filename.
Note: If you do not add the package to a category, Casper Admin displays the package in blue text in the Unknown category.
8. Click the Options tab and additional settings for the package, including the priority.
9. (Optional) Click the Limitations tab and configure limitations for the package, including operating system and architecture type requirements.
10. Click Save.
Editing or Deleting a Package Using Casper Admin
1. Open Casper Admin and authenticate to the JSS.
2. In the main repository, select the package you want to edit or delete.
3. Do one of the following:
�� To edit the package, double-click it and make changes as needed. Then click OK.
�� To delete the package, click Delete and then click Delete again to confirm. The edit or delete action is applied immediately on the master distribution point. The action is applied to your other distribution points when replication occurs.
228

Editing or Deleting a Package Using the JSS
1. Log in to the JSS with a web browser.
2. In the top-right corner of the page, click Settings .
3. Click Computer Management.
On a smartphone or iPod touch, this option is in the pop-up menu.
4. In the “Computer Management” section, click Packages .
5. Click the package you want to edit or delete.
6. Do one of the following:
�� To edit the package, click Edit and make changes as needed. Then click Save.
�� To delete the package, click Delete and then click Delete again to confirm. The edit or delete action is applied immediately on the master distribution point. The action is applied to your other distribution points when replication occurs.
Indexing a PackageIndexing a package creates a log of all the files contained within the package. This allows you to uninstall the package and view the contents of the package from the JSS.
Packages can be indexed using Casper Admin only. The time it takes to index a package depends on the amount of data in the package.
1. Open Casper Admin and authenticate to the JSS.
2. In the main repository, select the package you want to index and click Index at the bottom of the pane.
3. If prompted, authenticate locally. When the indexing process is complete, Casper Admin defaults back to the main repository.
Viewing the Contents of an Indexed Package
1. Log in to the JSS with a web browser.
2. In the top-right corner of the page, click Settings .
3. Click Computer Management.
On a smartphone or iPod touch, this option is in the pop-up menu.
4. In the “Computer Management” section, click Packages .
229

5. Click the package you want to view the contents of.
6. Click Contents. A table that contains the package contents is displayed.
Calculating a ChecksumThe checksum is calculated when a package is uploaded to the JSS. The checksum ensures authenticity when the package is downloaded.
The checksum can also be calculated manually using Casper Admin:
1. Open Casper Admin and authenticate to the JSS.
2. In the main repository, select the package you want to calculate checksum for.
3. Control-click (or right-click) and select Calculate Selected Package Checksum(s).
Related InformationFor related information, see the following sections in this guide:
�� Installing Packages
Find out how to install packages using a policy or Casper Remote.
�� Caching Packages
Find out how to cache packages using a policy or Casper Remote.
�� Installing Cached Packages
Find out how to install packages that were cached using the Casper Suite.
�� Uninstalling Packages
Find out how to uninstall packages that were installed using the Casper Suite.
230

Managing OS X Installers
Adding an OS X Installer to Casper Admin is the first step to installing a clean copy of OS X on computers.
If the OS X Installer is for OS X v10.6 or earlier, you can also create a custom OS X installation from the installer. This allows you to change the default software and language settings in OS X.
RequirementsTo manage OS X Installers, you need a distribution point set up in the JAMF Software Server (JSS). (For more information, see About Distribution Points.)
To add an OS X Installer to Casper Admin, the OS X Installer must be a .app file from the Mac App Store or a DMG.
Adding a .app File for OS X to Casper AdminAdding a .app file for OS X to Casper Admin adds it to the master distribution point and the JSS.
1. Open Casper Admin and authenticate to the JSS.
2. Drag the .app file to the main repository in Casper Admin.
Casper Admin extracts the InstallESD.dmg file from the .app file and then analyzes the contents of the InstallESD.dmg file.
231

The InstallESD.dmg file is displayed in blue text in the Unknown category until you add it to a category.
3. Double-click the package in the main repository.
4. Click the General tab and choose a category for the package.
5. Click OK.
232
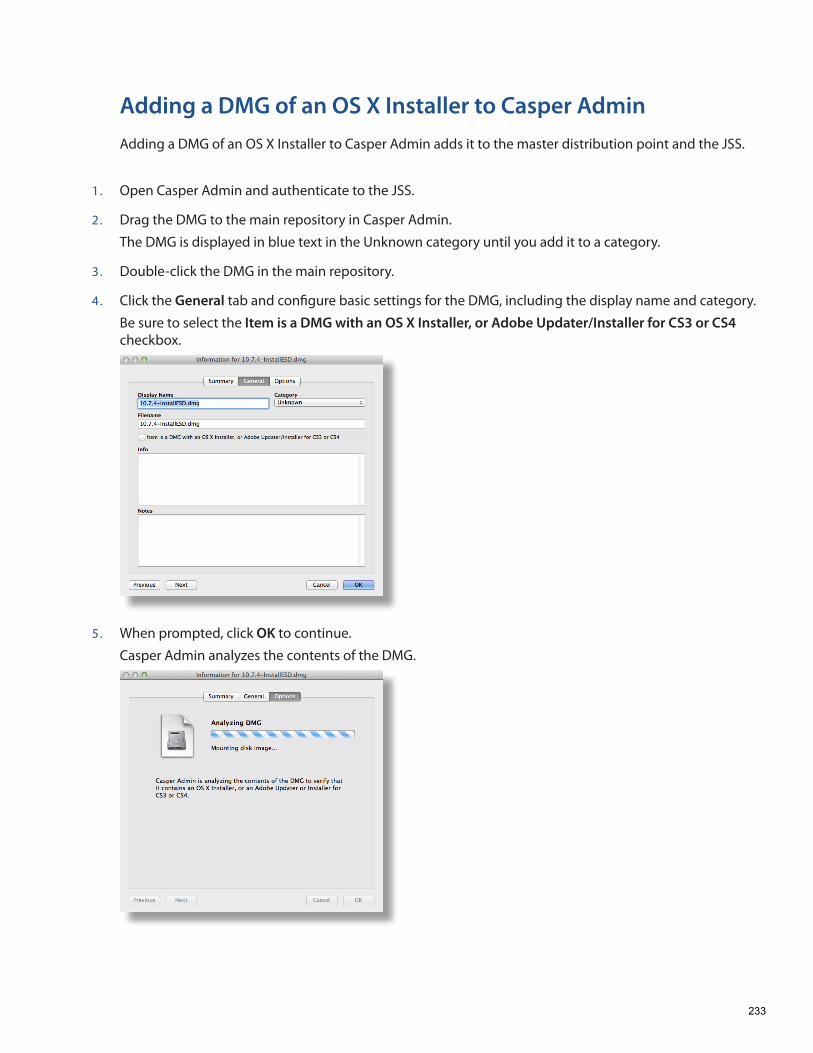
Adding a DMG of an OS X Installer to Casper AdminAdding a DMG of an OS X Installer to Casper Admin adds it to the master distribution point and the JSS.
1. Open Casper Admin and authenticate to the JSS.
2. Drag the DMG to the main repository in Casper Admin.
The DMG is displayed in blue text in the Unknown category until you add it to a category.
3. Double-click the DMG in the main repository.
4. Click the General tab and configure basic settings for the DMG, including the display name and category.
Be sure to select the Item is a DMG with an OS X Installer, or Adobe Updater/Installer for CS3 or CS4 checkbox.
5. When prompted, click OK to continue.
Casper Admin analyzes the contents of the DMG.
233

6. When the Options pane appears, choose a default language for the installation from the Language pop-up menu.
7. Click OK.
Creating a Custom OS X InstallationIf the DMG is for OS X v10.6 or earlier, you can create a custom OS X installation from the DMG. This allows you to change the default software and language settings in OS X.
1. Open Casper Admin and authenticate to the JSS.
2. Double-click the DMG of the OS X Installer that you want to base your custom installation on.
3. Click the Options tab and click Create Custom OS Install.
234

4. On the General pane, configure basic settings for the installation, including the display name and category.
5. Click the Options tab and configure additional settings for the installation.
6. Click OK.
Related InformationFor related information, see the following technical paper:
Deploying OS X v10.7 or Later with the Casper SuiteGet step-by-step instructions for deploying OS X v10.7 or later.
235

Administering Adobe CS3 and CS4
Deploying Adobe CS3 or CS4 involves the following steps:
1. Use Disk Utility to create a DMG of the installer DVD.
2. Add the DMG to Casper Admin.
For more information, see Adding a DMG of an Adobe CS3/CS4 Updater or Installer to Casper Admin.
3. Create an Adobe installation from the DMG.
For more information, see Creating a CS3/CS4 Adobe Installation.
4. Install the Adobe installation using a policy or Casper Remote.
For more information, see Installing Packages.
Updating Adobe CS3 or CS4 involves the following steps:
1. Obtain or create a DMG of the appropriate Adobe Updater.
The Adobe Updater must support silent installation.
Note: Most Adobe updates are available in the DMG format at Adobe’s website.
2. Add the DMG to Casper Admin.
For more information, see Adding a DMG of an Adobe CS3/CS4 Updater or Installer to Casper Admin.
3. Install the DMG using a policy or Casper Remote.
For more information, see Installing Packages.
RequirementsTo manage Adobe CS3/CS4 Updaters or Installers using Casper Admin, you need a distribution point set up in the JSS. (For more information, see About Distribution Points.)
Adding a DMG of an Adobe CS3/CS4 Updater or Installer to Casper AdminAdding a package to Casper Admin adds the package to the master distribution point and the JSS.
1. Open Casper Admin and authenticate to the JSS.
2. Drag the DMG to the main repository in Casper Admin.
The DMG is displayed in blue text in the Unknown category until you add it to a category.
3. Double-click the DMG in the main repository.
236

4. Click the General tab and configure basic settings for the DMG, including the display name and category.
Be sure to select the Item is a DMG with an OS X Installer, or Adobe Updater/Installer for CS3 or CS4 checkbox.
5. When prompted, click OK to continue.
Casper Admin analyzes the contents of the DMG.
237

6. When the Options pane appears, click OK.
Creating a CS3/CS4 Adobe InstallationAfter you add a DMG of an Adobe Installer to Casper Admin, you can create one or more Adobe installations. This allows you to do the following:
�� Choose a priority for the deploying or uninstalling CS3/CS4 during imaging.
�� Specify an installation language.
�� Enter a serial number for the installation.
�� Suppress the Dock item during installation.
�� Ignore conflicting processes.
�� Suppress the EULA, registration, and updates.
�� Allow the package to be uninstalled.
1. Open Casper Admin and authenticate to the JSS.
2. Click New Adobe Install .
3. If you have more than one DMG of Adobe Installers, choose the one on which you want to base your installation from the Installer/Updater pop-up menu.
238

4. On the General pane, configure basic settings for the installation, including the display name and category.
5. Click the Options tab and configure additional settings for the installation, including the priority and installation language.
6. Click OK.
239

Installing Packages
When you install a package, you can do the following:
�� Fill user templates.
�� Fill existing user home directories.
�� Add the package to Autorun data.
�� Specify a distribution point for computers to download the package from. There are two ways to install a package on computers: using a policy or using Casper Remote.
Note: You can also install packages during imaging. For more information, see Configurations.
RequirementsTo install a package on computers, the package must exist on the distribution point you plan to deploy it from and in the JSS. (For more information, see Managing Packages.)
Installing a Package Using a Policy
1. Log in to the JSS with a web browser.
2. Click Computers at the top of the page.
3. Click Policies.
On a smartphone or iPod touch, this option is in the pop-up menu.
4. Click New .
5. Use the General payload to configure basic settings for the policy, including the trigger and execution frequency.
For an overview of the settings in the General payload, see General Payload.
6. Select the Packages payload and click Configure.
7. Click Add for the package you want to install.
8. Choose "Install" from the Action pop-up menu.
9. Configure the settings for the package.
To add the package to each computer's Autorun data, select the Update Autorun data checkbox. For more information, see Autorun Imaging.
10. Specify a distribution point for computers to download the package from.
11. Use the Restart Options payload to configure settings for restarting computers.
For more information, see Restart Options Payload.
240

12. Click the Scope tab and configure the scope of the policy.
For more information, see Scope.
13. (Optional) Click the Self Service tab and make the policy available in Self Service.
For more information, see Self Service Policies.
14. (Optional) Click the User Interaction tab and configure messaging and deferral options.
For more information, see User Interaction.
15. Click Save. The policy runs on computers in the scope the next time they check in with the JSS and meet the criteria in the General payload.
Installing a Package Using Casper Remote
1. Open Casper Remote and authenticate to the JSS.
2. Click Site and choose a site.
This determines which items are available in Casper Remote.
Note: This button is only displayed if you have a site configured in the JSS and are logged in with a JSS user account that has full access or access to multiple sites.
3. In the list of computers, select the checkbox for each computer on which you want to install the package.
4. Click the Packages tab.
241

5. In the list of packages, select the checkbox for the package you want to install.
6. Choose "Install" from the Action pop-up menu.
7. Configure the settings for the package.
To add the package to each computer's Autorun data, select the Update Autorun data checkbox. For more information, see Autorun Imaging.
8. If you want to change the distribution point that computers download packages from, click Override Defaults and choose a distribution point.
242

9. Click the Restart tab and configure settings for restarting computers.
10. Do one of the following:
�� To immediately perform the tasks on the specified computers, click Go.
�� To schedule the tasks to take place at a specific day and time, click Schedule and choose a day and time. Then click Schedule again.
Related InformationFor related information, see the following sections in this guide:
�� About Policies
Learn the basics about policies.
�� Managing Policies
Find out how to create policies, view the plan and status for a policy, and view and flush policy logs.
243

Caching Packages
Caching packages allows you to download them on computers without installing them right away.
When you cache a package, you can specify a distribution point for computers to download the package from.
There are two ways to cache packages on computers: using a policy or using Casper Remote.
RequirementsTo cache a package on computers, the package must exist on the distribution point you plan to deploy it from and in the JSS. (For more information, see Managing Packages.)
Caching a Package Using a Policy
1. Log in to the JSS with a web browser.
2. Click Computers at the top of the page.
3. Click Policies.
On a smartphone or iPod touch, this option is in the pop-up menu.
4. Click New .
5. Use the General payload to configure basic settings for the policy, including the trigger and execution frequency.
For an overview of the settings in the General payload, see General Payload.
6. Select the Packages payload and click Configure.
7. Click Add for the package you want to cache.
8. Choose "Cache" from the Action pop-up menu.
9. Configure the settings for the package.
To add the package to each computer's Autorun data, select the Add to Autorun data checkbox. For more information, see Autorun Imaging.
10. Specify a server for computers to download the package from.
11. Use the Restart Options payload to configure settings for restarting computers.
For more information, see Restart Options Payload.
12. Click the Scope tab and configure the scope of the policy.
For more information, see Scope.
244

13. (Optional) Click the Self Service tab and make the policy available in Self Service.
For more information, see Self Service Policies.
14. (Optional) Click the User Interaction tab and configure messaging and deferral options.
For more information, see User Interaction.
15. Click Save. The policy runs on computers in the scope the next time they check in with the JSS and meet the criteria in the General payload.
Caching a Package Using Casper Remote
1. Open Casper Remote and authenticate to the JSS.
2. Click Site and choose a site.
This determines which items are available in Casper Remote.
Note: This button is only displayed if you have a site configured in the JSS and are logged in with a JSS user account that has full access or access to multiple sites.
3. In the list of computers, select the checkbox for each computer on which you want to cache the package.
4. Click the Packages tab.
245

5. In the list of packages, select the checkbox for the package you want to cache.
6. Choose "Cache" from the Action pop-up menu.
7. Configure the settings for the package.
To add the package to each computer's Autorun data, select the Update Autorun data checkbox. For more information, see Autorun Imaging.
8. If you want to change the distribution point that computers download packages from, click Override Defaults and choose a distribution point.
246

9. Click the Restart tab and configure settings for restarting computers.
10. Do one of the following:
�� To immediately perform the tasks on the specified computers, click Go.
�� To schedule the tasks to take place at a specific day and time, click Schedule and choose a day and time. Then click Schedule again.
Related InformationFor related information, see the following sections in this guide:
�� Smart Computer Groups
You can create smart computer groups based on cached packages.
�� About Policies
Learn the basics about policies.
�� Managing Policies
Find out how to create policies, view the plan and status for a policy, and view and flush policy logs.
�� Installing Cached Packages
Find out how to install a cached package using a policy or Casper Remote.
247

Installing Cached Packages
You can choose to install one or more specific cached packages, or all cached packages.
When you install one or more specific cached packages, you can do the following:
�� Fill user templates.
�� Fill existing user home directories.
�� Add the package to Autorun data.
There are two ways to install packages that were cached using the Casper Suite: using a policy or using Casper Remote.
RequirementsTo install a specific cached package,the package must exist on the distribution point you plan to deploy it from and in the JSS. (For more information, see Managing Packages.)
Installing a Cached Package Using a Policy
1. Log in to the JSS with a web browser.
2. Click Computers at the top of the page.
3. Click Policies.
On a smartphone or iPod touch, this option is in the pop-up menu.
4. Click New .
5. Use the General payload to configure basic settings for the policy, including the trigger and execution frequency.
For an overview of the settings in the General payload, see General Payload.
6. Select the Packages payload.
7. Click Configure.
8. Click Add for the cached package you want to install.
9. Choose "Install Cached" from the Action pop-up menu.
10. Configure the settings for the package.
To add the package to each computer's Autorun data, select the Update Autorun data checkbox. For more information on Autorun data and Autorun Imaging, see Autorun Imaging.
11. (Optional) Use the Restart Options payload to change the settings for restarting computers.
For more information, see Restart Options Payload.
248

12. Click the Scope tab and configure the scope of the policy.
For more information, see Scope.
13. (Optional) Click the Self Service tab and make the policy available in Self Service.
For more information, see Self Service Policies.
14. (Optional) Click the User Interaction tab and configure messaging and deferral options.
For more information, see User Interaction.
15. Click Save. The policy runs on computers in the scope the next time they check in with the JSS and meet the criteria in the General payload.
Installing a Cached Package Using Casper Remote
1. Open Casper Remote and authenticate to the JSS.
2. Click Site and choose a site.
This determines which items are available in Casper Remote.
Note: This button is only displayed if you have a site configured in the JSS and are logged in with a JSS user account that has full access or access to multiple sites.
3. In the list of computers, select the checkbox for each computer on which you want to install the cached package.
4. Click the Packages tab.
249

5. In the list of packages, select the checkbox for the cached package you want to install.
6. Choose "Install Cached" from the Action pop-up menu.
7. Configure the settings for the package.
To add the package to each computer's Autorun data, select the Update Autorun data checkbox. For more information, see Autorun Imaging.
8. Click the Restart tab and configure settings for restarting computers.
9. Do one of the following:
�� To immediately perform the tasks on the specified computers, click Go.
�� To schedule the tasks to take place at a specific day and time, click Schedule and choose a day and time. Then click Schedule again.
250

Installing All Cached Packages Using a Policy
1. Log in to the JSS with a web browser.
2. Click Computers at the top of the page.
3. Click Policies.
On a smartphone or iPod touch, this option is in the pop-up menu.
4. Click New .
5. Use the General payload to configure basic settings for the policy, including the trigger and execution frequency.
For an overview of the settings in the General payload, see General Payload.
6. Select the Maintenance payload and click Configure.
7. Select Install Cached Packages.
8. Use the Restart Options payload to configure settings for restarting computers.
For more information, see Restart Options Payload.
9. Click the Scope tab and configure the scope of the policy.
For more information, see Scope.
10. (Optional) Click the Self Service tab and make the policy available in Self Service.
For more information, see Self Service Policies.
11. (Optional) Click the User Interaction tab and configure messaging and deferral options.
For more information, see User Interaction.
12. Click Save. The policy runs on computers in the scope the next time they check in with the JSS and meet the criteria in the General payload.
Installing All Cached Packages Using Casper Remote
1. Open Casper Remote and authenticate to the JSS.
2. Click Site and choose a site.
This determines which items are available in Casper Remote.
Note: This button is only displayed if you have a site configured in the JSS and are logged in with a JSS user account that has full access or access to multiple sites.
251

3. In the list of computers, select the checkbox for each computer on which you want to install all cached packages.
4. Click the Packages tab.
5. Select the Install All Cached Packages checkbox.
252

6. Click the Restart tab and configure settings for restarting computers.
7. Do one of the following:
�� To immediately perform the tasks on the specified computers, click Go.
�� To schedule the tasks to take place at a specific day and time, click Schedule and choose a day and time. Then click Schedule again.
Related InformationFor related information, see the following sections in this guide:
�� About Policies
Learn the basics about policies.
�� Managing Policies
Find out how to create policies, view the plan and status for a policy, and view and flush policy logs.
253

Uninstalling Packages
There are two ways to uninstall packages that were installed using the Casper Suite: using a policy or using Casper Remote.
When you uninstall a package, you can remove the package from Autorun data.
RequirementsTo uninstall a package from computers, you need:
�� The package indexed in Casper Admin (For more information, see Managing Packages.)
�� The package configured so that it can be uninstalled (For more information, see Managing Packages.)
Note: If the package is an Adobe CS3/CS4 installation, it does not need to be indexed or configured so that it can be uninstalled.
Uninstalling a Package Using a Policy
1. Log in to the JSS with a web browser.
2. Click the Computers tab at the top of the page.
3. Click Policies.
On a smartphone or iPod touch, this option is in the pop-up menu.
4. Click New .
5. Use the General payload to configure basic settings for the policy, including the trigger and execution frequency.
For an overview of the settings in the General payload, see General Payload.
6. Select the Packages payload and click Configure.
7. Click Add for the package you want to uninstall.
8. Choose “Uninstall” from the Action pop-up menu.
9. Configure the settings for the package.
To remove the package from each computer's Autorun data, select the Update Autorun data checkbox. For more information on Autorun data and Autorun Imaging, see Autorun Imaging.
10. Use the Restart Options payload to configure settings for restarting computers.
For more information, see Restart Options Payload.
11. Click the Scope tab and configure the scope of the policy.
For more information, see Scope.
254

12. (Optional) Click the Self Service tab and make the policy available in Self Service.
For more information, see Self Service Policies.
13. (Optional) Click the User Interaction tab and configure messaging and deferral options.
For more information, see User Interaction.
14. Click Save. The policy runs on computers in the scope the next time they check in with the JSS and meet the criteria in the General payload.
Uninstalling a Package Using Casper Remote
1. Open Casper Remote and authenticate to the JSS.
2. Click Site and choose a site.
This determines which items are available in Casper Remote.
Note: This button is only displayed if you have a site configured in the JSS and are logged in with a JSS user account that has full access or access to multiple sites.
3. In the list of computers, select the checkbox for each computer from which you want to uninstall the package.
4. Click the Packages tab.
255

5. In the list of packages, select the checkbox for the package you want to uninstall.
6. Choose "Uninstall" from the Action pop-up menu.
7. Configure the settings for the package.
8. Click the Restart tab and configure settings for restarting computers.
9. Do one of the following:
�� To immediately perform the tasks on the specified computers, click Go.
�� To schedule the tasks to take place at a specific day and time, click Schedule and choose a day and time. Then click Schedule again.
256

Related InformationFor related information, see the following sections in this guide:
�� About Policies
Learn the basics about policies.
�� Managing Policies
Find out how to create policies, view the plan and status for a policy, and view and flush policy logs.
257

Patch Management
Running Software Update
When you run Software Update on computers, you can choose whether updates are installed from Apple’s Software Update server or an internal software update server.
There are two ways to run Software Update on computers: using a policy or using Casper Remote.
RequirementsTo have computers install updates from an internal software update server, the software update server must be in the JSS. (For more information, see Software Update Servers.)
Running Software Update Using a Policy
1. Log in to the JSS with a web browser.
2. Click Computers at the top of the page.
3. Click Policies.
On a smartphone or iPod touch, this option is in the pop-up menu.
4. Click New .
5. Use the General payload to configure basic settings for the policy, including the trigger and execution frequency.
For an overview of the settings in the General payload, see General Payload.
6. Select the Software Updates payload and click Configure.
7. Specify a server for computers to install software updates from.
8. Use the Restart Options payload to configure settings for restarting computers.
For more information, see Restart Options Payload.
9. Click the Scope tab and configure the scope of the policy.
For more information, see Scope.
258

10. (Optional) Click the Self Service tab and make the policy available in Self Service.
For more information, see Self Service Policies.
11. (Optional) Click the User Interaction tab and configure messaging and deferral options.
For more information, see User Interaction.
12. Click Save. The policy runs on computers in the scope the next time they check in with the JSS and meet the criteria in the General payload.
Running Software Update Using Casper Remote
1. Open Casper Remote and authenticate to the JSS.
2. Click Site and choose a site.
This determines which items are available in Casper Remote.
Note: This button is only displayed if you have a site configured in the JSS and are logged in with a JSS user account that has full access or access to multiple sites.
3. In the list of computers, select the checkbox for each computer on which you want to run Software Update.
4. Click the Packages tab.
259

5. Select the Install all updates checkbox.
6. If you want to change the software update server that computers download software updates from, click Override Defaults and choose a software update server.
7. Click the Restart tab and configure settings for restarting computers.
260

8. Do one of the following:
�� To immediately perform the tasks on the specified computers, click Go.
�� To schedule the tasks to take place at a specific day and time, click Schedule and choose a day and time. Then click Schedule again.
Related InformationFor related information, see the following sections in this guide:
�� About Policies
Learn the basics about policies.
�� Managing Policies
Find out how to create policies, view the plan and status for a policy, and view and flush policy logs.
261

Remote Control
Screen Sharing
Screen sharing allows you to remotely view and control the screen of another computer. You can allow the end user to see the screen sharing session, or you can hide the screen sharing session so that the user is not interrupted.
How Screen Sharing WorksWhen a screen sharing session is initiated from Casper Remote, the following steps are performed to start the screen sharing session:
1. Casper Remote creates an SSH connection to the target computer.
2. Casper Remote checks the target computer for the most current version of the jamf binary.
If the jamf binary is out of date or missing, Casper Remote installs the most current version over SCP or HTTP, depending on the way the Casper Remote preferences are configured.
3. Casper Remote checks the target computer for the following file and verifies that it contains the correct information:
/Library/Preferences/com.jamfsoftware.jss.plist If the file does not exist or contains incorrect information, Casper Remote automatically creates or overwrites the file.
4. The jamf binary checks if the JSS user who initiated the screen sharing session has the "Screen Share with Remote Computers" and "Screen Share with Remote Computers without Asking" privilege.
5. If the JSS user does not have the "Screen Share with Remote Computers without Asking" privilege, the end user is prompted to allow the screen sharing session to take place.
6. The JSS logs the connection.
7. On the target computer, Casper Remote starts the Screen Sharing service that is built into OS X.
8. On the target computer, Casper Remote creates a temporary account with limited privileges and uses it for the screen sharing session.
When the Screen Sharing window is closed, Casper Remote deletes the temporary account, stops the Screen Sharing service, and logs out of the SSH connection. If the SSH connection is terminated unexpectedly, a launch daemon deletes the temporary account and stops the Screen Sharing service within 60 seconds of the SSH connection being terminated.
262

RequirementsTo share the screen of another computer, SSH (Remote Login) must be enabled on the target computer.
Sharing the Screen of Another Computer
1. Open Casper Remote and authenticate to the JSS.
2. Click Site and choose a site.
This determines which items are available in Casper Remote.
Note: This button is only displayed if you have a site configured in the JSS and are logged in with a JSS user account that has full access or access to multiple sites.
3. In the list of computers, select the computer that you want to screen share with.
4. Click Screen Share .
5. When prompted, choose a screen sharing option:
�� To allow the end user to see the screen sharing session, choose "Share Display" (OS X v10.8 and 10.9) or "Ask to share the display" (OS X v10.7).
�� To hide the screen sharing session, choose "Log In" (OS X v10.8 and 10.9) or "Connect to a virtual display" (OS X v10.7).
If you do not have the “Screen Share Remote Computers Without Asking” privilege, the end user is prompted to allow the screen sharing session to take place.
263

Settings and Security Management
Managed Preferences
Managed Preferences are manifest files that define preferences for computers and users. You can use the JAMF Software Server (JSS) to create Managed Preference profiles, which contain groups of Managed Preferences. You can also specify the users and computers for which a profile should be applied (called “scope”).
The JSS comes with manifest files for many common Managed Preferences so that you can easily add them to profiles. You can also add custom Managed Preferences by creating them manually or uploading a manifest file.
Levels for Managed PreferencesWhen you add a Managed Preference to a profile, you must specify a level at which to apply the preference. The level determines how and when the preference is applied. The levels available for each Managed Preference depend on the application or utility for which you are defining the preference.
If you have applied Managed Preferences using Apple’s Workgroup Manager, the level names in the JSS may be unfamiliar to you. The following table shows each level, its Workgroup Manager equivalent, when and how it is applied, and whether it is available for some or all Managed Preferences.
JSS Levels Workgroup Manager Levels
Applied at Available for
User-level enforced Always Login with a login hook Some Managed Preferences
User-level at every login Often Login with a login hook All Managed Preferences
User-level at next login only
Once Login with a login hook All Managed Preferences
Computer-level enforced
Always (Applied to a computer object)
Reboot with a startup script
Some Managed Preferences
Unmanaged Unset Login or reboot All Managed Preferences
264

Compatibility with Third-Party ProvidersIn OS X v10.6 and v10.7, you can use more than one provider to apply Managed Preferences. In some cases, Managed Preferences applied using the JSS can interfere with or be interfered with by Managed Preferences from a third-party provider. The following table shows the compatibility of Managed Preferences applied using the JSS and tested third-party providers.
Third-Party Provider Local Home Directory
Network Home Directory
Mobile Home Directory
OS X Directory Utility–Active Directory
Compatible Compatible Compatible
OS X Directory Utility–Open Directory
Compatible Compatible Compatible
PowerBroker Identity Services (formerly called “Likewise”)
Compatible N/A Incompatible
ADmitMac Compatible Compatible Incompatible
Centrify Compatible N/A Incompatible
RequirementsTo apply user-level Managed Preferences, they must be enabled in the Login/Logout Hooks settings in the JSS. (For more information, see Login and Logout Hooks.)
To apply computer-level Managed Preferences, they must be enabled in the Startup Script settings in the JSS. (For more information, see Startup Script.)
Creating a Managed Preference Profile
1. Log in to the JSS with a web browser.
2. Click Computers at the top of the page.
3. Click Managed Preferences.
On a smartphone or iPod touch, this option is in the pop-up menu.
4. Click New .
5. Use the General payload to configure basic settings for the profile.
6. Use the rest of the payloads to configure the Managed Preferences you want to apply.
265

7. (Optional) Manually create a custom Managed Preference:
a. Select the Custom payload.
b. Click Add for Manual Setting.
c. Configure the Managed Preference using the options on the pane.
8. (Optional) Upload a manifest file:
a. Select the Custom payload.
b. Click Add for Upload Manifest.
c. Upload the manifest file.
9. Click the Scope tab and configure the scope of the profile.
For more information, see Scope.
10. Click Save. The profile is applied the next time computers in the scope check in with the JSS.
Cloning, Editing, or Deleting a Managed Preference Profile
1. Log in to the JSS with a web browser.
2. Click Computers at the top of the page.
3. Click Managed Preferences.
On a smartphone or iPod touch, this option is in the pop-up menu.
4. Click the Managed Preference profile you want to clone, edit, or delete.
5. Do one of the following:
�� To clone the profile, click Clone and make changes as needed. Then click Save.
�� To edit the profile, click Edit and make changes as needed. Then click Save.
�� To delete the profile, click Delete and then click Delete again to confirm. The clone, edit, or delete action is applied to computers in the scope the next time they check in with the JSS.
Related InformationFor related information, see the following section in this guide.
Viewing Managed Preferences for a ComputerFind out how to view managed preferences for a computer or user.
266

OS X Configuration Profiles
OS X configuration profiles are XML files (.mobileconfig) that provide an easy way to define settings and restrictions for computers and users. You can use the JAMF Software Server (JSS) to manually create an OS X configuration profile or upload a configuration profile that was created using Apple’s Profile Manager. Before creating a configuration profile, you should have basic knowledge of configuration profile payloads and settings, and how they affect computers. For detailed information about each payload and setting, see Apple’s Profile Manager documentation at:
https://help.apple.com/profilemanager/mac
Some configuration profile settings are unique to the JSS. For more information on these settings, see the following Knowledge Base article:
Configuration Profiles Reference When you create an OS X configuration profile, you must specify the level at which to apply the profile—computer level or user level. Each level has a unique set of payloads and a few that are common to both. You can also specify the computers and users to which the profile should be applied (called “scope”).
Payload Variables for OS X Configuration ProfilesThere are several payload variables that you can use to populate settings in an OS X configuration profile with attribute values stored in the JSS. This allows you to create payloads containing information about each computer and user to which you are distributing the profile. To use a payload variable, enter the variable into any text field when creating a configuration profile in the JSS. When the profile is installed on a computer, the variable is replaced with the value of the corresponding attribute in the JSS.
Variable Computer Information
$COMPUTERNAME Computer Name
$UDID UDID
$SERIALNUMBER Serial Number
$USERNAME Username associated with the computer in the JSS (computer-level profiles only)
Username of the user logging in to the computer (user-level profiles only)
267

Variable Computer Information
$FULLNAME or $REALNAME Full Name
$EMAIL Email Address
$PHONE Phone Number
$ROOM Room
$POSITION Position
$MACADDRESS MAC Address
$EXTENSIONATTRIBUTE_<#> Value for any LDAP attribute
Note: An $EXTENSIONATTRIBUTE_<#> variable is generated each time you create an extension attribute with the “LDAP Attribute Mapping” input type. For more information, see Computer Extension Attribute Input Types.
RequirementsTo install an OS X configuration profile, you need:
�� Computers with OS X v10.7 or later
�� The Enable certificate-based authentication and Enable push notifications settings configured in the JSS. (For more information, see Security Settings.)
�� (User-level profiles only) Computers that are bound to a directory service (For more information, see Binding to Directory Services.)
�� (User-level profiles only) Login hooks configured in your environment (For information on creating login hooks with the Casper Suite, see Login and Logout Hooks.)
Manually Creating an OS X Configuration Profile
1. Log in to the JSS with a web browser.
2. Click Computers at the top of the page.
3. Click Configuration Profiles.
On a smartphone or iPod touch, this option is in the pop-up menu.
4. Click New .
5. Use the General payload to configure basic settings, including the level at which to apply the profile.
Only payloads and settings that apply to the selected level are displayed for the profile.
6. Use the rest of the payloads to configure the settings you want to apply.
268

7. Click the Scope tab and configure the scope of the profile.
For more information, see Scope.
8. Click Save. Computer-level profiles are installed the next time computers in the scope check in with the JSS. User-level profiles are installed the next time users in the scope log in to their computers.
Uploading an OS X Configuration ProfileYou can create an OS X configuration profile by uploading a profile that was created using Apple’s Profile Manager.
Note: Some payloads and settings configured with Profile Manager are not displayed in the JSS. Although you cannot view or edit these payloads, they are still applied to computers and users.
1. Log in to the JSS with a web browser.
2. Click Computers at the top of the page.
3. Click Configuration Profiles.
On a smartphone or iPod touch, this option is in the pop-up menu.
4. Click Upload and upload the configuration profile (.mobileconfig).
5. Use the General payload to change or configure basic settings for the profile.
6. Use the rest of the payloads to configure or edit settings as needed.
7. Click the Scope tab and configure the scope of the profile.
For more information, see Scope.
8. Click Save. Computer-level profiles are installed the next time computers in the scope check in with the JSS. User-level profiles are installed the next time users in the scope log in to their computers.
Cloning, Editing, or Deleting an OS X Configuration Profile
1. Log in to the JSS with a web browser.
2. Click Computers at the top of the page.
3. Click Configuration Profiles.
On a smartphone or iPod touch, this option is in the pop-up menu.
4. Click the configuration profile you want to clone, edit, or delete.
269

5. Do one of the following:
�� To clone the profile, click Clone and make changes as needed. Then click Save.
�� To edit the profile, click Edit and make changes as needed. Then click Save.
�� To delete the profile, click Delete and then click Delete again to confirm. For computer-level profiles, the clone, edit, or delete action is applied to computers in the scope the next time they check in with the JSS. For user-level profiles, the clone, edit, or delete action is applied the next time users in the scope log in to their computers.
Downloading an OS X Configuration ProfileIf you want to view the contents of an OS X configuration profile for troubleshooting purposes, you can download the profile (.mobileconfig) from the JSS.
1. Log in to the JSS with a web browser.
2. Click Computers at the top of the page.
3. Click Configuration Profiles.
On a smartphone or iPod touch, this option is in the pop-up menu.
4. Click the configuration profile you want to download.
5. Click Download. The profile downloads immediately.
Related InformationFor related information, see the following sections in this guide:
�� Viewing the Pending Management Commands for a Computer
Find out how to view and cancel pending OS X configuration profile installations and removals for a computer.
�� Viewing Management History for a Computer
Find out how to view all completed, pending, and failed OS X configuration profile installations and removals for a computer.
�� Viewing Configuration Profiles for a Computer
Find out how to view the OS X configuration profiles in the scope for a computer.
270

OS X Remote Commands
The OS X remote commands available in the JAMF Software Server (JSS) allow you to remotely perform the following tasks on a computer:
�� Manage security by locking or wiping the computer.
�� Remove the MDM profile.
�� Send a blank push notification. You can send an OS X remote command to a single computer. The following table describes the OS X remote commands that you can send from the JSS.
OS X Remote Command Description
Lock Computer Logs the user out of the computer, restarts the computer, and then locks the computer
To unlock the computer, the user must enter the passcode that you specified when you sent the Lock Computer command.
Remove MDM Profile Removes the MDM profile from the computer, along with any configuration profiles that were distributed with the Casper Suite
If the MDM profile is removed, you can no longer send remote commands or distribute configuration profiles to the computer.
Note: Removing the MDM profile from a computer does not remove the computer from the JSS or change its inventory information.
Wipe Computer Permanently erases all data on the computer
Note: Wiping a computer does not remove the computer from the JSS or change its inventory information.
To restore the computer to the original factory settings, the user must enter the passcode that you specified when you sent the Wipe Computer command, and then reinstall the operating system.
For detailed information on OS X Recovery, see the following Apple Knowledge Base article: https://support.apple.com/kb/HT4718
Send Blank Push Sends a blank push notification, prompting the computer to check in with Apple Push Notification service (APNs)
RequirementsTo manage OS X remote commands, you need:
�� Computers with OS X v10.7 or later and a Recovery Partition
�� A push certificate in the JSS (For more information, see Push Certificates.)
�� The Enable certificate-based authentication and Enable push notifications settings configured in the JSS (For more information, see Security Settings.)
271

Sending an OS X Remote Command
1. Log in to the JSS with a web browser.
2. Click Computers at the top of the page.
3. Perform a simple or advanced computer search.
For more information, see Simple Computer Searches or Advanced Computer Searches.
4. Click the computer you want to send the OS X remote command to.
If you performed a simple search for an item other than computers, you must click Expand next to an item to view the computers related to that item.
5. Click the Management tab, and then click the button for the remote command that you want to send.
�� If you are sending a Lock Computer command, type a password that the user must enter to unlock the computer.
�� If you are sending a Wipe Computer command, type a password that the user must enter to restore the computer.
The remote command runs on the computer the next time the computer checks in with the JSS.
Viewing the Status of OS X Remote Commands
1. Log in to the JSS with a web browser.
2. Click Computers at the top of the page.
3. Perform a simple or advanced computer search.
For more information, see Simple Computer Searches or Advanced Computer Searches.
4. Click the computer you want to view OS X remote commands for.
If you performed a simple search for an item other than computers, you must click Expand next to an item to view the computers related to that item.
5. Click the History tab.
6. Use the Management History pane to view completed, pending, or failed commands.
Canceling an OS X Remote Command
1. Log in to the JSS with a web browser.
2. Click Computers at the top of the page.
3. Perform a simple or advanced computer search.
For more information, see Simple Computer Searches or Advanced Computer Searches.
272

4. Click the computer for which you want to cancel an OS X remote command.
If you performed a simple search for an item other than computers, you must click Expand next to an item to view the computers related to that item.
5. Click the History tab, and then click Pending Commands.
6. Find the command you want to cancel, and click Cancel across from it.
273

Managing Scripts
The way you manage scripts depends on the way scripts are stored in your environment. There are two ways scripts can be stored:
�� As data in the jamfsoftware database—Before you can run a script in this type of environment, the script must exist in the database. There are two ways to achieve this:
• Add the script to Casper Admin
• Add the script to the JSS using the script editor
�� As files on your distribution point(s)—Before you can run a script in this type of environment, the script must exist on the distribution point you plan to deploy it from and in the JSS. You can add the script to the master distribution point by adding it to Casper Admin. Then you can add the script to other distribution points via replication.
Note: For more information on migrating the scripts on your master distribution point, see the following Knowledge Base article:
Migrating Packages and Scripts
Each of these methods also involves configuring settings for the script. When you configure settings for a script, you can do the following:
�� Add the script to a category. (For more information, see Categories.)
�� Choose a priority for running the script during imaging.
�� Enter parameter labels.
�� Specify operating system requirements for running the script.
When you add, edit, or delete a script in Casper Admin, the changes are reflected in the JSS and vice versa.
RequirementsTo add a script to Casper Admin, the script file must be non-compiled and in one of the following formats:
�� Perl (.pl)
�� Bash (.sh)
�� Shell (.sh)
�� Non-compiled AppleScript (.applescript)
�� C Shell (.csh)
�� Zsh (.zsh)
�� Korn Shell (.ksh)
�� Tool Command Language (.tcl)
�� Hypertext Preprocessor (.php)
�� Ruby (.rb)
�� Python (.py)
274

Adding a Script to Casper AdminAdding a script to Casper Admin adds the script to the jamfsoftware database or the master distribution point, and to the JSS.
1. Open Casper Admin and authenticate to the JSS.
2. Drag the script to the main repository in Casper Admin.
The script is displayed in blue text in the Unknown category until you add it to a category.
3. Double-click the script in the main repository.
4. Click the General tab and configure basic settings for the script, including the display name and category.
5. Click the Options tab and configure additional settings for the script, including the priority and parameter labels.
6. Click OK.
275

Adding a Script to the JSSIf your environment is one in which scripts are stored in the jamfsoftware database, you can add a script to the JSS using the script editor.
1. Log in to the JSS with a web browser.
2. In the top-right corner of the page, click Settings .
3. Click Computer Management.
On a smartphone or iPod touch, this option is in the pop-up menu.
4. In the “Computer Management” section, click Scripts .
5. Click New .
6. Use the General pane to configure basic settings for the script, including the display name and category.
Note: If you do not add the script to a category, Casper Admin displays the script in blue text in the Unknown category.
7. Click the Script tab and enter the script contents in the script editor.
8. Click the Options tab and configure additional settings for the script, including the priority.
9. (Optional) Click the Limitations tab and configure operating system requirements for the script.
10. Click Save.
Editing or Deleting a Script Using Casper Admin
1. Open Casper Admin and authenticate to the JSS.
2. In the main repository, select the script you want to edit or delete.
3. Do one of the following:
�� To edit the script, double-click it and make changes as needed. Then click OK.
�� To delete the script, click Delete and then click Delete again to confirm. If the script is stored in the jamfsoftware database, the edit or delete action is applied immediately.
If the script is stored on your distribution point(s), the edit or delete action is applied immediately on the master distribution point. The action is applied to your other distribution points when replication occurs.
276

Cloning, Editing, Deleting a Script Using the JSS
1. Log in to the JSS with a web browser.
2. In the top-right corner of the page, click Settings .
3. Click Computer Management.
On a smartphone or iPod touch, this option is in the pop-up menu.
4. In the “Computer Management” section, click Scripts .
5. Click the script you want to edit or delete.
6. Do one of the following:
�� To clone the script, click Clone and make changes as needed. Then click Save.
�� To edit the script, click Edit and make changes as needed. Then click Save.
�� To delete the script, click Delete and then click Delete again to confirm. If the script is stored in the jamfsoftware database, the clone, edit, or delete action is applied immediately.
If the script is stored on your distribution point(s), the clone, edit, or delete action is applied immediately on the master distribution point. The action is applied to your other distribution points when replication occurs.
Related InformationFor related information, see the following section in this guide:
Running ScriptsFind out how to run scripts using a policy or Casper Remote.
277

Running Scripts
When you run a script, you can choose a priority for running the script. You can also enter parameter values for the script. There are two ways to run scripts on computers: using a policy or using Casper Remote.
RequirementsTo run a script on computers, the script must exist on the distribution point you plan to deploy it from and in the JSS, or in the jamfsoftware database. (For more information, see Managing Scripts.)
Running a Script Using a Policy
1. Log in to the JSS with a web browser.
2. Click the Computers tab at the top of the page.
3. Click Policies.
On a smartphone or iPod touch, this option is in the pop-up menu.
4. Click New .
5. Use the General payload to configure basic settings for the policy, including the trigger and execution frequency.
For an overview of the settings in the General payload, see General Payload.
6. Select the Scripts payload and click Configure.
7. Click Add for the script you want to run.
8. Configure the settings for the script.
9. Use the Restart Options payload to configure settings for restarting computers.
For more information, see Restart Options Payload.
10. Click the Scope tab and configure the scope of the policy.
For more information, see Scope.
11. (Optional) Click the Self Service tab and make the policy available in Self Service.
For more information, see Self Service Policies.
12. (Optional) Click the User Interaction tab and configure messaging and deferral options.
For more information, see User Interaction.
13. Click Save. The policy runs on computers in the scope the next time they check in with the JSS and meet the criteria in the General payload.
278

Running a Script Using Casper Remote
1. Open Casper Remote and authenticate to the JSS.
2. Click Site and choose a site.
This determines which items are available in Casper Remote.
Note: This button is only displayed if you have a site configured in the JSS and are logged in with a JSS user account that has full access or access to multiple sites.
3. In the list of computers, select the checkbox for each computer on which you want to run the script.
4. Click the Scripts tab.
5. In the list of scripts, select the checkbox for the script you want to run.
6. Configure the settings for the script.
279

7. Click the Restart tab and configure settings for restarting computers.
8. Do one of the following:
�� To immediately perform the tasks on the specified computers, click Go.
�� To schedule the tasks to take place at a specific day and time, click Schedule and choose a day and time. Then click Schedule again.
Related InformationFor related information, see the following sections in this guide:
�� About Policies
Learn the basics about policies.
�� Managing Policies
Find out how to create policies, view the plan and status for a policy, and view and flush policy logs.
280

Managing Printers
Adding printers to Casper Admin or the JAMF Software Server (JSS) is the first step to administering printers on computers.
When you add a printer to Casper Admin, you choose from a list of printers that are on the computer running Casper Admin. When you add a printer to the JSS, you manually specify information about the printer, such as the CUPS name and device URI.
When you add, edit, or delete a printer in Casper Admin, the changes are reflected in the JSS and vice versa.
When you configure a printer, you can do the following:
�� Add the printer to a category.
�� Choose whether or not the printer is set as the default when mapped during imaging.
�� Specify an operating system requirement for mapping the printer.
Adding a Printer to Casper AdminSeveral settings in Casper Admin have tool tips. To read more about a specific setting, hover your mouse over it until a tool tip is displayed.
1. Open Casper Admin and authenticate to the JSS.
2. Click Add Printers .
3. If prompted, authenticate locally.
4. Select the checkbox next to each printer you want to add.
5. (Optional) Choose a category to add printer(s) to.
6. Click Add.
7. Select the printer in the main repository and double-click it.
281

8. Click the General tab and configure basic settings for the printer, including the display name and category.
9. Click the Options tab.
10. Choose whether or not the printer is set as the default when mapped during imaging, and configure the operating system requirement.
11. Click OK.
Adding a Printer to the JSS
1. Log in to the JSS with a web browser.
2. In the top-right corner of the page, click Settings .
3. Click Computer Management.
On a smartphone or iPod touch, this option is in the pop-up menu.
4. In the “Computer Management” section, click Printers .
5. Click New .
282

6. Use the General pane to configure basic settings for the printer, including the display name and category.
7. Click the Definition tab and specify information about the printer, including the CUPS name and device URI.
8. (Optional) Click the Limitations tab and specify an operating system requirement.
9. Click Save.
Editing or Deleting a Printer in Casper Admin Several settings in Casper Admin have tool tips. To read more about a specific setting, hover your mouse over it until a tool tip is displayed.
1. Open Casper Admin and authenticate to the JSS.
2. In the main repository, select the printer you want to edit or delete.
3. Do one of the following:
�� To edit the printer, double-click it and make changes as needed. Then click OK.
�� To delete the printer, click Delete and then click Delete again to confirm.
Cloning, Editing, or Deleting a Printer in the JSS
1. Log in to the JSS with a web browser.
2. In the top-right corner of the page, click Settings .
3. Click Computer Management.
On a smartphone or iPod touch, this option is in the pop-up menu.
4. In the “Computer Management” section, click Printers .
5. Click the printer you want to clone, edit, or delete.
6. Do one of the following:
�� To clone the printer, click Clone and make changes as needed. Then click Save.
�� To edit the printer, click Edit and make changes as needed. Then click Save.
�� To delete the printer, click Delete and then click Delete again to confirm.
Related InformationFor related information, see the following section in this guide:
Administering PrintersFind out how to map and unmap printers using a policy or Casper Remote.
283

Administering Printers
There are two ways to map or unmap printers on computers: using a policy or using Casper Remote.
Note: You can also map printers during imaging. For more information, see Configurations. When you map a printer, you can choose whether or not to make the printer the default.
RequirementsTo map or unmap a printer, the printer must be added to Casper Admin or the JSS. (For more information, see Managing Printers.)
Mapping or Unmapping a Printer Using a Policy
1. Log in to the JSS with a web browser.
2. Click Computers at the top of the page.
3. Click Policies.
On a smartphone or iPod touch, this option is in the pop-up menu.
4. Click New .
5. Use the General payload to configure basic settings for the policy, including the trigger and execution frequency.
For an overview of the settings in the General payload, see General Payload.
6. Select the Printers payload and click Configure.
7. Click Add across from the printer you want to map or unmap.
8. Choose "Map" or "Unmap" from the Action pop-up menu.
9. (Optional) If you are mapping the printer, make it the default printer by selecting the Set as Default checkbox.
10. Use the Restart Options payload to configure settings for restarting computers.
For more information, see Restart Options Payload.
11. Click the Scope tab and configure the scope of the policy.
For more information, see Scope.
12. (Optional) Click the Self Service tab and make the policy available in Self Service.
For more information, see Self Service Policies.
284

13. (Optional) Click the User Interaction tab and configure messaging and deferral options.
For more information, see User Interaction.
14. Click Save. The policy runs on computers in the scope the next time they check in with the JSS and meet the criteria in the General payload.
Mapping or Unmapping a Printer Using Casper Remote
1. Open Casper Remote and authenticate to the JSS.
2. Click Site and choose a site.
This determines which items are available in Casper Remote.
Note: This button is only displayed if you have a site configured in the JSS and are logged in with a JSS user account that has full access or access to multiple sites.
3. In the list of computers, select the checkbox for each computer on which you want to map or unmap the printer.
4. Click the Printers tab.
285

5. In the list of printers, select the checkbox for the printer you want to map or unmap.
6. Select the Map or Unmap option.
7. (Optional) Make the printer the default by selecting the Set as Default checkbox.
8. Click the Restart tab and configure settings for restarting computers.
9. Do one of the following:
�� To immediately perform the tasks on the specified computers, click Go.
�� To schedule the tasks to take place at a specific day and time, click Schedule and choose a day and time. Then click Schedule again.
286

Related InformationFor related information, see the following sections in this guide:
�� Smart Computer Groups
You can create smart computer groups based on mapped printers.
�� About Policies
Learn the basics about policies.
�� Managing Policies
Find out how to create policies, view the plan and status of a policy, and view and flush policy logs.
287

Managing Dock Items
Adding Dock items to Casper Admin or the JAMF Software Server (JSS) is the first step to administering Dock items on computers.
When you add a Dock item to Casper Admin, you choose from a list of Dock items that are on the computer running Casper Admin. When you add a Dock item to the JSS, you manually specify information about the Dock item.
When you add, edit, or delete a Dock item in Casper Admin, the changes are reflected in the JSS and vice versa.
Adding a Dock Item to Casper Admin
1. Open Casper Admin and authenticate to the JSS.
2. Click Add Dock Items .
3. Select the checkbox next to each Dock item you want to add.
4. Click Add.
Adding a Dock Item to the JSS
1. Log in to the JSS with a web browser.
2. In the top-right corner of the page, click Settings .
3. Click Computer Management.
On a smartphone or iPod touch, this option is in the pop-up menu.
4. In the “Computer Management” section, click Dock Items .
5. Click New .
288

6. Configure the Dock item using the settings on the pane.
7. Click Save.
Deleting a Dock Item in Casper Admin
1. Open Casper Admin and authenticate to the JSS.
2. In the main repository, select the Dock item you want to delete.
3. Click Delete and then click Delete again to confirm.
Cloning, Editing, or Deleting a Dock Item in the JSS
1. Log in to the JSS with a web browser.
2. In the top-right corner of the page, click Settings .
3. Click Computer Management.
On a smartphone or iPod touch, this option is in the pop-up menu.
4. In the “Computer Management” section, click Dock Items .
5. Click the Dock item you want to clone, edit, or delete.
6. Do one of the following:
�� To clone the Dock item, click Clone and make changes as needed. Then click Save.
�� To edit the Dock item, click Edit and make changes as needed. Then click Save.
�� To delete the Dock item, click Delete and then click Delete again to confirm.
Related InformationFor related information, see the following section in this guide:
Administering Dock ItemsFind out how to add and remove Dock items using a policy or Casper Remote.
289

Administering Dock Items
There are two ways to add or remove Dock items on computers: using a policy or using Casper Remote.
When you add a Dock item on computers, you can choose whether to add it to the beginning or the end of the Dock.
RequirementsTo add or remove a Dock item on computers, the Dock item must be added to Casper Admin or the JSS. (For more information, see Managing Dock Items.)
Adding or Removing a Dock Item Using a Policy
1. Log in to the JSS with a web browser.
2. Click Computers at the top of the page.
3. Click Policies.
On a smartphone or iPod touch, this option is in the pop-up menu.
4. Click New .
5. Use the General payload to configure basic settings for the policy, including the trigger and execution frequency.
For an overview of the settings in the General payload, see General Payload.
6. Select the Dock Items payload and click Configure.
7. Click Add for the Dock item you want to add or remove.
8. Choose "Add to Beginning of Dock", "Add to End of Dock", or "Remove from Dock" from the Action pop-up menu.
9. Use the Restart Options payload to configure settings for restarting computers.
For more information, see Restart Options Payload.
10. Click the Scope tab and configure the scope of the policy.
For more information, see Scope.
11. (Optional) Click the Self Service tab and make the policy available in Self Service.
For more information, see Self Service Policies.
12. (Optional) Click the User Interaction tab and configure messaging and deferral options.
For more information, see User Interaction.
290

13. Click Save. The policy runs on computers in the scope the next time they check in with the JSS and meet the criteria in the General payload.
Adding or Removing a Dock Item Using Casper Remote
1. Open Casper Remote and authenticate to the JSS.
2. Click Site and choose a site.
This determines which items are available in Casper Remote.
Note: This button is only displayed if you have a site configured in the JSS and are logged in with a JSS user account that has full access or access to multiple sites.
3. In the list of computers, select the checkbox for each computer on which you want to add or remove the Dock item.
4. Click the Dock tab.
5. In the list of Dock items, select the checkbox for the Dock item you want to add or remove.
291

6. Select the Add to Beginning of Dock, Add to End of Dock, or Remove from Dock option.
7. Click the Restart tab and configure settings for restarting computers.
8. Do one of the following:
�� To immediately perform the tasks on the specified computers, click Go.
�� To schedule the tasks to take place at a specific day and time, click Schedule and choose a day and time. Then click Schedule again.
Related InformationFor related information, see the following sections in this guide:
�� About Policies
Learn the basics about policies.
�� Managing Policies
Find out how to create policies, view the plan and status of a policy, and view and flush policy logs.
292

Administering Local Accounts
You can perform the following local account administration tasks using a policy or Casper Remote:
�� Create a new account.
�� Delete an existing account.
�� Reset the password for an existing account.
�� (Policy only) Disable an existing account for FileVault 2 on computers with OS X v10.9 or later. When you create a new account, you can do the following:
�� Specify the password and password hint.
�� Specify a location for the home directory.
�� Configure the account picture.
�� Give the user administrator privileges to the computer.
�� (Policy only) Enable the account for FileVault 2 on computers with OS X v10.9 or later. When you delete an existing account, you can permanently delete the home directory or specify an archive location.
RequirementsTo enable a new account for FileVault 2, the computer must have OS X v10.9 or later and have an existing, valid individual recovery key that matches the recovery key stored in the JSS. To disable an existing account for FileVault 2, the computer must have OS X v10.9 or later.
Administering Local Accounts Using a Policy
1. Log in to the JSS with a web browser.
2. Click Computers at the top of the page.
3. Click Policies.
On a smartphone or iPod touch, this option is in the pop-up menu.
4. Click New .
5. Use the General payload to configure basic settings for the policy, including the trigger and execution frequency.
For an overview of the settings in the General payload, see General Payload.
6. Select the Local Accounts payload and click Configure.
7. Choose an action from the Action pop-up menu.
293

8. Configure the action using the options on the pane.
9. Use the Restart Options payload to configure settings for restarting computers.
For more information, see Restart Options Payload.
10. Click the Scope tab and configure the scope of the policy.
For more information, see Scope.
11. (Optional) Click the Self Service tab and make the policy available in Self Service.
For more information, see Self Service Policies.
12. (Optional) Click the User Interaction tab and configure messaging and deferral options.
For more information, see User Interaction.
13. Click Save. The policy runs on computers in the scope the next time they check in with the JSS and meet the criteria in the General payload.
Administering Local Accounts Using Casper Remote
1. Open Casper Remote and authenticate to the JSS.
2. Click Site and choose a site.
This determines which items are available in Casper Remote.
Note: This button is only displayed if you have a site configured in the JSS and are logged in with a JSS user account that has full access or access to multiple sites.
3. In the list of computers, select the checkbox for each computer on which you want to administer local accounts.
4. Click the Accounts tab.
294

5. Click Create, Reset Password, or Delete.
6. Configure the action using the options in the window that appears.
7. Click the Restart tab and configure settings for restarting computers.
8. Do one of the following:
�� To immediately perform the tasks on the specified computers, click Go.
�� To schedule the tasks to take place at a specific day and time, click Schedule and choose a day and time. Then click Schedule again.
295

Related InformationFor related information, see the following sections in this guide:
�� Smart Computer Groups
You can create smart computer groups based on local user accounts.
�� About Policies
Learn the basics about policies.
�� Managing Policies
Find out how to create a policy, view the plan and status of a policy, and view and flush policy logs.
�� Administering the Management Account
Find out how to reset the management account password, and enable or disable the management account for FileVault 2.
296

Administering the Management Account
You can reset the management account password using a policy or Casper Remote. You can also enable or disable the management account for FileVault 2 using a policy.
RequirementsTo enable the management account for FileVault 2, the computer must have OS X v10.9 or later and have an existing, valid individual recovery key that matches the recovery key stored in the JSS. To disable the management account for FileVault 2, the computer must have OS X v10.9 or later.
Resetting the Management Account Password Using a Policy
1. Log in to the JSS with a web browser.
2. Click the Computers tab at the top of the page.
3. Click Policies.
On a smartphone or iPod touch, this option is in the pop-up menu.
4. Click New .
5. Use the General payload to configure basic settings for the policy, including the trigger and execution frequency.
For an overview of the settings in the General payload, see General Payload.
6. Select the Management Account payload and click Configure.
7. Choose "Specify new password" or "Randomly generate new passwords" from the Action pop-up menu.
8. Configure the action using the options on the pane.
9. Use the Restart Options payload to configure settings for restarting computers.
For more information, see Restart Options Payload.
10. Click the Scope tab and configure the scope of the policy.
For more information, see Scope.
11. (Optional) Click the Self Service tab and make the policy available in Self Service.
For more information, see Self Service Policies.
12. (Optional) Click the User Interaction tab and configure messaging and deferral options.
For more information, see User Interaction.
13. Click Save. The policy runs on computers in the scope the next time they check in with the JSS and meet the criteria in the General payload.
297

Resetting the Management Account Password Using Casper Remote
1. Open Casper Remote and authenticate to the JSS.
2. Click Site and select a site.
This determines which items are available in Casper Remote.
Note: This button is only displayed if you have a site configured in the JSS and are logged in with a JSS user account that has full access or access to multiple sites.
3. In the list of computers, select the checkbox for each computer on which you want to administer local accounts.
4. Click the Accounts tab.
5. Do one of the following:
�� To randomly generate new passwords, select Randomly Generated Passwords and enter the number of characters required.
�� To specify a new password, select Change To and enter the new password.
298

6. Click the Restart tab and configure settings for restarting computers.
7. Do one of the following:
�� To immediately perform the tasks on the specified computers, click Go.
�� To schedule the tasks to take place at a specific day and time, click Schedule and choose a day and time. Then click Schedule again.
Enabling or Disabling the Management Account for FileVault 2You can enable or disable the management account for FileVault 2 on computers with OS X v10.9 or later. To enable the account for FileVault 2, the computer must have an individual recovery key.
1. Log in to the JSS with a web browser.
2. Click the Computers tab at the top of the page.
3. Click Policies.
On a smartphone or iPod touch, this option is in the pop-up menu.
4. Click New .
5. Use the General payload to configure basic settings for the policy, including the trigger and execution frequency.
For an overview of the settings in the General payload, see General Payload.
6. Select the Management Account payload and click Configure.
7. Choose "Enable User for FileVault 2" or "Disable User for FileVault 2" from the Action pop-up menu.
8. Use the Restart Options payload to configure settings for restarting computers.
For more information, see Restart Options Payload.
9. Click the Scope tab and configure the scope of the policy.
For more information, see Scope.
299

10. (Optional) Click the Self Service tab and make the policy available in Self Service.
For more information, see Self Service Policies.
11. (Optional) Click the User Interaction tab and configure messaging and deferral options.
For more information, see User Interaction.
12. Click Save. The policy runs on computers in the scope the next time they check in with the JSS and meet the criteria in the General payload.
Related InformationFor related information, see the following sections in this guide:
�� About Policies
Learn the basics about policies.
�� Managing Policies
Find out how to create a policy, view the plan and status of a policy, and view and flush policy logs.
300

Managing Directory Bindings
Adding a directory binding to the JAMF Software Server (JSS) is the first step to binding computers to a directory service. You can add the following types of directory bindings to the JSS:
�� OS X Directory Utility–Active Directory
�� OS X Directory Utility–Open Directory
�� PowerBroker Identity Services (formerly called “Likewise”)
�� ADmitMac
�� Centrify
Adding a Directory Binding
1. Log in to the JSS with a web browser.
2. In the top-right corner of the page, click Settings .
3. Click Computer Management.
On a smartphone or iPod touch, this option is in the pop-up menu.
4. In the “Computer Management” section, click Directory Bindings .
5. Click New .
6. Choose the type of directory binding you want to add and click Next.
7. Configure the directory binding using the tabs and options provided.
The tabs and options provided match the ones in the third-party directory service software.
8. Click Save.
Cloning, Editing, or Deleting a Directory Binding
1. Log in to the JSS with a web browser.
2. In the top-right corner of the page, click Settings .
3. Click Computer Management.
On a smartphone or iPod touch, this option is in the pop-up menu.
4. In the “Computer Management” section, click Directory Bindings .
5. Click the directory binding you want to clone, edit, or delete.
301

6. Do one of the following:
�� To clone the directory binding, click Clone and make changes as needed. Then click Save.
�� To edit the directory binding, click Edit and make changes as needed. Then click Save.
�� To delete the directory binding, click Delete and then click Delete again to confirm.
Related InformationFor related information, see the following section in this guide:
Binding to Directory ServicesFind out how to bind computers to a directory service using a policy or Casper Remote.
302

Binding to Directory Services
You can bind computers to a directory service using a policy or Casper Remote.
Note: You can also bind to directory services during imaging. For more information, see Configurations.
RequirementsTo bind computers to a directory service, you need a directory binding in the JSS. (For more information, see Managing Directory Bindings.)
Binding to a Directory Service Using a Policy
1. Log in to the JSS with a web browser.
2. Click Computers at the top of the page.
3. Click Policies.
On a smartphone or iPod touch, this option is in the pop-up menu.
4. Click New .
5. Use the General payload to configure basic settings for the policy, including the trigger and execution frequency.
For an overview of the settings in the General payload, see General Payload.
6. Select the Directory Bindings payload and click Configure.
7. Click Add for the directory service you want to bind to.
8. Use the Restart Options payload to configure settings for restarting computers.
For more information, see Restart Options Payload.
9. Click the Scope tab and configure the scope of the policy.
For more information, see Scope.
10. (Optional) Click the Self Service tab and make the policy available in Self Service.
For more information, see Self Service Policies.
11. (Optional) Click the User Interaction tab and configure messaging and deferral options.
For more information, see User Interaction.
12. Click Save. The policy runs on computers in the scope the next time they check in with the JSS and meet the criteria in the General payload.
303

Binding to a Directory Service Using Casper Remote
1. Open Casper Remote and authenticate to the JSS.
2. Click Site and choose a site.
This determines which items are available in Casper Remote.
Note: This button is only displayed if you have a site configured in the JSS and are logged in with a JSS user account that has full access or access to multiple sites.
3. In the list of computers, select the checkbox for each computer you want to bind to the directory service.
4. Click the Accounts tab.
5. In the list of directory bindings, select the checkbox for the directory service that you want to bind to.
304

6. Click the Restart tab and configure settings for restarting computers.
7. Do one of the following:
�� To immediately perform the tasks on the specified computers, click Go.
�� To schedule the tasks to take place at a specific day and time, click Schedule and choose a day and time. Then click Schedule again.
Related InformationFor related information, see the following sections in this guide.
�� About Policies
Learn the basics about policies.
�� Managing Policies
Find out how to create a policy, view the plan and status of a policy, and view and flush policy logs.
305

Managing Disk Encryption Configurations
Creating a disk encryption configuration in the JAMF Software Server (JSS) is the first step to activating FileVault 2 on computers with OS X v10.8 or later.
When you create a disk encryption configuration, you specify the following information:
�� The type of recovery key to use for recovering encrypted data. There are three recovery key options you can choose from:
• Individual (also known as “Personal”)—Uses a unique alphanumeric recovery key for each computer. The individual recovery key is generated on the computer and sent back to the JSS for storage when the encryption takes place.
• Institutional—Uses a shared recovery key. This requires you to create the recovery key with Keychain Access and upload it to the JSS for storage.
• Individual and Institutional—Uses both types of recovery keys.
�� The user for which to enable FileVault 2
• Management Account—Makes the management account on the computer the enabled FileVault 2 user.
• Current or Next User—Makes the user that is logged in to the computer when the encryption takes place the enabled FileVault 2 user. If no user is logged in, the next user to log in becomes the enabled FileVault 2 user.
Note: If you make the management account the enabled FileVault 2 user on computers with OS X v10.9 or later, you will be able to issue a new recovery key to those computers later if necessary. (For more information, see Issuing a New FileVault 2 Recovery Key.)
RequirementsTo use either the “Institutional” recovery key or the “Individual and Institutional” recovery key options in the disk encryption configuration, you must first create and export a recovery key using Keychain Access. (For more information, see the Creating and Exporting an Institutional Recovery Key Knowledge Base article.)
Creating a Disk Encryption Configuration
1. Log in to the JSS with a web browser.
2. In the top-right corner of the page, click Settings .
3. Click Computer Management.
On a smartphone or iPod touch, this option is in the pop-up menu.
4. In the “Computer Management” section, click Disk Encryption Configurations .
306

5. Click New .
6. Configure the disk encryption configuration using the fields and options on the pane.
7. Click Save.
Cloning, Editing, or Deleting a Disk Encryption Configuration
1. Log in to the JSS with a web browser.
2. In the top-right corner of the page, click Settings .
3. Click Computer Management.
On a smartphone or iPod touch, this option is in the pop-up menu.
4. In the “Computer Management” section, click Disk Encryption Configurations .
5. Click the disk encryption configuration you want to clone, edit, or delete.
6. Do one of the following:
�� To clone the configuration, click Clone and make changes as needed. Then click Save.
�� To edit the configuration, click Edit and make changes as needed. Then click Save.
�� To delete the configuration, click Delete, and then click Delete again to confirm.
Related InformationFor related information, see the following sections in this guide:
Deploying Disk Encryption ConfigurationsFind out how to activate FileVault 2 by deploying a disk encryption configuration using a policy or Casper Remote.
307

Deploying Disk Encryption Configurations
Deploying disk encryption configurations allows you to activate FileVault 2 on computers with OS X v10.8 or later. There are two ways to deploy a disk encryption configuration: using a policy or using Casper Remote. The event that activates FileVault 2 depends on the enabled FileVault 2 user specified in the disk encryption configuration. If the enabled user is “Management Account,” FileVault 2 is activated on a computer the next time the computer restarts. If the enabled user is “Current or Next User”, FileVault 2 is activated on a computer the next time the current user logs out or the computer restarts.
Requirements
To activate FileVault 2 on a computer, the computer must be running OS X v10.8 or later and have a “Recovery HD” partition.
Deploying a Disk Encryption Configuration Using a Policy
1. Log in to the JSS with a web browser.
2. Click Computers at the top of the page.
3. Click Policies.
On a smartphone or iPod touch, this option is in the pop-up menu.
4. Click New .
5. Use the General payload to configure basic settings for the policy, including the trigger and execution frequency.
For an overview of the settings in the General payload, see General Payload.
6. Select the Disk Encryption payload and click Configure.
7. Choose the disk encryption configuration you want to deploy from the Disk Encryption Configuration pop-up menu.
Note: Options are only displayed in the Disk Encryption Configuration pop-up menu if one or more configurations are configured in the JSS. For more information, see Managing Disk Encryption Configurations.
8. Use the Restart Options payload to configure settings for restarting computers.
For more information, see Restart Options Payload.
9. Click the Scope tab and configure the scope of the policy.
For more information, see Scope.
10. (Optional) Click the Self Service tab and make the policy available in Self Service.
For more information, see Self Service Policies.
308

11. (Optional) Click the User Interaction tab and configure messaging and deferral options.
For more information, see User Interaction.
12. Click Save.
Deploying a Disk Encryption Configuration Using Casper Remote
1. Open Casper Remote and authenticate to the JSS.
2. Click Site and choose a site.
This determines which items are available in Casper Remote.
Note: This button is only displayed if you have a site configured in the JSS and are logged in with a JSS user account that has full access or access to multiple sites.
3. In the list of computers, select the checkbox for each computer to which you want to deploy the disk encryption configuration.
4. Click the Restart tab and configure settings for restarting computers.
309

5. Click the Advanced tab.
6. In the list of disk encryption configurations, select the checkbox next to the configuration you want to deploy.
Note: Disk encryption configurations are only displayed in the list if one or more disk encryption configurations are configured in the JSS. For more information, see Managing Disk Encryption Configurations.
7. Do one of the following:
�� To immediately perform the tasks on the specified computers, click Go.
�� To schedule the tasks to take place at a specific day and time, click Schedule and choose a day and time. Then click Schedule again.
Related InformationFor related information, see the following sections in this guide:
�� Viewing the FileVault 2 Recovery Key for a Computer
Find out how to view the FileVault 2 recovery key(s) for a computer.
�� Smart Computer Groups
You can create smart computer groups based on criteria for FileVault 2.
�� About Policies
Learn the basics about policies.
�� Managing Policies
Find out how to create a policy, view the plan and status of a policy, and view and flush policy logs. For related information, see the following Knowledge Base article:
Smart Group and Advanced Search Criteria for FileVault 2 and Legacy FileVaultLearn about the smart computer group and advanced computer search criteria available for FileVault 2.
310

Issuing a New FileVault 2 Recovery Key
You can issue a new FileVault 2 recovery key to computers with OS X v10.9 or later that have FileVault 2 activated. This allows you to do the following:
�� Update the recovery key on computers on a regular schedule, without needing to decrypt and then re-encrypt the computers.
�� Replace an individual recovery key that has been reported as invalid and does not match the recovery key stored in the JAMF Software Server (JSS).
Note: You can create a smart group to verify the recovery key on computers on a regular basis. For information on FileVault 2 smart group criteria, see the following Knowledge Base article:
Smart Group and Advanced Search Criteria for FileVault 2 and Legacy FileVault You can issue a new FileVault 2 recovery key to computers using a policy.
Requirements
To issue a new individual recovery key to a computer, the computer must have:
�� OS X v10.9 or later
�� A “Recovery HD” partition
�� FileVault 2 activated
�� One of the following two conditions met:
• The management account configured as the enabled FileVault 2 user
• An existing, valid individual recovery key that matches the key stored in the JSS To issue a new institutional recovery key to a computer, the computer must have:
�� OS X v10.9 or later
�� A “Recovery HD” partition
�� FileVault 2 activated
�� The management account configured as the enabled FileVault 2 user
Issuing a New FileVault 2 Recovery Key
1. Log in to the JSS with a web browser.
2. Click Computers at the top of the page.
3. Click Policies.
On a smartphone or iPod touch, this option is in the pop-up menu.
4. Click New .
311

5. Use the General payload to configure basic settings for the policy, including the trigger and execution frequency.
For an overview of the settings in the General payload, see General Payload.
6. Select the Disk Encryption payload and click Configure.
7. Choose "Issue New Recovery Key" from the Action pop-up menu.
8. Select the type of recovery key you want to issue:
�� Individual—A new individual recovery key is generated on each computer and then submitted to the JSS for storage.
�� Institutional—A new institutional recovery key is deployed to computers and stored in the JSS.
To issue a new institutional recovery key, you must choose the disk encryption configuration that contains the institutional recovery key you want to use.
�� Individual and Institutional—Issues both types of recovery keys to computers.
9. Use the Restart Options payload to configure settings for restarting computers.
For more information, see Restart Options Payload.
10. Click the Scope tab and configure the scope of the policy.
For more information, see Scope.
11. (Optional) Click the Self Service tab and make the policy available in Self Service.
For more information, see Self Service Policies.
12. (Optional) Click the User Interaction tab and configure messaging and deferral options.
For more information, see User Interaction.
13. Click Save.
Related InformationFor related information, see the following sections in this guide:
�� Viewing the FileVault 2 Recovery Key for a Computer
Find out how to view the FileVault 2 recovery key(s) for a computer.
�� Smart Computer Groups
You can create smart computer groups based on criteria for FileVault 2.
�� About Policies
Learn the basics about policies.
�� Managing Policies
Find out how to create a policy, view the plan and status of a policy, and view and flush policy logs. For related information, see the following Knowledge Base article:
Smart Group and Advanced Search Criteria for FileVault 2 and Legacy FileVaultLearn about the smart computer group and advanced computer search criteria available for FileVault 2.
312

Administering Open Firmware/EFI Passwords
You can administer Open Firmware or EFI passwords to ensure the security of managed computers. There are two ways to set and remove an Open Firmware/EFI password: using a policy or using Casper Remote.
RequirementsIf you are setting or removing an Open Firmware/EFI password on models "Late 2010" or later, the "setregproptool" must be present on the volume(s) used to set firmware. (For more information, see the Setting EFI Passwords on Mac Computers (Models Late 2010 or Later Knowledge Base article.)
Setting or Removing an Open Firmware/EFI Password Using a Policy
1. Log in to the JSS with a web browser.
2. Click Computers at the top of the page.
3. Click Policies.
On a smartphone or iPod touch, this option is in the pop-up menu.
4. Click New .
5. Use the General payload to configure basic settings for the policy, including the trigger and execution frequency.
For an overview of the settings in the General payload, see General Payload.
6. Select the EFI Password payload and click Configure.
7. Do one of the following:
�� To set an Open Firmware/EFI password, choose "Command" from the pop-up menu and enter and verify the password.
�� To remove an Open Firmware/EFI password, choose "None" from the pop-up menu.
8. Use the Restart Options payload to configure settings for restarting computers.
For more information, see Restart Options Payload.
9. Click the Scope tab and configure the scope of the policy.
For more information, see Scope.
313

10. (Optional) Click the Self Service tab and make the policy available in Self Service.
For more information, see Self Service Policies.
11. (Optional) Click the User Interaction tab and configure messaging and deferral options.
For more information, see User Interaction.
12. Click Save. The policy runs on computers in the scope the next time they check in with the JSS and meet the criteria in the General payload.
Setting or Removing an Open Firmware/EFI Password Using Casper Remote
1. Open Casper Remote and authenticate to the JSS.
2. Click Site and choose a site.
This determines which items are available in Casper Remote.
Note: This button is only displayed if you have a site configured in the JSS and are logged in with a JSS user account that has full access or access to multiple sites.
3. In the list of computers, select the checkbox for each computer on which you want to set or remove an Open Firmware/EFI password.
4. Click the Accounts tab.
314

5. Select the Set Open Firmware/EFI Password checkbox.
6. Do one of the following:
�� To set the password, choose "command" from the Security Level pop-up menu and enter and verify the password.
�� To remove the password, choose "none" from the Security Level pop-up menu.
315

7. Click the Restart tab and configure settings for restarting computers.
8. Do one of the following:
�� To immediately perform the tasks on the specified computers, click Go.
�� To schedule the tasks to take place at a specific day and time, click Schedule and choose a day and time. Then click Schedule again.
Related InformationFor related information, see the following sections in this guide:
�� About Policies
Learn the basics about policies.
�� Managing Policies
Find out how to create a policy, view the plan and status of a policy, and view and flush policy logs.
316

Imaging
About Imaging
Imaging computers with the Casper Suite involves booting computers to a startup disk other than the target drive and then using the Casper Imaging application to deploy a configuration.
Some common startup disks used for imaging are USB or FireWire drives, Restore partitions, and NetBoot images.
There are four imaging methods:
�� Standard imaging—Standard imaging allows you to configure the imaging settings for a computer at imaging time.
�� Autorun imaging—Autorun imaging allows you to store imaging settings in the JAMF Software Server (JSS), so they don’t have to be configured at imaging time. In addition, Autorun imaging can be completely automated to run on a schedule.
�� PreStage imaging—PreStage imaging allows you to store imaging settings in the JSS and use them to image new computers as you add them to the network. This reduces the amount of time and interaction it takes to prepare new computers for use.
�� Target Mode Imaging (TMI)—TMI allows you to image multiple computers subsequently by connecting them to a host computer using a Firewire or Thunderbolt cable. This can be ideal when using a network connection is not optimal, such as when imaging MacBook Airs that do not have built-in ethernet.
Related InformationFor more information, see the following sections in this guide:
�� Configurations
Learn about configurations and find out how to create them.
�� Standard Imaging
Find out how to image computers using standard imaging.
�� Autorun Imaging
Find out how to image computers using Autorun imaging.
317

�� PreStage Imaging
Find out how to image computers using PreStage imaging.
�� Target Mode Imaging
Find out how to image computers using TMI. For related information, see the following Knowledge Base article:
Creating a NetBoot Image and Setting Up a NetBoot Server
318

Configurations
Configurations are modular images that allow you to quickly specify what needs to be installed and configured on computers during imaging. Unlike standard images, you can easily make changes to configurations without rebuilding them.
You can include the following items in a configuration:
�� Packages
�� Scripts
�� Printers
�� Directory bindings
�� Management account settings
�� A homepage
�� Partitions You can manage configurations using Casper Admin or the JSS. When you create, edit, or delete a configuration in Casper Admin, the changes are reflected in the JSS, and vice versa.
Standard and Smart ConfigurationsThere are two types of configurations: standard configurations and smart configurations.
Smart configurations inherit settings from another configuration (called a “parent configuration”). Making changes to the parent configuration automatically updates the smart configuration to reflect the changes. If there are settings in the parent configuration that you want to override, you can customize the packages, scripts, printers, or directory bindings in the smart configuration as needed.
Compiled ConfigurationsYou can compile both standard and smart configurations. Compiling a configuration builds a single DMG, allowing you to block-copy the entire configuration during imaging and speed up the process. You can choose to make the DMG a compressed or uncompressed file.
Configurations can only be compiled using Casper Admin. You can only compile configurations if your master distribution point is a file share distribution point.
Configurations with PartitionsThere are three ways to configure a partition in a configuration:
�� Image the partition using another configuration
�� Install a Winclone image on the partition
�� Make the partition a Restore partition
319

Restore partitions are hidden partitions that have only an OS package and Casper Imaging installed. They allow you to re-image computers without using NetBoot or an external drive.
Note: As a safety mechanism, drives that already have visible partitions cannot be re-partitioned using the Casper Suite.
Creating a Configuration Using Casper AdminSeveral settings in Casper Admin have tool tips. To read more about a specific setting, hover your mouse over it until a tool tip is displayed.
1. Open Casper Admin and authenticate to the JSS.
2. Click New Config .
3. Use the General pane to configure basic settings for the configuration.
To create a smart configuration, select the Smart Configuration option and choose a parent configuration.
4. (Optional) Click the Management tab and set or create a management account.
This ensures that computers imaged with the configuration are managed.
320

5. (Optional) Click the Homepage tab and enter a homepage URL.
6. (Optional) Click the Partitions tab and click Add (+) to set up a partition.
7. Click OK.
The configuration is added to the list of configurations in the sidebar.
8. Add packages, scripts, printers, and directory bindings by dragging them from the main repository to the configuration in the sidebar.
Creating a Configuration Using the JSS
1. Log in to the JSS with a web browser.
2. In the top-right corner of the page, click Settings .
3. Click Computer Management.
On a smartphone or iPod touch, this option is in the pop-up menu.
4. In the “Computer Management” section, click Configurations .
5. Click New .
6. Use the General payload to configure basic settings for the configuration.
To create a smart configuration, choose "Smart" from the Type pop-up menu and choose a parent configuration.
7. Use the Packages, Scripts, Printers, and Directory Bindings payloads to add items to the configuration.
321

8. (Optional) Use the Management payload to set or create a management account.
This ensures that computers imaged with the configuration are managed.
9. (Optional) Use the Homepage payload to set the homepage.
10. (Optional) Use the Partitions payload to set up partitions.
11. Click Save.
Compiling a ConfigurationThe time it takes to compile a configuration depends on the amount of data in the configuration. For fastest results, use a wired connection.
You may be prompted to authenticate several times during the compilation process.
Note: If you compile a configuration that includes a package with an architecture type requirement and a substitute package, the package substitution will not work.
1. Open Casper Admin and authenticate to the JSS.
2. In the sidebar, select the configuration and click Compile.
3. Choose to create a compressed or an uncompressed DMG.
4. Enter credentials for a local administrator account.
5. Click OK.
Editing or Deleting a Configuration Using Casper AdminSeveral settings in Casper Admin have tool tips. To read more about a specific setting, hover your mouse over it until a tool tip is displayed.
1. Open Casper Admin and authenticate to the JSS.
2. In the sidebar, select the configuration you want to edit or delete.
3. Do one of the following:
�� To edit the configuration, double-click it and make changes as needed. Then click OK.
�� To delete the configuration, click Delete and then click Delete again to confirm.
322

Cloning, Editing, or Deleting a Configuration Using the JSS
1. Log in to the JSS with a web browser.
2. In the top-right corner of the page, click Settings .
3. Click Computer Management.
On a smartphone or iPod touch, this option is in the pop-up menu.
4. In the “Computer Management” section, click Configurations .
5. Click the configuration you want to clone, edit, or delete.
6. Do one of the following:
�� To clone the configuration, click Clone and make changes as needed. Then click Save.
�� To edit the configuration, click Edit and make changes as needed. Then click Save.
�� To delete the configuration, click Delete and then click Delete again to confirm.
Related Information
For related information, see the following sections in this guide:
�� Standard Imaging
Find out how to image computers using a configuration and standard imaging.
�� Autorun Imaging
Find out how to image computers using a configuration and Autorun imaging.
�� PreStage Imaging
Find out how to image computers using a configuration an Imaging PreStage.
�� Target Mode Imaging
Find out how to image computers using a configuration and Target Mode Imaging.
For related information, see the following Knowledge Base article:
Creating Images with Winclone for Deployment with Casper ImagingFind out how to create a Winclone image that you can install on a partition during imaging.
323

Booting Computers to NetBoot Images
When you boot computers to a NetBoot image, you can choose which NetBoot server computers should use.
There are two ways to boot computers to a NetBoot image: using a policy or using Casper Remote.
RequirementsTo boot computers to a NetBoot image, you need a NetBoot server in the JSS. (For more information, see NetBoot Servers.)
Booting Computers to a NetBoot Image Using a Policy
1. Log in to the JSS with a web browser.
2. Click Computers at the top of the page.
3. Click Policies.
On a smartphone or iPod touch, this option is in the pop-up menu.
4. Click New .
5. Use the General payload to configure basic settings for the policy, including the trigger and execution frequency.
For an overview of the settings in the General payload, see General Payload.
6. Select the Restart Options payload.
7. Choose "NetBoot" from the Startup Disk pop-up menu.
8. Choose the server that hosts the NetBoot image you want to boot computers to.
9. Configure the rest of the settings for restarting computers.
10. Click the Scope tab and configure the scope of the policy.
For more information, see Scope.
11. (Optional) Click the Self Service tab and make the policy available in Self Service.
For more information, see Self Service Policies.
12. (Optional) Click the User Interaction tab and configure messaging and deferral options.
For more information, see User Interaction.
13. Click Save. The policy runs on computers in the scope the next time they check in with the JSS and meet the criteria in the General payload.
324

Boot Computers to a NetBoot Image Using Casper Remote
1. Open Casper Remote and authenticate to the JSS.
2. Click Site and choose a site.
This determines which items are available in Casper Remote.
Note: This button is only displayed if you have a site configured in the JSS and are logged in with a JSS user account that has full access or access to multiple sites.
3. In the list of computers, select the checkbox for each computer that you want to boot to the NetBoot image.
4. Click the Restart tab.
5. Choose "NetBoot" from the Startup Disk pop-up menu.
325

6. If you want to change the NetBoot server that computers use, click Override Defaults and choose a NetBoot server.
7. Configure the rest of the settings for restarting computers.
8. Do one of the following:
�� To immediately perform the tasks on the specified computers, click Go.
�� To schedule the tasks to take place at a specific day and time, click Schedule and choose a day and time. Then click Schedule again.
Related InformationFor related information, see the following sections in this guide:
�� About Policies
Learn the basics about policies.
�� Managing Policies
Find out how to create a policy, view the plan and status of a policy, and view and flush policy logs.
326

Standard Imaging
Standard imaging allows you to configure the imaging settings for a computer at imaging time. These settings include:
�� The target drive
�� The configuration to image with
�� The distribution point to download files from
RequirementsTo use standard imaging, you need:
�� A configuration (For more information, see Configurations.)
�� A distribution point (For more information, see About Distribution Points.)
Alternatively, you can use an external drive that is prepared for offline imaging. For more information, see the Offline Imaging Knowledge Base article.
�� A startup disk other than the target drive that has Casper Imaging installed (For more information, see About Imaging.)
Using Standard Imaging
1. On the target computer, boot to a startup disk other than the target drive.
2. Open Casper Imaging and authenticate locally.
3. Authenticate to the JSS when prompted.
4. To add the computer to a site, click Site and choose a site.
Note: This button is only displayed if you have a site configured in the JSS and are logged in with a JSS user account that has full access or access to multiple sites.
5. Choose a drive to image from the Target Drive pop-up menu.
327

6. To erase the target drive when the imaging process begins, select the Erase target drive checkbox.
7. Assign a name to the computer by entering a name in the Computer Name field.
Alternatively, use the arrows to choose "Computer Name," MAC Address," or "Serial Number". The value for the option you choose populates in the field.
8. Choose a configuration from the Configuration pop-up menu.
9. To boot the computer to the target drive after imaging, select the Boot to target drive after imaging checkbox.
10. Choose a distribution point from the Distribution Point pop-up menu.
11. (Optional) Use the options in the Autorun Imaging Options group box to configure Autorun imaging options for the computer.
For more information on Autorun imaging, see Autorun Imaging.
12. (Optional) Click Show Custom and use the tabs and options to customize the imaging process.
For an overview of each pane, see Customizing the Imaging Process.
13. Click Image.
Related InformationFor related information, see the following section in this guide:
Viewing Casper Imaging Logs for a ComputerFind out how to view Casper Imaging logs for a computer.
328

PreStage Imaging
PreStage imaging allows you to store imaging settings in the JAMF Software Server (JSS) and use them to image new computers as you add them to the network. This reduces the amount of time and interaction it takes to prepare new computers for use. PreStage imaging also enrolls computers with the JSS.
To use PreStage imaging, you need to create an Imaging PreStage in the JSS and then run Casper Imaging on target computers to image them. Creating an Imaging PreStage allows you to configure the imaging settings and specify the computers that should be imaged with the Imaging PreStage (called “scope”). When you open Casper Imaging on a computer in the scope, Casper Imaging is populated with the settings in the Imaging PreStage.
You can configure an Imaging PreStage to start the imaging process automatically the first time Casper Imaging is opened on a computer. Otherwise, you need to start the imaging process manually by clicking the Image button in Casper Imaging.
You can also bypass PreStage imaging to prevent Casper Imaging from being populated with the settings in the Imaging PreStage.
RequirementsTo create an Imaging PreStage, you need:
�� A configuration (For more information, see Configurations.)
�� A distribution point (For more information, see About Distribution Points.)
To image a computer using an Imaging PreStage, you need a startup disk other than the target drive that has Casper Imaging installed. (For more information, see About Imaging.)
Creating an Imaging PreStage
1. Log in to the JSS with a web browser.
2. Click Computers at the top of the page.
3. Click PreStage Imaging.
On a smartphone or iPod touch, this option is in the pop-up menu.
4. Click New .
5. Use the General payload to configure basic settings for the Imaging PreStage, including the activation and expiration date/time.
To start the imaging process automatically when Casper Imaging is opened on a computer in the scope, select the Image Automatically checkbox.
329

6. Select the Computer Names payload and choose a method for assigning names to computers.
Computer names are assigned as computers in the scope are imaged.
7. (Optional) Use the Purchasing Information payload to specify purchasing information for computers.
This information is stored in the JSS for each computer imaged using the Imaging PreStage.
8. (Optional) Use the Attachments payload to upload attachments to store for computers.
Attachments are stored in the JSS for each computer imaged using the Imaging PreStage.
9. Select the Install payload and configure the basic imaging settings, including the target drive, the configuration to image with, and the distribution point to download files from.
10. Enter credentials for a local account to bypass the prompt when Casper Imaging is opened on the computer.
11. To store the imaging settings as Autorun data for each computer, select the Store PreStage settings as Autorun data checkbox. Then configure additional options for Autorun imaging as needed.
For more information on Autorun imaging, see Autorun Imaging.
12. (Optional) Use the rest of the payloads to customize the imaging process.
For an overview of each payload, see Customizing the Imaging Process.
13. Click the Scope tab and configure the scope of the Imaging PreStage.
14. Click Save.
Cloning, Editing, or Deleting an Imaging PreStage
1. Log in to the JSS with a web browser.
2. Click Computers at the top of the page.
3. Click PreStage Imaging.
On a smartphone or iPod touch, this option is in the pop-up menu.
4. Click the Imaging PreStage you want to clone, edit, or delete.
5. Do one of the following:
�� To clone the Imaging PreStage, click Clone and make changes as needed. Then click Save.
�� To edit the Imaging PreStage, click Edit and make changes as needed. Then click Save.
�� To delete the Imaging PreStage, click Delete and then click Delete again to confirm.
330

Imaging a Computer Using an Imaging PreStage
If you configured the Imaging PreStage to start the imaging process automatically, simply boot the target computer to a startup disk other than the target drive and open Casper Imaging. If you did not configure the Imaging PreStage to start the imaging process automatically, complete the following instructions:
1. On a computer that is in the scope of the Imaging PreStage, boot to a startup disk other than the target drive and open Casper Imaging.
2. If prompted, authenticate locally.
3. (Optional) Make changes to the basic imaging settings as needed, including the target drive, the configuration to image with, and the distribution point to download files from.
4. (Optional) Use the options in the Autorun Imaging Options group box to configure Autorun imaging options for the computer.
For more information on Autorun imaging, see Autorun Imaging.
331

5. (Optional) Click Show Custom and use the tabs and options to customize the imaging process.
For an overview of each pane, see Customizing the Imaging Process.
6. Click Image.
Bypassing PreStage ImagingTo bypass PreStage imaging, hold down the Shift key when opening Casper Imaging.
Viewing Imaging PreStage LogsEach Imaging PreStage log includes a list of computers that were imaged using the Imaging PreStage and a list of the following information for each computer:
�� The date/time that the computer was imaged
�� The status of the imaging event
�� The actions that took place during the imaging event
1. Log in to the JSS with a web browser.
2. Click Computers at the top of the page.
3. Click PreStage Imaging.
On a smartphone or iPod touch, this option is in the pop-up menu.
4. Click the Imaging PreStage you want to view logs for.
5. Click Logs.
A list of computers imaged using the Imaging PreStage is displayed.
6. To view the list of actions that were performed when a computer was imaged, click Show for the computer.
332

Autorun Imaging Settings
The Autorun imaging settings in the JAMF Software Server (JSS) allow you to configure the following settings for Autorun imaging:
�� The delay before the imaging process starts automatically
This only applies if a computer’s Autorun data is configured to start the imaging process automatically. During the delay, a pane is displayed that allows you to cancel the imaging process.
�� The amount of space to leave available when caching files
�� The attribute to use for comparing cached files to files on a distribution point
This ensures that the most up-to-date files are cached on the computer.
Configuring the Autorun Imaging Settings
1. Log in to the JSS with a web browser.
2. In the top-right corner of the page, click Settings .
3. Click Computer Management.
On a smartphone or iPod touch, this option is in the pop-up menu.
4. In the ”Computer Management–Management Framework” section, click Autorun Imaging .
5. Click Edit.
6. Configure the settings on the pane.
7. Click Save.
Related InformationFor related information, see the following section in this guide:
Autorun ImagingFind out how to image computers using Autorun imaging.
333

Autorun Imaging
Autorun imaging allows you to store imaging settings in the JAMF Software Server (JSS) so you don’t have to configure them at imaging time. It also allows you to fully automate the imaging process. (For more information, see the Automating the Imaging Process Knowledge Base article.)
To use Autorun imaging, you need to create Autorun data for each target computer and then run Casper Imaging on the computers to image them. Creating Autorun data allows you to configure and store the imaging settings you want to use to image each computer. When you open Casper Imaging on a target computer, Casper Imaging is populated with the Autorun data.
You can configure Autorun data to start the imaging process automatically each time Casper Imaging is opened on a computer. Otherwise, you need to start the imaging process manually by clicking the Image button in Casper Imaging.
You can also bypass Autorun imaging to prevent Casper Imaging from being populated with the Autorun data.
There are three ways to create Autorun data for a computer:
�� Create the Autorun data using the JSS
�� Store Autorun data using Casper Imaging
�� Store Autorun data using an Imaging PreStage (For more information, see PreStage Imaging.)
RequirementsTo create and manage Autorun data using the JSS, you need:
�� A configuration (For more information, see Configurations.)
�� A distribution point (For more information, see About Distribution Points.)
To store Autorun data using Casper Imaging, you need:
�� A configuration (For more information, see Configurations.)
�� A distribution point (For more information, see About Distribution Points.)
Alternatively, you can use an external drive that is configured for offline imaging. (For more information, see the Offline Imaging Knowledge Base article.)
�� A startup disk other than the target drive that has Casper Imaging installed (For more information, see About Imaging.)
To image a computer using Autorun data, you need a startup disk other than the target drive that has Casper Imaging installed. (For more information, see About Imaging.)
334

Creating Autorun Data Using the JSS
1. Log in to the JSS with a web browser.
2. Click Computers at the top of the page.
3. Click Search Inventory.
On a smartphone or iPod touch, this option is in the pop-up menu.
4. Perform a simple or advanced computer search.
For instructions, see Simple Computer Searches or Advanced Computer Searches.
5. Click the computer you want to create Autorun data for.
If you performed a simple search for an item other than computers, you must click Expand next to an item name to view the computers related to that item.
6. Click Autorun Data.
7. Use the Install payload to configure basic imaging settings for the computer, including the target drive, the configuration to image with, and the distribution point to download files from.
8. Enter credentials for a local account to bypass the prompt when Casper Imaging is opened on the computer.
This is required if you plan to fully automate the imaging process.
9. To cache a copy of each file used for imaging, select the Cache Files checkbox.
10. To skip the delay that occurs before the imaging process starts automatically, select the Skip the delay that occurs before imaging automatically checkbox.
You can change this delay by using the Autorun Imaging settings. For more information, see Autorun Imaging Settings.
11. (Optional) Use the rest of the payloads to customize the imaging process.
For an overview of each payload, see Customizing the Imaging Process.
12. Click Save.
Storing or Editing Autorun Data Using Casper Imaging
1. On the target computer, boot to a startup disk other than the target drive and open Casper Imaging.
2. If prompted, authenticate locally.
335

3. (Optional) Configure or make changes to the basic imaging settings as needed, including the target drive, the configuration to image with, and the distribution point to download files from.
4. In the Autorun Imaging Options group box, select the Store imaging settings as Autorun data checkbox.
5. To start the imaging process automatically each time Casper Imaging is opened on the computer, select the Image Automatically checkbox.
6. To cache a copy of each file used for imaging, select the Cache Files checkbox.
7. To skip the delay that occurs before the imaging process starts automatically, select the Skip the delay that occurs before imaging automatically checkbox.
You can change this delay by using the Autorun Imaging settings in the JSS. For more information, see Autorun Imaging Settings.
8. (Optional) Click Show Custom and use the tabs and options to customize the imaging process.
For an overview of each pane, see Customizing the Imaging Process.
9. Click Image. The Autorun data is stored in the JSS when the imaging process is complete.
Editing or Deleting Autorun Data Using the JSS
1. Log in to the JSS with a web browser.
2. Click Computers at the top of the page.
3. Click Search Inventory.
On a smartphone or iPod touch, this option is in the pop-up menu.
4. Perform a simple or advanced computer search.
For instructions, see Simple Computer Searches or Advanced Computer Searches.
336

5. Click the computer you want to edit or delete Autorun data for.
If you performed a simple search for an item other than computers, you must click Expand next to an item name to view the computers related to that item.
6. Click Autorun Data.
7. Do one of the following:
�� To edit the Autorun data, make changes as needed. Then click Save.
�� To delete the Autorun data, click Delete and then click Delete again to confirm.
Imaging a Computer Using Autorun Imaging
If you configured the Autorun data to start the imaging process automatically, simply boot the target computer to a startup disk other than the target drive and open Casper Imaging. The imaging process begins after the specified delay. If you did not configure the Autorun data to start the imaging process automatically, complete the following instructions:
1. On the target computer, boot to a startup disk other than the target drive and open Casper Imaging.
2. If prompted, authenticate locally.
3. (Optional) Make changes to the basic imaging settings as needed, including the target drive, the configuration to image with, and the distribution point to download files from.
337

4. (Optional) Use the options in the Autorun Imaging Options group box to change Autorun imaging options for the computer.
5. (Optional) Click Show Custom and use the tabs and options to customize the imaging process.
For an overview of each pane, see Customizing the Imaging Process.
6. Click Image.
Bypassing Autorun ImagingTo bypass Autorun imaging when imaging a computer, hold down the Shift key when you open Casper Imaging.
Viewing Autorun LogsThe Autorun logs for each computer allow you to view the following information for each imaging event:
�� The date/time that the computer was imaged
�� The status of the imaging event
�� The actions that took place during the imaging event
1. Log in to the JSS with a web browser.
2. Click Computers at the top of the page.
3. Click Search Inventory.
On a smartphone or iPod touch, this option is in the pop-up menu.
4. Perform a simple or advanced computer search.
For instructions, see Simple Computer Searches or Advanced Computer Searches.
5. Click the computer you want to view Autorun logs for.
338

If you performed a simple search for an item other than computers, you must click Expand next to an item name to view the computers related to that item.
6. Click Autorun Data.
7. Click Logs.
A list of imaging events is displayed.
8. To view the actions that took place during an imaging event, click Show for the event.
Related InformationFor related information, see the following sections in this guide:
�� Autorun Imaging Settings
Find out to configure the settings for Autorun imaging.
�� Installing Packages
Find out how to add packages to a computer’s Autorun data when installing packages.
�� Caching Packages
Find out how to add packages to a computer’s Autorun data when caching packages.
�� Installing Cached Packages
Find out how to add packages to a computer’s Autorun data when installing a cached package.
�� Performing Mass Actions for Computers
Find out how to mass edit or delete Autorun data for computers.
339

Target Mode Imaging
Target Mode Imaging (TMI) allows you to image multiple computers subsequently by connecting them to a host computer using a Firewire or Thunderbolt cable. This can be ideal when using a network connection is not optimal, such as when imaging MacBook Airs that do not have built-in ethernet.
To use TMI, you run Casper Imaging on a host computer instead of a NetBoot image or an external drive. Then you boot target computers to target disk mode and connect them to the host computer.
RequirementsTo use TMI, you need:
�� Target computers that support target disk mode
�� A host computer with Casper Imaging installed and a FireWire or Thunderbolt port
�� A configuration (For more information, see Configurations.)
�� A distribution point (For more information, see About Distribution Points.)
Alternatively, you can use an external drive that is prepared for offline imaging. For more information, see the Offline Imaging Knowledge Base article.
Using TMI
1. On the host computer, open Casper Imaging and authenticate locally.
2. Authenticate to the JSS when prompted.
3. To add the computer to a site, click Site and choose a site.
Note: This button is only displayed if you have a site configured in the JSS and are logged in with a JSS user account that has full access or access to multiple sites.
4. Choose "Target Mode Imaging" from the Target Drive pop-up menu.
340

5. To erase each target drive before it is imaged, select the Erase drives connected to this computer checkbox.
6. From the Computer Names pop-up menu, choose how to assign names to target computers:
�� To be prompted to manually enter a name for each computer, choose "Prompt for Each Computer".
�� To automatically generate names in numerical order, choose "Use Numerical Order". Then enter a starting number, and a prefix and suffix as needed, and click OK.
�� To use each computer's MAC Address as the name, choose "Use MAC Address". Then enter a prefix and suffix for the MAC Address as needed and click OK.
�� To use each computer's serial number as the name, choose "Use Serial Number". Then enter a prefix and suffix for the serial number as needed and click OK.
�� To assign names based on the contents of a CSV file, choose "Upload CSV File" and upload the file.
For more information on using a CSV file to assign computer names, see the Creating a CSV File to Assign Computer Names During Target Mode Imaging Knowledge Base article.
7. Choose a configuration from the Configuration pop-up menu.
8. Choose a distribution point from the Distribution Point pop-up menu.
9. From Computers Will Check In with JSS pop-up menu, choose the approximate amount of time until computers will check in with the JSS.
Important: Computers that do not check in within the specified amount of time will not be enrolled with the JSS.
10. To bypass the prompt displayed before imaging each computer, deselect the Prompt before imaging each drive checkbox.
341

11. (Optional) Click Show Custom and use the tabs and options to customize the imaging process.
For an overview of each pane, see Customizing the Imaging Process.
12. Click Start.
13. Boot a target computer to target disk mode.
To do this, turn on the computer and immediately press and hold down the T key.
14. Use a FireWire or Thunderbolt cable to connect the target computer to the host computer, and then click OK if prompted.
The imaging process starts immediately.
15. When the imaging process is complete, disconnect the target computer.
16. Repeat steps 13–15 for each target computer.
Related InformationFor related information, see the following section in this guide:
Viewing Casper Imaging Logs for a ComputerFind out how to view Casper Imaging logs for a computer.
342

Customizing the Imaging Process
Although configurations let you specify most of the items you want to install and configure during imaging, you can further customize the imaging process by using Casper Imaging or using the JSS to configure an Imaging PreStage or Autorun data.
The items that you can add when customizing the imaging process are:
�� Packages
�� Scripts
�� Printers
�� Local accounts
�� Directory bindings
�� Open Firmware/ EFI password
�� Network settings
�� Values for Apple Remote Desktop Info fields
�� Post-imaging options, such as maintenance tasks and showing the OS X Setup Assistant after restart
When using Casper Imaging to customize the imaging process, you can also remove items that are in the selected configuration or items configured with an Imaging PreStage or Autorun data for the computer.
The interface you use to customize the imaging process depends on whether you are using Casper Imaging or the JSS. This section provides an overview of each pane displayed in Casper Imaging, but the information also applies to the payload-based interface in the JSS.
PackagesThis pane allows you to specify which packages you want to install as part of the imaging process. To add or remove a package, select or deselect the checkbox for the package.
Note: In Casper Imaging, packages that do not exist on the selected distribution point are displayed in red.
ScriptsThis pane allows you to specify which scripts you want to run as part of the imaging process.
To add or remove a script from the imaging process using Casper Imaging, select or deselect the checkbox for the script. Then specify parameter values as needed and choose a priority.
To add a script to the imaging process using the JSS, click Add for the script you want to add and then choose a priority and specify parameter values as needed. To remove a script, locate the script on the pane and click Remove .
343

PrintersThis pane allows you to specify which printers you want to map as part of the imaging process. To add or remove a printer, select or deselect the checkbox for the printer.
Note: In Casper Imaging, printers that do not exist on the selected distribution point are displayed in red.
AccountsThis pane allows you to do the following as part of the imaging process:
�� Create local accounts
�� Bind computers to a directory service
�� Set the Open Firmware/EFI password
Note: In the JSS, these are displayed in three separate payloads called Local Accounts, Directory Bindings, and EFI Password.
Local Accounts
To add a local account to the imaging process using Casper Imaging, click Add (+) and specify information about the account using the tabs and options provided. Then click OK. To remove a local account, select an account and click Remove (-).
To add a local account to the imaging process using the JSS, specify information about the account using the options provided. To remove an account, locate the account on the pane and click Remove .
Directory Bindings
To add or remove a directory binding from the imaging process, select or deselect the checkbox for the directory binding.
Open Firmware/EFI Password
To add an Open Firmware/EFI password to the imaging process using Casper Imaging, select the Set Open Firmware/EFI Password checkbox and choose “Command” from the Security Level pop-up menu. Then enter a password and type the password again to verify it. To remove an Open Firmware/EFI password, choose “None” from the Security Level pop-up menu.
To add an Open Firmware/EFI password to the imaging process using the JSS, choose “Command” from the Security Level pop-up menu. Then enter a password and type the password again to verify it. To remove the password, select “None” from the Security Level pop-up menu.
Network
This pane allows you to configure network settings as part of the imaging process.
344

To configure network settings, the network configuration (IPv4 connection method) must match the one built into the OS package you’re installing or the one in System Preferences on the computer.
To add or remove network settings from the imaging process, configure the options on the pane.
If the network configuration in your OS package is different than the one you want to set on the computer, you must take two additional steps to ensure that the network configuration is set. For more information, see the following Knowledge Base article:
Computer-Specific Network Settings
AdvancedThis pane allows you to configure the following items as part of the imaging process:
�� Values for Apple Remote Desktop Info fields
�� Post-imaging tasks, including:
• Fix ByHost files
• Fix disk permissions
• Show OS X Setup Assistant after restart
Apple Remote Desktop Info Fields
To add or remove values for the Apple Remote Desktop Info fields, enter or remove values from the fields displayed.
In Casper Imaging, you can populate these fields with the values on the computer by clicking Get Existing.
Post-imaging Tasks
To add or remove a post-imaging task, select or deselect the checkbox for the task.
345

Removable MAC Addresses
Adding removable MAC addresses to the JAMF Software Server (JSS) ensures that the JSS ignores certain MAC addresses. For example, MAC addresses of USB Ethernet dongles are commonly added as removable MAC addresses to prevent the JSS from using them as identifiers for computers.
Adding a Removable MAC Address
1. Log in to the JSS with a web browser.
2. In the top-right corner of the page, click Settings .
3. Click Computer Management.
On a smartphone or iPod touch, this option is in the pop-up menu.
4. In the ”Computer Management–Management Framework” section, click Removable MAC Addresses .
5. Click New .
6. Enter the MAC address that you want the JSS to ignore.
7. Click Save.
Cloning, Editing, or Deleting a Removable MAC Address
1. Log in to the JSS with a web browser.
2. In the top-right corner of the page, click Settings .
3. Click Computer Management.
On a smartphone or iPod touch, this option is in the pop-up menu.
4. In the ”Computer Management–Management Framework” section, click Removable MAC Addresses .
5. Click the removable MAC address you want to clone, edit, or delete.
6. Do one of the following:
�� To clone the removable MAC address, click Clone and change the MAC address. Then click Save.
�� To edit the removable MAC address, click Edit and change the MAC address. Then click Save.
�� To delete the removable MAC address, click Delete and then click Delete again to confirm.
346

License Management
About Licensed Software
Licensed software allows you to store and track licenses for the software in your environment so you can easily access license and purchasing information and monitor license compliance.
For each software product that you want to track licenses for, you must create a licensed software record in the JAMF Software Server (JSS). These records allow you to store information about the licenses owned and the software titles that count toward each license (called “software definitions”). Each time a computer submits inventory to the JSS, the software on the computer is compared to the software definitions in the licensed software records. If they match, the computer counts toward the number of licenses in use. After creating licensed software records, you can use the JSS to evaluate and monitor license compliance, view and report on the licenses in use, and view Application Usage information for the software you’re tracking licenses for.
Related InformationFor related information, see the following sections in this guide:
�� Licensed Software Records
Find out how to create licensed software records to store and track license information.
�� License Compliance
Find out how to evaluate license compliance by viewing the licensed software records in the JSS.
�� Viewing License Usage
Find out how to view the computers on which licenses are in use.
�� Application Usage for Licensed Software
Find out how frequently the licensed software in your environment is being used.
347

Licensed Software Records
For each software application you want to track licenses for, you must create a licensed software record in the JAMF Software Server (JSS). These records allow you to store the number of licenses owned and the software titles that count toward each license (called “software definitions”). They also allow you to store detailed license and purchasing information in the JSS.
Each time a computer submits inventory to the JSS, the software titles on the computer are compared to the software definitions in each record. If they match, the computer counts toward the number of licenses in use.
To monitor license compliance on an ongoing basis, you can enable email notifications for a licensed software record. This allows email notifications to be sent to JSS users when the number of licenses in use exceeds the number of licenses owned. (For information on setting up an SMTP server from which to send email notifications and enabling email notifications for a JSS user account, see Integrating with an SMTP Server and Email Notifications.)
Licensed software records also allow you to determine whether a license supersedes or is superseded by another license in the JSS. For example, you may have licenses for Adobe Illustrator and Adobe CS 5.5 Design Standard, both of which contain Adobe Illustrator. The licenses for Adobe Illustrator will not be counted toward the licenses for CS 5.5 Design Standard even though CS 5.5 Design Standard contains Adobe Illustrator. Viewing the licensed software record for Adobe Illustrator would show that the licenses are superseded by CS 5.5 Design Standard. Alternatively, viewing the record for CS 5.5 Design Standard would show that the licenses supersede Adobe Illustrator.
There are several ways to create a licensed software record in the JSS. You can manually create the record, use a licensed software template available in the JSS, or upload a licensed software template obtained from JAMF Nation. All licensed software templates have predefined software definitions.
Software definitions can be based on one of two items: the name and version number of each application, font, and plug-in, or the software identification (SWID) tags associated with each software title. For more information on SWID tags and how they are useful for tracking licensed software with the Casper Suite, see the following Knowledge Base article:
Software Identification Tags and Tracking Licensed Software
RequirementsTo create a licensed software record based on SWID tags, the software you want to track must have a SWID tag associated with it and the SWID tag must be in the JSS database.
Note: The JSS collects SWID tags from a computer each time the computer submits inventory. SWID tags are not listed in a computer’s inventory information in JSS, but they are stored in the JSS database for use with licensed software.
348

Manually Creating a Licensed Software Record
1. Log in to the JSS with a web browser.
2. Click Computers at the top of the page.
3. Click Licensed Software.
On a smartphone or iPod touch, this option is in the pop-up menu.
4. Click New .
5. Use the General pane to configure basic settings for the licensed software record.
To enable email notifications, select the Send email notification on violation checkbox.
6. Click the Licenses tab and add license and purchasing information:
a. Click Add .
b. Specify information about the license, including the license type and license count.
c. (Optional) Click the Purchasing Information tab and enter purchasing information.
d. (Optional) Click the Attachments tab and click Upload to upload an attachment.
e. Click Save.
f. Repeat steps a through e to add more license and purchasing information as needed.
7. Click the Software Definitions tab.
8. To specify software definitions based on applications, fonts, and plug-ins, do the following:
a. Choose “Applications, Fonts, and Plug-ins” from the Software Definitions Type pop-up menu.
b. Click Add for the item you want to add.
c. Specify a name, connector (“is” or “like”), and version number using the fields and pop-up menu provided.
d. Click Save.
e. Repeat steps a through d to specify additional software definitions as needed.
The items you added are displayed in a list.
9. To specify software definitions based on SWID tags, do the following:
a. Choose “Software ID Tags” from the Software Definitions Type pop-up menu.
b. Browse for and choose a reg ID.
c. Add a SWID tag by clicking Add . Then browse for and choose the SWID tag you want to add.
d. Select the activation statuses you want to include in the software definitions.
10. Click Save.
349

Creating a Licensed Software Record From a Template
1. Log in to the JSS with a web browser.
2. Click Computers at the top of the page.
3. Click Licensed Software.
On a smartphone or iPod touch, this option is in the pop-up menu.
4. Click New From Template .
5. Click the licensed software template you want to use.
6. Use the General pane to change or configure basic settings for the licensed software record.
To enable email notifications, select the Send email notification on violation checkbox.
7. Click the Licenses tab and add license and purchasing information:
a. Click Add .
b. Enter information about the license, including the license type and license count.
c. (Optional) Click the Purchasing Information tab and enter purchasing information.
d. (Optional) Click the Attachments tab and click Upload to upload an attachment.
e. Click Save.
f. Repeat steps a through e to add more license and purchasing information as needed.
8. To view or edit software definitions, click the Software Definitions tab and make changes as needed.
9. Click Save.
Uploading a Licensed Software TemplateYou can create a licensed software record by uploading a licensed software template obtained from JAMF Nation. Licensed software templates are available in JAMF Nation at:
https://jamfnation.jamfsoftware.com/licensedSoftwareTemplates.html
1. Log in to the JSS with a web browser.
2. Click Computers at the top of the page.
3. Click Licensed Software.
On a smartphone or iPod touch, this option is in the pop-up menu.
4. Click Upload and upload the licensed software template.
5. Use the General pane to change or configure basic settings for the licensed software record.
To enable email notifications, select the Send email notification on violation checkbox.
350

6. Click the Licenses tab and add license and purchasing information:
a. Click Add .
b. Enter information about the license, including the license type and license count.
c. (Optional) Click the Purchasing Information tab and enter purchasing information.
d. (Optional) Click the Attachments tab and click Upload to upload an attachment.
e. Click Save.
f. Repeat steps a through e to add more license and purchasing information as needed.
7. To view or edit software definitions, click the Software Definitions tab and make changes as needed.
8. Click Save.
Cloning, Editing, or Deleting a Licensed Software Record
1. Log in to the JSS with a web browser.
2. Click Computers at the top of the page.
3. Click Licensed Software.
On a smartphone or iPod touch, this option is in the pop-up menu.
4. Click the licensed software record you want to clone, edit, or delete.
5. Do one of the following:
�� To clone the licensed software record, click Clone and make changes as needed. Then click Save.
�� To edit the licensed software record, click Edit and make changes as needed. Then click Save.
�� To delete the licensed software record, click Delete and then click Delete again to confirm.
Related InformationFor related information, see the following sections in this guide:
�� License Compliance
Find out how to evaluate license compliance by viewing the licensed software records in the JSS.
�� Viewing License Usage
Find out how to view the computers on which licenses are in use.
�� Application Usage for Licensed Software
Find out how frequently the licensed software in your environment is being used.
�� Smart Computer Groups
You can create smart computer groups based on licensed software.
351

License Compliance
You can evaluate license compliance by viewing the licensed software records in the JSS and comparing the number of licenses in use to the number of licenses owned.
You can also monitor software compliance by allowing email notifications to be sent to JSS users each time a license limit is exceeded. (For more information see, Licensed Software Records.)
Evaluating License Compliance
1. Log in to the JSS with a web browser.
2. Click Computers at the top of the page.
3. Click Licensed Software.
On a smartphone or iPod touch, this option is in the pop-up menu. A list of licensed software records is displayed along with the number of licenses in use and the number of licenses owned for each record.
352

Viewing License Usage
If you are using licensed software records to track software licenses, you can view a list of computers with the licenses in use (called “license usage matches”).
Viewing License Usage Matches
1. Log in to the JSS with a web browser.
2. Click Computers at the top of the page.
3. Click Licensed Software.
On a smartphone or iPod touch, this option is in the pop-up menu.
4. Click the licensed software record you want to view license usage matches for.
5. Click View Matches.
Note: This button is only displayed if the licenses associated with the record are in use on managed computers.
A list license usage matches is displayed.
Related InformationFor related information, see the following sections in this guide:
�� Computer Reports
Find out how to export the data in a list of license usage matches to different file formats.
�� Performing Mass Actions for Computers
Find out how to perform mass actions for a list of license usage matches.
�� Viewing and Editing Inventory Information for a Computer
You can view the licensed software in use on a computer by viewing the computer’s inventory information in the JSS.
353

Application Usage for Licensed Software
You can find out how frequently licensed software is being used by viewing the Application Usage logs for a licensed software record. This allows you to view the amount of time that the software was open in the foreground on computers.
RequirementsTo view Application Usage logs for a licensed software record, the Computer Inventory Collection settings must be configured to collect Application Usage information. (For more information, see Computer Inventory Collection Settings.)
Viewing Application Usage Logs for a Licensed Software Record
1. Log in to the JSS with a web browser.
2. Click Computers at the top of the page.
3. Click Licensed Software.
On a smartphone or iPod touch, this option is in the pop-up menu.
4. Click the licensed software record you want to view Application Usage logs for.
5. Click View Logs.
Note: This button is only displayed if the licenses associated with the record are in use on managed computers. Application Usage logs for the record are displayed.
354

Usage Management
Application Usage
Application Usage logs allow you to monitor how frequently applications are used on computers and track usage behaviors. You can view the Application Usage logs for a computer or licensed software record.
Computers submit Application Usage information to the JAMF Software Server (JSS) each time they submit inventory.
RequirementsTo view Application Usage logs, the Computer Inventory Collection settings must be configured to collect Application Usage information. (For more information, see Computer Inventory Collection Settings.)
Viewing Application Usage Logs for a ComputerThe Application Usage logs for a computer consist of a pie chart that shows the amount of time each application was in the foreground on the computer during a specified date range.
1. Log in to the JSS with a web browser.
2. Click Computers at the top of the page.
3. Perform a simple or advanced computer search.
For more information, see Simple Computer Searches or Advanced Computer Searches.
4. Click the computer you want to view Application Usage logs for.
If you performed a simple search for an item other than computers, you must click Expand next to an item to view the computers related to that item.
5. Click the History tab.
Application Usage logs for the computer are displayed.
6. To view Application Usage logs for a different date range, specify the starting and ending dates using the Date Range pop-up menus. Then click Update.
355

Viewing Application Usage Logs for a Licensed Software RecordThe Application Usage logs for a licensed software record allow you to view the amount of time that the software was open in the foreground on computers.
1. Log in to the JSS with a web browser.
2. Click Computers at the top of the page.
3. Click Licensed Software.
On a smartphone or iPod touch, this option is in the pop-up menu.
4. Click the licensed software record you want to view Application Usage logs for.
5. Click View Logs.
Note: This button is only displayed if the licenses associated with the record are in use on managed computers.
Application Usage logs for the record are displayed.
Related InformationFor related information, see the following sections in this guide:
�� Flushing Logs
Find out how to schedule automatic log flushing or manually flush logs.
�� Simple Computer Searches
You can quickly search the Application Usage information in the JSS for a general range of results.
356

Computer Usage
Computer Usage logs allow you to monitor how frequently each computer is used and track usage behaviors. The following information is included in Computer Usage logs:
�� Startup dates/times
�� Login and logout dates/times
�� Usernames used to log in and out of the computer
RequirementsTo view Computer Usage logs, a startup script or login/logout hooks must be configured to log Computer Usage information. (For more information, see Startup Script and Login and Logout Hooks.)
Viewing Computer Usage Logs for a Computer
1. Log in to the JSS with a web browser.
2. Click Computers at the top of the page.
3. Perform a simple or advanced computer search.
For more information, see Simple Computer Searches or Advanced Computer Searches.
4. Click the computer you want to view Computer Usage logs for.
If you performed a simple search for an item other than computers, you must click Expand next to an item to view the computers related to that item.
5. Click the History tab, and then click the Computer Usage Logs category.
Computer Usage logs for the computer are displayed.
Related InformationFor related information, see the following section in this guide:
Flushing LogsFind out how to schedule automatic log flushing or manually flush logs.
357

Restricted Software
Restricted software allows you to prevent users or groups of users from accessing certain applications. For instance, you might want to prevent all users from accessing a peer-to-peer file sharing application or restrict everyone except the IT staff from accessing common administrative utilities.
For each application that you want to restrict, you must create a restricted software record. This allows you to specify the users to which the restriction applies and control what happens when the application is opened by those users. For instance, you can kill the restricted process, delete the application, and even display a message to the user.
If there is an SMTP server set up in the JSS, you can enable email notifications for the restricted software record. This allows email notifications to be sent to JSS users each time a violation occurs. (For information on setting up an SMTP server and enabling email notifications for JSS user accounts, see Integrating with an SMTP Server and Email Notifications.)
Creating a Restricted Software Record
1. Log in to the JSS with a web browser.
2. Click Computers at the top of the page.
3. Click Restricted Software.
On a smartphone or iPod touch, this option is in the pop-up menu.
4. Click New .
5. Configure the restricted software record using the fields and options on the pane.
To enable email notifications, select the Send email notification on violation checkbox.
6. Click the Scope tab and configure the scope of the restricted software record.
For more information, see Scope.
7. Click Save.
The restriction is applied to computers in the scope the next time they check in with the JSS.
Cloning, Editing, or Deleting a Restricted Software Record
1. Log in to the JSS with a web browser.
2. Click Computers at the top of the page.
3. Click Restricted Software.
On a smartphone or iPod touch, this option is in the pop-up menu.
358

4. Click the restricted software record you want to clone, edit, or delete.
5. Do one of the following:
�� To clone the restricted software record, click Clone and make changes as needed. Then click Save.
�� To edit the restricted software record, click Edit and make changes as needed. Then click Save.
�� To delete the restricted software record, click Delete and then click Delete again to confirm. The clone, edit, or delete action is applied to computers in the scope the next time they check in with the JSS.
Related Information
For related information, see the following section in this guide:
Viewing Restricted Software for a ComputerFind out how to view the restricted software for a computer. For related information, see the following Knowledge Base article:
Finding the Name of Processes When Configuring Restricted SoftwareLearn how to find the exact name of the process you want create restricted software for.
359

Managing Mobile Devices
360

Enrollment
About Mobile Device Enrollment
Enrollment is the process of adding mobile devices to the JAMF Software Server (JSS) to establish a connection between the devices and the JSS. This allows you to perform inventory, configuration, security management, and distribution tasks on the devices.
When mobile devices are enrolled, inventory information for the devices is submitted to the JSS. There are several ways to enroll mobile devices with the JSS:
�� User-initiated enrollment—You can allow users to enroll their own mobile devices by having them log in to an enrollment portal where they follow the onscreen instructions to install the necessary profile and certificates. You can provide this URL by sending it in an email or SMS invitation from the JSS, or through any other means that fit your environment.
�� Enroll connected mobile devices—You can create an enrollment profile using the JSS and install it on mobile devices by connecting them to a computer via USB. This enrollment method requires Apple Configurator or Apple’s iPhone Configuration Utility (iPCU).
Apple TV devices can only be enrolled by connecting them to a computer via USB and installing an enrollment profile using Apple Configurator.
�� Enroll mobile devices using a PreStage enrollment—A PreStage enrollment allows you to store enrollment and mobile device setup settings in the JSS and use them to enroll new mobile devices with the JSS. This reduces the amount of time and interaction it takes to prepare new mobile devices for use.
This enrollment method requires an account in Apple's Volume Services Portal. For more information, see the Integrating with Apple’s Device Enrollment Program Knowledge Base article.
�� Apple Configurator enrollment—You can enroll mobile devices with the JSS by connecting them to a computer via USB and using Apple Configurator, an enrollment URL, and an anchor certificate that you download from the JSS.
361

Related InformationFor more information, see the following sections in this guide:
�� User-Initiated Enrollment for Mobile Devices
Find out how to allow users to enroll their own mobile devices by having them log in to an enrollment portal.
�� Enrollment Profiles
Find out how to create and download enrollment profiles so you can enroll mobile devices by connecting them to a computer via USB.
�� Mobile Device PreStage Enrollments
Find out how to enroll mobile devices using a PreStage enrollment.
�� Apple Configurator Enrollment Settings
Find out how to enable Apple Configurator enrollment so you can enroll mobile devices using Apple Configurator and an enrollment URL.
�� Components Installed on Mobile Devices
Learn about the components installed on mobile devices during enrollment.
362

Components Installed on Mobile Devices
The following components are installed on mobile devices during enrollment:
�� MDM Profile—This profile includes a SCEP enrollment request and an MDM enrollment request.
�� Trust Profile—This profile contains the CA certificate. The CA certificate establishes trust between the certificate authority (CA) and mobile devices.
If you enrolled mobile devices using a PreStage enrollment, or using Apple Configurator and an enrollment URL, the Trust Profile is not a separate profile and it is contained within the MDM Profile.
�� Device certificate—This certificate verifies the identity of managed mobile devices each time they communicate with the JAMF Software Server (JSS).
�� Self Service web clip—The Self Service web clip allows you to distribute iOS configuration profiles, apps, eBooks, and updated MDM profiles to mobile devices for users to install. Users tap the web clip to browse and then install items using an interface similar to the App Store.
You can prevent the Self Service web clip from being installed on mobile devices if necessary. (For more information, see Self Service Web Clip.)
Note: The Self Service web clip is not installed on Apple TV devices.
363

User-Initiated Enrollment Settings for Mobile Devices
You can use the User-Initiated Enrollment settings for mobile devices to allow enrollment without an invitation and configure the enrollment process. When you configure the enrollment process, you can do the following:
�� Require users to install the CA certificate.
�� Restrict re-enrollment so that a user is only allowed to re-enroll a mobile device if one of the following conditions is met:
• The user is a JSS user with the “Mobile Devices” privilege.
• The username of the user re-enrolling the mobile device matches the Username field in the User and Location category in inventory information.
• The Username field in the User and Location category in inventory information is blank.
�� Customize the enrollment portal.
�� Customize the appearance of the MDM profile.
Configuring the User-Initiated Enrollment Settings for Mobile Devices
1. Log in to the JSS with a web browser.
2. In the top-right corner of the page, click Settings .
3. Click Mobile Device Management.
On a smartphone or iPod touch, this option is in the pop-up menu.
4. Click User-Initiated Enrollment .
5. Click Edit.
6. Configure the settings on the pane.
7. Click Save.
Related InformationFor related information, see the following sections in this guide:
�� User-Initiated Enrollment for Mobile Devices
Find out how to allow users to enroll their own mobile devices by having them log in to an enrollment portal.
364

�� User-Initiated Enrollment Experience for Mobile Devices
Learn about the steps users take to enroll their own mobile devices.
�� Certificates
Learn more about the CA certificate.
365

User-Initiated Enrollment for Mobile Devices
You can allow users to enroll their own mobile devices by having them access an enrollment portal where they are prompted to install the necessary profile and certificates.
To direct users to the enrollment portal, you need to provide them with the enrollment URL. This is the full URL for the JAMF Software Server (JSS) followed by “/enroll”. For example:
https://jss.mycompany.com:8443/enroll
You can provide this URL by sending it in an email or SMS invitation from the JSS, or through any other means that fit your environment. Sending an invitation from the JSS allows you to add mobile devices to a site during enrollment. Users can log in to the enrollment portal using an LDAP directory account or a JSS user account. If users log in to the enrollment portal with an LDAP directory account, user and location information is submitted during enrollment.
RequirementsTo send a mobile device enrollment invitation via email, you need an SMTP server set up in the JSS. (For more information, see Integrating with an SMTP Server.)
If you plan to provide the enrollment URL to users without using an email or SMS invitation, the User-Initiated Enrollment settings must be configured to allow enrollment without an invitation. (For more information, see User-Initiated Enrollment Settings for Mobile Devices.)
For users to log in to the enrollment portal with their LDAP directory account, you need an LDAP server set up in the JSS. (For more information, see Integrating with LDAP Directory Services.)
Sending a Mobile Device Enrollment InvitationYou can send an enrollment invitation by email or SMS message.
Before you configure the invitation, make sure you have the email addresses or phone numbers of the users you want to send the invitation to.
1. Log in to the JSS with a web browser.
2. Click Mobile Devices at the top of the page.
3. Click Enrollment Invitations.
On a smartphone or iPod touch, this option is in the pop-up menu.
366

4. Click New .
5. Follow the onscreen instructions to send the enrollment invitation. An enrollment invitation is immediately sent to email addresses or phone numbers you specified. You can view the status of the enrollment invitation in the list of invitations.
Viewing Mobile Device Enrollment Invitation UsageYou can view a list of mobile devices that were enrolled with a specific enrollment invitation.
1. Log in to the JSS with a web browser.
2. Click Mobile Devices at the top of the page.
3. Click Enrollment Invitations.
On a smartphone or iPod touch, this option is in the pop-up menu.
4. Click the enrollment invitation you want to view usage for.
5. Click View Enrolled Mobile Devices. A list of mobile devices enrolled with the invitation is displayed.
Deleting a Mobile Device Enrollment Invitation
1. Log in to the JSS with a web browser.
2. Click Mobile Devices at the top of the page.
3. Click Enrollment Invitations.
On a smartphone or iPod touch, this option is in the pop-up menu.
4. Click the enrollment invitation you want to delete.
5. Click Delete, and then click Delete again to confirm.
367

Related InformationFor related information, see the following sections in this guide:
�� User-Initiated Enrollment Experience for Mobile Devices
Learn about the steps users take to enroll their own mobile devices.
�� Enrollment Profiles
Find out how to create and download enrollment profiles so you can enroll mobile devices by connecting them to a computer via USB.
�� Mobile Device PreStage Enrollments
Find out how to enroll mobile devices using a PreStage enrollment.
�� Apple Configurator Enrollment Settings
Find out how to enable Apple Configurator enrollment so you can enroll mobile devices using Apple Configurator and an enrollment URL.
�� Components Installed on Mobile Devices
Learn about the components installed on the mobile devices during enrollment.
368

User-Initiated Enrollment Experience for Mobile Devices
When a user accesses the enrollment URL from their mobile device, they are guided through the following steps to enroll their device:
1. The user is prompted to enter credentials for an LDAP directory account or a JSS user account with user-initiated enrollment privileges, and then they must tap Login.
The login prompt is not displayed if the enrollment portal was accessed via an enrollment invitation for which the Require Login option is disabled. (For more information, see User-Initiated Enrollment for Mobile Devices.)
2. If notified that the device cannot verify the identity of the JSS, the user must tap Continue.
This notification only appears if the SSL certificate is not natively trusted by the device.
369

3. The user must tap Install Certificate to start the installation of the profile that contains the CA certificate.
4. The user must tap Install to continue.
370

5. When notified that the profile will change settings on the device, the user must tap Install Now.
If the device has a passcode, the user must enter the passcode.
6. To complete the installation, the user must tap Done.
371

7. The user must tap Install Profile to initiate the installation of the MDM profile.
8. The user must tap Install to continue.
372

9. When notified that installing the profile will change settings on the device, the user must tap Install Now.
If the device has a passcode, the user must enter the passcode.
10. When notified that installing the profile will allow an administrator to remotely manage the device, the user must tap Install.
373

11. To complete the enrollment process, the user must tap Done.
When the enrollment is complete, the device is enrolled with the JSS.
374

Apple Configurator Enrollment Settings
The Apple Configurator Enrollment settings allow you to enroll mobile devices with the JAMF Software Server (JSS) using Apple Configurator and an enrollment URL. This involves enabling enrollment in the JSS, downloading the anchor certificate, and then connecting devices to a computer via USB to enroll them using Apple Configurator and an enrollment URL.
When you enable the Apple Configurator Enrollment settings, you do the following:
�� Allow devices to be enrolled with the JSS using Apple Configurator and an enrollment URL:
https://jss.mycompany.com:8443/configuratorenroll
�� Download the anchor certificate that is needed to connect Apple Configurator to the JSS.
Note: The anchor certificate is only displayed if the SSL certificate you are using is signed with the JSS’s built-in CA. If the SSL certificate you are using is signed by an external CA (your organization’s CA or a trusted third-party CA), the anchor certificate is not displayed in the JSS.
RequirementsApple Configurator enrollment only applies to mobile devices with iOS 7 or later. In addition, you need Apple Configurator 1.5 or later.
Enabling Apple Configurator EnrollmentBefore you can enroll mobile devices using Apple Configurator and an enrollment URL, you must enable Apple Configurator enrollment in the JSS.
1. Log in to the JSS with a web browser.
2. In the top-right corner of the page, click Settings .
3. Click Mobile Device Management.
On a smartphone or iPod touch, this option is in the pop-up menu.
4. Click Apple Configurator Enrollment .
5. Click Edit.
6. Select the Allow Apple Configurator enrollment checkbox.
7. If you are using the JSS’s built-in CA, click Download next to the certificate to download the anchor certificate. This certificate is needed to connect Apple Configurator to the JSS.
The anchor certificate (.pem) downloads immediately.
8. Click Save.
When the anchor certificate is imported to Apple Configurator, it displays in the Anchor Certificates list with a name that identifies it as the CA certificate profile.
375

Related InformationFor related information, see the following sections in this guide:
�� User-Initiated Enrollment for Mobile Devices
Find out how to allow users to enroll their own mobile devices by having them log in to an enrollment portal.
�� Enrollment Profiles
Find out how to create and download enrollment profiles so you can enroll mobile devices by connecting them to a computer via USB.
�� Mobile Device PreStage Enrollments
Find out how to enroll mobile devices using a PreStage enrollment.
�� Components Installed on Mobile Devices
Learn about the components installed on mobile devices during enrollment.
376

Enrollment Profiles
Enrollment profiles are .mobileconfig files that allow you to enroll mobile devices with the JAMF Software Server (JSS). This involves creating an enrollment profile, connecting the devices to a computer via USB, and installing the enrollment profile using Apple Configurator or Apple’s iPhone Configuration Utility (iPCU). You can use the JSS to create and download enrollment profiles. When you create an enrollment profile, you can specify user and location information, purchasing information, and a site for mobile devices enrolled using the profile.
Important: You cannot distribute an updated MDM profile via the Self Service web clip to mobile devices enrolled using an enrollment profile. For information on updating an MDM profile, see the following Knowledge Base article:
Distributing Updated MDM Profiles
Tools for Installing Enrollment ProfilesBefore creating an enrollment profile, you need to decide which tool you will use to install the profile on mobile devices. The tool you use to install enrollment profiles affects the way you manage the profiles in the JSS. The following tools can be used to install enrollment profiles:
�� Apple Configurator—By default, when you create an enrollment profile in the JSS, it is created for use with Apple Configurator. Before you can use Apple Configurator to enroll mobile devices, you need to download both the enrollment profile and its Trust Profile from the JSS so you can import these profiles to Apple Configurator.
�� iPCU—You should only create an enrollment profile for use with iPCU if you plan to install the profile on mobile devices with iOS 6 or earlier. Before you can use iPCU to enroll mobile devices, you need to download the enrollment profile from the JSS so you can import it to iPCU.
Note: Enrollment profiles created using the JSS v9.0 or earlier cannot be used to enroll mobile devices with iOS 7 or later. If you plan to enroll mobile devices with iOS 7 or later, you need to create a new enrollment profile following the instructions in the Creating an Enrollment Profile for Use with Apple Configurator section.
For information on how to install enrollment profiles using Apple Configurator or iPCU, see the following Knowledge Base article:
Installing Enrollment Profiles Using Apple Configurator or iPCU
Creating an Enrollment Profile for Use with Apple Configurator
1. Log in to the JSS with a web browser.
2. Click Mobile Devices at the top of the page.
377

3. Click Enrollment Profiles.
On a smartphone or iPod touch, this option is in the pop-up menu.
4. Click New .
5. Use the General pane to configure basic settings for the enrollment profile.
Ensure that the Create profile for use with iPCU checkbox is not selected.
6. (Optional) Click the User and Location Information tab and specify user and location information for the devices.
7. (Optional) Click the Purchasing Information tab and specify purchasing information for the devices.
8. Click Save.
Creating an Enrollment Profile for Use with iPCU
1. Log in to the JSS with a web browser.
2. Click Mobile Devices at the top of the page.
3. Click Enrollment Profiles.
On a smartphone or iPod touch, this option is in the pop-up menu.
4. Click New .
5. Use the General pane to configure basic settings for the enrollment profile.
Select the Create profile for use with iPCU checkbox and choose a target iOS version.
The target iOS must match the iOS on the devices that you plan to enroll.
6. (Optional) Click the User and Location Information tab and specify user and location information for the devices.
7. (Optional) Click the Purchasing Information tab and specify purchasing information for the devices.
8. Click Save.
Cloning, Editing, or Deleting an Enrollment Profile
1. Log in to the JSS with a web browser.
2. Click Mobile Devices at the top of the page.
3. Click Enrollment Profiles.
On a smartphone or iPod touch, this option is in the pop-up menu.
378

4. Click the enrollment profile you want to clone, edit, or delete.
5. Do one of the following:
�� To clone the profile, click Clone and make changes as needed. Then click Save.
�� To edit the profile, click Edit and make changes as needed. Then click Save.
�� To delete the profile, click Delete. Then click Delete again to confirm.
Downloading an Enrollment ProfileYou need to download the enrollment profile (.mobileconfig) from the JSS before using it to enroll mobile devices using Apple Configurator or iPCU.
1. Log in to the JSS with a web browser.
2. Click Mobile Devices at the top of the page.
3. Click Enrollment Profiles.
On a smartphone or iPod touch, this option is in the pop-up menu.
4. Click the enrollment profile you want to download.
5. Click Download.
On OS X v10.7 or later, you may be prompted to install the profile. Click Cancel to decline.
The enrollment profile downloads immediately as a .mobileconfig file.
Downloading a Trust ProfileThe Trust Profile contains the CA certificate that establishes trust between the certificate authority (CA) and mobile devices. When you create an enrollment profile for use with Apple Configurator, the JSS automatically creates an associated Trust Profile. You need to download the Trust Profile (Trust Profile.mobileconfig) from the JSS so that you can import it to Apple Configurator along with the enrollment profile.
1. Log in to the JSS with a web browser.
2. Click Mobile Devices at the top of the page.
3. Click Enrollment Profiles.
On a smartphone or iPod touch, this option is in the pop-up menu.
379

4. Click the enrollment profile for which you want to download a Trust Profile.
5. Click Trust Profile.
On OS X v10.7 or later, you may be prompted to install the profile. Click Cancel to decline. The Trust Profile downloads immediately with the filename Trust Profile.mobileconfig.
When the Trust Profile is imported to Apple Configurator, it displays in the Profiles list with a name that identifies it as the CA certificate profile.
Related InformationFor related information, see the following sections in this guide:
�� User-Initiated Enrollment for Mobile Devices
Find out how to allow users to enroll their own mobile devices by having them log in to an enrollment portal.
�� Mobile Device PreStage Enrollments
Find out how to enroll mobile devices using a PreStage enrollment.
�� Apple Configurator Enrollment Settings
Find out how to enable Apple Configurator enrollment so you can enroll mobile devices using Apple Configurator and an enrollment URL.
�� Components Installed on Mobile Devices
Learn about the components installed during mobile device enrollment.
380

Mobile Device PreStage Enrollments
A PreStage enrollment allows you to store enrollment and mobile device setup settings in the JAMF Software Server (JSS) and use them to enroll new mobile devices with the JSS. This reduces the amount of time and interaction it takes to prepare mobile devices for use.
Before you can use a PreStage enrollment, you need to create it in the JSS. This allows you to configure the enrollment settings and specify the mobile devices that should be enrolled using the PreStage enrollment. You can also customize the user experience of the Setup Assistant.
You can require users to authenticate during mobile device setup using an LDAP directory account or a JSS user account. If users authenticate with an LDAP directory account, user and location information is submitted during enrollment.
RequirementsFor users to authenticate with their LDAP directory account during mobile device setup, you need an LDAP server set up in the JSS. (For more information, see Integrating with LDAP Directory Services.) In addition, authentication requires mobile devices with iOS 7.1 or later.
Configuring a Mobile Device PreStage Enrollment
1. Log in to the JSS with a web browser.
2. Click Mobile Devices at the top of the page.
3. Click PreStage Enrollments.
On a smartphone or iPod touch, this option is in the pop-up menu.
4. Click New .
5. Use the General payload to configure basic settings for the PreStage enrollment and customize the user experience of the Setup Assistant.
To customize the user experience of the Setup Assistant, select which steps you want to skip in the Setup Assistant. If you choose to skip steps, the user can enable these settings after the device is configured unless otherwise restricted.
6. (Optional) Use the User and Location payload to specify user and location information for the mobile devices.
This information is stored in the JSS for each mobile device enrolled using a PreStage enrollment.
Note: The User and Location Information payload is only displayed if the Authentication checkbox is not selected.
7. (Optional) Use the Purchasing payload to specify purchasing information for the mobile devices.
This information is stored in the JSS for each mobile device enrolled using a PreStage enrollment.
381

8. (Optional) Use the Attachments payload to upload attachments to store for mobile devices.
This information is stored in the JSS for each mobile device enrolled using a PreStage enrollment.
9. If the SSL certificate you are using is signed by an external CA (your organization's CA or a trusted third-party CA), use the Certificates payload to upload a certificate for the CA that you want mobile devices to trust at enrollment.
Note: The anchor certificate is only displayed if the SSL certificate you are using is signed by the JSS’s built-in CA.
10. Click the Scope tab and configure the scope of the PreStage enrollment by selecting the checkbox next to each mobile device you want to add to the scope.
Note: The mobile devices listed on the Scope tab are the mobile devices that are associated with the Device Enrollment Program via the server token file (.p7m) you downloaded from Apple's Volume Services Portal.
11. Click Save.
Refreshing PreStage Enrollment InformationThe JSS allows you to manually refresh information about the mobile devices in the PreStage enrollment as needed.
1. Log in to the JSS with a web browser.
2. Click Mobile Devices at the top of the page.
3. Click PreStage Enrollments.
On a smartphone or iPod touch, this option is in the pop-up menu.
4. Click the PreStage enrollment you want to refresh.
5. Click Refresh. If there is updated information about the mobile devices in the Device Enrollment Program, this information is displayed in the JSS.
Cloning, Editing, or Deleting a PreStage Enrollment
1. Log in to the JSS with a web browser.
2. Click Mobile Devices at the top of the page.
3. Click PreStage Enrollments.
On a smartphone or iPod touch, this option is in the pop-up menu.
4. Click the PreStage enrollment you want to clone, edit, or delete.
382

5. Do one of the following:
�� To clone the PreStage enrollment, click Clone and make changes as needed. Then click Save.
Note: Mobile devices added to the scope of a PreStage enrollment are not cloned when cloning the PreStage enrollment.
�� To edit the PreStage enrollment, click Edit and make changes as needed. Then click Save.
�� To delete the PreStage enrollment, click Delete. Then click Delete again to confirm.
Related InformationFor related information, see the following sections in this guide:
�� Integrating with the Device Enrollment Program
Find out how to configure an instance of the Device Enrollment Program.
�� User-Initiated Enrollment for Mobile Devices
Find out how to allow users to enroll their own mobile devices by having them log in to an enrollment portal.
�� Enrollment Profiles
Find out how to create and download enrollment profiles so you can enroll mobile devices by connecting them to a computer via USB.
�� Apple Configurator Enrollment Settings
Find out how to enable Apple Configurator enrollment so you can enroll mobile devices using Apple Configurator and an enrollment URL.
�� Components Installed on Mobile Devices
Learn about the components installed on mobile devices during enrollment.
383

Inventory
Mobile Device Inventory Collection Settings
The Mobile Device Inventory Collection settings allow you to do the following:
�� Configure the frequency at which inventory is collected from mobile devices.
�� Collect unmanaged apps as inventory.
By default, mobile devices submit inventory to the JAMF Software Server (JSS) once every day.
Configuring the Mobile Device Inventory Collection Settings
1. Log in to the JSS with a web browser.
2. In the top-right corner of the page, click Settings .
3. Click Mobile Device Management.
On a smartphone or iPod touch, this option is in the pop-up menu.
4. Click Inventory Collection .
5. Click Edit.
6. Configure the settings on the pane.
7. Click Save.
Related InformationFor related information, see the following sections in this guide:
�� Simple Mobile Device Searches
Learn how to quickly search the items in your inventory for a general range of results.
�� Advanced Mobile Device Searches
Lean how to create and save an advanced mobile device search.
�� Viewing and Editing Inventory Information for a Mobile Device
Find out how to view and edit inventory information for a mobile device.384

Mobile Device Extension Attributes
Mobile device extension attributes are custom fields that you can create to collect almost any type of data from a mobile device. When you create a mobile device extension attribute, you specify the following information:
�� Type of data being collected, such as string, integer, or date
�� Inventory category in which to display the extension attribute in the JSS, such as Hardware or Purchasing
�� Input type, which determines how the extension attribute is populated with data Extension attributes can add time and network traffic to the inventory process depending on the type of data you choose to collect and the input type used to collect it.
Mobile Device Extension Attribute Input TypesYou can choose to populate the value of a mobile device extension attribute using any of the following input types:
�� Text field—This displays a text field in mobile device inventory information that you can enter a value into. Only extension attributes created manually can be populated using a text field.
�� Pop-up menu—This displays a pop-up menu in mobile device inventory information from which you can choose a value. Only extension attributes created manually can be populated using a pop-up menu.
�� LDAP Attribute Mapping—This populates the extension attribute with the value for an LDAP attribute. It also generates a variable that can be used to populate configuration profile settings with values for the LDAP attribute. The variable is $EXTENSIONATTRIBUTE_<#>, where <#> is the extension attribute ID. For more information on payload variables for configuration profiles, see iOS Configuration Profiles.
RequirementsTo create a mobile device extension attribute with the “LDAP Attribute Mapping” input type, you need:
�� An LDAP server set up in the JSS (For more information, see Integrating with LDAP Directory Services.)
�� The Mobile Device Inventory Collection settings configured to collect user and location information from LDAP (For more information, see Mobile Device Inventory Collection Settings.)
Creating a Mobile Device Extension Attribute
1. Log in to the JSS with a web browser.
2. In the top-right corner of the page, click Settings .
385

3. Click Mobile Device Management.
On a smartphone or iPod touch, this option is in the pop-up menu.
4. Click Extension Attributes .
5. Click New .
6. Configure the settings on the pane.
7. Click Save. If the extension attribute has the “LDAP Attribute Mapping” input type, the LDAP attribute variable is displayed on the pane.
Cloning, Editing, or Deleting a Mobile Device Extension Attribute
1. Log in to the JSS with a web browser.
2. In the top-right corner of the page, click Settings .
3. Click Mobile Device Management.
On a smartphone or iPod touch, this option is in the pop-up menu.
4. Click Extension Attributes .
5. Click the extension attribute you want to clone, edit, or delete.
6. Do one of the following:
�� To clone the extension attribute, click Clone and make changes as needed. Then click Save.
�� To edit the extension attribute, click Edit and make changes as needed. Then click Save.
�� To delete the extension attribute, click Delete and then click Delete again to confirm.
Related InformationFor related information, see the following sections in this guide:
�� Mobile Device Inventory Display Settings
You can display extension attributes in the results of a simple mobile device search.
�� Viewing and Editing Inventory Information for a Mobile Device
You can view the extension attributes collected from a mobile device and edit extension attribute values for that mobile device.
�� Smart Mobile Device Groups
You can create smart mobile device groups based on extension attributes.
386

Mobile Device Inventory Display Settings
The Mobile Device Inventory Display settings allow you to choose which attribute fields to display in the results of a simple mobile device search.
Configuring the Mobile Device Inventory Display Settings
1. Log in to the JSS with a web browser.
2. In the top-right corner of the page, click Settings .
3. Click Mobile Device Management.
On a smartphone or iPod touch, this option is in the pop-up menu.
4. Click Inventory Display .
5. On each pane, select the checkbox for each attribute field you want to display.
6. Click Save.
Related InformationFor related information, see the following section in this guide:
Simple Mobile Device SearchesLearn how to quickly search the items in your inventory for a general range of results.
387

Simple Mobile Device Searches
A simple mobile device search functions like a search engine, allowing you to quickly search the items in your inventory for a general range of results. The following table shows the items that you can search by and the attributes on which you can base each search:
Inventory Item Searchable Attributes
Mobile devices Mobile device name
Wi-Fi MAC address
Bluetooth MAC address
UDID
Serial number
Username
Full name
Email address
Phone number
Position
Department
Building
Room
Mobile device apps Application name
Search SyntaxThis section explains the syntax to use for the following search functions:
�� Wildcard searches
�� Including multiple search terms
�� Excluding a search term
�� Returning all results In general, searches are not case-sensitive.
Note: The default search preference is “Exact Match”. For most items, the option can be changed to either “Starts with” or “Contains”. (For more information, see Configuring Account Preferences.)
388

Wildcard Searches
Asterisks (*) function as wildcard characters in simple searches. The following table explains the different ways asterisks can be used to refine a search:
Usage Example
Use an asterisk after a search term to return all results with attributes that begin with that term.
Perform an app search for “Adobe*” to return all apps that begin with “Adobe”.
Use an asterisk before a search term to return all results with attributes that end with that term.
Perform a mobile device search for “*@mycompany.com” to return all mobile devices with email addresses that end with “@mycompany.com”.
Use an asterisk before and after a search term to return all results that include that term.
Perform an app search for “*pro*” to return all apps that include “pro”.
Use an asterisk without any other terms to return all results for the item you are searching.
Perform a mobile device search for “*” to return all mobile devices.
Including Multiple Search Terms
Use multiple search terms separated by a comma (,) to return all results that include those search terms. For example, perform an app search for “news*, *pro” to return all applications that begin with “news” and end with “pro”.
Excluding a Search Term
Use a hyphen (-) before a search term to exclude results that include the term.
For example, perform a mobile device search for “*@mycompany.com, -555*” to return all mobile devices with email addresses that end with “@mycompany.com” except for those with phone numbers that begin with “555”.
Returning All Results
There are two ways to return all results: use an asterisk (*) without any other characters or terms, or perform a blank search.
Performing a Simple Mobile Device Search
1. Log in to the JSS with a web browser.
2. Click Mobile Devices at the top of the page.
3. Click Search Inventory.
On a smartphone or iPod touch, this option is in the pop-up menu.
389

4. Choose an item from the Search pop-up menu.
5. Enter one or more search terms in the field(s) provided.
For information on the syntax to use to refine your search, see Search Syntax.
6. Press the Enter key. The list of search results is displayed. If you searched for an item other than mobile devices, you can view the devices associated with a result by clicking Expand next to the result. You can also change the item on which the results are based by choosing an item from the pop-up menu at the top of the page.
Related InformationFor related information, see the following sections in this guide:
�� Viewing and Editing Inventory Information for a Mobile Device
Find out how to view and edit inventory information for a mobile device.
�� Mobile Device Reports
Find out how to export the data in your search results to different file formats.
�� Performing Mass Actions for Mobile Devices
Find out how to perform mass actions on the results of a mobile device search.
�� Advanced Mobile Device Searches
Find out how to create and save an advanced mobile device search.
�� Mobile Device Inventory Display Settings
Find out how to change the attribute fields displayed in the results of a simple mobile device search.
390

Advanced Mobile Device Searches
Advanced mobile device searches allow you to use detailed search criteria to search for devices in the JAMF Software Server (JSS). These types of searches give you more control over your search by allowing you to do the following:
�� Generate specific search results.
�� Specify which attribute fields to display in the search results.
�� Save the search.
Creating an Advanced Mobile Device Search
1. Log in to the JSS with a web browser.
2. Click Mobile Devices at the top of the page.
3. Click Search Inventory.
On a smartphone or iPod touch, this option is in the pop-up menu.
4. Click New .
5. Use the Search pane to configure basic settings for the search.
To save the search, select the Save this Search checkbox.
6. Click the Criteria tab and add criteria for the search: a. Click Add .
b. Click Choose for the criteria you want to add.
To display additional criteria, click Choose for "Other Criteria".
c. Choose an operator from the Operator pop-up menu.
d. Enter a value in the Value field or browse for a value by clicking Browse .
e. Repeat steps a through d to add criteria as needed.
7. Choose an operator from the And/Or pop-up menu(s) to specify relationships between criteria.
8. To group criteria and join multiple operations, choose parentheses from the pop-up menus around the criteria you want to group.
391

9. Click the Display tab and select the attribute fields you want to display in your search results.
10. Click Save. Operations in the search take place in the order they are listed (top to bottom).
The results of a saved search are updated each time mobile devices contact the JSS and meet or fail to meet the specified search criteria.
To view search results, click View.
Cloning, Editing, or Deleting a Saved Advanced Mobile Device Search
1. Log in to the JSS with a web browser.
2. Click Mobile Devices at the top of the page.
3. Click Search Inventory.
On a smartphone or iPod touch, this option is in the pop-up menu.
4. Click the advanced mobile device search you want to clone, edit, or delete.
5. Do one of the following:
�� To clone the search, click Clone and make changes as needed. Then click Save.
�� To edit the search, click Edit and make changes as needed. Then click Save.
�� To delete the search, click Delete. Then click Delete again to confirm.
Viewing Advanced Mobile Device Search Results
1. Log in to the JSS with a web browser.
2. Click Mobile Devices at the top of the page.
3. Click Search Inventory.
On a smartphone or iPod touch, this option is in the pop-up menu..
4. Click the advanced mobile device search you want to view the results for.
5. Click View. The list of search results is displayed.
392

Related InformationFor related information, see the following sections in this guide:
�� Mobile Device Reports
Find out how to export the data in your search results to different file formats.
�� Performing Mass Actions for Mobile Devices
Find out how to perform mass actions on the results of a mobile device search.
�� Viewing and Editing Inventory Information for a Mobile Device
Find out how to view and edit inventory information for a mobile device.
�� Simple Mobile Device Searches
Learn how to quickly search the items in your inventory for a general range of results.
393

Mobile Device Reports
The data displayed in smart or static group membership lists or mobile device search results can be exported from the JAMF Software Server (JSS) to the following file formats:
�� Comma-separated values file (.csv)
�� Tab delimited text file (.txt)
�� XML file You can change the way the data is organized by basing the export on any of the following inventory items:
�� Mobile devices
�� Mobile device groups
�� Apps
�� Configuration profiles
�� Certificates
�� Provisioning profiles The data is displayed in alphanumeric order by the selected inventory item.
Creating Mobile Device Reports
1. Log in to the JSS with a web browser.
2. Click Mobile Devices at the top of the page.
3. Do one of the following:
�� View mobile device group memberships. (For more information, see Smart Mobile Device Groups or Static Mobile Device Groups.)
�� View simple or advanced mobile device search results. (For more information, see Simple Mobile Device Searches or Advanced Mobile Device Searches.)
Note: You can only create a report from a simple mobile device search if you searched by devices.
4. At the bottom of the list, click Export.
5. Follow the onscreen instructions to export the data. The report downloads immediately.
394

Performing Mass Actions for Mobile Devices
Mass actions allow you to perform potentially tedious tasks for multiple mobile devices at the same time. You can use the JSS to perform the following mass actions:
�� Edit the site.
�� Look up and populate purchasing information from Apple's Global Service Exchange (GSX).
�� Send a mass email to users.
�� Delete the mobile devices from the JSS.
�� Send remote commands. Mass actions can be performed on static or smart group membership lists or mobile device search results.
Mass Editing the Site for Mobile DevicesMass editing the site for mobile devices allows you to add the devices to a site or change the site they belong to.
1. Log in to the JSS with a web browser.
2. Click Mobile Devices at the top of the page.
3. Do one of the following:
�� View mobile device group memberships. (For more information, see Smart Mobile Device Groups or Static Mobile Device Groups.)
�� View simple or advanced mobile device search results. (For more information, see Simple Mobile Device Searches or Advanced Mobile Device Searches.)
Note: You can only perform mass actions from a simple mobile device search if you searched by devices.
4. At the bottom of the list, click Action.
5. Select Edit the Site.
This option is only displayed if there are one or more sites in the JSS. (For more information, see Sites.)
6. Follow the onscreen instructions to edit the site.
395

Mass Looking up and Populating Purchasing Information for Mobile DevicesYou can mass look up purchasing information from Apple’s Global Service Exchange (GSX) and populate the information in the JSS if desired.
This requires a GSX connection set up in the JSS. (For more information, see Integrating with GSX.)
Note: GSX may not always return complete purchasing information. Only the information found in GSX is returned.
1. Log in to the JSS with a web browser.
2. Click Mobile Devices at the top of the page.
3. Do one of the following:
�� View mobile device group memberships. (For more information, see Smart Mobile Device Groups or Static Mobile Device Groups.)
�� View simple or advanced mobile device search results. (For more information, see Simple Mobile Device Searches or Advanced Mobile Device Searches.)
Note: You can only perform mass actions from a simple mobile device search if you searched by devices.
4. At the bottom of the list, click Action.
5. Select Look up Purchasing Information from GSX.
This option is only displayed if there is a GSX connection set up in the JSS.
6. Follow the onscreen instructions to look up and populate the purchasing information.
Sending a Mass Email to Mobile Device UsersYou can send a mass email to users associated with the mobile devices in the JSS. The email is sent to the email address associated with each device.
This requires an SMTP server set up in the JSS. (For more information, see Integrating with an SMTP Server.)
1. Log in to the JSS with a web browser.
2. Click Mobile Devices at the top of the page.
3. Do one of the following:
�� View mobile device group memberships. (For more information, see Smart Mobile Device Groups or Static Mobile Device Groups.)
�� View simple or advanced mobile device search results. (For more information, see Simple Mobile Device Searches or Advanced Mobile Device Searches.)
Note: You can only perform mass actions from a simple mobile device search if you searched by devices.
396

4. At the bottom of the list, click Action.
5. Select Send Email.This option is only displayed if there is an SMTP server set up in the JSS.
6. Follow the onscreen instructions to create and send the email.
Mass Deleting Mobile DevicesYou can mass delete mobile devices from the JSS.
1. Log in to the JSS with a web browser.
2. Click Mobile Devices at the top of the page.
3. Do one of the following:
�� View mobile device group memberships. (For more information, see Smart Mobile Device Groups or Static Mobile Device Groups.)
�� View simple or advanced mobile device search results. (For more information, see Simple Mobile Device Searches or Advanced Mobile Device Searches.)
Note: You can only perform mass actions from a simple mobile device search if you searched by devices.
4. At the bottom of the list, click Action.
5. Select Delete Mobile Devices.
6. Follow the onscreen instructions to delete the mobile devices.
Mass Sending Remote Commands to Mobile DevicesYou can mass send the following remote commands to mobile devices:
�� Clear password.
�� Lock device.
�� Update inventory.
1. Log in to the JSS with a web browser.
2. Click Mobile Devices at the top of the page.
3. Do one of the following:
�� View mobile device group memberships. (For more information, see Smart Mobile Device Groups or Static Mobile Device Groups.)
�� View simple or advanced mobile device search results. (For more information, see Simple Mobile Device Searches or Advanced Mobile Device Searches.)
Note: You can only perform mass actions from a simple mobile device search if you searched by devices.
397

4. At the bottom of the list, click Action.
5. Select Send Commands.
6. Select the remote command to send to mobile devices.
7. Follow the onscreen instructions to send the remote command.
Related InformationFor related information, see the following section in this guide:
Viewing and Editing Inventory Information for a Mobile DeviceFind out how to edit the site, or look up and populate purchasing information for a single mobile device.
398

Viewing and Editing Inventory Information for a Mobile Device
The JAMF Software Server (JSS) stores detailed inventory information for each managed mobile device. You can view and edit this information right from the JSS. The following table describes the information that you can view and edit for each mobile device:
Category Description Editable Fields
General View general information about the mobile device, including mobile device name, site, and management status.
Site
Asset Tag
AirPlay Password (Apple TV only)
User and Location View information about the user assigned to the mobile device, and the mobile device’s physical location.
Assign a user to the mobile device and populate user information from the Users tab. (For more information, see User Assignments.)
Username
Full name
Email address
Phone number
Department
Building
Room
Position
Purchasing View purchasing information, including PO details, warranty information, and purchasing contact.
Look up and populate purchasing information from Apple’s Global Service Exchange (GSX). (This requires a GSX connection set up in the JSS. For more information see Integrating with GSX.)
Purchased or leased
PO number
PO date
Vendor
Warranty expiration
AppleCare ID
Lease expiration
Purchase price
Life expectancy
Purchasing account
Purchasing contact
Extension Attributes
View custom data collected using extension attributes.
All extension attributes
Apps View a list of applications installed on the mobile device.
--
399

Category Description Editable Fields
Security View security information about the mobile device, including data protection, hardware encryption, passcode status, and Activation Lock status.
--
Network View network information about the mobile device, including home carrier network, current carrier network, and phone number.
Certificates View a list of certificates installed on the mobile device.
--
Profiles View a list of profiles installed on the mobile device.
--
Provisioning Profiles
View a list of active services. --
Attachments View a list of files attached to the inventory record.
Upload attachments.
Delete attachments.
--
Viewing Inventory Information for a Mobile Device
1. Log in to the JSS with a web browser.
2. Click Mobile Devices at the top of the page.
3. Perform a simple or advanced mobile device search.
For more information, see Simple Mobile Device Searches or Advanced Mobile Device Searches.
4. Click the mobile device you want to view information for.
If you performed a simple search for an item other than mobile devices, you must click Expand next to an item to view the devices related to that item.
The mobile device’s inventory information is displayed.
5. Use the categories to view information for the mobile device.
Editing Inventory Information for a Mobile Device
1. Log in to the JSS with a web browser.
2. Click Mobile Devices at the top of the page.
3. Perform a simple or advanced mobile device search.
For more information, see Simple Mobile Device Searches or Advanced Mobile Device Searches.
400

4. Click the mobile device you want to edit information for.
If you performed a simple search for an item other than mobile devices, you must click Expand next to an item to view the devices related to that item.
The mobile device’s inventory information is displayed.
5. Select the category that contains the information you want to edit and click Edit.
6. Make changes as needed.
If you are editing purchasing information, you can click Search to look up and populate information from Apple's Global Service Exchange (GSX).
Note: This button is only displayed if you have a GSX connection set up in the JSS.
If you are editing user and location information, the changes are applied in the Users tab. This specified information is also applied in the inventory information for computers, peripherals, and other mobile devices that the user is assigned to. For information on assigning a user to a mobile device or removing a user assignment, see User Assignments.)
7. Click Save.
401

Viewing Management Information for a Mobile Device
The JAMF Software Server (JSS) allows you to view the following management information for each mobile device:
�� Pending management commands
�� iOS configuration profiles
�� Activation Lock bypass code
�� Apps
�� eBooks
�� Group memberships
Viewing the Pending Management Commands for a Mobile DeviceWhen viewing management information for a mobile device, you can view a list of pending management commands for the mobile device. The list includes all pending actions related to the following:
�� Sending iOS remote commands
�� Installing or removing iOS configuration profiles
�� Installing or removing apps
�� Installing or removing Provisioning Profiles
�� Updating inventory You can also cancel a pending management command.
1. Log in to the JSS with a web browser.
2. Click Mobile Devices at the top of the page.
3. Perform a simple or advanced mobile device search.
For more information, see Simple Mobile Device Searches or Advanced Mobile Device Searches.
4. Click the mobile device you want to view pending management commands for.
If you performed a simple search for an item other than mobile devices, you must click Expand next to an item to view the mobile devices related to that item.
5. Click the Management tab.
A list of pending management commands for the mobile device is displayed.
6. To cancel a pending management command, click Cancel for the command.
402

Viewing Configuration Profiles for a Mobile DeviceWhen viewing management information for a mobile device, you can view a list of iOS configuration profiles that have the mobile device in the scope.
1. Log in to the JSS with a web browser.
2. Click Mobile Devices at the top of the page.
3. Perform a simple or advanced mobile device search.
For more information, see Simple Mobile Device Searches or Advanced Mobile Device Searches.
4. Click the mobile device you want to view configuration profiles for.
If you performed a simple search for an item other than mobile devices, you must click Expand next to an item to view the mobile devices related to that item.
5. Click the Management tab, and then click the Configuration Profiles category.
A list of configuration profiles for the mobile device is displayed.
Viewing the Activation Lock Bypass Code for a Mobile DeviceWhen viewing management information for a mobile device, you can view the Activation Lock bypass code for the mobile device. For more information about Activation Lock Bypass, see the following Knowledge Base article:
https://jamfnation.jamfsoftware.com/article.html?id=366
1. Log in to the JSS with a web browser.
2. Click Mobile Devices at the top of the page.
3. Perform a simple or advanced mobile device search.
For more information, see Simple Mobile Device Searches or Advanced Mobile Device Searches.
4. Click the mobile device you want to view the Activation Lock bypass code for.
If you performed a simple search for an item other than mobile devices, you must click Expand next to an item to view the mobile devices related to that item.
5. Click the Management tab, and then click the Activation Lock category.
6. Click Get Activation Lock Bypass Code.
The Activation Lock bypass code is displayed on the pane.
403

Viewing Apps for a Mobile DeviceWhen viewing management information for a mobile device, you can view a list of apps that have the mobile device in the scope.
1. Log in to the JSS with a web browser.
2. Click Mobile Devices at the top of the page.
3. Perform a simple or advanced mobile device search.
For more information, see Simple Mobile Device Searches or Advanced Mobile Device Searches.
4. Click the mobile device you want to view apps for.
If you performed a simple search for an item other than mobile devices, you must click Expand next to an item to view the mobile devices related to that item.
5. Click the Management tab, and then click the Apps category.
A list of apps for the mobile device is displayed.
Viewing eBooks for a Mobile DeviceWhen viewing management information for a mobile device, you can view a list of eBooks that have the mobile device in the scope.
1. Log in to the JSS with a web browser.
2. Click Mobile Devices at the top of the page.
3. Perform a simple or advanced mobile device search.
For more information, see Simple Mobile Device Searches or Advanced Mobile Device Searches.
4. Click the mobile device you want to view eBooks for.
If you performed a simple search for an item other than mobile devices, you must click Expand next to an item to view the mobile devices related to that item.
5. Click the Management tab, and then click the eBooks category.
A list of eBooks for the mobile device is displayed.
Viewing Group Memberships for a Mobile DeviceWhen viewing management information for a mobile device, you can view the smart and static group memberships for the device.
1. Log in to the JSS with a web browser.
2. Click Mobile Devices at the top of the page.
404

3. Perform a simple or advanced mobile device search.
For more information, see Simple Mobile Device Searches or Advanced Mobile Device Searches.
4. Click the mobile device you want to view group memberships for.
If you performed a simple search for an item other than mobile devices, you must click Expand next to an item to view the mobile devices related to that item.
5. Click the Management tab, and then click the Mobile Device Groups category.
A list of smart mobile device group memberships is displayed.
6. To view the static mobile device group memberships, click Static Groups.
A list of static mobile device group memberships is displayed.
Related InformationFor related information, see the following sections in this guide:
�� Viewing Smart Mobile Device Group Memberships
Find out how to view all group memberships for a smart group.
�� Viewing Static Mobile Device Group Memberships
Find out how to view all group memberships for a static group.
405

Viewing the History for a Mobile Device
The JAMF Software Server (JSS) allows you to view the history for each mobile device. The information you can view includes:
�� Management history (completed, pending, and failed management commands)
�� User and location history
�� Completed, pending, and failed app installations
Viewing Management History for a Mobile DeviceThe management history for a mobile device allows you to view lists of completed, pending, and failed management commands for the mobile device. The lists include all actions related to the following:
�� Sending iOS remote commands
�� Installing or removing iOS configuration profiles
�� Installing or removing apps
�� Installing or removing Provisioning Profiles
�� Updating inventory You can also cancel a pending management command.
1. Log in to the JSS with a web browser.
2. Click Mobile Devices at the top of the page.
3. Perform a simple or advanced mobile device search.
For more information, see Simple Mobile Device Searches or Advanced Mobile Device Searches.
4. Click the mobile device you want to view management history for.
If you performed a simple search for an item other than mobile devices, you must click Expand next to an item to view the mobile devices related to that item.
5. Click the History tab.
A list of completed management commands for the mobile device is displayed.
6. To view a list of pending management commands, click Pending Commands.
You can cancel a pending management command by clicking Cancel for the command.
7. To view a list of failed management commands, click Failed Commands.
406

Viewing User and Location History for a Mobile DeviceThe user and location history for a mobile device allows you to view a list of the user and location information associated with the mobile device over time. A record of the current information is added to the list whenever changes are made to the User and Location category in the mobile device’s inventory information.
1. Log in to the JSS with a web browser.
2. Click Mobile Devices at the top of the page.
3. Perform a simple or advanced mobile device search.
For more information, see Simple Mobile Device Searches or Advanced Mobile Device Searches.
4. Click the mobile device you want to view user and location history for.
If you performed a simple search for an item other than mobile devices, you must click Expand next to an item to view the mobile devices related to that item.
5. Click the History tab, and then click the User and Location History category.
User and location history for the mobile device is displayed.
Viewing App Installations for a Mobile DeviceYou can view the completed, pending, and failed app installations for a mobile device. You can also cancel pending app installations.
1. Log in to the JSS with a web browser.
2. Click Mobile Devices at the top of the page.
3. Perform a simple or advanced mobile device search.
For more information, see Simple Mobile Device Searches or Advanced Mobile Device Searches.
4. Click the mobile device you want to view app installation information for.
If you performed a simple search for an item other than mobile devices, you must click Expand next to an item to view the mobile devices related to that item.
5. Click the History tab, and then click the Apps category.
A list of apps installed on the mobile device is displayed.
6. To view a list of apps that are pending installation, click Pending Apps.
You can cancel a pending installation by clicking Cancel for the app.
7. To view a list of apps that failed to install, click Failed Apps.
407
Deleting a Mobile Device from the JSS
You can remove a mobile device from your inventory by deleting it from the JAMF Software Server (JSS). The components installed during enrollment are not removed from the mobile device when it is deleted from the JSS. It is recommended that you unmanage the device before deleting it. (For more information on unmanaging a mobile device, see iOS Remote Commands.)
1. Log in to the JSS with a web browser.
2. Click Mobile Devices at the top of the page.
3. Click Search Inventory.
On a smartphone or iPod touch, this option is in the pop-up menu.
4. Perform a simple or advanced mobile device search.
For more information, see Simple Mobile Device Searches or Advanced Mobile Device Searches.
5. Click the mobile device you want to delete.
If you performed a simple search for mobile device applications, you must click Expand next to an item name to view the mobile devices related to that item.
6. Click Delete, and then click Delete again to confirm.
Related InformationFor related information, see the following section in this guide:
Mass Deleting Mobile DevicesFind out how to mass delete mobile devices from the JSS.
408

Mobile Device Groups
About Mobile Device Groups
Mobile device groups allow you to organize mobile devices that share similar attributes. You can use these groups as a basis for performing advanced inventory searches and configuring the scope of remote management tasks.
There are two kinds of mobile device groups: smart mobile device groups and static mobile device groups. Smart mobile device groups are based on criteria and have dynamic memberships. Static mobile device groups have fixed memberships that you manually assign.
Related InformationFor related information, see the following sections in this guide:
�� Smart Mobile Device Groups
Learn how to create mobile device groups that are based on criteria and have dynamic memberships.
�� Static Mobile Device Groups
Learn how to create mobile device groups that have fixed memberships.
409

Smart Mobile Device Groups
Smart mobile device groups give you a way to organize mobile devices based on one or more attributes, such as last inventory update, model, and username. These groups have dynamic memberships that are updated each time mobile devices contact the JAMF Software Server (JSS).
If there is an SMTP server set up in the JSS, you can enable email notifications for the group. This allows email notifications to be sent to JSS users each time the group membership changes. (For information on setting up an SMTP server and enabling email notifications for JSS user accounts, see Integrating with an SMTP Server and Email Notifications.) After creating a smart mobile device group, you can view its memberships.
Creating a Smart Mobile Device Group
1. Log in to the JSS with a web browser.
2. Click Mobile Devices at the top of the page.
3. Click Smart Mobile Device Groups.
On a smartphone or iPod touch, this option is in the pop-up menu.
4. Click New .
5. Use the Mobile Device Group pane to configure basic settings for the group.
To enable email notifications, select the Send email notification on membership change checkbox.
6. Click the Criteria tab and add criteria to the group: a. Click Add .
b. Click Choose for the criteria you want to add.
To display additional criteria, click Choose for "Other Criteria".
c. Choose an operator from the Operator pop-up menu.
d. Enter a value in the Value field or browse for a value by clicking Browse .
e. Repeat steps a through d to add criteria as needed.
7. Choose an operator from the And/Or pop-up menu(s) to specify the relationships between criteria.
410

8. To group criteria and join multiple operations, choose parentheses from the pop-up menus around the criteria you want to group.
9. Click Save. Operations in the group take place in the order they are listed (top to bottom).
Group memberships are updated each time mobile devices contact the JSS and meet or fail to meet the specified criteria.
To view the group memberships, click View.
Cloning, Editing, or Deleting a Smart Mobile Device Group
1. Log in to the JSS with a web browser.
2. Click Mobile Devices at the top of the page.
3. Click Smart Mobile Device Groups.
On a smartphone or iPod touch, this option is in the pop-up menu.
4. Click the smart mobile device group you want to clone, edit, or delete.
5. Do one of the following:
�� To clone the group, click Clone and make changes as needed. Then click Save.
�� To edit the group, click Edit and make changes as needed. Then click Save.
�� To delete the group, click Delete. Then click Delete again to confirm. The clone, edit, or delete action is applied to mobile devices the next time they contact the JSS.
Viewing Smart Mobile Device Group Memberships
1. Log in to the JSS with a web browser.
2. Click Mobile Devices at the top of the page.
3. Click Smart Mobile Device Groups.
On a smartphone or iPod touch, this option is in the pop-up menu.
411

4. Click the mobile device group you want to view memberships for.
5. Click View. A list of group memberships is displayed.
Related InformationFor related information, see the following sections in this guide:
�� Mobile Device Reports
Find out how to export the data in group membership lists to different file formats.
�� Performing Mass Actions for Mobile Devices
Find out how to perform mass actions on group memberships.
�� Scope
Learn how to configure scope based on mobile device groups.
412

Static Mobile Device Groups
Static mobile device groups give you a way to organize mobile devices by assigning them to a group. These groups have fixed memberships that must be changed manually.
After creating a static mobile device group, you can view its memberships.
Creating a Static Mobile Device Group
1. Log in to the JSS with a web browser.
2. Click Mobile Devices at the top of the page.
3. Click Static Mobile Device Groups.
On a smartphone or iPod touch, this option is in the pop-up menu.
4. Click New .
5. Use the Mobile Device Group pane to configure basic settings for the group.
6. Click the Assignments tab and select the checkbox for each device you want to add.
7. Click Save.
Mobile devices become members of the group the next time they contact the JSS.
To view the group memberships, click View.
Cloning, Editing, or Deleting a Static Mobile Device Group
1. Log in to the JSS with a web browser.
2. Click Mobile Devices at the top of the page.
3. Click Static Mobile Device Groups.
On a smartphone or iPod touch, this option is in the pop-up menu.
4. Click the group you want to clone, edit, or delete.
5. Do one of the following:
�� To clone the group, click Clone and make changes as needed. Then click Save.
�� To edit the group, click Edit and make changes as needed. Then click Save.
�� To delete the group, click Delete. Then click Delete again to confirm. The clone, edit, or delete action is applied to mobile devices the next time they contact the JSS.
413

Viewing Static Mobile Device Group Memberships
1. Log in to the JSS with a web browser.
2. Click Mobile Devices at the top of the page.
3. Click Static Mobile Device Groups.
On a smartphone or iPod touch, this option is in the pop-up menu.
4. Click the mobile device group you want to view memberships for.
5. Click View. A list of group memberships is displayed.
Related InformationFor related information, see the following sections in this guide:
�� Mobile Device Reports
Find out how to export the data in group membership lists to different file formats.
�� Performing Mass Actions for Mobile Devices
Find out how to perform mass actions on group memberships.
�� Scope
Learn how to configure scope based on mobile device groups.
414

Configuration
iOS Configuration Profiles
iOS configuration profiles are XML files (.mobileconfig) that provide an easy way to define settings and restrictions for mobile devices. You can use the JAMF Software Server (JSS) to manually create an iOS configuration profile or upload a configuration profile that was created using Apple’s tools. Before creating a configuration profile, you should have basic knowledge of configuration profile payloads and settings, and how they affect mobile devices. For detailed information about each payload and setting, see Apple’s Profile Manager documentation at:
https://help.apple.com/profilemanager/mac
Some configuration profile settings are unique to the JSS. For more information on these settings, see the following Knowledge Base article:
Configuration Profiles Reference There are two different ways to distribute an iOS configuration profile—install it automatically (requires no interaction from the user) or make it available in the Self Service web clip. You can also specify the mobile devices and users to which the profile should be applied (called “scope”).
Payload Variables for iOS Configuration ProfilesThere are several payload variables that you can use to populate settings in an iOS configuration profile with attribute values stored in the JSS. This allows you to create payloads containing information about each mobile device and user to which you are distributing the profile. To use a payload variable, enter the variable into any text field when creating a profile in the JSS. When the profile is installed on a mobile device, the variable is replaced with the value of the corresponding attribute in the JSS.
415

Variable Mobile Device Information
$DEVICENAME Mobile Device Name
$SERIALNUMBER Serial Number
$UDID UDID
$USERNAME Username
$FULLNAME or $REALNAME Full Name
$EMAIL Email Address
$PHONE Phone Number
$ROOM Room
$POSITION Position
$MACADDRESS MAC Address
$EXTENSIONATTRIBUTE_<#> Value for any LDAP attribute
Note: An $EXTENSIONATTRIBUTE_<#> variable is generated each time you create an extension attribute with the "LDAP Attribute Mapping" input type. For more information, see Mobile Device Extension Attribute Input Types.
Manually Creating an iOS Configuration Profile
1. Log in to the JSS with a web browser.
2. Click Mobile Devices at the top of the page.
3. Click Configuration Profiles.
On a smartphone or iPod touch, this option is in the pop-up menu.
4. Click New .
5. Use the General payload to configure basic settings for the profile, including a distribution method.
6. If you chose to make the profile available in the Self Service web clip, do the following:
a. Choose a Security setting.
b. Click the Self Service Web Clip tab, and specify an icon to display in the Self Service web clip.
c. Click the Options tab to continue configuring the profile.
7. Use the rest of the payloads to configure the settings you want to apply.
8. Click the Scope tab and configure the scope of the profile.
For more information, see Scope.
9. Click Save. The profile is distributed to mobile devices in the scope the next time they contact the JSS.
416

Uploading an iOS Configuration ProfileYou can create an iOS configuration profile by uploading a profile that was created using Apple’s tools.
Note: Some payloads and settings configured with Apple's tools are not displayed in the JSS. Although you cannot view or edit these payloads, they are still applied to mobile devices.
1. Log in to the JSS with a web browser.
2. Click Mobile Devices at the top of the page.
3. Click Configuration Profiles.
On a smartphone or iPod touch, this option is in the pop-up menu.
4. Click Upload and upload the configuration profile (.mobileconfig).
5. Use the General payload to configure basic settings for the profile, including a distribution method.
6. If you chose to make the profile available in the Self Service web clip, do the following:
a. Choose a Security setting.
b. Click the Self Service Web Clip tab, and specify an icon to display in the Self Service web clip.
c. Click the Options tab to continue configuring the profile.
7. Use the rest of the payloads to configure or edit settings as needed.
8. Click the Scope tab and configure the scope of the profile.
For more information, see Scope.
9. Click Save. The profile is distributed to mobile devices in the scope the next time they contact the JSS.
Cloning, Editing, or Deleting an iOS Configuration Profile
1. Log in to the JSS with a web browser.
2. Click Mobile Devices at the top of the page.
3. Click Configuration Profiles.
On a smartphone or iPod touch, this option is in the pop-up menu.
4. Click the configuration profile you want to clone, edit, or delete.
5. Do one of the following:
�� To clone the profile, click Clone and make changes as needed. Then click Save.
�� To edit the profile, click Edit and make changes as needed. Then click Save.
�� To delete the profile, click Delete and then click Delete again to confirm. The clone, edit, or delete action is applied to mobile devices in the scope the next time they contact the JSS.
417

Downloading an iOS Configuration ProfileIf you want to view the contents of an iOS configuration profile for troubleshooting purposes, you can download the profile (.mobileconfig) from the JSS.
1. Log in to the JSS with a web browser.
2. Click Mobile Devices at the top of the page.
3. Click Configuration Profiles.
On a smartphone or iPod touch, this option is in the pop-up menu.
4. Click the configuration profile you want to download.
5. Click Download. The profile downloads immediately.
Related InformationFor related information, see the following sections in this guide:
�� Payload Capabilities for iOS Configuration Profiles
Learn about the payload capabilities of each iOS version.
�� Viewing the Pending Management Commands for a Mobile Device
Find out how to view and cancel pending iOS configuration profile installations and removals for a mobile device.
�� Viewing Configuration Profiles for a Mobile Device
Find out how to view the iOS configuration profiles in the scope for a mobile device.
�� Viewing Management History for a Mobile Device
Find out how to view all completed, pending, and failed iOS configuration profile installations and removals for a mobile device.
418

Payload Capabilities for iOS Configuration Profiles
The Casper Suite can be used to deploy iOS configuration profiles to the following types of mobile devices:
�� iPads with iOS 4 or later
�� iPhones with iOS 4 or later
�� iPod touches with iOS 4 or later
�� Apple TV devices with iOS 7 or later The following table provides an overview of the payload capabilities by iOS version:
Payload iOS 4 iOS 5 iOS 6 iOS 7General 3 3 3 3
Passcode 3 3 3 3
Restrictions1 3 3 3 3
Wi-Fi1 3 3 3 3
VPN1 3 3 3 3
Mail 3 3 3 3
Exchange ActiveSync 3 3 3 3
LDAP 3 3 3 3
Calendar 3 3 3 3
Contacts 3 3 3 3
Subscribed Calendars 3 3 3 3
Web Clips 3 3 3 3
Certificate 3 3 3 3
SCEP 3 3 3 3
APN 3 3
Cellular 3
Single App Mode 3 3
Global HTTP Proxy 3
Single Sign-On 3
AirPlay 3
419

Payload iOS 4 iOS 5 iOS 6 iOS 7AirPrint 3
Font 3
Web Content Filter 3
Notes:1. The Restrictions, Wi-Fi, and VPN payloads have additional settings that are specific to iOS 7. For more
information on these payloads, see Apple’s Configuration Profile Key Reference.
Related InformationFor related information, see the following section in this guide:
iOS Configuration ProfilesLearn about iOS configuration profiles and how to create them.
420

Security Management
iOS Remote Commands
The iOS remote commands available in the JAMF Software Server (JSS) allow you to remotely perform the following tasks on a mobile device:
�� Manage security by locking, wiping, or clearing the passcode on the device.
�� Update inventory.
�� Send a blank push notification.
�� Manage settings for voice or data roaming (only for devices with cellular capability). You can send an iOS remote command to a single mobile device.
Note: The remote commands available for a particular device vary depending on the type of device and the iOS version. For information on the iOS remote commands available by device type and iOS version, see Mobile Device Management Capabilities. The following table describes the iOS remote commands that you can send from the JSS:
iOS Remote Command Description
Update Inventory Prompts the mobile device to contact the JSS and update its inventory
Lock Device Locks the mobile device
(Optional) Displays a message on the mobile device when it locks. This message is only sent if the mobile device has a passcode.
(Optional) Displays a phone number on the mobile device when it locks. The phone number is only displayed if the mobile device has a passcode.
If the mobile device has a passcode, the user must enter it to unlock the device.
Clear Passcode Removes the passcode from the mobile device
If a configuration profile with a Passcode payload is installed on the device, the user is prompted to create a new passcode.
Wipe Device Permanently erases all data on the device and deactivates the device
Note: Wiping a device does not remove the device from the JSS or change its inventory information.
To restore the device to the original factory settings, you must manually reactivate the device.
421

iOS Remote Command Description
Unmanage Device Stops communication between the mobile device and the JSS, which means you can no longer perform management tasks on the device
When you unmanage a device, the following items are removed from the device:
�� MDM profile
�� Device certificate
�� Self Service web clip
�� Any configuration profiles that were distributed with the Casper Suite
�� Any managed apps that were distributed with the Remove app when MDM profile is removed checkbox selected
Note: Although an unmanaged device can no longer submit inventory, its inventory record remains in the JSS.
Send Blank Push Sends a blank push notification, prompting the device to check in with Apple Push Notification service (APNs)
Enable Voice Roaming
Disable Voice Roaming
Enable Data Roaming
Disable Data Roaming
Enables/disables voice or data roaming on the device
Note: Disabling voice roaming automatically disables data roaming.
Sending an iOS Remote CommandLog in to the JSS with a web browser.
1. Click Mobile Devices at the top of the page.
2. Perform a simple or advanced mobile device search.
For more information, see Simple Mobile Device Searches or Advanced Mobile Device Searches.
3. Click the mobile device you want to send the iOS remote command to.
If you performed a simple search for an item other than mobile devices, you must click Expand next to an item to view the devices related to that item.
4. Click the Management tab, and then click the button for the remote command that you want to send.
If you are sending a Lock Device command, enter a lock message and phone number if desired, and then click Lock Mobile Device. The remote command runs on the mobile device the next time the device contacts the JSS.
422

Viewing the Status of iOS Remote Commands
1. Log in to the JSS with a web browser.
2. Click Mobile Devices at the top of the page.
3. Perform a simple or advanced mobile device search.
For more information, see Simple Mobile Device Searches or Advanced Mobile Device Searches.
4. Click the mobile device you want to view iOS remote commands for.
If you performed a simple search for an item other than mobile devices, you must click Expand next to an item to view the devices related to that item.
5. Click the History tab.
6. Use the Management History pane to view completed, pending, or failed commands.
Canceling an iOS Remote Command
1. Log in to the JSS with a web browser.
2. Click Mobile Devices at the top of the page.
3. Perform a simple or advanced mobile device search.
For more information, see Simple Mobile Device Searches or Advanced Mobile Device Searches.
4. Click the mobile device for which you want to cancel an iOS remote command.
If you performed a simple search for an item other than mobile devices, you must click Expand next to an item to view the devices related to that item.
5. Click the History tab, and then click Pending Commands.
6. Find the command you want to cancel, and click Cancel across from it.
423

Self Service
Self Service Web Clip
The Self Service web clip allows you to distribute iOS configuration profiles, apps, eBooks, and updated MDM profiles to mobile devices for users to install. Users tap the web clip to browse and install items using an interface similar to the App Store.
By default, the Self Service web clip is installed on all managed mobile devices except Apple TV devices.
Configuring the Self Service Web Clip SettingsThe Self Service Web Clip settings in the JSS allow you to do the following:
�� Install or uninstall the Self Service web clip on managed mobile devices.
�� Require users to log in to the Self Service web clip with an LDAP directory account.
�� Display or hide the Install All button for in-house apps.
�� Display the following updates in the Self Service web clip:
• MDM profile updates
• App Store app updates
• In-house app updates
1. Log in to the JSS with a web browser.
2. In the top-right corner of the page, click Settings .
3. Click Mobile Device Management.
On a smartphone or iPod touch, this option is in the pop-up menu.
4. Click Self Service Web Clip .
5. Click Edit.
6. Configure the settings on the pane.
7. Click Save. The changes are applied the next time mobile devices contact the JSS.
424

Related InformationFor related information, see the following sections in this guide:
�� Integrating with LDAP Directory Services
Find out how to add an LDAP server to the JSS so you can require users can log in to the Self Service web clip using their LDAP directory accounts.
�� iOS Configuration Profiles
Find out how to make iOS configuration profiles available in the Self Service web clip.
�� App Store Apps
Find out how to make App Store apps available in the Self Service web clip.
�� In-House Apps
Find out how to make in-house apps available in the Self Service web clip.
�� eBooks Available in the iBookstore
Find out how to make iBookstore eBooks available in the Self Service web clip.
�� In-House eBooks
Find out how to make in-house eBooks available in the Self Service web clip.
For related information, see the following Knowledge Base articles:
�� Customizing the Self Service Web Clip Icon
Find out how to display a custom icon for the Self Service web clip.
�� Distributing Updated MDM Profiles
Find out why you may want to make updated MDM profiles available in the Self Service web clip and how to do so.
425

App Distribution
Understanding Managed Apps
When an app is managed by the JAMF Software Server (JSS), you have more control over distribution and removal of the app, as well as the backup of app data. The following table provides more detail:
Unmanaged apps Managed appsDistribution Methods
Make available in Self Service web clip 3 3
Prompt users to install 3
Removal Options
Remove from Self Service web clip 3 3
Remove from mobile devices 3
Remove when MDM profile is removed 3
Backup of App Data
Prevent backup of app data 3
Managed App RequirementsThere are two factors that determine whether an app can be managed by the JSS:
�� Whether users have to pay for the app
The app must be free or paid for by the organization using Apple's Volume Purchase Program (VPP). For more information on VPP, visit one of the following websites:
• Volume Purchase Program for Business
https://www.apple.com/business/vpp/
• Volume Purchase Program for Education
https://www.apple.com/education/volume-purchase-program/
�� The mobile devices to which you distribute the app
426

Mobile devices must have iOS 5 or later and an MDM profile that supports managed apps.
Mobile devices that have iOS 5 or later when they are enrolled with the JSS automatically obtain an MDM profile that supports managed apps. Managed iOS 4 devices that are upgraded to iOS 5 or later do not obtain this profile. For instructions on distributing an updated MDM profile that supports managed apps, see the following Knowledge Base article:
Distributing Updated MDM Profiles If you try to make an app managed but these requirements are not met, the app behaves as unmanaged.
427

Understanding App Distribution Methods
The JAMF Software Server (JSS) provides two app distribution methods: install the app automatically/prompt users to install the app, or make the app available in the Self Service web clip.
Install Automatically/Prompt Users to InstallWhen you distribute an app using this method, it is managed by the JSS when possible. (For more information, see Managed App Requirements.)
To distribute an app using this method, the app must be free or paid for by the organization using Apple’s Volume Purchase Program (VPP).
The app is installed automatically if the following conditions are met:
�� The device has iOS 7 or later.
�� The device is supervised.
Note: For more information on supervision, see Apple’s documentation at:
http://help.apple.com/configurator/mac/1.0/#cadee170260
�� The user is signed in to the iTunes Store on the device.
�� The App Store has not been disabled on the device.
�� The device is not configured to require an Apple ID password for all purchases.
�� If the app wasn't assigned to the user for VPP-managed distribution, the user has recently authorized an iTunes Store purchase on the device, or the user's Apple ID has previously been used to install the app.
If these conditions are not met, users are prompted to install the app.
Make Available in Self Service Web ClipWhen you distribute an app using this method, you can choose whether or not to make the app managed when possible. (For more information, see Managed App Requirements.)
Related InformationFor related information, see the following sections in this guide:
�� In-House Apps
Find out how to distribute in-house apps.
�� App Store Apps
Find out how to distribute App Store apps.
�� Understanding Managed Apps
Learn about managed apps and their requirements.
428

Provisioning Profiles
Provisioning profiles (.mobileprovision) authorize the use of in-house apps. For an in-house app to work, the provisioning profile that authorizes it must be installed on mobile devices.
If the provisioning profile that authorizes an in-house app is not bundled in the app archive (.ipa) file, you must upload the profile to the JAMF Software Server (JSS) before distributing the app.
Uploading a Provisioning Profile
1. Log in to the JSS with a web browser.
2. Click Mobile Devices at the top of the page.
3. Click Provisioning Profiles.
On a smartphone or iPod touch, this option is in the pop-up menu.
4. Click Upload and upload the provisioning profile.
5. Enter a display name for the profile.
6. Click Save.
Editing or Deleting a Provisioning ProfileIf a provisioning profile expires, you can edit the provisioning profile record in the JSS and replace the existing profile with the new version.
Deleting a provisioning profile removes it from mobile devices that have it installed.
1. Log in to the JSS with a web browser.
2. Click Mobile Devices at the top of the page.
3. Click Provisioning Profiles.
On a smartphone or iPod touch, this option is in the pop-up menu.
4. Click the provisioning profile you want to edit or delete.
5. Do one of the following:
�� To edit the profile, click Edit and upload the new profile. Then click Save.
�� To delete the profile, click Delete and then click Delete again to confirm. The edit or delete action is applied to mobile devices with the profile installed the next time they contact the JSS.
429

Downloading a Provisioning ProfileIf you no longer have access to the original .mobileprovision file for a provisioning profile in the JSS, you can download it from the JSS.
1. Log in to the JSS with a web browser.
2. Click Mobile Devices at the top of the page.
3. Click Provisioning Profiles.
On a smartphone or iPod touch, this option is in the pop-up menu.
4. Click the provisioning profile you want to download.
5. Click Download. The profile is downloaded immediately.
Related InformationFor related information, see the following sections in this guide:
�� In-House Apps
Find out how to distribute an in-house app and its provisioning profile.
�� Viewing and Editing Inventory Information for a Mobile Device
You can view the provisioning profiles installed on a mobile device by viewing the device's inventory information in the JSS.
�� Viewing the Pending Management Commands for a Mobile Device
Find out how to view and cancel pending provisioning profile installations and removals for a mobile device.
�� Viewing Management History for a Mobile Device
Find out how to view the completed, pending, and failed provisioning profile installations and removals for a mobile device.
430

In-House Apps
In-house apps are enterprise apps developed through Apple’s iOS Developer Enterprise Program. The JAMF Software Server (JSS) allows you to distribute in-house apps to mobile devices. After an app has been distributed, you can also use the JSS to distribute an update or remove the app from mobile devices.
For more information on Apple’s iOS Developer Enterprise Program or to register, visit the following website:
https://developer.apple.com/programs/ios/enterprise/ Before you distribute an in-house app, it is important to consider where the app will be hosted. There are three hosting locations you can use for in-house apps:
�� Distribution points—If your master distribution point is a JDS instance or the cloud distribution point, you can use the JSS to upload the app to the master distribution point.
Note: Apps cannot be replicated to file share distribution points.
�� jamfsoftware database—If your master distribution point is a file share distribution point, you can use the JSS to upload the app and host it in the jamfsoftware database.
�� Web server—To use this location, the app must be hosted on a web server before you distribute it. Then, when you distribute the app, you specify the URL where it is hosted.
If your master distribution point is a file share distribution point, it is recommended that you host large apps on a web server.
When you distribute an in-house app, you configure settings for the app, such as the hosting location, distribution method, and whether to make the app managed. (For more information, see Understanding App Distribution Methods and Understanding Managed Apps.) Then, you specify the users and mobile devices that should receive it (called “scope”).
Managed App ConfigurationYou can configure preferences and settings in the JSS for a managed app before distributing it to mobile devices. There are also several variables that you can use to populate settings in a managed app with attribute values stored in the JSS. This allows you to create preferences containing information about each mobile device and user to which you are distributing the app. When the app is installed on a mobile device, the variable is replaced with the value of the corresponding attribute in the JSS.
Variable Mobile Device Information
$DEVICENAME Mobile Device Name
$SERIALNUMBER Serial Number
$UDID UDID
431

Variable Mobile Device Information
$USERNAME Username
$FULLNAME or $REALNAME Full Name
$EMAIL Email Address
$PHONE Phone Number
$ROOM Room
$POSITION Position
$MACADDRESS MAC Address
$JSSID JSS ID
RequirementsTo distribute an in-house app, you need:
�� The bundle identifier for the app (located in the PLIST file for the app)
�� The archived app file (.ipa) or the URL where the app is hosted on a web server
Note: If you are hosting the app from a web server, the MIME type for the archived app file must be "/application/octet-stream".
�� The provisioning profile (.mobileprovision) uploaded to the JSS or bundled in the archived app file (For more information, see Provisioning Profiles.)
Managed App Configuration only applies to mobile devices with iOS 7 or later.
Per-App VPN connections are only applied to mobile devices with iOS 7 or later.
Distributing an In-House App
1. Log in to the JSS with a web browser.
2. Click Mobile Devices at the top of the page.
3. Click Apps.
On a smartphone or iPod touch, this option is in the pop-up menu.
4. Click New .
5. Select In-house app and click Next.
6. Use the General pane to configure settings for the app, including the distribution method and hosting location.
If you choose "Distribution Points" or "jamfsoftware database" from the Hosting Location pop-up menu, be sure to upload the archived app file.
432

7. Click the Scope tab and configure the scope of the app.
For more information, see Scope.
8. (Optional) Click the Self Service Web Clip tab and configure the way the app is displayed in the Self Service web clip.
Note: The Self Service Web Clip tab is only displayed if "Make Available in Self Service Web Clip" is chosen in the Distribution Method pop-up menu.
9. (Optional) Click the App Configuration tab and configure the preferences as needed.
Note: The App Configuration tab is only displayed if the Manage app when possible checkbox is selected.
10. Click Save. The app is distributed the next time mobile devices in the scope contact the JSS.
Cloning, Editing, or Deleting an In-House App
1. Log in to the JSS with a web browser.
2. Click Mobile Devices at the top of the page.
3. Click Apps.
On a smartphone or iPod touch, this option is in the pop-up menu.
4. Click the app you want to clone, edit, or delete.
5. Do one of the following:
�� To clone the app, click Clone and make changes as needed. Then click Save.
�� To edit the app, click Edit and make changes as needed. Then click Save.
�� To delete the app, click Delete and then click Delete again to confirm. The clone, edit, or delete action is applied to mobile devices in the scope the next time they contact the JSS.
Distributing an In-House App Update
1. Log in to the JSS with a web browser.
2. Click Mobile Devices at the top of the page.
3. Click Apps.
On a smartphone or iPod touch, this option is in the pop-up menu.
4. Click the app you want to update.
433

5. Do one of the following:
�� To distribute an update for an in-house app that is hosted on a web server, upload the new archived app file to the web server and update app URL.
�� To distribute an update for an in-house app that is hosted on distribution points or in the jamfsoftware database, upload the new archived app file using the JSS.
6. Enter the new version number for the app.
Important: Do not change the bundle identifier. The JSS uses the existing bundle identifier to distribute the update.
7. Click Save. The update is distributed the next time mobile devices in the scope contact the JSS.
Removing an In-House App from Mobile DevicesTo remove an in-house app from one or more devices, you remove the mobile device(s) from the scope.
1. Log in to the JSS with a web browser.
2. Click Mobile Devices at the top of the page.
3. Click Apps.
On a smartphone or iPod touch, this option is in the pop-up menu.
4. Click the app you want to remove.
5. Click the Scope tab and remove mobile devices from the scope as needed.
For more information, see Scope.
6. Click Save. The app is removed the next time the mobile devices contact the JSS.
Related InformationFor related information, see the following sections in this guide:
�� App Store Apps
Find out how to distribute, update, and remove App Store apps.
�� Viewing Apps for a Mobile Device
Find out how to view the apps in the scope of a mobile device.
�� Viewing the Pending Management Commands for a Mobile Device
Find out how to view and cancel pending app installations and removals for a mobile device.
434

�� Viewing App Installations for a Mobile Device
Find out how to view the completed, pending, and failed app installations for a mobile device. Also, find out how to cancel pending app installations.
�� iOS Configuration Profiles
You can create an iOS configuration profile with a Per-App VPN connection. For related information, see the following Knowledge Base article:
Hosting In-House eBooks and Apps on a Tomcat InstanceFind out how to hosting in-house apps on the Tomcat instance that hosts the JSS.
435

App Store Apps
The JAMF Software Server (JSS) allows you to distribute App Store apps to mobile devices. After an app has been distributed, you can also use the JSS to distribute an update or remove the app from mobile devices.
When you distribute an App Store app, you add it to the JSS and configure settings for the app, such as the distribution method and whether to make the app managed. (For more information, see Understanding App Distribution Methods and Understanding Managed Apps.) Then, you specify the users and mobile devices that should receive it (called “scope”).
VPP CodesWhen you distribute an App Store app, you can also associate Volume Purchase Program (VPP) codes with the app and track their redemption.
Note: The JSS also supports VPP-managed distribution, which involves VPP assignments instead of VPP codes. For more information, see VPP Assignments. For more information on VPP, visit one of the following websites:
�� Volume Purchase Program for Business
https://www.apple.com/business/vpp/
�� Volume Purchase Program for Education
https://www.apple.com/education/volume-purchase-program/
Managed App ConfigurationYou can configure preferences and settings in the JSS for a managed app before distributing it to mobile devices. There are also several variables that you can use to populate settings in a managed app with attribute values stored in the JSS. This allows you to create preferences containing information about each mobile device and user to which you are distributing the app. When the app is installed on a mobile device, the variable is replaced with the value of the corresponding attribute in the JSS.
Variable Mobile Device Information
$DEVICENAME Mobile Device Name
$SERIALNUMBER Serial Number
$UDID UDID
436
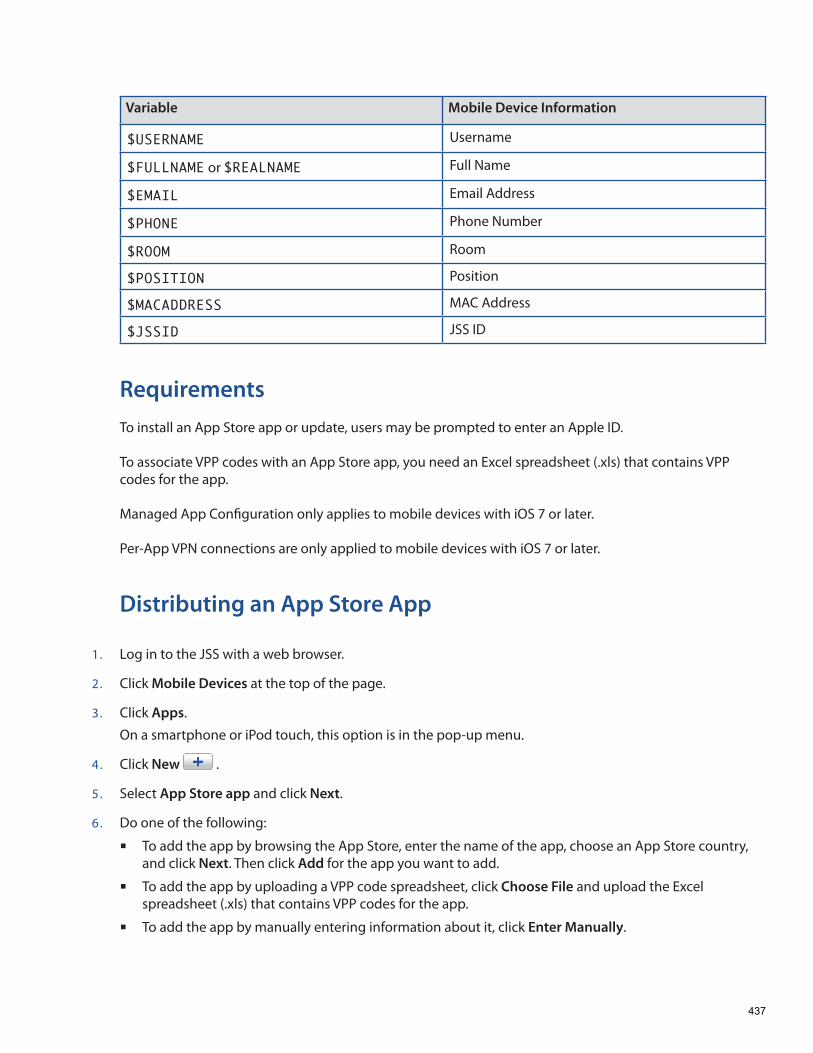
Variable Mobile Device Information
$USERNAME Username
$FULLNAME or $REALNAME Full Name
$EMAIL Email Address
$PHONE Phone Number
$ROOM Room
$POSITION Position
$MACADDRESS MAC Address
$JSSID JSS ID
RequirementsTo install an App Store app or update, users may be prompted to enter an Apple ID.
To associate VPP codes with an App Store app, you need an Excel spreadsheet (.xls) that contains VPP codes for the app. Managed App Configuration only applies to mobile devices with iOS 7 or later. Per-App VPN connections are only applied to mobile devices with iOS 7 or later.
Distributing an App Store App
1. Log in to the JSS with a web browser.
2. Click Mobile Devices at the top of the page.
3. Click Apps.
On a smartphone or iPod touch, this option is in the pop-up menu.
4. Click New .
5. Select App Store app and click Next.
6. Do one of the following:
�� To add the app by browsing the App Store, enter the name of the app, choose an App Store country, and click Next. Then click Add for the app you want to add.
�� To add the app by uploading a VPP code spreadsheet, click Choose File and upload the Excel spreadsheet (.xls) that contains VPP codes for the app.
�� To add the app by manually entering information about it, click Enter Manually.
437

7. Use the General pane to configure settings for the app, including the distribution method and whether to make the app managed.
8. Click the Scope tab and configure the scope of the app.
For more information, see Scope.
9. (Optional) Click the Self Service Web Clip tab and configure the way the app is displayed in the Self Service web clip.
Note: The Self Service Web Clip tab is only displayed if "Make Available in Self Service Web Clip" is chosen in the Distribution Method pop-up menu.
10. (Optional) If you have not already uploaded a VPP code spreadsheet, click the VPP Codes tab and upload the Excel spreadsheet (.xls) that contains VPP codes for the app.
Note: The VPP Codes tab is only displayed if the Free checkbox is not selected.
11. (Optional) Click the App Configuration tab and configure the preferences as needed.
Note: The App Configuration tab is only displayed if the Manage app when possible checkbox is selected.
12. Click Save. The app is distributed the next time mobile devices in the scope contact the JSS.
Cloning, Editing, or Deleting an App Store App
1. Log in to the JSS with a web browser.
2. Click Mobile Devices at the top of the page.
3. Click Apps.
On a smartphone or iPod touch, this option is in the pop-up menu.
4. Click the app you want to clone, edit, or delete.
5. Do one of the following:
�� To clone the app, click Clone and make changes as needed. Then click Save.
�� To edit the app, click Edit and make changes as needed. Then click Save.
�� To delete the app, click Delete and then click Delete again to confirm. The clone, edit, or delete action is applied to mobile devices in the scope the next time they contact the JSS.
438

Distributing an App Store App UpdateTo distribute an update for an App Store app, you update the version number and URL for the app in the JSS.
1. Log in to the JSS with a web browser.
2. Click Mobile Devices at the top of the page.
3. Click Apps.
On a smartphone or iPod touch, this option is in the pop-up menu.
4. Click the app you want to update.
5. Enter the new version number and URL.
Important: Do not change the bundle identifier. The JSS uses the existing bundle identifier to distribute the update.
6. Click Save. The update is distributed the next time mobile devices in the scope contact the JSS.
Removing an App Store App from Mobile DevicesTo remove an App Store app from one or more devices, you remove the mobile device(s) from the scope.
1. Log in to the JSS with a web browser.
2. Click Mobile Devices at the top of the page.
3. Click Apps.
On a smartphone or iPod touch, this option is in the pop-up menu.
4. Click the app you want to remove.
5. Click the Scope tab and remove mobile devices from the scope as needed.
For more information, see Scope.
6. Click Save. The app is removed the next time the mobile devices contact the JSS.
439

Related InformationFor related information, see the following sections in this guide:
�� In-House Apps
Find out how to distribute, update, and remove in-house apps.
�� Viewing and Editing Inventory Information for a Mobile Device
You can view the apps installed on a mobile device by viewing the device's inventory information in the JSS.
�� Viewing Apps for a Mobile Device
Find out how to view the apps in the scope of a mobile device.
�� Viewing the Pending Management Commands for a Mobile Device
Find out how to view and cancel pending app installations and removals for a mobile device.
�� Viewing App Installations for a Mobile Device
Find out how to view the completed, pending, and failed app installations for a mobile device. Also, find out how to cancel pending app installations.
�� iOS Configuration Profiles
You can create an iOS configuration profile with a Per-App VPN connection.
440

eBook Distribution
In-House eBooks
In-house eBooks are eBooks that are not available from the iBookstore. The JAMF Software Server (JSS) allows you to distribute in-house eBooks to mobile devices. Distributing an eBook displays it in the Self Service web clip for users to install. After users install an eBook, they can view it with Apple’s iBooks app.
Before you distribute an in-house eBook, it is important to consider where the eBook will be hosted. There are two hosting locations that you can use for in-house eBooks:
�� Distribution points—This hosting location is only available if your master distribution point is a JDS instance or the cloud distribution point. To use this hosting location, you upload the eBook to the master distribution point when configuring settings for the eBook in the JSS.
Note: eBooks cannot be replicated to file share distribution points.
�� Web server—This hosting location is always available, regardless of what type of distribution point the master is. To use this hosting location, the eBook must be hosted on a web server before you distribute it. Then, when you distribute the eBook, you specify the URL where it is hosted.
When you distribute an in-house eBook, you configure settings for the eBook. Then, you specify the users and mobile devices that should receive it (called “scope”).
RequirementsTo distribute an in-house eBook, the eBook must be one of the following types of files:
�� ePub file (.epub)
�� iBooks file (.ibooks)
�� PDF Installing an ePub file requires a mobile device with iOS 4 or later and iBooks 1.0 or later. Installing an iBooks file requires an iPad with iOS 5 or later and iBooks 2.0 or later.
441

Distributing an In-House eBook
1. Log in to the JSS with a web browser.
2. Click Mobile Devices at the top of the page.
3. Click eBooks.
On a smartphone or iPod touch, this option is in the pop-up menu.
4. Click New .
5. Select In-house eBook and click Next.
6. Use the General pane to configure settings for the app, including the display name.
If your master distribution point is a JDS instance or the cloud distribution point and you choose "Distribution Points" from the Hosting Location pop-up menu, be sure to upload the eBook file.
7. Click the Scope tab and configure the scope of the eBook.
For more information, see Scope.
8. Click the Self Service Web Clip tab and configure the way the eBook is displayed in the Self Service web clip.
9. Click Save. The eBook is distributed the next time mobile devices in the scope contact the JSS.
Cloning, Editing, or Deleting an In-House eBook
1. Log in to the JSS with a web browser.
2. Click Mobile Devices at the top of the page.
3. Click eBooks.
On a smartphone or iPod touch, this option is in the pop-up menu.
4. Click the eBook you want to clone, edit, or delete.
5. Do one of the following:
�� To clone the eBook, click Clone and make changes as needed. Then click Save.
�� To edit the eBook, click Edit and make changes as needed. Then click Save.
�� To delete the eBook, click Delete and then click Delete again to confirm. The clone, edit, or delete action is applied to mobile devices in the scope the next time they contact the JSS.
442

Related InformationFor related information, see the following sections in this guide:
�� eBooks Available in the iBookstore
Find out how to distribute eBooks that are available in the iBookstore.
�� Viewing eBooks for a Mobile Device
Find out how to view the eBooks in the scope of a mobile device. For related information, see the following Knowledge Base article:
Hosting In-House eBooks and Apps on a Tomcat InstanceFind out how to hosting in-house eBooks on the Tomcat instance that hosts the JSS.
443

eBooks Available in the iBookstore
The JAMF Software Server (JSS) allows you to distribute eBooks that are available in the iBookstore. Distributing an eBook displays it in the Self Service web clip for users to install. After users install an eBook, they can view it using Apple’s iBooks app.
When you distribute an eBook available in the iBookstore, you add it to the JSS and configure settings for the eBook. Then, you specify the users and mobile devices that should receive it (called “scope”).
Note: Teachers can also distribute eBooks (ePub format only) to classes using Casper Focus v9.1 or later. This automatically adds the eBook to the JSS and distributes the eBook to the student mobile devices in the class(es) that the teacher specifies. For more information on Casper Focus features, see the Casper Focus User Guide. This guide is available at:
http://www.jamfsoftware.com/product-documentation/administrators-guides
VPP CodesWhen you distribute an eBook available in the iBookstore, you can also associate Volume Purchase Program (VPP) codes with the eBook and track their redemption.
Note: The JSS also supports VPP-managed distribution, which involves VPP assignments instead of VPP codes. For more information, see VPP Assignments. For more information on VPP, visit one of the following websites:
�� Volume Purchase Program for Business
https://www.apple.com/business/vpp/
�� Volume Purchase Program for Education
https://www.apple.com/education/volume-purchase-program/
RequirementsTo distribute an eBook available in the iBookstore, the eBook must be an ePub file (.epub) or iBooks file (.ibooks). Installing an ePub file requires a mobile device with iOS 4 or later and iBooks 1.0 or later. Installing an iBooks file requires an iPad with iOS 5 or later and iBooks 2.0 or later.
444

Distributing an eBook Available in the iBookstore
1. Log in to the JSS with a web browser.
2. Click Mobile Devices at the top of the page.
3. Click eBooks.
On a smartphone or iPod touch, this option is in the pop-up menu.
4. Click New .
5. Select eBook available in the iBookstore and click Next.
6. Do one of the following:
�� To add the eBook by browsing the iBookstore, enter the name of the eBook, choose an iBookstore country, and click Next. Then click Add for the eBook you want to add.
�� To add the eBook by uploading a VPP code spreadsheet, click Choose File and upload the Excel spreadsheet (.xls) that contains VPP codes for the eBook.
�� To add the eBook by manually entering information about it, click Enter Manually.
Note: iBooks files (.ibooks) may need to be added manually.
7. Use the General pane to configure distribution settings for the eBook, including the display name.
8. Click the Scope tab and configure the scope of the eBook.
For more information, see Scope.
9. Click the Self Service Web Clip tab and configure the way the eBook is displayed in the Self Service web clip.
10. (Optional) If you have not already uploaded a VPP code spreadsheet, click the VPP Codes tab and upload the Excel spreadsheet (.xls) that contains VPP codes for the eBook.
Note: The VPP Codes tab is only displayed if the Free checkbox is not selected.
11. Click Save. The eBook is distributed the next time mobile devices in the scope contact the JSS.
Cloning, Editing, or Deleting an eBook Available in the iBookstore
1. Log in to the JSS with a web browser.
2. Click Mobile Devices at the top of the page.
3. Click eBooks.
On a smartphone or iPod touch, this option is in the pop-up menu.
4. Click the eBook you want to clone, edit, or delete.
445

5. Do one of the following:
�� To clone the eBook, click Clone and make changes as needed. Then click Save.
�� To edit the eBook, click Edit and make changes as needed. Then click Save.
�� To delete the eBook, click Delete and then click Delete again to confirm. The clone, edit, or delete action is applied to mobile devices in the scope the next time they contact the JSS.
Related InformationFor related information, see the following sections in this guide:
�� In-House eBooks
Find out how to distribute in-house eBooks.
�� Viewing eBooks for a Mobile Device
Find out how to view the eBooks in the scope of a mobile device.
446

Casper Focus
About Casper Focus
Casper Focus is designed to be used by teachers in the classroom. It gives teachers control over the devices used during class time by allowing the teacher to “focus” the devices on a single app or website. Focusing a device locks it on the app or website, preventing students from accessing any other screens or content on the device. In addition to focusing student devices, teachers can also perform the following actions in Casper Focus:
�� Clear passcodes on student devices.
�� Use AirPlay Mirroring to show the screen of a student device on Apple TV.
�� Distribute eBooks (ePub format only) so that students can install the eBooks on their devices from the Self Service web clip.
Casper Focus is available for free from the App Store.
Related InformationFor related information, see the following sections in this guide:
�� Preparing to Use Casper Focus
Learn how to prepare Casper Focus for teachers to use in the classroom.
�� Classes
Learn how to create classes in the JSS so teachers can control student devices using Casper Focus.
For instructions on how to use Casper Focus in the classroom, see the Casper Focus User Guide. This guide is available at:
http://www.jamfsoftware.com/product-documentation/administrators-guides
447

Preparing to Use Casper Focus
Before teachers can use Casper Focus, you need to prepare it for use in the classroom.
Device RequirementsYou must ensure that teacher and student mobile devices meet the minimum requirements for use, as well as the feature-specific device requirements for each Casper Focus feature that teachers plan to use.
Minimum Device Requirements
Teacher device:
�� iPad, iPhone, or iPod touch with iOS 6 or later Student device:
�� iPad, iPhone, or iPod touch with iOS 5.1.1 or later
�� Managed by the Casper Suite v8.7 or later
Feature-Specific Device Requirements
The following table shows the feature-specific device requirements that must be met to perform Casper Focus actions on student mobile devices. These requirements are in addition to the minimum device requirements.
Student Device Requirements Other Requirements
Focus on App • iOS 6 or later
• Supervised by Apple Configurator
--
Focus on Website • iOS 7 or later
• Supervised by Apple Configurator
• Managed by the Casper Suite v9.3 or later
--
Clear Passcodes (Minimum requirements only) --Mirror Device on Apple TV • iOS 7 or later
• Managed by the Casper Suite v9.1 or later
Apple TV with iOS 7 or later, managed by the Casper Suite v9.1 or later
Distribute eBooks • Managed by the Casper Suite v9.1 or later
• Self Service web clip installed
• For students to install an eBook (ePub format only) that was distributed using Casper Focus, the student device must have iBooks 1.0 or later
--
For more information on Casper Focus features, see the Casper Focus User Guide. This guide is available at:
http://www.jamfsoftware.com/product-documentation/administrators-guides
448

Before Using Casper FocusIn addition to ensuring that mobile devices meet the requirements for using Casper Focus, you also need to perform the following tasks to allow teachers to use Casper Focus:
�� Create classes in the JSS—The classes you create in the JAMF Software Server (JSS) allow teachers to use Casper Focus to control student devices during class time. (For more information, see Classes.)
�� Preconfigure the connection to the JSS—Casper Focus must be able to connect to the JSS to work. To do this, the JSS URL setting in Casper Focus must be populated with the JSS URL. With this setting preconfigured, teachers can log in and use Casper Focus without having to manually configure the JSS URL themselves.
For more information on preconfiguring the JSS URL, see the following Knowledge Base article:
Configuring Server Settings for Casper Focus
�� (Optional) Add an LDAP server to the JSS—Integrating with an LDAP directory service allows teachers to log in to Casper Focus using the username and password for their LDAP directory account. (For more information, see Integrating with LDAP Directory Services.)
If you do not have an LDAP server set up in the JSS, teachers can log in to Casper Focus with a JSS user account.
�� Check Web Content Filter payload settings—If you currently use the Web Content Filter payload in an iOS configuration profile to limit student devices to specific websites only, you need to ensure that the payload’s Specific Websites list includes the URLs of any websites that teachers will focus student devices on.
�� Specify AirPlay passwords for Apple TV devices—If teachers will be mirroring student devices on Apple TV using Casper Focus and the Apple TV devices are configured with AirPlay passwords, you will need to specify the AirPlay password for each Apple TV by editing its inventory information in the JSS. (For more information, see Viewing and Editing Inventory Information for a Mobile Device.)
449

Classes
For a teacher to control student devices using Casper Focus, a class that specifies the teacher(s), student devices, and meeting times of the class (optional) must exist in the JSS. When you create a class, you specify the following information:
�� A display name for the class
�� The username for each teacher
Teacher usernames can be usernames for JSS user accounts or, if you have an LDAP server set up in the JSS, LDAP directory accounts. (For more information on setting up an LDAP server, see Integrating with LDAP Directory Services.)
�� The method to use to assign student devices to the class
You can use the username associated with each student’s mobile device, or a smart or static mobile device group that contains the devices used in the class.
�� The student devices to assign to the class
�� (Optional) Meeting times for the class (times/days that the class takes place)
Specifying meeting times allows teachers to access the class in Casper Focus during the scheduled meeting times only.
�� (Optional) Apple TV devices to assign to the class
With one or more Apple TV devices assigned to a class, the teacher can use AirPlay Mirroring to show the screen of a student device on Apple TV.
After you create a class in the JSS, the teacher assigned to the class can log in to Casper Focus and control the student devices in that class.
Creating a Class
1. Log in to the JSS with a web browser.
2. Click Mobile Devices at the top of the page.
3. Click Classes.
On a smartphone or iPod touch, this option is in the pop-up menu.
4. Click New .
5. Use the General pane to configure settings for the class, such as the teacher usernames, method, and student devices.
6. (Optional) Click the Meeting Times tab and specify the times and days the class meets.
7. (Optional) Click the Apple TV tab and add targets to assign Apple TV devices to the class.
8. Click Save.
450

Cloning, Editing, or Deleting a Class
1. Log in to the JSS with a web browser.
2. Click Mobile Devices at the top of the page.
3. Click Classes.
On a smartphone or iPod touch, this option is in the pop-up menu.
4. Click the class you want to clone, edit, or delete.
5. Do one of the following:
�� To clone the class, click Clone and make changes as needed. Then click Save.
�� To edit the class, click Edit and make changes as needed. Then click Save.
�� To delete the class, click Delete. Then click Delete again to confirm. The clone, edit, or delete action is applied to Casper Focus the next time the app is launched or the Classes are refreshed in the sidebar.
Related InformationFor related information, see the following section in this guide:
Preparing to Use Casper FocusLearn how to prepare Casper Focus for teachers to use in the classroom.
451

Managing Users
452

Inventory
User Assignments
The JAMF Software Server (JSS) allows you to assign users to computers, mobile devices, and peripherals.
Note: You can only assign a user to a peripheral if you have completed the Migration Assistant and the peripheral is not already assigned to a computer. (For more information, see the Migrating Users Knowledge Base article.)
Assigning a User to a Computer or Mobile Device
1. Log in to the JSS with a web browser.
2. Click Computers or Mobile Devices at the top of the page.
3. Perform a simple or advanced search.
For more information on computer searches, see Simple Computer Searches or Advanced Computer Searches.
For more information on mobile device searches, see Simple Mobile Device Searches or Advanced Mobile Device Searches.
4. Click the computer or mobile device you want to assign a user to.
5. Select the User and Location category and click Edit.
6. Do one of the following:
�� To assign an existing user, enter the user’s partial or full username in the Username field and click the Search icon. Click Choose across from the user you want to assign, and then click Save.
The Full Name, Email Address, Phone Number, and Position fields are populated automatically.
�� To assign and create a new user, enter information about the user and click Save.
453

Assigning a User to a Peripheral
1. Log in to the JSS with a web browser.
2. Click Computers at the top of the page.
3. Click Search Inventory.
On a smartphone or iPod touch, this option is in the pop-up menu.
4. Choose “Peripherals” from the Search pop-up menu.
5. Enter one or more search terms in the field provided.
You can base peripheral searches on peripheral type, customizable peripheral fields, or bar code.
For information on the syntax to use to refine your search, see Search Syntax.
6. Press the Enter key.
The list of search results is displayed.
7. Click the peripheral you want to assign a user to.
8. Select the User and Location category and click Edit.
9. Do one of the following:
�� To assign an existing user, enter the user’s partial or full username in the Username field and click the Search icon. Click Choose across from the user you want to assign, and then click Save.
The Full Name, Email Address, Phone Number, and Position fields are populated automatically.
�� To assign and create a new user, enter information about the user and click Save.
Note: You can only assign a user to a peripheral if you have completed the Migration Assistant and the peripheral is not already assigned to a computer. (For more information, see the Migrating Users Knowledge Base article.)
If you specified user and location information, the information is applied in the Users tab and the user is assigned to the peripheral. This specified information is also applied in the inventory information for computers, mobile devices, and other peripherals that the user is assigned to.
Removing a User Assignment from a Computer or Mobile Device
1. Log in to the JSS with a web browser.
2. Click Computers or Mobile Devices at the top of the page.
3. Perform a simple or advanced search.
For more information on computer searches, see Simple Computer Searches or Advanced Computer Searches.
For more information on mobile device searches, see Simple Mobile Device Searches or Advanced Mobile Device Searches.
4. Click the computer or mobile device you want to remove a user assignment from.
454

5. Select the User and Location category and click Edit.
6. Remove the username from the Username field and click Save.
The information in the Full Name, Email Address, Phone Number, and Position fields is removed automatically.
Removing a User Assignment from a Peripheral
1. Log in to the JSS with a web browser.
2. Click Computers at the top of the page.
3. Click Search Inventory.
On a smartphone or iPod touch, this option is in the pop-up menu.
4. Choose “Peripherals” from the Search pop-up menu.
5. Enter one or more search terms in the field provided.
You can base peripheral searches on peripheral type, customizable peripheral fields, or bar code.
For information on the syntax to use to refine your search, see Search Syntax.
6. Press the Enter key.
7. The list of search results is displayed.
8. Click the peripheral you want to remove a user assignment from.
9. Select the User and Location category and click Edit.
10. Remove the username from the Username field and click Save.
The information in the Full Name, Email Address, Phone Number, and Position fields is removed automatically.
455

Simple User Searches
A simple user search functions like a search engine, allowing you to quickly search the users in your inventory for a general range of results. You can base searches on any of the following attributes:
�� Username
�� Full name
�� Email address
Search SyntaxThis section explains the syntax to use for the following search functions:
�� Wildcard searches
�� Including multiple search terms
�� Excluding a search term
�� Returning all users In general, searches are not case-sensitive.
Note: The default search preference is “Exact Match”. For most items, the option can be changed to either “Starts with” or “Contains”. (For more information, see Configuring Account Preferences.)
Wildcard Searches
Asterisks (*) function as wildcard characters in simple searches. The following table explains the different ways asterisks can be used to refine a search:
Usage Example
Use an asterisk after a search term to return all results with attributes that begin with that term.
Perform a search for “John*” to return all users with full names that begin with “John”.
Use an asterisk before a search term to return all results with attributes that end with that term.
Perform a search for “*@mycompany.com” to return all users with email addresses that end with “@mycompany.com”.
Use an asterisk before and after a search term to return all results that include that term.
Perform a search for “*Jane*” to return all users that include “Jane”.
Use an asterisk without any other terms to return all results for the item you are searching.
Perform a search for “*” to return all users.
456

Including Multiple Search Terms
Use multiple search terms separated by a comma (,) to return all results that include those search terms. For example, perform a search for “John*, *Doe” to return all users that begin with “John” and end with “Doe”.
Excluding a Search Term
Use a hyphen (-) before a search term to exclude results that include the term.
For example, perform a search for “Jane*, -*@mycompany.com” to return all users with full names that begin with “Jane” except for those with email addresses that end with “@mycompany.com”.
Returning All Users
There are two ways to return all users: use an asterisk (*) without any other characters or terms, or perform a blank search.
Performing a Simple User Search
1. Log in to the JSS with a web browser.
2. Click Users at the top of the page.
3. Click Search Users.
On a smartphone or iPod touch, this option is in the pop-up menu.
4. Enter one or more search terms in the field provided.
For information on the syntax to use to refine your search, see Search Syntax.
5. Press the Enter key. The list of search results is displayed.
Related InformationFor related information, see the following section in this guide:
Viewing and Editing Inventory Information for a UserFind out how to view and edit inventory information for a user.
Advanced User SearchesFind out how to create and save an advanced user search.
457

Advanced User Searches
Advanced user searches allow you to use detailed search criteria to search for users in the JAMF Software Server (JSS). These types of searches give you more control over your search by allowing you to do the following:
�� Generate specific search results.
�� Specify which attribute fields to display in the search results.
�� Save the search.
Creating an Advanced User Search
1. Log in to the JSS with a web browser.
2. Click Users at the top of the page.
If the migration assistant is displayed on the pane, you must migrate your users before you proceed. (For more information and complete instructions, see the Migrating Users Knowledge Base article.)
3. Click Search Users.
On a smartphone or iPod touch, this option is in the pop-up menu.
4. Click New .
5. Use the Search pane to configure basic settings for the search.
To save the search, select the Save this Search checkbox.
6. Click the Criteria tab and add criteria for the search: a. Click Add .
b. Click Choose for the criteria you want to add.
c. Choose an operator from the Operator pop-up menu.
d. Enter a value in the Value field or browse for a value by clicking Browse .
e. Repeat steps a through d to add criteria as needed.
7. Choose an operator from the And/Or pop-up menu(s) to specify the relationships between criteria.
8. To group criteria and join multiple operations, choose parentheses from the pop-up menus around the criteria you want to group.
458

9. Click the Display tab and select the attribute fields you want to display in your search results.
10. Click Save. Operations in the search take place in the order they are listed (top to bottom).
The results of a saved search are updated each time user information is modified and users meet or fail to meet the specified search criteria.
To view the search results, click View.
Cloning, Editing, or Deleting a Saved Advanced User Search
1. Log in to the JSS with a web browser.
2. Click Users at the top of the page.
3. Click Search Users.
On a smartphone or iPod touch, this option is in the pop-up menu.
4. Click the advanced user search you want to clone, edit, or delete.
5. Do one of the following:
�� To clone the search, click Clone and make changes as needed. Then click Save.
�� To edit the search, click Edit and make changes as needed. Then click Save.
�� To delete the search, click Delete. Then click Delete again to confirm.
Viewing Advanced User Search Results
1. Log in to the JSS with a web browser.
2. Click Users at the top of the page.
3. Click Search Users.
On a smartphone or iPod touch, this option is in the pop-up menu.
4. Click the advanced user search you want to view the results for.
5. Click View. The list of search results is displayed.
459

Related InformationFor related information, see the following sections in this guide:
�� Viewing and Editing Inventory Information for a User
Find out how to view and edit inventory information for a user.
�� Simple User Searches
Learn how to quickly search users in the JSS for a general range of results.
460

User Reports
The data displayed in smart or static group membership lists or user search results can be exported from the JAMF Software Server (JSS) to the following file formats:
�� Comma-separated values file (.csv)
�� Tab delimited text file (.txt)
�� XML file
Creating User Reports
1. Log in to the JSS with a web browser.
2. Click Users at the top of the page.
3. Do one of the following:
�� View user group memberships. (For more information, see Smart User Groups or Static User Groups.)
�� View simple or advanced user search results. (For more information, see Simple User Searches or Advanced User Searches.)
4. At the bottom of the list, click Export.
5. Follow the onscreen instructions to export the data. The report downloads immediately.
461
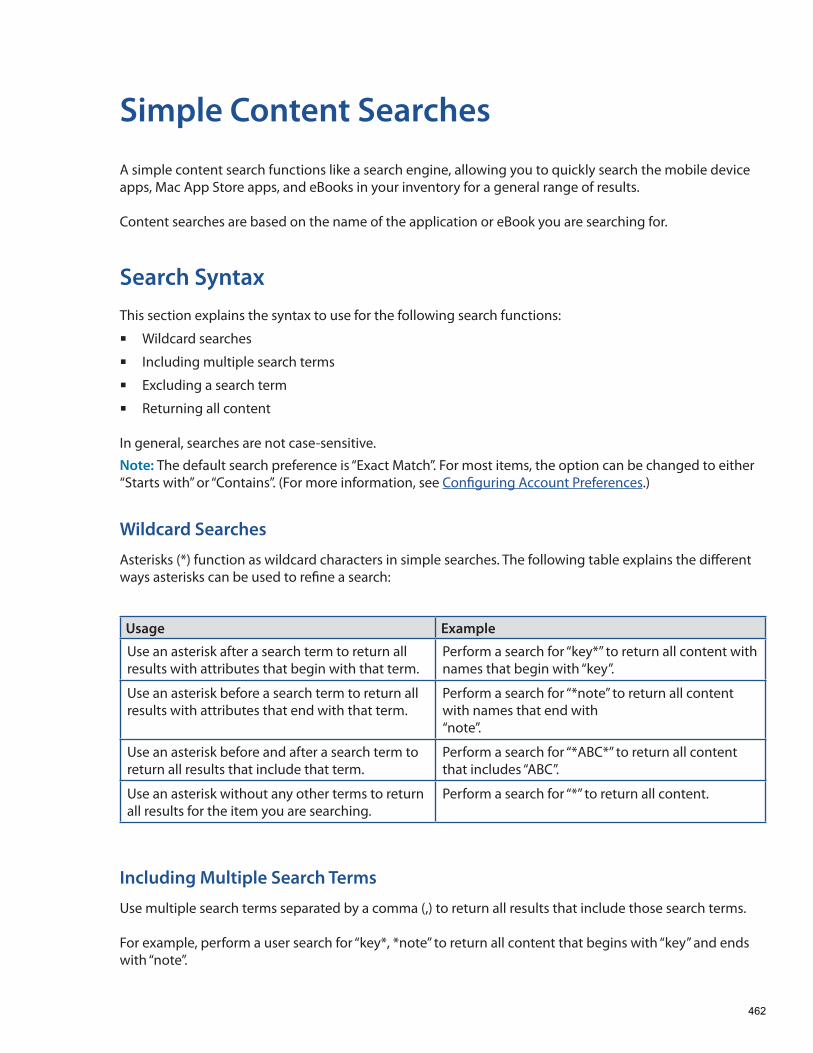
Simple Content Searches
A simple content search functions like a search engine, allowing you to quickly search the mobile device apps, Mac App Store apps, and eBooks in your inventory for a general range of results. Content searches are based on the name of the application or eBook you are searching for.
Search SyntaxThis section explains the syntax to use for the following search functions:
�� Wildcard searches
�� Including multiple search terms
�� Excluding a search term
�� Returning all content In general, searches are not case-sensitive.
Note: The default search preference is “Exact Match”. For most items, the option can be changed to either “Starts with” or “Contains”. (For more information, see Configuring Account Preferences.)
Wildcard Searches
Asterisks (*) function as wildcard characters in simple searches. The following table explains the different ways asterisks can be used to refine a search:
Usage Example
Use an asterisk after a search term to return all results with attributes that begin with that term.
Perform a search for “key*” to return all content with names that begin with “key”.
Use an asterisk before a search term to return all results with attributes that end with that term.
Perform a search for “*note” to return all content with names that end with “note”.
Use an asterisk before and after a search term to return all results that include that term.
Perform a search for “*ABC*” to return all content that includes “ABC”.
Use an asterisk without any other terms to return all results for the item you are searching.
Perform a search for “*” to return all content.
Including Multiple Search Terms
Use multiple search terms separated by a comma (,) to return all results that include those search terms. For example, perform a user search for “key*, *note” to return all content that begins with “key” and ends with “note”.
462

Excluding a Search Term
Use a hyphen (-) before a search term to exclude results that include the term.
For example, perform a user search for “ABC*, -*note” to return all content with names that begin with “ABC” except for those that end with “note”.
Returning All Content
There are two ways to return all content: use an asterisk (*) without any other characters or terms, or perform a blank search.
Performing a Simple Content Search
1. Log in to the JSS with a web browser.
2. Click Users at the top of the page.
If the migration assistant is displayed on the pane, you must migrate your users before you proceed. (For more information and complete instructions, see the Migrating Users Knowledge Base article.)
3. Click Search Content.
On a smartphone or iPod touch, this option is in the pop-up menu.
4. Enter one or more search terms in the field provided.
For information on the syntax to use to refine your search, see Search Syntax.
5. Press the Enter key. The list of search results is displayed.
Related InformationFor related information, see the following section in this guide:
Advanced Content SearchesFind out how to create and save an advanced content search.
463

Advanced Content Searches
Advanced content searches allow you to use detailed search criteria to search mobile device apps, Mac App Store apps, and eBooks in the JAMF Software Server (JSS). These types of searches give you more control over your search by allowing you to do the following:
�� Generate specific search results.
�� Specify which attribute fields to display in the search results.
�� Save the search.
Creating an Advanced Content Search
1. Log in to the JSS with a web browser.
2. Click Users at the top of the page.
If the migration assistant is displayed on the pane, you must migrate your users before you proceed. (For more information and complete instructions, see the Migrating Users Knowledge Base article.)
3. Click Search Content.
On a smartphone or iPod touch, this option is in the pop-up menu.
4. Click New .
5. Use the Search pane to configure basic settings for the search.
To save the search, select the Save this Search checkbox.
6. Click the Criteria tab and add criteria for the search: a. Click Add .
b. Click Choose for the criteria you want to add.
c. Choose an operator from the Operator pop-up menu.
d. Enter a value in the Value field or browse for a value by clicking Browse .
e. Repeat steps a through d to add criteria as needed.
7. Choose an operator from the And/Or pop-up menu(s) to specify the relationships between criteria.
8. To group criteria and join multiple operations, choose parentheses from the pop-up menus around the criteria you want to group.
464

9. Click the Display tab and select the attribute fields you want to display in your search results.
10. Click Save. Operations in the search take place in the order they are listed (top to bottom).
The results of a saved search are updated each time content is modified and meets or fails to meet the specified search criteria.
To view the search results, click View.
Cloning, Editing, or Deleting a Saved Advanced Content Search
1. Log in to the JSS with a web browser.
2. Click Users at the top of the page.
3. Click Search Content.
On a smartphone or iPod touch, this option is in the pop-up menu.
4. Click the advanced content search you want to clone, edit, or delete.
5. Do one of the following:
�� To clone the search, click Clone and make changes as needed. Then click Save.
�� To edit the search, click Edit and make changes as needed. Then click Save.
�� To delete the search, click Delete. Then click Delete again to confirm.
Viewing Advanced Content Search Results
1. Log in to the JSS with a web browser.
2. Click Users at the top of the page.
3. Click Search Content.
On a smartphone or iPod touch, this option is in the pop-up menu.
4. Click the advanced content search you want to view the results for.
5. Click View. The list of search results is displayed.
465

Related InformationFor related information, see the following sections in this guide:
�� Simple Content Searches
Learn how to quickly search content for a general range of results.
�� Content Reports
Find out how to export the data in your search results to different file formats.
466

Content Reports
The data displayed in content search results can be exported from the JAMF Software Server (JSS) to the following file formats:
�� Comma-separated values file (.csv)
�� Tab delimited text file (.txt)
�� XML file
Creating Content Reports
1. Log in to the JSS with a web browser.
2. Click Users at the top of the page.
3. Click Search Content.
On a smartphone or iPod touch, this option is in the pop-up menu.
4. View simple or advanced content search results. (For more information, see Simple Content Searches or Advanced Content Searches.)
Note: You can only create a report from a simple content search if you searched by all content.
5. At the bottom of the list, click Export.
6. Follow the onscreen instructions to export the data. The report downloads immediately.
467

Viewing and Editing Inventory Information for a User
The JAMF Software Server (JSS) allows you to view and edit user inventory information from the Users tab, or from the inventory information for a computer or mobile device that the user is assigned to. In each of these places, you can view and edit the following general inventory information for the user:
�� Username
�� Full name
�� Email address
�� Phone number
�� Position
The Users tab allows you to view the following additional information for each user:
�� Mobile Devices—View a list of mobile devices that the user is assigned to.
�� Computers—View a list of computers that the user is assigned to.
�� Peripherals—View a list of peripherals that the user is assigned to and peripherals assigned to computers that the user is assigned to.
�� VPP Assignments—View a list of content assigned to the user via VPP assignments.
�� VPP Codes—View a list of VPP codes redeemed by the user.
Viewing Inventory Information from the Users Tab
1. Log in to the JSS with a web browser.
2. Click Users at the top of the page.
If the migration assistant is displayed on the pane, you must migrate your users before you proceed. (For more information and complete instructions, see the Migrating Users Knowledge Base article.)
3. Perform a simple or advanced user search.
For more information, see Simple User Searches or Advanced User Searches.
4. Click the user you want to view information for.
The user's inventory information is displayed.
5. Use the categories to view information for the user.
468

Editing Inventory Information from the Users Tab
1. Log in to the JSS with a web browser.
2. Click Users at the top of the page.
3. Perform a simple or advanced user search.
For more information, see Simple User Searches orAdvanced User Searches.
4. Click the user you want to edit information for.
The user's inventory information is displayed.
5. Click Edit.
6. Make changes as needed.
7. Click Save. The changes are applied in the Users tab and in the inventory information for computers and mobile devices and peripherals that the user is assigned to.
Note: You cannot make changes to user and location information for peripherals that are assigned to a computer.
Related InformationFor related information, see the following sections in this guide:
�� Viewing and Editing Inventory Information for a Computer
Find out how to view and edit user inventory information from the inventory information for a computer that the user is assigned to.
�� Viewing and Editing Inventory Information for a Mobile Device
Find out how to view and edit user inventory information from the inventory information for a mobile device that the user is assigned to.
469

Manually Adding a User to the JSS
You can manually add a user to the JAMF Software Server (JSS).
1. Log in to the JSS with a web browser.
2. Click Users at the top of the page.
3. Click Search Users.
On a smartphone or iPod touch, this option is in the pop-up menu.
4. Leave the search field blank and press the Enter key.
5. Click New .
6. Enter information about the user.
7. Click Save.
Related InformationFor related information, see the following section in this guide:
User AssignmentsFind out how to assign a user to a computer or mobile device in inventory.
470

Deleting a User from the JSS
You can remove a user from your inventory by deleting it from the JAMF Software Server (JSS).
1. Log in to the JSS with a web browser.
2. Click Users at the top of the page.
3. Click Search Users.
On a smartphone or iPod touch, this option is in the pop-up menu.
4. Perform a search for the user you want to delete.
For more information, see Simple User Searches.
5. Click the user.
6. Click Delete, and then click Delete again to confirm.
471

User Groups
About User Groups
User groups allow you to organize users that share similar attributes. You can use these groups as a basis for configuring the scope of remote management tasks.
There are two kinds of user groups: smart user groups and static user groups. Smart user groups are based on criteria and have dynamic memberships. Static user groups have fixed memberships that you manually assign.
Related InformationFor related information, see the following sections in this guide:
�� Smart User Groups
Find out how to create user groups that are based on criteria and have dynamic memberships.
�� Static User Groups
Find out how to create user groups that have fixed memberships.
472

Smart User Groups
Smart user groups give you a way to organize users based on one or more attributes, such as username, full name, and email address. These groups have dynamic memberships that are updated whenever user information is edited.
If there is an SMTP server set up in the JSS, you can enable email notifications for the group. This allows email notifications to be sent to JSS users each time the group membership changes. (For information on setting up an SMTP server and enabling email notifications for JSS user accounts, see Integrating with an SMTP Server and Email Notifications.) After creating a smart user group, you can view its memberships.
Creating a Smart User Group
1. Log in to the JSS with a web browser.
2. Click Users at the top of the page.
3. Click Smart User Groups.
On a smartphone or iPod touch, this option is in the pop-up menu.
4. Click New .
5. Use the User Group pane to configure basic settings for the group.
To enable email notifications, select the Send email notification on membership change checkbox.
6. Click the Criteria tab and add criteria to the group: a. Click Add .
b. Click Choose for the criteria you want to add.
To display additional criteria, click Choose for "Other Criteria".
c. Choose an operator from the Operator pop-up menu.
d. Enter a value in the Value field or browse for a value by clicking Browse .
e. Repeat steps a through d to add criteria as needed.
7. Choose an operator from the And/Or pop-up menu(s) to specify the relationships between criteria.
473

8. To group criteria and join multiple operations, choose parentheses from the pop-up menus around the criteria you want to group.
9. Click Save. Operations in the group take place in the order they are listed (top to bottom).
Group memberships are updated each time user information is edited.
To view the group memberships, click View.
Cloning, Editing, or Deleting a Smart User Group
1. Log in to the JSS with a web browser.
2. Click Users at the top of the page.
3. Click Smart User Groups.
On a smartphone or iPod touch, this option is in the pop-up menu.
4. Click the smart user group you want to clone, edit, or delete.
5. Do one of the following:
�� To clone the group, click Clone and make changes as needed. Then click Save.
�� To edit the group, click Edit and make changes as needed. Then click Save.
�� To delete the group, click Delete. Then click Delete again to confirm.
Viewing Smart User Group Memberships
1. Log in to the JSS with a web browser.
2. Click Users at the top of the page.
474

3. Click Smart User Groups.
On a smartphone or iPod touch, this option is in the pop-up menu.
4. Click the smart user group you want to view memberships for.
5. Click View. A list of group memberships is displayed.
Related InformationFor related information, see the following section in this guide:
ScopeFind out how to configure scope based on smart user groups.
475

Static User Groups
Static user groups give you a way to organize users by assigning them to a group. These groups have fixed memberships that must be changed manually.
After creating a static user group, you can view its memberships.
Creating a Static User Group
1. Log in to the JSS with a web browser.
2. Click Users at the top of the page.
3. Click Static User Groups.
On a smartphone or iPod touch, this option is in the pop-up menu.
4. Click New .
5. Use the User Group pane to configure basic settings for the group.
6. Click the Assignments tab and select the checkbox for each user you want to add.
7. Click Save.
To view the group memberships, click View.
Cloning, Editing, or Deleting a Static User Group
1. Log in to the JSS with a web browser.
2. Click Users at the top of the page.
3. Click Static User Groups.
On a smartphone or iPod touch, this option is in the pop-up menu.
4. Click the group you want to clone, edit, or delete.
5. Do one of the following:
�� To clone the group, click Clone and make changes as needed. Then click Save.
�� To edit the group, click Edit and make changes as needed. Then click Save.
�� To delete the group, click Delete. Then click Delete again to confirm.
476

Viewing Static User Group Memberships1. Log in to the JSS with a web browser.
2. Click Users at the top of the page.
3. Click Static User Groups.
On a smartphone or iPod touch, this option is in the pop-up menu.
4. Click the user group you want to view memberships for.
5. Click View. A list of group memberships is displayed.
Related InformationFor related information, see the following section in this guide:
ScopeFind out how to configure scope based on static user groups.
477

VPP-Managed Distribution
VPP Registration
Before you can assign content purchased through Apple’s Volume Purchase Program (VPP) to users for VPP-managed distribution, users must be registered with VPP.
You can allow users to register by sending them a VPP invitation. There are two methods for sending a VPP invitation: prompt users by displaying the invitation as a message on the computers and mobile devices that the user is assigned to, or send the invitation via email. Prompting a user displays the invitation on any computers and mobile devices that the user is assigned to and that meet the registration requirements explained below.
RequirementsTo register users with VPP, you need a VPP account set up in the JSS. (For more information, see Integrating with VPP.)
To send a VPP invitation via email, you need an SMTP server set up in the JSS. (For more information, see Integrating with an SMTP Server.) If you send a VPP invitation via email, users must log in to a registration page with an LDAP directory account or a JSS user account. For users to log in with their LDAP directory account, you need an LDAP server set up in the JSS. (For more information, see Integrating with LDAP Directory Services.)
To send a VPP invitation by prompting users, you need:
�� Computers with OS X v10.9 or later that are bound to a directory service and/or mobile devices with iOS 7.0.4 or later (For more information, see Binding to Directory Services.)
�� A push certificate in the JSS (For more information, see Push Certificates.)
478

Sending a VPP Invitation1. Log in to the JSS with a web browser.
2. Click Users at the top of the page.
If the migration assistant is displayed on the pane, you must migrate your users before you proceed. (For more information and complete instructions, see the Migrating Users Knowledge Base article.)
3. Click VPP Invitations.
On a smartphone or iPod touch, this option is in the pop-up menu.
4. Click New .
5. Use the General pane to configure basic settings for the invitation, including the VPP account and the method.
The invitation is automatically added to the site that the VPP account belongs to.
6. Click the Scope tab and configure the scope of the invitation.
For more information, see Scope.
7. Click Save. A VPP invitation is immediately sent to the users you specified. You can view the status of the invitation in the list of invitations.
Viewing VPP Invitation Usage
1. Log in to the JSS with a web browser.
2. Click Users at the top of the page.
3. Click VPP Invitations.
On a smartphone or iPod touch, this option is in the pop-up menu.
4. Click the invitation you want to view usage for.
5. Click Usage.
6. Basic invitation usage information is displayed, such as the status and last action.
7. To view additional details such as the date sent and the invitation ID, click the username for that item.
479

Resending a VPP InvitationThe JSS allows you to resend VPP invitations to users that have not yet registered with VPP.
1. Log in to the JSS with a web browser.
2. Click Users at the top of the page.
3. Click VPP Invitations.
On a smartphone or iPod touch, this option is in the pop-up menu.
4. Click the invitation you want to resend.
5. Click Resend.
A VPP invitation is immediately sent to users in the scope that have not yet registered with VPP.
Cloning, Editing, or Deleting a VPP Invitation
1. Log in to the JSS with a web browser.
2. Click Users at the top of the page.
3. Click VPP Invitations.
On a smartphone or iPod touch, this option is in the pop-up menu.
4. Click the invitation you want to clone, edit, or delete.
5. Do one of the following:
�� To clone the invitation, click Clone and make changes as needed. Then click Save.
�� To edit the invitation, click Edit and make changes as needed. Then click Save.
�� To delete the invitation, click Delete and then click Delete again to confirm.
Related InformationFor related information, see the following sections in this guide:
�� VPP Registration Experience
Learn about the steps users take to register with VPP.
�� VPP Assignments
Find out how to assign content to users for VPP-managed distribution.
480

VPP Registration Experience
After sending a VPP invitation, users receive an email with a registration URL, or they are prompted on their computers and mobile devices. They are then guided through the VPP registration process.
If the VPP invitation was sent via email, users must click the URL in the invitation and enter credentials for an LDAP directory account or a JSS user account. Then the user must click Connect to App Store to be brought to the App Store.
If the VPP invitation was configured to prompt users on their computers and mobile devices, users must click Continue and are automatically brought to the App Store.
Note: Users only need to accept the VPP invitation on one device, even if the prompt is available on multiple devices. Users can dismiss prompts by clicking Cancel when the prompt appears on their device.
When the App Store opens, users are prompted to sign in using their Apple ID. Then they are prompted to agree to Apple’s terms and conditions, and privacy policy.
Once users have completed this process, they are registered with VPP.
481

VPP Assignments
he JAMF Software Server (JSS) allows you to assign content purchased through Apple’s Volume Purchase rogram (VPP) to users for VPP-managed distribution.
he JSS allows you to assign the following types of content to users:
�iOS apps
�Mac apps
�eBooks
fter apps have been assigned to users, you can also use the JSS to revoke them from users. eBooks annot be revoked.
hen you create a VPP assignment in the JSS, you choose a VPP account, and all content purchased for PP-managed distribution using the account is automatically available. Then you specify the content that ou want to assign, and the users you want to assign it to (called “scope”).
re information on VPP and VPP-managed distribution, visit one of the following websites:
ume Purchase Program for Business
ps://www.apple.com/business/vpp/
ume Purchase Program for Education
ps://www.apple.com/education/volume-purchase-program/
equirementsPP assignments only apply to mobile devices with iOS 7 or later and computers with OS X v10.9 or later.
o assign VPP content to users, you need:
�A VPP account set up in the JSS (For more information, see Integrating with VPP.)
TP T
���Ac
WVy
For mo
��Vol
htt
��Vol
htt
RV
T
���Users that are registered with VPP (For more information, see VPP Registration.)
Creating a VPP Assignment
1. Log in to the JSS with a web browser.
2. Click Users at the top of the page.
If the migration assistant is displayed on the pane, you must migrate your users before you proceed. (For more information and complete instructions, see the Migrating Users Knowledge Base article.)
3. Click VPP Assignments.
On a smartphone or iPod touch, this option is in the pop-up menu.
4. Click New .
482
482

5. Use the General payload to configure basic settings for the VPP assignment, including the VPP account.
Note: The assignment is automatically added to the site that the VPP account belongs to.
6. Select the Apps payload and then select the checkbox for each app you want to assign.
7. Select the eBooks payload and then select the checkbox for each eBook you want to assign.
8. Click the Scope tab and configure the scope of the assignment.
For more information, see Scope.
9. Click Save.
Cloning, Editing, or Deleting a VPP Assignment
1. Log in to the JSS with a web browser.
2. Click Users at the top of the page.
3. Click VPP Assignments.
On a smartphone or iPod touch, this option is in the pop-up menu.
4. Click the assignment you want to clone, edit, or delete.
5. Do one of the following:
�� To clone the assignment, click Clone and make changes as needed. Then click Save.
�� To edit the assignment, click Edit and make changes as needed. Then click Save.
�� To delete the assignment, click Delete and then click Delete again to confirm.
Revoking Apps from UsersTo revoke specific apps from all users in the scope of a VPP assignment, you remove the apps from the VPP assignment.
To revoke all the apps in a VPP assignment from specific users, you remove the users from the scope.
1. Log in to the JSS with a web browser.
2. Click Users at the top of the page.
3. Click VPP Assignments.
On a smartphone or iPod touch, this option is in the pop-up menu.
4. Click the VPP assignment you want to revoke.
5. Select the Apps payload and remove apps from the assignment as needed.
483

6. Click the Scope tab and remove users from the scope as needed.
For more information, see Scope.
7. Click Save. Users are notified that the apps are no longer assigned to them.
Revoking All Apps from Users
For each VPP account, you can revoke all apps that have been assigned to users.
1. Log in to the JSS with a web browser.
2. In the top-right corner of the page, click Settings .
3. Click Global Management.
On a smartphone or iPod touch, this option is in the pop-up menu.
4. Click VPP Accounts .
5. Click the VPP account for which you want to revoke all apps.
6. Click Revoke All and then click OK to confirm. Users are notified that the apps are no longer assigned to them.
Related InformationFor related information, see the following sections in this guide:
�� App Store Apps
Find out how to distribute App Store apps.
�� eBooks Available in the iBookstore
Find out how to distribute eBooks available in the iBookstore.
484