Veritas NetBackup™ for Oracle Administrator's Guide
341
Veritas NetBackup™ for Oracle Administrator's Guide UNIX, Windows, and Linux Release 8.1.1
-
Upload
khangminh22 -
Category
Documents
-
view
0 -
download
0
Transcript of Veritas NetBackup™ for Oracle Administrator's Guide
Veritas NetBackup™ forOracle Administrator'sGuide
UNIX, Windows, and Linux
Release 8.1.1
Veritas NetBackup™ for Oracle Administrator's GuideLast updated: 2018-04-13
Legal NoticeCopyright © 2018 Veritas Technologies LLC. All rights reserved.
Veritas, the Veritas Logo, and NetBackup are trademarks or registered trademarks of VeritasTechnologies LLC or its affiliates in the U.S. and other countries. Other names may betrademarks of their respective owners.
This product may contain third party software for which Veritas is required to provide attributionto the third party (“Third Party Programs”). Some of the Third Party Programs are availableunder open source or free software licenses. The License Agreement accompanying theSoftware does not alter any rights or obligations you may have under those open source orfree software licenses. Refer to the third party legal notices document accompanying thisVeritas product or available at:
https://www.veritas.com/about/legal/license-agreements
The product described in this document is distributed under licenses restricting its use, copying,distribution, and decompilation/reverse engineering. No part of this document may bereproduced in any form by any means without prior written authorization of Veritas TechnologiesLLC and its licensors, if any.
THE DOCUMENTATION IS PROVIDED "AS IS" AND ALL EXPRESS OR IMPLIEDCONDITIONS, REPRESENTATIONS AND WARRANTIES, INCLUDING ANY IMPLIEDWARRANTY OF MERCHANTABILITY, FITNESS FOR A PARTICULAR PURPOSE ORNON-INFRINGEMENT, ARE DISCLAIMED, EXCEPT TO THE EXTENT THAT SUCHDISCLAIMERS ARE HELD TO BE LEGALLY INVALID. VERITAS TECHNOLOGIES LLCSHALL NOT BE LIABLE FOR INCIDENTAL OR CONSEQUENTIAL DAMAGES INCONNECTION WITH THE FURNISHING, PERFORMANCE, OR USE OF THISDOCUMENTATION. THE INFORMATION CONTAINED IN THIS DOCUMENTATION ISSUBJECT TO CHANGE WITHOUT NOTICE.
The Licensed Software and Documentation are deemed to be commercial computer softwareas defined in FAR 12.212 and subject to restricted rights as defined in FAR Section 52.227-19"Commercial Computer Software - Restricted Rights" and DFARS 227.7202, et seq."Commercial Computer Software and Commercial Computer Software Documentation," asapplicable, and any successor regulations, whether delivered by Veritas as on premises orhosted services. Any use, modification, reproduction release, performance, display or disclosureof the Licensed Software and Documentation by the U.S. Government shall be solely inaccordance with the terms of this Agreement.
Veritas Technologies LLC500 E Middlefield RoadMountain View, CA 94043
http://www.veritas.com

Technical SupportTechnical Support maintains support centers globally. All support services will be deliveredin accordance with your support agreement and the then-current enterprise technical supportpolicies. For information about our support offerings and how to contact Technical Support,visit our website:
https://www.veritas.com/support
You can manage your Veritas account information at the following URL:
https://my.veritas.com
If you have questions regarding an existing support agreement, please email the supportagreement administration team for your region as follows:
[email protected] (except Japan)
DocumentationMake sure that you have the current version of the documentation. Each document displaysthe date of the last update on page 2. The latest documentation is available on the Veritaswebsite:
https://sort.veritas.com/documents
Documentation feedbackYour feedback is important to us. Suggest improvements or report errors or omissions to thedocumentation. Include the document title, document version, chapter title, and section titleof the text on which you are reporting. Send feedback to:
You can also see documentation information or ask a question on the Veritas community site:
http://www.veritas.com/community/
Veritas Services and Operations Readiness Tools (SORT)Veritas Services and Operations Readiness Tools (SORT) is a website that provides informationand tools to automate and simplify certain time-consuming administrative tasks. Dependingon the product, SORT helps you prepare for installations and upgrades, identify risks in yourdatacenters, and improve operational efficiency. To see what services and tools SORT providesfor your product, see the data sheet:
https://sort.veritas.com/data/support/SORT_Data_Sheet.pdf
Chapter 1 Introduction .......................................................................... 12
Providing feedback on Beta documentation ....................................... 12What’s new about NetBackup for Oracle ........................................... 13About NetBackup for Oracle ........................................................... 13NetBackup for Oracle features ........................................................ 14NetBackup for Oracle terminology .................................................... 18NetBackup for Oracle operation using the Oracle Intelligent Policy
........................................................................................... 19Logging the RMAN input and output on a client .................................. 21NetBackup for Oracle operation using a script- or template-based policy
........................................................................................... 22About Oracle RMAN ..................................................................... 23About the Oracle recovery catalog ................................................... 25
Chapter 2 NetBackup for Oracle QuickStart ................................. 26
Installing NetBackup for Oracle ....................................................... 26Registering Oracle database instances ............................................. 27Creating an Oracle database instance group ...................................... 29Creating an Oracle policy ............................................................... 29
Chapter 3 Installing NetBackup for Oracle .................................... 33
Verifying the operating system and platform compatibility ...................... 33NetBackup server and client requirements ......................................... 34Requirements for using NetBackup for Oracle in a NetBackup cluster
........................................................................................... 34About the license for NetBackup for Oracle ........................................ 35About linking Oracle RMAN with NetBackup for UNIX .......................... 35
Verifying environment variables and shutting down Oracle .............. 36Linking Oracle RMAN with NetBackup on UNIX platforms ............... 37
Chapter 4 Oracle policy configuration ............................................. 43
Preparing for NetBackup for Oracle configuration ................................ 43About Oracle policy configuration ............................................... 44Permissions for NetBackup for Oracle log directories ..................... 45
Contents

NetBackup for Oracle backup policy types ................................... 46Configuring the Maximum jobs per client for NetBackup for Oracle
..................................................................................... 52Instance management for an Oracle Intelligent Policy .......................... 53
About the NetBackup Discovery Service ..................................... 54Viewing the Oracle database instance repository .......................... 55Manually adding an Oracle database instance to the repository
..................................................................................... 56Registering an Oracle database instance .................................... 58About Oracle database instance groups ...................................... 60Adding an instance to an instance group ..................................... 60Automatic Registration of an instance group ................................ 61About instance actions ............................................................ 62
About Oracle Intelligent Policies (OIP) .............................................. 64Creating an Oracle Intelligent Policy (OIP) ................................... 66Oracle database upgrade effect on Oracle Intelligent Policies
..................................................................................... 68Configuring NetBackup for Oracle automatic backup schedules
..................................................................................... 69About NetBackup for Oracle schedule properties using Oracle
Intelligent Policy ............................................................... 70Oracle Intelligent Policy - Storage and Retention ........................... 71About Oracle Intelligent Policy master server behavior ................... 73Instances and Databases tab .................................................... 73Backup Selections tab ............................................................. 75Oracle tab ............................................................................. 78About using a NetBackup appliance share for Oracle backups
(Copilot) ......................................................................... 81Configuring an OIP using a share on the NetBackup appliance
(Copilot) ......................................................................... 83About script- or template-based Oracle policies .................................. 85
Adding a new script- or template-based Oracle policy .................... 86About policy attributes ............................................................. 87About backup schedules, templates, and scripts ........................... 88About schedule properties ....................................................... 88Script- or template-based policy - Storage and Retention ................ 90Adding clients to a policy .......................................................... 92About adding backup selections to an Oracle policy ....................... 93About configuring the run-time environment ................................. 95About creating templates and shell scripts ................................. 102
Configuring the logon account for the NetBackup Client Service forNetBackup for Oracle ............................................................ 111
Testing configuration settings for NetBackup for Oracle ...................... 112
5Contents

Chapter 5 Performing backups and restores of Oracle ............ 113
Overview of using NetBackup for Oracle .......................................... 113Maintaining the RMAN repository ................................................... 114Querying the RMAN repository ...................................................... 118About NetBackup for Oracle backups .............................................. 119
Running NetBackup for Oracle templates .................................. 120Using bpdbsbora to run a backup template ................................ 121Running the NetBackup for Oracle shell script ............................ 122Running RMAN .................................................................... 123
Browsing backups using the bplist command .................................... 123Managing expired backup images .................................................. 124About NetBackup for Oracle restores .............................................. 125
Starting the recovery wizard .................................................... 126Using the recovery wizard ...................................................... 127Using bpdbsbora to run a recovery template ............................... 128About an Oracle recovery shell script on the client ....................... 129Running RMAN on the client ................................................... 129About Oracle multistream restore for proxy backup ...................... 130Redirecting a restore to a different client .................................... 131
Using NetBackup for Oracle in a Microsoft Windows clusterenvironment ........................................................................ 135About backups of an Oracle clustered database on Windows
.................................................................................... 136Bringing the database instance offline on Windows ...................... 136Bringing the database instance online on Windows ...................... 137User-directed backup or restore from the Windows client .............. 138
Creating an instant recovery point from an Oracle Copilot image .......... 139Deleting an instant recovery point for Oracle Copilot instant recovery
.......................................................................................... 141Cleaning up the Copilot share after point in time restore of database
.......................................................................................... 142Single-step restore to ASM storage from a Copilot recovery point ......... 148About restoring from a data file copy to ASM storage using RMAN
.......................................................................................... 152
Chapter 6 Guided Recovery ............................................................. 153
About OpsCenter Guided Recovery ................................................ 153Setting up for Guided Recovery cloning ........................................... 154Guided Recovery cloning pre-operation checks ................................ 155Performing a Guided Recovery cloning operation .............................. 156Select a Master Server dialog ........................................................ 157Select Source Database panel ...................................................... 158
6Contents
Select Control File Backup panel ................................................... 158Destination host and login panel .................................................... 159Destination Parameters panel ....................................................... 159Selection summary panel ............................................................. 160Pre-clone check panel ................................................................. 160Job Details panel ........................................................................ 161Guided Recovery post-clone operations .......................................... 161Troubleshooting Guided Recovery ................................................. 162
Troubleshooting files for metadata collection operations at thetime of the backup .......................................................... 162
Troubleshooting files for Guided Recovery validation operations.................................................................................... 163
Troubleshooting files for Guided Recovery cloning operations.................................................................................... 163
Chapter 7 NetBackup for Oracle with Snapshot Client ............ 165
About NetBackup for Oracle with Snapshot Client ............................. 165Proxy copy .......................................................................... 167NetBackup for Oracle stream-based operations .......................... 167NetBackup for Oracle file-based operations ................................ 168
How NetBackup for Oracle with Snapshot Client works ....................... 169About the NetBackup for Oracle backup and restore operations
.................................................................................... 170Database objects supported by advanced backup methods ........... 170About NetBackup multistreaming ............................................. 171RMAN multiple channels ........................................................ 171Restoring data files to a new location ........................................ 171Redirecting a restore to a different client .................................... 172Symbolic links and raw data files (UNIX) .................................... 172Quick I/O data files (UNIX) ...................................................... 172RMAN incremental backups .................................................... 173Proxy backup examples ......................................................... 174
About configuring Snapshot Client with NetBackup for Oracle .............. 177Configuration requirements for snapshot backups with NetBackup
for Oracle ...................................................................... 177Configuring a snapshot policy for NetBackup for Oracle ................ 178Configuring a snapshot policy using a share on the NetBackup
appliance (Copilot) .......................................................... 182Restoring NetBackup for Oracle from a snapshot backup .................... 184
About restoring individual files from a NetBackup for Oraclesnapshot backup ............................................................ 184
7Contents

About NetBackup for Oracle restores of volumes and file systemsusing snapshot rollback ................................................... 185
About configuring NetBackup for Oracle block-level incrementalbackups on UNIX .................................................................. 187How BLI works with NetBackup for Oracle (UNIX) ....................... 188About the Storage Checkpoint facility and NetBackup for Oracle
.................................................................................... 189Configuration requirements for BLI backups with NetBackup for
Oracle .......................................................................... 190Configuring policies for BLI backups with NetBackup for Oracle
.................................................................................... 190About Snapshot Client effects ....................................................... 192
How Snapshot Client software affects backup types ..................... 192How Snapshot Client software affects schedule properties ............ 192How Snapshot Client software affects templates and scripts .......... 193NetBackup for Oracle with Snapshot Client environment variables
.................................................................................... 194About Oracle support for Replication Director ................................... 195
Configuring an Oracle Intelligent Policy using Replication Director.................................................................................... 196
Configuring a script- or template-based Oracle policy ................... 202
Chapter 8 Troubleshooting ................................................................ 208
About troubleshooting NetBackup for Oracle .................................... 209About NetBackup for Oracle troubleshooting steps ............................ 209NetBackup debug logs and reports ................................................. 211Enabling the debug logs manually (Windows) ................................... 212Enabling the debug logs manually (UNIX) ........................................ 213About the NetBackup for Oracle log files .......................................... 215Setting the debug level on a Windows client ..................................... 217Setting the debug level on a UNIX client .......................................... 217About RMAN utility logs ............................................................... 218Troubleshooting RMAN backup or restore errors ............................... 218
Verifying the RMAN script on UNIX ........................................... 218Troubleshooting each stage of the backup or restore ................... 219
Troubleshooting the UNIX browser interface and wizards .................... 221Troubleshooting NetBackup for Oracle with Snapshot Client ................ 222Minimizing timeout failures on large database restores ....................... 223Minimizing the loading and unloading of tapes for database backups
.......................................................................................... 224Delays in backup job transfer and completion ................................... 224
8Contents
Appendix A Real Application Clusters .............................................. 226
About Real Application Clusters ..................................................... 226About virtual names and NetBackup for Oracle ................................. 226About RAC archiving schemes ...................................................... 228About backing up a database ....................................................... 232Example of restoring a database .................................................... 233Troubleshooting database restores (UNIX and Windows) .................... 234About restoring archive logs .......................................................... 234
Appendix B Best practices for protecting Oracle RAC withNetBackup ................................................................... 236
Oracle RAC with NetBackup best practices ...................................... 237About using Templates and Oracle Intelligent Policy (OIP) with RAC
.......................................................................................... 237About NetBackup for Oracle operations ........................................... 238Example RAC configuration: Failover name exists and backup is not
load balanced ...................................................................... 239Example RAC configuration: Failover name exists and backup is load
balanced ............................................................................. 240Example RAC configuration: Failover name is not available and backup
is not load balanced .............................................................. 243Example RAC configuration: Failover name is not available, and backup
is load balanced, one policy with custom script ........................... 245Example RAC configuration: Failover name is not available and backup
is load balanced, simple script with manual policy failover ............. 247Image catalog configuration for RAC ............................................... 249Configuring the appliance within a RAC environment ......................... 254
Appendix C Deduplication best practices ........................................ 256
Optimizing and deduplicating stream-based and proxy copy Oraclebackups .............................................................................. 256
Configuring a stream-based Oracle backup ...................................... 258Example RMAN script for a stream-based backup ............................. 260Editing the RMAN script and configuring NetBackup for Oracle for a
proxy copy backup ................................................................ 262Example RMAN script for a proxy copy backup ................................. 263
Appendix D Snapshot Client support of SFRAC ............................ 265
About Snapshot Client support of SFRAC ........................................ 265NetBackup configuration for an SFRAC environment ......................... 265
9Contents
Configuring the SFRAC environment for a backup operation ................ 266Performing a rollback restore in an SFRAC environment ..................... 267Troubleshooting NetBackup in an SFRAC environment ...................... 269
Appendix E Script-based block-level incremental (BLI)backups without RMAN on UNIX and Linuxsystems ......................................................................... 271
About script-based block-level incremental (BLI) backups withoutRMAN ................................................................................ 271
About BLI backup and restore operations ........................................ 272Verifying installation requirements for BLI backups without RMAN
.......................................................................................... 272File system and Storage Checkpoint space management .............. 273
Creating NetBackup policies for script-based BLI backup .................... 274Number of policies required for BLI backup ................................ 275About BLI policy attributes ...................................................... 277About the BLI client list .......................................................... 277Backup selections list for BLI backups ....................................... 278About schedules for BLI backup policies .................................... 278Example Oracle BLI backup policy ........................................... 279Setting the maximum jobs per client global attribute ..................... 280About BLI backup methods ..................................................... 280Creating notify scripts for BLI backups ...................................... 282
Performing backups and restores ................................................... 286About NetBackup for Oracle agent automatic backups ................. 287About NetBackup for Oracle manual backups ............................. 287Backing up Quick I/O files ....................................................... 288Restoring BLI backup images .................................................. 289About NetBackup backup and restore logs ................................. 290
About troubleshooting backup or restore errors ................................. 290Troubleshooting stages of backup and restore operations ............. 291NetBackup restore and backup status codes .............................. 292Improving NetBackup backup performance ................................ 293About BLI backup and database recovery .................................. 293
Appendix F XML Archiver .................................................................... 295
NetBackup for Oracle XML export and XML import ............................ 295NetBackup for Oracle XML export and import archiving features
.................................................................................... 295XML export archive process .................................................... 296Sequence of operation: XML export archive ............................... 298
10Contents

XML import restore process .................................................... 300Sequence of operation: XML import restore ................................ 301
About the environment variables set by a user in the XML exportparameter file ....................................................................... 302
About XML export templates and shell scripts ................................... 303Creating XML export templates using the NetBackup for Oracle
wizard (UNIX) ................................................................ 303Creating XML export templates using the NetBackup for Oracle
wizard (Windows) ........................................................... 305Creating an XML export script from a template ............................ 306Creating XML export scripts manually ....................................... 307
Performing an XML export archive ................................................. 308Running NetBackup for Oracle XML export templates .................. 309Using bpdbsbora to run an XML export template ......................... 310Running the NetBackup for Oracle XML export script on the client
.................................................................................... 311Running bporaexp on the client as an Oracle user ....................... 312Writing to a directory versus writing to a storage unit .................... 312About bporaexp parameters .................................................... 314
Browsing XML export archives using bporaimp parameters ................. 317Browsing XML export archives using bplist ....................................... 318Restoring an XML export archive ................................................... 319
Running the XML import wizard on the client .............................. 319Using bpdbsbora to run an XML import template ......................... 321Running an XML import script on the client ................................ 322Running bporaimp on the client ............................................... 322About bporaimp parameters .................................................... 323About redirecting a restore of an XML export archive to a different
client ............................................................................ 326Troubleshooting XML export or XML import errors ............................. 328
Checking the logs to determine the source of an error .................. 329Troubleshooting each stage of the XML export or XML import
.................................................................................... 330Additional XML export and import logs ............................................ 333
Appendix G Register authorized locations ....................................... 334
Registering authorized locations used by a NetBackup databasescript-based policy ................................................................ 334
Index .................................................................................................................. 337
11Contents

IntroductionThis chapter includes the following topics:
■ Providing feedback on Beta documentation
■ What’s new about NetBackup for Oracle
■ About NetBackup for Oracle
■ NetBackup for Oracle features
■ NetBackup for Oracle terminology
■ NetBackup for Oracle operation using the Oracle Intelligent Policy
■ Logging the RMAN input and output on a client
■ NetBackup for Oracle operation using a script- or template-based policy
■ About Oracle RMAN
■ About the Oracle recovery catalog
Providing feedback on Beta documentationTo provide feedback on this beta documentation, please send us email at thefollowing address:
1Chapter

What’s new about NetBackup for Oracle
About NetBackup for OracleNetBackup integrates the database backup and recovery capabilities of the OracleRecovery Manager (RMAN) with the backup and recovery management capabilitiesof NetBackup.
Figure 1-1 shows the major components in a NetBackup configuration. The serverthat hosts the Oracle database must be a NetBackup client. The master servermust also have NetBackup for Oracle licensed.
Figure 1-1 NetBackup for Oracle on a sample network
System containing Oracledatabase Recovery Catalog
System hosting the Oracle database
Oracle databaseto back up orrestore
NetBackup for Oracle supplies:- Sample configurationprogram- Sample script files- NetBackup I/O library(libobk)- bporaimp and bporaexpAdditional NetBackupsoftware:- NetBackup client (required)
Oracle database software supplies:– Oracle Recovery Manager (RMAN)– Oracle Call Interface (OCI)
Storage unit
Network (TCP/IP)
NetBackup master server orremote media server
NetBackup software:– NetBackup master server– NetBackup media server
13IntroductionWhat’s new about NetBackup for Oracle
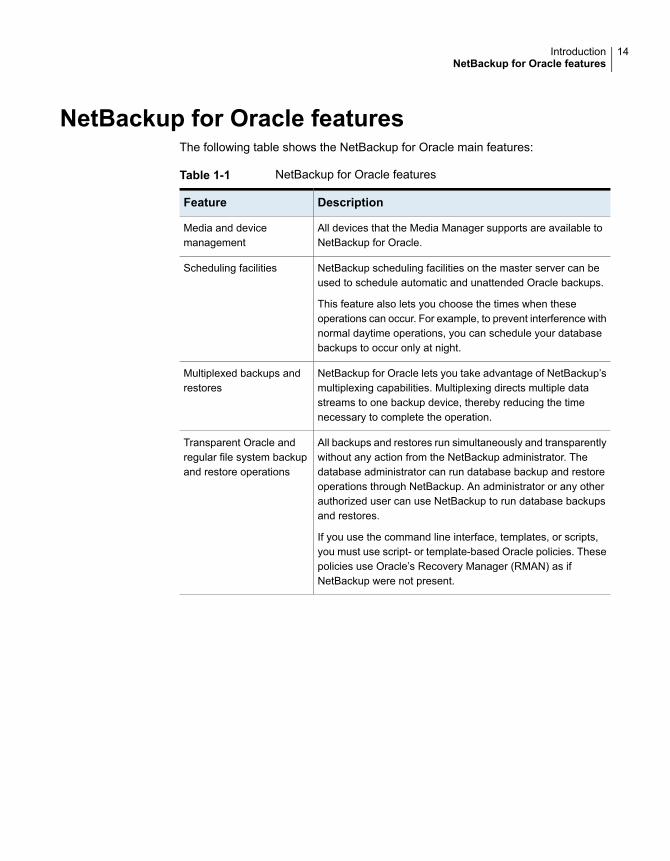
NetBackup for Oracle featuresThe following table shows the NetBackup for Oracle main features:
Table 1-1 NetBackup for Oracle features
DescriptionFeature
All devices that the Media Manager supports are available toNetBackup for Oracle.
Media and devicemanagement
NetBackup scheduling facilities on the master server can beused to schedule automatic and unattended Oracle backups.
This feature also lets you choose the times when theseoperations can occur. For example, to prevent interference withnormal daytime operations, you can schedule your databasebackups to occur only at night.
Scheduling facilities
NetBackup for Oracle lets you take advantage of NetBackup’smultiplexing capabilities. Multiplexing directs multiple datastreams to one backup device, thereby reducing the timenecessary to complete the operation.
Multiplexed backups andrestores
All backups and restores run simultaneously and transparentlywithout any action from the NetBackup administrator. Thedatabase administrator can run database backup and restoreoperations through NetBackup. An administrator or any otherauthorized user can use NetBackup to run database backupsand restores.
If you use the command line interface, templates, or scripts,you must use script- or template-based Oracle policies. Thesepolicies use Oracle’s Recovery Manager (RMAN) as ifNetBackup were not present.
Transparent Oracle andregular file system backupand restore operations
14IntroductionNetBackup for Oracle features

Table 1-1 NetBackup for Oracle features (continued)
DescriptionFeature
An Oracle instance discovery service automatically polls theclients throughout the NetBackup environment every fiveminutes. The service collects the discovered instances in aninstance repository. The user can view the instances on theNetBackup Administration Console or by using the nboraadmcommand.
You can create the instance groups that each contain a set ofinstances that are registered with a common set of credentials.A default instance group can be created for the newlydiscovered instances that are then automatically registered intothis group.
You select Oracle instances and instance groups to be part ofan Oracle backup policy. You can create the policy for thedefault instance group to make sure that all newly createdinstances are automatically protected.
Oracle DBAs can use the nboraadm command on theNetBackup client to manage instances, instance groups, andtheir credentials. This command is very useful in environmentswhere the Oracle credentials are known only by the DBAs andnot by the NetBackup administrators.
Oracle Instancemanagement
You can share the same devices and media that are used forother backups or give Oracle exclusive use of certain devicesand media. NetBackup for Oracle can use the Media Manager,disk, PureDisk storage units, etc.
Sharing the same storageunits that are used for otherfile backups
From the NetBackup master server, you can schedule databasebackups or start them manually for any client or instance. TheOracle databases can also reside on the hosts that are differentfrom the devices on which NetBackup stores the backups.
Centralized and networkedbackup operations
15IntroductionNetBackup for Oracle features

Table 1-1 NetBackup for Oracle features (continued)
DescriptionFeature
NetBackup provides the following graphical user interfaces forclient users and administrators:
■ Backup, Archive, and Restore user interface■ NetBackup Administration Console for Java■ NetBackup OpsCenter
NetBackup OpsCenter is the web-based graphical user interfacethat is used to perform an Oracle Guided Recovery cloningoperation.
See “About OpsCenter Guided Recovery” on page 153.
A database administrator or NetBackup administrator can startbackup or restore operations for Oracle from the NetBackupgraphical user interface on the master server.
Graphical user interfaces
The NetBackup for Oracle database wizards can create backupand recovery templates for script- or template-based Oraclepolicies. You can launch the backup wizard and the recoverywizard from the Backup, Archive, and Restore (BAR) interface.The wizards generate platform-independent templatescontaining the configuration information that the software useswhen it performs backups and restores.
The wizard-generated templates do not support all the featuresnative to Oracle. You may want to write a customized backupor restore script in a scripting language that the operatingsystem defines. You can use a template as the base for a script.
Templates
Guided Recovery clones an Oracle database from a backup,and simplifies the process of creating a new database frombackups of an existing database. Guided Recovery uses anOracle cloning wizard that executes on the OpsCenter graphicaluser interface.
Oracle Guided Recoverycloning
NetBackup for Oracle supports the parallel backup and restoreRMAN capabilities. For example, you can run more than onetape device at a time for a single Oracle backup or restore.This capability reduces the time necessary to complete theoperation.
Parallel backup and restoreoperations
Compression increases backup performance over the networkand reduces the size of the backup image that NetBackupwrites to the storage unit.
Compression
16IntroductionNetBackup for Oracle features

Table 1-1 NetBackup for Oracle features (continued)
DescriptionFeature
Replication director can be used to create snapshots of theOracle database. The snapshots can then be replicated to otherNetApp disk arrays or backup the snapshot to a storage unit.To use Replication Director, the Oracle database must existon a NetApp NAS disk array. Replication Director is notsupported on SAN storage at this time.
Oracle snapshot backups that use Replication Director aresupported on UNIX and Linux platforms only.
Support for ReplicationDirector
Note: This feature requires a NetBackup appliance runningsoftware version 2.7.1 or later.
This feature enhances the Oracle Intelligent Policy by givingyou options for protecting an Oracle database using a shareon a NetBackup appliance. This feature gives you better controlof backups when an Oracle database backup is placed in adatabase share by the DBA. This feature also lets you choosea database share as the destination for the first backup copy.The backup copy is a full set of database data file copiescreated, incrementally updated, and protected by NetBackup.You must create a share on the appliance for this option usingthe NetBackup Appliance Shell Menu.
Oracle backups only work on an NFS share on the NetBackupappliance.
For more information about how to set up the share, seeCreating a share from the NetBackup Appliance Shell Menu inthe Veritas NetBackup 52xx and 5330 Appliance Administrator’sGuide.
Support on a NetBackupappliance for backup to anappliance share (Copilot)
The Oracle DBA can start an immediate backup from the clientusing the nboraadm -immediate command. The OracleDBA can start the backup instead of waiting for the backup tobe initiated based on the NetBackup schedule. This commandoption is useful if the Oracle DBA wants to perform a backupbefore maintenance. The command must be initiated from theclient where the instance resides.
Immediate backup forOracle DBA
17IntroductionNetBackup for Oracle features

Table 1-1 NetBackup for Oracle features (continued)
DescriptionFeature
Oracle 12c introduced the container databases (CDB) andpluggable databases (PDB). The Oracle Intelligent Policy isenhanced and allows a backup to include single or multiplePDBs.
This feature also lets you select one or more Oracle 12cinstances along with non-Oracle 12c instances in OIP.
Support for Container andPluggable databases
NetBackup for Oracle terminologyTable 1-2 explains some Oracle terms as they pertain to NetBackup.
Table 1-2 Oracle terms
DefinitionTerm
A full backup backs up all the blocks into the backup set, skipping onlydata file blocks that have never been used. Note that a full backup isnot the same as a whole database backup; "full" is an indicator that thebackup is not incremental.
A full backup has no effect on subsequent incremental backups, whichis why it is not considered part of the incremental strategy. In otherwords, a full backup does not affect which blocks are included insubsequent incremental backups.
Full backup
An incremental backup is a backup of only those blocks that havechanged since a previous backup. Oracle lets you create and restoreincremental backups of data files, tablespaces, and a database. Youcan include a control file in an incremental backup set, but the controlfile is always included in its entirety. No blocks are skipped.
Incrementalbackup
18IntroductionNetBackup for Oracle terminology

Table 1-2 Oracle terms (continued)
DefinitionTerm
RMAN lets you create multilevel backups. RMAN can create multilevelincremental backup. A value of 0 or 1 denotes each incremental level.
A level 0 incremental backup, which is the base for subsequentincremental backups, copies all blocks containing data. You can createa level 0 database backup as backup sets or image copies.
The only difference between a level 0 incremental backup and a fullbackup is that a full backup is never included in an incremental strategy.Thus, an incremental level 0 backup is a full backup that happens tobe the parent of incremental backups whose level is greater than 0.
The benefit to performing multilevel incremental backups is that you donot back up all of the blocks all of the time. Incremental backups at alevel greater than zero (0) only copy the blocks that were modified.Hence, the backup size can be significantly smaller and the backupmight require much less time. The size of the backup file depends solelyupon the number of blocks that are modified and the incremental backuplevel.
Multilevelincrementalbackup
In a differential level 1 backup, RMAN backs up all blocks that havechanged since the most recent incremental backup at level 1 (cumulativeor differential) or level 0. For example, in a differential level 1 backup,RMAN determines which level 1 backup is the most recent backup.RMAN backs up all blocks that have been modified after that backup.If no level 1 is available, then RMAN copies all blocks that have changedsince the base level 0 backup.
Differentialincrementalbackup
In a cumulative level 1 incremental backup, RMAN backs up all blocksthat have changed since the most recent backup at level 0.
Cumulative incremental backups reduce the work that is needed for arestore. The cumulative incremental backup ensures that you only needone incremental backup from any particular level at restore time.Cumulative backups require more space and time than differentialincremental backups, however, because they duplicate the work thatprevious backups did at the same level.
Cumulativeincrementalbackup
NetBackup for Oracle operation using the OracleIntelligent Policy
The Oracle Intelligent Policy feature lets you create a policy that specifies one ormore Oracle instances to be backed up. You manage instances in an instancerepository available on the NetBackup Administration Console. The instance
19IntroductionNetBackup for Oracle operation using the Oracle Intelligent Policy
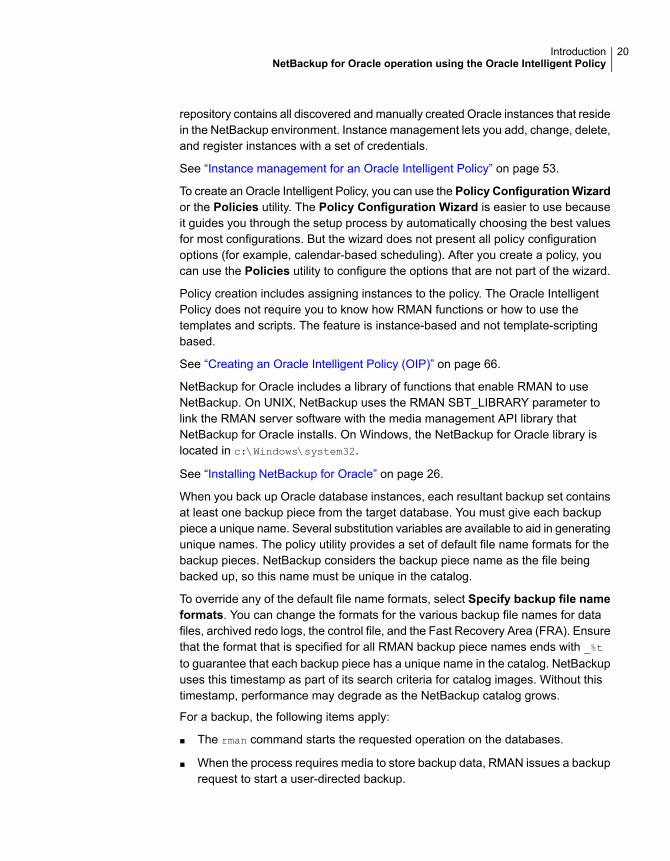
repository contains all discovered and manually created Oracle instances that residein the NetBackup environment. Instance management lets you add, change, delete,and register instances with a set of credentials.
See “Instance management for an Oracle Intelligent Policy” on page 53.
To create an Oracle Intelligent Policy, you can use the Policy ConfigurationWizardor the Policies utility. The Policy Configuration Wizard is easier to use becauseit guides you through the setup process by automatically choosing the best valuesfor most configurations. But the wizard does not present all policy configurationoptions (for example, calendar-based scheduling). After you create a policy, youcan use the Policies utility to configure the options that are not part of the wizard.
Policy creation includes assigning instances to the policy. The Oracle IntelligentPolicy does not require you to know how RMAN functions or how to use thetemplates and scripts. The feature is instance-based and not template-scriptingbased.
See “Creating an Oracle Intelligent Policy (OIP)” on page 66.
NetBackup for Oracle includes a library of functions that enable RMAN to useNetBackup. On UNIX, NetBackup uses the RMAN SBT_LIBRARY parameter tolink the RMAN server software with the media management API library thatNetBackup for Oracle installs. On Windows, the NetBackup for Oracle library islocated in c:\Windows\system32.
See “Installing NetBackup for Oracle” on page 26.
When you back up Oracle database instances, each resultant backup set containsat least one backup piece from the target database. You must give each backuppiece a unique name. Several substitution variables are available to aid in generatingunique names. The policy utility provides a set of default file name formats for thebackup pieces. NetBackup considers the backup piece name as the file beingbacked up, so this name must be unique in the catalog.
To override any of the default file name formats, select Specify backup file nameformats. You can change the formats for the various backup file names for datafiles, archived redo logs, the control file, and the Fast Recovery Area (FRA). Ensurethat the format that is specified for all RMAN backup piece names ends with _%t
to guarantee that each backup piece has a unique name in the catalog. NetBackupuses this timestamp as part of its search criteria for catalog images. Without thistimestamp, performance may degrade as the NetBackup catalog grows.
For a backup, the following items apply:
■ The rman command starts the requested operation on the databases.
■ When the process requires media to store backup data, RMAN issues a backuprequest to start a user-directed backup.
20IntroductionNetBackup for Oracle operation using the Oracle Intelligent Policy

■ The NetBackup media server connects to NetBackup for Oracle on the client.NetBackup for Oracle on the client sends the database data to the NetBackupmedia server which saves the data to secondary storage. A restore operationworks in essentially the same manner except that RMAN issues a restorerequest. Then NetBackup retrieves the data from secondary storage and sendsit to NetBackup for Oracle on the client.
■ RMAN supports parallel operations, so that a single rman command can startmore than one backup, or restore on the NetBackup system.
■ The status for an RMAN operation is stored in the RMAN catalog or in thedatabase control file. This same status appears in the output of the RMANcommand that is used to run the backup or restore. This status is the only statusthat a database administrator must check to verify that a backup or restore hasbeen successful.
■ You can see the RMAN script and RMAN output in the details of the controllingjob (bphdb) in the Activity Monitor.
■ NetBackup also logs status, but only for its own part of the operation. Thedatabase administrator cannot use the NetBackup status to determine whetherrman was successful. Errors can occur in rman that do not affect NetBackup andare not recorded in its logs.
Logging the RMAN input and output on a clientNetBackup has the ability to log the RMAN input and output that is logged locallyon the client and also sent to the Activity Monitor. The RMAN_OUTPUT_DIR entryspecifies which directory to place the RMAN input and output locally on the clientfor Oracle Intelligent Policy backups. The log is only created when a backup is runusing an Oracle Intelligent Policy (OIP) and the file is continuously updated duringthe RMAN backup. Only one RMAN_OUTPUT_DIR entry per client is allowed in aWindows environment. In a UNIX environment, each user can place the output ina different location by adding the RMAN_OUTPUT_DIR entry to $HOME/bp.conf file.The value in the $HOME/bp.conf file takes precedence if it exists. NetBackup doesnot clean up the log files so the Oracle user has to clean up the log files manually.
You must use the nbgetconfig and the nbsetconfig commands to view, add, orchange the option. The directory that is specified must exist and the Oracle userneeds to have permission to create files within the directory.
Use the following format:
RMAN_OUTPUT_DIR = directory_name
The directory_name is a directory to which the Oracle user has permission to createfiles within the directory.
21IntroductionLogging the RMAN input and output on a client
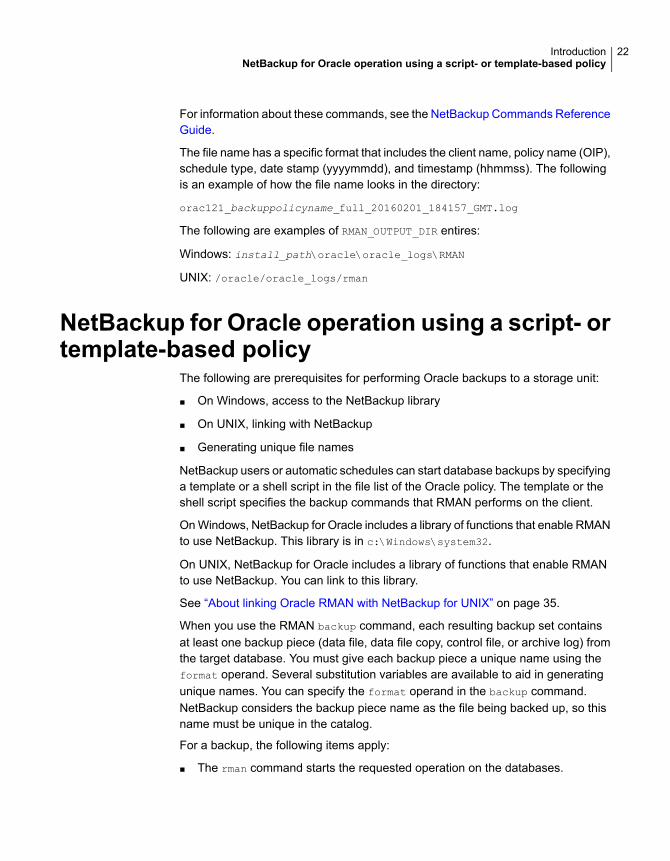
For information about these commands, see the NetBackup Commands ReferenceGuide.
The file name has a specific format that includes the client name, policy name (OIP),schedule type, date stamp (yyyymmdd), and timestamp (hhmmss). The followingis an example of how the file name looks in the directory:
orac121_backuppolicyname_full_20160201_184157_GMT.log
The following are examples of RMAN_OUTPUT_DIR entires:
Windows: install_path\oracle\oracle_logs\RMAN
UNIX: /oracle/oracle_logs/rman
NetBackup for Oracle operation using a script- ortemplate-based policy
The following are prerequisites for performing Oracle backups to a storage unit:
■ On Windows, access to the NetBackup library
■ On UNIX, linking with NetBackup
■ Generating unique file names
NetBackup users or automatic schedules can start database backups by specifyinga template or a shell script in the file list of the Oracle policy. The template or theshell script specifies the backup commands that RMAN performs on the client.
On Windows, NetBackup for Oracle includes a library of functions that enable RMANto use NetBackup. This library is in c:\Windows\system32.
On UNIX, NetBackup for Oracle includes a library of functions that enable RMANto use NetBackup. You can link to this library.
See “About linking Oracle RMAN with NetBackup for UNIX” on page 35.
When you use the RMAN backup command, each resulting backup set containsat least one backup piece (data file, data file copy, control file, or archive log) fromthe target database. You must give each backup piece a unique name using theformat operand. Several substitution variables are available to aid in generatingunique names. You can specify the format operand in the backup command.NetBackup considers the backup piece name as the file being backed up, so thisname must be unique in the catalog.
For a backup, the following items apply:
■ The rman command starts the requested operation on the databases.
22IntroductionNetBackup for Oracle operation using a script- or template-based policy
■ When the process requires media to store backup data, RMAN starts auser-directed backup by issuing a backup request.
■ The NetBackup media server connects to NetBackup for Oracle on the client.NetBackup for Oracle on the client sends the database data to the NetBackupmedia server which saves the data to secondary storage. A restore operationworks in essentially the same manner except that RMAN issues a restorerequest. Then NetBackup retrieves the data from secondary storage and sendsit to NetBackup for Oracle on the client.
■ RMAN supports parallel operations, so a single rman command can start morethan one backup, or restore on the NetBackup system.
■ The status for an RMAN operation is stored in the RMAN catalog or in thedatabase control file. This same status appears in the output of the RMANcommand that runs the backup or restore. This status is the only status that adatabase administrator must check to verify that a backup or restore has beensuccessful.
■ NetBackup also logs status, but only for its own part of the operation. Thedatabase administrator cannot use the NetBackup status to determine whetherrman was successful. Errors can occur in rman that do not affect NetBackup andare not recorded in its logs.
About Oracle RMANRMAN performs a wide variety of automated backup and recovery functions. Duringa backup or a restore, RMAN provides the interface to the databases, and it extractsand inserts data.
To start a database backup or restore, the database administrator runs the rman
command. You can run this command from the command line, a script, or anapplication such as NetBackup. The RMAN script is used as a parameter to therman command and specifies the operations to be performed (for example, backupor restore). The RMAN script also defines other components of the operation suchas the database objects to be backed up or restored.
During a backup or restore, RMAN controls the data streams going into or out of adatabase. RMAN can access storage devices when it is integrated with a mediamanagement system, such as the system that NetBackup provides.
RMAN provides true incremental backups. An incremental backup backs up datafiles and includes only the blocks that have been changed since the last incrementalbackup. For more information on the backup and recovery process, see your Oracledocumentation.
Table 1-3 explains Oracle RMAN terms as they pertain to NetBackup.
23IntroductionAbout Oracle RMAN
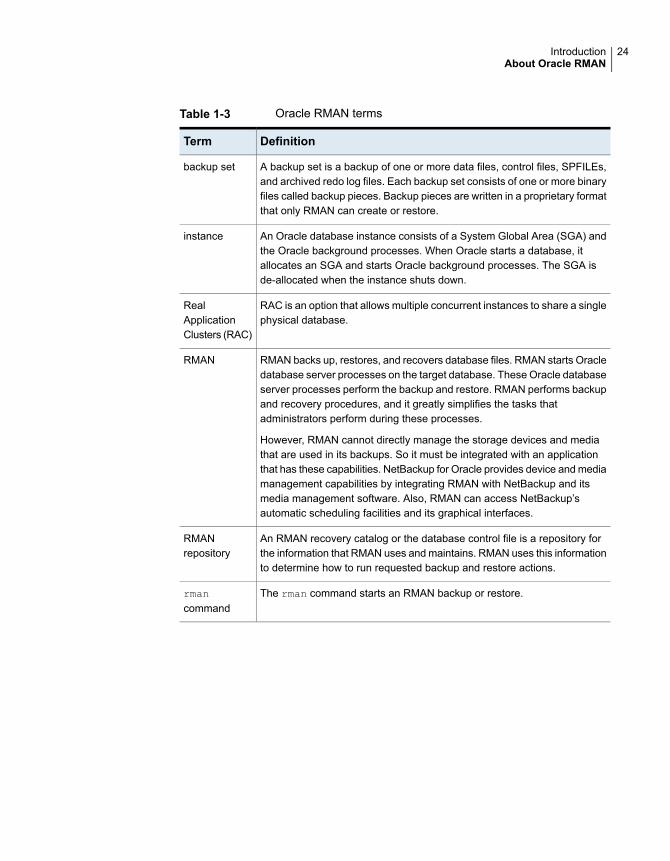
Table 1-3 Oracle RMAN terms
DefinitionTerm
A backup set is a backup of one or more data files, control files, SPFILEs,and archived redo log files. Each backup set consists of one or more binaryfiles called backup pieces. Backup pieces are written in a proprietary formatthat only RMAN can create or restore.
backup set
An Oracle database instance consists of a System Global Area (SGA) andthe Oracle background processes. When Oracle starts a database, itallocates an SGA and starts Oracle background processes. The SGA isde-allocated when the instance shuts down.
instance
RAC is an option that allows multiple concurrent instances to share a singlephysical database.
RealApplicationClusters (RAC)
RMAN backs up, restores, and recovers database files. RMAN starts Oracledatabase server processes on the target database. These Oracle databaseserver processes perform the backup and restore. RMAN performs backupand recovery procedures, and it greatly simplifies the tasks thatadministrators perform during these processes.
However, RMAN cannot directly manage the storage devices and mediathat are used in its backups. So it must be integrated with an applicationthat has these capabilities. NetBackup for Oracle provides device and mediamanagement capabilities by integrating RMAN with NetBackup and itsmedia management software. Also, RMAN can access NetBackup’sautomatic scheduling facilities and its graphical interfaces.
RMAN
An RMAN recovery catalog or the database control file is a repository forthe information that RMAN uses and maintains. RMAN uses this informationto determine how to run requested backup and restore actions.
RMANrepository
The rman command starts an RMAN backup or restore.rmancommand
24IntroductionAbout Oracle RMAN

Table 1-3 Oracle RMAN terms (continued)
DefinitionTerm
The RMAN script specifies the commands for RMAN to perform (forexample, backups and restores). For information on RMAN commands andscript files, see your Oracle documentation.
The following directory contains example RMAN shell scripts:
Windows:
install_path\NetBackup\dbext\Oracle\samples\rman
UNIX:
/usr/openv/netbackup/ext/db_ext/oracle/samples/rman
These example scripts run RMAN commands and are fully commented toexplain the features that are used. You can review these examples and usethem as a starting point for developing backup, restore, and recovery scripts.
RMAN script
For more information on RMAN terminology, see your Oracle documentation.
About the Oracle recovery catalogThe recovery catalog is a repository of information. RMAN uses the information inthe recovery catalog to determine how to perform requested backup and restoreactions.
The recovery catalog contains information about the following software components:
■ Data file and archive log backup sets and backup pieces.
■ Data file copies.
■ Archived redo logs and their copies.
■ Tablespaces and data files on the target database.
■ Stored scripts. These are named, user-created sequences of RMAN and SQLcommands.
Oracle recommends that you use RMAN with a recovery catalog, especially if youhave 20 or more data files. However, you are not required to maintain a recoverycatalog with RMAN.
For information on the benefits and disadvantages of using a recovery catalog, seeyour Oracle documentation.
25IntroductionAbout the Oracle recovery catalog
NetBackup for OracleQuickStart
This chapter includes the following topics:
■ Installing NetBackup for Oracle
■ Registering Oracle database instances
■ Creating an Oracle database instance group
■ Creating an Oracle policy
Installing NetBackup for OracleBefore you can create an Oracle Intelligent Policy, you need to install NetBackupfor Oracle and use the instance management facility.
2Chapter

To install NetBackup for Oracle
1 Verify that the NetBackup for Oracle agent is supported on your operatingsystem and platform.
See “Verifying the operating system and platform compatibility” on page 33.
2 Make sure that you meet the server requirements and client requirements ofNetBackup for Oracle.
See “NetBackup server and client requirements” on page 34.
3 Install NetBackup if it is not already on your system.
Note: The Oracle database agent is installed as part of the NetBackup clientinstallation.
For more information on NetBackup installation, see the NetBackup InstallationGuide.
Registering Oracle database instancesThe Oracle Discovery Service discovers Oracle database instances in the NetBackupenvironment and collects them in an instance repository. You must register all thediscovered instances that you want to protect by assigning them credentials. AnOracle policy accepts only registered instances.
You can register instances individually or add them to an instance group wherethey assume the credentials of the group. You can also manually add an instanceand assign it a set of credentials at that time. The Oracle database user is requiredto have a certain level of credentials. The Oracle database user must haveSYSBACKUP or SYSDBA privileges (based on version of Oracle).
Use the NetBackup Administration Console or the nboraadm command on theCLI to access the repository for instance registration. The nboraadm command isavailable on the NetBackup master server and the NetBackup clients. This commandis available because users such as the DBAs may not have access to the masterserver. The NetBackup administrator uses nboraadm on the master server to controlthe list of users and clients that have access to nboraadm on the NetBackup client.
To register Oracle database instances
1 In the NetBackup Administration Console, in the left pane, expandNetBackup Management > Applications > Oracle.
2 The Oracle entry in the left pane contains two items:
27NetBackup for Oracle QuickStartRegistering Oracle database instances

■ Click Instances to display the list of instances. The list includes the namesof instances that you have added and the instances that the OracleDiscovery Service has discovered. The following is an example of the screenthat appears:
■ Click Instance Groups to create an instance group to which you can thenadd instances with the same credentials.
Procedures are available about how to create an instance group.
See “Creating an Oracle database instance group” on page 29.
3 Select one or more instances on the instance list. Use the Ctrl and Shift keysas needed to select multiple instances.
4 Do one of the following:
■ If you have already created an instance group, selectAdd to group andregister using group credentials to add the instance(s) to the group.Select the instance group name from the Instance Group pulldown menu.The instance assumes the credentials of the instance group. Click OK tocontinue.
■ Click Use Instance Credentials. Enter the instance credentials and clickOK.
5 The credentials are validated and a Validation Report dialog shows the results.You can save the credentials even if the validation fails. Click OK to displaythe Instances list again.
6 Verify that the Instances list shows the date-time when you registered theinstance. The instance is now available to select for an Oracle Intelligent Policy.
7 Repeat for all other instances that you want registered individually or as partof an instance group.
See “Installing NetBackup for Oracle” on page 26.
See “Creating an Oracle database instance group” on page 29.
See “Creating an Oracle policy” on page 29.
28NetBackup for Oracle QuickStartRegistering Oracle database instances

Creating an Oracle database instance groupThis procedure lets you create an instance group that includes instances with acommon set of credentials. You can create a default instance group fornewly-discovered instances. Then you can create a policy that uses this instancegroup to automatically protect the new instances.
To create an Oracle database instance group
1 In the NetBackup Administration Console, in the left pane, expandNetBackup Management > Applications > Oracle.
2 Enter the Instance Group Name in the text window, then fill in the appropriatecredentials, and click OK.
Note: Instance group names cannot be localized.
The newly created instance group name appears in the right pane.
Click Help for help entering the appropriate credentials. If necessary, contactthe Oracle database administrator for the correct set of credentials.
3 To assign individual instances to this instance group, click Instances in theleft pane to display the list of instances.
4 Make sure Add to group and register using group credentials is selected.Use the Instance Group pulldown menu to select the instance group that youwant the instance to be added to, then click OK.
5 Repeat for each instance that you want included in the instance group.
6 You may want to make this instance group the default for all newly discoveredinstances. If so, all newly discovered instances are automatically added to thisinstance group. More information is available about auto-registering an instancegroup.
See “Automatic Registration of an instance group” on page 61.
See “Installing NetBackup for Oracle” on page 26.
See “Registering Oracle database instances” on page 27.
See “Creating an Oracle policy” on page 29.
Creating an Oracle policyThe easiest method to set up a backup policy is to use the Policy ConfigurationWizard. This wizard guides you through the setup process by automatically choosingthe best values for most configurations.
29NetBackup for Oracle QuickStartCreating an Oracle database instance group

See “About Oracle Intelligent Policies (OIP)” on page 64.
Not all policy configuration options are presented through the wizard (for example,calendar-based scheduling and the Data Classification setting). After the policy iscreated, modify the policy in the Policies utility to configure the options that are notpart of the wizard.
Use the following procedure to create a policy using the Policy Configuration Wizard.
To create a policy with the Policy Configuration Wizard
1 In theNetBackup Administration Console, in the left pane, clickNetBackupManagement.
2 In the right pane, click Create a Policy to begin the Policy ConfigurationWizard. The first panel of the Policy Configuration Wizard appears.
3 Select Oracle - Backup Oracle data on the panel, then click Next.
4 Follow the prompts. ClickHelp on any wizard panel for assistance while runningthe wizard.
Use the following procedure to create a policy without using the PolicyConfiguration Wizard.
To create a policy without the Policy Configuration Wizard
1 In the NetBackup Administration Console, in the left pane, expandNetBackup Management > Policies.
2 On the Actions menu, click New > New Policy.
3 Type a unique name for the new policy in the Add a New Policy dialog box.If necessary, clear the Use Policy Configuration Wizard check box, thenclick OK.
The Attributes tab of the Add New Policy dialog box appears along with thefollowing set of tabs across the top of the panel:
30NetBackup for Oracle QuickStartCreating an Oracle policy
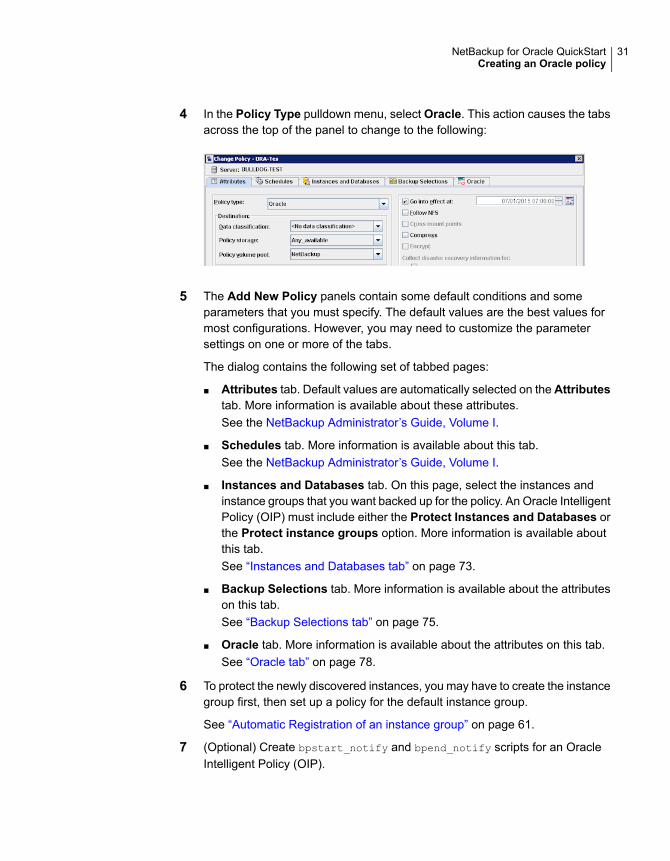
4 In the Policy Type pulldown menu, select Oracle. This action causes the tabsacross the top of the panel to change to the following:
5 The Add New Policy panels contain some default conditions and someparameters that you must specify. The default values are the best values formost configurations. However, you may need to customize the parametersettings on one or more of the tabs.
The dialog contains the following set of tabbed pages:
■ Attributes tab. Default values are automatically selected on the Attributestab. More information is available about these attributes.See the NetBackup Administrator’s Guide, Volume I.
■ Schedules tab. More information is available about this tab.See the NetBackup Administrator’s Guide, Volume I.
■ Instances and Databases tab. On this page, select the instances andinstance groups that you want backed up for the policy. An Oracle IntelligentPolicy (OIP) must include either the Protect Instances and Databases orthe Protect instance groups option. More information is available aboutthis tab.See “Instances and Databases tab” on page 73.
■ Backup Selections tab. More information is available about the attributeson this tab.See “Backup Selections tab” on page 75.
■ Oracle tab. More information is available about the attributes on this tab.See “Oracle tab” on page 78.
6 To protect the newly discovered instances, you may have to create the instancegroup first, then set up a policy for the default instance group.
See “Automatic Registration of an instance group” on page 61.
7 (Optional) Create bpstart_notify and bpend_notify scripts for an OracleIntelligent Policy (OIP).
31NetBackup for Oracle QuickStartCreating an Oracle policy
For an OIP, the scripts must include the .policyname or.policyname.schedule suffix or the script does not run at the start or end ofthe policy. An OIP ignores the generic bpstart_notify and bpend_notify
scripts and they do not work for a non-OIP.
The generic bpstart_notify or bpend_notify scripts reside on the serverand the location varies by platform:
■ UNIX: /usr/openv/netbackup/bin/goodies/
■ Windows: Install_path/NetBackup/bin/goodies/
The renamed script must be copied from the server and placed in theNetBackup bin directory on the client:
■ UNIX: /usr/openv/netbackup/bin/
■ Windows: Install_path\NetBackup\bin\
Examples of renamed scripts:
■ UNIX: /usr/openv/netbackup/bin/bpstart_notify.oip_instance1 or/usr/openv/netbackup/bin/bpend_notify.oip_instance2.full
■ Windows:install_path\NetBackup\bin\bpstart_notify.oip_instance1.bat orinstall_path\NetBackup\bin\bpend_notify.oip_instance2.full.bat
For more information about the bpstart_notify and bpend_notify scripts,refer to the NetBackup Administrator’s Guide, Volume II
See “Registering Oracle database instances” on page 27.
See “Creating an Oracle database instance group” on page 29.
See “Installing NetBackup for Oracle” on page 26.
32NetBackup for Oracle QuickStartCreating an Oracle policy

Installing NetBackup forOracle
This chapter includes the following topics:
■ Verifying the operating system and platform compatibility
■ NetBackup server and client requirements
■ Requirements for using NetBackup for Oracle in a NetBackup cluster
■ About the license for NetBackup for Oracle
■ About linking Oracle RMAN with NetBackup for UNIX
Verifying the operating system and platformcompatibility
Verify that the NetBackup for Oracle agent is supported on your operating systemor platform.
To verify operating system and compatibility
1 Go to the following webpage:
http://www.netbackup.com/compatibility
2 In the list of documents, click on the following document:
Application/Database Agent Compatibility List
3 For information on support for Snapshot Client, see the following document:
Snapshot Client Compatibility List
3Chapter
NetBackup server and client requirementsEvery NetBackup server includes the NetBackup client software by default.Therefore, you can use NetBackup for Oracle on a NetBackup server or client (ifNetBackup for Oracle is supported on that platform).
Verify that the following requirements are met for the NetBackup server:
■ The NetBackup server software is installed and operational on the NetBackupserver. The NetBackup server platform can be any that NetBackup supports.See the NetBackup Installation Guide.
■ One or more Oracle database instances must exist.
■ Make sure that you configure any backup media that the storage unit uses.
The number of media volumes that are required depends on several things:
■ The devices used
■ The sizes of the databases that you want to back up
■ The amount of data that you want to archive
■ The size of your backups
■ The frequency of backups or archivesSee the NetBackup Administrator’s Guide, Volume I.
■ Verify that the NetBackup client software is installed on the computer that hasthe databases you want to back up.If the database is clustered, you must use the same version of NetBackup oneach node in the cluster.
See “About the license for NetBackup for Oracle” on page 35.
Requirements for using NetBackup for Oracle ina NetBackup cluster
If you plan to use NetBackup for Oracle on a NetBackup server configured in aNetBackup cluster, verify the following requirements:
■ NetBackup supports your cluster environment.See the Software Compatibility List (SCL).
■ The NetBackup server software is installed and configured to work in aNetBackup cluster.See the NetBackup Installation Guide.See the NetBackup Clustered Master Server Administrator's Guide.
34Installing NetBackup for OracleNetBackup server and client requirements
■ The NetBackup client software is installed and operational on each node towhich NetBackup can failover.
■ A valid license for NetBackup for Oracle must exist on each node whereNetBackup server resides.
About the license for NetBackup for OracleThe NetBackup for Oracle agent is installed with the NetBackup client software.No separate installation is required. A valid license for the agent must exist on themaster server.
More information is available on how to add licenses.
See the NetBackup Administrator’s Guide, Volume I.
For a NetBackup cluster, a valid license for NetBackup for Oracle must exist oneach node where NetBackup server resides.
About linking Oracle RMAN with NetBackup forUNIX
Before writing to a storage unit, link the Oracle database server software with theNetBackup API library installed by NetBackup for Oracle. Oracle uses this librarywhen it needs to write to or read from the devices that NetBackup media managersupports.
To link your Oracle software with the NetBackup API library, use one of the followingmethods:
■ (Recommended) Use the SBT_LIBRARY parameter in the PARMS section ofthe allocate channel in the RMAN script. In the run block of the RMAN script,modify the ALLOCATE statement so that the SBT_LIBRARY parameter pointsto the NetBackup API library. For example:
ALLOCATE CHANNEL CH00 TYPE 'SBT_TAPE' PARMS 'SBT_LIBRARY=
/usr/openv/netbackup/bin/libobk.so64.1';
■ Use the linking script that NetBackup provides.
■ Create the links manually.
The linking process differs depending on your hardware platform, your Oracledatabase server release level, and your OS level. This topic does not address allthe supported combinations, but it specifies OS level differences.
35Installing NetBackup for OracleAbout the license for NetBackup for Oracle

The default location for the NetBackup API library is /usr/openv/netbackup/bin.The name of the NetBackup API library differs depending on your platform.
Table 3-1 lists the library names for the supported platforms.
Table 3-1 NetBackup API libraries
Library nameOraclePlatform
libobk.a6464-bitAIX
libobk.so64-bitHP Itanium
libobk.so6464-bitLinux x86
libobk.so64-bitLinux Itanium
libobk.so64-bitIBM pSeries
libobk.so64-bitIBM zSeries
libobk.so.64.164-bitSolaris (SPARC)
libobk.so.164-bitSolaris (x86)
Verifying environment variables and shutting down OracleThe following procedure describes how to correctly define your environment variablesand how to shut down the Oracle database instances.
To verify environment variables and shutdown Oracle database instances
1 Make sure that your Oracle environment variables are defined.
Define the variables as follows:
The directory path to the Oracle software location.ORACLE_HOME
The name of the Oracle database instance.ORACLE_SID
2 Become the Oracle user.
su - oracle
3 Determine if you need to link or re-link the library with NetBackup.
See “Linking Oracle RMAN with NetBackup on UNIX platforms” on page 37.
4 If this installation is an upgrade and the SBT_LIBRARY parameter is not inuse, restart the Oracle database instance.
36Installing NetBackup for OracleAbout linking Oracle RMAN with NetBackup for UNIX
Linking Oracle RMAN with NetBackup on UNIX platformsThe procedures in this topic show how to link RMAN with NetBackup. The automaticmethod is preferred. Use the manual method only if the link script fails or if youreceive Oracle messages to indicate that manual linking is required.
Link the library with NetBackup when you license NetBackup for Oracle for the firsttime.
For more information about what Oracle database release that NetBackup for Oraclesupports, review the Application/Database Agent Compatibility List.
To automatically link Oracle RMAN with NetBackup
1 Run the oracle_link script that is located in /usr/openv/netbackup/bin/.
This script determines the Oracle version level and then links Oracle with theNetBackup API library. This script writes output to /tmp/make_trace.<pid>. Tochange the trace file location, change the MAKE_TRACE variable in theoracle_link script.
2 If this installation is an upgrade, restart the Oracle database instance.
To manually link Oracle RMAN with NetBackup, follow the instructions in one ofthe platform-specific sub-topics:
■ See “Manually linking AIX (64-bit)” on page 37.
■ See “Manually linking HP Itanium (64-bit)” on page 38.
■ See “Manually linking Linux x86 (64-bit)” on page 39.
■ See “Manually linking IBM pSeries or zSeries” on page 40.
■ See “Manually linking Solaris x86 (64-bit)” on page 40.
■ See “Manually linking Solaris SPARC (64-bit)” on page 41.
Manually linking AIX (64-bit)To manually link AIX (64-bit)
1 Type the following cd command to change directories:
cd $ORACLE_HOME/lib
2 Type the following ls command to determine whether the Oracle library exists:
ls -l libobk.*
37Installing NetBackup for OracleAbout linking Oracle RMAN with NetBackup for UNIX
3 (Conditional) Use the mv command to move the Oracle library to an alternatelocation.
Perform this step if the output from step 2 shows that libobk.a exists.
For example:
mv libobk.a libobk.a.orig
4 Type the following ln command to create a new link:
ln -s /usr/openv/netbackup/bin/libobk.a64 libobk.a
5 If you run into problems and cannot re-link Oracle with the NetBackup APIlibrary, you can rollback what you have done. Enter the following:
cd $ORACLE_HOME/lib64
mv libobk.so.orig libobk.so
Manually linking HP Itanium (64-bit)To manually link HP Itanium (64-bit)
1 Type the following cd command to change directories:
cd $ORACLE_HOME/lib
2 Type the following ls command to determine whether the Oracle library exists:
ls -l libobk.so
3 (Conditional) Use the mv command to move the Oracle library to an alternatelocation.
Perform this step if the output from step 2 shows that libobk.so.
For example:
mv libobk.so libobk.so.orig
38Installing NetBackup for OracleAbout linking Oracle RMAN with NetBackup for UNIX

4 Type the following ln command to create new links:
ln -s /usr/openv/netbackup/bin/libobk.so libobk.so
5 If you run into problems and cannot re-link Oracle with the NetBackup APIlibrary, you can rollback what you have done. Enter the following:
cd $ORACLE_HOME/lib64
mv libobk.so.orig libobk.so
Manually linking Linux x86 (64-bit)To manually Linux x86 (64-bit)
1 Type the following cd command to change directories:
cd $ORACLE_HOME/lib
2 Type the following ls command to determine whether the Oracle library exists:
ls -l libobk.so
3 (Conditional) Use the mv command to move the Oracle library to an alternatelocation.
Perform this step if the output from step 2 shows that libobk.so is present.
For example:
mv libobk.so libobk.so.orig
4 Type the following ln command to create a new link:
ln -s /usr/openv/netbackup/bin/libobk.so64 libobk.so
5 If you run into problems and cannot re-link Oracle with the NetBackup APIlibrary, you can rollback what you have done. Enter the following:
cd $ORACLE_HOME/lib64
mv libobk.so.orig libobk.so
39Installing NetBackup for OracleAbout linking Oracle RMAN with NetBackup for UNIX
Manually linking IBM pSeries or zSeriesTo link manually IBM pSeries or zSeries
1 Type the following cd command to change directories:
cd $ORACLE_HOME/lib
2 Type the following ls command to determine whether the Oracle library exists:
ls -l libobk.so
3 (Conditional) Use the mv command to move the Oracle library to an alternatelocation.
Perform this step if the output from step 2 shows that libobk.so is present.
For example:
mv libobk.so libobk.so.orig
4 Type the following ln command to create a new link:
ln -s /usr/openv/netbackup/bin/libobk.so libobk.so
5 If you run into problems and cannot re-link Oracle with the NetBackup APIlibrary, you can rollback what you have done. Enter the following:
cd $ORACLE_HOME/lib64
mv libobk.so.orig libobk.so
Manually linking Solaris x86 (64-bit)To manually link Solaris x86 (64-bit)
1 Type the following cd command to change directories:
cd $ORACLE_HOME/lib
2 Type the following ls command to determine whether the Oracle library exists:
ls -l libobk.so
40Installing NetBackup for OracleAbout linking Oracle RMAN with NetBackup for UNIX
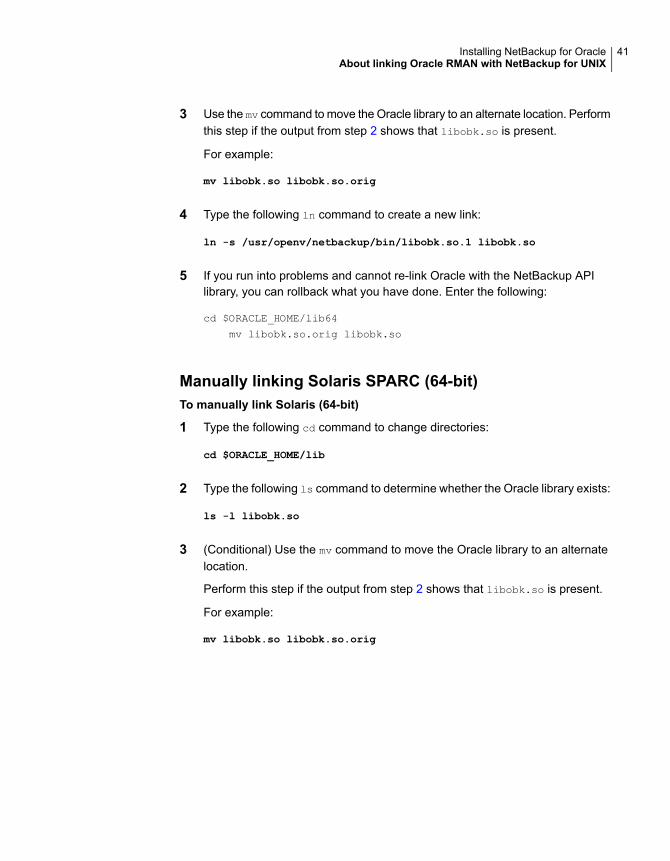
3 Use the mv command to move the Oracle library to an alternate location. Performthis step if the output from step 2 shows that libobk.so is present.
For example:
mv libobk.so libobk.so.orig
4 Type the following ln command to create a new link:
ln -s /usr/openv/netbackup/bin/libobk.so.1 libobk.so
5 If you run into problems and cannot re-link Oracle with the NetBackup APIlibrary, you can rollback what you have done. Enter the following:
cd $ORACLE_HOME/lib64
mv libobk.so.orig libobk.so
Manually linking Solaris SPARC (64-bit)To manually link Solaris (64-bit)
1 Type the following cd command to change directories:
cd $ORACLE_HOME/lib
2 Type the following ls command to determine whether the Oracle library exists:
ls -l libobk.so
3 (Conditional) Use the mv command to move the Oracle library to an alternatelocation.
Perform this step if the output from step 2 shows that libobk.so is present.
For example:
mv libobk.so libobk.so.orig
41Installing NetBackup for OracleAbout linking Oracle RMAN with NetBackup for UNIX

4 Type the following ln command to create a new link:
ln -s /usr/openv/netbackup/bin/libobk.so64.1 libobk.so
5 If you run into problems and cannot re-link Oracle with the NetBackup APIlibrary, you can rollback what you have done. Enter the following:
cd $ORACLE_HOME/lib64
mv libobk.so.orig libobk.so
42Installing NetBackup for OracleAbout linking Oracle RMAN with NetBackup for UNIX

Oracle policy configurationThis chapter includes the following topics:
■ Preparing for NetBackup for Oracle configuration
■ Instance management for an Oracle Intelligent Policy
■ About Oracle Intelligent Policies (OIP)
■ About script- or template-based Oracle policies
■ Configuring the logon account for the NetBackup Client Service for NetBackupfor Oracle
■ Testing configuration settings for NetBackup for Oracle
Preparing for NetBackup for Oracle configurationThe major part of configuring NetBackup for Oracle is to create and configure theOracle policies. The following topics prepare you to configure NetBackup for Oraclepolicies:
■ See “About Oracle policy configuration” on page 44.
■ See “Permissions for NetBackup for Oracle log directories” on page 45.
■ See “NetBackup for Oracle backup policy types” on page 46.
■ See “Configuring the logon account for the NetBackup Client Service forNetBackup for Oracle” on page 111.
■ See “Configuring the Maximum jobs per client for NetBackup for Oracle”on page 52.
4Chapter

About Oracle policy configurationNetBackup offers two ways to configure an Oracle policy.
■ Oracle Intelligent Policies. This method lets you create a single policy to protectmultiple Oracle database instances that are spread over multiple clients. Youselect Oracle database instances for a policy from a repository of instances thatare automatically discovered in the NetBackup environment. Among the featuresthat these policies provide is the ability to schedule frequent backups of archivedredo logs. These backups are accomplished in minutes instead of hours or days.
■ Script- or template-based policies. This method lets you create an Oracle backuppolicy by using a script or template that is based on a list of clients.
A backup policy for a database defines the backup criteria for a specific group ofinstances (Oracle Intelligent Policy) or clients (script- or template-based policy).
The Intelligent Oracle Policy includes the following criteria:
■ Storage unit and media to use
■ Policy attributes
■ Backup schedules. Automatic schedule and archive log schedule.
■ Instances to be backed up
■ Backup selections: Whole database, tablespaces, data files, FRA
The script- or template-based policy includes the following criteria:
■ Storage unit and media to use
■ Policy attributes
■ Backup schedules: Automatic schedule and application schedule.
■ Clients to be backed up
■ Backup templates or script files to be run on the clients
To back up the database environment, define at least one script- or template-basedOracle policy with the appropriate schedules and clients. Or, you can configure asingle Oracle Intelligent Policy that includes all instances.
Most requirements for database policies are the same as for file system backups.In addition to the policy attributes for Oracle, other attributes are available that youshould consider.
See the NetBackup Administrator’s Guide, Volume I.
44Oracle policy configurationPreparing for NetBackup for Oracle configuration
Permissions for NetBackup for Oracle log directoriesIn UNIX, NetBackup uses the /usr/openv/netbackup/logs directory tree for therecording of troubleshooting information. NetBackup also uses this directory treefor progress and communication updates to users and other NetBackup applications.Restrictive permissions on these directories can not only disable the collection oftroubleshooting data, but also prevent the application itself from functioning correctly.
Backup operations and restore operations fail when permissions are too restrictive.We recommend that you make all of the /usr/openv/netbackup/logs directoriesand subdirectories readable and writeable by all users (777 permissions). However,security requirements may prohibit global read-write access. If so, you can restrictpermissions of specific directories to a single group or user. If you do restrictpermissions, you have to make sure that these restrictions do not affect backupand restore operations. This means that all operations must be initiated using aprocess that has read and write access to the /usr/openv/netbackup/logs
directory and subdirectories.
Check that the /usr/openv/netbackup/logs/user_ops directory tree has 777permissions. The items in this directory need to be accessible for the applicationsto operate correctly.
If you restrict permissions on the other directories that are located in/usr/openv/netbackup/logs, backup and restore operations are not affected.However, troubleshooting efforts may be hindered when processes do not havethe appropriate permissions to update their designated debug logs.
In Windows, a situation can occur during backup and restore jobs of Oracle 12cwhere no debug log files are created in the dbclient and bpdbsbora folders. Inthe Oracle 12c release, an Oracle user can be a Windows built-in account(LocalSystem or LocalService) or a standard Windows user account. This issueis the result of security permissions for standard (non-administrator) Windows useraccounts.
If a standard (non-administrator) Windows user account is used, the Oracle usermay not have the proper privileges to write to the dbclient and bpdbsbora folders.To avoid this issue, change the Windows security permissions of the dbclient andbpdbsbora folders to give the Oracle user Full control permissions.
You need to review permissions on the user_ops folder and subfolders. By default,these folders are writeable by all users. If restrictive settings have been configured,ensure that full access is granted for any standard Windows user account that isused. Otherwise, backup and restore operations can fail.
For more information about how restrictive settings can cause issues during backups,restores, or troubleshooting, refer to the following article:
45Oracle policy configurationPreparing for NetBackup for Oracle configuration

http://www.veritas.com/docs/TECH52446
Oracle Home User permissions when NetBackup SANClient is usedTo use the NetBackup SAN Client to protect Oracle on Windows, the Oracle usermust have administrator privileges. Starting with Oracle Database 12c Release 1(12.1), Oracle Database on Windows supports the use of Oracle Home User. TheOracle Home User is specified at the time of Oracle Database installation and isused to run the Windows services for the Oracle home. The Oracle Home User thatis used to run Windows services is similar to the Oracle user for Oracle Databaseon Linux.
For more information, refer to the Oracle document "Supporting Oracle Home Useron Windows" at the following location:
http://docs.oracle.com/cd/E16655_01/win.121/e10714/oh_usr.htm
To use NetBackup SAN Client, make sure to selectUseWindowsBuilt-in Accountduring Oracle Database installation. Making this selection enables the Windowsservices for the Oracle home to run as LocalSystem or LocalService.
NetBackup for Oracle backup policy typesTable 4-1 shows the Oracle backup policy types you can specify.
Table 4-1 Oracle backup types
DescriptionBackup type
The Application Backup schedule enables user-controlledNetBackup operations from the client. These operationsinclude those initiated from the client and those initiated byan automatic schedule on the master server. NetBackup usesthe Application Backup schedule when the user starts abackup manually. Configure at least one Application Backupschedule for each database policy. TheDefault-Application-Backup schedule is configuredautomatically as an Application Backup schedule.
Application Backup – Script-or template-based policyusing streamed data only
46Oracle policy configurationPreparing for NetBackup for Oracle configuration
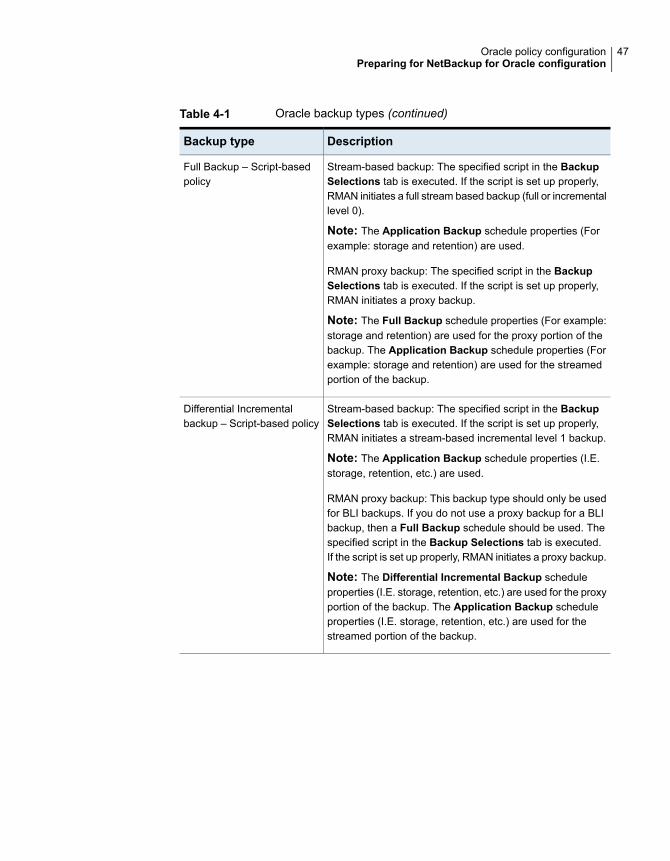
Table 4-1 Oracle backup types (continued)
DescriptionBackup type
Stream-based backup: The specified script in the BackupSelections tab is executed. If the script is set up properly,RMAN initiates a full stream based backup (full or incrementallevel 0).
Note: The Application Backup schedule properties (Forexample: storage and retention) are used.
RMAN proxy backup: The specified script in the BackupSelections tab is executed. If the script is set up properly,RMAN initiates a proxy backup.
Note: The Full Backup schedule properties (For example:storage and retention) are used for the proxy portion of thebackup. The Application Backup schedule properties (Forexample: storage and retention) are used for the streamedportion of the backup.
Full Backup – Script-basedpolicy
Stream-based backup: The specified script in the BackupSelections tab is executed. If the script is set up properly,RMAN initiates a stream-based incremental level 1 backup.
Note: The Application Backup schedule properties (I.E.storage, retention, etc.) are used.
RMAN proxy backup: This backup type should only be usedfor BLI backups. If you do not use a proxy backup for a BLIbackup, then a Full Backup schedule should be used. Thespecified script in the Backup Selections tab is executed.If the script is set up properly, RMAN initiates a proxy backup.
Note: The Differential Incremental Backup scheduleproperties (I.E. storage, retention, etc.) are used for the proxyportion of the backup. The Application Backup scheduleproperties (I.E. storage, retention, etc.) are used for thestreamed portion of the backup.
Differential Incrementalbackup – Script-based policy
47Oracle policy configurationPreparing for NetBackup for Oracle configuration

Table 4-1 Oracle backup types (continued)
DescriptionBackup type
Stream-based backup: The specified script in the BackupSelections tab is executed. If the script is set up properly,RMAN initiates a stream-based incremental level 1 cumulativebackup.
Note: The Application Backup schedule properties (I.E.storage, retention, etc.) are used.
RMAN proxy backup: This backup type should only be usedfor BLI backups. If you do not use a proxy backup for a BLIbackup, then a Full Backup schedule should be used. Thespecified script in the Backup Selections tab is executed.If the script is set up properly, RMAN initiates a proxy backup.
Note: The Cumulative Incremental Backup scheduleproperties (I.E. storage, retention, etc.) are used for the proxyportion of the backup. The Application Backup scheduleproperties (I.E. storage, retention, etc.) are used for thestreamed portion of the backup.
Cumulative Incrementalbackup – Script-based policy
Stream-based backup: The specified template in theBackupSelections tab is executed. Dynamically generates an RMANscript that initiates an incremental level 0 backup.
Note: The Application Backup schedule properties (I.E.storage, retention, etc.) are used.
RMAN proxy backup (Policy is defined to perform asnapshot): The specified template in theBackup Selectionstab is executed. Dynamically generates an RMAN script thatinitiates a proxy backup.
Note: The Full Backup schedule properties (I.E. storage,retention, etc.) are used for the proxy portion of the backup.The Application Backup schedule properties (I.E. storage,retention, etc.) are used for the streamed portion of thebackup.
Full Backup – Templatebased policy
48Oracle policy configurationPreparing for NetBackup for Oracle configuration

Table 4-1 Oracle backup types (continued)
DescriptionBackup type
Stream-based backup: The specified template in theBackupSelections tab is executed. Dynamically generates an RMANscript that initiates a Differential Incremental (INCREMENTALLEVEL 1) backup.
Note: The Application Backup schedule properties (I.E.storage, retention, etc.) are used.
RMAN proxy backup (Policy is defined to perform asnapshot): The specified template in theBackup Selectionstab is executed.
If the policy has Perform block level incremental backupsselected, the generated script causes RMAN to initiate aproxy backup.
If the policy does not have Perform block level incrementalbackups selected, the generated script causes RMAN toinitiate a Differential Incremental (INCREMENTAL LEVEL 1)stream-based backup.
Note: The Differential Incremental Backup scheduleproperties (I.E. storage, retention, etc.) are used for the proxyportion of the backup. The Application Backup scheduleproperties (I.E. storage, retention, etc.) are used for thestreamed portion of the backup.
Differential Incrementalbackup – Template basedpolicy
49Oracle policy configurationPreparing for NetBackup for Oracle configuration
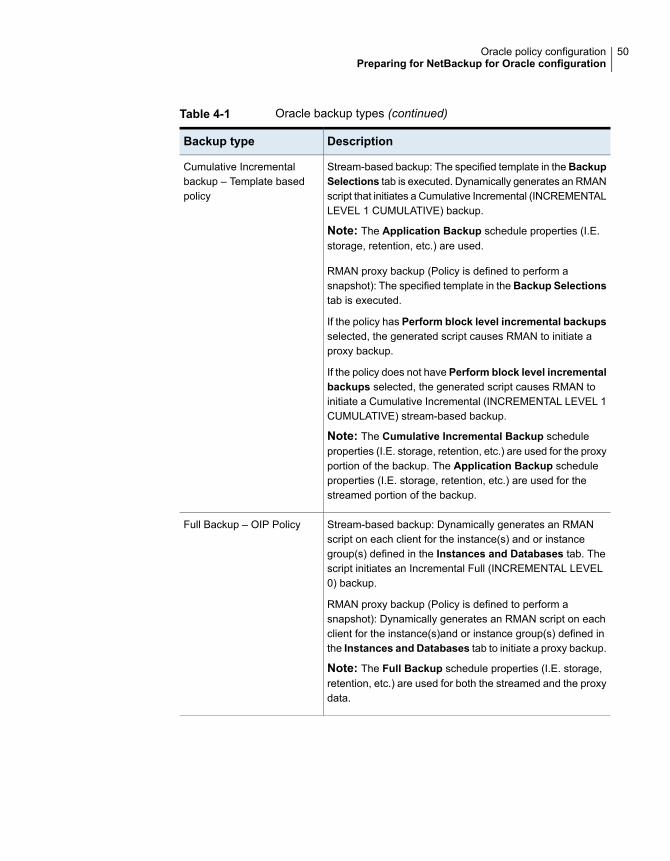
Table 4-1 Oracle backup types (continued)
DescriptionBackup type
Stream-based backup: The specified template in theBackupSelections tab is executed. Dynamically generates an RMANscript that initiates a Cumulative Incremental (INCREMENTALLEVEL 1 CUMULATIVE) backup.
Note: The Application Backup schedule properties (I.E.storage, retention, etc.) are used.
RMAN proxy backup (Policy is defined to perform asnapshot): The specified template in theBackup Selectionstab is executed.
If the policy has Perform block level incremental backupsselected, the generated script causes RMAN to initiate aproxy backup.
If the policy does not have Perform block level incrementalbackups selected, the generated script causes RMAN toinitiate a Cumulative Incremental (INCREMENTAL LEVEL 1CUMULATIVE) stream-based backup.
Note: The Cumulative Incremental Backup scheduleproperties (I.E. storage, retention, etc.) are used for the proxyportion of the backup. The Application Backup scheduleproperties (I.E. storage, retention, etc.) are used for thestreamed portion of the backup.
Cumulative Incrementalbackup – Template basedpolicy
Stream-based backup: Dynamically generates an RMANscript on each client for the instance(s) and or instancegroup(s) defined in the Instances and Databases tab. Thescript initiates an Incremental Full (INCREMENTAL LEVEL0) backup.
RMAN proxy backup (Policy is defined to perform asnapshot): Dynamically generates an RMAN script on eachclient for the instance(s)and or instance group(s) defined inthe Instances and Databases tab to initiate a proxy backup.
Note: The Full Backup schedule properties (I.E. storage,retention, etc.) are used for both the streamed and the proxydata.
Full Backup – OIP Policy
50Oracle policy configurationPreparing for NetBackup for Oracle configuration

Table 4-1 Oracle backup types (continued)
DescriptionBackup type
Stream-based backup: Dynamically generates an RMANscript on each client for the instance(s) and or instancegroup(s) defined in the Instances and Databases tab. Thescript initiates a Differential Incremental (INCREMENTALLEVEL 1) backup.
RMAN proxy backup (Policy is defined to perform asnapshot):
■ The policy has Perform block level incrementalbackups selected. An RMAN script is dynamicallygenerated on each client for the instance(s)and orinstance group(s) defined in the Instances andDatabases tab to initiate a proxy backup.
■
■ The policy does not have Perform block levelincremental backups selected. An RMAN script isdynamically generated on each client for the instance(s)and or instance group(s) defined in the Instances andDatabases tab. A Differential Incremental(INCREMENTAL LEVEL 1) stream-based backup isinitiated.
Note: The Differential Incremental Backup scheduleproperties (I.E. storage, retention, etc.) are used for both thestreamed and the proxy data.
Differential Incrementalbackup – OIP Policy
51Oracle policy configurationPreparing for NetBackup for Oracle configuration
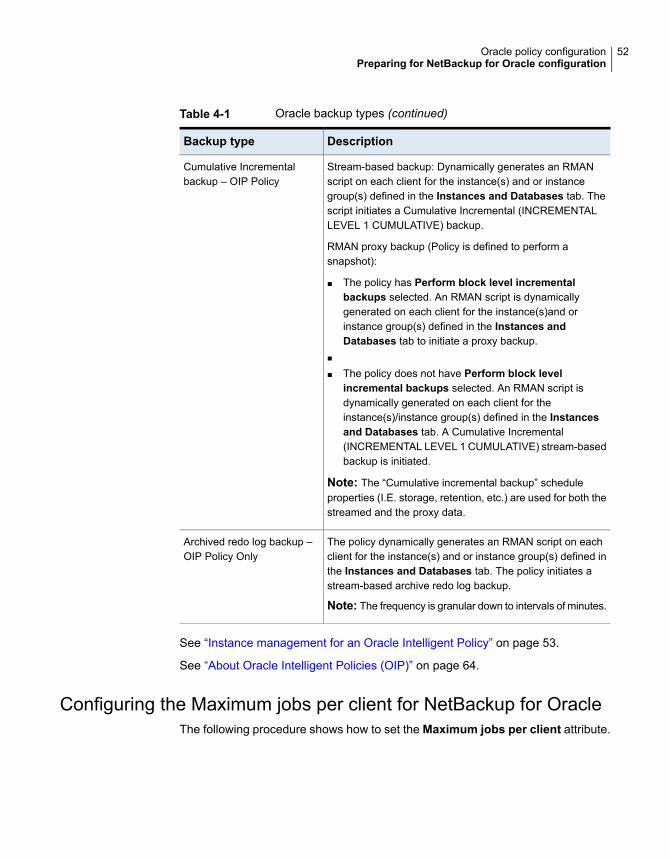
Table 4-1 Oracle backup types (continued)
DescriptionBackup type
Stream-based backup: Dynamically generates an RMANscript on each client for the instance(s) and or instancegroup(s) defined in the Instances and Databases tab. Thescript initiates a Cumulative Incremental (INCREMENTALLEVEL 1 CUMULATIVE) backup.
RMAN proxy backup (Policy is defined to perform asnapshot):
■ The policy has Perform block level incrementalbackups selected. An RMAN script is dynamicallygenerated on each client for the instance(s)and orinstance group(s) defined in the Instances andDatabases tab to initiate a proxy backup.
■
■ The policy does not have Perform block levelincremental backups selected. An RMAN script isdynamically generated on each client for theinstance(s)/instance group(s) defined in the Instancesand Databases tab. A Cumulative Incremental(INCREMENTAL LEVEL 1 CUMULATIVE) stream-basedbackup is initiated.
Note: The “Cumulative incremental backup” scheduleproperties (I.E. storage, retention, etc.) are used for both thestreamed and the proxy data.
Cumulative Incrementalbackup – OIP Policy
The policy dynamically generates an RMAN script on eachclient for the instance(s) and or instance group(s) defined inthe Instances and Databases tab. The policy initiates astream-based archive redo log backup.
Note: The frequency is granular down to intervals of minutes.
Archived redo log backup –OIP Policy Only
See “Instance management for an Oracle Intelligent Policy” on page 53.
See “About Oracle Intelligent Policies (OIP)” on page 64.
Configuring the Maximum jobs per client for NetBackup for OracleThe following procedure shows how to set the Maximum jobs per client attribute.
52Oracle policy configurationPreparing for NetBackup for Oracle configuration

To configure the maximum jobs per client
1 In the left pane of the NetBackup Administration Console, expand NetBackupManagement > Host Properties.
2 Select Master Server.
3 In the right pane, double-click the server icon.
4 Click Global Attributes.
5 Change the Maximum jobs per client value to 99.
The Maximum jobs per client specifies the maximum number of concurrentbackups that are allowed per client. The default is 1.
You can use the following formula to calculate a smaller value for the maximumjobs per client setting:
Maximum jobs per client = number_of_streams X number_of_policies
Refer to the following definitions:
The number of backup streams between the database serverand NetBackup. Each separate stream starts a new backup jobon the client.
number_of_streams
The number of policies of any type that can back up this client atthe same time. This number can be greater than one. Forexample, a client can be in two policies to back up two differentdatabases. These backup windows can overlap.
number_of_policies
For Oracle backups and restores, the number of jobs is difficult to determine. Thisdifficulty exists because Oracle internally determines when and how many streamsto run in parallel to optimize performance.
Note: Enter a large enough value for the Maximum jobs per client attribute tomeet the number of jobs that Oracle runs. You may need to experiment with differentvalues at your site.
Instance management for an Oracle IntelligentPolicy
The NetBackup Discovery Service runs on all clients in the environment and reportsto the master server when it finds instances of applications. This service helps youto build an Oracle Intelligent Policy by finding Oracle instances and displaying themin the NetBackup Administration Console and the Instances and Databases
53Oracle policy configurationInstance management for an Oracle Intelligent Policy

tab. When NetBackup is installed, the service checks the local client host for Oracledatabase instances and also checks periodically after installation (every 4 hours).Instance management collects the discovered instances in an instance repository.The user can access this repository on the NetBackup Administration Console orby using the nboraadm command.
DBAs can run nboraadm on a NetBackup client if the backup administrator enablesaccess to nboraadm by running the following command on the master server:
# nboraadm -add_dba <client_name> <user_name>
See the nboraadm description in the NetBackup Commands Reference Guide.
All instances that you want backed up as part of an Oracle Intelligent Policy mustbe registered with credentials. Instance management lets you assign credentialsto individual instances as well as instance groups. The instances in an instancegroup share the same set of credentials. You can direct the discovery service toassign the new instances that it discovers to an instance group. The Oracle databaseuser is required to have a certain level of credentials. The Oracle database usermust have SYSBACKUP or SYSDBA privileges (based on version of Oracle).
See “About the NetBackup Discovery Service” on page 54.
See “Manually adding an Oracle database instance to the repository” on page 56.
See “Registering an Oracle database instance” on page 58.
See “Creating an Oracle database instance group” on page 29.
See “About Oracle database instance groups” on page 60.
See “Adding an instance to an instance group” on page 60.
See “Automatic Registration of an instance group” on page 61.
See “About instance actions” on page 62.
See “About Oracle Intelligent Policies (OIP)” on page 64.
See “Oracle database upgrade effect on Oracle Intelligent Policies” on page 68.
About the NetBackup Discovery ServiceThe NetBackup Discovery Service (nbdisco) discovers Oracle database instancesthroughout the NetBackup environment. The discovery service reports to the masterserver when it finds instances of applications to help you build an Oracle IntelligentPolicy. The service polls the clients upon NetBackup installation and periodicallyafter installation (every 5 minutes). Instance management collects the discoveredinstances in an instance repository. The user can access this repository on theNetBackup Administration Console or by using the nboraadm command.
54Oracle policy configurationInstance management for an Oracle Intelligent Policy
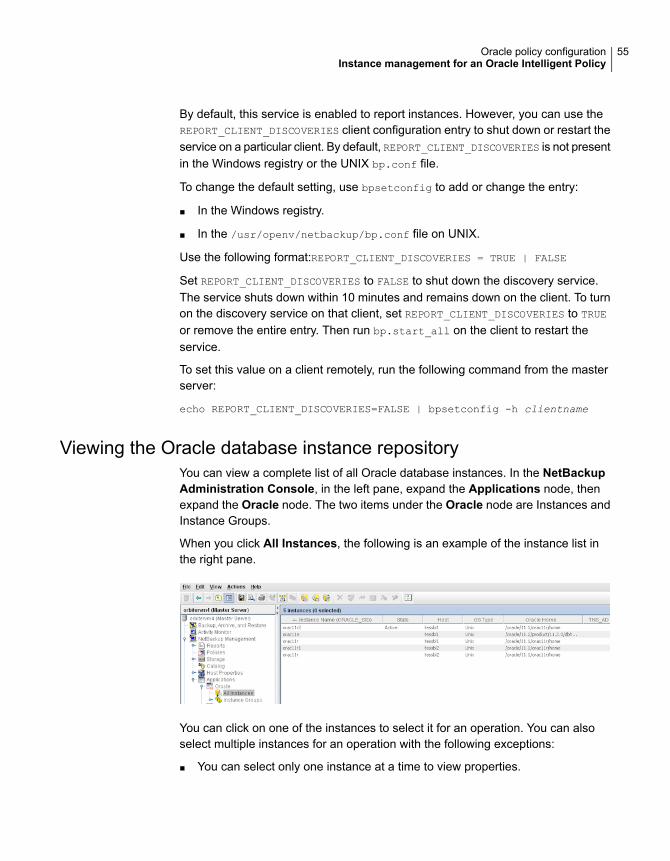
By default, this service is enabled to report instances. However, you can use theREPORT_CLIENT_DISCOVERIES client configuration entry to shut down or restart theservice on a particular client. By default, REPORT_CLIENT_DISCOVERIES is not presentin the Windows registry or the UNIX bp.conf file.
To change the default setting, use bpsetconfig to add or change the entry:
■ In the Windows registry.
■ In the /usr/openv/netbackup/bp.conf file on UNIX.
Use the following format:REPORT_CLIENT_DISCOVERIES = TRUE | FALSE
Set REPORT_CLIENT_DISCOVERIES to FALSE to shut down the discovery service.The service shuts down within 10 minutes and remains down on the client. To turnon the discovery service on that client, set REPORT_CLIENT_DISCOVERIES to TRUE
or remove the entire entry. Then run bp.start_all on the client to restart theservice.
To set this value on a client remotely, run the following command from the masterserver:
echo REPORT_CLIENT_DISCOVERIES=FALSE | bpsetconfig -h clientname
Viewing the Oracle database instance repositoryYou can view a complete list of all Oracle database instances. In the NetBackupAdministration Console, in the left pane, expand the Applications node, thenexpand the Oracle node. The two items under the Oracle node are Instances andInstance Groups.
When you click All Instances, the following is an example of the instance list inthe right pane.
You can click on one of the instances to select it for an operation. You can alsoselect multiple instances for an operation with the following exceptions:
■ You can select only one instance at a time to view properties.
55Oracle policy configurationInstance management for an Oracle Intelligent Policy
■ You can register multiple instances simultaneously only if the OS type is thesame (UNIX or Windows).
The instances are listed with the following column information:
The instance name (ORACLE_SID).Instance Name
The current state of the instance. Possible values are:
■ Blank - The instance is not yet registered and cannot beprotected using an Intelligent Oracle Policy.
■ Active - Credentials have been provided for the instance. AnIntelligent Oracle Policy can protect the instance.
■ Inactive - If the instance is added to a policy, it is not includedin the backup. An administrator can inactivate an instance totake it offline (for example, for upgrades).
State
Specifies the host where the Oracle database resides.Host
Specifies the operating system of the host. Valid values areWindows and UNIX.
OS Type
The file path of the Oracle home directory where the instanceresides.
ORACLE_HOME
Specifies the location of the network administration directory onthe client system if this directory is not in the default location.Consult your Oracle documentation for the default location of thenetwork administration directory on the client system.
TNS_ADMIN
Specifies the Oracle database instance group name that thisinstance is part of. This field is blank if the instance does not belongto an instance group.
Instance Group
Specifies the date and time when a user registered a set ofcredentials for this instance. This field is blank if the instance hasnot been given credentials.
Registered
The names of the policies that the instance has been assigned to.Policies
Manually adding an Oracle database instance to the repositoryNew instances the instance discovery system finds on the clients are automaticallyadded to the repository. However, you may need to add an instance manually. Forexample, you do not want to wait for the discovery service to discover the newinstance.
56Oracle policy configurationInstance management for an Oracle Intelligent Policy

Note: If necessary, contact the Oracle database administrator for the correct setof credentials. The DBA can also manually add the instance if the DBA is not willingor allowed to share the credentials with the backup administrator. The DBA canmanually add the instance using the nboraadm command on the client. The Oracledatabase user is required to have a certain level of credentials. The Oracle databaseuser must have SYSBACKUP or SYSDBA privileges (based on version of Oracle).
To manually add an Oracle database instance to the repository
1 In the NetBackup Administration Console, in the left pane, expandNetBackupManagement > Applications > Oracle.
2 Click All Instances. All instances in the repository are listed in the right pane.
3 Right-click All Instances and select New instance to display the following:
4 Fill in the Instance Name,Host, andORACLE_HOME parameters. ClickHelpto display descriptions of these parameters. For example:
57Oracle policy configurationInstance management for an Oracle Intelligent Policy
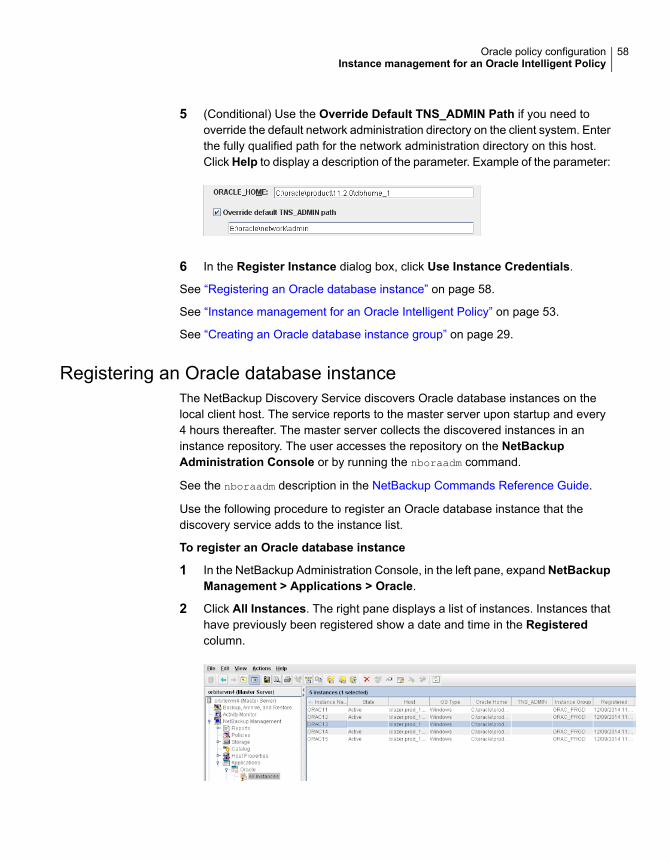
5 (Conditional) Use the Override Default TNS_ADMIN Path if you need tooverride the default network administration directory on the client system. Enterthe fully qualified path for the network administration directory on this host.Click Help to display a description of the parameter. Example of the parameter:
6 In the Register Instance dialog box, click Use Instance Credentials.
See “Registering an Oracle database instance” on page 58.
See “Instance management for an Oracle Intelligent Policy” on page 53.
See “Creating an Oracle database instance group” on page 29.
Registering an Oracle database instanceThe NetBackup Discovery Service discovers Oracle database instances on thelocal client host. The service reports to the master server upon startup and every4 hours thereafter. The master server collects the discovered instances in aninstance repository. The user accesses the repository on the NetBackupAdministration Console or by running the nboraadm command.
See the nboraadm description in the NetBackup Commands Reference Guide.
Use the following procedure to register an Oracle database instance that thediscovery service adds to the instance list.
To register an Oracle database instance
1 In the NetBackup Administration Console, in the left pane, expandNetBackupManagement > Applications > Oracle.
2 Click All Instances. The right pane displays a list of instances. Instances thathave previously been registered show a date and time in the Registeredcolumn.
58Oracle policy configurationInstance management for an Oracle Intelligent Policy

3 Double-click the instance that you want to register. The Edit Instance dialogbox appears. For example, you can select ORAC13 to display the following:
You can select multiple instances to register at the same time.
4 (Conditional) Use the Override Default TNS_ADMIN Path if you need tooverride the default network administration directory on the client system. Enterthe fully qualified path for the network administration directory on this host.Click Help to display a description of the parameter. Example of the parameter:
5 In the Register Instance dialog box, click Use Instance Credentials.
The Oracle database user is required to have a certain level of credentials.The Oracle database user must have SYSBACKUP or SYSDBA privileges (basedon version of Oracle).
6 In the right pane of the Applications dialog, check the Registered column tosee that the instance is now registered.
7 Repeat for all other instances that you want registered.
See “Instance management for an Oracle Intelligent Policy” on page 53.
See “Creating an Oracle database instance group” on page 29.
See “About instance actions” on page 62.
59Oracle policy configurationInstance management for an Oracle Intelligent Policy

About Oracle database instance groupsInstance groups can be a major time saver when you create Oracle policies.
■ You can configure an instance group to automatically add newly discovereddatabase instances to the group.
■ You need only enter a set of credentials once. The Oracle database user isrequired to have a certain level of credentials. The Oracle database user musthave SYSBACKUP or SYSDBA privileges (based on version of Oracle). Thereafter,all discovered instances can be automatically assigned the same set ofcredentials, registering instances on the fly.
■ With the selection of an instance group, you can create a single policy that backsup and restores hundreds and even thousands of instances.
See “Creating an Oracle database instance group” on page 29.
Adding an instance to an instance groupYou can add an instance to an instance group by using the NetBackup AdministrationConsole or by running the nboraadm command.
See the nboraadm description in the NetBackup Commands Reference Guide.
Note that you may have already registered an instance individually. When you addit to an instance group, its credentials are automatically changed to the groupcredentials.
To add an instance to an instance group
1 In the NetBackup Administration Console, in the left pane, expandNetBackupManagement > Applications > Oracle.
2 Click All Instances to display all instances in the right pane.
3 Select the instance that you want to be a member of an instance group. Youcan select multiple instances from the list.
4 On theActionsmenu, selectRegister. TheRegister Instance dialog appears.For example:
60Oracle policy configurationInstance management for an Oracle Intelligent Policy

5 On the Instance Group pulldown menu, select the desired instance group(InstanceGroup1 in the example).
6 ClickOK. A Validation Report dialog box appears that describes the validationsuccesses and failures.
See “About Oracle database instance groups” on page 60.
See “Creating an Oracle database instance group” on page 29.
See “Instance management for an Oracle Intelligent Policy” on page 53.
Automatic Registration of an instance groupThe Oracle Discovery Service brings newly discovered instances into the instancerepository. Auto Registration is a mechanism that allows a discovered instance tobe brought into the repository as a member of an instance group. The instanceassumes the credentials of the group and is automatically registered.
To auto-register an instance group
1 In the NetBackup Administration Console, in the left pane, expandNetBackupManagement > Applications > Oracle.
2 Click Instance Groups, then on theActionsmenu, selectAuto Registration.The following dialog box appears:
3 In the Automatic Registration dialog box, click the Automatically registernewly discovered instances. Then select the desired instance group fromthe pulldown menu.
61Oracle policy configurationInstance management for an Oracle Intelligent Policy

4 (Conditional) Use the Override default Unix TNS_ADMIN path and or theOverride default Windows TNS_ADMIN path if you need to override thedefault network administration directory on the client system. Enter the fullyqualified path for the correct operating system. You can automatically registerinstances in Windows, UNIX, or a combination of both operating systems. Thefollowing dialog box shows an example of this parameter:
5 Click OK to return to the Instances display. All newly discovered instancesare automatically added to the specified instance group and registered withthe group credentials.
6 A validation report shows if the instances passed or failed. Do one of thefollowing:
■ Click OK to save the credentials anyway. The instance is added to theinstance list. However, instances with invalidated credentials cannot beselected as part of an Oracle policy. Their backups fail with a 54xx statuserror.
■ Click Cancel to go back and change the credentials.
See “Adding an instance to an instance group” on page 60.
See “Registering an Oracle database instance” on page 58.
See “Instance management for an Oracle Intelligent Policy” on page 53.
About instance actionsThe Actions menu contains several operations that you can perform on theinstances in the repository. Another way to perform these actions is to highlight thedesired instance or instance group, then right-click and select the operation fromthe shortcut menu.
Table 4-2 describes the actions or operations that you can perform on Oracledatabase instances.
62Oracle policy configurationInstance management for an Oracle Intelligent Policy

Table 4-2 Instance actions
DescriptionAction
To create a new instance, select Actions > New > Instance. A New Instance dialogbox appears. Enter the instance properties (instance name, host, ORACLE_HOME,and credentials).
See “Manually adding an Oracle database instance to the repository” on page 56.
New instance
To create a new instance group, select Actions > New > Instance Group. A NewInstance Group dialog box appears.
See “About Oracle database instance groups” on page 60.
New Instance Group
To display instance or instance group properties, highlight the desired item. Then selectActions > Properties. The Edit Instance appears where you change the instanceproperties (instance name, host, ORACLE_HOME, override default TNS_admin path,and credentials).
Properties
To register an instance, highlight the instance, then select Actions > Register. TheRegister Instance dialog box appears. Change credentials for the selected item.
See “Registering an Oracle database instance” on page 58.
See “Adding an instance to an instance group” on page 60.
Register
To delete an instance or an instance group from the instances repository list, highlightthe item to be deleted, then select Actions > Delete.
You cannot delete an instance or an instance group that is part of a policy. First, usethe Instances and Databases tab to delete the instance from the policy. Then, in theinstances repository list, highlight the instance to be deleted, then select Actions >Delete.
Delete
To automatically register newly discovered instances as part of an instance group,highlight Instances in the left pane, then select Actions > Auto Registration.
See “Automatic Registration of an instance group” on page 61.
Auto Registration
This option lets you configure NetBackup to automatically clear orphaned instancesfrom instance management. Orphaned instances are the databases that werediscovered at one time but were never registered.
To enable instance cleanup, select Clean up After. Next, select how often (days) thatyou want NetBackup to perform instance cleanup.
Note: If instance cleanup is enabled and auto registration activated, cleaned upinstances may be rediscovered and added to the auto registration group.
Clean up instances
63Oracle policy configurationInstance management for an Oracle Intelligent Policy
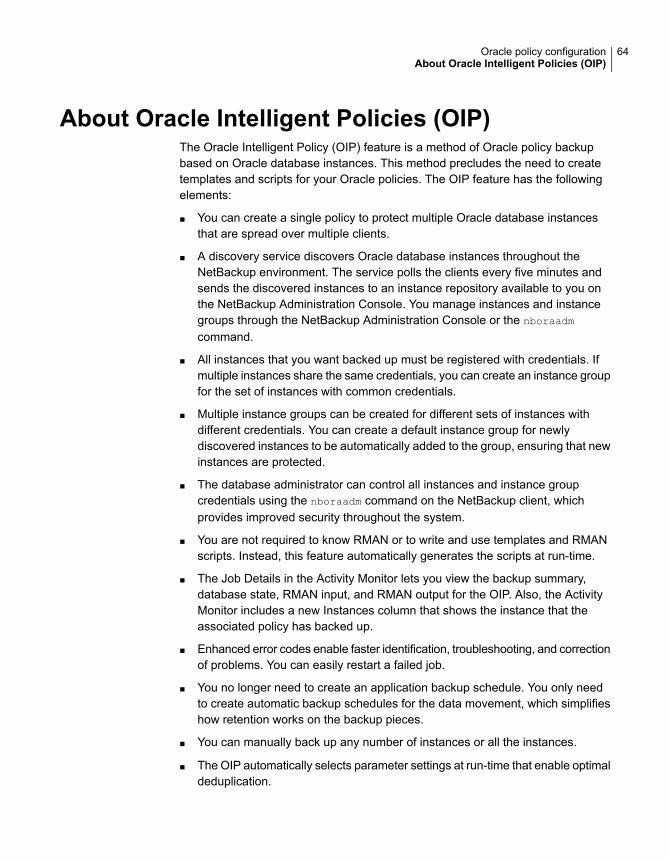
About Oracle Intelligent Policies (OIP)The Oracle Intelligent Policy (OIP) feature is a method of Oracle policy backupbased on Oracle database instances. This method precludes the need to createtemplates and scripts for your Oracle policies. The OIP feature has the followingelements:
■ You can create a single policy to protect multiple Oracle database instancesthat are spread over multiple clients.
■ A discovery service discovers Oracle database instances throughout theNetBackup environment. The service polls the clients every five minutes andsends the discovered instances to an instance repository available to you onthe NetBackup Administration Console. You manage instances and instancegroups through the NetBackup Administration Console or the nboraadm
command.
■ All instances that you want backed up must be registered with credentials. Ifmultiple instances share the same credentials, you can create an instance groupfor the set of instances with common credentials.
■ Multiple instance groups can be created for different sets of instances withdifferent credentials. You can create a default instance group for newlydiscovered instances to be automatically added to the group, ensuring that newinstances are protected.
■ The database administrator can control all instances and instance groupcredentials using the nboraadm command on the NetBackup client, whichprovides improved security throughout the system.
■ You are not required to know RMAN or to write and use templates and RMANscripts. Instead, this feature automatically generates the scripts at run-time.
■ The Job Details in the Activity Monitor lets you view the backup summary,database state, RMAN input, and RMAN output for the OIP. Also, the ActivityMonitor includes a new Instances column that shows the instance that theassociated policy has backed up.
■ Enhanced error codes enable faster identification, troubleshooting, and correctionof problems. You can easily restart a failed job.
■ You no longer need to create an application backup schedule. You only needto create automatic backup schedules for the data movement, which simplifieshow retention works on the backup pieces.
■ You can manually back up any number of instances or all the instances.
■ The OIP automatically selects parameter settings at run-time that enable optimaldeduplication.
64Oracle policy configurationAbout Oracle Intelligent Policies (OIP)

■ You can create a new archived log schedule that backs up the archived redologs within intervals of minutes.
■ The Oracle Intelligent Policy can protect an Oracle database when the OracleDBA places database backups in the share on a NetBackup appliance.
■ The OIP can create and maintain a full set of data file copies in the share on aNetBackup appliance. The Accelerator option is used to update the data filecopies using only the changed blocks since the last full backup.
■ Oracle 12c has introduced container databases (CDB) and pluggable databases(PDB) and they can be protected using the OIP.
■ You can create bpstart_notify and bpend_notify scripts for an OIP. An OIPignores the generic bpstart_notify and bpend_notify scripts and they donot work for a non-OIP.
Oracle DBAs can use the nboraadm command on the NetBackup client to manageinstances, instance groups, and their credentials. This command is particularlyuseful in environments where the Oracle credentials are known only by the DBAsand not the NetBackup administrators.
The Oracle DBA can use the nboraadm command to start an immediate backupfrom the client if the NetBackup administrator has given the Oracle DBA properpermissions. The nboraadm command allows the Oracle DBA to immediately protectan Oracle database backup instead of waiting for the NetBackup schedule to protectthe database backup. Use nboraadm command with the –immediate option to starta database backup.
You can select Oracle database instances and instance groups to be part of anOracle backup policy. An Oracle backup policy can be created for the defaultinstance group to ensure that all newly created instances are automatically protected.You can create an OIP in the following ways:
■ The Policy Configuration Wizard of the NetBackup Administration Console: Thewizard guides you through the setup process by automatically choosing the bestvalues for most configurations.
■ The Oracle Policy utility on the NetBackup Administration Console: The OraclePolicy utility is a set of five tabbed panels. The panels contain all the settingsand parameters that are needed to create or change an OIP.
See “Creating an Oracle Intelligent Policy (OIP)” on page 66.
See “About policy attributes” on page 87.
See “Instances and Databases tab” on page 73.
See “Backup Selections tab” on page 75.
65Oracle policy configurationAbout Oracle Intelligent Policies (OIP)

See “About using Templates and Oracle Intelligent Policy (OIP) with RAC”on page 237.
See “Instance management for an Oracle Intelligent Policy” on page 53.
See “About Oracle database instance groups” on page 60.
Creating an Oracle Intelligent Policy (OIP)This topic guides you through the steps for setting up an Oracle Intelligent Policy(OIP) using the NetBackup Administration Console. An OIP is used with OracleCDB and PDB databases, Copilot, and regular Oracle database instance backups.This method precludes the need to create templates and scripts for your Oraclepolicies.
Table 4-3 Steps for creating an OIP
InstructionsTaskSteps
NetBackup automatically discovers Oracle instances anddisplays them in the instance repository. An instance mustbe registered in order for that instance to be included in anOIP.
See “Instance management for an Oracle Intelligent Policy”on page 53.
See “About the NetBackup Discovery Service” on page 54.
See “Manually adding an Oracle database instance to therepository” on page 56.
See “Registering an Oracle database instance” on page 58.
Register Oracleinstances.
Step 1
Instance groups are for instances with common credentials.Add an instance to a group to register that instance. Thisstep is not required to create an OIP.
See “About Oracle database instance groups” on page 60.
See “Adding an instance to an instance group” on page 60.
See “Automatic Registration of an instance group”on page 61.
(Conditional)Create Oracleinstance group.
Step 2
66Oracle policy configurationAbout Oracle Intelligent Policies (OIP)
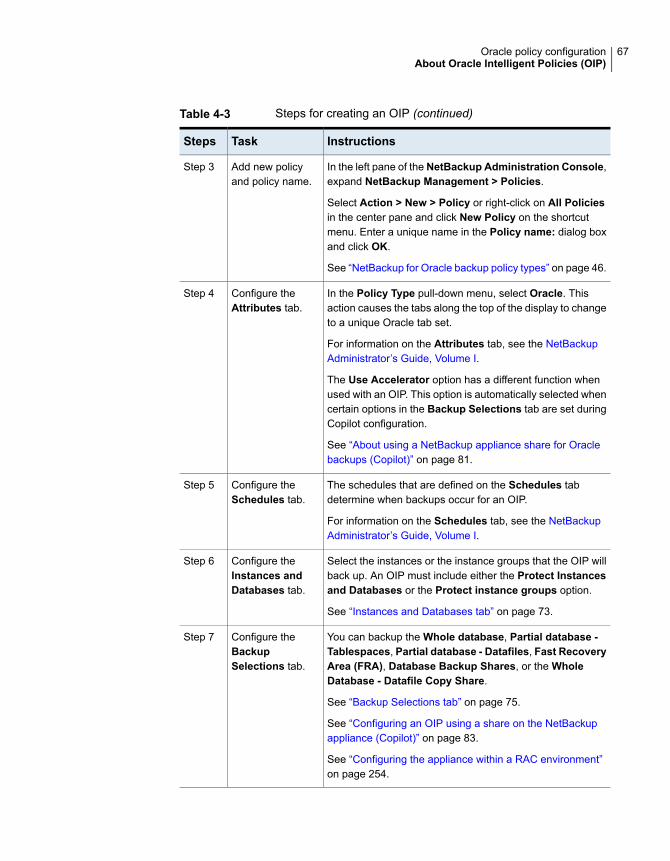
Table 4-3 Steps for creating an OIP (continued)
InstructionsTaskSteps
In the left pane of the NetBackup Administration Console,expand NetBackup Management > Policies.
Select Action > New > Policy or right-click on All Policiesin the center pane and click New Policy on the shortcutmenu. Enter a unique name in the Policy name: dialog boxand click OK.
See “NetBackup for Oracle backup policy types” on page 46.
Add new policyand policy name.
Step 3
In the Policy Type pull-down menu, select Oracle. Thisaction causes the tabs along the top of the display to changeto a unique Oracle tab set.
For information on the Attributes tab, see the NetBackupAdministrator’s Guide, Volume I.
The Use Accelerator option has a different function whenused with an OIP. This option is automatically selected whencertain options in the Backup Selections tab are set duringCopilot configuration.
See “About using a NetBackup appliance share for Oraclebackups (Copilot)” on page 81.
Configure theAttributes tab.
Step 4
The schedules that are defined on the Schedules tabdetermine when backups occur for an OIP.
For information on the Schedules tab, see the NetBackupAdministrator’s Guide, Volume I.
Configure theSchedules tab.
Step 5
Select the instances or the instance groups that the OIP willback up. An OIP must include either the Protect Instancesand Databases or the Protect instance groups option.
See “Instances and Databases tab” on page 73.
Configure theInstances andDatabases tab.
Step 6
You can backup the Whole database, Partial database -Tablespaces, Partial database - Datafiles, Fast RecoveryArea (FRA), Database Backup Shares, or the WholeDatabase - Datafile Copy Share.
See “Backup Selections tab” on page 75.
See “Configuring an OIP using a share on the NetBackupappliance (Copilot)” on page 83.
See “Configuring the appliance within a RAC environment”on page 254.
Configure theBackupSelections tab.
Step 7
67Oracle policy configurationAbout Oracle Intelligent Policies (OIP)
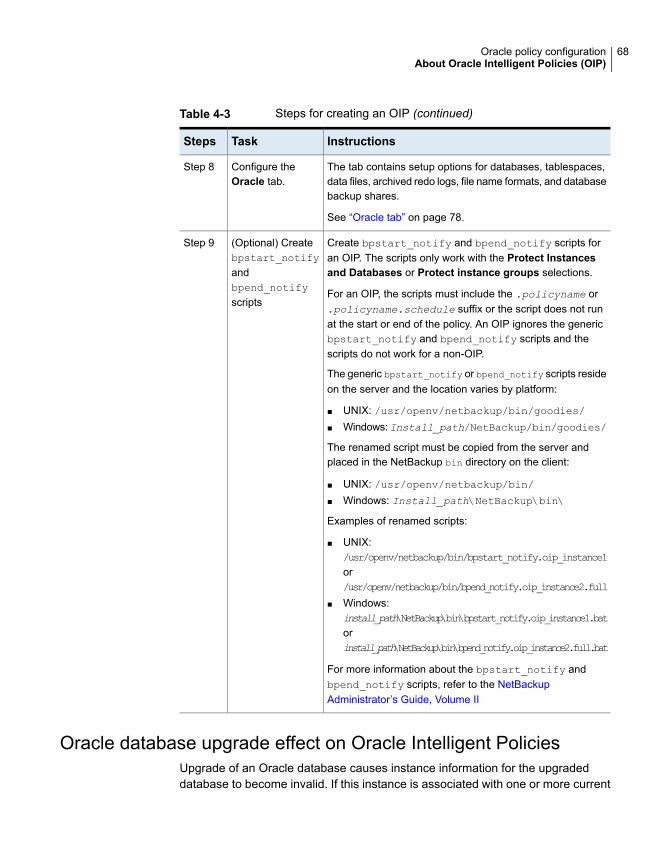
Table 4-3 Steps for creating an OIP (continued)
InstructionsTaskSteps
The tab contains setup options for databases, tablespaces,data files, archived redo logs, file name formats, and databasebackup shares.
See “Oracle tab” on page 78.
Configure theOracle tab.
Step 8
Create bpstart_notify and bpend_notify scripts foran OIP. The scripts only work with the Protect Instancesand Databases or Protect instance groups selections.
For an OIP, the scripts must include the .policyname or.policyname.schedule suffix or the script does not runat the start or end of the policy. An OIP ignores the genericbpstart_notify and bpend_notify scripts and thescripts do not work for a non-OIP.
The generic bpstart_notify or bpend_notify scripts resideon the server and the location varies by platform:
■ UNIX: /usr/openv/netbackup/bin/goodies/■ Windows:Install_path/NetBackup/bin/goodies/
The renamed script must be copied from the server andplaced in the NetBackup bin directory on the client:
■ UNIX: /usr/openv/netbackup/bin/■ Windows: Install_path\NetBackup\bin\
Examples of renamed scripts:
■ UNIX:/usr/openv/netbackup/bin/bpstart_notify.oip_instance1or/usr/openv/netbackup/bin/bpend_notify.oip_instance2.full
■ Windows:install_path\NetBackup\bin\bpstart_notify.oip_instance1.batorinstall_path\NetBackup\bin\bpend_notify.oip_instance2.full.bat
For more information about the bpstart_notify andbpend_notify scripts, refer to the NetBackupAdministrator’s Guide, Volume II
(Optional) Createbpstart_notifyandbpend_notifyscripts
Step 9
Oracle database upgrade effect on Oracle Intelligent PoliciesUpgrade of an Oracle database causes instance information for the upgradeddatabase to become invalid. If this instance is associated with one or more current
68Oracle policy configurationAbout Oracle Intelligent Policies (OIP)

NetBackup for Oracle Intelligent Policies, run-time failures can occur. The issueoccurs when an Oracle database is upgraded to a new version. The new versionis likely to have a different ORACLE_HOME, ORACLE_SID, or Oracle User. If anyof these values have changed, the existing instance information in the NetBackupinstance repository and in the current Oracle Intelligent Policies becomes invalid.When the discovery service (nbdisco) polls the clients again, it discovers thedatabase as a new instance. Consequently, there is no way to associate the newinstance to the old instance.
This issue is not version-specific and can affect any valid Oracle upgrade patch,such as:
■ Oracle 10 to version 11
■ Oracle 10 to version 12
■ Oracle 11 to version 12
For more information on valid Oracle upgrade paths, review the followingdocumentation on the Oracle Support website:
http://www.oracle.com/technetwork/database/upgrade/upgrading-oracle-database-wp-12c-1896123.pdf
Therefore, when an existing Oracle database is upgraded and the ORACLE_HOME,ORACLE_SID, or Oracle User are modified, remove the existing instance in theinstance repository. After the existing instance is removed, update the instancerepository with the new instance information. Make sure to update any policies withthe newly-discovered instances.
See “About Oracle Intelligent Policies (OIP)” on page 64.
See “Instance management for an Oracle Intelligent Policy” on page 53.
Configuring NetBackup for Oracle automatic backup schedulesEach policy has an automatic backup schedule. These schedules initiate automaticbackups and specify when a user can initiate operations.
To configure an automatic backup schedule
1 On the Policy dialog box, click the Schedules tab.
2 Click New.
3 Specify a unique name for the schedule.
4 Select the Type of backup.
69Oracle policy configurationAbout Oracle Intelligent Policies (OIP)

5 Specify the other properties for the schedule.
See “About schedule properties ” on page 88.
6 Click OK.
About NetBackup for Oracle schedule properties using OracleIntelligent Policy
This topic describes the schedule properties that have a different meaning for OracleIntelligent Policy backups than for file system backups. Other schedule propertiesvary according to your specific backup strategy and system configuration. Additionalinformation about other schedule properties is available.
See the NetBackup Administrator’s Guide, Volume I.
Table 4-4 Description of schedule properties
DescriptionProperty
Specifies the type of backup that this schedule can control. The selection list shows onlythe backup types that apply to the policy you want to configure.
See “NetBackup for Oracle backup policy types” on page 46.
Type of backup
You can schedule a backup in one of the following ways:
■ FrequencyThis setting is used only for scheduled backups. It is not used for user-directed backups.Frequency specifies the period of time that can elapse until the next backup or archiveoperation begins on this schedule. For example, assume that the frequency is 7 daysand a successful backup occurs on Wednesday. The next full backup does not occuruntil the following Wednesday. Typically, incremental backups have a shorter frequencythan full backups.
■ CalendarThis setting is used only for scheduled backups. It is not used for user-directed backups.The Calendar option lets you schedule the backup operations that are based on specificdates, recurring week days, or recurring days of the month.
Schedule type
70Oracle policy configurationAbout Oracle Intelligent Policies (OIP)
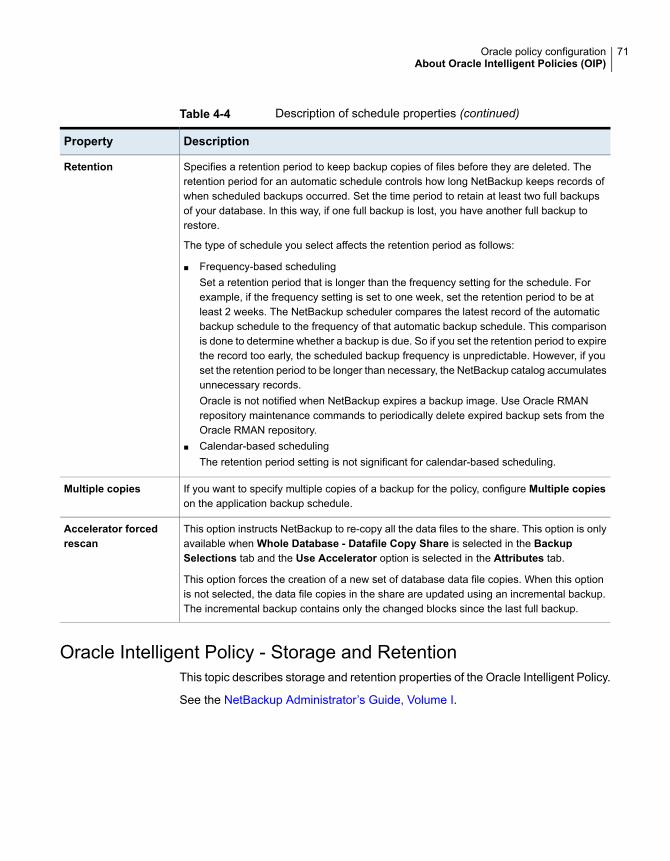
Table 4-4 Description of schedule properties (continued)
DescriptionProperty
Specifies a retention period to keep backup copies of files before they are deleted. Theretention period for an automatic schedule controls how long NetBackup keeps records ofwhen scheduled backups occurred. Set the time period to retain at least two full backupsof your database. In this way, if one full backup is lost, you have another full backup torestore.
The type of schedule you select affects the retention period as follows:
■ Frequency-based schedulingSet a retention period that is longer than the frequency setting for the schedule. Forexample, if the frequency setting is set to one week, set the retention period to be atleast 2 weeks. The NetBackup scheduler compares the latest record of the automaticbackup schedule to the frequency of that automatic backup schedule. This comparisonis done to determine whether a backup is due. So if you set the retention period to expirethe record too early, the scheduled backup frequency is unpredictable. However, if youset the retention period to be longer than necessary, the NetBackup catalog accumulatesunnecessary records.Oracle is not notified when NetBackup expires a backup image. Use Oracle RMANrepository maintenance commands to periodically delete expired backup sets from theOracle RMAN repository.
■ Calendar-based schedulingThe retention period setting is not significant for calendar-based scheduling.
Retention
If you want to specify multiple copies of a backup for the policy, configure Multiple copieson the application backup schedule.
Multiple copies
This option instructs NetBackup to re-copy all the data files to the share. This option is onlyavailable when Whole Database - Datafile Copy Share is selected in the BackupSelections tab and the Use Accelerator option is selected in the Attributes tab.
This option forces the creation of a new set of database data file copies. When this optionis not selected, the data file copies in the share are updated using an incremental backup.The incremental backup contains only the changed blocks since the last full backup.
Accelerator forcedrescan
Oracle Intelligent Policy - Storage and RetentionThis topic describes storage and retention properties of the Oracle Intelligent Policy.
See the NetBackup Administrator’s Guide, Volume I.
71Oracle policy configurationAbout Oracle Intelligent Policies (OIP)

Table 4-5 Storage and retention behavior
DescriptionProperty
If the policy is a snapshot type, the following are the possible scenarios of the retentionbehavior:
■ If the schedule does not override the policy storage unit, and the policy storage unitis a non-snapshot SLP, the SLP determines the retention period and the policyuses the policy storage unit.
■ If the schedule does not override the policy storage unit and the policy storage unitis not an SLP, the schedule determines the retention period, and the policy usesthe policy storage unit.
■ If the schedule does override the policy storage unit with an SLP, and it is not asnapshot SLP, the override storage unit takes precedence over the policy storageunit, and the SLP determines the retention period.
■ If the schedule overrides the policy storage unit with a snapshot SLP, the policystorage unit must be a non-snapshot SLP. The SLP on the policy storage unitdetermines the retention period for the streamed data. Also, the SLP on the scheduledetermines the retention for the snapshot data.
Policy is a snapshot type
If the policy is not a snapshot type, the following are the possible scenarios of theretention behavior:
■ If the schedule does not override the policy storage unit and the policy storage unitis not an SLP, the schedule determines the retention period.
■ If the schedule does not override the policy storage unit and the policy storage unitis an SLP, the SLP determines the retention period.
■ If the schedule overrides the policy storage unit, and the schedule storage unit isnot an SLP, the schedule determines the retention period.
■ If the schedule overrides the policy storage unit and the schedule storage unit isan SLP, the SLP determines the retention period.
Policy is not a snapshottype
The following are examples of the Oracle Intelligent Policy storage and retentionbehavior for snapshot-based policy types.
Snapshot dataretention isderived from:
Streamed dataretention isderived from:
Schedule storagePolicy storage
ScheduleSchedule-AdvancedDisk
SLPSLPSLPAdvancedDisk
SLPSLP-SLP
ScheduleSchedule-Tape library
72Oracle policy configurationAbout Oracle Intelligent Policies (OIP)
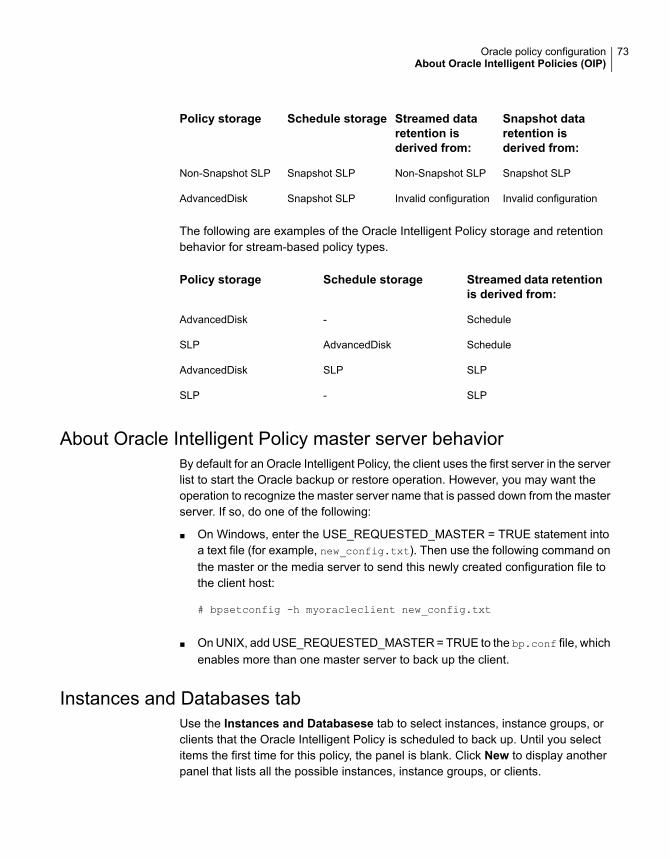
Snapshot dataretention isderived from:
Streamed dataretention isderived from:
Schedule storagePolicy storage
Snapshot SLPNon-Snapshot SLPSnapshot SLPNon-Snapshot SLP
Invalid configurationInvalid configurationSnapshot SLPAdvancedDisk
The following are examples of the Oracle Intelligent Policy storage and retentionbehavior for stream-based policy types.
Streamed data retentionis derived from:
Schedule storagePolicy storage
Schedule-AdvancedDisk
ScheduleAdvancedDiskSLP
SLPSLPAdvancedDisk
SLP-SLP
About Oracle Intelligent Policy master server behaviorBy default for an Oracle Intelligent Policy, the client uses the first server in the serverlist to start the Oracle backup or restore operation. However, you may want theoperation to recognize the master server name that is passed down from the masterserver. If so, do one of the following:
■ On Windows, enter the USE_REQUESTED_MASTER = TRUE statement intoa text file (for example, new_config.txt). Then use the following command onthe master or the media server to send this newly created configuration file tothe client host:
# bpsetconfig -h myoracleclient new_config.txt
■ On UNIX, add USE_REQUESTED_MASTER = TRUE to the bp.conf file, whichenables more than one master server to back up the client.
Instances and Databases tabUse the Instances and Databasese tab to select instances, instance groups, orclients that the Oracle Intelligent Policy is scheduled to back up. Until you selectitems the first time for this policy, the panel is blank. Click New to display anotherpanel that lists all the possible instances, instance groups, or clients.
73Oracle policy configurationAbout Oracle Intelligent Policies (OIP)

If you add a new Oracle policy or change an existing Oracle policy, this tab appearsalong the top of the policy configuration dialog.
You cannot mix instances and instance groups in this list. If you select instancesfor a policy, then you want to select an instance group, the instances you selectare deleted from the list.
The Instances and Databases tab displays all the instances or instance groupsthat the Oracle policy is scheduled to back up. If you add a new Oracle policy orchange an existing Oracle policy, this tab is one of several tabs that appear alongthe top of the dialog. Click Instances to display three possible categories of items:
■ Protect Instances andDatabases (OIP option). This panel displays all instancesthat you have selected to back up for this policy. To add new instances to thislist, click New. A Select Instances panel appears that displays all registeredinstances. Click the check box next to the instance or instances that you wantto add to the list. Instances that are already selected and in the list have theircheck boxes checked. If an instance does not appear in this panel because itis unregistered, you can register that instance and add it to the policy later.The instance selection does not take effect until you click OK.Table 4-6 describes all the instance fields for the instances in this list.
■ Protect instance groups (OIP option). This panel displays all instance groupsthat you have created. To add new instances to this list, click New. A SelectInstance Group panel appears that displays all instance groups that you havecreated. All instances that are a part of an instance group at backup time arebacked up. To add an instance group to the list of groups that are displayed onthis panel, click New.To see what instances are backed up if the policy is run for an instance group,select the group from the list, then click Preview Instances. A panel appearsthat shows a list of all the registered instances in the group to be backed up.
■ Clients for use with scripts or templates (Non-OIP option). This option is notfor use with OIP. If you want to use the client with scripts or templates methodof configuring an Oracle policy instead of the new instance method, selectClients for use with scripts or templates. If you select this option, the existingbackup selections and instances or instance group are erased. Also, theOptionstab and the Instances and Databases tab are removed, because those optionsmust now be set in the RMAN script that the user supplies.
74Oracle policy configurationAbout Oracle Intelligent Policies (OIP)

Table 4-6 Instances and Databases tab fields
DescriptionField
The selection at the top of the panel determines the listing in thepanel window.
■ Protect Instances and Databases displays all individualinstances that you have chosen for this Oracle policy.
■ Protect instance groups displays all the instance groups thatyou have created for this policy.
■ Clients for use with scripts or templates displays all clientsthat you have selected for this policy. Click New to add moreclients to this list.
Instance Name
The name of the selection that is referenced for this policy. TheBackup Selections tab defines what is backed up for theselections. This column only appears when you select ProtectInstances and Databases. The Database Name can reference:
■ An entire instance■ Single or multiple PDBs
Database Name
Active - DB will be backed up. Done in the host propertiesapplication.
State
Specifies the host where the Oracle database resides.Host
Specifies the operating system of the host. Valid values areWindows and UNIX.
OS Type
The file path of the Oracle home directory where the instanceresides.
ORACLE_HOME
Specifies the Oracle database instance group name that thisinstance is part of. This field is blank if the instance does not belongto an instance group.
Instance Group
Specifies the date and time when a user gave the instance a setof credentials. This field is blank if the instance has not been givencredentials.
Registered
Backup Selections tabThe Backup Selections tab lets you change the type of Oracle backup. You canback up the whole database, only the tablespaces, only the data files, the FastRecovery Area (FRA), Database Backup Shares, or the Whole Database -Datafile Copy Share. The following is the selection list:
75Oracle policy configurationAbout Oracle Intelligent Policies (OIP)
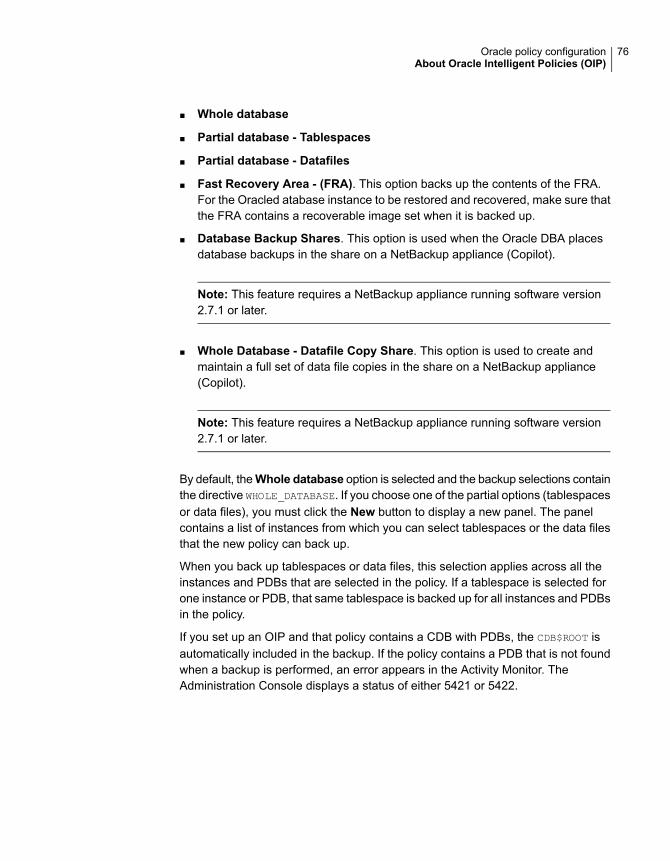
■ Whole database
■ Partial database - Tablespaces
■ Partial database - Datafiles
■ Fast Recovery Area - (FRA). This option backs up the contents of the FRA.For the Oracled atabase instance to be restored and recovered, make sure thatthe FRA contains a recoverable image set when it is backed up.
■ Database Backup Shares. This option is used when the Oracle DBA placesdatabase backups in the share on a NetBackup appliance (Copilot).
Note: This feature requires a NetBackup appliance running software version2.7.1 or later.
■ Whole Database - Datafile Copy Share. This option is used to create andmaintain a full set of data file copies in the share on a NetBackup appliance(Copilot).
Note: This feature requires a NetBackup appliance running software version2.7.1 or later.
By default, theWhole database option is selected and the backup selections containthe directive WHOLE_DATABASE. If you choose one of the partial options (tablespacesor data files), you must click the New button to display a new panel. The panelcontains a list of instances from which you can select tablespaces or the data filesthat the new policy can back up.
When you back up tablespaces or data files, this selection applies across all theinstances and PDBs that are selected in the policy. If a tablespace is selected forone instance or PDB, that same tablespace is backed up for all instances and PDBsin the policy.
If you set up an OIP and that policy contains a CDB with PDBs, the CDB$ROOT isautomatically included in the backup. If the policy contains a PDB that is not foundwhen a backup is performed, an error appears in the Activity Monitor. TheAdministration Console displays a status of either 5421 or 5422.
76Oracle policy configurationAbout Oracle Intelligent Policies (OIP)
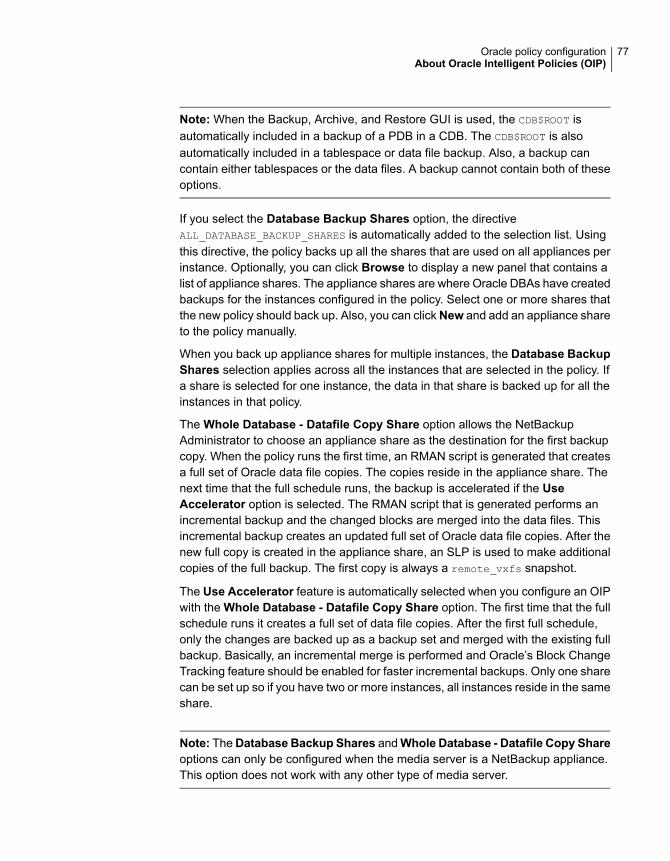
Note: When the Backup, Archive, and Restore GUI is used, the CDB$ROOT isautomatically included in a backup of a PDB in a CDB. The CDB$ROOT is alsoautomatically included in a tablespace or data file backup. Also, a backup cancontain either tablespaces or the data files. A backup cannot contain both of theseoptions.
If you select the Database Backup Shares option, the directiveALL_DATABASE_BACKUP_SHARES is automatically added to the selection list. Usingthis directive, the policy backs up all the shares that are used on all appliances perinstance. Optionally, you can click Browse to display a new panel that contains alist of appliance shares. The appliance shares are where Oracle DBAs have createdbackups for the instances configured in the policy. Select one or more shares thatthe new policy should back up. Also, you can clickNew and add an appliance shareto the policy manually.
When you back up appliance shares for multiple instances, the Database BackupShares selection applies across all the instances that are selected in the policy. Ifa share is selected for one instance, the data in that share is backed up for all theinstances in that policy.
The Whole Database - Datafile Copy Share option allows the NetBackupAdministrator to choose an appliance share as the destination for the first backupcopy. When the policy runs the first time, an RMAN script is generated that createsa full set of Oracle data file copies. The copies reside in the appliance share. Thenext time that the full schedule runs, the backup is accelerated if the UseAccelerator option is selected. The RMAN script that is generated performs anincremental backup and the changed blocks are merged into the data files. Thisincremental backup creates an updated full set of Oracle data file copies. After thenew full copy is created in the appliance share, an SLP is used to make additionalcopies of the full backup. The first copy is always a remote_vxfs snapshot.
The Use Accelerator feature is automatically selected when you configure an OIPwith the Whole Database - Datafile Copy Share option. The first time that the fullschedule runs it creates a full set of data file copies. After the first full schedule,only the changes are backed up as a backup set and merged with the existing fullbackup. Basically, an incremental merge is performed and Oracle’s Block ChangeTracking feature should be enabled for faster incremental backups. Only one sharecan be set up so if you have two or more instances, all instances reside in the sameshare.
Note: TheDatabase Backup Shares andWhole Database - Datafile Copy Shareoptions can only be configured when the media server is a NetBackup appliance.This option does not work with any other type of media server.
77Oracle policy configurationAbout Oracle Intelligent Policies (OIP)
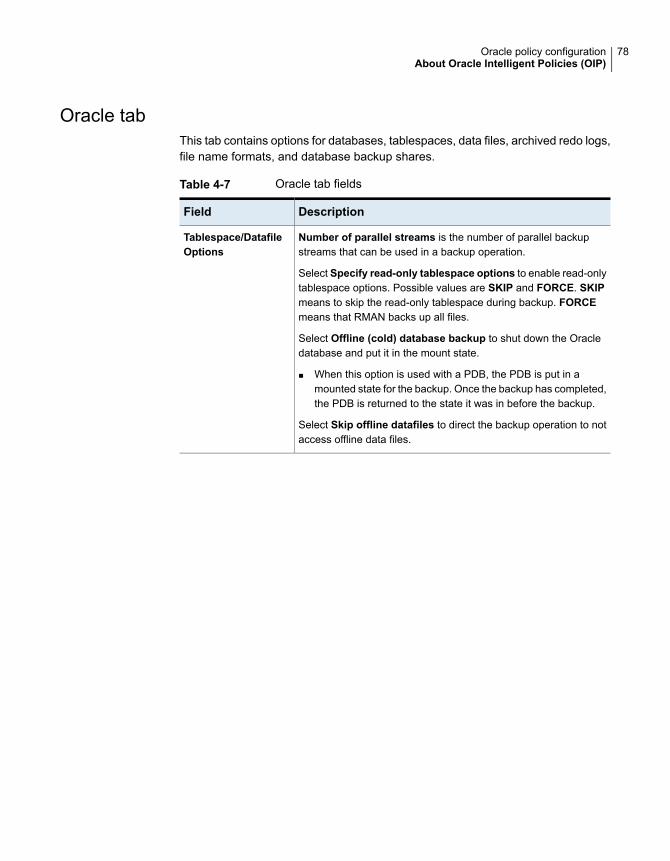
Oracle tabThis tab contains options for databases, tablespaces, data files, archived redo logs,file name formats, and database backup shares.
Table 4-7 Oracle tab fields
DescriptionField
Number of parallel streams is the number of parallel backupstreams that can be used in a backup operation.
Select Specify read-only tablespace options to enable read-onlytablespace options. Possible values are SKIP and FORCE. SKIPmeans to skip the read-only tablespace during backup. FORCEmeans that RMAN backs up all files.
Select Offline (cold) database backup to shut down the Oracledatabase and put it in the mount state.
■ When this option is used with a PDB, the PDB is put in amounted state for the backup. Once the backup has completed,the PDB is returned to the state it was in before the backup.
Select Skip offline datafiles to direct the backup operation to notaccess offline data files.
Tablespace/DatafileOptions
78Oracle policy configurationAbout Oracle Intelligent Policies (OIP)
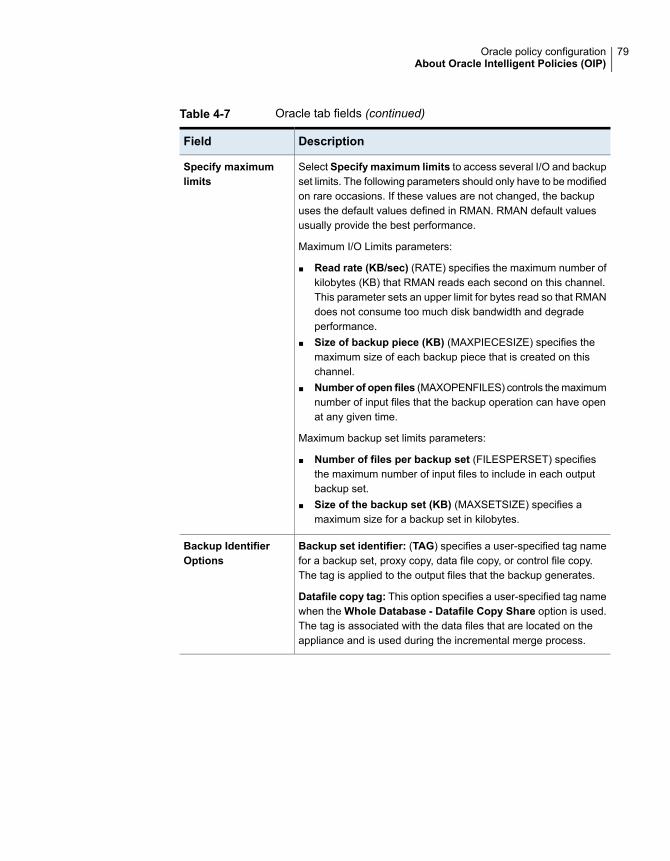
Table 4-7 Oracle tab fields (continued)
DescriptionField
Select Specify maximum limits to access several I/O and backupset limits. The following parameters should only have to be modifiedon rare occasions. If these values are not changed, the backupuses the default values defined in RMAN. RMAN default valuesusually provide the best performance.
Maximum I/O Limits parameters:
■ Read rate (KB/sec) (RATE) specifies the maximum number ofkilobytes (KB) that RMAN reads each second on this channel.This parameter sets an upper limit for bytes read so that RMANdoes not consume too much disk bandwidth and degradeperformance.
■ Size of backup piece (KB) (MAXPIECESIZE) specifies themaximum size of each backup piece that is created on thischannel.
■ Number of open files (MAXOPENFILES) controls the maximumnumber of input files that the backup operation can have openat any given time.
Maximum backup set limits parameters:
■ Number of files per backup set (FILESPERSET) specifiesthe maximum number of input files to include in each outputbackup set.
■ Size of the backup set (KB) (MAXSETSIZE) specifies amaximum size for a backup set in kilobytes.
Specify maximumlimits
Backup set identifier: (TAG) specifies a user-specified tag namefor a backup set, proxy copy, data file copy, or control file copy.The tag is applied to the output files that the backup generates.
Datafile copy tag: This option specifies a user-specified tag namewhen the Whole Database - Datafile Copy Share option is used.The tag is associated with the data files that are located on theappliance and is used during the incremental merge process.
Backup IdentifierOptions
79Oracle policy configurationAbout Oracle Intelligent Policies (OIP)
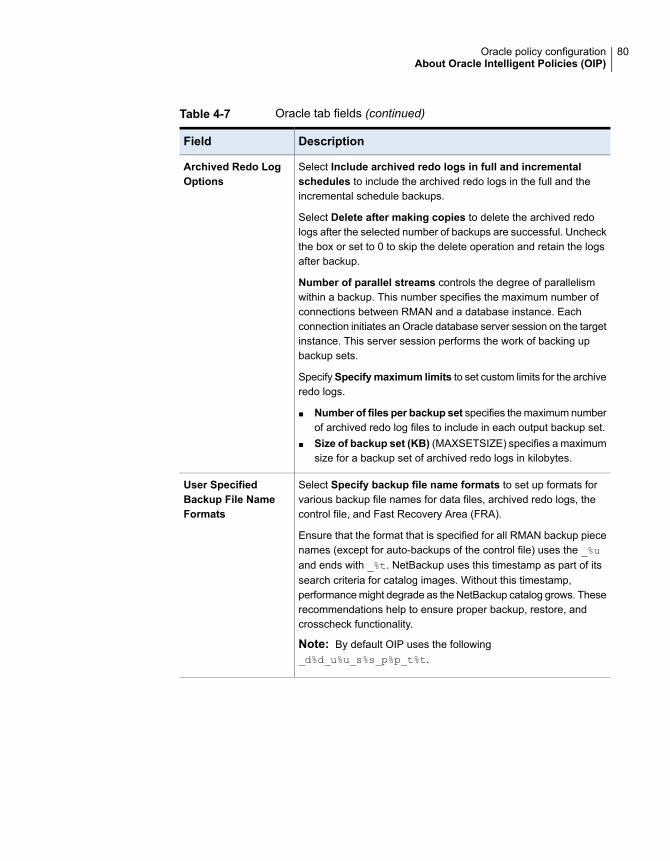
Table 4-7 Oracle tab fields (continued)
DescriptionField
Select Include archived redo logs in full and incrementalschedules to include the archived redo logs in the full and theincremental schedule backups.
Select Delete after making copies to delete the archived redologs after the selected number of backups are successful. Uncheckthe box or set to 0 to skip the delete operation and retain the logsafter backup.
Number of parallel streams controls the degree of parallelismwithin a backup. This number specifies the maximum number ofconnections between RMAN and a database instance. Eachconnection initiates an Oracle database server session on the targetinstance. This server session performs the work of backing upbackup sets.
SpecifySpecifymaximum limits to set custom limits for the archiveredo logs.
■ Number of files per backup set specifies the maximum numberof archived redo log files to include in each output backup set.
■ Size of backup set (KB) (MAXSETSIZE) specifies a maximumsize for a backup set of archived redo logs in kilobytes.
Archived Redo LogOptions
Select Specify backup file name formats to set up formats forvarious backup file names for data files, archived redo logs, thecontrol file, and Fast Recovery Area (FRA).
Ensure that the format that is specified for all RMAN backup piecenames (except for auto-backups of the control file) uses the _%uand ends with _%t. NetBackup uses this timestamp as part of itssearch criteria for catalog images. Without this timestamp,performance might degrade as the NetBackup catalog grows. Theserecommendations help to ensure proper backup, restore, andcrosscheck functionality.
Note: By default OIP uses the following_d%d_u%u_s%s_p%p_t%t.
User SpecifiedBackup File NameFormats
80Oracle policy configurationAbout Oracle Intelligent Policies (OIP)

Table 4-7 Oracle tab fields (continued)
DescriptionField
These options let you set a time when backup sets and backupcopies (data and control file copies) are automatically deleted fromthe appliance share. However, the files are only deleted if they havebeen successfully backed up from the share. The two options areDelete protected backup sets from share after and Deleteprotected backup copies from share after. The deletion is basedon the age of the file in the share. The original dump time or theupdate time (if an incremental merge is done on the file) determinesthe age of the file.
These options are only available when the Database BackupShares option is selected in the Backup Selections tab.
Use the drop downs to set the minutes, hours, days, or weeks.
Note: The Database Backup Shares delete options can only beconfigured when the media server is a NetBackup appliance. Thisoption does not work with any other type of media server. Thisfeature requires a NetBackup appliance running software version2.7.1 or later.
Database BackupShare Options
About using a NetBackup appliance share for Oracle backups(Copilot)
Note: This feature requires a NetBackup appliance running software version 2.7.1or later.
This feature enhances the Oracle Intelligent Policy by giving you two options forprotecting an Oracle database using a share on a NetBackup appliance. The firstoption gives you better control of backups when Oracle database backups areplaced in an appliance share by the DBA. The second option lets you choose anappliance share as the destination for the first backup copy. Now you do not haveto rely on the DBA to create backups in the share. You must provision a share onthe appliance for these options using the NetBackup Appliance Shell Menu.
The Database Backup Shares option provides a share for the DBA on theNetBackup appliance and is protected using the Oracle Intelligent Policy. Thebackup occurs on the appliance as an off-host backup and all data movementoccurs on the appliance and does not affect the Oracle client. Since the OIP protectsthe appliance share, the backups are visible when the DBA uses RMAN or OracleEnterprise Manager.
81Oracle policy configurationAbout Oracle Intelligent Policies (OIP)

The Whole Database - Datafile Copy Share option enhances the OIP to allow theNetBackup Administrator to choose an appliance share as the destination for thefirst backup copy. When the policy runs the first time, an RMAN script is generatedthat creates a full set of Oracle data file copies. The data file copies reside in theappliance share. The next time that the full schedule runs, the backup is acceleratedif the Use Accelerator option is selected. The RMAN script that is generatedperforms an incremental backup and the changed blocks are merged into the datafiles. This incremental backup creates an updated full set of Oracle data file copies.After the new full copy is created in the database backup share, an SLP is used tomake additional copies of the full backup. The first copy is always a remote_vxfs
snapshot. The remote_vxfs snapshot creates a vxfs_checkpoint snapshot of theshare on the NetBackup appliance.
On the Attributes tab, the Use Accelerator feature is automatically selected whenyou configure an OIP with Whole Database - Datafile Copy Share selected in theBackup Selections tab. The first time that the full schedule runs it creates a fullset of data file copies. After the first full schedule, only the changes are backed upas a backup set and merged with the existing full backup. Basically, an incrementalmerge is performed. Oracle’s Block Change Tracking feature should be enabledfor faster incremental backups.
When using Copilot to protect your database, NetBackup does not protect extendedattributes, extent attributes, or Access Control Lists associated with the database’sdata files.
Note: These options are available to you but only configurable when you have aNetBackup appliance configured as the media server. Create a share on theappliance using the procedures in the Managing shares section of the VeritasNetBackup 52xx and 5330 Appliance Administrator’s Guide. If you enter a sharepath that is not located on an appliance, nothing is backed up.
Note: The NetBackup appliance media server can only be configured in a pureIPv4 or dual stack IPv4/IPv6 mode.
See “Configuring an OIP using a share on the NetBackup appliance (Copilot)”on page 83.
See “Backup Selections tab” on page 75.
See “Creating an Oracle Intelligent Policy (OIP)” on page 66.
See “Configuring the appliance within a RAC environment” on page 254.
See “About restoring from a data file copy to ASM storage using RMAN” on page 152.
82Oracle policy configurationAbout Oracle Intelligent Policies (OIP)

Configuring an OIP using a share on the NetBackup appliance(Copilot)
Note: This feature requires a NetBackup appliance running software version 2.7.1or later.
TheDatabase Backup Shares option protects the database backups that an OracleDBA creates on a share on the NetBackup appliance.
The Whole Database - Datafile Copy Share option enhances the OIP to allow theNetBackup Administrator to choose an appliance share as the destination for thefirst backup copy. The backup copy is a full set of data file copies that are maintainedby updating only the changed blocks if Use Accelerator is selected.
Use the following procedure to set up a backup policy that protects shares on theNetBackup appliance.
To configure an OIP using the Database Backup Shares or Whole Database- Datafile Copy Share options
1 (Database Backup Shares option) The Oracle DBA asks NetBackupadministrator for the appliance share information.
2 The NetBackup administrator uses the NetBackup Appliance Shell Menu tocreate a share on the appliance and then sets permissions for the share.
■ For more information about how to set up the share, see Creating a sharefrom the NetBackup Appliance Shell Menu in the Veritas NetBackup 52xxand 5330 Appliance Administrator’s Guide
3 The NetBackup administrator sends information about the appliance share tosystem administrator.
4 The system administrator mounts an appliance share on the Oracle databaseserver using the OS tools.
83Oracle policy configurationAbout Oracle Intelligent Policies (OIP)
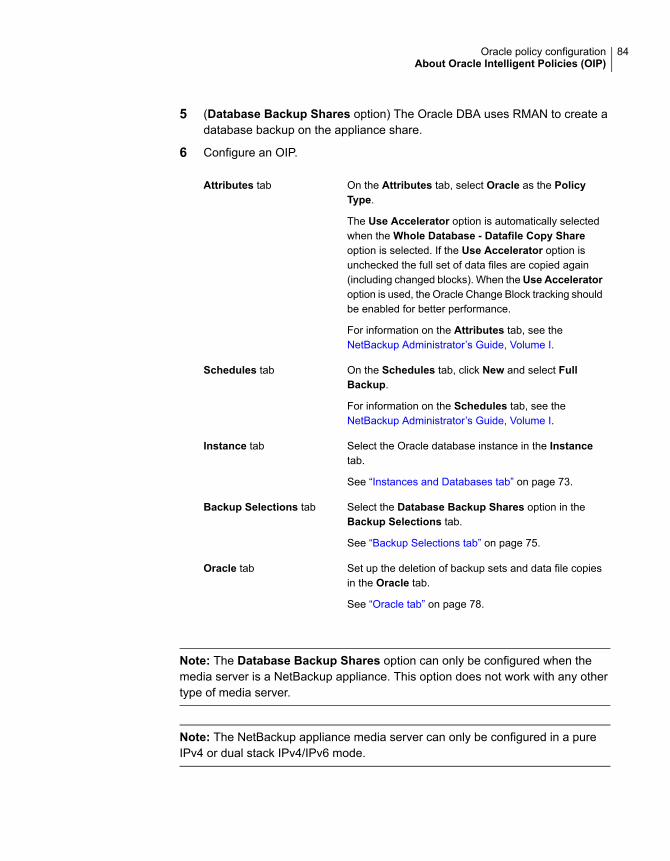
5 (Database Backup Shares option) The Oracle DBA uses RMAN to create adatabase backup on the appliance share.
6 Configure an OIP.
On the Attributes tab, select Oracle as the PolicyType.
The Use Accelerator option is automatically selectedwhen the Whole Database - Datafile Copy Shareoption is selected. If the Use Accelerator option isunchecked the full set of data files are copied again(including changed blocks). When theUse Acceleratoroption is used, the Oracle Change Block tracking shouldbe enabled for better performance.
For information on the Attributes tab, see theNetBackup Administrator’s Guide, Volume I.
Attributes tab
On the Schedules tab, click New and select FullBackup.
For information on the Schedules tab, see theNetBackup Administrator’s Guide, Volume I.
Schedules tab
Select the Oracle database instance in the Instancetab.
See “Instances and Databases tab” on page 73.
Instance tab
Select the Database Backup Shares option in theBackup Selections tab.
See “Backup Selections tab” on page 75.
Backup Selections tab
Set up the deletion of backup sets and data file copiesin the Oracle tab.
See “Oracle tab” on page 78.
Oracle tab
Note: The Database Backup Shares option can only be configured when themedia server is a NetBackup appliance. This option does not work with any othertype of media server.
Note: The NetBackup appliance media server can only be configured in a pureIPv4 or dual stack IPv4/IPv6 mode.
84Oracle policy configurationAbout Oracle Intelligent Policies (OIP)

See “ Configuring a snapshot policy using a share on the NetBackup appliance(Copilot)” on page 182.
See “About using a NetBackup appliance share for Oracle backups (Copilot)”on page 81.
See “Configuring the appliance within a RAC environment” on page 254.
About script- or template-based Oracle policiesNetBackup users or automatic schedules can start database backups by specifyinga template or a shell script in the file list of the Oracle policy. The template or theshell script specifies the backup commands that RMAN performs on the client.
Note: All scripts must be stored and run locally. One recommendation is that scriptsshould not be world-writable. Scripts are not allowed to be run from network orremote locations. Any script that is created and saved in the NetBackup db_ext
(UNIX) or dbext (Windows) location needs to be protected during a NetBackupuninstall.
For more information about registering authorized locations and scripts, review theknowledge base article:
http://www.veritas.com/docs/000126002
On UNIX, NetBackup for Oracle includes a library of functions that enable RMANto use NetBackup. You can link to this library
See the instructions for how to link to this library.
See “About linking Oracle RMAN with NetBackup for UNIX” on page 35.
On Windows, NetBackup for Oracle includes a library of functions that enable RMANto use NetBackup. This library is in c:\Windows\system32.
When you use the RMAN backup command, each resulting backup set containsat least one backup piece (data file, data file copy, control file, or archive log) fromthe target database. You must give each backup piece a unique name using theformat operand. Several substitution variables are available to aid in generatingunique names. You can specify the format operand in the backup command.NetBackup considers the backup piece name as the file being backed up, so thisname must be unique in the catalog.
For a backup, the following items apply:
■ The rman command starts the requested operation on the databases.
85Oracle policy configurationAbout script- or template-based Oracle policies

■ When the process requires media to store backup data, RMAN starts auser-directed backup by issuing a backup request.
■ The NetBackup media server connects to NetBackup for Oracle on the client.NetBackup for Oracle on the client sends the database data to the NetBackupmedia server which saves the data to secondary storage. A restore works inessentially the same manner except that RMAN issues a restore request. Thisrequest causes NetBackup to retrieve the data from secondary storage andsend it to NetBackup for Oracle on the client.
■ RMAN supports parallel operations, so a single rman command can start morethan one backup, or restore on the NetBackup system.
■ The status for an RMAN operation is stored in the RMAN catalog or in thedatabase control file. This same status appears in the output of the RMANcommand that is used to run the backup or restore. This status is the only statusthat a database administrator must check to verify that a backup or restore hasbeen successful.
■ NetBackup also logs status, but only for its own part of the operation. Thedatabase administrator cannot use the NetBackup status to determine whetherrman was successful. Errors can occur in rman that do not affect NetBackup andare not recorded in its logs.
Adding a new script- or template-based Oracle policyThis topic describes how to add a new backup policy for a database.
To add a new script- or template-based Oracle policy
1 Log on to the master server as administrator (Windows) or root (UNIX), andstart the NetBackup Administration Console.
2 If your site has more than one master server, choose the one on which youwant to add the policy.
3 In theNetBackup Administration Console, selectNetBackupManagement> Policies. Then select Actions > New > New Policy.
4 In the Add a New Policy dialog box, in the Policy name box, type a uniquename for the new policy. Click OK.
5 In the Add New Policy dialog box, in the Policy type list, select Oracle. Thetabs along the top of the dialog change to include an Instances and Databasestab.
The database agent policy type does not appear in the drop-down list unlessyour master server has a license for the database agent.
86Oracle policy configurationAbout script- or template-based Oracle policies

6 Click the Instances andDatabases tab and selectClients for usewith scriptsor templates.
7 Click Yes on the Backup Policy Management dialog box. The tabs along thetop of the dialog change again to include a Clients tab.
8 Click OK to return to the main screen of the NetBackup AdministrationConsole. Select View > Refresh to refresh the GUI so that the appropriateschedule information appears in the Schedules tab.
9 In the right pane, double-click the policy that you have added. Another optionis to right-click on the policy name in the center pane and select Change fromthe menu.
10 Complete the entries on the Attributes tab.
See “About policy attributes” on page 87.
11 Add other policy information as follows:
■ Add schedules.See “Configuring NetBackup for Oracle automatic backup schedules”on page 69.
■ Add clients. On the Clients tab, click Clients for use with Scripts ortemplates option. Then click New to display a list of all possible clients.Select new clients from this list, then click OK.See “Adding clients to a policy” on page 92.
■ Add templates or scripts to the backup selections list.See “About adding backup selections to an Oracle policy” on page 93.See “Registering authorized locations used by a NetBackup databasescript-based policy” on page 334.
12 When you have added all the schedules, clients, and backup selections youneed, click OK.
About policy attributesWith a few exceptions, NetBackup manages the policy attributes set for a databasebackup like a file system backup. Other policy attributes vary according to yourspecific backup strategy and system configuration.
Table 4-8 describes some of the policy attributes available for a NetBackup forOracle policy. For more information on policy attributes, see the NetBackupAdministrator’s Guide, Volume I.
87Oracle policy configurationAbout script- or template-based Oracle policies

Table 4-8 Policy attribute descriptions for NetBackup for Oracle policies
DescriptionAttribute
Determines the types of clients that can be backed up with the policy. For Oracle databases,select the policy type Oracle.
Policy type
Sets the maximum number of instances that NetBackup can back up concurrently with thispolicy.
Limit jobs per policy
This option is available for Oracle policies on UNIX. Select this attribute to back up the filesfrom NFS-mounted file systems. If this option is not selected, NetBackup cannot perform abackup of NFS-mounted files.
Also see the NetBackup Administrator's Guide, Volume I.
Note: This option is not available for snapshot backups.
Follow NFS
For NetBackup for Oracle, the Keyword phrase entry is ignored.Keyword phrase
This group contains the options that enable backups with Snapshot Client and ReplicationDirector.
Snapshot Client andReplication Director
About backup schedules, templates, and scriptsBe aware of what may happen if an automatic schedule invokes a script that a userauthored. NetBackup does not provide safeguards to prevent an automatic backupschedule, for example, from running a restore or recovery script.
To help guard against such mistakes, use a template instead of a script wheneverpossible. When a template runs, it detects the backup type on the schedule. Youare responsible for specifying a template with the correct operation type (backupor restore) in the policy.
About schedule propertiesThis topic describes the schedule properties that have a different meaning fordatabase backups than for file system backups. Other schedule properties varyaccording to your specific backup strategy and system configuration. Additionalinformation about other schedule properties is available. See the NetBackupAdministrator’s Guide, Volume I.
Table 4-9 Description of schedule properties
DescriptionProperty
Specifies the type of backup that this schedule can control. The selection list shows onlythe backup types that apply to the policy you want to configure.
Type of backup
88Oracle policy configurationAbout script- or template-based Oracle policies

Table 4-9 Description of schedule properties (continued)
DescriptionProperty
You can schedule an automatic backup in one of the following ways:
■ FrequencyFrequency specifies the period of time that can elapse until the next backup operationbegins on this schedule. For example, assume that the frequency is 7 days and asuccessful backup occurs on Wednesday. The next full backup does not occur until thefollowing Wednesday. Typically, incremental backups have a shorter frequency than fullbackups.
■ CalendarThe Calendar option lets you schedule the backup operations that are based on specificdates, recurring week days, or recurring days of the month.
Schedule type
The retention period for an application backup schedule refers to the length of time thatNetBackup keeps backup images (stream-based backups). The retention period for anautomatic schedule controls how long NetBackup keeps records of when scheduled backupsoccurred (proxy backups). For example, if your database is backed up once every Sundaymorning, you should select a retention period of at least 2 weeks.
The type of schedule you select affects the retention period as follows:
■ Frequency-based schedulingSet a retention period that is longer than the frequency setting for the schedule. Forexample, if the frequency setting is set to one week, set the retention period to be morethan one week. The NetBackup scheduler compares the latest record of the automaticbackup schedule to the frequency of that automatic backup schedule. This comparisonis done to determine whether a backup is due. So if you set the retention period to expirethe record too early, the scheduled backup frequency is unpredictable. However, if youset the retention period to be longer than necessary, the NetBackup catalog accumulatesunnecessary records.Oracle is not notified when NetBackup expires a backup image. Use Oracle RMANrepository maintenance commands to periodically delete expired backup sets from theOracle RMAN repository.Oracle XML export operations create archives for long-term storage and recovery. Setthe retention level to a period of years or to infinity.
■ Calendar-based schedulingThe retention period setting is not significant for calendar-based scheduling.
Retention
If you want to specify multiple copies of a backup for the policy, configure Multiple copieson the application backup schedule. If using Snapshot Client, also specify Multiple copieson the automatic schedule.
Multiple copies
89Oracle policy configurationAbout script- or template-based Oracle policies

Script- or template-based policy - Storage and RetentionThis topic describes storage and retention properties of the script- andtemplate-based policies.
See the NetBackup Administrator’s Guide, Volume I.
Table 4-10 Storage and retention behavior
DescriptionProperty
If the policy is a snapshot type, the following are the possible scenarios of the retentionbehavior:
■ If a schedule has overridden the policy storage, the override storage on the scheduletakes precedence over the policy storage.
■ If the policy storage is a snapshot SLP, the application schedule must override thepolicy storage. The storage that is specified on the application schedule may notbe a snapshot SLP.
■ If the storage being used is not an SLP, the schedule determines the retention forthe snapshot data.
■ If you use the policy storage unit as an SLP, the SLP determines the retention forthe snapshot data.
Streamed data is processed by using the application schedule. Snapshot data isprocessed by using the automatic schedule.
Policy is a snapshot type
If the policy is not a snapshot type, the following are the possible scenarios of theretention behavior:
■ If the application schedule has overridden the policy storage, the override storageon the schedule takes precedence over the policy storage.
■ If the storage being used is not an SLP, the retention is derived from the schedule.■ If the storage being used is an SLP, the retention is derived from the SLP.
Since all data is streamed, the data is processed using the application schedule.
Policy is not a snapshottype
The following are examples of the script- or template-based policy storage andretention behavior for snapshot-based policy types:
Snapshotdata retentionis derivedfrom:
Streameddata retentionis derivedfrom:
Full/Incrementalschedulestorage
Applicationschedulestorage
Policy storage
Full/IncrementalSchedule
ApplicationSchedule
--AdvancedDisk
90Oracle policy configurationAbout script- or template-based Oracle policies

Snapshotdata retentionis derivedfrom:
Streameddata retentionis derivedfrom:
Full/Incrementalschedulestorage
Applicationschedulestorage
Policy storage
Non-SnapshotSLP
ApplicationSchedule
Non-SnapshotSLP
-AdvancedDisk
Non-SnapshotSLP
ApplicationSchedule
-AdvancedDiskNon-SnapshotSLP
Full/IncrementalSchedule
Non-SnapshotSLP
-Non-SnapshotSLP
Tape library
Snapshot SLPonFull/IncrementalSchedule
ApplicationSchedule
Snapshot SLPAdvancedDisk(must bespecified)
Snapshot SLP
Snapshot SLPApplicationSchedule
Snapshot SLP-AdvancedDisk
Non-SnapshotSLP
Non-SnapshotSLP
--Non-SnapshotSLP
Snapshot SLPonFull/IncrementalSchedule
Non-Snapshoton ApplicationSchedule
Snapshot SLPNon-SnapshotSLP
AdvancedDisk
Snapshot SLPonFull/IncrementalSchedule
Non-Snapshoton ApplicationSchedule
Snapshot SLPNon-SnapshotSLP (must bespecified)
Snapshot SLP
The following are examples of the script- or template-based policy storage andretention behavior for stream-based policy types:
Streamed dataretention isderived from:
Applicationschedule storage
Schedule storagePolicy storage
Application ScheduleN/A-AdvancedDisk
Application ScheduleN/AAdvancedDiskNon-Snapshot SLP
Non-Snapshot SLPN/ANon-Snapshot SLPAdvancedDisk
Non-Snapshot SLPN/A-Non-Snapshot SLP
91Oracle policy configurationAbout script- or template-based Oracle policies

Streamed dataretention isderived from:
Applicationschedule storage
Schedule storagePolicy storage
Non-Snapshot SLPNon-Snapshot SLP-AdvancedDisk
Application ScheduleAdvancedDisk-Snapshot SLP
Adding clients to a policyThe client list contains a list of the clients on which your scripts are run during anautomatic backup or the clients that can send backup requests to the applicationschedule. A NetBackup client must be in at least one policy but can be in more thanone.
NetBackup attempts to run each template in the backup selections list for eachclient in the client list. If a template is not valid on a particular client, the templateis skipped. (For example, if the Oracle home that is specified in the template doesnot exist on that client.) A policy can contain multiple clients and multiple templates.Only a subset of the templates needs to be valid on each client. If the valid templatesare successful, the entire backup is successful.
For a NetBackup for Oracle policy, clients you want to add must have the followingitems installed or available:
■ Oracle
■ NetBackup client or server
■ The backup shell scripts, unless you use templates
To add clients to a NetBackup for Oracle policy
1 Open the policy you want to edit or create a new policy.
To access the Policy dialog box, double-click the policy name in the Policieslist in the NetBackup Administration Console.
2 Click the Clients tab.
3 Click New.
4 Type the name of the client and select the hardware and operating system ofthe client.
5 Choose one of the following:
■ To add another client, click Add.
■ If this client is the last client you want to add, click OK.
6 In the Policy dialog box, click OK.
92Oracle policy configurationAbout script- or template-based Oracle policies

About adding backup selections to an Oracle policyThe backup selections list in a database policy has a different meaning than fornon-database policies. For example, in a Standard or MS-Windows policy, the listcontains files and directories to be backed up.
In a database policy, you specify templates or scripts to be run.
Observe the following rules when you use templates or scripts:
■ Make sure that the scripts reside on each client in the client list.
■ NetBackup installs sample scripts when you install the software; you can modifythese scripts for your own use.
■ All scripts must be in an authorized location.See “Registering authorized locations used by a NetBackup databasescript-based policy” on page 334.
■ If you use NetBackup for Oracle in a NetBackup server cluster, make sure thatthe scripts reside in a location that is available after a failover.
Note: All scripts must be stored and run locally. One recommendation is that scriptsshould not be world-writable. Scripts are not allowed to be run from network orremote locations. Any script that is created and saved in the NetBackup db_ext
(UNIX) or dbext (Windows) location needs to be protected during a NetBackupuninstall.
For more information about registering authorized locations and scripts, review theknowledge base article:
http://www.veritas.com/docs/000126002
Add templates or scripts to the backup selections list only if you want to set up apolicy for automatic backups. These templates or scripts are run for manual backupsand for automatic schedules as specified under the Schedules tab. NetBackupruns the templates or scripts in the order that the templates or scripts appear in thebackup selections list.
Adding a template to the backup selections list in theNetBackup Administration ConsoleThe following procedure describes how to add a template to the backup selectionslist in the NetBackup Administration Console.
Note: Be sure to specify the correct template name in the backup selections list toprevent an error or a wrong operation.
93Oracle policy configurationAbout script- or template-based Oracle policies

To add a template to the backup selections list in the NetBackupAdministration Console
1 Open the Policy dialog box.
To access the Policy dialog box, double-click the policy name in the Policieslist in the NetBackup Administration Console.
2 Click the Backup Selections tab.
3 Click New.
4 From the Template Set list, choose the template type by operation.
5 From the Script or Template list, select a template or type the name of atemplate.
Include the .tpl extension. Do not include the full path. For example,weekly_full_backup.tpl.
6 Click Add to add the template to the list.
7 Click OK.
Adding a script to the backup selections list in theNetBackup Administration ConsoleThe following procedure describes how to add a script to the backup selections listin the NetBackup Administration Console.
Note: Be sure to specify the correct script name in the backup selections list toprevent an error or a wrong operation.
To add a script to the backup selections list in the NetBackup AdministrationConsole
1 Open the Policy dialog box.
To access the Policy dialog box, double-click the policy name in the Policieslist in the NetBackup Administration Console.
2 Click the Backup Selections tab.
3 Click New.
94Oracle policy configurationAbout script- or template-based Oracle policies

4 In the Script or Template box, type the full path name of a script on the client.
For example:
/backup_scripts/db/cold_backup.sh
C:\backup_scripts\db\cold_backup.cmd
See “Registering authorized locations used by a NetBackup databasescript-based policy” on page 334.
5 Click Add to add the script to the list.
6 Click OK.
About configuring the run-time environmentWhen the Oracle Intelligent Policy is not used, there are many user configurablevariables that can affect the operation of NetBackup for Oracle. Most can be setonly in the NetBackup for Oracle Template Wizard or in the RMAN script. A fewcan be set in multiple places, most notably those that specify the master server,client name, policy, and schedule.
When these variables are configured in multiple places, the following order ofprecedence is used (the list is ranked highest to lowest):
■ RMAN SEND command variables, if specified in the backup script.
■ RMAN ENV parameter variables, if specified in the backup script.See “About the RMAN SEND command variables” on page 98.
■ The template fields for Client name and Schedule name, if specified in thebackup template.
■ The template fields for Server name and Backup policy name, if specified in thebackup template and initiated from the client.
■ Environment variables that are inherited from the Oracle listener process startupenvironment, if RMAN connects to the database using TNS SQL*Net.
■ Environment variables that are set in the backup script before bpdbsboraorRMAN is started.
■ The environment variables that the login or shell inherits.See “About the Oracle RMAN environment” on page 96.
■ The environment variables that the master server initiation of an automaticschedule sets.See “About the environment variables set by NetBackup for Oracle” on page 98.
■ On UNIX, the Oracle user’s configuration file; $HOME/bp.conf.
95Oracle policy configurationAbout script- or template-based Oracle policies
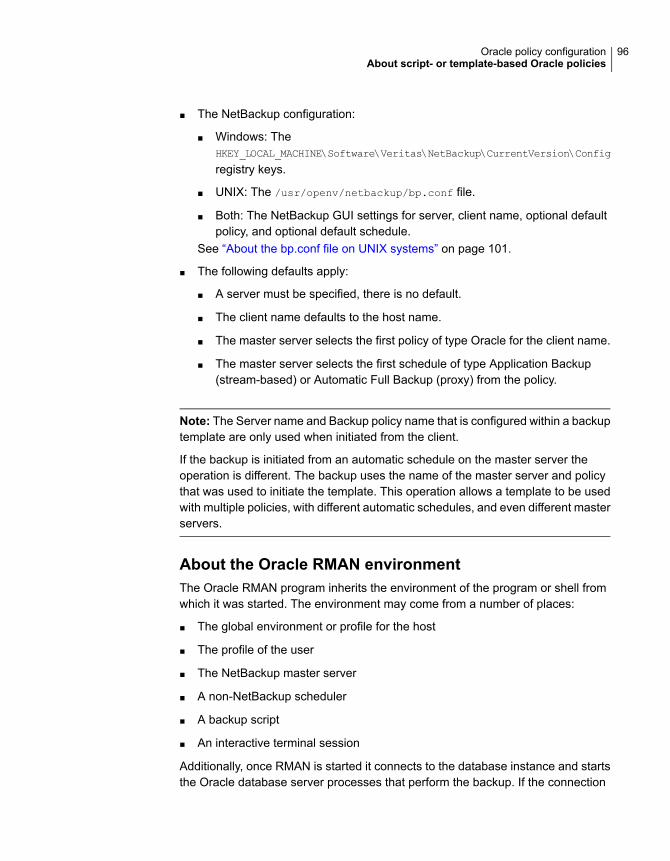
■ The NetBackup configuration:
■ Windows: TheHKEY_LOCAL_MACHINE\Software\Veritas\NetBackup\CurrentVersion\Config
registry keys.
■ UNIX: The /usr/openv/netbackup/bp.conf file.
■ Both: The NetBackup GUI settings for server, client name, optional defaultpolicy, and optional default schedule.
See “About the bp.conf file on UNIX systems” on page 101.
■ The following defaults apply:
■ A server must be specified, there is no default.
■ The client name defaults to the host name.
■ The master server selects the first policy of type Oracle for the client name.
■ The master server selects the first schedule of type Application Backup(stream-based) or Automatic Full Backup (proxy) from the policy.
Note: The Server name and Backup policy name that is configured within a backuptemplate are only used when initiated from the client.
If the backup is initiated from an automatic schedule on the master server theoperation is different. The backup uses the name of the master server and policythat was used to initiate the template. This operation allows a template to be usedwith multiple policies, with different automatic schedules, and even different masterservers.
About the Oracle RMAN environmentThe Oracle RMAN program inherits the environment of the program or shell fromwhich it was started. The environment may come from a number of places:
■ The global environment or profile for the host
■ The profile of the user
■ The NetBackup master server
■ A non-NetBackup scheduler
■ A backup script
■ An interactive terminal session
Additionally, once RMAN is started it connects to the database instance and startsthe Oracle database server processes that perform the backup. If the connection
96Oracle policy configurationAbout script- or template-based Oracle policies

is by local logon and password (without a TNS alias), the Oracle database serverprocess is a child of the RMAN program. The Oracle database server processinherits the environment from RMAN. Because the NetBackup for Oracle agent isa shared library loaded into the Oracle database server process it too inherits thatenvironment.
However, if RMAN connects to the database instance by SQL*Net (logon andpassword@TNSalias) the Oracle database server process is a child of the SQL*Netlistener service. This SQL*Net listener service was started previously andindependently of RMAN. As a result, the NetBackup for Oracle agent does notinherit the environment from RMAN. Instead, the agent inherits the environmentfrom which the listener service was started
To avoid unexpected results, it is recommended to configure RMAN to always usethe send command to pass the desired variables and values to NetBackup explicitly.Alternatively the RMAN ENV parameter can be used to make the variables andvalues available to NetBackup.
Example 1. Use the send command to specify the policy and server to use for adatabase backup. As this example shows, specify the variables in the string in theRMAN script after all channels have been allocated and before the backup
command.
run {
allocate channel t1 type 'SBT_TAPE';
allocate channel t2 type 'SBT_TAPE';
send 'NB_ORA_POLICY=your_policy,NB_ORA_SERV=your_server';
backup (database format 'bk_%U_%t');
release channel t1;
release channel t2;
}
Example 2. Use the parms operand to specify the policy and server to use for adatabase backup. The parms operand is set with each allocate channel commandin the shell script.
run {
allocate channel t1 DEVICE TYPE 'SBT_TAPE'
PARMS "SBT_LIBRARY=/usr/openv/netbackup/bin/libobk.so,
ENV=(NB_ORA_POLICY=your_policy,NB_ORA_SERV=your_server)";
allocate channel t2 DEVICE TYPE 'SBT_TAPE'
PARMS "SBT_LIBRARY=/usr/openv/netbackup/bin/libobk.so,
ENV=(NB_ORA_POLICY=your_policy,NB_ORA_SERV=your_server)";
backup (database format 'bk_%s_%p_%t');
release channel t1;
97Oracle policy configurationAbout script- or template-based Oracle policies

release channel t2;
}
About the environment variables set by NetBackup forOracleWhen an automatic schedule runs, NetBackup sets environment variables for shellscripts to use. These variables are set only if the backup is started from the server,either automatically by the NetBackup scheduler or manually through theadministrator interface.
On UNIX and Windows, these variables can be used to perform conditionaloperations within the backup script.
Table 4-11 shows the variables.
Table 4-11 Variables that NetBackup for Oracle sets
PurposeEnvironment variable
Name of the NetBackup server that initiated the automaticschedule.
NB_ORA_SERV
Name of the Oracle policy that contained the automaticschedule.
NB_ORA_POLICY
Name of the NetBackup client in the policy.NB_ORA_CLIENT
Set to 1 for a Full schedule.NB_ORA_FULL
Set to 1 for a Differential incremental schedule.NB_ORA_INCR
Set to 1 for a Cumulative incremental schedule.NB_ORA_CINC
Name of the automatic schedule.NB_ORA_PC_SCHED
About the RMAN SEND command variablesThe Oracle SEND command and ENV parameter support several options that areused with NetBackup for Oracle. The variables that the SEND command specifiessupersede those specified by the ENV parameter. Also, spaces are not permittedwhen the variables and values are specified.
Table 4-12 describes the options you can set for the RMAN SEND command.
98Oracle policy configurationAbout script- or template-based Oracle policies
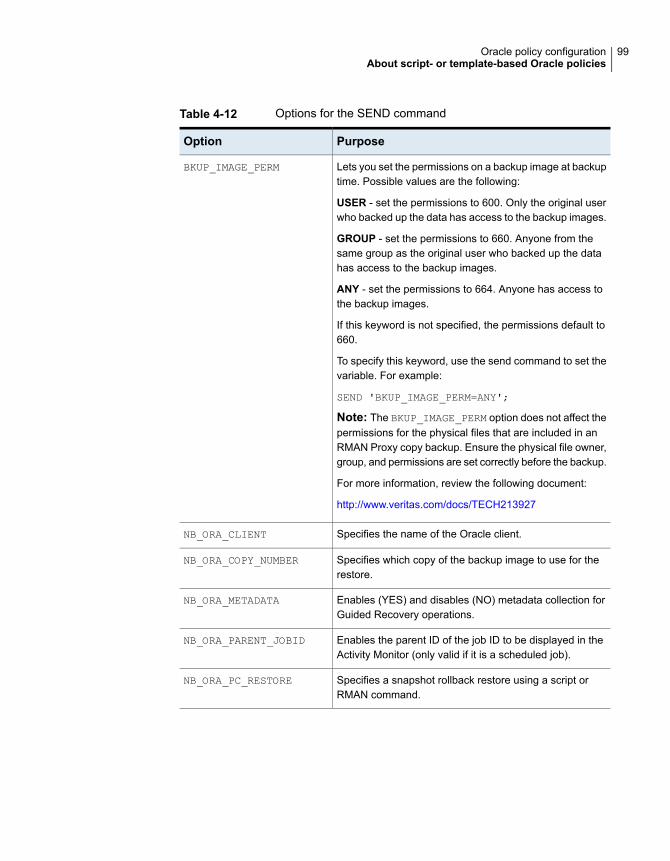
Table 4-12 Options for the SEND command
PurposeOption
Lets you set the permissions on a backup image at backuptime. Possible values are the following:
USER - set the permissions to 600. Only the original userwho backed up the data has access to the backup images.
GROUP - set the permissions to 660. Anyone from thesame group as the original user who backed up the datahas access to the backup images.
ANY - set the permissions to 664. Anyone has access tothe backup images.
If this keyword is not specified, the permissions default to660.
To specify this keyword, use the send command to set thevariable. For example:
SEND 'BKUP_IMAGE_PERM=ANY';
Note: The BKUP_IMAGE_PERM option does not affect thepermissions for the physical files that are included in anRMAN Proxy copy backup. Ensure the physical file owner,group, and permissions are set correctly before the backup.
For more information, review the following document:
http://www.veritas.com/docs/TECH213927
BKUP_IMAGE_PERM
Specifies the name of the Oracle client.NB_ORA_CLIENT
Specifies which copy of the backup image to use for therestore.
NB_ORA_COPY_NUMBER
Enables (YES) and disables (NO) metadata collection forGuided Recovery operations.
NB_ORA_METADATA
Enables the parent ID of the job ID to be displayed in theActivity Monitor (only valid if it is a scheduled job).
NB_ORA_PARENT_JOBID
Specifies a snapshot rollback restore using a script orRMAN command.
NB_ORA_PC_RESTORE
99Oracle policy configurationAbout script- or template-based Oracle policies
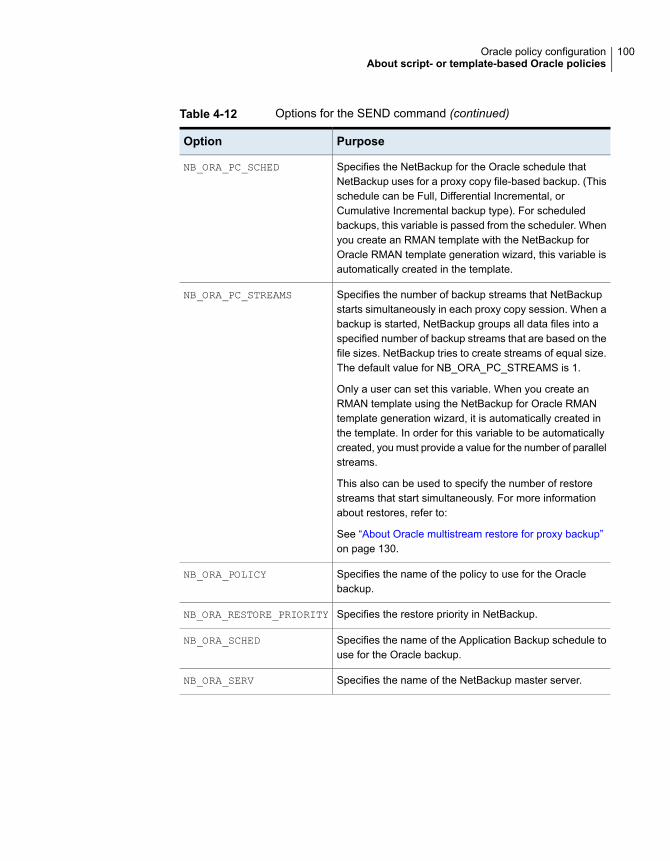
Table 4-12 Options for the SEND command (continued)
PurposeOption
Specifies the NetBackup for the Oracle schedule thatNetBackup uses for a proxy copy file-based backup. (Thisschedule can be Full, Differential Incremental, orCumulative Incremental backup type). For scheduledbackups, this variable is passed from the scheduler. Whenyou create an RMAN template with the NetBackup forOracle RMAN template generation wizard, this variable isautomatically created in the template.
NB_ORA_PC_SCHED
Specifies the number of backup streams that NetBackupstarts simultaneously in each proxy copy session. When abackup is started, NetBackup groups all data files into aspecified number of backup streams that are based on thefile sizes. NetBackup tries to create streams of equal size.The default value for NB_ORA_PC_STREAMS is 1.
Only a user can set this variable. When you create anRMAN template using the NetBackup for Oracle RMANtemplate generation wizard, it is automatically created inthe template. In order for this variable to be automaticallycreated, you must provide a value for the number of parallelstreams.
This also can be used to specify the number of restorestreams that start simultaneously. For more informationabout restores, refer to:
See “About Oracle multistream restore for proxy backup”on page 130.
NB_ORA_PC_STREAMS
Specifies the name of the policy to use for the Oraclebackup.
NB_ORA_POLICY
Specifies the restore priority in NetBackup.NB_ORA_RESTORE_PRIORITY
Specifies the name of the Application Backup schedule touse for the Oracle backup.
NB_ORA_SCHED
Specifies the name of the NetBackup master server.NB_ORA_SERV
100Oracle policy configurationAbout script- or template-based Oracle policies

Table 4-12 Options for the SEND command (continued)
PurposeOption
Configured to instruct the dbclient to lengthen or shortenthe timeout on the media server. The media server usesthis timeout when it waits for a progress status update fromthe client during transfer of the backup image. Typically,this setting should not be adjusted.
To review setting information and delay examples, refer tothe following article:
http://www.veritas.com/docs/TECH227741
NB_ORA_SERVER_READ_TIMEOUT
Specifies which media server to use when more than onehas access to the image to be restored.
Supersedes any FORCE_RESTORE_MEDIA_SERVERsetting on the master server.
NB_ORA_DISK_MEDIA_SERVER
Policy to be used for duplex copy number 1.CPF1_POLICY
Application backup schedule for duplex copy number 1.CPF1_SCHED
Policy to be used for duplex copy number 2.CPF2_POLICY
Application backup schedule for duplex copy number 2.CPF2_SCHED
Policy to be used for duplex copy number 3.CPF3_POLICY
Application backup schedule for duplex copy number 3.CPF3_SCHED
Policy to be used for duplex copy number 4.CPF4_POLICY
Application backup schedule for duplex copy number 4.CPF4_SCHED
For more information, see the NetBackup System Administrator’s Guide, VolumeI.
About the bp.conf file on UNIX systemsA NetBackup for Oracle user can create a bp.conf file in the Oracle user’s homedirectory on the NetBackup for Oracle client host. When a NetBackup for Oracleoperation is started, the user’s bp.conf file is searched before the masterconfiguration file (/usr/openv/netbackup/bp.conf). Any option that is found atthe user level overrides the same option’s setting at the master level.
Table 4-13 shows the options you can set in the user’s bp.conf file.
101Oracle policy configurationAbout script- or template-based Oracle policies

Table 4-13 Options for the user bp.conf file
PurposeOption
This option specifies the name of the policy to use forthe backup.
BPBACKUP_POLICY
This option specifies the name of the ApplicationBackup type of schedule to use for the backup.
BPBACKUP_SCHED
This option specifies the name of the Oracle client.This name is especially useful for a redirected restoreoperation.
CLIENT_NAME
Use this option to increase the number of seconds thatthe Oracle client initially waits for a response from theNetBackup server. The default is the greater of 900 orCLIENT_READ_TIMEOUT.
CLIENT_READ_TIMEOUT
Set to YES to enable metadata collection for GuidedRecovery.
ORACLE_METADATA
This option specifies the name of the NetBackupmaster server. There can only be one SERVER optionin the user bp.conf file.
SERVER
This option causes NetBackup to include moreinformation in its debug logs.
VERBOSE
For more information, see the NetBackup System Administrator’s Guide, VolumeI.
The following shows example bp.conf entries for an Oracle user:
SERVER=jupiter
CLIENT_READ_TIMEOUT=900
VERBOSE=1
About creating templates and shell scriptsRMAN templates and scripts contain the commands that run NetBackup RMANbackup and recovery jobs. Templates and scripts must be created before NetBackupcan perform scheduled backups. These are the template files or shell scripts thatare specified in policy configuration on the NetBackup server.
102Oracle policy configurationAbout script- or template-based Oracle policies

Starting the NetBackup Backup, Archive, and RestoreinterfaceTo start the NetBackup Backup, Archive, and Restore interface
1 Use operating system methods to log into the client upon which NetBackupfor Oracle is installed.
2 Make sure that the Oracle database is in the mount or open state.
3 Start the NetBackup Backup, Archive, and Restore interface on the NetBackupclient.
■ From the Windows Start menu, chooseAll Programs > Veritas NetBackup> Backup, Archive, and Restore.
■ On UNIX, run the following command:
/usr/openv/java/jbpSA &
4 Provide the information that the logon dialog box requests.
On Windows, you do not have to logon as the administrator or as the Oracleadministrator.
On UNIX systems, how you log onto NetBackup depends on how your Oracleauthentication is configured:
■ OS authentication for Oracle:Log on to NetBackup as an Oracle DBA UNIX account that includes sysdbaprivileges.
■ Oracle authentication by password file:Log on to NetBackup using any UNIX account, including root. You need toprovide additional Oracle logon information later in the backup process.
For the host name, type the name of the client upon which the Oracle databaseand NetBackup for Oracle reside. Type your user name and password in theother fields. You can log on as a regular user.
RMAN templates and shell scriptsYou can use templates or shell scripts with the NetBackup for Oracle agent.
The NetBackup for Oracle backup wizard creates backup templates. You can launchthis wizard from the NetBackup Backup, Archive, and Restore interface.
See “Creating RMAN templates using the NetBackup for Oracle RMAN templategeneration wizard” on page 104.
103Oracle policy configurationAbout script- or template-based Oracle policies
The NetBackup for Oracle backup wizard does not support all of the RMANcommands and options that Oracle provides. Write a shell script if a template doesnot provide all the functionality you require.
Shell scripts that the user writes must conform to RMAN and operating system shellsyntax. Sample backup and recovery shell scripts are installed on the client withthe NetBackup for Oracle agent. Modify these scripts to meet your individualrequirements.
See “About creating RMAN scripts manually” on page 106.
NetBackup for Oracle also provides a utility, bpdbsbora, that can generate a shellscript from a backup wizard template. A user can create a template with the wizardand then generate a shell script from the template. The script should be reviewedto make sure the TARGET_CONNECT_STR has the correct credentials before execution.
See “Creating an RMAN script from a template” on page 106.
Creating RMAN templates using the NetBackup for OracleRMAN template generation wizardThe NetBackup for Oracle backup wizard stores information about desired RMANbackup operations. The wizard uses the information to create a template that youcan run immediately. Or you can save in a NetBackup location on the master serverfor later use. Before you can save on the master server, the client must be in apolicy or have images in the NetBackup catalog.
For more information on backup strategies and RMAN functionality, see your Oracledocumentation.
If Oracle is installed on a Windows system, the Backup, Archive, and Restoreinterface on the client displays an Oracle node in the left pane. From the client,expand the Oracle node in the left pane to view an Oracle database instancehierarchy. Select a node in the left pane to view details in the right pane.
If your current logon does not have Oracle SYSDBA or SYSBACKUP privileges,the system prompts you to enter your Oracle database logon information. You needto enter your user name and password with SYSDBA or SYSBACKUP privilegesto continue. Optionally, you can also enter your net service name (TNS alias).
104Oracle policy configurationAbout script- or template-based Oracle policies
To create RMAN templates using the NetBackup for Oracle RMAN templategeneration wizard
1 Log on to NetBackup for Oracle client and start the NetBackup Backup, Archive,and Restore interface.
See “Starting the NetBackup Backup, Archive, and Restore interface”on page 103.
2 In the Backup, Archive, and Restore interface, expand an Oracle databaseinstance and select the database object(s) (data files, tablespaces, archivedredo logs) to back up.
When you select the Oracle database instance, you back up the whole databaseusing RMAN.
3 Choose Actions > Backup.
The NetBackup for Oracle RMAN template generation wizard displays thefollowing screens for you to enter information about the backup operation youwant to perform:
■ Welcome (UNIX only)
■ Target Database Logon Credentials (SYSDBA only)
■ Recovery Catalog Logon Credentials
■ Archived redo logs
■ Configuration Options
■ Backup Options
■ Database State
■ NetBackup for Oracle Configuration Variables
■ Backup Limits
If you need an explanation of any of the fields on the wizard screens or moredetails, click Help on the wizard screen.
4 After you complete the wizard, the Template Summary screen displays thesummary of the backup template:
You can run the template immediately after the wizard finishes, save thetemplate to the master server, or both. Select Perform backup immediatelyand or Save Template then click Finish.
See “About storing templates” on page 110.
See “About using Templates and Oracle Intelligent Policy (OIP) with RAC”on page 237.
105Oracle policy configurationAbout script- or template-based Oracle policies
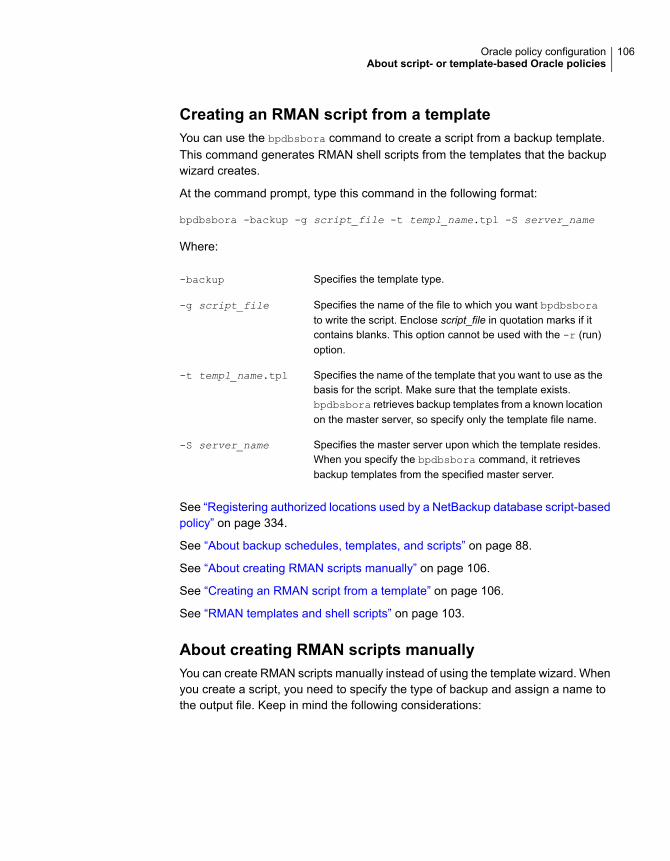
Creating an RMAN script from a templateYou can use the bpdbsbora command to create a script from a backup template.This command generates RMAN shell scripts from the templates that the backupwizard creates.
At the command prompt, type this command in the following format:
bpdbsbora -backup -g script_file -t templ_name.tpl -S server_name
Where:
Specifies the template type.-backup
Specifies the name of the file to which you want bpdbsborato write the script. Enclose script_file in quotation marks if itcontains blanks. This option cannot be used with the -r (run)option.
-g script_file
Specifies the name of the template that you want to use as thebasis for the script. Make sure that the template exists.bpdbsbora retrieves backup templates from a known locationon the master server, so specify only the template file name.
-t templ_name.tpl
Specifies the master server upon which the template resides.When you specify the bpdbsbora command, it retrievesbackup templates from the specified master server.
-S server_name
See “Registering authorized locations used by a NetBackup database script-basedpolicy” on page 334.
See “About backup schedules, templates, and scripts” on page 88.
See “About creating RMAN scripts manually” on page 106.
See “Creating an RMAN script from a template” on page 106.
See “RMAN templates and shell scripts” on page 103.
About creating RMAN scripts manuallyYou can create RMAN scripts manually instead of using the template wizard. Whenyou create a script, you need to specify the type of backup and assign a name tothe output file. Keep in mind the following considerations:
106Oracle policy configurationAbout script- or template-based Oracle policies

RMAN supports the following different types of backups (In theexamples, n must be 1 or higher):
■ BACKUP FULL■ BACKUP INCREMNTALLEVEL 0 (Full backup base for incremental
backups)■ BACKUP INCREMENTAL LEVEL n (Differential incremental
backup)■ BACKUP INCREMENTAL LEVEL n CUMULATIVE (Cumulative
incremental backup)
When generating a data file backup set, you can make either anincremental backup or a full backup. Both a full backup and anincremental level 0 perform a complete backup of the data file. However,an incremental level 0 backup can be used as the base for incrementallevel n and or incremental level n cumulative backups.
Backup type
Observe the following with regard to file names:
■ Each output file must have a unique name. Use the %U formatspecifier to satisfy this restriction. %U is equivalent to %u_%p_%c,and it guarantees the uniqueness of the backup set name in allcircumstances.
■ Put %t at the end of the backup file name format. NetBackup usesthe timestamp as part of its search criteria for catalog images.Without this timestamp, performance might degrade as theNetBackup catalog grows.
■ Ensure that the format that is specified for all RMAN backup piecenames does not contain any space characters.
File names
See “Registering authorized locations used by a NetBackup database script-basedpolicy” on page 334.
See “About the NetBackup for Oracle sample scripts” on page 107.
See “Using the NetBackup for Oracle sample scripts” on page 108.
See “About the set duplex command” on page 109.
About the NetBackup for Oracle sample scriptsWhen you install NetBackup for Oracle, there are some sample scripts that can beused as examples. You must modify any sample script you use to work within yourenvironment. The NetBackup installation writes example scripts to the followingdirectory:
Windows:
install_path\NetBackup\dbext\Oracle\samples\rman
107Oracle policy configurationAbout script- or template-based Oracle policies

UNIX:
/usr/openv/netbackup/ext/db_ext/oracle/samples/rman
The Oracle example scripts are as follows:
Windows:
cold_duplex_cluster_database_backup_full.cmd
cold_cluster_database_backup.cmd
cold_database_backup.cmd
cold_pdb_backup.cmd
cluster_database_restore.cmd
complete_database_restore.cmd
complete_pdb_restore.cmd
hot_database_tablespace_backup_proxy.cmd
hot_pdb_backup.cmd
hot_database_backup.cmd
hot_pdb_tablespace_backup_proxy.cmd
pit_database_restore.cmd
pit_cluster_database_restore.cmd
pit_pdb_restore.cmd
UNIX:
cold_database_backup.sh
cold_pdb_backup.sh
hot_database_backup.sh
hot_database_tablespace_backup_proxy.sh
hot_pdb_backup.sh
hot_pdb_tablespace_backup_proxy.sh
complete_database_restore.sh
complete_pdb_restore.sh
pit_database_restore.sh
pit_pdb_restore.sh
Using the NetBackup for Oracle sample scriptsThe following procedure describes how to use the sample scripts to manually createyour own script.
108Oracle policy configurationAbout script- or template-based Oracle policies

To use sample scripts provided by NetBackup for Oracle
1 Copy the example scripts to a different directory on your client. Oracle scriptscan be located anywhere on the client.
2 Modify each script for your environment.
3 On UNIX, make sure the su command logs into the correct user.
If you do not include an su - user (user is Oracle administrator account) inyour Oracle scripts, they do not run with the proper permissions andenvironment variables. Problems with your database backups and restorescan arise.
About the set duplex commandRMAN provides an API that lets you make up to four backup sets simultaneously,each an exact duplicate of the others. Using NetBackup, for example, you can backup each copy to a different tape to protect against disaster, media damage, orhuman error. Use the set duplex and the send commands to take advantage ofthis feature.
The set duplex command specifies the number of copies of each backup pieceto create. The set duplex command affects all channels that are allocated afteryou issue the command. It remains in effect until explicitly disabled or changedduring the session. You cannot issue the set duplex command after allocating achannel.
The command syntax is:
set duplex = {ON | OFF | 1 | 2 | 3 | 4}
By default, duplex is OFF (a single backup set is produced). If you specify ON, itproduces two identical backup sets.
Note that you must enable the BACKUP_TAPE_IO_SLAVES initialization parameter toperform duplexed backups. RMAN configures all media as needed for the numberof backup copies you request. For more information on BACKUP_TAPE_IO_SLAVES,see your Oracle documentation.
Use the send command to specify the policy and schedule to use with each backup.Because NetBackup uses the policy or schedule to determine what media to use,this information is required for each copy, or an error occurs.
The command syntax is as follows:
send 'keyword=value [, keyword=value,...]';
109Oracle policy configurationAbout script- or template-based Oracle policies
The keywords that are used to specify a policy are CPF1_POLICY, CPF2_POLICY,CPF3_POLICY, and CPF4_POLICY, which specify the backup policy for duplexed file1 through duplexed file 4.
The keywords that are used to specify a schedule are CPF1_SCHED, CPF2_SCHED,CPF3_SCHED, and CPF4_SCHED, which specify the Application Backup schedule forduplexed file 1 through duplexed file 4.
About storing templatesNetBackup for Oracle saves backup templates on the master server and restoretemplates on the client. A backup template is retrieved from the master server aspart of a backup (server-directed, scheduled, or user-directed) and is run on theclient. Backup templates are associated with a policy by specifying its name in thepolicy backup selections list. Because backup templates are stored on the serverin a known location, server-directed and scheduled backups use the same copy ofthe template. The server-directed and scheduled backups use the same copy ofthe template for each client in the policy client list.
When templates are saved, if the template does not end with '.tpl', the extensionis appended to the file name before the template is saved.
Before you run a template on a NetBackup for Oracle client, NetBackup verifiesthe validity of the template for that client. The verification is done by checking theOracle installation information that is stored in that template. Only valid templatesare run on each client.
The NetBackup for Oracle Recovery saves a template to a user-specified locationon the client. The location that is specified should include a fully qualified path to adirectory where the user has write access.
Templates store the encrypted passwords that are decrypted at run-time.
About storing shell scriptsShell scripts must reside on the NetBackup client. Backup shell scripts areassociated with a policy by specifying the file name (including path) in the policybackup selections list. For server-directed or scheduled backups, each client in thepolicy's client list must have a copy of the script with the same name in the samelocation.
See “About adding backup selections to an Oracle policy” on page 93.
The backup and the recovery process sometimes require passwords for Oracledatabase access or system user accounts. Because a shell interprets the shellscripts, store the passwords in clear text.
110Oracle policy configurationAbout script- or template-based Oracle policies
See “Registering authorized locations used by a NetBackup database script-basedpolicy” on page 334.
See “About storing templates” on page 110.
See “About backup schedules, templates, and scripts” on page 88.
Configuring the logon account for the NetBackupClient Service for NetBackup for Oracle
This topic applies to those that are running NetBackup for Oracle on a Windowsplatform.
Because the NetBackup Client Service is started by default under the SYSTEM
account, you must also give special attention to database user authentication. TheSYSTEM account does not have permission to connect to the target database if youuse OS authentication instead of passwords.
If you use OS authentication, run the NetBackup client service under an accountthat has SYSDBA privileges.
For more information on OS authentication, see your Oracle documentation.
Note: In a cluster environment, perform the steps on each database node in thecluster. For an off-host backup, perform the steps on the alternate client.
To configure the logon account for the NetBackup Client Service forNetBackup for Oracle
1 Open the Windows Services application.
2 Double-click the NetBackup Client Service entry.
3 Click the Log On tab.
4 Type the account name with SYSDBA privileges.
5 Type the password.
6 Click OK.
7 Stop and start the NetBackup Client Service.
8 Close the Services control panel application.
111Oracle policy configurationConfiguring the logon account for the NetBackup Client Service for NetBackup for Oracle

Testing configuration settings for NetBackup forOracle
After you configure the servers and clients in your environment, test the configurationsettings. Perform a manual backup (or backups) with the automatic backupschedules you created. A description of status codes and other troubleshootinginformation is available.
See the NetBackup Status Codes Reference Guide.
See the NetBackup Troubleshooting Guide.
To test the configuration settings
1 Log onto the master server as administrator (Windows) or root (UNIX).
2 Start the NetBackup Administration Console.
3 In the left pane, click Policies.
4 Click the policy you want to test.
5 Select Actions > Manual Backup.
The Schedules pane contains the name of possible schedule or schedulesthat are configured for the policy that you want to test.
For an Oracle Intelligent Policy, an Instances pane contains a list of instancesthat are configured for the policy. Select one or more of the instances to startthe backup.
For a script- or template-based policy, the Clients pane contains the name ofthe client or clients that are listed in the policy. Select one or more of the clientsto start the backup.
6 Follow the directions in the Manual Backup dialog box. Then click OK.
7 To check the status of the backup, click Activity Monitor in the NetBackupAdministration Console.
The Activity Monitor and the script output indicate the status of the backupoperation.
112Oracle policy configurationTesting configuration settings for NetBackup for Oracle

Performing backups andrestores of Oracle
This chapter includes the following topics:
■ Overview of using NetBackup for Oracle
■ Maintaining the RMAN repository
■ Querying the RMAN repository
■ About NetBackup for Oracle backups
■ Browsing backups using the bplist command
■ Managing expired backup images
■ About NetBackup for Oracle restores
■ Using NetBackup for Oracle in a Microsoft Windows cluster environment
■ Creating an instant recovery point from an Oracle Copilot image
■ Deleting an instant recovery point for Oracle Copilot instant recovery
■ Cleaning up the Copilot share after point in time restore of database
■ Single-step restore to ASM storage from a Copilot recovery point
■ About restoring from a data file copy to ASM storage using RMAN
Overview of using NetBackup for OracleThe NetBackup graphical user interfaces and command line interfaces let youperform Oracle backup and recovery operations using Oracle RMAN utilities. You
5Chapter
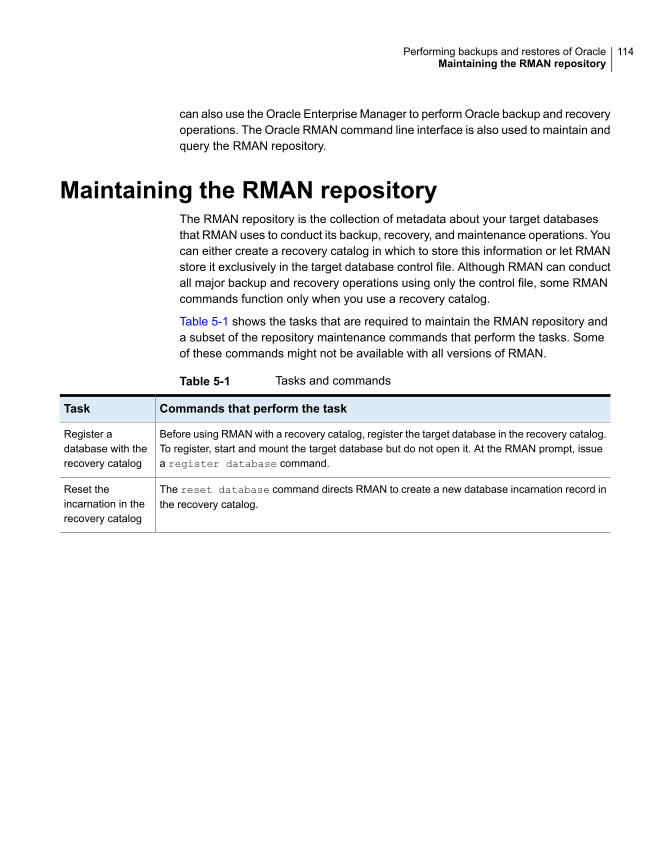
can also use the Oracle Enterprise Manager to perform Oracle backup and recoveryoperations. The Oracle RMAN command line interface is also used to maintain andquery the RMAN repository.
Maintaining the RMAN repositoryThe RMAN repository is the collection of metadata about your target databasesthat RMAN uses to conduct its backup, recovery, and maintenance operations. Youcan either create a recovery catalog in which to store this information or let RMANstore it exclusively in the target database control file. Although RMAN can conductall major backup and recovery operations using only the control file, some RMANcommands function only when you use a recovery catalog.
Table 5-1 shows the tasks that are required to maintain the RMAN repository anda subset of the repository maintenance commands that perform the tasks. Someof these commands might not be available with all versions of RMAN.
Table 5-1 Tasks and commands
Commands that perform the taskTask
Before using RMAN with a recovery catalog, register the target database in the recovery catalog.To register, start and mount the target database but do not open it. At the RMAN prompt, issuea register database command.
Register adatabase with therecovery catalog
The reset database command directs RMAN to create a new database incarnation record inthe recovery catalog.
Reset theincarnation in therecovery catalog
114Performing backups and restores of OracleMaintaining the RMAN repository

Table 5-1 Tasks and commands (continued)
Commands that perform the taskTask
Because NetBackup can expire images independently from Oracle, the RMAN repository cancontain outdated information. Run an RMAN crosscheck to ensure that data in the recoverycatalog or control file is in sync with data in the backup image catalog. The crosscheck queriesNetBackup for the existence of each backup piece and then marks it as available or expired inthe RMAN repository. Use one of the following commands to check the specified files. You needto run separate commands to delete images or repository records.
■ The change...crosscheck command queries NetBackup to determine if a backup pieceis available. If not, RMAN marks the backup piece as expired. If it was expired but is nowavailable, RMAN marks the backup piece as available. The command syntax is as follows:
change backuppiece {primary_keylist |filename_list | tag} crosscheck;
change backupset {primary_keylist} crosscheck;
■ The crosscheck backupset command operates on available and expired backup pieces.RMAN updates their status with the result (available or expired).
■ To crosscheck a database, start RMAN and connect to the target database and to the recoverycatalog (if used). At the rman command prompt, enter the following:
allocate channel for maintenance type 'SBT_TAPE';crosscheck backupset of database;
The length of time to perform an RMAN crosscheck depends on several factors:
■ Number of RMAN backup pieces being crosschecked.■ Number of RMAN backup pieces past their NetBackup retention period when NetBackup
expires them, not RMAN.■ Format of the RMAN backup piece name and if the Veritas recommended _%t appears at
the end of the format statement.■ Number of Oracle clients.■ Number of NetBackup policies of any kind.■ Length of time NetBackup retains backups and the number of backup images for the client
in the NetBackup catalog.■ Scheduling time and the length of time between RMAN catalog maintenance operations.■ Speed and accuracy of host name and reverse host name resolution on the NetBackup master
server.■ Number and complexity of the operations that the NetBackup master server performs during
each crosscheck request.■ Normal performance.
Crosscheck theinformation in theRMAN repository
115Performing backups and restores of OracleMaintaining the RMAN repository

Table 5-1 Tasks and commands (continued)
Commands that perform the taskTask
If files on a Copilot share are deleted outside of RMAN, the subsequent incremental mergebackups that are done to the share fail. An RMAN crosscheck of the share must be done beforethe next backup to prevent more failures. This version of the RMAN crosscheck is slightly differentfrom the other crosscheck examples because of the need to specify type disk instead of typeSBT_TAPE. When running the RMAN crosscheck, the default is the NetBackup_policyname.However, if the Datafile copy tag is changed in the Oracle tab, then that tag name must be usedin place of NetBackup_policyname. An example of the command syntax follows (using the defaultNetBackup_policyname):
Run {Allocate channel ch00 type 'disk';crosscheck backup tag <NetBackup_policyname>;delete noprompt expired backup;crosscheck copy <NetBackup_policyname>;delete noprompt expired copy;release channel ch00;}
Crosscheck usingthe Copilot share
The DELETE OBSOLETE command deletes the backups that are no longer needed to satisfyspecified recoverability requirements. You can delete obsolete pieces according to the configureddefault retention policy, or another retention policy that a DELETE OBSOLETE option specifies.As with other forms of the DELETE command, the deleted files are removed from the backupmedia (i.e. expired from NetBackup). Then they are deleted from the recovery catalog, and markedas DELETED in the control file.
If you specify the DELETE OBSOLETE command with no arguments, then RMAN deletes all theobsolete backups that the currently configured retention policy defines. For example:
Allocate channel for maintenance type 'SBT_TAPE';DELETE OBSOLETE;
You can also use the REDUNDANCY or RECOVERY WINDOW clauses with DELETE to delete thebackups that are obsolete under a specific retention policy instead of the configured default:
DELETE OBSOLETE REDUNDANCY = 3;DELETE OBSOLETE RECOVERY WINDOW OR 7 DAYS;
Delete obsoletebackups
116Performing backups and restores of OracleMaintaining the RMAN repository
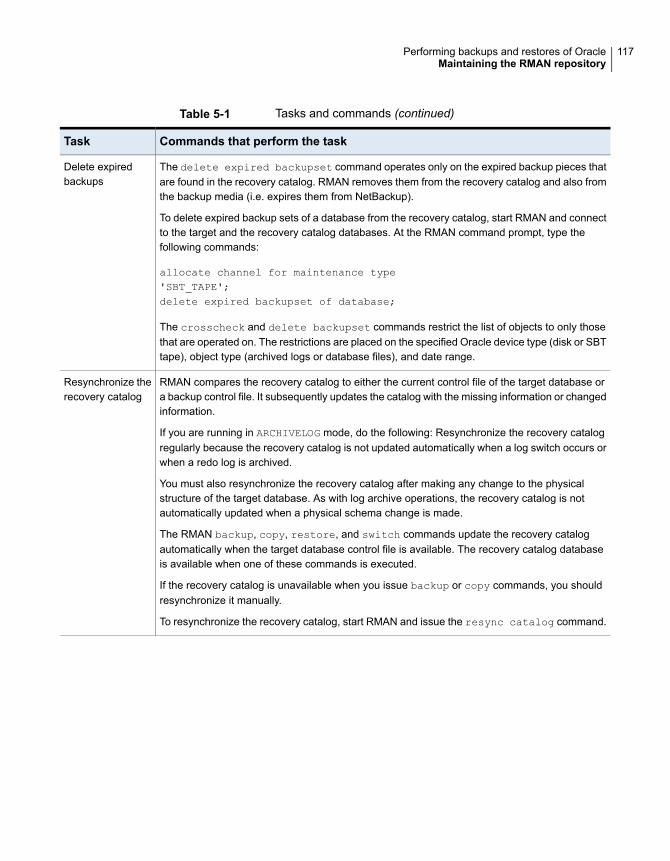
Table 5-1 Tasks and commands (continued)
Commands that perform the taskTask
The delete expired backupset command operates only on the expired backup pieces thatare found in the recovery catalog. RMAN removes them from the recovery catalog and also fromthe backup media (i.e. expires them from NetBackup).
To delete expired backup sets of a database from the recovery catalog, start RMAN and connectto the target and the recovery catalog databases. At the RMAN command prompt, type thefollowing commands:
allocate channel for maintenance type'SBT_TAPE';delete expired backupset of database;
The crosscheck and delete backupset commands restrict the list of objects to only thosethat are operated on. The restrictions are placed on the specified Oracle device type (disk or SBTtape), object type (archived logs or database files), and date range.
Delete expiredbackups
RMAN compares the recovery catalog to either the current control file of the target database ora backup control file. It subsequently updates the catalog with the missing information or changedinformation.
If you are running in ARCHIVELOG mode, do the following: Resynchronize the recovery catalogregularly because the recovery catalog is not updated automatically when a log switch occurs orwhen a redo log is archived.
You must also resynchronize the recovery catalog after making any change to the physicalstructure of the target database. As with log archive operations, the recovery catalog is notautomatically updated when a physical schema change is made.
The RMAN backup, copy, restore, and switch commands update the recovery catalogautomatically when the target database control file is available. The recovery catalog databaseis available when one of these commands is executed.
If the recovery catalog is unavailable when you issue backup or copy commands, you shouldresynchronize it manually.
To resynchronize the recovery catalog, start RMAN and issue the resync catalog command.
Resynchronize therecovery catalog
117Performing backups and restores of OracleMaintaining the RMAN repository

Table 5-1 Tasks and commands (continued)
Commands that perform the taskTask
Periodically, you might need to notify RMAN that the status of a backup set, backup piece, datafile copy, or archived redo log has changed. The RMAN change command enables you to makea variety of useful record changes.
The change ... uncatalog command removes references to a backup piece, data file copy,or archive log from the recovery catalog. This command works only with a recovery catalog.
The change ... delete command removes references to a backup piece, data file copy, orarchive log from the control file and recovery catalog. It physically deletes the file. This commandworks with or without a recovery catalog.
The change ... crosscheck command removes references to a backup piece, data filecopy, or archive log from the control file and recovery catalog. The references are removed whenthat file no longer exists. This command works with or without a recovery catalog.
The change ... unavailable command marks a backup piece, data file copy, or archivelog as unavailable. This command works only with a recovery catalog.
Change theavailability of abackup set or filecopy
A restore validation retrieves the backup pieces from storage (NetBackup) and checks that theretrieved pieces are intact. But the restore validation discards the backup pieces without savingthe contents into the database.
Use restore ... validate when you want RMAN to choose the backups to test.
Use validate backupset when you want to specify the backup sets to test.
Validate therestore of backups
Querying the RMAN repositoryRMAN lets you generate a number of reports relevant for backup and recoveryusing the report and list commands. The list command lists the contents ofthe recovery catalog or control file, and the report command performs a moredetailed analysis.
Use the report and list commands to determine what you have backed up andwhat you need to back up. The information is available whether or not you use arecovery catalog.
You can use the report command to answer many different questions.
Some examples are as follows:
■ Which files need a backup?
■ Which files have not had been backed up in awhile?
■ Which files are not recoverable due to unrecoverable operations?
■ Which backup files can be deleted?
118Performing backups and restores of OracleQuerying the RMAN repository
■ What was the physical schema of the database at some previous point in time?
The list command queries the recovery catalog and control file and produces alisting of its contents. The primary purpose of the list command is to determinethe backups that are available.
You can list the following information:
■ Backup sets containing a backup of a specified list of data files.
■ Backup sets containing a backup of any data file that is a member of a specifiedlist of tablespaces.
■ All backup sets or copies of all data files in the database.
■ Backup sets containing a backup of any archive logs with a specified name orwithin a specified range.
■ Incarnations of a specified database or of all databases that are known to therecovery catalog.
For more information on querying the RMAN repository, see your Oracledocumentation.
About NetBackup for Oracle backupsYou can perform different types of backups using NetBackup. Backups can be runautomatically by using the schedules that you determine, or you can run a backupmanually. The following table describes these methods of running a backup.
When the NetBackup scheduler invokes a schedule for an automaticbackup, the NetBackup for Oracle backup templates or shell scriptsrun as follows:
■ In the same order as they appear in the file list■ On all clients in the client list
The NetBackup for Oracle backup templates or shell scripts startthe database backup by running the rman command.
When the backup is started through NetBackup, RMAN performserror checking. The rman command generates an error if itconsiders a command invalid, but it allows any of the commandsit typically considers valid to proceed. When you specify the wrongscript file name, you can start an unintended operation.
Automatic backups
119Performing backups and restores of OracleAbout NetBackup for Oracle backups
You can use the NetBackup server software to manually run anautomatic backup schedule for the Oracle policy. For moreinformation, see the NetBackup Administrator’s Guide, Volume I.
See “Testing configuration settings for NetBackup for Oracle”on page 112.
Manual backups
Running NetBackup for Oracle templatesThe Oracle template administration interface is available in the NetBackup Backup,Archive, and Restore interface.
Use this dialog to run, edit, delete, rename, and view existing backup templates.These are the templates created by the NetBackup for Oracle RMAN templategeneration wizard. Before you can run, edit, delete, or rename templates on themaster server, the client must exist in a policy or in the NetBackup image catalog.
See “Creating RMAN templates using the NetBackup for Oracle RMAN templategeneration wizard” on page 104.
120Performing backups and restores of OracleAbout NetBackup for Oracle backups

To use Oracle template administration
1 In the Backup, Archive, and Restore interface, choose Actions > AdministerDatabase Templates > Oracle.
The Select Template list shows the names and descriptions of the RMANbackup templates that are stored on the current master server.
2 Select the name of the backup template you want to run.
3 Click Run.
You can use the View Status tool to see the status of the backup. Click Actions> View Status.
The Oracle template administration window provides the following functions:
Runs the selected template.Run
Changes the contents of an existing template. The selected backuptemplate is loaded into the NetBackup for Oracle RMAN templategeneration wizard.
Edit
Removes the selected template.
On Windows, you must be a system administrator or the templatecreator to delete a template.
On UNIX, you must be the root user or the template creator todelete a template.
Delete
Changes the name of the selected template.
On Windows, you must be a system administrator or the templatecreator to rename a template.
On UNIX, you must be the root user or the template creator torename a template.
Rename
Displays a summary of the selected template.View
Using bpdbsbora to run a backup templateThe bpdbsbora command lets you run a backup template that the NetBackup forOracle RMAN template generation wizard creates.
At the command prompt, type this command using the following options:
bpdbsbora -backup -r -t templ_name.tpl [-S srvr_name] [-L prog_file]
Where:
121Performing backups and restores of OracleAbout NetBackup for Oracle backups

Specifies the template type.-backup
Runs the template.-r
Specifies the file name of the template that you want to use.bpdbsbora retrieves backup templates from a known locationon the master server, so specify only the template file name.
-t templ_name.tpl
Optional. Specifies the master server upon which the templatesreside. When it is specified, the bpdbsbora command retrievesbackup templates from the specified master server.
-S server_name
Optional. Specifies a run-time progress log. Enclose prog_file inquotation marks (" ") if it contains space characters.
-L prog_file
For example:
bpdbsbora -backup -r -t ORCLMonfull.tpl -S my_mast -L my_prog_log
Running the NetBackup for Oracle shell scriptWhen you run a NetBackup for Oracle shell script on a client to initiate a backupfrom the command prompt, specify the full path name to the file that contains thescript. For example:
Windows:
install_path\oracle\scripts\db_full_backup.cmd
UNIX:
/oracle/scripts/db_full_backup.sh
The shell starts the database backup by running the Oracle shell script. The Oracleshell script contains commands to run rman.
The NetBackup installation script installs sample scripts in the following location:
Windows:
install_path\NetBackup\dbext\oracle\samples\rman
UNIX:
/usr/openv/netbackup/ext/db_ext/oracle/samples/rman
122Performing backups and restores of OracleAbout NetBackup for Oracle backups
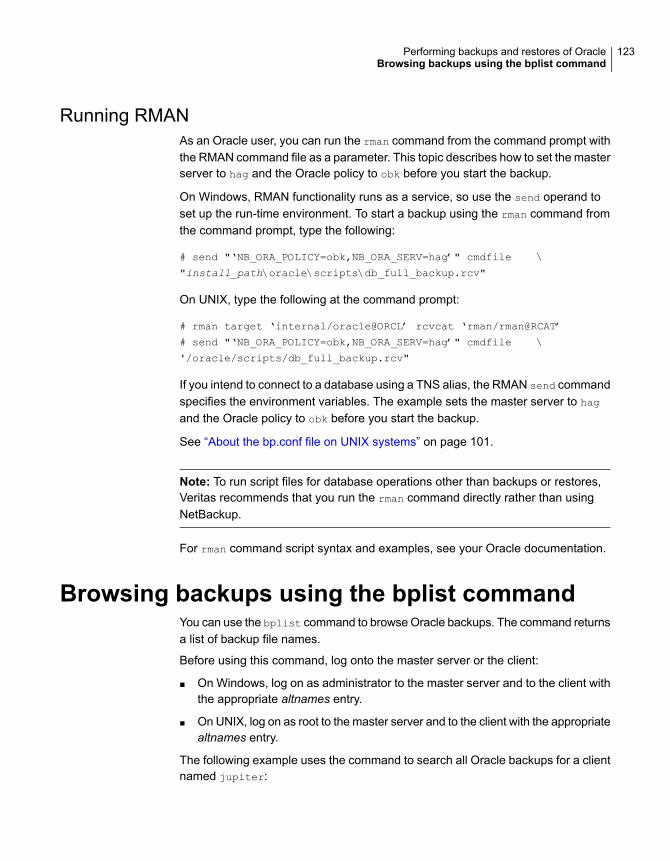
Running RMANAs an Oracle user, you can run the rman command from the command prompt withthe RMAN command file as a parameter. This topic describes how to set the masterserver to hag and the Oracle policy to obk before you start the backup.
On Windows, RMAN functionality runs as a service, so use the send operand toset up the run-time environment. To start a backup using the rman command fromthe command prompt, type the following:
# send "‘NB_ORA_POLICY=obk,NB_ORA_SERV=hag’" cmdfile \
"install_path\oracle\scripts\db_full_backup.rcv"
On UNIX, type the following at the command prompt:
# rman target ‘internal/oracle@ORCL’ rcvcat ‘rman/rman@RCAT’
# send "‘NB_ORA_POLICY=obk,NB_ORA_SERV=hag’" cmdfile \
'/oracle/scripts/db_full_backup.rcv"
If you intend to connect to a database using a TNS alias, the RMAN send commandspecifies the environment variables. The example sets the master server to hag
and the Oracle policy to obk before you start the backup.
See “About the bp.conf file on UNIX systems” on page 101.
Note: To run script files for database operations other than backups or restores,Veritas recommends that you run the rman command directly rather than usingNetBackup.
For rman command script syntax and examples, see your Oracle documentation.
Browsing backups using the bplist commandYou can use the bplist command to browse Oracle backups. The command returnsa list of backup file names.
Before using this command, log onto the master server or the client:
■ On Windows, log on as administrator to the master server and to the client withthe appropriate altnames entry.
■ On UNIX, log on as root to the master server and to the client with the appropriatealtnames entry.
The following example uses the command to search all Oracle backups for a clientnamed jupiter:
123Performing backups and restores of OracleBrowsing backups using the bplist command

# bplist -C jupiter -t 4 -R /
/exb_n2bm5bco_1_1392342936
/exb_mabm02ko_1_1392170136
/exb_lqbltds6_1_1392083334
The -t 4 on this command specifies the Oracle backups. The -R specifies thedefault number (999) of directory levels to search.
For more information on the bplist command, see the NetBackup CommandsReference Guide.
You can also use the RMAN report and list commands to browse Oracle backups.
See “Querying the RMAN repository” on page 118.
Managing expired backup imagesNetBackup and Oracle each maintain a repository of RMAN-initiated backup imageinformation. The retention setting in the Application Backup schedule for RMANstream-based backups determines the NetBackup image retention. But for RMANproxy backups and OIP backups, the retention setting on the Automatic Backupschedule determines retention of the NetBackup image.
To manage expired backup images from the NetBackup repository, access theRetention setting of the Application backup schedule. Specify the length of timebefore NetBackup expires a backup image.
See “About schedule properties ” on page 88.
You can also manage the expired backup images from the Oracle repository. Thismethod sets the backup retention as an RMAN attribute, rather than a NetBackupattribute. RMAN deletes the obsolete but not the unexpired backups from NetBackup.The following items are also part of this process:
■ Set the NetBackup backup retention for Oracle backups to be either infinite orsignificantly longer than the RMAN retention.
■ Set the RMAN retention to the number or duration to keep the backup sets inthe RMAN catalog. If no RMAN catalog exists, then use SQL to set anappropriate value for "control_file_record_keep_time". The minimum appropriatetime is the catalog backup retention time plus the maximum time between catalogmaintenance operations.
■ On a regular basis, run the RMAN delete obsolete command to expire obsoleteimages from the RMAN catalog, the control file, and from NetBackup.
■ If a cross-check of the catalog is required, perform the cross-check after RAMNdeletes the obsolete backups.
124Performing backups and restores of OracleManaging expired backup images
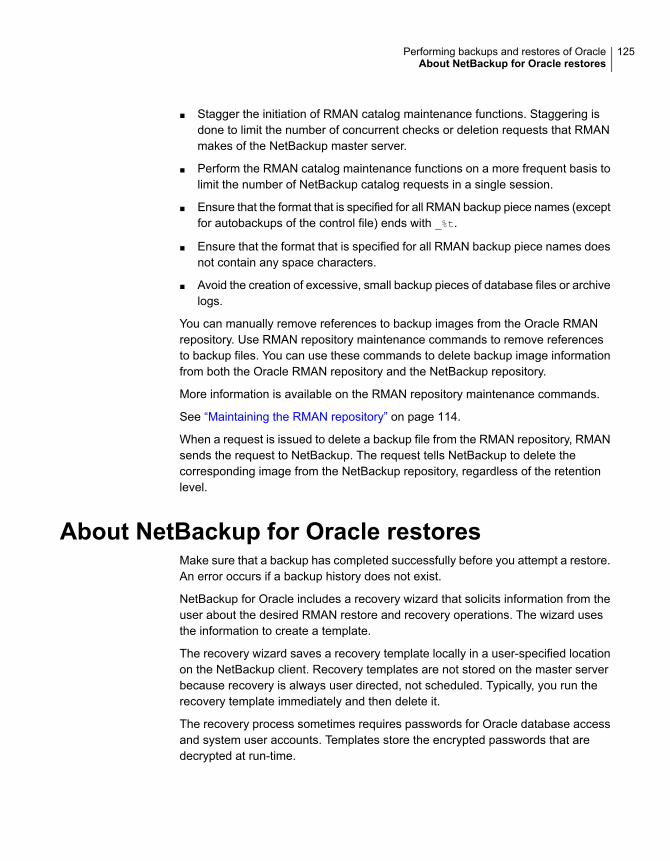
■ Stagger the initiation of RMAN catalog maintenance functions. Staggering isdone to limit the number of concurrent checks or deletion requests that RMANmakes of the NetBackup master server.
■ Perform the RMAN catalog maintenance functions on a more frequent basis tolimit the number of NetBackup catalog requests in a single session.
■ Ensure that the format that is specified for all RMAN backup piece names (exceptfor autobackups of the control file) ends with _%t.
■ Ensure that the format that is specified for all RMAN backup piece names doesnot contain any space characters.
■ Avoid the creation of excessive, small backup pieces of database files or archivelogs.
You can manually remove references to backup images from the Oracle RMANrepository. Use RMAN repository maintenance commands to remove referencesto backup files. You can use these commands to delete backup image informationfrom both the Oracle RMAN repository and the NetBackup repository.
More information is available on the RMAN repository maintenance commands.
See “Maintaining the RMAN repository” on page 114.
When a request is issued to delete a backup file from the RMAN repository, RMANsends the request to NetBackup. The request tells NetBackup to delete thecorresponding image from the NetBackup repository, regardless of the retentionlevel.
About NetBackup for Oracle restoresMake sure that a backup has completed successfully before you attempt a restore.An error occurs if a backup history does not exist.
NetBackup for Oracle includes a recovery wizard that solicits information from theuser about the desired RMAN restore and recovery operations. The wizard usesthe information to create a template.
The recovery wizard saves a recovery template locally in a user-specified locationon the NetBackup client. Recovery templates are not stored on the master serverbecause recovery is always user directed, not scheduled. Typically, you run therecovery template immediately and then delete it.
The recovery process sometimes requires passwords for Oracle database accessand system user accounts. Templates store the encrypted passwords that aredecrypted at run-time.
125Performing backups and restores of OracleAbout NetBackup for Oracle restores
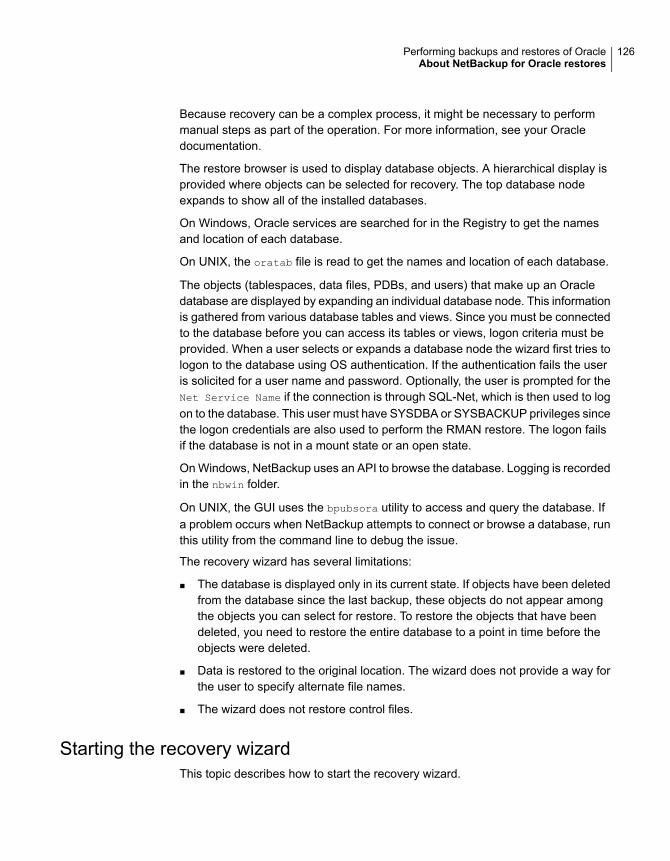
Because recovery can be a complex process, it might be necessary to performmanual steps as part of the operation. For more information, see your Oracledocumentation.
The restore browser is used to display database objects. A hierarchical display isprovided where objects can be selected for recovery. The top database nodeexpands to show all of the installed databases.
On Windows, Oracle services are searched for in the Registry to get the namesand location of each database.
On UNIX, the oratab file is read to get the names and location of each database.
The objects (tablespaces, data files, PDBs, and users) that make up an Oracledatabase are displayed by expanding an individual database node. This informationis gathered from various database tables and views. Since you must be connectedto the database before you can access its tables or views, logon criteria must beprovided. When a user selects or expands a database node the wizard first tries tologon to the database using OS authentication. If the authentication fails the useris solicited for a user name and password. Optionally, the user is prompted for theNet Service Name if the connection is through SQL-Net, which is then used to logon to the database. This user must have SYSDBA or SYSBACKUP privileges sincethe logon credentials are also used to perform the RMAN restore. The logon failsif the database is not in a mount state or an open state.
On Windows, NetBackup uses an API to browse the database. Logging is recordedin the nbwin folder.
On UNIX, the GUI uses the bpubsora utility to access and query the database. Ifa problem occurs when NetBackup attempts to connect or browse a database, runthis utility from the command line to debug the issue.
The recovery wizard has several limitations:
■ The database is displayed only in its current state. If objects have been deletedfrom the database since the last backup, these objects do not appear amongthe objects you can select for restore. To restore the objects that have beendeleted, you need to restore the entire database to a point in time before theobjects were deleted.
■ Data is restored to the original location. The wizard does not provide a way forthe user to specify alternate file names.
■ The wizard does not restore control files.
Starting the recovery wizardThis topic describes how to start the recovery wizard.
126Performing backups and restores of OracleAbout NetBackup for Oracle restores

To start the recovery wizard
1 Start the Backup, Archive, and Restore interface.
2 (Conditional) Change the policy type.
Perform this step if the Oracle node is not visible.
From the File menu (Windows) or Actions menu (UNIX), choose SpecifyNetBackup Machines and Policy Type.
3 Select files for Restore:
■ On Windows, click Select for Restore.
■ On UNIX, click the Restore Files tab.
4 Expand the Oracle node in the left pane to view an Oracle database instancehierarchy.
5 Select a node in the left pane to view details in the right pane.
Using the recovery wizardWhen you are ready to perform a recovery, follow these steps to create and run atemplate with the recovery wizard.
To use the recovery wizard
1 Open the Backup, Archive, and Restore interface.
2 Select the Restore operation:
■ On Windows, click Select for Restore
■ On UNIX, click on the Restore Files tab. In the Restore Type list, selectNormal Backups.
3 In the left pane, select the Oracle database instance.
4 In the right pane, select the database object(s) (databases, tablespaces, datafiles, and users) you want to recover.
If you select the Oracle database instance, the wizard recovers the entiredatabase using RMAN.
5 Click Actions > Restore.
Enter information about the recovery operation you want to perform in thescreens that the NetBackup for Oracle recovery wizard displays.
The screens are as follows:
■ Welcome
■ Target Database Logon Credentials
127Performing backups and restores of OracleAbout NetBackup for Oracle restores

■ Recovery Catalog Logon Credentials
■ Recovery Options
■ Restore Options
■ Recover Limits
■ Database State
If you need an explanation of any of the fields on the wizard screens, clickHelpon the wizard screen.
6 When you have completed the wizard, the Selection Summary screen displaysthe summary of the recovery template. Review this summary. You can chooseto run the template immediately after the wizard finishes or save the templatelocally, or both.
If you need an explanation of any of the fields on the wizard panels, click Helpon the wizard panel.
7 Click Finish to run, to save, or to run and save the recovery template.
Using bpdbsbora to run a recovery templateThe bpdbsbora command lets you run a recovery template that the NetBackupRecovery Wizard creates.
At the command prompt, type this command and the following options:
bpdbsbora -restore -r -t [/path/]templ_name.tpl [-L progress_file]
Where:
Specifies the template type.-restore
Runs the template.-r
Specifies the full-path name of the template file that you want touse.
Unlike backup templates, restore templates do not reside in apredetermined location on the master server. They are consideredto be temporary in nature and should reside on the client. If thefull path is not specified as part of the restore template name, thefile might not be found.
-t templ_name.tpl
Optional. Specifies a run-time process log. Enclose progress_filein quotation marks (" ") if they contain space characters.
-L progress_file
For example:
128Performing backups and restores of OracleAbout NetBackup for Oracle restores
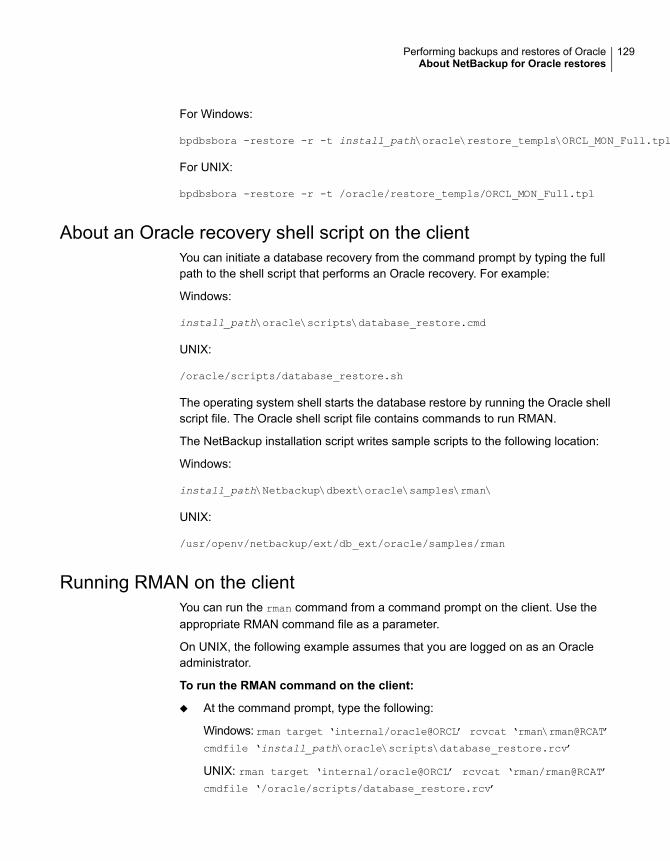
For Windows:
bpdbsbora -restore -r -t install_path\oracle\restore_templs\ORCL_MON_Full.tpl
For UNIX:
bpdbsbora -restore -r -t /oracle/restore_templs/ORCL_MON_Full.tpl
About an Oracle recovery shell script on the clientYou can initiate a database recovery from the command prompt by typing the fullpath to the shell script that performs an Oracle recovery. For example:
Windows:
install_path\oracle\scripts\database_restore.cmd
UNIX:
/oracle/scripts/database_restore.sh
The operating system shell starts the database restore by running the Oracle shellscript file. The Oracle shell script file contains commands to run RMAN.
The NetBackup installation script writes sample scripts to the following location:
Windows:
install_path\Netbackup\dbext\oracle\samples\rman\
UNIX:
/usr/openv/netbackup/ext/db_ext/oracle/samples/rman
Running RMAN on the clientYou can run the rman command from a command prompt on the client. Use theappropriate RMAN command file as a parameter.
On UNIX, the following example assumes that you are logged on as an Oracleadministrator.
To run the RMAN command on the client:
◆ At the command prompt, type the following:
Windows: rman target ‘internal/oracle@ORCL’ rcvcat ‘rman\rman@RCAT’
cmdfile ‘install_path\oracle\scripts\database_restore.rcv’
UNIX: rman target ‘internal/oracle@ORCL’ rcvcat ‘rman/rman@RCAT’
cmdfile ‘/oracle/scripts/database_restore.rcv’
129Performing backups and restores of OracleAbout NetBackup for Oracle restores
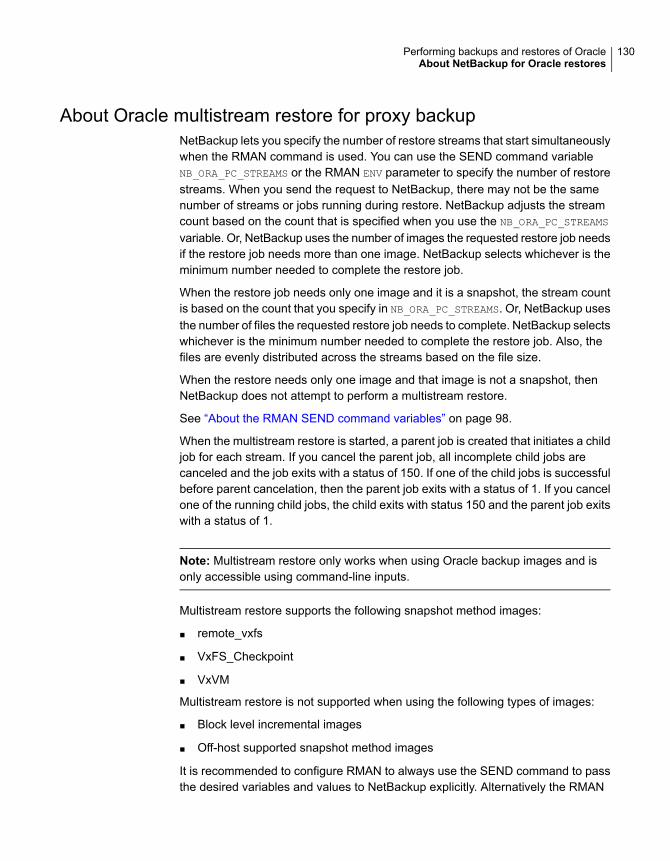
About Oracle multistream restore for proxy backupNetBackup lets you specify the number of restore streams that start simultaneouslywhen the RMAN command is used. You can use the SEND command variableNB_ORA_PC_STREAMS or the RMAN ENV parameter to specify the number of restorestreams. When you send the request to NetBackup, there may not be the samenumber of streams or jobs running during restore. NetBackup adjusts the streamcount based on the count that is specified when you use the NB_ORA_PC_STREAMS
variable. Or, NetBackup uses the number of images the requested restore job needsif the restore job needs more than one image. NetBackup selects whichever is theminimum number needed to complete the restore job.
When the restore job needs only one image and it is a snapshot, the stream countis based on the count that you specify in NB_ORA_PC_STREAMS. Or, NetBackup usesthe number of files the requested restore job needs to complete. NetBackup selectswhichever is the minimum number needed to complete the restore job. Also, thefiles are evenly distributed across the streams based on the file size.
When the restore needs only one image and that image is not a snapshot, thenNetBackup does not attempt to perform a multistream restore.
See “About the RMAN SEND command variables” on page 98.
When the multistream restore is started, a parent job is created that initiates a childjob for each stream. If you cancel the parent job, all incomplete child jobs arecanceled and the job exits with a status of 150. If one of the child jobs is successfulbefore parent cancelation, then the parent job exits with a status of 1. If you cancelone of the running child jobs, the child exits with status 150 and the parent job exitswith a status of 1.
Note: Multistream restore only works when using Oracle backup images and isonly accessible using command-line inputs.
Multistream restore supports the following snapshot method images:
■ remote_vxfs
■ VxFS_Checkpoint
■ VxVM
Multistream restore is not supported when using the following types of images:
■ Block level incremental images
■ Off-host supported snapshot method images
It is recommended to configure RMAN to always use the SEND command to passthe desired variables and values to NetBackup explicitly. Alternatively the RMAN
130Performing backups and restores of OracleAbout NetBackup for Oracle restores
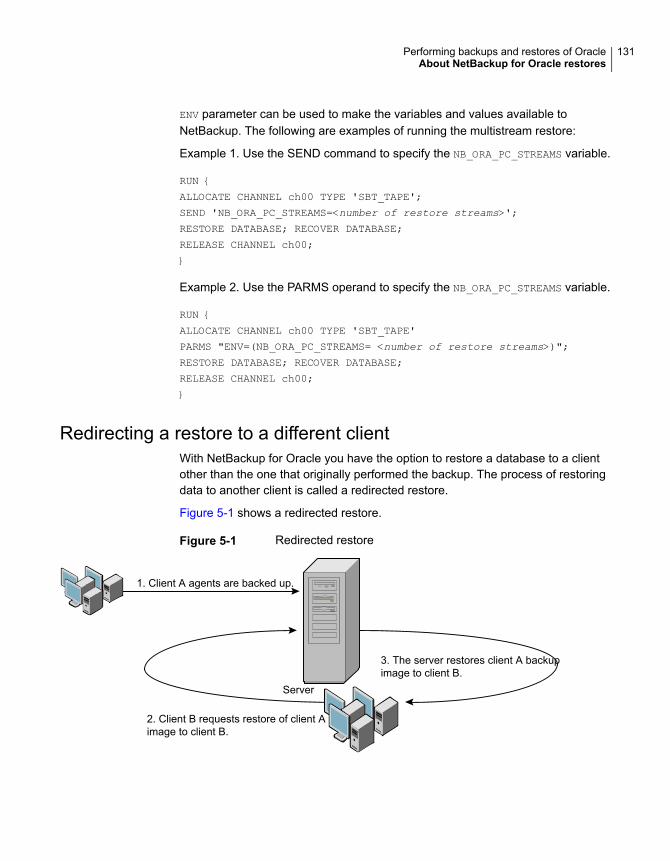
ENV parameter can be used to make the variables and values available toNetBackup. The following are examples of running the multistream restore:
Example 1. Use the SEND command to specify the NB_ORA_PC_STREAMS variable.
RUN {
ALLOCATE CHANNEL ch00 TYPE 'SBT_TAPE';
SEND 'NB_ORA_PC_STREAMS=<number of restore streams>';
RESTORE DATABASE; RECOVER DATABASE;
RELEASE CHANNEL ch00;
}
Example 2. Use the PARMS operand to specify the NB_ORA_PC_STREAMS variable.
RUN {
ALLOCATE CHANNEL ch00 TYPE 'SBT_TAPE'
PARMS "ENV=(NB_ORA_PC_STREAMS= <number of restore streams>)";
RESTORE DATABASE; RECOVER DATABASE;
RELEASE CHANNEL ch00;
}
Redirecting a restore to a different clientWith NetBackup for Oracle you have the option to restore a database to a clientother than the one that originally performed the backup. The process of restoringdata to another client is called a redirected restore.
Figure 5-1 shows a redirected restore.
Figure 5-1 Redirected restore
2. Client B requests restore of client Aimage to client B.
1. Client A agents are backed up.
3. The server restores client A backupimage to client B.
Server
131Performing backups and restores of OracleAbout NetBackup for Oracle restores

The user on client A cannot initiate a redirected restore to client B. Only the useron client B, which is the client receiving the backup image, can initiate the redirectedrestore. Any user who belongs to the database group that performed the backupcan restore it, unless the BKUP_IMAGE_PERM variable was set to USER.
Preparing the master server for an alternate restoreThe examples in the following procedure assume that the database instance ORAC11
was backed up by client2, and you want to restore ORAC11 to client1.
For more information on how to manage client restores, see the NetBackupAdministrator’s Guide, Volume I.
To prepare the NetBackup master server for alternate restores
1 Log onto the NetBackup master server that hosts the policy that backed updatabase instance ORAC11.
2 Create a dest_client_name file on the NetBackup master server.
■ Windows: install_path\NetBackup\db\altnames\dest_client_name
■ UNIX: /usr/openv/netbackup/db/altnames/dest_client_name
Where dest_client_name is the name of a client that is allowed to be adestination client for alternate restores. For example, client1.
3 After creating a dest_client_name file, add the name of the NetBackup forOracle source client to the dest_client_name file. For example, add the followingline to this file:
client2
For more information on managing a client restore, see the NetBackupAdministrator’s Guide, Volume I.
About performing a redirected restore with RMANPerform the following procedure on the destination client host if you want to restoreany RMAN backups that another client owns.
The user on client A cannot initiate a redirected restore to client B. Only the useron client B, which is the client receiving the backup image, can initiate the redirectedrestore. Any user who belongs to the database group that performed the backupcan restore it, unless the BKUP_IMAGE_PERM variable is set to USER.
Note: If the RMAN catalog database has been lost, restore the catalog databasefirst before continuing with the redirected restore.
132Performing backups and restores of OracleAbout NetBackup for Oracle restores

To perform a redirected restore
1 Enable a network connection to the RMAN catalog database that the sourceclient used.
2 Do one of the following:
■ On Windows, use the rman parms option to set the NB_ORA_CLIENT
environment variable to the source client.
■ On UNIX, set the NB_ORA_CLIENT environment variable to the source client.
3 On UNIX, check the bp.conf files on the source client. Make sure that theCLIENT_NAME variable either is not set or is set to the host name of the sourceclient.
4 Make the init.ora file of the source client available to the destination client.
Copy the file to the destination client or modify the file on the destination client.Change all location-specific parameters.
5 Create a folder or set the permissions for a directory to restore the data files:
■ On Windows, create and start an Oracle service for the previously setORACLE_SID. Create the folder to which you want to restore the data files.
■ On UNIX, grant write permission to the directory to which you want to restorethe data files.
6 Set up a password file for the destination client database.
7 Start the database in the nomount state.
8 Start RMAN, connecting to the catalog. On Windows, also connect to the targetdatabase.
9 On UNIX, set dbid to be the DBID of the source client database. Connect tothe target database without using a user ID and password.
10 Run an RMAN restore script. On UNIX, you can alternatively type the RMANcommands for the restore.
Example - Performing a redirected restore of OracleFor example, assume the following:
■ Source client is camel
■ Destination client is giraffe
■ Master server is lion
■ ORACLE_SID is test
133Performing backups and restores of OracleAbout NetBackup for Oracle restores

■ The user is connected to the Oracle database using a local connection, notSQL*Net
■ UNIX user is ora on both camel and giraffe
To perform a redirected restore (example)
1 Create the following file on server lion:
Windows: install_path\NetBackup\db\altnames\giraffe
UNIX: /usr/openv/netbackup/db/altnames/giraffe
Edit giraffe to contain the name camel:
2 Do one of the following:
■ Windows: Use the BAR GUI to set lion as the master server.
■ UNIX: Log onto giraffe as ora. Set SERVER=lion in$ORACLE_HOME/bp.conf. This server must be the first server that is listedin the bp.conf file.
3 Modify the network tnsnames.ora file to enable the RMAN catalog connection.
4 Create inittest.ora.file.
5 Windows: Using Oracle administration, create and start ORACLESERVICETEST.
6 Set the environment variable ORACLE_SID to test. On UNIX, also setNB_ORA_CLIENT to camel.
134Performing backups and restores of OracleAbout NetBackup for Oracle restores

7 Make sure that the destination database directory exists and has appropriateaccess permissions.
The data files are restored to the directory path with the same name they hadwhen they were backed up.
8 Start the database in a nomount state.
On UNIX, the following is the output:
SQL> startup nomount pfile=$ORACLE_HOME/dbs/inittest.ora
%rman catalog rman/rman@rcat
RMAN> set dbid=<dbid of source database on camel
RMAN> connect target/
RMAN> run {
RMAN> ALLOCATE CHANNEL CH00 TYPE 'SBT_TAPE';
RMAN> SEND 'NB_ORA_SERV=lion, NB_ORA_CLIENT=camel';
RMAN> restore controlfile;
RMAN> }
SQL> alter database mount;
%orapwd file=$ORACLE_HOME/dbs/orapwtest password=<oracle>
%rman catalog rman/rman@RCVCAT
RMAN>set dbid=<Saved dbID of Source Target>
RMAN>connect target/
RMAN>run {
RMAN> ALLOCATE CHANNEL CH00 TYPE 'SBT_TAPE';
RMAN> ALLOCATE CHANNEL CH01 TYPE 'SBT_TAPE';
RMAN> SEND 'NB_ORA_SERV=lion, NB_ORA_CLIENT=camel';
RMAN> restore database;
RMAN> restore archivelog all;
RMAN> }
SQL>recover database until cancel using backup controlfile;
Now apply the archived logs. Type cancel when you decide to stop recovery.
Using NetBackup for Oracle in a MicrosoftWindows cluster environment
To use NetBackup for Oracle in a Microsoft Cluster environment, the following mustbe installed in the cluster nodes:
■ NetBackup client or server (7.5 or greater)
135Performing backups and restores of OracleUsing NetBackup for Oracle in a Microsoft Windows cluster environment
■ NetBackup for Oracle on Windows (7.5 or greater)
■ Oracle Database version 10g or greater
■ Oracle Failsafe 3.11 for Oracle 10g or greater
■ Review the Oracle compatibility list for complete information.
NetBackup for Oracle users in a Microsoft Cluster environment must take someadditional steps to prepare for server-directed backups, user-directed backups, anduser-directed restores.
About backups of an Oracle clustered database on WindowsThe most convenient way to back up your clustered databases is to set up schedulesfor automatic backups. NetBackup for Oracle comes with sample scripts for clusteredOracle databases. The NetBackup for Oracle installation process installs the samplescripts in the following location:
install_path\NetBackup\dbext\oracle\samples\rman\
Modify the scripts to give values to the following variables:
■ Oracle SID
■ Oracle Home
■ Cluster Name, Domain
■ Failsafe Home
■ Failsafe user ID
■ Failsafe Password
■ Failsafe Database Resource Name
■ Virtual Oracle Database Name
You can also manually back up an Oracle policy. Refer to the following procedure:
See “Testing configuration settings for NetBackup for Oracle” on page 112.
For more information on how to back up or restore Microsoft Cluster usingNetBackup, see the NetBackup Administrator’s Guide, Volume I.
Bringing the database instance offline on WindowsBefore you can perform a user-directed backup or restore from the client, you musttake the database instance offline. You can use the Failsafe graphical user interfaceor the Failsafe command line (FSCMD).
136Performing backups and restores of OracleUsing NetBackup for Oracle in a Microsoft Windows cluster environment
To take the database instance offline with Failsafe graphical user interface
1 Select the Oracle database resource in the Failsafe graphical user interface.
2 Choose to bring it offline.
To take the database instance offline with Failsafe command line (FSCMD), typethe following command:
■ fscmd offlineresource salesdb /cluster=curly /offline=immediate
/domain=domainname /user=user /pwd=pwd
To bring the resource offline, the preceding command sets offline=immediate.
Alternately, based on your need you can specify one of the following as theargument:
Shuts down the database instantaneously by aborting the databaseinstance.
abort
Shuts down the database immediately by terminating SQLstatements in progress, rolling back uncommitted transactions anddisconnecting users.
immediate
Shuts down the database and doesn’t allow new connections afterthe command was issued. This command waits for the connectedusers to disconnect before the database is shut down.
normal
Shuts down the database only after all of the current transactionshave completed.
transactional
Because the offlineresource operation shuts down the Oracle database service,enter the following command to start the Oracle database service:
net start OracleService
Bringing the database instance online on WindowsAfter you perform a user-directed backup or restore from the client, you must bringthe database instance online. You can use the Failsafe graphical user interface orthe Failsafe command line (FSCMD).
To bring the database instance online with Failsafe graphical user interface
1 Select the resource in the Failsafe graphical user interface.
2 Choose to bring it online.
To bring the database instance online with Failsafe command line (FSCMD), typethe following command:
137Performing backups and restores of OracleUsing NetBackup for Oracle in a Microsoft Windows cluster environment

■ fscmd online resource salesdb /cluster=curly
/offline=immediate /domain=domainname /user=user /pwd=pwd
User-directed backup or restore from the Windows clientThis section explains the process to prepare a Microsoft Cluster environment for auser-directed backup or restore operation.
Note:When performing user-directed backups, make sure that you are on the nodethat owns the shared drive where the Oracle database is installed.
Note: When user-directed client restores are performed with different configurationoptions of NetBackup failover media servers and a UNIX or Windows master server,see the NetBackup Administrator’s Guide, Volume I.
To perform a user-directed backup or restore from the client
1 Take the clustered Oracle database instance offline.
See “Bringing the database instance offline on Windows” on page 136.
2 Shut down and then startup the database in mount state.
The sequence is necessary to perform administrative tasks like backup andrecovery. Use the svrmgrl or sqlplus utility from Oracle. At the commandline, type the following:
Shutdown option [normal, abort, immediate]
startup mount
3 Perform the backup or recovery.
See “Using the recovery wizard” on page 127.
4 Bring the Oracle database online with failsafe after the desired backup orrestore is complete. The database is then enabled to fail over between theconfigured cluster of nodes.
See “Bringing the database instance online on Windows” on page 137.
138Performing backups and restores of OracleUsing NetBackup for Oracle in a Microsoft Windows cluster environment

Creating an instant recovery point from anOracleCopilot image
The nborair command can determine if an image is available for Oracle Copilotinstant recovery.
Note: The functionality for creating an instant recovery point is not in the GUI. Thisfeature is command line option only.
Refer to the NetBackup Commands Reference Guide for more usage options usingthe nborair command.
To create an instant recovery point
1 Determine if there are any images available for instant recovery by running thenborair –list_images [-client name] [-server master] command.
The NetBackup administrator or the DBA can run this command from theNetBackup client or master server.
Example output:
# nborair -list_images -client orachost1.demo.com -server mastsrv123
Time: 08/30/2016 15:51:17 ID: orachost1.demo.com_1472590277 Full Backup policy1
Time: 08/31/2016 11:20:17 ID: orachost1.demo.com_1472660417 Full Backup policy1
Time: 09/02/2016 10:42:45 ID: orachost1.demo.com_1472830965 Full Backup policy1
2 List the files that are included in the backup image by running the nborair
–list_files –backupid backup_id command.
The NetBackup administrator or the DBA can run this command from theNetBackup client or master server. The DBA sees only the files they can accesswhen this command is run.
Example output:
# nborair -list_files -backupid orachost1.demo.com_1472590277
-rw-r----- orac112 dba 807411712 Sep 02 10:42 /backup/data_D-ORAC112_I-3955369132_TS-SYSAUX...
-rw-r----- orac112 dba 744497152 Sep 02 10:42 /backup/data_D-ORAC112_I-3955369132_TS-SYSTEM...
-rw-r----- orac112 dba 52436992 Sep 02 10:42 /backup/data_D-ORAC112_I-3955369132_TS-UNDOTBS...
-rw-r----- orac112 dba 5251072 Sep 02 10:42 /backup/data_D-ORAC112_I-3955369132_TS-USERS_FN...
-rw-r----- orac112 dba 163328 Sep 02 10:42 /backup/arch_D-ORAC112_I-3955369132_SCN-3744354_...
-rw-r----- orac112 dba 2560 Sep 02 10:42 /backup/arch_D-ORAC112_I-3955369132_SCN-3744354_5i...
-rw-r----- orac112 dba 98304 Sep 02 10:42 /backup/spfile_D-ORAC112_I-3955369132_T-20160902_...
-rw-r----- orac112 dba 1425408 Sep 02 10:42 /backup/cf_D-ORAC112_I-3955369132_T-20160902_5k...
139Performing backups and restores of OracleCreating an instant recovery point from an Oracle Copilot image
3 Create the instance recovery point by running the nborair
-create_recovery_point -backupid backup_id -dest_client name
command. The backup_id is the same backup_id found in step 1.
The NetBackup administrator must run this command from the NetBackupmaster server.
For this example, the destination client is oracdest.
Example output:
# nborair -create_recovery_point -backupid orachost1.demo.com_1472590277
-dest_client oracdest
Appliance: appl5330
Export path: /shares/share1_orachost1.demo.com_1472590277_rp1
Export options: oracdest(rw,no_root_squash,insecure)
4 Mount the recovery point on the destination client using the OS tools and withthe required mount options per Oracle documentation.
Example:
mount –t nfs
appl5330:/shares/share1_orachost1.demo.com_1472590277_rp1 /mnt
For Windows, Oracle’s DNFS needs to be configured. The recovery point hasto be exported with the insecure option.
5 (Conditional) On the destination host, verify the mount point is from the backupID that was requested by running the nborair –validate –backupid
backup_id -mount_path mount_path command.
The NetBackup administrator or the DBA can run this command on thedestination host.
Example output:
# nborair -validate -backupid orachost1.demo.com_1472590277 -mount_path /mnt
Validation successful - Recovery point mounted on /mnt was
created from backup ID orachost1.demo.com_1472590277
Note: The NetBackup appliance media server can only be configured in a pureIPv4 or dual stack IPv4/IPv6 mode.
See “Single-step restore to ASM storage from a Copilot recovery point” on page 148.
140Performing backups and restores of OracleCreating an instant recovery point from an Oracle Copilot image

Deleting an instant recovery point for OracleCopilot instant recovery
The nborair command can delete an instant recovery point that is available forOracle Copilot instant recovery.
Note: The functionality for deleting an instant recovery point is not in the GUI. Thisfeature is command line option only.
Refer to the NetBackup Commands Reference Guide for more usage options usingthe nborair command.
To delete an instant recovery point
1 (Conditional) Verify the recovery point is unmounted from the destination clientusing the OS tools.
UNIX: umount /mnt
2 List the recovery point on the NetBackup appliance by running the nborair
–list_recovery_points –appliance appliance_name command.
The NetBackup administrator must run this command from the NetBackupmaster server.
Example output:
# nborair -list_recovery_points -appliance appl5330
Total 1 recovery points found.
Export path: /shares/share1_orachost1.demo.com_1472590277_rp1
Share name: share1
Export options: oracdest(rw,no_root_squash,insecure)
3 Delete the recovery point on the NetBackup appliance by running the nborair
-delete_recovery_point -appliance appliance_name -export_path
export_path command.
The NetBackup administrator must run this command from the NetBackupmaster server.
Example output:
# nborair -delete_recovery_point -appliance appl5330
-export_path /shares/share1_orachost1.demo.com_1472590277_rp1
141Performing backups and restores of OracleDeleting an instant recovery point for Oracle Copilot instant recovery
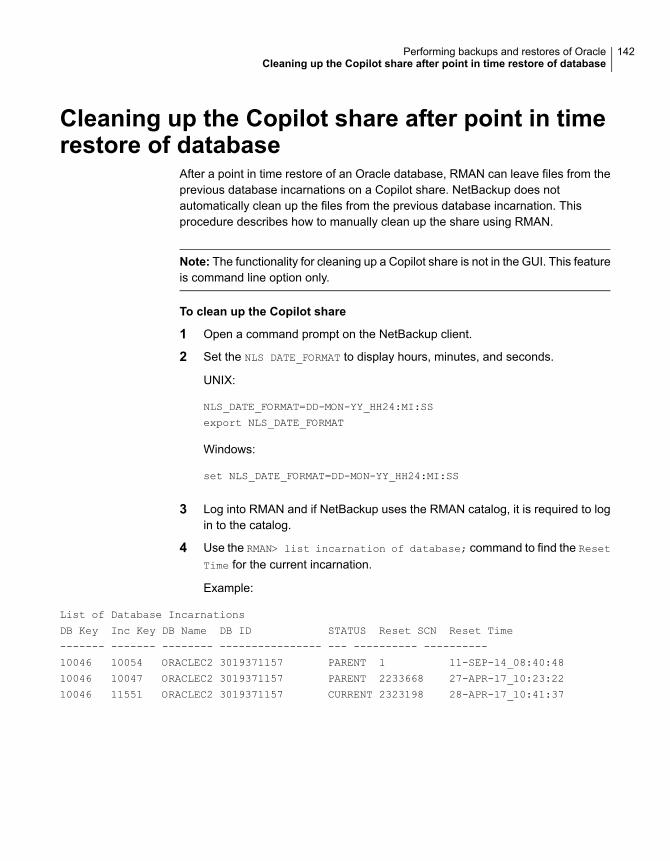
Cleaning up the Copilot share after point in timerestore of database
After a point in time restore of an Oracle database, RMAN can leave files from theprevious database incarnations on a Copilot share. NetBackup does notautomatically clean up the files from the previous database incarnation. Thisprocedure describes how to manually clean up the share using RMAN.
Note: The functionality for cleaning up a Copilot share is not in the GUI. This featureis command line option only.
To clean up the Copilot share
1 Open a command prompt on the NetBackup client.
2 Set the NLS DATE_FORMAT to display hours, minutes, and seconds.
UNIX:
NLS_DATE_FORMAT=DD-MON-YY_HH24:MI:SS
export NLS_DATE_FORMAT
Windows:
set NLS_DATE_FORMAT=DD-MON-YY_HH24:MI:SS
3 Log into RMAN and if NetBackup uses the RMAN catalog, it is required to login to the catalog.
4 Use the RMAN> list incarnation of database; command to find the Reset
Time for the current incarnation.
Example:
List of Database Incarnations
DB Key Inc Key DB Name DB ID STATUS Reset SCN Reset Time
------- ------- -------- ---------------- --- ---------- ----------
10046 10054 ORACLEC2 3019371157 PARENT 1 11-SEP-14_08:40:48
10046 10047 ORACLEC2 3019371157 PARENT 2233668 27-APR-17_10:23:22
10046 11551 ORACLEC2 3019371157 CURRENT 2323198 28-APR-17_10:41:37
142Performing backups and restores of OracleCleaning up the Copilot share after point in time restore of database
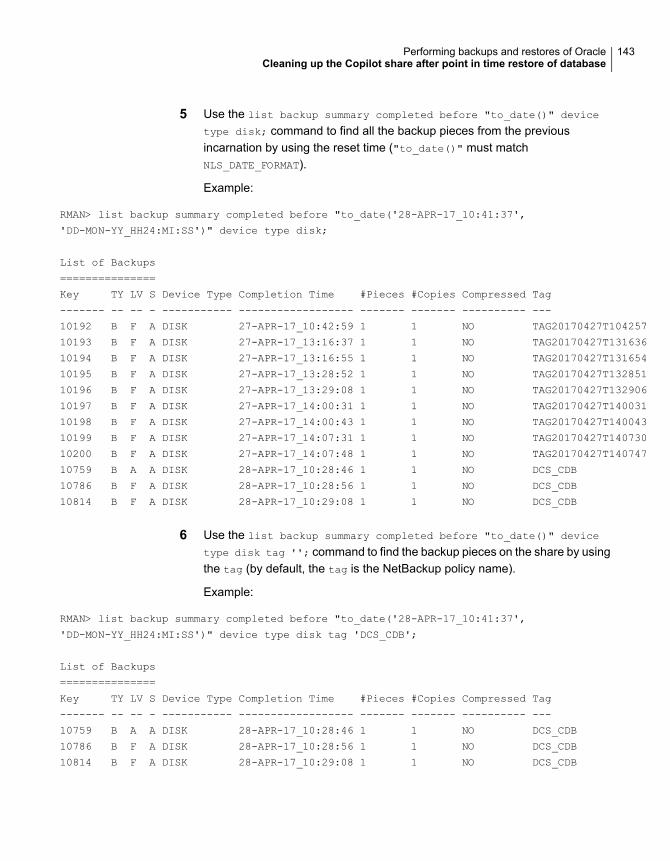
5 Use the list backup summary completed before "to_date()" device
type disk; command to find all the backup pieces from the previousincarnation by using the reset time ("to_date()" must matchNLS_DATE_FORMAT).
Example:
RMAN> list backup summary completed before "to_date('28-APR-17_10:41:37',
'DD-MON-YY_HH24:MI:SS')" device type disk;
List of Backups
===============
Key TY LV S Device Type Completion Time #Pieces #Copies Compressed Tag
------- -- -- - ----------- ------------------ ------- ------- ---------- ---
10192 B F A DISK 27-APR-17_10:42:59 1 1 NO TAG20170427T104257
10193 B F A DISK 27-APR-17_13:16:37 1 1 NO TAG20170427T131636
10194 B F A DISK 27-APR-17_13:16:55 1 1 NO TAG20170427T131654
10195 B F A DISK 27-APR-17_13:28:52 1 1 NO TAG20170427T132851
10196 B F A DISK 27-APR-17_13:29:08 1 1 NO TAG20170427T132906
10197 B F A DISK 27-APR-17_14:00:31 1 1 NO TAG20170427T140031
10198 B F A DISK 27-APR-17_14:00:43 1 1 NO TAG20170427T140043
10199 B F A DISK 27-APR-17_14:07:31 1 1 NO TAG20170427T140730
10200 B F A DISK 27-APR-17_14:07:48 1 1 NO TAG20170427T140747
10759 B A A DISK 28-APR-17_10:28:46 1 1 NO DCS_CDB
10786 B F A DISK 28-APR-17_10:28:56 1 1 NO DCS_CDB
10814 B F A DISK 28-APR-17_10:29:08 1 1 NO DCS_CDB
6 Use the list backup summary completed before "to_date()" device
type disk tag ''; command to find the backup pieces on the share by usingthe tag (by default, the tag is the NetBackup policy name).
Example:
RMAN> list backup summary completed before "to_date('28-APR-17_10:41:37',
'DD-MON-YY_HH24:MI:SS')" device type disk tag 'DCS_CDB';
List of Backups
===============
Key TY LV S Device Type Completion Time #Pieces #Copies Compressed Tag
------- -- -- - ----------- ------------------ ------- ------- ---------- ---
10759 B A A DISK 28-APR-17_10:28:46 1 1 NO DCS_CDB
10786 B F A DISK 28-APR-17_10:28:56 1 1 NO DCS_CDB
10814 B F A DISK 28-APR-17_10:29:08 1 1 NO DCS_CDB
143Performing backups and restores of OracleCleaning up the Copilot share after point in time restore of database
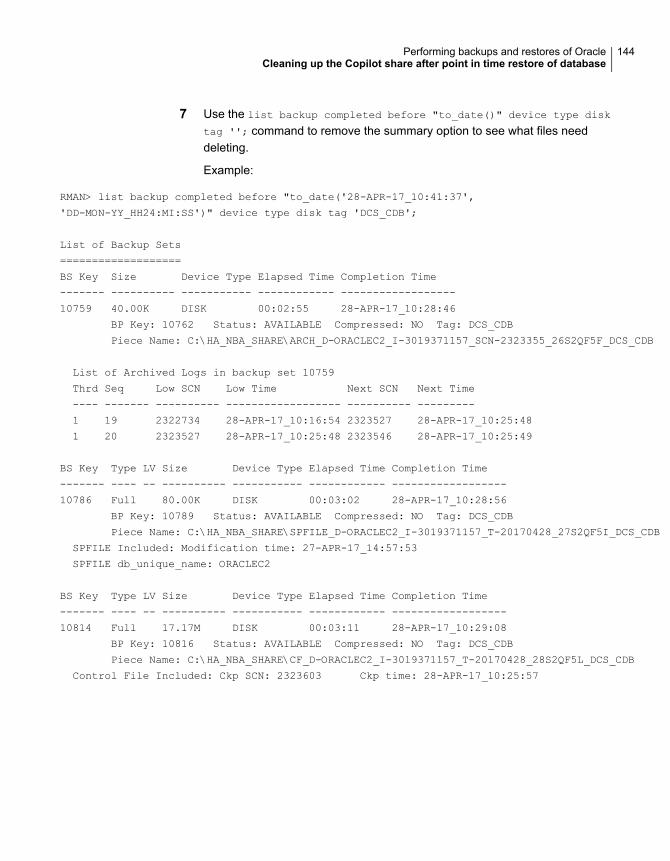
7 Use the list backup completed before "to_date()" device type disk
tag ''; command to remove the summary option to see what files needdeleting.
Example:
RMAN> list backup completed before "to_date('28-APR-17_10:41:37',
'DD-MON-YY_HH24:MI:SS')" device type disk tag 'DCS_CDB';
List of Backup Sets
===================
BS Key Size Device Type Elapsed Time Completion Time
------- ---------- ----------- ------------ ------------------
10759 40.00K DISK 00:02:55 28-APR-17_10:28:46
BP Key: 10762 Status: AVAILABLE Compressed: NO Tag: DCS_CDB
Piece Name: C:\HA_NBA_SHARE\ARCH_D-ORACLEC2_I-3019371157_SCN-2323355_26S2QF5F_DCS_CDB
List of Archived Logs in backup set 10759
Thrd Seq Low SCN Low Time Next SCN Next Time
---- ------- ---------- ------------------ ---------- ---------
1 19 2322734 28-APR-17_10:16:54 2323527 28-APR-17_10:25:48
1 20 2323527 28-APR-17_10:25:48 2323546 28-APR-17_10:25:49
BS Key Type LV Size Device Type Elapsed Time Completion Time
------- ---- -- ---------- ----------- ------------ ------------------
10786 Full 80.00K DISK 00:03:02 28-APR-17_10:28:56
BP Key: 10789 Status: AVAILABLE Compressed: NO Tag: DCS_CDB
Piece Name: C:\HA_NBA_SHARE\SPFILE_D-ORACLEC2_I-3019371157_T-20170428_27S2QF5I_DCS_CDB
SPFILE Included: Modification time: 27-APR-17_14:57:53
SPFILE db_unique_name: ORACLEC2
BS Key Type LV Size Device Type Elapsed Time Completion Time
------- ---- -- ---------- ----------- ------------ ------------------
10814 Full 17.17M DISK 00:03:11 28-APR-17_10:29:08
BP Key: 10816 Status: AVAILABLE Compressed: NO Tag: DCS_CDB
Piece Name: C:\HA_NBA_SHARE\CF_D-ORACLEC2_I-3019371157_T-20170428_28S2QF5L_DCS_CDB
Control File Included: Ckp SCN: 2323603 Ckp time: 28-APR-17_10:25:57
144Performing backups and restores of OracleCleaning up the Copilot share after point in time restore of database

8 Use the delete backup completed before "to_date()" device type
disk tag ''; command to delete the unwanted backup pieces.
Example:
RMAN> delete backup completed before "to_date('28-APR-17_10:41:37',
'DD-MON-YY_HH24:MI:SS')" device type disk tag 'DCS_CDB';
allocated channel: ORA_DISK_1
channel ORA_DISK_1: SID=242 device type=DISK
List of Backup Pieces
BP Key BS Key Pc# Cp# Status Device Type Piece Name
------- ------- --- --- ----------- ----------- ----------
10762 10759 1 1 AVAILABLE DISK C:\HA_NBA_SHARE\ARCH_D-ORACLEC2_I-3019371157_
SCN-2323355_26S2QF5F_DCS_CDB
10789 10786 1 1 AVAILABLE DISK C:\HA_NBA_SHARE\SPFILE_D-ORACLEC2_I-3019371157_
T-20170428_27S2QF5I_DCS_CDB
10816 10814 1 1 AVAILABLE DISK C:\HA_NBA_SHARE\CF_D-ORACLEC2_I-3019371157_
T-20170428_28S2QF5L_DCS_CDB
Do you really want to delete the above objects (enter YES or NO)? YES
deleted backup piece
backup piece handle=C:\HA_NBA_SHARE\ARCH_D-ORACLEC2_I-3019371157_SCN-2323355_26S2QF5F_DCS_CDB
RECID=50 STAMP=942488751
deleted backup piece
backup piece handle=C:\HA_NBA_SHARE\SPFILE_D-ORACLEC2_I-3019371157_T-20170428_27S2QF5I_DCS_CDB
RECID=51 STAMP=942488754
deleted backup piece
backup piece handle=C:\HA_NBA_SHARE\CF_D-ORACLEC2_I-3019371157_T-20170428_28S2QF5L_DCS_CDB
RECID=52 STAMP=942488758
Deleted 3 objects
145Performing backups and restores of OracleCleaning up the Copilot share after point in time restore of database

9 Use the list copy completed before "to_date()" tag ''; command tofind the data file copies on the share using the same reset time and tag.
Example:
RMAN> list copy completed before "to_date('28-APR-17_10:41:37',
'DD-MON-YY_HH24:MI:SS')" tag 'DCS_CDB';
specification does not match any control file copy in the repository
List of Datafile Copies
=======================
Key File S Completion Time Ckp SCN Ckp Time
------- ---- - ------------------ ---------- ------------------
10649 1 A 28-APR-17_10:25:39 2323417 28-APR-17_10:25:15
Name: C:\HA_NBA_SHARE\DATA_D-ORACLEC2_I-3019371157_TS-SYSTEM_FNO-1_1GS2QE1J_S-48_
I-3019371157_DCS_CDB
Tag: DCS_CDB
10251 2 A 28-APR-17_10:15:32 2243146 27-APR-17_10:31:51
Name: C:\HA_NBA_SHARE\DATA_D-ORACLEC2_I-3019371157_TS-SYSTEM_FNO-2_1LS2QEGQ_S-53_
I-3019371157_DCS_CDB
Tag: DCS_CDB
Container ID: 2, PDB Name: PDB$SEED
10648 3 A 28-APR-17_10:25:39 2323417 28-APR-17_10:25:15
Name: C:\HA_NBA_SHARE\DATA_D-ORACLEC2_I-3019371157_TS-SYSAUX_FNO-3_1IS2QE8G_S-50_
I-3019371157_DCS_CDB
Tag: DCS_CDB
10249 4 A 28-APR-17_10:13:19 2243146 27-APR-17_10:31:51
Name: C:\HA_NBA_SHARE\DATA_D-ORACLEC2_I-3019371157_TS-SYSAUX_FNO-4_1JS2QEBG_S-51_
I-3019371157_DCS_CDB
Tag: DCS_CDB
Container ID: 2, PDB Name: PDB$SEED
10647 5 A 28-APR-17_10:25:38 2323417 28-APR-17_10:25:15
Name: C:\HA_NBA_SHARE\DATA_D-ORACLEC2_I-3019371157_TS-UNDOTBS1_FNO-5_1HS2QE57_S-49_
I-3019371157_DCS_CDB
Tag: DCS_CDB
10646 6 A 28-APR-17_10:25:37 2323417 28-APR-17_10:25:15
Name: C:\HA_NBA_SHARE\DATA_D-ORACLEC2_I-3019371157_TS-USERS_FNO-6_1NS2QEJV_S-55_
I-3019371157_DCS_CDB
Tag: DCS_CDB
146Performing backups and restores of OracleCleaning up the Copilot share after point in time restore of database
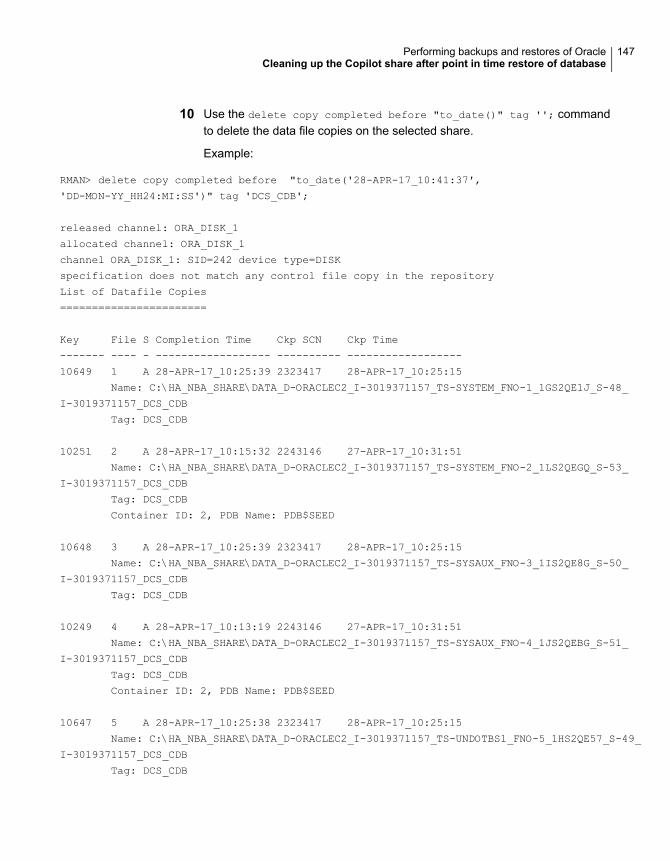
10 Use the delete copy completed before "to_date()" tag ''; commandto delete the data file copies on the selected share.
Example:
RMAN> delete copy completed before "to_date('28-APR-17_10:41:37',
'DD-MON-YY_HH24:MI:SS')" tag 'DCS_CDB';
released channel: ORA_DISK_1
allocated channel: ORA_DISK_1
channel ORA_DISK_1: SID=242 device type=DISK
specification does not match any control file copy in the repository
List of Datafile Copies
=======================
Key File S Completion Time Ckp SCN Ckp Time
------- ---- - ------------------ ---------- ------------------
10649 1 A 28-APR-17_10:25:39 2323417 28-APR-17_10:25:15
Name: C:\HA_NBA_SHARE\DATA_D-ORACLEC2_I-3019371157_TS-SYSTEM_FNO-1_1GS2QE1J_S-48_
I-3019371157_DCS_CDB
Tag: DCS_CDB
10251 2 A 28-APR-17_10:15:32 2243146 27-APR-17_10:31:51
Name: C:\HA_NBA_SHARE\DATA_D-ORACLEC2_I-3019371157_TS-SYSTEM_FNO-2_1LS2QEGQ_S-53_
I-3019371157_DCS_CDB
Tag: DCS_CDB
Container ID: 2, PDB Name: PDB$SEED
10648 3 A 28-APR-17_10:25:39 2323417 28-APR-17_10:25:15
Name: C:\HA_NBA_SHARE\DATA_D-ORACLEC2_I-3019371157_TS-SYSAUX_FNO-3_1IS2QE8G_S-50_
I-3019371157_DCS_CDB
Tag: DCS_CDB
10249 4 A 28-APR-17_10:13:19 2243146 27-APR-17_10:31:51
Name: C:\HA_NBA_SHARE\DATA_D-ORACLEC2_I-3019371157_TS-SYSAUX_FNO-4_1JS2QEBG_S-51_
I-3019371157_DCS_CDB
Tag: DCS_CDB
Container ID: 2, PDB Name: PDB$SEED
10647 5 A 28-APR-17_10:25:38 2323417 28-APR-17_10:25:15
Name: C:\HA_NBA_SHARE\DATA_D-ORACLEC2_I-3019371157_TS-UNDOTBS1_FNO-5_1HS2QE57_S-49_
I-3019371157_DCS_CDB
Tag: DCS_CDB
147Performing backups and restores of OracleCleaning up the Copilot share after point in time restore of database

10646 6 A 28-APR-17_10:25:37 2323417 28-APR-17_10:25:15
Name: C:\HA_NBA_SHARE\DATA_D-ORACLEC2_I-3019371157_TS-USERS_FNO-6_1NS2QEJV_S-55_
I-3019371157_DCS_CDB
Tag: DCS_CDB
Do you really want to delete the above objects (enter YES or NO)? YES
deleted datafile copy
datafile copy file name=C:\HA_NBA_SHARE\DATA_D-ORACLEC2_I-3019371157_TS-SYSTEM_FNO-1_1GS2QE1J_
S-48_I-3019371157_DCS_CDB RECID=36 STAMP=942488739
deleted datafile copy
datafile copy file name=C:\HA_NBA_SHARE\DATA_D-ORACLEC2_I-3019371157_TS-SYSTEM_FNO-2_1LS2QEGQ_
S-53_I-3019371157_DCS_CDB RECID=29 STAMP=942488132
deleted datafile copy
datafile copy file name=C:\HA_NBA_SHARE\DATA_D-ORACLEC2_I-3019371157_TS-SYSAUX_FNO-3_1IS2QE8G_
S-50_I-3019371157_DCS_CDB RECID=35 STAMP=942488739
deleted datafile copy
datafile copy file name=C:\HA_NBA_SHARE\DATA_D-ORACLEC2_I-3019371157_TS-SYSAUX_FNO-4_1JS2QEBG_
S-51_I-3019371157_DCS_CDB RECID=27 STAMP=942487999
deleted datafile copy
datafile copy file name=C:\HA_NBA_SHARE\DATA_D-ORACLEC2_I-3019371157_TS-UNDOTBS1_FNO-5_1HS2QE57_
S-49_I-3019371157_DCS_CDB RECID=34 STAMP=942488738
deleted datafile copy
datafile copy file name=C:\HA_NBA_SHARE\DATA_D-ORACLEC2_I-3019371157_TS-USERS_FNO-6_1NS2QEJV_
S-55_I-3019371157_DCS_CDB RECID=33 STAMP=942488737
Deleted 6 objects
Single-step restore to ASM storage from a Copilotrecovery point
The following procedure shows how to use RMAN to restore from a recovery point.This procedure is only viable after the command nborair -create_recovery_point
is run and the recovery point is mounted on a target client.
Note: The functionality for single-step restore to ASM storage is not in the GUI.This feature is run with RMAN only.
The procedure example assumes that a recovery point is already mounted anduses the mount point of /db_mp as the example. All RMAN commands must runfrom the target host.
148Performing backups and restores of OracleSingle-step restore to ASM storage from a Copilot recovery point

To perform a single-step restore to ASM storage from a recovery point
1 Catalog the backups from the recovery point.
RMAN> catalog start with '/db_mp/';
searching for all files that match the pattern /db_mp/
List of Files Unknown to the Database
=====================================
File Name: /db_mp/data_D-ORAC112_I-3955369132_TS-SYSAUX_FNO-2_8hrgu3qd_s-1297_I-3955369132
File Name: /db_mp/data_D-ORAC112_I-3955369132_TS-SYSTEM_FNO-1_8irgu3qk_s-1298_I-3955369132
File Name: /db_mp/data_D-ORAC112_I-3955369132_TS-UNDOTBS1_FNO-3_8jrgu3qr_s-1299_I-3955369132
File Name: /db_mp/data_D-ORAC112_I-3955369132_TS-USERS_FNO-4_8krgu3qt_s-1300_I-3955369132
File Name: /db_mp/arch_D-ORAC112_I-3955369132_SCN-5248163_a8rh0s3b
File Name: /db_mp/spfile_D-ORAC112_I-3955369132_T-20160929_a9rh0s3c
File Name: /db_mp/cf_D-ORAC112_I-3955369132_T-20160929_aarh0s3d
Do you really want to catalog the above files (enter YES or NO)? YES
cataloging files...
cataloging done
List of Cataloged Files
=======================
File Name: /db_mp/data_D-ORAC112_I-3955369132_TS-SYSAUX_FNO-2_8hrgu3qd_s-1297_I-3955369132
File Name: /db_mp/data_D-ORAC112_I-3955369132_TS-SYSTEM_FNO-1_8irgu3qk_s-1298_I-3955369132
File Name: /db_mp/data_D-ORAC112_I-3955369132_TS-UNDOTBS1_FNO-3_8jrgu3qr_s-1299_I-3955369132
File Name: /db_mp/data_D-ORAC112_I-3955369132_TS-USERS_FNO-4_8krgu3qt_s-1300_I-3955369132
File Name: /db_mp/arch_D-ORAC112_I-3955369132_SCN-5248163_a8rh0s3b
File Name: /db_mp/spfile_D-ORAC112_I-3955369132_T-20160929_a9rh0s3c
File Name: /db_mp/cf_D-ORAC112_I-3955369132_T-20160929_aarh0s3d
149Performing backups and restores of OracleSingle-step restore to ASM storage from a Copilot recovery point

2 Restore the datafiles from the point in time of the recovery point.
The following RMAN restore is from disk (DISK). Also, this example uses theNLS_DATE_FORMAT="DD-MM-YYYY-HH24:MI:SS" command that was set in theenvironment before RMAN was run. Use the date format for your environment.
RMAN> restore until time '2016-09-29-10:00:00' database;
Starting restore at 2016-10-12:15:51:22
allocated channel: ORA_DISK_1
channel ORA_DISK_1: SID=193 device type=DISK
channel ORA_DISK_1: restoring datafile 00001
input datafile copy RECID=461 STAMP=925055096
file name=/demo_2/data_D-ORAC112_I-3955369132_TS-SYSTEM_FNO-1_8irgu3qk_s-1298_I-3955369132
destination for restore of datafile 00001: /db/orac112/app/oradata/orac112/system01.dbf
channel ORA_DISK_1: copied datafile copy of datafile 00001
output file name=/db/orac112/app/oradata/orac112/system01.dbf RECID=0 STAMP=0
Finished restore at 2016-10-12:15:51:34
150Performing backups and restores of OracleSingle-step restore to ASM storage from a Copilot recovery point
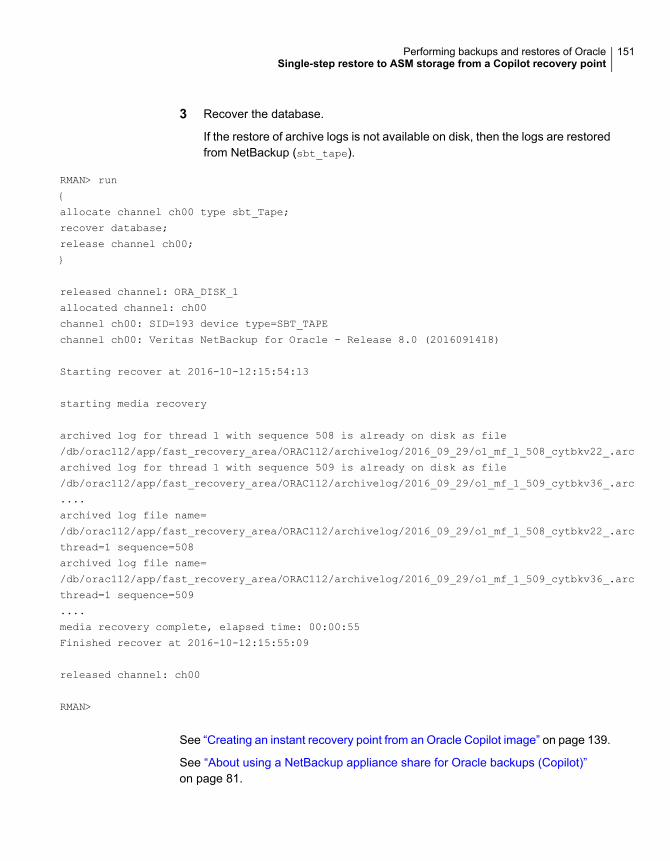
3 Recover the database.
If the restore of archive logs is not available on disk, then the logs are restoredfrom NetBackup (sbt_tape).
RMAN> run
{
allocate channel ch00 type sbt_Tape;
recover database;
release channel ch00;
}
released channel: ORA_DISK_1
allocated channel: ch00
channel ch00: SID=193 device type=SBT_TAPE
channel ch00: Veritas NetBackup for Oracle - Release 8.0 (2016091418)
Starting recover at 2016-10-12:15:54:13
starting media recovery
archived log for thread 1 with sequence 508 is already on disk as file
/db/orac112/app/fast_recovery_area/ORAC112/archivelog/2016_09_29/o1_mf_1_508_cytbkv22_.arc
archived log for thread 1 with sequence 509 is already on disk as file
/db/orac112/app/fast_recovery_area/ORAC112/archivelog/2016_09_29/o1_mf_1_509_cytbkv36_.arc
....
archived log file name=
/db/orac112/app/fast_recovery_area/ORAC112/archivelog/2016_09_29/o1_mf_1_508_cytbkv22_.arc
thread=1 sequence=508
archived log file name=
/db/orac112/app/fast_recovery_area/ORAC112/archivelog/2016_09_29/o1_mf_1_509_cytbkv36_.arc
thread=1 sequence=509
....
media recovery complete, elapsed time: 00:00:55
Finished recover at 2016-10-12:15:55:09
released channel: ch00
RMAN>
See “Creating an instant recovery point from an Oracle Copilot image” on page 139.
See “About using a NetBackup appliance share for Oracle backups (Copilot)”on page 81.
151Performing backups and restores of OracleSingle-step restore to ASM storage from a Copilot recovery point
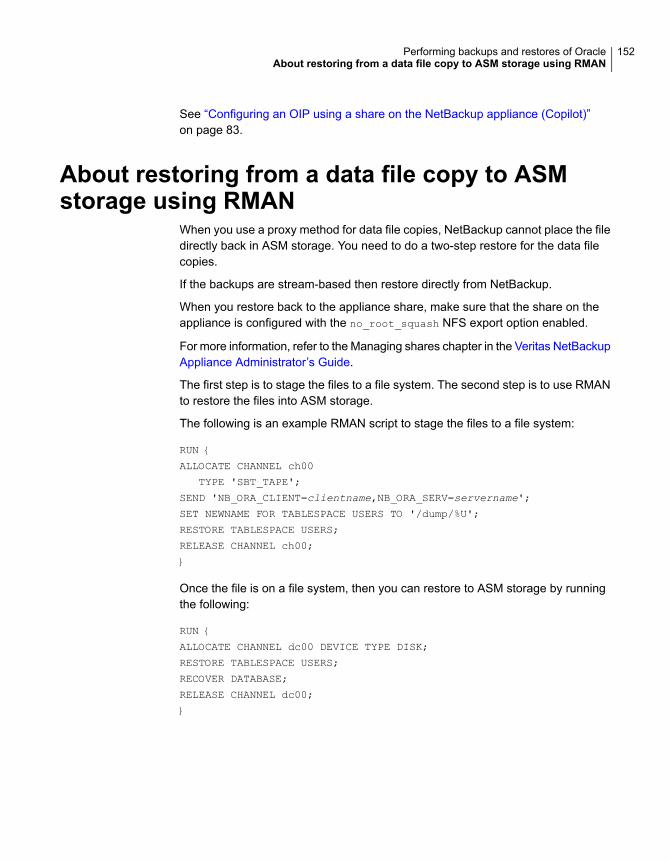
See “Configuring an OIP using a share on the NetBackup appliance (Copilot)”on page 83.
About restoring from a data file copy to ASMstorage using RMAN
When you use a proxy method for data file copies, NetBackup cannot place the filedirectly back in ASM storage. You need to do a two-step restore for the data filecopies.
If the backups are stream-based then restore directly from NetBackup.
When you restore back to the appliance share, make sure that the share on theappliance is configured with the no_root_squash NFS export option enabled.
For more information, refer to the Managing shares chapter in the Veritas NetBackupAppliance Administrator’s Guide.
The first step is to stage the files to a file system. The second step is to use RMANto restore the files into ASM storage.
The following is an example RMAN script to stage the files to a file system:
RUN {
ALLOCATE CHANNEL ch00
TYPE 'SBT_TAPE';
SEND 'NB_ORA_CLIENT=clientname,NB_ORA_SERV=servername';
SET NEWNAME FOR TABLESPACE USERS TO '/dump/%U';
RESTORE TABLESPACE USERS;
RELEASE CHANNEL ch00;
}
Once the file is on a file system, then you can restore to ASM storage by runningthe following:
RUN {
ALLOCATE CHANNEL dc00 DEVICE TYPE DISK;
RESTORE TABLESPACE USERS;
RECOVER DATABASE;
RELEASE CHANNEL dc00;
}
152Performing backups and restores of OracleAbout restoring from a data file copy to ASM storage using RMAN

Guided RecoveryThis chapter includes the following topics:
■ About OpsCenter Guided Recovery
■ Setting up for Guided Recovery cloning
■ Guided Recovery cloning pre-operation checks
■ Performing a Guided Recovery cloning operation
■ Select a Master Server dialog
■ Select Source Database panel
■ Select Control File Backup panel
■ Destination host and login panel
■ Destination Parameters panel
■ Selection summary panel
■ Pre-clone check panel
■ Job Details panel
■ Guided Recovery post-clone operations
■ Troubleshooting Guided Recovery
About OpsCenter Guided RecoveryThe use of the OpsCenter web-based user interface to guide a user through theOracle cloning operation offers several benefits:
■ The process is more automated, making the operation easier to perform.
6Chapter
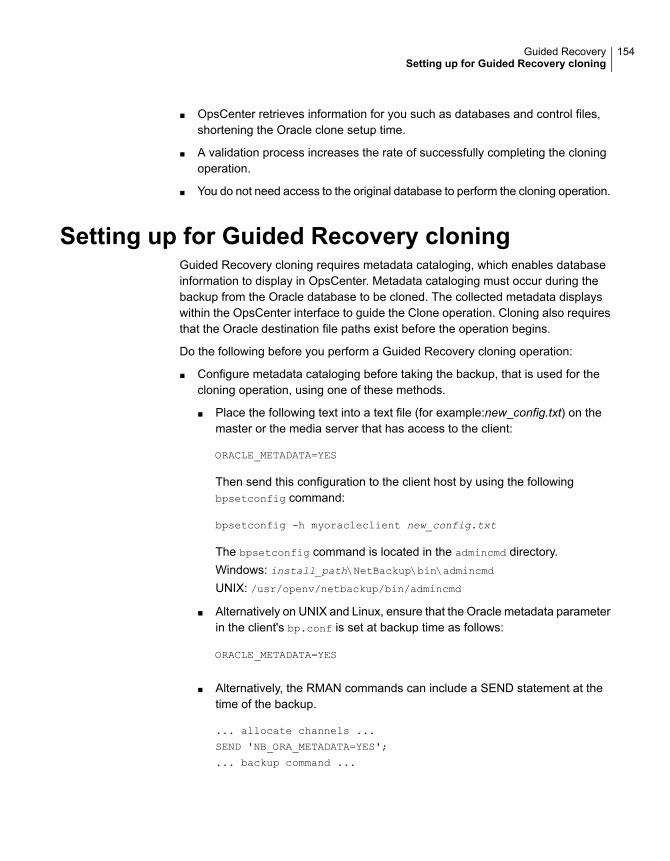
■ OpsCenter retrieves information for you such as databases and control files,shortening the Oracle clone setup time.
■ A validation process increases the rate of successfully completing the cloningoperation.
■ You do not need access to the original database to perform the cloning operation.
Setting up for Guided Recovery cloningGuided Recovery cloning requires metadata cataloging, which enables databaseinformation to display in OpsCenter. Metadata cataloging must occur during thebackup from the Oracle database to be cloned. The collected metadata displayswithin the OpsCenter interface to guide the Clone operation. Cloning also requiresthat the Oracle destination file paths exist before the operation begins.
Do the following before you perform a Guided Recovery cloning operation:
■ Configure metadata cataloging before taking the backup, that is used for thecloning operation, using one of these methods.
■ Place the following text into a text file (for example:new_config.txt) on themaster or the media server that has access to the client:
ORACLE_METADATA=YES
Then send this configuration to the client host by using the followingbpsetconfig command:
bpsetconfig -h myoracleclient new_config.txt
The bpsetconfig command is located in the admincmd directory.Windows: install_path\NetBackup\bin\admincmdUNIX: /usr/openv/netbackup/bin/admincmd
■ Alternatively on UNIX and Linux, ensure that the Oracle metadata parameterin the client's bp.conf is set at backup time as follows:
ORACLE_METADATA=YES
■ Alternatively, the RMAN commands can include a SEND statement at thetime of the backup.
... allocate channels ...
SEND 'NB_ORA_METADATA=YES';
... backup command ...
154Guided RecoverySetting up for Guided Recovery cloning

■ Set up all destination file paths before you run the cloning operation becausethe operation does not create new file paths during the process. Ensure thatthe Oracle user has write access to these paths.
Guided Recovery cloning pre-operation checksCheck the following items before you begin the cloning process:
■ Ensure that the source and the destination systems and the source and thedestination databases are compatible. Examples are Solaris 9 to Solaris 10 andOracle 11 to Oracle 11.
■ The cloning operation does not support offline tablespaces or raw tablespaces.
■ The cloning operation does not support Oracle Automatic Storage Management(ASM).
■ To use a different user or a different group for the clone, change the permissionsof the backup image at backup time. Add the 'BKUP_IMAGE_PERM=ANY' tothe send commands during the backup of the source database.See “About the environment variables set by NetBackup for Oracle” on page 98.
■ If the destination client is different than the source client, perform an alternaterestore procedure.See “Redirecting a restore to a different client” on page 131.
■ On Windows systems, if the NetBackup Legacy Network Service runs as theOracle user, that user needs the right to "Replace a process level token".
■ On Oracle 9 for Windows, run the Oracle service under the Oracle user account.By default, it runs under the local system. On Oracle 10G systems and later,you can run under the local system.
■ On Windows systems, if you clone to the same system, shut down the sourcedatabase to successfully complete the operation. Otherwise, an error indicatingthe database cannot be mounted in exclusive mode appears.
■ On UNIX and Linux systems, if the cloning user shares an existing Oracle home,the user must have write access to some directories such as DBS.
■ On UNIX and Linux systems, shut down the source database before you clonein the following situation: You clone to the same system and you either use thesame user or use the same home as the source database.
155Guided RecoveryGuided Recovery cloning pre-operation checks

Performing a Guided Recovery cloning operationYou need to log onto OpsCenter, to perform a cloning operation. OpsCenter is theweb GUI that you use to perform all guided recovery operations.
To perform a cloning operation on an Oracle database in OpsCenter
1 When you log onto OpsCenter, the first screen that appears is the MonitorOverview screen. Along the top of the screen, click Manage > Restore.
2 On the What do you want to restore? screen, click Clone Oracle Database.
3 On the small Select a Master Server dialog box, use the drop-down menu toselect the master server that you want to work with, then click OK.
See “Select a Master Server dialog” on page 157.
4 The Select Source Database screen lets you filter the list of databases bydatabase name, host name, database version, platform, and date. The defaultcondition is to display all databases that are backed up in the default daterange. Click Show Databases.
More information is available on this screen.
See “Select Source Database panel” on page 158.
5 The databases appear under the filtering part of the same screen. Click optionat the left side of the desired database entry to select the database on whichyou want to perform a cloning operation. Then click Next>.
6 The Select Control File Backup screen shows a timeline view of the controlfile backups. Select the icon for the desired control file backup from the timelineview. You can hover over the icon to display the control file details. If the iconrepresents multiple backups, you can hover over the icon to display all versionsof the backup for that time periods.
Additional information is available to verify that you have selected the correctcontrol file. The lower left corner of the screen lists three links. More informationis available about these links.
See “Select Control File Backup panel” on page 158.
Click on the icon of the control file backup you want to restore for the clone ofthe selected database. The default is the latest backup selected. Then clickNext>.
7 The Destination Host and Login screen contains parameters for thedestination of the clone to be created. Enter the destination host name in thetext box that is provided or click Browse and select from a list of availablehosts. Note the following prerequisites concerning the destination host:
■ The platform type of the source and destination must be the same.
156Guided RecoveryPerforming a Guided Recovery cloning operation

■ A NetBackup client must be installed.
■ A compatible version of Oracle must be installed.
See “Destination host and login panel” on page 159.
For operating system authentication, enter a user name, password (Windows),and domain (Windows). Then click Next>.
8 The Define Destination Parameters screen appears. The five tabs on thisscreen are used to change database attributes, the destination paths of controlfiles, data files, redo logs, and restore options. After you have changed thedestination parameters, click Next>.
See “Destination Parameters panel” on page 159.
9 TheSelection Summary screen lets you scan the information you have enteredon the previous screens. Links to the recovery sets and destination databaseattributes let you view and verify any changes you have made. When you aresatisfied with the summary information, click Next>.
See “Selection summary panel” on page 160.
10 The Pre-clone Check screen lets you validate the database attributes and thefile paths. To validate, click the underlined word here. If a directory path doesnot already exist, the validation check flags the error. If a file already exists,the validation check also flags the error, so that the cloning operation does notoverwrite the file.
See “Pre-clone check panel” on page 160.
When you are ready to launch the cloning operation, click Launch CloningProcess. A display appears that is similar to the NetBackup Activity Monitor.
Note: In NetBackup (7.1 or greater), validation of the data files that reside in rawdevices may fail even though the Clone operation was successful. You may receivean error that states the validation for specific paths failed.
Select a Master Server dialogFrom the pulldown menu, select the NetBackup master server that collected thebackup information to be used for the cloning operation.
157Guided RecoverySelect a Master Server dialog

Select Source Database panelWhen the Select Source Database screen first appears, the lowest portion of thescreen shows a list of the latest backups for all the databases that the master serverknows about for the default date range.
The upper portion of the screen shows parameters for filtering the list of databases.If the list is long, you can filter what databases appear by database name, hostname, database version, and date range. Multiple filter parameters can be used atthe same time.
For example, to show only the Solaris databases that are backed up between11/05/2011 and 11/12/2011, select Solaris from the Platform: pulldown menu. Thenselect the dates from the calendar icons. Then click Show Databases to displaythe new filtered list of databases.
Select Control File Backup panelThe Guided Recovery Select Control File Backup screen is a timeline view of allthe control files that are backed up for the selected database. The timeline displaysan icon for each control file that is associated with the backed up database. Whenyou first enter this screen, the latest backup control file is already selected.
Hover over the icon on the timeline to display a popup that shows information aboutthat file: backup name, type of media, the size of the backup, etc.
Multiple control files may be displayed on the timeline. To view all the instances ofcontrol files, you may need to increase the scope of the timeline. You can displaythe timeline in days, weeks, months, or years. If multiple control files were backedup during a single timeline unit, a different icon appears representing more thanone control file (for example, if the database was backed up twice in an hour). Toselect from among these files, hover over the icon. A popup lists each control filein table format. It shows several items including the backup name and the type ofmedia. Click option next to the desired control file.
You can also click one of the links in the lower left of the screen to verify that youhave selected the proper control file.
■ View Database Schema shows the schema of the selected control file. It showshow the database is laid out by listing each data file name, tablespace name,and its size.
■ View Datafiles Recovery Set shows the data file backups to be used for therestore process. It also shows the backup and image information that is displayedfor each data file. The data file recovery set is generated only for the files thatare backed up as part of an incremental strategy. Even though files that are
158Guided RecoverySelect Source Database panel
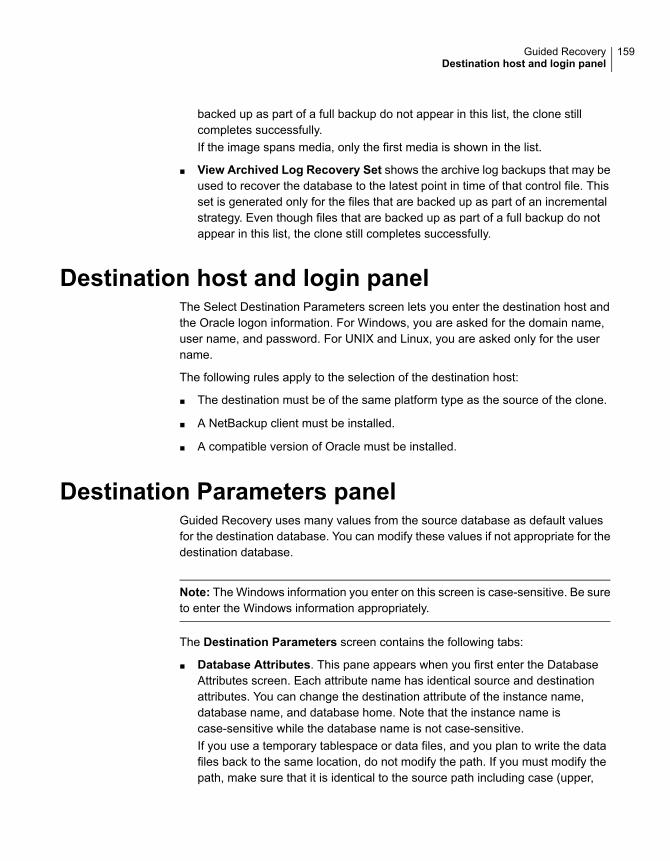
backed up as part of a full backup do not appear in this list, the clone stillcompletes successfully.If the image spans media, only the first media is shown in the list.
■ View Archived Log Recovery Set shows the archive log backups that may beused to recover the database to the latest point in time of that control file. Thisset is generated only for the files that are backed up as part of an incrementalstrategy. Even though files that are backed up as part of a full backup do notappear in this list, the clone still completes successfully.
Destination host and login panelThe Select Destination Parameters screen lets you enter the destination host andthe Oracle logon information. For Windows, you are asked for the domain name,user name, and password. For UNIX and Linux, you are asked only for the username.
The following rules apply to the selection of the destination host:
■ The destination must be of the same platform type as the source of the clone.
■ A NetBackup client must be installed.
■ A compatible version of Oracle must be installed.
Destination Parameters panelGuided Recovery uses many values from the source database as default valuesfor the destination database. You can modify these values if not appropriate for thedestination database.
Note: The Windows information you enter on this screen is case-sensitive. Be sureto enter the Windows information appropriately.
The Destination Parameters screen contains the following tabs:
■ Database Attributes. This pane appears when you first enter the DatabaseAttributes screen. Each attribute name has identical source and destinationattributes. You can change the destination attribute of the instance name,database name, and database home. Note that the instance name iscase-sensitive while the database name is not case-sensitive.If you use a temporary tablespace or data files, and you plan to write the datafiles back to the same location, do not modify the path. If you must modify thepath, make sure that it is identical to the source path including case (upper,
159Guided RecoveryDestination host and login panel
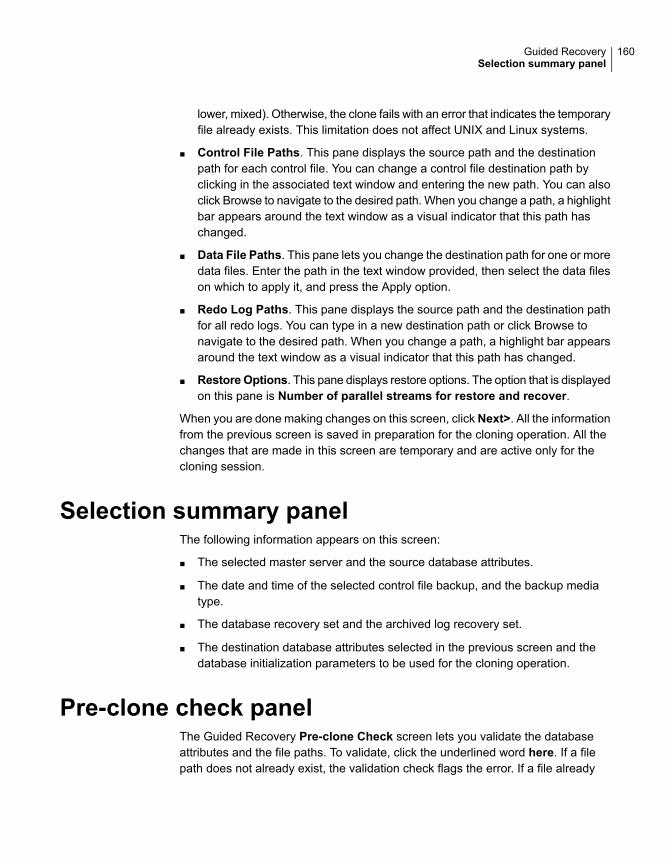
lower, mixed). Otherwise, the clone fails with an error that indicates the temporaryfile already exists. This limitation does not affect UNIX and Linux systems.
■ Control File Paths. This pane displays the source path and the destinationpath for each control file. You can change a control file destination path byclicking in the associated text window and entering the new path. You can alsoclick Browse to navigate to the desired path. When you change a path, a highlightbar appears around the text window as a visual indicator that this path haschanged.
■ Data File Paths. This pane lets you change the destination path for one or moredata files. Enter the path in the text window provided, then select the data fileson which to apply it, and press the Apply option.
■ Redo Log Paths. This pane displays the source path and the destination pathfor all redo logs. You can type in a new destination path or click Browse tonavigate to the desired path. When you change a path, a highlight bar appearsaround the text window as a visual indicator that this path has changed.
■ Restore Options. This pane displays restore options. The option that is displayedon this pane is Number of parallel streams for restore and recover.
When you are done making changes on this screen, clickNext>. All the informationfrom the previous screen is saved in preparation for the cloning operation. All thechanges that are made in this screen are temporary and are active only for thecloning session.
Selection summary panelThe following information appears on this screen:
■ The selected master server and the source database attributes.
■ The date and time of the selected control file backup, and the backup mediatype.
■ The database recovery set and the archived log recovery set.
■ The destination database attributes selected in the previous screen and thedatabase initialization parameters to be used for the cloning operation.
Pre-clone check panelThe Guided Recovery Pre-clone Check screen lets you validate the databaseattributes and the file paths. To validate, click the underlined word here. If a filepath does not already exist, the validation check flags the error. If a file already
160Guided RecoverySelection summary panel

exists, the validation check also flags the error, so that the cloning operation doesnot overwrite the file.
You can also specify an email address, so when the cloning process completes,an email is sent to you that gives you the status of the cloning operation along withother pertinent information.
Job Details panelThe Job Details screen is intended to reflect the NetBackup Activity Monitor. Moreinformation is available on the Activity Monitor.
For more information, see the NetBackup Administrator’s Guide, Volume I.
Guided Recovery post-clone operationsPerform the following after the cloning operation has completed:
■ On Windows systems, if the cloning operation fails, use the dbca utility to deletethe database. dbca sometimes removes directories, so verify before retryingthe operation.
■ On UNIX systems, update the oratab file with the appropriate instanceinformation.
■ On UNIX systems, if the cloning operation fails, do the following cleanup:
■ If the database is active, shut down the database.
■ Remove init<SID>.ora, spfile<SID>.ora, and any other files that areassociated with the SID being used, from the <$ORACLE_HOME>/DBSdirectory.
■ Remove all data files.
■ If a cloned Oracle database contains read-only tablespaces or data files, youmust make them read-write before RMAN backs them up, or RMAN cannotrestore them. After the backup (cloning operation), you can return the items toread-only.The following shows an example of the sequence of steps in the process:
■ Back up Oracle database A which contains read-only tablespace TABLE1.
■ Clone database A to database B.
■ Use the Oracle alter tablespace command to make tablespace TABLE1read-write. You may revert to read-only if you want.
■ Back up database B.
161Guided RecoveryJob Details panel
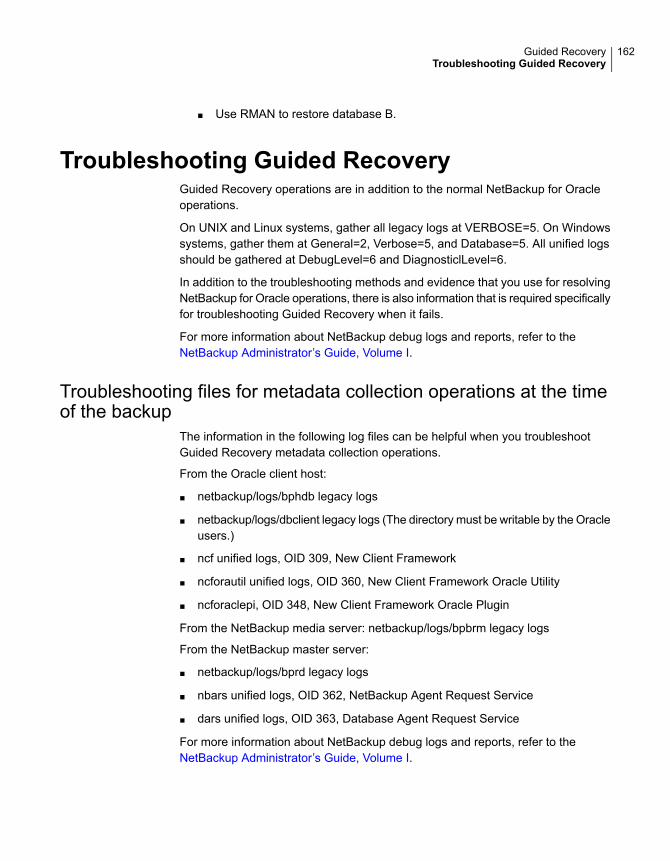
■ Use RMAN to restore database B.
Troubleshooting Guided RecoveryGuided Recovery operations are in addition to the normal NetBackup for Oracleoperations.
On UNIX and Linux systems, gather all legacy logs at VERBOSE=5. On Windowssystems, gather them at General=2, Verbose=5, and Database=5. All unified logsshould be gathered at DebugLevel=6 and DiagnosticlLevel=6.
In addition to the troubleshooting methods and evidence that you use for resolvingNetBackup for Oracle operations, there is also information that is required specificallyfor troubleshooting Guided Recovery when it fails.
For more information about NetBackup debug logs and reports, refer to theNetBackup Administrator’s Guide, Volume I.
Troubleshooting files for metadata collection operations at the timeof the backup
The information in the following log files can be helpful when you troubleshootGuided Recovery metadata collection operations.
From the Oracle client host:
■ netbackup/logs/bphdb legacy logs
■ netbackup/logs/dbclient legacy logs (The directory must be writable by the Oracleusers.)
■ ncf unified logs, OID 309, New Client Framework
■ ncforautil unified logs, OID 360, New Client Framework Oracle Utility
■ ncforaclepi, OID 348, New Client Framework Oracle Plugin
From the NetBackup media server: netbackup/logs/bpbrm legacy logs
From the NetBackup master server:
■ netbackup/logs/bprd legacy logs
■ nbars unified logs, OID 362, NetBackup Agent Request Service
■ dars unified logs, OID 363, Database Agent Request Service
For more information about NetBackup debug logs and reports, refer to theNetBackup Administrator’s Guide, Volume I.
162Guided RecoveryTroubleshooting Guided Recovery
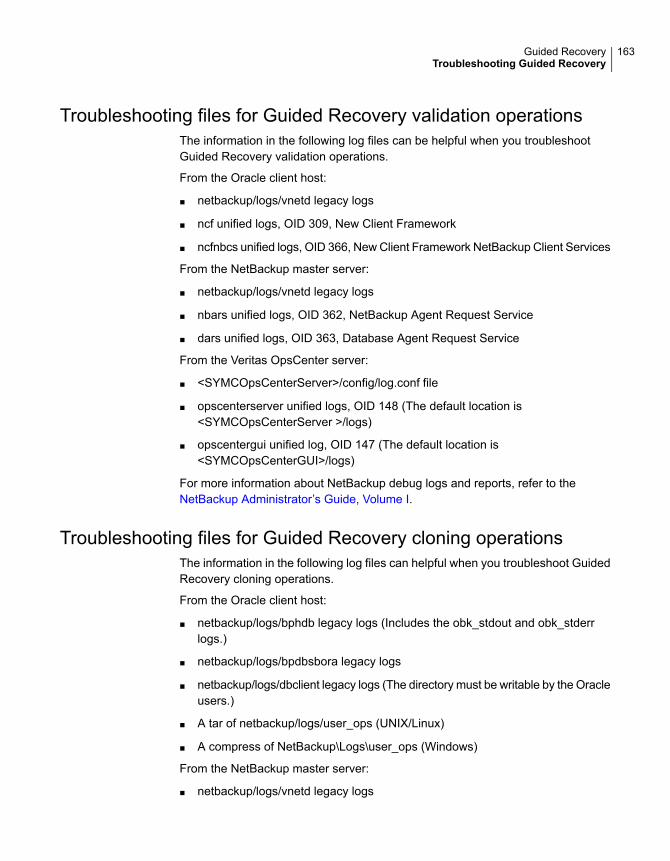
Troubleshooting files for Guided Recovery validation operationsThe information in the following log files can be helpful when you troubleshootGuided Recovery validation operations.
From the Oracle client host:
■ netbackup/logs/vnetd legacy logs
■ ncf unified logs, OID 309, New Client Framework
■ ncfnbcs unified logs, OID 366, New Client Framework NetBackup Client Services
From the NetBackup master server:
■ netbackup/logs/vnetd legacy logs
■ nbars unified logs, OID 362, NetBackup Agent Request Service
■ dars unified logs, OID 363, Database Agent Request Service
From the Veritas OpsCenter server:
■ <SYMCOpsCenterServer>/config/log.conf file
■ opscenterserver unified logs, OID 148 (The default location is<SYMCOpsCenterServer >/logs)
■ opscentergui unified log, OID 147 (The default location is<SYMCOpsCenterGUI>/logs)
For more information about NetBackup debug logs and reports, refer to theNetBackup Administrator’s Guide, Volume I.
Troubleshooting files for Guided Recovery cloning operationsThe information in the following log files can helpful when you troubleshoot GuidedRecovery cloning operations.
From the Oracle client host:
■ netbackup/logs/bphdb legacy logs (Includes the obk_stdout and obk_stderrlogs.)
■ netbackup/logs/bpdbsbora legacy logs
■ netbackup/logs/dbclient legacy logs (The directory must be writable by the Oracleusers.)
■ A tar of netbackup/logs/user_ops (UNIX/Linux)
■ A compress of NetBackup\Logs\user_ops (Windows)
From the NetBackup master server:
■ netbackup/logs/vnetd legacy logs
163Guided RecoveryTroubleshooting Guided Recovery
■ netbackup/logs/bprd legacy logs
■ nbars unified logs, OID 362, NetBackup Agent Request Service
■ dars unified logs, OID 363, Database Agent Request Service
From the Veritas OpsCenter server:
■ <SYMCOpsCenterServer>/config/log.conf file
■ opscenterserver unified logs, OID 148 (The default location is<SYMCOpsCenterServer >/logs)
■ opscentergui unified log, OID 147 (The default location is<SYMCOpsCenterGUI>/logs)
164Guided RecoveryTroubleshooting Guided Recovery

NetBackup for Oracle withSnapshot Client
This chapter includes the following topics:
■ About NetBackup for Oracle with Snapshot Client
■ How NetBackup for Oracle with Snapshot Client works
■ About configuring Snapshot Client with NetBackup for Oracle
■ Restoring NetBackup for Oracle from a snapshot backup
■ About configuring NetBackup for Oracle block-level incremental backups onUNIX
■ About Snapshot Client effects
■ About Oracle support for Replication Director
About NetBackup for Oracle with Snapshot ClientTo use NetBackup for Oracle with Snapshot Client, NetBackup Snapshot Clientand NetBackup for Oracle must both be licensed and installed.
Before you use NetBackup for Oracle with Snapshot Client, confirm that yourplatform is supported.
See “Verifying the operating system and platform compatibility” on page 33.
A snapshot is a disk image of the client’s data that is made almost instantaneously.When it is used with NetBackup Snapshot Client, NetBackup for Oracle can backup Oracle objects by taking snapshot images of the component files. Later, it backsup the snapshot version to the storage unit.
7Chapter
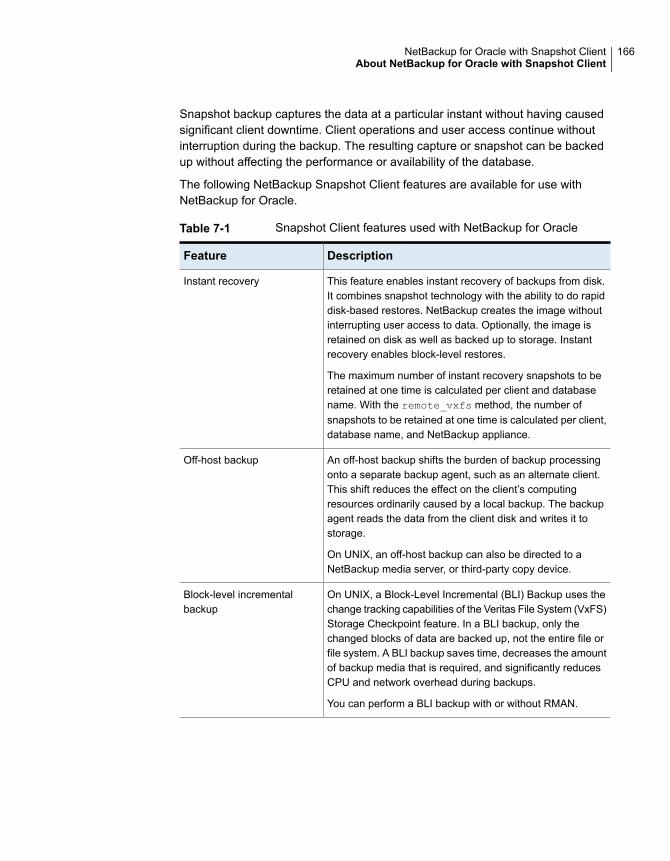
Snapshot backup captures the data at a particular instant without having causedsignificant client downtime. Client operations and user access continue withoutinterruption during the backup. The resulting capture or snapshot can be backedup without affecting the performance or availability of the database.
The following NetBackup Snapshot Client features are available for use withNetBackup for Oracle.
Table 7-1 Snapshot Client features used with NetBackup for Oracle
DescriptionFeature
This feature enables instant recovery of backups from disk.It combines snapshot technology with the ability to do rapiddisk-based restores. NetBackup creates the image withoutinterrupting user access to data. Optionally, the image isretained on disk as well as backed up to storage. Instantrecovery enables block-level restores.
The maximum number of instant recovery snapshots to beretained at one time is calculated per client and databasename. With the remote_vxfs method, the number ofsnapshots to be retained at one time is calculated per client,database name, and NetBackup appliance.
Instant recovery
An off-host backup shifts the burden of backup processingonto a separate backup agent, such as an alternate client.This shift reduces the effect on the client’s computingresources ordinarily caused by a local backup. The backupagent reads the data from the client disk and writes it tostorage.
On UNIX, an off-host backup can also be directed to aNetBackup media server, or third-party copy device.
Off-host backup
On UNIX, a Block-Level Incremental (BLI) Backup uses thechange tracking capabilities of the Veritas File System (VxFS)Storage Checkpoint feature. In a BLI backup, only thechanged blocks of data are backed up, not the entire file orfile system. A BLI backup saves time, decreases the amountof backup media that is required, and significantly reducesCPU and network overhead during backups.
You can perform a BLI backup with or without RMAN.
Block-level incrementalbackup
166NetBackup for Oracle with Snapshot ClientAbout NetBackup for Oracle with Snapshot Client

Table 7-1 Snapshot Client features used with NetBackup for Oracle(continued)
DescriptionFeature
A proxy copy is a special type of backup in which theNetBackup for Oracle agent manages the control of the datatransfer. During the backup and restore operations, the proxycopy enables the agent to manage the entire data movementbetween the disks that contain the data files and the storagedevices that NetBackup manages.
Backups and restores remain tightly integrated with Oracleand its catalog, greatly simplifying administration tasks.
Proxy copy
Oracle provides the list of files that require backup or restoreto NetBackup for Oracle with Snapshot Client.
More information is available.
See “NetBackup for Oracle file-based operations” on page 168.
File-based operations
Stream-based operations are the standard NetBackupimplementation of conventional NetBackup for Oracle backupand restore.
More information is available.
See “NetBackup for Oracle stream-based operations”on page 167.
Stream-based operations
Proxy copyA proxy copy is a special type of backup in which the NetBackup for Oracle agentmanages the control of the data transfer. During the backup and restore operations,proxy copy enables the agent to manage the entire data movement between thedisks that contain the data files and the storage devices that NetBackup manages.
With proxy copy, RMAN provides a list of files that require backup or restore to theNetBackup for Oracle agent. The agent determines how the data is moved andwhen to move the data. Proxy copy is an extension to Oracle’s Media ManagementAPI.
Backups and restores remain tightly integrated with RMAN and its catalog, whichgreatly simplifies administration tasks.
NetBackup for Oracle stream-based operationsStream-based operations are the standard NetBackup implementation ofconventional RMAN backup and restore. In a stream-based backup, NetBackup
167NetBackup for Oracle with Snapshot ClientAbout NetBackup for Oracle with Snapshot Client
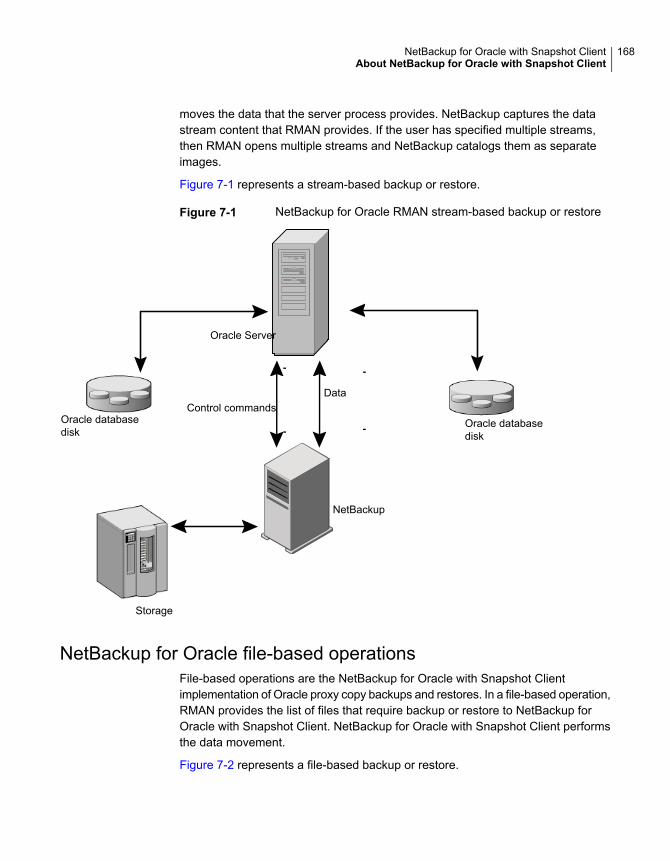
moves the data that the server process provides. NetBackup captures the datastream content that RMAN provides. If the user has specified multiple streams,then RMAN opens multiple streams and NetBackup catalogs them as separateimages.
Figure 7-1 represents a stream-based backup or restore.
Figure 7-1 NetBackup for Oracle RMAN stream-based backup or restore
Data
Oracle databasedisk
Oracle databasedisk
Control commands
Oracle Server
NetBackup
Storage
NetBackup for Oracle file-based operationsFile-based operations are the NetBackup for Oracle with Snapshot Clientimplementation of Oracle proxy copy backups and restores. In a file-based operation,RMAN provides the list of files that require backup or restore to NetBackup forOracle with Snapshot Client. NetBackup for Oracle with Snapshot Client performsthe data movement.
Figure 7-2 represents a file-based backup or restore.
168NetBackup for Oracle with Snapshot ClientAbout NetBackup for Oracle with Snapshot Client

Figure 7-2 NetBackup for Oracle with Snapshot Client file-based backup orrestore
List of filesOracle databasedisk
Oracle databasedisk
Control commands
Oracle Server
NetBackup
Storage
Data Data
How NetBackup for Oracle with Snapshot Clientworks
NetBackup users or schedules start database backups or restores. The OracleIntelligent Policy automatically generates an RMAN script. The script- ortemplate-based policy uses a template or a shell script in the backup selections listof the Oracle policy. A template-based policy uses the template to generate theRMAN script. The template or the shell script specifies backup or restore commandsfor the Oracle Recovery Manager (RMAN) to use when you perform the backup orrestore on the client.
The RMAN backup proxy command initiates a proxy copy backup of the specifiedobjects. The objects that can be backed up using the proxy copy functionality depend
169NetBackup for Oracle with Snapshot ClientHow NetBackup for Oracle with Snapshot Client works

on the Oracle version. RMAN translates the objects into the physical file namesand provides a list of file names to NetBackup for Oracle.
See “Database objects supported by advanced backup methods” on page 170.
The agent checks that the policy it uses for the backup is configured with theappropriate Snapshot Client attributes. The agent then initiates file-based backupsof the Oracle files and uses the NetBackup Snapshot Client interface to performthe data movement.
When Oracle performs proxy copy backups, it puts the data files being backed upinto backup mode. NetBackup then creates a snapshot of the files. After the snapshothas been created, the NetBackup for Oracle agent signals back to Oracle to takethe data files out of backup mode. The data files being backed up are in backupmode only for the period of time necessary to capture a snapshot of the data.
About the NetBackup for Oracle backup and restore operationsFor a backup operation, the NetBackup for Oracle agent performs the followingsteps:
■ Receives a list of files to back up from RMAN.
■ A unique backup file name identifies each file in the NetBackup catalog. Toensure that this procedure occurs, use the format operand to give each datafile a unique name.
■ Queries the policy to check whether the Snapshot Client policy attributes arespecified.
■ Initiates a configured number of Snapshot Client backups and waits until thejobs are completed.See “About NetBackup multistreaming” on page 171.
For a restore operation, the NetBackup for Oracle agent performs the followingsteps:
■ Receives a list of files to restore from RMAN.
■ Sends a restore request to the NetBackup server for all files in the list.
■ Waits for NetBackup to restore all files in the file list.
Database objects supported by advanced backup methodsOracle controls the kinds of database objects that can be backed up by proxy copyand, therefore, what NetBackup can back up using Snapshot Client backup methods.Oracle allows proxy copy backups of databases, tablespaces, and data files. WithOracle 10g releases and later, Oracle also allows proxy copy backups of archived
170NetBackup for Oracle with Snapshot ClientHow NetBackup for Oracle with Snapshot Client works

redo logs. As a result, NetBackup can use file-based Snapshot Client backupmethods to back up these objects.
For control files, Oracle RMAN performs conventional stream-based backups only.NetBackup for Oracle must use stream-based backups for control files even whenyou use Snapshot Client methods for the other database objects.
The Oracle Intelligent Policy handles both stream-based and file-based components.File-based and stream-based backups require different configurations. Whenconfiguring your NetBackup for Oracle with Snapshot Client backups, be sure toconfigure a policy that allows both stream-based and file-based backups.
About NetBackup multistreamingOn the initial call, NetBackup for Oracle with Snapshot Client returns a special entryto RMAN indicating that it supports proxy copy. It also indicates to RMAN that itsupports an unlimited number of files to be proxy-copied in a single proxy copysession. The number of channels that are allocated for the RMAN backup proxy
command does not control the degree of parallelism for proxy backups. RMAN usesonly one channel for proxy copy backups except when a specific configuration isused.
The NB_ORA_PC_STREAMS variable controls the number of proxy copy backup streamsto be started. By default, the agent initiates one backup job for all files. If the RMANsend command passes NB_ORA_PC_STREAMS, NetBackup for Oracle splits the filesinto the number of groups that the variable specifies based on the file size. Theagent attempts to create streams of equal size and determines the number ofprocesses that run to perform the backup.
RMAN multiple channelsIf you allocate multiple channels for an RMAN proxy copy backup session, RMANuses only one channel to perform a proxy backup of all objects. All other channelscan be used for a stream-based (non-proxy) backup of the control file or archivedredo logs.
See “Proxy backup examples” on page 174.
Restoring data files to a new locationNetBackup for Oracle with Snapshot Client can restore the data files that are backedup by proxy to a new location. The new location can be specified by using the RMANset newname command or ALTER DATABASE RENAME DATAFILE statement beforea restore is initiated. For example, to restore a data file for tablespace TEST to anew location, you can use the following RMAN commands:
171NetBackup for Oracle with Snapshot ClientHow NetBackup for Oracle with Snapshot Client works

RUN
{
allocate channel t1 'SBT_TAPE';
sql 'alter tablespace TEST offline immediate'
# restore the datafile to a new location
set newname for datafile '/oradata/test.f' to
'/oradata_new/test.f';
restore tablespace TEST;
# make the control file recognize the restored file as current
switch datafile all;
recover tablespace TEST;
release channel t1;
}
The RMAN procedure for the data files that are backed up by proxy is the same asfor conventionally backed up data files. RMAN knows that the data files were backedup by proxy, and it issues a proxy restore request to NetBackup for Oracle, whichrestores the data files to the new location. For more information on the requiredprocedure, see your Oracle documentation.
Redirecting a restore to a different clientThe procedure for restoring a proxy backup to a different destination client is thesame as the procedure for stream-based, non-proxy backups.
Symbolic links and raw data files (UNIX)NetBackup for Oracle with Snapshot Client backs up and restores the data filesthat consist of symbolic links and regular files. Both the symbolic link and the fileare backed up and restored. However, if you selectedRetain snapshots for instantrecovery then the symbolic link must reside on the same file system as the datafile. When you use instant recovery, if the symbolic link resides on a different filesystem than the data file it points to, the restore fails.
NetBackup for Oracle with Snapshot Client backs up and restores data files createdon raw partitions.
Quick I/O data files (UNIX)NetBackup for Oracle with Snapshot Client backs up and restores Quick I/O Oracledata files. A Quick I/O file consists of two components: a hidden file with spaceallocated for it and a link that points to the Quick I/O interface of the hidden file.
172NetBackup for Oracle with Snapshot ClientHow NetBackup for Oracle with Snapshot Client works

On the backup, NetBackup for Oracle with Snapshot Client follows the symboliclink and backs up both components of the Quick I/O file: the symbolic link and thehidden file.
On the restore, NetBackup for Oracle with Snapshot Client restores both componentsfrom the backup image. If one or both of the components are missing, NetBackupfor Oracle with Snapshot Client creates the missing component(s).
RMAN incremental backupsYou can use proxy copy backups as a part of the incremental strategy withconventional non-proxy RMAN backups. RMAN lets you create a proxy copyincremental level 0 backup. This backup can be the base for subsequent RMANtraditional incremental backups (level 1-n). To accomplish this backup, perform asnapshot proxy copy (file-based) level 0 incremental backup and follow with anRMAN traditional (stream-based) level 1-n incremental backup.
In Oracle 10g it is possible to track changed blocks using a change tracking file.Enabling change tracking does produce a small amount of database overhead, butit greatly improves the performance of incremental backups. Use the ALTER
DATABASE ENABLE BLOCK CHANGE TRACKING; sqlplus command to enable blockchange tracking on the database.
In the following example, the first run command initiates a proxy copy backup oftablespace tbs1. NetBackup for Oracle uses a snapshot file-based backup toperform a full tablespace backup. RMAN designates this backup as eligible forincremental level 1-n backups. The second run command initiates a traditionalnon-proxy level 1 incremental backup of the same tablespace tbs1. In this case,NetBackup for Oracle performs a stream-based backup.
run {
allocate channel t1 type 'SBT_TAPE';
backup
incremental level 0
proxy
format ’bk_%U_%t’
tablespace tbs1;
release channel t1;
}
run {
allocate channel t1 type 'SBT_TAPE';
backup
incremental level 1
format ’bk_%U_%t’
173NetBackup for Oracle with Snapshot ClientHow NetBackup for Oracle with Snapshot Client works
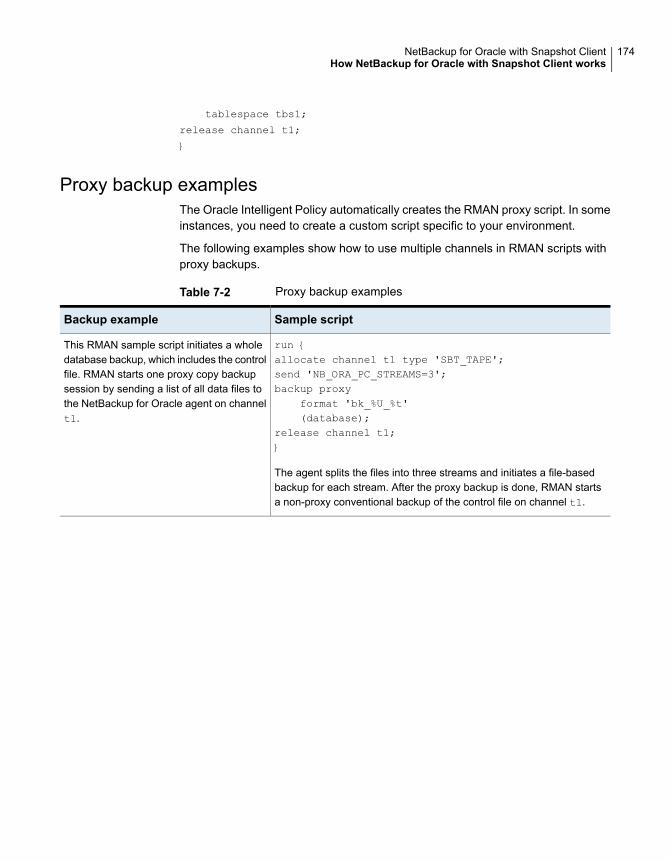
tablespace tbs1;
release channel t1;
}
Proxy backup examplesThe Oracle Intelligent Policy automatically creates the RMAN proxy script. In someinstances, you need to create a custom script specific to your environment.
The following examples show how to use multiple channels in RMAN scripts withproxy backups.
Table 7-2 Proxy backup examples
Sample scriptBackup example
run {allocate channel t1 type 'SBT_TAPE';send 'NB_ORA_PC_STREAMS=3';backup proxy
format 'bk_%U_%t'(database);
release channel t1;}
The agent splits the files into three streams and initiates a file-basedbackup for each stream. After the proxy backup is done, RMAN startsa non-proxy conventional backup of the control file on channel t1.
This RMAN sample script initiates a wholedatabase backup, which includes the controlfile. RMAN starts one proxy copy backupsession by sending a list of all data files tothe NetBackup for Oracle agent on channelt1.
174NetBackup for Oracle with Snapshot ClientHow NetBackup for Oracle with Snapshot Client works

Table 7-2 Proxy backup examples (continued)
Sample scriptBackup example
run {allocate channel t1 type 'SBT_TAPE';allocate channel t2 type 'SBT_TAPE';send 'NB_ORA_PC_STREAMS=3';backup proxy
format 'bk_%U_%t'(database);
release channel t1;release channel t2;}
If the RMAN recovery catalog is not used, the version of the control filebeing backed up does not contain information about the current backup.To include the information about the current backup, back up the controlfile as the last step in the backup operation. This step is not necessaryif the recovery catalog is used.
Run {allocate channel t1 type 'SBT_TAPE';backup
format 'cntrl_%s_%p_%t'current controlfile;
release channel t1;}
This RMAN sample script initiates a wholedatabase backup, which includes the controlfile. RMAN starts one proxy copy backupsession by sending a list of all data files tothe NetBackup for Oracle agent on channelt1. The agent splits the files into threestreams and initiates a file-based backup foreach stream. At the same time, RMAN startsa non-proxy conventional backup of thecontrol file on channel t2.
175NetBackup for Oracle with Snapshot ClientHow NetBackup for Oracle with Snapshot Client works

Table 7-2 Proxy backup examples (continued)
Sample scriptBackup example
run {allocate channel t1 type 'SBT_TAPE';backup proxy
format 'bk_%U_%t'(tablespace tbs1);
backup proxyformat 'bk_%U_%t'(tablespace tbs2);
release channel t1;}
This configuration can cause problems if the sequential backups createsnapshots on the same or a separate volume that share a snapshotresource specification. In such a situation, issue a single backupcommand such as the following which specifies both tablespaces ratherthan two separate backup commands:
run {allocate channel t1 type 'SBT_TAPE';backup proxy
format 'bk_%U_%t'(tablespace tbs1, tbs2);release channel t1;}
In this sample script, RMAN initiates twoproxy copy backups sequentially on channelt1. It starts a proxy backup of tablespacetbs1 data files. After the backup is done, itstarts another proxy backup of tablespacetbs2 data files.
run {allocate channel t1 type 'SBT_TAPE';send ’NB_ORA_POLICY=policy1’;allocate channel t2 type 'SBT_TAPE';send ’NB_ORA_POLICY=policy2’;backup proxy
format 'bk_%U_%t'(tablespace tbs1 channel t1);(tablespace tbs2 channel t2);
release channel t1;release channel t2;}
In this example, RMAN distributes proxycopy backups over two channels. It createstwo proxy copy backup sessions sendingtbs1 data files on channel t1 and tbs2data files on channel t2. Such a method isuseful if you want to specify differentNetBackup configurations for each channel.In this example, each send commandspecifies a different policy that is sent to theproxy backups. Each of the proxy backupsuses this policy.
176NetBackup for Oracle with Snapshot ClientHow NetBackup for Oracle with Snapshot Client works

About configuring Snapshot Client withNetBackup for Oracle
This topic explains how to configure snapshot and instant recovery backups for theOracle policy. For information on how a snapshot method is automatically selectedand details on the types of backup methods, see the NetBackup Snapshot ClientAdministrator’s Guide.
Snapshot backups do not back up all database objects. Your backup configurationmust include one or more automatic schedules to perform snapshot backups andone or more application schedules to perform stream-based backups. Thisconfiguration ensures that the entire database can be restored successfully.
For snapshot or instant recovery backups, configure the following policies andschedules as follows:
■ A Oracle policy with the following attributes:
■ Snapshot methods for the file systems in which the database files reside.
■ A backup method on the policy attributes dialog box.
■ An Automatic Full Backup schedule to perform snapshot and off-host backupsof the database.
■ (Conditional) For script- or template-based policies: An Application Backupschedule to back up the transaction logs.
To use NAS snapshot with NetBackup for Oracle, the Oracle database must beinstalled and configured to work in a NAS environment.
If you want to use a SnapVault storage unit, make sure that the storage unit isconfigured before you start configuring the NAS snapshot policy.
For more information about NAS snapshot and SnapVault, see the NetBackupSnapshot Client Administrator’s Guide.
Configuration requirements for snapshot backups with NetBackupfor Oracle
Each agent has its own hardware requirements, software requirements, compatibilitywith certain features, and the snapshot methods that are supported. Specialrequirements apply for specific types of backups. See the NetBackup SnapshotClient Administrator’s Guide and the Veritas Support website for more information.Familiarize yourself with this information before you configure any snapshot backups.
The following list highlights some of the requirements that pertain to databaseagents:
177NetBackup for Oracle with Snapshot ClientAbout configuring Snapshot Client with NetBackup for Oracle
■ Snapshot Client backups do not back up all database objects. Your backupconfiguration must include schedules to perform snapshot and stream-basedbackups. This configuration ensures that the entire database can be restoredsuccessfully.
■ On UNIX, the user identification and group identification numbers (UIDs andGIDs) associated with the files to be backed up must be available. The UID andGID must be available to both the primary client and the alternate backup client.The UID on the primary client and the alternate backup client must be the same.Similarly, the GID on the primary client and the alternate backup client must bethe same.
Note: The UID number can be different than the GID number.
■ Allocate different areas for data files, archived redo logs, and the control file fordatabase activities. Write the data files to their own repository because it isrequired for an instant recovery point-in-time rollback. Only data files can existon the volume or the file system that you want to restore.
■ The hardware and software that is required for the appropriate snapshot methodmust be installed and configured correctly.
■ NetBackup Snapshot Client must be installed and configured correctly, and thelicense for this option must be registered.
■ To perform off-host backups, perform any special configuration that is required.
Configuring a snapshot policy for NetBackup for OracleThe following procedure shows how to configure a snapshot policy with optionalinstant recovery, snapshot retention, and off-host backup.
This procedure does not detail how to configure a snapshot policy when using aNetBackup appliance.
See “ Configuring a snapshot policy using a share on the NetBackup appliance(Copilot)” on page 182.
178NetBackup for Oracle with Snapshot ClientAbout configuring Snapshot Client with NetBackup for Oracle
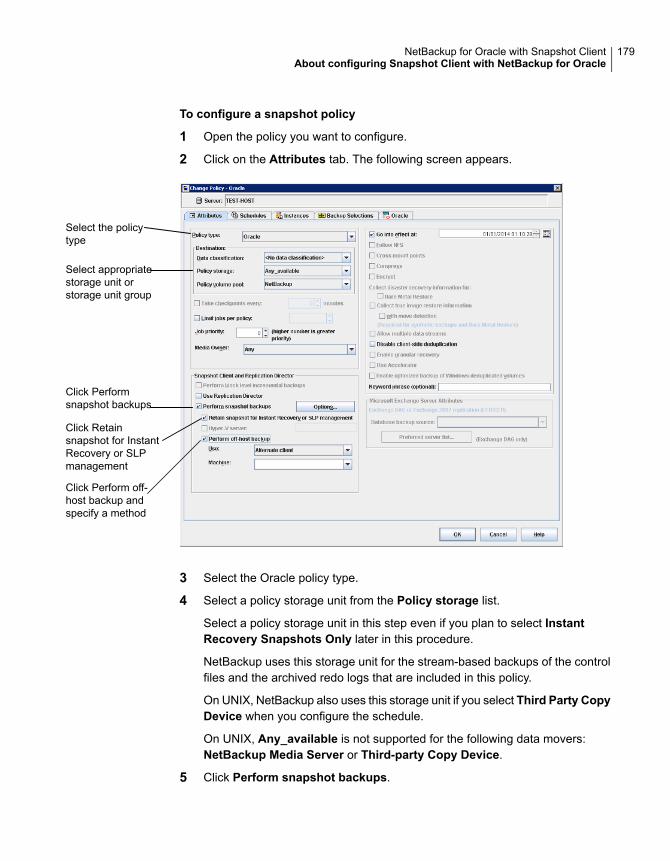
To configure a snapshot policy
1 Open the policy you want to configure.
2 Click on the Attributes tab. The following screen appears.
Select the policytype
Select appropriatestorage unit orstorage unit group
Click Performsnapshot backups
Click Retainsnapshot for InstantRecovery or SLPmanagement
Click Perform off-host backup andspecify a method
3 Select the Oracle policy type.
4 Select a policy storage unit from the Policy storage list.
Select a policy storage unit in this step even if you plan to select InstantRecovery Snapshots Only later in this procedure.
NetBackup uses this storage unit for the stream-based backups of the controlfiles and the archived redo logs that are included in this policy.
On UNIX, NetBackup also uses this storage unit if you select Third Party CopyDevice when you configure the schedule.
On UNIX, Any_available is not supported for the following data movers:NetBackup Media Server or Third-party Copy Device.
5 Click Perform snapshot backups.
179NetBackup for Oracle with Snapshot ClientAbout configuring Snapshot Client with NetBackup for Oracle

6 (Optional) Click Options to choose a snapshot method.
By default NetBackup chooses a snapshot method for you. To choose asnapshot method, click auto (the default) or click one of the methods that arepresented in the list.
The snapshot method that you can use depends on your hardware environmentand software environment. Only certain snapshot methods are supported incertain environments. See the NetBackup Snapshot Client Administrator’sGuide or the supported platforms matrix on the Veritas Support website formore information.
You can configure only one snapshot method per policy. For example, assumethat you want one snapshot method for clients a, b, and c, and a differentmethod for clients d, e, and f. Then you need to create two policies for eachgroup of clients and select one method for each policy.
7 (Optional) SelectRetain snapshot for Instant Recovery or SLPmanagement.
When this option is selected, NetBackup retains the snapshot backup imageon disk for later use in recovery.
8 (Optional) Select Perform off-host backup.
By default, the client that hosts the database performs the backup. If you wantto reduce the I/O processing load on the client that hosts the database, specifyan alternate client to perform the backup.
9 (Conditional) Select an off-host backup method.
The following off-host backup methods are available:
If you select Alternate client, also specify the name of the clientto perform the backup. This option may require additionalconfiguration. The alternate client must be a client that shares thedisk array.
Use Alternateclient (UNIX andWindows clients)
If you click Data mover, also select one of the following possibledata movers:
NetBackup Media Server
Third-Party Copy Device
Network Attached Storage
Use Data mover(UNIX clients only).
10 Click the Schedules tab.
11 Click New.
12 Configure a schedule for the database files.
180NetBackup for Oracle with Snapshot ClientAbout configuring Snapshot Client with NetBackup for Oracle

13 (Conditional) To create only disk images, in the Destination panel, underInstant Recovery, select Snapshots only.
This setting suppresses NetBackup’s default behavior, which is to copy thesnapshot to a storage unit. When you select Snapshots only, NetBackupcreates the on-disk snapshot copy of the database, but it does not copy thesnapshot to a storage unit. The on-disk snapshot becomes the only backupcopy. Note that the on-disk snapshot is not considered to be a replacementfor a traditional backup.
14 (Conditional) On the Schedules tab, configure a backup schedule for thecontrol files or archived redo logs.
■ Oracle Intelligent Policy backup policy. Configure an Archived Redo LogBackup schedule for this policy.
■ Script- or template-based backup policy. Configure anApplication Backupschedule for this policy.
NetBackup uses this storage unit for the stream-based backups of the controlfiles and the logs that are included in this policy. NetBackup copies thedatabase’s control files and archived redo logs to the storage unit you select.
For UNIX clients, if you selected Third-Party Copy Device as an off-hostbackup method, click Override policy storage unit. Then select a non-SANMedia Manager or other storage unit type that is appropriate to back up thecontrol files and archived redo logs.
15 Configure the Clients, instances, or instance groups.
■ Oracle Intelligent Policy backup policy. On the Instances and Databasestab, specify the instances or instance group, to be included in this policy.
■ Script- or template-based backup policy. On the Clients tab, specify theclients to be included in this policy.
16 On the Backup Selections tab, specify the correct setup depending on policysetup.
■ Oracle Intelligent Policy backup policy. Use the radio button to selectWholeDatabase, Partial database – Tablespaces, Partial database – Datafiles,Fast Recovery Area, Database Backup Shares, or Whole Database -Datafile Copy Share when using this type of policy.
■ Script- or template-based backup policy. Specify the backup template orbackup script when you use this type of policy.
More information is available about how to use templates and scripts for aNetBackup for Oracle policy with Snapshot Client.
181NetBackup for Oracle with Snapshot ClientAbout configuring Snapshot Client with NetBackup for Oracle

See “About Snapshot Client effects” on page 192.
17 Configure other attributes and add any additional schedules and backupselections.
Configuring a snapshot policy using a share on the NetBackupappliance (Copilot)
Note: This feature requires a NetBackup appliance running software version 2.7.1or later.
Use the following procedure to configure an Oracle snapshot policy that usesDatabase Backup Shares or Whole Database - Datafile Copy Share options.This procedure uses the Oracle Intelligent Policy, which makes configuration easier.
To configure a snapshot policy using a NetBackup appliance share
1 Open the policy you want to configure or create a new policy.
Do not use the Policy ConfigurationWizardwhen performing this procedure.
2 Select the Attributes tab.
3 Select Oracle as the policy type if this policy is new.
4 Select a policy storage unit from the Policy storage list.
■ Policy storage
Oracle combines snapshots (proxy) and stream-based backups as part of thesame backup. The storage that is indicated here is used for the stream-basedpart of the Database Backup Shares or Whole Database - Datafile CopyShare backup.
Select a storage lifecycle policy that is configured to contain the stream-based(non-snapshot) part of the database backup. The storage must use a storagelifecycle policy that is configured for non-snapshot backups.
5 Select Perform snapshot backups.
182NetBackup for Oracle with Snapshot ClientAbout configuring Snapshot Client with NetBackup for Oracle
6 Click Options to choose a snapshot method.
When you use the Database Backup Shares or Whole Database - DatafileCopy Share options, remote_vxfs is the only valid snapshot method.
Note: If there is more than one backup share that is associated with thedatabase instance, then Maximum Snapshots should be set to number ofrecovery points you want multiplied with number of backup shares. Example:If you want three recovery snapshot points and the database instance isassociated with two backup shares then Maximum Snapshots should be setto 6.
7 Select Retain snapshot for Instant Recovery or SLP management.
8 Select the Schedules tab.
9 Click New.
10 Configure a Full schedule for the database backup shares.
■ Type of backup: Select Full Backup. The Full Backup is used for boththe snapshot part of the database and the non-snapshot (stream-based)part of the Oracle database.
■ Override policy storage selection: Enable and select the SLP that isconfigured for a snapshot. (A snapshot SLP is one in which the firstoperation is a snapshot operation.) This option must be enabled so that theschedule storage overrides the policy storage with a snapshot SLP.
■ Retention: The retention for the streamed data is based on thenon-snapshot SLP that was indicated as the Policy storage in Step 4.
■ The non-snapshot SLP specified on the policy storage in Step 4determines the retention for the streamed data.
■ The snapshot SLP that is specified as the schedule storage (Overridepolicy storage selection) determines the retention for the snapshotdata.
When Database Backup Shares or Whole Database - Datafile Copy Shareis selected, it is recommended that an SLP is set up to backup from thesnapshots and copy snapshots to a storage unit. NetBackup retains thesnapshot backup image on disk for later use in SLP management.
Click OK to save the schedule.
11 (Optional) On the Schedules tab, configure an Archived Redo Log Backupschedule for the archived redo logs.
183NetBackup for Oracle with Snapshot ClientAbout configuring Snapshot Client with NetBackup for Oracle

12 Select the Instances and Databases tab and specify the instances to backup. The policy must include at least one instance. To continue to use the OracleIntelligent Policy method, select either Protect instances or Protect instancegroups.
13 On the Backup Selections tab, use the radio button to select DatabaseBackup Shares or Whole Database - Datafile Copy Share options.
14 (Optional) Configure other attributes and add any additional schedules.
Note: The NetBackup appliance media server can only be configured in a pureIPv4 or dual stack IPv4/IPv6 mode.
See “Configuring a snapshot policy for NetBackup for Oracle” on page 178.
See “About Snapshot Client effects” on page 192.
See “Configuring an OIP using a share on the NetBackup appliance (Copilot)”on page 83.
Restoring NetBackup for Oracle from a snapshotbackup
The following topics describe how to restore files, volumes, and file systems froma snapshot backup:
■ See “About restoring individual files from a NetBackup for Oracle snapshotbackup” on page 184.
■ See “About NetBackup for Oracle restores of volumes and file systems usingsnapshot rollback” on page 185.
■ See “Performing a NetBackup for Oracle point-in-time rollback restore from aSnapVault backup (UNIX)” on page 186.
■ See “Performing a snapshot rollback restore from the Java or Windows interface”on page 185.
About restoring individual files from a NetBackup for Oracle snapshotbackup
Data that is backed up with Snapshot Client methods is restored in the same wayas data that is backed up without Snapshot Client methods.
184NetBackup for Oracle with Snapshot ClientRestoring NetBackup for Oracle from a snapshot backup
Use this procedure for the files that were backed up with, or without, instant recoveryenabled. In all cases, Oracle determines the files that were backed up, and it initiatesa corresponding restore request to the database agent.
If instant recovery is enabled, NetBackup attempts to restore the file by using theunique restore methods available with the instant recovery feature. The type ofrestore method that NetBackup uses depends on your environment and the typeof backup performed. If NetBackup is unable to use any of the instant recoverymethods, it restores the file in the typical manner. Data is copied from the snapshotto the primary file system. Information on the instant recovery methods thatNetBackup uses is available.
See the NetBackup Snapshot Client Administrator’s Guide.
About NetBackup for Oracle restores of volumes and file systemsusing snapshot rollback
You can request that an entire volume or an entire file system be restored from aninstant recovery Snapshot backup. This type of a restore is called a point in timerollback. All the data in the snapshot is restored; single file restore is not availablein a rollback.
See the NetBackup Snapshot Client Administrator’s Guide.
The following considerations are relevant for NetBackup for Oracle restores:
■ Snapshot rollback overwrites the entire volume.
■ With NetBackup for Oracle, snapshot rollback always performs file verification.The agent checks for the following:
■ The requested files (number and names) are identical to those in the snapshot
■ The primary volume does not contain any files that were created after thesnapshot was made
If verification fails, the rollback aborts with status 249.
Performing a snapshot rollback restore from the Java orWindows interfaceThis topic describes how to perform a snapshot rollback restore from the Java orWindows interface.
To perform a snapshot rollback restore from the Java or Windows interface
1 Open the Backup, Archive, and Restore interface.
2 Select one of the following:
■ In the Java interface, click the Restore Files tab.
185NetBackup for Oracle with Snapshot ClientRestoring NetBackup for Oracle from a snapshot backup

■ In the Windows interface, select File > Select Files and Folders toRestore.If the data file you want to restore has not changes since it was backed up,the rollback may fail. Initiate the restore from a script and use the FORCEoption.
3 Select Actions > Select Restore Type > Point in Time Rollback.
4 Use the NetBackup for Oracle recovery wizard for the restore.
See “About NetBackup for Oracle restores” on page 125.
Performing a snapshot rollback restore using a script orRMAN commandThis topic describes how to perform a snapshot rollback restore using a script orRMAN command.
Note: If the data file you want to restore has not changed since it was backed up,the rollback may fail. Initiate the restore from a script and use the Oracle FORCEoption.
To specify a snapshot rollback restore using a script or RMAN command, followthis example:
■ If you want to use a shell script or RMAN command, set a new variable,NB_PC_ORA_RESTORE=rollback
■ Example:
RUN {
allocate channel t1 'SBT_TAPE';
send 'NB_ORA_PC_RESTORE=rollback';
sql 'alter tablespace TEST offline immediate'
restore tablespace TEST;
recover tablespace TEST;
release channel t1;
}
Performing a NetBackup for Oracle point-in-time rollbackrestore from a SnapVault backup (UNIX)When you select a point-in-time rollback restore from a SnapVault backup,NetBackup restores the entire subvolume (qtree) to a new subvolume (qtree) on
186NetBackup for Oracle with Snapshot ClientRestoring NetBackup for Oracle from a snapshot backup
the primary host. The restore does not overwrite the existing subvolume. Fileverification is not performed.
The format of the new subvolume name is as follows:
mountpointname_restore.timestamp
For example: subvol1_restore.2005.05.19.10h49m04s
To perform a NetBackup for Oracle point-in-time rollback restore from aSnapVault backup (UNIX)
1 Unmount the original subvolume, which is the subvolume that the restoreprocess did not overwrite.
2 Rename the original subvolume.
3 Rename the new subvolume with the name of the original.
4 Mount the new subvolume on the client. Use the ALTER DATABASE RENAME
DATAFILE command to point to the restored data file on the newly createdsubvolume.
About configuring NetBackup for Oracleblock-level incremental backups on UNIX
If only a small portion of a database changes on a daily basis, full database backupsare costly in terms of time and media. The Block-Level Incremental (BLI) Backupinterface extends the capabilities of NetBackup to back up only the file systemblocks that contain changed data blocks.
A database BLI backup is done at the file system block level, which means onlychanged file blocks are backed up. Unchanged blocks within the files are not backedup. The VxFS Storage Checkpoint facility tracks changed blocks in real time.Accordingly, a BLI backup does not need to search the entire volume for the modifiedblocks at backup time. BLI backup saves time, decreases the amount of backupmedia that is required, and significantly reduces CPU and network overhead duringbackups. In addition, BLI backup allows more frequent backups, so backup imagesare more up to date.
BLI backup is particularly useful for any large databases that are sized in terms ofhundreds of gigabytes or terabytes. Most traditional methods for database backuprequire that any change in the database—no matter how small—requires that theentire database is backed up. With BLI backup, only modified blocks (or file) needto be backed up.
The recommended method for performing BLI backups is the proxy BLI agent withRMAN. This method supports the other features of NetBackup for Oracle, including
187NetBackup for Oracle with Snapshot ClientAbout configuring NetBackup for Oracle block-level incremental backups on UNIX

the policy types and schedules and the convenience of the template generationwizard. It also remains tightly integrated with RMAN and its catalog, which greatlysimplifies administration tasks.
You can also perform backups with the script-based BLI method without RMAN.
See “About script-based block-level incremental (BLI) backups without RMAN”on page 271.
Note: Veritas recommends that Snapshot Client users who want to perform BLIbackups use BLI with RMAN.
NetBackup for Oracle also provides a method for BLI backup without RMAN thatuses scripts to put tablespaces into, and take them out of, backup mode. Thismethod is not recommended, and it requires a significantly different configuration.But for Oracle 12c, using script-based BLI backups without the use of RMAN arenot supported.
How BLI works with NetBackup for Oracle (UNIX)NetBackup supports BLI full backups and BLI incremental backups of Oracledatabases.
BLI backup supports two types of incremental backups: differential and cumulative.Full, differential incremental, and cumulative incremental backups are specified aspart of the policy schedule configuration. When a restore is performed, NetBackuprestores an appropriate full backup. Then it applies the changed blocks from theincremental backups.
Restoring any of the incremental backup images requires NetBackup to restore thelast full backup image and all the subsequent incremental backups. The restoreprocess continues until the specified incremental backup image is restored.NetBackup performs this restore process automatically, and it is completelytransparent. The media that stored the last full backup and the subsequentincremental backups must be available, or the restore cannot proceed.
Note that restoring a file rewrites all blocks in that file. The first subsequentdifferential incremental backup and or all subsequent cumulative incrementalbackups back up all the blocks in the restored file. After an entire database isrestored, the first subsequent backup results in a full backup.
The restore destination can be a VxFS, UFS (Solaris), JFS (AIX), or HFS (HP-UX)file system. The destination VxFS file system does not need to support the StorageCheckpoint feature to restore files. However, a VxFS file system with the StorageCheckpoint feature is needed to perform BLI backups of the restored data.
This topic uses the following terms to describe BLI backups:
188NetBackup for Oracle with Snapshot ClientAbout configuring NetBackup for Oracle block-level incremental backups on UNIX
■ Full Backup.A backup in which NetBackup backs up each database file completely, not justdata blocks that have changed since the last full or incremental backup.
■ Cumulative BLI Backup.This type of backup is a backup of all the changed blocks in the database filessince the last full backup. A cumulative BLI backup image contains only the datablocks of database files that changed since the last full backup. A cumulativeBLI backup can reduce the number of incremental backup images that must beapplied during a restore operation. This speeds up the restore process.
■ Differential BLI backup.A backup in which NetBackup performs a backup of only those data blocks(within the database files) that changed since the last backup. The previousbackup can be of type full, cumulative incremental, or differential incremental.
When NetBackup initiates BLI backups, it creates, manages, and uses theappropriate Storage Checkpoints of the filesystem(s) hosting the Oracle data filesystems. These Storage Checkpoints identify and maintain a list of modified blocks.
About the Storage Checkpoint facility and NetBackup for OracleThe BLI backup methodology uses the Storage Checkpoint facility in the VeritasFile System (VxFS). This facility is available through the Storage Foundation forOracle.
The VxFS Storage Checkpoint facility keeps track of the file blocks modified by thedatabase since the last backup. NetBackup with BLI backup leverages this facilityto back up only changed blocks for an incremental backup. The entire volume orfile is not backed up.
VxFS Storage Checkpoint is a disk-efficient and I/O-efficient snapshot of file systems.A Storage Checkpoint provides a consistent, stable view of a file system at theinstant when the file system was snapped or checkpointed. Instead of making aphysically separate copy of the file system, a Storage Checkpoint tracks changedfile system blocks. Disk space is saved and I/O overhead is significantly reduced.
Because the changed blocks are tracked, the VxFS Storage Checkpoint enablesBLI backups. VxFS Storage Checkpoint facility provides a consistent view of filesystems, which allows BLI backup to freeze the database image during databasebackups.
The Storage Checkpoint operation is similar to the snapshot file system mechanism.However, the Storage Checkpoint persists after a system restart which is unlike asnapshot. Also, the Storage Checkpoint operation is totally transparent to backupadministrators. The Checkpoint image is managed and available only through
189NetBackup for Oracle with Snapshot ClientAbout configuring NetBackup for Oracle block-level incremental backups on UNIX

NetBackup or through the VxDBA utility for database backup available with theVeritas Storage Foundation.
For more information on Storage Checkpoints, see the Veritas Storage FoundationAdministrator’s Guide.
You can take a Storage Checkpoint while the database is online or offline. To takea Storage Checkpoint while the database is online, you must enable archive logmode. During the creation of the Storage Checkpoint, all tablespaces are placedin backup mode.
Configuration requirements for BLI backups with NetBackup forOracle
Before you configure BLI backups, make sure that your configuration meets thefollowing requirements:
■ NetBackup for Oracle is installed, licensed, and configured.
■ NetBackup Snapshot Client is installed and configured, and the master servermust have a valid license for this option.
■ Veritas Storage Foundation for Oracle must be installed and configured.
■ Veritas File System must have Storage Checkpoint licensed.
For more information on requirements, see the NetBackup Snapshot ClientAdministrator’s Guide.
Configuring policies for BLI backups with NetBackup for OracleThis topic explains how to configure BLI backups for Oracle policies. BLI backupsdo not back up all database objects. Include schedules to perform stream-basedbackups.
Your backup configuration must ensure that the entire database can be successfullyrestored.
See “Configuration requirements for BLI backups with NetBackup for Oracle”on page 190.
To configure a policy for BLI backups, configure the following:
■ The BLI backup method on the policy attributes dialog box.
■ An Automatic Backup schedule to perform full and incremental snapshotbackups of the data files.
190NetBackup for Oracle with Snapshot ClientAbout configuring NetBackup for Oracle block-level incremental backups on UNIX
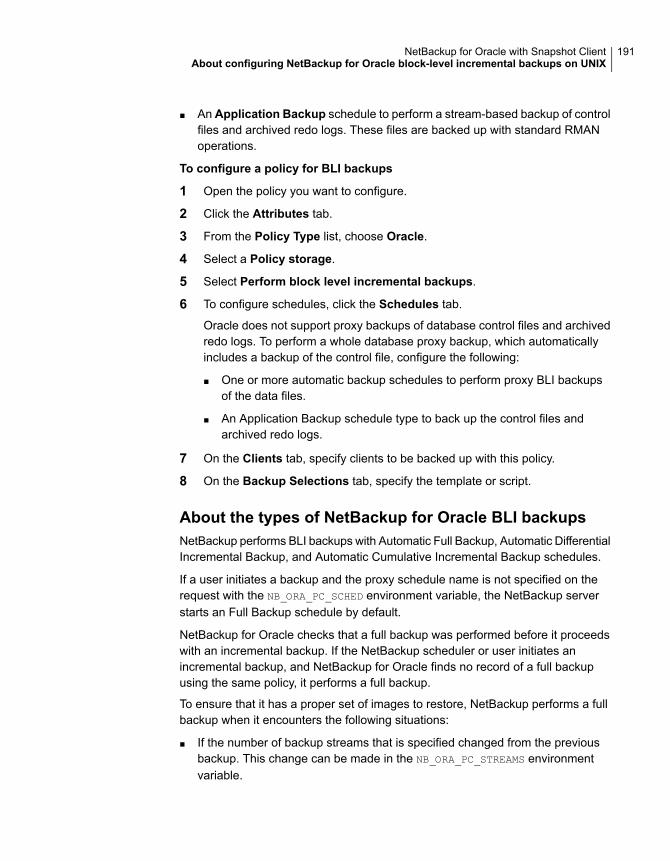
■ An Application Backup schedule to perform a stream-based backup of controlfiles and archived redo logs. These files are backed up with standard RMANoperations.
To configure a policy for BLI backups
1 Open the policy you want to configure.
2 Click the Attributes tab.
3 From the Policy Type list, choose Oracle.
4 Select a Policy storage.
5 Select Perform block level incremental backups.
6 To configure schedules, click the Schedules tab.
Oracle does not support proxy backups of database control files and archivedredo logs. To perform a whole database proxy backup, which automaticallyincludes a backup of the control file, configure the following:
■ One or more automatic backup schedules to perform proxy BLI backupsof the data files.
■ An Application Backup schedule type to back up the control files andarchived redo logs.
7 On the Clients tab, specify clients to be backed up with this policy.
8 On the Backup Selections tab, specify the template or script.
About the types of NetBackup for Oracle BLI backupsNetBackup performs BLI backups with Automatic Full Backup, Automatic DifferentialIncremental Backup, and Automatic Cumulative Incremental Backup schedules.
If a user initiates a backup and the proxy schedule name is not specified on therequest with the NB_ORA_PC_SCHED environment variable, the NetBackup serverstarts an Full Backup schedule by default.
NetBackup for Oracle checks that a full backup was performed before it proceedswith an incremental backup. If the NetBackup scheduler or user initiates anincremental backup, and NetBackup for Oracle finds no record of a full backupusing the same policy, it performs a full backup.
To ensure that it has a proper set of images to restore, NetBackup performs a fullbackup when it encounters the following situations:
■ If the number of backup streams that is specified changed from the previousbackup. This change can be made in the NB_ORA_PC_STREAMS environmentvariable.
191NetBackup for Oracle with Snapshot ClientAbout configuring NetBackup for Oracle block-level incremental backups on UNIX
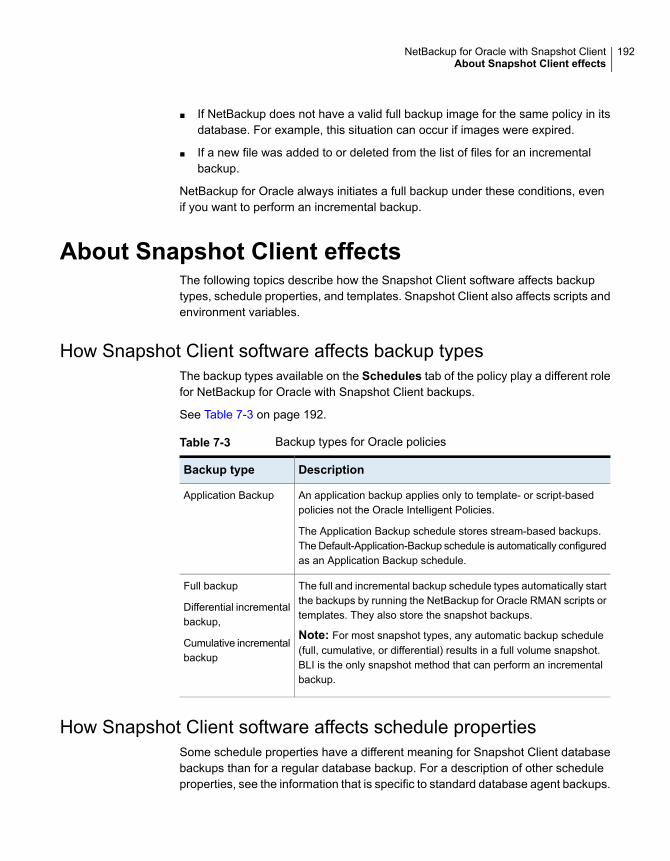
■ If NetBackup does not have a valid full backup image for the same policy in itsdatabase. For example, this situation can occur if images were expired.
■ If a new file was added to or deleted from the list of files for an incrementalbackup.
NetBackup for Oracle always initiates a full backup under these conditions, evenif you want to perform an incremental backup.
About Snapshot Client effectsThe following topics describe how the Snapshot Client software affects backuptypes, schedule properties, and templates. Snapshot Client also affects scripts andenvironment variables.
How Snapshot Client software affects backup typesThe backup types available on the Schedules tab of the policy play a different rolefor NetBackup for Oracle with Snapshot Client backups.
See Table 7-3 on page 192.
Table 7-3 Backup types for Oracle policies
DescriptionBackup type
An application backup applies only to template- or script-basedpolicies not the Oracle Intelligent Policies.
The Application Backup schedule stores stream-based backups.The Default-Application-Backup schedule is automatically configuredas an Application Backup schedule.
Application Backup
The full and incremental backup schedule types automatically startthe backups by running the NetBackup for Oracle RMAN scripts ortemplates. They also store the snapshot backups.
Note: For most snapshot types, any automatic backup schedule(full, cumulative, or differential) results in a full volume snapshot.BLI is the only snapshot method that can perform an incrementalbackup.
Full backup
Differential incrementalbackup,
Cumulative incrementalbackup
How Snapshot Client software affects schedule propertiesSome schedule properties have a different meaning for Snapshot Client databasebackups than for a regular database backup. For a description of other scheduleproperties, see the information that is specific to standard database agent backups.
192NetBackup for Oracle with Snapshot ClientAbout Snapshot Client effects

See “About schedule properties ” on page 88.
Table 7-4 explains the properties for Snapshot Client backups.
Table 7-4 Schedule properties
DescriptionProperty
Automatic Schedules:
Determines how long to retain history of the backups that themaster server schedules and also how long to retain snapshotbackups.
Application Schedules:
Determines how long to retain stream-based backups.
Retention
For snapshot backup, configureMultiple copies on the automaticbackup schedule.
For stream-based backups, configure Multiple copies on theApplication backup schedule.
Multiple Copies
Determines how often an Automatic schedule executes a backup.
Does not apply to Application backup schedules.
Frequency
How Snapshot Client software affects templates and scriptsYou can use a template that the NetBackup for Oracle wizard creates to performbackups with Snapshot Client. After they are created, templates reside on theNetBackup master server and are available for use by other NetBackup for Oracleclients.
See “About creating templates and shell scripts” on page 102.
In the RMAN template generation wizard, the Specify Maximum Limits selectionoptions on the backup limits screen are not applicable for snapshot backups. RMANuses these options only for conventional stream-based backups. If the templateincludes archived redo logs, NetBackup does use this option to back up the logs.
Whether you use a template or script, you must enable the advanced backup methodfor your clients. Configure this method on the Attributes tab of the policy. At runtime, the agent checks the policy attributes to determine if a Snapshot Client backupmethod is configured and performs a proxy file-based backup. A template defaultsto a single session for proxy backups.
If you use a script, the script must reside on each client that is included in the policy.Include the RMAN backup proxy command in the script to perform the advancedbackup method. Sample scripts are included with the installation.
193NetBackup for Oracle with Snapshot ClientAbout Snapshot Client effects

NetBackup for Oracle with Snapshot Client environment variablesYou can use environment variables to change the number of streams the proxycopy session uses or to specify an alternate backup schedule.
The following list shows the variables that you can to set that are specific toNetBackup for Oracle with Snapshot Client:
The NetBackup for Oracle schedule NetBackup uses fora proxy copy file-based backup. (This schedule can be Full,Differential Incremental, or Cumulative Incremental backuptype).
For scheduled backups, this variable is passed from thescheduler. When you create an RMAN template with theNetBackup for Oracle RMAN template generation wizard,this variable is automatically created in the template.
NB_ORA_PC_SCHED
Specifies the number of backup streams that NetBackupstarts simultaneously in each proxy copy session. When abackup starts, NetBackup groups all data files into aspecified number of backup streams that are based on thefile sizes. NetBackup tries to create streams of equal size.
The default value for NB_ORA_PC_STREAMS is 1.
Only a user can set this variable. When you create anRMAN template using the NetBackup for Oracle RMANtemplate generation wizard, this variable is automaticallycreated in the template when you provide a value for theNumber of parallel streams.
NB_ORA_PC_STREAMS
For NetBackup for Oracle with Snapshot Client, the order of precedence forenvironment variables is the same as for standard NetBackup for Oracle. Refer tothe instructions for how to configure the NetBackup and the user variables.
See “About configuring the run-time environment” on page 95.
NetBackup for Oracle installs sample scripts in the following location:
Windows:
install_path\NetBackup\dbext\oracle\samples\rman
UNIX:
/usr/openv/netbackup/ext/db_ext/oracle/samples/rman
The following are the scripts for NetBackup for Oracle with Snapshot Client thatshow how to configure the required variables:
194NetBackup for Oracle with Snapshot ClientAbout Snapshot Client effects
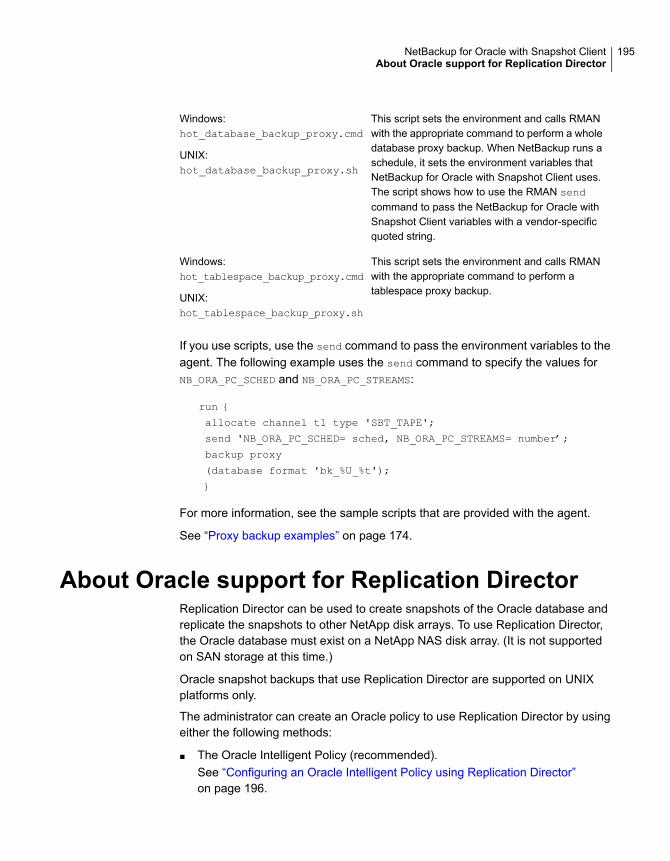
This script sets the environment and calls RMANwith the appropriate command to perform a wholedatabase proxy backup. When NetBackup runs aschedule, it sets the environment variables thatNetBackup for Oracle with Snapshot Client uses.The script shows how to use the RMAN sendcommand to pass the NetBackup for Oracle withSnapshot Client variables with a vendor-specificquoted string.
Windows:hot_database_backup_proxy.cmd
UNIX:hot_database_backup_proxy.sh
This script sets the environment and calls RMANwith the appropriate command to perform atablespace proxy backup.
Windows:hot_tablespace_backup_proxy.cmd
UNIX:hot_tablespace_backup_proxy.sh
If you use scripts, use the send command to pass the environment variables to theagent. The following example uses the send command to specify the values forNB_ORA_PC_SCHED and NB_ORA_PC_STREAMS:
run {
allocate channel t1 type 'SBT_TAPE';
send 'NB_ORA_PC_SCHED= sched, NB_ORA_PC_STREAMS= number’;
backup proxy
(database format 'bk_%U_%t');
}
For more information, see the sample scripts that are provided with the agent.
See “Proxy backup examples” on page 174.
About Oracle support for Replication DirectorReplication Director can be used to create snapshots of the Oracle database andreplicate the snapshots to other NetApp disk arrays. To use Replication Director,the Oracle database must exist on a NetApp NAS disk array. (It is not supportedon SAN storage at this time.)
Oracle snapshot backups that use Replication Director are supported on UNIXplatforms only.
The administrator can create an Oracle policy to use Replication Director by usingeither the following methods:
■ The Oracle Intelligent Policy (recommended).See “Configuring an Oracle Intelligent Policy using Replication Director”on page 196.
195NetBackup for Oracle with Snapshot ClientAbout Oracle support for Replication Director
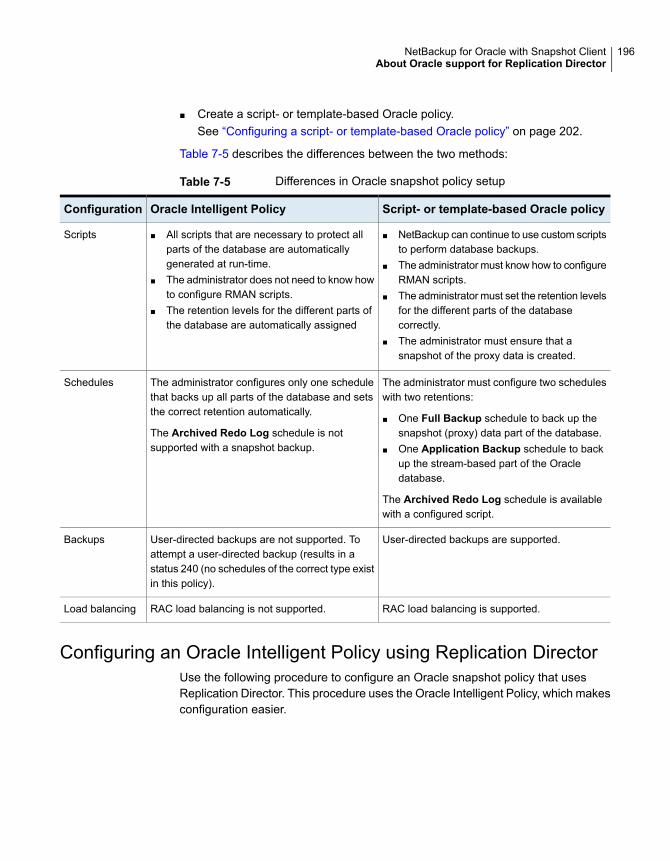
■ Create a script- or template-based Oracle policy.See “Configuring a script- or template-based Oracle policy” on page 202.
Table 7-5 describes the differences between the two methods:
Table 7-5 Differences in Oracle snapshot policy setup
Script- or template-based Oracle policyOracle Intelligent PolicyConfiguration
■ NetBackup can continue to use custom scriptsto perform database backups.
■ The administrator must know how to configureRMAN scripts.
■ The administrator must set the retention levelsfor the different parts of the databasecorrectly.
■ The administrator must ensure that asnapshot of the proxy data is created.
■ All scripts that are necessary to protect allparts of the database are automaticallygenerated at run-time.
■ The administrator does not need to know howto configure RMAN scripts.
■ The retention levels for the different parts ofthe database are automatically assigned
Scripts
The administrator must configure two scheduleswith two retentions:
■ One Full Backup schedule to back up thesnapshot (proxy) data part of the database.
■ One Application Backup schedule to backup the stream-based part of the Oracledatabase.
The Archived Redo Log schedule is availablewith a configured script.
The administrator configures only one schedulethat backs up all parts of the database and setsthe correct retention automatically.
The Archived Redo Log schedule is notsupported with a snapshot backup.
Schedules
User-directed backups are supported.User-directed backups are not supported. Toattempt a user-directed backup (results in astatus 240 (no schedules of the correct type existin this policy).
Backups
RAC load balancing is supported.RAC load balancing is not supported.Load balancing
Configuring an Oracle Intelligent Policy using Replication DirectorUse the following procedure to configure an Oracle snapshot policy that usesReplication Director. This procedure uses the Oracle Intelligent Policy, which makesconfiguration easier.
196NetBackup for Oracle with Snapshot ClientAbout Oracle support for Replication Director

To create an Oracle Intelligent Policy
1 In the NetBackup Administration Console, in the left pane, expandNetBackup Management > Policies.
2 On the Actions menu, click New > New Policy.
3 Type a unique name for the new policy in the Add a New Policy dialog boxand click OK.
Do not use the Policy Configuration Wizard to configure a policy forReplication Director.
4 Select theAttributes tab. The following items are specific to creating an Oraclepolicy for snapshots with Replication Director:
■ Policy typeFor NetBackup to perform Oracle backups, select Oracle. An Oracle tabappears.
■ Policy storageOracle combines snapshots (proxy) and stream-based backups as part ofthe same backup. The storage that is indicated here is used for thestream-based part of the Replication Director backup.Select a storage lifecycle policy that is configured to contain thestream-based (non-snapshot) part of the database backup. The storagemust use a storage lifecycle policy that is configured for non-snapshotbackups.
■ Use Replication DirectorEnableUse Replication Director to automatically select other options thatReplication Director requires:
■ Perform snapshot backups: Ensures that the policy creates snapshotsof the disk array.
■ Retain snapshots for Instant Recovery or SLPmanagement: Ensuresthat the policy retains the snapshot after the backup completes.
■ Options button
197NetBackup for Oracle with Snapshot ClientAbout Oracle support for Replication Director

■ Auto (default): The OpenStorage partner uses the bestsnapshot technology available to that partner to create thesnapshot.
■ Differential: The OpenStorage partner creates a snapshotthat is completely dependent on the source. This parameteris based on copy-on-write technology. The device creates acache object to maintain the original blocks of the snapshotwhen the blocks are modified.
■ Plex: The OpenStorage Partner creates a snapshot that iscompletely independent of the source snapshot. This optionis based on mirror-break-off technology. When a mirror deviceis attached to the source, the contents of the mirror device isexactly the same as the source device. When the relationshipis broken between the two, the mirror device is separated fromthe source. The mirror device acts as a point-in-time copy.
■ Clone: The OpenStorage Partner creates an independentcopy of the volume. The copy process can take some time asthe entire copy must be complete. The snapshot that is createdis independent of the source.
SnapshotType
Sets the maximum number of snapshots to be retained at onetime.
The default setting is one. Choose the number of snapshots thatis appropriate for your environment. Note that the maximumnumber of snapshots on a NetApp volume is 255.
When the maximum is reached, snapshot rotation occurs: Thenext snapshot causes the oldest to be deleted.
Managed by SLP retention is automatically selected if the Fixedor the Expire after Copy retention is currently selected in theSLP.
MaximumSnapshots
198NetBackup for Oracle with Snapshot ClientAbout Oracle support for Replication Director
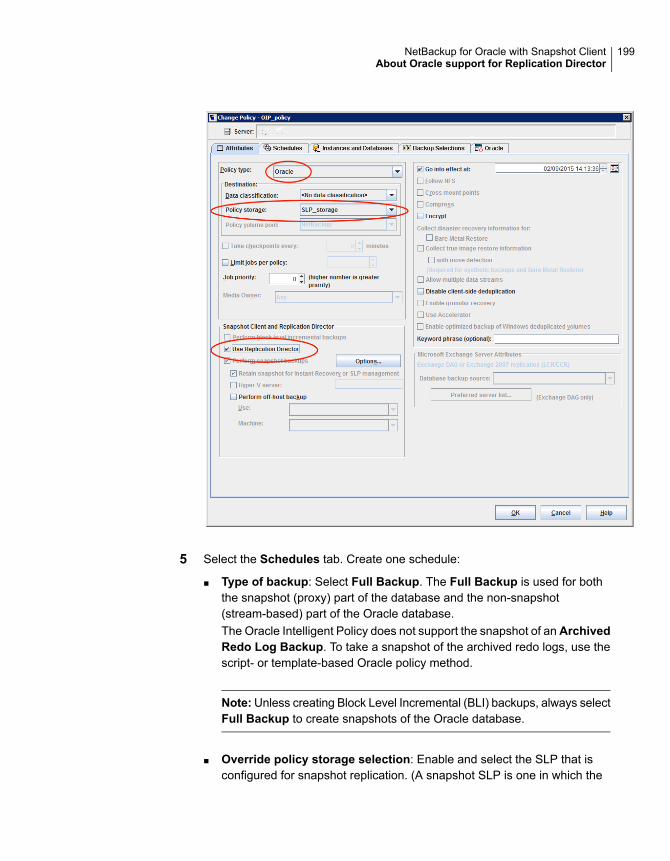
5 Select the Schedules tab. Create one schedule:
■ Type of backup: Select Full Backup. The Full Backup is used for boththe snapshot (proxy) part of the database and the non-snapshot(stream-based) part of the Oracle database.The Oracle Intelligent Policy does not support the snapshot of anArchivedRedo Log Backup. To take a snapshot of the archived redo logs, use thescript- or template-based Oracle policy method.
Note:Unless creating Block Level Incremental (BLI) backups, always selectFull Backup to create snapshots of the Oracle database.
■ Override policy storage selection: Enable and select the SLP that isconfigured for snapshot replication. (A snapshot SLP is one in which the
199NetBackup for Oracle with Snapshot ClientAbout Oracle support for Replication Director

first operation is a snapshot operation.) This option must be enabled sothat the schedule storage overrides the policy storage with a snapshot SLP.
■ Retention: The retention for the streamed data is based on thenon-snapshot SLP that was indicated as the Policy storage in Step 4.
■ The non-snapshot SLP specified on the policy storage in Step 4determines the retention for the streamed data.
■ The snapshot SLP that is specified as the schedule storage (Overridepolicy storage selection) determines the retention for the snapshotdata.
Click OK to save the schedule.
200NetBackup for Oracle with Snapshot ClientAbout Oracle support for Replication Director

6 Select the Instances and Databases tab and specify the instances to backup. The policy must include at least one instance. To continue to use the OracleIntelligent Policy method, select either Protect instances or Protect instancegroups.
Oracle Intelligent PolicyMethod
Script- or template-based Oracle policymethod
7 Select the Backup Selections tab. Select the parts of the database to backup. Note that the selection applies to all listed instances.
The following can be selected for the policies that use Replication Director:
■ Whole database: Backs up the entire database (default).
■ Partial database - Tablespaces: Backs up the tablespaces.
■ Partial database - Datafiles: Backs up the data files.
■ Fast Recovery Area (FRA): Do not select for a policy that uses ReplicationDirector.
■ Database Backup Shares: Do not select for a policy that uses ReplicationDirector.
■ Whole Database - Datafile Copy Share: Do not select for a policy thatuses Replication Director.
Note: If you back up the partial database, and later want to perform aPoint-in-time rollback restore, make sure that you select all of the tablespacesor data files from a partition in the Backup Selections.
For copy-back restores, this is not a requirement.
8 Select the Oracle tab to configure Oracle RMAN properties.
9 When the policy configuration is complete, click OK.
201NetBackup for Oracle with Snapshot ClientAbout Oracle support for Replication Director
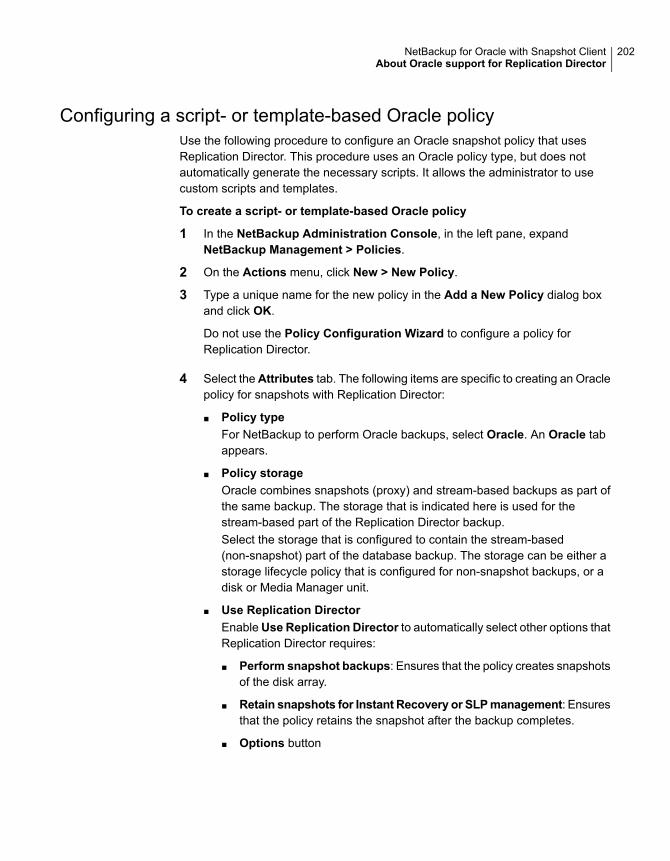
Configuring a script- or template-based Oracle policyUse the following procedure to configure an Oracle snapshot policy that usesReplication Director. This procedure uses an Oracle policy type, but does notautomatically generate the necessary scripts. It allows the administrator to usecustom scripts and templates.
To create a script- or template-based Oracle policy
1 In the NetBackup Administration Console, in the left pane, expandNetBackup Management > Policies.
2 On the Actions menu, click New > New Policy.
3 Type a unique name for the new policy in the Add a New Policy dialog boxand click OK.
Do not use the Policy Configuration Wizard to configure a policy forReplication Director.
4 Select theAttributes tab. The following items are specific to creating an Oraclepolicy for snapshots with Replication Director:
■ Policy typeFor NetBackup to perform Oracle backups, select Oracle. An Oracle tabappears.
■ Policy storageOracle combines snapshots (proxy) and stream-based backups as part ofthe same backup. The storage that is indicated here is used for thestream-based part of the Replication Director backup.Select the storage that is configured to contain the stream-based(non-snapshot) part of the database backup. The storage can be either astorage lifecycle policy that is configured for non-snapshot backups, or adisk or Media Manager unit.
■ Use Replication DirectorEnableUse Replication Director to automatically select other options thatReplication Director requires:
■ Perform snapshot backups: Ensures that the policy creates snapshotsof the disk array.
■ Retain snapshots for Instant Recovery or SLPmanagement: Ensuresthat the policy retains the snapshot after the backup completes.
■ Options button
202NetBackup for Oracle with Snapshot ClientAbout Oracle support for Replication Director

■ Auto (default): The OpenStorage partner uses the bestsnapshot technology available to that partner to create thesnapshot.
■ Differential: The OpenStorage partner creates a snapshotthat is completely dependent on the source. This parameteris based on copy-on-write technology. The device creates acache object to maintain the original blocks of the snapshotwhen the blocks are modified.
■ Plex: The OpenStorage Partner creates a snapshot that iscompletely independent of the source snapshot. This optionis based on mirror-break-off technology. When a mirror deviceis attached to the source, the contents of the mirror device isexactly the same as the source device. When the relationshipis broken between the two, the mirror device is separated fromthe source. The mirror device acts as a point-in-time copy.
■ Clone: The OpenStorage Partner creates an independentcopy of the volume. The copy process can take some time asthe entire copy must be complete. The snapshot that is createdis independent of the source.
SnapshotType
Sets the maximum number of snapshots to be retained at onetime.
The default setting is one. Choose the number of snapshots thatis appropriate for your environment. Note that the maximumnumber of snapshots on a NetApp volume is 255.
When the maximum is reached, snapshot rotation occurs: Thenext snapshot causes the oldest to be deleted.
Managed by SLP retention is automatically selected if the Fixedor the Expire after Copy retention is currently selected in theSLP.
MaximumSnapshots
203NetBackup for Oracle with Snapshot ClientAbout Oracle support for Replication Director
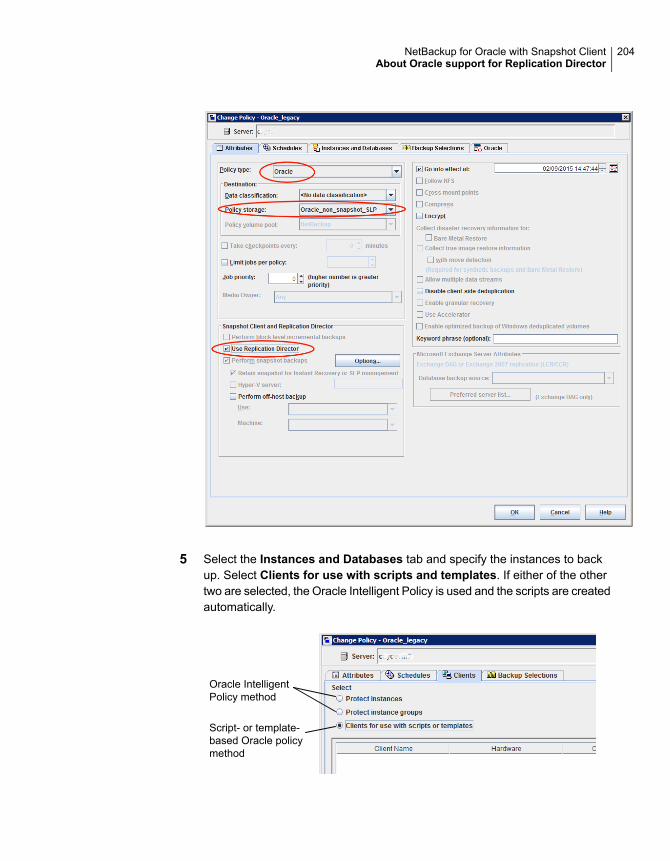
5 Select the Instances and Databases tab and specify the instances to backup. Select Clients for use with scripts and templates. If either of the othertwo are selected, the Oracle Intelligent Policy is used and the scripts are createdautomatically.
Oracle IntelligentPolicy method
Script- or template-based Oracle policymethod
204NetBackup for Oracle with Snapshot ClientAbout Oracle support for Replication Director

After selecting the Clients for use with scripts and templates option, amessage appears that describes the effect of this choice:
■ Existing selections (if any) for this policy are erased.
■ The Oracle tab is removed from this policy.
■ Another effect is that the Selections tab turns into the Clients tab.
Click Yes to continue Oracle policy configuration.
6 Click Yes to save and close the entire policy.
7 In the NetBackup Administration Console, select the policy and click therefresh button in the toolbar.
8 Re-open the policy and select the Schedules tab.
Modify the Default-Application-Backup schedule:
■ Override policy storage selection: Enable and select a non-snapshotstorage unit or a non-snapshot SLP. This is most likely the storage unit thatis specified on the Attributes tab. Indicating it here makes the selectionexplicit.
■ Retention: The policy or SLP indicates the retention for the backup:
■ When the storage is an SLP, the SLP determines the retention and noselection is possible here.
■ When the storage is not an SLP, the schedule determines the retentionand a selection is possible here.
Click OK to save the schedule.
205NetBackup for Oracle with Snapshot ClientAbout Oracle support for Replication Director
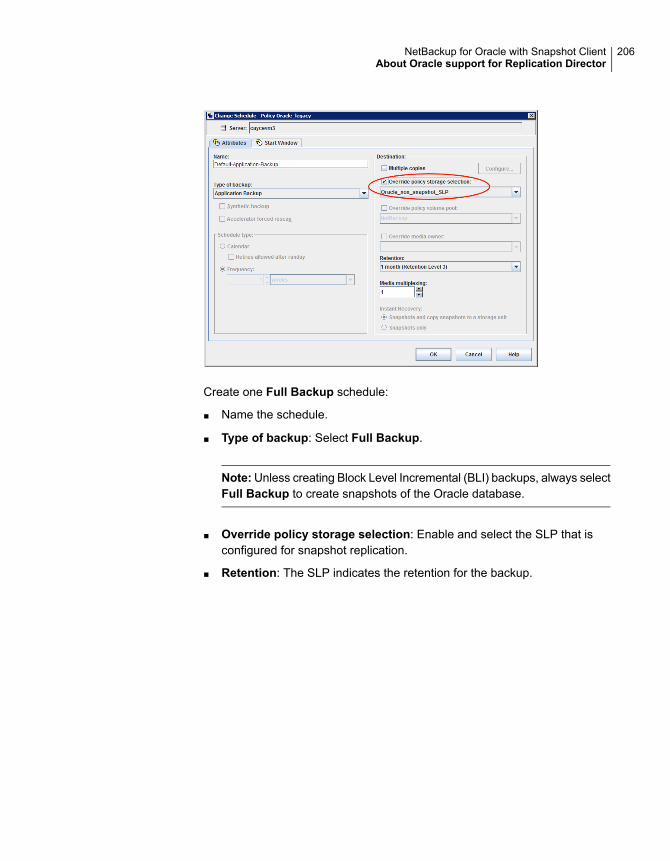
Create one Full Backup schedule:
■ Name the schedule.
■ Type of backup: Select Full Backup.
Note:Unless creating Block Level Incremental (BLI) backups, always selectFull Backup to create snapshots of the Oracle database.
■ Override policy storage selection: Enable and select the SLP that isconfigured for snapshot replication.
■ Retention: The SLP indicates the retention for the backup.
206NetBackup for Oracle with Snapshot ClientAbout Oracle support for Replication Director
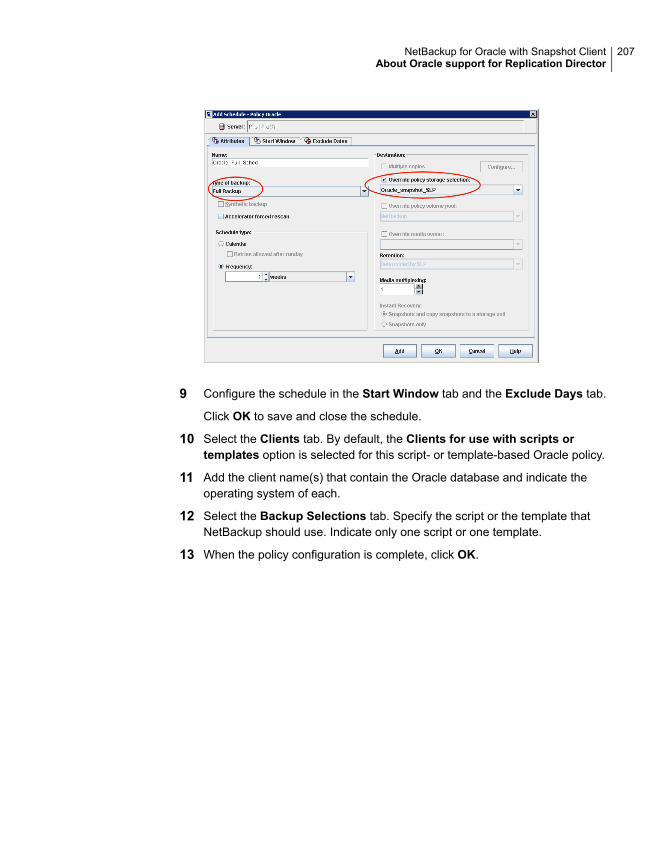
9 Configure the schedule in the Start Window tab and the Exclude Days tab.
Click OK to save and close the schedule.
10 Select the Clients tab. By default, the Clients for use with scripts ortemplates option is selected for this script- or template-based Oracle policy.
11 Add the client name(s) that contain the Oracle database and indicate theoperating system of each.
12 Select the Backup Selections tab. Specify the script or the template thatNetBackup should use. Indicate only one script or one template.
13 When the policy configuration is complete, click OK.
207NetBackup for Oracle with Snapshot ClientAbout Oracle support for Replication Director

TroubleshootingThis chapter includes the following topics:
■ About troubleshooting NetBackup for Oracle
■ About NetBackup for Oracle troubleshooting steps
■ NetBackup debug logs and reports
■ Enabling the debug logs manually (Windows)
■ Enabling the debug logs manually (UNIX)
■ About the NetBackup for Oracle log files
■ Setting the debug level on a Windows client
■ Setting the debug level on a UNIX client
■ About RMAN utility logs
■ Troubleshooting RMAN backup or restore errors
■ Troubleshooting the UNIX browser interface and wizards
■ Troubleshooting NetBackup for Oracle with Snapshot Client
■ Minimizing timeout failures on large database restores
■ Minimizing the loading and unloading of tapes for database backups
■ Delays in backup job transfer and completion
8Chapter
About troubleshooting NetBackup for OracleNetBackup, NetBackup for Oracle, and the Oracle Recovery Manager (RMAN) allprovide reports on database backup, archive, and restore operations. These reportsare useful for finding the errors that are associated with those applications.
For more information about debug logs and reports, refer to the NetBackupAdministrator’s Guide, Volume I.
AboutNetBackup forOracle troubleshooting stepsWhen troubleshooting NetBackup for Oracle problems, the following items arereferred to as the API:
■ On Windows, orasbt.dll is called the API.
■ On UNIX, the libobk module is called the API. Many media manager vendorsalso call the libobk module DMO (Database Module).
To perform this procedure, ensure that NetBackup is properly installed andconfigured:
209TroubleshootingAbout troubleshooting NetBackup for Oracle
To perform general troubleshooting steps
1 When verifying your installation, ensure that the NetBackup for Oracle binariesexist.
On UNIX, these are located in /usr/openv/netbackup/bin.
The binaries are as follows:
The binary resides on the client and both theNetBackup scheduler and the graphicalinterface uses the binary to start backups.The main purpose of bphdb is to run anOracle Intelligent Policy or a template or ashell script that calls rman, bporaexp, orbporaimp.
On Windows:install_path\NetBackup\bin\bphdb.exe
On UNIX: bphdb
Provides the functions that RMAN can call.On Windows:c:\Windows\System32\orasbt.dll
A shared library module that contains thefunctions that RMAN can call. This library isloaded when RMAN is started. The name ofthis binary depends on the operating system.
See “About linking Oracle RMAN withNetBackup for UNIX” on page 35.
On UNIX: libobk
2 For the Backup, Archive, and Restore interface and the Oracle Intelligent Policy,verify that the following binaries exist.
On Windows: install_path\NetBackup\bin\bpdbsbora.exe
On Windows: install_path\NetBackup\bin\bpubsora.exe
On Windows: install_path\NetBackup\bin\dbsbrman.dll
On UNIX: /usr/openv/netbackup/bin/bpdbsbora
On UNIX: /usr/openv/netbackup/bin/bpubsora
On UNIX: /usr/openv/lib/libdbsbrman.so (libdbsbrman.sl on HP-UX)
3 Check that both the NetBackup server and client software work properly. Thatis, check that normal operating system files can be backed up and restoredfrom the client. The NetBackup client must be running the same version ofsoftware as the NetBackup server.
4 The logs can become very large, especially bpdbm. Ensure that enough freedisk space exists in the log directory disk partition.
210TroubleshootingAbout NetBackup for Oracle troubleshooting steps

5 Check that the following NetBackup log directories exist:
■ On the Windows client: bpdbsbora, bporaexp, bporaimp, bpubsora,dbclient, bphdb, bpfis, bplist, and bpcd.
■ On the UNIX client: bpdbsbora, bporaexp (or boraexp64), bporaimp (orboraimp64), bpubsora, dbclient, bphdb, bpfis, and bpcd. These directoriesmust have 777 permissions.
■ On the master server: bprd and bpdbm.
■ On the host with the storage unit: bpbrm and bptm.
The VERBOSE level must be 5.
6 On UNIX, confirm the /usr/openv/netbackup/logs/user_ops directory andthe subdirectories have 777 permissions. They must exist and be accessiblefor the applications to operate correctly.
See “Permissions for NetBackup for Oracle log directories” on page 45.
NetBackup debug logs and reportsThe NetBackup server and client software let you enable detailed debugging logs.The information in these log files can help you troubleshoot the problems that occuroutside of either the database agent or RMAN.
Note the following with regard to these logs:
■ These logs do not reveal the errors that occur when RMAN is running unlessthose errors also affect NetBackup. Oracle may (or may not) write errors in theapplication to the NetBackup logs. Your best sources for Oracle error informationare the logs provided by Oracle.
■ Generally, each debug log corresponds to a NetBackup process and executable.However, for an RMAN backup, the debug log is created in the dbclient
directory, which has no corresponding executable.
More detailed information about the debug log files is available.
See the NetBackup Troubleshooting Guide.
Also refer to the following file:
Windows:
install_path\NetBackup\logs\README.debug file
UNIX:
/usr/openv/netbackup/logs/README.debug file
211TroubleshootingNetBackup debug logs and reports
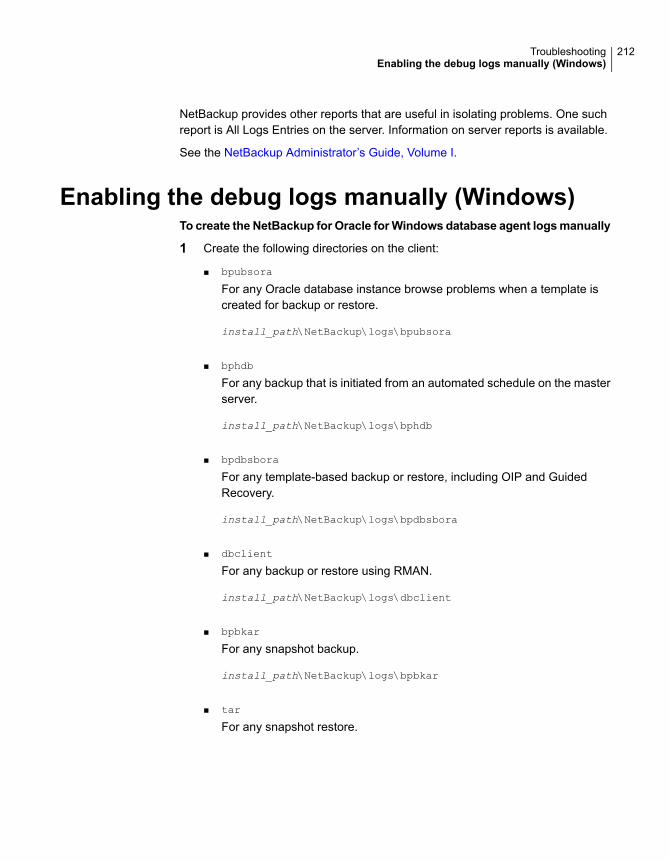
NetBackup provides other reports that are useful in isolating problems. One suchreport is All Logs Entries on the server. Information on server reports is available.
See the NetBackup Administrator’s Guide, Volume I.
Enabling the debug logs manually (Windows)To create the NetBackup for Oracle forWindows database agent logsmanually
1 Create the following directories on the client:
■ bpubsora
For any Oracle database instance browse problems when a template iscreated for backup or restore.
install_path\NetBackup\logs\bpubsora
■ bphdb
For any backup that is initiated from an automated schedule on the masterserver.
install_path\NetBackup\logs\bphdb
■ bpdbsbora
For any template-based backup or restore, including OIP and GuidedRecovery.
install_path\NetBackup\logs\bpdbsbora
■ dbclient
For any backup or restore using RMAN.
install_path\NetBackup\logs\dbclient
■ bpbkar
For any snapshot backup.
install_path\NetBackup\logs\bpbkar
■ tar
For any snapshot restore.
212TroubleshootingEnabling the debug logs manually (Windows)

install_path\NetBackup\logs\tar
2 Verify the user or group that the Oracle process (process that loadsorasbt.dll) has appropriate permissions to write to the following directoriesif they exist. If the following directories do not exist, the directories are createdautomatically with the correct permissions.
install_path\NetBackup\logs\user_ops
install_path\NetBackup\logs\user_ops\dbext
install_path\NetBackup\logs\user_ops\dbext\logs
Also verify that the user or group that the Oracle process runs as hasappropriate permissions to write to the log directories in step 1.
3 On the NetBackup server or servers, create the debug log directories for thelegacy processes that interact with the Oracle agent.
On the master server:
install_path\NetBackup\logs\bprd
On the media server or servers:
install_path\NetBackup\logs\bpbrm
install_path\NetBackup\logs\bptm
4 The debug logs for unified processes on the server and the client hosts arecreated automatically by NetBackup.
NetBackup writes unified logs to install_path\NetBackup\logs.
For information on how to use logs and reports, see the NetBackupTroubleshooting Guide.
Enabling the debug logs manually (UNIX)To create the NetBackup for Oracle for UNIX database agent logs manually
1 Create the following directories on the client:
■ bpubsora
For any Oracle database instance browse problems when a template iscreated for backup or restore.
/usr/openv/netbackup/logs/bpubsora
■ bphdb
213TroubleshootingEnabling the debug logs manually (UNIX)

For any backup that is initiated from an automated schedule on the masterserver.
/usr/openv/netbackup/logs/bphdb
■ bpdbsbora
For any template-based backup or restore, including OIP and GuidedRecovery.
/usr/openv/netbackup/logs/bpdbsbora
■ dbclient
For any backup or restore using RMAN.
/usr/openv/netbackup/logs/dbclient
■ bpbkar
For any snapshot backup.
/usr/openv/netbackup/logs/bpbkar
■ nbtar
For any snapshot restore.
/usr/openv/netbackup/logs/tar
2 Verify the user or group that the Oracle process (process that loads libobk)has appropriate permissions to write to the following directories if they exist. Ifthe following directories do not exist, the directories are created automaticallywith the correct permissions.
/usr/openv/logs/user_ops
/usr/openv/logs/user_ops/dbext
/usr/openv/logs/user_ops/dbext/logs
Also verify that the user or group that the Oracle process runs as hasappropriate permissions to write to the log directories in step 1.
214TroubleshootingEnabling the debug logs manually (UNIX)
3 On the NetBackup server or servers, create the debug log directories for thelegacy processes that interact with the Oracle agent.
On the master server:
/usr/openv/logs/bprd
On the media server or servers:
/usr/openv/logs/bpbrm
/usr/openv/logs/bptm
4 The debug logs for unified processes on the server and the client hosts arecreated automatically by NetBackup.
NetBackup writes unified logs to /usr/openv/logs.
For information on how to use logs and reports, see the NetBackupTroubleshooting Guide.
About the NetBackup for Oracle log filesTable 8-1 describes the logs that are created when you create the log directories.Use a text editor to view the contents of the logs.
The log are located in the following directories:
Windows: install_path\NetBackup\logs\<cmd>
UNIX: /usr/openv/netbackup/logs/<cmd>
For example, the logs for bphdb all appear in theinstall_path\NetBackup\logs\bphdb directory (Windows) or the/usr/openv/netbackup/logs/bphdb directory (UNIX).
215TroubleshootingAbout the NetBackup for Oracle log files
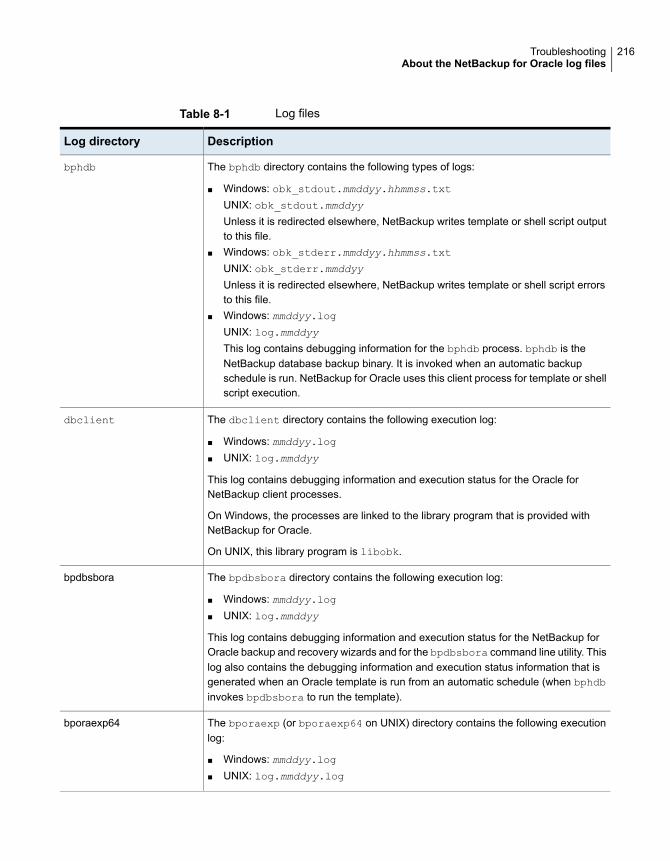
Table 8-1 Log files
DescriptionLog directory
The bphdb directory contains the following types of logs:
■ Windows: obk_stdout.mmddyy.hhmmss.txtUNIX: obk_stdout.mmddyyUnless it is redirected elsewhere, NetBackup writes template or shell script outputto this file.
■ Windows: obk_stderr.mmddyy.hhmmss.txtUNIX: obk_stderr.mmddyyUnless it is redirected elsewhere, NetBackup writes template or shell script errorsto this file.
■ Windows: mmddyy.logUNIX: log.mmddyyThis log contains debugging information for the bphdb process. bphdb is theNetBackup database backup binary. It is invoked when an automatic backupschedule is run. NetBackup for Oracle uses this client process for template or shellscript execution.
bphdb
The dbclient directory contains the following execution log:
■ Windows: mmddyy.log■ UNIX: log.mmddyy
This log contains debugging information and execution status for the Oracle forNetBackup client processes.
On Windows, the processes are linked to the library program that is provided withNetBackup for Oracle.
On UNIX, this library program is libobk.
dbclient
The bpdbsbora directory contains the following execution log:
■ Windows: mmddyy.log■ UNIX: log.mmddyy
This log contains debugging information and execution status for the NetBackup forOracle backup and recovery wizards and for the bpdbsbora command line utility. Thislog also contains the debugging information and execution status information that isgenerated when an Oracle template is run from an automatic schedule (when bphdbinvokes bpdbsbora to run the template).
bpdbsbora
The bporaexp (or bporaexp64 on UNIX) directory contains the following executionlog:
■ Windows: mmddyy.log■ UNIX: log.mmddyy.log
bporaexp64
216TroubleshootingAbout the NetBackup for Oracle log files
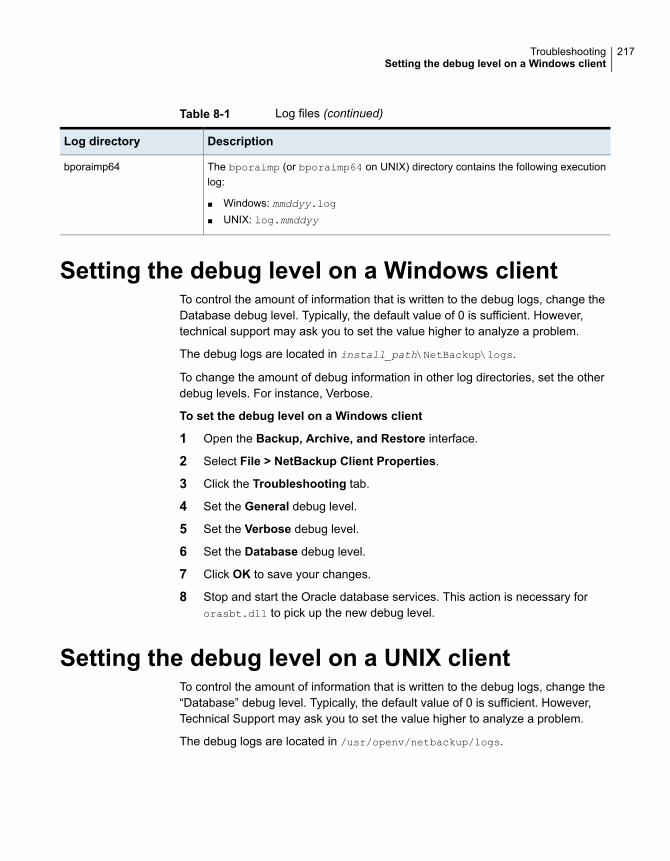
Table 8-1 Log files (continued)
DescriptionLog directory
The bporaimp (or bporaimp64 on UNIX) directory contains the following executionlog:
■ Windows: mmddyy.log■ UNIX: log.mmddyy
bporaimp64
Setting the debug level on a Windows clientTo control the amount of information that is written to the debug logs, change theDatabase debug level. Typically, the default value of 0 is sufficient. However,technical support may ask you to set the value higher to analyze a problem.
The debug logs are located in install_path\NetBackup\logs.
To change the amount of debug information in other log directories, set the otherdebug levels. For instance, Verbose.
To set the debug level on a Windows client
1 Open the Backup, Archive, and Restore interface.
2 Select File > NetBackup Client Properties.
3 Click the Troubleshooting tab.
4 Set the General debug level.
5 Set the Verbose debug level.
6 Set the Database debug level.
7 Click OK to save your changes.
8 Stop and start the Oracle database services. This action is necessary fororasbt.dll to pick up the new debug level.
Setting the debug level on a UNIX clientTo control the amount of information that is written to the debug logs, change the“Database” debug level. Typically, the default value of 0 is sufficient. However,Technical Support may ask you to set the value higher to analyze a problem.
The debug logs are located in /usr/openv/netbackup/logs.
217TroubleshootingSetting the debug level on a Windows client
To set the debug level on a UNIX client
◆ Enter the following line in the bp.conf file.
VERBOSE = X
Where X is the debug level you want.
About RMAN utility logsRMAN uses a command language interpreter, and it can be run in interactive orbatch mode. You can use the following syntax to specify a log file on the commandline to record significant RMAN actions:
msglog ‘logfile_name’
Troubleshooting RMAN backup or restore errorsAn RMAN backup error can originate from NetBackup or from Oracle, as follows:
■ On the NetBackup side, an error can be from the API, from the NetBackup serveror client, or from Media Manager.
■ On the Oracle side, an error can be from RMAN or from the target databaseinstance.
Veritas suggests that you use the following steps when troubleshooting a failedoperation:
■ Check the logs to determine the source of the error.
■ Troubleshoot each stage of the backup or restore.
Verifying the RMAN script on UNIXThe following procedure describes how to verify that the RMAN script workscorrectly.
To verify the RMAN script
1 Use RMAN to make a backup directly to disk. Do not use NetBackup.
2 Use RMAN with NetBackup to create a backup.
218TroubleshootingAbout RMAN utility logs
3 Check the /usr/openv/netbackup/logs/dbclient directory permissions.They should be set to 777.
4 Look for a log file in /usr/openv/netbackup/logs/dbclient.
If no log file exists, libobk is not linked into Oracle properly.
See “Testing configuration settings for NetBackup for Oracle” on page 112.
Troubleshooting each stage of the backup or restoreThe following explains the sequence of events for an action initiated by RMAN andsuggests solutions for the problems that can occur at each point in the sequence:
■ rman starts.
A backup or restore can be started in any of the following ways:
■ From an RMAN backup or restore initiated from the operating system promptsuch as:
rman target user/pwd[@TNS_alias] \
rcvcat user/pwd[@TNS_alias]\
cmdfile RMAN_script_file_name
Where the RMAN_script_file_name is fully qualified.
■ Using a template that runs from the NetBackup client interface or frombpdbsbora.
■ Manually from the administrator interface on the master server.
■ Automatically by an automatic backup schedule.If an error occurs now, check the RMAN log.
■ RMAN verifies its environment and then issues requests to the API.On Windows, some information, such as the NetBackup version, API versions,and trace file name, is registered with RMAN. An error now is usually due to aproblem with client and server communication. Check the messages in the bprd
and the bpcd logs for clues.On UNIX, some information, such as the NetBackup version, API versions, tracefile name, and NetBackup signal handlers, is registered with RMAN. An errornow is usually due to a problem with client and server communication. Checkthe messages in the bprdand the bpcd logs for clues. Also verify the bp.conf
entries on the client.
■ RMAN issues a backup or restore request.
219TroubleshootingTroubleshooting RMAN backup or restore errors

The API gathers necessary parameters and sends the backup or restorerequest to the NetBackup server. The API waits until both the server and clientare ready to transfer data before it returns to the request.The API then sends this information to the master server’s bprd process.To troubleshoot a problem in this part of the first sequence, examine the followingfile:Windows:
install_path\NetBackup\logs\dbclient\mmddyy.log
UNIX:
/usr/openv/netbackup/logs/dbclient/log.mmddyy
If the bprd process failed, check the logs for bprd and bpbrm.A failure now is frequently due to bad NetBackup server or Oracle policyconfiguration parameters.NetBackup can usually select the correct Oracle policy and schedules. ButNetBackup can select a policy or schedule in error if there are several Oraclepolicies in its database.On Windows, try setting the SERVER and NB_ORA_POLICY values in the clientenvironment.On UNIX, try setting the SERVER and POLICY values in the bp.conf file on theclient or by setting environment variables.For example, the following C Shell setenv commands specify the Oracle policy,schedule, and server for NetBackup to use:
setenv NB_ORA_POLICY policyname
setenv NB_ORA_SCHED application_backup_schedule_name
setenv NB_ORA_SERV NetBackup_server
■ RMAN issues read or write requests to the API, which then transfers data to orfrom the NetBackup server.A failure here is probably due to NetBackup media, network, or timeout errors.
■ RMAN tells the API to close the session.The API waits for the server to complete its necessary actions (for example, itverifies the backup image) and then exits.
An error can originate from either NetBackup or RMAN, as follows:
■ RMAN aborts if it encounters an error while it reads a data file during thebackup (for example, if Oracle blocks are out of sequence). It also aborts ifNetBackup sends a bad backup image during the restore.
220TroubleshootingTroubleshooting RMAN backup or restore errors
■ NetBackup might return an error code to the API if for some reason it couldnot complete the backup successfully.
Troubleshooting the UNIX browser interface andwizards
If you do not see the Oracle database instance in your Backup, Archive, and Restoreinterface, verify the following:
■ A NetBackup for Oracle license is installed on the master server.
■ For browsing in the restore window, the policy type must be set to Oracle.
Perform the following actions to change the client policy type:
■ On the Actions menu, select Specify NetBackup Machines and Policytype.
■ In the Policy type drop-down list, select Oracle.
■ Click OK.
On Windows, to change the client policy type:
■ On the File menu, select Specify NetBackup Machines and Policy Type.
■ On the Specify NetBackupMachines dialog, click theClients/Policy Typetab.
■ In the Policy Type drop-down list, select Oracle.
■ Click OK.
■ On UNIX, the oratab file is in the correct location (/etc/oratab or/var/opt/oracle/oratab) and contains all of the available Oracle SIDs.Although Oracle allows the use of wild cards in the oratab file, the NetBackupBAR GUI requires that each SID be specified.
If you have trouble connecting to the Oracle database, verify the following:
■ Make sure that the database is in a mount state or an open state.
■ Make sure that your login ID and password have Oracle SYSDBA orSYSBACKUP privileges. Initially, NetBackup for Oracle attempts OSAuthentication to log on. If that fails, you are prompted for a user name,password, and an optional Transparent Network Substrate (TNS) alias. Theuser name and password you enter must have SYSDBA or SYSBACKUPprivileges.
■ In a clustered environment, failure to connect to the database can mean aproblem with the network configuration. The browser must connect locally.
221TroubleshootingTroubleshooting the UNIX browser interface and wizards
However, in some environments, all connections are considered to be remoteconnections, even a connection to a local database. This behavior is true forexample in an Oracle Real Application Clusters (RAC) environment. In suchcases, you must make the connection using a TNS alias.
In a Linux environment, Oracle backups and restores fail if the Linux logon is notthe Oracle user. In such cases, Oracle generates the following message:
INF - ORA-19554: error allocating device, device type: SBT_TAPE, device name:
INF - ORA-27211: Failed to load Media Management Library
If you want to start an Oracle job as someone other than an Oracle user, augmentthe default shared library search path. Use the Linux ldconfig(8) command to add$ORACLE_HOME/lib to the search path.
Troubleshooting NetBackup for Oracle withSnapshot Client
Debug logs used for troubleshooting the problems that occur with NetBackup andNetBackup for Oracle have been discussed in previous areas. In addition to thoselogs, there are debug logs used for troubleshooting NetBackup for Oracle withSnapshot Client.
Snapshot Client backup and debug messages are written to the followingsubdirectories of:
Windows:
install_path\NetBackup\logs
UNIX:
/usr/openv/netbackup/logs/
The logs are as follows:
■ The bpbrm log is on the NetBackup media server.
■ The bptm/bpdm log is on the NetBackup media server.
■ The bpbkar log is on the NetBackup client and alternate client.
■ The bpfis log is on the NetBackup client and alternate client.
■ The bppfi log is on the NetBackup client or alternate client.
Snapshot Client restore and debug messages are written to the followingsubdirectories on the NetBackup master server:
222TroubleshootingTroubleshooting NetBackup for Oracle with Snapshot Client

■ The bprestore is almost always a client log on the NetBackup host that initiatedthe restore by using the bprestore command.
■ The bprd is on the NetBackup master server.
■ The bpbrm is on the NetBackup master server.
■ The bptm/bpdm is on the NetBackup media server. Both the tape and the diskbackup log to bptm, disk backups also log to bpdm.
■ The tar is on the NetBackup client or redirected client.
Additional help for troubleshooting most installation and other issues is availablein the NetBackup Snapshot Client Administrator’s Guide.
See “About NetBackup for Oracle troubleshooting steps” on page 209.
Minimizing timeout failures on large databaserestores
Large database restores sometimes fail when multiple restore sessions competefor resources. In this situation, a restore session can be delayed while waiting formedia or device access. If the delay is too long, the restore session times out. Usethe following procedure to minimize session timeouts and to allow the restores tocomplete successfully.
To minimize timeout failures on large database restores
1 In the NetBackup Administration Console, expand NetBackup Management> Host Properties > Clients.
2 Double-click the client.
3 Select the Timeouts properties.
4 Set the Client read timeout property to a large value.
The default for the Client read timeout setting is 300 seconds (5 minutes).For database agent clients, increase the value significantly from therecommended value.
See the NetBackup Administrator’s Guide, Volume 1.
For example, change this setting to 30-60 minutes to minimize timeout errors.
5 Click OK for each client.
223TroubleshootingMinimizing timeout failures on large database restores

Note: This change may delay detecting problems during subsequent backups.Consider putting the original value back in place once any restore that requires achange is complete.
Minimizing the loading and unloading of tapes fordatabase backups
You can minimize excessive unloading and reloading of tapes betweenmultistreamed database backups by changing the media settings for the master orthe media server.
See the NetBackup Administration Guide, Volume 1 for details.
To minimize loading and unloading of tapes
1 Open the NetBackup Administration Console.
2 Choose Host Properties.
3 Choose Master Servers or Media Servers.
4 Double-click on the name of the server.
5 In the left pane, click Media.
6 Configure the following settings:
■ Media unmount delay
■ Media request delayUse this variable only with non-robotic drives, such as tape stackers.
Delays in backup job transfer and completionSometimes you may see a Oracle backup job pause for an extended time duringthe data transfer. Also, the backup job may appear to hang after the transfercompletes but before the job completes. The delay may be due to one of thefollowing:
■ Oracle delays
■ Network issues
■ Storage unit delays
■ Oracle database server post-backup processing
The delays during the transfer can be especially pronounced if using large datafiles. Lengthy delays make it difficult for NetBackup to know if Oracle is hung or
224TroubleshootingMinimizing the loading and unloading of tapes for database backups

delayed. To review setting information and delay examples, refer to the followingarticle:
http://www.veritas.com/docs/TECH227741
To determine the cause of delays after the transfer, refer to the following article:
http://www.veritas.com/docs/TECH198864
225TroubleshootingDelays in backup job transfer and completion
Real Application ClustersThis appendix includes the following topics:
■ About Real Application Clusters
■ About virtual names and NetBackup for Oracle
■ About RAC archiving schemes
■ About backing up a database
■ Example of restoring a database
■ Troubleshooting database restores (UNIX and Windows)
■ About restoring archive logs
About Real Application ClustersIn a Real Application Clusters (RAC) environment, many Oracle database instancesexist on separate servers, each with direct connectivity to a single Oracle database.All the servers can run transactions concurrently against the same database. Shouldany single server or instance fail, processing continues on the surviving servers.
RAC supports all Oracle backup features that are available in exclusive mode,including online backups and offline backups of an entire database or individualtablespaces.
About virtual names and NetBackup for OracleUsers of a RAC can typically access the database by a virtual network host name.This access is dependent on the configuration of a RAC and any cluster softwareon which it is running.
AAppendix

The virtual network host name may be associated with an IP address in the followingways:
■ With an IP address for a host in the cluster
■ A virtual IP address for an Oracle database instance running on a host in thecluster
■ A failover virtual IP address that may move between the hosts in the cluster
Backup operations may use the various virtual network host names, or the networkhost name of the hosts in the cluster.
To differentiate between the various network names, the following terms anddefinitions are used:
The network host name that is associated with a specific hostin the cluster.
Host name
The network host name that is associated with a virtual IPaddress specific to an instance in the cluster.
VIP name
The network host name that is associated with an IP addressthat is active on a running node. This network host name isthe network host name that can perform a backup at thistime.
Failover name
Warning: Do not use a single client name if the backup is load balanced acrossmore than one node. In a load-balanced configuration, the node that hosts the IPaddress to which the client name resolves, generates successful backups. However,the jobs originating from the other nodes fail with status code 54.
Oracle 11g R2 Grid Infrastructure (CRS) includes the Single Client Access Name(SCAN) feature. A single SCAN can resolve to multiple IP addresses each assignedto a different physical node in the cluster.
A SCAN can be used in a NetBackup policy that receives the Application Backuprequest. However, this abstraction of the client name causes backup and restorejobs to fail with status code 54. Also, the client side fails with status code 6 (backup)or status code 5 (restore).
Accordingly, ensure that the client that appears in the NetBackup Oracle policy isnot a SCAN. Also, ensure that any NB_ORA_CLIENT or CLIENT_NAME that thenode provides in the backup request is not a SCAN. These names must reliablyresolve on both the master server and the media server to an IP address. This IPaddress allows the server processes to connect to the node from which the backuprequest originated.
227Real Application ClustersAbout virtual names and NetBackup for Oracle
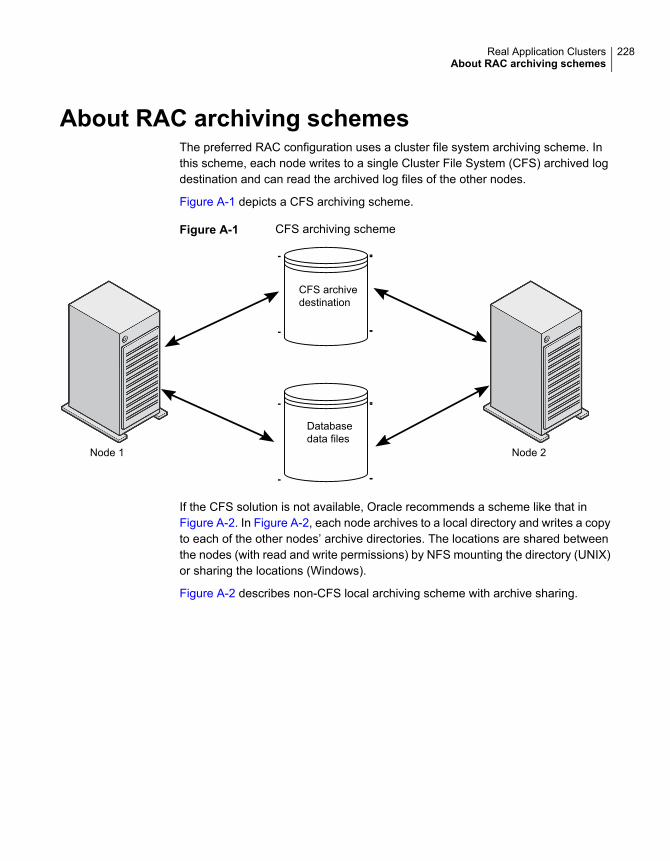
About RAC archiving schemesThe preferred RAC configuration uses a cluster file system archiving scheme. Inthis scheme, each node writes to a single Cluster File System (CFS) archived logdestination and can read the archived log files of the other nodes.
Figure A-1 depicts a CFS archiving scheme.
Figure A-1 CFS archiving scheme
Node 1 Node 2
CFS archivedestination
Databasedata files
If the CFS solution is not available, Oracle recommends a scheme like that inFigure A-2. In Figure A-2, each node archives to a local directory and writes a copyto each of the other nodes’ archive directories. The locations are shared betweenthe nodes (with read and write permissions) by NFS mounting the directory (UNIX)or sharing the locations (Windows).
Figure A-2 describes non-CFS local archiving scheme with archive sharing.
228Real Application ClustersAbout RAC archiving schemes

Figure A-2 Non-CFS local archiving scheme with archive sharing
ArchiveDestination
1
ArchiveDestination
2
ArchiveDestination
2
ArchiveDestination
1
Databasedata files
NFS mount or Shared locationread and write accessPhysically AttachedLogically Attached
Node 1 Node 2
229Real Application ClustersAbout RAC archiving schemes

A scheme similar to the previous one exists if each node archives to a local directory,and the locations are shared (read-only) with the other nodes in the cluster. Theselocations are shared among the nodes by NFS-mounting the directory (UNIX) orsharing the locations (Windows). Therefore, each node can read each archivedestination.
Figure A-3 describes non-CFS local archiving scheme with archive read-only sharing.
230Real Application ClustersAbout RAC archiving schemes

Figure A-3 Non-CFS local archiving scheme with archive read-only sharing
ArchiveDestination
1
ArchiveDestination
2
ArchiveDestination
2
ArchiveDestination
1
Databasedata files
NFS mount or Shared locationwrite accessPhysically AttachedLogically Attached
Node 1 Node 2
231Real Application ClustersAbout RAC archiving schemes

The simplest archiving scheme is local archiving with no sharing. Each node writesonly to the local destination, and no access is given to the other nodes in the cluster.
Figure A-4 describes non-CFS local archiving scheme with no archive sharing.
Figure A-4 Non-CFS local archiving scheme with no archive sharing
Node 1 Node 2
Archivedestination
1
Archivedestination
2
Databasedata files
For more information about configuration and additional archiving scheme examplessee your Oracle documentation.
About backing up a databaseIf you are in a RAC environment and you chose one of the archive log schemesthat are described in the previous topic, you can perform a backup with typicalRMAN scripts.
In the following example, RMAN backs up the database, including all of the archivelogs. This example assumes that the archive logs are accessible by each node inthe cluster. If they are not, then the archive logs need to be backed up separatelyon each node.
Note: This example works only if the backup is not load balanced across multiplenodes, because NB_ORA_CLIENT=$NB_ORA_CLIENT evaluates only to the nodeon which the RMAN script is executed.
232Real Application ClustersAbout backing up a database

RUN
{
ALLOCATE CHANNEL ch00 TYPE 'SBT_TAPE';
SEND 'NB_ORA_CLIENT=$NB_ORA_CLIENT,NB_ORA_SERV=$NB_ORA_SERV';
BACKUP
DATABASE;
sql 'alter system archive log current';
RELEASE CHANNEL ch00;
ALLOCATE CHANNEL ch00 TYPE 'SBT_TAPE';
SEND 'NB_ORA_CLIENT=$NB_ORA_CLIENT,NB_ORA_SERV=$NB_ORA_SERV';
BACKUP
ARCHIVELOG ALL ;
RELEASE CHANNEL ch00;
}
Example of restoring a databaseRestoring the database from the nodes where the backup was performed isstraightforward and identical to a typical RMAN restore.
In this example, the backup images to be restored must all be accessible by theclient name saturn in the image database on the master server jupiter.
Note: This example works only if the backup is not load balanced across multiplenodes. The reason is because NB_ORA_CLIENT=$NB_ORA_CLIENT evaluatesonly to the node on which the RMAN script is executed.
The following example restores the entire database from any node:
RUN {
ALLOCATE CHANNEL ch00 TYPE 'SBT_TAPE';
SEND 'NB_ORA_CLIENT=saturn,NB_ORA_SERV=jupiter';
RESTORE
DATABASE;
RECOVER
DATABASE;
RELEASE CHANNEL ch00;
}
233Real Application ClustersExample of restoring a database

Troubleshooting database restores (UNIX andWindows)
An RMAN restore to one node of a cluster can fail with a status code 39 when thefollowing situation is present:
■ The NB_ORA_CLIENT is set to the virtual name of the cluster.
■ The client name is set to the virtual name of the cluster.
To remedy this problem, use the hostname.
More information is available on restores and redirected restores.
See “About NetBackup for Oracle restores” on page 125.
See “Example of restoring a database” on page 233.
About restoring archive logsYou can use the typical RMAN script to restore the archive logs under the followingcircumstances:
■ If the remote archived log destinations allow write access.See Figure A-2 on page 229.
■ If the archive logs reside on a CFS.See Figure A-1 on page 228.
In the examples that follow, the client is saturn and the server is jupiter. The backupsare stored under the client name saturn.
The following example restores all of the archive logs:
RUN {
ALLOCATE CHANNEL ch00 TYPE 'SBT_TAPE';
SEND 'NB_ORA_CLIENT=saturn,NB_ORA_SERV=jupiter';
RESTORE
ARCHIVELOG ALL;
RELEASE CHANNEL ch00;
}
If the remote archive logs destinations do not allow write access, use a script suchas the following to restore the archive logs:
RUN {
ALLOCATE CHANNEL ch00 TYPE 'SBT_TAPE';
SEND 'NB_ORA_CLIENT=saturn,NB_ORA_SERV=jupiter';
234Real Application ClustersTroubleshooting database restores (UNIX and Windows)

SET ARCHIVELOG DESTINATION TO <directory>;
RESTORE
ARCHIVELOG ALL;
RELEASE CHANNEL ch00;
}
Where <directory> is the directory into which the archive logs are restored.
Use a script like the preceding one if your configuration is a configuration shown inone of the following topics:
■ See Figure A-3 on page 231.
■ See Figure A-4 on page 232.
235Real Application ClustersAbout restoring archive logs

Best practices forprotecting Oracle RACwith NetBackup
This appendix includes the following topics:
■ Oracle RAC with NetBackup best practices
■ About using Templates and Oracle Intelligent Policy (OIP) with RAC
■ About NetBackup for Oracle operations
■ Example RAC configuration: Failover name exists and backup is not loadbalanced
■ Example RAC configuration: Failover name exists and backup is load balanced
■ Example RAC configuration: Failover name is not available and backup is notload balanced
■ Example RAC configuration: Failover name is not available, and backup is loadbalanced, one policy with custom script
■ Example RAC configuration: Failover name is not available and backup is loadbalanced, simple script with manual policy failover
■ Image catalog configuration for RAC
■ Configuring the appliance within a RAC environment
BAppendix
Oracle RAC with NetBackup best practicesThe Real Application Clusters (RAC) option allows multiple concurrent instancesto share a single physical database.
Oracle database backup and recovery is more difficult as databases grow in sizeand greater demands on database availability limit the time to perform backups.Often the backup time window is too short to accommodate a complete backupprocess by using only one backup node in the cluster. Database administratorsneed more efficient methods to complete these large backups in the allotted time.For the Oracle RAC database, Oracle can split the backups into pieces and sendthem in parallel from multiple nodes, which shortens the processing time.
This section describes the methods that can be used to backup the Oracle RACdatabase. You can use one node to backup the database or balance the backupload across multiple nodes of an Oracle RAC database.
About using Templates and Oracle IntelligentPolicy (OIP) with RAC
The NetBackup for Oracle Template Wizard and Oracle Intelligent Policy both workwell for backing up Oracle database instances. They can be used to backup OracleRAC when only a single host name or client name is needed to affect the backup.They cannot be used to backup Oracle RAC when more than one client name mustbe used.
The following are the two situations when the Template Wizard or the OIP cannotbe used to backup Oracle RAC:
■ The channels are load balanced across the hosts in the cluster.
■ One client name is used to determine the host on which to execute RMAN, andthe channels are allocated using a different client name.
Note: Using a separate template or OIP for each instance in a RAC may besuccessful. However, using these methods may result in multiple backups of thesame shared application data.
Backup scripts or Oracle launch mechanisms provides greater flexibility for complexconfigurations and are preferred for use with RAC.
237Best practices for protecting Oracle RAC with NetBackupOracle RAC with NetBackup best practices

About NetBackup for Oracle operationsThe following lists what occurs when you initiate RMAN:
■ The NetBackup Oracle policy can contain one or more client names and one ormore backup scripts to execute.
Note:Oracle 11g R2 Grid Infrastructure (CRS) includes the Single Client AccessName (SCAN) feature. This feature allows a single host name to resolve tomultiple IP addresses each assigned to a different physical node in a cluster.Ensure that the client that appears in the NetBackup Oracle policy is not a SCAN.Also, ensure that any NB_ORA_CLIENT or CLIENT_NAME provided by theclient host in the backup request is not a SCAN. These names must reliablyresolve on both the master server and the media server to a client host IPaddress. This IP address allows the server processes to connect to the clienthost from which the backup request originated. If the SCAN is used in aNetBackup policy, this abstraction of the client name leads to backup and restorejobs failing. The backup and restore jobs may fail with a status 54. The clientside fails with status 6 (backup) or status 5 (restore).
■ The NetBackup master server uses the automatic schedules in the Oracle policyto determine when the scripts in the backup selections are run on clients.
■ The NetBackup scheduler starts one Automatic Backup job for each client inthe policy. The jobs for multiple clients can run concurrently. The schedulerexecutes each script on each client in the specified sequence. All the scripts forone client are run in the same automatic job.
■ The backup scripts start RMAN.
■ If an automatic schedule and script do not exist in the policy, a process on theclient can still initiate RMAN when necessary.
The following lists what occurs when RMAN requests the backup:
■ RMAN connects to the appropriate Oracle database instance(s) for the backup.Hence, the script may execute on one host, but the backup may take place ona different host.
■ RMAN allocates one or more channels according to the backup script.
■ RMAN sends one or more backup pieces on each channel, in sequence.
■ Each channel interacts with NetBackup for Oracle and sends a user-directedbackup request to the NetBackup master server for each backup piece.
238Best practices for protecting Oracle RAC with NetBackupAbout NetBackup for Oracle operations

■ Each request becomes a separate NetBackup Application Backup job. Hencethere can be one Application Backup job queued or active, concurrently, perallocated channel.
■ RMAN can send one or more of the variables NB_ORA_CLIENT,NB_ORA_POLICY, and NB_ORA_SCHED to the NetBackup master server.
■ If RMAN does not send NB_ORA_CLIENT, the client name is used.
■ If RMAN does not send NB_ORA_POLICY, the master server selects the firstOracle policy it finds for the client.
■ If RMAN does not send NB_ORA_SCHED, the master server selects the firstApplication Backup schedule in the policy.
■ The NetBackup master server must be able to match any requested client name,Oracle policy and Application Backup schedule, or the job fails.
The following lists how NetBackup receives the data from RMAN:
■ The Application Backup jobs activate and the NetBackup media server processeswhich connect to the provided client name to receive the data. Hence, the clientname that is sent in the user-directed request must bring the data connectionback to the requesting host.
■ RMAN sends the appropriate data on the appropriate channel, and the data istransferred to storage.
Example RAC configuration: Failover name existsand backup is not load balanced
In this configuration, a failover name exists such that the NetBackup media servercan always reach an available host to execute the backup script. Further, sinceload balancing is disabled, RMAN allocates the channels on a single host, typicallythe same host where the script executes.
The configuration is as follows:
■ Configure the policy to specify the failover name as the client name. Theautomatic schedule then runs the backup script on a host that is currentlyoperational.
■ The backup script or an identical copy must be accessible to all hosts in thecluster. The clustered file system is a good location.
■ Configure the backup script so that RMAN provides to NetBackup the failovername from the policy. It floats to the active instance-host and ensures successfuldata transfer, and all the backups are stored under that single client name.
239Best practices for protecting Oracle RAC with NetBackupExample RAC configuration: Failover name exists and backup is not load balanced
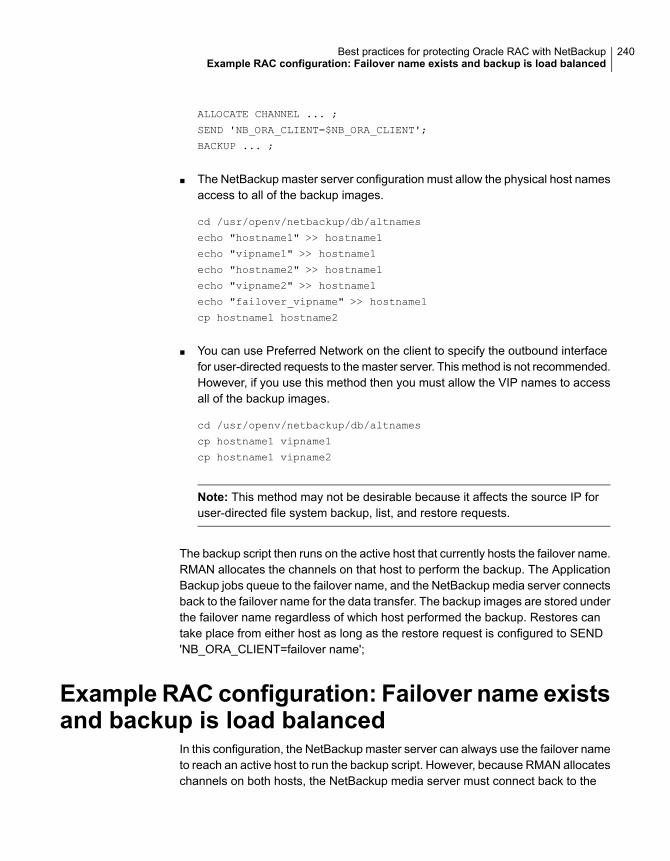
ALLOCATE CHANNEL ... ;
SEND 'NB_ORA_CLIENT=$NB_ORA_CLIENT';
BACKUP ... ;
■ The NetBackup master server configuration must allow the physical host namesaccess to all of the backup images.
cd /usr/openv/netbackup/db/altnames
echo "hostname1" >> hostname1
echo "vipname1" >> hostname1
echo "hostname2" >> hostname1
echo "vipname2" >> hostname1
echo "failover_vipname" >> hostname1
cp hostname1 hostname2
■ You can use Preferred Network on the client to specify the outbound interfacefor user-directed requests to the master server. This method is not recommended.However, if you use this method then you must allow the VIP names to accessall of the backup images.
cd /usr/openv/netbackup/db/altnames
cp hostname1 vipname1
cp hostname1 vipname2
Note: This method may not be desirable because it affects the source IP foruser-directed file system backup, list, and restore requests.
The backup script then runs on the active host that currently hosts the failover name.RMAN allocates the channels on that host to perform the backup. The ApplicationBackup jobs queue to the failover name, and the NetBackup media server connectsback to the failover name for the data transfer. The backup images are stored underthe failover name regardless of which host performed the backup. Restores cantake place from either host as long as the restore request is configured to SEND'NB_ORA_CLIENT=failover name';
Example RAC configuration: Failover name existsand backup is load balanced
In this configuration, the NetBackup master server can always use the failover nameto reach an active host to run the backup script. However, because RMAN allocateschannels on both hosts, the NetBackup media server must connect back to the
240Best practices for protecting Oracle RAC with NetBackupExample RAC configuration: Failover name exists and backup is load balanced
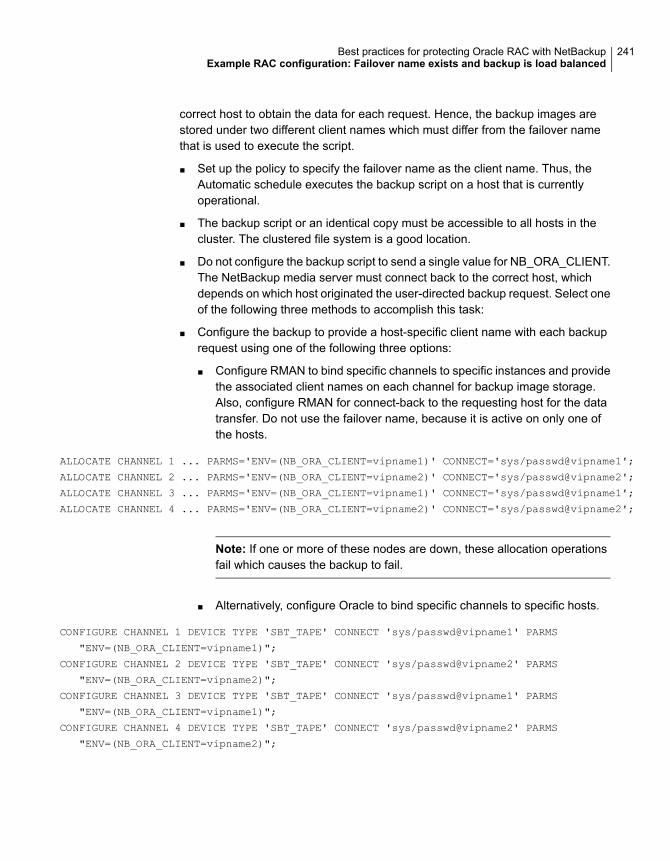
correct host to obtain the data for each request. Hence, the backup images arestored under two different client names which must differ from the failover namethat is used to execute the script.
■ Set up the policy to specify the failover name as the client name. Thus, theAutomatic schedule executes the backup script on a host that is currentlyoperational.
■ The backup script or an identical copy must be accessible to all hosts in thecluster. The clustered file system is a good location.
■ Do not configure the backup script to send a single value for NB_ORA_CLIENT.The NetBackup media server must connect back to the correct host, whichdepends on which host originated the user-directed backup request. Select oneof the following three methods to accomplish this task:
■ Configure the backup to provide a host-specific client name with each backuprequest using one of the following three options:
■ Configure RMAN to bind specific channels to specific instances and providethe associated client names on each channel for backup image storage.Also, configure RMAN for connect-back to the requesting host for the datatransfer. Do not use the failover name, because it is active on only one ofthe hosts.
ALLOCATE CHANNEL 1 ... PARMS='ENV=(NB_ORA_CLIENT=vipname1)' CONNECT='sys/passwd@vipname1';
ALLOCATE CHANNEL 2 ... PARMS='ENV=(NB_ORA_CLIENT=vipname2)' CONNECT='sys/passwd@vipname2';
ALLOCATE CHANNEL 3 ... PARMS='ENV=(NB_ORA_CLIENT=vipname1)' CONNECT='sys/passwd@vipname1';
ALLOCATE CHANNEL 4 ... PARMS='ENV=(NB_ORA_CLIENT=vipname2)' CONNECT='sys/passwd@vipname2';
Note: If one or more of these nodes are down, these allocation operationsfail which causes the backup to fail.
■ Alternatively, configure Oracle to bind specific channels to specific hosts.
CONFIGURE CHANNEL 1 DEVICE TYPE 'SBT_TAPE' CONNECT 'sys/passwd@vipname1' PARMS
"ENV=(NB_ORA_CLIENT=vipname1)";
CONFIGURE CHANNEL 2 DEVICE TYPE 'SBT_TAPE' CONNECT 'sys/passwd@vipname2' PARMS
"ENV=(NB_ORA_CLIENT=vipname2)";
CONFIGURE CHANNEL 3 DEVICE TYPE 'SBT_TAPE' CONNECT 'sys/passwd@vipname1' PARMS
"ENV=(NB_ORA_CLIENT=vipname1)";
CONFIGURE CHANNEL 4 DEVICE TYPE 'SBT_TAPE' CONNECT 'sys/passwd@vipname2' PARMS
"ENV=(NB_ORA_CLIENT=vipname2)";
241Best practices for protecting Oracle RAC with NetBackupExample RAC configuration: Failover name exists and backup is load balanced
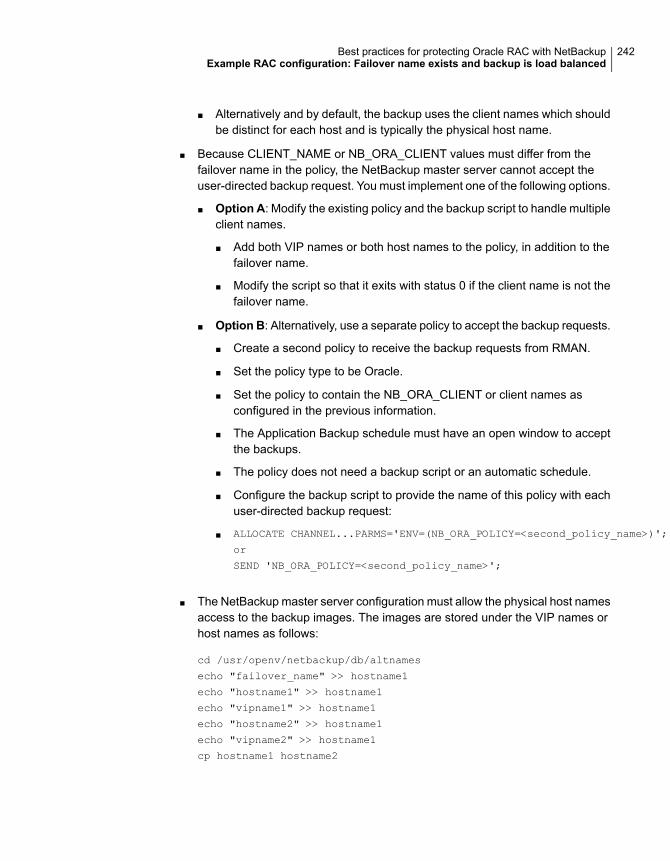
■ Alternatively and by default, the backup uses the client names which shouldbe distinct for each host and is typically the physical host name.
■ Because CLIENT_NAME or NB_ORA_CLIENT values must differ from thefailover name in the policy, the NetBackup master server cannot accept theuser-directed backup request. You must implement one of the following options.
■ Option A: Modify the existing policy and the backup script to handle multipleclient names.
■ Add both VIP names or both host names to the policy, in addition to thefailover name.
■ Modify the script so that it exits with status 0 if the client name is not thefailover name.
■ Option B: Alternatively, use a separate policy to accept the backup requests.
■ Create a second policy to receive the backup requests from RMAN.
■ Set the policy type to be Oracle.
■ Set the policy to contain the NB_ORA_CLIENT or client names asconfigured in the previous information.
■ The Application Backup schedule must have an open window to acceptthe backups.
■ The policy does not need a backup script or an automatic schedule.
■ Configure the backup script to provide the name of this policy with eachuser-directed backup request:
■ ALLOCATE CHANNEL...PARMS='ENV=(NB_ORA_POLICY=<second_policy_name>)';
or
SEND 'NB_ORA_POLICY=<second_policy_name>';
■ The NetBackup master server configuration must allow the physical host namesaccess to the backup images. The images are stored under the VIP names orhost names as follows:
cd /usr/openv/netbackup/db/altnames
echo "failover_name" >> hostname1
echo "hostname1" >> hostname1
echo "vipname1" >> hostname1
echo "hostname2" >> hostname1
echo "vipname2" >> hostname1
cp hostname1 hostname2
242Best practices for protecting Oracle RAC with NetBackupExample RAC configuration: Failover name exists and backup is load balanced
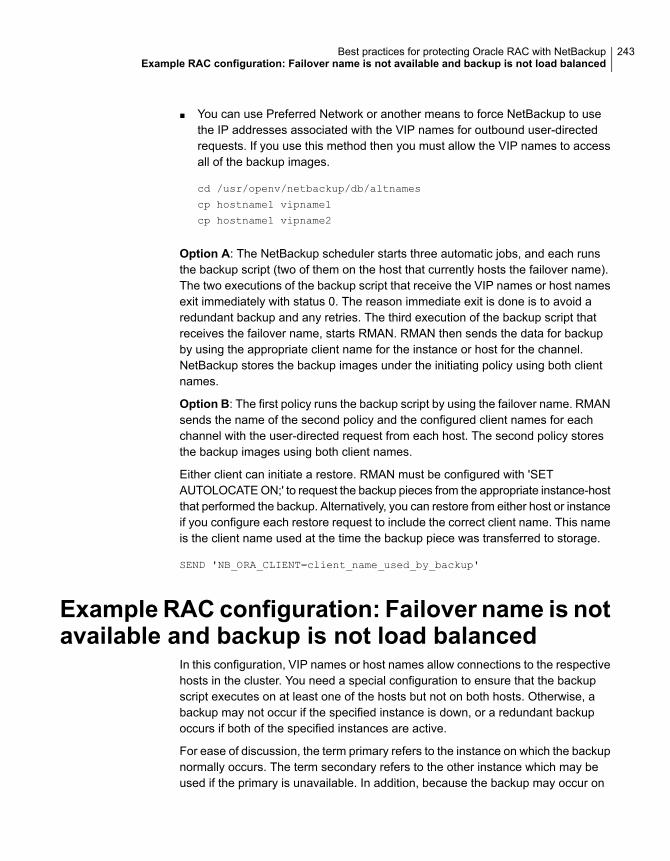
■ You can use Preferred Network or another means to force NetBackup to usethe IP addresses associated with the VIP names for outbound user-directedrequests. If you use this method then you must allow the VIP names to accessall of the backup images.
cd /usr/openv/netbackup/db/altnames
cp hostname1 vipname1
cp hostname1 vipname2
Option A: The NetBackup scheduler starts three automatic jobs, and each runsthe backup script (two of them on the host that currently hosts the failover name).The two executions of the backup script that receive the VIP names or host namesexit immediately with status 0. The reason immediate exit is done is to avoid aredundant backup and any retries. The third execution of the backup script thatreceives the failover name, starts RMAN. RMAN then sends the data for backupby using the appropriate client name for the instance or host for the channel.NetBackup stores the backup images under the initiating policy using both clientnames.
Option B: The first policy runs the backup script by using the failover name. RMANsends the name of the second policy and the configured client names for eachchannel with the user-directed request from each host. The second policy storesthe backup images using both client names.
Either client can initiate a restore. RMAN must be configured with 'SETAUTOLOCATE ON;' to request the backup pieces from the appropriate instance-hostthat performed the backup. Alternatively, you can restore from either host or instanceif you configure each restore request to include the correct client name. This nameis the client name used at the time the backup piece was transferred to storage.
SEND 'NB_ORA_CLIENT=client_name_used_by_backup'
Example RAC configuration: Failover name is notavailable and backup is not load balanced
In this configuration, VIP names or host names allow connections to the respectivehosts in the cluster. You need a special configuration to ensure that the backupscript executes on at least one of the hosts but not on both hosts. Otherwise, abackup may not occur if the specified instance is down, or a redundant backupoccurs if both of the specified instances are active.
For ease of discussion, the term primary refers to the instance on which the backupnormally occurs. The term secondary refers to the other instance which may beused if the primary is unavailable. In addition, because the backup may occur on
243Best practices for protecting Oracle RAC with NetBackupExample RAC configuration: Failover name is not available and backup is not load balanced

either host, the backup images have the potential to be stored under both clientnames. The image storage name is dependent on which host is active at the timeof the backup. The configuration is as follows:
■ The policy specifies client names for both hosts, either hostname1 andhostname2, or vipname1 and vipname2. The specification of client name ensuresthat the backup is attempted on a host which is currently operational.
■ The backup script must be accessible to both hosts in the cluster, the clusteredfile system makes a good location.
■ The backup script should be customized so that it starts RMAN on exactly oneof the clients. If the script is executed on the primary, then start RMAN andperform the backup. If the script is executed on the secondary and the primaryis up, then exit with status 0 so the NetBackup scheduler doesn't retry this client.If the script is executed on the secondary and the primary is down, then startRMAN and perform the backup. You can build the script customization arounda tnsping to the primary or even a query of the database. Use this customizationto see if the other instance is open and able to perform the backup.
$ select INST_ID, STATUS, STARTUP_TIME, HOST_NAME from gv$instance;
INST_ID STATUS STARTUP_T HOST_NAM
---------- ------------ --------- ---------
1 OPEN 13-JAN-09 vipname1
2 OPEN 13-JAN-09 vipname2
■ Each user-directed backup request must use a client name which allows theNetBackup media server to connect back to the correct host for the data transfer.By default, the backup uses the CLIENT_NAME from the bp.conf file which isdistinct for each host. A better solution is to configure RMAN to provide theappropriate client name from the policy as follows:
SEND 'NB_ORA_CLIENT=$NB_ORA_CLIENT';
■ Configure the NetBackup master server to give the physical host names accessto all of the backup images.
cd /usr/openv/netbackup/db/altnames
echo "hostname1" >> hostname1
echo "vipname1" >> hostname1
echo "hostname2" >> hostname1
echo "vipname2" >> hostname1
cp hostname1 hostname2
244Best practices for protecting Oracle RAC with NetBackupExample RAC configuration: Failover name is not available and backup is not load balanced
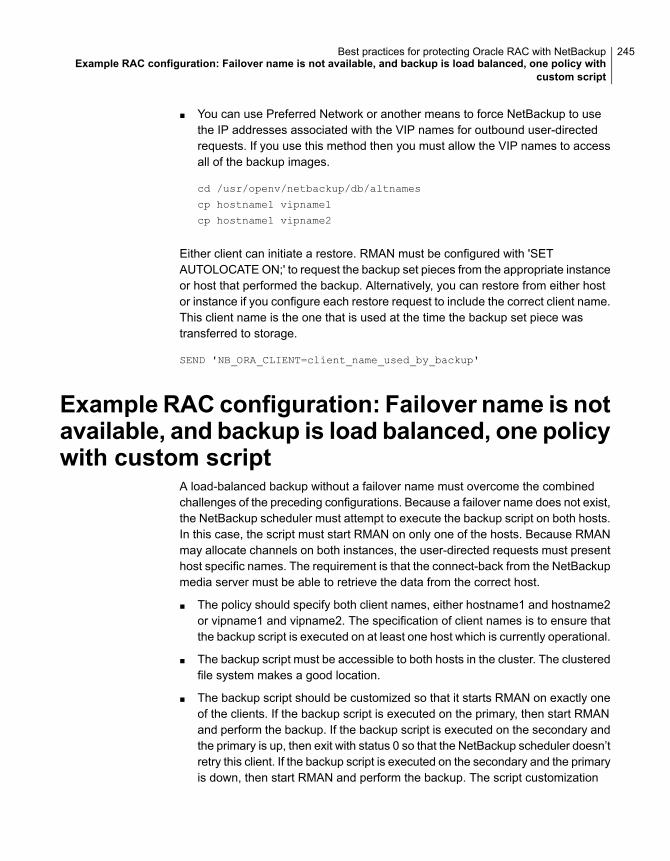
■ You can use Preferred Network or another means to force NetBackup to usethe IP addresses associated with the VIP names for outbound user-directedrequests. If you use this method then you must allow the VIP names to accessall of the backup images.
cd /usr/openv/netbackup/db/altnames
cp hostname1 vipname1
cp hostname1 vipname2
Either client can initiate a restore. RMAN must be configured with 'SETAUTOLOCATE ON;' to request the backup set pieces from the appropriate instanceor host that performed the backup. Alternatively, you can restore from either hostor instance if you configure each restore request to include the correct client name.This client name is the one that is used at the time the backup set piece wastransferred to storage.
SEND 'NB_ORA_CLIENT=client_name_used_by_backup'
Example RAC configuration: Failover name is notavailable, and backup is load balanced, one policywith custom script
A load-balanced backup without a failover name must overcome the combinedchallenges of the preceding configurations. Because a failover name does not exist,the NetBackup scheduler must attempt to execute the backup script on both hosts.In this case, the script must start RMAN on only one of the hosts. Because RMANmay allocate channels on both instances, the user-directed requests must presenthost specific names. The requirement is that the connect-back from the NetBackupmedia server must be able to retrieve the data from the correct host.
■ The policy should specify both client names, either hostname1 and hostname2or vipname1 and vipname2. The specification of client names is to ensure thatthe backup script is executed on at least one host which is currently operational.
■ The backup script must be accessible to both hosts in the cluster. The clusteredfile system makes a good location.
■ The backup script should be customized so that it starts RMAN on exactly oneof the clients. If the backup script is executed on the primary, then start RMANand perform the backup. If the backup script is executed on the secondary andthe primary is up, then exit with status 0 so that the NetBackup scheduler doesn’tretry this client. If the backup script is executed on the secondary and the primaryis down, then start RMAN and perform the backup. The script customization
245Best practices for protecting Oracle RAC with NetBackupExample RAC configuration: Failover name is not available, and backup is load balanced, one policy with
custom script

can be built around a tnsping to the primary or even a query of the database.Use this customization to see if the other instance is open and able to performthe backup.
$ select INST_ID, STATUS, STARTUP_TIME, HOST_NAME from gv$instance;
INST_ID STATUS STARTUP_T HOST_NAM
---------- ------------ --------- ---------
1 OPEN 13-JAN-09 vipname1
2 OPEN 13-JAN-09 vipname2
■ The backup script must not be configured to send a single value forNB_ORA_CLIENT. This configuration is because the NetBackup media serverneeds to connect back to the correct host depending on which host originatedthe user-directed backup request.
■ Configure the backup to provide a host-specific client name with each backuprequest using one of the following three options:
■ Configure RMAN to bind specific channels to specific instances and providethe associated client names on each channel for backup image storage.Also, configure RMAN for connect-back to the requesting host for the datatransfer.
ALLOCATE CHANNEL 1 ... PARMS='ENV=(NB_ORA_CLIENT=vipname1)' CONNECT='sys/passwd@vipname1';
ALLOCATE CHANNEL 2 ... PARMS='ENV=(NB_ORA_CLIENT=vipname2)' CONNECT='sys/passwd@vipname2';
ALLOCATE CHANNEL 3 ... PARMS='ENV=(NB_ORA_CLIENT=vipname1)' CONNECT='sys/passwd@vipname1';
ALLOCATE CHANNEL 4 ... PARMS='ENV=(NB_ORA_CLIENT=vipname2)' CONNECT='sys/passwd@vipname2';
Note: If one or more of these nodes are down, these allocation operationsfail which causes the backup to fail.
■ Alternatively, configure Oracle to bind specific channels to specific hosts.
CONFIGURE CHANNEL 1 DEVICE TYPE 'SBT_TAPE' CONNECT 'sys/passwd@vipname1' PARMS
"ENV=(NB_ORA_CLIENT=vipname1)";
CONFIGURE CHANNEL 2 DEVICE TYPE 'SBT_TAPE' CONNECT 'sys/passwd@vipname2' PARMS
"ENV=(NB_ORA_CLIENT=vipname2)";
CONFIGURE CHANNEL 3 DEVICE TYPE 'SBT_TAPE' CONNECT 'sys/passwd@vipname1' PARMS
"ENV=(NB_ORA_CLIENT=vipname1)";
CONFIGURE CHANNEL 4 DEVICE TYPE 'SBT_TAPE' CONNECT 'sys/passwd@vipname2' PARMS
"ENV=(NB_ORA_CLIENT=vipname2)";
246Best practices for protecting Oracle RAC with NetBackupExample RAC configuration: Failover name is not available, and backup is load balanced, one policy with
custom script
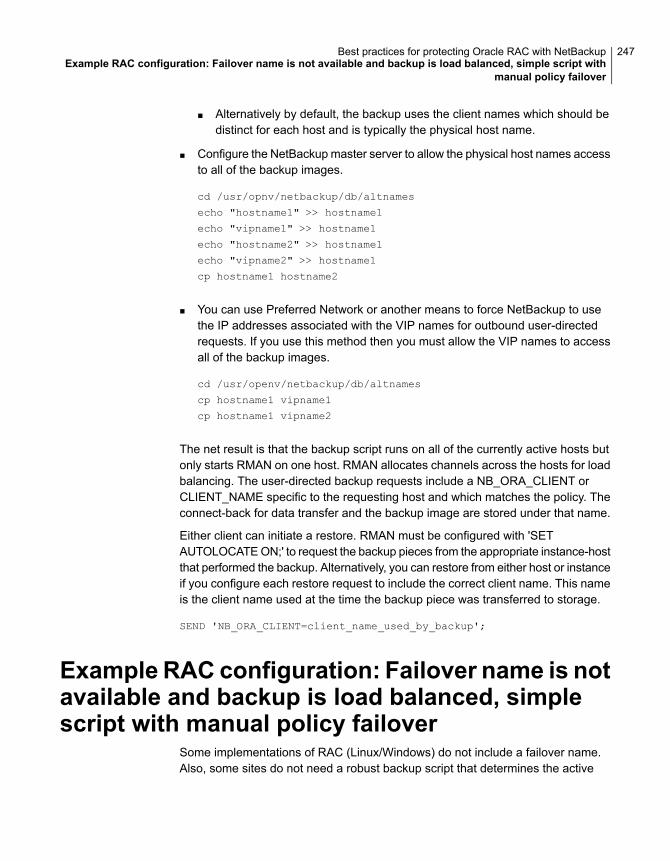
■ Alternatively by default, the backup uses the client names which should bedistinct for each host and is typically the physical host name.
■ Configure the NetBackup master server to allow the physical host names accessto all of the backup images.
cd /usr/opnv/netbackup/db/altnames
echo "hostname1" >> hostname1
echo "vipname1" >> hostname1
echo "hostname2" >> hostname1
echo "vipname2" >> hostname1
cp hostname1 hostname2
■ You can use Preferred Network or another means to force NetBackup to usethe IP addresses associated with the VIP names for outbound user-directedrequests. If you use this method then you must allow the VIP names to accessall of the backup images.
cd /usr/openv/netbackup/db/altnames
cp hostname1 vipname1
cp hostname1 vipname2
The net result is that the backup script runs on all of the currently active hosts butonly starts RMAN on one host. RMAN allocates channels across the hosts for loadbalancing. The user-directed backup requests include a NB_ORA_CLIENT orCLIENT_NAME specific to the requesting host and which matches the policy. Theconnect-back for data transfer and the backup image are stored under that name.
Either client can initiate a restore. RMAN must be configured with 'SETAUTOLOCATE ON;' to request the backup pieces from the appropriate instance-hostthat performed the backup. Alternatively, you can restore from either host or instanceif you configure each restore request to include the correct client name. This nameis the client name used at the time the backup piece was transferred to storage.
SEND 'NB_ORA_CLIENT=client_name_used_by_backup';
Example RAC configuration: Failover name is notavailable and backup is load balanced, simplescript with manual policy failover
Some implementations of RAC (Linux/Windows) do not include a failover name.Also, some sites do not need a robust backup script that determines the active
247Best practices for protecting Oracle RAC with NetBackupExample RAC configuration: Failover name is not available and backup is load balanced, simple script with
manual policy failover

instance in real time. If this scenario is the case, use the following configuration tomanually initiate a backup from the secondary host when the primary host is down.
■ Create a first Oracle policy with an Application Backup schedule to receive thebackup images from both hosts. Configure both VIP names or the host namesas clients in the policy. Do not configure an Automatic Backup schedule or abackup selection (script).
■ Create a second Oracle policy to execute the backup script on the primary host.Configure the VIP name or host name of the primary host in the policy. Configurethe pathname to the backup script in the policy. Create an Automatic Backupschedule with an open window in the policy.
■ Create a third Oracle policy that can be used to manually execute the backupscript on the secondary host when the primary host is unavailable. Configurethe VIP name or host name of the secondary host in the policy. Configure thepathname to the backup script in the policy. Create an Automatic Backupschedule without an open window in the policy.
■ The backup script must be accessible to both hosts in the cluster, the clusteredfile system makes a good location.
■ Configure the backup to provide a host-specific client name with each backuprequest using one of the following three options:
■ Configure RMAN to bind specific channels to specific instances and providethe associated client names on each channel for backup image storage.Also, configure RMAN for connect-back to the requesting host for the datatransfer.
ALLOCATE CHANNEL 1 ... PARMS='ENV=(NB_ORA_CLIENT=vipname1)' CONNECT='sys/passwd@vipname1';
ALLOCATE CHANNEL 2 ... PARMS='ENV=(NB_ORA_CLIENT=vipname2)' CONNECT='sys/passwd@vipname2';
ALLOCATE CHANNEL 3 ... PARMS='ENV=(NB_ORA_CLIENT=vipname1)' CONNECT='sys/passwd@vipname1';
ALLOCATE CHANNEL 4 ... PARMS='ENV=(NB_ORA_CLIENT=vipname2)' CONNECT='sys/passwd@vipname2';
Note: If one or more of these nodes are down, these allocation operationsfail which causes the backup to fail.
■ Alternatively, configure Oracle to bind specific channels to specific hosts.
CONFIGURE CHANNEL 1 DEVICE TYPE 'SBT_TAPE' CONNECT 'sys/passwd@vipname1' PARMS
"ENV=(NB_ORA_CLIENT=vipname1)";
CONFIGURE CHANNEL 2 DEVICE TYPE 'SBT_TAPE' CONNECT 'sys/passwd@vipname2' PARMS
"ENV=(NB_ORA_CLIENT=vipname2)";
CONFIGURE CHANNEL 3 DEVICE TYPE 'SBT_TAPE' CONNECT 'sys/passwd@vipname1' PARMS
"ENV=(NB_ORA_CLIENT=vipname1)";
248Best practices for protecting Oracle RAC with NetBackupExample RAC configuration: Failover name is not available and backup is load balanced, simple script with
manual policy failover
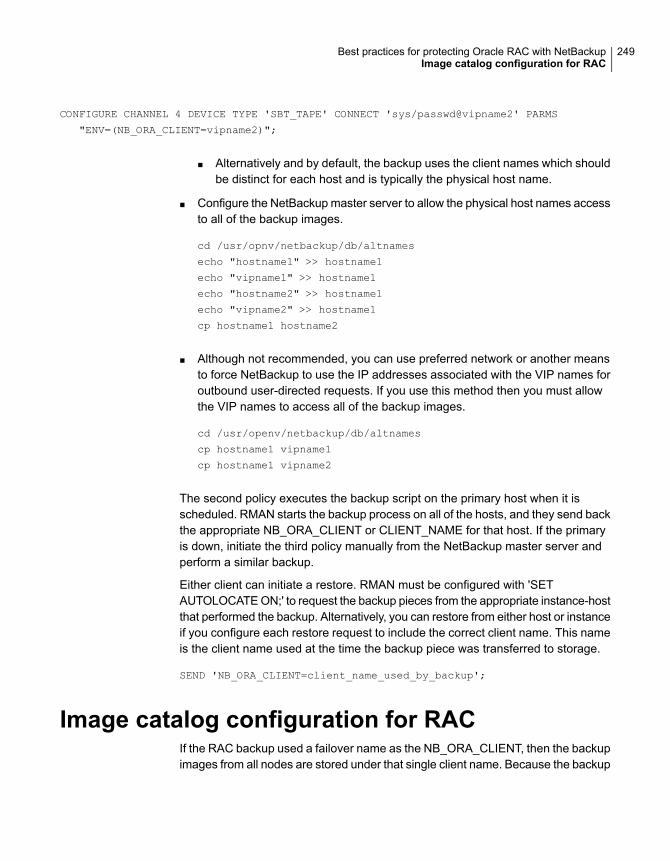
CONFIGURE CHANNEL 4 DEVICE TYPE 'SBT_TAPE' CONNECT 'sys/passwd@vipname2' PARMS
"ENV=(NB_ORA_CLIENT=vipname2)";
■ Alternatively and by default, the backup uses the client names which shouldbe distinct for each host and is typically the physical host name.
■ Configure the NetBackup master server to allow the physical host names accessto all of the backup images.
cd /usr/opnv/netbackup/db/altnames
echo "hostname1" >> hostname1
echo "vipname1" >> hostname1
echo "hostname2" >> hostname1
echo "vipname2" >> hostname1
cp hostname1 hostname2
■ Although not recommended, you can use preferred network or another meansto force NetBackup to use the IP addresses associated with the VIP names foroutbound user-directed requests. If you use this method then you must allowthe VIP names to access all of the backup images.
cd /usr/openv/netbackup/db/altnames
cp hostname1 vipname1
cp hostname1 vipname2
The second policy executes the backup script on the primary host when it isscheduled. RMAN starts the backup process on all of the hosts, and they send backthe appropriate NB_ORA_CLIENT or CLIENT_NAME for that host. If the primaryis down, initiate the third policy manually from the NetBackup master server andperform a similar backup.
Either client can initiate a restore. RMAN must be configured with 'SETAUTOLOCATE ON;' to request the backup pieces from the appropriate instance-hostthat performed the backup. Alternatively, you can restore from either host or instanceif you configure each restore request to include the correct client name. This nameis the client name used at the time the backup piece was transferred to storage.
SEND 'NB_ORA_CLIENT=client_name_used_by_backup';
Image catalog configuration for RACIf the RAC backup used a failover name as the NB_ORA_CLIENT, then the backupimages from all nodes are stored under that single client name. Because the backup
249Best practices for protecting Oracle RAC with NetBackupImage catalog configuration for RAC
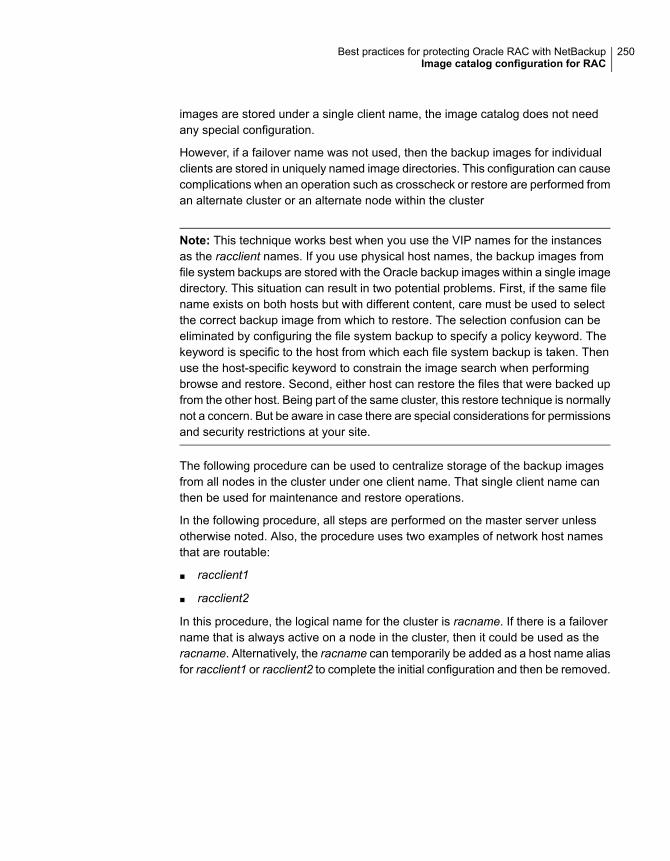
images are stored under a single client name, the image catalog does not needany special configuration.
However, if a failover name was not used, then the backup images for individualclients are stored in uniquely named image directories. This configuration can causecomplications when an operation such as crosscheck or restore are performed froman alternate cluster or an alternate node within the cluster
Note: This technique works best when you use the VIP names for the instancesas the racclient names. If you use physical host names, the backup images fromfile system backups are stored with the Oracle backup images within a single imagedirectory. This situation can result in two potential problems. First, if the same filename exists on both hosts but with different content, care must be used to selectthe correct backup image from which to restore. The selection confusion can beeliminated by configuring the file system backup to specify a policy keyword. Thekeyword is specific to the host from which each file system backup is taken. Thenuse the host-specific keyword to constrain the image search when performingbrowse and restore. Second, either host can restore the files that were backed upfrom the other host. Being part of the same cluster, this restore technique is normallynot a concern. But be aware in case there are special considerations for permissionsand security restrictions at your site.
The following procedure can be used to centralize storage of the backup imagesfrom all nodes in the cluster under one client name. That single client name canthen be used for maintenance and restore operations.
In the following procedure, all steps are performed on the master server unlessotherwise noted. Also, the procedure uses two examples of network host namesthat are routable:
■ racclient1
■ racclient2
In this procedure, the logical name for the cluster is racname. If there is a failovername that is always active on a node in the cluster, then it could be used as theracname. Alternatively, the racname can temporarily be added as a host name aliasfor racclient1 or racclient2 to complete the initial configuration and then be removed.
250Best practices for protecting Oracle RAC with NetBackupImage catalog configuration for RAC

To centralize storage of the backup images from all nodes in the cluster underone client name
1 On both the master and the media server, confirm that the RAC client namesare resolvable, network routable, and reverse resolve accurately:
bpclntcmd –hn racclient1
bpclntcmd –hn racclient2
ping racclient1
ping racclient2
bpclntcmd –ip <ip_address_for_racclient1>
bpclntcmd –ip <ip_address_for_racclient2>
Fix any host name forward and reverse resolution inconsistencies, and anynetwork routing problems. Be sure to clear the NetBackup host cache and wait10 seconds after making any name resolution changes:
bpclntcmd –clear_host_cache
251Best practices for protecting Oracle RAC with NetBackupImage catalog configuration for RAC

2 On the master server, check if image directories or client aliases already existfor either of the racclients or the logical name for the cluster:
Windows:
dir install_path\Veritas\NetBackup\db\images\racclient1
dir install_path\Veritas\NetBackup\db\images\racclient2
dir install_path\Veritas\NetBackup\db\images\racname
UNIX:
ls -ld /usr/openv/netbackup/db/images/racclient1
ls -ld /usr/openv/netbackup/db/images/racclient2
ls -ld /usr/openv/netbackup/db/images/racname
Windows or UNIX:
bpclient –client racclient1 –list_all_aliases
bpclient –client racclient2 –list_all_aliases
bpclient –client racname –list_all_aliases
Note: Do not continue this procedure if either of the client names already haveimage directories or are aliases to a client name other than the racname.
Instead of using this procedure, consider merging the existing image directoriesand client names per the following Veritas knowledge base article.
https://www.veritas.com/docs/000018409
Alternatively, create new network resolvable and network routable host namesfor the RAC clients and return to step 1.
3 If the logical cluster name already had an image directory and is an alias foritself, then skip to step 5.
4 Run a backup using the logical cluster name as a NetBackup client name.
■ If the racname is not a resolvable host name, temporarily make it a hostname alias for the host name of one of the RAC client names. Changingthe host name alias is most easily done my modifying the hosts file.
■ The backup should be a file system backup using a new or an existingpolicy, it can be a backup of only one file.
■ Afterward, make sure the racname has an image directory and client aliasper the checks in step 2. Then remove any temporary host name alias orpolicy that was created.
252Best practices for protecting Oracle RAC with NetBackupImage catalog configuration for RAC
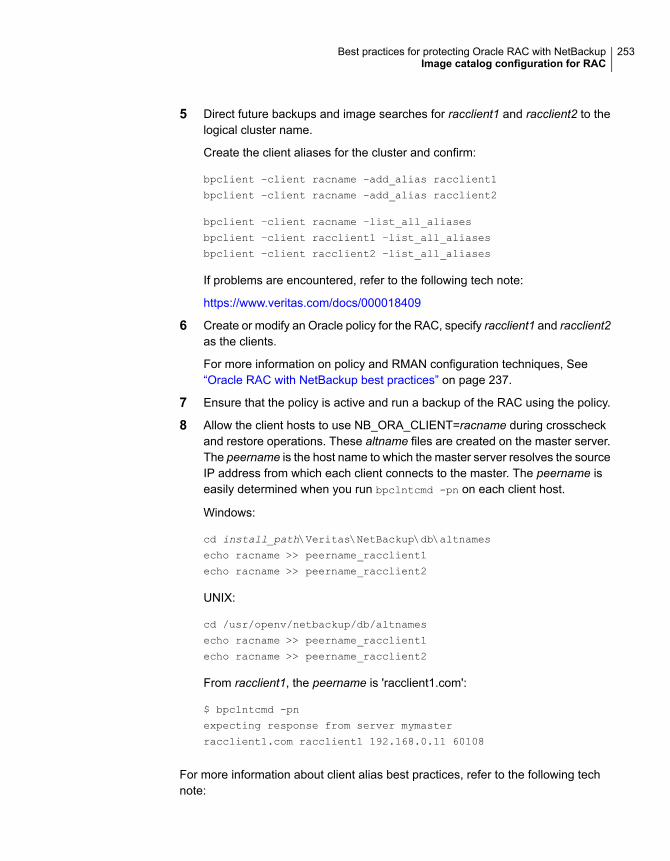
5 Direct future backups and image searches for racclient1 and racclient2 to thelogical cluster name.
Create the client aliases for the cluster and confirm:
bpclient –client racname –add_alias racclient1
bpclient –client racname –add_alias racclient2
bpclient –client racname –list_all_aliases
bpclient –client racclient1 –list_all_aliases
bpclient –client racclient2 –list_all_aliases
If problems are encountered, refer to the following tech note:
https://www.veritas.com/docs/000018409
6 Create or modify an Oracle policy for the RAC, specify racclient1 and racclient2as the clients.
For more information on policy and RMAN configuration techniques, See“Oracle RAC with NetBackup best practices” on page 237.
7 Ensure that the policy is active and run a backup of the RAC using the policy.
8 Allow the client hosts to use NB_ORA_CLIENT=racname during crosscheckand restore operations. These altname files are created on the master server.The peername is the host name to which the master server resolves the sourceIP address from which each client connects to the master. The peername iseasily determined when you run bpclntcmd -pn on each client host.
Windows:
cd install_path\Veritas\NetBackup\db\altnames
echo racname >> peername_racclient1
echo racname >> peername_racclient2
UNIX:
cd /usr/openv/netbackup/db/altnames
echo racname >> peername_racclient1
echo racname >> peername_racclient2
From racclient1, the peername is 'racclient1.com':
$ bpclntcmd -pn
expecting response from server mymaster
racclient1.com racclient1 192.168.0.11 60108
For more information about client alias best practices, refer to the following technote:
253Best practices for protecting Oracle RAC with NetBackupImage catalog configuration for RAC
http://www.veritas.com/docs/TECH208362
See “Oracle RAC with NetBackup best practices” on page 237.
See “About NetBackup for Oracle operations” on page 238.
Configuring the appliance within a RACenvironment
Note: This feature requires a NetBackup appliance running software version 2.7.1or later.
RAC may be used with the OIP and the appliance. You can use either theDatabaseBackup Shares or Whole Database - Datafile Copy Share option in the OIPconfiguration. Both options only use a single node when a share is used on theappliance.
When the Database Backup Shares option is used, the DBAs have the ability toload balance the backups to the appliance share. Once the DBAs have placed abackup on the appliance share, NetBackup uses a single node of the cluster toprotect the share. It does not matter which nodes are used to backup to the applianceshare. NetBackup only uses a single node to protect the data on the share.
The Whole Database - Datafile Copy Share option uses a single node of the RACcluster to move the data to the appliance share and protect the share.
Use the following procedure to configure the RAC environment to use OIP and theappliance to protect the share.
To configure the RAC environment with OIP and the appliance NFS share
1 Mount the appliance share at the same mount point on each node.
2 Configure all backups images so that they are cataloged under one client name.
■ See “Image catalog configuration for RAC” on page 249.
3 Configure the master server to allow physical host name access to the backupimages.
cd /usr/openv/netbackup/db/altnames
echo "failover_name" >> hostname1
echo "hostname1" >> hostname1
echo "vipname1" >> hostname1
echo "hostname2" >> hostname1
echo "vipname2" >> hostname1
cp hostname1 hostname2
254Best practices for protecting Oracle RAC with NetBackupConfiguring the appliance within a RAC environment
4 Add a database instance from one RAC node to the Oracle database instancerepository.
5 Create an OIP (using the Database Backup Shares or Whole Database -Datafile Copy Share option) and only put one instance from the RAC clusterinto the policy.
See “Configuring an OIP using a share on the NetBackup appliance (Copilot)”on page 83.
See “About using Templates and Oracle Intelligent Policy (OIP) with RAC”on page 237.
See “Oracle RAC with NetBackup best practices” on page 237.
255Best practices for protecting Oracle RAC with NetBackupConfiguring the appliance within a RAC environment
Deduplication bestpractices
This appendix includes the following topics:
■ Optimizing and deduplicating stream-based and proxy copy Oracle backups
■ Configuring a stream-based Oracle backup
■ Example RMAN script for a stream-based backup
■ Editing the RMAN script and configuring NetBackup for Oracle for a proxy copybackup
■ Example RMAN script for a proxy copy backup
Optimizing and deduplicating stream-based andproxy copy Oracle backups
NetBackup enables you to perform optimized deduplication of Oracle databases.You can perform either a stream-based backup or a proxy copy backup.
Veritas recommends that you perform a proxy copy if the database consists of manysmall tablespaces. A proxy copy is also recommended if the DBA or the backupadministrator does not want to set FILESPERSET=1.
To configure a proxy copy Oracle backup, you need to edit the RMAN script andconfigure NetBackup for Oracle.
See “Editing the RMAN script and configuring NetBackup for Oracle for a proxycopy backup” on page 262.
For stream-based backups, Veritas recommends that you specify FILESPERSET=1
for all Oracle database backups. When FILESPERSET=1 is specified, Oracle
CAppendix

generates the backup set identically each time. The backup set is generated withthe same data from the same files in the same sequence each time the databaseis backed up. This uniformity ensures better deduplication. In addition, whenFILESPERSET=1 is in effect, Oracle does not perform multiplexing, so Oracle includesonly one file in each backup set. If FILESPERSET is specified with a number otherthan 1, Oracle groups files together unpredictably and deduplication rates suffer.You may also want to increase the number of channels that are allocated to thebackup, if possible.
Veritas recommends that you test your database backups by running bothstream-based backups and proxy copy backups. Measure the deduplication ratesand the backup times, and see which method fits best in your environment. TheOracle database files themselves benefit the most from deduplication. Typically,the archive logs and the control files are unique, so they benefit less fromdeduplication.
Deduplication performs best when used in the following ways:
The Oracle Intelligent Policy detects bothASM and non-ASM environments to generatethe correct backup scripts ensuring gooddeduplication rates. In a non-ASMenvironment, scripts are generated that area non-snapshot proxy backup. In an ASMenvironment, scripts are generated that setFILESPERSET=1 if this command has notbeen modified in a backup policy.
You may need to create a custom script foryour environment. However, in mostsituations, the Oracle Intelligent Policy createsthe script that is needed for your environment.
Stream deduplication
When you use snapshot deduplication,nothing changes and NetBackup proxysnapshot backup is performed. If ASM isdetected, an error is displayed. Snapshotbackup is not allowed in an ASMenvironment.
Snapshot deduplication
257Deduplication best practicesOptimizing and deduplicating stream-based and proxy copy Oracle backups
Note: In OIP when deduplication storage is used and a stream-based backup isselected, the policy overrides and attempts to perform a proxy backup. The overrideis attempted if NO ASM storage is found in the database. TheORACLE_OVERRIDE_DATA_MOVEMENT setting in the bp.conf file can be used to overridethis behavior.
Set ORACLE_OVERRIDE_DATA_MOVEMENT=1 to always do streaming.
Set ORACLE_OVERRIDE_DATA_MOVEMENT=2 to always do proxy.
Set ORACLE_OVERRIDE_DATA_MOVEMENT=>2 to maintain standard behavior.
On UNIX you can edit the /usr/openv/netbackup/bp.conf file.
On Windows you can use the bpsetconfig command(install_path\NetBackup\bin\admincmd\bpsetconfig) on the server to set theclient’s configuration. See the following example:
bpsetconfig -h myoracleclient
ORACLE_OVERRIDE_DATA_MOVEMENT = 1
For information about the backup methods, see the following:
■ See “Configuring a stream-based Oracle backup” on page 258.
■ See “Editing the RMAN script and configuring NetBackup for Oracle for a proxycopy backup” on page 262.
Configuring a stream-based Oracle backupThe following procedure explains how to reconfigure an existing Oracle RMANspecification to achieve a stream-based, optimized, deduplicated Oracle backup.
To configure a stream-based Oracle backup
1 On the client computer that hosts the Oracle database, open the RMAN backupscript in a text editor, and make the following edits:
■ Add the FILESPERSET=1 parameter to the part of the RMAN script thatspecifies how you want to back up the database.Do not add FILESPERSET=1 to the section of the RMAN script that specifieshow to back up the control files or archive logs. Typically, these other dataobjects are unique to each backup, so there is very little potential gain fromoptimizing the control file and archive log backups for deduplication.Example RMAN script after editing:
258Deduplication best practicesConfiguring a stream-based Oracle backup
BACKUP
FILESPERSET=1
%BACKUP_TYPE%
FORMAT 'bk_u%%u_s%%s_p%%p_t%%t'
DATABASE;
The addition of FILESPERSET=1 suppresses Oracle multiplexing of morethan one data file into a backup set. When you suppress Oracle multiplexing,Oracle creates the backup set identically each time the backup runs.NetBackup can deduplicate these identical backup sets.
■ Specify parallel backup streams for the database backup.Specify appropriate ALLOCATE CHANNEL and RELEASE CHANNEL parametersin the backup script.
For an example that shows an edited backup script, see the following:
See “Example RMAN script for a stream-based backup” on page 260.
2 Disable Oracle's optimization and encryption for the duration of the databasebackup.
By default, Oracle disables optimization and encryption. If optimization andencryption are enabled, run the following RMAN commands from the commandline to disable optimization and encryption:
RMAN> CONFIGURE BACKUP OPTIMIZATION OFF;
RMAN> CONFIGURE ENCRYPTION FOR DATABASE OFF;
If your site requires encryption, you can specify encryption in the NetBackupfor Oracle backup policy.
259Deduplication best practicesConfiguring a stream-based Oracle backup
3 Disable Oracle's compression for the duration of the database backup.
By default, Oracle disables compression. If compression is enabled, Oraclecompresses unused sections in streams, and the result is unpredictablededuplication rates. If compression is enabled, run the following RMANcommand from the command line to disable compression:
RMAN> CONFIGURE DEVICE TYPE SBT_TAPE BACKUP TYPE TO BACKUPSET;
If your site requires compression, you can specify compression in theNetBackup for Oracle backup policy.
4 Configure a NetBackup for Oracle policy.
If you want to compress or encrypt the backup, enable compression andencryption in the NetBackup pd.conf file.
Run a full database backup as soon as you can. The policy can performincremental backups until the full backup can be run.
Note:Make sure that Oracle optimization, encryption, and compression are disabledfor the entirety of the database backup. Make sure to check specifications outsideof the RMAN backup script, too.
Example RMAN script for a stream-based backupThe following is an example fragment from an RMAN script that performs anoptimized, deduplicated, stream-based backup of an Oracle database.
RUN {
# Back up the database.
# Use 4 channels as 4 parallel backup streams.
ALLOCATE CHANNEL ch00 TYPE 'SBT_TAPE';
ALLOCATE CHANNEL ch01 TYPE 'SBT_TAPE';
ALLOCATE CHANNEL ch02 TYPE 'SBT_TAPE';
ALLOCATE CHANNEL ch03 TYPE 'SBT_TAPE';
SEND ' NB_ORA_SERV=$NB_ORA_SERV’;
BACKUP
$BACKUP_TYPE
SKIP INACCESSIBLE
TAG hot_db_bk_level0
260Deduplication best practicesExample RMAN script for a stream-based backup
# The following line sets FILESPERSET to 1 and facilitates database deduplication.
FILESPERSET 1
FORMAT 'bk_%s_%p_%t'
DATABASE;
sql 'alter system archive log current';
RELEASE CHANNEL ch00;
RELEASE CHANNEL ch01;
RELEASE CHANNEL ch02;
RELEASE CHANNEL ch03;
# Back up the archive logs
# The FILESPERSET parameter setting depends on the number of archive logs you have.
ALLOCATE CHANNEL ch00 TYPE 'SBT_TAPE';
ALLOCATE CHANNEL ch01 TYPE 'SBT_TAPE';
SEND ' NB_ORA_SERV=$NB_ORA_SERV’;
BACKUP
FILESPERSET 20
FORMAT 'al_%s_%p_%t'
ARCHIVELOG ALL DELETE INPUT;
RELEASE CHANNEL ch00;
RELEASE CHANNEL ch01;
#
# Note: During the process of backing up the database, RMAN also backs up the
# control file. This version of the control file does not contain the
# information about the current backup because "nocatalog" has been specified.
# To include the information about the current backup, the control file should
# be backed up as the last step of the RMAN section. This step would not be
# necessary if we were using a recovery catalog or auto control file backups.
#
ALLOCATE CHANNEL ch00 TYPE 'SBT_TAPE';
SEND ' NB_ORA_SERV=$NB_ORA_SERV’;
BACKUP
FORMAT 'cntrl_%s_%p_%t'
CURRENT CONTROLFILE;
RELEASE CHANNEL ch00;
}
261Deduplication best practicesExample RMAN script for a stream-based backup

Editing the RMAN script and configuringNetBackup for Oracle for a proxy copy backup
The following procedure explains how to edit the RMAN script on the client.
To edit the RMAN script
1 On the client computer that hosts the Oracle database, open the RMAN backupscript in a text editor, and make the following edits:
■ Add PROXY to the list of commands that backs up the data files.Example RMAN script after editing:
BACKUP
FORMAT 'bk_u%u_s%s_p%p_t%t'
PROXY
DATABASE;
■ Specify the NB_ORA_PC_STREAMS parameter in the database backup script.The NB_ORA_PC_STREAMS variable controls the number of proxy copy backupstreams to be started. By default, the agent initiates one backup job for allfiles. If the RMAN send command passes NB_ORA_PC_STREAMS, NetBackupfor Oracle splits the files into the number of groups that are specified bythe variable based on the file size. The agent attempts to create streamsof equal size and determines the number of processes that run to performthe backup.
For an example that shows an edited backup script, see the following:
See “Example RMAN script for a proxy copy backup” on page 263.
2 Disable Oracle's optimization and encryption for the duration of the databasebackup.
By default, Oracle disables optimization and encryption. If the optimization andencryption are enabled, run the following RMAN commands from the commandline to disable optimization and encryption:
RMAN> CONFIGURE BACKUP OPTIMIZATION OFF;
RMAN> CONFIGURE ENCRYPTION FOR DATABASE OFF;
If your site requires encryption, you can specify encryption in the NetBackupfor Oracle backup policy.
262Deduplication best practicesEditing the RMAN script and configuring NetBackup for Oracle for a proxy copy backup

3 Disable Oracle's compression for the duration of the database backup.
By default, Oracle disables compression. If compression is enabled, Oraclecompresses unused sections in streams, and the result is unpredictablededuplication rates. If compression is enabled, run the following RMANcommand from the command line to disable compression:
RMAN> CONFIGURE DEVICE TYPE SBT_TAPE BACKUP TYPE TO BACKUPSET;
If your site requires compression, you can specify compression in theNetBackup for Oracle backup policy.
4 Configure a NetBackup for Oracle policy.
If you want to compress or encrypt the backup, enable compression andencryption in the NetBackup pd.conf file.
Run a full database backup as soon as you can. You can perform incrementalbackups until the full backup can be run.
Note: Make sure that Oracle optimization, encryption, and compression aredisabled for the entirety of the database backup. Also, make sure to checkspecifications outside of the RMAN backup script.
Example RMAN script for a proxy copy backupThe following is an example of an RMAN script that performs an optimized,deduplicated, proxy copy backup of an Oracle database.
RUN {
# Back up the database.
ALLOCATE CHANNEL ch00 TYPE 'SBT_TAPE';
# Specify 2 streams.
SEND 'NB_ORA_PC_STREAMS=2';
BACKUP
PROXY
SKIP INACCESSIBLE
TAG hot_db_bk_proxy
FORMAT 'bk_%s_%p_%t'
263Deduplication best practicesExample RMAN script for a proxy copy backup

DATABASE;
sql 'alter system archive log current';
RELEASE CHANNEL ch00;
# Back up the archive logs.
# The FILESPERSET parameter setting depends on the number of archive logs you have.
ALLOCATE CHANNEL ch00 TYPE 'SBT_TAPE';
ALLOCATE CHANNEL ch01 TYPE 'SBT_TAPE';
SEND ' NB_ORA_SERV=$NB_ORA_SERV’;
BACKUP
FILESPERSET 20
FORMAT 'al_%s_%p_%t'
ARCHIVELOG ALL DELETE INPUT;
RELEASE CHANNEL ch00;
RELEASE CHANNEL ch01;
#
# Note: During the process of backing up the database, RMAN also backs up the
# control file. This version of the control file does not contain the
# information about the current backup because "nocatalog" has been specified.
# To include the information about the current backup, the control file should
# be backed up as the last step of the RMAN section. This step would not be
# necessary if we were using a recovery catalog or auto control file backups.
#
ALLOCATE CHANNEL ch00 TYPE 'SBT_TAPE';
SEND ' NB_ORA_SERV=$NB_ORA_SERV’;
BACKUP
FORMAT 'cntrl_%s_%p_%t'
CURRENT CONTROLFILE;
RELEASE CHANNEL ch00;
}
264Deduplication best practicesExample RMAN script for a proxy copy backup
Snapshot Client support ofSFRAC
This appendix includes the following topics:
■ About Snapshot Client support of SFRAC
■ NetBackup configuration for an SFRAC environment
■ Configuring the SFRAC environment for a backup operation
■ Performing a rollback restore in an SFRAC environment
■ Troubleshooting NetBackup in an SFRAC environment
About Snapshot Client support of SFRACVeritas Storage Foundation for the Oracle Real Application Clusters (RAC)environment leverages storage management and high availability technologies fordeployment of Oracle RAC on UNIX environments.
Storage Foundation is a complete solution for heterogeneous online storagemanagement. Based on VxVM and VxFS, it provides a standard set of integratedtools to centrally manage data growth, maximize storage hardware usage, andprovide data protection.
NetBackup configuration for an SFRACenvironment
To perform the offhost snapshot backup of Oracle database in the SFRACenvironment, the NetBackup client software must be installed on each node of thecluster.
DAppendix
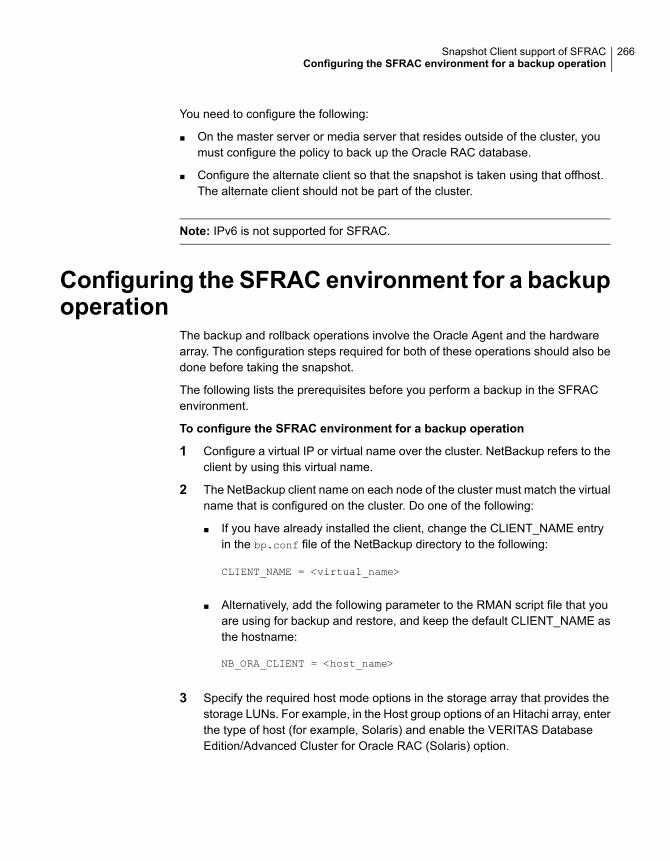
You need to configure the following:
■ On the master server or media server that resides outside of the cluster, youmust configure the policy to back up the Oracle RAC database.
■ Configure the alternate client so that the snapshot is taken using that offhost.The alternate client should not be part of the cluster.
Note: IPv6 is not supported for SFRAC.
Configuring the SFRAC environment for a backupoperation
The backup and rollback operations involve the Oracle Agent and the hardwarearray. The configuration steps required for both of these operations should also bedone before taking the snapshot.
The following lists the prerequisites before you perform a backup in the SFRACenvironment.
To configure the SFRAC environment for a backup operation
1 Configure a virtual IP or virtual name over the cluster. NetBackup refers to theclient by using this virtual name.
2 The NetBackup client name on each node of the cluster must match the virtualname that is configured on the cluster. Do one of the following:
■ If you have already installed the client, change the CLIENT_NAME entryin the bp.conf file of the NetBackup directory to the following:
CLIENT_NAME = <virtual_name>
■ Alternatively, add the following parameter to the RMAN script file that youare using for backup and restore, and keep the default CLIENT_NAME asthe hostname:
NB_ORA_CLIENT = <host_name>
3 Specify the required host mode options in the storage array that provides thestorage LUNs. For example, in the Host group options of an Hitachi array, enterthe type of host (for example, Solaris) and enable the VERITAS DatabaseEdition/Advanced Cluster for Oracle RAC (Solaris) option.
266Snapshot Client support of SFRACConfiguring the SFRAC environment for a backup operation
4 Add the following line to the bp.conf file, on each node in the cluster.
PREFERRED_NETWORK = <virtual-host-name>
This entry is required when running a rollback operation.
5 If the CFS version that you run does not support group quiescence, enableserial quiescence by adding the following lines to the/usr/openv/lib/vxfi/configfiles/vxfsfi.conf file.
[QUIESCENCE_INFO]
"QUIESCENCE_SERIAL_QUIESCENCE"=dword:00000001
6 Ensure that the database is in open (read-write) mode.
7 Ensure that the service group for the database in VCS is in the online state.
8 Because only the master node of the cluster supports the rollback restore,change the virtual IP before a rollback operation so that it points to the masternode.
9 Configure a snapshot backup policy for the SFRAC environment. In the backupselection tab of the policy, make sure that you provide a path name to theRMAN script. Make sure that the script resides on all the nodes of the cluster.Parameters like ORACLE_SID can differ on each of the nodes. For example,on node 1, the ORACLE_SID can be symc1 and on node 2, the ORACLE_SIDcan be symc2.
Performing a rollback restore in an SFRACenvironment
The following procedure describes the manual steps that are needed to restorevolumes and file systems by using the snapshot rollback method in an SFRACenvironment.
A typical host deployment for running NetBackup for Oracle in an SFRACenvironment is as follows: Host A and Host B are in the cluster and Host C is usedas an alternate client. The instant recovery snapshot is taken using the Oracle policyand the Hardware Snapshot FIM (frozen image method).
The application I/O stack is built upon the hardware array of VxVM (CVM) and VxFS(CFS).
The Veritas Cluster Server (VCS) controls the Oracle RAC database and otherrequired essential resources such as shared storage. VCS defines and managesits resources as a single unit called a service group. A service group contains allthe necessary components and resources of an application.
267Snapshot Client support of SFRACPerforming a rollback restore in an SFRAC environment

The following are entities in the VCS that monitor the application I/O stack:
■ CFSMount contains the mount points (cfs) where data files, archive logs, andcontrol files are stored.
■ CVMVolDg contains all the Volume Groups (cvm) configured on top of thevarious array LUNs that participate in the hardware snapshot.
■ The Database Resource Group contains the database instance and assists infailover.
To perform a rollback restore in the SFRAC environment
1 Ensure that you previously created a virtual IP for the clustered node. Pointthat virtual IP to the master node of the cluster.
2 On all the clustered nodes, take the VCS database service group (Oracle,CFSMount, and CVMVolDg resources) offline by using the following command:
# hagrp -offline <DB_Service_Group> -any
3 Freeze the database service group.
# hagrp -freeze <DB_Service_Group>
4 Mount the CFSMount points manually outside VCS on the master node. Thisaction helps when you start the database in mount state.
# mount -F vxfs -o cluster <mntPt>
5 Start the database with mount option on the clustered master node using oneof these options:
Option 1:
# sqlplus /as sysdba
# startup mount;
Option 2:
# sqlplus /as sysbackup
# startup mount;
268Snapshot Client support of SFRACPerforming a rollback restore in an SFRAC environment
6 Run the rollback restore operation from the RMAN script or the client GUI. Asample RMAN script file (hot_database_backup_proc) is located in thefollowing directory path:
/usr/openv/netbackup/ext/db_ext/oracle/samples/rman
To perform PIT rollback, add the following parameter to the script:
NB_ORA_PC_RESTORE=rollback
7 Unmount the CFS on the master node.
# umount <mntPt>
8 Unfreeze the VCS database service group.
# hagrp -unfreeze <DB_Service_Group>
9 On all the clustered nodes, take the VCS database service group (Oracle,CFSMount, and CVMVolDg resources) back online:
# hagrp -online <DB_Service_Group> -any
Troubleshooting NetBackup in an SFRACenvironment
The following describes some common errors and how to troubleshoot them:
■ Problem: The backup failed with error code 6 displayed in the GUI. Therman_script.out file shows the following error:
RMAN-06403: could not obtain a fully authorized session
ORA-01034: ORACLE not available
ORA-27101: shared memory realm does not exist
SVR4 Error: 2: No such file or directory
Resolution: Check the ORACLE_HOME and ORACLE_SID values.ORACLE_HOME should not have an extra ‘/’ at the end.
■ Problem: The backup failed with error code 239. The dbclient logs show thefollowing log statement:
serverResponse: ERR - server exited with status 239: the specified
client does not exist in the specified policy
01:02:23.844 [4000] <16> CreateNewImage: ERR - serverResponse() fail
269Snapshot Client support of SFRACTroubleshooting NetBackup in an SFRAC environment

Resolution: The client name mentioned in the policy and in the bp.conf file atthe client are different.
■ Problem: The backup failed with error 156. The bpfis logs show the followingerror.
CVxFSPlugin::vxFreezeAll : ioctl VX_FREEZE_ALL failed with errno : 16
CVxFSPlugin::quiesce - Could not quiesce as VX_FREEZE_ALL failed and
VX_FREEZE is not allowed
Resolution: Add the following lines to the/usr/openv/lib/vxfi/configfiles/vxfsfi.conffile:
file:[QUIESCENCE_INFO]
"QUIESCENCE_SERIAL_QUIESCENCE"=dword:00000001
■ Problem: The rollback failed with the following error displayed in the GUI:
Failed to process backup file <bk_113_1_728619266>
The dbclient logs show the following error:
xbsa_ProcessError: INF - leaving
xbsa_QueryObject: ERR - VxBSAQueryObject: Failed with error: Server
Status: client is not validated to use the server
xbsa_QueryObject: INF - leaving (3)
int_FindBackupImage: INF - leaving
int_AddToFileList: ERR - Failed to process backup file
<bk_113_1_728619266>
Resolution : Add the following line in the bp.conf file on the master node of thecluster PREFERRED_NETWORK = <virtual_name>
270Snapshot Client support of SFRACTroubleshooting NetBackup in an SFRAC environment

Script-based block-levelincremental (BLI) backupswithout RMAN on UNIXand Linux systems
This appendix includes the following topics:
■ About script-based block-level incremental (BLI) backups without RMAN
■ About BLI backup and restore operations
■ Verifying installation requirements for BLI backups without RMAN
■ Creating NetBackup policies for script-based BLI backup
■ Performing backups and restores
■ About troubleshooting backup or restore errors
About script-based block-level incremental (BLI)backups without RMAN
NetBackup for Oracle with Snapshot Client extends the capabilities of NetBackupto back up only changed data blocks of Oracle database files. NetBackuprecommends using RMAN-based BLI backups, which allow the use of templatesand remain tightly integrated with Oracle administration.
If you choose to use script-based BLI backups without RMAN, you can configureNetBackup for BLI support. A BLI backup backs up only the changed data blocks
EAppendix

of Oracle database files. NetBackup for Oracle script-based BLI performs backupsusing the Storage Checkpoint facility in the Veritas File System (VxFS) availablethrough the Veritas Storage Foundation for Oracle.
About BLI backup and restore operationsA BLI backup performs database backups by obtaining the changed blocks identifiedby the Storage Checkpoints. BLI backups can also be performed while the databaseis online or offline. As with Storage Checkpoints, you must enable archive log modeto perform online BLI backups.
A BLI backup places the tablespaces in backup mode, takes a Storage Checkpoint,and then performs the backup. You specify how and when to back up the databasewhen configuring the NetBackup notify scripts.
For example, suppose at 4:00 p.m. you lost a disk drive and its mirrored drive. Anumber of user tablespaces reside on the disk drive, and you want to recover allcommitted transactions up to the time you lost the drive. Because the BLI backupfacility lets you perform more frequent backups, you did an online differentialincremental backup at 1:00 p.m.
You recover by shutting down the database, installing new replacement disk drives,and restoring all the data files with NetBackup. Then you apply the archive logs torecover the tablespaces on the failed drive. If you used Fulldata StorageCheckpoints, the extra redo logs generated during an online backup are small, themedia recovery part of the database recovery takes very little time. Moreover,because you have a recent backup, the entire recovery is accomplished quickly.
Verifying installation requirements for BLIbackups without RMAN
Verify the following requirements before you begin the installation.
To verify the installation requirements
1 Make sure that the following products are properly installed and configured:
■ NetBackup
■ A supported level of Oracle
■ NetBackup for Oracle
272Script-based block-level incremental (BLI) backups without RMAN on UNIX and Linux systemsAbout BLI backup and restore operations
■ Veritas Storage Foundation for Oracle
2 Verify licensing.
The products must have valid licenses. To check for licenses, enter the followingcommands based on your version:
For VxFS versions earlier than 3.5:
# vxlicense -p
For VxFS versions 3.5 or later:
# vxlicrep
The command displays all the valid licenses that are installed on the system.If you have valid licenses, the Storage Checkpoint feature and the VeritasStorage Foundation for Oracle appear in the list.
3 Verify that both the NetBackup server (master and media) and client softwarework properly.
Particularly, verify that you can back up and restore typical operating systemfiles from the client.
File system and Storage Checkpoint space managementTo support BLI backups, the VxFS file systems need extra disk space to keep trackof the block change information. The space that is required depends on the typeof checkpoint that is used and the database change rate while the backup is running.
Using Storage Checkpoints has an effect on space in the following ways:
If the database is offline during the entire backup window (acold database backup) or you use this checkpoint type, theadditional space is minimal. Each file system requires about1% of free space.
This checkpoint sets a bit to indicate if a file block changed.When you use this checkpoint type, the data files are left inquiesce (write suspend) mode for the duration of the backup.
Nodata Storage Checkpoint
273Script-based block-level incremental (BLI) backups without RMAN on UNIX and Linux systemsVerifying installation requirements for BLI backups without RMAN

If the database is online during the backup and using thischeckpoint type, then more free space is needed in the filesystem.
NetBackup for Oracle keeps the Oracle containers in quiesce(write suspend) mode only for the time that is needed tocreate a Storage Checkpoint. During the backup, thecheckpoint creates copies of any file blocks immediatelybefore they are changed. The backup up contains only theunchanged blocks and the original copies of the changedblocks. After the backup completes, the Fulldata StorageCheckpoint is converted to a Nodata Storage checkpoint andthe copied blocks are returned to the free list.
If the workload change rate is light during backup or thebackup window is short, 10% free space is usually sufficientfor the workload. If the database has a heavy change ratewhile the backup is running, the file systems may requiremore than 10% of free space.
Fulldata Storage Checkpoint
Note: The default option that NetBackup uses for backups is Fulldata StorageCheckpoint.
To use Nodata Storage Checkpoint instead of the default option, a user must createthe following empty touch file:
/usr/openv/netbackup/ext/db_ext/NODATA_CKPT_PROXY
Creating NetBackup policies for script-based BLIbackup
To allow full and incremental backups, you must add at least one Standard typepolicy to NetBackup and define the appropriate schedules for that policy. Use theNetBackup Administration Console to add policies. NetBackup policies define thecriteria for the backup.
These criteria include the following:
■ Policy attributes
■ Clients and the files or directories to be backed up on the client
■ Storage unit to use
■ Backup schedules
274Script-based block-level incremental (BLI) backups without RMAN on UNIX and Linux systemsCreating NetBackup policies for script-based BLI backup

While most database NetBackup BLI backup policy requirements are the same asfor file system backups, the following items have special requirements:
■ The number of policies that are requiredSee “Number of policies required for BLI backup” on page 275.
■ Policy attribute valuesSee “About BLI policy attributes” on page 277.
■ The BLI client listSee “About the BLI client list” on page 277.
■ The list of directories and files to back upSee “Backup selections list for BLI backups” on page 278.
■ SchedulesSee “About schedules for BLI backup policies” on page 278.
Number of policies required for BLI backupA database BLI backup requires at least one Standard type policy.
This policy usually includes the following:
■ One full backup schedule
■ One incremental backup schedule
■ One user-directed backup schedule for control files and archive logs
Only one backup stream is initiated for each backup policy during automatic backups.To enable multiple backup streams, define multiple policies for the same database.If you have more than one database SID, configure policies for each SID. If youintend to do simultaneous backups of more than one SID on the same file system,use Nodata Storage Checkpoints. Set the METHOD to NODATA_CKPT_HOT.
For example, to back up file systems F1, F2, F3, and F4 with two streams, you needto define two policies (P1 and P2) with F1 and F2 backed up in P1, and F3 and F4
backed up in P2. If you have one large file system that needs to be backed up withmultiple streams, divide the files in the file system between different policies. Aftera file is added to a policy, it should stay in that policy. If you must rearrange the filelist, do so only prior to a full backup.
If you have more than one policy defined for an Oracle database instance,NetBackup groups the database instance by the NetBackup keyword phrase. Identifyone of the policies as the POLICY_IN_CONTROL in the NetBackup notify scripts. Thispolicy performs database shutdowns and restarts. All policies with the same keywordphrase need to be configured to start simultaneously.
275Script-based block-level incremental (BLI) backups without RMAN on UNIX and Linux systemsCreating NetBackup policies for script-based BLI backup

Warning: Care must be taken when specifying the keyword phrase. A multistreambackup is attempted if the backup process finds more than one policy with thefollowing characteristics: Each policy has the BLI attribute set, each policy is active,each policy contains the same client, and each policy has an identical keywordphrase.
Typical failure status is: “74 - timeout waiting for bpstart_notify to complete.”
"See “NetBackup restore and backup status codes” on page 292.
You can check the file systems on the backup client to see if they are included inone of the NetBackup policies on the server. To see if you need to add any newfile systems to the NetBackup policies, run the following commands from the serveron a regular basis, perhaps as a cron(1) job:
# cd /usr/openv/netbackup/bin/goodies/
# ./check_coverage -coverage -client mars -mailid \nbadmin
The preceding command generates the following output and mails it to the specifiedmailid:
File System Backup Coverage Report (UNIX only)
-----------------------------------------------
Key: * - Policy is not active
UNCOVERED - Mount Point not covered by an active policy
MULTIPLE - Mount Point covered by multiple active policies
CLIENT: mars
Mount Point Device Backed Up By Policy Notes
----------- ------ ------------------- -----
/ /dev/vg00/lvol3 production_servers
/home /dev/vg00/lvol5 production_servers
/oradata1 /dev/dsk/c1t0d0 block_incr1
/oradata2 /dev/dsk/c1t0d0 block_incr1
/oradata3 /dev/nbuvg/nbuvol UNCOVERED
/opt /dev/vg00/lvol6 production_servers
/oracle /dev/vg00/oracle production_servers
/stand /dev/vg00/lvol1 production_servers
/usr /dev/vg00/lvol7 production_servers
/var /dev/vg00/lvol8 production_servers
If there is an UNCOVERED file system that is used by Oracle, add it to one of theNetBackup policies so that all the necessary file systems are backed up at the sametime.
276Script-based block-level incremental (BLI) backups without RMAN on UNIX and Linux systemsCreating NetBackup policies for script-based BLI backup

Note: After a file system is added to a policy, it is a good idea to keep the file systemin that policy. If you change the policy, NetBackup performs a full backup the nexttime backups are run even if an incremental backup is requested.
About BLI policy attributesNetBackup applies policy attribute values when it backs up files.
The following attributes must be set for BLI backup:
Set to Standard.Policy Type
Select to enable BLI backups. If the BLI attribute is not enabled,NetBackup uses the standard method to back up the files inthe file list.
Perform block levelincremental backups
Set so that the BLI backup policies run before other policies.Job Priority
Define as the Oracle database instance name ($ORACLE_SID)in each of the policies for the same instance. Multistreambackups start when all the policies with a particular keywordphrase complete their respective startup scripts. If you havemultiple Oracle database instances (SIDs) use a separate setof policies for each SID. If the SIDs are backed upsimultaneously and any share a common file system for datafiles, use Nodata Storage Checkpoints. Set the METHOD toNODATA_CKPT_HOT.
Keyword phrase
Note:Do not change a keyword phrase after it is set in a policy. The keyword phraseis used in naming Storage Checkpoints. Changing the keyword phrase necessitatesa full backup even if an incremental backup is requested.
The NetBackup Administrator’s Guide, Volume I describes other policy attributesand how to configure them.
About the BLI client listThe client list specifies the clients upon which you configured a BLI backup. For adatabase backup, specify the name of the machine upon which the database resides.Specify the virtual hostname if clustered.
277Script-based block-level incremental (BLI) backups without RMAN on UNIX and Linux systemsCreating NetBackup policies for script-based BLI backup
Backup selections list for BLI backupsThe backup selections list specifies a list of directories and files to back up. The listmust contain all the database files or their directory names. Using directory names,rather than file names, ensures that new database files added to an existingconfiguration are backed up without having to update the file list. Use thecheck_coverage script to make sure all file systems are backed up.
If you are using the Quick I/O interface, you need to specify both the Quick I/O filename and the associated hidden file in the file list (for example, dbfile and.dbfile), or you need to specify the directory that contains both files. NetBackupdoes not follow the symbolic links to automatically back up the hidden file if youenumerate only the dbfile explicitly in the backup selections list. They are bothincluded if you enumerate their common directory.
When the NetBackup scheduler invokes an automatic backup schedule, it backsup the files one at a time, in the same order they appear in the backup selectionlist.
Oracle does not recommend backing up the online redo log, so it is recommendedthat you place online redo log files in a different file system than datafiles, archivelog files, or database control files. Do not include the online redo log files in the filelist.
About schedules for BLI backup policiesThe NetBackup server starts these schedule types:
■ Full Backup
■ Differential Incremental Backup
■ Cumulative Incremental Backup
Each BLI backup policy must include one full backup schedule and at least oneincremental backup schedule. In addition, you must designate one of the BLI backuppolicies as the POLICY_IN_CONTROL. The policies for each stream must have thesame types of schedules.
The NetBackup Administrator’s Guide, Volume I describes other schedule attributesand how to configure them.
You can configure the following types of schedules:
■ User-directed backup schedule. The user-directed backup scheduleencompasses all the days and times when user-directed backups are allowedto occur. Set the backup window as described.The policies for each stream must have the same types of schedules.
278Script-based block-level incremental (BLI) backups without RMAN on UNIX and Linux systemsCreating NetBackup policies for script-based BLI backup
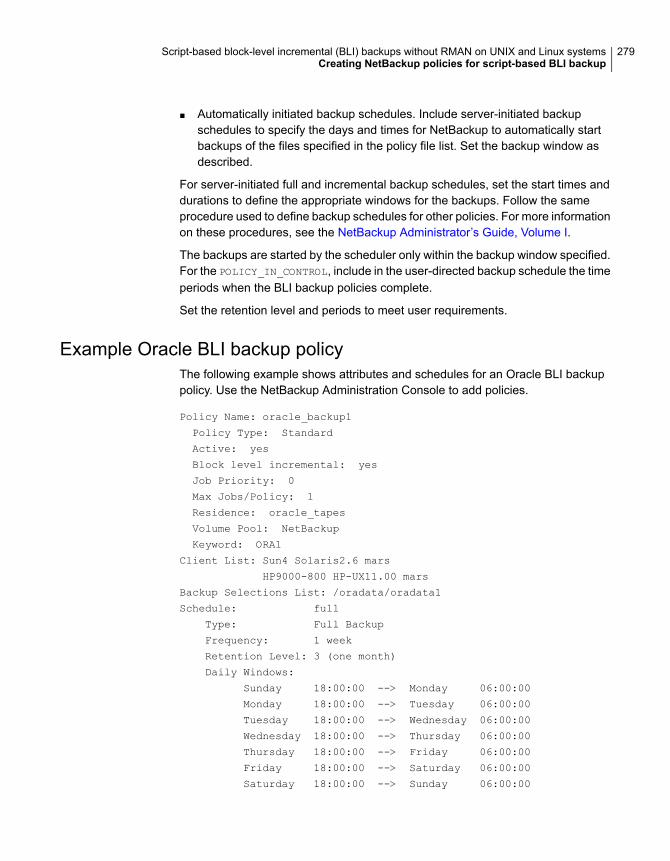
■ Automatically initiated backup schedules. Include server-initiated backupschedules to specify the days and times for NetBackup to automatically startbackups of the files specified in the policy file list. Set the backup window asdescribed.
For server-initiated full and incremental backup schedules, set the start times anddurations to define the appropriate windows for the backups. Follow the sameprocedure used to define backup schedules for other policies. For more informationon these procedures, see the NetBackup Administrator’s Guide, Volume I.
The backups are started by the scheduler only within the backup window specified.For the POLICY_IN_CONTROL, include in the user-directed backup schedule the timeperiods when the BLI backup policies complete.
Set the retention level and periods to meet user requirements.
Example Oracle BLI backup policyThe following example shows attributes and schedules for an Oracle BLI backuppolicy. Use the NetBackup Administration Console to add policies.
Policy Name: oracle_backup1
Policy Type: Standard
Active: yes
Block level incremental: yes
Job Priority: 0
Max Jobs/Policy: 1
Residence: oracle_tapes
Volume Pool: NetBackup
Keyword: ORA1
Client List: Sun4 Solaris2.6 mars
HP9000-800 HP-UX11.00 mars
Backup Selections List: /oradata/oradata1
Schedule: full
Type: Full Backup
Frequency: 1 week
Retention Level: 3 (one month)
Daily Windows:
Sunday 18:00:00 --> Monday 06:00:00
Monday 18:00:00 --> Tuesday 06:00:00
Tuesday 18:00:00 --> Wednesday 06:00:00
Wednesday 18:00:00 --> Thursday 06:00:00
Thursday 18:00:00 --> Friday 06:00:00
Friday 18:00:00 --> Saturday 06:00:00
Saturday 18:00:00 --> Sunday 06:00:00
279Script-based block-level incremental (BLI) backups without RMAN on UNIX and Linux systemsCreating NetBackup policies for script-based BLI backup

Schedule: incr
Type: Differential Incremental Backup
Frequency: 1 day
Retention Level: 3 (one month)
Daily Windows:
Sunday 18:00:00 --> Monday 06:00:00
Monday 18:00:00 --> Tuesday 06:00:00
Tuesday 18:00:00 --> Wednesday 06:00:00
Wednesday 18:00:00 --> Thursday 06:00:00
Thursday 18:00:00 --> Friday 06:00:00
Friday 18:00:00 --> Saturday 06:00:00
Saturday 18:00:00 --> Sunday 06:00:00
Schedule: userbkup
Type: User Backup
Retention Level: 3 (one month)
Daily Windows:
Sunday 00:00:00 --> Sunday 24:00:00
Monday 00:00:00 --> Monday 24:00:00
Tuesday 00:00:00 --> Tuesday 24:00:00
Wednesday 00:00:00 --> Wednesday 24:00:00
Thursday 00:00:00 --> Thursday 24:00:00
Friday 00:00:00 --> Friday 24:00:00
Saturday 00:00:00 --> Saturday 24:00:00
In this example, the oracle_backup1 policy backs up all the files in/oradata/oradata1. The policy specifies a weekly full backup, a daily differentialincremental backup, and a user-directed backup schedule. The archive logs andthe control file are backed up using the user-directed schedule at the completionof the full or incremental backup.
Setting the maximum jobs per client global attributeSet the Maximum Jobs per Client to the number of policies that have the samekeyword phrase. This number can be greater than one when multiple job policiesare defined to back up multiple file systems.
About BLI backup methodsYou can choose from the following backup methods when configuring BLI notifyscripts:
280Script-based block-level incremental (BLI) backups without RMAN on UNIX and Linux systemsCreating NetBackup policies for script-based BLI backup
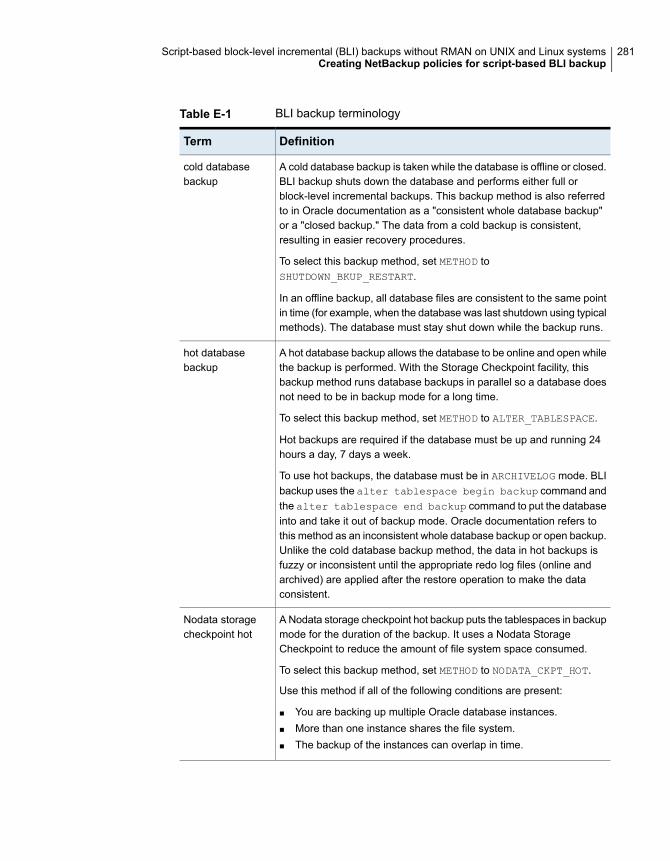
Table E-1 BLI backup terminology
DefinitionTerm
A cold database backup is taken while the database is offline or closed.BLI backup shuts down the database and performs either full orblock-level incremental backups. This backup method is also referredto in Oracle documentation as a "consistent whole database backup"or a "closed backup." The data from a cold backup is consistent,resulting in easier recovery procedures.
To select this backup method, set METHOD toSHUTDOWN_BKUP_RESTART.
In an offline backup, all database files are consistent to the same pointin time (for example, when the database was last shutdown using typicalmethods). The database must stay shut down while the backup runs.
cold databasebackup
A hot database backup allows the database to be online and open whilethe backup is performed. With the Storage Checkpoint facility, thisbackup method runs database backups in parallel so a database doesnot need to be in backup mode for a long time.
To select this backup method, set METHOD to ALTER_TABLESPACE.
Hot backups are required if the database must be up and running 24hours a day, 7 days a week.
To use hot backups, the database must be in ARCHIVELOG mode. BLIbackup uses the alter tablespace begin backup command andthe alter tablespace end backup command to put the databaseinto and take it out of backup mode. Oracle documentation refers tothis method as an inconsistent whole database backup or open backup.Unlike the cold database backup method, the data in hot backups isfuzzy or inconsistent until the appropriate redo log files (online andarchived) are applied after the restore operation to make the dataconsistent.
hot databasebackup
A Nodata storage checkpoint hot backup puts the tablespaces in backupmode for the duration of the backup. It uses a Nodata StorageCheckpoint to reduce the amount of file system space consumed.
To select this backup method, set METHOD to NODATA_CKPT_HOT.
Use this method if all of the following conditions are present:
■ You are backing up multiple Oracle database instances.■ More than one instance shares the file system.■ The backup of the instances can overlap in time.
Nodata storagecheckpoint hot
281Script-based block-level incremental (BLI) backups without RMAN on UNIX and Linux systemsCreating NetBackup policies for script-based BLI backup

Table E-1 BLI backup terminology (continued)
DefinitionTerm
The quick freeze database backup is different than an online databasebackup, because it requires the database to be brought down briefly totake a snapshot or Fulldata Storage Checkpoint of the database image.The Fulldata Storage Checkpoint is created in a few seconds and thedatabase can be restarted immediately. A backup image from a quickfreeze database backup is equivalent to a backup image from a colddatabase backup. You can choose this backup method when youconfigure BLI notify scripts.
To select this backup method, set METHOD toSHUTDOWN_CKPT_RESTART.
See “Creating notify scripts for BLI backups” on page 282.
quick freezedatabase backup
If the database is in ARCHIVELOG mode, you can use all four methods to back upthe database. If the database is in NOARCHIVELOG mode, you can only select thecold backup or quick freeze backup.
When you use the cold and quick freeze database backups, the default shutdowncommand that you use in the bpstart_notify.oracle_bli script is shutdown orshutdown normal. These commands wait for all users to log off before it initiatesthe shutdown. In some circumstances, even after all interactive users are loggedoff, processes such as the Oracle Intelligent Agent (Oracle dbsnmp account) canstill be connected to the database, preventing the database shutdown. Attempt touse the default shutdown commands to shut down the database cleanly.Alternatively, you can use shutdown immediate to initiate the database shutdownimmediately.
Creating notify scripts for BLI backupsCreate notify scripts that run on the clients to synchronize the backup operationand the database operation. You need a set of three notify scripts for each policythat is performing BLI backups. The scripts must be in the/usr/openv/netbackup/bin directory on the NetBackup client.
The scripts are named as follows:
■ bpstart_notify.POLICY
■ post_checkpoint_notify.POLICY
■ bpend_notify.POLICY
To create the notify scripts, run the following script as root:
282Script-based block-level incremental (BLI) backups without RMAN on UNIX and Linux systemsCreating NetBackup policies for script-based BLI backup
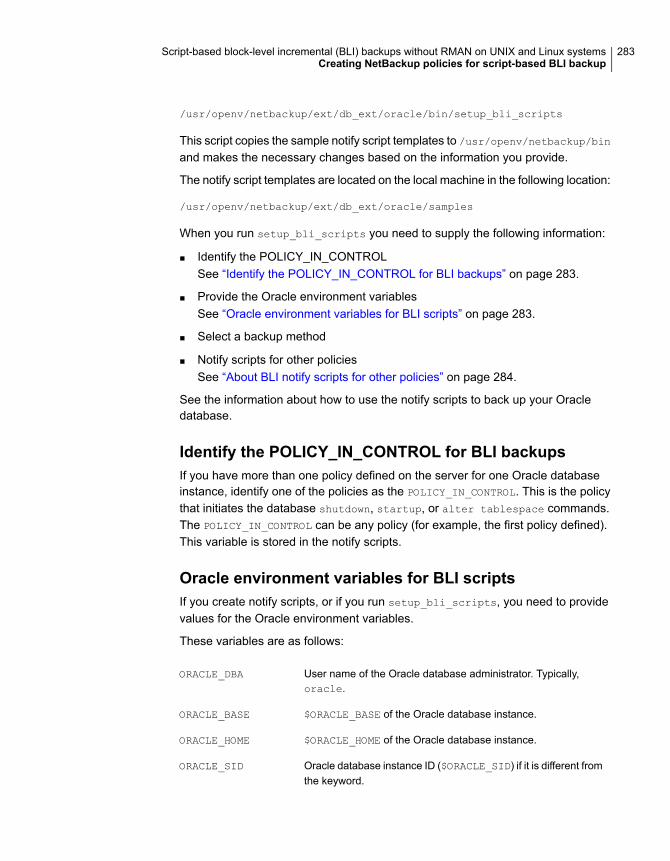
/usr/openv/netbackup/ext/db_ext/oracle/bin/setup_bli_scripts
This script copies the sample notify script templates to /usr/openv/netbackup/bin
and makes the necessary changes based on the information you provide.
The notify script templates are located on the local machine in the following location:
/usr/openv/netbackup/ext/db_ext/oracle/samples
When you run setup_bli_scripts you need to supply the following information:
■ Identify the POLICY_IN_CONTROLSee “Identify the POLICY_IN_CONTROL for BLI backups” on page 283.
■ Provide the Oracle environment variablesSee “Oracle environment variables for BLI scripts” on page 283.
■ Select a backup method
■ Notify scripts for other policiesSee “About BLI notify scripts for other policies” on page 284.
See the information about how to use the notify scripts to back up your Oracledatabase.
Identify the POLICY_IN_CONTROL for BLI backupsIf you have more than one policy defined on the server for one Oracle databaseinstance, identify one of the policies as the POLICY_IN_CONTROL. This is the policythat initiates the database shutdown, startup, or alter tablespace commands.The POLICY_IN_CONTROL can be any policy (for example, the first policy defined).This variable is stored in the notify scripts.
Oracle environment variables for BLI scriptsIf you create notify scripts, or if you run setup_bli_scripts, you need to providevalues for the Oracle environment variables.
These variables are as follows:
User name of the Oracle database administrator. Typically,oracle.
ORACLE_DBA
$ORACLE_BASE of the Oracle database instance.ORACLE_BASE
$ORACLE_HOME of the Oracle database instance.ORACLE_HOME
Oracle database instance ID ($ORACLE_SID) if it is different fromthe keyword.
ORACLE_SID
283Script-based block-level incremental (BLI) backups without RMAN on UNIX and Linux systemsCreating NetBackup policies for script-based BLI backup

Directory in which the Oracle archive logs reside.ORACLE_LOGS
Location to which a copy of the Oracle control file is written sothat it can be backed up.
ORACLE_CNTRL
sqldba, svrmgrl, or sqlplus command to start up or shutdown the database.
SQLCMD
Path name for the Oracle startup parameter file (INIT.ORA). Ifyou are using an Oracle SPFILE as your parameter file, do notset the ORACLE_INIT environment variable.
ORACLE_INIT
Path name for the Oracle configuration file (CONFIG.ORA). Somedatabase configurations use the CONFIG.ORA file to specifyvalues for the database parameters that usually do not change.The CONFIG.ORA file can be called by the INIT.ORA file usingan include statement.
ORACLE_CONFIG
About BLI notify scripts for other policiesIf you have more than one policy defined to support multiple backup streams, createa copy of the notify scripts for each policy defined.
For example, assume that you have two policies defined, oracle_backup1 andoracle_backup2. Also assume that POLICY_IN_CONTROL is set to oracle_backup1.You also need to create notify scripts for policy oracle_backup2. Thesetup_bli_scripts script performs this step automatically.
Sample setup_bli_scripts sessionThe following sample session shows how to use setup_bli_scripts to create thenotify scripts.
#/usr/openv/netbackup/ext/db_ext/oracle/bin/setup_bli_scripts
Please enter the user name of your Oracle administrator? orac901
ORACLE_BASE is the Oracle environment variable that identifies
the directory at the top of the Oracle software and administrative
file structure. The value of this variable is typically
/MOUNTPOINT/app/oracle
Please enter your ORACLE_BASE? /dbhome/oracle/orac901
ORACLE_HOME is the Oracle environment variable that identifies the
directory containing the Oracle software for a given Oracle server
284Script-based block-level incremental (BLI) backups without RMAN on UNIX and Linux systemsCreating NetBackup policies for script-based BLI backup

release. The value of this variable is typically
/dbhome/oracle/orac901/product/RELEASE
Please enter your ORACLE_HOME? /dbhome/oracle/orac901
sqlplus will be used.
The default "connect" statement that will be used to connect to the database is:
"connect / as sysdba"
Would you like to modify the connect and use a specific login? (y/n) n
"connect / as sysdba" will be used.
Please enter the Oracle instance (ORACLE_SID) you want to back up? orac901
If you are using a CONFIG.ORA file, you need to specify where
it is, so that it can be backed up. If this does not apply
apply to your configuration, hit ENTER to go on. If this does
apply to your configuration, specify the file path.
Typically this would be:
/dbhome/oracle/orac901/admin/orac901/pfile/configorac901.ora
but this file could not be found.
Enter your Oracle config file path or hit ENTER:
To back up a copy of the Oracle control file, you need to specify a file
path where Oracle can write a copy of the control file.
Please enter the file path where Oracle is to write a copy of your
control file? /dbhome/oracle/orac901/admin/orac901/pfile/cntrlorac901.ora
To back up the Oracle archive logs, you need to specify their location.
Enter the directory path to your Oracle archive logs?
/dbhome/oracle/orac901/admin/orac901/arch
Do you have more archive log locations? (y/n): n
Do you want the output of successful executions of the NetBackup
scripts mailed to you? y
285Script-based block-level incremental (BLI) backups without RMAN on UNIX and Linux systemsCreating NetBackup policies for script-based BLI backup

Please enter the mail address to send it to? [email protected]
Do you want the output of unsuccessful executions of the NetBackup
scripts mailed to you? y
Please enter the mail address to send it to? [email protected]
There are 4 backup methods to choose from:
ALTER_TABLESPACE - Use alter tablespace begin backup method
NODATA_CKPT_HOT - Use alter tablespace begin backup with nodata ckpts
SHUTDOWN_CKPT_RESTART - Shutdown, create the ckpt clones, and restart
SHUTDOWN_BKUP_RESTART - Shutdown the DB, backup, and then restart
If one of the methods requiring DB shutdown are selected, you may experience
problems with timeouts if the database can't be shut down in a timely
manner. You may want to change the shutdown command in the notify scripts to
shutdown immediate, or you may have to increase the BPSTART_TIMEOUT value in the
bp.conf file on the master server, or you may want to change the backup
method to ALTER_TABLESPACE or NODATA_CKPT_HOT.
Note: the default BPSTART_TIMEOUT value is 300 seconds.
Do you want to use the ALTER_TABLESPACE method? y
You now need to decide on how many NetBackup policies you will have
backing up simultaneously. The first one you enter will be known
as the POLICY_IN_CONTROL in the scripts and will perform any needed
DB operations. When you create the policies on the NetBackup server,
you will have to divide the filesystems between these policies.
Please enter the name of the policy that will be the POLICY_IN_CONTROL? BLI_1
Please enter the name of another policy or DONE to stop? BLI_2
Please enter the name of another policy or DONE to stop? BLI_3
Please enter the name of another policy or DONE to stop? BLI_4
Please enter the name of another policy or DONE to stop? BLI_5
Please enter the name of another policy or DONE to stop? BLI_6
Please enter the name of another policy or DONE to stop? DONE
Performing backups and restoresAfter the installation and configuration are complete, you can use the NetBackupinterfaces to start Oracle backups and restores. You can run backups manually byusing schedules that you determine. You can also run a schedule manually.
286Script-based block-level incremental (BLI) backups without RMAN on UNIX and Linux systemsPerforming backups and restores

Note: You must be the root user to perform all operations using the BLI backupsoftware.
About NetBackup for Oracle agent automatic backupsThe best way to back up databases is to set up schedules for automatic backups.
Note: You must be the root user to perform all operations using the BLI backupsoftware.
Note: For HP-UX PA-RISC checkpoints to unmount and be cleaned up, createtouch file /usr/openv/netbackup/AIO_READS_MAX that contains the value 1.
HP-UX PA-RISC checkpoints may not be unmounted on Oracle database agents.
About NetBackup for Oracle manual backupsYou can also run an Automatic Backup schedule manually using the NetBackupAdministration Console. For information about performing manual backups ofschedules, see the NetBackup Administrator’s Guide, Volume I.
Note: You must be the root user to perform all operations using the BLI backupsoftware.
Note: For HP-UX PA-RISC checkpoints to unmount and be cleaned up, createtouch file /usr/openv/netbackup/AIO_READS_MAX that contains the value 1.
To perform a cold (offline) backup, set the environment variable METHOD in thebpstart_notify script on the client to SHUTDOWN_BKUP_RESTART. Thebpstart_notify script shuts down the database before the backup begins andthe bpend_notify script restarts the database after the backup completes.
To perform a hot (online) backup using Fulldata Storage Checkpoints, make surethe database is running in ARCHIVELOG mode and set the variable METHOD toALTER_TABLESPACE. The bpstart_notify script changes the tablespaces to onlinebackup mode before the backup begins, and the post_checkpoint_notify scriptchanges the tablespaces back to normal mode after the Fulldata StorageCheckpoints are created.
To perform a Nodata Storage Checkpoint Hot (online) backup, make sure thedatabase is running in ARCHIVELOG mode and set the environment variable METHOD
287Script-based block-level incremental (BLI) backups without RMAN on UNIX and Linux systemsPerforming backups and restores

in the bpstart_notify script to NODATA_CKPT_HOT. The bpstart_notify scriptchanges the tablespaces to online backup mode before the backup begins. Thebpend_notify script changes the tablespaces back to normal mode after the backupcompletes.
To perform a quick freeze backup, set the environment variable METHOD in thebpstart_notify script to SHUTDOWN_CKPT_RESTART. The bpstart_notify scriptshuts down the database and the post_checkpoint_notify script restarts itimmediately after the Fulldata Storage Checkpoints are created. Taking VxFSFulldata Storage Checkpoints is very fast (within a minute), and with the NetBackupqueuing delay for scheduling the backup jobs, the database down time is typicallyonly a few minutes.
Backing up Quick I/O filesA Quick I/O file consists of two components: a hidden file with the space allocatedfor it, and a link that points to the Quick I/O interface of the hidden file. BecauseNetBackup does not follow symbolic links, you must specify both the Quick I/O linkand its hidden file in the list of files to be backed up.
Note: You must be the root user to perform all operations using the BLI backupsoftware.
For example:
ls -la /db02
total 2192
drwxr-xr-x 2 root root 96 Jan 20 17:39 .
drwxr-xr-x 9 root root 8192 Jan 20 17:39 ..
-rw-r--r-- 1 oracle dba 1048576 Jan 20 17:39 .cust.dbf
lrwxrwxrwx 1 oracle dba 22 Jan 20 17:39 cust.dbf ->\
.cust.dbf::cdev:vxfs:
The preceding example shows that you must include both the symbolic link cust.dbfand the hidden file .cust.dbf in the backup file list.
If you want to back up all Quick I/O files in a directory, you can simplify the processby only specifying the directory to be backed up. In this case, both components ofeach Quick I/O file is properly backed up. In general, you should specify directoriesto be backed up unless you only want to back up some, files in those directories.
Note: For HP-UX PA-RISC checkpoints to unmount and be cleaned up, createtouch file /usr/openv/netbackup/AIO_READS_MAX that contains the value 1.
288Script-based block-level incremental (BLI) backups without RMAN on UNIX and Linux systemsPerforming backups and restores
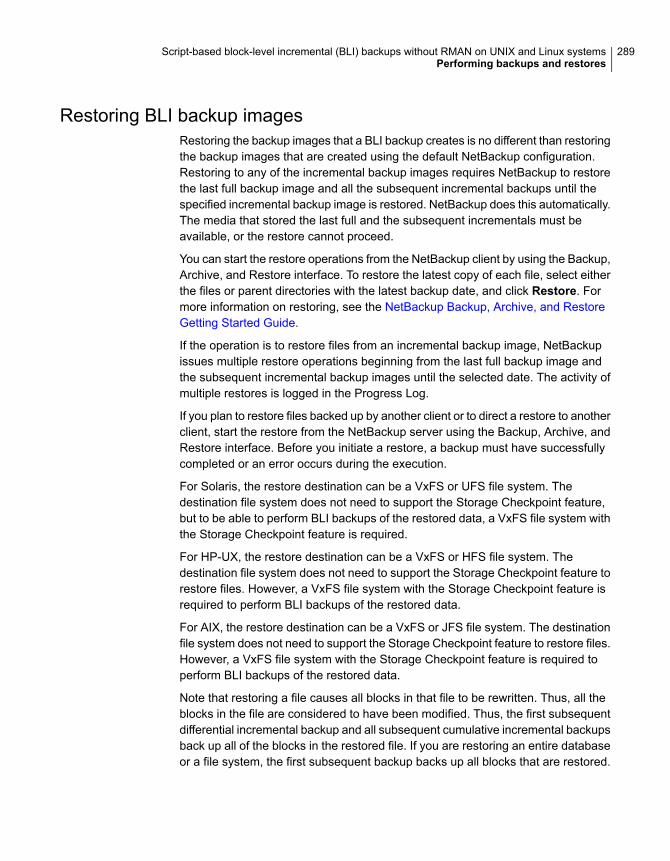
Restoring BLI backup imagesRestoring the backup images that a BLI backup creates is no different than restoringthe backup images that are created using the default NetBackup configuration.Restoring to any of the incremental backup images requires NetBackup to restorethe last full backup image and all the subsequent incremental backups until thespecified incremental backup image is restored. NetBackup does this automatically.The media that stored the last full and the subsequent incrementals must beavailable, or the restore cannot proceed.
You can start the restore operations from the NetBackup client by using the Backup,Archive, and Restore interface. To restore the latest copy of each file, select eitherthe files or parent directories with the latest backup date, and click Restore. Formore information on restoring, see the NetBackup Backup, Archive, and RestoreGetting Started Guide.
If the operation is to restore files from an incremental backup image, NetBackupissues multiple restore operations beginning from the last full backup image andthe subsequent incremental backup images until the selected date. The activity ofmultiple restores is logged in the Progress Log.
If you plan to restore files backed up by another client or to direct a restore to anotherclient, start the restore from the NetBackup server using the Backup, Archive, andRestore interface. Before you initiate a restore, a backup must have successfullycompleted or an error occurs during the execution.
For Solaris, the restore destination can be a VxFS or UFS file system. Thedestination file system does not need to support the Storage Checkpoint feature,but to be able to perform BLI backups of the restored data, a VxFS file system withthe Storage Checkpoint feature is required.
For HP-UX, the restore destination can be a VxFS or HFS file system. Thedestination file system does not need to support the Storage Checkpoint feature torestore files. However, a VxFS file system with the Storage Checkpoint feature isrequired to perform BLI backups of the restored data.
For AIX, the restore destination can be a VxFS or JFS file system. The destinationfile system does not need to support the Storage Checkpoint feature to restore files.However, a VxFS file system with the Storage Checkpoint feature is required toperform BLI backups of the restored data.
Note that restoring a file causes all blocks in that file to be rewritten. Thus, all theblocks in the file are considered to have been modified. Thus, the first subsequentdifferential incremental backup and all subsequent cumulative incremental backupsback up all of the blocks in the restored file. If you are restoring an entire databaseor a file system, the first subsequent backup backs up all blocks that are restored.
289Script-based block-level incremental (BLI) backups without RMAN on UNIX and Linux systemsPerforming backups and restores

To restore a Quick I/O file, if both the symbolic link and the hidden file already exist,NetBackup restores both components from the backup image. If either one of thetwo components is missing, or both components are missing, NetBackup createsor overwrites as needed.
Oracle database recovery might be necessary after restoring the files. See theOracle documentation for more information on doing database recovery.
About NetBackup backup and restore logsNetBackup provides logs on the database backup and restore operations. Theselogs are useful for finding problems that are associated with those operations. Thefollowing table describes the most useful logs and reports for troubleshooting backupand restore operations.
Table E-2 NetBackup backup and restore logs
DescriptionLog file type
For user-directed backups and restores performed with Backup, Archive, and Restoreinterface, the most convenient log to use for NetBackup is the progress log. The progresslog file is written to the user's home directory, by default in/usr/openv/netbackup/logs/user_ops/username/logs. This log indicates whetherNetBackup was able to complete its part of the operation. You can view the progress logfrom the Backup, Archive, and Restore interface, or you can use a file editor such as vi(1).
NetBackup progresslogs
The NetBackup server and client software provide debug logs for troubleshooting problemsthat occur outside of BLI backups. To enable these debug logs on the server or client, createthe appropriate directories under the following directory:
/usr/openv/netbackup/logs
For more information on debug logs, see the NetBackup Troubleshooting Guide or see the/usr/openv/netbackup/logs/README.debug file.
NetBackup debug logs
In addition to logs, NetBackup provides a set of reports that help isolate problems. One reportis All Log Entries on the server. For a description of all reports, see the NetBackupAdministrator’s Guide, Volume I.
NetBackup reports
About troubleshooting backup or restore errorsA backup or restore error can originate from NetBackup for Oracle, from theNetBackup server or client, from the Media Manager, or from VxFS. In addition toexamining log files and reports, you should determine at which stage of the backupor restore operation the problem occurred. You can also use NetBackup statuscodes to determine the cause of the problem.
290Script-based block-level incremental (BLI) backups without RMAN on UNIX and Linux systemsAbout troubleshooting backup or restore errors

Troubleshooting stages of backup and restore operationsRefer to the following list to determine the source of a backup or restore error:
■ A backup or restore can be started in either of the following ways:
■ Manually from the administrator interface on the master server
■ Automatically by a NetBackup server using a full schedule or incrementalschedule
If an error occurs during the start operation, examine the Java reports windowfor the possible cause of the error.
■ If the backup or restore starts successfully but eventually fails, one of thefollowing can be the cause:
■ Server/Client communication problem
■ Schedule error
■ Media-related error
■ VxFS errorsFor more information, see the NetBackup Troubleshooting Guide.
■ There can be insufficient disk space for the VxFS Fulldata Storage Checkpointsto keep track of changed block information. Check the All Log Entries reportfor errors.If there is a file system out-of-space condition, increase the size of the file systemso it is large enough for Fulldata Storage Checkpoints or use the Nodata StorageCheckpoint Hot backup method. This error does not affect the integrity of thebackup images because a full backup of the affected file system occurs afterthe condition is fixed.
■ If an incremental backup is intended, but the whole file system is backed upinstead, one of the following conditions might be present:
■ Storage Checkpoints that keep track of changes have been removed
■ The Block level incremental attribute is not selected
■ Other errors with a nonzero status codeThe most common cause of this problem is the file system removed the StorageCheckpoint that keeps track of the block changes. This action might occur if thefile system runs out of space, and there are no volumes available to allocate tothe file system. The integrity of the backup images is not affected, because afull backup of the file system occurs at the next backup opportunity afterNetBackup detects that a Storage Checkpoint is missing.
291Script-based block-level incremental (BLI) backups without RMAN on UNIX and Linux systemsAbout troubleshooting backup or restore errors
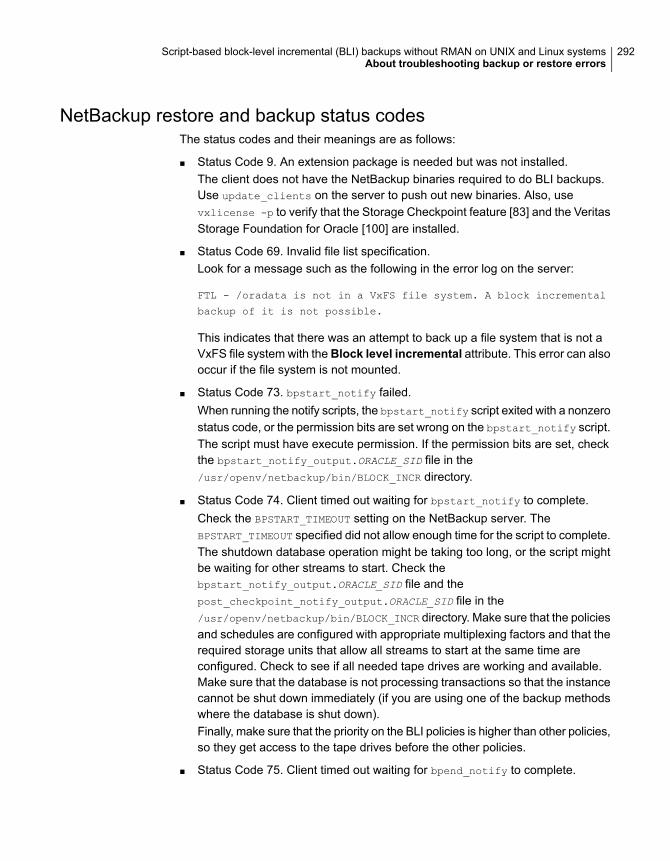
NetBackup restore and backup status codesThe status codes and their meanings are as follows:
■ Status Code 9. An extension package is needed but was not installed.The client does not have the NetBackup binaries required to do BLI backups.Use update_clients on the server to push out new binaries. Also, usevxlicense -p to verify that the Storage Checkpoint feature [83] and the VeritasStorage Foundation for Oracle [100] are installed.
■ Status Code 69. Invalid file list specification.Look for a message such as the following in the error log on the server:
FTL - /oradata is not in a VxFS file system. A block incremental
backup of it is not possible.
This indicates that there was an attempt to back up a file system that is not aVxFS file system with the Block level incremental attribute. This error can alsooccur if the file system is not mounted.
■ Status Code 73. bpstart_notify failed.When running the notify scripts, the bpstart_notify script exited with a nonzerostatus code, or the permission bits are set wrong on the bpstart_notify script.The script must have execute permission. If the permission bits are set, checkthe bpstart_notify_output.ORACLE_SID file in the/usr/openv/netbackup/bin/BLOCK_INCR directory.
■ Status Code 74. Client timed out waiting for bpstart_notify to complete.Check the BPSTART_TIMEOUT setting on the NetBackup server. TheBPSTART_TIMEOUT specified did not allow enough time for the script to complete.The shutdown database operation might be taking too long, or the script mightbe waiting for other streams to start. Check thebpstart_notify_output.ORACLE_SID file and thepost_checkpoint_notify_output.ORACLE_SID file in the/usr/openv/netbackup/bin/BLOCK_INCR directory. Make sure that the policiesand schedules are configured with appropriate multiplexing factors and that therequired storage units that allow all streams to start at the same time areconfigured. Check to see if all needed tape drives are working and available.Make sure that the database is not processing transactions so that the instancecannot be shut down immediately (if you are using one of the backup methodswhere the database is shut down).Finally, make sure that the priority on the BLI policies is higher than other policies,so they get access to the tape drives before the other policies.
■ Status Code 75. Client timed out waiting for bpend_notify to complete.
292Script-based block-level incremental (BLI) backups without RMAN on UNIX and Linux systemsAbout troubleshooting backup or restore errors
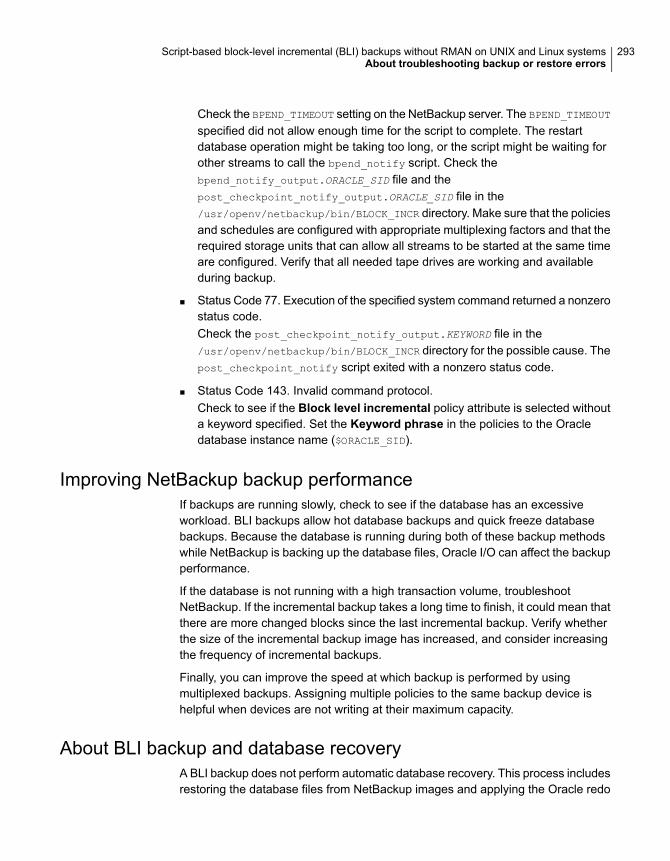
Check the BPEND_TIMEOUT setting on the NetBackup server. The BPEND_TIMEOUT
specified did not allow enough time for the script to complete. The restartdatabase operation might be taking too long, or the script might be waiting forother streams to call the bpend_notify script. Check thebpend_notify_output.ORACLE_SID file and thepost_checkpoint_notify_output.ORACLE_SID file in the/usr/openv/netbackup/bin/BLOCK_INCR directory. Make sure that the policiesand schedules are configured with appropriate multiplexing factors and that therequired storage units that can allow all streams to be started at the same timeare configured. Verify that all needed tape drives are working and availableduring backup.
■ Status Code 77. Execution of the specified system command returned a nonzerostatus code.Check the post_checkpoint_notify_output.KEYWORD file in the/usr/openv/netbackup/bin/BLOCK_INCR directory for the possible cause. Thepost_checkpoint_notify script exited with a nonzero status code.
■ Status Code 143. Invalid command protocol.Check to see if the Block level incremental policy attribute is selected withouta keyword specified. Set the Keyword phrase in the policies to the Oracledatabase instance name ($ORACLE_SID).
Improving NetBackup backup performanceIf backups are running slowly, check to see if the database has an excessiveworkload. BLI backups allow hot database backups and quick freeze databasebackups. Because the database is running during both of these backup methodswhile NetBackup is backing up the database files, Oracle I/O can affect the backupperformance.
If the database is not running with a high transaction volume, troubleshootNetBackup. If the incremental backup takes a long time to finish, it could mean thatthere are more changed blocks since the last incremental backup. Verify whetherthe size of the incremental backup image has increased, and consider increasingthe frequency of incremental backups.
Finally, you can improve the speed at which backup is performed by usingmultiplexed backups. Assigning multiple policies to the same backup device ishelpful when devices are not writing at their maximum capacity.
About BLI backup and database recoveryA BLI backup does not perform automatic database recovery. This process includesrestoring the database files from NetBackup images and applying the Oracle redo
293Script-based block-level incremental (BLI) backups without RMAN on UNIX and Linux systemsAbout troubleshooting backup or restore errors

log files to the database files. Follow the Oracle documentation to perform databaserecovery after a restore.
294Script-based block-level incremental (BLI) backups without RMAN on UNIX and Linux systemsAbout troubleshooting backup or restore errors
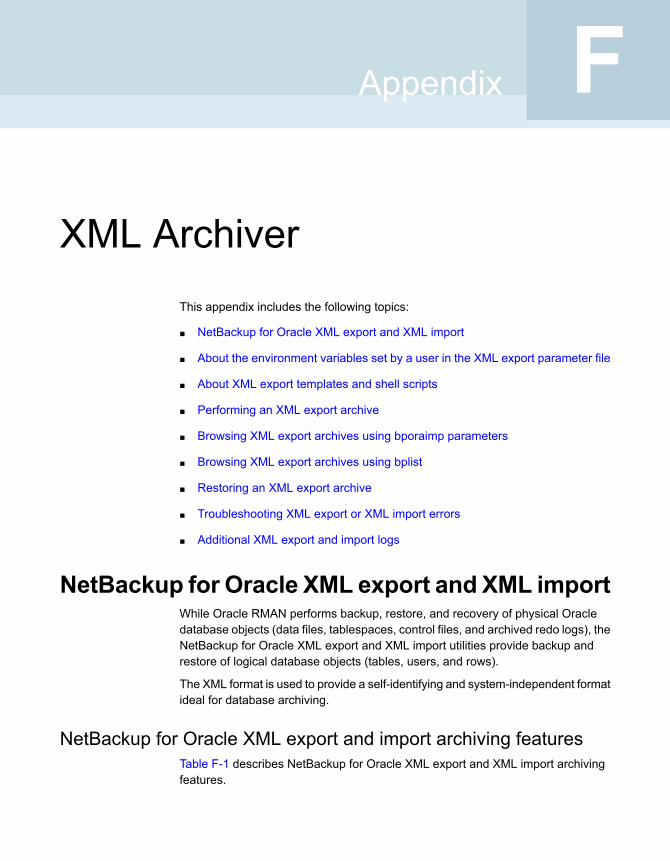
XML ArchiverThis appendix includes the following topics:
■ NetBackup for Oracle XML export and XML import
■ About the environment variables set by a user in the XML export parameter file
■ About XML export templates and shell scripts
■ Performing an XML export archive
■ Browsing XML export archives using bporaimp parameters
■ Browsing XML export archives using bplist
■ Restoring an XML export archive
■ Troubleshooting XML export or XML import errors
■ Additional XML export and import logs
NetBackup for Oracle XML export and XML importWhile Oracle RMAN performs backup, restore, and recovery of physical Oracledatabase objects (data files, tablespaces, control files, and archived redo logs), theNetBackup for Oracle XML export and XML import utilities provide backup andrestore of logical database objects (tables, users, and rows).
The XML format is used to provide a self-identifying and system-independent formatideal for database archiving.
NetBackup for Oracle XML export and import archiving featuresTable F-1 describes NetBackup for Oracle XML export and XML import archivingfeatures.
FAppendix

Table F-1 NetBackup for Oracle XML export and XML import archivingfeatures
DescriptionFeature
NetBackup for Oracle uses the eXtensible Markup Language (XML)standard to represent relational database table data that is extractedfrom an Oracle database.
The eXtensible Markup Language (XML) is a universal format forstructured documents and data. The XML 1.0 standards areproduced by the World Wide Web Consortium and include the XMLSchema standard.
Unicode UTF-8 is the character set encoding generated byNetBackup for Oracle. Standard XML processors support UTF-8.US7ASCII is a strict subset of UTF-8.
System- anddatabase-independentarchive format
The XML Schema standard is used to describe the table data thatis included in an archive. In this way, the archive contains the keyto understanding the format of the data as well as the data itself.
Self-identifying archiveformat
Parameter files specify the table data to include in an archive andthe table data to extract from an archive for import into an Oracledatabase.
Command lineinterfaces that allowexport and import atrow-level granularity
NetBackup for Oracle can either restore XML data to an operatingsystem directory or import the data back into the Oracle database.
Restore destinationoption
The NetBackup catalog contains information on the contents of thearchive that can be searched by using flexible search criteria, suchas tablename or user.
Flexible archive imagesearches
XML export archive processFigure F-1 shows the XML export archive process.
296XML ArchiverNetBackup for Oracle XML export and XML import

Figure F-1 XML export archives
OS Directory
Command line
NetBackupScheduler
Backup, archive, andrestore interface
Script or template (bporaexp orbporaexp64)
Query processor Oracle DBMS
OCI
Table list WHERE clause
XML generator
Table metadata / Table data
NetBackup
XML schema / XML instances
1
2 3
4
5
6
Table F-2 describes the archive activity.
Table F-2 Archive activity
ProcessActivity
NetBackup for Oracle extracts database table data, convertsit into XML format, and stores XML data to either of thefollowing types of repositories:
■ A directory■ A storage unit
Oracle XML archive
297XML ArchiverNetBackup for Oracle XML export and XML import
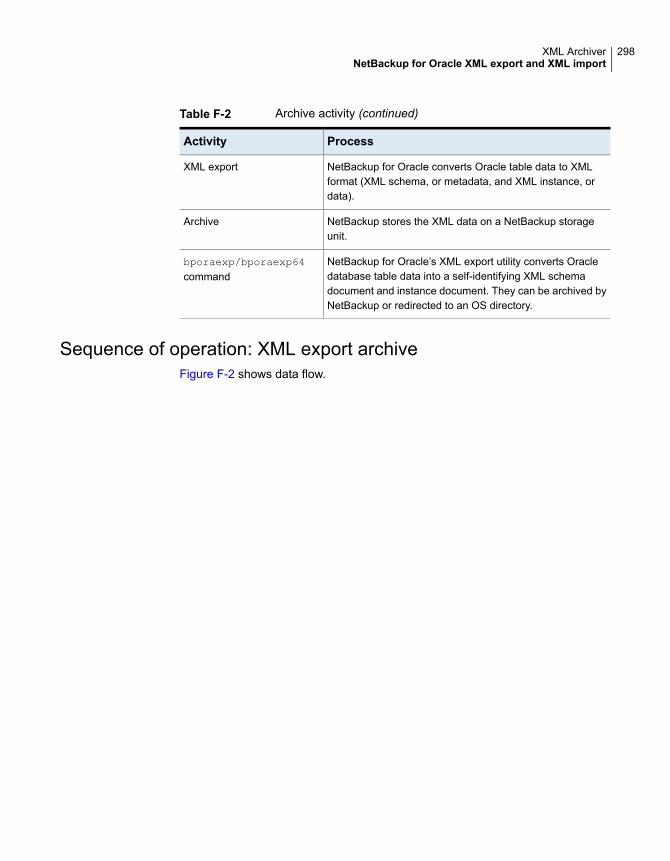
Table F-2 Archive activity (continued)
ProcessActivity
NetBackup for Oracle converts Oracle table data to XMLformat (XML schema, or metadata, and XML instance, ordata).
XML export
NetBackup stores the XML data on a NetBackup storageunit.
Archive
NetBackup for Oracle’s XML export utility converts Oracledatabase table data into a self-identifying XML schemadocument and instance document. They can be archived byNetBackup or redirected to an OS directory.
bporaexp/bporaexp64command
Sequence of operation: XML export archiveFigure F-2 shows data flow.
298XML ArchiverNetBackup for Oracle XML export and XML import

Figure F-2 XML export archive data flow
Script or template
(bporaexp)
(Parameter file)
Command line
Backup, archive, and restoreinterface
Table list WHERE clause
Table(s) metadata, Table(s) data
XML generator
XML schema(s), XMLinstance(s)
XML schema(s), XMLinstance(s)
OCI
Oracle DBMS
Option tocreate XMLfiles on disk
Query processor
NetBackup
NetBackup
Scheduler
NetBackup for Oracle users or automatic schedules start database XML exportarchives by performing a manual backup of an Oracle policy, by invoking the scriptor template at the command line on the client, or by invoking a template throughthe Backup, Archive, and Restore interface.
For an XML export archive:
■ The NetBackup for Oracle script or template calls the bporaexp utility with aspecified parameter file.
■ The query processor uses the parameters in the specified file to build an SQLquery for each table.
■ Oracle’s OCI API executes the queries on the Oracle database instance to bearchived.
299XML ArchiverNetBackup for Oracle XML export and XML import

■ The query processor passes the output (including metadata and data for a singletable or multiple tables) to the XML Generator.
■ For each table passed, the XML generator builds one or more sets of XMLschema and XML instance documents.
■ XML data streams are backed up by NetBackup.
■ Alternately, bporaexp allows the files to be saved to an operating systemdirectory.
XML import restore processFigure F-3 shows the XML import restore process.
Figure F-3 XML import restores
XMLexport
Restore
XML Format
OS Directory
OS Directory
NetBackup
Table F-3 describes the restore activity.
Table F-3 Restore activity
ProcessActivity
NetBackup for Oracle manages the retrieval of archiveddatabase table data, the parsing of the XML format, and theinsertion of the data back into the Oracle database.
Oracle XML Restore
NetBackup retrieves the XML-formatted data from the storageunit.
Restore
NetBackup for Oracle parses XML-formatted Oracle tabledata and inserts data into the Oracle database.
XML import
300XML ArchiverNetBackup for Oracle XML export and XML import

Table F-3 Restore activity (continued)
ProcessActivity
NetBackup for Oracle’s XML import utility can parse theXML-formatted data for re-insertion into the database or canredirect the data to an OS directory.
bporaimp/bporamip64commands
Sequence of operation: XML import restoreFigure F-4 shows data flow.
Figure F-4 XML import restore data flow
Command line or Backup, Archive, and Restoreinterface
Archive name
Keyword
Table name
XML schema(s), XMLinstance(s)
XML Parser
Option torestore XMLfiles on disk
XML schema(s), XMLinstance(s)
Table(s) metadata,Table(s) data
XML data loaderOCIOracle DBMS
Script or template(bporaimp)
(Parameter file)
NetBackup
NetBackup for Oracle users start database XML import restores by invoking aNetBackup for Oracle script or template at the client command line or by invokingan XML import restore template through the Backup, Archive, and Restore interface.
301XML ArchiverNetBackup for Oracle XML export and XML import
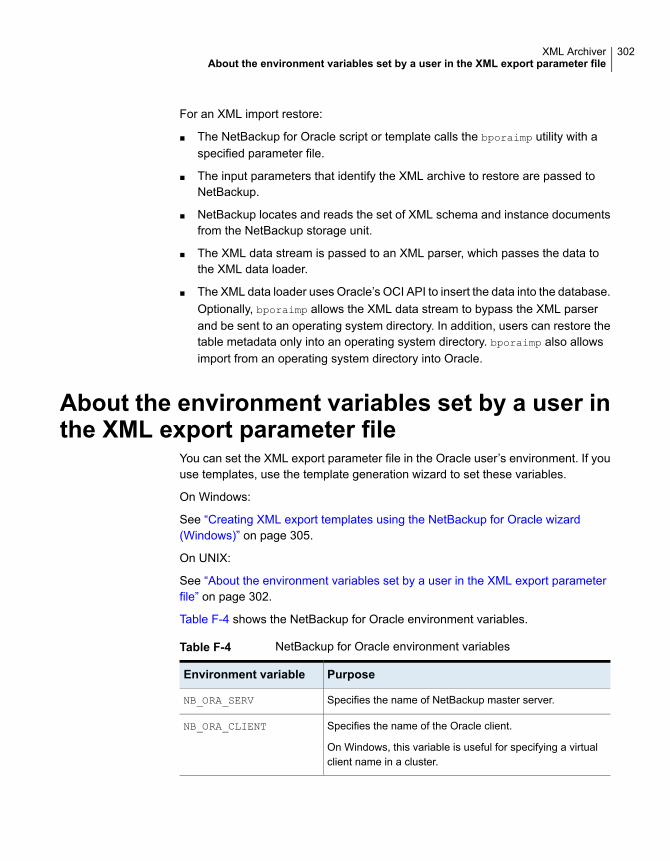
For an XML import restore:
■ The NetBackup for Oracle script or template calls the bporaimp utility with aspecified parameter file.
■ The input parameters that identify the XML archive to restore are passed toNetBackup.
■ NetBackup locates and reads the set of XML schema and instance documentsfrom the NetBackup storage unit.
■ The XML data stream is passed to an XML parser, which passes the data tothe XML data loader.
■ The XML data loader uses Oracle’s OCI API to insert the data into the database.Optionally, bporaimp allows the XML data stream to bypass the XML parserand be sent to an operating system directory. In addition, users can restore thetable metadata only into an operating system directory. bporaimp also allowsimport from an operating system directory into Oracle.
About the environment variables set by a user inthe XML export parameter file
You can set the XML export parameter file in the Oracle user’s environment. If youuse templates, use the template generation wizard to set these variables.
On Windows:
See “Creating XML export templates using the NetBackup for Oracle wizard(Windows)” on page 305.
On UNIX:
See “About the environment variables set by a user in the XML export parameterfile” on page 302.
Table F-4 shows the NetBackup for Oracle environment variables.
Table F-4 NetBackup for Oracle environment variables
PurposeEnvironment variable
Specifies the name of NetBackup master server.NB_ORA_SERV
Specifies the name of the Oracle client.
On Windows, this variable is useful for specifying a virtualclient name in a cluster.
NB_ORA_CLIENT
302XML ArchiverAbout the environment variables set by a user in the XML export parameter file

Table F-4 NetBackup for Oracle environment variables (continued)
PurposeEnvironment variable
Specifies the name of the policy to use for the Oracle backup.To define NB_ORA_POLICY, use the RMAN PARMSstatement or send statement in Oracle shell scripts. Forexample:
ALLOCATE CHANNEL ch01 TYPE 'SBT_TAPE' ;send 'NB_ORA_POLICY=Oracle_Backup' ;BACKUP
NB_ORA_POLICY
Specifies the name of the Application Backup schedule touse for the Oracle backup.
NB_ORA_SCHED
About XML export templates and shell scriptsThe following sections describe XML export templates and shell scripts. Thetemplates and scripts are as follows:
Templates. The NetBackup for Oracle XML export wizard creates XML exporttemplates. This wizard is initiated from the NetBackup Backup, Archive, and Restoreinterface.
The NetBackup for Oracle XML export wizard does not support all of the parametersthat the command line utility bporaexp provides. You can write a shell script if atemplate does not provide all of the required functionality.
Shell scripts. The user writes the shell scripts. They must conform to the operatingsystem’s shell syntax. Sample XML export and import shell scripts are installed onthe client with the NetBackup for Oracle agent. Modify these scripts to meet yourindividual requirements.
NetBackup for Oracle also provides a utility, bpdbsbora, that can generate a shellscript from an XML export or import wizard template. A user can then create atemplate with the wizard and generate a shell script from it. The user can run ormodify the shell script.
Creating XML export templates using the NetBackup for Oraclewizard (UNIX)
NetBackup for Oracle provides a wizard that solicits information about desired XMLexport operations. The wizard uses the information to create a template that can
303XML ArchiverAbout XML export templates and shell scripts

be run immediately or saved in a NetBackup-specific location on the current masterserver for later use.
To create XML export templates using the NetBackup for Oracle wizard
1 Open the Backup, Archive, and Restore interface.
See “Starting the NetBackup Backup, Archive, and Restore interface”on page 103.
2 Click the Backup Files tab.
3 In the left pane of the Backup, Archive, and Restore interface, expand theOracle node.
4 In the left pane, select the Oracle database instance.
Database objects that can be exported are listed under the Users node. Onlythe schema owners and objects accessible by the current user logon displays.
5 Expand the Users list to the schema owners of the objects to be exported.
6 In the right pane, select the Oracle objects to export.
7 Choose Actions > Backup to start the wizard.
The NetBackup for Oracle XML export wizard displays the following screensfor you to enter information about the export operation you want to perform:
■ Welcome
■ Target Database Logon Credentials
■ Configuration Options
■ Archive Export Options
■ NetBackup Archive Destination Options
If you need an explanation of any of the fields on the wizard screens or moredetails, click Help on the wizard screen.
8 When you have completed the wizard, the Template Summary screen displaysthe summary of the XML export template.
You can choose to run the template immediately after the wizard finishes, savethe template to the master server, or both. For explanations of your choices,click Help.
To save, to run, or to save and run the template, click Finish.
See “About storing templates” on page 110.
304XML ArchiverAbout XML export templates and shell scripts
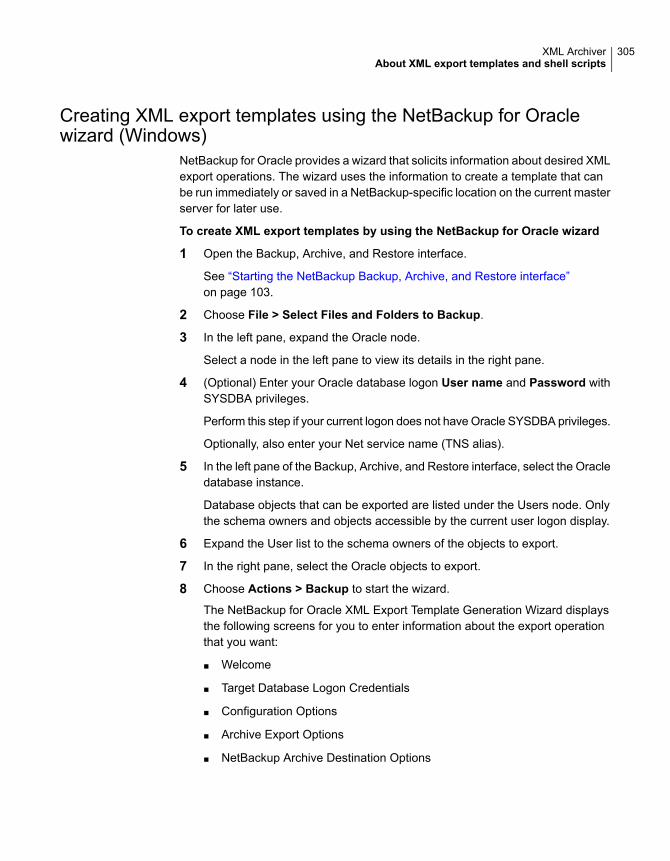
Creating XML export templates using the NetBackup for Oraclewizard (Windows)
NetBackup for Oracle provides a wizard that solicits information about desired XMLexport operations. The wizard uses the information to create a template that canbe run immediately or saved in a NetBackup-specific location on the current masterserver for later use.
To create XML export templates by using the NetBackup for Oracle wizard
1 Open the Backup, Archive, and Restore interface.
See “Starting the NetBackup Backup, Archive, and Restore interface”on page 103.
2 Choose File > Select Files and Folders to Backup.
3 In the left pane, expand the Oracle node.
Select a node in the left pane to view its details in the right pane.
4 (Optional) Enter your Oracle database logon User name and Password withSYSDBA privileges.
Perform this step if your current logon does not have Oracle SYSDBA privileges.
Optionally, also enter your Net service name (TNS alias).
5 In the left pane of the Backup, Archive, and Restore interface, select the Oracledatabase instance.
Database objects that can be exported are listed under the Users node. Onlythe schema owners and objects accessible by the current user logon display.
6 Expand the User list to the schema owners of the objects to export.
7 In the right pane, select the Oracle objects to export.
8 Choose Actions > Backup to start the wizard.
The NetBackup for Oracle XML Export Template Generation Wizard displaysthe following screens for you to enter information about the export operationthat you want:
■ Welcome
■ Target Database Logon Credentials
■ Configuration Options
■ Archive Export Options
■ NetBackup Archive Destination Options
305XML ArchiverAbout XML export templates and shell scripts
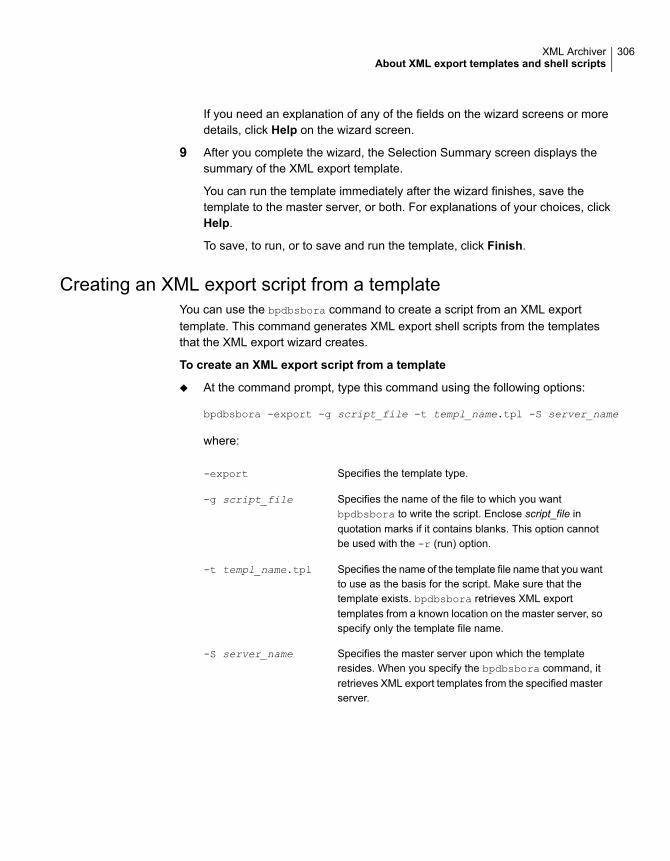
If you need an explanation of any of the fields on the wizard screens or moredetails, click Help on the wizard screen.
9 After you complete the wizard, the Selection Summary screen displays thesummary of the XML export template.
You can run the template immediately after the wizard finishes, save thetemplate to the master server, or both. For explanations of your choices, clickHelp.
To save, to run, or to save and run the template, click Finish.
Creating an XML export script from a templateYou can use the bpdbsbora command to create a script from an XML exporttemplate. This command generates XML export shell scripts from the templatesthat the XML export wizard creates.
To create an XML export script from a template
◆ At the command prompt, type this command using the following options:
bpdbsbora -export -g script_file -t templ_name.tpl -S server_name
where:
Specifies the template type.-export
Specifies the name of the file to which you wantbpdbsbora to write the script. Enclose script_file inquotation marks if it contains blanks. This option cannotbe used with the -r (run) option.
-g script_file
Specifies the name of the template file name that you wantto use as the basis for the script. Make sure that thetemplate exists. bpdbsbora retrieves XML exporttemplates from a known location on the master server, sospecify only the template file name.
-t templ_name.tpl
Specifies the master server upon which the templateresides. When you specify the bpdbsbora command, itretrieves XML export templates from the specified masterserver.
-S server_name
306XML ArchiverAbout XML export templates and shell scripts
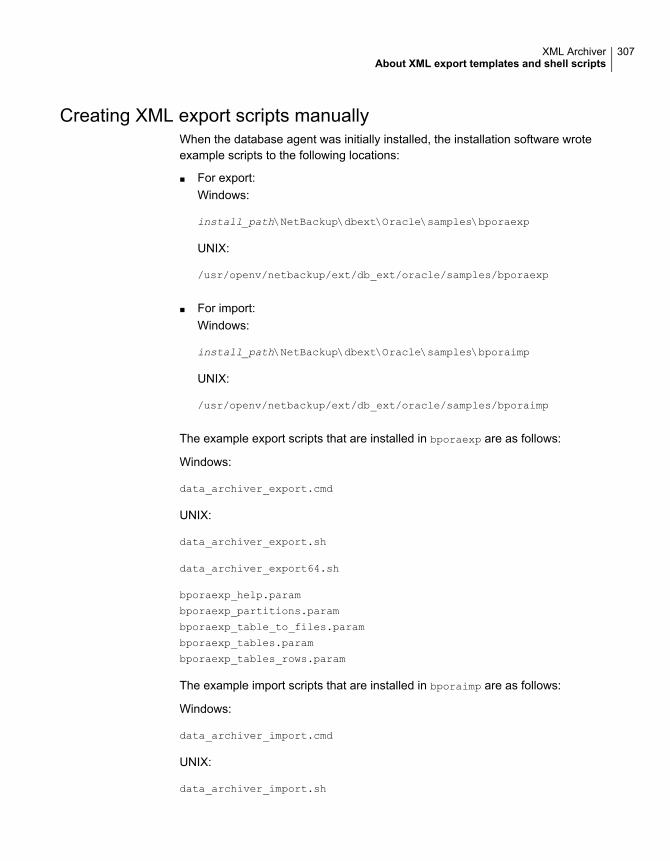
Creating XML export scripts manuallyWhen the database agent was initially installed, the installation software wroteexample scripts to the following locations:
■ For export:Windows:
install_path\NetBackup\dbext\Oracle\samples\bporaexp
UNIX:
/usr/openv/netbackup/ext/db_ext/oracle/samples/bporaexp
■ For import:Windows:
install_path\NetBackup\dbext\Oracle\samples\bporaimp
UNIX:
/usr/openv/netbackup/ext/db_ext/oracle/samples/bporaimp
The example export scripts that are installed in bporaexp are as follows:
Windows:
data_archiver_export.cmd
UNIX:
data_archiver_export.sh
data_archiver_export64.sh
bporaexp_help.param
bporaexp_partitions.param
bporaexp_table_to_files.param
bporaexp_tables.param
bporaexp_tables_rows.param
The example import scripts that are installed in bporaimp are as follows:
Windows:
data_archiver_import.cmd
UNIX:
data_archiver_import.sh
307XML ArchiverAbout XML export templates and shell scripts

data_archiver_import64.sh
bporaimp_archive.param
bporaimp_archive_schema_to_files.param
bporaimp_archive_to_users.param
bporaimp_bfile_table.param
bporaimp_help.param
bporaimp_ignore_rows_table.param
bporaimp_large_table.param
bporaimp_list.param
bporaimp_old_archive.param
bporaimp_partitions.pram
bporaimp_table_from_files.param
bporaimp_table_to_files.param
bporaimp_table_to_user.param
bporaimp_tables.param
To use the example scripts
1 Copy the example scripts to a different directory on your client. Oracle scriptscan be located anywhere on the client.
2 Modify each script for your environment.
3 On UNIX, make sure that the su command logs into the correct user.
If you do not include an su - user (user is Oracle administrator account) inyour Oracle scripts, they do not run with the proper permissions andenvironment variables. The result is problems with your database backups andrestores.
Performing an XML export archiveThe following sections describe how to perform an XML export archive.
308XML ArchiverPerforming an XML export archive

Table F-5 Tasks and commands
Commands used to accomplish the taskTask
As with Oracle backups using RMAN, the most convenient way to create Oracle archivesthat consist of XML exports of data from your database is to set up schedules for automaticbackups. The Oracle policy runs NetBackup for Oracle templates or shell scripts. For abackup using RMAN, a backup template is used, and for an XML export, an XML exporttemplate is used.
When the NetBackup scheduler invokes a schedule for an automatic backup, the NetBackupfor Oracle XML export templates or shell scripts run as follows:
■ In the same order as they appear in the file list■ On all clients in the client list
The NetBackup for Oracle XML export template or shell scripts start the XML export byrunning the NetBackup bporaexp or bporaexp64 utility.
Automatic backup of anOracle policy
The administrator can use the NetBackup server software to manually run an automaticbackup schedule for the Oracle policy. For more information, see the NetBackupAdministrator’s Guide, Volume I.
See “Testing configuration settings for NetBackup for Oracle” on page 112.
Manual backup of anOracle policy
The following sections describe procedures for performing user-directed XML exports.
■ Running NetBackup for Oracle XML export templates.See “Running NetBackup for Oracle XML export templates” on page 309.
■ Using bpdbsbora to run an XML export template.See “Using bpdbsbora to run an XML export template” on page 310.
■ Running the NetBackup for Oracle XML export script on the client.See “Running the NetBackup for Oracle XML export script on the client” on page 311.
■ Running bporaexp on the client as an Oracle user.See “Running bporaexp on the client as an Oracle user” on page 312.
■ Writing to a directory versus writing to a storage unit.See “Writing to a directory versus writing to a storage unit” on page 312.
■ bporaexp parametersSee “About bporaexp parameters” on page 314.
User-directed XMLexports from the client
Running NetBackup for Oracle XML export templatesThe Template Administration interface is available in the Backup, Archive, andRestore interface.
Use this dialog to run, edit, delete, rename, and view existing XML export templates.These are the templates created by the NetBackup for Oracle XML Export Wizardand stored in a predetermined location on the master server. Before you can run,
309XML ArchiverPerforming an XML export archive
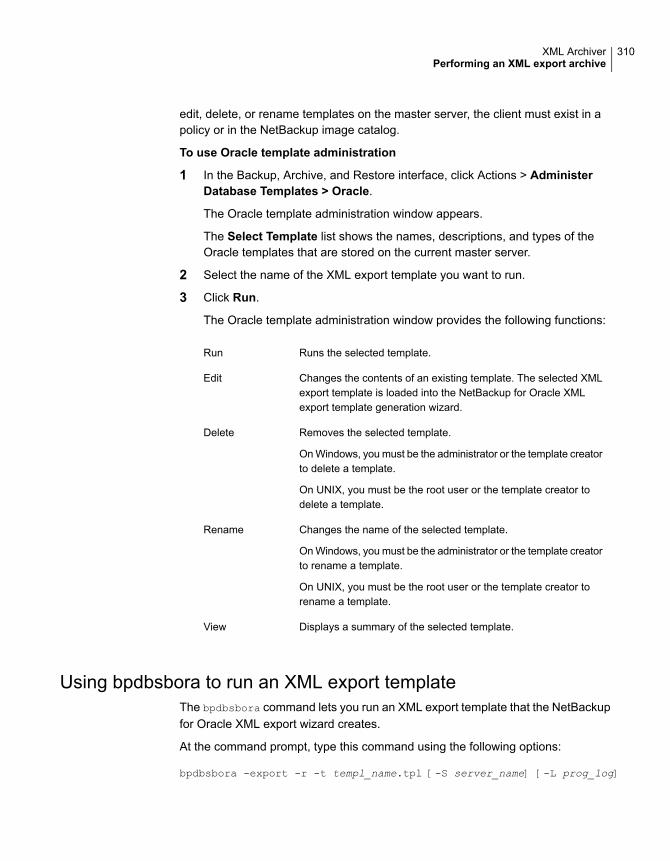
edit, delete, or rename templates on the master server, the client must exist in apolicy or in the NetBackup image catalog.
To use Oracle template administration
1 In the Backup, Archive, and Restore interface, click Actions > AdministerDatabase Templates > Oracle.
The Oracle template administration window appears.
The Select Template list shows the names, descriptions, and types of theOracle templates that are stored on the current master server.
2 Select the name of the XML export template you want to run.
3 Click Run.
The Oracle template administration window provides the following functions:
Runs the selected template.Run
Changes the contents of an existing template. The selected XMLexport template is loaded into the NetBackup for Oracle XMLexport template generation wizard.
Edit
Removes the selected template.
On Windows, you must be the administrator or the template creatorto delete a template.
On UNIX, you must be the root user or the template creator todelete a template.
Delete
Changes the name of the selected template.
On Windows, you must be the administrator or the template creatorto rename a template.
On UNIX, you must be the root user or the template creator torename a template.
Rename
Displays a summary of the selected template.View
Using bpdbsbora to run an XML export templateThe bpdbsbora command lets you run an XML export template that the NetBackupfor Oracle XML export wizard creates.
At the command prompt, type this command using the following options:
bpdbsbora -export -r -t templ_name.tpl [-S server_name] [-L prog_log]
310XML ArchiverPerforming an XML export archive

Where:
Specifies the template type.-export
Runs the template.-r
Specifies the name of the template file that you want to use.bpdbsbora retrieves the XML export templates from a knownlocation on the master server, so specify only the file name.
-t templ_name.tpl
Optional. Identifies the master server. bpdbsbora retrieves XMLexport templates from a specific master server when you specifythis option.
-S server_name
Optional. Specifies a run-time process log. Enclose prog_log inquotation marks (" ") if it contains space characters.
-L prog_log
For example:
bpdbsbora -export -r -t sales.tpl -S my_server -L my_progress_log
Running the NetBackup for Oracle XML export script on the clientYou can initiate a database XML export from the operating system command prompt:Type the full path to the shell script that performs the export. For example:
Windows:
install_path\oracle\scripts\data_archiver_export.cmd
UNIX:
/oracle/scripts/data_archiver_export.sh
The operating system shell starts the database XML export archive by running theXML export script. The XML export script contains commands to run bporaexp.
The NetBackup for Oracle installation script installs sample scripts in the followinglocation:
Windows:
install_path\NetBackup\dbext\oracle\samples\bporaexp
UNIX:
/usr/openv/netbackup/ext/db_ext/oracle/samples/bporaexp
311XML ArchiverPerforming an XML export archive
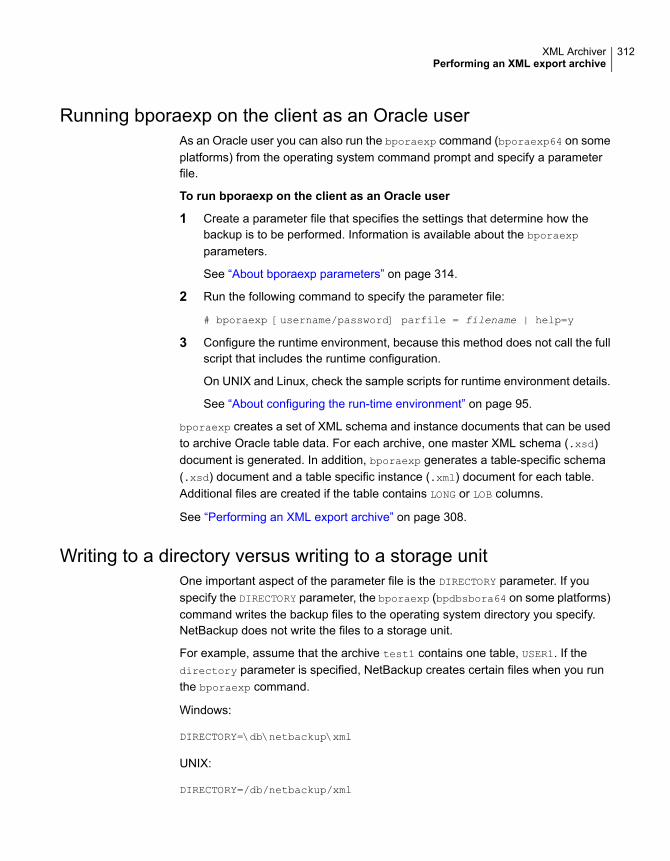
Running bporaexp on the client as an Oracle userAs an Oracle user you can also run the bporaexp command (bporaexp64 on someplatforms) from the operating system command prompt and specify a parameterfile.
To run bporaexp on the client as an Oracle user
1 Create a parameter file that specifies the settings that determine how thebackup is to be performed. Information is available about the bporaexp
parameters.
See “About bporaexp parameters” on page 314.
2 Run the following command to specify the parameter file:
# bporaexp [username/password] parfile = filename | help=y
3 Configure the runtime environment, because this method does not call the fullscript that includes the runtime configuration.
On UNIX and Linux, check the sample scripts for runtime environment details.
See “About configuring the run-time environment” on page 95.
bporaexp creates a set of XML schema and instance documents that can be usedto archive Oracle table data. For each archive, one master XML schema (.xsd)document is generated. In addition, bporaexp generates a table-specific schema(.xsd) document and a table specific instance (.xml) document for each table.Additional files are created if the table contains LONG or LOB columns.
See “Performing an XML export archive” on page 308.
Writing to a directory versus writing to a storage unitOne important aspect of the parameter file is the DIRECTORY parameter. If youspecify the DIRECTORY parameter, the bporaexp (bpdbsbora64 on some platforms)command writes the backup files to the operating system directory you specify.NetBackup does not write the files to a storage unit.
For example, assume that the archive test1 contains one table, USER1. If thedirectory parameter is specified, NetBackup creates certain files when you runthe bporaexp command.
Windows:
DIRECTORY=\db\netbackup\xml
UNIX:
DIRECTORY=/db/netbackup/xml
312XML ArchiverPerforming an XML export archive
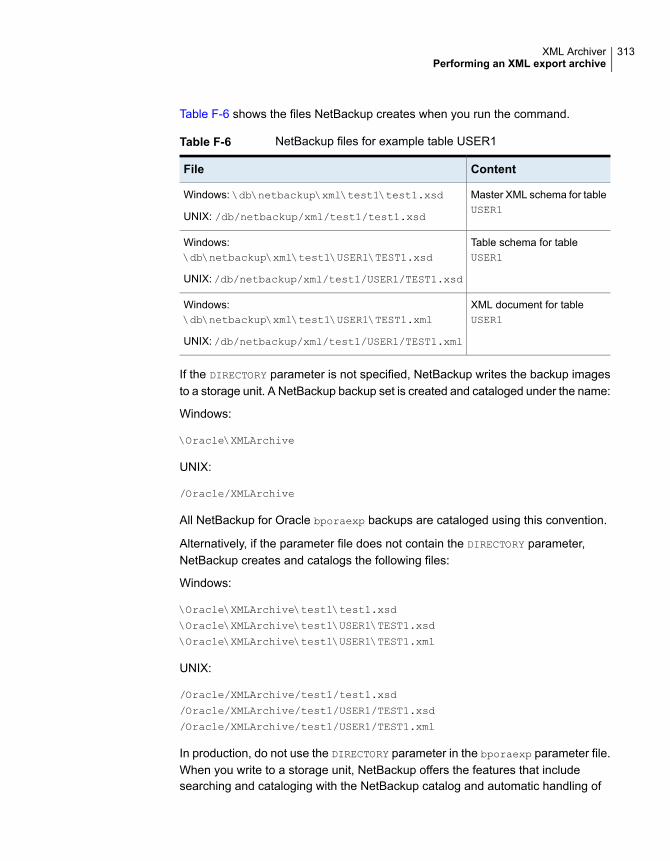
Table F-6 shows the files NetBackup creates when you run the command.
Table F-6 NetBackup files for example table USER1
ContentFile
Master XML schema for tableUSER1
Windows: \db\netbackup\xml\test1\test1.xsd
UNIX: /db/netbackup/xml/test1/test1.xsd
Table schema for tableUSER1
Windows:\db\netbackup\xml\test1\USER1\TEST1.xsd
UNIX: /db/netbackup/xml/test1/USER1/TEST1.xsd
XML document for tableUSER1
Windows:\db\netbackup\xml\test1\USER1\TEST1.xml
UNIX: /db/netbackup/xml/test1/USER1/TEST1.xml
If the DIRECTORY parameter is not specified, NetBackup writes the backup imagesto a storage unit. A NetBackup backup set is created and cataloged under the name:
Windows:
\Oracle\XMLArchive
UNIX:
/Oracle/XMLArchive
All NetBackup for Oracle bporaexp backups are cataloged using this convention.
Alternatively, if the parameter file does not contain the DIRECTORY parameter,NetBackup creates and catalogs the following files:
Windows:
\Oracle\XMLArchive\test1\test1.xsd
\Oracle\XMLArchive\test1\USER1\TEST1.xsd
\Oracle\XMLArchive\test1\USER1\TEST1.xml
UNIX:
/Oracle/XMLArchive/test1/test1.xsd
/Oracle/XMLArchive/test1/USER1/TEST1.xsd
/Oracle/XMLArchive/test1/USER1/TEST1.xml
In production, do not use the DIRECTORY parameter in the bporaexp parameter file.When you write to a storage unit, NetBackup offers the features that includesearching and cataloging with the NetBackup catalog and automatic handling of
313XML ArchiverPerforming an XML export archive

output that exceeds file system limits. With the DIRECTORY parameter, file systemlimits, such as a 2 GB maximum, can cause an error.
To run bporaexp on the client, run the following command:
bporaexp [username/password] parfile = filename | help=y
On some UNIX platforms, the bporexp64 command is used.
About bporaexp parametersThis topic describes the available bporaexp (bporaexp64 on some platforms)parameters.
Note the following:
■ Use the NetBackup parameters NB_ORA_SERV, NB_ORA_CLIENT, NB_ORA_POLICY,and NB_ORA_SCHED to specify the NetBackup runtime configuration. Otherwise,the order of precedence for the runtime configuration variable settings is used.
■ Some parameters are valid only when you write to a storage unit. Otherparameters are valid only when you write to a directory. In the following table,the Target Location column contains either Storage Unit or Directory to indicatewhether the parameter in that row applies to writing to a storage unit or to adirectory. Parameters that are recognized when you write to a directory areignored when you write to a storage unit.
Table F-7 shows the available bporaexp parameters with their default values.
Table F-7 bporaexp parameters and default values
Target locationDescriptionDefaultRequired?Parameter
DirectorySpecifies if bporaexp uses the SETTRANSACTION READ ONLY statement toensure that the data from all tables isconsistent to a single point in time and doesnot change during the execution of thebporaexp command. If the default ofCONSISTENT=N is used, each table isexported as an independent transaction.
NNCONSISTENT
DirectoryOptionally specifies a directory for the outputof the bporaexp utility.
no defaultNDIRECTORY
DirectoryDisplays a help message with descriptions ofbporaexp parameters. Does not export dataif HELP=Y.
NNHELP
314XML ArchiverPerforming an XML export archive
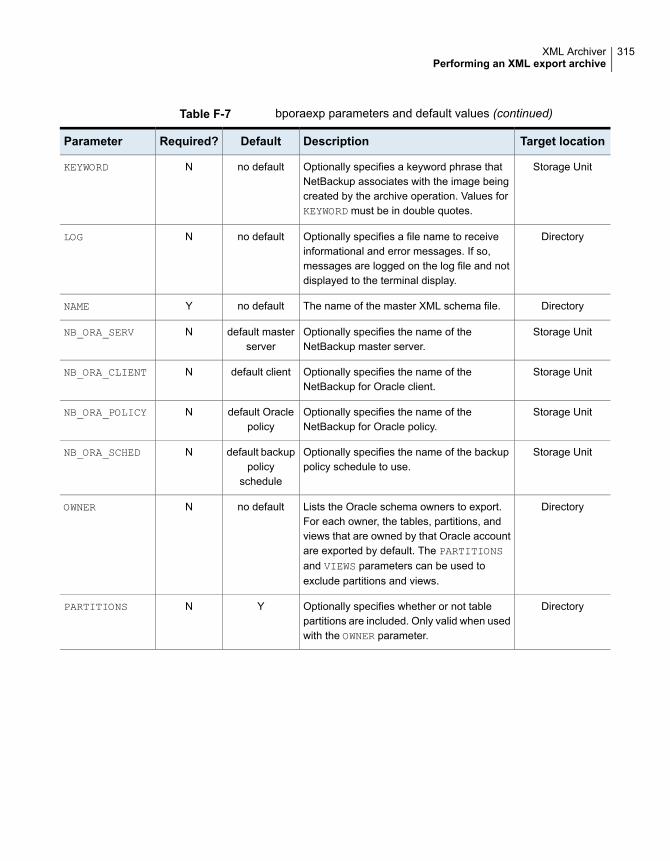
Table F-7 bporaexp parameters and default values (continued)
Target locationDescriptionDefaultRequired?Parameter
Storage UnitOptionally specifies a keyword phrase thatNetBackup associates with the image beingcreated by the archive operation. Values forKEYWORD must be in double quotes.
no defaultNKEYWORD
DirectoryOptionally specifies a file name to receiveinformational and error messages. If so,messages are logged on the log file and notdisplayed to the terminal display.
no defaultNLOG
DirectoryThe name of the master XML schema file.no defaultYNAME
Storage UnitOptionally specifies the name of theNetBackup master server.
default masterserver
NNB_ORA_SERV
Storage UnitOptionally specifies the name of theNetBackup for Oracle client.
default clientNNB_ORA_CLIENT
Storage UnitOptionally specifies the name of theNetBackup for Oracle policy.
default Oraclepolicy
NNB_ORA_POLICY
Storage UnitOptionally specifies the name of the backuppolicy schedule to use.
default backuppolicy
schedule
NNB_ORA_SCHED
DirectoryLists the Oracle schema owners to export.For each owner, the tables, partitions, andviews that are owned by that Oracle accountare exported by default. The PARTITIONSand VIEWS parameters can be used toexclude partitions and views.
no defaultNOWNER
DirectoryOptionally specifies whether or not tablepartitions are included. Only valid when usedwith the OWNER parameter.
YNPARTITIONS
315XML ArchiverPerforming an XML export archive

Table F-7 bporaexp parameters and default values (continued)
Target locationDescriptionDefaultRequired?Parameter
DirectorySelects a subset of rows from a set of tables.The value of the query parameter is a stringthat contains a WHERE clause for a SQL selectstatement that is applied to all tables andtable partitions listed in the TABLESparameter.
For example, if TABLES = emp, bonus andQUERY = "where job = ‘SALESMAN’ and
sal < 1600", two SQL statements are run:
■ SELECT*FROM emp wherejob=’SALESMAN’ and sal<1600;
■ SELECT*FROM bonus wherejob=’SALESMAN’ and sal<1600;
Each query that runs refers to a single tableat a time in the FROM clause, so it is illegal tohave a join in the WHERE clause.
no defaultNQUERY
DirectorySpecifies the size, in rows, of the buffer usedto fetch rows. Tables with LONG columns arefetched one row at a time. The maximumvalue allowed is 32767.
1000NROW_BUFFER
DirectoryLists the table names, view names, andpartition names to export. The USERID musthave SELECT privilege on the tables andviews. The syntax used is:schema.table:partition name or schema.view name
no defaultYTABLES
DirectorySpecifies the username/password (andoptional connect string) of the user initiatingthe export. If a connect string is not provided,the ORACLE_SID environment variable isused.
no defaultYUSERID
DirectoryOptionally specifies whether or not views areincluded. Only valid when used with theOWNER parameter.
YNVIEWS
316XML ArchiverPerforming an XML export archive
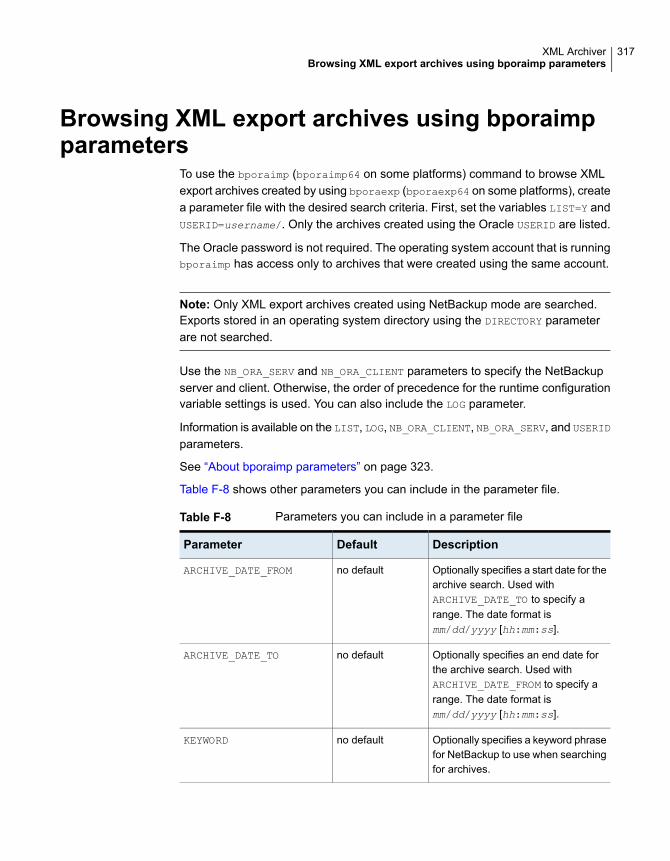
Browsing XML export archives using bporaimpparameters
To use the bporaimp (bporaimp64 on some platforms) command to browse XMLexport archives created by using bporaexp (bporaexp64 on some platforms), createa parameter file with the desired search criteria. First, set the variables LIST=Y andUSERID=username/. Only the archives created using the Oracle USERID are listed.
The Oracle password is not required. The operating system account that is runningbporaimp has access only to archives that were created using the same account.
Note: Only XML export archives created using NetBackup mode are searched.Exports stored in an operating system directory using the DIRECTORY parameterare not searched.
Use the NB_ORA_SERV and NB_ORA_CLIENT parameters to specify the NetBackupserver and client. Otherwise, the order of precedence for the runtime configurationvariable settings is used. You can also include the LOG parameter.
Information is available on the LIST, LOG, NB_ORA_CLIENT, NB_ORA_SERV, and USERID
parameters.
See “About bporaimp parameters” on page 323.
Table F-8 shows other parameters you can include in the parameter file.
Table F-8 Parameters you can include in a parameter file
DescriptionDefaultParameter
Optionally specifies a start date for thearchive search. Used withARCHIVE_DATE_TO to specify arange. The date format ismm/dd/yyyy [hh:mm:ss].
no defaultARCHIVE_DATE_FROM
Optionally specifies an end date forthe archive search. Used withARCHIVE_DATE_FROM to specify arange. The date format ismm/dd/yyyy [hh:mm:ss].
no defaultARCHIVE_DATE_TO
Optionally specifies a keyword phrasefor NetBackup to use when searchingfor archives.
no defaultKEYWORD
317XML ArchiverBrowsing XML export archives using bporaimp parameters
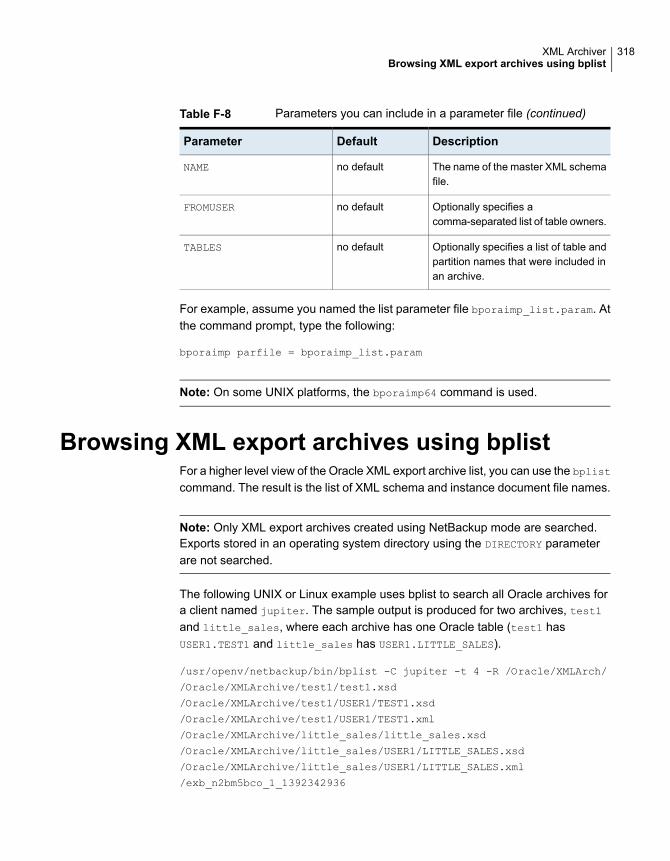
Table F-8 Parameters you can include in a parameter file (continued)
DescriptionDefaultParameter
The name of the master XML schemafile.
no defaultNAME
Optionally specifies acomma-separated list of table owners.
no defaultFROMUSER
Optionally specifies a list of table andpartition names that were included inan archive.
no defaultTABLES
For example, assume you named the list parameter file bporaimp_list.param. Atthe command prompt, type the following:
bporaimp parfile = bporaimp_list.param
Note: On some UNIX platforms, the bporaimp64 command is used.
Browsing XML export archives using bplistFor a higher level view of the Oracle XML export archive list, you can use the bplist
command. The result is the list of XML schema and instance document file names.
Note: Only XML export archives created using NetBackup mode are searched.Exports stored in an operating system directory using the DIRECTORY parameterare not searched.
The following UNIX or Linux example uses bplist to search all Oracle archives fora client named jupiter. The sample output is produced for two archives, test1and little_sales, where each archive has one Oracle table (test1 hasUSER1.TEST1 and little_sales has USER1.LITTLE_SALES).
/usr/openv/netbackup/bin/bplist -C jupiter -t 4 -R /Oracle/XMLArch/
/Oracle/XMLArchive/test1/test1.xsd
/Oracle/XMLArchive/test1/USER1/TEST1.xsd
/Oracle/XMLArchive/test1/USER1/TEST1.xml
/Oracle/XMLArchive/little_sales/little_sales.xsd
/Oracle/XMLArchive/little_sales/USER1/LITTLE_SALES.xsd
/Oracle/XMLArchive/little_sales/USER1/LITTLE_SALES.xml
/exb_n2bm5bco_1_1392342936
318XML ArchiverBrowsing XML export archives using bplist
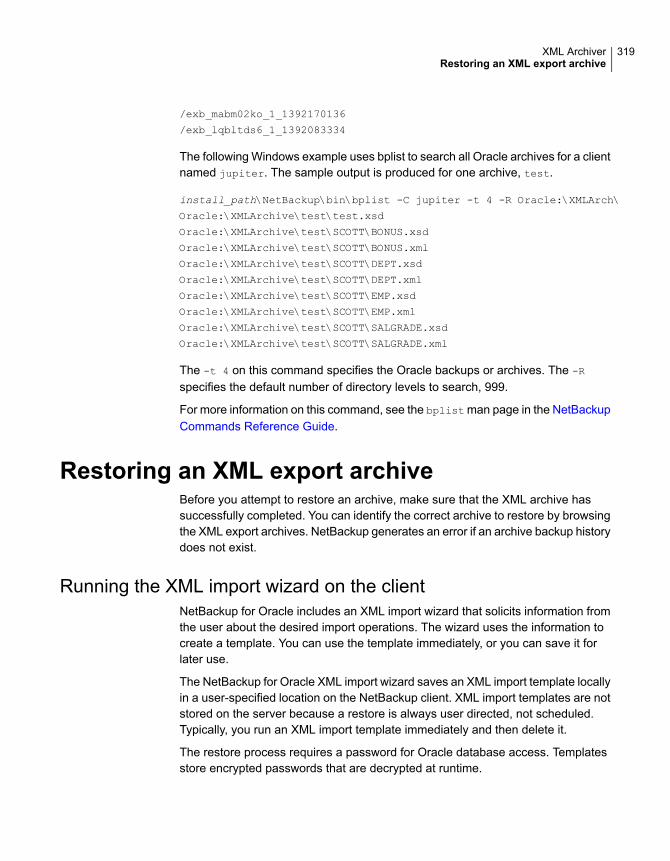
/exb_mabm02ko_1_1392170136
/exb_lqbltds6_1_1392083334
The following Windows example uses bplist to search all Oracle archives for a clientnamed jupiter. The sample output is produced for one archive, test.
install_path\NetBackup\bin\bplist -C jupiter -t 4 -R Oracle:\XMLArch\
Oracle:\XMLArchive\test\test.xsd
Oracle:\XMLArchive\test\SCOTT\BONUS.xsd
Oracle:\XMLArchive\test\SCOTT\BONUS.xml
Oracle:\XMLArchive\test\SCOTT\DEPT.xsd
Oracle:\XMLArchive\test\SCOTT\DEPT.xml
Oracle:\XMLArchive\test\SCOTT\EMP.xsd
Oracle:\XMLArchive\test\SCOTT\EMP.xml
Oracle:\XMLArchive\test\SCOTT\SALGRADE.xsd
Oracle:\XMLArchive\test\SCOTT\SALGRADE.xml
The -t 4 on this command specifies the Oracle backups or archives. The -R
specifies the default number of directory levels to search, 999.
For more information on this command, see the bplist man page in the NetBackupCommands Reference Guide.
Restoring an XML export archiveBefore you attempt to restore an archive, make sure that the XML archive hassuccessfully completed. You can identify the correct archive to restore by browsingthe XML export archives. NetBackup generates an error if an archive backup historydoes not exist.
Running the XML import wizard on the clientNetBackup for Oracle includes an XML import wizard that solicits information fromthe user about the desired import operations. The wizard uses the information tocreate a template. You can use the template immediately, or you can save it forlater use.
The NetBackup for Oracle XML import wizard saves an XML import template locallyin a user-specified location on the NetBackup client. XML import templates are notstored on the server because a restore is always user directed, not scheduled.Typically, you run an XML import template immediately and then delete it.
The restore process requires a password for Oracle database access. Templatesstore encrypted passwords that are decrypted at runtime.
319XML ArchiverRestoring an XML export archive

To start the XML import wizard
1 Start the NetBackup Backup, Archive, and Restore interface.
On UNIX and Linux, from the command line, run the following command:
/usr/openv/netbackup/bin/jbpSA &
2 Do one of the following:
■ On Windows: From the Windows Start menu, choose All Programs >Veritas NetBackup > Backup, Archive, and Restore. To change thepolicy type, choose File > Specify NetBackupMachines and Policy Type.Perform this step if the Oracle node is not visible.
■ On UNIX and Linux: (Conditional) To change the policy type, choose Actions> Specify NetBackup Machines and Policy Type.
3 Do one of the following:
■ On Windows, click Select for Restore.
■ On UNIX and Linux, click the Restore Files tab.
4 Expand the Oracle node in the left pane to view an Oracle database instancehierarchy in the right pane.
To use the XML import wizard
1 In the left pane of the Backup, Archive, and Restore interface, select the Oracledatabase instance.
Database objects that can be imported are listed under the Users node. Thetool displays only the schema owners and objects accessible by the currentuser login.
2 Expand the Users list to the schema owners of the objects to be imported.
3 In the right pane, select database objects that exist in the archive to be restored.
4 Choose Actions > Restore.
5 Enter information about the restore operation you want to perform in the screensthat the NetBackup for Oracle XML import wizard displays.
The screens are as follows:
■ Welcome
■ Target Database Logon Credentials
■ Archive Import Options
■ NetBackup Archive Source Options
320XML ArchiverRestoring an XML export archive

■ NetBackup Import Destination Options (Windows)
If you need an explanation of any of the fields on the wizard screens, or moredetails, click Help on the wizard screen.
6 Review the summary.
When you have completed the wizard, the Selection Summary screen displaysthe summary of the XML import template.
You can choose to run the template immediately after the wizard finishes, savethe template locally, or both.
See “About storing templates” on page 110.
Using bpdbsbora to run an XML import templateThe bpdbsbora command lets you run an XML import template that the NetBackupXML Import Wizard creates.
At the command prompt, type this command with the following options:
bpdbsbora -import -r -t templ_name.tpl [-L progress_file]
where:
Specifies the template type.-import
Runs the template.-r
Specifies the full path name of the template you want to use.
Unlike export templates, XML import templates do not residein a predetermined location on the master server. They areconsidered to be temporary in nature and should reside on theclient. If the full path is not specified as part of the XML importtemplate name, it must reside in the current directory.
-t templ_name.tpl
Optional. Specifies a run-time progress log. Encloseprogress_file in quotation marks (" ") if it contains spacecharacters.
-L progress_file
For example:
Windows:
bpdbsbora -import -r -t H:\oracle\imp_tpls\sales_imp.tpl -L prog_file
UNIX:
bpdbsbora -import -r -t /oracle/imp_tpls/sales_imp.tpl -L prog_file
321XML ArchiverRestoring an XML export archive

Running an XML import script on the clientYou can initiate a restore from the operating system command prompt by typingthe full path to the XML import script that initiates the restore. For example:
Windows:
install_path\oracle\scripts\data_archiver_import.cmd
UNIX:
/oracle/scripts/data_archiver_import.sh
The operating system shell starts the database restore by running the XML importscript file. The XML import script file contains commands to run bporaimp
(bporaimp64 on some platforms).
The NetBackup for Oracle installation script writes sample scripts to the followinglocation:
Windows:
install_path\NetBackup\dbext\oracle\samples\bporaimp
UNIX:
/usr/openv/netbackup/ext/db_ext/oracle/samples/bporaimp
Running bporaimp on the clientRun the bporaimp command from the operating system command line on the clientusing the appropriate parameter file.
The Windows account that runs bporaimp has access only to XML export archivesthat were created using the same Windows account.
The UNIX account that runs bporaimp has access only to XML export archives thatwere created using the same UNIX account. Be sure to configure the runtimeenvironment, because this method does not call the full script that includes theruntime configuration. Check the sample scripts for runtime environment details.
To run bporaimp on the client
◆ At the command prompt, type the bporaimp command in the following format:
bporaimp [username/password] parfile = filename | help=y
On some UNIX platforms, the bporaimp64 command is used.
See “About bporaimp parameters” on page 323.
322XML ArchiverRestoring an XML export archive

About bporaimp parametersUse the NetBackup parameters NB_ORA_SERV and NB_ORA_CLIENT to specify theNetBackup runtime configuration. Otherwise, the order of precedence for the runtimeconfiguration variable settings is used.
Some parameters are valid only when writing to a storage unit. Other parametersare valid only when writing to a directory. In the following table, the right-most columncontains either “Storage Unit” or “Directory” to indicate whether the parameter inthat row is applicable for either writing to a storage unit or to a directory. Parametersthat are recognized when writing to a directory are ignored when writing to a storageunit.
Table F-9 describes the bporaimp (bporaimp64 on some platforms) parametersand default values.
Table F-9 bporaimp parameters and default values
Targetlocation
DescriptionDefaultRequired?Parameter
Storage UnitOptionally specifies a start date for the archiveto be imported. Used with ARCHIVE_DATE_TOto specify a range. If not used, the most recentarchive is imported. If the range used results inmore than one archive, the most recent fromthe range is used. The date format ismm/dd/yyyy [hh:mm:ss].
no defaultNARCHIVE_DATE_FROM
Storage UnitOptionally specifies an end date for the archiveto be imported. Used withARCHIVE_DATE_FROM to specify a range. Ifnot used, the most recent archive is imported.If the range used results in more than onearchive, the most recent from the range is used.The date format is mm/dd/yyyy [hh:mm:ss].
no defaultNARCHIVE_DATE_TO
DirectorySpecifies a directory for the output of any BFILEcolumns being imported. Oracle’s CREATEDIRECTORY command can be used to createthe DIRECTORY in Oracle, and the name shouldmatch the name used in the export file.
no defaultY (if anytable being
imported hasBFILE
columns)
BFILE_DIRECTORY
323XML ArchiverRestoring an XML export archive

Table F-9 bporaimp parameters and default values (continued)
Targetlocation
DescriptionDefaultRequired?Parameter
DirectorySpecifies whether bporaimp should commitafter each array insert. The size of the array isdetermined by ROW_BUFFER. By default,bporaimp commits only after loading eachtable, and performs a rollback when an erroroccurs, before continuing with the next object.
NNCOMMIT
DirectoryOptionally specifies a directory for the input ofthe bporaimp utility.
no defaultNDIRECTORY
DirectoryOptionally specifies a comma-separated list ofusers to import from an archive containingmultiple users’ tables. If not specified, all of thetables are imported.
no defaultNFROMUSER
DirectoryDisplays a help message with descriptions ofbporaimp parameters.
NNHELP
DirectorySpecifies whether or not rows should beinserted into a table that is not empty. Thedefault is that the table already exists and thatit is empty. If it is not empty, IGNORE_ROWS =N causes an error to be reported, and the tableis skipped with no rows inserted. IGNORE_ROWS= Y causes rows to be inserted with errorsreported in the log file.
If IGNORE_ROWS = Y and an error such as aprimary key constraint violation occurs, no datais inserted if COMMIT = N. However, if COMMIT= Y, the array of rows (size determined byROW_BUFFER) is not inserted, but bporaimpcontinues to process additional row arrays inthe order in which they were exported. To causeall rows that do not violate a primary keyconstraint to be inserted, set COMMIT = Y,ROW_BUFFER = 1, and IGNORE_ROWS = Y.
NNIGNORE_ROWS
Storage UnitOptionally specifies a keyword phrase forNetBackup to use when searching for archivesfrom which to restore files.
no defaultNKEYWORD
324XML ArchiverRestoring an XML export archive
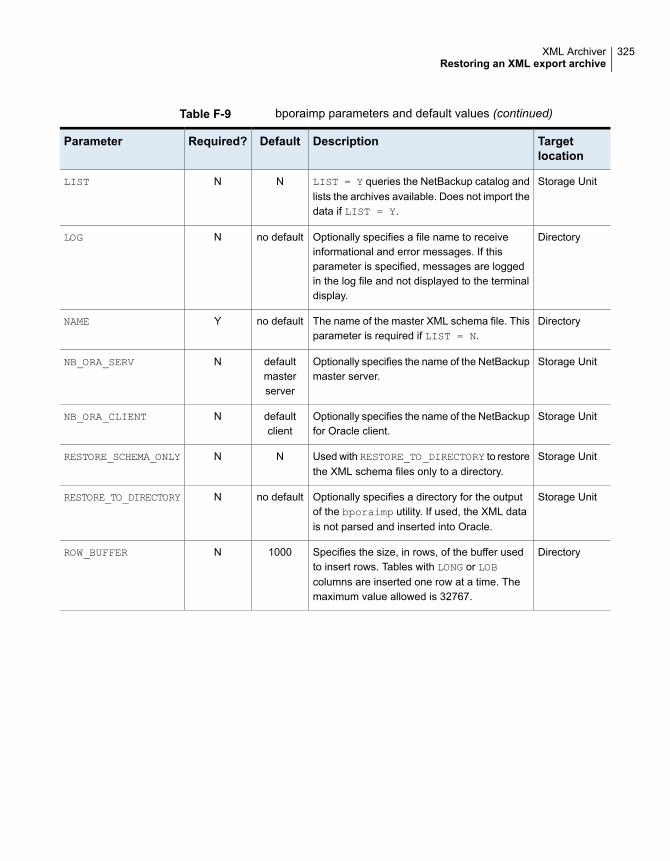
Table F-9 bporaimp parameters and default values (continued)
Targetlocation
DescriptionDefaultRequired?Parameter
Storage UnitLIST = Y queries the NetBackup catalog andlists the archives available. Does not import thedata if LIST = Y.
NNLIST
DirectoryOptionally specifies a file name to receiveinformational and error messages. If thisparameter is specified, messages are loggedin the log file and not displayed to the terminaldisplay.
no defaultNLOG
DirectoryThe name of the master XML schema file. Thisparameter is required if LIST = N.
no defaultYNAME
Storage UnitOptionally specifies the name of the NetBackupmaster server.
defaultmasterserver
NNB_ORA_SERV
Storage UnitOptionally specifies the name of the NetBackupfor Oracle client.
defaultclient
NNB_ORA_CLIENT
Storage UnitUsed with RESTORE_TO_DIRECTORY to restorethe XML schema files only to a directory.
NNRESTORE_SCHEMA_ONLY
Storage UnitOptionally specifies a directory for the outputof the bporaimp utility. If used, the XML datais not parsed and inserted into Oracle.
no defaultNRESTORE_TO_DIRECTORY
DirectorySpecifies the size, in rows, of the buffer usedto insert rows. Tables with LONG or LOBcolumns are inserted one row at a time. Themaximum value allowed is 32767.
1000NROW_BUFFER
325XML ArchiverRestoring an XML export archive

Table F-9 bporaimp parameters and default values (continued)
Targetlocation
DescriptionDefaultRequired?Parameter
DirectoryOptionally specifies a list of table, view, andpartition names to import. If not used, all objectsin the archive are imported. The objects mustalready exist, and the USERID must haveINSERT privilege on the objects. The objectnames cannot be qualified with owner names,and the FROMUSER parameter is used to specifya particular owner. If a partition name isspecified, it indicates the exported partition onlyand the rows are inserted according to thepartitioning scheme of the target table. If theexport contains partitions, and the import doesnot specify them, all are inserted.
no defaultNTABLES
DirectoryOptionally specifies a comma-separated list ofusers to import to that can be used with theFROMUSER parameter to change the tableowners. The TOUSER Oracle accounts mustalready exist, and the USERID must haveINSERT privilege on the tables that must alsoexist.
no defaultNTOUSER
DirectorySpecifies the username/password (and optionalconnect string) of the user initiating the import.If a connect string is not provided, theORACLE_SID environment variable is used.
no defaultYUSERID
About redirecting a restore of an XML export archive to a differentclient
With NetBackup for Oracle you have the option to restore an XML export archiveto a client other than the one that originally performed the XML export. The processof restoring data to another client is called a redirected restore.
Before you redirect the restore, see the following topic:
Figure F-5 illustrates a typical redirected restore.
326XML ArchiverRestoring an XML export archive

Figure F-5 Redirected restore of an XML export archive to a different client
2. Client B requests restore of client Aimage to client B.
1. Client A agents are backed up.
3. The server restores client A backupimage to client B.
Server
The user on client A cannot initiate a redirected restore to client B. Only the useron client B, which is the client receiving the backup image, can initiate the redirectedrestore. Any user who belongs to the database group that performed the backupcan restore it, unless the BKUP_IMAGE_PERM variable is set to USER.
Redirecting a restore of an XML export archive to a newclient using bporaimpOn UNIX and Linux, any user who belongs to the database group that performedthe archive can restore XML export archive. The BKUP_IMAGE_PERM variablemust be set to GROUP or ANY, not USER.
Perform the following procedure on the new client host if you want to restore XMLexport archives that are owned by another client.
To redirect a restore of an XML export archive to a new client using bporaimp
1 Set the environment variables for bporaimp (bporaimp64 on some platforms)on the new client, including ORACLE_HOME and ORACLE_SID.
2 In the bporaimp parameter file, include the following lines:
nb_ora_serv = NetBackup_server
nb_ora_client =
original_client_where_XML_export_occurred.
3 Specify any other bporaimp parameters.
See “Running bporaimp on the client” on page 322.
4 Run bporaimp.
327XML ArchiverRestoring an XML export archive
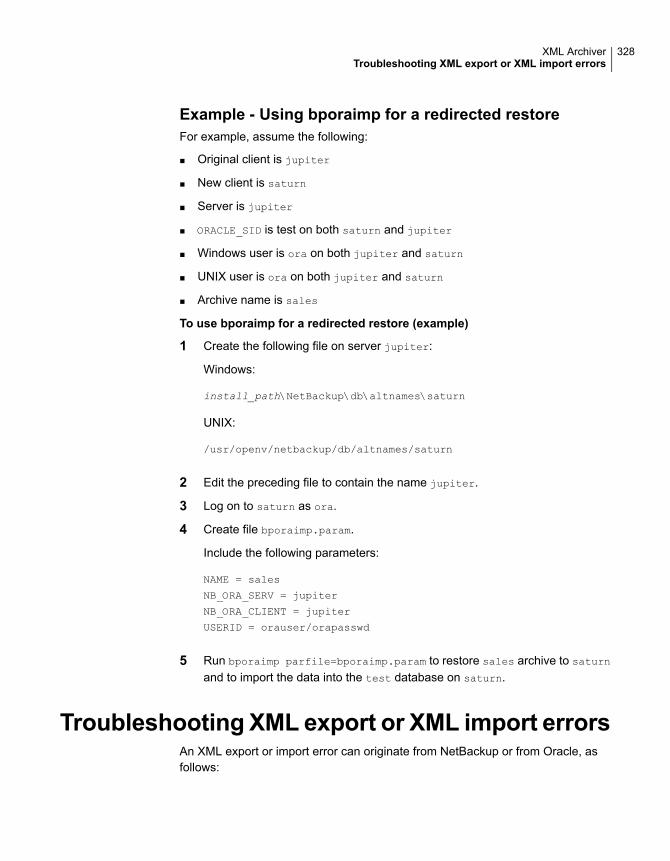
Example - Using bporaimp for a redirected restoreFor example, assume the following:
■ Original client is jupiter
■ New client is saturn
■ Server is jupiter
■ ORACLE_SID is test on both saturn and jupiter
■ Windows user is ora on both jupiter and saturn
■ UNIX user is ora on both jupiter and saturn
■ Archive name is sales
To use bporaimp for a redirected restore (example)
1 Create the following file on server jupiter:
Windows:
install_path\NetBackup\db\altnames\saturn
UNIX:
/usr/openv/netbackup/db/altnames/saturn
2 Edit the preceding file to contain the name jupiter.
3 Log on to saturn as ora.
4 Create file bporaimp.param.
Include the following parameters:
NAME = sales
NB_ORA_SERV = jupiter
NB_ORA_CLIENT = jupiter
USERID = orauser/orapasswd
5 Run bporaimp parfile=bporaimp.param to restore sales archive to saturn
and to import the data into the test database on saturn.
Troubleshooting XML export or XML import errorsAn XML export or import error can originate from NetBackup or from Oracle, asfollows:
328XML ArchiverTroubleshooting XML export or XML import errors

■ On the NetBackup side, an error can be from the bporaexp or bporaimpprograms, the NetBackup server or client, or Media Manager.
■ On the Oracle side, an error can be from the target database.
Use the following steps when troubleshooting a failed operation:
■ Check the logs to determine the source of the error.
■ Troubleshoot each stage of the XML export or XML import.The following sections describe these steps in detail.On UNIX and Linux, these sections describe the log files from the bporaexp
and bporaimp commands. The logs are created in/usr/openv/netbackup/logs/bporaexp or/usr/openv/netbackup/logs/bporaimp.
Checking the logs to determine the source of an errorThis topic describes how to check the logs to determine the source of an error.
To check the logs
1 Check the bporaexp or bporaimp log.
If the LOG parameter is specified in the bporaexp or bporaimp command’sparfile, the commands write logs to the file that is specified as the argumentto the LOG parameter. The commands write log information to the screen if LOGis not specified.
For example, incorrect installation or configuration causes the following commonproblems:
■ The ORACLE_HOME environment variable was not set.
■ The bporaexp or bporaimp program was unable to connect to the targetdatabase.
When bporaexp and bporaimp are being used and the backup images arebeing written to an operating system directory, these logs are the only sourceof error logging and tracking.
2 Check the NetBackup logs.
On Windows, the first NetBackup log to check isinstall_path\NetBackup\logs\bporaexp\log.mmddyy orinstall_path\NetBackup\logs\bporaimp\log.mmddyy.
On UNIX, the first NetBackup log to check is/usr/openv/netbackup/logs/bporaexp/log.mmddyy or/usr/openv/netbackup/logs/bporaimp/log.mmddyy.
329XML ArchiverTroubleshooting XML export or XML import errors

Examine these logs for messages that show how to determine the source ofan error.
These logs are written by the NetBackup client and contain the following:
■ Requests from bporaexp and bporaimp
■ Activities between bporaexp and bporaimp and NetBackup processes
If the logs do not contain any messages, the following conditions could bepresent:
■ bporaexp or bporaimp terminated before requesting service fromNetBackup.
■ bphdb (if started by the scheduler or graphical user interface) did not startthe template or shell script successfully. Check the bphdb logs for stderrand stdout files.
Try to run the XML export or XML import template or script file from thecommand line to determine the problem.
On UNIX, the error is usually due to a file permission problem for bphdb itselfor for the export or import script file.
Ensure that the full XML export or import script file name is entered correctlyin the Backup Selections list of the Oracle policy configuration, or for templates,that the name is correct.
On UNIX, logs are not created in this directory if the permissions are not setfor the Oracle user to write to the directory. The full permissions setting, chmod777, is best.
For more information about debug logs and reports, refer to the NetBackupAdministrator’s Guide, Volume I.
Troubleshooting each stage of the XML export or XML importThe information in this section does not apply to you if DIRECTORY is specified inbporaexp or bporaimp command’s parfile.
The following explains the sequence of events for an action that bporaexp orbporaimp initiates in NetBackup mode. This situation occurs when DIRECTORY isnot specified in the bporaexp or bporaimp command’s parfile. It suggests solutionsfor the problems that can occur at each point in the sequence.
To troubleshoot by stage
1 bporaexp or bporaimp starts.
An export or import can be started in any of the following ways:
330XML ArchiverTroubleshooting XML export or XML import errors

■ Command line from the system prompt.For example:
bporaexp parfile = parameter_filename
bporaimp parfile = parameter_filename
■ Using a template that is run from the NetBackup client GUI or bpdbsbora.
■ Manually from the NetBackup Administration Console on the master server.
■ Automatically by an automatic export schedule.
If an error occurs now, check the bporaexp or bporaimp log.
2 bporaexp or bporaimp verifies its environment and then connects to Oracleand NetBackup.
An Oracle environment problem, a database problem, an incorrect user ID, oran incorrect password can cause Oracle connect errors.
A NetBackup error now is usually due to a problem with client and servercommunication. Check the messages in the bprd and bpcd logs for clues.
Also verify the bp.conf entries on the UNIX or Linux client.
3 bporaexp or bporaimp issues a backup or restore request.
Before the backup or restore request proceeds, bporaexp or bporaimpcommands perform three functions:
■ Gather necessary parameters
■ The backup or restore request is sent to the NetBackup server
■ Wait until the server and client are ready to transfer data
The NetBackup client interfaces gather information from the following places:
■ The environment, including bporaexp and bporaimp parameter files. If youuse templates, the parameter files are generated from the template.If you use scripts, you have to generate the parameter file manually.
■ Server configuration parameters on Windows.
■ The user’s bp.conf and /usr/openv/netbackup/bp.conf files on the UNIXor Linux client.
This information is sent to the master server’s bprd process.
To troubleshoot a backup problem in this part of the sequence, examine thefollowing file:
Windows:
331XML ArchiverTroubleshooting XML export or XML import errors

install_path\NetBackup\logs\bporaexp\log.mmddyy
UNIX:
/usr/openv/netbackup/logs/bporaexp/log.mmddyy
If the bprd process failed, check the bprd and bpbrm logs.
During this sequence, most failures occur because of incorrect NetBackupserver or Oracle policy configuration parameters.
NetBackup can usually select the correct Oracle policy and schedules. However,NetBackup can select a policy or schedule in error if there are several Oraclepolicies in its database.
In Windows, try setting the SERVER and POLICY values in the client environmentor by setting the following bporaexp parameters:
NB_ORA_POLICY=policyname
NB_ORA_SCHED=schedule
NB_ORA_SERV=NetBackup_server
NB_ORA_CLIENT=NetBackup_client
In UNIX, try setting the SERVER and POLICY values in the bp.conf file on theclient or by setting the following bporaexp parameters:
NB_ORA_POLICY=policyname
NB_ORA_SCHED=schedule
NB_ORA_SERV=NetBackup_server
NB_ORA_CLIENT=NetBackup_client
To troubleshoot a restore, examine the following log file:
Windows:
install_path\NetBackup\logs\bporaimp\mmddyy.log
UNIX:
/usr/openv/netbackup/logs/bporaimp/log.mmddyy
Make sure that the correct NetBackup server and NetBackup client values areused by setting the following bporaimp parameters:
NB_ORA_SERV=NetBackup_server
NB_ORA_CLIENT=NetBackup_client
332XML ArchiverTroubleshooting XML export or XML import errors

Set these parameters to the same values that were used for the XML exportoperation.
4 bporaexp or bporaimp issues read or write requests to the NetBackup client,which then transfers data to or from the NetBackup server.
bporaexp builds an SQL query for each table being archived, and it uses theOracle Call Interface (OCI) to run the query. The query results are translatedinto XML. The XML output is passed to the NetBackup client interfaces.
bporaimp uses the reverse process. That is, XML data is restored, parsed,and inserted into the database.
A failure here is probably due to an Oracle error, or to a NetBackup media,network, or timeout error.
5 bporaexp or bporaimp tells the NetBackup client to close the session anddisconnects from the Oracle database.
The NetBackup client waits for the server to complete its necessary actions(backup image verification and so on) and then exits.
Additional XML export and import logsThe bporaexp and bporaimp utilities perform error logging and tracing in the filethat is specified by the LOG parameter. The log files contain Oracle errors and othererrors that are not related to NetBackup.
When bporaexp and bporaimp are used and the backup images are written to astorage unit, these errors are also logged in the NetBackup debug logs. These logsappear in the following directories:
Windows:
install_path\NetBackup\logs\bporaexp
install_path\NetBackup\logs\bporaimp
UNIX and Linux:
/user/openv/netbackup/logs/bporaexp
/user/openv/netbackup/logs/bporaimp
When you use bporaexp and bporaimp and the backup images are written to anoperating system directory, the file that is specified by the LOG= parameter is theonly source of error logging and tracing.
333XML ArchiverAdditional XML export and import logs

Register authorizedlocations
This appendix includes the following topics:
■ Registering authorized locations used by a NetBackup database script-basedpolicy
Registering authorized locations used by aNetBackup database script-based policy
During a backup, NetBackup checks for scripts in the default script location andany authorized locations. The default, authorized script location for UNIX isusr/openv/netbackup/ext/db_ext and for Windows isinstall_path\netbackup\dbext. If the script is not in the default script locationor an authorized location, the policy job fails. You can move any script into thedefault script location or any additional authorized location and NetBackuprecognizes the scripts. You need to update the policy with the script location if ithas changed. An authorized location can be a directory and NetBackup recognizesany script within that directory. An authorized location can also be a full path to ascript if an entire directory does need to be authorized.
If the default script location does not work for your environment, use the followingprocedure to enter one or more authorized locations for your scripts. Usenbsetconfig to enter an authorized location where the scripts reside. You can alsouse bpsetconfig, however this command is only available on the master or themedia server.
GAppendix
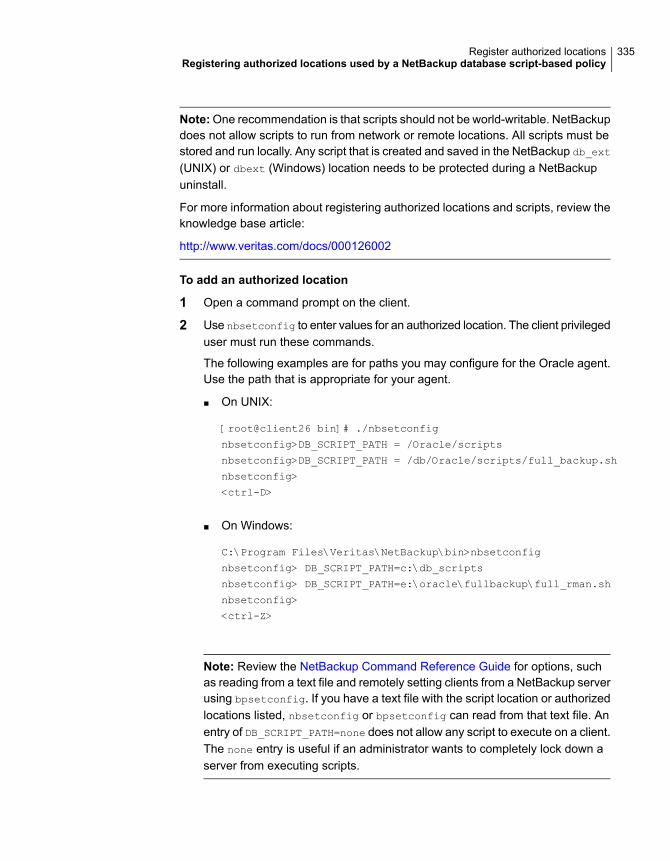
Note:One recommendation is that scripts should not be world-writable. NetBackupdoes not allow scripts to run from network or remote locations. All scripts must bestored and run locally. Any script that is created and saved in the NetBackup db_ext
(UNIX) or dbext (Windows) location needs to be protected during a NetBackupuninstall.
For more information about registering authorized locations and scripts, review theknowledge base article:
http://www.veritas.com/docs/000126002
To add an authorized location
1 Open a command prompt on the client.
2 Use nbsetconfig to enter values for an authorized location. The client privilegeduser must run these commands.
The following examples are for paths you may configure for the Oracle agent.Use the path that is appropriate for your agent.
■ On UNIX:
[root@client26 bin]# ./nbsetconfig
nbsetconfig>DB_SCRIPT_PATH = /Oracle/scripts
nbsetconfig>DB_SCRIPT_PATH = /db/Oracle/scripts/full_backup.sh
nbsetconfig>
<ctrl-D>
■ On Windows:
C:\Program Files\Veritas\NetBackup\bin>nbsetconfig
nbsetconfig> DB_SCRIPT_PATH=c:\db_scripts
nbsetconfig> DB_SCRIPT_PATH=e:\oracle\fullbackup\full_rman.sh
nbsetconfig>
<ctrl-Z>
Note: Review the NetBackup Command Reference Guide for options, suchas reading from a text file and remotely setting clients from a NetBackup serverusing bpsetconfig. If you have a text file with the script location or authorizedlocations listed, nbsetconfig or bpsetconfig can read from that text file. Anentry of DB_SCRIPT_PATH=none does not allow any script to execute on a client.The none entry is useful if an administrator wants to completely lock down aserver from executing scripts.
335Register authorized locationsRegistering authorized locations used by a NetBackup database script-based policy

3 (Conditional) Perform these steps on any clustered database or agent nodethat can perform the backup.
4 (Conditional) Update any policy if the script location was changed to the defaultor authorized location.
336Register authorized locationsRegistering authorized locations used by a NetBackup database script-based policy

Symbols.xml 312.xsd 312/Oracle/XMLArchive 319
AALTER_TABLESPACE 281, 287API
error 218, 221, 329libobk module 209
Application Backup schedulefor block level incremental backups 190with Snapshot Client 177
archive 298–299ARCHIVE_DATE_FROM 317, 323ARCHIVE_DATE_TO 317, 323ARCHIVELOG 282, 287Auto snapshot type 198, 203automatic archive 309automatic backups 287Automatic Cumulative Incremental Backup schedule
Snapshot Client effects 192Automatic Differential Incremental Backup schedule
Snapshot Client effects 192Automatic Full Backup schedule
Snapshot Client effects 192with Snapshot Client 177
Bbackup
configure schedule 69errors 290full 192manual backup 120, 309media 34methods 282methods or types of 280performing 287policy 119, 136, 309test 112
backup (continued)to appliance 81using scripts 119, 136, 309wizard
invoking 193Backup Selections list
adding scripts 94adding selections 93adding templates 94Database Backup Shares 83overview 93
BFILE_DIRECTORY 323binaries
pushing out 292BLI Backup
restores 289BLI no RMAN
adding policies 274backup example 279cold backup 281goodies directory 276hot backup 281improving performance 293mailid 276requirements 273schedules 282standard policy type 274workload 293
block level incrementalattributes 291troubleshooting 291
block level incremental backupconfiguring 190overview 187
bp.conf 101troubleshooting 220, 332
BPBACKUP_POLICY 102BPBACKUP_SCHED 99, 102bpdbsbora
for XML import 321bpend_notify 282, 293BPEND_TIMEOUT 293
Index

bphdb log 216bplist 123
browsing for backups 123browsing for XML export archives 318example 123
bporaexp 298–299, 311, 314bporaexp64 314bporaimp 301, 317–318
performing a restore 322bporaimp64 318, 322bpstart_notify 282, 287bpstart_notify.oracle_bli 282BPSTART_TIMEOUT 292browsing archives 317
Ccheck_coverage 278client read timeout property 223CLIENT_NAME 99, 102CLIENT_READ_TIMEOUT 99, 102clients list, for backup policies 92Clone snapshot type 198, 203commands
allocate channel 22, 85backup 22, 85, 117bpdbsbora 121bplist 123, 318bporaexp 298–299, 311, 314bporaimp 301, 317–318bporexp64 314change 118copy 117crosscheck 115crosscheck backupset 115delete expired backupset 117list 118register database 114report 118reset database 114restore 117resync catalog 117rman
execute backups 123execute scripts 123performing restore 129script syntax 123
send 109set duplex 109switch 117
COMMIT 324compatibility information 33configuration
database user authentication 111CONSISTENT 314Copy-on-write technology 198, 203correcting errors 290
Ddebug logs 290
accessing 215debug level 217enabling 211troubleshooting with log files 211UNIX 213Windows 212
Differential snapshot type 198, 203DIRECTORY
parameter 314, 324
Eenvironment variables 194environmental variables
user-directed backup 123error
checking 119correcting 290
examplesbplist 123parameter files 308RMAN script 107scripts 308
execution log 216–217
Ffailed operation
troubleshooting 218, 329file system
growing 291UNCOVERED 276
file-based operations 168FROMUSER 318, 324Fulldata Storage Checkpoint 274
GGetting Started Wizard 197, 202Guided Recovery 153
Destination host and login screen 159
338Index
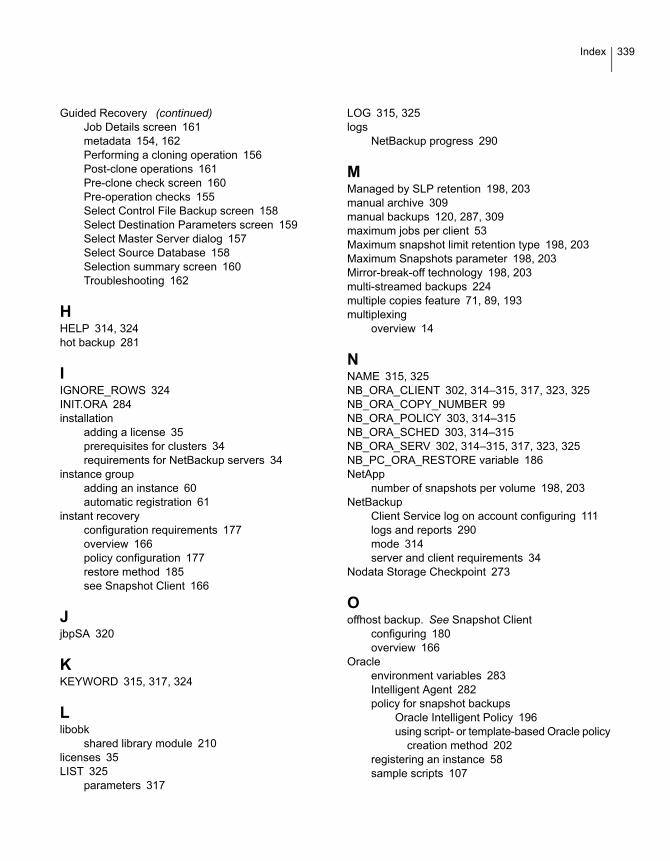
Guided Recovery (continued)Job Details screen 161metadata 154, 162Performing a cloning operation 156Post-clone operations 161Pre-clone check screen 160Pre-operation checks 155Select Control File Backup screen 158Select Destination Parameters screen 159Select Master Server dialog 157Select Source Database 158Selection summary screen 160Troubleshooting 162
HHELP 314, 324hot backup 281
IIGNORE_ROWS 324INIT.ORA 284installation
adding a license 35prerequisites for clusters 34requirements for NetBackup servers 34
instance groupadding an instance 60automatic registration 61
instant recoveryconfiguration requirements 177overview 166policy configuration 177restore method 185see Snapshot Client 166
JjbpSA 320
KKEYWORD 315, 317, 324
Llibobk
shared library module 210licenses 35LIST 325
parameters 317
LOG 315, 325logs
NetBackup progress 290
MManaged by SLP retention 198, 203manual archive 309manual backups 120, 287, 309maximum jobs per client 53Maximum snapshot limit retention type 198, 203Maximum Snapshots parameter 198, 203Mirror-break-off technology 198, 203multi-streamed backups 224multiple copies feature 71, 89, 193multiplexing
overview 14
NNAME 315, 325NB_ORA_CLIENT 302, 314–315, 317, 323, 325NB_ORA_COPY_NUMBER 99NB_ORA_POLICY 303, 314–315NB_ORA_SCHED 303, 314–315NB_ORA_SERV 302, 314–315, 317, 323, 325NB_PC_ORA_RESTORE variable 186NetApp
number of snapshots per volume 198, 203NetBackup
Client Service log on account configuring 111logs and reports 290mode 314server and client requirements 34
Nodata Storage Checkpoint 273
Ooffhost backup. See Snapshot Client
configuring 180overview 166
Oracleenvironment variables 283Intelligent Agent 282policy for snapshot backups
Oracle Intelligent Policy 196using script- or template-based Oracle policy
creation method 202registering an instance 58sample scripts 107
339Index

Oracle Recovery Managererrors 218example RMAN script 107
ORACLE_METADATA 102OWNER 315
Pparameter file 299, 302, 312parms operand 97PARTITIONS 315permission bits 292Plex snapshot type 198, 203Point-in-time copy 198, 203Point-in-time rollback restores
Oracle policy 201policies
changing properties 30creating 29
policy configurationadding clients 92attributes 87backup selections list 93for databases 86for Snapshot Client 178, 190overview 44testing 112
Policy Configuration Wizard 197, 202POLICY_IN_CONTROL 283–284post_checkpoint_notify 282, 293processes
log files for NetBackup processes 215Progress Log 289proxy copy 167
QQUERY 316
RRecovery Wizard
use with Snapshot Client 193redirected restores 131, 326redo log 278reports 211
See also debug logsAll Logs Entries 211database operations 209
restoreerrors 290
restore (continued)multistream 130Point-in-time rollback 185snapshot rollback 185–186to a different client 131, 326user-directed 322with Snapshot Client methods 185XML import 300–301
RESTORE_SCHEMA_ONLY 325RESTORE_TO_DIRECTORY 325restoring
Point-in-time rollback 201retention period
for Snapshot Client 193RMAN
browsing repository 123querying repository 118script example 107scripts 196SEND 98
rman change command 125rollback restores
Point-in-time rollback 201ROW_BUFFER 316, 325
Sschedules
backup 119, 136, 309frequency 70–71, 88, 90properties 70–71, 88, 90properties for Snapshot Client 192retention for Snapshot Client 193
scriptsbpend_notify 293bpstart_notify.oracle_bli 282cautions for using 88check_coverage 278notify 287RMAN 23, 25scheduler 119, 136, 309XML export 303
send operand 123SERVER 100, 102Setup
Oracle Intelligent PolicyOIP 66
setup_bli_scriptscontents of 283sample of 284
340Index

shared library modulelibobk 210
SHUTDOWN_BKUP_RESTART 281, 287SHUTDOWN_CKPT_RESTART 282, 288snapshot backup 165, 177, 185
configuration requirements 177database objects included 177policy configuration 177restore method 185
Snapshot Clientconfiguring policies 177effects on policies and schedules 192file-based operations 168overview 166proxy copy 167stream-based operations 168
snapshot rollback 185–186Snapshot Type parameter 198, 203SnapVault 187Storage Checkpoint 189
backup 282removing 291
stream-based operations 168
Ttab
Backup Selections tab 75Instances and Databases tab 73Oracle tab 78
TABLES 316, 318, 326templates
administration 309advantages over scripts 88creating for XML export 303, 305overview 16XML export 303
testing policy configuration 112timeout failures
minimizing 223TNS_ADMIN
automatic registration 61manually adding instance 56registering an instance 58
TOUSER 326transaction logs
see archive logs 190
UUNCOVERED file system 276Unicode 296unified logging 213, 215update_clients 292Use Replication Director property 87user-directed archive 309user-directed restore 322USERID 316–317, 326UTF-8 296
VVERBOSE 100–102Verifying installation 210Veritas Storage Foundation 190VIEWS 316
Wwizard
overview 16use with Snapshot Client 193
wizardsPolicy Configuration 29
XXML
archiving features 296export 298Export Wizard 304import 300Import Wizard 320instance 298–299, 301, 312schema 296, 299, 301, 312
341Index