NetBackup 9.1.0.1 Application Guide - Veritas SORT
65
NetBackup 9.1.0.1 Application Guide For Flex Appliance 2.1
-
Upload
khangminh22 -
Category
Documents
-
view
0 -
download
0
Transcript of NetBackup 9.1.0.1 Application Guide - Veritas SORT

NetBackup 9.1.0.1Application Guide
For Flex Appliance 2.1

Chapter 1 Product overview ................................................................. 4
Introduction to NetBackup applications for Flex Appliance ...................... 4About the Flex Appliance documentation ............................................ 5
Chapter 2 Release notes ...................................................................... 6
NetBackup 9.1.0.1 application new features, enhancements, andchanges ................................................................................. 6
Supported upgrade paths to this release ............................................. 6Operational notes ........................................................................... 6
Chapter 3 Geting started ....................................................................... 9
Prerequisites before you can create NetBackup application instances............................................................................................. 9
Installing the NetBackup Administration Console and client packages............................................................................................. 9
Chapter 4 Creating NetBackup application instances ................ 11
Creating application instances ......................................................... 11Creating a NetBackup master server instance .............................. 12Creating a NetBackup media server instance ............................... 14Creating a NetBackup WORM storage server instance ................... 20
Chapter 5 Managing NetBackup application instances ............. 25
Managing application instances from Flex Appliance and NetBackup........................................................................................... 25
Accessing NetBackup master and media server instances formanagement tasks ................................................................. 26Managing users on a master or media server instance ................... 26Running NetBackup commands on a master or media server
application instance .......................................................... 30Monitoring NetBackup services on a NetBackup master server
instance ......................................................................... 34
Contents

Mounting an NFS share on a NetBackup master server instance..................................................................................... 35
Setting environment variables on master and media serverinstances ........................................................................ 36
Storing custom data on a master or media server instance .............. 36Modifying or disabling the nbdeployutil utility on a master server
instance ......................................................................... 37Establishing trust with a NetBackup 7.7.3 master server instance
..................................................................................... 37Accessing NetBackup WORM storage server instances for
management tasks ................................................................. 38About the NetBackup WORM storage server shell ......................... 38
3Contents

Product overviewThis chapter includes the following topics:
■ Introduction to NetBackup applications for Flex Appliance
■ About the Flex Appliance documentation
Introduction to NetBackup applications for FlexAppliance
Veritas Flex Appliance is a customizable data management solution that lets youconsolidate multiple applications on a single hardware platform. An application isa Veritas software program that can be installed on Flex Appliance. You can usethese applications to create multiple, concurrent application instances, or singledeployments of applications that were historically standalone servers.
The following applications are available for NetBackup release 9.1.0.1:
■ NetBackup master serverYou can also configure a BMR master server with this application. However,the BMR boot server cannot be configured on the appliance.
■ NetBackup media server with the following storage options:
■ Media Server Deduplication Pool (MSDP)You can also configure MSDP cloud storage with this application. Refer tothe NetBackup Deduplication Guide after the instance is created.
■ AdvancedDisk
■ NetBackup WORM storage server version 15.0.2The WORM storage server application is included with the NetBackup releasebut follows a different version scheme. WORM storage server version 15.0.2requires a version 9.1.0.1 or later master server and media server.
1Chapter

For a full list of supported applications and versions, see the following article onthe Veritas Support website:
Flex Appliance supported applications and usage information
About the Flex Appliance documentationThe following documents contain information about the Flex Appliance andapplication software:
■ The Flex Appliance Getting Started and Administration GuideRefer to this guide to configure and manage the Flex Appliance software, aswell as for general information about creating and managing applicationinstances.
■ The NetBackup Application GuidesRefer to these guides for more specific information about the NetBackupapplications, including detailed instructions on how to create application instancesof each supported version.
The following documents contain information about the appliance hardware:
■ The Veritas 5350 Appliance Hardware Installation Guide
■ The Veritas 5350 Appliance Product Description
■ The Veritas 5340 Appliance Hardware Installation Guide
■ The Veritas 5340 Appliance Product Description
■ The Veritas 5250 Appliance Hardware Installation Guide
■ The Veritas 5250 Appliance Product Description
■ The Veritas 5150 Appliance Hardware Installation Guide
■ The Veritas 5150 Appliance Product Description
■ The Veritas Appliance Safety and Maintenance Guide
Flex Appliance also uses Veritas AutoSupport to monitor the appliance. You canfind additional information about AutoSupport in the Veritas Appliance AutoSupportReference Guide.
You can find the latest documentation on the Documentation page of the VeritasSupport website. Navigate to the Documentation tab, then select Flex ApplianceOS on the left-hand side.
API documentation is also available from the Knowledge Base page on VeritasSORT.
5Product overviewAbout the Flex Appliance documentation

Release notesThis chapter includes the following topics:
■ NetBackup 9.1.0.1 application new features, enhancements, and changes
■ Supported upgrade paths to this release
■ Operational notes
NetBackup 9.1.0.1 application new features,enhancements, and changes
This release does not include any new features, enhancements, or changes thatare specific to the NetBackup 9.1.0.1 application. It does include the new featuresfrom NetBackup unless they are called out as exceptions in this guide. See theNetBackup Release Notes for more information.
Supported upgrade paths to this releaseYou can upgrade directly from any previous NetBackup application version to version9.1.0.1.
Operational notesThis topic explains important aspects of the NetBackup 9.1.0.1 application that maynot be documented elsewhere in the documentation.
The following list contains the notes and the known issues that apply for this release:
■ If a media server instance restarts due to an appliance operation such as arestart or a power cycle, or if the instance is relocated as part of any operation,the following problems may result:
2Chapter
■ SAN client backups run over LAN instead of Fibre Transport.
■ SAN client backups fail.
■ Backups and restores through Fibre Transport fail.
■ Remote tape devices become unusable.To avoid these issues, monitor the Fibre Channel interfaces page of the FlexAppliance Console after an appliance restart or instance relocation. You canalso check the Fibre Channel tab of the instance details page. Wait for the linkstate of the ports to be up before you run any backups. The ports may take upto 10 minutes to become active.If the ports are up, but you still encounter problems with your backup jobs, doone of the following:
■ Log in to the NetBackup Java console, navigate to Media and DeviceManagement > Devices > SAN Clients, then choose each SAN client thatis affected and trigger a Fibre Channel (FC) rescan.
■ Log in to the media server instance and run the following commandsudo /usr/openv/netbackup/bin/admincmd/nbftconfig
-rescanallclients
■ For this release, WORM storage server instances do not support NetBackupCertificate Authority (CA) SHA-256 certificate fingerprints during instancecreation. If you create a WORM storage instance and select a NetBackup CA,enter the CA SHA-1 certificate fingerprint when prompted. Note that the WORMstorage instance can still use the SHA-256 CA. The SHA-1 fingerprint is onlyused to validate the NetBackup master server that you entered.
■ The username maintenance is no longer supported on application instances.If an existing user has the username maintenance when you upgrade to thisrelease, that user becomes disabled.
■ When you create a new application instance, theApplication instances sectionof theSystem topology pagemay show the instance status asPartially Deletedwhile the creation is in progress. The Partially Deleted status displays in errorand can be safely ignored. You can track the instance creation progress fromthe Activity Monitor, and the instance status changes toOnlinewhen the instancecreation has completed successfully.
■ When you create a NetBackup media server instance, the Flex ApplianceConsole does not prevent entering the same hostname in both the Hostnamefor NetBackupMedia Server and theMaster server hostname fields, but thatconfiguration is not supported. You must have a preexisting master server witha different hostname.
7Release notesOperational notes

■ When you create an instance, if you enter the IP address before you select anetwork interface, the IP address field displays the following error message:“IP address does not belong to the selected network’s subnet.”This message still displays after you select the network interface that correspondsto the IP address. To clear the message, click inside the IP address field andthen click or tab outside of it.
8Release notesOperational notes

Geting startedThis chapter includes the following topics:
■ Prerequisites before you can create NetBackup application instances
■ Installing the NetBackup Administration Console and client packages
Prerequisites before you can create NetBackupapplication instances
Before you begin working with NetBackup application instances, make sure thatyou have fully reviewed the Flex Appliance Getting Started Guide and haveperformed all of the following tasks:
■ Completed the initial configuration
■ Verified that you can access the Flex Appliance Console
■ Configured at least one network interface
■ Added at least one tenant
■ Added the application that you want to use to the repository
You also need access to the NetBackup Administration Console or the NetBackupRemote Administration Console, and the NetBackup client software. See “Installingthe NetBackup Administration Console and client packages” on page 9.
Installing the NetBackup Administration Consoleand client packages
To create and manage NetBackup instances, you need access to the NetBackupAdministration Console or the NetBackup Remote Administration Console. Use the
3Chapter

NetBackup Remote Administration Console if you want to manage your instancesfrom a computer that does not have NetBackup software installed.
You also need access to the NetBackup client software so that you can install it onthe computers that you want to back up.
The NetBackup Administration Console and the NetBackup client packages areincluded with the Electronic Software Distribution (ESD) images for NetBackupproduct installation. You can download the NetBackup ESD images from theDownloads page on the Veritas Support website.
For more information about the interfaces or installing the client software, refer tothe NetBackup Installation Guide, which is accessible from the NetBackup pageon the Support website.
10Geting startedInstalling the NetBackup Administration Console and client packages
Creating NetBackupapplication instances
This chapter includes the following topics:
■ Creating application instances
Creating application instancesYou can create application instances from the System topology page of the FlexAppliance Console. Navigate to theApplication instances section and clickCreateinstance to open a new page that lets you create instances of the followingapplications for NetBackup release 9.1.0.1:
■ NetBackup master serverYou can also configure a BMR master server with this application. However,the BMR boot server cannot be configured on the appliance.
■ NetBackup media server with the following storage options:
■ Media Server Deduplication Pool (MSDP)You can also configure MSDP cloud storage with this application. Refer tothe NetBackup Deduplication Guide after the instance is created.
■ AdvancedDisk
■ NetBackup WORM storage server version 15.0.2The WORM storage server application is included with the NetBackup releasebut follows a different version scheme. WORM storage server version 15.0.2requires a version 9.1.0.1 or later master server and media server.
For a full list of supported applications and versions, see the following article onthe Veritas Support website:
Flex Appliance supported applications and usage information
4Chapter

When you create a NetBackup instance, you need to complete additionalconfiguration steps from within NetBackup. Use the following procedures as a guideand refer to the NetBackup documentation for additional details.
See “Creating a NetBackup master server instance” on page 12.
See “Creating a NetBackup media server instance” on page 14.
See “Creating a NetBackup WORM storage server instance” on page 20.
Creating a NetBackup master server instanceUse the following procedure to create a NetBackup master server instance on FlexAppliance.
To create a NetBackup master server instance
1 Make sure that the NetBackup master server application you want to use islocated in the repository on the Flex Appliance Console.
2 Perform the following tasks if you have not already:
■ Configure at least one network interface. You can configure a physicalinterface, add a VLAN tag, or create a bond.
■ Add at least one tenant.
3 Gather the following information for the new instance:
Note: The hostname and IP address must not be in use anywhere else in yourdomain.
■ Tenant that you want to assign it to
■ Hostname (maximum of 63 characters including the domain name)
■ IP address
■ Network interface
■ Domain name
■ Name servers
■ Search domains
■ Usage Insights customer registration keyA Veritas Usage Insights customer registration key is required to createthis instance. To obtain a key, log in to the Veritas NetInsights Console sitewith your VEMS credentials. Go to theRegistration Keys page to downloadthe key
12Creating NetBackup application instancesCreating application instances

■ (Optional) NetBackup license keyNetBackup applications come with an evaluation license key. You mustadd a permanent NetBackup license key before the evaluation key expires.You can add your permanent key when you create the instance to avoidfuture issues.
Note: If the evaluation key expires before you create the instance, theinstance creation fails. Make sure that you have a valid license key beforeyou create an instance.
4 From the System topology page of the Flex Appliance Console, navigate tothe Application instances section.
5 Click Create instance.
6 Select the appropriate master server application from the repository list thatappears, making sure to verify the version number. Click Next.
7 Follow the prompts to create the instance. When you are done, you can viewthe progress in the Activity Monitor, which is accessible from the left pane ofthe Flex Appliance Console.
Note: If you do not want to use DNS or want to bypass DNS for certain hosts,verify that the hostname resolution information is included in the Hosts fileentries field. You must include entries for the media servers and any otherNetBackup hosts that you want to communicate with the instance.
8 Once the instance has been created successfully, you must change thepassword from the known default password.
13Creating NetBackup application instancesCreating application instances

Warning: You cannot access the NetBackup web UI to manage the instanceuntil you have changed the password.
To change the password, open an SSH session to the instance and log in withthe following credentials:
■ Username: appadmin
■ Password: P@ssw0rd
Follow the prompt to enter a new password. When the password change iscomplete, you are logged out. You can log back in with the new password.
Note: Do not configure AdvancedDisk storage on a NetBackup master serverinstance. The NetBackup Administration Console lets you create an AdvancedDiskstorage server on a master server instance, but Flex Appliance does not supportstorage configuration on master server instances. Create a separate NetBackupmedia server instance if you want to use AdvancedDisk storage.
Creating a NetBackup media server instanceUse the following procedure to create a NetBackup media server instance on FlexAppliance.
To create a NetBackup media server instance
1 Make sure that the NetBackup media server application you want to use islocated in the repository on the Flex Appliance Console.
2 Perform the following tasks if you have not already:
■ Configure at least one network interface. You can configure a physicalinterface, add a VLAN tag, or create a bond.
■ Add at least one tenant.
3 Gather the following information for the new instance:
Note: The hostname and IP address must not be in use anywhere else in yourdomain.
■ Tenant that you want to assign it to
■ Hostname (maximum of 63 characters including the domain name)
■ IP address
■ Network interface
14Creating NetBackup application instancesCreating application instances
■ Domain name
■ Name servers
■ Search domains
■ Master server hostname
■ Certificate Authority (CA) information for one of the following:
For a NetBackup CA:
■ CA SHA-1 or SHA-256 certificate fingerprintIf the master server is a Flex instance, you can locate this informationfrom the instance details page of the master server instance. Click onthe instance name under Application instances on the Systemtopology page.If the master server is not a Flex instance, see the NetBackup Securityand Encryption Guide for the steps to locate this information fromNetBackup.
■ (Optional) Token for host ID-based certificateDepending on the master server security level, the host may require anauthorization or a reissue token. If you do not specify a token when youcreate the instance, the wizard attempts to automatically obtain thecertificate.
For an external CA:
■ Trust store, in PEM format
■ Host certificate, in PEM format
■ Private key, in PEM format
■ (Optional) Passphrase of the private keyA passphrase is required if the key is encrypted.
■ (Optional) Custom CRL files
■ (Optional) Password for host name-based certificateA host name-based certificate is mandatory if Enhanced Auditing is enabledon the master server. You can specify the password when you create theinstance, or you can deploy the certificate from the master server later.
■ (Optional) NetBackup license keyNetBackup applications come with an evaluation license key. You mustadd a permanent NetBackup license key before the evaluation key expires.You can add your permanent key when you create the instance to avoidfuture issues.
15Creating NetBackup application instancesCreating application instances

Note: If the evaluation key expires before you create the instance, theinstance creation fails. Make sure that you have a valid license key beforeyou create an instance.
4 Add the hostname for the new instance to the Media Servers list or theAdditional Servers list on the master server, as follows:
■ Log on to the NetBackup Administration Console as the administrator.
■ In the main console window, in the left pane, clickNetBackupManagement> Host Properties > Master Servers.
■ In the right pane, double click on the master server hostname.
■ In the Master Server Properties window, click one of the following:
■ If you want MSDP storage on the instance, click Servers > AdditionalServers.
■ If you want AdvancedDisk storage on the instance, click Servers >Media Servers.
■ Click Add and enter the hostname for the new instance. The hostnameshould appear in the list.
■ Click OK.
5 If a firewall exists between the master server and the new instance, open thefollowing ports on the master server to allow communication:
■ vnetd: 13724
■ bprd: 13720
■ PBX: 1556
■ If the master server is a NetBackup appliance that uses TCP, open thefollowing ports:443, 5900, and 7578.
16Creating NetBackup application instancesCreating application instances

6 From the System topology page of the Flex Appliance Console, navigate tothe Application instances section.
7 Click Create instance.
8 Select the appropriate media server application from the repository list thatappears, making sure to verify the version number. Click Next.
9 Follow the prompts to create the instance. When you are done, you can viewthe progress in the Activity Monitor, which is accessible from the left pane ofthe Flex Appliance Console.
Note: If you do not want to use DNS or want to bypass DNS for certain hosts,verify that the hostname resolution information is included in the Hosts fileentries field. You must include entries for the master server and any otherNetBackup hosts that you want to communicate with the instance.
10 Once the instance has been created successfully, you must change thepassword from the known default password. To change the password, openan SSH session to the instance and log in with the following credentials:
■ Username: appadmin
■ Password: P@ssw0rd
Follow the prompt to enter a new password. When the password change iscomplete, you are logged out. You can log back in with the new password.
11 Create the storage servers for your selected storage, as follows:
■ Log on to the NetBackup Administration Console and select eitherNetBackup Management or Media and Device Management.
17Creating NetBackup application instancesCreating application instances

■ Click Configure Disk Storage Servers and follow the prompts to createthe storage servers. Enter the following storage information forAdvancedDisk and MSDP:
■ AdvancedDisk storage volume: /mnt/advanceddisk/vol*
■ MSDP storage path: /mnt/msdp/vol0
Note: If the MSDP disk pool spans multiple volumes, only select vol0.Also note that the wizard shows only a portion of the storage, but theremaining storage displays after the storage server is configured.
See the following guides for more information on NetBackup storageconfiguration:
■ The NetBackup AdvancedDisk Storage Solutions Guide
■ The NetBackup Deduplication Guide
12 (Optional) If you need to upload custom CRL files for an external CA, performthe following steps:
■ Run the following command on the instance to create a directory for thefiles:sudo mkdir -p /mnt/nbdata/hostcert/crl/
■ Use an SCP tool to copy the files to the new /mnt/nbdata/hostcert/crl/
directory.
■ Run the following commands on the instance to enable the CRL checkusing the custom files:sudo nbsetconfig ECA_CRL_CHECK = CHAIN
sudo nbsetconfig ECA_CRL_PATH = /mnt/nbdata/hostcert/crl/
See theNetBackup Security and Encryption Guide for more information on theCRL configuration options.
13 If you plan to create or already have multiple instances with deduplication orCloud Catalyst storage, Veritas recommends that you tune the MaxCacheSize
according to the following guidelines:
■ On each instance, allocate .75 GB to 1 GB of RAM for each TiB of storagethat is allocated to deduplication or Cloud Catalyst. For example, if thestorage pool has 80 TiB allocated, the MaxCacheSize should be 60 GB to80 GB of RAM.
18Creating NetBackup application instancesCreating application instances

■ The sum of the MaxCacheSize for all instances with deduplication or CloudCatalyst storage should not exceed 70% of the physical RAM on theappliance.
To tune the MSDP MaxCacheSize on this instance:
■ Run the following command on the instance:sudo /usr/openv/pdde/pdag/bin/pdcfg --write
/mnt/msdp/vol0/etc/puredisk/contentrouter.cfg --section CACHE
--option MaxCacheSize --value <percent%>
Where <percent%> is the percentage of the appliance RAM to use for thecache on the instance.
■ Restart the pdde-storage process with the following commands:sudo /etc/init.d/pdde-storage force-stop
sudo /etc/init.d/pdde-storage start
14 If you selected MSDP storage for the instance, log in to the instance. Run thefollowing command to create a backup policy to protect the MSDP catalog:
sudo /usr/openv/pdde/pdcr/bin/drcontrol --new_policy --residence
<storage unit> [--policy <policy name>] [--client<instance
hostname>]
Where <storage unit> is the name of the storage unit on which to store theMSDP catalog backups, and [--policy <policy name>] and [--client <instancehostname>] are optional.
See theNetBackup Deduplication Guide for the other options that are availablewith the drcontrol utility.
15 (5250 appliances only) If you selected MSDP storage for the instance, use thefollowing procedure to tune the MSDP parameters. Tuning the parametersincreases backup and restore performance on the 5250 hardware.
To tune the parameters on a Veritas 5250 Appliance:
■ Log in to the instance as the appadmin user and run the followingcommands:
■ sudo /usr/openv/pdde/pdag/bin/pdcfg --write
/mnt/msdp/vol0/etc/puredisk/contentrouter.cfg --section
CRDataStore --option MaxFileSize --value 256Mib
■ sudo /usr/openv/pdde/pdag/bin/pdcfg --write
/mnt/msdp/vol0/etc/puredisk/contentrouter.cfg --section
CRDataStore --option WriteBufferSize --value 65536
19Creating NetBackup application instancesCreating application instances
■ From the home or tmp directory, restart the pdde-storage and mtstrmd
processes with the following commands:
■ sudo /etc/init.d/pdde-storage force-stop
■ sudo /etc/init.d/pdde-storage start
Creating a NetBackup WORM storage server instanceNetBackupWORM (Write Once ReadMany) storage server instances prevent yourdata from being encrypted, modified, or deleted. Any data that is saved on theseinstances is protected with the following security measures:
■ ImmutabilityThis protection ensures that the backup image is read-only and cannot bemodified, corrupted, or encrypted after backup.
■ IndelibilityThis property protects the backup image from being deleted before it expires.The data is protected from malicious deletion.
See the NetBackup Administrator's Guide, Volume I for more information aboutWORM storage.
Use the following procedure to create a NetBackupWORM storage server instanceon Flex Appliance.
Note: Your appliance must be in lockdown mode before you can create a WORMstorage instance.
See the topic "Changing the lockdown mode" in the Flex Appliance Getting Startedand Administration Guide for the steps to enable lockdown mode.
To create a NetBackup WORM storage server instance
1 Make sure that the NetBackup WORM storage server application you want touse is located in the repository.
2 Perform the following tasks if you have not already:
■ Configure at least one network interface. You can configure a physicalinterface, add a VLAN tag, or create a bond.
■ Add at least one tenant.
■ Verify that the appliance is in lockdown mode. You can check or changethe lockdown mode from the Lockdownmode page on the Flex ApplianceConsole. See the topic "Changing the lockdownmode" in the Flex ApplianceGetting Started and Administration Guide for details.
20Creating NetBackup application instancesCreating application instances

3 Gather the following information for the new instance:
Note: The hostname and IP address must not be in use anywhere else in yourdomain.
■ Tenant that you want to assign it to
■ Hostname (maximum of 63 characters including the domain name)
■ IP address
■ Network interface
■ Domain name
■ Name servers
■ Search domains
■ Master server hostname (must be version 8.3.0.1 or later)
■ Media server hostname if applicable (must be version 8.3.0.1 or later)
■ Username for storageNetBackup requires this username to connect to the deduplication storage.The username must be between 4 and 30 characters and can includeuppercase letters, lowercase letters, and numbers.
■ Password for storageNetBackup requires this password to connect to the deduplication storage.The password must be between 15 and 32 characters and must include atleast one uppercase letter, one lowercase letter, one number, and onespecial character (_./@*!%#&).
■ KMS key group
■ KMS passphrase
■ Certificate Authority (CA) information for one of the following:
For a NetBackup CA:
■ CA SHA-1 certificate fingerprintIf the master server is a Flex instance, you can locate this informationfrom the instance details page of the master server instance. Click onthe instance name under Application instances on the Systemtopology page.If the master server is not a Flex instance, see the NetBackup Securityand Encryption Guide for the steps to locate this information fromNetBackup.
21Creating NetBackup application instancesCreating application instances

■ (Optional) Token for host ID-based certificateDepending on the master server security level, the host may require anauthorization or a reissue token. If you do not specify a token when youcreate the instance, the wizard attempts to automatically obtain thecertificate.
For an external CA:
■ Trust store, in PEM format
■ Host certificate, in PEM format
■ Private key, in PEM format
■ (Optional) Passphrase of the private keyA passphrase is required if the key is encrypted.
■ (Optional) Password for host name-based certificateA host name-based certificate is mandatory if Enhanced Auditing is enabledon the master server. You can specify the password when you create theinstance, or you can deploy the certificate from the master server later.
4 On the master server, use the nbsetconfig command or manually edit theNetBackup backup configuration file (bp.conf on Linux and UNIX, or theWindows registry) to add the following entry:
MSDP_SERVER=<MSDP hostname>
Where <MSDP hostname> is the hostname of the new WORM storage serverinstance.
5 If a firewall exists between the master server and the new instance, open thefollowing ports on the master server to allow communication:
■ vnetd: 13724
■ bprd: 13720
■ PBX: 1556
■ If the master server is a NetBackup appliance that uses TCP, open thefollowing ports:443, 5900, and 7578.
22Creating NetBackup application instancesCreating application instances

6 From the System topology page of the Flex Appliance Console, navigate tothe Application instances section.
7 Click Create instance.
8 Select the appropriate storage server application from the repository list thatappears, making sure to verify the version number. Click Next.
9 Follow the prompts to create the instance. When you are done, you can viewthe progress in the Activity Monitor, which is accessible from the left pane ofthe Flex Appliance Console.
Note: If you do not want to use DNS or want to bypass DNS for certain hosts,verify that the hostname resolution information is included in the Hosts fileentries field. You must include entries for the master server and any otherNetBackup hosts that you want to communicate with the instance.
10 Once the instance has been created successfully, you must change thepassword from the known default password. To change the password, openan SSH session to the instance and log in with the following credentials:
■ Username: msdpadm
■ Password: P@ssw0rd
Follow the prompt to enter a new password. When the password change iscomplete, you are logged out. You can log back in with the new password.
11 If you plan to create or already have multiple instances with deduplication orCloud Catalyst storage, Veritas recommends that you tune the MaxCacheSize
according to the following guidelines:
■ On each instance, allocate .75 GB to 1 GB of RAM for each TiB of storagethat is allocated to deduplication on the instance. For example, if the storage
23Creating NetBackup application instancesCreating application instances

pool has 80 TiB allocated, the MaxCacheSize should be 60 GB to 80 GB ofRAM.
■ The sum of the MaxCacheSize for all instances with deduplication or CloudCatalyst storage should not exceed 70% of the physical RAM on theappliance.
To tune the deduplication MaxCacheSize on this instance:
■ From the SSH session, run the following command on the instance:setting set-MSDP-param max-fp-cache-size value=<percent%>
Where <percent%> is the percentage of the appliance RAM to use for thecache on the instance.
■ Restart the dedupe process with the following commands:dedupe MSDP stop
dedupe MSDP start
12 The appliance automatically creates a PureDisk storage server for theWORMstorage instance that has the same name as the instance. Do one of thefollowing to create a disk pool on that storage server:
■ From the NetBackup Administration Console, select either NetBackupManagement or Media and Device Management, then click ConfigureDisk Pool in the right pane. Follow the prompts to configure the disk pool.
■ From the NetBackup web UI, click Storage, click the Disk pools tab, andthen click Add. Follow the prompts to configure the disk pool.
13 Do one of the following to create a deduplication storage unit for your instance:
■ From the NetBackup Administration Console, expand NetBackupManagement > Storage > Storage Units, then click New > Storage Unit.Complete the fields and select the Use WORM check box.
■ From the NetBackup web UI, click Storage, navigate to the Storage Unitstab, and then clickAdd. Follow the prompts and make sure that the EnableWORM option is activated.
You are ready to create a backup policy and start using your WORM storageinstance. See the NetBackup documentation for more information.
24Creating NetBackup application instancesCreating application instances

Managing NetBackupapplication instances
This chapter includes the following topics:
■ Managing application instances from Flex Appliance and NetBackup
■ Accessing NetBackup master and media server instances for managementtasks
■ Accessing NetBackup WORM storage server instances for management tasks
Managing application instances from FlexAppliance and NetBackup
After you have created your instances, the instancemanagement is divided betweenFlex Appliance and NetBackup, depending on the type of operation. In general,use Flex Appliance for any tasks that are related to the appliance or the applicationfiles. Use NetBackup for any tasks that are related to your backups. Refer to thefollowing information for more details.
Instance operations that you can perform from FlexApplianceUse Flex Appliance to do the following:
■ Resize instance storage
■ Edit instance network settings
■ Assign or unassign Fibre Channel ports
■ View instance performance metrics
■ Upgrade application instances
5Chapter

■ Manage application add-ons, including NetBackup EEBs
■ Delete application instances
■ Clear a configuration error status
Refer to the Flex Appliance Getting Started and Administration Guide for theseprocedures.
Instance operations that you can perform fromNetBackupAll other management tasks happen from NetBackup. This guide covers theinformation that is specific to the NetBackup application. For all other tasks, referto the regular NetBackup documentation as you would for any other environment.
Note that the following NetBackup features are not supported on applicationinstances:
■ Bare Metal Restore boot servers
■ IPv6
Accessing NetBackup master and media serverinstances for management tasks
To perform some management tasks on a master or a media server instance, youmust open an SSH session to the instance. When you log in to the instance for thefirst time, use the following default credentials:
■ Username: appadmin
■ Password: P@ssw0rd
You are required to change your password the first time you log in.
From the SSH session, you can run commands to manage the instance. Somecommands are specific to the NetBackup application, but you can also runNetBackup commands. To run NetBackup commands, specify sudo and enter theabsolute or the relative path. See “Running NetBackup commands on a master ormedia server application instance” on page 30.
Managing users on a master or media server instanceAfter you create a NetBackup master or media server application instance, you canlog in to the instance with the appadmin user account to add andmanage additionalusers.
The following types of users are supported:
26Managing NetBackup application instancesAccessing NetBackup master and media server instances for management tasks
■ Local usersSee “Adding and removing local users on a master or media server instance”on page 27.See “Changing a user password on a master or media server instance”on page 29.
■ Active Directory (AD) and Lightweight Directory Access Protocol (LDAP) usersSee “Connecting a remote user domain to a master or a media server instance”on page 28.
Adding and removing local users on a master or mediaserver instanceUse the following procedures to add or remove local users on a NetBackup masteror media server instance.
Adding local usersTo add a local user
1 Open an SSH session to the instance as the appadmin user.
2 Run the following command:
sudo useradd <username>
Where <username> is the username of the user that you want to add.
Note: The usernamemaintenance is not supported on application instances.
3 Run the following command to set a password for the new user:
sudo passwd <username>
Where <username> is the username that you added in the previous step.
Removing local usersTo remove a local user
1 Open an SSH session to the instance as the appadmin user.
2 Run the following command:
sudo userdel <username>
Where <username> is the username of the user that you want to remove.
27Managing NetBackup application instancesAccessing NetBackup master and media server instances for management tasks

Connecting a remote user domain to a master or a mediaserver instanceNetBackupmaster andmedia server application instances support Active Directory(AD) and Lightweight Directory Access Protocol (LDAP) users. Use the followingprocedure to connect a remote user domain to a master or a media server instance.
To connect a remote user domain
1 From the Flex Appliance Console, verify that the instance is on the samenetwork as the AD or the LDAP domain. If it is not, edit the settings so that theinstance can reach the domain.
2 Open the following ports between the instance and the remote host if they arenot already open:
■ 139
■ 145
3 Open an SSH session to the instance as the appadmin user and run thefollowing command:
sudo realm join <domain name> -v -U <domain administrator>
Where <domain name> is the domain that you want to connect, and <domainadministrator> is the username of an administrator user on that domain.
Enter the appadmin user password when prompted.
4 When the following prompts appear, enter the password for the domainadministrator user:
Password for Administrator:
Enter Administrator's password:
5 Wait for the process to complete. The following message should appear:
Successfully enrolled machine in realm
Run the following command to confirm:
sudo realm list
6 If you need to add user groups from this domain in the NetBackup web UI, youmust modify the sssd.conf file before you can add the groups. If you do notneed to add user groups and plan to add each user individually, do not performthis step.
To modify the sssd.conf file:
■ Navigate to /etc/sssd/sssd.conf on the instance and locate the followingsection:
28Managing NetBackup application instancesAccessing NetBackup master and media server instances for management tasks

[domain/<domain name>]
■ Add the following directive to this section:
enumerate = True
Note: If you have a large AD environment, you may need to perform additionaltuning of the sssd.conf file. Refer to the Red Hat documentation or contactVeritas Technical Support.
7 When the connection is complete, sign in to the instance as the appadminuser from the NetBackup web UI. Add and configure the remote users that youwant to have access to the instance. See the NetBackup Web UI SecurityAdministrator's Guide for details.
Note: The usernamemaintenance is not supported on application instances.
Changing a user password on a master or media serverinstanceFollow these steps to change the password of a local user or the default appadminuser on a NetBackup master or media server application instance.
Note: Active Directory user passwords cannot be changed from an instance. Theymust be changed from the server on which they reside.
To change a user password from that user's account
1 Open an SSH session to the instance as the user that you want to change thepassword for and run the following command:
passwd
2 Follow the prompt to change the password.
29Managing NetBackup application instancesAccessing NetBackup master and media server instances for management tasks

To change another user's password from the appadmin account
1 Open an SSH session to the instance as the appadmin user and run thefollowing command:
sudo passwd <username>
Where <username> is the username of the user whose password you want tochange.
2 Follow the prompt to change the password.
Running NetBackup commands on a master or media serverapplication instance
Flex Appliance provides the capability for the appadmin user to run NetBackupcommands on all NetBackup master and media server instances.
Note: Flex Appliance does not support adding local directories or manually editingany of the files on application instances. If you create a local directory or manuallyedit a file and the instance is relocated or stopped for any reason, the changes arenot maintained when the instance restarts.
To run NetBackup commands on an instance, open an SSH session to the instanceand log in as the appadmin user. For each command that you want to run, specifysudo and enter the absolute or the relative path. For example:
sudo /opt/veritas/vxapp-manage/tune -s
Commands on master and media serversYou can run commands for the following directories and executables on masterand media server instances:
■ /opt/veritas/vxapp-manage/cp-nbu-config
See “Creating a NetBackup touch file on a master or media server applicationinstance” on page 32.
■ /opt/veritas/vxapp-manage/cp-nbu-notify
See “Installing NetBackup notify scripts on a master or media server applicationinstance” on page 33.
■ /usr/openv/netbackup/bin*
■ /usr/openv/netbackup/bin/admincmd*
■ /usr/openv/netbackup/bin/goodies*
■ /usr/openv/netbackup/bin/support*
30Managing NetBackup application instancesAccessing NetBackup master and media server instances for management tasks

■ /usr/openv/volmgr/bin*
■ /usr/openv/volmgr/bin/goodies*
Note: Commands in the directories that are marked with an asterisk (*) can alsobe run in the following format without the path:
sudo -i <command>
For example:
sudo -i bpps
Commands on media servers onlyYou can run commands for the following directories and executables on mediaserver instances only:
■ /opt/veritas/vxapp-manage/tune
■ /usr/openv/pdde/pdag/bin/mtstrmd
■ /usr/openv/pdde/pdag/bin/pdcfg
■ /usr/openv/pdde/pdag/bin/pdusercfg
■ /usr/openv/pdde/pdconfigure/pdde
■ /usr/openv/pdde/pdcr/bin
■ /usr/sbin/mount.nfs
■ /usr/sbin/mount.nfs4
■ /usr/sbin/umount.nfs
■ /usr/sbin/umount.nfs4
Note: The df command may show incorrect usage information for applicationinstances. However, the total storage and the available storage are correct. Todetermine the correct usage information, subtract the available storage from thetotal storage.
For more information on NetBackup commands, refer to theNetBackup CommandsReference Guide.
31Managing NetBackup application instancesAccessing NetBackup master and media server instances for management tasks

Creating a NetBackup touch file on a master or mediaserver application instanceThe cp-nbu-config command copies the NetBackup configuration file from theuser's home space to the specified NetBackup configuration destination directory.A NetBackup administrator can use the cp-nbu-config command to create andedit a NetBackup touch configuration file in any of the following directories:
■ /usr/openv/netbackup
■ /usr/openv/netbackup/bin
■ /usr/openv/java
■ /usr/openv/lib/ost-plugins
■ /usr/openv/netbackup/bin/snapcfg
■ /usr/openv/netbackup/db/cloudSnap/credential
■ /usr/openv/netbackup/db/cloudSnap/proxy
■ /usr/openv/netbackup/db/config
■ /usr/openv/netbackup/db/event
■ /usr/openv/netbackup/db/images
■ /usr/openv/netbackup/db/media
■ /usr/openv/netbackup/ext/db_ext
■ /usr/openv/netbackup/ext/db_ext/db2
■ /usr/openv/var
■ /usr/openv/volmgr
■ /usr/openv/volmgr/database
You cannot use the cp-nbu-config command to delete a touch configuration file.
To create or edit a touch configuration file
1 Log in to the NetBackup application instance.
2 Create a new configuration file in the NetBackup administrator home directory,or use the cp command to copy an existing configuration file from its originallocation to the home directory.
For example:
cp /usr/openv/lib/ost-plugins/pd.conf ~/
32Managing NetBackup application instancesAccessing NetBackup master and media server instances for management tasks

3 Make changes to the file in the home directory.
4 Run the following command to install the modified file in its original directoryor a supported destination directory:
sudo /opt/veritas/vxapp-manage/cp-nbu-config <configuration-file>
<destination>
Where <configuration-file> is the file that you created or edited, and<destination> is the directory where it needs to be installed.
For example:
sudo /opt/veritas/vxapp-manage/cp-nbu-config ~/pd.conf
/usr/openv/lib/ost-plugins
Installing NetBackup notify scripts on a master or mediaserver application instanceThe cp-nbu-notify command installs NetBackup notify scripts from the user'shome space onto the application instance.
If you have not previously installed the notify scripts on the instance, they exist astemplates in the following directories:
■ /usr/openv/netbackup/bin/goodies
■ /usr/openv/volmgr/bin/goodies
To install or edit a NetBackup notify script
1 Log in to the NetBackup application instance.
2 Copy the NetBackup notify script from its original location to the home directory.
For example:
cp /usr/openv/netbackup/bin/goodies/bpstart_notify ~/
3 Make changes to the file in the home directory.
4 Run the following command to install the modified file in its original location:
sudo /opt/veritas/vxapp-manage/cp-nbu-notify ~/<notify script>
Where <notify script> is the script that you edited.
For example:
sudo /opt/veritas/vxapp-manage/cp-nbu-notify ~/bpstart_notify
33Managing NetBackup application instancesAccessing NetBackup master and media server instances for management tasks

Monitoring NetBackup services on a NetBackup master serverinstance
The NetBackup services health monitoring feature allows Flex Appliance to monitorcritical NetBackup services on master server instances. If any of the services godown, the appliance attempts to restart them.
Note:Make sure to disable the health monitoring before you start any maintenanceactivity.
Use the following procedures to enable or disable NetBackup services healthmonitoring.
Enabling NetBackup services health monitoringTo enable NetBackup services health monitoring
1 Log in to the instance as the appadmin user.
2 Enter the following command to run a precheck before you enable healthmonitoring:
sudo /opt/veritas/vxapp-manage/health precheck
3 Verify that the precheck did not return any errors, then run the followingcommand:
sudo /opt/veritas/vxapp-manage/health enable
4 Verify the health monitoring status with the following command:
sudo /opt/veritas/vxapp-manage/health status
Disabling NetBackup services health monitoringTo disable NetBackup services health monitoring
1 Log in to the instance as the appadmin user.
2 Enter the following command:
sudo /opt/veritas/vxapp-manage/health disable
3 Verify the health monitoring status with the following command:
sudo /opt/veritas/vxapp-manage/health status
34Managing NetBackup application instancesAccessing NetBackup master and media server instances for management tasks

Mounting an NFS share on a NetBackup master server instanceYou can configure the NetBackup catalog backup policy to send disaster recoveryfiles to a Network File System (NFS) share. Use the following procedure to mountan NFS share on a master server application instance for disaster recovery.
To mount the NFS share and configure the catalog backup policy:
1 On the NFS server, create a user with the user ID 1000 and the group ID 100.You do not need to do this step if a user with these credentials already exists.
To create the user, run the following command:
username <username> -u 1000 -g 100
Where <username> is the username of the new user.
2 On the NFS server, navigate to /etc/exports and add the following directive:
<NFS directory> <master IP address>(rw,noroot_squash)
Where <NFS directory> is the directory for the NFS share, and <master IPaddress> is the IP address of the master server instance.
For example:
/nfsdir 11.11.11.111(rw,no_root_squash)
3 Restart the NFS service.
4 Log in to themaster server instance as the appadmin user and run the followingcommands:
$ sudo bash
bash-4.2# cat > /mnt/nbdata/vxos/etc/fstab
<NFS IP address>:<NFS directory> /mnt/nbcatdr nfs v<NFS
version>,rw,x-mount.mkdir
Where <NFS IP address> is the IP address of the NFS server, <NFS directory>is the directory for the NFS share, and <NFS version> is either 3 or 4.
For example:
22.22.22.222:/nfsdir /mnt/nbcatdr nfs v3,rw,x-mount.mkdir
5 From the NetBackup Administration Console, use the Backup PolicyConfigurationWizard to configure a backup policy with the typeNBU-Catalog.Specify the following information for the catalog disaster recovery file:
■ Path: /mnt/nbcatdr/
■ Logon: appadmin
■ Password: Your appadmin user password
35Managing NetBackup application instancesAccessing NetBackup master and media server instances for management tasks

For more information about the catalog backup policy, see the chapter“Protecting the NetBackup Catalog” in the NetBackup Administrator’s Guide,Volume I.
Setting environment variables on master and media server instancesUse the following procedure to set environment variables on master and mediaserver application instances.
To add an environment variable
1 Log in to the instance as the appadmin user.
2 Navigate to one of the following locations:
■ If you want to set a variable for both interactive and non-interactive usersessions, navigate to /etc/profile.d/custom.sh.
■ If you want to set a variable for interactive user sessions only, navigate to/etc/profile.d/sh.local.
3 Edit the file to add the new variable.
Storing custom data on a master or media server instanceFlex Appliance does not generally support adding or editing directories and files onapplication instances. If you create or edit a directory or file and the instance isrelocated or stopped for any reason, the changes are not maintained when theinstance restarts.
However, if you have critical data that you must store on a NetBackup master ormedia server application instance, use the following procedure to add it to the/mnt/nblogs directory.
Warning: The /mnt/nblogs directory is used for NetBackup logs and has 250GBof storage space that cannot be resized. The data that you add to this directorymust be critical and small in size. If you use too much storage space, the instancemay be affected.
36Managing NetBackup application instancesAccessing NetBackup master and media server instances for management tasks

To store custom data on a NetBackup master or media server instance
1 Log in to the instance as the appadmin user.
2 Run the following command to create a directory under /mnt/nblogs:
sudo mkdir /mnt/nblogs/<directory>, where <directory> is the name ofthe new directory.
For example, if you need to store SSH authorized_key files on the instance,you can make the following directory:
sudo mkdir /mnt/nblogs/authorized_keys
3 If required, run the following command to create a subdirectory:
sudo mkdir /mnt/nblogs/<directory>/<subdirectory>, where <directory>is the name of the directory that you created in the previous step and<subdirectory> is the name of the subdirectory.
In the authorized_keys example, you can create the following subdirectoryto store a specific user's authorized_key file:
sudo mkdir /mnt/nblogs/authorized_keys/example_user
4 Add the required information to the new directory.
Modifying or disabling the nbdeployutil utility on a master serverinstance
The nbdeployutil utility may adversely affect performance of NetBackup applicationinstances on a Veritas 5150 Appliance. If you do not need this feature or if youdetermine that it causes performance issues due to high CPU usage, you canmodify the configuration or disable it as follows:
■ Log in to the master server instance and create the following nbdeployutilconfiguration file if it is not present:/usr/openv/var/global/nbdeployutilconfig.txt
■ Refer to the topic "Scheduling capacity licensing reports" in the NetBackupAdministrator's Guide, Volume II for the procedure to use custom values for thecapacity licensing report.
Establishing trust with a NetBackup 7.7.3 master server instanceTo establish a trust relationship between a later version master server instance anda NetBackup 7.7.3 master server instance, you must perform the following steps.
37Managing NetBackup application instancesAccessing NetBackup master and media server instances for management tasks

To establish trust with a NetBackup 7.7.3 master server instance
1 Log in to the instance as the appadmin user and use the following commandto enable the root account and set the password:
sudo passwd
Warning: The root account is a restricted user account that can put the systemat risk. It should only be enabled during configuration procedures or under thedirect supervision of Veritas Technical Support.
2 Establish trust between the source and the target domains. Use the rootaccount to add the 7.7.3 instance as a trusted master server. Refer to theNetBackup documentation for specific instructions.
3 Run the following command on the instance to disable the root account:
sudo passwd -l root
Accessing NetBackup WORM storage serverinstances for management tasks
To perform some management tasks on a WORM storage server instance, youmust open an SSH session to the instance and log in to the WORM storage servershell. When you log in to the instance for the first time, use the following defaultcredentials:
■ Username: msdpadm
■ Password: P@ssw0rd
You are required to change your password the first time you log in.
From the WORM storage shell, you can run commands to manage the instanceand your WORM storage. See “About the NetBackup WORM storage server shell”on page 38.
About the NetBackup WORM storage server shellUse the NetBackup WORM storage server shell to configure the immutable andindelible data from your Veritas Appliance. The interface provides tab-completedcommand options.
These are main categories of commands:
■ dedupe
38Managing NetBackup application instancesAccessing NetBackup WORM storage server instances for management tasks

This command lets you manage the deduplication service.See “About the dedupe command” on page 39.
■ retention
This command lets you manage image retention.See “About the retention command” on page 41.
■ setting
This command lets you manage the deduplication and system configurationsettings.See “About the setting command” on page 41.
■ support
This command lets you access and upload the relevant logs and configurationfiles for troubleshooting.See “About the support command” on page 53.
About the dedupe commandThe dedupe commands lets you manage the deduplication services.
The following table describes the options and arguments for the dedupe command.
Table 5-1 The options and arguments for the dedupe command.
DescriptionArgumentOption and its description
Display the state of the CRC checkingservices.
stateCRC
Check and manage the deduplicationCRC service. Enable the CRC checking services.enable
Enable the CRC checking serviceswith a fix mode.
enable-fixmode
Disable the fix mode of the CRCchecking services.
disable-fixmode
Disable the CRC checking services.disable
Restart the CRC checking services ina mode.
fast
Display the state of the fix mode of theCRC checking services.
fixmode-state
39Managing NetBackup application instancesAccessing NetBackup WORM storage server instances for management tasks

Table 5-1 The options and arguments for the dedupe command. (continued)
DescriptionArgumentOption and its description
Display the status of the CRQPservices.
statusCRQP
Manage the transaction log (Tlog)process service. Start the CRQP services.start
Show the CRQP services information.info
Enable the online checking services.enableonline-check
Manage online checking services. Display the status of the onlinechecking services.
status
Disable the online checking services.disable
Start the deduplication compactionservices.
startcompaction
Manage the MSDP compactionservice. Display the status of the deduplication
compaction services.state
Disable the deduplication compactionservices.
disable
Enable the deduplication compactionservices.
enable
Start the deduplication (MSDP)services.
startMSDP
Manage the MSDP services.
Display the status of the deduplication(MSDP) services.
status
Stop the deduplication (MSDP)services.
stop
Stopping and starting the MSDP services
To stop the MSDP services:
1. Check the health monitor status using the following command:
setting health status
2. If the health monitor is enabled, stop the monitor using the following command:
setting health disable
40Managing NetBackup application instancesAccessing NetBackup WORM storage server instances for management tasks

3. After disabling the health monitor, use the following command to stop the MSDPservices:
dedupe MSDP stop
To start the MSDP services:
1. Start the MSDP services using the following command:
dedupe MSDP start
2. Start the health monitor using the following command:
setting health enable
About the retention commandThe retention command lets you manage image retention.
The following table describes the options and arguments for the retention
command.
Table 5-2 The options and arguments for the retention command.
DescriptionArgumentOption and its description
List the images that have a retentionlock.
listpolicy
The backup policy to use for the imageretention with a retention lock. Display the audit information for the
images with a retention lock.audit
Disable the image retention using thebackup ID of the image.
For example:
retention policy disablebackup_ID=<test_123>copynumber=<number>
You can find the backup ID and thecopy number in the output of theretention policy listcommand.
disable
About the setting commandThie setting command lets youmanage the deduplication and system configurationsettings.
41Managing NetBackup application instancesAccessing NetBackup WORM storage server instances for management tasks

The following table describes the options and arguments for the setting command.
42Managing NetBackup application instancesAccessing NetBackup WORM storage server instances for management tasks
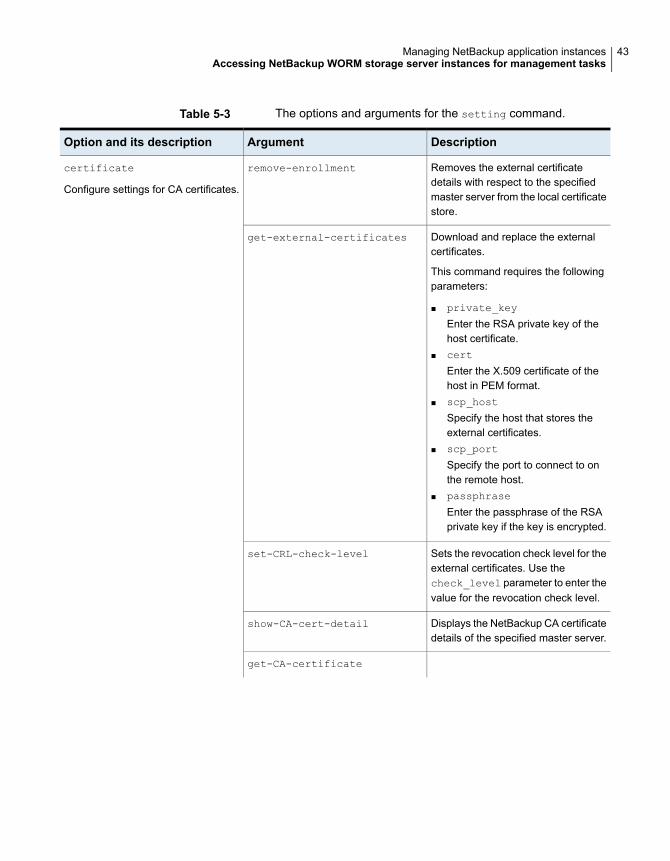
Table 5-3 The options and arguments for the setting command.
DescriptionArgumentOption and its description
Removes the external certificatedetails with respect to the specifiedmaster server from the local certificatestore.
remove-enrollmentcertificate
Configure settings for CA certificates.
Download and replace the externalcertificates.
This command requires the followingparameters:
■ private_key
Enter the RSA private key of thehost certificate.
■ cert
Enter the X.509 certificate of thehost in PEM format.
■ scp_host
Specify the host that stores theexternal certificates.
■ scp_port
Specify the port to connect to onthe remote host.
■ passphrase
Enter the passphrase of the RSAprivate key if the key is encrypted.
get-external-certificates
Sets the revocation check level for theexternal certificates. Use thecheck_level parameter to enter thevalue for the revocation check level.
set-CRL-check-level
Displays the NetBackup CA certificatedetails of the specified master server.
show-CA-cert-detail
get-CA-certificate
43Managing NetBackup application instancesAccessing NetBackup WORM storage server instances for management tasks

Table 5-3 The options and arguments for the setting command.(continued)
DescriptionArgumentOption and its description
Obtains the NetBackup CA certificatefrom the master server. By default, thecommand uses the first master serverentry in the NetBackup configurationfile.
You can specify an alternate masterserver using the master_serverparameter.
For example:
setting certificateget-CA-certificatemaster_serveralternatemaster server
Verifies the entered certificates, RSAkeys, and the trust store.
external-CA-health-check
Disable the NetBackup CA supportfrom this NetBackup host. Use thehost ID and the CA fingerprint of theNetBackup host whose CA you wantto disable.
For example:
setting certificatedisable-CA host_ID specifyhostID cafp host CAfingerprint
disable-CA
install-external-certificates
44Managing NetBackup application instancesAccessing NetBackup WORM storage server instances for management tasks

Table 5-3 The options and arguments for the setting command.(continued)
DescriptionArgumentOption and its description
Download and install the external CAcertificates.
This command requires the followingparameters:
■ private_key
Enter the RSA private key of thehost certificate.
■ cert
Enter the X.509 certificate of thehost in PEM format.
■ scp_host
Specify the host that stores theexternal certificates.
■ scp_port
Specify the port to connect to onthe remote host.
■ cacert
Enter the external CA trust store inPEM format.
■ passphrase
Enter the passphrase of the RSAprivate key if the key is encrypted.
Lists details of all the securitycertificates that are available on theNetBackup host.
list-certificates
Lists the CA details from the localNetBackup trust store.
list-CA-cert-details
Retrieves the revocation check levelfor the external certificates.
show-CRL-check-level
get-external-CA-certificate
45Managing NetBackup application instancesAccessing NetBackup WORM storage server instances for management tasks

Table 5-3 The options and arguments for the setting command.(continued)
DescriptionArgumentOption and its description
Download and install the external CAcertificate.
This command requires the followingparameters:
■ scp_host
Specify the host that stores theexternal certificates.
■ scp_port
Specify the port to connect to onthe remote host.
■ cacert
Enter the external CA trust store inPEM format.
Requests a NetBackup certificate forthe host from the master server.
This command requires the followingparameters:
■ master_server
Specify an alternate master server.By default, this command uses thefirst master server entry in theNetBackup configuration file.
■ force=true
Overwrite the certificate if it alreadyexists.
■ token
Securely enter an authorizationtoken if the command prompts thata token is required for the request.
get-certificate
Retrieves the enrollment status of theassociated master servers from thelocal certificate store.
list-enrollment-status
Verifies whether the host certificate isin the certificate revocation list.
host-self-check
Displays the External CA certificatedetails of the specified master server.
show-external-CA-cert-detail
46Managing NetBackup application instancesAccessing NetBackup WORM storage server instances for management tasks

Table 5-3 The options and arguments for the setting command.(continued)
DescriptionArgumentOption and its description
Disable FIPS in MSDP.disableFIPS
Manage FIPS settings. Enable FIPS in MSDP.enable
Display the status of FIPS in MSDP.status
Add a VLAN for the NetBackupWORM storage server.
Use the interface parameter toenter the IP address for the VLAN thatyou want to add.
addMSDP-VLAN
Configure the settings for MSDPVLAN.
Remove a VLAN for the NetBackupWORM storage server.
Use the interface parameter toenter the IP address for the VLAN thatyou want to remove.
remove
List all the VLANs for the NetBackupWORM storage server.
list
47Managing NetBackup application instancesAccessing NetBackup WORM storage server instances for management tasks

Table 5-3 The options and arguments for the setting command.(continued)
DescriptionArgumentOption and its description
Displays the password expiration dateof the user.
Use the username parameter todisplay the password expiration dateof the user.
show-password-exp-dateuser
Configure the settings for the SSHuser.
Change the password for a user.
This command requires the followingparameters:
■ username
Enter the username to change itspassword.
■ password
Enter the password for the user.The password must havecharacters between 15 but notgreater than 32. The passwordrequires at least one uppercasecharacter, one lowercasecharacter, one number, and onespecial character ( _, ., /, @,*, !, %, #, &).
change-password
Generate a random password.random-password
Display the user information.
Use the username parameter todisplay the information of that user.
show-user
Set the expiration date for the userpassword.
This command requires the followingparameters:
■ username
Enter the username to set theuser's password expiration date.
■ password_exp_date
Set a password expiration date inthe YYYY-MM-DD format.
set-password-exp-date
48Managing NetBackup application instancesAccessing NetBackup WORM storage server instances for management tasks

Table 5-3 The options and arguments for the setting command.(continued)
DescriptionArgumentOption and its description
delete-user Disable an SSH user.
Use the username parameter todisable the user.
List all the SSH users.list-users
Create an SSH user.
This command requires the followingparameters:
■ username
Enter the username of the newuser.
■ password
Enter the password for thenewuser that you want to create.The password must havecharacters between 4 but notgreater than 30. The characterscan be uppercase (A-Z), lowercaseletters (a-z), numbers (0-9), andspecial characters ( _, ., /, @,*, !, %, #, &).
add-user
Ping the network for a connectionstatus.
Use the ip parameter to enter the IPaddress of the network to check theconnection status.
pingnetwork
Configure the network settings.
Display the IP address of the network.ifconfig
Display the network route information.route
49Managing NetBackup application instancesAccessing NetBackup WORM storage server instances for management tasks

Table 5-3 The options and arguments for the setting command.(continued)
DescriptionArgumentOption and its description
Display the status of WORM storage.statusWORM
Configure the settings for immutableand indelible storage.
Specify the maximum duration to keepthe storage immutable and indelible.
Use the worm_max parameter tospecify the maximum duration inseconds to keep the storageimmutable and indelible (WORM).
set-max
Specify the minimum duration to keepthe storage immutable and indelible.
Use the worm_min parameter tospecify the minimum duration inseconds to keep the storageimmutable and indelible (WORM).
set-min
Display the WORM mode.show-mode
50Managing NetBackup application instancesAccessing NetBackup WORM storage server instances for management tasks

Table 5-3 The options and arguments for the setting command.(continued)
DescriptionArgumentOption and its description
Get and set the <WriteThreadNum>parameter.
Use the value parameter to enter thevalue that is used by the MSDPparameters.
write-thread-numset-MSDP-param
Set the parameters in the MSDPconfiguration files.
Get and set the <SpooldLogging>parameter.
spoold-logging
Get and set the<AllocationUnitSize> parameter.
allocation-unit-size
Get and set the <DataCheckDays>parameter.
data-check-days
Get and set the <MaxFPCacheSize>parameter.
max-fp-cache-size
Get and set the <MaxRetryCount>parameter.
max-retry-count
Get and set the <SpadLogging>parameter.
spad-logging
Get and set the <LogRetention>parameter.
log-retention
51Managing NetBackup application instancesAccessing NetBackup WORM storage server instances for management tasks

Table 5-3 The options and arguments for the setting command.(continued)
DescriptionArgumentOption and its description
Get and set the <WriteThreadNum>parameter.
write-thread-numget-MSDP-param
Get the parameters from the MSDPconfiguration files. Get and set the <SpooldLogging>
parameter.spoold-logging
Get and set the<AllocationUnitSize> parameter.
allocation-unit-size
Get and set the <DataCheckDays>parameter.
data-check-days
Get and set the <MaxFPCacheSize>parameter.
max-fp-cache-size
Get and set the <MaxRetryCount>parameter.
max-retry-count
Get and set the <SpadLogging>parameter.
spad-logging
Get and set the <LogRetention>parameter.
log-retention
Generates a random password.random-passwordMSDP-user
Configure the settings for the MSDPuser.
List all the MSDP users.list
Verify user password and user role.verify-user
Create an MSDP user.add-MSDP-user
Reset the password for the MSDPuser.
reset-password
52Managing NetBackup application instancesAccessing NetBackup WORM storage server instances for management tasks

Table 5-3 The options and arguments for the setting command.(continued)
DescriptionArgumentOption and its description
Enable KMS for MSDP.
This command requires the followingparameters:
■ kms_server
Enter the hostname of the KMSserver.
■ key_group
Enter the KMS key group name..
enable-kmsencryption
Configure the settings for MSDPencryption.
Display the current encryption status.status
Enable encryption for MSDP.enable
Display the current KMS status.kms-status
Search for a keyword in the kernelparameters.
Use the keyword to specify a keywordto search in the keyword parameters.
search-paramkernel
Get the information about the kernel.
About the support commandThe support command lets you access and upload the relevant logs andconfiguration files for troubleshooting.
The following table describes the options and arguments for the support command.
53Managing NetBackup application instancesAccessing NetBackup WORM storage server instances for management tasks

Table 5-4 The options and arguments for the support command.
DescriptionArgumentOption and its description
Append the last 10 lines of each file tostandard output.
This command requires the followingparameters:
■ file
Enter the filename. This is arequired parameter.
■ options
Enter the supported options forgrep: -i, -w, -E, or tail:-f, -n.
tailMSDP-history
Access the MSDP history files.
Collect files for transferring to thetarget host.
This command requires the followingparameters:
■ mmin
Find files that are modified nminutes ago. Same as mmin optionin find command. For example, 15,+15, -15.
■ pattern
Specify the naming pattern to findand select matching files andfolders. For example, spoold, orspad*.
■ mtime
Finds files that are modified n*24hours ago. Same as mtime optionin find command. For example, 2,+2, -2.
collect
List information about the FILEs.
Use the dir parameter to enter thedirectory name.
ls
scp
54Managing NetBackup application instancesAccessing NetBackup WORM storage server instances for management tasks

Table 5-4 The options and arguments for the support command.(continued)
DescriptionArgumentOption and its description
Securely transfer selected files to thetarget host.
This command requires the followingparameters:
■ scp_port
Specifies the port to connect to onthe remote host.
■ scp_target
Specifies the target host and pathfor transferring files. Use theuser@host:/directory path/format. This is a requiredparameter.
Concatenate files and print on thestandard output.
Use the file parameter to enter thefile name.
cat
Print lines that match patterns.
This command requires the followingparameters:
■ pattern
Specify the naming pattern to findand select matching files andfolders. For example, spoold, orspad*. This is a requiredparameter.
■ file
Enter the filename. This is arequired parameter.
■ options
Enter the supported options forgrep: -i, -w, -E, or tail:-f, -n.
grep
55Managing NetBackup application instancesAccessing NetBackup WORM storage server instances for management tasks

Table 5-4 The options and arguments for the support command.(continued)
DescriptionArgumentOption and its description
Display the MSDP processes.MSDP-processprocess
Displays information about the MSDPprocesses.
Display the CPU and memoryinformation.
htop
Display information about theoperating system.
atop
Display the PID statistics.pidstat
Displays the free and used memory.memory-usage
Display the MSDP version.show-MSDP-versionsoftware
Displays information about thesoftware.
Display the operating systeminformation.
show-OS-version
56Managing NetBackup application instancesAccessing NetBackup WORM storage server instances for management tasks

Table 5-4 The options and arguments for the support command.(continued)
DescriptionArgumentOption and its description
Append the last 10 lines of each file tostandard output.
This command requires the followingparameters:
■ file
Enter the filename. This is arequired parameter.
■ options
Enter the supported options forgrep: -i, -w, -E, or tail:-f, -n.
tailMSDP-log
Access the MSDP log files.
Collect files for transferring to thetarget host.
This command requires the followingparameters:
■ mmin
Find files that are modified nminutes ago. Same as mmin optionin find command. For example, 15,+15, -15.
■ pattern
Specify the naming pattern to findand select matching files andfolders. For example, spoold, orspad*.
■ mtime
Finds files that are modified n*24hours ago. Same as mtime optionin find command. For example, 2,+2, -2.
collect
List information about the files.
Use the dir parameter to enter thedirectory name.
ls
scp
57Managing NetBackup application instancesAccessing NetBackup WORM storage server instances for management tasks

Table 5-4 The options and arguments for the support command.(continued)
DescriptionArgumentOption and its description
Securely transfer selected files to thetarget host.
This command requires the followingparameters:
■ scp_port
Specifies the port to connect to onthe remote host.
■ scp_target
Specifies the target host and pathfor transferring files. Use theuser@host:/directory path/format. This is a requiredparameter.
Concatenate files and print on thestandard output.
Use the file parameter to enter thefile name.
cat
Print lines that match patterns.
This command requires the followingparameters:
■ pattern
Specify the naming pattern to findand select matching files andfolders. For example, spoold, orspad*. This is a requiredparameter.
■ file
Enter the filename. This is arequired parameter.
■ options
Enter the supported options forgrep: -i, -w, -E, or tail:-f, -n.
grep
Display the CPU and memoryinformation.
cpumemhardware
Displays information about thehardware.
58Managing NetBackup application instancesAccessing NetBackup WORM storage server instances for management tasks

Table 5-4 The options and arguments for the support command.(continued)
DescriptionArgumentOption and its description
Append the last 10 lines of each file tostandard output.
This command requires the followingparameters:
■ file
Enter the filename. This is arequired parameter.
■ options
Enter the supported options forgrep: -i, -w, -E, or tail:-f, -n.
tailMSDP-config
Access the MSDP configuration files.
Collect files for transferring to thetarget host.
This command requires the followingparameters:
■ mmin
Find files that are modified nminutes ago. Same as mmin optionin find command. For example, 15,+15, -15.
■ pattern
Specify the naming pattern to findand select matching files andfolders. For example, spoold, orspad*.
■ mtime
Finds files that are modified n*24hours ago. Same as mtime optionin find command. For example, 2,+2, -2.
collect
List information about the FILEs.
Use the dir parameter to enter thedirectory name.
ls
scp
59Managing NetBackup application instancesAccessing NetBackup WORM storage server instances for management tasks

Table 5-4 The options and arguments for the support command.(continued)
DescriptionArgumentOption and its description
Securely transfer selected files to thetarget host.
This command requires the followingparameters:
■ scp_port
Specifies the port to connect to onthe remote host.
■ scp_target
Specifies the target host and pathfor transferring files. Use theuser@host:/directory path/format. This is a requiredparameter.
Concatenate files and print on thestandard output.
Use the file parameter to enter thefile name.
cat
Print lines that match patterns.
This command requires the followingparameters:
■ pattern
Specify the naming pattern to findand select matching files andfolders. For example, spoold, orspad*. This is a requiredparameter.
■ file
Enter the filename. This is arequired parameter.
■ options
Enter the supported options forgrep: -i, -w, -E, or tail:-f, -n.
grep
60Managing NetBackup application instancesAccessing NetBackup WORM storage server instances for management tasks

Table 5-4 The options and arguments for the support command.(continued)
DescriptionArgumentOption and its description
Displays the information about the diskI/O.
iostatdiskio
Displays information about the diskI/O. Displays the information on the wait
on the disk I/O.vmstat
Display the information about themonitor system.
nmon
Display information about the diskvolume.
disk-volume
61Managing NetBackup application instancesAccessing NetBackup WORM storage server instances for management tasks

Table 5-4 The options and arguments for the support command.(continued)
DescriptionArgumentOption and its description
Append the last 10 lines of each file tostandard output.
This command requires the followingparameters:
■ file
Enter the filename. This is arequired parameter.
■ options
Enter the supported options forgrep: -i, -w, -E, or tail:-f, -n.
tailsyslogs
Access the system logs.
Collect files for transferring to thetarget host.
This command requires the followingparameters:
■ mmin
Find files that are modified nminutes ago. Same as mmin optionin find command. For example, 15,+15, -15.
■ pattern
Specify the naming pattern to findand select matching files andfolders. For example, spoold, orspad*.
■ mtime
Finds files that are modified n*24hours ago. Same as mtime optionin find command. For example, 2,+2, -2.
collect
List information about the FILEs.
Use the dir parameter to enter thedirectory name.
ls
scp
62Managing NetBackup application instancesAccessing NetBackup WORM storage server instances for management tasks

Table 5-4 The options and arguments for the support command.(continued)
DescriptionArgumentOption and its description
Securely transfer selected files to thetarget host.
This command requires the followingparameters:
■ scp_port
Specifies the port to connect to onthe remote host.
■ scp_target
Specifies the target host and pathfor transferring files. Use theuser@host:/directory path/format. This is a requiredparameter.
Concatenate files and print on thestandard output.
Use the file parameter to enter thefile name.
cat
Print lines that match patterns.
This command requires the followingparameters:
■ pattern
Specify the naming pattern to findand select matching files andfolders. For example, spoold, orspad*. This is a requiredparameter.
■ file
Enter the filename. This is arequired parameter.
■ options
Enter the supported options forgrep: -i, -w, -E, or tail:-f, -n.
grep
63Managing NetBackup application instancesAccessing NetBackup WORM storage server instances for management tasks

Table 5-4 The options and arguments for the support command.(continued)
DescriptionArgumentOption and its description
Append the last 10 lines of each file tostandard output.
This command requires the followingparameters:
■ file
Enter the filename. This is arequired parameter.
■ options
Enter the supported options forgrep: -i, -w, -E, or tail:-f, -n.
tailproc
Access process information about thepseudo-filesystem.
List information about the FILEs.
Use the dir parameter to enter thedirectory name.
ls
Concatenate files and print on thestandard output.
Use the file parameter to enter thefile name.
cat
Print lines that match patterns.
This command requires the followingparameters:
■ pattern
Specify the naming pattern to findand select matching files andfolders. For example, spoold, orspad*. This is a requiredparameter.
■ file
Enter the filename. This is arequired parameter.
■ options
Enter the supported options forgrep: -i, -w, -E, or tail:-f, -n.
grep
Here are some examples of the support command usage:
64Managing NetBackup application instancesAccessing NetBackup WORM storage server instances for management tasks

support MSDP-log ls dir=spoold
support MSDP-log ls dir=spad/sof1vm08.tec.com/spoold/spad/072320.log
support MSDP-log cat file=pdde-config.log
support MSDP-log cat file=spad/sof1vm08.tec.com/spoold/spad/072320.log
support MSDP-log tail file=pdde-config.log
support MSDP-log tail file=pdde-config.log options="-f"
support MSDP-log tail file=pdde-config.log options="-n 5"
support MSDP-log tail file=spad/sofia11vm08/spoold/spad/072320.log
options="-f -n 5"
support MSDP-log grep file=spad* pattern=sessionStartAgent
options="-r"
support MSDP-log grep file=pdde-setup.log pattern="pid 455"
support MSDP-log grep file=pdde-setup.log pattern="Pid" options="-w
-i"
support MSDP-log grep file=spoold* pattern="Pid" options="-w -i -r"
support MSDP-log grep file=pdde-setup.log pattern="MSDP-X|PureDisk"
options="-w -i -r -E"
Examples to uploading logs, history, or config files:
Uploading logs is a two-step process:
■ Run the collect command for the desired category to collect files of interest.For example:
support MSDP-log collect pattern=spoold* mmin="+2"
support MSDP-history collect
support MSDP-config collect
support syslogs collect pattern=crash mmin="-2"
■ Transfer files using scp commandRun the scp command from any category to create a tarball of all previouslycollected files (from all categories) and transfer the tarball to the target hostusing the scp protocol.support MSDP-config scp [email protected]:/tmp
65Managing NetBackup application instancesAccessing NetBackup WORM storage server instances for management tasks