Veritas NetBackup™ Administrator's Guide, Volume I
1225
Veritas NetBackup™ Administrator's Guide, Volume I UNIX, Windows, and Linux Release 7.7.2
-
Upload
khangminh22 -
Category
Documents
-
view
0 -
download
0
Transcript of Veritas NetBackup™ Administrator's Guide, Volume I

Veritas NetBackup™Administrator's Guide,Volume I
UNIX, Windows, and Linux
Release 7.7.2

Veritas NetBackup™ Administrator's Guide, VolumeI
Documentation version: 7.7.2
Legal NoticeCopyright © 2015 Veritas Technologies LLC. All rights reserved.
Veritas and the Veritas Logo are trademarks or registered trademarks of Veritas TechnologiesLLC or its affiliates in the U.S. and other countries. Other names may be trademarks of theirrespective owners.
This product may contain third party software for which Veritas is required to provide attributionto the third party (“Third Party Programs”). Some of the Third Party Programs are availableunder open source or free software licenses. The License Agreement accompanying theSoftware does not alter any rights or obligations you may have under those open source orfree software licenses. Please see the Third Party Legal Notice Appendix to this Documentationor TPIP ReadMe File accompanying this product for more information on the Third PartyPrograms.
The product described in this document is distributed under licenses restricting its use, copying,distribution, and decompilation/reverse engineering. No part of this document may bereproduced in any form by any means without prior written authorization of Veritas TechnologiesLLC and its licensors, if any.
THE DOCUMENTATION IS PROVIDED "AS IS" AND ALL EXPRESS OR IMPLIEDCONDITIONS, REPRESENTATIONS AND WARRANTIES, INCLUDING ANY IMPLIEDWARRANTY OF MERCHANTABILITY, FITNESS FOR A PARTICULAR PURPOSE ORNON-INFRINGEMENT, ARE DISCLAIMED, EXCEPT TO THE EXTENT THAT SUCHDISCLAIMERS ARE HELD TO BE LEGALLY INVALID. VERITAS TECHNOLOGIES LLCSHALL NOT BE LIABLE FOR INCIDENTAL OR CONSEQUENTIAL DAMAGES INCONNECTION WITH THE FURNISHING, PERFORMANCE, OR USE OF THISDOCUMENTATION. THE INFORMATION CONTAINED IN THIS DOCUMENTATION ISSUBJECT TO CHANGE WITHOUT NOTICE.
The Licensed Software and Documentation are deemed to be commercial computer softwareas defined in FAR 12.212 and subject to restricted rights as defined in FAR Section 52.227-19"Commercial Computer Software - Restricted Rights" and DFARS 227.7202, et seq."Commercial Computer Software and Commercial Computer Software Documentation," asapplicable, and any successor regulations, whether delivered by Veritas as on premises orhosted services. Any use, modification, reproduction release, performance, display or disclosureof the Licensed Software and Documentation by the U.S. Government shall be solely inaccordance with the terms of this Agreement.

Veritas Technologies LLC500 E Middlefield RoadMountain View, CA 94043
http://www.veritas.com
Made in Singapore.
10 9 8 7 6 5 4 3 2 1

Technical SupportTechnical Support maintains support centers globally. Technical Support’s primaryrole is to respond to specific queries about product features and functionality. TheTechnical Support group also creates content for our online Knowledge Base. TheTechnical Support group works collaboratively with the other functional areas withinthe company to answer your questions in a timely fashion.
Our support offerings include the following:
■ A range of support options that give you the flexibility to select the right amountof service for any size organization
■ Telephone and/or Web-based support that provides rapid response andup-to-the-minute information
■ Upgrade assurance that delivers software upgrades
■ Global support purchased on a regional business hours or 24 hours a day, 7days a week basis
■ Premium service offerings that include Account Management Services
For information about our support offerings, you can visit our website at the followingURL:
www.veritas.com/support
All support services will be delivered in accordance with your support agreementand the then-current enterprise technical support policy.
Contacting Technical SupportCustomers with a current support agreement may access Technical Supportinformation at the following URL:
www.veritas.com/support
Before contacting Technical Support, make sure you have satisfied the systemrequirements that are listed in your product documentation. Also, you should be atthe computer on which the problem occurred, in case it is necessary to replicatethe problem.
When you contact Technical Support, please have the following informationavailable:
■ Product release level
■ Hardware information
■ Available memory, disk space, and NIC information

■ Operating system
■ Version and patch level
■ Network topology
■ Router, gateway, and IP address information
■ Problem description:
■ Error messages and log files
■ Troubleshooting that was performed before contacting Technical Support
■ Recent software configuration changes and network changes
Licensing and registrationIf your product requires registration or a license key, access our technical supportWeb page at the following URL:
www.veritas.com/support
Customer serviceCustomer service information is available at the following URL:
www.veritas.com/support
Customer Service is available to assist with non-technical questions, such as thefollowing types of issues:
■ Questions regarding product licensing or serialization
■ Product registration updates, such as address or name changes
■ General product information (features, language availability, local dealers)
■ Latest information about product updates and upgrades
■ Information about upgrade assurance and support contracts
■ Advice about technical support options
■ Nontechnical presales questions
■ Issues that are related to CD-ROMs, DVDs, or manuals

Support agreement resourcesIf you want to contact us regarding an existing support agreement, please contactthe support agreement administration team for your region as follows:
[email protected] (except Japan)

Technical Support ............................................................................................ 4
Section 1 About NetBackup ...................................................... 32
Chapter 1 Introducing NetBackup interfaces ................................ 33
About NetBackup ......................................................................... 33NetBackup documentation ............................................................. 35About NetBackup administration interfaces ........................................ 35
About setting up the NetBackup Administration Console onUNIX ............................................................................. 37
Logging in to the NetBackup Administration Console ..................... 38Administering remote servers of different versions ......................... 41
Using the NetBackup Administration Console ..................................... 43About security certificates for NetBackup hosts ............................. 47Standard and user toolbars ...................................................... 53About customizing the NetBackup Administration Console .............. 54Configuring log files for the NetBackup Administration
Console ......................................................................... 54NetBackup configuration wizards ..................................................... 57Running the Troubleshooter ........................................................... 58
Chapter 2 Administering NetBackup licenses ............................... 60
About administering NetBackup licenses ........................................... 60
Section 2 Configuring hosts ...................................................... 65
Chapter 3 Configuring Host Properties ........................................... 66
About the NetBackup Host Properties ............................................... 68Methods to set the NetBackup configuration options ...................... 70Connecting to a host to view the host properties ........................... 70Changing the host properties on multiple hosts at the same
time ............................................................................... 71Property states for multiple hosts ............................................... 72
Contents

Exporting host properties ......................................................... 74Standard host property dialog box options ................................... 74
Access Control properties .............................................................. 75Authentication Domain tab of the Access Control properties ............ 76Authorization Service tab of the Access Control properties .............. 78Network Attributes tab of the Access Control properties .................. 79
Active Directory host properties ....................................................... 81Bandwidth properties .................................................................... 83
Bandwidth limit usage considerations and restrictions .................... 84Add Bandwidth Settings dialog box for Bandwidth properties ........... 85
Busy File Settings properties .......................................................... 85Activating the Busy File Settings in host properties ........................ 87
Clean-up properties ...................................................................... 88Client Name properties .................................................................. 90Client Attributes properties ............................................................. 92
Add Client dialog box .............................................................. 94General tab of the Client Attributes properties .............................. 94Connect Options tab of the Client Attributes properties ................... 99Windows Open File Backup tab of the Client Attributes
properties ..................................................................... 101Back-level and upgraded clients that use Windows Open File
Backup ......................................................................... 106Client Settings properties for UNIX clients ........................................ 107
VxFS file change log for incremental backups property ................. 110Client Settings properties for Windows clients ................................... 112
How to determine if change journal support is useful in yourNetBackup environment ................................................... 115
Guidelines for enabling NetBackup change journal support ........... 116Credential Access properties ......................................................... 117Data Classification properties ........................................................ 118
Creating a Data Classification ................................................. 120Default Job Priorities properties ..................................................... 121
Understanding the Job Priority setting ....................................... 123Distributed application restore mapping properties ............................. 125Encryption properties ................................................................... 126
Additional encryption methods for Windows clients ...................... 129Enterprise Vault properties ............................................................ 130Enterprise Vault Hosts properties ................................................... 131Exchange properties ................................................................... 132
About the Exchange credentials in the client host properties .......... 135Exclude Lists properties ............................................................... 136
About the Add to Exclude List and Add Exceptions to Exclude Listdialog boxes .................................................................. 139
8Contents

Syntax rules for exclude lists ................................................... 141About creating an include list on a UNIX client ............................ 144Configuring the exclude list on a Windows client from a UNIX
master server ................................................................. 144Traversing excluded directories ............................................... 146
Fibre Transport properties ............................................................ 147About Linux concurrent FT connections ..................................... 150
Firewall properties ...................................................................... 151Enabling logging for vnetd ...................................................... 155
General Server properties ............................................................ 155Forcing restores to use a specific server .................................... 158
Global Attributes properties ........................................................... 159About constraints on the number of concurrent jobs ..................... 162Setting up email notifications about backups .............................. 164Configuring the nbmail.cmd script on Windows ........................... 165Sending messages to the global administrator about unsuccessful
backups only ................................................................. 167Sending messages to the administrator about successful and
unsuccessful backups ..................................................... 167Installing and testing the email utility on Windows ........................ 169
Logging properties ...................................................................... 170Disabling the logging of NetBackup processes ............................ 180
Login Banner Configuration properties ............................................ 182Removing login banner screen and text ..................................... 184Enabling the Auto log off timeout option ..................................... 185
Lotus Notes properties ................................................................. 186Media properties ........................................................................ 189
Results when media overwrites are not permitted ........................ 193Recommended use for Enable SCSI reserve property .................. 194
NDMP Global Credentials properties .............................................. 195Network properties ...................................................................... 197Network Settings properties .......................................................... 199
Reverse Host Name Lookup property ....................................... 200IP Address Family Support property ......................................... 201
Port Ranges properties ................................................................ 201Registered ports and dynamically-allocated ports ........................ 203
Preferred Network properties ........................................................ 204Add or Change Preferred Network Settings dialog box ................. 206How NetBackup uses the directives to determine which network
to use ........................................................................... 208Configurations to use IPv6 networks ......................................... 211Configurations to use IPv4 networks ......................................... 212
9Contents

Order of directive processing in the Preferred Networkproperties ..................................................................... 213
Order of directives can affect processing ................................... 214bptestnetconn utility to display Preferred Network
information .................................................................... 214Configuration to prohibit using a specified address ...................... 216Configuration that uses the same specification for both the network
and the interface—less constrictive .................................... 216Configuration that uses the same specification for both the network
and the interface—more constrictive ................................... 217Configuration that limits the addresses, but allows any
interfaces ...................................................................... 217Resilient Network properties ......................................................... 218
Resilient connection resource usage ........................................ 221Specifying resilient connections ............................................... 221
Resource Limit properties ............................................................. 223Restore Failover properties ........................................................... 225
Assigning an alternate media server as a failover restoreserver ........................................................................... 227
Retention Periods properties ......................................................... 228Changing a retention period .................................................... 229Determining retention periods for volumes ................................. 230Retention Periods with end dates beyond 2038, excluding
Infinity .......................................................................... 231Scalable Storage properties .......................................................... 231
Configuring advanced bandwidth throttling settings ...................... 233Advanced bandwidth throttling settings ...................................... 234
Servers properties ...................................................................... 236Adding a server to a servers list ............................................... 239Removing a server from a server list ......................................... 240Enabling NetBackup clustered master server inter-node
authentication ................................................................ 240Adding a trusted master server ................................................ 242Removing a trusted master server ............................................ 243Changing the master server that performs backups and restores
for a client ..................................................................... 246SharePoint properties .................................................................. 246
Consistency check options for SharePoint Server ........................ 248SLP Parameters properties ........................................................... 248
About batch creation logic in Storage Lifecycle Manager ............... 253Deprecated storage lifecycle policy parameters ........................... 254
Throttle Bandwidth properties ........................................................ 254
10Contents

Add Bandwidth Settings dialog box for Throttle Bandwidthproperties ..................................................................... 255
Timeouts properties .................................................................... 256Universal Settings properties ......................................................... 258
Logging the status of a redirected restore .................................. 261User Account Settings properties ................................................... 262
Unlocking a user account ....................................................... 264UNIX Client properties ................................................................. 264UNIX Server properties ................................................................ 265VMware Access Hosts properties ................................................... 266Windows Client properties ............................................................ 268Configuration options not found in the Host Properties ........................ 268About using commands to change the configuration options on UNIX
clients and servers ................................................................ 270Configuration options for NetBackup servers .................................... 271
About robust logging ............................................................. 271ALLOW_MEDIA_OVERWRITE option for NetBackup
servers ......................................................................... 273ALLOW_NON_RESERVED_PORTS option for NetBackup servers
and clients ..................................................................... 273AUTHENTICATION_DOMAIN option for NetBackup servers and
clients .......................................................................... 274AUTHORIZATION_SERVICE option for NetBackup servers .......... 276AUTO_ADD_ALL_ALIASES_FOR_CLIENT option for NetBackup
servers ......................................................................... 277BPBRM_VERBOSE option for NetBackup servers ....................... 278BPCD_WHITELIST_PATH option for NetBackup servers and
clients .......................................................................... 279BPDBJOBS_COLDEFS options for UNIX master servers .............. 280BPDBM_VERBOSE option for NetBackup servers ....................... 284BPRD_VERBOSE option for NetBackup servers ......................... 285BPTM_VERBOSE option for NetBackup servers ......................... 286BPEND_TIMEOUT option for NetBackup servers ........................ 288BPSTART_TIMEOUT option for NetBackup servers ..................... 288CHECK_RESTORE_CLIENT option for NetBackup servers .......... 289CLIENT_CONNECT_TIMEOUT option for NetBackup
servers ......................................................................... 290CLIENT_PORT_WINDOW option for NetBackup servers and
clients .......................................................................... 290CLIENT_READ_TIMEOUT option for NetBackup servers .............. 291CLIENT_RESERVED_PORT_WINDOW option for NetBackup
servers and clients .......................................................... 293
11Contents

CLIENTDB_RESYNC_INTERVAL option for NetBackup serversand clients ..................................................................... 293
CONNECT_OPTIONS option for NetBackup servers andclients .......................................................................... 294
DEFAULT_CONNECT_OPTIONS option for NetBackup serversand clients ..................................................................... 298
DISABLE_JOB_LOGGING option for NetBackup servers .............. 300DISABLE_STANDALONE_DRIVE_EXTENSIONS option for
NetBackup servers .......................................................... 301DISALLOW_BACKUPS_SPANNING_MEDIA option for NetBackup
servers ......................................................................... 302DISALLOW_CLIENT_LIST_RESTORE option for NetBackup
servers ......................................................................... 302DISALLOW_CLIENT_RESTORE option for NetBackup
servers ......................................................................... 303EMMSERVER option for NetBackup servers .............................. 304FAILOVER_RESTORE_MEDIA_SERVERS option for NetBackup
servers ......................................................................... 305FORCE_RESTORE_MEDIA_SERVER option for NetBackup
servers ......................................................................... 305GENERATE_ENGLISH_LOGS option for NetBackup servers and
clients .......................................................................... 306INCOMPLETE_JOB_CLEAN_INTERVAL option for NetBackup
servers and clients .......................................................... 307INITIAL_BROWSE_SEARCH_LIMIT option for NetBackup servers
and clients ..................................................................... 308IP_ADDRESS_FAMILY option for NetBackup servers .................. 309JOB_PRIORITY option for NetBackup servers and clients ............. 310LIMIT_BANDWIDTH option for NetBackup servers ...................... 312MAX_LOGFILE_SIZE option for NetBackup servers and clients
for legacy logging ........................................................... 313MAX_NUM_LOGFILES option for NetBackup servers and clients
for legacy logging ........................................................... 314KEEP_LOGS_SIZE_GB for NetBackup servers and clients ........... 315ENABLE_CRITICAL_PROCESS_LOGGING .............................. 316MEDIA_UNMOUNT_DELAY option for NetBackup servers ............ 317MEDIA_REQUEST_DELAY option for NetBackup servers ............ 317MEDIA_SERVER option for NetBackup servers .......................... 318MPX_RESTORE_DELAY option for NetBackup servers ............... 319MUST_USE_LOCAL_DRIVE option for NetBackup servers ........... 319NBRNTD_IDLE_TIMEOUT option for NetBackup servers ............. 320PREFERRED_NETWORK option for NetBackup servers .............. 321
12Contents

RANDOM _PORTS option for NetBackup servers andclients .......................................................................... 324
RE_READ_INTERVAL option for NetBackup servers ................... 325REQUIRED_NETWORK option for NetBackup servers ................. 326RESILIENT_NETWORK option for NetBackup master servers
and clients ..................................................................... 327RESUME_ORIG_DUP_ON_OPT_DUP_FAIL option for NetBackup
servers ......................................................................... 328REVERSE_NAME_LOOKUP option for NetBackup servers and
clients .......................................................................... 328SERVER option for NetBackup servers ..................................... 329SERVER_CONNECT_TIMEOUT option for NetBackup
servers ......................................................................... 332SERVER_PORT_WINDOW option for NetBackup servers ............ 332SERVER_RESERVED_PORT_WINDOW option for NetBackup
servers and clients .......................................................... 333SKIP_RESTORE_TO_SYMLINK_DIR option for NetBackup
servers ......................................................................... 334TELEMETRY_UPLOAD option for NetBackup servers ................. 335THROTTLE_BANDWIDTH option for NetBackup servers .............. 336TRUSTED_MASTER option for NetBackup servers ..................... 340ULINK_ON_OVERWRITE option for NetBackup servers ............... 340USE_AUTHENTICATION option for NetBackup servers ............... 342USE_VXSS option for NetBackup servers and clients .................. 342VERBOSE option for NetBackup servers and clients .................... 343VXSS_NETWORK option for NetBackup servers ........................ 344
Configuration options for NetBackup clients ..................................... 346BPARCHIVE_POLICY option for NetBackup clients ..................... 347BPARCHIVE_SCHED option for NetBackup clients ..................... 347BPBACKUP_POLICY option for NetBackup clients ...................... 348BPBACKUP_SCHED option for NetBackup clients ...................... 349BUSY_FILE_ACTION option for NetBackup clients ...................... 350BUSY_FILE_DIRECTORY option for NetBackup clients ............... 351BUSY_FILE_NOTIFY_USER option for NetBackup clients ............ 352BUSY_FILE_PROCESSING option for NetBackup clients ............. 353CLIENT_NAME option for NetBackup clients .............................. 353COMPRESS_SUFFIX option for NetBackup clients ..................... 355CRYPT_CIPHER option for NetBackup clients ............................ 355CRYPT_KIND option for NetBackup clients ................................ 356CRYPT_OPTION option for NetBackup clients ........................... 357CRYPT_STRENGTH option for NetBackup clients ...................... 358CRYPT_LIBPATH option for NetBackup clients ........................... 359CRYPT_KEYFILE option for NetBackup clients ........................... 360
13Contents

DISALLOW_SERVER_FILE_WRITES option for NetBackupclients .......................................................................... 361
DO_NOT_RESET_FILE_ACCESS_TIME option for NetBackupclients .......................................................................... 362
IGNORE_XATTR option for NetBackup clients ............................ 363INFORMIX_HOME option for NetBackup clients ......................... 366KEEP_DATABASE_COMM_FILE option for NetBackup
clients .......................................................................... 367KEEP_LOGS_DAYS option for NetBackup clients ....................... 367LIST_FILES_TIMEOUT option for NetBackup clients ................... 368LOCKED_FILE_ACTION option for NetBackup clients ................. 369MEDIA_SERVER option for NetBackup clients ........................... 369MEGABYTES_OF_MEMORY option for NetBackup clients ........... 370NFS_ACCESS_TIMEOUT option for NetBackup clients ................ 371OLD_VNETD_CALLBACK option for NetBackup clients ............... 372REPORT_CLIENT_DISCOVERIES option for NetBackup
clients .......................................................................... 372RESTORE_RETRIES option for NetBackup clients ...................... 373SERVER option for NetBackup clients ...................................... 374SYBASE_HOME option for NetBackup clients ............................ 375USE_CTIME_FOR_INCREMENTALS option for NetBackup
clients .......................................................................... 376USE_FILE_CHG_LOG option for NetBackup clients .................... 377USEMAIL option for NetBackup clients ...................................... 378VXSS_NETWORK option for NetBackup clients .......................... 378
Chapter 4 Configuring server groups ............................................. 380
About NetBackup server groups .................................................... 380Configuring a NetBackup server group ............................................ 380
NetBackup server group properties .......................................... 382Deleting a server group ................................................................ 382
Chapter 5 Configuring host credentials ......................................... 383
About configuring credentials ........................................................ 383
Chapter 6 Managing media servers ............................................... 385
Activating or deactivating a media server ......................................... 385Adding a media server ................................................................. 386Registering a media server ........................................................... 387Deleting all devices from a media server .......................................... 388Removing a device host from the EMM database .............................. 391
14Contents

About decommissioning a media server .......................................... 391About decommissioning limitations ........................................... 392Before you decommission a media server .................................. 393Post decommission recommendations ...................................... 394Decommission actions ........................................................... 394
Previewing references to a media server ......................................... 397Decommissioning a media server ................................................... 398
Section 3 Configuring storage ................................................ 401
Chapter 7 Configuring disk storage ................................................ 402
About configuring BasicDisk storage ............................................... 402About configuring disk pool storage ................................................ 402Inventorying a NetBackup disk pool ................................................ 403Changing the disk pool state ......................................................... 403
Chapter 8 Configuring robots and tape drives ............................ 405
NetBackup robot types ................................................................. 406About the device mapping files ...................................................... 407Downloading the device mapping files ............................................ 407About configuring robots and tape drives in NetBackup ...................... 408
About device discovery .......................................................... 409About device serialization ....................................................... 410About adding devices without discovery .................................... 411About robot control ................................................................ 411About drive name rules .......................................................... 413
Configuring robots and tape drives by using the wizard ....................... 414Updating the device configuration by using the wizard ........................ 414Adding a robot to NetBackup manually ............................................ 415
Robot configuration options .................................................... 417Managing robots ........................................................................ 420
Changing robot properties ...................................................... 420Configuring a robot to operate in manual mode ........................... 421Deleting a robot .................................................................... 422Moving a robot and its media to a new media server .................... 422
Adding a tape drive to NetBackup manually ..................................... 423Tape drive configuration options ............................................... 425
Configuring drive name rules ......................................................... 429Adding a tape drive path .............................................................. 430
About SCSI reserve on drive paths ........................................... 430Drive path options ................................................................. 431
15Contents

About no rewind device files on UNIX ....................................... 432Adding a shared tape drive to a NetBackup environment .................... 432Correlating tape drives and SCSI addresses on Windows hosts ........... 433
Windows device correlation example ........................................ 433Correlating tape drives and device files on UNIX hosts ....................... 434
UNIX device correlation example ............................................. 435Managing tape drives .................................................................. 436
Changing a drive comment ..................................................... 436About downed drives ............................................................. 437Changing a drive operating mode ............................................ 437Changing a tape drive path ..................................................... 438Changing a drive path operating mode ...................................... 438Changing tape drive properties ................................................ 439Changing a tape drive to a shared drive .................................... 439Cleaning a tape drive from the Device Monitor ............................ 440Deleting a drive .................................................................... 441Resetting a drive .................................................................. 441Resetting the mount time of a drive .......................................... 442Setting the drive cleaning frequency ......................................... 442Viewing drive details .............................................................. 443
Performing device diagnostics ....................................................... 443Running a robot diagnostic test ................................................ 443Running a tape drive diagnostic test ......................................... 445Managing a diagnostic test step that requires operator
intervention ................................................................... 446Obtaining detailed information for a diagnostic test step ................ 446
Verifying the device configuration ................................................... 447About automatic path correction ..................................................... 447Enabling automatic path correction ................................................. 448Replacing a device ..................................................................... 448Updating device firmware ............................................................. 450About the NetBackup Device Manager ............................................ 451About external access to NetBackup controlled devices on UNIX .......... 451Stopping and restarting the device manager ..................................... 452
Chapter 9 Configuring tape media ................................................ 453
About NetBackup tape volumes ..................................................... 454About NetBackup volume pools ..................................................... 454
About reserved volume pool name prefixes ................................ 455About scratch volume pools .................................................... 456
About NetBackup volume groups ................................................... 457NetBackup media types ............................................................... 458
16Contents

About WORM media ................................................................... 460About using volume pools to manage WORM media .................... 461About using unique drive and media types to manage WORM
media ........................................................................... 462Disabling WORM volume pool name verification ......................... 463About WORM media and the Quantum drive .............................. 463Supported WORM drives ........................................................ 463
About adding volumes ................................................................. 464About adding robotic volumes ................................................. 464About adding standalone volumes ............................................ 465
About configuring media name and attribute rules ............................. 466Adding volumes by using the wizard ............................................... 466About media settings rules ............................................................ 467Configuring media settings ........................................................... 467
Media settings options ........................................................... 469About barcodes .......................................................................... 477
About barcode rules .............................................................. 479Configuring barcode rules ............................................................ 480
Barcode rules settings ........................................................... 483About media ID generation rules .................................................... 485Configuring media ID generation rules ............................................ 486
Media ID generation options ................................................... 488About media type mapping rules .................................................... 489Adding volumes by using the Actions menu ...................................... 490
Volume properties ................................................................. 491Configuring media type mappings .................................................. 494
About adding media type mapping entries ................................. 496Default and allowable media types ........................................... 496
Managing volumes ...................................................................... 501Changing the group of a volume .............................................. 501About rules for moving volumes between groups ......................... 502Changing the owner of a volume .............................................. 502Changing volume properties ................................................... 503About assigning and deassigning volumes ................................. 504Deleting a volume ................................................................. 505Erasing a volume .................................................................. 506About exchanging a volume .................................................... 507About frozen media ............................................................... 509About injecting and ejecting volumes ........................................ 510About rescanning and updating barcodes .................................. 513About labeling NetBackup volumes .......................................... 514About moving volumes ........................................................... 516About recycling a volume ....................................................... 518
17Contents

Suspending or unsuspending volumes ...................................... 519Managing volume pools ............................................................... 520
Adding a volume pool ............................................................ 520Changing the properties of a volume pool .................................. 520Deleting a volume pool .......................................................... 521
Managing volume groups on UNIX ................................................. 522Moving a volume group .......................................................... 522Deleting a volume group ........................................................ 524
About media sharing ................................................................... 524Configuring unrestricted media sharing ........................................... 525Configuring media sharing with a server group .................................. 525
Chapter 10 Inventorying robots .......................................................... 527
About robot inventory .................................................................. 527When to inventory a robot ............................................................. 528About showing a robot's contents ................................................... 530
About inventory results for API robots ....................................... 531Showing the media in a robot ........................................................ 533About comparing a robot's contents with the volume
configuration ........................................................................ 534Comparing media in a robot with the volume configuration .................. 535About previewing volume configuration changes ............................... 536Previewing volume configuration changes for a robot ......................... 537About updating the NetBackup volume configuration .......................... 539
Volume update prerequisites ................................................... 539Updating the NetBackup volume configuration with a robot's
contents .............................................................................. 540Robot inventory options ............................................................... 542About the vmphyinv physical inventory utility .................................... 543
How vmphyinv performs a physical inventory .............................. 545Example volume configuration updates ........................................... 549
Chapter 11 Configuring storage units .............................................. 559
About the Storage utility ............................................................... 559Using the Storage utility ......................................................... 560
Creating a storage unit ................................................................. 561Creating a storage unit by copying a storage unit ........................ 564Changing storage unit settings ................................................ 564Deleting storage units ............................................................ 565Media Manager storage unit considerations ............................... 566Disk storage unit considerations .............................................. 568NDMP storage unit considerations ........................................... 572
18Contents

About storage unit settings ........................................................... 574Absolute pathname to directory or absolute pathname to volume
setting for storage units .................................................... 574Density storage unit setting ..................................................... 575Disk pool storage unit setting .................................................. 575Disk type storage unit setting .................................................. 575Enable block sharing storage unit setting ................................... 576Enable multiplexing storage unit setting ..................................... 576High water mark storage unit setting ......................................... 576Low water mark storage unit setting .......................................... 577Maximum concurrent write drives storage unit setting ................... 577Maximum concurrent jobs storage unit setting ............................ 578Maximum streams per drive storage unit setting .......................... 580Media server storage unit setting ............................................. 580NDMP host storage unit setting ............................................... 582On demand only storage unit setting ......................................... 583Only use the following media servers storage unit setting .............. 583Properties option in the Change Storage Units dialog box ............. 584Reduce fragment size storage unit setting .................................. 585Robot number storage unit setting ............................................ 586Robot type storage unit setting ................................................ 586Staging schedule option in Change Storage Units dialog ............... 586Storage device setting for storage units ..................................... 587Storage unit name setting ....................................................... 587Storage unit type setting ......................................................... 587Enable temporary staging area storage unit setting ...................... 587Use any available media server storage unit setting ..................... 588
Chapter 12 Staging backups .............................................................. 589
About staging backups ................................................................ 589About basic disk staging ............................................................... 590Creating a basic disk staging storage unit ........................................ 591
Creating a schedule for a basic disk staging storage unit .............. 592Configuring multiple copies in a relocation schedule ........................... 593Disk staging storage unit size and capacity ...................................... 595Finding potential free space on a BasicDisk disk staging storage
unit .................................................................................... 597Disk Staging Schedule dialog box .................................................. 598Initiating a relocation schedule manually .......................................... 601
19Contents

Chapter 13 Configuring storage unit groups .................................. 602
About storage unit groups ............................................................. 602Creating storage unit groups for backups ......................................... 603Creating storage unit groups for snapshots ...................................... 605Deleting a storage unit group ........................................................ 607Storage unit selection criteria within a group ..................................... 607
Media server load balancing ................................................... 608Other load balancing methods ................................................. 609Exception to the storage unit selection criteria ............................ 611
About disk spanning within storage unit groups ................................. 611
Section 4 Configuring storage lifecycle policies(SLPs) ........................................................................ 612
Chapter 14 Configuring storage lifecycle policies ........................ 613
About storage lifecycle policies ...................................................... 613Creating a storage lifecycle policy .................................................. 614
Modifying the hierarchy of operations in a storage lifecyclepolicy ........................................................................... 617
Deleting a storage lifecycle policy ................................................... 618Lifecycle operation administration using the nbstlutil command ............ 619
Chapter 15 Storage operations .......................................................... 621
Operation types in a storage lifecycle policy ..................................... 621Backup operation in an SLP .......................................................... 621Backup From Snapshot operation in an SLP .................................... 623Duplication operation in an SLP ..................................................... 625Import operation in an SLP ........................................................... 627Index From Snapshot operation in an SLP ....................................... 629
Determining where and when the Index From Snapshot operationoccurs .......................................................................... 631
Replication operation in an SLP ..................................................... 632Snapshot operation in an SLP ....................................................... 635
About configuring storage lifecycle policies for snapshots andsnapshot replication ........................................................ 637
Primary snapshot storage unit ................................................. 639Primary + Replication source snapshot storage unit ..................... 639Replication source + Replication target snapshot storage
unit .............................................................................. 640Replication target snapshot storage unit .................................... 640
20Contents

Replication source + Replication target + Mirror snapshot storageunit .............................................................................. 641
Replication target + Mirror snapshot storage unit ......................... 641Creating a hierarchy of storage operations in a storage lifecycle
policy ................................................................................. 641
Chapter 16 Retention types for SLP operations ........................... 644
Retention types for storage lifecycle policy operations ........................ 644Capacity managed retention type for SLP operations ......................... 646
Rules and recommendations for using the Capacity Managedretention type ................................................................. 647
Capacity managed retention type and disk types that supportSIS .............................................................................. 647
Expire after copy retention type for SLP operations ............................ 648Fixed retention type for SLP operations ........................................... 648Maximum snapshot limit retention type for SLP operations .................. 649Mirror retention type for SLP operations .......................................... 650Target retention type for SLP operations .......................................... 651
Chapter 17 Storage lifecycle policy options ................................... 652
Storage Lifecycle Policy dialog box settings ..................................... 652New or Change Storage Operation dialog box settings ....................... 656
Properties tab of the Storage Operation dialog box ...................... 656Window tab of the Storage Operation dialog box ......................... 660Creating a new window for a storage lifecycle policy
operation ...................................................................... 662Excluding days from a window for a storage lifecycle policy
operation ...................................................................... 663Storage lifecycle policy validation dialog box .................................... 664Storage lifecycle policy Validation Report tab .................................... 665
Chapter 18 Using a storage lifecycle policy to create multiplecopies ............................................................................ 667
About writing multiple copies using a storage lifecycle policy ................ 667How the order of the operations determines the copy order ................. 668About ensuring successful copies using lifecycles ............................. 668
Chapter 19 Storage lifecycle policy versions ................................. 670
About storage lifecycle policy versions ............................................ 670Storage lifecycle changes and versioning ........................................ 671
21Contents

When changes to storage lifecycle policies become effective ............... 672Deleting old storage lifecycle policy versions .................................... 673
Section 5 Configuring backups .............................................. 675
Chapter 20 Creating backup policies ............................................... 676
About the Policies utility ............................................................... 677Planning for policies .................................................................... 679
Windows example of one client in multiple policies ...................... 681Policy attributes that affect how clients are grouped in
policies ......................................................................... 682About Microsoft DSFR backups ............................................... 683
Creating a backup policy .............................................................. 686Adding or changing schedules in a policy ........................................ 688Changing multiple policies at one time ............................................ 689Copying or moving policy items to another policy ............................... 690Copying a policy to create a new policy ........................................... 691Copying a schedule into the same policy or different policy .................. 692Deleting schedules, backup selections, or clients from a policy ............. 692Policy Attributes tab .................................................................... 693
Policy type (policy attribute) .................................................... 694Data classifications (policy attribute) ......................................... 697Policy storage (policy attribute) ................................................ 698Policy volume pool (policy attribute) .......................................... 701Take checkpoints every __ minutes (policy attribute) .................... 703Limit jobs per policy (policy attribute) ........................................ 706Job priority (policy attribute) .................................................... 708Media Owner (policy attribute) ................................................. 709Go into effect at (policy attribute) .............................................. 709Follow NFS (policy attribute) ................................................... 710Backup Network Drives (policy attribute) .................................... 711Cross mount points (policy attribute) ......................................... 713Compression (policy attribute) ................................................. 717Encryption (policy attribute) ..................................................... 719Collect disaster recovery information for Bare Metal Restore (policy
attribute) ....................................................................... 721Collect true image restore information (policy attribute) with and
without move detection .................................................... 721Allow multiple data streams (policy attribute) .............................. 725Disable client-side deduplication (policy attribute) ........................ 729Enable granular recovery (policy attribute) ................................. 729Use Accelerator (policy attribute) ............................................. 730
22Contents

Enable optimized backup of Windows deduplicated volumes ......... 751Keyword phrase (policy attribute) ............................................. 754Snapshot Client and Replication Director (policy attributes) ........... 754Perform block level incremental backups (policy attributes) ........... 755Use Replication Director (policy attributes) ................................. 755Perform snapshot backups (policy attributes) .............................. 757Microsoft Exchange Attributes (policy attributes) ......................... 757
Schedules tab ............................................................................ 757Schedule Attributes tab ................................................................ 758
Name (schedule attribute) ...................................................... 759Type of backup (schedule attribute) .......................................... 759Synthetic backup (schedule attribute) ........................................ 768Accelerator forced rescan option (schedule attribute) ................... 769Calendar (schedule attribute) .................................................. 771Frequency (schedule attribute) ................................................ 771Instant Recovery (schedule attribute) ........................................ 773Multiple copies (schedule attribute) ........................................... 774Override policy storage (schedule attribute) ................................ 778Override policy volume pool (schedule attribute) ......................... 779Override media owner (schedule attribute) ................................. 779Retention (schedule attribute) .................................................. 780Media multiplexing (schedule attribute) ...................................... 783
Start Window tab ........................................................................ 790Adding, changing, or deleting a time window in a policy
schedule ....................................................................... 790Example of schedule duration ................................................. 793
Excluding days from a schedule ..................................................... 794Include Dates tab ........................................................................ 795
Calendar scheduling with the Include Dates tab .......................... 795How NetBackup determines which schedule to run next ..................... 796About schedule windows that span midnight ..................................... 799How open schedules affect calendar-based and frequency-based
schedules ........................................................................... 800Creating an open schedule in the NetBackup Administration
Console ........................................................................ 803Runtime considerations that affect backup frequency ................... 804
About the Clients tab ................................................................... 805Adding or changing clients in a policy ........................................ 805Installing client software on secure and trusting UNIX clients ......... 807Browse for Hyper-V virtual machines ........................................ 809
Backup Selections tab ................................................................. 810Adding backup selections to a policy ......................................... 811Verifying the Backup Selections list .......................................... 813
23Contents
How to reduce backup time ..................................................... 816Pathname rules for Windows client backups ............................... 817Pathname rules for Windows disk image (raw) backups ................ 820Pathname rules for Windows registry backups ............................ 821About hard links to files and directories ..................................... 822Pathname rules for UNIX client backups .................................... 824Pathname rules for the clients that run extension products ............ 832About the directives on the Backup Selections list ....................... 832Files that are excluded from backups by default .......................... 845About excluding files from automatic backups ............................. 846Files that are excluded by Microsoft Windows Backup .................. 847
VMware Policy tab ...................................................................... 847Hyper-V Policies tab .................................................................... 849Disaster Recovery tab ................................................................. 851
Adding policies to the Critical Policies list of a catalog backuppolicy ........................................................................... 854
Creating a Vault policy ................................................................. 854Performing manual backups ......................................................... 856Active Directory granular backups and recovery ................................ 857
System requirements for Active Directory granular NetBackupbackups and recovery ..................................................... 858
Creating a policy that allows Active Directory granularrestores ........................................................................ 858
Restoring Active Directory objects ............................................ 860Troubleshooting granular restore issues .................................... 861
Chapter 21 Synthetic backups ........................................................... 864
About synthetic backups .............................................................. 864Recommendations for synthetic backups and restores ....................... 865Synthetic full backups .................................................................. 868Synthetic cumulative incremental backups ....................................... 870Schedules that must appear in a policy for synthetic backups .............. 872Adding clients to a policy for synthetic backups ................................. 872Change journal and synthesized backups ........................................ 873True image restore and synthesized backups ................................... 873Displaying synthetic backups in the Activity Monitor ........................... 873Logs produced during synthetic backups ......................................... 874Synthetic backups and directory and file attributes ............................. 874Using the multiple copy synthetic backups method ............................ 875
Configuring multiple copy synthetic backups ............................... 876Configuration variables for multiple copy synthetic backups ........... 877Multiple copy synthetic backups configuration examples ............... 878
24Contents

Optimized synthetic backups ......................................................... 879Optimized synthetic backups for deduplication .................................. 879
Chapter 22 Protecting the NetBackup catalog .............................. 880
About the NetBackup catalog ........................................................ 880Parts of the NetBackup catalog ...................................................... 881
About the NetBackup relational database .................................. 883About the NetBackup image database ...................................... 887About catalog backup of cloud configuration files ......................... 889
Protecting the NetBackup catalog .................................................. 890About catalog backups .......................................................... 891Using the Catalog Backup Wizard to configure a catalog
backup ......................................................................... 892Using the Policy Configuration Wizard to configure a catalog
backup ......................................................................... 895Configuring a catalog backup manually ..................................... 897Backing up NetBackup catalogs manually .................................. 899Concurrently running catalog backups with other backups ............. 900About catalog policy schedules ................................................ 900How catalog incrementals and standard backups interact on
UNIX ............................................................................ 901Determining whether or not a catalog backup succeeded .............. 901Strategies that ensure successful NetBackup catalog
backups ........................................................................ 902Recovering the catalog ................................................................ 902Disaster recovery emails and the disaster recovery file ....................... 902Archiving the catalog and restoring from the catalog archive ................ 903
Creating a catalog archiving policy ........................................... 906Catalog archiving commands .................................................. 907Catalog archiving considerations ............................................. 909Extracting images from the catalog archives ............................... 910
Estimating catalog space requirements ........................................... 910NetBackup file size considerations on UNIX systems ................... 912About the binary catalog format ............................................... 912Moving the image catalog ....................................................... 912About image catalog compression ............................................ 915
Chapter 23 About the NetBackup relational database ................ 919
About the NetBackup relational database (NBDB) installation .............. 919About NetBackup master server installed directories and
files .............................................................................. 922About the NetBackup configuration entry ................................... 931
25Contents

Sybase SQL Anywhere server management .............................. 932Sybase SQL Anywhere and clustered environments .................... 933
Using the NetBackup Database Administration utility on Windows ........ 933About the General tab of the NetBackup Database Administration
utility ............................................................................ 935About the Tools tab of the NetBackup Database Administration
utility ............................................................................ 941Using the NetBackup Database Administration utility on UNIX ............. 947
About the Select/Restart Database and Change Password menuoptions ......................................................................... 949
About the Database Space and Memory Management menuoptions ......................................................................... 950
About the Database Validation Check and Rebuild menuoptions ......................................................................... 952
About the Move Database menu options ................................... 953About the Unload Database menu options ................................. 954About the Backup and Restore Database menu options ................ 955
Post-installation tasks .................................................................. 956Changing the NetBackup database password ............................. 956Moving NBDB database files after installation ............................. 958Adding a mirrored transaction log ............................................. 959Creating the NBDB database manually ..................................... 961
About backup and recovery procedures .......................................... 964Database transaction log ........................................................ 964About catalog recovery .......................................................... 965Commands for backing up and recovering the relational
databases ..................................................................... 965About the catalog backup process ............................................ 967
Unloading the NetBackup database ................................................ 968Terminating database connections ................................................. 969Moving the NetBackup database from one host to another .................. 971
Chapter 24 Managing backup images ............................................. 972
About the Catalog utility ............................................................... 972About searching for backup images ................................................ 973Verifying backup images .............................................................. 976Viewing job results ...................................................................... 976Promoting a copy to a primary copy ................................................ 977Duplicating backup images ........................................................... 979
About multiplexed duplication considerations .............................. 984Jobs that appear while making multiple copies ............................ 985
Expiring backup images ............................................................... 986
26Contents

About importing backup images ..................................................... 987About importing expired images ............................................... 987Importing backup images ....................................................... 988
Section 6 Configuring replication ......................................... 990
Chapter 25 About NetBackup replication ........................................ 991
About NetBackup replication ......................................................... 991About NetBackup Auto Image Replication ........................................ 992
One-to-many Auto Image Replication model ............................... 994Cascading Auto Image Replication model .................................. 994About the domain relationship for replication .............................. 997About the replication topology for Auto Image Replication ............. 998Viewing the replication topology for Auto Image Replication ......... 1000About trusted master servers for Auto Image Replication ............. 1005About the storage lifecycle policies required for Auto Image
Replication .................................................................. 1006Using NetBackup Access Control (NBAC) with Auto Image
Replication .................................................................. 1011Auto Image Replication setup overview ................................... 1012How to resolve volume changes for Auto Image Replication ......... 1013Removing or replacing replication relationships in an Auto Image
Replication configuration ................................................ 1016About restoring from a backup at a target master domain ............ 1030Reporting on Auto Image Replication jobs ................................ 1031
About NetBackup Replication Director ........................................... 1032
Section 7 Monitoring and reporting ................................... 1034
Chapter 26 Monitoring NetBackup activity .................................... 1035
About the Activity Monitor ........................................................... 1035Setting Activity Monitor options .................................................... 1037About the Jobs tab .................................................................... 1038
Viewing job details in the Activity Monitor ................................. 1040Showing or hiding column heads in the Activity Monitor ............... 1040Monitoring the detailed status of a selected job in the Activity
Monitor ....................................................................... 1041Deleting completed jobs in the Activity Monitor .......................... 1041Canceling a job that has not completed in the Activity
Monitor ....................................................................... 1041Restarting a failed (completed) job in the Activity Monitor ............ 1042
27Contents

Suspending restore or backup jobs in the Activity Monitor ............ 1042Resuming suspended or incomplete jobs in the Activity
Monitor ....................................................................... 1042Printing job list information in the Activity Monitor ....................... 1043Exporting Activity Monitor data to a text file ............................... 1043Printing job detail information ................................................. 1043Copying Activity Monitor text to a file ....................................... 1044Changing the Job Priority dynamically from the Activity
Monitor ....................................................................... 1044About the Daemons tab .............................................................. 1045
Using the nbrbutil utility to configure the NetBackup ResourceBroker ........................................................................ 1050
Types of NetBackup daemons ............................................... 1055Monitoring NetBackup daemons ............................................ 1055Starting or stopping a daemon ............................................... 1056Displaying all media servers in the Activity Monitor ..................... 1056
About the Processes tab ............................................................. 1057Monitoring NetBackup processes in the Process Details dialog
box ............................................................................ 1061About the Drives tab .................................................................. 1062
Monitoring tape drives .......................................................... 1063Cleaning tape drives from the Activity Monitor ........................... 1063
About the jobs database ............................................................. 1063Changing the default bpdbjobs_options values .......................... 1064About the BPDBJOBS_OPTIONS environment variable .............. 1065bpdbjobs command line options ............................................. 1067Enabling the bpdbjobs debug log ........................................... 1067
About the Device Monitor ............................................................ 1068About media mount errors ........................................................... 1069About pending requests and actions ............................................. 1069
About pending requests for storage units ................................. 1070Resolving a pending request ................................................. 1071Resolving a pending action ................................................... 1072Resubmitting a request ........................................................ 1072Denying a request ............................................................... 1073
Chapter 27 Reporting in NetBackup ............................................... 1074
About the Reports utility ............................................................. 1074Running a report ....................................................................... 1078Copying report text to another document ........................................ 1078Saving or exporting a report ........................................................ 1079Printing a report ........................................................................ 1079
28Contents

Chapter 28 Using the Logging Assistant ....................................... 1081
About the Logging Assistant ........................................................ 1081Logging Assistant sequence of operation ....................................... 1084Viewing the Logging Assistant records .......................................... 1085Viewing the details of a Logging Assistant record ............................. 1085Adding a new Logging Assistant record ......................................... 1089Deleting a Logging Assistant record .............................................. 1091Setting up debug logging ............................................................ 1092Set minimum debug logging ........................................................ 1096Disabling debug logging ............................................................. 1097Collecting and uploading debug logs ............................................. 1098Collecting and uploading nbsu information ..................................... 1104Uploading evidence ................................................................... 1107
Section 8 Administering NetBackup ................................. 1110
Chapter 29 Management topics ....................................................... 1111
Configuring the NetBackup Client Service ...................................... 1111NetBackup naming conventions ................................................... 1112Wildcard use in NetBackup ......................................................... 1113Wildcard characters in backup selections for an NDMP policy ............ 1115How to access media and devices on other hosts ............................ 1118
Chapter 30 Accessing a remote server .......................................... 1120
Prerequisites for accessing a remote server ................................... 1120Allow access to another server .............................................. 1121Authorize users of one server to access another server .............. 1123
Accessing remote servers ........................................................... 1124About running the NetBackup Administration Console on a NetBackup
client ................................................................................ 1125Troubleshooting remote server administration ................................. 1125
Chapter 31 Using the NetBackup Remote AdministrationConsole ....................................................................... 1127
About the NetBackup Remote Administration Console ...................... 1128About authorizing NetBackup users .............................................. 1131Authorization file (auth.conf) characteristics .................................... 1132About authorizing nonroot users for specific applications ................... 1134About authorizing specific tasks in the Backup, Archive, and Restore
user interface ..................................................................... 1135
29Contents

About authorizing users on Windows NetBackup server .................... 1136Restricting access to the NetBackup Administration Console on
Windows ........................................................................... 1137Run-time configuration options for the NetBackup Administration
Console ............................................................................ 1137FIREWALL_IN .................................................................... 1138FORCE_IPADDR_LOOKUP .................................................. 1139INITIAL_MEMORY, MAX_MEMORY ....................................... 1141MEM_USE_WARNING ........................................................ 1141NBJAVA_CLIENT_PORT_WINDOW ....................................... 1141NBJAVA_CORBA_DEFAULT_TIMEOUT .................................. 1142NBJAVA_CORBA_LONG_TIMEOUT ...................................... 1142PBX_PORT ....................................................................... 1143VNETD_PORT ................................................................... 1143
About customizing jnbSA and jbpSA with bp.conf entries ................... 1143About improving NetBackup-Java performance ............................... 1144
About running the Java console locally .................................... 1144About running a console locally and administering a remote
server ......................................................................... 1145About enhancing console performance .................................... 1145About determining better performance when console is run locally
or uses remote display back ............................................ 1147About adjusting time zones in the NetBackup Administration
console ............................................................................. 1148Adjusting the time zone in the NetBackup Administration Console
or the Backup, Archive, and Restore console ...................... 1149Configuring a custom time zone in the NetBackup Administration
Console or the Backup, Archive, and Restore console .......... 1149
Chapter 32 Alternate server restores ............................................. 1151
About alternate server restores .................................................... 1151About supported configurations for alternate server restores .............. 1152About performing alternate server restores ..................................... 1153
About modifying the NetBackup catalogs ................................. 1154Overriding the original server for restores ................................. 1155About enabling automatic failover to an alternate server .............. 1157Expiring and importing media for alternate server restores ........... 1158
Chapter 33 Managing client backups and restores .................... 1160
About server-directed restores ..................................................... 1160About client-redirected restores .................................................... 1161
About restore restrictions ...................................................... 1162
30Contents

Allowing all clients to perform redirected restores ....................... 1162Allowing a single client to perform redirected restores ................. 1163Allowing redirected restores of a specific client’s files ................. 1163Examples of redirected restores ............................................. 1164
About restoring the files that have Access Control Lists (ACLs) .......... 1170About setting the original atime for files during restores on UNIX ......... 1171Restoring the System State ......................................................... 1171About the backup and restore of compressed files on VxFS file
systems ............................................................................ 1174About backups and restores on ReFS ........................................... 1175
Chapter 34 Powering down and rebooting NetBackupservers ......................................................................... 1176
Powering down and rebooting NetBackup servers ........................... 1176Shutting down and starting up all NetBackup services and
daemons ........................................................................... 1177Rebooting a NetBackup server .................................................... 1178Rebooting a NetBackup media server ........................................... 1178About displaying active processes with bpps on UNIX ...................... 1179About displaying robotic processes with vmps on UNIX ..................... 1180
Chapter 35 About Granular Recovery Technology ..................... 1181
About installing and configuring Network File System (NFS) for ActiveDirectory Granular Recovery ................................................. 1181
About configuring Services for Network File System (NFS) on Windows2012 and Windows 2012 R2 ................................................. 1182Enabling Services for Network File System (NFS) on a Windows
2012 or Windows 2012 R2 media server ............................ 1183Enabling Services for Network File System (NFS) on a Windows
2012 or Windows 2012 R2 client ...................................... 1187About configuring Services for Network File System (NFS) on Windows
2008 and Windows 2008 R2 ................................................. 1190Enabling Services for Network File System (NFS) on Windows
2008 or Windows 2008 R2 .............................................. 1192Disabling the Client for NFS on the media server ....................... 1194Disabling the Server for NFS ................................................. 1196
Configuring a UNIX media server and Windows clients for backupsand restores that use Granular Recovery Technology (GRT) ........ 1198
Configuring a different network port for NBFSD ............................... 1199
Index ................................................................................................................ 1200
31Contents

About NetBackup
■ Chapter 1. Introducing NetBackup interfaces
■ Chapter 2. Administering NetBackup licenses
1Section

Introducing NetBackupinterfaces
This chapter includes the following topics:
■ About NetBackup
■ NetBackup documentation
■ About NetBackup administration interfaces
■ Using the NetBackup Administration Console
■ NetBackup configuration wizards
■ Running the Troubleshooter
About NetBackupNetBackup provides a complete, flexible data protection solution for a variety ofplatforms. The platforms include Windows, UNIX, and Linux systems.
NetBackup administrators can set up periodic or calendar-based schedules toperform automatic, unattended backups for clients across a network. Anadministrator can carefully schedule backups to achieve systematic and completebackups over a period of time, and optimize network traffic during off-peak hours.The backups can be full or incremental. Full backups back up all client files.Incremental backups back up only the files that have changed since the last backup.
The NetBackup administrator can allow users to back up, restore, or archive thefiles from their computer. (An archive operation backs up a file, then deletes it fromthe local disk if the backup is successful.)
NetBackup includes both the server and the client software as follows:
1Chapter

■ Server software resides on the computer that manages the storage devices.
■ Client software resides on computer(s) that contain data to back up. (Serversalso contain client software and can be backed up.)
Figure 1-1 shows an example of a NetBackup storage domain.
Figure 1-1 NetBackup storage domain example
OpenStoragedisk pool
NetBackupclients
NetBackupmaster server
Media Manager tapestorage unit
BasicDiskstorage unit
Media servers
SAN
NetBackup accommodates multiple servers that work together under theadministrative control of one NetBackup master server in the following ways:
■ The master server manages backups, archives, and restores. The master serveris responsible for media and device selection for NetBackup. Typically, themaster server contains the NetBackup catalog. The catalog contains the internaldatabases that contain information about NetBackup backups and configuration.
■ Media servers provide additional storage by allowing NetBackup to use thestorage devices that are attached to them. Media servers can also increaseperformance by distributing the network load. Media servers can also be referredto by using the following terms:
■ Device hosts (when tape devices are present)
■ Storage servers (when I/O is directly to disk)
34Introducing NetBackup interfacesAbout NetBackup

■ Data movers (when data is sent to independent, external disk devices likeOpenStorage appliances)
During a backup or archive, the client sends backup data across the network to aNetBackup server. The NetBackup server manages the type of storage that isspecified in the backup policy.
During a restore, users can browse, then select the files and directories to recover.NetBackup finds the selected files and directories and restores them to the disk onthe client.
NetBackup documentationFor a complete list of NetBackup technical documents for each supported release,see the NetBackup release notes, Administration, Installation, Troubleshooting,Getting Started, and Solutions Guides page at the following URL:
http://www.veritas.com/docs/DOC5332
The documents are in Adobe® Portable Document Format (PDF), viewable withthe Adobe Acrobat Reader. Download the reader from http://www.adobe.com.
Veritas assumes no responsibility for the installation and use of the reader.
The NetBackup landing page on the Veritas Support website contains a list of helpfulhow-to and product alert topics.
About NetBackup administration interfacesNetBackup can be administered with several interfaces. The best choice dependson personal preference and the workstation that is available to the administrator.
35Introducing NetBackup interfacesNetBackup documentation

Table 1-1 NetBackup administration interfaces
DescriptionName ofinterface
The NetBackup Administration Console is the recommended interface and is the interfacereferred to by most procedures and examples in the documentation.
Veritas recommends that you run the NetBackup Administration Console on the master serverto configure and manage the storage devices on all of your media servers.
Multiple base versions of the NetBackup Administration Console are installed when you installthe server software. Select the version of the console that is compatible with the NetBackup serverthat you want to administer.
See “Administering remote servers of different versions” on page 41.
To start the NetBackup Administration Console
■ On Windows, select NetBackup 7.7.2 Administration Console from the Start menu.■ On UNIX, run the jnbSA command.
Note: To log in to any NetBackup Administration Console, your login credentials must beauthenticated from the connecting master or media server. This authentication occurs whether ornot NetBackup Access Control (NBAC) is in use.
NetBackupAdministrationConsole
Run the tpconfig command to start a character-based, menu interface for device management.
Use the tpconfig interface from any terminal (or terminal emulation window) that has a termcapor a terminfo definition.
Character-based,menu interface
NetBackup commands are available on both Windows and UNIX platforms. Enter NetBackupcommands at the system prompt or use the commands in scripts.
All NetBackup administrator programs and commands require root or administrator user privilegesby default.
See “About authorizing nonroot users for specific applications” on page 1134.
For complete information on all NetBackup commands, see the NetBackup Commands ReferenceGuide.
To view the commands online, use the UNIX man command.
Command line
Note: If there is more than one NetBackup server, the NetBackup AdministrationConsole can be run on more than one server at one time. However, if more thanone administrator makes changes to the configuration, the results are unpredictable.
See “Using the NetBackup Administration Console” on page 43.
See “Administering remote servers of different versions” on page 41.
36Introducing NetBackup interfacesAbout NetBackup administration interfaces

About setting up the NetBackup Administration Console on UNIXNetBackup provides two Java-based administration consoles through which theadministrator can manage NetBackup. The consoles can be run on either of thefollowing systems:
■ Directly on a supported NetBackup-Java capable UNIX computer by running/usr/openv/java/jnbSA &
The jnbSA command is described in the NetBackup Commands ReferenceGuide.Use the -r command to connect to the compatible version of the console forthe server that you want to administer.
■ On a Windows computer that has the NetBackup Administration Consoleinstalled.From the multiple versions of consoles installed, select the version of the consolethat is compatible with the NetBackup server that you want to administer.
Startup procedures and configuration information is explained in the following topics.
Setting up a CDE for the Java-based NetBackup interfaceson UNIXAlways set the window manager so that a window becomes active only when clicked.The NetBackup Java interfaces do not run properly with auto-focus enabled.Auto-focus causes a window to become active when the pointer moves over thewindow.
The following are general instructions for correctly setting up the focus on a CDE(Common Desktop Environment) window manager. CDE is the preferred windowmanager for NetBackup Java applications.
The NetBackup host that is specified on the login dialog box and the computerwhere you start the NetBackup Administration Console must run the sameNetBackup version.
The NetBackup Administration Console supports remote X Windows displayonly between same-platform systems. For example, assume that you are on aSolaris system named system1 and the NetBackup-Java software is on a Solarissystem named system2. Here, you can display the interface on system1 byperforming rlogin to system2. Then run jnbSA -d system1. However, if system2was an HP system, you could display jnbSA only directly on system2.
In addition, the system where the console appears must run a version of theoperating system that the console supports. Refer to the NetBackup release notesfor supported versions, including any required release updates.
The jnbSA command is described in the NetBackup Commands Reference Guide.
37Introducing NetBackup interfacesAbout NetBackup administration interfaces

To set up a CDE (Common Desktop Environment) for NetBackup Javainterfaces
1 On the front panel in the CDE window, click the Style Manager control icon.
2 On the Style Manager toolbar, click the Window control icon.
3 In the Style Manager-Window dialog box, click Click In Window To MakeActive.
4 Click OK.
5 Click OK when prompted to Restart the Workspace Manager.
Logging in to the NetBackup Administration ConsoleUse the NetBackup Administration Console to administer Windows or UNIXcomputers.
To start the NetBackup Administration Console
1 On a Windows host where theNetBackupAdministration Console is installedand configured, select Start > Programs > Veritas NetBackup > NetBackup7.7.2 Administration Console.
On a UNIX computer, use the jnbSA command:
/usr/openv/java/jnbSA &
2 The logon screen for the NetBackup Administration Console displays thehost name. Log into another server by typing the name of another host in theHost name field. Or, select a host name from the drop-down list.
If the server you enter is a media server or client, the media server or clientmust have a security certificate installed.
See “Deploying a security certificate on a NetBackup host ” on page 48.
38Introducing NetBackup interfacesAbout NetBackup administration interfaces

3 In the login screen, type your user name and password. To log into a Windowsserver, enter both the domain of the server and the user name as follows:
domain_name\user_name
The domain_name specifies the domain of the NetBackup host. If the host isnot a member of a domain, the domain_name is not required.
4 Click Login to log into the NetBackup-Java application server program on thespecified server. The interface program continues to communicate through theserver that is specified in the logon screen for the remainder of the currentsession.
The default host is the last host that was successfully logged into. Thedrop-down list contains the names of other hosts that have been logged into.
To log in to the application server using Windows Active Directory credentials, clickthe Use Active Directory login credentials check box. By enabling the option,you can bypass the authentication that is required using the user name and canenable Single Sign-on (SSO).
Users with administrative as well as non-administrative privileges can use SingleSign-on. The user with administrative privileges needs to right-click and select theRun as administrator option while launching the NetBackup AdministrationConsole. Selecting this option enables the user to view the console withadministrative privileges.
Note the following points about SSO:
■ The SSO option is available only when both the NetBackup master server andthe NetBackup client are Windows hosts.
■ After the first successful login using SSO, the Use Active Directory logincredentials check box remains in the enabled state for the next login attempton the same server for the same client. This behavior is applicable for successfulSSO login instance for each master server.
■ The NetBackup Administration Console on a UNIX master server does notshow the check box to use the Active Directory credentials.
■ UNIX hosts can log in to the application server using the user name-basedauthentication.
See “User Account Settings properties” on page 262.
Notes about using the NetBackup Administration Console■ Veritas recommends that after you install or upgrade NetBackup server software,
you should uninstall older versions of the NetBackup Remote AdministrationConsole (Windows and Java) present on the host. If the native NetBackup
39Introducing NetBackup interfacesAbout NetBackup administration interfaces

Administration Console for Windows is present, it is automatically uninstalledwhen you install or upgrade the NetBackup server software.
■ Multiple base versions of theNetBackup Administration Console are installedwhen you install NetBackup server software. For example, when you install orupgrade to NetBackup 7.7.2, base versions from 7.0 through 7.7.2 of the consoleare all installed.
■ To upgrade any of the multiple versions of consoles to a patch, you must firstinstall the base version of the Remote Administration Console. Use the installerof the base version to install the Remote Administration Console. You must thenupgrade to the corresponding required patch of the Remote AdministrationConsole.Upgrading directly to a patch version of theNetBackupAdministrationConsolefrom multiple versions of the consoles is not supported.
■ TheNetBackup Administration Console is best viewed at a screen resolutionof 1280 X 1024 or higher. The minimum supported screen resolution to use theconsole is 1024 X 768.
■ The NetBackup Administration Console does not support user-definedcharacters (UDC) and vendor-defined characters (VDC) because of theimplementation of Java’s encoding converters.
■ On non-English versions of Windows and UNIX systems, the NetBackupAdministration Console may display non-US ASCII characters incorrectly.This issue can lead to functional failures.This issue results from a character encoding mismatch between the NetBackupserver and the NetBackup Administration Console. For a detailed descriptionof the configuration, refer to the following tech note on the Veritas Supportwebsite:http://www.veritas.com/docs/TECH75745
■ To use the NetBackup Administration Console on a Windows computer, theMicrosoft Windows UAC (User Access Control) feature must be disabled. Seethe following link for instructions:http://windows.microsoft.com/en-us/windows/turn-user-account-control-on-off#1TC=windows-7
Figure 1-2 shows the selection to install only the NetBackup AdministrationConsole.
40Introducing NetBackup interfacesAbout NetBackup administration interfaces

Figure 1-2 Selection on the installation panel to install only the NetBackupAdministration Console
See “Accessing remote servers” on page 1124.
Administering remote servers of different versionsThe NetBackup server installation provides multiple versions of the NetBackupAdministration Console to administer remote servers of different versions. Whenstarting the Administration Console, select the version of the console that iscompatible with the NetBackup server that you want to administer.
41Introducing NetBackup interfacesAbout NetBackup administration interfaces

Alternatively, from the command line, you can use the jnbSA command with the -r
option to launch the console. For example, to connect to a 7.0 master server froma 7.7.2 UNIX master server, enter the following command on the 7.7.2 masterserver:
./jnbSA -r 7.0
If no -r option is specified, the default is the NetBackup version of the currentmaster server.
Note: To log on to anyNetBackup Administration Console, your logon credentialsmust be authenticated from the connecting master or media server. This requirementis true whether or not NetBackup Access Control (NBAC) is in use.
Backward compatibility with triple-dot versionsThe NetBackup Administration Console is backward-compatible between a patchrelease (x.x.x.x) and a major (x.x) or minor release (x.x.x) that shares the samefirst and second digits.
For example, the 7.6.0.2 console is compatible with a 7.6 master server. However,a NetBackup 7.6.0.2 console cannot administer a 7.5.0.7 master server. SeeFigure 1-3 for various examples.
42Introducing NetBackup interfacesAbout NetBackup administration interfaces

Figure 1-3 Examples of supported and unsupported back-level consoleconfigurations
7.6
Yes
7.6.0.2
No
7.5.0.7 7.5
Yes
7.5.0.7
No
7.1.0.7
7.5
7.6.0.2
See “Accessing remote servers” on page 1124.
Using the NetBackup Administration ConsoleThe NetBackup Administration Console provides a graphical user interfacethrough which the administrator can manage NetBackup. It runs on both theWindows and the UNIX platforms.
Figure 1-4 NetBackup Administration Console
1
2
7
4
10
8
11
9
5
6
3
43Introducing NetBackup interfacesUsing the NetBackup Administration Console

Table 1-2 NetBackup Administration Console description
Description
The name of the currently selected master server.
The information in the NetBackup Administration Console applies to this server only.
1
Backup, Archive, and Restore
Administrators can use theBackup, Archive, and Restore utility to back up, archive, and restore files, directories,and the formatted raw partitions that reside on the computer that is currently selected. Files can be restored atany time. However, files can be backed up or archived only during the time periods that the administrator defineswithin a schedule for user backups. Users can view the progress and final status of the operations performed.
Note: An archive is a special type of backup. During an archive, NetBackup first backs up the selected files,then deletes the files from the local disk if the backup is successful. In this manual, references to backups alsoapply to the backup portion of archive operations (except where otherwise noted).
Documentation for the NetBackup client is available as online Help from the Backup, Archive, and Restoreinterface.
2
Activity Monitor
Displays the NetBackup job information. The Activity Monitor provides the control over the jobs, services,processes, and drives.
3
NetBackup Management
The NetBackup Management contains many of the utilities to manage NetBackup:
4
Reports
Use to compile information to verify, manage, and troubleshoot NetBackup operations.
See “About the Reports utility” on page 1074.
44Introducing NetBackup interfacesUsing the NetBackup Administration Console

Table 1-2 NetBackup Administration Console description (continued)
Description
Policies
Use to create and specify the backup policies that define the rules for backing up a group of clients.
For example, the backup policy specifies when automatic backups occur for the clients that are specified in thepolicy. The backup policy also specifies whether users can perform their own backups and when. The administratorcan define any number of backup policies, each of which can apply to one or more clients. A NetBackup clientmust belong to at least one backup policy to be backed up.
See “About the Policies utility” on page 677.
Storage
Use to configure storage units, storage unit groups, storage lifecycle policies (SLPs), and windows for secondaryoperations in SLPs.
See “About the Storage utility” on page 559.
Catalog
Use to create and configure a catalog backup, which is a special type of backup that NetBackup requires for itsown internal databases.
These databases, called the NetBackup catalog, are located on the NetBackup master and media server. Thecatalog contains information on every client backup. Catalog backups are tracked separately from other backupsto ensure recovery in case of a server crash.
The Catalog utility is also used for the following actions:
■ To duplicate a backup image■ To promote a backup image from a copy to the primary backup copy■ To manually expire backup images■ To import expired backup images or images from another NetBackup server■ To search for a backup image to verify the contents of the media with what is recorded in the NetBackup
catalog
See “About the Catalog utility” on page 972.
Host Properties
Use to customize NetBackup configuration options. In most instances, no changes are necessary. However,HostProperties lets the administrator customize NetBackup to meet specific site preferences and requirements formaster servers, media servers, and clients.
See “About the NetBackup Host Properties” on page 68.
45Introducing NetBackup interfacesUsing the NetBackup Administration Console

Table 1-2 NetBackup Administration Console description (continued)
Description
SLP Windows
SLP Windows contains any schedules that are defined for secondary operations in a storage lifecycle policy.
A window can better define when the job for a secondary operation can run, making sure that the job does notinterfere with jobs of a higher priority.
5
Applications
Applications contains all discovered instances on SQL and Oracle clients and any manually added instances.These instances are used to build an Oracle or a SQL Intelligent Policy.
For more information, see the NetBackup for Oracle Administrator’s Guide and the NetBackup for SQL ServerAdministrator’s Guide.
6
Media and Device Management
Contains the utilities for managing the media and devices that NetBackup uses to store backups:
7
Device Monitor
Manages the drives, device paths, and service requests for operators.
Media
Adds and manages removable media.
Devices
Adds, configures, and manages storage devices.
Credentials
Adds, removes, and manages logon credentials for the following:
■ NDMP hosts (requires the NetBackup for NDMP license).■ Storage servers (requires a NetBackup Data Protection Optimization Option license).
Credentials appears only if one of these license keys is installed.
Access Management
NetBackup administrators can protect a NetBackup configuration by defining who may access NetBackup andwhat functions a user group can perform.AccessManagement is enabled when NetBackup Product Authenticationand Authorization and NetBackup Access Control (NBAC) is configured.
For more information about NetBackup Access Control, see the NetBackup Security and Encryption Guide.
8
Logging Assistant
The Logging Assistant is a tool that helps administrators configure, gather, and upload debug logs.
See “About the Logging Assistant” on page 1081.
9
46Introducing NetBackup interfacesUsing the NetBackup Administration Console

Table 1-2 NetBackup Administration Console description (continued)
Description
Additional licensed utilities appear under the main NetBackup nodes.10
The Details pane contains the configuration wizards and details specific to the utility that is selected.11
Note: A special search option is available for searching the text inside a table.When any table is displayed in an active console window, users can type the searchtext directly on the keyboard. The text is searched within the first column of thetable and the content is highlighted.
See “About security certificates for NetBackup hosts” on page 47.
See “Configuring log files for the NetBackup Administration Console” on page 54.
TheNetBackup Administration Consolemenus are described in the online Help.
About security certificates for NetBackup hostsNetBackup uses security certificates for authentication of NetBackup hosts for someuse cases. The NetBackup security certificates conform to the X.509 public keyinfrastructure standard. A NetBackup Certificate Authority (CA) issues thecertificates.
By default, individual NetBackup master servers are provisioned with a securitycertificate during a successful installation. Also, during a NetBackup push installationto a Windows Server Failover Cluster (WSFC), security certificates are deployedto all of the nodes in the failover cluster.
Other NetBackup use cases may require that you deploy a security certificate toNetBackup hosts so that NetBackup functions correctly, as follows:
For a NetBackup master server in a cluster solution otherthan WSFC, you must deploy a security certificate to allof the nodes in the cluster.
See “Deploying a security certificate on a NetBackuphost ” on page 48.
NetBackup master server clusterinstallation
For a Change Server operation to succeed, the targetNetBackup host must have a security certificate installed.
See “Deploying a security certificate on a NetBackuphost ” on page 48.
Change Server operation in theNetBackup AdministrationConsole
47Introducing NetBackup interfacesUsing the NetBackup Administration Console

To connect to a media server with the NetBackupAdministration Console, the media server must havea security certificate installed. Similarly, to connect to aNetBackup UNIX or Linux client with the Backup, Archive,and Restore user interface, the client must have asecurity certificate installed.
See “Deploying a security certificate on a NetBackuphost ” on page 48.
To use the NetBackup graphicaluser interfaces to connect tomedia servers and clients
If NBAC is enabled on a NetBackup host, it requires asecurity certificate. These certificates are automaticallydeployed when you enable NBAC.
See the NetBackup Security and Encryption Guide:
http://www.veritas.com/docs/DOC5332
NetBackup Access Control(NBAC)
The NetBackup CloudStore Service Container requiresthat a certificate be installed on the media server. If oneis not installed, the Service Container cannot start.
See the NetBackup Cloud Administrator’s Guide:
http://www.veritas.com/docs/DOC5332
For cloud storage
Deploying a security certificate on a NetBackup hostNetBackup hosts may require a security certificate for authentication for variouspurposes. If so, you must use a NetBackup command to deploy a certificate foreach host that requires one.
See “About security certificates for NetBackup hosts” on page 47.
The following are the procedures that you can use to deploy a security certificateon NetBackup hosts:
Use this procedure to deploy security certificates to all ofthe nodes in a NetBackup master server cluster. Exception:Not required for a Microsoft Windows Server FailoverCluster (WSFC) after a NetBackup push installation to theWSFC.
See To deploy a security certificate for a NetBackup masterserver in a cluster.
Deploying a security certificatefor a master server in a cluster
48Introducing NetBackup interfacesUsing the NetBackup Administration Console

This procedure uses IP address verification to identify thetarget NetBackup host and then deploy the certificate.
With this procedure, you can deploy a certificate for anindividual host, for all media servers, or for all clients.
See To deploy a security certificate for media servers orclients.
Deploying a security certificatefor media servers or clients
This procedure requires that you execute a command onthe NetBackup master server to create an identity for thetarget host. Then, you must execute a command on thetarget host to obtain the certificate from the master server.
With this procedure, you can deploy a certificate for anindividual host.
See To create a host identity and then deploy a securitycertificate for a media server or client.
Creating a host identity andthen deploying a securitycertificate for a media server orclient
Note: Deploying a security certificate is a one-time activity for a given NetBackuphost. You must be a NetBackup administrator to deploy certificates.
To deploy a security certificate for a NetBackup master server in a cluster
1 Run the following command on the active node of the master server cluster:
Windows: install_path\NetBackup\bin\admincmd\bpnbaz -setupat
UNIX: /usr/openv/netbackup/bin/admincmd/bpnbaz -setupat
2 Restart the NetBackup Service Layer service and the NetBackup Vault Managerservice on the active node of the master server.
49Introducing NetBackup interfacesUsing the NetBackup Administration Console

To deploy a security certificate for media servers or clients
1 Run the following command on the master server, depending on yourenvironment. Specify the name of an individual host, specify -AllMediaServers,or specify -AllClients.
Windows: install_path\NetBackup\bin\admincmd\bpnbaz -ProvisionCert
host_name|-AllMediaServers|-AllClients
UNIX: /usr/openv/netbackup/bin/admincmd/bpnbaz -ProvisionCert
host_name|-AllMediaServers|-AllClients
NetBackup appliance (as a NetBackupCLI user): bpnbaz -ProvisionCert
Media_server_name
2 Restart the NetBackup Service Layer service on the master server.
No services need to be restarted if the target host is a NetBackup client.
To create a host identity and then deploy a security certificate for a mediaserver or client
1 Run the following command on the master server to create an identity for thetarget NetBackup host.
Windows: install_path\NetBackup\bin\bpnbat –addmachine
target_hostname
UNIX: /usr/openv/netbackup/bin/bpnbat –addmachine target_hostname
Enter a password of your choice when prompted and make a note of it.
2 Run the following command on the target NetBackup host to obtain a certificatefrom the master server and deploy it:
Windows: install_path\NetBackup\bin\bpnbat –loginmachine
UNIX: /usr/openv/netbackup/bin/bpnbat –loginmachine
Enter the master server name as the authentication broker name whenprompted. Enter the same computer name and password that were used tocreate the target host identity on the master server.
Note: If a target host has multiple host names, repeat the steps for each hostname.
Verifying the NetBackup Certificate Authority (CA)The NetBackup Administration Console or the Backup, Archive, and Restoreuser interface communicates with NetBackup hosts (master server, media server,
50Introducing NetBackup interfacesUsing the NetBackup Administration Console

or client) over a secure channel. This channel is secured using a NetBackup hostsecurity certificate that is issued by the NetBackup Certificate Authority (CA).
The following message displays when you attempt to connect to a NetBackup hostwhose security certificate was issued by a CA that is not in your NetBackup truststore.
Note: Once you trust the CA certificate, the message is not displayed again whenyou connect to any NetBackup host in the same NetBackup domain.
The authenticity of the Certificate Authority can be verified using the followingprocedure:
51Introducing NetBackup interfacesUsing the NetBackup Administration Console

To verify the NetBackup Certificate Authority
1 Log in to the AT Broker host (master server) that owns this certificate and runthe following command:
On Windows:
install_path\NetBackup\sec\at\bin\ vssat showcred -p nbatd
On UNIX:
/usr/openv/netbackup/sec/at/bin/vssat showcred –p nbatd
The details of the root CA certificate are displayed.
2 Check the output to confirm that the Certificate Hash matches the RootCertificate Authority fingerprint that is contained in the message.
For example, if the Root Certificate Authority fingerprint in the messagedisplays the following fingerprint:
15:8D:CA:81:B6:2A:DC:8D:08:08:08:08:08:08:08:08:08:08:08:08
The Certificate Hash field should display the following:158dca81b62adc8d0a528381ca24cb22b6d92508
Verifying a security certificateUse the following procedure to verify that NetBackup security is deployed.
52Introducing NetBackup interfacesUsing the NetBackup Administration Console

To verify the security certificate
1 Check the contents of the follwing directory on the NetBackup host:
On Windows:
install_path\NetBackup\var\VxSS\credentials
On UNIX:
/usr/openv/var/vxss/credentials
The directory might list multiple certificate files. A single host can have acertificate for each name that it is referred to as.
For example, the NetBackup host can have a fully qualified name(v-123.acme.com) or it can also be referred to as v-123. The host would havetwo certificates.
2 for each certificate file, run the following command to view the details of thecertificate:
Note: Expired or invalid certificates can cause connection failures.
On Windows
install_path\NetBackup\bin\bpnbat -whoami -cf file_name
On UNIX:
/usr/openv/netbackup/bin/bpnbat -whoami -cf file_name
For example, bpnbat -whoami –cf v-123.acme.com
Verify the contents of the certificate. If both the host name and the expirationdate of the certificate are correct, the certificate is valid. If the certificate hasexpired, you must generate a new certificate.
Standard and user toolbarsUpon opening theNetBackupAdministrationConsole, a standard toolbar appearsby default.
When certain utilities are selected, a user toolbar appears. The buttons on thetoolbar provide shortcuts for menu commands. Slowly drag the pointer over a buttonto display a button description label.
To display or hide the standard NetBackup toolbar, click View > Toolbar.
53Introducing NetBackup interfacesUsing the NetBackup Administration Console

About customizing the NetBackup Administration ConsoleThe View menu contains options to customize the NetBackup AdministrationConsole.
For example, the Options selection opens a series of tabs that contain variousconfiguration options for the different utilities.
Select the Administration Console tab or the Administrative Options tab toconfigure the Auto log off timeout option. Use this option to automatically log auser out of the NetBackup Administration Console after a period of inactivity.
Click Help for more information about the dialog box options.
Configuring log files for the NetBackup Administration ConsoleYou can configure the logging options for theNetBackup Administration Console.
Most of the logging options degrade NetBackup Administration Consoleperformance and may write large amounts of data to the log files, possiblyfilling up the file system. Consider the following items that may help preventfilling up the file system on which NetBackup is installed:
■ Use an environment variable named JNB_LOG as follows:■ Set the variable to a log file pathname on a file system that has enough
space for the log files.Delete the environment variable when you stop logging NetBackupAdministration Console information.
■ On UNIX, set the variable to /dev/tty. The /dev/tty setting writesthe log information to the console window.
■ On UNIX: Use the -l option to the jnbSA or jbpSA command to specifyone of the following settings:■ To a log file pathname on a file system that has enough space for the
log file.■ To /dev/tty. The /dev/tty setting writes the log information to
the console window.
Caution
The log file directories and names are described in a different topic.
See “NetBackup Administration Console log files” on page 55.
To configure logging for the NetBackup Administration Console
1 In the NetBackup Administration Console, click View > Options to openthe Options dialog box.
2 Click the Logging tab.
3 Select the information that you want to write to the log file:
54Introducing NetBackup interfacesUsing the NetBackup Administration Console

Enable this option to capture the output from the commands thatthe NetBackup-Java application server (bpjava-susvc) runs.
See “About the Processes tab” on page 1057.
Note: The output from each command instance is limited to 500lines in the log file.
Enable commandlogs
Enable this option to capture command-line activity into the logfile. NetBackup writes information about the commands that residein the following directories:
■ Windows:■ install_path\Veritas\NetBackup\bin
■ install_path\Veritas\NetBackup\bin\admincmd
■ install_path\Veritas\Volmgr\bin
■ UNIX:■ /usr/openv/netbackup/bin
■ /usr/openv/netbackup/bin/admincmd
■ /usr/openv/volmgr/bin
Note: The NetBackup Administration Console often uses APIsand not the NetBackup commands to get data or update data. Inthose cases, information is not written to the log file.
Enable commandline logs
Enable this option to include a timestamp when NetBackup writesinformation to the log file.
Add date andtimestamp to logs
Enable this option to capture logging information from theNetBackup Activity Monitor.
Enable job trylogs
Use this option to set the verbosity of the logs. Five (5) is thehighest logging level.
Verbosity
4 Click OK.
See “Using the NetBackup Administration Console” on page 43.
NetBackup Administration Console log filesThe NetBackup Administration Console writes information into log files in thefollowing directories:
55Introducing NetBackup interfacesUsing the NetBackup Administration Console

install_path\NetBackup\logs\user_ops\nbjlogs
For the NetBackup Remote Administration Console, the log filesare in the following directory:
install_path\Veritas\Java\logs
Windows
/usr/openv/netbackup/logs/user_ops/nbjlogsUNIX
The log file names have the following format:
jbp.yyyymmddthhtmmtssths.log
The log files always begin with jbp. The following items describe theother components of the log file name:
■ yyyy: Year■ mm: Month■ dd: Day■ thh: Hour■ tmm: Minute■ tss: Second■ ths: Half-second
The following is an example:
jbp.201504149323710.log
Windows
jbp.`whoami`.gui.$$.log
The log files always begin with jbp. The following items describe theother components of the log file name:
■ gui: Either jpbSA (Backup, Archive, and Restore interface) orjnbSA (NetBackup Administration Console).
■ $$: The ID of the process for which log information was written whenthe log file was created.
The following is an example:
jbp.root.jnbSA.6156.log
UNIX
NetBackup creates a new log file when the current log file reaches a certain size.The size varies depending on many factors. Those factors include the number ofjobs that are active, the amount of activity the Administration Console performs,and others.
Log file retention corresponds to the retention level that you can configure in themaster server host properties Logging screen.
See “Logging properties” on page 170.
56Introducing NetBackup interfacesUsing the NetBackup Administration Console

See “Configuring log files for the NetBackup Administration Console” on page 54.
NetBackup configuration wizardsThe easiest way to configure NetBackup is to use the configuration wizards availablein the NetBackup Administration Console. The wizards help configure theproperties of a NetBackup environment.
The wizard selection varies in the pane on the right, depending on which NetBackuputility is selected in the left of the screen.
Table 1-3 Configuration wizards
DescriptionWizard
Configures NetBackup for the first time. The wizard leads the user through thenecessary steps to a working NetBackup configuration.
The Getting Started Wizard is comprised of the following wizards, which can alsobe run separately, outside of the Getting Started Wizard:
■ Device Configuration Wizard■ Volume Configuration Wizard■ Catalog Backup Wizard■ Policy Configuration Wizard
Configure more advanced properties through the individual utilities.
Note: Do not use the Getting Started Wizard to configure policies for ReplicationDirector.
Getting Started Wizard
Click Configure Storage Devices to configure NetBackup to use robotic tapelibraries and tape drives.
Device Configuration Wizard
Click Configure Disk Storage Servers to create the servers that manage diskstorage.
The wizard appears if a NetBackup Data Protection Optimization Option licenseis installed.
Storage Server ConfigurationWizard
Click Configure Cloud Storage Servers to add or configure a cloud provider.
For more information, see the NetBackup Cloud Administrator's Guide.
Cloud Storage ServerConfiguration Wizard
Click Configure Disk Pool to create pools of disk volumes for backup by one ormore media servers.
The wizard appears if a NetBackup Data Protection Optimization Option licenseis installed.
Disk Pool Configuration Wizard
Click Configure Volumes to configure removable media to use for backups.Volume Configuration Wizard
57Introducing NetBackup interfacesNetBackup configuration wizards

Table 1-3 Configuration wizards (continued)
DescriptionWizard
ClickConfigure the Catalog Backup to set up catalog backups. Catalog backupsare essential to recover data in the case of a server failure or crash.
Catalog Backup Wizard
Click Create a Policy to set up one of the policy types:
■ A policy to back up file systems, databases, or applications.■ A policy to protect VMware or Hyper-V virtual machines.■ A policy to back up NDMP hosts.■ A policy to back up Oracle data.
Note: Do not use the Policy Configuration Wizard to configure policies forReplication Director.
Policy Configuration Wizard
This wizard is available only on computers running Windows. Click Import Imagesto import NetBackup images in a two-part process.
See “About importing backup images” on page 987.
Import Images Wizard
Click Recover the Catalog to recover a catalog backup in a disaster recoverysituation.
For more information about NetBackup disaster recovery, see the NetBackupTroubleshooting Guide.
Catalog Recovery Wizard
Running the TroubleshooterWhen a NetBackup job returns a status code, use the Troubleshooter to find adescription of the problem and a recommended solution. The Troubleshooter isparticularly useful for understanding the status of a job in the Activity Monitor orin the Reports utility.
To run the Troubleshooter
1 In the NetBackup Administration Console, do one of the following:
■ In the left pane, click Activity Monitor.■ In the right pane, select the Jobs tab at the bottom
of the pane.■ Select a job from the list.
To understand the status of ajob in the Activity Monitor
58Introducing NetBackup interfacesRunning the Troubleshooter

■ In the left pane, expand NetBackup Management> Reports.
■ In the left pane, click the name of the report you wantto run.For some reports, you must first expand a reportgroup, and then click the name of the report.
■ In the right pane, click Run Report.■ Select a job from the list that is generated.
To understand the status of ajob in a report
Go to step 2.To look up a status code
2 Click Help > Troubleshooter.
The dialog box that appears describes the status code on the Problem tab.Possible solutions can be found on the Troubleshoot tab. The Veritas Supporttab displays the web address of Veritas Support or the URL to a tech note thataddresses the specific error code.
3 If no explanation appears, enter a status code and click Lookup.
The Troubleshooter provides assistance for NetBackup codes only. Assistancewith Media and Device Management codes is available by using NetBackuponline Help and searching for the particular status code.
See “Viewing job details in the Activity Monitor” on page 1040.
See “About the Jobs tab” on page 1038.
See “Copying report text to another document” on page 1078.
See “Printing a report” on page 1079.
See “Saving or exporting a report” on page 1079.
59Introducing NetBackup interfacesRunning the Troubleshooter

Administering NetBackuplicenses
This chapter includes the following topics:
■ About administering NetBackup licenses
About administering NetBackup licensesLicense keys are added when the software is installed. Licenses can be added laterin the License Key dialog box for separately-priced options.
Note: Restart the NetBackup Administration Console after any license updates.
Note: Perform a manual catalog backup after the license keys are updated.
An immediate, manual catalog backup prevents stale keys from being restored incase a catalog restore is necessary before the next scheduled catalog backup.
See “Backing up NetBackup catalogs manually” on page 899.
Perform the following tasks from the NetBackup License Keys dialog box:
Adding NetBackup license keysAdd a new license.
Printing a NetBackup license key listPrint a license.
Deleting NetBackup license keysDelete a license.
Viewing NetBackup license key propertiesView the properties of onelicense.
2Chapter

Exporting NetBackup license keysExport the license list.
On computers running UNIX, the license key utility is a menu-driven interface andcan also be used to access licenses.
Starting the NetBackup license key utility on a UNIX computer
Accessing license keys for a NetBackup serverUse the following procedure to access license keys for a NetBackup server.
To access license keys for a NetBackup server
1 To view the license keys of the current server:
In theNetBackupAdministrationConsole, in the toolbar, clickHelp > LicenseKeys.
To view the license keys of another server:
Select File > Change Server. Click OK to launch a new console. Enter thehost name of another server. Enter a user name and password and click Login.In the new console, select Help > License Keys.
2 Select the license details to view as follows:
Displays a summary of the active features that are licensed onthis server. This view lists each feature and the number ofinstances of the feature that are licensed.
Summary ofactive licensedfeatures
Displays the details of the license keys that are registered on thisserver.
The view lists the following:
■ Each license key■ The server where the key is registered■ When the key was registered,■ The features that the key provides
All registeredlicense keysdetails
Adding NetBackup license keysUse the following procedure to add NetBackup license keys to the selected server.
To add new license keys to the selected server
1 In the toolbar in theNetBackupAdministration Console, clickHelp > LicenseKeys.
2 Click New.
61Administering NetBackup licensesAbout administering NetBackup licenses

3 Enter the license key and click Add or OK.
If you added a license on a computer running UNIX, restart all of the NetBackuputilities. Restart the NetBackup Administration Console as well.
4 Perform a manual catalog backup after the license keys are updated.
An immediate, manual catalog backup prevents stale keys from being restoredin case a catalog restore is necessary before the next scheduled catalogbackup.
See “Backing up NetBackup catalogs manually” on page 899.
You can add license keys to a different NetBackup server:
Select File > Change Server. Click OK to launch a new console. Enter the hostname of another server. Enter a user name and password and click Login. In thenew console, select Help > License Keys.
Printing a NetBackup license key listUse the following procedure to print a list of license keys that are installed on aNetBackup server.
To print a list of license keys
1 In the toolbar in theNetBackupAdministration Console, clickHelp > LicenseKeys.
2 Select the license key you want to print. If no selection is made, all licensesprint.
The printed information includes the following:
■ License key
■ Name of the host
■ Date the key was added
■ Name of the product
■ Number of instances
■ Name of the feature
■ Whether or not the license is valid
■ Expiration date for the license
3 Click Print.
4 Make the print selections and click OK.
62Administering NetBackup licensesAbout administering NetBackup licenses

Deleting NetBackup license keysUse the following procedure to delete a license key that is installed on a NetBackupserver.
To delete a license key
1 In the toolbar in theNetBackupAdministration Console, clickHelp > LicenseKeys.
2 Select the license key you want to delete from the license key list. If the keyhas more than one feature, all the features are listed in the dialog box.
3 Click Delete.
4 Click OK or Yes to delete the key and all features that are associated with thekey. The license key cannot be restored.
If you deleted a license on a computer running UNIX, restart all of theNetBackup utilities. Restart the NetBackup Administration Console as well.
Viewing NetBackup license key propertiesUse the following procedure to view the properties of a NetBackup license key.
To view the properties of a NetBackup license key
◆ In the toolbar in theNetBackupAdministration Console, clickHelp > LicenseKeys.
Select one license and click Properties.
Exporting NetBackup license keysUse the following procedure to export NetBackup license keys.
To export NetBackup license keys
1 In the toolbar in theNetBackupAdministration Console, clickHelp > LicenseKeys.
2 Click Export.
3 Enter the path and the file name where you want the key properties of alllicenses to be exported.
4 Click Save.
The exported file contains a list of each license key, along with the:
■ Name of the host
■ Date the license was added
■ Name of the product
63Administering NetBackup licensesAbout administering NetBackup licenses

■ Number of instances
■ Name of the feature
■ Whether or not the license is valid
■ Expiration date for the license
Starting the NetBackup license key utility on a UNIXcomputerUse the following procedure to start the NetBackup license key utility on a computerrunning UNIX.
To start the NetBackup license key utility on a computer running UNIX
1 From the command line, run/usr/openv/netbackup/bin/admincmd/get_license_key
2 At the prompt, enter one of the following menu selections, then press Enter:
■ Type A to add a new license key, then type the license key at the prompt.
■ Type D to delete a license from the list, then type the license key at theprompt.
■ Type F to list only the licenses that are currently active. Expired licensesdo not appear in this listing. Specify a local or a remote host.
■ Type L to list all registered licenses—active or inactive. Specify a local ora remote host.
■ Type H for help on the License Key Utility.
■ Type q to quit the utility.
64Administering NetBackup licensesAbout administering NetBackup licenses

Configuring hosts
■ Chapter 3. Configuring Host Properties
■ Chapter 4. Configuring server groups
■ Chapter 5. Configuring host credentials
■ Chapter 6. Managing media servers
2Section

Configuring HostProperties
This chapter includes the following topics:
■ About the NetBackup Host Properties
■ Access Control properties
■ Active Directory host properties
■ Bandwidth properties
■ Busy File Settings properties
■ Clean-up properties
■ Client Name properties
■ Client Attributes properties
■ Client Settings properties for UNIX clients
■ Client Settings properties for Windows clients
■ Credential Access properties
■ Data Classification properties
■ Default Job Priorities properties
■ Distributed application restore mapping properties
■ Encryption properties
■ Enterprise Vault properties
3Chapter

■ Enterprise Vault Hosts properties
■ Exchange properties
■ Exclude Lists properties
■ Fibre Transport properties
■ Firewall properties
■ General Server properties
■ Global Attributes properties
■ Logging properties
■ Login Banner Configuration properties
■ Lotus Notes properties
■ Media properties
■ NDMP Global Credentials properties
■ Network properties
■ Network Settings properties
■ Port Ranges properties
■ Preferred Network properties
■ Resilient Network properties
■ Resource Limit properties
■ Restore Failover properties
■ Retention Periods properties
■ Scalable Storage properties
■ Servers properties
■ SharePoint properties
■ SLP Parameters properties
■ Throttle Bandwidth properties
■ Timeouts properties
■ Universal Settings properties
67Configuring Host Properties

■ User Account Settings properties
■ UNIX Client properties
■ UNIX Server properties
■ VMware Access Hosts properties
■ Windows Client properties
■ Configuration options not found in the Host Properties
■ About using commands to change the configuration options on UNIX clientsand servers
■ Configuration options for NetBackup servers
■ Configuration options for NetBackup clients
About the NetBackup Host PropertiesThe configuration options within theHost Properties let an administrator customizeNetBackup to meet specific site preferences and requirements.
In most NetBackup environments, the Host Properties default settings providesatisfactory results and can be left at the default setting.
Figure 3-1 shows theHost Properties in theNetBackup Administration Console.
Figure 3-1 Host Properties utility in theNetBackupAdministrationConsole
1
2
3
4
5
68Configuring Host PropertiesAbout the NetBackup Host Properties

Table 3-1 Host Properties utility
DescriptionNumber
The menu toolbar.1
The standard NetBackup toolbar.
See “Standard and user toolbars” on page 53.
2
The name of the currently selected master server.3
The user toolbar is specific to the Host Properties utility.
By default, the Host Properties user toolbar includes the following buttons:
■ Select a host in the right pane and click Connect to connect to that host.■ Select a host in the right pane and click Properties to view the properties of
that host.See “Connecting to a host to view the host properties” on page 70.
■ ClickConfiguremedia server to name a media server and view its properties.■ Click Configure Client to name a client and view its properties.
You can select which buttons appear on the user toolbar.
See “Standard and user toolbars” on page 53.
4
Right-click in the right pane to view the shortcut menu.5
To change the properties of another client or server, the NetBackup server whereyou logged on using the NetBackup Administration Console must be in theServers list on the other system.
See “Servers properties” on page 236.
See “Allow access to another server” on page 1121.
For example, if you logged on to server_1 using the NetBackup AdministrationConsole and want to change a setting on client_2, client_2 must include server_1in its Servers list.
Note: All updates to a destination host fail if Allow server file writes is not enabledon the destination host. This property is located in theUniversal Settings properties.
See “Universal Settings properties” on page 258.
Generally, these options are configured in theNetBackupAdministration Console,under Host Properties. However, some options cannot be configured by using theNetBackup Administration Console.
See “Configuration options not found in the Host Properties” on page 268.
69Configuring Host PropertiesAbout the NetBackup Host Properties

Methods to set the NetBackup configuration optionsA NetBackup administrator can use one of the following methods to read or set thedefault configuration options or to change those options that do not appear in theHost Properties:
Table 3-2 NetBackup Host Properties configuration methods
DescriptionMethod
Most properties are listed in the NetBackup Administration Console in the HostProperties. To navigate to the various properties, select NetBackup Management >Host Properties. Depending on the host to be configured, select Master Servers,Media Servers, or Clients.
See “About the NetBackup Host Properties” on page 68.
NetBackup AdministrationConsole interface
Use the nbgetconfig command or bpgetconfig command to obtain a list ofconfiguration entries. Then use nbsetconfig or bpsetconfig to change the optionsas needed.
These commands update the appropriate configuration files on both Windows (registry)and UNIX (bp.conf file) master servers and clients.
Use the nbemmcmd command to modify some options on hosts.
Detailed information on these commands is available in the NetBackup CommandsReference Guide.
Command line
The vm.conf file contains configuration entries for media and device management.
See the NetBackup Administrator's Guide, Volume II for more information.
vm.conf file
Administrators can specify configuration options for NetBackup clients.
See the NetBackup Backup, Archive, and Restore Getting Started Guide.
Backup, Archive, andRestore client interface
Connecting to a host to view the host propertiesTheNetBackupAdministrationConsole displays properties for NetBackup masterservers, media servers, and clients under Host Properties.
Use the following procedure to connect and view host properties of master server,media server, or client.
To connect and view host properties of master server, media server, or client
1 In theNetBackupAdministrationConsole, expandNetBackupManagement> Host Properties.
2 In the left pane, select Master Servers, Media Servers, or Clients.
3 In the right pane, perform one of the following to connect to a host:
70Configuring Host PropertiesAbout the NetBackup Host Properties

■ Highlight the host by selecting the row. The host is connected after a delayof approximately 3 seconds. If you select multiple rows, connection to thehosts is not established.
■ Right-click a host and selectConnect. If you select multiple rows right-clickand select Connect by pressing the Ctrl key, connection to all the hosts isestablished. If the host is already connected, the Connect option is gray.
Note: When you double-click a host that is not connected to view its hostproperties, an intermittent Loading Data dialog box is displayed. This dialogbox contains an Interrupt option. When you click Interrupt, the Loading Datadialog box closes. The connection to the host continues in the background.However, the Host Properties dialog box is not displayed.
Changing the host properties on multiple hosts at the same timeYou can change the host properties for multiple hosts at one time. This can be doneby one of the following procedures:
■ Changing multiple hosts in the Host Properties
■ Changing multiple hosts in the Policies utility
Changing multiple hosts in the Host PropertiesTo simultaneously change the properties on multiple hosts
1 In theNetBackupAdministrationConsole, expandNetBackupManagement> Host Properties.
2 Select Master Server, Media Server, or Clients.
3 In the right pane, select a host. Hold down the Shift key and select anotherhost.
4 With multiple hosts still selected, click Actions > Properties.
The properties dialog box displays the names of the selected hosts that areaffected by subsequent host property changes.
71Configuring Host PropertiesAbout the NetBackup Host Properties

The following information about each selected host appears:
■ Server or client name
■ Operating system
■ Type of computer in the configuration
■ Identifier
■ IP address
5 Make changes as necessary.
6 Click OK to save the changes for all hosts and to close the dialog box.
Changing multiple hosts in the Policies utilityTo simultaneously change the properties on multiple hosts from Summaryof All Policies
1 In theNetBackup Administration Console, navigate to Policies > Summaryof All Policies in the middle pane.
2 Under Summary of All Policies, expand Clients.
3 In the right pane, hold down the Shift key to select multiple clients.
4 With multiple hosts still selected, right-click and select Host Properties.
5 Change the client properties in the dialog box.
6 Click OK to apply the changes to all hosts and to close the dialog box.
Property states for multiple hostsTheHost Properties dialog boxes use the following conventions regarding multiplehost selections:
72Configuring Host PropertiesAbout the NetBackup Host Properties

If a dialog box contains a Selected Host (or similarly named)box, all controls reflect the values for the host currentlyselected in the Selected Host box.
If a dialog box does not contain a Selected Host (or similarlynamed) box, settings of all the selected hosts are combinedto arrive at a value that is displayed to the user.
Title of dialog box
When multiple hosts are selected, no options appear selected.Selecting any option updates the setting on all selected hosts.To leave each host configured independently, do not selectany option while multiple hosts are selected.
Option selection
When multiple hosts are selected, number spinners appearblank. Selecting any value updates the setting on all selectedhosts. To leave each host configured independently, do notselect any option while multiple hosts are selected.
Number spinners
The host property check boxes may appear in one of thefollowing states:
■ Selected (checked) if the attribute has been set the samefor all selected hosts. To set the property on all selectedhosts, select the check box.
■ Clear (unchecked) if the property has been set the samefor all selected hosts. To clear the property on all selectedhosts, clear the check box.
■ Gray check if the property is set differently on the selectedhosts. To leave the property unchanged, set the box to agray check.
Check box states
If the property contains a text field for specifying a value, thefield may be in one of the following states:
■ The field may contain a value if the property has the samevalue for all selected hosts.
■ The field may be empty or indicate <<Multiple Entries>>if the property was not set the same for all selected hosts.In this case, when the cursor is moved a field, a smallnotice appears at the bottom of the dialog box noting thatthe value is different on the selected hosts.
Edit field states
Note: In a clustered environment, host properties must be made on each node ofthe cluster separately.
If the focus is on a setting that is set differently between the selected hosts, thefollowing statement appears at the bottom of the dialog box:
73Configuring Host PropertiesAbout the NetBackup Host Properties

This value is different on the selected hosts.
This notice is especially helpful regarding differences in text field settings.
If the selected hosts are of various operating systems, none of the operatingsystem-specific information appears.
For example, select a Linux client and a Windows client. Neither the WindowsClient properties nor the UNIX Client properties appear in the Host Properties. Ifall the selected hosts are of the same operating system, the corresponding propertiesnode appears.
Exporting host propertiesUse the following procedure to export the properties of a host.
To export the properties of a host
1 In theNetBackupAdministrationConsole, expandNetBackupManagement> Host Properties > Master Servers, Media Servers, or Clients.
2 Select a host. If you want to select multiple hosts, hold down the Shift key andselect another host.
3 Click File > Export.
4 In the Export dialog box, name the file, browse to the directory where you wantto save it, and click Save.
Standard host property dialog box optionsThe following options are available in every host property dialog box.
Click Defaults to set all the properties in the current dialogbox to the default values.
Note: If you have enabled the Logging for critical processesoption on the Logging properties dialog box, clicking theDefaults button does not modify the Logging for criticalprocesses and Keep logs up to GB options.
While changing the logging properties for multiple hosts, ifthe Logging for critical processes option on one of the hostsis enabled, clicking the Defaults button does not modify theLogging for critical processes and Keep logs up to GB optionsof any host.
See “Logging properties” on page 170.
Defaults
74Configuring Host PropertiesAbout the NetBackup Host Properties

Click OK to apply all changes since Apply was last clicked.OK also closes the dialog box.
OK
Click Cancel to cancel the changes that were made sincethe last time changes were applied.
Cancel
Click Apply to save changes to all of the properties for theselected host(s).
Apply
Click Help for information on the properties that appear inthe current dialog box.
Help
Access Control propertiesUse theAccessControl host properties in theNetBackupAdministrationConsoleto configure NetBackup Authentication and Authorization. The properties apply tocurrently selected master servers, media servers, and clients.
The following tabs may display:
■ Authentication Domain tabSee “Authentication Domain tab of the Access Control properties” on page 76.
■ Authorization Service tabSee “Authorization Service tab of the Access Control properties” on page 78.
■ Network AttributesSee “Network Attributes tab of the Access Control properties” on page 79.
The tabs that display depend on whether the host that is selected is a master server,a media server, or a client.
The NetBackup Product Authentication and Authorization property displays,regardless of which tab is selected. It determines whether the local system usesaccess control and how the system uses it.
The NetBackup Product Authentication and Authorization property containsthe following options.
Table 3-3 NetBackup Product Authentication and Authorization propertyoptions
DescriptionOption
Specifies that the local system should accept requests only from the remote systems that useNetBackup authentication and authorization. Connections from the remote systems that do notuse NetBackup authentication and authorization are rejected. Select Required if all systemsare at NetBackup 5.0 or later and maximum security is required.
Required
75Configuring Host PropertiesAccess Control properties

Table 3-3 NetBackup Product Authentication and Authorization propertyoptions (continued)
DescriptionOption
Specifies that the local system should reject connections from any remote system that usesNetBackup authentication and authorization. Select Prohibited if the network is closed andmaximum performance is required.
Prohibited
Specifies that the local system should negotiate with the remote system about whether to useNetBackup authentication and authorization. Select Automatic if the network contains mixedversions of NetBackup.
Automatic
For more information about controlling access to NetBackup, see the NetBackupSecurity and Encryption Guide.
Authentication Domain tab of the Access Control propertiesThe Authentication Domain tab contains the properties that determine whichauthentication broker a computer uses. A master server that uses NetBackupauthentication and authorization must have at least one authentication domainentry.
76Configuring Host PropertiesAccess Control properties

Figure 3-2 Authentication Domain tab
If a media server or client does not define an authentication domain, it uses theauthentication domains of its master server.
The Authentication Domain tab on the Access Control dialog box contains thefollowing properties.
Table 3-4 Authentication Domain tab properties
DescriptionProperty
Select a broker, then click Find to list all ofthe available authentication domains.
Available Brokers
List of available authentication domains.Available Authentication Domains list
Select the authentication domain(s) that thishost can use and click Add.
Add button
List of the authentication domains that areselected for the host to use.
Selected Authentication Domains list
77Configuring Host PropertiesAccess Control properties

Table 3-4 Authentication Domain tab properties (continued)
DescriptionProperty
Select the authentication domain(s) that youno longer want to use and click Remove.
Remove button
Authorization Service tab of the Access Control propertiesThe Authorization Service tab refers to the authorization service that the localNetBackup server uses. The Authorization Service tab does not appear as aproperty for clients.
Figure 3-3 Authorization Service tab
The Authorization Service tab contains the following properties, which you canconfigure for a master or a media server.
78Configuring Host PropertiesAccess Control properties

Table 3-5 Authorization Service property options
DescriptionOption
Specifies the host name or IP address of the authorization service.Host name
Specifies a nonstandard port number. Select Customize the portnumber and enter the port number of the authorization service.
Customize the port number of theauthorization service
Note: Define a host to perform authorization if you configure this tab for a mediaserver to use access control.
Network Attributes tab of the Access Control propertiesThe Network Attributes tab contains a list of networks that are allowed (or notallowed) to use NetBackup authentication and authorization with the local system.
Figure 3-4 Network Attributes tab
79Configuring Host PropertiesAccess Control properties

The Network Attributes tab on the Access Control dialog box contains thefollowing properties:
The Networks property indicates whether specific networks can or cannot use NetBackupauthentication and authorization with the local system. The names on the list are relevantonly if the NetBackup Product Authentication and Authorization property in the AccessControl dialog box is set to Automatic or Required.
Veritas recommends setting the master server NetBackup Product Authentication andAuthorization property toAutomatic until the clients are configured for access control. Then,change theNetBackup Product Authentication and Authorization property on the masterserver to Required.
If a media server or client does not define a NetBackup Authentication and Authorizationnetwork, it uses the networks of its master server.
Click Add to add a network to the Network list.
Click Add to All to add a network to all currently selected hosts in the Network list.
Select a network name and click Remove to remove a network from the Network list.
Networks
TheNetBackup Product Authentication and Authorization property in this tab determineswhether the selected network uses access control and how the network uses it.
See “Access Control properties” on page 75.
NetBackup ProductAuthentication andAuthorizationproperty
Add Network dialog boxThe Add Network dialog box contains the following properties.
Table 3-6 Add Network dialog box properties
DescriptionProperty
Indicates whether the network to be added is a Host name or a Domain name.Host/Domain
Specifies that if the network is a host, one of the following items must be entered:
■ The host name of the remote system. (host.domain.com)■ The IP address of the remote system. (10.0.0.29)
Host Details
80Configuring Host PropertiesAccess Control properties

Table 3-6 Add Network dialog box properties (continued)
DescriptionProperty
■ Domain Name/IPEnter a dot that is followed by the Internet domain name of the remote systems. (.domain)or the network of the remote system, followed by a dot. (10.0.0.)
■ If the domain is specified by IP, select one of the following items:■ Bit count
Indicates that the mask is based on bit count. Select from between 1 and 32.For example: Mask 192.168.10.10/16 has the same meaning as subnet mask192.168.20.20:255:255:0.0
■ Subnet maskSelect to enter a subnet mask in the same format as the IP address.
Domain Details
Figure 3-5 Add Network dialog box
Active Directory host propertiesTheActive Directory properties in theNetBackup Administration Console applyto the backup of currently selected Windows Server 2008 clients. The ActiveDirectory properties determine how the backups that allow Active Directory granularrestores are performed.
See “Creating a policy that allows Active Directory granular restores” on page 858.
81Configuring Host PropertiesActive Directory host properties

Figure 3-6 Active Directory dialog box
The Active Directory dialog box contains the following properties.
Table 3-7 Active Directory dialog box properties
DescriptionProperty
Checks snapshots for data corruption. Applies only to snapshots thatthe Microsoft Volume Shadow Copy Services (VSS) performs.
If corrupt data is found and this option is not selected, the job fails.
See “Windows Open File Backup tab of the Client Attributesproperties” on page 101.
Perform consistency check before backupwhen usingMicrosoft Volume ShadowCopyService snapshot provider
Continues the backup job even if the consistency check fails.
It may be preferable for the job to continue, even if the consistencycheck fails. For example, a backup of the database in its current statemay be better than no backup at all. Or, it may be preferable for thebackup of a large database to continue if it encounters only a smallproblem.
Continue with backup if consistency checkfails
82Configuring Host PropertiesActive Directory host properties

Bandwidth propertiesUse theBandwidth properties to specify network bandwidth limits for the NetBackupclients of the selected server.
Note: The Bandwidth properties apply only to IPv4 networks. Use the ThrottleBandwidth properties to limit IPv6 networks.
See “Throttle Bandwidth properties” on page 254.
The actual limiting occurs on the client side of the backup connection. The bandwidthlimits only restrict bandwidth during backups. By default, the bandwidth is not limited.
The Bandwidth properties apply to currently selected master servers.
Figure 3-7 Bandwidth dialog box
To manage entries in the Bandwidth dialog box, select one of the following buttons.
Adds an entry to the bandwidth table for each of the selected clients.Add
83Configuring Host PropertiesBandwidth properties

Changes an entry to the bandwidth table for each of the selectedclients.
Change
Removes the selected entry from the bandwidth table.Remove
When a backup starts, NetBackup reads the bandwidth limit configuration asconfigured in the Bandwidth host properties. NetBackup then determines theappropriate bandwidth value and passes it to the client. NetBackup computes thebandwidth for each new job based on the number of jobs that are currently runningfor the IP range. The bandwidth value that is assigned to the job at start time remainsthe same until the job is completed.NetBackup does not include local backups inits calculations.
The NetBackup client software enforces the bandwidth limit. Before a buffer iswritten to the network, client software calculates the current value for kilobytes persecond and adjusts its transfer rate if necessary.
Bandwidth limit usage considerations and restrictionsSome usage restrictions apply to the bandwidth limit settings in the Bandwidthdialog box. The following table lists the restrictions and describes the specificbehaviors that you may need to consider.
Table 3-8 Bandwidth limit usage considerations and restrictions
Bandwidth limit behavior orrestrictions
Client or operation
Bandwidth limit is meant primarily for filesystem backups using Standard andMS-Windows policies. It is not implementedfor most other policy and client types.
■ Standard■ MS-Windows
If a server is also a client and data does notgo over the network, bandwidth limits haveno effect on local backups.
Local backups
Bandwidth limits restrict maximum networkusage and do not imply required bandwidth.For example, if you set the bandwidth limitfor a client to 500 kilobytes per second, theclient can use up to that limit. It does notmean, however, that the client requires 500kilobytes per second.
Setting required bandwidth
84Configuring Host PropertiesBandwidth properties

Table 3-8 Bandwidth limit usage considerations and restrictions (continued)
Bandwidth limit behavior orrestrictions
Client or operation
You cannot use bandwidth limits to distributethe backup workload of active backups byhaving NetBackup pick the most availablenetwork segment. NetBackup does not pickthe next client to run based on any configuredbandwidth limits.
Distributing the workload of active backups
Add Bandwidth Settings dialog box for Bandwidth propertiesThe Add Bandwidth Settings and the Change Bandwidth Settings dialog boxescontain the following properties.
Specifies the beginning of the IP address range of theclients and networks to which the entry applies. Forexample: 10.1.1.2
From Host
Specifies the end of the IP address range of the clientsand networks to which the entry applies. For example:10.1.1.9
To Host
Specifies the bandwidth limitation in kilobytes per second.A value of 0 disables the limits for an individual client orthe range of IP addresses covered by the entry. Forexample, a value of 200 indicates 200 kilobytes per second.
Bandwidth (KB/Sec)
Busy File Settings propertiesThe Busy File Settings properties in the NetBackup Administration Consoleapply to currently selected UNIX clients. The Busy File Settings properties definewhat occurs when NetBackup encounters a busy file during a backup of a UNIXclient.
85Configuring Host PropertiesBusy File Settings properties

Figure 3-8 Busy File Settings dialog box
The Busy File Settings dialog box contains the following properties.
Table 3-9 Busy File Settings dialog box properties
DescriptionProperty
Specifies the path to the busy-files working directory. On a UNIX client, the value in theuser’s $HOME/bp.conf file takes precedence if it exists. By default, NetBackup createsthe busy_files directory in the /usr/openv/netbackup directory.
Working directory
Specifies the recipient of the busy-file notification message when the action is set to Sendemail. By default, the mail recipient is the administrator. On a UNIX client, the value in theuser’s $HOME/bp.conf file takes precedence if it exists. By default,BUSY_FILE_NOTIFY_USER is not in any bp.conf file and the mail recipient is root.
Operator's emailaddress
Enables busy files to be processed according to the host property settings. NetBackupfollows the Busy File Settings if it determines that a file changes during a backup. Bydefault, Process busy files is not enabled and NetBackup does not process the busy files.
Additional information about busy file processing is available in the NetBackupAdministrator’s Guide, Volume II.
Process busy files
86Configuring Host PropertiesBusy File Settings properties

Table 3-9 Busy File Settings dialog box properties (continued)
DescriptionProperty
Specifies the absolute path and file name of the busy file. The metacharacters *, ?, [], [ - ]can be used for pattern matching of file names or parts of file names.
File action file list
Adds a new file entry. Enter the file and path directly, or browse to select a file.Add
Adds a new file entry for all of the clients currently selected. Enter the file and path directly,or browse to select a file.
Add to All
Removes the selected file from the file action list.Remove
The following options specify which action to take when busy-file processing is enabled.On a UNIX client, the value in the user’s $HOME/bp.conf file takes precedence if it exists.
■ Send email sends a busy sends a busy file notification message to the user that isspecified in Operator’s email address.
■ Retry the backup retries the backup on the specified busy file. The Retry count valuedetermines the number of times NetBackup tries a backup.
■ Ignore excludes the busy file from busy file processing. The file is backed up, then alog entry that indicates it was busy appears in the All Log Entries report.
Busy file action
Specifies the number of times to try the backup. The default retry count is 1.Retry count
Activating the Busy File Settings in host propertiesTo activate the settings in the Busy File Settings host properties, use the followingprocedure.
To activate Busy File Settings
1 Copy the bpend_notify_busy script:
/usr/openv/netbackup/bin/goodies/bpend_notify_busy
to the path:
/usr/openv/netbackup/bin/bpend_notify
2 Set the file access permissions to allow group and others to run bpend_notify.
3 Configure a policy with a user backup schedule for the busy file backups.
This policy services the backup requests that the repeat option in the actionsfile generates. The policy name is significant. By default, NetBackupalphabetically searches (uppercase characters first) for the first available policywith a user backup schedule and an open backup window. For example, apolicy name of AAA_busy_files is selected ahead of B_policy.
87Configuring Host PropertiesBusy File Settings properties

Clean-up propertiesThe Clean-up properties in the NetBackup Administration Console refer to theretention of various logs and incomplete jobs. The Clean-up properties apply tocurrently selected master servers.
Figure 3-9 Clean-up dialog box
The Clean-up dialog box contains the following properties.
88Configuring Host PropertiesClean-up properties

Table 3-10 Clean-up dialog box properties
DescriptionProperty
Specifies the number of days to keep true image restore information on disk.After the specified number of days, the images are pruned (removed). Appliesto all policies for which NetBackup collects true image restore information.The default is one day.
When NetBackup performs a true image backup, it stores the followingimages on the backup media:
■ Backed up files■ True image restore information
NetBackup also stores the true image restore information on disk in thefollowing directories:
On Windows:
install_path\NetBackup\db\images
On UNIX:
/usr/openv/netbackup/db/images
NetBackup retains the information for the number of days that this propertyspecifies.
Keeping the information on disk speeds up restores. If a user requests atrue image restore after the information was deleted from disk, NetBackupretrieves the required information from the media. The only noticeabledifference to the user is a slight increase in total restore time. NetBackupdeletes the additional information from disk again after one day.
Keep true image restorationinformation
Indicates the number of days that a failed restore job can remain in anIncomplete state. After that time, the Activity Monitor shows the job as Done.The default is 7 days. The maximum setting is 365 days. If Checkpoint Restartfor restores is used, the Restore retries property allows a failed restore jobto be retried automatically.
See “Universal Settings properties” on page 258.
See “Checkpoint restart for restore jobs” on page 705.
Move restore job from incompletestate to done state
89Configuring Host PropertiesClean-up properties

Table 3-10 Clean-up dialog box properties (continued)
DescriptionProperty
Indicates the maximum number of hours that a failed backup job can remainin an incomplete state. After that time, the Activity Monitor shows the job asDone. The minimum setting is 1 hour. The maximum setting is 72 hours.The default is 3 hours.
When an active job has an error, the job goes into an Incomplete state. Inthe Incomplete state, the administrator can correct the condition that causedthe error. If an Incomplete job does not complete successfully and is movedto the Done state, the job retains the error status.
Note: A resumed job reuses the same job ID, but a restarted job receivesa new job ID. The job details indicate that the job was resumed or restarted.
Note: This property does not apply to suspended jobs. Suspended jobsmust be resumed manually before the retention period of the job is met andthe image expires. If a suspended job is resumed after the retention periodis met, the job fails and is moved to the Done state.
Move backup job from incompletestate to done state
Specifies the maximum interval that can elapse before an image cleanup isrun. Image cleanup is run after every successful backup session (that is, asession in which at least one backup runs successfully). If a backup sessionexceeds this maximum interval, an image cleanup is initiated.
Image cleanup interval
Specifies the minimum interval that can elapse before an image cleanup isrun. Image cleanup is not run after a successful backup session until thisminimum interval has elapsed since the previous image cleanup.
Catalog cleanup wait time
Note: The following properties have been moved from theClean-up host propertiesto the Logging host properties: Keep logs and Keep Vault logs. On the Loggingproperties screen, these properties are referred to as Keep logs for days andKeep Vault logs for respectively.
See “Logging properties” on page 170.
Client Name propertiesThe Client name property in the NetBackup Administration Console specifiesthe NetBackup client name for the selected client. The name must match the namethe policy uses to back up the client. The only exception is for a redirected restore,where the name must match that of the client whose files are to be restored. Theclient name is initially set during installation.
90Configuring Host PropertiesClient Name properties

The name that is entered here must also match the client name in the ClientAttributes dialog box for the master server. If it does not match, the client cannotbrowse for its own backups.
Note: Using an IPv6 address as a client name in a policy can cause backups tofail. Specify a host name instead of an IPv6 address.
See “Client Attributes properties” on page 92.
Figure 3-10 Client Name dialog box
If the value is not specified, NetBackup uses the name that is set in the followinglocations:
■ For a Windows clientIn the Network application from the Control Panel.
■ For a UNIX clientThe name that is set by using the hostname command.
91Configuring Host PropertiesClient Name properties

The name can also be added to a $HOME/bp.conf file on a UNIX client. However,the name is normally added in this manner only for redirected restores. Thevalue in the $HOME/bp.conf file takes precedence if it exists.
Client Attributes propertiesIn theNetBackup Administration Console, theClient Attributes properties applyto the clients of currently selected master servers.
The Global client attributes property applies to all clients, unless overridden asdescribed in the following table.
Table 3-11 Global client attributes group box
DescriptionAttribute
Allows all clients to browse files for restoring. This attribute is overridden ifthe Browse and restore ability option on the General tab is set to Denyboth for a particular client(s).
Allow client browse
Allows all clients to restore files. This attribute is overridden if the Browseand restore ability option on the General tab is set to Allow browse onlyor Deny both.
Allow client restore
92Configuring Host PropertiesClient Attributes properties

Table 3-11 Global client attributes group box (continued)
DescriptionAttribute
Specifies the list of clients in the client database on the currently selectedmaster server(s). A client must be in the client database before you canchange the client properties in the Client Attributes dialog box.
The client database consists of directories and files in the followingdirectories:
On Windows: Install_path\NetBackup\db\client
On UNIX: /usr/openv/NetBackup/db/client
If a client is not listed in the Clients list, click Add to add clients. To removea client from the Clients list, select the client, then click Remove.
If a client is not listed in the Clients list, click Add to display the Add Clientdialog box and add a client to the client database. Type a client name in thetext box or click the browse button (...) and select a client.
See “Add Client dialog box” on page 94.
The name that is entered here must match the Client Name property for thespecific client. If it does not, the client cannot browse its own backups.
See “Client Name properties” on page 90.
Use the bpclient command to add clients to the client database if dynamicaddressing (DHCP) is in use.
Additional information about busy file processing is available in the NetBackupAdministrator’s Guide, Volume II.
On UNIX: You also can create, update, list, and delete client entries by usingthe bpclient command that is located in the following directory:
/usr/openv/netbackup/bin/admincmd
Clients
Specifies how to configure the selected Windows master servers (clients).
See “General tab of the Client Attributes properties” on page 94.
General tab
Specifies how to configure the connection between a NetBackup server anda NetBackup client.
See “Connect Options tab of the Client Attributes properties” on page 99.
Connect Options tab
Specifies whether a client uses Windows Open File Backup. Also, specifieswhether Volume Snapshot Provider or Volume Shadow Copy Serviceis used as the snapshot provider.
See “Windows Open File Backup tab of the Client Attributes properties”on page 101.
Windows Open File Backup tab
93Configuring Host PropertiesClient Attributes properties

Add Client dialog boxTo add a client to the database, enter the name of a client, or browse to find a client.The Add Client dialog box contains the following properties.
Specifies the name of the client to be added to the database.Type the name of the client to add.
Enter client name
Finds the list of current clients and displays them in the Browsefor computer window. Select the client to add to the databaseand click Add.
... (browse)
Adds the specified client to the client database (client namedisplays in the Clients window).
Add
Closes the Add Client dialog box.Close
Displays more information about how to add a client.Help
General tab of the Client Attributes propertiesThe properties on the General tab apply to selected Windows master servers. Thetab appears on the Client Attributes dialog box.
94Configuring Host PropertiesClient Attributes properties

Figure 3-11 General tab of Client Attributes dialog box
The General tab contains the following properties.
95Configuring Host PropertiesClient Attributes properties
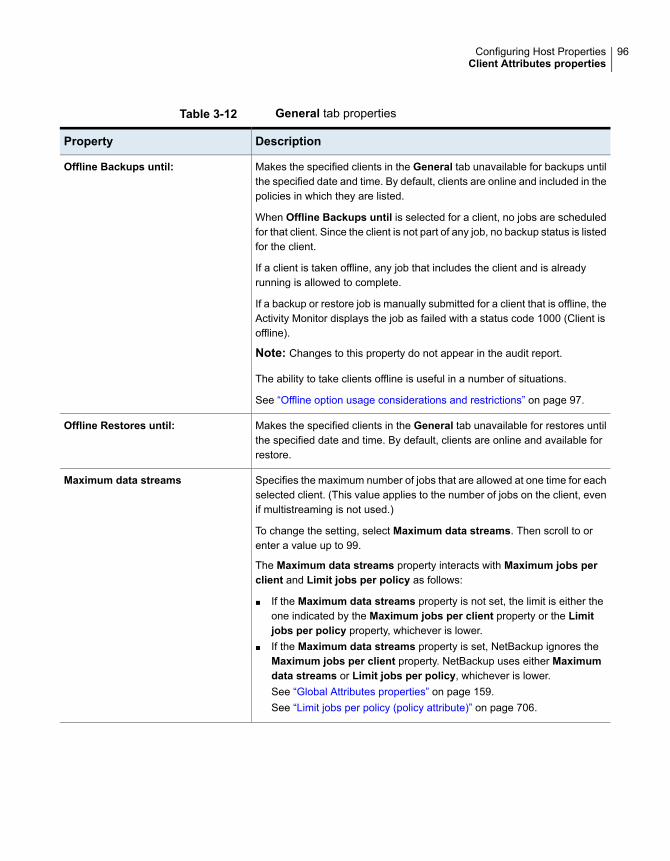
Table 3-12 General tab properties
DescriptionProperty
Makes the specified clients in the General tab unavailable for backups untilthe specified date and time. By default, clients are online and included in thepolicies in which they are listed.
When Offline Backups until is selected for a client, no jobs are scheduledfor that client. Since the client is not part of any job, no backup status is listedfor the client.
If a client is taken offline, any job that includes the client and is alreadyrunning is allowed to complete.
If a backup or restore job is manually submitted for a client that is offline, theActivity Monitor displays the job as failed with a status code 1000 (Client isoffline).
Note: Changes to this property do not appear in the audit report.
The ability to take clients offline is useful in a number of situations.
See “Offline option usage considerations and restrictions” on page 97.
Offline Backups until:
Makes the specified clients in the General tab unavailable for restores untilthe specified date and time. By default, clients are online and available forrestore.
Offline Restores until:
Specifies the maximum number of jobs that are allowed at one time for eachselected client. (This value applies to the number of jobs on the client, evenif multistreaming is not used.)
To change the setting, select Maximum data streams. Then scroll to orenter a value up to 99.
The Maximum data streams property interacts with Maximum jobs perclient and Limit jobs per policy as follows:
■ If the Maximum data streams property is not set, the limit is either theone indicated by the Maximum jobs per client property or the Limitjobs per policy property, whichever is lower.
■ If the Maximum data streams property is set, NetBackup ignores theMaximum jobs per client property. NetBackup uses either Maximumdata streams or Limit jobs per policy, whichever is lower.See “Global Attributes properties” on page 159.See “Limit jobs per policy (policy attribute)” on page 706.
Maximum data streams
96Configuring Host PropertiesClient Attributes properties

Table 3-12 General tab properties (continued)
DescriptionProperty
Specifies the client permissions to list and restore backups and archives.Select the client(s) in the General tab of the Client Attributes dialog boxand choose a Browse and restore ability property.
To use the Global client attributes settings, select Use global settings.
■ To allow users on the selected clients to both browse and restore, selectAllow both.
■ To allow users on the selected clients to browse but not restore, selectAllow browse only.
■ To prevent users on the selected clients from the ability to browse orrestore, select Deny both.
Browse and restore ability
Specifies whether the clients can list and restore from scheduled backups.(This setting does not affect user backups and archives.)
This property applies to the privileges that are allowed to a non-Windowsadministrator or non-root user who is logged into the client. This propertyalso applies to the users that do not have backup and restore privileges.
Windows administrators and root users can list and restore from scheduledbackups as well as user backups regardless of the Free browse setting.
Free browse
Specifies the deduplication action for clients if you use the NetBackup DataProtection Optimization Option.
For a description of the client-side deduplication options and their actions:
See “Where deduplication should occur” on page 98.
Deduplication
Offline option usage considerations and restrictionsThe ability to take clients offline is useful in a number of situations. For example,in the event of planned outages or maintenance, client systems can be taken offlineto avoid the unnecessary errors that administrators would then need to investigate.This option can also be used to anticipate new clients in the system; listing themin policies but configuring them as offline until they are in place and ready to beused
The following actions can be performed if a client is offline.
Table 3-13 Offline option actions
Action or restrictionType of job or operation
Offline clients continue to be included in any job.A client is offline and the job is already in progress
97Configuring Host PropertiesClient Attributes properties

Table 3-13 Offline option actions (continued)
Action or restrictionType of job or operation
Job retries continue as normal.A client is offline and job retries were started before theclient was taken offline
Continues to run until complete.Any duplication job that is associated with a storagelifecycle policy and an offline client
Continues to run until complete.LiveUpdate jobs for offline clients
Can be run for offline clients.Restore jobs
The backup fails with a status code 1000 (Client is offline).The user can either wait until the client is brought onlineagain or bring the client online manually. Use either theNetBackup Administration Console or the bpclientcommand to do so before resubmitting the manual job.
The user attempts a manual backup for an offline client
Not allowed for offline clients.Archive backups
Not allowed for offline clients.Administrators restarting or resuming jobs
Caution: If the master server is offline, hot catalog backups cannot run.
Where deduplication should occurThe Deduplication property specifies the deduplication action for clients if you useeither the NetBackup Data Protection Optimization Option. Table 3-14 describesthe client-side deduplication options.
The clients that deduplicate their own data and the master server must use thesame name to resolve the storage server. The name must be the host name underwhich the NetBackup Deduplication Engine credentials were created. If they do notuse the same name, backups fail. In some environments, careful configuration maybe required to ensure that the client and the master server use the same name forthe storage server. Such environments include those that use VLAN tagging andthose that use multi-homed hosts.
NetBackup does not support the following for client-side deduplication:
■ Multiple copies per each job configured in a NetBackup backup policy. For thejobs that specify multiple copies, the backup images are sent to the storageserver and may be deduplicated there.
■ NDMP hosts. The backup jobs fail if you try to use client-side deduplication forNDMP hosts.
98Configuring Host PropertiesClient Attributes properties

Table 3-14 Client-side deduplication options
DescriptionOption
Always deduplicates the data on the media server. The default.
Jobs fail if one of the following is true:
■ The deduplication services on the storage server are inactive.■ The deduplication pool is down.
Always use the media server (thedefault)
Deduplicates the data on the client and then sends it directly to the storageserver.
NetBackup first determines if the storage server is active. If it is active, theclient deduplicates the backup data and sends it to the storage server to bewritten to disk. If it is not active, the client sends the backup data to a mediaserver, which deduplicates the data.
Prefer to use client-side deduplication
Always deduplicates the backup data on the client and then sends it directlyto the storage server.
If a job fails, NetBackup does not retry the job.
Always use client-side deduplication
You can override the Prefer to use client-side deduplication or Always useclient-side deduplication host property in the backup policies.
See “Disable client-side deduplication (policy attribute)” on page 729.
More information about client deduplication is available in the NetBackupDeduplication Guide.
Connect Options tab of the Client Attributes propertiesThe properties in the Connect Options tab describe how a NetBackup serverconnects to NetBackup client tabs. The tab appears on the Client Attributes dialogbox.
99Configuring Host PropertiesClient Attributes properties

Figure 3-12 Connect Options tab of Client Attributes dialog box
The Connect Options tab contains the following options.
Table 3-15 Connect Options tab properties
DescriptionProperty
Specifies how daemons are to connect back to the NetBackup Client daemon(BPCD) and contains the following options:
■ Use default connect optionsUses the value that is defined in the Firewall host properties of the client’sNetBackup server.See “Firewall properties” on page 151.
■ Random portNetBackup randomly chooses a free port in the allowed range to perform thelegacy connect-back method.
■ VNETD portNetBackup uses the vnetd port number for the connect-back method.
BPCD connect back
100Configuring Host PropertiesClient Attributes properties

Table 3-15 Connect Options tab properties (continued)
DescriptionProperty
Specifies the method that the selected clients should use to connect to the serverand contains the following options:
■ Use default connect optionsUses the value that is defined in the Firewall host properties of the client’sNetBackup server.See “Firewall properties” on page 151.
■ Reserved portUses a reserved port number.
■ Non-reserved portUses a non-reserved port number.
Ports
Specifies the method that the selected clients should use to connect to the serverand contains the following options.
■ Use default connect optionsUses the value that is defined in the Firewall host properties of the client’sNetBackup server.
■ AutomaticConnects to the daemons on the server using vnetd if possible. If the daemonscannot use vnetd, the connection is made by using the daemon’s legacy portnumber.
■ VNETD onlyConnects to the daemons on the server by using only vnetd. If the firewallrules prevent a server connection using the legacy port number, check thisoption.When selected, the BPCD connect back setting is not applicable.In addition, the Ports setting uses Non-reserved port, regardless of the valueselected.
■ Daemon port onlyConnects to the daemons on the server by using only the legacy port number.This option only affects connections to NetBackup 7.0 and earlier. Forconnections to NetBackup 7.0.1 and later, the veritas_pbx port is used.
■ See “Resilient Network properties” on page 218.
Daemon connection port
Windows Open File Backup tab of the Client Attributes propertiesThe Windows Open File Backup properties in the NetBackup AdministrationConsole specify whether a client uses Windows Open File Backup. The propertiesalso specify whether Volume Snapshot Provider or Volume Shadow CopyService is used as the snapshot provider.
101Configuring Host PropertiesClient Attributes properties

Snapshots are a point-in-time view of a source volume. NetBackup uses snapshotsto access busy or active files during a backup job. Without a snapshot provider,active files are not accessible for backup.
Figure 3-13 Windows Open File Backup tab of Client Attributes dialog box
The Windows Open File Backup tab contains the following options.
102Configuring Host PropertiesClient Attributes properties

Table 3-16 Windows Open File Backup tab properties
DescriptionProperty
Adds the NetBackup clients only if you want to change the default settings on the WindowsOpen File Backup tab.
By default, no clients are listed in the Client Attributes dialog box. The server uses thefollowing Windows Open File Backup defaults for all Windows clients:
■ Windows Open File Backup is enabled on the client.■ Microsoft Volume Shadow Copy Service (VSS) is used for NetBackup 7.0 clients.
See “Back-level and upgraded clients that use Windows Open File Backup” on page 106.■ Snapshots are taken of individual drives (Individual drive snapshot) as opposed to all
drives at once (Global drive snapshot).■ Upon error, the snapshot is terminated (Abort backup on error).
Add
Deletes a client from the list by selecting the client and then clicking Delete.Remove
Specifies that Windows Open File Backups be used for the selected clients. Adds the clientsto the list only if you want to change the default property settings.
For Microsoft Distributed File System Replication (DFSR) servers, select Enable WindowsOpen File Backups. The Snapshot Provider must be Volume Shadow Copy Service.
See “About Microsoft DSFR backups” on page 683.
This option functions independently from the Perform Snapshot backups policy optionthat is available when the Snapshot Client is licensed.
If a client is included in a policy that has the Perform Snapshot backups policy optiondisabled and you do not want snapshots, the Enable Windows Open File Backups forthis client property must be disabled as well for the client. If both options are not disabled,a snapshot is created, though that may not be the intention of the administrator.
For more information, see the NetBackup Snapshot Client Administrator’s Guide.
EnableWindowsOpenFile Backups
103Configuring Host PropertiesClient Attributes properties

Table 3-16 Windows Open File Backup tab properties (continued)
DescriptionProperty
Note: This option is used for back-level versions of NetBackup only. Support for the Windowsversions that are listed here has ended.
Selects the snapshot provider for the selected clients:
■ Use Veritas Volume Snapshot Provider (VSP)This option specifies that Veritas VSP be used as the snapshot provider. VSP is requiredfor Windows 2000 clients and can also be used on 6.x Windows 2003 clients.
■ Use Microsoft Volume Shadow Copy Service (VSS)This option specifies thatMicrosoft VSS be used to create volume snapshots of volumesand logical drives for the selected clients.Configure VSS through the Microsoft VSS configuration dialog boxes.For information about how to do Active Directory granular restores when using VSS, seethe following topic:See “Active Directory host properties” on page 81.For Microsoft Distributed File System Replication (DFSR) servers, select UseMicrosoftVolume Shadow Copy Service (VSS).See “About Microsoft DSFR backups” on page 683.
Snapshot Provider
104Configuring Host PropertiesClient Attributes properties

Table 3-16 Windows Open File Backup tab properties (continued)
DescriptionProperty
Selects how snapshots are made for the selected clients:
■ Individual drive snapshotSpecifies that the snapshot should be of an individual drive (default). When this propertyis enabled, snapshot creation and file backup are done sequentially on a per volumebasis. For example, assume that drives C and D are to be backed up.If the Individual drive snapshot property is selected, NetBackup takes a snapshot ofdrive C, backs it up, and discards the snapshot. It then takes a snapshot of drive D,backs it up, and discards the snapshot.Volume snapshots are enabled on only one drive at a time, depending on which driveis to be backed up. This mode is useful when relationships do not have to be maintainedbetween files on the different drives.Use this configuration if snapshot creation fails when all volumes for the backup aresnapshot at once when the Global drive snapshot property is enabled. Individual drivesnapshot is enabled by default for all non-multistreamed backups by using the WindowsOpen File Backup option.
■ Global drive snapshotSpecifies that the snapshot is of a global drive. All the volumes that require snapshotsfor the backup job (or stream group for multistreamed backups) are taken at one time.For example, assume that drives C and D are to be backed up.In this situation, NetBackup takes a snapshot of C and D. Then NetBackup backs upCand backs up D.NetBackup then discards the C and D snapshots.This property maintains file consistency between files in different volumes. The backupuses the same snapshot that is taken at a point in time for all volumes in the backup.
Note: The Individual drive snapshot property and theGlobal drive snapshot propertyonly apply to non-multistreamed backups that use Windows Open File Backup. Allmultistreamed backup jobs share the same volumes snapshots for the volumes in themultistreamed policy. The volume snapshots are taken in a global fashion.
Snapshot usage
105Configuring Host PropertiesClient Attributes properties

Table 3-16 Windows Open File Backup tab properties (continued)
DescriptionProperty
Selects the processing instructions that NetBackup should follow if it encounters an errorduring processing:
■ Abort backup on errorSpecifies that a backup aborts if it fails for a snapshot-related issue after the snapshotis created and while the backup uses the snapshot to back up open or active files on thefile system.The most common reason for a problem after the snapshot is created and is in use bya backup, is that the cache storage is full. If the Abort backup on error property ischecked (default), the backup job aborts with a snapshot error status if the backup detectsa snapshot issue.This property does not apply to successful snapshot creation. The backup job continuesregardless of whether a snapshot was successfully created for the backup job. TheAbortbackup on error property applies only to the snapshot errors that occur after the snapshotis successfully created and is in use by a backup job.
■ Disable snapshot and continueSpecifies that if the snapshot becomes invalid during a backup, the volume snapshotsfor the backup are destroyed. The backup continues with Windows open file backupsdisabled.Regarding the file that had a problem during a backup—it may be that the file was notbacked up by the backup job. The file may not be able to be restored.
Note: Volume snapshots typically become invalid during the course of a backup becauseinsufficient cache storage was allocated for the volume snapshot. Reconfigure the cachestorage configuration of the Windows Open File Backup snapshot provider to aconfiguration that best suits your client’s installation.
Snapshot error control
Back-level and upgraded clients that use Windows Open File BackupThe following table shows the expected Open File Backup behavior based on theclient version and the Snapshot Provider setting.
Table 3-17 Snapshot Provider behavior for clients in a 7.x environment
BehaviorSnapshot Providersetting
Clientversion
Veritas VSP is used for Open File Backup.Veritas VSP
(6.5 default setting)
6.x
Veritas VSP is used for Open File Backup.Veritas VSP6.x
Windows VSS is used for Open File Backup.Windows VSS6.x
106Configuring Host PropertiesClient Attributes properties

Table 3-17 Snapshot Provider behavior for clients in a 7.x environment(continued)
BehaviorSnapshot Providersetting
Clientversion
Using VSS for Open File Backup is a new default behavior in 7.x.Windows VSS
(7.0 default setting)
7.x
Even if Veritas VSP is indicated, Windows VSS is used for Open FileBackup.
For upgraded clients:
■ For 6.x clients that used VSP and have been upgraded to 7.0:VSP settings are ignored and VSS snapshots are automaticallyimplemented.
■ For 6.x VSS users:You no longer need to create a Client Attribute entry to enable VSS.VSS is the only snapshot provider available to the NetBackup 7.0Windows client.
Veritas VSP7.x
Windows VSS is used for Open File Backup.Windows VSS7.x
Client Settings properties for UNIX clientsThe UNIX Client Settings properties in the NetBackup Administration Consoleapply to currently selected NetBackup clients running on the UNIX platform.
107Configuring Host PropertiesClient Settings properties for UNIX clients
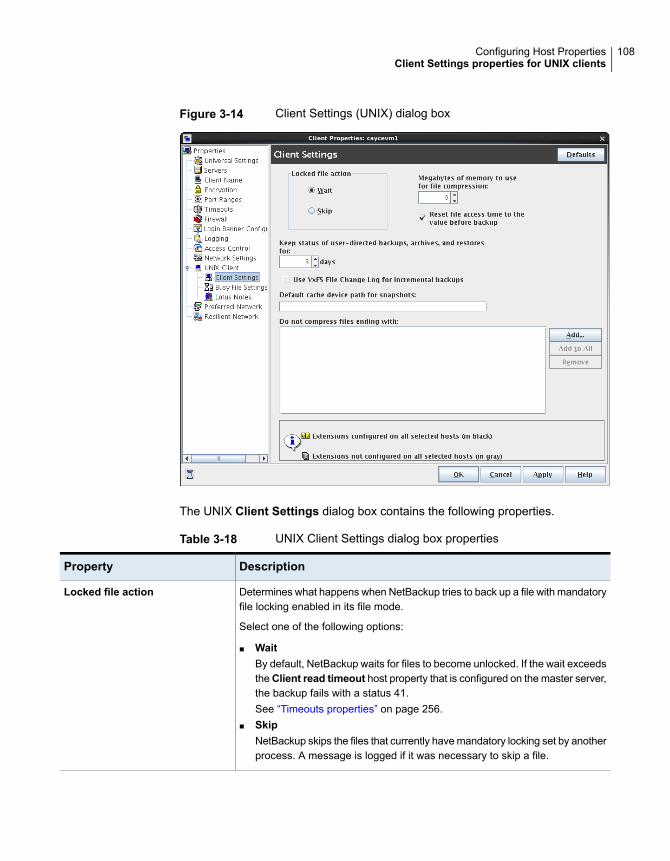
Figure 3-14 Client Settings (UNIX) dialog box
The UNIX Client Settings dialog box contains the following properties.
Table 3-18 UNIX Client Settings dialog box properties
DescriptionProperty
Determines what happens when NetBackup tries to back up a file with mandatoryfile locking enabled in its file mode.
Select one of the following options:
■ WaitBy default, NetBackup waits for files to become unlocked. If the wait exceedstheClient read timeout host property that is configured on the master server,the backup fails with a status 41.See “Timeouts properties” on page 256.
■ SkipNetBackup skips the files that currently have mandatory locking set by anotherprocess. A message is logged if it was necessary to skip a file.
Locked file action
108Configuring Host PropertiesClient Settings properties for UNIX clients

Table 3-18 UNIX Client Settings dialog box properties (continued)
DescriptionProperty
Specifies the number of days to keep progress reports before the reports aredeleted. The default is 3 days. The minimum is 0. The maximum is 9,999 days.
Logs for user-directed operations are stored on the client system in the followingdirectory:
install_path\NetBackup\logs\user_ops\ loginID\logs
Keep status of user-directedbackups, archives, and restores
Specifies that the access time (atime) for a file displays the backup time. Bydefault, NetBackup preserves the access time by resetting it to the value it hadbefore the backup.
Note: This setting affects the software and the administration scripts thatexamine a file’s access time.
Note: If NetBackup Accelerator is used to perform the backup, this setting isignored. Accelerator does not record and reset the atime for the files that itbacks up.
See “Accelerator notes and requirements” on page 734.
Reset file access time to the valuebefore backup
Specifies the amount of memory available on the client when files arecompressed during backup. If you select compression, the client software usesthis value to determine how much space to request for the compression tables.The more memory that is available to compress code, the greater thecompression and the greater the percentage of computer resources that areused. If other processes also need memory, use a maximum value of half theactual physical memory on a computer to avoid excessive swapping.
The default is 0. This default is reasonable; change it only if problems areencountered.
Megabytes of memory to use forfile compression
Determines if NetBackup uses the File Change Log on VxFS clients.
The default is off.
See “VxFS file change log for incremental backups property” on page 110.
Use VxFS file change log forincremental backups
For additional information, see the NetBackup Snapshot Client Administrator’sGuide.
Default cache device path forsnapshots
109Configuring Host PropertiesClient Settings properties for UNIX clients

Table 3-18 UNIX Client Settings dialog box properties (continued)
DescriptionProperty
Corresponds to adding a COMPRESS_SUFFIX =.suffix option to the bp.conffile.
Specifies a list of file extensions. During a backup, NetBackup does not compressfiles with these extensions because the file may already be in a compressedformat.
Do not use wildcards to specify these extensions. For example, .A1 is allowed,but not .A* or .A[1-9]
Files that are already compressed become slightly larger if compressed again.If compressed files with a unique file extension already exist on a UNIX client,exclude it from compression by adding it to this list.
Do not compress files endingwithlist
Adds file endings to the list of file endings that you do not want to compress.Click Add, then type the file extension in the File Endings dialog box. Usecommas or spaces to separate file endings if more than one is added. ClickAdd to add the ending to the list, then click Close to close the dialog box.
Add
Adds a file extension that you do not want to compress, to the lists of all clients.To add the file extension to the lists of all clients, select it in the list on the ClientSettings host property, then click Add to All.
Add to All
Removes a file extension from the list. To remove a name, either type it in thebox or click the browse button (...) and select a file ending. Use commas orspaces to separate names.
Remove
VxFS file change log for incremental backups propertyThe Use VxFS file change log for incremental backups property is supportedon all platforms and versions where VxFS file systems support FCL.
The following VxFS file systems support FCL:
■ Solaris SPARC platform running VxFS 4.1 or later.
■ AIX running VxFS 5.0 or later.
■ HP 11.23 running VxFS 5.0 or later.
■ Linux running VxFS 4.1 or later.
The File Change Log (FCL) tracks changes to files and directories in a file system.Changes can include files created, links and unlinks, files renamed, data that isappended, data that is overwritten, data that is truncated, extended attributemodifications, holes punched, and file property updates.
110Configuring Host PropertiesClient Settings properties for UNIX clients

NetBackup can use the FCL to determine which files to select for incrementalbackups, which can potentially save unnecessary file system processing time. TheFCL information that is stored on each client includes the backup type, the FCLoffset, and the timestamp for each backup.
The advantages of this property depend largely on the number of file system changesrelative to the file system size. The performance impact of incremental backupsranges from many times faster or slower, depending on file system size and usepatterns.
For example, enable this property for a client on a very large file system thatexperiences relatively few changes. The incremental backups for the client maycomplete sooner since the policy needs to read only the FCL to determine whatneeds to be backed up on the client.
If a file experiences many changes or multiple changes to many files, the timesaving benefit may not be as great.
See “Backup Selections tab” on page 810.
The following items must be in place for the Use VxFS file change log forincremental backups property to work:
■ Enable the Use VxFS file change log for incremental backups property forevery client that wants NetBackup to take advantage of the FCL.
■ Enable the FCL on the VxFS client.See the Veritas File System Administrator’s Guide for information about how toenable the FCL on the VxFS client.
■ Enable the Use VxFS file change log for incremental backups property onthe client(s) in time for the first full backup. Subsequent incremental backupsneed this full backup to stay synchronized.
■ Specify the VxFS mount point in the policy backup selections list in one of thefollowing ways:
■ Specify ALL_LOCAL_DRIVES.
■ Specifying the actual VxFS mount point.
■ Specifying a directory at a higher level than the VxFS mount point, providedthat Cross mount points is enabled.See “Cross mount points (policy attribute)” on page 713.
If the policy has Collect true image restore information or Collect true imagerestore information with move detection enabled, it ignores the Use VxFS filechange log for incremental backups property on the client.
The following table describes the additional options that are available on the VxFSfile change log feature.
111Configuring Host PropertiesClient Settings properties for UNIX clients

Table 3-19 VxFS file change log feature options
DescriptionOption
Displays any messages that note when the file change logis used during a backup as follows:
Using VxFS File Change Log for backup of pathname
Also notes when full and incremental backups are notsynchronized.
Activity Monitor messages
The data files must be in sync with the FCL for this propertyto work. To keep the data files synchronized with the FCL,do not turn the FCL on the VxFS client off and on.
Note: If NetBackup encounters any errors as it processesthe FCL, it switches to the normal files system scan. If thisswitch occurs, it appears in the Activity Monitor.
Keeping the data filessynchronized with the FCL
Additional VxFS commands are available to administrate theFCL in the Veritas File System Administrator’s Guide.
VxFS administration
Client Settings properties for Windows clientsThe Windows Client Settings properties apply to currently selected Windowsclients.
112Configuring Host PropertiesClient Settings properties for Windows clients

Figure 3-15 Windows Client Settings dialog box
TheClient Settings dialog box for Windows clients contains the following properties.
Table 3-20 Windows Client Settings properties
DescriptionProperty
Enables logs for bpinetd, bpbkar, tar, and nbwin. The higher the level, themore information is written. The default is 0.
General level
Enables logs for TCP.
Scroll to one of the following available log levels:
■ 0 No extra logging (default)■ 1 Log basic TCP/IP functions■ 2 Log all TCP/IP functions, including all read and write requests■ 3 Log contents of each read or write buffer
Note: Setting the TCP level to 2 or 3 can cause the status reports to be verylarge. It can also slow a backup or restore operation.
TCP level
113Configuring Host PropertiesClient Settings properties for Windows clients

Table 3-20 Windows Client Settings properties (continued)
DescriptionProperty
Specifies how long the client waits before the archive bits for a differentialincremental backup are cleared. The minimum allowable value is 300 (default).The client waits for acknowledgment from the server that the backup wassuccessful. If the server does not reply within this time period, the archive bits arenot cleared.
This option applies only to differential-incremental backups. Cumulative-incrementalbackups do not clear the archive bit.
Wait time before clearing archivebit
Note: The Use Change Journal option applies to Windows clients only.
This option works together with the Use Accelerator policy attribute and theAccelerator forced rescan schedule attribute.
See “Accelerator and the Windows change journal” on page 733.
See “Use Accelerator (policy attribute)” on page 730.
See “Accelerator forced rescan option (schedule attribute)” on page 769.
Use change journal
Specifies that files are selected for the backups that are based on the date thatthe file was last modified. When Use change journal is selected, Incrementalsbased on timestamp is automatically selected.
Incrementals based ontimestamp
Specifies that NetBackup include files in an incremental backup only if the archivebit of the file is set. The system sets this bit whenever a file is changed and itnormally remains set until NetBackup clears it.
A full backup always clears the archive bit. A differential-incremental backup clearsthe archive bit if the file is successfully backed up. The differential-incrementalbackup must occur within the number of seconds that the Wait time beforeclearing archive bit property indicates. A cumulative-incremental or user backuphas no effect on the archive bit.
Disable this property to include a file in an incremental backup only if the dateand time stamp for the file has changed since the last backup. For adifferential-incremental backup, NetBackup compares the date/time stamp to thelast full or incremental backup. For a cumulative-incremental backup, NetBackupcompares the timestamp to the last full backup.
If you install or copy files from another computer, the new files retain the datetimestamp of the originals. If the original date is before the last backup date onthis computer, then the new files are not backed up until the next full backup.
Note: Veritas recommends that you do not combine differential incrementalbackups and cumulative incremental backups within the same Windows policywhen the incremental backups are based on archive bit.
Incrementals based on archivebit
114Configuring Host PropertiesClient Settings properties for Windows clients

Table 3-20 Windows Client Settings properties (continued)
DescriptionProperty
Specifies the number of minutes to add to the date range for incremental backupswhen you use date-based backups. This value compensates for differences inthe speed of the clock between the NetBackup client and server. The default is60 minutes.
This value is used during incremental backups when you use the archive bit andwhen you examine the create time on folders. This comparison is done for archivebit-based backups as well as date-based backups.
Time overlap
Specifies the size (in kilobytes) of the TCP and the IP buffers that NetBackupuses to transfer data between the NetBackup server and client. For example,specify 10 for a buffer size of 10 kilobytes. The minimum allowable value is 2,with no maximum allowable value. The default is 128 kilobytes.
Communications buffer size
Specifies the seconds that are allowed between when a user requests a backupor restore and when the operation begins. The operation fails if it does not beginwithin this time period.
This property has no minimum value or maximum value. The default is 60 seconds.
User directed timeouts
Defines how many times a NetBackup client can send the same error messageto a NetBackup server. For example, if the archive bits cannot be reset on a file,this property limits how many times the message appears in the server logs. Thedefault is 10.
Maximum error messages forserver
Specifies how many days the system keeps progress reports before NetBackupautomatically deletes them. The default is 3 days.
Keep status of user-directedbackups, archives, and restores
Instructs NetBackup to search the default range of backup images automatically.The backed up folders and files within the range appear whenever a restorewindow is opened.
Clear the Perform default search for restore check box to disable the initialsearch. With the property disabled, the NetBackup Restore window does notdisplay any files or folders upon opening. The default is that the option is enabled.
Perform default search forrestore
How to determine if change journal support is useful in yourNetBackup environment
Using NetBackup support for the change journal is beneficial only where the volumesare large and relatively static.
Suitable candidates for enabling NetBackup change journal support are as follows:
■ If the NTFS volume contains more than 1,000,000 files and folders and thenumber of changed objects between incremental backups is small (less than
115Configuring Host PropertiesClient Settings properties for Windows clients

100,000), the volume is a good candidate for enabling NetBackup change journalsupport.
Unsuitable candidates for enabling NetBackup change journal support are as follows:
■ Support for the change journal is intended to reduce scan times for incrementalbackups by using the information that is gathered from the change journal on avolume. Therefore, to enable NetBackup change journal support is notrecommended if the file system on the volume contains relatively few files andfolders. (For example, hundreds of thousands of files and folders.) The normalfile system scan is suitable under such conditions.
■ If the total number of changes on a volume exceeds from 10% to 20% of thetotal objects, the volume is not a good candidate for enabling NetBackup changejournal support.
■ Be aware that virus scanning software can interfere with the use of the changejournal. Some real-time virus scanners intercept a file open for read, scan forviruses, then reset the access time. This results in the creation of a changejournal entry for every scanned file.
Guidelines for enabling NetBackup change journal supportThe following items are guidelines to consider for enabling NetBackup changejournal support:
■ Change journal support is not offered for user-directed backups. The USNstamps for full and incremental backups in the permanent record do not change.
■ NetBackup support for change journal works with checkpoint restart for restores.See “Checkpoint restart for restore jobs” on page 705.
■ Support for change journal is not offered with several NetBackup options orVeritas products.
If Use change journal is enabled, it has no effect while you use the followingoptions or products:
■ True image restore (TIR) or True image restore with Move DetectionSee “Collect true image restore information (policy attribute) with and withoutmove detection” on page 721.
■ Synthetic backupsSee “About synthetic backups” on page 864.
■ Bare Metal Restore (BMR)For more information, see the NetBackup Bare Metal Restore Administrator’sGuide.
116Configuring Host PropertiesClient Settings properties for Windows clients

See “How to determine if change journal support is useful in your NetBackupenvironment” on page 115.
Credential Access propertiesCertain NetBackup hosts that are not named as clients in a policy must be enabledto access NDMP or disk array credentials. Use the Credential Access propertiesdialog box to enter the names of those NetBackup hosts.
Figure 3-16 Credential Access dialog box
The Credential Access dialog box contains the following properties.
Table 3-21 Credential Access dialog box properties
DescriptionProperty
To add an NDMP client to the NDMP Clients list, click Add. Enter the names of theNDMP hosts that are not named as clients in a policy.
NDMP Clients list
117Configuring Host PropertiesCredential Access properties
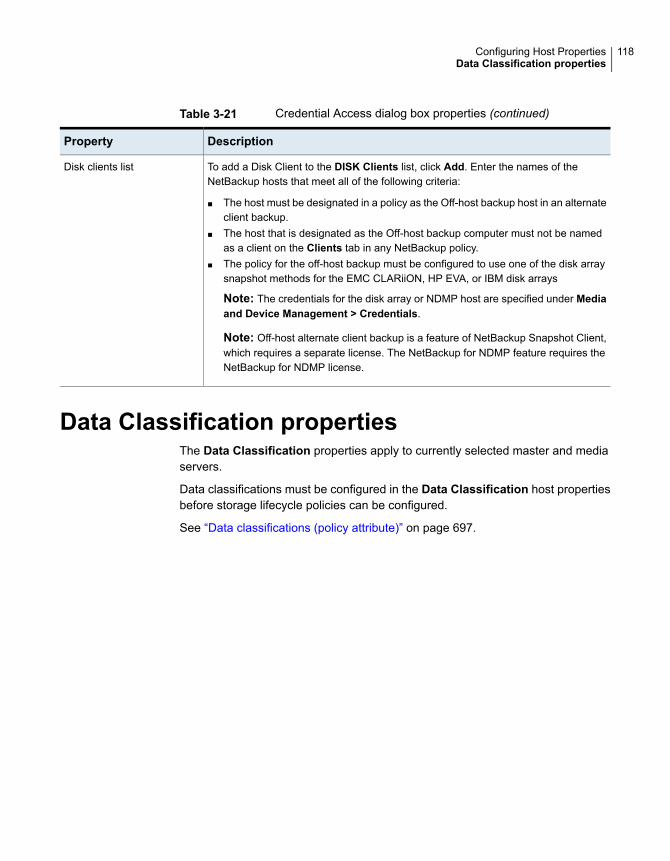
Table 3-21 Credential Access dialog box properties (continued)
DescriptionProperty
To add a Disk Client to the DISK Clients list, click Add. Enter the names of theNetBackup hosts that meet all of the following criteria:
■ The host must be designated in a policy as the Off-host backup host in an alternateclient backup.
■ The host that is designated as the Off-host backup computer must not be namedas a client on the Clients tab in any NetBackup policy.
■ The policy for the off-host backup must be configured to use one of the disk arraysnapshot methods for the EMC CLARiiON, HP EVA, or IBM disk arrays
Note: The credentials for the disk array or NDMP host are specified under Mediaand Device Management > Credentials.
Note: Off-host alternate client backup is a feature of NetBackup Snapshot Client,which requires a separate license. The NetBackup for NDMP feature requires theNetBackup for NDMP license.
Disk clients list
Data Classification propertiesThe Data Classification properties apply to currently selected master and mediaservers.
Data classifications must be configured in the Data Classification host propertiesbefore storage lifecycle policies can be configured.
See “Data classifications (policy attribute)” on page 697.
118Configuring Host PropertiesData Classification properties

Figure 3-17 Data Classification dialog box
The Data Classification dialog box contains the following properties.
119Configuring Host PropertiesData Classification properties

Table 3-22 Data Classification dialog box properties
DescriptionProperty
The Rank column displays the rank of the data classifications. The order of the dataclassifications determines the rank of the classification in relationship to the others inthe list. The lowest numbered rank has the highest priority.
Use the Move Up and Move Down options to move the classification up or down inthe list.
To create a new data classification, click New. New data classifications are added tobottom of the list. To increase the rank of a data classification, select a line and clickMove Up. To decrease the rank of a data classification, select a line and click MoveDown.
Rank column
The Name column displays the data classification name. While data classificationscannot be deleted, the data classification names can be modified.
NetBackup provides the following data classifications by default:
■ Platinum (highest rank by default)■ Gold (second highest rank by default)■ Silver (third highest rank by default)■ Bronze (lowest rank by default)
Name column
In the Description column, enter a meaningful description for the data classification.Descriptions can be modified.
Description column
The Data Classification ID is the GUID value that identifies the data classification andis generated when a new data classification is added and the host property is saved.This column is not displayed by default.
A data classification ID becomes associated with a backup image by setting the DataClassification attribute in the policy dialog box. The ID is written into the image header.The storage lifecycle policies use the ID to identify the images that are associated withclassification.
ID values can exist in image headers indefinitely, so data classifications cannot bedeleted. The name, description, and rank can change without changing the identity ofthe data classification.
Data Classification ID
Note: Data classifications cannot be deleted. However, the name, description, andthe rank can be changed. The classification ID remains the same.
Creating a Data ClassificationUse the following procedures to create or change a data classification.
120Configuring Host PropertiesData Classification properties

To create a data classification
1 In the NetBackup Administration Console, in the left pane, expandNetBackup Management > Host Properties.
2 In the left pane, click Data Classification.
3 Click New.
4 Add the name and description in the New Data Classification dialog box.
5 Click OK to save the classification and close the dialog box.
Note: Data classifications cannot be deleted.
6 Select a line in the Data Classification host properties and use the Move Upand Move Down options to move the classification level up or down in the list.
Default Job Priorities propertiesThe Default Job Priorities host properties let administrators configure the defaultjob priority for different job types. The Default Job Priorities host properties list18 job types and the configurable default priority for each.
121Configuring Host PropertiesDefault Job Priorities properties

Figure 3-18 Default Job Priorities dialog box
The job priority can be set for individual jobs in the following utilities:
■ In the Jobs tab of the Activity Monitor for queued or active jobs.See “Changing the Job Priority dynamically from the Activity Monitor” on page 1044.
■ In the Catalog utility for verify, duplicate, and import jobs.
■ In the Reports utility for a Media Contents report job.
■ In the Backup, Archive, and Restore client interface for restore jobs.
The Default Job Priorities dialog box contains the following properties.
Table 3-23 Default Job Priorities dialog box properties
DescriptionProperty
This listing includes 18 job types and the current configurable priority for each.Job Type and Job Priority list
122Configuring Host PropertiesDefault Job Priorities properties

Table 3-23 Default Job Priorities dialog box properties (continued)
DescriptionProperty
The Job Priority value specifies the priority that a job has as it competes with otherjobs for backup resources. The value can range from 0 to 99999. The higher the number,the greater the priority of the job.
A new priority setting affects all the policies that are created after the host property hasbeen changed.
A higher priority does not guarantee that a job receives resources before a job with alower priority. NetBackup evaluates jobs with a higher priority before those with a lowerpriority.
However, the following factors can cause a job with a lower priority to run before a jobwith a higher priority:
■ To maximize drive use, a low priority job may run first if it can use a drive that iscurrently loaded. A job with a higher priority that requires that the drive be unloadedwould wait.
■ If a low priority job can join a multiplexed group, it may run first. The job with ahigher priority may wait if it is not able to join the multiplexed group.
■ If the NetBackup Resource Broker (nbrb) receives a job request during anevaluation cycle, it does not consider the job until the next cycle, regardless of thejob priority.
Job Priority
Understanding the Job Priority settingNetBackup uses the Job Priority setting as a guide. Requests with a higher prioritydo not always receive resources before a request with a lower priority.
The NetBackup Resource Broker (NBRB) maintains resource requests for jobs ina queue.
NBRB evaluates the requests sequentially and sorts them based on the followingcriteria:
■ The request's first priority.
■ The request’s second priority.
■ The birth time (when the Resource Broker receives the request).
The first priority is weighted more heavily than the second priority, and the secondpriority is weighted more heavily than the birth time.
Because a request with a higher priority is listed in the queue before a request witha lower priority, the request with a higher priority is evaluated first. Even though thechances are greater that the higher priority request receives resources first, it isnot always definite.
123Configuring Host PropertiesDefault Job Priorities properties

The following scenarios present situations in which a request with a lower prioritymay receive resources before a request with a higher priority:
■ A higher priority job needs to unload the media in a drive because the retentionlevel (or the media pool) of the loaded media is not what the job requires. Alower priority job can use the media that is already loaded in the drive. Tomaximize drive utilization, the Resource Broker gives the loaded media anddrive pair to the job with the lower priority.
■ A higher priority job is not eligible to join an existing multiplexing group but alower priority job is eligible to join the multiplexing group. To continue spinningthe drive at the maximum rate, the lower priority job joins the multiplexing groupand runs.
■ The Resource Broker receives resource requests for jobs and places the requestsin a queue before processing them. New resource requests are sorted andevaluated every 5 minutes. Some external events (a new resource request ora resource release, for example) can also trigger an evaluation. If the ResourceBroker receives a request of any priority while it processes requests in anevaluation cycle, the request is not evaluated until the next evaluation cyclestarts.
124Configuring Host PropertiesDefault Job Priorities properties

Distributed application restoremapping propertiesFigure 3-19 Distributed Application Restore Mapping dialog box
Some applications, such as SharePoint and Exchange, distribute and replicate dataacross multiple hosts. You need to provide a mapping of the hosts in the databaseenvironment so thatNetBackup can successfully restore the databases.
The Distributed Application Restore Mapping dialog box contains the followingproperties.
125Configuring Host PropertiesDistributed application restore mapping properties

Table 3-24 Distributed Application Restore Mapping dialog box properties
DescriptionProperty
Adds a component host that is authorized to run restores on an SharePoint or Exchangeapplication host.
For SharePoint, NetBackup catalogs backup images under the front-end server name.To allowNetBackup to restore SQL databases to the correct hosts in a farm, you mustprovide a list of the SharePoint hosts. For Exchange, any operations that use GranularRecovery Technology (GRT) require that you provide a list of the Exchange virtual andthe physical host names. Also include the off-host client and the granular proxy host.
Note: For VMware backups and restores that protect SharePoint or Exchange, youonly need to add the hosts that browse for backups or perform restores.
Note: You can use the client's short name or its fully qualified domain name (FQDN).You do not need to provide both names in the list.
For more details, see the following:
NetBackup for SharePoint Server Administrator's Guide
NetBackup for Exchange Server Administrator's Guide
Add
Changes the application host or component host of the currently selected mapping.Change
Removes the currently selected mapping.Remove
Encryption propertiesThe Encryption properties control encryption on the currently selected client.
Multiple clients can be selected and configured at one time only if all selected clientsare running the same version of NetBackup. If not, the Encryption properties dialogbox is hidden.
More information is available in the NetBackup Security and Encryption Guide.
126Configuring Host PropertiesEncryption properties

Figure 3-20 Encryption dialog box
The Encryption permissions property indicates the encryption setting on theselected NetBackup client as determined by the master server.
Table 3-25 Encryption permissions selections
DescriptionProperty
Specifies that the client does not permit encrypted backups.If the server requests an encrypted backup, the backup jobends due to error.
Not allowed
Specifies that the client allows either encrypted orunencrypted backups. Allowed is the default setting for aclient that has not been configured for encryption.
Allowed
Specifies that the client requires encrypted backups. If theserver requests an unencrypted backup, the backup job endsdue to error.
Required
127Configuring Host PropertiesEncryption properties

Select the Enable encryption property if the NetBackup Encryption option is usedon the selected client.
After Enable Encryption is selected, choose from the properties in Table 3-26.
Table 3-26 Encryption dialog box properties
DescriptionProperty
Pertains to the 128-bit and the 256-bit options of NetBackup Encryption.
If the selected client does not use Legacy encryption,Enable standard encryption is automaticallyselected.
Enable standardencryption
The following cipher types are available: BF-CFB, DES-EDE-CFB, AES-256-CFB, andAES-128-CFB. AES-128-CFB is the default.
More information about the ciphers file is available in the NetBackup Security and EncryptionGuide.
Client Cipher
Pertains to the 40-bit and the 56-bit data encryption standard (DES) NetBackup encryptionpackages.
Enable legacyDES encryption
Defines the encryption strength on the NetBackup client when Legacy encryption is used:
■ DES_40Specifies the 40-bit DES encryption. DES_40 is the default value for a client that has not beenconfigured for encryption.
■ DES_56Specifies the 56-bit DES encryption.
Encryptionstrength
Specify the folder that contains the encryption libraries on NetBackup clients.
The default location is as follows:
■ On Windows:
install_path\netbackup\bin\
Where install_path is the directory where NetBackup is installed and by default is C:\ProgramFiles\VERITAS.
■ On UNIX:
/usr/openv/lib
If it is necessary to change the setting, specify the new name.
Encryptionlibraries
128Configuring Host PropertiesEncryption properties

Table 3-26 Encryption dialog box properties (continued)
DescriptionProperty
Specify the file that contains the encryption keys on NetBackup clients.
The default location is as follows:
■ On Windows:
install_path\NetBackup\bin\keyfile.dat
Where install_path is the folder where NetBackup is installed and by default is C:\ProgramFiles\VERITAS.
■ On UNIX:
/usr/openv/netbackup/keyfile
If it is necessary to change the setting, specify the new name.
Encryption keyfile
Additional encryption methods for Windows clientsIn addition to NetBackup client and server data encryption, Microsoft Windowsclients also have access to methods of encrypting the data on the original disk.
Each of the following methods has its own costs and benefits. NetBackup supportseach method for protecting Microsoft Windows clients.
Encrypting File SystemThe Encrypting File System (EFS) on Microsoft Windows is a feature introducedwith Windows 2000 and provides file system-level encryption. EFS is a form ofencryption where individual files or directories are encrypted by the file system itself.
The technology enables files to be transparently encrypted to protect confidentialdata from attackers with physical access to the computer. Users can enableencryption on a per-file, per-directory, or per-drive basis. The Group Policy in aWindows domain environment can also mandate some EFS settings.
No NetBackup settings are involved in protecting these encrypted objects. Anyobject with an encrypted file system attribute is automatically backed up and restoredin its encrypted state.
BitLocker Drive EncryptionBitLocker Drive Encryption is a full disk encryption feature included with certaineditions of Microsoft's Windows desktop and server versions, starting with Vistaand Windows Server 2008.
129Configuring Host PropertiesEncryption properties

Disk encryption is a technology which protects information by converting it intounreadable code that cannot be deciphered easily by unauthorized people. Diskencryption uses disk encryption software or hardware to encrypt every bit of datathat goes on a disk or a disk volume.
As with EFS, no NetBackup settings are involved to use BitLocker for encryption.Unlike EFS, the encryption layer is invisible to NetBackup, with the data beingautomatically decrypted and encrypted by the operating system.
NetBackup does nothing to manage the encryption process and therefore backsup and restores the unencrypted data.
Note: If you recover a Windows computer that has BitLocker encryption enabled,you must re-enable BitLocker encryption following the restore.
Off-host backup is not supported with volumes that run Windows BitLocker DriveEncryption.
Enterprise Vault propertiesThe Enterprise Vault properties apply to currently selected clients.
To perform backups and restores, NetBackup must know the user name andpassword for the account that is used to log on to the Enterprise Vault Server andto interact with the Enterprise Vault SQL database. The user must set the logonaccount for every NetBackup client that runs backup and restore operations forEnterprise Vault components.
130Configuring Host PropertiesEnterprise Vault properties

Figure 3-21 Enterprise Vault dialog box
The Enterprise Vault dialog box contains the following properties.
Table 3-27 Enterprise Vault dialog box properties
DescriptionProperty
Specify the user ID for the account that is used to log on to Enterprise Vault(DOMAIN\user name).
User Name
Specify the password for the account.Password
Select what kind of consistency checks to perform on the SQL Server databasesbefore NetBackup begins a backup operation.
Consistency check beforebackup
Enterprise Vault Hosts propertiesThe Enterprise Vault Hosts properties apply to currently selected master servers.
Special configuration is required to allow NetBackup to restore SQL databases tothe correct hosts in an Enterprise Vault farm. In the Enterprise Vault Hosts master
131Configuring Host PropertiesEnterprise Vault Hosts properties

server properties, specify a source and a destination host. By doing so, you specifya source host that can run restores on the destination host.
Figure 3-22 Enterprise Vault Hosts master server properties
The Enterprise Vault Hosts dialog box contains the following properties.
Table 3-28 Enterprise Vault Hosts dialog box properties
DescriptionOption
Adds the source and the destination hosts within the Enterprise Vault configuration.You must provide the name of the Source host and the name of theDestination host.
Add
Changes the source host and the destination host, an entry that you select from theEnterprise Vault Hosts field.
Change
Exchange propertiesThe Exchange properties apply to the currently selected Windows clients. Forclustered or replicated environments, configure the same settings for all nodes. If
132Configuring Host PropertiesExchange properties

you change the attributes for the virtual server name, only the CCR active node orDAG host server is updated.
For complete information on these options, see the NetBackup for Exchange ServerAdministrator's Guide.
Figure 3-23 Exchange dialog box
The Exchange dialog box contains the following properties.
Table 3-29 Exchange dialog box properties
DescriptionProperty
Note: This property only applies to MS-Exchange-Server backup policies withExchange 2007.
This option applies to off-host Exchange 2007 snapshot backups if the ExchangeSystem Management Tools are not installed on the alternate client. Specify thenumber of I/Os to process for each 1-second pause.
Snapshot verification I/O throttle
133Configuring Host PropertiesExchange properties

Table 3-29 Exchange dialog box properties (continued)
DescriptionProperty
Note: This property only applies to MS-Exchange-Server backup policies.
Choose which logs to include with snapshot backups:
■ Back up only uncommitted log filesSelect this option to back up only the log files that are uncommitted. This optionis not recommended for DAGs or Exchange 2007 CCR environments.
■ Back up all log files (including committed log files)
Backup option for log filesduring full backups
Note: This property only applies to MS-Exchange-Server backup policies.
Enable this option to delete transaction logs after a successful Instant Recoverybackup. By default, transaction logs are not deleted for a full Instant Recoverybackup that is snapshot only.
Truncate log after successfulInstant Recovery backup
Note: This property applies when you duplicate or browse a backup that usesGranular Recovery Technology (GRT).
You can specify a different Windows system to act as a proxy for the source clientwhen you duplicate or browse a backup (with bplist) that uses GRT. Use aproxy if you do not want to affect the source client or if it is not available.
For complete information on this option, see the NetBackup for Exchange ServerAdministrator's Guide.
Exchange granular proxy host
Note: This property only applies to MS-Exchange-Server backup policies withExchange 2007.
Enable this option to back up the data that is stored on a Single Instance Store(SIS) volume. This feature only applies to mailbox and public folder backups withExchange Server 2007.
Enable single instance backupfor message attachments
Note: This property only applies to MS-Exchange-Server backup policies.
Disable this option if you do not want to perform a consistency check during aDAG backup. If you check Continue with backup if consistency check fails,NetBackup continues to perform the backup even if the consistency check fails.
Perform consistency checkbefore backup with MicrosoftVolume Shadow Copy Service(VSS)
134Configuring Host PropertiesExchange properties

Table 3-29 Exchange dialog box properties (continued)
DescriptionProperty
Note the following for this property:
■ This property applies to MS-Exchange-Server and VMware backup policieswith Exchange recovery.
■ For Exchange 2013 and later, you must configure this property if you want touse GRT.
■ This property does not apply to any backup and restore operations that havea policy that uses the Microsoft Exchange Mailboxes:\ and theMicrosoft Exchange Public Folders:\ directives. Instead, you mustconfigure the logon account for the NetBackup Client Service with thecredentials for the account for NetBackup Exchange operations.
Provide the credentials for the account for NetBackup Exchange operations. Thisaccount must have the necessary permissions to perform Exchange restores.The permissions that are required depend on the Exchange version that you have.The account also needs the right to “Replace a process level token.”
For complete information on this property, see the NetBackup for Exchange ServerAdministrator's Guide.
Exchange credentials
About the Exchange credentials in the client host propertiesThe Exchange credentials in the client host properties indicate the account that hasnecessary permissions to perform Exchange restores. The permissions that arerequired depend on the Exchange version that you have.
Note the following:
■ The account that you configured for the Exchange credentials must also havethe right to “Replace a process level token.”
■ For database restores from VMware backups, the Exchange credentials thatyou provide must have permissions to restore VM files.
■ If you want to restore from a VMware snapshot copy that was created withReplication Director, do the following:
■ Provide the Exchange credentials in theDomain\user and Password fields.
■ Configure the NetBackup Client Service with an account that has access tothe CIFS shares that are created on the NetApp disk array.
Additional notes for Exchange 2013 and laterTo use GRT, configure the Exchange credentials on all granular clients.
135Configuring Host PropertiesExchange properties

Alternatively, you can configure the Exchange credentials only on the granularclients that perform restores. In this case, for the entire domain add “ExchangeServers” to the “View-Only Organization Management” role group. Perform thisconfiguration in the Exchange Administration Center (EAC) or in Active Directory.See the following Microsoft article for more information:
http://technet.microsoft.com/en-us/library/jj657492
Additional notes for Exchange 2010 and 2007These additional items apply to Exchange 2010 and 2007:
■ For granular restores from VMware backups, only the Exchange client thatperforms the granular restore requires configuration of the Exchange credentials.The Exchange credentials are not required for backup or browse operations.
■ If you configure the NetBackup Client Service with a logon account and configurethe Exchange credentials in the Exchange client host properties, you mustconfigure the “Replace a process level token” for both users.
■ In NetBackup 7.5 and earlier, you added the credentials to the logon accountfor the NetBackup Client Service and the NetBackup Legacy Network Service(Exchange 2010). Customers upgrading from earlier versions of NetBackup cancontinue to use this configuration (unless you use Replication Director). Veritasrecommends that you use the new configuration in the Exchange client hostproperties.
■ (Exchange 2007) If you use the Microsoft Exchange Mailboxes:\ and theMicrosoft Exchange Public Folders:\ directives in a policy, you must usethe old configuration. Configure the NetBackup Client Service to log on as theaccount for NetBackup Exchange operations.
Exclude Lists propertiesUse the Exclude Lists host properties to create and to modify the exclude lists forWindows clients. An exclude list names the files and directories to be excludedfrom backups of the selected Windows clients.
For UNIX clients, use the nbgetconfig and nbsetconfig commands to gather andmodify the exclude list files from the /usr/openv/netbackup directory on eachclient. nbgetconfig and nbsetconfig can also be used on a UNIX server to createan exclude list on a Windows client.
See “Configuring the exclude list on a Windows client from a UNIX master server”on page 144.
136Configuring Host PropertiesExclude Lists properties

Figure 3-24 Exclude Lists dialog box
Exclude Lists properties apply only to Windows clients.
For information about creating exclude lists for UNIX clients, see the following topic:
See “About excluding files from automatic backups” on page 846.
If more than one exclude or include list exists for a client, NetBackup uses only themost specific one.
For example, assume that a client has the following exclude lists:
■ An exclude list for a policy and schedule.
■ An exclude list for a policy.
■ An exclude list for the entire client. This list does not specify a policy or schedule.
In this example, NetBackup uses the first exclude list (for policy and schedule)because it is the most specific.
Exclude and include lists that are set up for a policy or for a policy and scheduleare not used to determine if an entire drive is to be excluded when NetBackupdetermines if a backup job should be started.
137Configuring Host PropertiesExclude Lists properties

Normally, this is not a problem. However, if a policy uses multistreaming and a driveor a mount point is excluded, that job will report an error status when it completes.To avoid the situation, do not use the policy or the policy and schedule lists toexclude an entire volume.
The Exclude Lists dialog box contains the following properties.
Table 3-30 Excludes Lists dialog box properties
DescriptionProperty
Indicates that the files and directories to exclude are case-sensitive.Use case sensitive excludelist
Displays the policies that contain schedule, file, and directory exclusions as follows:
■ AddClick to exclude a file from being backed up by a policy. The exclusion is configuredin the Add to exclude list dialog box, then added to the Exclude list. When thepolicies in this list are run, the files and directories that are specified on the list arenot backed up.
■ Add to allWhen multiple Windows clients are selected, click Add to all to add the selectedlist item to the Exclude list for all selected clients. Add to all is enabled only whenmultiple Windows clients are selected for configuration.
■ RemoveClick to remove the selected policy, schedule, or file from the Exclude list.
Exclude lists
138Configuring Host PropertiesExclude Lists properties

Table 3-30 Excludes Lists dialog box properties (continued)
DescriptionProperty
Displays the policies, schedules, files, and directories that are excepted from theExclude list. When the policies on the Exceptions to the exclude list run, the filesand directories on the list are backed up if they were part of the original file list andwere subsequently excluded. The list is useful to exclude all files in a directory but one.
For example, if the file list of items to back up contains /foo, and the exclude listcontains /foo/bar, adding /fum to the exceptions list does not back up the /fumdirectory. However, adding fum to the exceptions list will back up any occurrences offum (file or directory) that occur within /foo/bar.
Options include the following:
■ AddClick to create an exception to the Exclude list. The exception is configured in theAdd exceptions to exclude list dialog box, then added to the Exceptions to theexclude list.When the policies on the Exceptions to the exclude list run, the items on theexceptions list are backed up (if they were part of the original file list andsubsequently excluded). Effectively, you add files back into the backup list of apolicy.
■ Add to allWhen multiple Windows clients are selected, click Add to all to add the selectedlist item to the Exceptions to the exclude list for all selected clients. When thepolicies on the exclude list run, the items on the exceptions list are backed up onall selected clients.
■ RemoveClick to remove the selected policy, schedule, or file from the Exceptions list. Afterthe item is removed from the Exclude list, the item is excluded from the backup.
Exceptions to exclude list
About the Add to Exclude List and Add Exceptions to Exclude Listdialog boxes
The Add to Exclude List dialog box and the Add Exceptions to Exclude Listdialog box contain the following fields:
139Configuring Host PropertiesExclude Lists properties

Table 3-31 Add to Exclude dialog box
DescriptionField
The policy name that contains the files and the directoriesthat you want to exclude or make exceptions for. You canalso select the policy name from the drop-down menu. Toexclude or make exceptions for the backup of specific filesor directories from all policies, select All Policies.
Policy
The schedule name that is associated with the files and thedirectories that you want to exclude or make exceptions for.You can also select the schedule name from the drop-downmenu. To exclude or make exceptions for the backups ofspecific files or directories from all schedules, select AllSchedules.
Schedule
Either browse or enter the full path to the files and thedirectories that you want to exclude or make exceptions for.
Files/Directories
Figure 3-25 Add to Exclude List properties
Adding an entry to an exclude listUse the following procedure to add an entry to an exclude list for a policy:
To add an entry to the exclude list
1 In theNetBackupAdministrationConsole, expandNetBackupManagement> Host Properties > Clients. Double-click on a client.
2 Under the Exclude List, click Add.
3 In the Policy field, select a policy name from the drop-down menu or enter thename of a policy. Select All Policies to exclude these items from all policies.
140Configuring Host PropertiesExclude Lists properties

4 In the Schedule field, select a schedule name from the drop-down menu orenter the name of a schedule. Select All Schedules to exclude the specifiedfiles and directories from all schedules in the policy.
5 In the Files/Directories field, either browse or enter the files or directories tobe excluded from the backups that are based on the selected policy andschedule.
6 Click Add to add the specified files and directories to the exclude list.
7 Click Apply to accept the changes. Click OK to accept the changes and closethe host properties dialog box.
Adding an exception to the exclude listUse the following procedure to add an exception to the exclude list for a policy:
To add an exception to the exclude list
1 In theNetBackupAdministrationConsole, expandNetBackupManagement> Host Properties > Clients. Double-click on a client.
2 Under the Exceptions to the Exclude List, click Add.
3 In the Policy field, select a policy name from the drop-down menu or enter thename of a policy. Select All Policies to add these items back into all policies.(In other words, these items are to be excluded from the exclude list.)
4 In the Schedule field, select a schedule name from the drop-down menu orenter the name of a schedule. Select All Schedules to add these items backinto the schedules.
5 In the Files/Directories field, either browse or enter the files or directories tobe added back into the backups that are based on the selected policy andschedule.
6 Click Add to add the specified files and directories to the Exceptions to theExclude List.
7 Click Apply to accept the changes. Click OK to accept the changes and closethe host properties dialog box.
Syntax rules for exclude listsVeritas suggests that you always specify automounted directories and CD-ROMfile systems in the exclude list. Otherwise, if the directories are not mounted at thetime of a backup, NetBackup must wait for a timeout.
The following syntax rules apply to exclude lists:
■ Only one pattern per line is allowed.
141Configuring Host PropertiesExclude Lists properties

■ NetBackup recognizes standard wildcard use.See “Wildcard use in NetBackup” on page 1113.See “NetBackup naming conventions” on page 1112.
■ If all files are excluded in the backup selections list, NetBackup backs up onlywhat is specified by full path names in the include list. Files can be excluded byusing / or * or by using both symbols together (/*).
■ Spaces are considered legal characters. Do not include extra spaces unlessthey are part of the file name.For example, if you want to exclude a file namedC:\testfile (with no extra space character at the end)and your exclude list entry isC:\testfile (with an extra space character at the end)NetBackup cannot find the file until you delete the extra space from the end ofthe file name.
■ End a file path with \ to exclude only directories with that path name (for example,C:\users\test\). If the pattern does not end in \ (for example, C:\users\test),NetBackup excludes both files and directories with that path name.
■ To exclude all files with a given name, regardless of their directory path, enterthe name. For example:test
rather thanC:\test
This example is equivalent to prefixing the file pattern with\
\*\
\*\*\
\*\*\*\
and so on.
The following syntax rules apply only to UNIX clients:
■ Do not use patterns with links in the names. For example, assume /home is alink to /usr/home and /home/doc is in the exclude list. The file is still backedup in this case because the actual directory path, /usr/home/doc, does notmatch the exclude list entry, /home/doc.
■ Blank lines or lines which begin with a pound sign (#) are ignored.
142Configuring Host PropertiesExclude Lists properties

Example of a Windows client exclude listAssume that an exclude list in the Exclude Lists host properties contains thefollowing entries:
C:\users\doe\john
C:\users\doe\abc\
C:\users\*\test
C:\*\temp
core
Given the exclude list example, the following files, and directories are excludedfrom automatic backups:
■ The file or directory named C:\users\doe\john.
■ The directory C:\users\doe\abc\ (because the exclude entry ends with \).
■ All files or directories named test that are two levels beneath users on driveC.
■ All files or directories named temp that are two levels beneath the root directoryon drive C.
■ All files or directories named core at any level and on any drive.
Example of a UNIX exclude listIn this example of a UNIX exclude list, the list contains the following entries:
# this is a comment line
/home/doe/john
/home/doe/abc/
/home/*/test
/*/temp
core
Given the exclude list example, the following files and directories are excluded fromautomatic backups:
■ The file or directory named /home/doe/john.
■ The directory /home/doe/abc (because the exclude entry ends with /).
■ All files or directories named test that are two levels beneath home.
■ All files or directories named temp that are two levels beneath the root directory.
■ All files or directories named core at any level.
143Configuring Host PropertiesExclude Lists properties

About creating an include list on a UNIX clientTo add a file that is eliminated with the exclude list, create a/usr/openv/netbackup/include_list file. The same syntax rules apply as forthe exclude list.
Note: Exclude and include lists do not apply to user backups and archives.
To illustrate the use of an include list, we use the example from the previousdiscussion. The exclude list in that example causes NetBackup to omit all files ordirectories named test from all directories beneath /home/*/test.
In this case, add a file named /home/jdoe/test back into the backup by creatingan include_list file on the client. Add the following to the include_list file:
# this is a comment line
/home/jdoe/test
To create an include list for a specific policy or policy and schedule combination,use a .policyname or .policyname.schedulename suffix. The following are twoexamples of include list names for a policy that is named wkstations that containsa schedule that is named fulls.
/usr/openv/netbackup/include_list.workstations
/usr/openv/netbackup/include_list.workstations.fulls
The first file affects all scheduled backups in the policy that is named wkstations.The second file affects backups only when the schedule is named fulls.
For a given backup, NetBackup uses only one include list: the list with the mostspecific name. Given the following two files:
include_list.workstations
include_list.workstations.fulls
NetBackup uses only include_list.workstations.fulls as the include list.
Configuring the exclude list on a Windows client from a UNIX masterserver
An administrator can change the exclude list on a Windows client from a UNIXmaster server by using the nbgetconfig (or bpgetconfig) and the nbsetconfig
(or bpsetconfig) commands.
144Configuring Host PropertiesExclude Lists properties
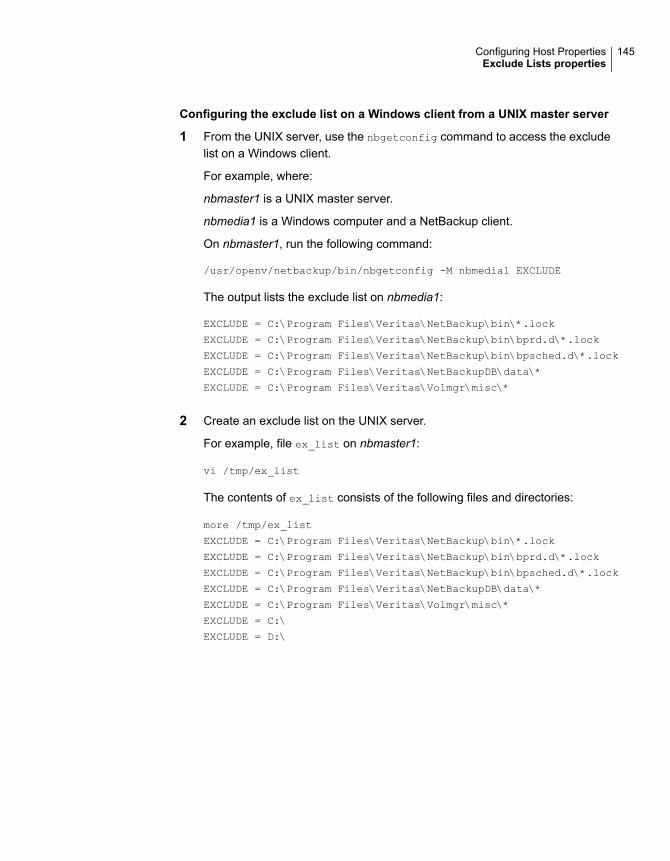
Configuring the exclude list on a Windows client from a UNIX master server
1 From the UNIX server, use the nbgetconfig command to access the excludelist on a Windows client.
For example, where:
nbmaster1 is a UNIX master server.
nbmedia1 is a Windows computer and a NetBackup client.
On nbmaster1, run the following command:
/usr/openv/netbackup/bin/nbgetconfig -M nbmedia1 EXCLUDE
The output lists the exclude list on nbmedia1:
EXCLUDE = C:\Program Files\Veritas\NetBackup\bin\*.lock
EXCLUDE = C:\Program Files\Veritas\NetBackup\bin\bprd.d\*.lock
EXCLUDE = C:\Program Files\Veritas\NetBackup\bin\bpsched.d\*.lock
EXCLUDE = C:\Program Files\Veritas\NetBackupDB\data\*
EXCLUDE = C:\Program Files\Veritas\Volmgr\misc\*
2 Create an exclude list on the UNIX server.
For example, file ex_list on nbmaster1:
vi /tmp/ex_list
The contents of ex_list consists of the following files and directories:
more /tmp/ex_list
EXCLUDE = C:\Program Files\Veritas\NetBackup\bin\*.lock
EXCLUDE = C:\Program Files\Veritas\NetBackup\bin\bprd.d\*.lock
EXCLUDE = C:\Program Files\Veritas\NetBackup\bin\bpsched.d\*.lock
EXCLUDE = C:\Program Files\Veritas\NetBackupDB\data\*
EXCLUDE = C:\Program Files\Veritas\Volmgr\misc\*
EXCLUDE = C:\
EXCLUDE = D:\
145Configuring Host PropertiesExclude Lists properties

3 From the UNIX server, use the nbsetconfig command to set the exclude liston a Windows client.
For example, run the following command on nbmaster1 to make ex_list theexclude list on client nbmedia1:
/usr/openv/netbackup/bin/nbsetconfig -h nbmedia1 /tmp/ex_list
4 On the UNIX server, use the nbgetconfig command to view the new excludelist on the Windows client.
For example:
/usr/openv/netbackup/bin/nbgetconfig -M nbmedia1 EXCLUDE
The output lists the updated exclude list on nbmedia1:
EXCLUDE = C:\Program Files\Veritas\NetBackup\bin\*.lock
EXCLUDE = C:\Program Files\Veritas\NetBackup\bin\bprd.d\*.lock
EXCLUDE = C:\Program Files\Veritas\NetBackup\bin\bpsched.d\*.lock
EXCLUDE = C:\Program Files\Veritas\NetBackupDB\data\*
EXCLUDE = C:\Program Files\Veritas\Volmgr\misc\*
EXCLUDE = C:\
EXCLUDE = D:\
Traversing excluded directoriesAn exclude list can indicate a directory for exclusion, while the client uses an includelist to override the exclude list. NetBackup traverses the excluded directories ifnecessary, to satisfy the client’s include list.
Assume the following settings for a Windows client:
■ The backup policy backup selection list indicates ALL_LOCAL_DRIVES. When ascheduled backup runs, the entire client is backed up.The entire client is also backed up if the backup selection list consists of only:/
■ The exclude list on the client consists of only: *An exclude list of * indicates that all files are excluded from the backup.
■ However, since the include list on the Windows client includes the following file:C:\WINNT, the excluded directories are traversed to back up C:\WINNT.If the include list did not contain any entry, no directories are traversed.
In another example, assume the following settings for a UNIX client:
■ The backup selection list for the client consists of the following: /
146Configuring Host PropertiesExclude Lists properties

■ The exclude list for the UNIX client consists of the following: /
■ The include list of the UNIX client consists of the following directories:/data1
/data2
/data3
Because the include list specifies full paths and the exclude list excludes everything,NetBackup replaces the backup selection list with the client’s include list.
Fibre Transport propertiesNetBackup Fibre Transport properties control how your Fibre Transport mediaservers and SAN clients use the Fibre Transport service for backups and restores.The Fibre Transport properties apply to the host type that you select in theNetBackup Administration Console, as follows:
Table 3-32 Host types for Fibre Transport properties
DescriptionHost type
Global Fibre Transport properties that apply to all SAN clients.Master server
The Fibre Transport Maximum concurrent FT connectionsproperty applies to the FT media server or servers that you selectedin the NetBackup Administration Console.
Media server
The Fibre Transport properties apply to the SAN client or clientsthat you selected in the NetBackup Administration Console. Thedefault values for clients are the global property settings of the masterserver. Client properties override the global Fibre Transportproperties.
Client
147Configuring Host PropertiesFibre Transport properties

Figure 3-26 Fibre Transport host properties for a master server
Table 3-33 describes the Fibre Transport properties. All properties are not availablefor all hosts. In this table, FT device is an HBA port on a Fibre Transport mediaserver. The port carries the backup and restore traffic. A media server may havemore than one FT device.
148Configuring Host PropertiesFibre Transport properties

Table 3-33 Fibre Transport dialog box properties
DescriptionProperty
This property appears only when you select an FT media server or servers in theNetBackup Administration Console.
This property specifies the number of FT connections to allow to the selectedmedia server or media servers. A connection is equivalent to a job.
NetBackup supports 644 buffers per media server for Fibre Transport. Todetermine the number of buffers that each connection uses, divide 644 by thevalue you enter. More buffers per connection equal better performance for eachconnection.
If no value is set, NetBackup uses the following defaults:
■ For NetBackup Appliance model 5330 and later: 32■ For NetBackup Appliance model 5230 and later: 32■ For NetBackup Fibre Transport media servers: 8 times the number of fast HBA
ports on the media server plus 4 times the number of slow HBA ports for. Afast port is 8 GB or faster, and a slow port is less than 8 GB.
You can enter up to the following maximum connections for the media server orservers to use:
■ On a Linux FT media server host: 40.Veritas recommends that you use 32 or fewer connections concurrently onLinux.On Linux hosts, you can increase that maximum by setting a NetBackup touchfile, NUMBER_DATA_BUFFERS_FT.See “About Linux concurrent FT connections” on page 150.
■ For NetBackup Appliance model 5330 and later: 40.■ For NetBackup Appliance model 5230 and later: 40.■ On a Solaris FT media server host: 64.
Maximum concurrent FTconnections
This property appears only when you select a client or client in the NetBackupAdministration Console.
This property specifies that the client follow the properties as they are configuredon the master server.
Use defaults from the masterserver configuration
The Preferred property specifies to use an FT device if one is available withinthe configured wait period in minutes. If an FT device is not available after thewait period elapses, NetBackup uses a LAN connection for the operation.
If you select this option, also specify the wait period for backups and for restores.
For the global property that is specified on the master server, the default isPreferred.
Preferred
149Configuring Host PropertiesFibre Transport properties
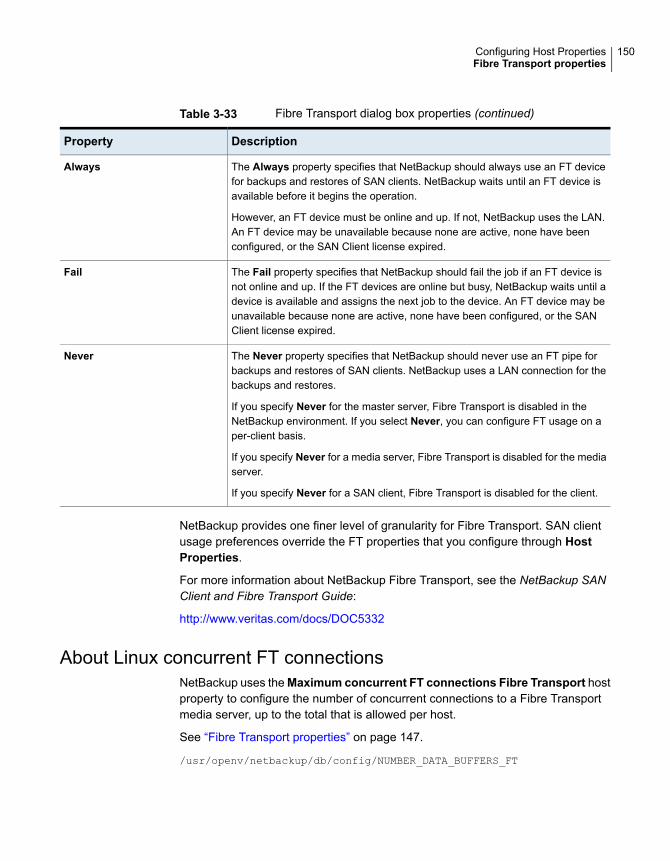
Table 3-33 Fibre Transport dialog box properties (continued)
DescriptionProperty
The Always property specifies that NetBackup should always use an FT devicefor backups and restores of SAN clients. NetBackup waits until an FT device isavailable before it begins the operation.
However, an FT device must be online and up. If not, NetBackup uses the LAN.An FT device may be unavailable because none are active, none have beenconfigured, or the SAN Client license expired.
Always
The Fail property specifies that NetBackup should fail the job if an FT device isnot online and up. If the FT devices are online but busy, NetBackup waits until adevice is available and assigns the next job to the device. An FT device may beunavailable because none are active, none have been configured, or the SANClient license expired.
Fail
The Never property specifies that NetBackup should never use an FT pipe forbackups and restores of SAN clients. NetBackup uses a LAN connection for thebackups and restores.
If you specify Never for the master server, Fibre Transport is disabled in theNetBackup environment. If you select Never, you can configure FT usage on aper-client basis.
If you specify Never for a media server, Fibre Transport is disabled for the mediaserver.
If you specify Never for a SAN client, Fibre Transport is disabled for the client.
Never
NetBackup provides one finer level of granularity for Fibre Transport. SAN clientusage preferences override the FT properties that you configure through HostProperties.
For more information about NetBackup Fibre Transport, see the NetBackup SANClient and Fibre Transport Guide:
http://www.veritas.com/docs/DOC5332
About Linux concurrent FT connectionsNetBackup uses theMaximum concurrent FT connections Fibre Transport hostproperty to configure the number of concurrent connections to a Fibre Transportmedia server, up to the total that is allowed per host.
See “Fibre Transport properties” on page 147.
/usr/openv/netbackup/db/config/NUMBER_DATA_BUFFERS_FT
150Configuring Host PropertiesFibre Transport properties

Table 3-34 shows the values that NetBackup supports for theNUMBER_DATA_BUFFERS_FT file. NetBackup supports 644 buffers per media serverfor Fibre Transport.
Table 3-34 Supported values for buffers per FT connection
Total concurrentconnections: Linux FTmedia server
Total concurrentconnections:NetBackup5230 and 5330 and laterappliances
NUMBER_DATA_BUFFERS_FT
404016
535312
646410
If you want, you then can limit the number of connections for a media server ormedia servers by using the Maximum concurrent FT connections of the FibreTransport host properties.
Firewall propertiesThe Firewall properties describe how the selected master servers and mediaservers that are connected to by other hosts.
Servers are added to the host list of the Firewall properties. To configure port usagefor clients, see the Client Attributes properties.
See “Client Attributes properties” on page 92.
151Configuring Host PropertiesFirewall properties

Figure 3-27 Firewall dialog box
The Firewall dialog box contains the following properties.
152Configuring Host PropertiesFirewall properties

Table 3-35 Firewall dialog box properties
DescriptionProperty
By default, NetBackup selects firewall-friendly connect options underDefault connectoptions. However, the default options can be set differently for individual servers underAttributes for selected Hosts.
By default, the firewall settings are configured to require the fewest possible ports tobe open.
These properties correspond to the DEFAULT_CONNECT_OPTIONS configuration option.
To change the default connect options for the selected server, click Change.
ClickChange to change theDefault connect options. Change the Firewall propertiesin the Default Connect Options dialog box.
Note: IfVNETD only is selected as theDaemon connection port, theBPCD connectback setting is not applicable. If VNETD only is selected as the Daemon connectionport, Use non-reserved ports is always used regardless of the value of the Portssetting.
Default connect options
To change the default connect options for any server, add the server to the host list.Servers do not automatically appear on the list.
■ Add optionClick Add to add a host entry to the host list. A host must be listed before it can beselected for configuration.
■ Add to all optionClick Add to All to add the listed hosts (along with the specified properties) to allhosts that are selected for host property configuration. (That is, the hosts that areselected upon opening the Host Properties.)
■ Remove optionSelect a host name in the list, then click Remove to remove the host from the list.
Hosts list
Connect options can be configured for individual servers.
These properties correspond to the CONNECT_OPTIONS configuration option.
Attributes for selected hosts
153Configuring Host PropertiesFirewall properties

Table 3-35 Firewall dialog box properties (continued)
DescriptionProperty
This property specifies how daemons are to connect back to the NetBackup Clientdaemon (BPCD) as follows:
■ Use default connect options (An option for individual hosts)Use the methods that are specified under Default connect options.
■ Random portNetBackup randomly chooses a free port in the allowed range to perform thetraditional connect-back method.
■ VNETD portThis method requires no connect-back. The Veritas Network Daemon (vnetd) wasdesigned to enhance firewall efficiency with NetBackup during server-to-server andserver-to-client communications. The server initiates all bpcd socket connections.Consider the example in which bpbrm on a media server initially connects withbpcd on a client. The situation does not pose a firewall problem because bpbrmuses the well-known bpcd port.
BPCD connect back
Select whether a reserved or non-reserved port number should be used to connect tothe server:
■ Use default connect options (An option for individual hosts)Use the methods that are specified under Default attributes.
■ Reserved portConnect to the server by a reserved port number.
■ Use non-reserved portsConnect to the server by a non-reserved port number. If this property is selected,also enableAccept connections from non-reserved ports for the selected serverin the Universal Settings properties.See “Universal Settings properties” on page 258.
Ports
154Configuring Host PropertiesFirewall properties

Table 3-35 Firewall dialog box properties (continued)
DescriptionProperty
This option only affects connections to NetBackup 7.0 and earlier. For connections toNetBackup 7.0.1 and later, the veritas_pbx port is used.
If configuring connections for NetBackup 7.0 and earlier, select theDaemon connectionport method to use to connect to the server:
■ Use default connect options (An option for individual hosts)Use the methods that are specified under Default connect options.
■ AutomaticThe daemons on the server are connected to by vnetd if possible. If it is not possibleto use vnetd, the daemon’s traditional port number makes the connection.
■ VNETD onlyThe daemons on the server are connected to by vnetd only. Select this propertyif your firewall rules prevent connections to the server by the traditional port number.
■ Daemon port onlyThe daemons on the server are connected to by the traditional port number only.
Note: If vnetd only is selected as the Daemon connection port, the BPCD connectback setting is not applicable. If vnetd only is selected as the Daemon connectionport, Non-reserved port is always used regardless of the value of the Ports setting.
Daemon connection port
Set property settings back to the defaults.Defaults
Enabling logging for vnetdUse the following procedure to enable logging for vnetd.
To enable logging for vnetd
◆ Create a vnetd directory in the following location:
■ On Windows: install_path\NetBackup\logs\vnetdOr, double-click mklogdir.bat in the install_path\NetBackup\logs\
directory to populate the logs directory with log subdirectories, includingone for vnetd.
■ On UNIX: /usr/openv/logs/vnetd
General Server propertiesThe General Server properties apply to selected master and media servers.
155Configuring Host PropertiesGeneral Server properties

Figure 3-28 General Server dialog box
The General Server dialog box contains the following properties.
Table 3-36 General Server dialog box properties
DescriptionProperty
This property specifies how long the server waits for additional restore requestsof multiplexed images on the same tape. All of the restore requests that arereceived within the delay period are included in the same restore operation (onepass of the tape).
The default is a delay of 30 seconds.
Delay on multiplexed restores
This property determines how often NetBackup checks disk storage units foravailable capacity. If checks occur too frequently, then system resources arewasted. If checks do not occur often enough, too much time elapses and backupjobs are delayed.
The default is 300 seconds (5 minutes).
Note: This property applies to the disk storage units of 6.0 media servers only.Subsequent releases use internal methods to monitor disk space more frequently.
Check the capacity of disk storageunits every
156Configuring Host PropertiesGeneral Server properties

Table 3-36 General Server dialog box properties (continued)
DescriptionProperty
This property appears for master servers only, but applies to all media serversas well. This property does not apply to NDMP drives.
If a client is also a media server or a master server and Must use local drive ischecked, a local drive is used to back up the client. If all drives are down, anothercan be used.
This property increases performance because backups are done locally ratherthan sent across the network. For example, in a SAN environment a storage unitcan be created for each SAN media server. Then, the media server clients maybe mixed with other clients in a policy that uses ANY AVAILABLE storage unit.When a backup starts for a client that is a SAN media server, the backups go tothe SAN connected drives on that server.
Must use local drive
By default, NetBackup for NDMP is configured to use Direct Access Recovery(DAR) during NDMP restores. DAR can reduce the time it takes to restore filesby allowing the NDMP host to position the tape to the exact location of therequested file(s). Only the data that is needed for those files is read.
Clear this check box to disable DAR on all NDMP restores. Without DAR,NetBackup reads the entire backup image, even if only a single restore file isneeded.
Use direct access recovery forNDMP restores
This option performs message-level cataloging when you duplicate Exchangebackup images that use Granular Recovery Technology (GRT) from disk to tape.To perform duplication more quickly, you can disable this option. However, thenusers are not able to browse for individual items on the image that was duplicatedto tape.
See the NetBackup for Exchange Administrator's Guide.
Enable message-level catalogingwhen duplicating Exchange imagesthat use Granular RecoveryTechnology
157Configuring Host PropertiesGeneral Server properties

Table 3-36 General Server dialog box properties (continued)
DescriptionProperty
Specific servers can be specified in this list as servers to perform restores,regardless of where the files were backed up. (Both servers must be in the samemaster and media server cluster.) For example, if files were backed up on mediaserver A, a restore request can be forced to use media server B.
The following items describe situations in which the capability to specify serversis useful:
■ Two (or more) servers share a robot and each have connected drives. A restoreis requested while one of the servers is either temporarily unavailable or isbusy doing backups.
■ A media server was removed from the NetBackup configuration, and is nolonger available.
To add a host to the Media host override list, click Add.
Click Add to All to add a host to the list for all of the hosts currently selected.
To change an entry in the list, select a host name, then click Change.
Configure the following options in the Add Media Override settings or ChangeMedia Override settings dialog box:
■ Original backup serverType the name of the server where data was backed up originally.
■ Restore serverType the name of the server that is to process future restore requests.
Media host override list
Sets all properties back to the default settings.Defaults
Forcing restores to use a specific serverUse the following procedure to force restores to use a specific server.
158Configuring Host PropertiesGeneral Server properties

To force restores to use a specific server
1 If necessary, physically move the media to the host to answer the restorerequests, then update the Enterprise Media Manager database to reflect themove.
2 Modify the NetBackup configuration on the master server. Add the originalbackup media server and the restore server to the Media host override list inthe General Server host properties.
3 Stop and restart the NetBackup Request Daemon (bprd) on the master server.
This process applies to all storage units on the original backup server. Restoresfor any storage unit on the Original backup server go to the server that islisted as the Restore server.
To revert to the original configuration for future restores, delete the line fromthe Media host override list.
Global Attributes propertiesThe Global Attributes properties apply to currently selected master servers. TheGlobal Attributes properties affect all operations for all policies and clients. Thedefault values are adequate for most installations but can be changed.
159Configuring Host PropertiesGlobal Attributes properties

Figure 3-29 Global Attributes dialog box
The Global Attributes dialog box contains the following properties.
Table 3-37 Global Attributes dialog box properties
DescriptionProperty
This property specifies how often NetBackup retries a job. The default is 10 minutes.The maximum is 60 minutes; the minimum is 1 minute.
Job retry delay
160Configuring Host PropertiesGlobal Attributes properties

Table 3-37 Global Attributes dialog box properties (continued)
DescriptionProperty
NetBackup considers the failure history of a policy to determine whether or not to runa scheduled backup job. The Schedule backup attempts property sets the timeframefor NetBackup to examine.
This property determines the following characteristics for each policy:
■ How many preceding hours NetBackup examines to determine whether to allowanother backup attempt (retry). By default, NetBackup examines the past 12 hours.
■ How many times a backup can be retried within that timeframe. By default,NetBackup allows two attempts. Attempts include the scheduled backups that startautomatically or the scheduled backups that are user-initiated.
Consider the following example scenario using the default setting 2 tries every 12hours:
■ Policy_A runs at 6:00 P.M.; Schedule_1 fails.■ Policy_A is user-initiated at 8:00 P.M.; Schedule_2 fails.■ At 11:00 P.M., NetBackup looks at the previous 12 hours. NetBackup sees one
attempt at 6:00 P.M. and one attempt at 8:00 P.M. The Schedule backup attemptssetting of two has been met so NetBackup does not try again.
■ At 6:30 A.M. the next morning, NetBackup looks at the previous 12 hours. NetBackupsees only one attempt at 8:00 P.M. The Schedule backup attempts setting of twohas not been met so NetBackup tries again. If a schedule window is not open atthis time, NetBackup waits until a window is open.
Note: This attribute does not apply to user backups and archives.
Schedule backup attempts
This property specifies how long NetBackup waits to process a policy after a policy ischanged. The interval allows the NetBackup administrator time to make multiple changesto the policy. The default is 10 minutes. The maximum is 1440 minutes; the minimumis 1 minute.
Policy update interval
This property specifies the maximum number of backup and archive jobs that NetBackupclients can perform concurrently. The default is one job.
NetBackup can process concurrent backup jobs from different policies on the sameclient only in the following situations:
■ More than one storage unit available■ One of the available storage units can perform more than one backup at a time.
See “About constraints on the number of concurrent jobs” on page 162.
Maximum jobs per client
This property specifies how long NetBackup waits after a backup before it compressesthe image catalog file.
Compress catalog interval
161Configuring Host PropertiesGlobal Attributes properties

Table 3-37 Global Attributes dialog box properties (continued)
DescriptionProperty
This property specifies the maximum number of vault jobs that are allowed to be activeon the master server. The greater the maximum number of vault jobs, the more systemresources are used.
If the active vault jobs limit is reached, subsequent vault jobs are queued and theirstatus is shown as Queued in the Activity Monitor.
If a duplication job or eject job waits, its status is shown as Active in the Activity Monitor.
See “About the Jobs tab” on page 1038.
Maximum vault jobs
This property specifies the address(es) where NetBackup sends notifications ofscheduled backups or administrator-directed manual backups.
To send the information to more than one administrator, separate multiple emailaddresses by using a comma, as follows:
[email protected],[email protected]
Disaster recovery information that is created during catalog backups is not sent to theaddresses indicated here. Disaster recovery information is sent to the address that isindicated on the Disaster Recovery tab in the catalog backup policy.
See “Disaster Recovery tab” on page 851.
Administrator emailaddress property
About constraints on the number of concurrent jobsSpecify any number of concurrent jobs within the following constraints.
Table 3-38 Constraints on concurrent jobs
DescriptionConstraint
NetBackup can perform concurrent backups to separate storage units or to driveswithin a storage unit. For example, a single Media Manager storage unit supports asmany concurrent backups as it has drives. A disk storage unit is a directory on disk,so the maximum number of jobs depends on system capabilities.
Number of storage devices
162Configuring Host PropertiesGlobal Attributes properties

Table 3-38 Constraints on concurrent jobs (continued)
DescriptionConstraint
Too many concurrent backups on an individual client interfere with the performanceof the client. The best setting depends on the hardware, operating system, andapplications that are running.
The Maximum jobs per client property applies to all clients in all policies.
To accommodate weaker clients (ones that can handle only a small number of jobsconcurrently), consider using one of the following approaches:
■ Set the Maximum data streams property for those weaker client(s) appropriately.(This property is found under Host Properties > Master Servers > Double-clickon a specific master server > Client Attributes > General tab.)See “General tab of the Client Attributes properties” on page 94.
■ Use the Limit jobs per policy policy setting in a client-specific policy. (Aclient-specific policy is one in which all clients share this characteristic).See “Limit jobs per policy (policy attribute)” on page 706.
Server and client speed
The available bandwidth of the network affects how many backups can occurconcurrently. Two Exabyte 8500, 8mm tape drives can create up to a900-kilobyte-per-second network load. Depending on other factors, the load might betoo much for a single Ethernet. For loading problems, consider backups over multiplenetworks or compression.
A special case exists to back up a client that is also a server. Network loading is not afactor because the network is not used. Client and server loading, however, is still afactor.
Network loading
Figure 3-30 Maximum jobs per client
Client
/home
/usr
Policy A
Policy B
Tape Drive 1
Server
Tape Drive 2
Note: Catalog backups can run concurrently with other backups. To do so, set theMaximum jobs per client value to greater than two for the master server. Thehigher setting ensures that the catalog backup can proceed while the regular backupactivity occurs.
163Configuring Host PropertiesGlobal Attributes properties

Setting up email notifications about backupsEmail notifications can be sent to the client's administrator or to the globaladministrator, specifying that a backup was successful or unsuccessful.
The following represents the contents of a notification email:
Backup on client hostname by root was partially successful.
File list
---------
C:\Documents and Settings
Before emails can be sent, the computing environment must be configured correctly.
Additional Windows configuration to receive emailsNetBackup can send notification to specified email addresses about backups onall clients or specific clients.
The nbmail.cmd script must be configured on any Windows host that is to receiveemail.
Windows systems also require that an application to transfer messages using theSimple Mail Transfer Protocol be installed to accept script parameters. UNIXplatforms have an SMTP transfer method built into the system.
Additional UNIX configuration to receive emailsNetBackup uses the mail transfer agent sendmail to send email notifications. Installsendmail from the following website and configure the environment accordingly:
http://www.sendmail.org/releases
Notification methodsTo set up email notifications about backups, choose one or both of the followingnotification methods:
■ Send emails about failed backups only.Send a message to the email address(es) of the NetBackup administrator(s)about any backup that ends in a non-zero status.To do so, configure the Administrator email address in the Global Attributesproperties. Since email is sent from the master server or the media server, thenbmail.cmd script or sendmail must be configured on the master and the mediaservers.See “Sending messages to the global administrator about unsuccessful backupsonly” on page 167.
■ Send emails about successful and failed backups.
164Configuring Host PropertiesGlobal Attributes properties

Send a message to the local administrator(s) of each client about successfuland unsuccessful backups.To do so, configure either the Client sends mail property or the Server sendsmail property in the Universal Settings properties for the client. Email is sentfrom the client (Client sends mail) or the master or the media server (Serversends mail). Therefore, nbmail.cmd or sendmail must be configured on themaster and the media servers, or the client if specified.See “Sending messages to the administrator about successful and unsuccessfulbackups” on page 167.
See “Installing and testing the email utility on Windows” on page 169.
See “About constraints on the number of concurrent jobs” on page 162.
Configuring the nbmail.cmd script on WindowsFor Windows hosts to receive email notifications about backups, the nbmail.com
script must be configured on the host.
By default, nbmail.cmd does not send email. Use the following procedure toconfigure the nbmail.cmd script.
To configure the nbmail.cmd script
1 On a NetBackup master server, copy nbmail.cmd from the following directory:
install_path\VERITAS\NetBackup\bin\goodies\nbmail.cmd
2 Paste it into the following directory on the server or client:
install_path\VERITAS\NetBackup\bin\
165Configuring Host PropertiesGlobal Attributes properties

3 Use a text editor to open nbmail.cmd. Create a backup copy of nbmail.cmdbefore modifying it.
In some text editors, using the word wrap option can create extra line feeds inthe script and render it non-functional.
The following options are used in the script:
The subject line of the email-s
Indicates who receives the email.-t
The originator of the email, though it is not necessarily known to themail server. The default (-i NetBackup) shows that the email is fromNetBackup.
-i
The name of the SMTP server that is configured to accept and relayemails.
-server
Suppresses all output to the screen.-q
4 Most of the lines are informational in nbmail.cmd.
Locate the following lines in the script:
@REM @IF "%~4"=="" (
@REM blat %3 -s %2 -t %1 -i NetBackup -server SERVER_1 -q
@REM ) ELSE (
@REM blat %3 -s %2 -t %1 -i NetBackup -server SERVER_1 -q -attach %4
@REM )
5 Adjust the fives lines as follows:
■ Remove @REM from each of the five lines to activate the necessarysections for BLAT to run.
■ Replace SERVER_1 with the name of the mail server. For example:
@IF "%~4"=="" (
blat %3 -s %2 -t %1 -i NetBackup -server emailserver.company.com -q
) ELSE (
blat %3 -s %2 -t %1 -i NetBackup -server emailserver.company.com -q -attach %4
)
6 Save nbmail.cmd.
See “About constraints on the number of concurrent jobs” on page 162.
166Configuring Host PropertiesGlobal Attributes properties

Sending messages to the global administrator about unsuccessfulbackups only
Use the following procedure to send messages to the global administrator aboutbackups with a non-zero status.
To sendmessages to the global administrator about backups with a non-zerostatus
1 On Windows servers, install and configure a mail client.
See “Installing and testing the email utility on Windows” on page 169.
Edit the nbmail.cmd script.
See “Configuring the nbmail.cmd script on Windows” on page 165.
2 On the master server, open the NetBackup Administration Console.
3 In theNetBackupAdministrationConsole, expandNetBackupManagement> Host Properties > Master Server.
4 In the right pane, double-click the master server you want to modify.
5 Open the host properties of the master server.
6 In the properties dialog box, in the left pane, click Global Attributes.
7 In the Administrator’s email address field, enter the email address of theadministrator to receive the notification emails. (Separate multiple addresseswith commas.) Click Apply.
The global administrator’s email address can also be changed by using thebpconfig command on the master server:
Install_Path\NetBackup\bin\admincmd\bpconfig -ma email_address
For example:
C:\Program Files\VERITAS\NetBackup\bin\admincmd\bpconfig
Sending messages to the administrator about successful andunsuccessful backups
An alternative to sending all emails through the master server is to send emailsthrough each client or through the media server that backed up the client. An emailcan be sent to the administrator after every backup.
167Configuring Host PropertiesGlobal Attributes properties

To send email notifications for all backups from a client
1 On a Windows client, install and configure a mail client.
See “Installing and testing the email utility on Windows” on page 169.
On the client or the media server, edit the nbmail.cmd script, depending onwhetherClient sendsmail is enabled or Server sendsmail is enabled in step6.
See “Configuring the nbmail.cmd script on Windows” on page 165.
2 On the master server, open the NetBackup Administration Console.
3 In theNetBackupAdministrationConsole, expandNetBackupManagement> Host Properties > Clients.
4 In the right pane, double-click the client you want to modify. Multiple clientscan also be selected.
5 In the properties dialog box, in the left pane, select Universal Settings.
6 Enable the Client sends mail option or if the client cannot send mail, enablethe Server sends mail option.
7 In the Client administrator’s email field, enter the email address of theadministrator(s) to receive the notification emails. (Separate multiple addresseswith commas.) Click Apply.
See “Universal Settings properties” on page 258.
168Configuring Host PropertiesGlobal Attributes properties

Installing and testing the email utility on WindowsBLAT is the most common application is used for email notification. It is a mail clientin the public domain. BLAT is used as an example in the following discussions.
Use the following procedure to install and configure the email utility.
To install and configure the email utility
1 Download the .ZIP file from the BLAT download page, currently: www.blat.net
2 Extract the files to a directory.
3 Copy the blat.exe file to the Windows System32 directory.
4 From a command prompt, run the following command:
blat -install emailserver.company.com [email protected]
Where:
emailserver.company.com is the host name or IP address of the mail serverthat sends the email notifications.
[email protected] is the primary account to send the emails fromthe specified server.
5 Test the email utility, following the To test the email utility procedure.
Use the following procedure to test the email utility.
To test the email utility
1 Create a test text file that contains a message. For example, createC:\testfile.txt
2 From a command prompt, run:
blat C:\testfile.txt -s test_subject -to [email protected]
A correct setup sends the contents of testfile.txt to the email addressspecified.
3 Use the following list to troubleshoot problems if NetBackup notification doesnot work correctly:
■ Make sure that the BLAT command is not commented out in the nbmail.cmd
script.
■ Make sure that the path to blat.exe is specified in nbmail.cmd if thecommand is not in the \system32 directory.
■ Make sure that BLAT syntax has not changed in the later versions of BLAT.Check the readme for the version of BLAT running on the system.
169Configuring Host PropertiesGlobal Attributes properties

■ The BLAT command may need the -ti n timeout parameter if the systemexperiences delays. (n represents seconds.)
■ The BLAT binary must not be corrupt or incompatible with the email system.Download the latest version.
■ Configure the email addresses correctly in the host properties.
■ The email account that is specified must be a valid on the mail server.
■ If the mail server requires authentication for SMTP, make sure that theaccount that is used for the NetBackup client process is authorized. Thedefault account is the local system.
Logging propertiesThe Logging properties apply to the master servers, media servers, and the clientsthat are currently selected. The available properties differ between master servers,media servers, and clients. The Logging properties contain the processes thatcontinue to use Legacy logging as well as processes that use Unified logging.
NetBackup Administration Console logging describes the logging for the NetBackupAdministration Console.
Legacy loggingFor those processes that use legacy logging, administrators must first create a logdirectory for each process to be logged. A logging level selection on the Loggingproperties page does not create the log directory.
Note: If you have used the Logging Assistant tool earlier, you do not need tomanually create log directories. The Logging Assistant tool automatically createslog directories.
Create the NetBackup legacy log directories in the following locations:
■ On Windows: install_path\NetBackup\logs\process_name
■ UNIX: /usr/openv/netbackup/logs/process_name
Note: Do not save logs to a remote file system such as NFS or CIFS. Logs that arestored remotely and then grow large can cause critical performance issues.
To create all of the NetBackup debug log directories at one time, run the followingfiles:
170Configuring Host PropertiesLogging properties

■ On Windows, run mklogdir.bat:install_path\NetBackup\logs\mklogdir.bat
■ On UNIX, run the mklogdir shell script: /usr/openv/netbackup/logs/mklogdir
Create the Media Manager legacy log directories in the following locations:
■ On Windows: install_path\Volmgr\debug
■ On UNIX: /usr/openv/volmgr/debug
In the case of legacy logging, NetBackup uses the configuration file (the Windowsregistry or the bp.conf file on UNIX) to set the maximum size of a log file. Use thebpsetconfig command-line interface to configure the following parameters:
■ The MAX_LOGFILE_SIZE parameter indicates the maximum size of a log file.When the log file size in NetBackup matches the MAX_LOGFILE_SIZE setting,the next logs are stored in a new log file.See “MAX_LOGFILE_SIZE option for NetBackup servers and clients for legacylogging” on page 313.
■ The MAX_NUM_LOGFILES parameter indicates the maximum number of log filesthat can be created in NetBackup. When the number of log files matches theMAX_NUM_LOGFILES setting, the older log files are purged.See “MAX_NUM_LOGFILES option for NetBackup servers and clients for legacylogging” on page 314.
Note: Do not edit the configuration file manually because incorrect syntax orcharacters in the file may adversely affect NetBackup operations.
See the NetBackup Commands Reference Guide for information about thebpsetconfig command.
Unified loggingUnified logging creates log file names and messages in a format that is standardizedacross Veritas products. Some NetBackup processes on the server use unifiedlogging.
Unified logging writes the logs into subdirectories in the following locations:
■ On Windows: install_path\NetBackup\logs
■ On UNIX: /usr/openv/logs
Unlike legacy logging, subdirectories for the processes that use unified logging arecreated automatically.
171Configuring Host PropertiesLogging properties

Note: Do not save logs to a remote file system such as NFS or CIFS. Logs that arestored remotely and then grow large can cause critical performance issues.
In the case of unified logging, NetBackup uses the nblog.conf configuration fileto set the maximum size of a log file. Use the vxlogcfg command to configure thefollowing log settings in the nblog.conf file:
■ Configure the MaxLogFileSizeKB parameter to set the maximum size of a logfile. When the log file size in NetBackup matches the MaxLogFileSizeKB setting,the next logs are stored in a new log file.
■ Configure the NumberOfLogFiles parameter to set the maximum number of logfiles that you want to create in NetBackup. When the number of log files inNetBackup matches the NumberOfLogFiles setting, the older log files are purged.See the NetBackup Logging Reference Guide for more information aboutcontrolling the log file size.
Note: Do not edit the nblog.conf file manually. Incorrect syntax or characters inthe file may adversely affect NetBackup operations.
See the NetBackup Commands Reference Guide for information about the vxlogcfg
command and the nblog.conf file.
172Configuring Host PropertiesLogging properties

Figure 3-31 Logging dialog box
The Logging dialog box contains the following properties:
173Configuring Host PropertiesLogging properties

Table 3-39 Logging dialog box properties
DescriptionProperty
This property controls the logging level for all processes in the Logging dialog box that are setto Same as global. The logging levels control the amount of information that the NetBackupserver writes to the logs.
■ No loggingNo log is created for any process that is set to Same as global.
■ Minimum logging (default)A small amount of information is logged for each process that is set to Same as global.Use this setting unless advised otherwise by Veritas Technical Support. Other settings cancause the logs to accumulate large amounts of information.
■ Levels 1 through 4Progressively more information is logged at each level for each process that is set to Sameas global.
■ 5 (Maximum)The maximum amount of information is logged for each process that is set to Same as global.
Some NetBackup processes allow individual control over the amount of information the processwrites to logs. For those processes you can specify a different logging level other than Same asglobal.
Global logginglevel
The processes that are listed under Process specific overrides use Legacy logging.
These services require that you first create a log directory in the following location:
■ On Windows: install_path\NetBackup\logs\process_name■ On UNIX: /usr/openv/netbackup/logs/process_name
The following settings are available for each process:
■ Same as globalMake this selection to use the same logging level as the Global logging level property. Ifthe Global logging level is set to No logging, no log is created for the individual process.
■ No loggingNo log is created for the specific process.
■ Minimum loggingA small amount of information is logged for the specific process.
■ Levels 1 through 4Progressively more information is logged at each level for the specific process.
■ 5 (Maximum)The maximum amount of information is logged for the specific process.
Table 3-40 lists and describes the processes that use legacy logging.
Process specificoverrides
174Configuring Host PropertiesLogging properties

Table 3-39 Logging dialog box properties (continued)
DescriptionProperty
These services use unified logging.
Each service creates a log automatically in the following directories:
■ On Windows: install_path\NetBackup\logs■ On UNIX: /usr/openv/logs
The following settings are available for each process:
■ Same as globalMake this selection to use the same logging level as the Global logging level property. Ifthe Global logging level is set to No logging, no log is created for the individual process.
■ No loggingNo log is created for the specific process.
■ Minimum loggingA small amount of information is logged for the specific process.
■ Levels 1 through 4Progressively more information is logged at each level for the specific process.
■ 5 (Maximum)The maximum amount of information is logged for the specific process.
You can also use the vxlogcfg command to change debug levels.
Table 3-41 lists and describes the services that use unified logging.
Debug logginglevels forNetBackupservices
175Configuring Host PropertiesLogging properties

Table 3-39 Logging dialog box properties (continued)
DescriptionProperty
Click Enable to create logs for critical NetBackup processes. In previous NetBackup versions,logging starts once you have created the log directories for the required processes. After youclick Enable, the log directories are automatically created for the critical NetBackup processesand logging begins.
See “ENABLE_CRITICAL_PROCESS_LOGGING” on page 316.
Note: Enabling Logging for critical processes is a one-time activity that you can do using theNetBackup Administration Console. After the logging is enabled, you cannot disable it using theLogging dialog box. To manually disable the logging for a process, disable the logging level ofthe process.
See “Disabling the logging of NetBackup processes” on page 180.
If you have enabled Logging for critical processes, clickingDefaults does not modify Loggingfor critical processes and Keep logs up to GB options. While changing the logging propertiesfor multiple hosts, if the Logging for critical processes option on one of the hosts is enabled,clicking Defaults does not modify the Logging for critical processes and Keep logs up to GBoptions of any host.
See “Standard host property dialog box options” on page 74.
After the Logging for critical processes is enabled, NetBackup sets the log retention to thedefault log size in GB. You can modify it by reconfiguring the Keep logs up to GB option.
Note: Clearing the Keep logs up to GB option may adversely affect NetBackup operations.Veritas recommends that you specify the log retention in GB when Logging for critical processesis enabled.
The following critical NetBackup processes are logged when you select the Enable option:
Master server processes:
■ bprd
■ bpdbm
Media server processes:
■ bpbrm
■ bptm
■ bpdm
Client processes:
■ bpfis
Note: You can enable Logging for critical processes for master servers, media servers, andclients. You cannot enable Logging for critical processes for media servers and clients atversions earlier than NetBackup 7.7, even if they are associated with current version masterservers.
176Configuring Host PropertiesLogging properties

Table 3-39 Logging dialog box properties (continued)
DescriptionProperty
Specifies how many days to keep the logs in case you need the logs to evaluate failures. Forexample, if you check the backups every day, you can delete the logs sooner than if you checkthe backups once a month. However, the logs can consume a large amount of disk space, so donot keep the logs any longer than necessary. The default is 28 days.
Specifies the length of time, in days, that the master server keeps its error catalog, job catalog,and debug log information. NetBackup derives the Backup Status, Problems, All Log Entries,and Media Log reports from the error catalog. Also limits the time period that these reports cancover. When this time expires, NetBackup also deletes these logs (that exist) on media serversand clients.
Keep logs fordays
177Configuring Host PropertiesLogging properties

Table 3-39 Logging dialog box properties (continued)
DescriptionProperty
Specifies the size of the NetBackup logs that you want to retain. When the NetBackup log sizegrows to this value, the older logs are deleted. To set the log size in GB, select the check boxand specify the value in GB.
See “KEEP_LOGS_SIZE_GB for NetBackup servers and clients” on page 315.
Note: In the case of NetBackup servers, the recommended value for the Keep logs up to GBoption is 25 GB or greater.
In the case of clients, the recommended value for the Keep logs up to GB option is 5 GB orgreater.
While configuring the Keep logs up to GB option, consider the NetBackup log pruning behavior.All logs are retained until the log size reaches the high watermark, that is, 95% of the Keep logsup to GB value. NetBackup checks for the log size every 10 minutes. Once the log size reachesthe high watermark, the deletion of older logs is started. The deletion continues until the log sizereaches the low watermark, that is, 85% of the Keep logs up to GB value.
Consider the following example:
■ The Keep logs up to GB option is set to 100 GB.■ NetBackup logs are created and retained until the log size reaches the high watermark, that
is, 95 GB.■ NetBackup checks the log size every 10 minutes and determines that the log size is 95 GB.■ Log pruning is started and older logs are deleted until the log size reaches the low watermark,
that is, 85 GB.■ Log pruning stops when the log size reaches 85 GB and all existing logs are retained until
the log size again reaches the high watermark.
If you do not select theKeep logs up to GB option, the default value is unlimited. The log retentionor log pruning does not happen based on the log size.
If bothKeep logs up to GB andKeep logs for days are selected, the logs are pruned dependingon the condition that occurs first.
If no log retention options are selected, the increasing log size may eventually lead to a situationof low disk space, as all logs are retained.
Note: You can verify the log pruning behavior in NetBackup using the logs at the followinglocation:
On Windows: install_path\NetBackup\logs\nbutil
On UNIX: /usr/openv/netbackup/logs/nbutil
Note: The Keep logs up to GB option is available for the NetBackup master server, mediaserver, and clients. The older versions of NetBackup media servers and clients that are associatedwith NetBackup 7.7 master servers do not have the Keep logs up to GB option.
Keep logs up toGB
178Configuring Host PropertiesLogging properties

Table 3-39 Logging dialog box properties (continued)
DescriptionProperty
If NetBackup Vault is installed, the Keep Vault logs for property is enabled. Select the numberof days to keep the Vault session directories, or select Forever.
Session directories are found in the following location:
install_path\netbackup\vault\sessions\vaultname\session_x
where x is the session number. This directory contains vault log files, temporary working files,and report files.
Keep Vault logsfor
Note:While collecting NetBackup logs using Logging Assistant, the total NetBackuplog size may increase. If you have enabled the new Keep logs up to GB optionand the total NetBackup log size reaches its high water mark, logs are deleted.Logs that you want to retain may also be deleted. To avoid the deletion of logs thatyou want to retain, disable the Keep logs up to GB option while you collect logsusing Logging Assistant. Alternatively, you can set the Keep logs up to GB optionto a value higher than the current value, so that the important logs are not deletedbefore the log collection is complete.
See “About the Logging Assistant” on page 1081.
Table 3-40 Process-specific overrides
DescriptionService
The NetBackup backup and restore manager.BPBRM logging level
The NetBackup tape manager.BPTM logging level
The NetBackup disk manager.BPDM logging level
The NetBackup Jobs Database Management daemon.BPJOBD logging level
The NetBackup database manager.BPDBM logging level
The NetBackup request daemon or manager.BPRD logging level
179Configuring Host PropertiesLogging properties

Table 3-41 Debug logging levels for NetBackup services
DescriptionService
This property appears for master servers.NBPEM creates Policy/Client tasks anddetermines when jobs are due to run. If apolicy is modified or if an image expires,NBPEM is notified and the appropriatePolicy/Client tasks are updated.
Policy Execution Manager
This property appears for master servers.NBJM accepts the jobs that the PolicyExecution Manager submits and acquires thenecessary resources.
Job Manager
NBRBmakes the allocations for storage units,tape drives, client reservations.
Resource Broker
Note: The Enable robust logging property has been removed from this release.Robust logging is now enabled by default.
The Enable robust logging property appears for earlier versions of master servers,media servers, or clients.
For more information about robust logging, refer to the section about legacy loggingin the NetBackup Logging Reference Guide.
NetBackup Administration Console loggingLegacy logging and unified logging write information about the NetBackup processesthat backup, restore, duplicate, and so on. You can also configure NetBackup sothat it writes log information about the NetBackup Administration Console. Thelog information may be helpful to troubleshoot problems.
See “Configuring log files for the NetBackup Administration Console” on page 54.
The NetBackup Logging Reference Guide describes how to troubleshoot theNetBackup Administration Console:
http://www.veritas.com/docs/DOC5332
Disabling the logging of NetBackup processesYou can disable the logging of a NetBackup process by changing the logging levelof the process.
180Configuring Host PropertiesLogging properties

Note: To enable Logging for critical processes, in theNetBackupAdministrationConsole, select NetBackup Management > Host Properties. Double-click onMaster Servers, Media Servers, or Clients and select a host. Open the Loggingproperties and click Enable.
To disable the logging of a process by changing the logging level
◆ Do any of the following:
■ In the Logging dialog box, in the Process specific overrides pane, setthe logging level of the process to No logging.
■ Use the Logging Assistant to change the logging level of a process to disablethe logging of the process.See “Disabling debug logging” on page 1097.
Note: For the processes for which you cannot change or disable logginglevels using the Logging > Process specific overrides pane or the LoggingAssistant, use the configuration file option.
■ Change or disable the logging level of a process by modifying using theconfiguration file (the Windows registry or the bp.conf file in UNIX). Usethe bpsetconfig command to set the ProcessName_VERBOSE parameterto -2.Example 1 - To disable logging for the bprd process, use the bpsetconfig
command to set the value of BPRD_VERBOSE as follows:
bpsetconfig> BPRD_VERBOSE = -2
Example 2 - To disable logging for the bpfis process that is specific toNetBackup clients, run the bpsetconfig command on the associated mediaserver or master server with the - h host option to set the value ofBPFIS_VERBOSE as follows:
bpsetconfig> -h client_host_name
bpsetconfig> BPFIS_VERBOSE = -2
See the NetBackup Commands Reference Guide for information on thebpsetconfig command.
Note: Do not edit the configuration file manually. Incorrect syntax orcharacters in the file may adversely affect NetBackup operations.
181Configuring Host PropertiesLogging properties

Login Banner Configuration propertiesUse the Login Banner Configuration properties to configure a banner screen thatappears each time a user logs into the NetBackup Administration Console orthe Backup, Archive, and Restore client console. The Login BannerConfiguration properties can be configured to make it mandatory for the user toacknowledge the login banner screen before the user can access the console.
A different login banner can be configured for any master server, media server, orclient.
Figure 3-32 shows example banner text for a media server.
Figure 3-32 Login Banner Configuration dialog box
The first time that the NetBackup Administration Console is launched, the LoginBanner Configuration properties are not configured so no banner appears to theuser. The Login Banner Configuration host properties must be configured in orderfor the banner to appear.
182Configuring Host PropertiesLogin Banner Configuration properties

The user can change the server once they log into the console. (On the File menu,click Change Server.) If the banner is configured for the remote server, the bannerappears on the remote server as well.
Note: The banner is not available on NetBackup versions before 6.5.4. If a userchanges to a host that is at NetBackup version 6.5.3 or earlier, no banner appears.
If a user opens a new console or window from the existing console, the bannerdoes not appear for the new window. (On the File menu, click the New Consoleoption or the New Window from Here option.)
Table 3-42 Login Banner Configuration dialog box properties
DescriptionProperty
Enter the text that is to appear in the banner.Login Banner Heading
Enter the text for the banner message. The maximum is 29,000 characters.Text of login banner
Configure this option when approval is necessary to use the NetBackupAdministration Console or the Backup, Archive, and Restore clientconsole. Specific approval may be required due to a legal agreement at thecompany in which the NetBackup environment resides.
If this option is enabled, users are required to click the Agree option andthen click OK before the console opens. The agreement is meant only forthe user that reads and agrees to the message.
If the user chooses the Disagree option, the screen is closed.
ShowAgree and Disagree buttons onthe login banner
183Configuring Host PropertiesLogin Banner Configuration properties

Figure 3-33 Login Banner with agreement option enabled
Figure 3-34 Login Banner without agreement option
Removing login banner screen and textTo remove the banner and the text that appears after a user logs into NetBackup,use the following procedure:
184Configuring Host PropertiesLogin Banner Configuration properties

To remove the login banner screen and text
1 In theNetBackupAdministrationConsole, expandNetBackupManagement> Host Properties.
2 Depending on the host that displays the login banner, select Master Servers,Media Servers, or Clients).
3 In the right pane, double-click the host name to display the properties.
4 In the properties dialog box, in the left pane, click the Login BannerConfiguration host properties.
5 Clear the Login Banner Heading text and the login banner text.
6 Click OK to save the changes.
Enabling the Auto log off timeout optionA related option, but one not configured in the Login Banner Configuration hostproperties, is the Auto log off timeout option.
The Auto log off timeout option allows NetBackup to automatically log a user outof theNetBackup Administration Console after a period of inactivity. The sessionmust be inactive for the configurable number of minutes, hours, or days before thelogoff.
To enable the Auto log off timeout option
1 Select View > Options. Then select the Administrative Options tab (UNIX)or the Administration Console tab (Windows).
2 Check the Auto log off timeout option.
3 Select the duration after which the user is logged off from an inactive session.The minimum logoff duration is 10 minutes and the maximum is two days.
Five minutes before the timeout value is reached, NetBackup warns that thesession is to expire in five minutes.
4 If the logoff warning appears, the user can choose one of the following options:
■ IgnoreIf the user selects this option (or does not respond to the warning), a dialogbox displays the time that remains before the session ends. Countdownwarnings display every minute until the timeout value is reached. When thesession ends, the user is logged out of the NetBackup AdministrationConsole or the Backup, Archive, and Restore client console.
■ ExtendIf the user selects this option, the session continues and the timeout extendsby the logoff timeout value.
185Configuring Host PropertiesLogin Banner Configuration properties

If the user begins to work at the console again, the logoff is canceled untilthe console is left idle again.
■ Log offIf the user selects this option, the session ends and NetBackup logs off theuser immediately.
Lotus Notes propertiesThe Lotus Notes properties apply to the clients that are currently selected and thatrun NetBackup for Lotus Notes.
For more information, see the NetBackup for Lotus Notes Administrator’s Guide.
Figure 3-35 Lotus Notes dialog box
The following properties can be configured in the Lotus Notes host properties orby using the nbgetconfig and nbsetconfig commands.
See “Methods to set the NetBackup configuration options” on page 70.
186Configuring Host PropertiesLotus Notes properties

For UNIX servers: If you have multiple installations of Domino server, the valuesin the client properties or the bp.conf only apply to one installation. For otherinstallations, specify the installation path and location of the notes.ini file with theLOTUS_INSTALL_PATH and NOTES_INI_PATH directives in the backup policy.
Table 3-43 Lotus Notes client host properties
DescriptionConfiguration optionsClient hostproperties
The maximum number of logs that can be prefetched in a singlerestore job during recovery. Specify a value greater than 1.
If this value is less than or equal to 1, NetBackup does not gathertransaction logs during recovery. One transaction log extent perjob is restored to the Domino server’s log directory.
LOTUS_NOTES_LOGCACHESIZE = 3
LOTUS_NOTES_LOGCACHESIZE
In the Windows registry, this valueis a DWORD value.
Maximumnumber oflogs torestore
Specify a path where NetBackup can temporarily store theprefetched transaction logs during recovery.
For example:
■ On Windows: D:\LogCache■ On UNIX: /tmp/logcache
If you do not specify a path, during recovery NetBackup restoresthe logs to the Domino server's transaction log directory.
Note the following before specifying the Transaction log cachepath:
■ If the specified path does not exist then it is created duringrestore.
■ The restore job fails with a Status 5 error if the user does nothave write permission for the folder.
■ Transaction logs are restored to the original location, theDomino transaction log directory, if a path is not specified.
■ If the value of Maximum number of logs to restore is lessthan or equal to 1 then this path is ignored. The logs are notprefetched; one transaction log per job is restored to theDomino Server’s log directory.
■ If there is not sufficient space to restore the specified numberof logs, NetBackup tries to restore only the number of logsthat can be accommodated.
LOTUS_NOTES_LOGCACHEPATH
In the Windows registry, this valueis a string value.
Transactionlog cachepath
187Configuring Host PropertiesLotus Notes properties

Table 3-43 Lotus Notes client host properties (continued)
DescriptionConfiguration optionsClient hostproperties
Enter the NOTES.INI file that is associated with the server usedto back up and restore the Lotus database. Use this setting tospecify the correct .INI file to back up and restore from Dominopartitioned servers. Specifying the .INI file for non-partitionedservers is not necessary.
Specify the absolute path to the NOTES.INI file:
■ On Windows:If the notes.ini file is not located in the default directory,indicate its location in the INI path box. For example:D:\Lotus\Domino\notes.ini
■ On UNIX:If the notes.ini is not located in the directory that is specifiedin the Path, indicate its location here. For example:/db/notesdata/notes.ini
Include the directory and the notes.ini file name.
LOTUS_NOTES_INI
In the Windows registry, this valueis a string value.
INI path
Specify the path where the Lotus Notes program files reside onthe client. NetBackup must know where these files are to performbackup and restore operations. The value in this box overridesthe Lotus registry key, if both are defined.
Specify the path where the Lotus Notes program files reside onthe client:
■ On Windows:Specify the path for Lotus program directory (wherenserver.exe resides). For example:D:\Lotus\Domino
■ On UNIX:Specify a path that includes the Domino data directory, theLotus program directory, and the Lotus resource directory.For example:/export/home/notesdata:/opt/lotus/notes/latest
/sunspa:/opt/lotus/notes/latest/sunspa/res/C
The Path value overrides the Lotus registry value, if both aredefined.
LOTUS_NOTES_PATH
In the Windows registry, this valueis a string value.
Path
188Configuring Host PropertiesLotus Notes properties

Media propertiesThe Media properties apply to the master servers and media servers that arecurrently selected. Media properties control how NetBackup manages media.
Figure 3-36 Media dialog box
The Media dialog box contains the following properties.
189Configuring Host PropertiesMedia properties
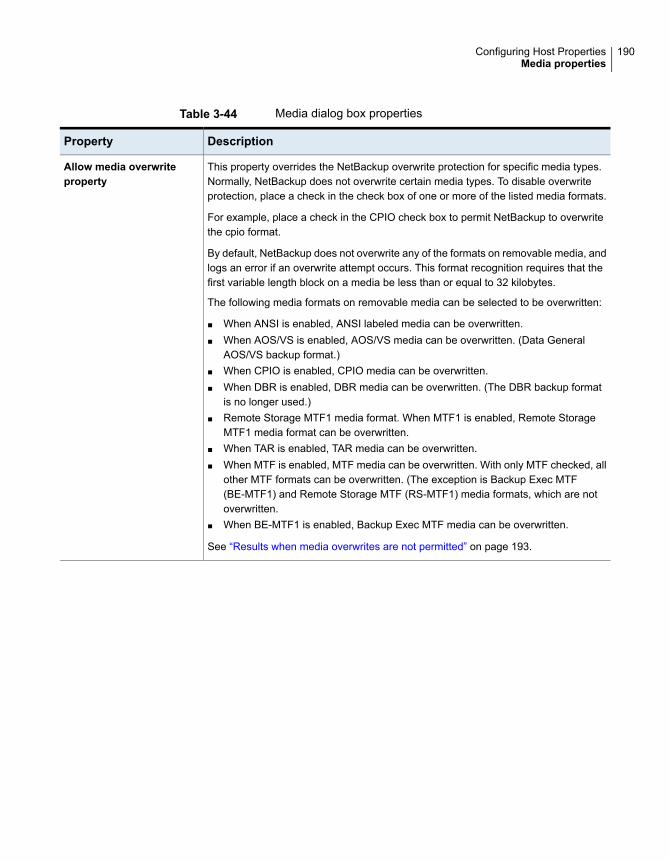
Table 3-44 Media dialog box properties
DescriptionProperty
This property overrides the NetBackup overwrite protection for specific media types.Normally, NetBackup does not overwrite certain media types. To disable overwriteprotection, place a check in the check box of one or more of the listed media formats.
For example, place a check in the CPIO check box to permit NetBackup to overwritethe cpio format.
By default, NetBackup does not overwrite any of the formats on removable media, andlogs an error if an overwrite attempt occurs. This format recognition requires that thefirst variable length block on a media be less than or equal to 32 kilobytes.
The following media formats on removable media can be selected to be overwritten:
■ When ANSI is enabled, ANSI labeled media can be overwritten.■ When AOS/VS is enabled, AOS/VS media can be overwritten. (Data General
AOS/VS backup format.)■ When CPIO is enabled, CPIO media can be overwritten.■ When DBR is enabled, DBR media can be overwritten. (The DBR backup format
is no longer used.)■ Remote Storage MTF1 media format. When MTF1 is enabled, Remote Storage
MTF1 media format can be overwritten.■ When TAR is enabled, TAR media can be overwritten.■ When MTF is enabled, MTF media can be overwritten. With only MTF checked, all
other MTF formats can be overwritten. (The exception is Backup Exec MTF(BE-MTF1) and Remote Storage MTF (RS-MTF1) media formats, which are notoverwritten.
■ When BE-MTF1 is enabled, Backup Exec MTF media can be overwritten.
See “Results when media overwrites are not permitted” on page 193.
Allow media overwriteproperty
190Configuring Host PropertiesMedia properties

Table 3-44 Media dialog box properties (continued)
DescriptionProperty
This property allows exclusive access protection for tape drives. With access protection,other host bus adaptors cannot issue commands to control the drives during thereservation.
SCSI reservations provide protection for NetBackup Shared Storage Optionenvironments or any other multiple-initiator environment in which drives are shared.
The protection setting configures access protection for all tape drives from the mediaserver on which the option is configured. You can override the media server settingfor any drive path from that media server.
See “Recommended use for Enable SCSI reserve property” on page 194.
See “Drive path options” on page 431.
The following are the protection options:
■ The SCSI persistent reserve option provides SCSI persistent reserve protectionfor SCSI devices. The devices must conform to the SCSI Primary Commands - 3(SPC-3) standard. SCSI persistent reserve is valid for NetBackup 6.5 and laterservers only. If you enable SCSI persistent reserve, NetBackup does not sendpersistent reserve commands to NetBackup media servers earlier than release 6.5.
■ The SPC-2 SCSI reserve option (default) provides SPC-2 SCSI reserve protectionfor SCSI devices. The devices must conform to the reserve and release managementmethod in the SCSI Primary Commands - 2 standard.
■ To operate NetBackup without tape drive access protection, clear the Enable SCSIreserve property. If unchecked, other HBAs can send the commands that maycause a loss of data to tape drives.
Note: Ensure that all of your hardware processes SCSI persistent reserve commandscorrectly. All of your hardware includes Fibre Channel bridges. If the hardware doesnot process SCSI persistent reserve commands correctly and NetBackup is configuredto use SCSI persistent reserve, no protection may exist.
Enable SCSI reserve
This property lets NetBackup mix retention levels on tape volumes. It applies to mediain both robotic drives and nonrobotic drives. The default is that the check box is clearand each volume can contain backups of only a single retention level.
Allow multiple retentionsper media
This property, when checked, lets backups span to multiple tape media. This propertylets NetBackup select another volume to begin the next fragment. The resulting backuphas data fragments on more than one volume. The default is that Allow backups tospan tape media is checked and backups are allowed to span media.
If the end of media is encountered and this property is not selected, the media is setto FULL and the operation terminates abnormally. This action applies to both roboticdrives and nonrobotic drives.
Allow backups to span tapemedia
191Configuring Host PropertiesMedia properties

Table 3-44 Media dialog box properties (continued)
DescriptionProperty
This property lets backups span disk volumes when one disk volume becomes full.The default is that this property is enabled.
The Allow backups to span disk property does not apply to AdvancedDisk orOpenStorage storage units. Backups span disk volumes within disk pools automatically.
The following destinations support disk spanning:
■ A BasicDisk storage unit spanning to a BasicDisk storage unit. The units must bewithin a storage unit group.
■ An OpenStorage or AdvancedDisk volume spanning to another volume in the diskpool.
For disk spanning to occur, the following conditions must be met:
■ The storage units must share the same media server.■ The multiplexing level on spanning storage units should be the same. If there are
any differences, the level on the target unit can be higher.See “Enable multiplexing storage unit setting” on page 576.
■ A disk staging storage unit cannot span to another storage unit. Also, a disk stagingstorage unit is not eligible as a target for disk spanning.
■ Disk spanning is not supported on NFS.
Allow backups to span disk
This property lets NetBackup use whatever labeled or unlabeled media is found in anonrobotic drive. The default is that the Enable standalone drive extension propertyis enabled.
Enable standalone driveextension
This property allows the logging of the job information. This logging is the sameinformation that the NetBackup Activity Monitor uses. The default is that job loggingoccurs.
Enable job logging
This property controls media sharing, as follows:
■ Enable this property to allow all NetBackup media servers and NDMP hosts in theNetBackup environment to share media for writing. Do not configure server groupsfor media sharing.
■ Clear this property to restrict media sharing to specific server groups. Then configuremedia server groups and backup policies to use media sharing.
■ Clear this property to disable media sharing. Do not configure media server groups.
The default is that media sharing is disabled. (The property is cleared and no servergroups are configured.)
See “About NetBackup server groups” on page 380.
Enable unrestricted mediasharing for all mediaservers
192Configuring Host PropertiesMedia properties
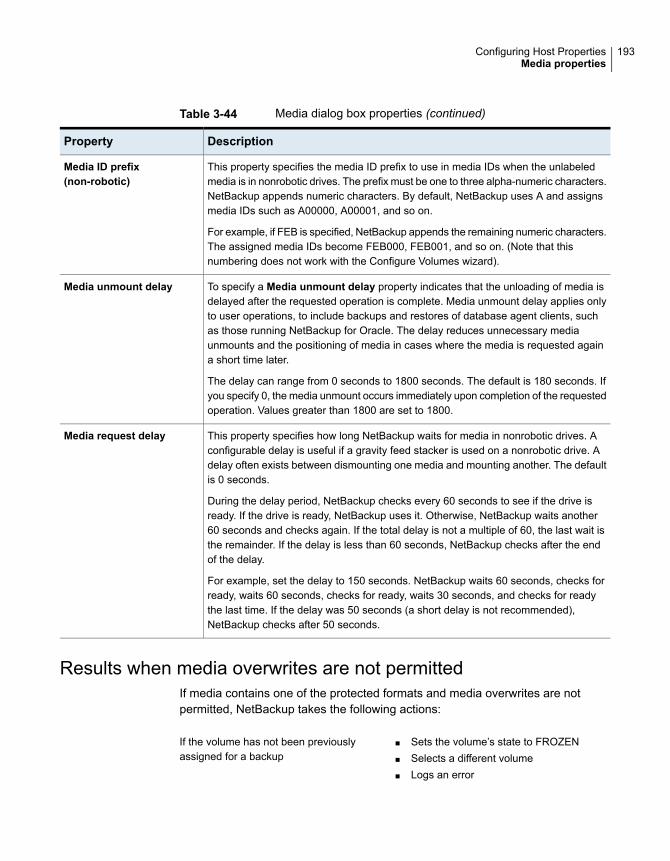
Table 3-44 Media dialog box properties (continued)
DescriptionProperty
This property specifies the media ID prefix to use in media IDs when the unlabeledmedia is in nonrobotic drives. The prefix must be one to three alpha-numeric characters.NetBackup appends numeric characters. By default, NetBackup uses A and assignsmedia IDs such as A00000, A00001, and so on.
For example, if FEB is specified, NetBackup appends the remaining numeric characters.The assigned media IDs become FEB000, FEB001, and so on. (Note that thisnumbering does not work with the Configure Volumes wizard).
Media ID prefix(non-robotic)
To specify a Media unmount delay property indicates that the unloading of media isdelayed after the requested operation is complete. Media unmount delay applies onlyto user operations, to include backups and restores of database agent clients, suchas those running NetBackup for Oracle. The delay reduces unnecessary mediaunmounts and the positioning of media in cases where the media is requested againa short time later.
The delay can range from 0 seconds to 1800 seconds. The default is 180 seconds. Ifyou specify 0, the media unmount occurs immediately upon completion of the requestedoperation. Values greater than 1800 are set to 1800.
Media unmount delay
This property specifies how long NetBackup waits for media in nonrobotic drives. Aconfigurable delay is useful if a gravity feed stacker is used on a nonrobotic drive. Adelay often exists between dismounting one media and mounting another. The defaultis 0 seconds.
During the delay period, NetBackup checks every 60 seconds to see if the drive isready. If the drive is ready, NetBackup uses it. Otherwise, NetBackup waits another60 seconds and checks again. If the total delay is not a multiple of 60, the last wait isthe remainder. If the delay is less than 60 seconds, NetBackup checks after the endof the delay.
For example, set the delay to 150 seconds. NetBackup waits 60 seconds, checks forready, waits 60 seconds, checks for ready, waits 30 seconds, and checks for readythe last time. If the delay was 50 seconds (a short delay is not recommended),NetBackup checks after 50 seconds.
Media request delay
Results when media overwrites are not permittedIf media contains one of the protected formats and media overwrites are notpermitted, NetBackup takes the following actions:
■ Sets the volume’s state to FROZEN■ Selects a different volume■ Logs an error
If the volume has not been previouslyassigned for a backup
193Configuring Host PropertiesMedia properties

■ Sets the volume’s state to SUSPENDED■ Aborts the requested backup■ Logs an error
If the volume is in the NetBackup mediacatalog and was previously selected forbackups
The backup is aborted and an error is logged.The error indicates the volume cannot beoverwritten.
If the volume is mounted for a backup of theNetBackup catalog
NetBackup aborts the request and logs anerror. The error indicates that the volumedoes not have a NetBackup format.
If the volume is mounted to restore files or listthe media contents
Recommended use for Enable SCSI reserve propertyAll tape drive and bridge vendors support the SPC-2 SCSI reserve and releasemethod. NetBackup has used SPC-2 SCSI reserve since NetBackup 3.4.3, and itis the default tape drive reservation method in NetBackup. SPC-2 SCSI reserve iseffective for most NetBackup environments.
The SCSI persistent reserve method provides device status and correction andmay be more effective in the following environments:
■ Where NetBackup media servers operate in a cluster environment.NetBackup can recover and use a reserved drive after a failover (if NetBackupowns the reservation). (With SPC-2 SCSI reserve, the drive must usually bereset because the reservation owner is inoperative.)
■ Where the drive has high availability.NetBackup can resolve NetBackup drive reservation conflicts and maintain highdrive availability. (SPC-2 SCSI reserve provides no method for drive statusdetection.)
However, the SCSI persistent reserve method is not supported or not supportedcorrectly by all device vendors. Therefore, thoroughly analyze the environment toensure that all of the hardware supports SCSI persistent reserve correctly.
Veritas recommends careful consideration of all of the following factors beforeEnable SCSI reserve is used:
■ Only a limited number of tape drive vendors support SCSI persistent reserve.
■ SCSI persistent reserve is not supported or not supported correctly by all FibreChannel bridge vendors. Incorrect support in a bridge means no accessprotection. Therefore, if the environment uses bridges, do not use SCSI persistentreserve.
■ If parallel SCSI buses are used, carefully consider the use of SCSI persistentreserve. Usually, parallel drives are not shared, so SCSI persistent reserve
194Configuring Host PropertiesMedia properties

protection is not required. Also, parallel drives are usually on a bridge, andbridges do not support SCSI persistent reserve correctly. Therefore, if theenvironment uses parallel SCSI buses, do not use SCSI persistent reserve.
■ The operating system tape drivers may require extensive configuration to useSCSI persistent reserve. For example, if the tape drives do not support SPC-3Compatible Reservation Handling (CRH), ensure that the operating system doesnot issue SPC-2 reserve and release commands.
If any of the hardware does not support SCSI persistent reserve, Veritasrecommends that SCSI persistent reserve is not used.
NDMP Global Credentials propertiesThe credentials that are entered for NDMP Global Credentials can apply to anyNDMP host in the configuration. However, the Use global NDMP credentials forthis NDMP host option must be selected in the Add NDMP Host dialog box forthe NDMP host.
Figure 3-37 NDMP Global Credentials dialog box
195Configuring Host PropertiesNDMP Global Credentials properties

The NDMP Global Credentials properties dialog box contains the followingproperties.
Table 3-45 NDMP Global Credentials dialog box properties
DescriptionProperty
The user name under which NetBackup accesses the NDMP server. This user musthave permission to run NDMP commands.
User name
Enter the password.Password
Re-enter the password.Confirm password
To access the Add NDMP Host dialog box, add an NDMP host under Media andDevice Management > Credentials > NDMP Hosts.
Figure 3-38 shows the Add NDMP Host dialog box. In the Credentials section,selectUse global NDMP credentials for this NDMPhost so that theNDMPGlobalCredentials apply to that host.
Note: Be careful when you add an NDMP host. If you add NDMP host credentialsusing the fully qualified domain name (FQDN), you must also indicate the fullyqualified domain name on the client for lookups. That is, the server list in the Backup,Archive, and Restore administration console must list the NDMP host by the FQDNas well.
If you add NDMP host credentials using its short name, you can use either the shortname or the FQDN in the client server list.
196Configuring Host PropertiesNDMP Global Credentials properties

Figure 3-38 Add NDMP Host dialog box
For NDMP Global Credentialsto apply, this must be selectedon the NDMP host as well
Network propertiesUse the Network properties to set the properties that define requirements forcommunications between clients and the master server. The Network propertiesapply to currently selected Windows clients.
197Configuring Host PropertiesNetwork properties

Figure 3-39 Network dialog box
The Network dialog box contains the following properties.
Table 3-46 Network dialog box properties
DescriptionProperty
This property specifies the port that the NetBackup client uses to communicate withthe NetBackup server. The default is 13782.
Note: If you change this port number, remember that it must be the same for allNetBackup servers and clients that communicate with one another.
NetBackup client serviceport (BPCD)
This property specifies the port for the client to use when it sends requests to theNetBackup request service (bprd process) on the NetBackup server. The default is13720.
Note: If you change this port number, remember that it must be the same for allNetBackup servers and clients that communicate with one another.
NetBackup request serviceport (BPRD)
198Configuring Host PropertiesNetwork properties

Table 3-46 Network dialog box properties (continued)
DescriptionProperty
This property specifies how many minutes the client waits before it announces that adifferent IP address is to be used. The announcement occurs only if the specified timeperiod has elapsed and the address has changed since the last time the clientannounced it.
Announce DHCP interval
Network Settings propertiesTheNetwork Settings host properties apply to master servers, media servers, andclients.
Figure 3-40 Network Settings dialog box
The Network Settings dialog box contains properties for Reverse Host NameLookup and IP Address Family Support.
199Configuring Host PropertiesNetwork Settings properties

Reverse Host Name Lookup propertyThe domain name system (DNS) reverse host name lookup is used to determinewhat host and domain name a given IP address indicates.
Some administrators cannot or do not want to configure the DNS server for reversehost name lookup. For these environments, NetBackup offers the Reverse HostName Lookup property to allow, restrict, or prohibit reverse host name lookup.
Administrators can configure the Reverse Host Name Lookup property for eachhost.
Table 3-47 Reverse Host Name Lookup property settings
DescriptionProperty
The Allowed property indicates that the host requires reverse host name lookup towork to determine that the connection comes from a recognizable server.
By default, the host resolves the IP address of the connecting server to a host nameby performing a reverse lookup.
If the conversion of the IP address to host name fails, the connection fails.
Otherwise, it compares the host name to the list of known server host names. If thecomparison fails, the host rejects the server and the connection fails.
Allowed setting
The Restricted property indicates that the NetBackup host first attempts to performreverse host name lookup. If the NetBackup host successfully resolves the IP addressof the connecting server to a host name (reverse lookup is successful), it comparesthe host name to the list of known server host names.
If the resolution of the IP address to a host name fails (reverse lookup fails), based onthe Restricted setting, the host converts the host names of the known server list to IPaddresses (using a forward lookup). The host compares the IP address of the connectingserver to the list of known server IP addresses.
If the comparison fails, the host rejects the connection from server and the connectionfails.
Restricted setting
The Prohibited property indicates that the NetBackup host does not try reverse hostname lookup at all. The host resolves the host names of the known server list to IPaddresses using forward lookups.
The NetBackup host then compares the IP address of the connecting server to the listof known server IP addresses.
If the comparison fails, the NetBackup host rejects the connection from the server andthe connection fails.
Prohibited setting
200Configuring Host PropertiesNetwork Settings properties

Reverse Host Name Lookup changes outside of theAdministration ConsoleIn some cases, a master server may not be able to view the host properties of amedia server or client in theNetBackup Administration Console. The NetBackupcustomer's DNS reverse host name lookup configuration may be one possiblereason why the Host Properties may not be visible.
In this case, since changing the NetBackup Reverse Host Name Lookup hostproperty requires being able to view theHost Properties, you’ll need to use anothermethod to change it.
Configure the REVERSE_NAME_LOOKUP option by using the nbgetconfig andnbsetconfig commands. The nbsetconfig command configures the option onWindows and UNIX master servers and clients.
See “Methods to set the NetBackup configuration options” on page 70.
The REVERSE_NAME_LOOKUP entry uses the following format:
REVERSE_NAME_LOOKUP = ALLOWED | RESTRICTED | PROHIBITED
For example:
REVERSE_NAME_LOOKUP = PROHIBITED
The values of ALLOWED, RESTRICTED, and PROHIBITED represent the same meaningas the values in the Network Settings host properties.
IP Address Family Support propertyOn the hosts that use both IPv4 and IPv6 addresses, use the IP Address FamilySupport property to indicate which address family to use:
■ IPv4 only (Default)
■ Both IPv4 and IPv6
While the IP Address Family Support property controls how host names areresolved to IP addresses, the Preferred Network properties control how NetBackupuses the addresses.
Port Ranges propertiesUse the Port Ranges properties in the NetBackup Administration Console todetermine how hosts connect to one another. These properties apply to selectedmaster servers, media servers, and clients.
201Configuring Host PropertiesPort Ranges properties

Figure 3-41 Port Ranges dialog box
The Port Ranges dialog box contains the following properties.
Table 3-48 Port Ranges dialog box properties
DescriptionProperty
Specifies how the selected computer chooses a port when it communicates withNetBackup on other computers. Enable this property to let NetBackup randomly selectports from those that are free in the allowed range. For example, if the range is from1023 through 5000, it chooses randomly from the numbers in this range.
If this property is not enabled, NetBackup chooses numbers sequentially, not randomly.NetBackup starts with the highest number that is available in the allowed range. Forexample, if the range is from 1023 through 5000, NetBackup chooses 5000. If 5000 isin use, port 4999 is chosen.
This property is enabled by default.
Use random portassignments
Lets the administrator define the range of non-reserved ports on the selected computer.NetBackup can use any available port within this range as the source port whencommunicating with NetBackup on another computer.
Client port window
202Configuring Host PropertiesPort Ranges properties

Table 3-48 Port Ranges dialog box properties (continued)
DescriptionProperty
Lets the operating system determine which non-reserved port to use.Use OS selected nonreserved port
This property is not used by NetBackup 7.0.1 and later unless one the followingconditions is true:
■ The connect options for the remote host specify that the daemon port be used.■ Attempts to connect to ports 1556 and 13274 on the remote host fail, which causes
the daemon port to be used.
If either condition is true, then this setting defines the range of reserved ports to useas the source port for the connection.
Beginning with NetBackup 7.0.1, connections to other daemon ports use only theClientport window, not the Client reserved port window.
Client reserved portwindow
This property specifies the range of non-reserved ports on which NetBackup processeson this computer to accept connections from NetBackup on other computers when theinbound connection is not to a well known port. This primarily applies to bpcd call-backwhen vnetd is disabled in the connect options for the remote NetBackup server orclient and that host is configured for non-reserved ports.
This property also applies in the situation where a third-party protocol is used, such asNDMP. It specifies the range of non-reserved ports on which this server acceptsNetBackup connections from other computers. The default range is 1024 through 5000.
Instead of indicating a range of ports, you can enable Use OS selected non reservedport to let the operating system determine which non-reserved port to use.
This setting applies to the selected master or media server that connects to a serveror client that is configured to accept only non-reserved ports. The Accept connectionson non reserved ports property must be enabled in the Universal Settings dialogbox for hosts running NetBackup 7.0.1 and prior versions.
See “Universal Settings properties” on page 258.
Server port window
This entry specifies the range of local reserved ports on which this computer acceptsconnections from NetBackup on other computers when the inbound connection is notto a well known port. This primarily applies to bpcd call-back when vnetd is disabledin the connect options for the remote NetBackup server or client.
Server reserved portwindow
Registered ports and dynamically-allocated portsNetBackup communicates between computers by using a combination of registeredports and dynamically-allocated ports.
203Configuring Host PropertiesPort Ranges properties

Registered portsThese ports are registered with the Internet Assigned Numbers Authority (IANA)and are permanently assigned to specific NetBackup services. For example, theport for the NetBackup client daemon (bpcd) is 13782.
The following system configuration file can be used to override the default portnumbers for each service:
On Windows: %systemroot%\system32\drivers\etc\services
On UNIX: /etc/services
Note: Veritas recommends that the port numbers that are associated with PBX(1556 and 1557) not be changed.
Dynamically-allocated portsThese ports are assigned as needed, from configurable ranges in the Port Rangeshost properties for NetBackup servers and clients.
In addition to the range of numbers, you can specify whether NetBackup selects aport number at random or starts at the top of the range and uses the first oneavailable.
Preferred Network propertiesUse the Preferred Network properties in theNetBackup Administration Consoleto specify to NetBackup which networks or interfaces to use for outgoing NetBackuptraffic from the selected hosts. These properties apply to currently selected masterservers, media servers, and clients.
The Preferred Network properties are useful in NetBackup environments thatinclude multihomed hosts—the hosts that are connected to two or more networks,or hosts that have two or more network addresses. The properties are especiallyhelpful to administrators who must configure an environment that includes bothInternet Protocol version 6 (IPv6) and IPv4 address families.
ThePreferred Network properties compare to theUse specified network interfaceproperty in theUniversal Settings properties. However, theUse specified networkinterface property can be used to specify only a single interface for NetBackup touse for outbound calls. The Preferred Network properties were introduced so thatadministrators can give more elaborate and constrictive instructions that apply tomultiple individual networks, or a range of networks. For example, an administratorcan configure a host to use any network except one.
204Configuring Host PropertiesPreferred Network properties

Note: Do not inadvertently configure hosts so that they cannot communicate withany other host. Use the bptestnetconn utility to determine whether the hosts cancommunicate as you intend.
See “bptestnetconn utility to display Preferred Network information” on page 214.
Figure 3-42 Preferred Network dialog box
The Preferred Network dialog box contains a list of networks and the directive thathas been configured for each.
205Configuring Host PropertiesPreferred Network properties

Table 3-49 Preferred Network dialog box properties
DescriptionProperty
The list of preferred networks contains the following information:
■ The Target column lists the networks (or host names or IP addresses) that have beengiven specific directives. If a network is not specifically listed as a target, or if a rangeof addresses does not include the target, NetBackup considers the target to be availablefor selection.Note that if the same network considerations apply for all of the hosts, the list of directivescan be identical across all hosts in the NetBackup environment. If a directive containsan address that does not apply to a particular host, that host ignores it. For example,an IPv4-only host ignores IPv6 directives, and IPv6-only hosts ignore IPv4 directives.This lets the administrator use the same Preferred Network configurations for all thehosts in the NetBackup environment.
■ The Specified as column indicates the directive for the network: Match, Prohibited,or Only.
■ The Source column lists source binding information to use to filter addresses. TheSource property is an optional configuration property.
List of networkspecifications forNetBackupcommunications
Select a network in the list, then click the up or down arrow to change the order of thenetwork in the list. The order can affect which network NetBackup selects.
See “Order of directive processing in the Preferred Network properties” on page 213.
Ordering arrows
Click Add to add a network to the Preferred Network properties. The directive for thenetwork is configured in the Add Preferred Network Settings dialog box.
See Table 3-50 on page 207.
Add
The Add to all button is active when multiple servers are selected.Add to all
Select a network in the list, then clickChange to change the Preferred Network properties.The directive is changed in the Change Preferred Network Settings dialog box.
See “Add or Change Preferred Network Settings dialog box” on page 206.
Change
Select a network in the list, then click Remove to remove the network from the list ofpreferred networks.
Remove
Add or Change Preferred Network Settings dialog boxThe Add Preferred Network Settings dialog box contains the following properties.
206Configuring Host PropertiesPreferred Network properties

Table 3-50 Add or Change Preferred Network Settings dialog box properties
DescriptionProperty
Enter a network address or a host name:
■ If an address is specified as the network, it's usually considered a remote or target address.
NetBackup recognizes the following wildcard entries as addresses:■ 0.0.0.0
Matches any IPv4 address.■ 0::0
Matches any IPv6 address.■ 0/0
Matches the address of any family.■ If a host name is specified as the network, then the address that is used is the first returned
by the DNS resolver.
Note: Do not use the following malformed entries as wildcards: 0/32, 0/64, or 0/128. The leftside of the slash must be a legitimate IP address. However, 0/0 may be used, as listed.
Target
The Match directive indicates that the specified network, address, or host name is preferred forcommunication with the selected host.
TheMatch directive does not reject other networks, addresses, or host names from being selected,even if they do not match. (The Only directive rejects unsuitable targets if they do not match.)
The Match directive is useful following a Prohibited or a Only directive. When used with otherdirectives, Match indicates to NetBackup to stop rule processing because a suitable match hasbeen found.
The Match directive can be used with the Source property to indicate source binding.
Match
Use the Prohibited directive to exclude or prevent the specified network, address, or host namefrom being considered. In a list of DNS addresses, addresses in these networks are avoided.
Prohibited
The Only directive indicates that the specified network, address, or host name that is used forcommunication with the selected host must be in the specified network.
Use the Only directive to prevent any network from being considered other than those specifiedas Only.
This directive replaces the REQUIRED_NETWORK configuration option.
The Only directive can be used with the Source property to indicate source binding.
Only
207Configuring Host PropertiesPreferred Network properties

Table 3-50 Add or Change Preferred Network Settings dialog box properties(continued)
DescriptionProperty
Use this property with the Match or the Only directives to describe the local host name, IPaddresses, or networks that may be used for source binding.
NetBackup matches the desired source interfaces, (backup networks, for example) with the targetaddresses described by the Source property.
The corresponding configuration option for this property is PREFERRED_NETWORK. This propertyreplaces the REQUIRED_INTERFACE entry.
See “PREFERRED_NETWORK option for NetBackup servers” on page 321.
Source
How NetBackup uses the directives to determine which network touse
Each host has an internal table of preferred network rules that NetBackup consultsbefore it selects a network interface to use for communication with another host.The table includes every interface-IP address combination available to the selectedhost. Based on the Preferred NetBackup directives, the table indicates toNetBackup whether or not the host is allowed to use a given network.
This topic uses the example of two multihomed servers (Server_A and Server_B)as shown in Figure 3-43. Server A is considering which addresses it can use toaccess Server_B, given the Preferred Network directives configured on Server_A.
When Preferred Network directives are used to place restrictions on targets, theyare added from the perspective of the server making the connection. The directiveson Server_A affect its preferences as to which Server_B addresses it can use.
208Configuring Host PropertiesPreferred Network properties

Figure 3-43 Multihomed servers example
2001:db8:0:11d::1efc
Backup interface
10.96.73.253
Backup interface2001:db8:0:11e::1efc2001:db8:0:11c::1efc
Backup interface
10.81.73.1472001:db8:0:1f0::1efc
Production interface
Server_B
Server_A
Directives on Server_Aindicate what interfacesit can use to accessServer_B
Figure 3-44 shows a table for Server_B. Server_B has multiple network interfaces,some of which have multiple IP addresses. In the table, yes indicates that NetBackupcan use the network-IP combination as a source. In this example, no directiveshave been created for the host. Since no networks are listed in the PreferredNetwork properties, any network-IP combinations can be used for communication.
Note: The following topic shows the bptestnetconn output for this exampleconfiguration:
See Figure 3-51 on page 215.
209Configuring Host PropertiesPreferred Network properties

Figure 3-44 From Server_A's perspective: Available IP addresses onServer_B when no directives are indicated on Server_A
IPv4 IPv6
2001:0db8:0:1f0::1efc
10.80.73.147
2001:0db8:0:11c::1efc
2001:0db8:0:11d::1efc
---
2001:0db8:0:11e::1efc
10.96.73.253
Yes
---
---
---
Yes
Yes
---
Yes
Yes
Yes
---
IP addresses
Net
wor
kin
terfa
ces
Figure 3-45 shows a table for the same host (Server_B). Now, the PreferredNetwork properties are configured so that all IPv4 addresses are excluded fromselection consideration by NetBackup. All NetBackup traffic is to use only IPv6addresses.
Figure 3-45 From Server_A's perspective: Available IP addresses onServer_B when directives to use IPv6 addresses only areindicated on Server_A
IPv4 IPv6
2001:0db8:0:1f0::1efc
10.80.73.147
2001:0db8:0:11c::1efc
2001:0db8:0:11d::1efc
---
2001:0db8:0:11e::1efc
10.96.73.253
No
---
---
---
No
Yes
---
Yes
Yes
Yes
---
IP addresses
Net
wor
kin
terfa
ces
The following topics describe various configurations:
■ See “Configurations to use IPv6 networks” on page 211.
■ See “Configurations to use IPv4 networks” on page 212.
■ See “Configuration to prohibit using a specified address” on page 216.
210Configuring Host PropertiesPreferred Network properties

■ See “Configuration that uses the same specification for both the network andthe interface—less constrictive” on page 216.
■ See “Configuration that uses the same specification for both the network andthe interface—more constrictive” on page 217.
■ See “Configuration that limits the addresses, but allows any interfaces”on page 217.
Configurations to use IPv6 networksThe following Preferred Network configurations instruct NetBackup to use onlyIPv6 addresses as targets in outbound calls for the currently selected hosts. Theconfigurations satisfy a topology where all backup traffic uses an IPv6 network andother traffic uses other networks.
One configuration uses the Prohibited directive (Figure 3-46) and one configurationuses the Match directive (Figure 3-47).
The more efficient method to specify one address family, (IPv6, in this case), is toprohibit IPv4. The behavior of the Match directive is not as exclusive as Prohibited.In this case, Match may not necessarily exclude other address families.
Figure 3-46 uses the Prohibited directive with a wildcard to indicate to NetBackupto not consider using any IPv4 addresses. In this situation, NetBackup must usean IPv6 address.
Note: The default configuration is for NetBackup to use only IPv4 addresses.Creating a directive that prohibits all IPv4 addresses renders the server mute unlessyou have IPv6 addresses and have them enabled.
See “IP Address Family Support property” on page 201.
Figure 3-46 Prohibit IPv4 addresses as targets
Figure 3-47 uses the Match directive with a wildcard to indicate to NetBackup toconsider only IPv6 addresses. In this case, NetBackup tries to use an IPv6 address,but may consider IPv4 addresses if necessary.
211Configuring Host PropertiesPreferred Network properties

Figure 3-47 Match IPv6 addresses as targets
Figure 3-48 shows another configuration that allows NetBackup to choose frommultiple IPv6 networks.
Given the multihomed example configuration, the directive indicates the following:
■ Four IPv6 networks, from fec0:0:0:fe04 to fec0:0:0:fe07, are described astargets.
■ For all addresses in these networks, a source binding address that is derivedfrom the IP addresses of host name host_fred is used.
See “How NetBackup uses the directives to determine which network to use”on page 208.
Figure 3-48 Indicating a range of IPv6 networks
Configurations to use IPv4 networksThe following Preferred Network configurations instruct NetBackup to use onlyIPv4 addresses as targets in outbound calls for the currently selected hosts. Theconfigurations satisfy a topology where all backup traffic uses an IPv4 network andother traffic uses other networks.
One configuration uses the Prohibited directive (Figure 3-49) and one configurationuses the Match directive (Figure 3-50).
The more efficient method to specify one address family, (IPv4, in this case), is toprohibit IPv6. The behavior of the Match directive is not as exclusive as Prohibited.In this case, Match may not necessarily exclude other address families.
212Configuring Host PropertiesPreferred Network properties

Figure 3-49 uses the Prohibited directive with a wildcard to indicate to NetBackupto not consider using any IPv6 addresses. In this situation, NetBackup must usean IPv4 address.
Figure 3-49 Prohibit IPv6 addresses as targets
Figure 3-50 uses the Match directive with a wildcard to indicate to NetBackup toconsider only IPv4 addresses. In this case, NetBackup tries to use an IPv4 address,but may consider IPv6 addresses if necessary.
Figure 3-50 Match IPv4 addresses as targets
Order of directive processing in the Preferred Network propertiesNetBackup sorts all directives into decreasing order by subnet size so that the morespecific network specifications, such as complete host names or IP addresses,match first. (For example, a /24 subnet matches before a /16 subnet.) In this way,NetBackup can honor host-specific overrides.
If NetBackup considers the directives of multiple networks to be equal in specificity(a tie), NetBackup looks at the order in which the networks are listed.
See “Order of directives can affect processing” on page 214.
NetBackup processes each resolved address in the network list according to specificrules. Directives that contain addresses that do not apply to the host are ignored.
Table 3-51 describes how NetBackup determines whether an address can be usedfor communication.
213Configuring Host PropertiesPreferred Network properties

Table 3-51 Order of directive processing
Target is selected or processing continuesNetBackup considers the targetStep
...then the target is treated as Prohibited, andprocessing stops for that target.
NetBackup considers the next target.
■ If the target is not a match for the directive, and■ if the directive is an Only directive...
1
...then the target is treated as Prohibited andprocessing stops for that target.
NetBackup considers the next target.
■ If the target is a match for the directive, and■ if the directive is a Prohibited directive...
2
...then the processing continues.
NetBackup considers the next directive in the list.
If the target is not a match...3
...then the directive is eitherOnly orMatch and furtherdirective processing stops.
An Only match is treated like a Match in terms ofsource binding computation. If no rules ever match,then the target is allowed, and no source binding isenforced.
If the target is a match...4
Order of directives can affect processingThe order of the networks in the list can affect which network NetBackup selectsfor communication for the selected hosts.
The strongest filters are Prohibited and Only.
Use the up or down arrows to the right of the list to change the order of the networks.
bptestnetconn utility to display Preferred Network informationThe bptestnetconn utility is available to administrators to test and analyze hostconnections. Use the preferred network option (--prefnet) to display informationabout the preferred network configuration along with the forward lookup informationof a host on the server list.
The bptestnetconn command is described in the NetBackup Commands ReferenceGuide.
Figure 3-51 shows the bptestnetconn output when run on Server_A, for Server_B.That is, bptestnetconn is run from Server_A's perspective. Based on the directivesconfigured on Server_A, for Server_B, bptestnetconn shows the available IPaddresses on Server_B. In this example, no directives are configured on Server_A.
214Configuring Host PropertiesPreferred Network properties

Figure 3-51 bptestnetconn for Server_B with no directives listed
[root@Server_A netbackup]# bptestnetconn -f --prefnet -H Server_B---------------------------------------------------------------------FL: Server_B -> 10.81.73.147 : 11 ms SRC: ANYFL: Server_B -> 10.96.73.253 : 11 ms SRC: ANYFL: Server_B -> 2001:db8:0:11d::1efc : 11 ms SRC: ANYFL: Server_B -> 2001:db8:0:11e::1efc : 11 ms SRC: ANYFL: Server_B -> 2001:d8b:0:1f0::1efc : 11 ms SRC: ANYFL: Server_B -> 2001:db8:0:11c::1efc : 11 ms SRC: ANY---------------------------------------------------------------------Total elapsed time: 0 sec
Any source is available touse for a connection
List of networks available toServer_B
Host for which lookupis performed
The following directive is added to the Preferred Networks properties on Server_B:
In the configuration file the directive appears as follows:
PREFERRED_NETWORK = 2001:0db8:0:11c::/62 ONLY
This directive provides NetBackup with the information to filter the addresses andchoose to communicate with only those that match the :11c, :11d, :11e, and :11fnetworks. The addresses that do not match the Only directive are prohibited, asshown in the bptestnetconn output.
See “PREFERRED_NETWORK option for NetBackup servers” on page 321.
Figure 3-52 shows the bptestnetconn output for Server_B, given this directive.
215Configuring Host PropertiesPreferred Network properties

Figure 3-52 bptestnetconn for Server_B with directive
[root@Server_A netbackup]# bptestnetconn -f --prefnet -H Server_B---------------------------------------------------------------------FL: Server_B -> 10.81.73.147 : 11 ms TGT PROHIBITEDFL: Server_B -> 10.96.73.253 : 11 ms TGT PROHIBITEDFL: Server_B -> 2001:db8:0:11d::1efc : 11 ms SRC: ANYFL: Server_B -> 2001:db8:0:11e::1efc : 11 ms SRC: ANYFL: Server_B -> 2001:d8b:0:1f0::1efc : 11 ms TGT PROHIBITEDFL: Server_B -> 2001:db8:0:11c::1efc : 11 ms SRC: ANY---------------------------------------------------------------------Total elapsed time: 0 sec
Directives make some targetsunavailable to Server_B
List of networks available toServer_B
Configuration to prohibit using a specified addressFigure 3-53 shows a configuration that prohibits NetBackup from using the specifiedaddress.
Figure 3-53 Prohibited target example
Configuration that uses the same specification for both the networkand the interface—less constrictive
Figure 3-54 shows a configuration that uses the same specification for both thenetwork and the interface.
For all target addresses in the specified network, a source binding in the samenetwork is selected. This directive is considered generic since the identical directiveapplies to all NetBackup hosts on the network. The closest preferred source addressthat matches a remote address is used for source binding.
A production network outside this range can then be Prohibited, thereby preferringthese addresses from both a remote and source binding perspective. AdditionalMatch directives may be used to indicate additional backup networks that areallowed.
216Configuring Host PropertiesPreferred Network properties

Figure 3-54 Match network selection with the source
Configuration that uses the same specification for both the networkand the interface—more constrictive
Figure 3-55 also uses the same specification for both target and source binding,however this example is more restrictive. With the Only property specified, thisconfiguration does not allow multiple backup networks to be specified.
Figure 3-55 Only network selection with the same source binding address
A host with the Only directive configured considers only those target addresses inthe 192.168.100.0 subnet. Additionally, source binding to the local interface mustbe done on the 192.168.100.0 subnet.
On hosts that have a 192.168.100.0 interface but no :1b0 interface, source bindingto the :1f0 interface is the default of the operating system.
Configuration that limits the addresses, but allows any interfacesFigure 3-56 shows a configuration that allows only the addresses that start with thespecified prefix to be considered. No source binding is specified, so any interfacemay be used.
217Configuring Host PropertiesPreferred Network properties

Figure 3-56 Limiting the addresses, without any source binding
Resilient Network propertiesThe Resilient Network properties appear for the master server, for media servers,and for clients. For media servers and clients, the Resilient Network propertiesare read only. When a job runs, the master server updates the media server andthe client with the current properties.
The Resilient Network properties let you configure NetBackup to use resilientnetwork connections for backups and restores. A resilient connection allows backupand restore traffic between a client and a NetBackup media server to functioneffectively in high-latency, low-bandwidth networks such as WANs. The data travelsacross a wide area network (WAN) to media servers in a central datacenter.
NetBackup monitors the socket connections between the remote client and theNetBackup media server. If possible, NetBackup re-establishes dropped connectionsand resynchronizes the data stream. NetBackup also overcomes latency issues tomaintain an unbroken data stream. A resilient connection can survive networkinterruptions of up to 80 seconds. A resilient connection may survive interruptionslonger than 80 seconds.
The NetBackup Remote Network Transport Service manages the connectionbetween the computers. The Remote Network Transport Service runs on the masterserver, the client, and the media server that processes the backup or restore job.If the connection is interrupted or fails, the services attempt to re-establish aconnection and synchronize the data.
NetBackup protects only the network socket connections that the NetBackup RemoteNetwork Transport Service (nbrntd) creates. Examples of the connections that arenot supported are:
■ Clients that back up their own data (deduplication clients and SAN clients)
■ Granular Recovery Technology (GRT) for Exchange Server or SharePoint Server
■ NetBackup nbfsd process.
218Configuring Host PropertiesResilient Network properties

NetBackup protects connections only after they are established. If NetBackup cannotcreate a connection because of network problems, there is nothing to protect.
Resilient connections apply between clients and NetBackup media servers, whichincludes master servers when they function as media servers. Resilient connectionsdo not apply to master servers or media servers if they function as clients and backup data to a media server.
Resilient connections can apply to all of the clients or to a subset of clients.
Note: If a client is in a different subdomain than the server, add the fully qualifieddomain name of the server to the client’s hosts file. For example,india.veritas.org is a different subdomain than china.veritas.org.
When a backup or restore job for a client starts, NetBackup searches the ResilientNetwork list from top to bottom looking for the client. If NetBackup finds the client,NetBackup updates the resilient network setting of the client and the media serverthat runs the job. NetBackup then uses a resilient connection.
Figure 3-57 Master server Resilient Network host properties
219Configuring Host PropertiesResilient Network properties

See “About the Daemons tab” on page 1045.
Table 3-52 describes the Resilient Network properties.
Table 3-52 Resilient Network dialog box properties
DescriptionProperty
The Host Name or IP Address of the host. The address canalso be a range of IP addresses so you can configure morethan one client at once. You can mix IPv4 addresses andranges with IPv6 addresses and subnets.
If you specify the host by name, Veritas recommends thatyou use the fully qualified domain name.
Use the arrow buttons on the right side of the pane to moveup or move down an item in the list of resilient networks.
Host Name or IP Address
Resiliency is either ON or OFF.Resiliency
Note: The order is significant for the items in the list of resilient networks. If a clientis in the list more than once, the first match determines its resilient connectionstatus. For example, suppose you add a client and specify the client IP addressand specify On for Resiliency. Suppose also that you add a range of IP addressesas Off, and the client IP address is within that range. If the client IP address appearsbefore the address range, the client connection is resilient. Conversely, if the IPrange appears first, the client connection is not resilient.
The resilient status of each client also appears as follows:
■ In the NetBackup Administration Console, select NetBackup Management> Policies in the left pane and then select a policy. In the right pane, aResiliency column shows the status for each client in the policy.
■ In the NetBackup Administration Console, select NetBackup Management> Host Properties > Clients in the left pane. In the right pane, a Resiliencycolumn shows the status for each client.
Other NetBackup properties control the order in which NetBackup uses networkaddresses.
See “Preferred Network properties” on page 204.
The NetBackup resilient connections use the SOCKS protocol version 5.
Resilient connection traffic is not encrypted. Veritas recommends that you encryptyour backups. For deduplication backups, use the deduplication-based encryption.For other backups, use policy-based encryption.
220Configuring Host PropertiesResilient Network properties

Resilient connections apply to backup connections. Therefore, no additional networkports or firewall ports must be opened.
Note: If multiple backup streams run concurrently, the Remote Network TransportService writes a large amount of information to the log files. In such a scenario,Veritas recommends that you set the logging level for the Remote Network TransportService to 2 or less. Instructions to configure unified logs are in a different guide.
See the NetBackup Logging Reference Guide.
Resilient connection resource usageResilient connections consume more resources than regular connections, as follows:
■ More socket connections are required per data stream. Three socket connectionsare required to accommodate the Remote Network Transport Service that runson both the media server and the client. Only one socket connection is requiredfor a non-resilient connection.
■ More sockets are open on media servers and clients. Three open sockets arerequired rather than one for a non-resilient connection. The increased numberof open sockets may cause issues on busy media servers.
■ More processes run on media servers and clients. Usually, only one moreprocess per host runs even if multiple connections exist.
■ The processing that is required to maintain a resilient connection may reduceperformance slightly.
Specifying resilient connectionsUse the following procedure to specify resilient connections for NetBackup clients.
See “Resilient Network properties” on page 218.
Alternatively, you can use the resilient_clients script to specify resilientconnections for clients:
■ Windows:install_path\Veritas\NetBackup\bin\admincmd\resilient_clients
■ UNIX: /usr/openv/netbackup/bin/admincmd/resilient_clients
To specify resilient connections
1 In theNetBackupAdministrationConsole, expandNetBackupManagement> Host Properties > Master Servers in the left pane.
2 In the right pane, select the master server on which to specify properties.
221Configuring Host PropertiesResilient Network properties

3 On the Actions menu, click Properties.
4 In the properties dialog box left pane, select Resilient Network.
5 In the Resilient Network dialog box, use the following buttons to manageresiliency for clients:
To add resilient settings
1 Click Add.
The Add Resilient Network Settings dialog box appears
2 Enter a client host name, an IP address, or an address range.
If you specify the client host by name, Veritas recommends thatyou use the fully qualified domain name.
For address ranges, use Classless Inter-Domain Routing (CIDR)notation (for example, 192.168.100.0/24 or fd00::/8).
3 Ensure that the Resiliency On option is selected.
4 Click Add.
5 Repeat until you have finished entering clients or address ranges.
6 When you finish adding network settings, click Close.
Add
If you select multiple hosts in the NetBackup Administration Console,the entries in the Resilient Network list may appear in different colors,as follows:
■ The entries that appear in black type are configured on all of thehosts.
■ The entries that appear in gray type are configured on some of thehosts only.
For the entries that are configured on some of the hosts only, you canadd them to all of the hosts. To do so, select them and click Add To All.
Add To All
To change resilient settings
1 Select the client host name, the IP address, or the address range.
2 Click Change.
The Change Resilient Network Settings dialog box appears
3 Select the desired Resiliency setting.
4 Click OK.
Change
222Configuring Host PropertiesResilient Network properties

Remove the select host or address rang
1 Select the client host name, the IP address, or the address range.
2 Click Remove.
The client is removed immediately; a confirmation dialog box doesnot appear.
Remove
Move an item in the list of items
1 Select the client host name, the IP address, or the address range.
2 Click the appropriate button to move up the item or move down theitem.
The order of the items in the list is significant.
See “Resilient Network properties” on page 218.
6 After specifying resilient connections, click OK.
The settings are propagated to the affected hosts through normal NetBackupinter-host communication, which can take up to 15 minutes.
7 If you want to begin a backup immediately, restart the NetBackup services onthe master server.
Resource Limit propertiesTheResource Limit properties in theNetBackup Administration Console controlthe number of simultaneous backups that can be performed on a VMware or Hyper-Vresource type. These settings apply to all policies for the currently selected masterserver.
For example, a VMwareResource Limit of four for Datastore means that NetBackuppolicies can perform no more than four simultaneous backups on any particulardatastore.
Note: The Resource Limit properties apply only to policies that use automaticselection of virtual machines (the policy's Query Builder). If you select virtualmachines manually on theBrowse for Virtual Machines dialog box, theResourceLimit properties have no effect.
The Resource Limit dialog box contains the following properties, depending onwhich application is selected.
For more information about the specific resource types, click Help.
223Configuring Host PropertiesResource Limit properties

Figure 3-58 Resource Limit dialog box with VMware application selected
224Configuring Host PropertiesResource Limit properties

Figure 3-59 Resource Limit dialog box with Hyper-V application selected
Restore Failover propertiesThe Restore Failover properties in the NetBackup Administration Consolecontrol how NetBackup performs automatic failover to a NetBackup media server.A failover server may be necessary if the regular media server is temporarilyinaccessible to perform a restore operation. The automatic failover does not requireadministrator intervention. By default, NetBackup does not perform automaticfailover. These properties apply to currently selected master servers.
225Configuring Host PropertiesRestore Failover properties

Figure 3-60 Restore Failover dialog box
The Restore Failover dialog box contains the following properties:
Table 3-53
DescriptionProperty
Displays the NetBackup media servers that have failover protection forrestores.
Media server
Displays the servers that provide the failover protection. NetBackupsearches from top to bottom in the column until it finds another serverthat can perform the restore.
Failover restoreserver
A NetBackup media server can appear only once in the Media server column butcan be a failover server for multiple other media servers. The protected server andthe failover server must both be in the same master and media server cluster.
The following situations describe examples of when to use the restore failovercapability:
226Configuring Host PropertiesRestore Failover properties

■ Two or more media servers share a robot and each has connected drives. Whena restore is requested, one of the servers is temporarily inaccessible.
■ Two or more media servers have stand alone drives of the same type. When arestore is requested, one of the servers is temporarily inaccessible.
In these instances, inaccessible means that the connection between bprd on themaster server and bptm on the media server (through bpcd) fails.
Possible reasons for the failure are as follows:
■ The media server is down.
■ The media server is up but bpcd does not respond. (For example, if theconnection is refused or access is denied.)
■ The media server is up and bpcd is running, but bptm has problems. (Forexample, bptm cannot find the required tape.)
Assigning an alternate media server as a failover restore serverYou can assign another media server to act as a failover restore server for yourmedia server. If your media server is unavailable during a restore, the failoverrestore server takes its place.
To assign an alternate media server as a failover restore server
1 In the NetBackup Administration Console, in the left panel, expandNetBackup Management > Host Properties > Master Servers.
2 In the right pane, double-click on the master server you want to modify.
3 In the properties dialog box, in the left pane, click Restore Failover.
4 Click Add.
5 In the Media server field, specify the media server for failover protection.
6 In the Failover restore servers field, specify the media servers to try if theserver that is designated in the Media server field is unavailable. Separatethe names of multiple servers with a single space.
7 Click Add. The dialog box remains open for another entry.
8 Click Close.
9 From the Restore Failover dialog box, click Apply to accept the changes.
Before the change takes effect, you must stop and restart the NetBackup Requestdaemon on the master server where the configuration was changed.
See “About enabling automatic failover to an alternate server” on page 1157.
227Configuring Host PropertiesRestore Failover properties

Retention Periods propertiesUse the Retention Periods properties in the NetBackup Administraton Consoleto define a duration for each retention level. You can select from 25 retention levels.
In a policy, the retention period determines how long NetBackup retains the backupsor the archives that are created according to the schedule. These properties applyto selected master servers.
Figure 3-61 Retention Periods dialog box
By default, NetBackup stores each backup on a volume that already containsbackups at the same retention level. However, NetBackup does not check theretention period that is defined for that level. When the retention period for a levelis redefined, some backups that share the same volume may have different retentionperiods.
For example, if the retention level 3 is changed from one month to six months,NetBackup stores future level 3 backups on the same volumes. That is, the backupsare placed on the volumes with the level 3 backups that have a retention period ofone month.
228Configuring Host PropertiesRetention Periods properties

No problem exists if the new and the old retention periods are of similar values.However, before a major change is made to a retention period, suspend the volumesthat were previously used for that retention level.
See “Determining retention periods for volumes” on page 230.
See “Suspending or unsuspending volumes” on page 519.
The Retention Periods dialog box contains the following properties.
Table 3-54 Retention Periods dialog box properties
DescriptionProperty
Assigns a number to the retention level setting.Value
Specifies the units of time for the retention period. The list includes hours as the smallestunit of granularity and the special units, Infinite, and Expires immediately.
Units
The retention level number (0 through 24).Retention Level
A list of the current definitions for the 25 possible levels of retention. By default, levels9 through 24 are set to infinite. Retention level 9 is the only level that cannot be changedand remains at infinite.
See “Retention Periods with end dates beyond 2038, excluding Infinity” on page 231.
With the default, there is no difference between a retention level of 12 and a retentionlevel of 20, for example.
The Schedule Count column indicates how many schedules currently use each level.If the retention period is changed for a level, it affects all schedules that use that level.
The Changes Pending column uses an asterisk (*) to indicate that the period hasbeen changed and not applied. NetBackup does not change the actual configurationuntil the administrator accepts or applies the changes.
Retention Period
Lists the number of schedules that use the currently selected retention level.Schedule Count
Displays a list of the current policy names and schedule names that use the retentionlevel.
Schedules using thisretention level
Displays a summary of how changes affect existing schedules. The list displays allschedules in which the retention period is shorter than the frequency period.
Impact Report
Changing a retention periodUse the following procedure to change a retention period.
229Configuring Host PropertiesRetention Periods properties

To change a retention period
1 In the NetBackup Administration Console, in the left pane, expandNetBackup Management > Host Properties > Master Servers.
2 In the right pane, double-click on the master server you want to modify.
3 In the properties dialog box, in the left pane, click Retention Periods.
4 Select the retention level to change.
By default, levels 9 through 24 are set to infinite. If the levels are left at thedefault, there is no difference between a retention level of 12 and a retentionlevel of 20. Level 9 cannot be changed and remains at a setting of infinite.
See “Retention Periods with end dates beyond 2038, excluding Infinity”on page 231.
The dialog box displays the names of all schedules that use the selectedretention level as well as the policy to which each schedule belongs.
5 Type the new retention period in the Value box.
6 From the Units drop-down list, select a unit of measure (days, weeks, months,years, Infinite, or Expires immediately).
After you change the value or unit of measure, an asterisk (*) appears in theChanges Pending column to indicate that the period was changed. NetBackupdoes not change the actual configuration until the administrator accepts orapplies the changes.
7 Click Impact Report.
The policy impact list displays the policies and the schedule names where thenew retention period is less than the frequency period. To prevent a potentialgap in backup coverage, redefine the retention period for the schedules orchange the retention or frequency for the schedule.
8 Do one of the following:
■ To discard your changes, click Cancel.
■ To save your changes and leave the dialog box open to make furtherchanges, click Apply.
■ To save your changes and close the dialog box, click OK.
Determining retention periods for volumesUse the following procedure to determine retention periods for volumes.
230Configuring Host PropertiesRetention Periods properties

To determine retention periods for volumes
1 In the NetBackup Administration Console, in the left pane, expand Mediaand Device Management > Media
2 In the right pane, find the volume on the list and examine the value in theRetention Period column.
To see all volumes that have the same retention period, click the Retention Periodcolumn header to sort the volumes by retention period. This column heading ishidden by default.
Retention Periods with end dates beyond 2038, excluding InfinityDue to UNIX epoch time and the year 2038 problem, any retention end date thatexceeds January 19, 2038 is automatically set to expire on January 19, 2038,regardless of whether the expiration end date is reached
This issue does not apply to retention levels for which the retention period is set toInfinity. NetBackup never expires media with a retention set to Infinity unlessinstructed to do so by the NetBackup administrator.
Scalable Storage propertiesThe Scalable Storage Cloud Settings properties contain information aboutencryption, metering, bandwidth throttling, and network connections between theNetBackup hosts and your cloud storage provider.
The Scalable Storage properties appear only if you install a NetBackup DataProtection Optimization Option license key.
The Scalable Storage properties apply to currently selected media servers.
231Configuring Host PropertiesScalable Storage properties

Figure 3-62 Scalable Storage Cloud Settings host properties
Table 3-55 describes the properties.
Table 3-55 Cloud storage host properties
DescriptionProperty
If you configured the NetBackup Key Management Service (KMS), the name of theKMS server.
Key Management Server(KMS) Name
Determines how often NetBackup gathers connection information for reporting purposes.NetBackup OpsCenter uses the information that is collected to create reports. Thevalue is set in seconds. The default setting is 300 seconds (5 minutes). If you set thisvalue to zero, metering is disabled.
Metering Interval
Use this value to specify the speed of your connection to the cloud. The value isspecified in kilobytes per second. The default value is 102400 KB/sec.
Total Available Bandwidth
The time, in seconds, between measurements of bandwidth usage. The larger thisvalue, the less often NetBackup checks to determine the bandwidth in use.
Sampling interval
232Configuring Host PropertiesScalable Storage properties

Table 3-55 Cloud storage host properties (continued)
DescriptionProperty
Click Advanced Settings to specify additional settings for throttling.
See “Configuring advanced bandwidth throttling settings” on page 233.
See “Advanced bandwidth throttling settings” on page 234.
Advanced Settings
The default maximum number of concurrent jobs that the media server can run for thecloud storage server.
This value applies to the media server not to the cloud storage server. If you have morethan one media server that can connect to the cloud storage server, each media servercan have a different value. Therefore, to determine the total number of connections tothe cloud storage server, add the values from each media server.
If you configure NetBackup to allow more jobs than the number of connections,NetBackup fails any jobs that start after the number of maximum connections is reached.Jobs include both backup and restore jobs.
You can configure job limits per backup policy and per storage unit.
See “Limit jobs per policy (policy attribute)” on page 706.
See “Maximum concurrent jobs storage unit setting” on page 578.
Note: NetBackup must account for many factors when it starts jobs: the number ofconcurrent jobs, the number of connections per media server, the number of mediaservers, and the job load-balancing logic. Therefore, NetBackup may not fail jobsexactly at the maximum number of connections. NetBackup may fail a job when theconnection number is slightly less than the maximum, exactly the maximum, or slightlymore than the maximum.
In practice, you should not need to set this value higher than 100.
Maximumconncurrent jobs
For more information about NetBackup cloud storage, see the NetBackup CloudAdministrator's Guide:
http://www.veritas.com/docs/DOC5332
Configuring advanced bandwidth throttling settingsAdvanced bandwidth throttling settings let you control various aspects of theconnection between the NetBackup hosts and your cloud storage provider.
The total bandwidth and the bandwidth sampling interval are configured on theCloud Settings tab of the Scalable Storage host properties screen.
See “Scalable Storage properties” on page 231.
233Configuring Host PropertiesScalable Storage properties

To configure advanced bandwidth throttling settings
1 In theNetBackupAdministrationConsole, expandNetBackupManagement> Host Properties > Media Servers in the left pane.
2 In the right pane, select the host on which to specify properties.
3 Click Actions > Properties.
4 In the properties dialog box left pane, select Scalable Storage.
5 In the right pane, click Advanced Settings. The Advanced ThrottlingConfiguration dialog box appears.
The following is an example of the dialog box:
6 Configure the settings and then click OK.
See “Advanced bandwidth throttling settings” on page 234.
Advanced bandwidth throttling settingsThe following table describes the advanced bandwidth throttling settings.
234Configuring Host PropertiesScalable Storage properties

Table 3-56 Advanced Throttling Configuration settings
DescriptionProperty
Use this field to specify the percentage of total bandwidth that readoperations can use. Specify a value between 0 and 100. If youenter an incorrect value, an error is generated.
If there is insufficient bandwidth to transmit the specified amountof data within a few minutes, restore or replication failures mayoccur due to timeouts.
Consider the total load of simultaneous jobs on multiple mediaservers when you calculate the required bandwidth.
Default value: 100
Possible values: 0 to 100
Read Bandwidth
Use this field to specify the percentage of total bandwidth that writeoperations can use. Specify a value between 0 and 100. If youenter an incorrect value, an error is generated.
If there is insufficient bandwidth to transmit the specified amountof data within a few minutes, backup failures may occur due totimeouts.
Consider the total load of simultaneous jobs on multiple mediaservers when you calculate the required bandwidth.
Default value: 100
Possible values: 0 to 100
Write Bandwidth
Use this field to specify the time interval that is considered worktime for the cloud connection.
Specify a start time and end time in 24-hour format. For example,2:00 P.M. is 14:00.
Indicate how much bandwidth the cloud connection can use in theAllocated bandwidth field. This value determines how much ofthe available bandwidth is used for cloud operations in this timewindow. The value is expressed as a percentage or in kilobytesper second.
Work time
235Configuring Host PropertiesScalable Storage properties

Table 3-56 Advanced Throttling Configuration settings (continued)
DescriptionProperty
Use this field to specify the time interval that is considered off timefor the cloud connection.
Specify a start time and end time in 24-hour format. For example,2:00 P.M. is 14:00.
Indicate how much bandwidth the cloud connection can use in theAllocated bandwidth field. This value determines how much ofthe available bandwidth is used for cloud operations in this timewindow. The value is expressed as a percentage or in kilobytesper second.
Off time
Specify the start and stop time for the weekend.
Indicate how much bandwidth the cloud connection can use in theAllocated bandwidth field. This value determines how much ofthe available bandwidth is used for cloud operations in this timewindow. The value is expressed as a percentage or in kilobytesper second.
Weekend
This field displays how much of the available bandwidth the cloudstorage server transmits to a NetBackup media server during eachrestore job. The value is expressed in kilobytes per second.
Read Bandwidth(KB/s)
This field displays how much of the available bandwidth theNetBackup media server transmits to the cloud storage serverduring backup jobs. The value is expressed in kilobytes per second.
Write Bandwidth(KB/s)
Servers propertiesThe Servers properties display the NetBackup server lists on selected masterservers, media servers, and clients. The server lists display the NetBackup serversthat each host recognizes.
The Master Server field contains the name of the master server for the selectedhost. (The name of the selected host appears in the title bar.)
The Servers dialog box contains the following tabs:
236Configuring Host PropertiesServers properties

Table 3-57 Servers dialog box properties
DescriptionTab
This tab (Figure 3-63) lists the additional servers that can access the server that isspecified as Master server.
During installation, NetBackup sets the master server to the name of the system wherethe server software is installed. NetBackup uses the master server value to validateserver access to the client. The master server value is also used to determine whichserver the client must connect to so that files can be listed and restored.
To configure access to a remote server, add to the server list the name of the host seekingaccess.
Note: For a Fibre Transport (FT) media server that has multiple network interfaces forVLANs: Ensure that the FT server’s primary host name appears before any other interfacenames for that FT media server host.
See “Accessing remote servers” on page 1124.
Additional Servers tab
This tab lists the hosts that are media servers only. Hosts that are listed as media serverscan back up and restore clients, but have limited administrative privileges.
If a server appears only on the Media servers tab, the server is a media server. Mediaservers can back up and restore clients, but they have limited administrative privileges.
A server that appears on the Media servers tab and the Additional servers tab mayintroduce unintended consequences. A computer that is defined as both a master serverand a media server gives the administrator of the media server full master serverprivileges. By listing the media server in both places, you may inadvertently give themedia server administrator more privileges than intended.
Media Servers tab
This tab lists the Veritas NetBackup OpsCenter servers that can access the currentlyselected master server.
To add a server to the list, ensure that the NetBackup server can reach the OpsCenterserver.
For more information, see the Veritas NetBackup OpsCenter Administrator's Guide.
OpsCenter Servers tab
237Configuring Host PropertiesServers properties

Table 3-57 Servers dialog box properties (continued)
DescriptionTab
Use this tab to add the remote master servers that you trust and to view the masterservers that are already trusted.
See “About trusted master servers for Auto Image Replication” on page 1005.
See “Adding a trusted master server” on page 242.
Note: If either the source or remote master server is clustered, you must enableinter-node communication on all of the nodes in the cluster. Do so before you add thetrusted master server.
See “Enabling NetBackup clustered master server inter-node authentication” on page 240.
You cannot remove a trusted master server when an Import SLP is configured in thatmaster server's domain.
Information about Auto Image Replication and storage lifecycle policies is available.
See “About NetBackup Auto Image Replication” on page 992.
See “About storage lifecycle policies” on page 613.
If you use NetBackup Access Control, read about access control with Auto ImageReplication.
See “Using NetBackup Access Control (NBAC) with Auto Image Replication” on page 1011.
Trusted Master Serverstab
238Configuring Host PropertiesServers properties

Figure 3-63 Additional servers tab in the Servers dialog box
Adding a server to a servers listDepending on the tab that is selected, you can add a master server, media server,client, or OpsCenter server to the server list in the Additional servers tab, theMedia servers tab, or the OpsCenter servers tab. All tabs appear in the Serversproperties dialog box.
To add a server to a list
1 In the NetBackup Administration Console, in the left pane, expandNetBackup Management > Host Properties.
2 Depending on the host to be configured, select Master Servers, MediaServers, or Clients.
3 In the right pane, double-click the master server, media server, or client thatyou want to modify.
4 In the properties dialog box, in the left pane, click Servers.
5 Select the tab that contains the server list that you want to modify.
239Configuring Host PropertiesServers properties

6 Click Add.
To add multiple hosts, select more than one media server or client in step 2and click Apply To All in step 5. However, you can add only one master serverto the list at a time.
7 In the Add a New Server Entry dialog box, type the name of the new server.
8 Click Add. The dialog box remains open for another entry.
9 Click Close.
Note: If you add a media server, run nbemmcmd -addhost to add the media serverto the Enterprise Media Manager (EMM) in the NetBackup database of the masterserver.
Removing a server from a server listYou can remove a master server or a media server from the Additional serverslist. You can also remove a media server from the Media servers list.
To remove a server from a server list
1 In the NetBackup Administration Console, in the left pane, expandNetBackup Management > Host Properties.
2 Depending on the host to be configured, select Master Servers, MediaServers, or Clients.
3 In the right pane, double-click the master server, media server, or client youwant to modify.
4 In the properties dialog box, in the left pane, click Servers.
5 Select a server from the Additional servers list, the Media servers list, or theOpsCenter servers list.
6 Click Remove.
Enabling NetBackup clustered master server inter-nodeauthentication
NetBackup requires inter-node authentication among the master servers in a cluster.For authentication, you must provision an authentication certificate on all of thenodes of the cluster. The certificates are used to establish SSL connections betweenthe NetBackup hosts. The inter-node authentication allows the following NetBackupfunctionality:
240Configuring Host PropertiesServers properties

The NetBackup Administration Console in master serverclusters requires the NetBackup authentication certificatesfor correct functionality.
NetBackup AdministrationConsole
Auto Image Replication in which a master server is in a clusterrequires inter-node authentication among the hosts in thatcluster. The NetBackup authentication certificates providethe means to establish the proper trust relationships.
Provision the certificates on the cluster hosts before you addthe trusted master server. This requirement applies regardlessof whether the clustered mastered server is the source of thereplication operation or the target.
See “About trusted master servers for Auto ImageReplication” on page 1005.
Targeted A.I.R. (Auto ImageReplication)
See “Adding a trusted master server” on page 242.
To enable clustered master server inter-node authentication
◆ On the active node of the NetBackup master server cluster, run the followingNetBackup command:
■ Windows: install_path\Veritas\NetBackup\bin\admincmd\bpnbaz-setupat
■ UNIX: /usr/openv/netbackup/bin/admincmd/bpnbaz -setupat
NetBackup creates the certificates on every node in the master server cluster.
The following is example output:
# bpnbaz -setupat
You will have to restart NetBackup services on this machine after
the command completes successfully.
Do you want to continue(y/n)y
Gathering configuration information.
Please be patient as we wait for 10 sec for the security services
to start their operation.
Generating identity for host 'bit1.remote.example.com'
Setting up security on target host: bit1.remote.example.com
nbatd is successfully configured on NetBackup Master Server.
Operation completed successfully.
241Configuring Host PropertiesServers properties

Adding a trusted master serverYou can configure a trust relationship between multiple NetBackup domains. Todo so, in a source domain you specify the remote master servers with which youwant to add a trust relationship. Use the following procedure in the source domainto add a remote master server as a trusted master server.
A trust relationship between domains helps with replication operations.
See “About trusted master servers for Auto Image Replication” on page 1005.
Note: If either the source or remote master server is clustered, you must enableinter-node communication on all of the nodes in the cluster. Do so before you addthe trusted master server.
See “Enabling NetBackup clustered master server inter-node authentication”on page 240.
To add a trusted master server
1 In theNetBackupAdministrationConsole, expandNetBackupManagement> Host Properties > Master Servers in the left pane.
2 In the right pane, select the master server.
3 On the Actions menu, click Properties.
4 In the properties dialog box left pane, select Servers.
5 In the Servers dialog box, select the Trusted Master Servers tab.
242Configuring Host PropertiesServers properties

6 On the Trusted Master Servers tab, click Add.
The Add a New Trusted Master Server dialog box appears.
The following is an example of the dialog box:
7 In the Add a New Trusted Master Server dialog box, enter the following andthen click OK:
■ The fully-qualified host name of the remote master server.
■ The logon account User name of the remote master server host.
■ The Password for the logon account of the remote master server host.
8 Repeat step 6 and step 7 for each master server with which you want to adda trust relationship.
9 When you finish adding trusted master servers, click OK.
Removing a trusted master serverYou can remove a remote master server with which you have configured a trustrelationship.
A trust relationship between domains helps with replication operations.
See “About trusted master servers for Auto Image Replication” on page 1005.
Two procedures exist, as follows:
243Configuring Host PropertiesServers properties

If the remote master server is online and active, use the NetBackupAdministration Console to remove the trusted master server. Thismethod also removes the reciprocal trust relationship.
See “To remove a trusted master server for inter-domain operations”on page 244.
The remote masterserver is online
If the remote master server is offline, use the NetBackup nbseccmdcommand to remove the trusted master server. This method doesnot remove the reciprocal trust relationship.
See “To remove a trusted master server that is offline” on page 245.
The remote masterserver is offline
To remove a trusted master server for inter-domain operations
1 Ensure that all replication jobs to the trusted master are complete. You canuse nbstlutil stlilist to list the state of all storage lifecycle policy-managedoperations. To cancel jobs use nbstlutil cancel.
See the NetBackup Commands Reference Guide for information about thenbstlutil command.
2 Delete all storage lifecycle policies (SLPs) that use the trusted master as adestination.
Note: Before deleting a storage lifecycle policy, ensure that there are no backuppolicies that indicate the SLP for the Policy storage.
3 In theNetBackupAdministrationConsole, expandNetBackupManagement> Host Properties > Master Servers in the left pane.
4 In the right pane, select the master server.
5 On the Actions menu, click Properties.
6 In the properties dialog box left pane, select Servers.
7 In the Servers dialog box, select the Trusted Master Servers tab.
244Configuring Host PropertiesServers properties

8 On the Trusted Master Servers tab, select the trusted master server that youwant to remove and click Remove.
The Remove Trusted Master Server dialog box appears.
The following is an example of the dialog box:
In the Remove Trusted Master Server dialog box, enter the credentials forthat master server host and then click Remove.
9 Repeat step 8 for each master server from which you want to remove a trustrelationship.
10 When you finish removing trusted master servers, click OK.
To remove a trusted master server that is offline
◆ On the source master server, enter the following NetBackup nbseccmd
command:
UNIX: /usr/openv/netbackup/bin/admincmd/nbseccmd-setuptrustedmaster -remove -masterserver master_server_name
-remotemasterserver remote_master -localonly
Windows: install_path\NetBackup\bin\admincmd\nbseccmd-setuptrustedmaster -remove -masterserver master_server_name
-remotemasterserver remote_master -localonly
245Configuring Host PropertiesServers properties

Changing the master server that performs backups and restores fora client
Use the Make Master option to change the master server that performs backupsand restores for a client. This option does not change a host into a master server.
This option is useful in a disaster recovery situation or in a NetBackup environmentwhere Auto Image Replication is configured. For example, select a client in thesource domain, then use Make Master to temporarily point the client to the masterserver of the target domain. After changing the master server, restores from thetarget domain can be initiated.
To change the master server that a client uses for backups and restores
1 In the NetBackup Administration Console, in the left pane, expandNetBackup Management > Host Properties.
2 Depending on the host to be configured, select Master Servers, MediaServers, or Clients.
3 In the details pane, double-click the master server, media server, or client youwant to modify.
4 In the dialog box, click Servers.
5 From the Additional servers list, select a server.
6 Click Make Master.
In the configuration file, the new master server appears as the first server entryin the list.
Changing the master server does not prevent the former master server frominitiating backups for the client. As long as that server continues to be listedon the client’s server list, the master server can perform backups.
SharePoint propertiesThe SharePoint properties apply to currently selected Windows clients to protectSharePoint Server installations.
246Configuring Host PropertiesSharePoint properties

Figure 3-64 SharePoint dialog box
The SharePoint dialog box contains the following properties.
Table 3-58 SharePoint dialog box properties
DescriptionProperty
Specifies the domain and the user name for the account youwant to use to log on to SharePoint (DOMAIN\user name).
Domain\User name
Specifies the password for the account.Password
Specifies the consistency checks to perform on the SQLServer databases before NetBackup begins a backupoperation. These checks are performed for bothserver-directed and user-directed backups.
If you choose to perform a consistency check, you can selectContinue with backup if consistency check fails.NetBackup then continues to perform the backup if theconsistency check fails.
Consistency check beforebackup
247Configuring Host PropertiesSharePoint properties

Table 3-58 SharePoint dialog box properties (continued)
DescriptionProperty
For VMware backups that protect Federated SharePointconfigurations, provide the name of the back-end SQL server.This server acts as the granular restore proxy host for thecatalog hosts (front-end servers in the farm).
SharePoint granular restoreproxy host
For complete information on these options, see the NetBackup for MicrosoftSharePoint Server Administrator’s Guide.
Consistency check options for SharePoint ServerThe following consistency checks can be performed before a SharePoint Serverbackup.
Table 3-59 Consistency check options
DescriptionOption
Do not perform consistency checking.None
Select this option to exclude indexes from the consistency check. If indexes are notchecked, the consistency check runs significantly faster but is not as thorough. Onlythe data pages and clustered index pages for each user table are included in theconsistency check. The consistency of the non-clustered index pages is not checked.
Full check, excludingindexes
Include indexes in the consistency check. Any errors are logged.Full check, includingindexes
SLP Parameters propertiesTheSLPParameters properties in theNetBackupAdministration Console allowadministrators to customize how storage lifecycle policies are maintained and howSLP jobs run. These properties apply to the SLPs of the currently selected masterservers.
248Configuring Host PropertiesSLP Parameters properties

Figure 3-65 SLP Parameters dialog box
In NetBackup 7.6 and earlier, the parameters that appear in the SLP Parameterswere configured in the LIFECYCLE_PARAMETERS configuration file. The hostproperties replace that file. An upgrade to 7.6 migrates the settings in theLIFECYCLE_PARAMETERS file to the SLP Parameters.
To change the parameters, either change them in the host properties or use thecommand line. If either method is used to change a storage lifecycle policy parameterdefault, the change creates the nbcl.conf configuration file.
The nbcl.conf file is found in the following locations, but is not present if the defaultof any parameter has not been changed.
■ On Windows:install_path\veritas\NetBackup\var\global\nbcl.conf
■ On UNIX:/usr/openv/var/global/nbcl.conf
To use the command-line method, use the nbgetconfig and the nbsetconfig
commands to change the defaults. For information about these commands, seethe NetBackup Commands Reference Guide.
249Configuring Host PropertiesSLP Parameters properties

Table 3-60 describes the SLP Parameters and the default of each. It also lists theconfiguration options and the syntax to use with the command-line method.
Use the drop-down menu in the Units column to change the units of measurementfor size or time.
Table 3-60 SLP Parameters
DescriptionProperty
The smallest batch size that can run as a single duplication job. The job does not rununtil enough images accumulate to reach this minimum batch size or until the Forceinterval for small jobs time is reached. Minimum: 1 kilobyte; no maximum size. Default:8 gigabytes.
Configuration option default: SLP.MIN_SIZE_PER_DUPLICATION_JOB = 8 GB
Minimum size perduplication job
The largest batch size that can run as a single duplication job. Minimum: 1 kilobyte;no maximum size. Default: 100 gigabytes.
Configuration entry default: SLP.MAX_SIZE_PER_DUPLICATION_JOB = 100 GB
Maximum size perduplication job
The largest batch size that can run as a single job for Auto Image Replication. Minimum:1 kilobyte; no maximum size. Default: 100 gigabytes.
Configuration entry default: SLP.MAX_SIZE_PER_BACKUP_REPLICATION_JOB =100 GB
Maximum size per A.I.R.replication job
The largest number of images in a single batch that can run as a single job. Default:50 images, with no minimum number or maximum number.
Use this parameter with the Limit I/O streams disk pool option which limits the numberof jobs that can run concurrently to each volume in the disk pool.
Configuration entry default: SLP.MAX_IMAGES_PER_SNAPSHOT_REPLICATION_JOB= 50
Maximum images persnapshot replication job
The fewest number of images in a single batch that can run as an Auto ImageReplication import job. The job does not run until either the minimum size is reachedor the Force interval for small jobs time is reached. Minimum: 1 image; no maximumnumber of images. Default: 1 image.
Configuration entry default: SLP.MIN_IMAGES_PER_IMPORT_JOB = 1
Minimum images per A.I.R.Import job
The largest number of images in a single batch that can run as an Auto ImageReplication import job. Minimum: 1 job; no maximum number of images. Default: 250images.
Configuration entry default: SLP.MAX_IMAGES_PER_IMPORT_JOB = 250
Maximum images per A.I.R.Import job
250Configuring Host PropertiesSLP Parameters properties

Table 3-60 SLP Parameters (continued)
DescriptionProperty
The age that the oldest image in a batch must reach after which the batch is submittedas a duplication job. This value prevents many small duplication jobs from running atone time or running too frequently. It also prevents NetBackup from waiting too longbefore it submits a small job. Default: 30 minutes, with no minimum number or maximumnumber.
Configuration entry default: SLP.MAX_TIME_TIL_FORCE_SMALL_DUPLICATION_JOB= 30 MINUTES
Force interval for small jobs
Indicates the frequency of the job submission for all operations. No minimum intervalor maximum interval. Default: 5 minutes.
By default, all jobs are processed before more jobs are submitted. Increase this intervalto allow NetBackup to submit more jobs before all jobs are processed. Set the intervalwhen the list of available images is scanned for those that can be batched togetherand jobs submitted. A shorter interval allows for a better response to changing systemworkloads at the cost of increased processing.
Configuration entry default: SLP.JOB_SUBMISSION_INTERVAL = 5 MINUTES
Job submission interval
The number of minutes between image-processing sessions. Set the interval whennewly created images are recognized and set up for SLP processing. Default: 5 minutes.
Configuration entry default: SLP.IMAGE_PROCESSING_INTERVAL = 5 MINUTES
Image processing interval
The time between when a job finishes and before NetBackup removes the job artifactsfor the completed job. No minimum interval or maximum interval. Default: 24 hours.
Configuration entry default: SLP.CLEANUP_SESSION_INTERVAL = 24 HOURS
Cleanup interval
The amount of time to wait before an unsuccessful operation is added to the first jobthat runs after the delay. (This applies to all SLP jobs.) The extra time gives theadministrator additional time to solve a problem that prevents job completion. Nominimum interval or maximum interval. Default: 2 hours.
Configuration entry default: SLP.IMAGE_EXTENDED_RETRY_PERIOD = 2 HOURS
Extended image retryinterval
Concerns the deletion of SLP versions where a more recent version exists. The settingcontrols how long a version must be inactive before NetBackup deletes it. Default: 14days.
Configuration entry default: SLP.VERSION_CLEANUP_DELAY = 14 DAYS
See “Deleting old storage lifecycle policy versions” on page 673.
Unused SLP definitionversion cleanup delay
251Configuring Host PropertiesSLP Parameters properties

Table 3-60 SLP Parameters (continued)
DescriptionProperty
Limits the number of concurrently active duplication jobs that can access a single tapemedia storage unit to xx times the number of available drives. Allows tuning to avoidoverloading the Resource Broker, yet makes sure that the devices are not idle. Nominimum multiplier or maximum multiplier. Default: 2 (multiply access to the write drivesby two).
Configuration entry default: SLP.TAPE_RESOURCE_MULTIPLIER = 2
Tape resource multiplier
Limits the number of concurrently active duplication jobs that can access a single diskstorage unit to xx times the number of available drives. Allows tuning to avoidoverloading the Resource Broker, yet makes sure that the devices are not idle. Nominimum multiplier or maximum multiplier. Default: 2 (multiply access to the write drivesby two).
Configuration entry default: SLP.DISK_RESOURCE_MULTIPLIER = 2
Disk resource multiplier
If this parameter is set to Yes (default), multiple SLPs of the same priority can beprocessed in the same job. If No, batching can occur only within a single SLP.
Configuration entry default: SLP.DUPLICATION_GROUP_CRITERIA = 1
Configuration entry for no, do not allowbatching:SLP.DUPLICATION_GROUP_CRITERIA = 0
Group images across SLPs
Sets the amount of time before a window closes when NetBackup does not submitnew jobs using that window. Minimum 2 minute; maximum: 60 minutes. Default: 15minutes.
Configuration entry default: SLP.WINDOW_CLOSE_BUFFER_TIME = 15 MINUTES
Window close buffer time
For deferred operations, jobs are submitted x time before the source copy is due toexpire. Default: 4 hours.
Configuration entry default: SLP.DEFERRED_DUPLICATION_OFFSET_TIME = 4HOURS
Deferred duplication offsettime
Used for Auto Image Replication, indicates whether an SLP (that contains an Importoperation) is created automatically in the target domain if no SLP is configured there.Default: Yes, an SLP is created in the target domain.
Configuration entry default: SLP.AUTO_CREATE_IMPORT_SLP = 1
Auto create A.I.R. ImportSLP
How long NetBackup retries an Import job before it stops and deletes the record. Afterthe initial four attempts, the retries become less frequent. Default: 0 (do not retry afterthe initial four attempts).
Configuration entry default: SLP.REPLICA_METADATA_CLEANUP_TIMER = 0 HOURS
How long to retry failedA.I.R. import jobs
252Configuring Host PropertiesSLP Parameters properties

Command-line units of measurement for the SLPparametersThe abbreviations are case-insensitive for units of measurement.
The following abbreviations can be used where sizes are indicated:
megabytembkilobyteskilobyte(s)kilobytekbbytes
tbgigabytesgigabyte(s)gigabytegbmegabytesmegabyte(s)
petabytespetabyte(s)petabytepbterabytesterabyte(s)terabyte
The following abbreviations can be used where units of time are indicated:
minutesminute(s)minuteminsecondssecond(s)secondsec
monthmondaysday(s)dayhourshour(s)hour
yearsyear(s)yearweeksweek(s)weekmonthsmonth(s)
About batch creation logic in Storage Lifecycle ManagerThe Storage Lifecycle Manager service (nbstserv) is in charge of creatingduplication jobs for storage lifecycle policies. Part of duplication job creation includesgrouping the backup (or source) jobs into batches.
Note: Restart nbstserv after making changes to the underlying storage for anyoperation in an SLP.
One objective of the batching logic is to prevent media contention for tape operations,including virtual tape libraries (VTL).
Batching logic applies to both disk and tape. (Though the method to prevent mediacontention for disk is to use disk pools and then to limit I/O streams to disk pools.)
The batching logic requires that for each evaluation cycle, nbstserv consider allcompleted source jobs when determining which duplication job to run next. Bydefault, nbstserv performs the evaluation once every 5 minutes.
nbstserv avoids overloading the Resource Broker (nbrb) queue with jobs. Toomany jobs in the queue make the role of the Resource Broker harder and slowsdown system performance.
By default, nbstserv now creates groups based on the Group images acrossSLPs parameter in theSLPParameters host properties. By default, multiple storagelifecycle policies with the same priority can be batched together.
253Configuring Host PropertiesSLP Parameters properties

See “SLP Parameters properties” on page 248.
This batching logic change affects how duplication jobs appear in the ActivityMonitor. Storage lifecycle policies that have been combined into one job appearunder a single policy name: SLP_MultipleLifecycles. If a storage lifecycle policyhas not been combined with another, the name appears in the Activity Monitorunder the name of the SLP: SLP_name.
Users may see some duplication jobs that, although in the running state, do notduplicate data because they have no resources to read or write. These jobs continueto run until they receive resources to complete the job.
To turn off grouping by duplication job priority, set the Group images across SLPsparameter to No in the SLP Parameters host properties.
Deprecated storage lifecycle policy parametersThree storage lifecycle policy parameters were deprecated in NetBackup 7.6 dueto changes in SLP processing.
DUPLICATION_SESSION_INTERVAL_MINUTES is no longer effective in controllingthe timing of SLP processing sessions. Two parameters now control sessionprocessing:
■ SLP.IMAGE_PROCESSING_INTERVAL controls how often new SLP-managedimages are recognized and set up for SLP processing.
■ SLP.JOB_SUBMISSION_INTERVAL controls how often SLP processing jobsare submitted for execution.
Import operations are controlled by the same session that performs other SLPoperations. As a result, IMPORT_SESSION_TIMER andIMPORT_EXTENDED_RETRY_SESSION_TIMER are no longer used.
As with other SLP operations, SLP.IMAGE_PROCESSING_INTERVAL andSLP.JOB_SUBMISSION_INTERVAL now control the frequency of SLP sessionoperations. SLP.IMAGE_EXTENDED_RETRY_PERIOD controls the retry behaviorfor all SLP operations including import operations.
Throttle Bandwidth propertiesUse the Throttle Bandwidth properties to specify a limit for the network bandwidthor transfer rate that NetBackup clients use on a network. The actual limiting occurson the client side of the backup connection. These properties limit only backups.Restores are unaffected. The default is that the bandwidth is not limited.
The Throttle Bandwidth properties are similar to the Bandwidth host properties,but offer greater flexibility in IPv6 environments.
254Configuring Host PropertiesThrottle Bandwidth properties

Figure 3-66 Throttle Bandwidth dialog box
To manage entries in the Throttle Bandwidth dialog box, select one of the followingbuttons:
Add a network or host to the Network or Host list using the AddBandwidth Settings dialog box.
Add
Change the selected network or host property using the ChangeBandwidth Settings dialog box.
Change
Removes the selected network or host from the Network or Hostlist.
Remove
Add Bandwidth Settings dialog box for Throttle Bandwidth propertiesThe Add Bandwidth Settings and the Change Bandwidth Settings dialog boxescontain the following properties.
The network or host to which the throttle applies.Network or Host
255Configuring Host PropertiesThrottle Bandwidth properties

The bandwidth or the transfer rate in kilobyte per second forthe network or host indicated. A value of zero disablesthrottling IPv6 addresses.
Bandwidth (KB/Sec)
Timeouts propertiesThe Timeouts properties apply to selected master servers, media servers, andclients.
Figure 3-67 Timeouts dialog box
The Timeouts dialog box contains the following properties.
Table 3-61 Timeouts dialog box properties
DescriptionProperty
Specifies the number of seconds the server waits before it times out when it connectsto a client. The default is 300 seconds.
Client connect timeout
256Configuring Host PropertiesTimeouts properties

Table 3-61 Timeouts dialog box properties (continued)
DescriptionProperty
Specifies the number of seconds the server waits for the bpstart_notify script ona client to complete. The default is 300 seconds.
Note: If using the bpstart_notify script: The Client read timeout(CLIENT_READ_TIMEOUT option) must be equal to or greater than the Backup startnotify timeout (BPSTART_TIMEOUT option). If the Client read timeout is less thanthe Backup start notify timeout, the job can timeout while the bpstart_notifyscript is running.
Backup start notify timeout
Specifies how long the client can wait for a response from the NetBackup master serverwhile it lists files.
Note: If it exists, the value in a UNIX client’s $HOME/bp.conf file takes precedenceto the property here.
If the limit is exceeded, the user receives a socket read failed error. The timeout canbe exceeded even while the server processes the request.
File browse timeout
Specifies that the client waits for the timeout period as determined by the operatingsystem when it lists files, as follows:
■ Windows client: 300 seconds■ UNIX client: 1800 seconds
UseOSdependent timeouts
Specifies how long NetBackup waits for the requested media to be mounted, positioned,and ready on backups, restores, and duplications.
This property applies to currently selected master servers.
Use this timeout to eliminate excessive waiting time during manual media mounts. (Forexample, when robotic media is out of the robot or is off-site.)
Media mount timeout
257Configuring Host PropertiesTimeouts properties

Table 3-61 Timeouts dialog box properties (continued)
DescriptionProperty
Specifies the number of seconds to use for the client-read timeout. This timeout canapply to a NetBackup master, remote media server, or database-extension client (suchas NetBackup for Oracle). The default is 300 seconds.
If the server does not get a response from a client within the Client read timeoutperiod, the backup or restore operation, for example, fails.
The client-read timeout on a database-extension client is a special case. Clients caninitially require more time to get ready than other clients. More time is required becausedatabase backup utilities frequently start several backup jobs at the same time, slowingthe central processing unit.
Note: For database-extension clients, Veritas suggests that the Client read timeoutbe set to a value greater than 5 minutes. 15 minutes are adequate for many installations.For other clients, change this property only if the client encounters problems.
The sequence on a database-extension client is as follows:
■ NetBackup on the database-extension client reads the client’s client-read timeoutto find the initial value. If the option is not set, the standard 5-minute default is used.
■ When the database-extension API receives the server’s value, it uses it as theclient-read timeout.
See “Client Settings properties for UNIX clients” on page 107.
Note: If using the bpstart_notify script: The Client read timeout(CLIENT_READ_TIMEOUT option) must be equal to or greater than the Backup startnotify timeout (BPSTART_TIMEOUT option). If the Client read timeout is less thanthe Backup start notify timeout, the job can timeout while the bpstart_notifyscript is running.
Client read timeout
Specifies the number of seconds that the server waits for the bpend_notify scripton a client to complete. The default is 300 seconds.
Note: If this timeout is changed, verify that Client read timeout is set to the same orhigher value.
Backup end notify timeout
Specifies the number of seconds that the master server waits before it times out whenit connects to a remote media server. The default is 30 seconds.
Media server connecttimeout
Universal Settings propertiesUse theUniversal Settings properties in theNetBackup Administration Consoleto configure basic backup and restore settings. These properties apply to selectedmaster servers, media servers, and clients.
258Configuring Host PropertiesUniversal Settings properties

Figure 3-68 Universal Settings dialog box
The Universal Settings dialog box contains the following options.
Table 3-62 Universal Settings dialog box properties
DescriptionProperty
Specifies the number of attempts a client has to restore after a failure. (The default is0; the client does not attempt to retry a restore. The client can try up to three times.)Change Restore retries only if problems are encountered.
If a job fails after the maximum number of retries, the job goes into an incomplete state.The job remains in the incomplete state as determined by the Move restore job fromincomplete state to done state property.
See “Clean-up properties” on page 88.
A checkpointed job is retried from the start of the last checkpointed file rather than atthe beginning of the job.
Checkpoint restart for restore jobs allows a NetBackup administrator to resume afailed restore job from the Activity Monitor.
See “Take checkpoints every __ minutes (policy attribute)” on page 703.
Restore retries
259Configuring Host PropertiesUniversal Settings properties

Table 3-62 Universal Settings dialog box properties (continued)
DescriptionProperty
Specifies how long ago NetBackup searches for files to restore. For example, to limitthe browse range to one week before the current date, clear the Last full backupcheck box and specify 7.
This limit is specified on the master server and applies to all NetBackup clients. A limitcan be specified on an individual client to reduce the size of the Search window. Theclient setting cannot make the browse window larger.
By default, NetBackup includes files from the time of the last-full backup through thelatest backup for the client. If the client belongs to more than one policy, then the browsestarts with the earliest of the set of last-full backups.
Browse timeframe forrestores
Indicates whether NetBackup includes all backups since the last successful full backupin its browse range. This property must be disabled to enter a value for the Browsetimeframe for restores property. The default is that this property is enabled.
Last full backup
Specifies the network interface that NetBackup uses to connect to another NetBackupclient or server. A NetBackup client or server can have more than one network interface.To force NetBackup connections to be made on a specific network interface, use thisentry to specify the network host name of that interface. By default, the operatingsystem determines the one to use.
Use specified networkinterface
Specifies whether a NetBackup server can create or modify files on the NetBackupclient. For example, enable this property to prevent server-directed restores and remotechanges to the client properties.
After theAllow server file writes property is applied, it can be cleared only by modifyingthe client configuration. The default is that server writes are allowed.
Allow server file writes
260Configuring Host PropertiesUniversal Settings properties
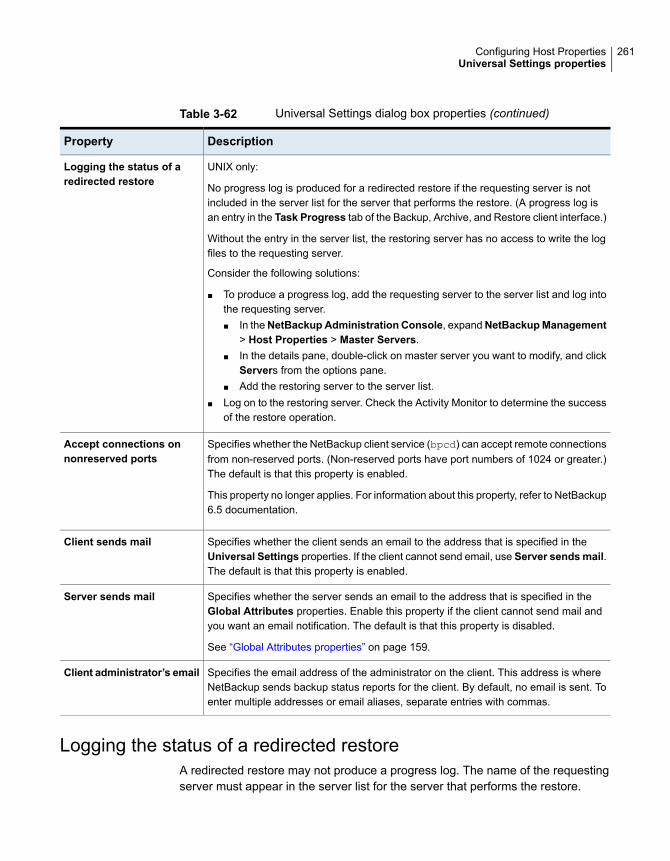
Table 3-62 Universal Settings dialog box properties (continued)
DescriptionProperty
UNIX only:
No progress log is produced for a redirected restore if the requesting server is notincluded in the server list for the server that performs the restore. (A progress log isan entry in the Task Progress tab of the Backup, Archive, and Restore client interface.)
Without the entry in the server list, the restoring server has no access to write the logfiles to the requesting server.
Consider the following solutions:
■ To produce a progress log, add the requesting server to the server list and log intothe requesting server.■ In theNetBackup Administration Console, expandNetBackupManagement
> Host Properties > Master Servers.■ In the details pane, double-click on master server you want to modify, and click
Servers from the options pane.■ Add the restoring server to the server list.
■ Log on to the restoring server. Check the Activity Monitor to determine the successof the restore operation.
Logging the status of aredirected restore
Specifies whether the NetBackup client service (bpcd) can accept remote connectionsfrom non-reserved ports. (Non-reserved ports have port numbers of 1024 or greater.)The default is that this property is enabled.
This property no longer applies. For information about this property, refer to NetBackup6.5 documentation.
Accept connections onnonreserved ports
Specifies whether the client sends an email to the address that is specified in theUniversal Settings properties. If the client cannot send email, use Server sendsmail.The default is that this property is enabled.
Client sends mail
Specifies whether the server sends an email to the address that is specified in theGlobal Attributes properties. Enable this property if the client cannot send mail andyou want an email notification. The default is that this property is disabled.
See “Global Attributes properties” on page 159.
Server sends mail
Specifies the email address of the administrator on the client. This address is whereNetBackup sends backup status reports for the client. By default, no email is sent. Toenter multiple addresses or email aliases, separate entries with commas.
Client administrator’s email
Logging the status of a redirected restoreA redirected restore may not produce a progress log. The name of the requestingserver must appear in the server list for the server that performs the restore.
261Configuring Host PropertiesUniversal Settings properties

Otherwise, no progress log is produced for a redirected restore.(A progress log isan entry in the Task Progress tab of the Backup, Archive, and Restore clientinterface.)
Without the entry in the server list, the restoring server has no access to write thelog files to the requesting server. Add the requesting server to the server list andlog into the requesting server.
To produce a progress log
1 In the NetBackup Administration Console, in the left pane, expandNetBackup Management > Host Properties > Master Servers.
2 In the right pane, double-click the master server you want to modify.
In the properties dialog box, in the left pane, click Servers.
3 Perform one of the following actions:
■ Additional serversFrom the Media servers list, click Add.
■ Media serversFrom the Additional servers list, click Add.
4 In the Add a New Server Entry dialog box, type the name of the new server.
5 Click Add. The dialog box remains open for another entry.
6 Click Close.
7 Log on to the restoring server.
Check the Activity Monitor to determine the success of the restore operation.
See “About the Jobs tab” on page 1038.
User Account Settings propertiesUse the User Account Settings properties in the NetBackup AdministrationConsole to customize the idle timeout and account lockout time for users.
262Configuring Host PropertiesUser Account Settings properties

Figure 3-69 User Account Settings dialog box
The User Account Settings dialog box contains the following properties.
Table 3-63 User Account Settings dialog box properties
DescriptionProperty
Specifies the idle timeout if the GUI is idle or if there is no activity on the GUI for aspecified period of time.
Select the Enable auto logoff timeout check box to set the auto logoff timeout durationas described:
■ Auto log off timeout: Select a time period. The user session is automaticallyterminated after the specified time.
GUI Idle Timeout
263Configuring Host PropertiesUser Account Settings properties

Table 3-63 User Account Settings dialog box properties (continued)
DescriptionProperty
Specifies the user account lockout duration if the number of invalid or failed logonattempts exceeds the specified number.
Select the Enable account lockout check box to set the account lockout duration asdescribed:
■ Number of failed login attempts allowed: Select 3 attempts and the accountwould be locked after 3 unsuccessful login attempts.
■ Account lockout duration: Select a time period after which a user account isautomatically unlocked after the set duration.
Account lockout
Unlocking a user accountA user account gets locked if the number of invalid login attempts exceeds thespecified attempts or after a specified duration allowed. The user account remainslocked until the specified account lockout period. However, you can unlock the useraccounts if there is an immediate requirement. Refer to the following section tounlock the accounts.
To unlock a user account
1 From the Actions menu, select the Unlock users option.
The Unlock Users screen is displayed; it lists names of the users whoseaccounts have been locked.
2 Select the users who you want to unlock and click Unlock.
The user accounts get unlocked.
Select the Refresh option on the top right. The user accounts that you unlockeddo not show up in the list.
UNIX Client propertiesUse the UNIX Client properties in the NetBackup Administration Console todefine properties of clients running on the UNIX platform.
264Configuring Host PropertiesUNIX Client properties

Figure 3-70 UNIX Client dialog box
See “Client Settings properties for UNIX clients” on page 107.
See “Busy File Settings properties” on page 85.
See “Lotus Notes properties” on page 186.
UNIX Server propertiesUse the UNIX Server properties in the NetBackup Adminstration Console tochange the NFS access timeout property. This property specifies how long thebackup waits to process the mount table before it considers an NFS file systemunavailable. The default is 5 seconds.
These properties apply to selected UNIX master servers.
265Configuring Host PropertiesUNIX Server properties

Figure 3-71 UNIX Server dialog box
See “Follow NFS (policy attribute)” on page 710.
VMware Access Hosts propertiesUse the VMware Access Hosts properties in the NetBackup AdministrationConsole to add or remove VMware backup hosts. These properties apply tocurrently selected master servers.
These properties appear when the NetBackup Enterprise Client license is installed.
266Configuring Host PropertiesVMware Access Hosts properties

Figure 3-72 VMware Access Hosts dialog box
The backup host is a NetBackup client that performs backups on behalf of the virtualmachines. (This host was formerly known as the VMware backup proxy server.)The backup host is the only host on which NetBackup client software is installed.As an option, the backup host can also be configured as a NetBackup master serveror media server.
The backup host is referred to as the recovery host when it performs a restore
You can add servers to and remove servers from the access hosts list:
Click Add and enter the fully qualified domain name of the backup host.Add
Select the backup host in the list and click Remove.Remove
For more information, see the NetBackup for VMware Administrator’s Guide.
267Configuring Host PropertiesVMware Access Hosts properties

Windows Client propertiesUse the Windows Client properties in the NetBackup Administration Consoleto define NetBackup properties for Microsoft Windows clients.
Figure 3-73 Windows Client dialog box
Windows Client properties include specific host properties for configuring Windowsclients.
Configuration options not found in the HostProperties
Most NetBackup configuration options can be found in the Host Properties of theNetBackup Administration Console. However, some options cannot be accessedin the Host Properties.
To change the default value for an option that is not found in the Host Properties,first use the nbgetconfig command to obtain a list of configuration options. Thenuse nbsetconfig to change the options as needed.
268Configuring Host PropertiesWindows Client properties

For information about these commands, see the NetBackup Commands ReferenceGuide.
The following NetBackup administration options cannot be configured by using theNetBackup Administration Console.
See “AUTO_ADD_ALL_ALIASES_FOR_CLIENT option forNetBackup servers” on page 277.
AUTO_ADD_ALL_ALIASES_FOR_CLIENT
See “BPARCHIVE_POLICY option for NetBackup clients”on page 347.
BPARCHIVE_POLICY
See “BPARCHIVE_SCHED option for NetBackup clients”on page 347.
BPARCHIVE_SCHED
See “BPBACKUP_POLICY option for NetBackup clients”on page 348.
BPBACKUP_POLICY
See “BPBACKUP_SCHED option for NetBackup clients”on page 349.
BPBACKUP_SCHED
See “BPDBJOBS_COLDEFS options for UNIX master servers”on page 280.
BPDBJOBS_COLDEFS
See “CHECK_RESTORE_CLIENT option for NetBackupservers” on page 289.
CHECK_RESTORE_CLIENT
See “EMMSERVER option for NetBackup servers” on page 304.EMMSERVER
See “GENERATE_ENGLISH_LOGS option for NetBackupservers and clients” on page 306.
GENERATE_ENGLISH_LOGS
See “IGNORE_XATTR option for NetBackup clients”on page 363.
IGNORE_XATTR
See “INFORMIX_HOME option for NetBackup clients”on page 366.
INFORMIX_HOME
See “KEEP_DATABASE_COMM_FILE option for NetBackupclients” on page 367.
KEEP_DATABASE_COMM_FILE
See “REPORT_CLIENT_DISCOVERIES option for NetBackupclients” on page 372.
REPORT_CLIENT_DISCOVERIES
See “RESUME_ORIG_DUP_ON_OPT_DUP_FAIL option forNetBackup servers” on page 328.
RESUME_ORIG_DUP_ON_OPT_DUP_FAIL
See “SYBASE_HOME option for NetBackup clients”on page 375.
SYBASE_HOME
269Configuring Host PropertiesConfiguration options not found in the Host Properties

See “ULINK_ON_OVERWRITE option for NetBackup servers”on page 340.
ULINK_ON_OVERWRITE
See the NetBackup Administrator's Guide, Volume II.vm.conf file (media and device configuration options)
About using commands to change theconfiguration options on UNIX clients and servers
When commands (nbsetconfig or bpsetconfig) are used to change theconfiguration options on UNIX NetBackup servers or clients, the commands changethe appropriate configuration files.
Most options are found in the following configuration file:
/usr/openv/netbackup/bp.conf
If a single UNIX system is running as both a client and a server, the bp.conf filecontains options for both the client and the server.
The bp.conf file observes the following syntax:
■ Use the # symbol to comment out lines.
■ Any number of spaces or tabs are allowed on either side of = signs.
■ Blank lines are allowed.
■ Any number of blanks or tabs are allowed at the start of a line.
Each nonroot user on a UNIX client can also have a personal bp.conf file in theirhome directory:
$HOME/bp.conf
The options in personal bp.conf files apply only to user operations. During a useroperation, NetBackup checks the $HOME/bp.conf file before/usr/openv/netbackup/bp.conf.
Root users do not have personal bp.conf files. NetBackup uses the/usr/openv/netbackup/bp.conf file for root users.
Stop and restart all NetBackup daemons and utilities on the server after you makea change to the bp.conf file on a UNIX master server. This action ensures that allof the NetBackup processes use the new bp.conf values. This action is not requiredfor changes to bp.conf files on a client or to a $HOME/bp.conf file on the masterserver.
270Configuring Host PropertiesAbout using commands to change the configuration options on UNIX clients and servers

The SERVER option must be present in the /usr/openv/netbackup/bp.conf file onall NetBackup UNIX clients and servers. During installation, NetBackup sets theSERVER option to the name of the master server where the software is installed. Itis the only required option in the bp.conf files. NetBackup uses internal softwaredefaults for all options in the bp.conf file, except SERVER.
The SERVER entries must be the same on all servers in a master and a media servercluster. Veritas recommends (but does not require) that all other entries also matchon all servers. (The CLIENT_NAME option is an exception.)
Configuration options for NetBackup serversThe following topics are about configuration options for NetBackup servers. Nearlyall of these options can also be set in the Host Properties in the NetBackupAdministration Console.
See “Configuration options not found in the Host Properties” on page 268.
About robust loggingThe Robust logging option indicates to NetBackup to limit the amount of disk spacethat a log directory consumes. When a log file grows to the specified maximumsize, the log file is closed and a new log file is opened. If the new log file causesthe maximum number of log files in the directory to be exceeded, the oldest log fileis deleted.
In NetBackup 7.6.1 or earlier versions, you can enable or disable robust logging inthe NetBackup Administration Console in the Logging host properties. TheEnable Robust Logging option was disabled by default.
See “Logging properties” on page 170.
Starting from NetBackup 7.7, the Enable Robust Logging option is removed fromthe Logging host properties because the option is always enabled. The error logsare always created based on the robust logging configuration parameters.
However, the following configuration parameter still appears when you run thebpgetconfig command: ENABLE_ROBUST_LOGGING = NO
Regardless of the value of the ENABLE_ROBUST_LOGGING configuration parameter,robust logging is always enabled.
Before NetBackup 7.7, robust logging was applicable only for unified logging. Robustlogging is also enabled for legacy logging for NetBackup servers and clients.
271Configuring Host PropertiesConfiguration options for NetBackup servers

Known issue: Robust logging is enabled only for Informix and SAP databaseagents for NetBackup. For the remaining NetBackup database agents, robustlogging is not enabled.
Robust logging functionality comprises the following configuration parameters:
This configuration parameter specifies the maximum size thatyou want to set for a log file in MB.
The default value for MAX_LOGFILE_SIZE is 50 MB.
See “MAX_LOGFILE_SIZE option for NetBackup servers andclients for legacy logging” on page 313.
MAX_LOGFILE_SIZE
This configuration parameter specifies the maximum numberof log files that you want to be created in NetBackup.
The default value for MAX_NUM_LOGFILES is infinite.
See “MAX_NUM_LOGFILES option for NetBackup serversand clients for legacy logging” on page 314.
MAX_NUM_LOGFILES
Note: Initially, MAX_LOGFILE_SIZE and MAX_NUM_LOGFILES parameter entries arenot present in the output for bpgetconfig. In this case, they are set to their defaultvalues. In UNIX, you can update the bp.conf configuration file using thebpsetconfig command to set these parameters to different values. In Windows,you can add the parameters using the bpsetconfig command in the registry.
About robust logging functionality after upgradeAfter an upgrade to NetBackup 7.7 or later, Enable Robust Logging is enabled.This is true even if the setting had been disabled before the upgrade.
After an upgrade to NetBackup 7.7 or later, the MAX_LOGFILE_SIZE is set to a newdefault.
The following points concern various upgrade scenarios to NetBackup 7.7 or laterwith respect to MAX_LOGFILE_SIZE:
■ If robust logging was enabled before the upgrade:
■ The old unified logging default value for MaxLogFileSizeKB was 51200 KB.After the upgrade, the legacy logging default for MAX_LOGFILE_SIZE is 50MB.
■ The old unified logging default value for NumberOfLogFiles was 3. After theupgrade, the legacy logging value for MAX_NUM_LOGFILES is 3.
■ If robust logging was disabled before the upgrade:
272Configuring Host PropertiesConfiguration options for NetBackup servers

After the upgrade, robust logging is enabled with the following configurationsettings:
■
MAX_LOGFILE_SIZE = 50 MB
MAX_NUM_LOGFILES = INFINITE
ALLOW_MEDIA_OVERWRITE option for NetBackup serversThis option overrides the NetBackup overwrite protection for various media formatson removable media.
Table 3-64 ALLOW_MEDIA_OVERWRITE information
DescriptionUsage
On NetBackup master servers.Where to use
Use the nbgetconfig and the nbsetconfig commands to view, add, or changethe option.
For information about these commands, see the NetBackup Commands ReferenceGuide.
Use the following format:
ALLOW_MEDIA_OVERWRITE = media_format
This option should appear only once in the configuration file.
How to use
On the master server (and media servers if applicable), add the following entry to permitoverwriting the cpio format:
ALLOW_MEDIA_OVERWRITE = CPIO
Example
NetBackupManagement > Host Properties >ClickMaster Servers orMedia Servers> Double-click on server > Media > Allow media overwrite.
See “Media properties” on page 189.
Equivalent AdministrationConsole property
ALLOW_NON_RESERVED_PORTS option for NetBackup serversand clients
This option is not applicable to NetBackup 7.0.1 or later.
This option specifies that the NetBackup Client daemon (bpcd) can accept remoteconnections from unauthorized ports (port numbers 1024 or greater). If this optionis not present, bpcd requires remote connections to come from privileged ports(port numbers 1024 or smaller). This option is useful when NetBackup clients andservers are on opposite sides of a firewall.
273Configuring Host PropertiesConfiguration options for NetBackup servers

Table 3-65 ALLOW_NON_RESERVED_PORTS information
DescriptionUsage
On NetBackup master servers or clients.Where to use
Use the nbgetconfig and the nbsetconfig commands to view, add, or changethe option.
For information about these commands, see the NetBackup Commands ReferenceGuide.
Use the following format:
ALLOW_NON_RESERVED_PORTS = YES | NO
This option should appear only once in the configuration file.
How to use
NetBackupManagement > Host Properties >ClickMaster Servers,Media Servers,Clients > Double-click on server > Universal Settings > Accept Connections onNon-reserved Ports.
See “Universal Settings properties” on page 258.
Equivalent AdministrationConsole property
AUTHENTICATION_DOMAIN option for NetBackup servers andclients
This option defines a set of NetBackup product authentication principles.
Table 3-66 AUTHENTICATION_DOMAIN information
DescriptionUsage
A master server, media server, or client that uses NetBackup product authenticationand authorization must have at least one AUTHENTICATION_DOMAIN entry listed forthis option. More than one domain can be specified.
If a media server or client does not define an authentication domain, it uses theauthentication domains of its master server.
Where to use
274Configuring Host PropertiesConfiguration options for NetBackup servers

Table 3-66 AUTHENTICATION_DOMAIN information (continued)
DescriptionUsage
Use the nbgetconfig and the nbsetconfig commands to view, add, or changethe option.
For information about these commands, see the NetBackup Commands ReferenceGuide.
Use the following format:
AUTHENTICATION_DOMAIN = domain "comment"mechanism broker [port]
This option may appear more than once in the configuration file.
The following variables are defined:
■ domain is an Internet domain name or a Windows domain name.■ "comment" is a quoted comment that describes the authentication domain.■ mechanism is the authentication mechanism.
The keywords for various mechanisms are as follows:■ NIS: Network Information Service version 1■ NIS+: Network Information Service version 2■ PASSWD: Local UNIX password file on the specified broker■ VXPD: The NetBackup product authentication and authorization private database■ WINDOWS: Windows Active Directory or primary domain controller
■ broker is the host name or IP address of the authentication broker.■ port is the port number of the authentication broker. The default is the standard port
number for authentication brokers.
How to use
275Configuring Host PropertiesConfiguration options for NetBackup servers

Table 3-66 AUTHENTICATION_DOMAIN information (continued)
DescriptionUsage
AUTHENTICATION_DOMAIN = mycompany.com "Typical UNIX logins"NIS broker1.mycompany.comAUTHENTICATION_DOMAIN = OurEnterprise "Typical Windows logins"WINDOWS broker2.mycompany.com 5544AUTHENTICATION_DOMAIN = mycompany.com "VxSS-Only Identities"VXPD broker1.mycompany.comAUTHENTICATION_DOMAIN = broker3.mycompany.com "LocalUNIX Logins on host broker3" PASSWD broker3.mycompany.com
In this example:
■ mycompany.com is the Internet domain name and OurEnterprise is the Windowsdomain name.
■ The broker on host name broker1 handles both NIS and private authenticationfor NetBackup product authentication.
■ The broker on host name broker2 handles Windows authentication for NetBackupproduct authentication.
■ broker2 uses the non-standard port number 5544.■ The broker on host name broker3 uses its local /etc/passwd file for NetBackup
product authentication.
Example
NetBackupManagement > Host Properties >ClickMaster Servers,Media Servers,Clients > Double-click on server > Access Control > Authentication Domain.
See “Authentication Domain tab of the Access Control properties” on page 76.
Equivalent AdministrationConsole property
AUTHORIZATION_SERVICE option for NetBackup serversThis option defines the NetBackup Product Authorization Service that the localNetBackup server uses.
Table 3-67 AUTHORIZATION_SERVICE information
DescriptionUsage
A master server that uses NetBackup product authorization must define an authorizationservice. If a media server does not define an authorization service, it uses theauthorization service of the master server.
Where to use
276Configuring Host PropertiesConfiguration options for NetBackup servers

Table 3-67 AUTHORIZATION_SERVICE information (continued)
DescriptionUsage
Use the nbgetconfig and the nbsetconfig commands to view, add, or changethe option.
For information about these commands, see the NetBackup Commands ReferenceGuide.
Use the following format:
AUTHORIZATION_SERVICE = host [ port ]
The following variables are defined:
■ host is the host name or IP address of the authorization service.■ port is the port number of the authorization service. The default is the standard port
number for the authorization service.
This option should appear only once in the configuration file.
How to use
NetBackupManagement > Host Properties >ClickMaster Servers orMedia Servers> Double-click on server > Access Control > Authorization Service.
See “Authorization Service tab of the Access Control properties” on page 78.
Equivalent AdministrationConsole property
AUTO_ADD_ALL_ALIASES_FOR_CLIENT option for NetBackupservers
This option allows client aliases to be automatically added to the NetBackupdatabase when bpdbm detects a new client in a backup policy.
Table 3-68 AUTO_ADD_ALL_ALIASES_FOR_CLIENT information
DescriptionUsage
On NetBackup master servers.Where to use
277Configuring Host PropertiesConfiguration options for NetBackup servers

Table 3-68 AUTO_ADD_ALL_ALIASES_FOR_CLIENT information(continued)
DescriptionUsage
By default, AUTO_ADD_ALL_ALIASES_FOR_CLIENT is not present in the configurationfile. When AUTO_ADD_ALL_ALIASES_FOR_CLIENT is not present, the option isenabled. That is, bpdbm is allowed to add client aliases automatically.
Use the nbgetconfig and the nbsetconfig commands to view, add, or changethe option.
For information about these commands, see the NetBackup Commands ReferenceGuide.
Use the following format:
AUTO_ADD_ALL_ALIASES_FOR_CLIENT = YES | NO
This entry should appear only once in the configuration file.
How to use
The following entry prohibits bpdbm from adding a client alias automatically:
AUTO_ADD_ALL_ALIASES_FOR_CLIENT = NO
Example
No equivalent exists in the NetBackup Administration Console host properties.Equivalent AdministrationConsole property
BPBRM_VERBOSE option for NetBackup serversThe BPBRM_VERBOSE option is used for debugging purposes. It controls the amountof information that NetBackup includes in the bpbrm debug log.
Table 3-69 BPBRM_VERBOSE information
DescriptionUsage
On NetBackup master servers.Where to use
278Configuring Host PropertiesConfiguration options for NetBackup servers

Table 3-69 BPBRM_VERBOSE information (continued)
DescriptionUsage
The default is that BPBRM_VERBOSE is the same value as the VERBOSE option (Globallogging level). The BPBRM_VERBOSE option overrides the VERBOSE option in theconfiguration file.
Use the nbgetconfig and the nbsetconfig commands to view, add, or changethe option.
For information about these commands, see the NetBackup Commands ReferenceGuide.
Use the following format:
BPBRM_VERBOSE = -1 | 0 | 1 | 2 | 3 | 4 | 5
This entry should appear only once in the configuration file.
How to use
■ To use the same value as the VERBOSE option, enter:BPBRM_VERBOSE = 0
This option is the same as setting the BPBRM logging level in the Logging hostproperties to Same as Global.
■ To log the minimum amount of information, enter:BPBRM_VERBOSE = -1
This option is the same as setting the BPBRM logging level to 0 in the Logginghost properties.
■ To log additional information, enter a value of 1 through 5:BPBRM_VERBOSE = 1
This option is the same as setting the BPBRM logging level to 1 in the Logginghost properties.
■ To log the maximum amount of information, enter:BPBRM_VERBOSE = 5
This option is the same as setting the BPBRM logging level to 5 in the Logginghost properties.
Example
NetBackup Management > Host Properties > Master Servers > Double-click onserver > Logging > BPBRM logging level.
See the NetBackup Logging Reference Guide for more information about the debuglog.
See “Logging properties” on page 170.
Equivalent AdministrationConsole property
BPCD_WHITELIST_PATH option for NetBackup servers and clientsNetBackup will deny access to a file that is specified for NetBackup operations ifthe path is a non-default path. For example, a path that is specified for progress
279Configuring Host PropertiesConfiguration options for NetBackup servers

log or rename files. You must use the BPCD_WHITELIST_PATH option to allow accessto non-default custom paths.
Table 3-70 BPCD_WHITELIST_PATH information
DescriptionUsage
On NetBackup servers or clients.Where to use
Use the nbgetconfig and the nbsetconfig commands to view, add, or changethe option.
For information about these commands, see the NetBackup Commands ReferenceGuide.
Use the following format:
BPCD_WHITELIST_PATH = Absolute pathname to the directory
How to use
The following are the example entries on a NetBackup server or client:
BPCD_WHITELIST_PATH = directory1
BPCD_WHITELIST_PATH = directory2
Create a separate entry for each directory.
Example
No equivalent exists in the NetBackup Administration Console host properties.Equivalent AdministrationConsole property
BPDBJOBS_COLDEFS options for UNIX master serversUse BPDBJOBS_COLDEFS entries to customize the output of the bpdbjobs process.Add a BPDBJOBS_COLDEFS option for every column you want to include in the output.
Add BPDBJOBS_COLDEFS entries to the bp.conf file to customize the output of thebpdbjobs process.
Table 3-71 BPDBJOBS_COLDEFS information
DescriptionUsage
On a UNIX NetBackup master server.Where to use
280Configuring Host PropertiesConfiguration options for NetBackup servers

Table 3-71 BPDBJOBS_COLDEFS information (continued)
DescriptionUsage
Add BPDBJOBS_COLDEFS to the /usr/openv/netbackup/bp.conf file.
Add an entry for every column to include in the output by using the following format:
BPDBJOBS_COLDEFS = COLDEFS_ENTRY [minimum_size [true |false]]
The following variables are defined:
■ COLDEFS_ENTRY is the name of the column to include in the output.■ minimum_size is the minimum column width. If not specified, the default is a width
of 5.■ true indicates that the column should expand as needed. If not specified, true
is the default.■ false indicates that the column should not expand beyond the minimum_size.
How to use
The order of the entries determines the order in which the column headings appear.
BPDBJOBS_COLDEFS = JOBID 5 trueBPDBJOBS_COLDEFS = TYPE 4 trueBPDBJOBS_COLDEFS = STATE 5 trueBPDBJOBS_COLDEFS = STATUS 6 trueBPDBJOBS_COLDEFS = POLICY 6 trueBPDBJOBS_COLDEFS = SCHEDULE 8 trueBPDBJOBS_COLDEFS = CLIENT 6 trueBPDBJOBS_COLDEFS = DSTMEDIA_SERVER 12 trueBPDBJOBS_COLDEFS = ACTPID 10 true
The appearance of BPDBJOBS_COLDEFS entries in the bp.conf file has the followingramifications:
■ The addition of any BPDBJOBS_COLDEFS option overrides all default columns.■ All users on the local system see only those columns that are specified in the
bp.conf file.
Example
No equivalent exists in the NetBackup Administration Console host properties.Equivalent AdministrationConsole property
Table 3-72 shows possible COLDEFS entries and the column which is created byeach.
281Configuring Host PropertiesConfiguration options for NetBackup servers

Table 3-72 COLDEFS entries
Column NameCOLDEFS entry
Active Elapsed (elapsed active time)ACTIVEELAPSED
Active PID (PID of job)ACTPID
AttemptATTEMPT
Backup TypeBACKUPTYPE
ClientCLIENT
Completion (percent complete)COMPLETION
Compression (yes or no)COMPRESSION
Dedup (shows deduplication rate inbpdbjobs command output)
DEDUPRATIO
Dest Media Svr (writing media server)DSTMEDIA_SERVER
Dest Media ID (writing media ID)DSTMEDIAID
Dest StUnit (writing storage unit)DSTSTORAGE_UNIT
Elapsed (elapsed time)ELAPSED
EndedENDED
Est File (estimated number of files)ESTFILE
Est KB (estimated number of kilobytes)ESTKB
FilesFILES
GroupGROUP
JobIDJOBID
KB Per SecKBPERSEC
KilobytesKILOBYTES
Last Backup (date and time)LASTBACKUP
Main PID (PID that spawns job, if applicable)MAINPID
Media to Eject (number of tapes to eject;Vault only)
NUMTAPESEJECT
282Configuring Host PropertiesConfiguration options for NetBackup servers

Table 3-72 COLDEFS entries (continued)
Column NameCOLDEFS entry
Operation (current operation)OPERATION
OwnerOWNER
PathnamePATHNAME
Parent JobIDPARENTJOBID
PolicyPOLICY
Policy TypePOLICYTYPE
PriorityPRIORITY
Profile (Vault only)PROFILE
Retention (retention period)RETENTION
ResumableRESUMABLE
Robot (Vault only)ROBOT
Request PID (PID requesting job, ifapplicable)
RQSTPID
ScheduleSCHEDULE
Schedule TypeSCHEDULETYPE
Session ID (Vault only)SESSIONID
Src Media SvrSRCMEDIA_SERVER
Src Media IDSRCMEDIAID
Src StUnitSRCSTORAGE_UNIT
StartedSTARTED
StateSTATE
StatusSTATUS
Stream NumberSTREAMNUMBER
SuspendableSUSPENDABLE
Type (job type)TYPE
283Configuring Host PropertiesConfiguration options for NetBackup servers

Table 3-72 COLDEFS entries (continued)
Column NameCOLDEFS entry
Vault (Vault only)VAULT
BPDBM_VERBOSE option for NetBackup serversThe BPDBM_VERBOSE option is used for debugging purposes. It controls the amountof information NetBackup includes in the bpdbm debug log.
Table 3-73 BPDBM_VERBOSE information
DescriptionUsage
On NetBackup master servers.Where to use
The default is that BPDBM_VERBOSE is the same value as the VERBOSE option (Globallogging level). The BPDBM_VERBOSE option overrides the VERBOSE option in theconfiguration file.
Use the nbgetconfig and the nbsetconfig commands to view, add, or changethe option.
For information about these commands, see the NetBackup Commands ReferenceGuide.
Use the following format:
BPDBM_VERBOSE = -1 | 0 | 1 | 2 | 3 | 4 | 5
This entry should appear only once in the configuration file.
How to use
284Configuring Host PropertiesConfiguration options for NetBackup servers

Table 3-73 BPDBM_VERBOSE information (continued)
DescriptionUsage
■ To use the same value as the VERBOSE option for, enter:BPDBM_VERBOSE = 0
This option is the same as setting the BPDBM logging level to Same as Globalin the Logging host properties.
■ To log the minimum amount of information, enter:BPDBM_VERBOSE = -1
This option is the same as setting the BPDBM logging level to 0 in the Logginghost properties.
■ To log additional information, enter a value of 1 through 5:BPDBM_VERBOSE = 1
This option is the same as setting the BPDBM logging level to 1 in the Logginghost properties.
■ To log the maximum amount of information, enter:BPDBM_VERBOSE = 5
This option is the same as setting the BPDBM logging level to 5 in the Logginghost properties.
The following examples show two entries which enable logging, while they minimizethe growth rate of the bpdbm debug file:
VERBOSE = 5
BPDBM_VERBOSE = -1
Example
NetBackup Management > Host Properties > Master Servers > Double-click onserver > Logging > Global logging level > BPDBM logging level.
See the NetBackup Logging Reference Guide for more information about logging.
See “Logging properties” on page 170.
Equivalent AdministrationConsole property
BPRD_VERBOSE option for NetBackup serversUsed for debugging purposes, the BPRD_VERBOSE option controls the amount ofinformation that NetBackup includes in the bprd debug logs.
Table 3-74 BPRD_VERBOSE information
DescriptionUsage
On NetBackup master servers.Where to use
285Configuring Host PropertiesConfiguration options for NetBackup servers

Table 3-74 BPRD_VERBOSE information (continued)
DescriptionUsage
The default is that the value is the same as the VERBOSE option (Global logging level).The BPRD_VERBOSE option overrides the VERBOSE option in the configuration file.
Use the nbgetconfig and the nbsetconfig commands to view, add, or changethe option.
For information about these commands, see the NetBackup Commands ReferenceGuide.
Use the following format:
BPRD_VERBOSE = -1 | 0 | 1 | 2 | 3 | 4 | 5
This entry should appear only once in the configuration file.
How to use
■ To use the same value as the VERBOSE option, enter:BPRD_VERBOSE = 0
This option is the same as setting the BPRD logging level in the Logging hostproperties to Same as Global.
■ To log the minimum amount of information, enter:BPRD_VERBOSE = -1
This option is the same as setting the BPRD logging level to 0 in the Logginghost properties.
■ To log additional information, enter a value of 1 through 5:BPRD_VERBOSE = 1
This option is the same as setting the BPRD logging level to 1 in the Logginghost properties.
■ To log the maximum amount of information, enter:BPRD_VERBOSE = 5
This option is the same as setting the BPRD logging level to 5 in the Logginghost properties.
Example
NetBackup Management > Host Properties > Master Servers > Double-click onserver > Logging > BPRD logging level.
See the NetBackup Logging Reference Guide for more information about the debuglog.
See “Logging properties” on page 170.
Equivalent AdministrationConsole property
BPTM_VERBOSE option for NetBackup serversThe BPTM_VERBOSE option is used for debugging purposes. It controls the amountof information that NetBackup includes in the bptm debug logs.
286Configuring Host PropertiesConfiguration options for NetBackup servers

Table 3-75 BPTM_VERBOSE information
DescriptionUsage
On NetBackup master servers.Where to use
The default is that BPTM_VERBOSE is the same value as the VERBOSE option (Globallogging level). The BPTM_VERBOSE option overrides the VERBOSE option in theconfiguration file.
Use the nbgetconfig and the nbsetconfig commands to view, add, or changethe option.
For information about these commands, see the NetBackup Commands ReferenceGuide.
Use the following format:
BPTM_VERBOSE = -1 | 0 | 1 | 2 | 3 | 4 | 5
This entry should appear only once in the configuration file.
How to use
■ To use the same value as the VERBOSE option, enter:BPTM_VERBOSE = 0
This option is the same as setting the BPTM logging level in the Logging hostproperties to Same as Global.
■ To log the minimum amount of information, enter:BPTM_VERBOSE = -1
This option is the same as setting the BPTM logging level to 0 in the Logginghost properties.
■ To log additional information, enter a value of 1 through 5:BPTM_VERBOSE = 1
This option is the same as setting the BPTM logging level to 1 in the Logginghost properties.
■ To log the maximum amount of information, enter:BPTM_VERBOSE = 5
This option is the same as setting the BPTM logging level to 5 in the Logginghost properties.
Example
NetBackup Management > Host Properties > Master Servers > Double-click onserver > Logging > BPTM logging level.
See the NetBackup Logging Reference Guide for more information about the debuglog.
See “Logging properties” on page 170.
Equivalent AdministrationConsole property
287Configuring Host PropertiesConfiguration options for NetBackup servers

BPEND_TIMEOUT option for NetBackup serversThe BPEND_TIMEOUT option specifies the number of seconds to wait for thebpend_notify script on a client to complete.
Table 3-76 BPEND_TIMEOUT information
DescriptionUsage
On NetBackup master servers.Where to use
Use the nbgetconfig and the nbsetconfig commands to view, add, or changethe option.
For information about these commands, see the NetBackup Commands ReferenceGuide.
Use the following format:
BPEND_TIMEOUT = seconds
The default timeout is 300 seconds (five minutes).
Note: If this option is changed, verify that the CLIENT_READ_TIMEOUT option is setto the same value or higher.
This entry should appear only once in the configuration file.
How to use
NetBackup Management > Host Properties > Master Servers > Double-click onserver > Timeouts > Backup end notify timeout.
See “Timeouts properties” on page 256.
Equivalent AdministrationConsole property
BPSTART_TIMEOUT option for NetBackup serversThe BPSTART_TIMEOUT option specifies the number of seconds to wait for thebpstart_notify script on a client to complete.
Table 3-77 BPSTART_TIMEOUT information
DescriptionUsage
On NetBackup master servers.Where to use
288Configuring Host PropertiesConfiguration options for NetBackup servers

Table 3-77 BPSTART_TIMEOUT information (continued)
DescriptionUsage
Use the nbgetconfig and the nbsetconfig commands to view, add, or changethe option.
For information about these commands, see the NetBackup Commands ReferenceGuide.
Use the following format:
BPSTART_TIMEOUT = seconds
The default timeout is 300 seconds (five minutes).
Note: If using the bpstart_notify script: The Client read timeout(CLIENT_READ_TIMEOUT option) must be equal to or greater than the Backup startnotify timeout (BPSTART_TIMEOUT option). If the Client read timeout is less thanthe Backup start notify timeout, the job can timeout while the bpstart_notifyscript is running.
This option should appear only once in the configuration file.
How to use
NetBackup Management > Host Properties > Master Servers > Double-click onserver > Timeouts > Backup start notify timeout.
See “Timeouts properties” on page 256.
Equivalent AdministrationConsole property
CHECK_RESTORE_CLIENT option for NetBackup serversThe CHECK_RESTORE_CLIENT option specifies that the client to be restored to ischecked before the restore starts. An unresponsive client can slow restores forother clients that have data on the same tapes.
Table 3-78 CHECK_RESTORE_CLIENT information
DescriptionUsage
On NetBackup master servers.Where to use
Use the nbgetconfig and the nbsetconfig commands to view, add, or changethe option.
For information about these commands, see the NetBackup Commands ReferenceGuide.
This option should appear only once in the configuration file.
How to use
No equivalent exists in the NetBackup Administration Console host properties.Equivalent AdministrationConsole property
289Configuring Host PropertiesConfiguration options for NetBackup servers
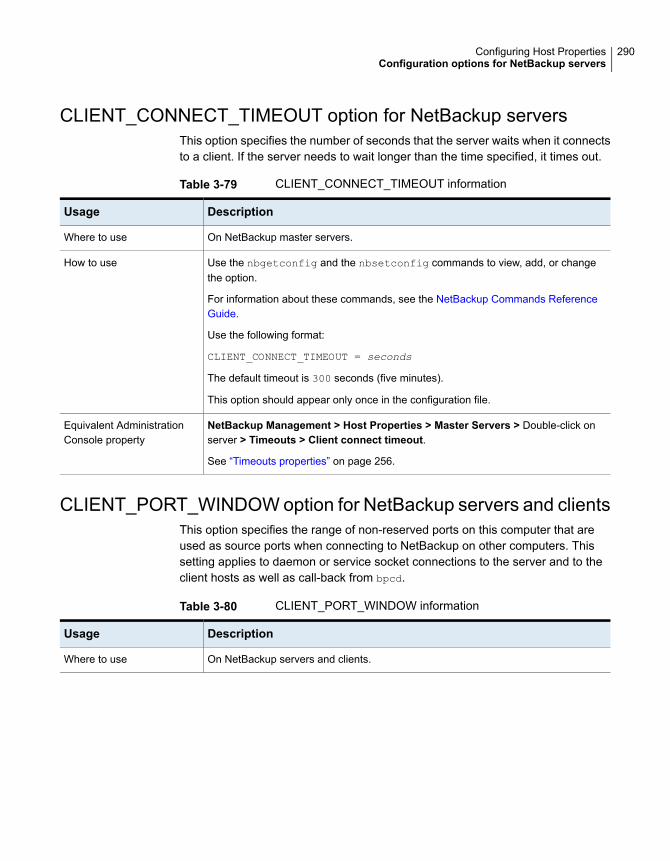
CLIENT_CONNECT_TIMEOUT option for NetBackup serversThis option specifies the number of seconds that the server waits when it connectsto a client. If the server needs to wait longer than the time specified, it times out.
Table 3-79 CLIENT_CONNECT_TIMEOUT information
DescriptionUsage
On NetBackup master servers.Where to use
Use the nbgetconfig and the nbsetconfig commands to view, add, or changethe option.
For information about these commands, see the NetBackup Commands ReferenceGuide.
Use the following format:
CLIENT_CONNECT_TIMEOUT = seconds
The default timeout is 300 seconds (five minutes).
This option should appear only once in the configuration file.
How to use
NetBackup Management > Host Properties > Master Servers > Double-click onserver > Timeouts > Client connect timeout.
See “Timeouts properties” on page 256.
Equivalent AdministrationConsole property
CLIENT_PORT_WINDOW option for NetBackup servers and clientsThis option specifies the range of non-reserved ports on this computer that areused as source ports when connecting to NetBackup on other computers. Thissetting applies to daemon or service socket connections to the server and to theclient hosts as well as call-back from bpcd.
Table 3-80 CLIENT_PORT_WINDOW information
DescriptionUsage
On NetBackup servers and clients.Where to use
290Configuring Host PropertiesConfiguration options for NetBackup servers

Table 3-80 CLIENT_PORT_WINDOW information (continued)
DescriptionUsage
Use the nbgetconfig and the nbsetconfig commands to view, add, or changethe option.
For information about these commands, see the NetBackup Commands ReferenceGuide.
Use the following format:
CLIENT_PORT_WINDOW = start_port_range end_port_range
If 0 is specified for the first number (default), the operating system determines thenon-reserved port to use.
This option should appear only once in the configuration file.
How to use
The following example permits ports from 4800 through 5000:
CLIENT_PORT_WINDOW = 4800 5000
Example
NetBackup Management > Host Properties > Master Servers > Double-click onserver > Port Ranges > Client port window.
See “Port Ranges properties” on page 201.
Equivalent AdministrationConsole property
CLIENT_READ_TIMEOUT option for NetBackup serversThe CLIENT_READ_TIMEOUT option specifies the number of seconds to use for theclient-read timeout.
If the master server does not get a response from a client within theCLIENT_READ_TIMEOUT period, the backup or restore operation, for example, fails.
Table 3-81 CLIENT_READ_TIMEOUT information
DescriptionUsage
On NetBackup master servers.Where to use
291Configuring Host PropertiesConfiguration options for NetBackup servers

Table 3-81 CLIENT_READ_TIMEOUT information (continued)
DescriptionUsage
Use the nbgetconfig and the nbsetconfig commands to view, add, or changethe option.
For information about these commands, see the NetBackup Commands ReferenceGuide.
Use the following format:
CLIENT_READ_TIMEOUT = seconds
By default, CLIENT_READ_TIMEOUT is not present on the server or the databaseagent and the client-read timeout is 300 seconds (five minutes). This time is areasonable default. Change only in the event of problems.
CLIENT_READ_TIMEOUT on a database agent is a special case because these typesof clients can initially require more time to get ready than other clients. Database backuputilities frequently start several backup jobs at the same time, which can slow the CPU.
The sequence on a database agent is as follows:
■ NetBackup on the database agent reads the client’s CLIENT_READ_TIMEOUT tofind the value to use initially. If the option is not set, the standard default of fiveminutes is used.
■ When the database agent API receives the server’s value, it uses it as theCLIENT_READ_TIMEOUT.
Note: Veritas suggests setting CLIENT_READ_TIMEOUT on the database agent to avalue greater than 5 minutes. A setting of 15 minutes is adequate for many installations.
Note: If using the bpstart_notify script: The Client read timeout(CLIENT_READ_TIMEOUT option) must be equal to or greater than the Backup startnotify timeout (BPSTART_TIMEOUT option). If the Client read timeout is less thanthe Backup start notify timeout, the job can timeout while the bpstart_notifyscript is running.
How to use
The following example configures a client read timeout of 15 minutes.
CLIENT_READ_TIMEOUT = 900
Example
NetBackup Management > Host Properties > Master Servers > Double-click onserver > Timeouts > Client read timeout.
See “Timeouts properties” on page 256.
Equivalent AdministrationConsole property
292Configuring Host PropertiesConfiguration options for NetBackup servers

CLIENT_RESERVED_PORT_WINDOW option for NetBackup serversand clients
The CLIENT_RESERVED_PORT_WINDOW option specifies the range of reserved portson this computer that are used for connecting to NetBackup on other computers.This setting applies when the computer connects to a client (bpcd) configured toaccept only reserved ports.
Beginning with NetBackup 7.0.1, connections to other daemon ports use only theCLIENT_PORT_WINDOW, not the CLIENT_RESERVED_PORT_WINDOW.
Table 3-82 CLIENT_RESERVED_PORT_WINDOW information
DescriptionUsage
On NetBackup master servers or clients.Where to use
Use the nbgetconfig and the nbsetconfig commands to view, add, or changethe option.
For information about these commands, see the NetBackup Commands ReferenceGuide.
Use the following format:
CLIENT_RESERVED_PORT_WINDOW = start_port_range end_port_range
The default is from 512 through 1023. Note that if 0 is specified for the first number, anon-reserved port is used instead. The operating system chooses the nonreservedport.
This option should appear only once in the configuration file.
How to use
The following example permits ports from 900 through 1023:
CLIENT_RESERVED_PORT_WINDOW = 900 1023
Example
NetBackup Management > Host Properties > Master Servers > Double-click onserver > Port Ranges > Client reserved port window.
See “Port Ranges properties” on page 201.
Equivalent AdministrationConsole property
CLIENTDB_RESYNC_INTERVAL option for NetBackup servers andclients
The CLIENTDB_RESYNC_INTERVAL option specifies the time interval to synchronizedata entry changes to the NetBackup client database.
293Configuring Host PropertiesConfiguration options for NetBackup servers

Table 3-83 CLIENTDB_RESYNC_INTERVAL information
DescriptionUsage
On NetBackup clients.Where to use
Use the nbgetconfig and the nbsetconfig commands to view, add, or changethe option.
For information about these commands, see the NetBackup Commands ReferenceGuide.
Use the following format:
CLIENTDB_RESYNC_INTERVAL = days
The default value is 1 day.
The maximum value for this option is 7 days. The minimum value for this option is zero,which implies that the option is turned off and that no data synchronization happens.
This option should appear only once in the configuration file.
How to use
The following example sets the time interval of 3 days to allow data synchronizationto the client database:
CLIENTDB_RESYNC_INTERVAL = 3
Example
No equivalent exists in the NetBackup Administration Console host properties.Equivalent AdministrationConsole property
CONNECT_OPTIONS option for NetBackup servers and clientsThe CONNECT_OPTIONS option specifies the following options that are designed toenhance firewall efficiency with NetBackup:
■ Whether processes on host are reached:
■ By using the Veritas Network daemon (vnetd) port only.
■ By using the daemon ports only.
■ By first using the vnetd port and then the daemon ports if needed.
■ Whether subsequent call-back connections with host use the traditional call-backmethod or use vnetd.
■ Whether connections to host use reserved or a non-reserved port number.
294Configuring Host PropertiesConfiguration options for NetBackup servers

Table 3-84 CONNECT_OPTIONS information
DescriptionUsage
On NetBackup master servers, media servers, or clients.Where to use
Use the nbgetconfig and the nbsetconfig commands to view, add, or changethe option.
For information about these commands, see the NetBackup Commands ReferenceGuide.
Use the following format:
CONNECT_OPTIONS = host [ 0 | 1 | 2 ][ 0 | 1 | 2 ][ 0 | 1 | 2 | 3]
The following variables are defined:
Host is a NetBackup system to which this computer connects. You may have multipleCONNECT_OPTIONS entries in the configuration. If a host is not specified in anyCONNECT_OPTIONS entries, the values from the DEFAULT_CONNECT_OPTIONS optionare used.
See “DEFAULT_CONNECT_OPTIONS option for NetBackup servers and clients”on page 298.
How to use
The first setting indicates the type of port to use as the source port for connections toservice daemons on host:
0 = Connections from this computer should be from a reserved source port number.It is selected from the CLIENT_RESERVED_PORT_WINDOW range.
1 = Connections from this computer should be from a non-reserved source port numberthat is selected from the CLIENT_PORT_WINDOW range. (The default is 1.) If this optionis selected for use with the daemon port and host is running a version of NetBackupolder than 7.1, enable Allow non reserved ports for the selected host.
In the NetBackup Administration Console, see the Universal Settings dialog boxunder Host Properties > Media Servers.
2 = Use the method that the DEFAULT_CONNECT_OPTIONS configuration optiondefines.
See “Universal Settings properties” on page 258.
295Configuring Host PropertiesConfiguration options for NetBackup servers

Table 3-84 CONNECT_OPTIONS information (continued)
DescriptionUsage
The second setting indicates the call-back method to use with host. (This applies ifconfigured to use the daemon port or if bpcd cannot be reached using ports 1556 or13724.)
0 = Use the traditional call-back method. Host connects back to a random port numberthat this computer has selected from the SERVER_RESERVED_PORT_WINDOW range,or SERVER_PORT_WINDOW range as determined by the first setting.
1 = Use the vnetd no call-back method. Connect to vnetd instead of a random port.If this computer is NetBackup 7.0.1 or later, attempt to connect to port 1556 beforeattempting to connect to vnetd. The connection is outbound to host if the third settingis 0 or 1. The connection is inbound from host if the third setting is 2.
2 = Use the method that the DEFAULT_CONNECT_OPTIONS configuration option defines(default).
The third setting affects which destination port number to use for connections to daemonservices on host.
0 = Use vnetd if possible, to connect to a daemon on this computer. If it is not possible,connect by using the traditional port number of the daemon. If this host is NetBackup7.0.1 or later, attempt to connect to port 1556 before attempting to connect to vnetd.If bpcd is reachable through port 1556 or vnetd, then the first two settings are ignoredand all connections to host are outbound and use non-reserved ports.
1 = Use vnetd to connect to a daemon on host. If this computer is NetBackup 7.0.1or later, attempt to connect to port 1556 before attempting to connect to vnetd. Thetraditional port number of the daemon is not used if the connection cannot be establishedusing port 1556 or vnetd. If bpcd is reachable through port 1556 or vnetd, then thefirst two settings are ignored and all connections to host are outbound and usenon-reserved ports.
2 = Use only the traditional port number of the daemon to connect to a daemon onhost. If the daemon is bpcd, the second setting is then used to determine the call-backmethod.
3 = Use the method that the DEFAULT_CONNECT_OPTIONS configuration option defines(default).
296Configuring Host PropertiesConfiguration options for NetBackup servers

Table 3-84 CONNECT_OPTIONS information (continued)
DescriptionUsage
The configuration file can contain CONNECT_OPTIONS settings for multiple hosts.
CONNECT_OPTIONS = shark 0 0 0
In this example, connections to daemons on shark attempt to use port 1556 if thiscomputer is running NetBackup 7.0.1 or later. If this computer is running a version ofNetBackup that is earlier than 7.0.1, or if the previous attempt was unsuccessful, thenthe connections try vnetd. If that attempt is unsuccessful, the daemon port is used. Ifthe connections are successful using 1556 or vnetd, then the first two settings areignored.
$ bptestbpcd -host shark0 0 110.82.105.11:40402 -> 10.82.104.249:155610.82.105.11:40404 -> 10.82.104.249:1556
Example 1
CONNECT_OPTIONS = dolphin 1 0 1
In this example, connections to daemons on dolphin attempt to use port 1556 if thiscomputer is running NetBackup 7.0.1 or later. If this computer is running a version ofNetBackup that is earlier than 7.0.1, of if the previous attempt was unsuccessful, thenthe connections try vnetd. The first two settings are ignored.
$ bptestbpcd -host dolphin1 0 110.82.105.11:40414 -> 10.82.104.249:1372410.82.105.11:40416 -> 10.82.104.249:13724
Example 2
CONNECT_OPTIONS = perch 0 1 2
In this example:
■ Connections to daemons on perch must use the daemon port numbers.■ Call-back connections are inbound to vnetd on this computer.■ The source ports for all connections are bound from the reserved port number
range.
Example 3
297Configuring Host PropertiesConfiguration options for NetBackup servers

Table 3-84 CONNECT_OPTIONS information (continued)
DescriptionUsage
CONNECT_OPTIONS = trout 1 1 2
In this example:
■ Connections to daemons on trout must use the daemon port numbers.■ Call-back connections are inbound to vnetd on this computer.■ The source ports for all connections are bound from the non-reserved port number
range.
Example 4
NetBackup Management > Host Properties > Master Servers > Click MasterServers, Media Servers, Clients > Double-click on server > Firewall.
See “Firewall properties” on page 151.
Equivalent AdministrationConsole property
DEFAULT_CONNECT_OPTIONS option for NetBackup servers andclients
The DEFAULT_CONNECT_OPTIONS option specifies the default values for theCONNECT_OPTIONS configuration option. If a host name is not specified in anyCONNECT_OPTIONS option, the value from the DEFAULT_CONNECT_OPTIONS option isused.
See “CONNECT_OPTIONS option for NetBackup servers and clients” on page 294.
Table 3-85 DEFAULT_CONNECT_OPTIONS information
DescriptionUsage
On NetBackup master servers, media servers, or clients.Where to use
Use the nbgetconfig and the nbsetconfig commands to view, add, or changethe option.
For information about these commands, see the NetBackup Commands ReferenceGuide.
Use the following format:
DEFAULT_CONNECT_OPTIONS = [ 0 | 1 ][ 0 | 1 ][ 0 | 1 | 2 ]
The default value is 0 1 0.
This option should appear only once in the configuration file.
How to use
298Configuring Host PropertiesConfiguration options for NetBackup servers

Table 3-85 DEFAULT_CONNECT_OPTIONS information (continued)
DescriptionUsage
The first setting indicates the type of port to use as the source port when connectingto service daemons on a destination host. It also indicates the type of server port ifusing the traditional call-back method.
0 = Connections on this computer should use a reserved port number. They are selectedfrom the CLIENT_RESERVED_PORT_WINDOW range for source ports and from theSERVER_RESERVED_PORT_WINDOW range if using the traditional call-back method.
1 = Connections on this computer should use a non-reserved port number. Connectionsare selected from the CLIENT_PORT_WINDOW range for source ports and from theSERVER_PORT_WINDOW range if using the traditional call-back method. If this optionis selected and the destination host is earlier than NetBackup 7.1, enable Allow nonreserved ports for the selected host. See the Universal Settings dialog box underHost Properties > Media Servers.
See “Universal Settings properties” on page 258.
The second setting indicates the call-back method to use. (This setting applies ifconfigured to use the daemon port or if bpcd cannot be reached using ports 1556 or13724.)
0 = Use the traditional call-back method. The destination host connects back to arandom port number that this computer has selected from theSERVER_RESERVED_PORT_WINDOW range, or the SERVER_PORT_WINDOW range asdetermined by the first setting.
1 = Use the vnetd no call-back method. Connect to vnetd instead of a random port.If this computer is NetBackup 7.0.1 or later, attempt to connect to port 1556 beforeattempting to connect to vnetd. The connection is outbound to the destination host ifthe third setting is 0 or 1. The connection is inbound if the third setting is 2.
299Configuring Host PropertiesConfiguration options for NetBackup servers

Table 3-85 DEFAULT_CONNECT_OPTIONS information (continued)
DescriptionUsage
The third setting affects which destination port number to use when attemptingconnections to daemon services on the destination host.
0 = Use vnetd to connect to a daemon on the destination host if possible, otherwiseconnect by using the traditional port number of the daemon. If this computer isNetBackup 7.0.1 or later, attempt to connect to port 1556 before attempting to connectto vnetd. If bpcd is reachable through port 1556 or vnetd, then the first two settingsare ignored and all connections are outbound and use non-reserved ports.
1 = Connect to a daemon on the destination host by using vnetd. If this computer isNetBackup 7.0.1 or later, attempt to connect to port 1556 before attempting to connectto vnetd. The traditional port number of the daemon will not be used if the connectioncannot be established using port 1556 or vnetd. If bpcd is reachable through port1556 or vnetd, then the first two settings are ignored and all connections are outboundand use non-reserved ports.
2 = Connect to a daemon on the destination host by using the traditional port numberof the daemon only. The first setting is used to determine the port range and the secondsetting is used to determine the call-back method.
NetBackupManagement > Host Properties >ClickMaster Servers,Media Servers,Clients > Double-click on server > Firewall.
See “Firewall properties” on page 151.
Equivalent AdministrationConsole property
DISABLE_JOB_LOGGING option for NetBackup serversThis option disables the logging of the job information that the NetBackup ActivityMonitor requires.
Table 3-86 DISABLE_JOB_LOGGING information
DescriptionUsage
On NetBackup master servers.Where to use
300Configuring Host PropertiesConfiguration options for NetBackup servers

Table 3-86 DISABLE_JOB_LOGGING information (continued)
DescriptionUsage
Use the nbgetconfig and the nbsetconfig commands to view, add, or changethe option.
For information about these commands, see the NetBackup Commands ReferenceGuide.
Use the following format:
DISABLE_JOB_LOGGING
The default is that this option is not present in the configuration file and that job loggingoccurs.
How to use
NetBackup Management > Host Properties > Master Servers > Double-click onserver > Media > Enable job logging.
See “Media properties” on page 189.
Equivalent AdministrationConsole property
DISABLE_STANDALONE_DRIVE_EXTENSIONS option forNetBackup servers
This option disables the nonrobotic drive operations. During a backup, NetBackupautomatically attempts to use standalone volumes in nonrobotic drives.
Table 3-87 DISABLE_STANDALONE_DRIVE_EXTENSIONS information
DescriptionUsage
On NetBackup master servers.Where to use
Use the nbemmcmd command to change the option. For example:
nbemmcmd -changesetting -DISABLE_STANDALONE_DRIVE_EXTENSIONS no
For information about these commands, see the NetBackup Commands ReferenceGuide.
This option should appear only once in the configuration file.
How to use
The following command enables nonrobotic drive operations.
nbemmcmd -changesetting -DISABLE_STANDALONE_DRIVE_EXTENSIONS no
Example
NetBackup Management > Host Properties > Master Servers > Double-click onserver > Media > Enable standalone drive extension. The default is that this optionis enabled.
See “Media properties” on page 189.
Equivalent AdministrationConsole property
301Configuring Host PropertiesConfiguration options for NetBackup servers
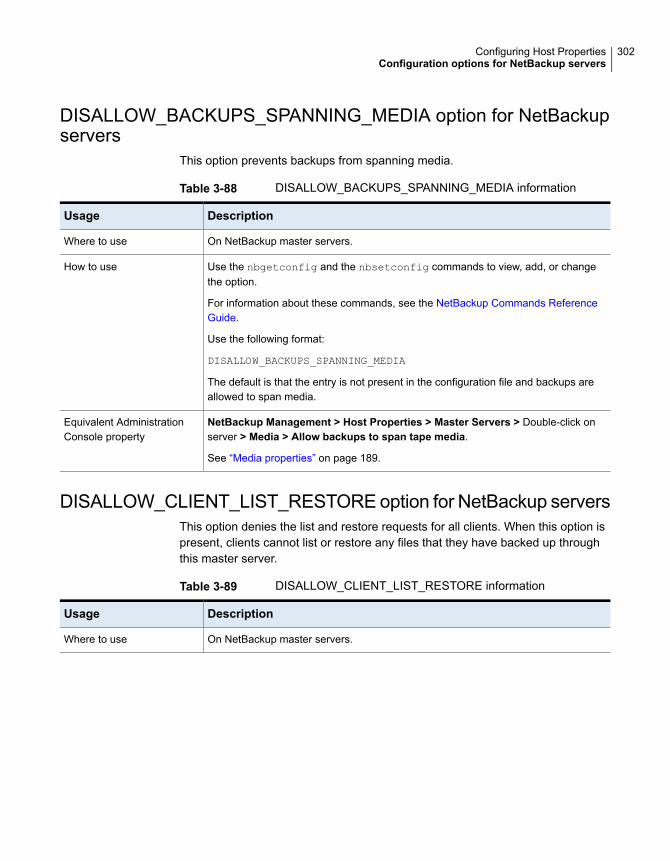
DISALLOW_BACKUPS_SPANNING_MEDIA option for NetBackupservers
This option prevents backups from spanning media.
Table 3-88 DISALLOW_BACKUPS_SPANNING_MEDIA information
DescriptionUsage
On NetBackup master servers.Where to use
Use the nbgetconfig and the nbsetconfig commands to view, add, or changethe option.
For information about these commands, see the NetBackup Commands ReferenceGuide.
Use the following format:
DISALLOW_BACKUPS_SPANNING_MEDIA
The default is that the entry is not present in the configuration file and backups areallowed to span media.
How to use
NetBackup Management > Host Properties > Master Servers > Double-click onserver > Media > Allow backups to span tape media.
See “Media properties” on page 189.
Equivalent AdministrationConsole property
DISALLOW_CLIENT_LIST_RESTORE option for NetBackup serversThis option denies the list and restore requests for all clients. When this option ispresent, clients cannot list or restore any files that they have backed up throughthis master server.
Table 3-89 DISALLOW_CLIENT_LIST_RESTORE information
DescriptionUsage
On NetBackup master servers.Where to use
302Configuring Host PropertiesConfiguration options for NetBackup servers

Table 3-89 DISALLOW_CLIENT_LIST_RESTORE information (continued)
DescriptionUsage
Use the nbgetconfig and the nbsetconfig commands to view, add, or changethe option.
For information about these commands, see the NetBackup Commands ReferenceGuide.
Use the following format:
DISALLOW_CLIENT_LIST_RESTORE
The default is that the entry is not present in the configuration file and clients can listand restore their files.
Note: Override the DISALLOW_CLIENT_LIST_RESTORE option for individual clientsby changing their list_restore setting.
How to use
NetBackup Management > Host Properties > Master Servers > Double-click onserver > Client Attributes > Allow Client Restore.
See “Client Attributes properties” on page 92.
Equivalent AdministrationConsole property
DISALLOW_CLIENT_RESTORE option for NetBackup serversThis option denies the restore requests for all clients. When this option is present,clients cannot restore the files that they have backed up through this master server.
Table 3-90 DISALLOW_CLIENT_RESTORE information
DescriptionUsage
On NetBackup master servers.Where to use
Use the nbgetconfig and the nbsetconfig commands to view, add, or changethe option.
For information about these commands, see the NetBackup Commands ReferenceGuide.
Use the following format:
DISALLOW_CLIENT_RESTORE
The default is that the entry is not present in the configuration file and clients can restoretheir files.
Note: To override the DISALLOW_CLIENT_RESTORE option for individual clients,change their list_restore setting.
How to use
303Configuring Host PropertiesConfiguration options for NetBackup servers

Table 3-90 DISALLOW_CLIENT_RESTORE information (continued)
DescriptionUsage
NetBackup Management > Host Properties > Master Servers > Double-click onserver > Client Attributes > Allow Client Browse.
See “Client Attributes properties” on page 92.
Equivalent AdministrationConsole property
EMMSERVER option for NetBackup serversIn releases before NetBackup 7.6, EMMSERVER indicated the master or the mediaserver that acted as the Enterprise Media Manager server for one or more masterservers.
Support for remote-EMM and shared-EMM server configurations was withdrawn in7.6. In a remote- or shared-EMM server configuration, the NetBackup relationaldatabase (NBDB), the Enterprise Media Manager (EMM), and the Resource Broker(RB) have been moved to a server that is not the master server. Customers whocurrently use this option should contact Veritas Support. Support engages VeritasEngineering to review the options to disengage this configuration.
Table 3-91 EMMSERVER information
DescriptionUsage
On NetBackup master servers.Where to use
Use the nbgetconfig and the nbsetconfig commands to view, add, or changethe option.
For information about these commands, see the NetBackup Commands ReferenceGuide.
Use the following format:
EMMSERVER = server_name
How to use
No equivalent exists in the NetBackup Administration Console host properties.Equivalent AdministrationConsole property
See “Moving the NetBackup database from one host to another” on page 971.
304Configuring Host PropertiesConfiguration options for NetBackup servers

FAILOVER_RESTORE_MEDIA_SERVERS option for NetBackupservers
This option specifies that an automatic failover media server be used if a server istemporarily inaccessible for a restore. This failover does not require administratorintervention.
Table 3-92 FAILOVER_RESTORE_MEDIA_SERVERS information
DescriptionUsage
On NetBackup master servers.Where to use
Use the nbgetconfig and the nbsetconfig commands to view, add, or changethe option.
For information about these commands, see the NetBackup Commands ReferenceGuide.
Use the following format:
FAILOVER_RESTORE_MEDIA_SERVERS = failed_host host1 host2 ...hostN
■ failed_host is the server that is not operational.■ host1 ... hostN are the servers that provide failover capabilities.
The default is that NetBackup does not perform automatic failover.
When automatic failover is necessary for a server, NetBackup searches from left toright through the associated FAILOVER_RESTORE_MEDIA_SERVERS list. It stops whenit finds one that is eligible to perform the restore.
Note: The configuration file can contain multipleFAILOVER_RESTORE_MEDIA_SERVERS entries and each entry can list multiple servers.However, a NetBackup server can be a failed_host in only one option.
After a FAILOVER_RESTORE_MEDIA_SERVERS option is added, stop and restart theNetBackup Request daemon on the master server where you plan to change theconfiguration.
How to use
NetBackup Management > Host Properties > Master Servers > Double-click onserver > Restore Failover.
See “Restore Failover properties” on page 225.
Equivalent AdministrationConsole property
FORCE_RESTORE_MEDIA_SERVER option for NetBackup serversThis option forces the restore to go to a specific server, regardless of where thefiles were backed up.
305Configuring Host PropertiesConfiguration options for NetBackup servers

Table 3-93 FORCE_RESTORE_MEDIA_SERVER information
DescriptionUsage
On NetBackup master servers.Where to use
Use the nbgetconfig and the nbsetconfig commands to view, add, or changethe option.
For information about these commands, see the NetBackup Commands ReferenceGuide.
Use the following format:
FORCE_RESTORE_MEDIA_SERVER = from_host to_host
Where from_host is the server that performed the original backup and to_host is theserver to use for the restore.
Stop and restart the NetBackup Request daemon on the master server after addingthe FORCE_RESTORE_MEDIA_SERVER option. Physically move the media to to_hostbefore attempting a restore. Update the Media Manager volume database to reflectthe move.
This setting applies to all storage units on the original server. Restores for any storageunit on from_host go to to_host. To revert to the original configuration for future restores,delete the option.
How to use
NetBackup Management > Host Properties > Master Servers > Double-click onserver > General Server > Media Host Override.
See “General Server properties” on page 155.
Equivalent AdministrationConsole property
GENERATE_ENGLISH_LOGS option for NetBackup servers andclients
This option enables the generation of an English error log, and English trace logsfor the bparchive, bpbackup, bpduplicate, bpimport, and bprestore commands.This option is useful to support personnel to assist in distributed environmentswhere different locales result in logs that contain various languages.
An English text error log (indicated by the suffix _en) is created in the followingdirectory:
■ On Windows: Install_path\Veritas\NetBackup\db\error
■ On UNIX: /usr/openv/netbackup/db/error
306Configuring Host PropertiesConfiguration options for NetBackup servers

Table 3-94 GENERATE_ENGLISH_LOGS information
DescriptionUsage
On NetBackup master servers or clients.Where to use
Use the nbgetconfig and the nbsetconfig commands to view, add, or changethe option.
For information about these commands, see the NetBackup Commands ReferenceGuide.
Use the following format:
GENERATE_ENGLISH_LOGS
This entry should appear only once in the configuration file.
Setting the GENERATE_ENGLISH_LOGS option also forces the -en argument on theexecution of the following commands when the progress log is specified (-L):bparchive, bpbackup, bpduplicate, bpimport, and bprestore.
The suffix _en indicates the English text progress log.
How to use
No equivalent exists in the NetBackup Administration Console host properties.Equivalent AdministrationConsole property
INCOMPLETE_JOB_CLEAN_INTERVAL option for NetBackupservers and clients
This option indicates the number of days a failed restore job can remain in theincomplete state before it is moved to the done state.
Table 3-95 INCOMPLETE_JOB_CLEAN_INTERVAL information
DescriptionUsage
On NetBackup master servers or clients.Where to use
307Configuring Host PropertiesConfiguration options for NetBackup servers

Table 3-95 INCOMPLETE_JOB_CLEAN_INTERVAL information (continued)
DescriptionUsage
Use the nbgetconfig and the nbsetconfig commands to view, add, or changethe option.
For information about these commands, see the NetBackup Commands ReferenceGuide.
Use the following format:
INCOMPLETE_JOB_CLEAN_INTERVAL = number_of_days
The default is 7 days.
Where x is a value between 0 and 365. A value of 0 indicates that failed, incompletejobs are never automatically moved to the done state.
This entry should appear only once in the configuration file.
How to use
NetBackup Management > Host Properties > Master Servers or Clients >Double-click on server > Clean-up > Move restore job from incomplete state todone state.
See “Clean-up properties” on page 88.
Equivalent AdministrationConsole property
INITIAL_BROWSE_SEARCH_LIMIT option for NetBackup serversand clients
This option specifies the number of days back that NetBackup searches for files torestore.
Table 3-96 INITIAL_BROWSE_SEARCH_LIMIT information
DescriptionUsage
On NetBackup master servers or clients.Where to use
308Configuring Host PropertiesConfiguration options for NetBackup servers

Table 3-96 INITIAL_BROWSE_SEARCH_LIMIT information (continued)
DescriptionUsage
Use the nbgetconfig and the nbsetconfig commands to view, add, or changethe option.
For information about these commands, see the NetBackup Commands ReferenceGuide.
Use the following format:
INITIAL_BROWSE_SEARCH_LIMIT = number_of_days
The default is that NetBackup includes files from the time of the last full backup throughthe latest backup for the client. If the client belongs to more than one policy the browsestarts with the earliest of the set of last full backups.
This entry should appear only once in the configuration file.
When this option is specified on a UNIX client, it applies only to that client. The optioncan reduce the size of the Search window from what is specified on the server (theclient setting cannot make the window larger).
How to use
The following example limits the browse range to the seven days before the currentdate.
INITIAL_BROWSE_SEARCH_LIMIT = 7
Example
NetBackup Management > Host Properties > Master Servers > Double-click onserver > Universal Settings > Browse timeframe for restores.
See “Universal Settings properties” on page 258.
Equivalent AdministrationConsole property
IP_ADDRESS_FAMILY option for NetBackup serversThe IP_ADDRESS_FAMILY option indicates whether NetBackup on this host supportsonly IPv4 or both IPv4 and IPv6.
If any of the SERVER entries do not support IPv4, NetBackup uses the setting thatindicates both IPv4 and IPv6.
Table 3-97 IP_ADDRESS_FAMILY information
DescriptionUsage
On NetBackup servers or clients.Where to use
309Configuring Host PropertiesConfiguration options for NetBackup servers

Table 3-97 IP_ADDRESS_FAMILY information (continued)
DescriptionUsage
On the hosts that use both IPv4 and IPv6, use this option to indicate which addressfamily to use.
Use the nbgetconfig and the nbsetconfig commands to view, add, or changethe option.
For information about these commands, see the NetBackup Commands ReferenceGuide.
Use the following format:
IP_ADDRESS_FAMILY = AF_INET | AF_UNSPEC
AF_INET indicates that the host supports only IPv4.
AF_UNSPEC indicates that the host supports both IPv4 and IPv6.
This entry should appear only once in the configuration file.
How to use
NetBackup Management > Host Properties > Master Servers > Double-click onserver > Network Settings.
See “Network Settings properties” on page 199.
Equivalent AdministrationConsole property
JOB_PRIORITY option for NetBackup servers and clientsUse this option to set the priority for a job type.
Table 3-98 JOB_PRIORITY information
DescriptionUsage
On NetBackup master servers or clients.Where to use
310Configuring Host PropertiesConfiguration options for NetBackup servers

Table 3-98 JOB_PRIORITY information (continued)
DescriptionUsage
Use the nbgetconfig and the nbsetconfig commands to view, add, or changethe option.
For information about these commands, see the NetBackup Commands ReferenceGuide.
Use the following format:
JOB_PRIORITY = P1 P2 P3 P4 P5 P6 P7 P8 P9 P10 P11P12 P13 P14 P15 P16 P17 P18 P19 P20 P21 P22 P23 P24
Variables P1, P2, and so on indicate the priority for each backup type.
Table 3-99 shows the default priority values.
The actual default values for the option appear as follows:
JOB_PRIORITY = 0 0 90000 90000 90000 90000 85000 8500080000 80000 80000 80000 75000 75000 70000 70000 5000050000 0 0 0 0 0 0
This entry should appear only once in the configuration file.
How to use
To give backup jobs a priority of 50000 and duplication jobs a priority of 30000, changethe JOB_PRIORITY entry as follows:
JOB_PRIORITY = 50000 0 90000 90000 90000 90000 85000 8500080000 80000 80000 80000 75000 75000 70000 70000 3000050000 0 0 0 0 0 0
Example
NetBackup Management > Host Properties > Master Servers or Clients >Double-click on server > Default Job Priorities > Job Priority.
See “Default Job Priorities properties” on page 121.
Equivalent AdministrationConsole property
Table 3-99 lists the order of the job types and the various job type defaults.
Table 3-99 Default job type priorities
DefaultRepresents this actionField
0Performing a backupP1
0Performing a database backup (a catalog backup)P2
90000Performing a restoreP3
90000Recovering a catalogP4
311Configuring Host PropertiesConfiguration options for NetBackup servers

Table 3-99 Default job type priorities (continued)
DefaultRepresents this actionField
90000Performing a staging operationP5
90000Performing the duplication jobs that Vault startsP6
85000Cleaning up imagesP7
85000Importing imagesP8
80000Requesting tapesP9
80000Cleaning a tapeP10
80000Tape formattingP11
80000Performing device diagnosticsP12
75000Verifying an imageP13
75000Running a media contents reportP14
70000Labeling tape mediaP15
70000Erasing mediaP16
50000Running a duplication jobP17
50000Performing an inventoryP18
0This field is not currently in useP19
0This field is not currently in useP20
0This field is not currently in useP21
0This field is not currently in useP22
0This field is not currently in useP23
0This field is not currently in useP24
LIMIT_BANDWIDTH option for NetBackup serversThis option specifies a limit for the network bandwidth that NetBackup clients useon a network. The actual limiting occurs on the client side of the backup connection.This option limits only backups. Restores are unaffected. The default is that thebandwidth is not limited.
312Configuring Host PropertiesConfiguration options for NetBackup servers

Note: LIMIT_BANDWIDTH applies only to IPv4 networks. Use theTHROTTLE_BANDWIDTH option to limit IPv6 networks.
See “Throttle Bandwidth properties” on page 254.
MAX_LOGFILE_SIZE option for NetBackup servers and clients forlegacy logging
The MAX_LOGFILE_SIZE option specifies the maximum size that you want to set fora log file. When the log file size in NetBackup matches the MAX_LOGFILE_SIZE
setting, the next logs are stored in a new log file.
See “About robust logging” on page 271.
Table 3-100 MAX_LOGFILE_SIZE information
DescriptionUsage
On NetBackup servers or clients.Where to use
Use the nbgetconfig (or bpgetconfig) and the nbsetconfig (or bpsetconfig)commands to view, add, or change the option.
For information about these commands, see the NetBackup Commands ReferenceGuide.
Initially, the bp.conf file does not contain MAX_LOGFILE_SIZE entry. In this case,the parameter is set to its default value, that is 50 MB.
To set it to a different value, update the bp.conf file using the nbsetconfigcommand.
Use the following format to set MAX_LOGFILE_SIZE to a new value in the bp.conffile:
MAX_LOGFILE_SIZE = X
'X' indicates maximum size of a NetBackup log file in MB.
Note: MAX_LOGFILE_SIZE should be set to an integer number, which should begreater than '0'. If you have set MAX_LOGFILE_SIZE to an invalid value such as 0 or-100, it is automatically set to the default value.
This entry should appear only once in the configuration file.
How to use
No equivalent exists in the NetBackup Administration Console host properties.Equivalent AdministrationConsole property
313Configuring Host PropertiesConfiguration options for NetBackup servers

MAX_NUM_LOGFILES option for NetBackup servers and clients forlegacy logging
The MAX_NUM_LOGFILES option specifies the maximum number of log files that youwant to be retained in a NetBackup log directory. When the number of log files inthe directory matches the MAX_NUM_LOGFILES setting, the oldest log file is deleted.
See “About robust logging” on page 271.
Table 3-101 MAX_NUM_LOGFILES information
DescriptionUsage
On NetBackup servers or clients.Where to use
Use the nbgetconfig (or bpgetconfig) and the nbsetconfig (or bpsetconfig)commands to view, add, or change the option.
For information about these commands, see the NetBackup Commands ReferenceGuide.
Initially, the bp.conf file does not contain MAX_NUM_LOGFILES entry. In this case,the parameter is set to its default value, which is infinite.
To set it to a different value, update the bp.conf file using the nbsetconfigcommand.
Use the following format to set MAX_NUM_LOGFILES to a new value in the bp.conffile:
MAX_NUM_LOGFILES = X
'X' indicates maximum number of NetBackup log files that are created in a log directory.
MAX_NUM_LOGFILES should be set to a number that should be greater than one (1).If you have set MAX_NUM_LOGFILES to an invalid value such as 0 or 1, it is automaticallyset to the default value, which is infinite. However, in the bp.conf file, theMAX_NUM_LOGFILES entry appears as follows:
MAX_NUM_LOGFILES = 0
Zero (0) indicates an infinite value.
This entry should appear only once in the configuration file.
How to use
No equivalent exists in the NetBackup Administration Console host properties.Equivalent AdministrationConsole property
314Configuring Host PropertiesConfiguration options for NetBackup servers

KEEP_LOGS_SIZE_GB for NetBackup servers and clientsThe KEEP_LOGS_SIZE_GB option specifies the size of the NetBackup logs that youwant to retain. When the NetBackup log size grows up to this configuration value,the older logs are deleted.
Table 3-102 KEEP_LOGS_SIZE_GB information
DescriptionUsage
On NetBackup servers or clients.Where to use
Use the nbgetconfig and the nbsetconfig commands to view,add, or change the option.
For information about these commands, see the NetBackupCommands Reference Guide.
Initially, the bp.conf file does not contain KEEP_LOGS_SIZE_GBentry.
Enable the Keep logs up to GB option in the Logging dialog boxon the NetBackup Administration Console to set the log retentionin GB. A corresponding entry is added in the bp.conf file as follows:
KEEP_LOGS_SIZE_GB = 25
If you disable the Keep logs up to GB option, the bp.conf fileshows the corresponding entry as follows:
KEEP_LOGS_SIZE_GB = 0
To set it to a different value, update the bp.conf file using thenbsetconfig command.
Use the following format to set KEEP_LOGS_SIZE_GB to a newvalue in the bp.conf file:
KEEP_LOGS_SIZE_GB = X
'X' indicates the log size in GB.
Note: For NetBackup servers, the recommended value for theKEEP_LOGS_SIZE_GB option is 25 GB or greater.
For NetBackup clients, the recommended value for theKEEP_LOGS_SIZE_GB option is 5 GB or greater.
This entry should appear only once in the bp.conf configurationfile.
How to use
315Configuring Host PropertiesConfiguration options for NetBackup servers

Table 3-102 KEEP_LOGS_SIZE_GB information (continued)
DescriptionUsage
NetBackup Management > Host Properties > Master Servers orClients >Double-click on server > Logging > Keep logs up to GB.
See “Logging properties” on page 170.
EquivalentAdministrationConsole property
ENABLE_CRITICAL_PROCESS_LOGGINGThe ENABLE_CRITICAL_PROCESS_LOGGING option lets you automatically log criticalNetBackup processes. Log directories for the critical processes are created andlogging begins when this option is enabled in the Logging host properties.
Table 3-103 ENABLE_CRITICAL_PROCESS_LOGGING information
DescriptionUsage
On NetBackup servers or clients.Where to use
Use the nbgetconfig and the nbsetconfig commands to viewthe option.
For information about these commands, see the NetBackupCommands Reference Guide.
Initially, the bp.conf file does not containENABLE_CRITICAL_PROCESS_LOGGING entry.
After logging for critical processes is enabled, a correspondingentry is added in the bp.conf file as follows:
ENABLE_CRITICAL_PROCESS_LOGGING = YES
Note: You should not modify theENABLE_CRITICAL_PROCESS_LOGGING parameter. To disablethe logging for critical processes, you need to modify their logginglevels.
See “Disabling the logging of NetBackup processes” on page 180.
How to use
NetBackup Management > Host Properties > Click MasterServers, Media Servers, Clients > Double-click on server >Logging > Logging for critical processes.
See “Logging properties” on page 170.
EquivalentAdministration Consoleproperty
316Configuring Host PropertiesConfiguration options for NetBackup servers

MEDIA_UNMOUNT_DELAY option for NetBackup serversWhen MEDIA_UNMOUNT_DELAY is specified, the media unload is delayed for thespecified number of seconds after the requested operation has completed. (Appliesonly to user operations.)
Table 3-104 MEDIA_UNMOUNT_DELAY information
DescriptionUsage
On NetBackup master servers.Where to use
Use the nbgetconfig and the nbsetconfig commands to view, add, or changethe option.
For information about these commands, see the NetBackup Commands ReferenceGuide.
Use the following format:
MEDIA_UNMOUNT_DELAY = seconds
The default is a media mount delay time of 180 seconds.
This entry should appear only once in the configuration file.
How to use
The delay is set to 120 seconds in the following example:
MEDIA_UNMOUNT_DELAY = 120
Example
NetBackup Management > Host Properties > Master Servers > Double-click onserver > Media > Media unmount delay.
See “Media properties” on page 189.
Equivalent AdministrationConsole property
MEDIA_REQUEST_DELAY option for NetBackup serversThis option specifies the number of seconds that NetBackup waits for a non-roboticdrive to become ready.
Table 3-105 MEDIA_REQUEST_DELAY information
DescriptionUsage
On NetBackup master servers.Where to use
317Configuring Host PropertiesConfiguration options for NetBackup servers

Table 3-105 MEDIA_REQUEST_DELAY information (continued)
DescriptionUsage
Change the MEDIA_REQUEST_DELAY by using the nbemmcmd command.
For information about these commands, see the NetBackup Commands ReferenceGuide.
The default is that NetBackup does not wait for non-robotic drives to become ready.
This option should appear only once in the configuration file.
How to use
The following command indicates to NetBackup to wait 150 seconds for a non-roboticdrive to become ready for use.
nbemmcmd -changesetting -MEDIA_REQUEST_DELAY 150
Example
NetBackup Management > Host Properties > Master Servers > Double-click onserver > Media > Media request delay.
See “Media properties” on page 189.
Equivalent AdministrationConsole property
MEDIA_SERVER option for NetBackup serversThis option is similar to the SERVER option.
A host that is listed as a MEDIA_SERVER can back up and restore clients. However,if the host is not specified as a SERVER, the host has limited administrativecapabilities.
Table 3-106 MEDIA_SERVER information
DescriptionUsage
On NetBackup master servers.Where to use
Use the nbgetconfig and the nbsetconfig commands to view, add, or changethe option.
For information about these commands, see the NetBackup Commands ReferenceGuide.
Use the following format:
MEDIA_SERVER = media_server_name
How to use
NetBackup Management > Host Properties > Master Servers > Double-click onserver > Servers > Media Servers.
See “Servers properties” on page 236.
Equivalent AdministrationConsole property
318Configuring Host PropertiesConfiguration options for NetBackup servers

MPX_RESTORE_DELAY option for NetBackup serversThis option applies to multiplexed restores. The MPX_RESTORE_DELAY specifies howlong the server waits for restore requests of files and raw partitions. In this case,the option applies to the files and raw partitions in a set of multiplexed images onthe same tape. All of the restore requests that are received within the delay periodare included in the same restore operation (one pass of the tape).
Table 3-107 MPX_RESTORE_DELAY information
DescriptionUsage
On NetBackup master servers.Where to use
Use the nbgetconfig and the nbsetconfig commands to view, add, or changethe option.
For information about these commands, see the NetBackup Commands ReferenceGuide.
Use the following format:
MPX_RESTORE_DELAY = seconds
The default is 30 seconds.
This option should appear only once in the configuration file.
How to use
The following example configures a server to wait 15 minutes.
MPX_RESTORE_DELAY = 900
Example
NetBackup Management > Host Properties > Master Servers > Double-click onserver > General Server > Delay on multiplexed restores.
See “General Server properties” on page 155.
Equivalent AdministrationConsole property
MUST_USE_LOCAL_DRIVE option for NetBackup serversThis option instructs NetBackup that if the client is also a media server and thisoption is present, backups for this client must occur on a local drive. If all drives aredown, another may be used. If the client is not a media server, this option has noeffect.
Table 3-108 MUST_USE_LOCAL_DRIVE information
DescriptionUsage
On NetBackup master servers.Where to use
319Configuring Host PropertiesConfiguration options for NetBackup servers

Table 3-108 MUST_USE_LOCAL_DRIVE information (continued)
DescriptionUsage
Use the nbemmcmd command to change the option. For example:
nbemmcmd -changesetting -MUST_USE_LOCAL_DRIVE yes
For information about these commands, see the NetBackup Commands ReferenceGuide.
This option should appear only once in the configuration file.
How to use
NetBackup Management > Host Properties > Master Servers > Double-click onserver > General Server > Must use local drive.
See “General Server properties” on page 155.
Equivalent AdministrationConsole property
NBRNTD_IDLE_TIMEOUT option for NetBackup serversThe NBRNTD_IDLE_TIMEOUT option specifies the number of seconds to wait beforethe Remote Network Transport Service (nbrntd) shuts itself down. The RemoteNetwork Transport Service provides resilient network connections. After it is shutdown, NetBackup must restart the service if a new resilient connection for backupsor restores is required.
Table 3-109 NBRNTD_IDLE_TIMEOUT information
DescriptionUsage
On NetBackup master servers.Where to use
Use the nbgetconfig and the nbsetconfig commands to view, add, or changethe option.
For information about these commands, see the NetBackup Commands ReferenceGuide.
Use the following format:
NBRNTD_IDLE_TIMEOUT = seconds
The default timeout is 300 seconds (five minutes).
By default, this entry is not present in the configuration file.
How to use
In the following example, the Remote Network Transport Service shuts off after 15minutes.
NBRNTD_IDLE_TIMEOUT = 900
Example
320Configuring Host PropertiesConfiguration options for NetBackup servers

See “RESILIENT_NETWORK option for NetBackup master servers and clients”on page 327.
PREFERRED_NETWORK option for NetBackup serversThe PREFERRED_NETWORK option replaces the REQUIRED_INTERFACE andREQUIRED_NETWORK entries.
The PREFERRED_NETWORK option is not needed in an environment if NetBackup isconfigured with appropriate host names. The operating system must resolve to thecorrect IP addresses and then route the addresses correctly.
When external constraints prevent the environment from being corrected,PREFERRED_NETWORK entries can be useful in the following situations:
■ To prevent NetBackup from connecting to specific destination addresses.
■ To cause NetBackup to connect only to specific destination addresses.
■ To request a subset of local interfaces for source binding when outboundconnections are made.
Table 3-110 PREFERRED_NETWORK information
DescriptionUsage
On NetBackup servers or clients.Where to use
Use the nbgetconfig and the nbsetconfig commands to view, add, or changethe option.
For information about these commands, see the NetBackup Commands ReferenceGuide.
The option uses the following syntax:
PREFERRED_NETWORK = target[/subnet] directive source[/subnet]
How to use
321Configuring Host PropertiesConfiguration options for NetBackup servers

Table 3-110 PREFERRED_NETWORK information (continued)
DescriptionUsage
The target[/subnet] is a host name or range of addresses to be compared to theprospective source or destination addresses being evaluated. The following areexamples of how to indicate a target or a subnet:
■ A host name: myserver.domain■ An IP address: 10.82.105.11■ A network with subnet: 10.82.105.0/21■ Any IPv4 address: 0.0.0.0■ Any IPv6 address: 0::0■ Any address: 0/0
Note: A host or a network name that cannot resolve causes the target to be ignored.However, any associated source is added to the source binding list.
The directive (MATCH, ONLY, or PROHIBITED) determines how the target iscompared to the source or the destination address that is under evaluation.
■ MATCH
This directive applies to destination addresses. If the address being evaluatedmatches the target, then the address is immediately selected to be used andevaluation stops. If a target is not matched, evaluation continues with the nextentry.
■ ONLY
This directive applies to destination addresses. If the address under evaluationdoes not match a target, it is not used and evaluation stops for this address. Ifthe destination is the only potential destination, the connection is not attempted. Ifthere is an additional potential destination, it is evaluated starting over with the firstentry.
■ PROHIBITED
The target applies to both the source and the destination addresses. If a sourceis specified, it is ignored and the target is still prohibited.If the matched address is a destination address, evaluation stops. If the matchedaddress was the only potential destination, no connection is attempted. If there areadditional potential destinations, they are evaluated starting over with the first entry.If the matched address is a source address, it is removed from the binding list. Ifsource entries exist, the shortened binding list may not be used. On someplatforms, prohibiting a local interface may cause unexpected results whenNetBackup connects to remote hosts. Prohibiting a local interface does not affectthe connections that are internal to the host.
322Configuring Host PropertiesConfiguration options for NetBackup servers

Table 3-110 PREFERRED_NETWORK information (continued)
DescriptionUsage
Indicating a source[/subnet] is optional. This is a host name or IP address rangethat is requested to be used as the local interface for outbound connection to addressesin target. The source applies to the directives ONLY and MATCH, but not to thedirective PROHIBITED.
Notes:
■ The operating system may not honor the source request.■ NetBackup does not request a source which has already been PROHIBITED.■ A host or a network name that cannot be resolved is ignored, but the evaluation
status of the target is still used.
NetBackup Management > Host Properties > Master Servers > Double-click onserver > Preferred Network.
See “Preferred Network properties” on page 204.
Equivalent AdministrationConsole property
The following Support document contains more information about using thePREFERRED_NETWORK option:
http://www.veritas.com/docs/HOWTO60779
Examples of the PROHIBITED directive■ An example that prevents the host from using IPv4 addresses:
PREFERRED_NETWORK = 0.0.0.0 PROHIBITED
■ An example that prevents the host from using IPv6 addresses:
PREFERRED_NETWORK = 0::0 PROHIBITED
■ This example prevents the host from using the address of the production_server:
PREFERRED_NETWORK = production_server PROHIBITED
■ This example prevents NetBackup from using any address between 12.34.0.0and 12.34.255.255 as the source or destination for a connection. If it matchesa local interface, NetBackup provides an ordered list of the remaining interfacesas the source binding list for the outbound interface when other entries do notspecify a source. The operating system may always use the first one in the listinstead of using the network routing tables to select the best one.
PREFERRED_NETWORK = 12.34.56.78/16 PROHIBITED
323Configuring Host PropertiesConfiguration options for NetBackup servers

Examples of the ONLY directive■ This example instructs the host to use only IPv6 addresses in that subnet range:
PREFERRED_NETWORK = 2001:1234:1efc::/48 ONLY
■ This example prevents NetBackup from connecting to any destination addressoutside the range of 12.34.56.0 to 12.34.56.255. The entry does not affectoutbound interface selection.
PREFERRED_NETWORK = 12.34.56.78/24 ONLY
■ This example prevents NetBackup from connecting to any destination addressoutside the range of 12.34.56.0 to 12.34.56.255. The entry requests that theoperating system use 98.76.54.32 as the outbound interface.
PREFERRED_NETWORK = 12.34.56.78/24 ONLY 98.76.54.32
Examples of the MATCH directive■ This example instructs the host to use the interface IPs of Host_A for all IPv4
and IPv6 addresses. The entry can appear multiple times in the configurationfile.
PREFERRED_NETWORK = 0/0 MATCH Host_A
■ This example allows connectivity to the host names that resolve to 12.34.0.0 to12.23.255.255. The entry does not affect outbound interface selection:
PREFERRED_NETWORK = 12.34.0.0/16 MATCH
■ This example allows connectivity to the host name that resolves to 12.34.56.78,and requests that the operating system use 98.76.54.32 as the outboundinterface:
PREFERRED_NETWORK = 12.34.56.78 MATCH 98.76.54.32
RANDOM _PORTS option for NetBackup servers and clientsThis option specifies whether NetBackup chooses port numbers randomly orsequentially when it requires one for communication with NetBackup on othercomputers.
324Configuring Host PropertiesConfiguration options for NetBackup servers

Table 3-111 RANDOM _PORTS information
DescriptionUsage
On NetBackup master servers or clients.Where to use
Use the nbgetconfig and the nbsetconfig commands to view, add, or changethe option.
For information about these commands, see the NetBackup Commands ReferenceGuide.
■ If RANDOM_PORTS = YES (default), NetBackup chooses port numbers randomlyfrom those that are free in the allowed range. For example, if the range is from 1024through 5000, it chooses randomly from the numbers in this range.
■ If RANDOM_PORTS = NO, NetBackup chooses numbers sequentially, starting withthe highest number available in the allowed range. For example, if the range is from1024 through 5000, NetBackup chooses 5000 (if the number is available). If 5000is not available, port 4999 is chosen.
By default, this option is not present in the configuration file and NetBackup uses therandom method for selecting port numbers.
How to use
NetBackup Management > Host Properties > Master Servers > Double-click onserver > Port Ranges > Use random port assignments.
See “Port Ranges properties” on page 201.
Equivalent AdministrationConsole property
RE_READ_INTERVAL option for NetBackup serversThe RE_READ_INTERVAL option determines how often NetBackup checks disk storageunits for available capacity.
Table 3-112 RE_READ_INTERVAL information
DescriptionUsage
On NetBackup master servers.Where to use
Use the nbgetconfig and the nbsetconfig commands to view, add, or changethe option.
For information about these commands, see the NetBackup Commands ReferenceGuide.
Use the following format:
RE_READ_INTERVAL = seconds
The default is 300 seconds (5 minutes).
This entry should appear only once in the configuration file.
How to use
325Configuring Host PropertiesConfiguration options for NetBackup servers

Table 3-112 RE_READ_INTERVAL information (continued)
DescriptionUsage
The reread interval is changed to 15 minutes in the following example:
RE_READ_INTERVAL = 900
Example
NetBackup Management > Host Properties > Master Servers > Double-click onserver > General Server > Check the capacity of disk storage units.
See “General Server properties” on page 155.
Equivalent AdministrationConsole property
REQUIRED_NETWORK option for NetBackup serversThe REQUIRED_NETWORK option specifies the required route for backup traffic in anenvironment where the network traffic is segregated.
For example, an environment can contain a production network at 145.21.14.0and a backup network at 192.132.28.0.
Table 3-113 REQUIRED_NETWORK information
DescriptionUsage
On NetBackup master servers.Where to use
Use the nbgetconfig and the nbsetconfig commands to view, add, or changethe option.
For information about these commands, see the NetBackup Commands ReferenceGuide.
Use the following format:
REQUIRED_NETWORK = IP_address
This entry should appear only once in the configuration file.
Note: If the variable is set and the network is not available, all connections fail andno backups are performed.
How to use
The required network is set to 192.132.28.0 in the following example:
REQUIRED_NETWORK = 192.132.28.0
Example
NetBackup Management > Host Properties > Master Servers > Double-click onserver > Preferred Network > Only.
See “Preferred Network properties” on page 204.
Equivalent AdministrationConsole property
326Configuring Host PropertiesConfiguration options for NetBackup servers

RESILIENT_NETWORK option for NetBackup master servers andclients
The RESILIENT_NETWORK option specifies the computers that should use a resilientconnection for backups and restores.
Table 3-114 RESILIENT_NETWORK information
DescriptionUsage
On NetBackup master servers or clients.Where to use
Use the nbgetconfig and the nbsetconfig commands to view, add, or changethe option.
For information about these commands, see the NetBackup Commands ReferenceGuide.
Use any of the following formats:
RESILIENT_NETWORK = hostname ON|OFF
RESILIENT_NETWORK = ip_address ON|OFF
RESILIENT_NETWORK = network address/network_mask ON|OFF
You can mix IPv4 addresses and ranges with IPv6 addresses and subnets.
By default, RESILIENT_NETWORK is not present in the configuration file.
How to use
The following are examples of valid forms for this entry:
RESILIENT_NETWORK = client.veritas.org ON
RESILIENT_NETWORK = 192.0.2.0 ON
RESILIENT_NETWORK = 192.0.2.0/26 OFF
RESILIENT_NETWORK = 2001:db8:0:0:0:0:0:0 ON
Examples
NetBackup Management > Host Properties > Master Servers or Clients >Double-click on server > Resilient Network.
See “Specifying resilient connections” on page 221.
Equivalent AdministrationConsole property
Note: The order is significant for the items in the list of resilient networks. If a clientis in the list more than once, the first match determines its resilient connectionstatus. For example, suppose you add a client and specify the client IP addressand specify On for Resiliency. Suppose also that you add a range of IP addressesas Off, and the client IP address is within that range. If the client IP address appearsbefore the address range, the client connection is resilient. Conversely, if the IPrange appears first, the client connection is not resilient.
327Configuring Host PropertiesConfiguration options for NetBackup servers
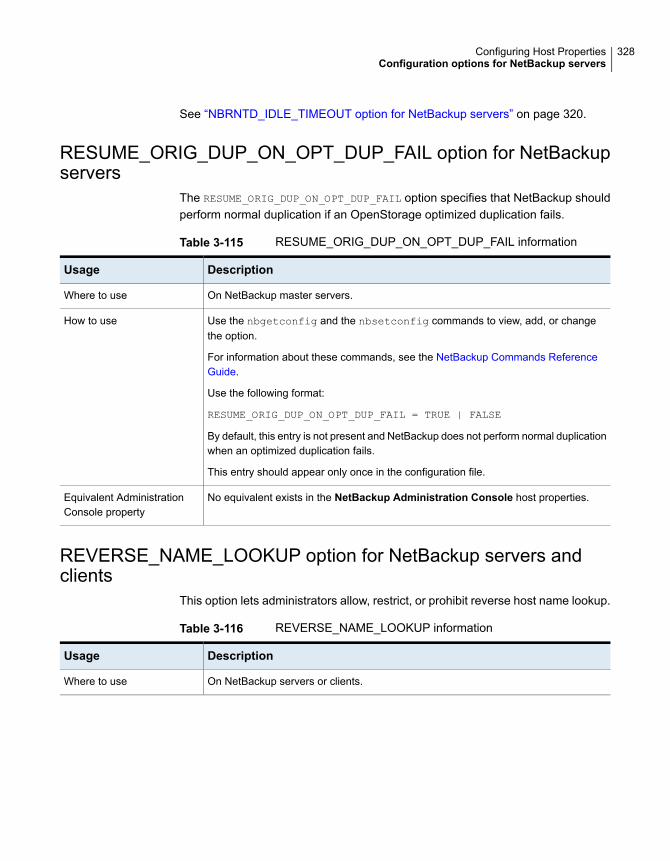
See “NBRNTD_IDLE_TIMEOUT option for NetBackup servers” on page 320.
RESUME_ORIG_DUP_ON_OPT_DUP_FAIL option for NetBackupservers
The RESUME_ORIG_DUP_ON_OPT_DUP_FAIL option specifies that NetBackup shouldperform normal duplication if an OpenStorage optimized duplication fails.
Table 3-115 RESUME_ORIG_DUP_ON_OPT_DUP_FAIL information
DescriptionUsage
On NetBackup master servers.Where to use
Use the nbgetconfig and the nbsetconfig commands to view, add, or changethe option.
For information about these commands, see the NetBackup Commands ReferenceGuide.
Use the following format:
RESUME_ORIG_DUP_ON_OPT_DUP_FAIL = TRUE | FALSE
By default, this entry is not present and NetBackup does not perform normal duplicationwhen an optimized duplication fails.
This entry should appear only once in the configuration file.
How to use
No equivalent exists in the NetBackup Administration Console host properties.Equivalent AdministrationConsole property
REVERSE_NAME_LOOKUP option for NetBackup servers andclients
This option lets administrators allow, restrict, or prohibit reverse host name lookup.
Table 3-116 REVERSE_NAME_LOOKUP information
DescriptionUsage
On NetBackup servers or clients.Where to use
328Configuring Host PropertiesConfiguration options for NetBackup servers

Table 3-116 REVERSE_NAME_LOOKUP information (continued)
DescriptionUsage
Use the nbgetconfig and the nbsetconfig commands to view, add, or changethe option.
For information about these commands, see the NetBackup Commands ReferenceGuide.
Use the following format:
REVERSE_NAME_LOOKUP = ALLOWED | RESTRICTED | PROHIBITED
This entry should appear only once in the configuration file.
How to use
NetBackup Management > Host Properties > Master Servers or Clients >Double-click on server > Network Settings > Reverse Host Name Lookup.
See “Network Settings properties” on page 199.
Equivalent AdministrationConsole property
SERVER option for NetBackup serversThe first SERVER option in the bp.conf file must point to the master server wherethe bp.conf option resides. During installation, SERVER is automatically set to thename of the system where the NetBackup master server software is installed.
Table 3-117 SERVER information
DescriptionUsage
On NetBackup master servers and media servers.
Note: For a Fibre Transport (FT) media server that has multiple network interfacesfor VLANs, ensure that the FT server’s primary host name appears before any otherinterface names for that FT media server host.
For more information, see the NetBackup SAN Client and Fibre Transport Guide.
Where to use
329Configuring Host PropertiesConfiguration options for NetBackup servers

Table 3-117 SERVER information (continued)
DescriptionUsage
An entry for the SERVER option must be present in the configuration file on all NetBackupservers and clients. It is the only required NetBackup option. This option is not usedin $HOME/bp.conf files on a client.
Use the nbgetconfig and the nbsetconfig commands to view, add, or changethe option.
For information about these commands, see the NetBackup Commands ReferenceGuide.
Note: This topic discusses the bp.conf entries on the server. However, note thatevery SERVER option in a client bp.conf file must be a NetBackup master or mediaserver. That is, each system that is listed as a SERVER must have either NetBackupmaster or media server software installed. The client service on some clients cannotbe started if the client name is incorrectly listed as a server.
If you configure NetBackup media servers for a master server, the bp.conf file onthe master server must have a SERVER entry or MEDIA_SERVER entry for each. Aspreviously mentioned, the first SERVER entry in the list designates the master serveritself. The SERVER entry or the MEDIA_SERVER entries should be added after the first,self-referencing option.
A NetBackup master server can be backed up as a NetBackup client by the serversthat belong to another cluster. In that case the bp.conf file on the master servershould have SERVER entries for those servers as well.
How to use
330Configuring Host PropertiesConfiguration options for NetBackup servers

Table 3-117 SERVER information (continued)
DescriptionUsage
The following is an example entry on a master server:
SERVER = Master_server (this master server itself)
SERVER = NB_server (master server of another cluster)
SERVER = Media_server_#1
MEDIA_SERVER = Media_server_#2
.
.
.
The first SERVER entry on all the media servers must point to the master server forthose media servers. A media server can have only one master server. However, amedia server can be backed up as a NetBackup client by the servers that belong toanother cluster, in which case the configuration file on the media server should haveSERVER entries for those servers as well.
The following is an example entry on a media server:
SERVER = Master_server (for this media server)
SERVER = NB_server (master server of another cluster)
SERVER = Media_server_#1
MEDIA_SERVER = Media_server_#2
.
.
.
The SERVER entries must be the same on all servers in a master and a media servercluster.
If a SERVER entry is added or modified in the bp.conf file on the master server, stopand restart bprd and bpdbm so that NetBackup recognizes the change. (The NetBackuprequest daemon and NetBackup database manager.)
Note: If the first SERVER entry (the master server) is modified on a media server, theEnterprise Media Manager (EMM) also needs to be updated. To update EMM, runnbemmcmd -updatehost to change the master server for a media server.
Example
331Configuring Host PropertiesConfiguration options for NetBackup servers

Table 3-117 SERVER information (continued)
DescriptionUsage
NetBackup Management > Host Properties > Master Servers or Media Servers >Double-click on server > Servers.
See “Servers properties” on page 236.
See “FAILOVER_RESTORE_MEDIA_SERVERS option for NetBackup servers”on page 305.
Equivalent AdministrationConsole property
SERVER_CONNECT_TIMEOUT option for NetBackup serversSERVER_CONNECT_TIMEOUT specifies the number of seconds that the master serverwaits before it times out when it connects to a media server.
Table 3-118 SERVER_CONNECT_TIMEOUT information
DescriptionUsage
On NetBackup master servers.Where to use
Use the nbgetconfig and the nbsetconfig commands to view, add, or changethe option.
For information about these commands, see the NetBackup Commands ReferenceGuide.
Use the following format:
SERVER_CONNECT_TIMEOUT = seconds
The default timeout period is 30 seconds.
This entry should appear only once in the configuration file.
How to use
The example permits a timeout of 60 seconds:
SERVER_CONNECT_TIMEOUT = 60
Example
NetBackup Management > Host Properties > Master Servers > Double-click onserver > Timeouts > Server connect timeout.
See “Timeouts properties” on page 256.
Equivalent AdministrationConsole property
SERVER_PORT_WINDOW option for NetBackup serversThe SERVER_PORT_WINDOW option specifies the range of non-reserved ports on whichNetBackup processes on this computer accept connections from NetBackup onother computers when the inbound connection is not to a well known port. This
332Configuring Host PropertiesConfiguration options for NetBackup servers

primarily applies to bpcd call-back when vnetd is disabled in the connect optionsfor the remote NetBackup server or client and that host is configured fornon-reserved ports. This also applies to NDMP call-back to the media server duringremote NDMP backups.
Table 3-119 SERVER_PORT_WINDOW information
DescriptionUsage
On NetBackup master servers or media servers.Where to use
Use the nbgetconfig and the nbsetconfig commands to view, add, or changethe option.
For information about these commands, see the NetBackup Commands ReferenceGuide.
Use the following format:
SERVER_PORT_WINDOW = start_port end_port
The default range is from 1024 through 5000.
This entry should appear only once in the configuration file.
How to use
The following example permits ports from 4900 through 5000:
SERVER_PORT_WINDOW = 4900 5000
Example
NetBackup Management > Host Properties > Master Servers or Media Servers >Double-click on server > Port Ranges > Server port window.
See “Port Ranges properties” on page 201.
Equivalent AdministrationConsole property
SERVER_RESERVED_PORT_WINDOW option for NetBackupservers and clients
This option specifies the range of local reserved ports on which this computeraccepts connections from NetBackup on other computers when the inboundconnection is not to a well known port. This primarily applies to bpcd call-back whenvnetd is disabled in the connect options for the remote NetBackup server or client.
The SERVER_RESERVED_PORT_WINDOW option applies when a server connects to aclient that is configured to accept only reserved ports. This option is generally notuseful on clients.
333Configuring Host PropertiesConfiguration options for NetBackup servers

Table 3-120 SERVER_RESERVED_PORT_WINDOW information
DescriptionUsage
On NetBackup master servers or media servers.Where to use
Use the nbgetconfig and the nbsetconfig commands to view, add, or changethe option.
For information about these commands, see the NetBackup Commands ReferenceGuide.
Use the following format:
SERVER_RESERVED_PORT_WINDOW = start_port end_port
The default range is from 512 through 1023.
This entry should appear only once in the configuration file.
How to use
The following example permits ports from 900 through 1023:
SERVER_RESERVED_PORT_WINDOW = 900 1023
Example
NetBackup Management > Host Properties > Master Servers or Media Servers >Double-click on server > Port Ranges > Server reserved port window.
See “Port Ranges properties” on page 201.
Equivalent AdministrationConsole property
SKIP_RESTORE_TO_SYMLINK_DIR option for NetBackup serversThe SKIP_RESTORE_TO_SYMLINK_DIR option forces NetBackup to check all directorieson a UNIX client into which files are restored. If the file to be restored is under asymbolically linked directory, NetBackup does not restore the file.
Table 3-121 SKIP_RESTORE_TO_SYMLINK_DIR information
DescriptionUsage
On NetBackup master servers.Where to use
334Configuring Host PropertiesConfiguration options for NetBackup servers

Table 3-121 SKIP_RESTORE_TO_SYMLINK_DIR information (continued)
DescriptionUsage
This option should appear only once in the configuration file.
For example, if the UNIX client requests a restore for /home/user/.cshrc and/home/user is a symbolic link, NetBackup does not restore .cshrc.
The addition of SKIP_RESTORE_TO_SYMLINK_DIR helps minimize potential securityand data loss problems if the restore is performed with root permissions. WithoutSKIP_RESTORE_TO_SYMLINK_DIR in the bp.conf file, NetBackup follows anysymbolically linked directories and restores files to that location.
Note: Restore job performance is reduced by using this option.
SKIP_RESTORE_TO_SYMLINK_DIR and UNLINK_ON_OVERWRITE do not affect eachother if both are specified, with one exception:
When the following options are enabled:
■ Overwrite existing files option■ SKIP_RESTORE_TO_SYMLINK_DIR
■ UNLINK_ON_OVERWRITE
Then, when a restore job comes across a symbolic link, the link is unlinked before thejob checks, and the files and directory are restored.
For example, /home/user/ is backed up as a directory and, when restored, it is asymbolic link to a directory.
These settings have the following outcomes:
■ With SKIP_RESTORE_TO_SYMLINK_DIR set (and Overwrite existing filesindicated), no files are restored into the directory the symbolic link points to, andthe symbolic link remains.
■ With both UNLINK_ON_OVERWRITE and SKIP_RESTORE_TO_SYMLINK_DIR (andOverwrite existing files indicated), the symbolic link directory is unlinked, theoriginal directory is restored, and all files within the directory are also restored.
■ With neither option set (and Overwrite existing files indicated), NetBackup followsthe symbolic link and restore all files into the directory to which the symbolic linkpoints.
How to use
NetBackup Management > Host Properties > Master Servers > Double-click onserver > Port Ranges > Server reserved port window.
See “Port Ranges properties” on page 201.
Equivalent AdministrationConsole property
TELEMETRY_UPLOAD option for NetBackup serversTELEMETRY_UPLOAD allows NetBackup to collect data about how the product is usedin a NetBackup environment. The information that Veritas receives becomes part
335Configuring Host PropertiesConfiguration options for NetBackup servers

of a continuous quality improvement program (NetBackup Product ImprovementProgram) that helps Veritas understand how customers configure, deploy, and usethe NetBackup product. The data is restricted to NetBackup and OpsCenterdevelopment at Veritas.
The telemetry collection agent runs on every NetBackup server and every OpsCenterserver. The telemetry collection agent does not run on NetBackup clients.
Table 3-122 TELEMETRY_UPLOAD information
DescriptionUsage
On NetBackup master servers.Where to use
Use the nbgetconfig and the nbsetconfig commands to view, add, or changethe option.
For information about these commands, see the NetBackup Commands ReferenceGuide.
Use the following format:
TELEMETRY_UPLOAD = YES | NO
The default is YES.
This entry should appear only once in the configuration file.
How to use
During the NetBackup or OpsCenter installation process, a prompt or check box appearsthat asks for the users' agreement to participate in the Product Improvement Program.
Equivalent AdministrationConsole property
THROTTLE_BANDWIDTH option for NetBackup serversThis option specifies a limit for the network bandwidth or transfer rate that NetBackupclients use on a network. The actual limiting occurs on the client side of the backupconnection. This option limits only backups. Restores are unaffected. The defaultis that the bandwidth is not limited.
While LIMIT_BANDWIDTH associates a bandwidth or transfer rate with all client IPaddresses in a range between two IP addresses, THROTTLE_BANDWIDTH is moreuseful in an IPv6 environment. THROTTLE_BANDWIDTH associates a bandwidth settingwith a subnet description.
For example, the following subnet will get 400kbs bandwidth:2001:db8:cb30:120::/64 400
336Configuring Host PropertiesConfiguration options for NetBackup servers

Table 3-123 THROTTLE_BANDWIDTH information
DescriptionUsage
On NetBackup master servers.Where to use
Use the nbgetconfig and the nbsetconfig commands to view, add, or changethe option.
For information about these commands, see the NetBackup Commands ReferenceGuide.
Use the following format in a single line:
THROTTLE_BANDWIDTH = xxxx:xxxx:xxxx:xxxx:
yyyy:yyyy:yyyy:yyyy::/nnn zzz
Each THROTTLE_BANDWIDTH option specifies the bandwidth value and the IP addressof the clients and networks to which it applies.
The following variables are defined:
■ xxxx.xxxx.xxxx.xxxx is the subnet portion (64-bits) of the IPv6 address range. (Forexample, 2001:db8:1:110.)
■ yyyy.yyyy.yyyy.yyyy is the host portion (64-bits) of the IPv6 address range. (Forexample, 0:0:0:8b72.)
■ nnn is the number of mask bits that, when applied to the IPv6 address, identifiesthe range of addresses that are considered for throttling. The valid range is 0 to128. Mask bits are applied left to right across the address range.
■ zzz is the bandwidth limitation in kilobytes per second. (For example, 200.) A valueof 0 disables throttling IPv6 addresses covered by this option.
How to use
The following are LIMIT_BANDWIDTH examples:
■ Configure a bandwidth limit of 500 kilobytes per second for all computers on thesubnet 2001:db8:1:110 as follows:LIMIT_BANDWIDTH = 2001:db8:1:110::/64 500
■ Configure a bandwidth limit of 700 kilobytes per second for a particular client(2001:db8:1:110:0:0:0:8b72) as follows:LIMIT_BANDWIDTH = 2001:db8:1:110:0:0:0:8b72::/128 700
■ To disable bandwidth limiting for a client in a subnet that has a bandwidth limit,specify 0 for the kilobytes per second:LIMIT_BANDWIDTH = 2001:db8:1:110::/64 500
LIMIT_BANDWIDTH = 2001:db8:1:110:0:0:0:8b72::/128 0
In this case, no limiting occurs for the client with IPv6 address2001:db8:1:110:0:0:0:8b72
Bandwidth examples
337Configuring Host PropertiesConfiguration options for NetBackup servers
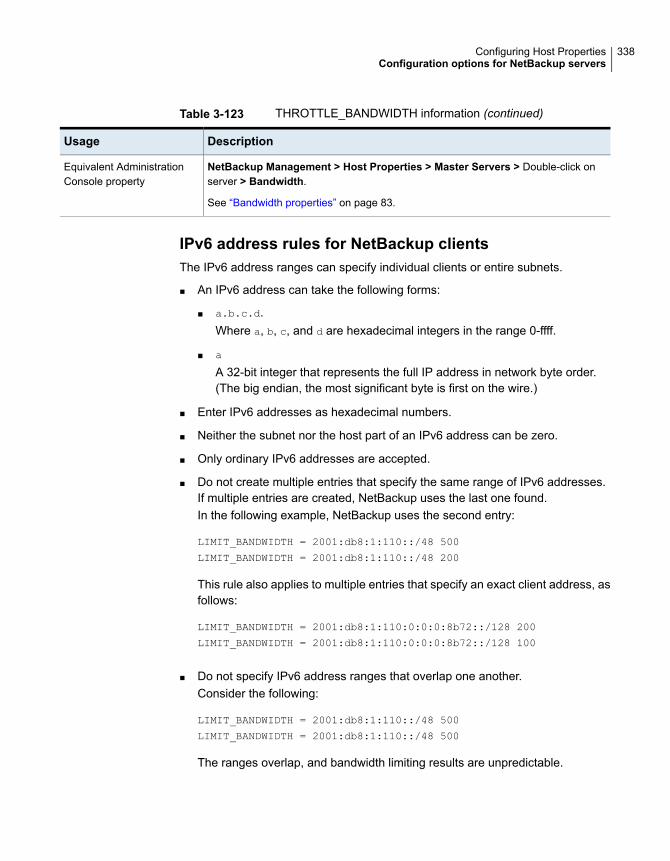
Table 3-123 THROTTLE_BANDWIDTH information (continued)
DescriptionUsage
NetBackup Management > Host Properties > Master Servers > Double-click onserver > Bandwidth.
See “Bandwidth properties” on page 83.
Equivalent AdministrationConsole property
IPv6 address rules for NetBackup clientsThe IPv6 address ranges can specify individual clients or entire subnets.
■ An IPv6 address can take the following forms:
■ a.b.c.d.Where a, b, c, and d are hexadecimal integers in the range 0-ffff.
■ a
A 32-bit integer that represents the full IP address in network byte order.(The big endian, the most significant byte is first on the wire.)
■ Enter IPv6 addresses as hexadecimal numbers.
■ Neither the subnet nor the host part of an IPv6 address can be zero.
■ Only ordinary IPv6 addresses are accepted.
■ Do not create multiple entries that specify the same range of IPv6 addresses.If multiple entries are created, NetBackup uses the last one found.In the following example, NetBackup uses the second entry:
LIMIT_BANDWIDTH = 2001:db8:1:110::/48 500
LIMIT_BANDWIDTH = 2001:db8:1:110::/48 200
This rule also applies to multiple entries that specify an exact client address, asfollows:
LIMIT_BANDWIDTH = 2001:db8:1:110:0:0:0:8b72::/128 200
LIMIT_BANDWIDTH = 2001:db8:1:110:0:0:0:8b72::/128 100
■ Do not specify IPv6 address ranges that overlap one another.Consider the following:
LIMIT_BANDWIDTH = 2001:db8:1:110::/48 500
LIMIT_BANDWIDTH = 2001:db8:1:110::/48 500
The ranges overlap, and bandwidth limiting results are unpredictable.
338Configuring Host PropertiesConfiguration options for NetBackup servers

■ Specify a range of addresses in one entry and an address for a specific clientin other entries.If a client is covered by an entry that specifies its exact IPv6 address and byanother entry that specifies a range of IPv6 addresses, NetBackup uses thebandwidth value in the entry with the exact IP address.The following sets the bandwidth for a range of IPv6 addresses:
LIMIT_BANDWIDTH = 2001:db8:1:110::/48 500
The following sets the bandwidth for a specific address that is within the range:
LIMIT_BANDWIDTH = 2001:db8:1:110:0:0:0:8b72::/128 200
In this case, NetBackup uses the specific entry (bandwidth of 200) for the clientwhose address is 2001:db8:1:110:0:0:0:8b72. This capability can also be usedto exclude specific clients from bandwidth limiting. The order of the range andspecific address entries in the bp.conf file is not significant.
Rules for setting bandwidth values for NetBackup clientsSet bandwidths for individual clients to one of the following values:
■ 0 (no bandwidth limiting), or
■ Less than or equal to any value that is set for the IPv6 address range thatcontains the IP address for the client.For example, the following is valid:
LIMIT_BANDWIDTH = 2001:db8:1:110:0:0:0:8b72::/64 500
LIMIT_BANDWIDTH = 2001:db8:1:110:0:0:0:8b72::/128 300
If the bandwidth is set higher for a client than is set for the range, NetBackup ignoresthe individual setting. NetBackup uses the value for the range instead. In this case,the client receives a share of the bandwidth that is specified for the network.
If the bandwidth limit for a client is equal to or lower than the value for the range,the client uses the lower of the following settings:
■ Its share of the network bandwidth value.
■ Its individual bandwidth value.
The bandwidth value that NetBackup uses for a client is always at least one kilobyteper second.
339Configuring Host PropertiesConfiguration options for NetBackup servers

TRUSTED_MASTER option for NetBackup serversThe TRUSTED_MASTER option lets administrators indicate a specific storage lifecyclepolicy in a target master server domain to configure Auto Image Replication. Theability to replicate to a specific target domain SLP is supported between MSDPstorage servers and PDDO storage servers.
Table 3-124 TRUSTED_MASTER information
DescriptionUsage
On NetBackup master servers or media servers.Where to use
Use the nbgetconfig and the nbsetconfig commands to view, add, or changethe option.
For information about these commands, see the NetBackup Commands ReferenceGuide.
Add TRUSTED_MASTER on the master server in the source domain and the masterserver in the target domain.
How to use
On the source domain master server, enter the name of the target master server:
TRUSTED_MASTER = Target_Server_Name
On the target domain master server, enter the name of the source master server:
TRUSTED_MASTER = Source_Server_Name
Example
NetBackup Management > Host Properties > Master Servers > Double-click onserver > Servers > Inter-domain Master Servers tab.
See “Servers properties” on page 236.
Equivalent AdministrationConsole property
ULINK_ON_OVERWRITE option for NetBackup serversWhen a UNIX client indicates Overwrite existing files as a restore option, theUNLINK_ON_OVERWRITE option forces NetBackup to perform the following actions:
■ Check for the existence of a file to be restored.
■ Unlink the file if it exists.
■ Restore the file.
The file can be any normal file, symbolic link, hard link, or empty directory.
The addition of UNLINK_ON_OVERWRITE helps minimize potential security and dataloss problems from following existing symbolic links. It also guarantees that filesare restored exactly as they were backed up.
340Configuring Host PropertiesConfiguration options for NetBackup servers

Table 3-125 ULINK_ON_OVERWRITE information
DescriptionUsage
On NetBackup master servers.Where to use
This option should appear only once in the configuration file.
Note: Restore job performance is reduced by using this option.
If the UNLINK_ON_OVERWRITE option is not indicated in the bp.conf file but theOverwrite existing files option is specified, the behavior of NetBackup is differentwhen it restores symbolic links. (Or, if the option is set to NO.) NetBackup unlinksexisting files or empty directories when it restores symbolic links, hard links, or specialfiles (CHR, BLK, and FIFO).
However, NetBackup does not unlink when it restores normal files or directories, whichcan be problematic. NetBackup follows the symbolic link and creates or replaces thefiles that the symbolic link points to. Or, it replaces the directory that the symbolic linkpoints to.
SKIP_RESTORE_TO_SYMLINK_DIR and UNLINK_ON_OVERWRITE do not affecteach other if both are specified, with one exception:
When the following options are enabled:
■ Overwrite existing files option■ SKIP_RESTORE_TO_SYMLINK_DIR
■ UNLINK_ON_OVERWRITE
Then, when a restore job comes across a symbolic link, the link is unlinked before thejob checks, and the files and directories are restored.
How to use
For example, if the /home/user/ path was backed up as a directory and, when restored,it is a symbolic link to a directory:
■ With SKIP_RESTORE_TO_SYMLINK_DIR set (and Overwrite existing filesindicated), no files are restored into the directory the symbolic link points to, andthe symbolic link remains.
■ With both UNLINK_ON_OVERWRITE and SKIP_RESTORE_TO_SYMLINK_DIR (andOverwrite existing files indicated), the symbolically linked directory is unlinked,the original directory is restored, and all files within the directory are also restored.
■ With neither set (and Overwrite existing files indicated), NetBackup follows thesymbolic link and restore all files into the directory the symbolic link points to.
Example
No equivalent exists in the NetBackup Administration Console host properties.Equivalent AdministrationConsole property
341Configuring Host PropertiesConfiguration options for NetBackup servers

USE_AUTHENTICATION option for NetBackup serversThe USE_AUTHENTICATION option can be used to audit user information withoutenabling NetBackup Access Control (NBAC).
Table 3-126 USE_AUTHENTICATION information
DescriptionUsage
On NetBackup master servers.Where to use
Use the nbgetconfig and the nbsetconfig commands to view, add, or changethe option.
For information about these commands, see the NetBackup Commands ReferenceGuide.
Use the following format:
USE_AUTHENTICATION = ON | OFF
The option uses the following parameters:
■ ON
The user is authenticated and is audited. Authentication is achieved without enablingNBAC.
■ OFF
The user is not authenticated and is not allowed to perform any operation. Only aroot user is allowed to make changes and is audited accordingly.
This entry should appear only once in the configuration file.
How to use
No equivalent exists in the NetBackup Administration Console host properties.Equivalent AdministrationConsole property
USE_VXSS option for NetBackup servers and clientsThe USE_VXSS option specifies whether the local system uses NetBackup productauthentication and authorization.
Table 3-127 USE_VXSS information
DescriptionUsage
On NetBackup master servers or clients.Where to use
342Configuring Host PropertiesConfiguration options for NetBackup servers

Table 3-127 USE_VXSS information (continued)
DescriptionUsage
Use the nbgetconfig and the nbsetconfig commands to view, add, or changethe option.
For information about these commands, see the NetBackup Commands ReferenceGuide.
Use the following format:
USE_VXSS = REQUIRED | PROHIBITED | AUTOMATIC
The option uses the following parameters:
■ REQUIRED
Indicates that the local system always uses NetBackup product authentication andauthorization. Connections from the systems that do not use NetBackup productauthentication and authorization are rejected.
■ PROHIBITED
(Default.) Indicates that the local system never uses NetBackup productauthentication and authorization. Connections from the systems that use NetBackupproduct authentication and authorization are rejected.
■ AUTOMATIC
Indicates that the local system negotiates with the remote system whether to useNetBackup product authentication and authorization.If the USE_VXSS = AUTOMATIC option is specified, VXSS_NETWORK entries canbe used to require or prohibit NetBackup product authentication and authorizationconnections with specified remote systems.See “VXSS_NETWORK option for NetBackup servers” on page 344.
This entry should appear only once in the configuration file.
How to use
NetBackup Management > Host Properties > Master Servers > Double-click onserver > Access Control > NetBackup product authentication and authorization.Change this option to Required.
See “Network Attributes tab of the Access Control properties” on page 79.
Equivalent AdministrationConsole property
VERBOSE option for NetBackup servers and clientsUsed for debugging purposes, the VERBOSE option controls the amount of informationNetBackup includes in its legacy logs.
Table 3-128 VERBOSE information
DescriptionUsage
On NetBackup master servers or clients.Where to use
343Configuring Host PropertiesConfiguration options for NetBackup servers

Table 3-128 VERBOSE information (continued)
DescriptionUsage
Use the nbgetconfig and the nbsetconfig commands to view, add, or changethe option.
For information about these commands, see the NetBackup Commands ReferenceGuide.
Use the following format:
VERBOSE = [ 0 | 1 | 2 | 3 | 4 | 5 ]
By default, this option is disabled.
This option should appear only once in the configuration file.
How to use
NetBackup Management > Host Properties > Master Servers > Double-click onserver > Logging > Global logging level.
See “Logging properties” on page 170.
Equivalent AdministrationConsole property
VXSS_NETWORK option for NetBackup serversThis option identifies whether a specific network or remote system must or mustnot use NetBackup product authentication and authorization with the localsystem.
If a media server or client does not define a NetBackup product authenticationand authorization network, it uses the NetBackup product authentication andauthorization networks of its master server.
Table 3-129 VXSS_NETWORK information
DescriptionUsage
On NetBackup master servers.Where to use
344Configuring Host PropertiesConfiguration options for NetBackup servers

Table 3-129 VXSS_NETWORK information (continued)
DescriptionUsage
Use the nbgetconfig and the nbsetconfig commands to view, add, or changethe option.
For information about these commands, see the NetBackup Commands ReferenceGuide.
Use the following format:
VXSS_NETWORK = hostname | IP_address | .domain | network.[AUTOMATIC | REQUIRED | PROHIBITED]
VXSS_NETWORK is relevant only if USE_VXSS is set to AUTOMATIC (USE_VXSS =AUTOMATIC). More than one VXSS_NETWORK option can be specified.
See “USE_VXSS option for NetBackup servers and clients” on page 342.
The option uses the following parameters:
■ hostname
The host name of the remote system.■ IP_address
The IP address of the remote system.■ .domain
A dot followed by the Internet domain name of the remote systems.■ network.
The network for the remote systems, followed by a dot.
The optional second value can be one of the following keywords:
■ AUTOMATIC
■ REQUIRED
■ PROHIBITED
Note: If multiple VXSS_NETWORK entries specify one particular system, the firstoccurrence takes precedence.
How to use
345Configuring Host PropertiesConfiguration options for NetBackup servers

Table 3-129 VXSS_NETWORK information (continued)
DescriptionUsage
USE_VXSS = AUTOMATICVXSS_NETWORK = fred.mycompany.comVXSS_NETWORK = 10.0.0.37 REQUIREDVXSS_NETWORK = 10.0.0. PROHIBITEDVXSS_NETWORK = .theircompany.comVXSS_NETWORK = wilma.theircompany.com PROHIBITEDVXSS_NETWORK = barney.mycompany.com PROHIBITED
In the example, NetBackup product authentication and authorization is requiredfor connections between the local system and the system with hostfred.mycompany.com.
NetBackup product authentication and authorization is required for connectionsbetween the local system and the system with IP address 10.0.0.37.
NetBackup product authentication and authorization is prohibited for connectionsbetween the local system and systems in the 10.0.0 network except for 10.0.0.37.
NetBackup product authentication and authorization is required for connectionsbetween the local system and systems within the theircompany.com Internet domain.
NetBackup product authentication and authorization is required for connectionsbetween the local system and the system with host name wilma.theircompany.comdespite the PROHIBITED option for wilma.theircompany.com. The REQUIREDoption for .theircompany.com takes precedence.
NetBackup product authentication and authorization is prohibited for connectionsbetween the local system and the system with host name barney.mycompany.com
Example
NetBackup Management > Host Properties > Master Servers > Double-click onserver > Access Control. Change the networks list property.
See “Network Attributes tab of the Access Control properties” on page 79.
Equivalent AdministrationConsole property
Configuration options for NetBackup clientsThe following topics are about configuration options for NetBackup clients. Nearlyall of these options can also be set in the Host Properties in the NetBackupAdministration Console.
See “Configuration options not found in the Host Properties” on page 268.
346Configuring Host PropertiesConfiguration options for NetBackup clients

BPARCHIVE_POLICY option for NetBackup clientsThe BPARCHIVE_POLICY entry specifies the name of the policy to use for userarchives.
Table 3-130 BPARCHIVE_POLICY information
DescriptionUsage
On NetBackup clients.Where to use
Use the nbgetconfig and the nbsetconfig commands to view, add, or changethe option.
For information about these commands, see the NetBackup Commands ReferenceGuide.
Use the following format:
BPARCHIVE_POLICY = policy_name
By default, BPARCHIVE_POLICY is not present in the configuration file. By default,NetBackup uses the first policy that it finds that has the client and a user archiveschedule.
If it is used, this option should appear only once in the configuration file.
The value in the user’s $HOME/bp.conf file takes precedence, if it exists.
See “Type of backup (schedule attribute)” on page 759.
How to use
No equivalent exists in the NetBackup Administration Console host properties.Equivalent AdministrationConsole property
BPARCHIVE_SCHED option for NetBackup clientsThis entry specifies the name of the schedule for user archives.
Table 3-131 BPARCHIVE_SCHED information
DescriptionUsage
On NetBackup clients.Where to use
347Configuring Host PropertiesConfiguration options for NetBackup clients

Table 3-131 BPARCHIVE_SCHED information (continued)
DescriptionUsage
Use the nbgetconfig and the nbsetconfig commands to view, add, or changethe option.
For information about these commands, see the NetBackup Commands ReferenceGuide.
Use the following format:
BPARCHIVE_SCHED = schedule_name
By default, BPARCHIVE_SCHED is not present in the configuration file. By default,NetBackup uses the first archive schedule in the first policy that it finds that containsthis client.
If it is used, this option should appear only once in the configuration file.
The value in the user’s $HOME/bp.conf file takes precedence if it exists.
See “Considerations for user schedules” on page 767.
How to use
No equivalent exists in the NetBackup Administration Console host properties.Equivalent AdministrationConsole property
BPBACKUP_POLICY option for NetBackup clientsThis entry specifies the name of the policy to use for user backups.
Table 3-132 BPBACKUP_POLICY information
DescriptionUsage
On NetBackup clients.Where to use
348Configuring Host PropertiesConfiguration options for NetBackup clients

Table 3-132 BPBACKUP_POLICY information (continued)
DescriptionUsage
Use the nbgetconfig and the nbsetconfig commands to view, add, or changethe option.
For information about these commands, see the NetBackup Commands ReferenceGuide.
Use the following format:
BPBACKUP_POLICY = policy_name
By default, BPBACKUP_POLICY is not present in the configuration file. By default,NetBackup uses the first policy it finds that has both the client and a user backupschedule.
If present, this option should appear only once in the configuration file.
The value in the user’s $HOME/bp.conf file takes precedence if it exists.
See “Type of backup (schedule attribute)” on page 759.
How to use
No equivalent exists in the NetBackup Administration Console host properties.Equivalent AdministrationConsole property
BPBACKUP_SCHED option for NetBackup clientsThis entry specifies the name of the schedule to use for user backups.
Table 3-133 BPBACKUP_SCHED information
DescriptionUsage
On NetBackup clients.Where to use
349Configuring Host PropertiesConfiguration options for NetBackup clients

Table 3-133 BPBACKUP_SCHED information (continued)
DescriptionUsage
Use the nbgetconfig and the nbsetconfig commands to view, add, or changethe option.
For information about these commands, see the NetBackup Commands ReferenceGuide.
Use the following format:
BPBACKUP_SCHED = schedule_name
By default, BPBACKUP_SCHED is not present in the configuration file. By default,NetBackup uses the first policy it finds that contains both the client and a user backupschedule.
If present, this option should appear only once in the configuration file.
The value in the user’s $HOME/bp.conf file takes precedence if it exists.
See “Considerations for user schedules” on page 767.
How to use
No equivalent exists in the NetBackup Administration Console host properties.Equivalent AdministrationConsole property
BUSY_FILE_ACTION option for NetBackup clientsThe BUSY_FILE_ACTION entry directs the action that NetBackup performs on busyfiles when busy-file processing is enabled.
Table 3-134 BUSY_FILE_ACTION information
DescriptionUsage
On NetBackup clients.Where to use
350Configuring Host PropertiesConfiguration options for NetBackup clients

Table 3-134 BUSY_FILE_ACTION information (continued)
DescriptionUsage
Use the nbgetconfig and the nbsetconfig commands to view, add, or changethe option.
For information about these commands, see the NetBackup Commands ReferenceGuide.
BUSY_FILE_ACTION = filename_template action_template
■ filename_templateThe absolute pathname and file name of the busy file. The shell languagemetacharacters *, ?, [], [ - ] can be used for matching patterns of file names or partsof file names.
■ action_template
Use one of the following parameters:■ MAIL | mail
Directs NetBackup to email a busy file notification message to the user that theBUSY_FILE_NOTIFY_USER option specifies.
■ REPEAT | repeat [repeat_count]
Directs NetBackup to retry the backup on the specified busy file. A repeat countcan be specified to control the number of backup attempts. The default repeatcount is 1.
■ IGNORE | ignore
Directs NetBackup to exclude the busy file from processing.
Multiple BUSY_FILE_ACTION entries are allowed.
The value in the user’s $HOME/bp.conf file takes precedence if it exists.
How to use
NetBackup Management > Host Properties > Double-click on client > Busy FileSettings.
See “Busy File Settings properties” on page 85.
Equivalent AdministrationConsole property
BUSY_FILE_DIRECTORY option for NetBackup clientsThe BUSY_FILE_DIRECTORY entry specifies the path to the busy-files working directorywhen busy-file processing is enabled.
Table 3-135 BUSY_FILE_DIRECTORY information
DescriptionUsage
On NetBackup clients.Where to use
351Configuring Host PropertiesConfiguration options for NetBackup clients

Table 3-135 BUSY_FILE_DIRECTORY information (continued)
DescriptionUsage
Use the nbgetconfig and the nbsetconfig commands to view, add, or changethe option.
For information about these commands, see the NetBackup Commands ReferenceGuide.
Use the following format:
BUSY_FILE_DIRECTORY = pathname
By default, BUSY_FILE_DIRECTORY is not present in the configuration file. By default,NetBackup creates the busy_files directory in /usr/openv/netbackup.
If present, this option should appear only once in the configuration file.
The value in the user’s $HOME/bp.conf file takes precedence, if it exists.
How to use
NetBackup Management > Host Properties > Double-click on client > Busy FileSettings.
See “Busy File Settings properties” on page 85.
Equivalent AdministrationConsole property
BUSY_FILE_NOTIFY_USER option for NetBackup clientsThe BUSY_FILE_NOTIFY_USER entry specifies who receives a notification when theBUSY_FILE_ACTION entry is set to MAIL.
Table 3-136 BUSY_FILE_NOTIFY_USER information
DescriptionUsage
On NetBackup clients.Where to use
Use the nbgetconfig and the nbsetconfig commands to view, add, or changethe option.
For information about these commands, see the NetBackup Commands ReferenceGuide.
Use the following format:
BUSY_FILE_NOTIFY_USER = email
By default, BUSY_FILE_NOTIFY_USER is not present in the configuration file. Bydefault, the email recipient is root.
If present, this option should appear only once in the configuration file.
The value in the user’s $HOME/bp.conf file takes precedence, if it exists.
How to use
352Configuring Host PropertiesConfiguration options for NetBackup clients

Table 3-136 BUSY_FILE_NOTIFY_USER information (continued)
DescriptionUsage
NetBackup Management > Host Properties > Double-click on client > Busy FileSettings.
See “Busy File Settings properties” on page 85.
Equivalent AdministrationConsole property
BUSY_FILE_PROCESSING option for NetBackup clientsThe BUSY_FILE_PROCESSING entry lets the administrator control what NetBackupdoes when a file changes while it is in the process of being backed up.
Table 3-137 BUSY_FILE_PROCESSING information
DescriptionUsage
On NetBackup clients.Where to use
Use the nbgetconfig and the nbsetconfig commands to view, add, or changethe option.
For information about these commands, see the NetBackup Commands ReferenceGuide.
Use the following format:
BUSY_FILE_PROCESSING = yes
By default, BUSY_FILE_PROCESSING is not present in the configuration file andbusy-file processing does not occur.
If present, this option should appear only once in the configuration file.
How to use
NetBackup Management > Host Properties > Double-click on client > Busy FileSettings.
See “Busy File Settings properties” on page 85.
Equivalent AdministrationConsole property
CLIENT_NAME option for NetBackup clientsThe CLIENT_NAME entry specifies the name of the client as it's known to NetBackup.
Table 3-138 CLIENT_NAME information
DescriptionUsage
On NetBackup clients.Where to use
353Configuring Host PropertiesConfiguration options for NetBackup clients

Table 3-138 CLIENT_NAME information (continued)
DescriptionUsage
Use the nbgetconfig and the nbsetconfig commands to view, add, or changethe option.
For information about these commands, see the NetBackup Commands ReferenceGuide.
Use the following format:
CLIENT_NAME = clientname
This option should appear only once in the configuration file.
If more than one entry appears, NetBackup observes only the last CLIENT_NAME entrythat is listed for the option. The client name in a policy that backs up the client shouldmatch the client name that is specified with CLIENT_NAME.
Note: Do not use an IP address as a client name in a policy or the backup may fail.Specify a host name instead.
The bp.conf of the master server does not require the addition of other clients, otherthan the master server as CLIENT_NAME = master server name. The name isadded by default.
During a restore, the default is to restore to the client that is named in the policy thatwas used for the backup. For an alternate client restore, indicate the name of thealternate client in the Backup, Archive, and Restore user interface. (Within the userinterface, theDestination client for restores field is located in the Specify NetBackupMachines and Policy Type dialog box.)
To use the bprestore command, a parameter can be given to bprestore to indicatethe destination client.
See “About client-redirected restores” on page 1161.
The client installation procedures automatically set CLIENT_NAME to the value that isspecified in ftp_to_client command or install_client command in theinstallation scripts.
If the value is not in any bp.conf file, NetBackup uses the value that thegethostname() library function returns.
See “Client Name properties” on page 90.
How to use
NetBackup Management > Host Properties > Double-click on client > Client Name.Equivalent AdministrationConsole property
354Configuring Host PropertiesConfiguration options for NetBackup clients

COMPRESS_SUFFIX option for NetBackup clientsThe COMPRESS_SUFFIX entry specifies a list of file extensions. During a backup,NetBackup does not compress files with these extensions because the file mayalready be in a compressed format.
Table 3-139 COMPRESS_SUFFIX information
DescriptionUsage
On NetBackup clients.Where to use
Use the nbgetconfig and the nbsetconfig commands to view, add, or changethe option.
For information about these commands, see the NetBackup Commands ReferenceGuide.
Use the following format:
COMPRESS_SUFFIX = .suffix
By default, COMPRESS_SUFFIX is not present in the bp.conf file. This option has areasonable default. Change only if problems result.
Multiple COMPRESS_SUFFIX entries are allowed.
Do not use wildcards to specify these extensions. Do not specify .A* or .A [1-9] (Forexample, specify .A1)
How to use
NetBackupManagement > Host Properties > ClientsDouble-click on client > ClientSettings.
See “Client Settings properties for UNIX clients” on page 107.
Equivalent AdministrationConsole property
CRYPT_CIPHER option for NetBackup clientsThe CRYPT_CIPHER entry applies to clients with the NetBackup Encryption optioninstalled.
Table 3-140 CRYPT_CIPHER information
DescriptionUsage
On NetBackup clients.Where to use
355Configuring Host PropertiesConfiguration options for NetBackup clients

Table 3-140 CRYPT_CIPHER information (continued)
DescriptionUsage
Use the nbgetconfig and the nbsetconfig commands to view, add, or changethe option.
For information about these commands, see the NetBackup Commands ReferenceGuide.
Use the following format:
CRYPT_CIPHER = value
Where value is one of the following:
■ AES-128-CFB (used when no method is specified; default)■ AES-256-CFB
■ BF-CFB
■ DES-EDE-CFB
This option should appear only once in the configuration file.
How to use
NetBackup Management > Host Properties > Double-click on client > Encryption.
See “Encryption properties” on page 126.
See the NetBackup Security and Encryption Guide.
Equivalent AdministrationConsole property
CRYPT_KIND option for NetBackup clientsThe CRYPT_KIND entry on the client determines whether the standard encryption orlegacy encryption is used in the backup. Normally, CRYPT_KIND is set automatically.
The CRYPT_KIND entry applies to clients with the NetBackup Encryption optioninstalled.
See the NetBackup Security and Encryption Guide.
Table 3-141 CRYPT_KIND information
DescriptionUsage
On NetBackup clients.Where to use
356Configuring Host PropertiesConfiguration options for NetBackup clients

Table 3-141 CRYPT_KIND information (continued)
DescriptionUsage
Use the nbgetconfig and the nbsetconfig commands to view, add, or changethe option.
For information about these commands, see the NetBackup Commands ReferenceGuide.
Use the following format:
CRYPT_KIND = type
The following values can be entered:
■ NONE
No encryption is used on the client (default)■ LEGACY
Legacy pertains to 40-bit and 56-bit data encryption standard (DES). Legacyencryption is not recommended.
■ STANDARD
Standard pertains to 128-bit and 256-bit encryption (AES, 3DES, Blowfish cipher).Standard encryption is recommended.
This option should appear only once in the configuration file.
How to use
NetBackup Management > Host Properties > Double-click on client > Encryption.
See “Encryption properties” on page 126.
Equivalent AdministrationConsole property
CRYPT_OPTION option for NetBackup clientsThe CRYPT_OPTION entry specifies the encryption options on NetBackup clients.NetBackup creates this entry automatically in the /usr/openv/netbackup/bp.conf
file on a UNIX client when the bpinst_crypt command is run on the NetBackupmaster server.
The CRYPT_OPTION entry applies to clients with the NetBackup Encryption optioninstalled.
See the NetBackup Security and Encryption Guide.
Do not alter the entry or create this file manually unless it was accidentally deleted.
Table 3-142 CRYPT_OPTION information
DescriptionUsage
On NetBackup clients.Where to use
357Configuring Host PropertiesConfiguration options for NetBackup clients

Table 3-142 CRYPT_OPTION information (continued)
DescriptionUsage
Use the nbgetconfig and the nbsetconfig commands to view, add, or changethe option.
For information about these commands, see the NetBackup Commands ReferenceGuide.
Use the following format:
CRYPT_OPTION = type
The following values can be entered:
■ DENIED|denied
Specifies that the client does not permit encrypted backups. If the server requestsan encrypted backup, it is considered an error. This option is the default for a clientthat has not been configured for encryption.
■ ALLOWED|allowed
Specifies that the client allows either encrypted or unencrypted backups.■ REQUIRED|required
Specifies that the client requires encrypted backups. If this value is specified andthe server requests an unencrypted backup, it is considered an error.
This option should appear only once in the configuration file.
How to use
NetBackup Management > Host Properties > Double-click on client > Encryption.
See “Encryption properties” on page 126.
Equivalent AdministrationConsole property
CRYPT_STRENGTH option for NetBackup clientsThe CRYPT_STRENGTH entry specifies the encryption strength on NetBackup clients.It applies to clients with the NetBackup Encryption option installed.
See the NetBackup Security and Encryption Guide.
Table 3-143 CRYPT_STRENGTH information
DescriptionUsage
On NetBackup clients.Where to use
358Configuring Host PropertiesConfiguration options for NetBackup clients

Table 3-143 CRYPT_STRENGTH information (continued)
DescriptionUsage
Use the nbgetconfig and the nbsetconfig commands to view, add, or changethe option.
For information about these commands, see the NetBackup Commands ReferenceGuide.
Use the following format:
CRYPT_STRENGTH = value
The allowable values are as follows:
■ DES_40|des_40
Specifies 40-bit DES encryption. 40-bit is the default value for a client that has notbeen configured for encryption.
■ DES_56|des_56
Specifies 56-bit DES encryption.
NetBackup creates this entry automatically on a UNIX client when the bpinst_cryptcommand is run on the NetBackup master server. This entry should appear only oncein the configuration file.
Do not alter the entry or create it manually unless it was accidentally deleted.
How to use
NetBackup Management > Host Properties > Double-click on client > Encryption.
See “Encryption properties” on page 126.
Equivalent AdministrationConsole property
CRYPT_LIBPATH option for NetBackup clientsThe CRYPT_LIBPATH entry specifies the directory that contains the encryption librariesfor NetBackup clients. NetBackup creates this entry automatically in the/usr/openv/netbackup/bp.conf file on a UNIX client when the bpinst_crypt
command is run on the NetBackup master server.
The CRYPT_LIBPATH entry applies to clients with the NetBackup Encryption optioninstalled. Do not alter the entry or create it manually unless it was accidentallydeleted. This entry should appear only once in the configuration file.
See the NetBackup Security and Encryption Guide.
Table 3-144 CRYPT_LIBPATH information
DescriptionUsage
On NetBackup clients.Where to use
359Configuring Host PropertiesConfiguration options for NetBackup clients

Table 3-144 CRYPT_LIBPATH information (continued)
DescriptionUsage
Use the nbgetconfig and the nbsetconfig commands to view, add, or changethe option.
For information about these commands, see the NetBackup Commands ReferenceGuide.
Use the following format:
CRYPT_LIBPATH = directory
If necessary, create the entry in the following locations:
■ The default value on UNIX systems is /usr/openv/lib/■ The default value on Windows systems is install_path\bin\
Where install_path is the directory where NetBackup is installed and by default isC:\Program Files\VERITAS.
How to use
NetBackup Management > Host Properties > Double-click on client > Encryption.
See “Encryption properties” on page 126.
Equivalent AdministrationConsole property
CRYPT_KEYFILE option for NetBackup clientsThe CRYPT_KEYFILE entry specifies the file that contains the encryption keys onNetBackup clients. NetBackup creates this entry automatically in the/usr/openv/netbackup/bp.conf file on a UNIX client when the bpinst_crypt
command is run on the NetBackup master server.
See the NetBackup Security and Encryption Guide.
Table 3-145 CRYPT_KEYFILE information
DescriptionUsage
On NetBackup clients.Where to use
360Configuring Host PropertiesConfiguration options for NetBackup clients

Table 3-145 CRYPT_KEYFILE information (continued)
DescriptionUsage
The CRYPT_KEYFILE entry applies to clients with the NetBackup Encryption optioninstalled. Do not alter the entry or create it manually unless it was accidentally deleted.
Use the nbgetconfig and the nbsetconfig commands to view, add, or changethe option.
For information about these commands, see the NetBackup Commands ReferenceGuide.
Use the following format:
CRYPT_KEYFILE = directory
The default values follow:
■ On Windows systemsinstall_path\bin\keyfile.dat
Where install_path is the directory where NetBackup is installed and by default isC:\Program Files\VERITAS.
■ On UNIX systems/usr/openv/netbackup/keyfile
This entry should appear only once in the configuration file.
How to use
NetBackup Management > Host Properties > Double-click on client > Encryption.
See “Encryption properties” on page 126.
Equivalent AdministrationConsole property
DISALLOW_SERVER_FILE_WRITES option for NetBackup clientsThe DISALLOW_SERVER_FILE_WRITES entry prevents the NetBackup server fromcreating files on the NetBackup client. For example, this entry preventsserver-directed restores or server-directed updates of the configuration file on theclient.
Table 3-146 DISALLOW_SERVER_FILE_WRITES information
DescriptionUsage
On NetBackup clients.Where to use
361Configuring Host PropertiesConfiguration options for NetBackup clients

Table 3-146 DISALLOW_SERVER_FILE_WRITES information (continued)
DescriptionUsage
Use the nbgetconfig and the nbsetconfig commands to view, add, or changethe option.
For information about these commands, see the NetBackup Commands ReferenceGuide.
Use the following format:
DISALLOW_SERVER_FILE_WRITES
By default, server writes are allowed.
This option should appear only once in the configuration file.
How to use
NetBackup Management > Host Properties > Double-click on client > UniversalSettings.
See “Universal Settings properties” on page 258.
Equivalent AdministrationConsole property
DO_NOT_RESET_FILE_ACCESS_TIME option for NetBackupclients
The DO_NOT_RESET_FILE_ACCESS_TIME entry specifies that if a file is backed up,its access time (atime) displays the time of the backup. The default is thatNetBackup preserves the access time by resetting it to the value it had before thebackup.
Note: The DO_NOT_RESET_FILE_ACCESS_TIME entry affects the software and theadministration scripts that examine a file’s access time. Do not use this option orUSE_CTIME_FOR_INCREMENTALS if Storage Migrator is on the system. Setting theseoptions causes the atime for files to be updated every time they are backed up.Each time the atime updates, it appears as if the files are frequently used andprevents Storage Migrator from selecting the files for migration.
Table 3-147 DO_NOT_RESET_FILE_ACCESS_TIME information
DescriptionUsage
On NetBackup clients.Where to use
362Configuring Host PropertiesConfiguration options for NetBackup clients

Table 3-147 DO_NOT_RESET_FILE_ACCESS_TIME information (continued)
DescriptionUsage
Use the nbgetconfig and the nbsetconfig commands to view, add, or changethe option.
For information about these commands, see the NetBackup Commands ReferenceGuide.
Use the following format:
DO_NOT_RESET_FILE_ACCESS_TIME
This option should appear only once in the configuration file.
How to use
NetBackupManagement > Host Properties >Double-click on client >Client Settings.
See “Client Settings properties for UNIX clients” on page 107.
Equivalent AdministrationConsole property
IGNORE_XATTR option for NetBackup clientsBy default, extended attribute files (Solaris 9 or later) and named data streams arebacked up. Use IGNORE_XATTR to exclude extended attributes and named datastreams from backups. (IGNORE_XATTR was formerly IGNORE_XATTR_SOLARIS.)
Table 3-148 IGNORE_XATTR information
DescriptionUsage
On NetBackup clients.Where to use
Use the nbgetconfig and the nbsetconfig commands to view, add, or changethe option.
For information about these commands, see the NetBackup Commands ReferenceGuide.
Use the following format:
IGNORE_XATTR
NetBackup does not check for extended attributes or named data streams if theIGNORE_XATTR entry is present in the bp.conf file.
This option should appear only once in the configuration file.
See “About backing up and restoring extended attribute files and named data streams”on page 829.
How to use
No equivalent exists in the NetBackup Administration Console host properties.Equivalent AdministrationConsole property
363Configuring Host PropertiesConfiguration options for NetBackup clients

Backing up and restoring the ACLs, extended attributes,and metadata attributes for GPFS volumesNetBackup recognizes the access control lists, extended attributes, and metadataattributes of General Parallel File System files and folders. By default, NetBackupbacks up and restores all of these for GPFS volumes. No additional configurationis necessary.
Restoring files with GPFS Extended Attributes to operating systems other than AIXor RHEL or file systems other than GPFS may generate errors or failed jobs. Theerrors occur because the restore target does not recognize the metadata.
Preventing the backup or restore of the ACL and extendedattributes for a GPFS volume■ To prevent backups of GPFS extended attributes:
Add the IGNORE_XATTR entry to the bp.conf file on the client:/usr/openv/netbackup/bp.conf
The entry does not require a value setting; the entry is only IGNORE_XATTR.
■ To prevent backups of the GPFS ACL:Add the IGNORE_ACL touch file to the client:/usr/openv/netbackup/IGNORE_ACL
Note: If extended attributes are allowed to be backed up, the ACL is also backedup, regardless of whether or not the IGNORE_ACL touch file is present.
■ To prevent restores of GPFS extended attributes (provided that they were backedup in the first place):Add the IGNORE_XATTR touch file to the client:/usr/openv/netbackup/IGNORE_XATTR
■ To prevent restores of the GPFS ACL (provided that it was backed up in thefirst place):Add the IGNORE_ACL touch file to the client:/usr/openv/netbackup/IGNORE_ACL
Note: If extended attributes are allowed for restore, the ACL is also restored,regardless of whether or not the IGNORE_ACL touch file is present.
364Configuring Host PropertiesConfiguration options for NetBackup clients

Considerations when backing up and restoring GPFSextended attributes■ Upon restore of a file or folder that has an ACL or extended attributes, the ACL
and extended attributes are also restored if they were originally backed up.However, if the restore job was interrupted, the last file that was in-process maybe skipped when the restore job resumes. In that case, the ACL and the extendedattributes of that file and all subsequent files will not be restored.
■ The IGNORE_XATTR option instructs NetBackup to ignore extended attributeswhen backing up files and folders that have extended attributes. In case of aNetBackup Accelerator initial backup, if IGNORE_XATTR is added to the bp.conffile or the registry and then is later removed for subsequent backups, performa backup with the Accelerator forced rescan option enabled.See “Accelerator forced rescan option (schedule attribute)” on page 769.
■ If the ACL interface is used to change ACL permissions after a backup isperformed, the restore may not preserve the ACL upon restore.
Support for GPFS metadata attributes: storage pools,metadata replication, and data replicationNetBackup has added support for the backup and restore of the following GPFSmetadata attributes: storage pools, metadata replication, and data replication. Bydefault, NetBackup backs up and restores the ACLs, the extended attributes, andthese additional metadata attributes for GPFS volumes. No additional configurationis necessary.
The following information is pertinent if, after restoring a file, the illplaced or theillreplicated flags display in the status of the file. (View the status of the file byusing the GPFS mmlsattr command.)
The illplaced flag displays if the file was restored to a different GPFS storagepool than where it was when it was backed up. The change could be due to achange in creation rules or the result of migration rules in the GPFS file placementpolicy. Or the GPFS administrator may have used the mmchattr command tomanually move the file to a different storage pool.
The illreplicated flag displays when the storage pool containing the restoredfile has fewer failure groups than required by the data replication setting or thesystem pool has fewer failure groups than the metadata replication setting.
The GPFS administrator can rebalance the replication factor of the file and resolvethe illplaced or illreplicated flags by running one of two GPFS commands,depending on the number of the files that are involved and the network traffic:
■ For a single file: mmrestripefile
365Configuring Host PropertiesConfiguration options for NetBackup clients

■ For the complete file system: mmrestripefs
Note: Restoring files with GPFS attributes and ACLs to an alternate platform doesnot restore the metadata attributes or the ACLs. For example, backing up files froman RHEL system and restoring to an AIX system. The restore may generate anerror such as “Invalid system call.” (Extended attributes can be restored to thealternate platform, however.)
Notes about support for GPFS metadata attributes■ Restoring files with GPFS attributes and ACLs to an alternate platform does not
restore the metadata attributes or the ACLs. For example, backing up files froman RHEL system and restoring to an AIX system. The restore may generate anerror such as “Invalid system call.” (Extended attributes can be restored to thealternate platform, however.)
■ When NetBackup 7.6.1 is used to restore a backup that was created with aNetBackup 7.6.1.1 client, any GPFS Extended Attributes or newly supportedGPFS metadata attributes that were backed up are not restored. (ACLs arerestored, however.) Depending on the verbose logging level used, the progresslog may display a message similar to the following:Unknown extended attribute (3 - META_GPFS) - information will be
lost
INFORMIX_HOME option for NetBackup clientsThe INFORMIX_HOME entry specifies the path to the Informix home directory and isrequired when the client uses NetBackup for Informix.
Table 3-149 INFORMIX_HOME information
DescriptionUsage
On NetBackup clients.Where to use
Use the nbgetconfig and the nbsetconfig commands to view, add, or changethe option.
For information about these commands, see the NetBackup Commands ReferenceGuide.
Use the following format:
INFORMIX_HOME
This option should appear only once in the configuration file.
How to use
366Configuring Host PropertiesConfiguration options for NetBackup clients

Table 3-149 INFORMIX_HOME information (continued)
DescriptionUsage
No equivalent exists in the NetBackup Administration Console host properties.Equivalent AdministrationConsole property
KEEP_DATABASE_COMM_FILE option for NetBackup clientsThe KEEP_DATABASE_COMM_FILE entry causes NetBackup to keep database agentlogs for seven days. The default is that NetBackup keeps database agent logs foronly one day.
Table 3-150 KEEP_DATABASE_COMM_FILE information
DescriptionUsage
On NetBackup clients.Where to use
Use the nbgetconfig and the nbsetconfig commands to view, add, or changethe option.
For information about these commands, see the NetBackup Commands ReferenceGuide.
Use the following format:
KEEP_DATABASE_COMM_FILE
For example, add it to a client that runs NetBackup for Informix.
This option should appear only once in the configuration file.
How to use
No equivalent exists in the NetBackup Administration Console host properties.Equivalent AdministrationConsole property
KEEP_LOGS_DAYS option for NetBackup clientsThe KEEP_LOGS_DAYS entry specifies how long to keep job and progress logs of theNetBackup-Java program, Backup, Archive, and Restore. The default is 3 days.
NetBackup writes these files in the following directories:
■ /usr/openv/netbackup/logs/user_ops/username/jobs
■ /usr/openv/netbackup/logs/user_ops/username/logs
A directory exists for each user that uses the Backup, Archive, and Restoreconsole. This entry also controls how long to keep the log files from theNetBackup-Java console.
367Configuring Host PropertiesConfiguration options for NetBackup clients

The log files are located in /usr/openv/netbackup/logs/user_ops/nbjlogs.
Table 3-151 KEEP_LOGS_DAYS information
DescriptionUsage
On NetBackup clients.Where to use
Use the nbgetconfig and the nbsetconfig commands to view, add, or changethe option file.
For information about these commands, see the NetBackup Commands ReferenceGuide.
Use the following format:
KEEP_LOGS_DAYS
This option should appear only once in the configuration file.
How to use
NetBackupManagement > Host Properties >Double-click on client >Client Settings.
See “Client Settings properties for UNIX clients” on page 107.
See “Client Settings properties for Windows clients” on page 112.
Equivalent AdministrationConsole property
LIST_FILES_TIMEOUT option for NetBackup clientsThe LIST_FILES_TIMEOUT entry specifies how long to wait for a response from theserver when it lists files by using the client-user interface or bplist. If this time isexceeded, the user receives a socket read failed error even if the servercontinues to process the user’s request. The default is that LIST_FILES_TIMEOUTis not in any bp.conf file and NetBackup uses a value of 30 minutes.
Table 3-152 LIST_FILES_TIMEOUT information
DescriptionUsage
On NetBackup clients.Where to use
Use the nbgetconfig and the nbsetconfig commands to view, add, or changethe option.
For information about these commands, see the NetBackup Commands ReferenceGuide.
Use the following format:
LIST_FILES_TIMEOUT
This option should appear only once in the configuration file.
The value in the $HOME/bp.conf file takes precedence if it exists.
How to use
368Configuring Host PropertiesConfiguration options for NetBackup clients

Table 3-152 LIST_FILES_TIMEOUT information (continued)
DescriptionUsage
NetBackup Management > Host Properties > Double-click on client > Timeouts.
See “Timeouts properties” on page 256.
Equivalent AdministrationConsole property
LOCKED_FILE_ACTION option for NetBackup clientsThe LOCKED_FILE_ACTION entry specifies the behavior of NetBackup when it backsup a file that has mandatory file locking enabled in its file mode. (See chmod(1)).If this entry is set to SKIP, NetBackup skips the files that currently have mandatorylocking set by another process. NetBackup logs a message to this effect.
Table 3-153 LOCKED_FILE_ACTION information
DescriptionUsage
On NetBackup clients.Where to use
Use the nbgetconfig and the nbsetconfig commands to view, add, or changethe option.
For information about these commands, see the NetBackup Commands ReferenceGuide.
Use the following format:
LOCKED_FILE_ACTION = SKIP
This option should appear only once in the configuration file.
Note: SKIP is the only legal value for this entry. The default is that NetBackup waitsfor files to become unlocked.
How to use
NetBackupManagement > Host Properties >Double-click on client >Client Settings.
See “Client Settings properties for UNIX clients” on page 107.
Equivalent AdministrationConsole property
MEDIA_SERVER option for NetBackup clientsThe MEDIA_SERVER entry specifies that the listed computer is a media server only.Computers that are listed as media servers can back up and restore clients, buthave limited administrative privileges.
369Configuring Host PropertiesConfiguration options for NetBackup clients

Table 3-154 MEDIA_SERVER information
DescriptionUsage
On NetBackup clients.Where to use
Use the nbgetconfig and the nbsetconfig commands to view, add, or changethe option.
For information about these commands, see the NetBackup Commands ReferenceGuide.
Use the following format:
MEDIA_SERVER = media_server_name
This option should appear only once in the configuration file.
How to use
NetBackup Management > Host Properties > Double-click on client > Servers.
See “SERVER option for NetBackup servers” on page 329.
Equivalent AdministrationConsole property
MEGABYTES_OF_MEMORY option for NetBackup clientsThe MEGABYTES_OF_MEMORY entry specifies how much memory is available on theclient to use to compress files during backup. If compression is selected, the clientsoftware uses this value to determine how much space to request for thecompression tables. The more memory that is available to the compress code, thegreater the compression. The percentage of computer resources that are used isalso greater. If other processes also need memory, use a maximum value of onehalf the actual physical memory on a computer to avoid excessive swapping.
Table 3-155 MEGABYTES_OF_MEMORY information
DescriptionUsage
On NetBackup clients.Where to use
370Configuring Host PropertiesConfiguration options for NetBackup clients

Table 3-155 MEGABYTES_OF_MEMORY information (continued)
DescriptionUsage
Use the nbgetconfig and the nbsetconfig commands to view, add, or changethe option.
For information about these commands, see the NetBackup Commands ReferenceGuide.
Use the following format:
MEGABYTES_OF_MEMORY = memory_value
The default is that NetBackup assumes a value of zero megabytes.
This option should appear only once in the configuration file.
Note: The MEGABYTES_OF_MEMORY entry has a reasonable default. Change it onlyif problems are encountered.
How to use
NetBackupManagement > Host Properties >Double-click on client >Client Settings.
See “Client Settings properties for UNIX clients” on page 107.
Equivalent AdministrationConsole property
NFS_ACCESS_TIMEOUT option for NetBackup clientsThe NFS_ACCESS_TIMEOUT entry specifies the number of seconds that the backupprocess waits to process an NFS mount table. After the time is exceeded, theprocess considers an NFS file system to be unavailable.
Table 3-156 NFS_ACCESS_TIMEOUT information
DescriptionUsage
On NetBackup clients.Where to use
Use the nbgetconfig and the nbsetconfig commands to view, add, or changethe option.
For information about these commands, see the NetBackup Commands ReferenceGuide.
Use the following format:
NFS_ACCESS_TIMEOUT = seconds
By default, NFS_ACCESS_TIMEOUT is set to five seconds.
This entry should appear only once in the configuration file.
How to use
NetBackup Management > Host Properties > Double-click on client > UNIX Server.
See “UNIX Server properties” on page 265.
Equivalent AdministrationConsole property
371Configuring Host PropertiesConfiguration options for NetBackup clients

OLD_VNETD_CALLBACK option for NetBackup clientsThe OLD_VNETD_CALLBACK entry specifies that the client should use the client-directrestore path rather than use the bptm process on a NetBackup media server. Theclient-direct restore path bypasses the NetBackup media server for the restore jobs.Configure this entry on the NetBackup clients that you want to receive data directlyfrom a Media Server Deduplication Pool storage server.
Before you decommission a media server that hosts aMedia Server DeduplicationPool, deactivate MSDP on that media server. See the NetBackup DeduplicationGuide for your release.
Table 3-157 OLD_VNETD_CALLBACK information
DescriptionUsage
On NetBackup clients.Where to use
Use the nbgetconfig and the nbsetconfig commands to view, add, or changethe option.
For information about these commands, see the NetBackup Commands ReferenceGuide.
Use the following format:
OLD_VNETD_CALLBACK = YES
This entry should appear only once in the configuration file.
How to use
No equivalent exists in the NetBackup Administration Console host properties.Equivalent AdministrationConsole property
REPORT_CLIENT_DISCOVERIES option for NetBackup clientsBy default, the NetBackup Discovery Service (nbdisco) runs on all clients in theNetBackup environment. The service helps you build Intelligent Policies by reportingto the master server when it finds instances of applications (such as Oracle).
Table 3-158 REPORT_CLIENT_DISCOVERIES information
DescriptionUsage
On NetBackup clients.Where to use
372Configuring Host PropertiesConfiguration options for NetBackup clients

Table 3-158 REPORT_CLIENT_DISCOVERIES information (continued)
DescriptionUsage
By default, REPORT_CLIENT_DISCOVERIES is not present in the configuration file.When REPORT_CLIENT_DISCOVERIES is not present, the NetBackup DiscoveryService is enabled.
Use the nbgetconfig and the nbsetconfig commands to view, add, or changethe option.
For information about these commands, see the NetBackup Commands ReferenceGuide.
Use the following format:
REPORT_CLIENT_DISCOVERIES = TRUE | FALSE
This option should appear only once in the configuration file.
■ If the entry is set to FALSE, the nbdisco process on that client stops reportingdiscoveries to the master server. The service shuts down within 10 minutes afterbeing set to FALSE and remains down.
■ To turn on the Discovery Service again, either change the entry on that client toREPORT_CLIENT_DISCOVERIES = TRUE or remove the entire option. Then, runbp.start_all on the client to restart the service.
■ To set this value on a client remotely, run the following command from the masterserver:nbsetconfig -h clientname
How to use
No equivalent exists in the NetBackup Administration Console host properties.Equivalent AdministrationConsole property
RESTORE_RETRIES option for NetBackup clientsThe RESTORE_RETRIES entry specifies the number of times to retry a restore aftera failure.
Table 3-159 RESTORE_RETRIES information
DescriptionUsage
On NetBackup clients.Where to use
373Configuring Host PropertiesConfiguration options for NetBackup clients

Table 3-159 RESTORE_RETRIES information (continued)
DescriptionUsage
Use the nbgetconfig and the nbsetconfig commands to view, add, or changethe option.
For information about these commands, see the NetBackup Commands ReferenceGuide.
Use the following format:
RESTORE_RETRIES = number_of_retries
The default is 0 (no retries).
This option should appear only once in the configuration file.
Note: The RESTORE_RETRIES entry has a reasonable default. Change it only ifproblems are encountered.
How to use
NetBackup Management > Host Properties > Double-click on client > UniversalSettings > Restore retries.
See “Universal Settings properties” on page 258.
Equivalent AdministrationConsole property
SERVER option for NetBackup clientsThe SERVER entry defines the list of NetBackup master servers and media serversthat can access the NetBackup client. During client installation, SERVER isautomatically set to the name of the primary master server for this client.
Other SERVER entries can be added for any other master servers for this client, andfor media servers for this client. Media servers for this NetBackup client can alsobe added by using the MEDIA_SERVER option.
Table 3-160 SERVER information
DescriptionUsage
On NetBackup clients.Where to use
374Configuring Host PropertiesConfiguration options for NetBackup clients

Table 3-160 SERVER information (continued)
DescriptionUsage
Use the nbgetconfig and the nbsetconfig commands to view, add, or changethe option.
For information about these commands, see the NetBackup Commands ReferenceGuide.
Note: Every SERVER entry in a client bp.conf file must be a NetBackup master ormedia server. That is, each system that is listed as a SERVER must have eitherNetBackup master or media server software installed. The client service on someclients cannot be started if the client name is incorrectly listed as a server.
If you configure media servers, each media server must have a SERVER or aMEDIA_SERVER entry in the bp.conf file of the client.
How to use
The following is an example bp.conf file on a client:
SERVER = Master_server (default master server)
SERVER = NB_server (other master server)
SERVER = Media_server_#1
MEDIA_SERVER = Media_server_#2
.
.
.
The first SERVER entry denotes the master server to which the client connects to bydefault for any requests. (For example, to back up, to list, or to restore files). TheSERVER entry must be present in the /usr/openv/netbackup/bp.conf file on allUNIX clients. The SERVER entry is the only required entry in the bp.conf file for clients.The SERVER entry is not used in a $HOME/bp.conf file. On NetBackup UNIX servers,the SERVER entry applies to both client and the server.
See “RESUME_ORIG_DUP_ON_OPT_DUP_FAIL option for NetBackup servers”on page 328.
See “MEDIA_SERVER option for NetBackup clients” on page 369.
Example
NetBackup Management > Host Properties > Double-click on client > Servers.
See “SERVER option for NetBackup servers” on page 329.
Equivalent AdministrationConsole property
SYBASE_HOME option for NetBackup clientsThe SYBASE_HOME entry specifies the path to the Sybase home directory. The entryis required for NetBackup to use Sybase to back up Sybase databases.
375Configuring Host PropertiesConfiguration options for NetBackup clients

Table 3-161 SYBASE_HOME information
DescriptionUsage
On a NetBackup for Sybase client.Where to use
Use the nbgetconfig and the nbsetconfig commands to view, add, or changethe option.
For information about these commands, see the NetBackup Commands ReferenceGuide.
Use the following format:
SYBASE_HOME = path_to_Sybase_home_directory
The default is that SYBASE_HOME is not in the configuration file.
This option should appear only once in the configuration file.
Note: This entry is not required to back up the Sybase SQL Anywhere database thatNetBackup uses as part of the NetBackup catalog.
For additional information, see the NetBackup for Sybase Administrator's Guide.
How to use
No equivalent exists in the NetBackup Administration Console host properties.Equivalent AdministrationConsole property
USE_CTIME_FOR_INCREMENTALS option for NetBackup clientsThe USE_CTIME_FOR_INCREMENTALS entry changes how NetBackup determineswhether or not a file has changed. This entry causes the client software to use bothmodification time and inode change time during incremental backups to determineif a file has changed. (mtime and ctime.)
Table 3-162 USE_CTIME_FOR_INCREMENTALS information
DescriptionUsage
On NetBackup clients.Where to use
376Configuring Host PropertiesConfiguration options for NetBackup clients

Table 3-162 USE_CTIME_FOR_INCREMENTALS information (continued)
DescriptionUsage
Use the nbgetconfig and the nbsetconfig commands to view, add, or changethe option.
For information about these commands, see the NetBackup Commands ReferenceGuide.
Use the following format:
USE_CTIME_FOR_INCREMENTALS
This option should appear only once in the configuration file.
By default, NetBackup uses only mtime.
Note: If you specify USE_CTIME_FOR_INCREMENTALS, you must also specifyDO_NOT_RESET_FILE_ACCESS_TIME. Do not use these options if Storage Migratoris on the system. Setting these options causes the file atime to be updated every timethey are backed up. When the atime updates, it appears as if the files are frequentlyused and prevents Storage Migrator from selecting the files for migration.
See “DO_NOT_RESET_FILE_ACCESS_TIME option for NetBackup clients”on page 362.
How to use
NetBackupManagement > Host Properties >Double-click on client > Client Settings> Reset file access time to the value before backup.
Equivalent AdministrationConsole property
USE_FILE_CHG_LOG option for NetBackup clientsThe USE_FILE_CHG_LOG entry specifies whether NetBackup uses the file changelog on VxFS clients. The default is off.
Table 3-163 USE_FILE_CHG_LOG information
DescriptionUsage
On NetBackup clients.Where to use
Use the nbgetconfig and the nbsetconfig commands to view, add, or changethe option.
For information about these commands, see the NetBackup Commands ReferenceGuide.
Use the following format:
USE_FILE_CHG_LOG
This option should appear only once in the configuration file.
How to use
377Configuring Host PropertiesConfiguration options for NetBackup clients

Table 3-163 USE_FILE_CHG_LOG information (continued)
DescriptionUsage
NetBackupManagement > Host Properties >Double-click on client > Client Settings> Use VxFS File Change Log for Incremental Backups.
See “VxFS file change log for incremental backups property” on page 110.
Equivalent AdministrationConsole property
USEMAIL option for NetBackup clientsThe USEMAIL entry specifies the email address where NetBackup sends status onthe outcome of operations for a UNIX client.
Table 3-164 USEMAIL information
DescriptionUsage
On NetBackup UNIX clients.Where to use
Use the nbgetconfig and the nbsetconfig commands to view, add, or changethe option.
For information about these commands, see the NetBackup Commands ReferenceGuide.
Use the following format:
USEMAIL = [email protected],[email protected],[email protected]
Note: Separate multiple email addresses using a comma, with no spaces.
Add USEMAIL as follows:
■ If the USEMAIL specifies an address, NetBackup sends automatic backup andmanual backup status to that address.
■ If the $HOME/bp.conf file specifies an address, NetBackup also sends status onthe success or failure of user operations to that address.
This option should appear only once in the configuration file.
How to use
NetBackup Management > Host Properties > Double-click on client > UniversalSettings.
See “Universal Settings properties” on page 258.
Equivalent AdministrationConsole property
VXSS_NETWORK option for NetBackup clientsThis entry identifies whether a specific network or remote system must or must notuseNetBackup product authentication and authorizationwith the local system.It can be configured on NetBackup servers and clients.
378Configuring Host PropertiesConfiguration options for NetBackup clients

See “VXSS_NETWORK option for NetBackup servers” on page 344.
See “Network Attributes tab of the Access Control properties” on page 79.
UNIX client examplesThe following is an example of a bp.conf file of a UNIX client:
SERVER = server1
CLIENT_NAME = client1
USEMAIL = [email protected]
COMPRESS_SUFFIX = .Addrs
COMPRESS_SUFFIX = .Counts
VERBOSE = 1
RESTORE_RETRIES = 1
BPBACKUP_POLICY = U1userdir
BPBACKUP_SCHED = userbackups
BPARCHIVE_POLICY = U1userdir
BPARCHIVE_SCHED = userarchives
LOCKED_FILE_ACTION = SKIP
Nonroot users on UNIX clients can have a personal bp.conf file in their homedirectory: $HOME/bp.conf.
Note: A root user cannot have a personal bp.conf file. For root users, NetBackupuses the /usr/openv/netbackup/bp.conf file.
A personal bp.conf file can have any of the following options:
USEMAIL = [email protected]
BPBACKUP_POLICY = user1
BPBACKUP_SCHED = userback
BPARCHIVE_POLICY = user1
BPARCHIVE_SCHED = userarch
LIST_FILES_TIMEOUT = 10
CLIENT_NAME = alternate_client_name
Specify CLIENT_NAME only when doing restores to an alternate client.
See “Configuration options for NetBackup clients” on page 346.
379Configuring Host PropertiesConfiguration options for NetBackup clients
Configuring server groupsThis chapter includes the following topics:
■ About NetBackup server groups
■ Configuring a NetBackup server group
■ Deleting a server group
About NetBackup server groupsA server group is a group of NetBackup servers that are used for a common purpose.A NetBackup Media Sharing group is a server group that shares tape media forwrite purposes (backups).
A Media Sharing group can contain the following:
■ NetBackup master server
■ NetBackup media servers
■ NDMP tape servers
Servers can be in more than one group. All members of a Media Sharing servergroup must have the same NetBackup master server.
See “About media sharing” on page 524.
See “Configuring media sharing with a server group” on page 525.
See “Configuring a NetBackup server group” on page 380.
Configuring a NetBackup server groupUse the following procedure to configure a server group.
4Chapter

Caution: NetBackup allows a server group name to be the same as the name ofa media server. To avoid confusion, Veritas recommends that you do not use thesame name for a server group and a media server.
See “About NetBackup server groups” on page 380.
To configure a server group
1 In the NetBackup Administration Console, expand Media and DeviceManagement > Devices > Server Groups.
2 In the Actions menu, select New > Server Group.
3 In the New Server Group dialog box, enter or select the appropriateinformation.
See “NetBackup server group properties” on page 382.
To add a server to the group, select it in the Servers Not in Group windowand click Add.
To remove a server from the group, select it in the Servers in Group windowand click Remove.
381Configuring server groupsConfiguring a NetBackup server group

NetBackup server group propertiesThe following table describes server group properties that include the followingoptions.
Table 4-1 Server group properties
DescriptionProperty
Specifies the name of the server group.
You cannot change the name of an existing server group.
Veritas recommends that server group names be unique. That is, donot use the same name for a server group that you use for a host suchas a media server. If you do, you may not be able to determine easilyif a tape is restricted to a specific media server or to a specific mediaserver group.
Server groupname
Specifies the type of server group.Server group type
Specifies the state of the server group:
■ Active. The server group is available for use.■ Inactive. The server group is not available for use.
To change the state, select the new state from the dropdown box.
State
Describes the server group.Description
Specifies the servers that belong to the group.Servers in group
Specifies the servers that do not belong to the group.Servers not ingroup
Deleting a server groupUse the following procedure to delete a server group.
To delete a server group
1 In the NetBackup Administration Console, select Media and DeviceManagement > Devices > Server Groups.
2 Select the group to delete.
3 Select Edit > Delete.
4 Click OK.
382Configuring server groupsDeleting a server group

Configuring hostcredentials
This chapter includes the following topics:
■ About configuring credentials
About configuring credentialsCredentials appears only if a feature that requires external credentials is licensed.
Use Media and Device Management > Credentials to manage log on credentialsfor the following:
■ Cloud storage credentials.Configure the credentials when you configure the storage server.See the NetBackup Cloud Administrator's Guide:http://www.veritas.com/docs/DOC5332
■ NetBackup Deduplication Engine credentials.Create the credentials when you configure the storage server.See the NetBackup Deduplication Guide:http://www.veritas.com/docs/DOC5332
■ NDMP hosts.See the NetBackup for NDMP Administrator’s Guide:http://www.veritas.com/docs/DOC5332
■ OpenStorage storage servers.Configure the credentials when you configure the storage server.See the NetBackup OpenStorage Solutions Guide for Disk.See the NetBackup Replication Director Solutions Guide.http://www.veritas.com/docs/DOC5332
5Chapter

■ Virtual machine server credentials.See the NetBackup VMware Administrator’s Guide.
384Configuring host credentialsAbout configuring credentials

Managing media serversThis chapter includes the following topics:
■ Activating or deactivating a media server
■ Adding a media server
■ Registering a media server
■ Deleting all devices from a media server
■ Removing a device host from the EMM database
■ About decommissioning a media server
■ Previewing references to a media server
■ Decommissioning a media server
Activating or deactivating a media serverWhen you activate a media server, NetBackup can use it for backup and restorejobs. You can deactivate a media server. A common reason to do so is to performmaintenance. When a media server is deactivated, NetBackup does not send jobrequests to it.
When you deactivate a media server, the following things occur:
■ Current jobs are allowed to complete.
■ If the host is part of a shared drive configuration, it does not scan drives.
6Chapter

To activate or deactivate a media server
1 In the NetBackup Administration Console, expand Media and DeviceManagement > Media Servers.
2 From theMedia Servers pane, select the media server to activate or deactivate.
3 On the Actions menu, select Activate or Deactivate.
Adding a media serverThe following table describes an overview of how to add a media server to anexisting NetBackup environment.
Note: The NetBackup Enterprise Media Manager service must be active when amedia server is added, devices and volumes are configured, and clients are backedup or restored.
Table 6-1 Adding a media server
SectionProcedure
See the vendor’s documentation.On the new media server host, attach the devices andinstall any software that is required to drive the storagedevices.
See theNetBackup Device Configuration Guide, availableat the following URL:
http://www.veritas.com/docs/DOC5332
On the new media server host, prepare the host’s operatingsystem.
See “Servers properties” on page 236.On the master server, add the new media server to theadditional servers list of the master server. Also, add thenew media server to the additional servers list of the clientsthat the new media server backs up.
If the new media server is part of a server group, add it tothe additional servers list on all media servers in the group.
To avoid problems with NetBackup, ensure that the hostname used in NetBackup matches the host name in theTCP/IP configuration.
See “Starting or stopping a daemon” on page 1056.Restart the NetBackup services on the master server andthe media servers where a new server name was added.
386Managing media serversAdding a media server

Table 6-1 Adding a media server (continued)
SectionProcedure
See the NetBackup Installation Guide, available at thefollowing URL:
http://www.veritas.com/docs/DOC5332
Install the NetBackup media server software.
See “Configuring robots and tape drives by using thewizard” on page 414.
On the master server, configure the robots and drives thatare attached to the media server.
See “About adding volumes” on page 464.On the master server, configure the volumes.
See “Creating a storage unit” on page 561.On the master server, add storage units to the mediaserver. Always specify the media server as the mediaserver for the storage unit.
The Device Configuration Wizard can create storageunits when you configure robots and drives. Therefore, ifyou created storage units already, skip this step.
See “About the Policies utility” on page 677.On the master server, configure the NetBackup policiesand schedules to use the storage units that are configuredon the media server.
See “Performing manual backups” on page 856.Test the configuration by performing a user backup or amanual backup that uses a schedule that specifies astorage unit on the media server.
Registering a media serverIf the master server is not running when you install a media server, the media serveris not registered. You cannot discover, configure, and manage the devices of thatmedia server. You must register the media server with the master server.
387Managing media serversRegistering a media server

To register a media server
1 Start the EMM service on the master server.
2 On the master server, run the following command. (For hostname, use the hostname of the media server.)
On Windows:
install_path\Veritas\NetBackup\bin\admincmd\nbemmcmd -addhost
-machinename hostname -machinetype media -masterserver server_name
-operatingsystem os_type -netbackupversion
level.major_level.minor_level
On UNIX:
Replace OldServer with the name of the host to be decommissioned.
/usr/openv/netbackup/bin/admincmd/nbemmcmd -addhost -machinename
hostname -machinetype media -masterserver server_name
-operatingsystem os_type -netbackupversion
level.major_level.minor_level
To avoid problems with NetBackup, ensure that the host name that is used inNetBackup matches the host name in the TCP/IP configuration.
Information about nbemmcmd command usage is available.
See the NetBackup Commands Reference Guide, available at the followingURL:
http://www.veritas.com/docs/DOC5332
Deleting all devices from a media serverYou can delete all devices from a media server. The media server can be up, down,or failed and unrecoverable. All devices include robots, drives, and disk pools.
Two procedures exist: one to delete all robots and drives and the other to deletedisk pools.
388Managing media serversDeleting all devices from a media server

To delete all robots and drives from a media server
◆ Enter the following command on the master server:
On Windows:
install_path\NetBackup\bin\admincmd\nbemmcmd -deletealldevices
-machinename server_name -machinetype media
On UNIX:
/usr/openv/netbackup/bin/admincmd/nbemmcmd -deletealldevices
-machinename server_name -machinetype media
Replace server_name with the name of the media server.
To delete disk pools from a media server
1 If the media server has disk pools configured, remove the media server fromthe storage units that use those disk pools. For each storage unit, run thefollowing command on the master server:
On Windows:
install_path\NetBackup\bin\admincmd\bpsturep -label
storage_unit_label -delhost host_name
On UNIX:
/usr/openv/netbackup/bin/admincmd/bpsturep -label
storage_unit_label -delhost host_name
Replace storage_unit_label with the name of the storage unit and host_namewith the name of the media server.
2 If the media server is the only storage server for the disk pools, change thestate of the disk pools to DOWN. To do so, enter the following command onthe master server for each disk pool:
On Windows:
install_path\NetBackup\bin\admincmd\nbdevconfig -changestate
-stype server_type -dp disk_pool_name -state DOWN
On UNIX:
/usr/openv/netbackup/bin/admincmd/nbdevconfig -changestate -stype
server_type -dp disk_pool_name -state DOWN
Replace server_typewith the type of storage server: AdvancedDisk, PureDisk,or the vendor string that identifies the OpenStorage server type.
Replace disk_pool_name with the name of the disk pool.
3 For each disk pool, do the following:
389Managing media serversDeleting all devices from a media server

■ Remove the media server from disk pool access by entering the followingcommand on the master server:On Windows:install_path\NetBackup\bin\admincmd\nbdevconfig -changedp -dp
-disk_pool_name -stype server_type -del_storage_servers
storage_server
On UNIX:/usr/openv/netbackup/bin/admincmd/nbdevconfig -changedp -dp
disk_pool_name -stype server_type -del_storage_servers
storage_server
Replace disk_pool_name with the name of the disk pool.Replace server_type with the type of storage server: AdvancedDisk,PureDisk, or the vendor string that identifies the OpenStorage server type.Replace storage_server with the name of the media server.
■ If the disk pool is on disk storage available only to the media server and isno longer required, delete the disk pool as follows:On Windows:install_path\NetBackup\bin\admincmd\nbdevconfig -deletedp -dp
disk_pool_name -stype server_type
On UNIX:/usr/openv/netbackup/bin/admincmd/nbdevconfig -deletedp -dp
disk_pool_name -stype server_type
You cannot delete a disk pool that has unexpired backup images. You mustfirst expire the images and delete the image fragments, as follows:
■ Expire the image as follows:On Windows:install_path\NetBackup\bin\admincmd\bpexpdate -dp
disk_pool_name -stype server_type -nodelete
On UNIX:/usr/openv/netbackup/bin/admincmd/bpexpdate -dp
disk_pool_name -stype server_type -nodelete
■ Determine the media IDs in the disk pool as follows:On Windows:install_path\NetBackup\bin\admincmd\bpimmedia -dp
disk_pool_name -stype server_type -nodelete
On UNIX:/usr/openv/netbackup/bin/admincmd/bpimmedia -dp
disk_pool_name -stype server_type
■ Delete each media ID in the disk pool as follows:
390Managing media serversDeleting all devices from a media server

On Windows:install_path\NetBackup\bin\nbdelete -dt disk_type -media_id
name
On UNIX:/usr/openv/netbackup/bin/nbdelete -dt disk_type -media_id
name
Removing a device host from the EMM databaseUse the following procedure to remove a device host from the Enterprise MediaManager (EMM) in the NetBackup database.
To remove a device host from the EMM database
1 In the NetBackup Administration Console, in the left pane, expand Mediaand Device Management > Devices > Media Servers.
2 Select the host.
3 On theActionsmenu, selectEnterpriseMediaManager Database > RemoveDevice Host.
4 Click Yes in the confirmation dialog box.
About decommissioning a media serverYou can use the NetBackup nbdecommission to decommission a media server.The command launches a text-based wizard that guides you through thedecommission process. The wizard removes the references to a media server froma NetBackup domain. (You may have to remove some references manually; thewizard provides instructions to do so in most cases.)
The nbdecommission command helps in the following scenarios:
■ You retire a server that is no longer required. After all of the backup images onthe old server expire, you can use the nbdecommission to remove the old serverfrom the NetBackup environment.
■ You replace an old server with a new server and keep the same storage. Youwant to access all of the old server storage and backup images from the newserver.
■ The old server fails, and you need to replace it with a new server.
■ You tried to decommission a media server manually and references to it stillremain. The wizard may clean up any references that remain.
391Managing media serversRemoving a device host from the EMM database
Throughout this documentation, the media server to be decommissioned is referredto as the old server.
Warning: Be careful when you use the nbdecommission command. Because thecommand may expire images, data loss may occur. Therefore, you shouldunderstand completely what the command does before you use it. Veritasrecommends that you first preview all of the references to a media server beforeyou decommission it.
See “Previewing references to a media server” on page 397.
The following topics provide more information and provide guidance for the entireprocess.
See “About decommissioning limitations” on page 392.
See “Before you decommission a media server” on page 393.
See “Decommission actions” on page 394.
See “Post decommission recommendations” on page 394.
See “Previewing references to a media server” on page 397.
See “Decommissioning a media server” on page 398.
About decommissioning limitationsThe following are the limitations of the nbdecommission command:
■ Does not decommission clustered media servers. Those include NetBackupfailover media servers or application clusters.
■ Does not process the Media Server Deduplication Pools.Before you decommission a media server that hosts a Media ServerDeduplication Pool, you must deactivate MSDP on that media server.See the NetBackup Deduplication Guide, available at the following URL:http://www.veritas.com/docs/DOC5332
■ Does not update the vm.conf files on the NetBackup servers in your environment.Therefore, the old server may remain in the vm.conf files on the NetBackupservers.
■ Does not update the configuration files on the clients. Therefore, the old servermay remain in the server lists on the clients. If you replace an old server with anew server, the new server is not added to the server list of the new client.
392Managing media serversAbout decommissioning a media server

■ Does not process the NetBackup Vault profiles. If NetBackup Vault profiles existthat refer to the storage units on the old server, update the Vault profilesmanually.
■ Does not notify you about orphaned resources.
■ Does not restart the daemons and services on other servers that thedecommissioning affects.
■ Requires that you shut down all daemons and services on the old server afterit is decommissioned.
■ Requires that you reconfigure devices on the new server manually (if required).
■ Requires that you know which jobs are running on the old server. You must killthem or let them run to completion before you run the decommission process.
■ The -list_ref option only reports on the references that it removes explicitly.The command removes some items implicitly and it does not report them. Forexample, host aliases and host credentials are removed but not reported.
■ Requires that you move any media ID generation rules that exist on the oldserver. You must move them manually to the media server that performs robotinventory.
■ Moves the old server to an Administrative Pause state so that no new jobs arestarted. However, NetBackup still can start backup and restore jobs for basicdisk; they obtain resources differently than do jobs for other storage destinations.Also, the nbdecommission command may clear the Administrative Pause toexpire images (depending on your responses to the wizard). Jobs may startduring this period.
Before you decommission a media serverBefore you decommission a media server, Veritas recommends that you do thefollowing:
■ Preview the actions of the nbdecommission command.See “Previewing references to a media server” on page 397.Analyze the output of the preview operation to ensure that the command capturesall references to the old server. If it did not, make a list of the items that thecommand does not cover and fix them manually later.
■ Back up the NetBackup catalog before you begin. You can use it to return yourenvironment to the pre-decommission state if something goes wrong or youhave to abort the decommission.
■ Run the command during a maintenance window when the load on theNetBackup environment is minimal.
393Managing media serversAbout decommissioning a media server

Post decommission recommendationsVeritas recommends the following actions after you run the nbdecommission
command:
■ Follow all of the instructions the command provides.The command may provide instructions for performing the actions that it cannotperform. For example, it may provide instructions to cancel the backup jobs thatare active on the old server.
■ Move the physical storage (if needed) and then reconfigure and reinventorythose devices.
■ Examine the vm.conf files on all of the NetBackup servers in your environment.Remove references to the old server and add references to the new serverwhere necessary.
■ Remove the old server from the server lists on the clients and add the newserver where necessary.The nbdecommission command outputs a list of clients that refer to old server.
■ Verify that the old server was removed correctly. Examine the various logicalcomponents (backup policies, storage units, and so on) to make sure that theold server references have been removed.
■ Back up the NetBackup catalog as soon as possible.
Decommission actionsThe nbdecommission command deletes the configuration for the old server fromthe EMM database, the NetBackup image catalog, and configuration files on servers.
The following table shows the actions it performs for the components that referencethe media server. The table is organized in the order in which the commandprocesses the component.
Table 6-2 nbdecommission command actions
ActionComponent
Deletes the following tape storage units:
■ Those in which the Storage device attribute specifies a robot for which the old server is therobot control host.
■ Those in which the Media server attribute specifies the old server.■ Those in which the Media server attribute specifies Any Available and the old server is the
only server that can access the storage unit.
Storage unit - Tape
394Managing media serversAbout decommissioning a media server

Table 6-2 nbdecommission command actions (continued)
ActionComponent
Deletes the tape drive path for each tape drive that is attached to the old server. If the path onthe old server is the only path, it also deletes the tape drive.
If a path to a drive exists on more than one media server, the tape drive may become unusable.You may have to connect the tape drive to a different media server and then reconfigure it inNetBackup. For example, if the old server is a scan host for a shared drive, NetBackup cannotuse the drive if no other host can scan.
Tape drive
Deletes all of the robotic libraries that are attached to the old server.
If the old server is the robot control host for a shared library, the drives and media becomestandalone and unusable. You must reconfigure and re-inventory the library.
Robotic library
Specifies if you want to expire the following tape media or move them to another media server:
■ Those assigned to the old server.■ Those owned by a media sharing group in which the old server is the only member of the
group.■ Those that have no specific Media owner and the last write host is same as the old server.
Tape media
Deletes the storage unit if no images exist on it. If images exist, the wizard lets you choose oneof the following options:
■ Expire the images and delete the storage unit.■ Move the images to the new server. The wizard also updates the Media server field in the
storage unit.The BasicDisk storage must be shared, and the same disk path must be available on the newserver.
Storage unit -BasicDisk
Specifies that if more than one media server can access the disk pool that is the destination ofthe storage unit, it does the following:
■ Removes the old server from the Media Servers list of the storage unit.■ Deletes the old server as a storage server.
If the old server is the only server that can access the disk pool, the wizard lets you choose todo one of the following:
■ Move the storage and images to the new server and delete the old server as a storage server.The disk volumes must be available on the new server at the same path as the old server.
■ Expire the images (if any), delete any storage units that reference the disk pool, delete thedisk pool, and delete the storage server. (A reference is when the disk pool appears in theDisk pool setting of a storage unit.)
Storage unit -AdvancedDisk
395Managing media serversAbout decommissioning a media server

Table 6-2 nbdecommission command actions (continued)
ActionComponent
Specifies that if more than one media server can access the disk pool that is the destination ofthe storage unit, it does the following:
■ Removes the old server from the Media Servers list of the storage unit.■ Deletes the media server as an OpenStorage storage server.
If the old server is the only server that can access the disk pool, the wizard lets you choose todo one of the following:
■ Transfer the credentials to the new server and update the Media server field in the storageunit if required.
■ Expire the images (if any), delete any storage units that reference the disk pool, and deletethe disk pool. (A reference is when the disk pool appears in the Disk pool setting of a storageunit.)
Storage unit -OpenStorage
Specifies that if the nbdecommission command deletes all of the storage units in a storage unitgroup, it also deletes the storage unit group. Deleting the storage unit group also may affectbackup policies and storage lifecycle policies.
See “Backup policy and schedule” and “Storage lifecycle policy” in this table.
Storage unit group
Deactivates any backup policy in which the storage destination (directly or indirectly) is a storageunit that the command deletes. Specifically, deactivates any backup policy that meets any of thefollowing conditions:
■ The destination is a storage unit that the nbdecommission command deleted.■ The destination is a storage unit group that contains only one storage unit and the
nbdecommission command deleted that storage unit.■ The destination is a storage lifecycle policy and the nbdecommission command deleted the
storage unit that is a Backup operation of the storage lifecycle policy.
Backup policy andschedule
Specifies that for each storage lifecycle policy in which one or more operations uses a storageunit that the command deleted, it does the following:
■ If images under the SLP control are in-process or yet to be processed, displays the commandsto cancel the SLP jobs and then exits. After you cancel the jobs (or wait until the jobs complete),rerun the nbdecommission command to continue with the decommissioning.
■ If all of the images under SLP control are processed, deactivates the storage lifecycle policy.■ If a deleted storage unit was used by aBackup or Snapshot operation, deactivates all backup
policies with the storage lifecycle policy as the destination.
Storage lifecyclepolicy
Displays the commands necessary to delete the old server as an FT media server and then exits.
After you delete the old server as an FT media server, rerun the nbdecommission commandto continue with the decommissioning.
Fibre Transportmedia server
396Managing media serversAbout decommissioning a media server

Table 6-2 nbdecommission command actions (continued)
ActionComponent
On UNIX NetBackup servers, removes the old server from the following bp.conf file entries:
■ SERVER
■ MEDIA_SERVER
■ CLIENT_NAME
■ BROWSER
On UNIX master servers, also removes the old server from the FORCE_RESTORE_MEDIA_SERVERand FAILOVER_RESTORE_MEDIA_SERVERS entries.
bp.conf file
On Windows NetBackup servers, removes the old server from the following registry keys:
■ SERVER
■ MEDIA_SERVER
■ CLIENT_NAME
■ BROWSER
On Windows master servers, also removes the old server from theFORCE_RESTORE_MEDIA_SERVER and FAILOVER_RESTORE_MEDIA_SERVERS keys.
Windows registry
Lists the clients on which the old server appears in their server lists. You must remove thereferences to the old server manually.
Clients
Previewing references to a media serverUse the following procedure to preview the associations and references to a mediaserver that you want to decommission. Veritas recommends that you preview thereferences to a media server before you decommission it.
The old server does not have to be up and responsive.
See “About decommissioning a media server” on page 391.
See “Decommissioning a media server” on page 398.
397Managing media serversPreviewing references to a media server

To preview references to a media server
1 Run the nbdecommission command on the master server or on a media server.The following is the command syntax:
On Windows:
install_path\Veritas\NetBackup\bin\admincmd\nbdecommission
-list_ref -oldserver OldServer > file.txt
On UNIX:
/usr/openv/netbackup/bin/admincmd/nbdecommission -list_ref
-oldserver OldServer > file.txt
Replace OldServer with the name of the host to be decommissioned. Replacefile with a name that denotes its contents or purpose.
2 Analyze the output of the preview operation to ensure that the commandcaptures all references to the old server. If it did not, make a list of the itemsthat the command does not cover and fix them manually later.
Decommissioning a media serverThis topic is part of a group of topics the provide information about decommissioninga NetBackup media server.
See “About decommissioning a media server” on page 391.
Your path through the nbdecommission wizard depends on how you respond tothe wizard prompts. Depending on your environment and how you respond toprompts, the wizard may advise you to perform an action and then exit. To continuein the wizard, you must run the wizard again after you perform the advised action.You may have to exit and rerun the wizard several times.
If active jobs exist on the media server, you must cancel them before the commandcan begin to decommission the media server. Alternatively, you can wait until theyfinish.
The OldServer does not have to be up and responsive.
Veritas recommends that you preview the media server references before youdecommission a media server.
See “Previewing references to a media server” on page 397.
The nbdecommission command logs to the standard NetBackup administratorcommands log directory.
Two procedures exist, as follows:
398Managing media serversDecommissioning a media server

See “To replace an old media server with anew media server” on page 399.
Replace an old media server with a newmedia server
See “To decommission a media server”on page 400.
Decommission a media server
To replace an old media server with a new media server
1 Run the nbdecommission command on the master server or on a media serverthat is not the object of this operation. The following is the command syntax:
On Windows:
install_path\Veritas\NetBackup\bin\admincmd\nbdecommission
-oldserver OldServer [-newserver NewServer] [-file decom_ops.txt]
On UNIX:
/usr/openv/netbackup/bin/admincmd/nbdecommission -oldserver
OldServer [-newserver NewServer] [-file decom_ops.txt]
Replace OldServer with the name of the host to be decommissioned.
-newserver is optional. If you specify a new server, the new server becomesthe default media server for the replacement operations. If you do not specifya new server, the wizard prompts you for the new server for each storage typethat contains valid backup images. This method is useful if you want to movebackup images to different media servers. For example, you can move backupimages from tape storage to one media server and backup images from diskstorage to another media server.
-file is optional. It writes the command operations to the specified file. Replacedecom_ops.txt with a name that denotes its purpose or contents. Veritasrecommends that you use the -file option to maintain a record of the commandoperations.
2 Follow the prompts and perform the requested actions.
For example, the command may make changes on the master server and onmultiple media servers. You may be required to restart the NetBackup serviceson those servers so that the changes take effect.
399Managing media serversDecommissioning a media server

To decommission a media server
1 Run the following command on the master server or on a media server that isnot the object of this operation. The OldServer does not have to be up andresponsive.
On Windows:
install_path\Veritas\NetBackup\bin\admincmd\nbdecommission
-oldserver OldServer
On UNIX:
/usr/openv/netbackup/bin/admincmd/nbdecommission -oldserver
OldServer
Replace OldServer with the name of the host to be decommissioned.
2 Follow the prompts and perform the requested actions.
400Managing media serversDecommissioning a media server

Configuring storage
■ Chapter 7. Configuring disk storage
■ Chapter 8. Configuring robots and tape drives
■ Chapter 9. Configuring tape media
■ Chapter 10. Inventorying robots
■ Chapter 11. Configuring storage units
■ Chapter 12. Staging backups
■ Chapter 13. Configuring storage unit groups
3Section

Configuring disk storageThis chapter includes the following topics:
■ About configuring BasicDisk storage
■ About configuring disk pool storage
■ Inventorying a NetBackup disk pool
■ Changing the disk pool state
About configuring BasicDisk storageA BasicDisk type storage unit consists of a directory on locally-attached disk ornetwork-attached disk. The disk storage is exposed as a file system to a NetBackupmedia server. NetBackup stores backup data in the specified directory.
No special configuration is required forBasicDisk storage. You specify the directoryfor the storage when you configure the storage unit.
See “Creating a storage unit” on page 561.
About configuring disk pool storageYou can configure disk pools if you license a NetBackup feature that uses diskpools.
For more information, see the NetBackup online Help or the following guides:
■ The NetBackup AdvancedDisk Storage Solutions Guide.
■ The NetBackup Cloud Administrator's Guide.
■ The NetBackup Deduplication Guide.
■ The NetBackup OpenStorage Solutions Guide for Disk.
7Chapter

■ The NetBackup Replication Director Solutions Guide.
The Guides are available through the following URL:
http://www.veritas.com/docs/DOC5332
Inventorying a NetBackup disk poolAn inventory of a NetBackup disk pool reads the capacity of the disk volumes inthe pool. An inventory operation lets you update NetBackup with the new capacityvalues if you do the following:
■ Increase or decrease the size of the disk volumes in a disk pool.
■ Add volumes to or remove volumes from a disk pool.
How you increase or decrease the underlying storage capacity depends on yourstorage implementation. You must complete that process before you inventory thedisk pool.
To inventory a NetBackup disk pool
1 in the NetBackup Administration Console, select Media and DeviceManagement > Devices > Disk Pools.
2 On the Actions menu, select Inventory Disk Pools.
3 In the Inventory Disk Pool dialog box, select the disk pool to inventory andthen click Start Inventory.
4 To update the NetBackup catalog with the capacity values returned by theinventory, click Update Configuration.
5 To inventory another disk pool, go to step 3.
6 To exit, click Close.
Changing the disk pool stateYou can change the state of a NetBackup disk pool. Pool states are UP or DOWN.
To change the state to DOWN, the disk pool must not be busy. If backup jobs areassigned to the disk pool, the state change fails. Cancel the backup jobs or waituntil the jobs complete.
To change the disk pool state
1 In the NetBackup Administration Console, in the left pane, select Mediaand Device Management > Device Monitor.
2 Select the Disk Pools tab.
403Configuring disk storageInventorying a NetBackup disk pool

3 Select the disk pool.
4 Select either Actions > Up or Actions > Down.
404Configuring disk storageChanging the disk pool state

Configuring robots andtape drives
This chapter includes the following topics:
■ NetBackup robot types
■ About the device mapping files
■ Downloading the device mapping files
■ About configuring robots and tape drives in NetBackup
■ Configuring robots and tape drives by using the wizard
■ Updating the device configuration by using the wizard
■ Adding a robot to NetBackup manually
■ Managing robots
■ Adding a tape drive to NetBackup manually
■ Configuring drive name rules
■ Adding a tape drive path
■ Adding a shared tape drive to a NetBackup environment
■ Correlating tape drives and SCSI addresses on Windows hosts
■ Correlating tape drives and device files on UNIX hosts
■ Managing tape drives
■ Performing device diagnostics
8Chapter

■ Verifying the device configuration
■ About automatic path correction
■ Enabling automatic path correction
■ Replacing a device
■ Updating device firmware
■ About the NetBackup Device Manager
■ About external access to NetBackup controlled devices on UNIX
■ Stopping and restarting the device manager
NetBackup robot typesA robot is a peripheral device that moves tape volumes into and out of tape drives.NetBackup uses robotic control software to communicate with the robot firmware.
NetBackup classifies robots according to one or more of the following characteristics:
■ The communication method the robotic control software uses; SCSI and APIare the two main methods.
■ The physical characteristics of the robot. Library usually refers to a larger robot,in terms of slot capacity or number of drives. Stacker usually refers to a robotwith one drive and low media capacity (6 - 12 media slots).
■ The media type commonly used by that class of robots. HCART (1/2-inchcartridge tape) and 8 mm are examples of media types.
Table 8-1 lists the NetBackup robot types, with drive and slot limits for each type.
To determine which robot type applies to the model of robot that you use, see theHardware Compatibility List for your NetBackup version:
http://www.netbackup.com/compatibility
Table 8-1 NetBackup robot types
NoteSlot limitsDrive limitsDescriptionRobot type
API control. The ACS librarysoftware host determines thedrive limit.
No limit1680Automated Cartridge SystemACS
SCSI control.152Tape library 4mmTL4
SCSI control.16000No limitTape library 8mmTL8
406Configuring robots and tape drivesNetBackup robot types

Table 8-1 NetBackup robot types (continued)
NoteSlot limitsDrive limitsDescriptionRobot type
SCSI control.32000No limitTape library DLTTLD
API control.No limit256Tape library Half-inchTLH
API control.No limit250Tape library MultimediaTLM
About the device mapping filesNetBackup uses several files to determine which protocols and settings to use tocommunicate with storage devices. NetBackup also uses the files during devicediscovery and configuration.
The device mapping files are available for download from the following webpage:
http://www.netbackup.com/compatibility
The download packages contain the following files:
■ external_robotics.txt
■ external_types.txt
■ Readme.txt
In some cases, you can add support for new or upgraded devices without waitingfor a release update from Veritas. To do so, download the current device mappingfiles package from the website and configure NetBackup to use that file. Forinstructions, see the Readme.txt file that is supplied with the device mapping filepackage.
Note: The contents of the device mapping files do not indicate support for any ofthe devices, only the ability to recognize and automatically configure them.
See “Downloading the device mapping files” on page 407.
See “About configuring robots and tape drives in NetBackup” on page 408.
Downloading the device mapping filesUse the following procedure to download the current device mapping files andupdate the NetBackup Enterprise Media Manager database with their information.
See “About the device mapping files” on page 407.
407Configuring robots and tape drivesAbout the device mapping files

To download the current device mapping files
1 Open the NetBackup compatibility lists knowledge base article at the followingURL:
http://www.netbackup.com/compatibility
2 In the NetBackup Device Mapping Files row in the table in the Solutionssection, select the link for your operating system.
A Veritas Knowledge Base article appears that contains installation instructionsand an archive file of the device mappings.
3 Download the archive file, either a .tar or .zip depending on operating system.
4 Follow the instructions in the Readme.txt file in the archive to update the devicemappings. The Readme.txt file contains instructions for both Windows andUNIX operating systems.
About configuring robots and tape drives inNetBackup
Before you configure robots and tape drives in NetBackup, they must be attachedto the computer and recognized by the operating system. The server platforms thatNetBackup supports may require operating system configuration changes to allowdevice discovery.
The NetBackup Device Configuration Guide provides information about how toconfigure device drivers for the systems that NetBackup supports. See the Guideat the following URL:
http://www.veritas.com/docs/DOC5332
Configure robots and tape drives in NetBackup as follows:
408Configuring robots and tape drivesAbout configuring robots and tape drives in NetBackup

Veritas recommends using the Device Configuration Wizard to add,configure, and update the following types of devices in NetBackup:
■ Robots, including those attached to NDMP hosts■ Tape drives, including those attached to NDMP hosts■ Shared drives (for NetBackup Shared Storage Option configurations
only)
See “Configuring robots and tape drives by using the wizard”on page 414.
The wizard discovers the devices that are attached to the media serversand helps to configure them.
See “About configuring robots and tape drives in NetBackup”on page 408.
DeviceConfigurationWizard
Alternatively, add robots and drives manually as follows:
■ Use menu options in the NetBackup Administration Console.See “Adding a robot to NetBackup manually” on page 415.See “Adding a tape drive to NetBackup manually” on page 423.
■ Use NetBackup commands.See the NetBackup Commands Reference Guide, available at thefollowing URL:http://www.veritas.com/docs/DOC5332
Manual methods do not use device discovery.
To add a robot and drives, first add the robot and then add the drivesthat are in the robot.
Manually
Before configuring robots and drives, read the following topics to understand theprocess.
See “About device serialization” on page 410.
See “About adding devices without discovery” on page 411.
See “About robot control” on page 411.
See “About drive name rules” on page 413.
See “Correlating tape drives and device files on UNIX hosts” on page 434.
See “Correlating tape drives and SCSI addresses on Windows hosts” on page 433.
About device discoveryDevice discovery is an exploratory method that determines which peripheral devicesa host can detect. Detection depends on physical attachment (SCSI, Fibre Channel,
409Configuring robots and tape drivesAbout configuring robots and tape drives in NetBackup

and so on) and device state (on and responding or off and not responding). Detectionalso depends on host operating system device-layer configuration.
The goal of device discovery is to provide information to enable fully or partiallyautomatic configuration of peripherals for use with NetBackup. Device discoveryprovides data that correlates the devices that are interconnected across multiplehosts or multiple host bus adapters on the same host.
To discover devices, NetBackup issues SCSI pass-through commands throughoperating system device files (on UNIX) or APIs (on Windows). The storage devicesmust be attached to the computer and recognized by the operating system. Apass-through path to a device must exist.
The operating systems that NetBackup supports may require configuration changesto allow device discovery.
The NetBackup Device Configuration Guide provides information about how toconfigure device drivers for the systems that NetBackup supports. See theNetBackup Device Configuration Guide, available at the following URL:
http://www.veritas.com/docs/DOC5332
NetBackup can discover the following types of devices:
■ SCSI-based robotic libraries (such as changers, autoloaders, and stackers)
■ SCSI-based tape drives
■ Native parallel SCSI, Fibre Channel Protocol (FCP) and FC-AL (loop) connections
■ SCSI over IP (reported)
■ API type robots, such as ACS, TLM, and TLH robots
■ NDMP devices that run NDMP version 3 or later
See “Enabling automatic path correction” on page 448.
About device serializationDevice serialization is a firmware feature that allows device identification andconfiguration. A unique serial number identifies a device.
NetBackup determines device relationships by comparing serial numbers frommultiple sources that refer to the same device. If both a robotic library and a drivefully support serialization, NetBackup can determine the drive's position (or address)in the robotic library.
Most robots and drives support device serialization.
If a device supports serialization, the following actions occur when NetBackupqueries the device:
410Configuring robots and tape drivesAbout configuring robots and tape drives in NetBackup
■ Each robot and each drive return a unique serial number.
■ Each robot also returns the number of drives and the serial number for each ofthe drives in the robot. NetBackup uses the information to determine the correctdrive number for each drive in the robot.
If a device does not support serialization, ask the vendor for a new firmware revisionthat returns serial numbers. Even with the proper firmware, some devices requirethe vendor to perform other actions to enable serialization for the device.
If you know that the devices do not support serialization, make sure that you followthe maximum configuration limits that the devices allow. You also must coordinatethe drives to their device files or SCSI addresses so you can configure themcorrectly.
See “Correlating tape drives and SCSI addresses on Windows hosts” on page 433.
See “Correlating tape drives and device files on UNIX hosts” on page 434.
The more devices in the configuration that do not support serialization, the greaterthe chance of configuration problems by using the Device Configuration Wizard.
About adding devices without discoveryNetBackup supports some devices that cannot be discovered automatically.NetBackup also supports some devices that require user intervention during thediscovery process. To add and configure those devices, select NetBackupAdministration Console > Media and Device Management or use the tpconfig
command.
For the devices that NetBackup cannot discover or that do not have serial numbers,automatic device path correction is limited.
About robot controlWhen you add a robot to NetBackup manually, you must configure how the robotis controlled. The New Robot dialog box includes a section named Robot control,in which you configure the control options.
See “Robot control (robot configuration options)” on page 418.
The following table lists the information that is required to configure the three robotcontrol types (local, NDMP, and remote). The information that is required dependson the robot type and the media server type.
411Configuring robots and tape drivesAbout configuring robots and tape drives in NetBackup

Table 8-2 Robot control information
Information required for configurationRobotcontrol
Media server typeRobottype
NDMP host name and robot deviceNDMPWindows, AIX, Solaris SPARC, HP-UX (exceptHP IA64), and Linux (except Linux64)
ACS
ACSLS hostRemoteAllACS
Robotic device fileLocalUNIXTL4
Robot device or SCSI coordinatesLocalWindowsTL4
Robotic device fileLocalUNIXTL8
Robot device or SCSI coordinatesLocalWindowsTL8
NDMP host name and robot deviceNDMPWindows, AIX, Solaris SPARC, HP-UX (exceptHP IA64), and Linux (except Linux64)
TL8
Robot control hostRemoteAllTL8
Robotic device fileLocalUNIXTLD
Robot device or SCSI coordinatesLocalWindowsTLD
NDMP host name and robot deviceNDMPWindows, AIX, Solaris SPARC, HP-UX (exceptHP IA64), and Linux (except Linux64)
TLD
Robot control hostRemoteAllTLD
Library nameLocalAll (except Solaris Opteron, HP IA64, AIX,Linux, and Linux64)
TLH
LMCP device fileLocalAIXTLH
NDMP host name and robot deviceNDMPWindows, AIX, Solaris SPARC, HP-UX (exceptHP IA64), and Linux (except Linux64)
TLH
Robot control hostRemoteAll (except Solaris Opteron, Linux64)TLH
DAS/SDLC serverRemoteAll (except Linux64 and HP IA64)TLM
Library sharing exampleFigure 8-1 shows library sharing with two servers using two drives in a TLD robot.
The robotic control for the robot is on the host that is named eel. One drive in therobot is connected to eel and the other is connected to the host shark.
412Configuring robots and tape drivesAbout configuring robots and tape drives in NetBackup

Host eel is the robot control host. To configure this robot on host eel, select Robotis controlled locally by this device host. To configure this robot on host shark,select Robot control is handled by a remote host. Then, enter eel for the Robotcontrol host.
Figure 8-1 Robot control host example
sharkeel
Drive 2Drive 1TLD RoboticControl
TLD robot (HP EML E-Series)
About drive name rulesThe drive name rules define the rules NetBackup uses to name drives.
The default, global drive name rule creates names in the following format:
vendor ID.product ID.index
If you use the default global rule when you add Quantum DLT8000 drives, the drivesare named as follows: The first one that you add is named QUANTUM.DLT8000.000,the second one QUANTUM.DLT8000.001, and so on.
You can change the default, global drive name rule.
You also can create drive name rules for specific device hosts (each device hostcan have its own rule). Host-specific rules override the global rule for the devicesthat are attached to the specified host.
Only one global rule can exist; it is used for all connected device hosts. The globalrule is used for the drive name unless a host-specific rule or local rule is specified.
Drive names are limited to 48 characters.
Use any of the following drive attributes as part of a drive name rule:
■ Host name
■ Robot number
■ Robot type
■ Drive position
413Configuring robots and tape drivesAbout configuring robots and tape drives in NetBackup

Drive position information varies depending on the robot type. Drive positioninformation can be ACS coordinates, TLM or TLH vendor drive name, or therobot drive number.
■ Drive type
■ Serial number
■ Vendor ID
■ Product ID
■ Index
A Custom Text field is also available which accepts any of the allowable drivename characters.
See “Configuring drive name rules” on page 429.
Configuring robots and tape drives by using thewizard
Veritas recommends that you use the NetBackup Device Configuration Wizardto configure robots and drives. However, you can add robots and drives manually.
To configure robots and drives by using the wizard
1 In the NetBackup Administration Console, in the left pane, click Media andDevice Management.
2 In the right pane, click the Configure Storage Devices and follow the wizardinstructions.
The properties you can configure depend on the robot type, the host type, andthe robot control.
Updating the device configuration by using thewizard
Veritas recommends that you use the Device Configuration Wizard to update theNetBackup device configuration when hardware changes occur.
Update the configuration for all storage device changes. For example, if you addor delete a robot or drive or add a new SCSI adapter in a host, update theconfiguration.
Do not update the device configuration during backup or restore activity.
414Configuring robots and tape drivesConfiguring robots and tape drives by using the wizard

To update the device configuration by using the wizard
1 In the NetBackup Administration Console, select Media and DeviceManagement > Devices.
2 From the list of wizards in the Details pane, click Configure Storage Devicesand follow the wizard instructions.
Adding a robot to NetBackup manuallyWhen you add a robot manually, you must specify how the robot is controlled.
See “NetBackup robot types” on page 406.
See “About robot control” on page 411.
After you add a robot, you should add the robot's drives.
See “Adding a tape drive to NetBackup manually” on page 423.
Note: Veritas recommends that you use the Device Configuration Wizard to addand update tape storage devices.
415Configuring robots and tape drivesAdding a robot to NetBackup manually

To add a robot using the Actions menu
1 In the NetBackup Administration Console, expand Media and DeviceManagement > Devices.
2 On the Actions menu, select New > Robot.
3 In the Add Robot dialog box, specify the properties for the robot.
The properties you can configure depend on the robot type, the host type, andthe robot control.
See “Robot configuration options” on page 417.
416Configuring robots and tape drivesAdding a robot to NetBackup manually

4 After you specify properties, click OK.
After you click OK, the Stop/Restart Media Manager Device Daemon dialogbox appears.
5 If you intend to make other changes, click Cancel in the Stop/Restart MediaManager Device Daemon dialog box. You can restart the Device Manager orthe device daemon after you make the final change.
If the device changes are complete, restart the device daemon by clickingOKin the Stop/Restart Media Manager Device Daemon dialog box.
If you restart the device daemon, any backups, archives, or restores that arein progress also may be stopped.
Robot configuration optionsThe following topics describe the robot properties that you can configure. Theproperties that you can configure depend on the robot type, host type, and robotcontrol selections that you make in the dialog box.
Device host (robot configuration option)Specifies the host to which the device is attached.
Robot type (robot configuration option)Specifies the type of robot. To locate the robot type to use for specific vendors andmodels, see the Veritas compatibility list website:
http://www.netbackup.com/compatibility
Robot number (robot configuration option)Specifies a unique, logical identification number for the robotic library. This numberidentifies the robotic library in displays (for example, TLD (21)) and is also usedwhen you add media for the robot.
■ Robot numbers must be unique for all robots on all hosts in the configuration,regardless of the robot type or the host that controls them. For example, if youhave two robots, use different robot numbers even if different hosts control them.
■ If you add a robot that is controlled by a remote device host, use the same robotnumber for that robot on all device hosts.
■ If the robot has its robotic control and drives on different hosts, specify the samerobot number in all references to that library. That is, use the same robot numberon the hosts with the drives as you do on the host that has the robotic control.
417Configuring robots and tape drivesAdding a robot to NetBackup manually

A Tape Library DLT robot is one that allows separate robotic control and drivehosts.Examples are available in theNetBackup Device Configuration Guide, availableat the following URL:http://www.veritas.com/docs/DOC5332
Robot control (robot configuration options)The Robot control section of the dialog box specifies the type of control for therobot. The options that you configure depend on the robot type and the media servertype.
Table 8-3 Robot configuration properties
DescriptionProperty
Specifies that an NDMP host controls the robot.
You must configure other options (depending on the robot type and device host type).
Robot control isattached to an NDMPhost
Specifies that the host to which the robot is attached controls the robot.
You must configure other options (depending on the robot type and device host type).
Robot is controlledlocally by this devicehost
Specifies that a host other than the device host controls the robot.
You must configure other options (based on the selected robot type and device host platform).
Robot control ishandled by a remotehost
418Configuring robots and tape drivesAdding a robot to NetBackup manually

Table 8-3 Robot configuration properties (continued)
DescriptionProperty
Specifies the name of the Sun StorageTek ACSLS host; the ACS library software residesACSLS host. On some UNIX server platforms, this host can also be a media server.
The ACS library software component can be any of the following:
■ Automated Cartridge System Library Software (ACSLS)Examples are available in the NetBackup Device Configuration Guide, available at thefollowing URL:http://www.veritas.com/docs/DOC5332
■ STK Library Station■ Storagenet 6000 Storage Domain Manager (SN6000).
This STK hardware serves as a proxy to another ACS library software component (suchas ACSLS).
Note: If the device host that has drives under ACS robotic control is a Windows server, STKLibAttach software must also be installed. Obtain the appropriate LibAttach software fromSTK.
For compatibility information, see the Hardware Compatibility List:
http://www.netbackup.com/compatibility
An overview of ACS robots is available in theNetBackup Device Configuration Guide, availableat the following URL:
http://www.veritas.com/docs/DOC5332
ACSLS host
The following applies only to a TLH robot:
For UNIX device hosts (except AIX), specifies the library name that is configured on the UNIXhost.
For Windows devices hosts, do the following:
■ Determine the library name by viewing the C:\winnt\ibmatl.conf file.For example, in the following example entry in that file, 3494AH is the library name:3494AH 176.123.154.141 ibmpc1
■ Enter the library name.
An overview of TLH robots is available in the NetBackup Device Configuration Guide. Seethe NetBackup Device Configuration Guide, available at the following URL:
http://www.veritas.com/docs/DOC5332
Library name
Specifies the name of the Library Manager Control Point device file name for TLH robot types.Use the same name that is configured on the AIX device host.
LMCP device file
Specifies the name of the NDMP host to which the robot is attached.NDMP host name
419Configuring robots and tape drivesAdding a robot to NetBackup manually

Table 8-3 Robot configuration properties (continued)
DescriptionProperty
Specifies the host that controls the robot.
The name of the host on which the robot information is defined for TL8, TLD, or TLH robots.
Robot control host
The following applies to a Windows device host only. Specifies the name of the robot device.
Click Browse and then select a robot from the list that appears in the Devices dialog box.
If the discovery operation fails to discover a robot, click More in the Devices dialog box. Entereither the Port, Bus, Target, and LUN numbers or the device name in the next dialog box.If the browse operation fails for any other reason, a dialog box appears that lets you enterthe information.
Use the Windows management tools to find the Port, Bus, Target, and LUN numbers.
If the browse operation does not find attached robots, an error dialog box appears.
Robot device
UNIX device host only. Specifies the device file that is used for SCSI connections. The devicefiles are located in the /dev directory tree on the device host.
To specify the robotic device file, click Browse and then select a robotic device file from thelist that appears in the Devices dialog box.
If the browse operation fails to show all of the attached robots, click More. Enter the path ofthe device file in the robotic device file field.
If the browse operation fails to show all of the attached robots, click Other Device. Enter thepath of the device file in the next dialog box.
If the browse operation does not find attached robots, an error dialog box appears.
Information about how to add device files is available in the NetBackup Device ConfigurationGuide. See the NetBackup Device Configuration Guide, available at the following URL:
http://www.veritas.com/docs/DOC5332
Robotic device file
NDMP host only. Specifies the name of the robotic device that is attached to the NDMP host.Robot device path
Windows hosts only. The Port, Bus, Target, and LUN are the SCSI coordinates for the roboticdevice. To specify the SCSI coordinates of the device, enter the Port, Bus, Target, and LUN.
Port, Bus, Target,LUN
Managing robotsYou can perform various tasks to manage your robots.
Changing robot propertiesUse the following procedure to change the configuration information for a robot.
420Configuring robots and tape drivesManaging robots

To change robot properties
1 In the NetBackup Administration Console, expand Media and DeviceManagement > Devices > Robots.
2 In the Robots pane, select the robotic library you want to change.
3 Click Edit > Change.
4 In the Change Robot dialog box, change the properties as necessary.
The properties that you can change depend on the robot type, the host type,and the robot control.
See “Robot configuration options” on page 417.
5 If the device changes are complete, select Yes on theRestart DeviceManagerdialog box or the Media and Device Management dialog box to restart theDevice Manager or the device daemon.
If you intend to make other changes, click No; you can restart the DeviceManager or the device daemon after you make the final change.
If you restart the Device Manager or the device daemon, any backups, archives,or restores that are in progress also may be stopped.
Configuring a robot to operate in manual modeYou can configure NetBackup so that storage unit mount requests are displayedin the Device Monitor if the robot or drive is down. Pending requests appear in theDevice Monitor, and you can assign these mount requests to drives manually.
See “About pending requests for storage units” on page 1070.
To configure a robot so that storage unit mount requests appear in the DeviceMonitor
◆ Set the robot to operate in Pend If Robot Down (PIRD) mode by using thefollowing command on the host to which the robot is attached:
On Windows:
install_path\Volmgr\bin\tpconfig -update -robot robot_number -pird
yes
On UNIX:
/usr/openv/volmgr/bin/tpconfig -update -robot robot_number -pird
yes
421Configuring robots and tape drivesManaging robots

Deleting a robotUse the following procedure to delete a robot or robots when the media server isup and running.
Any drives that are configured as residing in a robot that you delete are changedto standalone drives.
Any media in the deleted robot is also moved to standalone. If the media is nolonger usable or valid, delete it from the NetBackup configuration.
See “Deleting a volume” on page 505.
If the media server is down or the host has failed and cannot be recovered, youcan delete its robots by using a different procedure.
See “Deleting all devices from a media server” on page 388.
To delete a robot
1 In the NetBackup Administration Console, expand Media and DeviceManagement > Devices.
2 Select Robots in the tree pane.
3 In the Robots pane, select the robot or robots you want to delete.
4 On the Edit menu, select Delete.
5 At the prompt, click Yes.
Moving a robot and its media to a new media serverUse the following process to move a robot and its media from one server (theold_server) to a different media server (the new_server).
Table 8-4 Move a robot and media to a new server overview
ProcedureTask
Run the following bpmedialist command:
bpmedialist -mlist -l -h old_server
The -l option produces one line of output per tape.
Determine which tapes on the old_servercontain NetBackup images that have notexpired.
See “Moving volumes by using the Actions menu” on page 517.Move the tapes in the robot that is attached tothe old_server to non-robotic status(standalone).
422Configuring robots and tape drivesManaging robots

Table 8-4 Move a robot and media to a new server overview (continued)
ProcedureTask
If both the old_server and the new_server are at NetBackup 6.0 orlater, run the following command:
bpmedia -movedb -allvolumes -oldserver old_server-newserver new_server
If either server runs a NetBackup version earlier than 6.0, run thefollowing command for each volume that has active images:
bpmedia -movedb -ev media_ID -oldserver old_server-newserver new_server
For the media that has active images, see the bpmedialist commandoutput from the first step of this process.
Move the media logically from the old_serverto the new_server.
See “Forcing restores to use a specific server” on page 158.Configure NetBackup so that restore requestsare directed to the new_server.
See the vendor's documentation.Shut down both the old_server and thenew_server.
See the vendor's documentation.Disconnect the robot from the old_server.
See the vendor's documentation.Connect the robot to the new_server. Verifythat the operating system on the new mediaserver recognizes the robots.
See “Creating a storage unit” on page 561.Create the appropriate NetBackup storageunits.
See “Updating the NetBackup volume configuration with a robot'scontents” on page 540.
Inventory the robots that are attached to thenew_server. The inventory updates thelocation of all tapes in the robot.
Adding a tape drive to NetBackup manuallyUse the following procedures to add a tape drive manually.
Note: Veritas recommends that you use the Device Configuration Wizard to addand update tape storage devices.
423Configuring robots and tape drivesAdding a tape drive to NetBackup manually

To add a drive using the Actions menu
1 In the NetBackup Administration Console, expand Media and DeviceManagement > Devices.
2 On the Actions menu, select New > Tape Drive.
3 For the drive name, do one of the following:
■ Enter a name for the drive in the Drive name field.See “Drive name (tape drive configuration option)” on page 425.
■ Select Use drive name rules. This option uses rules to name the driveautomatically.See “About drive name rules” on page 413.See “Configuring drive name rules” on page 429.
4 To configure the host and the path information, click Add in the Host and pathinformation area of the dialog box.
See “Host and path information (tape drive configuration options)” on page 425.
424Configuring robots and tape drivesAdding a tape drive to NetBackup manually

5 In the Drive information area of the dialog box, configure the drive properties.
The properties depend on the drive type and host server type.
See “Drive information (tape drive configuration options)” on page 426.
6 After you configure all of the properties, click OK.
7 If the device changes are complete, select Yes on theRestart DeviceManagerdialog box or the Media and Device Management dialog box to restart theDevice Manager or the device daemon.
If you intend to make other changes, click No; you can restart the DeviceManager or the device daemon after you make the final change.
If you restart the Device Manager or the device daemon, any backups, archives,or restores that are in progress also may be stopped.
Tape drive configuration optionsYou can specify properties when you add a tape drive or change the properties ofa drive. The properties that you can specify depend on the drive type, serverplatforms, or NetBackup server types.
Drive name (tape drive configuration option)Specifies the name of the drive. Each drive name must be unique. Veritasrecommends that you use descriptive names. Drive names are limited to 48characters.
Alternatively, use the drive name rules to create a unique drive name.
Use drive name rules (tape drive configuration option)Adds a drive only. Select to use drive name rules to assign names to drivesautomatically.
To configure drive name rules, click Configure.
See “About drive name rules” on page 413.
See “Configuring drive name rules” on page 429.
Host and path information (tape drive configurationoptions)Use the Host and path information group box to add or change paths to the drive.You can specify multiple paths to the same physical device. If you specify multiplepaths for a drive, it becomes a shared drive.
425Configuring robots and tape drivesAdding a tape drive to NetBackup manually

To add a drive path, click Add.
To change a drive path, click Change.
To delete a drive path, click Remove.
See “About SCSI reserve on drive paths” on page 430.
See “Drive path options” on page 431.
Drive information (tape drive configuration options)The Drive information group box includes drive properties. The properties thatyou can specify depend on the drive type, server platforms, and NetBackup servertypes.
The following table describes the tape drive configuration options.
Table 8-5 Tape drive configuration options
DescriptionOption
Specifies the type of drive. The following are the valid drive types:
■ 4MM (4mm cartridge)■ 8MM (8mm cartridge)■ 8MM2 (8mm cartridge 2)■ 8MM3 (8mm cartridge 3)■ DLT (DLT cartridge)■ DLT2 (DLT cartridge 2)■ DLT3 (DLT cartridge 3)■ DTF (DTF cartridge)■ HCART (1/2-inch cartridge)■ HCART2 (1/2-inch cartridge 2)■ HCART3 (1/2-inch cartridge 3)■ QSCSI (1/4-inch cartridge)
Drive type
Specifies that the drive is in a robot. If the drive is a standalone drive (it is not in a robot), donot select this option.
If you select this option, configure the Robotic library and Robot drive number fields.
Drive is in a roboticlibrary
426Configuring robots and tape drivesAdding a tape drive to NetBackup manually

Table 8-5 Tape drive configuration options (continued)
DescriptionOption
Specifies the frequency-based cleaning for the drive. NetBackup does not support drive cleaningin some robot types.
If you want to configure a frequency-based cleaning schedule for the drive, set the number ofmount hours between each drive cleaning. When you add a drive or reset the mount time tozero, NetBackup records the amount of time that volumes have been mounted in that drive.The default frequency is zero.
When the accumulated mount time exceeds the time you specify for the cleaning frequency,drive cleaning occurs if the following are true:
■ If the drive is in a robotic library that supports drive cleaning■ If a cleaning cartridge is defined in that robotic library■ If the cleaning cartridge is compatible with the drive that needs to be cleaned■ If the cleaning cartridge has a nonzero number of cleanings that remain
NetBackup resets the mount time when the drive is cleaned.
Drives can also be cleaned from the Device Monitor.
If you do not specify a cleaning frequency, you can still use automated drive cleaning with theTapeAlert feature. Information about TapeAlert drive cleaning is available.
See the NetBackup Administrator's Guide, Volume II:
http://www.veritas.com/docs/DOC5332
Cleaning Frequency
On UNIX only.
Specifies the availability of the drive.
When you add a drive, the default drive status is UP, which means the drive is available. Whena drive is UP, the default mode is AVR (Automatic Volume Recognition).
To change the drive status, click UP or DOWN.
You can also change the drive status by using the commands on the Actions menu in DeviceMonitor.
Drive Status
A read-only field that shows the serial number of the drive.Serial Number
Specifies a robot that controls the drive. You can select any configured robot that can controlthe drive.
Robotic library
427Configuring robots and tape drivesAdding a tape drive to NetBackup manually

Table 8-5 Tape drive configuration options (continued)
DescriptionOption
Specifies the physical location in the robot of the drive. When you add more than one drive toa robot, you can add the physical drives in any order. For example, you can add drive 2 beforedrive 1.
The correct robot drive number is critical to the proper mounting and utilization of media. Youmust determine which logical device name (Windows) or the device file (UNIX) identifies whichphysical drive in the robot. You should correlate the drive serial number with drive serial numberinformation from the robot, as follows:
■ On Windows: You must determine which physical drive in the robot is identified by thelogical device name.See “Correlating tape drives and SCSI addresses on Windows hosts” on page 433.
■ On UNIX: You must determine which physical drive in the robot is identified by the devicefile name.See “Correlating tape drives and device files on UNIX hosts” on page 434.
NetBackup does not detect incorrect drive number assignment during configuration; however,an error occurs when NetBackup tries to mount media on the drive.
Note: The Robot drive number property does not apply when you add drives to API robots.API robots are ACS, TLH, and TLM type in NetBackup.
Robot drive number
Specify the drive locations within an ACS robot.
The following information applies only to the ACS robot drive. The ACS property specifies thephysical location of the drive within the robot. During installation, the correlation between thephysical drive in the robot and the device file you specified earlier represents. You establishthis correlation during installation.
The drive location properties are as follows:
■ ACS Number - specifies the index (in ACS library software terms) that identifies the robotthat has this drive.
■ LSM Number - specifies the Library Storage Module that has this drive.■ Panel Number - specifies the robot panel where this drive is located.■ Drive Number - specifies the physical number of the drive (in ACS library software terms).
ACS, LSM, Panel,Drive
Specifies the IBM device number of the drive within the robot. This property applies only tothe TLH robot drive.
IBM device number
Specifies the DAS/SDLC drive name of the drive within the robot. This property applies onlyto the TLM robot drive.
DAS drive name
428Configuring robots and tape drivesAdding a tape drive to NetBackup manually

Configuring drive name rulesUse the following procedure to configure the rules that NetBackup uses to nametape drives. The procedure describes how to configure the rules in the NetBackupAdministration Console.
Alternatively, if you use the NetBackup Device Configuration Wizard, clickConfigure Drive Name Rules in the Device Hosts screen. The same ConfigureDrive Name Rules dialog box that is described in the following procedure.
To configure drive name rules
1 In the NetBackup Administration Console, expand Media and DeviceManagement > Drives.
See “Adding a tape drive to NetBackup manually” on page 423.
2 On the Actions menu, select New > Tape Drive.
3 In the New Drive dialog box, click Configure.
4 In theConfigure Drive NameRules dialog box, configure the rules for namingdrives:
■ To change the global rule, select Global Rule.
■ To create a local rule, select the check box for the device host.
429Configuring robots and tape drivesConfiguring drive name rules

■ Select the fields from which to create the drive name from the list of availablefields. Click Add>> to make a field part of the rule.
■ To add own text to the drive name rule, enter the text in the Custom Textfield and click the Add button.
■ Use theMove Up andMove Down buttons to change the order of the fieldsthat are defined for the rule.
■ Click Create Rule to finalize the rule.
If you use <host name> in the rule and the drive is a shared drive, the nameof the first host that discovers the drive is used as the host name. The namefor a shared drive must be identical on all servers that share the drive.
See “About drive name rules” on page 413.
Adding a tape drive pathUsually, you add a tape drive path when you add a drive to NetBackup. Use thefollowing procedure to add a drive path.
To add a tape drive path
1 In the NetBackup Administration Console, expand Media and DeviceManagement > Devices > Drives.
2 Select Add a New Drive. In the dialog box, click Add.
3 In the Add Path dialog box, configure the properties for the drive path.
The properties that you can specify depend on drive type, server platform, orNetBackup server type.
See “About SCSI reserve on drive paths” on page 430.
See “Drive path options” on page 431.
About SCSI reserve on drive pathsNetBackup lets you configure exclusive access protection to tape drives so thatother host bus adaptors (HBAs) cannot control the drives during the reservation.The Enable SCSI Reserve host property configures the protection for each mediaserver.
See “Media properties” on page 189.
More information about how NetBackup reserves drives is available in theNetBackupAdministrator's Guide, Volume II:
http://www.veritas.com/docs/DOC5332
430Configuring robots and tape drivesAdding a tape drive path

Drive path optionsThe following table describes the options to add a drive path.
Table 8-6 Add drive path options
DescriptionOption
Specifies the device host for the drive.Host name (Windows)
Device host (UNIX)
Specifies that the path is active and that NetBackup can use it for backups and restores.Enable host path
Specifies the NDMP host for the device (if an NDMP host is configured in your NetBackupenvironment).
See the NetBackup for NDMP Administrator’s Guide for additional information about NDMPdrives:
http://www.veritas.com/docs/DOC5332
NDMP host
Specifies the SCSI reserve override setting for the drive path.
■ Server Default. Use the SCSI reserve protection setting configured for the media server.If the media server default is no protection, other HBAs can send the commands that cancause a loss of data to the tape drives.
■ SPC-2 SCSI Reserve. This option provides SCSI reserve and release protection for theSCSI devices that conform to the reserve and the release management method. Thatmethod is defined in the SCSI Primary Commands - 2 (SPC-2) standard.
■ SCSI Persistent Reserve. This option provides SCSI persistent reserve in and persistentreserve out protection for the SCSI devices that conform to the SCSI Primary Commands- 3 (SPC-3) standard.
Global SCSI reserve properties are configured in the Media host properties.
See “Media properties” on page 189.
Override SCSI Reservesettings
On UNIX hosts.
Specifies the path of the character-mode, no rewind device file on the specified host.
You can either type-in or browse and select one of the existing devices on the host. TheBrowse button is not available if the This path is for a Network Attached Storage Deviceoption is selected.
See “About no rewind device files on UNIX” on page 432.
Device files are in the /dev directory on the UNIX host. If the entries do not exist, see theNetBackup Device Configuration Guide for information about how to create them:
http://www.veritas.com/docs/DOC5332
Path
431Configuring robots and tape drivesAdding a tape drive path

Table 8-6 Add drive path options (continued)
DescriptionOption
On Windows hosts.
You can browse and select one of the existing devices on the host. When you select a device,Port, Bus, Target, and LUN are auto-filled. The Browse button is not available if the Thispath is for a Network Attached Storage Device option is selected.
To specify the SCSI coordinates of the device, enter the Port, Bus, Target, and LUN.
The device attributes on Windows systems cannot change during a NetBackup operation.
Port, Bus, Target, andLUN
Specifies that the path is for a Network Attached Storage (NAS) device.This path is for aNetwork Attachedstorage device
About no rewind device files on UNIXAlthough both rewind and no rewind on close device files are usually available,NetBackup requires only the no rewind device file. A no rewind device remains atits current position on a close operation. On some versions of UNIX, the device filename may be preceded or followed by the letter n.
Device files are in the /dev directory on the UNIX host. If the entries do not exist,you must create them. See the NetBackup Device Configuration Guide, availableat the following URL:
http://www.veritas.com/docs/DOC5332
Adding a shared tape drive to a NetBackupenvironment
Veritas recommends that you use the Device Configuration Wizard to add,configure, and update shared drives. TheNetBackupDevice ConfigurationWizardis the easiest method for adding shared drives in a Shared Storage Optionconfiguration.
For more information about the Shared Storage Option, see the NetBackupAdministrator's Guide, Volume II:
http://www.veritas.com/docs/DOC5332
432Configuring robots and tape drivesAdding a shared tape drive to a NetBackup environment

Correlating tape drives and SCSI addresses onWindows hosts
If your tape drives do not support device serialization, you may have to determinewhich logical device name or SCSI address matches the physical drive. You alsomay have to do so if you add the tape drives manually.
To correlate tape drives and SCSI addresses on Windows hosts
1 Note the SCSI target of the drive.
2 Correlate the SCSI target to the drive address by using the robot’s interfacepanel. Alternatively, examine the indicators on the rear panel of the tape drive.
3 Determine the physical drive address (for example, number) by checking labelson the robot.
4 Configure the robot in NetBackup and then add the drives.
When you add the drives, ensure that you assign the correct drive address toeach set of SCSI coordinates.
Optionally, use the appropriate NetBackup robotic test utility to verify theconfiguration.
Information about the robotic test utilities is available.
See NetBackup Troubleshooting Guide:
http://www.veritas.com/docs/DOC5332
To verify the device correlation Windows
1 Stop the NetBackup Device Manager (ltid).
2 Restart ltid, which starts the Automatic Volume Recognition process (avrd).Stop and restart ltid to ensure that the current device configuration has beenactivated.
If robotic control is not local to this host, also start the remote robotic controldaemon.
3 Use the robotic test utility to mount a tape on a drive.
4 Use the NetBackup Device Monitor to verify that the tape was mounted on thecorrect robot drive.
Windows device correlation exampleFor Windows hosts only.
Assume that a TLD robot includes three drives at the following SCSI addresses:
433Configuring robots and tape drivesCorrelating tape drives and SCSI addresses on Windows hosts

5,0,0,0Drive 1
5,0,1,0Drive 2
5,0,2,0Drive 3
Also assume that you requested that the tape be mounted on drive 1.
If the SCSI coordinates for the drive are configured correctly, the AdministrationConsole Device Monitor shows that the tape is mounted on drive 1.
If the Device Monitor shows that the tape is mounted on a different drive, the SCSIcoordinates for that drive are not correctly configured. For example, if the DeviceMonitor shows that the tape is mounted on drive 2, the SCSI coordinates for drive1 are incorrect. Replace the drive 1 SCSI coordinates (5,0,0,0) with the correctSCSI coordinates (5,0,1,0) for drive 2. You also know that the SCSI coordinatesfor drive 2 are incorrect. Possibly, the SCSI coordinates were swapped duringconfiguration.
Use the robotic test utility to unload and unmount the tape from drive 1. Repeat thetest for each drive.
If the data path to the drive in which the tape is mounted is not on the robot controlhost, you may have to unload the drive. To do so, use a command on another hostor use the drive’s front panel.
Correlating tape drives and device files on UNIXhosts
If your tape drives do not support device serialization, you may have to determinewhich device file or SCSI address matches the physical drive. You also may haveto do so if you add the tape drives manually.
Correlate device files to physical drives when you create the device files for eachdrive.
To correlate tape drives and device files on UNIX
1 Determine the physical location of each drive within the robotic library. Thelocation usually is shown on the connectors to the drives or in the vendor’sdocumentation.
2 Physically connect the drives to SCSI adapters in the host.
3 Record the adapter and SCSI addresses to which you connected each drive.
434Configuring robots and tape drivesCorrelating tape drives and device files on UNIX hosts

4 Create device files for each drive by using the SCSI addresses of the drivesand adapters.
Add the device file by using the notes from a previous step to complete thecorrelation between device files and physical drive location.
5 Configure the robot in NetBackup and then add the drives.
When you add the drives, verify that you assign the correct drive address (forexample, robot drive number) to each device path.
Optionally, use the appropriate NetBackup robotic test utility to verify theconfiguration.
Information about the robotic test utilities is available.
See NetBackup Troubleshooting Guide:
http://www.veritas.com/docs/DOC5332
To verify the device correlation on UNIX
1 Stop the NetBackup device daemon (ltid).
2 Start ltid, which starts the Automatic Volume Recognition daemon (avrd).Stop and restart ltid to ensure that the current device configuration is activated.
If robotic control is not local to this host, also start the remote robotic controldaemon.
3 Use the robotic test utility to mount a tape on a drive.
4 Use the NetBackup Administration Console Device Monitor to verify thatthe tape was mounted on the correct robot drive.
UNIX device correlation exampleOn UNIX only.
Assume a TLD robot includes three drives and the operating system includes thefollowing device paths:
/dev/rmt/0cbnDrive 1
/dev/rmt/1cbnDrive 2
/dev/rmt/3cbnDrive 3
Also assume that you requested that the tape be mounted on drive 1.
435Configuring robots and tape drivesCorrelating tape drives and device files on UNIX hosts

If the device path for the drive is configured correctly, the NetBackupAdministration Console Device Monitor shows that the tape is mounted on drive1.
If the Device Monitor shows that the tape is mounted on a different drive, the devicepath for that drive is not configured correctly. For example, if the Device Monitorshows that the tape is mounted on Drive 2, the device path for drive 1 is incorrect.Replace the drive 1 device path (/dev/rmt/0cbn) with the correct device path(/dev/rmt/1cbn) for drive 2. You may need to use a temporary device path whileyou make these changes. You also know that the device path for drive 2 is incorrect.Possibly, the device paths were swapped during configuration.
Use the robotic test utility to unload and unmount the tape from drive 1. Repeat thetest for each drive.
If the path to the drive where the tape is mounted is not on the host with directrobotic control, you may have to unload the drive with a command from anotherhost or from the drive’s front panel.
Managing tape drivesYou can perform various tasks to manage tape drives.
Changing a drive commentYou can change the comment that is associated with a drive. Drive commentsappear in the Drive Status pane.
To change a drive comment
1 In the NetBackup Administration Console, expand Media and DeviceManagement > Device Monitor.
2 If you licensed a disk pool feature, select the Drives tab.
3 In the Drive Status pane, select a drive or select multiple drives.
4 On theActionsmenu, selectChange Drive Comment. The dialog box showsthe current comment (if any is currently configured).
5 (Shared Storage Option.) For a shared drive, select the host and the devicepath to the selected drive that you want to change. You can change thecomment for any or all of the host and the device paths.
6 Add a comment or change the current drive comment.
See “NetBackup naming conventions” on page 1112.
7 Click OK.
436Configuring robots and tape drivesManaging tape drives

About downed drivesNetBackup downs a drive automatically when there are read or write errors thatsurpass the threshold within the time window. The default drive error threshold is2. That is, NetBackup downs a drive on the third drive error in the default timewindow (12 hours).
Common reasons for write failures are dirty write heads or old media. The reasonfor the action is logged in the NetBackup error catalog (view the Media Logs reportor the All Log Entries report). If NetBackup downs a device, it is logged in the systemlog.
You can use the NetBackup nbemmcmd command with the -drive_error_threshold
and -time_window options to change the default values.
Additional information about nbemmcmd is available.
See the NetBackup Commands Reference Guide:
http://www.veritas.com/docs/DOC5332
To reverse a down action, in the NetBackup Administration Console, expandMedia and Device Management > Device Monitor to set the device to Up.
See “Changing a drive operating mode” on page 437.
Changing a drive operating modeUsually you do not need to change the operating mode of a drive. When you adda drive, NetBackup sets the drive state to UP in Automatic Volume Recognition(AVR) mode. Other operating mode settings are used for special purposes.
The drive operating mode is displayed and changed in theDevice Monitorwindow.
To change the mode of a drive
1 In the NetBackup Administration Console, expand Media and DeviceManagement > Device Monitor.
2 If you licensed a disk pool feature, select the Drives tab.
3 In the Drive Status pane, select a drive or select multiple drives.
4 From the Actions menu, choose the command for the new drive operatingmode.
Note that Up Drive, Operator control applies only to standalone drives.
5 If the drive is configured with multiple device paths or is a shared drive (SharedStorage Option), a dialog box appears that contains a list of all device pathsto the drive. Select the path or paths to change.
6 Click OK.
437Configuring robots and tape drivesManaging tape drives

Changing a tape drive pathUse the following procedure to change a drive path.
See “Changing a drive path operating mode” on page 438.
To change a drive path
1 In the NetBackup Administration Console, expand Media and DeviceManagement > Devices > Drives. Double-click the drive that you want tochange.
2 In the Change Tape Drive dialog box, select the drive path in the Host andPath information list. Click Change.
3 In the Change Path dialog box, configure the properties for the drive path.
The properties you can change depend on drive type, server platform, orNetBackup server type.
See “About SCSI reserve on drive paths” on page 430.
See “Drive path options” on page 431.
4 Click OK to save the changes.
Changing a drive path operating modeIn the NetBackup Administration Console, expand Media and DeviceManagement > Device Monitor. In the right pane of the Device Monitor dialogbox, the Drive Paths pane shows path information for drives if one of the followingis true:
■ Multiple (redundant) paths to a drive are configured
■ Any drives are configured as shared drives (Shared Storage Option)
To change a drive path operating mode
1 In the NetBackup Administration Console, expand Media and DeviceManagement > Device Monitor.
2 If you licensed a disk pool feature, select the Drives tab.
3 In the Drive Paths pane, select a path or select multiple paths.
4 On the Actions menu, choose a command for the path action, as follows:
■ Up Path
■ Down Path
■ Reset Path
438Configuring robots and tape drivesManaging tape drives

Changing tape drive propertiesUse the following procedure to change the configuration information for a drive.
To change drive properties
1 In the NetBackup Administration Console, expand Media and DeviceManagement > Devices > Drives.
2 In the details pane, select the drive you want to change.
3 Click Edit > Change.
4 In the Change Tape Drive or the Change Drive dialog box, change theproperties of the drive.
The properties depend on the drive type and host server type.
See “Tape drive configuration options” on page 425.
5 If the device changes are complete, select Yes on theRestart DeviceManagerdialog box or the Media and Device Management dialog box to restart theDevice Manager or the device daemon.
If you intend to make other changes, click No; you can restart the DeviceManager or the device daemon after you make the final change.
If you restart the Device Manager or the device daemon, any backups, archives,or restores that are in progress also may be stopped.
The initial drive status is UP, so the drive is available as soon as you restartthe device daemon.
6 After you change the properties, click OK.
Changing a tape drive to a shared driveChange a drive to a shared drive by adding paths to a currently configured drive.
To configure and use a shared drive, a Shared Storage Option license is requiredon each master server and media server.
To change a drive to a shared drive
1 In the NetBackup Administration Console, expand Media and DeviceManagement > Devices.
2 Select Drives in the tree pane.
3 Select the drive you want to change in the Drives pane.
4 Click Edit > Change.
439Configuring robots and tape drivesManaging tape drives

5 In the Change Tape Drive dialog box, click Add.
6 In the Add Path dialog box, configure the properties for the hosts and pathsthat share the drive.
Cleaning a tape drive from the Device MonitorWhen you add a drive to NetBackup, you can configure the automatic,frequency-based cleaning interval.
You can also perform an operator-initiated cleaning of a drive regardless of thecleaning frequency or accumulated mount time of the drive. However, appropriatecleaning media must be added to NetBackup.
After you clean a drive, reset the mount time.
See “Resetting the mount time of a drive” on page 442.
See the NetBackup Administrator's Guide, Volume I:
http://www.veritas.com/docs/DOC5332
Drive cleaning functions can also be performed from the Activity Monitor.
See “Cleaning tape drives from the Activity Monitor” on page 1063.
To clean a tape drive
1 In the NetBackup Administration Console, expand Media and DeviceManagement > Device Monitor.
2 If a license that activates disk-based features is installed, select the Drivestab.
3 In the Drive pane, select the drive to clean.
4 On the Actions menu, expand Drive Cleaning > Clean Now. NetBackupinitiates drive cleaning regardless of the cleaning frequency or accumulatedmount time.
TheClean Now option resets the mount time to zero, but the cleaning frequencyvalue remains the same. If the drive is a standalone drive and it contains acleaning tape, NetBackup issues a mount request.
5 For a shared drive (Shared Storage Option), do the following:
In the list of hosts that share the drive, choose only one host on which thefunction applies. TheClean Now function can take several minutes to complete,so the cleaning information in theDrive Details dialog box may not be updatedimmediately.
440Configuring robots and tape drivesManaging tape drives

Deleting a driveUse the following procedure to delete a drive or drives when the media server isup and running.
If the media server is down or the host has failed and cannot be recovered, youcan delete its drives by using a different procedure.
See “Deleting all devices from a media server” on page 388.
To delete a drive
1 In the NetBackup Administration Console, expand Media and DeviceManagement > Devices.
2 Select Drives in the tree pane.
3 Select the drive or drives that you want to delete from the Drives pane.
4 On the Edit menu, select Delete.
5 At the prompt, click Yes.
Resetting a driveResetting a drive changes the state of the drive.
Usually you reset a drive when its state is unknown, which occurs if an applicationother than NetBackup uses the drive. When you reset the drive, it returns to a knownstate before use with NetBackup. If a SCSI reservation exists on the drive, a resetoperation from the host that owns the reservation can help the SCSI reservation.
If the drive is in use by NetBackup, the reset action fails. If the drive is not in useby NetBackup, NetBackup tries to unload the drive and set its run-time attributesto default values.
Note that a drive reset does not perform any SCSI bus or SCSI device resets.
Use the following procedure to reset a drive.
To reset a drive
1 In the NetBackup Administration Console, expand Media and DeviceManagement > Device Monitor.
2 If you licensed a disk pool feature, select the Drives tab.
3 In the Drive Status pane, select a drive or select multiple drives.
4 Select Actions > Reset Drive. If the drive is in use by NetBackup and cannotbe reset, restart the NetBackup Job Manager to free up the drive.
5 Determine which job controls the drive (that is, which job writes to or readsfrom the drive).
441Configuring robots and tape drivesManaging tape drives

6 In the NetBackup Administration Console, click on Activity Monitor. In theright pane of the Activity Monitor dialog box, select the Jobs tab and cancelthe job.
7 In the Activity Monitor, restart the NetBackup Job Manager, which cancelsall NetBackup jobs in progress.
Resetting the mount time of a driveYou can reset the mount time of the drive. Reset the mount time to zero after youperform a manual cleaning.
To reset the mount time
1 In the NetBackup Administration Console, expand Media and DeviceManagement > Device Monitor.
2 If you licensed a disk pool feature, select the Drives tab.
3 In the Drive Status pane, select a drive.
4 Select Actions >Drive Cleaning > Reset Mount Time. The mount time forthe selected drive is set to zero.
5 If you use the Shared drive (Shared Storage Option), do the following:
In the list of hosts that share the drive, choose only one host on which thefunction applies.
Setting the drive cleaning frequencyWhen you add a drive to NetBackup, you configure the automatic, frequency-basedcleaning interval. In the NetBackup Administration Console, expand Media andDevice Management > Device Monitor to change the cleaning frequency thatwas configured when you added the drive.
To set the cleaning frequency
1 In the NetBackup Administration Console, expand Media and DeviceManagement > Device Monitor.
2 If you licensed a disk pool feature, select the Drives tab.
3 In the Drive Status pane, select a drive.
442Configuring robots and tape drivesManaging tape drives

4 On the Actions menu, expand Drive Cleaning > Set Cleaning Frequency.
5 Enter a time (hours) or use the arrow controls to select the number of mounthours between drive cleaning.
The Cleaning Frequency option is not available for the drives that do notsupport frequency-based cleaning. This function is not available for shareddrives.
The drive cleaning interval appears in the Drive Details dialog box (Actions> Drive Details).
Viewing drive detailsYou can obtain detailed information about drives (or shared drives), such as drivecleaning, drive properties, drive status, host, and robotic library information.
Use the following procedure to view the drive details.
To view the drive details
1 In the NetBackup Administration Console, select Media and DeviceManagement > Device Monitor.
2 If you licensed a disk pool feature, select the Drives tab.
3 In the Drive Status pane, select a drive.
4 Select Actions > Drive Details.
5 If you use the Shared drive for shared drives, you can view the drive controlmode and drive index for each host that shares a drive. You also can view alist of hosts that share a drive.
Performing device diagnosticsDiagnostic functions let you run and manage drive and robot diagnostic tests.Diagnostics are executed in an ordered sequence to verify the functionality ofhardware devices. These tests can help you to troubleshoot drive or robot problems.
Running a robot diagnostic testUse this procedure to run diagnostic tests on TLD or TL8 robotic libraries.
Ensure that the library to be tested is properly configured for use with NetBackup.The existing NetBackup robotic control daemons or processes are used for the test.
443Configuring robots and tape drivesPerforming device diagnostics

Note: NetBackup does not support diagnostic tests for API-attached robotic tapelibraries and other types of SCSI-attached libraries.
To run a robot diagnostic test
1 In the NetBackup Administration Console, expand Media and DeviceManagement > Devices.
2 On the Actions menu, select Robot Diagnostics.
3 In theRobot Diagnostics dialog box, select the media server that is theDeviceHost for the robot that you want to test.
4 In the Robot Name field, select the robot that you want to diagnose.
444Configuring robots and tape drivesPerforming device diagnostics

5 Click Start to start the diagnostic tests.
The Results window shows results of each step in the test.
Operator intervention is required if the State column of the Results windowcontains Waiting. For example, a test step may prompt you to load a new tapeinto a drive before the test can continue.
6 If operator intervention is required, select the test step in the Results windowand click Details to determine what you must do. Complete the requestedoperation task and then clickContinue in the Test Details dialog box to resumethe test
To stop a test and change the device
1 Click Stop.
The test ends after it performs any necessary clean-up work and updates thetest records to reflect that the test run has been stopped.
2 In the Device Host and the Robot Name boxes, select the host and the robotthat you want to test.
3 Click Start to restart the diagnostic test.
Running a tape drive diagnostic testNetBackup diagnostic functions let you run and manage diagnostic tests. Diagnosticsare performed in an ordered sequence to verify the functionality of hardware devices.These tests can help you to troubleshoot drive problems.
To run a tape drive diagnostic test
1 In the NetBackup Administration Console, expand Media and DeviceManagement > Devices.
2 On the Actions menu, select Drive Diagnostics.
3 In the Drive Diagnostics dialog box, select the media server that contains thedrive that you want to test in the Device Host box.
4 In the Drive Name box, select the drive.
445Configuring robots and tape drivesPerforming device diagnostics

5 Click Start to start the diagnostic tests.
For robotic drives, the test media is loaded automatically.
For a standalone drive, insert the prelabeled test tape that is shown in the StepInformation column of the Results window.
The Results window shows results of each step in the test.
6 If operator intervention is required, the State column of the Results windowdisplays Waiting. For example, a test step may require that you to load a newtape into a drive before the test can continue.
Complete the intervention and then click Continue.
Select the test step in the Results window and click Details to determine whatyou must do. Complete the requested operation task and then click Continuein the Test Details dialog box to resume the test
To stop a test and change the device
1 Click Stop.
The test ends after it performs any necessary clean-up work and updates thetest records to reflect that the test run has been stopped.
2 In the Device Host and the Drive boxes, select the host and the drive that youwant to test.
3 Click Start to restart the diagnostic test.
Managing a diagnostic test step that requires operator interventionOperator intervention is required if theStatus column of theResults display containsWaiting. For example, a test step may prompt for a new tape to be loaded into adrive before the test continues.
To manage a diagnostic step
1 Complete the requested operations task.
2 Click Continue to resume the test.
If you clicked Details for a test step that requires operator intervention, youcan click Continue from the Test Details dialog box.
Obtaining detailed information for a diagnostic test stepYou can get information for a test step at any time during the test.
446Configuring robots and tape drivesPerforming device diagnostics

To obtain detailed information for a diagnostic test step
1 Select a test step in the Results display.
2 Click Details. A dialog box appears that displays information for the step.
The information includes a brief explanation of the checks that are performedby a specific step and the instructions that are associated with any step thatrequires manual intervention. For example, a step may prompt for a new tapeto be loaded into a tape drive before the diagnostic session continues.
3 Click Close to return to the Device Diagnostics dialog box.
Verifying the device configurationVerify the device configuration by running the Device Configuration Wizard. However,some details of a device configuration cannot be validated without attempting tapemounts. Use the NetBackup robtest utility to mount tapes and validate theconfiguration.
To verify robots and drives by using the wizard
1 In the NetBackup Administration Console, expand Media and DeviceManagement > Devices.
2 From the list of wizards in the Details pane, click Configure Storage Devicesand follow the wizard instructions.
About automatic path correctionNetBackup automatic path correction recognizes if you change a device becausethe serial number of the new device is different than the serial number of the olddevice. NetBackup updates the device configuration automatically.
NetBackup recognizes device changes as follows:
■ When the NetBackup Device Manager (ltid) performs automatic path correction.See “About the NetBackup Device Manager” on page 451.
■ When the Windows Plug-n-Play feature performs serial number checks.
By default, Windows and Linux systems are configured for automatic path correction.On other operating systems, you must enable it.
See “Enabling automatic path correction” on page 448.
In some circumstances, NetBackup may be unable to determine the correct serialnumber in a small number of tape drives and robotic libraries. For example,NetBackup may configure serialized devices as unserialized or configure a device
447Configuring robots and tape drivesVerifying the device configuration

with the wrong serial number. If so, a device may be unusable (such as the tapedrive may be downed).
To resolve such a problem, do one of the following actions:
■ Configure the new device by using the NetBackup Device ConfigurationWizard.The server operating system must recognize the device before you can configureit in NetBackup. Device configuration can require remapping, rediscovery, andpossibly a restart of the operating system.See theNetBackup Device Configuration Guide, available at the following URL:http://www.veritas.com/docs/DOC5332
■ Disable the automated device discovery by using the vm.conf fileAUTO_PATH_CORRECTION option.
Enabling automatic path correctionYou can enable automatic device path correction in NetBackup. To do so, use thefollowing procedure.
See “About automatic path correction” on page 447.
To configure automatic path correction
1 Use a text editor to open the following file:
On Windows:
install_path\VERITAS\Volmgr\vm.conf
On UNIX:
/usr/openv/volmgr/vm.conf
2 Add the following AUTO_PATH_CORRECTION entry to the file:
AUTO_PATH_CORRECTION = YES
If it already exists but is set to NO, change the value to YES.
3 Save the file and exit the text editor.
Replacing a deviceTwo processes exist for replacing a device, as follows:
See Table 8-7 on page 449.Replace a device on a single host
See Table 8-8 on page 449.Replace a shared device
448Configuring robots and tape drivesEnabling automatic path correction

Table 8-7 To replace a device on a single host
InstructionsTask
See “Changing a drive operating mode” on page 437.If the device is a drive, change the drive state to DOWN.
See the vendor's documentation.Replace the device. Specify the same SCSI ID for the newdevice as the old device.
See “Changing a drive operating mode” on page 437.If the device is a drive, change the drive state to UP.
See “Configuring robots and tape drives by using thewizard” on page 414.
If either of the following are true, configure the new deviceby using the NetBackup Device Configuration Wizard:
■ You replaced a drive with a different drive type.■ You replaced a serialized drive with an unserialized
drive.
Table 8-8 To replace a shared device
InstructionsTask
See “Changing a drive operating mode” on page 437.If the device is a drive, change the drive state to DOWN.
See the vendor's documentation.Replace the device. Specify the same SCSI ID for the newdevice as the old device.
The following command scans for new hardware andproduces a report that shows the new and the replacedhardware:
On Windows:
install_path\Veritas\Volmgr\bin\tpautoconf-report_disc
On UNIX:
/usr/openv/volmgr/bin/tpautoconf-report_disc
Produce a list of new and missing hardware.
See “Starting or stopping a daemon” on page 1056.Ensure that all servers that share the new device are upand that all NetBackup services are active.
449Configuring robots and tape drivesReplacing a device

Table 8-8 To replace a shared device (continued)
InstructionsTask
If the device is a robot, run the following command:
On Windows:
install_path\Veritas\Volmgr\bin\tpautoconf-replace_robot robot_number -pathrobot_path
On UNIX:
/usr/openv/volmgr/bin/tpautoconf-replace_robot robot_number -pathrobot_path
If the device is a drive, run the following commands:
On Windows:
install_path\Veritas\Volmgr\bin\tpautoconf-replace_drive drive_name -path path_name
On UNIX:
/usr/openv/volmgr/bin/tpautoconf-replace_drive drive_name -path path_name
Read the serial number from the new device and updatethe EMM database.
See “Configuring robots and tape drives by using thewizard” on page 414.
If the new device is an unserialized drive, run theNetBackup Device Configuration Wizard on all serversthat share the drive.
If the new device is a robot, run the NetBackup DeviceConfiguration Wizard on the server that is the robotcontrol host.
See “Changing a drive operating mode” on page 437.If the device is a drive, change the drive state to UP.
Updating device firmwareBy default, NetBackup recognizes if you update the firmware of a device.
The following table describes an overview of how to update device firmware.
450Configuring robots and tape drivesUpdating device firmware

Table 8-9 How to update device firmware
InstructionsTask
See “Changing a drive operating mode” on page 437.If the device is a drive,change the drive state toDOWN.
See the vendor's documentation.Update the firmware.
See “Changing a drive operating mode” on page 437.If the device is a drive,change the drive state to UP.
About the NetBackup Device ManagerThe NetBackup Device Manager (ltid) manages robot and tape processes forNetBackup. The Device Manager processes requests to mount and unmount tapesin robotically controlled devices through the robotic control processes. NetBackupstarts ltid on the hosts that have storage devices configured. The Device Managerstarts the Volume Manager (vmd), the automatic volume recognition process (avrd),and any robotic processes as needed.
In the NetBackup Administration Console, the NetBackup Device Manager isexposed as follows:
For Windows hosts, as the NetBackup DeviceManager.
For UNIX hosts, as ltid.
In the Activity Monitor
As the Media Manager Device Daemon.On the Actions menu
Note: If you stop and restart the Device Manager, any backups, archives, or restoresthat are in progress may fail.
See “Stopping and restarting the device manager” on page 452.
About external access to NetBackup controlleddevices on UNIX
On UNIX hosts, the NetBackup Device Manager restricts access to drives that arein an UP state by changing the permissions of the device files for those drives. TheDevice Manager changes the permissions to 0600 when it starts and back to their
451Configuring robots and tape drivesAbout the NetBackup Device Manager

original settings when it is terminated. The permissions also are returned to theiroriginal settings when a drive’s state is changed to DOWN.
See “About the NetBackup Device Manager” on page 451.
Do not modify the permissions of these device files when the Device Manager isactive. The automatic volume recognition process (avrd) periodically tries to rewindand read data from media in the drives that are UP and are not currently assignedin NetBackup.
To ensure reliable operation, do not use UNIX tape and drive commands on thedrives that are UP and controlled by the Device Manager. Users can use theNetBackup tpreq and tpunmount commands and the drive_mount_notify anddrive_unmount_notify scripts on those drives.
See “NetBackup notify scripts” in the NetBackup Administrator's Guide, Volume II
http://www.veritas.com/docs/DOC5332
Stopping and restarting the device managerUse the following procedure to stop and restart the NetBackup Device Manager.
See “About the NetBackup Device Manager” on page 451.
To start or stop the Device Manager
1 In the NetBackup Administration Console, expand Media and DeviceManagement > Devices.
2 On theActionsmenu, select Stop/Restart Media Manager Device Daemon.
3 In the Stop/Restart Media Manager Device Daemon dialog box, do thefollowing:
In the Device host dropdown list, select the wanted media server.1
Select the Action: Start, Stop, or Stop/Restart.
The actions that are available depend on the state of the device manager /daemon.
2
Select the wantedOptions: Eject media from standalone drive(s) or Enableverbose logging.
3
Click Apply or OK, depending on the following results:
■ Apply does not close the dialog box so you can select device hosts andactions for more than another device host.
■ OK closes the dialog box.
4
452Configuring robots and tape drivesStopping and restarting the device manager

Configuring tape mediaThis chapter includes the following topics:
■ About NetBackup tape volumes
■ About NetBackup volume pools
■ About NetBackup volume groups
■ NetBackup media types
■ About WORM media
■ About adding volumes
■ About configuring media name and attribute rules
■ Adding volumes by using the wizard
■ About media settings rules
■ Configuring media settings
■ About barcodes
■ Configuring barcode rules
■ About media ID generation rules
■ Configuring media ID generation rules
■ About media type mapping rules
■ Adding volumes by using the Actions menu
■ Configuring media type mappings
■ Managing volumes
9Chapter

■ Managing volume pools
■ Managing volume groups on UNIX
■ About media sharing
■ Configuring unrestricted media sharing
■ Configuring media sharing with a server group
About NetBackup tape volumesA tape volume is a data storage tape or a cleaning tape. NetBackup assignsattributes to each volume and uses them to track and manage the volumes.Attributes include the media ID, robot host, robot type, robot number, and slotlocation.
NetBackup uses two volume types, as follows:
Volumes that are located in a robot.
The robotic library moves the volumes into and out from therobotic drives as necessary.
Robotic volumes
Volumes that are allocated for the drives that are not in a robot.
Operator intervention is required to load volumes into and ejectvolumes from standalone drives.
Standalone volumes
NetBackup uses volume pools to organized volumes by usage.
See “About NetBackup volume pools” on page 454.
You can use WORM media with NetBackup.
See “About WORM media” on page 460.
Volume information is stored in the EMM database.
See “About the Enterprise Media Manager (EMM)” on page 886.
About NetBackup volume poolsA volume pool identifies a set of volumes by usage. Volume pools protect volumesfrom access by unauthorized users, groups, or applications. When you add mediato NetBackup, you assign them to a volume pool (or assign them as standalonevolumes, without a pool assignment).
By default, NetBackup creates the following volume pools:
454Configuring tape mediaAbout NetBackup tape volumes

The default pool to which all backup images are written (unless youspecify otherwise).
NetBackup
For DataStore use.DataStore
For NetBackup catalog backups.
Catalog backup volumes are not a special type in NetBackup. Theyare the data storage volumes that you assign to the CatalogBackupvolume pool. To add NetBackup catalog backups, use any of the addvolume methods. Ensure that you assign them to the volume poolyou use for catalog backups. After adding volumes, use theNetBackup Catalog Backup wizard to configure a catalog backuppolicy.
See “About the NetBackup catalog” on page 880.
CatalogBackup
For the volumes that are not assigned to a pool.None
You can add other volume pools. For example, you can add a volume pool for eachstorage application you use. Then, as you add volumes to use with an application,you assign them to that application’s volume pool. You can also move volumesbetween pools.
You also can configure a scratch pool from which NetBackup can transfer volumeswhen a volume pool has no volumes available.
See “About scratch volume pools” on page 456.
The volume pool concept is relevant only for tape storage units and does not applyto disk storage units.
You can use any of the approved characters for volume pools names.
See “NetBackup naming conventions” on page 1112.
NetBackup uses several special prefixes for volume pool names.
See “About reserved volume pool name prefixes” on page 455.
Examples of volume pool usage are available in the NetBackup Administrator’sGuide, Volume II:
http://www.veritas.com/docs/DOC5332
About reserved volume pool name prefixesNetBackup reserves the following prefixes (case sensitive) for the names of thevolume pools that contain media for specific purposes:
455Configuring tape mediaAbout NetBackup volume pools

For volumes on which NetBackup encrypts the data. The volumes in a volumepool that uses this name prefix must be targeted to encrypting tape drives.
See “About NetBackup encryption options” on page 719.
See the NetBackup Security and Encryption Guide.
ENCR
For WORM volumes on which NetBackup encrypts the data. The volumesin a volume pool that uses this name prefix must be targeted to encryptingtape drives.
See “About NetBackup encryption options” on page 719.
See the NetBackup Security and Encryption Guide.
See the NetBackup Commands Reference Guide, available at the followingURL:
http://www.veritas.com/docs/DOC5332
WENCR
For WORM volumes. NetBackup does not encrypt the data.
See “About using volume pools to manage WORM media” on page 461.
WORM
NetBackup examines the volume pool names to determine if they are specialpurpose volume pools. If a volume pool name begins with one of the special prefixes,NetBackup processes the media in that pool according to the requirements for thatpool. If not, NetBackup does not use special processing for that volume pool’smedia.
When you create a volume pool for any of these purposes, you must use uppercasecharacters. For readability, it may be beneficial to use an underscore characterafter the prefix, for example WORM_ or ENCR_.
About scratch volume poolsThe scratch pool is an optional pool that contains the media that NetBackup canallocate to other pools as needed. If you configure a scratch pool, NetBackup movesvolumes from that scratch pool to other pools that do not have volumes available.
Only one scratch pool is allowed. You cannot add a scratch pool if one exists.
You cannot change theNetBackup orDataStore pools to be scratch volume pools.
If you create a scratch pool, be aware of the following conditions:
■ If the scratch pool contains assigned volumes, these volumes remain in thescratch pool.NetBackup does not move assigned volumes to other pools as it does withunassigned volumes.
■ NetBackup does not assign volumes while they are in a scratch pool.
456Configuring tape mediaAbout NetBackup volume pools

For example if a NetBackup policy or schedule specifies the scratch pool, allrequests for those volumes are denied.
■ NetBackup returns expired media to the scratch volume pool automatically(media that is returned must have been originally in the same scratch pool).
■ To use NetBackup to manage the allocation of volumes to volume pools, do thefollowing:
■ Create volume pools as required, but do not add any volumes to the pools.
■ Define a scratch pool and add all of the volumes to it. NetBackup movesvolumes to the other pools as volumes are needed.
See “About NetBackup volume pools” on page 454.
See “Configuring media settings” on page 467.
See “About media settings rules” on page 467.
About NetBackup volume groupsA volume group identifies a set of volumes that reside at the same physical location.The location can be either the robot in which the volumes reside, standalone storage,or off-site storage if you use the NetBackup Vault option.
When you add media to NetBackup, NetBackup assigns all volumes in a robot tothat robot's volume group. Alternatively, you can assign the media to a differentgroup.
Volume groups are convenient for tracking the location of volumes, such as thecase when a volume is moved off site. Volume groups let you perform operationson a set of volumes by specifying the group name rather than each individual mediaID of each volume. Operations include moves between a robotic library and astandalone location or deletions from NetBackup.
If you move a volume physically, you also must move it logically. A logical movemeans to change the volume attributes to show the new location.
The following are the rules for assigning volume groups:
■ All volumes in a group must be the same media type.However, a media type and its corresponding cleaning media type are allowedin the same volume group (such as DLT and DLT_CLN).
■ All volumes in a robotic library must belong to a volume group.You cannot add volumes to a robotic library without specifying a group or havingMedia Manager generate a name for the group.
457Configuring tape mediaAbout NetBackup volume groups

■ The only way to clear a volume group name is to move the volume to standaloneand not specify a volume group.
■ More than one volume group can share the same location.For example, a robotic library can contain volumes from more than one volumegroup and you can have more than one standalone volume group.
■ All volumes in a group must be in the same robotic library or be standalone.That is, you cannot add a group (or part of a group) to a robotic library if it alreadyexists in another robotic library.
Examples of volume group usage are available.
See the NetBackup Administrator’s Guide, Volume II:
http://www.veritas.com/docs/DOC5332
NetBackup media typesNetBackup uses media types to differentiate the media that have different physicalcharacteristics. Each media type may represent a specific physical media type; forexample, NetBackup media type of 8MM, 8MM2, or 8MM3 can represent Sony AITmedia.
The NetBackup media types are also known as Media Manager media types.
The following table describes the NetBackup media types.
Table 9-1 NetBackup media types
DescriptionMedia type
4MM cartridge tape4MM
4MM cleaning tape4MM_CLN
8MM cartridge tape8MM
8MM cleaning tape8MM_CLN
8MM cartridge tape 28MM2
8MM cleaning tape 28MM2_CLN
8MM cartridge tape 38MM3
8MM cleaning tape 38MM3_CLN
DLT cartridge tapeDLT
DLT cleaning tapeDLT_CLN
458Configuring tape mediaNetBackup media types

Table 9-1 NetBackup media types (continued)
DescriptionMedia type
DLT cartridge tape 2DLT2
DLT cleaning tape 2DLT2_CLN
DLT cartridge tape 3DLT3
DLT cleaning tape 3DLT3_CLN
DTF cartridge tapeDTF
DTF cleaning tapeDTF_CLN
1/2 inch cartridge tapeHCART
1/2 inch cartridge tape 2HCART2
1/2 inch cartridge tape 3HCART3
1/2 inch cleaning tapeHC_CLN
1/2 inch cleaning tape 2HC2_CLN
1/2 inch cleaning tape 3HC3_CLN
1/4 inch cartridge tapeQCART
NetBackup writes media in a format that allows the position to be verified beforeappending new backups.
Alternate NetBackup media typesAlternate media types let you define more than one type of tape in the same library.You can use the alternate types to differentiate between different physical cartridges.
The following are examples of alternate media types:
■ 8MM, 8MM2, 8MM3
■ DLT, DLT2, DLT3
■ HCART, HCART2, HCART3
For example, if a robot has DLT4000 and DLT7000 drives, you can specify thefollowing media types:
■ DLT media type for the DLT4000 tapes
■ DLT2 media type for the DLT7000 tapes
459Configuring tape mediaNetBackup media types

NetBackup then does not load a tape that was written in a DLT4000 drive into aDLT7000 drive and vice versa.
You must use the appropriate default media type when you configure the drives.(When you configure drives in NetBackup, you specify the default media type touse in each drive type.)
In a robot, all of the volumes (of a specific vendor media type) must be the sameNetBackup media type. For example, for a TLH robot that contains 3490E media,you can assign either NetBackup HCART, HCART2, or HCART3 media type to thatmedia. You cannot assign HCART to some of the media and HCART2 (or HCART3)to other of the media.
See "Media formats" in the NetBackup Administrator’s Guide, Volume II, availableat the following URL:
http://www.veritas.com/docs/DOC5332
About WORM mediaYou can use WORM (Write-Once-Read-Many) media to protect key data fromunwanted modification or to meet compliance regulations.
NetBackup uses the QIC/WORM tape format for WORM media. This format letsNetBackup append images to WORM tape.
See "Media formats" in the NetBackup Administrator’s Guide, Volume II, availableat the following URL:
http://www.veritas.com/docs/DOC5332
Tape error recovery is disabled for WORM media. NetBackup has job resume logic,which tries to resume a job that has been interrupted (such as an interruption onthe Fibre Channel). However, NetBackup fails a job that uses WORM media andthen retries the failed job. Veritas recommends that you use checkpoint and restartfor backups.
The bplabel command labels only LTO-3 WORM tapes. All other WORM mediacannot be labeled because the label cannot be overwritten when the media is used.
The following are the limitations for WORM tape:
■ Third-party copy backups are not supported with WORM media.
■ NetBackup does not support resume logic with WORM tape. NetBackup fails ajob that uses WORM media and then retries the failed job. Alternatively, ifcheckpoint and restart are used, NetBackup restarts the job from the lastcheckpoint. Veritas recommends that you use checkpoint and restart for backups.
NetBackup provides two methods to manage WORM media, as follows:
460Configuring tape mediaAbout WORM media

■ Assign a reserved prefix to WORM volume pool names.See “About using volume pools to manage WORM media” on page 461.
■ Assign a specific drive type to all WORM drives and a specific media type to allWORM media.See “About using unique drive and media types to manage WORM media”on page 462.
About using volume pools to manage WORM mediaYou can dedicate volume pools for WORM media. This method lets aWORM-capable tape drive back up and restore standard and WORM media.NetBackup uses two reserved volume pool prefixes to indicate that the volumes ina pool are for WORM drives, as follows:
■ WORM (uppercase letters) denotes WORM media.
■ WENCR (uppercase letters) denotes WORM media on which NetBackup shouldencrypt the data.
See “About reserved volume pool name prefixes” on page 455.
For more information about encrypting data on your media, see the NetBackupSecurity and Encryption Guide, available at the following URL:
http://www.veritas.com/docs/DOC5332
When you create a volume pool for WORM media, specify one of the reservedprefixes as the first characters of the pool name. NetBackup examines the volumepool names to determine if they begin with a reserved prefix. For readability, it maybe beneficial to use an underscore character after the prefix, for example WORM_.
See “Adding a volume pool” on page 520.
Note the following cases:
■ If the drive contains WORM media and the media is in a WORM volume pool,NetBackup writes the media as WORM.
■ If the drive contains WORM media and the media is not in a WORM volumepool, NetBackup freezes the media.
■ If the drive contains standard media and the media is in a WORM volume pool,NetBackup freezes the media.
■ If the drive contains the Quantum media that has never been used or all of itsNetBackup images have expired, NetBackup uses the media.
See “About using a WORM scratch pool” on page 462.
See “About WORM media” on page 460.
461Configuring tape mediaAbout WORM media

See “About using unique drive and media types to manage WORM media”on page 462.
About using a WORM scratch poolFor all supported WORM-capable drives (except the Quantum drive), the scratchpool must only contain one type of media. Veritas recommends that you add themost commonly used media to the scratch pool. For example, if most NetBackupjobs use standard media, put standard media in the scratch pool.
If the scratch pool contains standard media, ensure that the WORM volume pooldoes not run out of media to complete backup jobs.
If the WORM volume pool runs out of media, NetBackup performs the followingactions:
■ Moves the standard media from the scratch pool into the WORM pool.
■ Loads the standard media into a WORM-capable drive.
■ Freezes the media.
NetBackup repeats this process until all of the standard media in the scratch poolis frozen.
The opposite also is true. If a standard volume pool runs out of media and thescratch pool contains WORM media, standard backups can fail because appropriatemedia are unavailable.
About using unique drive and media types to manage WORM mediaYou can assign a different drive and media type to all WORM drives and media.For example, configure standard drives and media as HCART and WORM-capabledrives and media as HCART2.
This method lets you add both types of media in the scratch pool because NetBackupselects the correct media type for the drive type.
However, because each drive is limited to backups and restores with a specific typeof media, optimal drive usage may not be achieved. For example, theWORM-capable drives cannot be used for backups with standard media even if noWORM backups are in progress.
Because Quantum drives use only a single media type, this method for managingthe WORM media is unnecessary.
See “About WORM media and the Quantum drive” on page 463.
If you use unique drive and media types to manage WORM media, disable theWORM volume pool name verification.
462Configuring tape mediaAbout WORM media

See “Disabling WORM volume pool name verification” on page 463.
Disabling WORM volume pool name verificationIf you use unique drive and media types to manage WORM media, disableNetBackup volume pool name verification. WORM volume pool name verificationis used only for the WORM volume pool method of managing WORM media.
See “About using unique drive and media types to manage WORM media”on page 462.
See “About using volume pools to manage WORM media” on page 461.
To disable the volume pool name verification
◆ Create the following touch file on the media server of the WORM drive:
On Windows:
install_path\netbackup\db\config\DISABLE_WORM_POOLCHECK
On UNIX:
/usr/openv/netbackup/db/config/DISABLE_WORM_POOLCHECK
About WORM media and the Quantum driveWhen you use the Quantum drive, only one kind of media can be used as eitherstandard media or WORM media.
If a WORM volume pool runs out of media, media are moved from the scratchvolume pool into the WORM pool. NetBackup determines whether the media areconfigured as standard or WORM media. For a standard media volume, NetBackupreads the tape label and verifies that the media is unused or that all images areexpired. NetBackup also verifies that the media is not currently assigned to a server.After verification, NetBackup configures the media as WORM media and continueswith the NetBackup job.
Supported WORM drivesNetBackup requires a SCSI pass-through driver to use WORM tape drives.NetBackup queries the drive to verify that drive is WORM-capable and that themedia in the drive is WORM media. SCSI pass-through paths are provided on theserver platforms NetBackup supports. SCSI pass-through paths may require specialoperating system configuration changes.
See the NetBackup Device Configuration Guide, available at the following URL:
http://www.veritas.com/docs/DOC5332
463Configuring tape mediaAbout WORM media

For information about the drives that NetBackup supports for WORM media, seethe Hardware Compatibility List at the following URL
http://www.netbackup.com/compatibility
All of the vendors except Quantum require the use of special WORM media.
Quantum lets NetBackup convert standard tape media to WORM media. To useQuantum drives for WORM media on Solaris systems, modify the st.conf file.
Information is available about how to configure nonstandard tape drives and howto edit the st.conf file.
See the NetBackup Device Configuration Guide, available at the following URL:
http://www.veritas.com/docs/DOC5332
About adding volumesAdding volumes is a logical operation that assigns NetBackup attributes to physicalmedia. The media can reside in storage devices already, or you can add them tothe storage devices when you add them to NetBackup. How you add volumesdepends on the type of volume: robotic or standalone.
See “About adding robotic volumes” on page 464.Volumes in a robotic library
See “About adding standalone volumes” on page 465.Standalone volumes
NetBackup uses the rules to assign names and attributes to volumes.
See “About configuring media name and attribute rules” on page 466.
About adding robotic volumesThe robotic volumes are the volumes that are located in a robotic tape library. Thefollowing table describes the methods for adding robotic volumes.
Table 9-2 Methods for adding robotic volumes
DescriptionMethod
See “Adding volumes by using the wizard”on page 466.
The Volume Configuration Wizard
See “About robot inventory” on page 527.
See “Updating the NetBackup volume configurationwith a robot's contents” on page 540.
Robot inventory
464Configuring tape mediaAbout adding volumes
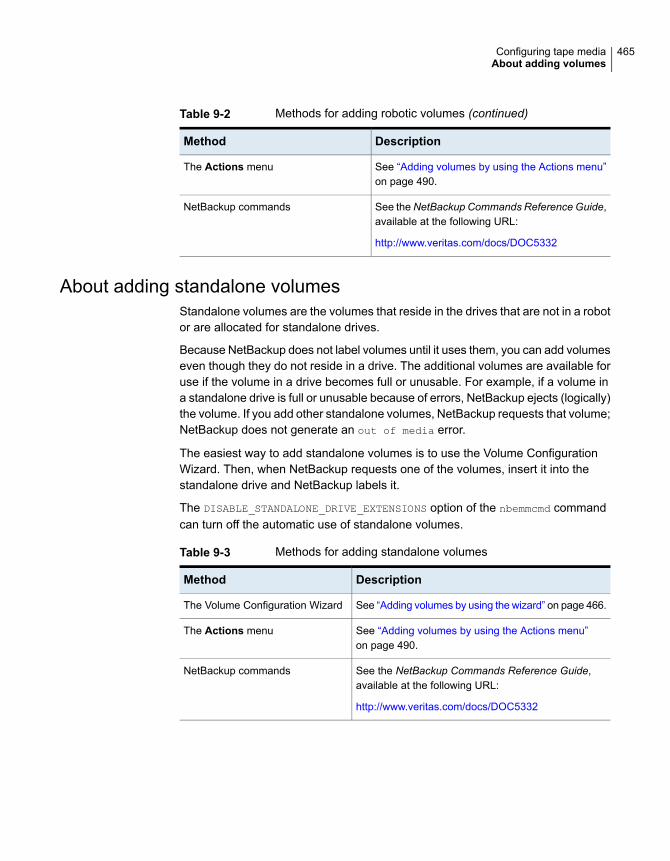
Table 9-2 Methods for adding robotic volumes (continued)
DescriptionMethod
See “Adding volumes by using the Actions menu”on page 490.
The Actions menu
See theNetBackup Commands Reference Guide,available at the following URL:
http://www.veritas.com/docs/DOC5332
NetBackup commands
About adding standalone volumesStandalone volumes are the volumes that reside in the drives that are not in a robotor are allocated for standalone drives.
Because NetBackup does not label volumes until it uses them, you can add volumeseven though they do not reside in a drive. The additional volumes are available foruse if the volume in a drive becomes full or unusable. For example, if a volume ina standalone drive is full or unusable because of errors, NetBackup ejects (logically)the volume. If you add other standalone volumes, NetBackup requests that volume;NetBackup does not generate an out of media error.
The easiest way to add standalone volumes is to use the Volume ConfigurationWizard. Then, when NetBackup requests one of the volumes, insert it into thestandalone drive and NetBackup labels it.
The DISABLE_STANDALONE_DRIVE_EXTENSIONS option of the nbemmcmd commandcan turn off the automatic use of standalone volumes.
Table 9-3 Methods for adding standalone volumes
DescriptionMethod
See “Adding volumes by using the wizard” on page 466.The Volume Configuration Wizard
See “Adding volumes by using the Actions menu”on page 490.
The Actions menu
See the NetBackup Commands Reference Guide,available at the following URL:
http://www.veritas.com/docs/DOC5332
NetBackup commands
465Configuring tape mediaAbout adding volumes

About configuringmedia name and attribute rulesNetBackup uses the default settings and rules to name and assign attributes tonew removeable media. NetBackup uses these rules when you do the following:
■ Use the Volume Configuration Wizard to add new media.
■ Use theRobot Inventory dialog box to inventory a robot. If NetBackup discoversnew media in the robot, it adds that media to NetBackup.
For most configurations, the default settings work well. However, you can changethe default settings and rules that NetBackup uses. Change the settings only if youhave special hardware or usage requirements. You can change the settings fromthe Volume Configuration Wizard or from the Robot Inventory dialog box.
The following table shows the rules that you can configure:
Table 9-4 Attributes for media
WhereWhat
See “About media settings rules” on page 467.
See “Configuring media settings” on page 467.
Media settings
See “About barcodes” on page 477.
See “Configuring barcode rules” on page 480.
Barcode rules
See “About media ID generation rules” on page 485.
See “Configuring media ID generation rules”on page 486.
Media ID generation rules
See “About media type mapping rules” on page 489.
See “Configuring media type mappings”on page 494.
Map media for API robots
Adding volumes by using the wizardThe easiest way to add volumes is to use the Volume Configuration Wizard.NetBackup assigns media IDs and labels the volumes automatically.
466Configuring tape mediaAbout configuring media name and attribute rules

To configure volumes by using the wizard
1 In the NetBackup Administration Console, in the left pane, expand Mediaand Device Management > Devices.
2 From the list of wizards in the right pane, click Configure Volumes and followthe wizard instructions.
You can change the default settings and rules that NetBackup uses to nameand assign attributes to new removeable media.
See “About configuring media name and attribute rules” on page 466.
About media settings rulesThe NetBackup media settings rules depend on the following:
■ For existing media, the volume group to which the volumes belong.
■ For new media, the media ID prefix, the media type, and the pool to which thevolume should be assigned.
You can change the default rules.
See “Configuring media settings” on page 467.
See “Media settings options” on page 469.
Configuring media settingsUse theMedia Settings tab of the NetBackupAdvancedRobot Inventory Optionsdialog box to configure the attributes for existing and new media.
See “About media settings rules” on page 467.
To configure media settings
1 Open the Advanced Robot Inventory Options dialog box, as follows:
1 In the NetBackup Administration Console, expandMedia and Device Management > Media > Robots inthe left pane.
2 Select the robot that you want to inventory.
3 On the Actions menu, select Inventory Robot.
4 Click either Preview volume configuration changesor Update volume configuration.
5 Click Advanced Options.
From the RobotInventory dialog box
467Configuring tape mediaAbout media settings rules

1 In the NetBackup Administration Console, in the leftpane, expand Media and Device Management >Devices.
2 From the list of wizards in the right pane, clickConfigure Volumes and follow the wizard instructions.
3 On the Robot Inventory panel of the VolumeConfiguration Wizard, click Advanced Options.
From the VolumeConfiguration Wizard
2 In the Advanced Robot Inventory Options dialog box, click the MediaSettings tab.
468Configuring tape mediaConfiguring media settings

3 Configure the settings, as follows:
In the Media which have been removed from the robot should be assignedto the volume group list, select a volume group for the media that are removedfrom the robot.
See “Media which have been removed from the robot... (existing media setting)”on page 470.
a.
In the Media which have been moved into or within the robot should beassigned to the volume group list, select a volume group for the media thatare in or are added to the robot.
See “Media which have been moved into or within the robot... (existing mediasetting)” on page 470.
b.
If the robotic library supports barcodes and the volume has readable barcodes,NetBackup creates media IDs automatically from the barcodes. You do notneed to configure a prefix.
However, if the media in the robotic library has unreadable barcodes or if therobot does not support barcodes, NetBackup assigns a default media ID prefix.
To use a media ID prefix other than the DEFAULT, click Browse in the Usethe following Media ID prefix field. Then, specify or choose a media ID prefixin the Media ID Prefix dialog box.
See “Use the following Media ID prefix (new media setting)” on page 471.
c.
To use your barcode rules to assign attributes to new volumes, select Usebarcode rules.
See “Use barcode rules (new media setting)” on page 473.
d.
To override your barcode rules for the new media in the robotic library, selecta Media type from the list.
See “Media type (new media setting)” on page 473.
e.
To override the default volume pool for the new media in the robotic library,select a Volume pool from the list.
See “Volume pool (new media setting)” on page 476.
f.
4 Click OK.
Media settings optionsThe following are the settings for the new media in a robot that you add to yourNetBackup volume configuration.
469Configuring tape mediaConfiguring media settings

Media which have been removed from the robot... (existingmedia setting)For the media that already exist in your volume configuration, you can specify thevolume group if the media are removed from the robot. Media which have beenremoved from the robot should be assigned to the volume group.
The Media which have been removed from the robot should be assigned tothe volume group drop-down box contains the following selections:
NetBackup automatically generates a new volume group.AUTOGENERATE
If there is an existing group with a compatible residence for the volume,the volume is added to that group. If a suitable volume group does notexist, NetBackup generates a new volume group name.
DEFAULT
The media are not assigned to a volume group.NO VOLUMEGROUP
Other selections may be available, depending on the setting of the Media type fieldof the New media section of the dialog box, as follows:
TheMedia which have been removed from the robot shouldbe assigned to the volume group dropdown box includes thevolume groups that are valid for the robot’s default media type.
If the Media type field isDEFAULT
TheMedia which have been removed from the robot shouldbe assigned to the volume group dropdown box includes thevolume groups that are valid for the specified media type.
To specify a volume group other thanDEFAULT, enter a volumegroup name or select one from the list.
If the Media type field isother than DEFAULT
See “Media type (new media setting)” on page 473.
Media which have been moved into or within the robot...(existing media setting)You can specify the volume group for the existing media that have been movedinto or within a robot.
The volume group to assign to the existing media that you have inserted into therobot (or moved to a new location within the robot).
TheMedia which have beenmoved into or within the robot should be assignedto the volume group drop-down box contains the following selections:
470Configuring tape mediaConfiguring media settings

NetBackup automatically generates a new volume group.AUTOGENERATE
If there is an existing group with a compatible residence for the volume,the volume is added to that group. If a suitable volume group does notexist, NetBackup generates a new volume group name.
DEFAULT
The following other selections may be available depending on the setting of theMedia type field of the New media section of the dialog box:
The Media which have been moved into or within the robotshould be assigned to the volume group drop-down boxincludes the volume groups that are valid for the robot’s defaultmedia type.
If the Media type field isDEFAULT
The Media which have been moved into or within the robotshould be assigned to the volume group drop-down boxincludes the volume groups that are valid for the specified mediatype.
To specify a volume group other thanDEFAULT, enter a volumegroup name or select one from the list.
If the Media type field isother than DEFAULT
If the robotic library contains multiple media types, Veritas recommends a DEFAULT
setting. If you specify a volume group and volumes of different media types weremoved into or within the robot, the new update fails. Volumes of different mediatypes cannot have the same volume group.
See “Media type (new media setting)” on page 473.
Use the following Media ID prefix (new media setting)if the media has unreadable barcodes or if the robot does not support barcodes,by default NetBackup assigns media ID prefixes as follows:
■ If MEDIA_ID_PREFIX entries are defined in the vm.conf file, NetBackup assignsthe last MEDIA_ID_PREFIX entry as the media ID prefix.
■ If no MEDIA_ID_PREFIX entries are defined in the vm.conf file, NetBackup usesthe letter A as the media ID prefix.
To configure NetBackup to use a media ID prefix other than the default, select Usethe following Media ID prefix field in the Advanced Robot Inventory Optionsdialog box and then click Browse. The Media ID Prefix dialog box appears.
471Configuring tape mediaConfiguring media settings

Figure 9-1 Media ID Prefix dialog box
The following are the alternative NetBackup media ID assignment behaviors thatyou can configure in the dialog box:
Deselect the Use a media ID prefix for media withunreadable barcodes or if the robot does not supportbarcodes option.
To not use a media ID prefix
Select theUse amedia ID prefix formedia with unreadablebarcodes or if the robot does not support barcodesoption.
To use a media ID prefix
Select the Specify the media ID prefix for the currentsession only option then enter the media ID prefix. You canspecify a prefix of one to five alphanumeric characters.NetBackup assigns the remaining numeric characters tocreate a six character media ID.
NetBackup uses the prefix only for the current operation.
To use a specific media IDprefix for the current operationonly
Select the Choose from the Media ID prefix list (stored invm.conf file) option and then select the prefix from the list.
To configure a media ID prefixto use for the current sessionand future sessions
Select the Choose from the Media ID prefix list (stored invm.conf file) option and then enter the prefix in the Newmedia ID prefix field. Click Add.
To add a new media ID prefixto the vm.conf file
472Configuring tape mediaConfiguring media settings

Select the Choose from the Media ID prefix list (stored invm.conf file) option, select the prefix from the list, and thenlick Remove.
To remove a media ID prefixfrom the vm.conf file
Information about the vm.conf file is available.
See the NetBackup Administrator’s Guide, Volume II:
http://www.veritas.com/docs/DOC5332
Use barcode rules (new media setting)Specifies whether or not to use barcode rules to assign attributes for new media.
To enable barcode rule support for API robots, add an API_BARCODE_RULES entryto the vm.conf file.
See “About barcodes” on page 477.
See “Configuring barcode rules” on page 480.
Information about the vm.conf file is available.
See the NetBackup Administrator’s Guide, Volume II, available at the followingURL:
http://www.veritas.com/docs/DOC5332
Media type (new media setting)Specifies the type for the new media that are added to a robot. The list includesthe media types that are valid for the robot.
How NetBackup determines the new media type depends on the Use barcoderules setting, as follows:
■ Use barcode rules is selected.See “Media type when using barcode rules” on page 473.
■ Use barcode rules is not selected.See “Media type when not using barcode rules” on page 475.
Note: For API robots, the Media type is always set to DEFAULT. To specify amedia type for API robots, use the Media Type Mappings tab of the dialog box.
See “Configuring media type mappings” on page 494.
Media type when using barcode rulesIf you use barcode rules in NetBackup, choose one of the following:
473Configuring tape mediaConfiguring media settings

NetBackup uses the barcode rules to determine the media type that isassigned.
Each media type to be added should have a barcode rule. For example,assume that you want to add DLT and half-inch cartridges to a TLDrobot with a single update operation. First create separate barcoderules for DLT and half-inch cartridges and then select the specific mediatypes when you create the barcode rules. Finally, select DEFAULT onthe Media Settings tab. The correct media type is assigned to eachmedia.
If you choose DEFAULT on the Media Settings tab and DEFAULT inthe barcode rule, NetBackup assigns the default media type for therobot.
DEFAULT
You can use a single barcode rule to add media of different types, suchas DLT and half-inch cartridges (HCART) to a TLD robot. First, selecta specific media type on the Media Settings tab. Second, selectDEFAULT for the barcode rule media type when you create the barcoderule. You can perform one update for DLT and another for half-inchcartridge, and the barcode rule assigns the correct media type.
If you specify a value other than DEFAULT, the barcode rule media typemust be the same as the media or be DEFAULT. If not, the barcode ruledoes not match the media (except for cleaning media).
Table 9-5 shows some combinations of media types on the MediaSettings tab and barcode rule media types for a TLD (non-API) robot.It also shows the results when the media are added to the volumeconfiguration.
A specific mediatype from the list.
Table 9-5 Example media type and barcode rule combinations
Media type addedto volumeconfiguration
Rule matches?Barcode rulemedia type
Media type onMedia Settingstab
DLTYesDEFAULTDLT
HCARTYesDEFAULTHCART
DLTYesDLTDLT
DLT_CLNYesDLT_CLNDLT
DLT_CLNNoDLTDLT_CLN
DLT_CLNYesDLT_CLNDLT_CLN
DLT_CLNYesDEFAULTDLT_CLN
474Configuring tape mediaConfiguring media settings

Table 9-5 Example media type and barcode rule combinations (continued)
Media type addedto volumeconfiguration
Rule matches?Barcode rulemedia type
Media type onMedia Settingstab
DLTNo8MM, 4MM, and so onDLT
DLTYesDEFAULTDEFAULT
DLTYesDLTDEFAULT
DLT_CLNYesDLT_CLNDEFAULT
Depends on robot typeNo8 MM, 4 MM, and soon
DEFAULT
The fourth row in the table shows how both cleaning cartridges and regular volumesare added using one update operation.
All the following conditions must be true:
■ The media type on the Media Settings tab is for regular media (DLT, in thisexample).
■ The barcode matches a barcode tag.
■ The media type for the barcode rule is cleaning media (DLT_CLN).
Another example is available:
The sixth row and seventh row in the table show how to add only a cleaning tape.In the sixth row, you specify the cleaning media type on the Media Settings taband in the barcode rule. In the seventh, specify the cleaning media on the MediaSettings tab and specify default when you configure the barcode rule.
See “Configuring barcode rules” on page 480.
Media type when not using barcode rulesChoose one of the following if the barcode rules in NetBackup are not used:
NetBackup uses the media type that is configured for the drives if:
■ The drives in the robot are configured on the robot control host■ All drives the same type■ At least one drive is configured on the robot control host
If the drives are not the same type, NetBackup uses the default mediatype for the robot.
DEFAULT
475Configuring tape mediaConfiguring media settings

If the robot supports multiple media types and you do not want to usethe default media type, select a specific type.
Select a specific media type if: the drives are not configured on therobot control host and the drives are not the default media type for therobot.
A specific mediatype
The following table shows the default media types for robots when drives are notconfigured on the robot control host:
Table 9-6 Default media types for non-API robots
Default media typeRobot type
4 MM cartridge tape.Tape Library 4 MM(TL4)
8 MM cartridge tape.
Also supports 8 MM cartridge tape 2 and 8 MM cartridge tape 3.
Tape Library 8 MM(TL8)
DLT cartridge tape.
Also supports the following:
■ DLT cartridge tape 2 and 3, 1/2-inch cartridge tape■ 1/2-inch cartridge tape 2, 1/2-inch cartridge tape 3■ 8 MM cartridge tape, 8 MM cartridge tape 2, 8 MM cartridge tape 3■ DTF cartridge tape■ 1/4-inch cartridge tape
Tape Library DLT(TLD)
Volume pool (new media setting)The volume pool for the new media. The actions depend on whether you usebarcode rules to assign media attributes, as follows:
DEFAULT. If you select DEFAULT and:
■ Use barcode rules, the barcode rules determine the volume pool towhich new volumes are assigned
■ Do not use barcode rules, NetBackup assigns data tapes to theNetBackup pool but does not assign cleaning tapes to a volumepool
DEFAULT
If you use barcode rules, this volume pool setting always overrides therule.
A specific volumepool.
476Configuring tape mediaConfiguring media settings

About barcodesWhen a robotic library has a barcode reader, it scans the media for barcodes andsaves the results. The results associate the slot number and the barcode with themedia in that slot. NetBackup obtains the barcode and slot information from therobotic library.
In the robots that have barcode readers, NetBackup verifies the barcode to ensurethat the robot loads the correct volume.
If the barcode on the volume does not match the barcode in the EMM database,NetBackup does one of the following:
■ Assigns the request a pending status (for media-specific jobs such as a restore)
■ Uses another volume (for backup or duplicate jobs)
If a requested volume is not in a robot, a pending request message appears in theNetBackup Administration Console Device Monitor.
The operator must find the volume and do one of the following:
■ Check the Device Monitor to find a suitable drive and mount the requestedvolume in that drive.
■ Move the volume into the robot, update the volume configuration to reflect thecorrect location for the media, and resubmit the request.
If the volume is labeled, the automatic volume recognition daemon reads the labeland the drive is assigned to the request. If the volume is unlabeled and notassociated with a robot, the operator manually assigns the drive to the request.
Barcode advantagesNetBackup functions well whether or not barcodes are used. However, Veritassuggests using media with barcodes in the robots that can read barcodes.
Barcodes offer the following advantages:
■ Automatic media ID assignmentWhen you add new media to a robot, NetBackup is able to assign media IDsaccording to specified criteria.
■ More accurate tracking of volume locationA robot inventory update can determine which volumes are in a robot.
■ Increased performanceNot using barcodes can adversely affect performance for some robots. A robotthat reads barcodes performs a scan each time it moves a tape. The robot storesthe correct barcode in memory or verifies a previously saved barcode. However,
477Configuring tape mediaAbout barcodes

if a tape does not have a barcode, the robot retries the scan multiple times,degrading performance.
Barcode best practicesConsider the following practices when you select barcodes for volumes:
■ Barcodes usually appear on the labels that are attached to the outside of tapevolumes.
■ The maximum barcode length that NetBackup supports depends on the type ofrobot.See theNetBackup Device Configuration Guide, available at the following URL:http://www.veritas.com/docs/DOC5332
■ Always follow the robotic library vendor’s recommendations when purchasingbarcode labels for use with NetBackup.Ensure that the barcodes have the correct number of characters.
■ Barcodes can represent any combination of alpha and numeric characters, butdifferent robots support different lengths of barcodes.See the robot vendor’s documentation to determine the requirements for aspecific robot type.
■ Use barcodes without spaces (at the beginning, at the end, or between anycharacters).Otherwise, the robot or NetBackup may not read them correctly.
■ Volumes in an API robot have a real or a logical barcode.This volume identifier is used as the NetBackup media ID. This volume identifieris the volume serial number in ACS, TLH, and TLM robots.
■ For API robots, the barcode for a volume must be identical to the NetBackupmedia ID.Match barcodes to media IDs by getting custom labels in the same series asthe media IDs. For example, to match a set of media IDs from AA0000 to ZZ9999,get barcode labels in that series.
■ When a robotic library can contain more than one media type, assign specificcharacters in the barcode to different media types. Do so by using media IDgeneration rules.Also, use barcodes to differentiate between data tapes and cleaning tapes orto differentiate between volume pools.
478Configuring tape mediaAbout barcodes

About barcode rulesA barcode rule specifies criteria for assigning attributes to new robotic volumes.NetBackup assigns these attributes by using the barcode for the volume that therobotic library provides and your barcode rules.
In NetBackup, you choose whether to use barcode rules when you set up the robotinventory update operation. The barcode rules are stored on the master server.
Note: NetBackup does not use barcode rules if a volume already uses a barcode.
About NetBackup actions for barcodesWhen a robot inventory update operation uses NetBackup barcode rules and a newbarcode is detected in the robot, NetBackup does the following:
■ Searches the list of rules (from first to last) for a rule that matches the newbarcode.
■ If the barcode matches a rule, NetBackup verifies that the media type in the ruleis compatible with the media type specified for the update.
■ If the media types match, NetBackup assigns the attributes in the rule to thevolume. The attributes include the media type, volume pool, maximum numberof mounts (or number of cleanings), and description.
Example barcode rulesThe following table shows some example barcode rules. Rules are sorted firstaccording to the number of characters in the barcode tag and then by the orderadded. Two exceptions are the <NONE> and <DEFAULT> rules, which are alwayslocated at the end of the list.
Table 9-7 Example barcode rules
DescriptionMax mountsand cleanings
Volume poolMedia typeBarcode tag
New 008volumes
55b_pool8MM0080
DLT backup200d_poolDLTDLT
DLT cleaning30NoneDLT_CLNCLD
8-mm cleaning20None8MM_CLNCLT
8-mm backup0t_pool8MMTL8
479Configuring tape mediaAbout barcodes

Table 9-7 Example barcode rules (continued)
DescriptionMax mountsand cleanings
Volume poolMedia typeBarcode tag
8-mm no pool0None8MMTL
No barcode0NoneDEFAULT<NONE>
Other barcodes0NetBackupDEFAULT<DEFAULT>
Assume that you select the following media settings (update options) for the updateoperation for a new 8-mm volume in a TL8 robot:
Media type = 8MM
Volume group = 00_000_TL8
Use barcode rules = YES
Volume pool = DEFAULT
If a new volume in this robotic library has a barcode of TL800001, NetBackup usesthe rule with the barcode tag of TL8. NetBackup assigns the following attributes tothe volume:
■ Media ID = 800001 (last six characters of barcode)
■ Volume group = 00_000_TL8
■ Volume pool = t_pool
■ Maximum mounts = 0 (no maximum)
If a new volume has a barcode of TL000001, NetBackup uses the rule with thebarcode tag of TL. NetBackup assigns the following attributes to the volume:
■ Media ID = 000001 (last six characters of barcode)
■ Volume group = 00_000_TL8
■ Volume pool = None
■ Maximum mounts = 0 (no maximum)
Configuring barcode rulesUse the Barcode Rules tab of the Advanced Robot Inventory Options dialogbox to configure rules for assigning attributes to the new volumes that are addedto a robot. NetBackup assigns barcodes when you select Use barcode rules onthe Media Settings tab.
480Configuring tape mediaConfiguring barcode rules

To enable barcode rule support for API robots, add an API_BARCODE_RULES entryto the vm.conf file.
Robot types are described in a different topic.
See “NetBackup robot types” on page 406.
Information about the vm.conf file is in the NetBackup Administrator's Guide, VolumeII:
http://www.veritas.com/docs/DOC5332
See “About barcodes” on page 477.
To configure barcode rules
1 Open the Advanced Robot Inventory Options dialog box, as follows:
1 In the NetBackup Administration Console, expandMedia and Device Management > Media > Robots inthe left pane.
2 Select the robot that you want to inventory.
3 On the Actions menu, select Inventory Robot.
4 Click either Preview volume configuration changesor Update volume configuration.
5 Click Advanced Options.
From the RobotInventory dialog box
481Configuring tape mediaConfiguring barcode rules

1 In the NetBackup Administration Console, in the leftpane, expand Media and Device Management >Devices.
2 From the list of wizards in the right pane, clickConfigure Volumes and follow the wizard instructions.
3 On the Robot Inventory panel of the VolumeConfiguration Wizard, click Advanced Options.
From the VolumeConfiguration Wizard
2 In the Advanced Robot Inventory Options dialog box, click the BarcodeRules tab.
482Configuring tape mediaConfiguring barcode rules

3 To configure the rules, do any of the following:
Click New and then configure the rule in the dialog box.Add a rule
Select the rule, click Change, and then change the rule in theChange Barcode Rule dialog box.
You cannot change the barcode tag of a barcode rule. You first mustdelete the old rule and then add a rule with a new barcode tag.
Change a rule
Select the rule, click Delete, and click OK in the Delete BarcodeRules dialog box. You can select and delete multiple rules with oneoperation.
Delete a rule
See “Barcode rules settings” on page 483.
4 When you are finished configuring rules, click OK.
Barcode rules settingsThe following table describes the settings you can configure for barcode rules.NetBackup uses these rules to assign barcodes to new media.
483Configuring tape mediaConfiguring barcode rules

Table 9-8 Barcode rule settings
DescriptionBarcode rule setting
A unique string of barcode characters that identifies the type of media.
For example, use DLT as the barcode tag for a barcode rule if the following is true:
■ You use DLT on the barcodes to identify DLT tapes■ DLT is not used on any other barcodes in the robot
Similarly, if you use CLND for DLT cleaning media, use CLND as the barcode tag forthe rule for DLT cleaning media.
The barcode tag can have from 1 to 16 characters but cannot contain spaces.
The following are the special barcode rules that can match special characters in thebarcode tags:
■ NONEMatches when rules are used and the volume has an unreadable barcode or therobot does not support barcodes.
■ DEFAULTFor volumes with barcodes, this tag matches when none of the other barcode tagsmatch. However, the following must be compatible: the media type in the DEFAULTrule and the media type on the Media Settings tab.
You cannot change the barcode tag of a barcode rule. Instead, first delete the old rule,then add a rule with a new barcode tag.
Use the Media Settings tab to set up the criteria for a robot update.
See “Configuring media settings” on page 467.
Barcode tag
A description of the barcode rule. Enter from 1 to 25 characters.Description
The maximum number of mounts (or cleanings) that are allowed for the volume.
For data volumes, a value of zero means the volume can be mounted an unlimitednumber of times.
For cleaning tapes, zero means that the cleaning tape is not used. Veritas recommendsthat you use barcodes for the cleaning media that cannot be confused with barcodesfor data media. Doing so can avoid a value of 0 for cleaning tapes.
Maximum mounts
484Configuring tape mediaConfiguring barcode rules

Table 9-8 Barcode rule settings (continued)
DescriptionBarcode rule setting
The media type to assign to the media.
The media type that is specified on theMedia Settings tab always overrides the mediatype of the barcode rule. If you specify a value other than DEFAULT on the MediaSettings tab, the barcode rule media type must be the same as the media or beDEFAULT. If not, the barcode rule does not match the media (except for cleaning media).
See “Media type when using barcode rules” on page 473.
Note: When a media type is selected, the maximum mounts value may revert to thedefault value for the specified media type. For example, it may revert to 0 for unlimitedwhen you select a non-cleaning media type.
See “NetBackup media types” on page 458.
Media type option
The volume pool for the new media. The actions depend on whether you use barcoderules to assign media attributes.
Select from the following:
■ DEFAULT
If DEFAULT is selected, NetBackup performs the following actions:■ If you use barcode rules, the barcode rules determine the volume pool to which
new volumes are assigned.■ If you do not use barcode rules, NetBackup assigns data tapes to the NetBackup
pool but does not assign cleaning tapes to a volume pool.■ A specific volume pool
This volume pool setting always overrides any barcode rules.
Volume pool
About media ID generation rulesUse media ID generation rules to override the default media ID naming methodNetBackup uses. The default method uses the last six characters of the barcodethe robot provides to generate the media ID.
Note: To use media ID generation rules, the robot must support barcodes and therobot cannot be an API robot. Media ID generation rules are saved in the MediaManager configuration file (vm.conf). Information about the vm.conf file is in theNetBackup Administrator's Guide, Volume II.
For example, two eight-character barcodes are S00006L1 and 000006L1. Withoutany media ID generation rules NetBackup uses the last six characters of the barcode
485Configuring tape mediaAbout media ID generation rules

to generate media IDs. In this example, the same media ID for the two barcodesis created (0006L1).
Use a rule to control how NetBackup creates media IDs by specifying whichcharacters of a barcode are used in the media ID. Or, specify that alphanumericcharacters are to be inserted into the ID.
Define multiple rules to accommodate the robots and the barcode lengths. Definerules to specific robots and for each barcode format that has different numbers orcharacters in the barcode. Multiple rules allow flexibility for the robots that supportmultiple media types.
Configuring media ID generation rulesFor non-API robots only. Robot types are described in a different topic.
See “NetBackup robot types” on page 406.
Use the Media ID Generation tab of the NetBackup Advanced Robot InventoryOptions dialog box to configure the rules that override the default naming method.To use media ID generation rules, the robot must support barcodes and the robotcannot be an API robot.
See “About media ID generation rules” on page 485.
To configure media ID generation rules
1 Open the Advanced Robot Inventory Options dialog box, as follows:
1 In the NetBackup Administration Console, expandMedia and Device Management > Media > Robots inthe left pane.
2 Select the robot that you want to inventory.
3 On the Actions menu, select Inventory Robot.
4 Click either Preview volume configuration changesor Update volume configuration.
5 Click Advanced Options.
From the RobotInventory dialog box
486Configuring tape mediaConfiguring media ID generation rules

1 In the NetBackup Administration Console, in the leftpane, expand Media and Device Management >Devices.
2 From the list of wizards in the right pane, clickConfigure Volumes and follow the wizard instructions.
3 On the Robot Inventory panel of the VolumeConfiguration Wizard, click Advanced Options.
From the VolumeConfiguration Wizard
2 In the Advanced Robot Inventory Options dialog box, click the Media IDGeneration tab.
487Configuring tape mediaConfiguring media ID generation rules

3 To configure the rules, do any of the following:
Click New and then configure the rule in the dialog box.Add a rule
Select the rule, click Change, and then change the rule in the dialogbox.
You cannot change the robot number or barcode length of a rule.To change those properties, first delete the old rule and then add arule.
Change a rule
Select the rule, click Delete, and click OK in the confirmation dialogbox. You can select and delete multiple rules with one operation.
Delete a rule
See “Media ID generation options” on page 488.
4 When you are finished configuring rules, click OK.
Media ID generation optionsNetBackup uses rules to generate the IDs for media in robots. The default rule usesthe last six characters of the barcode label from the tape.
You can configure media ID generation rules to override the default rule. Controlhow NetBackup creates media IDs by defining the rules that specify which charactersof a barcode label to use for the media ID.
The following subsections describe the media ID generation rule options.
The following list describes the media ID generation rule options:
■ Bar code lengthThe Barcode length is the number of characters in the barcode for tapes in therobot.You cannot change the barcode length of a rule. Rather, first delete the rule andthen add a new rule.
■ Media ID generation ruleAMedia ID generation rule consists of a maximum of six colon-separate fields.Numbers define the positions of the characters in the barcode that are to beextracted. For example, the number 2 in a field extracts the second character(from the left) of the barcode. You can specify numbers in any order.To insert a specific character in a generated media idea, precede the characterby a pound sign (#). Any alphanumeric characters that are specified must bevalid for a media ID.Use rules to create media IDs of many formats. However, it may be difficult tomanage media if the label on the media and the generated media ID are different.The table shows some examples of rules and the resulting media IDs.
488Configuring tape mediaConfiguring media ID generation rules

Generated media IDMedia ID generation ruleBarcode ontape
0329451:2:3:4:5:6032945L1
2945L3:4:5:6:7032945L1
N32945#N:2:3:4:5:6032945L1
9431#9:2:3:4543106L1
5431P1:2:3:4:#P543106L1
■ Robot numberThe number of the robot to which the rule applies.You cannot change the robot number of a rule. Rather, first delete the rule andthen add a new rule.
About media type mapping rulesApplies to API robots only. Robot types are described in a different topic.
See “NetBackup robot types” on page 406.
For API robots, NetBackup contains default mappings from a vendor's media typesto NetBackup media types. API robots are ACS, TLH, or TLM robot types.
You can change the default mappings. Changes apply only to the current volumeconfiguration update.
You also can add media type mappings.
See “About adding media type mapping entries” on page 496.
See “Default and allowable media types” on page 496.
See “NetBackup media types” on page 458.
Note: You can write a barcode rule that contains the media types that areincompatible with vendor media types. However, the robot inventory update mayassign NetBackup media types that are inconsistent with the vendor media types.Avoid this problem by grouping barcode rules by media type.
489Configuring tape mediaAbout media type mapping rules

Adding volumes by using the Actions menuVeritas recommends that you use the Volume Configuration Wizard or the robotinventory option to add volumes.
Be careful when you specify properties. You cannot change some properties later,such as the media ID or type. If you specify them incorrectly, you must delete thevolume and add it again.
To add volumes by using the Actions menu
1 For new volumes in a robotic library, insert them into the proper slots.
2 In the NetBackup Administration Console, in the left pane, expand Mediaand Device Management > Media.
3 On the Actions menu, select New > Volumes.
4 In the New Volumes dialog box, specify the properties for the volumes.
The properties that appear in the dialog box vary.
See “Volume properties” on page 491.
5 Click Apply or OK.
If the robot has a barcode reader, NetBackup performs the following actions:
■ Adds the volume to the EMM database using the specified media ID.
490Configuring tape mediaAdding volumes by using the Actions menu

■ Reads the barcode of each new volume.
■ Adds the barcodes as attributes in the EMM database.The Apply option adds the volume without closing the dialog box orrefreshing the display. You can then add more volumes.
Volume propertiesTable 9-9 describes the properties for volumes in NetBackup. The properties dependon whether you add, change, or move volumes.
The properties are arranged alphabetically.
Table 9-9 Volume properties
OperationDescriptionProperty
Add, moveThe name of the NetBackup media server to which the robot is attached.Device host
ChangeThe following does not apply to cleaning tapes.
The date after which the volume is too old to be reliable.
When the expiration date has passed, NetBackup reads data on the volume butdoes not mount and write to the volume. You should exchange it for a new volume.
See “About exchanging a volume” on page 507.
When you add a new volume, NetBackup does not set an expiration date.
The expiration date is not the same as the retention period for the backup data onthe volume. You specify data retention periods in the backup policies.
Expiration date
AddThis property appears only if the number of volumes is more than one.
The ID of the first volume in the range of volumes. Media IDs can be from 1 to 6characters in length. Valid only when you add a range of volumes.
Use the same pattern that you chose in theMedia ID naming style box. NetBackupuses the pattern to name the remaining volumes by incrementing the digits.
NetBackup allows specific characters in names.
See “NetBackup naming conventions” on page 1112.
First media ID
Add, moveThe number of the first slot in the robot in which the range of volumes resides. Ifyou add or move more than one media, NetBackup assigns the remainder of theslot numbers sequentially.
Note: You cannot enter slot information for volumes in an API robot. The robotvendor tracks the slot locations for API robot types.
First slot number
491Configuring tape mediaAdding volumes by using the Actions menu

Table 9-9 Volume properties (continued)
OperationDescriptionProperty
AddThe maximum number of times NetBackup should mount the volume or use thecleaning tape.
When a volume reaches the mount limit, the volume can be read, but not written.Zero (0) indicates unlimited mounts. If you enter a value larger than 99999,NetBackup may display it as 0 although it uses the actual value. For example, theoutput of the vmrule command displays 0 for values larger than 99999.
To determine the maximum mount limit to use, consult the vendor documentationfor information on the expected life of the volume.
Maximumcleanings
Add, changeThe following topic does not apply to cleaning tapes.
The Maximum mounts property specifies the number of times that the selectedvolumes can be mounted.
When the limit is reached, NetBackup reads data on the volume but does not mountand write to the volume.
A value of zero (the default) is the same as Unlimited.
To help determine the maximum mount limit, consult the vendor documentationfor information on the expected life of the volume.
Maximummounts
Add, changeA description of the media, up to 25 character maximum.
NetBackup allows specific characters in names.
See “NetBackup naming conventions” on page 1112.
Media description
Add, changeThis property appears only if the number of volumes is one.
The ID for the new volume. Media IDs can be from 1 to 6 characters in length.
Media IDs for an API robot must match the barcode on the media (for API robots,NetBackup supports barcodes from 1 to 6 characters). Therefore, obtain a list ofthe barcodes before you add the volumes. Obtain this information through a roboticinventory or from the robot vendor’s software.
NetBackup allows specific characters in names.
See “NetBackup naming conventions” on page 1112.
Media ID
492Configuring tape mediaAdding volumes by using the Actions menu

Table 9-9 Volume properties (continued)
OperationDescriptionProperty
AddThe style to use to name the range of volumes. Media IDs can be from 1 to 6characters in length. Using the pattern, NetBackup names the remaining volumesby incrementing the digits.
NetBackup media IDs for an API robot must match the barcode on the media. ForAPI robots, NetBackup supports barcodes from 1 to 6 characters. Therefore, obtaina list of the barcodes before you add the volumes. Obtain this information througha robotic inventory or from the robot vendor’s software.
NetBackup allows specific characters in names.
See “NetBackup naming conventions” on page 1112.
Media ID namingstyle
AddThe media type for the volume to add.
Select the type from the drop-down list.
See “NetBackup media types” on page 458.
Media type
AddThe number of volumes to add. For a robotic library, enough slots must exist forthe volumes.
Number ofvolumes
Add, moveThe robotic library to add or move the volumes to.
To add volumes for a different robot, select a robot from the drop-down list. Thelist shows robots on the selected host that can contain volumes of the selectedmedia type.
Robot
Add, moveIf you specified a robot, select from a volume group already configured for thatrobot. Alternatively, enter the name for a volume group; if it does not exist,NetBackup creates it and adds the volume to it.
If you do not specify a volume group (you leave the volume group blank), thefollowing occurs:
■ Standalone volumes are not assigned to a volume group.■ NetBackup generates a name for robotic volumes by using the robot number
and type. For example, if the robot is a TL8 and has a robot number of 50, thegroup name is 000_00050_TL8.
See “About NetBackup volume groups” on page 457.
See “About rules for moving volumes between groups” on page 502.
Volume group
493Configuring tape mediaAdding volumes by using the Actions menu

Table 9-9 Volume properties (continued)
OperationDescriptionProperty
Add, moveWhen you add a volume:
■ If the volume is in a robot, select Volume is in a robotic library.■ If the volume is a standalone volume, do not select Volume is in a robotic
library.
When you move a volume:
■ To inject a volume into a robotic library, select Volume is in a robotic library.Then, select a robot and the slot number (First slot number) for the volume.
■ To eject a volume from a robot, clear Volume is in a robotic library.
Volume is in arobotic library
Add, changeThe pool to which the volume or volumes should be assigned.
Select a volume pool you created or one of the following standard NetBackuppools:
■ None.■ NetBackup is the default pool name for NetBackup.■ DataStore is the default pool name for DataStore.■ CatalogBackup is the default pool name used for NetBackup catalog backups
of policy type NBU-Catalog.
When the images on a volume expire, NetBackup returns it to the scratch volumepool if it was allocated from the scratch pool.
See “About NetBackup volume pools” on page 454.
Volume pool
MoveThe Volumes to move section of the dialog box shows the media IDs of thevolumes that you selected to move.
Volumes to move
Configuring media type mappingsApplies to API robots only. Robot types are described in a different topic.
See “NetBackup robot types” on page 406.
Use the Media Type Mappings tab of the NetBackup Advanced Robot InventoryOptions dialog box to configure the attributes for existing and new media.
See “About media type mapping rules” on page 489.
To configure media type mappings
1 Open the Advanced Robot Inventory Options dialog box, as follows:
494Configuring tape mediaConfiguring media type mappings

1 In the NetBackup Administration Console, expandMedia and Device Management > Media > Robots inthe left pane.
2 Select the robot that you want to inventory.
3 On the Actions menu, select Inventory Robot.
4 Click either Preview volume configuration changesor Update volume configuration.
5 Click Advanced Options.
From the RobotInventory dialog box
1 In the NetBackup Administration Console, in the leftpane, expand Media and Device Management >Devices.
2 From the list of wizards in the right pane, clickConfigure Volumes and follow the wizard instructions.
3 On the Robot Inventory panel of the VolumeConfiguration Wizard, click Advanced Options.
From the VolumeConfiguration Wizard
2 In the Advanced Robot Inventory Options dialog box, click the Media TypeMappings tab.
The mappings that appear are only for the robot type that was selected forinventory. The default mappings and any mappings you added or changedappear.
495Configuring tape mediaConfiguring media type mappings

3 Select the row that contains the robot-vendor media type mapping that youwant to change and click Change Mapping.
4 In the Change Media Mapping dialog box, select a media type from the listof allowed selections.
5 Click OK.
To reset the mappings to the default, click Reset to Defaults.
About adding media type mapping entriesApplies to API robots only. Robot types are described in a different topic.
See “NetBackup robot types” on page 406.
The default media type mappings may not provide the wanted mappings. If not,add robot-specific media mappings to the vm.conf file on the host on which yourun the NetBackup Administration Console.
Information about the vm.conf file is in theNetBackup Administrator's Guide, VolumeII:
http://www.veritas.com/docs/DOC5332
Table 9-10 Examples of robot-specific media mappings
Robot default without a vm.confentry
Resultvm.conf entry
HCARTMaps the ACS 3490E to the HCART2media type.
ACS_3490E = HCART2
DLT for all ACS DLT media types, includingDLTIV
Maps ACS DLTIV to the DLT2 media type.ACS_DLTIV = DLT2
HCARTMaps the TLH 3490E to the HCART2media type.
TLH_3490E = HCART2
Default and allowable media typesApplies to API robots only. Robot types are described in a different topic.
See “NetBackup robot types” on page 406.
The default media types on the Media Type Mappings tab are the media typesprovided by each robot vendor.
The following tables contain the default and allowable media types for the API robotsas follows:
496Configuring tape mediaConfiguring media type mappings

■ NetBackup ACS type robots: Table 9-11
■ NetBackup TLH type robots: Table 9-12
■ NetBackup TLM type robots: Table 9-13
The following items provide information to help you understand the tables:
■ The first column of each table shows the vendor's media type.
■ The second column of each table shows the default media type in NetBackup.
■ The third column shows the media types to which you can map the defaults. Todo so, first add the allowable mapping entries to the vm.conf file.Some map entries are not allowed. For example, you cannot specify either ofthe following map entries for ACS robots:
ACS_DD3A = DLT
ACS_DD3A = HCART4
The following table shows the default media types and the allowable media typesfor ACS robots.
Table 9-11 Default and allowable media types for ACS robots
Allowablemedia typesthrough mappings
Default media typeACS media type
HCART, HCART2,HCART3
1/2-inch cartridge (HCART)3480
HCART, HCART2,HCART3
1/2-inch cartridge (HCART)3490E
HCART, HCART2,HCART3
1/2-inch cartridge tape 2(HCART2)
DD3A
HCART, HCART2,HCART3
1/2-inch cartridge tape 2(HCART2)
DD3B
HCART, HCART2,HCART3
1/2-inch cartridge tape 2(HCART2)
DD3C
HC_CLN, HC2_CLN,HC3_CLN
1/2-inch cartridge cleaningtape 2 (HC2_CLN)
DD3D
DLT, DLT2, DLT3Digital Linear Tape (DLT)DLTIII
DLT, DLT2, DLT3Digital Linear Tape (DLT)DLTIIIXT
DLT, DLT2, DLT3Digital Linear Tape (DLT)DLTIV
497Configuring tape mediaConfiguring media type mappings

Table 9-11 Default and allowable media types for ACS robots (continued)
Allowablemedia typesthrough mappings
Default media typeACS media type
HCART, HCART2,HCART3
1/2-inch cartridge (HCART)EECART
HCART, HCART2,HCART3
1/2-inch cartridge (HCART)JLABEL
HCART, HCART2,HCART3
1/2-inch cartridge (HCART)KLABEL
HCART, HCART2,HCART3
1/2-inch cartridge (HCART)LTO_100G
HCART, HCART2,HCART3
1/2-inch cartridge (HCART)LTO_10GB
HCART, HCART2,HCART3
1/2-inch cartridge (HCART2)LTO_200G
HCART, HCART2,HCART3
1/2-inch cartridge (HCART)LTO_35GB
HCART, HCART2,HCART3
1/2-inch cartridge tape 3(HCART3)
LTO_400G
HCART, HCART2,HCART3
1/2-inch cartridge tape 3(HCART3)
LTO_400W
HCART, HCART2,HCART3
1/2-inch cartridge (HCART)LTO_50GB
HCART, HCART2,HCART3
1/2-inch cartridge tape(HCART)
LTO_800G
HCART, HCART2,HCART3
1/2-inch cartridge tape(HCART)
LTO_800W
HCART, HCART2,HCART3
1/2-inch cartridge tape 2(HCART2)
LTO_1_5_T
HC_CLN, HC2_CLN,HC3_CLN
1/2-inch cartridge cleaningtape (HC_CLN)
LTO_CLN1
HC_CLN, HC2_CLN,HC3_CLN
1/2-inch cartridge cleaningtape (HC_CLN)
LTO_CLN2
498Configuring tape mediaConfiguring media type mappings

Table 9-11 Default and allowable media types for ACS robots (continued)
Allowablemedia typesthrough mappings
Default media typeACS media type
HC_CLN, HC2_CLN,HC3_CLN
1/2-inch cartridge cleaningtape (HC_CLN)
LTO_CLN3
HC_CLN, HC2_CLN,HC3_CLN
1/2-inch cartridge cleaningtape (HC_CLN)
LTO_CLNU
DLT, DLT2, DLT3Digital Linear Tape 3 (DLT3)SDLT
DLT, DLT2, DLT3Digital Linear Tape (DLT)SDLT_2
DLT, DLT2, DLT3Digital Linear Tape (DLT)SDLT_4
DLT, DLT2, DLT3Digital Linear Tape 2 (DLT2)SDLT_S1
DLT, DLT2, DLT3Digital Linear Tape (DLT)SDLT_S2
DLT, DLT2, DLT3Digital Linear Tape (DLT)SDLT_S3
DLT, DLT2, DLT3Digital Linear Tape (DLT)SDLT_S4
HCART, HCART2,HCART3
1/2-inch cartridge (HCART)STK1R
HC_CLN, HC2_CLN,HC3_CLN
1/2-inch cartridge cleaningtape (HC_CLN)
STK1U
HC_CLN, HC2_CLN,HC3_CLN
1/2-inch cartridge cleaningtape (HC_CLN)
STK1Y
HCART, HCART2,HCART3
1/2-inch cartridge tape 2(HCART2)
STK2P
HC_CLN, HC2_CLN,HC3_CLN
1/2-inch cartridge cleaningtape 2 (HC2_CLN)
STK2W
HCART, HCART2,HCART3
1/2-inch cartridge tape 3(HCART3)
T10000CT
HCART, HCART2,HCART3
1/2-inch cartridge tape 3(HCART3)
T10000T1
HCART, HCART2,HCART3
1/2-inch cartridge tape 3(HCART3)
T10000TS
499Configuring tape mediaConfiguring media type mappings

Table 9-11 Default and allowable media types for ACS robots (continued)
Allowablemedia typesthrough mappings
Default media typeACS media type
HCART, HCART2,HCART3, HC_CLN,HC2_CLN, HC3_CLN, DLT,DLT2, DLT3, DLT_CLN,DLT2_CLN, DLT3_CLN
1/2-inch cartridge tape 2(HCART2)
UNKNOWN (for unknown ACSmedia types)
HCART, HCART2,HCART3, HC_CLN,HC2_CLN, HC3_CLN, DLT,DLT2, DLT3, DLT_CLN,DLT2_CLN, DLT3_CLN
1/2-inch cartridge tape 2(HCART2)
VIRTUAL
The following table shows the default and allowable media types for TLH robots.
Table 9-12 Default and allowable media types for TLH robots
Allowable media typesthrough mappings
Default Media Managermedia type
TLHmedia type
HCART, HCART2, HCART31/2-inch cartridge (HCART)3480
HCART, HCART2, HCART31/2-inch cartridge (HCART)3490E
HCART, HCART2, HCART31/2-inch cartridge (HCART)3590J
HCART, HCART2, HCART31/2-inch cartridge (HCART)3590K
HCART, HCART2, HCART31/2-inch cartridge tape 2 (HCART2)3592JA
HCART, HCART2, HCART31/2-inch cartridge tape 2 (HCART2)3592JB
HCART, HCART2, HCART31/2-inch cartridge tape 2 (HCART2)3592JX
HCART, HCART2, HCART31/2-inch cartridge tape 2 (HCART2)3592JJ
HCART, HCART2, HCART31/2-inch cartridge tape 2 (HCART2)3592JR
HCART, HCART2, HCART31/2-inch cartridge tape 2 (HCART2)3592JW
HCART, HCART2, HCART31/2-inch cartridge tape 2 (HCART2)UNKNOWN (forunknown TLHmedia types)
The following table shows the default and allowable media types for TLM robots.
500Configuring tape mediaConfiguring media type mappings

Table 9-13 Default and allowable media types for TLM robots
Allowable media typesthrough mappings
Default media typeTLMmedia type
HCART, HCART2, HCART31/2-inch cartridge (HCART)3480
NONENONE
(OD_THICK is translated to mediatype REWR_OPT for robotcontents reports. OD_THICK isignored for all other roboticinventory operations)
OD_THICK
DLT, DLT2, DLT3Digital Linear Tape (DLT)DECDLT
8MM, 8MM2, 8MM38mm cartridge (8MM)8MM
4MM4mm cartridge (4MM)4MM
HCART, HCART2, HCART31/2-inch cartridge (HCART)3590
DTFDTF cartridge (DTF)DTF
8MM, 8MM2, 8MM38mm cartridge (8MM)SONY_AIT
HCART, HCART2, HCART31/2-inch cartridge (HCART)LTO
HCART, HCART2, HCART3, DLT,DLT2, DLT3, 8MM, 8MM2, 8MM3
1/2-inch cartridge tape 2 (HCART2)UNKNOWN
(for unknown TLMmedia types)
Note: The following TLM media types are not supported: OD_THIN, D2, VHS, CD,TRAVAN, BETACAM, AUDIO_TAPE, BETACAMCL, DVCM, and DVCL.
Managing volumesThe following sections describe the procedures to manage volumes.
Changing the group of a volumeIf you move a volume physically to a different robot, change the group of the volumeto reflect the move.
See “About rules for moving volumes between groups” on page 502.
501Configuring tape mediaManaging volumes

To change the group of a volume
1 In the NetBackup Administration Console, in the left pane, expand Mediaand Device Management > Media.
2 In the right pane, in the Volumes list, select the volumes that you want tochange the volume group assignment for.
3 On the Actions menu, select Change Volume Group.
4 In theNew volume group name field, enter the name of the new volume groupor select a name from the list of volume groups.
5 Click OK.
The name change is reflected in the volume list entry for the selected volumes.If you specified a new volume group (which creates a new volume group), thegroup appears under Volume Groups in the left pane.
About rules for moving volumes between groupsThe following are the rules for moving volumes between groups:
■ The target volume group must contain the same type of media as the sourcevolume group. If the target volume group is empty: The successive volumesthat you add to it must match the type of media that you first add to it.
■ All volumes in a robotic library must belong to a volume group. If you do notspecify a group, NetBackup generates a new volume group name by using therobot number and type.
■ More than one volume group can share the same location. For example, arobotic library can contain volumes from more than one volume group and youcan have more than one standalone volume group.
■ All members of a group must be in the same robotic library or be standalone.That is, if volume group already exists in another robotic library, you cannot addit (or part of it) to a robotic library.
See “About NetBackup volume groups” on page 457.
See “About moving volumes” on page 516.
Changing the owner of a volumeYou can change the media server or server group that owns the volume.
See “About NetBackup server groups” on page 380.
See “About media sharing” on page 524.
502Configuring tape mediaManaging volumes

To change the owner of a volume
1 In the NetBackup Administration Console, in the left pane, expand Mediaand Device Management > Media.
2 In the Volumes list, select the volume that you want to change.
3 On the Actions menu, select Change Media Owner.
4 In the Media Owner field, select one of the following:
Allows NetBackup to choose the media owner. NetBackupchooses a media server or a server group (if one isconfigured).
Any (default)
Specifies that the media server that writes the image to themedia owns the media. No media server is specified explicitly,but you want a media server to own the media.
None
Specify a server group. A server group allows only thoseservers in the group to write to the media on which backupimages for this policy are written. All server groups that areconfigured in the NetBackup environment appear in thedrop-down list.
A server group
5 Click OK.
Changing volume propertiesYou can change some of the properties of a volume, including the volume pool.
To change volume properties
1 In the NetBackup Administration Console, in the left pane, expand Mediaand Device Management > Media.
2 In the right pane, in the Volumes list, select a volume or volumes.
503Configuring tape mediaManaging volumes

3 On the Edit menu, select Change.
4 In the Change Volumes dialog box, change the properties for the volume.
See “Volume properties” on page 491.
5 Click OK.
About assigning and deassigning volumesAn assigned volume is one that is reserved for exclusive use by NetBackup. Avolume is set to the assigned state when either application writes data on it for thefirst time. The time of the assignment appears in the Time Assigned column forthe volume in the NetBackup Administration Console Volumes pane. When avolume is assigned, you cannot delete it or change its volume pool.
A volume remains assigned until NetBackup deassigns it.
To determine which application currently uses a volume, see the Applicationcolumn of the right pane, labeled Volumes.
NetBackup deassigns a volume only when the data is no longer required, as follows:
■ For regular backup volumes, when the retention period has expired for all thebackups on the volume.
504Configuring tape mediaManaging volumes

■ For catalog backup volumes, when you stop using the volume for catalogbackups.
To deassign a volume, you expire the images on the volume. After you expire avolume, NetBackup deassigns it and does not track the backups that are on it.NetBackup can reuse the volume, you can delete it, or you can change its volumepool.
See “Expiring backup images” on page 986.
You can expire backup images regardless of the volume state (Frozen, Suspended,and so on).
NetBackup does not erase images on expired volumes. You can still use the dataon the volume by importing the images into NetBackup (if the volume has not beenoverwritten).
See “About importing backup images” on page 987.
Note: Veritas recommends that you do not deassign NetBackup volumes. If youdo, be certain that the volumes do not contain any important data. If you areuncertain, copy the images to another volume before you deassign the volume.
Deleting a volumeYou can delete volumes from the NetBackup configuration.
Note: You cannot delete a volume if it is still assigned.
For example, if any of the following situations apply, you may want to delete thevolume:
■ A volume is no longer used and you want to recycle it by relabeling it with adifferent media ID.
■ A volume is unusable because of repeated media errors.
■ A volume is past its expiration date or has too many mounts, and you want toreplace it with a new volume.
■ A volume is lost and you want to remove it from the EMM database.
After a volume is deleted, you can discard it or add it back under the same or adifferent media ID.
Before you delete and reuse or discard a volume, ensure that it does not have anyimportant data. You cannot delete NetBackup volumes if they are assigned.
See “About assigning and deassigning volumes” on page 504.
505Configuring tape mediaManaging volumes

To delete volumes
1 In the NetBackup Administration Console, in the left pane, expand Mediaand Device Management > Media.
2 In the right pane, in the Volumes list, select the volume or volumes that youwant to delete.
You cannot delete a volume if it is still assigned.
3 On the Edit menu, select Delete.
4 In the Delete Volumes dialog box, click OK.
5 Remove the deleted volume or volumes from the storage device.
Erasing a volumeYou can erase the data on a volume if the following are true:
■ The volume is not assigned.
■ The volume contains no valid NetBackup images.
After NetBackup erases the media, NetBackup writes a label on the media.
If you erase media, NetBackup cannot restore or import the data on the media.
If a volume contains valid NetBackup images, deassign the volume so NetBackupcan label it.
See “About assigning and deassigning volumes” on page 504.
The following table describes the types of erase.
Table 9-14 Types of erase
DescriptionType of erase
Rewinds the media and the data is overwritten with a known datapattern. A SCSI long erase is also called a secure erase because iterases the recorded data completely.
Note: A long erase is a time-consuming operation and can take aslong as two hours to three hours. For example, it takes about 45 minutesto erase a 4-mm tape on a standalone drive
SCSI long erase
506Configuring tape mediaManaging volumes

Table 9-14 Types of erase (continued)
DescriptionType of erase
Rewinds the media and an erase gap is recorded on the media. Theformat of this gap is drive dependent. It can be an end-of-data (EOD)mark or a recorded pattern that the drive does not recognize as data.
Some drives do not support a quick erase (such as QUANTUMDLT7000). For the drives that do not support a quick erase, the newtape header that is written acts as an application-specific quick erase.
SCSI quick erase
Note: NetBackup does not support erase functions on NDMP drives.
To erase a volume
1 In the NetBackup Administration Console, in the left pane, expand Mediaand Device Management > Media.
2 In the right pane, in the Volumes list, select a volume or volumes that you wantto erase.
If you select multiple volumes, they must all be in the same robot.
3 Select either Actions > Quick Erase or Actions > Long Erase.
4 In the erase dialog box, specify the name of the media server to initiate theerase operation.
To overwrite any existing labels on the media, do not select Verify media labelbefore performing operation.
5 Click OK.
A dialog box warns you that this action is irreversible.
6 Click OK if you are certain you want to start the erase action.
A dialog box reminds you to use the Activity Monitor to view the progressand status of the action. (For many types of drives, you may not be able tocancel a label or erase media job from the Activity Monitor.) Click OK.
If you selected Verify media label before performing operation and theactual volume label does not match the expected label, the media is not erased.
About exchanging a volumeYou should exchange a volume (replace one volume with another volume) if avolume meets any of the following conditions:
507Configuring tape mediaManaging volumes

■ Full (in this case, to exchange a volume means to remove the volume from arobotic tape library).
■ Past the maximum number of mounts.
■ Old (past the expiration date).
■ Unusable (for example, because of repeated media errors).
Depending on whether you want to reuse the old media ID or not, follow one of theexchange volumes processes in the following subsections.
Exchanging a volume and using a new media IDUse this procedure when the following are true:
■ The volume contains current and valid NetBackup images.
■ You require slots in the robotic library for additional backups, duplications, vaultfunctions, or other purposes.
The following table describes the procedure that used to exchange a volume anduse a new media ID.
Table 9-15 Exchange a volume and using a new media ID
InstructionsTaskStep
See “About moving volumes”on page 516.
Move the volume to another location
If the volume is in a robotic library, remove it from the robotic libraryand move it to a standalone group.
Step 1
See “About adding volumes”on page 464.
Add a new volume or move an existing volume in as a replacementfor the volume you removed.
If you add a new volume, specify a new media ID. Specify thesame values for the other attributes as the removed volume (suchas robotic residence, volume pool, and the media type).
Step 2
Beyond the scope of the NetBackupdocumentation.
Physically replace the old volume.
Do not delete the old volume in case you need to retrieve the dataon the volume.
Step 3
Exchanging a volume and using the old media IDYou can exchange a volume and reuse the same media ID, which may be convenientin some instances.
Reuse a media ID only if all data on the old volume is not required and you recycleor discard the volume.
508Configuring tape mediaManaging volumes

Warning: If you exchange a media ID for a volume that has unexpired backupimages, serious operational problems and data loss may occur.
The following table describes the procedure to exchange a volume and use the oldmedia ID.
Table 9-16 Exchange a volume and use the old media ID
InstructionsTaskStep
See “Deleting a volume” on page 505.Delete the volume.Step 1
See “About injecting and ejecting volumes”on page 510.
Remove the old volume from the storage device.Physically add the new volume to the storage device.
Step 2
See “About adding volumes” on page 464.Add the new volume to the NetBackup volumeconfiguration and specify the same attributes as theold volume, including the old media ID.
Step 3
See “Changing volume properties” on page 503.Set a new expiration date for the volume.Step 4
See “Labeling a volume” on page 515.Optionally, label the volume. Although you do nothave to label the volume, the label process puts themedia in a known state. The external media labelmatches the recorded media label, and the mode isknown to be compatible with the drives in the roboticlibrary.
Step 5
About frozen mediaFrozen media is the media that NetBackup does not use for backups. NetBackupstops directing the backups and the archives to frozen media. NetBackup neverdeletes a frozen media ID from the NetBackup media catalog, even after theretention period ends for all backups on the media. NetBackup does not unassigna frozen volume from the NetBackup volume pool when its backup images expire.
All unexpired backup images on frozen media continue to be available for restores.
NetBackup freezes the tape volumes for a variety of reasons, as follows:
■ NetBackup freezes a volume when read or write errors surpass the thresholdwithin the time window. The default media error threshold is 2. That is, NetBackupfreezes media on the third media error in the default time window (12 hours).Common reasons for write failures are dirty write heads or old media. The reasonfor the action is logged in the NetBackup error catalog (view the Media Logsreport or the All Log Entries report).
509Configuring tape mediaManaging volumes

You can use the NetBackup nbemmcmd command with the-media_error_threshold and -time_window options to change the defaultvalues.Additional information about the nbemmcmd is available in the NetBackupCommands Reference Guide:http://www.veritas.com/docs/DOC5332
■ NetBackup freezes a volume if a write failure makes future attempts at positioningthe tape unreliable.
■ NetBackup freezes the catalog volumes during catalog recovery.
■ NetBackup freezes the volumes in some circumstances with write once readmany (WORM) media or WORM-capable drives.See “About using volume pools to manage WORM media” on page 461.
You can unfreeze the frozen volumes manually.
Freezing or unfreezing a volumeNetBackup freezes volumes under circumstances.
Use the following procedure to manually freeze or unfreeze a volume.
To freeze or unfreeze media
1 In the NetBackup Administration Console, in the left pane, expand Mediaand Device Management > Media.
2 In the right pane, in the Volumes list, select the volume that you want to freezeor unfreeze.
3 On the Actions menu, select Freeze or Unfreeze.
4 In the dialog box, click OK.
About injecting and ejecting volumesMedia access port (MAP) functionality differs between robotic libraries. For manylibraries, NetBackup opens and closes the MAP as needed. However, some librarieshave the front-panel inject and the eject functions that conflict with NetBackup’suse of the media access port. And for other libraries, NetBackup requires front-panelinteraction by an operator to use the media access port.
Read the operator manual for the library to understand the media access portfunctionality. Some libraries may not be fully compatible with the inject and ejectfeatures of NetBackup unless properly handled. Other libraries may not becompatible at all.
510Configuring tape mediaManaging volumes

Injecting volumes into robotsYou can inject volumes into the robots that contain media access ports.
Any volumes to be injected must be in the media access port before the operationbegins. If no volumes are in the port, you are not prompted to place volumes in themedia access port and the update operation continues.
Each volume in the MAP is moved into the robotic library. If the MAP containsmultiple volumes, they are moved to empty slots in the robotic library until the mediaaccess port is empty or all the slots are full.
After the volume or volumes are moved, NetBackup updates the volumeconfiguration.
Some robots report only that media access ports are possible. Therefore, Emptymedia access port prior to update may be available for some robots that do notcontain media access ports.
Inject volumes into the robots that contain media access ports
1 Load the volumes in the MAP.
2 Inventory the robot
See “Updating the NetBackup volume configuration with a robot's contents”on page 540.
3 Select Empty media access port prior to update on the Robot Inventorydialog box.
Ejecting volumesYou can eject single or multiple volumes.
You cannot eject multiple volumes with one operation if they reside in multiplerobots.
Operator intervention is only required if the robotic library does not contain a mediaaccess port large enough to eject all of the selected volumes. For these robot types,NetBackup prompts an operator to remove the media from the media access portso the eject operation can continue.
See “Media ejection timeout periods” on page 512.
To eject volumes
1 In the NetBackup Administration Console, in the left pane, expand Mediaand Device Management > Media.
2 In the right pane, in the Volumes list, select one or more volumes that youwant to eject.
511Configuring tape mediaManaging volumes

3 On the Actions menu, select Eject Volumes From Robot.
4 In the Eject Volumes dialog box, do one of the following actions:
Select the media access port to use for the ejection, thenclick Eject.
ACS and TLM robotsonly
Click Eject.All other robots
The robotic library may not contain a media access port large enough to ejectall of the selected volumes. For most robot types, you are prompted to removethe media from the media access port so the eject can continue with theremaining volumes.
See “NetBackup robot types” on page 406.
Media ejection timeout periodsThe media ejection period (the amount of time before an error condition occurs)varies depending on the capability of each robot.
The following table shows the ejection timeout periods for robots.
Table 9-17 Media ejection timeout periods
Timeout periodRobot types
One weekAutomated Cartridge System (ACS)
Tape Library Multimedia (TLM)
30 minutes.Tape Library 8MM (TL8)
Tape Library DLT (TLD)
None. The robot allows an unlimited amountof time to remove media.
Tape Library Half-inch (TLH)
Note: If the media is not removed and a timeout condition occurs, the media isreturned to (injected into) the robot. Inventory the robot and eject the media thatwas returned to the robot.
Some robots do not contain media access ports. For these robots, the operatormust remove the volumes from the robot manually.
Note: After you add or remove media manually, use NetBackup to inventory therobot.
512Configuring tape mediaManaging volumes

About rescanning and updating barcodesYou can rescan the media in a robot and then update NetBackup with the barcodesof that media.
You should rescan and update only in certain circumstances.
Note: Rescan and update barcodes does not apply to volumes in API robot types.
See “NetBackup robot types” on page 406.
Rescan and update barcodes only to add the barcodes that arenot in the EMM database.
For example: if you add a new volume but do not insert the tapeinto the robot, NetBackup does not add the barcode to thedatabase. Use this command to add the barcode after you insertthe tape into the robotic library.
When to rescan and toupdate barcodes
Do not rescan and update to correct the reports that show a mediaID in the wrong slot.
To correct that problem, perform one of the following actions:
■ Logically move the volume by selecting a volume and then onthe Actions menu select Move.
■ Logically move the volume by updating the volumeconfiguration.See “Updating the NetBackup volume configuration with arobot's contents” on page 540.
■ Physically move the volume into the correct slot.
To obtain an inventory of the robot without updating the barcodeinformation in the database, inventory the robot and use the showcontents option.
See “Showing the media in a robot” on page 533.
When not to rescan andto update barcodes
See “About barcodes” on page 477.
Rescanning and updating barcodesUse the following procedure to rescan the media in a robot and to update NetBackupwith the barcodes.
Note: Rescan and update barcodes does not apply to volumes in API robot types.
See “NetBackup robot types” on page 406.
513Configuring tape mediaManaging volumes

See “About rescanning and updating barcodes” on page 513.
To rescan barcodes and update the EMM database
1 In the NetBackup Administration Console, in the left pane, expand Mediaand Device Management > Media > Robots.
2 Select the robotic library that contains the volumes that you want to scan andupdate.
3 In the right pane, in the Volumes list, select the volumes.
4 On the Actions menu, select Rescan/Update Barcodes.
5 Click Start.
The results of the update appear in the output section of the dialog box.
About labeling NetBackup volumesWhen NetBackup labels a volume, it writes a record on the magnetic tape of thevolume; the record (or label) includes the NetBackup media ID.
Normally, NetBackup controls the labeling of its volumes. In most cases, NetBackuplabels a volume the first time it is used for a backup.
The volume label depends on whether or not the media has a barcode, as follows:
■ If the robot supports barcodes and the media has barcodes, NetBackup usesthe last six characters of the barcode for the media ID.To change this default action, specify and select specific characters by usingMedia ID generation rules.See “Configuring media ID generation rules” on page 486.
■ For volumes without barcodes, by default NetBackup uses a prefix of the letterA when it assigns a media ID to a volume (for example, A00001).To change the default prefix, use the MEDIA_ID_PREFIX configuration option inthe vm.conf file. Information about the vm.conf file is available in theNetBackupAdministrator’s Guide, Volume II:http://www.veritas.com/docs/DOC5332
Media is not labeled automatically in the following situations:
■ They were last used for NetBackup catalog backups.Do not label catalog backup volumes unless they are no longer used for catalogbackups.
■ They contain data from a recognized non-NetBackup application and NetBackupis configured to prohibit media overwrite for that media type.
To label these media types, the following must be true:
514Configuring tape mediaManaging volumes

■ NetBackup has not assigned the media
■ The media contains no valid NetBackup images
Labeling a volumeIf a volume contains valid NetBackup images, deassign the volume so that it canbe labeled.
See “About assigning and deassigning volumes” on page 504.
If you want to label media and assign specific media IDs (rather than allowNetBackup to assign IDs), use the bplabel command.
Note: If you label a volume, NetBackup cannot restore or import the data that wason the media after you label it.
Note: For many types of drives, you may not be able to cancel a label job from theActivity Monitor.
See “About labeling NetBackup volumes” on page 514.
To label a volume
1 In the NetBackup Administration Console, in the left pane, expand Mediaand Device Management > Media.
2 In the right pane, in the Volumes list, select a volume or the volumes that youwant to label.
If you select multiple volumes, they all must be in the same robot.
3 On the Actions menu, select Label.
4 In the Label dialog box, specify the following properties for the label operation.
Enter tname of the media server that controls the driveto write the label.
Media server
Select this option to verify that the media in the drive isthe expected media.
To overwrite any existing labels on the media, do notselect Verify media label before performingoperation.
Verify label beforeperforming operation
515Configuring tape mediaManaging volumes

5 Click OK.
6 In the warning dialog box, click OK.
If you selected Verify media label before performing operation and theactual volume label does not match the expected label, the media is notrelabeled.
About moving volumesWhen you move volumes in or out of a robotic library or from one robot to another,move the volumes physically and logically, as follows:
■ Physically move volumes by inserting or by removing them. For some robottypes, use the NetBackup inject and eject options.
■ Logically move volumes using NetBackup, which updates the EMM databaseto show the volume at the new location.
When you move volumes from one robotic library to another robotic library, performthe following actions:
■ Move the volumes to stand alone as an intermediate step.
■ Move the volumes to the new robotic library.
The following types of logical moves are available:
■ Move single volumes.
■ Move multiple volumes.
■ Move combinations of single and multiple volumes.
■ Move volume groups.
You cannot move volumes to an invalid location (for example, move DLT media toan 8-mm robot).
Veritas recommends that you perform moves by selecting and by moving only onetype of media at a time to a single destination.
The following are several examples of when to move volumes logically:
■ When a volume is full in a robotic library and no slots are available for newvolumes in the robotic library. Move the full volume to stand alone, remove itfrom the robot, then configure a new volume for the empty slot or move anexisting volume into that slot. Use the same process to replace a defectivevolume.
■ Moving volumes from a robotic library to an off-site location or from an off-sitelocation into a robotic library. When you move tapes to an off-site location, movethem to stand alone.
516Configuring tape mediaManaging volumes

■ Moving volumes from one robotic library to another (for example, if a library isdown).
■ Changing the volume group for a volume or volumes.
See “About NetBackup volume groups” on page 457.
Moving volumes by using the robot inventory updateoptionUse this procedure for the following:
The robot must have a barcode reader and the volumes mustcontain readable barcodes.
To move volumes withina robot.
Use this procedure even if the volumes do not contain barcodesor if the robot does not have a reader.
To remove volumesfrom a robot.
To move volumes by using a robot inventory update
1 Physically move the volumes to their new location.
2 On the Actions menu, select Inventory Robot.
3 In the Robot Inventory dialog box, select Update volume configuration.
4 Select other options as appropriate.
See “About robot inventory” on page 527.
Moving volumes by using the Actions menuIf you move a volume to a robotic library that has a barcode reader, NetBackupupdates the EMM database with the correct barcode.
To move volumes by using the Actions menu
1 Physically move the volumes to their new location.
2 In the NetBackup Administration Console, in the left pane, expand Mediaand Device Management > Media.
3 In the right pane, in the Volumes list, select the volumes that you want to move.
4 On the Actions menu, select Move.
5 In the Move Volumes dialog box, specify the properties for the move.
If you move a single volume, the dialog box entries show the current locationof the volume.
See “Volume properties” on page 491.
517Configuring tape mediaManaging volumes

About recycling a volumeIf you recycle a volume, you can use either the existing media ID or a new mediaID.
Caution: Recycle a volume only if all NetBackup data on the volume is no longerneeded or if the volume is damaged and unusable. Otherwise, you may encounterserious operational problems and a possible loss of data.
Recycling a volume and using the existing media IDNetBackup recycles a volume and returns it to the volume rotation when the lastvalid image on the volume expires.
To recycle a volume that contains unexpired backup images, you must deassignthe volume.
See “About assigning and deassigning volumes” on page 504.
Recycling a volume and using a new media IDRecycle a volume if it is a duplicate of another volume with the same media ID.Also recycle a volume if you change how you name volumes and you want to matchthe barcodes on the volume.
The following table describes the procedure to recycle a volume and use a newmedia ID.
Table 9-18 Recycling a volume and using a new media ID
DescriptionActionStep
See “Ejecting volumes” on page 511.Physically remove the volume from the storagedevice.
Step 1
See “About moving volumes” on page 516.If the volume is in a robotic library, move it to standalone.
Step 2
See the values in the Media (Media and DeviceManagement > Media in the NetBackupAdministration Console).
Record the current number of mounts and expirationdate for the volume.
Step 3
See “Deleting a volume” on page 505.Delete the volume entry.Step 4
518Configuring tape mediaManaging volumes

Table 9-18 Recycling a volume and using a new media ID (continued)
DescriptionActionStep
See “Adding volumes by using the Actions menu”on page 490.
Because NetBackup sets the mount value to zero fornew volume entries, you must adjust the value toaccount for previous mounts.
Set the maximum mounts to a value that is equal toor less than the following value:
The number of mounts that the manufacturerrecommends minus the value that you recordedearlier.
Add a new volume entry.Step 5
See “Injecting volumes into robots” on page 511.Physically add the volume to the storage device.Step 6
Set the number of mounts to the value you recordedearlier by using the following command:
On Windows hosts:
install_path\Volmgr\bin\vmchange -mmedia_id -n number_of_mounts
On UNIX hosts:
/usr/openv/volmgr/bin/vmchange -mmedia_id -n number_of_mounts
Configure the number of mountsStep 7
See “Changing volume properties” on page 503.Set the expiration date to the value you recordedearlier.
Step 8
Suspending or unsuspending volumesYou cannot use a suspended volume for backups until retention periods for allbackups on it have expired. At that time, NetBackup deletes the suspended volumefrom the NetBackup media catalog and unassigns it from NetBackup.
A suspended volume is available for restores. If the backups have expired, importthe backups first.
To suspend or unsuspend media
1 In the NetBackup Administration Console, in the left pane, select Mediaand Device Management > Media.
2 In the right pane, in the Volumes list, select the volume or volumes that youwant to suspend or unsuspend.
519Configuring tape mediaManaging volumes

3 On the Actions menu, select Suspend or Unsuspend.
4 In the dialog box, click OK.
Managing volume poolsThe following sections describe the operations you can perform to manage volumepools.
Adding a volume poolUse this procedure to add a new volume pool.
To add a volume pool
1 In the NetBackup Administration Console, in the left pane, expand Mediaand Device Management > Media.
2 On the Actions menu, select New > Volume Pool.
3 In the New Volume Pool dialog box, specify the properties for the volumepool.
See “Volume pool properties” on page 521.
4 Add volumes to the pool by adding new volumes to NetBackup or by changingthe pool of existing volumes.
See “Adding volumes by using the Actions menu” on page 490.
See “Adding volumes by using the wizard” on page 466.
See “Changing volume properties” on page 503.
Changing the properties of a volume poolUse this procedure to change the properties of a volume pool. The properties youcan change include the pool type (scratch pool or catalog backup pool).
To change a volume pool
1 In the NetBackup Administration Console, in the left pane, select Mediaand Device Management > Media > Volume Pools.
2 Select a pool in the Volume Pools list.
3 Select Edit > Change.
4 In the Change Volume Pool dialog box, change the attributes for the volumepool.
See “Volume pool properties” on page 521.
520Configuring tape mediaManaging volume pools

Volume pool propertiesYou can specify various properties for a volume pool.
The following table describes the properties that you can configure for volume pools,either when you add a new pool or change an existing one.
Table 9-19 Volume pool properties
DescriptionProperty
Select this option to use this volume pool for catalog backups. This check box createsa dedicated catalog backup pool to be used for NBU-Catalog policies. A dedicatedcatalog volume pool facilitates quicker catalog restore times.
Multiple catalog backup volume pools are allowed.
Catalog backup pool
Provides a brief description of the volume pool.Description
Does not apply to the None pool, catalog backup pools, or scratch volume pools.
Specifies the number of partially full media to allow in the volume pool for each of theunique combinations of the following in that pool:
■ Robot■ Drive type■ Retention level
The default value is zero, which does not limit the number of full media that are allowedin the pool.
Maximum number ofpartially full media
The Pool name is the name for the new volume pool. Volume pool names arecase-sensitive and can be up to 20 characters.
See “About reserved volume pool name prefixes” on page 455.
Pool name
Specifies that the pool should be a scratch pool.
Veritas recommends that you use a descriptive name for the pool and use the termscratch pool in the description.
Add sufficient type and quantity of media to the scratch pool to service all scratch mediarequests that can occur. NetBackup requests scratch media when media in the existingvolume pools are allocated for use.
Scratch pool
Deleting a volume poolYou cannot delete any of the following pools:
■ A volume pool that contains volumes
■ The NetBackup volume pool
521Configuring tape mediaManaging volume pools

■ The None volume pool
■ The default CatalogBackup volume pool
■ The DataStore volume pool
To delete a volume pool
1 In the NetBackup Administration Console, in the left pane, expand Mediaand Device Management > Media > Volume Pools.
2 Select a volume pool from the pools in the Volume Pools list.
3 Ensure that the volume pool is empty. If the pool is not empty, change the poolname for any volumes in the pool. If the volumes are not needed, delete them.
4 On the Edit > menu, select Delete.
5 Click Yes or No in the confirmation dialog box.
Managing volume groups on UNIXThese topics describe operations you can perform to manage volume groups.
Moving a volume groupYou can move a volume group from a robotic library to standalone storage or fromstandalone storage to a robotic library.
Moving a volume group changes only the residence information in the EMMdatabase. You must move the volumes physically to their new locations.
To move a volume group
1 In the NetBackup Administration Console, in the left pane, expand Mediaand Device Management > Media.
2 In the right pane, select the volume group that you want to move.
3 On the Actions menu, select Move.
522Configuring tape mediaManaging volume groups on UNIX

4 In the Move Volume Group dialog box, specify the properties for the move.
You can only specify the properties that apply for the move type.
The dialog box shows a move from standalone to the robot TL4(0) on hostprize.
See “Move volume group properties” on page 523.
5 After you move the volume group logically, physically move the volumes totheir new locations.
Move volume group propertiesThe following table describes the properties you can set when you move a volumegroup.
Table 9-20 Move volume group properties
DescriptionProperty
The destination for the move, as follows:
■ If you move the volume group from a robotic library, Standaloneis selected as the destination.
■ If you move the volume group from standalone, Robot isselected as the destination.
Destination
The host that controls the robotic library.Device host
The destination robotic library.Robot
523Configuring tape mediaManaging volume groups on UNIX

Table 9-20 Move volume group properties (continued)
DescriptionProperty
The volume group to move.
Displays "---" when you move standalone volumes.
Volume group
Deleting a volume groupUse the following procedure to delete a volume group.
To delete a volume group
1 In the NetBackup Administration Console, in the left pane, expand Mediaand Device Management > Media.
2 In the volumes list, verify that all of the volumes in the group are unassigned.You cannot delete the group until the application unassigns the volumes. If theTime Assigned column contains a value, the volume is assigned.
See “About assigning and deassigning volumes” on page 504.
3 Select a volume group in the right pane.
4 On the Edit menu, select Delete.
5 In the confirmation dialog box, confirm the action.
6 Remove the deleted volumes from the storage device.
About media sharingMedia sharing allows media servers to share media for write purposes (backups).
Media sharing provides the following benefits:
■ Increases the utilization of media by reducing the number of partially full media.
■ Reduces media-related expenses because fewer tape volumes are requiredand fewer tape volumes are vaulted (NetBackup Vault option).
■ Reduces administrative overhead because you inject fewer scratch media intothe robotic library.
■ Increases the media life because tapes are mounted fewer times. Media arenot repositioned and unmounted between write operations from different mediaservers.Reducing media mounts requires appropriate hardware connectivity betweenthe media servers that share media and the drives that can write to that media.
524Configuring tape mediaAbout media sharing

Appropriate hardware connectivity may include Fibre Channel hubs or switches,SCSI multiplexors, or SCSI-to-fibre bridges.
You can configure the following media sharing:
■ Unrestricted media sharing.See “Configuring unrestricted media sharing” on page 525.
■ Media media sharing with server groups.See “Configuring media sharing with a server group” on page 525.\
Note: The access control feature of Sun StorageTek ACSLS controlled robots isnot compatible with media sharing. Media sharing restricts volume access by therequesting hosts IP address. Use caution when you implement media sharing inan ACSLS environment.
Configuring unrestricted media sharingUnrestricted media sharing means that all NetBackup media servers and NDMPhosts in your NetBackup environment can share media for writing.
Note:Do not use both unrestricted media sharing and media sharing server groups.If you use both, NetBackup behavior is undefined.
To configure unrestricted media sharing
1 In the NetBackup Administration Console, in the left pane, expandNetBackup Management > Host Properties > Master Servers.
2 In the right pane, double-click the master server.
3 Select Media
4 Select Enable Unrestricted Media Sharing for All Media Servers.
If you allow unrestricted allow media sharing in your NetBackup environment,you do not need to create media sharing groups.
5 Click OK.
Configuring media sharing with a server groupMedia sharing with a server group restricts the sharing to members of the group.
See “About NetBackup server groups” on page 380.
Table 9-21 outlines the process for configuring media sharing with a server group.
525Configuring tape mediaConfiguring unrestricted media sharing

Note:Do not use both unrestricted media sharing and media sharing server groups.If you use both, NetBackup behavior is undefined.
Table 9-21 Configuring media sharing with a server group process overview
DescriptionActionStep
Beyond the scope of the NetBackupdocumentation.
Ensure the appropriate connectivitybetween and among the mediaservers and robots and drives.
Step 1
See “Configuring a NetBackup server group”on page 380.
Configure the media sharing servergroup.
Step 2
Set the Maximum number of partially fullmedia property for those pools.
See “Adding a volume pool” on page 520.
See “Changing the properties of a volumepool” on page 520.
Optionally, configure the volumepools for media sharing.
Step 3
Set the Policy Volume Pool and MediaOwner properties of the backup policies.
See “Creating a backup policy” on page 686.
Configure the backup policies thatuse the volume pools and mediasharing groups.
Step 4
526Configuring tape mediaConfiguring media sharing with a server group

Inventorying robotsThis chapter includes the following topics:
■ About robot inventory
■ When to inventory a robot
■ About showing a robot's contents
■ Showing the media in a robot
■ About comparing a robot's contents with the volume configuration
■ Comparing media in a robot with the volume configuration
■ About previewing volume configuration changes
■ Previewing volume configuration changes for a robot
■ About updating the NetBackup volume configuration
■ Updating the NetBackup volume configuration with a robot's contents
■ Robot inventory options
■ About the vmphyinv physical inventory utility
■ Example volume configuration updates
About robot inventoryRobot inventory is a logical operation that verifies the presence of media. (Robotinventory does not inventory the data on the media.)
After you physically add, remove, or move volumes in a robot, use a robot inventoryto update the NetBackup volume configuration.
10Chapter

The following table describes the NetBackup Administration Console robotinventory options for the robotic libraries that contain barcode readers and containbarcoded media.
Table 10-1 Robot inventory options
DescriptionInventory option
Queries the robot for its contents and displays the media in the selected roboticlibrary; does not check or change the EMM database.
See “About showing a robot's contents” on page 530.
For the robotic libraries without barcode readers (or that contain media withoutbarcodes ), you can only show the contents of a robot. However, more detailedinformation is required to perform automated media management. Use thevmphyinv physical inventory utility to inventory such robots.
See “About the vmphyinv physical inventory utility” on page 543.
Show contents
Queries the robot for its contents and compares the contents with the contentsof the EMM database. Does not change the database.
See “About comparing a robot's contents with the volume configuration”on page 534.
Compare contents with volumeconfiguration
Queries the robot for its contents and compares the contents with the contentsof the EMM database. If differences exist, NetBackup recommends changes tothe NetBackup volume configuration.
See “About previewing volume configuration changes” on page 536.
Preview volume configurationchanges
Queries the robot for its contents; if necessary, updates the database to matchthe contents of the robot. If the robot contents are the same as the EMM database,no changes occur.
See “About updating the NetBackup volume configuration” on page 539.
Update volume configuration
When to inventory a robotThe following table describes the criteria to use to determine when to inventory arobot and which options to use for the inventory.
528Inventorying robotsWhen to inventory a robot

Table 10-2 Robot inventory criteria
Inventory option to useAction
Use the Show contents option to determine the media in a robot and possiblytheir barcode numbers.
See “Showing the media in a robot” on page 533.
To determine the contents of arobot
For the robots with barcode readers and the robots that contain media withbarcodes, use the Compare contents with volume configuration option.
See “Comparing media in a robot with the volume configuration” on page 535.
To determine if volumes weremoved physically within a robot
For any robot NetBackup supports, use theUpdate volume configuration option.
The update creates media IDs (based on barcodes or a prefix that you specify).
See “Updating the NetBackup volume configuration with a robot's contents”on page 540.
To add new volumes to a robot (anew volume is one that does nothave a NetBackup media ID)
Use the Preview volume configuration changes option, which compares thecontents of the robot with the NetBackup volume configuration information.
After you examine the results, use the Update volume configuration option toupdate the volume configuration if necessary.
See “Updating the NetBackup volume configuration with a robot's contents”on page 540.
To determine whether new mediahave barcodes before you addthem to NetBackup
If the robot supports barcodes and the volumes have readable barcodes, use theUpdate volume configuration option. NetBackup updates the residenceinformation to show the new robotic location. NetBackup also updates the robothost, robot type, robot number, and slot location. Specify the volume group to whichthe volume is assigned.
See “Updating the NetBackup volume configuration with a robot's contents”on page 540.
If the robot does not support barcodes or the volumes do not contain readablebarcodes, move the volumes or use the physical inventory utility.
See “About moving volumes” on page 516.
See “About the vmphyinv physical inventory utility” on page 543.
To insert existing volumes into arobot (an existing volume is onethat already has a NetBackupmedia ID)
If the robotic library supports barcodes and the volumes have readable barcodes,use the Update volume configuration option. NetBackup updates the residenceinformation to show the new robotic or standalone location.
See “Updating the NetBackup volume configuration with a robot's contents”on page 540.
To move existing volumesbetween robotic and standalone(an existing volume is one thatalready has a NetBackup mediaID)
529Inventorying robotsWhen to inventory a robot

Table 10-2 Robot inventory criteria (continued)
Inventory option to useAction
If the robot supports barcodes and the volumes have readable barcodes, use theUpdate volume configuration option. NetBackup updates the residenceinformation to show the new slot location.
See “Updating the NetBackup volume configuration with a robot's contents”on page 540.
If the robot does not support barcodes or if the volumes do not contain readablebarcodes, move the volumes or use the physical inventory utility.
See “About moving volumes” on page 516.
See “About the vmphyinv physical inventory utility” on page 543.
To move existing volumes withina robot (an existing volume is onethat already has a NetBackupmedia ID)
If the robotic library supports barcodes and the volumes have readable barcodes,use theUpdate volume configuration option. NetBackup updates the NetBackupvolume configuration information.
See “Updating the NetBackup volume configuration with a robot's contents”on page 540.
If the robots do not support barcodes or the volumes do not contain readablebarcodes, move the volumes or use the physical inventory utility.
See “About moving volumes” on page 516.
See “About the vmphyinv physical inventory utility” on page 543.
For either operation, perform the following updates:
■ First move the volumes to standalone■ Then move the volumes to the new robot
If you do not perform both updates, NetBackup cannot update the entries andwrites an "Update failed" error.
To move existing volumes fromone robot to another (an existingvolume is one that already has aNetBackup media ID)
For any robot NetBackup supports, use the Update volume configuration optionto update the NetBackup volume configuration information.
See “Updating the NetBackup volume configuration with a robot's contents”on page 540.
To remove existing volumes froma robot (an existing volume is onethat already has a NetBackupmedia ID)
About showing a robot's contentsShow contents inventories the selected robotic library and generates a report.This operation does not check or change the EMM database. Use this option todetermine the contents of a robot.
The contents that appear depend on the robot type.
530Inventorying robotsAbout showing a robot's contents

The following table describes the report contents.
Note: On UNIX: If a volume is mounted in a drive, the inventory report lists the slotfrom which the volume was moved to the drive.
Table 10-3 Show contents description
Report contentsRobot and media
Shows if each slot has media and lists thebarcode for the media.
The robot has a barcode reader and the robotcontains media with barcodes.
Shows if each slot has media.The robot does not have a barcode reader orthe robot contains media without barcodes.
Shows a list of the volumes in the robot.
See “About inventory results for API robots”on page 531.
API robot.
The following figure shows an example of the report.
Figure 10-1 Show contents report
See “Showing the media in a robot” on page 533.
About inventory results for API robotsThe following table describes the contents of the robot inventory for the API robots.
531Inventorying robotsAbout showing a robot's contents

Table 10-4 API robot report contents
Report contentsRobot type
The results, received from ACS library software, show the following:
■ The ACS library software volume ID. The NetBackup media IDcorresponds to the ACS library software volume ID.
■ The ACS media type.■ The NetBackup Media Manager media type.■ The mapping between the ACS library software media type and the
corresponding NetBackup Media Manager media type (withoutconsidering optional barcode rules).
ACS
The results, received from the Automated Tape Library (ATL) librarymanager, show the following:
■ The volume serial number (volser). The Media Manager media IDcorresponds to the ATL volser.
■ The ATL media type.■ The Media Manager media type.■ The mapping between the ATL media type and the corresponding
Media Manager media type (without considering optional barcoderules).
TLH
The results, received from the DAS/SDLC server, show the following:
■ The volume serial number (volser). The Media Manager media IDcorresponds to the DAS/SDLC volser.
■ The DAS/SDLC media type■ The Media Manager media type.■ The mapping between the DAS/SDLC media type and the
corresponding Media Manager media type (without consideringoptional barcode rules).
TLM
The following figure shows the results for an ACS robot; the results for other APIrobots are similar.
532Inventorying robotsAbout showing a robot's contents

Figure 10-2 Show contents report (API robot)
Showing the media in a robotUse the following procedure to show the media that is in a robot.
See “About robot inventory” on page 527.
See “Robot inventory options” on page 542.
To show the media in a robot
1 In the NetBackup Administration Console, in the left pane, expand Mediaand Device Management > Media > Robots.
2 Select the robot you want to inventory.
533Inventorying robotsShowing the media in a robot

3 On the Actions menu, select Inventory Robot.
4 In the Robot Inventory dialog box, select Show contents.
5 Click Start to begin the inventory.
About comparing a robot's contents with thevolume configuration
Compare contents with volume configuration compares the contents of a roboticlibrary with the contents of the EMM database. Regardless of the result, the databaseis not changed.
Table 10-5 Compare contents description
Report contentsRobot and media
The report shows the differences betweenthe robot and the EMM database
The robot can read barcodes
534Inventorying robotsAbout comparing a robot's contents with the volume configuration

Table 10-5 Compare contents description (continued)
Report contentsRobot and media
The report shows only whether a slot containsa volume
If the media cave barcodes, this operation isuseful for determining if volumes have beenphysically moved within a robot.
The robot cannot read barcodes
The media ID and media type in the EMMdatabase are compared to the informationthat is received from the vendor’s roboticlibrary software.
For API robots
If the results show that the EMM database does not match the contents of therobotic library, perform the following actions:
■ Physically move the volume.
■ Update the EMM database. Use Actions > Move or use the Update volumeconfiguration option.
See “About updating the NetBackup volume configuration” on page 539.
The following figure shows a sample compare report.
Figure 10-3 Compare contents report (API robot)
See “Comparing media in a robot with the volume configuration” on page 535.
Comparing media in a robot with the volumeconfiguration
Use the following procedure to compare the media in a robot with the EMM database.
535Inventorying robotsComparing media in a robot with the volume configuration

See “About robot inventory” on page 527.
See “Robot inventory options” on page 542.
To compare media in a robot with the volume configuration
1 In the NetBackup Administration Console, in the left pane, expand Mediaand Device Management > Media > Robots.
2 Select the robot that you want to inventory.
3 On the Actions menu, select Inventory Robot.
4 In the Robot Inventory dialog box, select Compare contents with volumeconfiguration.
5 Click Start to begin the inventory.
About previewing volume configuration changesUse this option to preview the changes before you update the EMM database. Thisoption lets ensure that all new media have barcodes before you add them to theEMM database.
536Inventorying robotsAbout previewing volume configuration changes

Note: If you preview the configuration changes first and then update the EMMdatabase, the update results may not match the results of the preview operation.Possible causes may be the changes that occur between the preview and theupdate. Changes can be to the state of the robot, to the EMM database, to thebarcode rules, and so on.
Figure 10-4 Preview volume configuration changes (non-API robot)
See “Updating the NetBackup volume configuration with a robot's contents”on page 540.
Previewing volume configuration changes for arobot
Use the procedure in this topic to preview any volume configuration changes for arobot.
See “About previewing volume configuration changes” on page 536.
See “Robot inventory options” on page 542.
To preview the volume configuration changes for a robot
1 If necessary, insert new volume(s) into the robotic library.
2 In the NetBackup Administration Console, in the left pane, expand Mediaand Device Management > Media > Robots.
3 Select the robot you want to inventory.
537Inventorying robotsPreviewing volume configuration changes for a robot

4 On the Actions menu, select Inventory Robot.
5 In the Robot Inventory dialog box, select Preview volume configurationchanges.
Note: If you preview the configuration changes first and then update the EMMdatabase, the update results may not match the results of the preview operation.Possible causes may be the changes that occur between the preview and theupdate. Changes can be to the state of the robot, to the EMM database, to thebarcode rules, and so on.
6 To change the default settings and rules that NetBackup uses to name andassign attributes to new media, click Advanced Options.
See “About configuring media name and attribute rules” on page 466.
7 To inject any media that is in the media access port before the previewoperation, click Empty media access port prior to update.
8 Click Start to begin the inventory preview.
538Inventorying robotsPreviewing volume configuration changes for a robot

About updating the NetBackup volumeconfiguration
The Update volume configuration robot inventory option updates the databaseto match the contents of the robot. If the robot contents are the same as the EMMdatabase, no changes occur.
For a new volume (one that does not have a NetBackup media ID), the updatecreates a media ID. The media ID depends on the rules that are specified on theAdvanced Robot Inventory Options dialog box.
See “Robot inventory options” on page 542.
For API robots, the update returns an error if the volume serial number or the mediaID contain unsupported characters.
For robots without barcode readers, the new media IDs are based on a media IDprefix that you specify. Similarly, for volumes without readable barcodes, the newmedia IDs are based on a media ID prefix that you specify
Figure 10-5 is an example for an ACS robot. Results for other API robots are similar.
Robot inventory update returns an error if it encounters unsupported characters inthe volume serial number or media identifier from API robots.
See “Volume update prerequisites” on page 539.
Figure 10-5 Update volume configuration for API robot report
See “Updating the NetBackup volume configuration with a robot's contents”on page 540.
Volume update prerequisitesThe following are the robot prerequisites and media prerequisites for updating thevolume configuration:
539Inventorying robotsAbout updating the NetBackup volume configuration

■ The robotic library must read barcodes.
■ Volumes in the library must have readable barcodes.
You can check the barcode capabilities of the robotic library and the volumes bycomparing the robot contents with the NetBackup volume configuration.
See “Comparing media in a robot with the volume configuration” on page 535.
If the robotic library does not support barcodes or the volumes do not have readablebarcodes, save the results of the compare operation. The results can help youdetermine a media ID prefix if you use the Media Settings tab of the AdvancedOptions dialog box to assign a prefix.
Updating the NetBackup volume configurationwith a robot's contents
Use the procedure in this topic to update the EMM database with the contents ofa robot.
See “About updating the NetBackup volume configuration” on page 539.
See “Robot inventory options” on page 542.
To update the volume configuration with a robot's contents
1 If necessary, insert new volume(s) into the robotic library.
2 In the NetBackup Administration Console, in the left pane, expand Mediaand Device Management > Media > Robots.
3 Select the robot you want to inventory.
540Inventorying robotsUpdating the NetBackup volume configuration with a robot's contents

4 On the Actions menu, select Inventory Robot.
5 In the Robot Inventory dialog box, select Update volume configuration.
Note: If you preview the configuration changes first and then update the EMMdatabase, the update results may not match the results of the preview operation.Possible causes may be the changes that occur between the preview and theupdate. Changes can be to the state of the robot, to the EMM database, to thebarcode rules, and so on.
6 To change the default settings and rules that NetBackup uses to name andassign attributes to new media, click Advanced Options.
See “About configuring media name and attribute rules” on page 466.
7 To inject any media that is in the media access port before the update operation,click Empty media access port prior to update.
8 Click Start to begin the inventory update.
541Inventorying robotsUpdating the NetBackup volume configuration with a robot's contents

Robot inventory optionsThe following table shows the robot inventory options when you use theNetBackupAdministration Console:
Table 10-6 Robot inventory options
DescriptionOption
Advanced Options is active if Preview volume configuration changes orUpdate volume configuration is selected.
This button opens the Advanced Robot Inventory Options dialog box, fromwhich you can configure more options.
See “About configuring media name and attribute rules” on page 466.
Advanced options
The Device host option is the host that controls the robot.Device host
The Empty media access port prior to update operation is active only for therobots that support that function.
To inject volumes in the robot’s media access port into the robot before you beginthe update, select Empty media access port prior to update.
The volumes to be injected must be in the media access port before the operationbegins. If you select Empty media access port prior to update and the mediaaccess port is empty, you are not prompted to place volumes in the media accessport.
Note: If you use NetBackup to eject volumes from the robot, remove the volumesfrom the media access port before you begin an inject operation. Otherwise, ifthe inject port and eject port are the same, the ejected volumes may be injectedback into the robotic library.
Empty media access port priorto update
Use the Robot option to select a robot to inventory.
If you selected a robot in the NetBackup Administration Console, that robotappears in this field.
Robot
Displays the media in the selected robotic library; does not check or change theEMM database.
See “About showing a robot's contents” on page 530.
Show contents
Compares the contents of a robotic library with the contents of the EMM databasebut does not change the database.
See “About comparing a robot's contents with the volume configuration”on page 534.
Compare contents with volumeconfiguration
542Inventorying robotsRobot inventory options

Table 10-6 Robot inventory options (continued)
DescriptionOption
Compares the contents of a robotic library with the contents of the EMM database.If differences exist, NetBackup recommends changes to the NetBackup volumeconfiguration.
See “About previewing volume configuration changes” on page 536.
Preview volume configurationchanges
Updates the database to match the contents of the robot. If the robot contentsare the same as the EMM database, no changes occur.
See “About updating the NetBackup volume configuration” on page 539.
Update volume configuration
About the vmphyinv physical inventory utilityFor the following robotic libraries, the NetBackup Administration Console reportsonly the presence of media:
■ For the robots without barcode readers
■ For the robots that contain media without barcodes
More detailed information is required to perform automated media management.For such robots, use the vmphyinv physical inventory utility.
The vmphyinv physical inventory utility inventories non-barcoded tape libraries byperforming the following actions:
■ Mounts each tape
■ Reads the tape header
■ Identifies the tape in each slot
■ Updates the NetBackup volume configurationUse the vmphyinv -verbose option to display more information about thesuggested changes. The -verbose option shows the number of drives available,the contents of each tape, if the media is a catalog tape. (The media formatcolumn of the summary contains NetBackup database for NetBackup catalogtapes.)This verbose information is written to stderr. To save the information, redirectstderr to a file.
vmphyinv is a command-line utility. Additional information about the syntax of thevmphyinv command is available.
See the NetBackup Commands Reference Guide, available at the following URL:
http://www.veritas.com/docs/DOC5332
543Inventorying robotsAbout the vmphyinv physical inventory utility

Table 10-7 vmphyinv features, requirements, restrictions, and when to use
DescriptionItem
The vmphyinv utility has the following features:
■ Can be run from any master server, media server, or SAN media server.■ Can be used with barcoded tape libraries because it verifies the contents of the
media.■ Recognizes the NetBackup tape formats.■ Supports the remote administration. You do not need to run vmphyinv from the
host to which the drives are attached.■ Tries to use multiple drives in a robot even if the drives are attached to different
hosts.■ Works with shared drives (NetBackup Shared Storage Option).■ Supports all supported SCSI-based robot types.■ Can be used to inventory a single media in a standalone drive. Use the -u option
or the -n option to specify the drive; the drive must contain media and it must beready.
vmphyinv features
The vmphyinv utility has the following requirements and restrictions:
■ It cannot distinguish between the volume records based on the application type.■ When you move the media from robotic drives to standalone drives, you cannot
specify a new volume group for the media.
vmphyinv requirements andrestrictions
Use vmphyinv to update the EMM database for NetBackup in the following cases:
■ You want to inventory a robot that does not have a barcode reader or that containsnon-barcoded media.
■ You insert new media into a robotic library and no NetBackup volume recordscorrespond to the media. Use the slot range or list option of vmphyinv to performthe inventory operation. You do not need to add volume records to the EMMdatabase.
■ You insert some media that have unknown media IDs or globally unique identifiers(GUIDs) into a robot.For example, you insert 10 media from a different tape library in slots 11 to 20. Youdo not know the IDs on the tapes. Use the slot range or list option of vmphyinv toperform the inventory operation. The vmphyinv utility mounts the media, readsthe tape header, determines the media ID, and adds media records to the EMMdatabase.
■ Some of the media are misplaced and the EMM database does not reflect thecorrect physical location of these media. Inventory the robot or inventory a subsetof media in the robot by using options in vmphyinv.
When to use vmphyinv
See “How vmphyinv performs a physical inventory” on page 545.
544Inventorying robotsAbout the vmphyinv physical inventory utility

How vmphyinv performs a physical inventoryFor a physical inventory, the vmphyinv utility performs the following sequence ofoperations:
■ Obtains a list of drives to mount the mediaSee “About the vmphyinv list of drives” on page 545.
■ Obtains a list of media to mountSee “About the media that vmphyinv mounts” on page 545.
■ Mounts the media and reads the tape headersSee “How vmphyinv mounts the media and reads the tape header” on page 546.
■ Updates the EMM databaseSee “How vmphyinv updates the EMM database” on page 548.
About the vmphyinv list of drivesThe list of drives the vmphyinv utility uses to mount the media is obtained from theEMM database. The drives do not need to be configured locally.
You cannot specify which drives to use. However, you can specify the maximumnumber of drives to use, which lets you reserve drives for NetBackup backup orrestore operations. Specify the number of drives by using the -drv_cnt drive_countoption.
About the media that vmphyinv mountsThe vmphyinv command accepts several options for the media to be mounted, asfollows:
■ NetBackup robot number (-rn robot_number).The vmphyinv utility obtains a list of volume records for that robot and inventorieseach of the media in the list.To use this option, the NetBackup configuration must contain a volume recordthat corresponds to the robot number in the EMM database for the robot.
■ NetBackup robot number with filter options.If you do not want to inventory all of the media in a robot, specify a subset ofthe media by using filter options. Some filter options are volume pool, volumegroup, or slot range. To use these options, NetBackup volume records mustexist.The following are some filter examples.
Mounts the media only in robot 4 and in thevolume pool bear.
vmphyinv -rn 4 -pn bear
545Inventorying robotsAbout the vmphyinv physical inventory utility

Mounts the media in robot 2 and in the volumegroup moon.
vmphyinv -rn 2 -v moon
Mounts the media in robot 1 and slot range 2to 4.
vmphyinv -rn 1 -rc1 2 -number3
Mounts the media in robot 5, slot range 2 to 7,in volume group mars, and in the NetBackupvolume pool.
vmphyinv -rn 5 -pn NetBackup-v mars -rc1 2 -number 6
■ NetBackup robot number and a list of media that belong to a specific robot.For example, if the -rn robot_number and -ml A00001:A00002:A00003 optionsare specified, only the three specified media are inventoried. If any of thesemedia do not belong to the specified robot, the media are skipped and are notinventoried. To use this option, NetBackup volume records must exist.
■ NetBackup robot number and a slot range or list.Sometimes, media from a different robot or some other source are moved to arobot and the media ID on the tape is unknown. In these cases, specify a slotrange option or list option.With these options, the NetBackup volume record does not need to exist in theEMM database. However, you must specify the density (using the -d option).
Note: For a robot that supports multiple media types, specify the density carefully.If you specify the incorrect density, vmphyinv cannot complete the mount andpermanent drive failure can occur.
The following are some filter examples.
Mounts the media in slot range 2 to 10 inrobot 1.
vmphyinv -rn 1 -slot_range 2 10-d dlt
Mounts the media in slots 3, 4, and 5 inrobot 0.
vmphyinv -rn 0 -slot_list 3:4:5-d 8mm
Mounts the media in slots 2, 3, 4, 5, 6, and7 in robot 2.
vmphyinv -rn 2 -slot_range 2 4-slot_list 5:6:7 -d dlt
See “About the vmphyinv physical inventory utility” on page 543.
How vmphyinv mounts the media and reads the tapeheaderThe following sequence of operations explains the mount process:
546Inventorying robotsAbout the vmphyinv physical inventory utility

■ The vmphyinv utility contacts the NetBackup Volume Manager, vmd, on the localhost or remote host depending on where the drive is attached.
■ The NetBackup Volume Manager starts a process, oprd.
■ The vmphyinv utility communicates with oprd and sends the mount request tooprd. After oprd receives the request, it issues a mount request to ltid.
■ The vmphyinv utility reads the tape header to determine the recorded mediaID or globally unique identifier (GUID).
Note: The default mount timeout is 15 minutes. Specify a different mount timeby using the -mount_timeout option.
See “About the media that vmphyinv does not recognize” on page 547.
See “How vmphyinv processes cleaning media” on page 547.
About the media that vmphyinv does not recognizeIf the media is not NetBackup media, the media is unmounted and the next mediais mounted. vmphyinv does not generate a new record in the EMM database. Togenerate volume records for that media, use the vmupdate command.
How vmphyinv processes cleaning mediaIf the following conditions are all true, vmphyinv does not try to mount the mediaand the next media in the list is mounted:
■ You do not specify the vmphyinv slot range or list option.
■ The robot contains cleaning media.
■ The media type is specified as cleaning media in the volume record (such as4mm_clean or dlt_clean).
If the robot contains cleaning media and any of the following conditions are true,vmphyinv tries to determine if the media is cleaning media:
■ You use the slot range or list option and the media type of volume record in theEMM database is not a cleaning media type.
■ You use the slot range or list option, and the EMM database does not containa volume record that corresponds to the cleaning media.
■ You do not use the slot range or list option, and the EMM database does notcontain a volume record that corresponds to the cleaning media.
The vmphyinv utility tries to determine if the media is cleaning media. It uses theSCSI parameters (sense keys, tape alert flags, and physical (SCSI) media types)
547Inventorying robotsAbout the vmphyinv physical inventory utility

returned by the robot. If vmphyinv cannot determine if the media is cleaning media,it tries to mount the media until the mount request times out.
Note: NetBackup may not detect the presence of cleaning media for all drives.Some drives report the presence of cleaning media in a manner NetBackup cannotread.
How vmphyinv updates the EMM databaseAfter all of the media are mounted and the tape headers are read, vmphyinv displaysa list of recommended changes. Accept or reject the changes. If you accept thechanges, vmphyinv updates the EMM database.
Table 10-8 vmphyinv criteria and actions
DescriptionCriteria or action
For valid media types, vmphyinv performs the following actions:
■ Changes the residence fields and description fields of any NetBackup media recordif those fields do not match the media header.
■ Conditionally changes the media type of an unassigned NetBackup volume record.The media type is changed only if the new media type belongs to the same familyof media types as the old media type. For example, the media type DLT can onlybe changed to DLT2 or DLT3.
■ Never changes the volume pool, media type, and ADAMM_GUID of an assignedrecord.
■ Never unassigns an assigned NetBackup volume.
The vmphyinv updatecriteria
The vmphyinv utility searches the EMM database. It checks if the media ID from thetape is present in the media ID field of any record in the EMM database. If the mediaID exists, vmphyinv updates the NetBackup volume record that corresponds to themedia ID. If the media ID does not exist, vmphyinv creates a new NetBackup volumerecord that corresponds to the NetBackup media.
How vmphyinv updatesNetBackup media
548Inventorying robotsAbout the vmphyinv physical inventory utility

Table 10-8 vmphyinv criteria and actions (continued)
DescriptionCriteria or action
The vmphyinv utility may not be able to update the EMM database correctly in thefollowing cases. These cases are reported as errors.
If any of the following cases are encountered, you must intervene to continue:
■ Duplicate media IDs are found.Two or more media in the same robot have the same media ID.
■ A NetBackup volume record that belongs to a different robot is found.It contains the same media ID as the media ID read from the tape header.
■ The media type, media GUID, or volume pool of an assigned volume record needsto be changed.
■ The barcode of an existing volume record needs to be changed.
vmphyinv error cases
See “About the vmphyinv physical inventory utility” on page 543.
Example volume configuration updatesThe following examples show different types of volume configuration updates. Theexamples include only the relevant volume attributes.
Example 1: Removing a volume from a robotThe following is an example of how to remove a volume from a robotic library. Itdoes not matter whether the robot supports barcodes.
The following are the attributes for media ID 800001:
800001Media ID
8MM cartridge tapeMedia type
TL800001Barcode
TL8 backup volumeMedia description
NetBackupVolume pool
TL8 - Tape Library 8MMRobot type
EXB220Volume group
0 (unlimited)Maximum mounts allowed
Assume that you remove the volume from the robotic library, specify the followingon the Media Settings tab, then run the update:
549Inventorying robotsExample volume configuration updates

DEFAULTMedia type
NONROB_8MMVolume group
DEFAULTVolume pool
The resulting volume attributes for media ID 800001 are as follows:
800001Media ID
8MM cartridge tapeMedia type
TL800001Barcode
TL8 backup volumeMedia description
NetBackupVolume pool
NONE - Not RoboticRobot type
NONROB_8MMVolume group
0 (unlimited)Maximum mounts allowed
The new residence information in the EMM database shows a standalone locationin the volume group. The volume group is specified on the Media Settings tab.The media type and volume pool remain unchanged.
The results are the same for a volume that does not have a barcode.
Example 2: Adding existing standalone volumes to a robotThe following is an example of how to add a standalone volume that has a barcodeto a robotic library that supports barcodes (TL8).
When you move volumes from one robot to another robot, perform separate updates.
The following are the volume attributes for media ID 800021, which has a readablebarcode and already exists as a standalone volume:
800021Media ID
8MM cartridge tapeMedia type
TL800021Barcode
8MM standaloneMedia description
NoneVolume pool
None (standalone)Robot type
550Inventorying robotsExample volume configuration updates

NONROB_8MMVolume group
0 (unlimited)Maximum mounts allowed
Assume that you insert the volume into a TL8 robot, specify the following on theMedia Settings tab, then run the update:
DEFAULTMedia type
EXB220Volume group
YES (selected)Use barcode rules
NetBackupVolume pool
Assume that the barcode rules in Table 10-9 exist.
Table 10-9 Example barcode rules
DescriptionMax mounts/cleanings
Volume poolMedia typeBarcode tag
DLT cleaning30NoneDLT_CLNCLND
8mm cleaning20None8MM_CLNCLN8
TL8 backup0NetBackup8MMTL8
DLT backup200d_poolDLTDLT
8mm no pool0None8MMTS
No barcode0NoneDEFAULT<NONE>
Other barcodes0NetBackupDEFAULT<DEFAULT>
NetBackup recognizes that the media ID exists and changes the EMM databaseto reflect the new robotic location. NetBackup does not create a new media ID.
The volume attributes for media ID 800021 are as follows:
800021Media ID
8MM cartridge tapeMedia type
TL800021Barcode
8MM standaloneMedia description
NONEVolume pool
551Inventorying robotsExample volume configuration updates

TL8 - Tape Library 8MMRobot type
0Robot number
1Robot slot
sharkRobot host
EXB220Volume group
0 (unlimited)Maximum mounts allowed
The barcode matches the barcode of an existing standalone volume in theconfiguration. Therefore, NetBackup updates the residence information in the EMMdatabase to reflect the new robotic location. Because the volume is not new, barcoderules are ignored.
The only setting used on the Media Settings tab is the volume group for added ormoved volumes. The media type setting was not used because this example wasfor a single existing volume that already had a media type.
Example 3: Moving existing volumes within a robotThe following is an example of how to move a volume from one slot to another slotwithin the same robot. The robot supports barcodes and the volume has a readablebarcode.
Note: To move volumes within a robotic library, useUpdate volume configurationonly if the robotic library supports barcodes and the volumes have readablebarcodes. Otherwise, NetBackup cannot properly recognize the move.
The following are the attributes for media ID 800002, which currently resides in slot1 of the robotic library:
800002Media ID
8MM cartridge tapeMedia type
TL800002Barcode
TL8 backupMedia description
NetBackupVolume pool
TL8 - Tape Library 8MMRobot type
0Robot number
552Inventorying robotsExample volume configuration updates

1Robot slot
sharkRobot host
EXB220Volume group
0 (unlimited)Maximum mounts allowed
Assume that you move the volume to empty slot 10, specify the following on theMedia Settings tab, then run the update.
DEFAULTMedia type
EXB220Volume group
NO (not selected)Use barcode rules
DEFAULTVolume pool
The resulting volume attributes are the following:
800002Media ID
8MM cartridge tapeMedia type
TL800002Barcode
TL8 backupMedia description
NetBackupVolume pool
TL8 - Tape Library 8MMRobot type
0Robot number
10Robot slot
sharkRobot host
EXB220Volume group
0 (unlimited)Maximum mounts allowed
The updated volume attributes show the new slot number, but all other informationis unchanged.
Example 4: Adding new volumes to a robotThe following is an example of how to add new volumes with barcodes to a robotthat supports barcodes.
553Inventorying robotsExample volume configuration updates

Assume the following:
■ The new volume is an 8MM tape with a readable barcode of TL800002.
■ No media generation rules are defined.
■ The drives in the robot all have a drive type of 8MM or no drives are configuredon the robot control host.
Specify the following on the Media Settings tab and run the update:
DEFAULTMedia type
EXB2220Volume group
YES (selected)Use barcode rules
DEFAULTVolume pool
The following table contains the example barcode rules.
Table 10-10 Example barcode rules
DescriptionMax mounts/cleanings
Volume poolMedia typeBarcode tag
DLT cleaning30NoneDLT_CLNCLND
8mm cleaning20None8MM_CLNCLN8
TL8 backup0NetBackup8MMTL8
DLT backup200d_poolDLTDLT
8mm no pool0None8MMTS
No barcode0NoneDEFAULT<NONE>
The barcode on the media matches the barcode rule named TL8 and the resultingvolume attributes for the new volume are as follows:
800002Media ID
8MM cartridge tapeMedia type
TL800002Barcode
tl8 backupMedia description
NetBackupVolume pool
554Inventorying robotsExample volume configuration updates

TL8 - Tape Library 8MMRobot type
0Robot number
1Robot slot
sharkRobot host
EXB220Volume group
0 (unlimited)Maximum mounts allowed
No media ID generation rules exist. Therefore, the media ID is from the last sixcharacters of the barcode. The new residence information in the EMM databaseshows the robot host, robot type, robot number, slot, and host. The volume groupis from the Media Settings tab. The volume pool and the max mounts allowed arefrom the barcode rule.
If barcode rules (or barcodes) are not used, the media description, volume pool,and max mounts allowed are set to the following defaults:
Added by NetBackupMedia description
NetBackup for data tapes or None for cleaning tapesVolume pool
0 (unlimited)Maximum mounts allowed
Note: If the robot does not support barcodes or the barcode is unreadable, specifya Media ID prefix on the Media Settings tab. Alternatively, specify DEFAULT forthe media ID. If you do not, NetBackup does not add new media IDs.
Example 5: Adding cleaning tapes to a robotA special case exists when you add cleaning tapes. For example, assume that youupdate a TLD robot.
The tapes you inserted include regular tapes with barcodes that range fromDLT00000 to DLT00010 and a cleaning tape with a barcode of CLN001.
The following table contains the example barcode rules.
Table 10-11 Example barcode rules
DescriptionMax mounts/cleanings
Volume poolMedia typeBarcode tag
DLT cleaning30NoneDLT_CLNCLN
555Inventorying robotsExample volume configuration updates

Table 10-11 Example barcode rules (continued)
DescriptionMax mounts/cleanings
Volume poolMedia typeBarcode tag
DLT backup200d_poolDLTDL
No barcode0NoneDEFAULT<NONE>
Specify the following on the Media Settings tab, then run the update.
DLTMedia type
STK7430Volume group
YES (selected)Use barcode rules
The barcodes on the regular tapes match the DL barcode rule. The media type ofthe DL barcode rule matches the Media type on the Media Settings tab. The tapesare added as DLT.
The cleaning tape matches the CLN barcode rule. NetBackup recognizes thatDLT_CLN is the cleaning tape for DLT. NetBackup adds the cleaning tape CLN001as DLT_CLN type media along with the regular volumes.
This example shows NetBackup’s ability to add cleaning cartridges along withregular volumes when you use Update volume configuration.
If the volumes you insert include a cleaning tape, NetBackup adds the volumescorrectly if the following are true:
■ The Media type on the Media Settings tab is the regular media (DLT in thisexample).
■ The barcode on the volume matches a barcode tag (CLN in this example).
■ The media type for the barcode rule is the correct cleaning media (DLT_CLNin this example).
To add only cleaning media, specify the cleaning media type on the Media Settingstab and in the barcode rule (DLT_CLN in this example).
Example 6: Moving existing volumes between robotsWhen you move volumes from one robot to another and the volumes in both robotsare in the same EMM database, perform two separate updates.
These updates move the volumes to stand alone, as an intermediate step, and thento the new robot. Otherwise, NetBackup is unable to update the entries and youreceive an "Update request failed" error.
556Inventorying robotsExample volume configuration updates

This example assumes that robot 2 is able to read barcodes and the volume hasreadable barcodes. If not, NetBackup cannot manage the volumes.
To move existing volumes between robots, use the following process:
■ Remove the volume from robot 1 and insert the volume in robot 2.
■ Perform an Update volume configuration on robot 1. This action updates thevolume attributes to show the volume as standalone.
■ Perform an Update volume configuration on robot 2. This action updates theconfiguration to show the volume in robot 2.
This example is not recommended and is included only to illustrate the undesirableresults.
The following is an example of how to add an existing standalone volume to a TL4robot. A TL4 robot supports media inventory (detects media presence), but notbarcodes.
The following are the attributes for media ID 400021, which already exists as astandalone volume:
400021Media ID
4MM cartridge tapeMedia type
-----------Barcode
4MM standaloneMedia description
NoneVolume pool
NONE - Not RoboticRobot type
NONROB_4MMVolume group
0 (unlimited)Max mounts allowed
Example 7: Adding existing volumes when barcodes arenot usedAssume that you insert the volume into the robot, specify the following on the MediaSettings tab, and run the update:
DEFAULTMedia type
00_000_TL4Volume group
C4Media ID prefix
557Inventorying robotsExample volume configuration updates

DEFAULTVolume pool
The resulting volume attributes are as follows:
C40000Media ID
4MM cartridge tapeMedia type
-----------Barcode
Added by NetBackupMedia description
NetBackupVolume pool
TL4 - Tape Library 4MMRobot type
0Robot number
1Robot slot
sharkRobot host
00_000_TL4Volume group
0 (unlimited)Maximum mounts allowed
Note that NetBackup assigned a new media ID to the volume (C40000). Thisundesired result occurs if you use Update volume configuration and the volumesdo not contain readable barcodes or the robot does not support barcodes. Withouta barcode, NetBackup cannot identify the volume and assumes that it is new. Themedia ID C40000 is generated from the media ID prefix that is specified on theMedia Settings tab.
The old media ID (400021) remains in the configuration. The information for thenew media ID (C40000) shows the robotic location, which includes the robot host,robot type, number, slot, and host. The volume group and volume pool are configuredaccording to the Media Settings tab selections. The maximum mounts allowed isset to the default (0).
For this situation, use the physical inventory utility.
See “About the vmphyinv physical inventory utility” on page 543.
558Inventorying robotsExample volume configuration updates

Configuring storage unitsThis chapter includes the following topics:
■ About the Storage utility
■ Creating a storage unit
■ About storage unit settings
About the Storage utilityThe data that is generated from a NetBackup job is recorded into a type of storagethat NetBackup recognizes.
NetBackup recognizes the following storage configurations, all of which areconfigured in the Storage utility:
Storage unitsA storage unit is a label that NetBackup associates with physical storage. The labelcan identify a robot, a path to a volume, or a disk pool. Storage units can be includedas part of a storage unit group or a storage lifecycle policy.
See “Creating a storage unit” on page 561.
Storage unit groupsStorage unit groups let you identify multiple storage units as belonging to a singlegroup. The NetBackup administrator configures how the storage units are selectedwithin the group when a backup or a snapshot job runs.
See “About storage unit groups” on page 602.
Storage lifecycle policiesStorage lifecycle policies let the administrator create a storage plan for all of thedata in a backup or snapshot.
11Chapter

See “About storage lifecycle policies” on page 613.
Using the Storage utilityTo use the storage utility
◆ In theNetBackupAdministrationConsole, expandStorage >Storage Units,Storage Unit Groups, or Storage Lifecycle Policies.
The storage destinations that were created for the selected server are displayedin the right pane.
The storage configuration can be displayed for other master servers.
See “Accessing remote servers” on page 1124.
Figure 11-1 Storage Unit node of the Storage utility
1
2
7
3
45
6
Table 11-1 Storage Unit utility
DescriptionNumber
Currently selected master server.1
Click to create a new storage unit.
See “About storage unit settings” on page 574.
2
Click to create a new storage unit group.
See “Creating storage unit groups for backups” on page 603.
3
560Configuring storage unitsAbout the Storage utility

Table 11-1 Storage Unit utility (continued)
DescriptionNumber
Click to copy a storage unit.
See “Creating a storage unit by copying a storage unit” on page 564.
4
Click to initiate a data management job when using basic disk staging.
See “About basic disk staging” on page 590.
5
Click to create a new storage lifecycle policy.
See “Creating a storage lifecycle policy” on page 614.
6
Right-click in the right pane to view the shortcut menu.7
Creating a storage unitA storage unit is a label that NetBackup associates with physical storage. The labelcan identify a robot, a path to a volume, or a disk pool. Storage unit creation is partof several other wizards. However, a storage unit can be created directly from theStorage utility in the NetBackup Administration Console.
Figure 11-2 shows the different storage unit types and the option that needs to beinstalled, if necessary.
561Configuring storage unitsCreating a storage unit

Figure 11-2 Storage unit types
AdvancedDiskPoints to a disk pool (storage directly attached to amedia server). (Data Protection OptimizationOption)
BasicDiskPoints to a directory.
Cloud Storage (VendorName)Points to a disk pool of the type identified byVendorName where VendorName can be the nameof a cloud storage provider.
OpenStorage (StorageName)Points to a disk pool of the type identified byStorageName. (OpenStorage Disk Option)
PureDiskPoints to a disk pool. (Data Protection OptimizationOption)
Media Manager
Points to a robotor a standalonedrive
NDMP
Points to anNDMP host(NDMP Option)
Disk
To create a storage unit
1 In the NetBackup Administration Console, select the Storage utility.
2 Select Actions > New > New Storage Unit.
3 Enter a Storage unit name.
See “NetBackup naming conventions” on page 1112.
4 Select the Storage unit type. The selection specifies the type of storage thatthe storage unit uses: Media Manager, Disk, or NDMP.
5 For disk storage units:
■ Select a disk type from the Disk type drop-down menu.The Disk type identifies the type of storage unit destination:
The destination is a disk pool.AdvancedDiskstorage unit
The destination is a path to a volume on a host.BasicDiskstorage unit
562Configuring storage unitsCreating a storage unit

The destination is a disk pool of the type that includes aVendorName string. VendorName can be the name of a cloudstorage provider.
Possible values include Amazon, AT&T, and Rackspace.
These values also can contain a _crypt suffix (for example,Amazon_crypt).
The _crypt suffix indicates encrypted storage.
Cloud storageunit
The destination is an NDMP host. The NDMP protocol is used toperform backups and recoveries.
NDMP storage
The destination is a disk pool of the type that includes aVendorName string. The vendor supplies theStorageName string.
OpenStoragestorage unit
The destination is a Media Server Deduplication Pool or aPureDisk Deduplication Pool.
See the NetBackup Deduplication Guide.
PureDiskstorage unit
■ Select a media server in the Media server drop-down menu. The selectionindicates that the media server has permission to write to the storage unit.
■ Absolute pathname to directory or Absolute pathname to volumesetting.See “Absolute pathname to directory or absolute pathname to volumesetting for storage units” on page 574.
■ Maximum concurrent jobsSee “Maximum concurrent jobs storage unit setting” on page 578.
■ Reduce fragment sizeSee “Reduce fragment size storage unit setting” on page 585.
■ High water markSee “High water mark storage unit setting” on page 576.
■ Low water markSee “Low water mark storage unit setting” on page 577.
■ Enable block sharingSee “Enable block sharing storage unit setting” on page 576.
■ Enable Temporary staging areaSee “Enable temporary staging area storage unit setting” on page 587.
6 For Media Manager storage units, data is written to tape robots and standalonetape drives:
563Configuring storage unitsCreating a storage unit

■ Select a storage device from the Storage Device drop-down menu.
■ Select a media server in the Media server drop-down menu. The selectionindicates that the media server has permission to write to the storage unit.
■ Maximum concurrent write drivesSee “Maximum concurrent write drives storage unit setting” on page 577.
■ Enable multiplexingSee “Enable multiplexing storage unit setting” on page 576.
■ Reduce fragment sizeSee “Reduce fragment size storage unit setting” on page 585.
7 Click OK to save the storage unit configuration.
Creating a storage unit by copying a storage unitThe following procedure describes how to create a storage unit by copying a storageunit.
To create a storage unit by copying an existing storage unit
1 In theNetBackup Administration Console, selectNetBackupManagement> Storage.
2 In the right pane, select a storage unit.
3 Click Actions > Copy Storage Unit.
4 Type a unique name for the new storage unit. For example, describe the typeof storage. Use this name to specify a storage unit for policies and schedules.
See “NetBackup naming conventions” on page 1112.
5 Complete the fields in the Copy Storage Unit dialog box.
See “About storage unit settings” on page 574.
Changing storage unit settingsVeritas suggests that changes be made only during periods when no backup activityis expected for the policies that use the affected storage units.
564Configuring storage unitsCreating a storage unit

To change storage unit settings
1 In theNetBackup Administration Console, selectNetBackupManagement> Storage > Storage Units.
2 In the right pane, double-click the storage unit you want to change.
To select multiple storage units, hold down the Control or Shift key.
3 Complete the fields on the Change Storage Unit dialog box.
See “About storage unit settings” on page 574.
Deleting storage unitsTo delete a storage unit from a NetBackup configuration means to delete the labelthat NetBackup associates with the physical storage.
Deleting a storage unit does not prevent files from being restored that were writtento that storage unit, provided that the storage was not physically removed and thebackup image has not expired.
To delete a BasicDisk or Media Manager storage unit
1 Use the Catalog utility to expire any images that exist on the storage unit. Thisaction removes the image from the NetBackup catalog.
See “Expiring backup images” on page 986.
■ Do not manually remove images from the BasicDisk or Media Managerstorage unit.
■ Once the images are expired, they cannot be restored unless the imagesare imported.See “About importing backup images” on page 987.
NetBackup automatically deletes any image fragments from a disk storage unitor a disk pool. This deletion generally occurs within seconds of expiring animage. However, to make sure that all of the fragments are deleted, check thedirectory on the storage unit to make sure that it is empty.
2 Select Storage > Storage Units.
3 In the right pane, select the storage unit you want to delete. Hold down theControl or Shift key to select multiple storage units.
4 Select Edit > Delete.
5 In the confirmation dialog box, select the storage units to delete.
565Configuring storage unitsCreating a storage unit

6 Click OK.
7 Modify any policy that uses a deleted storage unit to use another storage unit.
If a storage unit points to disk pool, the storage unit can be deleted withoutaffecting the disk pool.
Media Manager storage unit considerationsTo create a storage unit of a tape robot or a standalone tape drive, select MediaManager as the Storage unit type.
See “About storage unit settings” on page 574.
Figure 11-3 Media Manager storage unit settings
566Configuring storage unitsCreating a storage unit

When NetBackup sends a job to a Media Manager storage unit, it requests resourcesfrom the Enterprise Media Manager (EMM). Then NetBackup requests that MediaManager mount the volume in a drive.
If a standalone drive does not contain media or if a required volume is not availableto a robot, a mount request appears in the Pending Requests pane of the DeviceMonitor. An operator can then find the volume, mount it manually, and assign it tothe drive.
Take the following items into consideration when adding a Media Manager storageunit:
■ Where to add the storage unit depends on which version of NetBackup is inuse.
■ Add the storage unit to the master server. Specify the media server wherethe drives attach.
■ If using NetBackup Server, add the storage unit to the master server wherethe drives attach. The robotic control must also attach to that server.
■ The number of storage units that you must create for a robot depends on therobot’s drive configuration.
■ Drives with identical densities must share the same storage unit on the samemedia server. If a robot contains two drives of the same density on the samemedia server, add only a single storage unit for the robot. Set the Maximumconcurrent write drives setting to 2.See “Maximum concurrent write drives storage unit setting” on page 577.
■ Drives with different densities must be in separate storage units. Consideran STK SL500 library that is configured as a Tape Library DLT (TLD). It canhave both half-inch cartridge and DLT drives. Here, you must define aseparate storage unit for each density.
■ If a robot’s drives and robotic control attach to different NetBackup servers,specify the server where the drives attach as the media server. Alwaysspecify the same robot number for the drives as is used for the robotic control.
■ Standalone drives with identical densities must be in the same storage unit.If a server contains two 1/4-inch qscsi drives, add a storage unit with Maximumconcurrent write drives set to 2. The media and device selection logic choosesthe drive to use when NetBackup sends a backup to this storage unit. The logicis part of the Enterprise Media Management (nbemm) service or daemon.
■ Standalone drives with different densities must be in different storage units.
■ A robot and a standalone drive cannot be in the same storage unit.
567Configuring storage unitsCreating a storage unit

Disk storage unit considerationsNetBackup permits the creation of an unlimited number of disk storage units.
Table 11-2 describes the different disk types that NetBackup can use as disk media.
Table 11-2 Disk media descriptions
DescriptionType of disk storage unit
A BasicDisk type storage unit consists of a directory on a locally-attached disk or anetwork-attached disk that is exposed as a file system to a NetBackup media server.NetBackup stores backup data in the specified directory.
Notes about the BasicDisk type storage unit:
■ Do not include the same volume or file system in multiple BasicDisk storage units.■ BasicDisk storage units cannot be used in a storage lifecycle policy.
BasicDisk
An AdvancedDisk disk type storage unit is used for a dedicated disk that is directlyattached to a NetBackup media server. An AdvancedDisk selection is available onlywhen the Data Protection Optimization Option is licensed.
NetBackup assumes the exclusive ownership of the disk resources that comprise anAdvancedDisk disk pool. If the resources are shared with other users, NetBackupcannot manage disk pool capacity or storage lifecycle policies correctly.
For AdvancedDisk, the NetBackup media servers function as both data movers andstorage servers.
See the NetBackup AdvancedDisk Storage Solutions Guide.
AdvancedDisk
An OpenStorage disk type storage unit is used for disk storage, usually provided by athird-party vendor. The actual name of the disk type depends on the vendor. AnOpenStorage selection is available only when the OpenStorage Disk Option is licensed.
The storage is integrated into NetBackup through an API. The storage vendor partnerswith Veritas to integrate the storage into NetBackup.
The storage host is the storage server. The NetBackup media servers function as thedata movers. The storage vendor's plug-in must be installed on each media server thatfunctions as a data mover. The logon credentials to the storage server must beconfigured on each media server.
See the NetBackup OpenStorage Solutions Guide for Disk.
OpenStorage
A PureDisk disk type storage unit is used for deduplicated data for a Media ServerDeduplication Pool. PureDisk appears as a selection when the NetBackup DataProtection Optimization Option is licensed.
PureDisk
Not all settings are available on each disk storage unit type.
See “About storage unit settings” on page 574.
568Configuring storage unitsCreating a storage unit

Note: Veritas recommends that you do not impose quotas on any file systems thatNetBackup uses for disk storage units. Some NetBackup features may not workproperly when file systems have quotas in place. (For example, thecapacity-managed retention selection in storage lifecycle policies and staging tostorage units.)
About the disk storage modelThe NetBackup model for disk storage accommodates all Enterprise Disk Options.That is, it is the model for all disk types except for the BasicDisk type.
The following items describe components of the disk storage model:
Data moverAn entity that moves data between the primary storage (the NetBackup client) andthe storage server. NetBackup media servers function as data movers.
Depending on the disk option, a NetBackup media server also may function as astorage server.
Storage serverAn entity that writes data to and reads data from the disk storage. A storage serveris the entity that has a mount on the file system on the storage.
Depending on the NetBackup option, the storage server is one of the following:
■ A computer that hosts the storage
■ A NetBackup media server
Disk poolA collection of disk volumes that are administered as an entity. NetBackupaggregates the disk volumes into pools of storage (a disk pool) you can use forbackups.
A disk pool is a storage type in NetBackup. When you create a storage unit, youselect the disk type and then you select a specific disk pool.
Configuring credentials for CIFS storage and disk storageunitsFor Common Internet File System (CIFS) storage with AdvancedDisk and BasicDiskstorage units, the following two NetBackup services on Windows computers requirematching account credentials:
569Configuring storage unitsCreating a storage unit

The NetBackup Client Service is either bpcd.exe orbpinetd.exe, depending on NetBackup release level.Regardless of the binary file name, the service requires thecredentials.
NetBackup Client Service
The NetBackup Remote Manager and Monitor Service binaryfile name is nbrmms.exe.
NetBackup Remote Managerand Monitor Service
The following items describe the requirements for the account and credentials:
■ Both of the services must run under the same Windows user account.
■ The account must be the same account that the Windows operating systemuses for read and write access to the CIFS share.
■ Configure the account and the credentials on the media server or media serversthat have a file system mount on the CIFS storage. Then, configure Windowsso that the two aforementioned services use that account.
If account credentials are not configured properly, NetBackup marks all CIFSAdvancedDisk and BasicDisk storage units that use the UNC naming conventionas DOWN.
To configure service credentials for CIFS storage and disk storage units
◆ In Windows, configure both the NetBackup Client Service and the NetBackupRemote Manager and Monitor Service so they meet the credential requirements.Those requirements are described previously in this document.
See your Windows operating system documentation for the procedures. Howto configure Windows is beyond the scope of the NetBackup documentation.
Disk storage units in storage lifecycle policiesFigure 11-4 is an example of how storage lifecycle policies can interact with volumesin a disk pool that a storage unit references.
Two backup policies are created as follows:
■ A backup policy named Policy_gold has a gold classification. For storage, it isconfigured to use an SLP named Lifecycle_Gold, which has a gold dataclassification.
■ A backup policy named Policy_silver has a silver classification. For storage, itis configured to use Any Available. That means it can use any available storageunit or any SLP that has a silver classification.
Two storage units are available to both backup policies as follows:
■ DSU_1 is an operation in Lifecycle_Gold and references DiskPool_A.
570Configuring storage unitsCreating a storage unit

■ DSU_2 is not in an SLP and references DiskPool_A.
DiskPool_A contains three disk volumes. Both the gold and the silver images canbe written to any disk volume in the pool.
Figure 11-4 Storage lifecycle policies and disk storage units referencing diskpools
Storage unit DSU_2Storage unit DSU_1
Disk volume Disk volume
DiskPool_A
Disk volume
Backup policy Policy_Silver
The data classification for this backuppolicy is silver. The policy is configuredto write to any available storage unit.
Policy_Silver writes to DSU_2.DSU_2 references DiskPool_A.
Backup policy Policy_Gold
The data classification for this backuppolicy is gold. The policy is configured towrite to Lifecycle_Gold.
SLP Lifecycle_Gold
Lifecycle_Gold contains a backup operationthat writes to storage unit DSU_1.
DSU_1 references DiskPool_A.
Gold image
Gold image
Silver image
Gold image
Silver image
Gold image
Both backup policies maywrite to any volume in thedisk pool that matches thedata classification of thepolicy.
In this way, a single diskpool may contain imageswith different dataclassifications.
See “About storage lifecycle policies” on page 613.
Maintaining available disk space on disk storage unitsDisk storage units can be managed so that they do not become entirely full andcause backups to fail.
Create space for more images on a disk storage unit in the following ways:
■ Add new disk space.
■ Set the High water mark to a value that best works with the size of backupimages in the environment.See “High water mark storage unit setting” on page 576.
Maintain space on basic disk staging storage units in the following ways:
571Configuring storage unitsCreating a storage unit

■ Increase the frequency of the relocation schedule. Or, add resources so that allimages can be copied to a final destination storage unit in a timely manner.
■ Run the nb_updatedssu script.Upon NetBackup installation or upgrade, the nb_updatedssu script runs. Thescript deletes the .ds files that were used in previous releases as pointers torelocated data. Relocated data is tracked differently in the current release andthe .ds files are no longer necessary. Under some circumstances, a .ds filecannot be deleted upon installation or upgrade. In that case, run the script again:On Windows: install_path\netbackup\bin\goodies\nb_updatedssuOn UNIX: /usr/openv/netbackup/bin/goodies/nb_updatedssu
■ Determine the potential free space.See “Finding potential free space on a BasicDisk disk staging storage unit”on page 597.
■ Monitor disk space by enabling the Check the capacity of disk storage unitshost property.This General Server host property determines how often NetBackup checks 6.0disk storage units for available capacity. Subsequent releases use internalmethods to monitor disk space more frequently.See “General Server properties” on page 155.
NDMP storage unit considerationsThe NetBackup for NDMP license must be installed on the media server to use thehosts as storage units. Media Manager controls NDMP storage units but the unitsattach to NDMP hosts.
See “About storage unit settings” on page 574.
572Configuring storage unitsCreating a storage unit

Figure 11-5 NDMP storage unit settings
Create NDMP storage units for drives directly attached to NAS filers. Any drive thatis attached to a NetBackup media server is considered a Media Manager storageunit, even if used for NDMP backups.
Note: Remote NDMP storage units may already be configured on a media serverfrom a previous release. Upon upgrade of the media server, those storage unitsare automatically converted to Media Manager storage units.
See the NetBackup for NDMP Administrator’s Guide for more information.
573Configuring storage unitsCreating a storage unit

About storage unit settingsThe following topics describe the settings that appear for all types of storage units.The settings are listed alphabetically. Each setting does not appear for each storageunit type.
Absolute pathname to directory or absolute pathname to volumesetting for storage units
Absolute pathname to directory or Absolute pathname to volume is availablefor any storage unit that is not based on disk pools.
The setting specifies the absolute path to a file system or a volume available forbackups to disk. Enter the path directly in the field, then click Add. Use any locationon the disk, providing that sufficient space is available.
Use platform-specific file path separators (/ and \) and colon (:) within a drivespecification.
The Properties button displays properties for the directory or volume.
See “Properties option in the Change Storage Units dialog box” on page 584.
Do not configure multiple BasicDisk storage units to use the same volume or filesystem. Not only do the storage units compete for space, but different Low watermarks can cause unexpected behaviors.
If the BasicDisk storage unit is used as a disk staging storage unit, Veritasrecommends dedicating a disk partition or file system to it. Dedicating space allowsthe disk staging space management logic to operate successfully. Or, considerdefining AdvancedDisk storage units, which use the disk pools that are composedof the disk volumes that are dedicated file systems for disk backup.
See “NetBackup naming conventions” on page 1112.
See “Low water mark storage unit setting” on page 577.
Directory can exist on the root file system or system disksetting for storage unitsThis setting allows the user to specify a directory on the root file system (UNIX) oron a system drive (Windows) in the Absolute pathname to directory field.
When this setting is checked, the directory is created automatically. If a storageunit is configured on C drive and this option is not checked, backups fail with statuscode 12 (file open failed).
574Configuring storage unitsAbout storage unit settings

Note: With this setting checked, the root file system or the system drive can fill up.
A job fails under the following conditions:
■ If the setting is not checked, and if the directory already exists on the root filesystem or on a system drive.
■ If the setting is not checked, and the requested directory is to be created on theroot file system or on a system drive.
See “Absolute pathname to directory or absolute pathname to volume setting forstorage units” on page 574.
Density storage unit settingThe Storage device selection determines the mediaDensity. This setting appearsfor Media Manager and NDMP storage units only.
Disk pool storage unit settingThe Disk pool storage unit setting specifies whether the storage unit uses a diskpool that is configured for snapshots.
The following table describes which disk pools appear in the drop-down list:
All NetBackup disk pools appear in the Disk pool list.For AdvancedDisk
Only the disk pools that the OpenStorage vendor exposesappear in the list.
For OpenStorage
The Media Server Deduplication Pools appear in the list.For PureDisk
Disk type storage unit settingThe Disk type storage unit setting identifies the type of storage unit.
A disk storage unit can be one of the following types:
■ AdvancedDisk (NetBackup Data Protection Optimization Option needed)
■ BasicDisk
■ OpenStorage (vendor name) (NetBackup OpenStorage Disk Option needed)
■ PureDisk (NetBackup Data Protection Optimization Option needed)
575Configuring storage unitsAbout storage unit settings

Note: The null_stu storage unit type is available only when Veritas Support usesthe NullOST plug-in to identify and isolate data transfer bottlenecks. The null_stustorage unit type is used for troubleshooting purposes only. Do not select null_stuas a storage unit type because the data that is written to a null storage unit cannotbe restored.
Enable block sharing storage unit settingThe Enable block sharing storage unit setting allows the sharing of data blocksthat have not changed from one backup to the next. Sharing data blocks cansignificantly save disk space in the storage unit.
Enable multiplexing storage unit settingThe Enable multiplexing storage unit setting allows multiple backups to multiplexonto a single drive in a storage unit.
Caution: For MS-SQL-Server policies, do not enable multiplexing for a schedulethat is also configured to backup with multiple stripes. Restores fail when multiplexingis enabled for a schedule that uses more than one stripe.
High water mark storage unit settingThe High water mark storage unit setting applies to BasicDisk storage units andto disk pools.
The High water mark setting (default 98%) is a threshold that triggers the followingactions:
■ When an individual disk volume of the underlying storage reaches the Highwatermark, NetBackup considers the volume full. NetBackup chooses a differentvolume in the underlying storage to write backup images to.
■ When all volumes in the underlying storage reach the High water mark, theBasicDisk storage is considered full. NetBackup fails any backup jobs that areassigned to a storage unit in which the underlying storage is full. NetBackupalso does not assign new jobs to a BasicDisk storage unit in which theunderlying storage is full.
■ NetBackup begins image cleanup when a volume reaches theHighwatermark;image cleanup expires the images that are no longer valid. NetBackup againassigns jobs to the storage unit when image cleanup reduces any disk volume'scapacity to less than the High water mark.
576Configuring storage unitsAbout storage unit settings

If the storage unit is in a capacity-managed storage lifecycle policy, other factorsaffect image cleanup.See “Capacity managed retention type for SLP operations” on page 646.
See “Maximum concurrent jobs storage unit setting” on page 578.
For more information, see the following guides:
■ NetBackup Deduplication Guide.
■ NetBackup Administrator's Guide, Volume II.
Low water mark storage unit settingThe Low water mark setting has no effect unless backups are written through astorage lifecycle policy, using the Capacity managed retention type. NetBackupcopies expired images to a final destination storage unit to create space.
Once the High water mark is reached, space is created on the disk storage unituntil the Low water mark is met. The default setting is 80%.
See “Capacity managed retention type for SLP operations” on page 646.
The Low water mark setting cannot be greater than the High water mark setting.
For the disk storage units that reference disk pools, the Low water mark appliesto the disk pool.
Note: Basic disk staging storage units may already be configured on a media serverof a previous release. Upon upgrade, the disk storage units are set with the Lowwater mark at 100%. To make the best use of upgraded storage units, adjust thelevel.
For more information, see the following:
■ NetBackup Deduplication Guide.
■ NetBackup Administrator's Guide, Volume II.
Maximum concurrent write drives storage unit settingThe Maximum concurrent write drives storage unit setting specifies the numberof tape drives that NetBackup can use at one time for jobs to this storage unit. Thenumber of tape drives available is limited to the maximum number of tape drivesin the storage device. If a job contains multiple copies, each copy applies towardthe Maximum concurrent write drives count.
When selecting the value forMaximum concurrent write drives, use the followingguidelines:
577Configuring storage unitsAbout storage unit settings
■ Storage unit that contains only standalone tape drivesSpecify a number that is less than or equal to the number of tape drives thatare in the storage unit.
■ RobotSpecify a number that is less than or equal to the number of tape drives thatattach to the NetBackup media server for the storage unit.
Assume that you have two standalone drives of the same density and specify 1.Both tape drives are available to NetBackup but only one drive can be used forbackups. The other tape drive is available for restores and other non-backupoperations. (For example, to import, to verify, and to duplicate backups as source.)
Note: To specify a Maximum concurrent write drives setting of 0 disables thestorage unit.
Maximum concurrent jobs storage unit settingTheMaximumconcurrent jobs storage unit setting specifies the maximum numberof jobs that NetBackup can send to a disk storage unit at one time. The defaultsetting is one job.
The maximum number of jobs that NetBackup can run concurrently is dependenton several factors and is not exclusively regulated by this setting. These factorsinclude the following: the risk of reaching a disk full situation, the scheduling orcapacity polling overhead, the media server I/O bandwidth, and variouscharacteristics of the disk storage. No definitive method exists that can predict whena critical limit will be exceeded in a given system.
Note: To specify a Maximum concurrent jobs setting of 0 disables the storageunit.
For example, three backup jobs are ready to be sent to the storage unit andMaximum concurrent jobs is set to two. The first two jobs start while the third jobwaits. If a job contains multiple copies, each copy applies toward the Maximumconcurrent jobs count.
Note: Increase the Maximum concurrent jobs setting if the storage unit is usedfor catalog backups as well as non-catalog backups. Increase the setting to ensurethat the catalog backup can proceed while regular backup activity occurs. Wheredisk pools are used, increase the setting if more than one server is in the storageunit.
578Configuring storage unitsAbout storage unit settings

The Maximum concurrent jobs setting uses and dependencies are as follows:
■ Can be used to balance the load between disk storage units. A higher value(more concurrent jobs) means that the disk may be busier than if the value wasset for fewer jobs.The media server load balancing logic considers all storage units and all activity.A storage unit can indicate three media servers. If Maximum concurrent jobsis set to three and two of the media servers are busy or down, the third mediaserver is assigned all three jobs.
■ This setting depends on the available disk space and the server’s ability to runmultiple backup processes. Where disk pools are used, the setting also dependson the number of media servers in the storage unit.If multiple storage units reference the same disk pool, the number of concurrentjobs that can access the pool is the sum of the Maximum concurrent jobssettings on all of the disk storage units. The setting applies to the storage unitand not to the disk pool. Therefore, the job load is automatically spread acrossthe media servers that the storage unit configuration indicates.
■ On Windows systems, even with multiple concurrent jobs, the time that is requiredfor a job to complete depends on other factors:
■ The number of other jobs that are started at the same time.
■ The sequence in which the jobs were started.
■ The time that is required to complete each job.
See “Impact when two disk storage units reference one disk pool” on page 579.
Impact when two disk storage units reference one diskpoolFigure 11-6 shows how the Maximum concurrent jobs settings are combinedwhen two disk storage units share one disk pool.
In the example, DSU_1 is configured as follows:
■ To use MediaServer_A
■ To have a Maximum concurrent jobs setting of two
■ To reference Disk_pool1
DSU_2 is configured as follows:
■ To use MediaServer_B
■ To have a Maximum concurrent jobs setting of three
■ To reference Disk_pool1
579Configuring storage unitsAbout storage unit settings

Both storage units reference the same disk pool. Combined, the storage units havea Maximum concurrent jobs setting of five. However, only two jobs can runconcurrently on MediaServer_A; three on MediaServer_B.
Figure 11-6 Impact when disk storage units use one disk pool but differentmedia servers
DSU_1
The maximum concurrent jobsthat can use the disk pool is 5.
Maximumconcurrent jobssetting: 2
MediaServer_A
DSU_2 Maximumconcurrent jobssetting: 3
MediaServer_BMediaServer_Aselected to movedata to the pool
MediaServer_Bselected to movedata to the pool
Disk_pool1
If the storage units were configured to use both media servers, the media serverscould run five concurrent jobs: two from DSU_1 and three from DSU_2.
See “About storage unit settings” on page 574.
Maximum streams per drive storage unit settingThe Maximum streams per drive storage unit setting determines the maximumnumber of concurrent, multiple client backups that NetBackup can multiplex ontoa single drive. The range is from 2 to 32.
See “Media multiplexing (schedule attribute)” on page 783.
Media server storage unit settingThe Media server storage unit setting specifies one of the following:
■ The NetBackup media server where the drives in the storage unit attach.
■ The NetBackup media server that controls the disk storage unit.
■ The NetBackup media servers that can write data to and read data from thedisk pool.
■ The NetBackup media servers that can move data to and from the disk pool.
■ The NetBackup media servers that function as deduplication servers.
580Configuring storage unitsAbout storage unit settings

To make this storage unit available to any media server (default), select AnyAvailable. NetBackup selects the media server dynamically at the time the policyis run.
Consider the following, depending on the type of storage.
Table 11-3 Media server setting details
ConsiderationsStorage unit type
To configure a disk storage unit, select a single media server.BasicDisk
The Media server setting specifies the NetBackup media servers that can write datato and read data from the disk pool.
The media servers that are configured as storage servers appear in the media serverslist. The disk storage must be directly attached to the media server that is configuredas the storage server.
NetBackup selects a media server when the policy runs.
AdvancedDisk
The Media server setting specifies the name of the media server that is to back upthe NDMP host. Only those media servers that can talk to the specified NDMP storagedevice appear in the drop-down menu.
An NDMP host can be authenticated on multiple media servers. Select Any Availableto have NetBackup select the media server and storage unit at the time the policy isrun.
NDMP
581Configuring storage unitsAbout storage unit settings

Table 11-3 Media server setting details (continued)
ConsiderationsStorage unit type
The Media server setting specifies the NetBackup media servers that can move datato or from the storage server.
To allow any media server in the media server list to move data to the storage server,check Use Any Available Media Server.
To restrict the media servers that can move data to the storage server, check OnlyUse The Following Media Servers. Then select the media servers that are allowedto move the data.
Any media server in the list can receive data from the storage server; it does not haveto be selected. A media server receives data for restore jobs and for storage monitoringpurposes.
Each media server that moves the data must meet the following requirements:
■ The vendor’s software plug-in is installed.■ The login credentials to the storage server are configured.
Only the media servers on which storage server credentials are configured appear inthe media servers list. If a server does not appear, verify that the software plug-in isinstalled and that login credentials are configured for that media server.
Note: Run the tpconfig command line utility directly on the media server to configureand verify credentials.
NetBackup selects a media server when the policy runs.
OpenStorage
To allow any media server in the list to deduplicate data, select Use Any AvailableMedia Server.
To restrict the media servers that can deduplicate data, selectOnly Use The FollowingMedia Servers. Then select the media servers that are allowed to deduplicate thedata.
Each media server must be configured as a deduplication media server.
See the NetBackup Deduplication Guide.
PureDisk (Media ServerDeduplication Pool)
See “Use any available media server storage unit setting” on page 588.
See “Only use the following media servers storage unit setting” on page 583.
NDMP host storage unit settingThe NDMP host storage unit setting specifies the NDMP tape server that is usedto write data to tape. Select the host name from the drop-down menu or click Addto add a host.
582Configuring storage unitsAbout storage unit settings

On demand only storage unit settingThe On demand only storage unit setting specifies whether the storage unit isavailable exclusively on demand—that is, only when a policy or schedule is explicitlyconfigured to use this storage unit. Uncheck On demand only to make the storageunit available to any policy or schedule.
Note: If On demand only is selected for all storage units, be sure to designate aspecific storage unit for each policy or schedule. Otherwise, NetBackup is unableto find a storage unit to use.
Only use the following media servers storage unit settingTheOnly use the followingmedia servers storage unit setting restricts the mediaservers that are earmarked for storage. Check this setting and select the mediaservers that you want to use.
The following table describes the media server functionality for each type of storage.
Table 11-4 Media server functionality
FunctionalityMedia server type
The media servers are both storage servers anddata movers. The media servers that areconfigured as the storage servers and data moversappear in the media servers list.
AdvancedDisk storage media server
The media servers that are configured as datamovers for the OpenStorage implementationappear in the media server list. (For OpenStorage,NetBackup media servers function as datamovers.) If a media server does not appear in thelist, verify that the software plug-in is installed andthat logon credentials are created.
Each media server that accesses the storage mustmeet the following requirements:
■ The vendor’s software plug-in is installed.■ The login credentials to the storage server are
configured.
OpenStorage media server
The media servers function as deduplicationservers.
NetBackup deduplication must be configured.
PureDisk media server (Media ServerDeduplication Pool)
583Configuring storage unitsAbout storage unit settings

See “Use any available media server storage unit setting” on page 588.
See “Only use the following media servers storage unit setting” on page 583.
Properties option in the Change Storage Units dialog boxClick Properties to display information about the volume or the disk pool, as follows:
Table 11-5 Storage Units Properties
DescriptionProperty
This value reflects the space that remains for storage on a disk storage unit. Thefollowing equation determines the available space:
Available space = free space + potential free space - committed space
The df command may report a value for the available space that is slightly differentfrom the actual free space value that appears as a result of the nbdevquery command:
nbdevquery -listdv -stype server_type -dp disk_pool
The available space that the df command lists does not include the space that theoperating system reserves. Since NetBackup runs as root, the nbdevquery commandincludes the reserved space in the available space equation.
Available storage orAvailable
The Capacity value reflects the total amount of space that the disk storage unit or poolcontains, both used and unused.
Capacity
Comments that are associated with the disk pool.Disk pool comments
The high water mark for the disk pool applies to both the individual disk volumes in thepool and the disk pool:
■ Individual volumesWhen a disk volume reaches the high water mark, new jobs are not assigned tothe volume. This behavior happens for all disk types except BasicDisk stagingstorage units. The high water mark event triggers the deletion of images that havebeen relocated, attempting to bring the used capacity of the disk volume down tothe low water mark
■ Disk poolWhen all volumes are at the high water mark, the disk pool is full. When a disk poolapproaches the high water mark, NetBackup reduces the number of jobs that areallowed to write to the pool.NetBackup does not assign new jobs to a storage unit in which the disk pool is full.The default setting is 99%.
High water mark
584Configuring storage unitsAbout storage unit settings

Table 11-5 Storage Units Properties (continued)
DescriptionProperty
The low water mark for the disk pool. Once a disk volume fills to its high water mark,NetBackup attempts to delete enough relocated images to reduce the used capacityof the disk volume down to the low water mark. The low water mark setting cannot begreater than the high water mark setting.
Note: The Low water mark setting has no effect unless backups are written througha storage lifecycle policy, using the capacity-managed retention type.
Low water mark
The name of the disk pool.Name
The number of disk volumes in the disk pool.Number of volumes
The percentage of storage that is currently in use on the volume.
The df command may report a percentage used (Use%) value that is different fromthe % full value. (See the preceding Available Storage topic for a description of whythe values appear differently.)
% full
The raw, unformatted size of the storage in the disk pool.Raw size
The amount of usable storage in the disk pools.Usable size
Reduce fragment size storage unit settingThe Reduce fragment size storage unit setting specifies the largest fragment sizethat NetBackup can create to store backups.
If an error occurs in a backup, the entire backup is discarded. The backup restartsfrom the beginning, not from the fragment where the error occurred. (An exceptionis for backups where checkpoint restart is enabled. In that case, fragments beforeand including the last checkpoint are retained; the fragments after the last checkpointare discarded.)
Maximum fragment size for Media Manager storage unitsThe default maximum fragment size for a Media Manager storage unit is 1000 GB.To specify a maximum fragment size other than the default, checkReduce fragmentsize. Then enter a value from 50 megabytes to 1,048,575 megabytes.
Fragmenting multiplexed tape backups can expedite restores. Fragments allowNetBackup to skip to the specific fragment before searching for a file. Generally,NetBackup starts at the beginning of the multiplexed backup and reads tar headersuntil it finds the file.
585Configuring storage unitsAbout storage unit settings

Maximum fragment size for disk storage unitsThe default maximum fragment size for a disk storage unit is 524,288 megabytes.To specify a maximum fragment size other than the default, enter a value from 20megabytes to 524,288 megabytes.
For aMedia Server Deduplication Pool, you can enter a value from 20 megabytesto 51200 megabytes.
Backups to disk are usually fragmented to ensure that the backup does not exceedthe maximum size that the file system allows.
The Reduce fragment size setting is intended primarily for storing large backupimages on a disk type storage unit.
Note: OpenStorage vendors may have special requirements for the maximumfragment size. Consult the vendor's documentation for guidance.
Note: Basic disk staging units with different maximum fragment sizes may alreadybe configured on a media server from a previous release. Upon upgrade, the diskstorage units are not automatically increased to the new default of 524,288megabytes. To make the best use of upgraded storage units, increase the fragmentsize on the upgraded storage units.
Robot number storage unit settingThe Robot number storage unit setting indicates the number of robots the storageunit contains. The Storage device selection determines the Robot number. It isthe same robot number used in the Media Manager configuration.
Robot type storage unit settingThe Robot type storage unit setting indicates the type of robot (if any) that thestorage unit contains. The Storage device setting determines the Robot type.
For the specific vendor types and models that correspond to each robot type, seethe Supported Peripherals section of the NetBackup Release Notes.
See “Storage device setting for storage units” on page 587.
Staging schedule option in Change Storage Units dialogClick the Staging Schedule option to configure the relocation schedule for thisstorage unit. A schedule is what makes the disk storage unit a basic disk staging
586Configuring storage unitsAbout storage unit settings

storage unit. During the relocation schedule, the backup image is duplicated fromthe temporary staging area to the final destination storage unit.
See “Disk Staging Schedule dialog box” on page 598.
See “Enable temporary staging area storage unit setting” on page 587.
See “About basic disk staging” on page 590.
See “About staging backups” on page 589.
Storage device setting for storage unitsThe Storage device list contains all possible storage devices available. Storageunits can be created for the listed devices only.
The Storage device selection determines the mediaDensity. This setting appearsfor Media Manager and NDMP storage units only.
Storage unit name settingThe Storage unit name setting defines a unique name for the new storage unit.The name can describe the type of storage. The Storage unit name is the nameused to specify a storage unit for policies and schedules.
The storage unit name cannot be changed after creation. The Storage unit nameis inaccessible when changing settings for a storage unit.
See “NetBackup naming conventions” on page 1112.
Storage unit type settingThe Storage unit type setting specifies the type of storage that this storage unituses, as follows:
See “Disk storage unit considerations” on page 568.Disk
See “Media Manager storage unit considerations” on page 566.Media Manager
See “NDMP storage unit considerations” on page 572.NDMP
Enable temporary staging area storage unit settingThe Enable temporary staging area storage unit setting allows this storage unitto be used as a temporary staging area. Check Enable Temporary Staging Areaand then configure the staging schedule.
See “Staging schedule option in Change Storage Units dialog” on page 586.
587Configuring storage unitsAbout storage unit settings

The Staging column in the Storage units details pane indicates whether or not theunit is used as a temporary staging area for basic disk staging. Not all columnsdisplay by default.
See “About basic disk staging” on page 590.
See “Staging schedule option in Change Storage Units dialog” on page 586.
Use any available media server storage unit settingWhen checked, the Use any available media server storage unit setting allowsany media server in the media server list to access the storage (default).
The following table describes the media server functionality for each type of storage.
Table 11-6 Media server functionality
FunctionalityStorage unit type
The media servers are both storage servers and data movers. The mediaservers that are configured as the storage servers and data movers appearin the media servers list.
AdvancedDisk storage media server
The media servers that are configured as data movers for the OpenStorageimplementation appear in the media server list. (For OpenStorage, NetBackupmedia servers function as data movers.) If a media server does not appearin the list, verify that the software plug-in is installed and that logon credentialsare created.
The following is required on each media server that accesses the storage:
■ The vendor’s software plug-in is installed.■ The login credentials to the storage server are configured.
OpenStorage media server
The media servers function as deduplication servers.
NetBackup deduplication must be configured.
PureDisk media server (Media ServerDeduplication Pool)
588Configuring storage unitsAbout storage unit settings

Staging backupsThis chapter includes the following topics:
■ About staging backups
■ About basic disk staging
■ Creating a basic disk staging storage unit
■ Configuring multiple copies in a relocation schedule
■ Disk staging storage unit size and capacity
■ Finding potential free space on a BasicDisk disk staging storage unit
■ Disk Staging Schedule dialog box
■ Initiating a relocation schedule manually
About staging backupsIn the staged backups process, NetBackup writes a backup to a storage unit andthen duplicates it to a second storage unit. Eligible backups are deleted on the initialstorage unit when space is needed for more backups.
This two-stage process allows a NetBackup environment to leverage the advantagesof disk-based backups for recovery in the short term.
Staging also meets the following objectives:
■ Allows for faster restores from disk.
■ Allows the backups to run when tape drives are scarce.
■ Allows the data to be streamed to tape without image multiplexing.
NetBackup offers the following methods for staging backups.
12Chapter

Table 12-1 Methods for staging backups
DescriptionStaging method
Basic disk staging consists of two stages. First, data is stored on the initial storage unit(disk staging storage unit). Then, per a configurable relocation schedule, data is copiedto the final location. Having the images on the final destination storage unit frees thespace on the disk staging storage unit as needed.
See “About basic disk staging” on page 590.
The following storage unit types are available for basic disk staging: BasicDisk andtape.
Basic disk staging
Staged backups that are configured within the Storage Lifecycle Policies utility alsoconsist of two stages. Data on the staging storage unit is copied to a final destination.However, the data is not copied per a specific schedule. Instead, the administrator canconfigure the data to remain on the storage unit until either a fixed retention period ismet, or until the disk needs additional space, or until the data is duplicated to the finallocation.
No BasicDisk or disk staging storage unit can be used in an SLP.
See “About storage lifecycle policies” on page 613.
Staging using the StorageLifecycle Policies utility
About basic disk stagingBasic disk staging is conducted in the following stages.
Table 12-2 Basic disk staging
DescriptionStage
Clients are backed up by a policy. The Policy storage selection in the policy indicates a storage unit thathas a relocation schedule configured. The schedule is configured in theNew orChange Storage unit dialogbox by clicking Staging Schedule.
Stage I
Images are copied from the Stage I disk staging storage unit to the Stage II storage unit. The relocationschedule on the disk staging storage unit determines when the images are copied to the final destination.Having the images on the final destination storage unit frees the space on the disk staging storage unit asneeded.
Stage II
The image continues to exist on both the disk staging storage unit and the finaldestination storage units until the image expires or until space is needed on thedisk staging storage unit.
Figure 12-1 shows the stages in basic disk staging.
590Staging backupsAbout basic disk staging

Figure 12-1 Stage I and II of basic disk staging
ClientDisk stagingstorage unit
Stage I
The relocation schedule on the diskstaging storage unit copies data to thefinal destination storage unit
Stage II
Final destinationstorage unit
A policy backs up client data to adisk staging storage unit
When the relocation schedule runs, NetBackup creates a data management job.The job looks for any data that can be copied from the disk staging storage unit tothe final destination. The Job Details in the Activity Monitor identify the job as oneassociated with basic disk staging. The Job Details list displays Disk Staging in thejob’s Data Movement field.
When NetBackup detects a disk staging storage unit that is full, it pauses the backup.Then, NetBackup finds the oldest images on the storage unit that successfullycopied onto the final destination. NetBackup expires the images on the disk stagingstorage unit to create space.
Note: The basic disk staging method does not support backup images that spandisk storage units.
To avoid spanning storage units, do not use Checkpoint restart on a backup policythat writes to a storage unit group that contains multiple disk staging storage units.
See “Take checkpoints every __ minutes (policy attribute)” on page 703.
Creating a basic disk staging storage unitUse the following processes to create a basic disk staging storage unit.
To create a basic disk staging storage unit
1 In theNetBackup Administration Console, selectNetBackupManagement> Storage > Storage Units.
2 Click Actions > New > Storage Unit or New Storage Unit.
3 In the New Storage Unit dialog box, name the storage unit.
See “Storage unit name setting” on page 587.
591Staging backupsCreating a basic disk staging storage unit

4 Select Disk as the Storage unit type.
See “Storage unit type setting” on page 587.
5 Select the Disk type of disk storage unit that is to be a disk staging storageunit: BasicDisk.
6 Select a media server.
See “Media server storage unit setting” on page 580.
7 Browse or specify the absolute path to the directory to be used for storage.
See “Absolute pathname to directory or absolute pathname to volume settingfor storage units” on page 574.
8 Select whether this directory can reside on the root file system or system disk.
See “Directory can exist on the root file system or system disk setting for storageunits” on page 574.
9 Enter the maximum concurrent jobs that are allowed to write to this storageunit at one time.
See “Maximum concurrent jobs storage unit setting” on page 578.
10 Enter a High water mark value.
The high water mark works differently for the BasicDisk disk type. NetBackupassigns new jobs to a BasicDisk disk staging storage unit, even if it is over theindicated high water mark. For BasicDisk, the high water mark is used to triggerthe deletion of images that have been relocated. NetBackup continues to deleteimages until the disk reaches the low water mark.
Note: The Low water mark setting does not apply to disk staging storageunits.
11 Check the Enable temporary staging area option. Once the option is enabled,create a schedule so that disk staging can occur.
Creating a schedule for a basic disk staging storage unitThe Disk Staging Schedule dialog box is similar to the Add New Schedule dialogbox used to configure schedules in backup policies. The differences appear on theAttributes tab.
592Staging backupsCreating a basic disk staging storage unit

To define the disk staging schedule
1 Click Staging Schedule.
2 The schedule name defaults to the storage unit name.
In the Disk Staging Schedule or the Disk Staging dialog box, select thepriority that the relocation jobs that are started from this schedule havecompared to other types of jobs.
See “Disk Staging Schedule dialog box” on page 598.
3 Select whether to create multiple copies. When the Multiple copies attributeis checked, NetBackup can create up to four copies of a backup simultaneously.
See “Multiple copies (schedule attribute)” on page 774.
4 Select a storage unit to contain the images from this storage unit uponrelocation.
5 Select a volume pool to contain the images from this storage unit uponrelocation.
6 Select a media owner to own the images from this storage unit upon relocation.
7 Select whether to use an alternate server for the images from this storage unitupon relocation.
8 Click OK to accept the disk staging schedule.
Configuring multiple copies in a relocationschedule
To configure a relocation schedule for basic disk staging to create multiple copies,use the following procedure.
To configure a relocation schedule for basic disk staging to create multiplecopies
1 In the NetBackup Administration Console, in the left pane, expandNetBackup Management > Storage > Storage Units.
2 Perform one of the following actions:
■ Select the storage unit to change.■ On the Edit menu, click Change.
To change an existing basicdisk storage unit
593Staging backupsConfiguring multiple copies in a relocation schedule

■ On the Actions menu, click New > Storage Unit.■ Name the storage unit.■ From the Storage unit type list, select Disk.■ Check Enable Temporary Staging Area.■ Configure the other storage unit settings as
necessary.■ See “Creating a basic disk staging storage unit”
on page 591.
To create a new basic diskstorage unit
See “About staging backups” on page 589.
3 Click the Staging Schedule option.
4 In the Add Schedule or Change Schedule dialog box that appears, on theAttributes tab, specify a priority in the field Priority of relocation jobs startedfrom this schedule (0 to 99999).
5 Select a schedule type and schedule when the policy should run.
6 Check Use alternate read server, and select an alternate server from thedrop-down list. The alternate server can read a backup image originally writtenby a different media server.
7 Select Multiple copies and click Configure.
8 In the Copies field, specify the number of copies to create simultaneously. Thenumber must be between 1 and 4.
Copy 1 is the primary copy. If Copy 1 fails, the first successful copy is theprimary copy.
Usually, NetBackup restores from the primary copy of an image. However, itis possible to restore from a specific backup copy other than the primary copy.To do so, use the bprestore command.
See “Configure Multiple Copies dialog box” on page 775.
See “About configuring multiple copies” on page 774.
9 Specify the storage unit where each copy is stored. If a Media Manager storageunit has multiple drives, it can be used for both the source and the destination.
10 Specify the volume pool where each copy is stored.
594Staging backupsConfiguring multiple copies in a relocation schedule

11 Select one of the following from the If this copy fails list:
Continues making the remaining copies.
Note: Note: If Take checkpoints every __ minutes isselected for this policy, only the last failed copy that containsa checkpoint can be resumed.
See “Take checkpoints every __ minutes (policy attribute)”on page 703.
continue
Fails the entire job.fail all copies
12 For tape media, specify who should own the media onto which NetBackupwrites the images:
NetBackup selects the media owner, either a media serveror server group.
Any
Specifies that the media server that writes to the media ownsthe media. No media server is specified explicitly, but youwant a media server to own the media.
None
Specifies that a media server group allows only those mediaservers in the group to write to the media on which backupimages for this policy are written. All media server groupsthat are configured in the NetBackup environment appear inthe list.
A server group
These settings do not affect images residing on disk. One media server doesnot own the images that reside on shared disks. Any media server with accessto the shared pool of disk can access the images.
13 Click OK.
Disk staging storage unit size and capacityTo take advantage of basic disk staging requires that the NetBackup administratorunderstand the life expectancy of the image on the Stage I storage unit.
The size and use of the file system of the Stage I storage unit directly affects thelife expectancy of the image before it is copied to the Stage II storage unit. Veritasrecommends a dedicated file system for each disk staging storage unit.
Consider the following example: A NetBackup administrator wants incrementalbackups to be available on disk for one week.
595Staging backupsDisk staging storage unit size and capacity
Incremental backups are done Monday through Saturday, with full backups doneon Sunday. The full backups are sent directly to tape and do not use basic diskstaging.
Each night’s total incremental backups are sent to a disk staging storage unit andaverage from 300 MB to 500 MB. Occasionally a backup is 700 MB. Each followingday the relocation schedule runs on the disk staging storage unit and copies theprevious night’s incremental backups to the final destination, a Media Manager(tape) storage unit.
The following items give more information about determining disk size for a basicdisk staging storage unit.
Minimum disk sizeThe minimum disk size is the smallest size that is required for the successfuloperation of the disk staging logic.
The minimum size must be greater than or equal to the largest combined size ofthe backups that are placed on the storage unit between runs of the disk stagingschedule. (In our example, the disk images remain on the disk for one week.)
In this example, the relocation schedule runs nightly, and the largest nightly backupis 700 MB. Veritas recommends that you double this value to allow for any problemsthat may occur when the relocation schedule runs. To double the value gives theadministrator an extra schedule cycle (one day) to correct any problems.
To determine the minimum size for the storage unit in this example, use the followingformula:
Minimum size = Max data per cycle × (1 cycle + 1 cycle for safety)
For example: 1.4 GB = 700 MB × (1+1)
Average disk sizeThe average disk size represents a good compromise between the minimum andthe maximum sizes.
In this example, the average nightly backup is 400 MB and the NetBackupadministrator wants to keep the images for one week.
To determine the average size for the storage unit in this example, use the followingformula:
Average size = Average data per cycle × (number of cycles to keep data + 1 cyclefor safety)
2.8 GB = 400 MB × (6 + 1)
596Staging backupsDisk staging storage unit size and capacity

Maximum disk sizeThe maximum disk size is the recommended size needed to accommodate a certainlevel of service. In this example, the level of service is that disk images remain ondisk for one week.
To determine the maximum size for the storage unit in this example, use the followingformula:
Maximum size = Max data per cycle × (# of cycles to keep data + 1 cycle for safety)
For example: 4.9 GB = 700 MB × (6 + 1)
Finding potential free space on a BasicDisk diskstaging storage unit
Potential free space is the amount of space on a disk staging storage unit thatNetBackup could free if extra space on the volume is needed. The space is thetotal size of the images that are eligible for expiration plus the images ready to bedeleted on the volume.
To find the potential free space on a BasicDisk storage unit, use the bpstulist
and the nbdevquery commands as follows:
■ Run bpstulist -label to find the disk pool name.Note that the name of the storage unit and disk pools are case-sensitive. In thecase of BasicDisk storage units, the name of the disk pool is the same as thename of the BasicDisk storage unit. In the following example, the name of thestorage unit is NameBasic:
bpstulist -label basic
NameBasic 0 server1 0 -1 -1 1 0 "C:\" 1 1 524288 *NULL* 0 1 0 98 80 0 NameBasic server1
■ Run the nbdevquery command to display the status for the disk pool, includingthe potential free space.Use the following options, where:
Specifies the vendor-specific string thatidentifies the storage server type. For aBasicDisk storage unit, enter BasicDisk.
-stype server_type
Specifies the disk pool name. For a basicdisk type, the disk pool name is the nameof the BasicDisk storage unit.
-dp
597Staging backupsFinding potential free space on a BasicDisk disk staging storage unit

So the complete command might look like the following.
nbdevquery -listdv -stype BasicDisk -dp NameBasic -D
The value is listed as potential_free_space.
Disk Volume Dump
name : <Internal_16>
id : <C:\>
diskpool : <NameBasic::server1::BasicDisk>
disk_media_id : <@aaaaf>
total_capacity : 0
free_space : 0
potential_free_space: 0
committed_space : 0
precommitted_space : 0
nbu_state : 2
sts_state : 0
flags : 0x6
num_read_mounts : 0
max_read_mounts : 0
num_write_mounts : 1
max_write_mounts : 1
system_tag : <Generic disk volume>
Disk Staging Schedule dialog boxClick Staging Schedule to display the Disk Staging Schedule dialog box. Thedialog box is similar to the scheduling dialog box that appears when a policy isconfigured.
The schedule that is created for the disk staging storage unit is not listed underSchedules in the NetBackup Administration Console when the Policies utilityis selected.
Figure 12-2 shows the disk staging schedule for a basic disk staging storage unit.
598Staging backupsDisk Staging Schedule dialog box

Figure 12-2 Disk Staging Schedule for a basic disk staging storage unit
The Attributes tab on the Disk Staging Schedule dialog box differs from theAttributes tab of a regular policy. The differences are described in the followingtable.
Table 12-3 The Attributes tab settings
DescriptionAttribute
The Name on the Disk Staging Schedule dialog box automatically defaults to thename of the storage unit.
Name
The Priority of relocation jobs started from this schedule field indicates the prioritythat NetBackup assigns to relocation jobs for this policy. Range: 0 to 99999 (highestpriority). The default value that is displayed is the value set for Default Job Priorities> Staging on the master server host properties.
Priority of relocation jobsstarted from this schedule
If the backups that use a disk staging storage unit run more frequently than expected,compare the retention level 1 setting with the Frequency setting. Internally, NetBackupuses the retention level 1 setting for scheduling purposes with disk staging storageunits.
Make sure that the frequency period is set to make the backups occur more frequentlythan the retention level 1 setting indicates. (The default is two weeks.)
For example, a frequency of one day and a retention level 1 of two weeks should workwell.
Retention levels are configured in the Retention Periods host properties.
See “Retention Periods properties” on page 228.
See “Frequency (schedule attribute)” on page 771.
Frequency
599Staging backupsDisk Staging Schedule dialog box

Table 12-3 The Attributes tab settings (continued)
DescriptionAttribute
If the schedule is a relocation schedule, a Final destination storage unit must beindicated. (A relocation schedule is created as part of a basic disk staging storage unitconfiguration.) A Final destination storage unit is the name of the storage unit wherethe images reside after a relocation job copies them.
To copy images to tape, NetBackup uses all of the drives available in the Finaldestination storage unit. However, the Maximum concurrent write drives settingfor that storage unit must be set to reflect the number of drives. The setting determineshow many duplication jobs can be launched to handle the relocation job.
NetBackup continues to free space until the Low water mark is reached.
See “Low water mark storage unit setting” on page 577.
See “Maximum concurrent write drives storage unit setting” on page 577.
See “About staging backups” on page 589.
Final destination storageunit
If the schedule is a relocation schedule, a Final destination volume pool must beindicated. (A relocation schedule is created as part of a basic disk staging storage unitconfiguration.) A Final destination volume pool is the volume pool where images areswept from the volume pool on the basic disk staging storage unit.
See “About staging backups” on page 589.
Note: The relocation schedule that was created for the basic disk staging storage unitis not listed under Schedules in the NetBackup Administration Console when thePolicies utility is selected.
Final destination volumepool
If the schedule is a relocation schedule, a Final destination media owner must beindicated. (A relocation schedule is created as part of a basic disk staging storage unitconfiguration.) A Final destinationmedia owner is the media owner where the imagesreside after a relocation job copies them.
Specify one of the following:
■ Any lets NetBackup choose the media owner. NetBackup chooses a media serveror a server group (if one is configured).
■ None specifies that the media server that writes the image to the media owns themedia. No media server is specified explicitly, but you want a media server to ownthe media.
■ A server group. A server group allows only those servers in the group to write tothe media on which backup images for this policy are written. All server groups thatare configured in the NetBackup environment appear in the Final destinationmedia owner drop-down list.
Final destination mediaowner
600Staging backupsDisk Staging Schedule dialog box

Table 12-3 The Attributes tab settings (continued)
DescriptionAttribute
An alternate read server is a server allowed to read a backup image originally writtenby a different media server.
The path to the disk or directory must be identical for each media server that is toaccess the disk.
If the backup image is on tape, the media servers must share the same tape library orthe operator must find the media.
If the backup image is on a robot that is not shared or a standalone drive, the mediamust be moved to the new location. An administrator must move the media, inventorythe media in the new robot, and execute bpmedia -oldserver -newserver orassign a failover media server.
To avoid sending data over the network during duplication, specify an alternate readserver that meets the following conditions:
■ Connected to the storage device that contains the original backups (the sourcevolumes).
■ Connected to the storage device that contains the final destination storage units.
If the final destination storage unit is not connected to the alternate read server, datais sent over the network.
Use alternate read server
Initiating a relocation schedule manuallyA relocation schedule may be started manually to copy images to the final destinationbefore the schedule is due to run.
To initiate a relocation schedule
1 In theNetBackup Administration Console, selectNetBackupManagement> Storage > Storage Units.
2 In the right pane, select a basic disk staging storage unit.
3 Select Actions > Manual Relocation or Manual Relocation to FinalDestination to initiate the schedule.
If the relocation schedule finds data that can be copied, NetBackup creates ajob to copy the data to the final destination storage unit.
The image then exists on both storage units until the disk staging (Stage I)storage unit becomes full and the oldest images are deleted.
See “Maintaining available disk space on disk storage units” on page 571.
601Staging backupsInitiating a relocation schedule manually

Configuring storage unitgroups
This chapter includes the following topics:
■ About storage unit groups
■ Creating storage unit groups for backups
■ Creating storage unit groups for snapshots
■ Deleting a storage unit group
■ Storage unit selection criteria within a group
■ About disk spanning within storage unit groups
About storage unit groupsStorage unit groups let you identify specific storage units as a group. You canspecify a storage unit group name as the storage for a policy in the same way thatyou specify individual storage units. When you specify a storage unit group, thepolicy directs backups or snapshots only to those storage units in the designatedgroup.
Storage unit groups can be one of the following types:
■ Backup storage unit groupsA backup storage unit group contains only the storage units that can containbackups. Furthermore, for Media Server Deduplication Pool and third-partydisk appliance (OpenStorage) storage, all storage units in the group must be ofthe same type of storage.See “Creating storage unit groups for backups” on page 603.
13Chapter

■ Snapshot storage unit groupsA snapshot storage unit group contains only the storage units that can containsnapshots. All storage units in the group must have the sameDisk type selected.See “Creating storage unit groups for snapshots” on page 605.
NetBackup does not support storage unit groups for the following use cases:
■ As a target for optimized duplication.If you use a storage unit group as a destination for optimized duplication ofdeduplicated data, NetBackup uses regular duplication.
■ As a source of or a target for Auto Image Replication.
■ As a target for optimized synthetic backups.If NetBackup cannot produce the optimized synthetic backup, NetBackup createsthe more data-movement intensive synthetic backup.
■ As a target for OpenStorage direct-to-tape operations.See the NetBackup OpenStorage Solutions Guide for Disk.
Creating storage unit groups for backupsThe following procedure describes how to create a storage unit group that consistsof the storage units that can contain backups.
To create a storage unit group
1 In theNetBackupAdministrationConsole, expandNetBackupManagement> Storage.
2 Right-click Storage Unit Groups and select New Storage Unit Group.
3 Enter a storage unit group name for the new storage unit group. The storageunit group name is case-sensitive.
See “NetBackup naming conventions” on page 1112.
4 For the storage unit group to contain backups, selectBackup in the drop-downmenu.
5 Add backup storage units to or remove backup storage units from the group:
■ To add storage units to the group, select the storage units from the Storageunits not in the group list and click Add.
■ To remove storage units from the group, select the storage units from theStorage units in group list and click Remove.
■ To change the priority of a storage unit, select the storage unit and clickMove Up or Move Down. The units at the top of the list have the highestpriority in the group.
603Configuring storage unit groupsCreating storage unit groups for backups

Note: For Media Server Deduplication Pool and third-party disk appliance(OpenStorage) storage, all storage units in the group must be of the same typeof storage.
6 Choose how storage units are selected within the group:
■ Prioritized. Choose the first storage unit in the list that is not busy, down,or out of media.
■ Failover. Choose the first storage unit in the list that is not down or out ofmedia.Veritas recommends that you select Failover for the following storage types:AdvancedDisk, Media Server Deduplication Pool, and OpenStorage(VendorName).
■ Round Robin. Choose the least recently selected storage unit in the list.
■ Media server load balancing. Choose a storage unit based on acapacity-managed approach.Veritas recommends the Media server load balancing criteria for diskstaging storage units within a storage unit group.See “Media server load balancing” on page 608.
See “Storage unit selection criteria within a group” on page 607.
One exception to the selection criteria is in the case of a client that is also amedia server with locally connected storage units.
See “Exception to the storage unit selection criteria” on page 611.
7 Click OK.
See “About storage unit groups” on page 602.
604Configuring storage unit groupsCreating storage unit groups for backups

Figure 13-1 Backup storage unit group configuration dialog box
Creating storage unit groups for snapshotsCreating storage unit groups is optional. A snapshot storage unit group must becomprised of storage units that have matching properties.
The following procedure describes how to create a storage unit group that consistsof the storage units that can contain snapshots.
To create a snapshot storage unit group
1 In theNetBackupAdministrationConsole, expandNetBackupManagement> Storage.
2 Right-click Storage Unit Groups and select New Storage Unit Group.
3 Enter a storage unit group name for the new storage unit group. The storageunit group name is case-sensitive.
See “NetBackup naming conventions” on page 1112.
4 For the storage unit group to contain snapshots, select Snapshot in thedrop-down menu.
5 A storage unit group can contain only those storage units that share similarproperties. NetBackup filters the storage units for selection so that dissimilarstorage units are not combined in one storage unit group.
605Configuring storage unit groupsCreating storage unit groups for snapshots

Note: The properties of the underlying storage units are read-only. You cannotchange the storage unit properties from this dialog box.
Select one or more properties to filter the storage units in the list. Only thosestorage units that have the selected properties are displayed. For example,selectReplication source andReplication target to display only those storageunits that are configured to act as both replication sources and replicationtargets.
Filter the storage units on the following properties:
■ PrimaryEnable Primary to display the storage units that can contain the initialsnapshot of primary data.
■ Replication sourceEnable Replication source to display the storage units that can serve asa source for a replicated snapshot.
■ Replication targetEnable Replication target to display the storage units that can receivereplicated snapshots from a replication source.
■ MirrorOptionally, enable Mirror to display the storage units that can serve asa mirrored replication target. (For example, NetApp SnapMirror.)
■ IndependentOptionally, enable Independent to display the storage units that canact as either a Mirror replication target (SnapMirror) or a non-mirrorreplication target (SnapVault).
For more information about snapshot properties, see the NetBackup ReplicationDirector Solutions Guide.
6 Add or remove storage units from the group:
■ To add storage units to the group, select the storage units from theAvailable storage units list and click Add.
■ To remove storage units from the group, select the storage units from theStorage units to be used in the group list and click Remove.
■ To change the priority of a storage unit, select the storage unit and clickMove Up or Move Down. The units at the top of the list have the highestpriority in the group.
7 Click OK to save and close the dialog box.
606Configuring storage unit groupsCreating storage unit groups for snapshots

Figure 13-2 Snapshot storage unit group configuration dialog box
Deleting a storage unit groupThe following procedure describes how to delete a storage unit group.
To delete a storage unit group
1 In theNetBackup Administration Console, selectNetBackupManagement> Storage > Storage Unit Groups.
2 In the right pane, from the list of storage unit groups, select the storage unitgroup you want to delete. Hold down theControl or Shift key to select multiplestorage units.
3 Select Edit > Delete.
4 Click OK.
Storage unit selection criteria within a groupThe storage unit selection criteria determines the order in which storage units areselected within a storage unit group.
The only difference between the selection criteria options is the order in which thestorage units are selected.
Choose from one of the following selection criteria.
607Configuring storage unit groupsDeleting a storage unit group

DescriptionSelection
If the Prioritized option is selected, NetBackup chooses thenext available storage unit in the list. Prioritized is the defaultselection.
If a storage unit is unavailable, NetBackup examines the nextstorage unit until it finds one that is available.
Prioritized
If the Failover option is selected, when a job must queue fora storage unit, the job queues rather than try another storageunit in the group.
Failover
If the Round robin option is selected, NetBackup choosesthe least recently selected storage unit in the list as each newjob is started.
If a storage unit is unavailable, NetBackup examines the nextstorage unit until it finds one that is available.
Round robin
If the Media server load balancing option is selected,NetBackup selects a storage unit based on acapacity-managed approach. In this way, NetBackup avoidssending jobs to busy media servers.
If a storage unit is unavailable, NetBackup examines the nextstorage unit until it finds one that is available.
See “Media server load balancing” on page 608.
Media server load balancing
A queue can form for a storage unit if the storage unit is unavailable.
The following are some reasons why a storage unit can be considered unavailable:
■ The storage unit is busy.
■ The storage unit is down.
■ The storage unit is out of media.
■ The storage unit has no available space.
■ The storage unit has reached the Maximum concurrent jobs setting.See “Maximum concurrent jobs storage unit setting” on page 578.
See “Exception to the storage unit selection criteria” on page 611.
Media server load balancingTheMedia server load balancing option indicates that NetBackup select a storageunit based on a capacity-managed approach. In this way, NetBackup avoids sendingjobs to busy media servers.
608Configuring storage unit groupsStorage unit selection criteria within a group

If a storage unit is unavailable, NetBackup examines the next storage unit until itfinds one that is available.
The selection is based on the following factors:
■ The rank of the media server.NetBackup considers the number of processes that are running on each CPUalong with the memory thresholds on each server to determine the rank of amedia server. If the free memory drops below a determined threshold, or if thenumber of running processes per CPU rises over a determined threshold, thenthe overall rank of the media server drops.
■ The number of jobs on the media server.NetBackup considers the number of scheduled jobs on each media server.
■ Whether the media server has enough disk space to accommodate the estimatedsize of the image. (Physical and virtual tapes ignore this requirement.)NetBackup estimates the size of any of the new or any current jobs on eachmedia server. It then determines whether the jobs fit on a given volume.NetBackup estimates the amount of space that the job may require, based onprevious backup history. If no history is available, the high water mark for thestorage unit serves as a guide.
Media server load balancing cannot be selected for a storage unit group thatincludes a BasicDisk storage unit. Also, a BasicDisk storage unit cannot be includedin an existing storage unit group with Media server load balancing enabled.
Note: Veritas recommends that you select Media server load balancing for diskstaging storage units within a storage unit group.
See “Other load balancing methods” on page 609.
Other load balancing methodsUsing theMedia server load balancing option to balance the storage load requiresa license.
The following methods to distribute the backup workload do not require additionallicenses:
609Configuring storage unit groupsStorage unit selection criteria within a group

■ Change the Limit jobs per policy policy attribute for one or more of thepolicies that are sent to a media server. Specifying a lower limit reducesthe workload on a media server on a specific network segment.See “Limit jobs per policy (policy attribute)” on page 706.
■ Reconfigure policies or schedules to use storage units on other mediaservers.
■ Consider changing theBandwidth host properties on one or more clients.See “Storage unit selection criteria within a group” on page 607.
Adjust the backup load on a mediaserver.
Reconfigure policy schedules so that they write backups to storage units onthe media servers that can handle the load (assuming that master serversand media servers are on separate hosts).
Distribute the backup load on mediaservers during peak periods.
Change the Maximum jobs per client global attribute. For example, raisingthe Maximum jobs per client limit increases the number of concurrent jobsthat any one client can process and therefore increases the load.
See “Storage unit selection criteria within a group” on page 607.
Adjust the backup load on the client.
Increase the number of jobs that clients can perform concurrently, or usemultiplexing. Another possibility is to increase the number of jobs that themedia server can perform concurrently for the policies that back up theclients.
Reduce the time needed to back upclients.
Increase the Limit jobs per policy attribute for the preferred policy relativeto other policies. Or, increase the priority for the policy.
See “Limit jobs per policy (policy attribute)” on page 706.
Give preference to a policy.
Increase the Limit jobs per policy andMaximum jobs per client for policiesand clients in a faster network. Decrease these numbers for slower networks.Another solution is to use the NetBackup capability to limit bandwidth.
See “Limit jobs per policy (policy attribute)” on page 706.
See “Storage unit selection criteria within a group” on page 607.
Adjust the load between fast and slownetworks.
Use multiplexing. Allow as many concurrent jobs per storage unit, policy,and client as possible without causing server, client, or network performanceproblems.
Maximize the use of devices.
■ Place some drives in a down state or limit the number that are usedconcurrently in a specific storage unit. For example, if there are four drivesin a robot, allow only two to be used concurrently.
■ Do not place all devices under Media Manager control.
Prevent backups from monopolizing tapedevices.
610Configuring storage unit groupsStorage unit selection criteria within a group

Exception to the storage unit selection criteriaThe only exception to the storage unit selection criteria order is in the case of aclient that is also a media server with locally connected storage units. The locallyavailable storage units take precedence over the defined sequence of storage unitsin the group.
You may have set up a storage unit to be On demand only. If the unit is in a storageunit group that a policy requires, the On demand only option is satisfied and thedevice is used.
See “On demand only storage unit setting” on page 583.
See “Storage unit selection criteria within a group” on page 607.
About disk spanning within storage unit groupsA backup may span storage units if a disk full condition is detected. Backups canspan from one BasicDisk storage unit to another BasicDisk storage unit if the storageunits are in the same storage unit group. The storage units must also share thesame media server.
See “Storage unit selection criteria within a group” on page 607.
611Configuring storage unit groupsAbout disk spanning within storage unit groups

Configuring storage lifecyclepolicies (SLPs)
■ Chapter 14. Configuring storage lifecycle policies
■ Chapter 15. Storage operations
■ Chapter 16. Retention types for SLP operations
■ Chapter 17. Storage lifecycle policy options
■ Chapter 18. Using a storage lifecycle policy to create multiple copies
■ Chapter 19. Storage lifecycle policy versions
4Section

Configuring storagelifecycle policies
This chapter includes the following topics:
■ About storage lifecycle policies
■ Creating a storage lifecycle policy
■ Deleting a storage lifecycle policy
■ Lifecycle operation administration using the nbstlutil command
About storage lifecycle policiesA storage lifecycle policy (SLP) is a storage plan for a set of backups. An SLP isconfigured within the Storage Lifecycle Policies utility.
An SLP contains instructions in the form of storage operations, to be applied to thedata that is backed up by a backup policy. Operations are added to the SLP thatdetermine how the data is stored, copied, replicated, and retained. NetBackupretries the copies as necessary to ensure that all copies are created.
SLPs offer the opportunity for users to assign a classification to the data at thepolicy level. A data classification represents a set of backup requirements, whichmakes it easier to configure backups for data with different requirements. Forexample, email data and financial data.
SLPs can be set up to provide staged backup behavior. They simplify datamanagement by applying a prescribed behavior to all the backup images that areincluded in the SLP. This process allows the NetBackup administrator to leveragethe advantages of disk-based backups in the near term. It also preserves theadvantages of tape-based backups for long-term storage.
14Chapter

TheSLPParameters properties in theNetBackupAdministration Console allowadministrators to customize how SLPs are maintained and how SLP jobs run.
See “SLP Parameters properties” on page 248.
Best-practice information about SLPs appears in the following document:
http://www.veritas.com/docs/TECH208536
Creating a storage lifecycle policyA storage lifecycle policy (SLP) is a storage plan for a set of backups. The operationsin an SLP are the backup instructions for the data. Use the following procedure tocreate an SLP that contains multiple storage operations.
To add a storage operation to a storage lifecycle policy
1 In theNetBackup Administration Console, selectNetBackupManagement> Storage > Storage Lifecycle Policies.
2 Click Actions > New > New Storage Lifecycle Policy (Windows) or Actions> New > Storage Lifecycle Policy (UNIX).
3 In the New Storage Lifecycle Policy dialog box, enter a Storage lifecyclepolicy name.
See “NetBackup naming conventions” on page 1112.
614Configuring storage lifecycle policiesCreating a storage lifecycle policy

4 Add one or more operations to the SLP. The operations are the instructionsfor the SLP to follow and apply to the data that is specified in the backup policy.
If this is the first operation added to the SLP, click Add.
If this is not the first operation in the SLP, add an operation that is eitherhierarchical or non-hierarchical:
To create a hierarchical operation, select an operation to become the sourceof the next operation. Click Add. The new operation is a child of the selectedoperation. The child is indented under the parent operation.
To create a non-hierarchical operation, do not select an operation. Anon-hierarchical operation means that the operation does not have a parentand child relationship with another operation. The new operation is not indented.
5 In the Properties tab of the New Storage Operation dialog box, select anOperation type. If you're creating a child operation, the SLP displays onlythose operations that are valid based on the parent operation that you'veselected.
The name of the operation reflects its purpose in the SLP:
■ BackupSee “Backup operation in an SLP” on page 621.
■ Backup From SnapshotSee “Backup From Snapshot operation in an SLP” on page 623.
■ DuplicationSee “Duplication operation in an SLP” on page 625.
■ ImportSee “Import operation in an SLP” on page 627.
615Configuring storage lifecycle policiesCreating a storage lifecycle policy

■ Index From SnapshotSee “Index From Snapshot operation in an SLP” on page 629.
■ ReplicationSee “Replication operation in an SLP” on page 632.See “About NetBackup Auto Image Replication” on page 992.
■ SnapshotSee “Snapshot operation in an SLP” on page 635.See “About NetBackup Replication Director” on page 1032.
6 Configure the properties for the operation.
See “Properties tab of the Storage Operation dialog box” on page 656.
7 The Window tab displays for the following operation types: Backup FromSnapshot, Duplication, Import, Index From Snapshot, and Replication. Ifyou'd like to control when the secondary operation runs, create a window forthe operation.
See “Window tab of the Storage Operation dialog box” on page 660.
8 Click the Advanced button in the Properties tab to display options about howthe window should behave if the window closes and a secondary operation isnot yet complete.
9 Click OK to create the operation.
10 Add additional operations to the SLP as needed. (See step 4.)
11 Change the hierarchy of the operations in the SLP if necessary.
See “Modifying the hierarchy of operations in a storage lifecycle policy”on page 617.
12 ClickOK to create the SLP. NetBackup validates the SLP when it is first createdand whenever it is changed.
See “Storage lifecycle policy validation dialog box” on page 664.
See “Storage lifecycle policy Validation Report tab” on page 665.
13 Configure a backup policy and select a storage lifecycle policy as the Policystorage.
See “Creating a backup policy” on page 686.
See “Policy storage (policy attribute)” on page 698.
616Configuring storage lifecycle policiesCreating a storage lifecycle policy

Modifying the hierarchy of operations in a storage lifecycle policyIn some cases, the hierarchy of operations in an SLP can be modified. Use thearrows to move it in the hierarchy.
Note: The order of the operations at the time that the SLP is saved may differ fromthe next time the SLP is opened. NetBackup reorders the operations while it storesthem in the catalog configuration file. How the hierarchy works is not changed,however, and the parent-child relationships are preserved.
Modify the order of the operation in the operation list if needed.
■ Click the arrows to move the operation into the new position.
■ Up arrowSwaps the position of the selected operation with the sibling above it, if oneexists.Using the up arrow does not change the source of the selected operation. Theup arrow also moves the children of an operation and preserves their relationshipwith the selected operation.The up arrow is disabled if no sibling appears above the selected operation.
■ Down arrowSwaps the position of the selected operation with the sibling below it, if oneexists.Using the down arrow does not change the source of the selected operation.The down arrow also moves the children of an operation and preserves theirrelationship with the selected operation.The down is disabled if no sibling appears below the selected operation.
■ Right arrowMoves the operation right in the hierarchy, making the sibling above the operationthe source for the operation.If no sibling exists above the operation in the hierarchy, the right arrow isdisabled. It is always disabled for Backup and Snapshot operations.Moving the operation to the right does not change the position number of theoperation in the list.The right arrow also moves the children of the operation and preserves theirrelationship with the selected operation.
■ Left arrowMoves the operation to the left in the hierarchy, turning the parent into a sibling.The left arrow is enabled for some operations. For the left arrow to be enabled,the selected operation must be either the first or last in a list of siblings.
617Configuring storage lifecycle policiesCreating a storage lifecycle policy

If the operation is the first sibling of a parent, click the left arrow to make it intoa sibling of its parent.Note that the left arrow also moves the children along with the selected operationto preserve the relationship with the operation.The left arrow is disabled for Backup and Snapshot operations.
Deleting a storage lifecycle policyTo delete a storage lifecycle policy, use the following procedure. Note that to deletean SLP deletes all versions of the SLP.
To delete a storage lifecycle policy
1 Remove the SLP from all backup policies to prevent new backup jobs fromwriting to the SLP.
2 Wait for all in-process backup jobs to the SLP to complete, or cancel the jobsusing the Activity Monitor or the command line.
3 To prevent new jobs or cancel any existing duplication jobs from writing to theSLP, run the following command:
nbstlutil cancel -lifecycle name
4 Use the Activity Monitor to cancel in-process jobs that use the SLP.
5 Once all of the operations are complete, delete the SLP using one of thefollowing methods:
■ The NetBackup Administration Console
■ Expand Storage > Storage Lifecycle Policies.
■ Select the SLP name.
■ Select Edit > Delete.
■ In the Delete Storage Lifecycle Policies dialog box, select the SLPname and click OK.
■ The nbstl commandnbstl storage_lifecycle_name -delete
If the administrator tries to delete an SLP with active images, status code 1519appears (Images are in process). Wait several minutes and try to delete theSLP again until the error no longer appears.
618Configuring storage lifecycle policiesDeleting a storage lifecycle policy

Note: If orphaned images are detected due to a system error, NetBackup logsthe fact that the images exist and alerts the administrator to address thesituation.
Lifecycle operation administration using thenbstlutil command
The NetBackup storage lifecycle policy utility command (nbstlutil) givesadministrators the ability to intervene between pending SLP operations. Specifically,the nbstlutil command can be used to cancel, inactivate, or activate theprocessing of existing SLP-managed images.
nbstlutil cannot affect the jobs that are currently running or queued. Use theActivity Monitor to intervene in the jobs that are running or queued.
Table 14-1 nbstlutil details
Detailsnbstlutil information
The command is found in the following location:
On Windows:
install_path\NetBackup\bin\admincmd\nbstlutil
On UNIX:
/usr/openv/netbackup/bin/admincmd/nbstlutil
Where to find
Use nbstlutil to perform the following administrative actions:
■ List the status of SLP-managed images. The EMM table that tracks the status ofSLP-processed images can be printed. Support may request this information totroubleshoot an SLP problem.
■ Cancel pending duplication operations on the selected images or image copies.When a duplication is canceled, NetBackup considers the image or image copy tobe SLP complete. It does not attempt to create any more copies of the backupimage.
■ Deactivate (suspend) pending and future SLP operations on selected images orimage copies. NetBackup retains the image information so that processing can beresumed by the administrator at a later time.
■ Activate (resume) suspended SLP operations on selected images or image copies.
See the NetBackup Commands Reference Guide for a description of all the optionsavailable for nbstlutil.
How to use
619Configuring storage lifecycle policiesLifecycle operation administration using the nbstlutil command

Table 14-1 nbstlutil details (continued)
Detailsnbstlutil information
NetBackup starts a duplication session every five minutes to copy data from a backupoperation for a duplication operation. Five minutes is the default frequency of the Imageprocessing interval parameter in the SLP Parameters host properties. parameter.)
If the copy fails, the next three duplication sessions retry the copy. If the copy fails allthree times, the copy is retried every two hours until it succeeds. Two hours is thedefault frequency of the Extended image retry interval parameter in the SLPParameters host properties.
Use the nbstlutil command in the case of a hardware problem that may requiremore than 15 minutes to resolve. That is, the problem may take longer to resolve thanthree duplication sessions five minutes apart.
For example, a duplication job fails because the library has a hard failure. It may takelonger than two hours to repair the library. The administrator may not want duplicationjobs to begin every two hours. Use the nbstlutil command to inactivate the SLPwhile the library is repaired. When ready, the SLP can be activated and duplicationjobs can begin.
Note: Once the job is reactivated, the administrator may want to temporarily changethe Extended image retry interval parameter to one hour to begin duplication jobssooner.
When to use
620Configuring storage lifecycle policiesLifecycle operation administration using the nbstlutil command

Storage operationsThis chapter includes the following topics:
■ Operation types in a storage lifecycle policy
■ Backup operation in an SLP
■ Backup From Snapshot operation in an SLP
■ Duplication operation in an SLP
■ Import operation in an SLP
■ Index From Snapshot operation in an SLP
■ Replication operation in an SLP
■ Snapshot operation in an SLP
■ Creating a hierarchy of storage operations in a storage lifecycle policy
Operation types in a storage lifecycle policyThe Operation selections are the instructions in the storage lifecycle policy. Thefollowing topics describe the purpose of each operation.
Backup operation in an SLPUse the Backup operation in a storage lifecycle policy to create a backup. AllBackup operations in a single storage lifecycle policy must be on the same mediaserver.
A Backup operation creates a tar-formatted image. To create a snapshot image,select a Snapshot operation.
15Chapter

Figure 15-1 Backup operation in the New Storage Operation dialog box
Table 15-1 Backup operation characteristics
DescriptionCharacteristic
The selection must be a backup storage unit or a backup storage unitgroup (see the following note).
The selection cannot be a snapshot storage unit or a snapshot storageunit group.
Note: If creating an SLP for Auto Image Replication, do not select astorage unit group. Auto Image Replication does not support replicatingfrom a storage unit group. That is, the source copy cannot be in a storageunit group.
See “About NetBackup Auto Image Replication” on page 992.
Storage unitselection
A Backup operation cannot serve as the child of any other operation.Therefore, do not click on any other operation in the SLP when addinga Backup operation.
See “Creating a storage lifecycle policy” on page 614.
Child of
A Backup operation can be the source of a Duplication operation. (SeeFigure 15-2.)
Source for
If a Backup operation appears in an SLP, it must be the first operation.
An SLP can contain a maximum of four Backup operations.
Hierarchy notes
622Storage operationsBackup operation in an SLP

Table 15-1 Backup operation characteristics (continued)
DescriptionCharacteristic
A Backup operation generates a Backup job in the Activity Monitor.Job type
Backup operations do not offer the option to create an SLP window.
See “Window tab of the Storage Operation dialog box” on page 660.
Window
Figure 15-2 SLP that contains a Backup operation
Backupstorage unit
Duplication
tar-formatted
Backupstorage unit
tar-formatted
Backup operationDuplicationoperation
Backup From Snapshot operation in an SLPUse the Backup From Snapshot operation to create a tar-formatted copy of thesnapshot. The new copy is a backup copy. The process is sometimes referred toas a snapdupe job.
623Storage operationsBackup From Snapshot operation in an SLP

Figure 15-3 Backup From Snapshot operation in the New Storage Operationdialog box
Table 15-2 Backup From Snapshot operation characteristics
DescriptionCharacteristic
The selection must be a backup storage unit or a backup storage unitgroup.
The selection cannot be a snapshot storage unit or a snapshot storageunit group.
Storage unitselection
A Backup From Snapshot operation must use a Snapshot operationas its source.
Therefore, click on the Snapshot operation in the SLP when adding aBackup From Snapshot operation.
See “Creating a storage lifecycle policy” on page 614.
Child of
ABackup FromSnapshot operation can be the source for aDuplicationoperation. (See Figure 15-4.)
Source for
An SLP may contain more than one Backup From Snapshot operation.If the firstBackup From Snapshot operation fails with an unrecoverableerror, NetBackup does not attempt the second one.
Note: The SLP may contain only oneBackup FromSnapshot operationif the SLP is used by an NDMP policy (or a Standard or MS-Windowspolicy with NDMP Data Mover enabled).
Hierarchy notes
624Storage operationsBackup From Snapshot operation in an SLP

Table 15-2 Backup From Snapshot operation characteristics (continued)
DescriptionCharacteristic
A Backup From Snapshot operation generates a Backup job in theActivity Monitor.
The Backup job that results from the Backup From Snapshot operationis under the control of the SLP Manager. If an SLP window is configured,the Backup job runs during the configured SLP window. If no SLP windowis configured, the Backup job can run at any time; possibly outside of thebackup window as configured in the backup policy. Users may experiencea slight degradation in performance on the client or the client storagedevice while NetBackup accesses the snapshot.
Job type
An SLP window can be created for aBackup FromSnapshot operation.
See “Window tab of the Storage Operation dialog box” on page 660.
Window
Figure 15-4 SLP that contains a Backup From Snapshot operation
Backupstorage unit
Duplication
Backupstorage unit
Backup
Snapshot
Snapshotstorage unit
Primary/Replication
source
Snapshotoperation
Backup From Snapshotoperation
Duplicationoperation
tar-formatted tar-formatted
Duplication operation in an SLPUse the Duplication operation to create a copy of a Backup, a Backup fromSnapshot, or anotherDuplication operation. A media server performs the operationand writes the copy.
Note: Use the Replication operation to create a copy of a Snapshot operation.
See “Replication operation in an SLP” on page 632.
625Storage operationsDuplication operation in an SLP
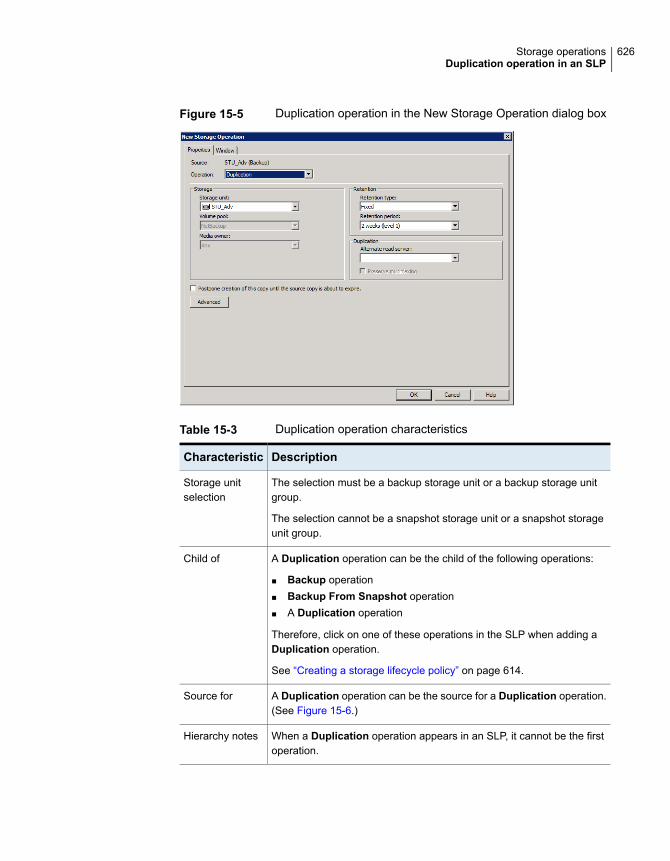
Figure 15-5 Duplication operation in the New Storage Operation dialog box
Table 15-3 Duplication operation characteristics
DescriptionCharacteristic
The selection must be a backup storage unit or a backup storage unitgroup.
The selection cannot be a snapshot storage unit or a snapshot storageunit group.
Storage unitselection
A Duplication operation can be the child of the following operations:
■ Backup operation■ Backup From Snapshot operation■ A Duplication operation
Therefore, click on one of these operations in the SLP when adding aDuplication operation.
See “Creating a storage lifecycle policy” on page 614.
Child of
A Duplication operation can be the source for a Duplication operation.(See Figure 15-6.)
Source for
When a Duplication operation appears in an SLP, it cannot be the firstoperation.
Hierarchy notes
626Storage operationsDuplication operation in an SLP

Table 15-3 Duplication operation characteristics (continued)
DescriptionCharacteristic
A Duplication operation generates a Duplication job in the ActivityMonitor.
Job type
An SLP window can be created for a Duplication operation.
See “Window tab of the Storage Operation dialog box” on page 660.
Window
Figure 15-6 SLP that contains one Backup operation and two Duplicationoperations
Backupstorage unit
Duplication
Backupstorage unit
Duplication
Backupstorage unit
Backup operation
tar-formatted tar-formatted tar-formatted
Duplicationoperation
Duplicationoperation
Import operation in an SLPUse the Import operation as part of Auto Image Replication. An Import operationin an SLP indicates that the SLP is to automatically import images into the targetmaster domain. An SLP that contains an Import operation is referred to as anImport SLP.
627Storage operationsImport operation in an SLP

Figure 15-7 Import operation in the New Storage Operation dialog box
Table 15-4 Import operation characteristics
DescriptionCharacteristic
An Import operation can import only from a backup storage unit or abackup storage unit group. It cannot import from a snapshot storage unitor a snapshot storage unit group.
Storage unitselection
An Import operation cannot serve as the child of any other operation.Therefore, do not click on any other operation in the SLP when addinga Import operation.
See “Creating a storage lifecycle policy” on page 614.
Child of
An Import operation can be the source of a Duplication operation.
At least one operation in the SLP must use the Target retention retentiontype.
Source for
If an SLP contains an Import operation, it must be the first in theoperations list and the only Import operation.
Hierarchy notes
An Import operation generates an Import job in the Activity Monitor.Job type
An SLP window can be created for an Import operation.
See “Window tab of the Storage Operation dialog box” on page 660.
Window
628Storage operationsImport operation in an SLP

TheOverride job priority option can be selected. It allows administrators to specifya job priority for any import jobs which use this SLP.
Index From Snapshot operation in an SLPThe Index From Snapshot operation indexes the contents of existing snapshots.When NetBackup indexes a snapshot, it creates an image .f file in the NetBackupcatalog for each snapshot. The presence of an image .f file assists the user whena file needs to be restored from the snapshot, as described in Table 15-5.
The Backup From Snapshot operation also creates an image .f file. An IndexfromSnapshotmay not be required if aBackup FromSnapshot occurs frequentlyenough for the restore needs in your environment. For example, if the BackupFrom Snapshot runs once per week but file restores are required daily, considerusing the Index from Snapshot.
The actual restore of the snapshot requires that the snapshot be mounted, regardlessof whether an Index from Snapshot has been performed or not.
Table 15-5 Restore operations
RequirementsDescriptionWhere performedType of restore
No .f file needs to be present inthe NetBackup catalog.
During a live browse restore,NetBackup automatically mountsthe snapshot so that the user cansee what files it contains. Mountingand unmounting the snapshot canbe time-consuming.
The user navigates the directorystructure to locate and select thefiles for restore.
■ NetBackupBackup, Archive,and Restoreinterface
■ NetBackupOpsCenterConsole
Live browse restore
The .f file must be present in theNetBackup catalog.
■ The user can search for filesbased on partial file name.Knowing the name of the clientor of the policy that created thebackup is not necessary.
■ Offers several filters to narrowsearch.
■ Search results display all therecovery points available to theuser for both backups andsnapshots.
NetBackup OpsCenterConsole
Search for restore
(Also referred to as aSimplified File Restoreor an OperationalRestore)
629Storage operationsIndex From Snapshot operation in an SLP
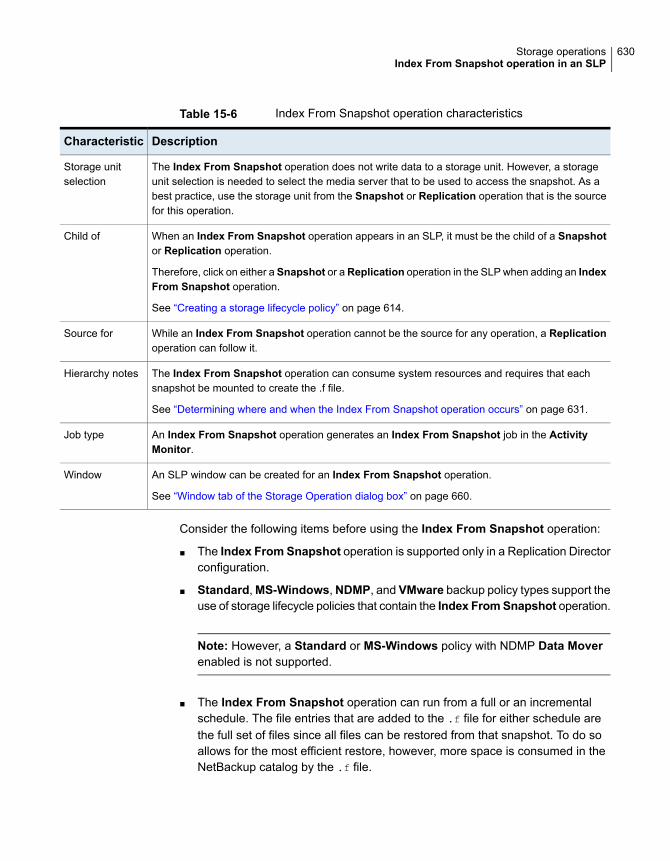
Table 15-6 Index From Snapshot operation characteristics
DescriptionCharacteristic
The Index From Snapshot operation does not write data to a storage unit. However, a storageunit selection is needed to select the media server that to be used to access the snapshot. As abest practice, use the storage unit from the Snapshot or Replication operation that is the sourcefor this operation.
Storage unitselection
When an Index From Snapshot operation appears in an SLP, it must be the child of a Snapshotor Replication operation.
Therefore, click on either a Snapshot or aReplication operation in the SLP when adding an IndexFrom Snapshot operation.
See “Creating a storage lifecycle policy” on page 614.
Child of
While an Index From Snapshot operation cannot be the source for any operation, a Replicationoperation can follow it.
Source for
The Index From Snapshot operation can consume system resources and requires that eachsnapshot be mounted to create the .f file.
See “Determining where and when the Index From Snapshot operation occurs” on page 631.
Hierarchy notes
An Index From Snapshot operation generates an Index From Snapshot job in the ActivityMonitor.
Job type
An SLP window can be created for an Index From Snapshot operation.
See “Window tab of the Storage Operation dialog box” on page 660.
Window
Consider the following items before using the Index From Snapshot operation:
■ The Index From Snapshot operation is supported only in a Replication Directorconfiguration.
■ Standard,MS-Windows,NDMP, and VMware backup policy types support theuse of storage lifecycle policies that contain the Index FromSnapshot operation.
Note: However, a Standard or MS-Windows policy with NDMP Data Moverenabled is not supported.
■ The Index From Snapshot operation can run from a full or an incrementalschedule. The file entries that are added to the .f file for either schedule arethe full set of files since all files can be restored from that snapshot. To do soallows for the most efficient restore, however, more space is consumed in theNetBackup catalog by the .f file.
630Storage operationsIndex From Snapshot operation in an SLP

Determining where and when the Index From Snapshot operationoccurs
Including the Index From Snapshot operation requires some consideration as theoperation can consume system resources and require additional time to perform.For example, to perform the operation can require that a snapshot be mounted orthat NetBackup gather content details from the file system to populate the catalog.
To help mitigate the extra resource and time that the operation may take, the systemadministrator can control when and where the Index From Snapshot operationruns:
■ Use the storage lifecycle policy Window tab to schedule when the Index FromSnapshot operation can run. Schedule the operation to run when it is least likelyto interfere with other jobs.See “Window tab of the Storage Operation dialog box” on page 660.
■ Use the following points to determine where to position the Index FromSnapshot operation in the SLP operations list:
■ Each NetBackup environment needs to determine where the operation worksbest in a specific SLP. To place the Index From Snapshot operation tooearly (toward the top of the operations list), may consume time when therestore capabilities are not needed. To place the operation toward the endof the operations list may cause the administrator to delay a restore untilearlier snapshots or replications complete.
■ Use the Index From Snapshot operation in an SLP only once. A restorecan be performed from any snapshot after one image .f file is created.
■ Any operations list that includes a Backup From Snapshot operation doesnot need an Index FromSnapshot operation. TheBackup FromSnapshotoperation creates an image .f file. The only exception is if the index isneeded for restores before the Backup From Snapshot operation occurs.
■ An Index From Snapshot operation cannot have any dependents. An SLPcannot validate an Index FromSnapshot operation with children. Figure 15-8shows an SLP with a valid configuration.Figure 15-9 is also a valid configuration. A Replication operation followsthe Index FromSnapshot operation, but it is not indented. TheReplicationoperation is a child of the Snapshot operation, not a child of the Index FromSnapshot operation.To add a Replication operation after an Index From Snapshot operation,click on the Snapshot operation, and then click Add.
631Storage operationsIndex From Snapshot operation in an SLP

Figure 15-8 Example 1 of a valid placement of the Index From Snapshotoperation
Figure 15-9 Example 2 of a valid placement of the Index From Snapshotoperation
Replication operation in an SLPUse the Replication operation for the following types of replication:
■ NetBackup Replication Director to replicate a snapshot, as shown inFigure 15-10.See “About NetBackup Replication Director” on page 1032.
■ NetBackup Auto Image Replication to replicate a backup, as shown inFigure 15-11.See “About the storage lifecycle policies required for Auto Image Replication”on page 1006.
632Storage operationsReplication operation in an SLP

Table 15-7 Replication operation characteristics
DescriptionCharacteristic
Under Destination storage attributes:
■ For Replication Director, select the Storage that is configured tocontain replicated snapshots.
■ For Auto Image Replication, choose to either:■ Replicate the backup to storage servers in all target NetBackup
domains.■ Replicate the backup to a specific master server in a specific
domain. This type of Auto Image Replication is known asTargeted A.I.R.
Storage unitselection
Click on the appropriate operation when adding aReplication operation.
A Replication operation can be the child of any of the followingoperations:
■ Snapshot operation for NetBackup Replication Director to replicatea snapshot.
■ Another Replication operation.■ Backup operation for NetBackup Auto Image Replication.
See “Creating a storage lifecycle policy” on page 614.
Child of
A Replication operation can be the source for the following operations:
■ Replication■ Backup From Snapshot
See “Backup From Snapshot operation in an SLP” on page 623.
Source for
A Replication operation generates a Replication job in the ActivityMonitor.
Job type
An SLP window can be created for a Replication operation.
See “Window tab of the Storage Operation dialog box” on page 660.
Window
633Storage operationsReplication operation in an SLP

Figure 15-10 Replication operation following a Snapshot operation
Figure 15-11 Replication operation following a Backup operation
634Storage operationsReplication operation in an SLP

Snapshot operation in an SLPA Snapshot operation creates a point-in-time, read-only, disk-based copy of data.NetBackup provides several types of snapshots, depending on the device wherethe snapshot occurs.
Use a Snapshot operation as the first operation in a storage lifecycle policy for aNetBackup Replication Director configuration.
Figure 15-12 Snapshot operation in the New Storage Operation dialog box
635Storage operationsSnapshot operation in an SLP

Table 15-8 Snapshot operation characteristics
DescriptionCharacteristic
The following topics describe the types of snapshot storage units thatcan be used as the storage for a snapshot operation:
■ See “Primary snapshot storage unit” on page 639.■ See “Primary + Replication source snapshot storage unit” on page 639.■ See “Replication source + Replication target snapshot storage unit”
on page 640.■ See “Replication target snapshot storage unit” on page 640.■ See “Replication source + Replication target + Mirror snapshot storage
unit” on page 641.■ See “Replication source + Replication target + Mirror snapshot storage
unit” on page 641.
A Storage unit selection is necessary in the following situations:
■ If the Snapshot is to be used by a subsequentReplication operation.The storage unit that is specified for the Snapshot operation mustbe a snapshot-capable storage unit that represents the primarystorage.
■ If the SLP contains only one operation and that is a Snapshotoperation, specify a storage unit. NetBackup uses that storage unitto determine which media server to use to launch the snapshot job.
If neither situation applies to the SLP, the administrator may select Nostorage unit or may simply make no selection. NetBackup uses thestorage unit that is selected for the Backup From Snapshot operation.
Storage unitselection
A Snapshot operation cannot serve as the child of any other operation.Therefore, do not click on any other operation in the SLP when addinga Snapshot operation.
See “Creating a storage lifecycle policy” on page 614.
Child of
A Snapshot operation can be the source for the following operations:
■ Backup From Snapshot■ Index From Snapshot■ Replication operation
Source for
If a Snapshot operation appears in an SLP, it must be first in theoperations list.
Hierarchy notes
ASnapshot operation generates aSnapshot job in theActivity Monitor.Job type
Snapshot operations do not offer the option to create an SLP window.
See “Window tab of the Storage Operation dialog box” on page 660.
Window
636Storage operationsSnapshot operation in an SLP

See “About configuring storage lifecycle policies for snapshots and snapshotreplication” on page 637.
About configuring storage lifecycle policies for snapshots andsnapshot replication
A storage lifecycle policy (SLP) contains instructions in the form of storageoperations, to be applied to the data. Operations are added to the SLP that determinehow the data is stored and copied or replicated. For example, the NetBackupadministrator creates an operation that determines where the data exists as asnapshot, as a replication, or as a duplication. The administrator also determinesthe retention of the data at each storage unit or storage unit group.
Storage operations that are defined in the SLP use storage units that representdisk pools. An SLP that is configured for snapshots or snapshot replication mustcontain a specific, hierarchical combination of operations.
The following figure represents an SLP for a replication scenario. In the example,the following operations are used:
■ A Snapshot operation creates a snapshot.
■ A Replication operation replicates the snapshot to another volume.
■ A Backup From Snapshot operation creates a tar-formatted backup from thesnapshot.
■ A Duplication operation copies the backup to tape.
Table 15-9 describes the four types of operations that are required in this examplereplication scenario.
Backupstorage unit
Duplication
Backupstorage unit
BackupReplication Replicationtarget
Snapshot
Primary/Replication
sourceSnapshot
Snapshotstorage unit
Snapshotstorage unit
Snapshotoperation
Replicationoperation
Backup From Snapshotoperation
Duplicationoperation
tar-formattedtar-formatted
637Storage operationsSnapshot operation in an SLP

Table 15-9 Example of a storage lifecycle policy configured for snapshotsand snapshot replication
DescriptionOperationOperationorder in SLP
Operation 1 creates a snapshot in the primary storage. The snapshot serves as thesource for the other operations in the SLP.
■ The operation must be a Snapshot operation.■ The storage must be a snapshot storage unit that has the following properties
set: Primary and Replication source.
Note: Only one operation to a Primary storage unit is permitted in an SLP.
Snapshot1
Operation 2 replicates the snapshot that the first operation created.
■ The operation must be a Replication operation and it must be the replicationpartner to the source storage unit.
■ The retention type determines what replication method is used. For example, ifretention type Fixed or Expire after copy is selected for a NetApp storagesystem, the SnapVault replication method is used.
■ The storage must be a snapshot storage unit that has the Replication targetproperty set. Since no other replica is created from this operation in this example,it does not need to have the Replication source property set.
Replication2
(Child to
operation 1)
Operation 3 creates a tar-formatted backup copy of the snapshot.
■ The operation must be a Backup From Snapshot operation. This operationcreates a backup image from the snapshot.
■ The storage must be a backup storage unit.
BackupFromSnapshot
3
(Child to
operation 2)
Operation 4 makes a duplicate copy from the tar-formatted backup copy. In thisexample, the copy is duplicated to tape media.
■ The operation must be a Duplication operation. This operation creates a backupcopy of the tar-formatted image.
■ The storage must be a backup storage unit.
Duplication4
(Child to
operation 3)
After the SLP is configured for different operations, the NetBackup administratorconfigures a backup policy that points to the snapshot SLP.
The SLP Parameters host properties in the NetBackup Administration Consoleallow administrators to customize how SLPs are maintained and how SLP jobs run.
See “SLP Parameters properties” on page 248.
Best-practice information about SLPs appears in the following document:
http://www.veritas.com/docs/TECH208536
638Storage operationsSnapshot operation in an SLP

Primary snapshot storage unitA snapshot operation can use a Primary snapshot storage unit. That is, the storageunit represents a disk pool that contains the volumes that have only the Primaryproperty set.
Figure 15-13 shows an SLP that contains one primary-only Snapshot operation,one Backup From Snapshot operation, and one Duplication operation. TheBackup From Snapshot operation is used to create a backup from the snapshoton the primary-only Snapshot operation. After the backup is created, it is duplicatedto a Duplication operation.
Figure 15-13 SLP that contains a Snapshot operation, a Backup FromSnapshot operation, and a Duplication operation
Backupstorage unit
Duplication
Backupstorage unit
BackupPrimary
Snapshot
Snapshotstorage unit
Snapshotoperation
Backup FromSnapshot operation
Duplicationoperation
tar-formattedtar-formatted
Primary + Replication source snapshot storage unitAn SLP operation can use a Primary + Replication source snapshot storage unit.That is, the storage unit represents a disk pool that contains volumes that haveboth the Primary property and the Replication source property set.
Figure 15-14 shows an SLP that contains aPrimary +Replication source snapshotstorage unit as one operation and one Replication target snapshot storage unitas another operation. The Primary +Replication source storage unit can replicateto the Replication target storage unit.
639Storage operationsSnapshot operation in an SLP

Figure 15-14 SLP that contains a Snapshot operation and a Replicationoperation
Replicationoperation
Replication Replicationtarget
Snapshot
Snapshotoperation
Primary/Replication
sourceSnapshot
Snapshotstorage unit
Snapshotstorage unit
Replication source + Replication target snapshot storage unitAn SLP operation can use a snapshot storage unit that represents a disk pool thatcontains volumes that have the following properties: Replication source andReplication target.
A snapshot storage unit with these properties can serve as both the Replicationsource for another operation in the SLP, and as the Replication target for anotheroperation in the SLP.
Figure 15-15 SLP that contains a Snapshot operation and two Replicationoperations
Replicationoperation
Snapshot
Snapshotoperation
Primary/Replication
sourceSnapshot
Snapshotstorage unit
Snapshotstorage unit
Replicationoperation
Replication Replicationtarget
Snapshot
Snapshotstorage unit
Replicationtarget/
Replicationsource
Replication
Replication target snapshot storage unitAn SLP operation can use a snapshot storage unit that represents a disk pool thatcontains volumes that have only the Replication target property set.
640Storage operationsSnapshot operation in an SLP

An operation with this property can serve only as a Replication target for anotheroperation in the SLP. It cannot serve as source for a replica, but it can serve as thesource for a Duplication operation.
Figure 15-16 SLP that contains a Snapshot operation, a Replication operation,a Backup From Snapshot operation, and a Duplication operation
Replication Replicationtarget
Snapshot
Primary/Replication
sourceSnapshot
Snapshotstorage unit
Snapshotstorage unit
Backupstorage unit
Duplication
Backupstorage unit
Backup
Snapshotoperation
Replicationoperation
Backup FromSnapshot operation
Duplicationoperation
tar-formatted tar-formatted
Replication source + Replication target + Mirror snapshot storageunit
An SLP can use a snapshot storage unit that represents a disk pool that containsvolumes that have the following properties:Replication source,Replication target,and Mirror.
An operation with these properties can serve as both:
■ A Replication source in a cascading configuration.
■ A mirrored Replication target in a cascading configuration. A mirroredReplication target must have a forced Mirror retention type.
Replication target + Mirror snapshot storage unitAn SLP can use a snapshot storage unit that represented a disk pool that containsvolumes that have the following properties: Replication target and Mirror.
A mirrored Replication target must have a forced Mirror retention type.
Creating a hierarchy of storage operations in astorage lifecycle policy
The list of operations in the storage lifecycle policy acts as a list of instructions toNetBackup about the data that the SLP protects. In some cases, one operation
641Storage operationsCreating a hierarchy of storage operations in a storage lifecycle policy

depends on another operation. For example, a snapshot may serve as the sourcefor a replication. Or, a backup may serve as the source of a duplication.
The operation hierarchy in the Storage Lifecycle Policy dialog box represents aparent and child relationship.
Figure 15-17 is an example of how the operation list uses indentation to indicatethe relationship between a parent operation and a child operation.
Figure 15-17 Hierarchical storage operations in an SLP
One copy can be the source for many other copies. Figure 15-18 shows how afterthe first copy is created, all subsequent copies can be made locally from that source,without tying up network resources.
Figure 15-18 Hierarchical operations
Data domain 1Data domain 2
Duplication operations
Snapshotoperation Backup from
Snapshotoperation
642Storage operationsCreating a hierarchy of storage operations in a storage lifecycle policy

Changing the location of an operation in the hierarchy changes the storage unitthat serves as the source for the subsequent copies. Changing the hierarchy cannotchange the operation type. (For example, change a backup operation into aduplication operation.)
643Storage operationsCreating a hierarchy of storage operations in a storage lifecycle policy

Retention types for SLPoperations
This chapter includes the following topics:
■ Retention types for storage lifecycle policy operations
■ Capacity managed retention type for SLP operations
■ Expire after copy retention type for SLP operations
■ Fixed retention type for SLP operations
■ Maximum snapshot limit retention type for SLP operations
■ Mirror retention type for SLP operations
■ Target retention type for SLP operations
Retention types for storage lifecycle policyoperations
The Retention type for an operation in a storage lifecycle policy determines howlong the data is kept on that storage media.
Table 16-1 describes which retention types are valid selections for the variousoperations.
16Chapter

Table 16-1 Operation and retention type configurations
Duplicationoperation
Backup FromSnapshotoperation
Replicationoperation
Snapshotoperation
Backupoperation
Retentiontype
ValidValidValidValidValidFixed
ValidValidValidValidValidExpire aftercopy
InvalidInvalidInvalidValid; SLPhonors the policysetting.
InvalidMaximumSnapshot limit
Valid for snapshotstorage only
InvalidValid forsnapshot storageonly
InvalidInvalidMirror
Valid if the firstoperation in the SLPis an Import.
InvalidValid if the firstoperation in theSLP is an Importand if the storageis of the backuptype.
InvalidInvalidTarget retention
Valid; AdvancedDiskdefault; set on thestorage server.
InvalidInvalidInvalidValid;AdvancedDiskdefault; set onthe storageserver.
Capacitymanaged
Note:Retention is not associated with the Index FromSnapshot operation becausethe operation does not create any copy.
Mixing retention typesVeritas does not recommend allowing capacity-managed images and fixed-retentionimages to be written to the same volume in a disk storage unit. The volume mayfill with fixed-retention images and not allow the space management logic to operateas expected.
Keep in mind the following points when configuring SLP operations or selecting thestorage location for a policy:
■ All SLPs that write to a volume in a disk storage unit should write images of thesame retention type: fixed or capacity-managed.
645Retention types for SLP operationsRetention types for storage lifecycle policy operations

■ Do not write images both to a volume in a disk storage unit within an SLP andto the same volume (by the storage unit) directly from a policy.
■ Mark all disk storage units that are used with SLPs as On demand only.
■ Check any storage unit groups to make sure that fixed and capacity-managedimages cannot be written to the same volume in a disk storage unit.
Capacity managed retention type for SLPoperations
A Capacity managed operation means that NetBackup automatically managesthe space on the storage, based on the High water mark setting for each volume.Capacity managed is not available to tape storage units since tape capacity isconsidered to be infinite.
The High water mark and Low water mark settings on the disk storage unit ordisk pool determine how the space is managed.
See “High water mark storage unit setting” on page 576.
See “Low water mark storage unit setting” on page 577.
An image copy with a Capacity Managed retention is not eligible for expirationuntil its dependent copies have been created.
If space is needed for new images, NetBackup removes expired backup imagesfrom a capacity-managed disk volume in two passes, as follows:
NetBackup removes any backup images that are past the Desired cacheperiod setting. NetBackup removes images until the low water mark is reachedor all images that are past the Desired cache period are removed.
Pass one
Pass two processing is initiated if the outcome of the pass one processing isone of the following:
■ The disk pool remains over the high water mark.■ The number of volumes in the disk pool under the high water mark is less
than the number of media servers that access the disk pool.
NetBackup removes images until the low water mark is reached or all imagesthat are not past the Desired cache period are removed.
An image may be deleted if it has not been duplicated for all operations in astorage lifecycle policy. If the operating system time is past the date thatmatches the longest retention period for an image, the image is eligible fordeletion.
Pass two
646Retention types for SLP operationsCapacity managed retention type for SLP operations

To see exactly when the storage reaches the low water mark value is difficult. Abackup can occur at the same time as the expiration process occurs. After thebackup is complete, the low water mark may be slightly greater than its lowestpossible value.
The retention period for capacity managed storage is not assured as it is for a fixedretention period. The Desired cache period becomes a target that NetBackup triesto maintain. If the space is not required, the backup data could remain on the storagelonger than the Desired cache period indicates.
Rules and recommendations for using the Capacity Managedretention type
Use the following recommendations and rules when configuring storage operationsor when selecting the storage location for a policy:
■ Veritas does not recommend allowing Capacity Managed images and Fixedretention images to be written to the same volume in a disk storage unit. Thevolume may fill with fixed-retention images and not allow the space managementlogic to operate as expected.
■ All SLPs that write to a volume in a disk storage unit should write images of thesame retention type: Fixed or Capacity Managed.
■ Do not write images both to a volume in a disk storage unit within a storagelifecycle policy and to the same volume (by the storage unit) directly from apolicy.
■ Mark all disk storage units that are used with SLPs as On demand only.
■ Check any storage unit groups to make sure that fixed and capacity-managedimages cannot be written to the same volume in a disk storage unit.
Capacity managed retention type and disk types that support SISCapacity managed is selectable for any disk storage unit that is allowed in an SLP.However, for the disk types that support single-instance storage (SIS), Capacitymanaged functions to various degrees. In order forCapacity managed to operate,NetBackup must know how much space a backup image uses. With SIS enabledon the storage unit, NetBackup cannot know exactly how much space a particularbackup image occupies.
The following storage unit configurations use SIS:
■ Media Server Deduplication Pool storage units
■ Some OpenStorage storage units, depending on the vendor characteristics.
647Retention types for SLP operationsCapacity managed retention type for SLP operations

Expire after copy retention type for SLPoperations
The Expire after copy retention indicates that after all direct (child) copies of animage are successfully duplicated to other storage, the data on this storage isexpired. The last operation in the SLP cannot use the Expire after copy retentiontype because no subsequent copy is configured. Therefore, an operation with thisretention type must have a child.
Veritas recommends that you not enable Expire after copy retention for any storageunits that are to be used with SLPs with either of the following: Accelerator orsynthetic backups. The Expire after copy retention can cause images to expirewhile the backup runs. To synthesize a new full backup, the SLP backup needs theprevious backup image. If the previous image expires during the backup, the backupfails.
Note: Although synthetic backups do support the use of storage lifecycle policies,SLPs cannot be used for the multiple copy synthetic backups method.
See “Using the multiple copy synthetic backups method” on page 875.
If a policy is configured to use an SLP for the backup, the retention that is indicatedin the SLP is the value that is used. The Retention attribute in the schedule is notused.
An image copy with an Expire after copy retention is expired as soon as all of itsdirect child copies have been successfully created. Any mirrored children must alsobe eligible for expiration.
Fixed retention type for SLP operationsThe Fixed retention indicates that the data on the storage is retained for the specifiedlength of time, after which the backups or snapshots are expired.
An image copy with a Fixed retention is eligible for expiration when all of thefollowing criteria are met:
■ The Fixed retention period for the copy has expired.
■ All child copies have been created.
■ All child copies that are mirror copies are eligible for expiration.
The Fixed retention period is always marked from the original backup time of theimage. For example, if a tape device is down, causing a 2-day delay in creating aduplicate tape copy, the expiration time of the duplicate copy is not different due to
648Retention types for SLP operationsExpire after copy retention type for SLP operations

the 2-day delay. The expiration time of the duplicate copy is still x days from thetime that the original backup was completed. It does not matter when the copy wascreated.
Maximum snapshot limit retention type for SLPoperations
TheMaximum snapshot limit determines the maximum number of snapshots thatcan be stored for a particular policy and client pair.
When the maximum is reached, the next snapshot causes the oldest job-completesnapshot to be deleted. A snapshot job is considered to be complete once all of itsconfigured dependent copies are complete. (Dependent copies are created as aresult of Backup From Snapshot, Index From Snapshot, or Replicationoperations.) The practice is referred to as rotation. This retention type applies onlyto snapshots, and not to backups.
For example, Policy P1 contains two clients: C1 and C2. After the policy runs fourtimes, it creates four snapshot images for C1 and four images for C2. If theMaximum snapshot limit is set to four, when the policy runs for the fifth time,NetBackup deletes the first snapshot that was created for both C1 and C2 toaccommodate the fifth snapshot.
The Maximum Snapshots parameter in the Replication Director Options dialogbox determines the maximum number of snapshots. To access the dialog box, clickOptions in the backup policy.
649Retention types for SLP operationsMaximum snapshot limit retention type for SLP operations
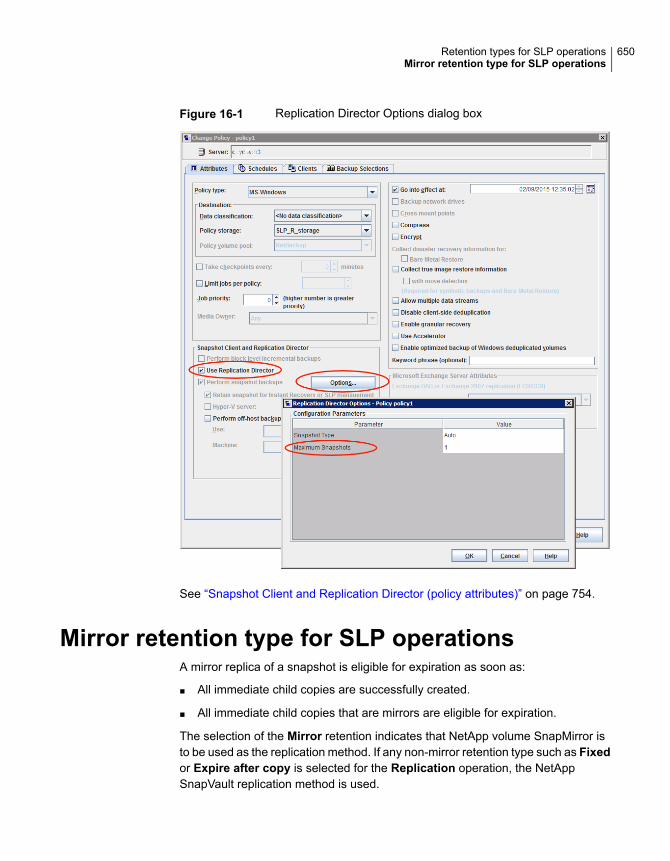
Figure 16-1 Replication Director Options dialog box
See “Snapshot Client and Replication Director (policy attributes)” on page 754.
Mirror retention type for SLP operationsA mirror replica of a snapshot is eligible for expiration as soon as:
■ All immediate child copies are successfully created.
■ All immediate child copies that are mirrors are eligible for expiration.
The selection of the Mirror retention indicates that NetApp volume SnapMirror isto be used as the replication method. If any non-mirror retention type such as Fixedor Expire after copy is selected for the Replication operation, the NetAppSnapVault replication method is used.
650Retention types for SLP operationsMirror retention type for SLP operations

In mirror replication, the replica copy is dependent on the existence of the source.(The source can be the original snapshot or another replica.) Therefore, the retentionof the replica depends on the retention of the source. If the source is deleted, themirror is automatically deleted.
In non-mirror replication, the replica is independent of the source and can have anindependent retention. If the source is deleted, the non-mirror replica is not affectedand can be used longer than the source. Or, if the replica is deleted first, it is notrecreated and the source can be kept longer than the replica.
Target retention type for SLP operationsThis setting is used in Auto Image Replication in an Import storage lifecycle policy.Every Import SLP must have at least one operation with a Target retention.
The Target retention is enforced at the target domain, but the actual retention forthe data is specified by the administrator at the source domain.
Target retention indicates that the data at the target master shall use the expirationdate that was imported with the image. The date is fixed because the copy musthave a fixed retention.
Similar to the Fixed retention, an image copy with a Target retention retention iseligible for expiration when all of the following criteria are met:
■ The Fixed retention period for the copy has expired.
■ All child copies have been created.
■ All child copies that are mirror copies are eligible for expiration.
See “About NetBackup Auto Image Replication” on page 992.
651Retention types for SLP operationsTarget retention type for SLP operations

Storage lifecycle policyoptions
This chapter includes the following topics:
■ Storage Lifecycle Policy dialog box settings
■ New or Change Storage Operation dialog box settings
■ Storage lifecycle policy validation dialog box
■ Storage lifecycle policy Validation Report tab
Storage Lifecycle Policy dialog box settingsTheNew Storage Lifecycle Policy dialog box and theChange Storage LifecyclePolicy dialog box contain the following settings.
17Chapter

Figure 17-1 Storage Lifecycle Policy tab
Table 17-1 Storage Lifecycle Policy tab
DescriptionSetting
The Storage lifecycle policy name describes the SLP. The name cannot be modified afterthe SLP is created.
Storage lifecyclepolicy name
653Storage lifecycle policy optionsStorage Lifecycle Policy dialog box settings

Table 17-1 Storage Lifecycle Policy tab (continued)
DescriptionSetting
The Data classification defines the level or classification of data that the SLP is allowedto process. The drop-down menu contains all of the defined classifications as well as theAny classification, which is unique to SLPs.
TheAny selection indicates to the SLP that it should preserve all images that are submitted,regardless of their data classification. It is available for SLP configuration only and is notavailable to configure a backup policy.
In an Auto Image Replication configuration where the master server domains run differentversions of NetBackup, see the following topic for special considerations:
See “About the storage lifecycle policies required for Auto Image Replication” on page 1006.
The Data classification is an optional setting.
One data classification can be assigned to each SLP and applies to all operations in theSLP.
If a data classification is selected (other than Any), the SLP stores only those images fromthe policies that are set up for that data classification. If no data classification is indicated,the SLP accepts images of any classification or no classification.
The Data classification setting allows the NetBackup administrator to classify data basedon relative importance. A classification represents a set of backup requirements. When datamust meet different backup requirements, consider assigning different classifications.
For example, email backup data can be assigned to the silver data classification and financialdata backup may be assigned to the platinum classification.
A backup policy associates backup data with a data classification. Policy data can be storedonly in an SLP with the same data classification.
Once data is backed up in an SLP, the data is managed according to the SLP configuration.The SLP defines what happens to the data from the initial backup until the last copy of theimage has expired.
Data classification
The Priority for secondary operations option is the priority that jobs from secondaryoperations have in relationship to all other jobs. The priority applies to the jobs that resultfrom all operations except for Backup and Snapshot operations. Range: 0 (default) to99999 (highest priority).
For example, you may want to set the Priority for secondary operations for a policy witha gold data classification higher than for a policy with a silver data classification.
The priority of the backup job is set in the backup policy on the Attributes tab.
See “Job priority (policy attribute)” on page 708.
Priority for secondaryoperations
654Storage lifecycle policy optionsStorage Lifecycle Policy dialog box settings

Table 17-1 Storage Lifecycle Policy tab (continued)
DescriptionSetting
Use the Add, Change, and Remove buttons to create a list of operations in the SLP. AnSLP must contain one or more operations. Multiple operations imply that multiple copiesare created.
See “About writing multiple copies using a storage lifecycle policy” on page 667.
The list also contains the columns that display information about each operation. Not allcolumns display by default.
For column descriptions, see the following topic:
See “New or Change Storage Operation dialog box settings” on page 656.
Operations
Use the arrows to indicate the indentation (or hierarchy) of the source for each copy. Onecopy can be the source for many other copies.
See “Creating a hierarchy of storage operations in a storage lifecycle policy” on page 641.
See “Modifying the hierarchy of operations in a storage lifecycle policy” on page 617.
Arrows
The Active and Postponed options appear under State of Secondary OperationProcessing and refer to the processing of all duplication operations in the SLP.
Note: The Active and Postponed options apply to duplication operations that createtar-formatted images. For example, those created with bpduplicate. The Active andPostponed options do not affect the images that are duplicated as a result of OpenStorageoptimized duplication, NDMP, or if one or more destination storage units are specified aspart of a storage unit group.
These options do not apply if either the source media server or the destination media serveris not at NetBackup 7.6 or later.
■ EnableActive to let secondary operations continue as soon as possible. When changedfrom Postponed to Active, NetBackup continues to process the images, picking upwhere it left off when secondary operations were made inactive.
■ Enable Postponed to postpone the secondary operations for the entire SLP. Postponeddoes not postpone the creation of duplication jobs, it postpones the creation of imagesinstead. The duplication jobs continue to be created, but they are not run until secondaryoperations are active again.All secondary operations in the SLP are inactive indefinitely unless the administratorselects Active or until the Until option is selected and an activation date is indicated.
Active
and
Postponed
Click this button to see how changes to this SLP can affect the policies that are associatedwith this SLP. The button generates a report that displays on the Validation Report tab.
This button performs the same validation as the -conflict option performs when usedwith the nbstl command.
See “Storage lifecycle policy Validation Report tab” on page 665.
Validate AcrossBackup Policies button
655Storage lifecycle policy optionsStorage Lifecycle Policy dialog box settings

New or Change Storage Operation dialog boxsettings
The Storage Operation dialog box contains two tabs:
■ Properties tabThe following topic describes the options in the Properties tab:See “Properties tab of the Storage Operation dialog box” on page 656.
■ Window tabCreate a window during which a secondary operation can run. The followingtopic describes the options in the Window tab:See “Window tab of the Storage Operation dialog box” on page 660.
Properties tab of the Storage Operation dialog boxTable 17-2 describes the options available to configure for the various operationsin a storage lifecycle policy. Not all options are available for each operation.
Table 17-2 Properties tab of the Storage Operation dialog box
DescriptionSetting
Indicates the storage unit that is the source for the operation.
The Source displays for the following operation types: Backup From Snapshot, Replication,Duplication, and Index From Snapshot.
Source
The Operation selection determines which options appear in the dialog box.
See “Operation types in a storage lifecycle policy” on page 621.
See “About writing multiple copies using a storage lifecycle policy” on page 667.
Operation
Select a Retention type from the following options:
■ See “Capacity managed retention type for SLP operations” on page 646.■ See “Expire after copy retention type for SLP operations” on page 648.■ See “Fixed retention type for SLP operations” on page 648.■ See “Maximum snapshot limit retention type for SLP operations” on page 649.■ See “Mirror retention type for SLP operations” on page 650.■ See “Target retention type for SLP operations” on page 651.
See “Retention types for storage lifecycle policy operations” on page 644.
Retention type
656Storage lifecycle policy optionsNew or Change Storage Operation dialog box settings

Table 17-2 Properties tab of the Storage Operation dialog box (continued)
DescriptionSetting
Specifies how long NetBackup retains the backup or copy. To set the retention period, select atime period (or level) from the list. When the retention period expires, NetBackup deletesinformation about the expired backup or copy. After expiration, the files are unavailable for restores.For example, if the retention is set to two weeks, data can be restored from a backup that thisschedule performs for two weeks after the backup.
See “Retention Periods properties” on page 228.
Retention period
Indicates that the copy of the image is to be created in a different master server domain. Thetarget master server manages the storage where the image is to be copied.
If Target master is selected for a Replication operation, the operation becomes an operationfor Auto Image Replication.
Target master
Indicate the storage unit to be used.
Select from the following storage units:
■ Media Manager storage units (tape)■ Disk storage units (no BasicDisk or disk staging storage units)■ Storage unit groups (may contain no BasicDisk or disk staging storage units). A storage
lifecycle policy can point to a storage unit group that contains a BasicDisk storage unit.However, NetBackup does not select BasicDisk storage units from a storage group for alifecycle policy.
Storage units or storage unit groups may appear in more than one storage lifecycle policy. Storageunits or storage unit groups may be used in a storage lifecycle policy while also being used asstandalone units.
Local storage
Indicate the storage unit to be used.
Select from the following storage units:
■ Media Manager storage units (tape)■ Disk storage units (no BasicDisk or disk staging storage units)■ Storage unit groups (may contain no BasicDisk or disk staging storage units). A storage
lifecycle policy can point to a storage unit group that contains a BasicDisk storage unit.However, NetBackup does not select BasicDisk storage units from a storage group for alifecycle policy.
■ No storage unitA storage unit selection is necessary if the snapshot is to be used by a subsequentReplicationoperation or if the SLP contains only one operation. If neither situation applies to the SLP,the administrator may select No storage unit or may simply make no selection.
Storage units or storage unit groups may appear in more than one lifecycle. Storage units orstorage unit groups may be used in a storage lifecycle while also being used as standalone units.
Storage unit
The Volume pool option is enabled for tape storage units or virtual tape libraries (VTL).Volume pool
657Storage lifecycle policy optionsNew or Change Storage Operation dialog box settings

Table 17-2 Properties tab of the Storage Operation dialog box (continued)
DescriptionSetting
A Media owner is a group of NetBackup servers that are used for a common purpose. Byspecifying a Media owner, you allow only those media servers to write to the media on whichbackup images for a policy are written.
Media owner
An Alternate read server specifies the name of the server that is allowed to read a backup imageoriginally written by a different media server. This option is available for Duplication operationsonly.
Alternate readserver
The Preserve Multiplexing option is available for the duplication operations that use tape mediaor virtual tape libraries (VTL). If the backup to be duplicated is multiplexed and you want thebackups to remain multiplexed, check Preserve Multiplexing.
To preserve multiplexing significantly improves performance of duplication jobs because iteliminates the need to request the write-side duplication media for every image.
Preservemultiplexing
The Override job priority option is available for an Import operation. The job priority that isindicated is the job priority for any import jobs which use this storage lifecycle policy.
Override jobpriority
Enable this option to defer the job until the source for the duplication is about to expire. Whenthis option is enabled, the job begins 4 hours before the source is to expire. This default can bechanged by changing the Deferred duplication offset time in the SLP Parameters hostproperties.
See “SLP Parameters properties” on page 248.
Postponecreation of thiscopy until thesource copy isabout to expire
658Storage lifecycle policy optionsNew or Change Storage Operation dialog box settings

Table 17-2 Properties tab of the Storage Operation dialog box (continued)
DescriptionSetting
If a window closes and the jobs for an SLP have not completed, NetBackup attempts to suspendthe images that are in progress. When the window reopens, NetBackup resumes those jobs atthe point they were when suspended.
Not all images can be suspended. The image must be the result of a duplication job where boththe source and target of the duplication resides on either an AdvancedDisk or Media Managerstorage unit.
In addition, the duplication job must meet the following conditions:
■ Both the source media server and the destination media server must have NetBackup 7.6 orlater installed.
■ The storage units must not be part of a storage unit group.■ The duplications were not created using optimized duplication, NDMP duplication, or
OpenStorage duplication.
See “Duplication operation in an SLP” on page 625.
Note: The closing of the window does not stop preliminary operations for some jobs. For example,NetBackup continues to extend the catalog for Exchange Granular Recovery after the windowcloses, but does not start duplications.
Images that result from all other operations (such as Replication operations), are not suspended.
Click the Advanced button to display the Window close preference options. The selectionsapply to the images that NetBackup does not suspend automatically.
Select what NetBackup should do if images are not completed by the time the window closesand if the images cannot be suspended:
■ Finish processing the active images.The window closes, but NetBackup continues to process the active images until they arefinished. NetBackup does not begin to process any other images until the window reopens.
■ Cancel the processing of the active images.The window closes and NetBackup immediately stops processing the active images. Whenthe window reopens, NetBackup begins to process the images where it left off.
Advanced buttonandWindowclosepreference options
659Storage lifecycle policy optionsNew or Change Storage Operation dialog box settings

Figure 17-2 Windows close preference selections for secondary operations
Window tab of the Storage Operation dialog boxThe Window tab appears for secondary operations in a storage lifecycle policy.
Creating a window for a secondary operation is optional. However, creating a windowcan better define when the job for the operation can run. In this way, the job froma secondary operation does not interfere with jobs of a higher priority, such asbackup jobs. Without a window defined, the job for an operation can run at anytime, on any day.
660Storage lifecycle policy optionsNew or Change Storage Operation dialog box settings

Figure 17-3 Window tab for secondary operations in a storage lifecycle policy
Table 17-3 Window tab of the Storage Operation dialog box
DescriptionSetting
You can either assign an existing window to the operation or create anew window for the operation.
To use an existing window, select this option and then select a windowfrom the drop-down menu.
Select from savedwindows
Select this option to create a new window for this operation to use.Create new
Enter a name for the new window.Window name
This option generates an Impact Report which lists the names of thestorage lifecycle policies that currently use the window. The ImpactReport also lists the operation that uses the window, and the sourceand the destination storage for the operation.
View ImpactReport option
661Storage lifecycle policy optionsNew or Change Storage Operation dialog box settings

Table 17-3 Window tab of the Storage Operation dialog box (continued)
DescriptionSetting
The Start Window grid is grayed out and cannot be modified if theDefault_24x7_Window is selected.
The Start Window grid is active if a saved window is selected or whena new window is created.
If the Start Window grid is changed for a saved window, click the ViewImpact Report option to display information about other operations inother SLPs that use the window.
See “Creating a new window for a storage lifecycle policy operation”on page 662.
Start Window tab
Use the Exclude Days tab to exclude specific dates from a window.
See “Excluding days from a window for a storage lifecycle policyoperation” on page 663.
Exclude Days tab
Creating a new window for a storage lifecycle policy operationTo create a new window for SLP operations
1 In the Window tab of the storage operation dialog box, enable Create new.
2 Select the Start Window tab.
3 The days of the week appear along the left side of the grid. The time of dayappears along the top of the grid in 24-hour time.
To change the increments available for selecting start times or end times,change the value in the Resolution field.
4 Indicate the opening and closing times of the window for each day. The followinglists several methods to do so:
■ Drag the cursor along the Start Window grid on each day you want thewindow to open and close.
■ Use the drop-down menus to select a Start day and an End day. Thenselect a Start time and an End time.
■ Use the drop-down menu to select a Start day and the Duration of thewindow for that day in hours and minutes. Adjust the Start time for yourenvironment.
To create multiple time windows:
■ First, create one window.
662Storage lifecycle policy optionsNew or Change Storage Operation dialog box settings

■ Click Duplicate.The window is duplicated to any days without existing schedules. Duplicationstops when it reaches a day that already contains a window.
■ On days that you do not want the time window to be open, select the windowand click Delete.
5 Use the buttons under the Start Window grid to do the following:
Adjust the Start time or End time.To change the start time orend time
Select a time window and click Delete.To delete a time window
Click Clear.To delete all the time windows
Click Undo.To erase the last action
6 Click OK to save the window and the operation.
Excluding days from a window for a storage lifecycle policy operationUse the Exclude Days tab to exclude specific days from a window. If a day isexcluded from a window, jobs do not run on that day. The tab displays a calendarof three consecutive months. Use the lists at the top of the calendar to change thefirst month or year displayed.
To exclude a day from the storage lifecycle policy window
1 In the Window tab, select the name of an existing window from the drop-downmenu.
2 Select the Exclude Days tab.
3 Use one or more methods to indicate the days to exclude:
■ Select the day(s) on the 3-month calendar that you want to exclude. Usethe drop-down lists at the top of the calendar to change the months or year.
■ To indicate Recurring Week Days:
■ Click Select All to select all of the days in every month for every year.
■ Click Deselect All to remove all existing selections.
■ Check a box in the matrix to select a specific day to exclude for everymonth.
■ Click the column head of a day of the week to exclude that day everymonth.
663Storage lifecycle policy optionsNew or Change Storage Operation dialog box settings

■ Click the 1st, 2nd, 3rd, 4th, or Last row label to exclude that week everymonth.
■ To indicate Recurring Days of the Month:
■ Click Select All to select all of the days in every month.
■ Click Deselect All to remove all existing selections.
■ Check a box in the matrix to select that day to exclude each month.
■ Click Last Day to exclude the last day of every month.
■ To indicate Specific Dates:
■ Click New. Enter the month, day, and year in the Date Selection dialogbox. Click OK.The date appears in the Specific Dates list.
■ To delete a date, select the date in the list. Click Delete.
4 Add additional dates as necessary, then click OK to save the window and theoperation.
Storage lifecycle policy validation dialog boxThe Storage Lifecycle Policy validation dialog box may appear if NetBackup cannotsave the SLP as configured because of problems with the operations in the SLP.The dialog box may also appear after the administrator clicks Validate AcrossBackup Policies, before the Validation Report tab displays.
The Storage Lifecycle Policy validation dialog box displays the errors that must becorrected before the SLP can be saved. For example, errors regarding the hierarchyof operations in the SLP or errors concerning the storage units that the operationsindicate.
The dialog box contains the following information about any validation errors:
The operation in the SLP that contains errors. The index number is theoperation's order in the SLP. For example, the second operation has anindex number of two.
Index
The type of operation where the error occurs in the SLP.Operation
The storage name that is indicated in the operation where the error occurs.Storage
The NetBackup status code. Use the NetBackup Troubleshooter or theNetBackup Status Codes Reference Guide to determine corrective actions.
See “Running the Troubleshooter” on page 58.
Error code
664Storage lifecycle policy optionsStorage lifecycle policy validation dialog box
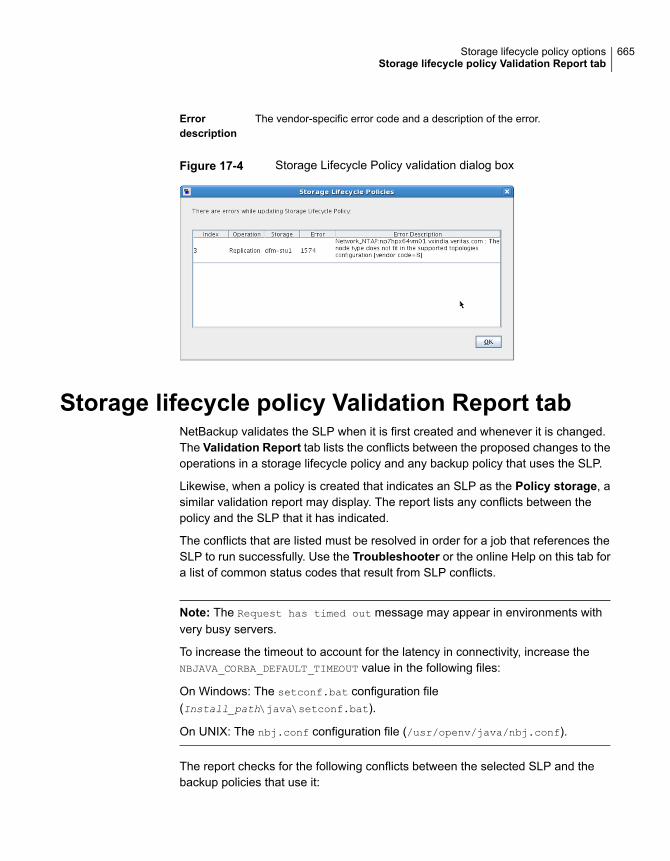
The vendor-specific error code and a description of the error.Errordescription
Figure 17-4 Storage Lifecycle Policy validation dialog box
Storage lifecycle policy Validation Report tabNetBackup validates the SLP when it is first created and whenever it is changed.The Validation Report tab lists the conflicts between the proposed changes to theoperations in a storage lifecycle policy and any backup policy that uses the SLP.
Likewise, when a policy is created that indicates an SLP as the Policy storage, asimilar validation report may display. The report lists any conflicts between thepolicy and the SLP that it has indicated.
The conflicts that are listed must be resolved in order for a job that references theSLP to run successfully. Use the Troubleshooter or the online Help on this tab fora list of common status codes that result from SLP conflicts.
Note: The Request has timed out message may appear in environments withvery busy servers.
To increase the timeout to account for the latency in connectivity, increase theNBJAVA_CORBA_DEFAULT_TIMEOUT value in the following files:
On Windows: The setconf.bat configuration file(Install_path\java\setconf.bat).
On UNIX: The nbj.conf configuration file (/usr/openv/java/nbj.conf).
The report checks for the following conflicts between the selected SLP and thebackup policies that use it:
665Storage lifecycle policy optionsStorage lifecycle policy Validation Report tab

■ The data classification in the storage lifecycle policy does not match that in thereferencing backup policies.
■ The SLP contains a Snapshot operation, but the referencing backup policiesdo not have Perform snapshot backups enabled.
■ The SLP does not contain a Snapshot operation, but the referencing backuppolicies have the Perform snapshot backups enabled.
■ The SLP contains a Snapshot operation, but the referencing backup policiescannot enable the Retain snapshots for Instant Recovery option.
■ The policy is of the NBU-Catalog backup type, but the SLP configuration doesnot indicate a CatalogBackup volume pool.
■ The policy is not of the NBU-Catalog backup type, but the SLP configurationindicates a CatalogBackup volume pool
To generate a validation report using the command line, run the following command:
nbstl SLP_name -impact
Figure 17-5 Validation Report tab of the Storage Lifecycle Policy dialog box
666Storage lifecycle policy optionsStorage lifecycle policy Validation Report tab

Using a storage lifecyclepolicy to create multiplecopies
This chapter includes the following topics:
■ About writing multiple copies using a storage lifecycle policy
■ How the order of the operations determines the copy order
■ About ensuring successful copies using lifecycles
About writing multiple copies using a storagelifecycle policy
A storage lifecycle policy can be used to create multiple copies of backups andsnapshots.
NetBackup permits only one method to create multiple copies to be in use at onetime. Use only one of the following methods:
■ Enable the Multiple copies option in a policy configuration.If a policy has the Multiple copies option enabled, the policy cannot select astorage lifecycle policy as the Policy storage.See “Multiple copies (schedule attribute)” on page 774.
■ Add multiple Backup operations or one or more Duplication or Replicationoperations to the operations list of the SLP.See “New or Change Storage Operation dialog box settings” on page 656.
The same criteria for creating copies applies to both methods.
18Chapter

The following topics are considerations when storage lifecycle policies are used tocreate multiple copies.
How the order of the operations determines thecopy order
The order in which the operations appear in a storage lifecycle policy determinesthe copy number.
For example, in Figure 18-1 a lifecycle is configured to create three copies:
■ Two copies as part of two different backup operations.
■ One copy as part of a duplication operation.
To make sure that copy 1 is written to disk, place the Backup operation that writesto a disk storage unit before the Backup operation that writes to a tape storageunit.
Figure 18-1 Operation order determines copy order
Copy 1 on disk
Copy 2 on tape
Copy 3 on disk
About ensuring successful copies using lifecyclesThe process to create copies as part of a storage lifecycle policy differs from theprocess to create copies as set up in a policy. The policy’s Configure MultipleCopies dialog box includes the option to Fail all copies. That option means thatif one copy fails, the remaining copies can be set to either continue or fail.
In an SLP, all copies must be completed. An SLP initially tries three times to createa copy. If no copy is created, NetBackup continues to try, but less frequently.
The successful completion of copies is important because an SLP does not allowa copy to be expired before all copy operations in the SLP are complete. NetBackupchanges the retention period of a copy to Infinity until all copies are created. Afterall copies are complete, the retention returns to the level as set in the policy.
To create successful copies, a Backup operation may be required to duplicate abackup onto the storage unit for another Backup operation.
668Using a storage lifecycle policy to create multiple copiesHow the order of the operations determines the copy order

Consider the following example: The operations list for an SLP contains twoBackupoperations to two storage units (BU_1, BU_2) and three Duplication operations.
The backup to BU_1 is successful, but the backup to BU_2 is unsuccessful.
To fulfill the backup on BU_2, NetBackup creates a duplication job from BU_1 toBU_2. The duplication job is in addition to the jobs that are run for the threeduplication operations.
Duplication jobs can be controlled by using the nbstlutil command.
See “Lifecycle operation administration using the nbstlutil command” on page 619.
669Using a storage lifecycle policy to create multiple copiesAbout ensuring successful copies using lifecycles

Storage lifecycle policyversions
This chapter includes the following topics:
■ About storage lifecycle policy versions
■ Storage lifecycle changes and versioning
■ When changes to storage lifecycle policies become effective
■ Deleting old storage lifecycle policy versions
About storage lifecycle policy versionsOnce a storage lifecycle policy is configured, it runs according to a singleconfiguration or definition. The definition affects the operations once they begin torun as well as the copies once the image is in process.
The ability to create SLP versions lets administrators safely modify a definitionwithout waiting until all of the copies that are associated with the SLP have beenprocessed. Each copy that an SLP manages is tagged with the SLP name and theSLP version number. These two attributes are written into the image header, in theNetBackup image catalog. Whenever an administrator creates or changes an SLP,NetBackup creates a new version (between 0 and n). New jobs use the most recentSLP version.
When a new job is submitted to the Activity Monitor, the job is tagged with the mostrecent SLP version number. The processing of a copy that is associated with aversion remains fixed according to that version of the SLP definition. It is fixed atjob time and does not change, unless the administrator uses the nbstl commandto modify an existing version.
19Chapter

An SLP version remains as long as there are any incomplete images that refer tothe version.
Storage lifecycle changes and versioningAdministrators can make changes to a storage lifecycle policy in one of the followingways:
■ Using the NetBackup Administration Console.Any change that an administrator makes to an SLP using the NetBackupAdministration Console creates a new SLP version. The new version is createdwhen the changes to the SLP are committed or saved. The NetBackupAdministration Console always displays the most recent version.
■ Using the nbstl command.If an administrator uses nbstl to change an SLP, nbstl creates a new versionby default.However, the nbstl command contains options to view different versions andto modify the definitions of existing SLP versions without creating a new version.The options are as follows:
Use to display all versions of an SLP definition. Withoutspecifying this option, only the most recent version isdisplayed by default.
-all_versions
Use to display a specific version.-version number
Use with most nbstl configuration options to make changesto the current SLP version without creating a new version.Knowing the current version number is not necessary if thisoption is used.
-modify_current
Use with most nbstl configuration options to make changesto a specific version without creating a new version.
-modify_version-version number
Use -modify_current or -modify_version to change any of the followingconfiguration options:
The duplication priority.-dp
The storage unit to be used for each operation.-residence
The volume pool for each operation.-pool
The server group for each operation.-server_group
671Storage lifecycle policy versionsStorage lifecycle changes and versioning

The retention level for each operation.-rl
The alternate read server for each operation.-as
The preserve multiplexing option for duplication copies.-mpx
Some fields require values for all of the operations in the SLP. Make sure that thenumber of values that are specified for the fields matches the existing operationcount.
For example, in an SLP that contains three operations, to change the value of one,a value must be given for all three operations. Note that the values for all threeoperations are replaced. To change the value for the second operation, provide theexisting values for the first and the third operations.
Some configuration options cannot be changed using -modify_current or-modify_version. To change any of the following options, you must create anentirely new SLP version:
The type of the operation.-uf
The retention type for the operation: Fixed, Capacitymanaged, or Expire after copy.
-managed
The source of an operation, used primarily in hierarchicalSLP configurations.
-source
The data classification of an existing version.-dc
The number of operations. You cannot add an operation orremove an operation from the SLP definitions.
See “Creating a storage lifecycle policy” on page 614.
You cannot instruct an SLP to follow the configuration of a previous version thathas been superseded. To revert to the behavior of a previous version, change thedefinition to match the earlier definition. The change creates a version with thesame content as the previous version, but with a new version number.
When changes to storage lifecycle policiesbecome effective
For the changes to become effective for a backlog of jobs, it may be necessary tocancel the applicable jobs.
672Storage lifecycle policy versionsWhen changes to storage lifecycle policies become effective

When the nbstl command is used to alter an existing storage lifecycle policyversion, those changes may not become effective immediately. The images thatare managed by the SLP version that was altered may already belong to a job thatis Active or Queued, as seen in the Activity Monitor. Once a job is queued, thecharacteristics (SLP attributes) are fixed for that job and subsequent changes tothe definition have no effect. To make changes effective for a backlog of jobs, cancelthe duplication jobs. The storage lifecycle policy manager creates and submits newduplication jobs for those images, using the changes to the configuration.
The following are conditions under which changes to an existing version are notimmediately effective:
■ Changes to a Backup operation have no effect because the backup job isalready underway or completed.
■ Changes to a Duplication operation do not affect the copies that previousduplication jobs created.
■ Changes to a Duplication operation do not affect the copies that have alreadybeen submitted and are currently represented by a duplication job in the ActivityMonitor, whether it be Active or Queued. If you want your changes to apply tothose active duplication jobs,cancel the applicable duplication jobs. Once thejob is canceled, nbstserv re-forms and re-submits new duplication jobs forthese copies, using the changes to the appropriate version of the SLP.
■ Changes to a Duplication operation affect the copies that have not yet beencreated and have not yet been submitted. (That is, they are not yet representedby a duplication job in the Activity Monitor). Your changes become effective forthe next duplication session. Whenever nbstserv begins a new session, itre-reads the definitions for processing instructions.
■ If a duplication job does not complete successfully, unfinished images in the jobare submitted as part of a new job. Changes to the version affect the resubmittedjob.
Deleting old storage lifecycle policy versionsWhen a version of a storage lifecycle policy is no longer the active (or most recent)version, the version is subject to deletion. NetBackup automatically deletes theinactive version after all the copies that refer to it have finished processing. Whenthe copies are complete, they are considered SLP-complete.
By default, NetBackup deletes an inactive SLP version after 14 days.
The following parameters in the SLP Parameters host properties apply to versiondeletion:
■ Cleanup interval (SLP.CLEANUP_SESSION_INTERVAL)
673Storage lifecycle policy versionsDeleting old storage lifecycle policy versions

■ Unused SLP definition version cleanup delay(SLP.VERSION_CLEANUP_DELAY)
See “SLP Parameters properties” on page 248.
674Storage lifecycle policy versionsDeleting old storage lifecycle policy versions

Configuring backups
■ Chapter 20. Creating backup policies
■ Chapter 21. Synthetic backups
■ Chapter 22. Protecting the NetBackup catalog
■ Chapter 23. About the NetBackup relational database
■ Chapter 24. Managing backup images
5Section

Creating backup policiesThis chapter includes the following topics:
■ About the Policies utility
■ Planning for policies
■ Creating a backup policy
■ Adding or changing schedules in a policy
■ Changing multiple policies at one time
■ Copying or moving policy items to another policy
■ Copying a policy to create a new policy
■ Copying a schedule into the same policy or different policy
■ Deleting schedules, backup selections, or clients from a policy
■ Policy Attributes tab
■ Schedules tab
■ Schedule Attributes tab
■ Start Window tab
■ Excluding days from a schedule
■ Include Dates tab
■ How NetBackup determines which schedule to run next
■ About schedule windows that span midnight
■ How open schedules affect calendar-based and frequency-based schedules
20Chapter

■ About the Clients tab
■ Backup Selections tab
■ VMware Policy tab
■ Hyper-V Policies tab
■ Disaster Recovery tab
■ Creating a Vault policy
■ Performing manual backups
■ Active Directory granular backups and recovery
About the Policies utilityBackup policies provide the instructions that NetBackup follows to back up clients.Use the Policies utility to provide the following instructions for a backup:
See “Policy Attributes tab” on page 693.What type of client to back up.
See “Policy Attributes tab” on page 693.Where to store the backup.
See “Schedules tab” on page 757.When and how frequently to perform thebackup.
See “About the Clients tab” on page 805.Which clients to back up.
See “Backup Selections tab” on page 810.Which client files and directories to back up.
Using the Policies utilityTo navigate in the Policies utility
1 In the NetBackup Administration Console, in the left pane, expandNetBackup Management > Policies.
2 To display the policy details of a singlepolicy:
In the center pane, select a policy name.The policy details display in the right pane.
In the center pane, double-click on thepolicy name. The Change Policy dialogbox opens.
To open a policy:
677Creating backup policiesAbout the Policies utility

In the center pane, click on the treeelement next to the policy name to expandthe policy configuration areas:
■ Attributes■ Schedules■ Clients■ Backup Selections
In the center pane, under a policy name,select one of the configuration areas to seea detailed view of that area.
To display specific configurationinformation:
In the center pane, click Summary of AllPolicies.
To display information about all policies onthe current master server:
Expand Summary of All Policies >Clients to display all of the clients that arein policies. Select multiple clients in theright pane. While the clients are selected,right-click and select Host Properties.
To simultaneously change the hostproperties of multiple clients fromSummary of All Policies:
Figure 20-1 Policies utility in the NetBackup Administration Console
1
2
3
5
6
4
7
Table 20-1 Policies utility in the NetBackup Administration Console
DescriptionNumber
The menu toolbar.1
678Creating backup policiesAbout the Policies utility

Table 20-1 Policies utility in the NetBackup Administration Console(continued)
DescriptionNumber
The standard NetBackup toolbar.
See “Standard and user toolbars” on page 53.
2
The name of the currently selected master server.3
Tree view in the left pane.4
The user toolbar is specific to the Policies utility.
See “Standard and user toolbars” on page 53.
5
Select a subnode from Summary of All Policies to display all possible nodeattributes in the right pane. For example, Schedules displays a list of allschedules.
6
Details pane.7
Planning for policiesPolicy configuration is flexible enough to meet the various needs of all the clientsin a NetBackup environment. To take advantage of this flexibility, take time to planbefore starting to configure the policies in the Policies utility.
The following table outlines the steps to take to ensure that you get optimal resultsfrom your policy configurations.
Table 20-2 Steps for planning policies
DescriptionActionStep
Gather the following information about each client:
■ The client name.■ The approximate number of files on each client to be backed up.■ The typical file size of the files.
One client may be a file server that contains a large amount of data whilethe other clients are workstations. To avoid long backup times, include thefile server in one policy and the workstations in another policy. It may bebeneficial to create more than one policy for the file server.
Gather client informationStep 1
679Creating backup policiesPlanning for policies

Table 20-2 Steps for planning policies (continued)
DescriptionActionStep
Divide the clients into groups according to the different backup and archiverequirements.
The groups can be based on the type of work that the clients perform. Clientsthat are used for similar tasks generally have similar backup requirements.For example, most clients in an engineering department create the sametypes of files at similar levels of importance. In some instances, create asingle policy for each group of clients. In other cases, subdivide the clientsand include them in the separate policies that are based on their backuprequirements.
A backup policy can apply to one or more clients. Every client must be in atleast one backup policy so that it can be backed up.
Group the clients based onbackup requirements
Step 2
The NetBackup environment may have some special storage requirementsthat the backup policies must accommodate.
The storage unit and volume pool settings apply to all the files that are backedup by a policy. If files have special storage requirements, create separatepolicies for the files, even if other factors are the same, such as schedules.
If it is necessary to keep backups for some files on separate media, createa policy that specifies a unique volume pool for those backups. Then, addthe media for that volume pool.
See “Windows example of one client in multiple policies” on page 681.
Consider the storagerequirements
Step 3
Create additional backup policies if the schedules in one policy do notaccommodate all clients and files.
Consider the following factors when deciding to create additional policies:
■ Best times for backups to occur.To back up different clients on different schedules may require additionalpolicies with different time schedules. For example, create differentpolicies for night-shift and day-shift clients.
■ How frequently the files change.If some files change more frequently than others, the difference may beenough to warrant creating another policy with a different backupfrequency.
■ How long backups need to be retained.Each schedule includes a retention setting that determines how longNetBackup keeps the files that are backed up by the schedule. Becausethe schedule backs up all the files in the backup selection list, all filesshould have similar retention requirements. Do not include the files whosefull backups must be retained forever, together in a policy where fullbackups are retained for only four weeks.
Consider the backupschedule
Step 4
680Creating backup policiesPlanning for policies

Table 20-2 Steps for planning policies (continued)
DescriptionActionStep
Create separate policies for the clients that require similar policy attributesettings.
See “Policy attributes that affect how clients are grouped in policies”on page 682.
Group clients by commonattributes
Step 5
Create separate policies as necessary to maximize the benefits of multiplexedbackups.
To maximize drive use, multiplex the slower clients that produce smallbackups. The higher-performance clients that produce long backups arelikely to use drives fully and not benefit from multiplexing.
See “Media multiplexing (schedule attribute)” on page 783.
Maximize multiplexedbackups
Step 6
Evaluate total backup times for each schedule and further subdivide policiesto reduce backup times to an acceptable level.
For example, if the backup of /usr, /h001, and /h002/projects on UNIXclient1 takes too much time, create a new policy for /h002/projects.
In addition to reducing the backup time for each policy, separate policiescan reduce the total backup time for the server. NetBackup processes fileswithin a backup selection list in the order they appear in the backup selectionlist. However, separate policies are processed in parallel if enough drivesare available and the Maximum jobs per client host property is set to allowit.
See “Global Attributes properties” on page 159.
The Multiplexing and Allow multiple data streams policy attributes alsoallow backup policies to be processed in parallel.
See “Allow multiple data streams (policy attribute)” on page 725.
Evaluate backup timesStep 7
See “About the Policies utility” on page 677.
See “Policy Attributes tab” on page 693.
Windows example of one client in multiple policiesThe following table shows that the files in two different subdirectories on one clientcan be stored in two different locations.
■ Policy1 sends backups of E:\h002\projects to 8mm storage.
■ Policy2 sends backups of E:\h002\DevExp and E:\h002\DesDoc to DLT storage.
681Creating backup policiesPlanning for policies

Table 20-3 One client in multiple policies
StorageFilesClientPolicies
8mmC:\D:\UserD:\h001E:\h002\Projects
client1Policy1
DLTE:\h002\DevExpE:\h002\DesDoc
client1
client1
Policy2
Policy attributes that affect how clients are grouped in policiesThe following table lists the attributes that may determine which clients are groupedin the same policy.
Table 20-4 Policy attributes that affect how clients are grouped in policies
DescriptionAttribute
Each client must be in a policy of the correct policy type. For example, Windows clients mustbe in a policy of a MS-Windows policy type.
See “Policy type (policy attribute)” on page 694.
Policy Type
All of the data that the policy generates is sent to the same destination that is indicated inthe policy. The data must share the same Data Classification, Policy storage, and Policyvolume pool.
See “Data classifications (policy attribute)” on page 697.
See “Policy storage (policy attribute)” on page 698.
See “Policy volume pool (policy attribute)” on page 701.
Destination
This attribute determines the priority for the backups of all of the clients in the policy.
See “Job priority (policy attribute)” on page 708.
Job Priority
Select this attribute if a UNIX client has NFS mounted files to be backed up. Consider placingthese clients in a separate policy so problems with NFS do not affect the other clients.
See “Follow NFS (policy attribute)” on page 710.
Follow NFS
This attribute lets NetBackup cross file system boundaries for all clients in the policy.
See “Cross mount points (policy attribute)” on page 713.
Cross mount points
682Creating backup policiesPlanning for policies

Table 20-4 Policy attributes that affect how clients are grouped in policies(continued)
DescriptionAttribute
This attribute lets NetBackup back up the files that all clients in the policy store on networkdrives. (Applies only to the MS-Windows policy type.)
See “Backup Network Drives (policy attribute)” on page 711.
Backup NetworkDrives
This attribute indicates that all clients in the policy are to compress their backups before theysend them to the server. Note that the time to compress can increase backup time and makeit unsuitable to use for all clients. Consider creating a different policy for those clients.
See “Compression (policy attribute)” on page 717.
Compression
About Microsoft DSFR backupsMicrosoft Distributed File System Replication (DFSR) service is a multi-masterreplication engine that is used to keep folders synchronized on multiple servers.To do this, each of these independent DFSR servers maintains a database whichis essential in providing this service but is independent of the DFSR data that isbeing replicated. AlthoughNetBackup protects this database, as well as the DFSRdata, there are some things to consider when restoring both.
A DFSR server maintains information in its database that is used by other DFSRservers to identify and validate replication changes that may be needed. One bit ofinformation is a globally unique version number (GVSN), which increasesmonotonically with every replicated file or folder alteration. It can be thought of asa version or generation number for each DFSR database on each replicated volume.
A problem occurs if a DFSR server is restored to an earlier database version. Theother servers, which monitor and remember each other’s numbers, will be confusedwhen presented with the older number. At this point replication is impossible andwill stop until this is corrected. Consider carefully if your restore actually needs toinclude the DFSR database, in addition to the DFSR data. This is likely to happenif you have a virtualized DFSR server and you restore it to a snapshot that hadbeen taken earlier. Please refer to the Microsoft documentation on managing andusing DFSR for additional details.
In an environment that has DFSR, two changes occur in NetBackup, as follows:
■ To preserve data integrity, the folder or folders that host the Shared ReplicaDFSR data are excluded automatically by NetBackup from normal file systembackups.
683Creating backup policiesPlanning for policies

■ The top-level DFSR shared folders become part of the Shadow CopyComponents. Therefore, the data is snapped consistently by Windows VolumeShadow Copy Service (VSS) before each backup.
Microsoft supports only the VSS writer for DFSR managed data backups. The VSSwriter stops and restarts the DFS Replication service automatically. Veritasrecommends that you schedule the backups to coincide with a period of low activity.(If you stop the replication service manually, Microsoft change journal problemsmay occur. Specifically, Update Sequence Number (USN) Journal wrap may occur.)
Veritas recommends that you back up DSFR data based on the amount of dataunder DSFR control as described in Table 20-5.
Table 20-5 Microsoft DSFR backup recommendations
Veritas recommendationAmount of data
Configure one policy as follows:
■ Choose the DFSR server host as the client.See “Adding or changing clients in a policy” on page 805.
■ Choose ALL_LOCAL_DRIVES as the Directive in the Backup Selections for the policy.TheALL_LOCAL_DRIVES directive includes theShadowCopyComponents:\ automatically.See “Adding backup selections to a policy” on page 811.
One policy can back up the data within a reasonable time window.
Less than 50 GBs
684Creating backup policiesPlanning for policies

Table 20-5 Microsoft DSFR backup recommendations (continued)
Veritas recommendationAmount of data
Configure one backup policy for each DSFR server, and in that policy specify only the replicationfolders. A policy for each host's replication data ensures that the DSFR data is backed up withina reasonable time window.
For each DSFR server host, do the following:
■ Create a global exclude list for All Policies and All Schedules. Exclude the following DSFRtop-level folder:Shadow Copy Components:\User Data\Distributed File SystemReplication\DfsrReplicatedFolder
The global exclude list ensures that the DFSR components are not backed up accidentallyby other backup policies for the client.See “Exclude Lists properties” on page 136.
■ Create a backup policy for the DSFR data, as follows:■ For the client, specify the DFSR server host. For the servers that are hosted in a cluster,
specify the DFSR cluster name rather than the local host name.See “Adding or changing clients in a policy” on page 805.
■ For the Backup Selections for the policy, specify the absolute path to each of the top-levelDFSR folders on that host. The following is an example path:Shadow Copy Components:\User Data\Distributed File SystemReplication\DfsrReplicatedFolders\folder_name
Tip: Use the Backup, Archive, and Restore interface to browse the Shadow CopyComponents for the DfsrReplicatedFolders folder. The BAR interface shows thepath to each DSFR folder that you need to enter as a backup selection.See “Adding backup selections to a policy” on page 811.
■ For the backup policy, create an exception to the exclude list and specify the top-level DFSRdirectory, as follows:Shadow Copy Components:\User Data\Distributed File SystemReplication\DfsrReplicatedFolders
For the exception Policy, specify the backup policy for the DSFR data. Also specify AllSchedules for the Schedule.If DFSR is hosted in a cluster, create the exception for each host in the cluster.The exception ensures that the Shadow Copy Components DFSR paths are included forbackup after NetBackup processes the global exclude list.See “Adding an exception to the exclude list” on page 141.
More that 50 GBs
The DSFR servers must be configured for Windows Open File Backup. Thesnapshot provider must be Volume Shadow Copy Service. Configure theseproperties in theNetBackupAdministrationConsolemaster server host propertiesClient Attributes tab.
See “Windows Open File Backup tab of the Client Attributes properties” on page 101.
685Creating backup policiesPlanning for policies

During a backup, Windows writes the following event ID messages to the applicationevent log of a DFSR host:
Event ID=1102
Severity=Informational
The DFS Replication service has temporarily stopped replication
because another application is performing a backup or restore
operation. Replication will resume after the backup or restore
operation has finished.
Event ID=1104
Severity=Informational
The DFS Replication service successfully restarted replication
after a backup or restore operation.
To restore DFSR data, use the NetBackup Backup, Archive and Restore clientinterface to browse the Shadow Copy Components for the files or folders to restore,as follows:
Shadow Copy Components:\User Data\Distributed File System
Replication\DfsrReplicatedFolders\folder_name
The following Veritas HOWTO provides a more detailed procedure about configuringDSFR backups:
http://www.veritas.com/docs/HOWTO65638
Creating a backup policyThe easiest method to set up a backup policy is to use the Policy ConfigurationWizard. This wizard guides you through the setup process by automatically choosingthe best values for most configurations.
Not all policy configuration options are presented through the wizard. For example,calendar-based scheduling and the Data Classification setting. After the policy iscreated, modify the policy in the Policies utility to configure the options that are notpart of the wizard.
Note:Do not use the Policy Configuration Wizard to configure policies for ReplicationDirector.
Using the Policy Configuration Wizard to create a backuppolicyUse the following procedure to create a backup policy with the Policy ConfigurationWizard.
686Creating backup policiesCreating a backup policy

To create a backup policy with the Policy Configuration Wizard
1 In theNetBackup Administration Console, in the left pane, click NetBackupManagement.
2 In the right pane, click Create a Policy to begin the Policy ConfigurationWizard.
3 Select the type of policy to create:
■ A policy to back up File systems, databases, or applications.
■ A policy to protect VMware or Hyper-V virtual machines.
■ A policy to back up NDMP hosts.
■ A policy to back up Oracle data.
4 Click Next to start the wizard and follow the prompts.
Click Help on any wizard panel for assistance while running the wizard.
Creating a backup policy without using the PolicyConfiguration WizardUse the following procedure to create a backup policy in the NetBackupAdministration Console without using the Policy Configuration Wizard.
To create a policy without the Policy Configuration Wizard
1 In the NetBackup Administration Console, in the left pane, expandNetBackup Management > Policies.
2 On the Actions menu, click New > Policy.
3 Type a unique name for the new policy in the Add a New Policy dialog box.
See “NetBackup naming conventions” on page 1112.
4 If necessary, clear the Use Policy Configuration Wizard check box.
5 Click OK.
6 Configure the attributes, the schedules, the clients, and the backup selectionsfor the new policy.
See “Policy Attributes tab” on page 693.
See “Schedules tab” on page 757.
See “About the Clients tab” on page 805.
See “Backup Selections tab” on page 810.
687Creating backup policiesCreating a backup policy

Adding or changing schedules in a policyChange policies only when no backup activity is expected for the affected policiesand clients. Make adjustments before backups begin to ensure an orderly transitionfrom one configuration to another.
Changing a policy causes NetBackup to recalculate when the policy is due.
Use the following procedure to add or change schedules in an existing NetBackuppolicy.
To add or change schedules in a policy
1 In the NetBackup Administration Console, in the left pane, expandNetBackup Management > Policies.
2 Expand the policy name in the middle pane, then select Schedules.
3 Perform one of the following actions:
On the Actions menu, click New > Schedule.Add a schedule
■ Expand the policy which contains a schedule thatyou'd like to copy.
■ In the right pane, right-click the schedule and selectCopy.
■ Expand the policy where you'd like to paste theschedule.
■ In the right pane, right-click anywhere in the schedulearea and select Paste.
You can also copy a schedule with the Edit > Copy toNew option:
See “Copying a schedule into the same policy ordifferent policy” on page 692.
Copy a schedule and paste itinto another policy
In the right pane, double-click the schedule name.Change an existing schedule
4 Complete the entries in the Attributes tab, Start Window tab, Exclude Daystab, and Include Dates tab (when applicable).
See “Schedule Attributes tab” on page 758.
See “Start Window tab” on page 790.
See “Excluding days from a schedule” on page 794.
See “Include Dates tab” on page 795.
688Creating backup policiesAdding or changing schedules in a policy

5 Click OK.
6 To add more schedules, click Add or New and repeat step 4.
If this schedule is the last schedule, click OK or Close.
Changing multiple policies at one timeUse the following procedure to change more than one NetBackup policy at thesame time.
Note: You can change Attributes, Clients, and Schedules of multiple policies atone time. However, you cannot change Backup Selections of multiple policies atone time.
To change multiple policies
1 In the NetBackup Administration Console, in the left pane, expandNetBackup Management and select Policies.
2 In the middle pane, expand Summary of All Policies and select the node thatyou want to change.
3 In the right pane, either hold down the Shift key and select contiguous rows,or hold down the Ctrl key and select discontiguous rows for multiple selection.
Note:
You can change different schedules across different policies at one time. Ifyou are changing multiple schedules of different policy types, the Attributestab is disabled. A tri-state is displayed for an attribute that has different valuesfor multiple policies you selected.
689Creating backup policiesChanging multiple policies at one time

4 On the Edit menu, click Change.
In the dialog box that appears, the settings display in one of the following states:
The setting has the same value for all selected policies,schedules, or clients.
A value
The attribute does not have the same value for allselected policies, schedules, or clients.
No value
The attribute is active for all the selected policies,schedules, or clients.
Checked
The attribute is inactive on all the selected policies,schedules, or clients.
Unchecked
The attribute is set differently on all the selected policies,schedules, or clients.
Gray checked
5 Specify a value, enable or disable an attribute, or enter text for the attributesyou want to change. Any change that you make is applied to the field for everyselected policy.
Check the box.To enable an attribute for allselected policies
Uncheck the box.To disable an attribute for allselected policies
Set (or leave) the box to a gray check.To leave an attributeunchanged for all selectedpolicies
See “Policy Attributes tab” on page 693.
See “Schedule Attributes tab” on page 758.
See “About the Clients tab” on page 805.
6 Click Cancel to cancel changes, or click OK to apply all changes and closethe dialog box.
Copying or moving policy items to another policyYou can copy or move entire policies, attributes, schedules, clients, and backupselections from one policy to another. The following is a description of which policyitems can be copied or moved.
690Creating backup policiesCopying or moving policy items to another policy

Use the following procedure to copy or move items from one policy to another.
To copy or move items from one policy to another
1 In the NetBackup Administration Console, in the left pane, expandNetBackup Management > Policies.
2 In the middle pane, select either Attributes, Schedules, Clients, or BackupSelections of a policy that you want to copy or move.
3 In the right pane, based on your selection in the previous step, select theattributes, schedules, clients, or backup selections of a policy that you want tocopy or move.
4 Do one of the following:
On the Edit menu, click Copy or, press Alt+C.To copy an item
■ On the Edit menu, click Cut.■ Click Yes when asked if you want to delete the
selected item from the policy.
To move an item
5 In the middle-pane, select the policy item to which you want to paste the copieditems.
6 From the Edit menu, click Paste.
When you paste items with the same name, you are provided an option toeither copy and replace the existing item, or copy but keep the existing item,or do not copy.
Note: If the schedules do not match the policy type, the schedules are notcopied. The action is indicated in a dialog box.
When you paste Attributes, the existing Attributes of the policy are alwaysreplaced. Whereas, when you paste Backup Selections, the Backup Selectionis always copied to the policy, and not replaced.
The copying or moving feature is also applicable to instances and instancegroups of Oracle and SQL type of backup policies.
Copying a policy to create a new policyUse theCopy to New option to save time creating policies. This option is especiallyuseful for the policies that contain many of the same policy attributes, schedules,clients, or backup selections.
691Creating backup policiesCopying a policy to create a new policy

To copy a policy to create a new one
1 In the NetBackup Administration Console, in the left pane, expandNetBackup Management > Policies.
2 In the middle pane, select the policy to copy.
3 On the Edit menu, click Copy to New
4 In the Copy a Policy dialog box, enter the name of the policy that you want tocopy. You can indicate a policy other than the one that is selected
5 Enter the name for the new policy.
6 Click OK. The only difference between the new policy and the copied policy isthe name.
Copying a schedule into the same policy ordifferent policy
Use the Copy to New option to save time creating schedules. Use this option tocopy a schedule into the same policy or different policy.
To copy a schedule to create a new one
1 In the NetBackup Administration Console, in the left pane, expandNetBackup Management > Policies.
2 In the middle pane, expand a policy and select the Schedules node thatcontains the schedule that you want to copy.
3 In the right pane, select the schedule that you want to copy.
4 On the Edit menu, click Copy to New
5 In the Copy Schedule dialog box, enter the name of the new schedule.
6 Use the menu to select the name of the policy to which you want to paste theschedule. You can paste the schedule into the same policy or a different policy.
7 Click OK. The Change Schedule dialog box opens for the new schedule.
Deleting schedules, backup selections, or clientsfrom a policy
Use the following procedure to delete schedules, backup selections, or clients froma NetBackup policy.
692Creating backup policiesCopying a schedule into the same policy or different policy

To delete a schedule, backup selections, or clients from a policy
1 In the NetBackup Administration Console, in the left pane, expandNetBackup Management > Policies.
2 Expand the policy name in the middle pane, then selectAttributes, Schedules,Backup Selections, or Clients.
3 In the right pane, select the item you want to delete.
4 On the Edit menu, click Delete.
5 Click Yes when asked if you want to delete the selected item from the policy.
When a client is deleted from the client list, the NetBackup client software is notdeleted or uninstalled from the client. Backups for the client can be recovered untilthe backups expire. Also, when a file is deleted from a backup selection list, theactual file is not deleted from the client.
Policy Attributes tabUse the policy Attributes tab to configure backup settings when you add a newpolicy or change an existing policy. When you create a policy, you give the policya name and select a policy type. The policy type you select typically depends onthe type of client you want to back up. The number of policy types available variesdepending on which NetBackup options are installed. Each policy type has a uniquecombination of attributes. Not all attributes apply to every policy type. When youselect a policy type, the attributes that apply to that policy type are active. Theunavailable attributes are grayed out.
Figure 20-2 shows the Attributes tab of a NetBackup policy.
693Creating backup policiesPolicy Attributes tab

Figure 20-2 Policy Attributes tab
The following topics describe the settings on the policy Attributes tab.
Policy type (policy attribute)The Policy type attribute determines the purpose of the policy. Select a policy typefrom the list. The policy type you select typically depends on the type of client tobe backed up. Some policy types are not used for client backups. For example,NBU-Catalog is not used for client backups.
The list of policy types changes depending on the NetBackup options that havebeen installed. Each policy type offers a unique combination of attributes. Whenyou select a policy type, only the attributes that apply to that policy type are active.
You can change the policy type of an existing policy. However, the schedules forthe policy may become invalid. If the schedules become invalid, NetBackup displays
694Creating backup policiesPolicy Attributes tab

a warning message and then deletes the invalid schedules or changes the schedulesto an equivalent type.
When you change the policy type of an existing policy, other selections or featuresof the policy may become invalid as well.
Table 20-6 describes all the types of NetBackup policies.
Table 20-6 NetBackup policy types
DescriptionPolicy type
Use for the policies that contain only clients with the NetBackup for SQL-BackTrackagent. For information on setting up this policy type, see the guide for this option.
DataTools-SQL-BackTrack
(UNIX only)
This policy type is reserved for use by Veritas or its partners to provide agents for newapplications or databases.
DataStore
Use for the policies that contain only clients with the NetBackup for DB2 agent. Forinformation on setting up this policy type, see the guide for this option.
DB2
Combines the speed of raw-partition backups with the ability to restore individual files.
This policy type applies to UNIX clients only. Requires the Enterprise Client license.
For information on setting up this type of policy, see the NetBackup Snapshot ClientGuide.
FlashBackup
(UNIX only)
Combines the speed of raw-partition backups with the ability to restore individual files.This policy type applies to Windows clients only. Requires the Enterprise Client license.
For information on setting up this type of policy, see the NetBackup Snapshot ClientGuide.
FlashBackup-Windows
(Windows only)
To back up the virtual machines that reside on Windows Hyper-V servers, by meansof on-host or off-host backups. This policy type requires the Enterprise Client license.
Users can upgrade pertinent policies to the Hyper-Vpolicy type using one of thefollowing methods:
■ Change the policy type in the NetBackup Administration Console for one policyat a time.
■ Change the policy type for multiple policies at one time using the bpplconvertscript that is located in the following location:On Windows: Install_path\Veritas\NetBackup\bin\goodiesOn UNIX: usr/openv/netbackup/bin/goodies
For information on setting up this type of policy, see the NetBackup for Hyper-V Guide.
Hyper-V
Use for the policies that contain only clients with the NetBackup for Informix agent. Forinformation on setting up this policy type, see the guide for this option.
Informix-On-BAR
(UNIX only)
695Creating backup policiesPolicy Attributes tab

Table 20-6 NetBackup policy types (continued)
DescriptionPolicy type
Use for the policies that contain only clients with the NetBackup for Lotus Notes agent.For information on setting up this policy type, see the guide for this option.
Lotus-Notes
Use for the policies that contain only clients with the NetBackup for Exchange Serveragent. For information on setting up this policy type, see the guide for this option.
This policy type applies to Windows clients only.
MS-Exchange-Server
(Windows only)
Use to configure a policy NetBackup for SharePoint Server.
This policy type applies to Windows clients only.
MS-SharePoint
(Windows only)
Use for the policies that contain only clients with the NetBackup for SQL Server agent.For information on setting up this policy type, see the guide for this option.
MS-SQL-Server
Use for the policies that contain only Windows clients of supported Windows operatingsystem levels.
Standard and MS-Windows policy types are the only policy types that support thefollowing options:
■ Checkpoint restart for backups or restoresSee “Take checkpoints every __ minutes (policy attribute)” on page 703.
■ Synthetic backupsSee “Policy type (policy attribute)” on page 694.
■ Collect disaster recovery information for Bare Metal RestoreSee “Collect disaster recovery information for Bare Metal Restore (policy attribute)”on page 721.
MS-Windows
Use for catalog backup jobs.NBU-Catalog
Use for the policies that contain only clients with the NetBackup NDMP option. Thispolicy type is available only when the NetBackup NDMP is installed and licensed. Forinformation on setting up this policy type, see the guide for this option.
NDMP
Use for the policies that contain only clients with the NetBackup for Oracle agent. Forinformation on setting up this policy type, see the guide for this option.
Oracle
Use for the policies that contain only clients with the NetBackup SAP agent. Forinformation on setting up this policy type, see the guide for this option.
SAP
696Creating backup policiesPolicy Attributes tab

Table 20-6 NetBackup policy types (continued)
DescriptionPolicy type
Use for UNIX clients (including supported Mac clients), except for those clients thatare covered by specific products, such as Oracle.
Standard and MS-Windows policy types are the only policy types that support thefollowing options:
■ Checkpoint restart for backups or restores■ Synthetic backups■ Collect disaster recovery information for Bare Metal Restore
Standard
Use for the policies that contain only clients with the NetBackup for Sybase agent. Forinformation on setting up this policy type, see the guide for this option.
Sybase
Use as a policy type to schedule and run a Vault job. This policy type is available onlywhen Vault is licensed.
Vault
For backup of any virtual machines that reside on VMware vSphere servers, by meansof off-host backups. This policy type requires the Enterprise Client license.
Users can upgrade pertinent policies to the VMware policy type using one of thefollowing methods:
■ Change the policy type in the NetBackup Administration Console for one policyat a time.
■ Change the policy type for multiple policies at one time using the bpplconvertscript that is located in the following location:On Windows: Install_path\Veritas\NetBackup\bin\goodiesOn UNIX: usr/openv/netbackup/bin/goodies
For information on setting up this type of policy, see the NetBackup for VMware Guide.
VMware
For more details on off-host backups, refer to the NetBackup Snapshot ClientAdministrator’s Guide.
Data classifications (policy attribute)The Data Classification attribute specifies the classification of the storage lifecyclepolicy that stores the backup. For example, a backup with a gold classification mustgo to a storage unit with a gold data classification. By default, NetBackup providesfour data classifications: platinum, gold, silver, and bronze.
This attribute is optional and applies only when the backup is to be written to astorage lifecycle policy. If the list displays No data classification, the policy usesthe storage selection that is displayed in the Policy storage list. If a data
697Creating backup policiesPolicy Attributes tab

classification is selected, all the images that the policy creates are tagged with theclassification ID.
See “Storage Lifecycle Policy dialog box settings” on page 652.
See “Data Classification properties” on page 118.
See “Creating a Data Classification” on page 120.
See “About storage lifecycle policies” on page 613.
Policy storage (policy attribute)The Policy storage attribute specifies the storage destination for the policy’s data.Select a specific storage unit, storage lifecycle policy, or storage unit group fromthe list.
When NetBackup looks for an available storage unit, it selects the first storage unitthat meets the following requirements:
■ The storage unit must not be designated as On demand only.
■ The storage unit must have available drives.
■ The storage unit must have media available in the required volume pool.
However, NetBackup makes an exception when a client is also a media server withlocally-attached storage units. In that case, NetBackup selects the locally-attachedstorage units first.
See “About staging backups” on page 589.
Select the name of the storage unit that is to be the storagedestination for the policy data. It can be disk or tape-based.
If it is configured to do so, the storage unit determines whichtype of disk staging is used for the policy.
See “Creating a storage unit” on page 561.
Storage unit
698Creating backup policiesPolicy Attributes tab

Select the name of the storage lifecycle policy that is to bethe storage destination for the policy data.
The drop-down list includes only those lifecycles that havethe same data classification as the policy. For example, goldbackup images cannot be sent to a silver storage lifecycle.Images that belong to a specific data classification cannotbe sent to a storage lifecycle that lacks a classification. Dataclassification is optional.
See “Global Attributes properties” on page 159.
If it is configured to do so, the storage lifecycle policydetermines which type of disk staging is used for the policy.
If setting up snapshot replication with Replication Director,select a storage lifecycle policy that contains asnapshot-capable storage unit.
See “About storage lifecycle policies” on page 613.
Storage lifecycle policy
Select the name of the storage unit group that is to be thestorage destination for the policy data.
See “About storage unit groups” on page 602.
Storage unit group
If Any Available is selected, NetBackup tries to store dataon locally-attached storage units first. To force NetBackupto use only a locally-attached drive, select Must use localdrive in the General Server properties. If a local device isnot found orMust use local drive is not selected, NetBackuptries to find an available storage unit alphabetically.
NetBackup does not select a null_stu storage unit if AnyAvailable is selected. A null_stu storage unit is createdonly when Veritas Support uses the NullOST plug-in toidentify and isolate data transfer bottlenecks.
Any Available
Figure 20-3 Icons indicate type of storage
Storage unit (tape device)
Storage unit (disk)
Storage unit group
Storage lifecycle policy
Note: If different storage is selected for the Override policy storage option on theSchedule Attributes tab, that selection overrides the Policy storage attribute.
699Creating backup policiesPolicy Attributes tab

See “Override policy storage (schedule attribute)” on page 778.
See “Considerations for selecting a destination for Policy storage” on page 700.
Considerations for selecting a destination for PolicystorageConsider the following scenarios before selecting a destination from the Policystorage list on the policy Attributes tab.
Table 20-7
ActionScenario
Do one of the following:
■ Specify Any Available for the Policy storage attribute.■ Do not specify a storage unit at the schedule level.
See “Override policy storage (schedule attribute)” on page 778.■ Do not set all storage units to On demand only. NetBackup may not find
an available storage unit for the backups.See “Changing storage unit settings” on page 564.See “On demand only storage unit setting” on page 583.
The site contains one storage unit, orthere is no storage unit preference.
Consider changing the destination to Any Available since backups cannotrun for those policies and the schedules that require the unit.
A specific storage unit is designated butthe unit is unavailable.
Be aware that any basic disk storage unit that is not assigned to a storagegroup is considered available for disk spanning.
See “Media properties” on page 189.
Any Available is selected.
700Creating backup policiesPolicy Attributes tab

Table 20-7 (continued)
ActionScenario
Do one of the following:
■ Select a storage unit group that contains only the units you want thepolicy to use.
■ Limit the storage units by doing the following:■ Create a volume pool that contains the volumes that are available
only to the specific storage units. Disable Scratch pool for the volumepool. If Scratch pool is enabled, any storage unit has access to thevolumes in the volume pool.See “Adding a volume pool” on page 520.See “About scratch volume pools” on page 456.
■ In the policy, set Policy volume pool to the volume pool that isdefined in the previous step.
■ For all policies, set Policy storage attribute to Any Available.■ If the policy specifies a storage unit group, set the storage units within
the group to On demand only to satisfy the policy requirement.See “Changing storage unit settings” on page 564.See “On demand only storage unit setting” on page 583.
You want to limit the storage unitsavailable to a policy.
Policy volume pool (policy attribute)The Policy volume pool attribute specifies the default volume pool where thebackups for the policy are stored. A volume pool is a set of media that is groupedfor use by a single application. The volume pool is protected from access by otherapplications and users.
The available volume pools appear on the list. Whenever a new volume is required,it is allocated from the volume pool indicated.
If you select a volume pool on the Schedule tab, that selection overrides the Policyvolume pool selection on the Attributes tab.
See “Override policy storage (schedule attribute)” on page 778.
See “Example of overriding the policy volume pool” on page 702.
The following table describes the default volume pools that NetBackup defines.
Table 20-8 Default volume pools defined by NetBackup
DescriptionVolume pool
The default pool for applications, other than NetBackup.None
701Creating backup policiesPolicy Attributes tab

Table 20-8 Default volume pools defined by NetBackup (continued)
DescriptionVolume pool
The default pool for DataStore.DataStore
Unless otherwise specified in the policy, all backups usemedia from the NetBackup pool. One exception is theNBU-Catalog policy type.
NetBackup
This pool is selected by default for the NBU-Catalog policytype. It is used exclusively for catalog backups. Catalogs aredirected to a single, dedicated pool to facilitate faster catalogrestores.
CatalogBackup
The following table describes the additional volume pools that are useful to create.
Table 20-9 Additional volume pools
DescriptionVolume pool
Allows NetBackup to automatically transfer volumes whenanother volume pool does not have media available.
Scratch volume pool
Used by automatic backups.Auto volume pool
Used by user backups.User volume pool
Media is assigned to the volume pools for Media Manager storage devices. Disk-typestorage devices are not allocated to a volume pool.
See “About NetBackup volume pools” on page 454.
See “Adding a volume pool” on page 520.
See “About scratch volume pools” on page 456.
Example of overriding the policy volume poolThe following example shows how to override the policy volume pool from the policySchedule tab. In this example, we change a policy named Backup-Archive. Untilnow, all schedules in the policy have used the Backups volume pool. Change thepolicy so that the user-archive schedule uses the Archive pool instead.
702Creating backup policiesPolicy Attributes tab

To override the Policy volume pool attribute
1 In the NetBackup Administration Console, in the left pane, expandNetBackup Management > Policies
2 In the left pane, select the Backup-Archive policy and on the Edit menu, clickChange.
3 In the policy Attributes tab, on the Policy volume pool list, select Backups.
4 Click the Schedules tab.
5 Select the schedules that use the Backups volume pool, and click Properties.
6 Make sure that Override policy volume pool is unchecked, and click OK tosave the change in the schedule.
7 Select the user-archive schedule that you want assigned to the Archive volumepool, and click Properties.
8 Check Override policy volume pool.
9 Underneath the check box, select Archive from the list.
10 Click OK to save the change in the schedule.
11 Click OK to save the change in the policy.
Take checkpoints every __ minutes (policy attribute)By taking checkpoints during a backup, you can save time if the backup fails. Bytaking checkpoints periodically during the backup, NetBackup can retry a failedbackup from the beginning of the last checkpoint. This is often quicker rather thanrestarting the entire job.
The checkpoint frequency indicates how often NetBackup takes a checkpoint duringa backup. The default is 15 minutes. The administrator determines checkpointfrequency on a policy-by-policy basis. When you select the checkpoint frequency,balance the loss of performance due to frequent checkpoints with the possible timelost when failed backups restart. If the frequency of checkpoints affects performance,increase the time between checkpoints.
Checkpoints are saved at file boundaries and point to the next file in the list.Checkpoint restart is only available for the MS-Windows or Standard policy types.Check Take checkpoints every __ minutes to enable checkpoint restart. Whenthe box is checked, NetBackup takes checkpoints during a backup job at thefrequency you specify. If the box is not checked, no checkpoints are taken and afailed backup restarts from the beginning of the job. Checkpoint restart can also beused for restore jobs.
See “Checkpoint restart for restore jobs” on page 705.
703Creating backup policiesPolicy Attributes tab

TheGlobal Attributes property, Schedule backup attempts, indicates the numberof times that NetBackup tries to restart a failed backup.
See “Global Attributes properties” on page 159.
Note: Checkpoints are saved at file boundaries and point to the next file in the listto be backed up. Checkpoints cannot occur in the middle of a file. After the file isbacked up, the checkpoint is saved.
Note:Checkpoints are not taken for a user-archive backup. If a user-archive backupresumes, it restarts from the beginning.
In the following situations, NetBackup starts a new job instead of resuming anincomplete job:
■ If a new job is due to run, or, for calendar-based scheduling, another run dayhas arrived.
■ If the time since the last incomplete backup was longer than the shortestfrequency in any schedule for the policy.
■ If the time indicated by the Clean-up property, Move backup job fromincomplete state to done state, has passed.
The following table describes the level of support for various policy attributes,storage, and clients for checkpoint restart. For an agent or option not listed, referto the manual for that agent or option.
Table 20-10 Support for checkpoint restart
DescriptionItem
Checkpoint restart is supported for Stage I. Checkpoint restart is not supported forStage II.
See “About basic disk staging” on page 590.
See “About staging backups” on page 589.
Basic disk staging
704Creating backup policiesPolicy Attributes tab

Table 20-10 Support for checkpoint restart (continued)
DescriptionItem
The following pertain to Windows clients:
■ Checkpoint restart is not supported for the backup selections that are indicated bya UNC path.
■ No checkpoints are taken during a system state backup.■ No checkpoints are taken during a Windows disk image (raw) backup.■ No checkpoints are taken for the remainder of the backup after NetBackup
encounters Single-instance Store (SIS).
When an incremental backup resumes and completes successfully, the archive bitsare cleared for the files that were backed up after the job resumes. However, the archivebits are not cleared for the files that were backed up before the resume. Since thearchive bits remain, the files that were backed up before the backup resumes arebacked up again during the next incremental backup.
MS-Windows (policy type)
Checkpoint restart is supported for the policies that are configured to create multiplebackup copies.
See “Multiple copies (schedule attribute)” on page 774.
The last failed copy that contains a checkpoint can be resumed if a copy is configuredto allow other copies to continue the job if the copy fails and subsequent checkpointsoccur.
Multiple copies (scheduleattribute)
Checkpoint restart is supported for use with local or alternate client backups. However,the following policy attributes are not supported:
■ Block Level incremental backups■ Media server Copy■ Third-Party Copy Device■ Instant Recovery backup
See “Snapshot Client and Replication Director (policy attributes)” on page 754.
Snapshot Client (policyattribute)
Checkpoint restart is supported for UNIX clients.Standard (policy type)
Checkpoint restart is not supported.
See “Synthetic backup (schedule attribute)” on page 768.
Synthetic backups(schedule attribute)
Checkpoint restart for restore jobsCheckpoint restart for restore jobs saves time by letting NetBackup resume a failedrestore job. The job resumes automatically from the start of the file that was lastcheckpointed rather than starting from the beginning of the entire restore job.NetBackup automatically takes checkpoints once every minute during a restorejob.
705Creating backup policiesPolicy Attributes tab

The following host properties affect checkpoint restart for restore jobs.
This Clean-up host property indicates thenumber of days that a failed restore job canremain in an Incomplete state.
See “Clean-up properties” on page 88.
Move restore job from incomplete state todone state
This Universal Setting host propertyspecifies the number of attempts that a clienthas to restore after a failure.
See “Universal Settings properties”on page 258.
Restore retries
Checkpoint restart for restore jobs has the following limitations:
■ The restore restarts at the beginning of the last checkpointed file, not within thefile.
■ Only the backups that are created usingMS-Windows or Standard policy typesare supported.
■ Third Party Copy and the Media Server Copy images that use Standard policytypes are supported. However, they cannot be suspended or resumed if thebackup image has changed blocks.
A NetBackup administrator can choose to suspend a checkpointed restore job andresume the job at a later time. For example, while an administrator runs a restorejob for several hours, the administrator receives a request for a second restore.The request is of a higher priority and requires the resources in use by the first job.The administrator can suspend the first job, start the second restore job and let itcomplete. The administrator can then resume the first job from the Activity Monitorand let the job complete.
Consider a situation in which a checkpointed restore that has no end date issuspended and then resumed. If a new backup occurs before the resume is initiated,the files from the new backup are included in the restore. For example, a userrequest the restore of a directory. The restore begins, but is suspended. The requestis resumed the next day after another backup of the directory is performed. Thefiles that are restored are from the latest backup.
See “Take checkpoints every __ minutes (policy attribute)” on page 703.
Limit jobs per policy (policy attribute)The Limit jobs per policy attribute limits the number of jobs that NetBackupperforms concurrently when the policy is run. By default, the box is unchecked, and
706Creating backup policiesPolicy Attributes tab

NetBackup performs an unlimited number of backup jobs concurrently. Otherresource settings can limit the number of jobs.
A configuration can contain enough devices so that the number of concurrentbackups affects performance. To specify a lower limit, check the box and specifya value from 1 to 999.
Figure 20-4 Limit jobs per policy attribute
Client B
Server Tape Drive 1
Client A and Client B backups can occur concurrently and back up to different devices
Tape Drive 2
Client A
This attribute operates differently for VMware policies, depending on how the policyselects virtual machines.
For more information, see the NetBackup for VMware Administrator's Guide.
Table 20-11 describes the factors that affect the number of concurrent backup jobsthat NetBackup can perform.
Table 20-11 Factors affecting the number of concurrent backup jobs
DescriptionItem
The limit does not apply to concurrent jobs if the jobs are from different policies.
For example, if three policies limit concurrent jobs to two, NetBackup can start two jobsfrom each policy. A total of six policies can be running at one time in this situation.
Jobs from different policies
If multiplexing is used, set the limit high enough to support the specified level ofmultiplexing.
Lower values can limit multiplexing within a policy if jobs from different schedules existwithin the policy. For example, the limit is set to two and an incremental backup scheduleis due to run for four clients. Only two clients are backed up at one time, regardless ofthe multiplexing settings.
Multiplexing
707Creating backup policiesPolicy Attributes tab

Table 20-11 Factors affecting the number of concurrent backup jobs(continued)
DescriptionItem
The available bandwidth of the network determines how many backups can occurconcurrently. If you encounter loading problems, consider multiple networks for backups.Or, configure the backup policy to use the Compression attribute.
See “Compression (policy attribute)” on page 717.
When the client that is backed up is also a server, it is a special case. In this instance,the network load is not a factor because the network is not used. However, the loadon the client and server is still a factor.
Network load
To process more than one backup job at a time, the configuration must include one ofthe following:
■ Multiple storage units.■ A storage unit with enough drives to perform more than one backup at a time.■ Storage units that are configured to multiplex.
With removable media devices such as tape drives, the number of concurrent jobsdepends on the total number of drives in the storage units. With disk storage, thestorage device is defined as a file path and the available disk space determines howmany paths are possible.
Number of storage devicesavailable and multiplexinglimits
Parent jobs do not count toward the limit. Only the children jobs count toward the limit.
The following are examples of the jobs that produce a parent job and children jobs:
■ Multistreamed jobs■ Catalog backups■ Snapshot Client snapshots■ Bare Metal Restore jobs
See “About the Jobs tab” on page 1038.
This attribute operates differently for VMware policies, depending on how the policyselects virtual machines.
For more information, see the NetBackup for VMware Administrator's Guide.
Parent job and children jobs
Too many concurrent backups interfere with the performance of the server. The bestnumber depends on the hardware, operating system, and applications that are running.
Server speed
Job priority (policy attribute)The Job priority attribute specifies the priority that a policy has as it competes withother policies for resources. Enter a value from 0 to 99999. The higher the number,
708Creating backup policiesPolicy Attributes tab

the greater the priority of the job. NetBackup assigns the first available resource tothe policy with the highest priority.
In the Default Job Priorities host properties, you can set a job priority default fora job type.
See “Default Job Priorities properties” on page 121.
Media Owner (policy attribute)The Media Owner attribute specifies which media server or server group shouldown the media that backup images for this policy are written to.
This attribute is active under the following conditions:
■ A Media Manager storage unit is used.
■ The Policy storage attribute is set to Any Available
You can specify the following for the Media Owner:
Allows NetBackup to select the media owner. NetBackup selects amedia server or a server group (if one is configured).
Any (default)
Specifies that the media server that writes the image to the media ownsthe media. No media server is specified explicitly, but you want a mediaserver to own the media.
None
Allows only those servers in the group to write to the media on whichbackup images for this policy are written. All server groups that areconfigured appear in the list.
A server group
See “About media sharing” on page 524.
See “Configuring a NetBackup server group” on page 380.
Go into effect at (policy attribute)The Go into effect at attribute specifies when the policy can begin to schedulebackups. For example, if today is Monday and you enter Wednesday at 12:00 A.M.,the policy does not run until that time or later. Use this attribute to configure a seriesof policies in advance of when the policies need to become active.
To activate the policy, check Go into effect at. The policy must be active forNetBackup to use the policy.
To deactivate a policy, uncheck the box. Inactive policies appear are unavailablein the NetBackup Administration Console. Inactive policies remain on the list ofpolicies in the left pane of the NetBackup Administration Console. To resume
709Creating backup policiesPolicy Attributes tab

backups, recheck the box. Make sure that the date and time are set to the time thatyou want to resume backups.
If the schedule is to be used for a catalog archive, the policy must not be active.Clear the check box to deactivate the policy.
See “Creating a catalog archiving policy” on page 906.
Follow NFS (policy attribute)The Follow NFS (Network File System) attribute specifies whether NetBackup isto back up or archive any NFS-mounted files. These files are named in the backupselection list or by the user, in the case of a user backup or archive. Uncheck thebox to prevent the backup or archive of NFS-mounted files.
Note: This attribute applies only to UNIX clients in certain policy types. NetBackupallows it to be selected in those instances only.
This attribute eliminates the need to locate and log on to the systems where thefiles reside. If the files are mounted on the NetBackup client, you can back up,archive, and restore them by working from the NetBackup client. You must havethe necessary permissions on the NFS mount. Use this capability to back up thesystems that the NetBackup client software does not support.
Generally, do not back up NetBackup clients over NFS. Back up and archive fileson the NFS server where the files physically reside. NFS backups have lowerperformance and sometimes encounter problems. If Follow NFS is selected, youmay want to use the policy only for the files and clients that are backed up orarchived over NFS.
Note: If Follow NFS is not selected, the backup process reads the client’s mounttable and evaluates each item in the table. NetBackup resolves any links to the truepath. NetBackup must resolve the links so it can accurately avoid backing up anyfiles that reside on NFS-mounted file systems.
If NetBackup cannot access a Network File System when it evaluates the mounttable, it assumes that the file system is unavailable. (The default time to access thefile system is five seconds.) To change the default, change the UNIX master serverhost property, NFS access timeout.
See “UNIX Server properties” on page 265.
710Creating backup policiesPolicy Attributes tab

Note:NetBackup specifically excludes mapped directories even if FollowNFS andCross mount points are enabled. To back up mapped directories, include thedirectories in the file list.
Consider the following before enabling this attribute:
Table 20-12 Issues that affect Follow NFS
DescriptionItem
The behavior of Follow NFS can vary depending on how it is used in combination withCross mount points.
See “Examples of using Cross mount points and Follow NFS in combination”on page 715.
See “Cross mount points (policy attribute)” on page 713.
Cross mount points (policyattribute)
This attribute has no effect on raw partitions. The Network File Systems that aremounted in a raw partition are not backed up. Nor can you back up raw partitions fromother computers that use NFS mounts to access the raw partitions. The devices arenot accessible on other computers through NFS.
Note: NetBackup does not support raw partition backups on unformatted partitions.
Raw partitions
This attribute causes files in automounted file systems to be backed up. Automounteddirectories can be excluded to allow the backup of other NFS mounts. To do so, addan entry for the automounter’s mount directory to the exclude list on the client.
Automounted directories
Backup Network Drives (policy attribute)The Backup Network Drives attribute is for use on single user systems, Win95,Win98, and ME. These operating systems are not supported with this version ofNetBackup. For a computer that is not a NetBackup client, the preferred methodfor backing up data is to use UNC paths. UNC paths are more precise and indicateexactly what should be backed up.
When you use Backup Network Drives or UNC paths, the network drives mustbe available to the service account that the NetBackup Client service logs into atstartup. By default, the startup account is set to System. You must change thisaccount on each Windows client that is backed up that contains data that is sharedfrom another computer.
This attribute must be enabled for the policies that back up to CD ROM drives. Forscheduled backups, the file list must indicate at least the first level of folders to bebacked up. For example, D:\Folder1 instead of only D:\
711Creating backup policiesPolicy Attributes tab
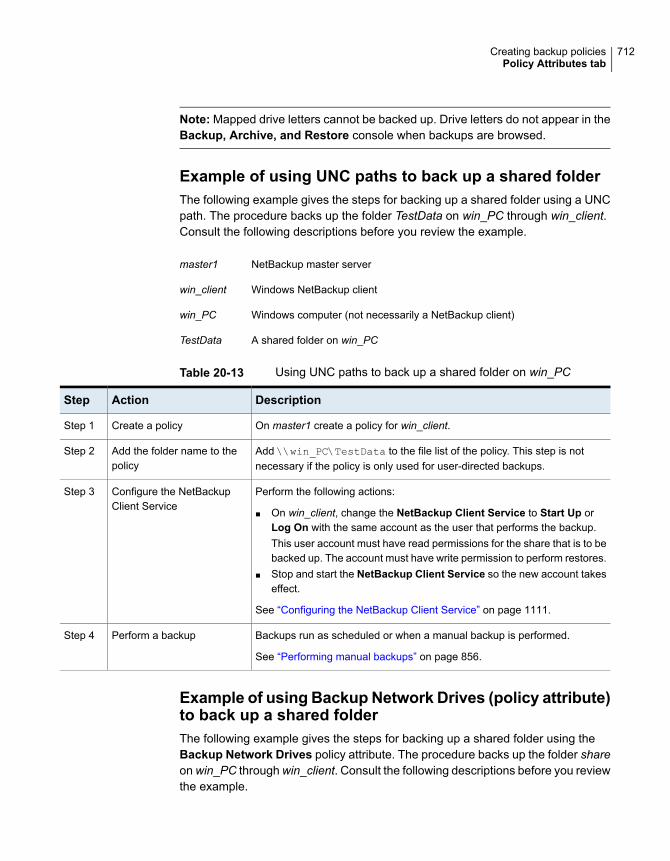
Note: Mapped drive letters cannot be backed up. Drive letters do not appear in theBackup, Archive, and Restore console when backups are browsed.
Example of using UNC paths to back up a shared folderThe following example gives the steps for backing up a shared folder using a UNCpath. The procedure backs up the folder TestData on win_PC through win_client.Consult the following descriptions before you review the example.
NetBackup master servermaster1
Windows NetBackup clientwin_client
Windows computer (not necessarily a NetBackup client)win_PC
A shared folder on win_PCTestData
Table 20-13 Using UNC paths to back up a shared folder on win_PC
DescriptionActionStep
On master1 create a policy for win_client.Create a policyStep 1
Add \\win_PC\TestData to the file list of the policy. This step is notnecessary if the policy is only used for user-directed backups.
Add the folder name to thepolicy
Step 2
Perform the following actions:
■ On win_client, change the NetBackup Client Service to Start Up orLog On with the same account as the user that performs the backup.This user account must have read permissions for the share that is to bebacked up. The account must have write permission to perform restores.
■ Stop and start the NetBackup Client Service so the new account takeseffect.
See “Configuring the NetBackup Client Service” on page 1111.
Configure the NetBackupClient Service
Step 3
Backups run as scheduled or when a manual backup is performed.
See “Performing manual backups” on page 856.
Perform a backupStep 4
Example of using Backup Network Drives (policy attribute)to back up a shared folderThe following example gives the steps for backing up a shared folder using theBackup Network Drives policy attribute. The procedure backs up the folder shareonwin_PC throughwin_client. Consult the following descriptions before you reviewthe example.
712Creating backup policiesPolicy Attributes tab

NetBackup master servermaster1
Windows NetBackup clientwin_client
Windows computer (not necessarily a NetBackup client)win_PC
A shared folder on win_PCshare
Table 20-14 Using Backup Network Drives to back up a shared folder onwin_PC
DescriptionActionStep
Onmaster1 create a policy forwin_client, and checkBackup network drivesin the policy attributes tab.
Create a policyStep 1
Perform the following actions:
■ On win_client, change the NetBackup Client Service to Start Up orLog On with the same account as the user that performs the backup.This user account must have read permissions for the share that is to bebacked up. The account must have write permission to perform restores.
■ Stop and start the NetBackup Client Service so the new account takeseffect.
See “Configuring the NetBackup Client Service” on page 1111.
Configure the NetBackupClient Service
Step 2
Create a batch file bpstart_notify.bat that does the following:
■ Maps a drive on win_client to \\win_PC\share.■ Includes the following command (where X: is the mapped drive letter):
net use X: \\win_PC\share
Create a batch fileStep 3
Backups run as scheduled or when a manual backup is performed.
See “Performing manual backups” on page 856.
Perform a backupStep 4
Cross mount points (policy attribute)TheCrossmount points attribute controls whether NetBackup crosses file systemboundaries to back up or archive all files and directories in the selected path. Forexample, if root (/) is specified as the file path on a UNIX system, NetBackup backsup root (/) and all files and directories under root in the tree.
When this attribute is disabled, only the files that are in the same file system as theselected file path are backed up. By disabling, you also prohibit NetBackup fromcrossing mount points to back up root (/) without backing up all the file systemsthat are mounted on root. (For example, /usr and /home.)
713Creating backup policiesPolicy Attributes tab

In some cases, consider creating separate policies for the backups that cross mountpoints and those that do not. For example, in one policy, disable Cross mountpoints and include root (/) in the backup selection list. As a result, only the rootfile system is backed up, and not the file systems that are mounted on it. In anotherpolicy, enable Cross mount points and include root (/) in the backup selectionlist. As a result, all the data on the client is backed up.
Note:NetBackup specifically excludes mapped directories even if FollowNFS andCross mount points are enabled. To back up mapped directories, include thedirectories in the file list.
The following table lists items to consider when you use this policy attribute.
Table 20-15 Considerations for Cross mount points (policy attribute)
DescriptionItem
The behavior of Cross mount points can vary depending on how it is used incombination with Follow NFS.
See “Examples of using Cross mount points and Follow NFS in combination”on page 715.
See “Follow NFS (policy attribute)” on page 710.
Follow NFS (policy attribute)
The following backup selection entries behave in the following manner for Windowsand UNIX computers when the Cross mount points attribute is used:
■ /
Valid for UNIX clients. For Windows clients, the forward slash expands toALL_LOCAL_DRIVES.
■ :\
Valid for Windows clients. For UNIX clients, this entry creates a status 69 (Invalidfilelist specification).
■ *:\
Valid for Windows clients. For UNIX clients, this entry creates a status 69 (Invalidfilelist specification).
Backup selection entries
This attribute has no effect on UNIX raw partitions. If a raw partition is the root partitionand contains mount points for other file systems, the other file systems are not backedup when Cross mount points is enabled.
UNIX raw partitions
Do not use Cross mount points in policies on UNIX systems where you use theALL_LOCAL_DRIVES directive in the backup selection list.
Enabling Cross mount points can cause multiple backups of mounted volumes.
ALL_LOCAL_DRIVESdirective
714Creating backup policiesPolicy Attributes tab

Table 20-15 Considerations for Cross mount points (policy attribute)(continued)
DescriptionItem
Do not cross mount points to back up a media server that uses mount points to anydisk storage that contains backup images. If the policy crosses mount points, theNetBackup backup images that reside on that disk storage are backed up. TheNetBackup disk storage unit typesuse mount points for disk storage.
Mount points to disk storage
Examples of using Cross mount points and Follow NFSin combinationBy using Cross mount points and Follow NFS in combination, you can get avariety of results. Table 20-16summarizes the possible results.
Table 20-16 Results of using Cross mount point and Follow NFS incombination
ResultFollow NFSCross mountpoints
No crossing of mount points (default).DisabledDisabled
Back up NFS files if the file path is (or ispart of) an NFS mount.
EnabledDisabled
Cross local mount points but not NFSmounts.
DisabledEnabled
Follow the specified path across mountpoints to back up files and directories(including NFS), regardless of the filesystem where they reside.
EnabledEnabled
Note:NetBackup specifically excludes mapped directories even if FollowNFS andCross mount points are enabled. To back up mapped directories, include thedirectories in the file list.
Example 1 and Example 2 assume that the client disks are partitioned as shownin Figure 20-5.
715Creating backup policiesPolicy Attributes tab

Figure 20-5 Example configuration of client disks
d1
d2 d3Disks onLocal System
Disk onRemote System
/(root)
/usr /home/home/njr
/net/net/freddie/net/freddie/home
NFS
Table 20-17 Legend
DescriptionDisks
Contains /(root), /usr, and /home in separate partitions.d1
Contains a file system named /home/njr. Mounted on /home, whichis a partition on d1.
d2
Contains a directory named /net/freddie/home that is NFS-mountedon /net/freddie
d3
Example 1:
■ Cross mount points and Follow NFS are not selected.
■ The backup selection list contains the following entry://usr/home
■ In this case, NetBackup considers only the directories and files that are in thesame file system as the backup selection list entry. It does not back up/home/njr or /net/freddie/home.
Example 2:
■ Cross mount points and Follow NFS are selected.
■ The backup selection list only contains a forward slash:/
■ In this case, NetBackup backs up all the files and directories in the tree, includingthose under /home/njr and /net/freddie/home.
To back up only /usr and individual files under /, leave / out of the list andseparately list the files and directories you want to include. For example:
716Creating backup policiesPolicy Attributes tab

/usr
/individual_files_under_root
Compression (policy attribute)TheCompression attribute specifies that the backups use the software compressionthat is possible, based on the policy type. Check the box to enable compression.By default, compression is disabled.
Note: The Compression attribute is independent of the VxFS compression state.
See “About the backup and restore of compressed files on VxFS file systems”on page 1174.
Compression reduces the size of a backup by reducing the size of files in the backup.In turn, the smaller backup size decreases the number of media that is required forstorage. Compression also decreases the amount of data that travels over thenetwork as well as the network load. However, compression increases the overheadcomputing on the client and increases backup time due to the time required tocompress the files. The lower transfer rate that is associated with compression onthe client reduces the ability of some tape devices (notably 8mm) to stream data.The effect of the lower transfer rate causes additional wear on those devices.
The savings in media and network resources continue to make compressiondesirable unless total backup time or client computing resources become a problem.If total backup time is a problem, consider multiplexing. The NetBackup multiplexingfeature backs up clients in parallel, reducing the total time to back them up.
See “Media multiplexing (schedule attribute)” on page 783.
The degree to which a file can be compressed depends on the data type. A backupusually involves more than one type of data. Examples include stripped andunstripped binaries, ASCII, and the non-unique strings that repeat. Some data typesare more favorable to compression.
Note: When compression is not used, the server may receive more data than thespace that exists on the client. The discrepancy is due to client disk fragmentationand the file headers that the client adds. (To tell how much space a file occupies,run the du command. To tell how much free disk space is available, run the df
command.)
Table 20-18 describes the various factors to consider when you choose to useCompression.
717Creating backup policiesPolicy Attributes tab

Table 20-18 Considerations regarding compression
DescriptionItem
Programs, ASCII files, and unstripped binaries (typically 40% of the original size).
Best-case compression: Files that are composed of the strings that repeat can sometimesbe compressed to 1% of their original size.
Data types thatcompress well
Stripped binaries (usually 60% of original size).
Worst-case compression: Files that are already compressed become slightly larger ifcompressed again.
Data types that do notcompress well
File size has no effect on the amount of compression. However, it takes longer to compressmany small files than a single large one.
Effect of file size
Compression requires client computer processing unit time and as much memory as theadministrator configures.
Client resources thatare required
Compression uses as much of the computer processing unit as available and affects otherapplications that require the computer processing unit. For fast CPUs, however, I/O ratherthan CPU speed is the limiting factor.
Effect on clientperformance
NetBackup does not compress the following files:
■ Files that are equal to or less than 512 bytes, because that is the tar block size.■ On UNIX clients, files with the following suffixes:
.arc .gz .iff .sit.bin
.arj .hqx .pit .tiff
.au .hqx.bin .pit.bin .Y
.cpt .jpeg .scf .zip
.cpt.bin .jpg .sea .zom
.F .lha .sea.bin .zoo
.F3B .lzh .sit .z
.gif .pak
■ On UNIX clients, if a compressed file has a unique file extension, exclude it fromcompression by adding it under the Client Settings (UNIX) properties.
Files that are notcompressed
If compressed data is written to a storage unit that has single-instance store (SIS) capabilities,the storage unit may not be able to use data deduplication on the compressed or the encrypteddata. In data deduplication, only one instance of the file is stored. Subsequent instances ofthe file reference the single file.
Effect of using withstorage units with SIScapabilities
Note: If compressed data is written to a storage unit that has deduplicationcapabilities, the storage unit may not be able to deduplicate the data.
718Creating backup policiesPolicy Attributes tab

Encryption (policy attribute)The Encryption attribute determines whether the backup should be encrypted bythe client. When the server initiates the backup, it passes on the Encryption policyattribute to the client in the backup request.
The client compares the Encryption policy attribute to the Encryption hostproperties for the client. If the encryption permissions for the client are set toREQUIRED or ALLOWED, the policy can encrypt the backups for that client.
See “Encryption properties” on page 126.
For additional encryption configuration information, see the NetBackup Securityand Encryption Guide.
Note: If encrypted data is written to a storage unit that has deduplication capabilities,the storage unit may not be able to deduplicate the encrypted data.
About NetBackup encryption optionsNetBackup provides several methods for encrypting backups, as described in thefollowing table.
Table 20-19 NetBackup encryption options
DescriptionOption
The NetBackup client encryption option is a software-basedsolution that encrypts the data on the client. The data is encryptedin transit and at rest. Each client manages its own encryptionkeys.
To enable client encryption, select the backup policy Encryptionattribute.
See “Encryption (policy attribute)” on page 719.
Client encryption
719Creating backup policiesPolicy Attributes tab

Table 20-19 NetBackup encryption options (continued)
DescriptionOption
With hardware-based tape drive encryption, an encrypting tapedrive encrypts the data. The data is encrypted at rest only. TheNetBackup Key Management Service manages the encryptionkeys.
See the “Data at rest key management” chapter in the NetBackupSecurity and Encryption Guide.
One method to manage the volumes for hardware-based tapeencryption is to use a reserved prefix on the volume pool name.The storage device must have encrypting tape drives. The storageunit must specify the storage device that has the encrypting tapedrives. The backup policy must specify the correct storage unitand volume pool.
See “About reserved volume pool name prefixes” on page 455.
Tape drive encryption
With software-based encryption, an agent on the media serverencrypts the data. The data is encrypted at rest only. The MediaServer Encryption Option uses an external agent that encryptsthe data and manages the encryption keys.
See the NetBackup Media Server Encryption OptionAdministrator’s Guide.
Software-based mediaserver encryption
A plug-in in the NetBackup OpenStorage stack encrypts the data.The data is encrypted at rest only. The NetBackup KeyManagement Service manages the encryption keys.
See the NetBackup AdvancedDisk Storage Solutions Guide.
AdvancedDisk encryption
A plug-in in the NetBackup OpenStorage stack encrypts the data.The data is encrypted at rest only (by default, NetBackup usesSSL for read and write operations). The NetBackup KeyManagement Service manages the encryption keys.
See the NetBackup Cloud Administrator’s Guide.
Cloud storage encryption
The MSDP deduplication plug-in encrypts the data. The data canbe encrypted in transit and at rest or at rest only. The NetBackupdeduplication plug-in manages the encryption keys.
See the NetBackup Deduplication Guide.
Media ServerDeduplication Poolencryption
720Creating backup policiesPolicy Attributes tab

Collect disaster recovery information for Bare Metal Restore (policyattribute)
The Collect disaster recovery Information for Bare Metal Restore attributespecifies whether the BMR client agent runs on each client. If the attribute is enabled,the BMR client agent runs before each backup to save the configuration informationof the client. The Activity Monitor displays the activity as a job separate from thebackup.
Only policy types MS-Windows (for Windows clients) and Standard (for UNIXclients) support this policy attribute. This attribute is enabled by default when oneof these policy types is used to create a policy on a master server that is licensedfor BMR.
For more information, see the Bare Metal Restore Administrator’s Guide:
For more information, see the Bare Metal Restore Administrator’s Guide.
Collect true image restore information (policy attribute) with andwithout move detection
The Collect true image restore information attribute specifies whether the policycollects the information necessary to perform a true image restore. A true imagerestore (TIR) restores the contents of a directory to reflect the contents of thedirectory at the time of an incremental or a full backup. Files that were deletedbefore the backup are not restored.
With the attribute enabled, a restore based on an incremental backup includes allfiles that were backed up since the last full backup. The restore also includes thosefiles that were deleted at any time during that period.
NetBackup starts to collect the true image restore information with the next full orincremental backup for the policy. The true image restore information is collectedfor each client regardless of whether any files were changed.
NetBackup does not provide true image restores based on the time of a user backupor archive. However, NetBackup uses a user backup for a true image restore if thebackup is more recent than the latest automatic full or incremental backup.
For true image incremental backups, enable With move detection to include thefiles that were moved, renamed, or newly installed in the directories. These filesmay be from a tar or a zip archive. (Depending on how the files were packaged andhow they were installed, some newly installed files are not backed up by non-TIRincremental backups.
NetBackup detects changes by comparing path names and inode numbers withthose from the previous full or incremental backup. If either the name or an inodenumber is new or changed, the file or directory is backed up. NetBackup begins to
721Creating backup policiesPolicy Attributes tab

collect the information for move detection with the next full or incremental backupfor the policy. This first backup after the attribute is set always backs up all files,even if it is an incremental backup.
Note: With move detection must be enabled to create a synthetic backup.
See “Synthetic backup (schedule attribute)” on page 768.
The following examples show how move detection backs up the files that otherwisewould not be backed up:
■ On Windows:
■ A file that is named C:\pub\doc is moved to or installed in C:\spec\doc.The archive bit is unchanged but C:\spec\doc is new in the C:\spec\
directory and is backed up.
■ A directory that is named C:\security\dev\ is renamed asC:\security\devices\. The archive bit is unchanged butC:\security\devices\ is a new directory and is backed up.
■ On UNIX:
■ A file that is named /home/pub/doc is moved to /home/spec/doc. Themodification time is unchanged but /home/spec/doc is new in the/home/spec/ directory and is backed up.
■ A directory that is named /etc/security/dev is renamed as/etc/security/devices. The modification time is unchanged but/etc/security/devices is a new directory and is backed up.
■ A file that is named /home/pub/doc is installed when extracted from a UNIXtar file. The modification time is before the time of the last backup. The fileis new in the /home/pub/ directory and is backed up.
■ A file that is named docA is removed, then a file that is named docB isrenamed as docA. The new docA has the same name but since its inodenumber has changed, it is backed up.
NetBackup begins to collect the information that is required for move detection withthe next full or incremental backup for the policy. This first backup after the attributeis set always backs up all files, even if it is an incremental backup.
Move detection consumes space on the client and the backup can fail if there isnot enough disk space available.
722Creating backup policiesPolicy Attributes tab
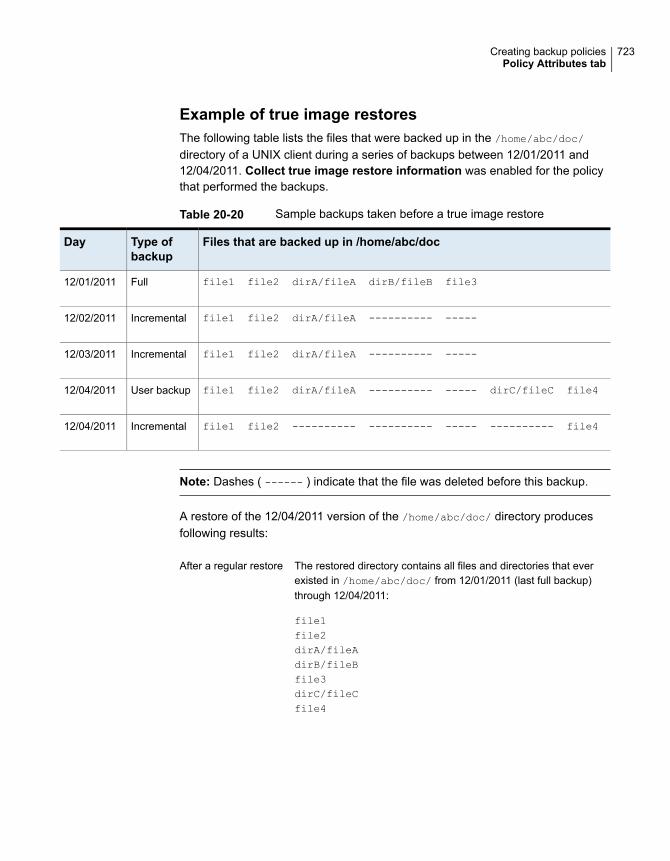
Example of true image restoresThe following table lists the files that were backed up in the /home/abc/doc/
directory of a UNIX client during a series of backups between 12/01/2011 and12/04/2011. Collect true image restore information was enabled for the policythat performed the backups.
Table 20-20 Sample backups taken before a true image restore
Files that are backed up in /home/abc/docType ofbackup
Day
file1 file2 dirA/fileA dirB/fileB file3Full12/01/2011
file1 file2 dirA/fileA ---------- -----Incremental12/02/2011
file1 file2 dirA/fileA ---------- -----Incremental12/03/2011
file1 file2 dirA/fileA ---------- ----- dirC/fileC file4User backup12/04/2011
file1 file2 ---------- ---------- ----- ---------- file4Incremental12/04/2011
Note: Dashes ( ------ ) indicate that the file was deleted before this backup.
A restore of the 12/04/2011 version of the /home/abc/doc/ directory producesfollowing results:
The restored directory contains all files and directories that everexisted in /home/abc/doc/ from 12/01/2011 (last full backup)through 12/04/2011:
file1file2dirA/fileAdirB/fileBfile3dirC/fileCfile4
After a regular restore
723Creating backup policiesPolicy Attributes tab

The restored directory contains only the files and directories thatexisted at the time of the incremental backup:
file1file2file4
NetBackup does not restore any of the files that were deleted beforethe 12/04/2011 incremental backup.
The restored directory does not include the subdirectories dirAand dirC, even though they were backed up on 12/04/2011 witha user backup.
NetBackup did not restore these directories because they did notexist at the time of the incremental backup. The incremental backupwas the reference for the true image restore.
After a true imagerestore
Consider the following points to use either Collect true image restore or Collecttrue image restore with move detection:
■ NetBackup collects additional information for the incremental backups that collecttrue image restore information. Policies that use move detection require evenmore space.
■ Incremental backups are slower for a policy in which true image restoreinformation is collected.
■ Configure the period of time that NetBackup retains the true image restoreinformation. Set the Keep true image restoration (TIR) information propertyin the Clean-up properties dialog box.See “Clean-up properties” on page 88.
■ Only directories can be listed and selected. In true image restore mode, theclient interface does not display individual files. Refer to the online Help in theBackup, Archive, and Restore client interface for more information on trueimage restores.
■ A true image restore preserves the files that are currently in the directory butwere not present when the backup was completed. If you created a file file5
after an incremental backup on 12/04/2011 but before a restore, the contentsof the restored directory would be as follows:
file1
file2
file4
file5
724Creating backup policiesPolicy Attributes tab

Allow multiple data streams (policy attribute)The Allow multiple data streams attribute specifies that NetBackup can divideautomatic backups for each client into multiple jobs. The directives, scripts, ortemplates in the backup selection list specify whether each job can back up only apart of the backup selection list. Because the jobs are in separate data streams,they can occur concurrently.
The directives, scripts, or templates in the backup selection list determine thenumber of streams (backup jobs) that start for each client. The list also determineshow the backup selection list is divided into separate streams.
The following settings determine the number of streams that can run concurrently:
■ Number of available storage units
■ Multiplexing settings
■ Maximum jobs parameters
Multistreamed jobs consist of a parent job to perform stream discovery and childrenjobs for each stream. Each child job displays its own job ID in the Job ID columnin the Activity Monitor. The job ID of the parent job appears in the Parent Job IDcolumn, which is not displayed by default. Parent jobs display a dash (-) in theSchedule column.
Note: If this attribute is enabled, and a file system is in a client’s exclude list, aNetBackup job appears in the Activity Monitor for the excluded file system.However, no files in the excluded file system are backed up by the job.
The following table describes the reasons to use multiple data streams.
725Creating backup policiesPolicy Attributes tab

Table 20-21 Reasons to use multiple data streams
DescriptionReason
Multiple data streams can reduce the backup time for large backups bysplitting the backup into multiple streams. Use multiplexing, multiple drives,or a combination of the two to process the streams concurrently.
Configure the backup so each device on the client is backed up by a separatedata stream that runs concurrently with streams from other devices.
For best performance, use only one data stream to back up each physicaldevice on the client. Multiple concurrent streams from a single physical devicecan adversely affect backup times. The heads must move back and forthbetween the tracks that contain files for the respective streams.
Figure 20-6 shows why multiple concurrent streams from a single device arenot recommended.
To reduce backup time
Because the backup streams run independently, the use of multiple datastreams can shorten the retry time in the event of a backup failure. A singlefailure only terminates a single stream. NetBackup can restart the failedstream without restarting the others.
For example, assume the backup for a 10-gigabyte partition is split into fivestreams, each containing 2 gigabytes. If the last stream fails after it writes1.9 gigabytes (a total of 9.9 gigabytes is backed up), NetBackup retries onlythe last gigabyte stream. If the 10-gigabyte partition is backed up withoutmultiple data streams and a failure occurs, the entire 10-gigabyte backupmust be retried.
The Schedule backup attempts property in the Global Attributesproperties, applies to each stream. For example, if the Schedule backupattempts property is set to 3, NetBackup retries each stream a maximumof three times.
The Activity Monitor displays each stream as a separate job. Use the jobdetails view to determine the files that are backed up by each of these jobs.
See “Global Attributes properties” on page 159.
To reduce retry time for backup failures
Use multiple data streams in a configuration that contains large file serverswith many file systems and volumes. Multiple data streams provide morebackups with fewer policies than are otherwise required.
To reduce administration by runningmore backups with fewer policies
726Creating backup policiesPolicy Attributes tab

Figure 20-6 Multiple stream recommendations
Recommended for best perfomance
Client
NetBackupServer
Drive A
Drive B
Back up each device with aseparate stream that runsconcurrently with streams fromother devices. Then, multiplexthe streams or send them toseparate tapes.
Stream
Stream
Not recommended
Client
NetBackupServer
Drive A
Drive B
Multiple concurrent streams froma single device can adverselyaffect backup times.
Stream
Stream
Stream
Stream
The following table describes the aspects of multiple data streams that areadjustable.
Table 20-22 Adjustable aspects of multiple data streams
DescriptionItem
The backup selection list determines the total number of streams that are started. TheNEW_STREAM directive lets you configure a fixed number of streams, or you canallow the client dynamically define the streams.
See “About the directives on the Backup Selections list” on page 832.
Note: For best performance, use only one data stream to back up each physical deviceon the client. Multiple concurrent streams from a single physical device can adverselyaffect backup times. Backup times are affected because the device heads must movebetween the tracks that contain files for the respective streams.
The total number of streams
727Creating backup policiesPolicy Attributes tab

Table 20-22 Adjustable aspects of multiple data streams (continued)
DescriptionItem
The following factors determine the number of streams that can run concurrently for apolicy or client:
■ Number of the drives that are available.■ Maximum concurrent jobs settings for the policy and client.■ Storage unit and schedule multiplexing limit.
Each storage unit and each schedule have a maximum multiplexing setting. Thelower of the two settings is the limit for a specific schedule and storage unit. Themaximum streams are limited to the sum of the multiplexing limits for all drivesavailable in the storage unit and schedule combinations.For example, assume that two storage units have one drive in each. Multiplexingon storage unit 1 is set to 3 and multiplexing on storage unit 2 is set to 5. Ifmultiplexing is set to 5 or greater in the schedules, then 8 streams can runconcurrently.See “Media multiplexing (schedule attribute)” on page 783.
The number of streams thatrun concurrently
The maximum jobs settings limit the maximum number of streams as follows:
Table 20-23 Job settings that limit the maximum number of streams
Access methodItem
■ In the left pane, expand NetBackup Management > Host Properties.■ Select Master Servers, and in the right pane, double-click the master server you
want to modify.■ In the properties dialog box, in the left pane, click Global Attributes.
See “Global Attributes properties” on page 159.
See “Media multiplexing (schedule attribute)” on page 783.
Maximum jobs per client(host property)
■ In the left pane, expand NetBackup Management > Policies.■ In the right pane, double-click a policy you want to modify.
See “Limit jobs per policy (policy attribute)” on page 706.
Limit jobs per policy (policyattribute)
■ In the left pane, expand NetBackup Management > Host Properties.■ Select Master Servers, and in the right pane, double-click the master server you
want to modify.■ In the properties dialog box, in the left pane, click Client Attributes.
See “General tab of the Client Attributes properties” on page 94.
Maximum data streams(host property)
Job settings also affect the maximum number of streams. The following tabledescribes the interdependency of these settings.
728Creating backup policiesPolicy Attributes tab

Table 20-24 Interdependency of job settings
DescriptionItem
NetBackup uses the value that is specified by eitherMaximum jobs per client or Limitjobs per policy, whichever is lower.
Maximum data streamsproperty is disabled.
NetBackup ignoresMaximum jobs per client. Instead, NetBackup uses the value thatis specified by either Maximum data streams or Limit jobs per policy, whichever islower.
Maximum data streamsproperty is enabled.
See “About the directives on the Backup Selections list” on page 832.
Disable client-side deduplication (policy attribute)The Disable client-side deduplication attribute appears only if the NetBackupData Protection Optimization Option license key is active.
The clients that are configured for client-side deduplication behave as follows whenthis attribute is enabled or disabled:
The clients do not deduplicate their own data and do not send theirbackup data directly to the storage server. The NetBackup clients sendtheir data to a deduplication media server. That server deduplicatesthe data and then sends it to the storage server.
Enabled
The clients deduplicate their own data. They also send it directly to thestorage server. Media server deduplication and data transport arebypassed.
Disabled
The Deduplication property configures clients for client-side deduplication. TheDisable client-side deduplication policy attribute overrides the Deduplicationproperty. The Deduplication property is found on the General tab of the ClientAttributes host properties.
See “Where deduplication should occur” on page 98.
See the NetBackup Deduplication Guide.
Enable granular recovery (policy attribute)The Enable granular recovery attribute is available for the following policy types:
■ MS-Exchange-Server
■ MS-SharePoint
■ MS-Windows (for Active Directory)
729Creating backup policiesPolicy Attributes tab

With this option enabled, users can restore the individual objects that reside withina database backup image, such as:
■ A user account from an Active Directory database backup
■ Email messages or folders from an Exchange database backup
■ A document from a SharePoint database backup
NetBackup does not support the compression or encryption of backups that useGranular Recovery Technology (GRT). When the Enable granular recovery optionis enabled, the Compression option and the Encryption option are automaticallydisabled.
Granular-level restores can be performed only if the backup was written to a diskstorage unit.
For more information on how to configure NetBackup to perform granular-levelbackups, see the following:
■ NetBackup for SharePoint Server Administrator’s Guide
■ NetBackup for Exchange Server Administrator’s Guide
■ See “Active Directory granular backups and recovery” on page 857.
Use Accelerator (policy attribute)NetBackup Accelerator increases the speed of full backups. The increase in speedis made possible by change detection techniques on the client. The client uses thechange detection techniques and the client's current file system to identify thechanges that occurred since the last backup. The client sends the changed datato the media server in a more efficient backup stream. The media server combinesthe changed data with the rest of the client's data that is stored in previous backups.
If a file or portion of a file is already in storage and has not been changed, the mediaserver uses the copy in storage rather than reading it from the client. The end resultis a full NetBackup backup.
Accelerator has the following advantages:
■ Reduces the I/O and CPU overhead on the client. The result is a faster backupand less load on the client.
■ Creates a compact backup stream that uses less network bandwidth betweenclient and server.
■ Creates a full image that contains all data that is needed for restore.
730Creating backup policiesPolicy Attributes tab

Note: Accelerator operates differently when used for backup of virtual machines,NDMP for NetApp filers, and databases.
For full details on Accelerator for VMware, see the NetBackup for VMwareAdministrator's Guide.
For full details on Accelerator for NDMP for NetApp filers, see the NetBackup forNDMP Administrator's Guide.
For full details on Accelerator for Oracle, SharePoint, Exchange, or SQL Server,see the NetBackup guide for that agent.
How the NetBackup Accelerator worksThe NetBackup Accelerator creates the backup stream and backup image as follows:
■ If the client has no previous backup, NetBackup performs a full backup andcreates a track log. The track log contains information about the client's data,for comparison at the next backup.
■ At the next backup, NetBackup identifies data that has changed since theprevious backup. To do so, it compares information from the track log againstinformation from the file system for each file. For NTFS and ReFS file systems,it also uses the Windows change journal to help identify the data that haschanged since the last backup.Accelerator uses the Windows change journal in two ways: To check for changesin the file system metadata, and to help detect which files have changed sincethe last backup.See “Accelerator and the Windows change journal” on page 733.
■ The NetBackup client sends to the media server a backup stream that consistsof the following: The client's changed blocks, and the previous backup ID anddata extents (block offset and size) of the unchanged blocks.
■ The media server receives the client's changed blocks and the backup ID anddata extents of the unchanged blocks. From the backup ID and file systemdescriptors, the media server locates the rest of the client's data in existingbackups.
■ The media server directs the storage server to write the changed blocks andthe unchanged blocks in a new full image.
Figure 20-7 shows how an Accelerator backup stream is composed.
731Creating backup policiesPolicy Attributes tab

Figure 20-7 NetBackup client: Accelerator backup stream
H1
Comparison with track logindicates H2 data is new:The rest is unchanged.
data H2 data H3 data ... H10 data
Files in backup selections:
Hn1 H2 data Hn3 ... Hn10
Client creates backup stream:
n = indicates data is unchanged. For unchangeddata, stream supplies backup ID, block offset, andsize, for reference to previous backups.
Figure 20-8 shows how the media server constructs a backup image from theAccelerator stream and from previous backups:
Figure 20-8 NetBackup media server constructs backup image
H1
Existing backupimage in storage
data H2 data H3 data ... H10 data
Hn1 H2 data Hn3 ... Hn10
New backupimage
H1 data H3 data ... H10 data
Media server reads backup streamand locates H1 and H3 – H10 data inexisting backups:
Media server tells storage server to write changed blocks (H2data) and unchanged blocks in a new full image:
unused
Backup streamfrom client
Figure 20-9 recaps Accelerator details in the context of the principal NetBackupprocesses.
732Creating backup policiesPolicy Attributes tab
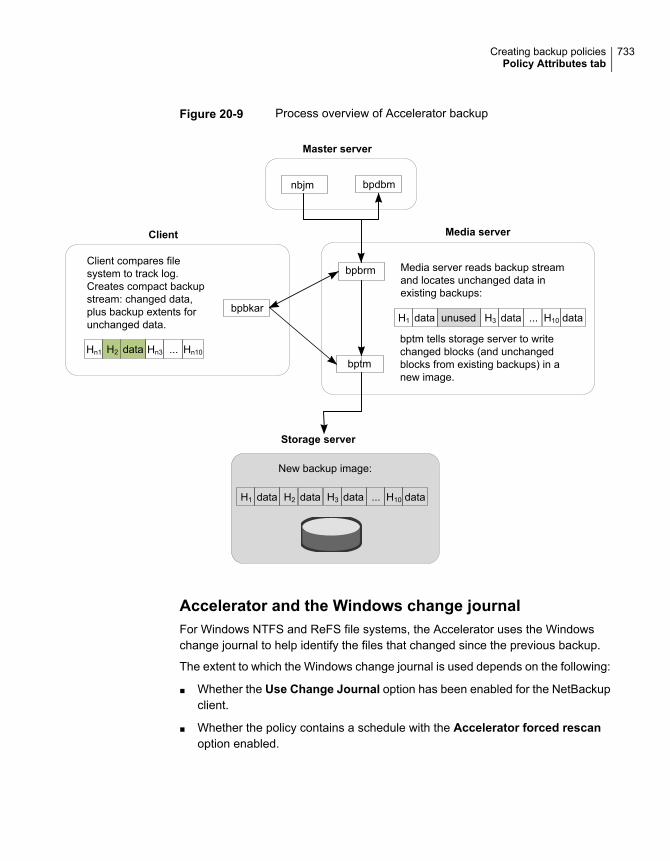
Figure 20-9 Process overview of Accelerator backup
H1
Client
data H2 data H3 data ... H10 data
Hn1 H2 data Hn3 ... Hn10
New backup image:
Media server
bpbkar
Master server
nbjm
bpbrm
bptm
H1 data H3 data ... H10 dataunused
Client compares filesystem to track log.Creates compact backupstream: changed data,plus backup extents forunchanged data.
Media server reads backup streamand locates unchanged data inexisting backups:
bptm tells storage server to writechanged blocks (and unchangedblocks from existing backups) in anew image.
Storage server
bpdbm
Accelerator and the Windows change journalFor Windows NTFS and ReFS file systems, the Accelerator uses the Windowschange journal to help identify the files that changed since the previous backup.
The extent to which the Windows change journal is used depends on the following:
■ Whether the Use Change Journal option has been enabled for the NetBackupclient.
■ Whether the policy contains a schedule with the Accelerator forced rescanoption enabled.
733Creating backup policiesPolicy Attributes tab

Note: Regardless of the Use Change Journal setting or the Accelerator forcedrescan setting, the Windows change journal always helps determine if a file haschanged.
Table 20-25 How Accelerator uses the Windows change journal
Accelerator use of change journalNetBackup configuration
For full backups and incremental backups, NetBackup examines the metadata forevery file to determine if the file has changed. Even without the Use ChangeJournal option, the Windows change journal helps determine if a file has changed.
The Use Change Journal optionis not enabled
The Windows change journal helps determine if a file has changed during both fullbackups and incremental backups.
■ During incremental backups, the Windows change journal is used exclusivelyto determine if a file has changed. NetBackup does not examine the filemetadata.
■ During full backups, NetBackup examines the metadata for every file, todetermine whether the file has changed. In addition, NetBackup uses theWindows change journal to help determine whether a file has changed.
The Use Change Journal optionis enabled but the Acceleratorforced rescan option is notenabled on any of the policy'sschedules
The Windows change journal helps determine if a file has changed during both fullbackups and incremental backups.
■ During incremental backups, the Windows change journal is used exclusivelyto determine if a file has changed. NetBackup does not examine the filemetadata.
■ During full backups:■ For a full backup schedule that does not enable the Accelerator forced
rescan option:The Windows change journal is used exclusively to determine if a file haschanged. NetBackup does not examine the file metadata.
■ For a full backup schedule that enables the Accelerator forced rescanoption:NetBackup examines the metadata for every file, to determine whether thefile has changed. In addition, NetBackup uses the Windows change journalto help determine whether a file has changed.
The Use Change Journal optionis enabled and the Acceleratorforced rescan option is enabledon at least one of the policy'sschedules
Accelerator notes and requirementsNote the following about the NetBackup Accelerator:
■ NetBackup Accelerator requires the Data Protection Optimization Option license.For the latest information on licensing, contact your Veritas sales or partnerrepresentative.
734Creating backup policiesPolicy Attributes tab

■ Supports the disk storage units only. Supported storage includes Media ServerDeduplication Pool, NetBackup appliance, cloud storage, and qualifiedthird-party OST storage. See the NetBackup Hardware Compatibility List forsupported storage types:
■ Storage unit groups are supported only if the storage unit selection in the groupis Failover.
■ Supports the MS-Windows and Standard policy types. Supports all features ofNetBackup that work with the MS-Windows or Standard policy types.
Note: Accelerator for virtual machines operates differently from Accelerator forphysical computers. For all details on Accelerator for virtual machines, see theNetBackup for VMware Administrator's Guide.
Note: Accelerator operates differently when used for backup of virtual machines,NDMP for NetApp filers, and Oracle databases.
For full details on Accelerator for VMware, see the NetBackup for VMwareAdministrator's Guide.
For full details on Accelerator for NDMP for NetApp filers, see the NetBackupfor NDMP Administrator's Guide.
For full details on Accelerator for Oracle, see the NetBackup for OracleAdministrator's Guide.
■ Accelerator backups ignore the policy attribute that resets the atime on filesafter backup.By default, NetBackup records the file access time (atime) for each UNIX filethat it backs up, and then resets the atime after the file is backed up. Resettingthe atime in this way causes the change time (ctime) to update as well. Thisbehavior is normally controlled by the following policy attribute:Reset file accesstime to the value before backup. (Default: enabled.)When NetBackup Accelerator is used to perform backups, NetBackup does notreset the atime after the file is backed up, regardless of the policy attributesetting. NetBackup does not reset the atime (which avoids updating the ctime)because a ctime update would require a loss in Accelerator optimization.See “Client Settings properties for UNIX clients” on page 107.
■ Supports the full backups and incremental backups.See “Accelerator backups and the NetBackup catalog” on page 737.
■ Supports all platforms, file systems, and logical volumes that NetBackupsupports.
735Creating backup policiesPolicy Attributes tab

■ Supports the Windows NTFS and ReFS change journal (Use Change Journal)but does not support the VxFS change journal.
■ For every policy that enables the Use Accelerator option, Veritas recommendsat a minimum the following backup schedules:A full backup schedule with the Accelerator forced rescan option enabled.Another full backup schedule without the Accelerator forced rescan optionenabled.See “Accelerator forced rescan option (schedule attribute)” on page 769.
■ If Collect true image restore information is enabled in the policy, NetBackupperforms a regular file system scan to determine the files and folders to includein the backup. It also queries the change journal to help determine which fileshave changed.More information is available on the Use change journal option and theAccelerator:See “Accelerator and the Windows change journal” on page 733.
■ If a previous backup of the client does not exist, NetBackup performs a fullbackup and creates a track log on the client. This initial backup occurs at thespeed of a normal (not accelerated) full backup. Subsequent Accelerator backupsof the client use the track log for accelerated backup speed.
Note: When you first enable a policy to use Accelerator, the next backup(whether full or incremental) is in effect a full backup: It backs up all files in theBackup Selections tab. If that backup was scheduled as an incremental, it maynot complete within the backup window. For example, when you upgrade policiesto 7.7 and first enable the Use Accelerator option, note: Make sure that thenext backup window is large enough for a full backup.
■ NetBackup retains track logs for future Accelerator backups. Whenever youchange the policy's backup selections list, NetBackup does a full non-acceleratedbackup of the selections that were changed or added in the list. The unchangedbackup selections are processed as normal Accelerator backups.
■ If the storage unit that is associated with the policy cannot be validated whenyou create the policy, note: The storage unit is validated later when the backupjob begins. If Accelerator does not support the storage unit, the backup fails. Inthe bpbrm log, a message appears that is similar to one of the following:
Storage server %s, type %s, doesn't support image include.
Storage server type %s, doesn't support accelerator backup.
736Creating backup policiesPolicy Attributes tab
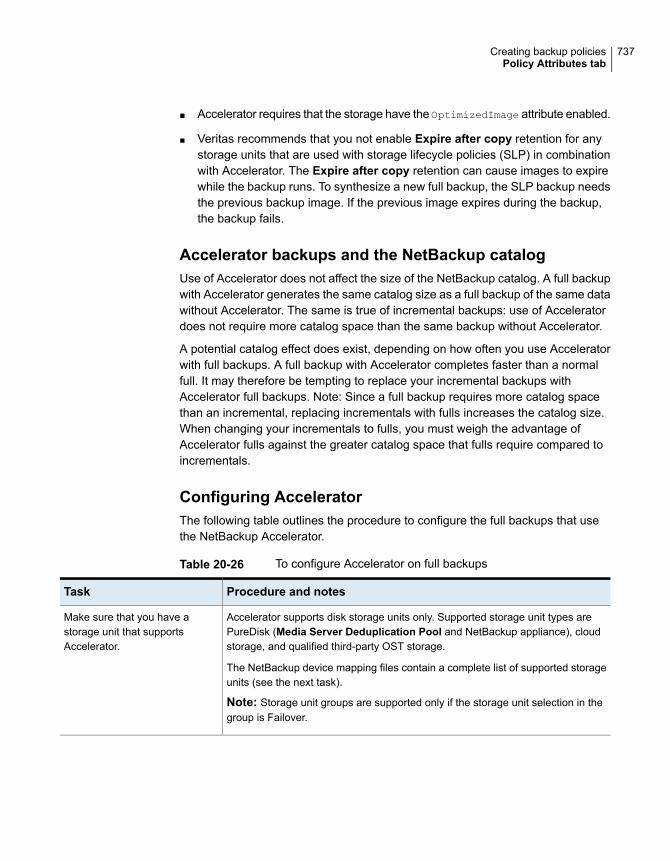
■ Accelerator requires that the storage have the OptimizedImage attribute enabled.
■ Veritas recommends that you not enable Expire after copy retention for anystorage units that are used with storage lifecycle policies (SLP) in combinationwith Accelerator. The Expire after copy retention can cause images to expirewhile the backup runs. To synthesize a new full backup, the SLP backup needsthe previous backup image. If the previous image expires during the backup,the backup fails.
Accelerator backups and the NetBackup catalogUse of Accelerator does not affect the size of the NetBackup catalog. A full backupwith Accelerator generates the same catalog size as a full backup of the same datawithout Accelerator. The same is true of incremental backups: use of Acceleratordoes not require more catalog space than the same backup without Accelerator.
A potential catalog effect does exist, depending on how often you use Acceleratorwith full backups. A full backup with Accelerator completes faster than a normalfull. It may therefore be tempting to replace your incremental backups withAccelerator full backups. Note: Since a full backup requires more catalog spacethan an incremental, replacing incrementals with fulls increases the catalog size.When changing your incrementals to fulls, you must weigh the advantage ofAccelerator fulls against the greater catalog space that fulls require compared toincrementals.
Configuring AcceleratorThe following table outlines the procedure to configure the full backups that usethe NetBackup Accelerator.
Table 20-26 To configure Accelerator on full backups
Procedure and notesTask
Accelerator supports disk storage units only. Supported storage unit types arePureDisk (Media Server Deduplication Pool and NetBackup appliance), cloudstorage, and qualified third-party OST storage.
The NetBackup device mapping files contain a complete list of supported storageunits (see the next task).
Note: Storage unit groups are supported only if the storage unit selection in thegroup is Failover.
Make sure that you have astorage unit that supportsAccelerator.
737Creating backup policiesPolicy Attributes tab

Table 20-26 To configure Accelerator on full backups (continued)
Procedure and notesTask
The NetBackup device mapping files contain all storage device types thatNetBackup can use. To add support for the new devices or upgraded devices thatsupport Accelerator, download the current device mapping files from the Veritassupport site.
See “About the device mapping files” on page 407.
See “Downloading the device mapping files” on page 407.
Update the NetBackup devicemapping files if needed.
Select the following on the policy Attributes tab:
■ A disk storage unit that supports Accelerator.■ The Use Accelerator option.
Accelerator operates differently when used for backup of virtual machines, NDMPfor NetApp filers, and Oracle databases.
■ For full details on Accelerator for VMware, see the NetBackup for VMwareAdministrator's Guide.
■ For full details on Accelerator for NDMP for NetApp filers, see the NetBackupfor NDMP Administrator's Guide.
■ For full details on Accelerator for Oracle, see the NetBackup for OracleAdministrator's Guide.
Configure a Standard,MS-Windows, VMware , NDMPor Oracle backup policy.
This option provides an additional level of Accelerator change detection in theclient's data. This option reduces the speed of Accelerator.
See “Accelerator forced rescan option (schedule attribute)” on page 769.
See “Accelerator and the Windows change journal” on page 733.
To periodically establish a newbaseline of change detection onthe client, you can select theAccelerator forced rescanoption on the Schedule Attributetab of the policy.
Accelerator messages in the backup job details logA NetBackup backup that uses Accelerator writes a message similar to the followingin the job details log:
11/23/2011 10:50:27 AM - Info bpbrm(pid=412) accelerator enabled
When NetBackup uses the NTFS or ReFS change journal for the backup, messagessimilar to the following appear in the job details log:
9/24/2011 8:54:14 PM - Info bpbkar32(pid=7868) change journal enabled
for <C:\>
9/24/2011 8:54:14 PM - Info bpbkar32(pid=7868) using change journal
data for <C:\>
738Creating backup policiesPolicy Attributes tab

If the NTFS or ReFS change journal cannot be used, a message of the followingform appears in the job details log:
not using change journal data for <backup selection>: <reason ...>
See “Log messages about the Use Change Journal option and Accelerator”on page 740.
When the Accelerator forced rescan option is used, a message similar to thefollowing appears in the job details log:
9/25/2011 5:46:52 PM - Info bpbrm(pid=4136) Accelerator enabled
backup with checksum based change detection needs to read each file and
calculate the checksum, and will have longer backup time.
See “Log messages about the Use Change Journal option and Accelerator”on page 740.
NetBackup logs for AcceleratorFor log messages about Accelerator, see the following NetBackup log directories.
Table 20-27 NetBackup logs that pertain to Accelerator
Resides onLog directory
NetBackup master or media serverUNIX: /usr/openv/netbackup/logs/bpbrm
Windows: install_path\NetBackup\logs\bpbrm
NetBackup media serverUNIX: /usr/openv/netbackup/logs/bptm
Windows: install_path\NetBackup\logs\bptm
NetBackup clientUNIX: /usr/openv/netbackup/logs/bpbkar
Windows: install_path\NetBackup\logs\bpbkar
To create the log directories, run the following command on the NetBackup serversand client:
On Windows:
install_path\NetBackup\logs\mklogdir.bat
On UNIX:
/opt/openv/netbackup/logs/mklogdir
739Creating backup policiesPolicy Attributes tab

Log messages about the Use Change Journal option andAcceleratorThe Accelerator uses the NTFS or ReFS change journal to help identify datachanges on the Windows client. The following table describes the change journalmessages that may appear in the NetBackup job details log in the Activity Monitor.The left column lists the messages.
For Accelerator backups, these messages indicate various impediments to the useof the Windows change journal. In general, they indicate either of the following:
■ That the Accelerator cannot use the change journal for the backup. To use thechange journal, you may need to reconfigure the policy.
■ That the Accelerator cannot exclusively use the change journal to detect changesin the file system. NetBackup examines the file system metadata for each file,to detect which files have changed. It also uses the change journal to help detectwhich files have changed.
Note: In the following messages, the variable <%%s> represents the items in yourbackup selections list.
The change journal messages often appear in pairs. The first message indicateswhy the change journal cannot be used. For example:
not using change journal data for <%%s>: forced rescan requested
The second message indicates that the Accelerator nevertheless can use thechange journal to detect changed files:
not using change journal data for enumeration for <%%s> but will use
it for change detection
Table 20-28 Accelerator messages on the Windows Use Change Journaloption (job details log)
DescriptionMessage in NetBackupjob details
NetBackup uses the change journal to help detect which files have changed. NetBackupalso examines the file system metadata for each file to help detect which files havechanged.
Note: Before this message appears, another message explains why NetBackup doesnot rely entirely on the change journal data to detect changed files.
not using changejournal data forenumeration for <%%s>but will use it forchange detection
740Creating backup policiesPolicy Attributes tab

Table 20-28 Accelerator messages on the Windows Use Change Journaloption (job details log) (continued)
DescriptionMessage in NetBackupjob details
The Accelerator forced rescan option is enabled on the full backup schedule for thepolicy. As a result, NetBackup cannot rely entirely on the change journal data to detectchanged files. NetBackup also examines the file system metadata for each file to helpdetect which files have changed.
not using changejournal data for<%%s>: forced rescanrequested
The backup uses a number of filters to determine which files and directories to includein the backup. The filters are the following: NetBackup exclude and include lists, thefiles and directories that are included in the Shadow Copy Components and in thesystem state backup, and others.
During a backup, a checksum is calculated against the filters. When a new backupruns, the checksum for the current backup is compared against the checksum of theprevious backup. If the checksums do not match, the change journal data cannot beused. Instead, Accelerator performs a regular file system scan to determine the filesand folders to include in the backup.
No action is required. If the filters do not change between backups, the change journaldata is used at the next backup.
not using changejournal data for<%%s>: filter checksumcalculation failed
Accelerator cannot use the Use Change Journal option in the following cases:
■ No previous backup exists: No baseline update sequence number (USN) wasestablished from the NTFS change journal.
■ The previous backup was not successful.
In these cases, theUse Change Journal option cannot be used. Accelerator performsa regular file system scan to determine the files and folders to include in the backup.
No action is required. Accelerator uses the Use Change Journal option at the nextbackup if all conditions are met.
not using changejournal data for<%%s>: unable tovalidate changejournal usage<reason=%%s>
Accelerator cannot use the Use Change Journal option in the following cases:
■ Too much activity has occurred on the system (records were purged from the changejournal databases before they could be processed).
■ Data corruption occurred.
Instead, Accelerator performs a regular file system scan to determine the files andfolders to include in the backup.
No action is required. When records have been purged, a new baseline is createdwhen the current backup completes. If corruption existed, it is detected and thedatabases are re-created. Accelerator uses the Use Change Journal option at thenext backup.
not using changejournal data for<%%s>: unable toinitialize changejournal usage<reason=%%s>
741Creating backup policiesPolicy Attributes tab

Table 20-28 Accelerator messages on the Windows Use Change Journaloption (job details log) (continued)
DescriptionMessage in NetBackupjob details
Accelerator cannot use the Use Change Journal option if a change corresponds to ahard link or to a reparse point. Note that the change may correspond to any numberof files and directories and the NTFS change journal does not track all of them.
No action is required. If no further changes occur to hard links or reparse points, theUse Change Journal option can be used at the next backup.
not using changejournal data for<%%s>: hard link orreparse point changedetected
Collect true image restore information or Collect true image restore informationwith move detection is specified in the policy. To process the files and determinewhich files have changed, NetBackup performs a regular file system scan to determinethe files and folders to include in the backup. It also queries the change journal to helpdetermine which files have changed.
not using changejournal data for<%%s>: not supportedwith true imagebackups
Accelerator does not support the selected schedule type with theUse Change Journaloption.
The Use Change Journal option is supported for incremental backups (cumulative ordifferential) or full backups. For full backups, Use Accelerator must be enabled on thepolicy Attributes tab.
not using changejournal data for<%%s>: invalidschedule type
In the backup selections, a path contains a reparse point (directory junction or a symboliclink). The Use Change Journal option cannot be used. NetBackup must perform aregular file system scan to back up the directories correctly.
not using changejournal data for<%%s>: path must belocal and not containdirectory junctionsand/or symbolic links
The Use Change Journal option was recently enabled. After Use Change Journalis first enabled, the NetBackup client may need time to process the NTFS changejournal and set up its databases.
The Use Change Journal option may be ready at the next backup.
not using changejournal data for<%%s>: change journalsetup is not complete(may still be inprogress)
The Use Change Journal option was recently enabled. After Use Change Journalis first enabled, the NetBackup client may need time to process the NTFS changejournal and set up its databases.
The Use Change Journal option may be ready at the next backup.
not using changejournal data for<%%s>: unable tolocate journal data
742Creating backup policiesPolicy Attributes tab

Table 20-28 Accelerator messages on the Windows Use Change Journaloption (job details log) (continued)
DescriptionMessage in NetBackupjob details
When many changes occur on a volume, the NetBackup Client Service may need toincrease the size of the internal databases. As a result, the databases may becomeinvalid.
After the databases are increased in size and are synchronized with the NTFS changejournal, they are marked as valid. The Use Change Journal option is used with thenext backup.
not using changejournal data for<%%s>: invalid changejournal data
For a snapshot-based backup, NetBackup uses the change journal databases on thesnapshot instead of on the live volume. An error occurred when NetBackup attemptedto open the databases on the snapshot.
When the next backup runs, NetBackup creates a new snapshot and the databasesmay be opened without error.
not using changejournal data for<%%s>: unable to applysnapshot
No previous full backup exists that used Accelerator.
NetBackup supports theUse Change Journal option with Accelerator on a full backuponly if a previous full backup exists that used Accelerator.
not using changejournal data for<%%s>: no previoustrack log
The Use Accelerator option is not enabled on the policy.
For full backups, the Use Change Journal option requires that Use Accelerator isenabled.
not using changejournal data for<%%s>: not supportedwith regular fullbackups
If a backup is partially successful (status code 1), the next Accelerator backup cannotuse the Use Change Journal option.
NetBackup can use the Use Change Journal option after the next successful backup.
not using changejournal data for<%%s>: unable tovalidate changejournal usage<reason=previousbackup wasn't asuccessful backup>
A backup selection in the policy is a resource for which the Windows change journalis not supported. Examples of unsupported resources are FAT volumes and FAT32volumes.
not using changejournal data for<%%s>: not supported
743Creating backup policiesPolicy Attributes tab

Table 20-28 Accelerator messages on the Windows Use Change Journaloption (job details log) (continued)
DescriptionMessage in NetBackupjob details
The backup has attempted to use a remote frozen image. The Use Change Journaloption is not supported with remote frozen images.
not using changejournal data for<%%s>: not supportedfor remote frozenimages
The Use Change Journal option is not enabled.not using changejournal data for<%%s>: not enabled
The Use Change Journal option is not enabled.not using changejournal data for<%%s>: not configuredfor use
An internal error occurred. The volumes to back up should be checked to ensure thata volume GUID is associated with each volume.
not using changejournal data for<%%s>: unable todetermine volume guid
To use the change journal data, NetBackup must be able to take a snapshot of thebackup volume to correctly identify and handle open files. This error occurs if a backupruns before NetBackup can take a snapshot of the volume. If a snapshot can be takenbefore the next backup occurs, NetBackup may be able to use change journal data atthe next backup.
not using changejournal data for<%%s>: snapshot hasnot been applied(unable to track openfiles)
The Use Change Journal option is only supported for Standard or MS-Windowspolicies.
not using changejournal data for<%%s>: invalid policytype
On the client, NetBackup keeps track of both Accelerator backups and changejournal-based backups. If the lists of these backups do not match, one of the followingoccurred:
■ An Accelerator backup occurred that did not use the change journal.■ A change journal-based backup occurred that did not use the Accelerator.
If either case, the Use Change Journal option cannot be used until the next full backupoccurs.
not using changejournal data for<%%s>: list ofaccelerator basedbackups does not matchlist of change journalbased backups
744Creating backup policiesPolicy Attributes tab

Table 20-28 Accelerator messages on the Windows Use Change Journaloption (job details log) (continued)
DescriptionMessage in NetBackupjob details
The change journal databases are fixed in size: they can contain only a fixed numberof records. If the volume undergoes a lot of activity, records may be purged from thechange journal database before a backup can process them. In that case, the UseChange Journal option cannot be used. No action is required. Accelerator uses theUse Change Journal option at the next backup if all conditions are met.
not using changejournal data for<%%s>: previous backuphad change journaldata that was notcomplete (missing usnrecords)
The backup selection in the policy is not for a local volume. For example, the backupselection specifies a UNC path.
not using changejournal data for<%%s>: not supportedfor non-local volumes/ file systems
This message appears only during Accelerator full backups. To use the change journaldata during Accelerator full backups, a policy schedule with the Accelerator forcedrescan option is required.
not using changejournal data for<%%s>: no forcedrescan scheduleconfigured
This message appears only during full backups, when the policy is not configured withthe Accelerator forced rescan option.
Before this message appears, another message explains why the change journal datacannot be used.
not using changejournal data for<%%s>: forcing rescan,each file will be readin order to validatechecksums
About reporting the amount of Accelerator backup datathat was transferred over the networkFor Accelerator backup reporting, several NetBackup commands can report theamount of data that is transferred over the network for each Accelerator backup.The amount of transferred data is often much less than the size of the Acceleratorbackup image.
For each Accelerator backup, NetBackup combines the client's (or VM's) changedblocks with the unchanged data from previous backups to synthesize a backupimage. However, NetBackup sends only the changed data over the network whenthe backup occurs. The resulting backup image may be much larger than the amountof backup data that travels the network. For backup reporting, it may be important
745Creating backup policiesPolicy Attributes tab

to distinguish between the backup image size and the amount of data that wastransferred over the network.
For Accelerator backups, the network-transferred data can appear in the output ofthe following NetBackup commands: bpdbjobs, bpimagelist, and bpclimagelist.
Table 20-29 lists the default location of these commands.
Table 20-29 Default location of bpdbjobs, bpimagelist, and bpclimagelist
Default locationCommand
Windows:
<install_path>\NetBackup\bin\admincmd\
UNIX, Linux
/usr/openv/netbackup/bin/admincmd/
bpdbjobs,bpimagelist
Windows:
<install_path>\NetBackup\bin\
UNIX, Linux
/usr/openv/netbackup/bin/
bpclimagelist
The following example uses the bpimagelist command to show the results of abackup of acmevm2:
bpimagelist -backupid acmevm2
Example output:
In this example, the backup image size in kilobytes is 7799632, and the amount ofdata that was transferred over the network is 225792.
746Creating backup policiesPolicy Attributes tab

You can use the following commands to show the amount of data that wastransferred over the network for an Accelerator backup.
bpimagelistbpimagelist -backupid backup_id [-l | -L | -json | -json_compact]
Brackets [ ] indicate optional elements, and the vertical bars | indicate that you canchoose only one of the options within the brackets.
Table 20-30 describes how the network-transferred data field appears in thebpimagelist output.
Table 20-30 bpimagelist options that show the amount of network-transferreddata for Accelerator backups
How the network-transferred data field appearsbpimagelistoption
The field is unlabeled. For example: 225792
See the bpimagelist example output earlier in this topic.
no option
The field is unlabeled (same as no option). For example: 225792-l
The field is labeled. For example:
Kilobytes Data Transferred: 225792
-L
The field is labeled. For example:
"kilobytes_data_transferred": 225792,
-json
The field is labeled. For example:
"kilobytes_data_transferred":225792,
-json_compact
bpdbjobsbpdbjobs –jobid job_id -report –most_columns
or
bpdbjobs –jobid job_id -report –all_columns
The network-transferred data field appears at the end of the output.
bpclimagelistbpclimagelist -client client_name
This command can only show the network-transferred data in the field that normallyshows the Accelerator backup image size. To show the network-transferred datawith this command, you must configure a NetBackup setting:
747Creating backup policiesPolicy Attributes tab

See “Replacing the Accelerator image size with the network-transferred data inNetBackup command output” on page 748.
Additional details on these commands are available in the NetBackup CommandsReference Guide or in the NetBackup man pages.
Replacing the Accelerator image size with thenetwork-transferred data in NetBackup command outputYou can configure the output of bpimagelist, bpdbjobs, and bpclimagelist toshow the amount of Accelerator backup data that was transferred over the networkinstead of the backup image size.
The following is the default bpimagelist output that shows the Accelerator imagesize (see the circled value 7799632). The amount of network-transferred dataappears farther down in the output (225792):
You can configure NetBackup command output to show the network-transferreddata in the image size field. In the output, the image size value is replaced with thenetwork-transferred data value (see the following example). A script that reads theimage size from the command output now reads the amount of network-transferreddata.
In the following bpimagelist output, the image size field shows thenetwork-transferred data (225792):
748Creating backup policiesPolicy Attributes tab

Note: The same change occurs in the labeled output of the commands (such aswith the -L option of bpimagelist). For example, the Kilobytes field shows thetransferred data value (225792 in the example) rather than the Accelerator backupimage size.
To enable the reporting of network-transferred data in the Accelerator imagesize field of bpimagelist, bpdbjobs, and bpclimagelist
◆ Use the bpsetconfig command to enable the output change.
To enable this change for the bpclimagelist command, enter the bpsetconfig
command on the master server. To enable this change for bpimagelist orbpdbjobs, enter the bpsetconfig command on the server where you intendto run bpimagelist or bpdbjobs.
Refer to Table 20-31 for the bpsetconfig command to use based on the typeof Accelerator backup that you want to report on.
749Creating backup policiesPolicy Attributes tab

Table 20-31 To enable the reporting of network-transferred data in theAccelerator image size field of bpimagelist, bpclimagelist, orbpdbjobs output
Enter this commandType of backupto report on
Windows
echo REPLACE_IMAGE_SIZE_WITH_DATA_TRANSFERRED = REPLACE_IMAGE_SIZE_FOR_ACCL_INC_VMWARE | install_path\NetBackup\bin\admincmd\bpsetconfig
UNIX, Linux
echo "REPLACE_IMAGE_SIZE_WITH_DATA_TRANSFERRED = REPLACE_IMAGE_SIZE_FOR_ACCL_INC_VMWARE" | /usr/openv/netbackup/bin/admincmd/bpsetconfig
IncrementalVMwareAcceleratorbackups
Windows
echo REPLACE_IMAGE_SIZE_WITH_DATA_TRANSFERRED = REPLACE_IMAGE_SIZE_FOR_ACCL_ALL_VMWARE | install_path\NetBackup\bin\admincmd\bpsetconfig
UNIX, Linux
echo "REPLACE_IMAGE_SIZE_WITH_DATA_TRANSFERRED = REPLACE_IMAGE_SIZE_FOR_ACCL_ALL_VMWARE" | /usr/openv/netbackup/bin/admincmd/bpsetconfig
All VMwareAcceleratorbackups (full andincremental)
Windows
echo REPLACE_IMAGE_SIZE_WITH_DATA_TRANSFERRED = REPLACE_IMAGE_SIZE_FOR_ACCL_INC_ALL | install_path\NetBackup\bin\admincmd\bpsetconfig
UNIX, Linux
echo "REPLACE_IMAGE_SIZE_WITH_DATA_TRANSFERRED = REPLACE_IMAGE_SIZE_FOR_ACCL_INC_ALL" | /usr/openv/netbackup/bin/admincmd/bpsetconfig
All incrementalAcceleratorbackups (physicalclients andVMware)
Windows
echo REPLACE_IMAGE_SIZE_WITH_DATA_TRANSFERRED = REPLACE_IMAGE_SIZE_FOR_ACCL_ALL_ALL | install_path\NetBackup\bin\admincmd\bpsetconfig
UNIX, Linux
echo "REPLACE_IMAGE_SIZE_WITH_DATA_TRANSFERRED = REPLACE_IMAGE_SIZE_FOR_ACCL_ALL_ALL" | /usr/openv/netbackup/bin/admincmd/bpsetconfig
All Acceleratorbackups (full andincremental,physical clientsand VMware)
750Creating backup policiesPolicy Attributes tab

To reset the command output to the default setting
◆ To disable the reporting of network-transferred data in the Accelerator imagesize field (return to default), enter the following:
Windows
echo REPLACE_IMAGE_SIZE_WITH_DATA_TRANSFERRED =
REPLACE_IMAGE_SIZE_DISABLED |
install_path\NetBackup\bin\admincmd\bpsetconfig
UNIX, Linux
echo "REPLACE_IMAGE_SIZE_WITH_DATA_TRANSFERRED =
REPLACE_IMAGE_SIZE_DISABLED" |
/usr/openv/netbackup/bin/admincmd/bpsetconfig
Enable optimized backup of Windows deduplicated volumesSelect this attribute to enable optimized backups of optimized files on a MicrosoftData Deduplication file system.
See “About backups and restores of Microsoft Data Deduplication file systems”on page 752.
If a client has a Microsoft Data Deduplication file system configured, NetBackupperforms an optimized backup of optimized files. (Unoptimized files are backed upas full, intact files.) If the client does not have a Microsoft Data Deduplication filesystem, a normal file backup occurs.
If you do not select this option, NetBackup still backs up the files but does so asintact files: the files are fully reconstructed and backed up as complete files. Anunoptimized backup of optimized files is not efficient: it takes extra time and extradisk activity to reconstruct each file. However, restores are faster becauseNetBackup does not reconstruct the files (restores are unoptimized regardless ofthe type of backup).
Note: For easier management, Veritas recommends creating a separate policy toback up deduplicated volumes.
Only full backups are optimized. Incremental and user backups are backed up asfull, intact files.
This option is supported on the Microsoft operating systems that support DataDeduplication file systems. For supported Microsoft operating systems, see theMicrosoft documentation.
751Creating backup policiesPolicy Attributes tab

See “Configuration for Microsoft Data Deduplication file system backups”on page 754.
See “Policy Attributes tab” on page 693.
About backups and restores of Microsoft DataDeduplication file systemsMicrosoft Data Deduplication file systems store files in one of two different states,as follows:
Files that do not qualify for optimization (that is, data deduplicationwithin the file system).
Unoptimized files
Files that have been deconstructed, and only their unique datasegments are stored on the file system.
Optimized files
NetBackup can do either optimized backups or unoptimized backups of the MicrosoftData Deduplication file systems, as follows:
Table 20-32 Microsoft Data Deduplication file systems backup types
DescriptionType
An unoptimized backup is one in which the Enable optimized backup ofWindows deduplicatedvolumes policy attribute is not selected.
NetBackup re-assembles the optimized files and backs them up as full, intact files. The storagesavings of the Data Duplication file system are not retained in the backup. The optimized filesremain optimized on the Data Deduplication file systems. The unoptimized files are backed upas full, intact files.
NetBackup supports any type of storage destination for unoptimized backups of Microsoft DataDeduplication file systems.
Unoptimizedbackup
752Creating backup policiesPolicy Attributes tab

Table 20-32 Microsoft Data Deduplication file systems backup types(continued)
DescriptionType
An optimized backup is one in which the Enable optimized backup of Windows deduplicatedvolumes policy attribute is selected. Only full backups are optimized. For incremental and userbackups, each file to be backed up is reconstructed and backed up in its full form.
For optimized files, NetBackup backs up the chunk store and the metadata that maps the filesto their segments in the chunk store. The chunk store is a location in the file system that containsthe data segments that comprise the files. For unoptimized files, NetBackup backs them up asfull, intact files.
The following are the attributes for an optimized backup of Microsoft Data Deduplication filesystems:
■ The policy must be a MS-Windows policy type.■ The storage destination must be BasicDisk storage.■ The Enable Optimized Backup for supportedWindows File Systems policy attribute must
be selected.See “Enable optimized backup of Windows deduplicated volumes” on page 751.
■ The system drive C: cannot be backed up. Microsoft Data Deduplication file systems cannotbe used for system drives.
Veritas recommends the following actions for backups of Microsoft Data Deduplication file systems:
■ Run a Microsoft optimization job and a Microsoft garbage collection job before you run a fullbackup of deduplicated volumes. One way to do so is to configure a Deduplication Schedulein the Windows Server Manager.
■ If you want to restore entire volumes, configure a disk image backup of the volumes. A diskimage backup saves time and ensures that the storage requirement can be met with theexisting volume.See “Pathname rules for Windows disk image (raw) backups” on page 820.
Optimized backups are supported on the Microsoft operating systems that support DataDeduplication file systems. For supported Microsoft operating systems, see the Microsoftdocumentation.
Optimized backups
To restore optimized backups, use the Restore from Optimized Backup optionin the Backup, Archive, and Restore interface.
Note the following items regarding restores from optimized backups:
■ Can only be restored to Microsoft Data Deduplication file systems.
■ Restores from optimized backups of Microsoft Data Deduplication files systemsusing the Microsoft deduplication API are slow. First, the image must be mountedthrough NFS. Then, the image must be accessed through the Microsoftdeduplication API, which requests data in the amounts that may be inefficient.The process to restore an entire drive may take a very long time.
753Creating backup policiesPolicy Attributes tab

Therefore, NetBackup restores all files as full, intact files (that is, non-optimized).The files are then optimized during the next scheduled file system optimizationjob, or you can initiate optimization manually. You should ensure that you haveadequate storage for the restored files in their unoptimized state.
Configuration for Microsoft Data Deduplication file systembackupsFor NetBackup to do an optimized backup of Microsoft Data Deduplication filesystems, specific Windows software must be installed and configured, as follows:
■ Microsoft Server for NFS must be installed on the NetBackup media server. UseWindows Server Manager to add the role. Enable the NFS services. (By default,the NFS services are not enabled.)
■ Microsoft Client for NFS must be installed on the Windows host that is to bebacked up. Use Windows Server Manager to add the role. Without Client forNFS, restores cannot be performed.
■ The Deduplication role must be installed on the Windows host that is to bebacked up by using the Windows Server Manager interface.
Also, ensure that the NetBackup Client Service is configured to run as Administrator.If not, restores from the optimized backups fail.
Keyword phrase (policy attribute)The Keyword phrase attribute is a phrase that NetBackup associates with allbackups or archives based on the policy. Only the Windows and UNIX clientinterfaces support keyword phrases.
Clients can use the same keyword phrase for more than one policy. The samephrase for multiple policies makes it possible to link backups from related policies.For example, use the keyword phrase “legal department documents” for backupsof multiple clients that require separate policies, but contain similar types of data.
The phrase can be a maximum of 128 characters in length. All printable charactersare permitted including spaces and periods. By default, the keyword phrase is blank.
Clients can also specify a keyword phrase for a user backup or archive. A userkeyword phrase overrides the policy phrase.
Snapshot Client and Replication Director (policy attributes)The Snapshot Client attributes are available when the NetBackup Enterprise Clientlicense is installed. A snapshot is a point-in-time, read-only, disk-based copy of aclient volume.
754Creating backup policiesPolicy Attributes tab

For more information about configuring snapshots, see the following guides:
■ NetBackup Snapshot Client Administrator’s Guide
■ NetBackup Replication Director Solutions Guide
■ NetBackup for VMware Administrator’s Guide
■ NetBackup for Hyper-V Administrator’s Guide
Perform block level incremental backups (policy attributes)The Perform block level incremental backups attribute allows NetBackup to backup only the changed data blocks of VMware virtual machines and Oracle or DB2database files.
For details, refer to the appropriate NetBackup database agent guide or to theNetBackup for VMware Administrator's Guide.
Use Replication Director (policy attributes)Enable the Use Replication Director attribute when configuring a backup policyfor Replication Director. By enabling this policy attribute, NetBackup enables otherpolicy attributes that Replication Director requires:
■ Perform snapshot backupsEnsures that the policy creates snapshots of the disk array.
■ Retain snapshots for Instant Recovery or SLP managementEnsures that the policy retains the snapshot after the backup completes.
■ Perform off-host backup
This option is selected automatically for anNDMP policy, along with the followingselections:
■ To use Data Mover
■ NDMP as the Machine selection.
■ Replication Director OptionsClick the Options button to see the Replication Director Options dialog boxand the default Configuration Parameters as follows:
755Creating backup policiesPolicy Attributes tab

■ Auto (default): The OpenStorage partner uses the best snapshottechnology available to that partner to create the snapshot.
■ Differential: The OpenStorage partner creates a snapshot that iscompletely dependent on the source. This parameter is based oncopy-on-write technology. The device creates a cache object to maintainthe original blocks of the snapshot when the blocks are modified.
■ Plex: The OpenStorage Partner creates a snapshot that is completelyindependent of the source snapshot. This option is based onmirror-break-off technology. When a mirror device is attached to thesource, the contents of the mirror device is exactly the same as thesource device. When the relationship is broken between the two, themirror device is separated from the source. The mirror device acts asa point-in-time copy.
■ Clone: The OpenStorage Partner creates an independent copy of thevolume. The copy process can take some time as the entire copy mustbe complete. The snapshot that is created is independent of the source.
SnapshotType
Sets the maximum number of Instant Recovery snapshots to be retainedat one time. When the maximum is reached, snapshot rotation occurs: Thenext snapshot causes the oldest to be deleted.
Managed by SLP retention is automatically selected if the Fixed or theExpire after Copy retention is currently selected in the SLP.
MaximumSnapshots
For additional information about Replication Director configuration, see theNetBackup Replication Director Solutions Guide.
See “About NetBackup Replication Director” on page 1032.
Validate Policy dialog boxThe Validate Policy dialog box appears for the backup policies that are configuredfor Replication Director and are not Exchange, Oracle, or VMware policies. Thedialog box appears upon selecting OK to save and close the policy.
To ensure that the backup policy can run successfully, NetBackup validates thepolicy according to the validation level that you select.
Select the validation level for the policy:
■ CompletePerforms full topology validation on underlying storage with provisioning.Provisioning dynamically allocates NetApp storage space to each volume orLUN as data is written.NetBackup checks the storage space on the resource pool members andperforms SnapVault and SnapMirror access checks.
■ Basic
756Creating backup policiesPolicy Attributes tab

Performs a subset of topology validation on underlying storage withoutprovisioning.NetBackup checks all policies to ensure that the client can perform a snapshotof the data that is indicated in the Backup Selections list.NetBackup performs license checks, performs SnapVault and SnapMirror accessstatus checks, and checks the CIFS/NFS status.
■ NoneNo topology validation or provisioning.NetBackup does not check the topology and does not provision the underlyingstorage.
If the policy validation finds no problems, the policy saves and closes. If validationproblems are found, NetBackup displays a message that contains an error codeand a description.
Perform snapshot backups (policy attributes)ThePerform snapshot backups attribute ensures that the policy creates snapshotsof the volumes that are indicated in the policy.
Microsoft Exchange Attributes (policy attributes)The Microsoft Exchange attributes let you indicate the database backup sourceto use for the following:
■ Exchange Database Availability Group
■ Exchange 2007 replication backup
See the NetBackup for Exchange Server Administrator’s Guide.
Schedules tabThe schedules that are defined on the Schedules tab determine when backupsoccur for the selected policy. Each schedule also includes various criteria, such ashow long to retain the backups.
From the policy Schedules tab, perform the following tasks:
■ To create a new schedule, click New.
■ To edit a schedule, select the schedule and click Change.
■ To delete a schedule, select the schedule and click Delete.
Schedule attributes appear on the following tabs:
757Creating backup policiesSchedules tab

Schedule the time and frequency at which a task runs,along with other scheduled attributes.
See “Schedule Attributes tab” on page 758.
Attributes tab
Schedule the time of each day that a task runs.
See “Start Window tab” on page 790.
Start Window tab
Indicate the days that a job cannot run.
See “Excluding days from a schedule” on page 794.
Exclude Days tab
Schedule the run days for a task by indicating specificdates, recurring weekdays, recurring days of the month.(This tab appears only when Calendar is selected asthe Schedule type.)
See “Include Dates tab” on page 795.
Include Dates tab
Schedule Attributes tabThe schedule Attributes tab contains both schedule information and otherconfiguration options, beyond when the job is to run.
Figure 20-10 Schedule Attributes tab
758Creating backup policiesSchedule Attributes tab

The following topics describe the options on the Attributes tab for schedules.
Name (schedule attribute)Specify a name for the schedule by typing it in the Name attribute. The schedulename appears on screens and messages about the schedule.
See “NetBackup naming conventions” on page 1112.
If the schedule is a relocation schedule created as part of a basic disk stagingstorage unit, the schedule name cannot be changed. The name defaults to thename of the storage unit.
See “About staging backups” on page 589.
Type of backup (schedule attribute)The Type of backup attribute specifies the type of backup that the schedule controls.Select a backup type from the list. The list displays only the backup types that applyto the current policy.
If the schedule is a relocation schedule created as part of a basic disk stagingstorage unit, no backup type selection is needed.
Table 20-33 describes the types of backups that come standard with NetBackup.Table 20-34 and Database agent backup types describe other types of backupsavailable in NetBackup.
Table 20-33 Standard backup types
DescriptionItem
Backs up all of the files that are specified in the backup selections list for the policy. Thefiles are backed up, regardless of when the files were last modified or backed up. Fullbackups occur automatically according to schedule criteria. If you run incremental backups,you must also schedule a full backup to perform a complete restore. Use this option if youconfigure a policy for a raw partition backup (formatted partitions only).
Full Backup
759Creating backup policiesSchedule Attributes tab

Table 20-33 Standard backup types (continued)
DescriptionItem
Backs up the files that are specified in the backup selections list that changed since thelast full backup. All files are backed up if no previous backup was done. Cumulativeincremental backups occur automatically according to schedule criteria. A complete restorerequires the last full backup and the last cumulative incremental backup.
Do not combine differential incremental backups and cumulative incremental backupswithin the same Windows policy when the incremental backups are based on archive bit(default).
By default, if the time between file creation and a full or a differential incremental backupis less than 5 minutes, the differential or cumulative incremental backup may yieldunexpected results. The backups are successful, but the additional files are backed up.
See “About incremental backups” on page 762.
Cumulative IncrementalBackup
Backs up the files that changed since the last successful incremental (differential orcumulative) or full backup. All files are backed up if no previous backup was done.Differential incremental backups occur automatically according to schedule criteria. Acomplete restore requires the last full backup, the last cumulative incremental, and alldifferential incremental backups that occurred since the last full backup.
By default, if the time between file creation and a full or a differential incremental backupis less than 5 minutes, the differential or cumulative incremental backup may yieldunexpected results. The backups are successful, but the additional files are backed up.
See “About incremental backups” on page 762.
Differential IncrementalBackup
A user initiates a user backup through the Backup, Archive, and Restore client interface.A user backup backs up all files that the user specifies. Users can start backups only duringthe times that are allowed on the schedule Start Window tab.
For a user to be able to initiate a backup, the policy must contain a schedule of the UserBackup type.
Use this backup type for a catalog archive.
See “Considerations for user schedules” on page 767.
See “Creating a catalog archiving policy” on page 906.
User Backup
760Creating backup policiesSchedule Attributes tab

Table 20-33 Standard backup types (continued)
DescriptionItem
A user initiates a user archive through the Backup, Archive, and Restore client interface.A user archive backup first backs up the files that the user indicates. The archive thendeletes the files from the local disk if the backup is successful. Archive backups free localdisk space while retaining a copy for future use. The copy is kept until the retention periodexpires. Users can start archives only during the times that are specified in the scheduleStart Window tab.
For a user to be able to initiate an archive, the policy must contain a schedule of the UserArchive type.
Note: The NetBackup administrator should make sure that a full backup of the client existsbefore a user archives files from the client.
User Archive
Table 20-34 describes the types of backups that are available when you installNetBackup Vault.
Table 20-34 NetBackup Vault backup types
DescriptionItem
Applies only to Vault policies. The option does not run a backup, but instead runs thecommand that is specified in the Vault policy’s backup selections list. In this way it startsan automatic, scheduled vault session or vault eject operation. Available only when Vaultis licensed.
See “Creating a Vault policy” on page 854.
Automatic Vault
Use when the schedule is for a catalog backup policy that Vault uses. Available only whenVault is licensed.
If this type is selected, you must configure one of the two schedule attribute combinationsor the schedule cannot be saved:
■ Check and configure Multiple copies, or■ CheckOverride policy storage selection,Override policy volume pool, and specify
the Retention.
Note: The selected storage unit selection should not be Any Available.
Vault Catalog Backup
Database agent backup typesEach database agent often has its own set of unique backup types for a schedule.For more information, see the NetBackup guide that came with the agent.
761Creating backup policiesSchedule Attributes tab

About incremental backupsThe following examples show how data is included in a series of full and incrementalbackups.
A differential incremental backup backs up the data that changed since the last fullor differential incremental backup.
Note: You must run a full backup before an incremental backup. If no full backupis run, the incremental performs the role of a full backup.
Figure 20-11 shows how data is included in a series of full and differentialincremental backups between January 1 and January 4.
Figure 20-11 Full and differential incremental example
Jan 1 Jan 2 Jan 3 Jan 4 disk fails
Recovery = Jan 1 (full) + Jan 2 (incr) + Jan 3 (incr) + Jan 4 (incr)
Full backup
Diff. incremental
Diff. incremental
Diff. incremental
The January 1 full backup includes all files and directories in the policy backupselections list. The subsequent differential incremental backups include only thedata that changed since the last full or differential incremental backup. If the diskfails sometime on January 4 (after the backup), the full backup and all three of theincremental backups are required for the recovery.
A cumulative incremental backup backs up the data that changed since the last fullbackup. Figure 20-12 shows how data is included in a series of full and cumulativeincremental backups between January 1 and January 4. The January 1 full backupincludes all files and directories in the policy backup selections list. Each of thecumulative incremental backups includes the data that changed since the last fullbackup. If the disk fails sometime on January 4 (after the backup), the full backupand the last cumulative incremental backup are required for the recovery.
762Creating backup policiesSchedule Attributes tab

Figure 20-12 Full and cumulative incremental example
Jan 1 Jan 2 Jan 3 Jan 4 disk fails
Recovery = Jan 1 (full) + Jan 4 (cumulative incremental)
Full backup
Cum. incremental
Cumulative incremental
Cumulative incremental
Table 20-35 describes how to determine the retention of differential and cumulativeincremental backups to prevent a gap in backup coverage.
Table 20-35 Retention requirements for incremental backups
CommentsRetentionrequirement
Type
To restore all files requires the last full backup and all the differential incrementalbackups that occurred since the last full backup. Therefore, all the differentialsmust be kept until the next full backup occurs.
LongerDifferential
Each cumulative incremental backup contains all the changes that occurredsince the last full backup. Therefore, a complete restore requires only the mostrecent cumulative incremental in addition to the full backup.
ShorterCumulative
Table 20-36 compares the advantages and disadvantages of using differential orcumulative incremental backups based on possible backup and restore times.
Table 20-36 Relative backup and restore times for incremental backups
CommentsRestoretime
Backup timeType
Less data in each backup, but all differential incremental backupsare required since the last full backup for a restore. This results ina longer restore time.
LongerShorterDifferential
More data in each backup, but only the last cumulative incrementalbackup is required for a complete restore (in addition to the full).
ShorterLongerCumulative
You can use a combination of cumulative and differential incremental backupstogether to get the advantages of both methods. For example, assume a set ofschedules with the following backup frequencies and retention periods. (Notice thatthe differential incremental backups occur more often.)
763Creating backup policiesSchedule Attributes tab

Table 20-37 Example frequencies and retention periods
Retention periodFrequencyBackup type
2 weeks6 daysFull
4 days2 daysCumulative incremental
2 days1 dayDifferential incremental
The schedules that are described in Table 20-37 result in the following series ofbackups:
Day 1 Day 2 Day 3 Day 4 Day 5 Day 6 Day 7 Day 8
Full FullDiff Cum Diff Cum Diff Diff
The example produces the following results:
■ Every other day a differential incremental backup occurs, which usually has aminimum backup time.
■ On alternate days, a cumulative incremental backup occurs, which requiresmore time than the differential backup, but not as much time as a full backup.The differential backup can now be expired.
■ To recover all files may require (at most), two incremental backups in additionto the most recent full backup. The combination of backups usually means lessrestore time than if all differential incremental backups were used. The fullbackups can be done less often if the amount of data being backed up by theincremental backups is small.
How NetBackup determines when Windows files are duefor backupOn Windows clients, NetBackup performs the incremental backups when thePerform incrementals based on archive bit setting is enabled. This setting isfound in the Backup, Archive, and Restore client interface, under File >NetBackup Client Properties, on the General tab.
If Perform incrementals based on archive bit is enabled, incremental backupsfor the client are based on the state of the archive bit of each file. The operatingsystem sets the bit whenever a file changes, and it remains set until cleared byNetBackup. The conditions under which NetBackup clears the bit depend on thetype of backup being performed.
764Creating backup policiesSchedule Attributes tab

NetBackup backs up files regardless of the state of theirarchive bit. After a full backup, the archive bit is alwayscleared.
Full Backup
NetBackup backs up the files that have the archive bit setand have therefore changed. When the client receives aresponse from the server that indicates that the backup wassuccessful (or partially successful) the archive bits arecleared. The clear archive bit lets the next differentialincremental backup back up only the files that changed sincethe previous full or differential incremental backup.
Differential IncrementalBackup
NetBackup backs up the files that have the archive bit set.However, NetBackup does not clear the archive bits after thebackup. Without a clear archive bit, the next cumulativeincremental backup backs up changed files and the files thatwere in the cumulative incremental backup.
Cumulative IncrementalBackup
If Perform incrementals based on archive bit is disabled, NetBackup includes afile in an incremental backup only if the datetime stamp of the file has changedsince the last backup. The datetime stamp indicates when the file was last backedup. The backup types use the datetime stamp differently.
NetBackup backs up files regardless of the datetime stamp.Full Backup
NetBackup compares the datetime stamp of the file againstthe last full or incremental backup.
Differential IncrementalBackup
NetBackup compares the datetime stamp of the file againstthe last full backup.
Cumulative IncrementalBackup
If files are installed or copied from another computer, the new files retain the datetimestamp of the originals. If the original date is before the last backup date, the newfiles are not backed up until the next full backup.
How NetBackup determines when UNIX files are due forbackupIncremental backups on UNIX clients consider all files and directories to determineif a backup is due based on a reference date. (That is, back up all the files that havechanged since date_x).
The following types of time are associated with UNIX files and directories:
765Creating backup policiesSchedule Attributes tab

The file modification time. The file system updates the mtime for a file ordirectory each time the file is modified. An application can save the mtimeof the file before it modifies it. The application then resets it with theutime(2) system call.
mtime
The file access time. The file system updates the atime for a file or directoryeach time the file is accessed (read or write). An application can save theatime of the file before it accesses it. The application then resets it with theutime(2) system call.
atime
The inode change time. The ctime for a file or directory is updated eachtime the file or directory’s inode changes. (For example, changes due topermissions, ownership, and link-counts changes.) The ctime for a file ordirectory cannot be saved before a change, and then reset after a change.The ctime of a file or a directory changes when the mtime and atime(changes with the utime(2) system call) is reset.
ctime
When NetBackup reads the data for a file that is included in a backup, it does notaffect the file modification time. It does affect the access time of the file. For thisreason, NetBackup saves the atime and mtime of the file before it reads the file.Then NetBackup resets the atime and mtime with the utime(2) system call.NetBackup does not cause problems for storage migration products or theadministrator scripts that use file access times (atime) as criteria for their operations.While this benefit is obvious, a side effect is that it does update the ctime of thefile.
Note: When NetBackup Accelerator is used to perform backups, NetBackup doesnot reset the atime after the file is backed up. This avoids updating the ctime,because a ctime update would require a loss in Accelerator optimization.
See “Accelerator notes and requirements” on page 734.
Customers can configure NetBackup so that it does not reset the access time ofthe file after it reads a file. Customers can choose to have NetBackup use the ctime
and the mtime of the file to determine what files to include in an incremental backup.Normally, these two options are used together, but there may be some sites thatwant to use one without the other. By default, NetBackup uses only the mtime ofthe file to determine what files and directories to back up.
When a file is moved from one location to another, the ctime of the file changes,but the mtime remains unchanged. If NetBackup uses only the mtime to determinethe files that are due during an incremental backup, it does not detect these movedfiles. For sites where using the mtime might create a problem, use the ctime todetermine files due to be included in an incremental backup. The ctime is used if
766Creating backup policiesSchedule Attributes tab

the bp.conf file contains the USE_CTIME_FOR_INCREMENTALS andDO_NOT_RESET_FILE_ACCESS_TIME entries.
See “USE_CTIME_FOR_INCREMENTALS option for NetBackup clients”on page 376.
See “DO_NOT_RESET_FILE_ACCESS_TIME option for NetBackup clients”on page 362.
When a directory is moved from one location to another, the ctime of the directorychanges, but the mtime remains unchanged. Neither the mtime nor the ctime arechanged for the files or directories within the moved directory. No reliable methodusing file timestamps can determine that files within a moved directory need to beincluded in an incremental backup.
In either case, these moved files and directories are included in subsequent fullbackups.
Considerations for user schedulesIn order for users to perform backups and archives, an administrator must createa schedule that allows user backups.
User backup schedules and user archive schedules can be included in a policy thatcontains automatic backup schedules. If you create separate policies for userbackups or user archives, the considerations are similar to those for automaticbackups. In user backup schedules, however, no backup selection list is necessarybecause users select the objects before they start the backup or archive.
To use a specific policy or schedule for user backups or user archives, perform thetasks that are specified for each client type:
Table 20-38 Tasks for specifying a policy or schedule for user backups oruser archives
TaskClient type
■ Start the Backup, Archive, and Restore client interface.■ On the File menu, click NetBackup Client Properties■ Select the Backups tab, and specify the backup policy and
backup schedule.
Microsoft Windowsclients
Specify the policy and schedule with BPARCHIVE_POLICY,BPARCHIVE_SCHED, BPBACKUP_POLICY, or BPBACKUP_SCHEDoptions in the bp.conf file.
UNIX clients
Restores can be performed at any time and are not scheduled.
767Creating backup policiesSchedule Attributes tab

Note: An archive is different from a backup. During an archive, NetBackup firstbacks up the selected files, then deletes the files from the local disk if the backupis successful. In this topic, references to backups also apply to the backup portionof archive operations unless otherwise noted.
How to plan schedules for user backups and user archivesTo plan schedules for user backups and user archives, consider the following:
If possible, do not permit user backups and user archives whenautomatic backups are running. If an automatic backup is runningwhen a user submits a backup or archive, NetBackup usuallyqueues the user job. The job is not queued if there is a limitingsetting. (For example, the Limit Jobs per Policy policy attributeor the Maximum jobs per client Global Attributes host property.)
See “Limit jobs per policy (policy attribute)” on page 706.
See “Global Attributes properties” on page 159.
If the automatic backup continues to run, the user job may missthe backup window depending on how the limiting settings areconfigured. On the other hand, user jobs can delay automaticbackups and can cause backups to miss the backup window.
Automatic backups
Use a different storage unit to eliminate conflicts with automaticbackups.
Storage units
Use a different volume pool to manage the media separate fromthe automatic backup media.
Volume pools
Consider setting the retention period for archives to infinite, sincethe disk copy of the files is deleted.
See “Retention Periods with end dates beyond 2038, excludingInfinity” on page 231.
Note: If the retention period expires for a backup, it can be difficultor impossible to restore the archives or backups.
Retention periods
Synthetic backup (schedule attribute)The Synthetic backup schedule attribute allows a backup to be assembled fromprevious backups. A synthetic backup may be a synthetic full or a syntheticcumulative incremental backup. The backups include one previous, traditional fullbackup, and subsequent differential backups, and a cumulative incremental backup.(A traditional full backup means a non-synthesized, full backup.) A client can then
768Creating backup policiesSchedule Attributes tab

use the synthesized backup to restore files and directories in the same way that aclient restores from a traditional backup.
Synthetic backups can be written to tape, to disk storage units, or to a combinationof both.
See “About synthetic backups” on page 864.
Accelerator forced rescan option (schedule attribute)The policy Schedules tab contains an option called Accelerator forced rescan.This option creates a checksum of the content of each file during backup. It usesthe checksums for change detection. It provides a safety net by establishing a newbaseline for the next Accelerator backup.
The Accelerator forced rescan option detects the following events:
■ The file’s data changes but the file’s metadata does not change.
■ The file's metadata becomes corrupted such that it does not indicate that thefile has changed.
■ A malicious user or application changes the file's metadata such that it does notindicate that the file has changed.
Note: If Accelerator forced rescan is enabled, NetBackup uses the Windowschange journal to help determine if a file has changed. NetBackup also examinesthe file system metadata for each file to help detect which files have changed.
For the most efficient use of Accelerator, Accelerator policies must include at leasttwo full-backup schedules: one full schedule with the Accelerator forced rescanoption disabled, and another full schedule withAccelerator forced rescan enabled.See Table 20-39.
Table 20-39 Required full-backup schedules for each Accelerator policy
Notes on schedule frequencyFull backup schedules
Configure this schedule to run most of your Accelerator fullbackups.
First schedule:
Accelerator forced rescandisabled
769Creating backup policiesSchedule Attributes tab

Table 20-39 Required full-backup schedules for each Accelerator policy(continued)
Notes on schedule frequencyFull backup schedules
Configure this schedule to run less often than the firstfull-backup schedule.
For example: If the first full-backup schedule runs weekly,run the second schedule (with theAccelerator forced rescanoption enabled) every few months. However, the bestfrequency for this schedule depends upon your environment.
Note: If the policy has no schedule that enables theAccelerator forced rescan option, all full backupsautomatically enable that option and backup performance isreduced.
Second schedule:
Accelerator forced rescanenabled
Note the following about the Accelerator forced rescan option:
■ The Accelerator forced rescan option is grayed out if the Use Acceleratoroption on the Attributes tab is not selected.
■ Because of the checksum processing on the client, this option reduces backupspeed as compared to the Use Accelerator option on its own. The speedreduction depends on the client's configuration and its current processing load.If the client is busy with many jobs when Accelerator backup begins, checksumprocessing can reduce backup speed.
■ If the Windows volume is not NTFS or ReFS, and the volume has no full backupschedule that is configured with the Accelerator forced rescan option, note:NetBackup uses Accelerator forced rescan on every full backup. TheAccelerator forced rescan option is not enabled in the schedule but is in factused, as indicated in the NetBackup log messages. This option may reduce thespeed of the backup as compared to the previous backups that did not useAccelerator forced rescan.See Table 20-39 for recommended full-backup schedules.
■ For an MS-Windows or Standard policy (to back up files and folders), all thedata on the client is read. However, NetBackup sends only the changed dataover the network to be included in the backup image. Sending only the changeddata is similar to a regular Accelerator full backup. Thus, for an Acceleratorforced rescan backup, the optimization percentage is similar to a regularAccelerator full backup. Note that the duration of the backup falls somewherebetween a non-Accelerator full backup and a regular Accelerator full backup.
770Creating backup policiesSchedule Attributes tab

Calendar (schedule attribute)Calendar-based schedules allow administrators to create a job schedule based ona calendar view. Select Calendar to display the Include Dates tab.
See “Include Dates tab” on page 795.
A calendar-based relocation schedule determines the days that images are sweptfrom the disk staging storage unit to the final destination storage unit. (A relocationschedule is created as part of a basic disk staging storage unit configuration.)
Enable Retries allowed after runday to have NetBackup attempt to complete theschedule until the backup is successful. With this attribute enabled, the scheduleattempts to run, even after a specified run day has passed.
Frequency (schedule attribute)Use the Frequency attribute to specify how much time must elapse between thesuccessful completion of a scheduled task and the next attempt.
For example, assume that a schedule is set up for a full backup with a frequencyof one week. If NetBackup successfully completes a full backup for all clients onMonday, it does not attempt another backup for this schedule until the followingMonday.
To set the frequency, select a frequency value from the list. The frequency can behours, days, or weeks.
A frequency-based relocation schedule determines how often images are sweptfrom the basic disk staging storage unit to the final destination storage unit. (Arelocation schedule is created as part of a basic disk staging storage unitconfiguration.)
NetBackup recognizes the intervals that suggest schedules based on days, evenif the job does not run daily. For example, if the frequency is 48 hours, NetBackuptries to run the job at the same time every other day. (NetBackup checks if thefrequency is divisible by 24 hours.) If the interval is not divisible by 24, NetBackupdoes not attempt to run the job at about the same time of day. Instead, NetBackuptries to run the job at the indicated interval after the last successful backup. (Forexample, 52 hours later.)
Note: Frequency does not apply to user schedules because the user can performa backup or archive whenever the time window is open.
771Creating backup policiesSchedule Attributes tab

About backup frequencyTo determine backup frequency, consider how often data changes. For example,determine if files change several times a day, once a day, weekly, or monthly.
Typically, sites perform daily backups to preserve daily work. Daily backups ensurethat only one day’s work is lost in case of a disk failure. More frequent backups arenecessary when important data changes many times during the day and the changeswould be difficult to reconstruct.
Daily backups are usually the incremental backups that record the changes sincethe last incremental or full backup. Incremental backups conserve resources becausethey use less storage and take less time to perform than full backups.
Full backups usually occur less frequently than incremental backups but shouldoccur often enough to avoid accumulating consecutive incremental backups. Alarge number of incremental backups between full backups increases the time ittakes to restore a file. The time increases because of the effort that is required tomerge the incremental backups when files and directories upon restore.
Consider the following when setting the frequency for full backups:
■ Extend the time between full backups for the files that seldom change. A longerfrequency uses fewer system resources. It also does not significantly increaserecovery time because the incremental backups between full backups aresmaller.
■ Decrease the time between full backups for the files that change frequently. Ashorter frequency decreases restore time. A shorter time between full backupscan also use fewer resources. It reduces the cumulative effect of the longerincremental backups that are necessary to keep up with frequent changes inthe files.
To achieve the most efficient use of resources, ensure that most of the files in agiven policy change at about the same rate. For example, assume that half of thefiles in a policy selection list change frequently enough to require a full backup everyweek. However, the remaining files seldom change and require monthly full backupsonly. If all the files are in the same policy, full backups are performed weekly on allthe files. This wastes system resources because half the files need full backupsonly once a month. A better approach is to divide the backups into two policies,each with the appropriate backup schedule, or to use synthetic backups.
If more than one automatic schedule is due for a client within a policy, the backupfrequency determines the schedule that NetBackup uses as follows:
■ Jobs from the schedule with the lower frequency (longer period between backups)always have higher priority. For example, a schedule that has a backup frequencyof one month takes priority over a schedule with a backup frequency of 2 weeks.
772Creating backup policiesSchedule Attributes tab

■ When two schedules are each due to run, the schedule with the schedule namethat is first in alphabetical order runs first. Alphabetical priority occurs if both ofthe following are true:
■ Each schedule is within the defined time window.
■ Each schedule is configured with the same frequency value.
NetBackup prioritizes the example schedules in the following order:
Table 20-40 Examples of schedule frequency and priority
PriorityFrequencySchedule Name
FirstOne monthmonthly_full
SecondOne weekweekly_full
ThirdOne daydaily_incremental
Instant Recovery (schedule attribute)The Instant Recovery attributes are available under the following conditions:
■ The Snapshot Client option is licensed and installed.Refer to the NetBackup Snapshot Client Administrator’s Guide.
■ Perform snapshot backups is selected.
■ Retain snapshots for Instant Recovery is selected.
See “Snapshot Client and Replication Director (policy attributes)” on page 754.
This attribute has two options.
The snapshot persists on the client volume with a backupcopy made to the storage unit on the media server.
Snapshots and copysnapshots to a storage unit
The snapshot is not backed up to tape or to other storage.NetBackup creates a snapshot on disk only. This option isrequired for the NAS_Snapshot method.
The snapshot is created on the same device as the one thatcontains the original data if it usesVxFS_Checkpointmethodor is VxVM space optimized. In this case, another policy canbe used to back up the data to a separate device.
Transaction logs are not truncated at the end of the backup.
Snapshots only
773Creating backup policiesSchedule Attributes tab

The Instant Recovery attributes are grayed out if the Policy storage option onthe Policy Attributes tab refers to a storage lifecycle policy. If that is the case, thestorage lifecycle policy configuration governs the Instant Recovery attributes.
However, the Override policy storage selection attribute on the ScheduleAttributes tab overrides the Policy storage option. If a storage unit is selected onthe Schedule Attributes tab, the Instant Recovery attributes become enabled.
See “Policy storage (policy attribute)” on page 698.
See “Override policy storage (schedule attribute)” on page 778.
Multiple copies (schedule attribute)When the Multiple copies attribute is enabled, NetBackup can create up to fourcopies of a backup simultaneously. The storage units must be on the same mediaserver with sufficient resources available for each copy. For example, to create fourcopies simultaneously in a Media Manager storage unit, the unit needs four tapedrives. (This option is sometimes referred to as Inline Copy, Inline Tape Copy, orITC.)
To create more than four copies, additional copies can be created at a later timeusing duplication.
If multiple original images are created simultaneously, the backup time that isrequired may be longer than for one copy. Also, if both Media Manager and diskstorage units are specified, the duration of disk write operations match that of slowerremovable media write operations.
About configuring multiple copiesTo create multiple copies, the following criteria must be met:
■ The backup destinations must share the same media server with sufficientresources available for each copy.
■ The storage units that are used for multiple copies must be configured to allowa sufficient number of concurrent jobs to support the concurrent copies. Thepertinent storage unit settings are Maximum concurrent jobs and Maximumconcurrent write drives.See “Maximum concurrent jobs storage unit setting” on page 578.See “Maximum concurrent write drives storage unit setting” on page 577.
Multiple copy operations do not support the following:
■ Third-party copies
■ NDMP storage units
■ Storage units that use a QIC (quarter-inch cartridge) drive type
774Creating backup policiesSchedule Attributes tab

■ Synthetic backups
■ Storage lifecycle policiesStorage lifecycle policies offer their own method to create multiple copies.See “About writing multiple copies using a storage lifecycle policy” on page 667.
Configure Multiple Copies dialog boxThe Configure Multiple Copies dialog box contains the following options:
Table 20-41 Configure Multiple Copies dialog box
DescriptionField
NetBackup can create up to four copies of a backup simultaneously. The storage units mustbe on the same media server and there must be sufficient resources available for each copy.
To create more than 4 copies, create additional copies at a later time by using duplication.
Copies
Indicate the priority that the duplication job (based on this schedule) has over other jobs inthe queue (0 to 99999).
Priority of duplicationjob
Copy 1 is the primary copy. If Copy 1 fails for some reason, the first successful copy is theprimary copy.
See “Promoting a copy to a primary copy” on page 977.
Primary copy
Specify the storage unit where each copy is to be stored. If a Media Manager storage unithas multiple drives, you can use it for both the source and the destination. To let NetBackupdecide at run-time, select Any Available.
Storage unit
Indicate where each copy is to be stored.Volume pool
Specify how long NetBackup retains the backups.
See “Retention (schedule attribute)” on page 780.
Retention schedule
In the event that the copy does not complete, select whether you want the entire job to fail(fail all copies), or whether you want the remaining copies to continue.
Regardless of how the fail or continue flag is set, all the copy jobs wait in the queue untilresources are available for all copies. The first job does not start until the copies haveresources.
If a copy is configured to allow other copies to continue the job if the copy fails, and ifCheckpoint restart for backup jobs is selected for this policy, only the last failed copy thatcontains a checkpoint can be resumed.
See “Take checkpoints every __ minutes (policy attribute)” on page 703.
If this copy fails
775Creating backup policiesSchedule Attributes tab

Table 20-41 Configure Multiple Copies dialog box (continued)
DescriptionField
Select who should own the media onto which NetBackup writes the images.
The following options are available:
■ AnyLets NetBackup select the media owner, either a media server or server group.
■ NoneSpecifies that the media server that writes to the media that owns the media. No mediaserver is specified explicitly, but you want a media server to own the media.
■ A server groupSpecify a media server group to allow only those media servers in the group to write tothe media on which backup images for this policy are written. All media server groupsthat are configured in the NetBackup environment appear in the drop-down list.See “Configuring a NetBackup server group” on page 380.
Media owner
Configuring multiple copies in a policy scheduleTo configure a policy schedule to create multiple copies, use the following procedure.
To configure a schedule to create multiple copies
1 In the NetBackup Administration Console, in the left pane, expandNetBackup Management > Policies.
2 Do one of the following:
■ Select the policy to change.■ On the Edit menu, click Change.
To change an existing policy
■ On the Actions menu, click New > Policy.■ Name the policy, and click OK.
To create a new policy
3 Select the Schedules tab.
4 Double-click an existing schedule or click New to create a new schedule.
5 In the dialog box that appears, click in the Attributes tab, select Multiplecopies, then click Configure.
If the destination for this policy is a storage lifecycle policy, the Multiple copiesbox is unchecked. NetBackup does not allow the two methods for creatingmultiple copies to be enabled at the same time.
See “Policy storage (policy attribute)” on page 698.
See “About writing multiple copies using a storage lifecycle policy” on page 667.
776Creating backup policiesSchedule Attributes tab

6 In the Copies field, specify the number of copies to be created simultaneously.The number must be between 1 and 4.
Copy 1 is the primary copy. If Copy 1 fails, the first successful copy is theprimary copy.
Usually, NetBackup restores from the primary copy of an image. However, itis possible to restore from a specific backup copy other than the primary copy.To do so, use the bprestore command.
To create more than four copies, create additional copies at a later time byusing duplication.
See “Configure Multiple Copies dialog box” on page 775.
See “About configuring multiple copies” on page 774.
7 In the Priority of duplication field, specify the priority of the duplication job incomparison to the other jobs in the queue (0 to 99999).
8 Specify the storage unit where each copy is stored. Select Any Available toallow NetBackup to select the storage unit at run-time.
If a Media Manager storage unit contains multiple drives, the storage unit canbe used for both the original image and the copies.
9 Specify the volume pool where each copy is stored.
10 Select the retention level for each copy.
See “Retention (schedule attribute)” on page 780.
11 Select one of the following from the If this copy fails list:
Continues making the remaining copies.
Note: If Take checkpoints every __ minutes is selectedfor this policy, only the last failed copy that contains acheckpoint can be resumed.
See “Take checkpoints every __ minutes (policy attribute)”on page 703.
continue
Fails the entire job.fail all copies
777Creating backup policiesSchedule Attributes tab

12 For tape media, specify who should own the media onto which NetBackupwrites the images:
NetBackup selects the media owner, either a media server orserver group.
Any
Specifies that the media server that writes to the media owns themedia. No media server is specified explicitly, but you want amedia server to own the media.
None
Specifies that a media server group allows only those mediaservers in the group to write to the media on which backup imagesfor this policy are written. All the media server groups that areconfigured in the NetBackup environment appear in the list.
A server group
These settings do not affect images residing on disk. One media server doesnot own the images that reside on shared disks. Any media server with accessto the shared pool of disk can access the images.
13 Click OK until the policy is saved.
Override policy storage (schedule attribute)The Override policy storage selection attribute works as follows:
Instructs the schedule to use the Policy storage as specified on thepolicy Attributes tab.
Disabled
Instructs the schedule to override the Policy storage as specified onthe policy Attributes tab.
Select the storage from the list of previously configured storage unitsand storage lifecycle policies. If the list is empty, no storage has beenconfigured.
Enabled
See “Policy storage (policy attribute)” on page 698.
If a data classification is indicated for the policy, only those storage lifecycles withthe same data classification appear in the list.
See “Data classifications (policy attribute)” on page 697.
Note: Storage lifecycle policies cannot be selected within the Configure MultipleCopies dialog box.
See “About configuring multiple copies” on page 774.
778Creating backup policiesSchedule Attributes tab

Override policy volume pool (schedule attribute)The Override policy volume pool attribute works as follows:
Instructs the schedule to override the volume pool that is specified asthe Policy volume pool on the policyAttribute tab. If no policy volumepool is specified, NetBackup uses NetBackup as the default. If the policyis for a NetBackup catalog, NBU-Catalog policies use CatalogBackup.
Disabled
Instructs the schedule to override the volume pool that is specified asthe Policy volume pool on the policy Attribute tab. Select the volumepool from the list of previously configured volume pools.
Enabled
See “Policy volume pool (policy attribute)” on page 701.
Override media owner (schedule attribute)TheOverridemedia owner attribute applies only to tape media. It specifies whetherto use the policy media owner or another owner for the schedule. The rules forshared disk media are more flexible so override settings are not needed for diskmedia.
The attribute works as follows:
Instructs the schedule to use the media owner that is specified as theMedia Owner in the policy Attribute tab.
Disabled
Instructs the schedule to override the media owner that is specified asthe Media Owner in the policy Attribute tab.
Select the new media owner from the list:
■ Any.NetBackup selects the media owner, either a media server or servergroup
■ NoneSpecifies that the media server that writes to the media owns themedia. No media server is specified explicitly, but you want a mediaserver to own the media.
■ A server groupSpecifies that a media server group allows only those media serversin the group to write to the media on which backup images for thispolicy are written. All media server groups that are configured in theNetBackup environment appear in the list.
Enabled
See “Media Owner (policy attribute)” on page 709.
779Creating backup policiesSchedule Attributes tab

Retention (schedule attribute)The Retention attribute specifies how long NetBackup retains the backups. To setthe retention period, select a time period (or level) from the list. When the retentionperiod expires, NetBackup deletes information about the expired backup. After thebackup expires, the files in the backup are unavailable for restores. For example,if the retention is 2 weeks, data can be restored from a backup that this scheduleperforms for only 2 weeks after the backup.
If a policy is configured to back up to a storage lifecycle policy, the Retentionattribute in the schedule is ignored. The retention period that the lifecycle indicatesis followed instead.
See “Creating a storage lifecycle policy” on page 614.
See “Retention Periods properties” on page 228.
About assigning retention periodsThe retention period for data depends on the likelihood of restoring information frommedia after a certain period of time. Some types of data (financial records, forexample) have legal requirements that determine the retention level. Other data(preliminary documents, for example) can probably be expired when the final versionis complete.
A backup’s retention also depends on what needs to be recovered from the backup.For example, if day-to-day changes are critical, keep all the incremental backupsin addition to the full backups for as long as the data is needed. If incrementalbackups only track work in progress toward monthly reports, expire the incrementalbackups sooner. Rely on the full backups for long-term recovery.
Establish some guidelines that apply to most of the data to determine retentionperiods. Note the files or the directories that have retention requirements outsideof these guidelines. Plan to create separate policies for the data that falls outsideof the retention requirement guidelines. For example, place the files and directorieswith longer retention requirements in a separate policy. Schedule longer retentiontimes for the separate policies without keeping all policies for the longer retentionperiod.
The following table describes recommended retention periods for different types ofbackups.
780Creating backup policiesSchedule Attributes tab

Table 20-42 Recommended retention periods for different types of backups
DescriptionType of backup
Specify a time period that is longer than the frequency settingfor the schedule. (The frequency is how often the backupruns). For example, if the frequency is one week, specify aretention period of 2-4 weeks. Two to 4 weeks providesenough of a margin to ensure that the current full backupdoes not expire before the next full backup occurs.
Full Backup
Specify a time period that is longer than the period betweenfull backups. For example, if full backups occur weekly, savethe incremental backups for 2 weeks.
Differential IncrementalBackup
Specify a time period that is longer than the frequency settingfor the schedule. (The frequency is how often the backupruns). For example, if the frequency setting is one day, specifya retention period of one week. One week provides enoughof a margin to ensure that the current cumulative-incrementalbackup does not expire before the next successful oneoccurs. A complete restore requires the previous full backupplus the most recent cumulative-incremental backup.
Cumulative IncrementalBackup
The following table suggests several ways that you can prevent backups fromexpiring earlier than desired.
Table 20-43 Suggestions for preventing prematurely expired backups
DescriptionItem
Assign an adequate retention period. NetBackup does nottrack backups after the retention period expires. Recoveringfiles is difficult or impossible after the retention period expires.
For the backups that must be kept for more than one year,set the retention period to infinite.
Retention period
Assign a longer retention period to full backups than toincremental backups within a policy. A complete restorerequires the previous full backup plus all subsequentincremental backups. It may not be possible to restore all thefiles if the full backup expires before the incremental backups.
Full backups and incrementalbackups
Set the retention period to infinite.Archive schedules
781Creating backup policiesSchedule Attributes tab

Table 20-43 Suggestions for preventing prematurely expired backups(continued)
DescriptionItem
Set the retention period to infinite. If infinite is unacceptablebecause of NetBackup database space limitations, set theretention period to match the length of time that the data isto be retained.
Tape
Another consideration for data retention is off-site storage of the backup media.Off-site storage protects against the disasters that may occur at the primary site.
Consider the following off-site storage methods as precautions for disaster recovery:
■ Use the duplication feature to make a second copy for off-site storage.
■ Send monthly or weekly full backups to an off-site storage facility.To restore the data, request the media from the facility. To restore a total directoryor disk with incremental backups requires the last full backup plus all incrementalbackups.
■ Configure an extra set of schedules to create the backups to use as duplicatesfor off-site storage.
Regardless of the method that is used for off-site storage, ensure that adequateretention periods are configured. Use the NetBackup import feature to retrieveexpired backups.
By default, NetBackup stores each backup on a tape volume that contains existingbackups at the same retention level. If a backup has a retention level of 2, NetBackupstores it on a tape volume with other backups at retention level 2. When NetBackupencounters a backup with a different retention level, it switches to an appropriatevolume. Because tape volumes remain assigned to NetBackup until all the backupson the tape expire, this approach results in more efficient use of media. One smallbackup with an infinite retention prevents a volume from being reused, even if allother backups on the volume expired.
To mix retention levels on volumes, select Allow multiple retentions per mediain the Media host properties.
If you keep only one retention level on each volume, do not use any more retentionlevels than necessary. Multiple retention levels increase the number of requiredvolumes.
See “Media properties” on page 189.
Note: Retention levels can be mixed on disk volumes with no restrictions.
782Creating backup policiesSchedule Attributes tab

See “Changing a retention period” on page 229.
Media multiplexing (schedule attribute)The Media multiplexing attribute specifies the maximum number of jobs from theschedule that NetBackup can multiplex onto any one drive. Multiplexing sendsconcurrent backup jobs from one or several clients to a single drive and multiplexesthe backups onto the media.
Specify a number from 1 through 32, where 1 specifies no multiplexing. Any changestake effect the next time a schedule runs.
Note: Some policy types and some schedule types do not support mediamultiplexing. The option cannot be selected in those instances.
Caution: For MS-SQL-Server policies, do not enable multiplexing for a schedulethat is also configured to backup with multiple stripes. Restores fail when multiplexingis enabled for a schedule that uses more than one stripe.
To configure multiplexed backups, multiplexing must be indicated in both the storageunit (MaximumStreams Per Drive setting) and the schedule (Media Multiplexingsetting) configuration. Regardless of the Media multiplexing setting, the maximumjobs that NetBackup starts never exceeds the Maximum Streams Per Drive valuefor the storage unit.
NetBackup multiplexing sends concurrent backups from one or several clients toa single storage device. NetBackup multiplexes the backups sequentially onto themedia. Multiplexed and unmultiplexed backups can reside on the same volume.Separate volume pools or media IDs are not necessary.
Figure 20-13 shows the multiplexed flow of client data to a server.
783Creating backup policiesSchedule Attributes tab

Figure 20-13 Multiplexed backups
Clients
Server
Removable media ormagnetic disk
Disk
Disk
Disk
About multiplexingMultiplexing is generally used to reduce the amount of time that is required tocomplete backups. The following table describes circumstances where performanceimproves by using multiplexing:
Table 20-44 Circumstances where multiplexing improves performance
DescriptionItem
Instances in which NetBackup uses software compression,which normally reduces client performance, are alsoimproved.
Slow clients
The parallel data streams take advantage of whatevernetwork capacity is available.
Multiple slow networks
In addition to providing parallel data streams, multiplexingreduces the time each job waits for a device to becomeavailable. Therefore, the storage device transfer rate ismaximized.
Many short backups (forexample, incrementalbackups)
No special action is required to restore a multiplexed backup. NetBackup finds themedia and restores the requested backup. Multiplexing reduces performance onrestores because it uses extra time to read the images.
To reduce the effect of multiplexing on restore times, set the storage unit maximumfragment size to a value smaller than the largest allowed value. Also, on UNIX,enable fast-tape positioning (locate block), if it applies to the tape drives in use.
784Creating backup policiesSchedule Attributes tab

Consider the following configuration settings when using multiplexing.
Table 20-45 Properties and attributes that affect multiplexing
Where to find itDescriptionItem
■ In the NetBackup AdministrationConsole, expand NetBackupManagement > Policies.
■ In the middle pane, double-click theAttributes node of a policy.Or, create a new policy and select theAttributes tab.
Limits the number of jobs that NetBackupperforms concurrently when a policy is run.Set this attribute high enough to support thespecified level of multiplexing.
See “Limit jobs per policy (policy attribute)”on page 706.
Limit jobs per policy(policy attribute)
785Creating backup policiesSchedule Attributes tab

Table 20-45 Properties and attributes that affect multiplexing (continued)
Where to find itDescriptionItem
■ In the NetBackup AdministrationConsole, expand NetBackupManagement >Host Properties >MasterServers.
■ In the right pane, double-click a masterserver.
■ In the Master Server Properties dialogbox, select Global Attributes from the leftpane.
■ The property appears in the right pane.
Limits the number of backup jobs that can runconcurrently on any NetBackup client. Thisproperty is part of Global Attributes hostproperties.
See “Global Attributes properties” on page 159.
Usually, the client setting does not affectmultiplexing. However, consider a case wherejobs from different schedules on the sameclient go to the same storage unit. In this case,the maximum number of jobs that arepermitted on the client is reached before themultiplexing limit is reached for the storageunit. When the maximum number of jobs onthe client is reached, NetBackup cannot usethe storage unit’s full multiplexing capabilities.
Select a value that is based on the ability ofthe central processing unit to handle paralleljobs. Because extra buffers are required,memory is also important. If the server cannotperform other tasks or runs out of memory orprocesses, reduce the Maximum streamsper drive setting for the storage unit.
To estimate the potential load that multiplexingcan place on the central processing unit,consider the following limits:
■ The maximum concurrent jobs thatNetBackup can attempt equals the sum ofthe concurrent backup jobs that can runon all storage units.
■ The maximum concurrent jobs that canrun on a storage unit equals the value ofMaximum streams per drive, multipliedby the number of drives.
See “Maximum streams per drive storage unitsetting” on page 580.
Maximum jobs perclient (host property)
786Creating backup policiesSchedule Attributes tab

Table 20-45 Properties and attributes that affect multiplexing (continued)
Where to find itDescriptionItem
■ In the NetBackup AdministrationConsole, expand NetBackupManagement >Host Properties >MasterServers.
■ In the right pane, double-click a masterserver.
■ In the Master Server Properties dialogbox, select Client Attributes from the leftpane.
■ The property appears in the right pane onthe General tab.
Set the maximum number of jobs that areallowed on a specific client without affectingother clients. This property is part of ClientAttributes host properties.
See “General tab of the Client Attributesproperties” on page 94.
Maximum datastreams (hostproperty)
■ In the NetBackup AdministrationConsole, expand NetBackupManagement >Host Properties >MasterServers.
■ In the right pane, double-click a masterserver.
■ In the Master Server Properties dialogbox, select General Server from the leftpane.
■ The property appears in the right pane.
Specifies how long the server waits foradditional restore requests of files and rawpartitions in a set of multiplexed images onthe same tape. This property is part ofGeneral Server host properties.
See “General tab of the Client Attributesproperties” on page 94.
Delay on multiplexedrestores (hostproperty)
■ In the NetBackup AdministrationConsole, expand NetBackupManagement > Policies.
■ In the middle pane, double-click theSchedules node of a policy.Or, create a new policy and select theSchedules tab.
■ Click New to create a new schedule andconfigure the Media Multiplexing option.
If the limit is reached for a drive, NetBackupsends jobs to other drives.
When NetBackup multiplexes jobs, itcontinues to add jobs to a drive until thenumber of jobs on the drive matches theMedia Multiplexing limit or the Maximumstreams per drive limit.
See “Media multiplexing (schedule attribute)”on page 783.
Media Multiplexing(policy scheduleattribute)
787Creating backup policiesSchedule Attributes tab

Table 20-45 Properties and attributes that affect multiplexing (continued)
Where to find itDescriptionItem
■ In the NetBackup AdministrationConsole, expand NetBackupManagement > Storage.
■ In the left pane, click Storage Units.■ In the right pane, double-click a storage
unit name.Or, create a new storage unit.
■ The setting appears on the dialog box thatappears.
NetBackup can add jobs from more than oneschedule to a drive.
When NetBackup multiplexes jobs, itcontinues to add jobs to a drive until thenumber of jobs on the drive matches theMaximum streams per drive limit or theMedia Multiplexing limit.
See “Maximum streams per drive storage unitsetting” on page 580.
Maximum streamsper drive (storage unitsetting)
See “MPX_RESTORE_DELAY option for NetBackup servers” on page 319.
Example of using multiplexing with schedulesFigure 20-14 provides an example of how schedules are affected when multiplexingis active.
Figure 20-14 Multiplexing process scenario
Media Multiplexing per drive = 2Schedule B
CAT
Storage unit
Drive 1
Drive 2
A1
A2
B1
B2
A3
A4
A5
B3
B4
1
2 10
3
4
11
5
6
7
8
13
9 12
OTTER
Media Multiplexing per drive = 4Schedule A
Job Job
Job Job
DOG FOX
A white number denotes an event that is starting.A gray number denotes an event that is completing.
Assume the following about Figure 20-14.
■ Schedule A begins first.Schedules can be in the same or in different policies.
788Creating backup policiesSchedule Attributes tab

■ Allow Multiple Data Streams is enabled.Consequently, a client can have multiple data streams.See “Allow multiple data streams (policy attribute)” on page 725.
Table 20-46 Description of the multiplexing process scenario
DescriptionEvent
■ Jobs A1 and A2 from client DOG start on Drive 1.■ For Schedule A, the Media Multiplexing limit of 2 is reached for
Drive 1.
1 and 2
■ Jobs A3 and A4 from client CAT start on Drive 2.■ For Schedule A, the Media Multiplexing limit of 2 is reached for
Drive 2.
3 and 4
■ Jobs B1 and B2 for client FOX start on Drive 1.■ The Maximum streams per drive storage unit setting is reached
for Drive 1.
5 and 6
■ Jobs B3 and B4 from client OTTER start on Drive 2.■ All jobs are now running for Schedule B.■ The Maximum streams per drive storage unit setting is reached
for Drive 2.
7 and 8
■ Jobs A1 and A2 from client DOG finish on Drive 1.■ However, jobs B1 and B2 for client FOX continue to run.■ For Schedule A, the Media Multiplexing limit of 2 prevents job A5
from starting on Drive 1
9 and 10
■ Job A3 from client CAT finishes on Drive 2■ Job B1 from client FOX finishes on Drive 1.■ Job B2 is the only job currently running on Drive 1.
11 and 12
■ Job A5 from client CAT starts on Drive 1.■ JobA5 is the last job for Schedule A.■ For Schedule A, the Media Multiplexing limit of 2 prevents job A5
from starting on Drive 2.■ Therefore, job A5 starts on Drive 1.
13
NetBackup attempts to add multiplexed jobs to drives that already use multiplexing.If multiplexed jobs are confined to specific drives, other drives are available fornon-multiplexed jobs.
If the backup window closes before NetBackup can start all the jobs in a multiplexingset, NetBackup completes only the jobs that have started.
789Creating backup policiesSchedule Attributes tab

For example, Figure 20-14 assumes that the Activity Monitor shows jobs A1through A5 as queued and active.
If only jobs A1 and A2 start before the window closes, NetBackup does not performthe other jobs that are in the set. If the window closes before any jobs start, thenonly the first queued and active job starts and completes. Job A1 in this example.
See “MPX_RESTORE_DELAY option for NetBackup servers” on page 319.
About demultiplexingDemultiplexing speeds up future restores and is useful for creating a copy for off-sitestorage. Use the duplication process in the Catalog utility to demultiplex a backup.
Duplication allows one multiplexed backup at one time to be copied from the sourcemedia to the target media. When duplication is complete, the target contains asingle demultiplexed copy of each duplicated backup. (The target can also containother backups.) The duplicate copy can be made into the primary copy. Do notselect Preserve Multiplexing in the Configure Multiple Copies dialog box whenbackups are duplicated.
Note: If you use the bpduplicate command instead of the NetBackupAdministration Console, do not include the -mpx option on that command.
See “Duplicating backup images” on page 979.
Start Window tabThe Start Window tab provides controls for setting time periods during whichNetBackup can start jobs when using a schedule. Time periods are referred to aswindows. Configure windows so that they satisfy the requirements necessary tocomplete a job.
For example, create different windows:
■ One for the backups that open each day for a specific amount of time
■ Another for the backups that keep the window open all week
Adding, changing, or deleting a time window in a policy scheduleUse one of the following procedures to add, change, or delete a time window.
790Creating backup policiesStart Window tab

To add or change a time window in the NetBackup Administration Console
1 In the NetBackup Administration Console, in the left pane, expandNetBackup Management > Policies.
2 Expand the policy name in the middle pane, then select Schedules.
3 Do one of the following:
■ Click Actions > New > Schedule.■ In the Add Schedule dialog box, type the name of a
schedule.
To add a time window
In the right pane, double-click the schedule you want tochange. The Change Schedule dialog box appears.
To change a timewindow
4 Click the Start Window tab.
5 To change the increments available for selecting start times or end times,change the value in the Resolution field. You can choose 5, 10, 15, or 30minutes. For example, a resolution of 10 minutes allows time windowadjustments by 10-minute increments.
6 To indicate the opening of the time window, do the following:
Click the day and time when you'd like the window tostart and drag it to the day and time when you'd like thewindow to close.
Drag your cursor in the timetable
■ In the Start day field, select the first day that thewindow opens.
■ In the Start time field, select the time that thewindow opens.
Use the settings in the dialogbox
791Creating backup policiesStart Window tab

Time window
Times of dayStart time
Current cursor position
7 To indicate the closing of the time window, do one of the following:
Click the day and time when you'd like the window tostart and drag it to the day and time when you'd like thewindow to close.
Drag your cursor in the timetable
Enter a length of time in the Duration (days, hours,minutes) fields.
Enter the duration of the timewindow
■ Select a day in the End day list.■ Select a time in the End time field.
Indicate the end of the timewindow
Time windows show as bars in the schedule display.
Specify enough time to allow all clients in the policy to complete a backup.
Consider allowing extra time in the schedule in case the schedule starts latedue to factors outside of NetBackup. (Delays due to unavailable devices, forexample.) Otherwise, all backups may not have a chance to start.
792Creating backup policiesStart Window tab

8 As necessary, do any of the following:
Deletes the selected time window.Click Delete.
Deletes all time windows from the schedule display.Click Clear.
Replicates the time window for the entire week.Click Duplicate.
Erases the last action.Click Undo.
9 Do one of the following:
To save the time window and leave the dialog box open.Click Add.
To save the time window and close the dialog box.Click OK.
Example of schedule durationFigure 20-15 illustrates the effect of schedule duration on two full backup schedules.The start time for Schedule B begins shortly after the end time for the previousSchedule A. Both schedules have three clients with backups due.
Figure 20-15 Duration example
Schedule BSchedule A
End TimeStart Time
Client A1
Client A2
Client A3
Client B1
Client B2
Client B3
End TimeStart Time
1
2
Figure 20-15 illustrates the following points:
Client A3 starts within the Schedule A time window but doesn’t completeuntil after the Schedule B start time. However, Client A3 runs tocompletion even if the window closes while the backup is running. ClientB1, on Schedule B, begins as soon as Client A3 completes.
Point 1
793Creating backup policiesStart Window tab

Schedule A does not leave enough time for all the clients on ScheduleB to be backed up. Consequently, Client B3 is unable to start becausethe time window has closed. Client B3 must wait until the next timeNetBackup runs Schedule B.
Point2
Excluding days from a scheduleUse the Exclude Days tab to exclude specific days from a schedule for a backuppolicy. If a day is excluded from a schedule, jobs do not run on that day. The tabdisplays a calendar of three consecutive months. Use the lists at the top of thecalendar to change the first month or year displayed.
To exclude a day from a schedule
1 Use one or more methods to indicate the days to exclude:
■ Select the day(s) on the 3-month calendar that you want to exclude. Usethe drop-down lists at the top of the calendar to change the months or year.
■ To indicate Recurring Week Days:
■ Click Select All to select all of the days in every month for every year.
■ Click Deselect All to remove all existing selections.
■ Check a box in the matrix to select a specific day to exclude for everymonth.
■ Click the column head of a day of the week to exclude that day everymonth.
■ Click the 1st, 2nd, 3rd, 4th, or Last row label to exclude that week everymonth.
■ To indicate Recurring Days of the Month:
■ Click Select All to select all of the days in every month.
■ Click Deselect All to remove all existing selections.
■ Check a box in the matrix to select that day to exclude each month.
■ Click Last Day to exclude the last day of every month.
■ To indicate Specific Dates:
■ Click New. Enter the month, day, and year in the Date Selection dialogbox. Click OK.The date appears in the Specific Dates list.
794Creating backup policiesExcluding days from a schedule

■ To delete a date, select the date in the list. Click Delete.
2 Add additional dates as necessary, then click OK to save the changes.
Include Dates tabThe Include Dates tab appears in the Add New Schedule or Change Scheduledialog box. For the tab to display, you must select the Calendar option as theSchedule type on the Attributes tab. Calendar-based schedules provide severalrun day options for determining when a task runs.
The tab displays a calendar of three consecutive months. Use the lists at the topof the calendar to change the first month or year displayed.
Calendar scheduling with the Include Dates tabUse the Calendar option in the policy Attributes tab to create a job schedule basedon a calendar view. The Include Dates tab lets administrators configure theschedules that run according to specific days, on recurring week days, or onrecurring days of the month.
Note: Using the calendar schedule, if a green checkmark does not appear on aday, the day is not included in the schedule.
If Retries allowed after runday is enabled, a job could run on a day that is notincluded in the schedule.
When a new calendar schedule is created with Retries allowed after rundayenabled, the schedule runs its first job on the next day when the backup window isopen. That day may be before the first run day that is included in the schedule.
To use a calendar to schedule run days
1 In the Attributes tab, enable the Calendar attribute.
2 Select the Include Dates tab.
3 Use one or more methods to schedule the days on which jobs can run:
■ Select the day(s) on the three-month calendar that you want jobs to run.Use the drop-down lists at the top of the calendar to change the months oryear.
■ To indicate Recurring Week Days:
■ Click Select All to select all of the days in every month for every year.
■ Click Deselect All to remove all existing selections.
795Creating backup policiesInclude Dates tab

■ Check a box in the matrix to select a specific day to include for everymonth.
■ Click the column head of a day of the week to include that day everymonth.
■ Click the 1st, 2nd, 3rd, 4th, or Last row label to include that week everymonth.
■ To indicate Recurring Days of the Month:
■ Click Select All to select all of the days in every month.
■ Click Deselect All to remove all existing selections.
■ Check a box in the matrix to select that day to include each month.
■ Click Last Day to include the last day of every month.
■ To indicate Specific Dates:
■ Click New. Enter the month, day, and year in the Date Selection dialogbox. Click OK.The date appears in the Specific Dates list.
■ To delete a date, select the date in the list. Click Delete.
4 Add additional dates as necessary, then click OK to save the included days.
How NetBackup determines which schedule torun next
When a policy contains one schedule, the schedule that is selected to run next isstraightforward. But when a policy contains multiple schedules, choosing whichschedule to run next can become more complicated.
NetBackup performs the following tasks to determine which schedule to run next:
■ NetBackup determines the due time for each schedule. The due time dependson the following:
■ The last backup data for each schedule based on comparable schedules.
■ The frequency that is added to each schedule to determine which scheduleis due next.
■ NetBackup checks the start time for each schedule. The schedule with thesoonest start time runs next. That is, the schedule with the next open window.
796Creating backup policiesHow NetBackup determines which schedule to run next

Figure 20-16 Schedule selection overview
Find last backup data
For frequency-based schedules,
add frequency
For calendar-based schedules,
add days untilnext run day
Determine due time First availablestart time
Scheduleselected to run
next
When any of the following events occurs, NetBackup recalculates which scheduleto run next in a policy:
■ A backup job finishes.
■ A client backup image expires.
■ The Policy Execution Manager (nbpem) starts.
■ The administrator changes the policy.NetBackup looks for updated policies every 10 minutes. If the policy has recentlybeen updated, NetBackup waits an additional minute to be sure that changesare not currently underway. You can change the frequency that NetBackup looksfor updates by changing the Policy Update Interval in the Global Attributeshost properties.See “Global Attributes properties” on page 159.
The due time for each schedule equals the last backup data for the schedule, plusthe schedule’s frequency:
Due time = Last backup data + Frequency
Last backup data refers to the schedule that ran most recently among comparableschedules. NetBackup uses the date and time of that schedule to determine thedue time for all the schedules that use that schedule as the last backup data.
In some cases, the last backup data for a schedule names the schedule itself. Inother cases, the last backup data for a schedule is another comparable schedule.
NetBackup makes the following comparisons to identify a comparable schedule:
Compared to other full schedules of the same or longerfrequency.
Full schedules
797Creating backup policiesHow NetBackup determines which schedule to run next

Compared to the following:
■ Full schedules of the same or longer frequency.■ Other cumulative incremental schedules of the same or
longer frequency.
Cumulative incrementalschedules
Compared to the following:
■ Full schedules of the same or longer frequency.■ Cumulative incremental schedules of the same or longer
frequency.■ Other differential incremental schedules of the same or
longer frequency.
Note: To have a longer frequency means that theschedule is configured to run less often.
Differential incrementalschedules
The comparison rules ensure that no schedule is overlooked for consideration,potentially causing a gap in backup coverage.
Figure 20-17 Schedule coverage
Sunday
Monday
Tuesday
Wednesday
Thursday
Friday
Saturday
Sunday
Monday
Tuesday
Wednesday
Thursday
Friday
Saturday
Sunday
Monday
Full
Differential Incremental
Differential Incremental
Cumulative Incremental
Differential Incremental
Differential Incremental
Cumulative Incremental
Full
Differential Incremental
Differential Incremental
Cumulative Incremental
Differential Incremental
Differential Incremental
Cumulative Incremental
Full
Differential Incremental
Data
Time
The following jobs create additional complexities in scheduling:
798Creating backup policiesHow NetBackup determines which schedule to run next

Each stream is scheduled independently. The data maychange in the time between the streamed backups. Tworestores that are based on the same backup may not beidentical if created from different streams.
Multistreaming jobs
NetBackup uses the previous synthetic job as the basis fordeterming when the next synthetic job should run.
Synthetic backup jobs
About schedule windows that span midnightA backup window may begin in one day and end in another. If this kind of policy isscheduled to run each day, NetBackup does not run the job again immediately aftermidnight. Instead, even though the window spans into the next day, NetBackupconsiders it to be one window. NetBackup recognizes that the administrator’sintention is usually not to have a job run again so soon after the previous backup.
Figure 20-18 shows a window that spans midnight.
If a policy is scheduled to run each day, NetBackup looks to see if another windowopens later in the day. If another window is set up to open later, NetBackup waitsand runs the job then.
Figure 20-18 Schedule that spans midnight
The first job begins Sunday.
The job is due Monday as well. Instead of running the job againimmediately after midnight, NetBackup looks for a window later inthe day and runs the job.
If no other window is scheduled to open later in the day, NetBackup does not wait.If the job has a daily frequency, the job runs again after midnight to meet the dailybackup frequency requirement.
799Creating backup policiesAbout schedule windows that span midnight

How open schedules affect calendar-based andfrequency-based schedules
A single backup window can span the entire week. This kind of schedule is calledan open schedule because a job may run at any time of day or night during theweek. Open schedules affect calendar-based and frequency-based schedulesdifferently.
Figure 20-19 shows an open schedule.
Figure 20-19 An open schedule
Open schedules affect calendar-based and frequency-based schedules differently:
Calendar-based schedules run whenever the calendarschedule indicates. NetBackup assumes that an environmentrequires one backup on each day that is selected on thecalendar schedule. Given an open schedule, backups runas soon after midnight as possible to satisfy the daily backuprequirement.
Calendar-based schedules
800Creating backup policiesHow open schedules affect calendar-based and frequency-based schedules

Frequency-based schedules run when the frequency settingindicates. For example, with a frequency of one day,NetBackup runs backups at 24-hour intervals based on thestart time.
Frequency-based schedules
Figure 20-20 shows that the backups on a calendar-based schedule would runMonday through Friday.
Figure 20-20 An open schedule that is calendar-based
Figure 20-21 and Figure 20-22 show that the backups based on a frequency-basedschedule should run every day of the week, including Saturday and Sunday.
801Creating backup policiesHow open schedules affect calendar-based and frequency-based schedules

Figure 20-21 An open schedule that is frequency-based
In Figure 20-22, backups run at 10:00 P.M. nightly based on the start time.
802Creating backup policiesHow open schedules affect calendar-based and frequency-based schedules

Figure 20-22 Example of a frequency-based schedule with an open schedule
Click on a window to see thestart time and end time ofeach day.
The start time indicateswhen backups can run.
The window has a durationof 1 day. The window isduplicated for each day, tocreate an open schedule.
Creating an open schedule in the NetBackup Administration ConsoleThe following procedure describes how to create an open schedule in an existingpolicy. In this procedure, the open schedule is configured to begin at 10:00 P.M.
To create an open schedule in the NetBackup Administration Console
1 In the NetBackup Administration Console, in the left pane, expandNetBackup Management > Policies.
2 In the middle pane, double-click on the policy name where you want to createan open schedule.
3 Select the Schedules tab.
4 Click New or Add to create a new schedule.
5 Complete the information on the Attributes tab.
6 Select the Start Window tab.
7 Select Sunday as the Modify Day and 10:00:00 PM as the Start time.
803Creating backup policiesHow open schedules affect calendar-based and frequency-based schedules

8 Select Monday as the End Day and 10:00:00 PM as the End time. TheDuration is then automatically set to one day.
9 Click Duplicate to copy this window to each day of the week.
10 Click OK to add the schedule to the policy.
Runtime considerations that affect backup frequencyThe following items may cause a NetBackup job to run more frequently thanexpected, or may prevent a job from meeting its backup frequency requirement.
Table 20-47 Items that can affect backup frequency
DescriptionItem
If the administrator changes or activates a policy, the change prompts NetBackup torun the job as soon as possible. It does not matter if the schedule is calendar-basedor frequency-based.
Changing a policy causes thepolicy to run
Whether the schedule is calendar-based or frequency-based, a job cannot run ifwindows are not open on the configured rundays.
■ For calendar-based schedules, windows must be open on the specific dates,recurring weekdays, or recurring days of the month that the calendar scheduleindicates.
Note: A frequency is not configurable for a calendar-based schedule. For thisschedule type, NetBackup assumes a daily backup frequency.
■ For frequency-based schedules, a daily frequency requires that a window is openeach day.
Window availability
A Global Attribute host property setting determines how many times a failed job canattempt to run. The Schedule backup attempts property includes the number ofattempts and the time period in which the attempts can take place.
By default, a failed job tries to run two times every 12 hours if an open window isavailable. Note that this setting supersedes any other frequency requirement and cancause a schedule to skip an open window.
For example, if a job meets the maximum number of job attempts, NetBackup doesnot try to run the job again during the retry period indicated. It does not attempt, evenin an open window and a daily backup frequency has not been met that day.
See “Global Attributes properties” on page 159.
Backup attempt limit
804Creating backup policiesHow open schedules affect calendar-based and frequency-based schedules

About the Clients tabThe Clients tab contains a list of clients to be backed up (or acted upon) by theselected policy. A client must be included in the list of at least one backup policyto be backed up.
Placing a client in more than one backup policy can be useful. For example, placethe client name in two policies to back up different sets of files on the client accordingto different policy rules.
The Clients tab does not appear for Vault or Catalog policy types.
On UNIX: You can also use theClients tab to install NetBackup software on trustingUNIX clients.
Adding or changing clients in a policyA client must be included in the list of at least one active backup policy to be backedup. Use the following procedures to add, change, or delete clients in an existingNetBackup policy.
To add, change, or delete a client in a policy
1 In theNetBackupAdministrationConsole, expandNetBackupManagement> Policies.
2 Open the policy that you want to change.
3 Select the Clients tab and perform one of the following actions:
Continue to step 4.To add a new client
Double-click on the client that you want to change or selectthe client and click Change. The Change Client dialog boxappears.
Click OK to accept the change and close the Change Clientdialog box. Or, click Cancel to close the dialog box withoutsaving the changes.
To change an existingclient
Select a client and click Delete. Hold down Shift to selectmultiple clients. A confirmation dialog box appears that liststhe clients to be deleted. Click Yes to delete the clients or Noto escape the dialog box.
To delete a client
4 To add a new client, click New. The Add Client dialog box appears.
805Creating backup policiesAbout the Clients tab

In the Add Client dialog box, enter the host name that you want to add. Orclick the Browse for Computer button, select the host from the network tree,and click OK.
Observe the following rules for assigning client names:
■ Use a name by which the server knows the client (one that you can use onthe server to ping or telnet to the client).
■ If the client is in multiple policies, use the same name in each policy.
■ If the network configuration has multiple domains, use a more qualifiedname. For example, use client1.null.com or client1. null rather thanonly client1.
■ Add only clients with the hardware and the operating systems that this policysupports. For example, do not add a UNIX client to anMS-Windows policy.If you add a client to more than one policy, designate the same hardwareand operating system in each of the policies.If the hardware and the operating system you want is not in the list,associated client software is not installed on the server. Check the/usr/openv/netbackup/client directory for the directories and softwarethat corresponds to the client you want to install. If the directories or softwareare not there, rerun the installation script on the server and select the optionto install client software.
■ Do not use an IP address as a client name in a policy or the backup mayfail. Specify a host name instead.
806Creating backup policiesAbout the Clients tab

5 You can either select the Detect client operating system check box or selectthe appropriate hardware and operating system for the client in the drop-downmenu.
Note: This feature is also available when you configure the LiveUpdate policytype and also when you use the Policy Configuration Wizard to configure apolicy. To be able to use the auto-detect feature, the master server name mustbe included in the bp.conf file on the client. This task is accomplished whenyou enter the master server name during the installation of the client softwareon the host.
NetBackup is migrating to a simplified client name for Windows clients. Thenew client selection Windows can be used for all supported Windows clients,regardless of the specific Windows version of the client. For Windows 8,Windows 2012 and later clients, choose theWindows option. In future releases,specific Windows version choices will be eliminated.
6 Perform one of the following:
■ Click Add to add the client to the list and leave the dialog box open to addanother client.
■ Click OK to add the client to the list and close the dialog box.
■ Click Cancel to close the dialog box without adding the client.
7 When you are finished in the Clients tab:
■ Click OK to close and save the policy.
■ Click Cancel to close the policy without saving any additions or changes.
Installing client software on secure and trusting UNIX clientsA secure UNIX client is a client that does not contain an entry for the NetBackupmaster server in its /.rhosts file. You can install software on a secure UNIX clientlocally by using the installation DVDs or by using a script.
By contrast, a trusting UNIX client contains an entry for the current master serverin its /.rhosts file. You can install client software on trusting UNIX clients from thepolicy Clients tab or from the Actions menu when the Policies utility is selected.
To install NetBackup Windows client software, see the NetBackup Installation Guidefor Windows.
Before you can install client software on trusting UNIX clients, the followingprerequisites must be met:
807Creating backup policiesAbout the Clients tab

■ You can install the client software from theNetBackup Administration Consoleonly from a UNIX NetBackup server. The server must be the server that wasspecified in the logon dialog box when the interface was started. This servermust also be the master where you currently manage backup policies, andclients must be in a policy on this master.
■ Each client that receives the software installation must contain an entry for thecurrent master server in its /.rhosts file. If these entries exist, the clients arereferred to as trusting clients. The /.rhosts entries for the master server arenot required for correct operation of NetBackup. The entries can be removedafter the client software is installed.
To install client software on trusting UNIX clients
1 In theNetBackupAdministrationConsole, expandNetBackupManagement> Policies.
Note: If you want to install client software, you cannot click File > ChangeServer to get to another master server. The master server must be the serverthat you specified in the logon dialog box.
2 Select the master server name at the top of the All Policies middle pane.
3 On the Actions menu, click Install UNIX Client Software.
4 In the Don’t install these clients box, select the clients in the list that youwant to receive the software. Click Add to move the client names to the Installthese clients box.
5 Click Install Client Software to start the installation.
Client software installation can take a minute or more per client. NetBackupwrites the messages in the Progress box as the installation proceeds. If theinstallation fails on a client, NetBackup notifies you but keeps the client in thepolicy. You cannot stop the installation once it starts.
During installation, NetBackup performs the following actions:
■ Copies the client software.
■ Copies from the/usr/openv/netbackup/client directory on the server.
■ Copies to the /usr/openv/netbackup directory on the client.
■ Adds the required entries to the client’s /etc/services and inetd.conf
files.
6 When the install is complete, click Close.
To install client software to a different location on the client:
808Creating backup policiesAbout the Clients tab
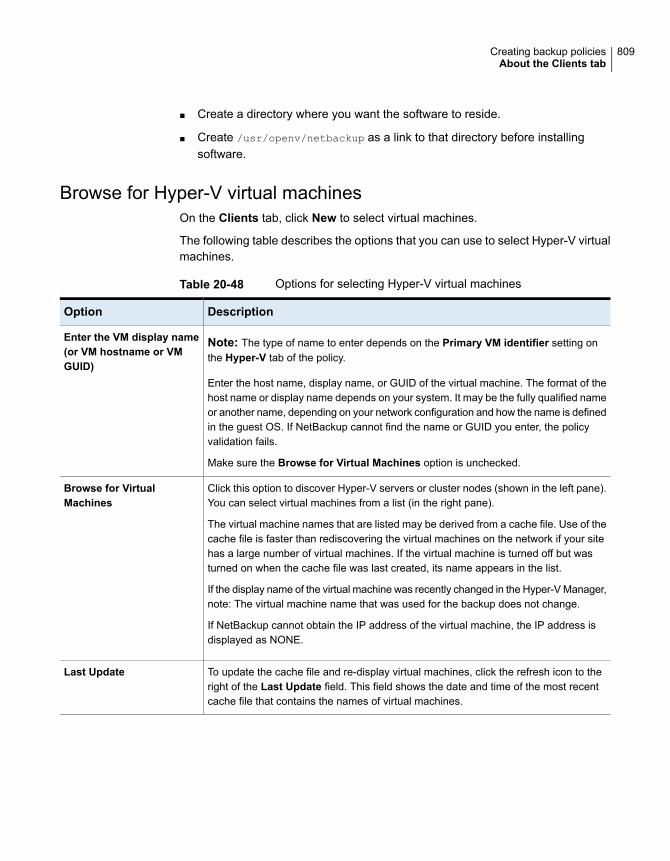
■ Create a directory where you want the software to reside.
■ Create /usr/openv/netbackup as a link to that directory before installingsoftware.
Browse for Hyper-V virtual machinesOn the Clients tab, click New to select virtual machines.
The following table describes the options that you can use to select Hyper-V virtualmachines.
Table 20-48 Options for selecting Hyper-V virtual machines
DescriptionOption
Note: The type of name to enter depends on the Primary VM identifier setting onthe Hyper-V tab of the policy.
Enter the host name, display name, or GUID of the virtual machine. The format of thehost name or display name depends on your system. It may be the fully qualified nameor another name, depending on your network configuration and how the name is definedin the guest OS. If NetBackup cannot find the name or GUID you enter, the policyvalidation fails.
Make sure the Browse for Virtual Machines option is unchecked.
Enter the VM display name(or VM hostname or VMGUID)
Click this option to discover Hyper-V servers or cluster nodes (shown in the left pane).You can select virtual machines from a list (in the right pane).
The virtual machine names that are listed may be derived from a cache file. Use of thecache file is faster than rediscovering the virtual machines on the network if your sitehas a large number of virtual machines. If the virtual machine is turned off but wasturned on when the cache file was last created, its name appears in the list.
If the display name of the virtual machine was recently changed in the Hyper-V Manager,note: The virtual machine name that was used for the backup does not change.
If NetBackup cannot obtain the IP address of the virtual machine, the IP address isdisplayed as NONE.
Browse for VirtualMachines
To update the cache file and re-display virtual machines, click the refresh icon to theright of the Last Update field. This field shows the date and time of the most recentcache file that contains the names of virtual machines.
Last Update
809Creating backup policiesAbout the Clients tab

Backup Selections tabThe Backup Selections tab contains a list of what to back up on each client, host,or instance when NetBackup runs an automatic schedule (for example, a fullbackup). The list does not apply to user backups or archives, where users selectthe objects to back up before they start the operation.
The backup selections list can contain the following:
■ Paths that identify the location of files or directories
■ Directives, which signal NetBackup to perform specific, predefined actions whenit processes the selections list
■ Scripts or templatesAdministrators create scripts to define and control database backups. Templatesare used exclusively for Oracle (legacy) and DB2 database backups.
■ Database objects
■ WildcardsCertain wildcards can be used in the selections list. See “Wildcard use inNetBackup” on page 1113.Windows clients support only the asterisk (*) and the question mark (?) as validwildcards in the Backup Selections tab.For information on how to use wildcards when you configure backup selectionsfor database agents and other options, refer to the guide for that agent or option.
The list applies to each client (or host, instance, or database) in the policy. Everyfile on the list does not need to exist on all of the clients. NetBackup backs up thefiles that it finds that are on the backup selections list. However, each client mustcontain at least one of the files in the backup selections list. Otherwise, the backupfails with status code 71 (none of the files in the file list exist). Use the Troubleshooterto find the description of a status code. See “Running the Troubleshooter”on page 58.
The policy type determines what type of backup selections appear in the list. SeeTable 20-49. See “Policy type (policy attribute)” on page 694.
Table 20-49 Items allowed in the Backup Selections list for specific policytypes
Items allowedPolicy type
Paths and directivesStandard
Paths and directivesMS-Windows
810Creating backup policiesBackup Selections tab

Table 20-49 Items allowed in the Backup Selections list for specific policytypes (continued)
Items allowedPolicy type
Paths and directivesLotus-Notes, MS-Exchange-Server,MS-SharePoint
For SQL Server Intelligent policies, you canselect the whole database, file groups, orfiles. For legacy SQL Server policies, you addbatch files.
MS-SQL-Server
ScriptsInformix-On-BAR, SAP, Sybase
Scripts and templatesDB2
For Oracle Intelligent Policies, you select anOracle database object or other option like abackup of the Fast Recovery Area (FRA). Forlegacy Oracle policies, you add scripts ortemplates.
Oracle
Vault commandsVault
Adding backup selections to a policyUse the following procedures to add backup selections to a NetBackup policy,without opening up the tab view of the policy.
To add backup selections to a policy
1 In theNetBackupAdministrationConsole, expandNetBackupManagement> Policies.
2 Open the policy where you want to add a backup selection.
3 Select the Backup Selections tab and perform one of the following actions:
811Creating backup policiesBackup Selections tab

Click Browse to browse to a specific client to specifythe path to the directory that you want to backup up. Orenter the pathname directly in the Pathname ordirective field.
The Browse button toggles to an Add button after aselection is made. Click Add to add the path to theselection list.
A path may contain up to 1023 characters.
See “Pathname rules for Windows client backups”on page 817.
See “Pathname rules for UNIX client backups”on page 824.
Entering a path to a directory
Select or enter a directive or a directive set in thePathname or Directive set drop-down menu.
Click Add to add the directive to the selection list.
See “About the directives on the Backup Selections list”on page 832.
Selecting a directive set ordirective
■ Select or enter a script or template in the Script ortemplate drop-down menu.Templates are stored in a known location on themaster server and do not need to be installed oneach client in theClients list. Enter only the templatefile name, without a path. For example:weekly_full_backup.tpl
Scripts require that you specify the full path. Be surethat the scripts that are listed are installed on eachof the clients that are specified on the Clients tab.
■ For Oracle policies, select a template set based onan operation from the Template set list.
■ For Oracle polices or DB2 policies, select a templatefrom the Script or template list, or type the nameof a template.Example of an Oracle script on UNIX:install_path/netbackup/ext/db_ext/oracle/samples/rman/cold_database_backup.sh
Example of a DB2 script on UNIX:/myscripts/db2_backup.sh
Click Add to add the script or template to the selectionlist.
Selecting a script or template
812Creating backup policiesBackup Selections tab

You can select multiple directories and files for backup. The policy typedetermines whether the backup selections list can contain paths, directives,scripts, templates, or a combination.
4 Click OK to add the selection list to the Backup Selections tab in the policy.
5 When you are finished in the Backup Selections tab:
■ Click OK to close and save the policy.
■ Click Cancel to close the policy without saving any additions or changes.
Verifying the Backup Selections listVerify the Backup Selections list to make sure that the file paths are correct forthe clients in the policy.
813Creating backup policiesBackup Selections tab
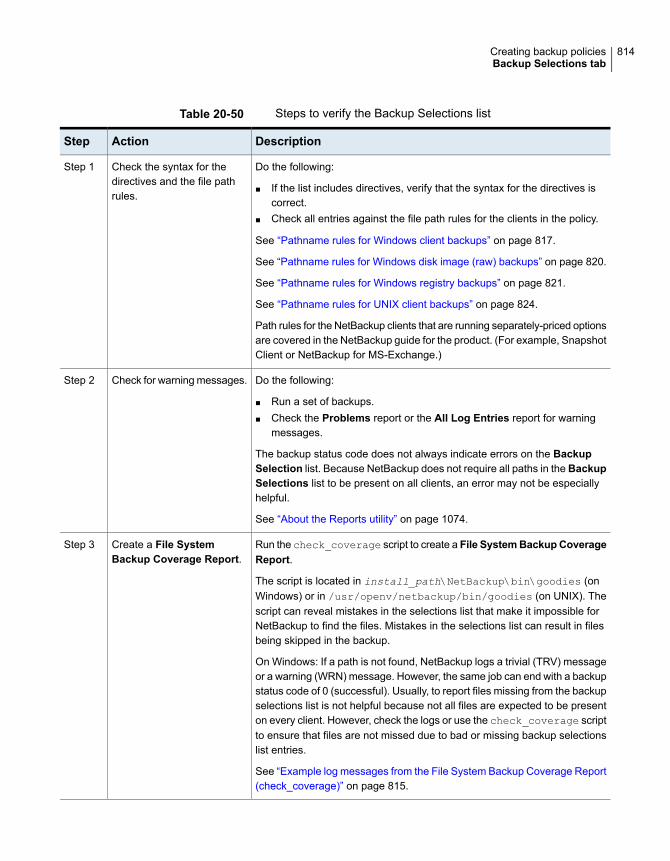
Table 20-50 Steps to verify the Backup Selections list
DescriptionActionStep
Do the following:
■ If the list includes directives, verify that the syntax for the directives iscorrect.
■ Check all entries against the file path rules for the clients in the policy.
See “Pathname rules for Windows client backups” on page 817.
See “Pathname rules for Windows disk image (raw) backups” on page 820.
See “Pathname rules for Windows registry backups” on page 821.
See “Pathname rules for UNIX client backups” on page 824.
Path rules for the NetBackup clients that are running separately-priced optionsare covered in the NetBackup guide for the product. (For example, SnapshotClient or NetBackup for MS-Exchange.)
Check the syntax for thedirectives and the file pathrules.
Step 1
Do the following:
■ Run a set of backups.■ Check the Problems report or the All Log Entries report for warning
messages.
The backup status code does not always indicate errors on the BackupSelection list. Because NetBackup does not require all paths in the BackupSelections list to be present on all clients, an error may not be especiallyhelpful.
See “About the Reports utility” on page 1074.
Check for warning messages.Step 2
Run the check_coverage script to create a File SystemBackupCoverageReport.
The script is located in install_path\NetBackup\bin\goodies (onWindows) or in /usr/openv/netbackup/bin/goodies (on UNIX). Thescript can reveal mistakes in the selections list that make it impossible forNetBackup to find the files. Mistakes in the selections list can result in filesbeing skipped in the backup.
On Windows: If a path is not found, NetBackup logs a trivial (TRV) messageor a warning (WRN) message. However, the same job can end with a backupstatus code of 0 (successful). Usually, to report files missing from the backupselections list is not helpful because not all files are expected to be presenton every client. However, check the logs or use the check_coverage scriptto ensure that files are not missed due to bad or missing backup selectionslist entries.
See “Example log messages from the File System Backup Coverage Report(check_coverage)” on page 815.
Create a File SystemBackup Coverage Report.
Step 3
814Creating backup policiesBackup Selections tab

Example log messages from the File System BackupCoverage Report (check_coverage)The File System Backup Coverage Report is created by running thecheck_coverage script. For information on check_coverage, see the comments inthe script.
On Windows: The following example shows the log message that appears whenfiles expected to be on a client are not found.
Assume that the backup selections list contains the path c:\worklist that is notpresent on all clients. NetBackup backs up C:\worklist on the clients where itexists.
For other clients, the Problems report or the All Log Entries report shows amessage similar to the following:
9/1/14 8:28:17 AM carrot freddie Info from client freddie: TRV
- object not found for file system backup: C:\worklist
This message occurs if c:\worklist is not the correct path name. For example,the directory name is c:\worklists, but c:\worklist was typed.
Note: If the paths seem correct and the message appears, ensure that no trailingspaces appear in the paths.
On UNIX: The following table shows examples of the log messages that appearwhen files expected to be on a client are not found.
Table 20-51 Example UNIX log messages from the File System BackupCoverage Report
DescriptionExample
Assume that the backup selections list contains a regular expression:
/home1[0123456789]
NetBackup backs up /home10 through /home19 if both exist.
If they are not present, the Problems report or the All Log Entries report displays amessage similar to the following:
02/02/14 20:02:33 windows freddie fromclient freddie: TRV -Found no matching file system for/home1[0123456789]
Regular expressions orwildcards
815Creating backup policiesBackup Selections tab

Table 20-51 Example UNIX log messages from the File System BackupCoverage Report (continued)
DescriptionExample
Assume that the backup selections list contains a path named /worklist that is notpresent on all clients. NetBackup backs up /worklist on the clients where it exists.
For other clients, the Problems report or theAll Log Entries report displays a messagesimilar to the following:
02/02/14 21:46:56 carrot freddie fromclient freddie: TRV - cannotprocess path /worklist: No suchfile or directory. Skipping
This message occurs if /worklist is not the correct path name. For example, thedirectory name is /worklists, but /worklist was typed.
Note: If the paths seem correct and the message continues to appear, ensure thatno trailing spaces appear in the paths.
Path not present on all clientsor wrong path specified
Assume the backup selections list names a symbolic link. NetBackup does not followsymbolic links and provides a message in the Problems report or the All Log Entriesreport:
02/02/14 21:46:47 carrot freddie fromclient freddie: WRN - /src is onlybeing backed up as a symbolic link
Resolve the symbolic link if you do not intend to back up the symbolic link itself.
Symbolic link
How to reduce backup timeA client can be added to multiple policies, to divide the client’s files among thedifferent backup selections lists. Multiple policies can reduce the backup time forthat client because the files can be backed up in parallel.
Multiple clients can be backed up in parallel in the following situations:
■ Multiple storage devices are available (or if the policies are multiplexed).
■ Maximum jobs per client (in Global Attributes host properties) and the Limitjobs per policy policy attribute are set to allow it.See “Global Attributes properties” on page 159.See “Limit jobs per policy (policy attribute)” on page 706.
816Creating backup policiesBackup Selections tab

Note: Understand disk and controller input and output limitations before configuringincluding a client in multiple policies. For example, if two file systems overload theclient when backed up in parallel, place both file systems in the same policy.Schedule the file systems at different times or set Maximum jobs per client to 1.
Another method to reduce backup time is to select Allow multiple data streamsfor a policy. Then, add NEW_STREAMS directives to the backup selections list.
For example:
NEW_STREAM
file_a
file_b
file_c
NEW_STREAM
file_d
file_e
file_f
The example produces two concurrent data streams. The first data string containsfile_a, file_b, and file_c. The second data stream contains file_d, file_e,and file_f.
See “Allow multiple data streams (policy attribute)” on page 725.
Note: For best performance, use only one data stream to back up each physicaldevice on the client. Multiple concurrent streams from a single physical device cancause longer backup times. The disk heads must move back and forth betweenthe tracks that contain files for the respective streams.
A directive instructs NetBackup to perform specific actions to process the files inthe backup selections list.
Pathname rules for Windows client backupsTo back up Windows clients, use the following conventions for entries in the backupselections list.
Table 20-52 Pathname rules for Windows client backups
DescriptionItem
Enter one path per line.Paths per line
817Creating backup policiesBackup Selections tab

Table 20-52 Pathname rules for Windows client backups (continued)
DescriptionItem
Begin all paths with the drive letter followed by a colon (:) and a backslash (\).
To specify an entire volume, append a backslash (\) to the entry to ensure that all data isprotected on that volume:
Correct entry: c:\
Incorrect entry: c:
Colons andbackslashes
The drive letter and path are case-insensitive.
The following example entries would successfully indicate the same directory:
c:\Worklists\Admin\C:\worklists\admin\c:\WORKLISTS\Admin\C:\Worklists\ADMIN\
Note: If a path is listed in the Backup Selections tab more than once, the data is backedup more than once.
Case sensitivity
Asterisks (*) and question marks (?) are the only wildcard characters allowed in the backupselection list for Windows clients.
Square brackets and curly brackets are not valid for Windows clients and can cause backupsto fail with a status 71.
For Windows clients, wildcards function correctly only when they are placed at the end of thepath, in the file or directory name. For example:
C:\abc\xyz\r*.doc
Wildcard characters do not work elsewhere in the path. For example, an asterisk functionsas a literal character (not as a wildcard) in the following examples:
C:\*\xyz\myfile
C:\abc\*\myfile
See “Wildcard use in NetBackup” on page 1113.
Wildcards
818Creating backup policiesBackup Selections tab

Table 20-52 Pathname rules for Windows client backups (continued)
DescriptionItem
To back up all local drives except for those that use removable media, specify the following:
:\
Or*:\
OrALL_LOCAL_DRIVES
The following drives are not backed up: floppy disks, CD-ROMs, and any drives that arelocated on remote systems but mounted on a system through the network.
All local drives
Do not specify a local drive path that is mapped to a CIFS share using the Windows MapNetwork Drive option.
This holds true for a policy that contains multiple clients as well. Do not specify paths thatpoint to different CIFS shares.
For example:
P:Q:R:
Use of mapped drives
If a backup policy contains multiple clients that specify a UNC path as a backup selection,the redundant backup copies are created of the same data from different clients.
Consider including the host in a policy as a client to be backed up.
For example:
\\host_name\dir1
Use of UNC path(s)
By default, NetBackup does not back up some files.
See “Files that are excluded from backups by default” on page 845.
Exclude specific files from backups by creating an exclusion list on the client.
See “About excluding files from automatic backups” on page 846.
The following backup selection list uses Windows conventions:
c:\d:\workfiles\e:\Special\statusc:\tests\*.exe
Omitted or excludedfiles
819Creating backup policiesBackup Selections tab

Pathname rules for Windows disk image (raw) backupsOn Windows clients, you can back up a logical disk drive as a disk image. That is,NetBackup backs up the entire logical drive on a bit-by-bit basis rather than bydirectories and files. Use the Full backup backup type to perform a disk imagebackup.
Figure 20-23 Disk image backups
Must select Full backup asbackup type
Logical drive name in thebackup selection list
To specify a disk image backup, add the logical name for the drive to the policybackup selection list. Disk images can be included in the same backup selectionlist with other backups. In the following sample backup selection list, the first entry(\\.\c:) creates a disk image backup of a logical drive C.
\\.\c:
d:\workfiles\
e:\Special\status
HKEY_LOCAL_MACHINE:\
To restore the backup, the user clicks Select for restore > Restore from Normalbackup.
820Creating backup policiesBackup Selections tab

When the backups are listed, the disk image appears as a file with the same namethat was specified in the backup selection list. For the previous example, the filename would show as follows:
\\.\c:
When you enter the destination to restore the file, use the following format:
\\.\drive:
Where drive is the location where the partition is to be restored.
Consider the following when working with disk image backups:
NetBackup first attempts to use Windows Open File Backupmethods. If that fails, NetBackup locks the logical drive, whichensures that no changes occur during the backup. If thereare open files on the logical drive, a disk image backup is notperformed.
Windows Open File Backupmethods
Before a disk image is backed up or restored, all applicationsthat have a file opened on the partition should be shut down.If the applications are not shut down, the operation fails.Examples of such applications are Windows Explorer orNorton AntiVirus.
Open files
Ensure that no active COW (Copy-On-Write) snapshots arein progress. If there is an active COW snapshot, the snapshotprocess itself has a handle open to the volume.
Copy-On-Write snapshots
NetBackup does not support raw partition backups onunformatted partitions.
Raw partitions
If the volume is configured to contain a paging file(pagefile.sys), a raw partition backup of that volume mayfail. In order for a raw partition backup of that volume tosucceed, the volume may need to be reconfigured so as notto contain a paging file. The raw partition backup of thevolume may work without reconfiguration if a snapshot cansuccessfully be taken of that volume.
Paging file
Pathname rules for Windows registry backupsThe Windows registry can be backed up for disaster recover or individual HKEYscan be backed up. Consider the following items when configuring a Windows registrybackup.
821Creating backup policiesBackup Selections tab

To ensure a successful recovery in case of a disk failure, alwaysback up the entire registry. That is, back up the directory thatcontains the entire registry.
On most Windows systems, this directory is located at:
%systemroot%\system32\config
Where %systemroot% is the directory where Windows is installed.
Note: To recover the registry, do not include individual registryfiles or HKEY entries in the selection list that’s used to back up theentire registry. If you use a NetBackup exclude list for a client, donot exclude any registry files from your backups.
To restore the registry in the case of a disk failure, see the DisasterRecovery chapter in the NetBackup Troubleshooting Guide.
Disaster recovery
Do not back up individual HKEYs for disaster recovery. You cannotperform a disaster recovery by restoring HKEYs. Do not includeHKEY entries in the same policy backup selection list that is usedto back up the entire registry. However, to restore individual keyswithin the registry, create a separate policy, then specify the specificHKEYs in the backup selection list for that policy.
The following is an example HKEY entry for a policy backupselection list:
HKEY_LOCAL_MACHINE:\
Backups and restores are slower than if the entire registry wasbacked up.
Individual HKEYs
About hard links to files and directoriesA hard link is a directory entry for a file. Every file can be considered to have atleast one hard link. A hard link differs from a symbolic link in that a hard link is nota pointer to another file. A hard link is two directory entries that point to the sameinode number.
If the backup selection list includes hard-linked files, the data is backed up onlyonce during a backup. NetBackup uses the first file name reference that is foundin the directory structure. If a subsequent file name reference is found, it is backedup as a link to the name of the first file. Backup up only the link means that onlyone backup copy of the data is created, regardless of the number of hard links. Anyhard link to the data works.
On most UNIX systems, only the root user can create a hard link to a directory.Some systems do not permit hard links, and many vendors recommend that these
822Creating backup policiesBackup Selections tab

links be avoided. NetBackup does not back up and restore hard-linked directoriesin the same manner as files.
Hard-linked files and hard-linked directories are different in the following ways:
■ During a backup, if NetBackup encounters hard-linked directories, the directoriesare backed up once for each hard link.
■ During a restore, NetBackup restores multiple copies of the hard-linked directorycontents if the directories do not already exist on the disk. If the directories existon disk, NetBackup restores the contents multiple times to the same disk location.
On NTFS volumes or on UNIX systems, each file can have multiple hard links.Therefore, a single file can appear in many directories (or even in the same directorywith different names). A volume serial number (VSN) and a File Index indicate theactual, unique file on the volume. Collectively, the VSN and File Index are referredto as the file ID.
During a backup, if the backup selection list includes hard-linked files, the data isbacked up only once. NetBackup uses the first file name reference that is found inthe directory structure. If a subsequent file name reference is found, the referenceis backed up as a link to the name of the first file. To back up subsequent referencesmeans that only one backup copy of the data is created, regardless of the numberof multiple hard links.
If all hard-link references are restored, the hard-linked files continue to point to thesame ID as the other files to which they are linked. However, if all the hard linksare not restored, you can encounter anomalies as shown in the following examples.
Example 1: Restoring Link2 and Link3
Assume that three hard links point to the same data. During a backup of Link2 andLink3, Link2 is encountered first and backed up. Then Link3 is backed up as a linkto Link2. The three files are all hard-linked to the same data.
Figure 20-24 Example of hard links to the same data
Data
Link1 Link2 Link3
The original copies of Link2 and Link3 are backed up to tape, then deleted. OnlyLink1 is left on the disk.
823Creating backup policiesBackup Selections tab

Figure 20-25 Example of hard links backed up to tape and disk
On Disk On Tape
Data Data
Link1 Link2 Link3
During a subsequent restore, Link2 and Link3 are restored. The restored files,however, do not point to the same file ID as Link1. Instead, they are assigned anew file ID or inode number and the data is written to a new place on the disk. Thedata in the new location is an exact copy of what is in Link1. The duplication occursbecause the backup does not associate Link2 and L3 with Link1.
Figure 20-26 Example of restored hard links
Data Data
Link1 Link2 Link3
Example 2: Restoring Link3
Assume that this time you attempt to restore only Link3. However, NetBackupcannot link Link3 to Link2 because Link2 does not exist. The restore can completeonly if it can link to Link2. A secondary restore request to the NetBackup serverautomatically restores Link2, which contains the data. Link2 can now be successfullyrestored.
Pathname rules for UNIX client backupsTo back up UNIX clients, use the following conventions for entries in the backupselections list.
Table 20-53 Pathname rules for UNIX client backups
DescriptionItem
Enter one pathname per line. NetBackup supports a maximum path length of 1023characters for UNIX clients.
Pathnames per line
Begin all pathnames with a forward slash (/).Forward slash
824Creating backup policiesBackup Selections tab

Table 20-53 Pathname rules for UNIX client backups (continued)
DescriptionItem
The following wildcard characters are allowed:
*?[ ]{ }
For UNIX clients, wildcards can appear anywhere in the path.
See “Wildcard use in NetBackup” on page 1113.
Wildcard characters
If a backup selection list entry contains trailing spaces and a matching entry is notfound, NetBackup deletes the spaces and checks again. If a match is not found,NetBackup skips the entry and logs a message in the Problems report or the All LogEntries report:
TRV - cannot process path pathname: No such file or directory.
Skipping TRV - Found no matching file system for pathname
Trailing spaces
Pathnames that cross mount points or that the client mounts through NFS can affectthe backup configuration. Read about the Follow NFS and Cross mount pointsattributes before you create a backup selection list.
See “Follow NFS (policy attribute)” on page 710.
See “Cross mount points (policy attribute)” on page 713.
Mount points
NetBackup can back up operating system, kernel, and boot files. However, NetBackupcannot create bootable tapes. Consult your system documentation to create a bootabletape.
Bootable tapes
By default, NetBackup does not back up all files.
See “Files that are excluded from backups by default” on page 845.
Exclude specific files from backups by creating an exclusion list on the client.
See “About excluding files from automatic backups” on page 846.
Omitted or excluded files
The Busy File Settings host properties for UNIX clients offers alternatives for handlingbusy and locked files.
See “Busy File Settings properties” on page 85.
Busy File Settings
On Solaris, HP-UX, AIX, Linux Red Hat 4 (and later), Linux SUSE SLE 9 (and later),and supported Mac platforms, NetBackup backs up Access Control Lists (ACLs).
Access Control Lists (ACLs)
NetBackup can back up and restore Sun PC NetLink files.Sun PC NetLink
825Creating backup policiesBackup Selections tab

Table 20-53 Pathname rules for UNIX client backups (continued)
DescriptionItem
■ By default, NetBackup backs up and restores Solaris 9 and 10 extended attributefiles.
■ The FlashBackup single file restore program (sfr) does not restore extendedattribute files.
■ By default, NetBackup backs up and restores named data streams for VxFS 4.0(Solaris SPARC) and VxFS 5.0 (Solaris, HP, Linux, and AIX).
■ The FlashBackup single file restore program (sfr) does not restore extendedattribute files.
See “About backing up and restoring extended attribute files and named data streams”on page 829.
Extended attribute files andnamed data streams
On Hewlett-Packard and Solaris SPARC platforms, NetBackup backs up VxFS extentattributes.
VxFS extent attributes
NetBackup backs up the symbolic link object and does not attempt to follow the link toback up what it may point to. To achieve a backup of the target of the symbolic link,include that target in the file list.
Restoring the symbolic link object restores only the object and not the data to which itmay point. To restore the target data, select it from the backup image.
See “About hard links to files and directories” on page 822.
Note: If NetBackup restores a symbolic link as root, NetBackup changes the ownerand group to the original owner and group. When NetBackup restores a symbolic linkas a non-root user, the owner and group are set to the owner and the group of theperson who performs the restore. Resetting the owner and group does not causeproblems. When the UNIX system checks permissions, NetBackup uses the ownerand group of the file to which the symbolic link points.
Symbolic links
NetBackup backs up the directory junction object and does not attempt to traverse intothe directory to which it may point. To achieve a backup of the target of the directoryjunction, include that target in the file list.
Restoring the directory junction link object restores only the object and not the data towhich it may point. To restore the target data, select it from the backup image.
Directory junctions
See “About the Reports utility” on page 1074.
UNIX raw partitionsSave a copy of the partition table before a raw partition backup is performed. Retainthe copy for reference. To restore the raw partition, make sure that a device fileexists. Also, the partition where the table is restored must be large enough or theresults of the restore are unpredictable.
826Creating backup policiesBackup Selections tab

Consider the following items when creating UNIX raw partition backups.
Use raw partition backups only if you can ensure that the files havenot changed in any way during the backup. Or, in the case of adatabase, if you can restore the database to a consistent state byusing transaction log files.
File changes during thebackup
Do not perform backup archives of raw partitions on any client. Anarchive backs up the raw partition, then deletes the device file thatis associated with the raw partition. The file system does not recoverthe space that the raw partition uses.
Backup archives
Before backing up file systems as raw partitions, unmount the filesystem. Unmounting the file system allows buffered changes to bewritten to the disk. Also, it prevents the possibility of any changesin the file system during the backup. Use the bpstart_notifyand the bpend_notify scripts to unmount and remount thebacked-up file systems.
File systems
The Cross mount points policy attribute has no effect on rawpartitions. If the root partition is backed up as a raw partition andcontains mount points to other systems, the file systems are notbacked up. The other file systems are not backed up, even withCross mount points selected.
See “Cross mount points (policy attribute)” on page 713.
The same is true for the Follow NFS policy attribute. NFS filesystems that are mounted in a raw partition are not backed up. Norcan you back up raw partitions from other computers by using NFSmounts to access the raw partitions. The devices are not accessibleon other computers through NFS.
See “Follow NFS (policy attribute)” on page 710.
Mount points
Specify the logical partition names for any disks that disk volumemanagers manage. (For example, Veritas Volume Manager (VxVM).
Disk volume managers
For clients in a FlashBackup policy, refer to the NetBackupSnapshot Client Administrator’s Guide for the differences betweenStandard and FlashBackup policies.
FlashBackup policy
827Creating backup policiesBackup Selections tab

The use of FlashBackup in aWindows Server Failover Clustering(WSFC) environment is supported, with the following limitation:Raw partition restores can only be performed when the disk beingrestored is placed in extended maintenance mode or removed fromthe WSFC resource group.
Note: Early versions of WSFC do not allow extended maintenancemode functionality. If the cluster does not support placing disks inextended maintenance mode, it is still possible to perform rawrestores to an alternate, non-shared disk.
Windows ServerFailover Clustering(WSFC) environment
If there are no file systems to back up and the disks are used in raw mode, backup the disk partitions as raw partitions. For example, databases are sometimesused in raw mode. Use bpstart_notify and bpend_notify scripts to provide thenecessary pre-processing and post-processing of databases when they are backedup as raw partitions.
You can also perform a raw partition backup of a disk partition that is used for filesystems. A disadvantage of this method is that you must restore the entire partitionto recover a single file (unless FlashBackup is in use). To avoid overwriting theentire partition, use the redirected restore feature to restore the raw partition toanother raw partition of the same size. Then, copy individual files to the original filesystem.
Raw partition backups are also useful for backing up entire disks. Since the filesystem overhead is bypassed, a raw partition backup is usually faster. The size ofthe raw partition backup is the size of the entire disk, regardless of whether theentire disk is used.
To specify a UNIX raw partition in the policy backup selection list, enter the full pathname of the device file.
For example, on a Solaris system, enter:
/devices/sbus@1,f8000000/esp@0,800000/sd@2,0:1h
Note: Do not specify wildcards (such as /dev/rsd*) in pathnames for raw partitionbackups. Doing so can prevent the successful restore of entire devices if there isoverlap between the memory partitions for different device files.
You can include raw partitions in the same backup selection list as other backups.For example:
/home
/usr
828Creating backup policiesBackup Selections tab

/etc
/devices/sbus@1,f8000000/esp@0,800000/sd@2,0:1h
Note: NetBackup does not distinguish between full and incremental backups whenit backs up a raw partition. The entire partition is backed up in both cases.
Raw partition backups occur only if the absolute pathname in the backup selectionlist is a block or character special device file. You can specify either block orcharacter special device files. Character special device files are often faster becausecharacter devices avoid the use of the buffer cache for accessed disk data. Testboth a block and character special device file to ensure the optimum backup speedfor your platform.
Ensure that you specify the actual block-device or character-device files. Sometimesthese are links to the actual device files. If a link is specified, only the link is backedup. If the device files are reached while backing up /dev, NetBackup backs up onlythe inode files for the device, not the device itself.
To perform a raw partition backup, select Full backup for the Type of Backupfrom the Schedules tab. Any other backup type does not work for backing up rawpartitions.
See “Type of backup (schedule attribute)” on page 759.
About backing up and restoring extended attribute filesand named data streamsNetBackup can back up and restore the following file attributes:
■ Extended attribute files of the Solaris UNIX file system (UFS) and temporaryfile system (tmpfs)
■ Named data streams of the VxFS file system
NetBackup backs up extended attribute files and named data streams as part ofnormal file system backups.
Extended attribute files and named data streams are normal files contained in ahidden attribute directory that relate to a particular base file. The hidden directoryis stored within the file system, but can be accessed only by the base file to whichit is related. To view which files have extended attributes on Solaris 9 (or greater)systems, enter: ls -@
Neither extended attribute files nor named data streams can be backed up orrestored individually. Rather, the files are backed up and restored all at once alongwith the base file.
829Creating backup policiesBackup Selections tab

The presence of a large number of extended attribute files or named data streamscan cause some degradation in backup and restore speed. The speed is affectedsince the base file and all associated files are backed up.
The speed is especially affected in the case of incremental backups, during whichNetBackup checks the mtime or ctime of each file individually.
On UNIX:
Figure 20-27 Example of base file and extended attribute directory and files
Extended attribute file 1
Extended attribute file 2
Extended attribute file 3
Extended attribute file 4
Extended attributesbacked up and restoredas a group along with thebase file
Hidden attribute directory for File 1
File 1 is a base file on a Solaris or VxFS clientFile 1
To back up or restore named data streams and extended attributes, the client,media server, and master server must run the following versions:
■ NetBackup clients
■ HP 11.23 running VxFS 4.1 or greater.
Note: Access Control Lists (ACLs) are not backed up unless running VxFS5.0 or greater.
■ AIX running VxFS 4.0 or greater.
Note: Access Control Lists (ACLs) are not backed up unless running VxFS5.0 or greater.
■ Solaris 10 running VxFS 5.0 or greater
■ Solaris SPARC 9, 10 running VxFS 4.0 or greater
■ Linux running VxFS 5.0 or greater.
■ A NetBackup master serverA NetBackup master server of any version can back up and restore named datastreams and Solaris extended attributes.
830Creating backup policiesBackup Selections tab

Restored attribute files and named data streams can replace existing files ifOverwrite existing files is selected in the Backup, Archive, and Restore clientinterface.
On UNIX: In the following example, File 1 is to be restored. Base File 1 currentlypossesses four extended attribute files.
Figure 20-28 Extended attribute files of Base File 1
Extended attribute file 1
Extended attribute file 2
Extended attribute file 3
Extended attribute file 4
File 1
Base file 1
On UNIX: The user restores File 1 from a backup that was created when File 1possessed only three extended attribute files.
Figure 20-29 Backup of File 1
Extended attribute file 1 backup
Extended attribute file 2 backup
Extended attribute file 3 backup
File 1 backup
On UNIX: Since Overwrite existing files is selected as a restore option, when theuser restores File 1, extended attribute files 1, 2, and 3 are overwritten. Extendedattribute file 4 remains and is not overwritten.
Figure 20-30 Restore of File 1
Restored extended attribute file 1
Restored extended attribute file 2
Restored extended attribute file 3
Extended attribute file 4
Restored file 1
If an attempt is made to restore the following items, an error message appears inthe Restore Monitor. The error message informs the user that the extendedattributes or named data streams are not restored.
■ The extended attribute files to any non-Solaris 9 client (or greater)
831Creating backup policiesBackup Selections tab

■ Named data streams to any non-VxFS 4.0 client
NetBackup then continues with the restore job.
To disable the restore of extended attribute files and named data streams, add anempty file to the client. Name the file IGNORE_XATTR and place it in the followingdirectory:
/usr/openv/netbackup/
The addition affects only Solaris 9 or VxFS 4.0 clients.
File IGNORE_XATTR was formerly known as IGNORE_XATTR_SOLARIS.
On UNIX: Only nbtar that is supplied with NetBackup can restore the extendedattributes or named data streams to a client.
On UNIX: For more information, see the NetBackup Administrator's Guide, VolumeII.
Note: Extended attributes and named data streams cannot be compressed.
Pathname rules for the clients that run extension productsPath rules for the NetBackup clients that are running separately-priced options arecovered in the NetBackup guide for the product. (For example, Snapshot Client orNetBackup for MS-Exchange.)
About the directives on the Backup Selections listDirectives on the Backup Selections list signal NetBackup to perform specific,predefined actions when it processes the files on the selections list.
The available directives depend on the policy type and whether the Allowmultipledata streams attribute is enabled for the policy. The following example is a backupselections list that contains the NEW_STREAM directive. TheMS-Windows policy typeis selected, and Allow multiple data streams is enabled.
NEW_STREAM
D:\Program Files
NEW_STREAM
C:\Winnt
832Creating backup policiesBackup Selections tab

Note: For best performance, use only one data stream to back up each physicaldevice on the client. Multiple concurrent streams from a single physical device canadversely affect backup times. The heads must move back and forth between thetracks that contain files for the respective streams.
The following table summarizes many of the directives available on the BackupSelections list.
Table 20-54 Summary of directives on the Backup Selections list
Applicable operatingsystem
DescriptionDirective
All supported systemsInstructs NetBackup to back up all local drives except forthose drives that use removable media. This directive alsoincludes critical system-related components.
See “ALL_LOCAL_DRIVES directive” on page 836.
ALL_LOCAL_DRIVES
All supported Windowssystems
Instructs NetBackup to back up critical system-relatedcomponents. The exact set of system components that arebacked up depends on the operating system version andsystem configuration.
See “System State:\ directive” on page 837.
System State:\
All supported Windowssystems
Instructs NetBackup to back up all writers for the VolumeShadow Copy component. This also implies and/or includesSystem State:\ if that was not also selected.
See “Shadow Copy Components:\ directive” on page 838.
Shadow CopyComponents:\
All supported Windowssystems
Active Directory Application Mode (ADAM) is a lightweightdirectory service that runs as a user service. This directivecan be used to back up ADAM data on computers where itis installed. However, it does not back up the Active Directoryitself.
Active DirectoryApplication Mode:\
Policy type specificApply only to specific policy types and can appear only inbackup selections lists for those policies.
See “Directives for specific policy types” on page 839.
Policy-specific directives
AllInterrupt the streaming of policy-specific directives. TheAllowmultiple data streams policy attribute must be enabledbefore these directives can be used.
See “UNSET and UNSET_ALL directives” on page 844.
UNSET and UNSET_ALL
833Creating backup policiesBackup Selections tab

Table 20-54 Summary of directives on the Backup Selections list (continued)
Applicable operatingsystem
DescriptionDirective
AllWhen NEW_STREAM is on the first line of the BackupSelections list, this directive determines how a backup isperformed in the following modes:
■ Administrator-defined streaming■ Auto-discovery streaming
The Allow multiple data streams policy attribute must beenabled before this directive can be used.
See “NEW_STREAM directive” on page 840.
NEW_STREAM
ALL_FILESYSTEMS and VOLUME_EXCLUDE_LISTdirectivesThe ALL_FILESYSTEMS directive provides a method to include all file systems andvolumes on an NDMP filer in an NDMP backup policy.
You can exclude specific volumes from an ALL_FILESYSTEMS backup selection ifyou do not want to back up every volume on an NDMP filer. Use theVOLUME_EXCLUDE_LIST directive for this purpose. You may use valid wildcardcharacters in the VOLUME_EXCLUDE_LIST statement.
Note: The following examples use selections that are specific to NetApp DataONTAP 7-mode. For specific examples of backup selections for other configurations,refer to the appropriate documentation.
The VOLUME_EXCLUDE_LIST statements must precede ALL_FILESYSTEMS statement.For example:
VOLUME_EXCLUDE_LIST=/vol/Hr_allfiles_vol01
ALL_FILESYSTEMS
or
VOLUME_EXCLUDE_LIST=/vol/testvol*
ALL_FILESYSTEMS
To specify multiple values in a VOLUME_EXCLUDE_LIST statement, separate thevalues with a comma. For example:
834Creating backup policiesBackup Selections tab

VOLUME_EXCLUDE_LIST=/vol/Hr_allfiles_vol01,/vol/testvol*
ALL_FILESYSTEMS
You can also specify more than one VOLUME_EXCLUDE_LIST statement with anALL_FILESYSTEMS directive. For example:
VOLUME_EXCLUDE_LIST=/vol/Hr_allfiles_vol01
VOLUME_EXCLUDE_LIST=/vol/testvol*
ALL_FILESYSTEMS
A VOLUME_EXCLUDE_LIST statement may include a maximum of 256 characters.Create multiple VOLUME_EXCLUDE_LIST statements if necessary to avoid exceedingthe limit of 256 characters. If you specify more than 256 characters, the volume listis truncated. A truncated statement may result in a backup job failure, and the errormessage Invalid command parameter(20) is displayed.
If the backup selection includes read-only volumes or full volumes, an NDMP backupjob fails with the status code 20 (Invalid command parameter(20)). If youencounter a similar NDMP backup job error, review the ostfi logs to identify thevolumes for which the failure occurred. You can use VOLUME_EXCLUDE_LIST
statements with the ALL_FILESYSTEMS statement to exclude the read-only volumesand the volumes with insufficient space.
In a NetBackup Replication Director environment where snapshots are replicatedto a secondary filer, Veritas recommends that you use storage lifecycle policies tocontrol backups on the secondary filer.
On NetApp 7-mode storage systems, it is generally not recommended for users tostore files in /vol/vol0 because the volume contains filer system files. For thisreason, vol0 should be excluded from the backup if the ALL_FILESYSTEMS directiveis used in the backup policy. The following is a backup selection list that excludes/vol/vol0:
VOLUME_EXCLUDE_LIST=/vol/vol0
ALL_FILESYSTEMS
■ Do not use ALL_FILESYSTEMS to backup all volumes on a secondary filer.Inconsistencies may occur when automatically created NetApp FlexClonevolumes are backed up or restored. Such volumes are temporary and used asvirtual copies or pointers to actual volumes and as such do not need to be backedup.
■ If you must back up all volumes on a secondary filer, Veritas recommends thatyou exclude the FlexClone volumes as well as replicated volumes. For example:
VOLUME_EXCLUDE_LIST=/vol/Clone_*
VOLUME_EXCLUDE_LIST=/vol/*_[0-9]
835Creating backup policiesBackup Selections tab

VOLUME_EXCLUDE_LIST=/vol/*_[0-9][0-9]
VOLUME_EXCLUDE_LIST=/vol/*_[0-9][0-9][0-9]
ALL_FILESYSTEMS
This example assumes all FlexClone volumes and only FlexClone volumesbegin with /vol/Clone_. Adjust the volume specifications appropriately for yourenvironment.
■ VOLUME_EXCLUDE_LIST applies only to ALL_FILESYSTEMS. It does not apply toexplicit backup selections or wildcard-based backup selections.If you use the ALL_FILESYSTEMS directive in an NDMP policy for Clustered DataONTAP, you must exclude each selected SVM's root volume using theVOLUME_EXCLUDE_LIST directive. Otherwise the backups fail.For more information, refer to the following topic:
Backups from snapshots for NDMP policies fail when the import of a snapshot failsfor volumes where logical unit numbers (LUNs) reside with status code 4213(Snapshot import failed). To avoid this error, use the VOLUME_EXCLUDE_LIST
directive to exclude any volumes that are used to create LUNs accessed througha storage area network (SAN).
ALL_LOCAL_DRIVES directiveUse the ALL_LOCAL_DRIVES directive to back up all local drives except for thosedrives that use removable media. If this directive is used, this directive must be theonly entry in the backup selections list for the policy. No other files or directives canbe listed. The directive applies only to the following policy types:
■ Standard
■ MS-Windows
ALL_LOCAL_DRIVES gives different results depending on whether Allow multipledata streams is enabled for the policy:
Applies only to Standard and MS-Windows policy types.NetBackup backs up the entire client, then splits the datafrom each drive (Windows) or file system (UNIX) into its ownbackup stream. NetBackup periodically preprocesses theclient to make necessary changes to the streams.
Allowmultiple data streamsenabled
NetBackup backs up the entire client and includes all drivesand file systems in the same stream.
Allowmultiple data streamsdisabled
See “Allow multiple data streams (policy attribute)” on page 725.
836Creating backup policiesBackup Selections tab

Caution: Do not select Cross mount points for policies where you use theALL_LOCAL_DRIVES directive.
See “ALL_LOCAL_DRIVES example: Auto-discovery mode” on page 837.
See “ALL_LOCAL_DRIVES example: Without multiple data streams” on page 837.
ALL_LOCAL_DRIVES example: Auto-discovery modeAssume that Allow multiple data streams is enabled in the auto-discovery mode.Assume that the client is a Windows system with two drive volumes, C:\ and D:\.The backup selections list contains the following directive:
ALL_LOCAL_DRIVES
For this backup selections list, NetBackup generates the following:
■ One stream for C:\
■ One stream for D:\
For a UNIX client, NetBackup generates a stream for each file system.
SYSTEM_STATE is also backed up because SYSTEM_STATE is included in theALL_LOCAL_DRIVES directive.
See “ALL_LOCAL_DRIVES example: Without multiple data streams” on page 837.
See “Allow multiple data streams (policy attribute)” on page 725.
ALL_LOCAL_DRIVES example: Without multiple data streamsAssume that Allow multiple data streams is not enabled. Assume that the clientis a Windows system with two drive volumes, C:\ and D:\. The backup selectionslist contains the following directive:
ALL_LOCAL_DRIVES
For this backup selections list, NetBackup backs up the entire client in one datastream that contains the data from both C:\ and D:\.
SYSTEM_STATE is also backed up because SYSTEM_STATE is included in theALL_LOCAL_DRIVES directive.
See “Allow multiple data streams (policy attribute)” on page 725.
System State:\ directiveThe System State:\ can be used on all supported Windows systems.
837Creating backup policiesBackup Selections tab

The System State:\ directive is needed for the operating system versions whichdo not support Shadow Copy Components.
The System State:\ directive creates a backup for critical system-relatedcomponents. The exact set of system components that are backed up depends onthe operating system version and system configuration.
The list of items that are backed up can include the following:
■ Active Directory
■ COM+ Class Database
■ Cluster Database
■ IIS Database
■ Registry
■ Boot Files and protected files
■ SYSVOL
■ Certificate Server
The files that comprise the registry can be found in the following location:
%SystemRoot%\SYSTEM32\Config
At a minimum, the following files are backed up as part of the registry:
■ DEFAULT
■ SAM
■ SOFTWARE
■ SECURITY
■ SYSTEM
Shadow Copy Components:\ directiveThe Shadow Copy Components:\ directive specifies that all of the Volume ShadowCopy component writers get backed up. This directive affects the backups of thefollowing clients:
■ Windows 2003 Server computers that use the Volume Shadow Copycomponents.
■ Windows IA64 systems with EFI System partitions.
838Creating backup policiesBackup Selections tab

Note: In the policies that back up Windows clients on IA64 platforms, use theShadow Copy components:\ directive instead of the System_State:\ directive.The Shadow Copy components:\ directive includes System State componentsand the EFI System partition automatically in the backup.
Since the Shadow Copy Components contain System State information, the ShadowCopy Components need to be backed up by a full backup.
The Volume Shadow Copy components include the following:
■ System files■ COM+ Class Registration Database■ SYSVOL■ Active Directory■ Cluster quorum■ Certificate Services■ Registry■ Internet Information Services
System Statewriters
■ Removable Storage Manager■ Event logs■ Windows Internet Name Service■ Windows Management Instrumentation■ Remote Storage■ Dynamic Host Configuration Protocol■ Terminal Server Licensing■ Background Intelligent Transfer Service
System Servicewriters
Items that the computer does not require to operate. For example,Active Directory Application Mode and Microsoft Distributed File SystemReplication (DSFR) folders.
See “About Microsoft DSFR backups” on page 683.
User Data
A category that is intended for future NetBackup releases.Other Data
Directives for specific policy typesSome directives apply only to specific policy types and can appear only in backupselections lists for those policies. NetBackup passes policy-specific directives tothe clients along with the backup selections list. The clients then perform theappropriate action according to the directive. All policy-specific directives that arepassed to a client in a stream are passed in all subsequent streams.
839Creating backup policiesBackup Selections tab

Note: Include policy-specific directives only in backup selections lists for the policiesthat support the directives or errors can occur.
The following policy types have their own backup selections list directives:
■ FlashBackup
■ NDMP
■ Lotus-Notes
■ MS-Exchange-Server
For information on other policy types and associated backup selections list directives,see the NetBackup guide for the option.
NEW_STREAM directiveThe NEW_STREAM directive is recognized only if Allow multiple data streams is setfor the policy. NEW_STREAM directives are ignored if Allow multiple data streamsis not set.
If this directive is used in a backup selections list, the first instance of it must be onthe first line. If it appears on the first line, it can also appear elsewhere in the list.
The presence of NEW_STREAM on the first line of the backup selections list determineshow the backup is performed in the following modes: in administrator-definedstreaming or in the auto-discovery streaming.
About the administrator-defined streaming modeIf NEW_STREAM is the first line of the backup selections list, the backup is performedin the administrator-defined streaming mode.
In this mode, the following actions occur:
■ The backup splits into a separate stream at each point in the backup selectionslist where the NEW_STREAM directive occurs.
■ All file paths between NEW_STREAM directives belong to the same stream.
■ The start of a new stream (a NEW_STREAM directive) defines the end of theprevious stream.
■ The last stream in the backup selections list is terminated by the end of thebackup selections list.
In the following examples, assume that each stream is from a separate physicaldevice on the client. Multiple concurrent streams from a single physical device can
840Creating backup policiesBackup Selections tab

adversely affect backup times. The backup time is longer if the heads must moveback and forth between the tracks that contain files for the respective streams.
For example, consider the following backup selections list:
On Windows:
NEW_STREAM
D:\Program Files
C:\Winnt
NEW_STREAM
C:\users
D:\DataFiles
This backup selections list contains two data streams:
■ The NEW_STREAM directive at the top of the list starts administrator-definedstreaming and the first data stream. This stream backs up D:\Program Files
and C:\Winnt.
■ The second NEW_STREAM starts a second data stream that backs upC:\users and D:\DataFiles.
On UNIX:
NEW_STREAM
/usr
/lib
NEW_STREAM
/home
/bin
This backup selection list contains two data streams:
■ The NEW_STREAM directive at the top of the list starts administrator-definedstreaming and the first stream. This stream backs up /usr and /lib.
■ The second NEW_STREAM starts a second data stream that backs up /home and/bin.
If a backup selections list entry is added to a stream, the entry is not backed upuntil the schedule is due for the policy. If the next backup due is an incremental,only the files that changed are backed up. To ensure that a new entry gets a fullbackup the first time, add it to a new stream. NetBackup performs a full backup ofnew streams that are added to the backup selections list.
In the previous example, assume that you add the following:
On Windows:
841Creating backup policiesBackup Selections tab

D:\Utilities
On UNIX:
/var
after
On Windows:
D:\Datafiles
On UNIX:
/bin
If an incremental backup is due that night, only changed files in D:\Utilities (onWindows) or in /var (on UNIX) are backed up. Add a NEW_STREAM directive beforeD:\Utilities (on Windows) or before /var (on UNIX), to perform a full backup ofall files in D:\Utilities (on Windows) or in /var (on UNIX), regardless of whenthe files were last changed.
About the auto-discovery streaming modeThe auto-discovery streaming mode is initiated if the NEW_STREAM directive is notthe first line of the backup selections list. The list must contain either theALL_LOCAL_DRIVES directive or wildcards.
In this mode, the backup selections list is sent to the client, which preprocessesthe list and splits the backup into streams as follows:
■ If the backup selections list contains the ALL_LOCAL_DRIVES directive, NetBackupbacks up the entire client. However, NetBackup splits each drive volume(Windows) or file system (UNIX) into its own backup stream.See “ALL_LOCAL_DRIVES directive” on page 836.
■ If wildcards are used, the expansion of the wildcards results in one stream perwildcard expansion. Wildcard usage is the same as for Windows clients.See “Wildcard use in NetBackup” on page 1113.
If the backup selections list contains neither the ALL_LOCAL_DRIVES directive norwildcards, the auto-discovery mode is not used. The server preprocesses ratherthan the client. Each file path in the backup selections list becomes a separatestream.
The auto-discovery streaming mode applies to Standard and MS-Windows policytypes.
842Creating backup policiesBackup Selections tab

Before the backup begins, the client uses auto-discovery to preprocess the backupselections list to determine how many streams are required. The first backup thata policy performs preprocesses the backup selections list. Depending on the lengthof the preprocess interval, preprocessing may not occur before every backup.
About setting the preprocess interval for auto-discoveryThe preprocess interval applies only to auto-discovery mode and specifies howoften preprocessing occurs. When a schedule is due and NetBackup usesauto-discovery, NetBackup checks whether the previous preprocessing sessionhas occurred within the preprocess interval.
NetBackup performs one of the following actions:
■ If the preprocessing session occurs within the preprocess interval, NetBackupdoes not run preprocessing on the client.
■ If the preprocessing session did not occur within the preprocess interval,NetBackup preprocesses the client and makes required changes to the streams.
If necessary, you can change the interval by using the bpconfig command. Thedefault is 4 hours and is a good value for most of the sites that run daily backups.
If the interval is too long or too short, the following problems can occur:
Can cause missed backups because new streams are not added earlyenough. For example, assume that the preprocess interval is set to 4hours and a schedule has a frequency of less than 4 hours. A newstream can be omitted from the next backup because the preprocessinginterval has not expired when the backup is due.
Interval is too long.
Can cause preprocessing to occur often enough to increase schedulingtime to an unacceptable level. A short interval is most likely to be aproblem when the server must contact a large number of clients forpreprocessing.
Interval is tooshort.
Use the following form of the bpconfig command to change the interval:
On Windows:
install_path\NetBackup\bin\admincmd\bpconfig [-prep hours]
On UNIX:
/usr/openv/netbackup/bin/admincmd/bpconfig [-prep hours]
For more information on the bpconfig command, see the NetBackup CommandsReference Guide.
843Creating backup policiesBackup Selections tab

UNSET and UNSET_ALL directivesUNSET, UNSET_ALL The UNSET and UNSET_ALL directives interrupt the streamingof policy-specific directives.
All policy-specific directives that are passed to a client in a stream are passed inall subsequent streams. The UNSET and UNSET_ALL directives change this behavior.These directives are recognized only if the Allow multiple data streams option isset for the policy.
See “Directives for specific policy types” on page 839.
See “Allow multiple data streams (policy attribute)” on page 725.
The UNSET directive interrupts a policy-specific directive so it is notpassed with any additional streams. The directive that was unset canbe defined again later in the backup selections list to be included in thecurrent and the later streams.
In the following backup selections list, the set command is aclient-specific directive that is passed to the first and all subsequentstreams.
NEW_STREAMset destpath=/etc/home/tmp/useNEW_STREAM/exportNEW_STREAM/var
For the set command to be passed to the first two streams only, useUNSET or UNSET_ALL at the beginning of the third stream. At thislocation, it prevents SET from being passed to the last stream.
NEW_STREAMset destpath=/etc/home/tmp/useNEW_STREAM/exportNEW_STREAMUNSET set destpath=/etc/home [or UNSET_ALL]/var
UNSET
844Creating backup policiesBackup Selections tab

UNSET_ALL has the same effect as UNSET but unsets all policy-specificdirectives in the backup selections list that have been defined up to thispoint.
UNSET_ALL
Files that are excluded from backups by defaultBy default, a number of files and file states are not backed up by NetBackup.
You can also exclude specific files from automatic backups by specifying the filesor directories in an exclude list on the client.
See “About excluding files from automatic backups” on page 846.
By default, NetBackup does not back up the following files:
■ NFS files or directories. To back up NFS files, enable Follow NFS.
■ Files or directories in a different file system. To back up files in a different filesystem, enable Cross mount points.
■ Files or directories with path lengths longer than 1023 characters.
■ Files or directories in which the operating system does not return inodeinformation (the lstat system call fails).
■ Directories that NetBackup cannot access (the cd command cannot access).
■ Socket special files. (Named pipes are backed up, however.)
■ Locked files when locked by an application that currently has the file open.
■ Busy files. If a file is open, NetBackup backs up the last saved version of thefile.
■ Files or directories beneath a bind mount (Linux).
NetBackup automatically excludes the following file system types on most platforms:
■ cdrom (all UNIX platforms)
■ cachefs (AIX, Solaris, UnixWare)
■ devpts (Linux)
■ mntfs (Solaris)
■ proc (UNIX platforms)Does not exclude automatically for AIX, so /proc must be added manually tothe exclude list. If /proc is not added manually, partially successful backupsmay result with the ALL_LOCAL_DRIVES directive on AIX.
■ tmpfs (Linux)
845Creating backup policiesBackup Selections tab

■ usbdevfs (Linux)
See “Follow NFS (policy attribute)” on page 710.
See “Cross mount points (policy attribute)” on page 713.
About excluding files from automatic backupsOn most NetBackup clients, you can exclude specific files from automatic backupsby specifying the files in an exclude list on the client.
You can also create an include list to add a file(s) specifically that is excluded. Theinclude list is useful when, for example, an entire directory is excluded except forone file on the include list.
Note: Exclude and include lists do not apply to user backups and archives.
The method for specifying files in the exclude list and the include list depends onthe type of client as follows:
Specify exclude and include lists in the Backup, Archive, andRestore client interface. Start Backup, Archive, and Restore.On the File menu, click NetBackup Client Properties. Selectthe Exclude List tab or the Include List tab. For furtherinstructions, see the NetBackup user’s guide for the client.
The Exclude List or the Include List can also be specifiedthrough the NetBackup Administration Console on the masterserver.
See “Exclude Lists properties” on page 136.
Microsoft Windows clients
Create the exclude and include lists in the following files on theclient:
■ /usr/openv/netbackup/include_list
■ /usr/openv/netbackup/exclude_list
UNIX clients
846Creating backup policiesBackup Selections tab

Create an exclude list for a specific policy or for a policy and aschedule combination. Create an exclude_list file with a.policyname or .policyname.schedulename suffix. The followingtwo file examples use a policy that is named wkstations. Thepolicy contains a schedule that is named fulls:
/usr/openv/netbackup/exclude_list.wkstations/usr/openv/netbackup/exclude_list.wkstations.fulls
The first file affects all scheduled backups in the policy that isnamed wkstations. The second file affects backups only whenthe schedule is named fulls.
For a given backup, NetBackup uses a single exclude list—thelist that contains the most specific name. For example, if thereare files named:
exclude_list.wkstations andexclude_list.wkstations.fulls
NetBackup uses only:
exclude_list.wkstations.fulls
Specific policy
Files that are excluded by Microsoft Windows BackupWindows maintains a list of files and folders that are excluded when MicrosoftWindows Backup is used to back up files. This list is known as theFilesNotToBackup list. NetBackup excludes those files and directories fromautomatic backups even if they are not in the NetBackup exclude list for the client.Those items also are excluded from user-directed backups (unlike items in aNetBackup exclude list, which can be backed up by a user-directed operation).
Windows also maintains a list of registry keys that are not to be restored. NetBackupdoes not restore the registry keys that are listed in theWindowsKeysNotToRestorelist.
VMware Policy tabThe VMware tab appears for policies of the VMware policy type.
The following options appear on the VMware tab.
847Creating backup policiesVMware Policy tab

Table 20-55 Options on the VMware tab of the policy
DescriptionOption
Specify the VMware backup host.VMware backuphost
Enable recovery of individual files. You can also recover the entire virtual machine.Enable filerecovery from VMbackup
Enable block-level backups of the virtual machine.Enable block-levelincremental backup
Reduce the size of the backup image by excluding any unused or deleted blocks within the filesystem on the virtual machine.
Exclude deletedblocks
Reduce the size of the backup image by excluding the guest OS system paging file (Windows)or the swap file (UNIX).
Exclude swap andpaging files
Specify the type of name by which NetBackup recognizes virtual machines when it selects themfor backup.
Primary VMidentifier
Specify the action that NetBackup takes when a snapshot is discovered before NetBackupcreates a new snapshot for the virtual machine backup.
Orphanedsnapshothandling
Options to protect applications.ApplicationProtection
Enable recovery of individual files from Exchange data in the virtual machine backup.Enable ExchangeRecovery
Truncates the Exchange transaction logs when the backup occurs.Truncate logs
Enable recovery of individual files from SQL Server data in the virtual machine backup.Enable SQL ServerRecovery
Truncates the SQL Server transaction logs when the backup occurs.Truncate logs
Enable recovery of individual files from SharePoint data in the virtual machine backup.Enable SharePointRecovery
Determine how the snapshot data travels from the VMware datastore to the VMware backuphost.
Transport modes
Set additional parameters for the VMware backup.Advanced...
848Creating backup policiesVMware Policy tab

Figure 20-31 VMware tab
For more information about VMware, see the NetBackup for VMware Guide.
Hyper-V Policies tabThe Hyper-V tab appears for policies of the Hyper-V policy type.
The following options appear on the Hyper-V tab.
Table 20-56 Options on the Hyper-V tab of the policy
DescriptionOption
Allows restore of individual files from the backup. With or without this option, you can restorethe entire virtual machine.
Optimizations
Enable filerecovery from VMbackup
849Creating backup policiesHyper-V Policies tab

Table 20-56 Options on the Hyper-V tab of the policy (continued)
DescriptionOption
Specifies the type of name by which NetBackup recognizes virtual machines when it selectsthem for backup.
Primary VMidentifier
Determines whether NetBackup is allowed to perform an offline backup of a virtual machine.This option is intended for guest operating systems that do not support VSS (such as Linux).
Enable offlinebackup ofnon-VSS VMs
Applies to backups of the virtual machines that are configured in a Microsoft Cluster that usescluster shared volumes (CSV).
Cluster sharedvolumes timeout
Sets additional parameters for the Hyper-V backup.Advanced...
For more information about Hyper-V, see the NetBackup for Hyper-V Guide.
Figure 20-32 Hyper-V Policies tab
850Creating backup policiesHyper-V Policies tab

Disaster Recovery tabTheDisaster Recovery tab appears for theNBU-Catalog policy type. TheDisasterRecovery tab contains options for configuring disaster recovery protection methodsfor the catalog data.
Note: Do not save the disaster recovery information to the local computer. Veritasrecommends that the image file be saved to a network share or a removable device.
Figure 20-33 Disaster Recovery tab
Table 20-57 describes the options on the Disaster Recovery tab.
851Creating backup policiesDisaster Recovery tab

Table 20-57 Options on the Disaster Recovery tab
DescriptionOption
Browse and specify the directory where the disaster recovery information is to be saved. Do notsave the disaster recovery information to the local computer. Veritas recommends that you savethe image file to a network share or a removable device.
The share must be established and available before the hot catalog backup runs.
Specify an NFS share or a UNC path (CIFS Windows share).
Note: The path cannot contain non-ASCII characters.
When indicating a UNC path, note the following:
■ A Windows master server can indicate a UNC path to a Windows computer.■ A UNIX master server cannot indicate a UNC path to a Windows computer.■ A UNIX master server cannot indicate a UNC path to a UNIX computer. To do so, first mount
the UNC location on the master server, and then provide the UNC path to the UNIX computer.
On UNIX: The path for the disaster recovery information cannot be to a directory that is on thesame partition as /usr/openv/netbackup. If the path is to a location on the same partition as/usr/openv/netbackup, NetBackup displays a status 20 error message. The message statesthat the disk path is invalid. Change the path on the Disaster Recovery tab to a directory on adifferent partition.
Path
Specify the logon and password information that is required to access an established Windowsor NFS share.
If the logon information is not valid, NetBackup returns a message. The message requests thatthe user either reenter the logon and password information or clear the alternate location optionto continue.
Logon
Specify the password that is required to log on to the share.Password
852Creating backup policiesDisaster Recovery tab

Table 20-57 Options on the Disaster Recovery tab (continued)
DescriptionOption
Specify the email address where the disaster recovery report should be sent. Veritas recommendsthat the disaster recovery report be sent to at least one email address. To send the informationto more than one address, separate email addresses with a comma as follows:
[email protected],[email protected]
See “Setting up email notifications about backups” on page 164.
On Windows: The nbmail.cmd or mail_dr_info.cmd script must be configured(Install_path\NetBackup\bin\goodies\). In addition specify the email addresses inthe Disaster Recovery tab.
On Windows: NetBackup performs the notification by passing the email addresses, subject, andmessage to nbmail.cmd or mail_dr_info.cmd. The scripts use the mail program that isspecified in the script to send email to the user. See the comments in the script for configurationinstructions.
On Windows: The following points describe how mail_dr_info.cmd and nbmail.cmd interact:
■ IfInstall_path\NetBackup\bin\mail_dr_info.cmd is configured, the disaster recoveryreport is sent to the email address of the administrators that are indicated in the DisasterRecovery tab. NetBackup administrators can set up the script to send the disaster recoveryinformation to alternate locations.
■ If mail_dr_info.cmd is not configured, andInstall_path\NetBackup\bin\goodies\nbmail.cmd is configured, the disasterrecovery report is sent to the administrators that are indicated in the Disaster Recovery tabby nbmail.cmd.
■ If neither file is configured, NetBackup attempts to use Microsoft internal IMAPI services.
Note: On Windows: By default, neither nbmail.cmd nor mail_dr_info.cmd is configured tosend email.
See “Configuring the nbmail.cmd script on Windows” on page 165.
On Windows: For more information on mail_dr_info.cmd, see the NetBackup Administrator’sGuide, Volume II.
Send in an emailattachment
Lists the policies that are considered crucial to the recovery of a site in the event of a disaster.The NetBackup Disaster Recovery report lists all of the media that is used for backups of criticalpolicies, including the most recent full backup. The NetBackup Disaster Recovery wizard warnsyou if any media for critical policies are not available.
Note: The Disaster Recovery report lists the media for only incremental and full backupschedules so critical policies should use only incremental or full backup schedules. Certaindatabase backups schedules, such as Oracle and Microsoft SQL Server, only use schedule typesof Application Backup and Automatic Backup. Because of the schedule types, media listings forthese backups do not appear on the Disaster Recovery report.
Critical policies
853Creating backup policiesDisaster Recovery tab

Note: Vault protects the disaster recovery data by sending the data to the Vaultsite as an email attachment of the Vault report email.
Adding policies to the Critical Policies list of a catalog backup policyUse the following procedure to add policies to the Critical Policies list of a catalogbackup policy.
To add a policy to the critical policies list
1 In the NetBackup Administration Console, in the left pane, expandNetBackup Management > Policies.
2 Do one of the following:
■ Double-click a configured catalog backup policy.
■ Create a catalog backup policy.See “Configuring a catalog backup manually” on page 897.
3 Select the Disaster Recovery tab.
4 Near the Critical Policies list, click Add. An active field appears in the list.
5 Click the icon at the far right of the active field to display a list of configuredpolicies. Select a policy to add to the Critical Policies list.
6 Do any of the following:
Click Add.To add another policy
Select the policy and click Change.To change a policy
Select the policy and click Delete.To delete a policy
7 ClickOK to save theCritical policies list and the other settings on theDisasterRecovery tab.
Creating a Vault policyA Vault policy differs from other policies in the following respects:
■ Vault must be specified as the policy type.
■ No clients are specified in Vault policies, so the Clients tab does not appear.
■ In the Backup Selections list, a Vault command is specified instead of files.
854Creating backup policiesCreating a Vault policy

To create a Vault policy
1 In the NetBackup Administration Console, in the left pane, expandNetBackup Management > Policies.
2 On the Actions menu, click New > Policy.
3 Type a unique name for the new policy in the Add a New Policy dialog box.Click OK.
4 On the Attributes tab, select Vault as the policy type.
5 On the Schedules tab, clickNew to create a new schedule. The type of backupdefaults to Automatic.
The Clients tab does not appear for Vault policy types.
6 Complete the schedule.
855Creating backup policiesCreating a Vault policy

7 On the Backup Selections tab, enter one of two Vault commands:
Use vltrun to specify the robot, vault name, and profile for the job.The vltrun command accomplishes all the steps necessary to select,copy, and eject media. If the vault profile name is unique, use thefollowing format:
vltrun profile_name
If the vault profile name is not unique, use the following format:
vltrun robot_number/vault_name/profile_name
vltrun
Use the vlteject command to eject media or to generate reports forcompleted Vault sessions. For example:
vlteject -eject -report [-vault vault_name[-sessionid id]] [-auto y|n] [-eject_delay seconds]
vlteject
Both commands are located in the following directory:
On Windows:
install_path\netbackup\bin
On UNIX:
/usr/openv/netbackup/bin/
For more information on Vault names, profile names, and command usage,see the Vault Administrator’s Guide.
8 Click OK.
Performing manual backupsA manual backup is user-initiated and is based on a policy.
A manual backup is useful in the following situations:
■ To test a configuration
■ To back up a client that missed the regular backup
■ To back up a client before new software is installed to preserve the oldconfiguration
■ To preserve records before a special event such as a company split or merger
856Creating backup policiesPerforming manual backups

■ To back up quarterly or yearly financial information
In some cases, it may be useful to create a policy and schedule that is used onlyfor manual backups. Create a policy for manual backups by creating a policy witha single schedule that has no backup window. Without a backup window, the policycan never run automatically.
To perform a manual backup
1 In the NetBackup Administration Console, in the left pane, expandNetBackup Management > Policies.
2 On Windows: Select the policy name in the left pane.
3 On UNIX: Select the policy name in the middle pane.
4 On the Actions menu, click Manual Backup. (To perform a manual backup,you must enable the Go into effect at attribute.)
See “Go into effect at (policy attribute)” on page 709.
If the Go into effect at attribute is set for a future date and time, the backupdoes not run.
5 In the Manual Backup dialog box, select the schedule and the clients that youwant to back up.
If you do not select any schedules, NetBackup uses the schedule with thehighest retention level. If you do not select any clients, NetBackup backs upall clients.
User schedules do not appear in the schedules list. A user schedule cannotbe manually backed up because it does not have a backup selection list (theuser selects the files).
6 Click OK to start the backup.
Active Directory granular backups and recoveryAdministrators can use NetBackup to restore individual objects and attributes inthe Active Directory instead of restoring the entire Active Directory. Administratorscan also restore deleted objects (tombstone objects) from the Active Directory.
The following topics describe how to configure a policy to perform recovery of anActive Directory object:
■ System requirements necessary to perform Active Directory granular backupsand restores.
■ How to configure a policy for an Active Directory backup that allows granularrestores.
857Creating backup policiesActive Directory granular backups and recovery

■ How to restore individual objects and attributes in the Active Directory.
System requirements for Active Directory granular NetBackupbackups and recovery
See the Operating System Compatibility List for a list of operating system versionsthat support Active Directory granular restore:
http://www.veritas.com/docs/TECH76648
To perform Active Directory granular backups and restores, ensure that you meetthe following requirements:
■ The Network File System (NFS) must be installed on the media server and allActive Directory domain controllers or ADAM/LDS hosts.See “About installing and configuring Network File System (NFS) for ActiveDirectory Granular Recovery” on page 1181.See “About configuring Services for Network File System (NFS) on Windows2012 and Windows 2012 R2” on page 1182.See “About configuring Services for Network File System (NFS) on Windows2008 and Windows 2008 R2” on page 1190.
■ The NetBackup Client Service must be configured to log on as an account withdomain privileges.To perform granular backups and restores of the Active Directory, the NetBackupLegacy Client Service (bpinetd) must run under the domain administratoraccount on the Active Directory domain controller or ADAM server. By default,bpinetd runs under the Local System account.See “Configuring the NetBackup Client Service” on page 1111.
For information on the media server platforms that support Granular RecoveryTechnology see the NetBackup compatibility lists on the NetBackup landing pageon the Veritas Support website.
Creating a policy that allows Active Directory granular restoresA NetBackup policy that backs up the Active Directory can be configured to allowthe restore of the objects and attributes in the Active Directory. The objects andattributes can be restored locally or remotely without the interruption of restartingthe domain controllers where the restore is performed.
The Active Directory host properties offer additional configuration options for thebackup of Windows Server 2008 computers. Specifically, whether or not NetBackupperforms a consistency check if Microsoft Volume Shadow Copy Service (VSS) isused as the snapshot provider.
858Creating backup policiesActive Directory granular backups and recovery

See “Active Directory host properties” on page 81.
To create a policy to allow Active Directory restores
1 Check that the NetBackup Legacy Client Service (bpinetd) is running underthe domain administrator account on the Active Directory domain controller.In this case, the Active Directory domain controller is the NetBackup client.
See “Configuring the NetBackup Client Service” on page 1111.
2 In the Policy dialog box, on the Attributes tab, select MS-Windows as thepolicy type. Specify the other policy attributes as needed.
3 Enable the Enable granular recovery option. If this option is not enabled, thebackup still runs, but the backup cannot produce granular restores.
4 In the Schedules tab, create schedules as needed.
Other items in the policy may use a differential or cumulative incrementalbackup type, but the Active Directory items are always fully backed up.
See “Active Directory backups are full backups” on page 859.
5 In the Backup Selections tab, open the Select Directive dialog.
6 For the Directive set, select Windows 2003 or Windows 2008.
7 To back up the Active Directory, select any one of the following directives:
■ See “System State:\ directive” on page 837.
■ See “Shadow Copy Components:\ directive” on page 838.
■ See “ALL_LOCAL_DRIVES directive” on page 836.
Note: Active Directory Application Mode (ADAM) is a lightweight directoryservice that runs as a user service. This directive can be used to back up ADAMdata on computers where it is installed. However, it does not back up the ActiveDirectory itself.
8 In the Clients tab, select the clients as needed.
9 Save the policy.
Active Directory backups are full backupsAny Active Directory backup is always a NetBackup full backup, whether it is agranular backup or not.
Whenever Active Directory is in a policy’s Backup Selections list, the ActiveDirectory portion is always fully backed up, even when the backup type is
859Creating backup policiesActive Directory granular backups and recovery

incremental, differential or cumulative. Any other items in the Backup Selectionslist may use a differential or cumulative incremental backup type as indicated. Eventhough a full backup is forced for an Active Directory backup, normal incrementalrules are applied to the non-Active Directory items in the policy file list.
Restoring Active Directory objectsThe following procedure describes how to restore objects from an Active Directorybackup in a non-disaster recovery situation:
To restore individual objects from an Active Directory backup
1 Open the NetBackup Backup, Archive, and Restore client interface.
2 Select File > Select Files and Folders to Restore.
3 Expand and browse the Active Directory node.
4 Select the objects to be restored. Do not select both granular and non-granularobjects. When a user explores and expands selections, a delay can occurduring communication with the NetBackup server. The delay is a result ofdynamically determining the contents from the image on the media server. Theapproach prevents the NetBackup catalog from unanticipated growth due tonumerous granular entries.
860Creating backup policiesActive Directory granular backups and recovery

5 Select Action > Restore.
6 If an Active Directory object is selected, the Restore Marked Files dialog boxcontains two tabs:
■ General tabWhen an Active Directory object is selected, the Restore DestinationChoices are disabled in theGeneral tab. Configure the other restore optionsas needed.
■ Active Directory tabThe Active Directory tab contains an option to recreate the objects thathave been deleted: Recreate deleted objects that cannot be restoredfrom the Active Directory Deleted Objects container.TheActive Directory tab contains an option that lets administrators recreatethe objects whose tombstone lifetimes have passed. The objects have alsobeen purged from the Active Directory Deleted Objects container.To allow this capability, enable the option labeledRecreate deleted objectsthat cannot be restored from the Active Directory Deleted Objectscontainer.
7 Click Start Restore in the Restore Marked Files dialog box.
Some restore situations require additional steps, depending on what is restored.
See “Troubleshooting granular restore issues” on page 861.
Troubleshooting granular restore issuesSome granular restore situations require additional steps to fully restore the objects.In other situations, a granular restore of some part of the Active Directory is notpossible.
Table 20-58 describes potential problems for granular restores.
861Creating backup policiesActive Directory granular backups and recovery

Table 20-58 Troubleshooting restore issues
RecommendationSituation
When user and computer accounts are restored from a granular Active Directory restore,they are sometimes disabled.
The following are possible reasons why the accounts can be disabled:
■ When objects in Active Directory are deleted, they are removed from their currentActive Directory or ADAM/AD LDS container. They are converted into tombstonesand placed in the Active Directory Deleted Objects container where their tombstonelifetime is monitored. By default, NetBackup restores deleted objects from thiscontainer if the tombstone lifetime has not passed.After the tombstone lifetime passes, the tombstones are purged from the ActiveDirectory Deleted Objects container. Purging the tombstones has the effect ofpermanently deleting the objects from the Active Directory and ADAM/AD LDSdatabases.
■ When restoring user objects, you must reset the object's user password and enablethe object's user account:■ For Active Directory user objects, use the Microsoft Active Directory Users and
Computers application.■ For ADAM/AD LDS user objects, use ADSI Edit.
In Active Directory, computer objects are derived from user objects. Some attributesthat are associated with a computer object cannot be restored when you restore adeleted computer object. They can only be restored if the attributes were savedthrough schema changes when the computer object was originally deleted.
■ Computer object credentials change every 30 days and the credentials from thebackup may not match the credentials that are stored on the actual computer. Whena computer object is restored it is disabled if the userAccountControl propertywas not preserved in the deleted object.
Use the Microsoft Active Directory Users and Computers application to reset theaccount of a computer object:■ Remove the computer from the domain.■ Re-join the computer to the domain. The security identifiers (SID) for the
computer remains the same since it is preserved when a computer object isdeleted. However, if the tombstone expired and a new computer object wasrecreated, the SID is different.
Restores that are disabled
862Creating backup policiesActive Directory granular backups and recovery

Table 20-58 Troubleshooting restore issues (continued)
RecommendationSituation
To restore Active Directory group membership links may require that the restore jobbe run twice.
For example, consider the case where a group and its member objects are deleted.
If a restore job contains both group objects and member objects, the job restores theobjects in alphabetical order. However, the group that is restored has a link dependencyon a member that does not exist yet. When the group is restored, the link cannot berestored.
Run the restore again to restore all forward and backward links.
Group and member objects
NetBackup does not support granular restores of Group Policy Objects.Group policy objects
863Creating backup policiesActive Directory granular backups and recovery

Synthetic backupsThis chapter includes the following topics:
■ About synthetic backups
■ Recommendations for synthetic backups and restores
■ Synthetic full backups
■ Synthetic cumulative incremental backups
■ Schedules that must appear in a policy for synthetic backups
■ Adding clients to a policy for synthetic backups
■ Change journal and synthesized backups
■ True image restore and synthesized backups
■ Displaying synthetic backups in the Activity Monitor
■ Logs produced during synthetic backups
■ Synthetic backups and directory and file attributes
■ Using the multiple copy synthetic backups method
■ Optimized synthetic backups
■ Optimized synthetic backups for deduplication
About synthetic backupsDuring a traditional full backup, all files are copied from the client to a master serveror a media server. The files are copied even though those files may not havechanged since the last incremental backup.
21Chapter

When NetBackup creates a synthetic full backup, NetBackup detects whether newor changed files have been copied to the media server during the last incrementalbackup. The client does not need to be running to combine the full backups andthe incremental backups on the media server to form a new, full backup. The new,full synthetic backup is an accurate representation of the clients’ file systems at thetime of the most recent full backup.
Because processing takes place on master and media servers instead of the client,synthetic backups help to reduce the network traffic. Files are transferred over thenetwork only once. After the backup images are combined into a synthetic backup,the tapes or disk that contain the component images can be recycled or reclaimed.Synthetic backups can reduce the number of tapes or disk space in use.
Synthetic backups can be written to tape storage units or disk storage units, or acombination of both. If the backups use tape, the backups can be synthesized whendrives are not generally in use. For example, if backups occur primarily at night,the drives can synthesize full backups during the day.
The Synthetic Backup option is available under the following conditions:
■ The policy type must be either Standard or MS-Windows.
■ The Collect True Image Restore Information With Move Detection optionmust be selected on the Policy Attributes tab.See “Collect true image restore information (policy attribute) with and withoutmove detection” on page 721.
■ The schedule that is created for a synthetic backup must haveSynthetic Backupselected.See “Synthetic backup (schedule attribute)” on page 768.
■ One of the following must be available:
■ Disk storage unit(s) with adequate space available.
■ Tape library(s) with multiple drives to read and write.See “Recommendations for synthetic backups and restores” on page 865.
■ A combination of disk storage unit(s) and tape library(s).
Recommendations for synthetic backups andrestores
The synthetic full backup is a scalable solution for backing up remote offices withmanageable data volumes and low levels of daily change.
865Synthetic backupsRecommendations for synthetic backups and restores

If the clients experience a high rate of change daily, the incremental backups aretoo large. In this case, a synthetic backup is no more helpful than a traditional fullbackup.
Synthetic backups are supported on all media server platforms and tier one masterserver platforms.
The following items describe recommendations to use synthesized backups to fulladvantage, and situations under which synthesized backups are not supported:
Recommendations concerning backups:
■ Do not multiplex any backups that are to be synthesized because it is inefficient.To synthesize multiplexed client images requires multiple passes over the sourcemedia—one per client.Performance issues can also occur if multiple streams are selected forsynthesized backups. The issues are similar to those encountered whilemultiplexing synthesized backups. Back up to disk whenever possible to improvemultiple stream performance issues.
■ Veritas recommends that you not enable Expire after copy retention for anystorage units that are to be used with SLPs with either of the following:Accelerator or synthetic backups. The Expire after copy retention can causeimages to expire while the backup runs. To synthesize a new full backup, theSLP backup needs the previous backup image. If the previous image expiresduring the backup, the backup fails.
■ Reduce the gap between the last incremental backup and the synthesizedbackup. Since a synthetic backup does not involve direct contact with the client,a synthetic backup is only as current as the last incremental backup. If there isa concern to reduce a potential gap in backup coverage, run an incrementalbackup before the synthetic backup.
■ You can create multiple copies with synthetic backups by using the multiplecopies synthetic backup method.Although synthetic backups do support the use of storage lifecycle policies,SLPs cannot be used for the multiple copy synthetic backups method.See “Using the multiple copy synthetic backups method” on page 875.
■ Synthetic backups are not supported if any of the component images areencrypted.
■ A user-generated backup cannot be used to generate a synthetic image. Abackup that is generated from a User Backup schedule or a User Archiveschedule cannot be used as one of the components of a synthetic backup.
■ Synthetic backups and optimized synthetic backups do not support Auto ImageReplication.
866Synthetic backupsRecommendations for synthetic backups and restores

Recommendations concerning restores:
■ The time that is required to perform a restore from a synthetic backup does notincrease significantly over time.
■ The restore times for both a complete synthetic backup and for a single file isthe same. It is the same whether the restore is from a traditional backup or froma synthetic backup.
■ The restore time of a single directory may increase over time when sourcedfrom synthetic backups. The restore time depends on the pattern of file changeswithin the directory.
■ Contrast a traditional full backup, which stores the files in file system order witha synthetic full backup, which stores the files in last-file-accessed order. Thesynthetic full contains the newest files at the front of the media and theunchanged files at the end. Over time, the processing order introduces thepotential for fragmentation of a single directory across the synthetic full image.
■ Note that the scenario is limited to single directory restores. Single file restoresand full image restores from synthetic fulls are equal or better than from traditionalfull backups, as noted in previous bullets.
■ If checkpoint restart is indicated for the policy, the backups that are producedwith the synthetic backup schedule are not checkpointed. The option is enabledif Take checkpoints on the policy Attributes tab is enabled. If the Takecheckpoints option is enabled for a synthetic backup, the property has no effect.
Table 21-1 Recommendations when using disk storage or tape storage forsynthetic backups
RecommendationsStorage unittype
Disk-based images are more efficient for synthesizing. NetBackup processes the newest componentimages first in a synthesized backup, followed by sequentially older images. When two or morecomponent images are written to the same tape, the tape movement can be inefficient compared todisk-based images.
Synthetic full backups are generated more quickly when built from disk-based incremental backups.If the synthetic full backup is also generated on disk, the run time is even faster. The disk copy thencan be duplicated to tape.
Disk storageunits
867Synthetic backupsRecommendations for synthetic backups and restores

Table 21-1 Recommendations when using disk storage or tape storage forsynthetic backups (continued)
RecommendationsStorage unittype
If tape is used instead of disk, the tape for the synthetic image must be different from the tape wherethe component images reside.
The maximum drive usage applies only to the drive that is needed for writing the synthetic backup.If any of the component images reside on tape, an additional drive is needed for reading.
If a single tape drive device is used to generate synthetic images, place component images in a harddrive location first. In that way, a synthetic image can be generated with the single tape drive device.
Tape storageunits
Synthetic full backupsA synthetic backup can be a synthetic full or a synthetic cumulative backup.
The images that are used to create the synthetic image are known as componentimages. For instance, the component images in a synthetic full are the previous fullimage and the subsequent incremental images.
Figure 21-1 illustrates the creation of synthetic full backups (B, C, D) from an existingfull backup (A) and shows the incremental backups between full backups.
868Synthetic backupsSynthetic full backups

Figure 21-1 Creation of synthetic full backups
Traditionalfull backup to disk (Sunday)
Incremental backupsto disk (Mon-Sat)
A B
Sunday's Syntheticfull Backup
C
Synthetic fullbackup (Sunday)
Syntheticfull backup to disk (Sunday)
D
Syntheticfullbackup(Sunday)Incremental backups
(Mon-Sat)
Incremental backups(Mon-Sat)
Sunday's syntheticfull backup
B
C
The traditional full backup (A) and the incremental backups are created in thetraditional manner: data is scanned, then copied from the client’s file system to thebackup media. The synthetic backups do not interact with the client system at all,but are instead synthesized on the media server.
See “Synthetic cumulative incremental backups” on page 870.
The following is an example of a synthetic full backup:
■ Create a Standard or MS-Windows policy for the clients (5.0 or later) you wantto back up. Include the following schedules:
■ A schedule for one full, traditional backup to run at least once.
■ A schedule for daily (Monday through Saturday) differential incrementalbackups.
■ A schedule for weekly full, synthetic backups.
■ Make sure that the traditional full backup runs. If the backup does not complete,run the backup manually.
869Synthetic backupsSynthetic full backups

■ Per schedule, run daily, differential incremental backups for the clients throughoutthe week. The last incremental backup for the week runs on Saturday.
■ Per schedule, run synthetic full backups for the clients on subsequent Sundays.
Note: The synthetic full backups in the scenario are only as current as the Saturdayincremental backup.
Synthetic cumulative incremental backupsThe scenario to create a synthetic, cumulative incremental backup is similar to thescenario to create a synthetic full backup. Remember, a cumulative incrementalbackup includes all changes since the last full backup.
If a cumulative incremental backup exists that is newer than the last full backup, asynthetic cumulative backup image is produced by consolidating the followingcomponent backup images:
■ All differential incremental backups that were taken since the last cumulativebackup.
■ The last cumulative incremental backup. If no cumulative incremental backupis available, only the differential incremental backups are used for the syntheticimage.
Figure 21-2 illustrates the creation of synthetic cumulative incremental backups (A,B, C) from the latest cumulative incremental backup and shows the subsequentdifferential incremental backups.
870Synthetic backupsSynthetic cumulative incremental backups

Figure 21-2 Creation of synthetic cumulative backups
Cumulative anddifferentialincremental backupsto disk (Mon-Sat)
A
Sunday's syntheticcumulative Incrementalbackup
B
Synthetic cumulative incrementalbackup (Sunday)
C
Synthetic cumulativeincremental backup(Sunday)
Incremental backups(Mon-Sat)
Incremental backups(Mon-Sat)
Sunday's syntheticcumulative incrementalbackup
A
B
Synthetic cumulative incrementalbackup to tape (Sunday)
The following is an example of a synthetic cumulative backup:
■ Create a Standard or MS-Windows policy for the clients (5.0 or later) you wantto back up. Include the following schedules:
■ A schedule for one full, traditional backup to run at least once.
■ A schedule for daily (Monday through Saturday) differential incrementalbackups.
■ A schedule for weekly cumulative incremental synthetic backups.
■ Make certain that the traditional full backup runs. If the backup does not complete,run the backup manually.
■ Per schedule, run daily differential incremental backups for the clients throughoutthe week. The last incremental for the week runs on Saturday.
■ Per schedule, run synthetic cumulative incremental backups for the clients onsubsequent Sundays.
871Synthetic backupsSynthetic cumulative incremental backups

Note: The synthetic cumulative backups in the scenario are only as current as theSaturday incremental backup.
Schedules that must appear in a policy forsynthetic backups
A policy for synthetic backups must contain one of the following types of schedules:
■ At least one traditional, full backup must be run successfully to create a fullimage. The synthetic backup job fails if there is not at least one previous fullimage.
■ Schedule(s) for incremental backups.Incremental backups are necessary to capture the changes in the file systemsince the last full or incremental backup. The synthetic backup job receives astatus code of 1 for a policy that contains full or incremental synthetic backupschedules, but no incremental backup schedules.The synthetic backup synthesizes all of the incremental backups to create anew full or cumulative backup image. Therefore, the synthetic backup is onlyas current as the last incremental backup.
Note: To configure a synthetic cumulative backup for any clients that are archivebit-based (default), use only differential incremental backups for the traditional,non-synthesized backups.
■ One full and one cumulative backup schedule with the Synthetic Backup optionselected.See “Synthetic backup (schedule attribute)” on page 768.
Adding clients to a policy for synthetic backupsAfter clients are added to a synthetic backup policy, run a traditional, full backup ofthe policy. A traditional backup is necessary before a synthetic backup can becreated.
Since Collect True Image Restore Information With Move Detection is requiredfor synthetic backups, all of the clients in the policy must support TIR.
See “Collect true image restore information (policy attribute) with and without movedetection” on page 721.
872Synthetic backupsSchedules that must appear in a policy for synthetic backups

Change journal and synthesized backupsIf the Use Change Journal host property on a Windows client is enabled, theproperty has no effect when the client is backed up using the synthetic backupschedule.
See “Client Settings properties for Windows clients” on page 112.
True image restore and synthesized backupsSince the Collect true Image restore information with move detection policyproperty must be enabled for synthetic backups, all clients that are included in thepolicy must support TIR.
See “Collect true image restore information (policy attribute) with and without movedetection” on page 721.
The Keep true image restoration (TIR) information property indicates how longTIR information in the image catalog is kept before it is pruned (removed). Theproperty is located in the master server Clean-Up host properties.
See “Clean-up properties” on page 88.
However, if a synthetic full and synthetic cumulative schedule was defined in thepolicy, the TIR information is pruned from the component images until a subsequenttraditional or synthetic full or cumulative backup image has generated successfully.
Consider a situation where Keep true image restoration (TIR) information hostspecifies that TIR information is pruned from the catalog after two days. On thethird day the TIR information is pruned only if a traditional or synthetic full backupimage has been generated.
If the TIR information was pruned from a component image and you accidentallyexpire the most recent synthetic image, rerun the synthetic backup job to restoreautomatically the TIR information to the catalog. In case the TIR information cannotbe restored due to bad, missing, or vaulted media, the synthetic backup job failswith error code 136 (TIR info was pruned from the image file). If the problem iscorrectable, run the synthetic backup again.
Displaying synthetic backups in the ActivityMonitor
A synthetic job is distinguished from a traditional full backup by the notation that isindicated in the Data Movement field of the Activity Monitor. Synthetic jobs displaySynthetic as the Data Movement type while traditional backups display Standard.
873Synthetic backupsChange journal and synthesized backups

Logs produced during synthetic backupsWhen a synthetic backup is scheduled, NetBackup starts the bpsynth program tomanage the synthetic backup process. bpsynth plans how the synthetic backup isbuilt from the previous backup images.
If it is needed, bpsynth then schedules the tape drive resources that are neededfor the synthetic backup. If the required resources are not available, the job failswith a status code that indicates that a resource is needed.
If the resources can be obtained eventually but not immediately, the synthetic jobwaits until the resources become available. A synthetic job may wait while a backup,restore, or another synthetic backup job uses a drive.
bpsynth passes the information to programs bptm and bpdm so that tape and diskimages can be read or written. Catalog information is managed using bpdbm. Eachof these programs has a debug log file in the logs directory.
If problems occur with synthetic backups, the following debug logs are required todiagnose the problem:
■ On the master server: bpsynth, bpdbm, and vnetd.
■ On the media server(s): bpcd, bptm (if any images are written to or from a tapedevice), and bpdm (if any images are written to or from disk).Note that several media servers can be involved if the component images areon different nodes.
The log files for synthetic backups are described in the NetBackup LoggingReference Guide.
However, bpsynth is used for each stream or client. To use bpsynth can beinefficient with tape images since bpsynth needs a tape drive to write the newimage. Also, bpsynth may use the same component image volumes. One mayneed to finish before the next can proceed.
Synthetic backups and directory and file attributesFor a synthetic backup to include directory and the file attribute changes, the changemust first be picked up by a component incremental backup. (For example, changeslike Access Control Lists (ACLs).)
On UNIX, changing an object’s ACL changes the ctime (inode change time) forthe object but not the mtime (data modification time). Since mtime triggersincremental backups, the ACL change is not reflected in an incremental backup,and therefore not in a synthetic full backup.
874Synthetic backupsLogs produced during synthetic backups

To include ACL changes in backups, enter USE_CTIME_FOR_INCREMENTALSin the bp.conf file on each UNIX client.
See “USE_CTIME_FOR_INCREMENTALS option for NetBackup clients”on page 376.
For each Windows client, enable Incrementals: Based onArchive Bit. The propertyis found under NetBackup Management > Host Properties > Clients > selectedclient(s) > Windows Client.
See “Client Settings properties for Windows clients” on page 112.
Using themultiple copy synthetic backupsmethodThe multiple copy synthetic backups method introduces the capability to producea second copy of a synthetic backup at a remote site as part of a normal syntheticbackup job.
This method provides the following benefits:
■ It eliminates the bandwidth cost of copying synthetic full backups to anothersite.Instead of duplicating a local synthetic full backup to a remote site to producea second copy, it is more efficient to produce the second copy by using datamovements only at the remote site.
■ It provides an efficient method to establish a dual-copy disaster recovery schemefor NetBackup backup images.
Table 21-2 emphasizes how the synthetic full backup produced at the remote siteis a clone, or a second copy, of the first copy produced at the local site.
Table 21-2 Comparing synthetic copy process with and without methodenabled
Using the multiple copy synthetic backupsmethod:
Without using the multiple copy syntheticbackups method:
Step
Step 1 remains the same.A full backup is performed at the local site (Site A).1
Step 2 remains the same.The full backup is duplicated to the remote site (SiteB).
2
Step 3 remains the same.An incremental backup is performed at Site A.3
Step 4 remains the same.The incremental backup is duplicated to Site B.4
Step 5 remains the same.Steps 3 and 4 are repeated each time an incrementalschedule runs.
5
875Synthetic backupsUsing the multiple copy synthetic backups method

Table 21-2 Comparing synthetic copy process with and without methodenabled (continued)
Using the multiple copy synthetic backupsmethod:
Without using the multiple copy syntheticbackups method:
Step
Step 6 remains the same.A full synthetic backup is produced at Site A.6
A full synthetic backup is produced at Site B fromimages at Site B.
The full synthetic backup at the remote site is a secondcopy of the synthetic backup at the local site.
The full backup is duplicated to Site B.7
Step 8 remains the same.Steps 2 through 7 repeat per backup schedulingneeds.
8
Figure 21-3 shows how no extra bandwidth is used to copy the synthetic full backupfrom Site A to Site B.
Figure 21-3 Remote creation of synthetic full backup
Site A(Local)
Full backup(Copy 1)
Incremental(Copy 1)
Incremental(Copy 1)
Synthetic fullbackup(Copy 1)
Incremental(Copy 1)
Incremental(Copy 1)
Time
Site B(Remote)
Full backup(Copy 2)
Incremental(Copy 2)
Incremental(Copy 2)
Synthetic fullbackup(Copy 2)
Incremental(Copy 2)
Incremental(Copy 2)
Copy 2 synthetic fullis created remotely
Backups are duplicated to the remote sites
Configuring multiple copy synthetic backupsTo configure a multiple copy synthetic backup, create a configuration file on themaster server for each synthetic backup policy for which a second copy is to beproduced.
The configuration file is a text file that is named after the policy and schedule:
multi_synth.policy.schedule
Create the file in the following location:
On Windows:
876Synthetic backupsUsing the multiple copy synthetic backups method

install_path\VERITAS\NetBackup\db\config\multi_synth.policy. schedule
On UNIX:
/usr/openv/netbackup/db/config/multi_synth.policy.schedule
Configuration variables for multiple copy synthetic backupsThe file format uses a traditional name-pair scheme for setting configurationpreferences. Each preference uses a key name that is separated from the preferencevalue by an equal sign with each name-value pair residing on a single line.
For example:
NAME=VALUE
Enter all values as integers.
Table 21-3 describes the configuration entries that can be included in theconfiguration file.
Table 21-3 Configuration entries
PurposeEntry
Specifies the copy number of each source component for the second synthetic backup. Everysource backup must have a copy by this number unless SRC_COPY_FALLBACK is specified.The default is 2.
SRC_COPY
Specifies the copy number for the second synthetic backup produced. The TARGET_COPYvalue must be different from the copy number of the first synthetic backup (which is 1). Defaultis 2.
TARGET_COPY
COPY is an alternate specification for SRC_COPY and TARGET_COPY.
If COPY is specified and either SRC_COPY and TARGET_COPY is not specified, the value forCOPY is used.
COPY
Specifies the storage unit name or storage unit group name where the second copy syntheticbackup is to be written. Use the special identifier __ANY__ to indicate that Any Availablestorage unit can be used that is not configured to be on demand only. Note that there aretwo underscores before and after ANY:
TARGET_STU=__ANY__
TARGET_STU
877Synthetic backupsUsing the multiple copy synthetic backups method

Table 21-3 Configuration entries (continued)
PurposeEntry
The second synthetic backup is produced immediately following the first copy syntheticbackup if no errors occur during production of the first copy. If an error occurs during thesecond copy, the FAIL_MODE value specifies the fate of the first copy job and image.
Specify one of the following:
■ FAIL_MODE=ALL
ALL means that if the second copy fails, the first copy and its job also fail. (Default.)■ FAIL_MODE=ONE
ONE means that if the second copy fails, the failure does not affect the first copy job.
FAIL_MODE
Specifies whether production of the second copy is enabled or disabled. This entry turns onthe feature.
Specify one of the following:
■ ENABLED=YES
Production of the second copy is enabled. (Default.)■ ENABLED=NO
Production of the second copy is disabled.
ENABLED
Specifies that if a copy by the number given in SRC_COPY or COPY does not exist, the syntheticbackup should use the primary backup.
The only valid value is the following:
SRC_COPY_FALLBACK=PRIMARY
SRC_COPY_FALLBACK
Specifies the volume pool for tape media, if one is used. If no volume pool is specified,NetBackup uses the volume pool that is specified in the policy. If a volume pool is enteredfor disk, the entry is ignored.
VOLUME_POOL
Multiple copy synthetic backups configuration examplesThe following multiple copy synthetic configuration example takes advantage ofdefault values to produce the second synthetic copy.
TARGET_STU=disk_stu
The default source of copy 2 and the default destination copy 2.
In this example, the second copy targets a tape library (tape_stu). The configurationspecifies a volume pool (Synthetics) for the target copy.
The copy number for the multiple copy synthetic backup is copy 3. If copy 3 isunavailable, SOURCE_COPY_FALLBACK indicates that copy 3 can be produced usingthe primary copy.
878Synthetic backupsUsing the multiple copy synthetic backups method
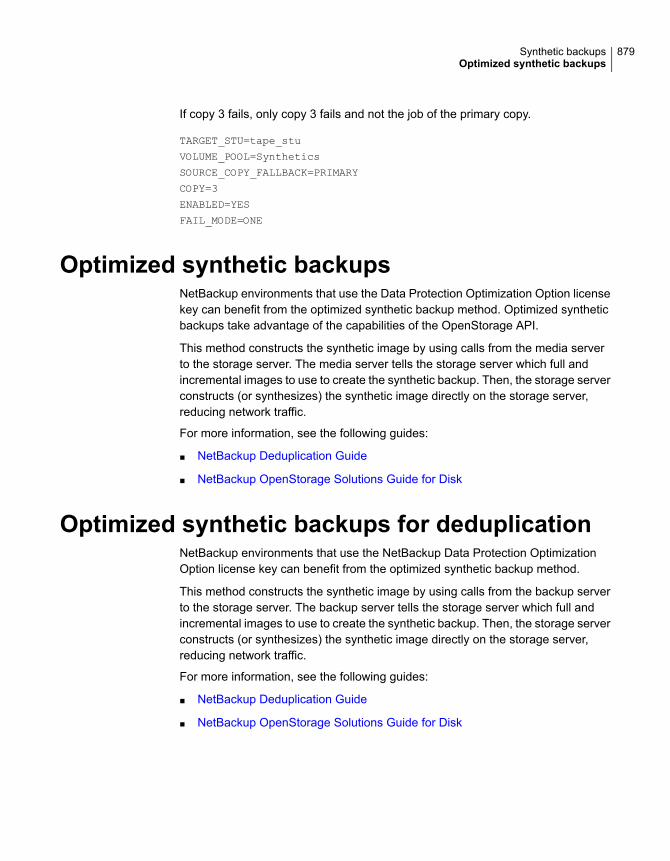
If copy 3 fails, only copy 3 fails and not the job of the primary copy.
TARGET_STU=tape_stu
VOLUME_POOL=Synthetics
SOURCE_COPY_FALLBACK=PRIMARY
COPY=3
ENABLED=YES
FAIL_MODE=ONE
Optimized synthetic backupsNetBackup environments that use the Data Protection Optimization Option licensekey can benefit from the optimized synthetic backup method. Optimized syntheticbackups take advantage of the capabilities of the OpenStorage API.
This method constructs the synthetic image by using calls from the media serverto the storage server. The media server tells the storage server which full andincremental images to use to create the synthetic backup. Then, the storage serverconstructs (or synthesizes) the synthetic image directly on the storage server,reducing network traffic.
For more information, see the following guides:
■ NetBackup Deduplication Guide
■ NetBackup OpenStorage Solutions Guide for Disk
Optimized synthetic backups for deduplicationNetBackup environments that use the NetBackup Data Protection OptimizationOption license key can benefit from the optimized synthetic backup method.
This method constructs the synthetic image by using calls from the backup serverto the storage server. The backup server tells the storage server which full andincremental images to use to create the synthetic backup. Then, the storage serverconstructs (or synthesizes) the synthetic image directly on the storage server,reducing network traffic.
For more information, see the following guides:
■ NetBackup Deduplication Guide
■ NetBackup OpenStorage Solutions Guide for Disk
879Synthetic backupsOptimized synthetic backups

Protecting the NetBackupcatalog
This chapter includes the following topics:
■ About the NetBackup catalog
■ Parts of the NetBackup catalog
■ Protecting the NetBackup catalog
■ Recovering the catalog
■ Disaster recovery emails and the disaster recovery file
■ Archiving the catalog and restoring from the catalog archive
■ Estimating catalog space requirements
About the NetBackup catalogA NetBackup catalog is the internal database that contains information aboutNetBackup backups and configuration. Backup information includes records of thefiles that have been backed up and the media on which the files are stored. Thecatalogs also contain information about the media and the storage devices.
Since NetBackup needs the catalog information so that it can restore client backups,configure a catalog backup before using NetBackup for regular client backups.Schedule the catalog backups to occur on a regular basis. Without regular catalogbackups, you risk losing regular backups if there is a problem with the disk thatcontains the catalogs.
For information on how to configure catalog backups in Windows clusteredenvironments, see the NetBackup Clustered Master Server Administrator's Guide.
22Chapter

Parts of the NetBackup catalogThe NetBackup catalog resides on the NetBackup master server. It manages andcontrols access to the following types of data:
■ Image metadata (information about backup images and copies (image headerfiles)).
■ Backup content data (information about the folders, files, and the objects in abackup (.f files)).
■ NetBackup backup policies.
■ NetBackup licensing data.
■ The NetBackup error log.
■ The client database.
■ Cloud configuration files.See “About catalog backup of cloud configuration files” on page 889.
The catalog consists of the following parts:
■ Relational database files.NetBackup uses the SQL Anywhere Relational Database Management Systemto store information in the NetBackup database (NBDB). The metadata includesinformation about the data that has been backed up, and about where the datais stored.See “About the NetBackup relational database” on page 883.
■ The image database.The image database contains information about the data that has been backedup.See “About the NetBackup image database” on page 887.
■ NetBackup configuration files.The configuration files (databases.conf and server.conf) are flat files thatcontain instructions for the SQL Anywhere daemon.See “About the NetBackup server.conf file” on page 923.See “About the databases.conf file” on page 925.
NetBackup is sensitive to the location of the master server components. Runningany part of NetBackup (the binaries, the logs, the database, the images) on anetwork share (NFS, for example) can affect performance of even normal operations.
NetBackup can be CIFS-mounted on SAN or NAS storage as long as the averageI/O service times remain less than 20 milliseconds.
881Protecting the NetBackup catalogParts of the NetBackup catalog

The storage must also meet certain conditions to ensure the Sybase requirementfor data integrity:
■ The order of file writes must be guaranteed.
■ When a write request is issued, the write must complete to the physical storage.The write request must not merely be buffered when the SAN or the NAS returnsfrom the write call.See the following article for more information:http://www.veritas.com/docs/TECH158868
Figure 22-1 Catalog configuration on Windows computers
License key andauthenticationinformation
\Netbackup\var
\cloud
\failure_history\class_template
\class
\jobs\error
\media
\scripts
\Netbackup\vault\Netbackup\db\NetbackupDB
\vault
\conf
databases.confserver.conf
\data
BMR_DATA.dbBMR_INDEX.dbBMRDB.dbBMRDB.logDARS_DATA.dbDARS_INDEX.dbDBM_DATA.dbDBM_INDEX.dbEMM_DATA.dbEMM_INDEX.dbJOBD_DATA.dbNBAZDB.dbNBAZDB.db.templateNBAZDB.logNBDB.dbNBDB.logSLP_DATA.dbSLP_INDEX.dbvxdbms.conf
\client_1 \Master\Media_server \client_n
Relational database files
Configuration files
Image database
Install_path\VERITAS
\config
\images
882Protecting the NetBackup catalogParts of the NetBackup catalog

Figure 22-2 Catalog configuration on UNIX computers
/error
/class /config
/failure _history
Image database
db_marker.txt /client_n/Media_server/Master/client_1
/db/data /netbackup/db /netbackup/vault /var /var/globalLicense key andauthenticationinformation
BMR_DATA.dbBMR_INDEX.dbBMRDB.dbBMRDB.logDARS_DATA.dbDARS_INDEX.dbDBM_DATA.dbDBM_INDEX.dbEMM_DATA.dbEMM_INDEX.dbJOBD_DATA.dbNBAZDB.dbNBAZDB.db.templateNBAZDB.logNBDB.dbNBDB.logSLP_DATA.dbSLP_INDEX.dbvxdbms.conf
Relational database files
databases.confserver.conf
/cltmp
/ss
/vault
/media
/jobs
/images
/cltmp_template
/cltmp_internal/class_template
/class_locks
/class_internal
Configurationfiles
/usr/openv/
/cloud
About the NetBackup relational databaseNetBackup installs Sybase SQL Anywhere during the master server installation asa private, non-shared server for the NetBackup database. The NetBackup database(NBDB) is also known as the Enterprise Media Manager (EMM) database. It containsinformation about volumes, and the robots and drives that are in NetBackup storageunits.
The same installation of Sybase SQL Anywhere is used for the optionally-licensedproduct, Bare Metal Restore (BMR) database. The BMRDB database contains theinformation that the NetBackup Bare Metal Restore option manages. The BMRdatabase is created during the BMR installation process.
See “About the NetBackup image database” on page 887.
See “About the NetBackup relational database (NBDB) installation” on page 919.
See “Post-installation tasks” on page 956.
883Protecting the NetBackup catalogParts of the NetBackup catalog
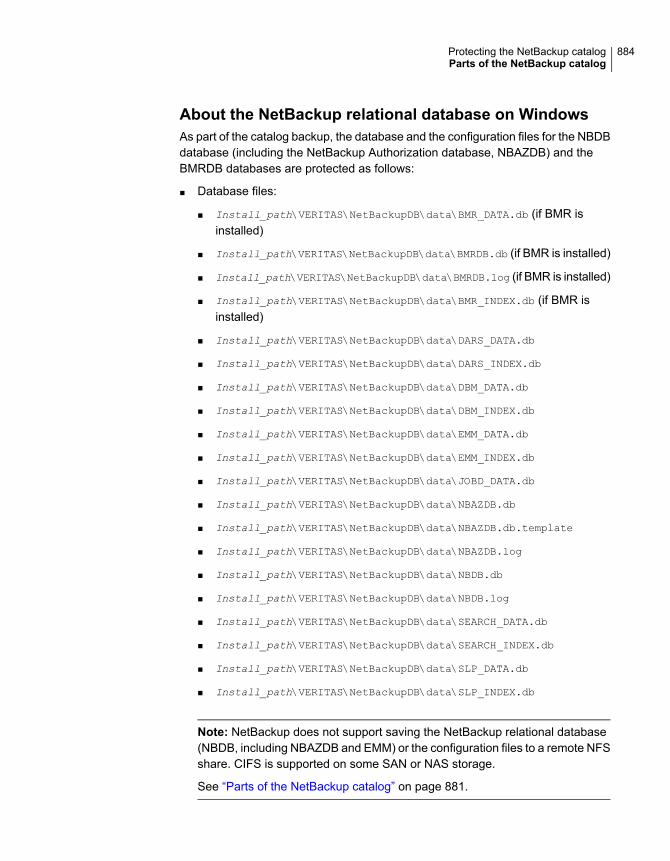
About the NetBackup relational database on WindowsAs part of the catalog backup, the database and the configuration files for the NBDBdatabase (including the NetBackup Authorization database, NBAZDB) and theBMRDB databases are protected as follows:
■ Database files:
■ Install_path\VERITAS\NetBackupDB\data\BMR_DATA.db (if BMR isinstalled)
■ Install_path\VERITAS\NetBackupDB\data\BMRDB.db (if BMR is installed)
■ Install_path\VERITAS\NetBackupDB\data\BMRDB.log (if BMR is installed)
■ Install_path\VERITAS\NetBackupDB\data\BMR_INDEX.db (if BMR isinstalled)
■ Install_path\VERITAS\NetBackupDB\data\DARS_DATA.db
■ Install_path\VERITAS\NetBackupDB\data\DARS_INDEX.db
■ Install_path\VERITAS\NetBackupDB\data\DBM_DATA.db
■ Install_path\VERITAS\NetBackupDB\data\DBM_INDEX.db
■ Install_path\VERITAS\NetBackupDB\data\EMM_DATA.db
■ Install_path\VERITAS\NetBackupDB\data\EMM_INDEX.db
■ Install_path\VERITAS\NetBackupDB\data\JOBD_DATA.db
■ Install_path\VERITAS\NetBackupDB\data\NBAZDB.db
■ Install_path\VERITAS\NetBackupDB\data\NBAZDB.db.template
■ Install_path\VERITAS\NetBackupDB\data\NBAZDB.log
■ Install_path\VERITAS\NetBackupDB\data\NBDB.db
■ Install_path\VERITAS\NetBackupDB\data\NBDB.log
■ Install_path\VERITAS\NetBackupDB\data\SEARCH_DATA.db
■ Install_path\VERITAS\NetBackupDB\data\SEARCH_INDEX.db
■ Install_path\VERITAS\NetBackupDB\data\SLP_DATA.db
■ Install_path\VERITAS\NetBackupDB\data\SLP_INDEX.db
Note: NetBackup does not support saving the NetBackup relational database(NBDB, including NBAZDB and EMM) or the configuration files to a remote NFSshare. CIFS is supported on some SAN or NAS storage.
See “Parts of the NetBackup catalog” on page 881.
884Protecting the NetBackup catalogParts of the NetBackup catalog

■ Configuration files:
■ Install_path\VERITAS\NetBackupDB\data\vxdbms.conf
■ Install_path\VERITAS\NetBackupDB\conf\server.conf
■ Install_path\VERITAS\NetBackupDB\conf\databases.conf
Note: The catalog backup process copies this data toInstall_path\VERITAS\NetBackupDB\staging and backs up the copy.
About the NetBackup relational database on UNIXAs part of the catalog backup, the database and the configuration files for the NBDBdatabase (including the NetBackup Authorization database, NBAZDB) and theBMRDB databases are protected as follows:
■ Database files
■ /usr/openv/db/data/BMR_DATA.db (if BMR is installed)
■ /usr/openv/db/data/BMRDB.db (if BMR is installed)
■ /usr/openv/db/data/BMRDB.log (if BMR is installed)
■ /usr/openv/db/data/BMR_INDEX.db (if BMR is installed)
■ /usr/openv/db/data/DARS_DATA.db
■ /usr/openv/db/data/DARS_INDEX.db
■ /usr/openv/db/data/DBM_DATA.db
■ /usr/openv/db/data/DBM_INDEX.db
■ /usr/openv/db/data/EMM_DATA.db
■ /usr/openv/db/data/EMM_INDEX.db
■ /usr/openv/db/data/JOBD_DATA.db
■ /usr/openv/db/data/NBAZDB.db
■ /usr/openv/db/data/NBAZDB.db.template
■ /usr/openv/db/data/NBAZDB.log
■ /usr/openv/db/data/NBDB.db
■ /usr/openv/db/data/NBDB.log
■ /usr/openv/db/data/SEARCH_DATA.db
885Protecting the NetBackup catalogParts of the NetBackup catalog

■ /usr/openv/db/data/SEARCH_INDEX.db
■ /usr/openv/db/data/SLP_DATA.db
■ /usr/openv/db/data/SLP_INDEX.db
Note: NetBackup does not support saving the NetBackup relational database(NBDB, including NBAZDB and EMM) or the configuration files to a remote NFSshare. CIFS is supported on some SAN or NAS storage.
See “Parts of the NetBackup catalog” on page 881.
■ Configuration files
■ /usr/openv/db/data/vxdbms.conf
■ /usr/openv/var/global/server.conf
■ /usr/openv/var/global/databases.conf
Note: The catalog backup process copies this data to /usr/openv/db/staging
and backs up the copy.
About the Enterprise Media Manager (EMM)The Enterprise Media Manager (EMM) is a NetBackup service that manages thedevice and the media information for NetBackup. The Enterprise Media Managerstores its managed information in a database that resides on the master server.The NetBackup Resource Broker queries EMM to allocate storage units, drives(including drive paths), and media.
EMM contains the following information:
■ Device attributes
■ Robotic library and standalone drive residence attributes
■ NDMP attributes
■ Barcode rule attributes
■ Volume pool attributes
■ Tape attributes
■ Media attributes
■ Storage unit attributes
886Protecting the NetBackup catalogParts of the NetBackup catalog

■ Storage unit group attributes
■ Hosts with assigned tape drives
■ Media and device errors
■ Disk pool and disk volume attributes
■ Storage server attributes
■ Log on credentials for storage servers, disk arrays, and NDMP hosts
■ Fibre Transport attributes
EMM ensures consistency between drives, robotic libraries, storage units, media,and volume pools across multiple servers. EMM contains information for all mediaservers that share devices in a multiple server configuration.
The NetBackup scheduling components use EMM information to select the server,drive path, and media for jobs. When the device manager ltid starts up, it readsdevice information from EMM into a shared memory segment. Components on thesame host communicate by using shared memory IPC or socket protocols. Socketprotocols are used between components across multiple hosts. Command lineinterfaces are available to obtain run-time (shared memory) information and staticdevice configuration information.
See “About the NetBackup relational database” on page 883.
About the NetBackup image databaseThe image database contains subdirectories for each client that is backed up byNetBackup, including the master server and any media servers.
The image database is located in the following location:
■ Windows: Program Files\VERITAS\Netbackup\db\images
■ UNIX: /usr/openv/netbackup/db/images
The image database contains the following files:
Files that store only backup set summary information.Image files
Used to prevent simultaneous updates on images..lck files
Used to store the detailed information about each file backup.Image .f files
Used to ensure that access to the db directory is valid when theNetBackup Database Manager starts up. Do not delete this file.
db_marker.txt
887Protecting the NetBackup catalogParts of the NetBackup catalog

The image database is the largest part of the NetBackup catalog. It consumes about99% of the total space that is required for the NetBackup catalog. While most ofthe subdirectories are relatively small in the NetBackup catalogs, \images (Windows)or /images (UNIX) can grow to hundreds of gigabytes. The image database on themaster server can grow too large to fit on a single tape. Image database growthdepends on the number of clients, policy schedules, and the amount of data thatis backed up.
See “Estimating catalog space requirements” on page 910.
If the image catalog becomes too large for the current location, consider moving itto a file system or disk partition that contains more space.
See “Moving the image catalog” on page 912.
The image database component of the NetBackup catalog uses the .f files in binaryformat for Windows, Solaris, AIX, and Linux platforms.
The catalog conversion utility (cat_convert) can be used to upgrade an imagedatabase to the binary format.
Information about the cat_convert command is available in the NetBackupCommands Reference Guide.
See “Estimating catalog space requirements” on page 910.
About NetBackup image filesEach image file is an ASCII file, generally less than 1 kilobyte in size. An image filecontains only backup set summary information. For example, the backup ID, thebackup type, the expiration date, fragment information, and disaster recoveryinformation.
About NetBackup image .f filesThe binary catalog contains one or more image .f files. This type of file is alsoreferred to as a files-file. The image .f file may be large because it contains thedetailed backup selection list for each file backup. Generally, image files range insize from 1 kilobyte to 10 gigabytes.
The file layout determines whether the catalog contains one .f file or many .f files.NetBackup configures the file layout automatically, based on the size of the binarycatalog. NetBackup uses one of two layouts: single file layout or multiple file layout.
■ Image .f file single file layoutNetBackup stores file information in a single image.f file if the information forthe catalog is less than 100 megabytes.
888Protecting the NetBackup catalogParts of the NetBackup catalog

When the backup file of one catalog backup is less than 100 megabytes,NetBackup stores the information in a single image.f file. The image.f file isalways greater than or equal to 72 bytes, but less than 100 megabytes.The following is a UNIX example of an .f file in a single file layout:
-rw------- 1 root other 979483 Aug 29 12:23 test_1030638194_FULL.f
■ Image .f file multiple file layoutWhen the file information for one catalog backup is greater than 100 megabytes,the information is stored in multiple .f files: one main image .f file plus nineadditional .f files.Separating the additional .f files from the image .f file and storing the files inthe catstore directory improves performance while writing to the catalog.The main image.f file is always exactly 72 bytes.
-rw- 1 root other 72 Aug 30 00:40 test_1030680524_INCR.f
-rw- 1 root other 804 Aug 30 00:08 catstore/test_1030680524_INCR.f-list
-rw- 1 root other 1489728 Aug 30 00:39 catstore/test_1030680524_INCR.f_imgDir0
-rw- 1 root other 0 Aug 30 00:40 catstore/test_1030680524_INCR.f_imgExtraObj0
-rw- 1 root other 1280176 Aug 30 00:39 catstore/test_1030680524_INCR.f_imgFile0
-rw- 1 root other 192 Aug 30 00:40 catstore/test_1030680524_INCR.f_imgHeader0
-rw- 1 root other 0 Aug 30 00:40 catstore/test_1030680524_INCR.f_imgNDMP0
-rw- 1 root other 9112680 Aug 30 00:39 catstore/test_1030680524_INCR.f_imgRecord0
-rw- 1 root other 2111864 Aug 30 00:39 catstore/test_1030680524_INCR.f_imgStrings0
-rw- 1 root other 11 Aug 30 00:40 catstore/test_1030680524_INCR.f_imgUserGroupNames0
About catalog backup of cloud configuration filesThe following cloud configuration files are backed up during the NetBackup catalogbackup process:
■ All .txt files in the meter directory, which contain intermediate metering data
■ CloudInstance.xml
■ CloudProvider.xml
■ cloudstore.conf
■ libstspiencrypt.conf
■ libstspimetering.conf
■ libstspithrottling.conf
■ libstspicloud_provider_name.conf
889Protecting the NetBackup catalogParts of the NetBackup catalog

All .conf files that are specific to cloud providers that NetBackup supports
■ libstspicloud_provider_name.pref
All .pref files that are specific to cloud providers that NetBackup supports
The cloud configuration files that are backed up during the catalog backup processreside at the following location:
Install_Path\netBackup\db\cloudWindows
usr/openv/netbackup/db/cloudUNIX
Note: The cacert.pem file is not backed up during the NetBackup catalog backupprocess.
Protecting the NetBackup catalogIn order for NetBackup to restore any file, NetBackup needs information from thecatalog to determine where the backup for the file is located. Without a catalog,NetBackup cannot restore data.
Because the catalog plays an integral part in a NetBackup environment, a specialtype of backup protects the catalog. A catalog backup backs up catalog-specificdata as well as produces disaster recovery information.
A catalog backup is configured separately from regular client backups by using theCatalog Backup Wizard. The catalog can be stored on a variety of media.
Configure a catalog backup before you run any regular backups.
Note: If portions of the catalog are relocated, note the changes so that subsequentcatalog backups are aware of the locations of all the catalog components. In theevent that a catalog recovery is needed, the same alterations must be implementedbefore the recovery of the catalog.
Note: To perform a catalog backup, the master server and the media server mustboth be at the same NetBackup version.
See the NetBackup Installation Guide for information about mixed version support.
As additional protection for the catalog, consider archiving the catalog.
See “Archiving the catalog and restoring from the catalog archive” on page 903.
890Protecting the NetBackup catalogProtecting the NetBackup catalog

The NetBackup Troubleshooting Guide provides helpful setup information to aid indisaster recovery. Since the catalog plays a critical role in the NetBackupenvironment, much of the information concentrates on catalog considerations.
About catalog backupsThe catalog backup is designed for active environments in which continual backupactivity occurs. The catalog backup can be performed while regular backup activityoccurs.
The catalog backup is policy-based so it has all of the scheduling flexibility of aregular backup policy. Because the policy allows for incremental backups, catalogbackup times for large catalogs can be significantly reduced. For Sybase SQLAnywhere, an incremental backup means a backup of the transaction log only.Transaction logs are managed automatically and truncated after each successfulbackup.
The catalog lets you recover either the entire catalog or pieces of the catalog. (Forexample, the databases separately from the image catalog.)
The catalog backup performs the following tasks:
■ Backs up the catalog while continual client backups are in progress.
■ Performs a full or an incremental catalog backup.
■ Runs the scheduled catalog backups.
■ Copies the relational database files to the staging directory and then backs upthat directory.
■ Catalog backups to tape also include the following items:
■ Spans multiple tapes for a catalog backup.
■ Allows for a flexible pool of catalog tapes.Catalog backups to tape use media from the CatalogBackup volume poolonly.
■ Appends to existing data on tape.
You can configure a catalog backup by using one of the following methods:
■ By using wizards:
■ The Catalog Backup Wizard.See “Using the Catalog Backup Wizard to configure a catalog backup”on page 892.
■ The Policy Configuration Wizard.
891Protecting the NetBackup catalogProtecting the NetBackup catalog

See “Using the Policy Configuration Wizard to configure a catalog backup”on page 895.
Either wizard automatically includes all the necessary catalog files to includethe database files (NBDB, NBAZDB, and BMRDB) and any catalog configurationfiles (vxdbms.conf, server.conf, databases.conf).
■ By creating a backup policy manually and indicating the NBU-Catalog policytype.See “Configuring a catalog backup manually” on page 897.
Using the Catalog Backup Wizard to configure a catalog backupCatalog backups write only to media in the CatalogBackup volume pool. Thisprocedure assumes that a storage device is configured and media is available inthe CatalogBackup volume pool.
Note: To perform a catalog backup, the master server and the media server mustboth be at the same NetBackup version.
See the NetBackup Installation Guide for information about mixed version support.
To use the Catalog Backup Wizard to configure a catalog backup
1 In theNetBackup Administration Console, in the left pane, click NetBackupManagement.
2 In the right pane, click Configure the Catalog Backup to launch theNetBackup Catalog Backup Wizard.
Click Help within any wizard panel for more information on the wizard settings.
3 Click Next on the Welcome panel.
4 On the NetBackup Catalog Backup Policy panel, select a policy from the listof existing catalog backup policies.
5 Or, to create a new catalog backup policy, selectCreate a new catalog backuppolicy. Click Next.
6 In the Policy Name and Type wizard panel, enter the policy name. Notice thatNBU-Catalog is automatically selected as the policy type.
Type a unique name for the new policy in the Add a New Policy dialog box.
See “NetBackup naming conventions” on page 1112.
Click Next.
7 On the Backup Type wizard panel, select the backup type. The User Backupdoes not apply for NBU-Catalog policies. Click Next.
892Protecting the NetBackup catalogProtecting the NetBackup catalog

8 On the Rotation wizard panel, select the rotation schedule. By default, afrequency-based schedule is selected. A frequency-based schedule ensuresthat the catalog backup has an opportunity to run in busy environments wherebackup jobs are running.
The selection After each backup session refers to a period when no regularbackup policy is running.
Catalog backups can be scheduled to run concurrently with other backup typeson the master server.
See “Concurrently running catalog backups with other backups” on page 900.
Click Next.
9 In the Start Window wizard panel, define a window of time during which thecatalog backup can start and click Next. The scheduled windows (Off hours,Working hours, All day, Custom) are preset in the wizard. To change thesesettings, first complete the wizard. Then, select the policy in the Policies utility.
User Window selections are disabled, as regular users (those who are notNetBackup administrators) cannot start catalog backups.
10 On the Catalog Disaster Recovery File wizard panel, browse or enter thepath where each disaster recovery image file can be saved on disk. The imagefile contains the disaster recovery information. Enter the logon and passwordinformation, if necessary.
Veritas recommends that you save the image file to a network share or aremovable device. Do not save the disaster recovery information to the localcomputer. You must also record this location so that Veritas Catalog can berecovered, if required.
Click Next.
893Protecting the NetBackup catalogProtecting the NetBackup catalog

11 Veritas recommends that you configure the NetBackup environment to sendthe disaster recovery information to a NetBackup administrator. Thisbackup-specific information is sent after every catalog backup.
On the E-mail Disaster Recovery Information wizard panel, enter one ormore addresses. To send the information to more than one administrator,separate multiple email addresses using a comma as follows:
[email protected],[email protected]
Make sure that email notification is enabled in your environment.
See “Disaster recovery emails and the disaster recovery file” on page 902.
Note: The disaster recovery email is not sent to the address that is specifiedin the Global Attributes properties. The Administrator’s email Address inthe Global Attributes properties specifies the addresses where NetBackupsends notifications of scheduled backups or administrator-directed manualbackups.
12 The last panel of the Policy Wizard describes that once the policy is created,you can make changes in NetBackup Management > Policies. Click Finishto create the policy.
13 The Catalog Backup Wizard resumes, with the new catalog backup policylisted.
14 Click Next to finish the Catalog Backup Wizard.
894Protecting the NetBackup catalogProtecting the NetBackup catalog

15 The final Catalog Backup Wizard panel displays the total number of catalogbackup policies for this master server. Click Finish to complete the wizard.
16 You may want to add critical policies to the Critical Policies list. Specify somepolicies as critical policies after the Catalog Backup Wizard is complete. Apolicy that is listed on the Critical Policies list is considered crucial to therecovery of a site in the event of a disaster.
See “Adding policies to the Critical Policies list of a catalog backup policy”on page 854.
The NetBackup Disaster Recovery report lists the media that is used forbackups of critical policies. The report lists the media for only incremental andfull backup schedules, so critical policies should use only incremental or fullbackup schedules.
See “Strategies that ensure successful NetBackup catalog backups”on page 902.
See “Determining whether or not a catalog backup succeeded” on page 901.
Using the Policy Configuration Wizard to configure a catalog backupCatalog backups write only to media in the CatalogBackup volume pool. Thisprocedure assumes that a storage device is configured and media is available inthe CatalogBackup volume pool.
Note: To perform a catalog backup, the master server and the media server mustboth be at the same NetBackup version.
See the NetBackup Installation Guide for information about mixed version support.
To use the Policy Configuration Wizard to configure a catalog backup
1 In theNetBackup Administration Console, in the left pane, click NetBackupManagement.
2 In the right pane, click Create a Policy in the right pane to launch the PolicyConfiguration Wizard.
Click Help within any wizard panel for more information on the wizard settings.
3 Select the Files systems, databases, applications option from the list. ClickNext.
895Protecting the NetBackup catalogProtecting the NetBackup catalog

4 In the Policy Name and Type wizard panel, enter the policy name. SelectNBU-Catalog as the policy type.
Click Next.
See “NetBackup naming conventions” on page 1112.
5 On theBackup Typeswizard panel, select the backup type. TheUser Backupdoes not apply for NBU-Catalog policies. Click Next.
6 On the Frequency and Retention wizard panel, select the rotation schedule.By default, a frequency-based schedule is selected. A frequency-basedschedule ensures that the catalog backup has an opportunity to run in busyenvironments where backup jobs are running.
The selection After each backup session refers to a period when no regularbackup policy is running.
Catalog backups can be scheduled to run concurrently with other backup typeson the master server.
See “Concurrently running catalog backups with other backups” on page 900.
Click Next.
7 In the Start Window wizard panel, define a window of time during which thecatalog backup can start and click Next. The scheduled windows (Off hours,Working hours, All day, Custom) are preset in the wizard. To change thesesettings, first complete the wizard. Then, select the policy in the Policies utilityand customize the settings.
User Window selections are disabled, as regular users (those who are notNetBackup administrators) cannot start catalog backups.
8 On the Catalog Disaster Recovery File wizard panel, browse or enter thepath where each disaster recovery image file can be saved on disk. The imagefile contains the disaster recovery information. Enter the logon and passwordinformation, if necessary.
Veritas recommends that you save the image file to a network share or aremovable device. Do not save the disaster recovery information to the localcomputer. You must also record this location so that NetBackup Catalog canbe recovered, if required.
Click Next.
896Protecting the NetBackup catalogProtecting the NetBackup catalog

9 Veritas recommends that you configure the NetBackup environment to sendthe disaster recovery information to a NetBackup administrator. Thisbackup-specific information is sent after every catalog backup.
To send the information to more than one administrator, separate multipleemail addresses using a comma as follows:
[email protected],[email protected]
Make sure that email notification is enabled in your environment.
See “Disaster recovery emails and the disaster recovery file” on page 902.
Note: The disaster recovery email is not sent to the address that is specifiedin the Global Attributes properties. The Administrator’s email Address inthe Global Attributes properties specifies the addresses where NetBackupsends notifications of scheduled backups or administrator-directed manualbackups.
10 Click Finish to complete the wizard.
11 You may want to add critical policies to the Critical Policies list. Specify somepolicies as critical policies after the Policy ConfigurationWizard is complete.A policy that is listed on the Critical Policies list is considered crucial to therecovery of a site in the event of a disaster.
See “Adding policies to the Critical Policies list of a catalog backup policy”on page 854.
The NetBackup Disaster Recovery report lists all of the media that is usedfor backups of critical policies, including the most recent full backup. The reportlists the media for only incremental and full backup schedules, so critical policiesshould use only incremental or full backup schedules.
Configuring a catalog backup manuallyYou can configure a catalog backup manually by using the Policy utility. Thisprocedure assumes that a storage device is configured and media is available inthe CatalogBackup volume pool.
To configure a catalog backup manually
1 In theNetBackupAdministrationConsole, expandNetBackupManagement> Policies.
2 Select Actions > New > Policy.
897Protecting the NetBackup catalogProtecting the NetBackup catalog

3 Type a unique name for the new policy in the Add a New Policy dialog box.
See “NetBackup naming conventions” on page 1112.
Click OK.
4 On the Attributes tab, complete the following entries:
■ Policy TypeSelect NBU-Catalog as the policy type.
■ Policy storageFor disk storage units, increase the Maximum Concurrent Jobs storageunit setting to ensure that the catalog backup can proceed during regularbackup activity.See “Maximum concurrent jobs storage unit setting” on page 578.
Note: The media server that is used for catalog backups must be at thesame NetBackup version as the master server. If your installation containsmedia servers of various levels, do not select Any Available for thedestination Policy Storage Unit. If media servers are at various versions,a media server at a level other than the master server could be selected.
■ Policy volume poolNetBackup automatically creates a CatalogBackup volume pool that isselected by default only for NBU-Catalog policy types.
■ For other policy attribute descriptions, see the following topic:See “Policy Attributes tab” on page 693.
5 Select the Schedules tab to set up a schedule for a catalog backup.
See “Concurrently running catalog backups with other backups” on page 900.
See “About catalog policy schedules” on page 900.
See “Schedule Attributes tab” on page 758.
Note: The Clients tab does not apply to the NBU-Catalog policy and does notappear.
6 The Disaster Recovery tab appears for NBU-Catalog policies only.
The tab contains information regarding the location of data crucial to disasterrecovery.
898Protecting the NetBackup catalogProtecting the NetBackup catalog

■ Browse or enter the path where each disaster recovery image file can besaved on disk. The image file contains the disaster recovery information.Enter the logon and password information, if necessary.Veritas recommends that you save the image file to a network share or aremovable device. Do not save the disaster recovery information to thelocal computer.
7 You may want to add critical policies to the Critical Policies list. The CriticalPolicies list contains the names of policies that back up critical data. Mediathat contains critical policy backups is listed on the NetBackup DisasterRecovery Report that is generated when the catalog backup is run. The reportlists the media for only incremental and full backup schedules, so critical policiesshould use only incremental or full backup schedules.
Click OK to save the policy.
Backing up NetBackup catalogs manuallyCatalog backups typically run automatically per the NBU-Catalog policy. However,a catalog backup can be started manually.
A manual catalog backup is useful in the following situations:
■ To perform an emergency backup. For example, if the system is schedule to bemoved and you cannot wait for the next scheduled catalog backup.
■ If there is only one standalone drive and the standalone drive is used for catalogbackups. In this situation, automatic backups are not convenient. The catalogbackup tape must be inserted before each catalog backup and removed whenthe backup is done. (The tape swap is necessary because NetBackup does notmix catalog and regular backups on the same tape.)
To perform a manual catalog backup
1 In theNetBackupAdministrationConsole, expandNetBackupManagement> Policies.
2 Select the catalog backup policy you want to run.
3 Select Actions > Manual Backup.
See “Performing manual backups” on page 856.
You can also run the bpbackup command from the command line to performa catalog backup.
More information is available in the NetBackup Commands Reference Guide.
899Protecting the NetBackup catalogProtecting the NetBackup catalog
Concurrently running catalog backups with other backupsYou can schedule catalog backups to run concurrently with other backup types forthe master server.
Make the following adjustments to ensure that the catalog backup can proceedwhile regular backup activity occurs:
■ Set the Maximum jobs per client value to greater than one. The property isfound in the Global Attributes host properties for the master server.See “Global Attributes properties” on page 159.
■ Increase the Maximum concurrent jobs setting on the storage unit where thebackups are sent.See “Maximum concurrent jobs storage unit setting” on page 578.
See “Determining whether or not a catalog backup succeeded” on page 901.
See “Strategies that ensure successful NetBackup catalog backups” on page 902.
About catalog policy schedulesWhen you work with catalog policy schedules, consider the following:
■ The schedules that are supported in the catalog backup policy type are asfollows:
■ Full
■ Differential incremental (depends on a full schedule)
■ Cumulative incremental
■ Session-based differential incremental
■ Session-based cumulative incremental
■ Veritas recommends that only one catalog backup policy be configured.
■ The media server that is used for catalog backups must be at the sameNetBackup version as the master server.
■ The incremental schedule depends on a full schedule.
■ The least frequent schedule runs if many schedules are due at the same time.
■ One catalog backup policy can contain multiple incremental schedules that aresession-based:
■ If one is cumulative and the others are differential, the cumulative runs whenthe backup session ends.
900Protecting the NetBackup catalogProtecting the NetBackup catalog

■ If all are cumulative or all are differential, the first schedule that is found runswhen the backup session ends.
■ The queued scheduled catalog backup is skipped if a catalog backup job fromthe same policy is running.
■ Session end means that no jobs are running. (This calculation does not includecatalog backup jobs.)
■ The Vault catalog backup is run whenever triggered from Vault, regardless ofwhether a catalog backup job is running from the same policy.
■ When an online catalog backup is run, it generates three jobs: A parent job, achild job for NetBackup relational database tables, and a child job for catalogimages and configuration data. The child jobs contain the actual backed up data.Consider both child jobs to duplicate, verify, or expire the backup.
How catalog incrementals and standard backups interact on UNIXA catalog backup policy can include both full catalog backups and incrementalcatalog backups. However, incremental catalog backups differ from incrementalstandard backups. Catalog backups use both mtime and ctime to identify changeddata. Standard incremental backups use only mtime to identify changed data.
Because of this difference, running a standard policy type backup that includes the/usr/openv/netbackup/db/images/ directory can adversely affect incrementalcatalog backups. When standard backups run, they reset the file access time(atime). In turn, the reset changes the ctime for files and directories. If anincremental catalog backup runs, it sees that the ctime has changed and backsup the files. The backup may be unnecessary since the files may not have changedsince the last catalog backup.
To avoid additional processing during catalog backups, Veritas recommends thefollowing:
If incremental catalog backups are configured, exclude the NetBackup/usr/openv/netbackup/db/images/ directory from standard backups.
To exclude that directory, create a /usr/openv/netbackup/exclude_list file onthe master server.
See “About NetBackup master server installed directories and files” on page 922.
Determining whether or not a catalog backup succeededThe All Log Entries, Problems, and Media Log reports, available from the Reportsutility, provide information on NetBackup catalog backups.
901Protecting the NetBackup catalogProtecting the NetBackup catalog

An email message is sent to the address that is indicated in theDisaster Recoverysettings for a catalog backup.
Configure this email with the mail_dr_info.cmd (on Windows) or the mail_dr_info
script (on UNIX).
See the Administrator’s Guide, Volume II for more information on setting up thisscript.
Strategies that ensure successful NetBackup catalog backupsUse the following strategies to ensure successful catalog backups:
■ Use only the methods that are described in this chapter to back up the catalogs.These are the only methods that can track all relevant NetBackup activities andensure consistency between the catalog files.
■ Back up the catalogs often. If catalog backup files are lost, the changes thatwere made between the last catalog backup and the time of the disk crash arelost.
■ If you back up your catalogs to disk, always back up to a different disk thanwhere the catalog files reside. If you back up the catalog to the disk where theactual catalog resides, both catalog backups are lost if the backup disk fails.Recovering the catalog is much more difficult. Also, ensure that the disk hasenough space for the catalogs. Backups to a full disk fail.
Note: If a catalog backup is on tape, the tape must be removed when the backupis finished or regular backups cannot proceed. NetBackup does not mix catalogand regular backups on the same tape.
Recovering the catalogCatalog recovery is discussed in the NetBackup Troubleshooting Guide.
Disaster recovery emails and the disasterrecovery file
The Catalog Backup Wizard and the Policy Configuration Wizard prompt youto send the disaster recovery information to an email address. If the catalog backupis configured manually using the Policy utility, this information appears on theDisaster Recovery tab.
902Protecting the NetBackup catalogRecovering the catalog

The disaster recovery email and the accompanying attachment that is sent containthe following important items for a successful catalog recovery:
■ A list of the media that contains the catalog backup
■ A list of critical policies.
■ Instructions for recovering the catalog
■ The image file as an attachment.If a catalog backup policy included both full backups and incremental backups,the attached image file can be a full or an incremental catalog backup.Recovering from an incremental catalog backup completely recovers the entirecatalog if the Automatically recover the entire NetBackup catalog option isselected on the wizard panel. The entire catalog is recovered because theincremental catalog backup references information from the last full backup.You do not need to recover the last full catalog backup before you recover thesubsequent incremental backups.
NetBackup emails the disaster recovery file when the following events occur:
■ The catalog is backed up.
■ A catalog backup is duplicated or replicated.
■ The primary catalog backup or any copy expires automatically or is expiredmanually.
On Windows: You can tailor the disaster recovery email process by providing themail_dr_info.cmd script in the Install_path\VERITAS\NetBackup\bin directory.This script is similar to the nbmail.cmd script. See the comments in the nbmail.cmd
script for use instructions.
Archiving the catalog and restoring from thecatalog archive
Catalog archiving helps administrators solve the kinds of problems that largeamounts of catalog data can pose: large catalogs require a greater amount of diskspace and can be time-consuming to back up.
Catalog archiving reduces the size of online catalog data by relocating the largecatalog .f files (files files) to secondary storage. NetBackup administration continuesto require regularly scheduled catalog backups, but the backups are faster withoutthe large amount of online catalog data.
Catalog archiving should not be used as a method to reclaim disk space when acatalog file system fills up. In that situation, investigate catalog compression or adddisk space to grow the file system.
903Protecting the NetBackup catalogArchiving the catalog and restoring from the catalog archive

For additional catalog archiving considerations, see the following topic:
See “Catalog archiving considerations” on page 909.
904Protecting the NetBackup catalogArchiving the catalog and restoring from the catalog archive
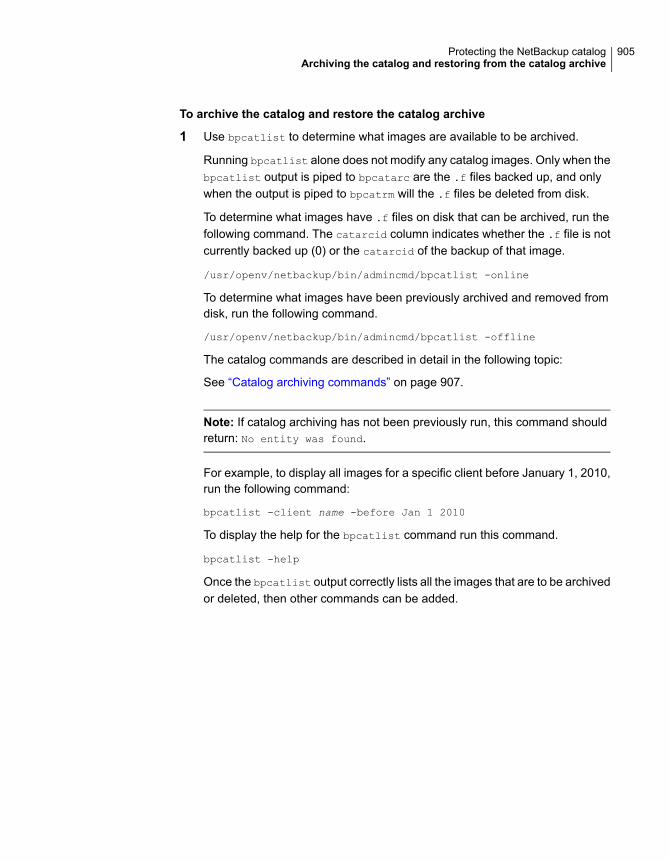
To archive the catalog and restore the catalog archive
1 Use bpcatlist to determine what images are available to be archived.
Running bpcatlist alone does not modify any catalog images. Only when thebpcatlist output is piped to bpcatarc are the .f files backed up, and onlywhen the output is piped to bpcatrm will the .f files be deleted from disk.
To determine what images have .f files on disk that can be archived, run thefollowing command. The catarcid column indicates whether the .f file is notcurrently backed up (0) or the catarcid of the backup of that image.
/usr/openv/netbackup/bin/admincmd/bpcatlist -online
To determine what images have been previously archived and removed fromdisk, run the following command.
/usr/openv/netbackup/bin/admincmd/bpcatlist -offline
The catalog commands are described in detail in the following topic:
See “Catalog archiving commands” on page 907.
Note: If catalog archiving has not been previously run, this command shouldreturn: No entity was found.
For example, to display all images for a specific client before January 1, 2010,run the following command:
bpcatlist -client name -before Jan 1 2010
To display the help for the bpcatlist command run this command.
bpcatlist -help
Once the bpcatlist output correctly lists all the images that are to be archivedor deleted, then other commands can be added.
905Protecting the NetBackup catalogArchiving the catalog and restoring from the catalog archive

2 Running the catalog archive.
Before running the catalog archive, create a backup policy named catarc. Thepolicy is required for the bpcatarc command to successfully process images.The name of the policy reflects that the purpose of the schedule is for catalogarchiving.
See the following topic for details about configuring the catarc policy:
See “Creating a catalog archiving policy” on page 906.
To run the catalog archive, first run the bpcatlist command with the sameoptions used in step 1 to display images. Then pipe the output through bpcatarc
and bpcatrm.
bpcatlist -client all -before Jan 1 2010 | bpcatarc | bpcatrm
A new job appears in theActivity Monitor. The command waits until the backupcompletes before it returns the prompt. The command reports an error only ifthe catalog archive fails, otherwise the commands return to the prompt.
The File List: section of the Job Details in the Activity Monitor displays a listof image files that have been processed. When the job completes with a status0, the bpcatrm command removes the corresponding .f files. If the job fails,no catalog .f files are removed.
If bpcatlist is piped to bpcatarc but the results are not piped to bpcatrm,then the backup occurs but the .f files are not removed from disk. The samebpcatlist command can then be rerun and piped to bpcatrm to remove the.f files.
3 Restoring the catalog archive.
To restore the catalog archive, first use the bpcatlist command to list thefiles that need to be restored. Once bpcatlist displays the proper files torestore, run the bpcatres command to restore the actual files.
To restore all the archived files from step 2, run the following command:
bpcatlist -client all -before Jan 1 2010 | bpcatres
This command restores all of the catalog archive files before January 1, 2010.
Creating a catalog archiving policyThe catalog archiving feature requires the presence of a policy named catarc beforethe catalog archiving commands can run properly. The policy can be reused forcatalog archiving.
906Protecting the NetBackup catalogArchiving the catalog and restoring from the catalog archive

To create a catalog archiving policy
1 Create a new policy and name it catarc. The catarc policy waits until bpcatarccan activate it. Users do not run this policy. Instead, bpcatarc activates thisspecial policy to perform a catalog backup job, then deactivates the policy afterthe job is done.
2 Set the backup type on the Attributes tab. The type of backup that is indicatedfor the catalog archive policy must be User Backup.
If Vault is used, the files are duplicated and vaulted similarly to other backups.
3 Deactivate the catalog archive policy by clearing the Go into effect at field onthe Attributes tab of the Policy dialog.
See “Go into effect at (policy attribute)” on page 709.
4 Set the retention level of the catalog archive for a time at least as long as thelongest retention period of the backups being archived. Data can be lost if theretention level of the catalog archive is not long enough.
You may find it useful to set up, then designate a special retention level forcatalog archive images.
5 Set a schedule for catarc. The schedule for catarc must include in its windowthe time bpcatarc command is run. If the bpcatarc command is run outsideof the schedule that is indicated in catarc, the operation fails.
6 On the Backup Selections tab, browse to the directory where catalog backupimages are placed:
On Windows: Install_path\NetBackup\db\images
On UNIX: /usr/openv/netbackup/db/images
7 On the Clients tab, enter the name of the master server.
8 Save the policy.
Catalog archiving commandsThe catalog archiving option relies on three commands to designate a list of catalog.f files, then archive the files. A fourth command, bpcatres, is used to restore thefiles if necessary.
Catalog archiving uses the following commands.
907Protecting the NetBackup catalogArchiving the catalog and restoring from the catalog archive

Table 22-1 Catalog archiving commands
DescriptionCommand
The bpcatlist command queries the catalog data. Then, bpcatlist lists the portions of thecatalog that are based on selected parameters. For example, date, client, policy, schedule name,backup ID, the age of the backup image, or the date range of the backup image. bpcatlistoutputs the formatted image summary information of matched images to standard output.
The other catalog archiving commands, bpcatarc, bpcatrm, and bpcatres, all depend oninput from bpcatlist by a piped command.
For example, to archive (backup and delete) all of the .f files that were created before January1, 2012, the following would be entered:
bpcatlist -client all -before Jan 1 2012 | bpcatarc | bpcatrm
bpcatlist is also used to provide status information.
For each catalog, it lists the following information:
■ Backup ID (Backupid)■ Backup date (Backup Date)■ Catalog archive ID (catarcid). After one .f file is successfully backed up, a catalog archive
ID is entered into the catarcid field in the image file. This field is zero (0) if the image wasnever archived.
■ Archived status (S). Indicates whether the catalog was archived (2) or was not archived (1).■ Compressed status (C). Indicates whether the catalog was compressed (positive_value) or
was not compressed (0).■ Catalog file name (Files file)
The following is an example of the bpcatlist output, showing all of the backups for client alphasince October 23:
# bpcatlist -client alpha -since Oct 23Backupid Backup Date ...Catarcid S C Files filealpha_097238 Oct 24 10:47:12 2012 ... 973187218 1 0 alpha_097238_UBAK.falpha_097233 Oct 23 22:32:56 2012 ... 973187218 1 0 alpha_097233_FULL.falpha_097232 Oct 23 19:53:17 2012 ... 973187218 1 0 alpha_097232_UBAK.f
More information is available in the NetBackup Commands Reference Guide.
bpcatlist
The bpcatarc command reads the output from bpcatlist and backs up the selected list of.f files. After one .f file is successfully backed up, a catalog archive ID is entered into thecatarcid field in the image file. For archiving of the.f files to proceed, a policy by the name ofcatarc is required. The policy is based on a User Backup type schedule. The schedule for catarcmust include in its window the time bpcatarc command is run.
See “Creating a catalog archiving policy” on page 906.
bpcatarc
908Protecting the NetBackup catalogArchiving the catalog and restoring from the catalog archive

Table 22-1 Catalog archiving commands (continued)
DescriptionCommand
The bpcatrm command reads the output from bpcatlist or bpcatarc. If the image file hasvalid catarcid entries, bpcatrm deletes selected image.f files from the online catalog.
bpcatrm does not remove one .f file unless the file has been previously backed up using thecatarc policy.
bpcatrm
Use the bpcatres command to restore the catalog. The bpcatres command reads the outputfrom bpcatlist and restores selected archived.f files to the catalog. For example:
bpcatlist -client all -before Jan 1 2012 | bpcatres
bpcatres
Catalog archiving considerationsConsider the following items before catalog archiving:
■ Perform catalog archiving operations when NetBackup is in an inactive state(no jobs are running).
■ Catalog archiving modifies existing catalog images. As a result, it should neverbe run when the catalog file system is 100% full.
■ To ensure that catalog backup images are not on the same tapes as userbackups, create a separate media pool for catalog archives.
■ You may find it useful to set up and then designate, a special retention level forcatalog archive images.To specify retention levels, go to Host Properties > Master Server > RetentionPeriods.See “Retention Periods properties” on page 228.
■ Additional time is required to mount the tape and perform the restore of archived.f files.
■ There is no simple method to determine to which tape the catalog has beenarchived. The bpcatlist -offline command is the only administrativecommand to determine what images have been archived. This command doesnot list what tape was used for the archive. As a result, exercise caution toensure that the tapes used for catalog archiving are available for restoring thearchived catalog images. Either create a separate volume pool to use exclusivelyfor catalog archives or find a method to label the tape as a catalog archive tape.
909Protecting the NetBackup catalogArchiving the catalog and restoring from the catalog archive

Extracting images from the catalog archivesThe situation may arise in which a storage provider needs to extract all of a specificclient’s records. The storage provider can extract the customer images from thecatalog archive by creating the archives that are based on client name.
To extract images from the catalog archives based on a specific client
1 Create a volume pool for the client.
2 Create a catalog archiving policy. Indicate the volume pool for that client in theAttributes tab.
3 Run bpcatlist so only the.f files from that client are listed. For example:
bpcatlist -client clientname | bpcatarc | bpcatrm
4 If you do not want to write more images to the client’s volume pool, changethe volume pool before you run another archiving catalog.
Estimating catalog space requirementsNetBackup requires disk space to store its error logs and information about the filesit backs up.
The disk space that NetBackup needs varies according to the following factors:
■ Number of files to be backed up
■ Frequency of full and incremental backups
■ Number of user backups and archives
■ Retention period of backups
■ Average length of full path of files
■ File information (such as owner permissions)
■ Average amount of error log information existing at any given time
■ Whether you have enabled the database compression option.
To estimate the disk space that is required for a catalog backup
1 Estimate the maximum number of files that each schedule for each policy backsup during a single backup of all its clients.
2 Determine the frequency and the retention period of the full and the incrementalbackups for each policy.
910Protecting the NetBackup catalogEstimating catalog space requirements
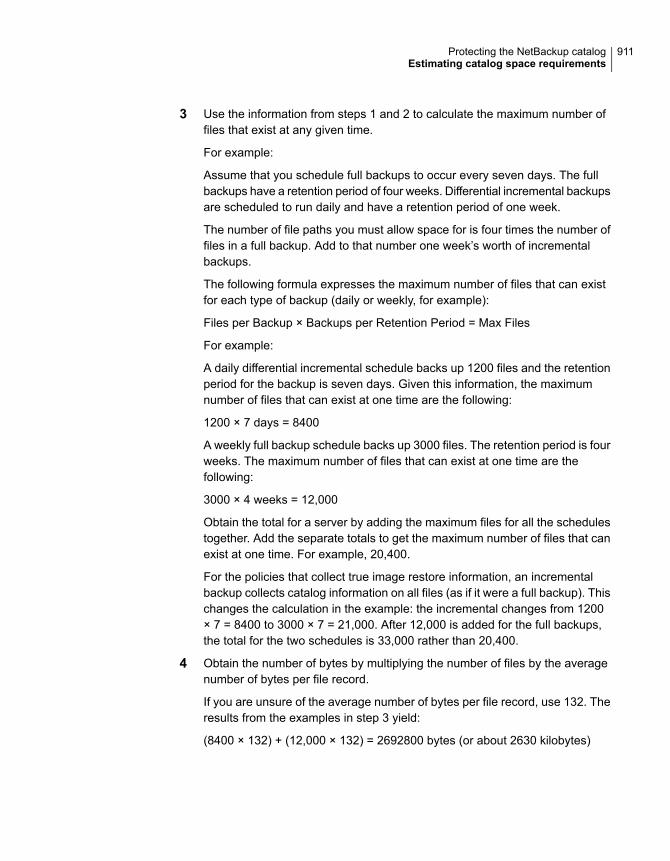
3 Use the information from steps 1 and 2 to calculate the maximum number offiles that exist at any given time.
For example:
Assume that you schedule full backups to occur every seven days. The fullbackups have a retention period of four weeks. Differential incremental backupsare scheduled to run daily and have a retention period of one week.
The number of file paths you must allow space for is four times the number offiles in a full backup. Add to that number one week’s worth of incrementalbackups.
The following formula expresses the maximum number of files that can existfor each type of backup (daily or weekly, for example):
Files per Backup × Backups per Retention Period = Max Files
For example:
A daily differential incremental schedule backs up 1200 files and the retentionperiod for the backup is seven days. Given this information, the maximumnumber of files that can exist at one time are the following:
1200 × 7 days = 8400
A weekly full backup schedule backs up 3000 files. The retention period is fourweeks. The maximum number of files that can exist at one time are thefollowing:
3000 × 4 weeks = 12,000
Obtain the total for a server by adding the maximum files for all the schedulestogether. Add the separate totals to get the maximum number of files that canexist at one time. For example, 20,400.
For the policies that collect true image restore information, an incrementalbackup collects catalog information on all files (as if it were a full backup). Thischanges the calculation in the example: the incremental changes from 1200× 7 = 8400 to 3000 × 7 = 21,000. After 12,000 is added for the full backups,the total for the two schedules is 33,000 rather than 20,400.
4 Obtain the number of bytes by multiplying the number of files by the averagenumber of bytes per file record.
If you are unsure of the average number of bytes per file record, use 132. Theresults from the examples in step 3 yield:
(8400 × 132) + (12,000 × 132) = 2692800 bytes (or about 2630 kilobytes)
911Protecting the NetBackup catalogEstimating catalog space requirements

5 Add between 10 megabytes to 15 megabytes to the total sum that wascalculated in step 4. The additional megabytes account for the average spacethat is required for the error logs. Increase the value if you anticipate problems.
6 Allocate space so all the data remains in a single partition.
NetBackup file size considerations on UNIX systemsFile system limitations on UNIX include the following:
■ Some UNIX systems have a large file support flag. Turn on the flag to enablelarge file support. For example, AIX disables large file support by default, so thefile size limit is 2 gigabytes.
■ Set the file size limit for the root user account to unlimited to support large filesupport.
About the binary catalog formatThe catalog in a binary file format has several advantages over the catalog in a textformat:
■ The catalog is more compact. The binary representations of numbers, dates,and other information, takes up less disk space than the text representations.
■ The catalog is much faster to browse and search, especially for large file sizes.
■ The catalog supports alternate backup methods without the need to post-processimages, which improve catalog performance for alternate backup methods.
The following points describe size the limitations that are associated with the binarycatalog:
■ The maximum number of files that can be backed up per image:(231) –1 files = 2,147,483,647 files = 7FFFFFFF files
■ The maximum number of different user IDs and group IDs (combined):(231) –1 IDs = 2,147,483,647 IDs = 7FFFFFFF IDs
See “About NetBackup image .f files” on page 888.
Moving the image catalogAn image catalog may become too large for its current location. Consider movingthe image catalog to a file system or disk partition that contains more availablespace.
912Protecting the NetBackup catalogEstimating catalog space requirements

Notes about moving the image catalog■ NetBackup does not support saving the catalog to a remote NFS share. CIFS
is supported on some SAN or NAS storage.See “Parts of the NetBackup catalog” on page 881.
■ NetBackup only supports moving the image catalog to a different file system ordisk partition. It does not support moving the other subdirectories that make upthe entire NetBackup catalog.For example, on Windows, do not use the ALTPATH mechanism to moveinstall_path\NetBackup\db\error.For example, on UNIX, do not move /usr/openv/netbackup/db/error. Thecatalog backup only follows the symbolic link when backing up the /images
directory. So, if symbolic links are used for other parts of the NetBackup catalog,the files in those parts are not included in the catalog backup.
■ The directory that is specified in the ALTPATH file is not automatically removedif NetBackup is uninstalled. If NetBackup is uninstalled, you must manuallyremove the contents of this directory.
Moving the image catalog between Windows hostsTo move the image catalog on Windows
1 Back up the NetBackup catalogs manually.
A backup of the catalogs ensures that you can recover image information incase something is accidentally lost during the move.
See “Backing up NetBackup catalogs manually” on page 899.
2 Check the Jobs tab in the Activity Monitor and ensure that no backups orrestores are running for the client.
If jobs are running, either wait for them to end or stop them by using the Jobstab in the Activity Monitor.
3 Use the Daemons tab in the Activity Monitor to stop the Request Managerand the Database Manager daemons. These services are stopped to preventjobs from starting. Do not modify the database while this procedure isperformed.
4 Create a file named ALTPATH in the image catalog directory.
For example, if NetBackup is installed in the default location and the clientname is mars, the path to the image catalog is:
C:\Program Files\VERITAS\NetBackup\db\images\mars\ALTPATH
913Protecting the NetBackup catalogEstimating catalog space requirements

5 Create the directory to which you intend to move the image information. Forexample:
E:\NetBackup\alternate_db\images\client_name
6 On the first line of the ALTPATH file, specify the path to the directory where youintend to move the client’s image information. For example:
E:\NetBackup\alternate_db\images\client_name
The path is the only entry in the ALTPATH file.
7 Move all files and directories (except the ALTPATH file) that are in the currentclient directory to the new directory.
For example, if the images are currently in
C:\Program Files\VERITAS\NetBackup\db\images\mars
and the ALTPATH file specifies
E:\NetBackup\alternate_db\images\mars
then move all files and directories (except the ALTPATH file) to
E:\NetBackup\alternate_db\images\mars
8 Start the NetBackup Request Daemon and NetBackup Database Manager inthe Daemons tab.
Backups and restores can now resume for the client.
Moving the image catalog between UNIX hostsTo move the image catalog on UNIX
1 Check that no backups are in progress by running:
/usr/openv/netbackup/bin/bpps
2 Stop bprd by running:
/usr/openv/netbackup/bin/admincmd/bprdreq -terminate
3 Stop bpdbm by running:
/usr/openv/netbackup/bin/bpdbm -terminate
4 Create the directory in the new file system. For example:
mkdir /disk3/netbackup/db/images
5 Move the image catalog to the new location in the other file system.
6 Create a symbolic link from /usr/openv/netbackup/db/images to the newlocation in the other file system.
914Protecting the NetBackup catalogEstimating catalog space requirements

See “NetBackup file size considerations on UNIX systems” on page 912.
About image catalog compressionThe image catalog contains information about all client backups. It is accessed anytime a user lists or restores files. NetBackup lets you compress all portions of thecatalog or only older portions of the catalog. No method selectively compressesimage catalog files other than by age.
Control image catalog compression by setting the Global Attributes property,Compress Catalog Interval. Use this property to specify how old the backupinformation must be before it is compressed. Specify the number of days to defercompression information, thus users who restore files from recent backups areunaffected. By default, Compress Catalog Interval is set to 0 and imagecompression is not enabled.
See “Global Attributes properties” on page 159.
Note: Veritas discourages manually compressing or decompressing the catalogbackups with the bpimage -[de]compress command or any other method. Manuallycompressing or decompressing a catalog backup while any backup (regular orcatalog) is running results in inconsistent image catalog entries. When users listand restore files, the results can be incorrect.
Before NetBackup 7.6, NetBackup used the compress command on the server toperform compression after each backup session. NetBackup now uses a built-incompression method to compress the image catalog. Image catalog files whichwere compressed using the older compression method are now migratedtransparently to the new method as they are accessed as part of NetBackupoperations.
It does not make a difference to NetBackup if the backup session was successful.The operation occurs while NetBackup expires backups and before it runs thesession_notify script and the backup of the NetBackup catalogs.
The time to perform compression depends on the server speed and the numberand size of the files being compressed. Files are compressed serially, and temporaryworking space is required in the same partition.
When numerous compressed image catalog files must be processed, the backupsession is extended until compression is complete. The additional backup time isespecially noticeable the first time you perform the compression. To minimize theeffect of the initial sessions, consider compressing the files in stages. For example,begin by compressing the records for the backups older than 120 days. Continue
915Protecting the NetBackup catalogEstimating catalog space requirements

to reduce the number of days over a period of time until you reach a comfortablesetting.
Compressing the image catalog accomplishes the following objectives:
■ Reduces greatly the disk space that is consumed.
■ Reduces the media that is required to back up the catalog.
The amount of space that is reclaimed varies with the types of backups you perform.Full backups result in a larger percentage of catalog compression than incrementalbackups. Normally, more data is duplicated in a catalog file for a full backup. Usingcatalog compression, a reduction of 80% is possible.
This reduction in disk space and media requirements is achieved at the expenseof performance when a user lists or restores files. Since the information isuncompressed at each reference, performance degradation is in direct proportionto the number and size of compressed files that are referenced. If the restorerequires numerous catalog files to be uncompressed, increase the timeout valuethat is associated with list requests.
Change the timeout value by changing the List Files Timeout General propertysetting on the client. Or, on UNIX clients, change the timeout value by changingthe LIST_FILES_TIMEOUT option in the bp.conf file.
Figure 22-3 List Files Timeout General property on the client
Uncompressing the NetBackup catalogYou may find it necessary to uncompress all records temporarily that are associatedwith an individual client. Uncompress the records if you anticipate large or numerousrestore requests, for example.
916Protecting the NetBackup catalogEstimating catalog space requirements

Use the following procedure to uncompress the NetBackup catalog.
To uncompress the NetBackup catalog on Windows
1 Verify that the partition where the image catalog resides contains enough spaceto accommodate the uncompressed catalog.
See “Estimating catalog space requirements” on page 910.
2 Stop the NetBackup Request Daemon service, bprd. Use the Activity Monitoror the Services application in the Windows Control Panel.
3 Verify that the NetBackup Database Manager, bpdbm, is running.
4 In theNetBackupAdministrationConsole, expandNetBackupManagement> Host Properties >Master Server. Double-click the host to be uncompressed.
5 Select the Global Attributes properties.
See “Global Attributes properties” on page 159.
6 Clear the Compress Catalog Interval check box and click OK to save thehost property change.
7 Open a command prompt. Change to the following directory:
install_path\veritas\netbackup\bin\admincmd
Run one of the followings commands.
To decompress the records for a specific client, enter:
bpimage -decompress -client_name
To decompress the records for all clients, enter:
bpimage -decompress -allclients
8 Restart the NetBackup Request Daemon bprd.
To uncompress the NetBackup catalog on UNIX
1 Perform the following steps as root on the master server to uncompress theNetBackup catalog.
Verify that the partition where the image catalog resides has enough space touncompress the client’s image records.
2 Stop the request daemon, bprd, by running:
/usr/openv/netbackup/bin/admincmd/bprdreq -terminate
3 Make sure that bpdbm is running:
/usr/openv/netbackup/bin/bpps
917Protecting the NetBackup catalogEstimating catalog space requirements

4 Expand Host Properties > Master Servers. Open the properties of a host.On the Global Attributes properties, clear the Compress Catalog Intervalcheck box.
See “Global Attributes properties” on page 159.
5 Set the Compress Catalog Interval Global Attributes property to 0.
6 Change your working directory to /usr/openv/netbackup/bin and run thecommand:
admincmd/bpimage -decompress -client name
7 Restart the request daemon, bprd, by running:
/usr/openv/netbackup/bin/initbprd
8 Perform the file restorations from the client.
9 Set the Compress Catalog After Global Attributes property to its previousvalue.
The records that were uncompressed for this client are compressed after thenext backup schedule.
See “About image catalog compression” on page 915.
918Protecting the NetBackup catalogEstimating catalog space requirements

About the NetBackuprelational database
This chapter includes the following topics:
■ About the NetBackup relational database (NBDB) installation
■ Using the NetBackup Database Administration utility on Windows
■ Using the NetBackup Database Administration utility on UNIX
■ Post-installation tasks
■ About backup and recovery procedures
■ Unloading the NetBackup database
■ Terminating database connections
■ Moving the NetBackup database from one host to another
About the NetBackup relational database (NBDB)installation
The following information can help you to install and operate the Sybase SQLAnywhere relational database management system.
Generally, the implementation of Sybase SQL Anywhere in the NetBackup catalogis transparent. NetBackup installs Sybase SQL Anywhere during the master serverinstallation as a private, non-shared server for the NetBackup database (NBDB).NBDB contains the NetBackup Authorization database, the Enterprise MediaManager (EMM) data, as well as other NetBackup data that NetBackup servicesuse.
23Chapter

The same installation of Sybase SQL Anywhere is used for the optionally-licensedproduct, Bare Metal Restore (BMR) and its associated database (BMRDB). TheBMR database is created during the BMR installation process.
By default, the NetBackup relational database (NBDB) is installed on the masterserver. The master server is also the default location for the Enterprise MediaManager (EMM). Since EMM is the primary user of NBDB, the NetBackup databasealways resides on the same computer as the Enterprise Media Manager.
See “About the Enterprise Media Manager (EMM)” on page 886.
Note: NetBackup does not support saving the NetBackup relational database(NBDB, including NBAZDB and EMM) or the configuration files to a remote NFSshare. CIFS is supported on some SAN or NAS storage.
See “Parts of the NetBackup catalog” on page 881.
Installing the NetBackup databaseThe following procedure is performed automatically during installation in the orderpresented. You can also use the same procedure to manually install the databaseindependently.
Installing the NetBackup database
1 As part of the NetBackup master server installation, the SQL Anywhere serveris created. The server parameters are set in the server.conf file in the followinglocation:
On Windows: Install_path\VERITAS\NetBackupDB\conf\server.conf
On UNIX: /usr/openv/var/global/server.conf
See “About the NetBackup server.conf file” on page 923.
2 On Windows: The following entry is added to the registry to set the databaselocation:
HKEY_LOCAL_MACHINE\SOFTWARE\VERITAS\NetBackup\CurrentVersion\
Config\VXDBMS_NB_DATA
See “About the NetBackup configuration entry” on page 931.
3 On UNIX: The following entry is added to the bp.conf file to set the databaselocation:
VxDBMS_NB_DATA = /usr/openv/db/data
920About the NetBackup relational databaseAbout the NetBackup relational database (NBDB) installation

4 On Windows: The VxDBMS configuration file for NetBackup is created. Thisfile requires the read and write permissions of a Windows administrator:
Install_path\VERITAS\NetBackupDB\data\vxdbms.conf
5 On UNIX: The VxDBMS configuration file for NetBackup is created. This filerequires the read and write permissions of root:
/usr/openv/db/data/vxdbms.conf
6 The NetBackup database is created:
On Windows: Install_path\VERITAS\NetBackupDB\data\NBDB.db
On UNIX: /usr/openv/db/data/NBDB.db
7 DBA password is set for the NetBackup database in vxdbms.conf:
VXDBMS_NB_PASSWORD = encrypted_password
8 Additional database files are created with contiguous space pre-allocated:
■ The NetBackup system database file that is mentioned in the following step:On Windows: Install_path\VERITAS\NetBackupDB\data\NBDB.dbOn UNIX: /usr/openv/db/data/NBDB.db
■ The EMM database files:On Windows:Install_path\VERITAS\NetBackupDB\data\EMM_DATA.db
Install_path\VERITAS\NetBackupDB\data\EMM_INDEX.db
On UNIX:/usr/openv/db/data/EMM_DATA.db
/usr/openv/db/data/EMM_INDEX.db
■ The authorization database files for NetBackup Access Control:On Windows: Install_path\VERITAS\NetBackupDB\data\NBAZDB.dbOn UNIX: /usr/openv/db/data/NBAZDB.db
■ The NetBackup transaction log, necessary for recovering the database:On Windows: Install_path\VERITAS\NetBackupDB\data\NBDB.logOn UNIX: /usr/openv/db/data/NBDB.log
921About the NetBackup relational databaseAbout the NetBackup relational database (NBDB) installation

9 The SQL Anywhere accounts and schema are created for each of theNetBackup components that make use of the NetBackup database. (Forexample, EMM_MAIN.)
10 The following command initializes the EMM data:
On Windows: Install_path\VERITAS\Volmgr\bin\tpext.exe
On UNIX: /usr/openv/volmgr/bin/tpext
See “About catalog backups” on page 891.
About NetBackup master server installed directories and filesSQL Anywhere is installed in the following directories:
On WindowsInstall_path\VERITAS\NetBackupDB
Install_path\VERITAS\NetBackup\bin
The files in Install_path\VERITAS\NetBackupDB\conf can be shared within acluster.
On UNIX/usr/openv/db
/usr/openv/var/global
The files in /global can be shared within a cluster.
The contents of each directory are examined in the following topics.
Relocating the NetBackup databaseThe NetBackup database, NBDB, and its associated files, is created on the masterserver by default. For performance reasons, NBDB can be moved to another host.
On Windows: The NBDB database files can be moved from their default locationin Install_path\VERITAS\NetBackupDB\data.
On UNIX: The NBDB database files can be moved from their default location in/usr/openv/db/data.
See “Moving NBDB database files after installation” on page 958.
922About the NetBackup relational databaseAbout the NetBackup relational database (NBDB) installation
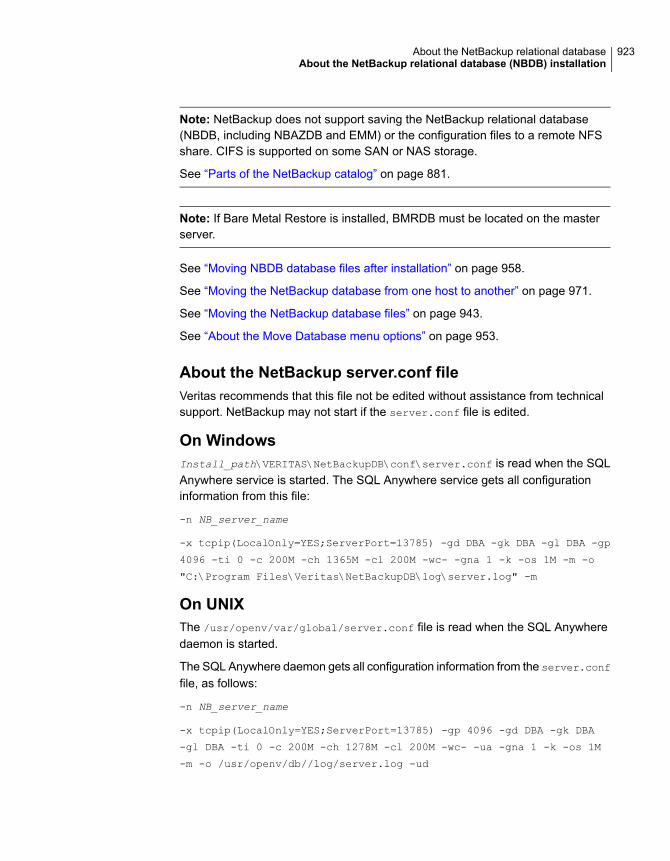
Note: NetBackup does not support saving the NetBackup relational database(NBDB, including NBAZDB and EMM) or the configuration files to a remote NFSshare. CIFS is supported on some SAN or NAS storage.
See “Parts of the NetBackup catalog” on page 881.
Note: If Bare Metal Restore is installed, BMRDB must be located on the masterserver.
See “Moving NBDB database files after installation” on page 958.
See “Moving the NetBackup database from one host to another” on page 971.
See “Moving the NetBackup database files” on page 943.
See “About the Move Database menu options” on page 953.
About the NetBackup server.conf fileVeritas recommends that this file not be edited without assistance from technicalsupport. NetBackup may not start if the server.conf file is edited.
On WindowsInstall_path\VERITAS\NetBackupDB\conf\server.conf is read when the SQLAnywhere service is started. The SQL Anywhere service gets all configurationinformation from this file:
-n NB_server_name
-x tcpip(LocalOnly=YES;ServerPort=13785) -gd DBA -gk DBA -gl DBA -gp
4096 -ti 0 -c 200M -ch 1365M -cl 200M -wc- -gna 1 -k -os 1M -m -o
"C:\Program Files\Veritas\NetBackupDB\log\server.log" -m
On UNIXThe /usr/openv/var/global/server.conf file is read when the SQL Anywheredaemon is started.
The SQL Anywhere daemon gets all configuration information from the server.conf
file, as follows:
-n NB_server_name
-x tcpip(LocalOnly=YES;ServerPort=13785) -gp 4096 -gd DBA -gk DBA
-gl DBA -ti 0 -c 200M -ch 1278M -cl 200M -wc- -ua -gna 1 -k -os 1M
-m -o /usr/openv/db//log/server.log -ud
923About the NetBackup relational databaseAbout the NetBackup relational database (NBDB) installation

NB_server_name indicates the name of the SQL Anywhere server. Each Sybaseserver has a unique name. Use the same name that was used during installation.If a fully qualified name was used at that time, use a fully qualified name here.
Note: If this name is changed, the Enterprise Media Manager cannot connect tothe database.
Table 23-1 Commands used in the server.conf file
DescriptionCommand
Indicates the initial memory that is reserved for caching database pages and otherserver information. The value may be changed for performance reasons.
-c 200M
Indicates the maximum cache size, as a limit to automatic cache growth. Thevalue is calculated automatically based on memory size of the computer.
-ch 1316M
Indicates the minimum cache size, as a limit to automatic cache resizing. Thevalue may be changed for performance reasons.
-cl 200M
Indicates that the DBA user is the account used to start, stop, load, and unloaddata.
-gd DBA
-gk DBA
-gl DBA
Enable automatic tuning of the network database server multiprogramming level.-gna 1
Indicates the maximum page size (in bytes) for the database. This parameter isgiven during database creation.
-gp 4096
If -k is specified when database server is started, the database server does notcollect Performance Monitor statics.
-k
Truncates the transaction log when a checkpoint is done.
This option provides a way to automatically limit the growth of the transaction log.Disable it using NbDbAdmin.exe (Windows) or dbadm (UNIX) by changing thetransaction mode option set to FULL from PARTIAL.
-m
On Windows: Indicates the location of server output messages. The messagesinclude start and stop events, checkpoints, error conditions, and cache changesize. This log is not managed, but growth is slow.
-o Install_path\VERITAS\
NetBackupDB\log\server.log
On UNIX: Indicates the location of server output messages. The messages includestart and stop events, checkpoints, error conditions, and cache change size. Thislog is not managed, but growth is slow.
-o /usr/openv/db/log/
server.log
Specifies a maximum size for the database server message log file.-os 1M
924About the NetBackup relational databaseAbout the NetBackup relational database (NBDB) installation

Table 23-1 Commands used in the server.conf file (continued)
DescriptionCommand
Indicates the client idle time that is allowed before shutdown. By default, no idletime is allowed, which prevents the database from shutting down.
-ti 0
Turns off the use of asynchronous I/O.-ua
Indicates that the server should run as a daemon.-ud
Control whether checksums are enabled on write operations for the database. Bydefault all database pages have checksums, so the database server defaults to-wc-.
-wc-
Indicates what kind of connections are allowed in addition to shared memory. Forexample, local TCP/IP connections that use port 13785.
-x tcpip(LocalOnly
=YES;ServerPort=13785)
See “About NetBackup master server installed directories and files” on page 922.
About the databases.conf fileThe Windows Install_path\VERITAS\NetBackupDB\conf\databases.conf
configuration file and the UNIX /usr/openv/var/global/databases.conf
configuration file contain the locations of the main database files and the databasenames for automatic startup when the SQL Anywhere service is started. Forexample, if NBDB and BMRDB are both located on the master server in the defaultlocations, databases.conf contains:
On Windows"C:\Program Files\VERITAS\NetBackupDB\data\NBDB.db" -n NBDB
"C:\Program Files\VERITAS\NetBackupDB\data\NBAZDB.db" -n NBAZDB
"C:\Program Files\VERITAS\NetBackupDB\data\BMRDB.db" -n BMRDB
On UNIX"/usr/openv/db/data/NBAZDB.db" -n NBAZDB
"/usr/openv/db/data/NBDB.db" -n NBDB
"/usr/openv/db/data/BMRDB.db" -n BMRDB
About the registration.dat file on WindowsThis file is created for use with Veritas NetBackup OpsCenter.
It is created in the following location:
925About the NetBackup relational databaseAbout the NetBackup relational database (NBDB) installation

Install_path\VERITAS\NetBackupDB\conf\registration.dat
About the vxdbms_env.csh, vxdbms_env.sh scripts (onUNIX)The scripts vxdbms_env.csh and vxdbms_env.sh set-up the SQL Anywhereenvironment as follows:
■ /usr/openv/db/vxdbms_env.csh
■ /usr/openv/db/vxdbms_env.sh
Other scripts and commands use vxdbms_env.csh and vxdbms_env.sh.
About the bin directoryOn Windows, NetBackup\bin contains NetBackup-specific binaries and commandsfor administrating NBDB and BMRDB:
■ NbDbAdmin.exe
This file launches the NetBackup Database Administration utility, which providesadministrators with a way to perform the tasks based on the nbdb commands.See “Using the NetBackup Database Administration utility on Windows”on page 933.To access the utility, the administrator must know the database password.See “Changing the NetBackup database password” on page 956.
■ create_nbdb.exe
Used during installation and upgrades to create and upgrade the NetBackupdatabase, NBDB.
■ nbdb_admin.exe
Among other things, use nbdb_admin.exe to change the DBA and NetBackupaccount passwords, or to start and stop individual databases.
■ nbdb_backup.exe
Use to make an online backup of the SQL Anywhere database files to a filesystem directory.
Note: Using this command (or the NetBackup Database Administration utility)to restore the NetBackup database can potentially break the consistency betweenthe NetBackup catalog and the database. This loss of consistency can lead toloss of data. Use this command (or the NetBackup Database Administrationutility) to restore the NetBackup catalog only as a precautionary measure.
926About the NetBackup relational databaseAbout the NetBackup relational database (NBDB) installation

■ nbdb_move.exe
Use to change the location of the SQL Anywhere database files from the defaultlocation.
■ nbdb_ping.exe
Displays the status of the SQL Anywhere database.
■ nbdb_restore.exe
Use to recover from an online backup in a file system directory that was createdusing nbdb_backup.
■ nbdb_unload.exe
Use to create a dump of all or part of the NBDB database or the BMRDBdatabase schema and data.
■ nbdbms_start_server.exe
Use to start and stop the SQL Anywhere service.
■ nbdb_upgrade.exe
Used internally to upgrade the NetBackup and BMR databases.
On UNIX, /usr/openv/db/bin contains SQL Anywhere commands andNetBackup-specific commands for administrating NBDB and BMRDB:
■ dbadm
This file launches the NetBackup Database Administration utility, which providesadministrators with a way to perform the tasks based on the nbdb commands.See “Using the NetBackup Database Administration utility on UNIX” on page 947.To access the utility, the administrator must know the database password.See “Changing the NetBackup database password” on page 956.
■ create_nbdb
Used during installation and upgrades to create and upgrade the NetBackupdatabase, NBDB.
■ nbdb_admin
Among other things, use nbdb_admin to change the DBA and NetBackup accountpasswords, or to start and stop individual databases.
■ nbdb_backup
Use to make an online backup of the SQL Anywhere database files to a filesystem directory.
927About the NetBackup relational databaseAbout the NetBackup relational database (NBDB) installation

Note: Using this command (or the NetBackup Database Administration utility)to restore the NetBackup database can potentially break the consistency betweenthe NetBackup catalog and the database. This loss of consistency can lead toloss of data. Use this command (or the NetBackup Database Administrationutility) to restore the NetBackup catalog only as a precautionary measure.
■ nbdb_move
Use to change the location of the SQL Anywhere database files from the defaultlocation.
■ nbdb_ping
Displays the status of the SQL Anywhere database.
■ nbdb_restore
Use to recover from an online backup in a file system directory that was createdusing nbdb_backup.
■ nbdb_unload
Use to create a dump of all or part of the NBDB database or the BMRDBdatabase schema and data.
■ nbdbms_start_server
Use to start and stop the SQL Anywhere daemon.
■ nbdb_upgrade
Used internally to upgrade the NetBackup and BMR databases.
Note:Due to performance issues, NetBackup supports database files only on locallyattached drives.
The commands are described in the NetBackup Commands Reference Guide andthe online Help.
About the contents of the NetBackup directoriesThe following table describes the contents of the NetBackup directories.
Table 23-2 NetBackup directory contents
DescriptionDirectory
The following directory contains SQL Anywhere-specific information.
On Windows: Install_path\VERITAS\NetBackupDB\charsets
On UNIX: /usr/openv/db/charsets
charsets
928About the NetBackup relational databaseAbout the NetBackup relational database (NBDB) installation

Table 23-2 NetBackup directory contents (continued)
DescriptionDirectory
On UNIX: The directory /usr/openv/db/lib contains all the SQL Anywhere sharedlibraries. The directory also includes ODBC libraries, used to connect to NBDB and BMRDB.
lib
The following directory contains the SQL Anywhere server log file server.log that containsonly Sybase logs.
On Windows: Install_path\VERITAS\NetBackupDB\log
On UNIX: /usr/openv/db/log
log
On UNIX: The directory /usr/openv/db/res contains SQL Anywhere-specific information.res
The following directory contains the SQL Anywhere scripts that are used to create thedatabase. The directory also contains NetBackup SQL scripts that are used to create theEMM and other schemas.
On Windows: Install_path\VERITAS\NetBackupDB\scripts
On UNIX: /usr/openv/db/scripts
Note: Do not edit the scripts that are located in this directory.
scripts
The directory that is used as a temporary staging area during catalog backup and recovery.
On Windows: Install_path\VERITAS\NetBackupDB\staging
On UNIX: /usr/openv/db/staging
staging
On UNIX: The directory /usr/openv/db/tix contains SQL Anywhere-specific information.tix
On Windows: The directory Install_path\VERITAS\NetBackupDB\WIN32 containsSQL Anywhere commands and .dll files.
WIN32
On Windows: The directory Install_path\VERITAS\NetBackupDB\java contains thecomponents necessary to run the NetBackup Administration Console on a Windowscomputer.
java
On Windows: The directory Install_path\VERITAS\NetBackupDB\shared is a directoryused by Veritas NetBackup OpsCenter.
shared
About the data directoryThe following directory is the default location of the NetBackup database, NBDB:
On Windows: Install_path\VERITAS\NetBackupDB\data
On UNIX: /usr/openv/db/data
NBDB includes the following files:
929About the NetBackup relational databaseAbout the NetBackup relational database (NBDB) installation

■ NBDB.db
The main NetBackup database file; considered a dbspace.
■ NBDB.log
The transaction log for the NetBackup database, necessary for recovery.NBDB.log is automatically truncated after a successful full or incremental catalogbackup of the SQL Anywhere database.
■ JOBD_DATA.db
An additional dbspace that contains job records data.
■ NBAZDB.db
The NetBackup Authorization database is present whether or not NetBackupAccess Control (NBAC) is configured and used.
■ EMM_DATA.db
An additional dbspace that contains EMM data.
■ EMM_INDEX.db
The file that enhances the EMM database performance.
■ SEARCH_DATA.db
Contains the metadata that is created while placing holds on backup images.
■ SEARCH_INDEX.db
The file that contains the indexes that are created in the SEARCH_DATA tables.
■ SLP_DATA.db
Contains the run-time information for storage lifecycle policies.
■ SLP_INDEX.db
The file that contains the indexes that are created in the SLP_DATA tables.
■ vxdbms.conf
The file that contains the configuration information specific to the Sybase SQLAnywhere installation:On Windows:
VXDBMS_NB_SERVER = NB_server_name
VXDBMS_NB_PORT = 13785
VXDBMS_NB_DATABASE = NBDB
VXDBMS_BMR_DATABASE = BMRDB
VXDBMS_AZ_DATABASE = NBAZDB
VXDBMS_NB_DATA = C:\Program Files\Veritas\NetBackupDB\data
VXDBMS_NB_INDEX = C:\Program Files\Veritas\NetBackupDB\data
VXDBMS_NB_TLOG = C:\Program Files\Veritas\NetBackupDB\data
VXDBMS_NB_PASSWORD = encrypted_password
930About the NetBackup relational databaseAbout the NetBackup relational database (NBDB) installation

AZ_DB_PASSWORD = encrypted_password
VXDBMS_ODBC_DRIVER = NB SQL Anywhere
On UNIX:
VXDBMS_NB_SERVER = NB_server_name
VXDBMS_NB_PORT = 13785
VXDBMS_NB_DATABASE = NBDB
VXDBMS_AZ_DATABASE = NBAZDB
VXDBMS_BMR_DATABASE = BMRDB
VXDBMS_NB_DATA = /usr/openv/db/data
VXDBMS_NB_INDEX = /usr/openv/db/data
VXDBMS_NB_TLOG = /usr/openv/db/data
VXDBMS_NB_STAGING = /usr/openv/db/staging
VXDBMS_NB_PASSWORD = encrypted_password
AZ_NB_PASSWORD = encrypted_password
The encrypted password that is used to log into the DBA accounts for NBDB,NBAZDB, and BMRDB, and other data accounts is stored in vxdbms.conf.The password is set to a randomly generated password upon installation. Usethe nbdb_admin command to change it to a known password if you have notdone so already.See “Changing the NetBackup database password” on page 956.
■ If BMR is installed, the directory also contains: BMRDB.db, BMRDB.log (transactionlog for BMR), BMR_DATA.db, BMR_INDEX.db
About the NetBackup configuration entryThe VXDBMS_NB_DATA registry entry (Windows) or the bp.conf entry (UNIX) is arequired entry and is created upon installation. The entry indicates the path to thedirectory where NBDB.db, NBAZDB.db, BMRDB.db, and the vxdbms.conf files arelocated.
On Windows:HKEY_LOCAL_MACHINE\SOFTWARE\VERITAS\NetBackup\CurrentVersion\
Config\VXDBMS_NB_DATA
On UNIX: /usr/openv/netbackup/bp.conf:
VXDBMS_NB_DATA = /usr/openv/db/data
931About the NetBackup relational databaseAbout the NetBackup relational database (NBDB) installation

Sybase SQL Anywhere server managementUpon startup, the Sybase SQL Anywhere server uses the SQL Anywhere serviceto set the server parameters in the server.conf file. Then, the service starts thedatabases that are indicated in the databases.conf file.
To start and stop the Sybase SQL Anywhere service on Windows, use one of thefollowing methods:
■ In the NetBackup Administration Console, select NetBackup RelationalDatabase Manager (SQLANYs_VERITAS_NB) in the Daemons tab of theActivity Monitor.
■ From the Windows Service Manager, select NetBackup Relational DatabaseManager (SQLANYs_VERITAS_NB).
■ Install_path\VERITAS\NetBackup\bin\bpdown -e SQLANYs_VERITAS_NB
■ Install_path\VERITAS\NetBackup\bin\bpup -e SQLANYs_VERITAS_NB
To start and stop the Sybase SQL Anywhere daemon on UNIX, use one of thefollowing methods:
■ Select NB_dbsrv in the Activity Monitor in the NetBackup AdministrationConsole.
■ From the command line:
■ /usr/openv/netbackup/bin/bp.kill_all | bp.start_all
The Sybase SQL Anywhere daemon is included in the stop command or thestart command, which starts and stops all NetBackup daemons.
■ /usr/openv/db/bin/nbdbms_start_server ndbms_start_server starts
the SQL Anywhere server if no option is specified.
■ /usr/openv/db/bin/nbdbms_start_server -stop -f
Stops the server; -f forces a shutdown with active connections.
■ /usr/openv/db/bin/nbdbms_start_server -stat
The -stat option tells whether the server is up or down:SQL Anywhere Server Ping Utility Version 11.0.1.2044 Ping server
successful.
■ /usr/openv/db/bin/nbdbms_start_server -h
Use -h to display usage information about the nbdbms_start_server.
Individual databases can be started or stopped, while the SQL Anywhere servicecontinues. To do so, use the NetBackup Database Administration utility or thefollowing commands:
■ nbdb_admin [-start | -stop]
932About the NetBackup relational databaseAbout the NetBackup relational database (NBDB) installation

Starts or stops NBDB without shutting down the SQL Anywhere server.To see whether the database is up, enter nbdb_ping.
■ nbdb_admin [-start | -stop BMRDB]
Starts or stops BMRDB without shutting down the SQL Anywhere server.To see whether the BMRDB database is up, enter nbdb_ping -dbn BMRDB.
Sybase SQL Anywhere and clustered environmentsSybase SQL Anywhere is supported in a clustered environment. Sybase SQLAnywhere failover is included with the NetBackup server failover solution. Thesoftware is installed on all computers in the cluster, but the database files are createdon a shared disk.
To facilitate the shared files, database and configuration files are installed on ashared drive.
Configuration files are stored in the following location:
On Windows: Shared_drive\VERITAS\NetBackupDB\conf.
On UNIX: /usr/openv/var/global.
Using the NetBackup Database Administrationutility on Windows
The NetBackup Database Administration utility is a standalone application(NbDbAdmin.exe) and is located in the following directory:
InstallPath\VERITAS\NetBackup\bin\NbDbAdmin.exe
To use the utility, you must be an administrator with administrator privileges.
When you start the NetBackup Database Administration utility, enter the DBApassword. The password is set to a randomly generated password upon installation.Use the nbdb_admin command to change it to a known password if you have notdone so already.
See “Changing the NetBackup database password” on page 956.
The NetBackup Database Administration utility displays the following information:
933About the NetBackup relational databaseUsing the NetBackup Database Administration utility on Windows

Table 23-3 NetBackup Database Administration properties
DescriptionProperty
Select either the NBDB or the BMRDB database to administer.
The list of possible databases is derived from the vxdbms.conf file. The vxdbms.conf fileis located in the directory that is specified in the bp.conf file or in the Windows registryparameter VXDBMS_NB_DATA.
The database must reside on the same computer where the NetBackup DatabaseAdministration console runs.
One of the following status reports display for the selected database:
■ If the database is available, the screen displays Alive and well.■ If the database is unavailable, the screen displays Not available.
Database name andstatus
Shuts down the selected database.Stop
Starts the selected database.Start
Contains information about database utilization.
See “About the General tab of the NetBackup Database Administration utility” on page 935.
General tab
Contains a variety of tools to administer the selected database.
See “About the Tools tab of the NetBackup Database Administration utility” on page 941.
Tools tab
Displays the amount of free space and used space on a drive. If the database files are onmultiple drives, this view is useful to see which drive has more free space available.
The Drive Space dialog displays the following information:
■ Drive■ Capacity■ Used space■ Free space■ % Utilized■ Space
Drive Space
Closes the Database Administration utility.Close
Provides additional assistance in the console.Help
934About the NetBackup relational databaseUsing the NetBackup Database Administration utility on Windows

About the General tab of the NetBackup Database Administrationutility
The General tab contains information about database space utilization. The tabcontains tools to let the administrator reorganize fragmented database objects, addfree space to the database files, and validate and rebuild the database.
Figure 23-1 shows the General tab of the Database Administration utility after auser logs on.
Figure 23-1 General tab of the NetBackup Database Administration utility
935About the NetBackup relational databaseUsing the NetBackup Database Administration utility on Windows

Table 23-4 General tab options
DescriptionOption
Displays the information about used space and free space in pie chart format for the followingdatabase system, data, and index files:
■ Free DBspaceThe amount of free space available.
■ Total DBspaceThe total amount of space that is allocated for the dbspace.
■ DB UtilizationThe utilization percentage is the percentage of the Total DBSpace used for data.When the NBDB or the BMRDB databases are created, extra space is allocated so thatcontiguous space is available as needed. As a result, a low space utilization percentageis a positive indication unless the database is very large and disk space is in short supply.
Space Utilization list
Use to display information about the selected database table or index file and elect todefragment (reorganize) fragmented files.
Select a database table or an index file in the Space Utilization list and click Details.
■ Database tablesSelect one or more tables in the Data (Table) Details dialog box and click Defragment.The database table is evaluated for fragmentation and if any fragmentation is detected,it is reorganized.Select one or more database tables to reorganize and then click Defragment. Eachselected database table is evaluated for fragmentation and if any fragmentation isdetected, it is reorganized.Table 23-5 describes the columns in the Data (Table) Details dialog box.
■ Index filesSelect one or more indexes in the Index Details dialog box and click Compress. Eachselected index is evaluated for fragmentation and if any fragmentation is detected, it isreorganized.Table 23-6 describes the columns in the Index Details dialog box.
Click Close after defragmenting the files.
Details
Use to add additional free space to individual dbspaces. Additional free space helps toreduce future fragmentation of the database objects that are stored in the database.
When the relational database is initially created or rebuilt, 25MB of free space is automaticallyadded to the data and the index dbspaces.
Click Add Space, then select one of the following amounts to add:
■ A small amount of space to add is 25MB.■ A medium amount of space to add is 50MB.■ A large amount of space to add is 100MB.
Click OK to add the space or Cancel to close the dialog box.
Add Space
936About the NetBackup relational databaseUsing the NetBackup Database Administration utility on Windows

Table 23-4 General tab options (continued)
DescriptionOption
The location and the file size of the transaction log.Transaction loginformation
The location and the file size of the mirrored log, if one exists.Mirrored log information
Displays the most current information.Refresh
This option automatically determines the database tables and indexes that are fragmented.The option then uses the SQL Anywhere REORGANIZE command to defragment the tablesand compress the indexes.
To click Reorganize All is equivalent to running the following command:
nbdb_admin.exe -reorganize
Reorganize All
This option informs you whether or not the selected database has passed the utility’svalidation check.
See Table 23-7 on page 940.
Validation status
937About the NetBackup relational databaseUsing the NetBackup Database Administration utility on Windows

Table 23-4 General tab options (continued)
DescriptionOption
This option performs a database validation on all of the database tables and indexes in theselected database.
Choose one of the following validation checks in the Validate Database dialog box:
■ StandardThe Standard validation option lets you validate the indexes and keys on all of the tablesin the database. Each table is scanned, and for each row, a check is made that it existsin the appropriate indexes. The number of rows in the table must match the number ofentries in the index.The equivalent command is nbdb_admin.exe -validate
■ FullIn addition to the Standard validation checks, a Full validation ensures that every rowthat is referenced in each index exists in the corresponding table. For foreign key indexes,it also ensures that the corresponding row exists in the primary table.The equivalent command is nbdb_admin.exe -validate -full
Note: To perform a full database validation, shut down NetBackup and start only thedatabase service.
After a validation check runs, the Results screen lists each database object. Each error islisted next to the database object where it was found. The total number of errors are listedat the end of the list of database objects. If no errors were found, that is indicated.
If any validation errors are reported, perform the following tasks:
■ Shut down NetBackup (all daemons and services).■ Start only the SQL Anywhere database server (SQLANYs_VERITAS_DB, the NetBackup
Relational Database Manager).■ Click Validate to repeat the validation check or use the nbdb_admin.exe command
line utility.
If validation errors persist, contact Veritas customer support. The administrator may beasked to rebuild the database using theRebuild option or the nbdb_unload.exe commandline utility.
Validate
938About the NetBackup relational databaseUsing the NetBackup Database Administration utility on Windows
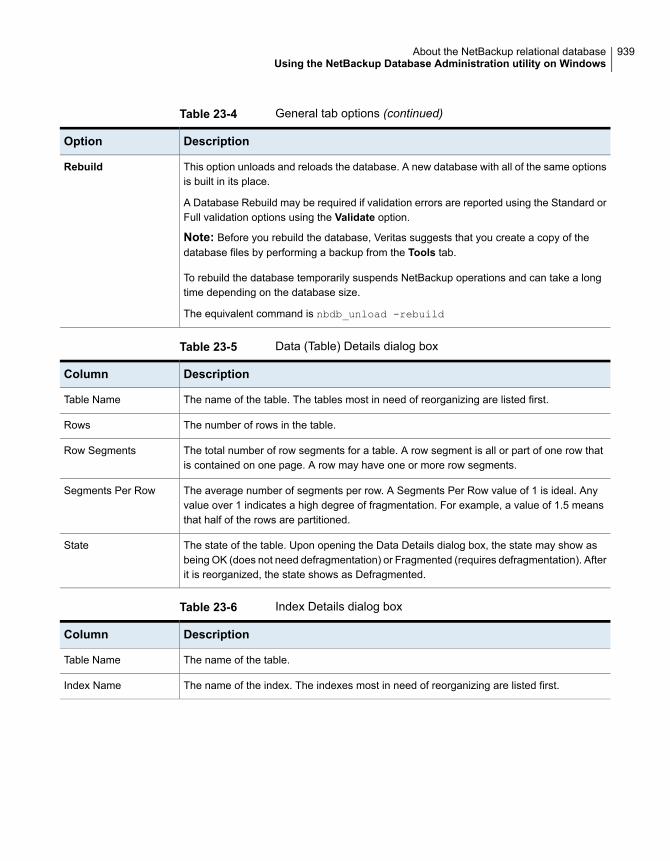
Table 23-4 General tab options (continued)
DescriptionOption
This option unloads and reloads the database. A new database with all of the same optionsis built in its place.
A Database Rebuild may be required if validation errors are reported using the Standard orFull validation options using the Validate option.
Note: Before you rebuild the database, Veritas suggests that you create a copy of thedatabase files by performing a backup from the Tools tab.
To rebuild the database temporarily suspends NetBackup operations and can take a longtime depending on the database size.
The equivalent command is nbdb_unload -rebuild
Rebuild
Table 23-5 Data (Table) Details dialog box
DescriptionColumn
The name of the table. The tables most in need of reorganizing are listed first.Table Name
The number of rows in the table.Rows
The total number of row segments for a table. A row segment is all or part of one row thatis contained on one page. A row may have one or more row segments.
Row Segments
The average number of segments per row. A Segments Per Row value of 1 is ideal. Anyvalue over 1 indicates a high degree of fragmentation. For example, a value of 1.5 meansthat half of the rows are partitioned.
Segments Per Row
The state of the table. Upon opening the Data Details dialog box, the state may show asbeing OK (does not need defragmentation) or Fragmented (requires defragmentation). Afterit is reorganized, the state shows as Defragmented.
State
Table 23-6 Index Details dialog box
DescriptionColumn
The name of the table.Table Name
The name of the index. The indexes most in need of reorganizing are listed first.Index Name
939About the NetBackup relational databaseUsing the NetBackup Database Administration utility on Windows

Table 23-6 Index Details dialog box (continued)
DescriptionColumn
The type of the index.
The Index Type can be one of the following values:
■ PKEY (primary key)■ FKEY (foreign key)■ UI (unique index)■ UC (unique constraint)■ NUI (non-unique index)
Index Type
The number of index levels in the index tree.
The index level and index density indicate whether or not an index needs to be reorganized.The number of levels in the index tree determines the number of input and output operationsthat are needed to access a row using the index.
Indexes with fewer levels are more efficient than indexes with greater numbers of levels.The density is a fraction between 0 and 1 providing an indication of how full each index pageis on average.
An Index Level value of 1 is ideal. An index with a value of 4 or above or with a value of 2or 3 and an Index Density greater than 0.5 is a good candidate for reorganization.
Index Level
The index density and the index level indicate whether or not an index needs to bereorganized. (See the Index Level description.)
Index Density
The state of the index. Upon opening the Index Details dialog box, the state may show asbeing OK (does not need defragmentation) or Fragmented (requires defragmentation).
After it is reorganized, the state shows as Defragmented.
State
Table 23-7 Validation status messages
DescriptionMessage
The database does not require further validation.Database passed validationcheck.
No statistics on the database can be gathered because the database is not available.Not available.
Validate, then rebuild the database. Before you rebuild the database, Veritas suggeststhat you create a copy of the database files by doing a Backup from the Tools tab.
Table 23-4 describes how to use the Validate option.
Database is corrupt.
See “About fragmentation” on page 941.
940About the NetBackup relational databaseUsing the NetBackup Database Administration utility on Windows

About fragmentationTable fragmentation can impede performance. When rows are not storedcontiguously, or if rows are split into more than one page, performance decreasesbecause these rows require additional page accesses.
When an update to a row causes it to grow beyond the originally allocated space,the row is split. The initial row location contains a pointer to another page wherethe entire row is stored. As more rows are stored on separate pages, more time isrequired to access the additional pages.
On Windows, use the Defragment option to defragment rows in a table or theCompress option to defragment the indexes which have become sparse due todeletions.
Reorganizing may also reduce the total number of pages that are used to store thetable and its indexes. It may reduce the number of levels in an index tree.
Note that the reorganization does not result in a reduction of the total size of thedatabase file.
On Windows, the Rebuild option on the General tab completely rebuilds thedatabase, eliminating any fragmentation, and free space. This option may result ina reduction of the total size of the database files.
See “Estimating catalog space requirements” on page 910.
About the Tools tab of the NetBackup Database Administration utilityThe Tools tab of the NetBackup Database Administration utility contains a varietyof tools to administer the selected database:
See “Changing the DBA password using the NetBackupDatabase Administration utility” on page 942.
Password section
See “Moving the NetBackup database files” on page 943.Move Database section
See “Exporting database schema and data” on page 945.Unload section
See “Copying or backing up the database files” on page 945.Backup section
See “Restoring database files from a backup” on page 946.Restore section
Figure 23-2 displays the Tools tab of the utility.
941About the NetBackup relational databaseUsing the NetBackup Database Administration utility on Windows

Figure 23-2 Tools tab of the Database Administration utility
Changing the DBA password using the NetBackupDatabase Administration utilityTo log into the Database Administration utility, you must know the current DBApassword.
To change the password for the first time after installation, use the nbdb_admin
command. The command updates the vxdbms.conf file with the new, encryptedstring:
See “Changing the NetBackup database password” on page 956.
To change a known password to a new password, you can either use thenbdb_admin command or the NetBackup Database Administration utility.
942About the NetBackup relational databaseUsing the NetBackup Database Administration utility on Windows

To change the DBA password from a known password to a new password
1 Start the NetBackup Database Administration utility that is located in thefollowing directory:
InstallPath\VERITAS\NetBackup\bin\NbDbAdmin.exe
2 Enter the database logon password and click OK.
See “Using the NetBackup Database Administration utility on Windows”on page 933.
3 Select the Tools tab.
4 In the Password section, click Change.
5 In the Change password dialog box, enter the new password and confirm thenew password. Changing the password changes it for both NBDB and BMRDB,if a BMR database is present.
6 Enable Create a backup file of your new DBA password to keep track ofthe password. Then, browse to a directory to store the file that contains thenew password.
7 Click OK.
The Change password dialog box warns you that it is important to rememberthe password. Veritas may not be able to recover information within the EMMdatabase if the password is unavailable.
8 Restart the database for the password change to take effect.
Moving the NetBackup database filesUse the NetBackup Database Administration utility to change the location of thedatabase files or to split the database files into multiple directories. Changing thelocation of the database files can improve performance when the database is verylarge.
Note:Due to performance issues, NetBackup supports database files only on locallyattached drives.
The database files are moved for both NBDB and BMRDB, if present.
943About the NetBackup relational databaseUsing the NetBackup Database Administration utility on Windows

To move the NetBackup database files
1 Start the NetBackup Database Administration utility that is located in thefollowing directory:
InstallPath\VERITAS\NetBackup\bin\NbDbAdmin.exe
2 Enter the database logon password and click OK.
See “Using the NetBackup Database Administration utility on Windows”on page 933.
3 Select the Tools tab.
4 In the Move Database section, click Move.
5 In the Move database files dialog box, select one or more of the followingoptions:
Use to change the location of the data dbspaces. Browse tothe new location.
Move data to
Use to change the location of the index dbspaces. Browseto the new location.
Move index to
Use to change the location of the transaction log. Thetransaction logs, NBDB.log, and BMRDB.log, are the criticalfiles that are used to recover the relational databases. Browseto the new location.
Move transaction logto
Use to create a mirrored transaction log. Create the mirroredlog in a different directory from the original log. Veritas alsorecommends the mirrored transaction log be placed on adifferent drive.
A mirrored transaction log offers extra protection.
Create mirroredtransaction log at
This option is displayed if a mirrored transaction log exists.
Use to change the location of the mirrored transaction log.Browse to the new location. Create the mirrored log in adifferent directory from the original log.
Move mirroredtransaction log to
This option is displayed if mirroring is used. Use this optionto stop mirroring of the transaction log. This option removesany existing mirrored transaction log from the directory.
Stop mirroring
6 Click OK. The NetBackup operations are temporarily suspended.
944About the NetBackup relational databaseUsing the NetBackup Database Administration utility on Windows

Exporting database schema and dataUse the NetBackup Database Administration utility to unload either the schema orthe schema and data from the relational database.
To export database schema and data
1 Start the NetBackup Database Administration utility that is located in thefollowing directory:
InstallPath\VERITAS\NetBackup\bin\NbDbAdmin.exe
2 Enter the database logon password and click OK.
See “Using the NetBackup Database Administration utility on Windows”on page 933.
3 Select the Tools tab.
4 In the Unload section, click Export.
5 In the Export database dialog box, browse to a destination directory.
6 Select one or more of the following options:
Unload only the database schema. The schema is unloadedas a file that is named reload.sql in the named directory.
Schema
Unload both the database schema and the data. The data isunloaded as a set of files in comma-delimited format. Onefile is created for each database table.
Schema and data
7 Click OK.
Copying or backing up the database filesUse the NetBackup Database Administration utility to back up the relational databaseto a specified directory.
Veritas recommends creating a backup copy of the database files in the followingsituations:
See “Moving the NetBackup database files”on page 943.
Before you move the database.
See “About the General tab of the NetBackupDatabase Administration utility” on page 935.
Before you rebuild the database.
Before you add data space.
945About the NetBackup relational databaseUsing the NetBackup Database Administration utility on Windows

See “About the General tab of the NetBackupDatabase Administration utility” on page 935.
Before you add index space.
Note: Using the NetBackup Database Administration utility to back up and restorethe NetBackup database can potentially break the consistency between theNetBackup catalog and the database. This loss of consistency can lead to loss ofdata. Use the tool to back up and restore the NetBackup catalog only as aprecautionary measure.
To copy or back up the database files
1 Start the NetBackup Database Administration utility that is located in thefollowing directory:
InstallPath\VERITAS\NetBackup\bin\NbDbAdmin.exe
2 Enter the database logon password and click OK.
See “Using the NetBackup Database Administration utility on Windows”on page 933.
3 Select the Tools tab.
4 In the Backup section, click Copy.
5 In the Copy database files dialog box, browse to a destination directory.
The destination directory contains the files that the backup creates. A copy ofall of the database files is made in this directory. This directory is also thelocation of the database files that the Restore option uses.
Note: This is not a catalog backup, performed as part of regular NetBackupoperations.
See “Restoring database files from a backup” on page 946.
6 Click OK.
Restoring database files from a backupUse the NetBackup Database Administration utility to restore a database from abackup copy.
The restore overwrites the current database files. The database is shut down andrestarted after the restore is completed.
A database restore causes NetBackup activity to be suspended, so do not performa database restore while active backups or other restores run.
946About the NetBackup relational databaseUsing the NetBackup Database Administration utility on Windows

Note: Using the Database Administration utility to back up and restore theNetBackup database can potentially break the consistency between the NetBackupcatalog and the database. This loss of consistency can lead to loss of data. Usethe tool to back up and restore the NetBackup database only as a precautionarymeasure.
To restore database files from a backup
1 Start the NetBackup Database Administration utility that is located in thefollowing directory:
InstallPath\VERITAS\NetBackup\bin\NbDbAdmin.exe
2 Enter the database logon password and click OK.
See “Using the NetBackup Database Administration utility on Windows”on page 933.
3 Select the Tools tab.
4 In the Restore section, click Restore.
5 In the Restore database dialog box, browse to the directory that contains thebackup database.
See “Copying or backing up the database files” on page 945.
6 Click OK.
Using the NetBackup Database Administrationutility on UNIX
The NetBackup Database Administration utility is a standalone application (dbadm)and is installed in the following location:
/usr/openv/db/bin
To use the NetBackup Database Administration utility, you must be an administratorwith root user privileges.
When you start the NetBackup Database Administration utility, enter the DBApassword. The password is set to a randomly generated password upon installation.Use the nbdb_admin command to change it to a known password if you have notdone so already.
See “Changing the NetBackup database password” on page 956.
Enter y to change the password or n to proceed without changing the password.
947About the NetBackup relational databaseUsing the NetBackup Database Administration utility on UNIX

After you log on, the NetBackup Database Administration utility displays the followinginformation about the current database:
Table 23-8 NetBackup Database Administration utility properties
DescriptionProperty
The selected database: NBDB or BMRDBSelected database
The status of the selected database: UP or DOWNStatus
The validation state of the selected database: OK, NOT_OK, or DOWN
This information can also be obtained running the following command:
nbdb_admin -validate
Note: To perform a full database validation, shut down NetBackup and start only the databaseservice.
Consistency
Space Utilization is a measure of the amount of used space as a percentage of the file systemspace allocated for the database. When the NBDB or the BMRDB databases are initiallycreated, extra space is allocated so that contiguous space is available as needed. As a result,a low Space Utilization is a positive indication unless the database is very large and diskspace is in short supply.
Space Utilization
The initial screen also displays the following Database Administration main menu:
Table 23-9 Database Administration main menu options
DescriptionOption
This option displays the menu where you can select a database to start or stop, and to changedatabase passwords.
See “About the Select/Restart Database and Change Password menu options” on page 949.
Select/RestartDatabase and ChangePassword
This option displays the menu where you can perform the following actions:
■ Generate a database space utilization report■ Reorganize fragmented database objects■ Add free space to the database files■ Modify database server memory cache settings
See “About the Database Space and Memory Management menu options” on page 950.
Database Space andMemory Management
This option displays the menu where you can truncate the transaction log of the database.You can also change the database's transaction log mode.
Transaction LogManagement
This option displays the menu where you can validate and rebuild the selected database.
See “About the Database Validation Check and Rebuild menu options” on page 952.
Database ValidationCheck and Rebuild
948About the NetBackup relational databaseUsing the NetBackup Database Administration utility on UNIX

Table 23-9 Database Administration main menu options (continued)
DescriptionOption
This option displays the menu where you can change the location of the database files. Youcan also split the files into multiple directories.
See “About the Move Database menu options” on page 953.
Move Database
This option displays the menu where you can unload either the schema or the schema anddata from the database.
See “About the Unload Database menu options” on page 954.
Unload Database
This option displays the menu where you can choose the backup and restore options for thedatabase.
See “About the Backup and Restore Database menu options” on page 955.
Backup and RestoreDatabase
This option refreshes the Status, Consistency, and Space Utilization in the main menu.Refresh DatabaseStatus
Online Help is available from all screens by selecting the h option from the mainmenu.
About the Select/Restart Database and Change Password menuoptions
Select this option to display the Select/Restart Database and Change Passwordmenu.
The Select/Restart Database and Change Password menu contains the followingoptions.
Table 23-10 Select/Restart Database and Change Password options
DescriptionOption
Select NBDB and then view or modify the database using the other dbadm menu options.NBDB
Select BMRDB and then view or modify the database using the other dbadm menu options.BMRDB
Starts the selected database.Start SelectedDatabase
Stops the selected database.Stop SelectedDatabase
949About the NetBackup relational databaseUsing the NetBackup Database Administration utility on UNIX

Table 23-10 Select/Restart Database and Change Password options(continued)
DescriptionOption
Changes the password for the databases. The password is changed for both NBDB andBMRDB, if applicable. Restart the database for the password change to take effect.
To log into the Database Administration utility, you must know the current DBA password.
To change the password for the first time after installation, use the nbdb_admin command.The command updates the vxdbms.conf file with the new, encrypted string:
See “Changing the NetBackup database password” on page 956.
To change a known password to a new password, you can either use the nbdb_admincommand or the NetBackup Database Administration utility.
Change Password
About the Database Space and Memory Management menu optionsYou can use the Database Space and Memory Management option to perform thefollowing functions:
■ To report on database space utilization
■ To reorganize fragmented database objects
■ To add free space to the database files
The Database Space and Memory Management menu contains the following options.
Table 23-11 Database Space and Memory Management options
DescriptionOption
Select this option to generate a report on space utilization for the currently selected database.
The report contains the dbspaces and the physical pathnames of the relational database.
For each dbspace, the report displays the name, the amount of free space in KBytes, the filesize in KBytes, and the space utilization. The report also displays the transaction log file sizeand the amount of free space that remains on each of the file systems being used for thedatabase.
Report on DatabaseSpace
950About the NetBackup relational databaseUsing the NetBackup Database Administration utility on UNIX

Table 23-11 Database Space and Memory Management options (continued)
DescriptionOption
Select this option to reorganize fragmented database tables and indexes.
These actions are performed from the Database Reorganize menu as follows:
■ 1) Defragment All
This option automatically determines the database tables and indexes that are fragmented.It then uses the SQL Anywhere REORGANIZE command to defragment the tables andcompress the indexes.The equivalent command is nbdb_admin -reorganize.
■ 2) Table Level Defragmentation
This option generates a fragmentation report for each database table. For each table, thereport includes the TABLE_NAME, number of ROWS, number of ROW_SEGMENTS,and SEGS_PER_ROW.In addition, a * displays in the ! column for an individual table if it would be automaticallyselected for reorganization by the Defragment All option.A row segment is all or part of one row that is contained on one page. A row may haveone or more row segments. The ROW_SEGMENTS value indicates total number of rowsegments for the table. The SEGS_PER_ROW value shows the average number ofsegments per row, and indicates whether or not a table is fragmented.A SEGS_PER_ROW value of 1 is ideal, and any value more than 1 indicates a highdegree of fragmentation. For example, a value of 1.5 means that half of the rows arepartitioned.See “About fragmentation” on page 941.
■ 3) Index Compression
This option generates a fragmentation report for each database index and lets theadministrator select individual indexes to be compressed. For each index the reportincludes the TABLE_NAME, INDEX_NAME, TYPE of index, LEVEL, and DENSITY. Theindex TYPE is one of the following values: PKEY (primary key), FKEY (foreign key), UI(unique index), UC (unique constraint), NUI (non-unique index).In addition, a * displays in the ! column for an individual index if it would be automaticallyselected for reorganization by the Defragment All option.The LEVEL and DENSITY indicate whether or not an index should be reorganized. Thenumber of levels in the index tree determines the number of I/O operations that are neededto access a row using the index. Indexes with fewer levels are more efficient than indexeswith greater numbers of levels. The density is a fraction between 0 and 1 providing anindication of how full each index page is on average.A LEVEL value of 1 is ideal. An index with a LEVEL value of 4 or more or with a levelvalue of 2 or 3 with a density greater than 0.5 is a good candidate for reorganization.
Database Reorganize
951About the NetBackup relational databaseUsing the NetBackup Database Administration utility on UNIX

Table 23-11 Database Space and Memory Management options (continued)
DescriptionOption
Select this option to add additional free space to individual dbspaces. Additional free spacehelps to reduce future fragmentation of the database objects that are stored in the database.
When the relational database is initially created or rebuilt, 25MB of free space is automaticallyadded to the data and the index dbspaces.
A Rebuild eliminates all free space and then adds back what was initially added when thedatabase was created. If you accidentally add too much free space, a Rebuild can be usedto eliminate the space.
Add Free Space
About the Database Validation Check and Rebuild menu optionsThe Database Validation Check and Rebuild option lets you validate and rebuildthe currently selected database.
The Database Validation Check and Rebuild menu contains the following options.
Table 23-12 Database Validation Check and Rebuild menu options
DescriptionOption
This option lets you validate the indexes and keys on all of the tables in the database. Eachtable is scanned. For each row, a check is made that it exists in the appropriate indexes. Thenumber of rows in the table must match the number of entries in the index.
This option is equivalent to the command nbdb_admin -validate.
Standard Validation
This option performs the same checks as the Standard Validation option. In addition, Fullvalidation ensures that every row that is referenced in each index exists in the correspondingtable. For foreign key indexes, it also ensures that the corresponding row exists in the primarytable. This option is equivalent to the command nbdb_admin -validate -full.
Note: To perform a full database validation, shut down NetBackup and start only the databaseservice.
If any validation errors are reported, perform the following tasks:
■ Shut down NetBackup (all daemons and services).■ Start only the SQL Anywhere database server (NB_dbsrv, the NetBackup Relational
Database Manager).■ Repeat the validation check using this tool or the nbdb_admin command line utility.
If validation errors persist, contact Veritas customer support. The administrator may be askedto rebuild the database using the Database Rebuild option or the nbdb_unload commandline utility.
Full Validation
952About the NetBackup relational databaseUsing the NetBackup Database Administration utility on UNIX

Table 23-12 Database Validation Check and Rebuild menu options (continued)
DescriptionOption
This option lets you rebuild the database. This menu option is equivalent to the commandnbdb_unload -rebuild. A Database Rebuild results in a complete unload and reload ofthe database. A new database with all of the same options is built in place. A DatabaseRebuild may be required if Database Validation errors are reported using the Standard orFull Validation options.
During a Database Rebuild, all NetBackup operations are suspended.
When you select this option, a message appears which recommends that you exit and createa backup using the Backup Database option before you rebuild the database. You then havethe choice of whether to continue or not.
See “About the Backup and Restore Database menu options” on page 955.
Database Rebuild
See “Using the NetBackup Database Administration utility on UNIX” on page 947.
About the Move Database menu optionsThe Move Database menu options let you change the location of the database filesor split the database files into multiple directories. Changing the location may improveperformance in the case of large databases. The database files are moved for bothNBDB and BMRDB, if present.
Note:Due to performance issues, NetBackup supports database files only on locallyattached drives.
In addition, the Move Database menu lets you create a mirrored transaction log.The transaction logs (NBDB.log and BMRDB.log) are critical files used to recoverthe relational databases.
For extra protection, a mirrored transaction log can be used. Create the mirroredlog in a different directory from the original log.
The Move Database menu contains the following options.
Table 23-13 Move Database menu options
DescriptionOption
Select this option to change the location of the data dbspaces. Changing the locationtemporarily suspends NetBackup operations.
Move Data
Select this option to change the location of the index dbspaces. Changing the locationtemporarily suspends NetBackup operations.
Move Index
953About the NetBackup relational databaseUsing the NetBackup Database Administration utility on UNIX

Table 23-13 Move Database menu options (continued)
DescriptionOption
Select this option to change the location of the transaction log. Changing the locationtemporarily suspends NetBackup operations.
Move Transaction Log
Select this option to change the location of the mirrored transaction log. If the mirroredtransaction log does not already exist, it is created in the new location. Changing the locationtemporarily suspends NetBackup operations.
Move/Create MirroredLog
This option is displayed only if a mirrored transaction log is used. Select this option to configurethe database server so that it stops using a mirrored transaction log. The existing mirroredtransaction log file is deleted. This action temporarily suspends NetBackup operations.
Stop Using MirroredTransaction Log
See “Using the NetBackup Database Administration utility on UNIX” on page 947.
About the Unload Database menu optionsThe Unload Database menu options let you unload either the schema or the schemaand data from the relational database.
A SQL command file is created that can be used to rebuild the database. If the datais also included in the unload, a set of data files in comma-delimited format iscreated.
The Unload Database menu contains the following options.
Table 23-14 Unload Database menu options
DescriptionOption
This option lets you unload only the database schema. The schema is unloaded as a file thatis named reload.sql in the named directory.
Schema Only
This option lets you unload both the database schema and the data. The data is unloadedas a set of files. One file is created for each database table.
Data and Schema
This option lets you change the directory location for the files that unload options (1) or (2)create.
Change Directoryoption for unloading thedatabase
See “Using the NetBackup Database Administration utility on UNIX” on page 947.
954About the NetBackup relational databaseUsing the NetBackup Database Administration utility on UNIX

About the Backup and Restore Database menu optionsThe Backup and Restore Database menu options let you back up the relationaldatabase to the specified directory. You can restore from a previously createdbackup.
Veritas recommends creating a backup copy of the database files in the followingsituations:
■ Before you move the database.
■ Before you rebuild the database.
■ Before you add data space.
■ Before you add index space.
■ Before you modify the transaction logging mode from FULL to PARTIAL.
■ Before you truncate the transaction log.
Note: Using the NetBackup Database Administration utility to back up and restorethe NetBackup database can potentially break the consistency between theNetBackup catalog and the database. This loss of consistency can lead to loss ofdata. Use the tool to back up and restore the NetBackup database only as aprecautionary measure.
The Backup and Restore Database menu contains the following options.
Table 23-15 Backup and Restore Database menu options
DescriptionOption
This option lets you make a copy of the database files while the database is active. OtherNetBackup activity is not suspended during this time.
Online Backup
This option lets you restore from a copy of the database files previously made with eitheroptions 1 or 2. The currently running database files are overwritten, and the database is shutdown and restarted after the restore is completed.
Restore Backup
This option lets you change the directory location for the files that backup options (1) or (2)create. This directory is the source of the files for the restore option (3).
Change Directory
See “Using the NetBackup Database Administration utility on UNIX” on page 947.
955About the NetBackup relational databaseUsing the NetBackup Database Administration utility on UNIX

Post-installation tasksThe tasks described in the following topics are optional and can be performed afterthe initial installation:
■ Change the database password.See “Changing the NetBackup database password” on page 956.
■ Move NBDB and BMRDB database files (possibly to tune performance).See “Moving NBDB database files after installation” on page 958.
■ Add a mirrored transaction log.See “Adding a mirrored transaction log” on page 959.
■ Recreate NBDB.See “Creating the NBDB database manually” on page 961.
Changing the NetBackup database passwordThe database password is set to a randomly generated password upon installation.This password is used for NBDB and BMRDB and for all DBA and applicationaccounts. (For example, EMM_MAIN.) You can use this procedure to change it to aknown password.
The password is encrypted and stored in the vxdbms.conf file. The permissionsfor the vxdbms.conf file allow only a Windows administrator or a root user to reador write to it.
956About the NetBackup relational databasePost-installation tasks

To change the database password
1 Log on to the server as a Windows Administrator or as root.
2 To change the password for the first time after installation, run the followingcommand. The command updates the vxdbms.conf file with the new, encryptedstring:
On Windows: Install_path\NetBackup\bin\nbdb_admin -dba new_password
On UNIX: /usr/openv/db/bin/nbdb_admin -dba new_password
The password needs to be an ASCII string. Non-ASCII characters are notallowed in the password string.
3 To change a known password to a new password, you can either use thenbdb_admin command or the NetBackup Database Administration utility. Youmust know the current password to log into the NetBackup DatabaseAdministration utility.
See “Using the NetBackup Database Administration utility on Windows”on page 933.
See “Using the NetBackup Database Administration utility on UNIX” on page 947.
Requirements to create a new password where NBAC isenabledIf the NetBackup environment has NetBackup Access Control (NBAC) enabled,keep in mind the following items before you run nbdb_admin -dba new_password.
■ Only the minimum services should be running: NB_dbsrv, nbatd, nbazd, bprd,bpdbm, bpjobd.
■ Users without root or administrator permissions need to have read and writepermissions to vxdbms.conf. Windows users can use the security Permissionstab in NBAC to allow a non-administrator user read and write permissions tovxdbms.conf.
■ To generate nbdb_admin logs, make sure that users have read and writepermissions to the following directory:On Windows: install_path\Veritas\NetBackup\logs\nbdbOn UNIX: /usr/openv/netbackup/logs/nbdb
■ To troubleshoot a situation where only the database server can be started,NBAC must be turned off.
957About the NetBackup relational databasePost-installation tasks

Moving NBDB database files after installationIn the case of large databases, you can change the location of the database filesor split the database files into multiple directories to improve performance.
Note:Due to performance issues, NetBackup supports database files only on locallyattached drives.
Note: Run a catalog backup to back up NBDB and BMRDB both before and aftermoving the database files.
Moving the database files on WindowsTo move the NBDB and the BMRDB database files on Windows
1 Perform a catalog backup.
2 Shut down all NetBackup services by typing the following command:
Install_path\VERITAS\NetBackup\bin\bpdown
3 Start the SQL Anywhere service by typing the following command:
Install_path\VERITAS\NetBackup\bin\bpup -e SQLANYs_VERITAS_NB
4 Use one of the following methods to move the existing data, index, andtransaction log files:
■ Use the NetBackup Database Administration utility.See “Moving the NetBackup database files” on page 943.
■ Type the following command:Install_path\VERITAS\NetBackup\bin\nbdb_move.exe
-data data_directory
-index index_directory -tlog log_directory
You can run the nbdb_move command at any time because it does not dropthe database and recreate it. Thus, all data is preserved.If a mirrored transaction log is in use, type the following command:Install_path\VERITAS\NetBackup\bin\nbdb_move.exe -data
data_directory
-index index_directory -tlog log_directory
-mlog log_mirror_directory
5 Start all services by typing the following command:
Install_path\VERITAS\NetBackup\bin\bpup
6 Perform a catalog backup.
958About the NetBackup relational databasePost-installation tasks

Moving the database files on UNIXTo move the NBDB and the BMRDB database files on UNIX
1 Perform a catalog backup.
2 Shut down all NetBackup daemons by typing the following command:
/usr/openv/netbackup/bin/bp.kill_all
3 Start the SQL Anywhere daemon by typing the following command:
/usr/openv/netbackup/bin/nbdbms_start_stop start
4 Use one of the following methods to move the existing data, index, andtransaction log files:
■ Use the NetBackup Database Administration utility.See “About the Move Database menu options” on page 953.
■ Type the following command:/usr/openv/db/bin/nbdb_move
-data data_directory
-index index_directory -tlog log_directory
You can run the nbdb_move command at any time because it does not dropthe database and recreate it. Thus, all data is preserved.If a mirrored transaction log is in use, type the following command:/usr/openv/db/bin/nbdb_move -data data_directory
-index index_directory -tlog log_directory
-mlog log_mirror_directory
5 Start all NetBackup daemons by typing the following command:
/usr/openv/netbackup/bin/bp.start_all
6 Perform a catalog backup.
See “About NetBackup master server installed directories and files” on page 922.
Adding a mirrored transaction logThe transaction logs NBDB.log and BMRDB.log are critical files used to recover theSQL Anywhere databases.
For extra protection, use a mirrored transaction log. Create this mirrored log in adifferent directory from the original log.
959About the NetBackup relational databasePost-installation tasks

Creating a mirrored transaction log on a WindowscomputerTo create a mirrored transaction log on a Windows computer
1 Perform a catalog backup.
2 Shut down all NetBackup services by typing the following command:
Install_path\VERITAS\NetBackup\bin\bpdown
3 Start the SQL Anywhere service by typing the following command:
Install_path\VERITAS\NetBackup\bin\bpup -e SQLANYs_VERITAS_NB
4 Create the mirrored transaction log:
Type the following command:
Install_path\NetBackup\bin\nbdb_move.exe -mloglog_mirror_directory
To move the existing data, index, transaction log files, and create the mirroredtransaction log, type the following command:
Install_path\NetBackup\bin\nbdb_move.exe -datadata_directory-index
index_directory -tlog log_directory-mlog log_mirror_directory
5 Start all NetBackup services by typing the following command:
Install_path\VERITAS\NetBackup\bin\bpup
6 Perform a catalog backup.
Creating a mirrored transaction log on a UNIX computerTo create a mirrored transaction log on a UNIX computer
1 Perform a catalog backup.
2 Shut down all NetBackup daemons by typing the following command:
/usr/openv/netbackup/bin/bp.kill_all
3 Start the SQL Anywhere daemon by typing the following command:
/usr/openv/netbackup/bin/nbdbms_start_stop start
960About the NetBackup relational databasePost-installation tasks

4 Create the mirrored transaction log:
Type the following command:
/usr/openv/db/bin/nbdb_move -mlog log_mirror_directory
To move the existing data, index, transaction log files, and create the mirroredtransaction log, type the following command:
/usr/openv/db/bin/nbdb_move -data data_directory-index
index_directory -tlog log_directory-mlog log_mirror_directory
5 Start all NetBackup daemons by typing the following command:
/usr/openv/netbackup/bin/bp.start_all
6 Perform a catalog backup.
See “About catalog backups” on page 891.
See “Moving NBDB database files after installation” on page 958.
Creating the NBDB database manuallyThe NBDB database is created automatically during NetBackup installation.However, it may be necessary during certain catalog recovery situations to createit manually by using the create_nbdb command.
Note: Recreating the database manually is not recommended in most situations.
Note: If the NBDB.db database already exists, the create_nbdb command doesnot overwrite it. If you want to move the database, move it by using the nbdb_move
command.
Creating the database on WindowsTo create the NBDB database manually on Windows
1 Shut down all NetBackup services by typing the following command:
Install_path\VERITAS\NetBackup\bin\bpdown
2 Start the SQL Anywhere service by typing the following command:
Install_path\VERITAS\NetBackup\bin\bpup -e SQLANYs_VERITAS_NB
3 Run the following command:
Install_path\NetBackup\bin\create_nbdb.exe
961About the NetBackup relational databasePost-installation tasks

4 Start all NetBackup services by typing the following command:
Install_path\VERITAS\NetBackup\bin\bpup
5 The new NBDB database is empty and does not contain the EMM data that isloaded during a normal installation.
Make sure that you have the most current support for new devices before thedata is repopulated. New devices are added approximately every 2 months.
6 Repopulate the EMM data by running the tpext utility. tpext updates the EMMdatabase with new versions of device mappings and external attribute files.
Install_path\VERITAS\Volmgr\bin\tpext.exe
During regular installation, tpext is run automatically.
If the create_nbdb command is used to create a database manually, the tpext
utility must also be run. tpext loads EMM data into the database.
Creating the database on UNIXTo create the NBDB database manually on UNIX
1 Shut down all NetBackup daemons by typing the following command:
/usr/openv/netbackup/bin/bp.kill_all
2 Start the SQL Anywhere daemon by typing the following command:
/usr/openv/netbackup/bin/nbdbms_start_stop start
3 Run the following command:
/usr/openv/db/bin/create_nbdb
4 Start all NetBackup daemons by typing the following command:
/usr/openv/netbackup/bin/bp.start_all
5 The new NBDB database is empty and does not contain the EMM data that isloaded during a normal installation.
Make sure that you have the most current support for new devices before thedata is repopulated. New devices are added approximately every two months.
6 Repopulate the EMM data by running the tpext utility. tpext updates the EMMdatabase with new versions of device mappings and external attribute files.
/usr/openv/volmgr/bin/tpext
During regular installation, tpext is run automatically.
If the create_nbdb command is used to create a database manually, the tpext
utility must also be run. tpext loads EMM data into the database.
962About the NetBackup relational databasePost-installation tasks

Additional create_nbdb optionsIn addition to using the create_nbdb command to create the NBDB database, youalso can use it to perform the following actions. In each command,NB_server_namematches the name in server.conf.
See “About the NetBackup server.conf file” on page 923.
■ Drop the existing NBDB database and recreate it in the default location by typingthe following command:
■ On Windows: create_nbdb -drop[current_data_directory]
Provide the location of the current NBDB data directory,current_data_directory, if the default location is not used.
■ On UNIX: create_nbdb -drop
The location of the current NBDB data directory is retrieved automaticallyfrom the bp.conf file.
The -drop option instructs NetBackup to drop the existing NBDB database.
■ Drop the existing NBDB database and do not recreate by typing the followingcommand:On Windows: create_nbdb -db_server NB_server_name
-drop_only[current_data_directory]
On UNIX: create_nbdb -drop_only
Provide the location of the current NBDB data directory,current_data_directory, if the default location is not used.
■ Drop the existing NBDB database and recreate it in the directories as specifiedby typing the following command:
■ On Windows:create_nbdb -drop [current_data_directory] -data
data_directory-index index_directory -tlog log_directory
[-mloglog_mirror_directory]
■ On UNIX:create_nbdb -drop -data data_directory -index index_directory
-tlog log_directory [-mloglog_mirror_directory]
If the NBDB database files were moved from the default location by using nbdb_move,use this command to recreate them in the same location. Specifycurrent_data_directory.
If the location of NBDB.db changed from the default, BMRDB.db must also berecreated. The BMRDB.db files must reside in the same location as the NetBackupdatabase files.
963About the NetBackup relational databasePost-installation tasks

About backup and recovery proceduresThe catalog method can be performed while regular backup activity takes place. Itruns according to a policy and is virtually transparent to the customer. Set up thepolicy by using either the Catalog Backup Wizard or the Policy Configuration Wizard.Either wizard automatically includes all the necessary catalog files to include thedatabase files (NBDB, NBAZDB, and BMRDB) and any catalog configuration files(vxdbms.conf, server.conf, databases.conf).
The catalog allows an administrator to recover either the entire catalog or piecesof the catalog. (For example, the databases separately from the image catalog.)
It offers an incremental backup. For Sybase SQL Anywhere, an incremental backupmeans a backup of the transaction log only. Transaction logs are managedautomatically, truncated after each successful backup.
Database transaction logThe transaction log for the NetBackup database is necessary for recovering thedatabase. It is automatically truncated after a successful catalog backup.
The transaction log, NBDB.log, is located by default in the following directory:
On Windows: Install_path\NetBackupDB\data\NBDB.log
On UNIX: /usr/openv/db/data/NBDB.log
The transaction log continues to grow until it becomes truncated. Catalog backupsmust run frequently enough so that the transaction log does not grow to fill the filesystem.
In addition to the default transaction log, a mirrored transaction log can be createdfor additional protection of NBDB.
The directory for the mirrored log should not be the same as the directory for thedefault transaction log. Ideally, the mirrored log should be located on a file systemon a different physical disk drive.
If BMR is installed, a transaction log for BMRDB is also created by default in:
On Windows: Install_path\NetBackupDB\data\BMRDB.log
On UNIX: /usr/openv/db/data/BMRDB.log
It has an optional mirrored log in the following location:
On Windows: mirrored_log_directory\BMRDB.m.log
On UNIX: mirrored_log_directory/BMRDB.m.log
964About the NetBackup relational databaseAbout backup and recovery procedures

The BMRDB transaction logs are backed up and truncated during the catalog backupalong with the NBDB transaction logs.
Note: If a catalog backup is not run, the logs are not truncated. Truncation mustbe managed in this manner as it is critical to recovery of the database.
About catalog recoveryRecovery scenarios include the following:
■ A full recovery form a complete disasterUsing the Disaster Recovery wizard, the databases are restored along withthe image catalog to a consistent state.
■ A recovery of the database files onlyUsing bprecover, the relational database files and configuration files can berestored and recovered.
Details about catalog recovery scenarios and procedures are available in theNetBackup Troubleshooting Guide.
Commands for backing up and recovering the relational databasesThe recommended method to protect the relational databases is to use the catalogbackup and recovery interfaces.
A temporary backup of the NBDB and BMRDB databases can be made for extraprotection before database administration activities such moving or reorganizingthe database files.
965About the NetBackup relational databaseAbout backup and recovery procedures

Table 23-16 Commands used to back up and recover relational databases
DescriptionCommand
Use nbdb_backup or nbdb_backup.exe to make a copy of the NBDB database files and theBMRDB database files in a directory. The nbdb_backup command does not truncate the transactionlog. Transaction logs are managed only by using the catalog backup.
On Windows:Install_path\NetBackup\bin\nbdb_backup.exe [-dbn database_name]-online destination_directory [tlog_only] [-truncate_tlog]
On UNIX: /usr/openv/db/bin/nbdb_backup [-dbn database_name] -onlinedestination_directory [tlog_only] [-truncate_tlog]
-dbn database_name only backs up the specified database (NBDB or BMRDB).
-online destination_directory is the location for the copied files.
-tlog_only generates only the database transaction log along with the configuration files forthe backup.
-truncate_tlog truncates the database transaction log after the backup completes the backup.
Note: Catalog backup activity is usually logged in the nbdb log. If the master server usesNetBackup Access Control (NBAC) in the REQUIRED mode and the EMM database is remote,the logging information appears in the bpdbm log.
Note: Using this command (or the NetBackup Database Administration utility) to back up theNetBackup database can potentially break the consistency between the NetBackup catalog andthe database. This loss of consistency can lead to loss of data. Use this command (or theNetBackup Database Administration utility) to back up the NetBackup catalog only as aprecautionary measure.
nbdb_backup ornbdb_backup.exe
966About the NetBackup relational databaseAbout backup and recovery procedures

Table 23-16 Commands used to back up and recover relational databases(continued)
DescriptionCommand
Use nbdb_restore to recover from a database backup that was made using nbdb_backup.
On Windows: Install_path\NetBackup\bin\nbdb_restore.exe -recoversource_directory -dbn database_name [-ignore_tlog]
On UNIX: /usr/openv/db/bin/nbdb_restore -recover source_directory -dbndatabase_name [-ignore_tlog]
Logs are recorded in the /admin or \admin directory.
nbdb_restore restores from the staging directory to recover only the NetBackup database(NBDB). The default is to apply the current transaction log to make the database as consistentas possible with the current db\images or /db/images directory.
-ignore_tlog does not apply the current transaction log to the NBDB recovery operation.
Note: Using this command (or the NetBackup Database Administration utility) to restore theNetBackup database can potentially break the consistency between the NetBackup catalog andthe database. This loss of consistency can lead to loss of data. Use this command (or theNetBackup Database Administration utility) to restore the NetBackup catalog only as aprecautionary measure.
nbdb_restore ornbdb_restore.exe
About the catalog backup processNormally, a catalog backup consists of one parent job and two or more child jobs.Events for these jobs appear in the dbm log.
An overview of the catalog backup process consists of the following process:
■ Creates a staging directory where the command can store the temporary copies:On Windows: Install_path\NetBackupDB\stagingOn UNIX: /usr/openv/db/stagingOnce the copy is made, NetBackup can back up the catalog files.
■ A child job backs up files in a single stream as follows:
■ Configuration files (server.conf, database.conf, vxdbms.conf)
■ Database filesBMR_DATA.db
BMRDB.db
BMRDB.log
BMR_INDEX.db
DARS_DATA.db
967About the NetBackup relational databaseAbout backup and recovery procedures

DARS_INDEX.db
DBM_DATA.db
DBM_INDEX.db
EMM_DATA.db
EMM_INDEX.db
JOBD_DATA.db
NBAZDB.db
NBAZDB.db.template
NBAZDB.log
NBDB.db
NBDB.log
vxdbms.conf
If BMR was installed
■ A second child job begins the image catalog backup.
■ Transaction logs are truncated after a successful full or incremental backup.If the transaction logs are manually changed or deleted, a hole could exist inthe recovery.The child job for the relational database backup is normally run on the masterserver. The master server is the default location for NBDB and the requiredlocation for BMRDB.If NBDB was moved to a media server, the child job runs on the media server.In this case, additional logging for the job appears in the admin log on the mediaserver.If NBDB was moved to a media server and BMRDB is installed on the masterserver, two child jobs exist for the relational database backup portion of thecatalog backup. One on the media server for NBDB and one on the masterserver for BMRDB.
Unloading the NetBackup databaseUse the NetBackup Database Administration utility or the nbdb_unload commandline utility to dump the entire NetBackup or Bare Metal Restore databases. Theseutilities can also be used to dump individual tables (one .dat file is created for eachtable), or schema. Use either method to create a copy of the SQL Anywheredatabase that may be requested in some customer support situations.
There should be no active connections to the database when nbdb_unload is run.
968About the NetBackup relational databaseUnloading the NetBackup database

When either method is used, a reload.sql script is generated. The script containsall the code that is required to recreate the database. Veritas Technical Supportuses this script and the associated files to assist in support cases.
On Windows:
Install_path\NetBackup\bin\nbdb_unload.exe [-dbn database_name] [-t
table_list] [-s] destination_directory
On UNIX:
/usr/openv/db/bin/nbdb_unload [-dbn database_name] [-t table_list]
[-s] destination_directory
In the script where:
■ -dbn database_name
database_name is NBDB (default) or BMRDB.
■ -t table_list
Must list the owner of the table, then the table name. For EMM, the accountEMM_MAIN owns all tables.nbdb_unload -t EMM_MAIN.EMM_Device, EMM_MAIN.EMM_Density
■ -s
No data is dumped, only schema.
■ destination_directory
Specify the location where the dump is created.
Terminating database connectionsBefore you run nbdb_unload, shut down NetBackup to terminate all activeconnections to the database. Shutting down NetBackup eliminates any possibleconcurrency problems.
Terminating database connections on WindowsTo terminate database connections on Windows
1 Shutdown all NetBackup services by typing the following command:
Install_path\VERITAS\NetBackup\bin\bpdown
2 In the Windows Services Manager, restart the service titled Adaptive ServerAnywhere – VERITAS_NB. On NetBackup 7.x systems, the service is titledNetBackup Relational Database Manager.
3 Use one of the following methods to terminate database connections:
969About the NetBackup relational databaseTerminating database connections

■ Use the NetBackup Database Administration utility.See “Using the NetBackup Database Administration utility on Windows”on page 933.
■ Run nbdb_unload and indicate the outputs (database name, table lists, orschema only) and the destination directory.
4 Stop the SQL Anywhere service by typing the following command:
Install_path\VERITAS\NetBackup\bin\bpdown -e SQLANYs_VERITAS_NB
5 Start all NetBackup services by typing the following command:
Install_path\VERITAS\NetBackup\bin\bpup
Terminating database connections on UNIXTo terminate database connections on UNIX
1 Shutdown all NetBackup daemons by typing the following command:
/usr/openv/netbackup/bin/bp.kill_all
2 Start the SQL Anywhere daemon by typing the following command:
/usr/openv/netbackup/bin/nbdbms_start_stop start
3 Start only the database server by using/usr/openv/netbackup/bin/nbdbms_start_stop start
4 Use one of the following methods to terminate database connections:
■ Use the NetBackup Database Administration utility.See “Using the NetBackup Database Administration utility on UNIX”on page 947.
■ Run nbdb_unload and indicate the outputs (database name, table lists, orschema only) and the destination directory.
5 Shut down the database server by using /usr/openv/netbackup/bin
nbdbms_start_stop stop.
6 Stop the SQL Anywhere daemon by typing the following command:
/usr/openv/netbackup/bin/nbdbms_start_stop stop
7 Start all NetBackup daemons by typing the following command:
/usr/openv/netbackup/bin/bp.start_all
Veritas does not recommend using reload.sql to make a copy of the relationaldatabases in a production environment. Use the NetBackup Database Administrationutility or nbdb_backup to make a physical copy or use nbdb_move to relocate thedatabase files.
970About the NetBackup relational databaseTerminating database connections

Moving the NetBackup database from one hostto another
The NetBackup database (NBDB) includes the Enterprise Media Manager (EMM).Both reside together on the master server. In previous releases, NetBackup allowedNBDB and EMM to be moved from the master server to another server.
Support for remote-EMM and shared-EMM server configurations was withdrawn in7.6. In a remote- or shared-EMM server configuration, the NetBackup relationaldatabase (NBDB), the Enterprise Media Manager (EMM), and the Resource Broker(RB) have been moved to a server that is not the master server. Customers whocurrently use this option should contact Veritas Support. Support engages VeritasEngineering to review the options to disengage this configuration.
971About the NetBackup relational databaseMoving the NetBackup database from one host to another

Managing backup imagesThis chapter includes the following topics:
■ About the Catalog utility
■ About searching for backup images
■ Verifying backup images
■ Viewing job results
■ Promoting a copy to a primary copy
■ Duplicating backup images
■ Expiring backup images
■ About importing backup images
About the Catalog utilityUse the Catalog utility in the NetBackup Administration Console to create andconfigure catalog backups. Catalog backups are required for NetBackup to protectNetBackup internal databases. The catalogs contain setup information as well ascritical information about client backups. The catalog backups are tracked separatelyfrom other backups to ensure recovery in case of a server crash.
The Catalog utility is also used to perform the following actions:
■ Search for backup images to verify the contents of media with what is recordedin the NetBackup catalog.
■ Duplicate a backup image.
■ Promote a backup image from a copy to the primary backup copy.
■ Expire backup images.
24Chapter

■ Import expired backup images or images from another NetBackup server.
Figure 24-1 Catalog utility options
1
3
5
2 4
6
Table 24-1 Host Properties utility
DescriptionNumber
The name of the currently selected master server.1
Right-click Catalog to view the shortcut menu.2
Select an action to perform in the Catalog utility.3
Set search criteria, including a specific media and date range.4
The user toolbar is specific to the Catalog utility.
See “Standard and user toolbars” on page 53.
5
Display of search results.6
About searching for backup imagesUse theCatalog utility to search for a backup image to perform the following actions:
■ Verify the backup contents with what is recorded in the NetBackup catalog.
■ Duplicate the backup image to create up to 10 copies.
■ Promote a copy of a backup to be the primary backup copy.
973Managing backup imagesAbout searching for backup images

■ Expire backup images.
■ Import expired backup images or images from another NetBackup server.
NetBackup uses the specific search criteria to build a list of backups from whichyou can make your selections.
When you search for specific kinds of images, note the following:
■ Verification imageBackups that have fragments on another volume are included, as they exist inpart on the specified volume.
■ Import imageThe backup is not imported if it begins on a media ID that the initiating backupprocedure did not process.The backup is incomplete if it ends on a media ID that the initiating backupprocedure did not process.See “About importing backup images” on page 987.
Table 24-2 lists the search criteria for backup images.
Table 24-2 Catalog utility search properties
DescriptionProperty
Specifies the action that was used to create the image: Verify, Duplicate, Import.
See “Verifying backup images” on page 976.
See “Duplicating backup images” on page 979.
See “Expiring backup images” on page 986.
Action
Specifies the media ID for the volume. Type a media ID in the box or select one from thescroll-down list. To search on all media, select <All>.
Media ID
On UNIX: Specifies the host name of the media server that produced the originals. Type ahost name in the box or select one from the scroll-down list. To search through all hosts, selectAll Media Hosts.
Media Host
On Windows: Specifies the name of the media server that produced the originals. Type amedia server name in the box or select one from the scroll-down list. To search through allmedia servers, select All Media Servers.
Media Server
Specifies the type of the disk storage unit on which to search for backup images.Disk type
Specifies the name of the disk pool on which to search for backup images.Disk pool
Specifies the ID of the disk volume in the disk pool on which to search for backup images.Volume ID
974Managing backup imagesAbout searching for backup images

Table 24-2 Catalog utility search properties (continued)
DescriptionProperty
Searches for an image on a disk storage unit, if the path is entered. Or, searches all of thedisk storage on the specified server, if All was selected. Appears if the disk type is BasicDisk.
Path
Specifies the range of dates and times that includes all the backups for which you want tosearch. The Global Attributes property Policy Update Interval determines the default range.
Date/time range
Specifies the source you want to search. From the scroll-down list, select either Primary orthe copy number.
Copies
Specifies the policy under which the selected backups were performed. Type a policy namein the box or select one from the scroll-down list. To search through all policies, select AllPolicies.
Policy
Specifies the host name of the client that produced the originals. Type a client name in thebox or select one from the scroll-down list. To search through all hosts, select All Clients.
Client (host name)
Specifies the type of schedule that created the backup. Type a schedule type in the box orselect one from the scroll-down list. To search through all schedule types, select All BackupTypes.
Type of backup
Selects the job priority for verify, duplicate, and import actions.
To change the default for the selected action, enable Override default job priority. Then,select a value in the Job Priority field.
Changes in the catalog dialog box affect the priority for the selected job only.
If this option is not enabled, the job runs using the default priority as specified in the DefaultJob Priorities host properties.
See “Default Job Priorities properties” on page 121.
Override default jobpriority
The Search tab columns list information about matching backup images based on the definedsearch criteria.
Search tab columns
The Results tab displays the progress of the request to verify, duplicate, expire, or import animage.
Results tab columns
On UNIX: Displays the messages about the tasks that run as background processes. Thepane appears only if there is an informative message or error message for a task. If the taskcompletes normally, the pane does not appear. The Messages pane can be maximized,minimized, or closed.
Messages pane
975Managing backup imagesAbout searching for backup images

Verifying backup imagesNetBackup can verify the contents of a backup by reading the volume and comparingits contents to what is recorded in the NetBackup catalog.
This operation does not compare the data on the volume to the contents of theclient disk. However, the operation does read each block in the image to verify thatthe volume is readable. (However, data corruption within a block is possible.)NetBackup verifies only one backup at a time and tries to minimize media mountsand positioning time.
To verify backup images
1 In the NetBackup Administration Console, in the left pane, expandNetBackup Management > Catalog.
2 In the right pane, on the Search tab, set up the search criteria for the imageyou want to verify. Click Search Now.
3 In the right pane, select the image you want to verify and on the Actiondrop-down menu, select Action > Verify.
4 In the right pane, click the Results tab, then select the verification job to viewthe job results.
Viewing job resultsThe results of verify, duplicate, or import jobs appear in the Results tab for theCatalog options. The top portion of the dialog box displays all existing log files.
To view a log file, select the name of the log from the list. The current log file appearsin the bottom portion of the Results dialog box. If an operation is in progress, thelog file results refresh as the operation proceeds.
To view job results
1 In the NetBackup Administration Console, in the left pane, expandNetBackup Management > Catalog.
2 In the right pane, click the Results tab.
3 Select a log file.
4 On the View menu, click View > Full View to display the entire log file in ascreen editor.
On the Edit menu, select Edit > Delete to delete the log.
You can also right-click the log file and select an action from the scroll-downmenu.
976Managing backup imagesVerifying backup images

Promoting a copy to a primary copyEach backup is assigned a primary copy. NetBackup uses the primary copy tosatisfy restore requests. The first backup image that is created successfully by aNetBackup policy is the primary backup. If the primary copy is unavailable and aduplicate copy exists, select a copy of the backup and set it to be the primary copy.
NetBackup restores from the primary backup, and Vault duplicates from the primarybackup. If your Vault profile performs duplication, you can designate one of theduplicates as the primary. In most circumstances, the copy remaining in the robotis the primary backup. When a primary backup expires, the next backup (if it exists)is promoted to primary automatically.
Use one of the following methods to promote a copy to a primary copy:
Promoting a backup copy to a primary copy using theNetBackup Administration Console
Promote a backup copy to a primary copy using searchcriteria
Promoting a copy to a primary copy for many backupsPromote a copy to a primary copy for many backups usingthe bpchangeprimary command
Promoting a backup copy to a primary copy usingbpduplicate
Promote a backup copy to a primary copy using thebpduplicate command
Figure 24-2 Primary copy status
Primary Copy status indicates that theimage is now the primary copy
977Managing backup imagesPromoting a copy to a primary copy

Promoting a backup copy to a primary copy using theNetBackup Administration ConsoleTo promote a backup copy to a primary copy
1 In the NetBackup Administration Console, in the left pane, expandNetBackup Management > Catalog.
2 In the right pane, set up the search criteria for the image you want to promoteto a primary copy. Be sure that you indicate a copy in the Copies field and notPrimary Copy. Click Search Now.
See “About searching for backup images” on page 973.
3 Select the image you want to promote.
4 On the Actions menu, click Actions > Set Primary Copy.
After the image is promoted to the primary copy, the Primary Status columnimmediately reads Yes.
Promoting a copy to a primary copy for many backupsTo promote a copy to a primary copy for many backups
◆ You can also promote a copy to be a primary copy for many backups usingthe bpchangeprimary command. For example, the following command promotesall copies on the media that belongs to the SUN volume pool. The copies musthave been created after August 8, 2012:
bpchangeprimary -pool SUN -sd 08/01/2012
In the next example, the following command promotes copy 2 of all backupsof client_a. The copies must have been created after January 1, 2012:
bpchangeprimary -copy 2 -cl client_a -sd 01/01/2012
More information is available in the NetBackup Commands Reference Guide.
978Managing backup imagesPromoting a copy to a primary copy

Promoting a backup copy to a primary copy usingbpduplicateTo use bpduplicate to promote a backup copy to a primary copy
1 Enter the following command:
On Windows:
Install_path\VERITAS\NetBackup\bin\admincmd\bpduplicate
-npc pcopy -backupid bid
On UNIX:
/usr/openv/netbackup/bin/admincmd/bpduplicate -npc pcopy
-backupid bid
Where:
pcopy is the copy number of the new primary copy.
bid is the backup identifier as shown in the Images on Media report.
Find the volume that contains the duplicate backup by using the Images onMedia report.
2 Specify the backup ID that is known (and also the client name if possible toreduce the search time).
The bpduplicate command writes all output to the NetBackup logs. Nothingappears in the command window.
After the duplicate copy is promoted to the primary copy, use the client interfaceon the client to restore files from the backup.
For instructions, see the online Help in the Backup, Archive, and Restore clientinterface.
Duplicating backup imagesNetBackup does not verify in advance whether the storage units and the drives thatare required for the duplicate operation are available for use. NetBackup verifiesthat the destination storage units exist. The storage units must be connected to thesame media server.
Table 24-3 lists the scenarios in which duplication is possible and scenarios in whichduplication is not possible:
979Managing backup imagesDuplicating backup images

Table 24-3 Backup duplication scenarios
Duplication not possibleDuplication possible
■ While the backup is created (unless makingmultiple copies concurrently).
■ When the backup has expired.■ By using NetBackup to schedule
duplications automatically (unless you usea Vault policy to schedule duplication)
■ When it is a multiplexed duplicate of thefollowing type:■ FlashBackup■ NDMP backup■ Backups from disk type storage units■ Backups to disk type storage units■ Nonmultiplexed backups
■ From one storage unit to another.■ From one media density to another.■ From one server to another.■ From multiplex to nonmultiplex format.■ From multiplex format and retain the
multiplex format on the duplicate. Theduplicate can contain all or any subsetof the backups that were included in theoriginal multiplexed group. The duplicateis created with a single pass of the tape.(A multiplexed group is a set of backupsthat were multiplexed together during asingle session.)
An alternative to taking time to duplicate backups is to create up to four copiessimultaneously at backup time. (This option is sometimes referred to as Inline Copy.)Another alternative is to use storage lifecycle policies.
See “About writing multiple copies using a storage lifecycle policy” on page 667.
To duplicate backup images
1 In the NetBackup Administration Console, in the left pane, expandNetBackup Management > Catalog.
2 In the right pane, set up the search criteria for the image you want to duplicate.Click Search Now.
980Managing backup imagesDuplicating backup images

3 Right-click the image(s) you want to duplicate and select Duplicate from theshortcut menu.
If you duplicate an online, hot catalog backup, select all child jobs that wereused to create the catalog backup. All jobs must be duplicated to duplicate thecatalog backup.
981Managing backup imagesDuplicating backup images

4 Specify the number of copies you want to create. NetBackup can create up to10 copies of unexpired backups.
If enough drives are available, the copies are created simultaneously.Otherwise, the system may require operator intervention if four copies are tobe created using only two drives, for example.
5 The primary copy is the copy from which restores are done. Normally, theoriginal backup is the primary copy.
If you want one of the duplicated copies to become the primary copy, checkthe appropriate check box, otherwise leave the fields blank.
When the primary expires, a different copy automatically becomes primary.(The copy that is chosen is the one with the smallest copy number. If the primaryis copy 1, copy 2 becomes primary when it expires. If the primary is copy 5,copy 1 becomes primary when it expires.)
6 Specify the storage unit where each copy is stored. If a storage unit has multipledrives, it can be used for both the source and destination.
All storage units must meet the criteria for creating multiple copies.
See “About configuring multiple copies” on page 774.
982Managing backup imagesDuplicating backup images

7 Specify the volume pool where each copy is stored.
The following volume pool selections are based on the policy type setting thatwas used for the query.
Specifies that all volume pools areincluded in the drop-down list. Bothcatalog and non-catalog volume pools areincluded.
If the Policy type is set toAll Policy Types(default).
Specifies that only catalog volume poolsare included in the drop-down list.
If the Policy type is set to NBU-Catalog.
Specifies that only non-catalog volumepools are included in the drop-down list.
If the Policy type is set to a policy typeother than NBU-Catalog or All PolicyTypes.
NetBackup does not verify that the media ID selected for the duplicate copy isdifferent from the media ID that contains the original backup. Because of thispotential deadlock, specify a different volume pool to ensure that a differentvolume is used.
8 Select the retention level for the copy, or select No change.
The duplicate copy shares many attributes of the primary copy, including backupID. Other attributes apply only to the primary. (For example, elapsed time.)NetBackup uses the primary copy to satisfy restore requests.
Consider the following items when selecting the retention level:
■ If No Change is selected for the retention period, the expiration date is thesame for the duplicate and the source copies. You can use the bpexpdate
command to change the expiration date of the duplicate.
■ If a retention period is indicated, the expiration date for the copy is thebackup date plus the retention period. For example, if a backup was createdon November 14, 2010 and its retention period is one week, the new copy’sexpiration date is November 21, 2010.
9 Specify whether the remaining copies should continue or fail if the specifiedcopy fails.
983Managing backup imagesDuplicating backup images

10 Specify who should own the media onto which you duplicate images.
Select one of the following:
Specifies that NetBackup chooses the media owner,either a media server or server group.
Any
Specifies the media server that writes to the mediaowns the media. No media server is specifiedexplicitly, but you want a media server to own themedia.
None
Specifies that only those media servers in the groupare allowed to write to the media on which backupimages for this policy are written. All of the mediaserver groups that are configured in your NetBackupenvironment appear in the drop-down list.
A server group
11 If the selection includes multiplexed backups and the backups are to remainmultiplexed in the duplicate, check Preserve Multiplexing. If you do notduplicate all the backups in a multiplexed group, the duplicate contains adifferent layout of fragments. (A multiplexed group is a set of backups that weremultiplexed together during a single session.)
By default, duplication is done serially and attempts to minimize media mountsand positioning time. Only one backup is processed at a time. If PreservedMultiplexing is enabled, NetBackup first duplicates all backups that cannotbe multiplex duplicated before the multiplexed backups are duplicated.
The Preserve Multiplexing setting does not apply when the destination is adisk storage unit. However, if the source is a tape and the destination is a diskstorage unit, select Preserve Multiplexing to ensure that the tape is read inone pass.
12 Click OK to start duplicating.
13 Click the Results tab, then select the duplication job to view the job results.
See “Viewing job results” on page 976.
See “About multiplexed duplication considerations” on page 984.
About multiplexed duplication considerationsConsider the following items about multiplexed duplication.
984Managing backup imagesDuplicating backup images

Table 24-4 Multiplexed duplication considerations
DescriptionConsideration
When multiplexed backups are duplicated, the multiplexsettings of the destination storage unit and the originalschedule are ignored. However, if multiple multiplexed groupsare duplicated, the grouping within each multiplexed groupis maintained. This means that the duplicated groups havea multiplexing factor that is no greater than the factor thatwas used during the original backup.
Multiplex settings are ignored
When backups in a multiplexed group are duplicated to astorage unit, the duplicated group is identical as well.However, the storage unit must have the same characteristicsas the unit where the backup was originally performed. Thefollowing items are exceptions:
■ If EOM (end of media) is encountered on either the sourceor the destination media.
■ If any of the fragments are zero length in the sourcebackups, the fragments are removed during duplication.A fragment of zero length occurs if many multiplexedbackups start at the same time.
Backups in a multiplexedgroup are duplicated andduplicated group is identical
Jobs that appear while making multiple copiesWhen multiple copies are made concurrently, a parent job appears, plus a job foreach copy.
The parent job displays the overall status, whereas the copy jobs display the statusof a single copy. Viewing the status of individual jobs lets you troubleshoot jobsindividually. For example, if one copy fails but the other copy is successful, or ifeach copy fails for different reasons. If at least one copy is successful, the statusof the parent job is successful. Use the Parent Job ID filter to display the parentJob ID. Use the Copy filter to display the copy number for a particular copy.
The following example shows a backup that contains two copies. The parent job is19, copy 1 is job 20, and copy 2 is job 21. Copy 1 finished successfully, but copy2 failed with an 800 status (disk volume cannot be used for more than one copy inthe same job). Since at least one copy successfully completed, the parent jobdisplays a successful (0) status.
985Managing backup imagesDuplicating backup images

Figure 24-3 Backup that contains two copies
Copy 1 was successful, butCopy 2 failed
The parent job was successful becauseat least one copy was successful
Expiring backup imagesTo expire a backup image means to force the retention period to expire, orinformation about the backup is deleted. When the retention period expires,NetBackup deletes information about the backup. The files in the backups areunavailable for restores without first re-importing.
To expire a backup image
1 In the NetBackup Administration Console, in the left pane, expandNetBackup Management > Catalog.
2 In the right pane, set up the search criteria for the image you want to expire,then click Search Now.
See “About searching for backup images” on page 973.
3 Select the image you want to expire and on the Actions menu, select Actions> Expire.
4 A message appears that announces that once the backups are expired, theycannot be used for restores. Select Yes to begin to expire the images.
If the user attempts to manually expire an image or some image copies that arenot SLP-complete, the request fails with status code 1573 (Backup image cannotbe expired because its SLP processing is not yet complete). Use the NetBackupTroubleshooter or the NetBackup Status Codes Reference Guide to determinecorrective actions.
986Managing backup imagesExpiring backup images

If you use the NetBackup Administration Console to expire NetBackup images,the image extension files remain in the catalog. However, NetBackup expires theimage extension files, usually within 12 hours.
About importing backup imagesNetBackup can import the backups that have expired or the backups from anotherNetBackup server.
During an import operation, NetBackup recreates NetBackup catalog entries forthe backups on the imported volume. The import capability is useful for movingvolumes from one site to another and for recreating NetBackup catalog entries.
About importing expired imagesThe expiration date for the imported items is the current date plus the retentionperiod. For example, if a backup is imported on November 14, 2014, and its retentionperiod is one week, the new expiration date is November 21, 2014.
Consider the following items when importing backup images:
■ NetBackup can import the disk images that NetBackup version 6.0 (or later)writes.
■ You cannot import a backup if an unexpired copy of it already exists on theserver.
■ NetBackup does not direct backups to imported volumes.
■ If you import a catalog backup, import all the child jobs that were used to createthe catalog backup. All jobs must be imported to import the catalog backup.
■ To import a volume with the same media ID as an existing volume on a server,use the following example where you want to import a volume with media IDA00001. (A volume with media ID A00001 already exists on the server.)
■ Duplicate the existing volume on the server to another media ID (for example,B00001).
■ Remove information about media ID A00001 from the NetBackup catalogby running the following command:On Windows:Install_path \VERITAS\NetBackup\bin\admincmd\bpexpdate
-d 0 -m mediaID
On UNIX:/usr/openv/NetBackup/bin/admincmd/bpexpdate -d 0 -m
media_ID
987Managing backup imagesAbout importing backup images

■ Delete media ID A00001 from Media Manager on the server.
■ Add the other A00001 to Media Manager on the server.To avoid this problem in the future, use unique prefix characters for media IDson all servers.
See “Expiring backup images” on page 986.
Importing backup imagesUse the following procedure to initiate an import of backup images.
To initiate an import of backup images
1 To import the images from tape, make the media accessible to the media serverso the images can be imported.
2 In the NetBackup Administration Console, in the left pane, expandNetBackup Management > Catalog.
3 On the Actions menu, select Actions > Initiate Import.
4 In the Initialize Import window, in the Media Server field, specify the nameof the host that contains the volume to import. This media server becomes themedia owner.
5 Indicate the location of the image. Under Image type, select whether the imagesto be imported are located on tape or on disk.
The following table shows the actions to take depending on the location of theimage.
In the Media ID field, type the Media ID of the volume thatcontains the backups to import.
If images are on tape
In the Disk type field, select the type of the disk storageunit on which to search for backup images. The disk typesdepend on which NetBackup options are licensed.
If the disk type references a disk pool, enter or select thedisk pool and the disk volume ID.
For a BasicDisk type, enter or browse to the path to theimages in the field provided.
If images are on disk
Click OK.
988Managing backup imagesAbout importing backup images

6 Click OK to begin reading the catalog information from the source volume.
7 Click on the Catalog Results tab to watch as NetBackup looks at each imageon the tape. NetBackup determines whether or not each image has expiredand can be imported. The job also displays in Activity Monitor as an Importtype. Select the import job log to view the job results.
989Managing backup imagesAbout importing backup images

Configuring replication
■ Chapter 25. About NetBackup replication
6Section

About NetBackupreplication
This chapter includes the following topics:
■ About NetBackup replication
■ About NetBackup Auto Image Replication
■ About NetBackup Replication Director
About NetBackup replicationNetBackup offers two forms of replication:
Auto Image Replication
Use this type of replication to replicate backups from one NetBackup domainto the NetBackup media server in another domain.
See “About NetBackup Auto Image Replication” on page 992.
Backups
NetBackup Replication Director
This type of replication makes use of NetBackup OpenStorage to replicatesnapshots on primary storage to the disk arrays of OpenStorage partners.
See “About NetBackup Replication Director” on page 1032.
For more information, see the NetBackup Replication Director SolutionsGuide.
Snapshots
25Chapter

About NetBackup Auto Image ReplicationThe backups that are generated in one NetBackup domain can be replicated tostorage in one or more target NetBackup domains. This process is referred to asAuto Image Replication.
The ability to replicate backups to storage in other NetBackup domains, often acrossvarious geographical sites, helps facilitate the following disaster recovery needs:
■ One-to-one modelA single production datacenter can back up to a disaster recovery site.
■ One-to-many modelA single production datacenter can back up to multiple disaster recovery sites.See “One-to-many Auto Image Replication model” on page 994.
■ Many-to-one modelRemote offices in multiple domains can back up to a storage device in a singledomain.
■ Many-to-many modelRemote datacenters in multiple domains can back up multiple disaster recoverysites.
NetBackup supports the following storage types for Auto Image Replication:
Table 25-1 NetBackup Auto Image Replication storage types
Link to more informationStorage type
See the NetBackup Deduplication Guide:
http://www.veritas.com/docs/DOC5332
Media Server DeduplicationPool
If your storage vendor's product supports replication, youcan automatically replicate backup images to a similardevice in a different master server domain.
See the NetBackup OpenStorage Solutions Guide forDisk:
http://www.veritas.com/docs/DOC5332
An OpenStorage disk appliance
Notes about Auto Image Replication■ Auto Image Replication is supported between the master server domains that
run any of the following versions of NetBackup:
■ NetBackup 7.1.0.4
■ NetBackup 7.5.0.3 and later
992About NetBackup replicationAbout NetBackup Auto Image Replication

For catalog backup images, NetBackup supports Auto Image Replication onlybetween the same release levels of NetBackup.Both master servers must be at NetBackup version 7.6 or later if Targeted A.I.R.is used. Targeted A.I.R. means that Auto Image Replication is configured toreplicate a backup to a specific master server in a specific domain.
■ Although Auto Image Replication is a disaster recovery solution, you cannotrestore to clients in the primary (or originating) domain from the target masterdomain.
■ Auto Image Replication does not support synthetic backups or optimized syntheticbackups.
■ Auto Image Replication does not support spanning volumes in a disk pool.NetBackup fails backup jobs to the disk pools that span volumes if the backupjob is in a storage lifecycle policy that also contains a replication operation.
■ Auto Image Replication does not support replicating from a storage unit group.That is, the source copy cannot be in a storage unit group.
■ The ability to perform Auto Image Replication between different versions ofNetBackup does not overrule the basic image compatibility rules. For example,a database backup that was taken in a 7.7 domain can be replicated to a 7.5.0.3domain, although a 7.5.0.3 server may not be able to successfully restore fromthis newer image.See the following article for information about version compatibility andinteroperability:http://www.veritas.com/docs/000026526
■ Synchronize the clocks of the master servers in the source and the targetdomains so that the master server in the target domain can import the imagesas soon as they are ready. The master server in the target domain cannot importan image until the image creation time is reached. Time zone differences arenot a factor because the images use Coordinated Universal Time (UTC).
Process OverviewTable 25-2 is an overview of the process, generally describing the events in theoriginating and target domains.
NetBackup uses storage lifecycle policies in the source domain and the targetdomain to manage the Auto Image Replication operations.
See “About the storage lifecycle policies required for Auto Image Replication”on page 1006.
993About NetBackup replicationAbout NetBackup Auto Image Replication

Table 25-2 Auto Image Replication process overview
Event descriptionDomain in which eventoccurs
Event
Clients are backed up according to a backup policy that indicates a storagelifecycle policy as the Policy storage selection. The SLP must include at leastone Replication operation to similar storage in the target domain.
Originating master server(Domain 1)
1
The storage server in the target domain recognizes that a replication eventhas occurred. It notifies the NetBackup master server in the target domain.
Target master server(Domain 2)
2
NetBackup imports the image immediately, based on an SLP that contains animport operation. NetBackup can import the image quickly because themetadata is replicated as part of the image. (This import process is not thesame as the import process available in the Catalog utility.)
Target master server(Domain 2)
3
After the image is imported into the target domain, NetBackup continues tomanage the copies in that domain. Depending on the configuration, the mediaserver in Domain 2 can replicate the images to a media server in Domain 3.
Target master server(Domain 2)
4
One-to-many Auto Image Replication modelIn this configuration, all copies are made in parallel. The copies are made withinthe context of one NetBackup job and simultaneously within the originating storageserver context. If one target storage server fails, the entire job fails and is retriedlater.
All copies have the same Target Retention. To achieve different Target Retentionsettings in each target master server domain, either create multiple source copiesor cascade duplication to target master servers.
Cascading Auto Image Replication modelReplications can be cascaded from the originating domain to multiple domains.Storage lifecycle policies are set up in each domain to anticipate the originatingimage, import it and then replicate it to the next target master.
Figure 25-1 represents the following cascading configuration across three domains.
■ The image is created in Domain 1, and then replicated to the target Domain 2.
■ The image is imported in Domain 2, and then replicated to a target Domain 3.
■ The image is then imported into Domain 3.
994About NetBackup replicationAbout NetBackup Auto Image Replication

Figure 25-1 Cascading Auto Image Replication
SLP (D1toD2toD3)Import
Duplication to local storage
SLP (D1toD2toD3)Backup
Replication to target master
SLP (D1toD2toD3)Import
Replication to target server
All copies have the sameTarget retention, asindicated in Domain 1.
Import
Domain 1
Domain 2
Domain 3
Import
In the cascading model, the originating master server for Domain 2 and Domain 3is the master server in Domain 1.
Note: When the image is replicated in Domain 3, the replication notification eventindicates that the master server in Domain 2 is the originating master server.However, after the image is imported successfully into Domain 3, NetBackupcorrectly indicates that the originating master server is in Domain 1.
The cascading model presents a special case for the Import SLP that replicatesthe imported copy to a target master. (This master server that is neither the firstnor the last in the string of target master servers.)
The Import SLP must include at least one operation that uses a Fixed retentiontype and at least one operation that uses a Target Retention type. So that theImport SLP can satisfy these requirements, the import operation must use a TargetRetention.
Table 25-3 shows the difference in the import operation setup.
995About NetBackup replicationAbout NetBackup Auto Image Replication

Table 25-3 Import operation difference in an SLP configured to replicate theimported copy
Import operation in a cascadingmodel
Import operation criteria
Same; no difference.The first operation must be an importoperation.
Same; no difference.A replication to target master must use aFixed retention type
Here is the difference:
To meet the criteria, the import operationmust use Target retention.
At least one operation must use the Targetretention.
The target retention is embedded in the source image.
In the cascading model that is represented in Figure 25-1, all copies have the sameTarget Retention—the Target Retention indicated in Domain 1.
For the copy in Domain 3 to have a different target retention, add an intermediaryreplication operation to the Domain 2 storage lifecycle policy. The intermediaryreplication operation acts as the source for the replication to target master. Sincethe target retention is embedded in the source image, the copy in Domain 3 honorsthe retention level that is set for the intermediary replication operation.
996About NetBackup replicationAbout NetBackup Auto Image Replication

Figure 25-2 Cascading replications to target master servers, with varioustarget retentions
Domain 3
SLP (D1toD2toD3)Import
Duplication
Domain 2
Domain 1
SLP (D1toD2toD3)Backup
Replication to target master
The copy in Domain 3 has theretention indicated by thesource replication in Domain 2.
SLP (D1toD2toD3)Import
DuplicationReplication to target master
Import
Import
About the domain relationship for replicationThe following table describes important configuration differences depending on thedevices that are used for NetBackup Auto Image Replication.
Table 25-4 Replication relationships
Domain RelationshipStorage
For NetBackup managed storage, establish the relationship between the originating domainand the target domain or domains by setting the properties in the source storage server.Specifically, in theReplication tab of theChange Storage Server dialog box of the sourcestorage server.
NetBackup managed storage that qualifies for replication is Media Server DeduplicationPool storage.
See the NetBackup Deduplication Guide:
http://www.veritas.com/docs/DOC5332
Before you configure the replication relationship, you can add the target master server asa trusted host.
See “About trusted master servers for Auto Image Replication” on page 1005.
NetBackup managedstorage
997About NetBackup replicationAbout NetBackup Auto Image Replication

Table 25-4 Replication relationships (continued)
Domain RelationshipStorage
For the third-party vendor appliance storage that is exposed through the OpenStorage API,the disk appliance manages the storage. The relationship between the originating domainand the target domain or domains is established by using the storage vendor's tools.
The originating NetBackup domain has no knowledge of the storage server in the targetdomain or domains. When the appliances are configured properly, NetBackup images onthe originating disk appliance are replicated automatically to the target disk appliance. Thatdisk appliance uses the OpenStorage API to notify NetBackup that a replication eventoccurred. NetBackup then imports those images.
NetBackup manages the lifecycle of the backup images but does not manage the storage.
Configuring the disk appliance replication relationship is beyond the scope of the NetBackupdocumentation.
Third-party vendor diskappliance
Caution: Choose the target storage server carefully. A target storage server mustnot also be a storage server for the originating domain.
About the replication topology for Auto Image ReplicationFor Auto Image Replication, the disk volumes have the properties that define thereplication relationships between the volumes. The knowledge of the volumeproperties is considered the replication topology. The following are the replicationproperties that a volume can have:
A source volume contains the backups of your clients. The volume is thesource for the images that are replicated to a remote NetBackup domain.Each source volume in an originating domain has one or more replicationpartner target volumes in a target domain.
Source
A target volume in the remote domain is the replication partner of a sourcevolume in the originating domain.
Target
The volume does not have a replication attribute.None
The following describes the replication topology for the supported storage types:
998About NetBackup replicationAbout NetBackup Auto Image Replication

Table 25-5 Replication topology by storage type
Replication topologyStorage type
NetBackup exposes the storage for a Media ServerDeduplication Pool as a single volume. Therefore, there isalways a one-to-one volume relationship for MSDP.
You configure the replication relationships in the sourcedomain. To do so, you add target storage servers in theReplication tab of the Change Storage Server dialog boxof the source storage server.
See the NetBackup Deduplication Guide:
http://www.veritas.com/docs/DOC5332
Media Server DeduplicationPool
Your storage administrator configures the replication topologyof the volumes in the storage devices. Based on the volumeproperties, you create homogeneous disk pools. That is, allof the volumes in a disk pool must have the same properties,and you create the disk pools to match that topology. Thedisk pools inherit the replication properties from the volumesthat you add to them.
You should work with your storage administrator tounderstand the topology so you can create the proper diskpools. You also should work with your storage administratorto understand any changes that are made to the replicationtopology.
NetBackup discovers the topology of the volumes when youconfigure a disk pool.
Disk storage devices thatsupport replication and alsoconform to the VeritasOpenStorage API
NetBackup discovers the replication topology when you configure the replicationrelationships. NetBackup discovers topology changes when you use the Refreshoption of the Change Disk Pool dialog box.
NetBackup includes a command that can help you understand your replicationtopology. Use the command in the following situations:
■ After you configure the replication targets.
■ After you configure the storage server and before you configure disk pools.
■ After changes to the volumes that comprise the storage.
See “Viewing the replication topology for Auto Image Replication” on page 1000.
999About NetBackup replicationAbout NetBackup Auto Image Replication

Viewing the replication topology for Auto Image ReplicationA volume that is a source of replication must have at least one replication partnerthat is the target of the replication. NetBackup lets you view the replication topologyof the storage.
See “About the replication topology for Auto Image Replication” on page 998.
To view the replication topology for Auto Image Replication
◆ Run the bpstsinfo command, specifying the storage server name and theserver type. The following is the command syntax:
■ Windows: install_path\NetBackup\bin\admincmd\bpstsinfo -lsuinfo
-storage_server host_name -stype server_type
■ UNIX: /usr/openv/netbackup/bin/admincmd/bpstsinfo -lsuinfo
-storage_server host_name -stype server_type
The following are the options and arguments for the command:
The name of the target storage server.-storage_server host_name
■ For aMedia Server Deduplication Pool target,use PureDisk.
■ For an OpenStorage disk appliance, the vendorprovides the string for server_type.
-stype server_type
Save the output to a file so that you can compare the current topology with theprevious topology to determine what has changed.
See “Sample volume properties output for MSDP replication” on page 1000.
See “Sample volume properties output for OpenStorage backup replication”on page 1002.
Sample volume properties output for MSDP replicationThe following two examples show output from the bpstsinfo -lsuinfo commandfor two NetBackup deduplication storage servers. The first example is the outputfrom the source disk pool in the originating domain. The second example is fromthe target disk pool in the remote master server domain.
The two examples show the following:
■ All of the storage in a deduplication disk pool is exposed as one volume:PureDiskVolume.
■ The PureDiskVolume of the deduplication storage serverbit1.datacenter.veritas.org is the source for the replication operation.
1000About NetBackup replicationAbout NetBackup Auto Image Replication

■ The PureDiskVolume of the deduplication storage servertarget_host.dr-site.veritas.org is the target of the replication operation.
> bpstsinfo -lsuinfo -storage_server bit1.datacenter.veritas.org -stype PureDisk
LSU Info:
Server Name: PureDisk:bit1.datacenter.veritas.org
LSU Name: PureDiskVolume
Allocation : STS_LSU_AT_STATIC
Storage: STS_LSU_ST_NONE
Description: PureDisk storage unit (/bit1.datacenter.veritas.org#1/2)
Configuration:
Media: (STS_LSUF_DISK | STS_LSUF_ACTIVE | STS_LSUF_STORAGE_NOT_FREED |
STS_LSUF_REP_ENABLED | STS_LSUF_REP_SOURCE)
Save As : (STS_SA_CLEARF | STS_SA_IMAGE | STS_SA_OPAQUEF)
Replication Sources: 0 ( )
Replication Targets: 1 ( PureDisk:target_host.dr-site.veritas.org:PureDiskVolume )
Maximum Transfer: 2147483647
Block Size: 512
Allocation Size: 0
Size: 74645270666
Physical Size: 77304328192
Bytes Used: 138
Physical Bytes Used: 2659057664
Resident Images: 0
> bpstsinfo -lsuinfo -storage_server target_host.dr-site.veritas.org -stype PureDisk
LSU Info:
Server Name: PureDisk:target_host.dr-site.veritas.org
LSU Name: PureDiskVolume
Allocation : STS_LSU_AT_STATIC
Storage: STS_LSU_ST_NONE
Description: PureDisk storage unit (/target_host.dr-site.veritas.org#1/2)
Configuration:
Media: (STS_LSUF_DISK | STS_LSUF_ACTIVE | STS_LSUF_STORAGE_NOT_FREED |
STS_LSUF_REP_ENABLED | STS_LSUF_REP_TARGET)
Save As : (STS_SA_CLEARF | STS_SA_IMAGE | STS_SA_OPAQUEF)
Replication Sources: 1 ( PureDisk:bit1:PureDiskVolume )
Replication Targets: 0 ( )
Maximum Transfer: 2147483647
Block Size: 512
Allocation Size: 0
Size: 79808086154
Physical Size: 98944983040
Bytes Used: 138
1001About NetBackup replicationAbout NetBackup Auto Image Replication

Physical Bytes Used: 19136897024
Resident Images: 0
Sample volume properties output for OpenStorage backupreplicationThe following examples show sample output from the bpstsinfo command for twoOpenStorage devices. The first example is the output from the source disk poolthat contains the client backups. The second example is from the target disk poolin the remote master server domain.
The two examples show the following:
■ Volume dv01 on storage server pan1 is the replication source for volume dv01
on pan2.
■ Volume dv02 on storage server pan1 is the replication source for volume dv02
on pan2.
■ Volume dv03 on both devices has no replication properties.
>bpstsinfo -lsuinfo -storage_server pan1 -stype Pan
LSU Info:
Server Name: pan1
LSU Name: dv01
Allocation : STS_LSU_AT_STATIC
Storage: STS_LSU_ST_NONE
Description: E:\
Configuration:
Media: (STS_LSUF_DISK | STS_LSUF_STORAGE_FREED | STS_LSUF_REP_ENABLED |
STS_LSUF_REP_SOURCE)
Save As : (STS_SA_IMAGE)
Replication Sources: 0 ( )
Replication Targets: 1 ( Pan:pan2:dv01 )
Maximum Transfer: 2147483647
Block Size: 512
Allocation Size: 0
Size: 80525455360
Physical Size: 0
Bytes Used: 2285355008
Physical Bytes Used: 0
Resident Images: 0
LSU Info:
Server Name: pan1
LSU Name: dv02
Allocation : STS_LSU_AT_STATIC
1002About NetBackup replicationAbout NetBackup Auto Image Replication

Storage: STS_LSU_ST_NONE
Description: E:\
Configuration:
Media: (STS_LSUF_DISK | STS_LSUF_STORAGE_FREED | STS_LSUF_REP_ENABLED |
STS_LSUF_REP_SOURCE)
Save As : (STS_SA_IMAGE)
Replication Sources: 0 ( )
Replication Targets: 1 ( Pan:pan2:dv02 )
Maximum Transfer: 2147483647
Block Size: 512
Allocation Size: 0
Size: 80525455360
Physical Size: 0
Bytes Used: 2285355008
Physical Bytes Used: 0
Resident Images: 0
LSU Info:
Server Name: pan1
LSU Name: dv03
Allocation : STS_LSU_AT_STATIC
Storage: STS_LSU_ST_NONE
Description: E:\
Configuration:
Media: (STS_LSUF_DISK | STS_LSUF_STORAGE_FREED)
Save As : (STS_SA_IMAGE)
Replication Sources: 0 ( )
Replication Targets: 0 ( )
Maximum Transfer: 2147483647
Block Size: 512
Allocation Size: 0
Size: 80525455360
Physical Size: 0
Bytes Used: 2285355008
Physical Bytes Used: 0
Resident Images: 0
>bpstsinfo -lsuinfo -storage_server pan2 -stype Pan
LSU Info:
Server Name: pan2
LSU Name: dv01
Allocation : STS_LSU_AT_STATIC
Storage: STS_LSU_ST_NONE
Description: E:\
1003About NetBackup replicationAbout NetBackup Auto Image Replication

Configuration:
Media: (STS_LSUF_DISK | STS_LSUF_STORAGE_FREED | STS_LSUF_REP_ENABLED |
STS_LSUF_REP_TARGET)
Save As : (STS_SA_IMAGE)
Replication Sources: 1 ( Pan:pan1:dv01 )
Replication Targets: 0 ( )
Maximum Transfer: 2147483647
Block Size: 512
Allocation Size: 0
Size: 80525455360
Physical Size: 0
Bytes Used: 2285355008
Physical Bytes Used: 0
Resident Images: 0
LSU Info:
Server Name: pan2
LSU Name: dv02
Allocation : STS_LSU_AT_STATIC
Storage: STS_LSU_ST_NONE
Description: E:\
Configuration:
Media: (STS_LSUF_DISK | STS_LSUF_STORAGE_FREED | STS_LSUF_REP_ENABLED |
STS_LSUF_REP_TARGET)
Save As : (STS_SA_IMAGE)
Replication Sources: 1 ( Pan:pan1:dv02 )
Replication Targets: 0 ( )
Maximum Transfer: 2147483647
Block Size: 512
Allocation Size: 0
Size: 80525455360
Physical Size: 0
Bytes Used: 2285355008
Physical Bytes Used: 0
Resident Images: 0
LSU Info:
Server Name: pan2
LSU Name: dv03
Allocation : STS_LSU_AT_STATIC
Storage: STS_LSU_ST_NONE
Description: E:\
Configuration:
Media: (STS_LSUF_DISK | STS_LSUF_STORAGE_FREED)
Save As : (STS_SA_IMAGE)
1004About NetBackup replicationAbout NetBackup Auto Image Replication

Replication Sources: 0 ( )
Replication Targets: 0 ( )
Maximum Transfer: 2147483647
Block Size: 512
Allocation Size: 0
Size: 80525455360
Physical Size: 0
Bytes Used: 2285355008
Physical Bytes Used: 0
Resident Images: 0
About trusted master servers for Auto Image ReplicationNetBackup provides the ability to establish a trust relationship between replicationdomains. A trust relationship is optional. The following items describe how a trustrelationship affects Auto Image Replication:
You can select a subset of your trusted domains as a targetfor replication. NetBackup then replicates to the specifieddomains only rather than to all configured replication targets.This type of Auto Image Replication is known as TargetedA.I.R.
Trust relationship
NetBackup replicates to all defined target storage servers.You cannot select a specific host or hosts as a target.
No trust relationship
You add a trusted master server in the source domain; you specify a remote masterserver as a trusted host. A trust relationship is reciprocal: If you add host B as atrusted master server for host A, host B then trusts hosts A.
See “Adding a trusted master server” on page 242.
You select the targets for replication when you configure a storage lifecycle policy.However, before you choose a specific storage server as a replication target, youmust create an import SLP in the target domain. Then, you choose the specifictarget master server and SLP when you create a storage lifecycle policy in thesource domain.
See “About storage lifecycle policies” on page 613.
See “Creating a storage lifecycle policy” on page 614.
1005About NetBackup replicationAbout NetBackup Auto Image Replication

Note: Before you can configure trust relationships for a clustered NetBackup masterserver, you must enable inter-node authentication on all of the nodes in the cluster.This requirement applies regardless of whether the clustered mastered server isthe source of the replication operation or the target.
See “Enabling NetBackup clustered master server inter-node authentication”on page 240.
See “About NetBackup Auto Image Replication” on page 992.
About the storage lifecycle policies required for Auto ImageReplication
To replicate images from one NetBackup domain to another NetBackup domainrequires two storage lifecycle policies. The following table describes the policiesand their requirements:
Table 25-6 SLP requirements for Auto Image Replication
Storage lifecycle policy requirementsDomain
The Auto Image Replication SLP in the source domain must meet the following criteria:
■ The first operation must be a Backup operation to storage that NetBackup supports for replication.Indicate the exact storage unit from the drop-down list. Do not select Any Available.
Note: The target domain must contain the same type of storage to import the image.
■ At least one operation must be a Replication operation to storage in another domain thatNetBackup supports for replication from the source storage.You can configure multiple Replication operations in an Auto Image Replication SLP. TheReplication operation settings determine whether the backup is replicated to all replication targetsin all master server domains or only to specific replication targets.See “About trusted master servers for Auto Image Replication” on page 1005.See “New or Change Storage Operation dialog box settings” on page 656.
■ The SLP must be of the same data classification as the Import SLP in Domain 2.
Note: If the source master server is at a NetBackup version earlier than 7.6 and the master serverin the target domain is at NetBackup 7.6 or later: Do not use the data classification of Any. Usea different data classification in the source domain or the Import job fails.
Domain 1
(Sourcedomain)
1006About NetBackup replicationAbout NetBackup Auto Image Replication

Table 25-6 SLP requirements for Auto Image Replication (continued)
Storage lifecycle policy requirementsDomain
If replicating to all targets in all domains, in each domain NetBackup automatically creates an ImportSLP that meets all the necessary criteria.
Note: If replicating to specific targets, you must create the Import SLP before creating the AutoImage Replication SLP in the originating domain.
The Import SLP must meet the following criteria:
■ The first operation in the SLP must be an Import operation. NetBackup must support theDestination storage as a target for replication from the source storage.Indicate the exact storage unit from the drop-down list. Do not select Any Available.
■ The SLP must contain at least one operation that has the Target retention specified.■ The SLP must be of the same data classification as the SLP in Domain 1. Matching the data
classification keeps a consistent meaning to the classification and facilitates global reporting bydata classification.
See the following topic for more information about Replication operation configuration:
See “Replicating to all inter-domain targets or to a specific target” on page 1008.
Domain 2
(Targetdomain)
Figure 25-3 shows how the SLP in the target domain is set up to replicate the imagesfrom the originating master server domain.
1007About NetBackup replicationAbout NetBackup Auto Image Replication

Figure 25-3 Storage lifecycle policy pair required for Auto Image Replication
SLP on master server in the source domain
Import
Replication operation indicatesa target master
Import operationimports copies
SLP that imports the copies to the target domain
Note: Restart nbstserv after you make changes to the underlying storage for anyoperation in an SLP.
Replicating to all inter-domain targets or to a specific targetWith Auto Image Replication, you can replicate backups to all configured replicationtargets or to a subset of all configured replication targets. To replicate to specificmaster server domains, you must first configure trusted master servers.
See “About trusted master servers for Auto Image Replication” on page 1005.
1008About NetBackup replicationAbout NetBackup Auto Image Replication

Table 25-7 Configuration differences between replicating to all inter-domaintargets or to a specific target
Import SLP configurationAuto ImageReplication SLP configurationReplication objective
The Import SLPs are createdautomatically in all domains.
See Figure 25-4 for arepresentation of this scenario.
Create an SLP in the originating domain.
■ The first operation must be a Backupoperation.
■ The SLP must include aReplication operation.To copy to all domains, selectAll inter-domainreplication target(s).
Replicate the backup to allconfigured master serverdomains.
The Import SLPs are not createdautomatically.
Note: Create the Import SLPbefore creating the Auto ImageReplication SLP in the originatingdomain.
Create an Import SLP in eachtarget domain.
The Import SLP must have anImport operation as the firstoperation, but can contain otheroperations as needed.
Figure 25-5 represents thisscenario.
In this case, first create the Import SLPs beforethe SLP in the originating domain.
■ The first operation must be a Backupoperation.
■ The SLP must include aReplication operation.Select A specific Master Server and indicatethe domain of the target master server.
Replicate the backup totargets in specific NetBackupmaster server domains.
Additional requirements for Auto Image Replication SLPs are described in thefollowing topic:
See “About the storage lifecycle policies required for Auto Image Replication”on page 1006.
1009About NetBackup replicationAbout NetBackup Auto Image Replication

Figure 25-4 Replicating from one domain to all inter-domain master servers
SLPImport
Target in domain 3
SLPImport
Target in domain 2
Duplication (optional)
SLPBackup
Master server domain 1
Import
Import
Replication to all inter-domain replication targets
Figure 25-5 represents replication to a specific master domain target.
Figure 25-5 Replicating from one domain to a specific inter-domain masterserver
SLPImport
Target in domain 3
SLPImport
Target in domain 2
Duplication (optional)
SLPBackup
Master server domain 1
Import
Replication to all inter-domain replication targets
1010About NetBackup replicationAbout NetBackup Auto Image Replication

To replicate copies to a specific domain, make sure that the target domain masterserver is a trusted master server of the originating domain.
See “Adding a trusted master server” on page 242.
Customizing how nbstserv runs duplication and importjobsThe NetBackup Storage Lifecycle Manager (nbstserv) runs replication, duplication,and import jobs. Both the Storage Lifecycle Manager service and the Import Managerservice run within nbstserv.
The NetBackup administrator can customize how nbstserv runs jobs by changingthe default of certain SLP-related configuration options.
See “SLP Parameters properties” on page 248.
Using NetBackup Access Control (NBAC) with Auto ImageReplication
If Auto Image Replication is configured for two domains and NetBackup AccessControl (NBAC) is used, it must be used in both the source domain and the targetdomain. The configuration for the master servers must be either USE_VXSS =
REQUIRED or USE_VXSS = AUTOMATIC. (However, the setting may be REQUIRED inone domain and AUTOMATIC in the other.
Auto Image Replication is not supported between master server domains whereone master server is configured to use NBAC and NBAC is disabled on the othermaster server. That is, the configuration for one master server is USE_VXSS =
AUTOMATIC or USE_VXSS = REQUIRED and on the other master server it is USE_VXSS= PROHIBITED (disabled).
The following configuration is necessary if NBAC is used in the master serverdomains:
■ In the source master server domain:The administrator should make sure that the target master server has thepermissions set correctly before configuration for the operation begins.
■ In the target master server domain:The security administrator in the target domain must give the administrator inthe source domain the correct set of permissions. The source domainadministrator needs Browse, Read, and Configure permissions on the followingobjects: HostProperties, DiskPool, and DevHost.The source domain administrator can be added as a member to any existinggroup which has all three permissions.
1011About NetBackup replicationAbout NetBackup Auto Image Replication
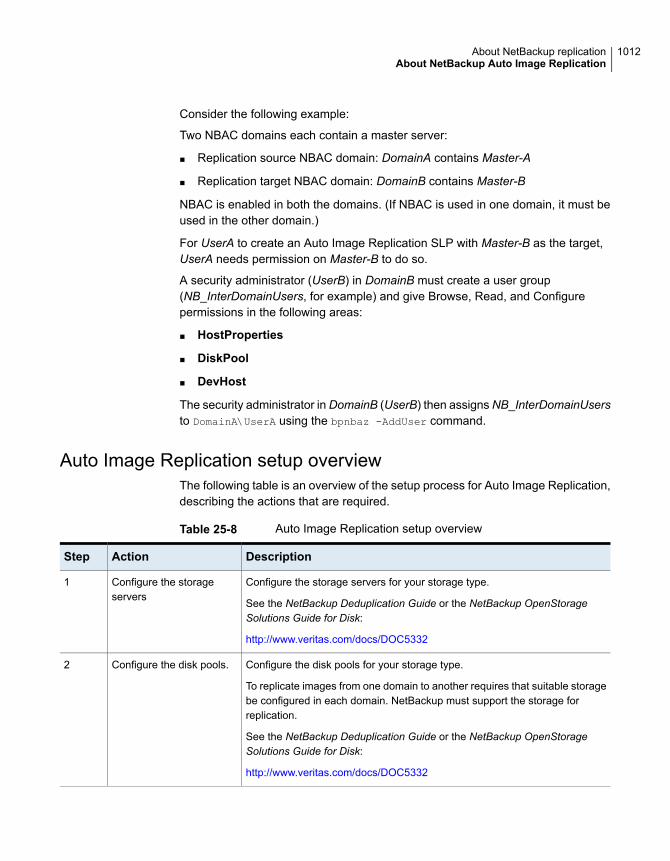
Consider the following example:
Two NBAC domains each contain a master server:
■ Replication source NBAC domain: DomainA contains Master-A
■ Replication target NBAC domain: DomainB contains Master-B
NBAC is enabled in both the domains. (If NBAC is used in one domain, it must beused in the other domain.)
For UserA to create an Auto Image Replication SLP with Master-B as the target,UserA needs permission on Master-B to do so.
A security administrator (UserB) in DomainB must create a user group(NB_InterDomainUsers, for example) and give Browse, Read, and Configurepermissions in the following areas:
■ HostProperties
■ DiskPool
■ DevHost
The security administrator inDomainB (UserB) then assignsNB_InterDomainUsersto DomainA\UserA using the bpnbaz -AddUser command.
Auto Image Replication setup overviewThe following table is an overview of the setup process for Auto Image Replication,describing the actions that are required.
Table 25-8 Auto Image Replication setup overview
DescriptionActionStep
Configure the storage servers for your storage type.
See the NetBackup Deduplication Guide or the NetBackup OpenStorageSolutions Guide for Disk:
http://www.veritas.com/docs/DOC5332
Configure the storageservers
1
Configure the disk pools for your storage type.
To replicate images from one domain to another requires that suitable storagebe configured in each domain. NetBackup must support the storage forreplication.
See the NetBackup Deduplication Guide or the NetBackup OpenStorageSolutions Guide for Disk:
http://www.veritas.com/docs/DOC5332
Configure the disk pools.2
1012About NetBackup replicationAbout NetBackup Auto Image Replication

Table 25-8 Auto Image Replication setup overview (continued)
DescriptionActionStep
Configure the storage units in both the originating domain and the targetdomain.
See “Creating a storage unit” on page 561.
Configure the storage units.3
Define the relationship between the domains so that the originating domainknows where to send the data.
See “About the domain relationship for replication” on page 997.
See “About trusted master servers for Auto Image Replication” on page 1005.
Define the relationshipbetween the domains.
4
Configure the necessary storage lifecycle policies.
See “About the storage lifecycle policies required for Auto Image Replication”on page 1006.
See “Creating a storage lifecycle policy” on page 614.
Configure the storagelifecycle policies.
5
The backup policy must indicate the configured SLP as the Policy storageselection.
See “Creating a backup policy” on page 686.
Configure and run thebackup policy in theoriginating domain.
6
How to resolve volume changes for Auto Image ReplicationWhen you open the Change Disk Pool dialog box, NetBackup loads the disk poolproperties from the catalog. NetBackup queries the storage server for changeswhen you either click the Refresh button in the Change Disk Pool dialog box orwhen you configure a new disk pool for the storage server.
Veritas recommends that you take the following actions when the volume topologychange:
■ Discuss the changes with the storage administrator. You need to understandthe changes so you can change your disk pools (if required) so that NetBackupcan continue to use them.
■ If the changes were not planned for NetBackup, ask your storage administratorto revert the changes so that NetBackup functions correctly again.
NetBackup can process changes to the following volume properties:
■ Replication Source
■ Replication Target
■ None
1013About NetBackup replicationAbout NetBackup Auto Image Replication

If these volume properties change, NetBackup can update the disk pool to matchthe changes. NetBackup can continue to use the disk pool, although the disk poolmay no longer match the storage unit or storage lifecycle purpose.
The following table describes the possible outcomes and how to resolve them.
Table 25-9 Refresh outcomes
DescriptionOutcome
No changes are required.No changes are discovered.
The new volumes appear in the Change Disk Pool dialog box. Text in the dialog boxchanges to indicate that you can add the new volumes to the disk pool.
NetBackup discovers the newvolumes that you can add to thedisk pool.
A Disk Pool Configuration Alert pop-up box notifies you that the properties of all of thevolumes in the disk pool changed, but they are all the same (homogeneous).
You must click OK in the alert box, after which the disk pool properties in the ChangeDisk Pool dialog box are updated to match the new volume properties
If new volumes are available that match the new properties, NetBackup displays thosevolumes in the Change Disk Pool dialog box. You can add those new volumes to thedisk pool.
In the Change Disk Pool dialog box, select one of the following two choices:
■ OK. To accept the disk pool changes, click OK in the Change Disk Pool dialog box.NetBackup saves the new properties of the disk pool.NetBackup can use the disk pool, but it may no longer match the intended purposeof the storage unit or storage lifecycle policy. Change the storage lifecycle policydefinitions to ensure that the replication operations use the correct source and targetdisk pools, storage units, and storage unit groups. Alternatively, work with your storageadministrator to change the volume properties back to their original values.
■ Cancel. To discard the changes, click Cancel in the Change Disk Pool dialog box.NetBackup does not save the new disk pool properties. NetBackup can use the diskpool, but it may no longer match the intended use of the storage unit or storagelifecycle policy.
The replication properties of all ofthe volumes changed, but theyare still consistent.
1014About NetBackup replicationAbout NetBackup Auto Image Replication

Table 25-9 Refresh outcomes (continued)
DescriptionOutcome
A Disk Pool Configuration Error pop-up box notifies you that the replication propertiesof some of the volumes in the disk pool changed. The properties of the volumes in thedisk pool are not homogeneous.
You must click OK in the alert box.
In the Change Disk Pool dialog box, the properties of the disk pool are unchanged, andyou cannot select them (that is, they are dimmed). However, the properties of the individualvolumes are updated.
Because the volume properties are not homogeneous, NetBackup cannot use the diskpool until the storage configuration is fixed.
NetBackup does not display new volumes (if available) because the volumes already inthe disk pool are not homogeneous.
To determine what has changed, compare the disk pool properties to the volumeproperties.
See “Viewing the replication topology for Auto Image Replication” on page 1000.
Work with your storage administrator to understand the changes and why they weremade. The replication relationships may or may not have to be re-established. If therelationship was removed in error, re-establishing the relationships seem justified. If youare retiring or replacing the target replication device, you probably do not want tore-establish the relationships.
The disk pool remains unusable until the properties of the volumes in the disk pool arehomogenous.
In the Change Disk Pool dialog box, click OK or Cancel to exit the Change Disk Pooldialog box.
The replication properties of thevolumes changed, and they arenow inconsistent.
1015About NetBackup replicationAbout NetBackup Auto Image Replication

Table 25-9 Refresh outcomes (continued)
DescriptionOutcome
A Disk Pool Configuration Alert pop-up box notifies you that an existing volume orvolumes was deleted from the storage device:
NetBackup can use the disk pool, but data may be lost.
To protect against accidental data loss, NetBackup does not allow volumes to be deletedfrom a disk pool.
To continue to use the disk pool, do the following:
■ Use the bpimmedia command or the Images on Disk report to display the imageson the specific volume.
■ Expire the images on the volume.■ Use the nbdevconfig command to set the volume state to DOWN so NetBackup
does not try to use it.
NetBackup cannot find a volumeor volumes that were in the diskpool.
Removing or replacing replication relationships in an Auto ImageReplication configuration
Auto Image Replication replicates backups from a storage server in the sourcedomain to storage servers in one or more target NetBackup domains. If a storageserver needs to be removed or replaced from such a relationship, the involveddomains need to make proper preparations to stop or to redirect replication. Thatis, to remove the replication relationship.
For example, consider a scenario where cascading Auto Image Replication is usedacross 3 domains. To remove the storage server in domain 2 (which serves as thedestination of the import from Domain 1) preparations need to be made in all threedomains. The preparations include modifying storage lifecycle policies and removingthe storage server from the replication topology.
1016About NetBackup replicationAbout NetBackup Auto Image Replication

Figure 25-6 Removing target storage server example
SLP (D1toD2toD3)Import
Duplication to local storage
SLP (D1toD2toD3)Backup
Replication to target master
SLP (D1toD2toD3)Import
Replication to target serverImport
Domain 1
Domain 2
Domain 3
Import
Storageserver 2
Table 25-10 contains topics that address processes that are involved in removingor replacing relationships in an Auto Image Replication configuration:
Table 25-10
ReferenceTopic
See “Adding or removing a replication relationship betweentwo storage servers” on page 1018.
Adding a replication relationship between two storageservers.
Removing a replication relationship between two storageservers.
See “Removing all replication relationships between adomain and a storage server” on page 1018.
Removing a replication relationship between a domainand a storage server.
See “Replacing all replication relationships between adomain and a storage server” on page 1019.
Replacing a replication relationship between a domain anda storage server.
See “Removing or replacing all replication relationshipsinvolving a storage server” on page 1023.
Removing all replication relationships involving a storageserver.
Replacing all replication relationships involving a storageserver.
1017About NetBackup replicationAbout NetBackup Auto Image Replication

Adding or removing a replication relationship betweentwo storage serversBefore adding a replication relationship, you must understand the consequencesof this action:
■ Any classic (or non-targeted) Auto Image Replication storage lifecycle policiesthat replicate from the source domain storage server will replicate to the targetdomain storage server.
Before removing a replication relationship, you must understand the consequencesof this action:
■ Any classic (or non-targeted) A.I.R. SLPs that replicate from the source domainstorage server will no longer replicate to the target domain storage server.
■ Any targeted A.I.R. SLPs that replicate from the source domain storage serverto the target domain storage server will fail. These SLPs should be removed ormodified so that they no longer replicate to the target domain.
Complete the following steps to add or remove a replication relationship betweentwo storage servers:
To change (add or remove) a replication relationship
1 This step depends on whether OpenStorage or MSDP storage is used:
■ For OpenStorage storage, contact your storage administrator to changethe replication relationship, as this procedure differs between vendors.
■ For MSDP storage, the relationships can be changed in the source domainby the NetBackup administrator.
2 After the relationship is changed, update the disk pools in both domains toreflect the topology changes:
In the NetBackup Administration Console, expand Media and DeviceManagement > Devices > Disk Pools. Select and refresh the disk pools. Thenbdevconfig –updatedp command can also be used. (See the OpenStorageSolutions Guide for information about the replication topology for Auto ImageReplication.)
Removing all replication relationships between a domainand a storage serverComplete the following steps to remove all replication relationships between twodomains. The procedure refers to domain D1 and a storage server in domain D2:
To remove all replication relationships between a domain and a storage server
1 In domain D1:
1018About NetBackup replicationAbout NetBackup Auto Image Replication

Run the following command on the master server:
nbdecommission -list_ref -oldserver
storage_server_name–machinetype replication_host
The output lists:
■ All of the storage servers in the domain that reference the deprecatedstorage server as a replication target or a replication source.
■ All of the targeted A.I.R. replication SLPs that reference an SLP that importsto the deprecated storage server.
Note: If an SLP has in-process images, either wait until those images arecomplete or cancel them before decommissioning the storage server. Notethat this includes SLPs of all versions. Use the SLP utility command (nbstlutil)to cancel the processing of existing SLP-managed images.
See “Lifecycle operation administration using the nbstlutil command”on page 619.
2 Remove the replication operations from the targeted A.I.R. storage lifecyclepolices that were found in step 1.
If these SLPs are no longer necessary, the SLPs can be deleted now.
3 Remove the replication relationships that were found in step 1.
See “Adding or removing a replication relationship between two storage servers”on page 1018.
Any remaining A.I.R. storage lifecycle polices in both domains that are nolonger necessary can be deleted now.
4 Run the following command to decommission the storage server:
nbdecommission -oldserver storage_server_name–machinetype
replication_host
Replacing all replication relationships between a domainand a storage server
Note: If the storage server to be replaced is involved in a classic (non-targeted)Auto Image Replication configuration, the replacement storage server must nothave any additional replication target relationships.
1019About NetBackup replicationAbout NetBackup Auto Image Replication

The procedure refers to two domains: D1 and D2. Auto Image Replication isconfigured to occur from storage servers in D1 to D2. Also, from D2 to D1.
A new storage server (S2) is added to D2 so that D2 now contains two storageservers (S1 and S2). Relationships to S1 must be replaced with relationships toS2.
Table 25-11 lists the configuration before the switch to D2. Table 25-12 lists theconfiguration after the changes have been made.
Table 25-11 Example configuration before changes
Storage lifecycle policiesStorage serversDomains
■ BACKUP_D1_REPLICATE_D2This SLP replicates to S1 in D2 using the target import SLPIMPORT_S1.
■ IMPORT_D1This SLP imports to a storage server in D1.
Contains several storageservers but they are notnecessary in the example.
D1
■ BACKUP_D2_REPLICATE_D1This SLP replicates to D1 using the target import SLP IMPORT_D1.
■ IMPORT_S1This SLP imports to D2 and stores on S1.
S1 (To be deprecated)
S2 (New in D2)
D2
Figure 25-7 Topology before changes
Domain 1 (D1) Domain 2 (D2)
Storage lifecycle policies Storageserver S1
Storageserver
IMPORT_D2 BACKUP_D2_REPLICATE_D1
IMPORT_S1BACKUP_D1_REPLICATE_D2
1020About NetBackup replicationAbout NetBackup Auto Image Replication

Table 25-12 Example configuration after changes
Storage lifecycle policiesStorage serversDomains
■ BACKUP_D1_REPLICATE_D2This SLP replicates to S2 in D2 using the target import SLPIMPORT_S2
■ IMPORT_S1This SLP imports to a storage server in D1.
Contains several storageservers but they are notnecessary in the example.
D1
■ BACKUP_D2_REPLICATE_D1This SLP replicates to D1 using the target import SLP IMPORT_D1.
■ IMPORT_S2This SLP imports to D2 and stores on S2.
S1 (To be deprecated)
S2 (New in D2)
D2
Figure 25-8 Topology after changes
Storage lifecycle policies Storageserver S2
Storageserver
IMPORT_D2 BACKUP_D2_REPLICATE_D1
IMPORT_S2BACKUP_D1_REPLICATE_D2
Circled items have been changed.
Domain 1 (D1) Domain 2 (D2)
In the following procedure, note that steps must be performed in specific domains.
1021About NetBackup replicationAbout NetBackup Auto Image Replication

Table 25-13 Replacing all replication relationships between a domain and astorage server
DescriptionStepDomain
Run the following command to determine the replication relationships of storage server S1:
bpstsinfo -lsuinfo -storage_server storage_server_name -stypestorage_server_type
For example:
bpstsinfo -lsuinfo -storage_server S1 -stype replication_host
1IndomainD2:
For each replication target relationship that is found in step 1, add a corresponding relationshipbetween storage server S2 and the target in D1.
See “Adding or removing a replication relationship between two storage servers” on page 1018.
2
Copy all import SLPs that import to storage server S1. Modify the new SLPs to import to storageserver S2.
For example, copy IMPORT_S1. Modify the SLP to import to storage server S2. Change the SLPname to reflect that it will import to S2: IMPORT_S2.
Note: Do not delete the existing import SLPs yet. All of the SLPs that are no longer performingany function can be deleted later in this procedure.
3
Run the following command on the master server:
nbdecommission -list_ref -oldserver storage_server_name–machinetypereplication_host
For example:
nbdecommission -list_ref -oldserver S1 –machinetype replication_host
The output lists:
■ All of the storage servers in the source domain (S1) that reference the deprecated storageserver as a replication target or replication source.
■ All of the targeted A.I.R. replication SLPs that reference an SLP that imports to the deprecatedstorage server.
Note: If an SLP has in-process images, either wait until those images are complete or cancelthem before decommissioning the storage server. Note that this includes SLPs of all versions.Use the SLP utility command (nbstlutil) to cancel the processing of existing SLP-managedimages.
See “Lifecycle operation administration using the nbstlutil command” on page 619.
4IndomainD1:
1022About NetBackup replicationAbout NetBackup Auto Image Replication

Table 25-13 Replacing all replication relationships between a domain and astorage server (continued)
DescriptionStepDomain
Complete steps 5-6 only if step 4 listed any replication source relationships.IndomainD2: Modify replication SLPs that replicate from S1 to domain D1 to replicate from S2. This includes
both non-targeted and targeted A.I.R. SLPs.
For example, change the Replication operation in BACKUP_D2_REPLICATE_D1. Change thebackup storage destination from S1 to S2.
5
Remove the replication source relationships that were found in step 4.
See “Adding or removing a replication relationship between two storage servers” on page 1018.
6
Complete steps 7-10 only if step 4 listed any replication target relationships.IndomainD1: Add replication relationships from each storage server that was listed in step 2 that has a replication
target relationship to storage server S2.
See “Adding or removing a replication relationship between two storage servers” on page 1018.
7
Modify the replication operations that were found in step 4. Change the target import SLP to thecorresponding import SLP created in step 3.
For example, change the Replication operation in BACKUP_D1_REPLICATE_D2. Change theTarget import SLP setting from IMPORT_S1 to IMPORT_S2.
8
Remove the replication target relationships that were found in step 4.
See “Adding or removing a replication relationship between two storage servers” on page 1018.
9
Run the following command to decommission the storage server:
nbdecommission -oldserver storage_server_name –machinetypereplication_host
For example:
nbdecommission -oldserver D1 –machinetype replication_host
10
Any import SLPs to S1 that are no longer necessary may now be deleted.
For example, IMPORT_S1 can be deleted now.
11IndomainD2:
Removing or replacing all replication relationshipsinvolving a storage serverTo remove or replace all of the replication relationships involving a storage server,completely remove or replace all replication relationships between a domain and
1023About NetBackup replicationAbout NetBackup Auto Image Replication

the storage server. This must be done for each domain that is involved in areplication relationship with the storage server.
The following command lists replication target and replication source relationships.The command is useful for determining which domains have replication relationshipswith the storage server:
bpstsinfo -lsuinfo -storage_server storage_server_name -stype
storage_server_type
Example: Replacing a storage server in a non-targetedAuto Image Replication configurationThis example walks through the steps necessary to replace a storage server in asimple, classic (non-targeted) Auto Image Replication configuration.
Specifically, to replace an MSDP storage server (D2_MSDP_1) in domain D2 withanother MSDP storage server (D2_MSDP_2).
Table 25-14 Example configuration
Storage lifecyclepolicies
Storage serversDomains
BACKUP_D1D1_MSDPD1
No replication-related SLPsD2_MSDP_1
D2_MSDP_2
D2
The changes to the replication and the storage lifecycle topologies are trackedthroughout the example.
Figure 25-9 Example replication topology before the process
Domain 1 Domain 2
D1_MSDP D2_MSDP_1
D2_MSDP_2
1024About NetBackup replicationAbout NetBackup Auto Image Replication

Figure 25-10 Example storage lifecycle policy topology
Domain 1
SLP: Backup_D1
Operation
BackupReplication
Target
D1_MSDPAll replication targets
To replace the storage server D2_MSDP_1 with D2_MSDP_2
1 Add a replication target relationship from D1_MSDP to D2_MSDP_2.
2 Refresh disk pools in both domains.
D1_MSDP D2_MSDP_1
D2_MSDP_2
3 Remove the replication target relationship between D1_MSDP andD2_MSDP_1.
1025About NetBackup replicationAbout NetBackup Auto Image Replication

4 Refresh disk pools in both domains.
Domain 1 Domain 2
D1_MSDP D2_MSDP_1
D2_MSDP_2
5 In D1, run the following command to decommission MSDP_D2_1:
nbdecommission –oldserver MSDP_D2_1 –machinetype replication_host
Example: Replacing a storage server in a cascading,targeted Auto Image Replication configurationThis example walks through the steps necessary to replace an MSDP storageserver in a cascading, targeted Auto Image Replication configuration. The changesto the replication and the storage lifecycle topologies are tracked throughout theexample.
The environment contains three domains. Each domain contains one or more MDSPstorage servers.
Table 25-15 Example configuration
Storage lifecyclepolicies
Storage serversDomains
BACKUP_D1D1_MSDPD1
IMPORT_D2D2_MSDP
D2_MSDP_2
D2
IMPORT_D3D3_MSDPD3
1026About NetBackup replicationAbout NetBackup Auto Image Replication

Figure 25-11 Example replication topology
Domain 3
D3_MSDP
Domain 2
D2_MSDP_1
D2_MSDP_2
Domain 1
D1_MSDP
Figure 25-12 Example storage lifecycle policy topology
Domain 1
SLP: Backup_D1
Operation
BackupReplication
Target
D1_MSDPIMPORT_D2
Domain 2
SLP: IMPORT_D2
Operation
ImportReplication
Target
D2_MSDPIMPORT_D3
Domain 3
SLP: IMPORT_D3
Operation
Import
Target
D3_MSDP
To replace the storage server D2_MSDP with D2_MSDP_2
1 Add replication target relationship from D2_MSDP_2 to D3_MSDP.
2 Refresh disk pools in both domain D2 and domain D3.
Domain 3
D3_MSDP
Domain 2
D2_MSDP_1
D2_MSDP_2
Domain 1
D1_MSDP
1027About NetBackup replicationAbout NetBackup Auto Image Replication

3 Copy IMPORT_D2 and modify name to IMPORT_2_D2 and destination storageto a storage unit on D2_MSDP_2.
Domain 3
SLP: IMPORT_D3
Oper.
Import
Target
D3_MSDP
Domain 2
SLP: IMPORT_2_D2
Oper.
ImportRep.
Target
D2_MSDP_2IMPORT_D3
SLP: IMPORT_2
Oper.
ImportRep.
Target
D2_MSDPIMPORT_D3
Domain 1
SLP: Backup_D1
Oper.
BackupRep.
Target
D1_MSDPIMPORT_D2_2
4 Add a replication target relationship from D1_MSDP to D2_MSDP_2.
5 Refresh disk pools in both domains.
Domain 3
D3_MSDP
Domain 2
D2_MSDP_1
Domain 1
D2_MSDP_2
D1_MSDP
1028About NetBackup replicationAbout NetBackup Auto Image Replication

6 Modify BACKUP_D1 Replication Operation Target import SLP toIMPORT_2_D2.
Domain 3
SLP: IMPORT_D3
Oper.
Import
Target
D3_MSDP
Domain 1 Domain 2
SLP: IMPORT_D2
Oper.
ImportRep.
Target
D2_MSDPIMPORT_D3
SLP: IMPORT_2_D2
Oper.
ImportRep.
Target
D2_MSDP_2IMPORT_D3
SLP: Backup_D1
Oper.
BackupRep.
Target
D1_MSDPIMPORT_D2_2
7 Remove the replication target relationship from D1_MSDP to D2_MSDP_1.
8 Refresh the disk pools in both domains.
Domain 3
D3_MSDP
Domain 2
D2_MSDP_1
Domain 1
D2_MSDP_2
D1_MSDP
9 Run the following command in D1:
nbdecommission –oldserver MSDP_D2 –machinetype replication_host
1029About NetBackup replicationAbout NetBackup Auto Image Replication

10 Delete IMPORT_D2.
Domain 1 Domain 2 Domain 3
SLP: IMPORT_D3
Oper.
Import
Target
D3_MSDP
SLP: IMPORT_2_D2
Oper.
ImportRep.
Target
D2_MSDP_2IMPORT_D3
SLP: Backup_D1
Oper.
BackupRep.
Target
D1_MSDPIMPORT_D2_2
11 Remove the replication target relationship from D2_MSDP_1 to D3_MSDP.
12 Refresh disk pools in both domains.
Domain 3
D3_MSDP
Domain 2
D2_MSDP_1
Domain 1
D2_MSDP_2
D1_MSDP
About restoring from a backup at a target master domainWhile it is possible to restore a client directly by using the images in the targetmaster domain, do so only in a disaster recovery situation. In this discussion, adisaster recovery situation is one in which the originating domain no longer existsand clients must be recovered from the target domain
1030About NetBackup replicationAbout NetBackup Auto Image Replication

Table 25-16 Client restores in disaster recovery scenarios
DescriptionDoes clientexist?
Disaster recoveryscenario
Configure the client in another domain and restore directly to the client.YesScenario 1
Create the client in the recovery domain and restore directly to theclient. This is the most likely scenario.
NoScenario 2
Perform an alternate client restore in the recovery domain.NoScenario 3
The steps to recover the client are the same as any other client recovery. The actualsteps depend on the client type, the storage type, and whether the recovery is analternate client restore.
For restores that use Granular Recovery Technology (GRT), an application instancemust exist in the recovery domain. The application instance is required so thatNetBackup has something to recover to.
For information on granular recovery, see the following topics and guides:
■ See “Active Directory granular backups and recovery” on page 857.
■ See “Enable granular recovery (policy attribute)” on page 729.
■ See “Configuring a UNIX media server and Windows clients for backups andrestores that use Granular Recovery Technology (GRT)” on page 1198.
■ The NetBackup for Microsoft SharePoint Server Administrator's Guide:http://www.veritas.com/docs/DOC5332
■ The NetBackup for Microsoft Exchange Server Administrator's Guide:http://www.veritas.com/docs/DOC5332
Reporting on Auto Image Replication jobsThe Activity Monitor displays both the Replication job and the Import job in aconfiguration that replicates to a target master server domain.
Table 25-17 Auto Image Replication jobs in the Activity Monitor
DescriptionJob type
The job that replicates a backup image to a target master displays in the Activity Monitor as aReplication job. The Target Master label displays in the Storage Unit column for this type of job.
Similar to other Replication jobs, the job that replicates images to a target master can work onmultiple backup images in one instance.
The detailed status for this job contains a list of the backup IDs that were replicated.
Replication
1031About NetBackup replicationAbout NetBackup Auto Image Replication

Table 25-17 Auto Image Replication jobs in the Activity Monitor (continued)
DescriptionJob type
The job that imports a backup copy into the target master domain displays in the Activity Monitor asan Import job. An Import job can import multiple copies in one instance. The detailed status for anImport job contains a list of processed backup IDs and a list of failed backup IDs.
Note: If the master servers in the source and target domains are not at the same NetBackup version,the following error can occur under certain circumstances: Failed to auto create data classification.
This error occurs if the master server in the source domain is at a NetBackup version earlier than 7.6and the data classification of Any is used. If the master server in the target domain is at NetBackup7.6, use a different data classification in the source domain or the Import job fails.
Note that a successful replication does not confirm that the image was imported at the target master.
If the data classifications are not the same in both domains, the Import job fails and NetBackup doesnot attempt to import the image again.
Failed Import jobs fail with a status 191 and appear in the Problems report when run on the targetmaster server.
The image is expired and deleted during an Image Cleanup job. Note that the originating domain(Domain 1) does not track failed imports.
See “Running a report” on page 1078.
Import
About NetBackup Replication DirectorReplication Director is the implementation of NetBackup OpenStorage-managedsnapshots and snapshot replication, where the snapshots are stored on the storagesystems of partnering companies. OpenStorage is a Veritas API that lets NetBackupcommunicate with the storage implementations that conform to the API.
Replication Director uses the functions of the OpenStorage partners to perform thefollowing tasks:
■ To share disks so that multiple heterogeneous media servers can access thesame disk volume concurrently.
■ To balance loads and tune performance. NetBackup balances backup jobs andstorage usage among the media servers and disk pools.
■ To make full use of disk array capabilities, including fast storage provisioningand almost unlimited storage.
■ To use as an alternative to off-site vaulting. Storage replication technologyprovides an efficient means to send copies of user data (files, applications,databases) to off-site storage as part of a disaster recovery plan.
1032About NetBackup replicationAbout NetBackup Replication Director

NetBackup stores snapshots of client data on the volumes that are available to thestorage server.
Snapshots represent a point-in-time of primary storage data as captured by thestorage hardware. NetBackup can then instruct the storage server to replicate thesnapshot from primary volumes to other volumes available to the storage server.The snapshot can be replicated to multiple volumes within the storage server, orto storage outside of the storage server, such as a tape device or other disk storage.Replication Director can accommodate an assortment of scenarios to meet thespecific data protection needs of an organization.
Note: Replication is not supported for EMC VNX and Celerra at this time.
Replication Director offers a single NetBackup interface for end-to-end dataprotection management for the following tasks:
■ Unified policy management.Use the NetBackup Administration Console as the one, centralized backupinfrastructure to manage the lifecycle of all data.
■ Snapshot copy management.Use NetBackup to manage the entire lifecycle of the snapshot. ReplicationDirector uses OpenStorage with a media server to access the storage servervolumes. No image can be moved, expired, or deleted from the disk array unlessNetBackup instructs the storage server to do so.The instruction to perform the initial snapshot comes from an operation in aNetBackup storage lifecycle policy (SLP). You can create one SLP that instructsNetBackup to create the initial snapshot, to replicate the snapshot to severallocations, and to indicate a different retention period for each of the replications.Additional instructions (or operations) can be included in the SLP that create abackup from the snapshot, index the snapshot, and more.
■ Snapshot copy monitoring.Use NetBackup OpsCenter to monitor the creation of each copy at each storagelocation. OpsCenter provides extensive reporting on the entire replicationenvironment.
■ Global search and restore.Recovery is available from any storage device in the environment that is definedto NetBackup. This includes recovery from the primary copy or any replicatedcopy on disk, or from any duplicated copy on disk or tape.
For more information, see the NetBackup Replication Director Solutions Guide.
1033About NetBackup replicationAbout NetBackup Replication Director

Monitoring and reporting
■ Chapter 26. Monitoring NetBackup activity
■ Chapter 27. Reporting in NetBackup
■ Chapter 28. Using the Logging Assistant
7Section

Monitoring NetBackupactivity
This chapter includes the following topics:
■ About the Activity Monitor
■ Setting Activity Monitor options
■ About the Jobs tab
■ About the Daemons tab
■ About the Processes tab
■ About the Drives tab
■ About the jobs database
■ About the Device Monitor
■ About media mount errors
■ About pending requests and actions
About the Activity MonitorUse the Activity Monitor in the NetBackup Administration Console to monitorand control the following aspects of NetBackup:
See “About the Jobs tab” on page 1038.
The job details are described in the online Help.
Jobs
See “About the Daemons tab” on page 1045.Services or Daemons
26Chapter

See “About the Processes tab” on page 1057.Processes
See “About the Drives tab” on page 1062.Drives
■ As long as the Activity Monitor is active in the NetBackup AdministrationConsole, the bpjobd daemon supplies the job activity status to the ActivityMonitor.Updates to the Activity Monitor occur as jobs are initiated, updated, andcompleted. Without a refresh cycle, updates occur instantaneously.The status bar appears in the Jobs tab, at the top of the Activity Monitor Detailspane.
Note: The Filter option on the View menu is useful for displaying in Activity Monitoronly those jobs with specified characteristics. For example, the jobs that were startedbefore a specific date; jobs in the queued state; jobs with status completion codeswithin a specified range.
The status bar displays the following information:
■ The master server on which the jobs reside.
■ The total number of jobs.
■ The number of jobs in each of the job states: Active, Queued, Waiting for Retry,Suspended, Incomplete, and Done.
■ The number of jobs currently selected.
■ The number of NetBackup services or daemons that run.
■ The number of drives and the state of each (Active, Down).
The numbers always reflect the actual number of jobs, even when the filter is used.
1036Monitoring NetBackup activityAbout the Activity Monitor

Figure 26-1 Activity Monitor
Standard toolbarCurrent masterserver
User toolbar
Status bar
Menu bar
Right-click in pane to view the shortcut menu
Four tabs
Setting Activity Monitor optionsThe following procedure describes how to set the options for the Activity Monitorin the NetBackup Administration Console.
1037Monitoring NetBackup activitySetting Activity Monitor options

To configure options for the Activity Monitor
1 In the NetBackup Administration Console, in the menu bar, click View >Options and select the Activity Monitor tab to access configurable optionsfor the Activity Monitor.
2 The following options are available to receive a confirmation warning.
Prompts the user with a confirmation dialogbox when a job is deleted.
Confirm job deletions
Prompts the user with a confirmation dialogbox when a job is canceled.
Confirm job cancellations
Enable to display a confirmation dialog boxwhen a daemon is stopped.
To discontinue further delete, cancel or stopdaemon confirmations, enable the In thefuture, do not show this warning option.
Confirm stop daemons
Specifies the maximum number of ActivityMonitor job details, daemon details, and theprocess details windows that can bedisplayed at one time.
Maximum details windows
Enable Automatically refresh display torefresh data on the Daemons tab and theProcesses tab and the job details elapsedtime. Other Jobs tab data refreshesindependently of the Auto Refresh setting.
Enter the rate (in seconds) at which datarefreshes in the Daemons tab and theProcesses tab.
Automatically refresh display
3 Click OK to close the dialog box and apply any changes.
About the Jobs tabThe Jobs tab in the Activity Monitor displays all of the jobs that are in process orthat have completed for the master server currently selected. The Jobs tab alsodisplays details about the jobs. The job details are described in the online Help.
For some backup jobs, a parent job is used to perform pre- and post-processing.Parent jobs display a dash (-) in the Schedule column.
1038Monitoring NetBackup activityAbout the Jobs tab

A parent job runs the start and end notify scripts (PARENT_START_NOTIFY,PARENT_END_NOTIFY) from the master server. The scripts are located in the followingdirectory:
On Windows: Install_path\VERITAS\NetBackup\bin
On UNIX: /usr/openv/netbackup/bin/
The role of the parent job is to initiate requested tasks in the form of children jobs.
The tasks vary, depending on the backup environment, as follows.
Table 26-1 Tasks initiated by parent jobs
DescriptionTask
The parent job creates the snapshot, initiates children jobs, and deletes the snapshotwhen complete.
Children jobs are created if the Snapshot Client settings are configured to retainsnapshots for Instant Recovery, then copy snapshots to a storage unit. (Snapshotsand copy snapshots to a storage unit is selected in the policy Schedule Attributestab.)
Children jobs are not created if the Snapshot Client settings are configured to retainsnapshots for Instant Recovery, but to create snapshots only. That is, the snapshot isnot backed up to a storage unit, so no children jobs are generated. (Snapshots onlyis selected in the policy Schedule Attributes tab.)
Snapshot Client
The parent job runs brmsavecfg, then initiates the backup as a child job. Ifmultistreaming and BMR are used together, the parent job can start multiple childrenjobs.
Bare Metal Restore
The parent job for catalog backups works with bpdbm to initiate multiple children backupjobs:
■ A Sybase backup■ A file system backup of the master server■ A backup of the BMR database, if necessary
Catalog backups
A multiple copies job produces one parent job and multiple child jobs. Child jobs thatare part of a multiple copies parent job cannot be restarted individually. Only the parentjob (and subsequently all the children jobs) can be restarted.
See “Multiple copies (schedule attribute)” on page 774.
Multiple copies
The parent job performs stream discovery and initiates children jobs. A parent job doesnot display a schedule in the Activity Monitor. Instead, a dash (-) appears for theschedule because the parent schedule is not used and the children schedules may bedifferent. The children jobs display the ID of the parent job in the Activity Monitor.
Multiple data streams
1039Monitoring NetBackup activityAbout the Jobs tab

Table 26-1 Tasks initiated by parent jobs (continued)
DescriptionTask
The parent job runs a resolver process during which children jobs are started. Thisprocess is similar to the stream discovery for multiple data streams. If multiple datastreams are enabled, some children jobs can be split into multiple streams.
SharePoint
The parent job starts the Vault profile. Then, the Vault profile starts the duplicates asjobs. The duplicates do not appear as children jobs in the Activity Monitor.
Vault
Viewing job details in the Activity MonitorThe following procedure describes how to view job details in the Activity Monitor inthe NetBackup Administration Console.
To view job details in the Activity Monitor
◆ In the NetBackup Administration Console, click Activity Monitor.
Double-click on a job that is displayed in the Jobs tab pane.
The Job Details dialog box contains detailed job information on separate tabs:
■ Job Overview tab
■ Detailed Status tab
■ Job Hierarchy tab
To view the details of the previous or the next job, click the up or down arrow.
Click Help to view the descriptions of the fields.
Not all columns appear by default. In theNetBackup Administration Console,click View > Columns > Layout or View > Column Layout to show or hidecolumns.
Showing or hiding column heads in the Activity MonitorThe following procedure describes how to show or hide column heads in the ActivityMonitor.
To show or hide column heads in the Activity Monitor
1 In the NetBackup Administration Console, open the Activity Monitor.
2 Select an item in the right-hand pane.
3 Click View > Columns > Layout. The Set Column Layout orColumn Layoutthe dialog box appears.
4 Select the heading you want to display or hide.
1040Monitoring NetBackup activityAbout the Jobs tab

■ Select the Show Column button to display the heading.
■ Select the Hide Column button if you do not want to see the column head.
5 To change the order in which the columns appear, select the column head.Then, click the Move Up button or the Move Down button to reorder thecolumns.
6 Click OK to apply the changes.
Monitoring the detailed status of a selected job in the Activity MonitorThe following procedure describes how to monitor the detailed status of a job.
To monitor the detailed status of a selected job
1 In the NetBackup Administration Console, open the Activity Monitor andselect the Jobs tab.
2 Select the job(s) for which you want to view details.
3 Select Actions > Details.
Deleting completed jobs in the Activity MonitorThe following procedure describes how to delete a completed job.
To delete completed jobs in the Activity Monitor
1 In the NetBackup Administration Console, open the Activity Monitor andselect the Jobs tab.
2 Select the job(s) you want to delete.
3 Select Edit > Delete.
When a parent job is deleted, all the children jobs are deleted as well. When a childjob is deleted that has no children, that child job alone is deleted.
Canceling a job that has not completed in the Activity MonitorThe following procedure describes how to cancel a job that has not completed.
To cancel a job that has not completed in the Activity Monitor
1 In the NetBackup Administration Console, open the Activity Monitor andselect the Jobs tab.
2 Select the job that has not completed that you want to cancel. It may be a jobthat is in the Queued, Re-Queued, Active, Incomplete, or Suspended state.
1041Monitoring NetBackup activityAbout the Jobs tab

3 Select Actions > Cancel Job.
If the selected job is a parent job, all the children of that parent job are canceledas well.
In most cases, a canceled child job cancels only that job and allows the otherchild jobs to continue. One exception is multiple copies created as part of apolicy or a storage lifecycle policy: canceling a child job cancels the parent joband all child jobs.
4 To cancel all jobs in the jobs list that have not completed, click Actions >Cancel All Jobs.
Restarting a failed (completed) job in the Activity MonitorThe following procedure describes how to restart a job that has completed. Usethis procedure to retry a job that has failed.
To restart a completed job in the Activity Monitor
1 In the NetBackup Administration Console, open the Activity Monitor andselect the Jobs tab.
2 Select the job that you want to restart.
3 Select Actions > Restart Job. In this case, a new job ID is created for the job.The job details for the original job references the job ID of the new job.
Suspending restore or backup jobs in the Activity MonitorThe following procedure describes how to suspend restore or backup jobs.
To suspend a restore or a backup job in the Activity Monitor
1 In the NetBackup Administration Console, open the Activity Monitor andselect the Jobs tab.
2 Select the job you want to suspend.
Only the backup and the restore jobs that contain checkpoints can besuspended.
3 Select Actions > Suspend Job.
Resuming suspended or incomplete jobs in the Activity MonitorThe following procedure describes how to resume suspended or incomplete jobs.
1042Monitoring NetBackup activityAbout the Jobs tab

To resume a suspended or an incomplete job in the Activity Monitor
1 In the NetBackup Administration Console, open the Activity Monitor andselect the Jobs tab.
2 Select the suspended or the incomplete job you want to resume.
Only the backup and the restore jobs that contain checkpoints can besuspended.
3 Select Actions > Resume Job.
Printing job list information in the Activity MonitorThe following procedure describes how to print job list information from a list ofjobs.
To print job list information from a list of jobs in the Activity Monitor
1 In the NetBackup Administration Console, open the Activity Monitor andselect the Jobs tab.
2 Select a job to print. Hold down the Control or Shift key to select multiple jobs.If no job is selected, all jobs print.
3 Select File > Print.
Exporting Activity Monitor data to a text fileThe following procedure describes how to export Activity Monitor data to a text file.
To export Activity Monitor data to a text file
1 In the NetBackup Administration Console, open the Activity Monitor.
2 From any Activity Monitor tab, select File > Export.
3 Select whether to export all rows or only the rows currently selected.
4 Enter the full path to the file where you want the job data to be written, thenclick Save.
Printing job detail informationThe following procedure describes how to print job detail information from a singlejob.
1043Monitoring NetBackup activityAbout the Jobs tab

To print job detail information from a single job in the Activity Monitor
1 In the NetBackup Administration Console, open the Activity Monitor andselect the Jobs tab.
2 Double-click on a job to open it.
3 In the Job Details dialog box, click Print. Then select a printer and set theprinter options.
Copying Activity Monitor text to a fileThe following procedure describes how to copy Activity Monitor text to a file.
To copy Activity Monitor text to a file
1 In the NetBackup Administration Console, open the Activity Monitor andselect rows that you want to copy.
2 Perform one of the following method:
■ Select Edit > Copy To Clipboard.
■ Press Ctrl + C.
■ Right-click and select Copy To Clipboard from the right-click menu.
■ Click the Copy To Clipboard icon on the toolbar.
3 Paste the selected text into the file (for example, an Excel document).
Note: These methods of copying information from the Activity Monitor also applyto other tables in NetBackup. The table title is not copied.
Changing the Job Priority dynamically from the Activity MonitorTo dynamically change the priority of a job, select one or more queued or activejobs that wait for resources. Then, either from the Actionsmenu or by right-clickingthe job, select Change Job Priority.
Select one of the following methods to change the job priority.
Table 26-2 Change Job Priority options
DescriptionOption
Enters the specific job priority for the selected jobs.Set Job Priority to
Raises the priority of the job by the selected internal.Increment the JobPriority by
1044Monitoring NetBackup activityAbout the Jobs tab

Table 26-2 Change Job Priority options (continued)
DescriptionOption
Lowers the priority of the job by the selected internal.Decrement the JobPriority by
Changes in the Change job priority dialog box affect the priority for the selectedjob only, and not all other jobs of that type.
To change the job priority defaults, use the Default Job Priorities host properties.
See “Default Job Priorities properties” on page 121.
About the Daemons tabIn the NetBackup Administration Console, the Daemons tab in the ActivityMonitor displays the status of NetBackup daemons on master and media servers.
Figure 26-2 The Daemons tab in the Activity Monitor
Not all columns display by default. Click View > Column Layout to show or hidecolumns.
Table 26-3 describes all of the NetBackup daemons.
1045Monitoring NetBackup activityAbout the Daemons tab

Table 26-3 NetBackup daemons
DescriptionDaemon
Populates the NetBackup catalog database with database agent metadata andservice requests for agents. This service is also responsible for initiating certainactions, such as starting jobs for Oracle cloning.
NetBackup Agent Request Server(nbars or nbars.exe)
The Audit Manager provides the mechanism to query and report on auditinginformation.
NetBackup Audit Manager(nbaudit or nbaudit.exe)
NetBackup Product Authentication validates identities and forms the basis forauthorization and access control in NetBackup. The authentication service alsogenerates security certificates that are consumed by various NetBackupcomponents.
See “About security certificates for NetBackup hosts” on page 47.
NetBackup Authentication (nbatdor nbatd.exe)
NetBackup Product Authorization provides access control in NetBackupapplications.
NetBackup Authorization (nbazdor nbazd.exe)
Is present if Bare Metal Restore Boot Server is installed. BMR boot servers manageand provide the resources that are used to rebuild systems.
NetBackup Bare Metal RestoreBoot Server Service (bmrbd orbmrbd.exe)
Is present if Bare Metal Restore is installed. Manages restoration data, objects,and servers.
NetBackup Bare Metal RestoreMaster Server (bmrd orbmrd.exe)
Is present if Bare Metal Restore is installed. Provides the PXE protocol servicesto Bare Metal Restore clients.
NetBackup BMR MTFTP Services(PXEMTFTP or PXEMTFTP.exe)
Is present if Bare Metal Restore is installed. Provides the TFTP protocol servicesto Bare Metal Restore clients.
NetBackup BMR PXE Service(bmrpxeserver orbmrpxeserver.exe)
The NetBackup Client daemon. This process issues requests to and from themaster server and the media server to start programs on remote hosts.
On UNIX clients, bpcd can only be run in standalone mode.
On Windows, bpcd always runs under the supervision of bpinetd.exe.NetBackup has a specific configuration parameter for bpcd. If the port numberis changed within the NetBackup configuration, the software also updates the portnumber in the services file.
NetBackup Client Service (bpcdor bpcd.exe)
1046Monitoring NetBackup activityAbout the Daemons tab

Table 26-3 NetBackup daemons (continued)
DescriptionDaemon
The CloudStore Service Container is a web-based service container that runs onthe media server that is configured for cloud storage. This container hosts differentservices such as the configuration service, the throttling service, and the meteringdata collector service. The container requires that an authentication certificate isinstalled on the media server.
See “About security certificates for NetBackup hosts” on page 47.
NetBackup CloudStore ServiceContainer (nbcssc ornbcssc.exe)
Communicates with legacy NetBackup services.NetBackup Compatibility Service(bpcompatd or bpcompatd.exe)
Manages the NetBackup internal databases and catalogs. BPDBMmust be runningon the NetBackup master server during all normal NetBackup operations.
NetBackup Database Manager(bpdbm or bpdbm.exe)
Runs on the NetBackup deduplication storage server host to store and managededuplicated client data. spoold stands for storage pool daemon; do not confuseit with a print spooler daemon.
Active only if the NetBackup Data Protection Optimization Option is licensed andthe media server is configured as a deduplication storage server.
NetBackup Deduplication Engine(spoold or spoold.exe)
Runs on the NetBackup deduplication storage server host to maintain theNetBackup deduplication configuration, control deduplication internal processes,control replication, control security, and control event escalation.
Active only if the NetBackup Data Protection Optimization Option is licensed andthe media server is configured as a deduplication storage server.
NetBackup Deduplication Manager(spad or spad.exe)
Starts the Volume Manager (vmd), the automatic volume recognition process(avrd), and any robotic processes. Processes the requests to mount and dismounttapes in robotically controlled devices through the robotic control processes.Mounts the volumes on the tape devices in response to user requests.
NetBackup Device Manager (ltidor ltid.exe)
Accesses and manages the database where media and device configurationinformation is stored (EMM_DATA.db). nbemm.exe must be running in order forjobs to run.
The service cannot be stopped from the Activity Monitor because it receivesdata that appears in the NetBackup Administration Console. If it is stopped,the console cannot display the data.
NetBackup Enterprise MediaManager (nbemm or nbemm.exe)
Provides the communication infrastructure to pass information and events betweendistributed NetBackup components. Runs on the same system as the NetBackupEnterprise Media Manager.
NetBackup Event ManagementService (nbevtmgr ornbevtmgr.exe)
Manages the Hold Service.NetBackup Indexing Manager(nbim or nbim.exe)
1047Monitoring NetBackup activityAbout the Daemons tab

Table 26-3 NetBackup daemons (continued)
DescriptionDaemon
Accepts the jobs that the Policy Execution Manager (nbpem or nbpem.exe)submits and acquires the necessary resources. The Job Manager then starts thejob and informs nbpem that the job is completed.
NetBackup Job Manager (nbjm ornbjm.exe)
A master server-based symmetric Key Management Service that providesencryption keys to media server BPTM processes.
NetBackup Key ManagementService (nbkms or nbkms.exe)
Listens for connections from NetBackup servers in the network and when anauthorized connection is made, starts the necessary NetBackup process to servicethe connection.
The service cannot be stopped from the Activity Monitor because it receivesdata that appears in the NetBackup Administration Console. If it is stopped,the console cannot display the data.
Note: On Windows, the Client Service must be run as either an Administrator orLocal System account. Problems arise if the Client Service logon account differsfrom the user that is logged on to use NetBackup. When NetBackup tries to contactthe Client Service, a message appears that states the service did not start becauseof improper logon information. The event is recorded in the Windows Systemevent log. The log notes that the account name is invalid, does not exist, or thatthe password is invalid.
To configure a BasicDisk storage unit that uses CIFS, nbrmms must share thesame logon credentials as bpinetd on the media server.
See “Configuring credentials for CIFS storage and disk storage units” on page 569.
NetBackup Legacy Client Service(bpinetd or bpinetd.exe)
NetBackup Legacy Network Service (vnetd or vnetd.exe)NetBackup Legacy NetworkService (vnetd or vnetd.exe)
Creates Policy/Client tasks and determines when jobs are due to run. If a policyis modified or if an image expires, nbpem is notified and the Policy/Client taskobjects are updated.
NetBackup Policy ExecutionManager (nbpem or nbpem.exe)
Executes the Open Storage (OST) calls on any host and returns the results tothe proxy plugin side. The plugin side returns them to the application. The proxyserver (and plugin) provides a network connection between different servers torelay Open Storage calls.
NetBackup Proxy Service(nbostpxy or nbostpxy.exe)
Manages the NetBackup relational database. The service must be running on theNetBackup master server during all normal NetBackup operations.
On Windows, the display name is SQLANYs_VERITAS_NB.
NetBackup Relational DatabaseManager (NB_dbsrv ordbsrv12.exe)
1048Monitoring NetBackup activityAbout the Daemons tab

Table 26-3 NetBackup daemons (continued)
DescriptionDaemon
Discovers and monitors disk storage on NetBackup media servers. Also discovers,monitors, and manages Fibre Transport (FT) connections on media servers andclients for the NetBackup SAN Client option. Runs on NetBackup media servers.
To configure a BasicDisk storage unit that uses CIFS, nbrmms must share thesame logon credentials as bpinetd on the media server.
See “Configuring credentials for CIFS storage and disk storage units” on page 569.
NetBackup Remote Manager andMonitor Service (nbrmms ornbrmms.exe)
Manages the socket connections between a NetBackup media server and a clientthat is configured for resilient communication. This service runs on the NetBackupmaster server, NetBackup media servers, and clients. NetBackup starts thisservice when resilient connections are required between hosts. The service stopswhen resilient connections are no longer required.
One instance of the service can process 256 connections. Multiple instances ofthe service can run simultaneously.
See “NBRNTD_IDLE_TIMEOUT option for NetBackup servers” on page 320.
See “Resilient Network properties” on page 218.
NetBackup Remote NetworkTransport Service (nbrntd ornbrntd.exe)
Processes the requests from NetBackup clients and servers. bprd also promptsNetBackup to perform automatically scheduled backups. bprd must be runningon the NetBackup master server to perform any backups or restores.
NetBackup Request Daemon(bprd or bprd.exe)
Allocates the storage units, tape drives, and client reservations for jobs. nbrbworks with the Enterprise Media Manager (NBEMM).
The nbrbutil utility can be used to add or change the Resource Broker settings.
See “Using the nbrbutil utility to configure the NetBackup Resource Broker”on page 1050.
NetBackup Resource Broker (nbrbor nbrb.exe)
Runs on NetBackup SAN clients. Implements the client side of the Fibre Transport(FT) mechanism. The client FT service opens and closes FT connections andmanages the FT connections for shared memory data transfers.
NetBackup SAN Client FibreTransport Service(nbftclnt.exe)
Facilitates the communication between the NetBackup graphical user interfaceand NetBackup logic. NBSL is required to run Veritas NetBackup OpsCenterwhich manages and monitors multiple NetBackup environments.
The service cannot be stopped from the Activity Monitor because it receivesdata that appears in the NetBackup Administration Console. If it is stopped,the console cannot display the data.
NetBackup Service Layer (nbslor nbsl.exe)
1049Monitoring NetBackup activityAbout the Daemons tab

Table 26-3 NetBackup daemons (continued)
DescriptionDaemon
Monitors the NetBackup services that run on the local computer. If a serviceunexpectedly terminates, the service tries to restart the terminated service. Ifnbsvcmon determines that NetBackup is configured for a cluster, the serviceshuts down, and the monitoring is taken over by the cluster.
The service cannot be stopped from the Activity Monitor because it receivesdata that appears in the NetBackup Administration Console. If it is stopped,the console cannot display the data.
NetBackup Service Monitor(nbsvcmon or nbsvcmon.exe)
Manages the storage lifecycle operations and schedules duplication jobs. Monitorsdisk capacity on capacity-managed volumes and removes older images whenrequired.
The SLP Manager and the Import Manager run within nbstserv:
■ The SLP Manager creates batches of the images to be imported based onSLP name and storage device (disk media id or robot number).
■ The Import Manager monitors a worklist in EMM for images to be importedand initiates bpimport jobs for those images.
Note: Restart nbstserv after making changes to the underlying storage for anyoperation in an SLP.
NetBackup Storage LifecycleManager (nbstserv ornbstserv.exe)
Manages NetBackup Vault. NBVAULT must be running on the NetBackup Vaultserver during all NetBackup Vault operations.
NetBackup Vault Manager(nbvault or nbvault.exe)
Manages the volumes (tapes) needed for backup or restore and starts local devicemanagement daemons and processes.
NetBackup Volume Manager (vmdor vmd.exe)
Note: This service does not appear in the Activity Monitor but is representedin the Windows Services utility.
Provides single-port access to clients outside the firewall that connect to Veritasproduct services. Service name: VRTSpbx.
Veritas Private Branch Exchange(pbx_exchange.exe)
Using the nbrbutil utility to configure the NetBackup Resource BrokerThe NetBackup Resource Broker (nbrb) allocates resources and maintains resourcerequests for jobs in the job queue. Use the nbrbutil utility to configure the ResourceBroker.
The nbrbutil utility is located in the following directory:
■ On Windows: Install_path\VERITAS\NetBackup\bin\admincmd\nbrbutil
■ On UNIX: /usr/openv/netbackup/bin/admincmd/nbrbutil
1050Monitoring NetBackup activityAbout the Daemons tab

For a complete description of nbrbutil, see the NetBackup Commands ReferenceGuide.
Table 26-4 describes the options available to nbrbutil command.
Table 26-4 nbrbutil options
DescriptionOption
Cancels the allocation request within the given identifier.-cancel requestID
Changes the request priority.-changePriority requestID
Changes the request priority class.-changePriorityClass requestID-priorityClass priorityClass
Adds or changes the nbrb configuration settings.
Table 26-5 describes the configuration settings in detail.
-changeSettingsparameterparameter_value
Deletes a Resource Broker configuration setting that is identified bysettingname.
-deleteSetting settingname
Dumps all Resource Broker allocation and request lists.-dump
Enables the Resource Broker to log its internal state in the specified filename.
-dumptables [-f filename]
Lists the help for this command.-help
Lists all the active jobs for a drive.-listActiveDriveJobs[driveName]
Lists all the active jobs.-listActiveJobs
Lists all the active jobs for a media ID (disk or tape).-listActiveMediaJobs mediaId
Lists all the active jobs for a volume pool.-listActivePoolJobs poolName
Lists all the active jobs for a storage unit or a storage unit group.-listActiveStuJobsstuName|stugroup
Lists the drives that are reserved in EMM but have no correspondingallocation in the Resource Broker.
-listOrphanedDrives
Lists the media that is reserved in EMM but has no corresponding allocationin the Resource Broker.
-listOrphanedMedia
Lists the orphaned Fibre Transport pipes.-listOrphanedPipes
1051Monitoring NetBackup activityAbout the Daemons tab

Table 26-4 nbrbutil options (continued)
DescriptionOption
Lists the storage units that are reserved in EMM but have no correspondingallocation in the Resource Broker.
-listOrphanedStus
Lists the configuration settings of the Resource Broker.-listSettings
Changes the request priority.-priority priority
Release the allocation with the given identifier.-release allocationID
Releases the allocation holds caused by allocation errors for drives andmedia.
-releaseAllocHolds
Releases all allocations for the named drive.-releaseDrive drivename
Releases the EMM and the MDS allocations that MDS allocates by thespecified identifier.
-releaseMDS mdsAlocationKey
Releases all allocations for the specified volume.-releaseMedia mediaid
Releases the drives that are reserved in EMM but have no correspondingallocation in the Resource Broker.
-releaseOrphanedDrive drivekey
Releases the media that are reserved in EMM but have no correspondingallocation in the Resource Broker.
-releaseOrphanedMedia mediakey
Releases the orphaned Fibre Transport pipes.-releaseOrphanedPipes
Releases the storage units that are reserved in EMM but have nocorresponding allocation in the Resource Broker.
-releaseOrphanedStu stuName
Reports inconsistent the allocations between the Resource Broker and MDS.-reportInconsistentAllocations
Resets all Resource Broker allocations, requests, and persisted states.-resetAll
Resets all Resource Broker EMM and MDS allocations that are relatedtoltid on the media server.
-resetMediaServer mediaserver
Resumes the Resource Broker processing.-resume
Disables the future job from joining the group for this drive.-setDriveGroupUnjoinable
Disables the future job from joining the group for this media.-setMediaGroupUnjoinable
Suspends the Resource Broker processing.-suspend
Syncs up any allocation difference between the Resource Broker and MDS.-syncAllocations
1052Monitoring NetBackup activityAbout the Daemons tab

Table 26-5 lists the parameters for the nbrbutil -changesettings option, anddescribes the use of each.
Use the nbrbutil command with the -changesettings option to add or changeResource Broker configuration settings.
Table 26-5 nbrbutil -changesettings parameters
DescriptionParameter
When the RB_DO_INTERMITTENT_UNLOADS parameter is set to true(default), nbrb initiates unloads of the drives that have exceeded the mediaunload delay. Drives become available more quickly to jobs that requiredifferent media servers or different media than the job that last used thedrive. However, the loaded media or drive pair may not be available for jobswith less priority in the prioritized evaluation queue that can use the drive ormedia without unload.
RB_DO_INTERMITTENT_UNLOADS=true
RB_DO_INTERMITTENT_UNLOADS
When the RB_ENABLE_OPTIMIZATION parameter is set to true (default),this entry instructs nbrb to cache states of resource requests.
RB_ENABLE_OPTIMIZATION=true
RB_ENABLE_OPTIMIZATION
When the RB_RESPECT_REQUEST_PRIORITY parameter is set to false(default), nbrb continues to evaluate jobs in the prioritized job queue. As aresult, a job is likely to reuse a drive more quickly after the drive has beenreleased. However, some lower priority jobs may receive drives before higherpriority jobs do.
When the RB_RESPECT_REQUEST_PRIORITY parameter is set to true,nbrb restarts its evaluation queue at the top of the prioritized job queue afterresources have been released.
RB_RESPECT_REQUEST_PRIORITY=false
RB_RESPECT_REQUEST_PRIORITY
When a high priority request appears (a tape span request, a subsequentrequest for a synthetic or a duplication job, or a read request for an optimizedduplication), nbrb immediately interrupts the evaluation cycle. nbrb releasesand unloads drives, if required, before a new evaluation cycle is started.
If the RB_BREAK_EVAL_ON_DEMAND parameter is set to true (default), theevaluation cycle can be interrupted by high priority requests.
RB_BREAK_EVAL_ON_DEMAND=true
RB_BREAK_EVAL_ON_DEMAND
1053Monitoring NetBackup activityAbout the Daemons tab

Table 26-5 nbrbutil -changesettings parameters (continued)
DescriptionParameter
Spanning requests and additional resources for an active duplication job areput in a special queue for priority processing. TheRB_MAX_HIGH_PRIORITY_QUEUE_SIZE parameter sets the maximumnumber of requests that NetBackup allows in that queue. (Default: 100requests.)
RB_MAX_HIGH_PRIORITY_QUEUE_SIZE=100
RB_MAX_HIGH_PRIORITY_QUEUE_SIZE
The RB_RELEASE_PERIOD parameter indicates the interval that NetBackupwaits before it releases a resource. (Default: 180 seconds.)
RB_RELEASE_PERIOD=180
RB_RELEASE_PERIOD
The RB_CLEANUP_OBSOLETE_DBINFO parameter indicates the number ofseconds that can elapse between the cleanup of obsolete information in thenbrb database. (Default: 60 seconds.)
RB_CLEANUP_OBSOLETE_DBINFO=60
RB_CLEANUP_OBSOLETE_DBINFO
The RB_MPX_GROUP_UNLOAD_DELAY parameter indicates the number ofseconds that nbrb waits for a new job to appear before a tape is unloaded.(Default: 10 seconds.)
RB_MPX_GROUP_UNLOAD_DELAY=10
This setting can help avoid unnecessary reloading of tapes and applies toall backup jobs. During user backups, nbrb uses the maximum value ofRB_MPX_GROUP_UNLOAD_DELAY and the Media mount timeout hostproperty setting when nbrb unmounts the tape.
During restores, Media mount timeout is used, notRB_MPX_GROUP_UNLOAD_DELAY.
See “Timeouts properties” on page 256.
RB_MPX_GROUP_UNLOAD_DELAY
The RB_RETRY_DELAY_AFTER_EMM_ERR parameter indicates how longNetBackup waits after an EMM error before it tries again. The error must beone where a retry is possible. For example, if a media server is down.(Default: 60 seconds.)
RB_RETRY_DELAY_AFTER_EMM_ERR=60
RB_RETRY_DELAY_AFTER_EMM_ERR
The RB_REEVAL_PENDING parameter indicates the number of seconds thatcan elapse between evaluations of the pending request queue. For example,a pending request queue can include, jobs awaiting resources. (Default: 60seconds.)
RB_REEVAL_PENDING=60
RB_REEVAL_PENDING
1054Monitoring NetBackup activityAbout the Daemons tab

Table 26-5 nbrbutil -changesettings parameters (continued)
DescriptionParameter
The RB_REEVAL_PERIOD parameter indicates the time between evaluationsif an outstanding request is not satisfied, and if no other requests or resourceshave been released. (Default: Five minutes must pass before the initialrequest is reevaluated.)
RB_REEVAL_PERIOD=300
RB_REEVAL_PERIOD
Types of NetBackup daemonsThe following table describes additional information about NetBackup daemons,found on the UNIX platform.
Always run and listen to accept connections. Examplesinclude bpdbm, bprd, bpjobd, and vmd.
Standalone daemons
Splits or forks a child process to handle requests. Examplesinclude bpdbm and bprd.
Multiprocess standalonedaemons
Accept connections and handle requests in the same process.Single-process standalonedaemons
inetd(1m) or bpinetd usually launch these NetBackupdaemons. Examples include bpcd, bpjava-msvc, andvnetd.
inetd daemons
Veritas recommends that you exit all instances of the NetBackup-JavaAdministration Console after restarting daemons in the Activity Monitor or byusing a command. Then restart the console with the jnbSA command.
The jnbSA command is described in the NetBackup Commands Reference Guide.
Monitoring NetBackup daemonsThe following procedure describes how to monitor NetBackup daemons.
To monitor NetBackup daemons
1 In the NetBackup Administration Console, select Activity Monitor.
2 Select the Daemons tab.
1055Monitoring NetBackup activityAbout the Daemons tab

3 Double-click the name of the daemon to view the details.
4 In the Daemon Details dialog box, click the up or down arrow to see the detailsof the next or the previous daemon in the list.
For a description of the daemon, click Help in the dialog box.
Starting or stopping a daemonThe following procedure describes how to start or stop a NetBackup daemon.
To start or stop a NetBackup daemon
1 In the NetBackup Administration Console, select Activity Monitor.
2 Select the Daemons tab.
3 Select the daemon(s) that you want to start or stop.
4 Select Actions > Stop Selected or Actions > Start Selected.
Or, select Actions > Start Daemon or Actions > Stop Daemon.
To start or stop daemons requires the necessary user permissions on the systemwhere the daemon runs.
Displaying all media servers in the Activity MonitorTheActivity Monitormay not immediately display all media servers in theDaemonstab as soon as the media is added. Also, the Media Servers tab of the StorageServer dialog may not immediately display all available media servers in a cloudenvironment.
Even though the media servers may not be visible, it does not affect existing mediaservers or other NetBackup operations.
To display all media servers:
■ Close the NetBackup Administration Console on the master server.
■ Stop and restart the NetBackup Service Layer (NBSL). Restarting NBSL doesnot affect any ongoing backup or restore jobs.
■ Open the NetBackup Administration Console. The services of the newlyadded media servers should be visible in the NetBackup AdministrationConsole.
This situation affects only the Remote Administration Console on Windows andthe OpsCenter interface.
1056Monitoring NetBackup activityAbout the Daemons tab

About the Processes tabIn the NetBackup Administration Console, the Processes tab in the ActivityMonitor displays the NetBackup processes that run on master and media servers.
Not all columns display by default. Click View > Column Layout to show or hidecolumns.
Table 26-6 lists and describes the NetBackup processes.
Table 26-6 NetBackup processes
DescriptionPortProcess
The acsd (Automated Cartridge System) daemon runs on the NetBackup media server andcommunicates mount and unmount requests to the host that controls the ACS robotics.
13702acsd
On UNIX: The NetBackup ACS storage server interface (SSI) event logger acssel logsevents.
Noneacssel
On UNIX: The NetBackup ACS storage server interface (SSI) acsssi communicates withthe ACS library software host. acsssi processes all RPC communications from acsd orfrom the ACS robotic test utility that is intended for the ACS library software.
Noneacsssi
The Automatic Volume Recognition process handles automatic volume recognition andlabel scans. The process allows NetBackup to read labeled tapes and assign the associatedremovable media requests to drives.
Noneavrd
The process for the NetBackup Bare Metal Restore Master Server service.8362bmrd
The NetBackup Client daemon issues requests to and from the master server and the mediaserver to start programs on remote hosts.
On UNIX clients, bpcd can only be run in standalone mode.
On Windows, bpcd always runs under the supervision of bpinetd.exe. NetBackup hasa specific configuration parameter for bpcd: if the port number is changed within theNetBackup configuration, the software also updates the port number in the services file.
13782bpcd
The process for the NetBackup Compatibility service.Nonebpcompatd
The process for the NetBackup Database Manager service.
The process that responds to queries that are related to the NetBackup catalog.
Manages the NetBackup internal databases and catalogs. This service must be running onthe NetBackup master server during all normal NetBackup operations.
13721bpdbm
1057Monitoring NetBackup activityAbout the Processes tab

Table 26-6 NetBackup processes (continued)
DescriptionPortProcess
On Windows: The process for the NetBackup Legacy Client Service.
The process that provides a listening service for connection requests.
Note: To configure a BasicDisk storage unit that uses CIFS, the media server and thefollowing processes must have the same logon credentials: bpinetd, nbrmms, and vnetd.
See “Configuring credentials for CIFS storage and disk storage units” on page 569.
Nonebpinetd
The NetBackup-Java application server authentication service program. bpinetd startsthe program during startup of the NetBackup-Java applications and authenticates the userthat started the NetBackup-Java application.
13722bpjava-msvc
The NetBackup-Java application server user service program on NetBackup servers.bpjava-msvc starts the program upon successful login with the NetBackup-Java applicationslogin dialog box. bpjava-susvc services all requests from the NetBackup-Java applicationsfor administration and end-user operations on the host on which the NetBackup-Javaapplication server is running.
Nonebpjava-susvc
The NetBackup Jobs Database Management daemon. This process queries and updatesthe jobs database.
13723bpjobd
The process for the NetBackup Request Daemon.
The process that starts the automatic backup of clients and responds to client requests forfile restores and user backups and archives.
NetBackup has a specific configuration parameter for bprd: if the port number changeswithin the NetBackup configuration, the software also updates the port number in the servicesfile.
13720bprd
The process for the NetBackup Device Manager service.Noneltid
The NetBackup Audit Manager runs on the master server. The Enterprise Media Manager(EMM) maintains audit records in the NetBackup database. The act of starting or stoppingnbaudit is audited, even if auditing is disabled.
nbaudit
The NetBackup Administration Console on the Windows platform.NoneNBConsole
The NetBackup Agent Request Server service populates the NetBackup catalog databasewith database agent metadata and services request for agents. This service is alsoresponsible for initiating certain actions, such as starting jobs for Oracle cloning.
Nonenbars
The process for the NetBackup Enterprise Media Manager service.
The process that accesses and manages the database where media and device configurationinformation is stored (EMM_DATA.db). nbemm.exe must be running in order for jobs to run.
Nonenbemm
1058Monitoring NetBackup activityAbout the Processes tab

Table 26-6 NetBackup processes (continued)
DescriptionPortProcess
The process for the NetBackup Event Manager service.
The process that creates and manages event channels and objects for communicationamong NetBackup daemon. The Event Manager daemon runs with the Enterprise MediaManager (nbemm) only on master servers.
NonenbEvtMgr
The process that controls the Fibre Transport target mode drivers on the media server.nbfdrv64 runs on the media servers that are configured for NetBackup Fibre Transport.
Nonenbfdrv64
The Fibre Transport (FT) server process that runs on the media servers that are configuredfor NetBackup Fibre Transport. It does the following for the server side of the FT connection:controls data flow, processes SCSI commands, manages data buffers, and manages thetarget mode driver for the host bus adaptors.
Nonenbftsrvr
The process for the NetBackup Job Manager service.
The process that accepts the jobs that the Policy Execution Manager (NBPEM) submits andacquires the necessary resources. The Job Manager then starts the job and informs nbpemthat the job is completed.
Nonenbjm
The process for the NetBackup Policy Execution Manager service.
It creates Policy/Client tasks and determines when jobs are due to run. If a policy is modifiedor if an image expires, NBPEM is notified and the appropriate Policy/Client tasks are updated.
Nonenbpem
The process that safely allows multithreaded NetBackup processes to use existingmultithreaded unsafe libraries.
Nonenbproxy
This process allocates storage units, tape drives, and client reservations for jobs. nbrbworks with the Enterprise Media Manager (NBEMM).
Nonenbrb
The process for the NetBackup Remote Manager and Monitor service. It enables NetBackupto remotely manage and monitor resources on a system that are used for backup (or affectedby backup activity).
Note: To configure a BasicDisk storage unit that uses CIFS, the media server and thefollowing processes must have the same logon credentials: bpinetd, nbrmms, and vnetd.
See “Configuring credentials for CIFS storage and disk storage units” on page 569.
Nonenbrmms
The process for the NetBackup Service Layer service.
nbsl facilitates the communication between the graphical user interface and NetBackuplogic.
Nonenbsl
1059Monitoring NetBackup activityAbout the Processes tab

Table 26-6 NetBackup processes (continued)
DescriptionPortProcess
The process for the NetBackup Storage Lifecycle Manager. Manages the storage lifecyclepolicy operations and schedules duplication jobs. Monitors the disk capacity on the volumesthat are capacity-managed and removes older images when required.
Note: Restart nbstserv after making changes to the underlying storage for any operationin an SLP.
Nonenbstserv
The process for the NetBackup Service Monitor. Monitors the NetBackup services. Whena service unexpectedly terminates, nbsvcmon attempts to restart the terminated service.
Nonenbsvcmon
If Vault is installed, the process for the NetBackup Vault Manager service.Nonenbvault
NDMP is the acronym for Network Data Management Protocol. NDMP servers are designedto adhere to this protocol and listen on port 10000 for NDMP clients to connect to them.
10000ndmp
The NetBackup Volume Manager (vmd) starts the oprd operator request daemon. Thisprocess receives requests to mount and unmount volumes and communicates the requeststo the NetBackup Device Manager ltid. The NetBackup Device Manager communicatesthe requests to the robotics through SCSI interfaces.
Noneoprd
The process for the NetBackup Deduplication Engine service. It runs on the deduplicationstorage server.
Active only if the NetBackup Data Protection Optimization Option is licensed and configured.
10082spoold
The tl4d process runs on the host that has a Tape Library 4mm. This process receivesNetBackup Device Manager requests to mount and unmount volumes and communicatesthese requests to the robotics through SCSI interfaces.
13713tl4d
The tl8d process runs on a NetBackup media server that manages a drive in a Tape Library8mm. This process receives NetBackup Device Manager requests to mount and unmountvolumes, and sends these requests to the robotic-control process tl8cd.
The tl8cd process communicates with the TL8 robotics through SCSI interfaces.
To share the tape library, tl8cd runs on the NetBackup server that provides the roboticcontrol.
13705tl8d
tl8cd
The tldd process runs on a NetBackup server that manages drive in a Tape Library DLT.This process receives NetBackup Device Manager requests to mount and unmount volumesand sends these requests to the robotic-control process tldcd.
The tldcd process communicates with the Tape Library DLT robotics through SCSIinterfaces.
To share the tape library, tldcd runs on the NetBackup server that provides the roboticcontrol.
13711tldd
tldcd
1060Monitoring NetBackup activityAbout the Processes tab

Table 26-6 NetBackup processes (continued)
DescriptionPortProcess
The tlhd process runs on each NetBackup server that manages a drive in a Tape LibraryHalf-inch. This process receives NetBackup Device Manager requests to mount and unmountvolumes and sends these requests to the robotic-control process tlhcd.
The tlhcd process runs on the NetBackup server that provides the robotic control andcommunicates with the TLH robotics through SCSI interfaces.
13717tlhd
tlhcd
The tlmd Tape Library Multimedia (TLM) daemon runs on a NetBackup server. Itcommunicates mount, unmount, and robot inventory requests to a NetBackup media serverthat hosts ADIC DAS/SDLC software and controls the TLM robotics.
13716tlmd
The process for the NetBackup Volume Manager service.13701vmd
This process is preserved for backward compatibility. For example, when the 7.0.1 Javainterface communicates with a 7.0 NetBackup server.
The Veritas Network Daemon allows all socket communication to take place while it connectsto a single port. Legacy NetBackup services that were introduced before NetBackup 6.0use the vnetd port number.
Note: To configure a BasicDisk storage unit that uses CIFS, the media server and thefollowing processes must have the same logon credentials: bpinetd, nbrmms, and vnetd.
See “Configuring credentials for CIFS storage and disk storage units” on page 569.
13724vnetd
The Veritas Authorization Service verifies that an identity has permission to perform a specifictask.
4032vrts-auth-port
The Veritas Authentication Service validates, identifies, and forms the basis for authorizationand access.
2821vrts-at-port
The Veritas Private Branch Exchange allows all socket communication to take place whileit connects through a single port. Connections to NetBackup 7.0.1 and later use theveritas_pbx port.
1556veritas_pbx
Monitoring NetBackup processes in the Process Details dialog boxThe following procedure describes how to view the details for a process.
1061Monitoring NetBackup activityAbout the Processes tab

To view the details for a process
1 In the NetBackup Administration Console, click Activity Monitor.
2 To view the details for a specific process, double-click on the process you wantto display in the Processes tab. The Process Details dialog box appears forthe selected process.
3 In the Process Details dialog box, click the up or down arrow to see the detailsof the next process in the list.
About the Drives tabThe Drives tab in the Activity Monitor displays the status of NetBackup drives onthe monitored server. Use the Drives tab to manage drives, device paths, andservice requests for operators. Change the status of the drive, clean the tape drive,and perform other operations that you can also perform using the Device Monitorunder Media and Device Management.
Figure 26-3 Activity Monitor Drives tab
To view the details for a drive, double-click the drive in the Drives tab pane. For adescription of the drive details, click Help in the Drives Details dialog box.
1062Monitoring NetBackup activityAbout the Drives tab
Monitoring tape drivesThe following procedure describes how to monitor NetBackup tape drives.
To monitor NetBackup tape drives
1 In the NetBackup Administration Console, click the Activity Monitor.
2 In the right pane, select the Drives tab. Double-click a drive from the drive listto view a detailed status.
3 A Drives Details dialog box appears for the drive you selected. To view thestatus of the previous drive or the next drive, click the up or down arrow.
Cleaning tape drives from the Activity MonitorDrive cleaning functions can also be performed from the Device Monitor.
To clean a tape drive
1 In the NetBackup Administration Console, select Activity Monitor. Then,select the Drives tab in the Details pane.
2 Select the drive that you want to clean.
3 SelectActions > Drive Cleaning, then select one of the following drive cleaningactions.
DescriptionAction
Starts an operator-initiated cleaning of the selected drive,regardless of the cleaning frequency or accumulated mounttime. If the drive is a standalone drive, it must contain acleaning tape for a mount request to be issued.Clean Nowresets the mount time to zero, but the cleaning frequencyvalue remains the same.
Clean Now
Resets the mount time for the selected drive to zero. UseReset Mount Time to reset the mount time after doing amanual cleaning of a drive.
Reset Mount Time
Sets the number of mount hours between drive cleanings.Set Cleaning Frequency
About the jobs databaseNetBackup uses the bpdbjobs -clean command to periodically delete the jobsthat are done.
1063Monitoring NetBackup activityAbout the jobs database

By default, the bpdbjobs process deletes all completed jobs that are more thanthree days old. By default, the bpdbjobs process retains more recent done jobsuntil the three-day retention period expires.
To keep jobs in the jobs database longer than the default of three days, you mustchange the default value.
If the bprd NetBackup request daemon is active, bprd starts the bpdbjobs processautomatically when it performs other cleanup tasks. The process starts the first timebprd wakes up after midnight. The automatic startups occur regardless of whetheryou choose to run bpdbjobs at other times by using cron or alternate methods.
The bpdbjobs -clean is located in the following directory:
On Windows: install_path\NetBackup\bin\admincmd\bpdbjobs -clean
On UNIX: /usr/openv/netbackup/bin/admincmd/bpdbjobs -clean
Changing the default bpdbjobs_options valuesUse the one of the following methods to change the default values of thebpdbjobs_options on a permanent basis:
■ On Windows:Use the following method to add new registry key(s) toHKEY_LOCAL_MACHINE\SOFTWARE\VERITAS\NetBackup\
CurrentVersion\Config
To add the key(s) safely, run the following commands. For example:
install_path\VERITAS\NetBackup\bin\admincmd\
echo KEEP_JOBS_HOURS = 192 | nbsetconfig
Where 192 is the number of hours that unsuccessful jobs are kept in the jobsdatabase or Activity Monitor display.For example, run:
echo KEEP_JOBS_SUCCESSFUL_HOURS = 192 | nbsetconfig
Where 192 is the number of hours that successful jobs are kept in the jobsdatabase or Activity Monitor display.
■ On UNIX:Change the entries in the bp.conf file.For example, add the following entry to the bp.conf file:
KEEP_JOBS_HOURS = 192
1064Monitoring NetBackup activityAbout the jobs database

Where 192 is the number of hours that unsuccessful jobs are kept in the jobsdatabase or Activity Monitor display.For example, to change the retention of successful jobs, add the following entry:
KEEP_JOBS_SUCCESSFUL_HOURS = 192
Where 192 is the number of hours that successful jobs are kept in the jobsdatabase or Activity Monitor display.
Consider the following notes when changing the default values:
■ The default values for KEEP_JOBS_SUCCESSFUL_HOURS and KEEP_JOBS_HOURS
is 78 hours.
■ The retention period values are measured against the time the job ended.
■ Information about successful jobs cannot be kept longer than information aboutunsuccessful jobs. If KEEP_JOBS_SUCCESSFUL_HOURS is greater thanKEEP_JOBS_HOURS, bpdbjobs sets KEEP_JOBS_SUCCESSFUL_HOURS to equalKEEP_JOBS_HOURS.
■ If KEEP_JOBS_SUCCESSFUL_HOURS is set to 0, bpjobd uses the KEEP_JOBS_HOURS
bpdbjobs value instead for successful jobs.If the KEEP_JOBS_SUCCESSFUL_HOURS value is greater than 0 but less thanKEEP_JOBS_HOURS, KEEP_JOBS_HOURS is used for unsuccessful jobs only.
About the BPDBJOBS_OPTIONS environment variableThe BPDBJOBS_OPTIONS environment variable provides a convenient method to setjob retention options with a script. The bpdbjobs process determines how long toretain a job by checking for the BPDBJOBS_OPTIONS environment variable.
If present on Windows: BPDBJOBS_OPTIONS overrides the registry key settings.
If present on UNIX: BPDBJOBS_OPTIONS overrides the bp.conf settings. To customizethe output of bpdbjobs, add a BPDBJOBS_COLDEFS entry to the bp.conf file for eachcolumn you want to appear in the output.
The following options can be used to determine the length of time NetBackup retainsjobs. The options should be entered in lower case in the BPDBJOBS_OPTIONS
environmental variable.
1065Monitoring NetBackup activityAbout the jobs database

Table 26-7 BPDBJOBS_OPTIONS environment variable options
DescriptionOption
Use with the -clean option to specify how many hoursbpdbjobs keeps unsuccessfully completed jobs. Default: 78hours.
To keep both successful and both failed jobs longer than thedefault of 78 hours, keep_successful_hours must be usedwith keep_hours.
-keep_hours hours
Use with the -clean option to specify how many hoursbpdbjobs keeps successfully completed jobs. The number ofhours must be less than or equal to keep_hours.
Values outside the range are ignored. Default: 78 hours.
-keep_successful_hours hours
Use with the -clean option to specify how many daysbpdbjobs keeps completed jobs. Default: 3 days.
-keep_days days
This value must be less than the -keep_days value.
Use with the -clean option to specify how many daysbpdbjobs keeps successfully completed jobs. Default: 3 days.
-keep_successful_days days
In the following example, a batch file (cleanjobs.bat) was used on a Windowsserver. You can copy the script directly from this document and change as needed.
■ The first line specifies how long to keep unsuccessful jobs (24 hours) andsuccessful jobs (five hours).
■ The second line specifies the path to the bpdbjobs command. Indicate thecorrect location of bpdbjobs in the .bat file. In this example, NetBackup wasinstalled in the default location:
set BPDBJOBS_OPTIONS= -keep_hours 24 -keep_successful_hours 5
C:\progra~1\VERITAS\NetBackup\bin\admincmd\bpdbjobs -clean
The same script on a UNIX server would look like the following:
setenv BPDBJOBS_OPTIONS "-keep_hours 24 -keep_successful_hours 5 -clean"
/usr/openv/netbackup/bin/admincmd/bpdbjobs ${*}
You can store the .bat file anywhere, as long as it is run from the appropriatedirectory.
In the following example, the administrator created and stored cleanjobs.bat inC:\Program Files\VERITAS\NetBackup.
1066Monitoring NetBackup activityAbout the jobs database

Figure 26-4 Running cleanjobs.bat on Windows
bpdbjobs command line optionsThe bpdbjobs command interacts with the jobs database to delete or movecompleted job files. The command line options supersede all other job retentioninstructions.
The -clean option causes bpdbjobs to delete the completed jobs that are olderthan a specified time period as follows:
bpdbjobs -clean [ -M <master servers> ]
[ -keep_hours <hours> ] or [ -keep_days <days> ]
[ -keep_successful_hours <hours> ] or
[ -keep_successful_days <days> ]
For example, the following command deletes unsuccessful jobs older than 72 hours.
bpdbjobs -clean -keep_hours 72
More information is available in the NetBackup Commands Reference Guide.
Enabling the bpdbjobs debug logIf you need detailed information on bpdbjobs activities, use the following procedure:
Enabling the bpdbjobs debug log
◆ Enable the bpdbjobs debug log by creating the following directory:
On Windows: install_path\NetBackup\logs\bpdbjobs
On UNIX: /usr/openv/netbackup/logs/bpdbjobs
1067Monitoring NetBackup activityAbout the jobs database

Note: Before you use a debug log, read the guidelines about legacy logging in theNetBackup Logging Reference Guide:
http://www.veritas.com/docs/DOC5332
About the Device MonitorUse the NetBackup Administration Console Device Monitor to manage yourtape drives, disk pools, and service requests for operators, as follows:
See “About media mount errors” on page 1069.Media mounts
See “About pending requests and actions” on page 1069.
See “About pending requests for storage units” on page 1070.
See “Resubmitting a request” on page 1072.
See “Resolving a pending action” on page 1072.
See “Denying a request” on page 1073.
Pending requestsand actions
See “Changing a drive comment” on page 436.
See “About downed drives” on page 437.
See “Changing a drive operating mode” on page 437.
See “Cleaning a tape drive from the Device Monitor” on page 440.
See “Resetting a drive” on page 441.
See “Resetting the mount time of a drive” on page 442.
See “Setting the drive cleaning frequency” on page 442.
See “Viewing drive details” on page 443.
See “Denying a request” on page 1073.
Tape drives
See “Changing the disk pool state” on page 403.
More information about disk pools is available in the NetBackup guidefor your disk storage option:
■ The NetBackup AdvancedDisk Storage Solutions Guide.■ The NetBackup Cloud Administrator's Guide.■ The NetBackup Deduplication Guide.■ The NetBackup OpenStorage Solutions Guide for Disk.■ The NetBackup Replication Director Solutions Guide.
The Guides are available through the following URL:
http://www.veritas.com/docs/DOC5332
Disk pools
1068Monitoring NetBackup activityAbout the Device Monitor

About media mount errorsErrors can occur when media is mounted for NetBackup jobs. Depending on thetype of error, the request queues or it is canceled.
When the mount request is queued, an operator-pending action is created andappears in the NetBackup Administration Console Device Monitor.
A queued mount request leads to one of the following actions:
■ The mount request is suspended until the condition is resolved.
■ The operator denies the request.
■ The media mount timeout is reached.
When a mount request is automatically canceled, NetBackup tries to select othermedia to use for backups. (Selection applies only in the case of backup requests.)
Many conditions lead to a mount request being automatically canceled instead ofqueued. When a media mount is canceled, different media is selected so that thebackup is not held up.
The following conditions can lead to automatic media reselection:
■ The requested media is in a DOWN drive.
■ The requested media is misplaced.
■ The requested media is write protected.
■ The requested media is in a drive not accessible to the media server.
■ The requested media is in an offline ACS LSM (Automated Cartridge SystemLibrary Storage Module). (ACS robot type only.)
■ The requested media has an unreadable barcode. (ACS robot type only.)
■ The requested media is in an ACS that is not accessible. (ACS robot type only.)
■ The requested media is determined to be unmountable.
About pending requests and actionsIn the NetBackup Administration Console, expand Media and DeviceManagement > Device Monitor. If requests await action or if NetBackup acts ona request, the Pending Requests pane appears. For example, if a tape mountrequires a specific volume, the request appears in the Pending Requests pane.If NetBackup requires a specific volume for a restore operation, NetBackup loadsor requests the volume. After all requests are resolved (automatically by NetBackupor manually by operator intervention), the Pending Requests pane disappears.
1069Monitoring NetBackup activityAbout media mount errors

If NetBackup cannot service a media-specific mount request automatically, itchanges the request or action to a pending state.
Table 26-8 Pending states
DescriptionPending state
Specifies that a pending request is for a tape mount that NetBackupcannot service automatically. Operator assistance is required tocomplete the request. NetBackup displays the request in the PendingRequests pane.
NetBackup assigns pending status to a mount request when it cannotdetermine the following:
■ Which standalone drive to use for a job.■ Which drive in a robot is in Automatic Volume Recognition (AVR)
mode.
Pending request
Specifies that a tape mount request becomes a pending action whenthe mount operation encounters problems, and the tape cannot bemounted. Operator assistance is required to complete the request, andNetBackup displays an action request in the Pending Requests pane.Pending actions usually occur with drives in robotic libraries.
Pending action
About pending requests for storage unitsIn the NetBackup Administration Console, expand Media and DeviceManagement > Device Monitor. The following tape mount requests do not appearin the Device Monitor Pending Requests pane:
■ Requests for backups
■ Requests for a tape that is required as the target of a duplication operation
These requests are for resources in a storage unit and therefore are not for a specificvolume. NetBackup does not assign a mount request for one storage unit to thedrives of another storage unit automatically. Also, you cannot reassign the mountrequest to another storage unit.
If the storage unit is not available, NetBackup tries to select another storage unitthat has a working robot. If NetBackup cannot find a storage unit for the job,NetBackup queues the job (a Queued state appears in the NetBackupAdministration Console Activity Monitor).
You can configure NetBackup so that storage unit mount requests are displayedin the Device Monitor if the robot or drive is down. Pending requests appear in theDevice Monitor, and you can assign these mount requests to drives manually.
See “Configuring a robot to operate in manual mode” on page 421.
1070Monitoring NetBackup activityAbout pending requests and actions

Resolving a pending requestUse the following procedure to resolve a pending request.
For ACS robots: If a request pends because the Library Storage Module (LSM) inwhich the media resides is offline, no operator action is required. NetBackup retriesthe requests hourly until the LSM is online. NetBackup reports the LSM offline statusin the Job Details dialog box. Open the Job Details dialog box from the Jobs tabin the Activity Monitor.
To resolve a pending request
1 Insert the requested volume in a drive that matches the density of the volumethat was requested.
2 In the NetBackup Administration Console, expand Media and DeviceManagement > Device Monitor.
3 If you licensed a disk pool feature, select the Drives tab.
4 In the Pending Requests pane, select the request and note the contents ofthe following columns of the request:
■ Density
■ External Media ID
■ Mode
5 In the Drive Status pane, find a drive type that matches the density for thepending request.
6 Verify that the drive is up and not assigned to another request.
7 Select the drive.
8 Ensure that the drive and the pending request are on the same host.
9 If necessary, get the media, write-enable it, and insert it into the drive.
10 Wait for the drive to become ready, as explained in the vendor’s drive equipmentmanual.
11 On the Actions menu, select Assign Request.
12 Verify that the request was removed from the Pending Requests pane.
13 In the Drive status pane, verify the following:
■ The job request ID appears in the Request ID column for the drive
■ The User column is not blank
1071Monitoring NetBackup activityAbout pending requests and actions

Resolving a pending actionA pending action is similar to a pending request. For a pending action, NetBackupdetermines the cause of the problem and issues instruction to the operator to resolvethe problem.
A media icon identifies a pending action; the icon appears to the left of the requestID. The icon includes a human hand, which depicts that a manual action is required.
Use the following procedure to resolve a pending action.
To resolve a pending action
1 In the NetBackup Administration Console, expand Media and DeviceManagement > Device Monitor.
2 If you licensed a disk pool feature, select the Drives tab.
3 In the Pending Requests pane, select the pending action.
4 On theActionsmenu, selectDisplay Pending Action (on UNIX, you can alsodouble-click the pending action).
5 In the message box that describes the problem, review the list of possiblecorrective actions. The message box also shows other information, such asuser name, recorded media ID, external media IDs, and drive number.
6 Click OK.
7 Correct the error condition and either resubmit the request or deny the request.
See “Resubmitting a request” on page 1072.
See “Denying a request” on page 1073.
Resubmitting a requestAfter you correct a problem with a pending action, you can resubmit the request.
Use the following procedure to resubmit a request.
If the problem is a volume missing from a robot, first locate the volume, insert it intothe robot, and then update the volume configuration. Usually, a missing volumewas removed from a robot and then requested by NetBackup.
See “Robot inventory options” on page 542.
To resubmit a request
1 In the NetBackup Administration Console, expand Media and DeviceManagement > Device Monitor.
2 If you licensed a disk pool feature, select the Drives tab.
1072Monitoring NetBackup activityAbout pending requests and actions

3 In the Pending Requests pane, select the request.
4 On the Actions menu, select Resubmit Request.
Denying a requestSome situations may require that you deny requests for service. For example, whena drive is not available, you cannot find the volume, or the user is not authorizedto use the volume. When you deny a request, NetBackup sends an appropriatestatus message to the user.
Use the following procedure to deny a request.
To deny a request
1 In the NetBackup Administration Console, expand Media and DeviceManagement > Device Monitor.
2 If you licensed a disk pool feature, select the Drives tab.
3 In the Pending Requests pane, select the request.
4 On the Actions menu, select Deny Request.
1073Monitoring NetBackup activityAbout pending requests and actions

Reporting in NetBackupThis chapter includes the following topics:
■ About the Reports utility
■ Running a report
■ Copying report text to another document
■ Saving or exporting a report
■ Printing a report
About the Reports utilityUse the Reports utility in the NetBackup Administration Console to generatereports to verify, manage, and troubleshoot NetBackup operations. NetBackupreports display information according to job status, client backups, and mediacontents. Use the Troubleshooter to analyze the cause of the errors that appearin a NetBackup report.
In the Reports window, in the right pane, manage the report data or select a reportto run.
27Chapter

Figure 27-1 Reports utility in the Windows NetBackup Administration Console
1
3
4
2
Figure 27-2 Report utility in the Java-based NetBackup AdministrationConsole
12
3
Table 27-1 Reports utility
DescriptionNumber
The name of the currently selected master server.1
1075Reporting in NetBackupAbout the Reports utility

Table 27-1 Reports utility (continued)
DescriptionNumber
The user toolbar is specific to the Reports utility.
See “Standard and user toolbars” on page 53.
2
Report descriptions.3
Right-click in the right pane to view the shortcut menu.4
NetBackup offers many different reports to view information about job activity andmedia.
Table 27-2 NetBackup Reports
DescriptionReport name
The Status of Backups report shows status and error information about the jobs that completedwithin the specified time period. If an error occurred, a short explanation of the error is included inthe report.
Status ofBackups
The Client Backups report shows detailed information about the backups that completed within thespecified time period.
ClientBackups
The Problems report generates a list of the problems that the server has logged during the specifiedtime period. The information in this report is a subset of the information that is obtained from the AllLog Entries report.
Problems
The All Log Entries report generates a list of all log entries for the specified time period. This reportincludes the information from the Problems report and Media Logs report. This report also displaysthe transfer rate. The transfer rate is useful to determine rates and predict backup times for futurebackups. (The transfer rate does not appear for multiplexed backups.)
All Log Entries
The Images on Media report generates a list of the media contents as recorded in the NetBackupimage catalog. You can generate this report for any type of media (including disk) and filter it accordingto client, media ID, or path.
Images onMedia
The Media Logs report shows the media errors or the informational messages that are recorded inthe NetBackup error catalog.
Media Logs
The Images on Tape report generates the contents of the tape-based media as recorded in theNetBackup image catalog. The Images on Tape is a subset of the Images on Media report.
Images onTape
The Tape Logs report displays all error logs related to tape-based backup and recovery. The TapeLogs report is a subset of the Media Logs report.
Tape Logs
1076Reporting in NetBackupAbout the Reports utility
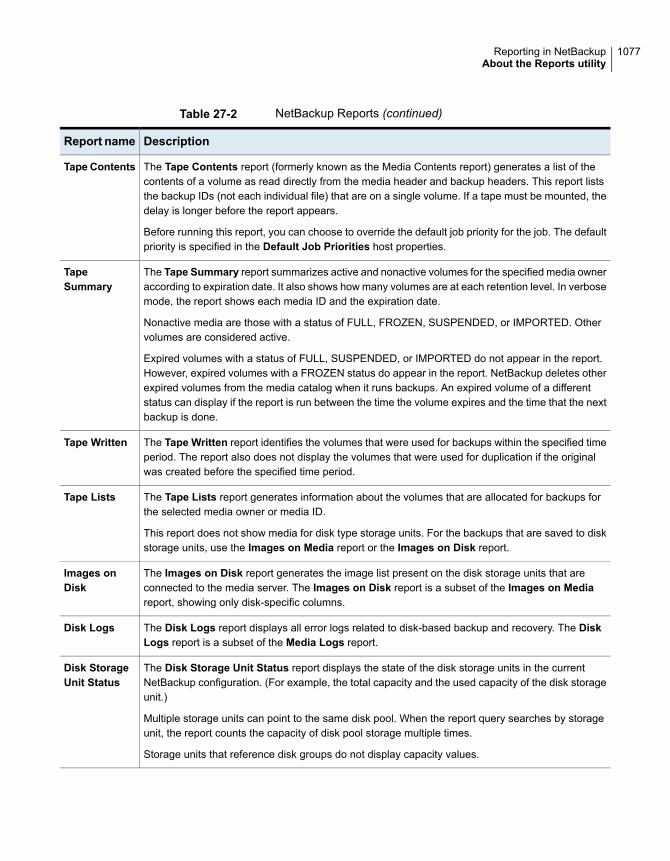
Table 27-2 NetBackup Reports (continued)
DescriptionReport name
The Tape Contents report (formerly known as the Media Contents report) generates a list of thecontents of a volume as read directly from the media header and backup headers. This report liststhe backup IDs (not each individual file) that are on a single volume. If a tape must be mounted, thedelay is longer before the report appears.
Before running this report, you can choose to override the default job priority for the job. The defaultpriority is specified in the Default Job Priorities host properties.
Tape Contents
The Tape Summary report summarizes active and nonactive volumes for the specified media owneraccording to expiration date. It also shows how many volumes are at each retention level. In verbosemode, the report shows each media ID and the expiration date.
Nonactive media are those with a status of FULL, FROZEN, SUSPENDED, or IMPORTED. Othervolumes are considered active.
Expired volumes with a status of FULL, SUSPENDED, or IMPORTED do not appear in the report.However, expired volumes with a FROZEN status do appear in the report. NetBackup deletes otherexpired volumes from the media catalog when it runs backups. An expired volume of a differentstatus can display if the report is run between the time the volume expires and the time that the nextbackup is done.
TapeSummary
The Tape Written report identifies the volumes that were used for backups within the specified timeperiod. The report also does not display the volumes that were used for duplication if the originalwas created before the specified time period.
Tape Written
The Tape Lists report generates information about the volumes that are allocated for backups forthe selected media owner or media ID.
This report does not show media for disk type storage units. For the backups that are saved to diskstorage units, use the Images on Media report or the Images on Disk report.
Tape Lists
The Images on Disk report generates the image list present on the disk storage units that areconnected to the media server. The Images on Disk report is a subset of the Images on Mediareport, showing only disk-specific columns.
Images onDisk
The Disk Logs report displays all error logs related to disk-based backup and recovery. The DiskLogs report is a subset of the Media Logs report.
Disk Logs
The Disk Storage Unit Status report displays the state of the disk storage units in the currentNetBackup configuration. (For example, the total capacity and the used capacity of the disk storageunit.)
Multiple storage units can point to the same disk pool. When the report query searches by storageunit, the report counts the capacity of disk pool storage multiple times.
Storage units that reference disk groups do not display capacity values.
Disk StorageUnit Status
1077Reporting in NetBackupAbout the Reports utility

Table 27-2 NetBackup Reports (continued)
DescriptionReport name
The Disk Pool Status report generates the details of one or more disk pools.Disk PoolStatus
See “Copying report text to another document” on page 1078.
For information about Vault reports, see the NetBackup Vault Administrator’s Guide.
Running a reportThe following procedure describes how to run a NetBackup report from theReportsutility.
To run a report
1 In the NetBackup Administration Console, in the left pane, expandNetBackup Management > Reports.
NetBackup runs the report for the master server that is currently selected. Torun a report on a different master server, on the File menu, click ChangeServer.
See “Accessing remote servers” on page 1124.
2 In the left pane, click the name of the report you want to run.
For some reports, you must first expand a report group, and then click thename of the report.
3 Select the criteria for what to include or exclude in the report. For example,select the media servers and clients on which to run the report, and select thetime period that the report should span.
4 Click Run Report.
See “Copying report text to another document” on page 1078.
Copying report text to another documentThe following procedure describes how to copy the text from a NetBackup reportand paste it into a spreadsheet or other document.
1078Reporting in NetBackupRunning a report

To copy report text to another document
1 In the NetBackup Administration Console, in the left pane, expandNetBackup Management > Reports.
2 In the left pane, double-click the name of the report you want to run.
For some reports, you must first expand a report group, and then click thename of the report.
3 Select the criteria for what to include or exclude in the report, and click RunReport.
4 Select the rows of the report you want to copy by holding down the Shift orCtrl key.
5 On the Edit menu, click Copy to Clipboard.
6 Paste the selected rows into a spreadsheet or other document.
Saving or exporting a reportThe following procedure describes how to save or export a NetBackup report.
To save or export a report
1 In the NetBackup Administration Console, in the left pane, expandNetBackup Management > Reports.
2 In the left pane, click the name of the report you want to run.
For some reports, you must first expand a report group, and then click thename of the report.
3 Select the criteria for what to include or exclude in the report and click RunReport.
4 On the File menu, click Export.
5 In the Save As dialog box, select the location where you want to save thereport, and specify the file name.
6 Click Save.
See “Copying report text to another document” on page 1078.
Printing a reportThe following procedure describes how to print a NetBackup report.
1079Reporting in NetBackupSaving or exporting a report

To print a report
1 In the NetBackup Administration Console, in the left pane, expandNetBackup Management > Reports.
2 In the left pane, click the name of the report you want to run.
For some reports, you must first expand a report group, and then click thename of the report.
3 Select the criteria for what to include or exclude in the report and click RunReport.
4 On the File menu, click Print.
1080Reporting in NetBackupPrinting a report

Using the LoggingAssistant
This chapter includes the following topics:
■ About the Logging Assistant
■ Logging Assistant sequence of operation
■ Viewing the Logging Assistant records
■ Viewing the details of a Logging Assistant record
■ Adding a new Logging Assistant record
■ Deleting a Logging Assistant record
■ Setting up debug logging
■ Set minimum debug logging
■ Disabling debug logging
■ Collecting and uploading debug logs
■ Collecting and uploading nbsu information
■ Uploading evidence
About the Logging AssistantLogging Assistant is a helpful tool that you can use to significantly shorten the timerequired to set up, collect, and upload debug logs and other information to VeritasTechnical Support. Because Logging Assistant automatically performs a number
28Chapter

of functions, you can avoid the problems associated with manually logging intoNetBackup hosts, creating log directories, and changing logging levels.
Note: Use Logging Assistant under the guidance of Veritas Support.
Logging Assistant uses a series of wizards to help you more quickly troubleshoota problem. Depending on the category of NetBackup problem that you encounter,the tool suggests the hosts involved in the problem and the logs to enable on thosehosts
Note:While collecting NetBackup logs using Logging Assistant, the total NetBackuplog size may increase. If you have enabled the new Keep logs up to GB optionon the Host Properties > Logging dialog box and the total NetBackup log sizereaches its high water mark, logs are deleted. Logs that you want to retain mayalso be deleted. To avoid the deletion of logs that you want to retain, you need todisable the Keep logs up to GB option while you collect logs using LoggingAssistant. Alternatively, you can set the Keep logs up to GB option to a valuehigher than the current value, so that the important logs are not deleted before thelog collection is complete.
See “Logging properties” on page 170.
Logging Assistant lets you upload three categories of data: debug logs, nbsudiagnostic information, and evidence. Evidence includes any other data that isrelevant to solving the problem, such as screen shots, core dumps, and even thedebug logs themselves. Each of the categories uses a different wizard.
To use Logging Assistant, make sure that NetBackup 7.6 or later is installed on allhosts. Logging Assistant considers the following as hosts: the master server, oneor more media servers (the master server can be the media server as well), andNetBackup clients. No special licensing is required. However, you must have rootpermissions to use Logging Assistant.
Table 28-1 shows a summary of the main Logging Assistant operations.
Table 28-1 Logging Assistant operations
DescriptionOperation
Add a Logging Assistant record that you use throughout the process of troubleshootinga NetBackup problem. Typically, you associate the record that you create with a failedjob that appears in the Activity Monitor. A list of records appears when you select theLogging Assistant node in the right pane of the NetBackup Administration Console.
See “Adding a new Logging Assistant record” on page 1089.
Add a new Logging Assistantrecord.
1082Using the Logging AssistantAbout the Logging Assistant

Table 28-1 Logging Assistant operations (continued)
DescriptionOperation
View the details for the selected record.View details.
After you upload data to Technical Support and the failed job runs successfully, youcan delete the Logging Assistant record.
See “Deleting a Logging Assistant record” on page 1091.
Delete a Logging Assistantrecord.
Use the Setup Debug Logging Wizard to enable selected NetBackup debug logs andother processes that Technical Support uses to troubleshoot NetBackup problems.Logging Assistant automatically creates the necessary log folders and sets the loglevels of the debug logs to the highest verbosity. (The highest log level of many of thedebug logs is 5).
See “Setting up debug logging” on page 1092.
Enable debug logging.
Use the Set Minimum Debug Logging Wizard to set the specified process log levels(verbosity) to a minimum value. This setting still allows info, warning, error, and criticalmessages (legacy logging), and application logs, diagnostic logs, and some debuglogs (unified logging). You may want to set the debug logging to minimum values afteryou resolve the job failure problem for the selected Logging Assistant record.
See “Set minimum debug logging” on page 1096.
Set minimum debug logging.
Use the Disable Debug Logging Wizard to disable the debug logging after you resolvethe job failure problem for the selected Logging Assistant record. The only logs thatNetBackup continues to generate are application logs and diagnostic logs.
See “Disabling debug logging” on page 1097.
Disable debug logging.
Use the Collect and Upload Logs Wizard to gather the selected logs onto the masterserver and upload the data to the Veritas FTP server. The wizard assists you in ensuringthat enough disk space is available on the master server to collect the logs.
See “Collecting and uploading debug logs” on page 1098.
Collect and upload logs.
Use the Collect and Upload nbsu Wizard to gather the nbsu diagnostic informationonto the master server and to upload the data to the Veritas FTP server.
See “Collecting and uploading nbsu information” on page 1104.
Collect and upload nbsu.
Use the Upload Evidence Wizard to upload the evidence that resides in the specifiedstaging location to the Veritas FTP server. Evidence such as screen shots and coredumps can be gathered and uploaded to help in the troubleshooting process.
See “Uploading evidence” on page 1107.
Upload evidence.
1083Using the Logging AssistantAbout the Logging Assistant

Table 28-1 Logging Assistant operations (continued)
DescriptionOperation
After you complete a collect and upload wizard, you can cancel the operation if it iscurrently in progress (for example, if the data is too large and the operation istime-consuming). Check that the progress field of this record displays In progress,then right-click the Logging Assistant record and select Cancel Operation.
Cancel operation.
Logging Assistant sequence of operationTable 28-2 shows a typical procedure that uses Logging Assistant to helptroubleshoot and solve a NetBackup problem.
Table 28-2 Steps for troubleshooting NetBackup problems
DescriptionActionStep
Create a Logging Assistant record to troubleshoot a NetBackup problem.You normally associate the record with a failed job that appears in the ActivityMonitor.
See “Adding a new Logging Assistant record” on page 1089.
Create a Logging Assistantrecord.
Step 1
Use the Setup Debug Logging Wizard to enable selected NetBackup debuglogging that Technical Support uses to troubleshoot NetBackup problems.
See “Setting up debug logging” on page 1092.
Enable debug logging.Step 2
Go to the Activity Monitor and rerun the failed job. NetBackup generates thedebug logs that you have enabled.
See “Restarting a failed (completed) job in the Activity Monitor” on page 1042.
Rerun the failed job.Step 3
You can collect and upload debug logs, nbsu diagnostics, and additionalevidence. Technical Support may want you to upload the NetBackup SupportUtility (nbsu) first to get diagnostic information. Then, if the problem persistsyou can upload debug logs. You can also collect and upload the evidencethat supports the debug logs and nbsu.
■ See “Collecting and uploading debug logs” on page 1098.■ See “Collecting and uploading nbsu information” on page 1104.■ See “Uploading evidence” on page 1107.
Collect and upload data.Step 4
Work with Technical Support to read and analyze the debug logs, nbsudiagnostics, and evidence, and correct any problems you detect.
Troubleshoot the problem.Step 5
1084Using the Logging AssistantLogging Assistant sequence of operation

Table 28-2 Steps for troubleshooting NetBackup problems (continued)
DescriptionActionStep
After you take corrective actions, retry the operation. If the job still fails, workwith Technical Support to identify and enable additional debug logs usingthe same Logging Assistant record. Repeat steps 2-6 until the job runssuccessfully.
Rerun the failed job.Step 6
Disable debug logging automatically removes the log directories and disablesall debug logging messages. Set minimum debug logging disables allmessages except application logs and diagnostic logs.
See “Disabling debug logging” on page 1097.
See “Set minimum debug logging” on page 1096.
Disable or set minimumdebug logging.
Step 7
Remove the Logging Assistant record from the list of records.
See “Deleting a Logging Assistant record” on page 1091.
Delete the record.Step 8
Viewing the Logging Assistant recordsThe Logging Assistant Recordsmain screen lists all the Logging Assistant recordsthat you create. The records are listed in the right pane of the NetBackupAdministration Console when you select the Logging Assistant node.
The following shows the Logging Assistant Records main screen containing onerecord.
The details for the records (status, description, progress, etc.) are listed in columnformat. This information is repeated for individual records when you select ViewDetails in the Actions menu.
Viewing the details of a Logging Assistant recordThe Logging Assistant Recordsmain screen lists all the Logging Assistant recordsthat you create. The records are listed in the right pane of the NetBackupAdministration Console when you select the Logging Assistant node.
1085Using the Logging AssistantViewing the Logging Assistant records

To view the details of a Logging Assistant record
1 In theNetBackupAdministrationConsole, in the left pane, select the LoggingAssistant node.
2 The right pane of the NetBackup Administration Console displays the listof Logging Assistant records. Select the record that you want to delete.
3 Select the record that you want details for.
1086Using the Logging AssistantViewing the details of a Logging Assistant record
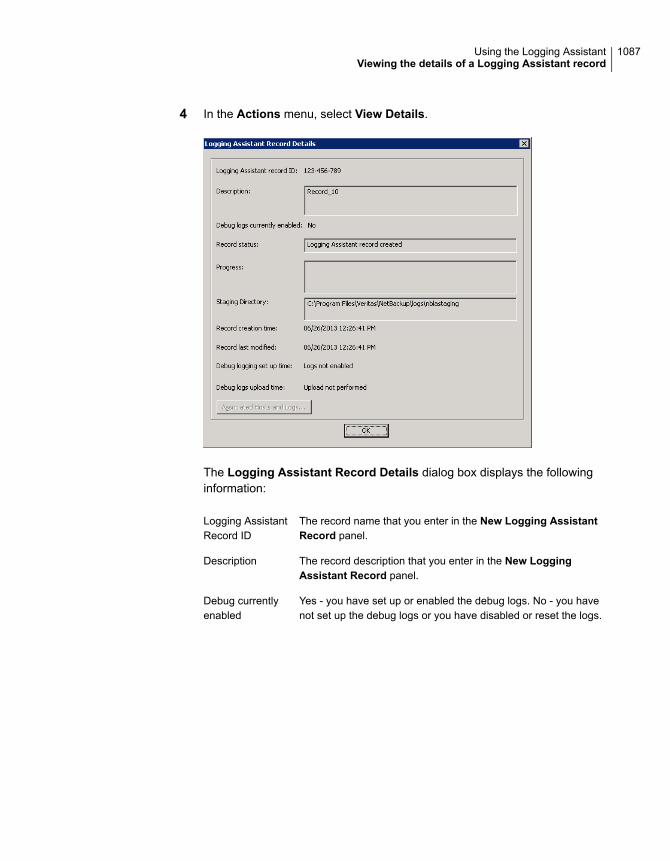
4 In the Actions menu, select View Details.
The Logging Assistant Record Details dialog box displays the followinginformation:
The record name that you enter in the New Logging AssistantRecord panel.
Logging AssistantRecord ID
The record description that you enter in the New LoggingAssistant Record panel.
Description
Yes - you have set up or enabled the debug logs. No - you havenot set up the debug logs or you have disabled or reset the logs.
Debug currentlyenabled
1087Using the Logging AssistantViewing the details of a Logging Assistant record

The following are several of the possible states of the LoggingAssistant records:
Record created - You have added this record to the LoggingAssistant database by using the Add a New Logging AssistantRecord panel.
Debug logging set up - You have completed the Setup DebugLogging Wizard for this record.
Debug Logging partially set up - You have set up debug loggingfor all the selected hosts and processes by using the Setup DebugLogging Wizard, but not all the hosts and processes have beenverified.
Debug logging set to minimum - You have completed the SetMinimum Debug Logging Wizard for this record.
Debug logging disabled - You have completed the Disable DebugLogging Wizard for this record.
Debug logs collected - You have completed the Collect and UploadDebug Logs Wizard, but did not select upload.
Logs collected and uploaded - You have completed the Collectand Upload Logs Wizard for this record.
nbsu output collected - You have completed the Collect and Uploadnbsu Wizard, but did not select upload.
Record status
The progress of the current activity being performed for the LoggingAssistant record.
Progress
The staging location where the debug logs and othertroubleshooting information is collected and uploaded to the masterserver.
Staging Directory
The date and time when you used the New Logging AssistantRecord panel to create this record.
Record creationtime
The date and time that you perform the most recent activity on therecord by using one of the Logging Assistant wizards.
Record lastmodified
The date and time when you complete the Setup Debug LoggingWizard.
Debug logging setup time
1088Using the Logging AssistantViewing the details of a Logging Assistant record

The date and time when you complete the Collect and UploadDebug Logs Wizard.
Debug logs uploadtime
5 Click Associated Host and Logs to display the Associated Hosts and LogsDetails panel. The panel displays the selected hosts for the current recordwhich includes the master server, any media servers, any associated clients,and a list of logs that are enabled on each host.
Adding a new Logging Assistant recordThe Add a New Logging Assistant Record panel contains two fields.
1089Using the Logging AssistantAdding a new Logging Assistant record

To create a new Logging Assistant record
1 In theNetBackupAdministrationConsole, in the left pane, select the LoggingAssistant node.
2 In the Actions menu, select New Logging Assistant Record. You can alsoselect the operation by using the right-click menu or pressing the Enter key todisplay the New Logging Assistant Record dialog box.
3 In the Logging Assistant Record ID text window, type a unique descriptivename for the new policy. Use numeric, alphabetic, plus, minus, underscore,and period characters. Do not use the minus (-) symbol as the first characteror leave spaces between characters.
We recommend that you use the Support Case ID as the Logging AssistantRecord ID to more easily track the record through the troubleshooting process.
4 In the optional Description field, you can enter a problem summary and theJob ID of the failed job (if applicable).
5 The Actions area of this dialog box lists the possible actions that can occurwhen you click OK to leave this dialog:
■ Collect and Upload nbsu - Select this option to immediately display theCollect and Upload nbsu Wizard when you leave this dialog. This is oftenthe first action to take after you create the Logging Assistant Record.See “Collecting and uploading nbsu information” on page 1104.
1090Using the Logging AssistantAdding a new Logging Assistant record

■ Setup Debug Logging - Select this option to immediately display the SetupDebug Logging Wizard after you leave this dialog.See “Setting up debug logging” on page 1092.
■ Upload Evidence - Select this option to immediately display the UploadEvidence Wizard when you leave this dialog.See “Uploading evidence” on page 1107.
■ No action - Select this option to return to the main screen when you leavethis dialog. The new record appears on the main screen.
Click OK to continue. Logging Assistant creates a Logging Assistant record inits database and adds it to the list of records in the Logging Assistant Recordspane.
Deleting a Logging Assistant recordAfter you upload logs to Technical Support and they confirm that the requiredevidence is available, you can delete the Logging Assistant record.
Warning: Before you delete the record, ensure that logging is disabled or set tominimum.
To delete a Logging Assistant record
1 In theNetBackupAdministrationConsole, in the left pane, select the LoggingAssistant node.
2 The right pane of the NetBackup Administration Console displays the listof Logging Assistant records. Select the record that you want to delete.
1091Using the Logging AssistantDeleting a Logging Assistant record

3 On the Actions menu or on the right-click menu, select DeleteDelete Recordto display the Delete Logging Assistant Record dialog box.
4 Click Yes in this dialog box if you are sure that you want to delete the selectedLogging Assistant record. Make sure that you have uploaded the required logsfor this record to the Veritas server.
Setting up debug loggingUse the Setup Debug Logging Wizard to enable selected NetBackup debug loggingthat Technical Support uses to troubleshoot NetBackup problems. Logging Assistantautomatically creates the necessary log folders and sets the verbosity of the pertinentlogs to their highest level.
Note: Ensure that each of the selected hosts contains enough available space forthe selected debug logs.
To set up debug logging
1 In theNetBackupAdministrationConsole, in the left pane, select the LoggingAssistant node.
2 Select the Logging Assistant record in the right pane for which you want to setup debug logging. On the Actions menu or on the right-click menu, selectSetup Debug Logging.
3 The Welcome panel for the Setup Debug Logging Wizard appears. Click Nextto continue.
4 The Job Selection panel appears. Do one of the following:
■ Enable the Analyze job to identify relevant hosts and debug loggingparameter. Then enter the Job ID, and click Next to continue. If you do notknow the Job ID, go to the Activity Monitor to find the Job ID of the failedjob. Logging Assistant identifies the hosts and the pertinent debug logsrelated to the job.
1092Using the Logging AssistantSetting up debug logging

Based on the Job ID that you enter, Logging Assistant identifies and selectsdebug logs for hosts and processes that enable the most effectivetroubleshooting of this problem. The wizard panels that follow this panelshow the processes that Logging Assistant has selected.
■ For the following scenarios, skip this panel that sets up the logs based ona Job ID, and click Next:
■ The problem does not involve a particular NetBackup job.
■ You already know the hosts and debug logs that you want to enable.
■ You want to re-enable the logs that you previously set up for this record.Those log selections appear automatically in the panels that follow.
The following Host Selection panel appears:
5 Do one or more of the following:
■ Click Setup debug logging on Master Server to set up debug logging onthe master server. The Master Server text window displays the masterserver.
1093Using the Logging AssistantSetting up debug logging

■ Click Setup debug logging on Media Server(s) to set up debug loggingon the media servers. If the master server is also a media server, you maystill want to select it again as a media server. Use the right arrow option(>>) to move a highlighted media server from theAvailable Media Serverswindow across to the Selected Media Servers window.
■ Click Setup debug logging on Client(s). Enter Client names. to set updebug logging on clients. In the text window under this parameter, type thenames of clients on which you want to set up debug logging. Separate theclient names by commas. Do not use any spaces between the client names.
Click Next to display the panel.
Click Next to continue. Logging Assistant validates the specified hosts toestablish connectivity and validates the NetBackup versions that are installedon the hosts.
1094Using the Logging AssistantSetting up debug logging

6 If you selected Setup debug logging on Master Server, the Setup DebugLogging on Master Server panel appears.
This panel contains a list of problem categories on the master server and theprocess names associated with each category of problem. Click the problemcategory or categories that apply to the failed job.
For example, if you are seeing problems with synthetic backups on the failedjob, click Backup - Synthetic. The debug logs for bpcd, bpdm, and bptm areenabled.
Click If required, specify additional components to set up debug loggingto enter components to enable debug logging. For example, if you have Javainterface problems, but only want the debug logs for jnbSA, instead of all fourof the processes list, type jnbSA in the text window. Type multiple componentsseparated by commas with no spaces between entries.
Technical Support publishes a list of valid components that you can specify inthis text box.
http://www.veritas.com/docs/TECH204256
Click Next to continue.
1095Using the Logging AssistantSetting up debug logging
7 Perform the same actions for the media server (if selected in step 5) and theclients (if selected in step 5).
Click Next to continue.
8 TheSetupDebug Logging Summary panel confirms all the items you selectedin the previous panels of the Setup Debug Logging Wizard. Review theinformation. The summary shows on which hosts of your NetBackup systemthat you chose to enable logs: master server, media servers, and clients or acombination of these items. It also shows the host names and the logs that areenabled on each.
ClickNext to enable the debug logging. All pertinent logs are set to their highest(most verbose) level.
9 The Setup Debug Logging Results panel displays the hosts and componentsthat have been successfully enabled and unsuccessfully enabled.
Click Finish to return to the Logging Assistant Records panel of theNetBackup Administration Console.
Set minimum debug loggingThe Set Minimum Debug Logging Wizard panel sets to minimum the logging levelsof the NetBackup debug logging that the Setup Debug Logging Wizard enabled.
Information about the logging levels that this wizard configures is available in thefollowing document:
http://www.veritas.com/docs/TECH204256
To set minimum debug logging
1 In theNetBackupAdministrationConsole, in the left pane, select the LoggingAssistant node.
2 The right pane of the NetBackup Administration Console displays the listof Logging Assistant records. Select the record whose debug logging you wantto set to minimum.
3 In the Actions menu, select Set Minimum Debug Log. The Welcome panelfor the Set Minimum Debug Logging Wizard appears.
Click Next to continue.
1096Using the Logging AssistantSet minimum debug logging
4 The Set Minimum Debug Logging Selected Hosts and Processes panelappears. Use this panel to confirm the host problem categories and processesfor all debug logs that were enabled. The hosts can be the master server, oneor more media servers, and one or more clients.
Click Next to continue.
5 The Set Minimum Debug Logging Results panel displays the results of thereset operation. The upper window shows the hosts and processes whosedebug logs are successfully reset. The lower window shows the unsuccessfuldebug logging resets.
Click Finish to complete the Set Minimum Debug Logging Wizard.
Disabling debug loggingThe Disable Debug Logging Wizard disables the NetBackup debug logging thatthe Setup Debug Logging Wizard enabled. A disabled debug log cannot generateany logging messages.
To disable debug logging
1 In theNetBackupAdministrationConsole, in the left pane, select the LoggingAssistant node.
2 The right pane of the NetBackup Administration Console displays the listof Logging Assistant records. Select the record whose debug logging you wantto disable.
3 In the Actions menu, select Disable Debug Logs. The Welcome panel forthe Reset Logging Wizard appears.
Click Next to continue.
4 The Selected Hosts and Processes panel appears. Use this panel to confirmthe host problem categories and processes for all debug logs that were enabled.The hosts can be the master server, one or more media servers, and one ormore clients.
Click Next to continue.
5 TheDisable Debug Logging Results panel displays the results of the disableoperation. The upper window shows the hosts and processes whose debuglogs are successfully disabled.
The lower window shows the results of the unsuccessful debug disableattempts. Logs that other Logging Assistant records use cannot be disabled,and are listed as unsuccessful in the lower window.
Click Finish to complete the Disable Logging Wizard.
1097Using the Logging AssistantDisabling debug logging

Collecting and uploading debug logsThe Collect and Upload Logs Wizard helps you gather debug logs to a staging areaof the master server, then uploads the log data to the Veritas FTP server. The debuglogs have previously been enabled in a Setup Debug Logging Wizard session.
To collect and upload debug logs
1 In theNetBackupAdministrationConsole, in the left pane, select the LoggingAssistant node.
2 The right pane of the NetBackup Administration Console displays the listof Logging Assistant records. Select the record whose debug logs you wantto collect and upload.
3 In the Actions menu, select Collect and Upload Debug Logs. The Welcomepanel for the Collect and Upload Logs Wizard appears.
Click Next to continue.
4 The Selected Hosts and Processes panel appears. Use this panel to confirmthe host problem categories and processes for all debug logs that you want tocollect and upload. The hosts can be the master server, one or more mediaservers, and one or more clients.
Click Next to continue.
5 The Collect Debug Logs panel appears.
1098Using the Logging AssistantCollecting and uploading debug logs

The following describes the parameters on this panel:
In the Specify Log Duration area, click one of thefollowing:
■ Collect available logs gathers all messages for theselected debug logs. Be careful
■ Collect logs spanning this time period collectslogs from one of three periods of time: the last 24hours, the last 3 days, or the last week.
■ Collect logs for specific time period collects logmessages that are generated within a precise timewindow. Specify the start date and time and the enddate and time. The statement at the top of this panelindicates when the debug logs for this LoggingAssistant Record were enabled. This date-time mayaffect the time window you select.
Specify Log Duration
1099Using the Logging AssistantCollecting and uploading debug logs

Click Collect nbsu output to collect the NetBackupSupport Utility (nbsu) information to be bundled andsent with the debug logs. nbsu contains a wide rangeof diagnostic information that Technical Support canuse to troubleshoot.
Collect nbsu output
Click Calculate to display the estimated available diskspace and default log location for each selected host.Use this information to determine if an alternatetemporary location is necessary.
Calculate
If you click Calculate, go to step 6.
Otherwise, click Next and go to step 8.
6 The Calculate Disk Space on Hosts panel appears.
This panel displays the free disk space information and the default temporarylocation for each of the selected hosts. Verify that the required disk space onthe host for the debug logs does not exceed the available free space on thathost. If it does, you can select the host entry, then click Change TemporaryLocation to change the log location on the host.
1100Using the Logging AssistantCollecting and uploading debug logs

7 The Change Temporary Location panel appears.
This panel lets you move debug logs to a different location on a host to avoidrunning out of disk space. Enter an alternate temporary directory path locationfor the logs in the text window, then click Check Free Disk Space. The Freedisk space on temporary location entry changes from Unknown to the freespace available on the alternate location. Compare that value with theEstimated required disk space for logs entry to determine if the space issufficient. If necessary, repeat until you find an alternate log location withsufficient disk space.
Click OK to return to the Calculate Disk Space panel.
Click OK again to return to the Collect debug logs panel.
Finally, click Nextto continue.
1101Using the Logging AssistantCollecting and uploading debug logs

8 The following Upload Collected Evidence panel appears.
The panel lets you enter information necessary to upload debug logs and otherevidence such as nbsu output.
The following describes the parameters on this panel:
1102Using the Logging AssistantCollecting and uploading debug logs

Note the staging file location in the text window. If youwant, change the location. If you are uncertain whetherenough free space is available for the staging location,click Check Free Space to display the following:
The Check Free Space on Master Server panel letsyou view all the mount points on the master server andthe space available on each. Click OK to return to theCalculate Disk Space on Hosts panel.
Check Free Space
Logging Assistant requires a staging location on themaster server for the debug logs to be uploaded. If youdetermine from the Check Free Space on MasterServer panel that you need to change the staginglocation, type the new location in the text window.
Staging location on masterserver
Select Upload collected logs to Veritas server if youwant to upload the debug logs to Veritas Support foranalysis and troubleshooting. Enter the Support CaseID associated with the Logging Assistant record, andenter the Veritas server location (for example, USA).Contact Technical Support to get this information.
Upload collected logs toVeritas server
You can add a brief message of up to 256 charactersin the text window. The message is included in theReadme file that is uploaded with the debug logs toVeritas Support.
Brief comment to beincluded in Readme
Click Remove staging directory on master serverafter upload to remove the staging location and all theuploaded data still on the master server.
Remove staging directoryon master server afterupload
1103Using the Logging AssistantCollecting and uploading debug logs

Click Next to initiate the upload operation.
9 The Collect and Upload Results panel appears. It shows the results of theupload operation. The progress of the operation is recorded in a file on themaster server.
You can monitor the progress of the collect and upload operations by returningto the Logging Assistant main screen. The Progress column of the main screenchanges as the operation progresses.
Click Finish to complete the Collect and Upload Logs Wizard.
Collecting and uploading nbsu informationTechnical Support often wants you to send initial evidence of a problem in the formof the NetBackup Support Utility (nbsu). You use the Collect and Upload nbsu LogsWizard to collect and upload the nbsu diagnostic information.
To collect and upload nbsu
1 In theNetBackupAdministrationConsole, in the left pane, select the LoggingAssistant node.
2 The right pane of the NetBackup Administration Console displays the listof Logging Assistant records. Select the record whose nbsu you want to collectand upload.
3 In the Actions menu, select Collect and Upload nbsu Logs. The Welcomepanel for the Collect and Upload nbsu Logs Wizard appears.
Click Next to continue.
1104Using the Logging AssistantCollecting and uploading nbsu information

4 The Host Selection panel appears:
5 Do one or more of the following:
■ Click Collect nbsu on master server to collect nbsu information on themaster server. The Master server text window displays the master servername.
■ Click Collect nbsu on media server to collect nbsu information from oneor more media servers. If the master server is also a media server, youmay still want to select it again as a media server. Use the right arrow option(>>) to move a highlighted media server from theAvailable Media Serverswindow across to the Selected Media Servers window.
■ Click Collect nbsu on NetBackup client(s) to collect nbsu informationfrom one or more clients. In the text window under this parameter, type thenames of clients on which you want to collect nbsu information. Separatethe client names by commas. Do not use any spaces between the clientnames.
Click Next to continue.
1105Using the Logging AssistantCollecting and uploading nbsu information

6 The Upload nbsu panel appears:
Enter the preparatory information required to upload the nbsu information.
The following describes the parameters on this panel:
Logging Assistant requires a staging location on themaster server for the nbsu information to be uploaded.
Staging location on masterserver
If you determine from theCheck Free Space onMasterServer panel that you need to change the staginglocation, type the new location in the text window.
Select Upload nbsu if you want to upload the nbsudiagnostic information to Technical Support for analysis
Upload nbsu
and troubleshooting. Enter the Support Case IDassociated with the Logging Assistant record, and enterthe Veritas server location (for example, USA). ContactTechnical Support to get this information.
You can add a brief message of up to 256 charactersin the text window. The message is included in the
Brief comment to beincluded in Readme
Readme file that is sent with the debug logs to TechnicalSupport.
1106Using the Logging AssistantCollecting and uploading nbsu information

Click Remove staging directory on master serverafter upload to remove the staging location and to freeup the memory that the staging location uses on themaster server.
Remove staging directoryon master server afterupload
Click Next to initiate the collection and upload of the nbsu.
7 The Collect and Upload nbsu Results panel lets you view the results of thenbsu collect and upload process. The Operation Details window of the panelshows the file on the master server where the progress of the operation isrecorded.
Click Finish to complete the Collect and Upload nbsu Wizard.
Uploading evidenceThe Upload Evidence Wizard lets you upload the auxiliary evidence which includesinformation such as screen shots, core dumps, nbcplogs, and emails.
To upload evidence
1 In theNetBackupAdministrationConsole, in the left pane, select the LoggingAssistant node.
2 The right pane of the NetBackup Administration Console displays the listof Logging Assistant records. Select the record whose nbsu you want to collectand upload.
3 In the Actions menu, select Upload evidence. The Welcome panel for theUpload Evidence Wizard appears.
Click Next to continue.
1107Using the Logging AssistantUploading evidence

4 The Upload Evidence panel appears:
This panel lets you enter the preparatory information that is needed to uploadevidence.
The following describes the parameters on this panel:
Logging Assistant requires a staging location on themaster server for the evidence to be uploaded. Checkthe default location in the text window. If you need tochange the location, type the new location in thewindow.
Evidence location onmaster server
Enter the Support Case ID associated with the LoggingAssistant record. Contact Technical Support to get thisinformation.
Support Case ID
You can add a brief message of up to 256 charactersin the text window. The message is included in theReadme file that is sent with the evidence to TechnicalSupport.
Brief comment to beincluded in Readme
Enter the Veritas server location that is associated withthe Logging Assistant record. Contact Technical Supportto get this information.
Veritas server location
Click Next to initiate the upload operation.
1108Using the Logging AssistantUploading evidence

5 The Upload Evidence Results panel lets you view the results of the evidenceupload operation. The Operation Details window of the panel displays the fileon the master server where the progress of the operation is recorded.
Click Finish to complete the Upload Evidence Wizard.
1109Using the Logging AssistantUploading evidence

Administering NetBackup
■ Chapter 29. Management topics
■ Chapter 30. Accessing a remote server
■ Chapter 31. Using the NetBackup Remote Administration Console
■ Chapter 32. Alternate server restores
■ Chapter 33. Managing client backups and restores
■ Chapter 34. Powering down and rebooting NetBackup servers
■ Chapter 35. About Granular Recovery Technology
8Section

Management topicsThis chapter includes the following topics:
■ Configuring the NetBackup Client Service
■ NetBackup naming conventions
■ Wildcard use in NetBackup
■ Wildcard characters in backup selections for an NDMP policy
■ How to access media and devices on other hosts
Configuring the NetBackup Client ServiceBy default, the NetBackup Client Service is configured on Windows with the LocalSystem account. The Local System account lacks sufficient rights to performcertain backup and restore operations.
For example, for NetBackup to access CIFS volumes, the account must be changedfrom Local System to an account with access to the CIFS share.
To change the NetBackup Client Service logon account on a Windows computer:
■ Open the Windows Services application.
■ To change the logon account, stop the NetBackup Client Service.
■ Open the properties for the NetBackup Client Service.
■ Provide the name and password of the account that has the necessarypermissions. For example, change the logon to that of Administrator.
■ Restart the service.
If the logon property is not changed for the NetBackup Client Service, the policyvalidation fails with status code 4206.
29Chapter

Situations in which the NetBackup Client Service logonaccount requires changingThe following list contains situations in which the NetBackup Client Service logonaccount needs to be changed:
■ To access CIFS storage for a storage unit.
■ To use UNC paths, the network drives must be available to the service accountthat the NetBackup Client Service logs into at startup. You must change thisaccount on each Windows client that is backed up that contains data that isshared with another computer.
■ During a snapshot: To have read access to the share for backup purposes andwrite access during restores.The account must be for a domain user that is allowed to access and write tothe share. To verify the account, log on as that user and try to access the UNCpath. (For example: \\server_name\share_name.
■ For database agents and options, configure the service with a logon accountthat has the necessary permission or privileges. See the documentation for youragent or option for more information.
■ For the database agents that support VMware backups on a NetApp disk array,configure the logon account to one that has access to the disk array.
NetBackup naming conventionsThe following set of characters can be used in user-defined names, such as storageunits and policies:
■ Alphabetic (A-Z a-z) (names are case-sensitive)
■ Numeric (0-9)
■ Period (.)
■ Plus (+)
■ Minus (-)Do not use a minus as the first character.
■ Underscore (_)
These characters are also used for foreign languages.
Note: No spaces are allowed.
1112Management topicsNetBackup naming conventions

Wildcard use in NetBackupNetBackup recognizes the following wildcard characters in areas where wildcardscan be used. (For example, in the paths of include and exclude file lists.)
The following table shows the wildcards that can be used in various NetBackupdialog boxes and lists.
Table 29-1 Wildcard use in NetBackup
UseWildcard
An asterisk serves as a wildcard for zero or more characters.
An asterisk can be used in the backup selection list, the include list, and theexclude list for Windows and UNIX clients.
For example:
r* refers to all files that begin with r
r*.doc refers to all files that begin with r and end with .doc.
To back up all files that end in .conf, specify:
/etc/*.conf
*
A question mark serves as a wildcard for any single character (A through Z; 0through 9).
A question mark can be used in the backup selection list, the include list, and theexclude list for Windows and UNIX clients.
For example:
file? refers to file2, file3, file4
file?? refers to file12, file28, file89
To back up all files named log01_03, log02_03, specify:
c:\system\log??_03
?
1113Management topicsWildcard use in NetBackup

Table 29-1 Wildcard use in NetBackup (continued)
UseWildcard
A pair of square brackets indicates any single character or range of charactersthat are separated with a dash.
For example:
file[2-4] refers to file2, file3, and file4
file[24] refers to file2, file4
*[2-4] refers to file2, file3, file4, name2, name3, name4
Brackets are not valid wildcards under all circumstances for all clients:
■ Brackets that are used as wildcards in include and exclude lists:Windows clients: AllowedUNIX clients: Allowed
■ Brackets that are used as wildcards in policy backup selections lists:Windows clients: Not allowed; the use of brackets in policy backup selectionslists causes backups to fail with a status 71.UNIX clients: Allowed
[ ]
Curly brackets can be used in the backup selection list, the include list, and theexclude list for UNIX clients only.
A pair of curly brackets (or braces) indicates multiple file name patterns. Separatethe patterns by commas only; no spaces are permitted. A match is made for anyor all entries.
For example:
{*1.doc,*.pdf} refers to file1.doc, file1.pdf, file2.pdf
Note: Curly brackets are valid characters for Windows file names and cannot beused as wildcards on Windows platforms. Backslashes cannot be used as escapecharacters for curly bracket characters.
{ }
To use wildcard characters literally, precede the character with a backslash (\).
A backslash (\) acts as an escape character only when it precedes a special or awildcard character. NetBackup normally interprets a backslash literally because abackslash is a legal character to use in paths.
Assume that the brackets in the following examples are to be used literally:
C:\abc\fun[ny]name
In the exclude list, precede the brackets with a backslash:
C:\abc\fun\[ny\]name
1114Management topicsWildcard use in NetBackup

Table 29-2 Placement of wildcards in the path of backup selections
ExamplesClient type
The following example is allowed:
C:\abc\xyz\r*.doc
Wildcard characters do not work elsewherein the path. For example, an asterisk functionsas a literal character (not as a wildcard) in thefollowing examples:
C:\*\xyz\myfile
C:\abc\*\myfile
For Windows clients, wildcards functioncorrectly only when they are placed at theend of the path, in the file or the directoryname.
See “Pathname rules for Windows clientbackups” on page 817.
The following examples are allowed:
/etc/*/abc/myfile
/etc/misc/*/myfile
/etc/misc/abc/*.*
For UNIX clients, wildcards can appearanywhere in the path.
See “Pathname rules for UNIX client backups”on page 824.
See “Backup Selections tab” on page 810.
Wildcard characters in backup selections for anNDMP policy
You can use wildcard characters in regular expressions or the directiveALL_FILESYSTEMS to specify path names in NDMP policy backup selections.
Note: Wildcard characters are not supported in releases of NetBackup beforeversion 7.6. To use wildcard characters in NDMP policy backup selections, bothyour master server and the media servers on which NetBackup for NDMP is installedmust run NetBackup 7.6 or later.
Wildcard characters in regular expressions or directives are valid for streaming andnon-streaming NDMP backups.
1115Management topicsWildcard characters in backup selections for an NDMP policy

Note: Directory-level expansion is not supported for some NDMP servers. SomeNDMP filer vendors do not have the APIs that NetBackup uses to support wildcardcharacters lower than the volume level.
If you specify a backup selection using wildcard characters lower than the volumelevel for these filers, status code 106 is generated. The following message isdisplayed: Invalid file pathname found, cannot process request.
Currently, only NetApp filers support wildcard characters for backup selectionslower than the volume level. This support is not available in NetApp clustered DataONTAP version 8.2. To see the versions of NetApp Data ONTAP that supportwildcard characters for backup selections lower than the volume level, refer to theNetBackup Master Compatibility List at the following URL:
www.netbackup.com/compatibility
You cannot use any wildcard characters that also match file names. For example,a backup selection might include /vol/vol_archive_01/autoit*. This specificationmight match a path name such as /vol/vol_archive_01/autoit_01/. However,if this specification also matches a file name like/vol/vol_archive_01/autoit-v1-setup.exe, the backup job fails with statuscode 99 because wildcards can specify only path names. The following messageis displayed: NDMP backup failure (99).
Table 29-3 Valid wildcard characters for NDMP policy backup selections
DescriptionWildcard character
Specifies a string match. For example:
/vol/vol_archive_*
This form of the path specification matches all paths that begin with the literal characters/vol/vol_archive_ and end with any characters.
The string match wildcard can also specify multiple variable characters between literalcharacters as in the following examples:
/vol/ora_*archive or /vol/ora_*archive*
/vol/ora_vol/qtree_*archive or /vol/ora_vol/qtree_*archive*
*
Specifies a single-character match.
/fs?
This path specification matches all paths that begin with the literal characters /fs andend with any single character. For example, /fs1,/fs3, /fsa, /fsd and so on matchthe specified pattern /fs?.
?
1116Management topicsWildcard characters in backup selections for an NDMP policy

Table 29-3 Valid wildcard characters for NDMP policy backup selections(continued)
DescriptionWildcard character
Specifies an alphanumeric pattern match. For example:
/fs[1-9]
This path specification matches all paths that begin with the literal characters /fs andend with any single numeric character from 1 through 9. For example, /fs1,/fs2,and so on up to /fs9 match the specified pattern /fs[1-9]. However, /fs0 and/fsa do not match the specified pattern; 0 is out of the specified numeric range, anda is a non-numeric character.
The pattern match wildcard can also specify alphanumeric patterns such as/fs[1-5a]. This specification matches /fs1, /fs2, and so on up to /fs5 as wellas /fsa.
Similarly, the pattern match wildcard can also specify patterns like /fs[a-p4]. Thisspecification matches /fsa, /fsb, and so on up to /fsp as well as /fs4.
You must use multiple backup selection specifications if the pattern can match morethan 10 volume names in a numeric series. For example, you may want to back up110 volumes that begin with the literal characters /vol/ndmp and are numbered 1through 110. To include these volumes in a backup selection with wildcards, specifythree backup selections with the following wildcard patterns:
■ /vol/ndmp[0-9]
This pattern matches any volume name that begins with /vol/ndmp and endswith a single numeric character 0 through 9.
■ /vol/ndmp[0-9][0-9]
This pattern matches any volume name that begins with /vol/ndmp and endswith the two-digit numeric characters 00 through 99.
■ /vol/ndmp[0-9][0-9][0-9]
This pattern matches any volume name that begins with /vol/ndmp and endswith the three-digit numeric characters 000 through 999.
Do not specify /vol/ndmp[1-110] in this example. This pattern produces inconsistentresults.
[...]
Note: Veritas recommends that you do not use a single forward-slash character(/) in an NDMP policy backup selection. This method of including all the volumeson an NDMP filer in the selection is not supported. Instead, use theALL_FILESYSTEMS directive:
See “ALL_FILESYSTEMS and VOLUME_EXCLUDE_LIST directives” on page 834.
1117Management topicsWildcard characters in backup selections for an NDMP policy

Note: Nested wildcard expressions can result in recursive path name expansionoperations that can impact performance, especially for directories that have a verylarge number of files or directories. An example of nested wildcard expansion is asfollows:
/vol/fome06/*/*private
Note: Wildcard expressions do not span or include a path separator (/).
Note: All backup selections that contain a wildcard expression must start with apath separator (/). An example of a correct wildcard expression is as follows:
/vol/archive_*
An example of an incorrect wildcard expression is as follows:
vol/archive_*
How to access media and devices on other hostsFor NetBackup to access media and device management functionality on a remoteNetBackup host, you may need to add a SERVER entry to the vm.conf file on theremote host.
The SERVER entries are used in the NetBackup bp.conf and vm.conf files forsecurity. You can add the entries that allow only specific hosts to access thosecapabilities remotely.
If the vm.conf file on a remote host contains no SERVER entries, a host can managemedia and devices on the remote host if it's added to the bp.conf file of the serveryou logged into. You do not need to add a SERVER entry to the vm.conf file.
If the vm.conf file on a remote host contains any SERVER entries, add a SERVER
entry for the host on which the NetBackup Administration Console is running(the server you logged into) to that vm.conf file.
Assume that you have three hosts named eel, yak, and shark. You want to centralizedevice management on host shark and also permit each host to manage its owndevices.
The following example scenario applies:
■ The vm.conf file on shark contains the following:
SERVER = shark
1118Management topicsHow to access media and devices on other hosts

The vm.conf file on shark does not require any additional SERVER entries,because all device management for shark is performed from shark.
■ The vm.conf file on eel contains the following, which lets eel manage its owndevices and permits shark to access them:
SERVER = eel
SERVER = shark
■ The vm.conf file on yak contains the following, which lets yak manage its owndevices and permits shark to access them:
SERVER = yak
SERVER = shark
See the NetBackup Administrator's Guide, Volume II:
http://www.veritas.com/docs/DOC5332
1119Management topicsHow to access media and devices on other hosts

Accessing a remote serverThis chapter includes the following topics:
■ Prerequisites for accessing a remote server
■ Accessing remote servers
■ About running the NetBackup Administration Console on a NetBackup client
■ Troubleshooting remote server administration
Prerequisites for accessing a remote serverIn a NetBackup environment, you can use multiple NetBackup servers to performvarious administrative tasks.
For example, consider a NetBackup environment that contains two NetBackupdomains. Server_1 in one domain and Server_2 in the other. You can log into theNetBackup Administration Console of Server_1 and then change to Server_2 toadminister Server_2. You must perform the following tasks before you can changeto a different server:
■ From one server, allow access to another server. See “Allow access to anotherserver” on page 1121.
■ Authorize users of one server to access another server. See “Authorize usersof one server to access another server” on page 1123.
To change to a different server, you can either specify the remote server on thelogin screen or change to the server from within the NetBackup AdministrationConsole. See “Accessing remote servers” on page 1124.
30Chapter

Allow access to another serverFor a local host to administer a remote server, the name of the local host mustappear in the server list of the remote server. Likewise, the remote host must includethe local host in its server list.
Figure 30-1 assumes that server_1 wants to administer server_2.
Figure 30-1 Server lists on local server and remote server
Server_1 wants toadminister Server_2
Server_1 Server_2
Server list on Server_1includes Server_2
Server list on Server_2includes Server_1
To add a server to a server list
1 In theNetBackupAdministrationConsole, expandHost Properties >MasterServer.
2 Double-click the name of the server to view the properties.
1121Accessing a remote serverPrerequisites for accessing a remote server

3 Select the Servers tab to display the server list.
If the remote server does not appear in the Additional Servers list, the currentserver considers it invalid.
Currently, server_2 allows remote accessto two servers: server_x and server_y
4 To add a server to the server list, click Add.
5 In the New Server dialog box, type the server name in the field.
1122Accessing a remote serverPrerequisites for accessing a remote server

6 Click Add to add the server to the list. Then, click Close to close the dialogbox. The server appears in the server list.
The bp.conf file on every UNIX server contains SERVER and possiblyMEDIA_SERVER entries. The server list in the Servers properties dialog boxrepresents these entries. Hosts that are listed as media servers have limitedadministrative privileges.
7 Click OK to save the changes.
Authorize users of one server to access another serverYou must explicitly authorize users of one server to access another server. Addusers of a server to the auth.conf file on the server that they are authorized toaccess. In this example, authorize users of Server_1 to access Server_2. This taskmust be performed on Server_2.
Note: Add only the users that don't have administrative privileges on one server tothe auth.conf file on another server.
On UNIX, the auth.conf file is located at /usr/openv/java.
On Windows, create the auth.conf file from the auth.conf.win.template file thatis located at C:\Program Files\Veritas\Java.
See “Authorization file (auth.conf) characteristics” on page 1132.
1123Accessing a remote serverPrerequisites for accessing a remote server

To authorize users of one server to access another server
◆ In the auth.conf file on Server_2, add users of Server_1 authorized to accessServer_2.
If Server_1 is a Windows host, add the following line in the auth.conf file:
For example, username ADMIN=ALL JBP=ALL
If Server_1 is a UNIX host, add the following line in the auth.conf file:
For example, root ADMIN=ALL JBP=ALL
Accessing remote serversIf a NetBackup site has multiple master servers, you can configure the systems sothat multiple servers can be accessed from one NetBackup AdministrationConsole.
If the server that you want to access is a media server or client, it must beprovisioned with a security certificate.
See “About security certificates for NetBackup hosts” on page 47.
Use the following procedure to access a remote server.
To access a remote server
1 Ensure that the remote server is accessible to the local server.
See “Allow access to another server” on page 1121.
2 Use one of the following methods to access a remote server:
■ Use the Change Server option:
■ Select any main node in the left pane of theNetBackup AdministrationConsole. (The option does not appear in the File menu unless a mainnode is selected.)
■ Select the File > Change Server menu command.
■ Click OK to launch a new console.
■ Enter the host name of another server.Enter a user name and password and click Login.If the user has the necessary permissions on both servers, the user cantransition from one to another without setting up trust relationships.If server_1 is not listed on the server list of server_2, server_1 receivesan error message after it tries to change servers to server_2.If the user has administrative privileges on one server and differentprivileges on another server, the user is required to reauthenticate.
1124Accessing a remote serverAccessing remote servers

■ Specify the remote server on the login screen:Enter the host name of the remote server.Enter the user name and password for an authorized NetBackupadministrator, then click Login.
To log in to a differentserver, specify the nameof the remote host in thelogin screen
About running the NetBackup AdministrationConsole on a NetBackup client
The NetBackup Administration Console on a client is useful to administer aNetBackup server remotely. (No NetBackup server software is installed.)
Run the NetBackup Administration Console on a client under the followingconditions:
■ On a Windows client if the Remote Administration Console is installed.
■ On a UNIX client if the client is NetBackup-Java capable.
Troubleshooting remote server administrationTo administer a server from another master server, make sure that the followingconditions are met:
■ The destination server is operational.
■ NetBackup daemons are running on both hosts.
■ The network connection is valid.
■ The user has administrative privileges on the destination host.
1125Accessing a remote serverAbout running the NetBackup Administration Console on a NetBackup client

■ To perform a Change Server operation, all servers should be at the sameversion.
■ The current host is listed in the server list of the destination host.See “Allow access to another server” on page 1121.The host does not need to be listed if the host is a media server or a client. Or,it does not need to be listed if only media and device management or monitoringis to take place.If you change the master server list, stop and restart the NetBackup DatabaseManager (bpdbm) and NetBackup Request Daemon (bprd) to ensure that allappropriate NetBackup processes use the new server entry.
■ Authentication is set up correctly, if used.
■ To perform a Change Server operation to a media server or client, the mediaserver or client must have a security certificate installed.See “Deploying a security certificate on a NetBackup host ” on page 48.
■ For problems changing servers to configure media or devices or monitor devices,verify that the NetBackup Volume Manager is running on that server.
■ If you cannot access devices on the remote host, it may be necessary to add aSERVER entry to the vm.conf file on that host.See the NetBackup Administrator’s Guide, Volume II for instructions.
■ If you cannot start or stop processes or services through the Activity Monitor,verify the following:
■ The remote server is a Windows system. Only on other Windows systemscan processes be monitored and controlled.
■ You have the required permissions on the remote server. Windows securitymust allow access to the user that is running the Activity Monitor.
1126Accessing a remote serverTroubleshooting remote server administration

Using the NetBackupRemote AdministrationConsole
This chapter includes the following topics:
■ About the NetBackup Remote Administration Console
■ About authorizing NetBackup users
■ Authorization file (auth.conf) characteristics
■ About authorizing nonroot users for specific applications
■ About authorizing specific tasks in the Backup, Archive, and Restore userinterface
■ About authorizing users on Windows NetBackup server
■ Restricting access to the NetBackup Administration Console on Windows
■ Run-time configuration options for the NetBackup Administration Console
■ About customizing jnbSA and jbpSA with bp.conf entries
■ About improving NetBackup-Java performance
■ About adjusting time zones in the NetBackup Administration console
31Chapter

About the NetBackup Remote AdministrationConsole
The NetBackup Remote Administration Console is a stand-alone Java-basedadministration console. This console is installed on a host that does not haveNetBackup server software. It is used to monitor NetBackup servers remotely.
Installing this console installs the NetBackup Administration Console and theclient software. The presence of the client software enables the computer to bebacked up like any other client. No master server software or media server softwareis installed.
Multiple base versions of the NetBackup Administration Console are installedwhen you install NetBackup server software. For example, when you install orupgrade to NetBackup 7.7.2, base versions from 7.0 through 7.7.2 of the consoleare all installed.
Note: Veritas recommends that after you install or upgrade NetBackup serversoftware, you should uninstall older versions of the NetBackup RemoteAdministration Console (Windows and Java) present on the host. If the nativeNetBackup Administration Console for Windows is present, it is automaticallyuninstalled when you install or upgrade the NetBackup server software.
Note: To upgrade any of the multiple versions of consoles to a patch, you mustfirst install the base version of the Remote Administration Console. Use the installerof the base version to install the Remote Administration Console. You must thenupgrade to the corresponding patch of the Remote Administration Console.
Upgrading directly to a patch version of the NetBackup Administration Consolefrom the multiple versions of the consoles is not supported.
1128Using the NetBackup Remote Administration ConsoleAbout the NetBackup Remote Administration Console

Figure 31-1 Installing the NetBackup Remote Administration Console
These processes can be run on two different NetBackup hosts. This distributedapplication architecture holds true for the Backup, Archive, and Restore clientinterface (jbpSA) on UNIX platforms as well.
The administrator first starts the Java-basedNetBackup Administration Consoleusing one of the following methods:
■ Select Start > Programs > Veritas NetBackup > NetBackup 7.7.2Administration Console on the Windows computer on which the NetBackupRemote Administration Console is installed.
■ Run the jnbSA command on a UNIX computer where NetBackup is installed.
Then the administrator logs on to the application server on the host that is specifiedin the logon dialog box.
The application server is the host that is specified in theNetBackup AdministrationConsole logon dialog box and authenticates the logon credentials of the user. Thecredentials are authenticated by using standard UNIX user account data andassociated APIs.
1129Using the NetBackup Remote Administration ConsoleAbout the NetBackup Remote Administration Console

Note: The host that is specified in the logon dialog box and the system that runsthe NetBackup Administration Console must run the same NetBackup version.
Note: To log on to anyNetBackup Administration Console, your logon credentialsmust be authenticated from the connecting master or media server. This holds truewhether or not NetBackup Access Control (NBAC) is in use.
Figure 31-2 NetBackup logon dialog box
Application server
The user name andpassword must be valid onthe application server.
The server that is usually the object of all administrative tasks is the host that isspecified in the NetBackup Administration Console logon dialog box.
An exception is the use of the File > Change Server capability in the NetBackupAdministration Console. The Change Server capability allows administration ofa remote server (a server other than the one specified in the NetBackupAdministration Console logon dialog box).
Note: To perform a Change Server operation, all servers should be at the sameversion.
Regardless of which server is administered, all administrative tasks that areperformed in the NetBackup Administration Console make requests of theapplication server. All tasks are run on the application server host, whether theserver is remote or whether the server is specified on the logon dialog box.
However, regardless of which NetBackup authorization method is configured,authorization for tasks in the NetBackup Administration Console is specific to
1130Using the NetBackup Remote Administration ConsoleAbout the NetBackup Remote Administration Console

the server being administered. For example, NetBackup-Java authorizationcapabilities are in use on Host_A. Use Change Server to change to Host_B. Thepermissions are honored as configured in the auth.conf on Host_B.
To administrate from a remote server, the application server host must be includedin the server list of the remote server.
See “Allow access to another server” on page 1121.
See “Accessing remote servers” on page 1124.
About authorizing NetBackup usersNetBackup offers access control through the Access Management utility in theNetBackup Administration Console.
Instructions on how to install the necessary components to use Access Managementare available in the NetBackup Security and Encryption Guide.
If NetBackup Access Control is not configured, you can still authorize users of theNetBackup Administration Console for specific applications. NetBackup AccessControl always takes precedence over the capabilities authorization of the console.
If a user is not an authorized administrator by NetBackup Access Control, the actionsthat the user can perform in the Backup, Archive, and Restore application arelimited. The user can perform the actions that are defined in the auth.conf file onthe host that is specified in the logon dialog box.
The auth.conf file contains the authorization data for accessing NetBackupapplications.
On Windows NetBackup servers, a template file named auth.conf.win.template
is present at NB_Install/Java. Use this template file to create an auth.conf fileat the same location.
The template file contains an example of giving permissions to a user.
See “About authorizing nonroot users for specific applications” on page 1134.
On UNIX NetBackup servers, the auth.conf file is located at NB_Install/Java.This file provides the following authorizations:
Administration capabilities for the root user and user backup andrestore capabilities for all other users.
On NetBackupservers
User backup and restore capabilities for all users.On NetBackup clients
To perform remote administration or user operations with jbpSA, a user must havevalid accounts on the NetBackup UNIX server or client computer.
1131Using the NetBackup Remote Administration ConsoleAbout authorizing NetBackup users

Note: If NetBackup Access Control is not configured for the users, by default theNetBackup-Java application server provides authorization data. The authorizationdata allows all users who are members of the local administrator group on theNetBackup master server to use all of the NetBackup-Java applications. Otherusers are allowed to access only Backup, Archive, and Restore.
Authorization file (auth.conf) characteristicsOn Windows NetBackup servers, a template file named auth.conf.win.template
is present at NB_Install/Java. Use this template file to create an auth.conf fileat the same location.
The template file contains an example of giving permissions to a user.
On UNIX NetBackup servers, the auth.conf file is located at NB_Install/Javaandcontains only the following entries:
root ADMIN=ALL JBP=ALL
* ADMIN=JBP JBP=ENDUSER+BU+ARC
The first field of each entry is the user name that is granted access to the rightsthat the entry specifies. In the released version, the first field lets root users use allof the NetBackup applications.
An asterisk in the first field indicates that any user name is accepted and the useris allowed to use the applications as specified. If the auth.conf file exists, it musthave an entry for each user. Or, the auth.conf file must have an entry that containsan asterisk (*) in the user name field; users without entries cannot access anyNetBackup applications. Any entries that designate specific user names mustprecede a line that contains an asterisk in the user name field.
Note: The asterisk specification cannot be used to authorize all users for anyadministrator capabilities. Each user must be authorized by using individual entriesin the auth.conf file.
To deny all capabilities to a specific user, add a line that indicates the user beforea line that starts with an asterisk.
For example:
mydomain\ray ADMIN= JBP=
* ADMIN=JBP JBP=ENDUSER+BU+ARC
The remaining fields specify the access rights.
1132Using the NetBackup Remote Administration ConsoleAuthorization file (auth.conf) characteristics

Specifies the applications that the user can access. ADMIN=ALL allows access to allNetBackup applications and the related administrator-related capabilities.
See “About authorizing nonroot users for specific applications” on page 1134.
ADMIN keyword
Specifies what the user can do with the Backup, Archive, and Restore client application(jbpSA). JBP=ALL allows access to all Backup, Archive, and Restore capabilities, includingthose for administration.
See “About authorizing specific tasks in the Backup, Archive, and Restore user interface”on page 1135.
JBP keyword
An asterisk in the first field indicates that any user name is accepted and the user is allowedto use the applications as specified. The second line of the released version contains anasterisk in the first field. The asterisk means that NetBackup validates any user name foraccess to the Backup, Archive, and Restore client application jbpSA.JBP=ENDUSER+BU+ARC allows users to back up, archive, and restore files only.
asterisk (*)
The user name and password that is entered in the logon screen must be valid onthe computer that is specified in the host field. The NetBackup-Java applicationserver authenticates the user name and password by using the system passwordfile data for the specified computer. The password must be the same password thatwas used upon logon at that computer.
For example, assume you log on with the following information:
username = joe
password = access
Here you must use the same user name and password to log into NetBackup.
You can log on to the NetBackup-Java application server under a different username than the name used to log on to the operating system. For example, if youlog on to the operating system with a user name of joe, you can subsequently logon to jnbSA as root.
Upon exit, some application state information is automatically saved in the directoryof joe $HOME/.java/.userPrefs/vrts directory. (For example, table column order.)The information is restored the next time you log on to the operating system underaccount joe and initiate the NetBackup application. This logon method is useful ifthere is more than one administrator because it saves the state information for eachadministrator.
Note: NetBackup creates a user’s $HOME/.java/.userPrefs/vrts directory thefirst time an application is exited. Only NetBackup-Java applications use the.java/.userPrefs/vrts directory.
1133Using the NetBackup Remote Administration ConsoleAuthorization file (auth.conf) characteristics

If the user name is not valid as determined by the contents of the auth.conf file,an error message appears. All applications are inaccessible to the user:
No authorization entry exists in the auth.conf file for username
name_specified_in_login_dialog. None of the NB-Java applications are
available to you.
To summarize, the following types of entries are contained in the auth.conf file, asfollows:
■ The defaults let anyone with any valid user name use the Backup, Archive,and Restore client application (jbpSA). Only root users can access theadministrator applications and the administrator capabilities in jbpSA.
■ Specify entries for valid user names.
Note: The validated user name is the account the user can back up, archive orrestore files from or to. The Backup, Archive, and Restore application (jbpSA)relies on system file permissions of when to browse directories and files to back upor restore.
About authorizing nonroot users for specificapplications
Nonroot users can be authorized for a subset of the NetBackup-Java administratorapplications.
To authorize users for a subset of the NetBackup-Java administrator applications,use the following identifiers for the ADMIN keyword in the auth.conf file:
Indicates that the user has administrative privileges for all of theapplications that are listed in this table.
ALL
Activity MonitorAM
Bare Metal RestoreBMR
Backup Policy ManagementBPM
Backup, Archive, and RestoreBAR or JBP
CatalogCAT
Device MonitorDM
Host PropertiesHPD
1134Using the NetBackup Remote Administration ConsoleAbout authorizing nonroot users for specific applications

Media ManagementMM
ReportsREP
Storage Unit ManagementSUM
Vault ManagementVLT
For example, to give a user (user1) access only to the Device Monitor and ActivityMonitor, add the following entry to the auth.conf file:
user1 ADMIN=DM+AM
In order for a nonroot user to modify the files that the NetBackup-JavaAdministration Console uses, run the nonroot_admin_nbjava script. The scriptchanges permissions on the following files:
/usr/openv/java/auth.conf
/usr/openv/java/Debug.properties
/usr/openv/java/nbj.conf
Note: nonroot_admin_nbjava is located in/usr/openv/java/nonroot_admin_nbjava.
About authorizing specific tasks in the Backup,Archive, and Restore user interface
The Backup, Archive, and Restore interface can be configured to let only a userperform certain tasks. Not all tasks can be performed successfully without someadditional configuration.
The following require additional configuration and are documented elsewhere:
■ Redirected restores.See “About server-directed restores” on page 1160.See “About client-redirected restores” on page 1161.
■ User backups or archives require a policy schedule of these types and the taskto be submitted within the time window of the schedule.
To authorize users for a subset of Backup, Archive, and Restore capabilities, usethe following identifiers for the JBP keyword in the auth.conf file:
1135Using the NetBackup Remote Administration ConsoleAbout authorizing specific tasks in the Backup, Archive, and Restore user interface

Table 31-1 Identifiers for the JBP keyword in the auth.conf file
DescriptionIdentifier
Allows the users to perform restore tasks from true image or regular backups plus redirected restores.ENDUSER
Allows the users to perform backup tasks.BU
Allows the users to perform archive tasks. The capability to perform backups (BU) is required toallow archive tasks.
ARC
Allows the users to perform raw partition restores.RAWPART
Allows the users to perform all actions, including server-directed restores. (Restores to a client thatis different from the client that is logged into.) Server-directed restores can only be performed froma NetBackup master server.
ALL
For example, to allow a user (user1) to restore but not backup up or archive files:
user1 ADMIN=JBP JBP=ENDUSER
About authorizing users on Windows NetBackupserver
To log on to the NetBackup-Java application server, log on to the dialog box thatappears when the console is started. Provide a valid user name and password forthe system that is specified in the Host name field of the log in dialog box.
The user name on a computer running Windows must be of the form:domainname\username
domainname specifies the domain of the NetBackup host. The domain is not requiredif the NetBackup host is not a member of a domain.
The NetBackup-Java application server authenticates the user name and passwordby using standard Windows authentication capabilities for the specified computer.
Note: If NetBackup Access Control is not configured for the users, by default theNetBackup-Java application server provides authorization data. The authorizationdata allows all users who are members of the local administrator group on theNetBackup master server to use all of the NetBackup-Java applications. Otherusers are allowed to access only Backup, Archive, and Restore.
1136Using the NetBackup Remote Administration ConsoleAbout authorizing users on Windows NetBackup server

To restrict access to NetBackup-Java or some of its applications, create anauth.conf file at NB_Install_path\java by using the template available at the samelocation.
See “About the NetBackup Remote Administration Console” on page 1128.
Restricting access to the NetBackupAdministration Console on Windows
Use the following procedure to restrict access to one or more of the NetBackupapplications.
To restrict access to one or more of the NetBackup applications
1 Create the following file on the Windows system:
NB_Install_path\java\auth.conf
Note: Use the template file available at the same location.
The template file contains an example of giving permissions to a user.
2 Add an entry in auth.conf for each user that accesses NetBackup applications.The existence of this file, along with the entries it contains, prohibits unlistedusers from accessing NetBackupapplications on the Windows system. Thefollowing is a sample auth.conf file on a Windows system:
mydomain\Administrator ADMIN=ALL JBP=ALL
mydomain\joe ADMIN=ALL JBP=ALL
* ADMIN=JBP JBP=ENDUSER+BU+ARC
See “About authorizing NetBackup users” on page 1131.
Run-time configuration options for the NetBackupAdministration Console
On Windows computers, the analogous file containing configuration options for theNetBackup Administration Console is Install_path\java\setconf.bat
On UNIX computers, file /usr/openv/java/nbj.conf contains configuration optionsfor the NetBackup Administration Console. Enter one option per line, followingthe same syntax rules as exist for the bp.conf file.
1137Using the NetBackup Remote Administration ConsoleRestricting access to the NetBackup Administration Console on Windows

nbj.conf and setconf.bat contain commands for each of the configuration optionsthat are described in the following topics. To make changes, change the value afterthe equal sign in the relevant set command.
FIREWALL_INThe FIREWALL_IN configuration option provides a method to use aNetBackup-JavaAdministration Console that is outside of a trusted network to administer theNetBackup master servers that are within a trusted network.
This option uses the following format.
On Windows:
SET FIREWALL_IN=
HOST1:PORT1=HOST2:PORT2;IP_ADDR1:PORT3=IP_ADDR2:PORT4
SET FIREWALL_IN >> "%NBJDIR%"\nbjconf
On UNIX:
FIREWALL_IN= HOST1:PORT1=HOST2:PORT2[;...;HOSTn:PORTn=HOSTm:PORTm]
Where HOST is a host name or an IP address.
This configuration option provides a way to allow administrators to bypass thefirewall by using one of the following methods:
■ Enter the port number of the bpjava service in the trusted internal network.Then, map the private interface where the bpjava service runs to a publicinterface that can be reached from outside the firewall.
■ Set up a Secure Shell (SSH) tunnel from the local host to the system inside thefirewall.
In the following example:
■ Master server NBMaster.symc.com is in a trusted network, behind a firewall.
■ The IP address of NBMaster.symc.com is 10.221.12.55.
■ The NetBackup Java Administration Console is installed on localhost.
■ SSH tunnels exist from localhost to NBMaster.symc.com as follows:
localhost:port1bpjava-msvc port (default 13722)
localhost:port2vnetd port (default 13724)
localhost:12345pbx port (default 1556)
Where localhhost is the host name and port1 is the IP port.
1138Using the NetBackup Remote Administration ConsoleRun-time configuration options for the NetBackup Administration Console

To make relevant changes for connections to bpjava-msvc and vnetd, see thefollowing topic:
See “VNETD_PORT” on page 1143.
On Windows systems, use setconf.bat to add the option:
SET FIREWALL_IN=
NBMaster.symc.com:1556=localhost:12345;10.221.12.55:12345=localhost:12345
SET FIREWALL_IN >> "%NBJDIR%"\nbjconf
On UNIX systems, add the following line to the nbj.conf file:
FIREWALL_IN=NBMaster.symc.com:1556=localhost:12345;10.221.12.55:12345=localhost:12345
The entry indicates the following:
■ The connection to NBMaster.symc.com:1556 is to be redirected tolocalhost:12345.
■ The connection to 10.221.12.55:1556 is to be redirected to localhost:12345.
Note: The same options are used if NBMaster.symc.com has a public interface(NBMasterpub.symc.com) that can be reached from the Internet. In this case, theadministrator replaces localhost with NBMasterPub.symc.com.
FORCE_IPADDR_LOOKUPThe FORCE_IPADDR_LOOKUP configuration option specifies whether NetBackupperforms an IP address lookup to determine if two host name strings are indeedthe same host. This option uses the following format:
FORCE_IPADDR_LOOKUP = [ 0 | 1 ]
Where:
Indicates that no IP address lookup is performed to determine if two host name stringsare indeed the same host. They are considered to be the same host if the host namestrings compare equally. Or, if a short name compares equally to the short name of apartially or fully qualified host name.
0
Indicates that an IP address lookup is performed if the two host name strings do notmatch. The lookup determines if they have the same host. The default is to performan IP address lookup if necessary to resolve the comparison. The IP address lookupis not performed if the host name strings compare equally.
1
1139Using the NetBackup Remote Administration ConsoleRun-time configuration options for the NetBackup Administration Console

Note:Use a value of 1 for this option if you have the same host name in two differentdomains. For example, eagle.abc.xyz and eagle.def.xyz or by using host namealiases.
Many places in the NetBackup Administration Console compare host names todetermine if the two are the same host. For example, the File > Change Servercommand.
The IP address lookup can consume time and result in slower response time.However, accurate comparisons are important.
No IP address lookup is necessary if the host name is specified consistently in theNetBackup Administration Console logon dialog box. It must match how the hostnames are configured in NetBackup. Host names are identified in the server listthat is found in the Servers host properties. On UNIX systems, the host names alsoappear in the bp.conf file.
Using host names eagle and hawk, the following describes how this option works:
Comparisons of the following result in no IP address lookup. The hosts areconsidered to be the same host.
eagle and eagleeagle.abc.def and eagle.abc.defeagle.abc and eagle.abc.defeagle and eagle.abc.defeagle and eagle.anything
The hosts are considered to be different for any comparisons of short,partially, or fully qualified host names of eagle and hawk regardless of aliases.
FORCE_IPADDR_LOOKUP = 0
Comparisons of the following result in no IP address lookup. The hosts areconsidered to be the same host.
eagle and eagleeagle.abc and eagle.abceagle.abc.def and eagle.abc.def
In addition to all comparisons of eagle and hawk, the following result in anIP address lookup. The comparison determines if the hosts are indeed thesame host.
eagle.abc and eagle.abc.defeagle and eagle.abc.defeagle and eagle.anything
FORCE_IPADDR_LOOKUP = 1
1140Using the NetBackup Remote Administration ConsoleRun-time configuration options for the NetBackup Administration Console
INITIAL_MEMORY, MAX_MEMORYBoth INITIAL_MEMORY and MAX_MEMORY allow configuration of memory usage forthe Java Virtual Machine (JVM).
Veritas recommends that all of the interfaces (theRemote Administration Console,the NetBackup Administration Console, or the NetBackup Backup, Archive,and Restore user interface) run on a system that contains at least 1 gigabyte ofphysical memory. Make sure that 256 megabytes of memory are available to theapplication.
INITIAL_MEMORY specifies how much memory is allocated for the heap when theJVM starts. The value probably does not require changing. The default is sufficientfor quickest initialization of jnbSA, the Remote Administration Console, or jbpSAon a system with the recommended amount of memory.
On UNIX systems, the initial memory allocation can also be specified as part of thejnbSA or jbpSA command. For example:
jnbSA -ms 36M
Default = 36M (megabytes).
MAX_MEMORY specifies the maximum heap size that the JVM uses for dynamicallyallocated objects and arrays. If the amount of data is large, consider specifying themaximum heap size. For example, a large number of jobs in the Activity Monitor.
On UNIX systems, the maximum memory allocation can also be specified as partof the jnbSA or jbpSA command. For example:
jnbSA -mx 512M
Default = 256M (megabytes).
MEM_USE_WARNINGThe MEM_USE_WARNING configuration option specifies the percent of memory usedas compared to MAX_MEMORY, at which time a warning dialog box appears tothe user. Default = 80%. This option uses the following format:
MEM_USE_WARNING=80
NBJAVA_CLIENT_PORT_WINDOWThe NBJAVA_CLIENT_PORT_WINDOW configuration option specifies the range ofnon-reserved ports on this computer to use for connecting to the NetBackup-Java
1141Using the NetBackup Remote Administration ConsoleRun-time configuration options for the NetBackup Administration Console

application server. It also specifies the range of ports to use to connect to the bpjobd
daemon from the Activity Monitor in the NetBackup Administration Console.
This option uses the following format:
NBJAVA_CLIENT_PORT_WINDOW = n m
Where:
Indicates the first in a range of non-reserved ports that are used for connecting to the bpjava processes onthe NetBackup-Java application server. It also specifies the range of ports to use to connect to the bpjobddaemon or Windows service from the Activity Monitor of the Remote Administration Console.
If n is set to 0, the operating system determines the non-reserved port to use (default).
n
Indicates the last in a range of non-reserved ports that are used for connecting to theNetBackup AdministrationConsole or the Remote Administration Console.
If n and m are set to 0, the operating system determines the non-reserved port to use (default).
m
The minimum acceptable range for each user is 120. Each additional concurrentuser requires an additional 120. For example, the entry for three concurrent usersmight look as follows:
NBJAVA_CLIENT_PORT_WINDOW = 5000 5360
If the range is not set wide enough, jnbSA exits with an error message that statesan invalid value has occurred during initialization.
Note: Performance is reduced with the use of NBJAVA_CLIENT_PORT_WINDOW.
NBJAVA_CORBA_DEFAULT_TIMEOUTThe NBJAVA_CORBA_DEFAULT_TIMEOUT configuration entry specifies the defaulttimeout that is used for most CORBA operations that the Java AdministrationConsole performs.
This option is present by default and uses the following format:
NBJAVA_CORBA_DEFAULT_TIMEOUT=60
The default is 60 seconds.
NBJAVA_CORBA_LONG_TIMEOUTThe NBJAVA_CORBA_LONG_TIMEOUT configuration entry specifies the timeout valuethat the Java Administration Console uses in the following areas:
1142Using the NetBackup Remote Administration ConsoleRun-time configuration options for the NetBackup Administration Console

■ Device Configuration Wizard
■ Disk Pool Configuration Wizard
■ Disk Pool Inventory
This option is present by default and uses the following format:
NBJAVA_CORBA_LONG_TIMEOUT=1800
The default is 1800 seconds.
PBX_PORTThe PBX_PORT configuration entry specifies the pbx port.
This option is present by default and uses the following format:
PBX_PORT=1556
VNETD_PORTThe VNETD_PORT is the configured port for the vnetd daemon process and isregistered with the Internet Assigned Number Authority (IANA).
This option uses the following format:
VNETD_PORT=13724
Veritas recommends that this port not be changed. If changes are necessary, makethe change on all NetBackup hosts in the relevant NetBackup cluster.
This option is preserved for backward compatibility when the 7.0.1 Java interfaceis used to communicate with a 7.0 NetBackup server.
For more information, see the NetBackup Installation Guide.
The value must be set in the corresponding setconf.bat (Windows) or nbj.conf(UNIX) configuration option.
About customizing jnbSA and jbpSAwith bp.confentries
The INITIAL_BROWSE_SEARCH_LIMIT and KEEP_LOGS_DAYS options in the/usr/openv/netbackup/bp.conf file let the administrator and users customize thefollowing aspects of jbpSA operation, as follows:
1143Using the NetBackup Remote Administration ConsoleAbout customizing jnbSA and jbpSA with bp.conf entries

■ INITIAL_BROWSE_SEARCH_LIMIT limits the start date of the search for restoresand can improve performance when large numbers of backups are done.
■ KEEP_LOGS_DAYS specifies how long job and progress log files are kept that theNetBackup-JavaBackup, Archive, and Restore application (jbpSA) generates.The files are written into the following directories:
/usr/openv/netbackup/logs/user_ops/_username_/jobs
/usr/openv/netbackup/logs/user_ops/_username_/logs
A directory exists for each user that uses the Backup, Archive, and Restoreconsole. This entry also controls how long to keep the log files from theNetBackup-Java console.The log files are located in /usr/openv/netbackup/logs/user_ops/nbjlogs.The default is three days.
About improving NetBackup-Java performanceThe most important factor to consider concerning performance issues for thefollowing interfaces is the platform on which the console runs:
■ Remote Administration Console
■ NetBackup Administration Console
■ NetBackup Backup, Archive, and Restore user interface
Regardless of the platform, you can run the administration console from one of thefollowing locations:
■ Run it locally on a desktop host (on supported Windows and UNIX platforms)
■ Run it remotely and display it back to a desktop host (from supported UNIXplatforms)
To provide the best performance, the recommended method for using these consolesis to run the consoles locally on a desktop host. When the consoles are run locally,they do not exhibit the font and the display issues that can be present in someremote display-back configurations.
About running the Java console locallyOn Windows platforms, select Start > Programs > Veritas NetBackup >NetBackup 7.7.2 Administration Console to start the console.
1144Using the NetBackup Remote Administration ConsoleAbout improving NetBackup-Java performance

On supported UNIX platforms, the console is run locally if jnbSA or jbpSA is enteredon the same host on which the console appears. That is, your display environmentvariable is set to the host on which the jnbSA or jbpSA commands were entered.
Improvements in Java technology have made remote X-display back potentiallyviable on some platforms. However, problems continue with certain controls in theconsoles. For example, incorrect box operations, sluggish scrolling, and displayproblems in tables with many rows. More serious issues have also occurred.Consoles can abort and hang because of a Java Virtual Machine (JVM) failurewhen run in this mode on some platforms. These JVM failures are most often seenon the AIX platform. Therefore, Veritas cannot recommend running the consolesin a remote X-display back configuration.
About running a console locally and administering a remote serverTheNetBackup Administration Console and theBackup, Archive, and Restoreuser console are distributed applications. Both applications consist of two majorand separate system processes that can run on different computers. For example:the NetBackup Administration Console on one computer and the console’sapplication server - bpjava processes on another computer.
The NetBackup Administration Console does not need to run on a NetBackupserver host. However, the application server must run on this host in order for youto be able to administer NetBackup.
Although the NetBackup-Java Administration Console does not run on allNetBackup-supported platforms, the application server for the console does run onall supported platforms. The distributed application architecture enables directadministration of all NetBackup platforms, even though the consoles themselvesrun only on a subset of the NetBackup-supported platforms.
To log into the NetBackup-Java Administration Console, specify a host name.The host name is the computer where the application server (bpjava) runs. (Forexample, a NetBackup master server.) All requests or updates that are initiated inthe console are sent to its application server that runs on this host.
About enhancing console performancePerformance of the NetBackup-Java applications depends on the environmentwhere the applications are running, including available resources and networkthroughput. The NetBackup-Java default configuration, specifically theINITIAL_MEMORY and MAX_MEMORY configuration options, assumes sufficient memoryresources on the computer where the console is running. For example, where thejnbSA command is run or the NetBackup Administration Console is started.
Following are guidelines for improving performance:
1145Using the NetBackup Remote Administration ConsoleAbout improving NetBackup-Java performance

■ Consider the network communication speed and the amount of data beingtransferred.
■ Consider the amount of work being performed on the relevant computers.Run NetBackup-Java on a computer that has a low level of activity. For example,there can be large differences in response time when other memory-intensiveapplications are running on the computer. (For example, web browsers.) Multipleinstances of NetBackup-Java on the same computer have the same effect.
■ Run NetBackup-Java on a 1-gigabyte computer that has at least 256 MB ofRAM available to the application. In some instances, the application does notinitiate due to insufficient memory. A number of messages identify these failuresin the xterm window where the jnbSA command was run. Or, the messagesappear in the application log file. Possible messages include the following:
Error occurred during initialization of VM
Could not reserve enough space for object heap
Out of Memory
See “INITIAL_MEMORY, MAX_MEMORY” on page 1141.
■ Consider the amount of physical memory on the relevant computers. Possiblyadd memory on the host being administered (the console’s application serverhost).
■ Consider increasing the swap space to relevant computers:
■ The console host (the host where the console is started)
■ The host being administeredTo increase performance, increase the amount of swap space available to thesystem where you are running the applications. This is especially true if thereis a great deal of other activity on the computer. More swap space can alleviatehangs or other problems that relate to insufficient memory for the applications.
■ Consider additional or faster CPUs to relevant computers:
■ The console host (the host where the console is started)
■ The host being administered
■ To save startup time, allow NetBackup-Java to run rather than exit and restart.Startup of the Java Virtual Machine can take longer than other applications.
■ Consider limiting the amount of NetBackup data that is retained for long periodsof time to only that which is necessary. For example, do not retain successfullycompleted jobs for more than a few hours.See “About the jobs database” on page 1063.
1146Using the NetBackup Remote Administration ConsoleAbout improving NetBackup-Java performance

About determining better performance when console is run locallyor uses remote display back
Performance depends on the following:
■ The speed of the network
■ The console and the application server computer resources
■ The workloads on the console
■ The application server hosts
■ The amount of NetBackup data (Data is the number of jobs in the Activity Monitoror number of NetBackup policies.)
The console may perform better if started on the console’s application server host,then displayed back to the desktop host. However, Veritas is not aware of a situationwhere that configuration produces better console performance. As previouslymentioned, the configuration is not recommended due to problems unrelated toperformance issues.
Consider the following scenarios to determine what would provide the bestperformance for your configuration.
NetBackup-Java performance scenario 1Assume no deficiency in either the console host’s resources or the applicationserver host’s resources. Assume that the amount of NetBackup configuration databeing transferred to the console host far exceeds the X-Windows pixel display data.That is, the actual console screen being sent from the remote host.
Unfortunately, the only way to determine the viability of this situation is to try it.Network capabilities and the proximity of the two hosts influences each NetBackupconfiguration.
NetBackup-Java performance scenario 2Assume that the available resources of the application server host far exceed thatof the console host.
Assume that the console host has a very limited CPU and memory as comparedto the NetBackup master server being administered. (The console host is thecomputer on which the console is started.) If the console is run on the master serverand displayed back to the desktop host, performance may be enhanced.
If the desktop host is a Windows computer, X-terminal emulation or remote displaytools such as Exceed and VNC are required.
These scenarios address the performance aspect of using the NetBackup-Javaconsole. There may be other reasons that require you to display back remotely to
1147Using the NetBackup Remote Administration ConsoleAbout improving NetBackup-Java performance

your desktop, however, it is not recommended. Review the release notes foradditional issues of relevance to the NetBackup-Java Administration Consoleand the Backup, Archive, and Restore client console.
Table 31-2 shows the files that contain configuration entries.
Table 31-2 Files containing configuration entries
DescriptionFile
Authorization options./usr/openv/java/auth.conf
Configuration options (server and client)./usr/openv/netbackup/bp.conf
Configuration options for theNetBackup-Java Console
/usr/openv/java/nbj.conf
Configuration options for media and devicemanagement.
/usr/openv/volmgr/vm.conf
Configuration options for user (on client).$HOME/bp.conf
About adjusting time zones in the NetBackupAdministration console
Sites in a geographically dispersed NetBackup configuration may need to adjustthe time zone in the NetBackup Administration Console for administration ofremote NetBackup hosts. (A remote NetBackup host may either be the host that isspecified in the administration console logon dialog box or one referenced by theFile > Change Server capability in the console.)
The default time zone for the console is that of the host on which the console isstarted, not the host that is specified (if different) in the console logon dialog box.
For backup, restore, or archive operations from within the NetBackupAdministration Console or the Backup, Archive, and Restore application whenrun on a client, set the time zone relative to the NetBackup server from which theclient restores files.
Set the time zone in separate instances of theNetBackup Administration Consolewhen servers in different time zones are administered.
For example, open a NetBackup Administration Console to set the time zonefor the local server in the Central time zone. To set the time zone for a server inthe Pacific time zone as well, open another NetBackup Administration Console.
1148Using the NetBackup Remote Administration ConsoleAbout adjusting time zones in the NetBackup Administration console

Change servers (File > Change Server), and then set the time zone for the Pacifictime zone server. Doing so changes the time zone for the Central time zone serveras well.
To perform aChange Server operation to a media server or client, the media serveror client must have a security certificate installed.
See “Deploying a security certificate on a NetBackup host ” on page 48.
Adjusting the time zone in the NetBackup Administration Console orthe Backup, Archive, and Restore console
Use the following procedure to adjust the time zone or to use daylight savings time.
To adjust the time zone
1 In the NetBackup Administration Console, or in the Backup, Archive, andRestore console box, select File > Adjust Application Time Zone.
2 Select the Standard tab.
3 Clear the Use custom time zone check box.
4 Select the time zone.
5 For daylight savings time, select Use daylight savings time.
6 To have administrative capabilities and to apply the settings to the currentsession and all future sessions, select Save as default time zone.
7 Click OK.
Configuring a custom time zone in the NetBackup AdministrationConsole or the Backup, Archive, and Restore console
Use the following procedure to configure a custom time zone in the administrationor the client consoles.
To configure a custom time zone
1 In the NetBackup Administration Console, or in the Backup, Archive, andRestore console, select File > Adjust Application Time Zone.
2 Select the Use custom time zone check box.
3 Select the Custom tab.
4 Select the time zone on which to base the Backup, Archive, and Restoreinterface time.
1149Using the NetBackup Remote Administration ConsoleAbout adjusting time zones in the NetBackup Administration console

5 For the Offset from Greenwich Mean Time setting, adjust the time to reflecthow many hours and minutes the server’s time zone is either behind or aheadof Greenwich Mean Time.
6 Select the Use daylight savings time check box.
7 To make a selection in the Daylight savings time starts section of the dialog,see the following table for descriptions of each option:
Select Absolute date and indicate the month and dayBegin daylight savings time on a specific date
Select First day of week in month. Indicate the day of theweek and the month.
Begin daylight savings time on the first occurrence of aday in a month
Select First day of week in month after date. Indicate theday of the week and the month and day.
Begin daylight savings time on the first occurrence of aday in a month and after a specific date
Select Last day of week in month. Indicate the day of theweek and the month.
Begin daylight savings time on the last occurrence of aday in a month
Select Last day of week in month before date. Indicatethe day of the week and the month and day.
Begin daylight savings time on the last occurrence of aday in a month and before a specific date
8 Indicate when daylight savings time should end by using one of the methodsin the previous step.
9 To have administrative capabilities and apply the settings to the current sessionand all future sessions, select Save as default time zone.
10 Click OK.
1150Using the NetBackup Remote Administration ConsoleAbout adjusting time zones in the NetBackup Administration console

Alternate server restoresThis chapter includes the following topics:
■ About alternate server restores
■ About supported configurations for alternate server restores
■ About performing alternate server restores
About alternate server restoresThis topic explains how to restore files by using a server other than the one thatwas used to write the backup. This type of restore operation is called an alternateserver restore or server independent restore. It allows easier access to data forrestores in master and media server clusters and provides better failover anddisaster recovery capabilities.
The architecture of NetBackup allows storage devices to be located on multipleservers (either separate storage devices or a shared robot). The NetBackup imagecatalog on the master server contains an entry that defines the server (master ormedia server) to which each backup was written. Information specific to the backupmedia is contained within the master server image catalog (in the attribute file foreach backup). The information is also contained in the Enterprise Media Manager(EMM) database, generally located on the master server.
To restore data through a device on another server is more involved than otherrestores. Use the methods that are described in this topic to restore the backups.Although the methods do not require you to expire and import backup images, insome instances it is useful.
The information in this topic is also pertinent in the case of restoring from a backupcopy. If you created multiple copies of a backup, it is possible to restore from aspecific backup copy other than the primary copy. To do so, use the bprestore
command.
32Chapter
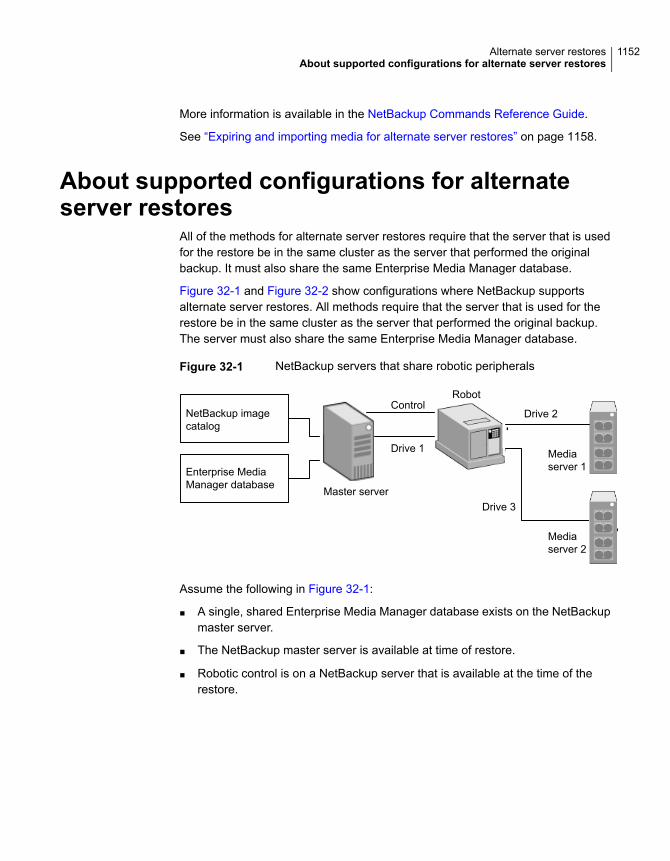
More information is available in the NetBackup Commands Reference Guide.
See “Expiring and importing media for alternate server restores” on page 1158.
About supported configurations for alternateserver restores
All of the methods for alternate server restores require that the server that is usedfor the restore be in the same cluster as the server that performed the originalbackup. It must also share the same Enterprise Media Manager database.
Figure 32-1 and Figure 32-2 show configurations where NetBackup supportsalternate server restores. All methods require that the server that is used for therestore be in the same cluster as the server that performed the original backup.The server must also share the same Enterprise Media Manager database.
Figure 32-1 NetBackup servers that share robotic peripherals
NetBackup imagecatalog
Enterprise MediaManager database Master server
Drive 1
ControlRobot
Drive 2
Drive 3
Mediaserver 1
Mediaserver 2
Assume the following in Figure 32-1:
■ A single, shared Enterprise Media Manager database exists on the NetBackupmaster server.
■ The NetBackup master server is available at time of restore.
■ Robotic control is on a NetBackup server that is available at the time of therestore.
1152Alternate server restoresAbout supported configurations for alternate server restores

Figure 32-2 NetBackup servers with separate non-shared peripherals
Robot 1
Control
Drive 1
Drive 2
Robot 2
Control
Stand alone drive
Drive 1
Mediaserver 1
Mediaserver 2
NetBackup imagecatalog
Enterprise MediaManager database
Master server
Drive 1
Media servers 1 and 2 can be off-site.
Assume the following in Figure 32-2:
■ The media is made physically accessible through an available NetBackup server.The Enterprise Media Manager database is updated to reflect this move.
■ A single, shared Enterprise Media Manager database exists on the NetBackupmaster server.
■ The NetBackup master server is available at time of restore
■ Robotic control (if applicable) is on a NetBackup server that is available at thetime of the restore.
About performing alternate server restoresThe method that NetBackup administrators can use to perform alternate serverrestores depends on the configuration and the situation. The method can includeone or more of the following:
■ Modify the NetBackup catalogs.See “About modifying the NetBackup catalogs” on page 1154.
■ Override the original server for restores.See “Overriding the original server for restores” on page 1155.
■ Enable automatic failover to an alternate server
1153Alternate server restoresAbout performing alternate server restores

See “About enabling automatic failover to an alternate server” on page 1157.
About modifying the NetBackup catalogsTo perform alternate server restores by modifying the NetBackup catalogs, changethe contents of the NetBackup catalogs. Use this method only when the serverreassignment is permanent.
Some examples of when to use this method are as follows:
■ Media is moved to an off-site location, where a media server exists.
■ A robot was moved from one server to another.
■ Two (or more) servers share a robot, each with connected drives and one ofthe servers is to be disconnected or replaced.
■ Two (or more) servers each have their own robots. One of the server’s robotshas run out of media capacity for future backups, while several empty slots existon another server’s robot.
The actual steps that are used vary depending on whether the original server is stillavailable.
Modifying NetBackup catalogs when the server that wrotethe media is availableUse the following procedure to modify catalogs when the server that wrote themedia is available.
To modify NetBackup catalogs when the server that wrote the media isavailable
1 If necessary, physically move the media.
2 Update the Enterprise Media Manager database by using move volume optionsin the Media Manager administration utilities.
3 Update the NetBackup image catalog on the master server.
4 Update the NetBackup media catalogs on both the original NetBackup server(oldserver) and the destination NetBackup server (newserver).
Use the following command, which can be run from any one of the NetBackupservers.
Enter the admincmd command on one line:
■ As administrator on a Windows NetBackup server:
1154Alternate server restoresAbout performing alternate server restores

cd install_path\NetBackup\bin\admincmd
bpmedia.exe -movedb -m media_id
-newserver hostname -oldserver hostname
■ As root on a UNIX NetBackup server:
cd /usr/openv/netbackup/bin/admincmd
bpmedia -movedb -m media_id -newserver hostname
-oldserver hostname
Modifying NetBackup catalogs when the server that wrotethe media is unavailableUse the following procedure to modify catalogs when the server that wrote themedia is unavailable.
To modify NetBackup catalogs when the server that wrote the media isunavailable
1 If necessary, physically move the media.
2 Update the Enterprise Media Manager database by using the move volumeoptions in the Media and Device Management window.
3 Update only the NetBackup image catalog on the master server.
Use the following commands from the NetBackup master server.
Enter the admincmd command on one line:
■ As administrator on a Windows NetBackup server:
cd install_path\NetBackup\bin\admincmd
bpimage.exe -id media_id -newserver hostname
-oldserver hostname
■ As root on a UNIX NetBackup server:
cd /usr/openv/netbackup/bin/admincmd
bpimage -id media_id -newserver hostname
-oldserver hostname
Overriding the original server for restoresNetBackup allows the administrator to force restores to a specific server, regardlessof where the files were backed up. For example, if files were backed up on serverA, a restore request can be forced to use server B.
1155Alternate server restoresAbout performing alternate server restores

Examples of when to use this method are as follows:
■ Two (or more) servers share a robot, each with connected drives. A restore isrequested while one of the servers is either temporarily unavailable or is busydoing backups.
■ A server was removed from the NetBackup configuration, and is no longeravailable.
Use the following procedure to override the original server for restores.
To override the original server for restores
1 In the NetBackup Administration Console, in the left pane, expandNetBackupManagement > Host Properties. Depending on the type of serverto override, click on either Master Servers or Media Servers.
See “General Server properties” on page 155.
2 In the right pane, click on the selected server to open the General Server hostproperties dialog box.
3 In the General Server host properties dialog box, click on the Add button toopen the Add Media Override settings window. Add entries for the originalbackup server and the restore server and click the Add button in the AddMedia Override settings window.
4 Click OK.
Overriding the original server for restores manuallyUse the following procedure to manually override the original server for restores.
To manually override the original server for restores
1 If necessary, physically move the media and update the Enterprise MediaManager database Media Manager volume database to reflect the move.
2 Modify the NetBackup configuration on the master server as follows:
■ By using the NetBackup Administration Console:In the NetBackup Administration Console, in the left pane, expandNetBackup Management > Host Properties. Click on Master Servers.In the right pane, click on the selected server to open the General Serverhost properties dialog box of the master server.In the General Server host properties dialog box, click on the Add buttonto open the Add Media Override settings window. Add entries for theoriginal backup server and the restore server and click the Add button inthe Add Media Override settings window.
■ By modifying the bp.conf file on a UNIX NetBackup server:
1156Alternate server restoresAbout performing alternate server restores

As root add the following entry to the
/usr/openv/netbackup/bp.conf file:
FORCE_RESTORE_MEDIA_SERVER = fromhost tohost
The fromhost is the server that wrote the original backup and the tohost isthe server to use for the restore.
To revert to the original configuration for future restores, delete the changesthat were made in this step.
3 Click OK.
4 Stop and restart the NetBackup Request daemon on the master server.
The override applies to all storage units on the original server. This means thatrestores for any storage unit on fromhost go to tohost.
About enabling automatic failover to an alternate serverNetBackup allows the administrator to configure automatic restore failover to analternate server if the original server is temporarily inaccessible. Once it isconfigured, this method does not require administrator intervention.
See “Restore Failover properties” on page 225.
Some examples of when to use this method are as follows:
■ Two or more servers share a robot, each with connected drives.When a restore is requested, one of the servers is temporarily inaccessible.
■ Two or more servers have standalone drives of the same type.When a restore is requested, one of the servers is temporarily inaccessible.
In these instances, inaccessible means that the connection between bprd on themaster server and bptm on the original server (through bpcd) fails.
Possible reasons for the failure are as follows:
■ The original server is down.
■ The original server is up but bpcd on that server does not respond. (For example,if the connection is refused or access is denied.)
■ The original server is up and bpcd is fine, but bptm has problems. (For example,if bptm cannot find the required tape.)
Note: The failover uses only the failover hosts that are listed in the NetBackupconfiguration. By default, the list is empty and NetBackup does not perform theautomatic failover.
1157Alternate server restoresAbout performing alternate server restores

Failing over to an alternate serverUse the following procedure to enable automatic failover to an alternate server.
To enable automatic failover to an alternate server
1 Modify the NetBackup configuration on the master server are as follows:
■ By using the NetBackup Administration Console:In the NetBackup Administration Console, in the left pane, expandNetBackup Management > Host Properties. Click on Master Servers toopen the Master Server Properties dialog box. In the left pane, click onRestore Failover to open theRestore Failover host properties dialog box.In the Restore Failover host properties dialog box, click on the Add buttonto open theAdd Failover Serverswindow. Add entries for the media serverand the failover restore server(s) and click the Add button in the AddFailover Servers window. Click OK.
■ By modifying the bp.conf file on a UNIX NetBackup server:As root, add the following entry to the/usr/openv/netbackup/bp.conf file:
FAILOVER_RESTORE_MEDIA_SERVERS =
failed_host host1 host2 ... hostN
Where:failed_host is the server that is not operational.host1 ... hostN are the servers that provide failover capabilities.
When automatic failover is necessary for a given server, NetBackup searchesthrough the relevant FAILOVER_RESTORE_MEDIA_SERVERS list. NetBackup looksfrom left to right for the first server that is eligible to perform the restore.
There can be multiple FAILOVER_RESTORE_MEDIA_SERVERS entries and eachentry can have multiple servers. However, a NetBackup server can be afailed_host in only one entry.
2 Stop and restart the NetBackup Request daemon on the master server.
Expiring and importing media for alternate server restoresIt may be necessary to expire media and then import it, even with the alternateserver restore capabilities.
Regarding identifying media spanning groups, an alternate server restore operationcan include media IDs that contain backup images that span media. It may benecessary to identify the media IDs that contain fragments of the spanned images.The group of related media is called a media spanning group.
1158Alternate server restoresAbout performing alternate server restores

On Windows: To identify the media in a specific media spanning group, run thefollowing command as administrator from the command prompt on the NetBackupmaster server:
cd install_path\NetBackup\bin
bpimmedia.exe -spangroups -U -mediaid media_id
On UNIX: To identify the media in a specific media spanning group, run the followingcommand as root on the NetBackup master server:
cd /usr/openv/netbackup/bin/admincmd
bpimmedia -spangroups -U -mediaid media_id
To display all media in all spanning groups, omit -mediaid media_id from thecommand.
1159Alternate server restoresAbout performing alternate server restores

Managing client backupsand restores
This chapter includes the following topics:
■ About server-directed restores
■ About client-redirected restores
■ About restoring the files that have Access Control Lists (ACLs)
■ About setting the original atime for files during restores on UNIX
■ Restoring the System State
■ About the backup and restore of compressed files on VxFS file systems
■ About backups and restores on ReFS
About server-directed restoresBy default, NetBackup clients are configured to allow NetBackup administrators ona master server to direct restores to any client.
To prevent server-directed restores, configure the client accordingly as follows:
■ On Windows clients:In the NetBackup Administration Console, in the toolbar, click File > Backup,Archive, and Restore.Select File > NetBackup Client Properties > General, then clear the Allowserver-directed restores check box.
■ On UNIX clients:Add DISALLOW_SERVER_FILE_WRITES to the following file on the client:
33Chapter

/usr/openv/netbackup/bp.conf
Note: On UNIX systems, the redirected restores can incorrectly set UIDs orGIDs that are too long. The UIDs and GIDs of files that are restored from oneplatform to another may be represented with more bits on the source systemthan on the destination system. If the UID or the GID name in question is notcommon to both systems, the original UID or GID may be invalid on thedestination system. In this case, the UID or GID is replaced with the UID or GIDof the user that performs the restore.
On UNIX: No progress log is produced if the bp.conf file of the requesting serverdoes not contain an entry for the server that performs the restore. (A progress logis an entry in the Task Progress tab of the Backup, Archive, and Restore clientinterface.)
On UNIX: Without the entry in the bp.conf file (or the server list), the restoringserver has no access to write the log files to the requesting server.
Consider the following solutions:
■ To produce a progress log, add the requesting server to the server list.To do so, log into the requesting server. In the NetBackup AdministrationConsole, expand NetBackup Management > Host Properties > MasterServers > Double-click on the master server > Servers. Add the restoring serverto the server list.
■ Log on to the restoring server. Check the Activity Monitor to determine thesuccess of the restore operation.
To restore a UNIX backup that contains soft and hard links, run the Backup,Archive, and Restore client interface from a UNIX machine. Only the Java versionof the client interface contains the Rename hard links and Rename soft linksrestore options. Windows users can install the Remote Administration Consoleto access the Java version of the Backup, Archive, and Restore interface from aWindows computer. The Remote Administration Console is sometimes referredto as the Windows Display Console.
About client-redirected restoresThe Backup, Archive, and Restore client interface contains options for allowingclients to restore the files that were backed up by other clients. The operation iscalled a redirected restore.
1161Managing client backups and restoresAbout client-redirected restores

About restore restrictionsBy default, NetBackup permits only the client that backs up files to restore thosefiles. NetBackup ensures that the client name of the requesting client matches thepeer name that was used to connect to the NetBackup server.
Unless clients share an IP address, the peer name is equivalent to the client’s hostname. (Clients can share an IP address due to the use of a gateway and token ringcombination, or multiple connections.) When a client connects through a gateway,the gateway can use its own peer name to make the connection.
The NetBackup client name is normally the client’s short host name, such as client1rather than a longer form such as client1.null.com.
The client name is found in the following locations:
■ On Windows clients:In theNetBackupAdministration Console, in the toolbar, select File > Backup,Archive, and Restore. In the Backup, Archive, and Restore dialog box, inthe toolbar, select File > Specify NetBackup Machines and Policy Type. Theclient name that is selected as Source Client for Restores is the source of thebackups to be restored.
■ On UNIX clients:In the Backup, Archive, and Restore dialog box, select File > SpecifyNetBackupMachines and Policy Type. In the Specify NetBackupMachinesand Policy Type dialog box, select the client name as the Source client forrestores.
Allowing all clients to perform redirected restoresThe NetBackup administrator can allow clients to perform redirected restores. Thatis, allow all clients to restore the backups that belong to other clients.
To do so, first create an altnames directory on the NetBackup master server wherethe backup policy for the clients resides. Place an empty No.Restrictions fileinside of the directory.
■ On Windows:Install_path\NetBackup\db\altnames\No.Restrictions
Do not add a suffix to the files in the altnames directory.
■ On UNIX:/usr/openv/netbackup/db/altnames/No.Restrictions
The NetBackup client name setting on the requesting client must match the nameof the client for which the backup was created. The peer name of the requestingclient does not need to match the NetBackup client name setting.
1162Managing client backups and restoresAbout client-redirected restores

Note: The altnames directory can present a breach of security, so use it only limitedcircumstances. Users that are permitted to restore files from other clients may alsohave local permission to create the files that are found in the backup.
Allowing a single client to perform redirected restoresThe NetBackup administrator can permit a single client to restore the backups thatbelong to other clients.
To do so, create an altnames directory on the NetBackup master server where thepolicy that backed up the other client(s) resides. Place an empty peername fileinside of the altnames directory where peername is the client to possess restoreprivileges.
■ On Windows:Install_path\NetBackup\db\altnames\peername
■ On UNIX:/usr/openv/netbackup/db/altnames/peername
In this case, the requesting client (peername) can access the files that are backedup by another client. The NetBackup client name setting on peername must matchthe name of the other client.
Allowing redirected restores of a specific client’s filesThe NetBackup administrator can permit a single client to restore the backups thatbelong to another specific client.
To do so, create an altnames directory on the NetBackup master server of therequesting client in the following location:
■ On Windows:Install_path\NetBackup\db\altnames\peername
■ On UNIX:/usr/openv/netbackup/db/altnames/peername
Then, create a peername file inside of the directory where peername is the clientto possess restore privileges. Add to the peername file the names of the client(s)whose files the requesting client wants to restore.
The requesting client can restore the files that were backed up by another client if:
■ The names of the other clients appear in the peername file, and
■ The NetBackup client name of the requesting client is changed to match thename of the client whose files the requesting client wants to restore.
1163Managing client backups and restoresAbout client-redirected restores

Examples of redirected restoresThis topic provides some example configurations that allow clients to restore thefiles that were backed up by other clients. These methods may be required whena client connects through a gateway or has multiple Ethernet connections.
In all cases, the requesting client must have access to an image database directoryon the master server or the requesting client must be a member of an existingNetBackup policy.
■ On Windows: Install_path\NetBackup\db\images\client_name
■ On UNIX: /usr/openv/netbackup/db/images/client_name
Note:Not all file system types on all computers support the same features. Problemscan be encountered when a file is restored from one file system type to another.For example, the S51K file system on an SCO computer does not support symboliclinks nor does it support names greater than 14 characters long. You may want torestore a file to a computer that doesn’t support all the features of the computerfrom which the restore was performed. In this case, all files may not be recovered.
In the following examples, assume the following conditions:
■ client1 is the client that requests the restore.
■ client2 is the client that created the backups that the requesting client wants torestore.
■ On Windows: Install_path is the path where you installed the NetBackup software.By default, this path is C:\Program Files\VERITAS.
Note: The information in this topic applies to the restores that are made by usingthe command line, not the Backup, Archive, and Restore client interface.
Note: On Windows: You must have the necessary permissions to perform thefollowing steps.
On UNIX: You must be a root user for any of the steps that must be performedon the NetBackup server. You may also need to be a root user to make thechanges on the client.
1164Managing client backups and restoresAbout client-redirected restores

Example of a redirected client restoreAssume you must restore files to client1 that were backed up from client2. Theclient1 and client2 names are those specified by the NetBackup client name settingon the clients.
In the nominal case, do the following:
■ On Windows: Log on to the NetBackup server.
Add client2 to the following file and perform one of the following:
■ Edit Install_path\NetBackup\db\altnames\client1 to include the nameof client2.
■ Create the following empty file:
Install_path\NetBackup\db\altnames\No.Restrictions
■ On UNIX: Log on as root on the NetBackup server.
Perform one of the following actions:
■ Edit /usr/openv/netbackup/db/altnames/client1 so it includes the nameof client2. Or,
■ Run the touch command on the following file:
/usr/openv/netbackup/db/altnames/No.Restrictions
Note: The No.Restrictions file allows any client to restore files from client2.
■ Log on to client1 and change the NetBackup client name to client2.
■ Restore the file.
■ Undo the changes that were made on the server and client.
Example of a redirected client restore using the altnamesfileThis example explains how altnames provides restore capabilities to clients thatdo not use their own host name when they connect to the NetBackup server.
By default, the NetBackup client name of the requesting client must match the peername that is used in the connection to the NetBackup server. When the NetBackupclient name is the host name for the client and matches the peer name (normalcase), this requirement is met.
1165Managing client backups and restoresAbout client-redirected restores

However, problems arise when clients connect to multiple ethernet or connect tothe NetBackup server through a gateway.
Figure 33-1 Example restore from a token ring client
client2
client1
client3
TokenRing
TCPGateway
NetBackupserver
In this example, restore requests from client1, client2, and client3 are routed throughthe TCP gateway. Because the gateway uses its own peer name rather than theclient host names for connection to the NetBackup server, NetBackup refuses therequests. Clients cannot restore even their own files.
To correct the situation, do the following.
Determine the peer name of the gateway:
■ Try a restore from the client in question. In this example, the request fails withan error message similar to the following:client is not validated to use the server
■ Examine the NetBackup problems report and identify the peer name that is usedon the request. Entries in the report may be similar to the following:01/29/12 08:25:03 bpserver - request from invalid server or client
client1.dvlp.null.com
In this example, the peer name is client1.dvlp.null.com.
On Windows: Determine the peer name, then create the following file on theNetBackup master server:
Install_path\NetBackup\db\altnames\peername
On UNIX: Run the touch command on the following file:
/usr/openv/netbackup/db/altnames/peername
In this example, the file is:
On Windows:
Install_path\NetBackup\db\altnames\client1.dvlp.null.com
1166Managing client backups and restoresAbout client-redirected restores

On UNIX:
/usr/openv/netbackup/db/altnames/client1.dvlp.null.com
Edit the peername file so that it includes the client names.
For example, if you leave file client1.dvlp.null.com empty, client1, client2, andclient3 can all access the backups that correspond to their NetBackup client namesetting.
See “Allowing a single client to perform redirected restores” on page 1163.
If you add the names client2 and client3 to the file, you give these two clients accessto NetBackup file restores, but exclude client1.
See “Allowing redirected restores of a specific client’s files” on page 1163.
Note that this example requires no changes on the clients.
Restore the files.
Example of how to troubleshoot a redirected client restoreusing the altnames fileIf you cannot restore files with a redirected client restore by using the altnames
file, troubleshoot the situation, as follows.
On Windows:
■ Create the debug log directory for the NetBackup Request Daemon:Install_path\NetBackup\logs\bprd
■ On the master server, stop and restart the NetBackup Request Daemon. Restartthe service to ensure that this service is running in verbose mode and logsinformation regarding client requests.
■ On client1 (the requesting client), try the file restore.
■ On the master server, identify the peer name connection that client1 uses.
■ Examine the failure as logged on the All Log Entries report. Or, examine thedebug log for the NetBackup Request Daemon to identify the failing namecombination:Install_path\NetBackup\logs\bprd\mmddyy.log
■ On the master server, do one of the following:
■ Create an Install_path\NetBackup\db\altnames\No.Restrictions file.The file allows any client to access client2 backups if the client changes itsNetBackup client name setting to client2.
1167Managing client backups and restoresAbout client-redirected restores

■ Create an Install_path\NetBackup\db\altnames\peername file. The fileallows client1 to access client2 backups if client1 changes its NetBackupclient name setting to client2.
■ Add client2 name to the following file:Install_path\NetBackup\db\altnames\peername.
■ client1 is allowed to access backups on client2 only.
■ On client1, change the NetBackup client name setting to match what is specifiedon client2.
■ Restore the files from client1.
■ Perform the following actions:
■ Delete Install_path\NetBackup\logs\bprd and the contents.
■ On the master server, select NetBackup Management > Host Properties> Master Servers > Double-click on master server. In the Master ServerProperties dialog box, in the left pane, click on Logging. Clear the Keeplogs for days property check box.
■ If you do not want the change to be permanent, do the following:
■ Delete Install_path\NetBackup\db\altnames\No.Restrictions (ifexistent).
■ Delete Install_path\NetBackup\db\altnames\peername (if existent).
■ On client1, change the NetBackup client name to its original value.
On UNIX:
■ On the NetBackup master server, add the VERBOSE entry and a logging level tothe bp.conf file. For example:
VERBOSE = 3
■ Create the debug log directory for bprd by running the following command:mkdir /usr/openv/netbackup/logs/bprd
■ On the NetBackup server, stop the NetBackup Request Daemon, bprd, andrestart it in verbose mode by running:
/usr/openv/netbackup/bin/admincmd/bprdreq -terminate
/usr/openv/netbackup/bin/bprd -verbose
Restart bprd to ensure that bprd logs information regarding client requests.
■ On client1, try the file restore.
1168Managing client backups and restoresAbout client-redirected restores

■ On the NetBackup server, identify the peer name connection that client1 used.Examine the failure as logged on the All Log Entries report or examine the bard
debug log to identify the failing name combination:/usr/openv/netbackup/logs/bprd/log.date
■ Take one of the following on the NetBackup server:
■ Enter the following commands:mkdir -p /usr/openv/netbackup/db/altnames touch
/usr/openv/netbackup/db/altnames/No.Restrictions
These commands allow any client access to client2 backups by changingits NetBackup client name setting to specify the client2.
■ Run the touch command on the following file:/usr/openv/netbackup/db/altnames/peername
The command allows client1 access to any client2 backups by changing itsNetBackup client name setting to specify client2.
■ Add client2 to the /usr/openv/netbackup/db/altnames/peername file. Theaddition to the peername file allows client1 access to the backups that werecreated on client2 only.
■ On client1, change the NetBackup client name setting in the user interface tomatch what is specified on client2.
■ Restore the files to client1.
■ Do the following:
■ Delete the VERBOSE entry from the /usr/openv/netbackup/bp.conf file onthe master server.
■ Delete /usr/openv/netbackup/logs/bprd and the contents.
■ To return the configuration to what it was before the restore, do the following:
■ Delete /usr/openv/netbackup/db/altnames/peer.or.hostname (if it exists)
■ Delete /usr/openv/netbackup/db/altnames/No.Restrictions (if it exists)
■ On client1, restore the NetBackup client name setting to its original value.
See “Allowing redirected restores of a specific client’s files” on page 1163.
See “Allowing a single client to perform redirected restores” on page 1163.
1169Managing client backups and restoresAbout client-redirected restores

About restoring the files that have Access ControlLists (ACLs)
An Access Control List (ACL) is a table that conveys the access rights users needto a file or directory. Each file or directory can have a security attribute that extendsor restricts users’ access.
By default, the nbtar (/usr/openv/netbackup/bin/nbtar) restores ACLs alongwith file and directory data.
However, in some situations the ACLs cannot be restored to the file data, as follows:
■ Where the restore is cross-platform. (Examples: An AIX ACL restored to a Solarisclient or a Windows ACL restored to an HP client.)
■ When a restore utility (tar) other than nbtar is used to restore files.
In these instances, NetBackup stores the ACL information in a series of generatedfiles in the root directory using the following naming form:
.SeCuRiTy.nnnn
These files can be deleted or can be read and the ACLs regenerated by hand.
Note: If performing an alternate restore where the original directory wasACL-enabled, the alternate restore directory must also be ACL-enabled. If thealternate restore directory is not ACL-enabled, the restore is not successful.
Restoring files without restoring ACLsThe NetBackup client interface on Windows is available to administrators to restoredata without restoring the ACLs. Both the destination client and the source of thebackup must be Windows systems.
To restore files without restoring ACLs, the following conditions must be met:
■ The policy that backed up the client is of policy type MS-Windows.
■ An administrator performs the restore and is logged into a NetBackup server(Windows or UNIX). The option is set at the server by using the client interface.The option is unavailable on standalone clients (clients that do not contain theNetBackup server software).
■ The destination client and the source of the backup must both be systemsrunning supported Windows OS levels. The option is disabled on UNIX clients.
Use the following procedure to restore files without restoring ACLs.
1170Managing client backups and restoresAbout restoring the files that have Access Control Lists (ACLs)

To restore files without restoring ACLs
1 Log on to the NetBackup server as administrator.
2 Open the Backup, Archive, and Restore client interface.
3 From the client interface, initiate a restore.
4 Select the files to be restored, then select Actions > Start Restore of MarkedFiles.
5 In theRestore Marked Files dialog box, place a check in theRestore withoutaccess-control attributes check box.
6 Make any other selections for the restore job.
7 Click Start Restore.
About setting the original atime for files duringrestores on UNIX
During a restore, NetBackup sets the atime for each file to the current time bydefault. You can elect to have NetBackup set the atime for each restored file tothe value the file had when it was backed up. To do so, create the following file onthe client:
/usr/openv/netbackup/RESTORE_ORIGINAL_ATIME
Restoring the System StateThe System State includes the registry, the COM+ Class Registration database,and boot and system files. If the server is a domain controller, the data also includesthe Active Directory services database and the SYSVOL directory.
Note: The best recovery procedure depends on many hardware and softwarevariables that pertain to the server and its environment. For a complete Windowsrecovery procedure, refer to the Microsoft documentation.
Read the following notes carefully before you restore the System State:
■ The System State should be restored in its entirety. Do not restore selectedfiles.
■ Do not redirect a System State restore. System State is computer-specific andto restore it to an alternate computer can result in an unusable system.
1171Managing client backups and restoresAbout setting the original atime for files during restores on UNIX

■ Do not cancel a System State restore operation. To cancel the operation mayleave the system unusable.
■ To restore the System State to a domain controller, the Active Directory mustnot be running.
Restoring the System StateUse the following procedure to restore the System State.
To restore the System State
1 To restore the Active Directory, restart the system, and press F8 during theboot process. F8 brings up a startup options menu. Press F8 upon restart ifthe system to which you are to restore is a Windows domain controller.Otherwise, begin with step 4.
2 From the startup options, select Directory Services Restore Mode andcontinue the boot process.
3 Ensure that the NetBackup Client Service, either bpinetd on Windows orinetd on UNIX, has started. Use the Activity Monitor or the Servicesapplication in the Windows Control Panel.
4 Start the Backup, Archive, and Restore client interface. Click Select forRestore, and place a checkmark next to System State.
1172Managing client backups and restoresRestoring the System State

5 To restore a system state backup using an incremental backup, select the fullbackup and one or more differential-incremental or cumulative-incrementalbackups.
6 From the Actions menu, select Restores.
7 From the Restore Marked Files dialog box, select Restore everything to itsoriginal location and Overwrite the existing file.
Do not redirect the System State restore to a different host. System State iscomputer-specific. To restore it to a different computer can result in an unusablesystem.
8 Click Start Restore.
1173Managing client backups and restoresRestoring the System State

9 The network may contain more than one domain controller. To replicate ActiveDirectory to other domain controllers, perform an authoritative restore of theActive Directory after the NetBackup restore job completes.
To perform an authoritative restore of the Active Directory, run the Microsoftntdsutil utility after you restored the System State data but before the serveris restarted. An authoritative restore ensures that the data is replicated to allof the servers.
Additional information about an authoritative restore and the ntdsutil utilityis available.
See the Microsoft documentation.
10 Restart the system before performing subsequent restore operations.
If you booted into Directory Services Restore Mode on a domain controller,restart into normal mode when the restore is complete.
About the backup and restore of compressed fileson VxFS file systems
NetBackup can back up and restore VxFS-compressed files, maintaining thecompression state when the target volume supports file system compression. Futurereleases will expand this capability to other file systems.
Upon backup of files on a VxFS file system, a message displays in the ActivityMonitor whenever NetBackup encounters a compressed file:
Compress flag found for ‘file_name’.
Upon restore, NetBackup restores the files to a VxFS file system in their compressedform.
If the restore is to a non-VxFS file system, NetBackup restores the files in anuncompressed form. The following message displays in the Progress tab of theBackup, Archive, and Restore client interface:
File ‘file_name’ will not be restored in compressed form. Please
refer to the Release Notes or User Guide.
The message appears only for the first file that cannot be restored in its compressedform.
Note: The compression messages display if the verbose level is 1 or greater.
1174Managing client backups and restoresAbout the backup and restore of compressed files on VxFS file systems

About backups and restores on ReFSMicrosoft Resilient File System (ReFS) support in NetBackup is automatic andrequires no additional configuration.
To restore optimized backups, use the Restore from Optimized Backup in theBackup, Archive, and Restore interface. You can select individual files for restore.
NetBackup does not support a redirected restore of a Microsoft Resilient FileSystems (ReFS) file system.
Table 33-1 lists the ReFS-to-NTFS backup and restore combinations and thesuccess of each.
Table 33-1 ReFS backup and restore
RestoresBackupsBetween filesystems
SuccessfulSuccessfulReFS to ReFS
SuccessfulSuccessfulReFS to NTFS
Limited success
For successful restores:
■ Restore NTFS backups to NTFS file system.■ Remove all non-supported ReFS items.■ Copy the files to an ReFS file system.
SuccessfulNTFS to ReFS
1175Managing client backups and restoresAbout backups and restores on ReFS

Powering down andrebooting NetBackupservers
This chapter includes the following topics:
■ Powering down and rebooting NetBackup servers
■ Shutting down and starting up all NetBackup services and daemons
■ Rebooting a NetBackup server
■ Rebooting a NetBackup media server
■ About displaying active processes with bpps on UNIX
■ About displaying robotic processes with vmps on UNIX
Powering down and rebooting NetBackup serversTo close and restart NetBackup servers, use the following recommended procedure.
To power down a server
1 In the NetBackup Administration Console, in the left pane, click ActivityMonitor. Click the Jobs tab and make sure that no jobs are running.
2 Click the Daemons tab and right-click the NetBackup Request daemon, bprd.
Select Stop daemon to stop additional job activity and to let current activityend.
3 Right-click any daemons that are still running and select Stop daemon.
34Chapter

4 From the command line, run:
On Windows:
Install_path\VERITAS\NetBackup\bin\admincmd\bprdreq -terminate
On UNIX:
/usr/openv/netbackup/bin/admincmd/bprdreq -terminate
bprdreq does not run on a media server.
5 Run the system shutdown command.
The installation process copies the appropriate startup and shutdown scriptfrom /usr/openv/netbackup/bin/goodies to /init.d and creates links to itfrom the appropriate /rc directory.
Use system startup scripts to begin the Media Manager and NetBackupdaemons when the system boots up. Use shutdown scripts to terminate thedaemons at system shutdown.
The NetBackup Installation Guide contains more information about the startupand shutdown scripts.
6 On Windows, run:
Install_path\VERITAS\NetBackup\bin\bpdown
7 Power down the server.
Shutting down and starting up all NetBackupservices and daemons
To shut down and start all NetBackup services and daemons, enter the followingcommands from a command line:
On Windows:
■ To shut down all NetBackup services:
Install_path\VERITAS\NetBackup\bin\bpdown
■ To startup all NetBackup services:
Install_path\VERITAS\NetBackup\bin\bpup
On UNIX:
■ To shut down all NetBackup daemons:
1177Powering down and rebooting NetBackup serversShutting down and starting up all NetBackup services and daemons

/usr/openv/netbackup/bin/bp.kill_all
■ To startup all NetBackup daemons:
/usr/openv/netbackup/bin/bp.start_all
All open Java NetBackup Administration Console sessions need to be restartedand reconnected if NetBackup services are restarted or if a NetBackup server hasbeen rebooted.
Rebooting a NetBackup serverUse the following procedure to reboot a NetBackup server.
To reboot a NetBackup master server
1 Restart the system.
2 On Windows: If the required NetBackup services are not set up to startautomatically, do the following:
■ From the Windows desktop, start the Windows Services applet.
■ Start the NetBackup Client service.
■ Start the NetBackup Device Manager service. The NetBackup VolumeManager service also starts automatically.
■ Start the NetBackup Request Daemon service to start the NetBackupDatabase Manager service.
3 On UNIX: Ensure that bprd, bpdbm, and vmd are up by running the followingscript:
/usr/openv/netbackup/bin/bpps -a
4 On UNIX: Start all NetBackup daemons:
/usr/openv/netbackup/bin/bp.start_all
Rebooting a NetBackup media serverUse the following procedure to reboot a NetBackup media server.
1178Powering down and rebooting NetBackup serversRebooting a NetBackup server

To reboot a NetBackup media server
1 Restart the system.
2 On Windows: The required NetBackup services start automatically if they areset up to do so.
If they are not set to start automatically, do the following:
■ From the Windows desktop, start the Windows Services applet.
■ Start the NetBackup Client service.
■ Start the NetBackup Device Manager service (ltid). The NetBackupVolume Manager service (vmd) also starts.
3 On UNIX: Start ltid if it is not already running:
From the NetBackup Administration Console, do the following:
■ Click Activity Monitor, then select the Processes tab.
■ Right-click ltid and select Start Daemon.
4 On UNIX: From the command line, run:
/usr/openv/volmgr/bin/ltid
About displaying active processes with bpps onUNIX
NetBackup provides the bpps script to determine which NetBackup processes areactive on a UNIX system.
bpps is located in the following directory:
/usr/openv/netbackup/bin/bpps
The following is example output:
root 310 0.0 0.0 176 0 ? IW Oct 19 15:04 /usr/openv/netbackup/bin/bpdbm
root 306 0.0 0.0 276 0 ? IW Oct 19 2:37 /usr/openv/netbackup/bin/bprd
To prevent bpps from displaying processes you do not want to check, add theprocesses to an exclude list. See the comments within the script for moreinformation.
To display both NetBackup and Media Manager options, run:
/usr/openv/netbackup/bin/bpps -a
1179Powering down and rebooting NetBackup serversAbout displaying active processes with bpps on UNIX

About displaying robotic processes with vmpson UNIX
The vmps script shows the Media Manager daemons and robotic processes thatare active on a UNIX system.
To run this script, use the following command:
/usr/openv/volmgr/bin/vmps
In the following sample, the second column contains the process IDs for theprocesses.
root 303 0.0 0.2 136 264 ? S Feb 11 4:32 ltid -v
root 305 0.0 0.0 156 0 ? IW Feb 11 0:54 vmd -v
root 306 0.0 0.0 104 0 ? IW Feb 11 0:15 tl8d -v
root 307 0.0 0.0 68 56 ? S Feb 11 12:16 avrd
root 310 0.0 0.0 116 0 ? IW Feb 11 0:07 tl8cd -v
The status for the nbemm command is not shown in the output of vmps. The nbemm
status is shown in the output of the bpps script.
1180Powering down and rebooting NetBackup serversAbout displaying robotic processes with vmps on UNIX

About Granular RecoveryTechnology
This chapter includes the following topics:
■ About installing and configuring Network File System (NFS) for Active DirectoryGranular Recovery
■ About configuring Services for Network File System (NFS) on Windows 2012and Windows 2012 R2
■ About configuring Services for Network File System (NFS) on Windows 2008and Windows 2008 R2
■ Configuring a UNIX media server and Windows clients for backups and restoresthat use Granular Recovery Technology (GRT)
■ Configuring a different network port for NBFSD
About installing and configuring Network FileSystem (NFS) for Active Directory GranularRecovery
NetBackup Granular Recovery leverages Network File System, or NFS, to readindividual objects from a database backup image. Specifically, the NetBackup clientuses NFS to extract data from the backup image on the NetBackup media server.The NetBackup client uses “Client for NFS” to mount and access a mapped drivethat is connected to the NetBackup media server. The NetBackup media serverhandles the I/O requests from the client through NBFSD.
35Chapter

NBFSD is the NetBackup File System (NBFS) service that runs on the media server.NBFSD makes a NetBackup backup image appear as a file system folder to theNetBackup client over a secure connection.
Network File System, or NFS, is a widely recognized, open standard for client andserver file access over a network. It allows clients to access files on dissimilarservers through a shared TCP/IP network. NFS is typically bundled with the hostoperating system. NetBackup uses Granular Recovery Technology (GRT) and NFSto recover the individual objects that reside within a database backup image, suchas:
■ A user account from an Active Directory database backup
■ Email messages or folders from an Exchange database backup
■ A document from a SharePoint database backup
Multiple NetBackup agents that support GRT (for example, Exchange, SharePoint,and Active Directory) can use the same media server.
About configuring Services for Network FileSystem (NFS) on Windows 2012 and Windows2012 R2
To restore individual items from the Active Directory, you must configure Servicesfor NFS on the NetBackup media server and all Active Directory domain controllersor ADAM/LDS hosts.
1182About Granular Recovery TechnologyAbout configuring Services for Network File System (NFS) on Windows 2012 and Windows 2012 R2

Table 35-1 Configuring NFS on Windows 2012 and Windows 2012 R2
DescriptionActionStep
On the media server do the following:
■ Stop and disable the ONC/RPC Portmapper service, if it exists.■ Enable NFS.
See “Enabling Services for Network File System (NFS) on a Windows2012 or Windows 2012 R2 media server” on page 1183.
■ Stop the Server for NFS service.See “Disabling the Server for NFS” on page 1196.
■ Stop the Client for NFS service.See “Disabling the Client for NFS on the media server” on page 1194.Note: If the Active Directory domain controller or ADAM/LDS hostresides on the media server, do not disable the Client for NFS.
■ Configure the portmap service to start automatically at server restart.Issue the following from the command prompt:sc config portmap start= auto
This command should return the status [SC] ChangeServiceConfigSUCCESS.
Configure NFS on the mediaserver.
Step 1
On all Active Directory domain controllers or ADAM/LDS hosts, do thefollowing:
■ Enable NFS on the clients.See “Enabling Services for Network File System (NFS) on a Windows2012 or Windows 2012 R2 client” on page 1187.
■ Stop the Server for NFS service.See “Disabling the Server for NFS” on page 1196.
Configure NFS on all ActiveDirectory domain controllersor ADAM/LDS hosts.
Step 2
Enabling Services for Network File System (NFS) on a Windows2012 or Windows 2012 R2 media server
To restore individual items from a backup that uses Granular Recovery Technology(GRT), you must enable Services for Network File System (NFS). When thisconfiguration is completed on the media server, you can disable any unnecessaryNFS services.
1183About Granular Recovery TechnologyAbout configuring Services for Network File System (NFS) on Windows 2012 and Windows 2012 R2

To enable Services for Network File System (NFS) on a Windows 2012 orWindows 2012 R2 media server
1 Open the Server Manager.
2 From the Manage menu, click Add Roles and Features.
3 In the Add Roles and Features Wizard, on the Before You Begin page, clickNext.
1184About Granular Recovery TechnologyAbout configuring Services for Network File System (NFS) on Windows 2012 and Windows 2012 R2

4 On the Select installation type page, select Role-based or feature-basedinstallation.
5 Click Next.
6 On the Server Selection page, click Select a server from the server pooland select the server. Click Next.
1185About Granular Recovery TechnologyAbout configuring Services for Network File System (NFS) on Windows 2012 and Windows 2012 R2

7 On the Server Roles page, expand File and Storage Services and File andiSCSI Services.
8 Click File Server and Server for NFS. When you are prompted, click AddFeatures. Click Next.
9 If the media server is also an Active Directory domain controllers or ADAM/LDShost, on the Features page, click Client for NFS. Click Next.
1186About Granular Recovery TechnologyAbout configuring Services for Network File System (NFS) on Windows 2012 and Windows 2012 R2

10 On the Confirmation page, click Install.
11 Disable any unnecessary services, as follows:
■ If you have a single host that functions as both the media server and theActive Directory domain controllers or ADAM/LDS host, you can disablethe Server for NFS service.See “Disabling the Server for NFS” on page 1196.
■ For a host that is only the NetBackup media server, you can disable theServer for NFS and the Client for NFS services.See “Disabling the Server for NFS” on page 1196.See “Disabling the Client for NFS on the media server” on page 1194.
Enabling Services for Network File System (NFS) on a Windows2012 or Windows 2012 R2 client
To restore individual items from a backup that uses Granular Recovery Technology(GRT), you must enable Services for Network File System (NFS). When thisconfiguration is completed all the Active Directory domain controllers or ADAM/LDShosts, you can disable any unnecessary NFS services.
1187About Granular Recovery TechnologyAbout configuring Services for Network File System (NFS) on Windows 2012 and Windows 2012 R2
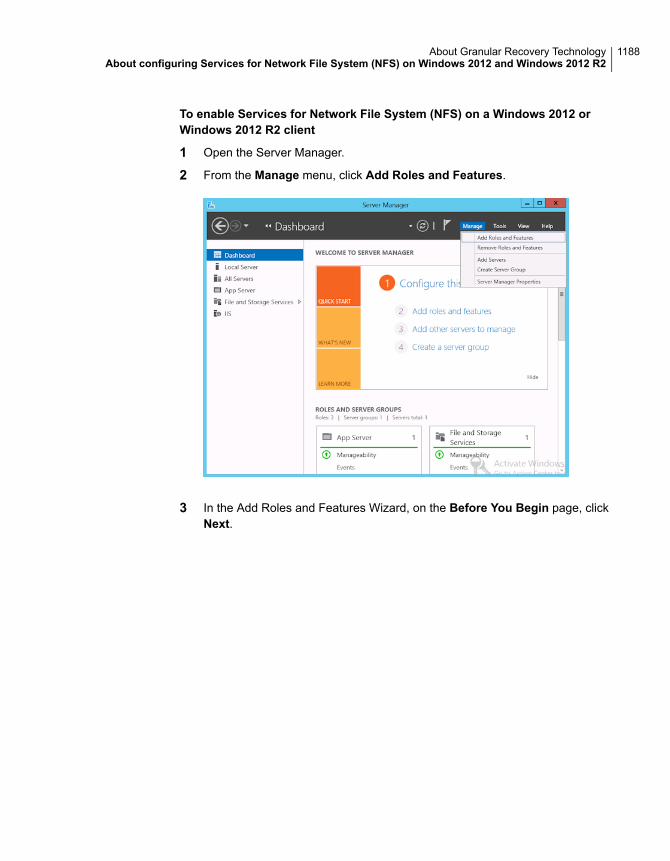
To enable Services for Network File System (NFS) on a Windows 2012 orWindows 2012 R2 client
1 Open the Server Manager.
2 From the Manage menu, click Add Roles and Features.
3 In the Add Roles and Features Wizard, on the Before You Begin page, clickNext.
1188About Granular Recovery TechnologyAbout configuring Services for Network File System (NFS) on Windows 2012 and Windows 2012 R2

4 On the Select installation type page, select Role-based or feature-basedinstallation.
5 Click Next.
6 On the Server Selection page, click Select a server from the server pooland select the server. Click Next.
7 On the Server Roles page, click Next.
1189About Granular Recovery TechnologyAbout configuring Services for Network File System (NFS) on Windows 2012 and Windows 2012 R2

8 On the Features page, click Client for NFS. Click Next.
9 On the Confirmation page, click Install.
About configuring Services for Network FileSystem (NFS) on Windows 2008 and Windows2008 R2
To restore individual items from the Active Directory, you must configure Servicesfor NFS on the NetBackup media server and all Active Directory domain controllersor ADAM/LDS hosts.
1190About Granular Recovery TechnologyAbout configuring Services for Network File System (NFS) on Windows 2008 and Windows 2008 R2

Table 35-2 Configuring NFS in a Windows 2008 or Windows 2008 R2environment
DescriptionActionStep
On the media server do the following:
■ Stop and disable the ONC/RPC Portmapper service, if it exists.■ Enable NFS.
See “Enabling Services for Network File System (NFS) on Windows2008 or Windows 2008 R2” on page 1192.
■ Stop the Server for NFS service.See “Disabling the Server for NFS” on page 1196.
■ Stop the Client for NFS service.See “Disabling the Client for NFS on the media server” on page 1194.Note: If the Active Directory domain controller or ADAM/LDS hostresides on the media server, do not disable the Client for NFS.
■ Configure the portmap service to start automatically at server restart.Issue the following from the command prompt:sc config portmap start= auto
This command should return the status [SC] ChangeServiceConfigSUCCESS.
Configure NFS on the mediaserver.
Step 1
On all Active Directory domain controllers or ADAM/LDS hosts, do thefollowing:
■ Enable NFS.See “Enabling Services for Network File System (NFS) on Windows2008 or Windows 2008 R2” on page 1192.
■ Stop the Server for NFS service.See “Disabling the Server for NFS” on page 1196.
Configure NFS on all ActiveDirectory domain controllersor ADAM/LDS hosts.
Step 2
On all Active Directory domain controllers or ADAM/LDS hosts, install thehotfix for Client for NFS. The hotfix is available at the following location:
http://support.microsoft.com/kb/955012
Note: Important Windows Vista hotfixes and Windows Server 2008 hotfixesare included in the same packages. However, the hotfix Request pagelists only Windows Vista. To request the hotfix package that applies toone or both operating systems, select the hotfix that is listed underWindows Vista on the page. Always refer to the Applies To sectionin articles to determine the actual operating system for each hotfix.
Install the hotfix for Client forNFS on all Active Directorydomain controllers orADAM/LDS hosts.
Step 3
1191About Granular Recovery TechnologyAbout configuring Services for Network File System (NFS) on Windows 2008 and Windows 2008 R2

Enabling Services for Network File System (NFS) on Windows 2008or Windows 2008 R2
To restore individual items from a backup that uses Granular Recovery Technology(GRT), you must enable Services for Network File System (NFS). When thisconfiguration is completed on the media server and all Active Directory domaincontrollers or ADAM/LDS hosts, you can disable any unnecessary NFS services.
To enable Services for Network File System (NFS) on Windows 2008 orWindows 2008 R2
1 Open the Server Manager.
2 In the left pane, click Roles and, in the right pane, click Add Roles.
3 In the Add Roles Wizard, on the Before You Begin page, click Next.
1192About Granular Recovery TechnologyAbout configuring Services for Network File System (NFS) on Windows 2008 and Windows 2008 R2

4 On the Select Server Roles page, under Roles, check the File Servicescheck box. Click Next.
Note: If a role service is already installed for the File Services role, you canadd other role services from Roles home page. In the File Services pane, clickAdd Role Services.
5 On the Files Services page, click Next.
6 On the Select Role Services page, do the following:
■ Uncheck File Server.
■ Check Services for Network File System.
■ Click Next and complete the wizard.
1193About Granular Recovery TechnologyAbout configuring Services for Network File System (NFS) on Windows 2008 and Windows 2008 R2

7 For each host in your configuration, choose from one of the following:
■ If you have a single host that functions as both the media server and theActive Directory domain controllers or ADAM/LDS host, you can disablethe Server for NFS.
■ For a host that is only the NetBackup media server, you can disable theServer for NFS and the Client for NFS.
■ For a host that is only an Active Directory domain controllers or ADAM/LDShost, you can disable the Server for NFS.
Disabling the Client for NFS on the media serverAfter you enable Services for Network File System (NFS) on a host that is only aNetBackup media server, you can disable the Client for NFS.
1194About Granular Recovery TechnologyAbout configuring Services for Network File System (NFS) on Windows 2008 and Windows 2008 R2

To disable the Client for NFS on the NetBackup media server
1 Open the Server Manager.
2 In the left pane, expand Configuration.
3 Click Services.
4 In the right pane, right-click on Client for NFS and click Stop.
5 In the right pane, right-click on Client for NFS and click Properties.
1195About Granular Recovery TechnologyAbout configuring Services for Network File System (NFS) on Windows 2008 and Windows 2008 R2

6 In the Client for NFS Properties dialog box, from the Startup type list, clickDisabled.
7 Click OK.
Disabling the Server for NFSAfter you enable Services for Network File System (NFS) on the media server andon the Active Directory domain controllers or ADAM/LDS hosts, you can disableServer for NFS.
To disable the Server for NFS
1 Open the Server Manager.
2 In the left pane, expand Configuration.
1196About Granular Recovery TechnologyAbout configuring Services for Network File System (NFS) on Windows 2008 and Windows 2008 R2

3 Click Services.
4 In the right pane, right-click on Server for NFS and click Stop.
5 In the right pane, right-click on Server for NFS and click Properties.
1197About Granular Recovery TechnologyAbout configuring Services for Network File System (NFS) on Windows 2008 and Windows 2008 R2

6 In the Server for NFS Properties dialog box, from the Startup type list, clickDisabled.
7 Click OK.
8 Repeat this procedure for the media server and for all Active Directory domaincontrollers or ADAM/LDS hosts.
Configuring a UNIX media server and Windowsclients for backups and restores that useGranularRecovery Technology (GRT)
To perform backups and restores that use Granular Recovery Technology (GRT),perform the following configuration if you use a UNIX media server and Windowsclients:
■ Confirm that your media server is installed on a platform that supports granularrecovery.See the Software Compatibility List.
■ No other configuration is required for the UNIX media server.
1198About Granular Recovery TechnologyConfiguring a UNIX media server and Windows clients for backups and restores that use Granular Recovery
Technology (GRT)

■ Enable or install NFS on all Active Directory domain controllers or ADAM/LDShosts.See “Enabling Services for Network File System (NFS) on a Windows 2012 orWindows 2012 R2 media server” on page 1183.See “Enabling Services for Network File System (NFS) on a Windows 2012 orWindows 2012 R2 client” on page 1187.See “Enabling Services for Network File System (NFS) on Windows 2008 orWindows 2008 R2” on page 1192.
■ You can configure a different network port for NBFSD.See “Configuring a different network port for NBFSD” on page 1199.
Configuring a different network port for NBFSDNBFSD runs on port 7394. If another service uses the standard NBFSD port in yourorganization, you can configure the service on another port. The following proceduresdescribe how to configure a NetBackup server to use a network port other than thedefault.
To configure a different network port for NBFSD (Windows server)
1 Log on as administrator on the computer where NetBackup server is installed.
2 Open Regedit.
3 Open the following key.:
HKEY_LOCAL_MACHINE\SOFTWARE\VERITAS\NetBackup\CurrentVersion\Config
4 Create a new DWORD value named FSE_PORT.
5 Right-click on the new value and click Modify.
6 In the Value data box, provide a port number between 1 and 65535.
7 Click OK.
To configure a different network port for NBFSD (UNIX server)
1 Log on as root on the computer where NetBackup server is installed.
2 Open the bp.conf file.
3 Add the following entry, where XXXX is an integer and is a port number between1 and 65535.
FSE_PORT = XXXX
1199About Granular Recovery TechnologyConfiguring a different network port for NBFSD

Symbols.ds files 572.f files in catalog 629, 631, 887–888.lck catalog files 887.SeCuRiTy.nnnn files 1170
AAbsolute pathname to directory/volume storage unit
setting 574Accelerator
and the NetBackup catalog 737configuring 737description 731does not reset atime 109, 735, 766Expire after copy retention type 648, 866Forced rescan schedule attribute 114, 365forced rescan schedule attribute 769logs for 739messages in the backup job details log 738notes and requirements 734policy attribute 730replacing image size with network-transferred
data in command output 748reporting network-transferred data in command
output 745Accept connections on non reserved ports
property 261, 274Access Control
auditing user information without enabling 342authorizing users 1132, 1136changing DBA password 957host properties 75–76, 78–80, 344to a server or client 374utility in Administration Console 46within the NetBackup Administration
Console 1131Access Control Lists (ACLs) 825, 830, 874, 1170Access Control Lists (ACLs) for GPFS 364–365Access Management utility 46ACS robot type 406
ACS, LSM, Panel, Drive tape drive configurationoption 428
ACSLS host robot configuration option 419Active Directory
Application Mode (ADAM) 858–859, 862granular recovery 857–859host properties 81–82restoring objects 860
Active secondary operations 655Activity Monitor
about the utility 1035bpdbjobs command 1067BPDBJOBS_OPTIONS environmental
variable 1065canceling uncompleted jobs 1041copy job information 1044Daemons tab 1045deleting completed jobs 1041detailed job status 1041, 1056disabling job logging 192displaying Backup jobs 623, 625displaying Duplication jobs 627displaying Import jobs 628displaying Index From Snapshot jobs 630displaying Replication jobs 633displaying Snapshot jobs 636filtering column heads 1040problem displaying media servers 1056restarting a completed job 1042resuming suspended jobs 1043saving job data to a file 1043setup options 1037starting and stopping daemons 1056stopping jobs 1041suspending a job 1042using the Troubleshooter 58
ADAM (Active Directory Application Mode). SeeActiveDirectory Application Mode (ADAM)
adjust time zone 1148–1149administrator
account for NetBackup Client Service 1111email address property 162
Index

administrator (continued)nonroot 1134
AdvancedDisk disk storage units 568–569All log entries report 177, 1076ALL_FILESYSTEMS 834Allow backups to span tape media property 191Allow client browse property 92Allow client restore property 92Allow media overwrite property 190, 273Allow multiple data streams
set policy attribute 725when to use 726
Allow multiple retentions per media property 191, 782Allow server file writes property 69, 260, 362ALLOW_MEDIA_OVERWRITE 273ALLOW_NON_RESERVED_PORTS 273alternate
client restores 354media types 459read server for SLP operations 658server, expiring and importing media for 1158server, failing over to 1158
Alternate restore failover machines hostproperties 226
altnames fileNo.Restrictions file 1162peername file 1163
Always property in Fibre Transport host properties 150Announce DHCP interval property 199ANSI format 190AOS/VS format 190API robots 478, 489archive bit 114, 760, 764, 872archive jobs 109, 368asterisk as wildcard 1113atime 109, 362, 377, 766, 901, 1171auditing
Audit Manager 1046, 1058report 96USE_AUTHENTICATION 342
auth.conf filecapabilities identifiers 1135description 1132entries for specific applications 1134overview 1131
authentication certificates. See security certificatesAuthentication Domain tab 75–76AUTHENTICATION_DOMAIN 274Authorization Service tab 75, 78
AUTHORIZATION_SERVICE 276Auto create A.I.R. Import SLP (SLP parameter) 252Auto Image Replication
about 992and trusted master servers 1005Backup operation in source domain 993Maximum size per A.I.R. replication job (SLP
parameter) 250nbstserv 1011no disk spanning support 993Non-targeted 1018–1019, 1024overview 992role of Backup operation in source domain 622role of Import operation 627role of Replication operation 632supported versions 992synchronizing clocks of master servers 993Target master option 633, 657Target retention type 651Targeted 241, 633, 993, 1005, 1018–1019, 1026topology of storage 998TRUSTED_MASTER 340using the Make Master option 246
Auto log off timeout option 54, 185Auto snapshot type 756Auto-discovery streaming mode 842AUTO_ADD_ALL_ALIASES_FOR_CLIENT 269, 277Automated Cartridge System
drive information 428automatic
failover to an alternate server 1157path correction 447Volume Recognition service (avrd) 1057
Automatic Volume Recognition process (avrd)and the NetBackup Device Manager 451
automounted directories 711avrd (Automatic Volume Recognition process) 1057
BBackup
end notify timeout property 258, 288job 623, 625network drives policy attribute 711operation 621, 654start notify timeout property 257, 289
Backup From Snapshot operation 623, 631Backup option for log files during full backups
property 134
1201Index

Backup Selections listALL_FILESYSTEMS directive 834VOLUME_EXCLUDE_LIST directive 834wildcard characters 1115
Backup, Archive, and Restore 1135backups
activating policy 709Client backups report 1076creating copies 667, 776cumulative Incremental Backup 760differential incremental backups 760duplicating 979duration of schedule window 792–793expiring 986frequency setting 772full 759how NetBackup determines when files are
due 764–765importing 987manual 857NetBackup database files 945, 955network drives 711NFS mounted files 693, 710off-site storage 782policy types 759raw partitions on Windows 705, 820replacing Accelerator image size with
network-transferred data in commandoutput 748
reporting network-transferred data forAccelerator 745
selections listpathname rules 817, 820–821, 824, 832verifying 813
send email notification about 164, 167, 169Status of Backups report 1076status report 177user archive 761user directed 760
schedules 767verifying 976windows 790
Bandwidth host properties 83–85, 312barcodes 513
actions for 479adding media type mapping entries 496advantages of 477best practices 478checking 477
barcodes (continued)comparing robot contents with volume 534configuring rules 480rules 479settings 483
Bare Metal Restore (BMR) 116, 721, 883, 920, 1039, 1046
Bare Metal Restore service 1057basic disk staging
creating a storage unit 591Final destination media owner 600Final destination storage unit 600Final destination volume pool 600priority of duplication jobs 594relocation schedule 586, 598, 759storage units
checkpoint restart 704low water mark 577size recommendations 595
Use alternate read server attribute 594, 601BasicDisk storage units 657
configuring 402credentials for CIFS 569, 1048–1049, 1058–
1059, 1061media description 568spanning within storage unit groups 611
BE-MTF1 format 190bind mount on Linux 845BitLocker Drive Encryption 129BLAT mail utility 169block level incremental backups 705, 755Blowfish cipher encryption 357bmrbd (NetBackup Bare Metal Restore Boot Server
Service) 1046bmrbd (NetBackup Bare Metal Restore Master
Server) 1046BMRD (NetBackup Bare Metal Restore Master
Server) 1057BMRDB.db
configuration entry 931in catalog 883relocating 923, 958
bmrpxeserver (NetBackup BMR PXE Service) 1046bp.conf file
about entries 270configuring 70configuring to use ctime 767customizing jnbSA and jbpSA 1143entries for Activity Monitor 1064
1202Index

bp.conf file (continued)indicating database location 920NetBackup-Java Administration Console
configuration entries 1137personal file
for UNIX nonroot user 270, 379for UNIX root user 270
BPARCHIVE_POLICY 269, 347, 767BPARCHIVE_SCHED 269, 347, 767bpbackup command 899BPBACKUP_POLICY 269, 348, 767BPBACKUP_SCHED 269, 349, 767BPBRM logging property 179BPBRM_VERBOSE 278bpcatarc command 908bpcatlist command 908bpcatres command 909bpcatrm command 909bpcd client process 570BPCD connect-back property 100, 154bpcd daemon 1046, 1057BPCD port setting on client 198BPCDD (NetBackup Client Service) 1046bpchangeprimary command 978BPCOMPATD (NetBackup Compatibility
Service) 1047, 1057bpconfig command 843bpdbjobs
adding entries to bp.conf file 1064adding registry key 1064command 1067debug log 1067
BPDBJOBS_COLDEFS 269, 280BPDBJOBS_OPTIONS environmental variable 1065BPDBM (NetBackup Database Manager) 957, 1047,
1057BPDBM logging property 179BPDBM_VERBOSE 284BPDM logging property 179bpend_notify script 258BPEND_TIMEOUT 288bpexpdate command 983bpgetconfig 70BPINETD (NetBackup Legacy Client Service) 1048bpinetd client process 570, 1058bpjava-msvc service 1058bpjava-susvc service 1058bpjobd (NetBackup Jobs Database Management
daemon) 957
BPJOBD logging property 179bpjobd process 1058bpps script 1179BPRD
logging property 179NetBackup Request Daemon 1049NetBackup Request Daemon, with NBAC 957port setting on client 198process 1058
BPRD_VERBOSE 285bpsetconfig 70, 270bpstart_notify script 257–258, 289, 292BPSTART_TIMEOUT 257–258, 288–289, 292bpstsinfo command 1000bpsynth log 874bptestnetconn utility 214BPTM logging level property 179, 287BPTM_VERBOSE 286Browse and restore ability property 97buffer size for data transfer 115Busy action property 87Busy file host properties 86–87, 350–353BUSY_FILE_ACTION 350BUSY_FILE_DIRECTORY 351BUSY_FILE_NOTIFY_USER 86, 352BUSY_FILE_PROCESSING 86, 353
Ccachefs file systems, excluding from backup 845Calendar schedule type 771, 795canceling uncompleted jobs 1041Capacity managed retention type 646–647case sensitivity
in exclude list 138in NetBackup names 1112in storage unit and disk pool names 597in storage unit names 603, 605in volume pool names 521
catalogand use of Accelerator 737archiving 710, 907cloud configuration files 889files 887recovery 58, 891, 902utility 972
catalog backupsabout 891adding critical policies to 854archiving 903, 906–907, 909–910
1203Index

catalog backups (continued)compressing image catalog 915determining success of 901image files 888, 987manual backup 899master server offline 98Maximum concurrent jobs setting 578media server version 890, 892, 895moving client images 912multiple file layout 889overview 880parent and child jobs 1039policy type 851running concurrently with other backups 163schedules for 900single file layout 888space required 910strategies 902uncompressing 916wizard 57–58, 892
Catalog cleanup wait time property 90CatalogBackup volume pool 455, 666, 702cataloging snapshots 629, 631CDE (Common Desktop Environment) 37cdrom file system, excluding from backup 845Certificate Authority (CA) 51Certificate Hash 52certificates. See security certificatesChange journal
and synthetic backups 873determining if enabling is useful 115guideslines 116problems when stopping the replication service
manually 684Change Server operation 38, 47, 61–62, 183, 808,
1078, 1124, 1126, 1130, 1149Check the capacity of disk storage units property 156,
572CHECK_RESTORE_CLIENT 269, 289Checkpoint restart
and disk staging 591and synthetic backups 867backup jobs 703configuration option for maximum incomplete
status 307for restore jobs 705Move job from incomplete state to done state
property 89–90
CIFScredentials for BasicDisk storage units 1048–
1049, 1058–1059, 1061credentials for disk storage units 569share in the Backup Selections tab 819volumes 1111
cipher types for NetBackup encryption 128Clean-up host properties 88, 307, 706cleaning
drives 440, 1063frequency 427
Cleaning Frequency tape drive configurationoption 427
Cleanup interval (SLP parameter) 251Client administrator's email property 261Client Attributes host properties 92, 95, 99Client backups report 1076Client cipher property 128Client connect timeout property 256, 290Client name property 90Client port window property 202Client read timeout property 108, 258, 292Client sends mail setting 261, 378Client Service, NetBackup 1111CLIENT_CONNECT_TIMEOUT 290CLIENT_NAME 271, 353CLIENT_PORT_WINDOW 290CLIENT_READ_TIMEOUT 257–258, 289, 291–292CLIENT_RESERVED_PORT_WINDOW 293CLIENTDB_RESYNC_INTERVAL 293clients
adding a client to the client database 93adding and removing clients 101adding to a policy 805bp.conf options 270choosing a policy type 694deleting from policy 693exclude and include lists 146exclude files list 136–137, 140–141, 846include files list 144installing 807maximum jobs 161moving image catalog 912name 1162peername 1162secure 807setting host names 806taking offline 97taking offline for backup and restore 96
1204Index

clients (continued)trusting clients 808
Clone snapshot type 756cloud configuration files 889Cloud Settings tab 231cloud storage configuration wizard 57cloud storage server
credentials for 383CloudStore, NetBackup 1047clustering 73, 880, 922, 933, 1152
master server inter-node authentication 240Collect disaster recovery information for Bare Metal
Restore policy attribute 721Collect true image restore information (TIR)
property 723Collect true image restore information (TIR) with move
detection property 89, 721, 724, 872Communications buffer size property 115compatibility list
for NDMP 1116Compress catalog interval property 161, 915COMPRESS_SUFFIX 355Compression policy attribute
considerations regarding compression 717disabled by Enable granular recovery policy
attribute 730compression used by VxFS 717, 1174concurrent jobs
on client 161per policy 707
CONNECT_OPTIONS 153, 294Consistency check before backup host property 247Continue with backup if consistency check fails
property 134Coordinated Universal Time (UTC) 993copies
creating using Catalog duplicating option 979creating using storage lifecycle policies 667, 776option in the Configure Multiple Copies dialog
box 775primary 775, 977, 983third party 774
copya policy 691a policy schedule 692NetBackup database files 945, 955policy backup selections, clients, schedules 690report text to anoter document 1078
Copy-on-writesnapshots 821technology 756
correcting paths of devices automatically 447cpio format 190Credential Access host properties 117credentials 383
about NDMP 383virtual machine server 384
Critical Policies list 853–854, 895, 897, 899cross mount points
effect with UNIX raw partitions 714interaction with Follow NFS policy attribute 715policy attribute 827policy setting 713separate policies for 714
CRYPT_KEYFILE 360CRYPT_KIND 356CRYPT_LIBPATH 359CRYPT_STRENGTH 358ctime 830cumulative incremental backups 760, 762curly brackets as wildcards 1114
DDaemon connection port property 101, 155Daemon port only property 155daemons
check with vmps 1180checking processes 1179monitoring 1056starting and stopping 1056tab in the Activity Monitor 1045types 1055
DAS drive name tape drive configuration option 428data
deduplication 718–719, 751movers 569
data classificationscreating 120host properties 118in storage lifecycle policies 613, 654policy attribute 697, 699, 778use of Any 1006, 1032
Data Mover off-host backup method 624, 630, 755Data Protection Optimization Option license key 879Database Administration utility 926–927, 933, 947Database manager process (bpdbm) 1057database schema, exporting 945, 954
1205Index

database, for jobs 1063database-extension clients, adding file paths for 832DataStore
policy type 695volume pool 494, 702
DataTools-SQL-BackTrack policy type 695datetime stamp 765Daylight savings time 1149DB2 policy type 695, 811db_marker.txt 887DBA password, changing 926, 942, 950, 956dbadm (Database Administration utility) 947DBR format 190deactivating policy 709debug logging levels 175decommissioning a media server 391, 398deduplication optimized synthetic backup method 879Deduplication property 97–98deduplication storage server
credentials for 383defining target for Auto Image Replication 997
Default cache device path for Snapshots property 109Default Job Priorities host properties 121, 709DEFAULT_CONNECT_OPTIONS 153, 295–296, 298Deferred duplication offset time (SLP parameter) 252,
658Defragment NetBackup database files 937, 951Delay on multiplexed restores property 156deleting
all devices for a media server 388device hosts 391drives 441license keys 63robots 422schedules 793schedules, backup selections, or clients from a
policy 692server groups 382storage lifecycle policies 618storage unit groups 607storage units 565volume group 524volume pools 521
Density storage unit setting 575Detailed job status 1041, 1056Device Configuration Wizard 57device hosts
removing 391robot configuration option 417
Device Monitoradd drive comment 436assigning requests 1071display pending requests 1069resubmit request 1072
devicesconfiguration wizard 414configuring 408discovery 410file 420file permissions 452managing remotely 36mapping files 407
devpts file system, excluding from backup 845DHCP setting on client 199differential incremental backups 760, 762Differential snapshot type 756Direct Access Recovery (DAR) 157Directory can exist on the root file system or system
disk setting 574directory junctions on UNIX 826Disable client-side deduplication policy attribute 729DISABLE_JOB_LOGGING 300DISABLE_STANDALONE_DRIVE_EXTENSIONS 301,
465DISALLOW_BACKUPS_SPANNING_MEDIA 302DISALLOW_CLIENT_LIST_RESTORE 302DISALLOW_CLIENT_RESTORE 303DISALLOW_SERVER_FILE_WRITES 260, 361disaster recovery
file 894, 902information 162sending e-mails 853tab 851, 854using the Make Master option 246
diskarray, credentials for 117image backups 820spanning 192, 611, 700staging storage units 609
Disk logs report 1077disk pool
changing the state 403Disk pool status report 1078Disk pool storage unit setting 575disk pools
AdvancedDisk 402, 1068cloud 402, 1068configuration wizard 57
1206Index
disk pools (continued)deduplication 402, 1068description 569OpenStorage 402, 1068Replication Director 403, 1068
Disk resource multiplier (SLP parameter) 252disk staging 589Disk storage unit status report 1077Disk type storage unit setting 575disk-image backups
checkpoint restart 705Distributed Application Restore Mapping
host properties 125Do not compress files ending with property 110, 355DO_NOT_RESET_FILE_ACCESS_TIME 362domains
replicating backups to another. See Auto ImageReplication
down a device 437Drive is in a robotic library tape drive configuration
option 426Drive name tape drive configuration option 425Drive path options 431Drive Status tape drive configuration option 427drives
access permission 452adding comment 436cleaning 427, 440, 443, 1063drive status 427monitoring 1063name rules 413name rules, configuring 429replacing 448running diagnostics 445servicing requests 1070types 426updating firmware 450
DSFR. See Microsoft Distributed File SystemReplication
Shadow Copy Components:\ directive 839snapshot provider 104Windows Open File Backups 103
duplicate backupsbecoming a primary copy 982creating 979restoring from 977
Duplicationjob 627optimized 655, 659
Duplication (continued)SLP operation 625
Duplication Manager 1050See also Storage Lifecycle Manager service
(nbstserv)Duplication to remote master. See Auto Image
ReplicationDUPLICATION_SESSION_INTERVAL_MINUTES 254dynamically-allocated ports 203
EEFI System partitions 838ejecting volumes 511Email
address for administrator of this client 261disaster recovery 853notifications 162, 164–165, 167, 169send from client 261, 378send from server 261
EMMSERVER 269, 304Enable block sharing storage unit setting 576Enable encryption property 128Enable granular recovery policy attribute 729, 859Enable job logging property 192Enable multiplexing storage unit setting 576Enable optimized backup of Windows deduplicated
volumes 751Enable robust logging property 180Enable SCSI reserve property 191Enable single instance backup for message
attachments property 134Enable standalone drive extension property 192, 301Enable standard encryption property 128Encrypting File System (EFS) 129Encryption host properties 127, 129, 356, 866Encryption policy attribute 719
about NetBackup encryption options 719disabled by Enable granular recovery policy
attribute 730English error log 306Enterprise Media Manager (EMM) 240, 331, 567,
883, 1047, 1058, 1152, 1154–1156database 919removing a device host 391service 386, 388, 886
Enterprise Vault Hosts properties 131Enterprise Vault properties 130erasing media 506error codes. See status codes
1207Index

escape character on UNIX 1114Exchange credentials property 135Exchange granular proxy host property 134exclude
cdrom file system from backup 845days from a backup policy schedule 794days from an SLP window 662–663files and directories from backup 137, 140–141files and directories from UNIX backups 136files and directories from Windows backups 136files list 146, 846list syntax 141
Exclude list host properties 138–139exclude lists
configuring the exclude list on a Windows clientfrom a UNIX master server 144
for specific policies and schedules 847UNIX example 143Windows example 143
exclude_list 846Expire after copy retention type 648, 672, 866expiring backups 986export
database schema and data 945, 954host properties 74license keys 63reports 1079
Extended attribute filesdisabling the restore of 832Solaris 9 826to ignore during backup 363
Extended attribute files for GPFSto ignore during backup 364
Extended image retry interval (SLP parameter) 251, 620
FFail all copies when creating multiple copies 595, 777Fail property in Fibre Transport host properties 150failover
media server to alternate media server(s) 225servers, adding or changing 227storage unit selection in group 608to an alternate server 1157
FAILOVER_RESTORE_MEDIA_SERVERS 305Federated SharePoint configurations 248Fibre Transport (FT)
host properties 147media servers 237, 329
File browse timeout property 257, 369File Change Log (FCL) 109–110file lists
extension clients 832links on UNIX 823raw partitions 826UNIX clients 824UNIX files not backed up 825, 845Windows clients 817
file names (not allowed in Backup Selections list) 1116File system backup coverage report 814files
.SeCuRiTy.nnnn 1170/.rhosts 808catalog space requirements 910excluded from backups 845excluding from backup 136–137, 140–141linked, UNIX 826NFS mounted 693, 710No.Restrictions 1162NOTES.INI 188peername 1163redirected restores 1164restrictions on restores 1162
FilesNotToBackup list 847Final destination
media owner 600storage unit 600volume pool 600
Firewall host properties 151, 298FIREWALL_IN 1138Fixed retention type 648FlashBackup 826–828
policy type 695Windows policy type 695
Follow NFS mountscross mount points 711raw partitions 711, 827
Follow NFS policy attribute 710, 715Force interval for small job (SLP parameter) 251FORCE_IPADDR_LOOKUP 1139FQDN or IP Address property in Resilient Network
host properties 220Free browse property 97Frequency schedule attribute 771frozen media 509–510full backups 759, 868
1208Index

GGeneral level logging property 113General server host properties 156, 158GENERATE_ENGLISH_LOGS 269, 306get_license_key license key utility 64Getting Started Wizard 57Global attributes host properties 160, 162Global logging level property 174, 343globally unique version number (GVSN) 683Go into effect at policy attribute 709GPFS (General Parallel File System) 364–365Granular recovery of Active Directory objects 857Granular Recovery Technology (GRT) 157, 659, 729Group images across SLPs (SLP parameter) 252Group Policy Objects 863
Hhard and soft links
hard links in UNIX directories 823hard links NTFS volumes 823restoring 1161
Hardware Compatibility List (HCL) 406, 419High water mark storage unit setting 576HKEYS, backing up 822host
device 34properties
changing in a clustered environment 73exporting 74permission to change 69
host credentials. See credentialsHow long to retry failed import jobs (SLP
parameter) 252Hyper-V policy type 695, 849Hyper-V virtual machines
browse 809
IIBM device number tape drive configuration option 428If this copy fails option 775IGNORE_ACL touch file 364IGNORE_XATTR 269, 363–365image .f files 629, 631, 887image catalog
compressing 161moving 912
Image cleanup property 90Image processing interval (SLP parameter) 251, 620
IMAGE_EXTENDED_RETRY_PERIOD_IN_HOURS 620images
changing primary copy 977duplicating 979moving client catalog 912on disk report 1077on media report 1076restoring from duplicate 977verifying 976
Impact Report 229, 661Import
Images Wizard 58job 628Manager 1011, 1050
See also Storage Lifecycle Manager service(nbstserv)
operation 1007SLP operation 627
IMPORT_EXTENDED_RETRY_SESSION_TIMER 254IMPORT_SESSION_TIMER 254importing backups 987–988Inactive media 1077Include Dates tab 795include files list 144include list, on client 146, 846include_list 846INCOMPLETE_JOB_CLEAN_INTERVAL 307Incrementals based on
archive bit property 114timestamp property 114
Independent property 606Index From Snapshot operation 629, 631, 645Infinite retention 231Informix policy type 695, 811INFORMIX_HOME 269, 366INI file, for Lotus Notes 188Initial browse search limit property 260INITIAL_BROWSE_SEARCH_LIMIT 308, 1144INITIAL_MEMORY 1141, 1145inject volume into robot
multiple volumes 542robot inventory 511
Inline copy option 774, 980, 985Inline Tape Copy 774Inode change time 376installing and configuring Network File System
(NFS) 1181installing client software
on secure clients 807
1209Index

installing client software (continued)on trusting clients 807
Instant RecoveryAdvanced Backup method 705Backups to disk only setting 773
Inter-domain Master Servers 238, 340, 1011Internet Assigned Numbers Authority (IANA) 204,
1143inventory and compare robot contents 530IP Address Family Support host property 201IP_ADDRESS_FAMILY 201, 309IPv4
addresses 211–212IP_ADDRESS_FAMILY option 309networks, limiting bandwidth 83, 313PREFERRED_NETWORK option 321
IPv6addresses 211–212and client names 91, 806IP_ADDRESS_FAMILY option 309networks, limiting bandwidth 254, 336PREFERRED_NETWORK option 321
JJava
auth.conf file 1132authorizing users 1131directory 1133performance improvement hints 1145Virtual Machine (JVM) 1141
Java Remote Administration Console 1129configuration options 1137
jbpSA 1129, 1131, 1133–1135, 1141, 1143, 1145jnbSA 37, 1055, 1143Job Manager logging property 180Job retry delay property 160JOB_PRIORITY 310jobs
canceling 1041Concurrent per disk storage unit 578database 1063filtering 1040maximum per client 161maximum per policy 707priority for policy 709restarting 1042resuming 1043setting default priority 121SLP_MultipleLifecycles 254
jobs (continued)suspending 1042viewing in the Activity Monitor 1038, 1040
JVM (Java Virtual Machine) 1141
KKeep logs for days property 177Keep logs up to GB property 178Keep status of user-directed backups 109, 115, 368Keep true image restoration information property 89Keep vault logs for property 179KEEP_DATABASE_COMM_FILE 269, 367KEEP_LOGS_DAYS 368, 1144KEEP_LOGS_SIZE_GB 315KeysNotToRestore list 847Keyword phrase policy attribute 754
Llabeling media 514–515legacy logging 174, 180, 1083library
name robot configuration option 419sharing 412
license keys 60–64LIFECYCLE_PARAMETERS file 249Limit jobs per policy setting 707, 728–729, 768, 785LIMIT_BANDWIDTH 312, 337limiting bandwidth 83–84links
UNIX hard-linked directories 823UNIX symbolic 826
Linux bind mount 845LIST_FILES_TIMEOUT 368, 916LiveUpdate 98LMCP device file robot configuration option 419load balancing methods 609Locked file action property 108, 369LOCKED_FILE_ACTION 369locking a user account 264logging
Accelerator 739bpdbm 966bpsynth 874deleting logs after a set time 177disabling for NetBackup processes 180host properties 170legacy 170nbdb 966
1210Index

logging (continued)NetBackup Administration Console
add data and timestamp to logs 55configuring 54enable command logs 55log file directories 55log file name format 56log file size 56rnable command line logs 55
off of NetBackup automatically 185redirected restore 262unified 171
Logging Assistantadding a new record 1089debug logging 1092, 1096–1098deleting a record 1091NetBackup Support Utility (nbsu) 1104new in the NetBackup Administration Console 46overview 1082uploading evidence 1107using for troubleshooting 1084viewing records 1085
Logging for critical processes property 176, 180Logging host properties 278, 284–286, 343Login Banner Configuration host properties 182login banner text, removing 184long erase 507Lotus Notes
host properties 186policy type 696
Lotus-Notespolicy type 811
Low water mark storage unit setting 574, 577ltid. See NetBackup Device Manager (ltid)ltid (NetBackup Device Manager) 1058
MMac OS X 697mail notifications
administrator email address 261Disaster Recovery attachment
sending 853USEMAIL on UNIX clients 378
mail_dr_info.cmd 903Make Master option 246Managed by SLP retention 756manual backups
NetBackup catalogs 899policy for 857
Master Compatibility List 1116master servers
changing 246inter-node authentication for clustering 240rebooting 1179
Match directive for Preferred Network hostproperties 207, 212, 214, 216
MAX_LOGFILE_SIZE 171, 272, 313MAX_MEMORY 1141, 1145MAX_NUM_LOGFILES 171, 272, 314maximum
jobs per client 161jobs per policy 707vault jobs property 162
Maximum concurrent FT connections property in FibreTransport host properties 149
Maximum concurrent jobs storage unit setting 578Maximum concurrent write drives setting 577Maximum concurrent write drives storage unit
setting 774Maximum data streams property 96, 728–729Maximum error messages for server property 115Maximum images for snapshot replication job (SLP
parameter) 250Maximum images per A.I.R. Import job (SLP
parameter) 250Maximum jobs per client property 728–729Maximum number of logs to restore property 187Maximum size per A.I.R. replication job (SLP
parameter) 250Maximum size per duplication job (SLP
parameter) 250Maximum snapshot limit retention type 649Maximum Snapshots parameter 649, 756Maximum streams per drive storage unit setting 580,
783media
active 1077ejection timeout period 512erasing 506formats 459frozen 509–510host override property 158host properties 189ID prefix (non-robotic) property 193ID, generation rules 485, 488ID, prefix for update robot 471inactive 1077labeling 515
1211Index

media (continued)log entries report 177, 1076mount errors 1069pools. See volume poolsrequest delay property 193, 318server connect timeout property 258suspend and unsuspend 519type when not an API robot 473types 458unmount delay property 193
media access port (MAP) functionality 510Media host properties 273, 301–302, 317Media Manager device daemon (ltid). SeeNetBackup
Device Manager (ltid)Media mount timeout property 257Media owner policy attribute 709Media request delay property 318Media server copy advanced backup method 705Media Server Deduplication Pool
changing the state 403Media server load balancing storage unit selection in
group 608–609Media server storage unit setting 581media servers
activate or deactivate 385adding 386adding a media server to the Alternate restore
failover machine list 227decommissioning 391, 393–394, 398delete all devices from 388moving a robot and its media 422previewing references to 397problems displaying 1056rebooting 1179registering 387Restore failover host properties 225
media sharingabout 524configuring unrestricted 525configuring with a server group 525
MEDIA_REQUEST_DELAY 318MEDIA_SERVER 318MEDIA_UNMOUNT_DELAY 317Megabytes of memory property 109, 371MEM_USE_WARNING 1141metadata attributes for GPFS 364–365Microsoft Data Deduplication file systems
about backups 752about restores 753
Microsoft Data Deduplication file systems (continued)configuration for backups 754enable backups of 751
Microsoft Distributed File System ReplicationAbout backups 683Shadow Copy Components:\ directive 839snapshot provider 104Windows Open File Backups 103
Microsoft Exchange Attributes 757Microsoft Volume Shadow Copy Service (VSS) 82,
104Microsoft Windows Backup 847Microsoft Windows User Access Control (UAC) 40Minimum images per A.I.R. Import job (SLP
parameter) 250Minimum size per duplication job (SLP parameter) 250Mirror property 606, 641Mirror retention type 650Mirror-break-off technology 756mirrored transaction log, creating 959mixing retention levels on tape volumes 782mklogdir shell script 171mklogdir.bat 171mntfs file system, excluding from backup 845monitoring
NetBackup drives 1063NetBackup processes 1061
mountpoints 713requests, pending 1069
movea robot and its media 422backup job from incomplete state to done state
property 90NBDB database files 958NetBackup database files 943, 953restore job from incomplete state to done
state 705restore job from incomplete state to done state
property 89Move backup job from incomplete state to done state
property 704MPX_RESTORE_DELAY 319MS-Exchange-Server policy type 696, 811MS-SharePoint policy type 696, 811MS-SQL-Server policy type 696, 811MS-Windows policy type 696, 810MSDP
storage servers 340
1212Index

MTF format 190mtime 830multihomed server example 208multiple
data streams 726, 1039file layout for NetBackup catalogs 889installations 187
multiple copiescheckpoint restart 705creating using a policy schedule 776creating using SLPs 668creating using storage lifecycle policies 667criteria for creating 774fail all copies 595, 777parent and child jobs 1039setting 774synthetic backups method 648, 866, 875–878
multiplexing (MPX)and synthetic backups 866demultiplexing 790Maximum jobs per client property 786preserving 658set for schedule 783use with Enable block sharing 576
multistreaming backups 798, 866Must use local drive property 157, 320
Nnamed data streams
disabling the restore of 832to ignore during backups 363
naming conventions 1112nb_updatedssu script 572NBAC (NetBackup Access Control). See NetBackup
Access Control (NBAC)nbars (NetBackup Agent Request Server) 1046, 1058nbatd (NetBackup Product Authentication) 957, 1046nbaudit (NetBackup Audit Manager) 1046nbaudit (NetBackup Audit Service) 1058nbazd (NetBackup Product Authorization) 957, 1046NBAZDB 921, 931
See also NetBackup Authorization databaseNBDB.db
configuration entry 931creating manually 961in catalog 883installation overview 920moving from one host to another 971relocating 922, 958
NbDbAdmin.exe (Database Administration utility) 933nbdecommission command 398NBEMM (NetBackup Enterprise Media
Manager) 1047, 1058nbemmcmd command 70nbevtmgr (NetBackup Event Management
Service) 1047nbEvtMgr process 1059nbfsd port 1199nbftsrvr process 1059nbgetconfig 70nbim (NetBackup Indexing Manager) 1047nbj.conf 665, 1137NBJAVA_CLIENT_PORT_WINDOW 1142NBJAVA_CORBA_DEFAULT_TIMEOUT 665, 1142NBJAVA_CORBA_LONG_TIMEOUT 1143NBJM (NetBackup Job Manager) 180, 1059nblog.conf file 172nbmail.cmd script 162, 164, 903nbostpxy (NetBackup Proxy Service ) 1048NBPEM (NetBackup Policy Execution Manager) 180,
1048, 1059nbproxy process 1059NBRB (NetBackup Resource Broker) 180, 1049nbrb process 1059nbrbutil configuration utility 1050NBRMMS (NetBackup Remote Management and
Monitor Service) 570, 1049, 1059NBRNTD (NetBackup Remote Network Transport
Service) 1049NBRNTD_IDLE_TIMEOUT 320nbsetconfig 70, 270NBSL (NetBackup Service Layer) 1049, 1056nbsl process 1059nbstlutil (lifecycle utility) command 619nbstserv process 253, 1008, 1011, 1050, 1060nbsvcmon process 1060NBU-Catalog policy type 666, 696, 702, 851NBVAULT (NetBackup Vault Manager) 1050, 1060NDMP
ALL_FILESYSTEMS directive in backuppolicies 834
credentials for 46, 117, 383Data Mover off-host backup method 755Direct Access Recovery for restores 157drives 157global credentials 195host name robot configuration option 419host storage unit setting 582
1213Index

NDMP (continued)hosts 195, 409policy type 624, 696storage units 572, 587, 655, 659, 774wildcard characters in NDMP policy backup
selections 1115NetApp
disk arrays 135, 1112, 1116FlexClone volumes 835policy validation for 756SnapMirror or SnapVault replication method 638,
650NetBackup
Authorization database 930client service 198Client Service (bpcd) 1111request service port (BPRD) 198
NetBackup Accelerator. See AcceleratorNetBackup Access Control (NBAC) 36, 42, 46, 75,
342, 921, 930–931, 957, 966, 1011, 1131NetBackup Administration Console
administering different versions 41available consoles 35configuration options 1142improving performance 1144–1145remote console 40setting up on UNIX 37starting 38when to restart 1178
NetBackup Audit Manager 1058NetBackup Authorization database 919, 921, 931NetBackup Client Service (BPCD) 1046NetBackup Cloud Storage 57NetBackup CloudStore 1047NetBackup compatibility lists 408NetBackup Compatibility Service
(BPCOMPATD) 1047NetBackup database files
adding space 936backing up 945, 955changing DBA password 942, 950defragmenting space 936exporting database schema 945free and used space 936moving 943, 953rebuilding 939, 953restoring 946, 955validating 938, 952
NetBackup Database Manager (BPDBM) 1047
NetBackup Deduplication Engine 383NetBackup Device Manager (ltid)
about 451in the Activity Monitor 1047
NetBackup Discovery Service (nbdisco) 46, 372NetBackup for Informix 366NetBackup Java Administration Console
configuration options 1137NetBackup Java Administration Console configuration
options 1178NetBackup Java, set up for 37NetBackup Job Manager (NBJM) 180, 1048NetBackup Key Management Service (NBKMS) 1048NetBackup Legacy Client Service (BPINETD) 1048NetBackup Legacy Network Service (vnetd) 1061NetBackup Monitor Service 1050NetBackup Policy Execution Manager (NBPEM) 180,
1048NetBackup Product Authentication and Authorization
AUTHORIZATION_SERVICE 276NetBackup product Authentication and Authorization
AUTHENTICATION_DOMAIN 274NetBackup Product Improvement Program 336NetBackup Remote Management and Monitor Service
(NBRMMS) 1049NetBackup Remote Network Transport Service
(NBRNTD) 1049NetBackup Request Daemon (BPRD) 1049NetBackup Request Service Port (BPRD) property 198NetBackup Resource Broker (NBRB) 123, 180, 1049–
1050NetBackup Scalable Storage 233–234NetBackup Service Layer (NBSL) 1049, 1059NetBackup Storage Lifecycle Manager 1050NetBackup Support Utility (nbsu) 1104NetBackup Vault Manager (NBVAULT) 1050NetBackup Volume Manager (VMD)
the Activity Monitor 1050NetBackup Volume Manager (vmd)
and the NetBackup Device Manager 451NetBackup volume pool 702NetBackup-Java Administration Console
configuration options 1138–1139, 1141–1143improving performance 1147restricting access to 1137running locally 1145when to restart 1178
networkaddresses, prohibiting 216
1214Index
network (continued)drives, backing up 711
Network Attached Storage (NAS) 573Network Attributes tab 75, 79–80Network File System (NFS), described 1181Network host properties 198Network Settings host properties 199, 201Never property in Fibre Transport host properties 150NEW_STREAM
file list directive 840NFS (Network File System)
Follow NFS policy attribute 710, 715NFS access timeout property 265, 371no disk spanning 192
NFS services 754NFS_ACCESS_TIMEOUT 371No storage unit selection 657non reserved ports 261, 274Non-targeted A.I.R. 1018–1019, 1024None volume pool 701nonroot administration for specific applications 1134NTFS Deduplication 751null_stu storage unit type 576, 699NulOST plug-in 576, 699
Ooffline
master server and catalog backups 98taking clients 96–97
Offline Backups 96OLD_VNETD_CALLBACK 372On demand only storage unit setting 583, 611, 647Online Backups 96Only directive for Preferred Network host
properties 207, 214, 217open schedules 800OpenStorage
optimized duplication 328, 655, 659storage server. See NetBackup OpenStorage
Solutions Guide for DiskOpenStorage Disk Option 568, 575, 613OpenStorage disk storage units 568, 604OpenStorage optimized synthetic backup method 879operating mode of tape drive, changing 437Operational Restore, OpsCenter 629operations, scheduling windows for 660Operator’s email address property 86, 353OpsCenter 336, 925, 929, 1033, 1049, 1056OpsCenter Operational Restore 629
OpsCenter servers tab 237, 239Oracle
Instances and Instance Groups 46Intelligent Policy 46policy type 696–697, 756, 811
Override default job priorityfor Catalog jobs 122, 975for Media Contents report 122for Media contents report 1077for queued or active jobs 1044
Override policystorage selection setting 778volume pool setting 779
Overwrite existing files property 335, 340, 831
Ppagefile.sys 821parent jobs 725, 1038
in Activity Monitor Jobs tab 1038Limit jobs per policy setting 708parent_end_notify script 1039parent_start_notify script 1039
parent_end_notify script 1039parent_start_notify script 1039password, changing 926, 942, 950, 956paths
changing for a tape drive 438correction, enabling automatic 448separators 574
PBX (Veritas Private Branch Exchange) 204, 1061PBX_PORT 1143PC NetLink files 825PDDO storage servers 340peername files 1162–1163pending actions 1072Perform consistency check before backup with
Microsoft Volume Shadow Copy Service (VSS)property 134
Perform default search for restore property 115Perform incrementals based on archive bit 764Perform off-host backup policy attribute 755Perform snapshot backups policy attribute 755, 757permissions
for device access 452to change NetBackup properties 69
physical inventory utility 543Plex snapshot type 756Point-in-time copy 756
1215Index

policiesactivating 709backup types 759changing multiple policies at one time 689changing properties 687–688, 690, 693, 804–
805creating 686, 855for Active Directory granular restores 858Include Dates tab 795media owner attribute 709overview 677planning 679setting priority 121, 709types 694user schedules 767validation 756volume pool policy setting 701–702
Policy Configuration Wizard 58, 895Policy Execution Manager
Logging property 180Policy storage policy attribute 698, 700, 898Policy update interval property 161, 797, 975policy validation 756Port Ranges host properties 202–203Port, Bus, Target, LUN configuration option 420ports
allow operating system to select non reservedport 203
dynamically-allocated 203non reserved 261, 274
Postponed secondary operations 655power down NetBackup servers 1176Preferred Network host properties 204, 206, 208, 213–
214, 326Preferred property in Fibre Transport host
properties 149PREFERRED_NETWORK 321prelabel media 515preprocess interval 843Preserve multiplexing option 658previewing a media server's references 397primary copies 977, 982Primary copy setting in the Configure Multiple Copies
dialog box 775Primary property 606, 639print
job detail information 1044job list information 1043license key 62
print (continued)list of SLP-processed images 619reports 1079
Prioritized storage unit selection in group 608priority
of a job 121, 709of duplication jobs 594of relocation jobs started from this schedule
setting 599Priority for secondary operations 654Priority of duplication job option 775Private Branch Exchange 1050, 1061Problems report 177, 1076proc file system, excluding from backups 845Process busy files property 86, 353processes
check with vmps 1180monitoring 1061show active 1179
Product Improvement Program 336Prohibited directive for Preferred Network host
properties 207, 212, 214, 216properties
changing on multiple hosts 71, 678exporting 74viewing 70
PureDiskStorage Option 575Storage Pool Authority (SPA) 575storage units 647
PXEMTFTP (NetBackup Bare Metal Restore MTFTPServices) 1046
QQuery Builder 223question mark as wildcard 1113quick erase 507quotas on file systems 569
Rrandom ports, setting on server 202RANDOM_PORTS 324raw partitions
backing up 705, 759, 820backups on UNIX 826, 828Follow NFS policy attribute 711restoring 820
RE_READ_INTERVAL 325
1216Index

rebooting NetBackup servers 1178–1179recovering the catalog 891, 902redirected restores 828, 1162Reduce fragment size storage unit setting 585ReFS file system 1175register a media server 387registered ports 203registry, backup/restore 822Reload NetBackup database 939, 953reload.sql 969–970relocation schedule 593, 599, 601, 759, 771remote
access, allowing 1121device management 36server, troubleshooting access 1125
Remote Administration Console 1129configuration options 1137configuring 1142, 1161displaying media servers in the Activity
Monitor 1056improving performance 1144installing 40on a Windows client 1125upgrading 40
removing a device host 391REORGANIZE command to defragment NetBackup
database 937, 951Replace a process level token 135replacing a drive 448replication
between NetBackup domains. See Auto ImageReplication
job 633method 638, 650source property 606, 639–641target property 606, 640–641to an alternate NetBackup domain. See Auto
Image ReplicationReplication Director
Getting Started Wizard, unsupported 57Policy Configuration Wizard, unsupported 58,
686policy validation for 756Replication operation 632SLP selection in policy 699Solutions Guide 383, 606, 1033use of Index From Snapshot operation in
SLP 630Use Replication Director policy attribute 755
Replication operation 632REPORT_CLIENT_DISCOVERIES 269, 372reports
All log entries report 1076Client backups report 1076copying to another document 1078Disk logs report 1077Disk pool status report 1078Disk storage unit status report 1077Images on Disk report 1077Images on media report 1076Media log entries report 1076printing 1079Problems report 1076running 1078saving 1079Status of backups report 1076Tape contents report 122, 1077Tape lists report 1077Tape logs report 1076Tape summary report 1077Tape written report 1077using the Troubleshooter 58utility in Administration Console 1074
requestsassigning 1071denying 1073resolving pending tape 1071
REQUIRED_INTERFACE 321, 326See also Preferred Network host properties
REQUIRED_NETWORK 321reset
file access time property 109, 735mount time 442
Resiliency property in Resilient Network hostproperties 220
Resilient connectionResilient Network host properties 218
Resilient Network host properties 218FQDN or IP Address property in 220Resiliency property in 220
RESILIENT_NETWORK 327Resource Broker (NBRB) 123, 1050Resource Broker logging property 180Resource Limit host properties 223restarting jobs 1042Restore Failover host properties 225
1217Index

restore jobsmove restore job from incomplete state to done
state 705Restore retries
checkpoint restart 706property 259, 374
RESTORE_RETRIES 373restores
adjust time zone for 1148–1149alternate server 1151directed from the server 1160from a specific backup copy 594, 777, 1151keeping progress reports 109, 368NetBackup database files 946, 955overriding the original server 1155–1156raw partition 820redirected 225, 1162registry on Windows clients 822server independent 1151symbolic links on UNIX 826System State 1172using a specific server 158
RESUME_ORIG_DUP_ON_OPT_DUP_FAIL 269, 328
resuming suspended jobs 1043Retain snapshots for Instant Recovery or SLP
management policy attribute 755retention levels
for archiving catalogs 907retention periods
changing 229guidelines for setting 780mixing on tape volumes 191, 782precautions for setting 781redefining in the host properties 228setting 657, 780volumes 230
retention types for SLP operationsCapacity managed 646–647Expire after copy 648Fixed 648Maximum snapshot limit 649Mirror 650mixing 645Target 651
retire a media server. See decommissioning a mediaserver
Retries allowed after runday 795Retries allowed after runday policy setting 771
Retry count property 87Retry restores, setting 259Reverse Host Name Lookup host property 200–201,
328REVERSE_NAME_LOOKUP option 201, 328robot configuration
changing 420robot number option 417robot type option 417
Robot control host robot configuration option 420Robot control is attached to an NDMP host robot
configuration option 418Robot control is handled by a remote host robot
configuration option 418robot control options 418Robot device path robot configuration option 420Robot device robot configuration option 420Robot drive number tape drive configuration
option 428Robot is controlled locally by this device host robot
configuration option 418Robot number robot configuration option 417Robot number storage unit setting 586Robot operating in manual mode
configuring 421Robot type robot configuration option 417Robot type storage unit setting 586robot types 406Robotic device file robot configuration option 420Robotic library tape drive configuration option 427robots
adding 415compare contents 530configuring 408device file 420device host configuration option 417inventory 527–528moving to new media server 422running diagnostics 443unsupported characters in media ID 539update procedure 540updating the volume configuration 539
root CA certificate 52Root Certificate Authority fingerprint 52Round robin storage unit selection in group 608RS-MTF1 format 190
SSAP policy type 696, 811
1218Index

save a report 1079Scalable Storage host properties 231, 233–234Scalable Storage, NetBackup 233–234Schedule backup attempts property 161, 704, 726,
804schedules
adding to a policy 688backups on specific dates 795creating a time window 791default for user backups 349deleting a time window 793determining due time 797excluding dates 794frequency setting 771how NetBackup determines which schedule to
run 796naming 759open 800, 803overview 757priority 772recalculating 797retention periods
guidelines 780setting 780
specify multiplexing 783Start Windows tab 790storage unit/storage lifecycle policy 778type of backup 759user backup or archive 767volume pool 779windows that span midnight 799, 804
scheduling secondary operations in an SLP 660scratch
pool and WORM media 462pool, adding 456, 521volume pool 702
scripts 1039bpdbjobs example 1066bpps 1179bpstart_notify 257–258, 289, 292vmps 1180
SCSIlong erase 506pass-through command 410persistent reserve
drive path override 431quick erase 507reserve, configuring 191
SCSI (continued)reserve/release
drive path override 431search_data 930Security Certificates
for media servers and clients 38security certificates
deploying 48for cloud storage 48for media servers and client 48for media servers and clients 47for NetBackup hosts 47generated by 1046to access remote servers 1124verifying 52verifying the Certificate Authority 51
SeCuRiTy.nnnn files 1170sendmail 164Serial Number tape drive configuration option 427SERVER 374
vm.conf entry 1118server
-directed restores 1136allowing access 1121alternate server restores 1151directed restore 1160host properties 236, 239
media servers 318, 370using 1121
independent restores 225, 1151list, adding a server 1121NetBackup
controlling access 374power down 1176rebooting 1176
SERVER configuration option 329server groups
configuring 380deleting 382for media sharing 380
Server liston UNIX client 374, 376
Server reserved port window host property 203Server sends mail property 261SERVER_CONNECT_TIMEOUT 332SERVER_PORT_WINDOW 203, 296, 333SERVER_RESERVED_PORT_WINDOW 296, 333servers
removing from server list 240
1219Index

Service Manager 932setconf.bat 665setconf.bat file 1137Shadow Copy Components directive 838Shadow Copy Service 82, 104shared drives
configuration wizards 409SharePoint Server
consistency checks options 248Federated configurations 248properties 246
shut down NetBackupdaemons 1177services 1177
Simplified File Restore 629See also OpsCenter Operational Restore
single filelayout for NetBackup catalogs 888restore program
FlashBackup 826Single Sign-on (SSO) 39Single-Instance Storage (SIS) 134, 647, 705, 718–
719SKIP_RESTORE_TO_SYMLINK_DIR 334slot number
for volume 491SLP Parameters host properties 248, 253, 638SLP Windows 46, 656, 660SLP.AUTO_CREATE_IMPORT_SLP 252SLP.CLEANUP_SESSION_INTERVAL 251, 673SLP.DEFERRED_DUPLICATION_OFFSET_TIME 252SLP.DISK_RESOURCE_MULTIPLIER 252SLP.DUPLICATION_GROUP_CRITERIA 252SLP.IMAGE_EXTENDED_RETRY_PERIOD 251SLP.IMAGE_PROCESSING_INTERVAL 251, 254SLP.JOB_SUBMISSION_INTERVAL 251, 254SLP.MAX_IMAGES_PER_IMPORT_JOB 250SLP.MAX_IMAGES_PER_SNAPSHOT_REPLICATION_JOB 250SLP.MAX_SIZE_PER_BACKUP_REPLICATION_JOB 250SLP.MAX_SIZE_PER_DUPLICATION_JOB 250SLP.MAX_TIME_TIL_FORCE_SMALL_DUPLICATION_JOB 251SLP.MIN_IMAGES_PER_IMPORT_JOB 250SLP.MIN_SIZE_PER_DUPLICATION_JOB 250SLP.REPLICA_METADATA_CLEANUP_TIMER 252SLP.TAPE_RESOURCE_MULTIPLIER 252SLP.VERSION_CLEANUP_DELAY 251, 674SLP.WINDOW_CLOSE_BUFFER_TIME 252SLP_MultipleLifecycles job 254
snapdupe 623See also Backup From Snapshot operation
Snapshot Client 103, 266, 773, 1039checkpoint restart 705
Snapshot Client and Replication Director policyattributes 755, 757
Snapshot operation type 635Snapshot Type parameter 756Snapshot verification I/O throttle property 133snapshots
cataloging 629, 631creating copies 667disk array snapshot methods 118job 636Maximum images per snapshot replication
job 250Microsoft Volume Shadow Copy Service 82MS-Exchange-Server 133–134operation type 654, 666Replication Director 135selecting the snapshot provider 93, 101, 103–
106storage unit groups for 603, 605
Solaris 9 extended attributes 826Source binding 206, 208, 212, 214, 216–217SPC-2 SCSI reserve 191SQL
Instances and Instance Groups 46Intelligent Policy 46
SQL Anywherein NetBackup installation 883
SQLANYs_VERITAS_NB 932, 1048square brackets as wildcards 1114SSO (Single Sign-on) 39staging
backups 589schedule storage unit setting 586using BasicDisk storage unit 574
Standard policy type 810standard toolbar 53start up NetBackup
daemons 1178services 1177
Start Window tab 790startup text, removing 184status codes
1000 (Client is offline) 96, 9812 (file open failed) 5741519 (Images are in process) 618
1220Index

status codes (continued)1573 (Backup image cannot be expired because
its SLP processing is not yet complete) 9864206 (Authentication error occurred) 111171 (none of the files in the file list exist) 810
Status of backups report 1076stopping jobs 1041Storage device storage unit setting 587Storage Lifecycle Manager service (nbstserv) 253,
1008, 1011, 1050, 1060storage lifecycle policies 1050
See also Storage Lifecycle Manager service(nbstserv)
Active secondary operations 655Alternate read server option 658and synthetic backups 648, 866and the Multiple copies configuration dialog 778batch creation logic 253best practices document 614, 638Capacity managed retention type 646–647cataloging snapshots 629, 631copy number 668Data classification setting 654deleting 618deleting old versions of 673deprecated parameters 254hierarchy 615, 617, 642Impact Report 229, 661LIFECYCLE_PARAMETERS file 249Local storage option 657Media owner option 658mixing retention types 645operations 614
windows 623, 625, 627–628, 630, 633, 636operations, windows for 46parameters for 248Postponed secondary operations 655Preserve multiplexing option 658Priority for secondary operations 654retention types 644, 656, 780scheduling secondary operations 660SLP_DATA.db 930Storage lifecycle policy name 653Storage unit option 657Target master option 657using nbstlutil to administrate lifecycle
operations 619utility 613Validate Across Backup Policies button 655, 665
storage lifecycle policies (continued)versions of 670–672Volume pool option 657writing multiple copies 667
storage servercredentials for cloud storage 383credentials for deduplication 383define target for Auto Image Replication 997description 569OpenStorage. See NetBackup OpenStorage
Solutions Guide for DiskStorage Server Configuration Wizard 57storage unit groups
and NetBackup Accelerator 735and storage lifecycle polices 655, 659create for backups 603create for snapshots 605deleting 607not supported for Auto Image Replication
source 622, 993storage unit selection criteria 607, 611
storage unitsAdvancedDisk disk type 568available storage property of volume 584BasicDisk type 568capacity property of volume 584changing server to manage 1124creating 561, 564creating a basic disk staging unit 591deleting 565disk pool comment property 584disk storage units 568for policy 698, 700for schedule 778high water mark property of volume 576, 584low water mark property of volume 577, 585Media Manager type 566name setting 587NDMP disk type 572null_stu 576, 699number of volumes property 585OpenStorage disk type 568, 647percent full property on volume 585PureDisk disk type 568, 647QIC drive type 774raw size property on volume 585storage lifecycle policies 570type setting 587types 604
1221Index

storage units (continued)usable size property of volume 585utility for configuring 560vendor-specific 568
Submission interval (SLP parameter) 251subnets 84, 338Sun PC NetLink 825SureScale
credentials 384suspended jobs 90, 1042–1043Sybase policy type 697, 811Sybase SQL Anywhere
dbsrv12.exe 1048management of 932starting/stopping the service 932use in NetBackup 919
SYBASE_HOME 269, 375symbolic links
included in backup selection list 813UNIX 826
synthetic backupsand encryption 866checkpoint restart 705component images 868, 870deduplication 879logs produced during 874multiple copy backups method 648, 866, 875no Auto Image Replication support 866, 993no multiple copy support 775no NetBackup change journal support 116OpenStorage optimized method 879recommendations for using 865schedules 769, 798
System Statebackups, checkpoint restart 705directive 838restoring 1172
TTake checkpoints every __ minutes (policy
attribute) 703Tape contents report 1077tape drive configuration
ACS, LSM, Panel, Drive option 428Cleaning Frequency option 427DAS drive name option 428Drive is in a robotic library option 426Drive Status option 427IBM device number option 428
tape drive configuration (continued)Robot drive number option 428Robotic library option 427Serial Number option 427
tape drivesadding 423, 432adding a path 430assigning requests for tapes 1071changing operating mode 437changing to a shared tape drive 439configuration options 425–426configuring 408Drive name configuration option 425paths, changing 438properties, changing 439shared, operating modes of 437–438, 440TapeAlert 427
Tape lists report 1077Tape logs report 1076Tape Media contents report 1077Tape resource multiplier (SLP parameter) 252Tape summary report 1077Tape written report 1077TapeAlert 427tar format 190tar-formatted backup 623, 625, 637–638, 641Target master storage option 657Target retention type 651Targeted A.I.R. 241, 993, 1018–1019, 1026TCDebug_TCPP level logging property 113TELEMETRY_UPLOAD 336temporary staging area 577, 586–587, 593third-party copies 774Third-Party Copy Device Advanced Backup
method 705Throttle Bandwidth host properties 254–255, 336THROTTLE_BANDWIDTH 254, 336Time overlap property 115time zones
adjustment for restores 1148–1149setting Daylight savings time 1149
Timeouts host properties 256, 288, 290–291, 320, 332, 369
tlmd daemon 1061tmpfs file system, excluding from backup 845topology of storage 998, 1000tpext utility 962Transaction log cache path property 187transaction log, creating 959
1222Index
traversing directories to back up a file 146Troubleshooter 58True Image Restoration (TIR)
Error code 136 873pruning information 873with Move Detection 873
True Image Restore (TIR) with Move Detection 116Truncate log after successful Instant Recovery backup
property 134trusted master servers
adding 242for Auto Image Replication 1005removing 243Trusted Master Servers tab of Servers host
properties 238trusted NetBackup domain. See trusted master
serversTRUSTED_MASTER 340
UULINK_ON_OVERWRITE 270UNC path
checkpoint restart 705in the Backup Selections tab 819with CIFS and AdvancedDisk storage units 570with CIFS and BasicDisk storage units 570
uncompress NetBackup catalogs 916unified logging 171, 175, 180, 271–272, 1083Universal Settings host properties 204, 258, 274, 362,
374, 378UNIX Client host properties 264UNIX Client Settings host properties 107, 110, 355,
363, 368–369, 371, 377UNIX clients
checkpoint restart 705UNIX epoch time 231UNIX server properties 265, 371UNLINK_ON_OVERWRITE 340Unload NetBackup database 939, 953unloading
database schema 945the database schema 954the NetBackup database 968
unlocking user account 264UNSET file list directive 844UNSET_ALL file list directive 845Unused SLP definition version cleanup delay (SLP
parameter) 251Update Sequence Number (USN) 684
updating drive firmware 450usbdevfs file system, excluding from backup 846Use Active Directory login credentials 39Use alternate read server attribute 594, 601Use case sensitive exclude list host property 138Use Change Journal option
and synthesized backups 873and use with Accelerator 731, 736, 738, 740guidelines for using 116
Use defaults from the master server configurationproperty in Fibre Transport host properties 149
Use Direct Access Recovery for NDMP restoresproperty 157
Use legacy DES encryption property 128Use non reserved ports property 154Use OS dependent timeouts property 257Use random port assignments properties 202Use reserved ports property 154Use specified network interface property 204, 260Use VxFS file change log for Incremental backups
property 109USE_AUTHENTICATION 342USE_CTIME_FOR_INCREMENTALS 376USE_FILE_CHG_LOG 377USE_VXSS 342USEMAIL on UNIX clients 378user
archive backups 761backups 760schedules, planning 767toolbar 53unlocking account 264
User Access Control (UAC) 40User Account Settings properties 262User directed timeouts property 115UTC (Coordinated Universal Time) 993
VValidate Across Backup Policies button in SLP 655,
664–665Validate NetBackup database 938, 952Validate Policy dialog box 756validation for backup policies 756Validation Report tab 655, 665Vault
backup type 761catalog archiving 907designating duplicate as the primary 977Maximum vault host property 162
1223Index

Vault (continued)parent and child jobs 1040policy type 697, 811, 855process 1060vlteject command 856vltrun command 856
vendor-specific storage units 568VERBOSE 343verifying backup
images 976selections list 813
Veritas Private Branch Exchange 1050, 1061Veritas Security Subsystem (VxSS)
USE_VXSS 342, 344, 1011Veritas Volume Manager (VxVM) 773, 827Veritas Volume Snapshot Provider 104veritas_pbx (Symantec Private Branch
Exchange) 101, 155veritas_pbx (Veritas Private Branch Exchange) 1061veritas_pbx port 101, 155view properties of a license key 63virtual machine server
credentials 384virtual tape libraries (VTL) 657–658VLANs 237, 329vlteject Vault command 856vltrun Vault command 856vm.conf file, adding SERVER entries 1118VMD (NetBackup Volume Manager)
and the NetBackup Device Manager 451the Activity Monitor 1050
vmd process 1061vmphyinv physical inventory utility 543vmps script 1180VMware
Access Host properties 266policy type 697, 756, 847
vnetdenabling logging for 155NetBackup Legacy Network Service 1048, 1061Only property (for selection of ports) 155Veritas Network Daemon 154with CIFS BasicDisk storage units 1058–1059,
1061VNETD_PORT 1143volume groups
changing name 502–503, 510deleting 524moving 522
volume groups (continued)rules for assigning 457
volume pool namesreserved prefixes 455
volume poolsadding 520and WORM media 461changing attributes 520changing for a volume 503DataStore pool 702deleting 521for schedule 779indicating one for use by a policy 701overview 454properties 521reserved prefixes for names 455scratch 456
Volume Shadow Copy Service (VSS) 82, 93, 104, 684, 838
Volume Snapshot Provider (VSP) 93, 103–104VOLUME_EXCLUDE_LIST 834volumes
adding 464, 466, 490assignments 701changing properties 503configuration wizard 57determining retention period 230ejecting 511exchanging 508, 518injecting 511maximum mounts allowed 492moving 502, 516–517preview configuration update 536properties 491update volume configuration 517
VRTSpbx (Veritas Private Branch Exchange) 1050VXDBMS_NB_DATA registry entry 931VxFS
file change log 109named data streams 829restore of compressed files 1174
vxlogcfg command 172, 175VXSS_NETWORK 343–344, 378
WWait time before clearing archive bit property 114wildcard characters 818, 825, 1113, 1115
in Backup Selections list 1115Window close buffer time (SLP parameter) 252
1224Index

Window tab for secondary operations 46, 656, 660Windows 2003 838, 859Windows 2008 859Windows 2012 807Windows 8 807Windows Client host properties 268Windows Client Settings host properties 112, 115–
116, 368Windows Disk-Image (raw) backups 705, 820Windows Map Network Drive option 819Windows Open File Backup host properties 101Windows policy type 696Windows Server Failover Clustering (WSFC) 828Windows Service Manager 932Windows User Access Control (UAC) 40windows, for storage lifecycle policy operation 46,
623, 625, 627–628, 630, 633, 636wizards
Catalog Backup 58, 890, 892Catalog Recovery 58Cloud Storage Server Configuration 57Device Configuration 57, 414Disk Pool Configuration 57Getting Started 57Import Images 58Policy Configuration 58, 686, 895Storage Server Configuration 57Volume Configuration 57
Working directory property 86, 352WORM media 462, 464
about 460and the Quantum drive 463and unique drive and media types 462and volume pools 461Disabling WORM volume pool name
verification 463encrypting 461
Yyear 2038 problem 231
1225Index