SonicOS Standard Administrator's Guide
321
COMPREHENSIVE INTERNET SECURITY ™ S o n i c WALL Internet Security Ap p l i a n c e s SonicOS Standard Administrator's Guide
-
Upload
khangminh22 -
Category
Documents
-
view
1 -
download
0
Transcript of SonicOS Standard Administrator's Guide

COMPREHENSIVE INTERNET SECURITY™
S o n i c WALL Internet Security Ap p l i a n c e s
SonicOS StandardAdministrator's Guide

Page 1
ContentsCopyright Notice ...................................................................................................................... 7LIMITED WARRANTY ............................................................................................................. 7
About this Guide ................................................................................................................8Product Features ............................................................................................................... 9SonicWALL Technical Support .......................................................................................... 9Firmware Version ..............................................................................................................9
1 Introduction ....................................................................................................11SonicWALL SonicOS 2.0s Overview ..................................................................................... 11SonicWALL Internet Security Appliance Features ................................................................. 12
2 Configuring Network Settings Using the Setup Wizard .............................17Configuring a Static IP Address with NAT Enabled ............................................................... 17
Configuring DHCP Networking Mode .............................................................................. 24Configuring NAT Enabled with PPPoE ............................................................................ 29Configuring PPTP Network Mode .................................................................................... 35
3 Registering at mySonicWALL.com ..............................................................41Creating a New User Account ......................................................................................... 41Problems Creating a mysonicWALL.com User Account? ............................................... 46User Name and Password Functions .............................................................................. 46Registering Your SonicWALL Internet Security Appliance .............................................. 46Click Here Registration .................................................................................................... 47Quick Registration ........................................................................................................... 47Status and Options .......................................................................................................... 49Managing Your SonicWALL ............................................................................................ 50Renaming Your SonicWALL ............................................................................................ 50Transferring a SonicWALL Product .................................................................................51Delete Product ................................................................................................................. 52Managing Services for Your SonicWALL ........................................................................ 53Activating Services Using mySonicWALL.com ................................................................ 54
4 System Settings .............................................................................................55System>Status ....................................................................................................................... 55System Messages .................................................................................................................. 55
System Information .......................................................................................................... 56Subscribed Services ........................................................................................................ 56Most Recent Alerts .......................................................................................................... 56Network Interfaces ........................................................................................................... 56System>Licenses ............................................................................................................ 57System>Administration .................................................................................................... 58Login Security .................................................................................................................. 59Login Failure Handling ..................................................................................................... 59Logging in as an Administrator from the WLAN .............................................................. 59Management Protocol ..................................................................................................... 60Advanced Management ................................................................................................... 60

Page 2 SonicWALL SonicOS 2.0s Administrator’s Guide
Enable Management Using SonicWALL GMS ................................................................ 62System>Time ...................................................................................................................63System>Settings ............................................................................................................. 64System>Diagnostics ........................................................................................................ 66System>Restart ............................................................................................................... 70
5 Network ...........................................................................................................71Network>Settings ................................................................................................................... 71
Network Addressing Mode ..............................................................................................72Interfaces ......................................................................................................................... 73Standard Configuration .................................................................................................... 77Configuring NAT Enabled Mode ...................................................................................... 78Configuring NAT with DHCP Client .................................................................................82Configuring NAT with PPPoE Client ................................................................................ 86Configuring NAT with L2TP Client ................................................................................... 90Configuring NAT with PPTP Client .................................................................................. 94Network>One-to-One NAT ..............................................................................................99One-to-One NAT Configuration Example ......................................................................101Firewall>Web Proxy .......................................................................................................102Configuring Automatic Proxy Forwarding (Web Only) ...................................................102Network>Routing ...........................................................................................................103ARP Cache ....................................................................................................................106DHCP Server .................................................................................................................107
Current DHCP Leases .........................................................................................................1126 Firewall .........................................................................................................113
Wireless Access Rules ..................................................................................................114Firewall>Access Rules ..................................................................................................114Adding Rules using the Network Access Rules Wizard ................................................116Configuring a Public Server Rule ..................................................................................117Creating a General Network Access Rule .....................................................................118Adding Rules .................................................................................................................122Adding New Rule Examples ..........................................................................................124Access Rules> Advanced ..............................................................................................125Firewall>Services ..........................................................................................................127
User Defined (Custom) Services .........................................................................................1277 SonicWALL VPN ..........................................................................................129
Before You Start Configuring VPN Tunnels .........................................................................129Site to Site VPN Configurations ...........................................................................................129
VPN Planning Sheet for Site-to-Site VPN Policies ........................................................130Using the VPN Wizard to Configure VPN Security Policy .............................................131Creating a Custom VPN Policy using IKE and a Preshared Secret ..............................134Creating a Manual Key VPN Policy with the VPN Policy Wizard ..................................139VPN>Settings ................................................................................................................143Global IPSec Settings ....................................................................................................143VPN Policies ..................................................................................................................143
Page 3
Currently Active VPN Policies .......................................................................................144Adding VPN Policies to the SonicWALL ........................................................................144Configuring a VPN Policy using IKE with Preshared Secret .........................................148Configuring a VPN Policy using Manual Key .................................................................152Advanced Settings .........................................................................................................161Configuring a SonicWALL for VPN Single Armed Mode ...............................................163DHCP over VPN ............................................................................................................165DHCP Relay Mode ........................................................................................................165Configuring DHCP over VPN Remote Gateway ............................................................167Device Configuration .....................................................................................................168Current DHCP over VPN Leases ..................................................................................169VPN>L2TP Server .........................................................................................................169General ..........................................................................................................................170SonicWALL Third Party Digital Certificate Support .......................................................171Overview of Third Party Digital Certificate Support .......................................................172Importing Certificate with private key .............................................................................172Creating a Certificate Signing Request .........................................................................174VPN>CA Certificates .....................................................................................................175
8 Users .............................................................................................................177Users > Status .....................................................................................................................177Active User Status ...............................................................................................................177
Users>Settings. .............................................................................................................178Global User Settings ......................................................................................................178RADIUS .........................................................................................................................180
9 Security Services .........................................................................................183Security Services>Summary ................................................................................................183Security Services>Content Filtering .....................................................................................184
Content Filter Status ......................................................................................................185Content Filter Type ........................................................................................................185URL List .........................................................................................................................187Consent .........................................................................................................................187Mandatory Filtered IP Addresses ..................................................................................188Restrict Web Features ...................................................................................................189Message to Display when Blocking ...............................................................................190
10 SonicWALL Anti-Virus ..............................................................................191Overview ..............................................................................................................................191
System Requirements for SonicWALL Anti-Virus ..........................................................192Configuring SonicWALL Anti-Virus ................................................................................193Activating Your Subscription ..........................................................................................194Anti-Virus Settings .........................................................................................................194Anti-Virus Administration ...............................................................................................195Anti-Virus License Sharing ............................................................................................197Configuring Anti-Virus Policies ......................................................................................198Network Anti-Virus E-Mail Filter .....................................................................................200

Page 4 SonicWALL SonicOS 2.0s Administrator’s Guide
11 Log ..............................................................................................................203Log>View .............................................................................................................................203
SonicWALL Log Messages ...........................................................................................204Log>Categories .............................................................................................................205Log>Automation ............................................................................................................207Log>Reports ..................................................................................................................209Data Collection ..............................................................................................................209Log>ViewPoint ..............................................................................................................210SonicWALL ViewPoint ...................................................................................................210
12 Configuring Wireless on the SOHO TZW ................................................211Considerations for Using Wireless Connections ...........................................................212Recommendations for Optimal Wireless Performance ..................................................212Adjusting the SOHO TZW Antennas .............................................................................212Wireless Guest Services (WGS) ...................................................................................213MAC Filter List ...............................................................................................................213WiFiSec Enforcement ....................................................................................................214
Wireless Status Page Updates ............................................................................................214SOHO TZW Deployment Scenarios ..............................................................................215Configuring the SOHO TZW as an Office Gateway ......................................................216Configuring the SOHO TZW as a Secure Access Point ................................................223Configuring the SOHO TZW as a Guest Internet Gateway ...........................................229Configuring the SOHO TZW using a Custom Deployment ............................................235Using the Wireless Wizard ............................................................................................242Configuring Additional Wireless Features .....................................................................246Station Status ................................................................................................................249Wireless>Settings ..........................................................................................................250WiFiSec Enforcement ....................................................................................................250Secure Wireless Bridging ..............................................................................................251Configuring a Secure Wireless Bridge ...........................................................................252Wireless > WEP Encryption ...........................................................................................255WEP-on-Demand ..........................................................................................................257Adding WEP-on-Demand Clients ..................................................................................258Advanced Radio Settings ..............................................................................................260Wireless>MAC Filter List ...............................................................................................262Wireless Intrusion Detection Services ...........................................................................263
13 Wireless > Guest Services ........................................................................267Configuring Wireless Guests .........................................................................................272Flexible Default Route ...................................................................................................274Secure Access Point with Wireless Guest Services ......................................................276

Page 5
14 SonicWALL Options and Upgrades .........................................................279SonicWALL VPN Client .................................................................................................279SonicWALL Network Anti-Virus .....................................................................................279Content Filter List Subscription ......................................................................................280Vulnerability Scanning Service ......................................................................................280SonicWALL ViewPoint Reporting ..................................................................................280SonicWALL Global Management System .....................................................................281Contact Your Reseller or SonicWALL ...........................................................................281
15 Appendices ................................................................................................283Appendix A - SonicWALL Support Solutions .................................................................283Appendix B - Introduction to Networking .......................................................................290Appendix C - IP Port Numbers ......................................................................................295Appendix D - Configuring TCP/IP Settings ....................................................................296Appendix E - Basic VPN Terms and Concepts .............................................................301Appendix F- Erasing the Firmware ................................................................................305Appendix G - Configuring RADIUS and ACE Servers ...................................................306Notes .............................................................................................................................310

Page 6 SonicWALL SonicOS 2.0s Administrator’s Guide

Page 7
Copyright Notice© 2003 SonicWALL, Inc. All rights reserved.Under the copyright laws, this manual or the software described within, can not be copied, in whole or part, without the written consent of the manufacturer, except in the normal use of the software to make a backup copy. The same proprietary and copyright notices must be affixed to any permitted copies as were affixed to the original. This exception does not allow copies to be made for others, whether or not sold, but all of the material purchased (with all backup copies) can be sold, given, or loaned to another person. Under the law, copying includes translating into another language or format.SonicWALL is a registered trademark of SonicWALL, Inc. Other product and company names mentioned herein can be trademarks and/or registered trademarks of their respective companies. Specifications and descriptions subject to change without notice.
LIMITED WARRANTYSonicWALL, Inc. warrants the SonicWALL Internet Security Appliance (the Product) for one (1) year from the date of purchase against defects in materials and workmanship. If there is a defect in the hardware, SonicWALL will replace the product at no charge, provided that it is returned to SonicWALL with transportation charges prepaid. A Return Materials Authorization (RMA) number must be displayed on the outside of the package for the product being returned for replacement or the product will be refused. The RMA number can be obtained by calling SonicWALL Customer Service between the hours of 8:30 AM and 5:30 PM Pacific Standard Time, Monday through Friday.Phone:(408) 752-7819Fax:(408) 745-9300Web: <http://www.sonicwall.com/support>This warranty does not apply if the Product has been damaged by accident, abuse, misuse, or misapplication or has been modified without the written permission of SonicWALL.In no event shall SonicWALL, Inc. or its suppliers be liable for any damages whatsoever (including, without limitation, damages for loss of profits, business interruption, loss of information, or other pecuniary loss) arising out of the use of or inability to use the Product. Some states do not allow the exclusion or limitation of implied warranties or liability for incidental or consequential damages, so the above limitation or exclusion can not apply to you. Where liability can not be limited under applicable law, the SonicWALL liability shall be limited to the amount you paid for the Product. This warranty gives you specific legal rights, and you can have other rights which vary from state to state.By using this Product, you agree to these limitations of liability.THIS WARRANTY AND THE REMEDIES SET FORTH ABOVE ARE EXCLUSIVE AND IN LIEU OF ALL OTHER WARRANTIES, ORAL OR WRITTEN, EXPRESS OR IMPLIED. No dealer, agent, or employee of SonicWALL is authorized to make any extension or addition to this warranty.
Page 8 SonicWALL SonicOS 2.0s Administrator’s Guide
About this GuideThank you for purchasing the SonicWALL Internet Security appliance. The SonicWALL protects your PC from attacks and intrusions, filters objectional Web sites, provides private VPN connections to business partners and remote offices, and offers a centrally-managed defense against software viruses.This manual covers the configuration of the SonicWALL SonicOS 2.0s and its features.
Organization of this GuideChapter 1, Introduction - describes the features and applications of the SonicWALL.Chapter 2, Configuring Network Settings Using the Setup Wizard, has detailed instructions for using the Setup Wizard to configure the SonicWALL for Internet connectivity. Chapter 3, Registering at mySonicWALL.com - provides details on registering your SonicWALL appliance in the product registration database.Chapter 4, System Settings, describes the configuration of the SonicWALL IP settings, time, and password as well as providing instructions to restart the SonicWALL, import and export settings, upload new firmware, and perform diagnostic tests.Chapter 5, Network, outlines configuring network settings manually for the SonicWALL as well as static routes and RIPv2 advertising on the network. Setting up the SonicWALL to act as the DHCP server on your network is also covered in this chapter. Chapter 6, Firewall, explains how to permit and block traffic through the SonicWALL, set up One-to-One NAT, and configuring automatic proxy forwarding.Chapter 7, SonicWALL VPN, explains how to create a VPN tunnel between two SonicWALLs and creating a VPN tunnel from the VPN client to the SonicWALL.Chapter 8, Users, describes the configuration of user level authentication as well as the setup of RADIUS servers for user authentication. Chapter 9, Security Services, provides configuration instructions for Content Filtering Service and licensing. Chapter 10, SonicWALL Anti-Virus, configuring Anti-Virus protection on the SonicWALL. Chapter 11, Logging and Alerts, illustrates the SonicWALL logging, alerting, and reporting features.Chapter 12, Configuring Your Wireless Connectivity, describes the wireless features of your SonicWALL TZW and configuring wireless access using a Deployment Scenario Wizard.Chapter 13, SonicWALL Options and Upgrades, presents a brief summary of the SonicWALL's subscription services, firmware upgrades and other options.Appendix A, Troubleshooting Guide - lists solutions to commonly encountered issues.Appendix B, SonicWALL Support Solutions - describes available support packages from SonicWALL. Appendix C, Introduction to Networking - provides an overview of the Internet, TCP/IP settings, IP security, and other general networking topics.Appendix D, IP Port Numbers - offers information about IP port numbering.Appendix E, Configuring TCP/IP Settings - provides instructions for configuring your Management Station's IP address.

Page 9
Appendix F, Basic VPN Terms and Concepts - covers VPN terminology and configuration concepts. Appendix G, Erasing the Firmware - describes the reset firmware procedure.Appendix H, Configuring RADIUS and ACE Servers - provides vendor-specific configuration instructions for RADIUS and ACE servers. The appendix also includes a RADIUS Attributes Dictionary.
Product FeaturesSonicOS 2.0s provides the same functionality to the SOHO TZW, TZ 170, and the PRO 3060. However, the SOHO TZW provides wireless connectivity to your network. Certain features are only available on the SOHO TZW. These features are clearly marked in the text. The terms, WLAN and DMZ, can be used interchangeably except in the chapters on wireless connectivity.
SonicWALL Technical SupportFor fast resolution of technical questions, please visit the SonicWALL Tech Support Web site at <http://www.sonicwall.com/support>. There, you will find resources to resolve most technical issues and a Web request form to contact one of the SonicWALL Technical Support engineers.
Firmware Version This manual is updated and released with firmware version SonicOS 2.0s. Always check <http:www.sonciwall.com/products/documentation.html> for the latest version of this manual as well as other upgrade manuals.
Icons Used in this Manual
Alert! Important information about features that can affect firewall performance, security features, or cause potential problems with your SonicWALL.
Tip! Useful information about security features and configurations on your SonicWALL.
Note: Information not contained in the body of the manual, but should be noted.

Page 10 SonicWALL SonicOS 2.0s Administrator’s Guide
Introduction Page 11
1 IntroductionSonicWALL SonicOS 2.0s OverviewThe SonicWALL SonicOS 2.0s, the standard version of SonicWALL firmware, provides a complete security solution that protects your network from attacks, intrusions, and malicious tampering. In addition, the SonicWALL filters objectionable Web content and logs security threats. SonicWALL VPN provides secure, encrypted communications to business partners and branch offices. The SonicWALL SonicOS 2.0s uses stateful packet inspection to ensure secure firewall filtering. Stateful packet inspection is widely considered to be the most effective method of filtering IP traffic. MD5 authentication is used to encrypt communications between your Management Station and the SonicWALL Web Management Interface. MD5 Authentication prevents unauthorized users from detecting and stealing the SonicWALL password as it is sent over your network.

Page 12 SonicWALL SonicOS 2.0s Administrator’s Guide
SonicWALL Internet Security Appliance FeaturesInternet Security
• ICSA-Certified Firewall After undergoing a rigorous suite of tests to expose security vulnerabilities, SonicWALL Internet security appliances have received Firewall Certification from ICSA, the internationally-accepted authority on network security. The SonicWALL uses stateful packet inspection, the most effective method of packet filtering, to protect your LAN from hackers and vandals on the Internet.
• Hacker Attack Prevention The SonicWALL automatically detects and thwarts Denial of Service (DoS) attacks such as Ping of Death, SYN Flood, LAND Attack, and IP Spoofing.
• Network Address Translation (NAT) Network Address Translation (NAT) translates the IP addresses used on your private LAN to a single, public IP address that is used on the Internet. NAT allows multiple computers to access the Internet, even if only one IP address has been provided by your ISP.
• Network Access Rules The default Network Access Rules allow traffic from the LAN to the Internet and block traffic from the Internet to the LAN. You can create additional Network Access Rules that allow inbound traffic to network servers, such as Web and e-mail servers, or that restrict outbound traffic to certain destinations on the Internet.
• Autoupdate The SonicWALL maintains the highest level of security by automatically notifying you when new firmware is released. When new firmware is available, the SonicWALL Web Management Interface displays a link to download and install the latest firmware.
• Wireless Connectivity - SonicWALL SOHO TZW The SonicWALL SOHO TZW combines three networking components to offer a fully secure wireless firewall: an 802.11b Access Point, a secure wireless gateway, and a stateful firewall with flexible NAT and VPN termination and initiation capabilities. With this combination, the SOHO TZW offers the flexibility of wireless without compromising network security.
• SNMP (Simple Network Management Protocol) Support SNMP is a network protocol used over User Datagram Protocol (UDP) that allows network administrators to monitor the status of the SonicWALL Internet Security Appliances and receive notification of any critical events as they occur on the network.

Introduction Page 13
Content Filtering • SonicWALL Content Filtering
You can use the SonicWALL Web content filtering feature to enforce your company's Internet access policies. The SonicWALL blocks specified categories, such as violence or nudity, using an optional Content Filter Service. Users on your network can bypass the Content Filter Service by authenticating with a unique user name and password.
• Log and Block or Log Only You can configure the SonicWALL to log and block access to objectionable Web sites, or to log inappropriate usage without blocking Web access.
• Filter Protocols In addition to filtering access to Web sites, the SonicWALL can also block Newsgroups, ActiveX, Java, Cookies, and Web Proxies.
Logging and Reporting• Log Categories
You can select the information you wish to display in the SonicWALL event log. You can view the event log from the SonicWALL Web Management Interface or receive the log as an e-mail file.
• Syslog Server Support In addition to the standard screen log, the SonicWALL can write detailed event log information to an external Syslog server. Syslog is the industry-standard method to capture information about network activity.
• ViewPoint Reporting (optional) Monitoring critical network events and activity, such as security threats, inappropriate Web use, and bandwidth levels, is an essential component of network security. SonicWALL ViewPoint complements the SonicWALL security features by providing detailed and comprehensive reports of network activity. SonicWALL ViewPoint is a software application that creates dynamic, Web-based network reports. ViewPoint reporting generates both real-time and historical reports to offer a complete view of all activity through your SonicWALL Internet Security Appliance.
• E-mail Alerts The SonicWALL can be configured to send alerts of high-priority events, such as attacks, system errors, and blocked Web sites. When these events occur, alerts can be immediately sent to an e-mail address or e-mail pager.
Page 14 SonicWALL SonicOS 2.0s Administrator’s Guide
Dynamic Host Configuration Protocol (DHCP)• DHCP Server
The DHCP Server offers centralized management of TCP/IP client configurations, including IP addresses, gateway addresses, and DNS addresses. Upon startup, each network client receives its TCP/IP settings automatically from the SonicWALL DHCP Server.
• DHCP Client The DHCP Client allows the SonicWALL to acquire TCP/IP settings (such as IP address, gateway address, DNS address) from your ISP. This is necessary if your ISP assigns you a dynamic IP address.
• DHCP over VPN DHCP over VPN allows a Host (DHCP Client) behind a SonicWALL obtain an IP address lease from a DHCP server at the end of a VPN tunnel. In some network deployments, it is desirable to have all VPN networks residing in one IP subnet address space. This facilitates address administration for the networks using VPN tunnels.
Easy Installation and Configuration• Multiple Wizards
The SonicWALL provides multiple wizards to configure features such as VPN Policies Associations and Access Rules as well as a Deployment Wizard for wireless networks. A Set Up Wizard guides you step by step through configuring the SonicWALL on your network.
• Online help SonicWALL help documentation is provided by our web-based help. A basic troubleshooting and configuration help file is provided on the SonicWALL to get you quickly and easily connected to the Internet.
IPSec VPN• SonicWALL VPN
SonicWALL VPN provides a simple, secure tool that enables corporate offices and business partners to connect securely over the Internet. By encrypting data, SonicWALL VPN provides private communications between two or more sites without the expense of leased site-to-site lines.
• VPN Client Software for Windows Mobile users with dial-up Internet accounts can securely access remote network resources with the SonicWALL VPN Client. The SonicWALL VPN Client establishes a private, encrypted VPN tunnel to the SonicWALL, allowing users to transparently access network servers from any location.

Introduction Page 15
Contact Information Contact SonicWALL, Inc. for information about the Content Filter List, Network Anti-Virus subscriptions, and other upgrades.
Web: http://www.sonicwall.comE-mail: [email protected]: (408) 745-9600Fax:(408) 745-9300

Page 16 SonicWALL SonicOS 2.0s Administrator’s Guide

Configuring Network Settings Using the Setup Wizard Page 17
2 Configuring Network Settings Using the Setup WizardThe SonicWALL provides you with a comprehensive set of wizards to configure features quickly and easily. The Setup Wizard takes you step by step through network configuration for Internet connectivity. There are four types of network connectivity available: Static IP with NAT, DHCP, PPPoE, and PPTP. Instructions for configuring the SonicWALL with a static IP address begin on this page. DHCP instructions begin on page 24. PPPoE instructions begin on page 29. PPTP instructions begin on page 35.
Configuring a Static IP Address with NAT EnabledIf this is the first time you have logged into the SonicWALL, the Setup Wizard is launched automatically. To launch the Setup Wizard from the SonicWALL, log into the SonicWALL using your admin name and password. Click Wizards and select Setup Wizard.
Using NAT to set up your SonicWALL eliminates the need for separate IP addresses for allcomputers on your LAN. It is a way to conserve IP addresses available from the pool of IPv4addresses for the Internet. If you do not have enough individual IP addresses for allcomputers on your network, you can use NAT for your network configuration.
Essentially, NAT translates the IP addresses in one network into those for a different network.As a form of packet filtering for firewalls, it protects a network from outside intrusion fromhackers by replacing the internal (LAN) IP address on packets passing through a SonicWALLwith a “fake” one from a fixed pool of addresses. The actual IP addresses of computers onthe LAN are hidden from outside view.
This section describes configuring the SonicWALL appliance in the NAT mode. If you areassigned a single IP address by your ISP, follow the instructions below.
Tip!: Be sure to have your network information including your WAN IP address, subnet mask, and DNS settings ready. This information is obtained from your ISP.

Page 18 SonicWALL SonicOS 2.0s Administrator’s Guide
Setup Wizard
Note: Your Web browser must be Java-enabled and support HTTP uploads in order to fully manage SonicWALL. Internet Explorer 5.0 and above as well as Netscape Navigator 4.0 and above are recommended.
1. Read the instructions on the Welcome window and click Next to continue.
Step 1: Change Password

Configuring Network Settings Using the Setup Wizard Page 19
2. To set the password, type a new password in the New Password and Confirm New Password fields. Do not select Managed by SGMS unless instructed by your administrator.
Tip! It is very important to choose a password which cannot be easily guessed by others.
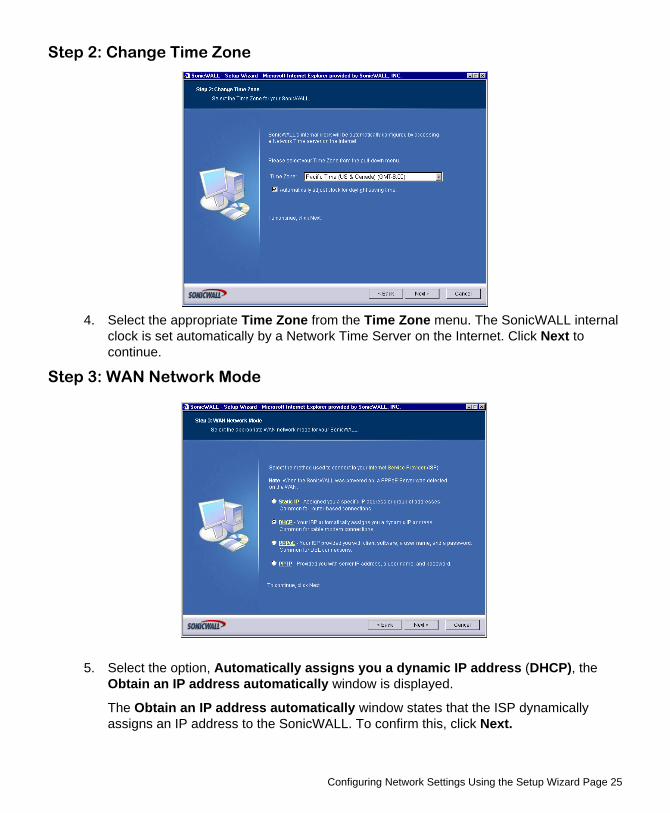
Step 2: Change Time Zone
3. Select the appropriate Time Zone from the Time Zone menu. The SonicWALL internal clock is set automatically by a Network Time Server on the Internet. Click Next to continue.
Step 3: WAN Network Mode

Page 20 SonicWALL SonicOS 2.0s Administrator’s Guide
4. Confirm that you have the proper network information necessary to configure the SonicWALL to access the Internet. Click the hyperlinks for definitions of the networking terms. Select Assigned you a single static IP address, if your ISP has provided you with a single, valid IP address.
5. Click Next.
Step 4: WAN Network Mode: NAT Enabled
6. Enter the public IP address provided by your ISP in the SonicWALL WAN IP Address, then fill in the rest of the fields: WAN/DMZ Subnet Mask, WAN Gateway (Router) Address, and DNS Server Addresses. Click Next to continue.
Step 5: LAN Settings

Configuring Network Settings Using the Setup Wizard Page 21
7. The Fill in information about your LAN page allows the configuration of the SonicWALL LAN IP Addresses and the LAN Subnet Mask.The SonicWALL LAN IP Addresses are the private IP address assigned to the LAN port of the SonicWALL. The LAN Subnet Mask defines the range of IP addresses on the LAN. The default values provided by the SonicWALL work for most networks. If you do not use the default settings, enter your IP address and subnet mask in the fields and click Next to continue. Enter a private IP address and subnet mask for the SonicWALL LAN. The default values work well for most networks.
Step 6: LAN DHCP Settings
8. The Optional-SonicWALL DHCP Server window configures the SonicWALL DHCP Server. If enabled, the SonicWALL automatically configures the IP settings of computers on the LAN. To enable the DHCP server, select Enable DHCP Server, and specify the range of IP addresses that are assigned to computers on the LAN.
9. If Disable DHCP Server is selected, you must configure each computer on your network with a static IP address on your LAN. Click Next to continue.

Page 22 SonicWALL SonicOS 2.0s Administrator’s Guide
Step 7: SonicWALL Configuration Summary
10. The Configuration Summary window displays the configuration defined using the Installation Wizard. To modify any of the settings, click Back to return to the Connecting to the Internet window. If the configuration is correct, click Next to proceed to the Storing SonicWALL Configuration window.
Storing SonicWALL Configuration

Configuring Network Settings Using the Setup Wizard Page 23
Setup Wizard Complete
Tip! The new SonicWALL LAN IP address, displayed in the URL field of the Congratulations window, is used to log in and manage the SonicWALL.
11. The SonicWALL stores the network settings.
Note: The final window provides important information to help configure the computers on the LAN. Click Print this Page to print the window information.
12. The SonicWALL takes approximately 90 seconds or longer to restart. During this time, the yellow Test LED is lit. Click Close to exit the SonicWALL Wizard.
Page 24 SonicWALL SonicOS 2.0s Administrator’s Guide
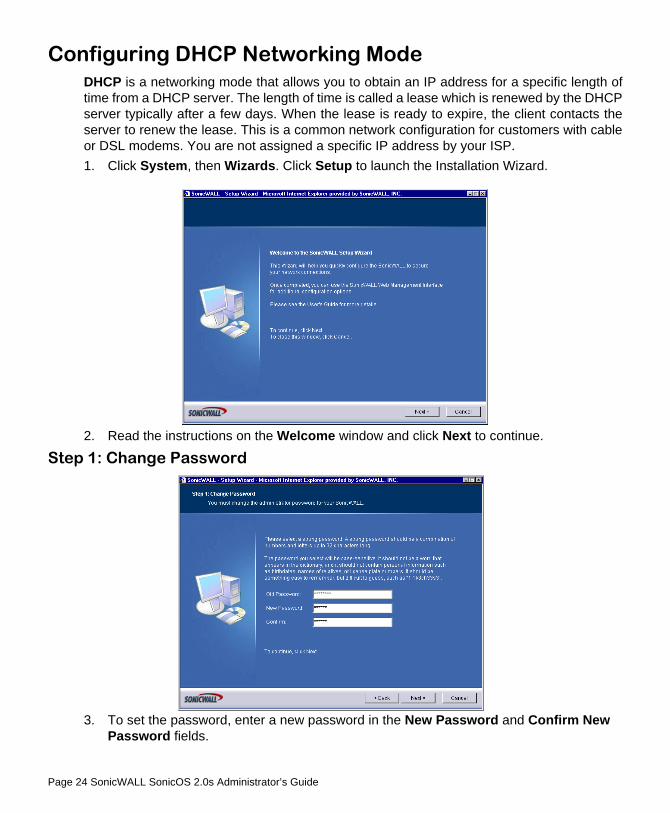
Configuring DHCP Networking ModeDHCP is a networking mode that allows you to obtain an IP address for a specific length oftime from a DHCP server. The length of time is called a lease which is renewed by the DHCPserver typically after a few days. When the lease is ready to expire, the client contacts theserver to renew the lease. This is a common network configuration for customers with cableor DSL modems. You are not assigned a specific IP address by your ISP.1. Click System, then Wizards. Click Setup to launch the Installation Wizard.
2. Read the instructions on the Welcome window and click Next to continue.
Step 1: Change Password
3. To set the password, enter a new password in the New Password and Confirm New Password fields.
Configuring Network Settings Using the Setup Wizard Page 25
Step 2: Change Time Zone
4. Select the appropriate Time Zone from the Time Zone menu. The SonicWALL internal clock is set automatically by a Network Time Server on the Internet. Click Next to continue.
Step 3: WAN Network Mode
5. Select the option, Automatically assigns you a dynamic IP address (DHCP), the Obtain an IP address automatically window is displayed.
The Obtain an IP address automatically window states that the ISP dynamically assigns an IP address to the SonicWALL. To confirm this, click Next.

Page 26 SonicWALL SonicOS 2.0s Administrator’s Guide
Step 4: WAN Network Mode: NAT with DHCP Client
6. An IP address is automatically assigned to the SonicWALL by your ISP. DHCP-based configurations are most common with cable modem connections.
Step 5: LAN Settings
7. The Fill in information about your LAN page allows the configuration of SonicWALL LAN IP Addresses and Subnet Masks. SonicWALL LAN IP Addresses are the private IP addresses assigned to the LAN of the SonicWALL. The LAN Subnet Mask defines the range of IP addresses on the networks. The default values provided by the SonicWALL are useful for most networks.

Configuring Network Settings Using the Setup Wizard Page 27
Step 6: DHCP Settings
8. The Optional-SonicWALL DHCP Server window configures the SonicWALL DHCP Server. If enabled, the SonicWALL automatically configures the IP settings of computers on the LAN. To enable the DHCP server, select Enable DHCP Server, and specify the range of IP addresses that are assigned to computers on the LAN.
If Disable DHCP Server is selected, the DHCP Server is disabled. Click Next to continue.
Configuration Summary
9. The Configuration Summary window displays the configuration defined using the Installation Wizard. To modify any of the settings, click Back to return to the Connecting to the Internet window. If the configuration is correct, click Apply.
Page 28 SonicWALL SonicOS 2.0s Administrator’s Guide
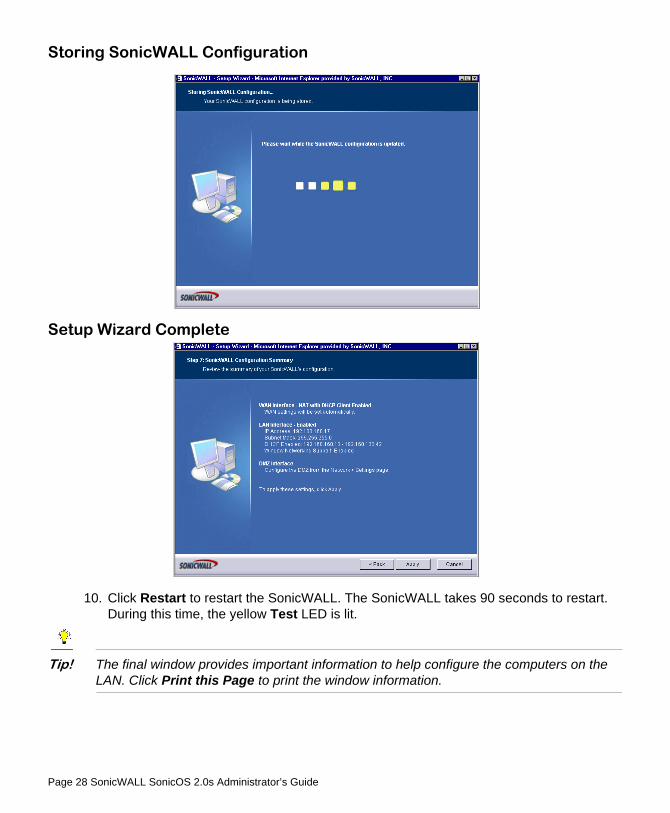
Storing SonicWALL Configuration
Setup Wizard Complete
10. Click Restart to restart the SonicWALL. The SonicWALL takes 90 seconds to restart. During this time, the yellow Test LED is lit.
Tip! The final window provides important information to help configure the computers on the LAN. Click Print this Page to print the window information.
Configuring Network Settings Using the Setup Wizard Page 29
Tip! The new SonicWALL LAN IP address, displayed in the URL field of the Congratulations window, is used to log in and manage the SonicWALL.
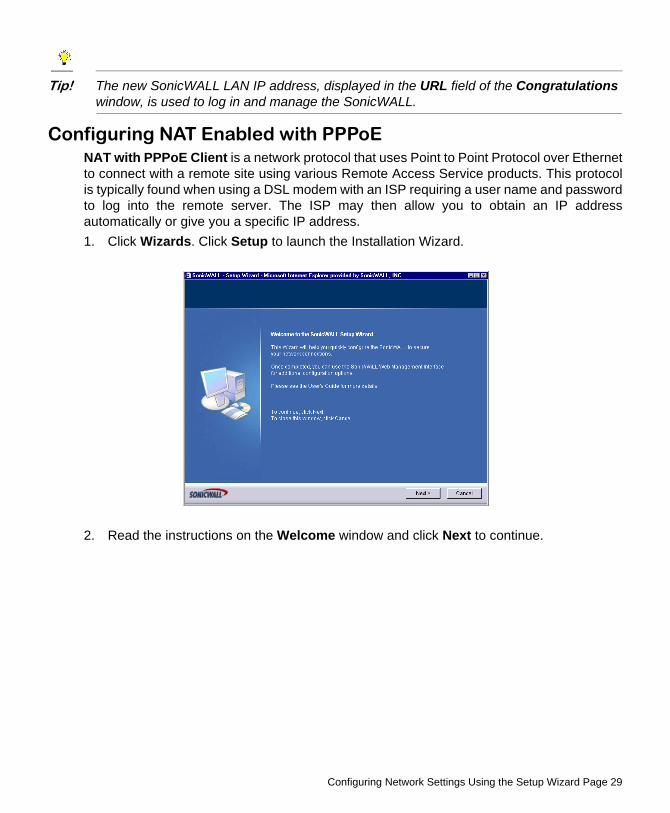
Configuring NAT Enabled with PPPoENAT with PPPoE Client is a network protocol that uses Point to Point Protocol over Ethernetto connect with a remote site using various Remote Access Service products. This protocolis typically found when using a DSL modem with an ISP requiring a user name and passwordto log into the remote server. The ISP may then allow you to obtain an IP addressautomatically or give you a specific IP address.1. Click Wizards. Click Setup to launch the Installation Wizard.
2. Read the instructions on the Welcome window and click Next to continue.

Page 30 SonicWALL SonicOS 2.0s Administrator’s Guide
Step 1: Change Password
3. To set the password, enter a new password in the New Password and Confirm New Password fields.
Step 2: Change Time Zone
4. Select the appropriate Time Zone from the Time Zone menu. The SonicWALL internal clock is set automatically by a Network Time Server on the Internet. Click Next to continue.

Configuring Network Settings Using the Setup Wizard Page 31
Step 3: WAN Network Mode
5. Select PPPoE: Your ISP provided you with desktop software, a user name and password, if your ISP has provided you with desktop software, a user name and password information.
6. Click Next to proceed to the next step.
Step 4: WAN Network Mode: NAT with PPPoE Client
7. Type the User Name and Password provided by your ISP into the User Name and Password fields.

Page 32 SonicWALL SonicOS 2.0s Administrator’s Guide
Step 5: LAN Settings
8. The LAN Settings page allows the configuration of SonicWALL LAN IP Addresses and LAN Subnet Mask.The SonicWALL LAN IP Address is the private IP address assigned to the LAN port of the SonicWALL. The LAN Subnet Mask defines the range of IP addresses on the LAN. The default values provided by the SonicWALL are useful for most networks. If you do not use the default settings, enter the IP addresses in the fields and click Next to continue.
Step 6: DHCP Server
9. The Optional-SonicWALL DHCP Server window configures the SonicWALL DHCP Server. If enabled, the SonicWALL automatically configures the IP settings of computers on the LAN. To enable the DHCP server, select Enable DHCP Server, and specify the range of IP addresses that are assigned to computers on the LAN.

Configuring Network Settings Using the Setup Wizard Page 33
If Disable DHCP Server is selected, you must configure each computer on your network with a static IP address on your LAN. Click Next to continue.
Step 7: SonicWALL Configuration Summary
10. The Configuration Summary window displays the configuration defined using the Installation Wizard. To modify any of the settings, click Back to return to the Connecting to the Internet window. If the configuration is correct, click Next to proceed to the Congratulations window.
Storing SonicWALL Configuration

Page 34 SonicWALL SonicOS 2.0s Administrator’s Guide
Tip! The new SonicWALL LAN IP address, displayed in the URL field of the Congratulations window, is used to log in and manage the SonicWALL.
Setup Wizard Complete
11. Click Restart to restart the SonicWALL.
Tip! The final window provides important information to help configure the computers on the LAN. Click Print this Page to print the window information.
12. The SonicWALL takes approximately 90 seconds or longer to restart. During this time, the yellow Test LED is lit.

Configuring Network Settings Using the Setup Wizard Page 35
Configuring PPTP Network ModeNAT with PPTP Client mode uses Point to Point Tunneling Protocol (PPTP) to connect to aremote server. It supports older Microsoft implementations requiring tunneling connectivity.1. Click Wizards. Click Setup to launch the Installation Wizard.
2. Read the instructions on the Welcome window and click Next to continue.
Step 1: Change Password
3. To set the password, enter a new password in the New Password and Confirm New Password fields.

Page 36 SonicWALL SonicOS 2.0s Administrator’s Guide
Step 2: Change Time Zone
4. Select the appropriate Time Zone from the Time Zone menu. The SonicWALL internal clock is set automatically by a Network Time Server on the Internet. Click Next to continue.
Step 3: WAN Network Mode
5. Select PPTP: Provided you with a server IP address, a user name and password.
6. Click Next.

Configuring Network Settings Using the Setup Wizard Page 37
Step 4: WAN Network Mode: NAT with PPTP Client
7. Type the User Name and Password provided by your ISP into the User Name and Password fields.
Step 5: LAN Settings
8. The LAN Settings page allows the configuration of SonicWALL LAN IP Addresses and LAN Subnet Mask.The SonicWALL LAN IP Address is the private IP address assigned to the LAN port of the SonicWALL. The LAN Subnet Mask defines the range of IP addresses on the LAN. The default values provided by the SonicWALL are useful for most networks. If you do not use the default settings, enter the IP addresses in the fields and click Next to continue.

Page 38 SonicWALL SonicOS 2.0s Administrator’s Guide
Step 6: DHCP Server
9. The Optional-SonicWALL DHCP Server window configures the SonicWALL DHCP Server. If enabled, the SonicWALL automatically configures the IP settings of computers on the LAN. To enable the DHCP server, select Enable DHCP Server, and specify the range of IP addresses that are assigned to computers on the LAN.
If Disable DHCP Server is selected, you must configure each computer on your network with a static IP address on your LAN. Click Next to continue.
Step 7: SonicWALL Configuration Summary
10. The Configuration Summary window displays the configuration defined using the Installation Wizard. To modify any of the settings, click Back to return to the

Configuring Network Settings Using the Setup Wizard Page 39
Connecting to the Internet window. If the configuration is correct, click Next to proceed to the Storing SonicWALL Configuration window.
Storing SonicWALL Configuration
Tip! The new SonicWALL LAN IP address, displayed in the URL field of the Congratulations window, is used to log in and manage the SonicWALL.
Setup Wizard Complete
11. Click Restart to restart the SonicWALL.
Page 40 SonicWALL SonicOS 2.0s Administrator’s Guide
Tip! The final window provides important information to help configure the computers on the LAN. Click Print this Page to print the window information.
12. The SonicWALL takes approximately 90 seconds or longer to restart. During this time, the yellow Test LED is lit.

Registering at mySonicWALL.com Page 41
3 Registering at mySonicWALL.comAfter you complete the initial installation and configuration of your SonicWALL, you should register your SonicWALL Internet Security Appliance at <http://www.mysonicwall.com>. MySonicWALL.com delivers a convenient, centralized way to register all your SonicWALL Internet Security appliances and Security Services. It eliminates the need to individually register SonicWALL appliances and upgrades to streamline the management of all your SonicWALL security services. You can do the following with mySonicWALL.com: • Centrally register all your SonicWALL appliances and services.• Access firmware and security service updates. • Get SonicWALL alerts on services, firmware, and products. • Check status of your SonicWALL services and upgrades linked to each registered Son-
icWALL Internet security appliance. • Manage (activate, change, or delete) your SonicWALL security services online.
Alert! You must register your SonicWALL on mySonicWALL.com to access technical support. By registering your SonicWALL, you provide the initial information necessary for technical support if any problems arise during installation.
Creating a New User AccountIf you currently have a mySonicWALL.com user account, you can skip this section and proceed to Adding New Appliances or Services.1. Type <https://www.mysonicwall.com> into your Web browser.
2. As a new user, locate the statement, “If you are not a registered user, click here.” Click the link, and an information form appears.

Page 42 SonicWALL SonicOS 2.0s Administrator’s Guide
Account Information
3. All field marked with an * are required fields. Be sure to fill out the form completely before submitting to the user database. Create a User Name and password for your mySonicWALL account. Confirm the password by typing it in the Confirm Password field. For your convenience, you can record the information below. User Name:______________________ Password:__________________
Alert! You must remember your user name and password until you have activated your account. If you forget your password before your user account is active, you must create a new user account.
Tip! If your security policy doesn’t allow you to write down passwords, write down a hint or a prompt for your password.
4. Create a Secret Question and Answer to prompt you for your password if you forget it.
Registering at mySonicWALL.com Page 43
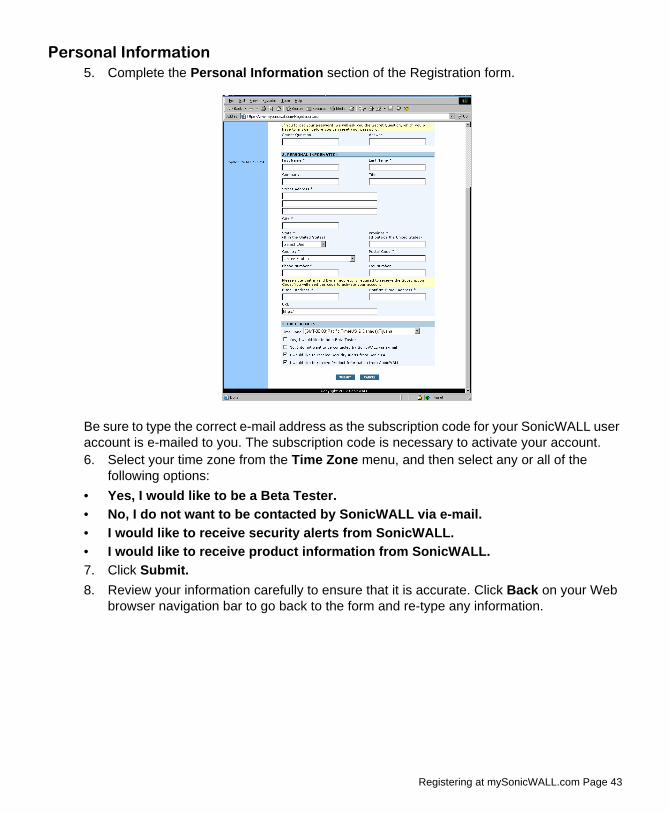
Personal Information5. Complete the Personal Information section of the Registration form.
Be sure to type the correct e-mail address as the subscription code for your SonicWALL user account is e-mailed to you. The subscription code is necessary to activate your account. 6. Select your time zone from the Time Zone menu, and then select any or all of the
following options: • Yes, I would like to be a Beta Tester. • No, I do not want to be contacted by SonicWALL via e-mail. • I would like to receive security alerts from SonicWALL. • I would like to receive product information from SonicWALL. 7. Click Submit. 8. Review your information carefully to ensure that it is accurate. Click Back on your Web
browser navigation bar to go back to the form and re-type any information.

Page 44 SonicWALL SonicOS 2.0s Administrator’s Guide
9. If all the information is correct, click OK. A confirmation message appears notifying you that your account must be activated within 72 hours of creating it. You also receive an e-mail with your subscription code in it. Write your subscription code below:Subscription code:_______________________________
Note: For security reasons, the subscriber name and part of the subscription code are masked. 10. Return to the mySonicWALL.com login screen, or alternatively, click on the link in the
e-mail message to provide your subscription code to activate your account.
Registering at mySonicWALL.com Page 45
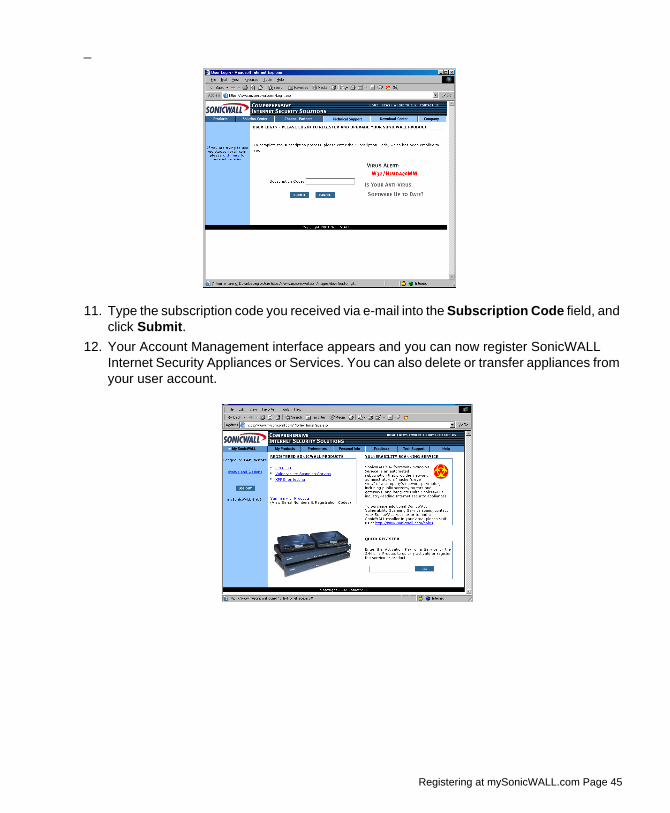
_
11. Type the subscription code you received via e-mail into the Subscription Code field, and click Submit.
12. Your Account Management interface appears and you can now register SonicWALL Internet Security Appliances or Services. You can also delete or transfer appliances from your user account.

Page 46 SonicWALL SonicOS 2.0s Administrator’s Guide
Problems Creating a mysonicWALL.com User Account?
If you’re having trouble creating a user account on the mySonicWALL.com Web site, be sure to check the following items in your browser:• Accept Cookies• Internet Explorer 5.0 or higher• Netscape 4.5 or higher• Allow Java scripts• Correct Password for mysonicWALL.com
User Name and Password FunctionsIf you forget your user name, you must send an e-mail message to Tech Support requesting your user name. Be sure to include the e-mail address used to create the mysonicWALL.com account. If you forget your password, use the Forget Password? Click here link to use your Secret Question and Answer to remember your password. If you did not set up a Secret Question and Answer for your password, a link appears allowing you to reset your password. Be sure to use the same user name and e-mail address as your mysonicWALL.com user account.
Registering Your SonicWALL Internet Security ApplianceTo register your SonicWALL Internet Security Appliance, click the hyperlink, Click Here, in the Registered SonicWALL Products section. Or to quickly register your appliance, type the Activation Key of a service, or a SonicWALL Internet Security Appliance serial number into the field in the Quick Register section.
Registering at mySonicWALL.com Page 47
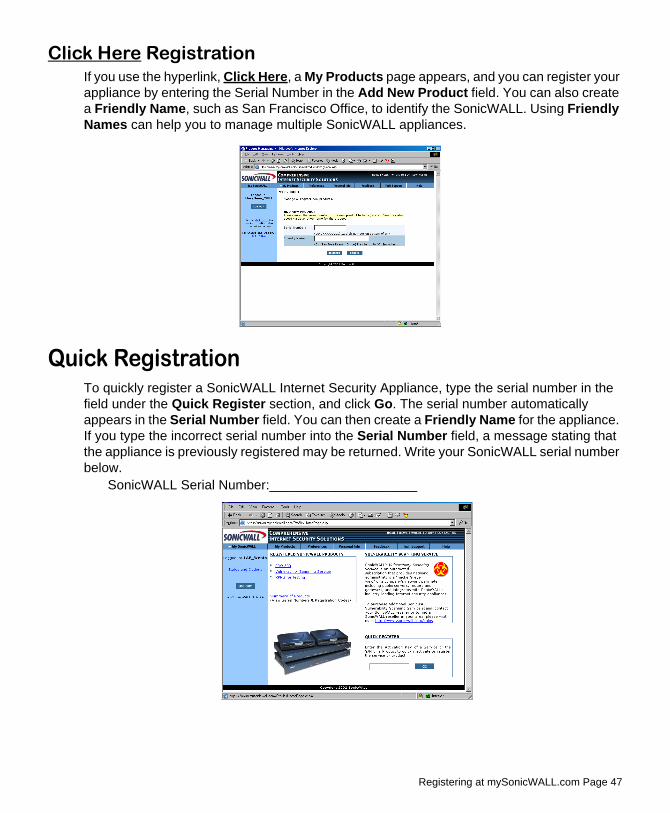
Click Here RegistrationIf you use the hyperlink, Click Here, a My Products page appears, and you can register your appliance by entering the Serial Number in the Add New Product field. You can also create a Friendly Name, such as San Francisco Office, to identify the SonicWALL. Using Friendly Names can help you to manage multiple SonicWALL appliances.
Quick RegistrationTo quickly register a SonicWALL Internet Security Appliance, type the serial number in the field under the Quick Register section, and click Go. The serial number automatically appears in the Serial Number field. You can then create a Friendly Name for the appliance. If you type the incorrect serial number into the Serial Number field, a message stating that the appliance is previously registered may be returned. Write your SonicWALL serial number below.
SonicWALL Serial Number:____________________

Page 48 SonicWALL SonicOS 2.0s Administrator’s Guide
After you register the SonicWALL, the Friendly Name appears as a hyperlink under Registered SonicWALL Products. Click on the Friendly Name to view the services activated on the appliance.
Note: Services may vary from model to model and may not have the same activated fields as the above appliance. Also, the serial number, registration code, and activation keys are masked for security reasons.
Registering at mySonicWALL.com Page 49
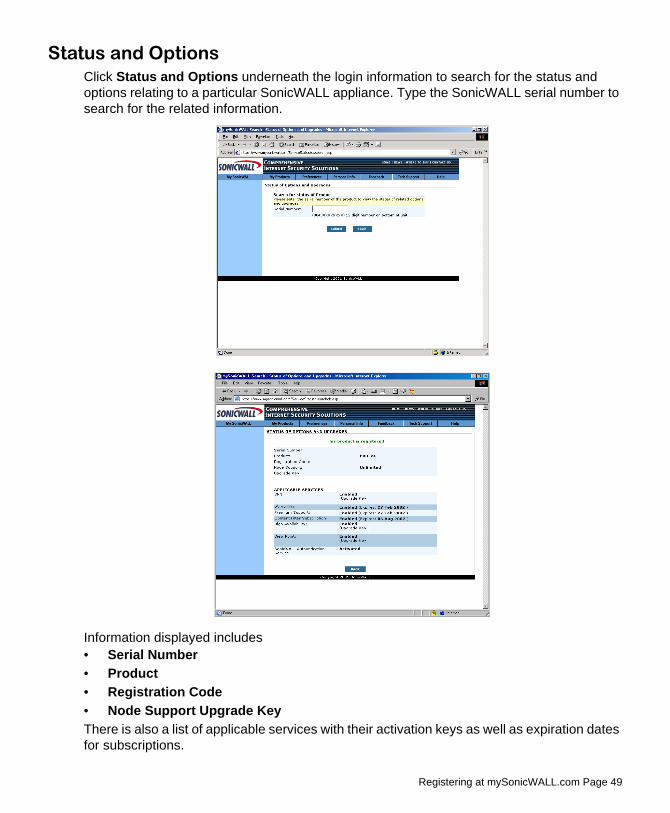
Status and OptionsClick Status and Options underneath the login information to search for the status and options relating to a particular SonicWALL appliance. Type the SonicWALL serial number to search for the related information.
Information displayed includes• Serial Number • Product • Registration Code • Node Support Upgrade Key There is also a list of applicable services with their activation keys as well as expiration dates for subscriptions.

Page 50 SonicWALL SonicOS 2.0s Administrator’s Guide
Managing Your SonicWALLYou can rename your SonicWALL, transfer your SonicWALL, or delete your SonicWALL in this section of Services Management.
Renaming Your SonicWALLYou can rename your SonicWALL at any time in order to manage your SonicWALLs. To rename your SonicWALL, click Rename in the Manage Products section. Type the new name in the Friendly Name field, and click Submit.
After clicking Submit, a new page appears with the message that you have successfully renamed your SonicWALL.

Registering at mySonicWALL.com Page 51
Transferring a SonicWALL ProductYou can transfer a SonicWALL to another mySonicWALL.com user at any time. Transferring a SonicWALL is necessary if you sell the appliance to another user, or if you want to transfer it to another person in your company. For example, the sales manager for the East Coast has left, and you were managing the services for his SonicWALL. However, another manager may have an immediate need for the SonicWALL, and requests that you transfer the appliance to him. To transfer a SonicWALL to another user, click Transfer in the Manage Product section.
Type the User Name of the new owner, and the e-mail address ID in the appropriate fields. Click Submit. A page is returned with the message that you’ve successfully transferred the SonicWALL to the new user.

Page 52 SonicWALL SonicOS 2.0s Administrator’s Guide
Also, an e-mail message is sent to both the old and new user as a notification that the appliance was transferred.
Tip! You can only transfer a SonicWALL to another registered user of mySonicWALL.com.
Delete ProductYou can also delete a SonicWALL from your mySonicWALL.com user account. Click on the Friendly Name for the appliance, and then click Delete. A confirmation message appears in the next window, and you have successfully deleted a SonicWALL from your user account. You can add the SonicWALL back to your account at any time.

Registering at mySonicWALL.com Page 53
Managing Services for Your SonicWALL In the Applicable Services section of mySonicWALL.com, a list of installed and inactivated services for your SonicWALL is displayed.
Activated services are indicated by the Installed icon with a green check mark.
Inactive services are indicated by the Activate icon with a red arrow. Activated service names are also hyperlinked to an information page with Activation Status and the Expiration Date of the service. Services can also be renewed by clicking on the name, and entering the activation key into the Activation Key field.
Page 54 SonicWALL SonicOS 2.0s Administrator’s Guide
Activating Services Using mySonicWALL.comTo activate a service such as Content Filter, use the following steps:1. Log into mySonicWALL.com using your username and password. Select the appliance
to be upgraded with the Content Filter List subscription, and click the name.
2. Click Activate next to Content Filter. The following screen appears with an Activation Key field, and a Terms and Conditions message.
3. Type the Activation Key into the Activation Key field, and select I have read and agreed to all of the above terms and conditions. Click Submit.
4. The Content Filter List subscription is now active, and you can download the Content Filter List through your SonicWALL appliance.
System Settings Page 55
4 System SettingsAll management functions on the SonicWALL are performed through a Web browser using the SonicWALL management interface. Any computer on the same network as the SonicWALL can be used to access the management interface. A computer used to manage the SonicWALL is referred to as the “Management Station.” The Web browser used to access the management interface must be Java-enabled and support HTTP uploads in order to fully manage the SonicWALL. If your Web browser does not support these functions, certain features such as uploading firmware and saved preferences files are not available.
Tip! Microsoft Internet Explorer 5.0 or higher, or, Netscape Navigator 4.5 or higher are two recommended Web browsers.
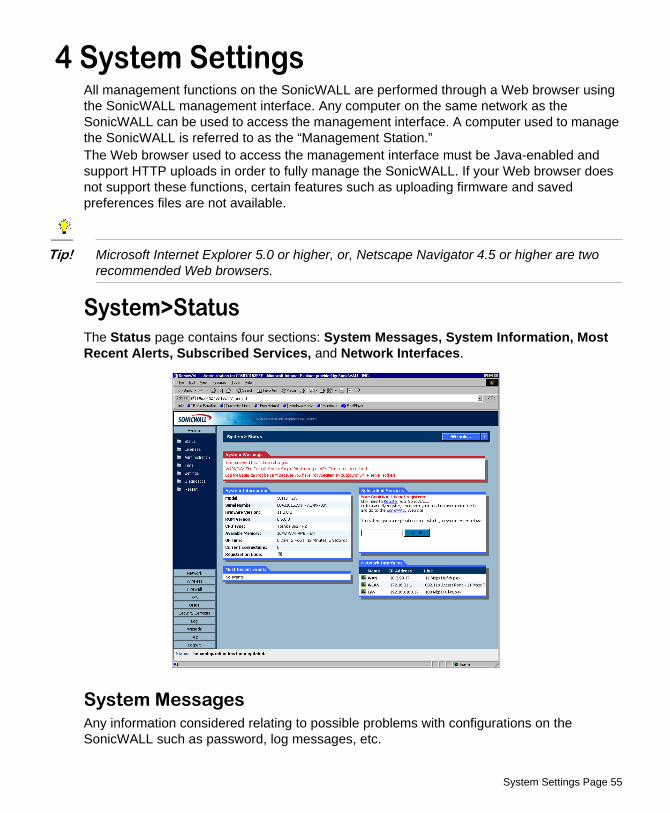
System>StatusThe Status page contains four sections: System Messages, System Information, Most Recent Alerts, Subscribed Services, and Network Interfaces.
System MessagesAny information considered relating to possible problems with configurations on the SonicWALL such as password, log messages, etc.

Page 56 SonicWALL SonicOS 2.0s Administrator’s Guide
System InformationThe following information is displayed in this section:• Model - type of SonicWALL product• Serial Number - also the MAC address of the SonicWALL• Authentication Code - the alphanumeric code used to authenticate the SonicWALL on
the registration database at <https://www.mysonicwall.com>. • Firmware Version - the firmware version loaded on the SonicWALL.• ROM Version - indicates the ROM version.• CPU - displays the type and speed of the SonicWALL processor.• Memory - indicates the amount of RAM and flash memory.• VPN Hardware Acceleration - when enabled, it allows better throughput for VPN
connections. • Uptime - the length of time, in days, hours, and seconds the SonicWALL is active. • Registration Code - the registration code is generated when your SonicWALL is
registered at <http://www.mysonicwall.com>.• Current Connections - the number of network connections currently existing on the
SonicWALL.
Subscribed ServicesA list of available services for the SonicWALL are listed in this section with the status of unsubscribed or subscribed. Services requiring subscriptions include Content Filtering Service, Anti-Virus, E-mail Filtering, and ViewPoint. Clicking the arrow displays the System>Licenses page.
Most Recent AlertsAny messages relating to system errors or attacks are displayed in this section. Attack messages include AV Alerts, forbidden e-mail attachments, fraudulent certificates, etc. System errors include WAN IP changed and encryption errors.
Network InterfacesThe following information is contained in this section:• WAN - network speed, for example 100 Mbps, and devices connected to the WAN link.• LAN - network speed and network address mode• DMZ - network speed and network address mode• WLAN (SOHO TZW) - transmission speed, for example 11 Mbps, and if NAT is activated.Clicking the arrow displays the Network>Settings page.

System Settings Page 57
System>LicensesThe System>Licenses page provides links to activate, upgrade, or renew services. It also has links to free trials of SonicWALL services.
Security Services SummarySubscribed Services
A list of currently available services through mysonicwall.com is displayed. Subscribed services are displayed with Subscribed in the Status column. If the service is limited to a number of users, the number is displayed in the Nodes column. The service expiration date is displayed in the Expiration column.
SummaryClick the link to activate, upgrade, or renew services. You can also click a link to get free trial subscriptions to Content Filter Service and Anti-Virus Service.
Manual Node UpgradeTo add more nodes to your SonicWALL, type your upgrade key from mysonicwall.com in the Enter upgrade key.

Page 58 SonicWALL SonicOS 2.0s Administrator’s Guide
System>Administration
Firewall NameThe Firewall Name uniquely identifies the SonicWALL and defaults to the serial number of the SonicWALL. The serial number is also the MAC address of the unit. To change the Firewall Name, type a unique alphanumeric name in the Firewall Name field. It must be at least 8 characters in length.
Name/PasswordAdministrator NameThe Administrator Name can be changed from the default setting of admin to any word using alphanumeric characters up to 32 characters in length. To create an new administrator name, type the new name in the Administrator Name field. Click Apply for the changes to take effect on the SonicWALL.
Changing the Administrator PasswordTo set the password, Type the old password in the Old Password field, and the new password in the New Password field. Type the new password again in the Confirm New Password field and click Apply. Once the SonicWALL has been updated, a message confirming the update is displayed at the bottom of the browser window.
System Settings Page 59
Login SecurityThe Administrator Inactivity Timeout setting allows you to set the length of inactivity time that elapses before you are automatically logged out of the Web Management Interface. By default, the SonicWALL logs out the administrator after 5 minutes of inactivity.
Tip! If the Administrator Inactivity Timeout is extended beyond 5 minutes, you should end every management session by clicking Logout to prevent unauthorized access to the SonicWALL Web Management Interface.
Type the desired number of minutes in the Administrator Inactivity Timeout section and click Update. The Inactivity Timeout can range from 1 to 99 minutes. Click Apply, and a message confirming the update is displayed at the bottom of the browser window.
Login Failure HandlingYou can configure the SonicWALL to lockout an administrator or a user if the login credentials are incorrect. Select the Enable User Lockout on login failure checkbox to prevent users from attempting to log into the SonicWALL without proper authentication credentials. Type the number of failed attempts before the user is locked out in the Lock out user after __ failed login attempts in a 1 minute period field. Type the length of time that must elapse before the user attempts to log into the SonicWALL again in the Lockout Period (minutes) field.
Alert! If the administrator and a user are logging into the SonicWALL using the same source IP address, the administrator is also locked out of the SonicWALL. The lockout is based on the source IP address of the user or administrator.
Logging in as an Administrator from the WLANLogging in as the Administrator from the WLAN is strictly controlled by a set of Firewall Access Rules on the SonicWALL. • WGS-related Enforcement - when Wireless Guest Services are enabled on the Son-
icWALL, administrator login is disabled even if you create more permissive HTTP Man-agement rules on the SonicWALL.
• WiFiSec-related Enforcement - When WiFiSec is enforced on the WLAN, administrator login is only permitted with a VPN connection over the WLAN. HTTPS Management is also denied without a VPN connection.
Tip! This feature is available only on the SOHO TZW.
Page 60 SonicWALL SonicOS 2.0s Administrator’s Guide
Management ProtocolThe SonicWALL can be managed using HTTP or HTTPS and a Web browser. Both HTTP and HTTPS are enabled by default. The default port for HTTP is port 80, but you can configure access through another port. Type the number of the desired port in the Port field, and click Update. However, if you configure another port for HTTP management, you must include the port number when you use the IP address to log into the SonicWALL. For example, if you configure the port to be 76, then you must type <LAN IP Address>:76 into the Web browser, i.e. <http://192.168.168.1:76>The default port for HTTPS management is 443, the standard port. You can add another layer of security for logging into the SonicWALL by changing the default port. To configure another port for HTTPS management, type the preferred port number into the Port field, and click Update. For example, if you configure the HTTPS Management Port to be 700, then you must log into the SonicWALL using the port number as well as the IP address, for example, <https://192.168.168.1:700> to access the SonicWALL. The HTTPS Management Certificate Common Name field defaults to the SonicWALL LAN Address. This allows you to continue using a certificate without downloading a new one each time you log into the SonicWALL.
Advanced ManagementEnable SNMP
SNMP (Simple Network Management Protocol) is a network protocol used over User Datagram Protocol (UDP) that allows network administrators to monitor the status of the SonicWALL and receive notification of critical events as they occur on the network. The SonicWALL supports SNMP v1/v2c and all relevant Management Information Base II (MIB) groups except egp and at. The SonicWALL replies to SNMP Get commands for MIBII via any interface and supports a custom SonicWALL MIB for generating trap messages. The custom SonicWALL MIB is available for download from the SonicWALL Web site and can be loaded into third-party SNMP management software such as HP Openview, Tivoli, or SNMPC. To enable SNMP on the SonicWALL, log into the Management interface and click System, then Administration. Select the Enable SNMP checkbox, and then click Configure.

System Settings Page 61
1. Type the host name of the SonicWALL in the System Name field.
2. Type the network administrator’s name in the System Contact field. 3. Type an e-mail address, telephone number, or pager number in the System Location
field.4. Type a name for a group or community of administrators who can view SNMP data in the
Get Community Name field. 5. Type a name for a group or community of administrators who can view SNMP traps in
the Trap Community Name field.6. Type the IP address or host name of the SNMP management system receiving SNMP
traps in the Host 1 through Host 4 fields. You must configure at least one IP address or host name, but up to four addresses or host names can be used.
7. Click OK. Configuring Log/Log Settings for SNMP
Trap messages are generated only for the alert message categories normally sent by the SonicWALL. For example, attacks, system errors, or blocked Web sites generate trap messages.If none of the categories are selected on the Log Settings page, then no trap messages are generated.
Configuring SNMP as a Service and Adding RulesBy default, the SonicWALL responds only to Get SNMP messages received on its LAN interface. Appropriate rules must be configured to allow SNMP traffic to and from the WAN interface. SNMP trap messages can be sent via the LAN or WAN. See Chapter 6, Firewall, for instructions on adding services and rules to the SonicWALL. If your SNMP management system supports discovery, the SonicWALL agent automatically discover the SonicWALL appliance on the network. Otherwise, you must add the SonicWALL to the list of SNMP-managed devices on the SNMP management system.

Page 62 SonicWALL SonicOS 2.0s Administrator’s Guide
Enable Management Using SonicWALL GMSYou can configure the SonicWALL to be managed by SonicWALL Global Management System (GMS). Select the Enable Management Using GMS checkbox, then click Configure. The Management Method window is displayed.
1. Type the host name or IP address of the GMS Console in the GMS Host Name or IP Address field.
2. Type the port in the GMS Syslog Server Port field. The default value is 514.3. Select Send Heartbeat Status Messages Only to send only heartbeat status instead of
log messages.4. Select GMS over VPN if the SonicWALL is managed through a VPN connection. Use the
information in the Security Association Information section to configure the SA in GMS.5. Select GMS behind NAT Device if the GMS Console is placed behind a device using
NAT on the network. Type the IP address of the NAT device in the NAT Device IP Address field.
6. Click OK. The SonicWALL is now managed by GMS.

System Settings Page 63
System>TimeSet Time
The SonicWALL uses the time and date feature to timestamp log events, automatically update Content Filtering Services, and other internal purposes.To configure the time settings on the TZW, click System, then Time.
1. Select your time zone from the Time Zone list.
2. Click Apply to update the SonicWALL. You can also select Automatically adjust clock for daylight savings time changes, Display UTC in logs (instead of local time), Display time in International format, and Use NTP to set time automatically. Automatically adjust clock for daylight savings time changes and Use NTP to set time automatically are selected by default. To set the time and date manually, clear the check boxes and type the time, in 24-hour format, and the date.
NTP SettingsNetwork Time Protocol (NTP) is a protocol used to synchronize computer clock times in a network of computers. NTP uses Coordinated Universal Time (UTC) to synchronize computer clock times to a millisecond, and sometimes, to a fraction of a millisecond. The SonicWALL has an internal list of NTP servers so manually entering a NTP server is optional. Select Use NTP to set time automatically if you want to use your local server to set the SonicWALL clock. You can also configure Update Interval (minutes) for the NTP server to update the SonicWALL. The default value is 60 minutes. To add an NTP server to the SonicWALL configuration, click Add. The Add NTP Server window is displayed. Type the IP address of an NTP server in the NTP Server field. Click Ok.

Page 64 SonicWALL SonicOS 2.0s Administrator’s Guide
Then click Apply on the System>Time page to update the SonicWALL. To delete an NTP server, highlight the IP address and click Delete. Or, click Delete All to delete all servers.
System>Settings
SettingsImport Settings
To import a previously saved preferences file into the SonicWALL, follow these instructions:1. Click Import Settings to import a previously exported preferences file into the
SonicWALL. The Import Settings window is displayed.
2. Click Browse to locate the file which has a *.exp file name extension. 3. Select the preferences file.4. Click Import, and restart the firewall.
Export Settings To export configuration settings from the SonicWALL, use the instructions below:1. Click Export Settings.
2. Click Export. 3. Click Save, and then select a location to save the file. The file is named “sonicwall.exp”
but can be renamed. 4. Click Save. This process can take up to a minute. The exported preferences file can be
imported into the SonicWALL if it is necessary to reset the firmware.

System Settings Page 65
Restore DefaultsYou can restore the SonicWALL to its factory default settings by clicking Restore Defaults. This affects all settings except the administrator name and password, the WAN IP address, and the DMZ IP address as well as the subnet mask. Click Restore Defaults, and a message is displayed asking if you are sure you want to reset the SonicWALL. Click Yes to restore the default settings or No to cancel this action. New FirmwareTo receive automatic notification of new firmware, select the Notify me when new firmware is available check box. If you enable this feature, the SonicWALL sends a status message to the SonicWALL firmware server daily with the following information:• SonicWALL Serial Number • Product Type • Current Firmware Version • Language • Currently Available Memory • ROM Version • Options and Upgrades
Alert! After the initial 90 days from purchase, firmware updates are available only to registered users with a valid support contract. You must register your SonicWALL at <https://www.mysonicwall.com>.
Updating Firmware ManuallyClick Upload New Firmware to load new firmware in the SonicWALL. A message is displayed warning you that your settings may be erased. You should export your current SonicWALL settings to a preferences file before uploading new firmware. Click OK to continue the upload process.
Alert! When uploading firmware to the SonicWALL, you must not interrupt the Web browser by closing the browser, clicking a link, or loading a new page. If the browser is interrupted, the firmware may become corrupted.

Page 66 SonicWALL SonicOS 2.0s Administrator’s Guide
System>DiagnosticsThe SonicWALL has several diagnostic tools which help troubleshoot network problems. Click System on the menu bar, and then click Diagnostics.
Select Diagnostic ToolDNS Name Lookup
The SonicWALL has a DNS lookup tool that returns the IP address of a domain name. Or, if you type an IP address, it returns the domain name for that address. 1. Type the host name or IP address in the Look up name field. Do not add http to the host
name.
2. The SonicWALL queries the DNS Server and displays the result in the Result section. It also displays the IP address of the DNS Server used to perform the query.
The DNS Name Lookup section also displays the IP addresses of the DNS Servers configured on the SonicWALL. If there is no IP address or IP addresses in the DNS Server fields, you must configure them on the Network>Settings page.
Find Network PathFind Network Path indicates if an IP host is located on the WAN, WLAN, DMZ, or the LAN. This can diagnose a network configuration problem on the SonicWALL. For example, if the SonicWALL indicates that a computer on the Internet is located on the LAN, then the network or Intranet settings may be misconfigured. Find Network Path can be used to determine if a target device is located behind a network router and the Ethernet address of the target device. It also displays the gateway the device is using and helps isolate configuration problems.

System Settings Page 67
PingThe Ping test bounces a packet off a machine on the Internet and returns it to the sender. This test shows if the SonicWALL is able to contact the remote host. If users on the LAN are having problems accessing services on the Internet, try pinging the DNS server, or another machine at the ISP location. If the test is unsuccessful, try pinging devices outside the ISP. If you can ping devices outside of the ISP, then the problem lies with the ISP connection.1. Select Ping from the Diagnostic Tool menu.
2. Type the IP address or host name of the target device and click Go. 3. If the test is successful, the SonicWALL returns a message saying the IP address is alive
and the time to return in milliseconds (ms).Packet Trace
The Packet Trace tool tracks the status of a communications stream as it moves from source to destination. This is a useful tool to determine if a communications stream is being stopped at the SonicWALL, or is lost on the Internet.To interpret this tool, it is necessary to understand the three-way handshake that occurs for every TCP connection. The following displays a typical three-way handshake initiated by a host on the SonicWALL LAN to a remote host on the WAN.1. TCP received on LAN [SYN]
From 192.168.168.158 / 1282 (00:a0:4b:05:96:4a)
To 204.71.200.74 / 80 (02:00:cf:58:d3:6a)
The SonicWALL receives SYN from LAN client.2. TCP sent on WAN [SYN]
From 207.88.211.116 / 1937 (00:40:10:0c:01:4e)
To 204.71.200.74 / 80 (02:00:cf:58:d3:6a)
The SonicWALL forwards SYN from LAN client to remote host.3. TCP received on WAN [SYN,ACK]
From 204.71.200.74 / 80 (02:00:cf:58:d3:6a)
To 207.88.211.116 / 1937 (00:40:10:0c:01:4e)
The SonicWALL receives SYN,ACK from remote host.4. TCP sent on LAN [SYN,ACK]
From 204.71.200.74 / 80 (02:00:cf:58:d3:6a)
To 192.168.168.158 / 1282 (00:a0:4b:05:96:4a)
The SonicWALL forwards SYN,ACK to LAN client.5. TCP received on LAN [ACK]
From 192.168.168.158 / 1282 (00:a0:4b:05:96:4a)
To 204.71.200.74 / 80 (02:00:cf:58:d3:6a)

Page 68 SonicWALL SonicOS 2.0s Administrator’s Guide
Client sends a final ACK, and waits for start of data transfer.6. TCP sent on WAN [ACK]
From 207.88.211.116 / 1937 (00:40:10:0c:01:4e
To 204.71.200.74 / 80 (02:00:cf:58:d3:6a)
The SonicWALL forwards the client ACK to the remote host and waits for the data transfer to begin.When using packet traces to isolate network connectivity problems, look for the location where the three-way handshake is breaking down. This helps to determine if the problem resides with the SonicWALL configuration, or if there is a problem on the Internet.Select Packet Trace from the Diagnostic tool menu.
Tip! Packet Trace requires an IP address. The SonicWALL DNS Name Lookup tool can be used to find the IP address of a host.
7. Type the IP address of the remote host in the Trace on IP address field, and click Start. You must type an IP address in the Trace on IP address field; do not type a host name, such as “www.yahoo.com”. The Trace is off turns from red to green with Trace Active displayed.
8. Contact the remote host using an IP application such as Web, FTP, or Telnet. 9. Click Refresh and the packet trace information is displayed.10. Click Stop to terminate the packet trace, and Reset to clear the results.
Captured PacketsThe Captured Packets table displays the packet number and the content of the packet, for instance, ARP Request send on WAN 42 bytes.
Packet DetailSelect a packet in the Captured Packets table to display packet details. Packet details include the packet number, time, content, source of the IP address, and the IP address destination.
Tech Support ReportThe Tech Support Report generates a detailed report of the SonicWALL configuration and status, and saves it to the local hard disk. This file can then be e-mailed to SonicWALL Technical Support to help assist with a problem.
Alert! You must register your SonicWALL on mySonicWALL.com to receive technical support.
Before e-mailing the Tech Support Report to the SonicWALL Technical Support team, complete a Tech Support Request Form at <https://www.mysonicwall.com>. After the form is submitted, a unique case number is returned. Include this case number in all correspondence, as it allows SonicWALL Technical Support to provide you with better service.
System Settings Page 69
In the Tools section, select Tech Support Report from the Select a diagnostic tool menu. Four Report Options are available in the Tech Support Report section:• VPN Keys - saves shared secrets, encryption, and authentication keys to the report.• ARP Cache - saves a table relating IP addresses to the corresponding MAC or physical
addresses. • DHCP Bindings - saves entries from the SonicWALL DHCP server. • IKE Info - saves current information about active IKE configurations.
Generating a Tech Support Report1. Select Tech Support Report from the Choose a diagnostic tool menu.
2. Select the Report Options to be included with your e-mail. 3. Click Save Report to save the file to your system. When you click Save Report, a
warning message is displayed.4. Click OK to save the file. Attach the report to your Tech Support Request e-mail.
Trace RouteTrace Route is a diagnostic utility to assist in diagnosing and troubleshooting router connections on the Internet. By using Internet Connect Message Protocol (ICMP) echo packets similar to Ping packets, Trace Route can test interconnectivity with routers and other hosts that are farther and farther along the network path until the connection fails or until the remote host responds.Type the IP address or domain name of the destination host. For example, type yahoo.com and click Go. A second window is displayed with each hop to the destination host.By following the route, you can diagnose where the connection fails between the SonicWALL and the destination.
Page 70 SonicWALL SonicOS 2.0s Administrator’s Guide
System>Restart
Click Restart to display the System>Restart page. The SonicWALL can be restarted from the Web Management interface. Click Restart SonicWALL and then click Yes to confirm the restart. The SonicWALL takes approximately 90 seconds to restart, and the yellow Test light is lit during the restart. During the restart time, Internet access is momentarily interrupted on the LAN.
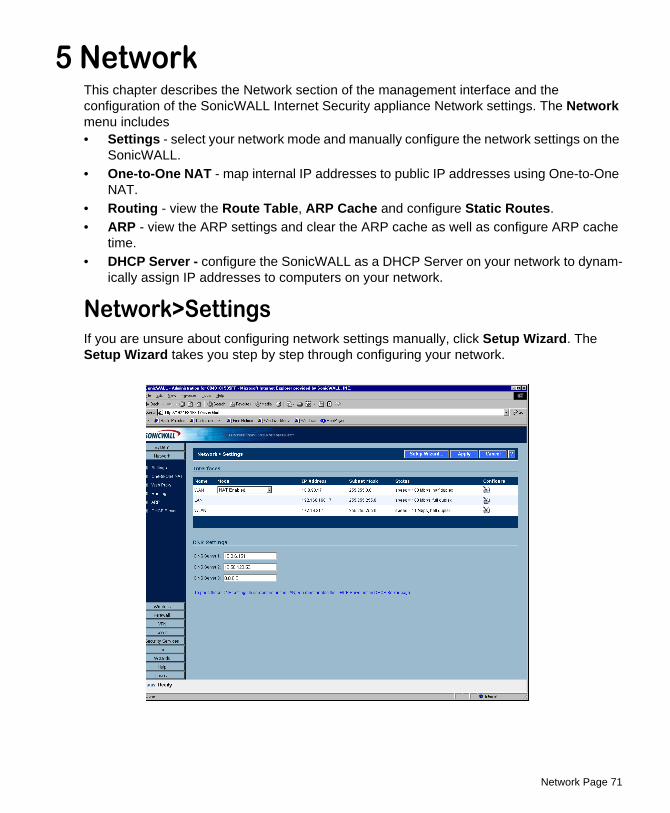
Network Page 71
5 NetworkThis chapter describes the Network section of the management interface and the configuration of the SonicWALL Internet Security appliance Network settings. The Network menu includes• Settings - select your network mode and manually configure the network settings on the
SonicWALL.• One-to-One NAT - map internal IP addresses to public IP addresses using One-to-One
NAT. • Routing - view the Route Table, ARP Cache and configure Static Routes. • ARP - view the ARP settings and clear the ARP cache as well as configure ARP cache
time. • DHCP Server - configure the SonicWALL as a DHCP Server on your network to dynam-
ically assign IP addresses to computers on your network.
Network>SettingsIf you are unsure about configuring network settings manually, click Setup Wizard. The Setup Wizard takes you step by step through configuring your network.

Page 72 SonicWALL SonicOS 2.0s Administrator’s Guide
Network Addressing ModeThe Network Addressing Mode menu determines the network address scheme of your SonicWALL. It includes five options: NAT Enabled, NAT with DHCP Client, NAT with PPPoE, NAT with L2TP Client, and NAT with PPTP Client.• Standard mode requires valid IP addresses for all computers on your network, but al-
lows remote access to authenticated users. Your public WAN IP address is visible to the Internet.
• NAT Enabled mode translates the private IP addresses on the network to the single, val-id IP address of the SonicWALL. Select NAT Enabled if your ISP assigned you only one or two valid IP addresses.
• NAT with DHCP Client mode configures the SonicWALL to request IP settings from a DHCP server on the Internet. NAT with DHCP Client is a typical network addressing mode for cable and DSL customers.
• NAT with PPPoE mode uses PPPoE to connect to the Internet. If desktop software and a user name and password is required by your ISP, select NAT with PPPoE.
• NAT with L2TP Client mode uses IPSec to connect a L2TP server and encrypts all data transmitted from the client to the server. However, it does not encrypt network traffic to other destinations.
• NAT with PPTP Client mode uses Point to Point Tunneling Protocol (PPTP) to connect to a remote server. It supports older Microsoft implementations requiring tunneling con-nectivity.

Network Page 73
InterfacesThe Interfaces table lists the IP Addresses, Subnet Mask, and Status information for the WAN, LAN, WLAN or DMZ links. To configure the WAN, LAN, WLAN or DMZ settings, click the Notepad icon in the Configure column.
Configuring WAN SettingsClick on the Notepad icon in the Configure column of the WAN information. The WAN Properties window is displayed.
WAN Properties>General1. In the WAN Settings section, enter a valid public IP address in the SonicWALL WAN IP
(NAT Public) Address field.
2. Enter the subnet mask in the WAN Subnet Mask field. 3. Enter the IP address of the router in the WAN Gateway (Router) Address field. 4. Click the Ethernet tab. The Ethernet tab allows you to manage the Ethernet settings of
links connected to the SonicWALL.

Page 74 SonicWALL SonicOS 2.0s Administrator’s Guide
5. Auto Negotiate is selected by default because the Ethernet links automatically negotiate the speed and duplex mode of the Ethernet connection. If you select Force, you must force the connection speed and duplex from the Ethernet card to the SonicWALL as well.
6. If you select Force, select the speed and duplex from the pulldown menus. 7. Select Proxy management workstation Ethernet address on WAN if you are
managing the Ethernet connection from the LAN side of your network. The SonicWALL takes the Ethernet address of the computer managing the SonicWALL appliance and proxies that address onto the WAN port of the SonicWALL. For instance, if your ISP is using the MAC address of your network card for identification, you can proxy the MAC address of your network card onto the SonicWALL WAN port.
Alert! If you enable this feature, it may take the SonicWALL a lengthy period of time to locate the management station.
8. Select Bandwidth Management to allocate bandwidth resources to critical applications on the your network. 20.00 Kbps is the default available WAN bandwidth.
Alert! Bandwidth management is only available on outbound network traffic.
9. Fragment outbound packets larger than WAN MTU is selected by default with a default WAN MTU value of 1500 based on the Ethernet standard MTU. The minimum value is 68. Decreasing the packet size can improve network performance as large packets require more network transmissions when a router cannot handle the packet size.
10. Click OK. Then click Apply on the Network>Settings page. The SonicWALL is now updated.

Network Page 75
Configuring LAN SettingsClick on the Notepad icon in the Configure column of the LAN information. The LAN Properties window is displayed.
LAN Properties>General1. In the LAN Settings section, enter a valid private IP address in the SonicWALL LAN IP
(NAT Public) Address field.
2. Enter the subnet mask in the LAN Subnet Mask field. Multiple LAN Subnet SupportThis features supports legacy networks incorporating the SonicWALL, and makes it easier to add more nodes if the original subnet is full. To configure this feature, you must have an additional IP address assigned to the SonicWALL. All users on the subnet must use this address as their default router/gateway address. 3. Click Add. The Add LAN Subnet Entry window is displayed.
4. Enter the additional LAN IP address in the IP Address field. 5. Enter the subnet in the Subnet Mask field. 6. Select an entry and click Edit to change the information.7. Select an entry and click Delete to remove the entry from the table. 8. Click Delete All to remove all the entries in the table.
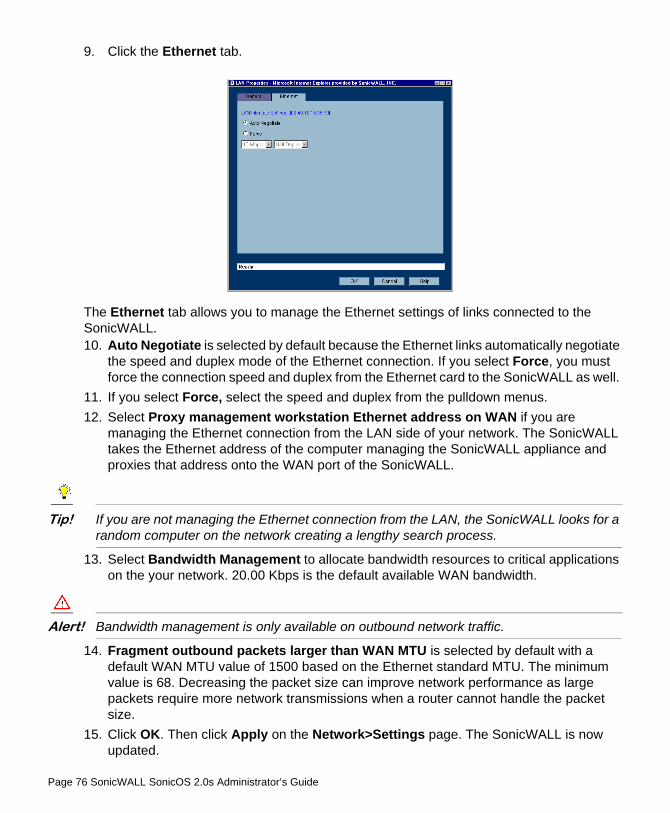
Page 76 SonicWALL SonicOS 2.0s Administrator’s Guide
9. Click the Ethernet tab.
The Ethernet tab allows you to manage the Ethernet settings of links connected to the SonicWALL. 10. Auto Negotiate is selected by default because the Ethernet links automatically negotiate
the speed and duplex mode of the Ethernet connection. If you select Force, you must force the connection speed and duplex from the Ethernet card to the SonicWALL as well.
11. If you select Force, select the speed and duplex from the pulldown menus. 12. Select Proxy management workstation Ethernet address on WAN if you are
managing the Ethernet connection from the LAN side of your network. The SonicWALL takes the Ethernet address of the computer managing the SonicWALL appliance and proxies that address onto the WAN port of the SonicWALL.
Tip! If you are not managing the Ethernet connection from the LAN, the SonicWALL looks for a random computer on the network creating a lengthy search process.
13. Select Bandwidth Management to allocate bandwidth resources to critical applications on the your network. 20.00 Kbps is the default available WAN bandwidth.
Alert! Bandwidth management is only available on outbound network traffic.
14. Fragment outbound packets larger than WAN MTU is selected by default with a default WAN MTU value of 1500 based on the Ethernet standard MTU. The minimum value is 68. Decreasing the packet size can improve network performance as large packets require more network transmissions when a router cannot handle the packet size.
15. Click OK. Then click Apply on the Network>Settings page. The SonicWALL is now updated.
Network Page 77
Configuring DMZ SettingsClick on the Notepad icon in the Configure column of the DMZ information. The DMZ Properties window is displayed.1. Enter a private IP address in the DMZ Private Address field.
2. Enter the subnet in the DMZ Subnet Mask field. 3. If configuring the DMZ in NAT Many-to-One mode, enter a public IP address in the DMZ
NAT Many-to-One field.
Standard ConfigurationIf your ISP provided you with enough IP addresses for all the computers and network devices on your LAN, enable Standard mode.To configure Standard addressing mode, complete the following instructions:1. Select Standard from the Network Addressing Mode menu. Because NAT is disabled,
you must assign valid IP addresses to all computers and network devices on your LAN.
2. Enter a unique, valid IP address from your LAN address range in the SonicWALL LAN IP Address field. The SonicWALL LAN IP Address is the address assigned to the SonicWALL LAN and is used for management of the SonicWALL.
3. Enter your network subnet mask in the LAN Subnet Mask field. The LAN Subnet Mask tells your SonicWALL which IP addresses are on your LAN. The default value, "255.255.255.0", supports up to 254 IP addresses.
4. Enter your WAN router or default gateway address in the WAN Gateway (Router) Address field. Your router is the device that connects your network to the Internet. If you use Cable or DSL, your WAN router is located at your ISP.
5. Enter your DNS server IP address(es) in the DNS Servers field. The SonicWALL uses the DNS servers for diagnostic tests and for upgrade and registration functionality.
6. Click Update. Once the SonicWALL has been updated, a message confirming the update is displayed at the bottom of the browser window. Restart the SonicWALL for these changes to take effect.

Page 78 SonicWALL SonicOS 2.0s Administrator’s Guide
Configuring NAT Enabled ModeIf your ISP has not given you enough IP addresses for all of the computers and network devices on your LAN, you can configure the SonicWALL to use NAT Enabled mode. Using a single IP address, you can connect your network to the Internet securely and invisibly using Network Address Translation (NAT). NAT provides additional security and anonymity to your network. Because you do not have enough IP addresses for your network, enable NAT and assign private IP addresses to the computers and devices on your LAN. You can use IP addresses from one of the following IP address ranges:• 10.0.0.0 - 10.255.255.255• 172.16.0.0 - 172.31.255.255• 192.168.0.0 - 192.168.255.255
Alert! Do not assign the same IP address range to the LAN, WLAN, and the DMZ.
To configure the SonicWALL in the NAT Enabled Mode, select NAT Enabled from the Network Addressing Mode menu. Click Apply.Configuring WAN SettingsClick the Notepad icon in the Configure column of the WAN information. The WAN Properties window is displayed.

Network Page 79
WAN Properties>General1. In the WAN Settings section, enter a valid public IP address in the SonicWALL WAN IP
(NAT Public) Address field.
2. Enter the subnet mask in the WAN Subnet Mask field. 3. Enter the IP address of the router in the WAN Gateway (Router) Address field. 4. Click the Ethernet tab. The Ethernet tab allows you to manage the Ethernet settings of
links connected to the SonicWALL.
5. Auto Negotiate is selected by default because the Ethernet links automatically negotiate the speed and duplex mode of the Ethernet connection. If you select Force, you must force the connection speed and duplex from the Ethernet card to the SonicWALL as well.
6. If you select Force, select the speed and duplex from the pulldown menus. 7. Select Proxy management workstation Ethernet address on WAN if you are
managing the Ethernet connection from the LAN side of your network. The SonicWALL takes the Ethernet address of the computer managing the SonicWALL appliance and proxies that address onto the WAN port of the SonicWALL.
Tip! If you are not managing the Ethernet connection from the LAN, the SonicWALL looks for a random computer on the network creating a lengthy search process.
8. Select Bandwidth Management to allocate bandwidth resources to critical applications on the your network. 20.00 Kbps is the default available WAN bandwidth.
Alert! Bandwidth management is only available on outbound network traffic.
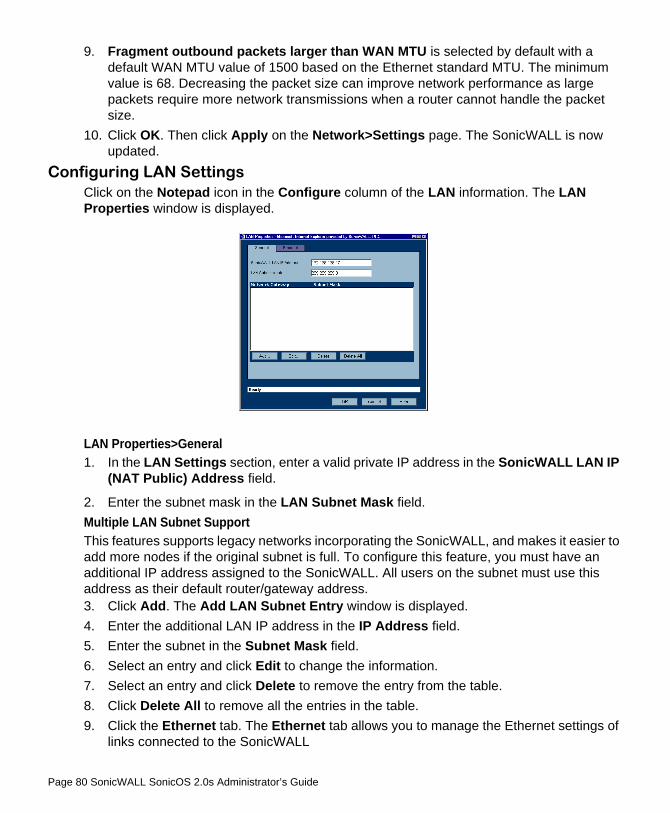
Page 80 SonicWALL SonicOS 2.0s Administrator’s Guide
9. Fragment outbound packets larger than WAN MTU is selected by default with a default WAN MTU value of 1500 based on the Ethernet standard MTU. The minimum value is 68. Decreasing the packet size can improve network performance as large packets require more network transmissions when a router cannot handle the packet size.
10. Click OK. Then click Apply on the Network>Settings page. The SonicWALL is now updated.
Configuring LAN SettingsClick on the Notepad icon in the Configure column of the LAN information. The LAN Properties window is displayed.
LAN Properties>General1. In the LAN Settings section, enter a valid private IP address in the SonicWALL LAN IP
(NAT Public) Address field.
2. Enter the subnet mask in the LAN Subnet Mask field. Multiple LAN Subnet SupportThis features supports legacy networks incorporating the SonicWALL, and makes it easier to add more nodes if the original subnet is full. To configure this feature, you must have an additional IP address assigned to the SonicWALL. All users on the subnet must use this address as their default router/gateway address. 3. Click Add. The Add LAN Subnet Entry window is displayed. 4. Enter the additional LAN IP address in the IP Address field. 5. Enter the subnet in the Subnet Mask field. 6. Select an entry and click Edit to change the information.7. Select an entry and click Delete to remove the entry from the table. 8. Click Delete All to remove all the entries in the table. 9. Click the Ethernet tab. The Ethernet tab allows you to manage the Ethernet settings of
links connected to the SonicWALL

Network Page 81
.
10. Auto Negotiate is selected by default because the Ethernet links automatically negotiate the speed and duplex mode of the Ethernet connection. If you select Force, you must force the connection speed and duplex from the Ethernet card to the SonicWALL as well.
11. If you select Force, select the speed and duplex from the pulldown menus. 12. Click OK. Then click Apply on the Network>Settings page.

Page 82 SonicWALL SonicOS 2.0s Administrator’s Guide
Configuring NAT with DHCP ClientIf your ISP did not provide you with a public IP address, the SonicWALL can obtain an IP address from a DHCP server at the ISP. NAT with DHCP Client is typically used with cable and DSL connections. To configure NAT with DHCP Client, log into the SonicWALL and click Network.
1. Select NAT with DHCP Client from the Network Addressing Mode menu.
2. Click the Notepad icon in the WAN entry of the Interfaces table. The WAN Properties window is displayed.
3. Enter the host name assigned to you by your ISP in the Host Name field. (Optional)

Network Page 83
4. Click Renew to obtain new IP address settings for the SonicWALL. 5. Click Release to remove the IP address settings from the SonicWALL. Click Refresh to
reload the current settings into the SonicWALL. 6. Click the Ethernet tab. The Ethernet tab allows you to manage the Ethernet settings of
links connected to the SonicWALL.
7. Auto Negotiate is selected by default because the Ethernet links automatically negotiate the speed and duplex mode of the Ethernet connection. If you select Force, you must force the connection speed and duplex from the Ethernet card to the SonicWALL as well.
8. If you select Force, select the speed and duplex from the pulldown menus. 9. Fragment outbound packets larger than WAN MTU is selected by default. If the MTU
size is too large, it requires more transmissions if the packet encounters a router unable to handle a larger packet. The default value is 1500 octets based on the Ethernet standard MTU. The minimum packet size is 68 octets. Decreasing the packet size may improve network performance.
10. Click OK.
Note: DNS Settings are obtained automatically when the SonicWALL receives its IP address information from the DHCP Server.

Page 84 SonicWALL SonicOS 2.0s Administrator’s Guide
Configuring LAN SettingsClick on the Notepad icon in the Configure column of the LAN information. The LAN Properties window is displayed.
LAN Properties>General1. In the LAN Settings section, enter a valid private IP address in the SonicWALL LAN IP
(NAT Public) Address field.
2. Enter the subnet mask in the LAN Subnet Mask field. Multiple LAN Subnet Mask SupportThis features supports legacy networks incorporating the SonicWALL, and makes it easier to add more nodes if the original subnet is full. To configure this feature, you must have an additional IP address assigned to the SonicWALL. All users on the subnet must use this address as their default router/gateway address. 3. Click Add. The Add LAN Subnet Entry window is displayed. 4. Enter the additional LAN IP address in the IP Address field. 5. Enter the subnet in the Subnet Mask field. 6. Select an entry and click Edit to change the information.7. Select an entry and click Delete to remove the entry from the table. 8. Click Delete All to remove all the entries in the table.
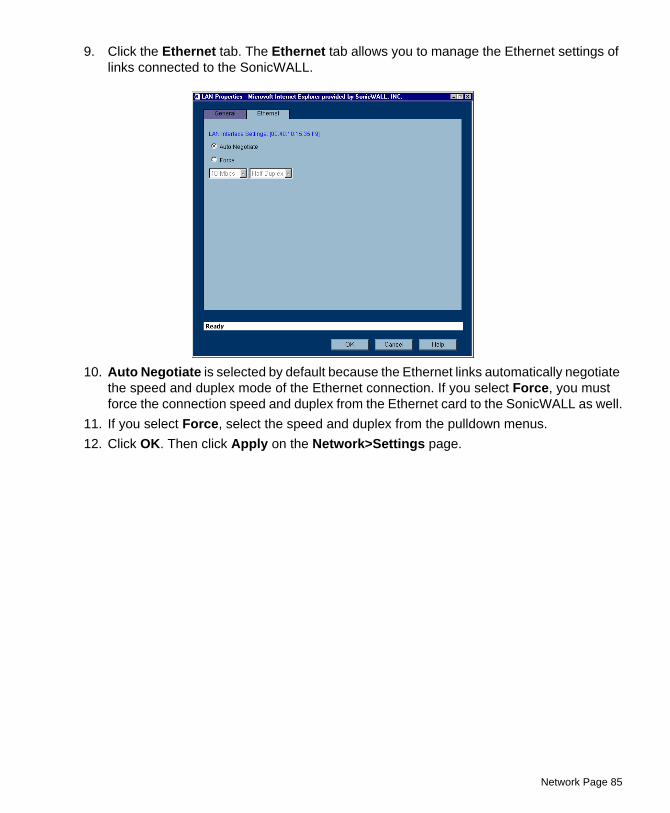
Network Page 85
9. Click the Ethernet tab. The Ethernet tab allows you to manage the Ethernet settings of links connected to the SonicWALL.
10. Auto Negotiate is selected by default because the Ethernet links automatically negotiate the speed and duplex mode of the Ethernet connection. If you select Force, you must force the connection speed and duplex from the Ethernet card to the SonicWALL as well.
11. If you select Force, select the speed and duplex from the pulldown menus. 12. Click OK. Then click Apply on the Network>Settings page.

Page 86 SonicWALL SonicOS 2.0s Administrator’s Guide
Configuring NAT with PPPoE ClientThe SonicWALL can use Point-to-Point Protocol over Ethernet to connect to the Internet. If your ISP requires the installation of desktop software as well as a user name and password to access the Internet, enable NAT with PPPoE Client. 1. Log into the SonicWALL and click Network.
2. Select NAT with PPPoE Client from the Network Addressing Mode menu. 3. Click the Notepad icon in the WAN entry of the Interfaces table. The WAN Properties
window is displayed.
4. Select Obtain an IP Address Automatically if you do not have a public IP address from your ISP.

Network Page 87
5. If you have an IP address from your ISP, select Use the following Address, and enter the IP address in the IP address field.
6. Click the PPPoE tab.
7. Enter your user name and password provided by your ISP in the User Name and User Password fields.
8. Select Inactivity Disconnect (minutes) to end the connection after a specified time of inactivity. 10 minutes is the default value.
9. Click the Ethernet tab. The Ethernet tab allows you to manage the Ethernet settings of links connected to the SonicWALL
10. Auto Negotiate is selected by default because the Ethernet links automatically negotiate the speed and duplex mode of the Ethernet connection. If you select Force,
11. Select the speed and duplex from the pulldown menus. If you select Force, you must force the connection speed and duplex from the Ethernet card to the SonicWALL as well.
12. Click OK.

Page 88 SonicWALL SonicOS 2.0s Administrator’s Guide
Configuring LAN Properties for NAT with PPPoE ClientClick the Notepad icon in the LAN entry of the Interfaces table. The LAN Propertieswindow is displayed.
1. In the LAN Settings section, enter a valid private IP address in the SonicWALL LAN IP (NAT Public) Address field.
2. Enter the subnet mask in the LAN Subnet Mask field. Multiple LAN Subnet SupportThis features supports legacy networks incorporating the SonicWALL, and makes it easier to add more nodes if the original subnet is full. To configure this feature, you must have an additional IP address assigned to the SonicWALL. All users on the subnet must use this address as their default router/gateway address. 3. Click Add. The Add LAN Subnet Entry window is displayed. 4. Enter the additional LAN IP address in the IP Address field. 5. Enter the subnet in the Subnet Mask field. 6. Select an entry and click Edit to change the information.7. Select an entry and click Delete to remove the entry from the table. 8. Click Delete All to remove all the entries in the table.
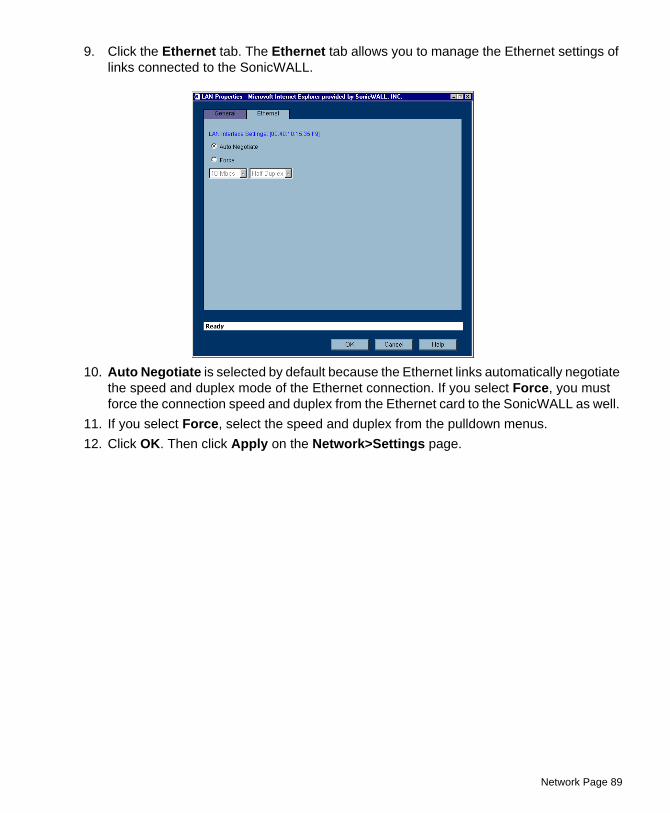
Network Page 89
9. Click the Ethernet tab. The Ethernet tab allows you to manage the Ethernet settings of links connected to the SonicWALL.
10. Auto Negotiate is selected by default because the Ethernet links automatically negotiate the speed and duplex mode of the Ethernet connection. If you select Force, you must force the connection speed and duplex from the Ethernet card to the SonicWALL as well.
11. If you select Force, select the speed and duplex from the pulldown menus.12. Click OK. Then click Apply on the Network>Settings page.

Page 90 SonicWALL SonicOS 2.0s Administrator’s Guide
Configuring NAT with L2TP ClientIf your Internet connection is provided through a L2TP server, you must configure the SonicWALL to use NAT with L2TP Client. L2TP (Layer 2 Tunneling Protocol) provides interoperability between VPN vendors that protocols such as Point-to-Point Tunneling Protocol (PPTP) and Layer 2 Forwarding (L2F) do not have. 1. Log into the SonicWALL, and click Network.
2. Select NAT with L2TP Client from the Network Addressing Mode menu.3. Click the Notepad icon in the WAN entry of the Interfaces table. The WAN Properties
window is displayed.
4. Obtain an IP Address Automatically is selected by default. Enter your host name in the the Host Name field. Click Renew to obtain new IP addressing information. Click

Network Page 91
Release to discard IP addressing information. Click Refresh to reload the IP addressing information.
5. If you have IP addressing information, select Use the following IP Address. 6. Enter the WAN IP address in the SonicWALL WAN IP (NAT Public) Address field. 7. Enter the WAN Subnet information in the WAN Subnet Mask field. 8. Enter the WAN Gateway IP address in the WAN Gateway (Router) Address field. 9. Click on the L2TP tab.
10. Enter your user name in the User Name field.11. Enter your password in the User Password field. 12. Enter the IP address of the L2TP Server in the L2TP Server IP Address field. 13. Enter the host name of the L2TP Server in the L2TP Host Name field. 14. Select Inactivity Disconnect (minutes) to end the connection after a specified time of
inactivity. 15. Once a connection is established, the SonicWALL WAN IP address, the Gateway
address and the DNS Server IP addresses are displayed in the Settings Acquired via L2TP section.

Page 92 SonicWALL SonicOS 2.0s Administrator’s Guide
16. Click the Ethernet tab. The Ethernet tab allows you to manage the Ethernet settings of links connected to the SonicWALL.
17. Auto Negotiate is selected by default because the Ethernet links automatically negotiate the speed and duplex mode of the Ethernet connection. If you select Force, you must force the connection speed and duplex from the Ethernet card to the SonicWALL as well.
18. If you select Force, select the speed and duplex from the pulldown menus. 19. Fragment outbound packets larger than WAN MTU is selected by default. If the MTU
size is too large, it requires more transmissions if the packet encounters a router unable to handle a larger packet. The default value is 1500 octets based on the Ethernet standard MTU. The minimum packet size is 68 octets. Decreasing the packet size may improve network performance.
20. Click OK. Configuring LAN Properties for NAT with L2TP Client
Click the Notepad icon in the LAN entry of the Interfaces table. The LAN Propertieswindow is displayed.
1. In the LAN Settings section, enter a valid private IP address in the SonicWALL LAN IP (NAT Public) Address field.

Network Page 93
2. Enter the subnet mask in the LAN Subnet Mask field. Multiple LAN Subnet Mask SupportThis features supports legacy networks incorporating the SonicWALL, and makes it easier to add more nodes if the original subnet is full. To configure this feature, you must have an additional IP address assigned to the SonicWALL. All users on the subnet must use this address as their default router/gateway address. 3. Click Add. The Add LAN Subnet Entry window is displayed. 4. Enter the LAN IP address in the IP Address field. 5. Enter the subnet in the Subnet Mask field. 6. Select an entry and click Edit to change the information.7. Select an entry and click Delete to remove the entry from the table. 8. Click Delete All to remove all the entries in the table.9. Click the Ethernet tab. The Ethernet tab allows you to manage the Ethernet settings of
links connected to the SonicWALL.
10. Auto Negotiate is selected by default because the Ethernet links automatically negotiate the speed and duplex mode of the Ethernet connection. If you select Force, you must force the connection speed and duplex from the Ethernet card to the SonicWALL as well.
11. If you select Force, select the speed and duplex from the pulldown menus. 12. Click OK. Then click Apply on the Network>Settings page.

Page 94 SonicWALL SonicOS 2.0s Administrator’s Guide
Configuring NAT with PPTP Client If your Internet connection is provided through a PPTP server, you must configure the SonicWALL to use NAT with PPTP Client. Log into the SonicWALL, and click Network.
1. Select NAT with PPTP Client from the Network Addressing Mode menu.
2. Click the Notepad icon in the WAN entry of the Interfaces table. The WAN Properties window is displayed.
3. Obtain an IP Address Automatically is selected by default. Enter your host name in the Host Name field. Click Renew to obtain new IP addressing information. Click Release
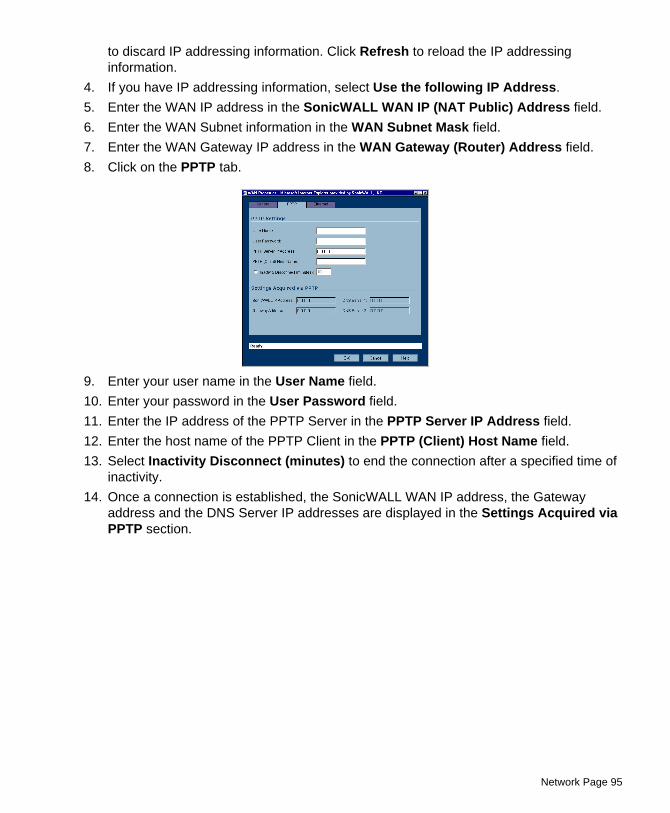
Network Page 95
to discard IP addressing information. Click Refresh to reload the IP addressing information.
4. If you have IP addressing information, select Use the following IP Address. 5. Enter the WAN IP address in the SonicWALL WAN IP (NAT Public) Address field. 6. Enter the WAN Subnet information in the WAN Subnet Mask field. 7. Enter the WAN Gateway IP address in the WAN Gateway (Router) Address field. 8. Click on the PPTP tab.
9. Enter your user name in the User Name field.10. Enter your password in the User Password field. 11. Enter the IP address of the PPTP Server in the PPTP Server IP Address field. 12. Enter the host name of the PPTP Client in the PPTP (Client) Host Name field. 13. Select Inactivity Disconnect (minutes) to end the connection after a specified time of
inactivity. 14. Once a connection is established, the SonicWALL WAN IP address, the Gateway
address and the DNS Server IP addresses are displayed in the Settings Acquired via PPTP section.
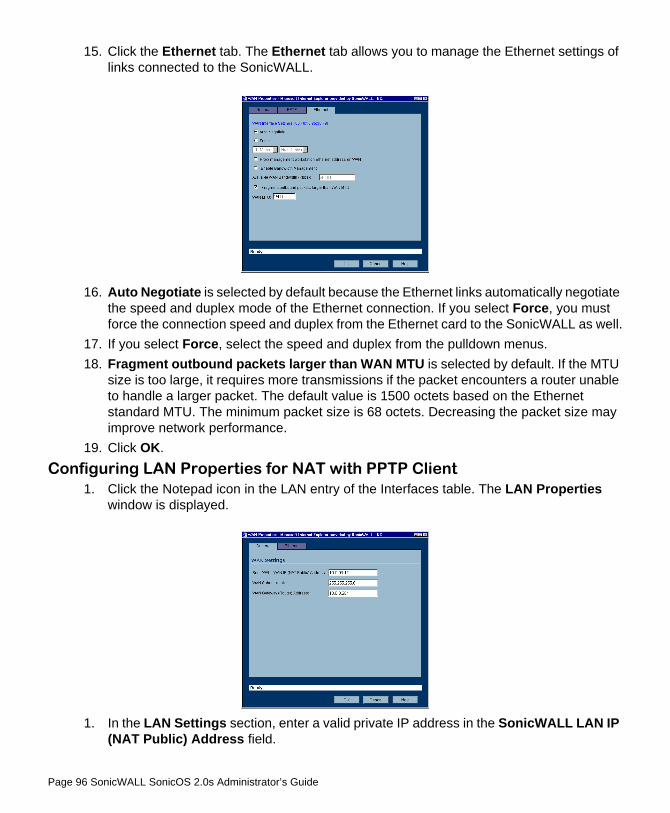
Page 96 SonicWALL SonicOS 2.0s Administrator’s Guide
15. Click the Ethernet tab. The Ethernet tab allows you to manage the Ethernet settings of links connected to the SonicWALL.
16. Auto Negotiate is selected by default because the Ethernet links automatically negotiate the speed and duplex mode of the Ethernet connection. If you select Force, you must force the connection speed and duplex from the Ethernet card to the SonicWALL as well.
17. If you select Force, select the speed and duplex from the pulldown menus. 18. Fragment outbound packets larger than WAN MTU is selected by default. If the MTU
size is too large, it requires more transmissions if the packet encounters a router unable to handle a larger packet. The default value is 1500 octets based on the Ethernet standard MTU. The minimum packet size is 68 octets. Decreasing the packet size may improve network performance.
19. Click OK. Configuring LAN Properties for NAT with PPTP Client
1. Click the Notepad icon in the LAN entry of the Interfaces table. The LAN Properties window is displayed.
1. In the LAN Settings section, enter a valid private IP address in the SonicWALL LAN IP (NAT Public) Address field.
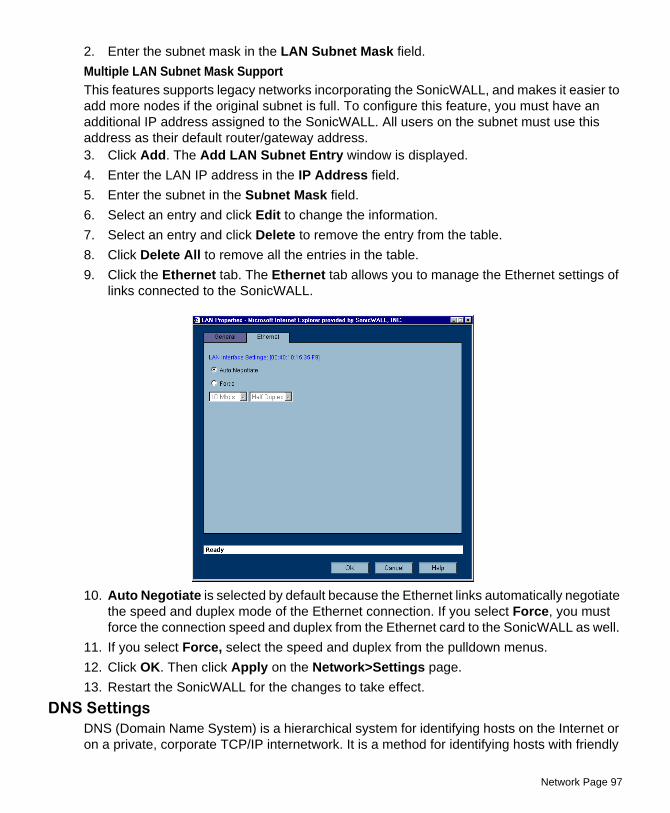
Network Page 97
2. Enter the subnet mask in the LAN Subnet Mask field. Multiple LAN Subnet Mask SupportThis features supports legacy networks incorporating the SonicWALL, and makes it easier to add more nodes if the original subnet is full. To configure this feature, you must have an additional IP address assigned to the SonicWALL. All users on the subnet must use this address as their default router/gateway address. 3. Click Add. The Add LAN Subnet Entry window is displayed. 4. Enter the LAN IP address in the IP Address field. 5. Enter the subnet in the Subnet Mask field. 6. Select an entry and click Edit to change the information.7. Select an entry and click Delete to remove the entry from the table. 8. Click Delete All to remove all the entries in the table.9. Click the Ethernet tab. The Ethernet tab allows you to manage the Ethernet settings of
links connected to the SonicWALL.
10. Auto Negotiate is selected by default because the Ethernet links automatically negotiate the speed and duplex mode of the Ethernet connection. If you select Force, you must force the connection speed and duplex from the Ethernet card to the SonicWALL as well.
11. If you select Force, select the speed and duplex from the pulldown menus. 12. Click OK. Then click Apply on the Network>Settings page. 13. Restart the SonicWALL for the changes to take effect.
DNS SettingsDNS (Domain Name System) is a hierarchical system for identifying hosts on the Internet or on a private, corporate TCP/IP internetwork. It is a method for identifying hosts with friendly

Page 98 SonicWALL SonicOS 2.0s Administrator’s Guide
names instead of IP addresses as well as a method for locating hosts. Hosts are located by resolving their names into their associated IP addresses so network communication can be initiated with the host computer. You can enter up to three IP addresses in the DNS Settings section. However, at least one IP address of a DNS Server is required to resolve host names to IP addresses or IP addresses to host names.
Note: It is strongly recommended to have at least two DNS IP addresses configured on the SonicWALL. This provides redundancy in the event one DNS server is unavailable.
1. Enter the IP address in the DNS Server 1 field.
2. Enter the second IP address in the DNS Server 2 field. 3. Click Apply for the changes to take effect on the SonicWALL.

Network Page 99
Network>One-to-One NAT One-to-One NAT maps valid, external addresses to private addresses hidden by NAT. Computers on your private LAN are accessed on the Internet at the corresponding public IP addresses.You can create a relationship between internal and external addresses by defining internal and external address ranges. Once the relationship is defined, the computer with the first IP address of the private address range is accessible at the first IP address of the external address range, the second computer at the second external IP address, etc.To configure One-to-One NAT, click Firewall, then One-to-One NAT.
To configure One-to-One NAT, complete the following instructions.1. Select the Enable One-to-One NAT check box.
2. Click Add.

Page 100 SonicWALL SonicOS 2.0s Administrator’s Guide
3. Enter the beginning IP address of the private address range being mapped in the Private Range Start field. This is the IP address of the first machine that is accessible from the Internet.
4. Enter the beginning IP address of the valid address range being mapped in the Public Range Begin field. This address should be assigned by your ISP and be in the same logical subnet as the NAT public IP address.
ALERT! Do not include the SonicWALL WAN IP (NAT Public) Address or the WAN Gateway (Router) Address in this range.5. Enter the number of public IP addresses that should be mapped to private addresses in
the Range Length field. The range length can not exceed the number of valid IP addresses. Up to 64 ranges can be added. To map a single address, enter a Range Length of 1.
6. Click OK.7. Click Apply. Once the SonicWALL has been updated, a message confirming the update
is displayed at the bottom of the browser window.
Alert! One-to-One NAT maps valid, public IP addresses to private LAN IP addresses. It does not allow traffic from the Internet to the private LAN.
Tip! A rule must be created in the Rules section to allow access to LAN servers. After One-to-One NAT is configured, create an Allow rule to permit traffic from the Internet to the private IP address(es) on the LAN.
To edit an existing entry in the One-to-One Network Address Translation (NAT) Ranges, click the Notepad icon. To delete an entry, click the Trashcan icon. To delete all entries, click Delete All.
Network Page 101
One-to-One NAT Configuration ExampleThis example assumes that you have a SonicWALL running in the NAT-enabled mode, with IP addresses on the LAN in the range 192.168.1.1 - 192.168.1.254, and a WAN IP address of 208.1.2.2. Also, you own the IP addresses in the range 208.1.2.1 - 208.1.2.6.
Alert! If you have only one IP address from your ISP, you cannot use One-to-One NAT.
You have three web servers on the LAN with the IP addresses of 192.168.1.10, 192.168.1.11, and 192.168.1.12. Each of the servers must have a default gateway pointing to 192.168.1.1, the SonicWALL LAN IP address. You also have three additional IP addresses from your ISP, 208.1.2.4, 208.1.2.5, and 208.1.2.6, that you want to use for three additional web servers. Use the following steps to configure One-to-One NAT:1. Select Enable One-to-One NAT.
2. Click Add.3. Enter in the IP address, 192.168.1.10, in the Private Range Begin field. 4. Enter in the IP address, 208.1.2.4, in the Public Range Begin field.5. Enter in 3 in the Range Length field.
Tip! You can configure the IP addresses individually, but it is easier to configure them in a range. However, the IP addresses on both the private and public sides must be consecutive to configure a range of addresses.
6. Click OK.7. Click Apply.8. Click Access Rules.9. Click Add.10. Configure the following settings:• Allow • Service - HTTP • Source - WAN • Destination - LAN 192.168.1.10 - 192.168.1.12 In the Options tab, select always from the Apply this Rule menu.Click OK.Requests for <http://208.1.2.4> are answered by the server at 192.168.1.10. Requests for <http://208.1.2.5> are answered by the server at 192.168.1.11, and requests for <http://208.1.2.6> are answered by the server at 192.168.1.12. From the LAN, the servers can only be accessed using the private IP addresses (192.168.1.x), not the public IP addresses or domain names. For example, from the LAN, you must use URLs like

Page 102 SonicWALL SonicOS 2.0s Administrator’s Guide
<http://192.168.1.10> to reach the web servers. An IP address, such as 192.168.1.10, on the LAN cannot be used in both public LAN server configurations and in public LAN server One-to-One NAT configurations.
Firewall>Web ProxyA Web proxy server intercepts HTTP requests and determines if it has stored copies of the requested Web pages. If it does not, the proxy completes the request to the server on the Internet, returning the requested information to the user and also saving it locally for future requests. Setting up a Web proxy server on a network can be cumbersome, because each computer on the network must be configured to direct Web requests to the server. If you have a proxy server on your network, instead of configuring each computer’s Web browser to point to the proxy server, you can move the server to the WAN and enable Web Proxy Forwarding. The SonicWALL automatically forwards all Web proxy requests to the proxy server without requiring all the computers on the network to be configured.
Configuring Automatic Proxy Forwarding (Web Only)
Alert! The proxy server must be located on the WAN; it can not be located on the LAN.
To configure a Proxy Web sever, click Firewall, and then Web Proxy.
1. Connect your Web proxy server to a hub, and connect the hub to the SonicWALL WAN port.
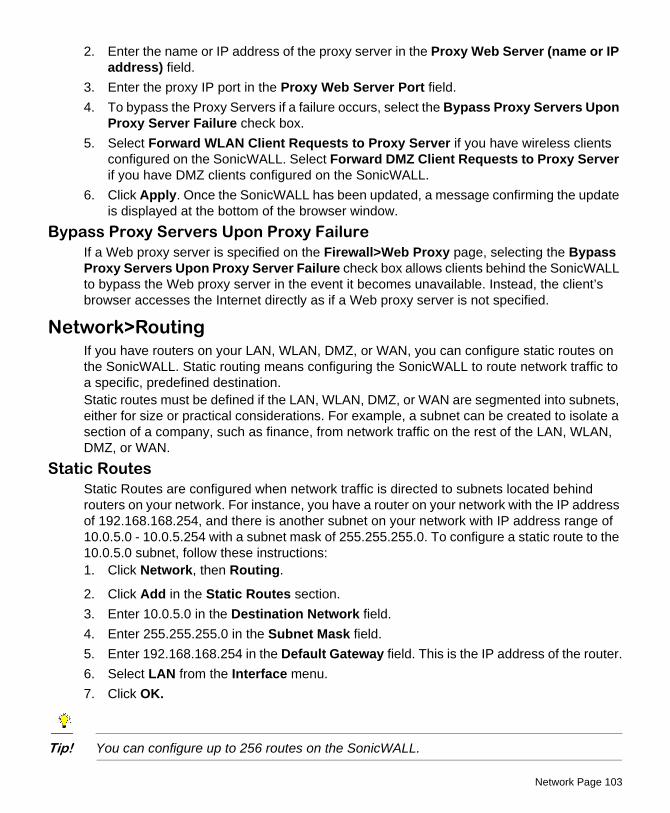
Network Page 103
2. Enter the name or IP address of the proxy server in the Proxy Web Server (name or IP address) field.
3. Enter the proxy IP port in the Proxy Web Server Port field. 4. To bypass the Proxy Servers if a failure occurs, select the Bypass Proxy Servers Upon
Proxy Server Failure check box. 5. Select Forward WLAN Client Requests to Proxy Server if you have wireless clients
configured on the SonicWALL. Select Forward DMZ Client Requests to Proxy Server if you have DMZ clients configured on the SonicWALL.
6. Click Apply. Once the SonicWALL has been updated, a message confirming the update is displayed at the bottom of the browser window.
Bypass Proxy Servers Upon Proxy FailureIf a Web proxy server is specified on the Firewall>Web Proxy page, selecting the Bypass Proxy Servers Upon Proxy Server Failure check box allows clients behind the SonicWALL to bypass the Web proxy server in the event it becomes unavailable. Instead, the client’s browser accesses the Internet directly as if a Web proxy server is not specified.
Network>RoutingIf you have routers on your LAN, WLAN, DMZ, or WAN, you can configure static routes on the SonicWALL. Static routing means configuring the SonicWALL to route network traffic to a specific, predefined destination. Static routes must be defined if the LAN, WLAN, DMZ, or WAN are segmented into subnets, either for size or practical considerations. For example, a subnet can be created to isolate a section of a company, such as finance, from network traffic on the rest of the LAN, WLAN, DMZ, or WAN.
Static RoutesStatic Routes are configured when network traffic is directed to subnets located behind routers on your network. For instance, you have a router on your network with the IP address of 192.168.168.254, and there is another subnet on your network with IP address range of 10.0.5.0 - 10.0.5.254 with a subnet mask of 255.255.255.0. To configure a static route to the 10.0.5.0 subnet, follow these instructions:1. Click Network, then Routing.
2. Click Add in the Static Routes section. 3. Enter 10.0.5.0 in the Destination Network field. 4. Enter 255.255.255.0 in the Subnet Mask field. 5. Enter 192.168.168.254 in the Default Gateway field. This is the IP address of the router.6. Select LAN from the Interface menu. 7. Click OK.
Tip! You can configure up to 256 routes on the SonicWALL.

Page 104 SonicWALL SonicOS 2.0s Administrator’s Guide
Static Route Configuration ExampleStatic Route configurations allow for multiple subnets separated by an internal (LAN) router to be supported behind the sonicwall LAN. This option is only be used when the secondary subnet is accessed through an internal (LAN) router that is between it and the Sonicwall LAN port. Once static routes are configured, network traffic can be directed to these subnets. Key terms: • Destination Network: the network IP address of the remote subnet. The address usually
ends in 0, i.e 10.0.5.0. • Subnet Mask: the subnet mask of the remote network (i.e. 255.255.255.0) • Gateway: the IP address of the Internal (LAN) router that is local to the sonicwall. For example: SW LAN IP ADDRESS: 192.168.168.1Subnet mask: 255.255.255.0Router IP ADDRESS: 192.168.168.254 Secondary Subnet: 10.0.5.0Subnet mask: 255.255.255.0If you have an Internal (LAN) router on your network with the IP address of 192.168.168.254, and there is another subnet on your network with IP address range of 10.0.5.0 - 10.0.5.254 with a subnet mask of 255.255.255.0. To configure a static route to the 10.0.5.0 subnet, follow these instructions: Click Network, and then Routing. 1. Click Add in the Static Routes section.
2. Enter 10.0.5.0 in the Destination Network field. 3. Enter 255.255.255.0 in the Subnet Mask field. 4. Enter 192.168.168.254 in the Default Gateway field. This is the IP address of the internal
(LAN) router that is local to the SonicWall. 5. Select LAN from the Interface menu. 6. Click OK.
Tip! Be sure the Internal (LAN) router is configured as follows: If the SonicWall is in NAT Enabled mode, the internal (LAN) router needs to have a route of last resort (i.e. gateway address) that is the SonicWall LAN IP address.
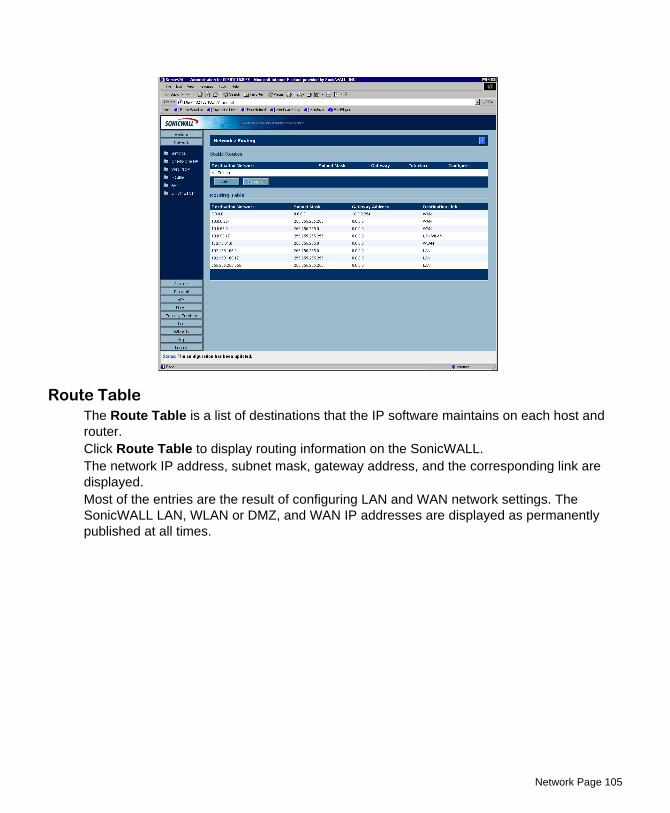
Network Page 105
Route TableThe Route Table is a list of destinations that the IP software maintains on each host and router. Click Route Table to display routing information on the SonicWALL. The network IP address, subnet mask, gateway address, and the corresponding link are displayed.Most of the entries are the result of configuring LAN and WAN network settings. The SonicWALL LAN, WLAN or DMZ, and WAN IP addresses are displayed as permanently published at all times.

Page 106 SonicWALL SonicOS 2.0s Administrator’s Guide
ARP CacheThe ARP (Address Resolution Protocol) Cache stores IP or logical addresses received from ARP replies in order to minimize the number of ARP broadcasts on a network. ARP broadcasts can degrade network performance if too many broadcast requests are sent over the network. Once the ARP request is stored, the host does not have to send out ARP requests for the same IP datagram.
It is sometimes necessary to flush the ARP cache if the IP address has changed for a device on the network. Since the IP address is linked to a physical address, the IP address can change but still be associated with the physical address in the ARP Cache. Flushing the ARP Cache allows new information to be gathered and stored in the ARP Cache. Click Flush ARP Cache to clear the information. To configure a specific length of time for the entry to time out, enter a value in minutes in the ARP Cache entry time out (minutes) field.
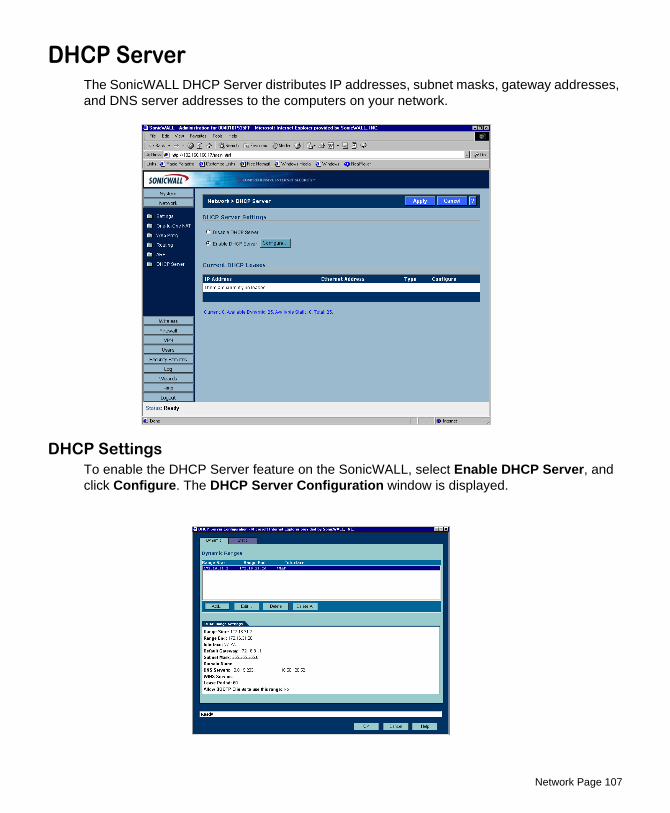
Network Page 107
DHCP ServerThe SonicWALL DHCP Server distributes IP addresses, subnet masks, gateway addresses, and DNS server addresses to the computers on your network.
DHCP SettingsTo enable the DHCP Server feature on the SonicWALL, select Enable DHCP Server, and click Configure. The DHCP Server Configuration window is displayed.

Page 108 SonicWALL SonicOS 2.0s Administrator’s Guide
Configuring DHCP ServerThe Dynamic TabIn the Dynamic Ranges table, the Range Start, Range End, and Interface information is displayed. To add ranges to the table, click Add. The Dynamic Ranges Configuration window is displayed.
The General Tab1. Select LAN or WLAN or DMZ from the Interface menu. If LAN is selected, the IP
addresses are in the same private subnet as the SonicWALL LAN. If WLAN is selected, the IP addresses are in the same private subnet as the SonicWALL WLAN. If DMZ is selected, the IP addresses are in the same private subnet as the SonicWALL DMZ.
2. Enter the beginning IP address in the Range Start field. The default IP address is appropriate for most networks.
3. Enter the last IP address in the Range End field. If there are more than 25 computers on your network, enter the appropriate ending IP address in the Range End field.
4. Enter the number of minutes an IP address is used before it is issued another IP address in the Lease Time (minutes) field. 60 minutes is the default value.
5. Select the gateway from the Gateway Preferences menu. The LAN IP address is the default value, but you can select Other and enter a different IP address for the gateway.
6. If you select the SonicWALL LAN IP address from the Gateway Preferences menu, the Default Gateway and Subnet Mask fields are unavailable. If you select Other, the fields are available for you to enter the Default Gateway and Subnet Mask information into the fields.
7. Select Allow BOOTP Clients to use Range if you have BOOTP Clients on your network.8. Click the DNS/WINS tab to continue configuring the DHCP Server feature.

Network Page 109
The DNS/WINS Tab
9. If you have a domain name for the DNS Server, enter it in the Domain Name field. 10. Set DNS Servers using SonicWALL’s Network Settings is selected by default. When
selected, the DNS Server IP fields are unavailable. 11. If you do not want to use the SonicWALL network settings, select Specify Manually, and
enter the IP address of your DNS Server in the DNS Server 1 field. You must specify at least one DNS server.
12. If you have WINS running on your network, enter the WINS server IP address(es) in the WINS Server 1 field.
13. Click OK to add the settings to the SonicWALL. 14. Then click Apply for the settings to take effect on the SonicWALL.

Page 110 SonicWALL SonicOS 2.0s Administrator’s Guide
Configuring Static DHCP EntriesClick the Static tab to add static DHCP entries to the SonicWALL. Static entries are IP addresses assigned to servers requiring permanent IP settings.TIP! Static DHCP entries should not be configured for computers with IP addresses configured in Network
To configure static entries, click Add.
The General Tab1. Select LAN, WLAN, or DMZ from the Interface menu. If LAN is selected, the IP
addresses are in the same private subnet as the SonicWALL LAN. If WLAN is selected, the IP addresses are in the same private subnet as the SonicWALL WLAN. If DMZ is selected, the IP addresses are in the same private subnet as the SonicWALL DMZ.
2. Enter the device IP address in the Static IP Address field. 3. Enter the device Ethernet (MAC) address in the Ethernet Address field.
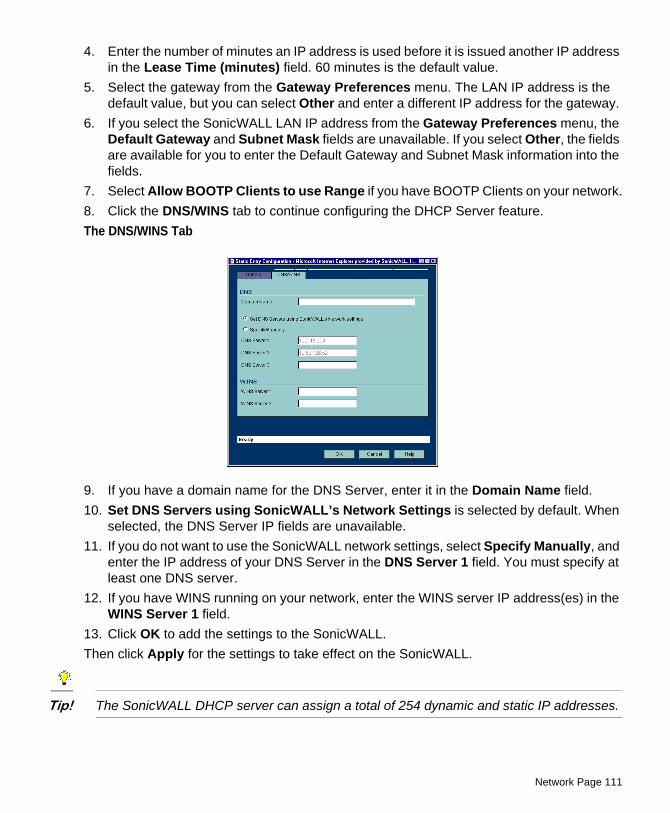
Network Page 111
4. Enter the number of minutes an IP address is used before it is issued another IP address in the Lease Time (minutes) field. 60 minutes is the default value.
5. Select the gateway from the Gateway Preferences menu. The LAN IP address is the default value, but you can select Other and enter a different IP address for the gateway.
6. If you select the SonicWALL LAN IP address from the Gateway Preferences menu, the Default Gateway and Subnet Mask fields are unavailable. If you select Other, the fields are available for you to enter the Default Gateway and Subnet Mask information into the fields.
7. Select Allow BOOTP Clients to use Range if you have BOOTP Clients on your network.8. Click the DNS/WINS tab to continue configuring the DHCP Server feature. The DNS/WINS Tab
9. If you have a domain name for the DNS Server, enter it in the Domain Name field. 10. Set DNS Servers using SonicWALL’s Network Settings is selected by default. When
selected, the DNS Server IP fields are unavailable. 11. If you do not want to use the SonicWALL network settings, select Specify Manually, and
enter the IP address of your DNS Server in the DNS Server 1 field. You must specify at least one DNS server.
12. If you have WINS running on your network, enter the WINS server IP address(es) in the WINS Server 1 field.
13. Click OK to add the settings to the SonicWALL. Then click Apply for the settings to take effect on the SonicWALL.
Tip! The SonicWALL DHCP server can assign a total of 254 dynamic and static IP addresses.

Page 112 SonicWALL SonicOS 2.0s Administrator’s Guide
Current DHCP LeasesThe current DHCP lease information is displayed in the Current DHCP Leases table. Each binding displays the IP address and the Ethernet address along with the type of binding, Dynamic, Dynamic BOOTP, or Static BOOTP. To delete a binding, which frees the IP address on the DHCP server, click the Trashcan icon next to the entry. To edit an entry, click the Notepad icon next to the entry.

Firewall Page 113
6 FirewallNetwork Access Rules are management tools that allow you to define inbound and outbound access policy, configure user authentication, and enable remote management of the SonicWALL. By default, the SonicWALL’s stateful packet inspection allows all communication from the LAN to the Internet, and blocks all traffic to the LAN from the Internet. The following behaviors are defined by the “Default” stateful inspection packet rule enabled in the SonicWALL:• Allow all sessions originating from the LAN to the WAN, WLAN, or DMZ.• Allow all sessions originating from the WLAN or DMZ to the WAN.• Deny all sessions originating from the WAN to the WLAN or DMZ. • Deny all sessions originating from the WAN and WLAN or DMZ to the LAN.Additional Network Access Rules can be defined to extend or override the default rules. For example, rules can be created that block certain types of traffic such as IRC from the LAN to the WAN, or allow certain types of traffic, such as Lotus Notes database synchronization, from specific hosts on the Internet to specific hosts on the LAN, or restrict use of certain protocols such as Telnet to authorized users on the LAN. The custom rules evaluate network traffic source IP addresses, destination IP addresses, IP protocol types, and compare the information to rules created on the SonicWALL. Network Access Rules take precedence, and can override the SonicWALL’s stateful packet inspection. For example, a rule that blocks IRC traffic takes precedence over the SonicWALL default setting of allowing this type of traffic.
Alert! The ability to define Network Access Rules is a very powerful tool. Using custom rules can disable firewall protection or block all access to the Internet. Use caution when creating or deleting Network Access Rules.
Using Bandwidth Management with Access Rules
Bandwidth management allows you to assign guaranteed and maximum bandwidth to services and also prioritize the outbound traffic. Bandwidth management only applies to outbound traffic from the SonicWALL to the WAN or any other destination. The minimum guaranteed bandwidth in Kbps is 20 and the maximum is 100000 kbps. Any rule using bandwidth management has a higher priority than rules not using bandwidth management. Rules using bandwidth management based the assigned priority and rules without bandwidth management are given lowest priority. For instance, if you create a rule for outbound mail traffic (SMTP) and enable Bandwidth Management with a guaranteed bandwidth of 20 Kbps and a maximum bandwidth of 40 Kbps, priority of 0, outbound SMTP traffic always has 20 Kbps available to it and can get as much as 40 Kbps. If this is the only rule using Bandwidth Management, it has priority over all other rules on the SonicWALL. Other rules use the leftover bandwidth minus 20 Kbps (guaranteed) or minus 40 Kbps (maximum).

Page 114 SonicWALL SonicOS 2.0s Administrator’s Guide
Alert! You must select Bandwidth Management on the WAN>Ethernet tab. Click Network, then Configure in the WAN line of the Interfaces table, and enter your available bandwidth in the Available WAN Bandwidth (Kbps) field.
Wireless Access RulesThe Firewall Access Rules are automatically updated when certain wireless features are enabled on the SonicWALL. These features are listed below:• Enforce WiFiSec - when selected, the SonicWALL creates inbound and outbound IKE
rules allowing VPN traffic on the WLAN. • Wireless Guest Services - when selected, the SonicWALL creates a WLAN to HTTP
Management Rule (admin denied) to allow a WGS user to log into the SonicWALL.• Interclient Communications - a rule denying WLAN to WLAN traffic is enabled by de-
fault on the SonicWALL. If you select Enable, the Interclient Communications rule chang-es from Deny to Allow.
Note: Wireless Access Rules only apply to the SOHO TZW.
Firewall>Access RulesThe Access Rules page displays a table of defined Network Access Rules. Rules are sorted from the most specific at the top, to less specific at the bottom of the table. At the bottom of the table is the Default rule. The Default rule is all IP services except those listed in the Access Rules page. Rules can be created to override the behavior of the Default rule; for example, the Default rule allows users on the LAN to access all Internet services, including NNTP News.

Firewall Page 115
.
You can enable or disable Access Rules by selecting or clearing the check box in the Enable column. Clicking the Notepad icon allows you to edit an existing rule, or clicking the Trashcan icon deletes an existing rule. If the two icons are unavailable, the rule cannot be changed or removed from the list. Rules with a Funnel icon are using bandwidth management.
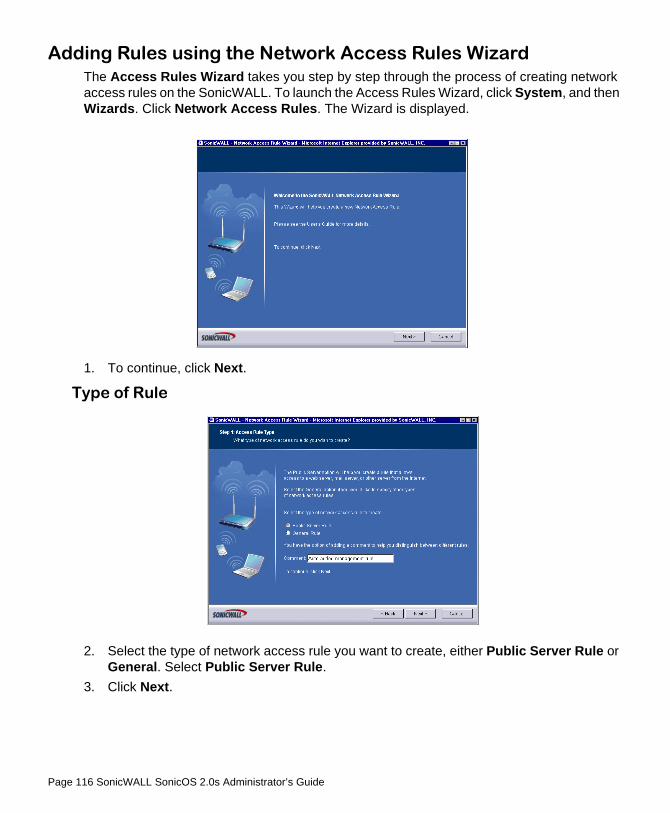
Page 116 SonicWALL SonicOS 2.0s Administrator’s Guide
Adding Rules using the Network Access Rules WizardThe Access Rules Wizard takes you step by step through the process of creating network access rules on the SonicWALL. To launch the Access Rules Wizard, click System, and then Wizards. Click Network Access Rules. The Wizard is displayed.
1. To continue, click Next.
Type of Rule
2. Select the type of network access rule you want to create, either Public Server Rule or General. Select Public Server Rule.
3. Click Next.
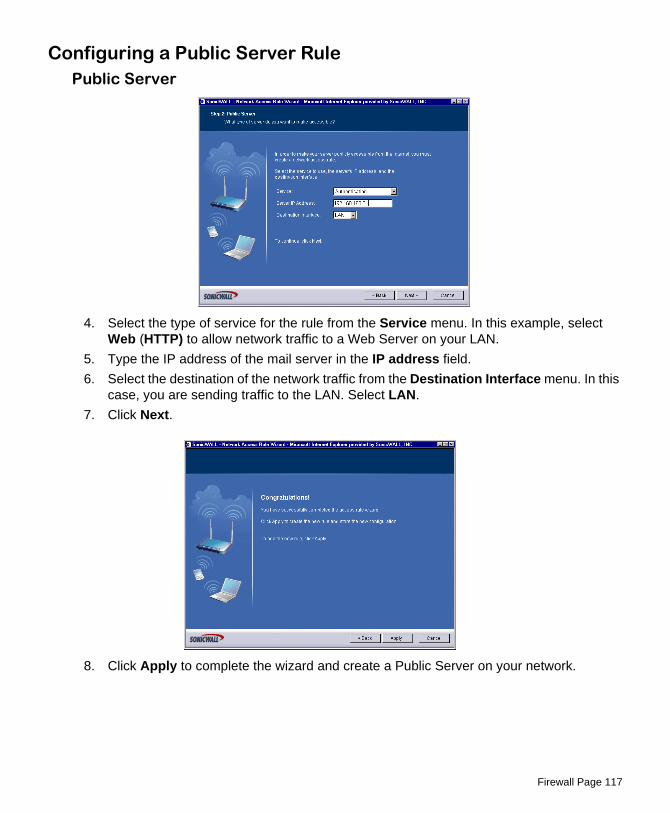
Firewall Page 117
Configuring a Public Server RulePublic Server
4. Select the type of service for the rule from the Service menu. In this example, select Web (HTTP) to allow network traffic to a Web Server on your LAN.
5. Type the IP address of the mail server in the IP address field. 6. Select the destination of the network traffic from the Destination Interface menu. In this
case, you are sending traffic to the LAN. Select LAN. 7. Click Next.
8. Click Apply to complete the wizard and create a Public Server on your network.

Page 118 SonicWALL SonicOS 2.0s Administrator’s Guide
Creating a General Network Access RuleTo launch the Access Rules Wizard, click System, and then Wizards. Click Network Access Rules. The Wizard is displayed.
1. To continue, click Next.
Type of Rule
2. Select the type of network access rule you want to create, in this case, General. 3. Click Next.

Firewall Page 119
Service
4. Select the type of service for the rule. If you do not see the service in the list, you must add it manually to the list of services on the Firewall>Services page.
5. Click Next.Action
6. Select Allow to allow the service to the network, or select Deny to disallow the service to the network.
7. Type a value in minutes in the Inactivity Timeout (minutes) field. The default value is 5 minutes.
8. Click Next.
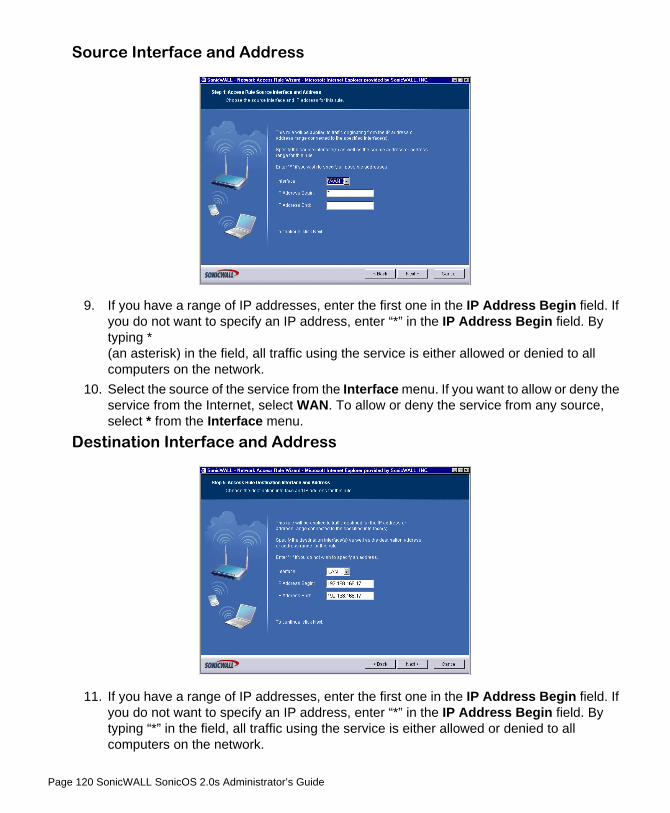
Page 120 SonicWALL SonicOS 2.0s Administrator’s Guide
Source Interface and Address
9. If you have a range of IP addresses, enter the first one in the IP Address Begin field. If you do not want to specify an IP address, enter “*” in the IP Address Begin field. By typing *(an asterisk) in the field, all traffic using the service is either allowed or denied to all computers on the network.
10. Select the source of the service from the Interface menu. If you want to allow or deny the service from the Internet, select WAN. To allow or deny the service from any source, select * from the Interface menu.
Destination Interface and Address
11. If you have a range of IP addresses, enter the first one in the IP Address Begin field. If you do not want to specify an IP address, enter “*” in the IP Address Begin field. By typing “*” in the field, all traffic using the service is either allowed or denied to all computers on the network.

Firewall Page 121
12. Select the source of the service from the Interface menu. If you want to allow or deny the service from the Internet, select WAN. To allow or deny the service from any source, select * from the Interface menu.
Time
13. The rule is always active unless you specify a time period for the rule to be active. For instance, you can deny access to News (NNTP) between 8 a.m. and 5 p.m. Monday through Friday, but allow access after work hours and on weekends.
14. Click Next.Completing the Network Access Rule Wizard
15. To use the Network Access Rule Wizard everytime you create a rule, select Use Network Access Rule Wizard when adding rules. Click Finish.
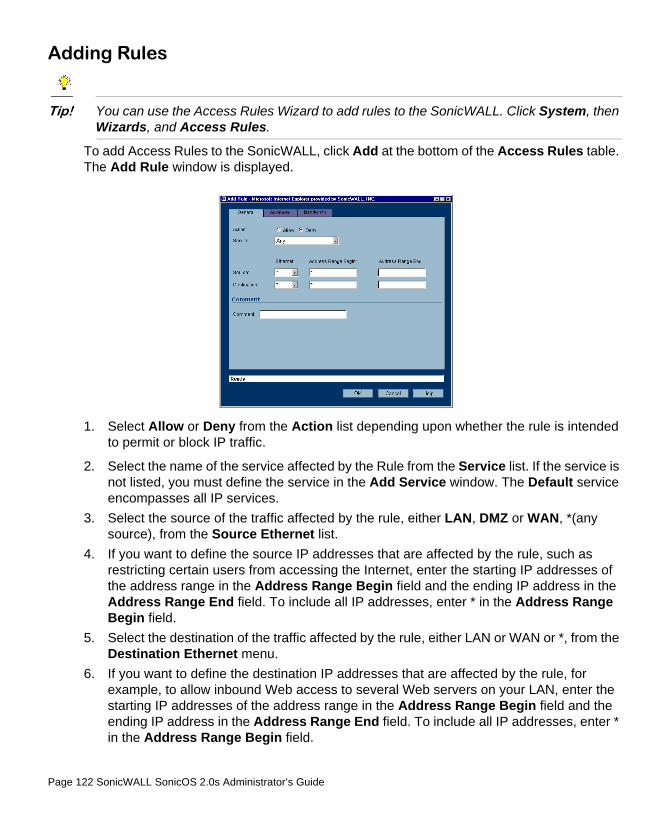
Page 122 SonicWALL SonicOS 2.0s Administrator’s Guide
Adding Rules
Tip! You can use the Access Rules Wizard to add rules to the SonicWALL. Click System, then Wizards, and Access Rules.
To add Access Rules to the SonicWALL, click Add at the bottom of the Access Rules table. The Add Rule window is displayed.
1. Select Allow or Deny from the Action list depending upon whether the rule is intended to permit or block IP traffic.
2. Select the name of the service affected by the Rule from the Service list. If the service is not listed, you must define the service in the Add Service window. The Default service encompasses all IP services.
3. Select the source of the traffic affected by the rule, either LAN, DMZ or WAN, *(any source), from the Source Ethernet list.
4. If you want to define the source IP addresses that are affected by the rule, such as restricting certain users from accessing the Internet, enter the starting IP addresses of the address range in the Address Range Begin field and the ending IP address in the Address Range End field. To include all IP addresses, enter * in the Address Range Begin field.
5. Select the destination of the traffic affected by the rule, either LAN or WAN or *, from the Destination Ethernet menu.
6. If you want to define the destination IP addresses that are affected by the rule, for example, to allow inbound Web access to several Web servers on your LAN, enter the starting IP addresses of the address range in the Address Range Begin field and the ending IP address in the Address Range End field. To include all IP addresses, enter * in the Address Range Begin field.
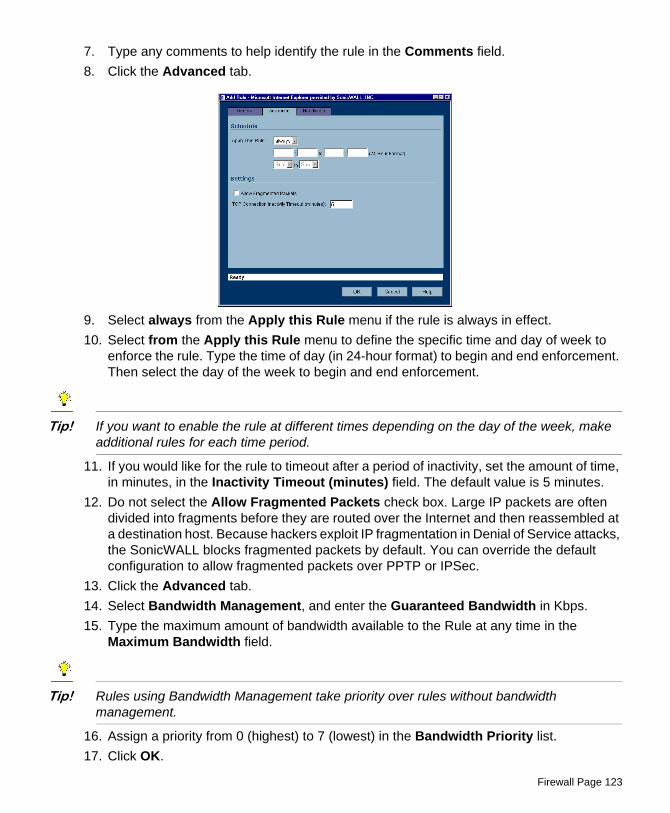
Firewall Page 123
7. Type any comments to help identify the rule in the Comments field. 8. Click the Advanced tab.
9. Select always from the Apply this Rule menu if the rule is always in effect. 10. Select from the Apply this Rule menu to define the specific time and day of week to
enforce the rule. Type the time of day (in 24-hour format) to begin and end enforcement. Then select the day of the week to begin and end enforcement.
Tip! If you want to enable the rule at different times depending on the day of the week, make additional rules for each time period.
11. If you would like for the rule to timeout after a period of inactivity, set the amount of time, in minutes, in the Inactivity Timeout (minutes) field. The default value is 5 minutes.
12. Do not select the Allow Fragmented Packets check box. Large IP packets are often divided into fragments before they are routed over the Internet and then reassembled at a destination host. Because hackers exploit IP fragmentation in Denial of Service attacks, the SonicWALL blocks fragmented packets by default. You can override the default configuration to allow fragmented packets over PPTP or IPSec.
13. Click the Advanced tab. 14. Select Bandwidth Management, and enter the Guaranteed Bandwidth in Kbps. 15. Type the maximum amount of bandwidth available to the Rule at any time in the
Maximum Bandwidth field.
Tip! Rules using Bandwidth Management take priority over rules without bandwidth management.
16. Assign a priority from 0 (highest) to 7 (lowest) in the Bandwidth Priority list. 17. Click OK.
Page 124 SonicWALL SonicOS 2.0s Administrator’s Guide
Tip! Although custom rules can be created that allow inbound IP traffic, the SonicWALL does not disable protection from Denial of Service attacks, such as the SYN Flood and Ping of Death attacks.
Adding New Rule ExamplesThe following examples illustrate methods for creating Network Access Rules.
Blocking LAN Access for Specific Services This example shows how to block LAN access to NNTP servers on the Internet during business hours.1. Click Add to launch the Add window.
2. Select Deny from the Action settings.3. Select NNTP from the Service menu. If the service is not listed in the list, you must to
add it in the Add Service window.4. Select LAN from the Source Ethernet menu.5. Since all computers on the LAN are to be affected, enter * in the Source Address Range
Begin field.6. Select WAN from the Destination Ethernet menu.7. Type * in the Destination Address Range Begin field to block access to all NNTP
servers.8. Click on the Options tab.9. Select from the Apply this Rule list to configure the time of enforcement.10. Type 8:30 and 17:30 in the hour fields.11. Select Mon to Fri from the menu.12. Click OK.
Enabling PingBy default, your SonicWALL does not respond to ping requests from the Internet. This Rule allows ping requests from your ISP servers to your SonicWALL.1. Click Add to launch the Add Rule window.
2. Select Allow from the Action menu.3. Select Ping from the Service menu. 4. Select WAN from the Source Ethernet menu.5. Type the starting IP address of the ISP network in the Source Address Range Begin
field and the ending IP address of the ISP network in the Source Address Range End field.
6. Select LAN from the Destination Ethernet menu.

Firewall Page 125
7. Since the intent is to allow a ping only to the SonicWALL, enter the SonicWALL LAN IP Address in the Destination Address Range Begin field.
8. Click the Options tab.9. Select Always from the Apply this Rule menu to ensure continuous enforcement.10. Click OK.
Access Rules> AdvancedClick Advanced underneath Access Rules.The Advanced Rule Options page is displayed.
Windows Networking (NetBIOS) Broadcast Pass ThroughComputers running Microsoft Windows communicate with one another through NetBIOS broadcast packets. By default, the SonicWALL blocks these broadcasts. Select From LAN to DMZ to allow broadcasts from the LAN to the DMZ. Select From LAN to WAN to allow broadcasts from the LAN to the WAN. SOHO TZW Only Select From WLAN to WAN to allow broadcasts from the WLAN to the WAN. Or, select From WLAN to LAN to allow broadcasts from the WLAN to the WAN.
Detection PreventionEnable Stealth ModeBy default, the SonicWALL responds to incoming connection requests as either "blocked" or "open". If you enable Stealth Mode, your SonicWALL does not respond to blocked inbound connection requests. Stealth Mode makes your SonicWALL essentially invisible to hackers.

Page 126 SonicWALL SonicOS 2.0s Administrator’s Guide
Randomize IP IDSelect Randomize IP ID to prevent hackers using various detection tools from detecting the presence of a SonicWALL appliance. IP packets are given random IP IDs which makes it more difficult for hackers to “fingerprint” the SonicWALL appliance.
Dynamic PortsSelect Enable support for Oracle (SQLNet) if you have Oracle applications on your network. Select Enable Support for Windows Messenger if you are having problems using Windows Messenger through the SonicWALL. If Enable Support for Windows Messenger is selected, it may affect the performance of the SonicWALL. Select Enable SIP Transformations to support Internet telephony sessions or multimedia sessions. Select Enable H.323 Transformations if you are having problems with videoconferencing. H.323 promotes compatibility for videoconferencing over IP networks as well as interoperability in audio, video and data transmissions. Select Enable RTSP Transformations to support on-demand delivery of real-time data, such as audio and video. RTSP (Real Time Streaming Protocol) is an application-level protocol for control over delivery of data with real-time properties.
Source Routed PacketsDrop Source Routed Packets is selected by default. Clear the check box if you are testing traffic between two specific hosts and you are using source routing.
TCP Connection Inactivity TimeoutIf a connection to a remote server remains idle for more than five minutes, the SonicWALL closes the connection. Without this timeout, Internet connections could stay open indefinitely, creating potential security holes. You can increase the Inactivity Timeout if applications, such as Telnet and FTP, are frequently disconnected.

Firewall Page 127
Firewall>ServicesServices are anything a server provides to other computers. A service can be as simple as the computer asking a server for the correct time (NTP) and the server returns a response. Other types of services provide access to different types of data. Web servers (HTTP) respond to requests from clients (browser software) for access to files and data. Services are used by the SonicWALL to configure network access rules for allowing or denying traffic to the network.
User Defined (Custom) ServicesIf protocol is not listed in the Predefined Services table, you can add it to the User Defined (Custom) Services table by clicking Add.
1. Type the name of the service in the Name field.
2. Type the port number or numbers that apply to the service. A list of well know port numbers can be found in any networking reference.
3. Select the type of protocol, TCP, UDP, or ICMP from the Protocol menu.4. Click OK. The service appears in the User Defined (Custom) Services table.

Page 128 SonicWALL SonicOS 2.0s Administrator’s Guide
SonicWALL VPN Page 129
7 SonicWALL VPNSonicWALL VPN provides secure, encrypted communication to business partners and remote offices at a fraction of the cost of dedicated leased lines. Using the SonicWALL intuitive Web Management Interface, you can quickly create a VPN Security Association to a remote site. Whenever data is intended for the remote site, the SonicWALL automatically encrypts the data and sends it over the Internet to the remote site, where it is decrypted and forwarded to the intended destination.SonicWALL VPN is based on the industry-standard IPSec VPN implementation, therefore, it is interoperable with other VPN products, such as Check Point FireWall-1 and Axent Raptor. Basic VPN terminology definitions are located in Appendix F-Basic VPN Terms and Concepts.
Before You Start Configuring VPN TunnelsWhen designing VPN connections, be sure to document all pertinent IP Addressing information and create a network diagram to use as a reference. A sample planning sheet is provided on the next page. The SonicWALL must have a routable WAN IP Address whether it is dynamic or static.Be sure that the networks behind the SonicWALLs are unique. The same subnets cannot reside behind two different VPN gateways. In a VPN network with dynamic and static IP addresses, the VPN gateway with the dynamic address must initiate the VPN connection.
Site to Site VPN ConfigurationsBranch Office (Gateway to Gateway) - A SonicWALL is configured to connect to another SonicWALL via a VPN tunnel. Or, a SonicWALL is configured to connect via IPSec to another manufacturer’s firewall. Hub and Spoke Design - All SonicWALL VPN gateways are configured to connect to a central SonicWALL (hub), such as a corporate SonicWALL. The hub must have a static IP address, but the spokes can have dynamic IP addresses. If the spokes are dynamic, the hub must be a SonicWALL. Mesh Design - All sites connect to all other sites. All sites must have static IP addresses.

Page 130 SonicWALL SonicOS 2.0s Administrator’s Guide
VPN Planning Sheet for Site-to-Site VPN PoliciesYou need the information below before you begin configuring Site-to-Site VPN Policies.
Site A WorkstationLAN IP Address: ___.___.___.___Subnet Mask: ___.___.___.___Default Gateway: ___.___.___.___SonicWALL LAN IP Address: ___.___.___.___WAN IP Address: ___.___.___.___Subnet Mask: ___.___.___.___Default Gateway: ___.___.___.___
RouterInternet GatewayWAN IP Address: ___.___.___.___Subnet Mask: ___.___.___.___DNS Server #1: ___.___.___.___DNS Server #2: ___.___.___.___
Additional InformationSA Name:____________________Manual Key, SPI In_____ SPI Out_____Enc.Key:____________________Auth.Key:___________________If Preshared Secret, Shared Secret:___________________Phase 1 DH - 1 2 5SA Lifetime 28800 or ____________Phase 1 Enc/Auth DES 3DES AES-128 AES-256 MD5 SHA1 (circle)Phase 2 Enc/Auth DES 3DES AES-128 AES-256 MD5 SHA1 (circle)ARC NULL__ Use this SA as default route for Internet traffic__ IP Addresses use DHCP through this SA__ Specify destination networks below:Network/Range Start: ___.___.___.___Range End: ___.___.___.___Subnet Mask: ___.___.___.___
Site BWorkstationLAN IP Address: ___.___.___.___Subnet Mask: ___.___.___.___Default Gateway: ___.___.___.___SonicWALL LAN IP Address: ___.___.___.___WAN IP Address: ___.___.___.___Subnet Mask: ___.___.___.___Default Gateway: ___.___.___.___
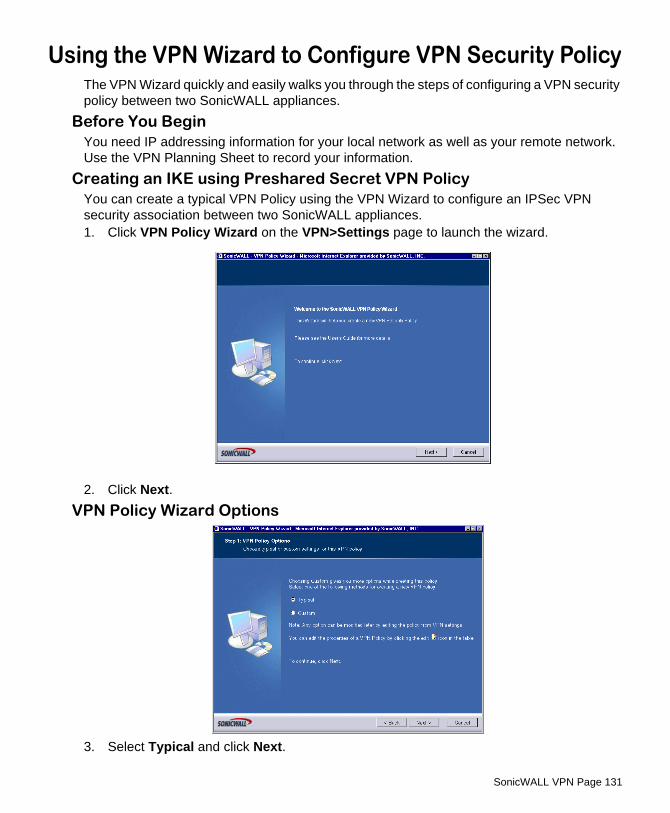
SonicWALL VPN Page 131
Using the VPN Wizard to Configure VPN Security PolicyThe VPN Wizard quickly and easily walks you through the steps of configuring a VPN security policy between two SonicWALL appliances.
Before You BeginYou need IP addressing information for your local network as well as your remote network. Use the VPN Planning Sheet to record your information.
Creating an IKE using Preshared Secret VPN PolicyYou can create a typical VPN Policy using the VPN Wizard to configure an IPSec VPN security association between two SonicWALL appliances. 1. Click VPN Policy Wizard on the VPN>Settings page to launch the wizard.
2. Click Next.VPN Policy Wizard Options
3. Select Typical and click Next.

Page 132 SonicWALL SonicOS 2.0s Administrator’s Guide
VPN Policy Name and Address
4. Type a name for the policy in the Policy Name field. You may want to use the name of a remote office or other identifying feature so that it is easily identified. Type the IP address or Fully Qualified Domain Name of the remote destination in the IPSec Gateway Name or Address field.
5. Click Next.VPN Destination Networks
6. Type the IP address of the network protected by the remote SonicWALL in the Remote Network field. This is a private IP address on the remote network. Type the subnet mask in the Remote Netmask field.

SonicWALL VPN Page 133
Shared Secret
7. Type a shared secret in the Shared Secret field. Use a combination of letters and numbers to create a unique secret.
8. Click Next. Congratulations!
You have now configured a simple VPN tunnel using IKE and a preshared secret. To enable the VPN policy immediately, click Apply. If you prefer to disable the policy initially, select Create this Policy Disabled, and then click Apply.

Page 134 SonicWALL SonicOS 2.0s Administrator’s Guide
Creating a Custom VPN Policy using IKE and a Preshared SecretClick VPN Policy Wizard to launch the wizard.
1. Click Next to continue.
VPN Policy Options
2. Select Custom, and click Next.

SonicWALL VPN Page 135
VPN Policy Name and Address
3. Type a name for the policy in the Policy Name field. You may want to use the name of a remote office or other identifying feature so that it is easily identified. Type the IP address or Fully Qualified Domain Name of the remote destination in the IPSec Gateway Name or Address field.
VPN Tunnel Destination Networks
4. Type the IP address of the network protected by the remote SonicWALL in the Remote Network field. This is a private IP address on the remote network. Type the subnet mask in the Remote Netmask field.
5. Click Next.

Page 136 SonicWALL SonicOS 2.0s Administrator’s Guide
IPSec Keying Mode
6. Select IKE using Preshared Secret as the IPSec Keying Mode. 7. Click Next.
Shared Secret
8. Type a shared secret in the Shared Secret field. Use a combination of letters and numbers to create a unique secret.
9. Click Next.
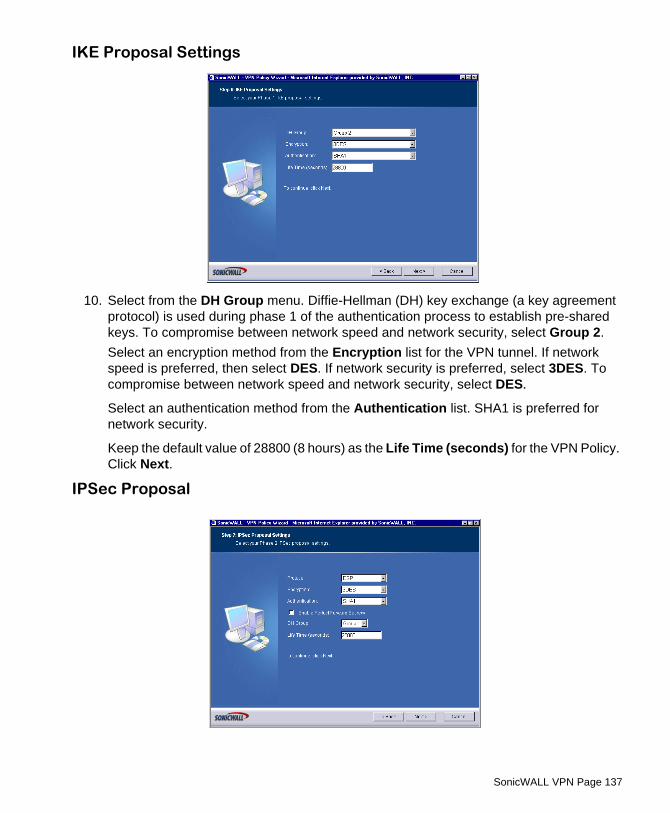
SonicWALL VPN Page 137
IKE Proposal Settings
10. Select from the DH Group menu. Diffie-Hellman (DH) key exchange (a key agreement protocol) is used during phase 1 of the authentication process to establish pre-shared keys. To compromise between network speed and network security, select Group 2.Select an encryption method from the Encryption list for the VPN tunnel. If network speed is preferred, then select DES. If network security is preferred, select 3DES. To compromise between network speed and network security, select DES.
Select an authentication method from the Authentication list. SHA1 is preferred for network security.
Keep the default value of 28800 (8 hours) as the Life Time (seconds) for the VPN Policy. Click Next.
IPSec Proposal

Page 138 SonicWALL SonicOS 2.0s Administrator’s Guide
11. Select ESP from the Protocol menu. ESP is more secure than AH, but AH requires less processing overhead.Select 3DES from the Encryption menu. 3DES is extremely secure.
Select SHA1 from the Authentication menu.
Select Enable Perfect Forward Secrecy. The Enable Perfect Forward Secrecy check box increases the renegotiation time of the VPN tunnel. By enabling Perfect Forward Secrecy, a hacker using brute force to break encryption keys is not able to obtain other or future IPSec keys. During the phase 2 renegotiation between two SonicWALL appliances or a Group VPN SA, an additional Diffie-Hellman key exchange is performed. Enable Perfect Forward Secrecy adds incremental security between gateways.
If Enable Perfect Forward Secrecy is enabled, select the type of Diffie-Hellman (DH) Key Exchange (a key agreement protocol) to be used during phase 2 of the authentication process to establish pre-shared keys.
Leave the default value, 28800, in the Life Time (seconds) field. The keys renegotiate every 8 hours.
Click Next.
Congratulations!
You have now configured a simple VPN tunnel using IKE and a preshared secret. To enable the VPN policy immediately, click Apply. If you prefer to disable the policy initially, select Create this Policy Disabled, and then click Apply.

SonicWALL VPN Page 139
Creating a Manual Key VPN Policy with the VPN Policy WizardYou can create a custom VPN Policy using the VPN Wizard to configure a different IPSec method or configure more advanced features for the VPN Policy. Follow the steps in the previous section, except select Customize instead of Typical.
1. Click Next to continue.
VPN Policy Name and Address
2. Type the name for the VPN Policy in the Policy Name field.

Page 140 SonicWALL SonicOS 2.0s Administrator’s Guide
VPN Tunnel Destination Networks
3. Type the IP address range of the remote network into the Remote Network field. 4. Type the remote subnet in the Remote Netmask field. 5. Click Next.
IPSec Keying Mode
6. Select Manual Key from the IPSec Keying Modes list.
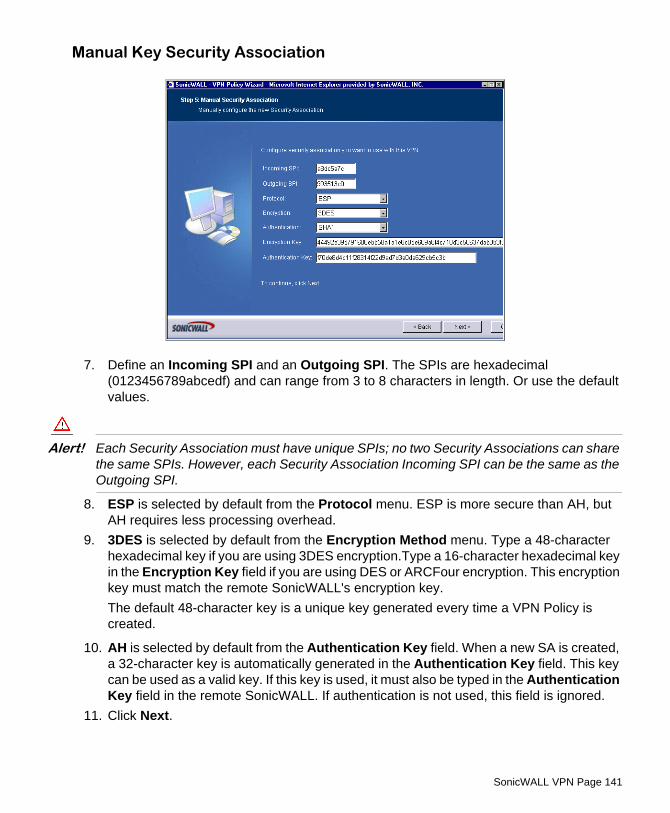
SonicWALL VPN Page 141
Manual Key Security Association
7. Define an Incoming SPI and an Outgoing SPI. The SPIs are hexadecimal (0123456789abcedf) and can range from 3 to 8 characters in length. Or use the default values.
Alert! Each Security Association must have unique SPIs; no two Security Associations can share the same SPIs. However, each Security Association Incoming SPI can be the same as the Outgoing SPI.
8. ESP is selected by default from the Protocol menu. ESP is more secure than AH, but AH requires less processing overhead.
9. 3DES is selected by default from the Encryption Method menu. Type a 48-character hexadecimal key if you are using 3DES encryption.Type a 16-character hexadecimal key in the Encryption Key field if you are using DES or ARCFour encryption. This encryption key must match the remote SonicWALL's encryption key. The default 48-character key is a unique key generated every time a VPN Policy is created.
10. AH is selected by default from the Authentication Key field. When a new SA is created, a 32-character key is automatically generated in the Authentication Key field. This key can be used as a valid key. If this key is used, it must also be typed in the Authentication Key field in the remote SonicWALL. If authentication is not used, this field is ignored.
11. Click Next.

Page 142 SonicWALL SonicOS 2.0s Administrator’s Guide
Completing the VPN Policy Wizard
12. The VPN Policy is automatically enabled after you complete the wizard steps. To disable the VPN Policy, select Create this Policy Disabled. Click Finish to complete the VPN Policy configuration.

SonicWALL VPN Page 143
VPN>SettingsTo begin configuring VPN Policies, log into the SonicWALL and click VPN. The default page is VPN>Settings.
Global IPSec SettingsThe Global VPN Settings section displays the following information:• Unique Firewall Identifier - the default value is the serial number of the SonicWALL.
You can change the Identifier, and use it for configuring VPN tunnels.• Enable VPN must be selected to allow VPN policies through the SonicWALL. .
VPN Policies
Tip! VPN Policies can be edited at anytime by clicking on the Notepad icon in the table entry.
All existing VPN Security Associations are displayed in the VPN Policy table. Each entry displays the following information:• Name - user-defined name to identify the Security Association.• Gateway - the IP address of the remote SonicWALL. If 0.0.0.0 is used, no Gateway is
displayed. • Destinations - the IP addresses of the destination networks.• Crypto Suite - the type of encryption used• Enable - selecting the check box enables the VPN Policy. Clearing the check box
disables it.

Page 144 SonicWALL SonicOS 2.0s Administrator’s Guide
• Configure - edit or delete the VPN Policy information. Group VPN has a Save icon for exporting the configuration to Global VPN Clients.
The number of VPN Policies defined, Policies enabled, and the maximum number of Policies allowed is displayed below the table.
Currently Active VPN Policies A list of currently active VPN tunnels is displayed in this section. The table lists the name of the VPN Policy, the local LAN IP addresses, and the remote destination network IP addresses as well as the Peer Gateway IP address.
Adding VPN Policies to the SonicWALL
Tip! You can use the VPN Wizard to add VPN Policies to the SonicWALL. Click System, then Wizards. Click VPN Wizard to begin configuration.
Configuring Group VPN Policy on the SonicWALLSonicWALL VPN defaults to a Group VPN setting. This feature facilitates the set up and deployment of multiple VPN clients by the administrator of the SonicWALL appliance. Security settings can now be exported to the remote client and imported into the remote VPN client settings. Group VPN allows for easy deployment of multiple VPN clients making it unnecessary to individually configure remote VPN clients. Group VPN is only available for VPN clients and it is recommended to use XAUTH/RADIUS or third party certificates in conjunction with the Group VPN for added security.To edit the default settings for Group VPN, click the Notepad icon in the Group VPN entry. The VPN Policy window is displayed.

SonicWALL VPN Page 145
VPN Policy>GeneralIKE using Preshared Secret is the default setting for IPSec Keying Mode. You can also use Third Party Certificates for authentication. Group VPN is the default policy name and cannot be changed. A Shared Secret is automatically generated in the Shared Secret field, or you can generate your own shared secret. Shared Secrets must be minimum of four characters. Click the Proposals tab to continue the configuration process.VPN Policy>Proposals
In the IKE (Phase 1) Proposal section, select the following settings:1. Group 2 from the DH Group menu.
2. 3DES from the Encryption menu 3. SHA1 from the Authentication menu 4. Leave the default setting, 28800, in the Life Time (secs) field. This setting forces the
tunnel to renegotiate and exchange keys every 8 hours. In the IPSec (Phase 2) Proposal section, select the following settings:5. ESP from the Protocol menu 6. 3DES from the Encryption menu 7. MD5 from the Authentication menu 8. Select Enable Perfect Forward Secrecy if you want an additional Diffie-Hellman key
exchange as an added layer of security. Then select Group 2 from the DH Group menu.9. Leave the default setting, 28800, in the Life Time (secs) field. This setting forces the
tunnel to renegotiate and exchange keys every 8 hours. 10. Click the Advanced tab.

Page 146 SonicWALL SonicOS 2.0s Administrator’s Guide
VPN Policy>Advanced
Tip! These settings are optional and are not required for VPN tunnel configuration.
• Enable Windows Networking (NetBIOS) broadcast - to allow access to remote net-work resources by browsing the Windows® Network Neighborhood.
• Apply NAT and Firewall Rules - This feature allows a remote site’s LAN subnet to be hidden from the corporate site, and is most useful when a remote office’s network traffic is initiated to the corporate office. The IPSec tunnel is located between the SonicWALL WAN interface and the LAN segment of the corporation. To protect the traffic, NAT (Net-work Address Translation) is performed on the outbound packet before it is sent through the tunnel, and in turn, NAT is performed on inbound packets when they are received. By using NAT for a VPN connection, computers on the remote LAN are viewed as one ad-dress (the SonicWALL public address) from the corporate LAN.
Alert! Offices can have overlapping LAN IP ranges if the Apply NAT and Firewall Rules feature is selected.
• Forward Packets to Remote VPNs - allows the remote VPN tunnel to participate in the SonicWALL routing table. Inbound traffic is decrypted and can be forwarded to a remote site via another VPN tunnel. Normally, inbound traffic is decrypted and only forwarded to the SonicWALL LAN or a specific route on the LAN configured on the Routing page lo-cated in the Network section. Enabling this feature allows a network administrator to cre-ate a “hub and spoke” network configuration by forwarding inbound traffic to a remote site via a VPN security association. To create a “hub and spoke” network, select the Forward Packets to Remote VPNs check box.Traffic can travel from a branch office to a branch office via the corporate office.
• Default LAN Gateway - used at a central site in conjunction with a remote site using Use this VPN Tunnel as default route for all Internet traffic. Default LAN Gateway allows
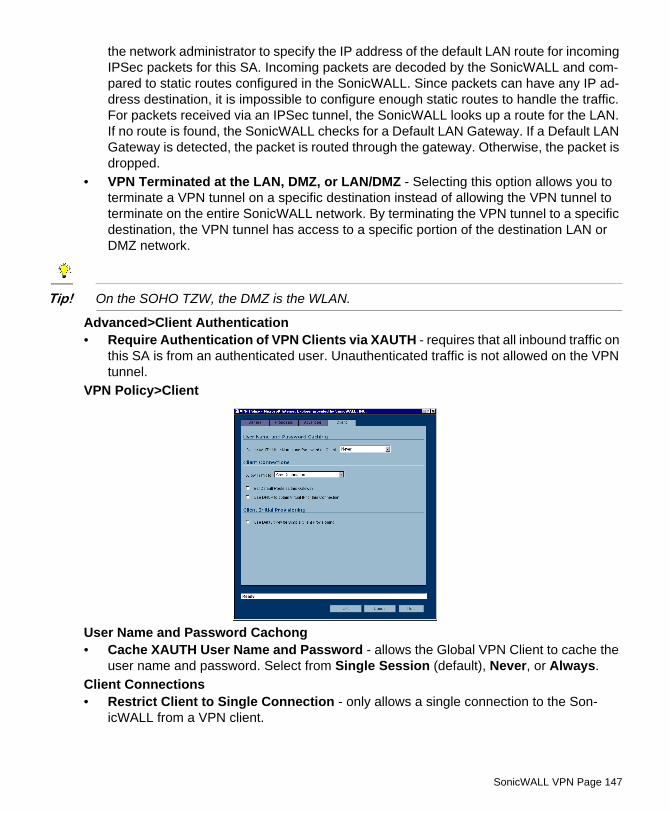
SonicWALL VPN Page 147
the network administrator to specify the IP address of the default LAN route for incoming IPSec packets for this SA. Incoming packets are decoded by the SonicWALL and com-pared to static routes configured in the SonicWALL. Since packets can have any IP ad-dress destination, it is impossible to configure enough static routes to handle the traffic. For packets received via an IPSec tunnel, the SonicWALL looks up a route for the LAN. If no route is found, the SonicWALL checks for a Default LAN Gateway. If a Default LAN Gateway is detected, the packet is routed through the gateway. Otherwise, the packet is dropped.
• VPN Terminated at the LAN, DMZ, or LAN/DMZ - Selecting this option allows you to terminate a VPN tunnel on a specific destination instead of allowing the VPN tunnel to terminate on the entire SonicWALL network. By terminating the VPN tunnel to a specific destination, the VPN tunnel has access to a specific portion of the destination LAN or DMZ network.
Tip! On the SOHO TZW, the DMZ is the WLAN.
Advanced>Client Authentication • Require Authentication of VPN Clients via XAUTH - requires that all inbound traffic on
this SA is from an authenticated user. Unauthenticated traffic is not allowed on the VPN tunnel.
VPN Policy>Client
User Name and Password Cachong • Cache XAUTH User Name and Password - allows the Global VPN Client to cache the
user name and password. Select from Single Session (default), Never, or Always.Client Connections • Restrict Client to Single Connection - only allows a single connection to the Son-
icWALL from a VPN client.

Page 148 SonicWALL SonicOS 2.0s Administrator’s Guide
• Allow Traffic to - Client network traffic matching destination networks of each gateway is sent through the VPN tunnel of that specific gateway. Select from Any Destination, This Gateway Only, or All Secured Gateways.
• Set Default Route as this Gateway - Enable this check box if all remote VPN connec-tions access the Internet through this VPN Polciy. You can only configure one VPN Policy to use this setting.
• Use DHCP to obtain Virtual IP for this Connection - allows the VPN Client to obtain an IP address using DHCP over VPN.
Client Initial Provisioning• Allow Initial Provisioning Using Default Key - the initial Aggressive mode exchange
by the gateway and VPN clients uses a default Preshared Key for authentication.
Configuring a VPN Policy using IKE with Preshared SecretTo manually configure a VPN Policy using IKE with Preshared Secret, follow the steps below:
1. Log into the SonicWALL and click VPN.
2. Click Add. The VPN Policy window is displayed.
3. IKE using Preshared Secret is selected by default from the IPSec Keying Mode menu.
Tip! Use the VPN worksheet at the beginning of this chapter to record your settings. These settings are necessary to configure the remote SonicWALL and create a successful VPN connection.
4. Enter a name for the VPN Policy in the Name field. 5. Enter the IP address or gateway name of the REMOTE SonicWALL in the IPSec
Gateway Name or Address field.

SonicWALL VPN Page 149
6. Enter a combination of letters, symbols, and numbers as the Shared Secret in the Shared Secret field.
Tip! The Shared Secret must be a minimum of four characters.
Destination Networks 7. Choose from the following options:
• Use this VPN Tunnel as the default route for all Internet traffic - select this option if all remote VPN connections access the Internet through this SA. You can only con-figure one SA to use this option.
• Destination network obtains IP addresses using DCHP through this SA - select this option if you are managing your network IP address allocation from a central loca-tion.
• Specify destination networks below - configure the remote destination network for your SA. Click Add to add the IP address and subnet mask. You can modify existing destination networks by click Edit, and delete networks by selecting the network and clicking Delete.
ProposalsIKE (Phase 1) Proposal
The default settings offer a secure connection configuration, however, the settings can be modified to reflect your preferences. In addition to 3DES, AES-128, AES-192, and AES-256 can be selected for encryption methods. IPSec (Phase 2) Proposal The default settings offer a secure connection configuration, however, the settings can be modified to reflect your preferences. In addition to 3DES, AES-128, AES-192, and AES-256 can be selected for encryption methods.Selecting Enable Perfect Forward Secrecy prevents a hacker using brute force to break encryption keys from obtaining the current and future IPSec keys. During Phase 2

Page 150 SonicWALL SonicOS 2.0s Administrator’s Guide
negotiation, an additional Diffie-Hellman key exchange is performed. This option adds an additional layer of security to the VPN tunnel.
Advanced
Advanced Settings
Tip! These settings are optional and are not required for VPN tunnel configuration.
• Enable Keep Alive - Select Enable Keep Alive to allow the VPN tunnel to remain active or maintain its current connection by listening for traffic on the network segment. Inter-ruption of the traffic forces the tunnel to renegotiate with the SonicWALL.
• Enable Windows Networking (NetBIOS) broadcast - to allow access to remote net-work resources by browsing the Windows® Network Neighborhood.
• Require authentication of local users - requires all outbound VPN traffic from this SA is from an authenticated source.
• Require authentication of remote users - requires all inbound VPN traffic for this SA is from an authenticated user. Select Remote users behind VPN gateway if remote users are terminating on the VPN gateway. Select Remote VPN clients behind VPN gateway if remote Global VPN Clients are required to authenticate using XAUTH.
• Apply NAT and Firewall Rules - This feature allows a remote site’s LAN subnet to be hidden from the corporate site, and is most useful when a remote office’s network traffic is initiated to the corporate office. The IPSec tunnel is located between the SonicWALL WAN interface and the LAN segment of the corporation. To protect the traffic, NAT (Net-work Address Translation) is performed on the outbound packet before it is sent through the tunnel, and in turn, NAT is performed on inbound packets when they are received. By using NAT for a VPN connection, computers on the remote LAN are viewed as one ad-dress (the SonicWALL public address) from the corporate LAN.
SonicWALL VPN Page 151
Alert! You cannot use this feature if you have selected Use this VPN Tunnel as the default route for all Internet trafficin the Advanced window.
Alert! Offices can have overlapping LAN IP ranges if the Apply NAT and Firewall Rules feature is selected.
• Forward Packets to Remote VPNs - allows the remote VPN tunnel to participate in the SonicWALL routing table. Inbound traffic is decrypted and can be forwarded to a remote site via another VPN tunnel. Normally, inbound traffic is decrypted and only forwarded to the SonicWALL LAN or a specific route on the LAN configured on the Routing page lo-cated in the Network section. Enabling this feature allows a network administrator to cre-ate a “hub and spoke” network configuration by forwarding inbound traffic to a remote site via a VPN security association. To create a “hub and spoke” network, select the Forward Packets to Remote VPNs check box.Traffic can travel from a branch office to a branch office via the corporate office.
• Default LAN Gateway - used at a central site in conjunction with a remote site using the Route all internet traffic through this SA check box. Default LAN Gateway allows the net-work administrator to specify the IP address of the default LAN route for incoming IPSec packets for this SA. Incoming packets are decoded by the SonicWALL and compared to static routes configured in the SonicWALL. Since packets can have any IP address des-tination, it is impossible to configure enough static routes to handle the traffic. For packets received via an IPSec tunnel, the SonicWALL looks up a route for the LAN. If no route is found, the SonicWALL checks for a Default LAN Gateway. If a Default LAN Gateway is detected, the packet is routed through the gateway. Otherwise, the packet is dropped.
• VPN Terminated at the LAN, DMZ, or LAN/DMZ - Selecting this option allows you to terminate a VPN tunnel on a specific destination instead of allowing the VPN tunnel to terminate on the entire SonicWALL network. By terminating the VPN tunnel to a specific destination, the VPN tunnel has access to a specific portion of the destination LAN or DMZ network.
Note: On the SOHO TZW, the DMZ is the WLAN.

Page 152 SonicWALL SonicOS 2.0s Administrator’s Guide
Configuring a VPN Policy using Manual KeyTo manually configure a VPN Policy using Manual Key, follow the steps below:
1. Log into the SonicWALL and click VPN.
2. Click Add. The VPN Policy window is displayed.
3. Select Manual Key from the IPSec Keying Mode menu.
Tip! Use the VPN worksheet at the beginning of this chapter to record your settings. These settings are necessary to configure the remote SonicWALL and create a successful VPN connection.
4. Enter a name for the VPN Policy in the Name field. 5. Enter the IP address or gateway name of the REMOTE SonicWALL in the IPSec
Gateway Name or Address field.Destination Networks
• Use this SA as the default route for all Internet traffic - select this option if all remote VPN connections access the Internet through this SA. You can only configure one SA to use this option.
• Specify destination networks below - configure the remote destination network for your SA. Click Add to add the IP address and subnet mask. You can modify existing destination networks by click Edit, and delete networks by selecting the network and clicking Delete.

SonicWALL VPN Page 153
VPN Policy > ProposalsIPSec SA
6. Define an Incoming SPI and an Outgoing SPI. The SPIs are hexadecimal (0123456789abcedf) and can range from 3 to 8 characters in length. Or use the default values.
Alert! Each Security Association must have unique SPIs; no two Security Associations can share the same SPIs. However, each Security Association Incoming SPI can be the same as the Outgoing SPI.
7. ESP is selected by default from the Protocol menu. ESP is more secure than AH, but AH requires less processing overhead.
8. 3DES is selected by default from the Phase 2 Encryption menu. Type a 48-character hexadecimal key if you are using 3DES encryption.Type a 16-character hexadecimal key in the Encryption Key field if you are using DES or ARCFour encryption. This encryption key must match the remote SonicWALL's encryption key. The default 48-character key is a unique key generated every time a VPN Policy is created.
9. SHA1 is selected by default from the Phase 2 Authentication menu. When a new Policy is created, a 32-character key is automatically generated in the Authentication Key field. This key can be used as a valid key. If this key is used, it must also be typed in the Authentication Key field in the remote SonicWALL. If authentication is not used, this field is ignored.
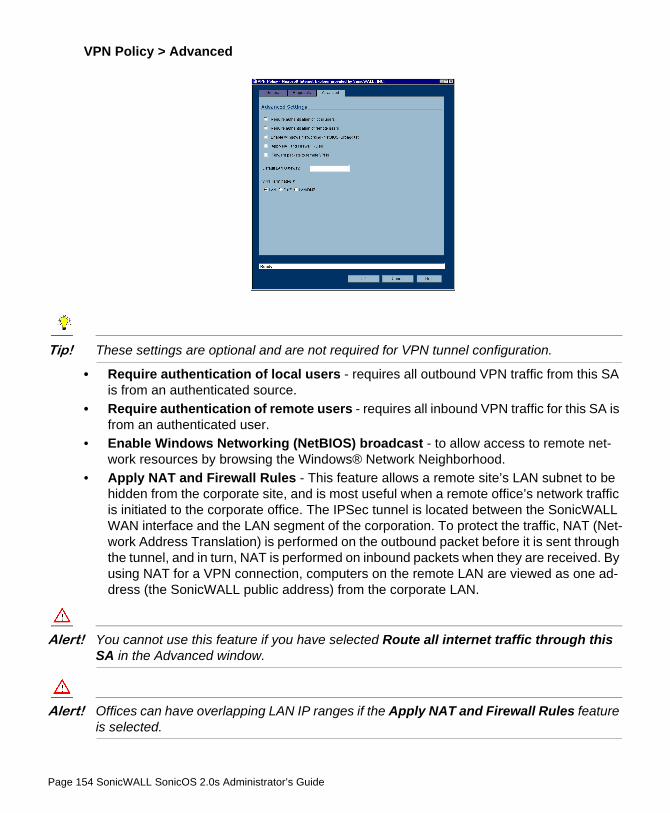
Page 154 SonicWALL SonicOS 2.0s Administrator’s Guide
VPN Policy > Advanced
Tip! These settings are optional and are not required for VPN tunnel configuration.
• Require authentication of local users - requires all outbound VPN traffic from this SA is from an authenticated source.
• Require authentication of remote users - requires all inbound VPN traffic for this SA is from an authenticated user.
• Enable Windows Networking (NetBIOS) broadcast - to allow access to remote net-work resources by browsing the Windows® Network Neighborhood.
• Apply NAT and Firewall Rules - This feature allows a remote site’s LAN subnet to be hidden from the corporate site, and is most useful when a remote office’s network traffic is initiated to the corporate office. The IPSec tunnel is located between the SonicWALL WAN interface and the LAN segment of the corporation. To protect the traffic, NAT (Net-work Address Translation) is performed on the outbound packet before it is sent through the tunnel, and in turn, NAT is performed on inbound packets when they are received. By using NAT for a VPN connection, computers on the remote LAN are viewed as one ad-dress (the SonicWALL public address) from the corporate LAN.
Alert! You cannot use this feature if you have selected Route all internet traffic through this SA in the Advanced window.
Alert! Offices can have overlapping LAN IP ranges if the Apply NAT and Firewall Rules feature is selected.

SonicWALL VPN Page 155
• Forward Packets to Remote VPNs - allows the remote VPN tunnel to participate in the SonicWALL routing table. Inbound traffic is decrypted and can be forwarded to a remote site via another VPN tunnel. Normally, inbound traffic is decrypted and only forwarded to the SonicWALL LAN or a specific route on the LAN configured on the Routing page lo-cated in the Network section. Enabling this feature allows a network administrator to cre-ate a “hub and spoke” network configuration by forwarding inbound traffic to a remote site via a VPN security association. To create a “hub and spoke” network, select the Forward Packets to Remote VPNs check box.Traffic can travel from a branch office to a branch office via the corporate office.
• Default LAN Gateway - used at a central site in conjunction with a remote site using the Use this VPN Tunnel as the default route for all internet traffic. Default LAN Gate-way allows the network administrator to specify the IP address of the default LAN route for incoming IPSec packets for this VPN Policy. Incoming packets are decoded by the SonicWALL and compared to static routes configured in the SonicWALL. Since packets can have any IP address destination, it is impossible to configure enough static routes to handle the traffic. For packets received via an IPSec tunnel, the SonicWALL looks up a route for the LAN. If no route is found, the SonicWALL checks for a Default LAN Gateway. If a Default LAN Gateway is detected, the packet is routed through the gateway. Other-wise, the packet is dropped.
• VPN Terminated at the LAN, DMZ, or LAN/DMZ - Selecting this option allows you to terminate a VPN tunnel on a specific destination instead of allowing the VPN tunnel to terminate on the entire SonicWALL network. By terminating the VPN tunnel to a specific destination, the VPN tunnel has access to a specific portion of the destination LAN or DMZ network.
Tip! On the SOHO TZW, the DMZ is the WLAN.
10. Click OK to add the Manual Key VPN Policy to the SonicWALL.
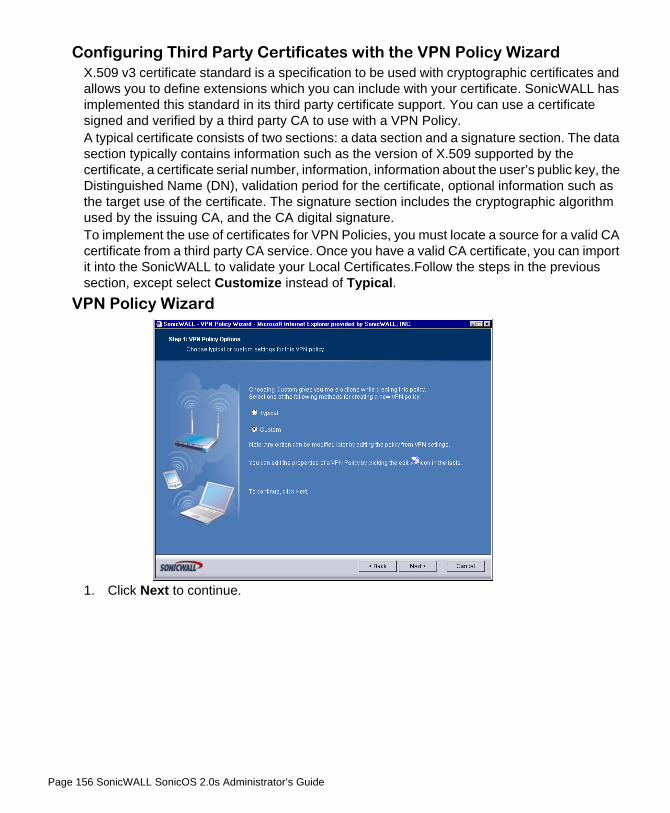
Page 156 SonicWALL SonicOS 2.0s Administrator’s Guide
Configuring Third Party Certificates with the VPN Policy WizardX.509 v3 certificate standard is a specification to be used with cryptographic certificates and allows you to define extensions which you can include with your certificate. SonicWALL has implemented this standard in its third party certificate support. You can use a certificate signed and verified by a third party CA to use with a VPN Policy.A typical certificate consists of two sections: a data section and a signature section. The data section typically contains information such as the version of X.509 supported by the certificate, a certificate serial number, information, information about the user’s public key, the Distinguished Name (DN), validation period for the certificate, optional information such as the target use of the certificate. The signature section includes the cryptographic algorithm used by the issuing CA, and the CA digital signature.To implement the use of certificates for VPN Policies, you must locate a source for a valid CA certificate from a third party CA service. Once you have a valid CA certificate, you can import it into the SonicWALL to validate your Local Certificates.Follow the steps in the previous section, except select Customize instead of Typical.
VPN Policy Wizard
1. Click Next to continue.

SonicWALL VPN Page 157
VPN Policy Name and Address
2. Type the name for the VPN Policy in the Policy Name field. VPN Tunnel Destination Networks
3. Type the IP address range of the remote network into the Remote Network field. 4. Type the remote subnet in the Remote Netmask field. 5. Click Next.

Page 158 SonicWALL SonicOS 2.0s Administrator’s Guide
IPSec Keying Mode
6. Select IKE using 3rd Party Certificates from the IPSec Keying Modes list. Security Association Certificate
7. Select your third party certificate from the Third Party Certificate menu. Select the ID type from the Peer Certificate’s ID Type, and enter the ID string in the ID string to match field. Click Next.
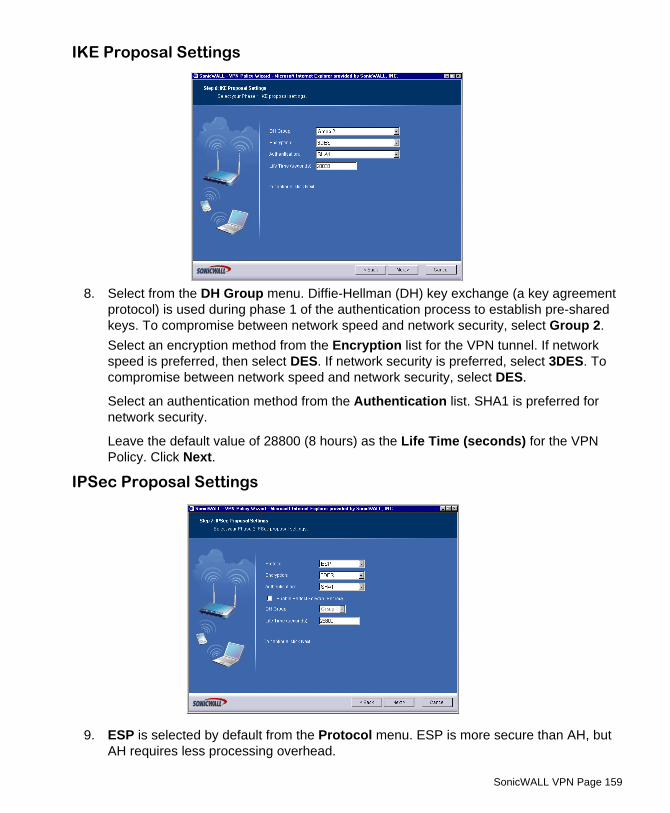
SonicWALL VPN Page 159
IKE Proposal Settings
8. Select from the DH Group menu. Diffie-Hellman (DH) key exchange (a key agreement protocol) is used during phase 1 of the authentication process to establish pre-shared keys. To compromise between network speed and network security, select Group 2.Select an encryption method from the Encryption list for the VPN tunnel. If network speed is preferred, then select DES. If network security is preferred, select 3DES. To compromise between network speed and network security, select DES.
Select an authentication method from the Authentication list. SHA1 is preferred for network security.
Leave the default value of 28800 (8 hours) as the Life Time (seconds) for the VPN Policy. Click Next.
IPSec Proposal Settings
9. ESP is selected by default from the Protocol menu. ESP is more secure than AH, but AH requires less processing overhead.

Page 160 SonicWALL SonicOS 2.0s Administrator’s Guide
10. 3DES is selected by default from the Encryption Method menu. Type a 48-character hexadecimal key if you are using 3DES encryption.Type a 16-character hexadecimal key in the Encryption Key field if you are using DES or ARCFour encryption. This encryption key must match the remote SonicWALL's encryption key. The default 48-character key is a unique key generated every time a VPN Policy is created.
11. AH is selected by default from the Authentication Key field. When a new SA is created, a 32-character key is automatically generated in the Authentication Key field. This key can be used as a valid key. If this key is used, it must also be typed in the Authentication Key field in the remote SonicWALL. If authentication is not used, this field is ignored.
12. Click Next. Completing the VPN Policy Wizard
The VPN Policy is automatically enabled after you complete the wizard steps. To disable the VPN Policy, select Create this Policy Disabled. Click Finish to complete the VPN Policy configuration.

SonicWALL VPN Page 161
Advanced SettingsAll of the Advanced Settings for VPN connections are accessed by clicking Advanced in the menu bar. The following settings are available on the Advanced page:
• Disable Windows Networking (NetBIOS) broadcast - Computers running Microsoft Windows® communicate with one another through NetBIOS broadcast packets. Clear the Disable Windows Networking (NetBIOS) broadcast check box to access remote net-work resources by browsing the Windows® Network Neighborhood.
• Enable Fragmented Packet Handling - if the VPN log report shows the log message "Fragmented IPSec packet dropped", select this feature. Do not select it until the VPN tunnel is established and in operation.
• Enable NAT Traversal - IPSec VPNs protect traffic exchanged between authenticated endpoints, but authenticated endpoints cannot be dynamically re-mapped mid-session for NAT traversal to work. Therefore, to preserve a dynamic NAT binding for the life of an IPSec session, a 1-byte UDP is designated as a “NAT Traversal keepalive” and acts as a “heartbeat” sent by the VPN device behind the NAT or NAPT device. The “keepalive” is silently discarded by the IPSec peer.
Selecting Enable NAT Traversal allows VPN tunnels to support this protocol, and log messages are generated by the SonicWALL when a IPSec Security Gateway is detected behind a NAT/NAPT device. The following log messages are found on the View Log tab:• Peer IPSec Gateway behind a NAT/NAPT device • Local IPSec Security Gateway behind a NAT/NAPT device • No NAT/NAPT device detected between IPSec Security

Page 162 SonicWALL SonicOS 2.0s Administrator’s Guide
• Peer IPSec Security Gateway doesn’t support VPN NAT Traversal • Keep Alive interval (seconds) - Keep Alive Interval (seconds) - the default value is
240 seconds (4 minutes). If Enable Keep Alive is selected on the Advanced Settings window, this is the interval of time between “heartbeats.”
• Enable IKE Dead Peer Detection - select if you want inactive VPN tunnels to be dropped by the SonicWALL. Type the number of seconds between “heartbeats” in the Dead peer detection Interval (seconds) field. The default value is 60 seconds. Type the number of missed heartbeats in the Failure Trigger Level (missed heartbeats) field. The default value is 3. If the trigger level is reached, the VPN connection is dropped by the Son-icWALL. The SonicWALL uses a UDP packet protected by Phase 1 Encryption as the heartbeat.
VPN Single-Armed Mode (stand-alone VPN gateway)VPN Single-Armed Mode allows you to deploy a SonicWALL with single port (WAN) utilized as a VPN tunnel termination point. Clear text traffic is routed to the single interface and the data is encapsulated to the appropriate IPSec gateway. An example of a deployment is to place the SonicWALL between the existing firewall and the router connected to the Internet. Traffic is sent in clear text to the SonicWALL, then encrypted and sent to the appropriate VPN Gateway.

SonicWALL VPN Page 163
If VPN Single-Armed Mode (stand-alone VPN gateway) is enabled, a warning message appears as follows:
Click OK to enable the SonicWALL in VPN Single Armed Mode.
Configuring a SonicWALL for VPN Single Armed ModeYou have the following information to configure the IP addresses on the firewalls:
To configure a SonicWALL in VPN Single Armed Mode in front of an existing SonicWALL, follow these steps: 1. Configure the Remote and Local SonicWALLs in your preferred networking mode. 2. Configure a VPN SA using IKE and Pre-shared Secret on the Remote SonicWALL using
the VPN WAN IP address as the IPSec Gateway, and the Local SonicWALL WAN IPaddress as the Destination Network.
3. Configure a Static Route on the Local SonicWALL to send network traffic destined for theRemote SonicWALL to the VPN SonicWALL.
4. Configure the VPN SonicWALL in Standard networking mode. 5. Click Advanced, then Intranet. Select the VPN Single Armed Mode (stand alone VPN
gateway) checkbox, and click Update.
Remote SonicWALL Corporate SonicWALL
WAN IP Address: 66.120.118.11 WAN IP Address:66.120.118.25
Subnet Mask: 255.255.255.0 Subnet Mask: 255.255.255.0
LAN IP Address 192.168.1.1 LAN IP Address: 192.168.3.1
Subnet Mask: 255.255.255.0 Subnet Mask: 255.255.255.0
VPN Single Armed Mode SonicWALL
WAN IP Address: 66.120.118.13
Subnet Mask: 255.255.255.0
LAN IP Address: 192.168.2.1
Subnet Mask: 255.255.255.0

Page 164 SonicWALL SonicOS 2.0s Administrator’s Guide
6. A rule is automatically added to the VPN SonicWALL for HTTPS management from theWAN. The LAN port is disabled when you configure a SonicWALL for VPN Single Armedmode.
7. Configure a VPN SA using IKE and Pre-shared Secret on the VPN SonicWALL tosecurely connect to the Remote SonicWALL. Enter the Remote SonicWALL WAN IPaddress as the IPSec Gateway and the Remote SonicWALL LAN IP Address range asthe Destination Network, if configuring “Many to One NAT”.
8. Click Advanced, and then Routes. Enter the Corporate SonicWALL WAN IP address inthe Dest. Network field. Enter the subnet mask in the Subnet Mask field. Enter the LocalSonicWALL WAN IP address as the Gateway, and select WAN from the Link menu.Click Update.
• Now that all SonicWALLs are configured, network traffic on the corporate SonicWALL destined for the remote office is routed to the VPN SonicWALL, encrypted, and sent to the remote SonicWALL.
VPN Bandwidth ManagementYou can allocate bandwidth to all outbound VPN traffic. To enable VPN Bandwidth Management, select Enable VPN Bandwidth Management, and enter the amount of bandwidth in Kbps for VPN guaranteed bandwidth and VPN maximum bandwidth. Select VPN bandwidth priority from the VPN bandwidth priority menu, 0 (highest) to 7 (lowest).
Tip! Bandwidth management is available only on outbound VPN traffic. You cannot configure individual Security Associations to use bandwidth management.

SonicWALL VPN Page 165
DHCP over VPNDHCP over VPN allows a Host (DHCP Client) behind a SonicWALL obtain an IP address lease from a DHCP server at the other end of a VPN tunnel. In some network deployments, it is desirable to have all VPN networks on one logical IP subnet, and create the appearance of all VPN networks residing in one IP subnet address space. This facilitates IP address administration for the networks using VPN tunnels.
DHCP Relay ModeThe SonicWALL appliance at the remote and central site are configured for VPN tunnels for initial DHCP traffic as well as subsequent IP traffic between the sites. The SonicWALL at the remote site (Remote Gateway) passes DHCP broadcast packets through its VPN tunnel. The SonicWALL at the central site (Central Gateway) relays DHCP packets from the client on the remote network to the DHCP server on the central site.

Page 166 SonicWALL SonicOS 2.0s Administrator’s Guide
Configuring the Central Gateway for DHCP Over VPN
To configure DHCP over VPN for the Central Gateway, use the following steps:1. Log into the Management interface, click DHCP, and then DHCP over VPN.
2. Select Central Gateway from the DHCP Relay Mode menu. 3. Click Configure. The DHCP over VPN Configuration window is displayed.
4. Select Use Internal DHCP Server to enable the Global VPN Client or a remote firewall or both to use an internal DHCP server to obtain IP addressing information.
5. If you want to send DHCP requests to specific servers, select Send DHCP requests to the server addresses listed below.
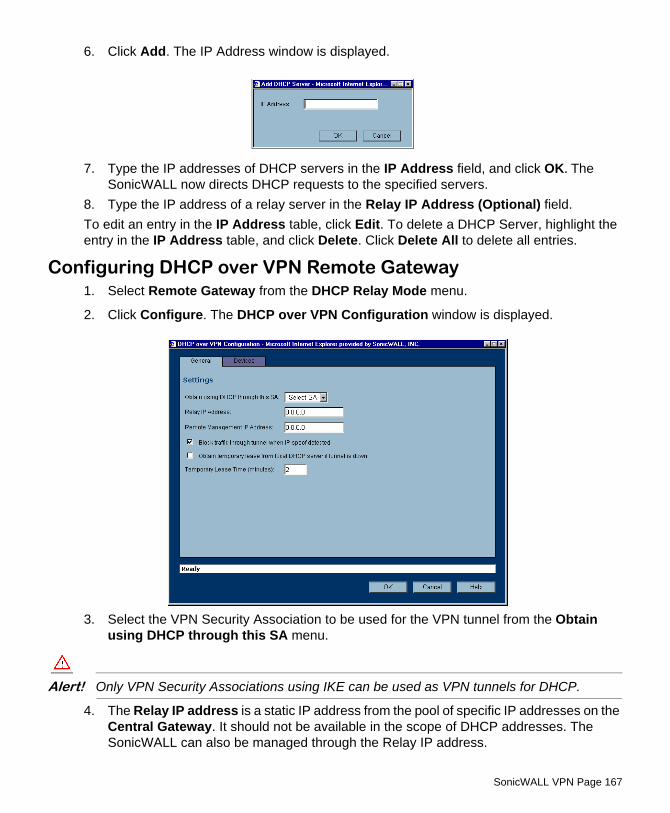
SonicWALL VPN Page 167
6. Click Add. The IP Address window is displayed.
7. Type the IP addresses of DHCP servers in the IP Address field, and click OK. The SonicWALL now directs DHCP requests to the specified servers.
8. Type the IP address of a relay server in the Relay IP Address (Optional) field. To edit an entry in the IP Address table, click Edit. To delete a DHCP Server, highlight the entry in the IP Address table, and click Delete. Click Delete All to delete all entries.
Configuring DHCP over VPN Remote Gateway1. Select Remote Gateway from the DHCP Relay Mode menu.
2. Click Configure. The DHCP over VPN Configuration window is displayed.
3. Select the VPN Security Association to be used for the VPN tunnel from the Obtain using DHCP through this SA menu.
Alert! Only VPN Security Associations using IKE can be used as VPN tunnels for DHCP.
4. The Relay IP address is a static IP address from the pool of specific IP addresses on the Central Gateway. It should not be available in the scope of DHCP addresses. The SonicWALL can also be managed through the Relay IP address.

Page 168 SonicWALL SonicOS 2.0s Administrator’s Guide
5. If you enable Block traffic through tunnel when IP spoof detected, the SonicWALL blocks any traffic across the VPN tunnel that is spoofing an authenticated user’s IP address. If you have any static devices, however, you must ensure that the correct Ethernet address is typed for the device. The Ethernet address is used as part of the identification process, and an incorrect Ethernet address can cause the SonicWALL to respond to IP spoofs.
6. If the VPN tunnel is disrupted, temporary DHCP leases can be obtained from the local DHCP server. Once the tunnel is again active, the local DHCP server stops issuing leases. Enable the Obtain temporary lease from local DHCP server if tunnel is down check box. By enabling this check box, you have a failover option in case the tunnel ceases to function. If you want to allow temporary leases for a certain time period, enter the number of minutes for the temporary lease in the Temporary Lease Time box. The default value is two (2) minutes.
Device Configuration 7. To configure Static Devices on the LAN, click Add, and enter the IP address of the
device in the IP Address field and then enter the Ethernet Address of the device in the Ethernet Address field. An example of a static device is a printer as it cannot obtain an IP lease dynamically. If you do not have Block traffic through tunnel when IP spoof detected enabled, it is not necessary to enter the Ethernet address of a device.
8. You must exclude the Static IP addresses from the pool of available IP addresses on the DHCP server so that the DHCP server does not assign these addresses to DHCP clients. You should also exclude the IP address used as the Relay IP Address. It is recommended to reserve a block of IP address to use as Relay IP addresses. Click Add, and enter the Ethernet address in the Ethernet Address field.
Alert! You must configure the local DHCP server on the remote SonicWALL to assign IP leases to these computers.
Alert! If a remote site has trouble connecting to a central gateway and obtaining a lease, verify that Deterministic Network Enhancer (DNE) is not enabled on the remote computer.
Tip! If a static LAN IP address is outside of the DHCP scope, routing is possible to this IP, i.e. two LANs.

SonicWALL VPN Page 169
Current DHCP over VPN LeasesThe scrolling window shows the details on the current bindings: IP and Ethernet address of the bindings, along with the Lease Time, and Tunnel Name. To edit an entry, click the Notepad icon under Configure for that entry. To delete a binding, which frees the IP address in the DHCP server, select the binding from the list, and then click the Trashcon icon. The operation takes a few seconds to complete. Once completed, a message confirming the update is displayed at the bottom of the Web browser window.Click Delete All to delete all VPN leases.
VPN>L2TP ServerYou can use Layer 2 Tunneling Protocol (L2TP) to create VPN over public networks such as the Internet. L2TP provides interoperability between different VPN vendors that protocols such as PPTP and L2F do not, although L2TP combines the best of both protocols and is an extension of them. L2TP is supported on Microsoft Windows 2000 Operating System. L2TP supports several of the authentication options supported by PPP, including Password Authentication Protocol (PAP), Challenge Handshake Authentication Protocol (CHAP), and Microsoft Challenge Handshake Authentication Protocol (MS-CHAP). You can use L2TP to authenticate the endpoints of a VPN tunnel to provide additional security, and you can implement it with IPSec to provide a secure, encrypted VPN solution.

Page 170 SonicWALL SonicOS 2.0s Administrator’s Guide
GeneralTo enable L2TP Server functionality on the SonicWALL, select Enable L2TP Server. Then click Configure to display the L2TP Server Configuration window.
L2TP Server Settings
Configure the following settings:1. Type the number of seconds in the Keep alive time (secs) field to send special packets
to keep the connection open.
2. Type the IP address of your first DNS server in the DNS Server 1 field. 3. If you have a second DNS server, enter the IP address in the DNS Server 2 field.4. Type the IP address of your first WINS server in the WINS Server 1 field.5. If you have a second WINS server, enter the IP address in the WINS Server 2 field.
IP Address Settings6. Select IP address provided by RADIUS Server if a RADIUS Server provides IP
addressing information to the L2TP clients.7. If the L2TP Server provides IP addresses, select Use the Local L2TP IP pool. Type the
range of private IP addresses in the Start IP and End IP fields. The private IP addresses should be a range of IP addresses on the LAN.
8. Click OK. Adding L2TP Clients to the SonicWALL SonicWALL
To add L2TP clients to the local user database or a RADIUS database, click Users, then Add. When adding privileges for a user, select L2TP Client as one of the privileges. Then the user can access the SonicWALL as a L2TP client.

SonicWALL VPN Page 171
Currently Active L2TP Sessions• User Name - the user name assigned in the local user database or the RADIUS user da-
tabase. • PPP IP - the source IP address of the connection.• Interface - the enter of interface used to access the L2TP Server, whether it’s a VPN cli-
ent or another SonicWALL appliance. • Authentication - enter of authentication used by the L2TP client.• Host Name - the name of the network connecting to the L2TP Server.
SonicWALL Third Party Digital Certificate SupportTip This section assumes that you are familiar with Public Key Infrastructure (PKI) and the implementation of digital certificates with VPN. A digital certificate is an electronic means to verify identity by a trusted third party known as a Certificate Authority (CA). SonicWALL now supports third party certificates in addition to the existing Authentication Service. The difference between third party certificates and the SonicWALL Authentication Service is the ability to select the source for your CA certificate. Using Certificate Authority Certificates and Local Certificates is a more manual process than using the SonicWALL Authentication Service; therefore, experience with implementing Public Key Infrastructure (PKI) is necessary to understand the key components of digital certificates. Internet Key Exchange (IKE) is an important part of IPSec VPN solutions, and it can use digital signatures to authenticate peer devices before setting up security associations. Without digital signatures, VPN users must authenticate by manually exchanging shared secrets or symmetric keys. Devices using digital signatures do not require configuration changes every time a new device is added to the network. SonicWALL has implemented X.509v3 as its certificate form and CRLv2 for its certificate revocation list. SonicWALL supports the following two vendors of Certificate Authority Certificates:• VeriSign • Entrust

Page 172 SonicWALL SonicOS 2.0s Administrator’s Guide
Overview of Third Party Digital Certificate SupportX.509 Version 3 Certificate Standard
X.509 v3 certificate standard is a specification to be used with cryptographic certificates and allows you to define extensions which you can include with your certificate. SonicWALL has implemented this standard in its third party certificate support. You can use a certificate signed and verified by a third party CA to use with a VPN SA.A typical certificate consists of two sections: a data section and a signature section. The data section typically contains information such as the version of X.509 supported by the certificate, a certificate serial number, information, information about the user’s public key, the Distinguished Name (DN), validation period for the certificate, optional information such as the target use of the certificate. The signature section includes the cryptographic algorithm used by the issuing CA, and the CA digital signature.To implement the use of certificates for VPN SAs, you must locate a source for a valid CA certificate from a third party CA service. Once you have a valid CA certificate, you can import it into the SonicWALL to validate your Local Certificates.
Current CertificatesBoth Certificate Requests and validated Certificates appear in the list of Current Certificates. The Certificate Details section lists the same information as the CA Certificate Details section, but a Status entry now appears in the details. If a certificate is valid and ready to be used with a VPN Security Association, the Status is Verified. If the certificate is not signed by the CA, the Status is Request Generated. You can also import the corresponding Signed Certificate in this section. Additionally, Certificate Signing Requests can be exported and deleted in the Certificate Details section of a Request Generated certificate.
Importing Certificate with private keyAfter a certificate is signed by the CA and returned to you, you can import the certificate into the SonicWALL to be used as a Local Certificate for a VPN Security Association. Use the following steps to import the certificate into the SonicWALL:1. In the Import Certificate with private key section of Local Certificates, enter the
Certificate Name.
2. Type the Certificate Management Password. This password was created when you exported your signed certificate.
3. Use Browse to locate the certificate file. 4. Click Import, and the certificate appears in the list of Current Certificates. 5. To view details about the certificate, select it from the list of Current Certificates.
Certificate DetailsBoth Certificate Requests and validated Certificates appear in the list of Current Certificates. The Certificate Details section lists the same information as the CA Certificate Details section, but a Status entry now appears in the details. If a certificate is valid and ready to be used with a VPN Security Association, the Status is Verified. If the

SonicWALL VPN Page 173
certificate is not signed by the CA, the Status is Request Generated. You can also import the corresponding Signed Certificate in this section. Additionally, Certificate Signing Requests can be exported and deleted in the Certificate Details section of a Request Generated certificate.
Certificate Revocation List (CRL)A Certificate Revocation List (CRL) is a way to check the validity of an existing certificate. A certificate may be invalid for several reasons:• It is no longer needed.• A certificate was stolen or compromised.• A new certificate was issued that takes precedence over the old certificate.If a certificate is invalid, the CA may publish the certificate on a Certificate Revocation List at a given interval, or on an online server in a X.509 v3 database using Online Certificate Status Protocol (OCSP). Consult your CA provider for specific details on locating a CRL file or URL.Tip The SonicWALL supports obtaining the CRL via HTTP or manually downloading the list.You can import the CRL by locating the URL and then importing it into the SonicWALL. Certificates are checked against the CRL by the SonicWALL for validity when they are used. You can also enter a URL location of the CRL by typing the address in the Enter CRL’s location for this CA (URL) field. The CRL is downloaded automatically at intervals determined by the CA service.
Importing a Signed Local CertificateWhen the CA service returns the signed certificate request generated locally, import it into the SonicWALL using the following steps:1. In the Current Certificates section of Local Certificates, select the corresponding
request from the Certificates menu.
2. Click Browse, and select the *.der from the Choose File dialogue box. 3. Click Import Certificate. 4. The certificate is now updated to Verified, and you can now use it for a VPN SA using a
third party certificate. Configuring a VPN Security Association using IKE and a Third Party
CertificateTo create a VPN SA using IKE and third party certificates, follow these steps:1. Click VPN, then Add.
2. Type a Name for the Security Association in the Name field. 3. Select a certificate from the Select Certificate list. 4. Type the Gateway address in the IPSec Gateway Address field. 5. In the Security Policy section, select the enter of DH group from the Phase 1 DH Group
menu. 6. The SA Lifetime (secs) automatically defaults to 28800 seconds (8 hours).
Page 174 SonicWALL SonicOS 2.0s Administrator’s Guide
7. Select the enter of Phase 1 Encryption/Authentication from the menu. 8. Select the enter of Phase 2 Encryption/Authentication from the menu. 9. In the Peer Certificate’s ID section, you must select the ID Type from the ID Type menu.
You can select Distinguished Name, E-mail ID, or Domain Name from the menu. Then cut and paste the information from the Local Certificate into the text field.
10. In the Destination Networks section, select the type of destination for the VPN tunnel: - Use this SA as default route for all Internet traffic can be used for only one SA, and routes all VPN traffic destined for the WAN through the SA.
- Destination network obtains IP addresses using DHCP through this VPN tunnel to allow computers at the VPN destination to obtain IP addresses using DHCP over VPN.
- Specify destination network below If the VPN destination is a specific IP address.
11. Click Add New Network... enter the network IP address and subnet mask in the fields, and click OK.
Creating a Certificate Signing RequestTo create a certificate for use with a VPN SA, follow these steps:
Tip! You should create a Certificate Policy to used in conjunction with local certificates. A Certificate Policy determines the authentication requirements and the authority limits required for the validation of a certificate.
1. Click VPN, then Local Certificates.
2. In the Generate Certificate Signing Request section, enter a name for the certificate in the Certificate Name field. Using the drop down menus, enter information for the certificate request. As you enter information in the Request fields, the Distinguished Name (DN) is created. You may also attach an optional Subject Alternative Name to the certificate such as the Domain Name or E-mail Address.
3. The Subject Key enter is preset as an RSA algorithm. RSA is a public key cryptographic algorithm used for encrypting data.
4. Select a Subject Key size from the from the Subject Key Size menu. 5. Not all key sizes are supported by a Certificate Authority, therefore you should check with
your Certificate Authority for supported key sizes. 6. Click Generate to create a certificate file. 7. Once the Certificate Signing Request is generated, a message describing the result is
displayed.8. Click Export to download the file to your computer, and then click Save to save it to a
directory on your computer. Now that you have generated the Certificate Request, you can send it to your CA service for validation.
SonicWALL VPN Page 175
VPN>CA CertificatesImporting CA Certificates into the SonicWALL
After your CA service has validated your CA Certificate, you can import it into the SonicWALL and use it to validate Local Certificates for VPN Security Associations. To import your CA Certificate into the SonicWALL, use the following steps:1. Click VPN, then CA Certificates.
2. Click Browse, and locate the PKCS#7 or DER encoded file sent by the CA service. 3. Click Open to set the directory path to the certificate, and then click Import to import the
certificate into the SonicWALL. Once it is imported, you can view the Certificate Details.

Page 176 SonicWALL SonicOS 2.0s Administrator’s Guide

Users Page 177
8 UsersThe SonicWALL provides a mechanism for user level authentication that gives users access to the LAN from remote locations on the Internet as well as a means to bypass content filtering. Also, you can permit only authenticated users to access VPN tunnels and send data across the encrypted connection. User level authentication can performed using a local user database, RADIUS, or a combination of the two applications. The local database on the SonicWALL can support up to 500 users. If you have more than 500 users, you must use RADIUS for authentication
Users > Status
Active User StatusA list of all current users is displayed in a table at the bottom of the page. The Current Users table lists the User Name, the IP Address of the user, the Session Time, Time Remaining of the session, and the Inactivity Remaining time. You can also click the Trashcan icon in the Logout column to log a user out of the SonicWALL..

Page 178 SonicWALL SonicOS 2.0s Administrator’s Guide
Users>Settings.
Global User SettingsThe settings listed below apply to all users when authenticated through the SonicWALL. • Inactivity timeout (minutes) - users can be logged out of the SonicWALL after a pre-
configured inactivity time. Enter the number of minutes in this field.• Limit login session time to (minutes) - you can limit the time a user is logged into the
SonicWALL by selecting the check box and enter the amount of time, in minutes, in the field.
• Allow unauthenticated VPN users to access DNS - selecting this check box allows un-authenticated users access to DNS servers across a VPN tunnel with authentication en-forcement.
• Restrict Internet access to privileged users - selecting this feature only allows Internet access to users configured on the SonicWALL. There is a corresponding check box when adding a user to the SonicWALL allowing you to grant access to the Internet.
Configuring Users in the SonicWALL Database• Use RADIUS - Select Use Radius if you have a RADIUS server for authenticating users
accessing the network through the SonicWALL. If you have more than 500 users requir-ing authentication, you must use a RADIUS server. If you select Use RADIUS, users must log into the SonicWALL using HTTPS in order to encrypt the password sent to the SonicWALL. If a user attempts to log into the SonicWALL using HTTP, the browser is automatically redirected to HTTPS.

Users Page 179
• Allow only users listed below - Select this setting if you have a subset of RADIUS users accessing the SonicWALL. The user names must be added to the internal SonicWALL user database before they can be authenticated using RADIUS.
• Authenticate users listed below - Selecting this option allows you to configure users in the local database. To add new users, click Add.
1. Create a user name and enter it in the User Name field.
2. Create a password for the user and enter it in the Password field. Passwords are case-sensitive and should consist of a combination of letters and numbers rather than names of family, friends, or pets.
3. Confirm the password by retyping it in the Confirm Password field. 4. Select from the following list of privileges to assign them to the user:
• Access to the Internet when access is restricted - If you have selected Restrict Internet to privileged users, you can allow individual users to access the Internet.
• Bypass Filters - select Bypass Filters if the user has unlimited access to the Internet from the LAN, bypassing Web, News, Java, and ActiveX blocking.
• Access to VPNs - select the check box if the user can send information over the VPN Security Associations with authentication enforcement.
• Access from VPN Client with XAUTH - select if the user requires XAUTH for authentication and accesses the firewall via a VPN client.
• Access from L2TP VPN Client - if you have remote L2TP clients accessing the Son-icWALL, select this setting to allow the remote user access to the LAN.
• Limited Management Capabilities - By enabling this check box, the user has limited local management access to the SonicWALL Management interface. The access is limited to the following pages:
• General - Status, Network, Time• Log - View Log, Log Settings, Log Reports• Tools - Restart, Diagnostics minus Tech Support Report

Page 180 SonicWALL SonicOS 2.0s Administrator’s Guide
RADIUSIf Use RADIUS is selected, the Configure button becomes available. Click Configure to set up your RADIUS server settings on the SonicWALL. The RADIUS Configuration window is displayed.
1. Define the RADIUS Server Timeout in Seconds. The allowable range is 1-60 seconds with a default value of 5.
2. Define the number of times the SonicWALL attempts to contact the RADIUS server in the RADIUS Server Retries field. If the RADIUS server does not respond within the specified number of retries, the connection is dropped. This field can range between 1 and 10, however 3 RADIUS server retries is recommended.

Users Page 181
RADIUS Servers3. Specify the settings of the primary RADIUS server in the RADIUS servers section. An
optional secondary RADIUS server can be defined if a backup RADIUS server exists on the network.
4. Type the IP address of the RADIUS server in the IP Address field.5. Type the Port Number for the RADIUS server.6. Type the RADIUS server administrative password or "shared secret" in the Shared
Secret field. The alphanumeric Shared Secret can range from 1 to 31 characters in length. The shared secret is case sensitive.
7. If there is a secondary RADIUS server, enter the appropriate information in the Secondary Server section.
8. Type the RADIUS server administrative password or "shared secret" in the Shared Secret field. The alphanumeric Shared Secret can range from 1 to 31 characters in length. The shared secret is case sensitive.
RADIUS UsersClick the RADIUS Users tab. You can select the default privileges for all RADIUS users in this section.
• Access to the Internet when access is restricted - If you have selected Restrict Internet to privileged users, you can allow individual users to access the Internet.
• Bypass Filters - select Bypass Filters if the user has unlimited access to the Internet from the LAN, bypassing Web, News, Java, and ActiveX blocking.
• Access to VPNs - select the check box if the user can send information over the VPN Security Associations with authentication enforcement.
• Access from VPN Client with XAUTH - select if the user requires XAUTH for authentication and accesses the firewall via a VPN client.
• Access from L2TP VPN Client - allows L2TP clients to connect using RADIUS for authentication.

Page 182 SonicWALL SonicOS 2.0s Administrator’s Guide
• Wireless Guest Services User - select to allow the user wireless access on the Son-icWALL and create a permanent account. The user is provided a link to download the SonicWALL Global VPN Client.
• Use “Easy ACL” with WGS - if MAC Filter List is enforced, select this feature to allow wireless clients to add themselves to the MAC Filter List. Once authenticated, a link is provided for the user to download the SonicWALL Global VPN Client.
• - Limited Management Capabilities - By enabling this check box, the user has lim-ited local management access to the SonicWALL Management interface. The access is limited to the following pages:
• General - Status, Network, Time• Log - View Log, Log Settings, Log Reports• Tools - Restart, Diagnostics minus Tech Support Report
RADIUS Client TestYou can test your RADIUS Client user name and password by typing in a valid user name in the User field, and the password in the Password field. If the validation is successful, the
Status messages changes to Success. If the validation fails, the Status message changes to Failure. Once the SonicWALL has been configured, a VPN Security Association requiring RADIUS authentication prompts incoming VPN clients to enter a User Name and Password into a dialogue box.

Security Services Page 183
9 Security ServicesSecurity Services>Summary
Subscribed Services
A list of currently available services through mysonicwall.com is displayed. Subscribed services are displayed with Subscribed in the Status column. If the service is limited to a number of users, the number is displayed in the Nodes column. The service expiration date is displayed in the Expiration column. Security Services Settings
Reduce Anti-Virus and E-mail Filter traffic for ISDN connections - Selecting this feature enables the SonicWALL Anti-Virus to only check daily (every 24 hours) for updates and reduces the frequency of outbound traffic for users who do not have an “always on” Internet connection.Synchronize - Click Synchronize to update the licensing and subscription information on the SonicWALL.

Page 184 SonicWALL SonicOS 2.0s Administrator’s Guide
Security Services>Content FilteringThe SonicWALL Content Filtering Subscription Service helps organizations increase productivity and reduce legal and privacy risks by automatically enforcing acceptable use policies while minimizing administration overhead. Integrated with SonicWALL's line of Internet security appliances, the SonicWALL Content Filtering subscription enables organizations such as businesses, schools and libraries to maintain Internet access policies tailored to their specific needs.With SonicWALL Content Filtering, network administrators have a flexible tool to provide comprehensive filtering based on keywords, time of day, trusted and forbidden domain designations, and file types such as Cookies, Java™ and ActiveX® for privacy. The SonicWALL Content Filtering Subscription Service automatically updates the filters, making maintenance substantially simpler and less time consuming.SonicWALL Content Filtering can be customized to add or remove specific URLs from the blocked list and to block specific keywords. When a user attempts to access a site that is blocked by the SonicWALL, a customized message is displayed on the user’s screen. SonicWALL Internet security appliances can also be configured to log attempts to access sites on the SonicWALL Content Filter List, on a custom URL list, and on a keyword list to monitor Internet usage before putting new usage restrictions in place.To activate a subscriptions, see the SonicWALL Content Filtering Service User’s Guide located at <http://www.sonicwall.com/support/documentation.html>.

Security Services Page 185
Content Filter StatusIn this section, you can easily view the status of the Content Filter Server, as well as the date and time that your subscription expires. The expiration date and time is displayed in Universal Time Code (UTC) format.
Content Filter TypeThere are three types of content filtering available on the SonicWALL. • SonicWALL CFS - Selecting SonicWALL CFS as the Content Filter List Type allows
you to use the Content Filter List Subscription available as an upgrade as well as cus-tomize features such as allowed and forbidden domains as well as content filtering using key-words.
• N2H2 - N2H2 is a third party content filter software package supported by SonicWALL. You can obtain more information on N2H2 at [http://www.n2h2.com].
• Websense Enterprise - Websense Enterprise is also a third party content filter list sup-ported by SonicWALL. You can obtain more information on Websense Enterprise at <ht-tp://www.websense.com>.
Configuring SonicWALL CFSLog into the SonicWALL using your administrator name and password. Click Security Services and then Content Filter. Select SonicWALL CFS from the Content Filter Type menu, and click Configure. The SonicWALL Filter Properties window is displayed.
Page 186 SonicWALL SonicOS 2.0s Administrator’s Guide
Custom ListYou can customize your URL list to include Allowed Domains and Forbidden Domains. By customizing your URL list, you can include specific domains to be allowed (accessed), forbidden (blocked), and include specific keywords to be used to block sites. Select the checkbox Enable Allowed/Forbidden Domains to activate this feature. To allow access to a Web site that is blocked by the Content Filter List, click Add, and enter the host name, such as “www.ok-site.com”, into the Allowed Domains fields. 256 entries can be added to the Allowed Domains list.To block a Web site that is not blocked by the Content Filter List, click Add, and enter the host name, such as “www.bad-site.com” into the Forbidden Domains field. 256 entries can be added to the Forbidden Domains list.
Alert! Do not include the prefix “http://” in either the Allowed Domains or Forbidden Domains the fields. All subdomains are affected. For example, entering “yahoo.com” applies to “mail.yahoo.com” and “my.yahoo.com”.
To remove a trusted or forbidden domain, select it from the appropriate list, and click Delete Domain. Once the domain has been deleted, the Status bar displays Ready.Enable Keyword BlockingTo enable blocking using Keywords, select Enable Keyword Blocking.Click Add, and type the keyword to block in the Add Keyword field, and click OK. To remove a keyword, select it from the list and click Delete Keyword. Once the keyword has been removed, the Status bar displays Ready. Disable all Web traffic except for Allowed Domains When the Disable Web traffic except for Allowed Domains check box is selected, the SonicWALL only allows Web access to sites on the Allowed Domains list. With careful screening, this can be nearly 100% effective at blocking pornography and other objectionable material.
Settings>Time of DayThe Time of Day feature allows you to define specific times when Content Filtering is enforced. For example, you could configure the SonicWALL to filter employee Internet access during normal business hours, but allow unrestricted access at night and on weekends.Tip Time of Day restrictions only apply to the Content Filter List, Customized blocking and Keyword blocking. Consent and Restrict Web Features are not affected.• Block Always
When selected, Content Filtering is enforced at all times.
• Block Between When selected, Content Filtering is enforced during the time and days specified. Enter the time period, in 24-hour format, and select the starting and ending day of the week that Content Filtering is enforced.

Security Services Page 187
URL ListBlock all categories
The SonicWALL uses a Content Filter Service Web server to block access to objectionable Web sites. The database classifies objectionable Web sites based upon input from a wide range of social, political, and civic organizations. Select the Block all categories check box to block all of these categories. Alternatively, you can select categories individually by selecting the appropriate check box.This page is only available if a Content Filter Service subscription is activated.When you register your SonicWALL at <http://www.mysonicwall.com>, you can download a one month subscription to Content Filter Service. The following is a list of the Content Filter List categories:
Visit <http://www.sonicwall.com/products/cfs.html> for a detailed description of the criteria used to define Content Filter Service categories.
ConsentThe Consent tab allows you to enforce content filtering on designated computers and provide optional filtering on other computers. Consent can be configured to require the user to agree to the terms outlined in an Acceptable Use Policy window before Web browsing is allowed.To enable the Consent properties, select Require Consent. • Maximum Web usage
In an environment where there are more users than computers, such as a classroom or library, time limits are often imposed. The SonicWALL can be used to remind users when their time has expired by displaying the page defined in the Consent page URL field. Enter the time limit, in minutes, in the Maximum Web usage field. When the default value of zero (0) is entered, this feature is disabled.
• User Idle Timeout is 5 minutes (configure here) After a period of Web browser inactivity, the SonicWALL requires the user to agree to the terms outlined in the Consent page before accessing the Internet again. To configure the value, follow the link to the Users window and enter the desired value in the User Idle Timeout section.
1. Violence 5. Weapons 9. Criminal Skills/Illegal Skills
2. Intimate Apparel/Swimsuit
6. Hate/Racism 10. Sex Education
3. Nudism 7. Cult/Occult 11. Gambling
4. Adult/Mature Content/Pornography
8. Drugs/Illegal Drugs 12. Alcohol/Tobacco

Page 188 SonicWALL SonicOS 2.0s Administrator’s Guide
• Consent page URL (Optional Filtering) When a user opens a Web browser on a computer requiring consent, they are shown a consent page and given the option to access the Internet with or without content filtering. You must create this Web (HTML) page. It can contain the text from, or links to an Acceptable Use Policy (AUP).
This page must contain links to two pages contained in the SonicWALL, which, when selected, tell the SonicWALL if the user wishes to have filtered or unfiltered access. The link for unfiltered access must be <192.168.168.168/iAccept.html> and the link for filtered access must be <192.168.168.168/iAcceptFilter.html>, where the SonicWALL LAN IP Address is used instead of "192.168.168.168".
• “Consent Accepted” URL (Filtering Off) When a user accepts the terms outlined in the Consent page and chooses to access the Internet without the protection of Content Filtering, they are shown a Web page confirming their selection. Enter the URL of this page in the “Consent Accepted” (Filtering Off) field. This page must reside on a Web server and be accessible as a URL by users on the LAN.
• “Consent Accepted” URL (Filtering On) When a user accepts the terms outlined in the Consent page and chooses to access the Internet with the protection of Content Filtering, they are shown a Web page confirming their selection. Enter the URL of this page in the “Consent Accepted” (Filtering On) field. This page must reside on a Web server and be accessible as a URL by users on the LAN.
Mandatory Filtered IP Addresses• Consent page URL (Mandatory Filtering)
When a user opens a Web browser on a computer using mandatory content filtering, a consent page is displayed. You must create the Web page that appears when the Web browser is opened. It can contain text from an Acceptable Use Policy, and notification that violations are logged or blocked.
This Web page must reside on a Web server and be accessible as a URL by users on the LAN. This page must also contain a link to a page contained in the SonicWALL that tells the SonicWALL that the user agrees to have filtering enabled. The link must be <192.168.168.168/iAcceptFilter.html>, where the SonicWALL LAN IP Address is used instead of "192.168.168.168".
Type the URL of this page in the Consent page URL (Mandatory Filtering) field and click OK. Once the SonicWALL has been updated, a message confirming the update is displayed at the bottom of the Web browser window.
• Add New Address The SonicWALL can be configured to enforce content filtering for certain computers on the LAN. Enter the IP addresses of these computers in the Add New Address field and click Submit button. Up to 128 IP addresses can be entered.

Security Services Page 189
To remove a computer from the list of computers to be filtered, highlight the IP address in the Mandatory Filtered IP Addresses list and click Delete Address.
Restrict Web FeaturesRestrict Web Features enhances your network security by blocking potentially harmful Web applications from entering your network. Select any of the following applications to block:
Block: • ActiveX
ActiveX is a programming language that embeds scripts in Web pages. Malicious programmers can use ActiveX to delete files or compromise security. Select the ActiveX check box to block ActiveX controls.
• Java Java is used to download and run small programs, called applets, on Web sites. It is safer than ActiveX since it has built-in security mechanisms. Select the Java check box to block Java applets from the network.
• Cookies Cookies are used by Web servers to track Web usage and remember user identity. Cookies can also compromise users' privacy by tracking Web activities. Select the Cookies check box to disable Cookies.

Page 190 SonicWALL SonicOS 2.0s Administrator’s Guide
• Known Fraudulent Certificates Digital certificates help verify that Web content and files originated from an authorized party. Enabling this feature protects users on the LAN from downloading malicious programs warranted by these fraudulent certificates. If digital certificates are proven fraudulent, then the SonicWALL blocks the Web content and the files that use these fraudulent certificates.
Known fraudulent certificates blocked by SonicWALL include two certificates issued on January 29 and 30, 2001 by VeriSign to an impostor masquerading as a Microsoft employee.
• Access to HTTP Proxy Servers When a proxy server is located on the WAN, LAN users can circumvent content filtering by pointing their computer to the proxy server. Check this box to prevent LAN users from accessing proxy servers on the WAN.
• Don’t Block Java/ActiveX/Cookies to Trusted Domains Select this option if you have trusted domains using Java, ActiveX, and Cookies. To add a trusted domain, enter the domain name into the Add Trusted Domain field. Click Update to add the domain to the list of trusted domains. To delete a domain, select it from the list, and then click Delete.
Trusted DomainsTrusted Domains can be added in the Restrict Web Features section of the Configure tab. If you trust content on specific domains, you can select Don’t block Java/ActiveX/Cookies to Trusted Domains and then add the Trusted Domains to the SonicWALL using the Add Trusted Domain field. Java scripts, ActiveX, and cookies are not blocked from Trusted Domains if the checkbox is selected.
Message to Display when BlockingEnter your customized text to display to the user when access to a blocked site is attempted. The default message is Web Site blocked by SonicWALL Filter. Any message, including embedded HTML, up to 255 characters long, can be entered in this field.

SonicWALL Anti-Virus Page 191
10 SonicWALL Anti-VirusOverviewBy their nature, anti-virus products typically require regular, active maintenance on every PC. When a new virus is discovered, all anti-virus software deployed within an organization must be updated with the latest virus definition files. Failure to do so severely limits the effectiveness of anti-virus software and disrupts productive work time. With more than 50,000 known viruses and new virus outbreaks occurring regularly, the task of maintaining and updating virus protection can become unwieldy. Unfortunately, many small to medium businesses don’t have adequate IT staff to maintain their anti-virus software. The resulting gaps in virus defenses may lead to data loss and decreased employee productivity.The widespread outbreaks of viruses, such as NIMDA and Code Red, illustrate the problematic nature of virus defense for small and medium businesses. Users without the most current virus definition files allow these viruses to multiply and infect many other users and networks. SonicWALL Network Anti-Virus prevents occurrences like these and offers a new approach to virus protection. SonicWALL Internet Security appliances constantly monitors the version of the virus definition file and automatically triggers download and installation of new virus definition files to each user’s computer. In addition, the SonicWALL restricts each user’s access to the Internet until they are protected, therefore acting as an enforcer of the company’s virus protection policy. This new approach ensures the most current version of the virus definition file is installed and active on each PC on the network, preventing a rogue user from disabling the virus protection and potentially exposing the entire organization to an outbreak.
Tip! You must purchase an Anti-Virus subscription to enforce Anti-Virus through the SonicWALL. Log into your mysonicwall.com account for more information or contact your reseller.

Page 192 SonicWALL SonicOS 2.0s Administrator’s Guide
System Requirements for SonicWALL Anti-VirusMicrosoft Windows Version Supported
Windows 95, 98, 98se, ME, NT 4.X (Service Pack 6), XP, and 2000.Supported Browsers
Microsoft Internet Explorer 5.0 or later. Other browsers can be used on your computer but Internet Explorer is required for installation.
Hard Disk SpaceVirusScan ASaP requires 7 MB of hard disk space over the requirements of Windows for a swap file. Windows generally needs twice as much free space as the amount of RAM for the swap file. A Windows 9x operating system with 32 MB of system RAM requires 64 MB free to operate properly and 7 additional MB for VirusScan ASaP.
System RAMMinimum 32 MB for Windows 9x and Windows NT 4.x64 MB or higher is recommended. Minimum 64 MB for Windows 2000128 MB or higher is recommended.
NetworkSonicWALL Network Anti-Virus is designed to be a Web-based application and requires an Internet connection to install and update the software. Even though Rumor Technology shares updates, every computer using VirusScan ASaP must be able to connect to the Internet and access McAfee.com Web site to start the update process. VirusScan ASaP only supports anonymous or Windows NT authentication proxies. Port 80 on your firewall must be open for outbound traffic to allow VirusScan ASaP updates.Rumor technology functions entirely on the local area network (LAN). Port 6515 must be open on the proxy but can be closed on the firewall. Any network applications operating on the client computer that open port 6515 causes that node to malfunction as a Rumor server and also prevent other nodes from updating using Rumor. Also, any network applications running on the client server that open port 1967 causes the node to malfunction as a Rumor server or client.
WARNING! Do Not Install Anti-Virus Client Software on a Network Server. Forcing the installation of Anti-Virus Client software on a network server may interfere with server process and is not recommended or supported.
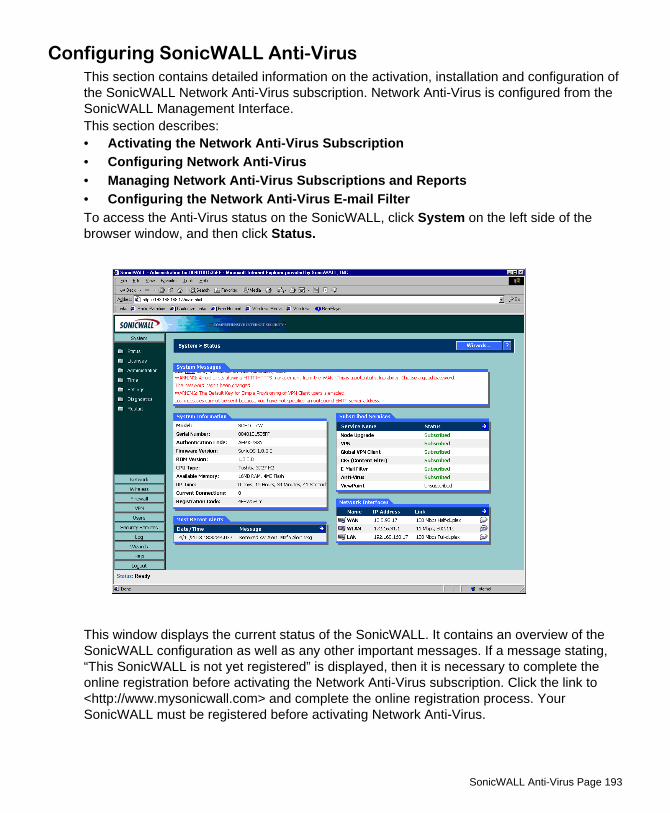
SonicWALL Anti-Virus Page 193
Configuring SonicWALL Anti-VirusThis section contains detailed information on the activation, installation and configuration of the SonicWALL Network Anti-Virus subscription. Network Anti-Virus is configured from the SonicWALL Management Interface.This section describes:• Activating the Network Anti-Virus Subscription • Configuring Network Anti-Virus • Managing Network Anti-Virus Subscriptions and Reports • Configuring the Network Anti-Virus E-mail Filter To access the Anti-Virus status on the SonicWALL, click System on the left side of the browser window, and then click Status.
This window displays the current status of the SonicWALL. It contains an overview of the SonicWALL configuration as well as any other important messages. If a message stating, “This SonicWALL is not yet registered” is displayed, then it is necessary to complete the online registration before activating the Network Anti-Virus subscription. Click the link to <http://www.mysonicwall.com> and complete the online registration process. Your SonicWALL must be registered before activating Network Anti-Virus.

Page 194 SonicWALL SonicOS 2.0s Administrator’s Guide
Activating Your SubscriptionTo activate your Anti-Virus subscription, click System, then Licenses. Use the click here link to log into your mysonicwall.com account. Or click Security Services, then Summary. Use the click here link to log into your mysonicwall.com account.
Anti-Virus Settings
The Anti-Virus>Settings page displays the following information: • Enable Anti-Virus
After activating the Network Anti-Virus subscription, selecting the Enable Anti-Virus check box enables Anti-Virus enforcement on the network.
• Number of Anti-Virus Licenses The number of the current licenses that have been registered for the firewall.
Tip! Each anti-virus license allows the use of SonicWALL Network Anti-Virus on one computer. period.
• Expiration Date The expiration date of the current subscription is displayed.
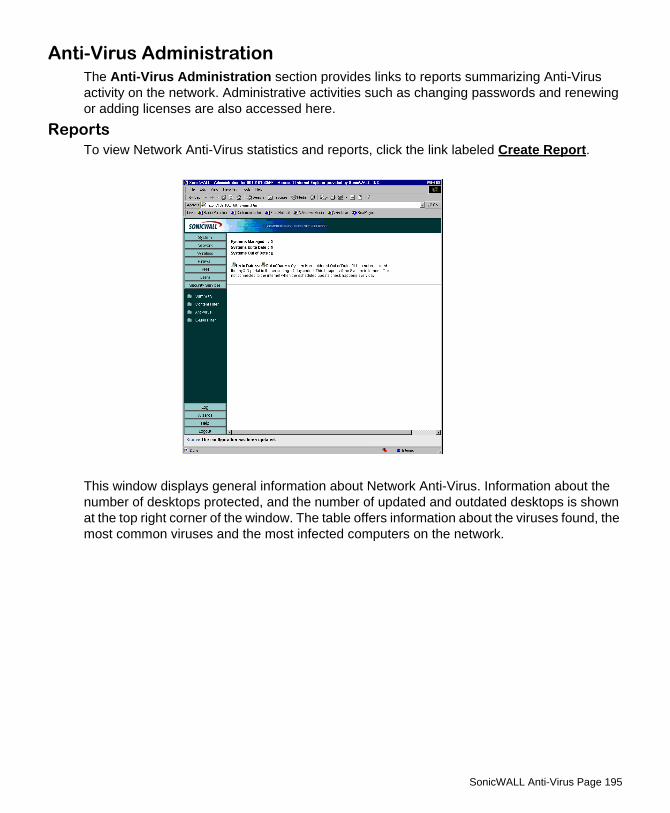
SonicWALL Anti-Virus Page 195
Anti-Virus AdministrationThe Anti-Virus Administration section provides links to reports summarizing Anti-Virus activity on the network. Administrative activities such as changing passwords and renewing or adding licenses are also accessed here.
Reports To view Network Anti-Virus statistics and reports, click the link labeled Create Report.
This window displays general information about Network Anti-Virus. Information about the number of desktops protected, and the number of updated and outdated desktops is shown at the top right corner of the window. The table offers information about the viruses found, the most common viruses and the most infected computers on the network.

Page 196 SonicWALL SonicOS 2.0s Administrator’s Guide
Add or Renew LicensesTo manage Anti-Virus licenses, click the link labeled Manage Licenses on the Anti-Virus> Settings page, and type your mysonicwall User Name and Password. Click Submit.
Add/Renew Anti-Virus SubscriptionThe standard SonicWALL Network Anti-Virus subscription package can be used to activate Network Anti-Virus, to increase the number of Anti-Virus licenses or to renew the current subscription. Since a Network Anti-Virus Activation Key may not be reused, additional subscription packages are required to add or renew Anti-Virus licenses.1. Click Renew in the Anti-Virus line of the Licenses>Summary table.
2. Type the New License Key displayed on the back of the Network Anti-Virus Administrator’s Guide or obtained from mysonicwall.com in the New License Key field. Multiple keys may be required. For example, if you have 30 computers on your network, you have purchased three 10-user subscriptions. Then, three Activation Keys are used for activation on the SonicWALL.
3. Click Submit. The operation takes a few seconds to complete. Once completed, the new number of Anti-Virus licenses appears in the Licenses>Summary table.
Alert! When adding licenses, a new subscription is granted with a single new number of licenses and a single expiration date. Multiple grants are not tracked. The time remaining on the previous subscription is combined with the new 12-month period of the additional grant to create a single subscription.

SonicWALL Anti-Virus Page 197
Renewing the Current SubscriptionA Subscription Renewal is the process of renewing the existing Anti-Virus subscriptions and the number of Anti-Virus licenses does not increase. If the current subscription has 10 users, a 10-user renewal extends the subscription period by one year, but the total number of users remains the same.The purchase of a standard Anti-Virus subscription is necessary to renew a current license.
Tip! When renewing a Network Anti-Virus subscription, the number of licenses for subscription renewal must be equal to the number of licenses in the current subscription.
To renew the current subscription, complete the following steps:1. Click Renew in the Anti-Virus line of the Summary table.
2. Type the Activation Key displayed on the back of the Complete Anti-Virus User’s Guide in the New License Key field. Multiple keys can be required for activation. The number of licenses for renewal must equal the number of existing licenses to renew your subscription.
3. Click Submit. The operation takes a few seconds to complete. Once completed, the new expiration date appears in the Anti-Virus Summary window.
Anti-Virus License Sharing Anti-Virus License Sharing allows you to distribute Anti-Virus licenses among multiple SonicWALL appliances. License sharing assigns a License Sharing Group (LSG) to a SonicWALL from which this feature is activated. You may then add other SonicWALL appliances to the LSG, by their serial numbers and assign them Anti-Virus licenses from the pool of remaining available licenses in the LSG. To set up a License Sharing Group, follow the directions below:1. Log into the Management station and click Security Services.
2. Click Anti-Virus.3. Click Manage Licenses, and then click Share in the Anti-Virus line of the Summary
table. 4. Type each SonicWALL appliance serial number in the Add a new SonicWALL to the
License Sharing Group, and click Add. 5. The SonicWALL is added to the list for license sharing.
Tip! You can only add SonicWALL appliances to your group that do not have active Anti-Virus subscriptions. The SonicWALL appliance must be registered at <http://www.mysonicwall.com> before it can be added to the group.

Page 198 SonicWALL SonicOS 2.0s Administrator’s Guide
6. To distribute licenses between the SonicWALL appliance, type the number of licenses for the first SonicWALL appliance into the Licenses field, and click Update. Repeat for each SonicWALL appliance.
You can also remove a SonicWALL appliance or redistribute the number of licenses between the SonicWALL appliances. To remove a SonicWALL appliance, click Remove next to the SonicWALL serial number. To redistribute licenses, type the new number of licenses into the License field and click Update. Repeat for each SonicWALL appliance. The License Availability information changes as you change the license distribution or add more SonicWALL appliances. A
Configuring Anti-Virus PoliciesTo configure Anti-Virus Policies, click Anti-Virus and then Configure.
The following features are available in the Anti-Virus Policies section:• Enable WLAN policing - Selecting Enable WLAN policing enforces anti-virus policies
on computers located on the WLAN.• Disable policing from LAN to WLAN - Choosing this option allows computers on the
LAN to access computers on the WLAN, even if anti-virus software is not installed on the LAN computers.
• Maximum number of days allowed before forcing update - This feature defines the maximum number of days may access the Internet before the SonicWALL requires the latest virus date files to be downloaded.
• Force Update on Alert - SonicWALL, Inc. broadcasts virus alerts to all SonicWALL ap-pliances with an Anti-Virus subscription. Three levels of alerts are available, and you may select more than one.When an alert is received with this option selected, users are upgraded to the latest version of VirusScan ASaP before they can access the Internet. This option overrides the Maximum number of days allowed before forcing update selection.
SonicWALL Anti-Virus Page 199
In addition, every virus alert is logged, and an alert message is sent to the administrator. Please refer to the Logging and Alerts section of the SonicWALL Internet Security Appliance User Guide for instructions on configuring log and E-mail alerts.
- Low Risk - A virus that is not reported in the field and is considered unlikely to be found in the field in the future has a low risk. Even if such a virus includes a very serious or unforeseeable damage payload, its risk is still low.
- Medium Risk - If a virus is found in the field, and if it uses a less common infection mechanism, it is considered to be medium risk. If its prevalence stays low and its payload is not serious, it can be downgraded to a low risk. Similarly it can be upgraded to high risk if the virus becomes more and more widespread.
- High Risk - To be assigned a high risk rating, it is necessary that a virus is reported frequently in the field. Additionally, the payload must have the ability to cause at least some serious damage. If it causes very serious or unforeseeable damage, high risk may be assigned even with a lower level of prevalence.
Exempt ComputersSonicWALL Network Anti-Virus currently supports Windows 95, 98, NT, XP, and 2000 platforms. In order to access the Internet, computers with other operating systems must be exempt from Anti-Virus policies. To ensure full network protection from virus attacks, it is recommended that only servers and unsupported machines are excluded from protection, and that third party Anti-Virus software is installed on each machine before excluding that machine from Anti-Virus enforcement. There are three options for defining exempt computers:• Enforce Anti-Virus policies for all computers • Selecting this option forces computers to install VirusScan ASaP in order to access the
Internet or the DMZ. This is the default configuration.• Include specified address range in the Anti-Virus
enforcement • Choosing this option allows the administrator to define ranges of IP addresses to receive
Anti-Virus enforcement. If you select this option, specify a range of IP addresses to be enforced. Any computer requiring enforcement needs a static IP address within the spec-ified range of IP addresses. Up to 64 IP address ranges can be entered for enforcement.
• Exclude specified address range in the Anti-Virus enforcement • Selecting this option allows the administrator to define ranges of IP addresses that are
exempt from Anti-Virus enforcement. If you select this option, specify the range of IP ad-dresses are exempt. Any computer requiring unrestricted Internet access needs a static IP address within the specified range of IP addresses. Up to 64 IP address ranges can be entered.

Page 200 SonicWALL SonicOS 2.0s Administrator’s Guide
Network Anti-Virus E-Mail FilterThe Network Anti-Virus E-Mail Filter allows the administrator to selectively delete or disable inbound E-mail attachments as they pass through the SonicWALL. This feature provides control over executable files and scripts, and applications sent as E-mail attachments. This feature is available only with the purchase of an E-mail Filter subscription. Click Anti-Virus on the left side of the browser window, and then click E-Mail Filter.
E-Mail Attachment FilteringThe E-mail Attachment Filtering section configures the file extensions that are filtered by the SonicWALL.Enable Rapid E-Mail Attachment Filtering Select this feature to automatically block the most prevalent e-mail viruses on the current Rapid E-mail Attachment Block List. Enable E-Mail Attachment Filtering Select this check box to filter E-mail attachments. Forbidden File Extensions Type the file extensions to be filtered in the Add Extension field. Hackers commonly spread viruses through Visual Basic and Windows Executable files, therefore "vbs" and "exe" are provided as default extensions for this feature. To add a file extension to the list, type the file extension in the Add Extension field and click Update. To delete a file extension, select the file extension from the list, and click Delete Extension.
E-Mail Attachment Filtering OptionsIn this section, the administrator chooses the action that the SonicWALL performs when filtering E-mail attachments. The attached file can either be deleted or it can be disabled by altering the file extension. In either case, the original E-mail text is still sent to the intended recipient.• Disable forbidden file by altering the file extension • Select this option to disable forbidden attachment files as they pass through the Son-
icWALL. The SonicWALL replaces the third character of file extensions with "_". If the E-mail attachment is a valid file, the E-mail recipient may return the attachment to its original file extension without damaging the file.
• Delete forbidden file • Select this option to delete forbidden attachment files as they pass through the Son-
icWALL.Warning Message Text
This is a warning message that can be customized and added to E-mails filtered by the Network Anti-Virus E-mail Filter. Type the desired warning message in the Warning Message Text box. Up to 256 alphanumeric characters may be entered.When you have configured the E-mail Filter settings, click Update. Once the SonicWALL has been updated, a message confirming the update is displayed at the bottom of the browser window.

SonicWALL Anti-Virus Page 201
E-Mail BlockingSelect Block SMTP E-Mail Fragments (Content-Type: message\partial) to enable blocking of partial e-mail messages. E-mail fragments are e-mail messages with the MIME Content-Type: message/partial in the header. Partial e-mails can be a security threat by allowing viruses to escape undetected by virus scanners because they are fragmented. The virus becomes fully functional once reassembled on the client.

Page 202 SonicWALL SonicOS 2.0s Administrator’s Guide

Log Page 203
11 LogThe SonicWALL Internet security appliance provides logging, alerting, and reporting features, which can be viewed in the Log section of the SonicWALL Web Management Interface.
Log>ViewThe SonicWALL maintains an Event log which displays potential security threats. This log can be viewed with a browser using the SonicWALL Web Management Interface, or it can be automatically sent to an e-mail address for convenience and archiving. The log is displayed in a table and is sortable by column.The SonicWALL can alert you of important events, such as an attack to the SonicWALL. Alerts are immediately e-mailed, either to an e-mail address or to an e-mail pager. Each log entry contains the date and time of the event and a brief message describing the event.Click Log on the left side of the browser window. The default view is Log>View.
Page 204 SonicWALL SonicOS 2.0s Administrator’s Guide
SonicWALL Log MessagesEach log entry contains the date and time of the event and a brief message describing the event. It is also possible to copy the log entries from the management interface and paste into a report. • Dropped TCP, UDP, or ICMP packets
When IP packets are blocked by the SonicWALL, dropped TCP, UDP and ICMP messages are displayed. The messages include the source and destination IP addresses of the packet. The TCP or UDP port number or the ICMP code follows the IP address. Log messages usually include the name of the service in quotation marks.
• Blocked Web Sites When a computer attempts to connect to the blocked site or newsgroup, a log event is displayed. The computer’s IP address, Ethernet address, the name of the blocked Web site, and the Content Filter List Code is displayed. Code definitions for the 12 Content Filter List categories are displayed in the table below:
Descriptions of the categories are available at <http://www.sonicwall.com/products/cfs.html>.
• Blocked Java, etc. When ActiveX, Java or Web cookies are blocked, messages with the source and destination IP addresses of the connection attempt is displayed.
• Ping of Death, IP Spoof, and SYN Flood AttacksThe IP address of the machine under attack and the source of the attack is displayed. In most attacks, the source address shown is fake and does not reflect the real source of the attack.
Tip! Some network conditions can produce network traffic that appears to be an attack, even if no one is deliberately attacking the LAN. Verify the log messages with SonicWALL Tech Support before contacting your ISP to determine the source of the attack.
1. Violence 5. Weapons 9. Criminal Skills/Illegal Skills
2. Intimate Apparel/Swimsuit
6. Hate/Racism 10. Sex Education
3. Nudism 7. Cult/Occult 11. Gambling
4. Adult/Mature Content/Pornography
8. Drugs/Illegal Drugs 12. Alcohol/Tobacco
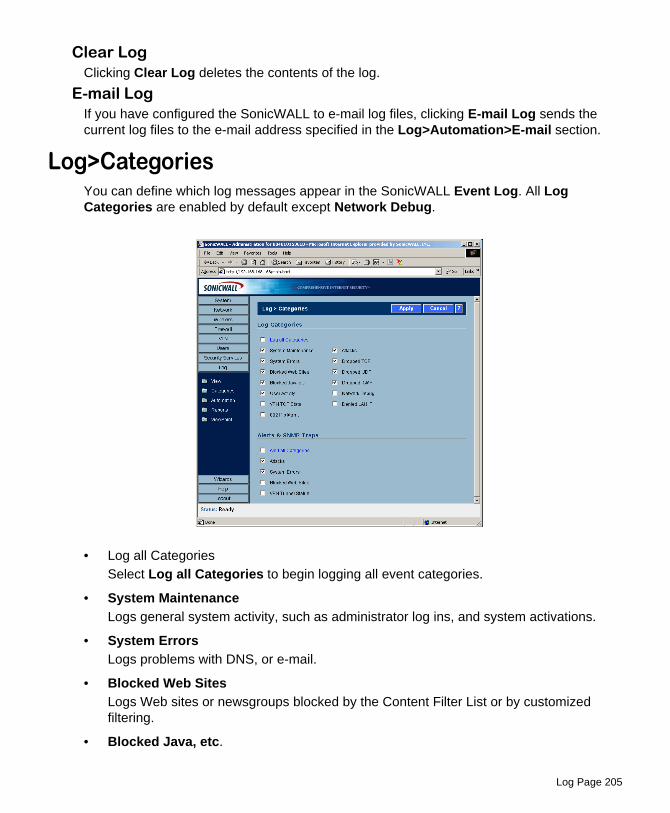
Log Page 205
Clear LogClicking Clear Log deletes the contents of the log.
E-mail LogIf you have configured the SonicWALL to e-mail log files, clicking E-mail Log sends the current log files to the e-mail address specified in the Log>Automation>E-mail section.
Log>CategoriesYou can define which log messages appear in the SonicWALL Event Log. All Log Categories are enabled by default except Network Debug.
• Log all CategoriesSelect Log all Categories to begin logging all event categories.
• System MaintenanceLogs general system activity, such as administrator log ins, and system activations.
• System ErrorsLogs problems with DNS, or e-mail.
• Blocked Web SitesLogs Web sites or newsgroups blocked by the Content Filter List or by customized filtering.
• Blocked Java, etc.

Page 206 SonicWALL SonicOS 2.0s Administrator’s Guide
Logs Java, ActiveX, and Cookies blocked by the SonicWALL.
• User ActivityLogs successful and unsuccessful log in attempts.
• VPN TCP Stats Logs TCP connections over VPN tunnels.
• WLAN 802.11b Management When selected, 802.11b layer information is logged such as station authentication pass/fail, station association pass/fail, station unassociation and unauthentication.
• Attacks Logs messages showing Denial of Service attacks, such as SYN Flood, Ping of Death, and IP spoofing.
• Dropped TCPLogs blocked incoming TCP connections.
• Dropped UDP Logs blocked incoming UDP packets.
• Dropped ICMP Logs blocked incoming ICMP packets.
• Network Debug Logs NetBIOS broadcasts, ARP resolution problems, and NAT resolution problems. Also, detailed messages for VPN connections are displayed to assist the network administrator with troubleshooting problems with active VPN tunnels. Network Debug information is intended for experienced network administrators.
• Denied LAN IP Logs all LAN IP addresses denied by the SonicWALL.
Alerts & SNMP Traps Alerts are events, such as attacks, which warrant immediate attention. When events generate alerts, messages are immediately sent to the e-mail address defined in the Send alerts to field. Attacks and System Errors are enabled by default, Blocked Web Sites and VPN Tunnel Status are disabled.• Alert all Categories
Select Alert all Categories to begin logging of all alert categories.
• Attacks Log entries categorized as Attacks generate alert messages.
• System Errors Log entries categorized as System Errors generate alert messages.
• Blocked Web Sites

Log Page 207
Log entries categorized as Blocked Web Sites generate alert messages.
• VPN Tunnel Status Log entries categorized as VPN Tunnel Status generate alert messages.
Once you have configured the Log Settings window, click Apply. Once the SonicWALL is updated, a message confirming the update is displayed at the bottom of the browser window.
Log>AutomationClick Log, and then Automation to begin configuring the SonicWALL to send log files using e-mail and configuring syslog servers on your network.
E-mail1. Mail Server - to e-mail log or alert messages, type the name or IP address of your mail
server in the Mail Server field. If this field is left blank, log and alert messages are not e-mailed.
2. Send Log To - type your full e-mail address in the Send log to field to receive the event log via e-mail. Once sent, the log is cleared from the SonicWALL memory. If this field is left blank, the log is not e-mailed.
3. Send Alerts To - type your full e-mail address ([email protected]) in the Send alerts to field to be immediately e-mailed when attacks or system errors occur. Type a standard e-mail address or an e-mail paging service. If this field is left blank, e-mail alert messages are not sent.
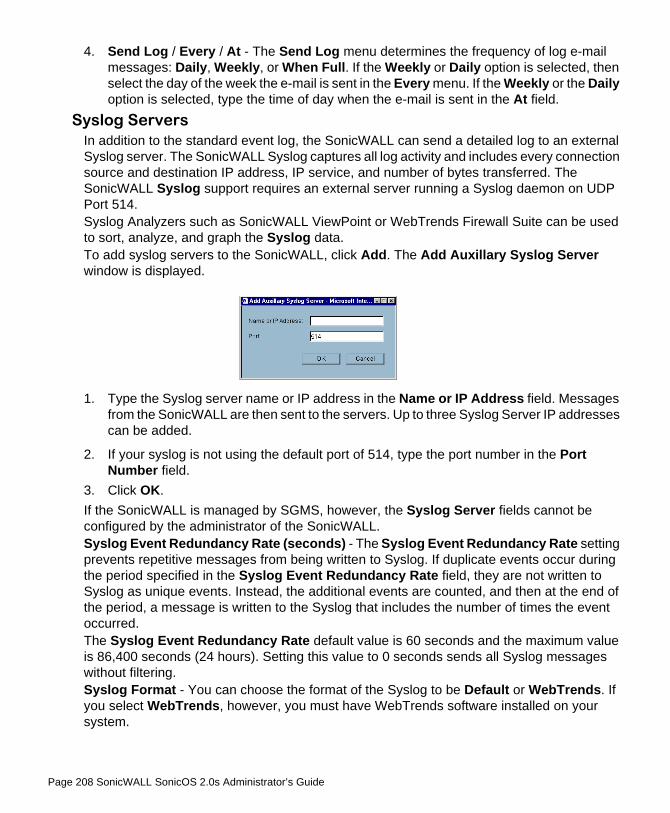
Page 208 SonicWALL SonicOS 2.0s Administrator’s Guide
4. Send Log / Every / At - The Send Log menu determines the frequency of log e-mail messages: Daily, Weekly, or When Full. If the Weekly or Daily option is selected, then select the day of the week the e-mail is sent in the Every menu. If the Weekly or the Daily option is selected, type the time of day when the e-mail is sent in the At field.
Syslog ServersIn addition to the standard event log, the SonicWALL can send a detailed log to an external Syslog server. The SonicWALL Syslog captures all log activity and includes every connection source and destination IP address, IP service, and number of bytes transferred. The SonicWALL Syslog support requires an external server running a Syslog daemon on UDP Port 514.Syslog Analyzers such as SonicWALL ViewPoint or WebTrends Firewall Suite can be used to sort, analyze, and graph the Syslog data.To add syslog servers to the SonicWALL, click Add. The Add Auxillary Syslog Server window is displayed.
1. Type the Syslog server name or IP address in the Name or IP Address field. Messages from the SonicWALL are then sent to the servers. Up to three Syslog Server IP addresses can be added.
2. If your syslog is not using the default port of 514, type the port number in the Port Number field.
3. Click OK. If the SonicWALL is managed by SGMS, however, the Syslog Server fields cannot be configured by the administrator of the SonicWALL. Syslog Event Redundancy Rate (seconds) - The Syslog Event Redundancy Rate setting prevents repetitive messages from being written to Syslog. If duplicate events occur during the period specified in the Syslog Event Redundancy Rate field, they are not written to Syslog as unique events. Instead, the additional events are counted, and then at the end of the period, a message is written to the Syslog that includes the number of times the event occurred. The Syslog Event Redundancy Rate default value is 60 seconds and the maximum value is 86,400 seconds (24 hours). Setting this value to 0 seconds sends all Syslog messages without filtering.Syslog Format - You can choose the format of the Syslog to be Default or WebTrends. If you select WebTrends, however, you must have WebTrends software installed on your system.

Log Page 209
Log>ReportsThe SonicWALL can perform a rolling analysis of the event log to show the top 25 most frequently accessed Web sites, the top 25 users of bandwidth by IP address, and the top 25 services consuming the most bandwidth. Click Log on the left side of the browser window, and then click the Reports.
Data CollectionThe Reports window includes the following functions and commands:• Start Data Collection
Click Start Data Collection to begin log analysis. When log analysis is enabled, the button label changes to Stop Data Collection.
• Reset DataClick Reset Data to clear the report statistics and begin a new sample period. The sample period is also reset when data collection is stopped or started, and when the SonicWALL is restarted.
• View Data Select the desired report from the Report to view menu. The options are Web Site Hits, Bandwidth Usage by IP Address, and Bandwidth Usage by Service. These reports are explained below. Click Refresh Data to update the report. The length of time analyzed by the report is displayed in the Current Sample Period.
Page 210 SonicWALL SonicOS 2.0s Administrator’s Guide
Web Site HitsSelecting Web Site Hits from the Report to view menu displays a table showing the URLs for the 25 most frequently accessed Web sites and the number of hits to a site during the current sample period.The Web Site Hits report ensures that the majority of Web access is to appropriate Web sites. If leisure, sports, or other inappropriate sites appear in the Web Site Hits Report, you can choose to block the sites.
Bandwidth Usage by IP AddressSelecting Bandwidth Usage by IP Address from the Report to view menu displays a table showing the IP Address of the 25 top users of Internet bandwidth and the number of megabytes transmitted during the current sample period.
Bandwidth Usage by ServiceSelecting Bandwidth Usage by Service from the Report to view menu displays a table showing the name of the 25 top Internet services, such as HTTP, FTP, RealAudio, etc., and the number of megabytes received from the service during the current sample period.The Bandwidth Usage by Service report shows whether the services being used are appropriate for your organization. If services such as video or push broadcasts are consuming a large portion of the available bandwidth, you can choose to block these services.
Log>ViewPoint
SonicWALL ViewPointSonicWALL ViewPoint is a software solution that creates dynamic, Web-based reports of network activity. ViewPoint generates both real-time and historical reports to provide a complete view of all activity through your SonicWALL Internet Security Appliance. With SonicWALL ViewPoint, you are able to monitor network access, enhance network security and anticipate future bandwidth needs. SonicWALL ViewPoint • Displays bandwidth use by IP address and service. • Identifies inappropriate Web use. • Presents detailed reports of attacks. • Collects and aggregates system and network errors.

Configuring Wireless on the SOHO TZW Page 211
12 Configuring Wireless on the SOHO TZW
The SOHO TZW uses a wireless protocol called IEEE 802.11b, commonly known as Wi-Fi, and sends data via radio transmissions. Wi-Fi transmission speed is usually faster than broadband connection speed, but it is slower than Ethernet.The SonicWALL SOHO TZW combines three networking components to offer a fully secure wireless firewall: an 802.11b Access Point, a secure wireless gateway, and a stateful firewall with flexible NAT and VPN termination and initiation capabilities. With this combination, the SOHO TZW offers the flexibility of wireless without compromising network security. Typically, the SOHO TZW is the access point for your wireless LAN and serves as the central access point for computers on your LAN. In addition, it shares a single broadband connection with the computers on your network. Since the SOHO TZW also provides firewall protection, intruders from the Internet cannot access the computers or files on your network. This is especially important for an “always-on” connection such as a cable modem or T1 line that is shared by computers on a network.However, wireless LANs are vulnerable to “eavesdropping” by other wireless networks which means you should establish a wireless security policy for your wireless LAN. Wired Equivalent Privacy, WEP, should not be used as your only security policy. On the SOHO TZW, wireless clients connect to the Access Point layer of the firewall. Instead of bridging the connection directly to the wired network, wireless traffic is first passed to the Secure Wireless Gateway layer where the client is required to be authenticated via User Level Authentication. Access to Wireless Guest Services (WGS) and MAC Filter Lists are managed by the SOHO TZW. It is also at this layer that the SOHO TZW has the capability of enforcing WiFiSec, an IPSec-based VPN overlay for wireless networking. As wireless network traffic successfully passes through these layers, it is then passed to the VPN-NAT-Stateful firewall layer where WiFiSec termination, address translation, and access rules are applied. If all of the security criteria is met, then wireless network traffic can then pass via one of the following Distribution Systems (DS):• LAN• WAN• Wireless Client on the WLAN• VPN tunnel
Page 212 SonicWALL SonicOS 2.0s Administrator’s Guide
Considerations for Using Wireless Connections• Mobility - if the majority of your network is laptop computers, wireless is more portable
than wired connections.• Convenience - wireless networks do not require cabling of individual computers or
opening computer cases to install network cards.• Speed - if network speed is important to you, you may want to consider using Ethernet
connections rather than wireless connections. • Range and Coverage - if your network environment contains numerous physical barriers
or interference factors, wireless networking may not be suitable for your network.• Security - wireless networks have inherent security issues due to the unrestricted nature
of the wireless transmissions. However, the SOHO TZW is a firewall and has NAT capabilities which provides security, and you can use WiFiSec to secure data transmissions.
Recommendations for Optimal Wireless Performance• Place the SOHO TZW near the center of your intended network. This can also reduce the
possibility of eavesdropping by neighboring wireless networks. • Minimize the number of walls or ceilings between the SOHO TZW and the receiving
points such as PCs or laptops. • Try to place the TZW in a direct line with other wireless components. Best performance
is achieved when wireless components are in direct line of sight with each other. • Building construction can make a difference on wireless performance. Avoid placing the
TZW near walls, fireplaces, or other large solid objects. Placing the TZW near metal ob-jects such as computer cases, monitors, and appliances can affect performance of the unit.
• Metal framing, UV window film, concrete or masonry walls, and metallic paint can reduce signal strength if the TZW is installed near these types of materials.
• Installing the TZW in a high place can help avoid obstacles and improve performance for upper stories of a building.
• Neighboring wireless networks and devices can affect signal strength, speed, and range of the SOHO TZW. Also, devices such as cordless phones, radios, microwave ovens, and televisions may cause interference on the TZW.
Adjusting the SOHO TZW AntennasThe antennas on the SOHO TZW can be adjusted for the best radio reception. Begin with the antennas pointing straight up, and then adjust as necessary. Note that certain areas, such as the area directly below the SOHO TZW, get relatively poor reception. Pointing the antenna directly at another wireless device does not improve reception. Do not place the antennas next to metal doors or walls as this can cause interference.
Configuring Wireless on the SOHO TZW Page 213
Wireless Guest Services (WGS)With your SOHO TZW, you can provide wireless guest services to wireless-equipped users who are not part of your corporate network, for example, a consultant or a sales person. You can offer authenticated wireless users access to the Internet through your SOHO TZW while preventing access to your corporate LAN, or allowing them access to specific resources on the LAN and unencrypted access to the Internet. When WGS is active, wireless clients can authenticate and associate with the Access Layer of the SonicWALL. When a Web browser is launched, the wireless user is prompted to provide a user name and password to gain access to WGS. The browser is redirected to the HTTP (unencrypted) management address of the SOHO TZW, but the user name and password is not transmitted. Instead, a secure hash is transmitted rendering the information useless to anyone “eavesdropping” on the network. After authentication, users are tracked and controlled by the client MAC address as well as Account and Session lifetimes. In order to take advantage of Wireless Guest Services, you must provide a guest with a user name and password which they use to authenticate themselves using HTTP and a Web browser, creating a secure HTTP session.
Wireless Node Count EnforcementUsers on the WLAN are not counted towards the node enforcement on the SonicWALL. Only users on the LAN are counted towards the node limit.
MAC Filter List802.11b wireless networking protocol provides native MAC address filtering capabilities. When MAC address filtering occurs at the 802.11 layer, wireless clients are prevented from authenticating and associating with the wireless access point. Since data communications cannot occur without authentication and association, access to the network cannot be granted until the client has given the network administrator the MAC address of their wireless network card. The SOHO TZW uses WGS to overcome this limitation by moving MAC address filtering to the Secure Wireless Gateway layer. This allows wireless users to authenticate and associate with the Access Point layer of the SonicWALL, and be redirected to the WGS by the Secure Wireless Gateway where the user authenticates and obtains WLAN to WAN access. Easy WGS MAC Filtering is an extension of WGS that simplifies the administrative burden of manually adding MAC addresses to the MAC Filter List. Users can add themselves to the MAC Filter List by providing a user name and password assigned to them by the SonicWALL administrator. WGS must be enabled on the SOHO TZW before Easy MAC Filter List can be implemented.

Page 214 SonicWALL SonicOS 2.0s Administrator’s Guide
WiFiSec EnforcementEnabling WiFiSec Enforcement on the SonicWALL enforces the use of IPSec-based VPN for access from the WLAN to the WAN or LAN, and provides access from the WLAN to the WAN independent of WGS. Access from one wireless client to another is configured on the Wireless>Advanced page where you can disable or enable access between wireless clients. WiFiSec uses the easy provisioning capabilities of the SonicWALL Global VPN client making it easy for experienced and inexperienced administrators to implement on the network. The level of interaction between the Global VPN Client and the user depends on the WiFiSec options selected by the administrator. WiFiSec IPSec terminates on the WLAN/LAN port, and is configured using the Group VPN Security Policy including noneditable parameters specifically for wireless access. • Apply NAT & Firewall Rules - On• Forward Packets to Remote VPNs - On• Default LAN Gateway - <management IP Address> if left unspecified• VPN Terminated at the LAN/WLAN - to differentiate between VPN Security
Associations terminated at the WAN port.
SonicOS 2.0s Wireless Features and EnhancementsSonicOS 2.0s introduces a number of new features designed to enhance the functionality, performance, and versatility of the SOHO TZW.
• Wireless Status Page Updates • Secure Wireless Bridging • WEP-on-Demand • Enhanced Wireless Guest Services • Dynamic Address Translation • Flexible Default Route
Wireless Status Page UpdatesIn addition to providing different status views for Access Point and Wireless Bridge modes, two new functions have been added to the Wireless > Status page:
• Hyperlinked WLAN Settings - All configurable WLAN settings are now hyperlinked to their respective pages for configuration. (Present in both Access Point and Wireless Bridge modes). Enabled features are displayed in green, and disabled features are displayed in red.
• Automated Station Blocking - Previously, the Station Status view allowed for stations to be added to the MAC allow list, or disassociated from the SOHO TZW. The disassoci-ated station, however, could easily re-associate unless other prohibitive actions were tak-en. This functionality has been enhanced by adding the Block icon. Clicking this icon disassociates the station and adds the station to the MAC block list.

Configuring Wireless on the SOHO TZW Page 215
SOHO TZW Deployment ScenariosOffice Gateway - Provides secure access for wired and wireless users on your network.
Secure Access Point - Add secure wireless access to an existing wireless network.
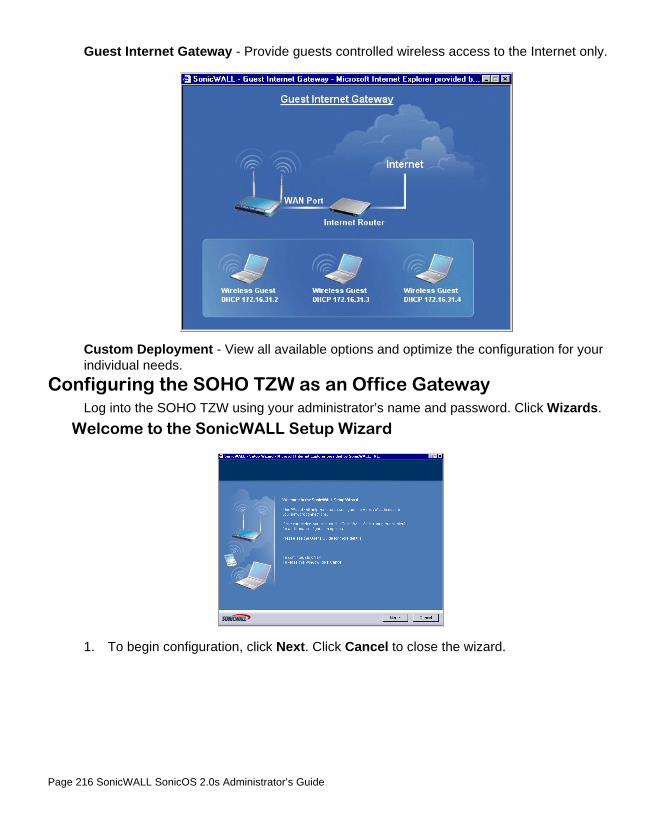
Page 216 SonicWALL SonicOS 2.0s Administrator’s Guide
Guest Internet Gateway - Provide guests controlled wireless access to the Internet only.
Custom Deployment - View all available options and optimize the configuration for your individual needs.
Configuring the SOHO TZW as an Office GatewayLog into the SOHO TZW using your administrator’s name and password. Click Wizards.
Welcome to the SonicWALL Setup Wizard
1. To begin configuration, click Next. Click Cancel to close the wizard.
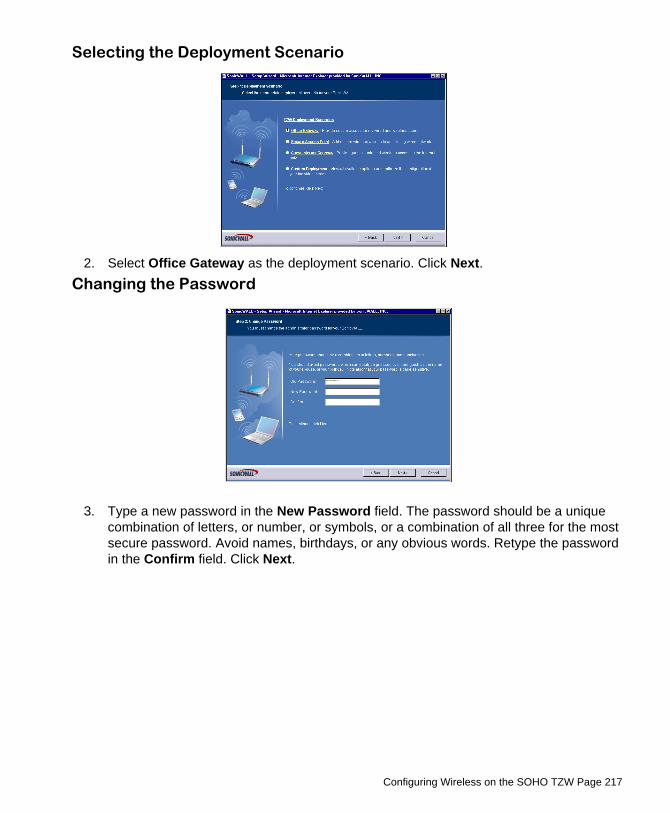
Configuring Wireless on the SOHO TZW Page 217
Selecting the Deployment Scenario
2. Select Office Gateway as the deployment scenario. Click Next. Changing the Password
3. Type a new password in the New Password field. The password should be a unique combination of letters, or number, or symbols, or a combination of all three for the most secure password. Avoid names, birthdays, or any obvious words. Retype the password in the Confirm field. Click Next.

Page 218 SonicWALL SonicOS 2.0s Administrator’s Guide
Selecting Your Time Zone
4. Select your Time Zone from the Time Zone menu. The SonicWALL uses an internal clock to timestamp logs and other functions requiring time. Click Next.
Configuring the WAN Network Mode
5. If a DCHP server is detected on the WAN, the SonicWALL defaults to NAT with DHCP Client network mode. All WAN network settings are automatically detected and used for the network mode. If a PPPoE server is detected on the WAN, type the user name and password provided to you by your ISP in the User Name and Password fields. If your ISP has provided you with a single public IP address and other network information, use it to configure the SonicWALL WAN settings. Click Next.

Configuring Wireless on the SOHO TZW Page 219
Configuring WAN Settings
6. If you selected Assigned you a single, static IP address, or assigned you two more IP addresses, you must have your IP address information from your ISP to fill in the above fields.
Configuring LAN Settings
7. Type a private IP address in the SonicWALL LAN IP Address field. The default private IP address is acceptable for most configurations. Type the subnet in the Subnet Mask field. Click Next.
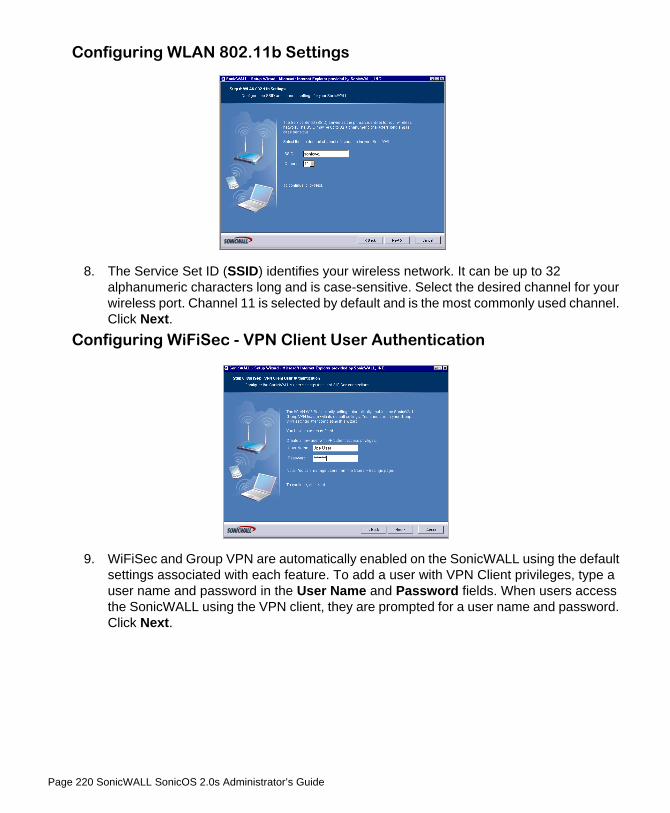
Page 220 SonicWALL SonicOS 2.0s Administrator’s Guide
Configuring WLAN 802.11b Settings
8. The Service Set ID (SSID) identifies your wireless network. It can be up to 32 alphanumeric characters long and is case-sensitive. Select the desired channel for your wireless port. Channel 11 is selected by default and is the most commonly used channel. Click Next.
Configuring WiFiSec - VPN Client User Authentication
9. WiFiSec and Group VPN are automatically enabled on the SonicWALL using the default settings associated with each feature. To add a user with VPN Client privileges, type a user name and password in the User Name and Password fields. When users access the SonicWALL using the VPN client, they are prompted for a user name and password. Click Next.

Configuring Wireless on the SOHO TZW Page 221
Configuring Wireless Guest Services
10. When Wireless Guest Services is selected, guests on your WLAN are permitted access only to the WAN and are required to log in when accessing the Internet. Up to 10 users by default can use the same guest account. Type in the account name and password in the Account Name and Password fields. Configure the Account Lifetime and the Session Timeout times.
SonicWALL Configuration Summary
11. The Configuration Summary page displays all of the settings configured using the Deployment Scenario Wizard. To change any of the settings, click Back until you see the settings you want to change. To use this configuration on the SonicWALL, click Apply.

Page 222 SonicWALL SonicOS 2.0s Administrator’s Guide
Storing SonicWALL Configuration
12. Wait for the settings to take effect on the SonicWALL. Congratulations!
13. When the settings are applied to the SonicWALL, the Congratulations page is displayed. Click Restart to complete the configuration.

Configuring Wireless on the SOHO TZW Page 223
Configuring the SOHO TZW as a Secure Access PointLog into the SOHO TZW using your administrator’s name and password. Click Wizards.
Welcome to the SonicWALL Setup Wizard
1. To begin configuration, click Next. Click Cancel to close the wizard.
Selecting the Deployment Scenario
2. Select Secure Access Point as the deployment scenario. Click Next.

Page 224 SonicWALL SonicOS 2.0s Administrator’s Guide
Changing the Password
3. Type a new password in the New Password field. The password should be a unique combination of letters, or number, or symbols, or a combination of all three for the most secure password. Avoid names, birthdays, or any obvious words. Retype the password in the Confirm field. Click Next.
Selecting Your Time Zone
4. Select your Time Zone from the Time Zone menu. The SonicWALL uses an internal clock to timestamp logs and other functions requiring time. Click Next.
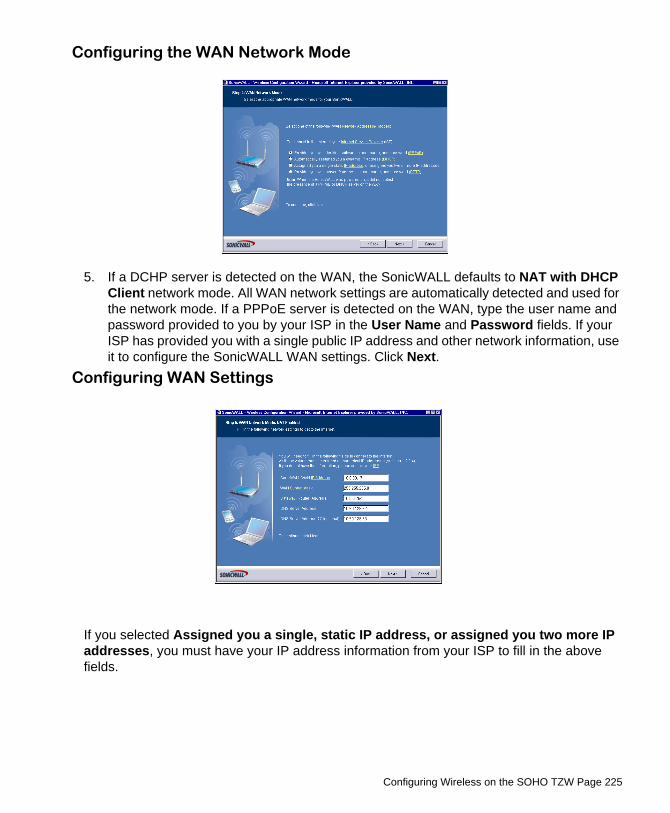
Configuring Wireless on the SOHO TZW Page 225
Configuring the WAN Network Mode
5. If a DCHP server is detected on the WAN, the SonicWALL defaults to NAT with DHCP Client network mode. All WAN network settings are automatically detected and used for the network mode. If a PPPoE server is detected on the WAN, type the user name and password provided to you by your ISP in the User Name and Password fields. If your ISP has provided you with a single public IP address and other network information, use it to configure the SonicWALL WAN settings. Click Next.
Configuring WAN Settings
If you selected Assigned you a single, static IP address, or assigned you two more IP addresses, you must have your IP address information from your ISP to fill in the above fields.
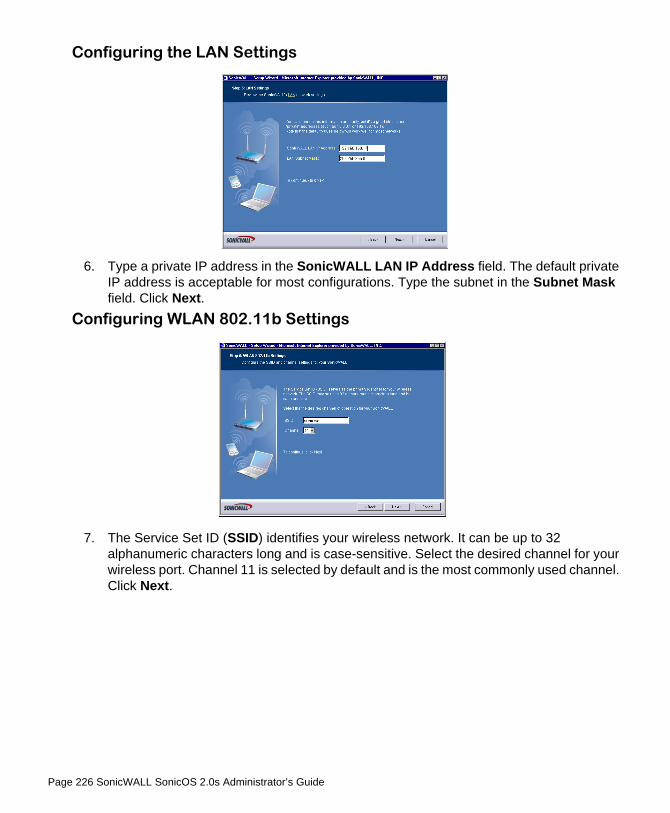
Page 226 SonicWALL SonicOS 2.0s Administrator’s Guide
Configuring the LAN Settings
6. Type a private IP address in the SonicWALL LAN IP Address field. The default private IP address is acceptable for most configurations. Type the subnet in the Subnet Mask field. Click Next.
Configuring WLAN 802.11b Settings
7. The Service Set ID (SSID) identifies your wireless network. It can be up to 32 alphanumeric characters long and is case-sensitive. Select the desired channel for your wireless port. Channel 11 is selected by default and is the most commonly used channel. Click Next.

Configuring Wireless on the SOHO TZW Page 227
Configuring WiFiSec - VPN Client User Authentication
8. WiFiSec and Group VPN are automatically enabled on the SonicWALL using the default settings associated with each feature. To add a user with VPN Client privileges, type a user name and password in the User Name and Password fields. When users access the SonicWALL using the VPN client, they are prompted for a user name and password. Click Next.
Configuring Wireless Guest Services
9. When Wireless Guest Services is selected, guests on your WLAN are permitted access only to the WAN and are required to log in when accessing the Internet. Up to 10 users by default can use the same guest account. Type in the account name and password in the Account Name and Password fields. Configure the Account Lifetime and the Session Timeout times.

Page 228 SonicWALL SonicOS 2.0s Administrator’s Guide
SonicWALL Configuration Summary
10. The Configuration Summary page displays all of the settings configured using the Deployment Scenario Wizard. To change any of the settings, click Back until you see the settings you want to change. To apply the current settings to the SonicWALL, click Apply.
Storing SonicWALL Configuration
11. Wait for the settings to take effect on the SonicWALL.
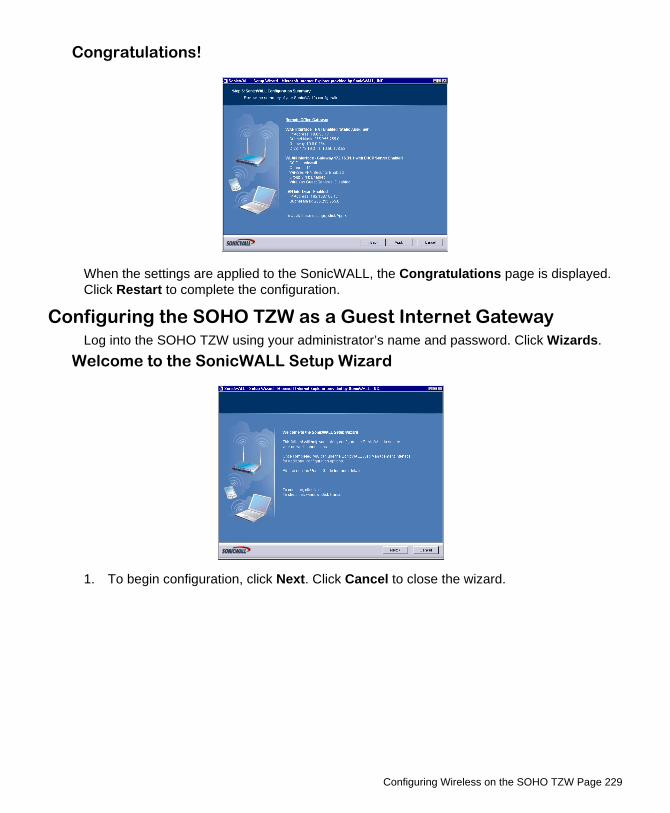
Configuring Wireless on the SOHO TZW Page 229
Congratulations!
When the settings are applied to the SonicWALL, the Congratulations page is displayed. Click Restart to complete the configuration.
Configuring the SOHO TZW as a Guest Internet GatewayLog into the SOHO TZW using your administrator’s name and password. Click Wizards.
Welcome to the SonicWALL Setup Wizard
1. To begin configuration, click Next. Click Cancel to close the wizard.
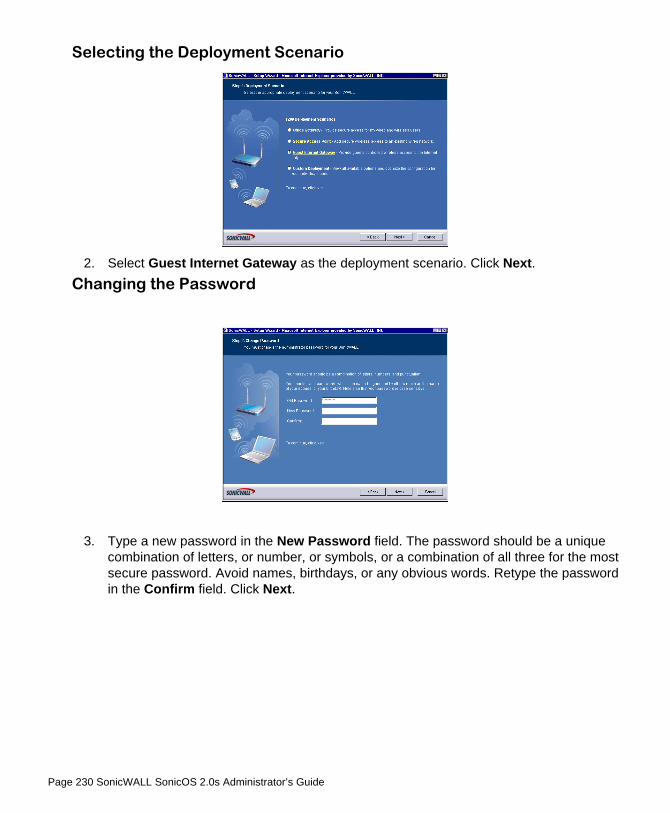
Page 230 SonicWALL SonicOS 2.0s Administrator’s Guide
Selecting the Deployment Scenario
2. Select Guest Internet Gateway as the deployment scenario. Click Next.Changing the Password
3. Type a new password in the New Password field. The password should be a unique combination of letters, or number, or symbols, or a combination of all three for the most secure password. Avoid names, birthdays, or any obvious words. Retype the password in the Confirm field. Click Next.
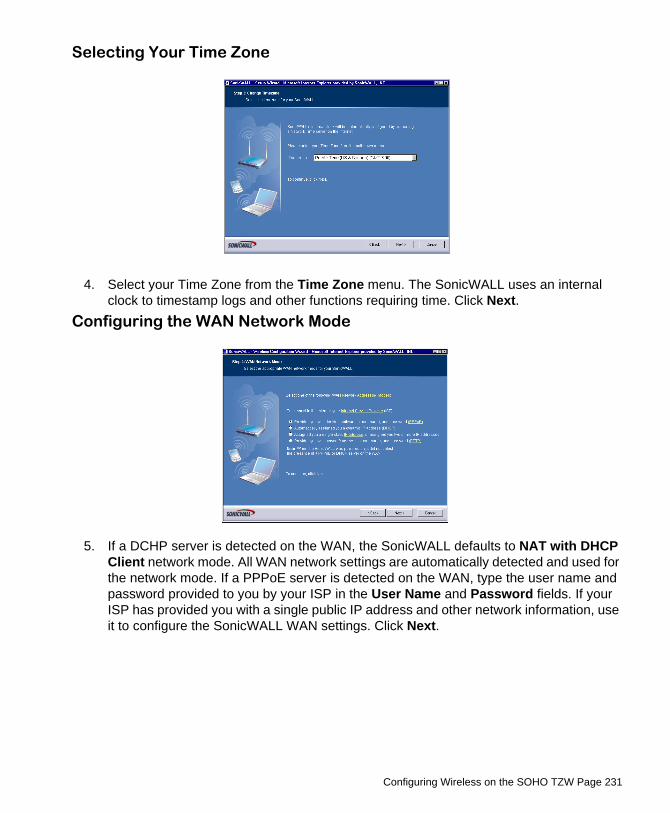
Configuring Wireless on the SOHO TZW Page 231
Selecting Your Time Zone
4. Select your Time Zone from the Time Zone menu. The SonicWALL uses an internal clock to timestamp logs and other functions requiring time. Click Next.
Configuring the WAN Network Mode
5. If a DCHP server is detected on the WAN, the SonicWALL defaults to NAT with DHCP Client network mode. All WAN network settings are automatically detected and used for the network mode. If a PPPoE server is detected on the WAN, type the user name and password provided to you by your ISP in the User Name and Password fields. If your ISP has provided you with a single public IP address and other network information, use it to configure the SonicWALL WAN settings. Click Next.

Page 232 SonicWALL SonicOS 2.0s Administrator’s Guide
Configuring WAN Settings
6. If you selected Assigned you a single, static IP address, or assigned you two more IP addresses, you must have your IP address information from your ISP to fill in the above fields.
Configuring the LAN Settings
7. Type a private IP address in the SonicWALL LAN IP Address field. The default private IP address is acceptable for most configurations. Type the subnet in the Subnet Mask field. Click Next.

Configuring Wireless on the SOHO TZW Page 233
Configuring WLAN 802.11b Settings
8. The Service Set ID (SSID) identifies your wireless network. It can be up to 32 alphanumeric characters long and is case-sensitive. Select the desired channel for your wireless port. Channel 11 is selected by default and is the most commonly used channel. Click Next.
Configuring Wireless Guest Services
9. When Wireless Guest Services is selected, guests on your WLAN are permitted access only to the WAN and are required to log in when accessing the Internet. Up to 10 users by default can use the same guest account. Type in the account name and password in the Account Name and Password fields. Configure the Account Lifetime and the Session Timeout times.
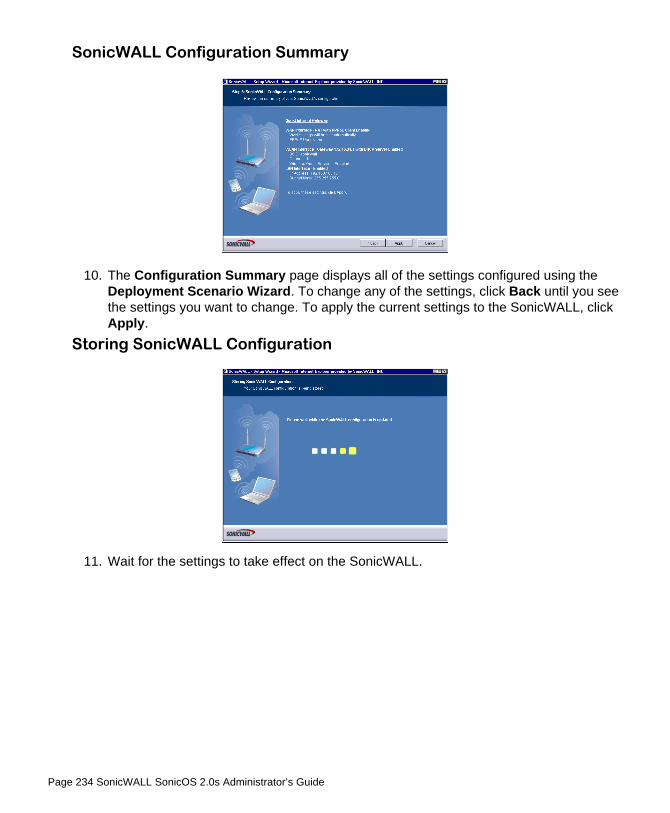
Page 234 SonicWALL SonicOS 2.0s Administrator’s Guide
SonicWALL Configuration Summary
10. The Configuration Summary page displays all of the settings configured using the Deployment Scenario Wizard. To change any of the settings, click Back until you see the settings you want to change. To apply the current settings to the SonicWALL, click Apply.
Storing SonicWALL Configuration
11. Wait for the settings to take effect on the SonicWALL.

Configuring Wireless on the SOHO TZW Page 235
Congratulations!
When the settings are applied to the SonicWALL, the Congratulations page is displayed. Click Restart to complete the configuration.
Configuring the SOHO TZW using a Custom Deployment Log into the SOHO TZW using your administrator’s name and password. Click Wizards.
Welcome to the SonicWALL Setup Wizard
1. To begin configuration, click Next. Click Cancel to close the wizard.

Page 236 SonicWALL SonicOS 2.0s Administrator’s Guide
Selecting the Deployment Scenario
2. Select Custom Deployment as the deployment scenario. Click Next. Changing the Password
3. Type a new password in the New Password field. The password should be a unique combination of letters, or number, or symbols, or a combination of all three for the most secure password. Avoid names, birthdays, or any obvious words. Retype the password in the Confirm field. Click Next.
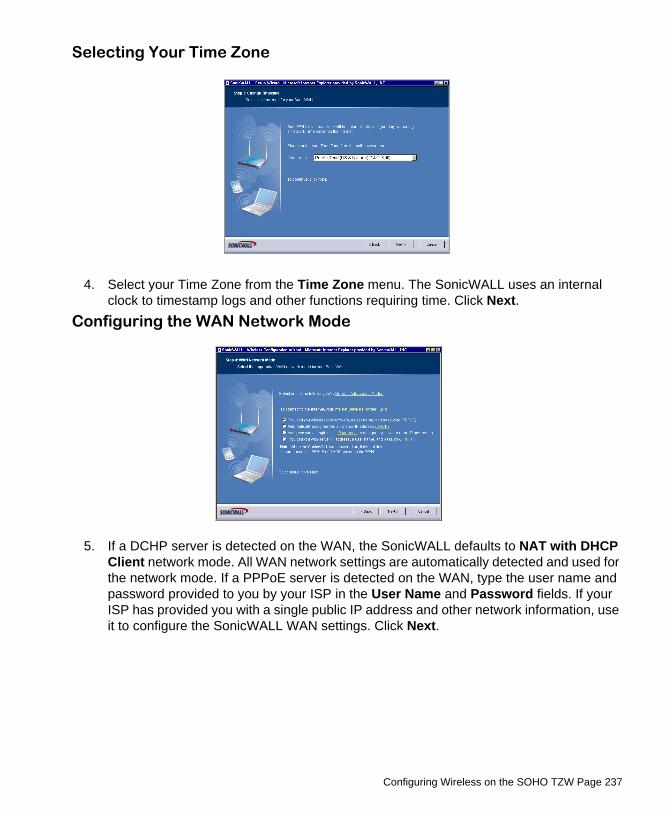
Configuring Wireless on the SOHO TZW Page 237
Selecting Your Time Zone
4. Select your Time Zone from the Time Zone menu. The SonicWALL uses an internal clock to timestamp logs and other functions requiring time. Click Next.
Configuring the WAN Network Mode
5. If a DCHP server is detected on the WAN, the SonicWALL defaults to NAT with DHCP Client network mode. All WAN network settings are automatically detected and used for the network mode. If a PPPoE server is detected on the WAN, type the user name and password provided to you by your ISP in the User Name and Password fields. If your ISP has provided you with a single public IP address and other network information, use it to configure the SonicWALL WAN settings. Click Next.

Page 238 SonicWALL SonicOS 2.0s Administrator’s Guide
Configuring WAN Settings
6. If you selected Assigned you a single, static IP address, or assigned you two more IP addresses, you must have your IP address information from your ISP to fill in the above fields.
Configuring LAN Settings
7. Type a private IP address in the SonicWALL LAN IP Address field. The default private IP address is acceptable for most configurations. Type the subnet in the Subnet Mask field. Click Next.
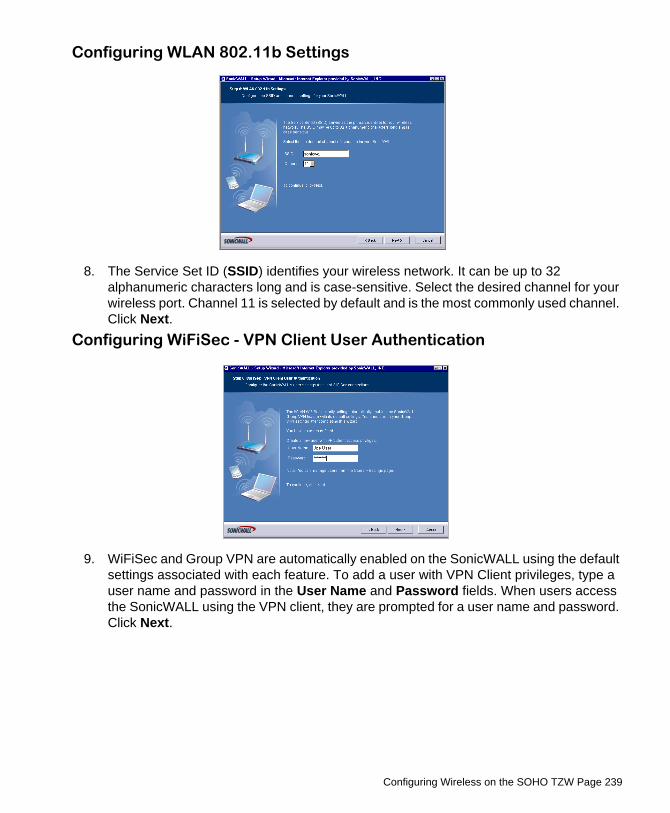
Configuring Wireless on the SOHO TZW Page 239
Configuring WLAN 802.11b Settings
8. The Service Set ID (SSID) identifies your wireless network. It can be up to 32 alphanumeric characters long and is case-sensitive. Select the desired channel for your wireless port. Channel 11 is selected by default and is the most commonly used channel. Click Next.
Configuring WiFiSec - VPN Client User Authentication
9. WiFiSec and Group VPN are automatically enabled on the SonicWALL using the default settings associated with each feature. To add a user with VPN Client privileges, type a user name and password in the User Name and Password fields. When users access the SonicWALL using the VPN client, they are prompted for a user name and password. Click Next.
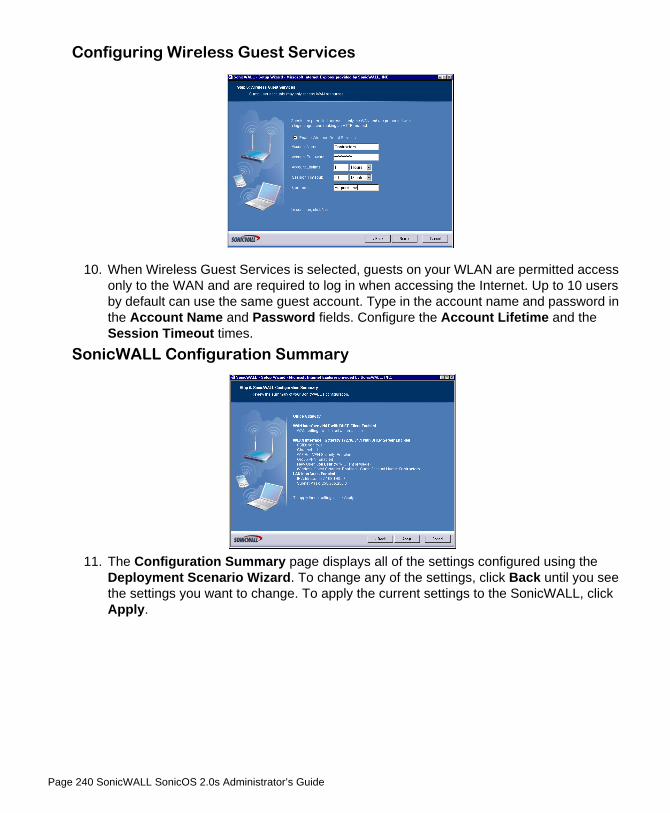
Page 240 SonicWALL SonicOS 2.0s Administrator’s Guide
Configuring Wireless Guest Services
10. When Wireless Guest Services is selected, guests on your WLAN are permitted access only to the WAN and are required to log in when accessing the Internet. Up to 10 users by default can use the same guest account. Type in the account name and password in the Account Name and Password fields. Configure the Account Lifetime and the Session Timeout times.
SonicWALL Configuration Summary
11. The Configuration Summary page displays all of the settings configured using the Deployment Scenario Wizard. To change any of the settings, click Back until you see the settings you want to change. To apply the current settings to the SonicWALL, click Apply.

Configuring Wireless on the SOHO TZW Page 241
Storing SonicWALL Configuration
12. Wait for the settings to take effect on the SonicWALL. Congratulations!
When the settings are applied to the SonicWALL, the Congratulations page is displayed. Click Restart to complete the configuration.
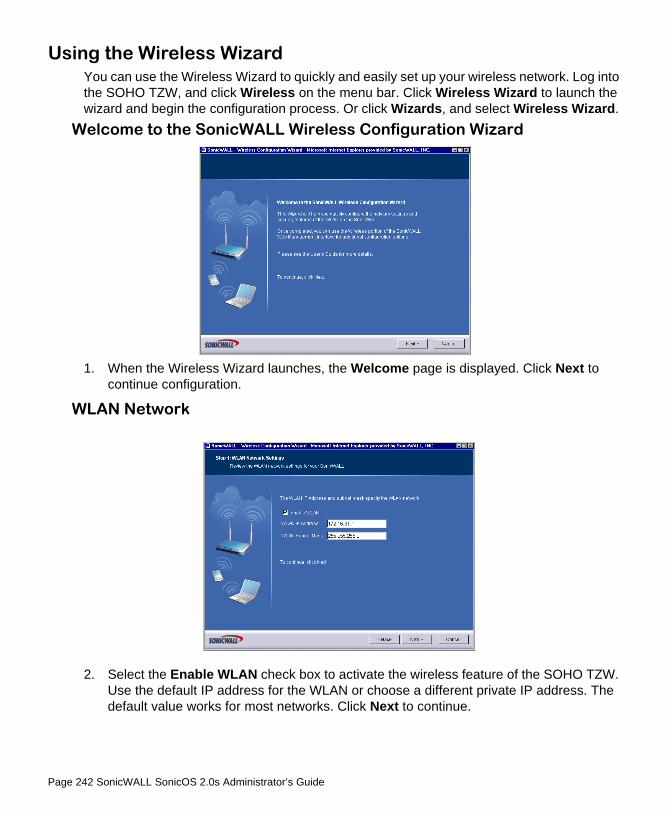
Page 242 SonicWALL SonicOS 2.0s Administrator’s Guide
Using the Wireless WizardYou can use the Wireless Wizard to quickly and easily set up your wireless network. Log into the SOHO TZW, and click Wireless on the menu bar. Click Wireless Wizard to launch the wizard and begin the configuration process. Or click Wizards, and select Wireless Wizard.
Welcome to the SonicWALL Wireless Configuration Wizard
1. When the Wireless Wizard launches, the Welcome page is displayed. Click Next to continue configuration.
WLAN Network
2. Select the Enable WLAN check box to activate the wireless feature of the SOHO TZW. Use the default IP address for the WLAN or choose a different private IP address. The default value works for most networks. Click Next to continue.

Configuring Wireless on the SOHO TZW Page 243
Alert! You cannot use the same private IP address range as the LAN port of the SOHO TZW.
WLAN 802.11b Settings
3. Type a unique identifier for the SOHO TZW in the SSID field. It can be up to 32 alphanumeric characters in length and is case-sensitive. The default value is sonicwall.
WLAN Security Settings
4. Choose the desired security setting for the SOHO3 TZW. WiFiSec is the most secure and enforces IPSec over the wireless network. If you have an existing wireless network and want to use the SOHO TZW, select WEP + Stealth Mode.

Page 244 SonicWALL SonicOS 2.0s Administrator’s Guide
WiFiSec - VPN Client User Authentication
5. Create a new user with VPN Client privileges by typing a user name and password in the User Name and Password fields.
Alert! Selecting WiFiSec automatically enables the SonicWALL Group VPN feature and its default settings. Verify your Group VPN settings after configuring your wireless connection.
Wireless Guest Services
6. The Enable Wireless Guest Services check box is selected by default. You can create guest wireless accounts to grant access to the WAN only. If you enable Wireless Guest Services, type a name for the account in the Account Name field, and a password in the Account Password field. The Account Lifetime is set to one hour by default, but you can configure Minutes, Hours, or Days to determine how long the guest account is active.Type the value in the Session Timeout field. Select Minutes, Hours, or Days.
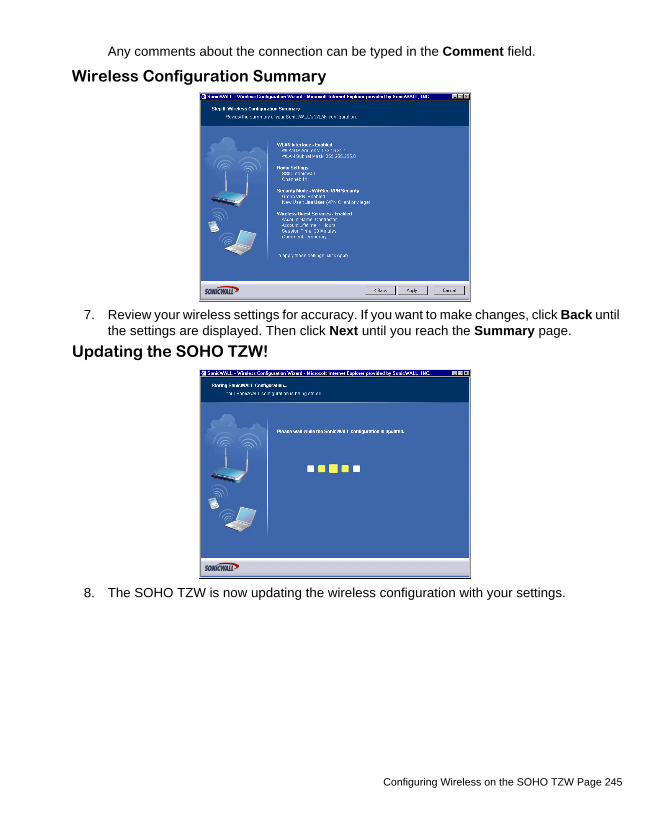
Configuring Wireless on the SOHO TZW Page 245
Any comments about the connection can be typed in the Comment field.
Wireless Configuration Summary
7. Review your wireless settings for accuracy. If you want to make changes, click Back until the settings are displayed. Then click Next until you reach the Summary page.
Updating the SOHO TZW!
8. The SOHO TZW is now updating the wireless configuration with your settings.

Page 246 SonicWALL SonicOS 2.0s Administrator’s Guide
Congratulations!
9. Congratulations! You have successfully completed configuration of your wireless settings. Click Finish to exit the Wizard.
Configuring Additional Wireless FeaturesThe SonicWALL SOHO TZW has the following features available:• WiFiSec Enforcement - an IPSec-based VPN overlay for wireless networking• WEP Encryption - configure Wired Equivalent Privacy (WEP) Encryption • Beaconing and SSID Controls - manage transmission of the wireless signal.• Wireless Client Communications - configure wireless client settings.• Advanced Radio Settings - fine-tune wireless broadcasting on the SOHO TZW• MAC Filtering - use MAC addresses for allowing access or blocking access to the SOHO
TZW.
In addition to providing different status views for Access Point and Wireless Bridge modes, two new functions have been added to the Wireless > Status page:
• Hyperlinked WLAN Settings - All configurable WLAN settings are now hyperlinked to their respective pages for configuration. (Present in both Access Point and Wireless Bridge modes). Enabled features are displayed in green, and disabled features are displayed in red.
• Automated Station Blocking - Previously, the Station Status view allowed for stations to be added to the MAC allow list, or disassociated from the SOHO TZW. The disassoci-ated station, however, could easily re-associate unless other prohibitive actions were taken. This functionality has been enhanced by adding the Block icon. Clicking this icon disassociates the station and adds the station to the MAC block list.To begin configuring advanced features on the SOHO TZW, log into the management interface, and click

Configuring Wireless on the SOHO TZW Page 247
Wireless. The Status page is displayed and contains information relating to the WLAN connection.
Access Point Status
WLAN Settings Value
WLAN: Enabled or Disabled
WiFiSec: Enabled or Disabled
SSID: Network Identification Information
MAC Address: Serial Number of the SOHO TZW
WLAN IP Address: IP address of the WLAN port
WLAN Subnet Mask: Subnet information
Regulatory Domain FCC - North America for domestic appliances ETSI - Europe for international appliances
Channel Channel Number selected for transmitting wireless signal
Radio Tx Rate Network speed in Mbps
Radio Tx Power the current power level of the radio signal transmission
Link Status: Network speed in mbps, full or half duplex
WEP Encryption: Enabled or Disabled
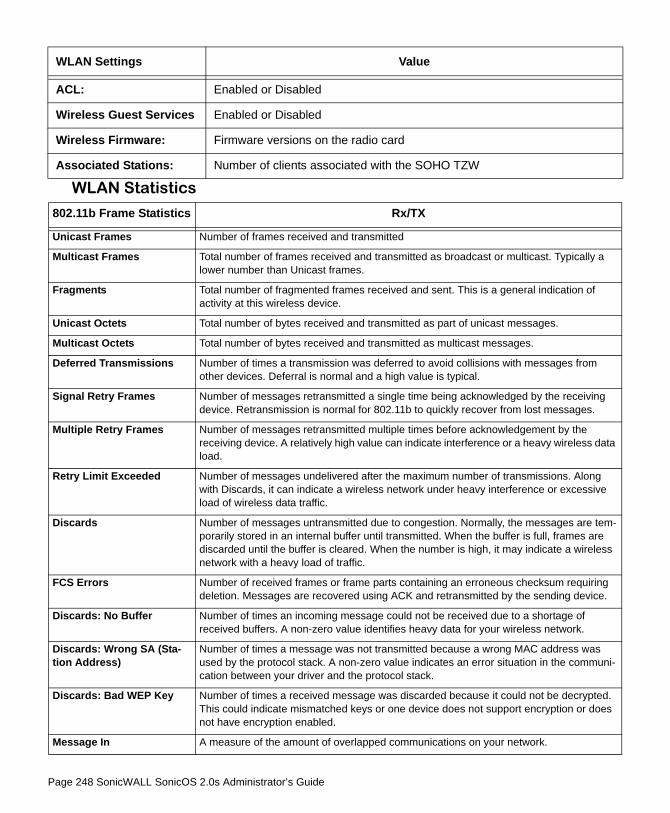
Page 248 SonicWALL SonicOS 2.0s Administrator’s Guide
WLAN Statistics
ACL: Enabled or Disabled
Wireless Guest Services Enabled or Disabled
Wireless Firmware: Firmware versions on the radio card
Associated Stations: Number of clients associated with the SOHO TZW
802.11b Frame Statistics Rx/TX
Unicast Frames Number of frames received and transmitted
Multicast Frames Total number of frames received and transmitted as broadcast or multicast. Typically a lower number than Unicast frames.
Fragments Total number of fragmented frames received and sent. This is a general indication of activity at this wireless device.
Unicast Octets Total number of bytes received and transmitted as part of unicast messages.
Multicast Octets Total number of bytes received and transmitted as multicast messages.
Deferred Transmissions Number of times a transmission was deferred to avoid collisions with messages from other devices. Deferral is normal and a high value is typical.
Signal Retry Frames Number of messages retransmitted a single time being acknowledged by the receiving device. Retransmission is normal for 802.11b to quickly recover from lost messages.
Multiple Retry Frames Number of messages retransmitted multiple times before acknowledgement by the receiving device. A relatively high value can indicate interference or a heavy wireless data load.
Retry Limit Exceeded Number of messages undelivered after the maximum number of transmissions. Along with Discards, it can indicate a wireless network under heavy interference or excessive load of wireless data traffic.
Discards Number of messages untransmitted due to congestion. Normally, the messages are tem-porarily stored in an internal buffer until transmitted. When the buffer is full, frames are discarded until the buffer is cleared. When the number is high, it may indicate a wireless network with a heavy load of traffic.
FCS Errors Number of received frames or frame parts containing an erroneous checksum requiring deletion. Messages are recovered using ACK and retransmitted by the sending device.
Discards: No Buffer Number of times an incoming message could not be received due to a shortage of received buffers. A non-zero value identifies heavy data for your wireless network.
Discards: Wrong SA (Sta-tion Address)
Number of times a message was not transmitted because a wrong MAC address was used by the protocol stack. A non-zero value indicates an error situation in the communi-cation between your driver and the protocol stack.
Discards: Bad WEP Key Number of times a received message was discarded because it could not be decrypted. This could indicate mismatched keys or one device does not support encryption or does not have encryption enabled.
Message In A measure of the amount of overlapped communications on your network.
WLAN Settings Value

Configuring Wireless on the SOHO TZW Page 249
Station StatusThe Station Status table displays information about wireless connections associated with the SOHO TZW.
• Station - the name of the connection used by the MAC address• MAC Address - the wireless network card MAC address• Authenticated - status of 802.11b authentication• Associated - status of 802.11b association• Association ID - assigned by the SonicWALL• Tx Rate - in Mbps• Timeout - number of seconds left on the session• Power Mgmt - if power management is enabled on your wireless network card, the set-
ting is displayed here. • Delete - delete the entry from the MAC Filter List.
Message In Bad This number is expected to be zero. Non-zero values indicate a heavily loaded system.
802.11b Frame Statistics Rx/TX
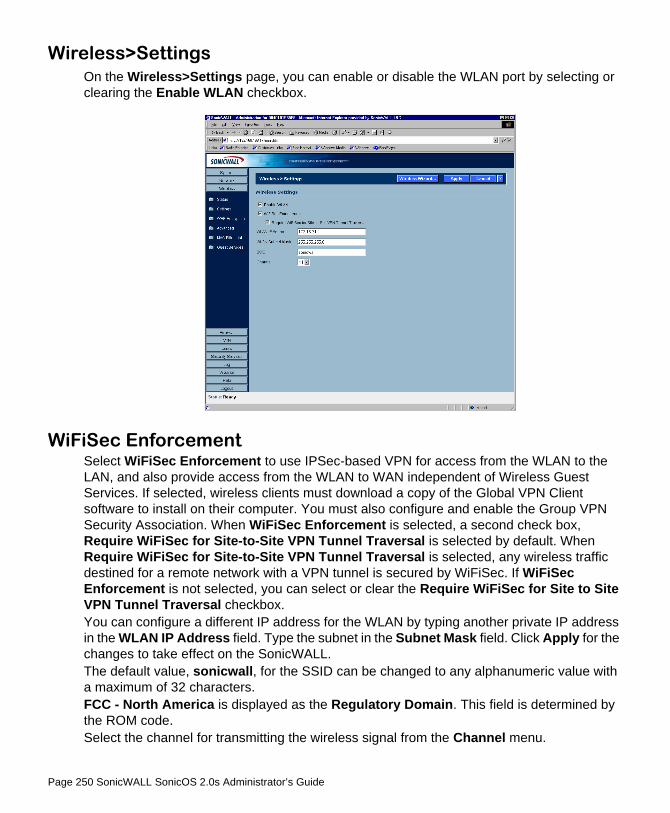
Page 250 SonicWALL SonicOS 2.0s Administrator’s Guide
Wireless>SettingsOn the Wireless>Settings page, you can enable or disable the WLAN port by selecting or clearing the Enable WLAN checkbox.
WiFiSec EnforcementSelect WiFiSec Enforcement to use IPSec-based VPN for access from the WLAN to the LAN, and also provide access from the WLAN to WAN independent of Wireless Guest Services. If selected, wireless clients must download a copy of the Global VPN Client software to install on their computer. You must also configure and enable the Group VPN Security Association. When WiFiSec Enforcement is selected, a second check box, Require WiFiSec for Site-to-Site VPN Tunnel Traversal is selected by default. When Require WiFiSec for Site-to-Site VPN Tunnel Traversal is selected, any wireless traffic destined for a remote network with a VPN tunnel is secured by WiFiSec. If WiFiSec Enforcement is not selected, you can select or clear the Require WiFiSec for Site to Site VPN Tunnel Traversal checkbox. You can configure a different IP address for the WLAN by typing another private IP address in the WLAN IP Address field. Type the subnet in the Subnet Mask field. Click Apply for the changes to take effect on the SonicWALL. The default value, sonicwall, for the SSID can be changed to any alphanumeric value with a maximum of 32 characters. FCC - North America is displayed as the Regulatory Domain. This field is determined by the ROM code. Select the channel for transmitting the wireless signal from the Channel menu.

Configuring Wireless on the SOHO TZW Page 251
Secure Wireless BridgingWireless Bridging is a feature that allows two or more physically separated networks to be joined over a wireless connection. The SOHO TZW provides this capability by shifting the radio mode at remote networks from Access Point mode to Wireless Bridge mode. Operating in Wireless Bridge mode, the SOHO TZW connects to another SOHO TZW acting as an access point, and allows communications between the connected networks via the wireless bridge.
Secure Wireless Bridging employs a WiFiSec VPN policy, providing security to all communications between the wireless networks. Previous bridging solutions offered no encryption, or at best, WEP encryption.
Wireless Bridging (without WiFiSec)To provide compatibility with other non-WiFiSec wireless access points, the SOHO TZW supports a non-secure form of wireless bridging, but insecure wireless communications should only be employed when data is non-sensitive. By default, WiFiSec Enforcement is enabled on Wireless Settings for Wireless Bridge Mode. To connect to a non-WiFiSec access point, this checkbox must be disabled. Since VPN tunnels are not established in non-secure Wireless Bridging deployments, traffic routes must be clearly defined for both the Access Point and the Bridge Mode sites:
• The default route on the Bridge Mode SOHO TZW must from the WLAN interface to the WLAN interface of the connecting Access Point SOHO TZW.
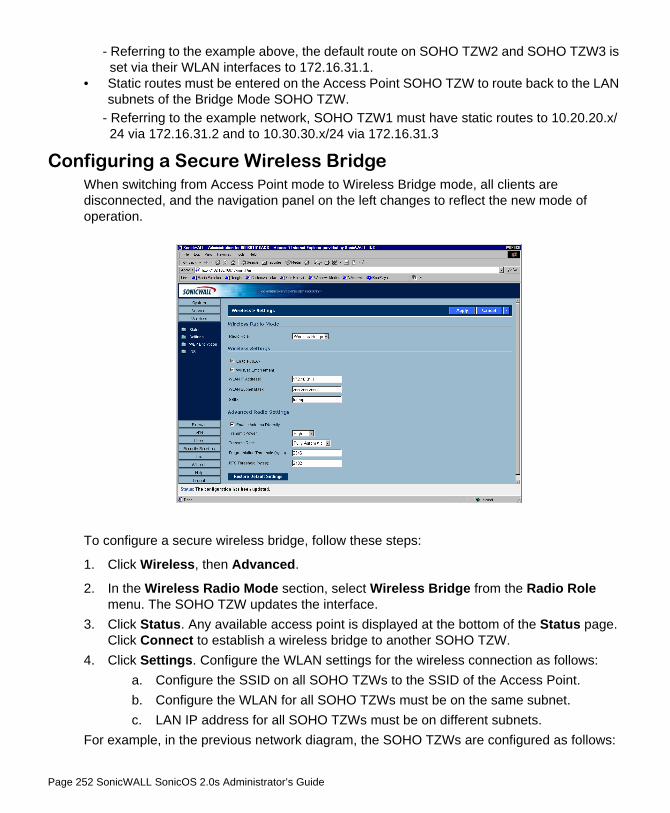
Page 252 SonicWALL SonicOS 2.0s Administrator’s Guide
- Referring to the example above, the default route on SOHO TZW2 and SOHO TZW3 is set via their WLAN interfaces to 172.16.31.1.
• Static routes must be entered on the Access Point SOHO TZW to route back to the LAN subnets of the Bridge Mode SOHO TZW.
- Referring to the example network, SOHO TZW1 must have static routes to 10.20.20.x/24 via 172.16.31.2 and to 10.30.30.x/24 via 172.16.31.3
Configuring a Secure Wireless BridgeWhen switching from Access Point mode to Wireless Bridge mode, all clients are disconnected, and the navigation panel on the left changes to reflect the new mode of operation.
To configure a secure wireless bridge, follow these steps:
1. Click Wireless, then Advanced.
2. In the Wireless Radio Mode section, select Wireless Bridge from the Radio Role menu. The SOHO TZW updates the interface.
3. Click Status. Any available access point is displayed at the bottom of the Status page. Click Connect to establish a wireless bridge to another SOHO TZW.
4. Click Settings. Configure the WLAN settings for the wireless connection as follows:a. Configure the SSID on all SOHO TZWs to the SSID of the Access Point.b. Configure the WLAN for all SOHO TZWs must be on the same subnet. c. LAN IP address for all SOHO TZWs must be on different subnets.
For example, in the previous network diagram, the SOHO TZWs are configured as follows:
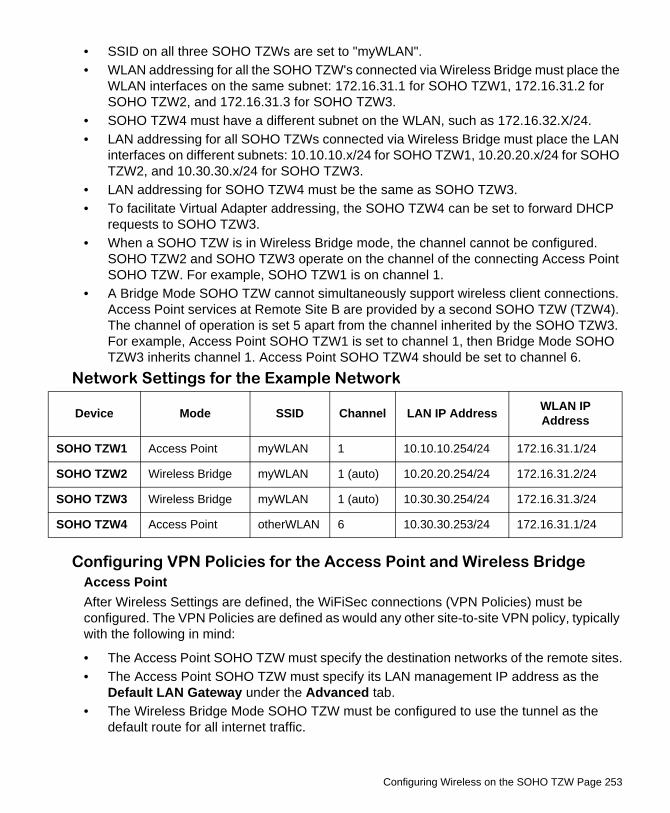
Configuring Wireless on the SOHO TZW Page 253
• SSID on all three SOHO TZWs are set to "myWLAN".• WLAN addressing for all the SOHO TZW's connected via Wireless Bridge must place the
WLAN interfaces on the same subnet: 172.16.31.1 for SOHO TZW1, 172.16.31.2 for SOHO TZW2, and 172.16.31.3 for SOHO TZW3.
• SOHO TZW4 must have a different subnet on the WLAN, such as 172.16.32.X/24.• LAN addressing for all SOHO TZWs connected via Wireless Bridge must place the LAN
interfaces on different subnets: 10.10.10.x/24 for SOHO TZW1, 10.20.20.x/24 for SOHO TZW2, and 10.30.30.x/24 for SOHO TZW3.
• LAN addressing for SOHO TZW4 must be the same as SOHO TZW3.• To facilitate Virtual Adapter addressing, the SOHO TZW4 can be set to forward DHCP
requests to SOHO TZW3. • When a SOHO TZW is in Wireless Bridge mode, the channel cannot be configured.
SOHO TZW2 and SOHO TZW3 operate on the channel of the connecting Access Point SOHO TZW. For example, SOHO TZW1 is on channel 1.
• A Bridge Mode SOHO TZW cannot simultaneously support wireless client connections. Access Point services at Remote Site B are provided by a second SOHO TZW (TZW4). The channel of operation is set 5 apart from the channel inherited by the SOHO TZW3. For example, Access Point SOHO TZW1 is set to channel 1, then Bridge Mode SOHO TZW3 inherits channel 1. Access Point SOHO TZW4 should be set to channel 6.
Network Settings for the Example Network
Configuring VPN Policies for the Access Point and Wireless BridgeAccess Point After Wireless Settings are defined, the WiFiSec connections (VPN Policies) must be configured. The VPN Policies are defined as would any other site-to-site VPN policy, typically with the following in mind:
• The Access Point SOHO TZW must specify the destination networks of the remote sites.• The Access Point SOHO TZW must specify its LAN management IP address as the
Default LAN Gateway under the Advanced tab.• The Wireless Bridge Mode SOHO TZW must be configured to use the tunnel as the
default route for all internet traffic.
Device Mode SSID Channel LAN IP Address WLAN IP Address
SOHO TZW1 Access Point myWLAN 1 10.10.10.254/24 172.16.31.1/24
SOHO TZW2 Wireless Bridge myWLAN 1 (auto) 10.20.20.254/24 172.16.31.2/24
SOHO TZW3 Wireless Bridge myWLAN 1 (auto) 10.30.30.254/24 172.16.31.3/24
SOHO TZW4 Access Point otherWLAN 6 10.30.30.253/24 172.16.31.1/24

Page 254 SonicWALL SonicOS 2.0s Administrator’s Guide
Referring to our example network, the Access Point SOHO TZW has the following two VPN Policies defined:
Advanced Configuration for both VPN Policies 5. Click Advanced. 6. Select Enable Keep Alive and Try to bring up all possible tunnels.7. Select Enable Windows Networking (NetBIOS) Broadcast. 8. Select Forward Packets to remote VPNs. 9. Enter the LAN IP address of the Access Point in the Default LAN Gateway field. 10. Select LAN for VPN Terminated at. 11. Click OK to close the window, and then click Apply for the settings to take effect on the
SonicWALL.

Configuring Wireless on the SOHO TZW Page 255
Wireless Bridge VPN Policy
The Wireless Bridge VPN Policy is configured as follows:
1. Click VPN, then Configure.
2. Select IKE using Preshared Secret from the IPSec Keying Mode menu.3. Enter a name for the SA in the Name field. 4. Type the IP address of the Access Point in the IPSec Gateway field. In our example
network, the IP address is 172.16.31.1.5. Select Use this VPN Tunnel as default route for all Internet traffic from the
Destination Networks section. Click OK to close the window, and then click Apply for the settings to take effect on the SonicWALL.
Wireless > WEP EncryptionWEP (Wired Equivalent Protocol) can be used to protect data as it is transmitted over the wireless network, but it provides no protection past the SonicWALL. It is designed to provide a minimal level of protection for transmitted data, and is not recommended for network deployments requiring a high degree of security. WiFiSec should be enabled in addition to WEP for added security on the wireless network.
WEP Encryption SettingsOpen-system authentication is the only method required by 802.11b. In open-system authentication, the SonicWALL allows the wireless client access without verifying its identity. Shared-key authentication uses WEP and requires a shared key to be distributed to wireless clients before authentication is allowed. The SOHO TZW provides the option of using Open System, Shared Key, or both when WEP is used to encrypt data.

Page 256 SonicWALL SonicOS 2.0s Administrator’s Guide
If Both Open System & Shared Key is selected, the Default Key assignments are not important as long as the identical keys are used each field. If Shared Key is selected, then the key assignment is important. To configure WEP on the SonicWALL, log into the SonicWALL and click Wireless, then WEP Encryption.
1. Select the authentication type from the Authentication Type list. Both (Open System & Shared Key) is selected by default.
2. Select 64-bit or 128-bit from the WEP Key Mode. 128-bit is considered more secure than 64-bit. This value is applied to all keys.
WEP Encryption Keys3. Select the key number, 1,2,3, or 4, from the Default Key menu.4. Select the key type to be either Alphanumeric or Hexadecimal.
5. Type your keys into each field. 6. Click Apply.
WEP - 64-bit WEP - 128-bit
Alphanumeric - 5 characters (0-9, A-Z) Alphanumeric - 13 characters (0-9, A-Z)
Hexadecimal - 10 characters (0-9, A-F) Hexadecimal - 26 characters (0-9, A-F)

Configuring Wireless on the SOHO TZW Page 257
WEP-on-DemandWEP-on-Demand is a SonicWALL exclusive technology designed to offer extensive support to the ever-broadening multifunctional array of 802.11 wireless devices. Not all 802.11 devices are capable of WiFiSec, and instead offer WEP as the only form of supported encryption. These devices include wireless print servers, wireless multimedia gateways, and Portable Data Terminals. Unfortunately, WEP is designed in an all-or-nothing fashion. If you want to use WEP with just a single device on your wireless network, all of your wireless devices must use WEP. In other words, if WEP is on - it's on, if WEP is off - it's off.
WEP-on-Demand is most useful when combined with WiFiSec enforcement so that WiFiSec clients benefit from the strongest wireless security available while non-WiFiSec clients that are WEP-capable only also have some form of confidentiality for their communications.
Configuring WEP-on-DemandWEP-on-Demand (WoD) is activated from the Wireless > WEP Encryption page by
1. Selecting WEP-on-Demand from the Authentication Type menu.
2. Select 128-bit or 64-bit from the WEP Key Mode menu. 128-bit is considered more secure than 64-bit. This value is applied to all keys.
Note: Most devices are capable of both 64- and 128-bit operation, but some older wireless devices experience performance decreases if the encryption strength is increased.
3. After selecting the WEP Key Mode, the WEP Keys must be defined. Hexadecimal notation is more commonly supported than Alphanumeric, but most devices support both.
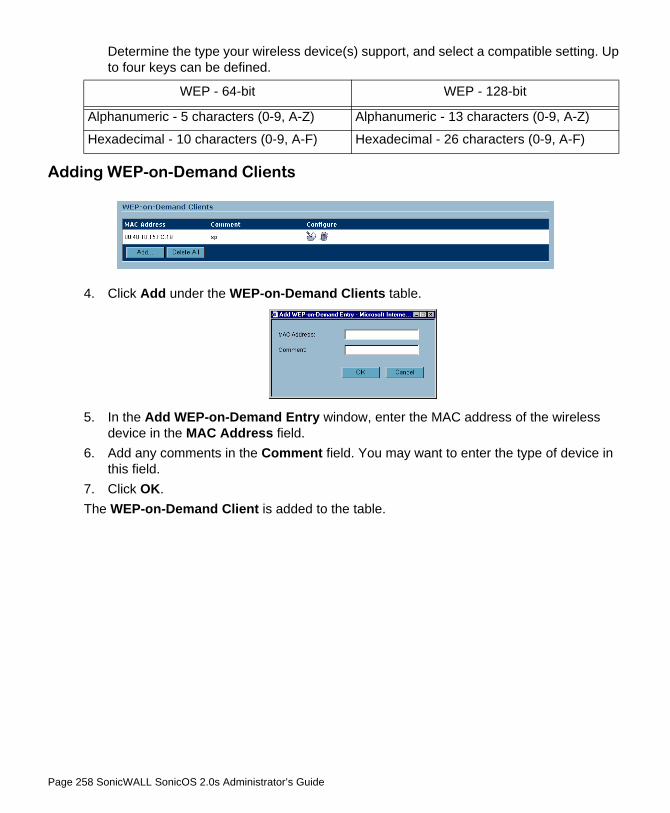
Page 258 SonicWALL SonicOS 2.0s Administrator’s Guide
Determine the type your wireless device(s) support, and select a compatible setting. Up to four keys can be defined.
Adding WEP-on-Demand Clients
4. Click Add under the WEP-on-Demand Clients table.
5. In the Add WEP-on-Demand Entry window, enter the MAC address of the wireless device in the MAC Address field.
6. Add any comments in the Comment field. You may want to enter the type of device in this field.
7. Click OK. The WEP-on-Demand Client is added to the table.
WEP - 64-bit WEP - 128-bit
Alphanumeric - 5 characters (0-9, A-Z) Alphanumeric - 13 characters (0-9, A-Z)
Hexadecimal - 10 characters (0-9, A-F) Hexadecimal - 26 characters (0-9, A-F)

Configuring Wireless on the SOHO TZW Page 259
Wireless>AdvancedTo access Advanced configuration settings for the SOHO TZW, log into the SonicWALL, click Wireless, and then Advanced.
Beaconing & SSID Controls1. Select Hide SSID in Beacon. If you select Hide SSID in Beacon, your wireless network
is invisible to anyone who does not know your SSID. This is a good way to prevent “drive by hackers” from seeing your wireless connection.
2. Select Block Response to Unspecified SSID. 3. Type a value in milliseconds for the Beacon Interval. Decreasing the interval time makes
passive scanning more reliable and faster because Beacon frames announce the network to the wireless connection more frequently.
Wireless Client Communications1. Type the number of clients to associate with the SOHO TZW in the Maximum Client
Associations field. The default value is 32 which means 32 users can access the WLAN at the same time. However, an unlimited number of wireless clients can access the WLAN because node licensing does not apply to the WLAN.
2. If you do not want wireless clients communicating to each other, select Disabled from the Interclient Communications menu. If you want wireless clients communicating with each other, select Enabled. Enabling and disabling Interclient communications changes the associated network access rule on the Firewall>Access Rules page.

Page 260 SonicWALL SonicOS 2.0s Administrator’s Guide
3. Guests on the wireless network can download the SonicWALL Global VPN Client to install on their computer or laptop. Type the URL location for the software in the VPN Client Download URL http:// field. This field can contain up to 128 characters.
Advanced Radio SettingsConfigurable Antenna Diversity
The SOHO TZW employs dual 5 dBi antennas running in diversity mode. The default implementation of diversity mode means that one antenna acts as a transmitting, and both antennas act as potential receive antenna. As radio signals arrive at both antennas on the SOHO TZW, the strength and integrity of the signals are evaluated, and the best received signal is used. The selection process between the two antennas is constant during operation to always provide the best possible signal.
To allow for external (e.g. higher gain uni-directional) antennas to be used, antenna diversity can now be disabled from the Wireless > Advanced > Advanced Radio Settings section.
Clearing the Enable Antenna Diversity checkbox presents a pop-up message indicating that only the antenna nearest the power-socket is active when antenna diversity is disabled. The antenna nearest the serial connector must be disconnected when antenna diversity is disabled. The optional antenna should then be connected to the RP-TNC type connector near the power-socket. This antenna is not used exclusively for transmitting and receiving.

Configuring Wireless on the SOHO TZW Page 261
Select High from the Transmit Power menu to send the strongest signal on the WLAN. For example, select High if the signal is going from building to building. Medium is recommended for office to office within a building, and Low or Lowest is recommended for shorter distance communications. 4. Select Short or Long from the Preamble Length menu. Short is recommended for
efficiency and improved throughput on the wireless network.5. The Fragmentation Threshold (bytes) is 2346 by default. Increasing the value means
that frames are delivered with less overhead but a lost or damaged frame must be discarded and retransmitted.
6. The RTS Threshold (bytes) is 2432 by default. If network throughput is slow or a large number of frame retransmissions is occurring, decrease the RTS threshold to enable RTS clearing.
7. The default value for the DTIM Interval is 3. Increasing the DTIM Interval value allows you to conserve power more effectively.
8. The Authentication process times out after 10 seconds by default. If your network is very busy, you can increase the timeout by increasing the number of seconds in the Authentication Timeout (seconds) field.
9. The Association Timeout (seconds) is 300 seconds by default. If your network is very busy, you can increase the timeout by increasing the number of seconds in the Authentication Timeout (seconds) field.
10. Broadcast Rate - network speed in Mbps. Click Restore Default Settings to return the radio settings to the default settings.
Disconnect Antenna NearPower Socket
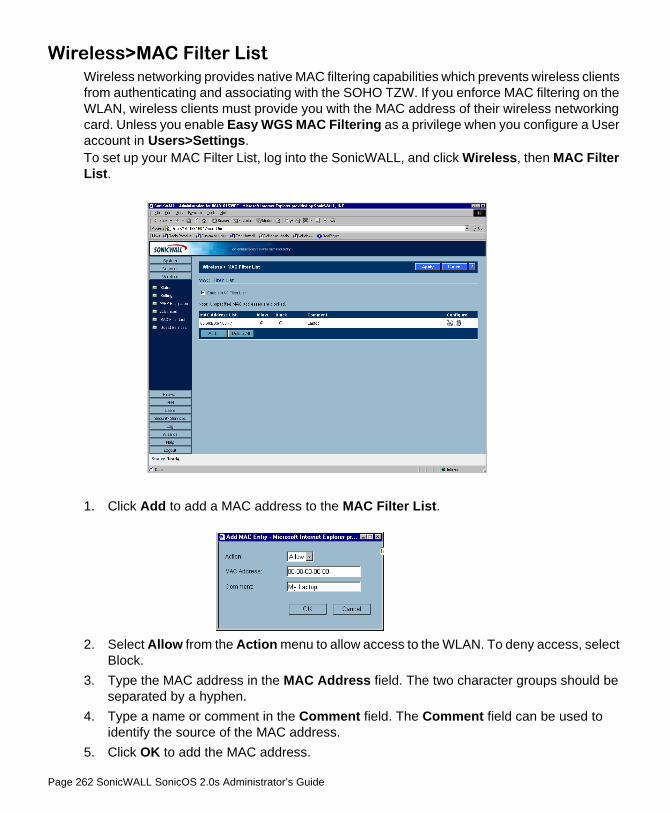
Page 262 SonicWALL SonicOS 2.0s Administrator’s Guide
Wireless>MAC Filter ListWireless networking provides native MAC filtering capabilities which prevents wireless clients from authenticating and associating with the SOHO TZW. If you enforce MAC filtering on the WLAN, wireless clients must provide you with the MAC address of their wireless networking card. Unless you enable Easy WGS MAC Filtering as a privilege when you configure a User account in Users>Settings. To set up your MAC Filter List, log into the SonicWALL, and click Wireless, then MAC Filter List.
1. Click Add to add a MAC address to the MAC Filter List.
2. Select Allow from the Action menu to allow access to the WLAN. To deny access, select Block.
3. Type the MAC address in the MAC Address field. The two character groups should be separated by a hyphen.
4. Type a name or comment in the Comment field. The Comment field can be used to identify the source of the MAC address.
5. Click OK to add the MAC address.

Configuring Wireless on the SOHO TZW Page 263
Once the MAC address is added to the MAC Address List, you can select Allow or Block next to the entry. For example, if the user with the wireless card is not always in the office, you can select Block to deny access during the times the user is offsite. Click on the Notepad icon under Configure to edit the entry. Click on the Trashcan icon to delete the entry. To delete all entries, click Delete All.
Wireless Intrusion Detection ServicesWireless Intrusion Detection Services (WIDS) greatly increase the security capabilities of the SOHO TZW by enabling it to recognize and even take countermeasures against the most common types of illicit wireless activity. WIDS consists of three types of services, namely, Sequence Number Analysis, Association Flood Detection, and Rogue Access Point Detection. WIDS logging and notification can be enabled under Log > Categories by selecting the WIDS checkbox under Log Categories and Alerts.
Wireless Bridge IDSWhen the Radio Role of the SOHO TZW is set to a Wireless Bridge mode, Rogue Access Point Detection defaults to active mode (actively scanning for other Access Points using probes on all channels).

Page 264 SonicWALL SonicOS 2.0s Administrator’s Guide
Access Point IDSWhen the Radio Role of the SOHO TZW is set to Access Point mode, all three types of WIDS services are available, but Rogue Access Point detection, by default, acts in a passive mode (passively listening to other Access Point Beacon frames only on the selected channel of operation). Selecting Scan Now momentarily changes the Radio Role to allow the SOHO TZW to perform an active scan, and may cause a brief loss of connectivity for associated wireless clients. While in Access Point mode, the Scan Now function should only be used if no clients are actively associated, or if the possibility of client interruption is acceptable.
Sequence Number AnalysisSequence Number Analysis is an advanced method of wireless intrusion detection enabling the SOHO TZW to recognize malicious wireless client activity designed to gain unauthorized access by means of disassociation attacks and MAC address spoofing. A disassociation attack is a method used to gain unauthorized access to a wireless network by sending an authorized and associated wireless client a disassociation message, causing it to momentarily drop from the network, and then assuming that client's identify via MAC spoofing.
Enable Sequence Number Analysis is selected by default.
Association Flood Detection Association Flood is a type of Wireless Denial of Service attack intended to interrupt wireless services by depleting the resources of a wireless Access Point. An attacker can employ a variety of tools to establish associations, and consequently association IDs, with an access point until it reaches its association limit (generally set to 255). Once association saturation occurs, the access point discards further association attempts until existing associations are terminated.
Association Flood Detection allows thresholds to be set limiting the number of association attempts a client makes in a given span of time before its activities are considered hostile. Association attempts default to a value of 5 (minimum value is 1, maximum value is 100) within and the time period defaults to a value of 5 seconds (minimum value is 1 second, maximum value is 999 seconds). If association attempts exceed the set thresholds, an event is logged according to log settings.
If the Block station's MAC address in response to an association flood option is selected and MAC Filtering is enabled, then in addition to logging actions, the SOHO TZW takes the countermeasure of dynamically adding the MAC address to the MAC filter list. Any future Denial of Service attempts by the attacker are then blocked.
Enable Association Flood Detection is selected by default. The Association Flood Threshold is set to 5 Association attempts within 5 seconds by default.

Configuring Wireless on the SOHO TZW Page 265
Rogue Access Point DetectionRogue Access Points have emerged as one of the most serious and insidious threats to wireless security. In general terms, an access point is considered rogue when it has not been authorized for use on a network. The convenience, affordability and availability of non-secure access points, and the ease with which they can be added to a network creates a easy environment for introducing rogue access points. Specifically, the real threat emerges in a number of different ways, including unintentional and unwitting connections to the rogue device, transmission of sensitive data over non-secure channels, and unwanted access to LAN resources. So while this doesn't represent a deficiency in the security of a specific wireless device, it is a weakness to the overall security of wireless networks.
The SOHO TZW can alleviate this weakness by recognizing rogue access points potentially attempting to gain access to your network. It accomplishes this in two ways: active scanning for access points on all 802.11b channels, and passive scanning (while in Access Point mode) for beaconing access points on a single channel of operation.
Active scanning occurs when the SOHO TZW starts up, and at any time Scan Now is clicked on the Wireless > IDS page. When the SOHO TZW is operating in a Bridge Mode, the Scan Now feature does not cause any interruption to the bridged connectivity. When the SOHO TZW is operating in Access Point Mode, however, a temporary interruption of wireless clients occurs for no more than a few seconds. This interruption manifests itself as follows:
• Non-persistent, stateless protocols (such as HTTP) should not exhibit any ill-effects.• Persistent connections (protocols such as FTP) are impaired or severed.• WiFiSec connections should automatically re-establish and resume with no noticeable
interruption to the client.
Alert! If service disruption is a concern, it is recommended that the Scan Now feature not be used while the SOHO TZW is in Access Point mode until such a time that no clients are active, or the potential for disruption becomes acceptable.
Authorizing Access Points on Your NetworkAccess Points detected by the SOHO TZW are regarded as rogues until they are identified to the SOHO TZW as authorized for operation. To authorize an access point, it can be manually added to the Authorized Access Points list by clicking Add and specifying its MAC address (BSSID) along with an optional comment. Alternatively, if an access point is discovered by the SOHO TZW scanning feature, it can be added to the list by clicking the Authorize icon.

Page 266 SonicWALL SonicOS 2.0s Administrator’s Guide
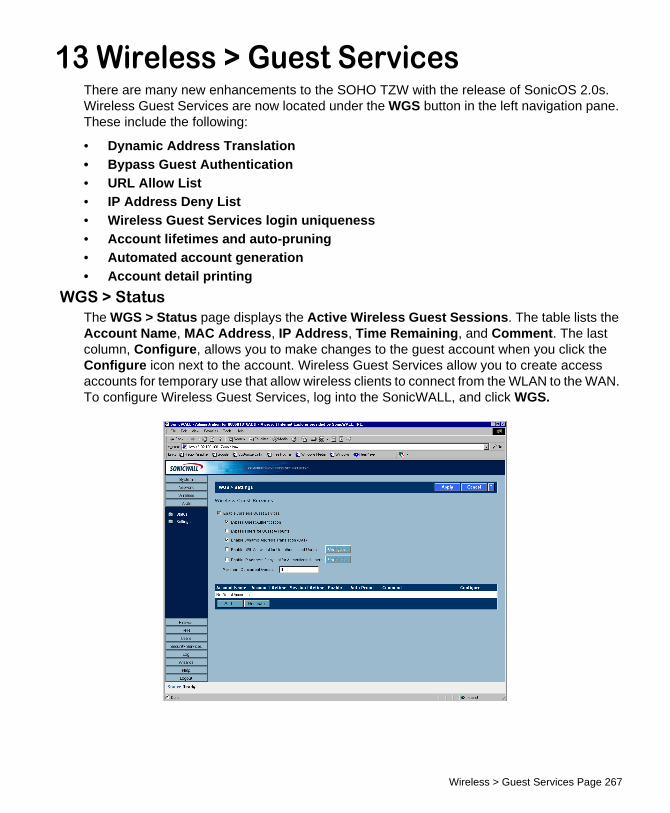
Wireless > Guest Services Page 267
13 Wireless > Guest ServicesThere are many new enhancements to the SOHO TZW with the release of SonicOS 2.0s. Wireless Guest Services are now located under the WGS button in the left navigation pane. These include the following:
• Dynamic Address Translation • Bypass Guest Authentication • URL Allow List • IP Address Deny List • Wireless Guest Services login uniqueness • Account lifetimes and auto-pruning • Automated account generation • Account detail printing
WGS > StatusThe WGS > Status page displays the Active Wireless Guest Sessions. The table lists the Account Name, MAC Address, IP Address, Time Remaining, and Comment. The last column, Configure, allows you to make changes to the guest account when you click the Configure icon next to the account. Wireless Guest Services allow you to create access accounts for temporary use that allow wireless clients to connect from the WLAN to the WAN. To configure Wireless Guest Services, log into the SonicWALL, and click WGS.
Page 268 SonicWALL SonicOS 2.0s Administrator’s Guide
Wireless Guest ServicesSelect Enable Wireless Guest Services to allow configured guest accounts access to the SOHO TZW.
Bypass Guest AuthenticationBypass Guest Authentication feature is designed to allow a SOHO TZW running WGS to integrate into environments already using some form of user-level authentication. This feature automates the WGS authentication process, allowing wireless users to reach WGS resources without requiring authentication. This feature should only be used when unrestricted WGS access is desired, or when another device upstream of the SOHO TZW is enforcing authentication.
Dynamic Address Translation (DAT)One of the SOHO TZW key features is Wireless Guest Services (WGS), which provides spur of the moment “hotspot" access to wireless-capable guests and visitors. For easy connectivity, WGS allows wireless users to authenticate and associate, obtain IP settings from the SOHO TZW DHCP services, and authenticate using any web-browser. Without DAT, if a WGS user is not a DHCP client, but instead has static IP settings incompatible with the SOHO TZW WLAN network settings, network connectivity is prevented until the user’s settings change to compatible values.
Dynamic Address Translation (DAT) is a form of Network Address Translation (NAT) that allows the SOHO TZW to support any IP addressing scheme for WGS users. For example, the SOHO TZW WLAN interface is configured with its default address of 172.16.31.1, and one WGS client has a static IP Address of 192.168.0.10 and a default gateway of 192.168.0.1, while another has a static IP address of 10.1.1.10 and a gateway of 10.1.1.1, and DAT enables network communication for both of these clients.
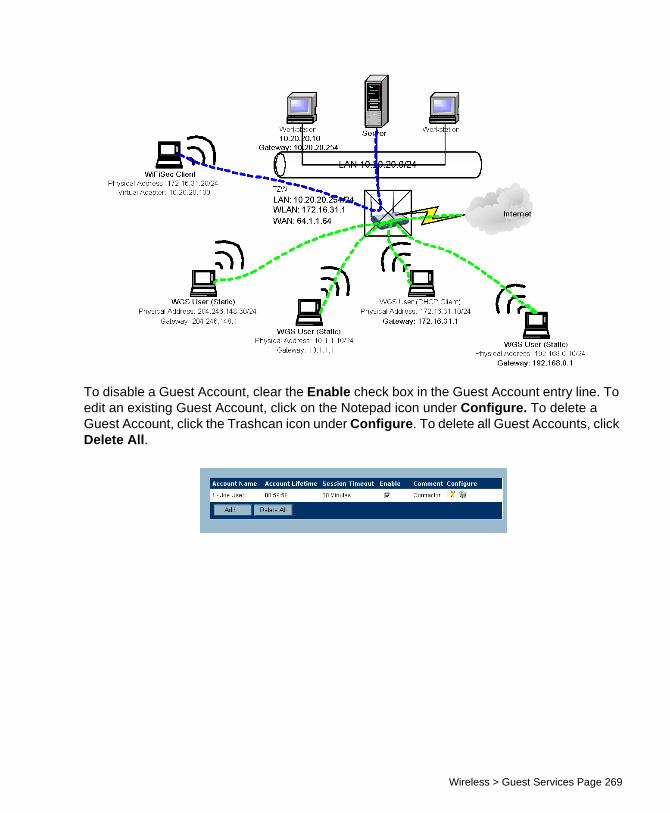
Wireless > Guest Services Page 269
To disable a Guest Account, clear the Enable check box in the Guest Account entry line. To edit an existing Guest Account, click on the Notepad icon under Configure. To delete a Guest Account, click the Trashcan icon under Configure. To delete all Guest Accounts, click Delete All.

Page 270 SonicWALL SonicOS 2.0s Administrator’s Guide
URL Allow ListEnable URL Allow List for Unauthenticated Users, when selected, allows for the creation of a list of URLs (HTTP and HTTPS only) that WGS users can visit even before they authenticate. This feature could be used, for example, to allow users to reach advertising pages, disclaimer pages, search engines, etc. Entries should be made in URL format, and can be in either Fully Qualified Domain Name (FQDN) or IP address syntax. 1. Select Enable URL Allow List for Unauthenticated Users.
2. Click Configure to display the URL Allow List Configuration window.
3. Click Add to display the Add URL dialogue box. 4. Enter the URL in http or https format or domain name. For instance,
http://www.yahoo.com or yahoo.com. Click OK, then OK again.
Tip! Up to 32 entries consisting of 128 characters each can be added to the SOHO TZW.

Wireless > Guest Services Page 271
IP Deny List When IP Address Deny List for authenticated users is selected, allows for the specification of IP addresses/subnet masks to which WGS users are explicitly denied access. Individual hosts can be entered by using a 32 bit subnet mask (255.255.255.255), networks can be entered with appropriate subnet mask, or network ranges can be aggregated using CIDR notation or supernetting (e.g. entering 192.168.0.0/255.255.240.0 to cover individual class C networks 192.168.0.0/24 through 192.168.15.0/24).
1. Select Enable IP Address Deny List for Authenticated Users.
2. Click Configure.
3. Click Add to display the Add IP Address Deny List Entry window. 4. Type the IP Address in the IP Network field. Type the subnet mask in the Subnet Mask
field. 5. Click OK. Then click OK again. The IP address or network range is added to the list.
Tip! Up to 32 entries consisting of 128 characters each can be added to the SOHO TZW.

Page 272 SonicWALL SonicOS 2.0s Administrator’s Guide
Configuring Wireless GuestsTo configure new wireless guest accounts, click Add. The Add Guest Account window is displayed.
By default, the following settings are selected:
Enable AccountWhen selected, the wireless guest account is automatically enabled. You can clear the checkbox to disable the account until necessary.
Auto-Prune AccountBy default, newly created accounts are set to Auto-Prune, automatically deleted when expired. If Auto-Prune is cleared, the account remains in the list of WGS accounts with an Expired status, allowing it to be easily reactivated.
WGS Login UniquenessBy enforcing login uniqueness, the SOHO TZW allows only a single instance of a WGS account to be used at any one time. By default, this feature is enabled when creating a new WGS account. If you want to allow multiple users to login with a single account, this enforcement is disabled by clearing the Enforce login uniqueness checkbox.
Activate Account Upon First LoginBy default, the Activate Account Upon First Login is enabled on the SOHO TZW. The WGS account remains inactive until the user logs in and activates the account.
Automated Account GenerationThe task of generating a new WGS account is now easier with the introduction of an automated account generation function with the ability to generate (or re-generate) account name and account password information. Clicking Generate in the WGS>Settings page

Wireless > Guest Services Page 273
creates a fully populated WGS account dialog box. Alternatively, add an account by clicking Add, and manually entering account name and password information. Or click the separate Generate buttons for account name and account password within this window.
Account LifetimeThis setting defines how long an account remains on the SOHO TZW before the account expires. If Auto-Prune is enabled, the account is deleted by the SonicWALL. If the Auto-Prune checkbox is cleared, the account remains in the list of WGS accounts with an Expired status, allowing easy reactivation.
Session LifetimeDefines how long a WGS session remains active after it has been activated. By default, activation occurs the first time a WGS user logs into an account. Alternatively, activation can occur at the time the account is created by clearing the Activate account upon first login checkbox. The Session Lifetime cannot exceed the value set in the Account Lifetime.
Idle TimeoutDefines the maximum period of time when no traffic is passed on an activated WGS session. Exceeding the period defined by this setting expires the session, but the account itself remains active as long as the Account Lifetime hasn't expired. The Idle Timeout cannot exceed the value set in the Session Lifetime.
CommentAny text can be entered as a comment in the Comment field.
Account Detail PrintingFollowing the generation of an account, it is possible to click the Print icon on the WGS > Settings page to send the pertinent account details to the active printer on the administrative workstation for easy distribution to WGS users. Clicking the Print icon launches the following window, followed by the administrative workstation's system print dialog.

Page 274 SonicWALL SonicOS 2.0s Administrator’s Guide
Flexible Default RoutePreviously, network traffic from the LAN and WLAN was directed to the WAN interface. With the release of SonicOS 2.0s, the Default Route can be the WAN, LAN, or WLAN allowing flexible configuration of the SOHO TZW, primarily wireless bridging without WiFiSec and Secure Access Point with Virtual Adapter support.
Secure Access Point with Virtual Adapter SupportSecure Access Point deployment previously required the corporate LAN to be connected to the SOHO TZW WAN port, because the default route could only be specified on the SOHO TZW WAN interface. However, the SOHO TZW could not support Wireless Guest Services and SonicWALL Global VPN Clients simultaneously preventing corporate LAN clients from communicating with WLAN clients, inhibiting crucial functions such as wireless print servers, Microsoft Outlook mail notification, or any other function requiring LAN initiated communications to WLAN clients.
Any LAN clients attempting to resolve an IP address of a Global VPN Virtual Adapter address receives a response from the SOHO TZW LAN.

Wireless > Guest Services Page 275
This allows any client on the LAN to communicate directly with WLAN client via the secure WiFiSec link, enabling configurations like the one below.
The above example shows a network configuration with the addition of a SOHO TZW (as a Secure Access Point). The SOHO TZW points to the upstream SonicWALL PRO 330 at 10.1.1.254. Security Services, such as Content Filtering Service and Anti-Virus, are hosted centrally on the PRO 330. In the example above, PRO 330 does not require a route to the 172.16.31.X as long as the Virtual Adapter is used by all clients.
To configure routing on the SOHO TZW to support the above example, click Network and then Routing.
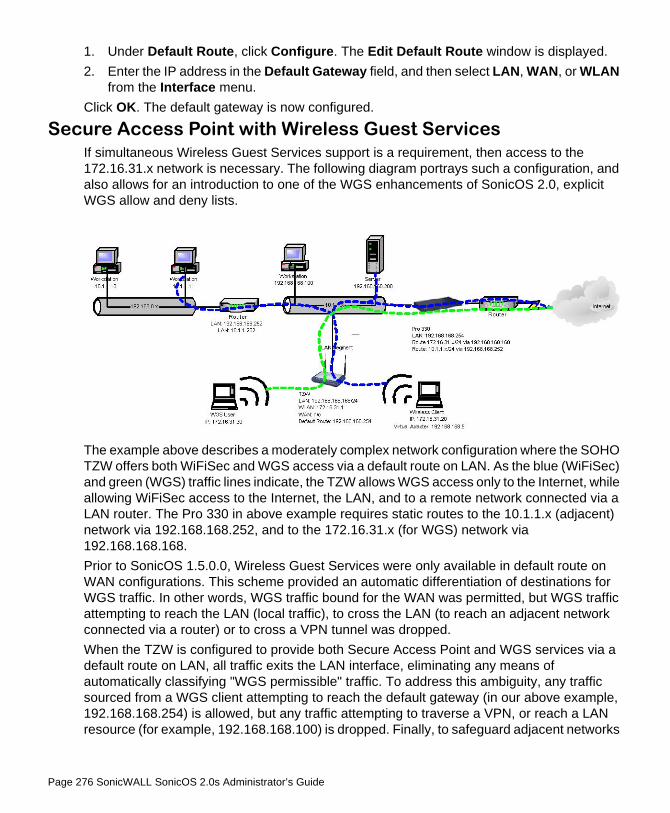
Page 276 SonicWALL SonicOS 2.0s Administrator’s Guide
1. Under Default Route, click Configure. The Edit Default Route window is displayed. 2. Enter the IP address in the Default Gateway field, and then select LAN, WAN, or WLAN
from the Interface menu. Click OK. The default gateway is now configured.
Secure Access Point with Wireless Guest ServicesIf simultaneous Wireless Guest Services support is a requirement, then access to the 172.16.31.x network is necessary. The following diagram portrays such a configuration, and also allows for an introduction to one of the WGS enhancements of SonicOS 2.0, explicit WGS allow and deny lists.
The example above describes a moderately complex network configuration where the SOHO TZW offers both WiFiSec and WGS access via a default route on LAN. As the blue (WiFiSec) and green (WGS) traffic lines indicate, the TZW allows WGS access only to the Internet, while allowing WiFiSec access to the Internet, the LAN, and to a remote network connected via a LAN router. The Pro 330 in above example requires static routes to the 10.1.1.x (adjacent) network via 192.168.168.252, and to the 172.16.31.x (for WGS) network via 192.168.168.168.Prior to SonicOS 1.5.0.0, Wireless Guest Services were only available in default route on WAN configurations. This scheme provided an automatic differentiation of destinations for WGS traffic. In other words, WGS traffic bound for the WAN was permitted, but WGS traffic attempting to reach the LAN (local traffic), to cross the LAN (to reach an adjacent network connected via a router) or to cross a VPN tunnel was dropped.When the TZW is configured to provide both Secure Access Point and WGS services via a default route on LAN, all traffic exits the LAN interface, eliminating any means of automatically classifying "WGS permissible" traffic. To address this ambiguity, any traffic sourced from a WGS client attempting to reach the default gateway (in our above example, 192.168.168.254) is allowed, but any traffic attempting to traverse a VPN, or reach a LAN resource (for example, 192.168.168.100) is dropped. Finally, to safeguard adjacent networks

Wireless > Guest Services Page 277
attached via a router, a WGS IP Address Deny List has been added to the WGS > Settings page.

Page 278 SonicWALL SonicOS 2.0s Administrator’s Guide

SonicWALL Options and Upgrades Page 279
14 SonicWALL Options and UpgradesSonicWALL, Inc. offers a variety of options and upgrades to enhance the functionality of your SonicWALL Internet security appliance. SonicWALL options and upgrades include the following:• SonicWALL VPN Client• SonicWALL Network Anti-Virus Subscription • Content Filter List Subscription • Vulnerability Scanning Service • ViewPoint Reporting • SonicWALL Global Management
SonicWALL VPN ClientThe SonicWALL VPN Client allows remote users to securely access resources on your private LAN from a broadband or dial-up Internet connection. It establishes a private, encrypted VPN tunnel to the SonicWALL, allowing users to contact your network servers from any location. The SonicWALL VPN Client is perfect for business travelers and remote users who require access to private resources on your network.For more information on the SonicWALL VPN Client, visithttp://www.sonicwall.com/vpn/index.html
SonicWALL Network Anti-VirusSonicWALL Network Anti-Virus offers a new approach to virus protection by delivering managed anti-virus protection over the Internet. By combining leading-edge anti-virus technology from McAfee.com with SonicWALL Internet Security Appliances, Complete Anti-Virus ensures that all the computers on your network have a secure defense against viruses.SonicWALL Network Anti-Virus provides constant, uninterrupted protection by monitoring computers for outdated virus software and automatically triggering the installation of new virus software. In addition, the SonicWALL restricts access to the Internet if virus software is not detected on the client, enforcing virus protection. This strategy ensures that current virus software is installed and active on every computer on the network, preventing a rogue user from disabling virus protection and exposing the entire organization to an outbreak. SonicWALL Network Anti-Virus provides centrally managed and enforced virus installation, transparent software updates, and comprehensive Web-based reports. SonicWALL Network Anti-Virus is a subscription-based solution that can be purchased in 5-, 10-, 50-, and 100-license annual subscriptions. For more information on the SonicWALL Network Anti-Virus, visithttp://www.sonicwall.com/anti-virus/index.html

Page 280 SonicWALL SonicOS 2.0s Administrator’s Guide
Content Filter List SubscriptionInappropriate online content can create an uncomfortable work environment, lead to harassment lawsuits, or expose children to pornography or racially intolerant sites. The SonicWALL Content Filter List subscription allows your organization to create and enforce Internet access policies tailored to the requirements of the organization.An annual subscription to the Content Filter List (provided by CyberPatrol) allows you to block or monitor access to undesirable Internet sites, such as pornography or violence. Automatic weekly updates of the customizable Content Filter List ensure proper enforcement of access restrictions to new and relocated sites.For more information on the SonicWALL Content Filtering, visithttp://www.sonicwall.com/content-filter/index.html
Vulnerability Scanning ServiceSonicWALL Vulnerability Scanning Service is an automated, subscription that provides network administrators a "hacker's eye view" of a company's network perimeter, including public servers, routers and gateways, and integrates with SonicWALL's industry-leading Internet security appliances.SonicWALL Vulnerability Scanning Service examines a network perimeter for security weaknesses on an ongoing basis. It reports all vulnerabilities detected and provides administrators with in-depth, expert guidance to quickly close up any security holes in a network. This subscription based service offers vulnerability assessment scans that can scheduled on a regular basis or run on demand when policies change or new equipment is deployed.For more information on the SonicWALL Vulnerability Scanning Service, visithttp://www.sonicwall.com/products/vss/
SonicWALL ViewPoint ReportingSonicWALL ViewPoint, a Web-based graphical reporting tool, enables administrators to understand and manage their network. ViewPoint compliments and extends SonicWALL's complete security platform by delivering comprehensive, high-level historical reports and real-time monitoring. SonicWALL ViewPoint includes everything you need to get up and running in one easy-to-install product, including a Web server, syslog server, database and reporting software. ViewPoint uses a Web-based interface and easily installs on any Windows NT or Windows 2000 computer on the network. For more information on the SonicWALL ViewPoint, visithttp://www.sonicwall.com/products/viewpoint/

SonicWALL Options and Upgrades Page 281
SonicWALL Global Management SystemSonicWALL Global Management System (GMS) is a scalable, cost-effective solution that extends the SonicWALL's ease of administration, giving you the tools to manage the security policies of remote, distributed networks.SonicWALL GMS lets you administer SonicWALLs at your corporate headquarters, branch offices and telecommuters from a central location. SonicWALL GMS reduces staffing requirements, speeds up deployment, and lowers delivery costs by centralizing the management and monitoring of security policies. SonicWALL GMS uses a hierarchical structure to simplify the management of SonicWALLs with similar security profiles. This gives you the flexibility to manage the security policies of remote SonicWALLs on an individual, group or global level.For more information on the SonicWALL Global Management System, visit<http://www.sonicwall.com/products/sgms/index.html>.
Contact Your Reseller or SonicWALLContact your local reseller to purchase SonicWALL upgrades. A SonicWALL sales representative can help locate a SonicWALL-authorized reseller near you. Web:http://www.sonicwall.com E-mail:[email protected]:(888) 557-6642 or (408) 745-9600 Fax: (408) 745-9300

Page 282 SonicWALL SonicOS 2.0s Administrator’s Guide

Appendices Page 283
15 AppendicesAppendix A - SonicWALL Support SolutionsSonicWALL’s powerful security solutions give unprecedented protection from the risks of Internet attacks. SonicWALL’s comprehensive support services protect your network security investment and offer the support you need - when you need it.
Knowledge BaseAll SonicWALL customers have immediate, 24X7 access to our state-of-the-art electronic support tools. Power searching technologies on our Web site allow customers to locate information quickly and easily from our robust collection of technical information - including manuals, product specifications, operating instructions, FAQs, Web pages, and known solutions to common customer questions and challenges.
Internet Security ExpertiseTechnical Support is only as good as the people providing it to you. SonicWALL support professionals are Certified Internet Security Administrators with years of experience in networking and Internet security. They are also supported by the best in class tools and processes that ensure a quick and accurate solution to your problem.
SonicWALL Support Offers
Warranty Support - North America and InternationalSonicWALL products are recognized as extremely reliable as well as easy to configure, install, and manage. SonicWALL Warranty Support enhances these features with
• 1 year, factory replacement for defective hardware• 90 days of advisory support for installation and configuration assistance during local
business hours• 90 days of software and firmware updates• Access to SonicWALL’s electronic support and Knowledge Base system.
SonicWALL Support 8X5Designed for customers who need advanced technical support and the additional benefits of ongoing software and firmware updates, SonicWALL Support 8X5 is an annual service that includes
• Factory replacement for defective hardware• Telephone or electronic technical support during local business hours• Access to SonicWALL’s electronic support and Knowledge Base systems• All software and firmware updates and upgrades

Page 284 SonicWALL SonicOS 2.0s Administrator’s Guide
SonicWALL Support 24X7For customers with mission-critical network requirements who cannot afford downtime, SonicWALL Support 24X7 is an annual subscription service that offers
• Advanced-exchanged replacement of defective hardware• Telephone or electronic support, 24 hours, seven days a week• Enhanced escalation for high priority problems• Access to SonicWALL’s electronic support and Knowledge Base systems
All of SonicWALL Support Services offer a variety of support services to meet your unique needs including fast, responsive service, instant access to electronic support tools, and high quality technical support.
SonicWALL Support Services Features and BenefitsTelephone or Web-based Technical Support. SonicWALL’s technical support experts help solve your problems or answer your questions quickly, reducing your risk of Internet attack.Knowledge Base. Instant access to solutions and documentation provides answers to questions and solves problems electronically. Firmware/Software Upgrades. Automatic firmware and software upgrades give instant access to new features and capabilities, allowing you to extend your Internet security investment. Annual Support Agreement. Low, fixed prices for support services allow you to budget accurately and protect you from unexpected technical support expenses.
SonicWALL Warranty
SonicWALL Support 8X5
Super SonicWALL
Support
Telephone/Web-based technical sup-port
90 days8:00 a.m. - 5:00 p.m., local time, Monday - Friday
1-year8:00 a.m. - 5:00 p.m., local time, Monday - Friday
1-year 24 hours by 7 days a week
Hardware Replace-ment
1 year, return to factory
1 year, return to factory
1 year, advanced exchange
Software/Firmware Updates
90 days 1-year 1-year
Enhanced Escalation Yes

Appendices Page 285
Warranty Support - North AmericaIncluded with all SonicWALL products, SonicWALL warranty support includes return-to-factory hardware replacement for one year. Warranty Support also includes technical support and software/firmware updates for 90 days. Coverage is provided during normal business hours.
Coverage HoursSupport is provided during standard business hours, 24 hours per day local time, seven days per week, including locally-recognized SonicWALL holidays.
Telephone and Web-based SupportSonicWALL provides technical assistance during standard coverage hours by telephone or through Web-based support tools for 90 days after the date of purchase. A SonicWALL technical specialist works with you to remotely diagnose and identify firmware and hardware not performing to documented specifications. Web-based support includes interactive communication with a SonicWALL technical specialist. SonicWALL also provides general assistance regarding usage and documentation on a limited basis.
Hardware ServiceWarranty Support includes the repair or replacement of failing hardware returned to the SonicWALL factory for a period of year following the date of purchase. Upon diagnosis of a hardware failure, a SonicWALL technical specialist issues an RMA number and provides instructions for returning the hardware to SonicWALL. SonicWALL ships a replacement appliance to you based upon the RMA information. Upon receipt of the failed appliance, SonicWALL ships a fully functional replacement appliance to you. The replacement appliance is equivalent to a new appliance. SonicWALL does not accept failed appliances without a valid RMA number.
Software/Firmware SupportSonicWALL logs, tracks, prioritizes, and resolves software, firmware and/or documentation bug reports and enhancement requests for software support for a period of 90 days after the date of purchase.
Software/Firmware UpdatesAll software and firmware maintenance releases and updates are included for 90 days after the date of purchase. SonicWALL notifies administrators via electronic mail of new updates. The updates are delivered exclusively via the Web.
Support ToolsWarranty Support provides access to SonicWALL’s Web-based support tools, including FAQs, documentation, and Knowledge Base systems.
AvailabilityThis warranty is available only in the United States and Canada.

Page 286 SonicWALL SonicOS 2.0s Administrator’s Guide
Warranty Support - InternationalIncluded with all SonicWALL products, SonicWALL warranty support includes return-to-factory hardware replacement for one year. Warranty Support also includes technical support and software/firmware updates for 90 days. Coverage is provided during normal business hours.
Coverage HoursSupport is provided during standard business hours, 24 hours per day local time, seven days per week, including locally-recognized SonicWALL holidays.
Hardware ServiceWarranty Support includes the repair or replacement of failing hardware returned to the SonicWALL factory for a period of year following the date of purchase. Upon diagnosis of a hardware failure, a SonicWALL technical specialist issues an RMA number and provides instructions for returning the hardware to SonicWALL. Upon receipt of the failed appliance, SonicWALL ships a fully functional appliance. The replacement appliance is equivalent to a new appliance. SonicWALL does not accept failed appliances without a valid RMA number.
Software/Firmware UpdatesAll software and firmware maintenance releases and updates are included for 90 days after the date of purchase. SonicWALL notifies administrators via electronic mail of new updates. The updates are delivered exclusively via the Web.
Support ToolsWarranty Support provides access to SonicWALL’s Web-based support tools, including FAQs, documentation, and Knowledge Base systems.
AvailabilityThis warranty applied to products sold in Europe, the Middle East, Africa, Asia, Central and South America.

Appendices Page 287
SonicWALL Support 24X7Available for all SonicWALL products, SonicWALL Support 24X7 includes software/firmware technical support, and factory replacement of defective hardware. Coverage is provided 24 hours a day, seven days a week.
Coverage HoursSupport is provided during standard business hours, 24 hours per day local time, seven days per week, including locally-recognized SonicWALL holidays.
Telephone and Web-based SupportSonicWALL provides technical assistance during standard coverage hours by telephone or through Web-based support tools. A SonicWALL technical specialist works with you to remotely diagnose and identify firmware and hardware not performing to documented specifications. Web-based support includes interactive communication with a SonicWALL technical specialist. SonicWALL also provides general assistance regarding usage and documentation on a limited basis.
Hardware ServiceSonicWALL Support 24X7 includes the repair or replacement of failing hardware returned to the SonicWALL factory. Upon diagnosis of a hardware failure, a SonicWALL technical specialist issues an RMA number and provides instructions for returning the hardware to SonicWALL. SonicWALL ships a replacement appliance to you based upon the RMA information. You are responsible for returning the failed appliance to SonicWALL with 30 days or be charged for the full replacement cost. SonicWALL does not accept failed appliances without a valid RMA number.
Software/Firmware SupportSonicWALL logs, tracks, prioritizes, and resolves software, firmware and/or documentation bug reports and enhancement requests for software support under this agreement. SonicWALL Support 24X7 includes priority escalation based on problem severity.Support for software, firmware, and documentation is limited to the most current version and the immediate prior revision.
Software/Firmware UpdatesAll software and firmware maintenance releases and updates are included with this agreement. SonicWALL notifies administrators via electronic mail of new updates. The updates are delivered exclusively via the Web.
Support ToolsSonicWALL Support 24X7 provides access to SonicWALL’s Web-based support tools, including FAQs, documentation, and Knowledge Base systems.
AvailabilitySonicWALL Support 24X7 is an annual service available for sale at the time of product purchase or anytime before warranty expiration.

Page 288 SonicWALL SonicOS 2.0s Administrator’s Guide
SonicWALL Support 8X5Available for all products, SonicWALL Support 8X5 includes software/firmware technical support and factory hardware replacement. Coverage is provided during standard business hours.
Coverage HoursSupport is provided during standard business hours, 8:00 a.m. - 5:00 p.m. local time, Monday through Friday, excluding locally-recognized SonicWALL holidays.
Telephone and Web-based SupportSonicWALL provides technical assistance during standard coverage hours by telephone or through Web-based support tools. A SonicWALL technical specialist works with you to remotely diagnose and identify firmware and hardware not performing to documented specifications. Web-based support includes interactive communication with a SonicWALL technical specialist. SonicWALL also provides general assistance regarding usage and documentation on a limited basis.
Hardware ServiceSonicWALL Support 8X5 includes the repair or replacement of failing hardware returned to the SonicWALL factory. Upon diagnosis of a hardware failure, a SonicWALL technical specialist issues an RMA number and provides instructions for returning the hardware to SonicWALL. Upon receipt of the failed appliance, SonicWALL ships a fully functional replacement appliance to you. The replacement appliance is equivalent to a new appliance. SonicWALL does not accept failed appliances without a valid RMA number.
Software/Firmware SupportSonicWALL logs, tracks, prioritizes, and resolves software, firmware and/or documentation bug reports and enhancement requests for software support under this agreement.SonicWALL Support 8X5 includes priority escalation based on problem severity.Support for software, firmware, and documentation is limited to the most current version and the immediate prior revision.
Software/Firmware UpdatesAll software and firmware maintenance releases and updates are included with this agreement. SonicWALL notifies administrators via electronic mail of new updates. The updates are delivered exclusively via the Web.

Appendices Page 289
Support ToolsSonicWALL Support 8X5 provides access to SonicWALL’s Web-based support tools, including FAQs, documentation, and Knowledge Base systems.
AvailabilitySonicWALL Support 8X5 is an annual service available for sale at the time of product purchase or anytime before warranty expiration.
Page 290 SonicWALL SonicOS 2.0s Administrator’s Guide
Appendix B - Introduction to NetworkingThis appendix provides a non-technical overview of the network protocols supported by the SonicWALL and includes a discussion of Internet Protocol (IP) addressing.It can be helpful to review a book on TCP/IP for an overview of protocols such as TCP (Transmission Control Protocol), UDP (User Datagram Protocol), and ICMP (Internet Control Message Protocol). The following book is recommended for beginner and intermediate network administrators:Teach Yourself TCP/IP in 14 Days Second EditionTimothy Parker, Ph.D SAMS PublishingISBN # 0-672-30885-1
Network Hardware Components• Computers - IBM- compatible, MAC, notebooks, and PDAs• Resources - printers, fax machines, tape backup units, and file storage devices• Cables - crossover, ethernet• Connectors - bridges, routers• Network Interface Card (NIC) - a card installed inside a computer that physically con-
nects a computer to a network and controls the flow of data from the network to the com-puter. The NIC has a port where the network cable is connected.
Network Types• LAN stands for Local Area Network. Local area refers to a network in one location, Lo-
cal Area Networks connect computers and devices close to each other such as on one floor of a building, one building, or a campus. LANs can connect as few as two computers or as many as 100 computers.
• WAN (Wide Area Network) connects LANs together. The networks that make up a WAN can be located throughout a country or even around the world. If a single company owns a WAN, it is often referred to as an enterprise network. The Internet is currently the larg-est WAN.
FirewallsA firewall is a software or hardware system that prevents unauthorized outside access, theft, deletion, or modification of information stored on a local network. Typically, unauthorized access would be via an organization’s Internet connection.
GatewaysA gateway can be a computer that acts as a connector between a private internal network and another network such as the Internet. A gateway used as a firewall can transmit information from an internal network to the Internet. Also, gateways can examine incoming information and determine if the information is allowed access to the network.

Appendices Page 291
Network ProtocolsThe method that used to regulate a workstation’s access to a computer network to prevent data collisions. The SonicWALL uses the TCP/IP protocol.
• TCP/IP - Internet Protocol, or "IP", provides connectionless data transfer over a TCP/IP network. Since IP alone does not provide end-to-end data reliability as well as some other services, other protocols such as TCP (Transmission Control Protocol) can be added to provide these services. In TCP/IP, TCP works with IP to ensure the integrity of the data traveling over the network. TCP/IP is the protocol of the Internet.
• FTP - File Transfer Protocol (FTP) is used to transfer documents between different types of computers on a TCP/IP network.
• HTTP - HyperText Transfer Protocol (HTTP) is a widely used protocol to transfer infor-mation over the Internet. Typically, it is used to transfer information from Web servers to Web browsers.
• UDP - User Datagram Protocol (UDP) transfers information using virtual ports between two applications on a TCP/IP network. Slightly faster than TCP, it is not as reliable.
• DNS - Domain Name System (DNS) is a protocol that matches Internet computer names to their corresponding IP addresses. By using DNS, a user can type in a computer name, such as www.sonicwall.com, instead of an IP address, such as 192.168.168.168, to ac-cess a computer.
• DHCP - Dynamic Host Configuration Protocol (DHCP) allows communication between network devices and a server that administers IP numbers. A DHCP server leases IP addresses and other TCP/IP information to DHCP client that requests them. Typically, a DHCP client leases an IP address for a period of time from a DHCP server which allows a larger number of clients to use a set pool of IP addresses.
• WINS - Windows Internet Naming System (WINS), used on Microsoft® TCP/IP Networks, matches Microsoft® network computer names to IP addresses. Using this protocol allows computers on the Microsoft® network to communicate with other networks and computers that use the TCP/IP suite.
• HTTPS - Secure HyperText Transfer Protocol (HTTPS) is a protocol to transfer informa-tion securely over the Internet. HTTPS encrypts and decrypts information exchanged be-tween a Web server and a Web browser using Secure Socket Layer (SSL).
• SMTP - Simple Mail Transfer Protocol (SMTP) is used to send and receive e-mail messages. Typically, SMTP is used only to send e-mail while another protocol, POP3, is used to receive e-mail messages.
• POP3 - Post Office Protocol 3 (POP3) is used to receive e-mail messages and storing messages on a server, referred to as a POP server.
• ICMP - Internet Control Messages Protocol (ICMP) reports errors and controls messages on a TCP/IP network. PING uses ICMP protocol to test if a network device is available.

Page 292 SonicWALL SonicOS 2.0s Administrator’s Guide
IP AddressingTo become part of an IP network, a network device must have an IP address. An IP address is a unique number that differentiates one device from another on the network to avoid confusion during communication. To help illustrate IP addresses, the following sections compare an IP address to the telephone numbering system, a system that is used every day.Like a phone number with its long distance “1” and area code, an IP address contains a set of four numbers. While we separate phone number components with dashes, for example 1-408-555-1212, IP address number components are separated by decimal points or dots (called dotted decimal notation), for example 123.45.67.89. Because computers use a binary number system, each number in the set must be less than 255.There are three components of IP addressing:
• IP address • Subnet mask • Default gateway
IP AddressJust as each household or business requires a unique phone number, a networked device (such as a computer, printer, file server, or router) must have a unique IP address. Unlike phone numbers, an IP address requires the entire number when communicating with other devices.There are three classes of IP addresses: A, B, and C. Like a main business phone number that one can call, and then be transferred through interchange numbers to an individual’s extension number, the different classes of IP addresses provide for varying levels of “interchanges” or subnetworks, and “extensions” or device numbers. The classes are based on estimated network size:
• Class A — used for very large networks with hundreds of subnetworks and thousands of devices. Class A networks use IP addresses between 0.0.0.0 and 127.255.255.255.
• Class B — used for medium to large networks with 10–100 subnetworks and hundreds of devices. Class B networks use IP addresses between 128.0.0.0 and 191.255.255.255.
• Class C — used for small to medium networks, usually with only a few subnetworks and less than 250 devices. Class C networks use IP addresses between 192.0.0.0 and 223.255.255.255.
Just as one would go to the phone company for a phone number, there are controlling bodies for IP addresses. The overall controlling body for IP addresses worldwide is InterNIC. Businesses or individuals can request one or many IP addresses from InterNIC. It’s a good idea to estimate the network’s future growth when requesting the class and number of IP addresses requested.

Appendices Page 293
Subnet MaskThe IP addressing system allows subnetworks or “interchanges” to be created and device numbers or “extensions” to be established within these subnetworks. These numbers are created using a mathematical device called a subnet mask. A subnet mask, like the IP address, is a set of four numbers in dotted decimal notation. Subnet masks typically take three forms:
• 255.0.0.0• 255.255.0.0• 255.255.255.0
The number 255 “masks” out the corresponding number of the IP address, resulting in IP address numbers that are valid for the network. For example, an IP address of 123.45.67.89 and a subnet mask of 255.255.255.0 results in a sub network number of 123.45.67.0 and a device number of 89. The IP address numbers that are actually valid to use are those assigned by InterNIC. Otherwise, anyone could set up IP addresses that are duplicates of those at another company.The subnet mask used for the network typically corresponds to the class of IP address assigned. If the IP address is Class A, it uses a subnet mask of 255.0.0.0. Class B addresses use a subnet mask of 255.255.0.0, and Class C IP addresses use a subnet mask of 255.255.255.0.
Default GatewayA default gateway is like a long distance operator. Users can dial the operator to get assistance connecting to the end party. In complex networks with many subnetworks, gateways keep traffic from traveling between different subnetworks unless addressed to travel there. While this helps to keep overall network traffic more manageable, it also introduces another level of complexity.To communicate with a device on another network, one must go through a gateway that connects the two networks. Therefore, users must know the default gateway IP address. If there is no gateway in the network, use an IP address of 0.0.0.0 in fields that apply to a default gateway.
Network Address Translation (NAT)NAT hides internal IP addresses by converting all internal host IP addresses to the IP address of the firewall as packets are routed through the firewall. The firewall then retransmits the data payload of the internal host from its own address using a translation table to keep track of which sockets on the exterior interface equate to which sockets on the interior interface. To the Internet, all of the traffic on the network appears to come from the same computer.

Page 294 SonicWALL SonicOS 2.0s Administrator’s Guide
NodesA node is a device, such as a PC or a printer, on a network with an IP address. The feature chart shows how many node licenses for PCs or printers are included with a SonicWALL Internet Security appliance. The TELE3 has a non-upgradeable 5-node license, but the SOHO is upgradeable up to have 10, 50, or an unlimited number of node licenses. The PRO 100, PRO 200, and PRO 300 have an unlimited number of node licenses. The TELE3, SOHO-10, and SOHO-50 allow a maximum of 5, 10, or 50 LAN IP addresses, respectively, to exist on the LAN (Local Area Network). The licenses for the nodes are counted cumulatively, not simultaneously. When the SonicWALL is turned on and configured, the SonicWALL begins to count IP addresses against the license, and continues to count new LAN IP addresses accessing the Internet until the appliance is rebooted.When a computer or other device connects to the LAN port of the SonicWALL, it is detected via broadcast and stores the computer or other device IP address in memory. If 5, 10, or 50 IP addresses have been stored in the SonicWALL, the SonicWALL does not permit any additional machines to access the Internet. Therefore, the SonicWALL restricts the number of IP addresses on the LAN, not the number of simultaneous connections to the Internet. If you have fewer than the maximum number of computers or other devices on your LAN, but it appears that the IP license limit is exceeded, download a Tech Support Report and review the devices with IP addresses. Rogue devices such as printers are filling up the SonicWALL IP address limit. Tech Support Reports are explained in the System chapter of this manual. Additionally, computers with two (2) Network Interface Cards (NIC) can take up two IP addresses. You must reconfigure your network to avoid these problems by turning off IP forwarding on Windows® NT or Windows2000® servers using two NICs.If devices on the LAN receive IP addresses from a DHCP server, see the DHCP chapter of this manual.
Appendices Page 295
Appendix C - IP Port Numbers The port numbers are divided into three ranges: Well Known Ports, Registered Ports, and Dynamic and/or Private Ports.Well Known Ports range from 0 through 1023.Registered Ports range from 1024 through 49151.Dynamic and/or Private Ports range from 49152 through 65535.
Well Known Port NumbersWell Known Ports are controlled and assigned by the Internet Assigned Numbers Authority (IANA) <http://www.iana.org> and on most systems can only be used by system processes, or by programs executed by privileged users. Many popular services, such as Web, FTP, SMTP/POP3 e-mail, DNS, etc. operate in this port range.The assigned ports use a small portion of the possible port numbers. For many years the assigned ports were in the range 0-255. Recently, the range for assigned ports managed by the IANA has been expanded to the range 0-1023.
Registered Port NumbersRegistered Ports are not controlled by the IANA and on most systems can be used by ordinary user processes or programs executed by ordinary users.While the IANA can not control uses of these ports it does list uses of these ports as a convenience.The Registered Ports are in the range 1024-65535.Visit <http://www.ietf.org/rfc/rfc1700.txt> for a list of IP port numbers.
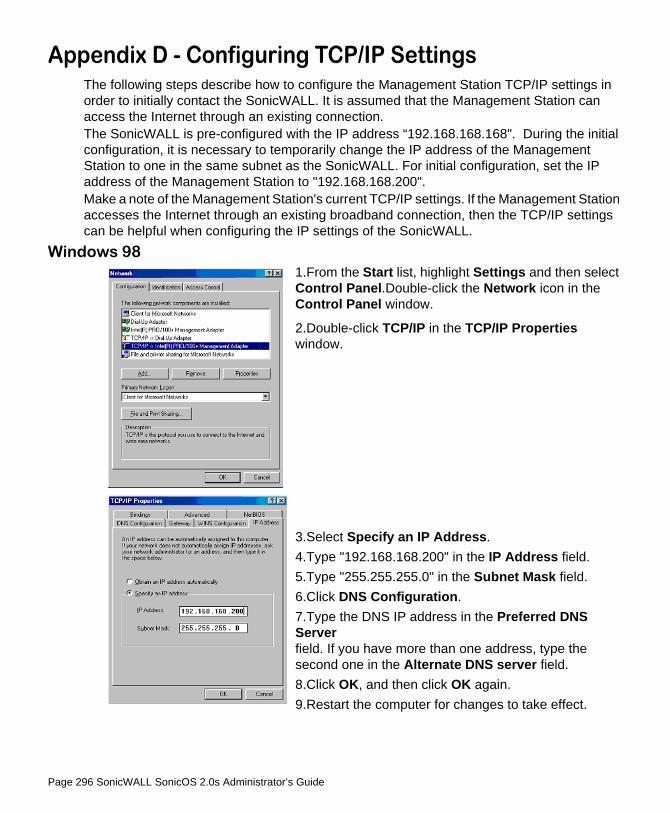
Page 296 SonicWALL SonicOS 2.0s Administrator’s Guide
Appendix D - Configuring TCP/IP SettingsThe following steps describe how to configure the Management Station TCP/IP settings in order to initially contact the SonicWALL. It is assumed that the Management Station can access the Internet through an existing connection.The SonicWALL is pre-configured with the IP address “192.168.168.168". During the initial configuration, it is necessary to temporarily change the IP address of the Management Station to one in the same subnet as the SonicWALL. For initial configuration, set the IP address of the Management Station to "192.168.168.200". Make a note of the Management Station's current TCP/IP settings. If the Management Station accesses the Internet through an existing broadband connection, then the TCP/IP settings can be helpful when configuring the IP settings of the SonicWALL.
Windows 981.From the Start list, highlight Settings and then select Control Panel.Double-click the Network icon in the Control Panel window.
2.Double-click TCP/IP in the TCP/IP Properties window.
3.Select Specify an IP Address.4.Type "192.168.168.200" in the IP Address field.5.Type "255.255.255.0" in the Subnet Mask field.6.Click DNS Configuration.7.Type the DNS IP address in the Preferred DNS Serverfield. If you have more than one address, type the second one in the Alternate DNS server field. 8.Click OK, and then click OK again. 9.Restart the computer for changes to take effect.
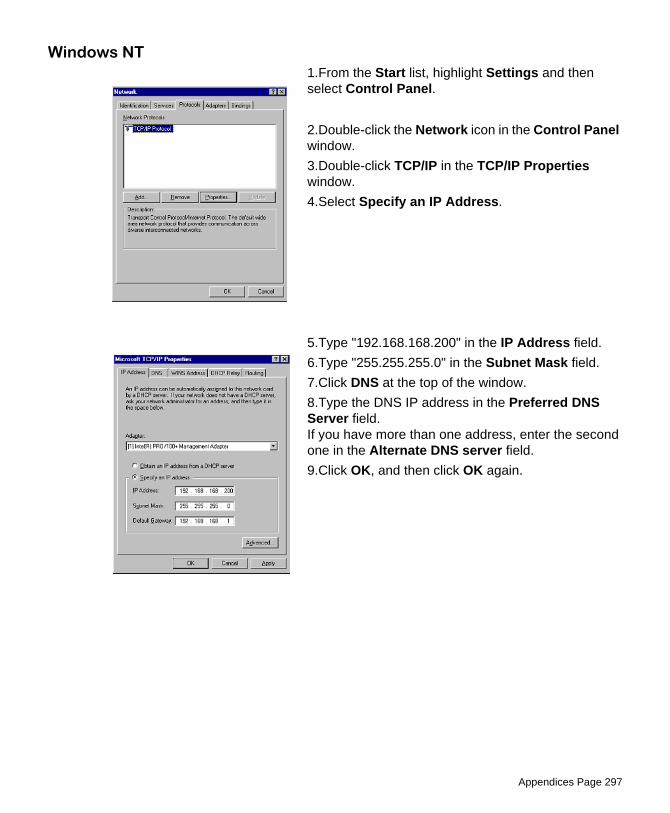
Appendices Page 297
Windows NT1.From the Start list, highlight Settings and then select Control Panel.
2.Double-click the Network icon in the Control Panel window.3.Double-click TCP/IP in the TCP/IP Properties window.4.Select Specify an IP Address.
5.Type "192.168.168.200" in the IP Address field.6.Type "255.255.255.0" in the Subnet Mask field.7.Click DNS at the top of the window. 8.Type the DNS IP address in the Preferred DNS Server field. If you have more than one address, enter the second one in the Alternate DNS server field. 9.Click OK, and then click OK again.

Page 298 SonicWALL SonicOS 2.0s Administrator’s Guide
Windows 20001.In Windows 2000, click Start, then Settings.
2.Click Network and Dial-up Connections. Double-click the network connection name to open the Status window.3.Click Status to open the Properties window.
4.Double-click Internet Protocol (TCP/IP) to open the TCP/IP properties window.
5.Select Use the following IP address and enter 192.168.168.200 in the IP address field. 6.Type 255.255.255.0 in the Subnet mask field. 7.Type the DNS IP address in the Preferred DNS Server field. If you have more than one address, enter the second one in the Alternate DNS server field. 8.Click OK, then OK again. 9.Click Close to finish the network configuration.
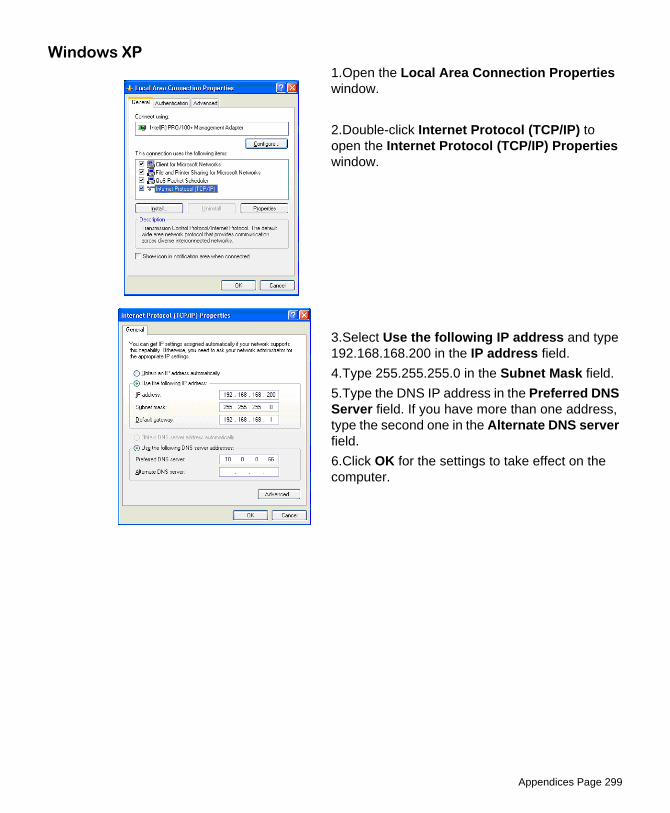
Appendices Page 299
Windows XP1.Open the Local Area Connection Properties window.
2.Double-click Internet Protocol (TCP/IP) to open the Internet Protocol (TCP/IP) Properties window.
3.Select Use the following IP address and type 192.168.168.200 in the IP address field. 4.Type 255.255.255.0 in the Subnet Mask field. 5.Type the DNS IP address in the Preferred DNS Server field. If you have more than one address, type the second one in the Alternate DNS server field. 6.Click OK for the settings to take effect on the computer.

Page 300 SonicWALL SonicOS 2.0s Administrator’s Guide
Macintosh OS 10From a Macintosh computer, do the following:1. From the Apple list, choose Control Panel, and then choose TCP/IP to open the TCP/IP
Control Panel.
2. From the Configure list, choose Manually.3. Type "192.168.168.200" in the IP address field.4. Type the Subnet Mask address in the Subnet Mask field. 5. Click OK.Follow the SonicWALL Installation Wizard instructions to perform the initial setup of the SonicWALL.

Appendices Page 301
Appendix E - Basic VPN Terms and Concepts• VPN Tunnel
A VPN Tunnel is a term that describes a connection between two or more private nodes or LANs over a public network, typically the Internet. Encryption is often used to maintain the confidentiality of private data when traveling over the Internet.
• Encryption Encryption is a mathematical operation that transforms data from "clear text" (something that a human or a program can interpret) to "cipher text" (something that cannot be interpreted). Usually the mathematical operation requires that an alphanumeric "key" be supplied along with the clear text. The key and clear text are processed by the encryption operation, which leads to data scrambling that makes encryption secure. Decryption is the opposite of encryption: it is a mathematical operation that transforms cipher text to clear text.
• Key A key is an alphanumeric string used by the encryption operation to transform clear text into cipher text. A key is comprised of hexadecimal characters (0, 1, 2, 3, 4, 5, 6, 7, 8, 9, a, b, c, d, e, f). A valid key would be 1234567890abcdef. Keys used in VPN communications can range in length, but typically consist of 16 or 32 characters. The longer the key, the more difficult it is to break the encryption.
• Asymmetric vs. Symmetric Cryptography Asymmetric and symmetric cryptography refer to the keys used to authenticate, or encrypt and decrypt the data.
Asymmetric cryptography, or public key cryptography, uses two keys for verification. Organizations, such as RSA Data Security and Verisign, support asymmetric cryptography.
With symmetric cryptography, the same key is used to authenticate on both ends of the VPN. Symmetric cryptography, or secret key cryptography, is usually faster than asymmetric cryptography. Therefore symmetric algorithms are often used when large quantities of data have to be exchanged. SonicWALL VPN uses Symmetric Cryptography. As a result, the key on both ends of the VPN tunnel must match exactly.
• Security Association (SA) A Security Association (SA) is a group of security settings related to a specific VPN tunnel. A Security Association groups together all of the settings necessary to create a VPN tunnel. Different SAs can be created to connect branch offices, allow secure remote management, and pass unsupported traffic. All Security Associations require a specified Encryption Method, IPSec Gateway Address and Destination Network Address. IKE includes a Shared Secret. Manual Keying includes two SPIs and an Encryption and Authentication Key.

Page 302 SonicWALL SonicOS 2.0s Administrator’s Guide
• Internet Key Exchange (IKE) IKE is a negotiation and key exchange protocol specified by the Internet Engineering Task Force (IETF). An IKE SA automatically negotiates Phase 1 Encryption/Authentication Keys. With IKE, an initial exchange authenticates the VPN session and automatically negotiates keys that is used to pass IP traffic. The initial exchange occurs on UDP port 500, so when an IKE SA is created, the SonicWALL automatically opens port 500 to allow the IKE key exchange.
• Manual Key The Manual Key SA allows you to specify the Encryption and Authentication keys as well as Incoming and Outgoing Security Parameter Indices (SPI). SonicWALL VPN supports Manual Key VPN Security Associations.
• Shared Secret A Shared Secret is a predefined field that the two endpoints of a VPN tunnel use to set up an IKE SA. This field can be any combination of alphanumeric characters with a minimum length of 4 characters and a maximum of 128 characters. Precautions should be taken when delivering/exchanging this shared secret to assure that a third party cannot compromise the security of a VPN tunnel.
• Advanced Encryption Standard (AES) AES is an encryption algorithm for securing sensitive but unclassified materials by U.S. Government agencies. It may eventually become the standard encryption method for commercial transactions in the private sector.
As a potential replacement for DES and possible 3DES, AES is a symmetric algorithm which means it uses the same key for encryption and decryption and block encryption 128-bits in size. The algorithm supports key sizes of 128, 192, and 256 bits as a minimum.
• Encapsulating Security Payload (ESP) ESP provides confidentiality and integrity of data by encrypting the data and encapsulating it into IP packets. Encryption can be in the form of ARCFour (similar to the popular RC4 encryption method), DES, etc.
The use of ESP increases the processing requirements in SonicWALL VPN and also increases the communications latency. The increased latency is due to the encryption and decryption required for each IP packet containing an Encapsulating Security Payload.
ESP typically involves encryption of the packet payload using standard encryption mechanisms, such as RC4, ARCFour, DES, or 3DES. The SonicWALL supports 56-bit ARCFour and 56-bit DES and 168-bit 3DES.
• Authentication Header (AH) The Authentication Header provides strong integrity and authentication by adding authentication information to IP packets. This authentication information is calculated

Appendices Page 303
using header and payload data in the IP packet which provides an additional level of security.
Using AH increases the processing requirements of VPN and also increases the communications latency. The increased latency is primarily due to the calculation of the authentication data by the sender, and the calculation and comparison of the authentication data by the receiver for each IP packet containing an Authentication Header.
• Data Encryption Standard (DES) When DES is used for data communications, both sender and receiver must know the same secret key, which can be used to encrypt and decrypt the message, or to generate and verify a message authentication code. SonicWALL DES encryption algorithm uses a 56 bit key.
The SonicWALL VPN DES Key must be exactly 16-characters long and is comprised of hexadecimal characters. Valid hexadecimal characters are "0" to "9", and "a" to "f" inclusive (0, 1, 2, 3, 4, 5, 6, 7, 8, 9, a, b, c, d, e, f). For example, a valid key would be 1234567890abcdef.
• ARCFour ARCFour is used for communications with secure Web sites using the SSL protocol. Many banks use a 40 bit key ARCFour for online banking, while others use a 128 bit key. SonicWALL VPN uses a 56 bit key for ARCFour.
ARCFour is faster than DES for several reasons. First, it is a newer encryption mechanism than DES. As a result, it benefits from advances in encryption technology. Second, unlike DES, it is designed to encrypt data streams, rather than static storage.
The SonicWALL VPN ARCFour key must be exactly 16 characters long and is comprised of hexadecimal characters. Valid hexadecimal characters are "0" to "9", and "a" to "f" inclusive (0, 1, 2, 3, 4, 5, 6, 7, 8, 9, a, b, c, d, e, f). For example, a valid key would be 1234567890abcdef.
• Strong Encryption (Triple DES) Strong Encryption, or Triple DES (3DES), is a variation on DES that uses a 168-bit key. As a result, 3DES is dramatically more secure than DES, and is considered to be virtually unbreakable by security experts. It also requires a great deal more processing power, resulting in increased latency and decreased throughput.
The SonicWALL 3DES Key must be exactly 24 characters long and is comprised of hexadecimal characters. Valid hexadecimal characters are "0" to "9", and "a" to "f" inclusive (0, 1, 2, 3, 4, 5, 6, 7, 8, 9, a, b, c, d, e, f). For example, a valid key would be 1234567890abcdef12345678.
• Security Parameter Index (SPI) The SPI is used to establish a VPN tunnel. The SPI is transmitted from the remote VPN gateway to the local VPN gateway. The local VPN gateway then uses the network, encryption and keys associated with the SPI to establish the tunnel.

Page 304 SonicWALL SonicOS 2.0s Administrator’s Guide
The SPI must be unique, is from one to eight characters long, and is comprised of hexadecimal characters. Valid hexadecimal characters are "0" to "9", and "a" to "f" inclusive (0, 1, 2, 3, 4, 5, 6, 7, 8, 9, a, b, c, d, e, f). For example, valid SPIs would be 999 or 1234abcd.

Appendices Page 305
Appendix F- Erasing the FirmwareThere can be instances when it is necessary to reset the SonicWALL to its factory clean state if the following events happen to the appliance:
• Administrator password is forgotten• The firmware has become corrupt, and you cannot contact the Management Interface• The test light comes on and stays on for more than a few minutes.• During the troubleshooting process, you must start from a “known” state.
Once the firmware is erased, new firmware must be loaded, and the SonicWALL must be reconfigured.The following procedure erases all settings and reverts the unit to the factory default state. It is necessary to follow the initial configuration procedures detailed in this manual's QuickStart section to reconfigure the SonicWALL. If you need the firmware, download it from <http://firmware.sonicwall.com> or load it from the CD included with the appliance. You can also download firmware by logging into <http://www.mysonicwall.com> as a registered user.
Locating the Reset button on your SonicWALLSonicWALL SonicWALL uses the small recessed button on the back of the unit for this procedure.
Erasing the Firmware for all Models1. Turn off the SonicWALL and disconnect all cables to the network.
2. Locate the recessed Reset Switch on the back panel of the SonicWALL. 3. Press and hold the Reset Switch and then apply power to the SonicWALL. Once the Test
LED starts to flash, let go of the Reset Switch.The Test LED flashes for approximately 90 seconds while the firmware is erased. After completing the diagnostic sequence, the Test LED stays lit, indicating that the firmware has been erased. It is normal for the Test LED to stay lit after erasing the firmware. It does not go off until the firmware is installed and loaded into memory by the automatic restart. 4. Log back into the SonicWALL at the default IP address, "http://192.168.168.168". Make
sure that the Management Station's IP address is in the same subnet as the SonicWALL--for example, "192.168.168.200".
5. The SonicWALL Management Interface displays a message stating that the firmware has been erased. Click the Browse button to locate the SonicWALL firmware file on the Management Station hard drive. Or upload the firmware file that is located on the SonicWALL Companion CD.
6. Reconfigure the SonicWALL as described in Chapter 2.
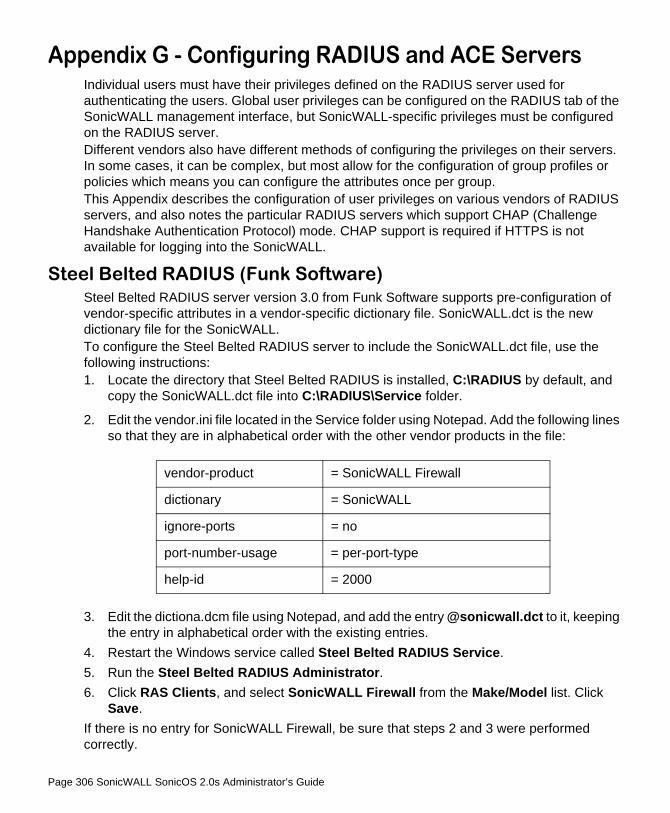
Page 306 SonicWALL SonicOS 2.0s Administrator’s Guide
Appendix G - Configuring RADIUS and ACE ServersIndividual users must have their privileges defined on the RADIUS server used for authenticating the users. Global user privileges can be configured on the RADIUS tab of the SonicWALL management interface, but SonicWALL-specific privileges must be configured on the RADIUS server.Different vendors also have different methods of configuring the privileges on their servers. In some cases, it can be complex, but most allow for the configuration of group profiles or policies which means you can configure the attributes once per group. This Appendix describes the configuration of user privileges on various vendors of RADIUS servers, and also notes the particular RADIUS servers which support CHAP (Challenge Handshake Authentication Protocol) mode. CHAP support is required if HTTPS is not available for logging into the SonicWALL.
Steel Belted RADIUS (Funk Software)Steel Belted RADIUS server version 3.0 from Funk Software supports pre-configuration of vendor-specific attributes in a vendor-specific dictionary file. SonicWALL.dct is the new dictionary file for the SonicWALL. To configure the Steel Belted RADIUS server to include the SonicWALL.dct file, use the following instructions:1. Locate the directory that Steel Belted RADIUS is installed, C:\RADIUS by default, and
copy the SonicWALL.dct file into C:\RADIUS\Service folder.
2. Edit the vendor.ini file located in the Service folder using Notepad. Add the following lines so that they are in alphabetical order with the other vendor products in the file:
3. Edit the dictiona.dcm file using Notepad, and add the entry @sonicwall.dct to it, keeping the entry in alphabetical order with the existing entries.
4. Restart the Windows service called Steel Belted RADIUS Service. 5. Run the Steel Belted RADIUS Administrator. 6. Click RAS Clients, and select SonicWALL Firewall from the Make/Model list. Click
Save. If there is no entry for SonicWALL Firewall, be sure that steps 2 and 3 were performed correctly.
vendor-product = SonicWALL Firewall
dictionary = SonicWALL
ignore-ports = no
port-number-usage = per-port-type
help-id = 2000

Appendices Page 307
Configuring User PrivilegesTo configure user privileges, follow these steps:1. With Steel Belted RADIUS Administrator open, click Users and select the User to
configure. Or select a profile to be configured from the Profile Name menu.
2. Click Ins and select SonicWALL-User-Privilege from the Available Attributes list. 3. Select the privilege to be set, and click Add. Repeat until all of the privileges are added
for the user. Steel Belted RADIUS does support CHAP, so authentication takes place even if HTTPS is not available when logging into the SonicWALL management interface. Select Allow PAP or CHAP when setting user passwords.
ACE Server (RSA)The ACE Server, version 4.1, from RSA, configures RADIUS attributes into the profiles. It does not support pre-configuration of vendor-specific attributes on the server. It also only allows one vendor-specific attribute to be set per profile, and only support vendor-specific attributes containing ASCII text. User privileges are added manually using the following instructions:1. Open the ACE Server Database Administrator program.
2. Select Edit Profiles from the menu, and select the profile to be configured with user privileges. Click OK.
3. From the Available Attributes menu, select Vendor-Specific, and then click Add Attribute... .
4. Set the value to 8741 2 “privileges-list” where privileges list is a comma-separated list of 2-letter privileges, as follows:RA - Remote Access
BF - Bypass Filters
VC - Access from VPN Client
VA - Access to VPNs
LM - Limited Management
For example, to configure a profile with Access to VPN privileges and allow Access from VPN Client, the value is set as follows:
8741 2 “VA, VC”
The ACE Server from RSA does not support CHAP with RADIUS, therefore it is necessary to configure the SonicWALL to use HTTPS when logging into the SonicWALL management interface.
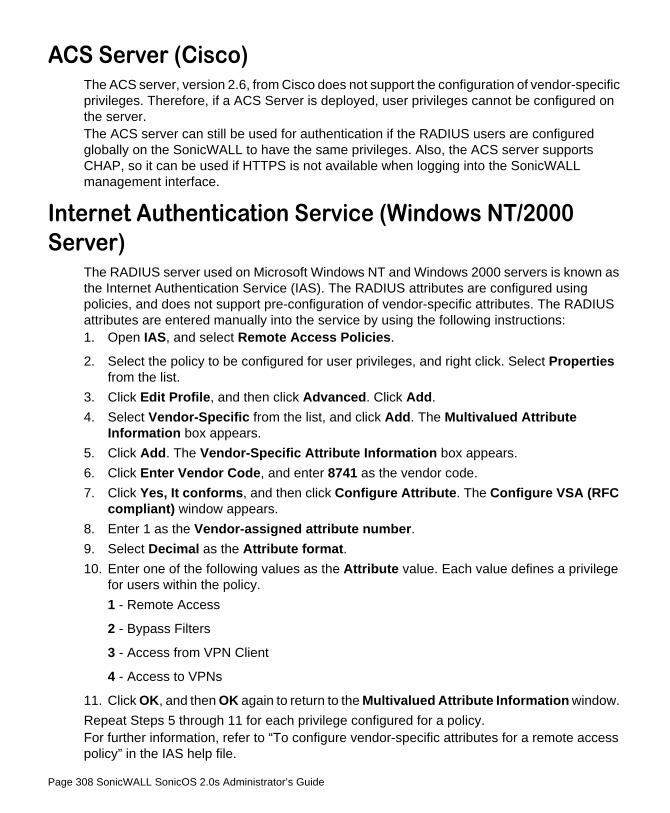
Page 308 SonicWALL SonicOS 2.0s Administrator’s Guide
ACS Server (Cisco)The ACS server, version 2.6, from Cisco does not support the configuration of vendor-specific privileges. Therefore, if a ACS Server is deployed, user privileges cannot be configured on the server.The ACS server can still be used for authentication if the RADIUS users are configured globally on the SonicWALL to have the same privileges. Also, the ACS server supports CHAP, so it can be used if HTTPS is not available when logging into the SonicWALL management interface.
Internet Authentication Service (Windows NT/2000 Server)
The RADIUS server used on Microsoft Windows NT and Windows 2000 servers is known as the Internet Authentication Service (IAS). The RADIUS attributes are configured using policies, and does not support pre-configuration of vendor-specific attributes. The RADIUS attributes are entered manually into the service by using the following instructions:1. Open IAS, and select Remote Access Policies.
2. Select the policy to be configured for user privileges, and right click. Select Properties from the list.
3. Click Edit Profile, and then click Advanced. Click Add. 4. Select Vendor-Specific from the list, and click Add. The Multivalued Attribute
Information box appears. 5. Click Add. The Vendor-Specific Attribute Information box appears. 6. Click Enter Vendor Code, and enter 8741 as the vendor code. 7. Click Yes, It conforms, and then click Configure Attribute. The Configure VSA (RFC
compliant) window appears. 8. Enter 1 as the Vendor-assigned attribute number. 9. Select Decimal as the Attribute format. 10. Enter one of the following values as the Attribute value. Each value defines a privilege
for users within the policy. 1 - Remote Access
2 - Bypass Filters
3 - Access from VPN Client
4 - Access to VPNs
11. Click OK, and then OK again to return to the Multivalued Attribute Information window. Repeat Steps 5 through 11 for each privilege configured for a policy. For further information, refer to “To configure vendor-specific attributes for a remote access policy” in the IAS help file.

Appendices Page 309
With IAS, the user database is located on the domain controller. Therefore, IAS only supports CHAP with RADIUS if the domain controller is configured to store passwords using reversible encryption for all users. If the domain controller is not configured in this manner, it is necessary to use HTTPS to log into the SonicWALL management interface.
RADIUS Attributes DictionaryThe following is the RADIUS dictionary in the format used with Funk Software’s Steel Belted RADIUS server.

Page 310 SonicWALL SonicOS 2.0s Administrator’s Guide
Notes

Appendices Page 311
Notes

Page 312 SonicWALL SonicOS 2.0s Administrator’s Guide
Notes

Appendices Page 313
Notes

Page 314 SonicWALL SonicOS 2.0s Administrator’s Guide
Notes

Appendices Page 315
Notes

Page 316 SonicWALL SonicOS 2.0s Administrator’s Guide
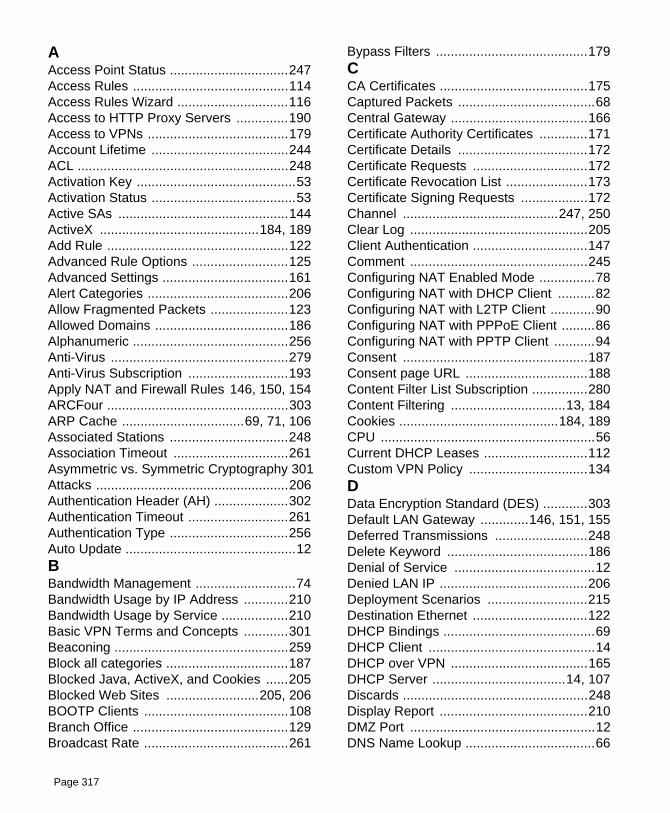
Page 317
AAccess Point Status ................................247Access Rules ..........................................114Access Rules Wizard ..............................116Access to HTTP Proxy Servers ..............190Access to VPNs ......................................179Account Lifetime .....................................244ACL .........................................................248Activation Key ...........................................53Activation Status .......................................53Active SAs ..............................................144ActiveX ...........................................184, 189Add Rule .................................................122Advanced Rule Options ..........................125Advanced Settings ..................................161Alert Categories ......................................206Allow Fragmented Packets .....................123Allowed Domains ....................................186Alphanumeric ..........................................256Anti-Virus ................................................279Anti-Virus Subscription ...........................193Apply NAT and Firewall Rules 146, 150, 154ARCFour .................................................303ARP Cache .................................69, 71, 106Associated Stations ................................248Association Timeout ...............................261Asymmetric vs. Symmetric Cryptography 301Attacks ....................................................206Authentication Header (AH) ....................302Authentication Timeout ...........................261Authentication Type ................................256Auto Update ..............................................12BBandwidth Management ...........................74Bandwidth Usage by IP Address ............210Bandwidth Usage by Service ..................210Basic VPN Terms and Concepts ............301Beaconing ...............................................259Block all categories .................................187Blocked Java, ActiveX, and Cookies ......205Blocked Web Sites .........................205, 206BOOTP Clients .......................................108Branch Office ..........................................129Broadcast Rate .......................................261
Bypass Filters .........................................179CCA Certificates ........................................175Captured Packets .....................................68Central Gateway .....................................166Certificate Authority Certificates .............171Certificate Details ...................................172Certificate Requests ...............................172Certificate Revocation List ......................173Certificate Signing Requests ..................172Channel ..........................................247, 250Clear Log ................................................205Client Authentication ...............................147Comment ................................................245Configuring NAT Enabled Mode ...............78Configuring NAT with DHCP Client ..........82Configuring NAT with L2TP Client ............90Configuring NAT with PPPoE Client .........86Configuring NAT with PPTP Client ...........94Consent ..................................................187Consent page URL .................................188Content Filter List Subscription ...............280Content Filtering ...............................13, 184Cookies ...........................................184, 189CPU ..........................................................56Current DHCP Leases ............................112Custom VPN Policy ................................134DData Encryption Standard (DES) ............303Default LAN Gateway .............146, 151, 155Deferred Transmissions .........................248Delete Keyword ......................................186Denial of Service ......................................12Denied LAN IP ........................................206Deployment Scenarios ...........................215Destination Ethernet ...............................122DHCP Bindings .........................................69DHCP Client .............................................14DHCP over VPN .....................................165DHCP Server ....................................14, 107Discards ..................................................248Display Report ........................................210DMZ Port ..................................................12DNS Name Lookup ...................................66

Page 318 SonicWALL SonicOS 2.0s Administrator’s Guide
DNS Server Addresses ............................20DNS Settings ............................................97Dropped ICMP ........................................206Dropped TCP ..........................................206Dropped UDP .........................................206DTIM Interval ..........................................261Dynamic Host Configuration Protocol (DHCP) 14EEasy ACL ........................................182, 213E-mail Alerts .............................................13E-Mail Filter ............................................200E-mail Filter ............................................193E-mail Log ..............................................205Enable Allowed/Forbidden Domains ......186Enable DHCP Server ..............21, 27, 32, 38Enable VPN ............................................143Encapsulating Security Payload (ESP) ..302Encryption ...............................................301Event ......................................................203Export Settings .........................................64FFCS Errors ..............................................248Filter Protocols ..........................................13Filtered IP Addresses .............................188Find Network Path ....................................66Firewall Name ...........................................58Firmware Version .....................................56Flush ARP ..............................................106Forbidden Domains ................................186Forward Packets to Remote VPNs 146, 151, 155Fragmentation Threshold .......................261Fragments ..............................................248Friendly Name ..........................................47GGet Community Name ..............................61Global IPSec Settings .............................143Global Management System ..................281Global User Settings ...............................178GMS Host Name ......................................62GMS over VPN .........................................62Group VPN .............................................144Guest Internet Gateway ..........................229
Guest Services .......................................267HH.323 ......................................................126Hexadecimal. ..........................................256Hub and Spoke Design ...........................129IICMP .......................................................204ICSA .........................................................12IEEE 802.11b .........................................211IKE Dead Peer Detection .......................162IKE Info .....................................................69IKE using Preshared Secret VPN SA .....131Import Settings .........................................64Inactivity Timeout ......................................59Incoming SPI ..................................141, 153Installation and Configuration ...................14Installation Wizard ....................................14Interclient Communications ....................259Internet Key Exchange (IKE) ..................302IP Spoof ..................................................204IP spoof ..................................................168IPSec VPN ................................................14JJava ................................................184, 189KKeep Alive interval ..................................162Key .........................................................301Keyword Blocking ...................................186Known Fraudulent Certificates .......189, 190LL2TP Clients ...........................................170L2TP Server ...........................................169L2TP Sessions .......................................171L2TP VPN Client ....................................179License Availability .................................198License Sharing Group ...........................197Link Status ..............................................247Local Certificates ............................171, 172Log ..........................................................203Log Categories .................................13, 205MMAC Address .........................................247MAC Address List ...................................263MAC Filter List ........................................262

Page 319
MAC Filtering ..........................................246Manage Licenses ...................................196Management Protocol ..............................60Mandatory Filtering .................................188Manual Key VPN SA ..............................139Manual Keying ........................................302Manual Node Upgrade .............................57Mesh Design ...........................................129Message In .............................................248Message In Bad ......................................249MTU ..........................................................74Multicast Frames ....................................248Multicast Octets ......................................248Multiple Retry Frames ............................248NN2H2 ......................................................185Name/Password .......................................58NAT Enabled ............................................72NAT Traversal ........................................161NAT with DHCP ........................................72NAT with DHCP Client ..............................72NAT with L2TP Client ...............................72NAT with PPPoE ......................................72NAT with PPTP .........................................72NAT with PPTP Client ..............................72NetBIOS .................................................125Network Access Rules ..............................12Network Address Translation (NAT) .........12Network Anti-Virus ..................................279Network Debug .......................................206Network Interfaces ....................................56Network Settings ......................................71Network Status .........................................56New User Account ....................................41NTP ..........................................................63NTP Settings ............................................63OOffice Gateway .......................................216One-to-One NAT ................................71, 99Online help ...............................................14Open System ..........................................256Oracle (SQLNet) .....................................126Outgoing SPI ..................................141, 153
PPacket Detail ............................................68Packet Trace ............................................67Perfect Forward Secrecy ........................138Phase 1 DH Group .........................137, 159Ping ..........................................................67Ping of Death ....................................12, 204Preamble Length ....................................261private key ..............................................172privileged users ......................................178Proxy Failure ..........................................103Public Server Rule ..................................117QQuick Register ..........................................47RRADIUS ..................................................180RADIUS Client Test ................................182RADIUS Servers .....................................181RADIUS Users ........................................181Randomize IP ID ....................................126Registration Code .....................................56Relay IP Address ....................................168Relay IP address ....................................167Relay Mode ............................................165Reports ...................................................209Reset Data ..............................................209Restart ......................................................70Restore Default Settings .........................261Restore Defaults .......................................65Restrict Web Features ............................189Retry Limit Exceeded .............................248ROM Version ............................................56Route Table ......................................71, 105RTS Threshold .......................................261SSecret Question and Answer ....................42Secure Access Point ..............................223Security Association (SA) .......................301Security Associations .............................143Security Parameter Index (SPI) ..............303Send Alerts To ........................................207Send Log / Every / At ..............................208Send Log To ...........................................207Services ..................................................127

Page 320 SonicWALL SonicOS 2.0s Administrator’s Guide
Session Timeout .....................................244Set Time ...................................................63Shared Key .............................................256Shared Secret .........................................302Signal Retry Frames ...............................248Site to Site VPN ......................................129SNMP .......................................................60SonicWALL CFS .....................................185SSID .......................................................247SSID Controls .........................................259Start Data Collection ...............................209Static Devices on the LAN ......................168Static DHCP Entries ...............................110Static Routes ....................................71, 103Stealth Mode ..........................................125Strong Encryption (TripleDES) ...............303Subject Key Size ....................................174Subscribed Services .........................57, 183Subscription Code ....................................45Subscription code .....................................44Subscription Renewal .............................197SYN Flood Attacks .................................204Syslog Format ........................................208Syslog Individual Event Rate ..................208Syslog Server Support ..............................13System Errors .................................205, 206System Maintenance ..............................205TTCP ........................................................204Tech Support Report ................................68Tech Support Request Form ....................68Temporary Lease Time ..........................168Third Party Certificates ...........................156Third Party Digital Certificate ..................171Time of Day ............................................186Trace Route ..............................................69Transmit Power ......................................261Trap Community Name ............................61UUDP ........................................................204Unicast Frame ........................................248Unicast Octets ........................................248Unique Firewall Identifier ........................143Updating Firmware ...................................65
Uptime ......................................................56User Activity ............................................206User Lockout ............................................59UTC ..........................................................63VView Data ...............................................209ViewPoint ................................................280Virtual IP .................................................148VPN ..........................................................14VPN Client ........................................14, 279VPN Keys .................................................69VPN Planning Sheet ...............................130VPN Remote Gateway ...........................167VPN TCP Stats .......................................206VPN Tunnel ............................................301Vulnerability Scanning Service ...............280WWAN Gateway (Router) Address ..............20WAN IP Address .......................................20WAN/DMZ Subnet Mask ..........................20Web Proxy ..............................................102Web Site Hits ..........................................210WEP Encryption .............................246, 247WEP Key Mode ......................................256WiFiSec ..........................................211, 247WiFiSec Enforcement .....................214, 250Windows Messenger ..............................126WINS Server ...........................................109Wireless Access Rules ...........................114Wireless Client Communications ............246Wireless Firmware ..................................248Wireless Guest Services ................213, 248Wireless Node Count ..............................213Wireless Wizard ......................................242WLAN .....................................................247WLAN IP Address ...................................247WLAN Statistics ......................................248WLAN Subnet Mask ...............................247XX.509 ......................................................172XAUTH ...........................................147, 179