Legato Storage Manager Administrator's Guide - Oracle Help ...
160
Legato Storage Manager Legato Storage Manager Administrator’s Guide Release 8.0.4 November 1997 Part No. A58373-01 This Legato Storage Manager Administrator’s Guide contains complete information for using Legato Storage Manager (LSM) as an Oracle data storage management system. It describes the initial configuration procedure for LSM. It then explains how to use LSM for managing Oracle backup devices and volumes, monitoring Oracle backup and restore operations, and managing Oracle backup data. See your Oracle Server Installation Guide for installation instructions.
-
Upload
khangminh22 -
Category
Documents
-
view
2 -
download
0
Transcript of Legato Storage Manager Administrator's Guide - Oracle Help ...
Legato Storage Manager
Legato Storage Manager Administrator’s Guide
Release 8.0.4
November 1997
Part No. A58373-01
This Legato Storage Manager Administrator’s Guide contains complete information for using Legato Storage Manager (LSM) as an Oracle data storage management system. It describes the initial configuration procedure for LSM. It then explains how to use LSM for managing Oracle backup devices and volumes, monitoring Oracle backup and restore operations, and managing Oracle backup data. See your Oracle Server Installation Guide for installation instructions.

Legato Storage Manager Administrator’s Guide
Part No. A58373-01
Release 8.0.4
Copyright © 1997, Oracle Corporation. All rights reserved.
Printed in the U.S.A
The programs are not intended for use in any nuclear, aviation, mass transit, medical, or other inherently dangerous applications. It shall be licensee’s responsibility to take all appropriate fail-safe, back up, redundancy and other measures to ensure the safe use of such applications if the Programs are used for such purposes, and Oracle disclaims liability for any damages caused by such use of the Programs.
This Program contains proprietary information of Oracle Corporation; it is provided under a license agreement containing restrictions on use and disclosure and is also protected by copyright patent and other intellectual property law. Reverse engineering of the software is prohibited.
The information contained in this document is subject to change without notice. If you find any problems in the documentation, please report them to us in writing. Oracle Corporation does not warrant that this document is error free.
If this Program is delivered to a U.S. Government Agency of the Department of Defense, then it is delivered with Restricted Rights and the following legend is applicable:
Restricted Rights Legend Programs delivered subject to the DOD FAR Supplement are 'commercial computer software' and use, duplication and disclosure of the Programs shall be subject to the licensing restrictions set forth in the applicable Oracle license agreement. Otherwise, Programs delivered subject to the Federal Acquisition Regulations are 'restricted computer software' and use, duplication and disclosure of the Programs shall be subject to the restrictions in FAR 52.227-14, Rights in Data -- General, including Alternate III (June 1987). Oracle Corporation, 500 Oracle Parkway, Redwood City, CA 94065.
Registered Trademarks of Oracle Corporation ConText, Oracle, the Oracle logo, Oracle Book, Oracle ConText, Pro*Ada, Pro*COBOL, Pro*FORTRAN, Pro*Pascal, Pro*PL/I, SQL*Loader, SQL*Module, SQL*Net, and SQL*Plus are registered trademarks of Oracle Corporation.
Non-Registered Trademarks of Oracle Corporation Advanced Networking Option, Advanced Replication Option, Developer/2000, Enabling the Information Age, InterOffice, Network Computing Architecture, Oracle Applications, Oracle Call Interface, Oracle Enterprise Manager, Oracle Installer, Oracle InterOffice, Oracle Multiprotocol Interchange, Oracle Names, Oracle Network Manager, Oracle Parallel Server, Oracle Server Manager, Oracle Toolkit, Oracle TRACE, Oracle WebServer, Oracle7, Oracle7 Enterprise Backup Utility, Oracle8, PL/SQL, Pro*C/C++, and Trusted Oracle are trademarks of Oracle Corporation.
Legato is a registered trademark in the United States, licensed exclusively through Legato. UNIX is a registered trademark in the United States and other countries, licensed exclusively through X/Open Company Limited. All other products or company names are used for identification purposes only, and may be trademarks of their respective owners.
All other company or product names mentioned are used for identification purposes only and may be trademarks of their respective owners.
For more information about Oracle’s trademarks and intellectual property policies, contact the Oracle Legal Department at (650)506-5100.
Contents
Send Us Your Comments .................................................................................................................... v
Preface........................................................................................................................................................... vii
1 Introduction
What is Legato Storage Manager? ................................................................................................... 1-1Overview of LSM Features ............................................................................................................... 1-2Overview of Oracle Backup and Recovery System...................................................................... 1-6
Oracle7 on Windows NT ............................................................................................................. 1-6Oracle8 on UNIX and Windows NT.......................................................................................... 1-9
Additional Legato Documentation................................................................................................ 1-12UNIX Online Help...................................................................................................................... 1-12UNIX Online Manual Pages...................................................................................................... 1-12Windows Online Help ............................................................................................................... 1-13Windows Command-Line Utilities Help ................................................................................ 1-15
2 Preparing to Use LSM
LSM Architecture................................................................................................................................ 2-1Overview of LSM Operations .......................................................................................................... 2-4Using the LSM Administrator GUI............................................................................................... 2-11
LSM Administrator GUI on UNIX........................................................................................... 2-12LSM Administrator GUI on Windows .................................................................................... 2-13
Configuration Roadmap.................................................................................................................. 2-16Post-Installation Steps ..................................................................................................................... 2-17
i

Setting the System Path on Windows NT ............................................................................... 2-17Setting Up Regular Filesystem Backup ................................................................................... 2-18
Configuring LSM Resources .......................................................................................................... 2-18Client Resource ........................................................................................................................... 2-19Server Resource........................................................................................................................... 2-22Specifying LSM Administrators ............................................................................................... 2-25Other LSM Resources................................................................................................................. 2-28
3 Media Management
Configuring Storage Devices............................................................................................................ 3-1Device Resources .......................................................................................................................... 3-3Device Configuration on UNIX .................................................................................................. 3-7Device Configuration on Windows ........................................................................................... 3-8
Using Volume Pools and Label Templates .................................................................................. 3-10Default Volume Pool .................................................................................................................. 3-11
Labeling and Mounting Storage Volumes................................................................................... 3-13Labeling a Volume on UNIX..................................................................................................... 3-13Labeling a Volume on Windows .............................................................................................. 3-15Mounting a Volume on UNIX .................................................................................................. 3-16Mounting a Volume on Windows............................................................................................ 3-17Unmounting a Volume on UNIX ............................................................................................. 3-17Unmounting a Volume on Windows....................................................................................... 3-18
Auto Media Management for Tape Devices................................................................................ 3-18Using the Volumes Window........................................................................................................... 3-20Volume Operations .......................................................................................................................... 3-21
4 Backup and Restore Operations
Running Oracle Backups and Restores .......................................................................................... 4-1Using the Oracle Backup/Restore Utility ................................................................................. 4-2Using the Oracle Enterprise Manager Backup Manager ........................................................ 4-3
LSM Server Bootstrap Backups........................................................................................................ 4-4Automatic Bootstrap Backup ...................................................................................................... 4-5Manual Bootstrap Backup ........................................................................................................... 4-8Maintaining Bootstrap Information ........................................................................................... 4-8
Monitoring Oracle Backups and Restores ..................................................................................... 4-9
ii

5 Disaster Recovery
Types of Disaster Recovery .............................................................................................................. 5-1Disaster Preparation ........................................................................................................................... 5-4
Bootstrap Save Set ID................................................................................................................... 5-4Disk Information........................................................................................................................... 5-6Disaster Recovery Procedures .................................................................................................... 5-8
Disaster Recovery on UNIX .............................................................................................................. 5-9Recovering the Operating System and LSM Software............................................................ 5-9Recovering LSM Indexes and Configuration Files ................................................................ 5-10Restoring Oracle8 Data on UNIX ............................................................................................. 5-14Recovering LSM to a New Machine ........................................................................................ 5-15
Disaster Recovery on Windows NT .............................................................................................. 5-16Recovery Requirements............................................................................................................. 5-16Recovering the Operating System and LSM Software.......................................................... 5-17Recovering LSM Indexes and Configuration Files ................................................................ 5-18Restoring Oracle Data on Windows NT.................................................................................. 5-22Recovering LSM to a New Machine ........................................................................................ 5-23
Recovering Oracle Data ................................................................................................................... 5-24
A Scanner
Scanner on UNIX ............................................................................................................................... A- 1Save Set Recover and Scanner ................................................................................................... A- 1scanner .......................................................................................................................................... A- 4The scanner Program Requests an Entry for Record Size ..................................................... A- 5
Scanner on Windows NT ................................................................................................................. A- 6Using the Scanner Program ....................................................................................................... A- 6
B Client Server Communications
Client-Server Communications on UNIX ..................................................................................... B- 1How to Troubleshoot IP Errors ................................................................................................. B- 1How to Set Up Host Tables ........................................................................................................ B- 2How to Disable Name Servers for Troubleshooting .............................................................. B- 3How to Use ping to Verify Network Connections ................................................................. B- 3How to Use rpcinfo to Verify that Sessions Can Be Established .......................................... B- 4
iii

How to Verify Firmware for Switches and Routers ............................................................... B- 5Naming Requirements ................................................................................................................ B- 5Binding to Server Errors ............................................................................................................. B- 6
Client/Server Communications on Windows NT........................................................................ B- 7Configuring Server Communications....................................................................................... B- 8
C Using Label Templates
Labeling Storage Volumes on UNIX............................................................................................. C- 1How LSM Uses Label Templates.............................................................................................. C- 1How to Customize Label Templates........................................................................................ C- 2How to Use Label Template Components .............................................................................. C- 5
Labeling Storage Volumes on Windows NT ............................................................................... C- 6How NetWorker Uses Label Templates.................................................................................. C- 6Label Template Dialog Box ....................................................................................................... C- 7Using Label Template Components....................................................................................... C- 10Creating Label Templates........................................................................................................ C- 11Editing Label Templates .......................................................................................................... C- 12
D Running the NetWorker User Program
Using the NetWorker Programs ..................................................................................................... D- 1Running the NetWorker User Program .................................................................................. D- 1
Glossary
Index
iv

Send Us Your Comments
Legato Storage Manager Administrator’s Guide
Part No. A58373-01
Oracle Corporation welcomes your comments and suggestions on the quality and usefulness of this publication. Your input is an important part of the information used for revision.
■ Did you find any errors?■ Is the information clearly presented?■ Do you need more information? If so, where?■ Are the examples correct? Do you need more examples?■ What features did you like most about this manual?
If you find any errors or have other suggestions for improvement, please indicate the chapter, section, and page number (if available). You can send comments to us in the following ways:
■ e-mail: [email protected]■ postal service:
Server Technologies Documentation ManagerOracle Corporation500 Oracle Parkway, Mailstop 4op12Redwood Shores, CA 94065USA
If you would like a reply, please give your name, address, and telephone number below.
v

vi

Preface
This Legato Storage Manager Administrator’s Guide contains complete information for using Legato Storage Manager (LSM) as an Oracle data storage management system. It describes the initial configuration procedure for LSM. It then explains how to use LSM for managing Oracle backup devices and volumes, monitoring Oracle backup and restore operations, and managing Oracle backup data.
Major Topics:■ Audience
■ How This Guide Is Organized
■ Document Conventions
■ Contacting Customer Support
■ Required Oracle Documentation
■ Send Us Your Comments
AudienceThe information in this guide is for system administrators and Oracle database administrators (DBAs) who are responsible for maintaining Oracle Server backup and recovery systems. It includes information on configuring an Oracle data storage management system for Oracle7 Server on Windows NT or Oracle8 Server on UNIX or Windows NT.
vii

You need a working knowledge of Oracle concepts and terminology, especially as related to Oracle database backup and recovery, to use this guide effectively. This guide does not include LSM installation instructions. For information about installing LSM, refer to the Oracle8 Server Installation Guide for your particular system.
How This Guide Is OrganizedThe Legato Storage Manager Administrator’s Guide has five chapters, followed by a glossary and an index. The first two chapters introduce you to LSM and its major features. They describe how to properly configure LSM to work with the other components of a complete Oracle backup and recovery system. Chapters 3 through 5 contain details about how to use LSM to manage Oracle backups and recoveries as well as the devices and volumes used during the Oracle backup and restore operations.
Chapter 1: IntroductionThis chapter surveys the main features of LSM and how they compare with the features of the Legato NetWorker upgrade product. It explains how LSM functions with other major components of an Oracle7 (on Windows NT) or Oracle8 (on UNIX or Windows NT) backup and recovery system.
Chapter 2: Preparing to Use LSMThis chapter provides a more detailed view of the internal LSM organization of resources and attributes and how they are used during Oracle backup and restore operations. It also includes information about the proper configuration of LSM resources.
Chapter 3: Media ManagementThis chapter focuses on the procedures for configuring and managing the storage devices and volumes LSM uses for Oracle backup and restore operations. It explains how LSM uses volume pools to sort the Oracle storage volumes and describes the system that LSM uses to manage the life cycle of the data backed up to those volumes.
viii

Chapter 4: Backup and Restore OperationsThis chapter provides information about using LSM for Oracle backup and restore operations, after you have configured the required LSM Server resources. It covers the methods for running Oracle backups and restores, including the LSM Server bootstrap backups that are essential for disaster recovery. This chapter also outlines the procedures for monitoring Oracle backups and restores by means of the LSM Administrator GUI and specific log files.
Chapter 5: Disaster RecoveryThis chapter explains how you can use LSM to recover from different types of system disasters on your Oracle Server. It stresses the importance of preparing for a disaster.
Document ConventionsBecause UNIX is case-sensitive, conventions in this document may differ slightly from those used in Oracle product documentation.
The following conventions apply to text in this guide:
monospace Monospace type indicates UNIX commands, directory names, pathnames, and filenames.
brackets [ ] Words enclosed in brackets indicate key names (for example, Press [Return]). Note that brackets have a different meaning when used in command syntax.
italics Italic type indicates a variable, including variable portions of filenames, document titles, or emphasis.
UPPERCASE Uppercase letters indicate Structured Query Language (SQL) commands, initialization parameters, or environment variables.
ix

Command syntax is shown in monospace font in this guide. The following conventions apply to command syntax:
backslash \ A backslash indicates a command that is too long to fit on a single line. Enter the line as printed (with a backslash) or enter it as a single line without a backslash:dd if=/dev/rdsk/c0t1d0s6 of=/dev/rst0 bs=10b \
count=10000
braces { } Braces indicate required items: .DEFINE {macro1}
brackets [ ] Brackets indicate optional items: cvtcrt termname [outfile]
Note that brackets have a different meaning when used in regular text.
ellipses ... Ellipses indicate an arbitrary number of similar items:CHKVAL fieldname value1 value2 ... valueN
italics Italic type indicates a variable. Substitute a value for the variable: library_name
boldface Bold type indicates commands or text you type: connect
boldface italic Bold type indicates commands or text you type and need to substitute a variable: nwadmin -s server-name
vertical line | A vertical line indicates a choice within braces or brackets:SIZE filesize [K|M]
x

Contacting Customer SupportPlease copy this page and distribute it within your organization as necessary.
Oracle Worldwide Customer Support Services (WWCS) can be reached at the following numbers (the hours are specified in your support contract):
■ In the United States, call: 1.650.506.1500.
■ In Europe, call: +44.1344.860160.
■ In Asia-Pacific, call: +81.3.5717.1850.
Please prepare the following information before you call:
❏ Your CSI number (if applicable) or complete contact details, including any special project information.
❏ The release levels of the Oracle Server and associated products (for example, Oracle8 Server release 8.0.3.0, and Oracle Forms release 4.5.6.3.2).
❏ Operating system name and release level, including patches and packages.
❏ Details of error codes, numbers, and descriptions associated with the problem.
❏ A full description of the issue, including:
■ What happened? For example, the command used and result obtained.
■ When did it happen? For example, time of day, or after a particular command, or after an operating system or Oracle upgrade.
■ Where did it happen? For example, on a particular system, or within a particular procedure or table.
■ What is the extent of the problem? For example, is your production system unavailable, or is the impact less severe? Is the problem getting worse?
Keep in mind what did not happen, as well as what did happen.
❏ Copies of any trace files, core dumps, or log files recorded near the time of the incident.
For installation-related problems, please have the following information available:
❏ Listings of the contents of the ORACLE_HOME directory, and any staging area, if applicable.
❏ Contents of the installation log files in the $ORACLE_HOME/orainst directory: install.log, sql.log, make.log, and os.log.
For more information, contact http://www.oracle.com/support.
xi

Required Oracle DocumentationThis document provides Legato Storage Manager user information. Installation, configuration and tuning recommended for a production database system is discussed in detail in the following manuals:
■ Oracle8 Server Installation Guide for (your operating system)
■ Oracle8 Server Backup and Recovery Handbook
Ordering Related DocumentationTo order documentation, call the appropriate number listed below.
■ In the United States, call Documentation Sales at: 1.800.252.0303.
■ In the United Kingdom, call Oracle Direct Response at: +44.990.332200.
■ In other European countries, contact your local Oracle Support office.
■ In the Asia-Pacific region, contact your Oracle sales representative.
Shipping InquiriesFor shipping inquiries, product exchanges, or returns, call the appropriate number listed below.
■ In the United States, call Client Relations at: 1.650.506.1500.
■ In the United Kingdom, call Customer Relations at: +44.990.622300.
■ In other European countries, contact your local Oracle Support office.
■ In the Asia-Pacific region, contact your Oracle sales representative.
xii

Introd
1
IntroductionThis chapter provides an overview of Legato Storage Manager (LSM) for Oracle. It surveys the major features and functionality of LSM and explains how LSM operates in conjunction with the other components of an integrated Oracle backup and recovery system.
Major Topics:■ What is Legato Storage Manager?
■ Overview of LSM Features
■ Overview of Oracle Backup and Recovery System
■ Additional Legato Documentation
What is Legato Storage Manager?LSM is a comprehensive Oracle data storage management system. LSM augments the Oracle backup and recovery subsystem in Oracle7 on Windows NT or Oracle8 by means of its media management functionality.
LSM provides Oracle data storage management service to the Oracle Server. You use LSM to configure the Oracle backup devices and the storage volumes in those devices. LSM interacts with the backup/restore utility on the Oracle Server during Oracle backup and restore operations. That utility is Enterprise Backup Utility (EBU) in Oracle7 on Windows NT and Recovery Manager (RMAN) in Oracle8.
You initiate an Oracle backup or restore by running the appropriate backup/restore utility on the Oracle Server. During the backup, LSM receives the Oracle data from the Oracle utility and stores that data on the backup volumes. During the restore operation, LSM retrieves the required data from the backup volumes and passes it
uction 1-1

Overview of LSM Features
to the Oracle utility. LSM also maintains information records about the Oracle backups in its online index files, using this information to track the backed-up data.
As part of an overall Oracle backup and recovery system, LSM provides:
■ Complete storage device and volume management services
■ Convenient tracking of Oracle backup data on storage volumes
■ Management of Oracle backup data throughout a complete data life cycle
■ Complete disaster recovery protection for Oracle databases
Overview of LSM FeaturesLSM has two major components:
■ LSM Server
■ LSM Administrator GUI
As the main component of LSM, the LSM Server comprises all the programs and information files essential to running LSM. The LSM Server is the component that uses the Oracle backup devices and volumes and maintains information about Oracle backups in its online index files.
You must install the LSM Server on the same Windows NT or UNIX machine as the Oracle Server. You must also connect the Oracle backup devices to the Oracle Server machine.
The LSM Administrator GUI is a graphical user interface to access the LSM Server and its resources. You can run the LSM Administrator GUI to connect to and configure the LSM Server, storage devices, and storage volumes. You can also use the LSM Administrator GUI to monitor the status of Oracle backup and restore operations.
The LSM Administrator GUI can run on the Oracle Server machine. You install both the LSM Server and LSM Administrator GUI components during the LSM installation procedure on the Oracle Server machine. In addition, you can install and run the LSM Administrator GUI separately on a Windows NT or Windows 95 platform.
1-2 Legato Storage Manager Administrator’s Guide
Overview of LSM Features
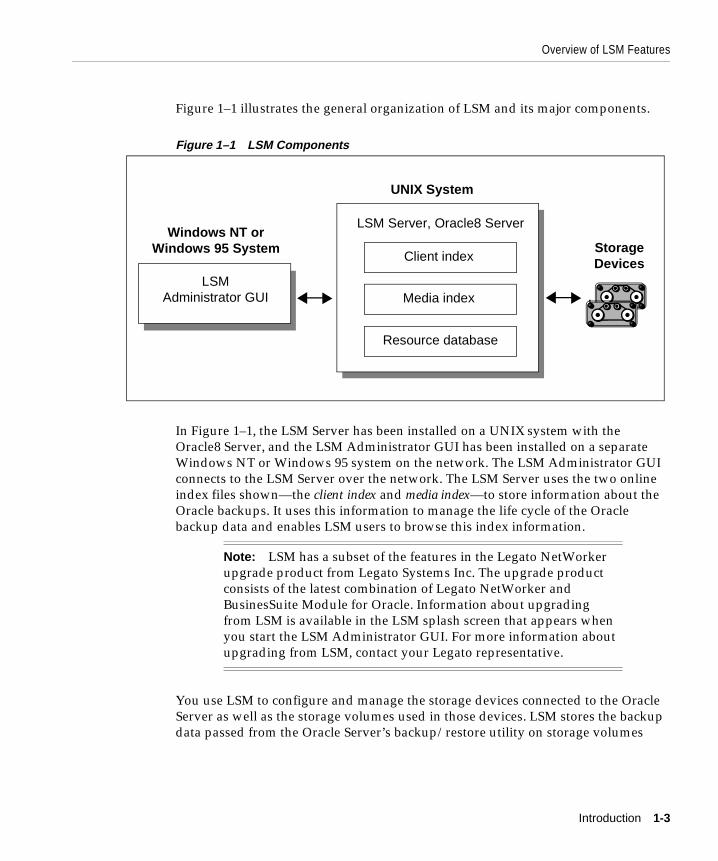
Figure 1–1 illustrates the general organization of LSM and its major components.
Figure 1–1 LSM Components
In Figure 1–1, the LSM Server has been installed on a UNIX system with the Oracle8 Server, and the LSM Administrator GUI has been installed on a separate Windows NT or Windows 95 system on the network. The LSM Administrator GUI connects to the LSM Server over the network. The LSM Server uses the two online index files shown—the client index and media index—to store information about the Oracle backups. It uses this information to manage the life cycle of the Oracle backup data and enables LSM users to browse this index information.
You use LSM to configure and manage the storage devices connected to the Oracle Server as well as the storage volumes used in those devices. LSM stores the backup data passed from the Oracle Server’s backup/restore utility on storage volumes
Note: LSM has a subset of the features in the Legato NetWorker upgrade product from Legato Systems Inc. The upgrade product consists of the latest combination of Legato NetWorker and BusinesSuite Module for Oracle. Information about upgrading from LSM is available in the LSM splash screen that appears when you start the LSM Administrator GUI. For more information about upgrading from LSM, contact your Legato representative.
LSM Administrator GUI
Storage Devices
Windows NT or Windows 95 System
UNIX System
Resource database
LSM Server, Oracle8 Server
Client index
Media index
Introduction 1-3

Overview of LSM Features
mounted in the devices. During Oracle data recovery, LSM retrieves the backed-up Oracle data from the appropriate storage volumes and passes it to the Oracle utility.
You start an Oracle backup or restore by running one of the two following programs:
■ Command-line interface of the Oracle backup/restore utility on the Oracle Server
■ Oracle Enterprise Manager (OEM) Backup Manager
The Oracle backup/restore utility—either the Enterprise Backup Utility (EBU) in Oracle7 or Recovery Manager (RMAN) in Oracle8—creates the Oracle backup data objects and then passes them to LSM.
As an optional component of the Oracle backup and recovery system, OEM Backup Manager is a graphical user interface to the Oracle backup/restore utility. OEM Backup Manager directs the Oracle utility on the Oracle Server to perform the backup. You must install OEM Backup Manager on a Windows NT or Windows 95 system, which can be either the Oracle Server machine or a separate machine on the network.
It is possible to install the LSM GUI on the same machine as OEM Backup Manager. Again, you can use the LSM Administrator GUI to connect to and configure LSM Server, manage the storage devices and volumes, and monitor the status of Oracle backups and restores. You can also configure and use LSM by means of LSM command-line utilities on the Oracle Server.
LSM supports the backup of Oracle tablespaces, datafiles, control files, and archived logs. However, it only supports the backup of Oracle data on the Oracle Server machine—not the backup of any other filesystem data on that machine or the backup of data on any other machine connected to the same network.
LSM supports a maximum of four concurrent tertiary storage devices (tape only) and a maximum of four Oracle data streams being backed up simultaneously to the available storage devices. LSM does not support certain other features of the upgrade Legato NetWorker storage management product, such as autochangers (or jukeboxes), cloning, and scheduled Oracle backups.
Note: If you want to back up non-Oracle filesystem data on the Oracle Server in addition to Oracle data, you can contact your Legato Systems Inc. representative for more information.
1-4 Legato Storage Manager Administrator’s Guide

Overview of LSM Features
In summary, the following list outlines the major features of LSM, running on the same machine as the Oracle Server:
■ With Oracle7, support for Windows NT 4.0 only
■ With Oracle8, support for Windows NT 4.0, AIX 4.1.4, HP-UX 10.20, and Solaris 2.5.1
■ LSM configuration and use by means of the LSM Administrator GUI, which can run on either the Oracle Server or a separate Windows NT or Windows 95 machine
■ Configuration and management of the storage devices and volumes used for Oracle backups
■ Support for backup and restore of Oracle tablespaces, datafiles, control files, and archived logs
■ Support for backup and restore of only Oracle data on the Oracle Server— not other filesystem data on that machine or data on another machine on the network
■ During Oracle backup, storage of the Oracle data objects created by the Oracle backup/restore utility onto volumes in the backup devices
■ During recovery of Oracle data, retrieval of the appropriate Oracle data objects from appropriate storage volumes
■ Monitoring of the progress of Oracle backup and restore operations
■ Management of the Oracle backup data life cycle by means of two online indexes
■ Browsing of online index information for Oracle backups
■ Support for up to four concurrent storage devices
■ Support for up to four simultaneous data streams
LSM does not support certain features of the standard Legato NetWorker storage management system—autochangers, cloning, and scheduled backups.
Introduction 1-5

Overview of Oracle Backup and Recovery System
Overview of Oracle Backup and Recovery SystemLSM functions with the components of the standard Oracle backup and recovery subsystem to produce a comprehensive Oracle data storage management system. To implement a well-defined Oracle backup and recovery strategy, you need to understand how LSM and the Oracle components work together. The following two sections present the functional details for Oracle7 and Oracle8.
Oracle7 on Windows NTDuring Oracle7 backup and restore operations, LSM interacts with the Oracle7 backup and recovery subsystem. The Oracle7 backup and recovery subsystem consists of the following main components:
■ Oracle7 Server
■ EBU
■ EBU Catalog
■ OEM Backup Manager (optional)
1-6 Legato Storage Manager Administrator’s Guide

Overview of Oracle Backup and Recovery System
Figure 1–2 illustrates the functional relationship between LSM, EBU, and the Oracle7 Server.
Figure 1–2 Oracle7 Backup and Recovery System
EBU is the main Oracle7 backup/restore utility for backing up, restoring, and recovering Oracle7 databases. It uses information from the EBU Catalog to locate, back up, restore, and recover datafiles, control files, and archived logs.
EBU simplifies Oracle backup and recovery procedures by providing a way to:
■ Configure frequently executed backup operations
■ Generate a printable log of all backup and recovery actions
■ Use the EBU Catalog to automate restore and recovery operations
■ Perform parallelization of backups and restores
■ Back up an entire database, selected tablespaces, or selected datafiles while the database is open
EBU
MMAPI
LSM Server
Oracle7 Server
Oracle7 Database Files
OEM Backup
Manager
EBU Catalog
Oracle7 Server
GUI Console
LSM Administrator GUI
Introduction 1-7

Overview of Oracle Backup and Recovery System
The EBU Catalog is a repository of information maintained by EBU. Oracle7 EBU uses the information in the EBU Catalog to determine how to execute requested backup and restore actions.
The EBU Catalog includes information about the following types of objects:
■ Datafile and archivelog backup sets and backup pieces
■ Archived redo logs and copies of them
■ Tablespaces and datafiles at the target database
For more detailed information about EBU and the EBU Catalog and Oracle7 backup and recovery operations, refer to the Oracle7 Enterprise Backup Utility Administrator’s Guide.
Before running an Oracle7 backup or recovery, you must properly install and configure LSM software on the Oracle7 Server. The LSM installation automatically configures the Oracle7 Server as a storage management client of the LSM Server. Then, you can use the LSM Administrator GUI to configure the necessary backup devices and label backup volumes. For more information about LSM configuration, see Chapter 2, “Preparing to Use LSM”.
In providing storage management services for Oracle7 Server data, LSM uses the Oracle Media Management (MM) Application Programming Interface (API). LSM interacts with the Oracle7 EBU through the MM API.
To initiate an Oracle7 backup, you must run either the EBU command-line interface or the OEM Backup Manager GUI, with the proper administrative privileges. The OEM Backup Manager, in turn, generates commands for EBU. The ebu process interacts with the LSM Server through the MM API to coordinate a backup of the Oracle7 Server database files.
At the end of the Oracle7 backup, LSM updates the online client and media indexes with information about the backup media used and the Oracle data stored on it. LSM takes care of the storage management tasks while EBU takes care of passing the data from Oracle7 to LSM. LSM automatically backs up the client and media indexes once every day as part of the regular LSM Server bootstrap backup.
When you initiate an EBU restore request, the MM API translates the object names requested by EBU into a format understood by the LSM Server and forwards it to the LSM Server. The LSM Server searches its online media index for the media containing the objects requested and recovers the data to the Oracle7 Server.
1-8 Legato Storage Manager Administrator’s Guide

Overview of Oracle Backup and Recovery System
Oracle8 on UNIX and Windows NTLSM interacts with the Oracle8 backup and recovery subsystem during Oracle8 backup and restore operations. The Oracle8 backup and recovery subsystem comprises the following major components:
■ Oracle8 Server
■ Recovery Manager (RMAN)
■ Recovery Catalog (optional)
■ OEM Backup Manager (optional)
Figure 1–3 illustrates the architecture of the overall Oracle8 backup and recovery system and shows the functional relationship between LSM, RMAN, and Oracle8 Server.
Figure 1–3 Oracle8 Backup and Recovery System
RMAN is the main Oracle8 backup/restore utility for backing up, restoring, and recovering Oracle8 databases. It uses information from an Oracle8 database’s
Oracle8 Server
MM API
LSM Server
Oracle8 Database Files
OEM Backup
Manager
LSM Administrator GUI
Recovery Catalog
Oracle8 Server
RMAN
GUI Console
Introduction 1-9

Overview of Oracle Backup and Recovery System
control file or Recovery Catalog to locate, back up, restore, and recover datafiles, control files, and archived logs.
RMAN simplifies Oracle backup and recovery procedures by providing a way to:
■ Configure frequently executed backup operations
■ Generate a printable log of all backup and recovery actions
■ Use the Recovery Catalog to automate restore and recovery operations
■ Perform automatic parallelization of backups and restores
■ Find datafiles requiring a backup based on user-specified limits on the amount of redo that must be applied
■ Back up an entire database, selected tablespaces, or selected datafiles
The Recovery Catalog is a repository of information maintained by RMAN. Oracle8 RMAN uses the information in the Recovery Catalog or database control file to determine how to execute requested backup and restore actions.
The Recovery Catalog includes information about the following types of objects:
■ Datafile and archivelog backup sets and backup pieces
■ Archived redo logs and copies of them
■ Tablespaces and datafiles at the target database
■ Stored scripts (for example, user-created sequences of RMAN commands)
Although a Recovery Catalog is not mandatory, Legato recommends using a Recovery Catalog, especially if you have 20 or more datafiles. If you do not use a Recovery Catalog, the following functions are not supported:
■ Point-in-time recovery
■ Stored scripts
■ Restore and recovery when the control file is lost or damaged
For more detailed information about RMAN and the Recovery Catalog and Oracle8 backup and recovery operations, refer to the Oracle8 Server Backup and Recovery Guide.
Before running an Oracle8 backup or recovery, you must properly install and configure LSM software on the Oracle8 Server. The LSM installation automatically configures the Oracle8 Server as a storage management client of the LSM Server. Then, you can use the LSM Administrator GUI to configure the necessary backup
1-10 Legato Storage Manager Administrator’s Guide

Overview of Oracle Backup and Recovery System
devices and label backup volumes. For more information about LSM configuration, see Chapter 2, “Preparing to Use LSM”.
You can start an Oracle8 backup or recovery by issuing the appropriate commands to RMAN through its command-line interface. Alternatively, you can start the backup or recovery by means of the OEM Backup Manager, the optional graphical user interface to RMAN. The OEM Backup Manager generates RMAN commands that are sent to the Oracle8 Server, providing a simple interface. Oracle Enterprise Manager enables users to perform backup and recovery by means of the point-and-click method. For information about performing backup and recovery using Oracle Enterprise Manager, refer to the Oracle8 Enterprise Manager User’s Guide.
The RMAN command-line interface starts Oracle8 Server processes on the database to be backed up or restored (the target database). These Oracle8 Server processes perform the backup or restore. For example, during an Oracle8 backup, the Server process reads the datafile, control file, or archived redo log being backed up and writes it to the LSM Server, through the MM API. The LSM Server, in turn, stores the Oracle data to the appropriate backup tape device.
LSM includes a Media Management Library (MML). It is integrated with Oracle8 during LSM installation on the Oracle8 Server. The LSM installation links the media management software routines of the LSM library with the Oracle kernel software. This allows the Oracle8 Server processes to call the MM API routines to back up and restore Oracle datafiles to and from the media controlled by LSM.
At the end of the Oracle8 backup, the LSM Server updates the online client and media indexes with information about the backup media used and Oracle data stored on it. LSM takes care of the storage management tasks while RMAN passes the data from the Oracle8 Server to LSM. LSM automatically backs up the client and media indexes once every day as part of the regular LSM Server bootstrap backup.
When you initiate an RMAN restore request, the MM API translates the object names requested by RMAN into a format understood by the LSM Server and forwards it to the LSM Server. The LSM Server searches its online media index for the media containing the requested data objects. It reads the media and passes the data back to the Oracle8 Server process, which writes the Oracle data to the disk.
Introduction 1-11

Additional Legato Documentation
Additional Legato DocumentationTo take best advantage of the information in this Legato Storage Manager Administrator’s Guide, use it in conjunction with the information available in the following documentation.
UNIX Online Help
The UNIX version of the LSM Administrator GUI includes online help. This online help contains specific information about the GUI, including context-sensitive help in each window that describes the purpose of the window and the information to enter in each field in the window. Other help topics describe LSM features and provide the step-by-step instructions for carrying out LSM functions with the GUI.
To access the online help, select the Help menu displayed in the GUI. There are four choices:
■ On Window provides context-sensitive help about the current window.
■ On Topic supplies a list of help topics from which to choose.
■ On Help gives information about how to use the online help system itself.
■ On Version provides information about which version of LSM is installed on your system.
The UNIX version of the LSM Administrator GUI also provides Help buttons in most of the dialog boxes. Clicking the Help button in an LSM dialog box displays the help topic associated with that LSM feature.
UNIX Online Manual PagesThe manual (man) pages provided with the UNIX version of LSM are a reference for the syntax and function of the LSM commands you issue from the command line. To view a man page, you can perform the following steps:
Note: Since the online help component in LSM is the same as that in the Legato NetWorker upgrade product, you might see “NetWorker” references in the online help. For any reference to “NetWorker,” substitute “LSM.” Also, note that several features documented in the online help are not supported by LSM — such as authorization and registration, archiving, cloning, and using jukeboxes (or autochangers).
1-12 Legato Storage Manager Administrator’s Guide

Additional Legato Documentation
1. Verify that the MANPATH environment variable includes the path to where you installed the LSM man pages.
2. At the shell prompt, enter the man command plus the name of the LSM command. For example, to view the man page for the nsrmm command, you can type the following man command:
man nsrmm
To print a copy of the entire collection of LSM man pages, enter the troff command at the shell prompt with the options shown in this example:
troff -t -man ‘nsr_man -l‘| lpr -t -P printer-name
The command for your machine might vary (for example, your print command might be lp instead of lpr ), depending on the operating system and the version of PostScript software you have installed.
Windows Online Help
The Windows NT version of the LSM Administrator GUI has an extensive online help component. You can access the online help both by selecting Help Topics from the Help menu and by clicking the Help button in dialog boxes.
Click the Help Topics toolbar button or select Help Topics from the Help menu to display the Help Topics dialog box, common to most online help systems running on Windows computers. The Help Topics dialog box provides a contents tab, index tab, and keyword search feature to help you find the help topic you need.
Click the Contents tab (the default tab) to display a table of contents organized into books and topics. Double-click a book to display the additional books and/or topics the book contains. Double-click a topic to open the Help dialog box in the upper right corner of your computer screen. You can move and resize the Help dialog box.
Note: Since the online help component in LSM is the same as that in the Legato NetWorker upgrade product, you might see “NetWorker” references in the online help. For any reference to “NetWorker,” substitute “LSM.” Also, note that several features documented in the online help are not supported by LSM — such as authorization and registration, archiving, cloning, and using jukeboxes (or autochangers).
Introduction 1-13

Additional Legato Documentation
Click the Index tab to display a scrollable index of keywords and terms, much like an index found in a printed book. Double-click the keyword or term that pertains to the subject on which you want help. If there is only one relevant topic, it automatically appears. If there are multiple topics, you can select the one you want to see.
Click the Find tab to display a help wizard that leads you through a process to find help topics based on keywords you enter.
LSM also provides Help buttons in most of its dialog boxes. Click the Help button in an LSM dialog box to display the help topic associated with that LSM feature.
When a help topic appears on your computer screen, you can move and resize the window just like with any other Windows help topic. The Help window also contains buttons that enable you to print the topic, view the previous topic, or return to the Help Topics dialog box.
‘How Do I’ HelpThe ‘How’ Do I help feature provides online information for commonly used LSM functions. ‘How Do I’ help is similar to Windows online help and has its own Help Topics dialog box. Select ‘How Do I’ from the Help menu to access ‘How Do I’ help.
‘What Is This’ HelpThe ‘What Is This’ help feature on many Windows NT and Windows 95 applications provides a short description of each feature in the LSM Administrator GUI program. You access this help by clicking a button, icon, or other graphical feature with the right mouse button. Right-click the mouse on these items to display a pop-up menu next to the pointer. Here you can select the ‘What Is This’ command, as well as other commands. Selecting the ‘What Is This’ command displays a pop-up box that contains information about what the item is and what actions you can take with it.
‘Field’ HelpThe ‘Field’ Help feature appears when you click the ‘Field’ Help button in certain dialog boxes. Because of LSM’s architecture, the items that appear in a dialog box can vary depending on the configuration of the LSM Server to which you are connected. To meet the dynamic nature of these dialog box contents, ‘Field’ Help provides a dynamic help system based on the items you see on screen.
Dialog boxes with ‘Field’ Help still have buttons for accessing the Windows online help. The online help topic for a dialog box indicates whether you need to access ‘Field’ Help to view a description of the dialog box contents.
1-14 Legato Storage Manager Administrator’s Guide

Additional Legato Documentation
Windows Command-Line Utilities HelpAvailable with the Windows NT version of LSM, the Command-Line Utilities Help files provide highly technical information about certain LSM commands. Some of these commands are not represented in the Windows interface. In some cases, the Command-Line Utilities Help files provide additional information about using LSM hidden attributes.
The Command-Line Utilities Help files are HTML files in the DOCS\CLUHELP subdirectory on the Oracle7 for Windows NT or Oracle8 for Windows NT CD-ROM that also contains LSM. These files are not installed on your local disk during Oracle or LSM installation. You must access them directly from the CD-ROM.
To view the Command-Line Utilities Help files, follow these steps:
1. Load the Oracle7 for Windows NT or Oracle8 for Windows NT CD-ROM in the appropriate drive.
2. Start your favorite web browser and select the Open File command or equivalent.
3. Select INDEX.HTM in the DOCS\CLUHELP subdirectory to start the Command-Line Utilities Help files home page.
4. Follow the instructions on the home page to obtain information about a specific command utility.
Note: You must use a web browser to view these files. Do not attempt to use the Acrobat Reader.
Introduction 1-15

Additional Legato Documentation
1-16 Legato Storage Manager Administrator’s Guide

Preparing to Use
2
Preparing to Use LSMThis chapter gives a more detailed description of the internal components of Legato Storage Manager (LSM) and their organization as a set of resources and attributes. It describes how LSM uses these components and how you can configure them in preparation for Oracle backup and restore operations. This chapter also provides information about using the LSM Administrator GUI program.
The information presented in this chapter assumes that you have already installed the LSM software on your Oracle Server. For information about installing LSM, refer to the Oracle installation guide for your particular system, as shipped with your LSM product.
Major Topics:■ LSM Architecture
■ Overview of LSM Operations
■ Using the LSM Administrator GUI
■ Configuration Roadmap
■ Post-Installation Steps
■ Configuring LSM Resources
LSM ArchitectureAs explained in Chapter 1, “Introduction,” LSM has a set of features configured for Oracle data storage management service. The process of installing LSM on the Oracle Server preconfigures LSM’s features to default settings that enable you to start using LSM for Oracle data storage operations with a minimum of additional configuration.
LSM 2-1

LSM Architecture
The LSM Server can use its programs for Oracle data storage operations only if all the required LSM configurations are in place—most of the required configurations are already in place immediately after LSM installation. The LSM client-server technology uses a Resource Allocation Protocol (RAP) whereby the LSM Server maintains its configurations as a set of internal resources. There are several different types of internal LSM resources (for example, client, server, device, and pool types of resources).
LSM configuration is a process of creating, modifying, or removing LSM resources by using the LSM Administrator GUI or available LSM commands. Each LSM resource also has its own components known as attributes, to which you assign values.
For example, the value of the Name attribute of an LSM resource defines the name of that particular resource. When you create a new LSM resource, you often need to assign a unique name to that resource by assigning a unique value to its Name attribute.
On UNIX systems, the graphical user interface analogy for an LSM resource is a window; the analogy for a resource attribute is a field, radio button, or check box in the window. On Windows NT systems, a resource can be represented by a dialog box and its attributes by the various text boxes, drop-down lists, and similar components in that dialog box.
The remainder of this chapter describes LSM configuration in more detail. Before you can use a device attached to the LSM Server for Oracle backups, you must have a device type of resource for it in the LSM Server. An important step in LSM configuration for Oracle operations is creating the required resource in the LSM Server for each attached storage device. By modifying the set of resources maintained by LSM, you can modify LSM performance and functionality.
The LSM Server maintains all the information about its configured resources in an online resource database file, as shown in Figure 1–1.
2-2 Legato Storage Manager Administrator’s Guide

LSM Architecture
Table 2–1 lists the main types of resources that LSM uses for Oracle data storage management.
The resource types listed in Table 2–1 are the only ones you need to configure to enable full LSM functionality for Oracle data storage. LSM does not use or support all the resource types available with Legato NetWorker. For example, LSM does not support the autochanger, registration, and schedule types of resources.
Some of the resources described in Table 2–1 exist as attributes of the other resources. These interdependent relationships affect the order in which you implement the configuration of the LSM resources because LSM requires component resources to be defined before they can be listed as attributes of other resources.
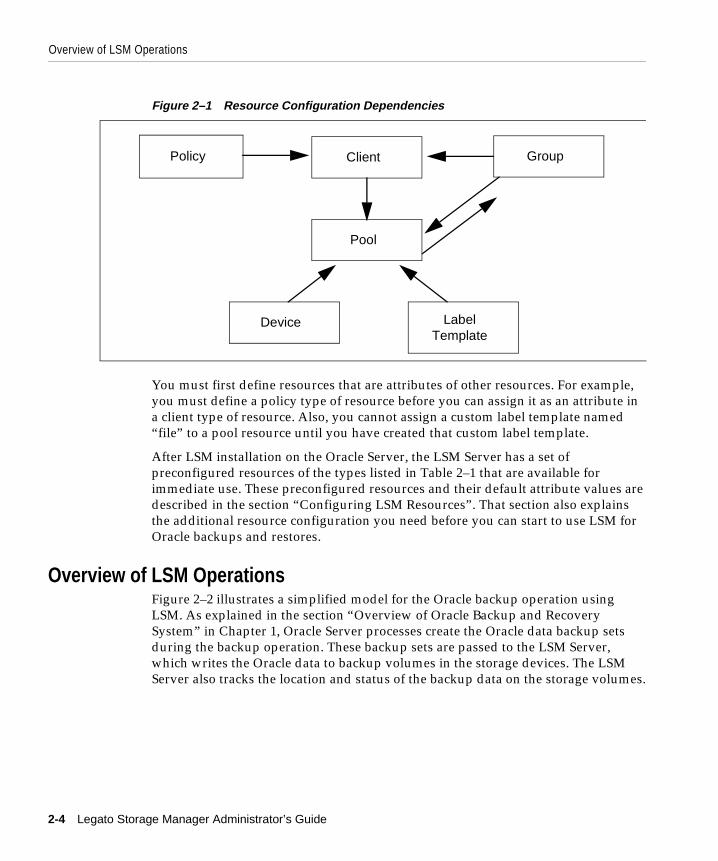
Figure 2–1 shows the dependencies between the LSM resources. The resources with outgoing arrows are both independent resources themselves and attributes of the resources where the arrows end.
Table 2–1 LSM Resource Types
Resource Type Function
Client Identifies the Oracle Server as the LSM backup client and specifies the policies that LSM uses for the Oracle backup data management.
Device Describes a storage device connected to the Oracle Server that LSM can use for the Oracle backup and restore operations.
Group Lists the specifications for the automatic LSM Server bootstrap backup.
Label Template Provides instructions for LSM to use in creating a label for a storage volume. Each storage volume belongs to a volume pool (represented by a pool type of resource), and each pool has a specific label template associated with it.
Policy Names and defines a time period used for managing the backup data life cycle.
Pool Names a collection of backup volumes and specifies the criteria that Oracle data must meet to be written to this named collection.
Server Identifies the LSM Server characteristics. (Only one server type of resource can exist per LSM Server.)
Preparing to Use LSM 2-3
Overview of LSM Operations
Figure 2–1 Resource Configuration Dependencies
You must first define resources that are attributes of other resources. For example, you must define a policy type of resource before you can assign it as an attribute in a client type of resource. Also, you cannot assign a custom label template named “file” to a pool resource until you have created that custom label template.
After LSM installation on the Oracle Server, the LSM Server has a set of preconfigured resources of the types listed in Table 2–1 that are available for immediate use. These preconfigured resources and their default attribute values are described in the section “Configuring LSM Resources”. That section also explains the additional resource configuration you need before you can start to use LSM for Oracle backups and restores.
Overview of LSM OperationsFigure 2–2 illustrates a simplified model for the Oracle backup operation using LSM. As explained in the section “Overview of Oracle Backup and Recovery System” in Chapter 1, Oracle Server processes create the Oracle data backup sets during the backup operation. These backup sets are passed to the LSM Server, which writes the Oracle data to backup volumes in the storage devices. The LSM Server also tracks the location and status of the backup data on the storage volumes.
Client
Pool
Policy
Label Template
Device
Group
2-4 Legato Storage Manager Administrator’s Guide

Overview of LSM Operations
Figure 2–2 Data Backup Flow
The LSM Server tracks the location and status of the Oracle backup data by means of two special online index files that it maintains—the client index and media index. The client index file contains a database of information with entries for each Oracle data object backed up. The media index file contains a database of indexed entries tracking the location and content of each storage volume managed by LSM. The media index includes information about the life cycle status of all the data on each Oracle backup volume.
At the end of an Oracle backup, the LSM Server adds entries for that particular backup to the client index and media index files. To the client index, it adds information about the specific Oracle data that was backed up. To the media index, it writes entries specifying the location of the backup volume and the Oracle data written to that volume.
The LSM Server is also preconfigured to perform a special automatic backup—the LSM Server bootstrap backup—every day at 3:33 a.m. The bootstrap is a special backup set essential for disaster recovery procedures on the Oracle Server. The bootstrap consists of the following three files from the LSM Server:
■ Client index
■ Media index
■ Resource database
As mentioned in the section “LSM Architecture”, the LSM Server can only perform the Oracle backup operations after you have properly configured the required LSM resources. A client type of resource must exist identifying the Oracle Server as the LSM backup client. You must configure a server resource, identifying the LSM
Backup Sets
Oracle Server LSM Server Storage Medium
Backup data tracking structures
Data Flow
Client IndexInformation
Media Index
Information
Backup Volume
Preparing to Use LSM 2-5

Overview of LSM Operations
Server and specifying the parallelism or maximum number of concurrent data streams. The server resource also specifies the users who belong to the LSM Administrator list—those users having sufficient privilege to modify the LSM configuration. You must have a separate device type of resource configured for each Oracle backup device used by the LSM Server. And, you must have a storage volume labeled and mounted in each device to be used for backup. When labeling a volume, LSM assigns the volume to a volume pool, for which a pool type of resource must exist.
The section “Configuring LSM Resources” provides more information about the preconfigured and recommended attribute settings of these required LSM resources.
Two important attributes of the client resource are the browse policy and retention policy. The LSM Server uses the browse policy and retention policy for managing the Oracle backup data life cycle. These policies specify how long the backed up Oracle data is available for recovery. After LSM installation, the LSM Server contains a preconfigured client resource for the Oracle Server that has the browse policy attribute set to a year and the retention policy set to ten years. Legato recommends that you do not modify either of these policy attributes in the client resource.
The browse policy determines how long the client index file on the LSM Server maintains the information about an Oracle backup. As long as the browse policy period for a particular backup set has not expired, the entry for that backup remains in the client index. And, as long as there is an entry for the backup in the client index, you can use the Oracle backup/restore utility— either Enterprise Backup Utility (EBU) in Oracle7 on Windows NT or Recovery Manager (RMAN) in Oracle8—to restore the backup set from the volumes managed by LSM. Using the Oracle utility, you can restore individual Oracle data objects or an entire database and reconstruct an Oracle database during a recover session.
After the browse policy period for an Oracle backup set is exceeded, LSM automatically removes the entry for that backup from the online client index. When the entry has been removed from the client index, you cannot restore the backup using the Oracle backup/restore utility. However, as long as an entry for the backup still exists in the media index, you can restore the Oracle backup set from its storage volume using the LSM program scanner.
The retention policy determines the minimum period of time that the media index file maintains information about Oracle backup data. The media index tracks the Oracle backup sets on the storage volumes. The retention policy is different from the browse policy in that its expiry does not trigger the automatic removal of entries from the media index.
2-6 Legato Storage Manager Administrator’s Guide

Overview of LSM Operations
After the retention policy period for an Oracle backup save set is exceeded, LSM marks the status of the backup save set “recyclable” but retains its entry in the media index. When all the backup sets on a volume are marked “recyclable,” LSM changes the volume’s mode to “recyclable.” The volume is then eligible for automatic relabeling by LSM. LSM removes the entries for a volume from the media index only when either the volume is relabeled or you manually remove the volume’s entries using the Volumes window of the LSM Administrator GUI.
You can still use the scanner program to recover a backup set that has passed its browse policy and retention policy as long as an entry for the backup exists in the media index.
For example, if you mount a “recyclable” volume in a tape device and enable the “auto media management” attribute in the device’s LSM resource, the volume is available for relabeling and reuse by LSM. If LSM relabels the volume, all entries for the volume’s original backup sets are removed from the media index. When a volume is relabeled, you can no longer recover the data on the volume. For more information about the auto media management feature, see the section “Auto Media Management for Tape Devices”in Chapter 3.
All entries for a volume’s backup save sets are also removed from the media index when you manually remove the volume from the LSM volume inventory. You can perform this type of manual removal within the Volumes window of the LSM Administrator GUI. For more information about using the Volumes window, see “Using the Volumes Window” in Chapter 3.
Note that you can still use the scanner program to recover the data on a manually removed volume. The scanner program can retrieve the information needed to re-create entries in either the client index or the media index, or in both. If the scanner program re-creates entries in the client index, a user with the proper permissions can restore data through the Oracle backup/restore utility. If the scanner program re-creates entries in the media index, a user with LSM administration privileges can recover data only with scanner.
Note: When LSM relabels a volume for reuse within the same volume pool, the volume identification (the volume name as it appears in the volume label) remains unchanged. Even so, after relabeling, the information that LSM needs to locate and access all existing data on the volume is destroyed and the scanner program is no longer an option. At this point, the volume is ready for new data. All existing data is inaccessible and is overwritten.
Preparing to Use LSM 2-7

Overview of LSM Operations
The scanner man page contains information about using the scanner program with LSM on UNIX. Run the man scanner command to access the information. For details about using the scanner program with LSM on Windows NT, refer to scanner in the Command-Line Utilities Help provided with LSM on Windows NT. Information about using the Command-Line Utilities Help is available in the section “Windows Command-Line Utilities Help” in Chapter 1.
See Appendix A, “Scanner” for more information on scanner.
In its system of tracking the status of Oracle storage volumes and the backup save sets on them, LSM assigns a “status” value to each backup save set (or “save set”) and a “mode” value to each storage volume.
2-8 Legato Storage Manager Administrator’s Guide

Overview of LSM Operations
Table 2–2 shows the possible values that LSM can assign for save set status.
As long as a save set remains in the client index, its status is “browsable.” After LSM removes the save set from the client index, its status changes from “browsable” to “recoverable,” and recovery of the save set cannot be performed directly with the available Oracle utility.
The status of a save set remains “recoverable” until its retention policy expires. Then, the save set’s status changes from “recoverable” to “recyclable.” When all the
Table 2–2 Save Set Status Values
Status Value Meaning Description
abort aborted The backup for this save set was aborted manually, or a crash occurred during the operation. This save set is considered immediately eligible for recycling.
brows browsable The Browse policy for this save set has not expired. The files in this save set retain entries in the client index. You can restore all the files using Oracle’s utility.
inpro in progress This save set is currently being backed up.
recov recoverable The Browse policy for this save set has expired but the Retention policy has not expired. The files in this save set no longer have entries in the client index but do have entries in the media index. You can only restore the files with the scanner program.
recyc recyclable The Retention policy for this save set has expired, but the files in this save set still have entries in the media index. You can only restore the files with the scanner program.
scann scanned-in The client index entry for this save set was restored with the scanner program. This entry remains in the client index and media index until you remove it manually.
susp suspect An attempt to restore this save set failed. The restore operation could not read all the blocks of the save set; for example, if there was a bad spot in the tape.
Preparing to Use LSM 2-9

Overview of LSM Operations
save sets on a volume change status to “recyclable,” the mode of the storage volume itself changes to “recyclable.” See Table 2–3 for the meanings of storage volume modes.
Although the status of a save set is either “recoverable” or “recyclable,” you can restore the save set from its storage volume by using the scanner program. Alternatively, you can use the scanner program to re-create a save set’s entries in the client file index and enable file recovery using the Oracle utility.
Table 2–3 lists the possible modes for a storage volume tracked by LSM and their definitions within LSM.
When you run the LSM Administrator GUI and select the Volumes window, you can see the list of all the Oracle backup volumes and their modes, as well as the save sets on each volume and their status. For details about how to run the LSM Administrator GUI, see the next section, “Using the LSM Administrator GUI”. For more information about using the Volumes window, see “Using the Volumes Window” in Chapter 3.
Table 2–3 Storage Volume Modes
Mode Value Meaning Description
appen appendable The volume contains empty space. Oracle data that meets the criteria for the pool to which the volume belongs can be backed up to the volume.
man manual recycle
The volume is exempt from automatic recycling. You can only change the mode manually using the Volumes window of the LSM Administrator GUI.
(R) read-only The save sets on the volume are considered read-only. You can only change the mode manually using the Volumes window of the LSM Administrator GUI.
recyc recyclable The volume is eligible for automatic recycling. (LSM must relabel the volume before it can overwrite it.)
2-10 Legato Storage Manager Administrator’s Guide

Using the LSM Administrator GUI
Chapter 3, “Media Management” also contains more information about how LSM manages storage volumes for Oracle backups.
Using the LSM Administrator GUIAs explained in the “Overview of LSM Features” in Chapter 1, the LSM Administrator GUI is the graphical user interface for connecting to and configuring the LSM Server and its attached Oracle storage devices and volumes. You can also use the LSM Administrator GUI to monitor the status of Oracle backup and restore operations as well as the status of Oracle backup volumes and the backup sets stored on them.
The LSM Administrator GUI is installed along with the LSM Server during the LSM installation procedure on the Oracle Server. In addition, you can install and run the LSM Administrator GUI on a separate Windows NT or Windows 95 platform on the same network as the Oracle Server.
The following two sections explain how to use the LSM Administrator GUI on either a UNIX or Windows system. To run the LSM Administrator GUI on the same UNIX system as the LSM Server, see “LSM Administrator GUI on UNIX”. The section “LSM Administrator GUI on Windows” contains information about using the LSM Administrator GUI on a Windows system to connect to the LSM Server, where the LSM Server is on either the same Windows system or a different UNIX or Windows platform.
Note: Legato recommends that you do not modify the existing Browse policy and Retention policy attributes of the client resource in the LSM Server from their default values of Year and Decade, respectively. The browse policy period of a year ensures that the save sets retain a “browsable” status in LSM and you can restore Oracle backup data using the Oracle backup/restore utility for at least a year. Furthermore, with the retention policy of a decade, the storage volumes do not become “recyclable” for at least ten years.
Note: Using the LSM Administrator GUI to administer a non-LSM (i.e., regular NetWorker) Server on the same network is not supported. You can only use the LSM Administrator GUI to configure and manage an LSM Server.
Preparing to Use LSM 2-11

Using the LSM Administrator GUI
LSM Administrator GUI on UNIXIf you installed LSM on a UNIX system with your Oracle Server, you can run the LSM Administrator GUI on that UNIX system by performing the following steps:
1. Become root user on the Oracle Server.
2. Enter the nwadmin command at the shell prompt.
The main LSM Administrator window is displayed as shown in Figure 2–3.
Figure 2–3 LSM Administrator on UNIX
The nwadmin man page contains detailed information about running the nwadmin program on UNIX. Use the man nwadmin command to access the information.
2-12 Legato Storage Manager Administrator’s Guide

Using the LSM Administrator GUI
The nwadmin command is an X Window System application that provides a graphical user interface to administer and monitor LSM servers. To start the nwadmin program, become root on the machine you are currently working from and enter the following command at the shell prompt:
nwadmin [ -s server-name ]
If you do not specify a server-name with the -s command option, the nwadmin command uses the server selection rules described in the nsr(1m) man page. When multiple LSM servers are accessible, you can select them from within the graphical user interface; simply click the Change Servers speedbar button and enter the host ID of the server you want to access.
The main window of the nwadmin graphical user interface display provides status information similar to that provided by the nsrwatch program for character-based displays.
For more information on how to use the nwadmin graphical user interface, select the Topics choice from the Help menu displayed in the main window. A list of topics appears for you to scroll through and access.
Only users who have administrative privileges can create or apply configurations. Because only root@server-name has LSM administrative privileges by default, you must become root on the LSM server machine before you start any LSM administration programs or tasks. You can add other users to the list of authorized LSM administrators later.
If you have trouble running the LSM Administrator GUI on UNIX, it could be due to a network problem on your system. See Appendix B, “Client Server Communications” for troubleshooting advice.
For more information about the UNIX version of the LSM Administrator GUI, you can access its online help component, as described in “UNIX Online Help” in Chapter 1 of this guide.
Now, proceed to “Configuration Roadmap”.
LSM Administrator GUI on WindowsTo ensure that you can successfully start the LSM Administrator GUI on a Windows system, fulfill the following TCP/IP network requirements:
■ Add the LSM Server name to the local HOSTS file in %SystemDrive%\system32\drivers\etc or the Domain Name Server (DNS) file that contains the names and aliases of the servers (hosts) on your network. If you are using DNS, you must correctly configure reverse lookup.
Preparing to Use LSM 2-13

Using the LSM Administrator GUI
■ If the LSM Server is a Dynamic Host Configuration Protocol (DHCP) client, it must use a reserved address.
■ If you are using DHCP with dynamic addresses, you must synchronize DHCP with DNS.
■ We suggest that you use the same name for the LSM Server’s TCP/IP hostname and the Windows NT machine name.
To run the LSM Administrator GUI on the Windows system, perform one of the following steps:
■ Select the LSM Administrator icon from the Taskbar.
■ Double-click the LSM Administrator icon from the Program Manager.
2-14 Legato Storage Manager Administrator’s Guide

Using the LSM Administrator GUI
The main NT LSM Administrator window is displayed as shown in Figure 2–4.
Figure 2–4 LSM Administrator on Windows
Preparing to Use LSM 2-15

Configuration Roadmap
If the LSM Server is on a different platform from the Windows system running the LSM Administrator GUI, connect to the LSM Server by means of one of the following methods:
■ Right-click a server icon in the Network or Messages window and select Connect to This Server from the pop-up menu.
■ Click the Connect to Server toolbar button to open the Connect To Server dialog box, enter the server name in the Server text box, and click OK.
When the connection is successful, the LSM Administrator program displays a Server window for the LSM Server.
If you have any difficulty starting the LSM Administrator GUI on your Windows system, consider the following possibilities:
■ LSM cannot resolve the LSM Server name into a network address.
■ You are attempting to connect to a machine not currently running the LSM Server software.
■ The LSM Server to which you are attempting to connect is unreachable or down.
If you have problems establishing the connection to the remote LSM Server, troubleshooting information is also available in Appendix B, “Client Server Communications”.
For more information about using the Windows version of the LSM Administrator GUI, you can access its extensive online help component, as described in “Windows Online Help” in Chapter 1.
Now, proceed to “Configuration Roadmap”.
Configuration RoadmapYou must properly configure the LSM Server by means of the following steps before you can use LSM for Oracle data storage management:
1. Install LSM according to the instructions in the Oracle installation guide for your particular system. You can install LSM during the process of installing your Oracle Server.
2. Perform essential post-installation procedures, as outlined in the section “Post-Installation Steps”.
3. Customize the server resource in LSM to modify the list of LSM Administrators as required. Ensure that the required users have administrative privileges on
2-16 Legato Storage Manager Administrator’s Guide

Post-Installation Steps
both the UNIX or Windows NT machine running the LSM Server software and any Windows NT or Windows 95 machine running the LSM Administrator GUI.
4. Configure an LSM device resource for each storage device attached to the LSM Server used for Oracle backup and restore operations.
5. Customize any required volume pool resource and corresponding label template resource in the LSM Server.
6. Label and mount your storage volumes in the required devices for Oracle backups.
7. Verify that the LSM client and Default group resources are properly configured for the automatic daily LSM Server bootstrap backup.
After you have finished installing LSM, see the next section “Post-Installation Steps” for important information about additional procedures required on your particular system.
Post-Installation StepsAfter installing LSM, follow the procedures in one or both of the following two subsections if required:
■ If you have installed LSM on a Windows NT system, refer to the following section “Setting the System Path on Windows NT” for important additional information.
■ If you will be setting up your LSM Server as a client of one or more NetWorker servers for the purpose of regular filesystem backup, refer to the instructions in the section “Setting Up Regular Filesystem Backup”.
After you have completed any required post-installation steps, proceed to the section “Configuring LSM Resources”.
Setting the System Path on Windows NTOn Windows NT, you must set the system path to enable proper Oracle backup and restore operations. After you have installed LSM on a Windows NT system, add the LSM installation directory to the system search path by following these steps:
1. Double-click My Computer.
2. Double-click Control Panel.
Preparing to Use LSM 2-17

Configuring LSM Resources
3. Double-click System.
4. In the System Properties window, select Environment.
5. Select Path from the System Variables list box.
6. Add c:\win32app\nsr\bin to the path value.
7. Select Set.
8. Select OK.
9. Reboot the Windows NT system.
Setting Up Regular Filesystem BackupBefore you configure your LSM Server as a client of a NetWorker server for regular filesystem backup, you need to enable the filesystem backup by adding the name of the NetWorker server to the proper servers file on the LSM Server. Follow these steps for each NetWorker server that will be used to back up the LSM Server’s filesystem:
1. On the LSM Server, create the required servers file if it does not yet exist. On a UNIX system, the file is named /nsr/res/servers; on Windows NT, the required file is c:\win32app\nsr\res\servers.
2. Add the name of the NetWorker server to the end of the servers file. The NetWorker server name must appear on a separate line in the file, as the fully-qualified machine name (for example, rebel.legato.com) or an alias (for example, rebel).
3. Stop and restart the NetWorker Remote Exec service on the LSM Server.
Note that if you do not perform these steps first, you will receive the following error when you attempt to configure the LSM Server as a client of the Networker server:
Can’t access LSM_server_name due to network problem, missing client nsrexecd, or incorrect /.rhosts file, re-apply to create anyway
Configuring LSM ResourcesThe LSM Server contains a number of preconfigured resources after installation on the Oracle Server machine; the two main ones are the client resource and server resource. The section “LSM Architecture” contains general information about how LSM uses its system of internal resources and attributes. The attribute values set in
2-18 Legato Storage Manager Administrator’s Guide

Configuring LSM Resources
the client resource and server resource determine how the LSM Server and Oracle Server communicate during Oracle operations.
You can view and configure LSM resources and their attribute settings by means of the LSM Administrator GUI. For more information about running the GUI, see “Using the LSM Administrator GUI”. If the LSM Administrator GUI is on a Windows system separate from the Oracle Server, remember to connect to the LSM Server in the GUI by one of the methods outlined in “LSM Administrator GUI on Windows”.
Use the information in the remainder of this chapter to properly configure your LSM Server for Oracle backup and restore operations.
Client ResourceThe LSM Server contains a preconfigured client resource for the Oracle Server. You cannot modify any of the attribute settings for this preconfigured client resource.
To view the client resource configuration in the LSM Administrator GUI, open the Clients window by one of the following methods, depending on the type of system running the GUI:
■ On a UNIX system, select Client Setup from the Clients pull-down menu in the main LSM Administrator window.
■ On a Windows system, click the Configure tab in the Server window (of the main Administrator window) to make the Configure window active, and then click Manage Clients to open the Clients window.
The Clients window lists only the one client resource having the name of the Oracle Server. On a UNIX system, the Clients window also shows all the attribute settings of the client resource.
Preparing to Use LSM 2-19

Configuring LSM Resources
On a UNIX system, the Clients window is displayed as shown in Figure 2–5.
Figure 2–5 Clients Window on UNIX
On a Windows system, the Clients window does not automatically show the attribute settings of the client resource; you must perform the following additional steps to see the client’s attributes:
1. In the Clients window, right-click the icon of the LSM client, and select Edit from the pop-up menu to open the Edit Client dialog box.
2. In the Edit Client dialog box, the General (default) tab shows the client resource attributes used by the LSM Server for operations on the Oracle Server. Click Field Help to learn more about each attribute shown.
2-20 Legato Storage Manager Administrator’s Guide

Configuring LSM Resources
The Edit Client dialog box on a Windows system, listing all the attributes of the client resource, is displayed as shown in Figure 2–6.
Figure 2–6 Edit Client Dialog Box on Windows
The Name field shows that the Name attribute is set to the hostname of the Oracle Server. The Browse policy attribute is set to a Year, and the Retention policy is set to a Decade. Use of these policies for management of the Oracle backup data is described in the “Overview of LSM Operations”.
The Group attribute must be set to Default for proper configuration of the automatic daily LSM Server bootstrap backup. For more information on the bootstrap backup configuration, see “Automatic Bootstrap Backup” in Chapter 4.
Preparing to Use LSM 2-21

Configuring LSM Resources
As mentioned in the section “LSM Architecture”, the LSM Server does not use all of the attributes represented by the fields in the Clients window (UNIX) or Edit Client dialog box (Windows) for the client resource.
Server ResourceThe LSM Server also contains a preconfigured server resource with attribute settings that influence the performance and security of the Oracle backups. Unlike the preconfigured client resource, you can modify one of the attribute settings of this server resource—the Administrator attribute setting.
To view the server resource configuration in the LSM Administrator GUI, open the Server window (UNIX) or Set Up Server dialog box (Windows) by one of the following methods, depending on the type of system running the GUI:
■ On a UNIX system, select Server Setup from the Server pull-down menu in the main LSM Administrator window.
■ On a Windows system, click the Configure tab in the Server window (of the main Administrator window) to make the Configure window active, and then click Set Up Server to open the Set Up Server dialog box. The General (default) tab shows the server resource attributes of interest.
2-22 Legato Storage Manager Administrator’s Guide

Configuring LSM Resources
On a UNIX system, the Server window is displayed as shown in Figure 2–7.
Figure 2–7 Server Window on UNIX
Preparing to Use LSM 2-23

Configuring LSM Resources
The Set Up Server dialog box on a Windows system shows all the attribute values for the server resource, as shown in Figure 2–8.
Figure 2–8 Set Up Server Dialog Box on Windows
2-24 Legato Storage Manager Administrator’s Guide

Configuring LSM Resources
The Server window on UNIX or Set Up Server dialog box on Windows lists the attribute settings of the server resource. The only attribute in this server resource that you can modify is the Administrator attribute. The main attributes of the server resource are as follows:
■ Name
This attribute lists the hostname of the LSM Server.
■ Parallelism
This attribute sets the maximum number of backup data streams that the LSM Server sends to the attached backup devices at any one time. The LSM Server can write up to four simultaneous data streams. Backing up multiple data streams simultaneously increases the efficiency of the storage device operations.
■ Administrator
Although any user can view the LSM Server’s resource settings, only users specified in the Administrator attribute can modify the LSM Server configuration. The initial default setting of this attribute is as follows, where hostname is the LSM Server machine name:
root@hostname (UNIX)
Administrators@hostname (Windows NT)
The section “Specifying LSM Administrators” explains the procedure for modifying the list of users in the Administrator attribute.
Specifying LSM AdministratorsThe only users with sufficient privileges to modify the LSM Server’s resource configurations are LSM Administrators—those users specified in the Administrator attribute of the server resource. On a UNIX platform, the Administrator attribute of the server resource is initially set to root@hostname. LSM on Windows NT initially sets the Administrator attribute to Administrators@hostname, so that members of the Administrators group are set up as LSM Administrators by default.
By definition, only an LSM Administrator can change the attributes of the LSM Server’s resources. Only an LSM Administrator can grant LSM Administrator privileges to other users (or user groups on Windows NT) and change or delete entries in the LSM Administrator list.
To enable proper LSM operations, be sure to include the name of the "oracle owner" in the Administrator list of the server resource in the LSM Server configuration. For example, if the "oracle owner" name is missing from the Administrator list, you can
Preparing to Use LSM 2-25

Configuring LSM Resources
encounter one of the following two error messages in the dmo.messages file (the file /nsr/applogs/dmo.messages on UNIX or \win32app\nsr\logs\dmo.messages on Windows NT):
(128) NSR-sbt: 12/21/97 16:30:00 Sbtinfo: kitten.legato.com could not find backup file BBPD_2000 on server kitten.legato.com
or
(130) NSR-sbt: 12/21/97 16:32:00 Sbtremove: media index update failed for BBPD_2000 failed: user oracle on machine kitten is not on administrator list
After initial installation of LSM, the Administrator list contains only the following name by default, where "hostname" is the LSM Server machine name:
root@hostname (on UNIX)Administrators@hostname (on Windows NT)
If the "oracle owner" name (for example, "oracle@hostname") is not yet in the Administrator list, add the name to the list before attempting to run LSM.
Table 2–4 lists the types of names that are acceptable in the Administrator attribute of the server resource.
Table 2–4 LSM Administrator Names
Acceptable Usage Example
local group@hostname(only on Windows NT)
Administrators@empire
global group@hostname(only on Windows NT)
Domain Admins@empire
user@hostname jglen@empire
wildcard@hostname *@empire
2-26 Legato Storage Manager Administrator’s Guide
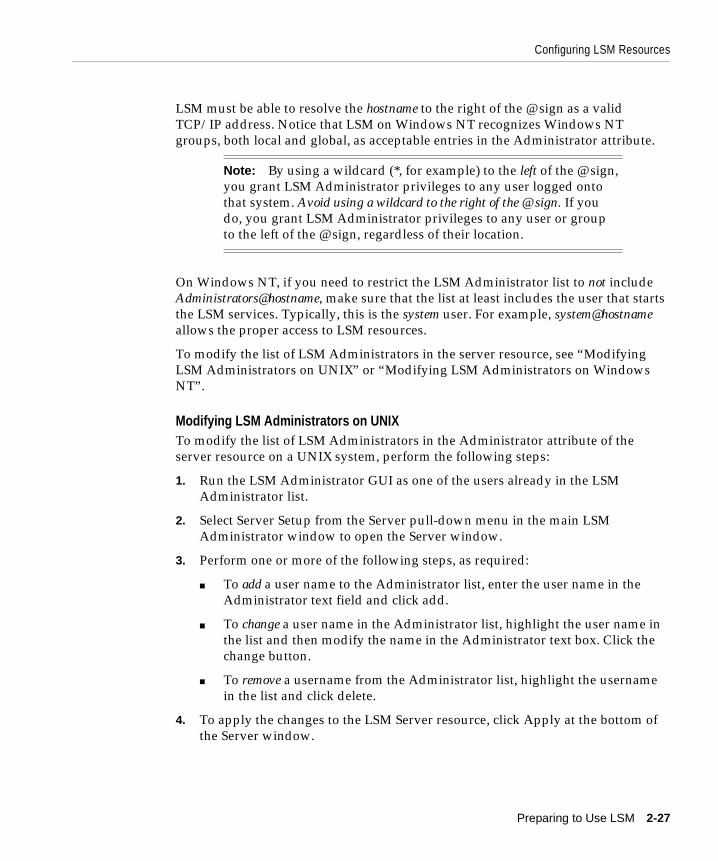
Configuring LSM Resources
LSM must be able to resolve the hostname to the right of the @ sign as a valid TCP/IP address. Notice that LSM on Windows NT recognizes Windows NT groups, both local and global, as acceptable entries in the Administrator attribute.
On Windows NT, if you need to restrict the LSM Administrator list to not include Administrators@hostname, make sure that the list at least includes the user that starts the LSM services. Typically, this is the system user. For example, system@hostname allows the proper access to LSM resources.
To modify the list of LSM Administrators in the server resource, see “Modifying LSM Administrators on UNIX” or “Modifying LSM Administrators on Windows NT”.
Modifying LSM Administrators on UNIXTo modify the list of LSM Administrators in the Administrator attribute of the server resource on a UNIX system, perform the following steps:
1. Run the LSM Administrator GUI as one of the users already in the LSM Administrator list.
2. Select Server Setup from the Server pull-down menu in the main LSM Administrator window to open the Server window.
3. Perform one or more of the following steps, as required:
■ To add a user name to the Administrator list, enter the user name in the Administrator text field and click add.
■ To change a user name in the Administrator list, highlight the user name in the list and then modify the name in the Administrator text box. Click the change button.
■ To remove a username from the Administrator list, highlight the username in the list and click delete.
4. To apply the changes to the LSM Server resource, click Apply at the bottom of the Server window.
Note: By using a wildcard (*, for example) to the left of the @ sign, you grant LSM Administrator privileges to any user logged onto that system. Avoid using a wildcard to the right of the @ sign. If you do, you grant LSM Administrator privileges to any user or group to the left of the @ sign, regardless of their location.
Preparing to Use LSM 2-27

Configuring LSM Resources
5. To exit the Server window, select Exit from the File pull-down menu.
Modifying LSM Administrators on Windows NTTo modify the list of LSM Administrators in the Administrator attribute of the server resource on a Windows NT system, perform the following steps:
1. Run the LSM Administrator GUI as one of the users already in the LSM Administrator list.
2. Click the Configure tab in the Server window (of the main Administrator window) to make the Configure window active.
3. Click Set Up Server to open the Set Up Server dialog box. The General (default) tab displays the Administrator attribute.
4. Perform one or more of the following steps, as required:
■ To add a user or group name to the Administrator list, enter the name in the Administrator list box.
■ To change a name in the list, highlight the name in the Administrator list box and type the modified name.
■ To remove a name from the list, highlight the name in the Administrator list box and press [Delete]. Do not remove all names from the list, especially do not remove system@hostname.
5. Click OK to apply the changes to the LSM Server resource and exit the Set Up Server dialog box.
Other LSM ResourcesBefore you can use LSM for Oracle backup and restore operations, you need to create a device resource for each device to be used by the LSM Server. In addition, you must label and mount a storage volume in each backup device. You can also use the LSM Administrator GUI for these volume operations. For details about configuration and management tasks involving the Oracle backup devices and volumes, see Chapter 3, “Media Management”.
Finally, you need to verify that the LSM client and Default group resources are properly configured for the automatic daily LSM Server bootstrap backup. For more information on configuring and running bootstrap backups, see “LSM Server Bootstrap Backups” in Chapter 4.
2-28 Legato Storage Manager Administrator’s Guide

Media Manage
3
Media ManagementThis chapter provides details about how to configure and manage the storage devices and volumes LSM uses for Oracle backup and restore operations. It explains how LSM sorts Oracle data onto volumes that are grouped into volume pools and how you can label and mount volumes in the storage devices in preparation for Oracle backups. It also reviews the procedures LSM uses to track Oracle storage volumes and manage the data on them.
Major Topics:■ Configuring Storage Devices
■ Using Volume Pools and Label Templates
■ Labeling and Mounting Storage Volumes
■ Auto Media Management for Tape Devices
■ Using the Volumes Window
■ Volume Operations
Configuring Storage DevicesAn Oracle storage device is the drive on the LSM Server that LSM uses to write data during an Oracle backup and to read data during an Oracle restore operation. Before LSM can recognize an attached storage device, you must configure a device resource for it in the LSM Server.
Keep the following LSM Server features in mind when you plan the configuration of the Oracle backup devices to be used by LSM:
■ Support for backup to tape devices, on either UNIX or Windows NT
■ Support for a maximum of four storage devices attached to the LSM Server
ment 3-1

Configuring Storage Devices
■ Support for a maximum of four Oracle data streams backing up simultaneously to the storage devices
■ No support for autochangers (jukeboxes)
■ No support for cloning
LSM supports the following types of storage devices:
■ Four millimeter (DAT) tape drives (4mm)
■ Eight millimeter tape drives (8mm)
■ Eight millimeter five GB (double-density) tape drives (8mm 5GB)
■ Digital linear tape drives (dlt)
The specific device models supported by LSM are:
■ Conner CTD-8000 (4mm)
■ HP SureStore 6000 (4mm)
■ Sony SDT 9000 (4mm)
■ Exabyte 8505 XL (8mm)
■ Sony SDX 300C (8mm)
■ Quantum DLT 4000
■ Exabyte Mammoth
HP-UX does not support Sony SDX 500C or DLT 7000.
You can configure up to a maximum of four storage devices on the LSM Server for Oracle backup and restore operations.
Note: When you configure a tape device, you must specify a no-rewind device name. When backing up to a tape volume, the LSM Server writes a file mark on the volume at the end of each backup and uses the position of that file mark to append data onto the volume during the next backup. If the device rewinds the volume at the end of a backup, the file mark position is lost and the existing data on the volume is overwritten during the next backup.
3-2 Legato Storage Manager Administrator’s Guide

Configuring Storage Devices
Device ResourcesDuring the LSM installation process on UNIX, you can specify up to four backup devices; LSM automatically creates the required device resource for each of those devices. LSM installation on a Windows NT system also includes the automatic configuration of an LSM device resource for a 4mm tape device. For details about LSM installation procedures, refer to the Oracle installation guide for your particular system.
If your LSM Server is installed on a Windows NT system, see the next section “Device Considerations on Windows NT”. Otherwise, proceed to “Preparing for Device Configuration”.
Device Considerations on Windows NTOn a Windows NT system, you need to use the Tape Devices program in the Windows NT Control Panel to install the device driver for a storage device before you configure the LSM resource for that device.
Only devices currently registered with the Windows NT Registry are available for use with LSM. To determine what devices are available, follow these steps:
1. Open an MS/DOS window.
2. Change to the LSM directory (%SystemDrive%\win32app\nsr\bin, by default).
3. Enter the following command at the system prompt to display all the devices currently available:
inquire
Devices that have a Registry entry of \\.\TAPE# are tape devices. Devices that have a Registry entry of \\.\PHYSICALDRIVE# are regular disk drives.
Some physical hard drives can also have a \\.\PHYSICALDRIVE# Registry entry but are not compatible with LSM. Any devices not listed, or listed without a Registry entry, are unavailable to LSM.
If a tape device does not appear in the Windows NT Registry, consider one of the following reasons:
■ The tape device is not properly installed.
■ The device driver is not properly installed.
■ The driver might not be compatible with your device. See the device manufacturer for information on the latest supported drivers.
Media Management 3-3
Configuring Storage Devices
Now, proceed to “Preparing for Device Configuration”.
Preparing for Device ConfigurationAfter you install the LSM Server, you can view, add, modify, or remove LSM device resources by means of the LSM Administrator GUI. You must have a separate LSM device resource configured for each attached Oracle storage device, up to a maximum of four device resources.
For details about running the LSM Administrator GUI, see “Using the LSM Administrator GUI” in Chapter 2. If the LSM Administrator GUI is on a Windows system separate from the Oracle Server, remember to connect to the LSM Server in the GUI by one of the methods outlined in “LSM Administrator GUI on Windows” in Chapter 2.
To view or modify the LSM device resource configurations in the LSM Administrator GUI, open the Devices window by one of the following methods, depending on the type of system running the GUI:
■ On a UNIX system, select Devices from the Media pull-down menu in the main LSM Administrator window.
■ On a Windows system, click the Configure tab in the Server window (of the main Administrator window) to make the Configure window active, and then click Devices to open the Devices window.
The Devices window lists each configured device on the LSM Server. On a UNIX system, the window also shows all the attribute settings of the device resource that is highlighted in the Devices scrolling list at the top of the window.
Note: You must run the LSM Administrator GUI as one of the users listed in the Administrator attribute of the server resource to be able to create, modify, or remove an LSM device resource. To simply view LSM resources, you do not need to run the GUI as an LSM Administrator.
3-4 Legato Storage Manager Administrator’s Guide

Configuring Storage Devices
On a UNIX system, the Devices window is displayed as shown in Figure 3–1.
Figure 3–1 Devices Window on UNIX
This example shows a single device listed in the Devices scrolling list. With the /dev/rmt/0hbn device name highlighted in the list, the resource attributes for the device with that name are displayed in the lower part of the window. The Media type attribute for the device is 8mm 5GB.
Media Management 3-5

Configuring Storage Devices
On a Windows system, the Devices window itself (shown in Figure 3–2) does not show the attribute settings of the device resources.
Figure 3–2 Devices Window on a Windows System
With the Devices window open in the LSM Administrator GUI, you can perform LSM device configuration operations as described next. If the LSM Administrator GUI is running on a UNIX system, see “Device Configuration on UNIX”. See “Device Configuration on Windows” if the GUI is on a Windows system.
3-6 Legato Storage Manager Administrator’s Guide

Configuring Storage Devices
Device Configuration on UNIXOn a UNIX system, the Devices window appears as shown in Figure 3–1. To view the attribute settings for any specific device, highlight the device name in the Devices scrolling list in the upper part of the window. The attributes for that device resource are then displayed in the lower part of the window.
If you attach a new Oracle backup device to the LSM Server, you need to create a new LSM device resource for it using the procedure in the next section “Adding a Device Resource on UNIX”. To modify an existing LSM device resource, see “Modifying a Device Resource on UNIX”. To remove an LSM device resource, see “Removing a Device Resource on UNIX”.
You must run the LSM Administrator GUI as one of the users listed in the Administrator attribute of the server resource to be able to create, modify, or remove a device resource. For more information about LSM Administrator privileges, see “Specifying LSM Administrators” in Chapter 2.
After you have properly configured an Oracle storage device in the LSM Server, the device name is displayed in the Devices section of the main LSM Administrator window, as shown in Figure 2–3.
After you have completed the required resource configuration tasks for your storage devices, see the section “Using Volume Pools and Label Templates” for information about using volumes in the devices.
Adding a Device Resource on UNIXTo create a new device resource in the LSM Server, perform the following steps:
1. In the Devices window, click the Create button under the Devices scrolling list.
2. In the Name field, enter the correct device pathname for the storage device.
3. For the Media type field, click the down arrow to the right of the field and select the correct type of media from the drop-down list.
4. For the Read only field, select Yes to specify that the device be used only for restoring Oracle data. Select No if the device is to be used for both backup and restore operations.
5. If the device resource is for a tape device, enable auto media management by selecting Yes for the final field. For more information about auto media management, see “Auto Media Management for Tape Devices”.
6. Click Apply at the bottom of the window to apply the device configuration settings.
Media Management 3-7

Configuring Storage Devices
Modifying a Device Resource on UNIXTo modify an existing LSM device resource, follow these steps:
1. In the upper part of the Devices window, highlight the appropriate device name in the Devices scrolling list.
2. Make the necessary changes to any of the following attribute fields:
■ Media type
■ Read only
■ Auto media management
3. Click Apply at the bottom of the window to apply the changes to the device resource configuration.
Removing a Device Resource on UNIXTo remove an LSM device resource, follow these steps:
1. In the upper part of the Devices window, highlight the appropriate device name in the Devices scrolling list.
2. Click the Delete button under the Devices scrolling list.
3. In the dialog box that pops up asking whether you are sure you want to delete the device, click OK.
Device Configuration on WindowsWhen you run the LSM Administrator GUI on a Windows system, the Devices window appears, as shown in Figure 3–2. To view the attribute settings for any specific device, right-click the icon of that device and select Edit from the pop-up menu. The Edit Device dialog box opens, displaying the attributes for the device.
If you attach a new Oracle backup device to the LSM Server, see the next section, “Adding a Device Resource on Windows” for instructions about how to create the required device resource for it. To modify an existing LSM device resource, see “Modifying a Device Resource on Windows”. To remove an LSM device resource, see “Removing a Device Resource on Windows”.
Note: Verify that the Enabled field is set to Yes to ensure that the device is enabled for Oracle operations.
3-8 Legato Storage Manager Administrator’s Guide

Configuring Storage Devices
You must run the LSM Administrator GUI as one of the users listed in the Administrator attribute of the server resource to be able to create, modify, or remove a device resource. For more information about LSM Administrator privileges, see “Specifying LSM Administrators” in Chapter 2.
After you have properly configured an Oracle storage device in the LSM Server, the device name is displayed in the Devices section of the Monitor window. To make the Monitor window active, click the Monitor tab in the Server window (of the main Administrator window).
After you have completed the required resource configuration tasks for your storage devices, see the section “Using Volume Pools and Label Templates” for information about using volumes in the devices.
Adding a Device Resource on WindowsTo create a new device resource using the LSM Administrator GUI on Windows, perform the following steps:
1. In the Devices window, right-click the main Devices icon and select Create from the pop-up menu to open the Create Device dialog box.
2. In the Name text box, enter the correct device pathname for the storage device.
3. Select the correct type of media from the Media type drop-down list.
4. Select Yes from the Read only drop-down list to specify that the device be used only for restoring Oracle data. Select No if the device is to be used for both backup and restore operations.
5. If the device resource is for a tape device, enable auto media management by clicking the Operation tab and then selecting Yes from the final drop-down list. For more information about auto media management, see “Auto Media Management for Tape Devices”.
6. Click OK to apply the device configuration settings.
Modifying a Device Resource on WindowsTo modify an existing LSM device resource using the LSM Administrator GUI on Windows, follow these steps:
1. In the Devices window, right-click the icon of the device that you want to edit and select Edit from the pop-up menu to open the Edit Device dialog box.
Media Management 3-9

Using Volume Pools and Label Templates
2. Make the necessary changes to any of the following text boxes in the Edit Device dialog box:
■ Media type
■ Read only
■ Auto media management
3. Click OK to apply the changes to the device resource configuration.
Removing a Device Resource on WindowsTo remove an LSM device resource using the LSM Administrator GUI on Windows, follow these steps:
1. In the Devices window, right-click the icon of the device that you want to remove and select Delete from the pop-up menu.
2. In the dialog box that pops up asking whether you are sure that you want to delete the device, click Yes.
Using Volume Pools and Label TemplatesAn LSM volume pool is a set of storage volumes that LSM groups together according to specific common characteristics. LSM uses pools of volumes to sort and store Oracle backup data. Before LSM can back up Oracle data to a storage device, there must be a properly labeled volume mounted in the device. When LSM labels a volume, it assigns the volume to a volume pool.
Each LSM volume pool is defined by its pool resource in the LSM Server. The attribute settings specified in a pool’s resource act as a filter LSM uses to determine which data to write to the volumes in that pool. Each pool configuration contains a list of criteria that data must meet for the data to be written to the volumes belonging to that pool.
Every volume belongs to a pool. Every pool has a specific label template associated with it. When LSM labels a volume for a specific pool, it automatically creates the label according to the rules of the label template associated with the pool. Label templates provide a method for consistently naming and labeling volumes so you do not have to keep track of how many volumes you have used. LSM uses pools of
Note: Verify that the Enabled attribute is set to Yes to ensure that the device is enabled for Oracle operations.
3-10 Legato Storage Manager Administrator’s Guide

Using Volume Pools and Label Templates
volumes in conjunction with their label templates to maintain information about what data is on which volume.
For more information about how LSM uses label templates please see Appendix C, “Appendix Title”.
When an Oracle backup occurs, LSM tries to match the characteristics of the save stream to the resource attributes configured for a volume pool. If the save stream matches the criteria of a pool configuration, LSM directs the save stream to a labeled volume belonging to that pool. LSM then checks whether a correctly labeled volume is mounted on a configured device. If a correctly labeled volume is mounted on a device, LSM writes the backup data to the volume. If there is no correctly labeled volume mounted on a storage device, LSM’s actions depend on whether there is a configured tape device with auto media management enabled:
■ If auto media management is enabled for a tape device, LSM can automatically label and mount an unlabeled or recyclable volume that is loaded in the device and proceed with the backup. For more information about auto media management, see “Auto Media Management for Tape Devices”.
■ If auto media management is not enabled for a tape device, LSM requests that a labeled volume be mounted and waits until an operator mounts an appropriate volume. It then continues with the backup to that volume.
Although LSM contains several preconfigured volume pools after installation, it only supports volume pools of the “Backup” type. Only one preconfigured volume pool of the “Backup” type is initially enabled for LSM use—the pool named “Default.”
Legato recommends that you use the Default volume pool for all your Oracle backups to tape. See the next section, “Default Volume Pool”, for more information about this preconfigured pool.
Default Volume PoolThe preconfigured resource for the Default volume pool has the following attributes:
Name: DefaultEnabled: YesPool type: BackupLabel template: DefaultStore index entries: YesAuto media verify: NoRecycle to other pools: NoRecycle from other pools: No
Media Management 3-11

Using Volume Pools and Label Templates
You cannot modify the Default pool resource. You can view the Default pool resource configuration by running the LSM Administrator GUI and following these steps, depending on your particular type of system:
■ In the LSM Administrator GUI on a UNIX system:
1. Select Pools from the Media pull-down menu in the main LSM Administrator window to open the Pools window.
2. In the upper part of the Pools window, highlight Default in the Pools scrolling list. The Default pool attributes are displayed in the lower part of the window.
■ In the LSM Administrator GUI on a Windows system:
1. Click the Configure tab in the Server window (of the main Administrator window) to make the Configure window active.
2. Click Manage Pools to open the Pools window.
3. Right-click the Default icon and select Edit from the pop-up menu to open the Edit Pool dialog box where the Default pool attributes are displayed.
If you do not enable or create another “Backup” type of volume pool, LSM routes all Oracle backup data to the Default pool.
The preconfigured label template associated with the Default pool is also named Default. The LSM resource for the Default label template has the following attributes:
Name: DefaultFields: hostname, 001-999Separator: .
LSM automatically uses this Default label template when it labels volumes for the Default pool. For example, if the hostname of the LSM Server is jupiter, LSM automatically labels the volumes for the Default pool as jupiter.001, jupiter.002, jupiter.003, and so on. Note that you can override this default labeling scheme when you manually label a backup volume. For more information about labeling volumes, see the next section “Labeling and Mounting Storage Volumes”.
3-12 Legato Storage Manager Administrator’s Guide

Labeling and Mounting Storage Volumes
Labeling and Mounting Storage VolumesEach configured Oracle backup device attached to the LSM Server must have a labeled storage volume mounted in it before the LSM Server can use it for backup and restore operations. Labeling a volume associates the volume with a particular volume pool. After a volume is labeled, it becomes eligible to be used for backup when LSM needs a volume from the volume pool. LSM must mount the volume in a configured storage device before it can back up Oracle data to it.
LSM uses unique volume labels to maintain a record of each volume in its online media index. For more information about how LSM uses the media index for tracking storage volumes and the data on them, see “Overview of LSM Operations” in Chapter 2.
You can have LSM automatically label and mount volumes in a tape device by enabling the auto media management attribute in the tape device resource. For details, see “Auto Media Management for Tape Devices”.
LSM must label a volume and mount it into a storage device before LSM can back up data to it or restore data from it. A volume must also be unmounted from the device before you can replace the volume in the device with another volume. The procedures for manually labeling, mounting, and unmounting a volume by means of the LSM Administrator GUI are included below.
You can have LSM label a storage volume, and optionally mount the volume after labeling it, by means of the LSM Administrator GUI. If the GUI is running on a UNIX system, follow the instructions in “Labeling a Volume on UNIX”. To use the GUI on a Windows system, see “Labeling a Volume on Windows”.
To mount a volume using the LSM Administrator GUI on UNIX, see “Mounting a Volume on UNIX”. To mount a volume using the LSM Administrator GUI on Windows, see “Mounting a Volume on Windows”.
To unmount a volume from a device by means of the LSM Administrator GUI, see “Unmounting a Volume on UNIX” or “Unmounting a Volume on Windows”.
Labeling a Volume on UNIXIf you are running the LSM Administrator GUI on UNIX as an administrative user (a user listed in the Administrator attribute of the server resource), you can label a storage volume (and optionally mount it afterwards) by following these steps:
1. If you are using a tape device, load an unlabeled or recyclable volume into the device.
Media Management 3-13

Labeling and Mounting Storage Volumes
2. Highlight the device name in the Devices section of the main LSM Administrator window.
3. Open the Label dialog box by clicking the Label speedbar button (if you selected Speedbar from the Options pull-down menu) or select Label from the Media pull-down menu.
4. Select Default for the Pool for a tape volume.
5. If you want to override the Volume name automatically displayed with an individual label name not associated with a template, edit the Volume name and enter a unique label name.
6. To make the volume mode “manual recycle,” select Manual recycle. The volume becomes exempt from automatic recycling and does not change its mode to recyclable automatically according to the retention policy. In this case, only an LSM Administrator can change the volume’s mode to recyclable. For more information about storage volume modes, see Table 2–3.
7. If you want to have LSM automatically mount the volume after labeling it, select Mount after labeling. To have LSM label the volume without mounting it, deselect Mount after labeling.
8. Click OK to label (and optionally mount) the storage volume.
As the first step in the labeling process, LSM verifies that the volume is unlabeled. Then LSM labels the volume with the name specified in the Volume name field, you either the next sequential label from the label template associated with the chosen pool or an override volume name you entered.
Both the Devices and Messages sections of the main LSM Administrator window display information confirming the success of the volume labeling (and optional mounting) operation.
Note: If you relabel a recyclable volume from the same pool, the volume label name and sequence number remain the same, but access to the original data on the volume is destroyed and the volume becomes available for new data. For example, if LSM recycles a volume labeled empire.003 in the same pool, it leaves the volume label as empire.003, it does not assign a new label with the next available sequence number, such as empire.007. However the data on empire.003 is now permanently inaccessible.
3-14 Legato Storage Manager Administrator’s Guide

Labeling and Mounting Storage Volumes
After LSM labels and mounts a volume in a device, the volume is available to receive backup data. Because the LSM label is internal and machine-readable, it is a good idea to put an adhesive label on a tape volume that matches the internal volume label.
Labeling a Volume on WindowsIf you are running the LSM Administrator GUI on a Windows system as an administrative user, you can label a storage volume (and optionally mount it afterwards) by following these steps:
1. If you are using a tape device, load an unlabeled or recyclable volume into the device.
2. Click the Monitor tab in the Server window (of the main Administrator window) to make the Monitor window active. Highlight the device name in the Devices section of the Monitor window.
3. Click the Configure tab to make the Configure window active and click Devices to open the Devices window.
4. Right-click the icon for the specific storage device and select Operations from the pop-up menu to open the Device Operations dialog box.
5. Click Label to open the Label dialog box.
6. Select Default for the Pool for a tape volume.
7. If you want to override the Volume Label automatically displayed with an individual label name not associated with a template, edit the Volume Label and enter a unique label name.
8. To make the volume mode “manual recycle,” select Manual Recycle. The volume becomes exempt from automatic recycling and does not change its mode to recyclable automatically according to the retention policy. In this case, only an LSM Administrator can change the volume’s mode to recyclable. For more information about storage volume modes, see Table 2–3.
9. If you want to have LSM automatically mount the volume after labeling it, select Mount after Labeling. To have LSM label the volume without mounting it, deselect Mount after Labeling.
10. Click OK to label (and optionally mount) the storage volume.
As the first step in the labeling process, LSM verifies that the volume is unlabeled. Then LSM labels the volume with the name specified in the Volume Label field,
Media Management 3-15

Labeling and Mounting Storage Volumes
you either the next sequential label from the label template associated with the chosen pool or an override volume name you entered.
Both the Devices and Messages sections of the Monitor window (of the main Administrator window) display information confirming the success of the volume labeling (and optional mounting) operation.
After LSM labels and mounts a volume in a device, the volume is available to receive backup data. Because the LSM label is internal and machine readable, it is a good idea to put an adhesive label on a tape volume that matches the internal volume label.
Mounting a Volume on UNIXIf you are running the LSM Administrator GUI on UNIX as an administrative user, you can mount a labeled storage volume in a configured device by following these steps:
1. If you are using a tape device, ensure that the appropriate labeled volume is loaded in the drive.
2. Highlight the device name in the Devices section of the main LSM Administrator window.
3. Click the Mount speedbar button (if you selected Speedbar from the Options pull-down menu) or select Mount from the Media pull-down menu.
Both the Devices and Messages sections of the main LSM Administrator window display information confirming that the volume has been mounted in the device.
Note: If you relabel a recyclable volume from the same pool, the volume label name and sequence number remain the same, but access to the original data on the volume is destroyed and the volume becomes available for new data. For example, if LSM recycles a volume labeled empire.003 in the same pool, it leaves the volume label as empire.003—it does not assign a new label with the next available sequence number, such as empire.007. However the data on empire.003 is now permanently inaccessible.
3-16 Legato Storage Manager Administrator’s Guide

Labeling and Mounting Storage Volumes
Mounting a Volume on WindowsTo mount a labeled volume in a specific storage device by using the LSM Administrator GUI on a Windows system, ensure that you are running the GUI as an administrative user and then follow these steps:
1. If you are using a tape device, ensure that the labeled volume is loaded in the drive.
2. Click the Monitor tab in the Server window (of the main Administrator window) to make the Monitor window active. Highlight the device name in the Devices section of the Monitor window.
3. Click the Configure tab to make the Configure window active and click Devices to open the Devices window.
4. Right-click the icon for the specific storage device and select Operations from the pop-up menu to open the Device Operations dialog box.
5. Click Mount.
LSM mounts the volume into the selected storage device. When the mounting operation is complete, the Device Operations dialog box displays the following message:
mounted <media type and label name>
where it had previously displayed
unmounted <label name>
Also, the Devices and Messages sections of the Monitor window (of the main Administrator window) both display information confirming the success of the volume mounting operation.
Unmounting a Volume on UNIXTo unmount a volume from a specific storage device by means of the LSM Administrator GUI on UNIX, ensure that you are running the GUI as an administrative user and then follow these steps:
1. Highlight the device name in the Devices section of the main LSM Administrator window.
2. Click the Unmount speedbar button (if you selected Speedbar from the Options pull-down menu) or select Unmount from the Media pull-down menu.
Media Management 3-17

Auto Media Management for Tape Devices
Both the Devices and Messages sections of the main LSM Administrator window display information confirming that the volume has been unmounted from the device.
Unmounting a Volume on WindowsTo unmount a volume from a specific storage device by means of the LSM Administrator GUI on a Windows system, ensure that you are running the GUI as an administrative user and then follow these steps:
1. Click the Monitor tab in the Server window (of the main Administrator window) to make the Monitor window active. Highlight the device name in the Devices section of the Monitor window.
2. Click the Configure tab to make the Configure window active and click Devices to open the Devices window.
3. Right-click the icon for the specific storage device and select Operations from the pop-up menu to open the Device Operations dialog box.
4. Click Unmount.
LSM unmounts the volume from the selected storage device. When the unmounting operation is complete, the Device Operations dialog box displays the following message:
unmounted <label name>
where it had previously displayed
mounted <media type and label name>
Also, the Devices and Messages sections of the Monitor window (of the main Administrator window) both display information confirming that the volume has been unmounted from the device.
Auto Media Management for Tape DevicesLSM supports auto media management for tape devices. The auto media management feature gives LSM automatic control over a tape volume (which is manually) loaded in a configured tape device. If the auto media management feature is enabled in the tape device’s resource, LSM can automatically label, mount, and overwrite a volume that it considers unlabeled, and automatically recycle a volume eligible for reuse when it is loaded in the device.
3-18 Legato Storage Manager Administrator’s Guide

Auto Media Management for Tape Devices
LSM considers a volume unlabeled if one of the following conditions apply:
■ The volume has no internal label.
■ The volume is labeled with information other than a recognizable LSM label.
■ The volume is labeled with an LSM label, but the density indicated on the internal label differs from the density of the device where the volume is mounted.
If the auto media management feature is not enabled for a tape device, LSM ignores an unlabeled tape in the device and does not consider it for backup.
If the auto media management feature is enabled for a tape device, LSM exhibits the following behavior when a volume becomes full during a backup:
1. LSM issues a notification that it is waiting for a writable volume. At the same time, LSM waits for the full, verified volume to be unmounted.
2. LSM monitors the device, and waits for the operator to insert another volume into the device.
3. After LSM detects a new volume, it checks that the volume is labeled. If so, LSM mounts the volume. LSM checks to see whether the volume is a candidate to which to write data. If so, the write operation continues. If not, LSM waits for a writable volume to continue the backup.
4. If the volume is recyclable and is a member of the required pool, LSM recycles it the next time a writable volume is needed—in this case, immediately.
5. If the volume is unlabeled, LSM labels it when the next writable volume is needed for a backup—in this case, immediately.
In general, if a non-full volume is unmounted from a tape drive and auto media management is enabled, LSM waits for 60 minutes before the volume is automatically remounted in the drive. This hour is considered a reasonable delay to give an administrator or operator time to unload the volume after unmounting it.
If you want to enable auto media management for a tape device, you can modify the device resource for the tape drive by means of the LSM Administrator GUI. Follow the procedure in “Modifying a Device Resource on UNIX” or “Modifying a
Note: Because the auto media management feature can relabel a tape volume with a different density, it is possible to inadvertently overwrite data that still has value. For this reason, be careful if tape volumes are shared between devices with different densities.
Media Management 3-19

Using the Volumes Window
Device Resource on Windows”. The value of Yes in the Auto media management attribute of the tape device resource enables the feature.
Using the Volumes Window“Overview of LSM Operations” in Chapter 2 describes the process that LSM uses to track each Oracle backup volume and the backup sets (save sets) on it. That section also describes the “status” value that LSM assigns to each save set and the “mode” value given to each volume. See Table 2–2 for details about the save set status values and Table 2–3 for all the possible storage volume modes.
You can use the Volumes window in the LSM Administrator GUI to view information about the complete inventory of Oracle backup volumes and the save sets on them. If you run the GUI as an administrative user, you can also use the Volumes window to perform the following volume operations:
■ Change the status of save sets
■ Change the mode of volumes
■ Recycle storage volumes
■ Remove storage volumes from the media index
You can open the Volumes window by running the LSM Administrator GUI and following these steps, depending on your particular type of system:
■ On a UNIX system, select Volumes from the Media pull-down menu in the main LSM Administrator window.
■ On a Windows system, select the Volumes tab in the Server window (of the main Administrator window).
On UNIX, the Volumes window has two separate sections, each displaying different types of information about the storage volumes:
■ Volumes – volume-specific information
■ Save Sets – details about the save sets stored on the particular volume highlighted in the Volumes section
On a Windows system, only volume-specific information is displayed in the Volumes window. For information about a volume’s save sets, right-click the specific volume name in the list and select Show Save Sets from the pop-up menu to open the Volume Save Sets dialog box. If you leave the Volumes window open for an extended period of time, you can occasionally refresh the information
3-20 Legato Storage Manager Administrator’s Guide

Volume Operations
displayed in the Volumes window by right-clicking anywhere in the window and selecting Refresh from the pop-up menu.
Volume OperationsThe system of volume labeling used by LSM provides unique names for tracking and recognizing the Oracle backup volumes. LSM refers to volume labels in the records that it stores in the online media index. LSM uses the records in the media index to determine which volumes are needed for backing up or restoring data.
If you place a new label on a storable volume or recycle a volume by relabeling it, any existing data stored on the volume becomes unavailable for recovery.
During a backup, LSM searches for a volume from the appropriate pool to accept the backup data. The storage volumes available for use are the ones mounted in configured devices and the volumes accessible to LSM through auto media management.
If you try to back up Oracle data when an appropriate volume is not mounted, LSM requests a writable volume by displaying a message similar to the following in the Pending Messages window:
media waiting: backup to pool ‘Default’ waiting for 1 writable backup tape or disk
You receive one of three messages suggesting that you mount a volume, relabel a volume, or label a new volume.
If you are restoring files, LSM requests the volume name you need to mount in the device by displaying a message similar to the following in the Pending Messages window:
media waiting: recover waiting for 8mm 5GB tape_volume_name
If you need more than one volume to restore the files, the Pending Messages window lists all the volumes in the order they are needed. During the restore process, LSM requests each volume it needs, one at a time.
If more than one volume is mounted in the configured devices, LSM uses the following hierarchy to select a volume on which to write data:
■ An already mounted, appendable volume from the appropriate pool
■ An already mounted, recyclable volume from the appropriate pool but not currently in use
Media Management 3-21

Volume Operations
■ An already mounted, unlabeled volume not currently in use and in a device for which “Auto media management” is enabled
■ An appendable volume not currently mounted in the device but from the appropriate pool
■ A recyclable volume not currently mounted in the device but from the appropriate pool
Backup data is destined for a specific pool. When the data is ready to be written, LSM monitors the active devices to locate a volume from the appropriate pool.
If only one volume from the pool is mounted and appendable, the data is directed to that volume.
If two volumes from the same pool are mounted on devices, LSM factors in the following considerations to guide its volume selection:
■ The expiration date of the volume
The volume expiration date is set by default at two years after the date on which the storage volume was labeled (or relabeled). To override this default setting, change the expiration date through the Devices dialog box. If the default setting has been overridden, LSM checks to ensure that the volume expiration date is farther in the future than the date on which the save set exceeds its retention policy. If it is, the save set is written to the volume. Otherwise, LSM does not write the save set to the volume. (This checking behavior does not occur under the default condition.)
■ The volume mode
LSM first writes to a mounted appendable volume from the appropriate pool, if one is available. However, if the appendable volume is also recyclable, that is, if all the save sets on the appendable volume have the status recyclable, the volume is treated as recyclable. A mounted recyclable volume from the appropriate pool is the second choice. A mounted recyclable volume that belongs to a pool that is not the pool needed is not recycled. The choice is a new, unlabeled volume.
■ Volume label time, which is the time when the volume was labeled.
Volumes with the oldest label time are selected before volumes that were labeled more recently.
■ The number of sessions currently writing to the device
3-22 Legato Storage Manager Administrator’s Guide

Volume Operations
If LSM cannot find a mounted volume from the appropriate pool, it initiates a mount request. If Auto media management is not enabled, mount requests continue to be generated until a volume is mounted and writing begins.
Media Management 3-23

Volume Operations
3-24 Legato Storage Manager Administrator’s Guide

Backup and Restore Oper
4
Backup and Restore OperationsThis chapter presents information about using LSM for Oracle backup and restore operations after you have configured the requisite LSM resources in the LSM Server. It provides general information on how to run Oracle backups and restores as well as details on LSM Server bootstrap backups. The methods for monitoring Oracle backups and restores by means of the LSM Administrator GUI and specific log files are also outlined.
Major Topics:■ Running Oracle Backups and Restores
■ LSM Server Bootstrap Backups
■ Monitoring Oracle Backups and Restores
Running Oracle Backups and RestoresThe preceding chapters of this guide outline the procedures for configuring LSM for Oracle backup and restore operations. After applying the information in those chapters, you should have all the required client, server, device, and volume pool resources configured in the LSM Server. Also, you should have a labeled volume mounted in each configured backup device—or, if auto media management is enabled for a tape device, a tape loaded in the tape device for LSM to use automatically.
As explained in “Overview of LSM Features” in Chapter 1, you can start an Oracle backup or restore by running one of the two following programs:
■ Command-line interface of the Oracle backup/restore utility on the Oracle Server
■ OEM Backup Manager on a Windows NT or Windows 95 system
ations 4-1
Running Oracle Backups and Restores
For information about using the command-line interface, see “Using the Oracle Backup/Restore Utility” as follows. For more information on using the GUI, see “Using the Oracle Enterprise Manager Backup Manager”.
Using the Oracle Backup/Restore UtilityThe Oracle backup/restore utility is one of the following programs:
■ Enterprise Backup Utility (EBU) in Oracle7
■ Recovery Manager (RMAN) in Oracle8
You can use the command-line interface to issue the appropriate EBU or RMAN command to start a specific type of backup, restore, or recovery on your Oracle7 Server or Oracle8 Server. The backup/restore utility interacts with LSM in performing the backup or restore operation, as explained in “Overview of Oracle Backup and Recovery System” in Chapter 1.
For information on using EBU in Oracle7, refer to the Oracle7 Enterprise Backup Utility Administrator’s Guide. It outlines the EBU commands that you can use to start different types of Oracle7 backup and restore operations. It also describes the important procedures that you must perform prior to using EBU with LSM. The following tasks are among those outlined in the Oracle7 guide:
■ How to create an EBU Catalog
■ How to register an Oracle database in the EBU Catalog
■ How to properly set up the required EBU_HOME environment variable
For details about using RMAN in Oracle8, refer to the Oracle8 Server Backup and Recovery Guide. This guide outlines the RMAN commands to use for starting different types of Oracle8 backup and restore operations. It also explains the prerequisite tasks to perform prior to using RMAN with LSM. The following tasks are among those outlined in the Oracle8 guide:
■ How to create a Recovery Catalog
■ How to register an Oracle database in the Catalog
■ How to resynchronize the Recovery Catalog
■ How to allocate a channel connection to the target database
4-2 Legato Storage Manager Administrator’s Guide

Running Oracle Backups and Restores
■ How to generate unique output file names for backups
Using the Oracle Enterprise Manager Backup ManagerYou can use the Oracle Enterprise Manager instead of the Oracle utility command-line interface to start an Oracle backup or recovery. The OEM Backup Manager is the graphical user interface to the Oracle backup/restore utility that enables you to perform backup and restore operations through a point-and-click method.
The Oracle Enterprise Manager provides a much simpler interface for running Oracle backups and restores; it generates the required commands for the appropriate Oracle utility. In Oracle7, the OEM Backup Manager generates commands for EBU, while in Oracle8, it generates RMAN commands.
Note: For RMAN backups using LSM, each backup piece (or LSM "save set") must have a unique generated name.
As mentioned in the section "Generating Unique File Names" in the Oracle8 Server Backup and Recovery Guide, you must generate a unique name for each backup piece by means of the substitution variables (%d, %t, %s, %p, and %u) provided by Recovery Manager.
The format string specified in the "backup" command or "allocate channel" command determines the name of the backup piece. If an RMAN backup using LSM generates a name that already exists in the LSM index database, the original backup save set with that name is deleted.
For example, if you back up two databases to one LSM server, and you use the format string %s%p in the backup command for both databases, the same piece names will be generated for both databases. In this case the database backup which started first will be deleted when the backup of the second database begins, as %s%p is not unique across databases.
Alternatively; if you use the format string ORA_%d_%u where %d is the database name and %u is a generated number, then each save set backed up with a unique name can be restored later without difficulty.
Backup and Restore Operations 4-3

LSM Server Bootstrap Backups
For complete information on using the Oracle Enterprise Manager, refer to the Oracle Enterprise Manager Administrator’s Guide and the other Oracle Enterprise Manager documentation included with your product kit.
You must install the Oracle Enterprise Manager on a Windows NT or Windows 95 system, which can be either the Oracle Server machine or a separate machine on the network.
It is possible to install and run the LSM Administrator GUI on the same Windows NT or Windows 95 machine as the Oracle Enterprise Manager. (The LSM installation process automatically installs the LSM Administrator GUI on the Oracle Server.) You can use the LSM Administrator GUI to connect to the LSM Server and monitor the status of Oracle backup and restore operations.
LSM Server Bootstrap BackupsAs mentioned in “Overview of LSM Operations” in Chapter 2, the LSM Server is preconfigured to perform a special automatic backup—the LSM Server bootstrap backup—every day at 3:33 a.m. The bootstrap consists of the following three files from the LSM Server:
■ Client index
■ Media index
■ Resource database
The bootstrap is a special backup set essential for disaster recovery procedures of the LSM Server. LSM writes the bootstrap file to the backup media and generates a report about the success of the bootstrap backup. LSM sends an automatic notification to the administrator about the bootstrap backup and displays the same information in the LSM Administrator GUI. Also, bootstrap information is sent to a printer on the LSM Server.
You can also run the bootstrap backup manually. For example, after finishing the last of many Oracle backups performed during a day, it would be advisable to manually run a bootstrap backup, to ensure that you have an up-to-date bootstrap. An up-to-date bootstrap is essential for a complete disaster recovery on the Oracle Server.
Note: Note that if the LSM system is down at the time that the automatic bootstrap backup is scheduled to run, the backup will run when the system comes back up.
4-4 Legato Storage Manager Administrator’s Guide
LSM Server Bootstrap Backups
The next section, “Automatic Bootstrap Backup”, contains instructions about how to verify that the LSM Server is properly configured for the automatic bootstrap backup. For information about how to run the bootstrap backup manually, see “Manual Bootstrap Backup”. “Maintaining Bootstrap Information” has details about the critical bootstrap information you need to keep for future disaster recovery procedures.
Chapter 5, “Disaster Recovery” contains complete details about how to use the LSM Server bootstrap during a disaster recovery on the Oracle Server.
Automatic Bootstrap BackupTo verify that the LSM Server configuration is properly set up for the automatic bootstrap backup, you need to run the LSM Administrator GUI. See “Using the LSM Administrator GUI” in Chapter 2 for details about running the GUI on either a UNIX or Windows system.
Then, you need to verify that the client resource and Default group resource are both configured correctly. For information about accessing the client resource, see “Client Resource” in Chapter 2. In the client resource, be sure that the Group attribute is set to Default.
Finally, check the Default group resource configuration. Open the Groups window by one of the following methods, depending on the type of system running the GUI:
■ On a UNIX system, select Groups from the Customize pull-down menu in the main LSM Administrator window.
■ On a Windows system, click the Configure tab in the Server window (of the main Administrator window) to make the Configure window active, and then click Manage Groups to open the Groups window.
The Groups window lists the single group resource, with the name Default. On a UNIX system, the Groups window also shows all the attribute settings of the group resource.
Backup and Restore Operations 4-5

LSM Server Bootstrap Backups
On a UNIX system, the Groups window is displayed as shown in Figure 4–1.
Figure 4–1 Groups Window on UNIX
On a Windows system, the Groups window does not automatically show the attribute settings of the group resource, so you must perform the following additional steps to see the group’s attributes:
1. In the Groups window, right-click the icon of the Default group and select Edit from the pop-up menu to open the Edit Group dialog box.
4-6 Legato Storage Manager Administrator’s Guide

LSM Server Bootstrap Backups
2. In the Edit Group dialog box, the General (default) tab shows the attributes of the Default group resource. Click Field Help to learn more about each attribute shown.
The Edit Group dialog box on a Windows system, listing all the attributes of the group resource, is displayed as shown in Figure 4–2.
Figure 4–2 Edit Group Dialog Box on Windows
The Start time attribute specifies when the bootstrap backup is configured to begin—3:33 a.m. by default. To have the bootstrap information sent to a specific printer, set the Printer attribute to the name of that printer.
Note that information confirming the completion of the automatic bootstrap backup is displayed in the LSM Administrator GUI. It’s in the Messages section of the main LSM Administrator window on a UNIX system or in the Messages section of the Monitor window on a Windows system.
Note: Be sure that the Autostart attribute is set to Enabled to enable the automatic bootstrap backup. If Autostart is set to Disabled, the bootstrap backup does not run.
Backup and Restore Operations 4-7

LSM Server Bootstrap Backups
Manual Bootstrap BackupIf you want to manually run the bootstrap backup, you must be root on the LSM Server on a UNIX system or Administrator on a Windows NT system. Then, to run the manual backup, enter this savegrp command at the system prompt:
savegrp -O -l full -P printer_name -c server_name
Here, printer_name is the name of the printer where the bootstrap information is printed at the end of the bootstrap backup. Also, server_name is the hostname of the LSM Server.
On UNIX, refer to the savegrp manual page for information about the savegrp command and its options. On Windows NT, refer to savegrp in the Command-Line Utilities Help provided with LSM on Windows NT. See “Windows Command-Line Utilities Help” in Chapter 1 for details about using the Command-Line Utilities Help.
Note that information confirming the completion of the manual bootstrap backup is displayed in the LSM Administrator GUI. It’s in the Messages section of the main LSM Administrator window on a UNIX system or in the Messages section of the Monitor window on a Windows system.
Maintaining Bootstrap InformationAt the end of the automatic daily bootstrap backup, LSM prints the bootstrap information to the printer specified in the Printer attribute of the Default group resource; or, if that Printer attribute is blank, to the default printer.
At the end of a manual bootstrap backup run with the savegrp command, as described in “Manual Bootstrap Backup”, the bootstrap information is sent to the printer specified in that savegrp command.
Be sure to store the bootstrap printout in a safe place. The printed bootstrap information includes dates, locations, and save set ID numbers for the bootstrap save sets backed up during the past month. With this information, you can determine which volumes are needed to recover the LSM Server indexes and resource database files during a disaster recovery.
An example of a bootstrap printout is as follows:
August 20 03:30 1997 LSM bootstrap information Page 1date time level ssid file record volume8/19/97 2:29:08 9 1148868949 56 0 jupiter.0058/20/97 2:52:25 9 1148868985 77 0 jupiter.001
4-8 Legato Storage Manager Administrator’s Guide

Monitoring Oracle Backups and Restores
Monitoring Oracle Backups and RestoresYou can use the LSM Administrator GUI to monitor the status of Oracle backup and restore operations. In the GUI on UNIX, the messages are displayed in the Sessions and Messages sections of the main LSM Administrator window. In the GUI on Windows NT, the messages appear in the Monitor window.
You can view progress messages that appear during the backup and completion messages that advise when the backup is complete. You can also view the messages in specific online system files.
■ For progress messages, watch the Sessions display in the LSM Administrator GUI. The Sessions display information is also written to a daemon.log file in the /nsr/logs directory on UNIX or in \win32app\nsr\logs on Windows NT.
■ For completion messages, watch the Messages display in the LSM Administrator GUI. The Messages display information is also written to a messages file in the /nsr/logs directory on UNIX or in \win32app\nsr\logs on Windows NT.
■ For information about why a backup cannot progress, view the messages in the Pending display. The Pending display shows requests to mount tapes and other conditions that require operator intervention. See “Volume Operations” in Chapter 3 for examples of the messages that LSM displays when requesting a volume for Oracle backup or restore.
■ LSM also writes error messages to a specific system file. On UNIX, the file is /nsr/applogs/dmo.messages. On Windows NT running Oracle7 or Oracle8, LSM error messages are written to \win32app\nsr\logs\dmo.messages and \win32app\nsr\logs\orasbt.messages. In some circumstances, these messages files can be created in your TEMP directory. On Windows NT running Oracle8, the error messages can also be found in $ORACLE_HOME\RDBMS80\TRACE\sbtio.log. For more information on a particular error condition, refer to the appropriate error file for your system.
Note: Ensure that Oracle has write permissions on the dmo.messages and orasbt.messages files mentioned above.
Backup and Restore Operations 4-9

Monitoring Oracle Backups and Restores
The following example shows the types of messages displayed in the Sessions and Messages sections of the main LSM Administrator window on UNIX during Oracle backups.
Figure 4–3 Oracle Backup Messages on UNIX
4-10 Legato Storage Manager Administrator’s Guide

Disaster Rec
5
Disaster RecoveryThis chapter provides information about how you can use LSM to recover from different types of system disasters on your Oracle Server. It stresses the importance of preparing for a disaster. If you back up your Oracle data regularly and implement the planning procedures outlined in this chapter, you will be well prepared to recover from a disaster.
Major Topics:■ Types of Disaster Recovery
■ Disaster Preparation
■ Disaster Recovery on UNIX
■ Disaster Recovery on Windows NT
■ Recovering Oracle Data
Types of Disaster RecoveryYou can use LSM to recover from different types of disaster on your Oracle Server machine. The degree of data loss during a disaster can range from one or more files lost when a disk crashes to an entire computer system. The degree of severity of the disaster determines the procedures you need to perform to recover data on your Oracle Server.
The information in this chapter explains how to recover from four different types of disaster on your Oracle Server:
■ Figure 5–1 illustrates how the operating system and LSM software can be damaged or destroyed. In this example, an Oracle Server on UNIX has several physical disks. A power outage has corrupted the filesystem on Disk 0, and the operating system and LSM software residing on Disk 0 has been lost. To
overy 5-1

Types of Disaster Recovery
recover from the disaster, you need to replace the disk, reinstall the operating system and LSM software, and use LSM to recover the lost server configuration and any data that was lost when the filesystem was corrupted.
Figure 5–1 Damaged disk containing OS and LSM software
■ Figure 5–2 shows how the directory containing the LSM online indexes and resource configuration files can be damaged or destroyed. In this example, a disaster has corrupted the disk on the Windows NT Oracle Server that contains the LSM indexes and configuration files. To recover from a disaster of this type, you need to recover the contents of the bootstrap save set.
Figure 5–2 Damaged disk containing LSM indexes
Note: In a situation where the primary disk containing both the operating system and the LSM binaries has been destroyed, you must always reinstall the operating system, reinstall LSM, and then use LSM to recover the remainder of your data. You cannot recover data backed up by LSM without reinstalling the operating system and LSM software first.
Damaged disk containing OS and LSM software
Undamaged disks containing a variety of data and applications
/kernel//usr/sbin
Disk 3Disk 0 Disk 1
Disk 2
Damaged disk containing server indexes and configuration files C: \win32app\nsr\res
C:\nsr\index
5-2 Legato Storage Manager Administrator’s Guide

Types of Disaster Recovery
■ Figure 5–3 illustrates how Oracle data can be damaged or destroyed. In this example, a Windows NT Oracle Server has two disks. The second disk containing the Oracle data has been destroyed by a disk crash. However, the disk containing the operating system and LSM software is still operational. To recover from this situation, you can use the Oracle backup/restore utility—either EBU on Oracle7 or RMAN on Oracle8.
Figure 5–3 Damaged disk containing Oracle data
■ In the example in Figure 5–4, the LSM Server is destroyed. To recover from this disaster, you need to recover all the data to a new system by the same name.
Figure 5–4 Destroyed LSM Server
Undamaged disk containing OS and LSM software
Damaged disk containing Oracle data
C: \WNNT \win32app\nsr\ D:
Destroyed LSM server
New LSM Server using the same name as the original server
Disaster Recovery 5-3

Disaster Preparation
Disaster PreparationIt is important to develop a plan for recovering from a disaster on your Oracle Server. Not only do you need to back up important data on a daily basis, but you need to develop and test a plan for recovering your data should you experience a disk crash or loss of data. The more time and effort you invest in creating and testing your disaster recovery plan, the better prepared you will be should disaster strike.
The section “LSM Server Bootstrap Backups” in Chapter 4 describes how the LSM Server is preconfigured to perform an automatic nightly bootstrap backup. The bootstrap is a special backup save set that includes the client index, media index, and resource database. You can also perform a manual bootstrap backup by using the procedure in “Manual Bootstrap Backup” in Chapter 4.
The bootstrap information printed at the end of every bootstrap backup is essential for recovering LSM Server indexes and resource configuration files. As explained in “Maintaining Bootstrap Information” in Chapter 4, you should keep the bootstrap printout in a safe place, ready for use during a disaster recovery. If you do not keep the bootstrap printout, you will need to determine the save set ID of the most recent bootstrap by means of the procedure in “Bootstrap Save Set ID” below.
For more information on using the bootstrap information, see the section “Recovering LSM Indexes and Configuration Files”, under either “Disk Information on Windows NT” or “Disaster Recovery on Windows NT”.
Along with the bootstrap information, you should keep accurate records of your network and system configurations and maintain all your original software in a safe location. For a comprehensive disaster recovery, you need the following items:
■ Original operating system media and patches
■ Original LSM media
■ Device drivers and media device names
■ Filesystem configuration
■ IP addresses and hostnames
■ Bootstrap information
Bootstrap Save Set IDThe most efficient way to recover the bootstrap is to be sure to save the bootstrap information prior to a disaster. However, if you do not have the information, you
5-4 Legato Storage Manager Administrator’s Guide

Disaster Preparation
must scan the most recent backup volume to find the save set ID of the most recent bootstrap. Use the scanner -B command, as it will always find a valid bootstrap.
Finding the Bootstrap for UNIXUse the following steps to find the most recent save set ID for a bootstrap on a UNIX system:
1. Place the most recent media used for backups in the LSM Server device.
2. At the system prompt, change to the directory where you originally installed LSM, typically, /usr/sbin.
3. Use the scanner -B command to locate the most recent bootstrap on the media. For example:
For Solaris systems:
/usr/sbin/scanner -B /dev/rmt/0hbn
For AIX systems:
/usr/bin/scanner -B /dev/rmt0.1
For HP-UX 10.x systems:
/opt/networker/bin/scanner -B /dev/rmt/0mnb
The scanner -B command displays the latest bootstrap save set information found on the backup volume, as illustrated in the following example:
scanner: scanning 8mm tape jupiter.001 /dev/rmt/0hbnscanner: Bootstrap 1148869870 of 8/21/96 7:45:15 located on volume jupiter.001, file 88
After you locate the bootstrap with the most recent date, you can run the mmrecov command on a UNIX system to recover the LSM Server indexes and resource configuration. For more information, see “Recovering LSM Indexes and Configuration Files”.
Finding the Bootstrap for Windows NTUse the following steps to find the most recent save set ID for a bootstrap on a Windows NT system:
1. Place the most recent media used for backups in the LSM Server device.
Disaster Recovery 5-5

Disaster Preparation
2. In Command Prompt window, change to the directory where you originally installed LSM, typically, \win32app\nsr.
3. Use the scanner -B command to locate the most recent bootstrap. For example:
C:\win32app\nsr\bin scanner -B \\.\Tape0
The scanner -B command displays the latest bootstrap save set information found on the backup volume, as show in this example:
scanner: scanning 8mm tape mars.006 on \\.\Tape0scanner: Bootstrap 1148869870 8/11/96 6:29:58 mars.006, file 88
After you locate the bootstrap with the most recent date, you can run the mmrecov command on a Windows NT system to recover the LSM Server indexes and resource configuration. For more information, see “Recovering LSM Indexes and Configuration Files”.
Disk InformationAs an additional precautionary step to help you recover from loss of critical data, find out how each disk on your Oracle Server machine is partitioned and formatted—prior to a disaster recovery— and print and save this information. If a disk is damaged or destroyed during a disaster, use the disk information to recreate the disk exactly as it was prior to the disk crash.
Disk Information on UNIXUse the df command to find out how the LSM Server disks are partitioned and mounted. Use the appropriate operating system command to print disk partitioning information.
■ For Solaris, use the df and prtvtoc command.
■ For AIX, use the df and lslv commands or the Logical Volume Manager in the System Management Interface Tool (SMIT).
■ For HP-UX, use the df command.
Note: When you recreate your disk configuration, you will need to have partitions large enough to hold all the recovered data. Make the partitions at least as big as they were prior to the crash.
5-6 Legato Storage Manager Administrator’s Guide

Disaster Preparation
For example, the df information looks similar to the following:
Filesystem kbytes used avail capacity Mounted on/dev/dsk/c0t3d0s6 480919 414138 18691 96% /usr/dev/dsk/c0t3d0s0 1251422 183449 942833 17% /swap 208112 380 207732 1% /tmp/dev/dsk/c0t3d0s5 96031 12799 73632 15% /var
The prtvtoc command example below provides information about how each disk is partitioned for a Solaris system. The device name is the “raw” device corresponding to the device name used for the output from the df command shown previously.
/dev/dsk/c0t3d0s0 partition map
Dimensions: 512 bytes/sector 80 sectors/track 19 tracks/cylinder 1520 sectors/cylinder 3500 cylinders 2733 accessible cylinders
Flags: 1: unmountable 10: read-only
First Sector LastPartition Tag Flags Sector Count Sector Mount Directory 0 2 00 0 2663040 2663039 / 1 3 01 2663040 261440 2924479 2 5 00 0 4154160 4154159 5 7 00 2924480 205200 3129679 /var 6 4 00 3129680 1024480 4154159 /usr
Disaster Recovery 5-7

Disaster Preparation
The lslv command example below gives you information about the logical volumes on an AIX system.
OUTPUT of $ lslv hd6
LOGICAL VOLUME: hd6 VOLUME GROUP: rootvgLV IDENTIFIER: 00004421b56f747b.1 PERMISSION: read/writeVG STATE: active/complete LV STATE: opened/syncdTYPE: paging WRITE VERIFY: offMAX LPs: 128 PP SIZE 4 megabyte(s)COPIES: 1 SCHED POLICY: parallelLPs: 8 PPs: 8STALE PPs: 0 BB POLICY: non-relocatableINTER-POLICY: minimum RELOCATABLE: yesINTRA-POLICY: middle UPPER BOUND 32MOUNT POINT: N/A LABEL: NoneMIRROR WRITE CONSISTENCY: offEACH LP COPY ON A SEPARATE PV ?: yes
If a disk was damaged, you will be able to restore it and recover the filesystems to their original state, using the hardcopy information from these disk information commands.
Disk Information on Windows NTPrior to a disaster, copy the information that appears in the Windows NT Disk Administrator window, including the size of the partitions, the formatting methods, and the drive letters the partitions have been assigned to.
Disaster Recovery ProceduresThe procedures to follow for disaster recovery depend on whether your Oracle Server machine is running UNIX or Windows NT. For more information, see “Disaster Recovery on UNIX” below or “Disaster Recovery on Windows NT”.
For either UNIX or Windows NT, it is difficult to provide step-by-step disaster recovery instructions since every disaster situation is unique. The examples included in the following sections are designed to give you general principles on how to recover critical data and to help you understand the procedures.
5-8 Legato Storage Manager Administrator’s Guide

Disaster Recovery on UNIX
Disaster Recovery on UNIX
Recovering the Operating System and LSM SoftwareWhen a disk with the operating system and LSM binaries has been damaged or completely destroyed, you need to replace the damaged disk and reinstall both the operating system and the LSM software. If the disk was not completely destroyed and the operating system or LSM is still operational, use only those steps in this section that apply to your situation.
Use the following steps to guide you through recovering the operating system and LSM software:
1. Replace the damaged disk if necessary. Make sure the replacement disk is as large or larger than the original disk.
2. Use the saved disk partition information to recreate the disk partitions with the same structure as the original disk. See “Disk Information on UNIX”.
3. Use the output from the disk information command to make a filesystem for each raw partition that you plan to recover, then mount the block partition. (LSM does not initialize or create filesystems; it recovers data into existing filesystems.)
4. Reinstall the operating system, using the original software and documentation. The attached storage devices are automatically configured when you install the operating system. After you reinstall the operating system, run the tar command to verify that the storage device is functioning properly. You need to fully configure the operating system by recreating any unique configurations that existed before you lost data or experienced a disk crash.
If you use a device with a default configuration that is not directly supported by the operating system, you also need to modify the appropriate device configuration files:
■ On Solaris systems, you might need to modify the /kernel/drv/st.conf file to support a DLT tape drive.
■ On AIX, use SMIT to configure the devices.
Note: When you recover the operating system, you must do so in single-user mode from the system console, not from the X window system.
Disaster Recovery 5-9

Disaster Recovery on UNIX
■ On HP-UX systems, you must reconfigure the control port for the device robotics. Enter lsdev -d spt to get the major number for the driver. Then enter ioscan -f to view a list of devices and mknod /path/of/device c spt-major-number 0xIITL00. Then enter jbinfo to verify the configuration.
5. If you had a link to another disk that contains the LSM indexes and configuration files (/nsr/res) or any other LSM directories located on another disk, recreate it now. By default, /nsr is a link to /usr/nsr.
6. Reinstall the LSM software, using the original software and accompanying documentation. Refer to the appropriate Oracle installation guide for your particular UNIX system.
If you lost the LSM indexes and resource configuration files that reside in the /nsr/res directory, you will need to follow the instructions in the next section to recover them.
Recovering LSM Indexes and Configuration FilesIf the LSM Server indexes and configuration files that reside in the /nsr/res directory have been destroyed, you will need to use the mmrecov command to recover them.
If the operating system and LSM software were also destroyed, they must be reinstalled prior to recovering the /nsr/res directory contents. See “Recovering the Operating System and LSM Software”.
When you use the mmrecov command to recover the /nsr directory, you actually recover the contents of three important directories:
■ /nsr/mm (media manager) directory – contains the LSM media index that tracks all of the LSM backup volumes.
■ /nsr/index/server-name directory – contains the LSM client index, which has a list of all the server files that were backed up prior to the disaster.
■ /nsr/res directory – contains special LSM resource configuration files. The nsr.res file contains the LSM Server configurations including device information. Unlike the indexes, the contents of this directory cannot be reliably overwritten while LSM is running. Therefore, mmrecov recovers the /nsr/res directory as /nsr/res.R. Later, you must change the directory name to /nsr/res.
Using the mmrecov CommandThe mmrecov command asks you for the bootstrap save set identification number (ssid). If you followed the recommended procedures to prepare for loss of critical
5-10 Legato Storage Manager Administrator’s Guide

Disaster Recovery on UNIX
data, you have a copy of the bootstrap file as a hardcopy printout with the name of the backup media you need and the bootstrap save set ID (ssid).
In the following example, ssid “17851237” is the most recent bootstrap backup:
Jun 17 22:21 1997 mars’s NetWorker bootstrap informationdate time level ssid file record volume6/14/92 23:46:13 full 17826163 48 0 mars.16/15/92 22:45:15 9 17836325 87 0 mars.26/16/92 22:50:34 9 17846505 134 0 mars.26/17/92 22:20:25 9 17851237 52 0 mars.3
If you do not have this information, you can still recover the indexes by finding the ssid using the scanner -B command. See “Bootstrap Save Set ID”.
After you locate the bootstrap with the most recent date on your UNIX system, you can run the mmrecov command, supplying the save set ID and file number displayed by the scanner command, to recover the LSM Server indexes and resource configuration.
With the operating system and LSM software in place, recover the indexes and configuration files from the backup media by following these steps:
1. Find the bootstrap information, which you need for the next two steps.
2. Mount the backup media that contains the most recent backup named bootstrap in a storage device.
3. Use the mmrecov command to extract the contents of the bootstrap backup. For example:
# mmrecov
Doing mmrecov operation as root on the server !!!mmrecov: Using mars as server NOTICE: mmrecov is used to recover the NetWorker server’s on-line file and media indexes from media (backup tapes or disks) when either of the server’s on-line file or media index has been lost or damaged.Note that this command will OVERWRITE the server’s existing on-line file and media indexes. mmrecov is not used to recover NetWorker clients’ on-line indexes; normal recover procedures may be used for this purpose. See the mmrecov(8) and nsr_crash(8) man pages for more details. rd=mars:/space1/DISKDEV1 rd=mars:/space1/DISKDEV2 /space1/DISKDEV1 /space1/DISKDEV2 What is the name of the device you plan on using [rd=mars:/space1/DISKDEV1]? /space1/DISKDEV1
Disaster Recovery 5-11

Disaster Recovery on UNIX
Enter the latest bootstrap save set id []: 17851237Enter starting file number (if known) [0]: 52Enter starting record number (if known) [0]: 0 Please insert the volume on which save set id 17851237 started into /space1/DISKDEV1. When you have done this, press <RETURN>: [Return] Scanning /space1/DISKDEV1 for save set 17851237; this may take a while...scanner: scanning optical disk TestBackup.199 on /space1/DISKDEV1/nsr/res/nsr.res/nsr/res/nsrjb.resscanner: ssid 17851237: scan completescanner: ssid 17851237: 44 KB, 11 file(s)/nsr/res/nsrla.res/nsr/res//nsr/mm//nsr/index/mars//nsr/index//nsr//nsrmmdbasm -r /nsr/mm/mmvolume/nsrindexasm -r /nsr/index/mars/db//space1/DISKDEV1: mount operation in progress/space1/DISKDEV1: mounted optical disk TestBackup.199 (write protected) The bootstrap entry in the on-line index for mars has been recovered.The complete index is now being reconstructed from the various partial indexes which were saved during the normal save for this server. If your resource files were lost, they are now recovered in the ‘res.R’directory. Copy or move them to the ‘res’ directory, after the index has been reconstructed and you have shut down the daemons. Then restart the daemons.Otherwise, just restart the daemons after the index has been reconstructed. 7 records recovered, 0 discarded.nsrindexasm: Pursuing index pieces of /nsr/index/mars/db from mars.Recovering files into their original locations.nsrindexasm -r ./mars/db/merging with existing mars indexmars: 2035 records recovered, 0 discarded.Received 1 matching file(s) from NSR server ̀ mars’Recover completion time: Tue Jun 24 16:46:38 1997Cross checking index for client mars to remove duplicate recordsThe index for ̀ mars’ is now fully recovered.
5-12 Legato Storage Manager Administrator’s Guide

Disaster Recovery on UNIX
You can use LSM commands such as nsrwatch or nwadmin to watch the progress of the LSM Server during the recovery of the index and configuration files. Open a new window (shell tool) to monitor the recovery so that the mmrecov output does not display on top of the nsrwatch output.
mars# nsrwatchTue 16:36:11 server notice: startedTue 16:36:30 index notice: The client index is missing, recover the index or run nsrck -cTue 16:36:30 index notice: completed checking 2 client(s)Tue 16:36:34 /space1/DISKDEV1 volume TestBackup.199 not found in media indexTue 16:45:21 /space1/DISKDEV1 mount operation in progressTue 16:45:30 /space1/DISKDEV1 mounted optical disk TestBackup.199 (write protected)Tue 16:45:33 index notice: nsrim has finished cross checking the media dbTue 16:46:24 index notice: cross-checking index for marsTue 16:46:30 /space1/DISKDEV1 mounted optical disk TestBackup.199 (write protected)Tue 16:46:31 mars:/nsr/index/mars (6/24/97) starting read from TestBackup.199 of 397Tue 16:46:35 mars:/nsr/index/mars (6/24/97) done reading 397 KBTue 16:46:38 index notice: cross-checking index for mars
Renaming the Configuration Files DirectoryUnlike the /nsr/indexes directory, the /nsr/res directory containing the configuration files cannot be reliably overwritten while LSM is running. Therefore, mmrecov recovers the /nsr/res directory as /nsr/res.R.
To complete the recovery of the LSM configuration files:
1. Shut down LSM.
2. Rename the existing /nsr/res directory to nsr/Res.orig.
3. Rename the recovered /res.R directory to /nsr/res.
4. Restart LSM.
Complete these steps after mmrecov has finished and this final message appears:
The on-line index for ‘server’ is now fully recovered.
1. Shut down the LSM Server using the nsr_shutdown command:
# nsr_shutdown2. Save the original /res directory as /res.orig, and rename the recovered file (res.R)
to res.
Disaster Recovery 5-13

Disaster Recovery on UNIX
# cd /nsr# mv res res.orig# mv res.R res
3. Restart LSM. When it restarts, the Server uses the recovered configuration data residing in the recovered /res directory.
# cd /# nsrd# nsrexecd
4. Once you verify the LSM configurations are correct, you can remove the res.orig directory.
# rm -r /nsr/res.orig
Restoring Oracle8 Data on UNIXThis section describes how to recover from a crash in which one or more files of an Oracle8 database were damaged on your UNIX Oracle8 Server.
The first sign of a disk crash will usually be an I/O error. Oracle will usually document the I/O error in the trace file and in the alert log.
If only one database file is affected, your database may have encountered a bad spot on the disk. This can be circumvented by reformatting the disk to make a new list of bad blocks. However, this can be time-consuming, so it is prudent to have a spare disk available to swap in while you reformat.
If several database files are affected, all on the same disk, you could have a disk controller problem or a disk head crash. A bad controller can be replaced, and data on the disk will often be in perfect shape. But after a head crash, you will need to use that spare disk as a replacement.
Keep an extra disk on hand as a “hot spare,” in case a disk failure occurs. Format it and verify that it works. If a disk failure does occur, it is much faster to swap in a spare disk than it is to rename database files and update the control file accordingly.
After you have determined the Oracle8 data that needs to be recovered, you must first restore the relevant files.
You can restore and recover the Oracle8 database files by using one of these programs:
■ Command-line interface of the Recovery Manager (RMAN) utility on the Oracle8 Server
5-14 Legato Storage Manager Administrator’s Guide
Disaster Recovery on UNIX
■ OEM Backup Manager
For more information about the Oracle Enterprise Manager, see “Using the Oracle Enterprise Manager Backup Manager” in Chapter 4. For complete details about using RMAN in Oracle8, refer to the Oracle8 Server Backup and Recovery Guide.
Recovering LSM to a New MachineThis section describes the situation where your original LSM machine is beyond repair, so you want to move LSM to a new machine. This procedure assumes that you are not updating the operating system or the LSM software.
If you want to make changes to the operating system or the LSM software, we strongly suggest that you configure the new machine exactly like the original, using the same version of the operating system and LSM software. After configuring the new machine, make sure the system is operational, perform a couple of successful backups, and then, update or upgrade the operating system or the LSM software, one at a time.
To move LSM to a new machine, use the same steps for recovering a primary disk and the LSM indexes and configuration files. See “Recovering the Operating System and LSM Software” and “Recovering LSM Indexes and Configuration Files” for complete information.
However, you should be aware of the following requirements for configuring the software:
■ Use the original hostname for the new LSM machine. You must use the same hostname because the LSM Server indexes were created under the original LSM machine hostname.
■ Make sure the original server name is listed as an alias for the server in the Client window of the nwadmin program
After LSM is moved to another machine, you must recover the LSM resource database (nsr.res file) to have the same resource and attribute settings on your new machine as you had on the previous one.
After you successfully move your server, check the following:
Note: Do not make major changes to the your operating system or LSM software at the same time you move to a new machine.
Disaster Recovery 5-15

Disaster Recovery on Windows NT
■ Verify the LSM Server resource configurations by means of the LSM Administrator GUI.
■ Use the savegrp -O command to perform a manual bootstrap backup as soon as possible. See “Manual Bootstrap Backup” in Chapter 4 for more information.
■ Check the Recover window to make sure all the client indexes are browsable and, therefore, recoverable.
Disaster Recovery on Windows NT
Recovery RequirementsWhile performing any disaster recovery procedures on your Windows NT system, keep in mind the following hardware, operating system, and LSM requirements. Fulfill the requirements that are pertinent to the disaster recovery procedure that you are following.
Hardware RequirementsUse the following list to install and configure your system hardware correctly:
■ Replace a damaged disk with a disk of the same size or larger
■ Recreate the disk partitions on the new system the same size or larger
■ Format the disk partitions using the same formats as the original disk (for example, FAT or NTFS)
Operating System RequirementsAdhere to the following list when you reinstall the Windows NT operating system:
■ Reinstall the same version of Windows NT
■ Reinstall Windows NT in the same directory where it originally resided
■ Use the same server name, TCP/IP hostname, and DNS Domain name
■ Reinstall any Microsoft Service Packs or Hotfixes that existed before the disaster
■ Reinstall the device and SCSI drivers
■ Make sure all networks protocols are working properly
■ After reinstalling Windows NT, reboot your system and log on as Administrator
5-16 Legato Storage Manager Administrator’s Guide

Disaster Recovery on Windows NT
LSM RequirementsFulfill the following requirements to ensure that you reinstall LSM successfully. Refer to the Oracle installation guide for your Windows NT system for LSM installation instructions.
■ Reinstall the same version of the LSM software.
■ Reinstall LSM into the same directory where it was originally installed.
■ Reinstall any patches that were installed prior to the disaster.
■ Be sure to stop and restart LSM after you rename the configuration files directory.
Recovering the Operating System and LSM SoftwareWhen a disk with the operating system and LSM binaries has been damaged or completely destroyed, you need to replace the damaged disk and reinstall both the operating system and the LSM software. If the disk was not completely destroyed and the operating system or LSM is still operational, use only those steps in this section that apply to your situation.
To recover the operating system and LSM software, follow these steps:
1. Replace the damaged disk. Make sure the replacement disk is as large or larger than the original disk.
2. Use the saved disk partition information to recreate the disk partitions with the same structure as the original disk. We recommend that you format each partition on the disk with the same filesystems as before, for example: FAT, NTFS, or HPFS. See “Disk Information on Windows NT” for more information.
3. Reinstall the operating system into the same directory where the operating system originally resided, using the original software and accompanying documentation. Be sure you use the same TCP/IP hostname and DNS Domain name you used prior to losing the operating system.
Note: Install the Windows NT operating system into a workgroup. Do not install the server in a Domain. When you recover the Registry later in this procedure, the server will be returned to its original Domain after the recovery is complete and you restart the system.
Disaster Recovery 5-17

Disaster Recovery on Windows NT
You need to fully configure the operating system by recreating any unique configurations that existed before you lost data or experienced a disk crash.
4. Install and configure the correct SCSI controller and tape device drivers.
5. If the system had a Microsoft Service Pack installed prior to the disk crash, reinstall it now.
6. Reboot the system, and log on as Administrator.
7. Reinstall the LSM software in the same location it was originally installed. Refer to the Oracle installation guide for your Windows NT system for LSM installation instructions. Also, at this time, reinstall any LSM patches you had installed prior to the disaster.
If you lost the LSM indexes and configuration files directory, you will need to follow the instructions in the next section to recover them.
Recovering LSM Indexes and Configuration FilesIf the LSM indexes and configuration files that reside in the \nsr\res directory have been destroyed, you need to use the mmrecov command to recover them.
If the operating system and the LSM software were also destroyed, they must be reinstalled prior to recovering the \nsr\res directory contents. See the preceding section, “Recovering the Operating System and LSM Software”.
When you use the mmrecov command to recover the \nsr directory, you actually recover the contents of three important directories:
■ \nsr\mm (media manager) directory – contains the LSM media index that tracks the LSM backup volumes and their save sets.
■ \nsr\index\server-name directory – contains the LSM client index, which has a list of all the server files that were backed up prior to the disaster.
■ \nsr\res directory – contains special LSM resource configuration files. The nsr.res file contains the LSM Server configurations including device information. Unlike the indexes, the contents of this directory cannot be reliably overwritten while LSM is running. Therefore, mmrecov recovers the \nsr\res directory as \nsr\res.R. Later, you must change the directory name to \nsr\res.
Using the mmrecov CommandThe mmrecov command asks you for the bootstrap save set identification number (ssid). If you followed the recommended procedures to prepare for loss of critical
5-18 Legato Storage Manager Administrator’s Guide

Disaster Recovery on Windows NT
data, you have a copy of the bootstrap file as a hardcopy printout with the name of the backup media you need and the bootstrap save set ID (ssid).
In the following example, ssid “1148869870” is the most recent bootstrap backup:
August 20 03:30 1996 LSM bootstrap information Page 1date time level ssid file record volume8/08/96 7:44:38 full 1148869706 55 0 mars.0048/09/96 6:12:09 full 1148869754 48 0 mars.0058/10/96 6:14:23 full 1148869808 63 0 mars.0068/11/96 6:29:58 full 1148869870 88 0 mars.006
If you do not have this information, you can still recover the indexes by finding the bootstrap ssid using the scanner -B command. See “Bootstrap Save Set ID”.
After you locate the bootstrap with the most recent date on your Windows NT system, you can run the mmrecov command, supplying the save set ID and file number displayed by the scanner command, to recover the LSM Server indexes and resource configuration.
With the operating system and LSM software in place, recover the indexes and configuration files from the backup media:
1. Find the bootstrap information, which you need for the next two steps.
2. Retrieve the backup media that contains the most recent backup named bootstrap and mount it in a backup device.
3. Use the mmrecov command to extract the contents of the bootstrap save set. For example:
mmrecovC:\win32app\nsr\bin>mmrecovmmrecov: Using mars.universe.com as serverNOTICE: mmrecov is used to recover the LSM server’s on-line file and media indexes from media (backup tapes or disks) when either of the server’s on-line file or media index has been lost or damaged. Note that this command will OVERWRITE the server’s existing on-line file and media indexes. mmrecov is not used to recover LSM clients’ on-line indexes; normal recover procedures may be used for this purpose.Enter the latest bootstrap save set id []: 15132Enter starting file number (if known) [0]: 9Enter starting record number (if known) [0]:Please insert the volume on which save set id 15132 started into \\.\Tape0. When you have done this, press <RETURN>:Scanning \\.\Tape0 for save set 15132; this may take a while..scanner: scanning 4mm tape mars.universe.com.001 on \\.\Tape0
Disaster Recovery 5-19

Disaster Recovery on Windows NT
C:\win32app\nsr\res\nsr.resC:\win32app\nsr\res\nsrjb.resC:\win32app\nsr\res\nsrla.resC:\win32app\nsr\res\nsrmmdbasm -r C:\win32app\nsr\mm\mmvolumeC:\win32app\nsr\mm\mmvolume: file exists, overwriting nsrindexasm -r C:\win32app\nsr\index\mars.universe.com\dbC:\win32app\nsr\index\mars.universe.com\C:\win32app\nsr\index\C:\win32app\nsr\mm\C:\win32app\nsr\C:\win32app\C:\scanner: ssid 15132: scan completescanner: ssid 15132: 290 KB, 12 filestakin.legato.com: 2247 records recovered, 0 discarded.Cross checking index for client mars.universe.com to remove duplicate recordsThe index for ‘mars.universe.com' is now fully recovered.\\.\Tape0: mount operation in progress\\.\Tape0: verifying label, moving backward 2 files\\.\Tape0: mounted 4mm tape mars.universe.com.001The bootstrap entry in the on-line index for mars.universe.com has been recovered.If your resource files were lost, they are now recovered in the 'res.R' directory. Copy or move them to the 'res' directory, after you have shut down the service. Then restart the service.Otherwise, just recycle the service.
The LSM Server indexes and configuration files should be fully recovered.
Renaming the Configuration Files DirectoryUnlike the \nsr\index directory, the \nsr\res directory that contains the configuration files cannot be reliably overwritten while LSM is running. Therefore, mmrecov recovers the \nsr\res directory as \nsr\res.R. To complete the recovery of the LSM configuration files, shut down LSM, rename the recovered \nsr\res.R directory to \nsr\res, and then restart LSM.
When the mmrecov program finishes recovering the indexes, it displays this final message:
The on-line index for ‘server’ is now fully recovered.
5-20 Legato Storage Manager Administrator’s Guide

Disaster Recovery on Windows NT
Complete these steps after mmrecov completes:
1. Stop the LSM Backup and Recover Server service by using the Windows NT Service Control Panel.
2. Save the original \res directory as \res.orig, and rename the recovered directory (res.R) to res.
3. Restart the LSM Backup and Recover Server service by using the Windows NT Service Control Panel.
4. Once you have verified that the LSM configurations are correct, you can remove the res.orig directory.
Completing the Recovery on Windows NTOnce you recover the LSM Server’s indexes and configuration files, you can recover the remainder of the Server’s data including the Registry by using the NetWorker User program.
The NetWorker User program is provided as part of your LSM installation. You can start the NetWorker User program by selecting the NetWorker User icon from the taskbar or double-clicking the NetWorker User icon from the Program Manager. For more information about how to use the program, see the NetWorker User online help or refer to Appendix D, “Running the NetWorker User Program”.
To recover the remainder of the data on your LSM Server, follow these steps:
1. Start the NetWorker User program.
2. Click the Recover speedbar button to open the Recover window. NetWorker displays the system’s directory structure in the Recover window.
3. Select and mark the Registry for recovery.
4. Click the Start speedbar button to begin the recovery.
5. Boot your computer once the recovery is completed.
6. Log on as Administrator.
7. Select all remaining data for recovery.
8. Deselect the following directories and/or files before you recover the data:
■ \nsr\index\server_name, \nsr\res, and \nsr\mm directoriesThese directories were recovered when you ran the mmrecov command.
■ %SystemDrive%\system32\smss.exe file This file was possibly installed during disaster recovery.
Disaster Recovery 5-21

Disaster Recovery on Windows NT
9. Click the Start speedbar button to begin the recovery.
10. After NetWorker completes the recovery, reboot the system.
The system should be restored to its status prior to the disk crash.
Restoring Oracle Data on Windows NTThis section describes how to recover from a crash in which one or more files of an Oracle database were damaged on your Windows NT Oracle Server.
The first sign of a disk crash will usually be an I/O error. Oracle will usually document the I/O error in the trace file and in the alert log
If only one database file is affected, your database may have encountered a bad spot on the disk. This can be circumvented by reformatting the disk to make a new list of bad blocks. However, this can be time-consuming, so it is prudent to have a spare disk available to swap in while you reformat.
If several database files are affected, all on the same disk, you could have a disk controller problem or a disk head crash. A bad controller can be replaced, and data on the disk will often be in perfect shape. But after a head crash, you will need to use that spare disk as a replacement.
Keep an extra disk on hand as a “hot spare,” in case a disk failure occurs. Format it and verify that it works. If a disk failure does occur, it is much faster to swap in a spare disk than it is to rename database files and update the control file accordingly.
After you have determined the Oracle data that needs to be recovered, you must first restore the relevant files.
You can restore and recover the Oracle database files by using one of these programs:
■ Command-line interface of the Oracle restore utility on the Oracle Server
■ OEM Backup Manager
For more information about the Oracle Enterprise Manager, see “Using the Oracle Enterprise Manager Backup Manager” in Chapter 4.
Restoring Oracle DataFor complete information about recovering database files using EBU in Oracle7, refer to the Oracle7 Enterprise Backup Utility Administrator’s Guide. To recover an Oracle8 database using Recovery Manager, please see the Oracle8 Server Backup and Recovery Guide.
5-22 Legato Storage Manager Administrator’s Guide

Disaster Recovery on Windows NT
Recovering LSM to a New MachineThis section describes the situation where your original LSM machine is beyond repair, so you want to move LSM to a new machine. This procedure assumes that you are not updating the operating system or the LSM software.
If you want to make changes to the operating system or the LSM software, we strongly suggest that you configure the new server exactly like the original, using the same version of the operating system and LSM software. After configuring the new server, make sure the system is operational, perform a couple of successful backups, and then, update or upgrade the operating system or the LSM software, one at a time.
To move LSM to a new machine, use the same steps for recovering a primary disk and the LSM indexes and configuration files. See “Recovering the Operating System and LSM Software” and “Recovering LSM Indexes and Configuration Files” for complete information.
However, you should be aware of the following requirements for configuring the software:
■ Use the original hostname for the new LSM machine. You must use the same hostname because the LSM Server indexes were created under the original LSM machine hostname.
■ Make sure the original server name is listed as an alias for the server in the Create Client dialog box of the LSM Administrator program.
After LSM is moved to another machine, you must recover the LSM resource database (nsr.res file) to have the same resource and attribute settings on your new machine as you had on the previous one.
After you successfully move your server, check the following:
■ Verify the LSM Server resource configurations by means of the LSM Administrator GUI.
■ Use the savegrp -O command to perform a manual bootstrap backup as soon as possible. See “Manual Bootstrap Backup” in Chapter 4 for more information.
■ Check the Recover window to make sure all the client indexes are browsable and, therefore, recoverable.
Note: Do not make major changes to the your operating system or LSM software at the same time as you move to a new machine.
Disaster Recovery 5-23

Recovering Oracle Data
Recovering Oracle DataThe methods for restoring and recovering Oracle database files are outlined in the Oracle8 Server Backup and Recovery Guide for RMAN, and the Oracle7 Enterprise Backup Utility Administrator’s Guide for EBU
5-24 Legato Storage Manager Administrator’s Guide

Sc
A
ScannerScanner on UNIX
Save Set Recover and ScannerUse save set recover to recover backed up data that has passed the period of its browse policy but is still in the media database. Save set recover can be initiated either from the command line by executing the recover program and providing specific save set identification numbers (ssid) as options, or from the LSM adminis-tration program (nwadmin). Individual files or directories can be specified by including the exact path along with the ssid. Permission to perform a save set
Use save set recover only when the entries have been removed from the online file index (when the save set has passed its browse policy). When you perform a save set recover, you must recover the level full backup first, then recover the other back-ups in level order, 1 through 9, then recover the incremental backups.
Use the scanner program to re-create client file index entries or re-create media database entries, if no entries for the volume exist in the media database. The scanner program can read the storage volume directly, without assistance from LSM.
To find the volume that contains the file you want, use the mminfo program if the volume is still in the media database or the scanner program, if the volume is no longer in the media database. The mminfo and the scanner programs provide detailed information of the contents of the volume. This information includes:
■ The name of the backup volume
■ The name of the save set that contains the file you want
■ The name of the client to which the file belongs
anner A-1
Scanner on UNIX
■ The date and time the file was backed up
How to Rebuild a Save Set Entry in the Client File IndexIf the file is not browsable (which means that the save set’s browse policy has expired), but its save set is still tracked by LSM in the media database (which means that the save set’s retention policy has not expired), follow these steps to recover the save set’s entry back into the client file index:
1. Run the mminfo program:
mminfo -a -v volume-name
2. From the mminfo output, find the save set ID that you believe contains the file you want. Make sure it is not the bootstrap save set ID.
3. Once you have the proper save set ID, replace the save set entry in the file index with the scanner program:
scanner -i -s save-set-id device-name
4. Use the LSM recover program to mark the file for recovery.
If the save set that contains the file is not browsable, and the save set is not repre-sented in the media database, both the browse and retention policies have expired. Follow these steps to rebuild the save set’s entry in both the client file index and the media database:
1. Run the scanner program on the backup volume that you believe contains the file you want (make a guess based on the adhesive label on the volume).
scanner device-name
2. Use the output from the scanner program to decide whether to re-introduce the contents of this volume into the client file indexes and whether the save set you want to rebuild is on this volume. You must locate all of the volumes that contain this save set ID.
3. Once you have determined which volumes to re-introduce into the online indexes, run the scanner command below:
Note: If the save set spans volume boundaries, use the scanner program to read from all the volumes. Otherwise, the client file index will not be fully rebuilt, making it impossible to perform an online recovery of the files in this save set.
A-2 Legato Storage Manager Administrator’s Guide

Scanner on UNIX
scanner -i device-name
The scanner command asks for a new volume until you terminate it. To rebuild the indexes completely, you must scan in all of the volumes that contain the save set ID.
4. Use the nwrecover program to browse the file index for the file you want to recover.
How to Recover an Entire Save Set to the LSM Server To recover an entire save set directly to your disk volume, use the following options to invoke the scanner program:
scanner -s save-set-id device-name | uasm -rv
This command reads all the information associated with the save set ID from the volume and place a copy of this data on the LSM server in the exact way that it is stored on the backup volume. In other words, the backup volume may contain files for a client, but will be recovered to the LSM server’s hard drive.
If you want to be sure this action is correct before you actually perform it, add the -n flag to the uasm command. The -n flag sends the output from scanner to /dev/null and lists all the filenames contained in the save set.
You could also use rsh (or its equivalent) in conjunction with the following com-mand in order to recover the save set to the client, if the save set originated on a LSM client instead of the LSM server.
scanner -s ssid device-name | rsh client "(cd destdir; /pathto/uasm -rv)"
How to Recover One File Directly from a VolumeTo recover a single file from a volume, run one of the following commands:
scanner -s save-set-id device-name | uasm -rv filename
or
scanner -s save-set-id device-name | uasm -rv -m source=dest filename
The -m option of uasm maps (relocates) the recovered file from the source to the dest (destination) directory.
Scanner A-3

Scanner on UNIX
scannerThe scanner program directly reads LSM media (such as backup tapes, optical disks, or files) to confirm the contents of a volume, to extract a save set from a vol-ume, or to rebuild the LSM online indexes. You can only run this command as root. You must specify a device, which is usually one of the device names used by the LSM server. If the device is a tape drive, it must be a nonrewinding type.
If the scanner program is invoked without options (or only the -v option), the vol-ume on the specified device is scanned and a table of contents is generated. The table of contents contains information about each save set found on the volume. By default, one line of information is written to standard output for each save set found on the volume. The information provides the client name, save set name, save time, level, size, files, save set ID, and a flag.
The following example describes the format and options available for the scan-ner program:
scanner [ -Bimnpqv ] [ -s server ] [ -S ssid ] [ -c client ] [ -N name ] [ -f file ] [ -r record ] [ -t type ] [ -b pool ] device [ -x command argument-list ]
■ Use the -b pool option to specify the pool that the volume should belong to. This option only applies to volumes backed up by versions of LSM that did not store pool information on the media.
■ Use the -B option, without the -S option, to quickly scan the tape to the loca-tion of the start of the bootstrap save sets. When the entire tape has been scanned, the save set ID and tape file location of the most recent bootstrap save set is printed to standard output.
■ Use the -c client option to instruct scanner to only process save sets that came from the machine specified by client. You can specify more than one client name in the same command line. The -c option can also be used in conjunction with the -N option, but only if the -i or -x option are also specified.
■ Use the -f file option to start the scan at a specific media file number.
■ Use the -i option to instruct scanner to rebuild both the client file indexes and media database from the volumes that are read. If you specify a single save set with the -S ssid option, only the entries from the specified save set are made to the client file index.
■ Use the -m option to instruct scanner to rebuild only the media database for the volumes that are read.
A-4 Legato Storage Manager Administrator’s Guide

Scanner on UNIX
■ Use the -n option to run scanner without rebuilding the client file indexes or media database. This option provides a way to check the media without modi-fying the client file indexes or media database.
■ Use the -N name option to process only save sets that match the specified name. The value of name should be a literal string. You can specify multiple names when this option is used in conjunction with the -c client option, but only if the -i or -x option are also specified.
■ Use the -p option to print out information about each save set as it is processed.
■ Use the -q option to only display error messages or messages of significance.
■ Use the -r record option to start the scan at a specific media record number, to avoid a scan of potentially unused information.
■ Use the -s server option, when you run the scanner program on a storage node, to specify the controlling LSM server.
■ Use the -S ssid option to extract the save set specified by ssid. When this option is used in conjunction with the -i or -x options, you can specify multiple ssid values. The save sets selected are in addition to any selected by the use of the -c and -N options. If the -B option is also specified, the value of ssid is assumed to be that of the bootstrap save set; only one ssid can be specified in this case.
■ Use the -x command option, with an optional list of command arguments, to specify a UNIX command to execute on each save set scanned. This option can only be specified once per scanner command line, after the device specifica-tion.
Refer to the scanner(1m) man page for examples of scanner command usage and a list of common error messages.
The scanner Program Requests an Entry for Record SizeIf you use the scanner program with the -s option but without an -i or -m option, and you the following message:
please enter record size for this volume (’q’ to quit) [xx]
The number in the bracket [xx] is the entry from the last query.
The scanner command always rewinds the tape and reads the volume label to determine the block size. If the volume label is corrupted or unreadable, you will see a message asking you to enter the block size (in kilobytes).
Scanner A-5

Scanner on Windows NT
Type in the block size; it must be an integer equal to or greater than 32. If you enter an integer that is less than 32, you receive the following message:
illegal record size (must be an integer >=32)
Scanner on Windows NT
Using the Scanner Program The scanner program reads the volume directly, without accessing information that may be available in the media database. If no entries exist in the media data-base, you must take an educated guess at which volume contains the data to recover.
Mount the volume and execute the scanner command with any of its options. The most commonly used scanner options are as follows:
■ Rebuild the media database entries for everything on the storage volume (by executing scanner -m device) and perform a save set recovery.
■ Rebuild the media database and client file index entries for everything on the storage volume (by executing scanner -i device) and perform either a save set recovery or a client file index-based recovery.
■ Rebuild the media database entries for a specific save set on the storage volume (by executing scanner -s save-set-id -i device) and perform a save set recov-ery.
■ Rebuild the media database and client file index entries for a specific save set on the storage volume (by executing scanner -s save-set-id -m device) and perform either a save set recovery or a client file index-based recovery.
■ Execute scanner with -c client-name and -N save-set-name options, along with any other of the options previously described to further specify the save sets by client or name.
■ Execute scanner -s save-set-id to send a specific save set to standard output.
■ Use the scanner program’s -x option to introduce further processing com-mands on a per save set basis.
A-6 Legato Storage Manager Administrator’s Guide

Client Server Communica
B
Client Server CommunicationsClient-Server Communications on UNIX Many of the problems that LSM users report when they set up and configure LSM are actually problems with the communications in their networks. This section con-tains a procedure for testing the communications in a network.
How to Troubleshoot IP Errors 1. Read this section. Document the steps you take and the results, especially error
messages, in case you need to contact Oracle Worldwide Customer Support.
2. Set up host tables for LSM clients and LSM servers. See “How to Set Up Host Tables”.
3. Disable other name servers to simplify testing. See “How to Disable Name Serv-ers for Troubleshooting”.
4. Use ping to establish basic connectivity. See “How to Use ping to Verify Net-work Connections”.
5. Use rpcinfo to verify that sessions can be established and that portmapping is correct. See “How to Use rpcinfo to Verify that Sessions Can Be Established”.
tions B-1

Client-Server Communications on UNIX
How to Set Up Host Tables Legato recommends that you troubleshoot IP problems using only host tables. Trou-bleshooting using only host tables does not mean you cannot use your name ser-vice, for example, DNS, with LSM. Test using only host tables to determine whether you have LSM installed correctly. After you know LSM works with host tables, you can enable whatever name server you are using.
To configure host tables on a server or client:
1. On the LSM client, list the client and the LSM servers to which it connects, for example:
127.0.0.1 localhost loopback123.456.789.111 client client.domain.com123.456.789.222 server server.domain.com
2. On the LSM server, list the LSM server itself and all of its clients, for example:
127.0.0.1 localhost loopback123.456.789.111 server server.domain.com123.456.789.222 client client.domain.com
3. Use the guidelines in “How to Use ping to Verify Network Connections” to ensure the highest success rate for host table parsing within any operating sys-tem.
Notes for host table configuration:
■ Do not use blank lines in the body of your host tables.
■ The end of the host table should always contain a blank line.
■ The first unremarked entry should always be the loopback line in the exact order and format shown above.
■ The last character of each unremarked line should be a space, not a carriage return.
On UNIX platforms, the host tables reside in /etc/hosts.
Host tables can be used in addition to DNS where necessary, but it is simplest to temporarily disable DNS for troubleshooting purposes.
B-2 Legato Storage Manager Administrator’s Guide

Client-Server Communications on UNIX
How to Disable Name Servers for Troubleshooting To simplify the troubleshooting of name resolution problems, Legato recommends disabling services like DNS, WINS, and DHCP. If you have name resolution prob-lems, first configure only the host tables for your machines, then test your backups.
Some common problems you may encounter with DNS, WINS, and DHCP services:
■ The DNS is not configured with a reverse lookup table.
■ The clients are configured with the wrong IP addresses for DNS or WINS serv-ers.
■ The DHCP services do not properly update the WINS server with new addresses.
DNS does not need to be disabled for your entire network, only for the initial setup of the LSM clients and the LSM server you want to test. Only disable the ability of a client to obtain IP naming information from a DNS server. Typically, you do not need to disable the DNS server itself.
To disable the DNS server on most UNIX platforms, rename the file /etc/resolv.conf and reboot.
For a Solaris you can, instead of renaming resolv.conf, set up the IP name search order so that the host table is searched before DNS.
To set up the IP name search order:
1. Edit the /etc/nsswitch.conf file and verify that the /etc/resolv.conf file exists.
2. Set the host file to be first in search order, with DNS second and NIS last, for example:
hosts: files [NOTFOUND=continue] DNS [NOTFOUND=continue] nis
How to Use ping to Verify Network Connections After you have created the host tables, test with ping. Use just the steps marked with an asterisk (*) if the server is the only client.
On the LSM client:
■ ping the client short name (host name) from the client
■ ping the client long name (host name plus domain information) from the cli-ent
■ ping the client IP address from the client
Client Server Communications B-3

Client-Server Communications on UNIX
■ ping the server short name from the client
■ ping the server long name from the client
■ ping the server IP address from the client
The following example shows pinging the client short name and client long name from a LSM client called mars in the oak domain:
ping marsping mars.oak.com
On the LSM server:
■ ping the server short name from the server *
■ ping the server long name from the server *
■ ping the server IP address from the server *
■ ping the client short name from the server
■ ping the client long name from the server
■ ping the client IP address from the server
How to Use rpcinfo to Verify that Sessions Can Be Established If ping is successful and backup problems still exist, you can also test with rpcinfo. Because LSM relies heavily on mapping of ports, use rpcinfo to test the operation of the portmapper. Using ping tests the connection up to the net-work layer in the OSI model, rpcinfo checks for communication up to the session layer.
Use the same tests with rpcinfo as with ping. Run just the steps marked with an asterisk (*) if the server is the only client.
For rpcinfo to be used successfully, the machine whose hostname is entered on the command line must have a portmapper running. Legato portmappers are com-patible with fully functional portmappers from other vendors (this is called a third-party portmapper) in most cases. If you are using a product that provides its own portmapper, Legato recommends not loading the third-party portmapper until you have verified that LSM works with the rest of your environment. This pro-cess lets you test portmapper compatibility without adding other unknowns.
On Solaris, the rpcbind daemon must be running. The rpcinfo utility is part of the operating system.
The syntax for using rpcinfo to display ports using TCP is:
B-4 Legato Storage Manager Administrator’s Guide

Client-Server Communications on UNIX
rpcinfo -p hostname
Substitute the long name and short name for the variable hostname, just like for ping.
You can view other rpcinfo command line options by typing rpcinfo at the command line. Notes on the rpcinfo command and its error messages are avail-able in the UNIX man page for rpcinfo. Repeat rpcinfo using all of the loca-tions and all of the iterations listed in this document for ping.
When rpcinfo runs successfully, the output is a list of port numbers and names. For troubleshooting, we are only interested in the exact text of any error messages. Typical successful responses have the following format:
rpcinfo for marsprogram vers proto port100000 2 tcp 111 portmapper100000 2 udp 111 portmapper390103 2 tcp 760390109 2 tcp 760390110 1 tcp 760390103 2 udp 764390109 2 udp 764390110 1 udp 764390113 1 tcp 7937390105 5 tcp 821390107 4 tcp 819390107 5 tcp 819390104 105 tcp 822
How to Verify Firmware for Switches and Routers If you are using switches or routers from any vendor, make sure that the switch or router firmware is dated after August 1995 (wherever they exist on your network) to ensure that RPC traffic is handled properly. Most of the switch and router ven-dors with whom we have worked have significantly improved their handling of RPC traffic since August 1995.
Naming Requirements LSM UNIX clients release 4.2 and later use the servers file located in the /nsr/res sub-directory to determine if a LSM server is authorized to back up the client’s data.
Make sure the servers file on a client contains both the short name and long name of the server you want to back up that client’s data. For example, the servers file on a
Client Server Communications B-5

Client-Server Communications on UNIX
LSM client would contain the following names for a LSM server named mars located in the oak.com domain:
marsmars.oak.com
In the Clients resource, list both the short name and the long name, plus any other applicable aliases for each client, in the Alias attribute.
Binding to Server ErrorsLSM is designed to follow the client/server model, where servers provide services to the client through the Remote Procedure Call (RPC). These services live inside of long-lived processes, known as daemons.
For clients to find these daemons, the daemons must be registered with a registra-tion service. When the daemons start up, they register themselves with the registra-tion service provided by the portmapper.
LSM servers provide a backup and recover service. They receive data from clients, store the data on backup media, and retrieve it on demand. If the LSM daemons are not running and a LSM service is requested, you receive the following messages in your savegroup completion mail:
“Server not available”“RPC error, remote program is not registered”
These messages indicate that the LSM daemons nsrd, nsrexecd, nsrindexd, nsrmmd, and nsrmmdbd may not be running. To restart the daemons, become root and enter the following command at the shell prompt:
/etc/init.d/networker start
B-6 Legato Storage Manager Administrator’s Guide

Client/Server Communications on Windows NT
Client/Server Communications on Windows NTYou establish communication between the LSM server and its clients by assigning values in both the Set Up Server dialog box and the Client dialog box of each client. To help you understand how these values work together, this section discusses com-munication issues internal to LSM. LSM relies on full and accurate configuration of the network to implement features that protect data and ensure security.
Configure your server by using the Set Up Server dialog box (Figure B–1). Here you make choices that affect the performance and security of your backups, such as setting the server parallelism, enabling concurrent devices, and adding or changing LSM administrators. You also use the Set Up Server dialog box to provide impor-tant company and product information that is required for registering your LSM products.
Figure B–1 Set Up Server Dialog Box
Click Set Up Server in the Server window to open the Set Up Server dialog box. The Set Up Server dialog box contains overlapping tabs containing resource attributes to configure your LSM server. Many of these attributes are determined when you initially install and register your LSM server software. Some attributes are read-only, or contain information more advanced and detailed than most LSM
Client Server Communications B-7

Client/Server Communications on Windows NT
users need, particularly if Hidden Attributes is enabled. Legato technical support engineers may request that you provide information displayed in these attributes to understand your system configuration. Click Field Help to learn more about each attribute.
Configuring Server CommunicationsThe following sections address various client-server communication issues using LSM.
Name ResolutionIn a pure Windows NT environment, you may find using WINS or LMHOSTS is adequate for using LSM. However, using LSM with other types of clients requires using a local host file or DNS name resolution.
You must add the LSM server name to either the local HOSTS file located in %Sys-temDrive%\system32\drivers\etc or the Domain Name Server (DNS) which contains the names of all the servers on your network.
Backup Operators GroupThe Backup Operators local group provides its members the rights necessary to backup and recover data from a Windows NT system. A user requesting a backup must be in the Backup Operators or Administrators group of the domain into which they are logged. The Backup Operators group is assigned on a machine-by-machine basis. It is not assigned globally by the domain. If you are hav-ing trouble performing tasks on one LSM server but not another, check the problem-atic machine’s Backup Operators group to ensure you are properly assigned.
DHCP ClientsTypically, addresses for Dynamic Host Configuration Protocol (DHCP) clients change because they use dynamic addressing. If your LSM server is a DHCP client, you must reserve a static TCP/IP address on your DHCP server. If the address changes, the authorization code for that LSM server becomes invalid.
SAPLSM uses Service Advertising Protocol (SAP) to resolve IPX/SPX names into net-work addresses. Because of the nature of SAP, LSM can resolve IPX/SPX host-names only if the named machine is up and running. When using IPX/SPX, make sure the SAP Agent is installed, and that SPX has been started.
B-8 Legato Storage Manager Administrator’s Guide

Client/Server Communications on Windows NT
Backup and Recover ServiceIn the Windows NT operating system, the LSM Backup and Recover Server service is normally started by the Windows NT System account. This allows the services to be running even if no one is logged onto that system.
Client Server Communications B-9

Client/Server Communications on Windows NT
B-10 Legato Storage Manager Administrator’s Guide
Using Label Temp
C
Using Label TemplatesLabeling Storage Volumes on UNIX LSM labels (initializes) each storage volume with a unique internal label that corre-sponds to a pool. During backup and other operations, LSM can identify the pool to which a volume belongs by its label. LSM applies a label template to create a unique internal label for each volume.
LSM uses label templates and pool configuration settings to sort, store, and track data on media volumes. If you need to recover data, LSM prompts you for the spe-cific volume that contains the required data by volume name and sequence number.
How LSM Uses Label Templates LSM writes a given set of data to a specific pool of volumes. For LSM to recognize that a particular volume belongs to the correct pool of volumes, the volume must have an internal identification label that associates it with the correct pool. The con-tents of the volume label follow rules defined in a specific label template which you create in the Label Templates resource. You then associate a label template with a specific pool in the Pools resource. If you do not associate data with a specific pool, LSM uses the preconfigured Default pool and corresponding Default label template.
lates C-1

Labeling Storage Volumes on UNIX
Figure C–1 illustrates how a pool configuration uses its associated label template to label a volume. You must configure a label template before you configure the associ-ated pool in order for your custom template to be available in the Pools resource.
Figure C–1 How LSM Labels a Volume Using a Label Template
How to Customize Label Templates Display the Label Template resource and specify values for the following attributes:
■ Name
Keep the label Name consistent with the pool Name so users and administra-tors can easily see how the data is organized. You can use the same or similar names. For example, you could create a label template called “AcctFull” for vol-umes that belong to a pool called “Accounting Full.”
You can use only alphanumeric characters when you create label templates. LSM does not allow the following characters in label template names:
/ \ * [ ] ( ) $ ! ^ ’ ; ‘ ~ < > & | { }
Label TemplatePool
Name:
Sales Full
Fields:
SalesFull
001-100
Separator:
period
Next:
025
Resulting volume label: SalesFull.025
Name: Sales Full
Group: Sales
Level: Full
Label Template: Sales Full
C-2 Legato Storage Manager Administrator’s Guide

Labeling Storage Volumes on UNIX
In addition, you cannot use the following characters, because they are used as separators in label templates:
colon (:), dash (-), period (.), and underscore (_).
■ Fields
A label template is made up of one or more components. Each field, or compo-nent, provides a layer of specificity to your organizational structure. You can have as many components as you want, but it is best to keep the template sim-ple, with few components. The total length of the label cannot exceed 64 charac-ters.
There are four types of components you can use:
Range of numbers – for example, 001-999
Range of lowercase letters – for example, aa-zz
Range of uppercase letters – for example, AA-ZZ
Character string – for example, Accounting
Each range includes a start value, a dash (-), and an end value. The start value and the end value must have the same number of characters. For example, use “01-99” not “1-99” or “aaa-zzz,” not “aa-zzz.” (This rule does not apply to a list of character strings or words; character strings are separated by a blank space.)
The order in which you enter each component of the template is important. LSM applies each component in a left-to-right order, starting with the first one you enter.
Table C–1 illustrates how label templates use components to create a number sequence for volume labels.
Table C–1 Examples of Number Sequences for Volume Labels
Type of Components Fields Number Sequence ResultTotal Number of Labels
Range of numbers 001-100 001, 002, 003,...100 100
Character string Range of numbers
SalesFull 001-100
SalesFull.001,...SalesFull.100 100
Using Label Templates C-3

Labeling Storage Volumes on UNIX
Your label template should allow for expansion of your backup media storage system. For example, it is better to create a template for 100 tapes and not use all of them, than to create a template for only 10 tapes and run out of labels. When LSM reaches the end of the template number sequence, LSM wraps around to the start value. For example, after zz.99, the 67,600th label in the example shown in Table C–1, the next label LSM uses is aa.00 for label 67,601.
■ Separator
Choose what character symbol you want to appear between component entries. You can use the period, dash, colon, or underscore to separate each component of the label template. If you do not select a separator, the label com-ponents do not have separators (for example, AA00aa), which makes the labels difficult to read.
■ Next
Choose the next sequence number to write on the label LSM places on a vol-ume (according to the template). If you want to force a label to start the label scheme at a particular point, enter the desired start label value. LSM continues to generate labels from that point on, according to the rules of the template. If you want LSM to generate the first label for you, leave this attribute blank.
When LSM recycles a storage volume, the volume label does not change, as long as the volume remains in the same pool. That is, if a storage volume labeled “Dev.006” is recycled, it retains the volume label “Dev.006” and will not receive a new label with the next sequence number.
Range of lowercase letters
Range of numbers
aa-zz
00-99
aa.00,...aa.99,
ab.00,...ab.99,
ac.00,...ac.99,
:
az.00...az.99,
ba.00,...ba.99
:
zz.00,...zz.99
67,600 (262 times 102)
Table C–1 Examples of Number Sequences for Volume Labels
Type of Components Fields Number Sequence ResultTotal Number of Labels
C-4 Legato Storage Manager Administrator’s Guide

Labeling Storage Volumes on UNIX
How to Use Label Template Components LSM is shipped with preconfigured label templates that correspond to the precon-figured pools. If you choose to create your own templates, you can include as many components in the Fields attribute as necessary to suit your organizational struc-ture. However, it is a good idea to keep the template simple with few components. For example, if you create a label template for your Accounting Department, you could customize your label template in several ways depending on the size of your storage system and media device capabilities. Table C–2 illustrates several ways you could use components to organize your labels.
Table C–2 Using Label Template Components
Type of Organizational Structure
Fields (Components) Separator Resulting Volume Labels
Sequential AcctFull
001-100
period AcctFull.001
(100 total labels)
Storage oriented (for exam-ple, 3 storage racks with 5 shelves each, each shelf holding 100 tapes)
1-3
1-5
001-100
dash 1-1-001
This label is for the first tape in rack 1 on shelf 1.
(1,500 total labels)
Two sided media (for exam-ple, optical device)
AcctFull
000-999
a-b
underscore AcctFull_000_a (side 1)
AcctFull_000_b (side 2)
(2,000 total labels)
Using Label Templates C-5

Labeling Storage Volumes on Windows NT
Labeling Storage Volumes on Windows NTEvery volume belongs to a pool and requires a corresponding, identifying label. NetWorker creates a unique label for each volume by applying a label template. LSM uses label templates and pool configuration settings to sort, store, and track data on media volumes so you do not have to. If you need to recover data, Net-Worker will ask you for the specific volume(s) that contains the required data by volume name and sequence number.
How NetWorker Uses Label TemplatesNetWorker writes a given set of data to a specific pool. For NetWorker to recognize that a particular volume belongs to the correct pool, the volume must have an iden-tifying label that associates it with the correct pool. The contents of the volume label follow rules defined in a specific label template that you create in the Label templates dialog box. You then associate a label template with a specific pool in the Pools dialog box. If you do not associate data with a specific pool, NetWorker uses the preconfigured Default pool and corresponding Default label template.
C-6 Legato Storage Manager Administrator’s Guide

Labeling Storage Volumes on Windows NT
Figure C–2 illustrates how a pool configuration uses its associated label template to label a volume. You must configure a label template before configuring the associ-ated pool in order for the label template Name to appear as a choice in the Pools dialog box.
Figure C–2 Labeling a Volume Using a Label Template
Label Template Dialog BoxThe Label Template dialog box is where you enter or change configuration informa-tion for label templates. The Label Template dialog box opens whenever you select the Create or Edit commands for label templates. Figure C–3 shows the Edit Label Template dialog box as a sample. There may be differences in contents between the Create and Edit Label Template dialog boxes.
The Label Template dialog box consists of overlapping tabs containing resource attributes. The General (default) tab contains most of the attributes required for cre-ating a label template. Some attributes are read-only, or contain information more advanced and detailed than most LSM users need, particularly if Hidden Attributes is enabled. Legato technical support engineers may request that you pro-
Label Template
Pool
Name: Sales FullField(s): SalesFull
001-100Separator:periodNext: 025
Resulting volume label: SalesFull.025
During the labeling process, NetWorker associates a media volume with a pool.
NetWorker applies the label template associated with the Sales Full pool.
Unlabeled volume
Name:Sales FullGroup:SalesLevel: FullLabel Template: Sales Full
Using Label Templates C-7

Labeling Storage Volumes on Windows NT
vide attribute information to understand your system configuration. Click Field Help to learn more about each attribute.
Figure C–3 Edit Label Template Dialog Box
The following sections describe the main attributes of the Label Templates resource.
NameThe Name you choose will appear in the Pools dialog box as a label template choice. Consistent naming is the most important aspect for defining label tem-plates. Keep the label Name consistent with the pool Name so users and adminis-trators can easily see how the data is organized. You can use the same or similar names for the pool Name and label template Name. For example, you could create a label template called “AcctFull” for volumes that belong to a pool called “Accounting Full.”
Use only alphanumeric characters in the Name text box when you create label tem-plates. NetWorker does not allow the following characters in label template names:
/ \ * [ ] ( ) $ ! ^ ’ ; ‘ ~ < > & | { }
In addition, you cannot use the following characters in the Name text box because they are used as separators in label templates:
colon (:), dash (-), period (.), and underscore (_).
FieldsA label template is made up of one or more components that you enter in the Fields text box. Each component provides a layer of specificity to your organizational structure. You can have as many components as you want, but it is best to keep the
C-8 Legato Storage Manager Administrator’s Guide

Labeling Storage Volumes on Windows NT
template simple, with few components. The total length of the label cannot exceed 64 characters.
There are four types of components you can use:
■ Range of numbers – for example, 001-999
■ Range of lowercase letters – for example, aa-zz
■ Range of uppercase letters – for example, AA-ZZ
■ Character string – for example, Accounting
Each range includes a starting value, a dash (-), and an ending value. The starting value and the ending value must have the same number of characters. For example, use “01-99” not “1-99” or “aaa-zzz,” not “aa-zzz.” This rule does not apply to a list of strings or words. You can have as many components as you want, but it is best to keep the template simple, with few components. The total length of the label must be less than 64 characters.
The order in which you enter each component of the template is important. Net-Worker applies each component in a left-to-right order, starting with the first one you enter. Table C–1 illustrates how label templates use components to create a numbering sequence for volume labels.
Your label template should allow for expansion of your backup media storage sys-tem. For example, it is better to create a template for 100 tapes and not use all of them, than to create a template for only 10 tapes and run out of labels. When Net-Worker reaches the end of the template numbering sequence, NetWorker wraps around to the starting value. For example, after zz.99, the 67,600th label in the above example, the next label NetWorker uses is aa.00 for label 67,601.
Table C–3 Examples of Numbering Sequences for Volume Labels
Type of Component(s) Fields Resulting Numbering SequenceTotal Number of Labels
Range of Numbers 001-100 001, 002, 003, ...100 100
Character String
Range of Numbers
SalesFull
001-100
SalesFull.001, SalesFull.002, Sales-Full.003, ...SalesFull.100
100
Using Label Templates C-9

Labeling Storage Volumes on Windows NT
SeparatorThe Separator text box allows you to choose what character symbol you want to appear between component entries. You can use the period, dash, colon, or under-score to separate each component of the label template. If you do not select a sepa-rator, the label components will not have separators (for example, AA00aa), which makes the labels difficult to read.
NextThe Next text box allows you choose the next sequence number that NetWorker will place on a volume label (according to the template). If you want to force a label to start the labeling scheme at a particular point, enter the desired starting label in the Next text box. NetWorker continues to generate labels from that point on, according to the rules of the template. If you want NetWorker to generate the first label for you, leave the Next text box blank. Note that when LSM recycles a storage volume, the volume label does not change if the volume remains in the same pool. That is, if a storage volume labeled “Dev.006” is recycled, it will retain the volume label “Dev.006” and will not receive a new label with the next sequence number. The original data on the volume, however, will be overwritten by new data.
Using Label Template ComponentsLSM ships with preconfigured label templates that correspond to the preconfigured pools of volumes. If you choose to create your own templates, you can include as many components in the Fields text box as necessary to suit your organizational structure. For clarity’s sake, however, it is a good idea to keep the template simple, with few components. For example, if you were creating a label template for your Accounting Department, you could customize your label template in several ways
Range of Lowercase LettersRange of Numbers
aa-zz00-99
aa.00, aa.01, aa.02 ...aa.98,aa.99, ab.00, ab.01, ab.02, ...ab.98, ab.99,ac.00, ac.01, ac.02, ...ac.98, ac.99,:az.00, az.01, az.02, ...az.98, az.99,ba.00, ba.01, ba.02, ...ba.98, ba.99:zz.00, zz.01, zz.02, ...zz.98, zz.99
67,600 (262 times 102)
Table C–3 Examples of Numbering Sequences for Volume Labels
Type of Component(s) Fields Resulting Numbering SequenceTotal Number of Labels
C-10 Legato Storage Manager Administrator’s Guide

Labeling Storage Volumes on Windows NT
depending on the size of your storage system and media device capabilities. Table illustrates several ways you could use components to organize your labels.
Creating Label TemplatesResource dialog box contents vary depending on the server. Use these steps as a general guideline to follow. However, additional attributes may be present (particu-larly if Hidden Attributes is enabled), or attributes mentioned here may be absent. Use Field Help for guidance in completing these additional attributes as necessary.
To create a label template, follow these steps:
1. Select the Configure tab in the Server window to make the Configure window active.
2. Click Manage Label Templates to open the Label Templates window.
3. Right-click on the main Label Templates icon, and select Create from the pop-up menu to open the Create Label Template dialog box.
4. Enter the name of the label template in the Name text box.
5. Enter the components for your label template in the Fields list box. Press [Return] after entering each component. You can use any or all of the following four components for your label template:
Range of number – for example, 001-999
Range of lowercase letters – for example, aa-zz
Table C–4 Using Label Template Components
Type of Organizational Structure
Fields (Components) Separator
Resulting Volume Label(s)
Sequential AcctFull
001-100
period AcctFull.001
(100 total labels)
Storage Oriented (for exam-ple, 3 storage racks with 5 shelves each, each shelf holding 100 tapes)
1-3
1-5
001-100
dash 1-1-001
This label is for the first tape in rack 1 on shelf 1.
(1,500 total labels)
Two-sided Media (e.g. opti-cal device)
AcctFull
000-999
a-b
underscore AcctFull_000_a (side 1)
AcctFull_000_b (side 2)
(2,000 total labels)
Using Label Templates C-11

Labeling Storage Volumes on Windows NT
Range of uppercase letters – for example, AA-ZZ
Character string – for example, Accounting
If you enter a range of numbers of characters, they change incrementally with each new label. For example:
First labelEngineeing.001
Second labelEngineering.002
Third labelEngineering.003
6. Select a separator symbol in the Separator list box and click OK. If no symbol is selected, the components will have no separators (for example, AA00aa).
7. Complete the other attributes as necessary and click OK.
Editing Label TemplatesTo edit a label template, follow these steps:
1. Select the Configure tab in the Server window to make the Configure window active.
2. Click Manage Label Templates to open the Label Templates window.
3. Right-click on the icon of the label template you want to edit, and select Edit from the pop-up menu to open the Edit Label Template dialog box.
4. Edit the attributes and click OK. Click Field Help to learn more about each attribute.
You cannot change the name of a label template. However, if you want to change an individual label name, delete the existing name in the Next text box, and enter a new name.
C-12 Legato Storage Manager Administrator’s Guide

Running the NetWorker User Pro
D
Running the NetWorker User ProgramUsing the NetWorker ProgramsNetWorker software consists of two main programs: the NetWorker User program for manually backing up and recovering files and the NetWorker Administrator program for managing and configuring scheduled backups. System administrators need to have both programs on their systems. To access and run the NetWorker pro-grams in conjunction with Windows NT, there are certain privileges and system requirements you must configure correctly.
Running the NetWorker User ProgramUse the NetWorker User program to manually back up and recover client files. The User program does not provide any capability for administering or configuring NetWorker. The program is for users who simply want to back up and recover files without being concerned with the administration of NetWorker.
To start the User program, select the NetWorker User icon from the Taskbar, or dou-ble-click the NetWorker User icon from the Program Manager.
For instructions on how to use the program, see the NetWorker User online help. For additional information about recovery options and permissions, see Chapter 5, “Disaster Recovery”.
To run the NetWorker User program on a Windows NT Workstation or Server, you must belong to the appropriate Windows NT groups.
gram D-1

Using the NetWorker Programs
Table lists the different groups you must belong to in order to run the NetWorker User program.
The Backup Operators and Administrators groups are local- and remote-type Microsoft security groups. Both groups, by default, have the users’ rights policies of “Back up files and directories” and “Restore files and directories” assigned. If either of these groups do not have these rights assigned, you must assign them by using the User Rights Policy dialog box in the Windows NT User Manager.
Table D–1 LSM User Groups Requirements
Logged onWindows NT Workstation
Windows NT Server (not a domain controller)
Windows NT Server (domain controller)
Locally Backup Operators or Administrators
Backup Operators or Administrators
N/A
To the domain Domain Administrators
Domain Administrators
Backup Operators or Administrators
D-2 Legato Storage Manager Administrator’s Guide

Glossary
This glossary contains terms and definitions found in this manual. Most of the terms are specific to LSM products
8mm
Choice in the Devices window; represents eight-millimeter magnetic tape.
Administrators group
Members of this Windows NT user group have all the rights and abilities of users in other groups, plus the ability to create and manage all the users and groups in the domain. Only members of the Administrators group can modify Windows NT OS files, maintain the built-in groups, and grant additional rights to groups.
annotation
A comment that you associate with an archive save set, to help identify that data later on. Annotations are stored in the media index for ease of searching and are limited to 1024 characters.
Application Specific Module (ASM)
A program, that when used in a directive, specifies the way that a set of files or directories is to be backed up and recovered.
ASM
See Application Specific Module.
Glossary-1

autochanger
A mechanism which uses a robotic arm to move media among various components located in a device including slots, media drives, media access ports, and transports. Autochangers automate media loading and mounting functions during backups and recovers.
Backup Operators group
Members of this Windows NT group have the capability to log onto a domain from a workstation or a server, back it up, and restore the data. Backup Operators also can shut down servers or workstations.
backup set
See save set.
backup volume
Backup media, such as magnetic tape or optical disk.
bootstrap
Information that includes the server index, media index, and configuration files needed for recovering LSM after a disk crash.
browse policy
The policy that determines how long entries for your files remain in the online file index.
client
A machine that accesses the LSM server to back up or recover files. Clients may be workstations, PCs, or fileservers.
client index
A database of information maintained by LSM which tracks every file or filesystem backed up.
command line
The shell prompt, where you enter commands.
device
The backup device (tape drive, optical drive, or autochanger) connected to the LSM server; used for backing up and recovering client files.
Glossary-2
directive
An instruction directing LSM to take special actions on a given set of files.
fileserver
A machine with disks that provides services to other machines on the network.
filesystem
1. A file tree which is on a specific disk partition or other mount point. 2. The entire set of all files. 3. A method of storing files.
heterogeneous
Heterogeneous networks are networks with systems of different platforms that interact meaningfully across the network.
interoperability
The ability of software and hardware on multiple machines from multiple vendors to communicate meaningfully.
machine
Any computer, including file or compute servers, diskfull workstations, or diskless workstations.
media
Magnetic tape or optical disks used to back up files.
media index
A database of information maintained by LSM which tracks every backup volume.
media manager
The LSM component that tracks save sets to backup volumes.
LSM
A Legato network-based software product to back up and recover Oracle7 or Oracle8 databases.
LSM client
The Oracle Server machine that can access the backup and recover services from the LSM server.
Glossary-3

LSM Server
The machine on a network running the LSM software, containing the online indexes, and providing backup and recover services to the Oracle Server.
notice
A response to a LSM event.
nsrhost
The logical hostname of the machine that is the LSM server.
online indexes
The databases located on the LSM server that contain all the information pertaining to the Oracle backups and backup volumes.
operator
The person who monitors the server status, loads backup volumes into the server devices, and otherwise executes day-to-day tasks using LSM.
pathname
Instructions for accessing a file. An absolute pathname tells you how to find a file beginning at the root directory and working down the directory tree. A relative pathname tells you how to find the file starting where you are now.
preconfigured
Existing selections or configurations for different LSM features.
Send data to a printer.
recycle
A volume whose data has passed both its browse and retention policies and is available for relabeling.
Registry
A database of configuration information central to Windows NT operations. The overall effect centralizes all Windows NT settings and provides security and control over system, security, and user account settings.
Glossary-4

retention policy
This policy determines how long entries will be retained in the media index and thus be recoverable.
save
The LSM command that backs up client files to backup volumes and makes data entries in the online index.
save set
A set of files or a filesystem backed up onto backup media using LSM.
save set ID
An internal identification number assigned to a save set by LSM.
scanner
The LSM command used to read a backup volume when the online indexes are no longer available.
server
The machine on a network running the LSM software, which contains the online indexes, and provides backup and recover services to the clients on a network.
shell prompt
A cue for input in a shell window where you enter a command.
system administrator
The person normally responsible for installing, configuring, and maintaining LSM.
user
The person who can use LSM from his or her workstation to back up and recover files.
volume
Backup media, such as magnetic tape or optical disk.
volume ID
The internal identification assigned to a backup volume by LSM.
Glossary-5
volume name
The name you assign to a backup volume when it is labeled.
volume pool
A feature that allows you to sort backup data to selected volumes. A volume pool contains a collection of backup volumes to which specific data has been backed up.
Glossary-6

Index
Aaborted save set, 2-8Administrator GUI, LSMClients Window on UNIX, 2-20Devices Window on UNIX, 3-5Devices Window on Windows NT, 3-6Edit Client Dialog Box on Windows, 2-21Edit Group Dialog Box on Windows, 4-5, 4-7Groups Window on UNIX, 4-5labeling a volume on UNIX, 3-13, 3-14labeling a volume on Windows, 3-15Messages display on UNIX, 4-9, 4-10mounting a volume on UNIX, 3-16mounting a volume on Windows, 3-17overview, 2-11Pending Messages Window, 3-21Server Window on UNIX, 2-23Sessions display on UNIX, 4-9, 4-10Set Up Server Dialog Box on Windows, 2-24UNIX, 2-12unmounting a volume on UNIX, 3-17unmounting a volume on Windows, 3-18Windows NT, 2-13
administrators, LSMacceptable names, 2-26administrator server attribute, 2-25modifying on UNIX, 2-27modifying on Windows NT, 2-28server resource attributes, 2-25specifying, 2-25using wildcard to grant privileges, 2-27
APIMM, 1-8, 1-11
architecture, LSM, 2-1, 2-2, 2-3attributes for resources
client resource, 2-19, 2-20, 2-21server resource, 2-25storage device resource, 3-5volume pool resource, 3-11, 3-12
auto media managementenabled behavior, 3-19for tape devices, 3-18not enabled, 3-19, 3-23
automatic bootstrap backup, 2-5, 4-5
Bbackup
automatic bootstrap, 4-5LSM server bootstrap, 4-4maintaining bootstrap information, 4-8manual bootstrap, 4-8messages on UNIX, 4-10monitoring Oracle backups and restores, 4-9Oracle backup/restore utility, 4-2viewing volume inventory, 3-20
Backup and Recover service, B- 9backup and recovery system
backup unable to progress, Pending Messages Window, 3-21
bootstrap, 2-5how LSM backs up data, 2-4Oracle7, 1-6, 1-7, 1-8Oracle8, 1-9, 1-10overview of Oracle, 1-6
Backup Operators group, B- 8bootstrap
Index-1

automatic backups, 4-5finding, 5-4mantaining bootstrap information, 4-8manual backups, 4-8server backups, 4-4
browsable save set, 2-8browse policy, 2-6
Cclient
browse policy, 2-6index, 2-5resource attributes, 2-19, 2-20, 2-21retention policy, 2-6
clientscommunicating with servers, B- 7DHCP, B- 8
client-server communications, problems with, B- 1 to ??
commanddf, 5-7dkinfo, 5-7scanner, 5-5, 5-6
Command Line Utilities Help, LSM, Windows, 1-15
command line utility, OracleEnterprise Backup Utility, Oracle7, 4-2Recovery Manager (RMAN), Oracle8, 4-2
components, LSM, 1-3configuration files directory
contents, UNIX, 5-10contents, Windows NT, 5-18
configuration, LSMadministrators
modifying on NT, 2-27modifying on UNIX, 2-27server resource, 2-25specifying, 2-25, 2-26
configuration roadmap, 2-16LSM resources
client dialog box, Windows NT, 2-21client resource, 2-18server resource, 2-22
administrator, 2-25
name, 2-25
overview, 2-21
parallelism, 2-25overview, 2-2resource dependencies, 2-3resource types, 2-3, 2-5storage devices
configuring on UNIX, 3-7configuring on Windows, 3-8, 3-9labeling a volume
on UNIX, 3-13
on Windows, 3-15, 3-16labeling and mounting volumes, 3-13mounting a volume
on UNIX, 3-16
on Windows, 3-17server features, 3-1tape device, no-rewind name, 3-1types that LSM supports, 3-1unmounting a volume
on UNIX, 3-17
on Windows, 3-18volume pools
default attributes, 3-11, 3-12
file-type device, 3-10
label templates, 3-10conventions
used in documentation, ixcreating partitions, 5-6
Ddestroyed server, 5-3device resources, 3-3df command, 5-7DHCP, B- 8disaster recovery
procedures overview, 5-8recovering Oracle data
overview, 5-24types, 5-1, 5-2, 5-3
disaster recovery on UNIX
Index-2

configuration files directory, renaming, 5-13mmrecov command, 5-10, 5-11nsrwatch or nwadmin to watch recovery, 5-13recovering LSM indexes and configuration
files, 5-10recovering LSM to a new machine, 5-15recovering OS and LSM software, 5-9restoring Oracle8 data on UNIX, 5-14
disaster recovery on Windows NTconfiguration files directory, renaming, 5-20mmrecov command, 5-18, 5-19recovering LSM indexes and configuration
files, 5-18recovering LSM to a new machine, 5-23recovering OS and LSM software, 5-17recovery requirements
hardware requirements, 5-16LSM requirements, 5-17operating system requirements, 5-16
restoring Oracle DataOracle7 data, 5-22overview, 5-22
disaster recovery preparationbootstrap save set ID
finding the bootstrap for UNIX, 5-5overview, 5-4scanner -B command, 5-5
disk informationon UNIX, 5-6, 5-8overview, 5-6
finding the bootstrap for Windows NT, 5-5overview, 5-4
disksaving information, 5-6
document conventions, ix
EEnterprise Backup Utility (EBU), Oracle7, 1-6, 1-7,
1-8EBU catalog, 1-8
Ffeatures, LSM, 1-4
types of storage devices supported, 3-1files
HOSTS, B- 8finding bootstrap, 5-4
Ggroup attributes, default, 4-5, 4-7GUI, LSM
Clients Window on UNIX, 2-20Devices Window on UNIX, 3-5Devices Window on Windows NT, 3-6Edit client Dialog Box on Windows, 2-21Edit Group Dialog Box on Windows, 4-5, 4-7Groups Window on UNIX, 4-5labeling a volume on UNIX, 3-13, 3-14, 3-17labeling a volume on Windows, 3-15, 3-18messages display on UNIX, 4-9, 4-10mounting a volume on UNIX, 3-16mounting a volume on Windows, 3-17overview, 2-11Pending Messages Window, 3-21Server Window on UNIX, 2-23Sessions display on UNIX, 4-9, 4-10Set Up Server Dialog Box on Windows, 2-24UNIX, 2-12Volumes Window, 3-20Windows NT
running, 2-13, 2-15, 2-16TCP/IP requirements, 2-13
GUI, OracleOracle Enterprise Manager, 4-3
Hhelp
Field Help, 1-14How Do I Help, 1-14UNIX, 1-12UNIX online manual pages, 1-12, 1-13What Is This Help, 1-14Windows Command Line Utilities, LSM, 1-15Windows NT online help, 1-13
host tableshow to set up, B- 2
Index-3

testing with ping, B- 3hostname, Oracle server, 2-21HOSTS file, B- 8
Iin progress save set, 2-8index
client, 2-5media, 2-5save set status value in client index, 2-9
IP errors, troubleshooting, B- 1 to B- 2
Llabel template, C- 1
components, C- 5customizing, C- 2
Label Template dialog box, C- 7label templates
components, C- 10creating, C- 11editing, C- 12how NetWorker uses, C- 6numbering sequences, C- 9organizational structure, C- 10pool, matching to a, C- 6separator, C- 10sequence number, C- 10
labeling storage volumes, C- 1labels
volume, C- 6logs
UNIX, 4-9, 4-10Windows NT, 4-9, 4-10
LSMAdministrator GUI
overview, 2-11UNIX, 2-12Volumes Window, 3-20Windows NT
running, 2-13, 2-15, 2-16
TCP/IP requirements, 2-13administrators
acceptable names, 2-26
modifying on UNIX, 2-27modifying on Windows NT, 2-28specifying, 2-25using wildcard to grant privileges, 2-27
architecture, 2-1, 2-2, 2-3bootstrap backups
automatic, 4-5maintaining information, 4-8manual, 4-8server, 4-4, 4-5
Command-Line Utilities Help, Windows, 1-15components, 1-3configuration
client resource, 2-19, 2-20, 2-21overview, 2-2resource dependencies, 2-3resource types, 2-3server resource, 2-22, 2-23, 2-24, 2-25storage devices, 3-1, 3-2, 3-4, 3-5, 3-6, 3-7, 3-9
features, 1-3, 1-4how LSM backs up data, 2-4overview, 1-1tracking volume modes, 2-10
Mmaintaining bootstrap information, 4-8man pages, UNIX, 1-12, 1-13manual bootstrap backup, 4-8media index, 2-5
Pending Messages Windowrecovery waiting for tape volume name, 3-21waiting for backup tape, 3-21
removing storage volumes, 3-20volume labels, 3-21
media index directorycontents, UNIX, 5-10contents, Windows NT, 5-18
media managementauto enabled, behavior, 3-19auto for tape devices, 3-18auto not enabled, 3-19, 3-23automatic for tape devices, 3-19changing the volume modes, 3-20device configuration on UNIX
Index-4

adding a device resource, 3-7modifying a device resource, 3-8overview, 3-7removing a device resource, 3-8
device configuration on Windows NTadding a device resource, 3-9moving a device resource, 3-9overview, 3-8removing a device resource, 3-10
device resources, 3-3labeling a volume
on UNIX, 3-13on Windows, 3-15, 3-16
labeling and mounting volumes, 3-13mounting a volume
on UNIX, 3-16on Windows, 3-17
storage devices, 3-1, 3-2, 3-4, 3-5, 3-6, 3-7unlabeled volumes, 3-19unmounting a volume
on UNIX, 3-17on Windows, 3-18
viewingdetails of save sets on volume, 3-20inventory of backup volumes, 3-20volume-specific information, 3-20
volume poolsdefault attributes, 3-12default resource attributes, 3-11label templates, 3-10, 3-11
Media Management Library (MML), Oracle8, 1-11messages
display on UNIX, 4-9, 4-10logs on Windows NT, 4-9, 4-10logs UNIX, 4-9, 4-10
MMAPI
Oracle7, 1-8Oracle8, 1-11
Nname attribute, server resource, 2-25name resolution, B- 8names, LSM administrators, 2-26
NetWorkerlabel template, using, C- 1name resolution, B- 8naming requirements, B- 5services, B- 9
NetWorker serverrestarting, 5-13shutting down, 5-13
NetWorker User program, D- 1privileges, D- 1starting, D- 1
networksSAP, B- 8
nsr_shutdown command, 5-13nwadmin command, 2-12
Oonline help
Field Help, 1-14How Do I Help, 1-14UNIX, 1-12UNIX manual pages, 1-12, 1-13What Is This Help, 1-14Windows Command Line Utilities, LSM, 1-15Windows NT, 1-13
operations, volume, 3-21Oracle backup volumes
viewing, 3-20Oracle backups and restores
backup/restore utility, 4-2monitoring, 4-9prerequisites to running, 4-1
Oracle Enterprise Manager, 4-3Oracle7, 1-8Oracle8, 1-11
Oracle serverhostname, 2-21
Oracle7backup and recovery system, 1-6, 1-7, 1-8Enterprise Backup Utility (EBU), 1-6, 1-7, 1-8,
4-2EBU catalog, 1-8
MM API, 1-8Oracle Enterprise Manager, 4-3
Index-5

Oracle8backup and recovery system, 1-9, 1-10Media Management Library (MML), 1-11MM API, 1-11Oracle Enterprise Manager, 1-11, 4-3Recovery Catalog, 1-9, 1-10Recovery Manager (RMAN), 1-9, 1-11, 4-2
overviewLSM, 1-1LSM Features, 1-3, 1-4Oracle backup and recovery system, 1-6
Pparallelism attribute, server resource, 2-25partitions, creating, 5-6Pending Messages Window
recovery waiting for tape_volume_name, 3-21waiting for writable backup tape, 3-21
ping, host table testing, B- 3policy
browse, 2-6retention, 2-6
poolslabel templates, using with, C- 6
pools, volumedefault resource attributes, 3-11, 3-12label templates, 3-10, 3-11selection considerations
expiration date of the volume, 3-22number of volumes, 3-22volume label time, 3-22volume mode, 3-22
unable to find a mounted volume, 3-23portmapper, testing with rpcinfo, B- 4preface
Send Us Your Comments, vprimary disk
recover for UNIX, 5-9, 5-17privileges
NetWorker User program, D- 1privileges, LSM administrators, 2-27prtvtoc command, 5-7
Rrecoverable save set, 2-8recovering
OS and NetWorker, UNIX, 5-9, 5-17to new server, UNIX, 5-15, 5-23
Recovery Catalog, Oracle8, 1-9, 1-10Recovery Manager (RMAN), Oracle8, 1-9, 1-11recyclable save set, 2-8recyclable volumes, 2-7redo logs, applying, 5-24related documentation, xiirenaming configuration files
UNIX, 5-13Windows NT, 5-20
resource typesclient, 2-3, 2-5
browse policy, 2-6retention policy, 2-6
device, 2-3, 3-3label template, 2-3policy, 2-3pool, 2-3server, 2-3, 2-5
retention policy, 2-6save set, 2-9
routers, verifying, B- 5rpcinfo, use of to test portmapper, B- 4
SSAP, B- 8save set
changing the status, 3-20recover, A- 1retention policy, 2-9status value
aborted, 2-8browsable, 2-8client index, 2-9in progress, 2-8recoverable, 2-8recyclable, 2-8scanned-in, 2-8suspect, 2-8
Index-6

viewing details of save sets on volume, 3-20scanned-in save set, 2-8scanner command, 5-5, 5-6, 5-11, ?? to A- 3scanner program, A- 6
Command Line Utilities Help, 2-8man page, 2-8using to recover save sets, 2-7, 2-10using to recover volumes, 2-7
Send Us Your Commentsboilerplate, v
server backupautomatic bootstrap backup, 4-5bootstrap backup, 4-4maintaining bootstrap information, 4-8manual bootstrap backup, 4-8
server destroyed, 5-3server index directory
contents, UNIX, 5-10contents, Windows NT, 5-18
server indexes and configuration filesdamaged, 5-2recovering for UNIX, 5-10
server resourceadministrator, 2-25name, 2-25overview, 2-21parallelism, 2-25
server resource type, 2-5servers
communicating with clients, B- 7Service Advertising Protocal. <em Emphasis>See
SAPservices, B- 9Set Up Server dialog box, B- 7storage devices
configuring, 3-1on UNIX, 3-7, 3-8on Windows, 3-8, 3-9
labeled volumes, 3-11labeling a volume
on UNIX, 3-13on Windows, 3-15, 3-16
labeling and mounting volumes, 3-13LSM server features, 3-1mounting a volume
on UNIX, 3-16on Windows, 3-17
recycling volumes, 3-20removing storage volumes from media
index, 3-20resource attributes, 3-5tape device
auto media management, 3-18, 3-19no-rewind device name to prevent data
loss, 3-1types that LSM supports, 3-1unmounting a volume
on UNIX, 3-17on Windows, 3-18
volume pools, 3-10, 3-11, 3-12suspect save set, 2-8switches, verifying, B- 5
Ttape devices
auto media management, 3-18, 3-19tracking volume modes, 2-10
UUNIX
finding bootstrap, 5-5, 5-6, 5-11, 5-19recovering OS and NetWorker, 5-9, 5-17recovering server indexes and configuration
files, 5-10recovering to new server, 5-15, 5-23renaming configuration files, 5-13
unlabeled volumes, 3-19
Vvolumes
auto media management for tape devices, 3-18, 3-19
changing the modes, 3-20labeling, C- 6labeling and mounting, 3-13labeling on UNIX, 3-13, 3-14labeling on Windows, 3-15, 3-16
Index-7

labeling storage, C- 1manually removed, recoverable using
scanner, 2-7modes
appendable, 2-10manual recycle, 2-10read-only, 2-10recyclable, 2-10tracking, 2-10
mounting on UNIX, 3-16mounting on Windows, 3-17operations
Pending Messages Window, 3-21pool considerations
expiration date of the volume, 3-22pool volume considerations
number of sessions, 3-22
volume label time, 3-22
volume mode, 3-22tracking volumes, 3-21
poolsdefault attributes, 3-11default resource attributes, 3-12label templates, 3-10mounted on storage devices, 3-11pool resource, 3-10tape volumes and file-type volumes must be
separate, 3-10unable to find mounted volume, 3-23volume considerations, 3-22
recyclable, 2-7recycling volumes, 3-20relabeled volumes
unavailable for recovery, 3-21relabeled, not recoverable using scanner, 2-7removing from media index, 3-20unlabeled volumes, 3-19unmounting on UNIX, 3-17unmounting on Windows, 3-18viewing details of save sets on a volume, 3-20viewing inventory of Oracle backup
volumes, 3-20viewing volume-specific information, 3-20
Wwildcard
using to grand LSM administrator privileges, 2-27
Windows NTrenaming configuration files, 5-20saving disk information, 5-8
Index-8


![Mission Manager[1]](https://static.fdokumen.com/doc/165x107/6313fe215cba183dbf075a68/mission-manager1.jpg)