Workforce Management Administrator's Guide
326
This PDF is generated from authoritative online content, and is provided for convenience only. This PDF cannot be used for legal purposes. For authoritative understanding of what is and is not supported, always use the online content. To copy code samples, always use the online content. Workforce Management 8.5.1 Workforce Management Administrator's Guide 12/29/2021
-
Upload
khangminh22 -
Category
Documents
-
view
2 -
download
0
Transcript of Workforce Management Administrator's Guide

This PDF is generated from authoritative online content, andis provided for convenience only. This PDF cannot be usedfor legal purposes. For authoritative understanding of whatis and is not supported, always use the online content. Tocopy code samples, always use the online content.
Workforce Management 8.5.1
Workforce ManagementAdministrator's Guide
12/29/2021
www.princexml.com
Prince - Non-commercial License
This document was created with Prince, a great way of getting web content onto paper.

Table of ContentsWorkforce Management 8.5 Administrator's Guide 5About Workforce Management 7Change History 8Overview 9
Architecture 11Components and Connections 13Data Flow 16
Integration 20High Availability 22
Planning Your Deployment 23WFM Configuration Objects 24WFM Policy Objects 31Data Synchronization 35Forecasting and Scheduling 36Performance and Adherence Monitoring 39Customized View in Web for Agents 44
Deploying WFM 45Preparing to Install WFM 46Installing Workforce Management 55
Manually Creating and Configuring WFM Application Objects 56Installing WFM Database Utility 60Installing and Uninstalling WFM Components 62Installing WFM Web 68
Starting and Stopping WFM 76Configuring Data Aggregator 86WFM in Multi-Site Environments 89WFM Server Load Balancing 91Daily Operations 95
Scheduling 96Forecasting 104Monitoring Workforce Performance and Adherence 107User Security 111Calendar Management 114Time-Off Bidding 117Configuring WFM Task Sequence 119

Using E-mail Notifications in WFM 121Scheduling Breaks and Meals in WFM 126Enabling and Configuring Wait-lists 131Overtime 135
How WFM Calculates Adherence 141WFM Configuration Options 143
Creating New Configuration Sections and Options 144WFM Server Options 146WFM Web Options 161WFM Builder Options 173WFM Data Aggregator Options 179WFM Daemon Options 185WFM Client Options 190WFM Options Removed 193
WFM Statistics: Recommended Settings 195Configuring WFM Statistics for Voice Interactions 202Configuring WFM Statistics for eServices (Multimedia) Interactions 206
Managing the WFM Database 214Using the Backup-Restore Utility 226Using ETL Database Schema 229Troubleshooting WFM 231
Troubleshooting WFM Components and Connections 232Troubleshooting Your WFM Configuration 238Using Log Files to Troubleshoot WFM 244
WFM Localization 245Using Genesys Localization Software 246
Preparing for Genesys Localization 251Preparing the WFM Web Interfaces 260
Using Self-Localization 266WFM Metrics 274
Schedule Summary Report 275Contact Center Performance Reporting Metrics 284Agent Adherence Reporting Metrics and End Notes 292
WFM Primers 295Time Off Primer 296Overlays Primer 305Multi Forecasting Primer 309

Using Copy and Paste Format for Statistics 318MS SQL Database Replication 322

Workforce Management 8.5 Administrator'sGuideWelcome to the Workforce Management 8.5 Administrator’s Guide. The topics in this guide introduceyou to the concepts, terminology, and procedures relevant to Genesys Workforce Management.
Find the information you need by clicking the topic links below or by using the Table of Contents inthe left-side navigation bar.
OrientationFind information that provides anoverview of Workforce Management.
OverviewArchitectureIntegrationHigh Availability
DeploymentFind procedures that will help you todeploy WFM manually or by usingwizards.
PlanningInstalling Workforce ManagementStarting and Stopping WFMUsing ETL Database
Daily OperationsFind information about setting up andperforming WFM Daily Operations in yourenvironment.
SchedulingForecastingMonitoringCalendar Management
LocalizationFind procedures and other informationabout how to localize your WFMdeployment.
Genesy Localization (Language Packs)Self-Localization
Reports and MetricsFind information about WFM reports,
WFM PrimersFind information about how to use WFM
Workforce Management 8.5 Administrator's Guide
Workforce Management Administrator's Guide 5

metrics, and use ETL Database to enableother customized reporting.
Schedule Summary View and ReportContact Center Performance ReportAgent Adherence Report
Primers to optimize the efficiency of yourcontact center.
Multi-ForecastingTime OffOverlays
Workforce Management 8.5 Administrator's Guide
Workforce Management Administrator's Guide 6

About Workforce ManagementGenesys Workforce Management (WFM) provides a sophisticated package of contact centermanagement tools, enabling contact center managers to better manage their workforce. It isdesigned for the true multi-media, multi-site environment, providing optimal schedules for multi-skilled agents who may handle customer interactions of different media types. Agent preferences,skills, proficiency, customer segmentation, historical trends, such as email response times, andoutbound call lengths are all considered within the forecast, schedule, and adherence components.
WFM is designed to integrate with the Framework components of the Genesys Customer InteractionManagement Platform and Genesys Routing. Key functionality is presented through a web interface,which increases its accessibility and flexibility.
Agents and their skill sets are entered and maintained in Genesys Configuration Manager, so there isno need to re-enter this information in a stand-alone workforce management application. Thisintegration also allows contact centers to leverage real-time statistics, contact center performance,and agent adherence data across all communication channels.
Workforce Management consists of the following components:
• WFM Web (with separate interfaces for Supervisors and Agents)• WFM Server• WFM Daemon• WFM Builder• WFM Database Utility• WFM API
WFM also requires a database to store all the relevant configuration, forecasting, scheduling, agentadherence, performance, and historical data.
ImportantWFM Configuration Utility is discontinued and no longer supported. Functionality thatwas previously in this component is now in WFM Web.
Find a high-level description of Workforce Management in the Overview and subtopics.
About Workforce Management
Workforce Management Administrator's Guide 7

Change HistoryThis topic contains a summary of the topics that are new or have changed significantly in thespecified version of this Administrator's Guide.
Document version 8.5.101
• The topic "New in This Release" was removed and in the Overview topic, was replaced with a link toWorkforce Management 8.5 Release Information.
• The topic Configuring Data Aggregator was added to describe the configuration of reason codes, hotstandby, and set parameters to enable Data Aggregator to be restarted at the business and site level.
• The LocalTimezones configuration option has been moved from the WFM Client Application to the WFMServer Application. See WFM Server Application's [ConfigService] configuration section.
• The sub topics "Timeout Error During Database Update" and "Unacceptably Slow Response from WFMConfiguration Utility" have been removed from the topic Troubleshooting WFM Components andConnections, because they are no longer applicable.
• The sub topics "WFM Configuration Utility Error Messages" has been removed from the topicTroubleshooting Your WFM Configuration, because it is no longer applicable.
• The configuration option x-LogSynchronizationTrace has been removed from "WFM Data AggregatorOptions" and added to WFM Options Removed.
• The topic "List of Terms" has been removed. The terms described in this topic and throughout thedocument appear as links that reference a glossary containing descriptions of these terms. You canview descriptions by clicking the link (in bold red). For example, average handle time.
Document version 8.5.001
• All reference, descriptive, and procedural content related to WFM Configuration Wizards have beenremoved. WFM Configuration Wizards are no longer supported.
Change History
Workforce Management Administrator's Guide 8

OverviewGenesys Workforce Management (WFM) is a strategic asset in advancing your goals of providing thehighest-quality customer service for the best value. In today’s contact center, interactions take amultitude of forms, and agents may have a broad variety of skills. WFM creates forecasts andschedules for multi-skilled agents who are handling interactions in a variety of media, as well as for amore traditional single-skilled agent pool handling mostly voice interactions.
WFM enables Supervisors to create proposed future schedules, Agents to bid on those schedules, andSupervisors to integrate the bids into real schedules.
WFM enables agents to request time off and specific working hours, and also to trade schedules withother agents, without sacrificing optimal staffing levels. Flexible agent scheduling can help improveagent retention, resulting in fewer new hires who require training before they can become effectivepromoters of your business.
WFM provides real-time contact center performance and agent-adherence monitoring. You canimmediately adjust the number of agents working on a specific activity if you see that the service-level statistics for that activity have fallen out of the acceptable range. Or, if the service levels aremore than satisfactory, you can encourage agents to spend additional time up-selling new products,move them to another activity, or even give them time off.
The next few topics provide a high-level overview of the WFM features and functions. In WorkforceManagement 8.5 Release Information, you will find recent additions and changes to WFMfunctionality that may be of particular interest to those migrating from an earlier release of GenesysWFM.
The information in this Administrator's Guide:
• Is valid only for the 8.5 release(s) of this product.• Introduces the product, lists important features, and presents the WFM architecture.• Offers deployment-planning recommendations and considerations.• Explains how to configure and install the Workforce Management (WFM) components.• Explains how to start and stop all components.• Explains how to use the WFM Database Utility.• Provides troubleshooting suggestions.• Includes a list of WFM-specific terms and their definitions.
The Genesys Glossary, which provides a comprehensive list of the Genesys and computer-telephonyintegration (CTI) terminology and acronyms used in this document.
Other topics of interest
• High Availability
Overview
Workforce Management Administrator's Guide 9

• Integration• Daily Operations
Important WFM Features
WFM features and functionality:
ForecastingSchedulingCalendar ManagementPolicy ObjectsMulti-Channel Adherence
WFM features and functionality:
User SecurityNotificationsPerformanceAdherenceReports
Overview
Workforce Management Administrator's Guide 10

ArchitectureThis topic explains the interconnections among the various components of Genesys WorkforceManagement (WFM) and how WFM interacts with the Genesys Framework. It includes informationabout WFM components, data flow, and the Genesys Framework servers to which WFM connects inthe following sections:
• Applications• Servers• Related Topics
Workforce Management (WFM) functionality is provided via four graphical user interface (GUI)applications and four servers. See Data Flow—WFM Components for a graphic overview of all thecomponents and their connections.
Applications
The user-facing applications are:
• WFM Web for Supervisors (browser-based)• WFM Web for Agents (browser-based)• WFM Database Utility (client application)
Servers
These applications are supported by these servers:
• WFM Server• WFM Data Aggregator• WFM Builder• WFM Web• WFM Daemon (server/background process)
In addition, you need to use a web server as a container for the WFM Web server. Genesys WFMsupports Tomcat and WebSphere. WFM does not include Tomcat in its installation package. You mustobtain and install it separately.
Overview Architecture
Workforce Management Administrator's Guide 11

ImportantFor supported versions of WebSphere and Tomcat, see the Genesys SupportedOperating Environment Reference Manual.
Related topics
• Components and Connections• Data Flow
Overview Architecture
Workforce Management Administrator's Guide 12

Components and ConnectionsThis topic contains descriptions of the Workforce Management (WFM) components and connections.
Web
WFM Web is a server application that is hosted on a servlet container and provides content for twoWeb browser-based user interfaces, one for Supervisors and one for Agents. The appropriateinterface opens after login, depending on the login information you enter.
The system administrator or supervisor provides agents with the URL to access WFM Web for Agentson their desktop (for example, http://<wfm_web_server>:8080/wfm85x) or smartphone(http://<wfm_web_server>:8080/wfm85x/m). The agent simply enters their user name andpassword in the Login window.
• Web for Supervisors—Includes calendar management, forecasting, scheduling, real-time agentadherence, contact center performance statistics, configuration of email notifications, and reporting.These functions are all entirely accessible through any computer with a supported browser and networkaccess.
When you open WFM Web for the first time in your browser, it installs a Java applet on your machine.This applet provides WFM functionality and is presented in the user’s web browser. An updated versionof this applet is downloaded to each user’s machine each time a more recent version of WFM Web isinstalled on the web application server.
ImportantThere is an increased demand on the web server when WFM Web is deployed, because it now provides almostall client user-interface functionality. In addition, WFM Web is also the web server component that generatesreports. To find sizing recommendations for WFM Web server, see the Genesys Hardware Sizing Guide.
• Web for Agents—Enables contact center managers to easily distribute schedule information to theiremployees and provides agents with proactive scheduling capabilities, such as entering schedulepreferences, planning time off, schedule bidding, and trading schedules.
Back to Top
Database Utility
Use this application to create and format a new database (for new users or those migrating from aprevious WFM release), to migrate your existing data to the new database, and to perform databasemaintenance and cleanup.
Overview Architecture
Workforce Management Administrator's Guide 13

You also use the WFM Database Utility to update the WFM database, which is a common task thatmust be done as part of an upgrade to a newer WFM release. If you are upgrading from WFM 7.x tothe most recent 8.5 release, you will need to perform a database update.
ImportantIf you are migrating from an earlier release to WFM 8.5 and want to find importantadvisories about the database migration process, see the procedures provided in the“Workforce Management Migration Procedures” chapter of the Genesys MigrationGuide.
Servers
The GUI applications are supported by the following servers:
• WFM Server—Automatically synchronizes configuration data, and acts as the main data and applicationservices source and locator for WFM clients.
• WFM Data Aggregator—Collects historical data and provides real-time agent-adherence information tousers of WFM Web for Supervisors.
• WFM Builder—Builds WFM schedules.• WFM Web Server—Serves content for the Web browser-based GUI applications and generates reports
upon request from users of WFM Web for Supervisors.• WFM Daemon—can be configured to send (through a customer-supplied SMTP server) email
notifications to agents and supervisors.
Back to Top
Database
WFM also requires a database to store all the relevant configuration, forecasting, scheduling, agentadherence, performance, and historical data.
ImportantIf you have been using WFM 6.x, you must migrate your existing data into a newdatabase using the WFM Database Utility before starting to use WFM 8.5. For details,see the “Workforce Management Migration Procedures” chapter in the GenesysMigration Guide.
Overview Architecture
Workforce Management Administrator's Guide 14

Connections
WFM connects to the following Genesys Framework servers:
• Stat Server—Provides statistical data to WFM Data Aggregator.• Configuration Server—Provides Genesys’ centralized configuration information to the WFM, and
authenticates all WFM users and components.
WFM works in single-site environments or across multi-site enterprises.
Back to Top
Overview Architecture
Workforce Management Administrator's Guide 15

Data FlowThe figure below Data Flow—WFM Components shows the Workforce Management components andtheir interrelationships. It also shows how WFM draws on Configuration Layer data and statistical datathat Stat Server provides.
ImportantTomcat and WebSphere, the supported web server containers, are not WorkforceManagement components. This graphic includes them to show how they fit into thetotal Workforce Management architecture.
Overview Architecture
Workforce Management Administrator's Guide 16

Figure: Data Flow—WFM Components
Component Connections
Table: WFM Component Connections shows the connections that are configured on the Connectionstab of each component’s Application object. These connections offer an alternative, butcomplementary, way of understanding the Workforce Management architecture. Here are somethings to consider:
• As you can see, WFM Server acts as a hub, connecting to, and being connected to, every component.
Overview Architecture
Workforce Management Administrator's Guide 17

• The WFM database, represented in Table: WFM Component Connections by its Data Access Point (DAP)(see Create a Data Access Point), forms a different sort of central hub with many of the componentsconnecting directly to it. Others connect indirectly, through WFM Server.
• Through its connection to Stat Server, WFM Data Aggregator provides one point of interaction betweenWorkforce Management and the Genesys Framework. All components are connected to theConfiguration Layer in the sense that they exist as objects in the Configuration Database.
• If you are using Management Layer, the Message Server connections and the WFM Solution objectspecification of the instance of Solution Control Server (SCS) used to control the solution also connectWorkforce Management with the Genesys Framework.
Table: WFM Component Connections
Componentname Connections to:
Server Builder Daemon DataAggr. Web DAP Stat
ServerMsgServer
Server (X+) X+ X X (X)Builder X (X)Daemon X (X) (X)DataAggregatorX X X (X)
Web X (X) (X)DatabaseUtility X X
Legend:
• X—single connection• X+—one or more connections• (X)—optional connection
Footnotes to Table:
1. Configure the Message Server connections if you are using Management Layer to run WorkforceManagement.
2. WFM Server may connect to other instances of WFM Server if you are using an environment with anumber of WFM Servers and want to create schedules for all the sites they serve. For information abouthow to create this configuration, see Configuring Multiple WFM Server Applications and MultiForecasting Primer.
3. You can configure and connect to multiple instance of WFM Builder. See Configuring Multiple WFMBuilder Applications.
4. Although the WFM Daemon connection to WFM Web is marked as optional (X), it is required if you wantto use WFM's scheduled reporting. For example, if this connection is not set, WFM Daemon cannotgenerate the Report Scheduler.
Overview Architecture
Workforce Management Administrator's Guide 18

ImportantThe WFM Daemon background process connects to Genesys Configuration Server forauthentication, configuration and connection to other Genesys servers’ information. Itretrieves all data required for its work from WFM Server.
Overview Architecture
Workforce Management Administrator's Guide 19

IntegrationIn this topic, find out how WFM integrates with other Genesys Solutions and about the WFMIntegration API.
WFM Integration API
The WFM Integration API enables you to create a client application that, in turn, enables you toretrieve WFM information and make certain changes to WFM objects.
For example:
• The WFM Schedule includes planned meetings, trainings, time-off, and so on for all agents. You can usethe WFM Integration API to facilitate integration of this WFM data with third-party human resourcesapplications and PIMs such as Outlook.
• You can take information from third-party applications and incorporate it in WFM without having tomanually re-enter each update into WFM.
• You can retrieve WFM data and use it to generate custom reports using your preferred reporting tool.• You can read agent schedule information, such as the total number of paid hours an agent worked
during a particular day, and automatically feed this information into a payroll system.
ImportantNot all WFM functionality is available through the WFM Integration API.
For detailed information about the WFM Integration API, see the Integration API Developer's Guide(JavaDoc).
Integration With Other Genesys Solutions
Workforce Management is tightly integrated with the Genesys Customer Interaction Management(CIM) environment.
Configuration Layer IntegrationWFM can automatically retrieve agent and skills information from the Genesys unified configurationenvironment, reducing the effort needed to maintain the WFM system and removing the chance ofhuman errors caused by redundant data entry. You can configure WFM to place agents within a siteautomatically, based on their switch logins, if the switch is used to represent a site in WFM. Also, youcan easily configure WFM to retrieve statistics from Routing objects (queues, routing points, virtual
Overview Integration
Workforce Management Administrator's Guide 20

queues, and so on) within the Genesys platform, reducing the effort needed to support changes inrouting strategies
Management Layer IntegrationManagement Layer delivers powerful solution-wide control of Genesys solutions from a single accesspoint. Through Solution Control Interface (SCI), Management Layer provides control and monitoringfunctions that allow a user to start or shut down single applications, or an entire solution, in a singleoperation and to monitor current runtime status of applications and entire solutions.
Workforce Management is integrated with the Genesys Management Layer, enabling easy solution-wide configuration, overview of Workforce Management status, and automatic switching to backupservers if necessary.
If you use Management Layer to control and monitor WFM, each computer on which a WorkforceManagement server is installed also runs a Local Control Agent that constantly checks that server’sstatus. If a server goes down, SCI signals the user, enabling a prompt response.
Problems are centrally logged for convenient access. For more information on the ManagementLayer, see the Management Layer User’s Guide. Management Layer installation and configuration aredescribed in Genesys Management Framework documentation.
Enterprise-Routing IntegrationYou can configure Genesys Enterprise Routing (ER) to route calls based on WFM schedules. Doing socan help ensure a more-balanced multi-skill workload for agents and improved schedule adherence.
Routing strategies can route based on the anticipated availability of an agent. For example,interactions are not routed to agents immediately before they are scheduled for a break. Thisimproves agent adherence and leads to better customer service and worker efficiency. Schedules arecreated in WFM Web for Supervisors and stored in the WFM database. You configure WFM routingstrategies in Interaction Routing Designer, a user interface provided with ER to create routingstrategies.
Overview Integration
Workforce Management Administrator's Guide 21

High AvailabilityWFM Data Aggregator supports hot-standby high availability. You can install a second DataAggregator server as a backup and configure it to take over automatically if the primary server goesdown.
The backup reads the same information as the primary Data Aggregator, so if it is necessary toswitch to the backup, there is no delay or loss of data. At the transition, the backup Data Aggregatorsimply starts writing to the database, beginning where the primary Data Aggregator left off.
Because the failure of other WFM servers does not result in critical data loss, they do not support hot-or warm-standby high availability. However, if you are using Management Layer, you can configurethe Local Control Agents running on the server computers to restart the WFM processes and re-establish their connections.
Overview High Availability
Workforce Management Administrator's Guide 22

Planning Your DeploymentBefore configuring Workforce Management (WFM), plan a detailed, suitable combination ofConfiguration Manager objects and workforce management activities. This information is the basis forall subsequent workforce planning and should not be changed. Any changes to the workforcemanagement activity configuration might compromise the usefulness of historical data. Agents,users, time zones, and skills are defined as objects in Configuration Manager. These objects arebrought into WFM through automatic synchronization with the Configuration Database.
Carefully consider the relationships among these objects when using them for enterprise planning.The relationship between skills configured in Configuration Manager and activities created in Web forSupervisors, is especially important.
Using WFM Web
WFM Web for Supervisors enables you to configure WFM objects and working rules in theConfiguration and Policies sections of the application. Configuration objects include user securitysettings, organizations, activities, schedule-state groups, skills, and time zones. Organization rules,contracts, shifts, task sequences, time-off types, time-off accrual rules, exception types, meetings,marked-time types, and rotating patterns are set up in the Policies section.
WFM Web includes modules that enable you to import and export historical data, and providescalendar management, forecasting, scheduling, performance monitoring, real-time agent-adherencemonitoring, and reporting capabilities. The success of your forecasts and schedules dependsconsiderably on the accuracy and completeness of your configuration of WFM objects and workingrules.
Other topics to help with your planning
• About WFM Configuration Objects• About WFM Policy Objects• Forecasting Considerations• Scheduling Considerations• About Performance Monitoring• About Adherence Monitoring
Planning Your Deployment High Availability
Workforce Management Administrator's Guide 23

WFM Configuration ObjectsWFM Web's Configuration module enables you to configure a number of object types. The followingsections briefly describe each object type and offer some considerations to assist you in planningyour configuration.
Topics on this page include:
• Agents• Organization
• Business Units• Sites• Time Zones
• Schedule State Groups• Activities
• Activity Sets• Multi-Site Activities• Activities Statistics
• Skills• Users• Roles (User Security)
ImportantThe following sections provide only brief introductions to these objects and focus onaspects relevant to deployment planning. For a full description, see WorkforceManagement Web for Supervisors Help.
Agents
When you are setting up or making changes within your contact center you must plan for andmanage the contact information, agent IDs, and profiles for all agents in the various sites within theenterprise. WFM Web provides many configuration panes and categories that you can use to manageagents effectively. See also Configuration > Agents in the Workforce Management Web forSupervisors Help.
Planning Your Deployment WFM Configuration Objects
Workforce Management Administrator's Guide 24

Organization
Use the Organization module to configure sites, business units, and time zones. To configure thismodule, determine the sites that belong to business units. Decide on the site properties, themaximum seats, the Data Aggregator and WFM Server the site uses, the switch you will use to collectstatistics, and so on. Collect information about agent team and site associations, as well as agentsettings, such as rotating pattern (if any), contracts, and rules for the accrual of accrued time off.
Keep in mind that there are many WFM configuration objects that are associated with a site, includingRotating Patterns, Contracts, Activities, Time-Off Types, Time-Off Rules, Exception Types,and more. When you move an agent from one site to another, you must reassign that agent to a newContract, Time Off Rules, and new Rotating Patterns—if these were previously assigned. You musttake this action to correctly schedule the moved agent under the new site.
Business UnitsAt times, you might need to create business units. To create and configure new ones, see theConfiguration > Organization > Business Units > Creating Business Units in the seeWorkforce Management Web for Supervisors Help.
SitesSites can be equivalent to switches, which are defined in Configuration Manager and imported intoWFM. You can also create sites in WFM that are unrelated to a switch. This is appropriate whenswitches do not correlate with your company's organization. For example, a single location could bedivided into multiple entities to reflect divisions along business unit lines.
To configure sites in your enterprise, see the WFM Web for Supervisors Configuration >Organization module.
Teams
Within new or existing sites, you can create and add agents to teams. Creating teams enables you togroup agents meet scheduling and business requirements. You can organize teams by agent skillsets, schedule, sales targets, achievements, geographies, or any other factor. For example, emailagents, Christmas sales drive, or platinum customer care. An agent can belong to only one team at atime. Use the Sites > Properties pane in Web for Supervisors to create teams.
Time ZonesTime zones are set up in Configuration Manager and imported into WFM during synchronization. Youcan assign time zones to business units only. You can also configure a default time zone, for efficiencyin configuring new objects, and a user time zone, which is used as the alternative time zone in WFMWeb Performance views. All newly created sites and business units use the default time zone, unlessspecified otherwise.
To learn how to configure and work with Time Zones, see the Configuration > Time Zones in theWorkforce Management Web for Supervisors Help.
Planning Your Deployment WFM Configuration Objects
Workforce Management Administrator's Guide 25

Schedule-State Groups
A schedule-state group is a collection of schedule states that is linked to a site. These include breaks,meals, exceptions, activities, time off, and so on. You can group these, and then associate the groupwith one or more Genesys states.
Additionally, you can configure adherence thresholds for this schedule state group, which definewhen an agent should be considered to be non-adherent to the schedule states contained in thegroup.
To configure schedule-state groups, determine what schedule states you are using, what are the mostlogical groupings, and which Genesys state(s) best corresponds to each group.
To learn how to configure Schedule State Groups and Adherence Rules for them, see theConfiguration > Schedule State Groups in the Workforce Management Web for Supervisors Help.
Activities
Activities are defined as different categories of work that comprise the total workload for a contactcenter. Workload and staffing forecasts are created for each activity. Each site configures its ownactivities, to take into account of local conditions. All agent work that is forecast and scheduled mustbe assigned to an activity.
Activities can take various forms. They might describe types of work, such as inbound calls or email;groups of customers served, such as preferred customer care; or work times, such as overnight. Youcan also use activities for non-CTI work. Each activity is then associated with one or morepreconfigured skills. Because activities are a fundamental unit for forecasts and schedules, it iscritical that you configure them accurately.
Maximum Simultaneous Users for ActivitiesThe Maximum Simultaneous Users feature limits the number of agents that can be scheduled for anactivity, even if the workload requires more. Maximum Simultaneous Users can be understood as away to prevent excessive staffing for some activities so that the agents can be moved to moreimportant activities, even if it leaves some less-important activities understaffed. This feature is bestused when the contact center is understaffed as a whole. As the Maximum Simultaneous Users valueis reached, agents are then assigned to other activities.
ImportantOnly use the Maximum Simultaneous Users feature in a multi-skilled environment.
Planning Your Deployment WFM Configuration Objects
Workforce Management Administrator's Guide 26

Activity SetsThe Activities module enables you to set activity open hours and staffing constraints. You can alsouse it to create activity sets (previously called exclusivity sets).
Activity sets provide a means to combine activities into groups for multi-skilled scheduling. Activitysets are associated with sites. Any agent can work on an activity set if that agent has the skillsrequired for the activities included in the activity set. When performing activity set work, agents mustperform only the activities included in the set for a specified period of time.
When planning your deployment, consider which activities could logically be grouped into activitysets.
Multi-site ActivitiesMulti-site activities, formerly called virtual activities, are performed at multiple physical sites. Theyenable you to view several local activities as a single WFM object. The performance information issplit among the sites that perform the activity. You can build interaction volume forecasts, staffingforecasts, and view contact center performance for multi-site activities.
Activities StatisticsAdministrators and supervisors can associate Stat Server statistics with activities and multi-siteactivities in WFM Web. WFM uses the WFM Data Aggregator to track four statistical categories:Interaction Volume, Abandonment Percentage, Quality of Service, and Handle Time. Thesestatistics are written to the WFM database, providing the historical data necessary for WFMForecasting, Scheduling, Performance monitoring, and Adherence monitoring.
Because WFM Data Aggregator receives its statistics from the Genesys Stat Server, it supports a veryflexible configuration. In WFM Web you associate Stat Server statistics with activities. These StatServer statistics may be out-of-the-box or customized statistics.
For example, you can sum up values from any set of statistics you want, such as totalTalkTime +totalHoldTime + totalAfterCallWorkTime. This type of flexible configuration overcomes thelimitations of ACD switch reports and integration, allowing you to choose the statistics that bestrepresent the work associated with servicing each customer interaction.
Skills
You can configure interactions to be routed to specific agents within a contact center, based on skilldefinitions.
For example, you may want to have incoming interactions go first to an agent at the highest level ofa certain skill. If no agent with that skill level for that activity is available, then the interaction can berouted to an agent with the next highest level of that skill. If no agent is available at that level, thenthe interaction can be routed to the next available agent, regardless of the agent’s skill level for theactivity.
Planning Your Deployment WFM Configuration Objects
Workforce Management Administrator's Guide 27

The contact center manager can decide whether to staff for the higher skill levels, or whether to staffso that any agent can handle the interaction.
Skills are defined and assigned to agents in Configuration Manager, then imported into WFMautomatically during synchronization. In WFM, skills are assigned to business units. A skill can beassigned to one business unit only and can be assigned only to activities and profiles under thisbusiness unit. To learn how to assign skills to business units, see the Configuration > Skills topic inthe Workforce Management Web for Supervisors Help.
ImportantAfter you update the WFM database to 8.5.1, skills are no longer assigned to specificbusiness units. For example, if you previously assigned a skill to BU1, you cannot usethis skill for activities under other business units, but you can use this skill foractivities and profiles under BU1.
Matching Skills and ActivitiesActivities often correspond to skills but may also correspond to agent skill levels. Choosing anappropriate strategy for a contact center’s activities allows for improved staffing decisions.
For example, in a simple scenario, the relationship among the queue, skills, and activities is a 1-1-1correspondence. As things get more complex, the relationships get more complex. Activities consistof multiple skills, and each site has many activities associated with it. The goal is to find the bestcombination of relationships to meet staffing requirements.
Users
Users are supervisors and other persons who are not agents. They are divided into two groups:
• Users who have been imported into WFM (WFM users).• Users who are configured in Genesys but not selected as WFM users (Genesys Users).
In WFM Web you can create a list of existing WFM users or import Genesys users from ConfigurationManager. You can configure user properties, and assign security roles and privileges to them,enabling access to specific business units, sites, and teams within the enterprise.
Before you import Genesys users into WFM, ensure you understand the how the user's security rightsand privileges are impacted by the move. Be sure to read the topics Roles (User Security) andGenesys Configuration Manager Objects Imported to WFM.
Users are configured in the WFM Web for Supervisors Configuration > Users module.
Planning Your Deployment WFM Configuration Objects
Workforce Management Administrator's Guide 28

Roles (User Security)
Workforce Management (WFM) has its own security/access rights system that defines the objects andmodules that each WFM Supervisor user can access in WFM. In addition, WFM implements tenantsecurity for the objects that are shared with Genesys Configuration Layer.
WFM implements security/access as follows:
• If the user belongs to Enterprise in Genesys Administrator, all objects are accessible to the user inWFM, if the appropriate WFM access rights are assigned.
• If the user belongs to a tenant, the WFM user has access to object under that tenant only, even if theWFM access rights are assigned for related objects.
ImportantWFM follows tenant access rights only (and no other Configuration Layer accessrights).
User security roles are configured in the Configuration > Roles module, enabling you to configuresecurity settings for all supervisors (that is, all non-agents who use WFM). It groups role privilegesinto the following categories: General, Configuration, Policies, Calendar, Forecast, Schedule,Trading, Performance, Adherence, Reports, and Notifications. Under each category are variousoptions.
For example, Notifications is an option under the Configuration category. If a user is assigned theNotifications privilege, that user can then access the Notifications module in WFM Web. Userswithout this permission cannot access and therefore cannot modify the configuration of emailnotifications.
ImportantThere is a distinction between the Notifications category and the Notificationsprivilege under the Configuration category. For further clarification, seeConfiguration > Roles in the Workforce Management Web for Supervisors Help.
The user security settings allow for a great deal of flexibility. You can specify which sites and businessunits, teams, and so on, the user can access. You can configure calendar, forecast, and scheduleaccess; read-only access; or full access.
In addition, you can enable users to make only pending schedule changes—that is, schedule changesthat require approval from a qualified user before they are incorporated into the Master Schedule.
To configure user security settings efficiently, determine the access levels appropriate for all users.You can change settings at any time, as necessary. You can also use security roles to more easilyconfigure security settings for users, by creating a Security Role, assigning privileges to it, and thenassigning one or more WFM users to that security role.
Planning Your Deployment WFM Configuration Objects
Workforce Management Administrator's Guide 29

When importing users, administrators will configure a security role. All new users added to the WFMsystem will be assigned to this security role—and will be limited to its access permissions. Roles canbe changed at any time. See the Configuration > Roles > Creating Roles in the WorkforceManagement Web for Supervisors Help.
Planning Your Deployment WFM Configuration Objects
Workforce Management Administrator's Guide 30

WFM Policy ObjectsContractual obligations, legal requirements, and business practices comprise constraints under whicha contact center operates. Workforce Management (WFM) enables you to use Policy objects to specifyconstraints in great detail, resulting in forecasts and schedules that comply with constraints whileoptimizing staffing levels.
Exception Types
Exception types define periods of time when agents are engaged in non-work activities, such astraining or meetings. Each site configures its own set of exception types based on its businessrequirements. You can configure exceptions to be considered during Meeting Planner use, to beconvertible to a day off, and so on. You can assign agents to multiple partial-day exceptions if theexceptions do not overlap.
Because you can group agents into teams, you can assign exceptions to large groups of agents atone time.
TipGenesys recommends that you make use of the time-off capabilities introduced in 8.xreleases, rather than configuring time off using exception types.
Time Off Types
Use the Time-off Types module to create time-off types for each type of time off that you want to beable to track.
Time-off types can be accrued (time off accumulates over time) or awarded (the total amount of timeoff for the year is assigned at a single time). For example, you might want personal time off toaccumulate, whereas holidays—since there is a fixed number during the year—can be awarded.
You can associate multiple time-off rules with a single time-off type. This enables you to havedifferent time-off types accumulate at different rates. For example, you can set different time-offrules for different levels of seniority.
Planning Your Deployment WFM Policy Objects
Workforce Management Administrator's Guide 31

Time-Off Rules
The Time-Off Rules module enables you to set allocation parameters for both accrued and awardedtime-off types. Constraints include the number of hours that are assigned per year or thataccumulate per working period, and the carry-over date for each time-off type you use, and whethertime-off requests can be auto-approved.
Each type of time off can be associated with one or more time-off rules. Because you can configure anumber of time-off types (using the WFM Web's Time-Off Types module), you can have time offaccumulate at different rates, providing more flexibility in managing contact center staff.
You also use this module to assign time-off rules to specific agents. Agents can have multiple time-offrules assigned, each with its own time-off type.
Configure Time Off RulesTo learn how to create and configure Time Off rules, see the topic Policies > "Time-Off Rules" topicin WFM Web for Supervisors Help.
Meetings
Use the Meetings module to create meetings and assign them to agents. You can set up a series ofrecurring meetings that must meet your constraints for frequency, number of occurrences, and so on.
Use the Meeting Planner in the WFM Web to configure preplanned meetings such as team meetingsthat recur weekly or monthly. If you need to create an ad hoc meeting, use the Meeting Schedulerwithin the WFM Web for Supervisors Application.
Marked Time
By configuring marked-time types, you can specify periods of time that you want to monitor andreport on that are not already labeled using an existing category. For example, you might want tomark the periods that agents worked on a particular project. Or you can mark overtime so that youcan report on it.
You can insert and view marked time in the Schedule Intra-Day views. Two new reports, the ScheduleMarked Time Report and the Schedule Marked Time Totals Report, display marked time statistics.
Shifts
The method used to create WFM shifts allows for a flexible description of shift durations and of start
Planning Your Deployment WFM Policy Objects
Workforce Management Administrator's Guide 32

and end times. Additionally, WFM schedules use flexible break and meal parameters.
In a sense, a WFM shift is an abstraction, representing countless possible working times, even thoughyou can configure a shift to produce very regular, fixed, agent schedules.
A single WFM shift can incorporate hundreds of possible start times and durations as long as they fallwithin the parameters of the contract. However, through more rigid shift configuration, agent starttimes and workday durations can be fixed. This combination of flexibility and structure makes theWFM shift a tremendously powerful scheduling mechanism. In fact, in some cases, you can configurean entire contact center using only a few WFM shifts.
Allocating WFM Shifts EffectivelyThe WFM shift contrasts sharply with the conventional notion of a shift, with fixed weekly start time,fixed duration, and set breaks. You can configure shifts to work in tandem with contracts, whichefficiently and effectively controls the placement of working times.
For example, consider a contact center with a standard full-time shift of 8 hours a day, 5 days aweek, and an alternative full-time shift of 10 hours a day, 4 days a week. Both types of agents canuse a single shift with a flexible duration of 8–10 hours per day. In either case, the agents arecontracted to receive 40 hours work each week and to work 4 or 5 days. You can configure WFM toguarantee that specific agents work 4 or 5 days a week, or you can leave it to the WFM Scheduler todetermine how many agents of each full-time type should be used to provide the least costlyschedule.
Such an efficient method of shift allocation allows you to take into account the effect of complexscheduling requirements and agent-centric considerations, while making the best possible use ofmulti-skilled agents.
If you have a need in your contact center for more precise control over when an agent works and theduration of his workday, you may consider using Rotating Patterns. This is a way to lock in specifictypes of schedules for an agent without creating a unique shift for him.
Contracts
Contracts are sets of rules that describe the contact center’s contractual obligations to agents. Themaximum working hours for a contract should include allowances for meetings, training, overtime,and other planned, paid activities. You can configure an unlimited number of contracts. In some casesa unique contract might be necessary for each agent.
Use contracts to describe a single agent’s availability. For example, a student might prefer to workMonday, Wednesday, and Friday evenings, any time Tuesday and Thursday, and have weekends offfor study and fun. You could configure this student’s contract to enable these availability parameters.
A contract is not the same as a shift. A shift indicates the hours an agent will work, whereas acontract describes how many hours an agent should work. For further details on shifts, see Shifts.
Planning Your Deployment WFM Policy Objects
Workforce Management Administrator's Guide 33

Constraints for Working Days, Hours, and Days OffYou can set the numbers of working days and hours and days off for one of several schedulingperiods, depending on which best suit your enterprise’s business practices and any applicable legalrequirements. You can set these parameters per week, per month, or per any period of 2 to 6 weeks.
For example, you can ensure that employees always receive 2 weekends off per month or work anexactly specified number of hours per 6-week period.
Configuring ProfilesA profile is an abstract or hypothetical agent constructed from user-defined contract data. You cancreate multiple profile types, which you can use to construct schedules containing empty scheduleslots appropriate for the contracts you have or intend to hire for. You can insert actual agents into theschedule slots after you build the schedule.
Rotating Patterns
Rotating patterns increase scheduling flexibility and control. A rotating pattern is a series of weeklypatterns arranged in a repeating sequence. You construct each weekly pattern from a combination ofshift assignments, agent availability times, days off, and so on, depending on what constraint is mostimportant for any specific day.
Rotating patterns include availability times as options for weekly pattern days. If used, theseavailability settings override the availability settings that you configured in the Contract module forthat day. Rotating pattern assignments are displayed in the Calendar along with all other pre-planneddata.
Planning Your Deployment WFM Policy Objects
Workforce Management Administrator's Guide 34

Data SynchronizationWorkforce Management (WFM) Server performs data synchronization automatically, bringingConfiguration Database objects, such as agents, agent skills, and time zones into WFM. You can setthe level of synchronization for full and real-time synchronization, and set the time period, in whichyou want WFM to perform full synchronization.
TipWFM Server can only update usernames and email addresses of existing users. Newusers are not imported during synchronization. New users are imported manuallyusing WFM Web.
You configure this functionality in the ConfigService section of the WFM Server ApplicationOptions tab. For more information, see the SynchronizationLevel and SynchronizationTimeoutconfiguration options.
Before you configure these options, take note of the objects that WFM Server will synchronize whenset to these levels 1 and 2:
SynchronizationLevel = 1 SynchronizationLevel = 2
Only Sites associates with the current WFM Serverare synchronized.
All Sites are synchronized, except those that areassociated with another WFM Server.Sites that are not associated with any WFM Serverare also synchronized.
ImportantTo avoid errors during synchronization and further work, your configuration must notcontain duplicate names for switches, time zones, or skills—not under differenttenants, and not in different Genesys Administrator instances that access the sameWFM database.
Planning Your Deployment Data Synchronization
Workforce Management Administrator's Guide 35

Forecasting and SchedulingThis topic provides information that you should consider when planning your forecasting andscheduling requirements for your contact center. See:
• Forecasting Considerations• Scheduling Considerations
Forecasting Considerations
You can create forecasts based on various kinds of data. Ideally, you already have a substantialquantity of good-quality historical data on contact center interactions that you can import into theWFM database. If you have historical data, you can use either of two forecasting algorithmsdepending on the amount of quality historical data available. The Expert Average Engine requires afull week of historical data with no missing timesteps. To use the Universal Modeling Engine, youmust have at least a full year of historical data to create forecasts.
If historical data is unavailable or of poor quality, you can create forecasts based on templates.Templates reflect estimated interaction levels for different days and times and can be constructed foreach activity.
When you do not have enough historical data to use the Expert Average Engine or the UniversalModeling Engine, you can combine the historical data with overlap templates, which fill in gaps in thehistorical data.
Creating optimal forecasts depends not only on whether historical data is available, but also on usualworkflow. Contact centers with very regular interaction volumes require different forecastingconsiderations than contact centers that experience frequent or marked variations of interactionlevels.
If your site activity load is highly predictable, you can apply a specific interaction volume or AHT toeach time interval in the scenario.
Forecasting also incorporates figures such as staffing overheads, service objectives, and occupancyinto the staffing calculations, allowing precise regulation of forecasting levels. You can create avariety of forecast scenarios, by using different service objectives or staffing parameters to help youcreate realistic contact center strategies for varying circumstances. After you decide which scenariobest fits your environment, you publish it to the WFM database, where it becomes a part of yourMaster Forecast, upon which schedules are built.
Factors and EventsEvents are specific instances of occurrences that affect scheduling requirements and forecasts. Forexample, a catalog drop might increase demand for agents handling inbound interactions. Byconfiguring an event, you can forecast and schedule to incorporate its effects, ensuring appropriatestaffing levels throughout the period that the event affects.
Planning Your Deployment Forecasting and Scheduling
Workforce Management Administrator's Guide 36
WFM can track events that may affect interaction volume. These events are based on factors, whichare event types upon which events are built. When planning your forecasting, consider what factorsand events might affect forecasts so you can configure them before creating forecasts. A salespromotion or marketing campaign, for example, may cause a predictable peak in interaction volume.Such events are entered in WFM Web and used by the advanced WFM algorithms. If an event recurs,the forecasting algorithms learn the impact of that event and account for its impact in futureforecasts.
To learn how to create and configure Events and Factors (Events are instances of Factors), see theForecast > Historical Data Views > New Event Page in the Workforce Management Web forSupervisors Help.
Scheduling Considerations
WFM schedules each agent individually, building schedules that allow for intra-day overhead.Therefore, you do not need to inflate staffing requirements to accommodate overhead. The onlyoverhead additions that you need to account for are intangibles, such as starting up agent desktopapplications, bathroom breaks, and so forth, and unplanned overhead, such as training or meetingsthat are not yet scheduled (or sick days, which, presumably, are always unplanned).
TipThe schedule is only as accurate as the forecast. If you do not build the forecastcarefully, the schedule will not necessarily provide adequate coverage.
Because each site is different, some planners might choose to fully configure meetings and training.Others might opt to build these into the schedule after it is generated. WFM supports both strategies.However, a good rule of thumb says that if the meeting or training must occur at a specific time, itshould be configured beforehand. Otherwise, you can add meetings and training after building theschedule.
Creating Blank SchedulesAgent-based scheduling might not always be appropriate for your contact center. If not, you can alsocreate schedules using profile agents. Profile agents are user-defined, hypothetical agents, based oncontract data. Using profile agents results in blank schedules that contain an appropriate number andassortment of schedule slots for the agents to be hired.
TipYou can combine profile agents with actual agents when creating a schedule.
Planning Your Deployment Forecasting and Scheduling
Workforce Management Administrator's Guide 37

Managing Schedule BiddingSupervisors can create a profile schedule which authorized Agents then bid against, for the scheduleslots that they prefer. The Supervisor can automate the resolution of conflicting bids according tostated Agent preferences as well as their Seniority and Rank, and then tweak it manually beforepublishing the official schedule. Such a schedule can be designed to repeat over an entire quarter.
Planning Your Deployment Forecasting and Scheduling
Workforce Management Administrator's Guide 38

Performance and Adherence MonitoringThis topic provides information that you should consider when planning your performance andadherence monitoring for your contact center. See:
• About Performance Monitoring• About Adherence Monitoring
About Performance Monitoring
The Performance module of WFM Web for Supervisors enables you to view how closely your serviceobjectives are being met at the site, business unit, and activity level. You can also configure alerts toappear when service objective statistics fall outside of an acceptable range. You need to considerwhat your target service objectives are. To help you determine the most effective way to resolveunacceptable performance, the Performance module includes What-If capabilities, where you can seethe potential effect of changing some parameter in your environment.
The table below lists the statistics shown on the Performance > Intra-Day view and explains howeach is calculated. For more information about how to configure statistics, see Locating PreconfiguredStat Server Statistics in Genesys Administrator and the "Activities" section in Workforce ManagementWeb for Supervisors.
Statistic Definition
Interaction Volume—ForecastTaken from the Master Forecast Interaction Volume.For sites, business units, and the enterprise, this isthe sum of the associated local activities.
Interaction Volume—Actual
The Interaction Volume collected by WFM DataAggregator. The specifics of the statistic beingmonitored is determined by the Interaction Volumestatistic defined for this activity in WFM Web. Forsites, business units, and the enterprise, this is thesum of the associated local activities.
Interaction Volume—DifferenceThe difference between the forecast and actualInteraction Volume collected by WFM DataAggregator.
Interaction Volume—Difference %The difference between the forecast and actualInteraction Volume collected by WFM DataAggregator, expressed in a percentage.
AHT—Forecast
Taken from the Master Forecast AHT. For sites,business units, and the enterprise, this is theweighted average of the associated local activities(weighted by the corresponding forecastinteraction volumes).
AHT—Actual The AHT collected by WFM Data Aggregator. The
Planning Your Deployment Performance and Adherence Monitoring
Workforce Management Administrator's Guide 39

Statistic Definitionspecifics of the statistic being monitored isdetermined by the AHT statistic defined for thisactivity in WFM Web. For sites, business units, andthe enterprise, this is the weighted average of theassociated local activities (weighted by thecorresponding actual handled interaction volumes).
AHT—Difference The difference between the forecast and actualAHT collected by WFM Data Aggregator.
AHT—Difference %The difference between the forecast and actualAHT collected by WFM Data Aggregator, expressedin a percentage.
Abandoned-Interactions—Scheduled
The percentage of calls expected to be abandonedwith the number of scheduled agents working,assuming that the forecast IV and AHT are correct.For sites, business units, and the enterprise, this isthe sum of the associated local activities (weightedby the corresponding forecast interaction volumes).
Abandoned-Interactions—Calculated
The number of required calls expected to beabandoned with the number of calculated agentsworking, assuming that the forecast IV and AHT arecorrect. For sites, business units, and theenterprise, this is the sum of the associated localactivities (weighted by the corresponding forecastinteraction volumes).
Abandoned-Interactions—Required
The number of required calls expected to beabandoned with the number of required agentsworking, assuming that the forecast IV and AHT arecorrect. For sites, business units, and theenterprise, this is the sum of the associated localactivities (weighted by the corresponding forecastinteraction volumes).
Abandoned-Interactions—Actual
The actual number of abandoned calls as collectedby WFM Data Aggregator. The specifics of thestatistic being monitored is determined by theAbandoned Calls Percentage statistic defined forthis activity in WFM Web. For sites, business units,and the enterprise, this is the sum of theassociated local activities (weighted by thecorresponding actual interaction volumes).
Service-Level—Scheduled
The Service Level that would be expected if thescheduled number of agents are working, assumingthat the forecast IV and AHT are correct. Thiscalculation is based on the Service-Level objectivesdefined when you built the Staffing forecast. If youdid not define these objectives, this value is notcalculated. For sites, business units, and theenterprise, this is the weighted average of theassociated local activities (weighted by thecorresponding forecast interaction volumes).
Service-Level—CalculatedThe expected Service Level if the calculatednumber of agents are working, assuming that theforecast IV and AHT are correct. This calculation is
Planning Your Deployment Performance and Adherence Monitoring
Workforce Management Administrator's Guide 40
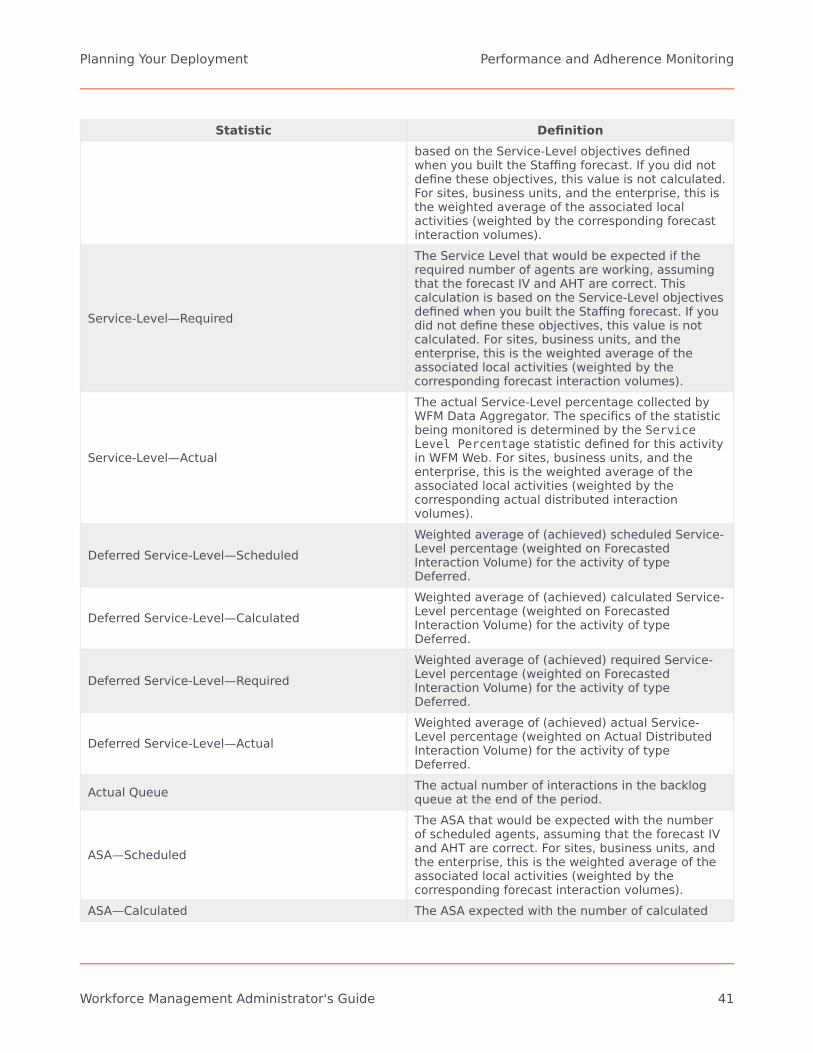
Statistic Definitionbased on the Service-Level objectives definedwhen you built the Staffing forecast. If you did notdefine these objectives, this value is not calculated.For sites, business units, and the enterprise, this isthe weighted average of the associated localactivities (weighted by the corresponding forecastinteraction volumes).
Service-Level—Required
The Service Level that would be expected if therequired number of agents are working, assumingthat the forecast IV and AHT are correct. Thiscalculation is based on the Service-Level objectivesdefined when you built the Staffing forecast. If youdid not define these objectives, this value is notcalculated. For sites, business units, and theenterprise, this is the weighted average of theassociated local activities (weighted by thecorresponding forecast interaction volumes).
Service-Level—Actual
The actual Service-Level percentage collected byWFM Data Aggregator. The specifics of the statisticbeing monitored is determined by the ServiceLevel Percentage statistic defined for this activityin WFM Web. For sites, business units, and theenterprise, this is the weighted average of theassociated local activities (weighted by thecorresponding actual distributed interactionvolumes).
Deferred Service-Level—ScheduledWeighted average of (achieved) scheduled Service-Level percentage (weighted on ForecastedInteraction Volume) for the activity of typeDeferred.
Deferred Service-Level—CalculatedWeighted average of (achieved) calculated Service-Level percentage (weighted on ForecastedInteraction Volume) for the activity of typeDeferred.
Deferred Service-Level—RequiredWeighted average of (achieved) required Service-Level percentage (weighted on ForecastedInteraction Volume) for the activity of typeDeferred.
Deferred Service-Level—ActualWeighted average of (achieved) actual Service-Level percentage (weighted on Actual DistributedInteraction Volume) for the activity of typeDeferred.
Actual Queue The actual number of interactions in the backlogqueue at the end of the period.
ASA—Scheduled
The ASA that would be expected with the numberof scheduled agents, assuming that the forecast IVand AHT are correct. For sites, business units, andthe enterprise, this is the weighted average of theassociated local activities (weighted by thecorresponding forecast interaction volumes).
ASA—Calculated The ASA expected with the number of calculated
Planning Your Deployment Performance and Adherence Monitoring
Workforce Management Administrator's Guide 41

Statistic Definitionagents, assuming that the forecast IV and AHT arecorrect. For sites, business units, and theenterprise, this is the weighted average of theassociated local activities (weighted by thecorresponding forecast interaction volumes).
ASA—Required
The ASA that would be expect with the number ofrequired agents, assuming that the forecast IV andAHT are correct. For sites, business units, and theenterprise, this is the weighted average of theassociated local activities (weighted by thecorresponding forecast interaction volumes).
ASA—Actual
The ASA collected by WFM Data Aggregator. Thespecifics of the statistic being monitored isdetermined by the ASA statistic defined for thisactivity in WFM Web. For sites, business units, andthe enterprise, this is the weighted average of theassociated local activities (weighted by thecorresponding actual interaction volumes).
Coverage
Number of agents scheduled for each activity. If anagent works only part of a time interval, only theportion during which the agent works (rounded tothe nearest minute) is counted toward scheduledstaffing. As a result, these values may be fractionsor decimals.
Staffing—Calculated
The number of agents per timestep for eachactivity. Taken from the Master Schedule.In a multi-skill environment, an agent may be available formultiple activities but will only be scheduled for one activity inany timestep.If an agent is scheduled to work only part of a time interval, onlythe fraction of the time period during which she or he works iscounted.Therefore, the value for staffing may be expressed as a fraction.For example, if an agent is scheduled to work for 10 minutes ofa 15–minute timestep, she is counted as 2/3 (or .667) of anagent.
Staffing—Required Required number of agents per timestep scheduledfor each activity. Taken from the Master Forecast.
Variance—Scheduled
The value obtained by subtracting the schedulednumber of agents working during a timestep fromthe optimal staffing for that timestep.Optimal staffing is a calculation based on actualinteraction volume, actual AHT, and the serviceobjectives specified in the forecast. This value isnot displayed but is used in calculating Variancevalues.
Variance—Required
The value obtained by subtracting the requirednumber of agents working during a timestep fromthe optimal staffing for that timestep.Optimal staffing is a calculation based on actualinteraction volume, actual AHT, and the serviceobjectives specified in the forecast. This value isnot displayed but is used in calculating Variance
Planning Your Deployment Performance and Adherence Monitoring
Workforce Management Administrator's Guide 42
Statistic Definitionvalues.
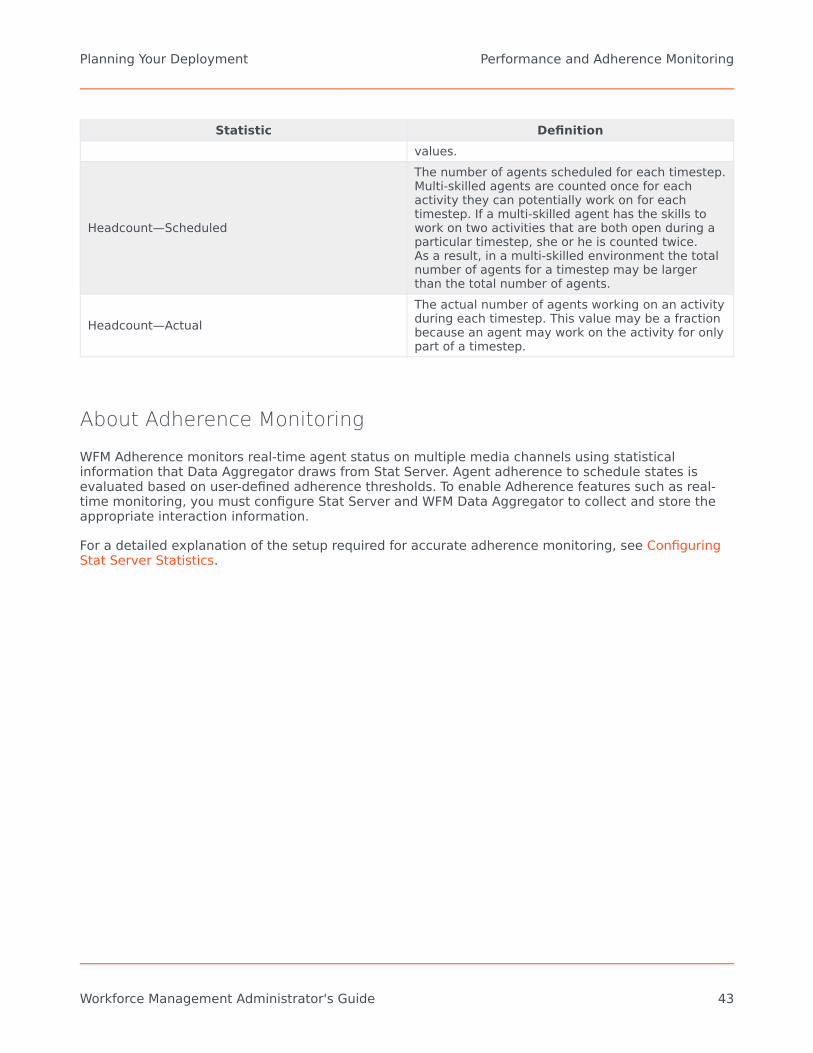
Headcount—Scheduled
The number of agents scheduled for each timestep.Multi-skilled agents are counted once for eachactivity they can potentially work on for eachtimestep. If a multi-skilled agent has the skills towork on two activities that are both open during aparticular timestep, she or he is counted twice.As a result, in a multi-skilled environment the totalnumber of agents for a timestep may be largerthan the total number of agents.
Headcount—ActualThe actual number of agents working on an activityduring each timestep. This value may be a fractionbecause an agent may work on the activity for onlypart of a timestep.
About Adherence Monitoring
WFM Adherence monitors real-time agent status on multiple media channels using statisticalinformation that Data Aggregator draws from Stat Server. Agent adherence to schedule states isevaluated based on user-defined adherence thresholds. To enable Adherence features such as real-time monitoring, you must configure Stat Server and WFM Data Aggregator to collect and store theappropriate interaction information.
For a detailed explanation of the setup required for accurate adherence monitoring, see ConfiguringStat Server Statistics.
Planning Your Deployment Performance and Adherence Monitoring
Workforce Management Administrator's Guide 43

Customized View in Web for AgentsWorkforce Management (WFM) enables you to add custom views to the Web for Agents interface,which in turn provides customized information to specific agents. For example, the agent might seetheir adherence in a customized format.
WFM itself does not provide this information, but rather obtains it via a URL to a custom applicationthat gathers data from either a third-party database or the WFM API. While WFM supports the customview, it does not provide the functionality to produce the data used in the custom view.
This functionality is controlled by configuration options in the WFM Web Application. Use GenesysAdmnistrator to enable it, by creating a new section named AgentCustom in the WFM WebApplication's Options tab. In the new section, add the following values:
• name
• url
• agenttag
ImportantAll three options must be added for the custom module to appear in the Web forAgents interface.
After these options are configured, the custom view is displayed together with WFM Web for Agents'standard modules at the top of the interface.
For a complete description of these configuration options, see the AgentCustom section.
Planning Your Deployment Customized View in Web for Agents
Workforce Management Administrator's Guide 44

Deploying WFMA successful Workforce Management (WFM) deployment requires more than installing and setting upthe software. You must design effective strategies to use for translating corporate business rules intoWFM objects and constraints. For this reason, it is important to understand key WFM concepts beforeconfiguring and using the application.
This topic introduces the WFM features and functions you must understand to effectively deploy thisproduct in your enterprise, and provides procedures to help you install WFM and maintain it after it isup and running. It includes information about how to complete the following tasks:
Planning your deployment
Installing the WFM components
Starting and stopping WFM
Use the information in these sections to achieve an efficient, customized deployment.
TipThis topic provides a conceptual overview of WFM objects and settings. For softwareand hardware prerequisites, see the Genesys Supported Operating EnvironmentReference Manual, and the Genesys Hardware Sizing Guide.
Deploying WFM Customized View in Web for Agents
Workforce Management Administrator's Guide 45

Preparing to Install WFMTo prepare Workforce Management (WFM) for installation, read through the topics on this page andcomplete the procedures as required.
WFM works in conjunction with a number of software components. Before installing WFM, set upGenesys Framework. The installation should include at least the following components:
• Configuration Manager• Configuration Server• DB Server• T-Server• Stat Server
ImportantFor full interoperability with WFM 8.5, the Genesys components must be release 7.6 orlater. Using WFM 8.5 with earlier releases of these components limits use ofManagement Layer support and Reason Code support. For example, the WFM Daemonwizard will work only with Genesys Framework 7.6 or later, because it uses the newWFM Daemon Application type which was introduced in Configuration Manager 7.6.
Software Requirements
For complete and up-to-date information on software requirements, review the Genesys SupportedOperating Environment Reference Manual. You will need a Genesys-supplied login and password toaccess certain documents there.
ImportantWhen installing WFM components, ensure they are all within the same major releasestream. Mixing components from different major release streams is untested andtherefore, not supported in production environments. The major release stream isdetermined by the first three digits in the release number. For example, 8.1.0, 8.1.1,8.1.2, 8.1.3.
Deploying WFM Preparing to Install WFM
Workforce Management Administrator's Guide 46

Management Layer System Requirements
The Management Layer of Genesys Framework enables administrators to start, stop, and monitor thestatus of entire solutions from a centralized location. To use Management Layer, you must also havethe following Genesys Framework components installed:
• DB Server• Configuration Server• Message Server• Log Database• Solution Control Server (SCS)• Solution Control Interface (SCI)• Local Control Agents (LCA)
For more information on installing any of these components, see the Management Frameworkdocumentation.
To use Management Layer, you must install LCA on the servers running WFM Builder, WFM Server,WFM Data Aggregator, and WFM Daemon.
Register the Server Host Computers
You must register each host computer that runs one or more of the servers. See Registering a HostComputer.
Connect to Backup Configuration Server
After installation, WFM components connect to Configuration Server to obtain information about theenvironment. If the primary Configuration Server is not available during startup, WFM Web, Server,Builder, Daemon, and Data Aggregator can connect to the backup Configuration Server.
To implement this feature in 8.1.3 and later releases
• For WFM Web and Daemon, this feature is implemented automatically during installation.• For WFM Server, Builder, and Data Aggregator this feature is implemented by setting the backuphost
and backupport options in the Start command line or in the NT Service command line.
To implement this feature in 8.1.2
• For WFM Web, manually configure two optional keys backuphost and backupport in theConfigServer.properties file located in the Tomcat directory webapps\wfm\WEB-INF (assuming WFM
Deploying WFM Preparing to Install WFM
Workforce Management Administrator's Guide 47

Web was deployed as wfm.war, otherwise replace wfm with the specified name). After you have madethe changes, save the file and restart the host.
• In the WFM Server Application, WFM Builder Application, and Data Aggregator Applicationobjects, set the backuphost and backupport options to take effect during startup. (These options arenot set automatically during installation for these components.)
• For WFM Daemon, no configuration is required.
Connect to Backup WFM Server
If you plan to install a redundant WFM Server, you can configure it as the backup server for theprimary WFM Server Application in Configuration Manager (or Genesys Administrator). All WFMcomponents will then connect to the backup server if the primary WFM Server fails.
Create Your WFM Database
If you are updating from WFM 7.x to WFM 8.5, you do not need to create a new database. Simplyupdate your current database as described in Managing WFM Database Utility.
If you are installing WFM for the first time or migrating from version 6.x, you must create a newdatabase.
ImportantIf you are migrating from WFM 6.x, see the “Workforce Management MigrationProcedures” chapter in the Genesys Migration Guide to find information about how totransfer your data from your current database to the new one.
Ensure your database meets the following criteria:
• Is of an appropriate size.• Allows room for expansion.• Is configured to be case insensitive.
Database Access PrivilegesYou must have specific privileges or security roles to access the database which differ slightly,depending on the platform being used.
Deploying WFM Preparing to Install WFM
Workforce Management Administrator's Guide 48

Microsoft SQL Server (MSSQL) Security Roles:
Creates and maintains WFM database (can use all WFM applications and their functionality):
• db_datareader• db_datawriter• db_ddladmin (must to be able to CREATE/ALTER/DROP OBJECTS, DISABLE/ENABLE TRIGGERS, TRUNCATE
TABLES, UPDATE STATISTICS)
Uses WFM applications only (does not access database server directly nor modify WFM databaseobjects):
• db_datareader• db_datawriter
Oracle Database Server Security Roles:
• GRANT CREATE SESSION TO <user name>• GRANT CREATE TABLE TO <user name>• GRANT CREATE VIEW TO <user name>• GRANT CREATE PROCEDURE TO <user name>• GRANT CREATE SEQUENCE TO <user name>• GRANT CREATE TRIGGER TO <user name>• GRANT CREATE TYPE TO <user name>• GRANT UNLIMITED TABLESPACE TO <user name>
ImportantThe privileges listed above must be assigned to Oracle database owners to ensureWFM Applications are fully functional when the WFM database runs on an Oracleplatform.
IBM DB2 Server Security Roles:
• Connect to database• Create tables• Create packages• Register routines to execute in database manager's process• Database administrator authority• Create schemas implicitly
Deploying WFM Preparing to Install WFM
Workforce Management Administrator's Guide 49

• Access to the load utility• Create external routines• Connect to quiesced database
ImportantA DB2 database requires specific configuration, which is described in the section NewDatabase Configuration.For an Oracle database, the database server name that the client application uses to access the database isactually an alias. If you use different database aliases on the various client computers, you cannot use thesame Database Access Point (DAP) for data from each client.
The procedure required to create your WFM Database varies, depending upon which database type you areusing. A qualified database administrator should perform this procedure.
To ensure the WFM applications work properly, you must set Microsoft SQL and Oracledatabase management systems to be case-insensitive.
Create a Database Access Point
Many of the WFM Application objects require a connection to a Database Access Point (DAP), whichspecifies the name and location of the WFM Database. To create a DAP, see Creating a DatabaseAccess Point.
Requirements for Using an Oracle DatabaseBefore you install an Oracle Database, ensure you are using:
• The latest Oracle Client 11 with Oracle NET and Oracle Provider for OLE DB.• The 64-bit Oracle Client with 64-bit WFM servers.• The 32-bit Oracle Client on the WFM Database Utility host computers (which are 32-bit
applications).
Important• Do not install 64-bit WFM Data Aggregator and WFM Server on the same machine as
32-bit WFM Database Utility, because they require different Oracle Clients.• Regardless of the version of Oracle Database Server used, Genesys recommends that
you use Oracle Client version 11.2 or later on all WFM hosts.
Deploying WFM Preparing to Install WFM
Workforce Management Administrator's Guide 50

• To install all required components, use the Oracle Client or Oracle ODAC installationpackages.
Import the WFM Templates
Import the Application templates. WFM component applications use the Application template.See Importing the Application Templates.
Procedures
The procedures in this section relate to the topics on this page.
Registering a Host ComputerPurpose: To enable the computer to run one or more servers required by WFM. Prerequisites: Thecomputer being registered is on the same network as the computer you are using to register it.
Start of Procedure
1. Identify the host computer’s assigned name on the network.2. Open Genesys Administrator and select Environment > Hosts.3. Right-click Hosts and from the shortcut menu, select New > Host.4. In the dialog box that opens, enter the host name of a computer on which you are installing a WFM
server.
ImportantHost names must be lowercase. They are case sensitive.
5. Enter the host computer’s operating system, version, and its IP address.6. Accept the default port number, and ensure the State Enabled check box is selected.7. Click Apply.
Repeat the process for all computers that will run a WFM server.
End of Procedure
Deploying WFM Preparing to Install WFM
Workforce Management Administrator's Guide 51

Creating a Database Access PointPurpose: To enable the Database Utility and WFM Server to specify the DAP on their Applicationobject Connections tab. Prerequisites: You know the name of your new WFM Database, its location,its type, and the login name and password for a user with DBO privileges.
Start of Procedure
1. In Genesys Administrator, open Environment and then right-click Applications.2. From the shortcut menu that appears, select New Application.3. From the Templates list, choose your DAP Application template and then click OK.4. On the General tab, enter a unique DAP name.
ImportantYou do not need to select a DB Server. WFM does not use DB Server to access its database.
5. On the Server Info tab, enter any valid host name and port number.WFM does not use them, but you cannot save the DAP Application object unless these fields are filledin.
6. Enter the appropriate information on the remaining Application object tabs.If you need help with this step, see “Configuring Database Access Points” in the Framework DB ServerUser's Guide.
7. To save the new Application object, click OK.
End of Procedure
Installing the Oracle Client with Oracle NET and Oracle Provider for OLE DatabasePurpose: To install the Oracle Client with Oracle NET.
Start of Procedure
1. Uninstall all Oracle Client software that is currently installed. Use the Oracle Deinstall Tool and stepsdescribed in the Oracle® Database Client Quick Installation Guide. See the topic, "Removing OracleDatabase Client Software".
2. Download the latest Oracle Client 11g complete installation package with the appropriate bit version:Oracle ODAC 11g 32-bit or Oracle ODAC 11g 64-bit.
3. During Oracle Client installation, use any type of installation.
Deploying WFM Preparing to Install WFM
Workforce Management Administrator's Guide 52

ImportantRecommended types are Administrator or Runtime installation types which will install all requiredcomponents. The installation type Instant Client will need an additional Oracle Provider for OLE DBinstallation, found in Oracle ODAC. The installation type Custom will require you to manually select the OracleNET and Oracle Provider for OLE DB.
4. Connect Oracle Database Client to an Oracle Database. In the Oracle® Database Client QuickInstallation Guide, see the topic, "Oracle Database Client Post installation Tasks".
End of Procedure
Installing Oracle ODAC with Oracle Provider for OLE DB and Oracle Instant ClientPurpose: To install Oracle ODAC with Oracle Provider.
Start of Procedure
1. Uninstall all Oracle Client software that is currently installed. Use the Oracle Deinstall Tool and stepsdescribed in the Oracle® Database Client Quick Installation Guide. See the topic, "Removing OracleDatabase Client Software".
2. Download the latest Oracle Client 11g complete installation package with the appropriate bit version:Oracle ODAC 11g 32-bit or Oracle ODAC 11g 64-bit.
3. During the Oracle ODAC installation, select Oracle Provider for OLE DB and Oracle Instant Clientcomponents.
4. Connect Oracle Database Client to an Oracle Database. In the Oracle® Database Client QuickInstallation Guide, see the topic, "Oracle Database Client Post installation Tasks".
End of Procedure
Importing Application TemplatesPurpose: To enable WFM installation, which requires the current Application templates.
Start of Procedure
1. In Genesys Administrator, select Environment > Application Templates.2. Right-click Application Templates and from the shortcut menu, select Import Application
Template.A dialog box opens that enables you to browse to the Application templates on your WorkforceManagement installation disk.
3. Select one of the following templates and then, click Open:• WFM_Builder.apd
• WFM_Client.apd (used by the WFM Database Utility)• WFM_Data_Aggregator.apd
Deploying WFM Preparing to Install WFM
Workforce Management Administrator's Guide 53

• WFM_Daemon.apd
• WFM_Server.apd
• WFM_Web.apd
4. If you want to, enter a name for the template in the Name text box on the General tab.
ImportantDo not make any other changes to the template. When you create Application objects using the importedtemplates, you configure them as explained in the following sections.
5. To save the template, click OK.6. Repeat Steps 1–5 to import all of the Application templates.
End of Procedure
Next Step: Configure the new Application objects, based on the imported Application templates,as described in the various sections in Installing Workforce Management.
Deploying WFM Preparing to Install WFM
Workforce Management Administrator's Guide 54

Installing Workforce ManagementThis topic provides step-by-step instructions for installing and configuring Workforce Management(WFM), including creating your WFM database.
ImportantIf you are migrating from a previous version of WFM, read the instructions in the“Workforce Management Migration Procedures” chapter of the Genesys MigrationGuide before beginning your installation. In particular, WFM 8.1 requires a new,separate database into which your existing data is imported.
This topic includes the following pages:
• Manually Creating and Configuring the Application Objects• Installing WFM Database Utility• Installing and Uninstalling WFM Components
You can install, create, and configure WFM components, by using the Configuration Wizards orperform these tasks manually. The procedures are the same to the end of the section Import the WFMTemplates. For instructions about how to perform a manual setup of WFM Application objects, seeManually Create and Configure the Applications.
ImportantGenesys recommends that you do not install WFM components, by using a MicrosoftRemote Desktop connection. The installation must be performed locally.
Before running Workforce Management Setup or the Installation and Configuration Wizards:
• Review the predeployment topics in Deployment Planning.• Verify that you have set up the computers that will be running WFM, as described in Preparing to Install
WFM.
Deploying WFM Installing Workforce Management
Workforce Management Administrator's Guide 55

Manually Creating and Configuring WFMApplication ObjectsThis topic contains information and procedures that will help you use Genesys Administrator andother tools to manually create Workforce Management (WFM) Application objects and performother configurations manually.
Manually Create the Application Objects
If you are familiar with Genesys Administrator, you can create and configure the componentApplication objects manually rather than using the wizards. See Creating Application ObjectsManually.
TipYou might also want to install redundant WFM Servers. If so, see Connect to BackupWFM Server.
WFM Daemon Setup
To successfully run WFM Daemon, you must set the correct SMTP server host and port. Depending onyour configuration, you might also need to set the user name and password. For information abouthow to set these options, see the “SMTP Section” of WFM Daemon Options.
To support automatic report creation, perform these configurations using Genesys Administrator:
• In the WFM Web Application, set the Reports section variable ServerURL. See Installing WFM Web asReport Server.
• In the WFM Web Application, set the Reports section variable PathToAutoGeneratedReports to thenetwork path for storing generated reports. See WFM Web Options.
• In the WFM Daemon Application, add a connection to the WFM Web Application that you installed asthe report server in Installing WFM Web as Report Server.
For notifications to work successfully:
• Each agent and supervisor must have the proper email set. E-mail addresses are initially defined inGenesys Administrator as part of the Person object. Once email addresses exist in the Configuration
Deploying WFM Installing Workforce Management
Workforce Management Administrator's Guide 56

Database, they are automatically imported into WFM Database.• The supplied SMTP server must be configured to accept emails for those addresses. Before anything can
be sent, you must first configure notifications in WFM Web for Supervisors, Configuration module.• A Supervisor’s ability to receive notifications depends on their security settings (see User Security).
Supervisors must be granted rights to receive notifications for each notification type and have accessto the agent teams for which they want to receive notifications.
For more information about user security and notifications, see Workforce Management Web forSupervisor Help.
Manually Change Configuration Server Host and Port
You might need to change the Configuration Server host and port information for the WFM serversafter installing WFM.
ImportantEditing a startServer.bat file is effective only if the server is started by using the.bat file. If you start the server manually from the control panel, or if it is startedautomatically as a Windows service, you must unregister the server and then re-register it. If you start the server using the Solution Control Interface (SCI), you mustchange the settings for the server in the server’s Application object, by usingGenesys Administrator.
To update or change this information manually you can use one of two methods:
• Edit the startServer.bat file for each affected server.• Unregister the servers and then reregister them, by using the updated host, port, and application name
information.
For procedures that describe both methods, see Editing the startServer.bat Files and Using ServerRegistration to Change Host and Port.
The startServer.bat files for each server are located in the same directory as the executable forthat server.
Backup Configuration Server Host and PortWFM Web supports a backup Configuration Server during application startup with the addition of twonew values in ConfigServer.properties file: BackupHost and BackupPort. These options arespecified in the same way as the Host and Port options and have the same meaning, except thatthey specify how to connect to the backup Configuration Server. If the primary Configuration Server isnot available, WFM Web uses this information to connect to the backup Configuration Server.
Deploying WFM Installing Workforce Management
Workforce Management Administrator's Guide 57

To configure these options manually, edit the ConfigServer.properties file in the Tomcat directorywebapps\wfm\WEB-INF (assuming that WFM Web was deployed as wfm.war, otherwise wfm should bereplaced with the specified name). In addition, the application name must be the same on bothprimary and backup Configuration Server.
For more information about configuring connections to backup Configuration Server, see Connect toBackup Configuration Server.
ImportantThese options might not be set automatically during application startup. By default,they do not exist. Therefore, you must configure the options manually, as describedabove.
Procedures
The procedures in this section relate to the topics on this page.
Creating Application Objects ManuallyPurpose: To create WFM Application objects manually.
Start of Procedure
1. In Genesys Administrator, open the Environment > Applications folder.2. Right-click in the folder and select New Application from the shortcut menu that appears.3. Browse to and select the appropriate application template from those you previously imported. If
necessary, see Importing Application Templates for instructions.4. Enter the appropriate information in each tab of the Application object.
The information on most of these tabs is familiar to regular users of Genesys Administrator. Ensure thesettings are correct on the Connections tab of each Application object. For the complete set ofrequired connections, see Table: WFM Component Connections.
End of Procedure
Next Step:
• Manually configure the Options tab settings. For a list of options with default settings and descriptions,see WFM Configuration Options.
Deploying WFM Installing Workforce Management
Workforce Management Administrator's Guide 58

Editing the startServer.bat FilesPurpose: To edit the WFM startServer.bat files.
Start of Procedure
1. To edit the WFM startServer.bat file, stop the WFM server.2. Open the startServer.bat file in a text editor such as WordPad.3. Change the host and port information.4. Save the edited file.5. Restart the server.
End of Procedure
Using Server Registration to Change Host and PortPurpose: To change the host and port for a server.Summary: You can also change the host and port information for the servers by unregistering themas services and then re-registering them using the new host and port.
Start of Procedure
1. Execute the following command from the command line to unregister the installed service:<server .exe filename> -removeFor example, WFMServer.exe -remove
2. Register the service with new host and port information:<server .exe filename> -install -host “<hostname>” -port “<portnumber>” -app<applicationname>For example, WFMServer.exe -install -host “Siamese” -port 4000 -app WFMServer_76
End of Procedure
Deploying WFM Installing Workforce Management
Workforce Management Administrator's Guide 59

Installing WFM Database UtilityThe Workforce Management (WFM) Database Utility configures the database you created (see CreateYour WFM Database) to receive WFM data. If you are migrating from a previous version of GenesysWorkforce Management (WFM), the WFM Database Utility also transfers your existing data into thenew database.
ImportantIf you are migrating, see the "Workforce Management Migration Procedures" chapterin the Genesys Migration Guide for instructions. The procedures in this Administrator’sGuide are based on the assumption that this is a new installation and do not describethe steps that are necessary for migration.
Procedure: Installing the WFM Database Utility
Purpose: To install the WFM Database Utility.
Start of Procedure
1. Ensure the Microsoft .NET Framework Version 1.1 or higher is installed on the host.See the Genesys Supported Operating Environment Reference Manual.
2. On your Workforce Management release disk, navigate to the solution_specific\WFMDatabaseUtility\windows directory.
3. Double-click Setup.exe.The Database Utility Installation Wizard opens.
4. Click Next to start using the Database Utility Installation Wizard.5. Select the directory into which you want to install the WFM Database Utility and then click Next.6. On the Ready to Install window, click Install.
A progress bar shows the setup status.7. Click Finish to close the Installation Wizard.
ImportantYou must restart your computer before you can use the WFM Database Utility.
End of Procedure
Deploying WFM Installing Workforce Management
Workforce Management Administrator's Guide 60
Running the WFM Database Utility
When you start the WFM Database Utility for the first time, the options that are available depends onwhether the WFM Database Utility finds a 7.x database. If you have only a blank database, you canchoose one of three actions:
1. Restore Database from .MDB File—Use this option to restore your database from a backup file.Restoring creates a database with the same version number as the database you backed up andrestores your data from the backup file to the new database.
ImportantIn some cases, after restoring your database, you must run the WFM Database Utility again and select UpdateDatabase to update your database to the latest 8.5 version.
2. Create Database—Use this option to create your 8.5 database if this is your first WFM installation.3. Migrate Database—Use this option to migrate data from a release 6.x database.
If you have been running WFM 7.x, select Update Database to update the database to the latestversion.
ImportantYou must configure your database to be case insensitive.
Deploying WFM Installing Workforce Management
Workforce Management Administrator's Guide 61

Installing and Uninstalling WFMComponentsThis topic provides information and procedures about how to install and uninstall the WorkforceManagement (WFM) components. All of the component installations are straight forward, but you willneed to complete additional tasks for WFM Web. See Installing WFM Web.
To uninstall any or all WFM components, see Uninstalling Workforce Management.
Installing the Components
Before you begin installing the WFM components, determine whether to install more than onecomponent on a single machine. If you do so, determine which components should be installedtogether.
See Deploying WFM, for some general deployment guidelines and recommendations. See theGenesys Hardware Sizing Guide for more extensive recommendations.
By default, all the servers are installed as Windows Services. For instructions about how to useWindows services, see the Windows Help file.
For instructions about how to install the WFM components, see the procedures on this page andInstalling WFM Web.
ImportantFunctionality that was previously in the WFM Configuration Utility is now in WFM Web(see Workforce Management 8.5 Release Information) and Configuration Utility is nolonger supported, nor delivered on the WFM Installation DVD.
Date and Time Dependencies for WFM ApplicationsThe following are the sources of the date and time setting for WFM applications:
• In WFM Web Supervisor, the date, time, and number formats depend on the language preferencesconfigured in the browser you are using.
• In WFM Web Agent, the date and time format depends on the locale of Web Server and is identical forall agents connected to the same server.
Deploying WFM Installing Workforce Management
Workforce Management Administrator's Guide 62

Uninstalling Workforce Management
Use the Task Summary in this section to ensure you have completely uninstalled WFM.
Task Summary: Uninstalling WFM WebTask Description and procedures
Stop all WFM components, including those runningas Windows Services. See Starting and Stopping WFM Components.
If you are using Tomcat, delete WFM from Tomcat. For instructions, see Deleting WFM Web fromTomcat.
If you are using WebSphere, delete WFM fromWebSphere.
For instructions, see Deleting WFM Web fromWebSphere and your WebSphere documentation.
Use Add/Remove Programs to uninstall the WFMcomponents from the Windows platform.
For instructions, see Using Add/Remove Programsto Uninstall WFM.
If you are using a Unix-based platform, delete allfiles in the relevant folders. Be sure to use caution when deleting files.
Procedures
Use the procedures in this section to install WFM components.
Installing WFM ServerPurpose: To install WFM Server.
Start of Procedure
1. On your Workforce Management release disk, navigate to the solution_specific\WFMServer\windowsdirectory.
2. Double-click Setup.exe.The WFM Server Installation Wizard opens.
3. Click Next to begin using the Wizard.4. Enter your Configuration Server host name, port number, user name, and password, and then, click
Next.A list of WFM Server Application objects displays.
5. Select the correct Application object and then click Next.The properties for each WFM Server Application object display in the Application Properties listwhen that Application is selected.
6. Specify the destination directory into which you want to install WFM Server. Then, click Next.7. In the Ready to Install window, click Install.
A progress bar shows the setup status.
Deploying WFM Installing Workforce Management
Workforce Management Administrator's Guide 63

TipYou must restart your computer before starting WFM Server. If you are installingmultiple components on one machine, you can install them all before restarting.However, you cannot install multiple instances of the same component on thesame host.
End of Procedure
Installing WFM BuilderPurpose: To install WFM Builder.
Start of Procedure
1. On your Workforce Management release disk, navigate to the solution_specific\WFMBuilder\windows directory.
2. Double-click Setup.exe.The WFM Builder Installation Wizard opens.
3. Click Next to begin using the Wizard.4. Enter your Configuration Server host name, port number, user name, and password, and then, click
Next.A list of WFM Builder Application objects displays.
5. Select the correct Application object and then click Next.The properties for each WFM Builder Application object display in the ApplicationProperties list when that Application is selected.
6. Specify the destination directory into which you want to install WFM Builder. Then, click Next.7. In the Ready to Install window, click Install.
A progress bar shows the setup status.8. Click Finish to close the Installation Wizard.
End of Procedure
Installing WFM Data AggregatorPurpose: To install WFM Data Aggregator.
TipA restriction limits the number of clients to about 8 if WFM Data Aggregator and WFMWeb are installed on the same computer. For full details, see TCP/IP ConnectionSettings.
Deploying WFM Installing Workforce Management
Workforce Management Administrator's Guide 64

Start of Procedure
1. On your Workforce Management release disk, navigate to the solution_specific\WFMDataAggregator\windows directory.
2. Double-click Setup.exe.The WFM Data Aggregator Installation Wizard opens.
3. Click Next to begin using the Wizard.4. Enter your Configuration Server host name, port number, user name, and password. Click Next.
A list of WFM Data Aggregator Application objects displays.5. Select the correct Application object and then click Next.
The properties for each WFM Data Aggregator Application object display in the ApplicationProperties list when that Application is selected.
6. Specify the destination directory into which you want to install WFM Data Aggregator. Then, click Next.7. In the Ready to Install window, click Install.
A progress bar shows the setup status.8. Choose to restart your computer now or later and then click Finish to close the Installation Wizard.
TipYou must restart your computer before starting WFM Data Aggregator. If you are installing multiplecomponents on one machine, you can install them all before restarting. However, you cannot install multipleinstances of the same component on the same host.
End of Procedure
Installing WFM DaemonPurpose: To install WFM Daemon.Prerequisites: Framework and Java SDK are installed and configured. To determine the requiredversions of Framework and Java, consult the WFM section at the end of the table “ProductPrerequisites” in the Genesys Supported Operating Environment Reference Manual.
TipYou must install a Java version that includes the <specifier> time zones update. Seedetails and use the Java version that is specified on the java.sun.com website.
Start of Procedure
1. On your Workforce Management release disk, navigate to the solution_specific\WFMDaemon\windowsdirectory.
2. Double-click Setup.exe.The WFM Daemon Installation Wizard opens.
Deploying WFM Installing Workforce Management
Workforce Management Administrator's Guide 65

3. Click Next to begin using the Wizard.4. Enter this information for your Configuration Server: host name, port number, user name, and
password. Then click Next.A list of WFM Daemon Application objects displays.
5. Select the correct Application and then click Next.The properties for each WFM Daemon Application object displays in the Application Properties listwhen that Application is selected.
TipIf you are using Genesys Configuration Server 7.6 or later, your WFM Daemon’s Application type must benamed WFM Daemon.
6. Specify the destination directory into which you want to install WFM Daemon. Then, click Next.7. In the Ready to Install window, click Install.
A progress bar shows the setup status.8. Choose to restart your computer now or later and then click Finish to close the Installation Wizard.
TipYou must restart your computer before starting WFM Daemon. If you are installing multiple components onone machine, you can install them all before restarting. However, you cannot install multiple instances of thesame component on the same host.
End of Procedure
For more information about WFM Daemon, see Using E-mail Notifications in WFM.
Deleting WFM Web from TomcatPurpose: To delete WFM Web from Tomcat.Summary:
• Genesys recommends using Tomcat Manager to correctly deploy/undeploy WFM Web.• Uninstalling WFM Web does not remove the .war file or the WFM directory from the webapps folder.
Genesys recommends that you remove the .war file and WFM directory prior to reinstalling or updatingWFM Web.
• If you reinstall or update WFM Web, before clients can access the software, you must remove the old fileand replace the .war file with the new version of the file. The default file name is wfm.war and thedefault directory name is wfm.
• If you reinstall WFM Web without first manually deleting these files, the files are not updated. WFM Webwill not run if you install a later version of WFM Web over an earlier one without first deleting thesefiles.
Deploying WFM Installing Workforce Management
Workforce Management Administrator's Guide 66

Start of Procedure
1. Open the >CATALINA_HOME>\webapps directory.See Set Environment Variables.
2. Delete the WFM .war file and the WFM directory from the webapps folder.3. Delete the $CATALINA_BASE\work\Catalina\localhost\wfm folder.
End of Procedure
Deleting WFM Web from WebSpherePurpose: To delete WFM Web from WebSphere.
Start of Procedure
1. Delete WFM Web by using your WebSphere Administrative Console. For procedures on how to do this,see your WebSphere documentation.
TipAfter completing the uninstall, you can then deploy a new version of WFM Web by using the WebSphereAdministrative Console.
End of Procedure
Using Add/Remove Programs to Uninstall WFMPurpose: To uninstall WFM components using the Add/Remove Programs tool on Windows platforms.
Start of Procedure
1. Select Start > Settings > Control Panel and open Add/Remove Software.2. Scroll through the list of programs to locate the one you intend to uninstall.3. Click Change/Remove.4. When the UninstallShield Wizard opens, follow the prompts.
TipAlthough you might not be prompted to restart your computer after removing a WFM component, it isrecommended.
End of Procedure
Deploying WFM Installing Workforce Management
Workforce Management Administrator's Guide 67

Installing WFM WebBefore you install Workforce Management Web, you must consider ensure the prerequisites, andsome web tools and applications are installed and configured on the WFM Web host computer. Usethe Task Summary in this section to ensure you have adequately prepared the WFM host and yourinstallation goes smoothly.
ImportantFor information and procedures describing how to uninstall WFM Web, see UninstallingWorkforce Management.
Task Summary: Preparing and Installing the WFM Web HostTask Description and procedures
Ensure the prerequisites are installed.
Framework 7.2 or higher and Java SDK arerequired.To learn which version of Java is required, consult the WFMsection at the end of the table “Product Prerequisites” in theGenesys Supported Operating Environment Reference Manual.
Install and configure Jakarta Tomcat or IBMWebSphere.
For installation and configuration instructionsspecific to Genesys Workforce Management:
• For Tomcat see, Configuring Tomcat for WFMWeb
• For WebSphere see, Configuring WebSphere forWFM Web
Install the WFM Web application. See Choosing the Platform for WFM Web.
Install a supported browser on each workstationthat will access WFM Web.
For WFM Web for Supervisors, the browserinstallation must include the appropriate Java plug-in. If this plug-in was not installed with the browser,download the plug-in from java.sun.com.To learn which version of Java is required, consult the WFMsection at the end of the table “Product Prerequisites” in theGenesys Supported Operating Environment Reference Manual.
Important to Note—If the computers that will be accessingWFM Web for Supervisors have pop-up blockers installed, theymust be configured to allow popups from the WFM Web URL.Otherwise, pop-up blockers prevent WFM Web for Supervisorsfrom opening.
The version of Java that you install must include the latest timezones update (TZ/Olson database). See java.sun.com for detailsand use the Java version that is specified there.
Deploying WFM Installing Workforce Management
Workforce Management Administrator's Guide 68

Task Description and proceduresEnsure your browser and TCP/IP settings areconfigured to run WFM Web for Supervisorscorrectly.
See Browser Security Considerations and TCP/IPConnection Settings
Verify that your window resolution has been set todisplay WFM Webcorrectly.
WFM Web is optimized for a window resolution of atleast 1024 x 768. At lower resolutions, someelements (such as table headers) might not displaycorrectly.
(Optional) Set up WFM Web as Report server. See Recommendations for WFM Web as a ReportServer.
Browser Security Considerations
WFM Web uses technical approaches that might be affected by web browser security settings, suchas:
• WFM Web uses signed Java applets on Supervisors’ workstations.• WFM Web uses Java applets on Supervisors’ workstations that are run by Sun’s Java Plug-in. On
Windows operating systems, the Java Plug-in is running as ActiveX, which means that supervisors musthave rights to run ActiveX controls.
• WFM Web uses non-encrypted form data in the login page for all users.• WFM Web relies on active scripting for all users.• When running WFM Web in an AIX or Solaris operating system environment, if the X Server software is
not installed, reports might not be generated or might be generated incorrectly. In the case of WFMWeb, X Server provides fonts and related functionality.
TCP/IP Connection Settings
In environments with higher loads (more than 100 total supervisors or 50+ supervisors running agentreal-time adherence views) you might need to change the default TCP settings on computers runningthe WFM servers: WFM Web, WFM Data Aggregator, and WFM Server. You can determine whether youneed to adjust your settings by monitoring the number of TCP sockets in the TIMED_WAIT mode. If thenumber exceeds 2000 on one computer or if WFM Web with servers start to report TCP socket errors,modify the settings to make TCP release port resources faster.
ImportantGenesys has identified this issue on Windows-based machines. Similar changes areprobably required for other operating systems. However, Genesys has not determinedrecommended adjustments to other operating systems.
Deploying WFM Installing Workforce Management
Workforce Management Administrator's Guide 69

To resolve this issue, you must make changes to the HKEY_LOCAL_MACHINE\SYSTEM\CurrentControlSet\Services\Tcpip\Parameters\ section in the registry of the host computers.
You can find a reference for this registry modification in the Microsoft TCP/IP Implementation Detailsdocument for the appropriate operating system at www.microsoft.com.
Genesys recommends these values:
• Increase the MaxFreeTcbs configuration option value from 2000 to 9000.• Increase the MaxFreeTWTcbs option value from 1000 to 8000.• Increase the MaxHashTableSize option value from 512 to 2048.• Increase the MaxUserPort option from value 5000 to 65534.• Reduce the TcpTimedWaitDelay option value from 240 to 60.
Configuring Tomcat for WFM Web
After installing WFM Web, use Tomcat Manager to copy the .war file (by default, located in the WFM8\Web directory) to the Tomcat webapps directory.
TipWhen using Tomcat Manager to copy the .war file, you might need to increase the filesize limit in the Manager's settings if the wfm.war file that is produced by the installeris too large to deploy with the default settings.Tomcat is available for download at jakarta.apache.org. There is no charge for this program.
For basic installation and configuration instructions, see the Tomcat documentation,available at the same website as the program.
WarningGenesys developed and tested supported servlet containers using the default settingsas configured for each particular servlet runner during installation time. Any changesto default settings are described in this document. If you use custom settings forservlet containers and experience issues while configuring and/or running WFM Web,Genesys recommends that you evaluate the impact of those custom settings. Youmight need to re-adjust them to ensure they do not interfere with the operation ofWFM Web.
The following sections describe specific configurations that enable Tomcat to support WFM Web:
Deploying WFM Installing Workforce Management
Workforce Management Administrator's Guide 70

Set Environment VariablesWhen configuring Tomcat, add the variables JAVA_HOME and CATALINA_HOME to the Windows Start >Settings > Control Panel > System > Environment > System Variables list. Enter the full path toeach home directory for the values for theses variables. CATALINA_HOME is the folder in which Tomcatis installed.
JVM Command-Line SettingsTomcat’s default settings are not suitable for production sites that experience moderate or heavyload. To support Web Services, you must enter the settings in the Table: Tomcat JVM Settings for theJava Virtual Machine (JVM) that runs Tomcat.
You can enter Tomcat settings in different ways, depending on your Tomcat version and configuration.Refer to your Tomcat documentation for details.
Table: Tomcat JVM Settings
JVM Setting Purpose
-Xms256m Instructs JVM to initially allocate 256 MB of memoryfor its own needs.
-Xmxnm
Determines the maximum amount of memory theJVM can allocate for its own needs. For example,-Xmx256m would allocate a maximum of 256 MB.If you are experiencing OutOfMemory exceptions with Tomcat,increase this setting’s n parameter to provide Tomcat morememory. Make sure that enough physical memory is available tosupport the parameter that you choose.
-XX:MaxPermSize =256m
Sets the size of the Permanent Generation, soTomcat can run properly. 256 is the (mandatory)minimum value.This option is required only for environments inwhich Tomcat is configured to use versions prior toJDK 8.
WFM 8.5 requires settings changes to the Apache Tomcat Properties dialog, accessible by openingthe file C:\Apache\Tomcat6.0\bintomcat6w.exe (the location on your computer might be different).Select the Java tab. See Table: Minimum Tomcat Java Settings.
Table: Minimum Tomcat Java Settings
Item Recommended settingInitial memory pool 256Maximum memory pool 1024
Deploying WFM Installing Workforce Management
Workforce Management Administrator's Guide 71

Configuring WebSphere for WFM Web
TipSee the Warning, which applies to configuring both Tomcat and WebSphere.
The libraries that WebSphere provides by default for web services are older than, and incompatiblewith, the libraries that WFM Web requires. If you do not set the Classloader Mode option toPARENT_LAST, the WebSphere libraries are loaded first, causing WFM Web not to run. After you setPARENT_LAST, the WFM Web libraries are loaded first, which enables WFM Web to run correctly.
TipConfiguring the Classloader Mode option to PARENT_LAST in no way affects otherapplications running simultaneously in WebSphere.
See also, Configuring WebSphere.
Choosing the Platform for WFM Web
Install WFM Web on either a Windows or a Unix-based platform:
• To install on Windows platforms, see Installing WFM Web (Windows).• To install on Unix-based platforms, see Installing WFM Web (Unix).
Recommendations for WFM Web as a Report Server
Workforce Management no longer uses the WFM Reports server component found in previous WFMversions to generate reports. Instead, Workforce Management uses the WFM Web component togenerate reports.
TipIn addition to functioning as a report server, by default, WFM Web 8.1 continues toperform all its usual WFM Web functions.
Deploying WFM Installing Workforce Management
Workforce Management Administrator's Guide 72

Report generation requires the same, and sometimes more hardware requirements than other WFMWeb functions, Genesys recommends that medium or large sites (as described in the GenesysHardware Sizing Guide) install a separate WFM Web Server to function as a report server. If you areupgrading, use the same hardware previously used for the 7.2 WFM Reports component to set up 8.1WFM Web as the report server.
To install WFM Web as the reports, see Installing WFM Web as Report Server server.
Procedures
Use the procedures in this section to .
<multistep>
Configuring WebSpherePurpose: To configure WebSphere for WFM Web.
Start of Procedure
1. Log in to the WebSphere Administration Console.2. Navigate to Applications > Enterprise Applications.3. Install the WFM Application from the wfm_war directory and save it to the master configuration.4. Locate the newly-installed WFM WebApp and click its link to drill down into the configuration.5. On the Configuration tab, locate the Related Items group.
The Classloader Mode setting, located on Configuration tab, is not the correct place to setthe classloader option. It will not provide the desired effect if set only in that tab.
6. Click the Web Modules link to open the WebModuleDeployment page.7. Click the *.war link to open Web Module configuration properties.8. Locate the Classloader Mode row and change the control value to PARENT_LAST.9. Save the changes.
TipGenesys recommends that you adjust memory and processing thread settings forWebSphere to similar values as specified for Tomcat (see Table: Tomcat JVM Settings).For the exact location of those settings, consult the Websphere documentation.
End of Procedure
Next Step: Start the WFM application.
Deploying WFM Installing Workforce Management
Workforce Management Administrator's Guide 73

Installing WFM Web (Windows)Purpose: To install WFM Web on the Windows platform.
Start of Procedure
1. On your Workforce Management release disk, navigate to the windows subdirectory in thesolution_specific\WFMWeb directory.
2. Double-click Setup.exe.The WFM Web Installation Wizard opens.
3. Click Next to begin using the Wizard.4. Enter your Configuration Server host name, port number, user name, and password, and then, click
Next.A list of WFM Web Application objects displays.
5. Select the correct Application object and then click Next.The properties for each WFM Web Application object display in the Application Propertieslist when that Application is selected.
6. Specify the destination directory into which you want to install WFM Web. Then, click Next.7. In the Ready to Install window, click Install.
A progress bar shows the setup status.8. Click Finish to close the Installation Wizard.9. Using the Tomcat or WebSphere Administrative Console, locate the WFM .war file and move it to the
appropriate directory for the web server you are using.For example, if you are using Tomcat, deploy the .war file in the webapps directory. For thelocation if you are using WebSphere, see your WebSphere documentation.
End of Procedure
Installing WFM Web (Unix)Purpose: To install WFM on the Unix platform.
Start of Procedure
1. On your Workforce Management release disk, navigate to the appropriate subdirectory in thesolution_specific\WFMWeb directory.Your choice of subdirectory depends on the platform on which you are installing WFM Web.The choices are AIX and Solaris.
2. Launch install.sh.3. Enter this information for your Configuration Server: host name, port number, user name, and
password.4. Enter the name of your WFM Web Application object.5. Specify the destination directory into which you want WFM Web installed.6. Click Finish to close the Installation Wizard.
Deploying WFM Installing Workforce Management
Workforce Management Administrator's Guide 74

7. Using the Tomcat or WebSphere Administrative Console, locate the WFM .war file and move it to theappropriate directory for the web server you are using.For example, if you are using Tomcat, deploy the .war file in the webapps directory. For thelocation if you are using WebSphere, see your WebSphere documentation.
End of Procedure
Installing WFM Web as a Report ServerPurpose: To install and configure a separate instance of WFM Web as the reports server.
Start of Procedure
1. Install WFM Web using the steps, as described in Installing WFM Web (Windows) or Installing WFM Web(Unix). .
2. In the Configuration Manager, in the WFM Web Application properties, set the value for optionServerURL in the Reports section, by entering the complete URL that was used to installed WFM Web.For a complete description of the ServerURL option, see WFM Web Options.For example: http://<host>:<port>/<appname>In this example:• <host> and <port> refer to where the servlet container (the one that will function as the report
server) for WFM Web is running.• <appname> is the name that is used while WFM Web is being deployed.
TipYou must be able to use this URL to login to the WFM Web Server that will function as the report server.
3. In the Connections tab of the WFM Web Application that will perform all the usual WFM Web functionsexcept report generating, include the Application name of the WFM Web Application that willfunction as the report server.
End of Procedure
Deploying WFM Installing Workforce Management
Workforce Management Administrator's Guide 75

Starting and Stopping WFMTo maintain your Workforce Management (WFM) Servers, you can start and stop them by usingManagement Layer or start and stop them manually. When using Management Layer, you start WFMServer, WFM Builder, WFM Data Aggregator, and WFM Daemon from the Solution Control Interface(SCI).
You must start WFM Web and WFM Database Utility manually, even when you are using ManagementLayer.
{{NoteFormat|When starting WFM, confirm that all servers are running before starting WFM Web andthe WFM Database Utility
This topic includes procedures you can use to start and stop WFM Applications and components inthe following sections:
• Using Solution Control Interface• WFM Servers• WFM Database Utility• WFM Web
Using Solution Control Interface
Use SCI to start and stop WFM by completing the procedures in this section.
[+] See the procedures
Procedure: Starting WFM Using SCI
Purpose: To start Workforce Management by using SCI.
Prerequisites: Management Layer is running.
Start of Procedure
1. Start the SCI.2. Go to the Solutions view.3. Right-click the desired solution and from the shortcut menu, select Start.
-or-Select the desired solution and on the menu bar choose Action > Start.The command to start WFM is sent to Solution Control Server (SCS), which uses Local Control Agents(LCA) to activate the WFM solution components in the order established during solution configuration.
Deploying WFM Starting and Stopping WFM
Workforce Management Administrator's Guide 76
SCI reports a successful start of WFM after all solution components display Running status withinthe configured timeout. When all servers are started, the solution status changes from Stoppedto Started.
ImportantMany components are shared by a number of solutions.Therefore, some WFM components display the status Runningbefore WFM is started.
SCI reports a successful start of WFM unless a required WFM component wasnot started. For more information, see Framework Solution Control InterfaceHelp. To view the Help, open SCI and click Help.
End of Procedure
For more information on Management Layer topics, see the Framework Management Layer User'sGuide.
Procedure: Stopping WFM from Inside SCI
Purpose: To stop WFM while running SCI.Prerequisites: You are using Management Layer.
Start of Procedure
1. Start SCI.2. Go to the Solutions view.3. Right-click the desired solution and from the shortcut menu, select Stop.
-or-Select the desired solution and on the menu bar choose Action > Stop.The command to stop WFM is sent to Solution Control Server (SCS), which uses Local Control Agents(LCA) to activate the WFM solution components in the order established during solution configuration.
When all servers are stopped, the solution status changes from Started to Stopped.
ImportantMany components are shared by a number of solutions, therefore,some WFM components display the status Running before WFM is
Deploying WFM Starting and Stopping WFM
Workforce Management Administrator's Guide 77

stopped.
End of Procedure
For assistance, see Framework Solution Control Interface Help. To view Help, open SCI, and clickHelp.
Back to Top
WFM Servers
There are several ways to start the WFM servers (WFM Server, WFM Builder, WFM Data Aggregator,and WFM Daemon). See the procedures in Starting WFM Servers
ImportantThe servers are installed on Windows platforms as Windows Services, by default.
You can also stop the WFM servers in several ways, depending on whether you are usingManagement Layer and whether the servers are installed as Windows Services. See the procedures inStopping WFM Servers.
ImportantIf you terminate a server using the Windows Task Manager, you will lose all data oncurrently active interactions because Windows does not allow enough time for theservers to save the active data.
Starting WFM Servers[+] See the procedures
Procedure: Configuring Windows Services
Purpose: To open and configure each WFM Windows Service.
Deploying WFM Starting and Stopping WFM
Workforce Management Administrator's Guide 78

TipYou can configure a Windows Service to start automatically ormanually.
Start of Procedure
1. In Windows, select Start > Programs > Settings > Control Panel > Services.The Services window appears. Each service has status settings showing whether it starts manually orautomatically and whether it is currently running.
2. Highlight the service you want to configure and then click Startup.3. Select automatic or manual.4. Click OK. In the Services window, click Close.
The settings are saved.
End of Procedure
Procedure: Starting a Windows Service Manually
Purpose: To start a Windows service manually.
TipIf a Windows Service is configured to start automatically, it will startwhenever the computer is started. No further action is required.
Prerequisite: This Windows service is configured to start manually.
Start of Procedure
1. In Windows, select Start > Programs > Settings > Control Panel > Services.The Services window appears.
2. Highlight the Service that you want to start.3. Click Start.
End of Procedure
Deploying WFM Starting and Stopping WFM
Workforce Management Administrator's Guide 79

Procedure: Starting WFM Servers Manually
Purpose: To start the Workforce Management servers manually.
Start of Procedure
1. In Windows, select Start > Programs > Genesys Solutions > Workforce Management > <servername>.The server console window opens and the server begins its initialization routine.
2. If desired, right-click the window title bar to change server display settings.3. Minimize the window after the server has started.
End of Procedure
Stopping WFM Servers[+] See the procedures
Procedure: Stopping a Server Manually
Purpose: To terminate a server process that is running in a console window rather than as a Servicewithout using the Windows Task Manager.
Summary: The method for stopping a server manually depends on whether or not you installed it asa Windows Service. If the server is running in a console window rather than as a Service, shut it downusing this procedure.
Start of Procedure
1. Enter [Ctrl+Break] or [Ctrl+C].
End of Procedure
ImportantYou cannot close a server by clicking the Close button (X) or byselecting File > Close from the console menu bar. Abrupt orabnormal shutdown can cause data loss.
Procedure: Stopping a Server from Command Prompt
Deploying WFM Starting and Stopping WFM
Workforce Management Administrator's Guide 80

Purpose: To stop a server’s Windows Service from the command prompt.
ImportantThis procedure does not apply to WFM Daemon.
Start of Procedure
1. In Windows, select Start > Programs > Command Prompt.2. Change to the directory in which the server’s .exe file is located.3. At the prompt, enter <servername>.exe -sstop.4. If you are using SCI in the Management Layer:
i. Select the server application.ii. Click Stop.
End of Procedure
Procedure: Stopping a Server’s Windows Service
Purpose: To stop a Service from the Services window.
Start of Procedure
1. In Windows, select Start > Programs > Settings > Control Panel > Services.2. Select the appropriate Service.3. Click Stop.4. Click Close.5. If you are using SCI in the Management Layer:
i. Select the server application.ii. Click Stop.
End of Procedure
Back to Top
Deploying WFM Starting and Stopping WFM
Workforce Management Administrator's Guide 81

WFM Database Utility
Use the procedures in this section to start and stop WFM Database Utility.
[+] See the procedures
Procedure: Starting WFM Database Utility
Purpose: To start the WFM Database Utility.
Prerequisites: The WFM Servers are running.
Start of Procedure
1. In Windows, select Start > Programs > Genesys Solutions > Workforce Management > DatabaseUtility.The Login dialog box appears.
2. Enter your user name and password.3. If this is the first time you are opening the WFM Database Utility, click Details. Then enter the
Configuration Server host name and port number and the name of the WFM Database UtilityApplication object that you configured using Configuration Manager.
4. On the first window, select the appropriate radio button to start using the WFM Database Utility.
End of Procedure
TipFor more information about how to use the WFM Database Utility,see Managing WFM Database Utility.
Procedure: Stopping WFM Database Utility
Purpose: To stop the WFM Database Utility.
Start of Procedure
1. In the upper-right corner of the application window, click the X button.-or-In the main window, click the Close button.
Deploying WFM Starting and Stopping WFM
Workforce Management Administrator's Guide 82

End of Procedure
WFM Web
Use the procedures in this section to start and stop WFM Web.
[+] See the procedures
Deploying WFM Starting and Stopping WFM
Workforce Management Administrator's Guide 83

Procedure: Starting WFM Web
Purpose: To start WFM Web.
Prerequisites: The WFM Servers are running.
Start of Procedure
1. Start your web server (for example, Tomcat).
TipFor starting, stopping, and other configuration instructions, seethe documentation for your web server.
2. Open a web browser.3. Type or paste the WFM Web URL into the address line of the browser and press Enter.
The User Login dialog box appears.
ImportantContact your system administrator for the URL. The URL is case-sensitive. Follow the capitalization settings exactly.
4. Enter your user name and password.5. Click OK.
Those whose logins identify them as Supervisors will see the WFM Web for Supervisors GUI. Agents willsee the WFM Web for Agents interface.
End of Procedure
Procedure: Stopping the WFM Web
Purpose: To log out of WFM Web.
Start of Procedure
1. Click Log off from any window in WFM Web.
Deploying WFM Starting and Stopping WFM
Workforce Management Administrator's Guide 84

End of Procedure
Back to Top
Deploying WFM Starting and Stopping WFM
Workforce Management Administrator's Guide 85

Configuring Data AggregatorYou configure Data Aggregator to enable statistics gathering and set certain parameters to ensurethe specified Data Aggregator application can be restarted within sites and business units. However,you might also want to configure configure Reason Codes to provide more specific information aboutagent states, or configure a separate Data Aggregator instance as a hot-standby backup server.
You will find the information you need to perform these tasks in the following topics:
• Setting Up Data Aggregator• Adding Reason Codes• Using Hot-Standby Data Aggregator for Backup
Setting Up Data Aggregator
To set up Data Aggregator, you set certain parameters in the WFM Web Organization module, ineither the Business Unit or Sites views. The parameters are set to:
• Enable Data Aggregator to be restarted at the business units or site level• Define the Tenant (default is always Environment) and password• Display the specified Stat Server (read-only parameter)• Align the Data Aggregator's time profile with Stat Server's time profile.
ImportantTo view and configure these settings in the Business Units or Sites panes, you musthave the Access backend configuration security right. See the Configuration >Organization module, Business Units > Configuration and Sites >Configuration panes in the Workforce Management Web for Supervisors Help.
Adding Reason Codes
When associating agent schedule states provided by WFM with Genesys events, you can configurereason codes with Genesys events. This allows you to refine the Genesys agent-state information thatWFM uses to track agent compliance with their scheduled states.
WFM Data Aggregator can process reason codes that come from hard and/or soft phones. To receivereason codes from hard phones, or in a mixed hard/soft phone environment, set theReasonCodeKeyName option in the WFM Data Aggregator Application object to ReasonCode.
Configuring Data Aggregator Starting and Stopping WFM
Workforce Management Administrator's Guide 86

See the procedure... [+]
Configuring Data Aggregator to Process Reason CodesPurpose: To enable Data Aggregator to process Reason Codes.
Prerequisite: You created a WFM Data Aggregator Application object for the current installationin Genesys Administrator.
ImportantYou can use reason codes only if your CTI environment supports them.
Start of Procedure
1. In Genesys Administrator, open the WFM Data Aggregator Application object.2. On the Options tab, create an option named ReasonCodeKeyName, if it does not already exist.3. Set the value of ReasonCodeKeyName to ReasonCode.4. Save the changes.
End of Procedure
For more information about reason codes, see Using Reason Codes.
Using Hot-Standby Data Aggregator for Backup
You can configure a hot-standby backup WFM Data Aggregator for each primary WFM DataAggregator server. You will need to create an Application object for the backup server and then, inthe primary Data Aggregator Application, create a connection to the backup. See Manually Createthe Application Objects.
The backup reads the same information as the primary WFM Data Aggregator, so if it is necessary toswitch to the backup, there is no delay or loss of data. At the transition, the backup WFM DataAggregator simply starts writing to the database starting from where the primary WFM DataAggregator left off.
If configured properly, WFM Data Aggregator also backs up data in the event of a disconnect from thedatabase and the subsequent WFM Data Aggregator shutdown. It first writes all current data to alocal dump file. You must specify a path and file name for the DBDumpFile option on the Options tabof the WFM Data Aggregator Application object.
See the procedure... [+]
Configuring Data Aggregator Starting and Stopping WFM
Workforce Management Administrator's Guide 87

Configuring Data Aggregator to Backup Data on DisconnectPurpose: To enable an emergency Data Aggregator info dump.
Prerequisite: You created a WFM Data Aggregator Application object for the current installationin Genesys Administrator.
ImportantYou can use reason codes only if your CTI environment supports them.
Start of Procedure
1. In Genesys Administrator, open the WFM Data Aggregator Application object.2. On the Options tab, create an option named DBDumpFile, if it does not already exist.3. Set the value of the DBDumpFile option to a path and file name—for example: C:\DAEmergency\
DBDumpFile.txt.4. Save the changes.
If WFM Data Aggregator loses its connection to the database, before closing down it writes all currentdata to the local file (the so-called dump file). After restart and reconnection to the database, WFMData Aggregator reads the dump file, writes the data to the database, and deletes the dump file.
ImportantThe dump file does not prevent data loss during the period that WFM Data Aggregatoris shut down.
End of Procedure
Back to Topic
Configuring Data Aggregator Starting and Stopping WFM
Workforce Management Administrator's Guide 88

WFM in Multi-Site EnvironmentsUse the information in this topic to configure multiple WFM Server Applications and multiple WFMBuilder Applications for your multi-site environment.
Configuring WFM Server Applications
Purpose: To configure multiple WFM Server Application objects for multi-site environments. Startof Procedure
1. Configure a WFM Server Application object for each WFM Server and install the WFM Servers asinstructed in this section and in Installing WFM Server.Decide which of the WFM Servers will act as the main WFM Server and which are to beconfigured as subordinate.
2. Open the main WFM Server Application object’s Connections tab and add all the subordinate WFMServers.
3. Open WFM Web and ensure the correct WFM Server is associated with each site. Check theConfiguration > Organization > Sites > Configuration pane.
4. Start all the WFM Servers.Use WFM Web for Supervisors to create schedules for activities on all sites in any WFMServer Application object.
End of Procedure
Adding Connections in WFM Server
Purpose: To add a connection to WFM Builder in the WFM Server Application object.Prerequisites: You have created a WFM Builder Application object.
Start of Procedure
1. In Genesys Administrator, select your WFM Server Application object from the SolutionComponents list and then click Properties.The Properties dialog box of the WFM Server Application object opens.
2. Click the Connections tab.3. Enter or browse to your WFM Builder Application object, and then click OK.
The Application objects are now configured for the four solution components in the SolutionComponents list.
End of Procedure
WFM in Multi-Site Environments Starting and Stopping WFM
Workforce Management Administrator's Guide 89
Configuring WFM Builder Applications
If multiple WFM Builder Applications are connected to the WFM Server, you can configure WFMServer to select the WFM Builder Application with the shortest queue.
1. Go to the Configuration > User Security > User_name > Modules tab.2. From the WFM Builder drop-down list, select None (the default).
For each supervisor's request to build a schedule, WFM Web asks WFM Server to locate an instance ofWFM Builder. To do so, WFM Web goes to an original locator—although not to the WFM Server in itscurrent session.
WFM Server selects a WFM Builder instance from its Connections list. (WFM Server periodically pollsall of the WFM Builder Applications that are specified in its connection list to get information abouttheir current request queue and to make sure the connections remain active.) In response to therequest from WFM Web to locate a WFM Builder instance, WFM Server returns the active WFMBuilder Application with the shortest queue.
Selecting a Specific Builder Application
For each user that is defined in WFM, you can select a specific WFM Builder Application (one thatis installed on a user's workstation or dedicated to a group of users) that would serve all schedulebuilding requests initiated by that user.
1. Go to the Configuration > User Security > User_name > Modules tab.2. From the WFM Builder drop-down list, select an item (not the default None).
If you want all users to share the same WFM Builder server, specify None.
WFM in Multi-Site Environments Starting and Stopping WFM
Workforce Management Administrator's Guide 90

WFM Server Load BalancingUse the information in this topic to load balance Workforce Management (WFM) Server when youhave multiple computers available, and one computer alone cannot handle the work load. Use theprocedures provided to assist you when configuring the load balancing method you choose for WFMServer in your environment.
This topic includes the following sections:
• Load Balancing Methods• Configuration• Procedures
Load Balancing Methods
There are two main methods of load balancing: Processor and Memory. WFM Server supports bothtypes.
Processor BalancingProcessor Balancing support is based on the assignment of a session to the best-qualified processorand is the more common type of balancing required. It is often needed when one computer does nothave enough processor power to handle a large number of simultaneous users. WFM accomplishesthis method by balancing WFM Server requests between several different WFM Server instancesrunning on different computers. Each server/computer instance is known as a location.
WFM Server's built-in load balancing service is called Locator Service. Every time you open a newuser session, Locator Service identifies the location that is best suited to serve the new session.Usually that is the location that is currently handling the fewest requests. From then on, all requestsfrom that particular session are handled exclusively by the assigned location.
To configure the Processor Balancing on a WFM Server, Configuring Process Balancing
Memory BalancingMemory Balancing support is based on reconfiguring at the site level. As you create multiple WFMServers, you can assign each to a different site as required.
Here is an example application of Memory Balancing: if your configuration has 50,000 agents, youwill likely need more than 2-3 GB of RAM (the limit on 32-bit Windows applications). One computeralone does not have enough memory to handle this huge configuration.
In Memory Balancing, as you start each new session, you associate it with a site. The session is thendirected to the WFM Server instance that is assigned to that site. This allows different servers to workwith different subsets of data—thereby reducing the amount of memory needed per server.
WFM Server Load Balancing Starting and Stopping WFM
Workforce Management Administrator's Guide 91

ImportantYou can also create a configuration that uses both types of load balancing.
To configure Memory Balancing on a WFM Server, Configuring Memory Balancing
Back to Top
Configuration
As noted previously, WFM Server's built-in load balancing service is called Locator Service. Normally,one WFM Server instance is designated as Locator.
Any client that wants to open a user session with WFM Server must first ask Locator for the URL ofthe WFM Server that is best suited to serve the new session, from a load-balancing point of view.Usually that is the location that is currently handling the fewest requests. The URL is obtained andthe client opens the new session on that server.
TipAll WFM Servers run the Locator Service and any server can act as Locator.
To configure the Locator Server on a WFM Server, see Configuring the Locator Service
Procedures
Click the red arrow to view procedures that relate to the topics on this page. <multistep>
|-| Configuring the Locator Service=
Purpose: To enable load balancing correctly
Start of Procedure
1. Open Genesys Administrator.2. Open the WFM Server Application that will be the Locator.3. Add all other WFM Servers (except the Locator) to the Connections list.4. Save and close the Locator.5. Open the WFM Web Application.
WFM Server Load Balancing Starting and Stopping WFM
Workforce Management Administrator's Guide 92

6. Add the WFM Server Application that will be the Locator to the Connections list.7. Save and close the WFM Web Application.
End of Procedure
TipAdvanced users can add cross-references in the Connections lists between allconfigured WFM Servers, so that any of them could act as Locator. For example, if youare running two instances of WFM Web, you might want to assign a different WFMServer to each WFM Web instance to act as Locator, but still have load balancingenabled.
|-| Configuring Processor Balancing=
Purpose: To configure processor balancing. (Processor Balancing is the default method of loadbalancing.)
Prerequisite: You have configure the Locator Service. See Configuring the Locator Service
Start of Procedure
1. Open Genesys Administrator.2. Open the Connections list of the WFM Server Application that you have designated to act as Locator.3. Add a reference to each WFM Server that you want to balance.
End of Procedure
The result: Locator regularly checks the number of open sessions on the servers that it finds in itsConnections list, and then directs new sessions to the server with the least number of open sessions.In this way, connected users are balanced across the servers.
|-| Configuring Memory Balancing=
Purpose: To enable Memory Balancing.
Prerequisites:
• You have configured the Locator Service. See Configuring the Locator Service.• You have assigned WFM Servers to specific site(s). (Complete this procedure for each site.)
Start of Procedure
1. Open WFM Web.
WFM Server Load Balancing Starting and Stopping WFM
Workforce Management Administrator's Guide 93

2. Go to Configuration > Organization > Sites.3. Click Configuration and assign a WFM Server to serve that site, by selecting a server from the drop-
down list WFM Server Name.
ImportantTo disable Memory Balancing, select none in the drop-down list WFM Server Name for every site. Otherwise,the Locator will direct sessions to the selected WFM Server, in defiance of Processor Balancing.
4. Open Genesys Administrator.5. Add all WFM Servers Applications to the Connections list of the WFM Server Application that you
designate to act as Locator.
End of Procedure
The result: When you open a new session and identify it with a site, the session is automaticallydirected to the WFM Server that is assigned to that site. </multistep>
Back to Top
WFM Server Load Balancing Starting and Stopping WFM
Workforce Management Administrator's Guide 94

Daily OperationsAfter deploying Workforce Management (WFM), there are many tasks that, as a workforceadministrator, you will need to perform regularly and sometimes on a daily basis. These topicsprovides information about setting up and performing these daily operations in your environment.
WFM daily operations
SchedulingPerformance, Adherence, ReportsForecastingUser Security
WFM daily operations
Calendar ManagementTime-Off BiddingTask Sequencing
WFM daily operations
E-mail NotificationsScheduling Meals & BreaksEnabling WaitListsTracking Overtime
Daily Operations Starting and Stopping WFM
Workforce Management Administrator's Guide 95

SchedulingThis topic provides detailed information about Workforce Management (WFM) Scheduling that willhelp you to plan and create schedules for your workforce. It includes the following sections:
• Scheduling Overview• Maximum Agents by Length of Schedule Period• Profile Scheduling• Skills-Based Scheduling• Mulit-Site Planning• Agent Preferences• Flexible Shifts• Task Sequences• Schedule Trading• Marked Time• Intra-Day Scheduling• Pending Schedule Changes
Scheduling Overview
Workforce Management (WFM) uses the published Master Forecast to create agent schedules thatcomply with user-defined business constraints. Or you can create “empty” schedules to which youcan then assign agents. Schedule constraints include available personnel with required skills, staffingrequirements, employment contracts, business policies, and agent preferences.
The staffing requirements act as a target for schedule generation. An optimized schedule ensures theleast amount of over- and understaffing while still meeting contractual obligations. WFM uses eachagent’s individual skills, contracted working rules, and calendar items as guides to help identify wheneach agent can work, and what he or she will work on.
WFM aids compliance with regional working rules by helping to apply the following aspects ofContract rules:
• User-defined weekend days• Schedule synchronization based on specific days of the week• Maximum number of consecutive weekends an agent may work
You can schedule agents to be available to perform multiple types of work at once or you canschedule them to work on specific types of work for periods of time within their day. You can alsocombine these, to create schedules in which some periods are set aside for specific types of work
Daily Operations Scheduling
Workforce Management Administrator's Guide 96

while at other times agents perform any work that arrives for which they are qualified.
Once you finalize your schedule, you can publish it to the Master Schedule, where it immediatelybecomes available for agents to view through WFM Web for Agents. Agents may then trade theirschedules as needed, if the schedule trade complies with trading rules and is either auto-approved oris approved by a qualified supervisor.
Maximum Agents by Length of Schedule Period
You can build schedules for up to 5,000 agents and 6 weeks. Memory requirements are decreased,and contiguous memory is not necessary for scheduling. If you have 1.5 GB of virtual memoryavailable, you can now build large schedules (5,000 agents). Generally, for schedules with 2,000 orfewer agents, 600 MB of virtual memory is enough.
ImportantConsider the preceding limits to be rough estimates; scheduling duration variesdepending on your configuration. There is no way to provide a general estimate forschedule build time, based on just a few simple parameters such as the number ofschedule weeks and the number of agents. The maximum schedule size must bedetermined uniquely by each user, based on specific performance requirements.
Back to Top
Profile Scheduling
Although agent-based scheduling offers a multitude of advantages, in some cases you must buildschedules without agents assigned to them. To do so, you create a schedule composed of emptyschedule slots that are appropriate for the contract types or agent skill sets you currently have, or forwhich you anticipate hiring. WFM offers several methods for creating blank schedules to which youcan assign agents:
• Scheduling Using Profiles—Profiles are based on contracts and include a skill set. They are used torepresent a typical kind of agent or a proposed new agent classification. For example, you can create anew flexible full-time profile to enable planners to evaluate the adoption of a 4-day, 10-hours-per-daywork week. Each profile has a skill set with assigned skill levels. Scheduler uses either a user-specifiednumber of each profile type or a blend of profiles based on the current staff, to create blank schedulesto which you can assign qualified agents.
• Mixed Scheduling—You can build schedules using a combination of profiles and actual agents. Thiscan enable planners to create additional optimized schedules for expected new hires or for outsourcedagents to use.
• Schedule Bidding—Supervisors create an optimal set of schedules with no agent names, authorize aset of agents to participate in the bidding process, and open the schedules for bidding. Agents reviewthe schedules on which they are qualified to work, and bid by numbering the most desirable and leastdesirable schedules 1, 2, 3, and so on. The Supervisor can then have WFM assign the schedules to the
Daily Operations Scheduling
Workforce Management Administrator's Guide 97

agents automatically, based on the agents’ bids as well as their seniority and/or "rank".
Back to Top
Automated Schedule BiddingAutomated Schedule Bidding allows supervisors to create schedules with no agent names associated,and then distribute them to agents via the Web. The agents can view, filter, and sort these schedules,and bid on their favorite schedules over a preconfigured period of time. An automated assignmentengine then assigns schedules to agents, based on their bids and their seniority and/or rank. Whenpossible, preplanned Calendar items such as granted time off, days off, and exceptions are integratedinto agent schedules when the schedules are published to the Master.
This new and powerful feature helps contact centers to comply with union regulations requiring thatagents be assigned their desired schedules based on their seniority or rank. It also enhancessupervisor productivity by automating the process. Even in non-unionized contact centers,automated schedule bidding improves agent satisfaction by giving agents more control over theirfuture schedules.
Back to Top
Skills-Based Scheduling
You can build schedules based on primary and secondary skills. WFM defines activity/skill levels asfollows:
• Primary activity—Is assigned to the agent directly and not marked as secondary. If activity assignmentis based on skills and skill levels, the primary activity is one, for which none of the agent's skills aremarked as secondary.
• Secondary activity—Is assigned to the agent directly and marked as secondary. If activity assignment isbased on skills and skill levels, the secondary activity is one, for which at least one of agent's skills ismarked as secondary.
ImportantWFM Builder API 8.5.1 or later must be installed to enable full implementation of thisfeature. If you installed an older WFM Builder API or you have disabled the primary/secondary activities feature, scheduling behavior is the same as in earlier versions.
Algorithm for Skills-Based SchedulingAgents are typically assigned a list of activities to work on for each day of the schedule scenario.When primary/secondary skills-based scheduling is enabled, WFM assigns two lists of activities:primary activities and secondary activities, and uses the following algorithm for daily distribution:
1. Minimum required primary activity
Daily Operations Scheduling
Workforce Management Administrator's Guide 98

2. Minimum required all activities3. Regular required primary activity4. Regular required all activities
Here are some other things to consider when using skills-based scheduling:
• For timesteps, when no activities are selected during daily distribution or if activities are removedduring swapping, the primary activities have a higher weighting during selection.
• While tasks are being optimized, the primary activities have a higher weighting during activity selection.• Task sequences, activity sets, and scheduled shift items might negatively impact primary/secondary
activity selection. Be sure to check every timestep individually to determine if any agents are workingon a secondary activity, instead of a primary activity.
Multi-Site Planning
Using a familiar tree structure, you can configure WFM’s objects to correspond exactly to yourEnterprise organization. For centralized, multi-site contact centers, WFM enables forecasting andbuilding of schedules for work activities spanning all sites.
For decentralized, multi-site contact centers, WFM supports two main models.
• For multi-site contact centers that distribute calls based on percentage allocation, WFM enables you toforecast interaction volumes centrally and distribute the workload to each site for further planningefforts. Each site can set parameters such as service objectives and staffing requirements, and canbuild schedules.
• For multi-site contact centers that are virtualized and distribute calls based on agent availability, skillset, and so on, WFM enables you to forecast staffing centrally and then split the staffing requirementsto each site. Schedules may then be built for each site. By building staffing requirements centrally,WFM can account for the efficiencies of scale that are seen in a true virtual contact center environment.
The browser-based capabilities provided by WFM ensure that in any multi-site environment usersacross the enterprise can participate in the planning process.
Also see Multi Forecasting Primer.
Back to Top
Agent Preferences
The Scheduler can optionally consider agent preferences when building schedules. Agents can enterpreferences for shifts, days off, availability, and time off using WFM Web for Agents. Supervisors canenter agent preferences in WFM Web for Supervisors and, with the appropriate security permissions,can grant or reject preferences. If a supervisor grants a preference, the calendar algorithm considersthat agent’s preference when building the schedule, along with various other criteria such asseniority.
Daily Operations Scheduling
Workforce Management Administrator's Guide 99

Preference Fulfillment and Schedule OptimizationContact center administrators can also specify whether preference fulfillment or scheduleoptimization is the more important goal. This adds another layer of control over preferencescheduling.
Flexible Shifts
The method WFM uses to create shifts enables you to configure flexible shift durations and start andend times. Additionally, WFM schedules use flexible break and meal parameters.
In a sense a WFM shift is an abstraction, representing countless possible working times. This is trueeven if the shift is configured to produce very regular, fixed, agent schedules. This is in contrast tothe conventional notion of a shift with a mandatory fixed weekly start time, fixed duration, and setbreaks.
A single WFM shift can incorporate hundreds of possible start times and durations as long as they fallwithin the parameters of the associated contract. However, through synchronicity constraints and useof more-rigid shift configuration settings, you can fix agent start times and workday durations. Thiscombination of flexibility and structure makes the WFM shift a tremendously powerful schedulingmechanism. In fact, in some cases, you can configure an entire contact center using only a few WFMshifts.
Back to Top
Example of a WFM Shift:
Consider a contact center with a standard full-time shift of 8 hours a day, 5 days a week, and analternative full-time shift of 10 hours a day, 4 days a week. You can schedule both types of agentsusing a single shift with a flexible duration of 8 to 10 hours per day. In either case, the agents arecontracted to receive 40 hours work each week and to work 4 or 5 days. You can configure WFM toguarantee that specific agents work 4 days a week and others 5 days, or let the WFM Schedulerdetermine how many agents of each full-time type to use to provide the most effective schedule.
Task Sequences
WFM task-based scheduling enables you to configure sequences of work activities to be used inshifts. These task sequences guarantee that a specific period of time is spent on a specified activityor set of work activities.
Using task sequences, multimedia contact centers can generate agent-friendly schedules that buildin extended periods of time set aside for handling specific tasks. Agents are thus able to focus on asingle media or skill set, enabling them to complete their tasks more effectively, without theconfusing effects of frequently switching media. Contact center planners can ensure that task time isequitably distributed among all qualified agents. And WFM can optimize the assignment of task timesbased on forecast staffing requirements.
For example, you can guarantee that all appropriately skilled agents receive exactly 2 hours of
Daily Operations Scheduling
Workforce Management Administrator's Guide 100

outbound work for every shift, or you can allow WFM to determine how much outbound work todistribute to each agent. You can configure Genesys Routing to use WFM schedule information asinput for routing decisions. In this way, you can use task-based scheduling to provide a closed-looprouting system that complements an agent-based approach to contact center management.
For more information about task sequences, see Configuring WFM Task Sequences.
Back to Top
Schedule Trading
WFM schedule trading enables agents to trade schedules among themselves. They can do so eitherthrough a trade with a specified agent or through a trade open to any qualified agents within theircommunity.
Contact center planners no longer need to spend an excessive amount of time managing andprocessing agent schedule-trade requests. Agents feel that they have flexibility when they need tochange their usual schedule and that they have more proactive control over the times they work. Insome cases, schedule trades can be approved without supervisor intervention, enabling managers tofocus on trades that may affect service levels or violate company policies.
Marked Time
Use marked time to distinguish any periods of time that are not otherwise tracked and reported on inan existing WFM category. For example, you can create a marked-time type for a particular project.Or you can use marked time to identify overtime periods that you want to appear in a report.
You configure marked-time types using WFM Web. You can specify marked time in WFM Web forSupervisors and view periods of marked time in its Intra-Day schedule view. You can report onmarked time using the Schedule Marked Time Report and the Schedule Marked Time Totals Report.
Intra-Day Scheduling
The WFM Web for Supervisors Intra-Day schedule views enable you to make real-time adjustments toschedule scenarios or to the Master Schedule. You can insert exceptions, edit or change shift startand end times, assign meetings, enter time off for an agent who has suddenly gone home ill, changethe activities agents are working on, or make other changes to the schedule to improve contactcenter performance and to make the schedule reflect actual contact center circumstances.
You can make changes one at a time or use one of the Schedule wizards to make changes to multipleagents’ schedules at once.
Back to Top
Daily Operations Scheduling
Workforce Management Administrator's Guide 101

Intra-Day Schedule Re-OptimizationWhen you build a schedule in WFM, the scheduling algorithm minimizes the over and under-staffingof agents against the forecasted staffing requirements, while meeting the configured working rules.Since schedules can be built several weeks in advance, a variety of circumstances can cause theschedule to become suboptimal by the time a particular schedule day arrives.
Here are some examples:
• Contact center management re-forecast volumes and staffing for the day.• Agents called in sick or were granted time off.• Existing agent schedules were manually adjusted.• Additional agents were added into the schedule.• Meetings or other types of exceptions were added to the schedule.
It does not make sense to re-optimize schedule items for days or hours that have already passed. Formost contact centers, it is also not practical to re-optimize the current hour. Any changes to meals,breaks, and/or work activities might be difficult to communicate to the affected agents. For thesereasons, a re-optimization wizard allows you to select the date, start time, affected agents, and theset of schedule items to be re-optimized.
For example, you have the option to re-optimize the placement of:
1. Breaks only2. Meals and breaks only3. Activity sets/task sequences/activities only4. Breaks/meals/activity sets/task sequences/activities without affecting shift start/end times5. Breaks/meals/activity sets/task sequences/activities, and shift start/end times
Re-optimization provides some flexibility if you do not wish to change certain shift items or workactivities because it might be difficult for your agents to adjust to those changes. For example, ifagents use their meal breaks to go out of the office and go to appointments, you might not want tochange these times once they have been published. Similarly, you can decide whether shift durationsshould be allowed to change or not. In some contact centers, this can be done to offer additionalwork hours to certain agents. In other contact centers, this is not a desired practice.
Additionally, you can choose to exclude from re-optimization any agents whose schedules havealready been manually edited. You might have already spent time manually adjusting shift items orwork activities for an agent (for example, you moved meals or breaks based on a particular requestfrom an agent) and you don’t want to lose those changes.
Back to Top
Pending Schedule Changes
Users who do not have the Approve Changes security permission enabled can make only pending
Daily Operations Scheduling
Workforce Management Administrator's Guide 102

changes to the Master Schedule. Pending changes do not affect the official version of the MasterSchedule.
A user with the Approve Changes security permission enabled must commit pending changes beforethey are incorporated into the official schedule. Discarded changes are rolled back.
Alternatively, such a user can go to the Master Schedule Changes Approval module (invisible to userswithout the Approve Changes security permission enabled). There, she or he can review the pendingchanges to the Master Schedule made by any user, and approve or reject them.
You can also enter pending changes into a schedule scenario. Such pending changes are visible onlyto the user who entered them. You can later review your pending changes, and either commit themor roll them back. Once committed, the changes are visible to all users with access to the schedulescenario.
ImportantIf a scenario with pending changes is published to the Master Schedule, the pendingchanges are not included.
Schedule State Group Totals ViewThis view provides intra-day totals of the number of agents in each schedule state group (Meetings,Lunch, Breaks, and more).
It helps managers and supervisors understand how many agents are scheduled for each type ofactivity during a particular time period, and provides a snapshot view of productive vs. nonproductivetime on an intra-day basis.
Back to Top
Daily Operations Scheduling
Workforce Management Administrator's Guide 103

ForecastingUse the Workforce Management (WFM) Forecasting tool to predict contact center workload andstaffing requirements, based on historical data or user-defined templates. WFM provides multiplemethods of forecasting the workload and staffing requirements for work activities in the followingsections:
• Using Historical Data• Using Forecasting Events• Setting Service Objectives• Flexible Forecasting• Deferred-Work Forecasting• Multi-Skill Support
Start by creating one or multiple forecast scenarios. Creating multiple scenarios enables you to seethe effects of changes to forecasting parameters, such as service objectives and predicted interactionvolume. When you have determined the most satisfactory forecast, publish it, making it the MasterForecast on which schedule scenarios, and eventually the Master Schedule, are based.
If you choose to, you can derive workload forecasts from historical information that is either collectedautomatically by WFM from the Genesys system or imported from .csv files using the WFM Web. Youcan also create workload and staffing forecasts as reusable templates. Once you have generated aworkload prediction, WFM determines the staffing requirements needed to service the workload,taking into account any applicable service objectives.
ImportantWFM Configuration Utility is no longer supported and the Import/Export Datafunctionality is now in WFM Web. See Forecast > Import and Reports > ForecastReports > Forecast Report in the Workforce Management Web for SupervisorsHelp.
Using Historical Data
WFM automatically collects historical data from Stat Server for all work activities handled by theGenesys platform encompassing all media, contact segments, and service types. Using Genesys StatServer, rather than automatic call distribution (ACD) reports, provides you with far greater flexibilityin defining and gathering statistics that provide an appropriate measure of contact centerperformance over time.
WFM analyzes interaction volumes and average handling time (AHT) in order to predict future trendsfor each work activity. This data enables WFM to build accurate forecasts for the anticipated
Daily Operations Forecasting
Workforce Management Administrator's Guide 104

workload, and to calculate the staffing required to meet that workload.
Using the WFM API, you can also develop a custom application that will enable Interaction Volumeand AHT data from a third-party system to be imported directly into the WFM database. This is usefulif you want to use WFM to forecast and schedule a type of work that is not being routed by Genesys.
Back to Top
Using Forecasting Events
WFM can track events that might affect interaction volume. A sales promotion or marketingcampaign, for example, might cause a predictable peak in interaction volume. These types of eventsare entered in WFM Web for Supervisors and used by the advanced WFM algorithms. If an eventrecurs, the forecasting algorithms learn the impact of that event and account for its impact in futureforecasts.
Setting Service Objectives
With WFM forecasting, you can set specific service objectives. You can also adjust these objectivesand then rebuild the forecast, which provides a detailed "what-if" analysis of the potential impact ofstaffing or service-objective changes. WFM forecasting uses parameters to determine effects ofdifferent service objective settings, such as:
• Interaction volumes• Average handle time (AHT)• Average speed of answer (ASA)• Desired percentage of interactions handled within a target time (service level)• Occupancy• Maximum percentage of abandoned interactions
Back to Top
Flexible Forecasting
WFM supports an unlimited number of forecasting scenarios, enabling you to create multipleforecasts and evaluate how changes in the parameters or the forecasting method that you use, affectexpected service objectives. Resource planners can then easily create reliable forecasts, fine-tuningthe results in tabular and graphical data views. You can also save forecast workforce data astemplates for use in subsequent forecast building.
WFM offers several different forecasting methods of varying complexity:
• Template-Based—Good for work activities with little historical information or for activities with very
Daily Operations Forecasting
Workforce Management Administrator's Guide 105

predictable interaction traffic.• Expert Average Engine—Good for work activities that have a reasonable amount of historical data or
those that fluctuate more dramatically because of unknown factors.• Universal Modeling Engine—Good for work activities with more than one year of historical data and
accurate forecasting event information.• Copy Historical Data—Good for work activities when you have some historical data, but not enough to
use the Expert Average Engine or the Universal Modeling Engine. You can combine the historical datawith overlap templates, which fill in gaps in the historical data.
• Use Value—Good for work activities if your site activity load is very regular. Applies a specificinteraction volume or AHT to each time interval in the scenario.
Deferred-Work Forecasting
WFM is designed to consider work activities that can be deferred, such as email, as inherentlydifferent from immediate work, such as a phone call. WFM uses a proprietary algorithm designed todistribute the backlog of interactions that can be deferred across the day in order to satisfy yourservice goal, which is expressed in minutes, hours, or days.
Spreading out the deferred work enables you to avoid spikes in workload forecasts when a contactcenter opens for the day, or during brief periods of high volume.
Back to Top
Multi-Skill Support
A multi-skilled contact center presents an opportunity for increased productivity.
An agent might be idle in a single-skill environment, because she cannot answer calls that arequeuing for a particular activity/skill that she possesses—because the schedule prevents her fromusing that skill.
In a multi-skilled environment, the agent can use her additional skills to answer calls. A multi-skilledagent is qualified to work on multiple activities, and therefore can perform different types of workduring a shift.
In a multi-skill environment, an agent can be available for multiple activities during any timestep. Theagent can be scheduled to work on an activity for only part of a timestep, and only the fraction of thetime period during which she works is counted.
Because of this, the value for staffing can be expressed as a fraction. For details, see MultiForecasting Primer.
Back to Top
Daily Operations Forecasting
Workforce Management Administrator's Guide 106

Monitoring Workforce Performance andAdherenceWorkforce Management (WFM) provides the tools, described in this topic, to help you can monitor theperformance and adherence in your workforce environment. You can generate Performance andAdherence reports, enabling you to analyze data and spot trends that might be developing over time.These reports and many others provided by WFM, are described in this topic. See the follwingsections:
• Performance• Adherence• Reports
Performance
The Performance modules compare the forecast and schedule to what is actually happening in thecontact center. WFM shows intra-day statistics, such as interaction volume, average handling time(AHT), agents logged in, service level, average speed of answer (ASA), and abandons, and comparesthem to the planned values.
Intra-day contact center performance data is displayed in an informative and easy-to-read format,enabling efficient performance monitoring and quick response to unanticipated interaction flow oragent-staffing situations.
WFM also provides a “what-if” calculator as an aid to decision making. You can enter new values forstaffing, interaction volume, and/or other performance statistics into the What-If window. The what-ifcalculator then supplies the results to be expected if the values change as you project.
See also, Contact Center Performance Report Metrics.
Adherence
Workforce Management provides real-time agent-adherence data, which compares the current agentstatus to the scheduled status. WFM can track agent adherence per time interval on a single channelor across multiple channels simultaneously.
Agents who are not adhering to their schedules (within user-defined thresholds) are highlighted inyellow if they are nonadherent or in red if they are severely nonadherent. WFM also displays theamount of time, in minutes, that the agent’s current status has differed from the scheduled status.This running total is continually updated.
Daily Operations Monitoring Workforce Performance and Adherence
Workforce Management Administrator's Guide 107
Multi-Channel AdherenceTo enable tracking of multi-channel adherence in WFM Web, assign a media channel to a ScheduleState Group; WFM then calculates adherence by comparing real-time states to the scheduled statesfor that channel. See the example in Use Case 1: Multi-Channel Adherence.
Use Case 1: Multi-Channel AdherenceA site in the contact center has voice and email related activities, and agents can make outboundcalls, which are scheduled as exceptions. The schedule state groups can be configured as follows:
Schedule state group Channel Schedule state Real-time state
Inbound calls Voice/unspecified All (immediate) voice-related activities
WaitForNextCall,CallRinging,AfterCallWork,CallInbound
Outbound calls Voice/unspecifiedException types thatrepresent outbound callwork
WaitForNextCall,CallRinging,AfterCallWork,CallOutbound
E-mail <channel_name> (forexample, email)
Deferred, email relatedactivities
WaitForNextCall,CallRinging,AfterCallWork,CallInbound
Overhead None (no channel) Breaks, meals, time off,exceptions, etc.
NotReadyForTheNextCall,LoggedOut
If WFM is tracking multi-channel adherence (new in WFM 8.5), and there are no Schedule StateGroups with a channel name under the Site, WFM calculates adherence as it would for a single agentreal-time state, and Stat Server aggregates the statistics as it did prior to 8.5. However, if there is atleast one Schedule State Group with a configured channel name, WFM tracks multiple channels. Foreach Site, WFM tracks as many different channels as there are distinct channel names for allSchedule State Groups under the Site.
For information about how to configure multi-channel adherence, see the topic Configuration >Schedule State Groups > Configuring Adherence Rules > Configuring Media Channels for ScheduleState Groups in the Workforce Management Web for Supervisors Help.
For information about WFM adherence calculations, see How WFM Calculates Adherence.
ImportantAfter updating to 8.5, if any site in your environment supports multiple mediachannels and you have configured Schedule State Groups to a setting other thanNone, the Agent Adherence Report includes data that differs from the data in WFM8.1.3 in two ways:
1. For any given set of criteria (site/timezone/agent/date), the data in the 8.5 report isdifferent than the data in the 8.1.3 report, because the adherence rules change when
Daily Operations Monitoring Workforce Performance and Adherence
Workforce Management Administrator's Guide 108

you add multi-channel settings to Schedule State Groups, which means the adherencepercentages also changes.
2. The Schedule State, Agent State, Start Time, End Time columns are in reverse order. In8.5, the report displays the columns in this order: Start Time, End Time, Schedule State,Agent State.
Using Reason CodesWFM enables you to enter reason (aux) codes when you configure agent-adherence rules. The reasoncodes are linked to Genesys Agent States and add additional details to the state information. TheGenesys state + reason code combination is mapped to WFM Scheduled State Groups and isdisplayed in Adherence views.
TipWhen you filter on user-defined reason codes in the Adherence Filter dialog, thereason code that you specify must not contain any spaces within or at the end of thekey value.
For example, an agent might signal that she is in a NotReady state. By adding a reason code, shecan specify that she is doing after-call work or answering email. This detailed information thenappears in the WFM Web Adherence Details view and agent-adherence reports.
To use reason codes, your switch must support them. See your T-Server documentation to find outwhether your switch can include reason codes when it sends Genesys TEvents.
See also, Agent Adherence Report Metrics and End Notes
Back to Top
Reports
WFM Web for Supervisors provides access to a variety of reports that are designed to present keycontact center data in a flexible and accessible format. The report types are:
• Configuration Reports—Contain information about work activity configuration.• Policies Reports—Contain information about agents, contracts, shifts, and rotating patterns.• Calendar Reports—Contain information about time off and agent calendar items.• Forecast Reports—Display forecast interaction volumes, AHT, and staffing requirements in tabular and
graph formats.
Daily Operations Monitoring Workforce Performance and Adherence
Workforce Management Administrator's Guide 109

• Schedule Reports—Display schedule data for agents, activities, teams, sites, multi-site activities, andbusiness units at various granularities. Also present budget information and schedule validationwarnings and errors.
• Performance Reports—Contain various types of contact center performance statistics in detailed andsummary formats.
• Adherence Reports—Contain agent-adherence information for agents, teams, sites, business units, andthe enterprise.
• Audit Reports—Contain information that enables you to audit a history of changes made within theCalendar subsystem and a history of changes made to the Master Schedule.
For more information about Workforce Management report data and other metrics, see WFM Metrics
Back to Top
Daily Operations Monitoring Workforce Performance and Adherence
Workforce Management Administrator's Guide 110

User SecurityThe Workforce Management (WFM) user security modules Configuration > Roles andConfiguration > Users in WFM Web for Supervisors, enable you to fine-tune the precise accesseach user has to WFM modules, objects, and functions. For example, you can:
• Limit certain users so that they can view only certain sites or teams.• Limit certain users so that they can read the schedule but not change it.• Limit access to reports.• Limit access to WFM configuration settings modules, such as Contracts and Time Off Rules.
Securing Schedule Changes
User security enables you to control who can make changes to schedule scenarios and to the MasterSchedule. Users might be able to enter changes to the Master Schedule, but unable to commit orapprove changes. These changes are in Pending status. An authorized user can then review thechanges, and either commit/approve them or roll back/delete the changes.
This enables contact center managers to provide Master Schedule access to certain users who mightnot ordinarily have access. For example, supervisors who manage teams of agents, but who don’tnormally have any scheduling responsibility, can enter team meetings or other exceptions into theschedule. Workforce-scheduling professionals can then review these to ensure that coverage is notadversely affected.
Genesys Administrator Objects Imported to WFM
Workforce Management has its own security/access rights system, but also implements tenantsecurity for the objects that are shared with Genesys Administrator. (See Roles (User Security).)
You define Switch, Person (agents and supervisors), Skills, and Time Zone objects in GenesysAdministrator, which are then saved in the Configuration Database.
When you click a Person (agent) object in Genesys Administrator the Properties dialog box opensenabling you to select various parameter for this object, including the Skill set that you want toassociate with the agent.
ImportantWFM synchronization automatically brings Person objects and assigned Skillinformation in the Configuration Database into the WFM Database.
Daily Operations User Security
Workforce Management Administrator's Guide 111

Agent Field in Genesys Administrator
When importing users into WFM, users (non-agents) available for selection have the Agent check boxcleared in the Genesys Administrator Properties dialog box, as shown in the example below.
Figure: Agent Check Box
Genesys Administrator SecurityThe security setup in Genesys Administrator also applies to WFM. For example, a user who is loggedin to Web for Supervisors, but does not have permission to view certain objects/users in the GenesysAdministrator, will not be able to view those objects/users in Web for Supervisors.
A user's ability to see, interact with, and synchronize agents and skills in WFM matches that user'stenant-based access permissions in the Genesys Administrator.
In other words, in order to access an agent or a skill in WFM, you must be able to do it in GenesysAdministrator. The agent can be assigned or unassigned.
ImportantIn Genesys Administrator, you can restrict access (using security permissions) toobjects, including Person objects. If you do not see a particular user in WFM under theGenesys Administrator heading, check that Person object's Genesys Administratorsecurity settings.
This access permission is tenant-based. If you are working in a multi-tenant environment, this
Daily Operations User Security
Workforce Management Administrator's Guide 112
behavior affects every display of agents or skills in WFM. Tenants exist only in a multi-tenantenvironment. For details about tenants, see the Management Framework Configuration Manager Helptopic Configuration Database Objects > Resources / Tenants > Tenant > Object Overview.
About the WFM Database
You create or update the WFM Database schema using the WFM Database Utility. You configure theWFM Database using WFM Web for Supervisors. For more information about the WFM DatabaseUtility, see Managing the WFM Database.
Daily Operations User Security
Workforce Management Administrator's Guide 113

Calendar ManagementWorkforce Management’s (WFM) unique agent-based scheduling approach enables robust agent-calendar management prior to scheduling. WFM can incorporate known obligations into agentschedules to ensure that agents can keep appointments and request adjusted shifts or working hourswhile WFM maximizes contact center efficiency. By more accurately planning for known obligations,WFM can take the guesswork out of forecasting for staffing overheads, leading to more efficient useof the agent pool.
Calendar Management includes the following sections:
• Planning and Scheduling Meetings• Time Off• Schedule Exceptions
Planning and Scheduling Meetings
The Meeting Planner provides great flexibility when planning meetings. You select the meetingparticipants, define the range of time in which the meeting should occur, and set the duration of themeeting. You can configure recurring meetings, specifying either the number of occurrences or thestart and end dates of the meeting series and the interval (weekly, for example).
The Meeting Scheduler builds the meeting into the work schedules of the participants during thescheduling process, finding the optimal times for agents’ shifts and the meeting at the same time.
The meeting is included as an exception in all attendees’ schedules. WFM displays the meetingexception in the Schedule views using the meeting short name, so you can find it easily when lookingat schedules. If a sufficient percentage of participating agents is unavailable, then the meeting is notscheduled, and you receive a warning.
Additional FunctionalityUse the Meeting Scheduler...
• To insert meetings directly into multiple agent schedules as an exception after building the schedule.• To create optimally-scheduled meetings within an existing schedule.
Use the Meeting Planner...
• To configure meetings that are pre-planned, such as recurring team meetings.
Play ‘what if’...
• To add a meeting to a schedule that has already been built, and WFM will insert the meeting into themost optimal time slot, based on the list of participants.
Daily Operations Calendar Management
Workforce Management Administrator's Guide 114

Supervisors can use this feature to better determine the optimal meeting times that otherwiserequired manual calculation or guesswork.
Back to Top
Time Off
You can use the WFM Web's Time Off Types module to configure multiple types of time off. Doing soenables you to set different characteristics for each type, define different rules for the accumulationof accrued time off and distribution of awarded time off, and fine-tune your record-keeping using theTime Off Report.
Time off can be accrued or awarded. The settings for these differ slightly, but both are configured inthe WFM Web’s Time-Off Rules module. You can configure separate time-off rules for each time-offtype, or assign several time-off types to the same time-off rule, meaning all of the time-off typesassigned to this rule share the time-off balance.
You can also associate multiple time-off rules with one time-off type. For example, you might want tohave different accrual rules for agents with more seniority than for those who were recently hired. Byassigning the appropriate time-off rule to each agent who receives time off of that type, you candetermine the rate at which each agent accrues the time off.
Use the Calendar module in WFM Web for Supervisors to set time-off limits. You can set time-offlimits for an activity, for a team, or for an entire site. You can also set different time-off limits for aspecified period. For example, you might want to further limit time off because of specialcircumstances.
You can also set different time-off limits for various periods during the day. For example, you mightpermit more time off in the evening than in the busier morning.
Agents can view their balances for each time-off type and request time off in WFM Web for Agents.Agents can request both full-day and part-day time off. Supervisors can enter time-off requests intothe WFM Web for Supervisors Calendar module.
Requested time off can be manually approved by the supervisor or automatically approved by WFMWeb, based on agent time-off balances and the limits set on the number of agents with time off peractivity, team, or site.
When the Scheduler runs, all time off that has been granted is scheduled. Additional time off can bescheduled, depending on whether it meets time-off limits and scheduling optimization constraints.Once time off is scheduled, agents can no longer edit or remove the time-off assignment using WFMWeb for Agents.
Time Off Wait-ListWhen a time-off request is made, but time off limits have already been reached, if the agent asks forthe request to be wait-listed, the request remains in the WFM Calendar in a Preferred status, ratherthan being declined. Supervisors can view this wait list in the Calendar, sorting the time off requestsby timestamp, and selectively grant time off requests.
Daily Operations Calendar Management
Workforce Management Administrator's Guide 115

Supervisors can grant agent time off for future periods, if the time off limits are raised, or if otheragents cancel their existing requests. This improves supervisor productivity by no longer requiringthem to track these requests with a paper-based system.
Your supervisor can enable automatic approval (also known as auto-granting), which eliminates theneed for that supervisor to approve your legitimate time-off requests.
Time Off Within Bidding PeriodsYou can enable Time-Off Bidding by configuring bidding periods in WFM Web and associating themwith sites within your enterprise. Agents within the site can submit multiple time off requestsconcurrently and WFM processes them within the specified bidding period. This configuration ensuresthat agent requests are all granted, declined, or wait-listed on the same processing date andeliminates the possibility of some requests for a vacation period being granted, while others are not.For details, see Time-Off Bidding.
Back to Top
Schedule Exceptions
Exceptions are additions to a schedule that are not work, but which must be taken into account toallocate agent time correctly. Examples of exceptions include meetings, training, and special projects.
Exception TypesYou create exception types based on the needs of your contact center. These types can be extremelyflexible and you can link them to other WFM scheduling features. For example, you can specify thatsome exception types are used in meeting planning, and that some can be converted to a day off, ifnecessary.
Exceptions can be full-day or part-day. You can assign multiple part-day exceptions, assuming they donot overlap or otherwise violate internal WFM consistency checks.
Exception and Preference HierarchyExceptions and preferences are ranked in a hierarchy. This means that, if multiple exceptions andpreferences are assigned for an agent on a single day, Calendar Management analyzes theassignments and immediately selects the highest-priority exception for assignment, noting the othersas declined.
However, declined exceptions and preferences are stored in the WFM database, in case there arechanges to calendar information later. If, for example, a training session is canceled, an agent’spreviously overridden day-off preference might then change status and be available for scheduling.
Back to Top
Daily Operations Calendar Management
Workforce Management Administrator's Guide 116
Time-Off BiddingWhen you enable time-off bidding, WFM processes agent requests for time off that are within aconfigured bidding period on the same process date and time. This ensures that all requests thatwere made concurrently within this period are all granted, declined, or wait-listed on the sameprocessing date, and eliminates the possibility that some requests for a vacation period are granted,while others are not. WFM grants these requests, based on seniority and/or rank. If there areavailable time slots, WFM grants any requests that were not previously granted, based on the orderof submission.
Bidding Period
The bidding period is the time interval (in days) when agents can request time off. You determine andconfigure, edit, or delete bidding periods, based on your contact center requirements. However, youcannot change a bidding period that is being processed or has been processed. All requests withinthat period are processed on a specified date with a configured ranking, which determines how therequests are resolved.
Any changes you make to the bidding period can take effect immediately. For example, you might setthe processing date to a date in the past when the actual bidding period, and the requests within thatperiod, have not yet been processed. If items are flagged by a bidding period and you later delete theperiod before the processing date occurs, requests for that period are not processed unless youcreate a new bidding period that covers the dates of those items. If you enter items and then set thebidding period, items are processed if they are eligible for processing (if the preferred wait-list flag ispresent).
Each bidding period has a status that indicates when it is complete.
Request Processing
WFM batches all agent time off requests that fall within a bidding period, marks them as one requestand, after all of the items pass validation, saves them to the WFM database. The initial request cancontain any number of items. (Items entered in a previous version of WFM can contain only one itemper request.) If items in a request fall within multiple bidding periods, WFM processes the requestonly once, on the latest processing date for all bidding periods.
You cannot modify single items in a request. If one item is modified, deleted, or recalled, the sameaction is performed on all items in the request.
Bid Processing
You can manually modify all items in a request before the processing date. Any request items thatyou manually grant are not automatically processed. WFM processes bidding items when the
Daily Operations Time-Off Bidding
Workforce Management Administrator's Guide 117

processing date conditions are met and the requests in a specified bidding period have not beenprocessed.
During bid processing, any one of the following scenarios can occur:
• All items in request can be auto-granted (and possibly auto-published), based on the agent's seniorityor rank.
• All items can be removed from the processing list and remain in Preferred status. They can becomeeligible for wait-list processing (on a first-come, first-served basis by the original submission date), ifthe following conditions occur:• Auto-grant does not apply for at least one item in the batch request.• The bidding period no longer applies (was deleted or edited) for at least one item in the request.• There are no time-off slots available to accommodate all batch request items on the bidding period
processing date.
Time-Off Balances
Bidding time-off items display as regular time-off items and reduce the agent's time-off balance forthe specific time-off type.
Wait-List Processing
Wait-listed items are not processed within bidding periods that are not yet processed. If there are noconfigured bidding periods or a bidding period for the wait-listed item date is already processed, theentire request is wait-listed and the BatchRequest configuration option in the CalendarServicesection of WFM Server Application is set to true. In previous WFM releases, items were wait-listedone by one.
WFM generates a warning when the time-off limit has been reached.
Time-Off Limits
Time-off limits can be changed during active the bidding period, but do not take effect until theprocessing date for that period. The bidding period implies that time-off limits are set to 0 and time-off requests are not granted. If there is no configured bidding period for a certain date, time-off limitswork as in previous WFM releases.
Daily Operations Time-Off Bidding
Workforce Management Administrator's Guide 118

Configuring WFM Task SequenceThis topic presents information about how to configure task sequences. It supplements theinformation found in Workforce Management Web for Supervisors Help and includes the followingsections:
• Definitions• Purpose of Task Sequencing• Creating Task Sequences
Definitions
Within Genesys Workforce Management, a task sequence is a defined period of time during thatagents can work only on one task or a specified set of tasks, called an activity set. You could alsothink of a task sequence as an activity sequence.
ActivitiesActivities (tasks) are work that is tracked and managed using Workforce Management. For example, abusiness might define the following activities in WFM Web for product A:
• Answering inbound calls• Responding to email• Completing after-call work• Performing scheduled callbacks• Participating in chat sessions
These same activities might also be defined for products B and C.
You can use any activity set that is configured for a specific site and use the same activity set in anynumber of task sequences.
Back to Top
Purpose of Task Sequencing
Task sequences enable you to control how much the nature of an agent’s work changes during part ofa day. You can avoid asking agents to jump constantly from activity to activity—a situation that canresult in agent confusion and fatigue and lower productivity. You do this by configuring tasksequences. Once configured, you can assign a task sequence to any compatible shift in the samesite.
Daily Operations Configuring WFM Task Sequence
Workforce Management Administrator's Guide 119

Creating Task Sequences
You create task sequences in the Web for Supervisors Policies module, by selecting Shifts > TaskSequences. The Task Sequence pane is also where you configure task sequences for a shift, byselecting one of three options:
• Do not use Task Sequences• Task sequences must be used• Task sequences can optionally be used
If you want to use task sequences, create them by configuring the settings in the Task Sequencepanes. See Task Sequence panes in Web for Supervisors below.
Also, see the procedure "Creating a Task Sequence" in Workforce Management Web for SupervisorsHelp, in the Policies > Shifts > Shift Task Sequences topic.
Figure: Task Sequence Settings
How Task Sequences Appear in WFMAfter you configure task sequences and assign them to shifts (which are then assigned to agents),task sequences appear in the Intra-Day and Agent-Extended views. The task sequence appears asa blue area on the color-coded bar (unless you changed the color in the Configuration module inWFM Web Supervisors), where each type of schedule item is represented by a different color. Theremainder of the color-coded bar (where no task sequence is scheduled) appears in a different color.For example, the figure above shows a work item in blue and the remainder of the sequence inyellow.
Back to Top
Daily Operations Configuring WFM Task Sequence
Workforce Management Administrator's Guide 120
Using E-mail Notifications in WFMThis topic provides information about how to use the Notifications module in Workforce Management(WFM) Web for Supervisors to configure email notifications, by site, for the following types of events:
• Schedule trade status changes—This type of notification can be received by both agents andsupervisors who are affected by a schedule trade proposal or response.
• Time off request status changes—This type of notification can be received by both agents andsupervisors who are affected by a time off request.
• Schedule modifications—This type of notification can be received by the agent who is affected by theschedule change.
The Role of WFM Daemon
A standalone server component, WFM Daemon sends out notifications to agents and supervisors.
ImportantBy default, WFM does not send notifications. To send notifications, you must select atleast one site to send notifications of a given type in the Targets tab in theNotifications module and save.Agents and supervisors who are to receive email notifications must have their email addresses configured.These email addresses are stored as part of the Person object in the Genesys Configuration Database andare synchronized into WFM automatically.
Additionally, WFM must be set up properly and connected to a customer-supplied SMTP server. For detailsabout how to configure WFM Daemon to send notifications, see WFM Daemon Options. After you completethese steps,
WFM sends notifications of the selected type(s).
Schedule Trade Status ChangesWFM Daemon uses the following rules when sending schedule trade status change notifications:
• Both the proposing agent (creating the trade request) and responding agent (receiving the tradeproposal) associated with the selected sites are notified when a trade status is User-declined, User-approved, Auto-declined, Auto-approved, or Cancelled.
• Supervisors who have appropriate security rights and are associated with the selected sites are notifiedwhen a trade status is Pending.
• Supervisors who have the appropriate security rights are notified when the Schedule Trade statuschanges from Pending to any other status.
Daily Operations Using E-mail Notifications in WFM
Workforce Management Administrator's Guide 121

• The responding agent is notified when the status of a trade proposal is In Review or Open.• The proposing agent is notified when the response status of a trade proposal is Accepted, In Review,
or Cancelled.
Time Off Request Status ChangesWFM Daemon uses the following rules when sending time off status change notifications:
• When a supervisor manually changes agent time off in the Calendar module, the affected agent isnotified.
• When an agent requests time off (that is not Auto-declined), supervisors who have the appropriatesecurity rights are notified.
• When automatic Time-Off request status changes occur, supervisors who have the appropriate securityrights and affected agents are notified.
• When Time-Off balance-affecting changes occur, supervisors who have the appropriate security rightsare notified.
For a complete description of the WFM security roles and privileges, see the Workforce ManagementWeb for Supervisors Help topic Configuration > Roles.
Schedule ModificationsWhen a supervisor changes one or more scheduled days, WFM sends a schedule modificationnotification to the affected agent in the configured site and to supervisors who have the appropriatesecurity rights.
Procedures: How to Set Up E-mail Notifications in WFM
To set up email notifications, complete all of the procedures in this section.
Creating and Configuring WFM DaemonPurpose: To create and configure the WFM Daemon Application object.
Start of Procedure
1. In Genesys Administrator, create the WFM Daemon Application and install it.See Creating Application Objects Manually.
2. Configure the WFM Daemon’s connection to the WFM Server Application.See Component Connections.
3. Configure the SMTP server settings for the WFM Daemon.See the WFM Daemon's SNMP configuration section.
Daily Operations Using E-mail Notifications in WFM
Workforce Management Administrator's Guide 122

End of Procedure
Configuring a Security RolePurpose: To create a user security role to access email notifications.
Start of Procedure
1. In WFM Web for Supervisors' Configuration module, select Roles.2. In the Role pane, click New.
A new security role appears in the Role pane with a default name.3. In the Role Privileges pane, change the Name of the role (if desired).4. In the list of Role Privileges, expand Notifications and check the boxes beside the privileges you want
to assign to this role.
ImportantBe sure to uncheck all privileges in the entire list that you do not want to assign to this role.
5. Click Save.
End of Procedure
ImportantFor a complete description of all privileges, see Configuration > Roles > RolePrivileges in the Workforce Management Web for Supervisors Help.
Assigning a Security Role to a UserPurpose: To assign a security role to a user, enabling access email notifications.
Start of Procedure
1. In WFM Web for Supervisors' Configuration module, select Roles.2. At the top of the Role Privileges pane, click Users, and choose one of the following:
• Click Assign Users to assign a WFM user to this role.A new pane opens, containing a list of WFM users.
• Click Import Genesys User to assign a Genesys user to this role.A new pane opens, containing a list of Genesys users (in Genesys Administrator).
Daily Operations Using E-mail Notifications in WFM
Workforce Management Administrator's Guide 123

WarningNew users are automatically granted access to all modules, objects, and sites
• Select the users you want to assign to this role and click Apply.• In the Users pane, click Save Now.
End of Procedure
Adding E-mail Addresses to the WFM DatabasePurpose: To add Supervisor and Agent email addresses to the WFM Database, so they can receivenotifications.
TipTo receive notifications, Supervisor and Agent email addresses must be in the WFMDatabase.
Start of Procedure
1. In Genesys Adminstrator, enter these email addresses into the Supervisor and Agent person objects.After WFM synchronization the email address will be available in the WFM Database.
End of Procedure
Enabling Notifications in Web SupervisorPurpose: To configure the Web Supervisor Application to enable notifications.
Start of Procedure
1. In WFM Web Supervisors' Configuration module, select Notifications.All three supported email notification types are listed in the left-side navigation pane.
2. Select the one that you want to enable and in the right-side pane, click the Targets tab.3. Check the sites for which you want to enable notifications. See the figure below.
Daily Operations Using E-mail Notifications in WFM
Workforce Management Administrator's Guide 124

Figure: WFM Web Supervisor, with Notifications Selected4. Use the Messages tab to configure the email Subject and Message for all email notifications of this
type. You can change the text or keep the default.If the WFM Daemon is running and properly connected to a running SMTP server, you can now use thefeature. (You can check WFM Daemon’s status in the Windows Services Control Panel or throughSolution Control Interface.)
For additional information, including descriptions of the rules that generate notifications, see The Roleof WFM Daemon.
End of Procedure
Daily Operations Using E-mail Notifications in WFM
Workforce Management Administrator's Guide 125

Scheduling Breaks and Meals in WFMThis topic describes how to use Workforce Management (WFM) to schedule meals and breaks inconjunction with Exceptions.
Pre-planned Breaks and Meals
Workforce Management enables you to pre-plan the breaks and meals (called shift items) that will bescheduled during a particular shift. You can define several parameters for these shift items, such asthe time window during which they should be scheduled and whether they are paid or unpaid.
For example, if you set up a shift called 8-Hour Full-Time, as part of the shift item configuration,you have specified that there should be a 15- minute paid break in the shift. The Min Length fromShift Start parameter is set to 2:00 (2 hours) and the Max Length from Shift Start parameter isset to 4:00.
Additionally, your shift item configuration specifies that there should be an unpaid meal in the middleof the shift, with both the Min Time Before This Meal and Min Time After This Meal parametersset to 3:00.
You have configured a rotating pattern for a particular agent that specifies that the agent should workthe 8-hour full-time shift every day, starting at 8:00 a.m.
Due to the shift item configuration, when WFM builds a schedule scenario that includes this agent, itwill try to schedule the break and meal in the following time windows:
• It will try to schedule the break in the time window between 10:00 a.m. and 12:00 p.m.• It will try to schedule the meal in the time window between 11:00 a.m. and 1:30 p.m.
Sometimes the configured time windows for breaks and/or meals conflicts with planned exceptions,such as meetings, training sessions, or administrative time, that were entered through the WFMCalendar. In these cases, the behavior of the Scheduler varies, depending on the particular type ofshift item and its properties.
Default Behavior of the Scheduler
This section describes the default behavior of the Scheduler in the following three scenarios.
When Unpaid Breaks Conflict with ExceptionsWhen the time window of an unpaid break is covered by a planned exception, the Scheduler relaxesthe constraints of the break, in order to schedule it. That is, the time window is widened in both
Daily Operations Scheduling Breaks and Meals in WFM
Workforce Management Administrator's Guide 126

directions (if possible) so that the break can be scheduled adjacent to the exception—eitherimmediately before the exception or immediately after the exception.
This relaxation of the break constraints occurs because unpaid breaks are considered mandatory bythe Scheduler due to their effect on the paid time of the shift.
There will be instances when one or more unpaid break(s) cannot be scheduled, even though theyare considered mandatory. For example, if a shift has a paid duration of 8 hours, and there is agranted exception in the Calendar that also has a paid duration of 8 hours, that would not leave anytime remaining for the Scheduler to place an unpaid break. As a result, the unpaid break is notscheduled and a warning is generated when the scenario is built.
When Paid Breaks Conflict with ExceptionsUnlike unpaid breaks, by default, paid breaks are not considered mandatory. Therefore, if there is aconflict between a planned exception and a paid break—so that the time window of the paid break iscovered by the exception—by default, the paid break is not scheduled when the scenario is built.
When Meals Conflict with ExceptionsMeals are considered a mandatory part of a shift, if the shift has a meal configured. If there is aconflict between a planned exception and a meal—so that the time window of the meal is covered bythe planned time for the exception—one of two things happen when the scenario is built:
• WFM looks for, and finds, another shift that is compatible with the agent’s contract, and allows theexception to be scheduled, or
• When WFM resolves the conflicting items in the Calendar (prior to the schedule being built), it declinesthe exception unless it can find another shift that is compatible with the agent's contract that allowsthe exception to be scheduled. In this case, the exception is not scheduled and a warning is generated.
Changing the Behavior of the Scheduler
Configuration options are available that can change the default behavior of the Scheduler whenbreaks and/or meal time windows conflict with planned exceptions. These options are described indetail in this section.
Paid Breaks are MandatoryThis is an optional setting that controls whether or not a paid break is scheduled even when the timewindow of the break is covered by an exception. As described above, this is always the behavior ofthe Scheduler with unpaid breaks. However, if this setting is turned on, the same behavior occurswith paid breaks; if the time window of the paid break is covered by an exception, the paid break willbe scheduled adjacent to the exception—either immediately before the exception or immediatelyafter it.
There still might be times when some breaks cannot be scheduled, even if this setting is turned on,because there is not enough room in the shift to accommodate the exception and all the configured
Daily Operations Scheduling Breaks and Meals in WFM
Workforce Management Administrator's Guide 127

breaks. In this case, a warning will be generated when the scenario is built.
See below, some sample scenarios when WFM would not be able to schedule a break (paid orunpaid), regardless of whether the user defines this as being mandatory or not:
Examples... [+]Example 1
There is a shift with an 8-hour duration but which is 7.5 paid hours. The user grants a paid exceptionthat is 7.5 hours, right in the middle of the shift, leaving 15 minutes on either side of the exception inwhich to schedule any breaks. If there is a 30-minute unpaid break to schedule, it cannot bescheduled unless the user wants to allow breaks to be scheduled “during the exception” (see belowfor more information about that optional setting).
Example 2
There is an 8-hour shift from 8:00 a.m. to 4:00 p.m. The configuration of Break 1 (15-min) allows thebreak to be scheduled in a time window between 9:00 A.M -10:30 a.m. The configuration of Break 2(15-min) allows the break to be scheduled within a time window between 2:00 p.m. - 4:00 p.m. Theuser grants an exception in the Calendar from 8:00 a.m. - 3:45 p.m. Unless the user wants to allowbreak(s) to be scheduled “during the exception,” one of the breaks cannot be scheduled, becausethere are only 15 minutes within the shift that is not already covered by the exception, and two15-minute breaks to schedule.
Example 3
There is an 8-hour shift from 8:00 a.m. - 4:00 p.m. The user grants an exception in the Calendar from8:00 a.m. - 11:45 a.m. and another exception from 12:00 p.m. - 4:00 p.m. This leaves only 15minutes between the two exceptions in which to schedule any breaks. Unless the user wishes toallow break(s) to be scheduled “during the exception,” it is likely that one or more breaks would notbe scheduled.
Example 4
Assume a shift from 8:00 a.m. - 1:00 p.m., one exception from 8:30 a.m. - 11:30 a.m., and two 1-hourbreaks (the first one with configured window from 9:00 a.m. - 11:00 a.m., and the second one from12:00 p.m. - 1:00 p.m.). Because the exception covers the first break, the break should be placedafter the exception (because there is no room before it), from 11:30 a.m. - 12:30 p.m. Because of thescheduling of the first break, there is no room for the second break at all (but not because of theexception). In this case, one of the breaks would not be scheduled.
Suppress Break-Related WarningsThis is an optional setting to control whether schedule warnings that describe issues with breakscheduling are hidden from the user. If you are scheduling a lot of long exceptions that you know willmake it impossible for the Scheduler to fit in most of the breaks you have configured, you might wantto check this setting so that the break-related warnings are suppressed. This allows you to focus onthe other schedule warnings that you want to resolve.
Daily Operations Scheduling Breaks and Meals in WFM
Workforce Management Administrator's Guide 128

Allow Breaks and Meals During ExceptionFor each Exception Type, this setting might be turned on. If this option is configured, then if aplanned exception of this type is being scheduled and it covers the time window of a break, theScheduler tries to schedule the break during the exception, preserving the original configured timewindow. The Scheduler might not always be able to accomplish this, so if it cannot schedule one ormore breaks during the exception, it will next try to schedule them adjacent to the exception. Thissetting always affects the scheduling of unpaid breaks. This setting only affects the scheduling ofpaid breaks, if paid break scheduling is configured as mandatory.
This setting also controls whether the Scheduler will try to schedule meals during an exception, incases when the configured time window of the meal is covered by the exception. However, if theScheduler is unable to schedule the meal during the exception for some reason, it will not bescheduled adjacent to the exception as it will try to do with breaks.
It is important to note that when the user configures an exception type, such that break(s) andmeal(s) could be scheduled during the exception, it does not mean that all of these shift items will bescheduled during the exception. For example, the user has configured a 15-minute break with a5-minute start step. The break configuration permits the break to be scheduled somewhere between8:45 a.m. and 10:15 a.m. There is an exception from 9:00 a.m. - 10:00 a.m.
The break could be scheduled in many possible places, including: 8:45 a.m. - 9:00 a.m.9:00 a.m. - 9:15 a.m.9:05 a.m. - 9:20 a.m.9:10 a.m. - 9:25 a.m.. . .9:45 a.m. - 10:00 a.m.
Also note that although the absolute start and end times of the exception will not be changed. Forexample, it is possible that the start of the exception could be covered by a break (both the breakand the exception start at the same time).
Other ConsiderationsWhen there is no conflict between an exception and some break(s), but yet the exception makes itimpossible for WFM to schedule the breaks according to all of their configured constraints, WFMcontinues its default software behavior, which is to relax the break constraints so that they can bescheduled.
Examples... [+]Example 1
There is a 15-minute break that could be scheduled between 9:00 a.m. - 1:00 p.m., and a second15-minute break that could be scheduled between 10:00 a.m. - 2:00 p.m. The user has configuredthat the minimum distance between these breaks must be 3 hours. The user has granted anexception that goes from 11:00 a.m. - 3:00 p.m. It is impossible to meet the minimum distanceconstraint and also schedule these two breaks within their configured time windows. Therefore, WFMcould relax the break constraints, in order to meet the minimum distance constraint and one breakwould be scheduled prior to the exception, and the other break would be scheduled after theexception.
Daily Operations Scheduling Breaks and Meals in WFM
Workforce Management Administrator's Guide 129

As described above, when relaxing break constraints to accommodate planned exceptions, WFMattempts to schedule the break immediately adjacent to the exception. However, it is not alwayspossible to do this, and sometimes there will be a small duration of activity work scheduled betweenthe break and the exception.
Example 2
The user has granted an exception from 12:00 p.m. - 1:05 p.m., and the configured time window for aparticular 15-minute break specifies that the break must be scheduled somewhere between 1:15p.m. - 2:15 p.m. Based on schedule coverage, WFM could place that break at 1:15 p.m., leaving just10 minutes of activity work in between the exception and the break.
Example 3
The user has granted an exception from 12:00 p.m. - 2:00 p.m., and the configured time window for aparticular 15-minute break specifies that the break must be scheduled somewhere between 1:00p.m. - 2:16 p.m. WFM would only have between 2:00 p.m. - 2:16 p.m. in which to schedule the break.WFM could schedule the break from 2:01 p.m. - 2:16 p.m., leaving 1 minute of work between theexception and the break.
Also note that the features described in this section only address partial-day exceptions, not full-dayexceptions. Therefore, if the user needs to schedule an exception that covers a worker's entire shift,they should consider using a full-day exception type.
Example 4
The user wants to grant an exception (type: meeting) after the Schedule has been built. In theCalendar, the user creates the Calendar Item and rebuilds the schedule. The meeting is reflected inthe updated schedule and, in some cases, takes place during a paid break/meal or is adjacent to it.
ImportantIf the user attempts to schedule the meeting, by using the Meeting Planner (after theschedule is built), the meeting is not scheduled, nor is the warning messagessuppressed—assuming that the system is configured in this way.
Hierarchy of Constraints
If breaks cannot be scheduled according to all of their configured constraints, WFM tries to satisfy theconstraints in the following order:
1. Time window2. Start step & start offset3. Minimum distance between shift items4. Maximum distance between shift items
Daily Operations Scheduling Breaks and Meals in WFM
Workforce Management Administrator's Guide 130

Enabling and Configuring Wait-listsThis topic contains lists and descriptions of the conditions and settings that make WorkforceManagement (WFM) wait-list functionality possible, and provides instructions for these tasks:
• Automatic Approval (sometimes called auto-granting)• Auto-publishing• Wait-listing• Handling preferred time-off requests• Making ungranted time-off requests count in a build• Improved viewing time-off availability
If WFM cannot immediately grant a time-off request, it puts the request on a waiting list (called wait-listing). When all requirements are met, including configuration, WFM can grant the request andinsert it into the Master Schedule automatically.
The information in this topic supplements the information found in Workforce Management Web forSupervisors Help and Workforce Management Web for Agents Help.
Overview
WFM considers all wait-listed time-off requests on a First-In, First-Out (FIFO) basis, using the date andtime of the request. To determine if there are slots available for the wait-listed time-off request, theprocess first considers all time off instances that are Granted/Granted and Scheduled and haveintersecting time steps with the wait-listed request for time off. If the CalendarOverScheduleoption is set, then Granted/Not Scheduled time off instances are also taken into account beforeprocessing the wait-list.
Next, WFM considers all Preferred time-off requests that were submitted earlier than the wait-listedrequest that is currently being processed. Only Preferred time-off instances that count against thetime-off limit according to their actual status are considered. Also, if an earlier Preferred request isnot valid for time-off within the various limits, it is ignored.
You can configure the advance threshold for automated time-off wait-listing. You can also configurethe minimum number of weeks in advance that a request can be made for each time-off rule; thatminimum number is called the automatic approval threshold. If an ungranted time-off request in thewait-list violates the automatic approval threshold, then WFM removes the request from the wait-list.That time-off request remains in the status Preferred, but it cannot remain wait-listed.
See Enabling Automatic Approval and Configuring the Threshold below.
Events that might change the system’s ability to grant time off, such as the agent’s contractavailability status, can affect the validity of any time-off request. Thus, wait-listing takes place on aschedule that is specified by a timeout option.
Daily Operations Enabling and Configuring Wait-lists
Workforce Management Administrator's Guide 131

Enabling and Configuring Wait-listing
The following sections provides information about enabling and configuring wait-listing, and describeshow auto-approvals, thresholds, and auto-publishing affect wait-listing.
Automatic Approval of Time-off RequestsWait-list automation is related to automatic approval functionality. The common workflow of wait-listautomation is:
1. An agent’s time-off request is automatically approved, but there are no time-off slots within the limits ofthe request.
2. The request is wait-listed until the appropriate time-off slots appear, and then automatically approved, ifpossible.
3. If automatic approval is enabled but the time-off request is beyond the automatic approval threshold,then the request cannot be wait-listed. It is instead saved with the status Preferred.
ImportantAutomatic approval must be enabled for wait-listing to work. If automatic approval isnot enabled, then the supervisor must manually grant time-off requests and a requestcannot be wait-listed, even if requested by the agent.
Enabling Automatic Approval and Configuring the Threshold
Automatic Approval must be enabled for wait-listing to work.
To learn about automatic approval, in the Workforce Management Web for Supervisors Help, seePolicies > Time-Off Rules > Rules for Requests.
To enable and configure automatic approval, see the options Automatically approve time-offrequest if: Request is made by the following number of weeks in advance <number> andMinimum requested time off is <number> (hours and minutes).
Configuring Auto-PublishingWhen WFM automatically approves a time-off request, it can also insert it into the Master Scheduleautomatically, if auto-publishing is enabled.
To enable and configure auto-publishing, use Genesys Administrator to set the WFM ServerAutoPublishTimeOffToSchedule option value to 1 or 2. Find this option in the CalendarServiceconfiguration section.
Daily Operations Enabling and Configuring Wait-lists
Workforce Management Administrator's Guide 132

Configuring Wait-Listing
Wait-listing is a background function that is enabled by circumstances and configuration. Thecircumstances are: automatic approval must be enabled and an agent’s time-off request must bevalid (time off slots and agent credit must be available).
To configure wait-listing, use Genesys Administrator to set the WFM Server WaitlistTimeout optionin the CalendarService section.
Notes
Why does a time-off request get wait-listed?
• The time-off request is valid (for example, not for time in the past).• The time-off request is not for more time than the agent’s time-off balance contains.• The automatic approval option is enabled.
WFM will only wait-list those time-off requests that would have been automatically approved, if notfor time-off limits. Also:
• If automatic approval is not set up in the accrual rule or the threshold has been passed, then thatparticular time-off cannot be wait-listed.
• The requesting agent should have sufficient time-off balance and there can be no other restrictions.• If limits allow, the request will be granted and not wait-listed.
Treatment of Preferred Time-off RequestsPreferred time-off requests (having the status Preferred) are not considered during schedulebuilding. When a master schedule is published, Preferred time-offs do not count against limits andagent balance anymore, because they are usually not scheduled.
To override this functionality, use Genesys Administrator to set the WFM Server optionCalendarOverScheduleData in the CalendarService section, which makes unscheduled time-offscount against the agent balance and time-off limits.
Viewing Available Time-off SlotsNow Agents can see if the time off that they want is available before they request it. At the Time Offscreen, just hover the cursor over any time slot, and you will see time off limits and wait list dataabout the time slot in a popup.
In the Workforce Management Web for Agents Help, see the topic Wait-Listing Notes > Time Off >Requesting Time Off.
Use Cases and Notes
The following use cases discuss scenarios to compare availability and seniority, and provide some
Daily Operations Enabling and Configuring Wait-lists
Workforce Management Administrator's Guide 133

additional important rules to keep in mind.
When Availability Overrides Seniority
1. Request A asks for time slots that are not available (8AM-6PM). The time 8-9AM is not available, and soRequest A is wait-listed.
2. Request B comes in later, but asks for time slots that are available (10AM-6PM).
The Result:Request B is granted and Request A remains wait-listed, even though Request B came in later.
When Seniority Overrides Availability
1. Request A is wait-listed. The time slots for automatic approval of this request become available, but thewait-list timeout has not yet expired.So this request remains wait-listed.
2. Request B comes in later and asks for the same time slots as Request A.
The Result:
• If the time slots are available for both requests, Request B is honored immediately and Request A ishonored after the wait-list timeout expires.
• If the time slots are available for only one request, Request B is wait-listed and after the wait-listtimeout expires, Request A is granted first.
Rules to Remember
• When the wait-list process can grant a request, it changes the saved status of that request to granted(and removes the internal wait-list flag).
• If the auto-publish and wait-list functions are set up together, then granted requests are published tothe master schedule.
• A wait-listed request can be granted only if: automatic approval is enabled, the time-off request is valid,there are no other restrictions.
WFM removes from the wait-list any time-off request that has expired (the time steps that it specifiesare in the past) or belongs to an agent with no time-off balance.
Daily Operations Enabling and Configuring Wait-lists
Workforce Management Administrator's Guide 134

OvertimeWorkforce Management (WFM) provides Overtime planning and tracking views for supervisors, intowhich they can enter overtime hours for a single agent or multiple agents by specifying the timeinterval and activity.
This topic includes the following sections:
• Overview• Overtime Requirements View• Assigning Secondary Skill Sets for Overtime• Tracking Scheduled Overtime Results
Overview
WFM automates the overtime insertion process in the following ways:
• Finds the appropriate shift definition for the extended shift• Schedules break/meals on the overtime part of the shift• Designates overtime by specifying a marked type
ImportantOvertime functionality is available on the Master Schedule only. There is noovertime interface for Agents.
You can also enter overtime in the Intra-Day, Agent Extended, and Weekly views by inserting awork set with Marked Time. Secondary shifts and activities can be used to plan overtime.
Back to Top
Overtime Requirements View
In WFM Web, you can plan, set, and track how overtime requirements are met in the MasterSchedule > Overtime view. To use this view, set the user security rights in Configuration > Roles> Role Privileges > Access Overtime Requirement or Configuration > Users > RolePrivileges > Access Overtime Requirement.
Overtime data is displayed in a grid, which has an editable Overtime Requirement column and a
Daily Operations Overtime
Workforce Management Administrator's Guide 135

read-only Overtime Scheduled column. The Overtime Scheduled column is calculated accordingto the scheduled Marked Time (ensure the Overtime option is checked). The following optionalcolumns contain information that justifies the need for overtime hours (see the figure below):
• Staffing—Calculated and required staffing.• Difference—Schedule coverage showing the difference between calculated and required.• Variance—Equals the coverage minus the calculated, and is the anticipated unplanned overhead.
Figure: Overtime Requirement View with Monthly Granularity
Back to Top
Assigning Secondary Skill Sets for Overtime
Shifts are assigned to contacts in Web for Supervisors in the Policies > Contracts view (see thefigure below) as either Primary or Secondary. Secondary assignments are used for overtime onlyand represent a broader set of constraints, while Primary assignments are used for otherfunctionality.
Daily Operations Overtime
Workforce Management Administrator's Guide 136

Figure: Web for Supervisors—Policies > Contracts > Shift Assignment
Secondary activities can be defined in one of two ways in Web for Supervisors in the Configuration> Agents > Activities view (see the figure below):
1. Assigning skills to the agent as Secondary2. Assigning activities as Secondary with an effective date.
During overtime, agents can work on activities for which they are not normally scheduled. Therefore,entering overtime for an agent can change the agent’s work day so that the usual shift definition nolonger fits.
Figure: Web for Supervisors—Configuration > Agents > Activities View
ImportantDuring WFM migration from 7.6.1 to 8.x, all shifts and activities are set as Primary
Daily Operations Overtime
Workforce Management Administrator's Guide 137

assignments.
Configuring Overtime for Individual AgentsThe Overtime view is available in the Master Schedule only. However, you must publish a scenariowith the inserted work sets before the information can be seen in the Overtime view.
You can schedule overtime for an agent by inserting a work set and using Marked Time to mark it asovertime. Use one the wizards in the following views:
• Insert Wizard—Schedule > Intra-Day, Agent-Extended views (Master and Scenarios)• Insert Multiple Wizard—Schedule > Intra-Day, Agent-Extended, and Weekly views (Master and
Scenarios)
Display procedure... [+]
Using the Insert Multiple Wizard to Set Overtime for an AgentPurpose: To add a work set for an individual agent for overtime by using the Insert MultipleWizard in WFM Web.
Start of Procedure
1. In the Intra-Day, Agent Extended, or Weekly view, select Insert Multiple from one of the following:
• Actions toolbar• Actions menu• On the agent's schedule, Right-click and select the Shortcut menu (not in Weekly view)
If you have unsaved changes, WFM Web prompts you to save them before proceeding.
• In the Insert Multiple Wizard, select Insert Work set.• Create a new overtime work set by selecting Marked Time for the designated work type.
ImportantYou must select Marked Time; otherwise the resulting work set is not created asovertime (see the figure below). Also, inserting a work set over an existing shift canchange the scheduled activities in the affected interval.
Daily Operations Overtime
Workforce Management Administrator's Guide 138

Figure: Insert Multiple Wizard—Inserting an Overtime Work Set
End of Procedure
Back to Top
Tracking Scheduled Overtime Results
You can use the following views to track scheduled overtime results:
• Schedule > Schedule Scenarios Intra-Day view in the Performance Data pane• Schedule > Master Schedule Intra-Day view in the Performance Data pane• Schedule > Master Schedule view > Overtime view
The Performance Data pane separates the scheduled overtime part of the coverage within thecalculated staffing graph and distinguishes it from the overtime requirement. See the figure below.
Daily Operations Overtime
Workforce Management Administrator's Guide 139

Figure: Calculated Staffing Graph—Full Day View
Back to Top
Daily Operations Overtime
Workforce Management Administrator's Guide 140

How WFM Calculates AdherenceWorkforce Management (WFM) calculates adherence for single channel or multi-channelenvironments. For sites, in which there are schedule state groups configured for a single channel,WFM compares the agent's real-time state to the current schedule state. For sites, in which there areschedule state groups configured for multiple channels, WFM compares the agent's real-time stateand reason code on each channel, with the scheduled states for that same channel during eachspecified time interval. If at least one scheduled state for that channel can be mapped to the channelreal-time state, according to its adherence rules, the agent is considered adherent.
Single-Channel Adherence Calculation
Single channel agent adherence is calculated as follows:
1. WFM maps the agent's real-time state plus the reason code. If there is more than one reason code,there is more than one state + reason code mapping. If there is no reason code, WFM uses only thestate for mapping. For example, if the agent has real-time state WaitingForNextCall with reasoncodes r1 and r2, for adherence purposes, WFM maps WaitingForNextCall + r1 andWaitingForNextCall + r2.
2. WFM then finds all schedule state groups that are adherent to at least one agent real-time state fromstep 1. A list of schedule state groups is compiled that maps to the state, based on the configuration ofthe schedule state groups.
3. WFM obtains all scheduled states from the current agent schedule and maps them to the schedule stategroups.
4. WFM collects all schedule state groups from step 3.5. WFM Intersects the sets of schedule state groups from steps 2 and 4. If the intersection is not empty,
the agent is adherent.
Multi-Channel Adherence Calculation
Multi-channel agent adherence is calculated as follows:
1. Similar to step 1 in Single-Channel Adherence Calculation, WFM maps the agent real-time state +reason code. However, in addition to the aggregated agent state, WFM also adds separate real-timestates for each channel configured on the site. (Agents can sometimes have no state on certainchannels.) If reason codes are used, WFM could map multiple state + reason code pairs for eachchannel, plus the aggregated state.
2. Similar to step 2 in Single-Channel Adherence Calculation, WFM maps schedule state groups adherentto the aggregated state. However, in addition, WFM finds a separate set of schedule state groups foreach channel. WFM considers only the schedule state groups that are specifically assigned to aparticular channel for adherence with the states on that channel. WFM considers the schedule state
How WFM Calculates Adherence Overtime
Workforce Management Administrator's Guide 141

groups without a channel for adherence with the aggregated agent state.3. WFM obtains all scheduled states from the current agent schedule and maps them to the schedule state
groups.4. WFM collects all schedule state groups from step 3.5. WFM Intersects the sets of schedule state groups from steps 2 and 4 separately for each channel. If
both sets are empty or the intersection is not empty, WFM considers the agent is adherent to thechannel. For the aggregated agent status, WFM assumes adherence, when either the pair in step 4 isempty or step 2 and step 4 intersect. WFM considers the agent adherent, if he/she is adherent on allchannels and adherent to the aggregated status.
The multi-channel algorithm also comes to a boolean conclusion; that is, the agent is either adherentor non-adherent. However, to be adherent the agent must be adherent on every channel, on whichhe/she is scheduled or, for which he/she receives a real-time state. Also, if the agent is scheduled onnon-channel-related states, he/she must also be adherent to those states. See the example in UseCase 2: Multi-Channel Adherence.
Use Case 2: Multi-Channel AdherenceThis use case is based on the schedule state group configuration in Use Case 1: Multi-ChannelAdherence.
Summary Real-time state Scheduled states AdherenceAgent is working onvoice only,but scheduled for emailand voice
Agent state:CallInboundDN email: NotReadyDN 2323: CallInbound
E-mail activity, voiceactivity Not adherent
Agent is working onemail and voice,but scheduled for emailonly.
Agent state:CallInboundDN email:WaitForNextCallDN 2323: CallInbound
E-mail activity Not adherent
Agent is on a break.Agent state: NotReadyDN email: NotReadyDN 2323: NotReady
Break Adherent
Calculation of Agent HeadcountWFM calculates the agent head count for activities in this way: If the activity belongs to a channel-related schedule state group, the agent is counted for the activity, only if the he/she is compliant withthe adherence rules for that channel. Also, if an agent is non adherent overall, but adherent for achannel, the agent is added to the headcount for the activities for that channel.
How WFM Calculates Adherence Overtime
Workforce Management Administrator's Guide 142

WFM Configuration OptionsWhen you initially create and configure your Workforce Management (WFM) component Applicationobjects, the Options tab is created with default settings.
To customize your applications, open the Application objects in Configuration Manager and adjustthe settings as desired, using the descriptions in this topic for guidance.
ImportantPerform the complete set of configuration and installation procedures as described inInstalling and Configuring Workforce Management, before configuring the Options tabsettings for the various applications.
This topic includes the following sections:
Configuring WFM Options
Creating New Sections and OptionsServer Options TabWeb Options TabBuilder Options Tab
Configuring WFM Options
Data Aggregator Options TabDaemon Options TabClient Options TabOptions Removed
WFM Configuration Options Overtime
Workforce Management Administrator's Guide 143

Creating New Configuration Sections andOptionsThe settings you can configure on the Options tab control various features, such as logging, fontstyles and sizes for some applications, security settings such as whether to show agent salaryinformation, whether to use reason codes, and many others. In many cases, the default setting willbe the most appropriate for your environment. However, Genesys recommends that you review theavailable options to determine where customization might benefit your enterprise.
ImportantWhen viewing WFM configuration options templates, you might see options beginningwith x- (for example, x-<option name>). Changing the default value of these optionsis not recommended, and should only be used in exceptions when troubleshooting isrequired, and with the assistance of a Genesys Customer Care representative.
TipWhen the valid values for an option are listed as true or false, you can also enteralternate values to achieve the same result. For example, you can enter the valuetrue as yes or 1, and you can enter the value false as no or 0.
Creating New Sections and Options
In some cases, configuration sections and options documented for this product are not included inthe shipped version of the templates. Many users will not need these sections or options but if youdo, create them using the following procedures:
<multistep> |-| Procedure: Creating a New Section=
Purpose: To add a new section, which will contain at least one option, to the WFM database.
Prerequisite: The WFM software application template and database must allow this section.
Start of Procedure
1. On the Options tab, click the New icon or right-click in an empty area and select New.The Add Section dialog box appears.
2. Enter the appropriate section name.
WFM Configuration Options Creating New Configuration Sections and Options
Workforce Management Administrator's Guide 144

3. Click OK.4. Save your work.
You can now create new options in this section.
End of Procedure
|-| Procedure: Creating a New Option=
Purpose: To add a new option to the WFM database.
Prerequisite: The WFM software application template and database must allow this option.
Start of Procedure
1. On the appropriate section pane, click the New icon or right-click in an empty spot and select New.The Edit Option dialog box appears.
2. Enter the option name and the value for the new option.3. Click OK.4. Save your work.5. Perform the actions (if any) that are required to activate the option.
End of Procedure
</multistep>
WFM Configuration Options Creating New Configuration Sections and Options
Workforce Management Administrator's Guide 145
WFM Server OptionsWFM Server is the only WFM component that has both configuration Annex and Options tab settings.
Options Tab Settings
From the Options tab you can modify the default WFM Server configuration settings. The tabcontains nine sections. The options in each of these sections are described below.
CalendarService SectionAutoPublishTimeOffToScheduleType: OptionalDefault Value: 0Valid Values: 0, 1, 2Dependencies: None
Enables, disables, and configures automatic publishing of granted time off to an agent’s existingschedule. The following settings specify WFM’s response when an agent requests time off:
• 0—Feature is off.• 1—Feature is on; a part-day time-off cannot overlap exceptions.• 2—Feature is on; a part-day time-off deletes overlapped exceptions.
BatchRequestType: OptionalDefault Value: trueValid Values: true, falseDependencies: None
Specifies how WFM Server processes multiple time-off requests submitted simultaneously by a singleagent. When this option is set to true, WFM Server processes these time-off items in one batch.When this option is set to false, WFM Server processes these time-off items one-by-one.
CalendarOverScheduleDataType: OptionalDefault Value: 0Valid Values: 0, 1, 2, 3Dependencies: None
Enables the resolution of conflicts between granted or preferred time-off items and schedule data.Previously, when schedule data overlapped calendar data, unscheduled time off items were notconsidered when WFM Server checked agent time-off limits and balances.
WFM Configuration Options WFM Server Options
Workforce Management Administrator's Guide 146

• 0—Disables the resolution functionality (default value).• 1—Enables resolution between granted calendar time-off items and overlapping schedule data.• 2—Adds resolution of preferred time-off items to value 1 functionality.• 3—These requests are counted against an agent’s time-off balance and limits:
• All requests with the status granted/not scheduled.• Only wait-listed requests with the status preferred/not scheduled.
CarryOverTimeoutType: OptionalDefault Value: 1440Valid Values: Any positive integer (-1 = off)Dependencies: None
Specifies the time interval (in minutes) between process runs that handle automatic carry-over forTime Off balances.
DetermineFullDayTimeOffStartEndPaidHoursType: OptionalDefault Value: falseValid Values: true, falseDependencies: None
Specifies whether or not WFM Server resolves the Start/End time. If set to true when a user adds aFull-Day Time Off with the Start/End times not specified, WFM Server resolves the Start/End times.
MaxAuditReportsType: OptionalDefault Value: NoneValid Values: Any positive integerDependencies: None
Specifies the number of audit reports that can be built at one time. The recommended value is 1. Ifyou request a greater number than is specified, the additional reports go into a queue.
HideMessagesForNotWorkingAgentsType: OptionalDefault Value: falseValid Value: true, falseDependencies: None
Specifies whether to prevent WFM Web from displaying error messages when Calendar items are setfor agents who have been terminated or have not yet been hired, set this value to true. If you want toview error messages when Calendar items are set for agents who have been terminated or have notyet been hired, set this option to false.
ImportantThis section and option are not included in the template by default. You must createthem yourself. See Creating New Configuration Sections and Options for instructions.
WFM Configuration Options WFM Server Options
Workforce Management Administrator's Guide 147

PreventTimeOffNoAvailabilityType: OptionalDefault Value: 0Valid Values: 0, 1, 2Dependencies: None
Specifies whether an additional check is turned on or off for already-configured days of days off whenan agent requests time off.
• 0—The option is off.• 1—Prevents an agent from requesting time off for weekdays, when the agent has no Contract
availability.• 2—Same as described for the value 1, except weekdays when Contract nonavailability is overwritten by
an open granted availability interval. Also applies to dates with granted no-availability preferences andgranted day-off preferences and to days when an agent has a rotating day-off according to his or herassigned rotating schedule.
When this option is on:
• If an agent requests a new time-off that overlaps an existing day-off, that agent receives an error andthe time-off is not inserted into the calendar.
• The supervisor receives a warning, which is possible to override.
WaitlistTimeoutType: OptionalDefault Value: 60Valid Values: Any positive integer (-1 = off)
Specifies the interval, in minutes, between process runs that handle wait-listed Calendar items.
Client SectionCfgServerRequestTimeoutType: MandatoryDefault Value: 15Valid Value: Any positive integerDependencies: None
Specifies the number of seconds to wait for a response from Configuration Server before timing out.This key is used when requesting the list of objects from Configuration Server for synchronizationpurposes. The value should be increased in configurations with a high number of objects or slownetwork connections.
SOAPTimeoutType: MandatoryDefault Value: 60Valid Value: Any positive integerDependencies: None
Specifies the number of seconds to wait for the response from WFM Server before timing out.
WFM Configuration Options WFM Server Options
Workforce Management Administrator's Guide 148

ConfigService SectionAcceptZeroSkillLevelType: OptionalDefault Value: trueValid Value: true, falseDependencies: None
Specifies whether or not WFM Server can set an agent skill level to 0. When this option is set to trueit enables WFM Server to set an agent skill level to 0. When set to false it prevents (disables) WFMServer from setting an agent skill level to 0.
CacheLifespan Type: OptionalDefault Value: No default value (null value means the size is unlimited)Valid Value: Any positive integerDependencies: None
Specifies the amount of time, in hours, that data remains in the Configuration cache without beingaccessed. After this duration, the data is dropped from the cache.
CachePreloadTimeoutType: OptionalDefault Value: No default value (null value means 120 minutes)Valid Value: Any positive integerDependencies: None
Specifies the time, in minutes, for preloading data in the cache. Data is preloaded up to the amountspecified in the MinCacheSize option.
LocalTimezonesType: OptionalDefault Value: falseValid Value: true, falseDependencies: None
When this option value is set to true, WFM Server interprets the timezone Daylight Saving Time(DST) settings from Configuration Server in the local time zone time, instead of usual CoordinatedUniversal Time (UTC). Genesys recommends setting this option value to true, if the timezone DSTrules in Configuration Server is configured in local time, instead of the required UTC.
MaxCacheSizeType: OptionalDefault Value: No default valueValid Value: Any positive integerDependencies: None
Specifies the maximum size, in megabytes (MB), of the Configuration cache.
MinCacheSizeType: OptionalDefault Value: No default valueValid Value: Any positive integerDependencies: None
WFM Configuration Options WFM Server Options
Workforce Management Administrator's Guide 149

Specifies the minimum size, in megabytes (MB), of the Configuration cache. The cache is preloadedup to the minimum size.
MSARestrictAccessType: OptionalDefault Value: falseValid Value: true, falseChanges Take Effect: ImmediatelyDependencies: None
Specifies whether or not users can access Multi-Site Activites (MSA). When this option is set to true,users must have access to all Activities under MSA to view any multi-site activity. When set to falseusers must have access to at least one Activity under MSA to view multi-site activities (currentfunctionality).
SynchronizationCheckUpdatesTimeoutSecType: OptionalDefault Value: 60 secondsValid Value: Any positive integerDependencies: None
Specifies the time, in seconds, between checks for changes to Site configuration. When thisconfiguration option value is set to 0, checking is turned off and WFM Server does not check forchanges to Site configuration.
SynchronizationLevelType: OptionalDefault Value: 2Valid Value: 0, 1, 2Dependencies: None
Specifies the level, at which WFM Server performs synchronization. Valid values are:
• 0—Synchronization is off• 1—Synchronization is on for agents only in Sites that have WFM Server configured with this option set to
1.• 2—Full synchronization is on, only if (at least one) WFM Server is configured with this options set to 2.
SynchronizationTimeoutType: OptionalDefault Value: 0Valid Value: 0 - 71582Dependencies: None
Specifies the time period, during which WFM Server performs full synchronization. This valuedetermines the time period in minutes, after which WFM Server starts full synchronization. If thisvalue is set to 0, WFM Server performs full synchronization on startup. Thereafter, WFM Serverperforms real-time synchronization only.
The level of synchronization started by the timeout setting depends on the optionSynchronizationLevel. Here are some examples:
• SynchronizationLevel = 2
WFM Configuration Options WFM Server Options
Workforce Management Administrator's Guide 150

SynchronizationTimeout = 0WFM Server performs full synchronization on startup. Thereafter, WFM Server performsreal-time synchronization only.
• SynchronizationLevel = 1SynchronizationTimeout = 300WFM Server performs full synchronization (except time zones and skills) on startup andthen, full synchronization (except time zones and skills) every 5 hours. In between fullsynchronizations, WFM Server performs real-time synchronization (except time zones andskills).
• SynchronizationLevel = 0SynchronizationTimeout = 300WFM Server does not perform synchronization. The SynchronizationTimeout option isignored, in this case.
ETL SectionDaysAheadType: OptionalDefault Value: 14 daysValid Values: Any integer between 1 and 365Dependencies: None
Specifies the number of days in the future from current date to track Fact data.
DaysBackType: OptionalDefault Value: 14 daysValid Values: Any integer between 0 and 365Dependencies: None
Specifies the number of days in the past from current date to track Fact data.
DayChunkType: OptionalDefault Value: 7 daysValid Values: Any integer between 1 and 31Dependencies: Should be less than (DaysBack + DaysAhead)
Specifies the number of days that will be processed at a time. The tracked day range is defined bythe values set in the DaysBack and DaysAhead parameters and is processed in the specified chunksof data. So, this parameter determines the size of transaction. Larger transactions require morememory and other resources, but can be processed faster.
ETLTimeoutType: OptionalDefault Value: 180 minutesValid Values: Any integer between 0 and 2880Dependencies: None
Specifies the timeout interval (in minutes) between each execution of the ETL process. Negative orzero values disable the ETL process.
WFM Configuration Options WFM Server Options
Workforce Management Administrator's Guide 151
ForecastService SectionForecastTimestepType: OptionalDefault Value: 15Valid Values: 15, 30, 60 (Expert Average Engine) OR 15, 60 (Universal Modeling Engine)Dependencies: None
Specifies the step used in the Expert Average. If the step is 60, then all values (that is, four values,each representing a 15-minute timestep value) in the 60-minute interval will be filled with the samepredicted value.
MaxScenarioCacheSizeType: OptionalDefault Value: No default value (null value means the size is unlimited)Valid Value: Any positive integerDependencies: None
Specifies the maximum size of the Forecast Scenario cache expressed in megabytes (MB).
ServiceLevelMethodType: OptionalDefault Value: 0Valid Value: 0, 1Dependencies: None
Specifies whether Service Level should be calculated from the number of interactions distributed (asin Workforce Management 6.5) or from the number of interactions offered, taking into accountabandoned interactions. The default value, 0, indicates that Service Level is calculated, based on thenumber of interactions distributed. To include abandoned interactions, set the value to 1.
This option is not included in the template by default. You must create it yourself. Create this option ifyou want to include abandoned interactions (value set to 1). If you do not create this option, WFMfunctions as though you have set the value to 0. See Creating New Configuration Sections andOptions for instructions.
Identity SectionApplicationTypeType: Optional in a Framework 8.x environment.Default Value: WFMServerValid Value: WFMServerDependencies: None
Specifies which Workforce Management component this application is for. Configure this option only ifyou are using an application of the type ThirdPartyServer.
Log SectionverboseType: MandatoryDefault Value: all
WFM Configuration Options WFM Server Options
Workforce Management Administrator's Guide 152

Valid Values: all, trace, standard, none, yes (= all), no (= none)Dependencies: None
Filters the output of log messages, based on their assigned priority.
• all—Enables output of all messages to the log file• Trace—Enables informational and error messages and disables debug messages• Standard—Enables error messages only and disables informational and debug messages• None—Disables all messages.
bufferingType: MandatoryDefault Value: falseValid Values: true, falseDependencies: None
Specifies whether system file buffering is turned on (true) or off (false).
segmentType: MandatoryDefault Value: falseValid Values: false, <number>, <number>KB, <number>MB, <number>HrDependencies: None
Sets the maximum size (in KB, MB, or hours) of the log file segment, after which a new segment iscreated. The default size is in KB. The number (<number>) cannot be less than 100 KB or less thanone hour. A value of No indicates no segmentation of the log file.
expireType: MandatoryDefault Value: falseValid Values: false, <number>, <number> file, <number> dayDependencies: None
Sets the expiration mode for old segments. The number to be stored cannot be less than 1 file or 1day or more than 100 files or 100 days. A value of No indicates that files do not expire.
messagefileType: MandatoryDefault Value: wfmserver.lmsValid Value: wfmserver.lmsDependencies: None
Specifies the name of the file that stores application-specific log messages. The only valid value iswfmserver.lms.
standardType: MandatoryDefault Value: stdoutValid Values: log output types, such as stdout, stderr, syslog, network, <filename>Dependencies: None
Specifies that log events of the Standard level are to be sent to the listed outputs. For centralized
WFM Configuration Options WFM Server Options
Workforce Management Administrator's Guide 153

logging, use a value of network. You can use a local file name as the value, stdout, or network.
traceType: MandatoryDefault Value: stdoutValid Values: log output types, such as stdout, stderr, syslog, network, <filename>Dependencies: None
Specifies that log events of the Trace level are to be sent to the listed outputs. For centralizedlogging, use network. You can use a local file name as the value, stdout, or network.
debugType: MandatoryDefault Value: stdoutValid Values: log output types, such as stdout, stderr, syslog, network, <filename>Dependencies: None
Specifies that log events of the Debug level are to be sent to the listed outputs.
WarningDo not use the value network unless requested by Genesys Professional Servicesbecause it generates extremely heavy message loads that can degrade systemperformance.
allType: MandatoryDefault Value: stdoutValid Values: log output types, such as stdout, stderr, syslog, network, <filename>Dependencies: None
Specifies that log events of all levels, Standard, Trace, and Debug, are to be sent to the listedoutputs.
WarningDo not use the value network unless requested by Genesys Professional Servicesbecause it generates extremely heavy message loads that can degrade systemperformance.
Back to Top
PerformanceService SectionMaxActivityDaysType: OptionalDefault Value: 25,000Valid Value: Any positive integer
WFM Configuration Options WFM Server Options
Workforce Management Administrator's Guide 154

Dependencies: None
Controls the maximum cost of performance-related and forecast-related data that can be returned byWFM Server. It prevents very large requests from overloading WFM Server. The value representsActivity Days. For example, a request for 50 activities over a 31-day period would require 1550Activity Days.
If the request requirement exceeds the MaxActivityDays option limit, then the server returns thismessage:Specified date range is too long for selected target. Please select different targetor a shorter date range.
The default value is based on a typical customer configuration. You might need to adjust it,depending on your installed hardware, user work pattern, or if the server is too slow or short ofmemory when handling certain requests.
NoCallsServiceLevelType: OptionalDefault Value: 0Valid Values: 0, 100Dependencies: None
Specifies whether the Performance window shows service level as 0% or 100% when there are noincoming interactions.
ImportantThis section and option are not included in the template by default. You must createthem yourself. See Creating New Sections and Options for instructions.
RecalculateForecastStaffingValid Value: boolean (yes, no, true, false, y, n, 0, 1)Default Value: false
Specifies whether or not WFM Server recalculates deferred activity forecasted staffing. When thisoption is set to true, Server recalculates deferred activity forecasted staffing, based on the schedule,if there is one. When set to false, staffing is returned as saved in the WFM database.
ScheduleService SectionMaxAuditReportsType: OptionalDefault Value: NoneValid Values: Any positive integerDependencies: None
Specifies how many audit reports can be built at one time. The recommended value for this option is1. If you request a greater number than is specified, the additional reports go into a queue.
SplitCoverage
WFM Configuration Options WFM Server Options
Workforce Management Administrator's Guide 155
Type: OptionalDefault Value: true or 1Valid Values: true or 1, false or 0Dependencies: SplitMode and SplitMS options
Specifies whether schedule coverage should be reported in fractional units in views and reports whichinclude this metric. The possible values are:
• false—Split coverage is not reported in fractional units, and the SplitMode option is ignored. Forexample, the agent is covering one activity per timestep.
• true—Split coverage is reported in fractional units, and the SplitMode option is applied. For example, ifan agent is scheduled to cover three activities during a 15-minute interval, he will count 0.33 towardthe coverage of each activity. The agent’s split coverage might not be always 0.33. It could be 0.2, 0.8,or any other percentage, depending on the forecast staffing requirement, but the sum is always equalto 1 for the 15-minute timestep.
SplitModeType: OptionalDefault Value: 0Valid Values: 0, 1, 2Dependencies: SplitCoverage and SplitMS options
This option becomes affective only when the SplitCoverage option is set to true. The three possiblevalues and their characteristics are as follows:
• 0—The coverage split is calculated when the schedule is built or modified, and is stored along with theschedule. This means that the coverage split does not change if you change the activity forecaststaffing requirement after the schedule is built. (You would have to rebuild the schedule to have anyeffect on the coverage split.) Fractional coverage is not available for legacy schedules.
TipThe term legacy schedule refers to a schedule that was built with an older version ofWFM in which split coverage was not yet implemented.
• 1—The coverage split is calculated when the schedule is built, and is stored along with the schedule.This setting is similar to SplitMode = 0. However, if you have a legacy schedule or a schedule createdwith SplitCoverage = false, there is no coverage split stored within the schedule. The fractionalcoverage is recalculated dynamically for that schedule only.
• 2—The coverage split is always calculated dynamically for all new and legacy schedules. If you changethe activity forecast staffing requirement after the schedule is built, the coverage split is adjusteddynamically. This
mode should not be used in production environments unless it is suggested by Genesys, because itcould have severe performance impact on WFM Server operations
Important
WFM Configuration Options WFM Server Options
Workforce Management Administrator's Guide 156

Genesys recommends you set the SplitMode option value to 0 in most environments(in which there are no legacy schedules that require editing with split coverageconsiderations)
.SplitMSType: OptionalDefault Value: falseValid Values: true, falseDependencies: SplitMode and SplitCoverage. If SplitCoverage is false, then SplitMS is ignored.
Enables and disables multi-skill splitting of schedule coverage. When this option value is set to truein the WFM Web Application, the coverage split is dynamically adjusted to maximize multi-skillperformance gain. It works on top of the obtained coverage, based on either of these option settings:SplitMode = 0 or SplitMode = 2.
AutoCleanupTimeoutType: OptionalDefault Value: 0 (disabled)Valid Values: Any positive integer (minutes) or 0 (zero) (default; disables the option)Dependencies: None
Enables WFM Server to perform automatic schedule cleanup for terminated agents, and specifies thetime interval, in minutes, at which it does this. For example, setting the value to 60 specifies thatWFM Server automatically cleans up the schedules of terminated agents every 60 minutes. Settingthe value to 0 disables automatic schedule cleanup by WFM Server.
Special Handling for Terminated Agents
• The schedules of terminated agents will be deleted from the Master Schedule only for dates that occuron or after the agents' termination dates.
• Each running WFM Server cleans up terminated agent schedules only for those sites that are assignedto this particular server in the Organization > Sites > Properties section of WFM Web. If the serverhas no specific sites assigned to it, it will clean up all sites when automatic cleanup is enabled.
MaxCacheSizeType: OptionalDefault Value: No default valueValid Value: Any positive integerDependencies: None
Specifies the maximum size, in megabytes (MB), of the Schedule cache.
MinCacheSizeType: OptionalDefault Value: No default valueValid Value: Any positive integerDependencies: None
WFM Configuration Options WFM Server Options
Workforce Management Administrator's Guide 157

Specifies the minimum size, in megabytes (MB), of the Schedule cache. The cache is preloaded up tothe minimum size.
MaxScenarioCacheSizeType: OptionalDefault Value: No default valueValid Value: Any positive integerDependencies: None
Specifies the maximum size, in megabytes (MB), of the Schedule Scenario cache.
CachePreloadDayChunksType: OptionalDefault Value: No default value (null value means 14 days)Valid Value: Any positive integerDependencies: MinCacheSize
Specifies the chunk of days to load when performing a schedule cache preload.
CachePreloadMaxDaysType: OptionalDefault Value: No default value (null value means 365 days)Valid Value: Any positive integerDependencies: MinCacheSize
Specifies the number of days to preload starting from the current date. The preload stops if theMinCacheSize is reached.
CachePreloadTimeoutType: OptionalDefault Value: No default value (null value means 180 minutes)Valid Value: Any positive integerDependencies: None
Specifies the time, in minutes, for preloading data in the cache. Data is preloaded up to the amountspecified in MinCacheSize.
CacheLifespanType: OptionalDefault Value: No default value (null value means the size is unlimited)Valid Value: Any positive integerDependencies: None
Specifies the amount of time, in hours, that data remains in the Schedule cache without beingaccessed. After this duration, the data is dropped from the cache.
Server SectionMaxThreadPoolSizeType: MandatoryDefault Value: 80Valid Value: Any positive integerDependencies: None
WFM Configuration Options WFM Server Options
Workforce Management Administrator's Guide 158

Specifies the maximum number of threads in the thread pool.
MinThreadPoolSizeType: MandatoryDefault Value: 8Valid Value: Any positive integerDependencies: None
Specifies the minimum number of threads in the thread pool.
ProxyType: OptionalDefault Value: No default valueValid Value: <proxyservername>:<port>Dependencies: None
Specifies a proxy server.
SessionTimeoutType: MandatoryDefault Value: 10Valid Value: Any positive integerDependencies: None
Specifies the timeout, in minutes, for any client session with this WFM Server.
ThreadPoolDownsizeTimeoutType: MandatoryDefault Value: 15m (minutes)Valid Value: Any positive integer.Dependencies: None
Specifies how long a thread stays idle before it is removed from the thread pool. Follow the numberwith s (seconds) or m (minutes). By default, the value is in minutes.
ThreadPoolUpsizeTimeoutType: MandatoryDefault Value: 10s (seconds)Valid Value: Any positive integerDependencies: None
Specifies how long a request stays in queue before the thread pool size is increased. Follow thenumber with s (seconds) or m (minutes). By default, the value is in seconds.
VirtualDirectoryType: Not applicableDefault Value: No default valueValid Value: Not applicableDependencies: None
For future use.
WFM Configuration Options WFM Server Options
Workforce Management Administrator's Guide 159

Annex Tab Settings
From the Annex tab you can modify the default WFM Server configuration settings. The tab containsone sections. The options in each of these sections are described below.
security Sectionrequire-authenticationType: OptionalDefault Value: trueValid Value: true, falseDependencies: None
Specifies whether authentication is (or is not) required for third-party connections to WFM Server. Thedefault value true is in effect if this option is not defined.
ImportantPrior to release 8.1, the WFM API allowed third-party clients to connect to WFM usingthe system account without authentication. Now, this behavior is disabled by defaultand all third-party connections require proper user/password authentication.
WFM Configuration Options WFM Server Options
Workforce Management Administrator's Guide 160

WFM Web OptionsFrom the Options tab you can modify the default WFM Web configuration settings. The tab containseleven sections. The options in each of these sections are described below.
Adherence Section
RefreshTimeType: MandatoryDefault Value: 10Valid Value: Any positive integerDependencies: None
Specifies the amount of time, in seconds, between updates to the real-time agent adherence datadisplayed in WFM Web.
AgentBidding Section
AllowBiddingType: MandatoryDefault Value: trueValid Value: true, falseDependencies: None
Enables agent bidding as part of Schedule Bidding. See WFM Web for Supervisors Help for details.
AgentCustom Section
nameType: MandatoryDefault Value: noneValid Value: Any name. For example, My Adherence.Dependencies: None
Specifies the name that is displayed in Web for Agents' interface together with WFM's standardmodules such as, Schedule, Trading, etc.
urlType: MandatoryDefault Value: none
WFM Configuration Options WFM Web Options
Workforce Management Administrator's Guide 161

Valid Value: Any URL. For example, http://www.customapps.com/agenttag.Dependencies: None
Specifies the URL that points to a third-party application that opens and displays the custom pagewhen the custom module is selected.
agenttagType: MandatoryDefault Value: stringValid Value: The agent ID. For example, AgntID6528.Dependencies: None
Specifies the string that is searched in the url option and substituted with the agent ID from WFM. Itidentifies the agent, for whom the custom information is displayed.
ImportantAll three options must be added for the custom module to appear in the Web forAgents interface.
AgentPreferences Section
AllowPreferencesType: MandatoryDefault Value: trueValid Value: true, false Dependencies: None
Controls whether or not Preferences will appear in the agent part of WFM Web.
AgentSchedule Section
AccessLevelType: OptionalDefault Value: 2Valid Values: 1, 2, 3Dependencies: None
Controls which filtering options appear in the Other Schedules view and how much data an agentcan see. (The option People I work with is always present.) Enter a valid value to specify whichother options are available:
• 1—My Team
• 2—My Team and My Site
• 3—My Team, My Site, and My Business Unit
WFM Configuration Options WFM Web Options
Workforce Management Administrator's Guide 162

AllowAccessToOthersScheduleType: OptionalDefault Value: trueValid Values: true, falseDependencies: None
If this option value is set to true, agents can see other agents’ schedules in the Other Schedule tabof the WFM Web for Agents Schedule view.
AllowAccessToCarpoolsType: OptionalDefault Value: trueValid Values: true, falseDependencies: None
If this option value is set to true, agents can access Shared Transportation functionality—in the WFMWeb for Agents My Schedule tab Sidebar, and other locations. If set to false or absent from theconfiguration, all carpool functionality is disabled for this installation of WFM 8.1.
ImportantShared Transportation functionality for Supervisors is not enabled or disabled by usingthis configuration option. See WFM Web > Configuration > Roles. Carpools andcarpooling are common words in the United States for shared transportation, but theydo not describe busses and other forms of shared transportation.
AllowInsertExceptionsType: OptionalDefault Value: falseValid Values: true, falseDependencies: None
If this option value is set to true, agents can access the Add Exception button—and its underlyingfunctionality—in the WFM Web for Agents My Schedule tab.
CommitAgentInsertedExceptionsType: OptionalDefault Value: falseValid Values: true, falseDependencies: Enabled only if AllowInsertExceptions is set to true
If this option value is set to true, exceptions that are inserted by an agent are committed to theschedule or inserted, pending approval by a supervisor.
AgentTimeOff Section
AllowEnterFullDayStartEndType: OptionalDefault Value: true
WFM Configuration Options WFM Web Options
Workforce Management Administrator's Guide 163

Valid Values: true, falseDependencies: None
Set this option value to false to disable an agent’s ability to specify the start and end of a full-daytime off. Omit this option or set the value to true to enable that ability.
AllowEnterPaidTimeType: OptionalDefault Value: falseValid Values: true, falseDependencies: None
Controls whether an agent can specify a the number of paid hours to deduct, when creating orediting a full-day time-off request in the Time Off Request view.
AllowTimeOffPlannerType: MandatoryDefault Value: trueValid Value: true, falseDependencies: None
Controls whether or not the time off planner appears in the agent part.
AllowWaitListType: MandatoryDefault Value: trueValid Values: true, falseDependencies: None
Controls whether the Wait-List check box—and the option that it represents—appears in theInserting New Time Off Items dialog box when an agent is requesting time off.
ImportantEven when this option is set to false, a supervisor may wait-list a timeoff requestwhen adding or editing the item through the WFM Calendar. However, if the agentsubsequently edits such a wait-listed time-off item, the status changes, and the itemis no longer wait-listed.
SeparateStartEndForEachDayType: OptionalDefault Value: falseValid Values: true, falseDependencies: None
If this option value is set to true, an agent can define a separate (and different) start and end timesfor each full day in a new time-off request that spans multiple days. If this option value is omitted orset to false, an agent can define only identical start and end times for all full days in a new time-offrequest that spans multiple days.
WFM Configuration Options WFM Web Options
Workforce Management Administrator's Guide 164

AgentTrading Section
AllowNoCommentsType: OptionalDefault Value: falseValid Value: true, falseDependencies: None
If this option value is set to true, agents do not have the ability to enter comments while workingwith trades.
AllowAccessToOthersScheduleType: MandatoryDefault Value: trueValid Value: true, falseDependencies: AllowScheduleTrading
If this option value is set to true, agents can see other agents’ schedules in the Schedule tab of theWFM Web for Agents Trading view.
AllowScheduleTradingType: MandatoryDefault Value: trueValid Value: true, falseDependencies: None
If this option value is set to true, trading functionality is enabled for agents. If set to false, tradingfunctionality is disabled and Trading is not available in the WFM Web for Agents menu.
TradeOnlyInsideTeamType: MandatoryDefault Value: trueValid Value: true, falseDependencies: AllowScheduleTrading, AllowAccessToOthersSchedule
Controls the type of schedules that an agent can see. If this option value is set to true, agents seeschedules only of other agents who are in the same team. If set to false, agents see schedules of allagents who belong to the same site.
Client Section
SOAPTimeoutType: MandatoryDefault Value: 60Valid Value: Any positive integerDependencies: None
Specifies the number of seconds to wait for the response from WFM Server before timing out.
WFM Configuration Options WFM Web Options
Workforce Management Administrator's Guide 165

Identity Section
ApplicationTypeType: Optional in a Framework 8.x environment.Default Value: WFMWebValid Value: WFMWebDependencies: None
Specifies Workforce Management component for which this application is used. Configure this optioinonly if you are using an application of the type ThirdPartyServer.
Log Section
allType: MandatoryDefault Value: stdoutValid Values: log output types, such as stdout, stderr, syslog, network, <filename>Dependencies: None
Specifies that log events of all levels, Standard, Trace, and Debug, are to be sent to the listedoutputs.
WarningDo not use the value network unless requested by Genesys Professional Servicesbecause it generates extremely heavy message loads that can degrade systemperformance.
bufferingType: MandatoryDefault Value: falseValid Values: true, falseDependencies: None
Specifies whether system file buffering is turned on (true) or off (false).
debugType: MandatoryDefault Value: stdoutValid Values: log output types, such as stdout, stderr, syslog, network, <filename>Dependencies: None
Specifies that log events of the Debug level are to be sent to the listed outputs.
WFM Configuration Options WFM Web Options
Workforce Management Administrator's Guide 166

WarningDo not use the value network unless requested by Genesys Professional Servicesbecause it generates extremely heavy message loads that can degrade systemperformance.
expireType: MandatoryDefault Value: falseValid Values: false, <number>, <number> file, <number> dayDependencies: None
Sets the expiration mode for old segments. The number to be stored cannot be less than 1 file or 1day or more than 100 files or 100 days. A value of No indicates that files do not expire.
segmentType: MandatoryDefault Value: falseValid Values: false, <number>, <number>KB, <number>MB, <number>HrDependencies: None
Sets the maximum size (in KB, MB, or hours) of the log file segment, after which a new segment iscreated. The default size is in KB. The number (<number>) cannot be less than 100 KB or less thanone hour. A value of No indicates no segmentation of the log file.
standardType: MandatoryDefault Value: stdoutValid Values: log output types, such as stdout, stderr, syslog, network, <filename>Dependencies: None
Specifies that log events of the Standard level are to be sent to the listed outputs. For centralizedlogging, use a value of network. You can use a local file name as the value, stdout, or network.
traceType: MandatoryDefault Value: stdoutValid Values: log output types, such as stdout, stderr, syslog, network, <filename>Dependencies: None
Specifies that log events of the Trace level are to be sent to the listed outputs. For centralizedlogging, use network. You can use a local file name as the value, stdout, or network.
verboseType: MandatoryDefault Value: allValid Values: all, trace, standard, none, yes (= all), no (= none)Dependencies: None
Filters the output of log messages, based on their assigned priority.
• all—Enables output of all messages to the log file
WFM Configuration Options WFM Web Options
Workforce Management Administrator's Guide 167

• Trace—Enables informational and error messages and disables debug messages• Standard—Enables error messages only and disables informational and debug messages• None—Disables all messages.
Options Section
CustomActivitiesType: OptionalDefault Value: noneValid Value: a text string up to 255 charactersDependencies: The ShowAllActivities option value must be set to false.
Controls the display of the selected agent in the Main, Schedule Details, and Printing views).When this option is enabled, the custom value is displayed against the agents schedule, rather thanany of the activities for which they are scheduled. This value can be set to null, which displaysnothing in Web for Agents.
• If this option value is not defined or its value is empty (no text), then WFM Web displays a list of allactivities for which the agent is scheduled.
• If this option value is a text string, WFM Web displays that text string.• If the ShowAllActivities option value is set to true, this option has no effect; WFM Web displays a list
of all activities for which the agent has skills.• If the ShowAllActivities option value is set to false, the value replaces the list of all activities, for
which the agent has skills.
HideNamesType: MandatoryDefault Value: falseValid Value: true, falseDependencies: None
Specifies whether or not agent names are displayed in the Adherence views.
NameOrderType: MandatoryDefault Value: 1Valid Value: 1, 2, 3Dependencies: None
Determines how WFM Web presents agent names.
• 1—First name is presented first.• 2—Last name is presented first.• 3—Last name is presented first and is separated from first name with a comma.
NoPerformanceInScheduleType: Mandatory
WFM Configuration Options WFM Web Options
Workforce Management Administrator's Guide 168

Default Value: falseValid Value: true, falseDependencies: None
Controls whether or not target selection and performance data retrieval is automatic in the ScheduleIntra-Day view. It can be useful in improving the WFM performance in some situations. If this optionvalue is set to false (the default), target selection and performance data retrieval is automatic. If setto true, the user must explicitly select a target for performance data, or else no performance data isretrieved.
OpenHoursCellColorType: OptionalDefault Value: FFCC00 (hot yellow)Valid Value: Any standard hex code value for a color. For example, D3D3D3 is light gray.Dependencies: None
Specifies the color of the background in the opening hours cells of Forecast views. The defaultvalue applies if you omit this option.
PageCharSetType: OptionalDefault Value: No default valueValid Value: Any standard character set value. For example, enter x-sjis for the Japanese characterset. Dependencies: None
Specifies the character set that every page in WFM Web employs. If empty, no character set isspecified.
ShowAllActivitiesType: OptionalDefault Value: falseValid Values: true, falseDependencies: None
Specifies how the Daily Schedule pane is displayed in WFM Web for Agents. Set this option value tofalse to have only the agent’s scheduled activities displayed. Set it to true to create a displaycontaining all possible activities for that agent, whether scheduled or not.
See the option CustomActivities for related functionality.
Table: The affect of ShowAllActivities settings on CustomActivities
Statistics Definitiontrue any valuefalse emptyfalse text
Reports Section
Charset
WFM Configuration Options WFM Web Options
Workforce Management Administrator's Guide 169
Type: OptionalDefault Value: No default valueValid Values: Any standard code page value. For example, enter cp1257 for a Baltic code page.Dependencies: None
Specifies the code page to be used for fonts in generated reports. If empty, code page 1252, Latin 1,is used.
FontType: OptionalDefault Value: No default valueValid Value: Any font name that exists on the computer used to generate reports.Dependencies: None
Specifies the font name to be used in on the computer used to generated WFM reports.
x-FontPathType: OptionalDefault Value: No default valueValid Value: Physical pathDependencies: None
Physical directory path where the font resides (as specified above in Reports/Font).
OwnerCaptionType: MandatoryDefault Value: No default valueValid Value: Any stringDependencies: None
Provides the default value for the report header. You can change this value in the Header field on thefirst window of any Report Wizard.
OwnerVisibleType: MandatoryDefault Value: falseValid Value: true, falseDependencies: None
Provides the default value for the Show Header check box in the first page of all Report Wizards.
PageLimitType: OptionalDefault Value: 0Valid Value: 0 and upDependencies: None
Specifies the maximum number of pages a normal report can contain. If this number is exceeded,report generation is cancelled. Values less than 2 specify no limit.
PageLimitForCSVType: OptionalDefault Value: 0Valid Value: 0 and upDependencies: None
WFM Configuration Options WFM Web Options
Workforce Management Administrator's Guide 170

Specifies the maximum number of pages that a CSV-friendly report can contain. If this number isexceeded, report generation is cancelled. Values less than 2 specify no limit.
PathToAutoGeneratedReportsType: MandatoryDefault Value: NoneValid Value: a valid and accessible network pathDependencies: None
Specifies the network path for storing generated reports. If this value is not set, then generatedreports are lost (not stored at all).
RevertDiffCalculationType: MandatoryDefault Value: 0, false, noValid Value: 0, false, no, 1, true, yesDependencies: None
By default, the Difference column in the Contact Center Performance and Workforce Performancereports is calculated as the Scheduled or Forecasted value minus the Actual value. Set this option to1 (true) if you want the Difference column to be calculated as the Actual value minus theScheduled or Forecasted value.
ServerURLType: OptionalDefault Value: No default valueValid Value: URLDependencies: None
A URL for the location of the WFM Web that is used as the reports server. For more information, seeInstalling WFM Web as Report Server.
ShowActualHeadcountType: MandatoryDefault Value: falseValid Values: true, falseDependencies: None
Applies to the Contact Center Performance Report and the Workforce Performance Report. If thisoption value is set to false, the report displays the Actual Number of Agents that were collectedby Data Aggregator in the wm_agents_in option (logged in agents). If set to true, the report displaysthe Actual Headcount, which is the wm_agent_minutes option value divided by 15.
For example, if 1 agent is logged in but works only 14 minutes per timestep, the headcount equals0.93. Dependencies: None
ImportantFor CCPR, this condition is executed only for Actual data; for Planning DataEPerfInfoItems.PERF_ITEM_SCH_HEADCOUNT is always shown as Number of Agents.
ShowSSGonFirstPageOnly
WFM Configuration Options WFM Web Options
Workforce Management Administrator's Guide 171

Type: OptionalDefault Value: falseValid Value: true, falseDependencies: None
Set this option value to true to disable repeated display of the Select Schedule State Groups andSchedule States section on each page of all reports. If disabled (set to true) the report will displaythe complete list once, and then never repeat it.
WFM Configuration Options WFM Web Options
Workforce Management Administrator's Guide 172

WFM Builder OptionsFrom the Options tab you can modify the default WFM Builder configuration settings. The tabcontains four sections. The options in each of these sections are described below.
Client Section
CfgServerRequestTimeoutType: MandatoryDefault Value: 15Valid Value: Any positive integerDependencies: None
Specifies the number of seconds to wait for a response from Configuration Server before timing out.This key is used when requesting the list of objects from Configuration Server for synchronizationpurposes. The value should be increased in configurations with a high number of objects or slownetwork connections.
SOAPTimeoutType: MandatoryDefault Value: 120Valid Value: Any positive integerDependencies: None
The SOAP connection timeout, in seconds.
Identity Section
ApplicationTypeType: Optional in Framework 8.x environments.Default Value: WFMBuilderValid Value: WFMBuilderDependencies: None
Specifies the Workforce Management component for which this application is used. Configure thisoption only if you are using an application of the type ThirdPartyServer.
Logs Section
verboseType: MandatoryDefault Value: allValid Values: all, trace, standard, none, yes (= all), no (= none)
WFM Configuration Options WFM Builder Options
Workforce Management Administrator's Guide 173

Dependencies: None
Filters output of log messages based on their assigned priority. All enables output of all messages tothe log file. Setting the option value to:
• trace—Enables informational and error messages and disables debug messages.• standard—Enables error messages only and disables informational and debug messages.• none—Disables all messages.
bufferingType: MandatoryDefault Value: noValid Values: yes, noDependencies: None
Turns system file buffering on (yes) or off (no).
segmentType: MandatoryDefault Value: noValid Values: no, <number>, <number>KB, <number>MB, <number>HrDependencies: None
Sets the maximum size (in KB, MB, or hours) of the log file segment, after which a new segment iscreated. The default size is in KB. The number cannot be less than 100 KB or less than one hour.Setting this option value to no indicates no segmentation of the log file.
expireType: MandatoryDefault Value: noValid Values: no, <number>, <number> file, <number> dayDependencies: None
Sets the Expiration mode for old segments. The number to be stored cannot be less than 1 file or 1day or more than 100 files or 100 days. Setting this option value to no indicates that files do notexpire.
messagefileType: MandatoryDefault Value: wfmbuilder.lmsValid Value: wfmbuilder.lmsDependencies: None
Sets the name of the file that stores application-specific log messages. The only valid value iswfmbuilder.lms.
standardType: MandatoryDefault Value: stdoutValid Values (log output types): stdout, stderr, syslog, network, <filename>Dependencies: None
Specifies that log events of the Standard level are to be sent to the listed outputs. For centralized
WFM Configuration Options WFM Builder Options
Workforce Management Administrator's Guide 174

logging, set this option value to network. You can use a local file name or stdout, as well asnetwork.
traceType: MandatoryDefault Value: stdoutValid Values (log output types): stdout, stderr, syslog, network, <filename>Dependencies: None
Specifies that log events of the Trace level are to be sent to the listed outputs. For centralizedlogging, set this option value to network. You can use a local file name, stdout, as well as network.
debugType: MandatoryDefault Value: stdoutValid Values (log output types): stdout, stderr, syslog, network, <filename>Dependencies: None
Specifies that log events of the Debug level are to be sent to the listed outputs.
WarningDo not use network unless requested by Genesys Professional Services, because itgenerates extremely heavy message loads that can degrade system performance.
allType: MandatoryDefault Value: stdoutValid Values (log output types): stdout, stderr, syslog, network, <filename>Dependencies: None
Specifies that log events of all levels, Standard, Trace, and Debug, are to be sent to the listedoutputs.
WarningDo not use network unless requested by Genesys Professional Services, because itgenerates extremely heavy message loads that can degrade system performance.
x-ScheduleBuilderProgressTraceType: OptionalDefault Value: No default valueValid Values: true, falseDependencies: None
Enables or disables the reporting of schedule progress in the log file.
x-ScheduleBuilderTrace
WFM Configuration Options WFM Builder Options
Workforce Management Administrator's Guide 175

Type: OptionalDefault Value: No default valueValid Values: true, falseDependencies: “x-ScheduleLogPath”
Indicates that WFM Builder must write scheduling data, output data, and messages to the Schedulelog file. To use this option, you must specify a Schedule log path. One log file is created for everyschedule build. Used for Schedule debugging only.
x-ScheduleLogPathType: OptionalDefault Value: No default valueValid Value: Path to the Schedule log directory.Dependencies: None
For Schedule debugging only. Indicates the directory into which WFM Builder will write the filecontaining Schedule log data and messages.
x-ScheduleMaxLogsType: OptionalDefault Value: No default valueValid Values: 1-1000Dependencies: “x-ScheduleLogPath”
Specifies the maximum number of Schedule log files (or pairs, if the x-SwordTrace option value isalso set to yes) to keep in the folder specified in the x-ScheduleLogPath option. If you reach themaximum number of files, WFM Builder deletes files as necessary to stay within the limit, startingwith the oldest file.
x-SwordTraceType: OptionalDefault Value: No default valueValid Values: yes, noDependencies: "x-ScheduleLogPath”
Indicates that scheduling algorithm output messages must be written to the Schedule log. Used forSchedule debugging only.
Options Section
MaxSchedulingThreadPoolSizeType: OptionalDefault Value: 0Valid Values: 0, 1, <number> (the number of CPU cores available to the process)Dependencies: None
Limits the maximum number of CPU cores that WFM Builder uses when scheduling multi-siteschedule scenarios. If the value is missing or is set to anything less than 1, then WFM Builder usesthe maximum number of CPU cores for scheduling.
WFM Configuration Options WFM Builder Options
Workforce Management Administrator's Guide 176

ImportantThe number of CPU cores that WFM Builder might use depends upon the number ofsites that are in the schedule scenario. WFM Builder can schedule a multi-sitescenario, using a separate CPU core for each site. If there are ten sites in the schedulescenario, then Builder can use ten CPU cores for scheduling.
MultiSiteActivitiesEnabledType: OptionalDefault Value: falseValid Values: true, falseDependencies: None
Use this option if you are configuring multi-site activities to Specify that Builder will use multi-sitestaffing requirements when building multi-site schedule scenarios. If this option value is set to:
• True—Use the staffing requirements of multi-site activities.• False—Use the staffing requirements of related-site activities.
NameOrderType: MandatoryDefault Value: 1Valid Values: 1, 2, 3Dependencies: None
Specifies how names are presented in warning messages. If this option is set to:
• 1—First name is presented first.• 2—Last name is presented first.• 3—Last name is presented first and is separated from first name with a comma.
PreserveMarkedTimeType: OptionalDefault Value: falseValid Values: true, falseDependencies: None
If this option is set to:
• True—Agent days that have marked time will be excluded from intra-day reoptimization.• False (or empty)—Does not exclude Agent days that have marked time from intra-day reoptimization.
Special100ShiftCheckType: OptionalDefault Value: falseValid Values: true, falseDependencies: None
If the option value is:
WFM Configuration Options WFM Builder Options
Workforce Management Administrator's Guide 177
• True—Sets the Builder shift limit to 100 shifts.• False (or empty)—Sets the Builder shift limit to 500 shifts.
ImportantError 43 appears if your configuration violates the current shift limit.
WFM Configuration Options WFM Builder Options
Workforce Management Administrator's Guide 178

WFM Data Aggregator OptionsFrom the Options tab you can modify the default WFM Data Aggregator configuration settings. Thetab contains four sections. The options in each of these sections are described below.
Client Section
CfgServerRequestTimeoutType: MandatoryDefault Value: 10Valid Values: Any positive integerDependencies: None
Specifies the number of seconds to wait for a response from Configuration Server before timing out.This key is used when requesting the list of objects from Configuration Server for synchronizationpurposes. The value should be increased in configurations with a high number of objects or slownetwork connections.
SOAPTimeoutType: MandatoryDefault Value: 90Valid Value: Any positive integerDependencies: None
Specifies the SOAP connection timeout, in seconds.
Identity Section
ApplicationTypeType: Optional in a Framework 8.x environment.Default Value: WFMDataAggregatorValid Value: WFMDataAggregatorDependencies: None
Specifies the Workforce Management component for which this application is used. Configure thisoption only if you are using an application of the type ThirdPartyServer.
Logs Section
verboseType: MandatoryDefault Value: allValid Values: all, trace, standard, none, yes (= all), no (= none)
WFM Configuration Options WFM Data Aggregator Options
Workforce Management Administrator's Guide 179

Dependencies: None
Filters output of log messages based on their assigned priority. All enables output of all messages tothe log file. Setting the option value to:
• trace—Enables informational and error messages and disables debug messages.• standard—Enables error messages only and disables informational and debug messages.• none—Disables all messages.
bufferingType: MandatoryDefault Value: noValid Values: yes, noDependencies: None
Turns system file buffering on (yes) or off (no).
segmentType: MandatoryDefault Value: noValid Values: no, <number>, <number>KB, <number>MB, <number>HrDependencies: None
Sets the maximum size (in KB, MB, or hours) of the log file segment, after which a new segment iscreated. The default size is in KB. The number cannot be less than 100 KB or less than one hour.Setting this option value to no indicates no segmentation of the log file.
expireType: MandatoryDefault Value: noValid Values: no, <number>, <number> file, <number> dayDependencies: None
Sets the Expiration mode for old segments. The number to be stored cannot be less than 1 file or 1day or more than 100 files or 100 days. Setting this option value to no indicates that files do notexpire.
messagefileType: MandatoryDefault Value: wfmdataaggregator.lmsValid Value: wfmdataaggregator.lmsDependencies: None
Sets the name of the file that stores application-specific log messages. The only valid value iswfmdataaggregator.lms.
standardType: MandatoryDefault Value: stdoutValid Values (log output types): stdout, stderr, syslog, network, <filename>Dependencies: None
Specifies that log events of the Standard level are to be sent to the listed outputs. For centralized
WFM Configuration Options WFM Data Aggregator Options
Workforce Management Administrator's Guide 180

logging, set this option value to network. You can use a local file name or stdout, as well asnetwork.
traceType: MandatoryDefault Value: stdoutValid Values (log output types): stdout, stderr, syslog, network, <filename>Dependencies: None
Specifies that log events of the Trace level are to be sent to the listed outputs. For centralizedlogging, set this option value to network. You can use a local file name, stdout, as well as network.
debugType: MandatoryDefault Value: stdoutValid Values (log output types): stdout, stderr, syslog, network, <filename>Dependencies: None
Specifies that log events of the Debug level are to be sent to the listed outputs.
WarningDo not use network unless requested by Genesys Professional Services, because itgenerates extremely heavy message loads that can degrade system performance.
allType: MandatoryDefault Value: stdoutValid Values (log output types): stdout, stderr, syslog, network, <filename>Dependencies: None
Specifies that log events of all levels, Standard, Trace, and Debug, are to be sent to the listedoutputs.
WarningDo not use network unless requested by Genesys Professional Services, because itgenerates extremely heavy message loads that can degrade system performance.
x-DBWriterTraceType: OptionalDefault Value: No default valueValid Values: yes, noDependencies: None
When set to yes (or true or 1), this option enables an additional logging option that is used by DataAggregator to record how a statistic's records are being stored in the database.
WFM Configuration Options WFM Data Aggregator Options
Workforce Management Administrator's Guide 181

x-LogAgentEventTraceType: OptionalDefault Value: No default valueValid Values: yes, noDependencies: None
Specifies whether or not Data Aggregator writes agent event data to a log file. This option is used fordebugging only.
x-LogConfigServerConnectionTraceType: OptionalDefault Value: No default valueValid Values: yes, noDependencies: None
Specifies whether or not Data Aggregator writes Configuration Server connection data to a log file.This option is used for debugging only.
x-LogConfigServerTraceType: OptionalDefault Value: No default valueValid Values: yes, noDependencies: None
Indicates whether Data Aggregator should write Configuration Server process data to a log file. Thisoption is used for debugging only.
x-LogWFMServerTraceType: OptionalDefault Value: No default valueValid Values: yes, noDependencies: None
Specifies whether or not Data Aggregator writes WFM Server process data to a log file. This option isused for debugging only.
Options Section
AcceptZeroSkillLevelType: OptionalDefault Value: falseValid Value: true, falseDependencies: None
Specifies whether or not WFM Data Aggregator can set an agent skill level to 0. When this option isset to true it enables Data Aggregator to set an agent skill level to 0. When set to false it prevents(disables) Data Aggregator from setting an agent skill level to 0.
DBDumpFileType: OptionalDefault Value: No default value
WFM Configuration Options WFM Data Aggregator Options
Workforce Management Administrator's Guide 182

Valid Value: Any valid file nameDependencies: None
Specifies a file to which WFM Data Aggregator writes its current data if it loses its connection to thedatabase. When Data Aggregator is restarted or the connection to the database is restored, it locatesthe dump file, retrieves the data, writes it to the database, and then deletes the dump file. If you donot specify a file name, the file is DBdump.dat located in \\...\Workforce Management\DataAggregator.
HandleTimeWriteBackType: OptionalDefault Value: No default valueValid Value: 1-12Dependencies: None
Enables Data Aggregator to transfer the handling time of the recent timestep to a previous timestepand adjust the average handling time (AHT) value of the previous timestep when there were no callshandled in the current timestep, but a handling time was registered. This option prevents DataAggregator from setting the AHT value to 0 (zero) for timesteps, in which agents performed after-callwork (ACW) on calls that occurred in a previous timestep.
If this key is present and has an integer value between 1 and 12, Data Aggregator searches for theprevious timestep that is no further back than the specified key value and, in which at least one callwas handled. If Data Aggregator finds a timestep like this, it updates the AHT of that timestep toincorporate the handle time registered during the recent timestep.
The value for this key determines the number of timesteps that WFM Data Aggregator searches back.Therefore, the ACW must occur within 12 timesteps, or 3 hours, after call completion. A value of 0(zero) disables this option.
ImportantSome calls are brief enough to be considered short-abandoned calls, but they beginand end in different timesteps and thus require special handling to avoid skewing CallCenter data. WFM Data Aggregator can identify a call like this because the timestepwhere it ends has an associated HandleTime statistic but no HandleVolume statistic.WFM Data Aggregator uses the value of the HandleTimeWriteBack option whensearching for the beginning of a short-abandoned call like this, to adjust the priortimestep where that call began. See the topic "Configuration > Activities > Statistics> Configuring Statistics for Activities” in Workforce Management Web for SupervisorsHelp.
ReasonCodeKeyNameType: OptionalDefault Value: ReasonCodeValid Value: Any valid reason-code key nameDependencies: None
Specifies the reason (aux)-code key used in the enterprise. It is not necessary to configure this optionif you do not use reason codes. Data Aggregator can process reason codes that come from hard and/or soft phones. To receive reason codes from hard phones, or in a mixed hard/soft phone
WFM Configuration Options WFM Data Aggregator Options
Workforce Management Administrator's Guide 183
environment, set the Data Aggregator Application’s ReasonCodeKeyName option value toReasonCode in Configuration Manager.
ImportantYou can only use reason codes from hard phones if you are using Stat Server 7.x.
ReasonCodeWaitTimeType: OptionalDefault Value: 15Valid Value: 2–600Dependencies: None
Necessary only if you are using a pre-6.5 release of Stat Server and are using reason codes. Itspecifies how long, in seconds, Data Aggregator delays processing information during a timestepwhile waiting for reason code information. This parameter is useful when Stat Server and/or thenetwork are busy enough to delay reason code data.
ScheduleLookAheadMinutesType: OptionalDefault Value: No default valueValid Value: 0-1440Dependencies: None
Specifies how many additional minutes of agent schedules should be loaded from WFM Server foradherence calculations. Should be used only in environment where agent schedules andconfiguration are updated infrequently.
WFM Configuration Options WFM Data Aggregator Options
Workforce Management Administrator's Guide 184

WFM Daemon OptionsFrom the Options tab you can modify the default WFM Daemon configuration settings (see Using E-mail Notifications in WFM). The tab contains five sections. The options in each section are describedbelow.
Client Section
SOAPTimeoutType: MandatoryDefault Value: 60Valid Values: Any positive integerDependencies: None
Specifies the connection timeout, in seconds, to WFM Server.
Identity Section
ApplicationTypeType: Optional in a Framework 8.x environment.Default Value: WFMDaemonValid Value: WFMDaemonDependencies: None
Identifies the WFM Daemon application.
Log Section
allType: MandatoryDefault Value: stdoutValid Values: log output types, such as stdout, stderr, syslog, network, <filename>Dependencies: None
Specifies that log events of all levels, Standard, Trace, and Debug, are to be sent to the listedoutputs.
WarningDo not use the value network unless requested by Genesys Professional Services
WFM Configuration Options WFM Daemon Options
Workforce Management Administrator's Guide 185

because it generates extremely heavy message loads that can degrade systemperformance.
bufferingType: MandatoryDefault Value: falseValid Values: true, falseDependencies: None
Specifies whether system file buffering is turned on (true) or off (false).
debugType: MandatoryDefault Value: stdoutValid Values: log output types, such as stdout, stderr, syslog, network, <filename>Dependencies: None
Specifies that log events of the Debug level are to be sent to the listed outputs.
WarningDo not use the value network unless requested by Genesys Professional Servicesbecause it generates extremely heavy message loads that can degrade systemperformance.
expireType: MandatoryDefault Value: falseValid Values: false, <number>, <number> file, <number> dayDependencies: None
Sets the expiration mode for old segments. The number to be stored cannot be less than 1 file or 1day or more than 100 files or 100 days. A value of No indicates that files do not expire.
segmentType: MandatoryDefault Value: falseValid Values: false, <number>, <number>KB, <number>MB, <number>HrDependencies: None
Sets the maximum size (in KB, MB, or hours) of the log file segment, after which a new segment iscreated. The default size is in KB. The number (<number>) cannot be less than 100 KB or less thanone hour. A value of No indicates no segmentation of the log file.
standardType: MandatoryDefault Value: stdoutValid Values: log output types, such as stdout, stderr, syslog, network, <filename>
WFM Configuration Options WFM Daemon Options
Workforce Management Administrator's Guide 186

Dependencies: None
Specifies that log events of the Standard level are to be sent to the listed outputs. For centralizedlogging, use a value of network. You can use a local file name as the value, stdout, or network.
traceType: MandatoryDefault Value: stdoutValid Values: log output types, such as stdout, stderr, syslog, network, <filename>Dependencies: None
Specifies that log events of the Trace level are to be sent to the listed outputs. For centralizedlogging, use network. You can use a local file name as the value, stdout, or network.
verboseType: MandatoryDefault Value: allValid Values: all, trace, standard, none, yes (= all), no (= none)Dependencies: None
Filters the output of log messages, based on their assigned priority.
• all—Enables output of all messages to the log file• Trace—Enables informational and error messages and disables debug messages• Standard—Enables error messages only and disables informational and debug messages• None—Disables all messages.
Options Section
CharSetType: OptionalDefault Value: No default valueValid Values: Any standard character set value. For example, enter x-sjis for the Japanese characterset.Dependencies: None
Specifies the character set of notification messages sent. Must be specified if messages containspecific locale characters and they are not presented correctly in the received message.
NameOrderType: MandatoryDefault Value: 1Valid Values: 1, 2, 3Dependencies: None
Specifies first and last name order when sending email notifications.
• 1—First name is presented first.• 2—Last name is presented first.
WFM Configuration Options WFM Daemon Options
Workforce Management Administrator's Guide 187

• 3—Last name is presented first and is separated from first name with a comma.
pollTimerType: MandatoryDefault Value: 1Valid Value: Any positive integerDependencies: None
Specifies how often WFM Daemon must verify for data updates. The value is specified in minutes.
ReportGenerationTimeoutType: OptionalDefault Value: 120Valid Value: 1-1440Dependencies: None
Specifies the time (in minutes) after which a scheduled report task will be terminated, whether or notreport is finished. Use this option to control how long scheduled report tasks can run.
TrackAheadType: MandatoryDefault Value: 0Valid Value: Any integer, positive or negativeDependencies: The TrackBack option. If you specify 0 for this option value and the TrackBack optionvalue, Daemon tracks any data changes without date range limitations. If only one of these optionvalues is set to 0, Daemon treats it as an indicator of the current day.
Specifies how many days in advance of the current date that WFM Daemon requests data from WFMServer, counting from the current date. Relevant for any type of notification (see Using E-mailNotifications in WFM). The value specified is in days, and can be a negative number to specify thepast or a positive number to specify the future.
TrackBackType: MandatoryDefault Value: 0Valid Values: Any integer, positive or negativeDependencies: The TrackAhead option. If you specify 0 for this option value and the TrackAheadoption value, Daemon tracks any data changes without date range limitations. If only one of them is0, Daemon treats it as an indicator of the current day.
Specifies how many days back from the current date that WFM Daemon should request data fromWFM Server, counting from the current date. Relevant for any type of notification (see Using E-mailNotifications in WFM). The value specified is in days, and can be a negative number to specify thepast or a positive number to specify the future.
SMTP Section
AnonymousAccessType: OptionalDefault Value: falseValid Values: true, false
WFM Configuration Options WFM Daemon Options
Workforce Management Administrator's Guide 188

Dependencies: None
If this option value is set to true it enables WFM Daemon’s ability to send anonymous emails. If setto false it disable WFM Daemon’s ability to send anonymous emails.
fromAddressType: OptionalDefault Value: No default valueValid Values: Any valid email addressDependencies: None
Specifies the FROM email address that is presented to users that receive notifications.
HostType: MandatoryDefault Value: No default valueValid Values: Not applicableDependencies: None
Specifies the host name of machine where the SMTP server is located.
PasswordType: OptionalDefault Value: No default valueValid Values: Any valid passwordDependencies: None
Specifies the password that is used when connecting to the SMTP server. Specified only if SMTPserver requires connection authorization.
PortType: MandatoryDefault Value: 25Valid Values: Any positive integerDependencies: None
Specifies the SMTP server port number.
UserType: OptionalDefault Value: No default valueValid Values: Any valid usernameDependencies: None
Specifies the username that is used to connect to the SMTP server. Specified only if SMTP serverrequires connection authorization.
WFM Configuration Options WFM Daemon Options
Workforce Management Administrator's Guide 189

WFM Client OptionsThe Client Application object is used by the WFM Database Utility. In the Options tab you canmodify the default configuration settings for both utilities.
The Client Options tab contains three sections. The options in each of these sections are describedbelow. If you choose to use a user-created option, you can create an OptionalSettings section. SeeCreating New Configuration Sections and Options for instructions.
Logs Section
allType: MandatoryDefault Value: stdoutValid Values (log output types): stdout, stderr, syslog, network, <filename>Dependencies: None
Specifies that log events of all levels, Standard, Trace, and Debug, are to be sent to the listedoutputs.
ImportantDo not use network unless requested by Genesys Professional Services because itgenerates extremely heavy message loads that can degrade system performance.
bufferingType: MandatoryDefault Value: noValid Values: yes, noDependencies: None
Turns system file buffering on (yes) or off (no).
debugType: MandatoryDefault Value: stdoutValid Values (log output types): stdout, stderr, syslog, network, <filename>Dependencies: None
Specifies that log events of the Debug level are to be sent to the listed outputs.
Important
WFM Configuration Options WFM Client Options
Workforce Management Administrator's Guide 190

Do not use network unless requested by Genesys Professional Services because itgenerates extremely heavy message loads that can degrade system performance.
expireType: MandatoryDefault Value: noValid Values: no, <number>, <number> file, <number> dayDependencies: None
Sets the Expiration mode for old segments. The number to be stored cannot be less than 1 file or1 day or more than 100 files or 100 days. If this option value is set to no, files do not expire.
messagefileType: MandatoryDefault Value: No default valueValid Value: Any character stringDependencies: None
Sets the name of the file that stores application-specific log messages.
segmentType: MandatoryDefault Value: noValid Values: no, <number>, <number>KB, <number>MB, <number>HrDependencies: None Sets the maximum size (in KB, MB, or hours) of the log file segment, after whicha new segment is created. The default size is in KB. The number cannot be less than 100 KB or lessthan one hour. If this option value is set to no, the log file is not segmented.
standardType: MandatoryDefault Value: stdoutValid Values (log output types): stdout, stderr, syslog, network, <filename>Dependencies: None
Specifies that log events of the Standard level are to be sent to the listed outputs. For centralizedlogging, use the option value network. You can use a local file name or stdout as well as network.
traceType: MandatoryDefault Value: stdoutValid Values (log output types): stdout, stderr, syslog, network, <filename>Dependencies: None
Specifies that log events of the Trace level are to be sent to the listed outputs. For centralizedlogging, use network. You can use a local file name or stdout as well as network.
verboseType: MandatoryDefault Value: allValid Values: all, trace, standard, none, yes (= all), no (= none)Dependencies: None
WFM Configuration Options WFM Client Options
Workforce Management Administrator's Guide 191

Filters output of log messages based on their assigned priority. All enables output of all messages tothe log file.
• trace—Enables informational and error messages and disables debug messages.• standard—Enables error messages only and disables informational and debug messages.• none—Disables all messages.
Options Section
AllowLessUpdatesType: OptionalDefault Value: 0Valid Value: 0, 1Dependencies: None
Controls whether the Update Database to Version drop-down text box appears in the WFM DatabaseUtility after you choose to update your database. Normally, you would only update to the latestdatabase version. However, in some circumstances, you might need to choose to update to adatabase version other than the most recent one. In this case, you need to use the Update Databaseto Version drop-down text box.
To have the WFM Database Utility display the Update Database to Version drop-down text box, setthis value to 1. To remove this drop-down text box from the WFM Database Utility interface, set thisoption to 0.
AllowMigratePerformanceType: OptionalDefault Value: 0Valid Values: 0, 1Dependencies: None
Specifies whether to enable the Performance Data Migration option in the WFM Database Utilitywizard. To enable it, set this option to 1. This means that you can choose to migrate performancedata from your 7.x database to your new WFM 8.x database.
WFM Configuration Options WFM Client Options
Workforce Management Administrator's Guide 192

WFM Options RemovedThis section lists the WFM options that no longer supported by WFM and have been removed.
WFM Web
ShowTerminatedAgents (new name)HideTerminatedAgents (old name)Renamed and removed in 8.5.101.Can now be configured in WFM Web for Supervisors About > Settings dialog.
WFM Server
AdjustCarryOverByBonusRemoved in release WFM 8.5.1.
ImportantThe removal of the AdjustCarryOverByBonus configuration option affects the carry-over functionality in this way; Now in 8.5.1, WFM works as if the this option is set toTrue. Previous to 8.5.1, if the option was set to False, and the agent did not use theassigned bonus hours before the carry-over date, those hours might be lost in 8.5.1.
WFM Client
CommandTimeoutRemoved in release WFM 8.5.1.
CsynchFileRemoved in release WFM 8.5.1.
CfgServerRequestTimeoutRemoved in release WFM 8.5.1.
SOAPTimeoutRemoved in release WFM 8.5.1.
HelpFileRemoved in release WFM 8.5.1.
WFM Configuration Options WFM Options Removed
Workforce Management Administrator's Guide 193

HideTerminatedAgentsRemoved in release WFM 8.5.1.
NameOrderRemoved in release WFM 8.5.1.
FontSizeRemoved in release WFM 8.5.1.
FontRemoved in release WFM 8.5.1.
HideDA_settingsRemoved in release WFM 8.5.1.
Data Aggregator
AgentEventsFromInterfaceRemoved in release WFM 8.1.1.
SynchronizeUnassignedAgentsRemoved in release WFM 8.5.1.
x-LogSynchronizationTraceRemoved in release WFM 8.5.1.
WFM Configuration Options WFM Options Removed
Workforce Management Administrator's Guide 194

WFM Statistics: Recommended SettingsThis topic provides recommendations for configuring statistics for Genesys Stat Server, VoiceInteractions, and Genesys eServices (Multimedia) Interactions, in the following sections:
• Configuring Stat Server Statistics• Configuring Statistics for Voice Interactions• Configuring WFM Statistics for eServices (Multimedia) Interactions• Procedures• Tables: Recommended Stat Server Statistics
Configuring Stat Server Statistics
You configure the Stat Server statistics that WFM Data Aggregator tracks and records using WFMWeb. Therefore, you must configure certain Stat Server settings required by WFM before launchingWFM Web and completing the WFM Data Aggregator configuration (see Configuring DataAggregator).
In addition, you must locate or configure in Genesys Administrator the necessary Stat Serverstatistics for tracking WFM activities, so they will be available when configuring WFM Data Aggregatorstatistics in the WFM Web.
WarningYou must restart Stat Server after configuration changes.
You must configure two parameters in Stat Server: TimeProfile and TimeRange.
Back to Top
TimeProfileWFM Data Aggregator uses TimeProfile to order statistics for WFM activities from Stat Server basedon a specific interval of time. This time interval is configured in Stat Server as TimeProfile.
To configure the time profile, check the TimeProfiles section on the Options tab of the Stat ServerApplication object. If it does not exist, create this section.
After locating or creating this section, add the options:
• WFMProfile,Growing=0:00+0:15
WFM Statistics: Recommended Settings WFM Options Removed
Workforce Management Administrator's Guide 195

• TimeProfileName,Growing=0:00+0:15
TimeProfileName indicates the name of the time profile to be used. The 0:15 parameter indicatesthat the request statistics are based on 15-minute intervals.
ImportantA 15-minute interval is the only timestep currently supported.
Back to Top
TimeRangeWFM Data Aggregator uses TimeRange to request that the service-factor statistics be calculated,based on the specified time interval. Usually, service factor is calculated as X% of calls answeredin Y seconds. The Y seconds must be configured as the TimeRange parameter.
After you configure the time range, Stat Server uses it by default and returns the value for anyservice-factor statistic as X% of calls answered in [TimeRange] seconds. To configure the timerange, check for the TimeRanges section of the Stat Server Application object. If it does not exist,create this section.
After locating or creating this section, add these options:
• TimeRange10=0-10
• TimeRange15=0-15
• TimeRange20=0-20
• TimeRange30=0-30
• TimeRange60=0-60
• TimeRange90=0-90
In this case, 10, 15, 20, and so on, represent the Y seconds portion of the service factor calculationdescribed above.
You can configure multiple time ranges for multiple service-level goals. A Customer Service goal of 80percent of calls answered in 30 seconds and a Corporate Customer Service goal of 90 percent of callsanswered in 10 seconds is configured as follows:
• CustTimeRange '0-30'
• CorpTimeRange '0-10'
After you configure TimeRange statistic, use this option when configuring the Stat Server request inthe WFM Web.
WFM Statistics: Recommended Settings WFM Options Removed
Workforce Management Administrator's Guide 196

ImportantAfter restarting Stat Server, be certain that during initialization the TimeProfile andTimeRange statistics proceed successfully. See the Stat Server documentation formore details.
Back to Top
ProceduresThe following procedures relate to the topics on this page: View procedures...[+]
Locating Preconfigured Stat Server Statistics in Genesys AdministratorPurpose: To locate preconfigured Stat Server statistics.
Start of Procedure
1. Click the plus sign (+) next to Environment in the Genesys Administrator tree view.2. Click Applications.
The list of available Applications appears in the right-hand pane of the window.3. Double-click the Stat Server Application object.
The Properties window appears, containing several tabs.4. Click the Options tab.
The preset statistics are listed on the Options tab.5. Scroll through the list to determine which statistics (from those discussed in this topic) are already
available, and which ones you need to create.
End of Procedure
Next Steps:
• Complete the Creating New Stat Server Statistics for each statistic you need to create.• Complete the Entering Settings for New Statistics for each new statistic.
Creating New Stat Server StatisticsPurpose: To create new Stat Server statistics.
Prerequisite: The statistics that WFM requires are not in the preset list.
WFM Statistics: Recommended Settings WFM Options Removed
Workforce Management Administrator's Guide 197

Start of Procedure
1. On the Stat Server Option tab, click Create New Section/Option.The Add Statistic window appears.
2. Enter a statistic name from the Stat Server Statistics Settings tables starting with Table 1 .3. Click OK.
The new statistic appears in the Option tab of the Statistics list.
ImportantCertain Genesys eServices (Multimedia) statistics require additional configuration. Formore details, see Configuring WFM Statistics for eServices (Multimedia) Interactions.
End of Procedure
Next Steps:
• Complete the procedure Entering Settings for New Statistics for each new statistic.
Entering Settings for New StatisticsPurpose: To configure the new statistics just created.
Prerequisite: You have completed the Creating New Stat Server Statistics.
Summary: After you create new statistics, you must configure each to attach the correct propertiesto each. You can create one or more separate requests for each activity. For example, if an activitynamed CustomerCare is handled by two different queues, the interaction volume can be obtainedby creating a separate request to Stat Server for the TotalNumberCallsInbound statistic for eachqueue. WFM Data Aggregator automatically sums these results to calculate the total number ofCustomerCare interactions.
WarningStat Server statistics are used to collect historical data. It is critical that the statisticrequests be configured correctly.
Start of Procedure
1. Double-click a new statistic.The Properties window appears, but is blank.
2. In the Properties window, right-click in the blank area and, from the shortcut menu, select New. TheEdit Option dialog box opens.
WFM Statistics: Recommended Settings WFM Options Removed
Workforce Management Administrator's Guide 198

3. Enter four option names and values for each new statistic.4. In the Option Name box, enter an option name from Table 1: Recommended Stat Server Statistics.5. In the Option Value box, enter the corresponding option value.
ImportantEnter the option values exactly as shown in Table 1: Recommended Stat ServerStatistics.
6. Click OK.The new settings appear in the Properties window.
7. Repeat Steps 1–5 until you have defined properties for all four options.8. After entering all the required properties, click OK.9. To create the next statistic, click Create New Section/Options again.
10. Continue the procedure until you have created all the recommended statistics.11. Click OK.
End of Procedure
To find more information about Stat Server statistics, see the Stat Server documentation. You cancopy-and-paste a generic set of these recommended statistics, in the topic Using Copy and PasteFormat for Statistics.
Table: Recommended Stat Server StatisticsView tables.. [+]
Interaction VolumeItem Description
Statistic Name TotalNumberCallsEntered
Statistic ConfigurationOption/Value pairs
Objects = Queue, RoutePoint, GroupQueuesCategory = TotalNumberMainMask = CallEnteredSubject = DNAction
Comments Predefined. Collects the number of interactions thatenter the object.
WFM Statistics: Recommended Settings WFM Options Removed
Workforce Management Administrator's Guide 199

Abandonment VolumeItem Description
Statistic Name TotalNumberCallsAband
Statistic ConfigurationOption/Value pairs
Objects = Queue, RoutePoint, GroupQueuesCategory = TotalNumberMainMask = CallAbandonedSubject = DNAction
Comments Predefined. Collects the number of interactionsabandoned while waiting in the object.
Statistic Name TotalNumberShortAbandons
Statistic ConfigurationOption/Value pairs
Objects = Queue, RoutePoint, GroupQueuesCategory = TotalNumberInTimeRangeMainMask = CallAbandoned, CallAbandonedFromRingingSubject = DNAction
Comments Predefined. Collects the number of interactionsabandoned while waiting in the object.
Quality of ServiceItem Description
Statistic Name ServiceFactor1
Statistic ConfigurationOption/Value pairs
Objects = Queue, RoutePoint, GroupQueuesCategory = ServiceFactor1MainMask = CallAnswered, CallAbandoned,CallAbandonedFromRingingSubject = DNAction
Comments
Predefined. You must configure a time range to usethis statistic. Reports the percentage ofinteractions answered byagents within the time range. Calculated as interactionsanswered divided by total interactions (answered +abandoned).
Statistic Name TotalNumberCallsDistrib
Statistic ConfigurationOption/Value pairs
Objects = Queue, RoutePoint, GroupQueuesCategory = TotalNumberMainMask = CallDistributedSubject = DNAction
CommentsPredefined. Reports the number of interactionsdistributed to other objects from the specifiedobject.
Statistic Name AverTimeBeforeAnswering
WFM Statistics: Recommended Settings WFM Options Removed
Workforce Management Administrator's Guide 200

Item Description
Statistic ConfigurationOption/Value pairs
Objects = Queue, RoutePoint, GroupQueuesCategory = AverageTimeMainMask = CallAnsweredSubject = DNAction
Comments
Not predefined. Reports the average time aninteraction range before being answered.Calculated as a ratio of total wait time forinteractions to be answered divided by the numberanswered. Only interactions answered during thecurrent time interval are counted.
Handle TimeItem Description
Statistic Name TotalHandleTime
Statistic ConfigurationOption/Value pairs
Objects = Agent, Place, GroupAgents, GroupPlacesCategory = TotalAdjustedTimeMainMask = CallInbound, CallOutbound, AfterCallWorkSubject = DNAction
CommentsPredefined. Reports the total time an agent spenthandling inbound or outbound interactions anddoing offline or after call work.
Statistic Name TotalNumberCallsHandled
Statistic ConfigurationOption/Value pairs
Objects = Agent, Place, GroupAgents, GroupPlacesCategory = TotalNumberMainMask = CallInbound, CallOutboundSubject = DNAction
CommentsNot predefined. Reports the number of inbound andoutbound interactions that ended during a specifictimestep.
You can copy-and-paste a generic set of these recommended statistics, in the topic, "Using Copy-and-Paste Format for Statistics".
Back to Top
WFM Statistics: Recommended Settings WFM Options Removed
Workforce Management Administrator's Guide 201

Configuring WFM Statistics for VoiceInteractionsYou can copy-and-paste a generic set of these recommended statistics, into those described in thetopic Using Copy-and-Paste Format for Statistics.
Table 1: Interaction Volume
Item Description
Statistic NameTotalNumberCallsEnteredorWFMTotalNumberCallsEntered
Statistic ConfigurationOption/Value pairs
Objects = Queue, RoutePoint, GroupQueuesCategory = TotalNumberMainMask = CallEnteredSubject = DNAction
Comments Predefined. Collects the number of interactions thatenter the object.
Table 2: Abandonment Volume
Item Description
Statistic NameTotalNumberCallsAbandorWFMTotalNumberCallsAband
Statistic ConfigurationOption/Value pairs
Objects = Queue, RoutePoint, GroupQueuesCategory = TotalNumberMainMask = CallAbandonedSubject = DNAction
Comments Predefined. Collects the number of interactionsabandoned while waiting in the object.
Back to Top
Table 3: Short Abandonment Volume
Item DescriptionStatistic Name TotalNumberShortAbandons
Statistic ConfigurationOption/Value pairs
Objects = Queue, RoutePoint, GroupQueuesCategory = TotalNumberInTimeRangeMainMask = CallAbandoned, CallAbandonedFromRinging
WFM Statistics: Recommended Settings Configuring WFM Statistics for Voice Interactions
Workforce Management Administrator's Guide 202

Item Description
Subject = DNAction
Comments
Predefined. Collects the number of interactionsabandoned within a configurable timeperiod—typically a few seconds—while waiting inthe object. Short Abandons are usually consideredto be wrong numbers or similar, and are typicallyexcluded when computing statistics.
Quality of Service
Table 4: Distributed Interactions
Item Description
Statistic NameTotalNumberCallsDistriborWFMTotalNumberCallsDistrib
Statistic ConfigurationOption/Value pairs
Objects = Queue, RoutePoint, GroupQueuesCategory = TotalNumberMainMask = CallDistributedSubject = DNAction
CommentsPredefined. Reports the number of interactionsdistributed to other objects from the specifiedobject.
Back to Top
Table 5: Service Factor
Item Description
Statistic NameServiceFactor1orWFMServiceFactor1
Statistic ConfigurationOption/Value pairs
Objects = Queue, RoutePoint, GroupQueuesCategory = ServiceFactor1MainMask = CallAnswered, CallAbandoned,CallAbandonedFromRingingSubject = DNAction
Comments
Predefined. You must configure a time range to usethis statistic. Reports the percentage ofinteractions answered by agents within the timerange. Calculated as interactions answered dividedby total interactions (answered + abandoned).
WFM Statistics: Recommended Settings Configuring WFM Statistics for Voice Interactions
Workforce Management Administrator's Guide 203

Table 6: Average Speed of Answer
Item Description
Statistic NameAverTimeBeforeAnsweringorWFMAverTimeBeforeAnswering
Statistic ConfigurationOption/Value pairs
Objects = Queue, RoutePoint, GroupQueuesCategory = AverageTimeMainMask = CallAnsweredRelMask = CallAnsweredSubject = DNAction
Comments
Not predefined. Reports the average time aninteraction rang before being answered. Calculatedas a ratio of total wait time for interactions to beanswered divided by the number answered. Onlyinteractions answered during the current timeinterval are counted.
Back to Top
Handle Time
Table 7: Total Handle Time
Item Description
Statistic NameTotalHandleTimeorWFMTotalHandleTime
Statistic ConfigurationOption/Value pairs
Objects = Agent, Place, GroupAgents,GroupPlacesCategory = TotalAdjustedTimeMainMask = CallInbound, CallOutbound,OfflineWorkType1Subject = DNAction
CommentsPredefined. Reports the total time an agent spenthandling inbound or outbound interactions anddoing offline work.
Table 8: Interactions Handled
Item Description
Statistic NameTotalNumberCallsHandledorWFMTotalNumberCallsHandled
WFM Statistics: Recommended Settings Configuring WFM Statistics for Voice Interactions
Workforce Management Administrator's Guide 204

Item Description
Statistic ConfigurationOption/Value pairs
Objects = Agent, Place, GroupAgents,GroupPlacesCategory = TotalNumberMainMask = CallInbound, CallOutboundSubject = DNAction
CommentsNot predefined. Reports the number of inbound andoutbound interactions that ended during a specifictimestep.
WFM Statistics: Recommended Settings Configuring WFM Statistics for Voice Interactions
Workforce Management Administrator's Guide 205

Configuring WFM Statistics for eServices(Multimedia) InteractionsThe recommendations in this topic only describe how to configure statistics, based on InteractionQueues. If you want to copy-and-paste a generic set of these recommended statistics, see UsingCopy-and-Paste Format for Statistics.
See recommended statistics for:
• Chat Interactions• E-mail Interactions• iWD Interactions
Statistics For Chat Interactions
This section contains recommended statistics for Genesys eServices (Multimedia) statistics for chatinteractions.
Table 1: Interaction Volume
Item DescriptionWFM statistic object type Interaction queueConfigServer object type ScriptStatistic name <name is user-definable>
Statistic ConfigurationOption/Value pairs
AggregationType = TotalCategory = JavaCategoryDescription = The total number of interactions of the specifiedmedia type that entered this staging area during the specifiedperiod.JavaSubCategory = eServiceInteractionStat.jar:OMQ TotalEnteredMediaType = chatObjects = StagingArea
Statistic created by Must be configured manually.
Table 2: Abandonment Volume
Item DescriptionWFM statistic object type Interaction queueConfigServer object type ScriptStatistic name Chat_Total_Abandoned_From_Queue
WFM Statistics: RecommendedSettings
Configuring WFM Statistics for eServices (Multimedia)Interactions
Workforce Management Administrator's Guide 206

Item Description
Statistic ConfigurationOption/Value pairs
AggregationType = TotalCategory = JavaCategoryDescription = The total number of email interactionsabandoned.JavaSubCategory = eServiceInteractionStat.jar:OMQ TotalAbandonedMediaType = chatObjects = StagingArea
Statistic created by Must be configured manually.
Back to Top
Quality of ServiceTable 3: Average Speed of Answer
Item DescriptionWFM statistic object type Interaction queueConfigServer object type ScriptStatistic name <name is user-definable>
Statistic ConfigurationOption/Value pairs
AggregationType = TotalCategory = JavaCategoryJavaSubCategory = eServiceInteractionStat.jar:OMQ AverageWaiting TimeMediaType = chatObjects = StagingArea
Statistic created by Must be configured manually.
Table 4: Distributed Interactions
Item DescriptionWFM statistic object type Interaction queueConfigServer object type ScriptStatistic name <name is user-definable>
Statistic ConfigurationOption/Value pairs
AggregationType = TotalCategory = JavaCategoryJavaSubCategory = eServiceInteractionStat.jar:OMQ TotalDistributedMediaType = chatObjects = StagingArea
Statistic created by Must be configured manually.
Back to Top
Handle Time
WFM Statistics: RecommendedSettings
Configuring WFM Statistics for eServices (Multimedia)Interactions
Workforce Management Administrator's Guide 207

Table 5: Total Handle Time
Item DescriptionWFM statistic object type GroupAgents, GroupPlacesConfigServer object type GroupAgents, GroupPlacesStatistic name Interactions_Processing_Time
Statistic ConfigurationOption/Value pairs
Category = TotalTimeDescription = The total amount of time that this resource spenthandling interactions during the specified period.MainMask = InteractionHandlingObjects = Agent, GroupAgents, GroupPlaces, PlaceSubject = AgentStatus
Statistic created by Genesys eServices (Multimedia) WizardFilter <name is user-definable>Filter configuration MediaType=chat & PairExists(“Queue”,X)
Filter created by Must be configured manually. X is the name of theinteraction queue.
Table 6: Interactions_Handled
Item DescriptionWFM statistic object type GroupAgents, GroupPlacesConfigServer object type GroupAgents, GroupPlacesStatistic name Interactions_Processed
Statistic ConfigurationOption/Value pairs
Category = TotalNumberDescription = The total number of interactions that werehandled by this resource during the specified period.MainMask = InteractionHandlingObjects = Agent, GroupAgents, GroupPlaces, PlaceSubject = AgentStatus
Statistic created by Genesys eServices (Multimedia) WizardFilter <name is user-definable>Filter configuration MediaType=chat & PairExists(“Queue”,X)
Filter created by Must be configured manually. X is the name of theinteraction queue.
Back to Top
Statistics For E-Mail Interactions
This section contains recommended statistics for Genesys eServices (Multimedia) statistics for emailinteractions.
Table 7: Interaction Volume
WFM Statistics: RecommendedSettings
Configuring WFM Statistics for eServices (Multimedia)Interactions
Workforce Management Administrator's Guide 208

Item DescriptionWFM statistic object type Interaction queueConfigServer object type ScriptStatistic name IxnQueue_Email_Entered
Statistic ConfigurationOption/Value pairs
AggregationType = TotalCategory = JavaCategoryDescription = Total number of email interactions that enteredthe queue.JavaSubCategory = eServiceInteractionStat.jar:EQR TotalEnteredObjects = StagingArea
Statistic created by Genesys eServices (Multimedia) Wizard.
Back to Top
Handle TimeTable 8: Total Handle Time
Item DescriptionWFM statistic object type GroupAgents, GroupPlacesConfigServer object type GroupAgents, GroupPlacesStatistic name nteractions_Processing_Time
Statistic ConfigurationOption/Value pairs
Category = TotalTimeDescription = The total amount of time that this resource spenthandling interactions during the specified period.MainMask = InteractionHandlingObjects = Agent, GroupAgents, GroupPlaces, PlaceSubject = AgentStatus
Statistic created by Genesys eServices (Multimedia) WizardFilter <name is user-definable>Filter configuration MediaType = E-mail & PairExists(“Queue”,X)
Filter created by Must be configured manually. X is the name of theinteraction queue.
Table 9: Interactions Handled
Item DescriptionWFM statistic object type GroupAgents, GroupPlacesConfigServer object type GroupAgents, GroupPlacesStatistic name Interactions_Processed
Statistic ConfigurationOption/Value pairs
Category = TotalNumberDescription = The total number of interactions that werehandled by this resource during the specified period.
WFM Statistics: RecommendedSettings
Configuring WFM Statistics for eServices (Multimedia)Interactions
Workforce Management Administrator's Guide 209

Item Description
MainMask = InteractionHandlingObjects = Agent, GroupAgents, GroupPlaces, PlaceSubject = Action
Statistic created by Genesys eServices (Multimedia) WizardFilter <name is user-definable>Filter configuration MediaType = E-mail & PairExists(“Queue”,X)
Filter created by Must be configured manually. X is the name of theinteraction queue.
Back to Top
BacklogTable 10: E-mails
Item Description
Statistic nameEmailsWaitingInQueueorWFMEmailsWaitingInQueue
Statistic ConfigurationOption/Value pairs
Objects = StagingAreaCategory = JavaCategoryAggregationType = CurrentJavaSubCategory = eServiceInteractionStat.jar:OMQ CurrentWaiting ProcessingMediaType = email
CommentsNumber of email interactions that have beensubmitted to a queue and are currently awaitingprocessing.
Back to Top
Statistics For iWD Interactions
This section contains recommended statistics for Genesys eServices (Multimedia) statistics forintelligent Workload Distribution (iWD) interactions.
Table 11: Interaction Volume
Item DescriptionConfigServer object type ScriptStatistic name <name is user-definable>Statistic Configuration AggregationType = Total
WFM Statistics: RecommendedSettings
Configuring WFM Statistics for eServices (Multimedia)Interactions
Workforce Management Administrator's Guide 210

Item Description
Option/Value pairs
Category = JavaCategoryDescription = The total number of interactions of the specifiedmedia type that entered this staging area during the specifiedperiod.JavaSubCategory = eServiceInteractionStat.jar:OMQ TotalEnteredMediaType = MediaXObjects = StagingArea
Statistic created byMust be configured manually. MediaX is the mediatype for corresponding intelligent WorkloadDistribution.
Table 12: Abandonment Volume
Item DescriptionWFM statistic object type Interaction queueConfigServer object type ScriptStatistic name <name is user-definable>
Statistic ConfigurationOption/Value pairs
AggregationType = TotalCategory = JavaCategoryDescription = Total number of email interactions abandoned.JavaSubCategory = eServiceInteractionStat.jar:OMQ TotalAbandonedMediaType = MediaXObjects = StagingArea
Statistic created byMust be configured manually. MediaX is the mediatype for corresponding intelligent WorkloadDistribution.
Back to Top
Quality of ServiceTable 13: Average Speed of Answer
Item DescriptionWFM statistic object type Interaction queueConfigServer object type ScriptStatistic name <name is user-definable>
Statistic ConfigurationOption/Value pairs
AggregationType = TotalCategory = JavaCategoryJavaSubCategory = eServiceInteractionStat.jar:OMQ AverageWaiting TimeMediaType = MediaXObjects = StagingArea
Statistic created by Must be configured manually. MediaX is the mediatype for corresponding intelligent Workload
WFM Statistics: RecommendedSettings
Configuring WFM Statistics for eServices (Multimedia)Interactions
Workforce Management Administrator's Guide 211

Item DescriptionDistribution.
Table 14: Distributed Interactions
Item DescriptionWFM statistic object type Interaction queueConfigServer object type ScriptStatistic name <name is user-definable>
Statistic ConfigurationOption/Value pairs
AggregationType = TotalCategory = JavaCategoryJavaSubCategory = eServiceInteractionStat.jar:OMQ TotalDistributedMediaType = MediaXObjects = StagingArea
Statistic created byMust be configured manually. MediaX is the mediatype for corresponding intelligent WorkloadDistribution.
Back to Top
Handle TimeTable 15: Total Handle Time
Item DescriptionWFM statistic object type GroupAgents, GroupPlacesConfigServer object type GroupAgents, GroupPlacesStatistic name Interactions_Processing_Time
Statistic ConfigurationOption/Value pairs
Category = TotalTimeDescription = The total amount of time that this resource spenthandling interactions during the specified period.MainMask = InteractionHandlingObjects = Agent, GroupAgents, GroupPlaces, PlaceSubject = AgentStatus
Statistic created by Genesys eServices (Multimedia) WizardFilter <name is user-definable>Filter configuration MediaType = MediaX
Filter created by Must be configured manually. X is the name of theinteraction queue.
Table 16: Interactions_Handled
Item DescriptionWFM statistic object type GroupAgents, GroupPlaces
WFM Statistics: RecommendedSettings
Configuring WFM Statistics for eServices (Multimedia)Interactions
Workforce Management Administrator's Guide 212

Item DescriptionConfigServer object type GroupAgents, GroupPlacesStatistic name Interactions_Processed
Statistic ConfigurationOption/Value pairs
Category = TotalNumberDescription = The total number of interactions that werehandled by this resource during the specified period.MainMask = InteractionHandlingObjects = Agent, GroupAgents, GroupPlaces, PlaceSubject = AgentStatus
Statistic created by Genesys eServices (Multimedia) WizardFilter <name is user-definable>Filter configuration MediaType = MediaX
Filter created by Must be configured manually. X is the name of theinteraction queue.
Back to Top
WFM Statistics: RecommendedSettings
Configuring WFM Statistics for eServices (Multimedia)Interactions
Workforce Management Administrator's Guide 213

Managing the WFM DatabaseUse Workforce Management (WFM) Database Utility to configure, update, maintain, back up andrestore, and if required, migrate your database. The Database Utility provides a number of functionsin a single interface that enable you to perform these tasks, which are described in these sections:
• Overview• New Database Configuration• Update Your WFM Database• Database Maintenance• Back Up and Restore Your Database• Database Migration• ETL Database Setup• Procedures
Overview
Use the Database Utility to:
• Create and configure a new database.• Update your database to that latest release.• Perform other database updates as needed.• Perform regular maintenance, such as cleanup of obsolete data.• Migrate data from a previous WFM releases to a WFM 8.5 database.
ImportantTo ensure the WFM Web Application to work properly, you must set Microsoft SQL andOracle database management systems to be case-insensitive.
The WFM Database Utility uses the Application object typically named WFM ClientApplication.
Back to Top
Managing the WFM Database Configuring WFM Statistics for eServices (Multimedia) Interactions
Workforce Management Administrator's Guide 214

New Database Configuration
If your first installed release of this product is Workforce Management 7.6 (or higher) or if you aremigrating from release 6.x, you will use a new database. The WFM Database Utility populates andconfigures the new database for you, setting up the necessary tables, views, indexes, and so on. Forinstructions, see Installing WFM Database Utility. If you are already using WFM 7.x, its not necessaryto install a new database. Simply perform a database update to transition your database to release8.1.
DB2 Configuration RecommendationsThe settings in this section are required when you create the WFM database, and will optimize itsperformance. Click the + sign to display the details for each recommended setting. See alsoConfiguring the DB2 Database.
LOGFILSIZ
[+]Default value LOGFILSIZ = 1000
Recommended LOGFILSIZ = 1000Update with this
CommandUPDATE DATABASE CONFIGURATION FOR db_nameUSING LOGFILSIZ 1000;
LOGPRIMARY
[+]Default value LOGPRIMARY = 3
Recommended LOGPRIMARY = 10Use with this
CommandUPDATE DATABASE CONFIGURATION FOR db_nameUSING LOGPRIMARY 10;
LOGSECOND
[+]Default value LOGSECOND = 2
Recommended LOGSECOND = 2Use with this
CommandUPDATE DATABASE CONFIGURATION FOR db_nameUSING LOGSECOND 2;
STMTHEAP
[+]SQL SQL statement heap (4KB)
DescriptionThe statement heap is used as a work space for theSQL compiler during compilation of an SQLstatement. This parameter specifies the size of this
Managing the WFM Database Configuring WFM Statistics for eServices (Multimedia) Interactions
Workforce Management Administrator's Guide 215
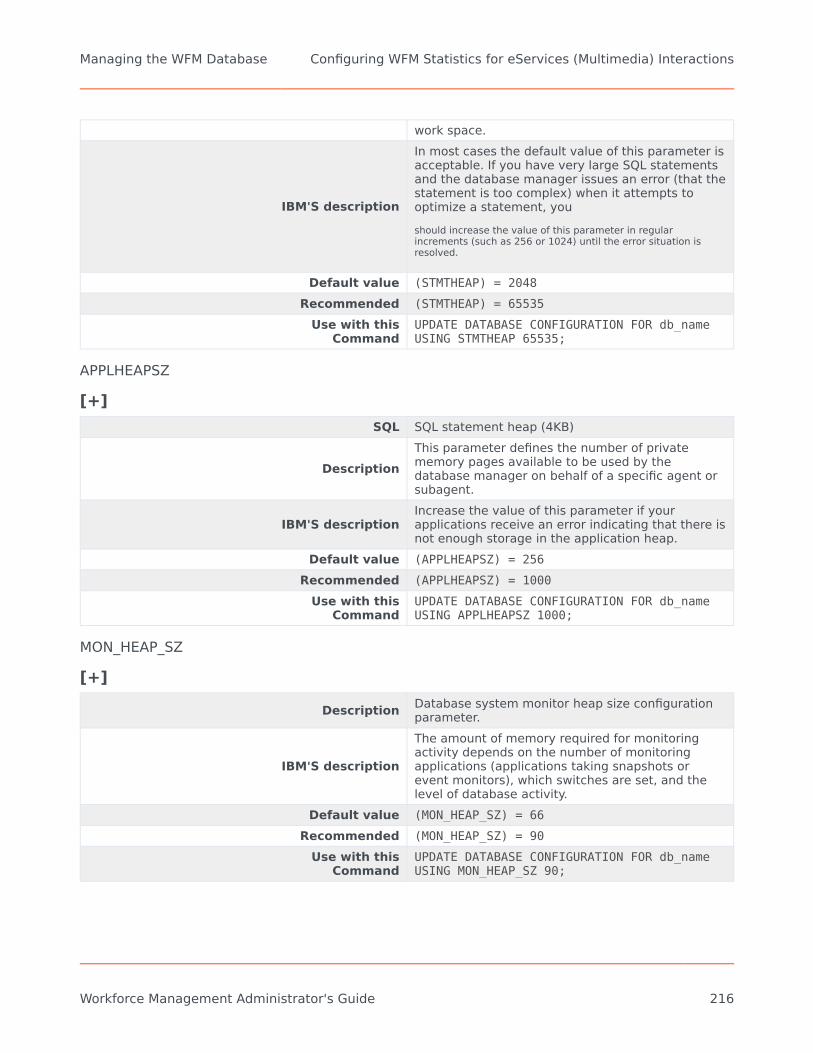
work space.
IBM'S description
In most cases the default value of this parameter isacceptable. If you have very large SQL statementsand the database manager issues an error (that thestatement is too complex) when it attempts tooptimize a statement, youshould increase the value of this parameter in regularincrements (such as 256 or 1024) until the error situation isresolved.
Default value (STMTHEAP) = 2048Recommended (STMTHEAP) = 65535
Use with thisCommand
UPDATE DATABASE CONFIGURATION FOR db_nameUSING STMTHEAP 65535;
APPLHEAPSZ
[+]SQL SQL statement heap (4KB)
DescriptionThis parameter defines the number of privatememory pages available to be used by thedatabase manager on behalf of a specific agent orsubagent.
IBM'S descriptionIncrease the value of this parameter if yourapplications receive an error indicating that there isnot enough storage in the application heap.
Default value (APPLHEAPSZ) = 256Recommended (APPLHEAPSZ) = 1000
Use with thisCommand
UPDATE DATABASE CONFIGURATION FOR db_nameUSING APPLHEAPSZ 1000;
MON_HEAP_SZ
[+]
Description Database system monitor heap size configurationparameter.
IBM'S description
The amount of memory required for monitoringactivity depends on the number of monitoringapplications (applications taking snapshots orevent monitors), which switches are set, and thelevel of database activity.
Default value (MON_HEAP_SZ) = 66Recommended (MON_HEAP_SZ) = 90
Use with thisCommand
UPDATE DATABASE CONFIGURATION FOR db_nameUSING MON_HEAP_SZ 90;
Managing the WFM Database Configuring WFM Statistics for eServices (Multimedia) Interactions
Workforce Management Administrator's Guide 216

SHEAPTHRES
[+]
IBM'S description
Ideally, you should set this parameter to areasonable multiple of the largest sortheapparameter you have in your database managerinstance. This parameter should be at least twotimes the largest sortheap defined for anydatabase within the instance.
Default value SHEAPTHRES = 16130Recommended SHEAPTHRES = 20000
Use with thisCommand
UPDATE DATABASE CONFIGURATION FOR db_nameUSING SHEAPTHRES 20000;
Back to Top
Buffer PoolThe default buffer pool Page size (4) and other values are too small. Genesys recommends you enterthe following values for the settings in the Alter Buffer Pool dialog box:
Table 1: Recommended Buffer Pool Settings for DB2
Setting Default value Recommended valuePage Size 4 32Bufferpool size 1000 60000Size in 4KB pages 1000 60000
Regular TableSpace
Create a Regular table space using buffer poolwith 32KB Page size.
System Temporarytable space
Create a System Temporary table space usingbuffer pool with 32KB Page size.
User TemporaryTable Space
Create a User Temporary table space using bufferpool with 32KB Page size.
Using the Table SpacesIn the Change User dialog box, on the Table Space tab, ensure the table spaces you want to use,are checked (see figure below).
ImportantEnsure you create the same user as your operating system user.
Managing the WFM Database Configuring WFM Statistics for eServices (Multimedia) Interactions
Workforce Management Administrator's Guide 217

Figure: Using newly created table spaces when creating new users
Back to Top
Tuning the Transaction Log CharacteristicsBefore you enable a database for spatial operations, ensure that you have enough transaction logcapacity. The default values for the transaction log configuration parameters do not provide sufficienttransaction log capacity if your plans include:
• Enabling a database for spatial operations in a Windows environment• Using the ST_import_shape stored procedure to import from shape files• Using geocoding with a large commit scope• Running concurrent transactions
If you plan to use any of these now or in the future, you need to increase the capacity of yourtransaction log for the database, by increasing one or more of the transaction log configurationparameters. Otherwise, you can use the default characteristics and proceed to tuning the applicationheap size.
Recommended Minimum Values
See the table below for the recommended minimum values for the three transaction log configurationparameters.
Table 2: Recommended minimum values for transaction configuration parameters
Parameter Description Default value Recommendedminimum value
LOGFILSIZSpecifies the log file sizeas a number of 4-KBblocks
1000 1000
Managing the WFM Database Configuring WFM Statistics for eServices (Multimedia) Interactions
Workforce Management Administrator's Guide 218

Parameter Description Default value Recommendedminimum value
LOGPRIMARYSpecifies how manyprimary log files are tobe pre-allocated to therecovery log files
3 10
LOGSECOND Specifies the number ofsecondary log files 2 2
If the capacity of your transaction log is not adequate, the following error message is issued whenyou try to enable a database for spatial operations: GSE0010N Not enough log space isavailable to DB2.
Back to Top
Update Your WFM Database
From time to time, Genesys issues Maintenance Releases (MR) of its products. Some of the WorkforceManagement updates require database updates. If so, you can perform them using the WFMDatabase Utility.
ImportantIf you are migrating from WFM 7.x to 8.1, all you need to do to your database is toupdate it. You do not need to create a new database.
Do You Need to Update Your Database?You might need to update your database, but perhaps you are not sure. Use the steps to help youdecide:
1. Open the WFM Database Utility.2. Check lower-right in the main window to see whether it indicates that your database is up-to-date. The
database version number should correspond to the version number of the WFM Database Utility youare running.
To update the database, see Performing a Database Update.
Database Maintenance
To properly maintain your database, you might need to clean it up periodically to remove obsoletedata. To do so, see Performing a Database Cleanup.
Back to Top
Managing the WFM Database Configuring WFM Statistics for eServices (Multimedia) Interactions
Workforce Management Administrator's Guide 219

Back Up and Restore Your Database
You can use the WFM Database Utility to back up the data in your Workforce Management databaseto a local file and then restore it if necessary. The local files are in Microsoft Access format.
ImportantAn Access 2002 .MDB file has a maximum database size of about 2 GB.
To backup and/or restore your WFM database, see Performing a Backup and Restoring Your Database.
Starting in 8.1.3, you can use the beta Backup-Restore Utility (BRU), which provides an improvedmethod of backing up and restoring the WFM Database. See Using the Backup-Restore Utility.
Database Migration
At some point, you might have to migrate data from a previous release to a current one. To do this,use the WFM Database Utility to transfer your existing data into the new database. After reading thistopic, see the Migrating Data.
• If you are migrating from release 7.x to 8.5, use the Update Database feature of the Database Utility.To migrate data into a WFM 8.5 database that is in use, you must update the database tothe latest version required by the WFM Database Utility you are using. To do this, use theUpdate Database feature of the WFM Database Utility.
• If you are migrating from release 6.x to 8.5, you must migrate your 6.5 data to a new 8.5 database,which the migration utility creates for you.You can migrate performance data from a WFM 6.5. database to your WFM 8.5 databaseafter you have started using WFM 8.5. This enables you to bring performance data intoyour database that was collected during the database migration.
For migration instructions, see the "Workforce Management Migration Procedures” chapter in theGenesys Migration Guide.
ETL Database Setup
You can set up an WFM ETL (Extract, Transform and Load) database schema to enable GenesysInfomart or other third-party reporting applications to easily create reports, by incorporating WFMdata. Previously, the only way to build customer reports was to use the WFM API.
ETL functionality obtains Schedule, Adherence and Performance information from WFM and stores itinto a documented relational database schema. For more information about this functionality or toset up an ETL database schema, see Setting up an ETL Database.
Back to Top
Managing the WFM Database Configuring WFM Statistics for eServices (Multimedia) Interactions
Workforce Management Administrator's Guide 220

Procedures
Click the red arrow to view a list of procedures related to the topics on this page. <multistep>
|-| Configuring the DB2 Database=
Purpose: To modify the value of one or more configuration parameters in the database.
Prerequisites:
• You have system administration and installation experience and skill with the associated tools.• The DB2 database is installed.
Start of Procedure
1. From the Configure Database window of the DB2 Control Center, or by reviewing the output from theGET DATABASE CONFIGURATION command, find the current value for the LOGFILSIZ, LOGPRIMARY, andLOGSECOND parameters.
2. Change one, two, or three of the values, based on the information in Table 2.3. Enter a value for each parameter that you want to change.
You can change the values by issuing one or more of the following commands, where db_name identifiesyour database:• UPDATE DATABASE CONFIGURATION FOR db_name USING LOGFILSIZ 1000
• UPDATE DATABASE CONFIGURATION FOR db_name USING LOGPRIMARY 10
• UPDATE DATABASE CONFIGURATION FOR db_name USING LOGSECOND 2
If the only parameter that you change is LOGSECOND, the change takes effect immediately. In this case,proceed to tuning the application heap size.
4. If you change the LOGFILSIZ, LOGPRIMARY parameter, or both:a. Disconnect all applications from the database.b. If the database was explicitly activated, deactivate the database.Changes to the LOGFILSIZ or LOGPRIMARY parameters take effect the next time either the database is activated or a connection tothe database is established.
Table 3: Parameter Recommendations Comparison
Parameter Description Default value Developer'svalue QA value
(LOGFILSIZ) Log file size (4KB) 1024 10000 10000
(LOGPRIMARY) Number ofprimary log files 3 64 128
(LOGSECOND)Number ofsecondary logfiles
0 16 72
Managing the WFM Database Configuring WFM Statistics for eServices (Multimedia) Interactions
Workforce Management Administrator's Guide 221

End of Procedure
|-| Performing a Database Update=
Purpose: To update WFM database.
Start of Procedure
1. Open the WFM Database Utility.2. Select the Database Update radio button.3. Click Next.4. If you enabled the AllowLessUpdates option in the WFM Client Application object, from the drop-
down list, choose the database version to which you wish to update. If not, your database is updated tothe latest available version.
ImportantIn some cases you might not choose the most recent version. For example, you might need to restore from abackup. You must select the same version as the database in the backup file. After restoring, you can thenupdate your database version.
5. Click Finish.The WFM Database Utility runs the appropriate scripts and displays a message indicating the results ofthe update.
End of Procedure
|-| Performing a Database Cleanup=
Purpose: To remove obsolete data from your database.
Prerequisite: Your database is up-to-date.
Start of Procedure
1. Open the WFM Database Utility.2. Select the Cleanup Database radio button and then, click Next.
ImportantYour database must be up-to-date to perform a database cleanup.
3. From the drop-down list, select a date.Data up to (but not including) this date will be deleted.
Managing the WFM Database Configuring WFM Statistics for eServices (Multimedia) Interactions
Workforce Management Administrator's Guide 222

4. In the dialog box that appears, select the items you want to remove.
WarningDouble-check your choices before you click Finish. You cannot retrieve deleted data.
5. Click Finish.The WFM Database Utility removes all data up to the date you selected in the Wizard. Data for theselected day is not deleted.
End of Procedure
|-| Performing a Backup=
Purpose: To back up the data in your WFM database.
Start of Procedure
1. Open the WFM Database Utility.2. Select the Backup Database to .MDB File radio button.3. Specify the file name and the location into which data is to be written.4. Select the type(s) of data you want to back up.
By default, all data types (except Audit Data) are selected. You must always back up Core data. Inaddition, you can choose to back up all data (by selecting Entire Database) or select from AuditData, Performance, Forecast, or Schedule data.
5. Click Next.The next dialog box shows that tables that are to be backed up.
6. Click Finish to complete the process or Back to change your selections.The WFM Database Utility performs the backup and presents a results message at the end.
End of Procedure
|-| Restoring Your Database=
Purpose: To restore the data in your WFM database.
Start of Procedure
1. Open the WFM Database Utility.2. Select the Restore Database from .MDB File radio button.3. Specify the file name and the location from which data is to be retrieved and then, click Next.4. Click Next to create the database into which files are to be restored.
Managing the WFM Database Configuring WFM Statistics for eServices (Multimedia) Interactions
Workforce Management Administrator's Guide 223

ImportantYou do not need to create a database ahead of time. The restore utility creates the correct database versionfor your data restoration.
5. Select the type(s) of data you want to restore.By default, all data types that were backed up in the selected backup file are selected, and you cannotselect data types that were not backed up. You must always restore Core data. In addition, you canchoose to restore all data (by selecting Entire Database) or select from Audit Data, Performance,Forecast, or Schedule data.
6. Click Next.The next dialog box displays the tables that are to be backed up or restored.
7. Click Finish to complete the process or Back to change your selections.
WarningAlternatively, you could select Cancel to cancel a database restoration in progress. However, if you do so,your database is corrupted and you must clear up the affected sections or create a new database.
The WFM Database Utility performs the restoration and presents a results message at the end.
End of Procedure
|-| Migrating Data=
Purpose: To migrate data from a previous release to a current one.
Start of Procedure
1. Open the WFM Database Utility.2. Select the Migrate Performance Data radio button.3. When the Database Migration Wizard opens, follow the prompts.
ImportantIf you are migrating from release 6.x to 8.1, and you enabled the AllowMigratePerformance option in theWFM Client Application object, the Wizard prompts you to transfer performance data from your 6.xdatabase to your new WFM database. When you migrate data after you start using the WFM database, allperformance data of the type(s) you select is overwritten by the performance data from the 6.x database.
End of Procedure
</multistep>
Managing the WFM Database Configuring WFM Statistics for eServices (Multimedia) Interactions
Workforce Management Administrator's Guide 224

Back to Top
Managing the WFM Database Configuring WFM Statistics for eServices (Multimedia) Interactions
Workforce Management Administrator's Guide 225

Using the Backup-Restore UtilityA beta version of the command-line WFM Backup-Restore Utility (BRU) is included in the WFMDatabase Utility (DBU) Installation Package (IP). Unlike the WFM DBU backup file (.MDB format),which has a maximum 2 Gb file size limit, the BRU uses a new backup file format (.DB) and has no filesize limit. This new backup file format, which is much faster than DBU format, is expected to replacethe current backup file format in future WFM releases. The BRU supports backups for MSSQL, Oracle,and DB2 databases to the new backup file (.DB) format. The backups created by BRU are accepted byGenesys Customer Care. However, support for restoring these databases is currently limited andshould not be used in production environments, since BRU is still in the beta stage and has not beenfully tested.
Command Line and Usage Commands
User the following command line and usage commands syntax:
WFMBRU.exe <command> <data source> -FILE <file name>.db [<additional options>]
Table: Usage Commands
Option Description-BACKUP Backup the WFM database to a backup file.
-RESTORE Restore the WFM database from the backup file(database is created if it does not exist).
-UPDATE
Update the WFM database to the latest schemaversion (can be combined with -RESTORE).Can also be used to create the latest schema on anempty database (the database is created if it doesnot exist).
-CLEANUP Delete all data in the database.
-DROPDrop entire database.Can be combined with the -RESTORE and/or-UPDATE options.
Table: Data Source (Connection Strings)
Connection string Description
-DSN <OLE DB connection string>Enables specification of the OLE DB connectionstring directly (should not be used with –DB option)See usage examples in Table: String Format forVarious Databases for details.
-DB <Connection String>Specifies the connection in simplified syntax that islater translated into OLE DB connection stringformat.
Using the Backup-Restore Utility Configuring WFM Statistics for eServices (Multimedia) Interactions
Workforce Management Administrator's Guide 226
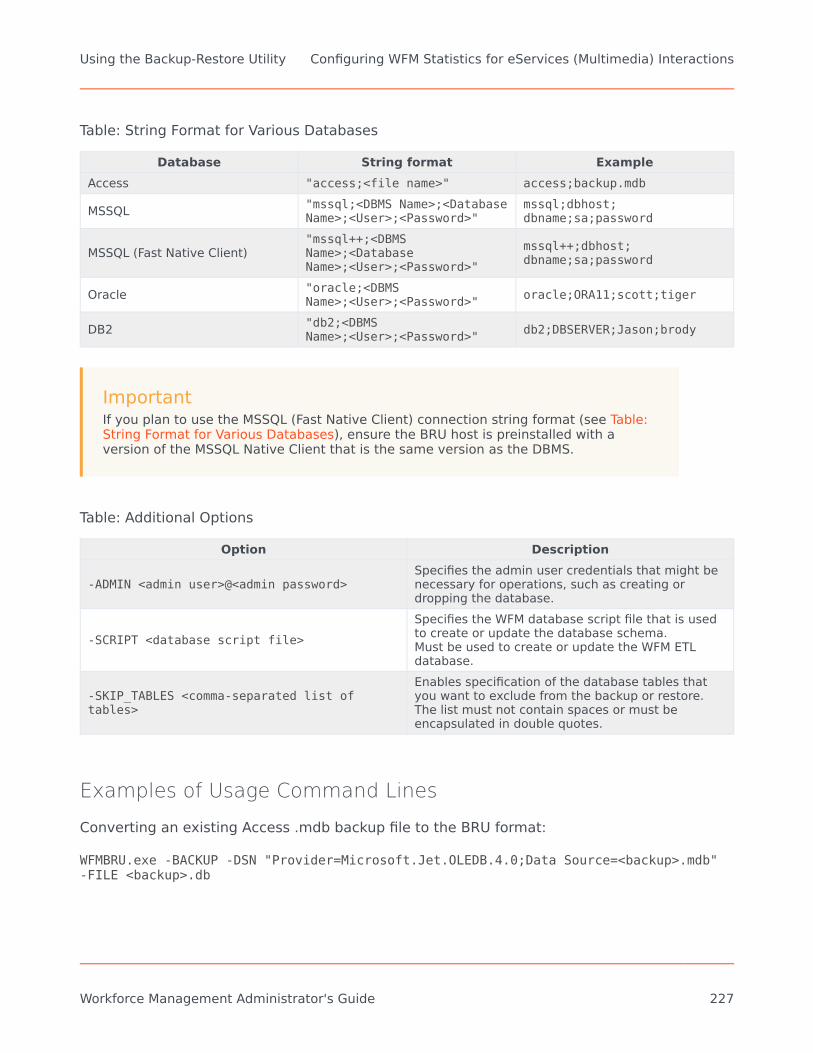
Table: String Format for Various Databases
Database String format ExampleAccess "access;<file name>" access;backup.mdb
MSSQL "mssql;<DBMS Name>;<DatabaseName>;<User>;<Password>"
mssql;dbhost;dbname;sa;password
MSSQL (Fast Native Client)"mssql++;<DBMSName>;<DatabaseName>;<User>;<Password>"
mssql++;dbhost;dbname;sa;password
Oracle "oracle;<DBMSName>;<User>;<Password>" oracle;ORA11;scott;tiger
DB2 "db2;<DBMSName>;<User>;<Password>" db2;DBSERVER;Jason;brody
ImportantIf you plan to use the MSSQL (Fast Native Client) connection string format (see Table:String Format for Various Databases), ensure the BRU host is preinstalled with aversion of the MSSQL Native Client that is the same version as the DBMS.
Table: Additional Options
Option Description
-ADMIN <admin user>@<admin password>Specifies the admin user credentials that might benecessary for operations, such as creating ordropping the database.
-SCRIPT <database script file>Specifies the WFM database script file that is usedto create or update the database schema.Must be used to create or update the WFM ETLdatabase.
-SKIP_TABLES <comma-separated list oftables>
Enables specification of the database tables thatyou want to exclude from the backup or restore.The list must not contain spaces or must beencapsulated in double quotes.
Examples of Usage Command Lines
Converting an existing Access .mdb backup file to the BRU format:
WFMBRU.exe -BACKUP -DSN "Provider=Microsoft.Jet.OLEDB.4.0;Data Source=<backup>.mdb"-FILE <backup>.db
Using the Backup-Restore Utility Configuring WFM Statistics for eServices (Multimedia) Interactions
Workforce Management Administrator's Guide 227

ImportantThis command does not work with WFMBRU x64, because it requires the x64 Jet driver,which does not exist. Use the 32-bit version of WFMBRU.exe.
Backup MSSQL database:
WFMBRU.exe -BACKUP -DSN "Provider=SQLOLEDB;Data Source=<DBMS Name>;InitialCatalog=<Database Name>;User ID=<User Name>;Password=<Password>;" -FILE <backup>.db
Backup Oracle database:
WFMBRU.exe -BACKUP -DSN "Provider=OraOLEDB.Oracle;Data Source=<DBMS Name>;UserID=<User Name>;Password=<Password>;" -FILE <backup>.db
ImportantUse 32-bit WFMBRU.exe if you installed the 32-bit Oracle client on your system or the64-bit WFMBRU.exe if your Oracle client is 64-bit.
Backup DB2 database:
WFMBRU.exe -BACKUP -DSN "Provider=IBMDADB2;DSN=<DBMS Name>;User ID= <UserName>;Password=<Password>" -FILE <backup>.db
Restore to MSSQL database:
WFMBRU.exe -RESTORE -DSN "Provider=SQLOLEDB;Data Source=<DBMS Name>;InitialCatalog=<Database Name>;User ID=<User Name>;Password=<Password>;" -FILE <backup>.db
Retore to MSSQL database using native client: (super fast):
WFMBRU.exe -RESTORE -DSN "Provider=SQLNCLI;Data Source=<DBMS Name>;InitialCatalog=<Database Name>;User ID=<User Name>;Password=<Password>;" -FILE <backup>.db
Restore and Update to MSSQL database (super fast):
WFMBRU.exe -RESTORE –UPDATE -DSN "Provider=SQLNCLI;Data Source=<DBMS Name>;InitialCatalog=<Database Name>;User ID=<User Name>;Password=<Password>;" -FILE <backup>.db
Update MSSQL database to the latest schema version only:
WFMBRU.exe –UPDATE -DSN "Provider=SQLNCLI;Data Source=<DBMS Name>;InitialCatalog=<Database Name>;User ID=<User Name>;Password=<Password>;"
Using the Backup-Restore Utility Configuring WFM Statistics for eServices (Multimedia) Interactions
Workforce Management Administrator's Guide 228

Using ETL Database SchemaUsing a WFM ETL (Extract, Transform and Load) database schema enables Genesys InteractiveInsights and other third-party reporting applications to easily create reports that incorporate GenesysWorkforce Management (WFM) data. Once configured, this functionality can obtain Schedule,Adherence, and Performance information from WFM and store it into a documented relationaldatabase schema. (Prior to WFM 8.1.3, the only way to build customer reports was to use WFM API.)
ETL Database Schema and Script
WFM itself does not use the data from ETL storage for any task. ETL stores the data into thedesignated database schema, for use only by Genesys Interactive Insights or third-party reportingapplications. The ETL schema can be part of, and co-exist with the main operational Genesys WFMdatabase. It can be a standalone database or part of any other database. WFM provides the SQLscript to create the database schema, but does not specify which physical tablespace, user, ordatabase on which to create it.
The script is included in WFM Database Utility (DBU) IP, but is not executed automatically by the DBU.The database administrator must execute the script, by using a third-party SQL interpreter. The scriptis found in the \Scripts folder in WFM Database Utility deployment folder.
Database Tables and CategoriesThe ETL database schema contains two types of tables: Fact tables and Dimension tables. Dimensiontables somewhat correspond to the WFM organization, configuration, and policy objects. TheDimension tables provide sorting, grouping, and filtering capabilities for reports. The Fact tablescontain adherence, performance, and schedule information and can be sorted, grouped, and filteredby dimensions.
The ETL schema contains the following Dimension and Fact tables:
Dimension Tables Schedule Fact TablesWFM_BU WFM_SCH_AGENT_DAYWFM_SITE WFM_SCH_AGENT_STATEWFM_TEAMWFM_SSGWFM_STATE
WFM Server's Role in the ETL Process
WFM Server has built-in ETL functionality. However, you must configure some WFM ServerApplication options to enable it (see Enabling ETL Functionality).
Using ETL Database Schema Configuring WFM Statistics for eServices (Multimedia) Interactions
Workforce Management Administrator's Guide 229

In the following two deployment options, you must also create a connection to WFM Server for theETL database to function properly:
1. If the ETL schema is created in a database, other than the WFM database, two WFM Server instancesare required—one that is connected to the operational WFM database and one connected to the ETLdatabase. In this setup, the ETL WFM Server instance (with the connection to the ETL database), alsoconnects to the main WFM Server instance (with the connection to WFM database) and obtains data, byusing the WFM binary API (also used to generate WFM internal reports). This means, a connection tothe main WFM Server must be added to the ETL WFM Server Application. When WFM operationaland ETL schemas share the same database, a single WFM Server instance is sufficient to perform bothfunctions—serving WFM API requests and performing ETL data storage.
2. If you set up a dedicated WFM Server to perform ETL functions only and the server accesses only theETL database and not the operational WFM database, you must disable all cache preload functions,because the corresponding database tables are not available in the ETL database. The WFM Server IPcontains the WFM Server Application template for a dedicated ETL Server. It will create the ETLoptions, set the default values, and disable cache preload functionality and wait list processes. Thededicated ETL WFM Server generates an error if a reporting client tries to obtain its data, by using theWFM API.
ETL Process FlowWhen the ETL process starts, it synchronizes the WFM operational database with the ETL database.During synchronization, the process first transfers all new Dimension information the WFMoperational database to the ETL database. Then, updates all of the Dimension objects that wereupdated in operational database since the last run of the ETL process. After the Dimensioninformation is synchronized, the process transfers newly updated or modified Fact information in thesame way. However, the process does not try to synchronize all Fact information, but only a specifiednumber of days in the past and future. The number of days is specified by setting the configurationoptions in the WFM Server Application (see below).
Enabling ETL Functionality
You can configure the ETL database schema, by using the following options, which are configured inthe WFM Server Application, in the ETL section under the Options tab:
• DaysAhead—The number of days (from the current day) to look ahead for Fact data.• DaysBack—The number of days (from the current day) to look back (to the past) for Fact data.• DayChunk—The number of days that will be processed at a time.• ETLTimeout—A non-zero value that starts the ETL process within WFM Server. The number represents
the timeout interval between executions of the ETL process.
For a detailed description of these configuration options, see the ETL Section in WFM Server Options.
Using ETL Database Schema Configuring WFM Statistics for eServices (Multimedia) Interactions
Workforce Management Administrator's Guide 230

Troubleshooting WFMIn this topic find troubleshooting tips, steps to verify your configuration, and solutions for commonproblems. You will find:
• Architectural issues, such as configuration of the WFM components and the connections between them• Configuration conflicts in WFM that result in forecasting and scheduling errors• Information about when to use log files for error tracking
ImportantAfter working through the suggestions in this chapter, if your configuration appears tobe correct but WFM still does not function properly, contact Genesys Customer Carefor further assistance.
Click one of these three main troubleshooting topics to learn about the issues or scenarios that mightbe helpful to you.
Troubleshooting WFM Components and Connections
Troubleshooting Your WFM Configuration
Using Log Files to Troubleshoot WFM
Troubleshooting WFM Configuring WFM Statistics for eServices (Multimedia) Interactions
Workforce Management Administrator's Guide 231

Troubleshooting WFM Components andConnections
ImportantIssues addressed in this section can also affect WFM Web functionality such asforecasting and scheduling. Be sure to review all possible sources of errors duringyour troubleshooting process.
To troubleshoot your Workforce Management components and connections, see the suggestions forresolutions to specific issues on this page.
See Other Troubleshooting Topics
• Troubleshooting Your WFM Configuration• Using Log Files to Troubleshoot WFM
Expired Digital Signature or Security Certificates
Even if you set up Genesys (or Sun) as a trusted publisher in your browser, you might see one of thefollowing messages:
The digital signature was generated with a trusted certificate but has expired or isnot yet valid.The security certificate has expired or is not yet valid.
As a common practice, Genesys renews its certificates once a year. Sun does not provide certificaterenewal for javahelp, so it expired in 2004.
Here is how to respond to that warning message:
• During your first access of WFM Web, check the always trust option in both warning messages. This willmark certificates as trusted and the user will not see these warnings again.
• Import the certificates to the Java plug-in manually for each new user. Certificates for import could beexported from any workstation where WFM Web has been already accessed and certificates whereconfirmed with the always trust option check.
An applet that is signed with a certificate that has expired is still safe to download or use, but only ifthe applet was signed when the certificate that was issued by the Certificate Authority (CA) was stillvalid. If it was, then according to the specification for signing Java applets, the applet is valid. Also,according to the specification, it is the responsibility of the JVM to warn the user if an applet has been
Troubleshooting WFM Troubleshooting WFM Components and Connections
Workforce Management Administrator's Guide 232

modified after it was digitally signed with a certificate issued by a CA.
As long as the JVM does not return an error stating that the applet has been modified since it wassigned, the applet is still valid and safe to run.
Blank Screen When Attempt to Access WFM Web
If you are using Tomcat and this issue occurs, it might be because you only have the Java RuntimeEnvironment (JRE) installed and not Sun’s Java Developers Kit (JDK) software. Tomcat 5.0.x requiresthe JDK. If you look at the Tomcat logs, you will see an error saying that java compiler was not found.If you don’t want to install the JDK, then the other option is to use Tomcat 5.5.x, which only requiresthe JRE.
Unable to Connect to Data Source
If you cannot connect to your database, verify the following:
• That the correct versions of Microsoft Data Access Components (MDAC) and Jet are installed on yourcomputer. See Determine the MDAC Version.
• You have added the Database Access Point (DAP) on the Connections tab of the Application object of thecomponent you are using.
• You have configured the DAP correctly.• Your database is set to be case insensitive.
Determine the MDAC Version
Microsoft supplies a free diagnostic program, MDAC Configuration Checker, that scans your computerto determine whether or not you are running the correct version of MDAC. You can download theprogram from the Microsoft web site. See Supported Operating Environment Reference Manual forthe current MDAC requirements.
"DA Server Not Found" Error
Data Aggregator is not running. Start it manually, under Windows Services.
"Host Not Found" Error
The host names you configure in Configuration Manager are case sensitive and must be lowercase.
Troubleshooting WFM Troubleshooting WFM Components and Connections
Workforce Management Administrator's Guide 233

• Rename the host and try the procedure again.
WFM Data Aggregator Does Not Start
When WFM Data Aggregator is running as a Windows Service on a host computer and the host is shutdown and restarted, Data Aggregator leaves an open connection to Configuration Server. This causesData Aggregator to fail to start after rebooting. In particular, Service Manager indicates a status ofStarting for the WFM Data Aggregator service for a long time after you try to start it.
In this situation, use the procedure Closing an Incorrect Connection Between Data Aggregator andConfiguration Server to restart WFM Data Aggregator.
WFM Web Does Not Open
Pop-up blockers interfere with WFM Web for Supervisors operation. If you are running a pop-upblocker on your computer, disable it before trying to open WFM Web for Supervisors.
Applets Do Not Load in WFM Web
WFM Web uses Java Server Pages (JSPs) to create its dynamic web pages. To use WFM Web, yourbrowser must have Java support. If the necessary plug-in was not installed with the browser, you candownload the plug-in from www.oracle.com. To learn which version of Java is required, consult theWFM section at the end of the “Product Prerequisites” table in the Supported Operating EnvironmentReference Manual.
On Supervisors’ workstations, WFM Web uses Java applets that are run by Sun’s Java Plug-in. OnWindows operating systems the Java Plug-in is running as ActiveX, which means that supervisorsmust have rights to run ActiveX controls.
Cannot Log In to WFM Web
The ConfigServer.properties file might be configured incorrectly. This could happen if you installedWFM Web without being connected to Configuration Server or if you manually entered incorrectvalues when you were configuring the WFM Web Application object.
In this situation, correct the configuration by completing the Correcting the ConfigServer.propertiesFile.
Troubleshooting WFM Troubleshooting WFM Components and Connections
Workforce Management Administrator's Guide 234

"WFM Server Cannot be Reached" Error
There are two different issues that might be responsible for this error message. If you receive thismessage sporadically, you might have too few TCP sockets (see Scenario 1). If it occurs every timeyou open WFM Web, it is probably because it is not correctly configuration (see Scenario 2).
Scenario 1This error message may occur because there are too few TCP sockets for the number of WFM Web forSupervisors connections you are trying to establish. To improve performance:
• Install WFM Web on a separate computer.• Increase the refresh rate from the default value (2 seconds) to 5 seconds. This should increase the
number of supervisors that are able to simultaneously access the Adherence views by approximately100 percent.
Scenario 2You might have specified the wrong application type when you installed WFM Web. If so, uninstall andreinstall WFM Web, entering the correct values in the Installation Wizard screens.
• If you are running WFM in a Framework 6.x environment, the WFM Web application type must beThirdPartyServer.
• If you are running in a 7.x environment, the application type should be WFM Web.
The Agent Weekly Preference View Does Not Display 24-HourGraphical Data
ImportantThis resolution applies to UNIX environments only.
If your Unix server does not have an X Server installed or you have not set the DISPLAY environmentvariable, the WFM Web Agent Weekly Preferences window is presented without 24-hour graphicalinformation.
For non-Windows environments (such as Unix and Linux), you must have X or some form of X (X11Server or X Windows server) running and point the DISPLAY environment variable to the machinerunning X.
Synchronization with the Configuration Database Takes an
Troubleshooting WFM Troubleshooting WFM Components and Connections
Workforce Management Administrator's Guide 235

Unreasonably Long Time
If you are using Microsoft SQL, to reduce synchronization time, make sure that the databaseAutoShrink feature is turned on.
Procedures
The procedures in this section relate to the topics on this page.
Closing an Incorrect Connection Between Data Aggregator and ConfigurationServerPurpose: To enable WFM Data Aggregator to restart
Start of Procedure
1. In Genesys Administrator, rename the WFM Data Aggregator Application object, and then click OK toclose the Properties window.
2. Reopen the Properties window and change the Application object name back to the original and thenclick OK again. Doing this clears the connection.
End of Procedure
After this, WFM Data Aggregator should immediately connect to Configuration Server. To prevent thisissue from happening again, before shutting down and/or rebooting the host computer, use theServices window to stop the WFM Data Aggregator Service.
If WFM Data Aggregator fails to start, it writes a message to the daerror.log file, which is located inthe WFM Data Aggregator working directory. Use this log file to diagnose the issue that is preventingWFM Data Aggregator from starting correctly.
Correcting the ConfigServer.properties FilePurpose: To correctly configure the ConfigServer.properties file.
Start of Procedure
1. Remove the incorrectly configured application from the servlet runner.2. Reinstall WFM Web, providing correct values during the installation.3. Deploy the newly installed application.4. If reinstalling WFM Web does not resolve the issue, check that you have entered the correct URL for
WFM Web, remembering these points:• The URL is case sensitive.
Troubleshooting WFM Troubleshooting WFM Components and Connections
Workforce Management Administrator's Guide 236

• Do not include login.asp or login.jsp in the URL. The URL should simply point to the applicationvirtual directory.
End of Procedure
Troubleshooting WFM Troubleshooting WFM Components and Connections
Workforce Management Administrator's Guide 237

Troubleshooting Your WFM ConfigurationTo troubleshoot your Workforce Management configuration, click any of the following topics to findsuggestions for resolutions to specific issues:
• Inaccurate Actual Headcount for Multi-Site Activities and Activity Groups• Performance Shows No Intra-Day Statistics• Headings Do Not Match Columns in Exported Reports• Real-Time Agent Adherence Is Not Working Correctly• Agents Are Not Being Scheduled• Calculation of Average Handling Time Based on TotalTime Statistics• Cannot Find Agents or Sites• Errors or Warnings When Creating a Schedule• Data on Active Interactions Disappears• Forecast Appears Inaccurate• Schedules Are Highly Over- or Understaffed
See Other Troubleshooting Topics
• Troubleshooting WFM Components and Connections• Using Log Files to Troubleshoot WFM
_____________________________________________________________________________________________________
Inaccurate Actual Headcount for Multi-Site Activities and ActivityGroups
The algorithms used in the Performance subsystem, Daily Average Actual Headcount for Multi-SiteActivities (MSA), Activity Group (AG), and Site Activities have changed from the algorithm used inWFM 8.0 and earlier releases.
Function of the AlgorithmIn prior releases, the Actual Headcount algorithm for MSA and AG levels tended to produce inaccurateActual Headcount in configurations that included multi-skilled agents, or schedules and MSA or AGconfigured for more than one Associated Activity from the same site.
This issue is resolved by using the new algorithm (introduced in 8.1), that produces accurate Actual
Troubleshooting WFM Troubleshooting Your WFM Configuration
Workforce Management Administrator's Guide 238

Headcount for MSA and Activity Groups. It includes the following important changes to the ActualHeadcount timestep and Daily Average algorithms:
1. Dedicated for MSA and AG levels, Data Aggregator aggregates the Actual Headcount separate from theAssociated Activities Actual Headcount.
2. MSA level Daily Average Actual Headcount algorithm takes into account the MSA and AssociatedActivities open hours.
3. Site Activity level Average Actual Headcount algorithm takes into account the Activity open hours.4. Agent Minutes (<agent adherent minutes> divided by 15) Headcount algorithm is used instead of
LoggedIn Agents Headcount.
Example: If 1 agent is logged in (adherent), but works only 14 minutes per-timestep, the ActualHeadcount in Agent Minutes equals 14/15 = 0.93.
Calculations Model for Multi-Site Activities LevelIn the WFM Performance subsystem, Multi-Site Activity (MSA) Actual Headcount Daily Average iscalculated in the following ways, depending on the state of the Multi-Site Activities button:
When the Use Multi-Site Activities button is set to ON:
• The Actual Headcount Daily Average is calculated by using MSA open hours and MSA per-timestepActual Headcount data.
• If any timesteps outside MSA open hours contain non-zero values, WFM includes the values for thesetimesteps in the Actual Headcount Daily Average calculations.
• The Actual Headcount is calculated by using the Agents Minutes algorithm (see item 4 above).
When the Use Multi-Site Activities button is set to OFF:
• The Actual Headcount Daily Average is calculated, by using the Associated Activities open hours and thesum of the Associated Activities per-timestep Actual Headcount data.
• If any timesteps outside the Associated Activities open hours contain non-zero values, WFM includes thevalues for these timesteps in the Multi-Site Activity Actual Headcount Daily Average calculations.
• The Actual Headcount is calculated, by using the Agents Minutes algorithm (see item 4 above).
Calculations for Activity Group LevelIn the WFM Performance subsystem, Activity Group Actual Headcount Daily Average is calculated inthe following way:
• The Actual Headcount Daily Average is calculated, by using the Associated Activities Actual Headcountdata per-timestep for entire day.
• The Actual Headcount is calculated by using the Agents Minutes algorithm (see item 4 above).
Calculations for Site Activity LevelIn the WFM Performance subsystem, Site Activity Actual Headcount Daily Average is calculated in the
Troubleshooting WFM Troubleshooting Your WFM Configuration
Workforce Management Administrator's Guide 239

following way:
• The Actual Headcount Daily Average is calculated, by using Activity open hours and the Activity per-timestep Actual Headcount data.
• If any timesteps outside of the Activity open hours contain non-zero values, WFM includes the values forthese timesteps in the Activity Actual Headcount Daily Average algorithms.
• The Actual Headcount is calculated by using the Agents Minutes algorithm (see item 4 in Overview).
ImportantIn releases prior to 8.1, open hours were not taken into account for MSA and SiteActivities Daily Average algorithms. WFM used the Associated Activities ActualHeadcount data from timesteps for the entire day for Multi-Site Activity ActualHeadcount Daily Average algorithms, whether or not the Use Multi-Site Activitiesbutton was set to ON or OFF.
Performance ReportsPerformance reports (by default) show the Actual Headcount, based on the LoggedIn Agents that arecollected by Data Aggregator, while Performance Intra-Day displays the Actual Headcount, based onAgents Minutes (see item 4 above).
To change the Performance reports Actual Headcount calculation to Agent Minutes (to matchPerformance Intra-Day calculation), the WFM Web Application option ShowActualHeadcount in theReports section must be set to true.
Back to Top
Performance Shows No Intra-Day Statistics
If the WFM Web Performance subsystem does not display statistics for Interaction Volume, AverageHandling Time, Service Level, and other key Intra-Day statistics, verify that:
• WFM Data Aggregator has initialized successfully; has made successful connections to ConfigurationServer, Stat Server, and the WFM database; and has been running for 30 minutes.
• A schedule has been published for the current time interval.• The correct Stat Server name appears in the Configuration > Organization > Sites >
Configuration pane in WFM Web for Supervisors.• The necessary statistics are configured in the Configuration > Activities > Statistics in WFM Web
for Supervisors.• Time zones are configured correctly for the business unit or site.• The statistics are monitoring the correct Genesys objects, such as queues, routing points, and so on.• The TimeProfile parameter is correctly configured in Stat Server.
Troubleshooting WFM Troubleshooting Your WFM Configuration
Workforce Management Administrator's Guide 240

Headings Do Not Match Columns in Exported Reports
When you export the reports, select the MS Excel Tabular option.
Back to Top
Real-Time Agent Adherence Is Not Working Correctly
If the Real-Time Agent Adherence window is empty, then verify that:
• A schedule has been published for the current time interval.• You have associated the correct WFM Data Aggregator name with the site that contains the agents you
are looking at in the WFM Web for Supervisors.• You have configured a connection to the appropriate Stat Server in the WFM Data Aggregator
Application object.• Your WFM Data Aggregator Application object specifies a connection to your WFM Server on the
Connections tab.• T-Server, Stat Server, and WFM Data Aggregator are running properly.• Stat Server is configured to connect to the appropriate T-Server.
ImportantIf there are no agent names visible in the Real-Time Agent Adherence window,publish a schedule for the current day.
Agents Are Not Being Scheduled
Verify that:
• The agents’ hire dates are not the same as the current date and come before the start of the scheduleperiod.
• The agents are associated with a Contract that can be scheduled.• The agents’ Contract is not associated with shifts that are incorrectly configured, preventing the agents
who is in that Contract from being given any shifts.• The agents have skills configured.• The agents have skills that qualify for at least one of the activities you are scheduling.
Troubleshooting WFM Troubleshooting Your WFM Configuration
Workforce Management Administrator's Guide 241

Calculation of Average Handling Time Based on TotalTimeStatistics
Average Handling Time (AHT) is calculated by taking the total duration of all interactions that arecompleted during a timestep, divided by the total number of interactions handled during thattimestep.
In cases where Total Handle Time is collected for an interval, but no interactions have been handledin that interval, WFM can optionally associate the Handle Time with the previous interval. To enablethis feature, use the HandleTimeWriteBack configuration option. See the Options Section in WFMData Aggregator Options.
Back to Top
Cannot Find Agents or Sites
Verify that:
• WFM is synchronized with Configuration Server.• The WFM user experiencing this issue has permission to view the site, agents, and logins for the missing
sites and/or agents.
Errors or Warnings When Creating a Schedule
In most cases, when schedule results are not as expected, a configuration error is the cause. With avalid configuration, you rarely see errors.
If the configuration settings lead to a disparity between the staffing requirements and the actualschedule, the Schedule Validation window records the problems. Sometimes it indicates whichparameters you must change to correct the disparity.
When schedule validation warnings appear, it is essential to begin narrowing down the scope of thescheduling problem by isolating a single agent, team, contract, shift, or other object until theproblematic configuration point is identified and resolved. The most frequent causes of scheduleerrors and warnings include:
• Incompatibility between day-off constraints and constraints set for weekly hours or schedule planningperiod hours.
• Incorrectly configured meal and shifts constraints.• Exceptions inconsistent with contract or rotating pattern constraints.
If you are unsure how to troubleshoot the schedule results or are reluctant to change WFMconfiguration data, contact Genesys Customer Care.
Troubleshooting WFM Troubleshooting Your WFM Configuration
Workforce Management Administrator's Guide 242
Data on Active Interactions Disappears
If you close WFM Data Aggregator using the Windows NT Task Manager, you will lose all data oncurrently active interactions, because Windows NT does not allow enough time for WFM DataAggregator to save the active data.
Back to Top
Forecast Appears Inaccurate
Verify that:
• The statistics being used to collect data for each activity are appropriate.• The Genesys objects (queues, routing points, and so on) used to monitor statistics are appropriate.• The Genesys objects are not combining data for interactions that should be associated with different
activities. For example, if multiple interaction types are coming through a single routing point, thenattached data must be used to filter statistics by interaction type.
• There is no historical data with null values in the WFM historical data tablewm_perf_activities.wm_callvol. You can verify this by exporting the historical data to a local fileusing WFM Web for Supervisors.
• You have a sufficient quantity of historical data for the forecasting method you are using. The ExpertAverage Engine requires one full week of historical data and the Universal Modeling Engine requires atleast one year of historical data.
Schedules Are Highly Over- or Understaffed
Verify that:
• The schedule was built after a forecast was published.• There is sufficient flexibility in the working hours constraints for the agents’ weekly and schedule-
planning periods, configured in the Contracts module.• There is sufficient flexibility in the working days constraints.• There is sufficient flexibility in the weekend day-off rules for the schedule-planning period.• The agents’ contract availability is flexible enough to cover the open hours for the desired activities.• Team constraints are not enabled or are configured with enough flexibility to adequately cover the
entire day’s interaction volumes.• All shifts have valid configurations.• All scheduled agents have received the correct number of weekly and/or schedule-planning period
hours. If they haven’t, this indicates a configuration error.
Back to Top
Troubleshooting WFM Troubleshooting Your WFM Configuration
Workforce Management Administrator's Guide 243

Using Log Files to Troubleshoot WFMWorkforce Management log files are intended to be used for diagnosis of configuration and programerrors. They should not be used in normal day-to-day operation because they slow WFM performance.
If you contact Genesys Customer Care for assistance with WFM, you might be instructed to turn onlogging and attempt to re-create the problem. The logs can provide Technical Support with importantinformation on the nature of the malfunction.
Each component of WFM uses its own log file. For information on configuring logs, see the Log optioninformation for each component’s Options tab.
By default, the WFM log files are stored in \\<Workforce Management directory>\Logs.
You can view WFM log files with any ASCII viewer, such as Notepad.
If WFM Data Aggregator fails to start, it writes a message to the daerror.log file, which is located inthe WFM Data Aggregator working directory. Use this log file to diagnose the problem that preventedWFM Data Aggregator from starting correctly.
See Other Troubleshooting Topics
• Troubleshooting WFM Components and Connections• Troubleshooting Your WFM Configuration
Troubleshooting WFM Using Log Files to Troubleshoot WFM
Workforce Management Administrator's Guide 244

WFM LocalizationGenesys localizes (translates) Workforce Management (WFM) into a number of languages. You canlocalize WFM components by using Genesys localization software or by using the self-localizationmethod.
If Genesys localizes into your language, you can use the Genesys-provided localization software tolocalize WFM Daemon, Server, Builder, Data Aggregator, and Web. Otherwise, you can use the self-localization method to localize WFM Web Supervisor and Agent. Contact your Genesys salesrepresentative to inquire about specific localized versions.
The two methods of localization are described in detail in the following topics.
Using Genesys Localization Software
Using Self-Localization
Legal Notice:Customer-enabled language translation functionality is provided on an as-is basis for internal useonly. Outside distribution of this functionality and/or any translation(s) created using suchfunctionality is not permitted except under a separate agreement negotiated with Genesysspecifically for the purpose of distributing Genesys-related translations.
Partners who intend to redistribute translated versions must first sign the GENESYS PARTICIPANTENABLED LANGUAGE TRANSLATION AGREEMENT consistent with the "Participant Enabled LanguageTranslation Distribution License".
ImportantThis does not imply or ensure that all preferred elements of localization within theproduct for any possible locale are done. For example, right to left mirroring (Arabic)or vertical text presentation (some Chinese).
WFM Localization Using Log Files to Troubleshoot WFM
Workforce Management Administrator's Guide 245

Using Genesys Localization SoftwareThis topic describes how to use the Genesys localization software or Language Packs (LP) to localizeWorkforce Management (WFM). Localized software displays the WFM interface, controls, and dialogsin the language of the installed LP. If you are deploying WFM and want to localize it, contact aGenesys representative to obtain localized software.
WFM uses Language Packs to provide localized resources for the end user. The Language Pack is aseparate IP that is installed over the component IP. It contains only localized resources that replacethe resources in the original product IP. The Language Pack contains resources for a single language.Each language requires a separate LP. If you are installing more than one LP, you must install themone at a time. Each component IP can use only one Language Pack at a time.
WFM has LPs for the following components:
• WFM Web• WFM Daemon• WFM Server• WFM Data Aggregator• WFM Builder
ImportantWFM Configuration Utility is discontinued and no longer in use. Functionality,previously found in Configuration Utility is now in WFM Web.
Context Information in Localization KitsWFM localization kits now include context information. The kits contain resources for translation thatappear in the product. The information about how the resource is used by the product can be used toimprove translation. In addition, context information simplifies verification testing, enabling the testerto easily find and check the effects of translated content.
User and System Locales on Windows
The WFM server (Server, Builder, and Data Aggregator) services choose the installed Language Packaccording to the locale. It uses the exact language match or, if it is unavailable, the Language Packfor the same language group.
WFM servers check the user or system account locale of the operating system on which it is running.By default, it is either the user account (Windows 2003) or system account (Windows 2008). To adjustthe user and system account settings, see the procedures Adjusting the System Account Locale
WFM Localization Using Genesys Localization Software
Workforce Management Administrator's Guide 246

(Windows 2008), Adjusting the User Account Locale (Windows 2003), and Verifying the Locale in theWindows Registry.
After checking the locale, WFM servers attempt to load a Language Pack whose language (orlanguage group) matches this locale. For example, if the user account locale or system account localeis French (Canada) and the French (Canada) Language Pack is not installed, then the French (France)Language Pack is used. If the process is run as a service (which is usually the case), then the systemaccount locale must be adjusted.
Language Settings in the Web BrowserYou must change the language settings in the browser to view WFM Web in your preferred language.The location and type of settings will differ, depending on the browser and browser version you areusing (for example, Internet Explorer, FireFox, or Chrome). For more information about these settings,check the appropriate vendor website or Help. Also, see Changing the Preferred Language in the WebBrowser
Important Information About Changing Locales on Windows with JavaApplications InstalledAn incompatibility relating to the rules that govern locale settings was detected when WFM Web andDaemon applications are running on Windows operating systems with Java 7. (See article #4700857on the vendor website www.oracle.com.)
Changes to the WFM local settings are made in different locations depending on which Java versionyou are using. In Java 7, the Display language settings determine the locale settings. In Java 6, theRegional Settings dialog in Control Panel determine the locale settings.
Also, if you are installing WFM on Windows versions earlier than Windows Vista such as Windows2003 or Windows XP, you cannot set the display language because these operating systems alwaysuse the language selected during installation and the locale settings cannot be changed.
You can use one of two workarounds to set a different locale setting for WFM applications:
1. Select the appropriate display language that contains the locale settings you want to use.2. If step 1 cannot be done, complete one or both of following steps:
1. Revert Java 7 to Java 6 behavior—Set the -Dsun.locale.formatasdefault Java 7 option to trueand then, set the locale settings in the Regional Settings in Control Panel to the locale you want touse.
2. On any version of Java—Explicitly override the locale setting for the JVM by changing the-Duser.language, -Duser.region, and -Duser.country Java options.
Preparing WFM for Genesys Localization
The following information and procedures will help you prepare WFM for localization. Complete onlyas many procedures as are required for you to complete your WFM localization.
WFM Localization Using Genesys Localization Software
Workforce Management Administrator's Guide 247

Task Summary: Preparing WFM for Genesys Localization
Task Procedures
Adjust and verify the system account locale.• Adjusting the System Account Locale in
(Windows 2008)• Verifying the Locale for the System Account
Adjust the user account locale. Adjusting the User Account Locale (Windows 2003)Change the date format in WFM email notifications. Changing the Date Format in E–mail NotificationsAdjust WFM Web to display the weekday in thecorrect language.
Adjusting WFM Web to Display Weekday in theCorrect Language
Read about how to prepare the Web interfaces. Preparing the WFM Web Interfaces
Configure the date/time format and your languagepreference in the WFM Web interfaces.
• Changing the Preferred Language Settings inthe Web Browser
• Changing the Date and Time Format in the WebAgent Interface (Solaris)
• Overriding the User Account Locale (Windows• Overriding the User Account Locale (Solaris)
ImportantAfter you have completed the procedures in the Task Summary: Preparing WFM forGenesys Localization (above), complete the procedures in Installing the WFMLanguage Packs.
Installing the WFM Language Packs
Click the red arrow to view simple procedures that will help you to install the Language Packs foreach of the WFM components. Complete all of the procedures to localize your WFM deployment.
Installing the Web Language PackPurpose: To localize WFM Web by installing the Web Language Pack.Prerequisite: The WFM Web IP is installed on the host.
Start of Procedure
1. Start the Web Language Pack IP for the language you are installing and follow the steps in theInstallation Wizard.
WFM Localization Using Genesys Localization Software
Workforce Management Administrator's Guide 248

2. If WFM Web is already deployed in the servlet container, undeploy it using the servlet container-specificinstructions.
ImportantYou must undeploy WFM Web from the servlet container, but do not uninstall itfrom system.
3. Deploy the WFM Web wfm.war file that was updated by the Language Pack IP, by using the servletcontainer specific instructions.
WFM Web uses localized resources from the Language Pack.
End of Procedure
Installing the Daemon Language PackPurpose: To localize WFM Daemon by installing the Daemon Language Pack.Prerequisite: The WFM Daemon IP is installed on the host.
Start of Procedure
1. Stop the WFM Daemon process.2. Start the WFM Daemon Language Pack IP for the language you are installing and follow the steps in the
Installation Wizard.3. Start the WFM Daemon process.
The WFM Daemon uses localized resources from the Language Pack.
End of Procedure
Installing the Server, Builder, and Data Aggregator Language PackPurpose: To localize WFM Server, Builder, or Data Aggregator by installing the associated LanguagePack.Prerequisites:
• The WFM Server, Builder, or Data Aggregator IP is installed on the host.• The user account locale is adjusted to match the Language Pack that is being installed. See Adjusting
the User Account Locale (Windows 2003) or Adjusting the System Account Locale (Windows 2008).
Start of Procedure
1. Stop the WFM Server, Builder, or Data Aggregator process.2. Start the WFM Server, Builder, or Data Aggregator Language Pack IP for the language you are installing
and follow the steps in the Installation Wizard.3. Start the WFM Server, Builder, or Data Aggregator process.
WFM Localization Using Genesys Localization Software
Workforce Management Administrator's Guide 249

End of Procedure
WFM Localization Using Genesys Localization Software
Workforce Management Administrator's Guide 250

Preparing for Genesys Localization
TipAfter you have completed these procedures, go to Installing the Language Packs.
Adjusting the System Account Locale (Windows 2008)
Purpose: To adjust the system account locale on the WFM server (Server, Builder, and DataAggregator) to match the language in a specific Language Pack.
ImportantBefore you install any WFM Language Pack, complete the procedures below on theWindows 2008 host.
Start of Procedure
1. On the host, go to Control Panel > Regional and Language Options.2. On the Formats tab, in the Formats section, select the language/region that matches the Language
Pack you will be installing later and click Apply. (See figure below.)
WFM Localization Using Genesys Localization Software
Workforce Management Administrator's Guide 251

Formats—Region and Language Settings (Windows 2008)
3. On the Administrative tab, click Copy Settings.... (See figure below.)
WFM Localization Using Genesys Localization Software
Workforce Management Administrator's Guide 252

Administrative—Region and Language Settings (Windows 2008)
4. In the Copy your current settings to: section, check the Welcome screen and system accountscheckbox. (See figure below.)
WFM Localization Using Genesys Localization Software
Workforce Management Administrator's Guide 253

Welcome—Region and Language Settings (Windows 2008)
5. To save the settings, click OK and/or Apply on each tab before closing.6. Reboot the system.
End of Procedure
Next Steps: Complete the procedure Verifying the System Account Locale in the Windows Registryto verify that the correct locale is configured for the local system account.
Verifying the System Account Locale in the Windows Registry
Purpose: To adjust the user account locale on the WFM server (Server, Builder, and DataAggregator) to match the language in a specific Language Pack.Prerequisite: The system account locale or user account locale is adjusted to match the language inthe installed LP. See the procedure Adjusting the System Account Locale (Windows 2008) or Adjustingthe User Account Locale (Windows 2003).
WFM Localization Using Genesys Localization Software
Workforce Management Administrator's Guide 254

Start of Procedure
1. On the WFM server (Server, Builder, and Data Aggregator), in the Windows Registry Editor, open thefollowing hive: HKEY_USERS\.DEFAULT\Control Panel\International
2. Check the following locale-related keys (see figure below):
• Locale
• sCountry
• sLanguage
TipTo interpret any specific locale ID, see the Microsoft article, "Locale IDs Assigned byMicrosoft".
Verify Locale in the Windows Registry
• Save and close the registry.
End of Procedure
Adjusting the User Account Locale (Windows 2003)
Purpose: To adjust the user account locale on the WFM server (Server, Builder, and DataAggregator) to match the language in a specific Language Pack.
WFM Localization Using Genesys Localization Software
Workforce Management Administrator's Guide 255

ImportantBefore you install any WFM Language Pack, complete the procedures below on theWindows 2003 host.
Start of Procedure
1. On the host, go to Control Panel > Regional and Language Options.2. On the Regional Options tab, in the Standards and formats section, select the language/region that
matches the Language Pack you will be installing later. (See figure below.)
Regional Options—Region and Language Settings (Windows 2003)
3. On the Advanced tab, copy the regional settings to the local system or default account, by adding acheck mark to the Default user account settings checkbox. (See figure below.)
WFM Localization Using Genesys Localization Software
Workforce Management Administrator's Guide 256

Advanced—Region and Language Settings (Windows 2003)
4. To save the settings, click Apply and/or OK.5. Reboot the system.
End of Procedure
Changing the Date Format in E–mail Notifications
The WFM Daemon service, which uses the operating system account locale to provide the dateformat, dictates the format for WFM email notifications. By default, WFM Daemon is installed underthe system account and therefore, it uses the system user (or default user) locale. You can changethe date format in email notification sent by WFM Daemon by changing the locale settings for thesystem user account and set the language (country) to match the desired date format.
If changing the system account locale is not an option (for example, if other services are using thelocale settings), you can instruct WFM Daemon to override the service user account locale settings.See the procedure below.
Purpose: To change the date format in email notifications by overriding the WFM Daemon serviceuser account locale settings.
WFM Localization Using Genesys Localization Software
Workforce Management Administrator's Guide 257

Start of Procedure
1. Verify the WFM Daemon service name. (By default, it is WFMDaemon.)2. Stop the WFM Daemon service.3. Open the Windows Registry Editor and navigate to the following registry key:
HKEY_LOCAL_MACHINE\SOFTWARE\Apache Software Foundation\Procrun2.0\<WFM Daemon servicename>\Parameters\JavaWhere: <WFM Daemon service name> is the name of the WFM Daemon service. For example, thedefault key path is:HKEY_LOCAL_MACHINE\SOFTWARE\Apache Software Foundation\Procrun2.0\WFMDaemon\Parameters\Java
4. Open the Option value and add the Java language, region, and country options using the followingsyntax (see Figure below):
• -Duser.language=fr
• -Duser.region=CA
• -Duser.country=CA
Windows Registry Editor—Changing the Date/Time Format
• Press Enter to add a new line.
WFM Localization Using Genesys Localization Software
Workforce Management Administrator's Guide 258

ImportantYou must add a new line after the last option, otherwise the option is not parsed.
• Click OK to apply the changes, and close the Registry Editor.• Start the WFM Daemon process and check the email notifications date format.
End of Procedure
Adjusting WFM Web to Display Weekday in the Correct Language
To correctly display the weekday in certain language character sets, you must modify a configurationoption in the WFM Web Application.
Purpose: To configure the WFM Web Application to display the weekday in in certain languagecharacter sets (or in the correct language you prefer).
Start of Procedure
1. In the WFM Web Application properties, click the Options tab.2. In the Options section, select the PageCharSet option and set the value to the code page that specifies
the language you want to use. For example, to correctly display the weekday in the French language,the set the option value as follows: PageCharSet = windows-1252
End of Procedure
WFM Localization Using Genesys Localization Software
Workforce Management Administrator's Guide 259

Preparing the WFM Web InterfacesSometimes the date and time format in the WFM Web Applications have a different format than therequired company standard. This section contains information about the date and time formats andincludes procedures that describes how to change the format in each WFM Web Interface.
Generally, date and time format in the Web Applications are determined by the operating system’slocale settings. For example, the Language (Country) locale is read from the operating system andthe Java Runtime Environment (JRE) sets the appropriate date and time format accordingly. However,some WFM Web Application interface date and time formats are determined by locale settings onother hosts.
ImportantThe JRE does not take into consideration any custom formatting on the Windowsplatform. It simply reads the Language (Country) format from the locale settings andsets date and time format accordingly. For example, if the date and time format isEnglish (Canada), the time format is always AM/PM whether the Windows settingshave been customized or not, because that is the default for this country.
Therefore, to use the 24h time format in the WFM Web Applications, you must select the relevantlanguage (country) for which the 24h format is the default. For the English language, it could beeither English (United Kingdom) or English (Ireland).
The date and time format for each of the three WFM Web Application interfaces—Supervisor, Agent,and Reports—is determined by the language preference that is configured in the browser that isbeing used.
Web Supervisor
The WFM Web Supervisor interface date and time format is determined by the language preferencethat is configured in the browser that is being used. This enables each supervisor to choose the dateand time format for their own workstation. See Changing the Preferred Language Settings in the WebBrowser.
To configure the date and time format for WFM Web Supervisor on a Windows host, complete Steps 1and 2 in the Adjusting the User Account Locale (Windows 2003).
Web Agent
The WFM Web Agent interface date and time format is determined by the Web Server host andServer service user account locale. This enables a unified Web Agent view of the date and time
WFM Localization Using Genesys Localization Software
Workforce Management Administrator's Guide 260

format for all agents.
There are two ways to change the date and time format in the WFM Web Agent interface:
1. Change Web Server (Tomcat) service operating system user account locale. By default, the Tomcatservice is installed under the Local System account (or default account) like most of the services.
• To change the date and time format in the Web Agent interface on Windows, see in the Adjusting theSystem Account Locale (Windows 2008) or Adjusting the User Account Locale (Windows 2003).
• To change the date and time format in the Web Agent interface on Solaris, see the Changing the Dateand Time Format in the WFM Web Agent Interface (Solaris).
• Set Tomcat JVM locale options to override operating system user account locale. If, for any reason, youcannot change the locale settings for the System Local account to change the Java date and time format,you can override the locale settings for only the Tomcat environment, by using the -Duser.language and-Duser.country Java options
• To configure these options on Windows, see the Overriding the User Account Locale by Setting theTomcat JVM Locale Options (Windows).
• To configure these options on Solaris, see the Overriding the User Account Locale by Setting the TomcatJVM Locale Options (Solaris).
Web Reports
The WFM Web Reports date and time format is determined by the Web Server host or Web Serverservice user account locale that is executing Reports. If there is one WFM Web instance or severalWeb instances, without a dedicated WFM Web for the Reports instance, the date and time format istaken from the Web Server host that is hosting WFM Web. If there is a dedicated WFM Web for theReports instance, the Reports date and time format is obtained from the Web Server host for theReports or Web Server service user account locale.
To change the date and time format for Reports, complete the same procedures as those used forWFM Web Agent on the WFM Web for Reports host or Tomcat instance. See Web Agent. If it is thesame instance as WFM Web Agent, the settings will affect both the Web Agent and Web Reports dateand time formats.
Procedures
The procedures in this section relate to the topics on this page.
Changing the Preferred Language Settings in the Web BrowserPurpose: To change the preferred language settings in the web browser.
WFM Localization Using Genesys Localization Software
Workforce Management Administrator's Guide 261

TipThis procedure describes the steps to change the language settings in InternetExplorer. However, language preference settings might be in different locations foreach vendor’s browser (for example, FireFox or Chrome), and even different versionsof the browser. For information about how to change the settings in the browser youare using, Genesys recommends you check the vendor’s web site or Help.
Start of Procedure
1. In Internet Explorer, go to Tools > Internet Options.2. In the Internet Options dialog, on the General tab click Languages.3. In the Language Preferences dialog, click Add.4. In the Add Language dialog, select the language you want to use and click OK.
ImportantEnsure the language you select is the first language in the list. If there is morethan one language in the list, highlight your selection and then click Move Up untilyour language preference is at the top of the list.
5. Click OK twice to save the settings and close the Internet Options dialog.
End of Procedure
Changing the Date and Time Format in the Web Agent Interface (Solaris)Purpose: To change the date and time format in the Web Agent interface to match the LP language.Summary: In Solaris, the Java Virtual Machine (JVM) obtains the default locale from the current userenvironment.
Start of Procedure
1. Type locale at the command prompt to determine the current locale setting.2. Set the LANG environment variable to set the change locale parameter. For example: :> export
LANG=en_GB
3. To verify that the locale is changed, type locale at the command prompt again. The following output isdisplayed::>localeLANG=en_GBLC_CTYPE="en_GB"LC_NUMERIC="en_GB"LC_TIME="en_GB"LC_COLLATE="en_GB"
WFM Localization Using Genesys Localization Software
Workforce Management Administrator's Guide 262

LC_MONETARY="en_GB"LC_MESSAGES="en_GB"LC_ALL=
4. Restart Tomcat.
TipFor more information about Solaris locale values and how to change them, see theSun Solaris documentation on the vendor web site.
End of Procedure
Overriding the User Account Locale (Windows)Purpose: To override the user account locale by using Tomcat JVM locale options on Windows.
Start of Procedure
1. Open the Apache Tomcat Properties window.2. Select the Java tab.3. To set the locale settings for the Tomcat JVM, in the Java Options text box, add the -Duser.language
and -Duser.country (or -Duser.region) options. See the examples and figure below.
Examples:
• To have English weekday names and UK date format dd/mm/yy @HH:MM, add:• -Duser.language=en
• -Duser.region=GB
• -Duser.country=GB
• To have English weekday names and US date format mm/dd/yy @hh:mm AM/PM, add:• -Duser.language=en
• -Duser.region=US
• -Duser.country=US
• To have French weekday names and CA date format yy-mm-dd @HH:MM, add:• -Duser.language=fr
• -Duser.region=CA
• -Duser.country=CA
WFM Localization Using Genesys Localization Software
Workforce Management Administrator's Guide 263

Figure: Java Options—Apache Tomcat Properties
• Restart Tomcat.
End of Procedure
Overriding the User Account Locale (Solaris)Purpose: To override the user account locale by using Tomcat JVM locale options on Solaris.
Start of Procedure
1. In the JRE, update the JAVA_OPTS environment variable with the -Duser.language, -Duser.region, and-Duser.country options.For example, see the following options string: JAVA_OPTS="$CATALINA_OPTS -server -Xms128m-Xmx256m -Djava.awt.headless=true -Duser.language=en -Duser.region=GB-Duser.country=GB"
ImportantThe options in the example might be different in an actual Java environment.These options were used as an example only.
2. Restart Tomcat.
WFM Localization Using Genesys Localization Software
Workforce Management Administrator's Guide 264

End of Procedure
WFM Localization Using Genesys Localization Software
Workforce Management Administrator's Guide 265

Using Self-LocalizationYou can localize the GUIs for WFM Web Supervisor and WFM Web Agent without having to obtainlocalized software from Genesys. This enables Genesys partners and customers to deploy translatedversions of these user interfaces, when Genesys does not provide localized versions of WFM.
The WFM Agent and Supervisor components each draw their GUI text from a properties file, whichyou can modify. You can localize WFM to any language that you wish, by translating the text in thesefiles.
Perform this localization carefully, by making backups that you can use to undo mistakes and byusing text that has the precise meaning of the words and phrases that you are translating. Genesysassumes no responsibility for work performed by anyone, other than a Genesys employee.
ImportantSelf-localization does not affect all text in WFM Web. The text of some messages (suchas the resolution of Calendar items, Schedule Build Validation messages, and others)do not reside in the wfm.war properties files, and are therefore, not localized.
Requirements
Ensure you have the following requirements to complete your self-localization:
• JDK (the Java Development Kit, same version as required by WFM Web) must be located in the pathJAVA_HOME.
• Certificate to sign Java code.
Using localization.batThe localization.bat batch file is installed in the same directory where WFM Web was initiallyinstalled. Use this file to:
• Extract the agent.properties and supervisor.properties properties files from the wfm.war file.• Update the wfm.war file by reinserting the two WFM Properties files. Run the localization.bat file
from the Windows command line interface.
For example, To display the help message, which summarizes all functionality, enter:C:\Program Files\GCTI\WFM76\Web>localization -h
Display help message.. [+]USAGE:
WFM Localization Using Self-Localization
Workforce Management Administrator's Guide 266

localization -{xuci} [wfm-war-file] OR -{eh}
[-a OR -a8 [agent-properties-file]] [-s [supervisor-properties-file]]
Options:
-x extract properties from WFM war
-u update WFM war with new properties
-c create WFM localization jar archive
-i insert WFM localization jar in the war archive
-a define path to agent properties file
-a8 define path to agent800 properties file
-s define path to supervisor properties file
-e show examples
-h,/? show this message
Parameters:
[wfm-war-file] path to WFM war
[agent-properties-file] path to agent properties file
[supervisor-properties-file] path to supervisor properties file
Additional Info:
If you not define the file name the default name will be used.
For war it is 'wfm.war' in current folder.
For agent it is 'agent.properties' in current folder.
For agent800 it is 'agent800.properties' in current folder.
For supervisor it is 'supervisor.properties' in current folder.
CAUTION:
Please backup the original properties to the safe place
already after extraction.
You may use them for restoring if something goes wrong.
WFM Localization Using Self-Localization
Workforce Management Administrator's Guide 267

Precautions
Before localizing your WFM deployment, ensure you take the following precautions:
• Back up wfm.war before you make your changes. You may need to replace the modified file if yourchanges have unexpected results.
• Back up the properties files before you make your changes, for the same reason that you back upwfm.war.
• Back up wfm.war, as well as the properties files, after you make your changes too. When you install aWFM Web patch, you also install a new (non-localized) wfm.war file. The backup allows you to restoreyour changes accurately and with a minimum of effort.
• With that backup, you can restore your changes accurately and with a minimum of effort after installinga WFM Web patch, which includes a new (non-localized) wfm.war file.
• Wait for the extraction and updating processes to finish; they do not display status.
Due to changes in the Java security model, localized resources must be placed into signed wfm-localization.jar. See docs.oracle.com, The localizer is responsible for obtaining a certificate andfor signing the file wfm-localization.jar.
Task Summary: WFM Localization ProcessTask Summary
1. Extract the properties files from inside wfm.war2. Localize the properties files. See Localizing WFM the First Time.3. Create the file wfm-localization.jar, including inside translated resources from task 2 of thissummary.4. Sign the wfm-localization.jar file (from task 3).5. Update wfm.war with the signed wfm-localization.jar (from task 4).6. Deploy the new wfm.war on the web application server.
ImportantBefore you begin the self-localization process, read this entire section, especially thePrecautions and Requirements sections.
Initial and Subsequent Localizaton
You will use different procedures for the initial and subsequent localization of WFM.
WFM Localization Using Self-Localization
Workforce Management Administrator's Guide 268

Initial LocalizationThe first time you localize WFM, you must follow the steps in the Localizing WFM the First Time. Whenyou localize the text in your WFM web archive, you are modifying the program’s software—themessages, menus and other elements of the screen display. By doing this yourself, you must acceptresponsibility for any possible errors you might make and ensure that you can recover from anypossible errors. Therefore:
• Accept responsibility by following these instructions closely. Do not take shortcuts.• Ensure error recovery by backing up your files before and after every change.
All Subsequent LocalizationsIn the future, if there is an updated version of WFM Web that you need to deploy (for example, apatch or software update) and you have already localized WFM, follow the steps in the LocalizingWFM the Next Time (Subsequently).
Procedures
The procedures in this section relate to the topics on this page.
Localizing WFM the First TimePurpose: To localize WFM for the first time (the initial process).
Start of Procedure
1. Make a backup copy of the existing wfm.war file and save it in a safe place (in a different directory, witha different name, or both). The wfm.war file is an important WFM software component, and you mightneed to replace a broken version.
ImportantYou must make a backup of the wfm.war file before and after you make changesso that you can update the new, non-localized wfm.war file that arrives with anynew patches that are released.In a worst-case scenario, you can always reinstall WFM Web from the originalsoftware release disk or FTP download that you received from Genesys.
2. Extract the supervisor.properties and agent.properties properties files from the wfm.war file, byusing the software tool localization.bat. Click Start > Run to open a command window. Then enter:localization -x...where -x extracts the properties files. See Using localization.bat for ways to specify file names andlocations.
WFM Localization Using Self-Localization
Workforce Management Administrator's Guide 269

3. Make a backup copy of the properties files before you change them, rename them with a descriptivename (for example, agent.properties.english.v8.1.000.10), and then store them in a safe place.You will need these in the future to compare with newer properties files when software updates to WFMWeb are released.
4. Using a text editor, update the two properties files by changing the English text strings to the languageyou want to use.
TipTo help identify the text strings in context, you might want to run WFM in anotherwindow while you do this work.
5. Make a backup copy of these localized properties files, rename them with a descriptive name (forexample, agent.properties.czech.v8.1.000.10) and then store them in a safe place.
6. Create the wfm-localization.jar file, by using the localization -c option.7. Sign the wfm-localization.jar file, by using Java's utility keytool, which is documented here:
docs.oracle.com.8. Update the wfm.war file. Use the localization -i option.9. Deploy the wfm.war file to the WFM Web Server, by completing the following steps:
• Stop Tomcat.• Copy the edited wfm.war file and then paste it into the Tomcat folder.• Restart Tomcat.
End of Procedure
Localizing WFM the Next Time (Subsequently)Purpose: To localize WFM after an updated version has been deployed (subsequent to the initiallocalization).Prerequisite: Your WFM deployment has been localized at least once before. See Initial Localization.
Start of Procedure
1. Use the localization.bat file to extract the two properties files (one for the WFM Web for Agents GUIand one for the WFM Web for Supervisors GUI) from the wfm.war file. (See step 2 in the Localizing WFMthe First Time.)
2. Compare the new versions of the properties files with the original ones, by using the windiff tool (orany text editor that provides comparison capabilities) to identify any new or changed strings thatrequire localization.
3. Using the text editor, update the two localized properties files that you created in step 3 in LocalizingWFM the First Time, adding any new string resources in the appropriate place.
WFM Localization Using Self-Localization
Workforce Management Administrator's Guide 270

TipMake a new backup copy of the properties files; if you make a mistake, you cancontinue to work, by using the backup you created in step 4 in Localizing WFM theFirst Time.
4. Create and sign the wfm-localization.jar file and update the file wfm.war, by using the same tools asdescribed steps 6 and 7 in Localizing WFM the First Time.
5. Deploy the updated wfm.war file on the Web application server. See instructions for deleting the .warfile from Tomcat (step 9 in Localizing WFM the First Time).
End of Procedure
Tools and File Descriptions
Use the tools specified in the table below to localize your installation of WFM.
Tool Description
localization.batUse this batch file to extract and update theproperties files from wfm.war. See Usinglocalization.bat.
wfm.warThis Web archive file contains the WFM propertiesfiles agent.properties andsupervisor.properties.
agent.properties Edit the text inside this properties file, to localizethe WFM Web for Agents GUI.
agent800.properties Edit the text inside this properties file, to localizeparts of the WFM Web for Agents GUI.
supervisor.properties Edit the text inside this properties file, to localizethe WFM Web for Supervisors GUI.
wfm-localization.jar The archive that contains the translated resources.
Text editor Use a non-formatting text editor (such as Notepador Wordpad) to edit the properties files.
Windows system toolsUse the appropriate system tools to stop andrestart the web application server, and to copy thelocalized wfm.war to its appropriate location.
Web Application ServerThis appendix uses Tomcat as the default devicethat enables access to WFM. However, dependingon your configuration and version of WFM, it couldinstead be WebSphere.
Back to Top
WFM Localization Using Self-Localization
Workforce Management Administrator's Guide 271

Applying the Localization.bat File Options
This section describes how to use the options in the Localization.bat file and provides examples.
Specifying the DefaultsEach file used by the localization.bat file has a default name and a default location. To use thesedefaults, enter the command line in its simplest format. See examples.
• localization -xThis command line applies all the defaults:
• The web archive is named wfm.war and is located in the current directory.• The Properties files that are extracted from wfm.war are named agent.properties and
supervisor.properties and are saved to the current directory.
• localization -uDo not use this option; it has been replaced by options -c and -i
• localization -cThis option creates the file wfm-localization.jar from localized resources, making it available forsigning.
• localization -iThis option inserts the file wfm-localization.jar into wfm.war. Be certain that wfm-localization.jar is signed before inserting or the problems described in docs.oracle.com will appearwhen you try to run WFM Web for Supervisors.
Specifying DirectoriesYou can specify absolute paths or relative paths to the directories that hold the files. See examples.
• localization -x “C:\Program Files\GCTI\WFM76\Web\wfm.war”wfm.war is in the absolute directory C:\Program Files\GCTI\WFM76\Web\. You can also specifyabsolute directories for the properties files. For example:localization -u -a “\Program Files\GCTI\WFM76\Web\propfiles\agent.properties”localization -x -s “\Program Files\GCTI\WFM76\Web\propfiles\supervisor.properties”
• localization -x “..\safe\wfm.war”wfm.war is in the directory \safe\, whose position is relative to the current directory (they share thesame parent directory). You can also specify relative directories for the properties files. For example:localization -x -a “..\propfiles\agent.properties”localization -u -s “..\propfiles\supervisor.properties”
Specifying FilenamesYou can specify different filenames for any of the files. See examples.
• localization -u “wfmLOCALIZED.war”The web archive is named wfmLOCALIZED.war. You can specify names for the properties files. Forexample:localization -x -a “agentORIGINAL.txt”localization -u -s “supervisorREVISED.txt”
WFM Localization Using Self-Localization
Workforce Management Administrator's Guide 272

Combining OptionsYou can combine any or all of these options. This example occupies a single command line, and hasbeen wrapped in arbitrary places for readability: See examples.
• localization -u “C:\Program Files\GCTI\WFM76\Web\wfmLOCALIZED.war”-a “C:\Program Files\GCTI\WFM76\Web\propfiles\agentORIGINAL.txt”-s “..\propfiles\supervisorREVISED.txt”
HelpTo see usage examples, enter this command line: localization -e
WFM Localization Using Self-Localization
Workforce Management Administrator's Guide 273

WFM MetricsFind everything you need to know about Workforce Management (WFM) metrics, by clicking on thesetopic links.
Schedule Summary Report
Contact Center Performance Report
Agent Adherence Report
End Notes
TipA period in these metrics refers to the specific granularity of the report being run. ForIntra-day granularity a period is 15 minutes; for Daily granularity a period is 1 day;and so on.
WFM Metrics Using Self-Localization
Workforce Management Administrator's Guide 274

Schedule Summary ReportIn this topic, find information about the Workforce Management Schedule Summary reportingmetrics. To go directly to a specific metric, click any link in the tables below.
• AHT – Difference• AHT – Forecasted• AHT – Scheduled
• ASA – Difference• ASA – Forecasted• ASA – Scheduled
• Budget –Difference• Budget –Forecasted• Budget –Scheduled
• Coverage –Difference• Coverage –Published• Coverage –Scheduled
• Difference –Calculated• Difference –Required
• InteractionVolume –Difference• InteractionVolume –Forecasted• InteractionVolume –Scheduled
• Number ofAgents
• Occupancy –Difference• Occupancy –Forecasted• Occupancy –Scheduled
• Service Level –Difference• Service Level –Forecasted• Service Level –Scheduled
• Staffing –Calculated• Staffing –Required
TipA period in these metrics refers to the specific granularity of the report being run. ForIntra-day granularity a period is 15 minutes; for Daily granularity a period is 1 day;and so on.
See Other Metrics Topics
• Contact Center Performance Report Metrics• Agent Adherence Report Metrics• Endnotes (for Metrics)
____________________________________________________________________________________________________________________
Number of Agents
Number of Agents is also called Headcount or Agents in Seats. If an agent is multi-skilled and isscheduled for more than one activity for a given period, he will actually count as 1 headcount foreach of the activities for which he is scheduled. Therefore, in comparison with Coverage, Headcountcan double count an agent if he is multi-skilled and is scheduled for more than one activity during aparticular period.
WFM Metrics Schedule Summary Report
Workforce Management Administrator's Guide 275

For example, if an agent is scheduled for two activities in a particular 15-minute timestep, he mightcount as 0.5 towards the Coverage of each of those activities, but he would count as 1 Headcounttowards each of those activities. Unlike Coverage, where an agent could count towards partialcoverage if he’s scheduled for something other than activity work for part of a 15-minute timestep,for Headcount it is all or nothing. This means that as long as an agent is scheduled for at least 1minute of work on an activity during a given 15-minute timestep, he will count as 1 Headcounttowards that activity.
Back to Top
How the Total / Average is CalculatedThe value for Headcount in the totals/averages row at the top of this view (or bottom of the report) isa simple average of all the values for all the timesteps of the selected time period (which can be:Intra-day, Daily, nWeeks, or Monthly).
Service Level – Scheduled
The Service Level that you should achieve on this activity, with the number of agents currentlyscheduled for this activity. Due to agent rounding, this value may differ from the original service levelobjective that was stated when the staffing forecast was built.
For example, WFM might forecast a staffing requirement of 12 agents to meet a service levelobjective of 80% of interactions answered within 20 seconds. But a Service Level Percentage Forecastmay report a higher number, such as 83.48%. This is because 12 was the minimum number of agentsrequired to meet the 80% service level objective but, with that number of agents, the contact centercan be expected to achieve a slightly better service level than 80%. With one less agent (11 agents),the contact center would not be expected to achieve the 80% service level.
How the Total / Average is CalculatedA weighted average, calculated across the open hours:
AVG SL Scheduled = S (Scheduled SLi * Forecasted IVi) / S (Forecasted IVi)
Where:
Scheduled SLi= Calculated Service Level based on the number of scheduled agents for timestepiForecasted IVi= Forecasted Interaction Volume for timestepi
timestepi= timestep number over the open hours
Back to Top
Service Level—Forecasted
The Service Level Percentage objective that you should be able to achieve when staffing with thenumber of agents from the staffing forecast (also known as Budget – Difference).
WFM Metrics Schedule Summary Report
Workforce Management Administrator's Guide 276

How the Total / Average is CalculatedA weighted average, weighted by Forecasted IV:
AVG SL Forecasted = Σ (Forecasted SLi * Forecasted IVi) / Σ (Forecasted IVi)
Where:
Forecasted SLi= Forecasted Service Level for timestepiForecasted IVi= Forecasted Interaction Volume for timestepi
timestepi= timestep number over the open hours
Service Level – Difference
Service Level – Scheduled minus Service Level – Forecasted.
Interaction Volume – Scheduled
The number of interactions that can be handled based on the schedule coverage. Calculated by usingthe inverse of the WFM’s staffing forecast algorithm.
WFM uses a modified Erlang algorithm to derive Calculated Staffing based on the IV, the AHT, andservice objectives stated when building the forecast. Therefore, to calculate the scheduled interactionvolume, WFM uses that formula in reverse.
Back to Top
How the Total / Average is CalculatedThe sum is across the entire report time range.
Interaction Volume – Forecasted
The interaction volume taken from the Master Forecast.
How the Total / Average is CalculatedThe sum across the entire report time range.
WFM Metrics Schedule Summary Report
Workforce Management Administrator's Guide 277

Interaction Volume – Difference
Interaction Volume – Scheduled minus Interaction Volume – Forecasted.
AHT – Scheduled
The Average Handling Time (AHT) per interaction that you should achieve, based on the schedulecoverage. Calculated by using the inverse of the WFM’s staffing forecast algorithm.
WFM uses a modified Erlang algorithm to derive Calculated Staffing, based on the IV, AHT, andservice objectives stated when building the forecast. Therefore, to calculated the scheduled AHT, ituses that formula in reverse.
Back to Top
How the Total / Average is CalculatedA weighted average, weighted by Forecasted IV:
AVG AHT Scheduled = Σ (Scheduled AHTi * Forecasted IVi)/ Σ (Forecasted IVi)
Where:
Scheduled AHTi= Scheduled Average Handling Time for timestepiForecasted IVi= Forecasted Interaction Volume for timestepi
timestepi= timestep number over the open hours
AHT – Forecasted
Average Handling Time of interactions, taken from the Master Forecast.
How the Total / Average is CalculatedA weighted average, weighted by Forecasted IV:
AVG AHT Forecasted = Σ (Forecasted AHTi * Forecasted IVi)/ Σ (Forecasted IVi)
Where:
Forecasted AHTi= Forecasted Average Handling Time for timestepiForecasted IVi= Forecasted Interaction Volume for timestepi
timestepi= timestep number over the open hours
WFM Metrics Schedule Summary Report
Workforce Management Administrator's Guide 278
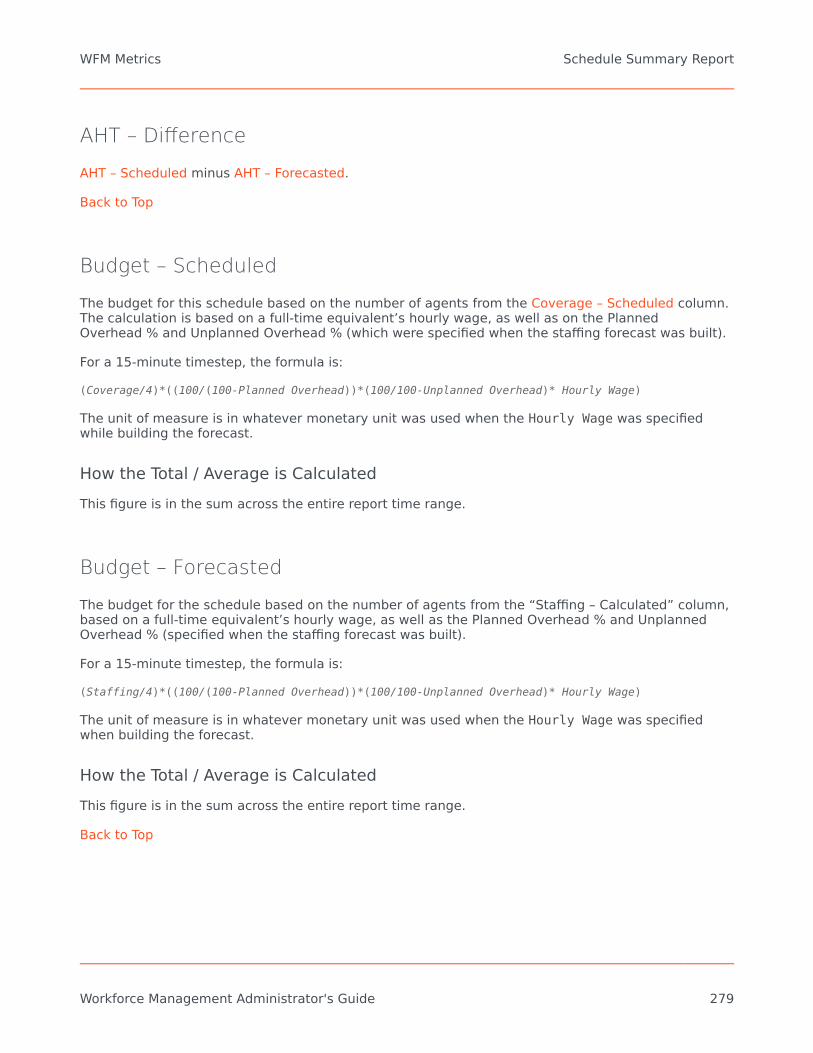
AHT – Difference
AHT – Scheduled minus AHT – Forecasted.
Back to Top
Budget – Scheduled
The budget for this schedule based on the number of agents from the Coverage – Scheduled column.The calculation is based on a full-time equivalent’s hourly wage, as well as on the PlannedOverhead % and Unplanned Overhead % (which were specified when the staffing forecast was built).
For a 15-minute timestep, the formula is:
(Coverage/4)*((100/(100-Planned Overhead))*(100/100-Unplanned Overhead)* Hourly Wage)
The unit of measure is in whatever monetary unit was used when the Hourly Wage was specifiedwhile building the forecast.
How the Total / Average is CalculatedThis figure is in the sum across the entire report time range.
Budget – Forecasted
The budget for the schedule based on the number of agents from the “Staffing – Calculated” column,based on a full-time equivalent’s hourly wage, as well as the Planned Overhead % and UnplannedOverhead % (specified when the staffing forecast was built).
For a 15-minute timestep, the formula is:
(Staffing/4)*((100/(100-Planned Overhead))*(100/100-Unplanned Overhead)* Hourly Wage)
The unit of measure is in whatever monetary unit was used when the Hourly Wage was specifiedwhen building the forecast.
How the Total / Average is CalculatedThis figure is in the sum across the entire report time range.
Back to Top
WFM Metrics Schedule Summary Report
Workforce Management Administrator's Guide 279

Budget – Difference
Budget – Scheduled minus Budget – Forecasted.
Staffing – Calculated
A value taken directly from the staffing forecast, for the particular timestep.
How the Total / Average is CalculatedThe value in the column footer is calculated based on the same approach as what is described forCoverage – Scheduled.
Staffing – Required
A value taken directly from the staffing forecast, for the particular timestep. It will be populated onlyif you put some values in the optional Required Staffing column in your staffing forecast.
How the Total / Average is CalculatedThe value in the column footer is calculated based on the same approach as what is described forCoverage – Scheduled.
Difference – Calculated
Coverage – Scheduled minus Staffing – Calculated.
Back to Top
How the Total / Average is CalculatedThe value in the column footer is calculated based on the same approach as what is described forCoverage – Scheduled.
Difference – Required
Coverage – Scheduled minus Staffing – Required.
WFM Metrics Schedule Summary Report
Workforce Management Administrator's Guide 280

Coverage – Scheduled
The actual amount of time that an agent should count towards coverage of the work in this timeperiod. If an agent is multi-skilled and is scheduled for multiple activities during a given period, hemay count fractionally towards the coverage of each activity (for example, as 0.5 toward each of twoactivities for which he’s scheduled).
If an agent has something other than activity work scheduled for part of a period, that will besubtracted from the amount of time he’s counted towards the coverage of that activity work. Forexample, an agent who is scheduled for an activity for a given 15-minute timestep but has a breakfor the first 5 minutes of that timestep, would count as 0.67 towards the coverage of that activity forthat period.
Back to Top
How the Total / Average is CalculatedThis figure is in FTEs. For the calculation, see Endnote 1.
The value in the totals/averages row at the top of this view (or bottom of the report) is calculated asfollows:
1. WFM calculates the sum of the agents which are covering this activity within each timestep during theday.
2. The value calculated in step 1 is multiplied by 15 minutes in order to get the total time of activity work.3. The value calculated in step 2 is divided by the value set for Paid Hours a Day, which was entered
while building staffing forecast for this activity.
Coverage – Published
The original values from the Coverage – Scheduled column the last time a schedule scenario waspublished to the Master Schedule.
How the Total / Average is CalculatedThe value in the column footer is calculated based on the same approach as what is described forCoverage – Scheduled.
Coverage – Difference
Coverage – Scheduled minus Coverage – Published.
WFM Metrics Schedule Summary Report
Workforce Management Administrator's Guide 281

ASA – Scheduled
The Average Speed of Answer that you should achieve on this activity, with the number of agentscurrently scheduled for this activity.
The totals/average row for ASA Scheduled reports a weighted average, calculated across the openhours and weighted by Forecasted IV (exactly as for Service Level – Scheduled):
A weighted average, weighted by Forecasted IV:
AVG ASA Scheduled = S (Scheduled ASAi * Forecasted IVi) / S (Forecasted IVi)
Where:
Scheduled ASAi= Calculated Average Speed of Answer based on the number of scheduled agentsfor timestepiForecasted IVi= Forecasted Interaction Volume for timestepi
timestepi= timestep number over the open hours
Back to Top
ASA – Forecasted
The totals/average row for ASA Forecasted reports a weighted average, calculated across the openhours and weighted by Forecasted IV (exactly like for Service Level – Forecasted):
A weighted average, weighted by Forecasted IV:
AVG ASA Forecasted = S (Forecasted ASAi * Forecasted IVi) / S (Forecasted IVi)
Where:
Forecasted ASAi= Calculated Average Speed of Answer based on the number of scheduled agentsfor timestepiForecasted IVi= Forecasted Interaction Volume for timestepi
timestepi= timestep number over the open hours
ASA – Difference
ASA – Scheduled minus ASA – Forecasted.
Occupancy – Scheduled
The Occupancy that you should achieve on this activity, with the number of agents currentlyscheduled.
WFM Metrics Schedule Summary Report
Workforce Management Administrator's Guide 282
How the Total / Average is CalculatedThe totals/average row for Occupancy reports a weighted average, calculated across the openhours and weighted by Forecasted IV (exactly as for Service Level – Scheduled:
A weighted average, calculated across the open hours and weighted by Forecasted IV:
AVG Occupancy Scheduled = S (Scheduled Occi * Forecasted IVi) / S (Forecasted IVi)
Where:
Scheduled Occi= Calculated Occupancy based on the number of scheduled agents for timestepiForecasted IVi= Forecasted Interaction Volume for timestepi
timestepi= timestep number over the open hours
Occupancy – Forecasted
The Occupancy objective that you should be able to achieve when staffing with the number of agentsfrom the staffing forecast (Staffing – Calculated).
Back to Top
How the Total / Average is CalculatedThe totals/average row for Occupancy reports a weighted average, calculated across the openhours and weighted by Forecasted IV (exactly as for Service Level – Forecasted):
A weighted average, weighted by Forecasted IV:
AVG Occupancy Forecasted = S (Forecasted Occi * Forecasted IVi) / S (Forecasted IVi)
Where:
Forecasted Occi= Forecasted Occupancy for timestepiForecasted IVi= Forecasted Interaction Volume for timestepi
timestepi= timestep number over the open hours
Occupancy – Difference
Occupancy – Scheduled minus Occupancy – Forecasted.
Back to Top
WFM Metrics Schedule Summary Report
Workforce Management Administrator's Guide 283

Contact Center Performance ReportingMetricsIn this topic, find information about the Workforce Management Contact Center Performancereporting metrics. Click any link in the Contents to go directly to a specific metric.
• Abandon Factor –Actual• Abandon Factor –Scheduled
• AHT – Actual• AHT – Difference• AHT – Forecasted• AHT – Percentage
• ASA – Actual• ASA – Scheduled
• Coverage – Difference• Coverage – Optimal• Coverage –Percentage• Coverage – Scheduled
• Interaction Volume – Actual• Interaction Volume – Difference• Interaction Volume –Forecasted• Interaction Volume –Percentage
• Number of Agents – Actual• Number of Agents – Difference• Number of Agents – Percentageof Difference• Number of Agents – Scheduled
• Service Level – Actual• Service Level – Scheduled
TipA period in these metrics refers to the specific granularity of the report being run. ForIntra-day granularity a period is 15 minutes; for Daily granularity a period is 1 day;and so on.
See Other Metrics Topics
• Schedule Summary Report Metrics• Agent Adherence Report Metrics• Endnotes (for Metrics)
_____________________________________________________________________________________________________________________
ImportantThe Difference calculation is controlled by the WFM Web Application optionRevertDiffCalculation in Genesys Administrator.false (default): Scheduled or Forecasted minus Actualtrue: Actual minus Scheduled or Forecasted
WFM Metrics Contact Center Performance Reporting Metrics
Workforce Management Administrator's Guide 284

This document uses the default value.
Coverage – Scheduled
The actual amount of time that an agent should count toward coverage of the work in this timeperiod. If an agent is multi-skilled and is scheduled for multiple activities during a given period, hemay count fractional amounts of time toward the coverage of each activity (for example, 0.5 towardeach of two activities for which he is scheduled).
If an agent has something other than activity work scheduled for part of a period, that will besubtracted from the amount of time counted toward the coverage of that activity work. For example,an agent who is scheduled for an activity for a given 15-minute timestep, but who has a break for thefirst five minutes of that timestep, would count as 0.67 toward the coverage of that activity for thatperiod.
Back to Top
How the Total / Average Is CalculatedThis figure is in FTEs. For the calculation, see Endnote 1.
The value in the totals/averages row at the top of this view (or at the bottom of the report) iscalculated as follows:
1. WFM calculates the sum of the agents who are covering this activity within each timestep during theday.
2. The value calculated in Step 1 is multiplied by 15 minutes in order to get the total time of activity work.3. The value calculated in Step 2 is divided by the value set for Paid Hours a Day, which was entered
while building the staffing forecast for this activity.
Coverage – Optimal
The coverage that would have been required in order to meet the original service objectives, basedon the actual IV and AHT.
Coverage – Difference
Coverage – Optimal minus Coverage – Scheduled.
WFM Metrics Contact Center Performance Reporting Metrics
Workforce Management Administrator's Guide 285

Coverage – PercentageCoverage – Optimal
———————————————————————————————————————————————Coverage – Optimal minus Coverage – Scheduledin concept: Optimal / (Optimal – Scheduled)
Number of Agents – Scheduled
The number of agents scheduled for this period, also known as headcount.
Back to Top
How the Total / Average is CalculatedA simple average across the entire report time range. Thus, even if activity is only open for a portionof the day, if this report were run for a intra-day period, the average would be calculated over 96timesteps.
Number of Agents – Actual
The number of agents who were actually logged in during this period, also known as headcount.
How the Total / Average is CalculatedA simple average of the number of time steps when agents were logged in.
Σ (Agentsi) / Number of time steps
Where
Agentsi is the number of agents logged in (as reported by Stat Server) during timestepi
Number of Agents – Difference
Number of Agents – Scheduled minus Number of Agents – Actual.
Number of Agents – Percentage of Difference(Number of Agents – Scheduled minus Number of Agents – Actual)
————————————————————————————————————————————————————————————————Number of Agents – Scheduled
WFM Metrics Contact Center Performance Reporting Metrics
Workforce Management Administrator's Guide 286

in concept: (Scheduled – Actual) / Scheduled
Interaction Volume – Forecasted
The number of interactions forecasted for this period (taken directly from the Master Forecast).
Back to Top
How the Total / Average is CalculatedThis Sum is spread across the entire report time range.
Interaction Volume – Actual
The number of interactions actually received. The exact nature of this metric will depend on whatStat Server statistic is configured for Interaction Volume.
For example, for voice interactions, normally this is based on Number of Calls Entered.
How the Total / Average is CalculatedThe sum is of Interaction Volume for each time step within the report time range.
Σ (IVi)
Where:
IVi is the Interaction Volume recorded by Stat Server during timestepi
Interaction Volume – Difference
Interaction Volume – Forecasted minus Interaction Volume – Actual.
Interaction Volume – Percentage(Interaction Volume – Forecasted minus Interaction Volume – Actual)
—————————————————————————————————————————————————————————————————————Interaction Volume – Forecasted
in concept: (Forecasted - Actual) / Forecasted
Back to Top
WFM Metrics Contact Center Performance Reporting Metrics
Workforce Management Administrator's Guide 287

AHT – Forecasted
Forecasted Average Handling Time for this period (taken directly from the Master Forecast)
How the Total / Average is CalculatedA weighted average, weighted by Forecasted IV:
AVG AHT Forecasted = Σ (Forecasted AHTi * Forecasted IVi) / Σ (Forecasted IVi)
Where:
Forecasted AHTi = Forecasted Average Handling Time for timestepiForecasted IVi = Forecasted Interaction Volume for timestepi
timestepi = timestep number over the open hours
AHT – Actual
Actual Average Handling Time for calls handled during this period. This metric is based on what StatServer statistics are configured for Total Handle Time and Number of Calls Handled.
How the Total / Average is CalculatedA weighted average, weighted by Number of Calls Handled:
Σ (AHTi * CallsHandledi) / Σ (CallsHandledi)
Where:
AHTi = AHT recorded by Stat Server for timestepiCallsHandledi = Number of interactions handled during timestepi as recorded by Stat Server.
AHT – Difference
AHT – Forecasted minus AHT – Actual.
AHT – Percentage(AHT – Forecasted minus AHT – Actual)
———————————————————————————————————————AHT – Forecasted
in concept: (Forecasted - Actual) / Forecasted
Back to Top
WFM Metrics Contact Center Performance Reporting Metrics
Workforce Management Administrator's Guide 288

Service Level – Scheduled
The Service Level that was scheduled to be achieved, based on the scheduled number of agents.
How the Total / Average is CalculatedA weighted average, weighted by Forecasted IV:
AVG SL Scheduled = Σ (Scheduled SLi * Forecasted IVi) / Σ (Forecasted IVi)
Where:
Scheduled SLi = Calculated Service Level based on the number of scheduled agents fortimestepiForecasted IVi = Forecasted Interaction Volume for timestepi
timestepi = timestep number over the open hours
Service Level – Actual
The Service Level that was actually achieved. This metric is based on what Stat Server statistics areconfigured for Service Factor, Number of Calls Distributed, Average Speed of Answer, and TimeRange.
How the Total / Average is CalculatedA weighted average, weighted by Number of Calls Distributed:
Σ (SFi * CallsDistributedi) / Σ (CallsDistributedi)
Where:
SFi= Service Factor recorded by Stat Server for timestepi
CallsDistributedi= Number of calls distributed during timestepi as recorded by Stat Server.(This value does not appear in the report but is recorded by Stat Server. For more details, seeEndnote 2.)
ASA – Scheduled
The Average Speed of Answer that was scheduled to be achieved, based on the scheduled number ofagents. Calculated by using the inverse of the WFM’s staffing forecast algorithm.
WFM uses a modified Erlang algorithm to derive Calculated Staffing, based on the IV, AHT, andservice objectives such as ASA that were stated when building the forecast. Therefore, to calculatedthe Scheduled ASA it uses that formula in reverse.
WFM Metrics Contact Center Performance Reporting Metrics
Workforce Management Administrator's Guide 289

How the Total / Average is CalculatedA weighted average, weighted by Forecasted IV:
AVG ASA Scheduled = Σ (Scheduled ASAi * Forecasted IVi) / Σ (Forecasted IVi)
Where:
Scheduled ASAi = Calculated ASA based on the number of scheduled agents for timestepiForecasted IVi = Forecasted Interaction Volume for timestepi
timestepi = timestep number over the open hours
Back to Top
ASA – Actual
The Average Speed of Answer that was actually achieved. This metric is based on what Stat Serverstatistics are configured for ASA.
How the Total / Average is CalculatedA weighted average, weighted by Number of Calls Distributed:
Σ (ASAi x CallsDistributedi) / Σ (CallsDistributedi)
Where:
ASAi = Average Speed of Answer for timestepi as recorded by Stat ServerCallsDistributedi = Number of calls distributed during timestepi as recorded by Stat Server
Abandons Factor – Scheduled
The expected number of abandoned interactions based on the scheduled number of agents.Calculated by using the inverse of the WFM’s staffing forecast algorithm.
WFM uses a modified Erlang algorithm to derive Calculated Staffing, based on the IV, AHT, andservice objectives such as Abandonment percentage that were stated when building the forecast.Therefore, to calculate the Scheduled Abandons, WFM uses that formula in reverse.
How the Total / Average is CalculatedA weighted average, weighted by Forecasted IV:
AVG AF Scheduled = Σ (Scheduled AFi * Forecasted IVi) / Σ (Forecasted IVi)
Where:
Scheduled AFi = Calculated Abandon Factor based on the number of scheduled agents for
WFM Metrics Contact Center Performance Reporting Metrics
Workforce Management Administrator's Guide 290
timestepiForecasted IVi = Forecasted Interaction Volume for timestepi
timestepi = timestep number over the open hours
Abandons Factor – Actual
The actual number of abandoned interactions during a specific period, based on which Stat Serverstatistics are configured for Abandoned Interactions.
How the Total / Average is CalculatedA weighted average, weighted by Number of Calls Distributed:
Σ (Abandonsi * CallsDistributedi) / Σ (CallsDistributedi)
Where:
Abandonsi = Number of calls abandoned during timestepi as recorded by Stat ServerCallsDistributedi = Number of calls distributed during timestepi, as recorded by Stat Server
Back to Top
WFM Metrics Contact Center Performance Reporting Metrics
Workforce Management Administrator's Guide 291
Agent Adherence Reporting Metrics andEnd NotesIn this topic, find information about Workforce Management Agent Adherence reporting metrics andendnotes.
See Other Topics About WFM Metrics
• Schedule Summary Report Metrics• Contact Center Performance Report Metrics
Agent Adherence Report
There is only one Adherence reporting metric.
Percentage Adherence Per DayThe percentage of the day during which the agent was adherent to his or her scheduled state.
How the Percentage is Calculated100 - ((NC+UNC)*100/(ST+UNC))
Where:
NC = Noncompliant timeUNC = Noncompliant time outside of scheduled timeST = Scheduled time
Endnotes
This secton contains detailed descriptions and definitions for formula symbols that are used tocalculate WFM metrics.
Endnote 1The Formula for FTEs:
WFM Metrics Agent Adherence Reporting Metrics and End Notes
Workforce Management Administrator's Guide 292

FTEs = (staffingi ÷ stepsHr ÷ paidHrsi x (100 ÷ (100 - pOverheadHrsi)))
Where:
n = Number of time steps in a day (96)i = Current time step
staffing = Calculated staffing requirementsstepsHr = Time steps in one hour (4)paidHrs = Paid Hours in a Day as specified in staffing forecast
pOverhead = Planned Overhead percentage as specified in staffing forecast
Back to Top
Endnote 2The Total/Average value of Service Level in the Contact Center Performance report is calculated asa weighted average, where for the weight coefficient we use the TotalNumberCallsDistributedconfiguration option.
That is, for an Activity when we define the Quality of Service Statistic type in the WFM Web, we arerequired to specify three statistics:
1. Service Factor2. Distributed Interactions3. Average Speed of Answer
(plus two time ranges required for Service Factor statistic calculation)
The Number of Distributed Interactions statistic (or TotalNumberCallsDistributed) plays the role of theweight coefficient in order to calculate the weighted average value of Service Level per:
TimestepIf we calculate Service Level for the same activityseveral objects (for example, across some Queues)this gives us the possibility to get an accurateresult rather then a simple average.
Day A weighted average gives a very accurate result incomparison with simple average.
So the calculation of Total Service Level per day is done by the formula:
SUM (SLi x TNCDi)Service Level Total = ————————————————————
SUM (TNCDi)
Where:
i = 1 ... 96 (intra-day 15 minute timesteps from 00:00 through 23:45)SLi = Service Level value for the timestepi
TNCDi = TotalNumberCallsDistributed value for the timestepi
Here is a simple example of the calculation, using this data:
WFM Metrics Agent Adherence Reporting Metrics and End Notes
Workforce Management Administrator's Guide 293

Timestep SL TNCD TNCDxSL10:45 am 60.00 20 120011:00 am 90.00 1 9011:15 am 20.00 150 300011:30 am 65.00 35 2275
If we assume that during the day we have only 4 timesteps of historical data, our Total Service Levelwill be:
60x20 + 90x1 + 20x150 + 65x35 6565SL weighted = —————————————————————————————— = —————— = 31.87
20+1+150+35 206
Here an example of calculating a simple average:
60+90+20+65SL simple average = ————————————— = 58.7
4
This example shows that a timestep with Service Level=90 where only one call has been processedshould have minimal impact on the overall Service Level for the day, in comparison with a timestepwhere SL=20 and 150 calls have been processed. This is the reason the calculation is done in thisway.
The user won’t be able to see TotalNumberCallsDistributed in the report, as this value is stored inthe WFM database for internal purposes only (in the table WM_perf_activities in the fieldWM_distrib_calls, for each activity and for each timestep).
Also keep in mind that TotalNumberCallsDistributed is not the same as Interaction Volume, sincein general Interaction Volume is configured as TotalNumberCallsEntered (Answered + Abandoned),while TotalNumberCallsDistributed is the number of calls which are being distributed from thequeue.
Back to Top
WFM Metrics Agent Adherence Reporting Metrics and End Notes
Workforce Management Administrator's Guide 294

WFM PrimersWorkforce Management (WFM) primers provide detailed information about certain WFM functions andfeatures and suggest ways in which you might use them in your deployment to optimize theefficiency of your contact center.
Primers contain suggestions and example, which may or may not be applicable to your environment,but the information is provided to help you to make the best choice, based on these recommendeduses and applications.
Primers are provided for these important WFM features:
Multi-Forecasting
Time Off
Overlays
WFM Primers Agent Adherence Reporting Metrics and End Notes
Workforce Management Administrator's Guide 295

Time Off PrimerUse the information in this topic to learn how WFM processes time off and how to configure it to suitthe needs of your workforce and contact center. For more information on this topic, see theWorkforce Management Web for Supervisors Help and Workforce Management Web for Agents Help,
This topic contains the following sections:
• Time-Off Types and Time-Off Rules• Time-Off Limits• Time-Off Request and Approval Process• Agent Time-Off Planner
Time-Off Types and Time-Off Rules
You must understand the basics of the time off features in WFM to use them correctly and efficiently.Before you can use time off, you must configure Time-Off types and Time-Off rules.
Time-Off TypesProbably the simpler of the two objects, because each time off type is simply a container. You addtime off to, or remove time off from, each container. You can create and arbitrarily name an unlimitednumber of Time-Off types.
You create Time-Off types for each individual site. You can use time off to track an agent request ormaintain a balance of requests on a regular basis. Time off types include vacation, personal time off,flexible time off, paid sick days, floating holidays, and more.
Time-Off RulesYou can configure a Time-Off rule for a one or multiple Time-Off types. When you configure multipleTime-Off types for the same rule, the Time-Off balance is calculated and accrued for all Time-Offtypes associated with that rule. This configuration enables multiple Time-Off types to share the sameTime-Off balance.
Time-off rules define:
• The rate at which time off is accumulated for an agent, and how and when an agent can request timeoff.
• Whether or not a Time-Off request will be manually approved, or auto-approved by the WFM system.
You assign Time-Off type/Time-Off rule combinations to agents by using the Configuration >Agents > Time Off or Policies > Time-Off Rules > Assignments pane in WFM Web forSupervisors.
WFM Primers Time Off Primer
Workforce Management Administrator's Guide 296

ImportantTime-Off types are configured on a per site basis. Therefore, if an agent hasoutstanding Time-Off requests and is moved to a different site, the requests arehidden, because WFM tracks them only at the initial site. The default Time-Off typeVacation is the only exception. Vacation is considered valid for all sites in the system,and Time-Off requests for vacation are retained in the system even after the agentmoves from site-to-site. In addition, WFM recalculates the agent's Time-Off balance(s)when the agent moves from one site to another, based on the change in Time-Offrules. Moving an agent to a different site does not affect his/her Time-Off status.
Figure: Relationship Between Time-Off Types, Time-Off Rules, and the Agents Assigned to Them
Notes About the Figure Above
• Agents are assigned to Time-Off rules, not directly to Time-Off types.• The association of Time-Off rules to time off types is many-to-one, because for a single Time-Off type
(for example, personal time off), different agents might be given this type of time off at differentrates—perhaps based on seniority. For example, you might want requests from a certain type of agentfor paid sick days to be auto-granted by the system, but for another type of agent you might want thesame requests to be manually reviewed.
• When you create a Time-Off rule, you define whether it is a rule of the type award (a fixed number ofhours) or accrual (a number of hours that accumulates during the year). In the figure below, all FloatingHoliday time offs are awarded and all Personal Time Offs are accrued. Compensation Time can be eitherawarded or accrued, depending on an Agent's assigned Time-Off rule.
WFM Primers Time Off Primer
Workforce Management Administrator's Guide 297

Figure: Awarded versus Accrued Time Off
Back to Top
Notes About the Figure Above
• An agent can be assigned to mulitiple Time-Off rules.Example 1: Jun Woo has three Time-Off rules assigned to him. One rule defines how he will beawarded a Floating Holiday each year and when he can use that time off. The second rule defines therate at which he will accrue Personal Time Off, how much balance he can have, and when he can use it.The third rule defines how he will be awarded Compensation Time each year.
• Not all agents need to be assigned to a rule for each Time-Off type.Example 2: John Smith has a Floating Holiday award rule and a Personal Time-Off accrual rule.However, he has no Time-Off rule defining how he can accrue or be awarded Compensation Time.Therefore, he will have no balance of this time off type and will not be able to request it.
Exception Used as Time OffWhen you configure an exception type in WFM Web, you can use the option Exception is used asTime Off to designate the exception as time off. This is a legacy feature from earlier versions ofWFM, which supported only one type of time off. WFM now supports an unlimited number of Time-Offtypes, which means Agents and Supervisors can request both full-day and partial-day time off.Therefore, Genesys recommends that you do not use exceptions to represent time off.
When Type Off Types No Longer ApplyA combo box in the upper-left corner of an agent’s Time-Off Planner displays all the Time-Off typesthat are configured for that agent’s site. Some of these might not relevant for the agent. (Agents areassigned to Time-Off rules, which in turn are associated with Time-Off types.)
WFM Primers Time Off Primer
Workforce Management Administrator's Guide 298

An agent can create, edit, delete, or recall time off requests only for those types correspond to aTime-Off Rule that is assigned to that agent. Therefore, an agent might be able to view Time-OffTypes corresponding to Time-Off Rules are no longer assigned to him or her. The agent can seethese “old” Time-Off types, but he or she cannot interact with them. They appear below the Otherslegend in the combo box.
Figure: Time-Off Types Combo Box
Back to Top
Time-Off Types that the agent can use appear above the Others legend.
WFM enables an Agent to select a Time-Off Type from below the Others legend in the combo box;however, the agent cannot perform any functions with it (such as requesting time off or viewing hisor her time off balance).
Time-Off Limits
Before giving your Agents the ability to request time off, you should configure Time-Off Limits. Todo so, use the Calendar module in WFM Web Supervisor.
If you have the correct permissions, you can configure the maximum number of Agents who can taketime off for each 15-minute interval of each calendar day.
For example, you could configure that from midnight to 8 a.m. on March 3, 2007, 5 Agents can beallowed to take time off, whereas from 8 a.m. to 4 p.m., only 3 Agents can be take time off. You canset Time-Off limits either for an absolute number of Agents, or for a maximum percentage of Agents.
Additionally, you can set Time-Off limits at three levels: Site, Team, and Activity.
ImportantYou cannot set different Time-Off limits for different Time-Off types. A single set ofTime-Off limits governs the total amount of time off of all types that can be grantedfor a specified time of day, for a specified date.
Time-Off Request and Approval Process
There are two different processes for scheduling time off for agents. The process that is useddepends on whether the user is planning for a future schedule period (see Planning for Time Off in
WFM Primers Time Off Primer
Workforce Management Administrator's Guide 299

the Future) or working within a schedule period that is already published to the Master Schedule (seePlanning for Time Off for the Current Schedule Period).
Planning for Time Off in the FutureFor future time periods (schedule days that are not yet published to the Master Schedule), theprocess works as shown in the below.
Figure: Future Time Periods Process
Back to Top
The Time-Off Planner (in the WFM Web Agent application) and the Calendar (in the 'WFM WebSupervisor application) are really two different ways to input the same information. The Time-OffPlanner is the Agent’s method of entering Calendar items. It allows the Agent to enter time off, butthat is all.
The Supervisor’s Calendar module has much more power: the Supervisor can enter all types ofCalendar items, including shifts, working hours, exceptions, days off, and time off.
WFM Primers Time Off Primer
Workforce Management Administrator's Guide 300

Both of these schedule-building input tools have the same result: the Time-Off items are recorded inthe WFM Calendar.
Granted Time Off versus Preferred Time Off
WFM considers only Time-Off items with the status granted when building a schedule scenario. Itdoes not include Time-Off items with the status preferred.
ImportantWFM enables a Supervisor to consider Agent preferences when building schedules.These preferences include: day off, availability, and shift preferences; but not Time-Offpreferences.
Time Off Items in the Calendar Hierarchy
When you enter multiple types of Calendar items for the same Agent on the same day, WFM uses itsinternal hierarchy to resolve their status.
• Example 1: Full-Day Time Off versus Rotating Schedule Day In—An Agent is assigned a RotatingPattern for the week starting September 17, 2006, and for the date of September 19 his RotatingPattern assignment states he should be on a Day In. But a supervisor grants a full-day time off forSeptember 19. Now, the agent has two conflicting Calendar items for the same day: a working dayaccording to the Rotating Pattern assignment, and a full-day time off according to the Calendar. TheCalendar hierarchy specifies that the Full-Day Time-Off item should be granted and this should causethe Rotating Pattern assignment for that day should be declined. The statuses are reflected in theCalendar and the supervisor can read the reasons there. Some items in the Calendar do have a higherpriority that Full-Day Time-Off items.
• Example 2: Full-Day Exception versus Full-Day Time Off—A full-day exception is granted for anagent in the Calendar for the same day as a full-day time off. The Calendar hierarchy specifies that thefull-day exception should take priority and the Full-Day Time-Off item should be declined. The hierarchyof the WFM Calendar is described in the Workforce Management Web for Supervisors Help in the topicCalendar Items Overview.
Back to Top
Using the Calendar to Understand the Status of Time-Off Items
You can view the Actual Status of any item in the Calendar; a status of Granted, Preferred, orDeclined confirms that no schedule has been published for this Agent for this date. In a built andpublished schedule, the Actual Status of an item will be either Scheduled or Not Scheduled. If aCalendar item was not scheduled, you can view a Reason field which will describe why it was notscheduled (in the Reason column).
Planning for Time Off for the Current Schedule PeriodTo enter agent Time-Off items for days that are already published to the Master Schedule, use eitherof these methods:
WFM Primers Time Off Primer
Workforce Management Administrator's Guide 301
1. Enter time off directly into the Master Schedule.
ImportantThe agent can view this Time-Off entry in his schedule by logging in to the WFM Web for AgentsApplication. He/she will also see a change to his time-off balance in the WFM Web for Agents' Time OffPlanner and he/she can see that time off for this day is scheduled, when he views his Time-Off Planner.However, no entry for this time off will be made in the WFM Calendar, because the Calendar is a planningtool, and is meant for entering items such as exceptions, time off, days off, etc., that are to be consideredwhen building a schedule scenario.
2. Enter the granted Time-Off request into the WFM Calendar.3. Click Update Schedule.
WFM has now automatically updated the Master Schedule with the agent's Granted Time Off.
Using Update Schedule from within the Calendar updates the Master Schedule from theCalendar for the agent's Time-Off request, which streamlines the review and approval process andeliminates the need to manually rebuild the schedule.
ImportantFrom within the Calendar module, users can update the Master Schedule with agranted Time-Off items for any agent on any date for which the agent has a schedulepublished, and the Time-Off request is compatible with the agent's existing schedule.For more details, see the WFM Web for Supervisors Help topics Calendar ItemsOverview and Update Schedule Options.
Agent Time-Off Planner
Agents request time off and see the status of these requests through WFM Web for Agents Time-Off Planner. If you do not want your agents to have access to the Time-Off Planner, you candisable this through the Time-Off Planner Enabled setting. In Configuration Manager, for yourWFM Web Application object, open Options > AgentTimeOff, and set the variableAllowTimeOffPlanner to false.
Time-Off Balance in Agent’s Time-Off PlannerThe Time-Off Planner displays the balances for an agent's time off, in this way: the agent selects aTime-Off type and clicks on a date in the yearly planning calendar to view balances for that type, upto that date.
The agent can also view the types of Time-Off hours prior to the selected date: already granted,preferred, declined and scheduled, bonus, advance, and carried-over.
When an agent’s Time-Off rule is changed, his time off is recalculated, based on the new rules.
WFM Primers Time Off Primer
Workforce Management Administrator's Guide 302

See some examples.. [+]
• If a Time-Off rule is assigned to an agent and you change any of the rule's properties.• If a Time-Off rule is assigned to an agent and you use the Time Off tab under Configuration >
Organization > Agent properties to change the rule.• If a Time-Off rule is assigned to an agent and you use the Assignments tab under Policies > Time-Off
Rules > Properties to remove the assignment.
In each case, the user is asked to approve the calculation before it is performed.
WarningMoving agents to different sites can affect their time-off balances. After the move,they might appear to have lost a portion of their time-off balance since WFM tracksthat time off only at the old site. To preserve the Time-Off hours that the agent earnedat the previous site, her supervisor must enter these hours as a bonus to the newAgent Rule under the new site. For details, see the WFM Web for Supervisors Helptopic Agent Time Off > Bonus Time Off Hours.
Back to Top
Recalling Time Off RequestsAn agent can recall a Time-Off request that is in preferred or granted status, as long as the Time-Offitem has not been scheduled. Use the WFM Web for Agents Time-Off Planner; see the topic"Requesting Time Off".
After an agent’s Time-Off request has been granted, scheduled, and published to the MasterSchedule, the agent cannot recall the time off.
Only the supervisor can do that, by manually changing the agent’s schedule for that date, throughthe Master Schedule. And only the supervisor can schedule a different activity for the agent for thatdate, in lieu of the time off.
Wait Listed Time Off RequestsWhen an agent makes a Time-Off request, he can optionally ask for it to be wait-listed. (See step 7 inthe Workforce Management Web for Agents Help topic "Requesting Time Off": If you want yourrequest to be wait-listed, click the Wait-list check box.)
ImportantWait-listing means that if a Time-Off request is denied because the Time-Off limitshave been reached, the request stays in a preferred status in case an openingbecomes available. The request could eventually be granted by a supervisor, althoughthis is not guaranteed.
WFM Primers Time Off Primer
Workforce Management Administrator's Guide 303

In detail, this means that if the Time-Off request would be declined because the Time-Off limits havealready been reached, wait listing gives it a preferred status. If some Time-Off slots become availablefor certain dates due to cancellations, or if the Supervisor decides to raise the Time-Off limits for acertain date, the Supervisor user can review all of these preferred Time-Off items in the Calendar andgrant some of them. There is a field in the Calendar which displays the date and time that the Agentor Supervisor submitted each Time-Off item, to help the supervisor manage the wait list. Agents’Time-Off requests are not pulled automatically from this wait list; these requests must be manuallygranted by the supervisor.
Viewing the Status of Time Off RequestsAgents can view the status of any Time-Off request, for any calendar date, with some limitations. Ifan agent requests time off for a date on a schedule that is already been published to the MasterSchedule:
• This request will not be scheduled.• The Agent can view the reason it was not scheduled, in the Reason column.• The request, with the same status and reason, will appear in the WFM Calendar, where Supervisors can
see it.
However, the supervisor will not know to look for the request unless the agent tells him to look for it.Therefore, if an agent sees Time-Off requests with status Not Scheduled in the Time-Off Planner,she should alert her supervisor.
The supervisor can then do one of two things:
1. Grant the time off through the WFM Calendar and rebuild/republish the agent’s schedule for theaffected date(s).
2. Manually add the time off to the Master Schedule.
The Time-Off Planner gives agents a limited view into their Time-Off status in the WFM Calendar.Therefore, when a supervisor adds or deletes time off in the WFM Calendar, he must rebuild andrepublish the schedule for the affected date(s).
Back to Top
WFM Primers Time Off Primer
Workforce Management Administrator's Guide 304

Overlays PrimerWorkforce Management Overlays are events designed to indicate the abnormalities in historical dataor anticipated ones in the future. Abnormalities, such as fluctuation of interaction volumes, AHT(other than the usual, seasonal fluctuation), or intra-week and intra-day trends. If events occur thathighlight an abnormality, of the type that happens multiple times or can happen in again in thefuture, you can arrange these overlay events (or Overlays) into overlay groups. Some examples arebilling, promotion, or catalog drops.
This Overlays topic includes the following sections:
• Impact of Overlay Events on Prediction Data• Impact of Overlay Events on Historical Data• Calculating an Overlay's Impact
Impact of Overlay Events on Prediction Data
Overlays impact prediction data directly when a specific overlay event occurs over a predictioninterval.
Two types of overlays exist, based on how the impact on prediction data is calculated:
• Multiplicative—Increase (or decrease) every step of predicted data by a percentage. The percentageis defined by overlay impact distribution, multiplied by the strength of the event. The duration of theinterval is affected by event changes.
• Overriding—Re-distribute (but does not change) the volume of an event's interval. The total volumedoes not change, but it might be moved from one event-step to another.
Multiplicative OverlaysThis type of overlay factor has existed in WFM since early versions and was called Factor. Each step(daily or hourly) of prediction data covered by the event is adjusted by a certain percentage, which isalso multiplied by event strength.
Overriding OverlaysThis type of overlay is designed to keep the predicted total of the affected period and adjust thedistribution of the volumes within that period. WFM applies the events of this overlay type as the laststep of the prediction. It applies the seasonal components (intra-day, daily, or yearly) andmultiplicative overlays before the overriding overlays are calculated.
The overriding overlay distributes the volumes according to the weight (or the percentage) of eachevent-step (daily or hourly). It adjusts the volume of each event-step, so the event-step receives itsportion of the total of the entire event period, according to its weight.
WFM Primers Overlays Primer
Workforce Management Administrator's Guide 305

For example, an overriding overlay has 3 event-steps with the following weights: 20, 30, 50. If thepredicted total of the entire interval is 1000, then the first event step receives 200, the second 300,and the last one 500.
ImportantThe initial predicted total of the event-step is not considered when the impact of thisoverlay type is calculated. The weight of the event-step is determined by the overlayitself, and the predicted total of the entire interval that is affected by the event, isconsidered.
When the event-step (daily or hourly) is calculated, its total is distributed proportionally to 15-minutetimesteps to a volume of each timestep before the event was applied. So, the intra-day or intra-hourpattern is preserved.
The overriding overlay event type cannot be calculated when it overlaps with other events of thesame type, even if both events belong to different overlays. However, it can overlap with events ofmultiplicative overlays.
Event Impact Distribution
There are three ways to determine the impact of each event-step:
1. By using start-end.2. By keeping the entire detailed distribution.3. By performing the calculation for each event-step during the prediction.
These three methods of determining impact distribution are applicable to both multiplicative andoverriding overlay type. WFM specifies how each overlay's impact distribution will be determined andapplies it to all of the overlay's events.
Start-end
WFM determines the overlay's impact distribution by specifying start and end impact values. Itgradually changes the impact by the same amount every event-step from start value to end value.For example, if the start value is 100 and the end value is 200 and it is a daily overlay with a lengthof 6 days, then the impact on the first day is 100, on the second day it is 120, then 140, 160, 180 and200 on the last day.
Back to Top
Distribution
The overlay saves the impact of each event-step separately. You can either determine the impact byprecalculating it, by entering it manually, or by using a combination of both methods.
WFM Primers Overlays Primer
Workforce Management Administrator's Guide 306

Always Calculating
The overlay impact is always calculated during the prediction. To ensure the calculation is successful,the historical period must have one or more events for the same overlay. The impact of the overlay isdetermined by the prediction algorithm according to the historical data, and it is then used in theprediction.
Impact of Overlay Events on Historical Data
Events within any overlay type can have a ignore historical data flag. If this flag is set for an event,the historical data interval data covered by the event is not used in the calculation of either volumeprediction or impact of overlays (see Calculating an Overlay's Impact).
If an event does not have the ignore historical data flag set, the the data covered by the event isconsidered for prediction.
ImportantIn 7.6.1, WFM does not do perform any additional processing of historical data that isaffected by the event. WFM simply uses it or ignores it.
Calculating an Overlay's Impact
You can determine the impact of overlay by analyzing the historical data and using a predictionalgorithm. The algorithm analyzes the period of historical data, which contains one or more overlayevents to be calculated.
You can pre-calculated Overlays before starting volume forecasting or during volume forecasting(see, Event Impact Distribution). If the historical data and method used are the same, the results willbe identical.
Impact of Multiplicative OverlaysWFM calculates Multiplicative overlays by separating seasonal component (yearly, daily, intra-day)from the event impact for each event of the overlay in the given historical data. The impact is dividedby the strength of the event and then averaged.
When the impact of an event is applied to the prediction interval, it is multiplied by the strength ofthat event.
Impact of Overriding OverlaysThe percentage of each event-step in the total of the whole event period is calculated for each eventand then averaged. For example, a historical period has two daily overlay events that are 3 days
WFM Primers Overlays Primer
Workforce Management Administrator's Guide 307

long. The 3 days of the first event are: 150, 200, 150 (that is 30%. 40%, 30% of the totalrespectively) and the 3 days of the second event are: 150, 150, 200. In this example, the overlay iscalculated as 30%, 35%, 35%.
Back to Top
WFM Primers Overlays Primer
Workforce Management Administrator's Guide 308

Multi Forecasting PrimerIn this topic, find information about the Workforce Management approach to multi-site forecasting ina networked contact center, where some call types and activities are distributed to agents workingacross multiple sites. It also describes the Genesys approach to multi-skill forecasting, where agentswith multiple skills can increase the center’s efficiency by performing multiple tasks within a singletimestep.
This topic contains the following sub topics:
• Multi-Site Forecasting• Multi-Skill Forecasting
Multi-Site Forecasting
A contact center analyst can use Genesys WFM to model a networked contact center, where somecall types and activities are distributed to agents working across multiple sites. To model a multi-siteenvironment, follow the steps and guidelines outlined in these sections:
Set Up Multi-Site ActivitiesThese multi-site activities are work activities that are handled at the site (child) level, and in theobject tree they appear higher in the hierarchy.
Determine the Total DemandTo configure Multi-Site Forecasting (MSF) properly, you need data to inform your choices. To gatherthat data, you can configure WFM to collect:
• Historical Interaction Volume (IV) and Average Handle Times (AHT) for multi-site activities• Historical average handle times at the child level
After you build a volume forecast at the multi-site activity level and understand the total demand forthis call type across all sites, you can configure MSF for two scenarios:
Option A: Contact centers that do a percentage allocation across their sites
To configure for this scenario, perform these steps:
1. Split the volume of the multi-site activity to the site level.2. Build staffing forecasts at the site level for each child activity.
Option B: Virtual contact centers that do routing based on resource availability, open hours,
WFM Primers Multi Forecasting Primer
Workforce Management Administrator's Guide 309

etc.
To configure for this scenario, perform these steps:
1. Split the volume of the multi-site activity to the site level.2. Build a staffing forecast at the multi-site activity level. (See Figure: Comparing two multi-site scenarios
below.)3. Split the staffing forecast to each child activity.
ImportantThe volume split is the required first step, so that the staffing splitting algorithmunderstands the demand at each site.
Figure: Comparing two multi-site scenarios
Back to Top
Volume SplittingIn a multi-site enterprise, when you split the volume of multi-site activity interaction to the child sites,you must decide which Average Handling Time (AHT) to use:
• AHT collected at the multi-site activity level
WFM Primers Multi Forecasting Primer
Workforce Management Administrator's Guide 310

• AHT collected at the child activity level
To inform your decision, determine if there is a measurable difference in AHT at the various sites inthe enterprise. For example, if one site consists of many less-skilled agents (perhaps they are new totheir jobs), you may expect to see a longer AHT at this site for some activities. In this case, you woulddo well to use the child AHT rather than the multi-site AHT.
After you split the volume to the child sites, decide if you want to:
• Build staffing forecasts for each activity, at the site level• Build staffing forecast at the multi-site activity level and then split that forecast to the site level
Be aware, when WFM splits the interaction volume to the child sites, the forecast splitting algorithmconsiders:
• Agent skills• Contract availability• Activity open hours• Time zones• Agent hire/termination dates• Granted, pre-planned items from the WFM Calendar (days off, time off, shifts, working hours,
availability, exceptions, and rotating patterns)
In the figure below, you can see model of the contact center environment that WFM uses whensplitting volumes from the multi-site activity level to the site (child) activity level.
WFM Primers Multi Forecasting Primer
Workforce Management Administrator's Guide 311

Figure: Model of Contact Center Environment Used by WFM
Key to Figure: Model of the Contact Center Environment
See more.. [+]IV—Interaction Volume at the multi-site activity level. There is a separate IV for each of three MSAs(1, 2, 3)
Arrows—The distribution of the activity work from the multi-site activity level to the site level.
1, 2, 3—These numbers represent MSAs.
AHTsubscript—Average Handle Time. When each MSA is split to the site level, there is a separate setof AHT values for each activity/site combination. As described above, this is an option. The usermight also choose to use the AHT collected at the multi-site level, in which case, for example, AHT3Aand AHT3B would be equivalent.
Circles—The agent pool at each site. At site A, there are two sets of agents. One set of agents hasskills that qualify them to work on activities 1 and 2. The other set of agents has skills that qualifythem to work on MSAs 1, 2, and 3. At site B, there are also two sets of agents. One set can only workon activity 2, and the other set can work on either MSA 2 or 3.
WFM Primers Multi Forecasting Primer
Workforce Management Administrator's Guide 312

Model of the Contact Center Environment Explained
See more.. [+]As the activity work is distributed from the multi-site level to the site level, WFM must estimate (foreach timestep) the percentage of time that an agent will be handling each type of activity for whichshe is skilled. In some cases, there is only one choice.
For MSA 1: No agents at site B are skilled to handle that activity. Thus, all the workload must bedistributed to site A.
For MSA 3: Agents at both site A and site B who can handle this activity. But the diagram showsother factors to consider in distributing activity 3 work:
• Not every agent at every site can handle activity 3.• Some of the agents who can handle activity 3 can also handle other activities.
Therefore, when WFM estimates for each agent how much of each timestep should be allocated to acertain type of work, WFM will consider:
• The demand for the activity• The number of agents who can handle that activity across all sites• The work allocation of these other agents
Volume Splitting Using Percentages
You can specify a percentage to allocate volumes from a multi-site activity to each Child (site) activityor apply a template. The interval can be the entire forecast scenario, weekday, or timestep.
For more information about this feature, see the Web for Supervisor Help topic Forecast > ForecastScenarios > Volume Split Wizard.
Back to Top
Staffing SplittingAs described above in Scenario B, for virtual contact centers, you can build a staffing forecast at themulti-site activity level and then split that staffing forecast across the child activities. This allows theenterprise to more accurately model a virtual routing environment where there is an efficiency gain inthe way that calls are handled. WFM recalculates service objectives at this multi-site level and makesthese calculations available in the Performance and Schedule views, and in reports.
When building the staffing forecast at the MSA level, you may specify the indirectly occupied time(IOT) and service objectives.
However, you cannot specify the hourly wage or paid hours a day when building the MSA staffingforecast. Instead, you specify those values during the splitting process, when you split the calculatedstaffing from the MSA level to the child activity level.
WFM Primers Multi Forecasting Primer
Workforce Management Administrator's Guide 313
ImportantBefore you split the staffing forecast from the MSA level to the child activity level, youmust first split the volume forecast so that the staffing splitting algorithm knows theresource demand at each site.The staffing splitting wizard gives you the option to consider the AHT values of the child activities. You canuse it to better estimate how to distribute staffing requirements across child activities.
Although the staffing splitting wizard splits calculated staffing by default, it offers youthe option to split required staffing.
After the staffing split is accomplished, you can view results data for calculated staffing (andoptionally, required staffing) at the child activity level.
You can examine this data at the MSA level or as the sum or weighted average of the child activities,in these views:
• Schedule Coverage• Intra-Day Schedule• Schedule Summary• Performance views
You can manipulate the MSA staffing results in the same way that you can manipulate child activitystaffing. Forecast graphs are also available for MSA staffing.
Multi-Skill Forecasting
A multi-skilled contact center presents an opportunity for increased productivity.
An agent might be idle in a single-skill environment because she cannot answer calls that arequeuing for an activity/skill which she may posses—but a skill that the schedule prevents her fromusing.
In a multi-skilled environment, she can use her additional skills to answer those calls.
ImportantA high-load environment does not present much opportunity for increased efficiency,because the agents have very little idle time. However, in an overstaffedenvironment, agents have more idle time and can use their multiple skills to increaseefficiency.
WFM Primers Multi Forecasting Primer
Workforce Management Administrator's Guide 314

How WFM Supports Multi-Skilled AgentsA multi-skilled agent is qualified to work on multiple activities, and therefore may perform differenttypes of work during a shift.
In a multi-skill environment, an agent might be available for multiple activities during any timestep.That agent can be scheduled to work for an activity for only part of a time interval, and only thefraction of the time period during which she or he works is counted.
Because of this, the value for staffing can be expressed as a fraction. Consider the following exampleof a 15-minute timestep:
Example: An agent is scheduled to work on Activity A for 10 minutes and for 5 minutes on Activity B.She is counted as 2/3 (or .667) of an agent for Activity A, and as 1/3 (or .333) of an agent for ActivityB.
Back to Top
Enabling Multi-Skill Support
Display procedure..[+]To enable multi-skill support, follow these steps:
1. Open Genesys Administrator.2. Open the WFM Server Application.3. From the Options tab, open the section ScheduleService.4. Create a new option named SplitMS and set the value to true. (See figure below.)
Figure: Enable Multi-Skill Support
Calculating Multi-Skill EquivalentsConsider the comparison of Single Skill Equivalents (SSE) to Multi-Skill Equivalents (MSE) in the figurebelow.
The Multi-Skilled forecasting algorithm takes into account how many agents (with their various skillsets) could be available to work on each Activity, as well as how the occupancy of an average agent
WFM Primers Multi Forecasting Primer
Workforce Management Administrator's Guide 315

would be divided among this Activity and the other Activities on which the agent could work.
Figure: Comparing Multi-Skill and Single-Skill Equivalents
When building a schedule, WFM can optionally use the staffing forecast in Multi-Skilled Equivalents(MSEs) while taking into account agents that the schedule is being built for, as well as agents forwhom schedules have already been built.
If the MSE option is set, in the Performance views/reports and Schedule views/reports, coverage foran Activity is based on MSEs, calculated from actual agent schedules. See the figure below, whichdepicts multi-skill gains.
Figure: Multi-Skill Gains
WFM Primers Multi Forecasting Primer
Workforce Management Administrator's Guide 316

Back to Top
WFM Primers Multi Forecasting Primer
Workforce Management Administrator's Guide 317

Using Copy and Paste Format for StatisticsThis topic contains four examples of the statistics defined in WFM Statistics: Recommended Settings.Use these examples only as generic starting points for your configuration, making the modificationsnecessary to ensure they function properly within your environment.
These statistics do not include any of the required filters or timeranges; those items are specific toyour installation. Add these filters only if they are missing from the relevant section(s) of yourconfiguration.
This topic contains the following sections:
• Using the Copy and Paste Format• Multimedia Statistics for E-mail Interactions• Statistics for Chat Interactions• Statistics for intelligent Workload Distribution Interactions• Statistics for Voice Interactions
Using the Copy and Paste Format
All of the statistics in this topic appear in this format:
[WFMTotalNumberCallsEntered]Category=TotalNumberMainMask=CallEnteredDescription=The total number of interactionsSubject=DNActionObjects=Queue,RoutePoint,GroupQueues
You can amend the text within the square brackets (use underscores rather than spaces) and thedescription line. For example, you could change the above example to this:
[Special_Call_Entered_Stat_4_Steve]Category=TotalNumberMainMask=CallEnteredDescription=This reflects the number of inbound calls receivedthrough a queueSubject=DNActionObjects=Queue,RoutePoint,GroupQueues
Back to Top
Using Copy and Paste Format for Statistics Multi Forecasting Primer
Workforce Management Administrator's Guide 318

Multimedia Statistics for E-mail Interactions
[WFM_Email_Entered]AggregationType=TotalCategory=JavaCategoryDescription=The total number of interactionsJavaSubCategory=eServiceInteractionStat.jar:EQR Total EnteredObjects=StagingArea[WFM_Email_Handle_Time]Category=TotalTimeMainMask=InteractionHandlingDescription=Total time spent handling interactionsObjects=Agent,GroupAgents,GroupPlaces,PlaceSubject=AgentStatus[WFM_Email_Handled]Category=TotalNumberMainMask=InteractionHandlingDescription=Total number of interactions handledObjects=Agent,GroupAgents,GroupPlaces,PlaceSubject=DNAction
Back to Top
Statistics for Chat Interactions
[WFM_Chat_Entered]AggregationType=TotalCategory=JavaCategoryDescription=The total number of interactionsJavaSubCategory=eServiceInteractionStat.jar:OMQ Total EnteredObjects=StagingAreaMediaType=chat[WFM_Chat_Abandoned]AggregationType=TotalCategory=JavaCategoryDescription=The total abandoned from queueJavaSubCategory=eServiceInteractionStat.jar:OMQ Total AbandonedObjects=StagingAreaMediaType=chat[WFM_Chat_Average_Speed_Answer]AggregationType=TotalCategory=JavaCategoryDescription=Average time taken to answerJavaSubCategory=eServiceInteractionStat.jar:OMQ Average Waiting TimeObjects=StagingAreaMediaType=chat[WFM_Chat_Total_Distributed]AggregationType=TotalCategory=JavaCategoryDescription=Total Distributed
Using Copy and Paste Format for Statistics Multi Forecasting Primer
Workforce Management Administrator's Guide 319

JavaSubCategory=eServiceInteractionStat.jar:OMQ Total DistributedObjects=StagingAreaMediaType=chat[WFM_Chat_Handle_Time]Category=TotalTimeMainMask=InteractionHandlingDescription=Total time spent handling interactionsObjects=Agent,GroupAgents,GroupPlaces,PlaceSubject=AgentStatus[WFM_Chat_Handled]Category=TotalNumberMainMask=InteractionHandlingDescription=Total number of interactions handledObjects=Agent,GroupAgents,GroupPlaces,PlaceSubject=DNAction
Back to Top
Statistics for intelligent Workload Distribution Interactions
[WFM_OMedia_Entered]AggregationType=TotalCategory=JavaCategoryDescription=The total number of interactionsJavaSubCategory=eServiceInteractionStat.jar:OMQ Total EnteredObjects=StagingAreaMediaType=MediaX[WFM_OMedia_Abandoned]AggregationType=TotalCategory=JavaCategoryDescription=The total abandoned from queueJavaSubCategory=eServiceInteractionStat.jar:OMQ Total AbandonedObjects=StagingAreaMediaType=MediaX[WFM_OMedia_Average_Speed_Answer]AggregationType=TotalCategory=JavaCategoryDescription=Average time taken to answerJavaSubCategory=eServiceInteractionStat.jar:OMQ Average Waiting TimeObjects=StagingAreaMediaType=MediaX[WFM_OMedia_Total_Distributed]AggregationType=TotalCategory=JavaCategoryDescription=Total DistributedJavaSubCategory=eServiceInteractionStat.jar:OMQ Total DistributedObjects=StagingAreaMediaType=MediaX[WFM_OMedia_Handle_Time]Category=TotalTimeMainMask=InteractionHandlingDescription=Total time spent handling interactions
Using Copy and Paste Format for Statistics Multi Forecasting Primer
Workforce Management Administrator's Guide 320

Objects=Agent,GroupAgents,GroupPlaces,PlaceSubject=AgentStatus[WFM_OMedia_Handled]Category=TotalNumberMainMask=InteractionHandlingDescription=Total number of interactions handledObjects=Agent,GroupAgents,GroupPlaces,PlaceSubject=DNAction
Back to Top
Statistics for Voice Interactions
[WFMTotalNumberCallsEntered]Category=TotalNumberMainMask=CallEnteredSubject=DNActionObjects=Queue,RoutePoint,GroupQueues[WFMTotalNumberCallsAband]Category=TotalNumberMainMask=CallAbandoned, CallAbandonedFromRingingSubject=DNActionObjects=Queue,RoutePoint,GroupQueues[WFMTotalNumberCallsDistrib]Category=TotalNumberMainMask=CallDistributedSubject=DNActionObjects=Queue,RoutePoint,GroupQueues[WFMServiceFactor1]Category=ServiceFactor1MainMask=CallAnswered,CallAbandoned,CallAbandonedFromRingingSubject=DNActionObjects=Queue, RoutePoint, GroupQueues[WFMAverTimeBeforeAnswering]Category=AverageTimeMainMask=CallAnsweredRelMask=CallAnsweredSubject=DNActionObjects=Queue, RoutePoint, GroupQueues[WFMTotalHandleTime]Category=TotalAdjustedTimeMainMask=CallInbound, CallOutbound, AfterCallWorkSubject=DNActionObjects=Agent, Place,GroupAgents,GroupPlaces[WFMTotalNumberCallsHandled]Category=TotalNumberMainMask=CallInbound,CallOutboundSubject=DNActionObjects=Agent,Place,GroupAgents,GroupPlaces
Back to Top
Using Copy and Paste Format for Statistics Multi Forecasting Primer
Workforce Management Administrator's Guide 321

MS SQL Database ReplicationThis topic contains information that will help you to replicate and maintain your MS SQL database foryour Workforce Management deployment, based on the assumption that there is an existing singledatabase instance.
Before you begin replicating the database, ensure that the existing instance is updated to the latestversion. For new WFM installations, create a database as described in Create Your WFM Database.
This topic includes the following sections:
• System Requirements• Setting Up the Database Replication• Maintaining Database Replication• Application-Level Access Limitations
System Requirements
The replication solution requires MS SQL Server 2008 R2 Enterprise Edition server.
Setting Up the Database ReplicationThere are two ways to set up the replication: copying during replication andcopying before replication. Display procedures... [+]
Copying During ReplicationPurpose: To create a copy of the WFM database during replication.
Prerequisite: Your original WFM database has been updated to the latest WFM Database version (ifit is not a new installation of WFM).
Start of Procedure
1. Make a WFM Database Utility (DBU) backup of the original database.2. Create new database instances in all locations; On each instance, run the WFM Database Utility (DBU)
to create the WFM table structure. (In this case, the original WFM database is not used.)3. Set up replication:
a. Enable distribution on all servers manually, or by using a script named 1 Before Replication.
MS SQL Database Replication Multi Forecasting Primer
Workforce Management Administrator's Guide 322

Enable Distribution - run on all servers.sql, that is provided by the DBU in theinstallation directory \scripts\.
b. Create a Publication on one Database Server manually, or by using the script named 2 BeforeReplication. Create Publication - run on one server only.sql, that is provided by theDBU in the installation directory \scripts\.
c. Make the Publication peer-to-peer manually, or by using the script named 3 Before Replication.Enable Peer-To-Peer Replication - run on one server only.sql, that is provided by theDBU in the installation directory \scripts\.
ImportantFor the scripts listed in steps 3a, 3b, and 3c, specific Database Servernames—and in some cases, other information, such as database name, fileslocation, publication name, user login, and password—must be entered intothe script before running it.
d. Configure the ranges for the primary key values. Identity value ranges must be assigned forreplicated tables which use auto-incremented identify fields. WFM Database Utility provides ascript named 4 Reseed. Change Identify Field Ranges - run on all servers.sql, that youcan find in the installation directory \scripts\.
ImportantThe identity ranges on each database instance must be unique and values in the script must be modifiedmanually, based on the number of database instances used.
5. Restore the WFM DBU database backup (from Step 1 above) to any single database instance.
Restored data is synchronized across all locations by MSSQL Server replication.
End of Procedure
Copying Before ReplicationPurpose: To create a copy of the WFM database before replication.
Prerequisite: Your original WFM database has been updated to the latest WFM Database version (ifit is not a new installation of WFM).
Start of Procedure
1. Back up your WFM database, using DBU backup or MSSQL backup tools.2. Create new additional database instances, if needed. (In this case, the original WFM database is not
used.)
MS SQL Database Replication Multi Forecasting Primer
Workforce Management Administrator's Guide 323

3. Create and restore the database on each new instance using WFM Database Utility or restore theMSSQL backup from Step 1.
4. Set up replication:a. Enable distribution on all servers manually, or by using a script named 1 Before Replication.
Enable Distribution - run on all servers.sql, that is provided by the DBU in theinstallation directory \scripts\.
b. Create a Publication on one Database Server manually, or by using the script named 2 BeforeReplication. Create Publication - run on one server only.sql, that is provided by theDBU in the installation directory \scripts\.
c. Make the Publication peer-to-peer manually, or by using the script named 3 Before Replication.Enable Peer-To-Peer Replication - run on one server only.sql, that is provided by theDBU in the installation directory \scripts\.
ImportantFor the scripts listed in steps 4a, 4b, and 4c, specific Database Servernames—and in some cases, other information, such as database name, fileslocation, publication name, user login, and password—must be entered intothe script before running it.
d. Configure the ranges for the primary key values. Identity value ranges must be assigned forreplicated tables which use auto-incremented identify fields. WFM Database Utility provides ascript named 4 Reseed. Change Identify Field Ranges - run on all servers.sql, that youcan find in the installation directory \scripts\.
ImportantThe identity ranges on each database instance must be unique and values in the script must be modifiedmanually, based on the number of database instances used.
End of Procedure
Back to Top
Maintaining Database ReplicationAfter you have backed up your database, you can use the procedure and otherinformation in this section to restore it. Display procedure... [+]
Restoring Replicated Databases from BackupPurpose: To restore a back up of the replicated database.
MS SQL Database Replication Multi Forecasting Primer
Workforce Management Administrator's Guide 324
Start of Procedure
1. Verify that none of the database instances are in use.2. For MSSQL backups, use Microsoft tools and documentation to restore the backup of the replicated
database.3. For WFM Database Utility backups, use the Database Restore functionality on a single instance of the
database.
All data will be replicated and synchronized across the instances.
End of Procedure
Replication IssuesDue to unforeseen usage scenarios or operational mistakes in access rights configuration, theremight be occasional data collisions caused by replication. Solve these collisions on a case-by-casebasis, using MSSQL conflict resolution tools.
Back to Top
Application-Level Access Limitations
Genesys recommends that you deploy the WFM application so that all actively running WFM Serverand WFM Data Aggregator components access the same database instance. (Actively running meansthat these components are updating the database.) You could set up WFM Server instances to accessand write to different instances of database; If you do, Genesys recommends certain applications anduser restrictions (see Site Access Rights and Module Access Rights.
Using certain deployment and access limitations ensures that multiple database instances are notmodifying the same data at the same time. The MSSQL database replication does not resolve datacollisions caused by complex simultaneous modifications of the same data records on differentdatabase instances. To prevent collisions on the application level, assign access rights and restrictcertain functionality so that it is performed only on the main database instance.
Site Access RightsWhen you are configuring the system you must decide which site will be configured by using WFMWeb, and on which database instance.
For users who connect to that instance and want to change the data by using WFM Web, you mustlimit access to only those sites that are to be modified in that particular database instance.
Module Access RightsWFM Web contains functionality that involves the modification of data for multiple sites, or data thatis not related to a site object and therefore, cannot be protected by site access rights. There are alsosubsystems which provide access to data that is also modified by WFM Server through the WFM Web
MS SQL Database Replication Multi Forecasting Primer
Workforce Management Administrator's Guide 325

interface. Accessibility to this functionality must be limited only to users who are connecting to themain database by using WFM Server.
The following list of subsystems, menu items, or functions must be restricted in local databaseinstances, and be available only to users who are connecting to the main database server.
• User Security—Security option Configuration > Users and Configuration > Roles
• Skills—Security option Configuration > Organization > Skills
• Time Zones—Security option Configuration > Organization > Time Zones
• Organization/BU, Sites—Enable only the security option Configuration > Organization >Add/Edit/Delete
• Organization Teams—These can be accessible on remote sites, but only in read only mode. Enable onlythe security option Configuration > Organization > Read
• Schedule State Groups—Enable only the security option Configuration > Schedule State Groups
ImportantOn the Master database, users must enable both options: Modules > Configuration> Organization > Read and Modules > Configuration > Organization >Add/Edit/Delete. This setting enables users to perform any action on BUs, Sites andTeams.In Remote locations, users must enable only Modules > Configuration > Organization > Read. Thissetting enables users to move agents between teams, but they cannot delete or create a BU, site or team.
Disable the Modules > Configuration > Organization > Add/Edit/Delete option forusers who connect to and work on remote locations or databases.
Back to Top
MS SQL Database Replication Multi Forecasting Primer
Workforce Management Administrator's Guide 326