Administrator's Guide HP Vertica Analytics Platform
969
Administrator's Guide HP Vertica Analytics Platform Software Version: 7.0.x Document Release Date: 1/24/2014
-
Upload
independent -
Category
Documents
-
view
0 -
download
0
Transcript of Administrator's Guide HP Vertica Analytics Platform

Administrator's Guide
HP Vertica Analytics Platform
Software Version: 7.0.x
Document Release Date:1/24/2014

Legal Notices
WarrantyThe only warranties for HP products and services are set forth in the express warranty statements accompanying such products and services. Nothing herein should beconstrued as constituting an additional warranty. HP shall not be liable for technical or editorial errors or omissions contained herein.
The information contained herein is subject to change without notice.
Restricted Rights LegendConfidential computer software. Valid license from HP required for possession, use or copying. Consistent with FAR 12.211 and 12.212, Commercial ComputerSoftware, Computer Software Documentation, and Technical Data for Commercial Items are licensed to the U.S. Government under vendor's standard commerciallicense.
Copyright Notice© Copyright 2006 - 2013 Hewlett-Packard Development Company, L.P.
Trademark NoticesAdobe® is a trademark of Adobe Systems Incorporated.
Microsoft® andWindows® are U.S. registered trademarks of Microsoft Corporation.
UNIX® is a registered trademark of TheOpenGroup.
HP Vertica Analytics Platform (7.0.x) Page 2 of 969

Contents
Contents 3
Administration Overview 51
Managing Licenses 52
Copying Enterprise, Evaluation, and Flex Zone License Files 52
Obtaining a License Key File 52
Understanding HP Vertica Licenses 52
License Types 53
Installing or Upgrading a License Key 54
New HP Vertica License Installations 54
HP Vertica License Renewals or Upgrades 54
Uploading or Upgrading a License Key Using Administration Tools 55
Uploading or Upgrading a License Key UsingManagement Console 55
Flex Zone License Installations 55
Viewing Your License Status 56
Examining Your License Key 56
Viewing Your License Status 57
Viewing Your License Status ThroughMC 57
Calculating the Database Size 57
How HP Vertica Estimates Raw Data Size 57
Excluding Data From Raw Data Size Estimate 58
Evaluating Data Type Footprint Size 58
Using AUDIT to Estimate Database Size 58
Monitoring Database Size for License Compliance 59
Viewing the Current License State 59
Manually Running an Audit of the Entire Database 59
Targeted Auditing 60
UsingManagement Console toMonitor License Compliance 60
Managing LicenseWarnings and Limits 61
Term LicenseWarnings and Expiration 61
HP Vertica Analytics Platform (7.0.x) Page 3 of 969

Data Size LicenseWarnings and Remedies 61
If Your HP VerticaEnterprise Edition Database Size Exceeds Your Licensed Limits 62
If Your HP VerticaCommunity Edition Database Size Exceeds Your Licensed Limits 62
Configuring the Database 63
Configuration Procedure 64
IMPORTANT NOTES 64
Prepare Disk Storage Locations 65
Specifying Disk Storage Location During Installation 65
To Specify the Disk Storage LocationWhen You install: 66
Notes 66
Specifying Disk Storage Location During Database Creation 66
Notes 67
Specifying Disk Storage Location onMC 67
Configuring Disk Usage to Optimize Performance 67
Using Shared StorageWith HP Vertica 68
Viewing Database Storage Information 68
Disk Space Requirements for HP Vertica 68
Disk Space Requirements for Management Console 68
Prepare the Logical Schema Script 68
Prepare Data Files 69
How to NameData Files 69
Prepare Load Scripts 70
Create anOptional Sample Query Script 70
Create an Empty Database 72
Creating a Database Name and Password 72
Database Passwords 72
Create an Empty Database UsingMC 74
How to Create an Empty Database on anMC-managed Cluster 74
Notes 75
Create a Database Using Administration Tools 76
Create the Logical Schema 77
Administrator's GuideContents
HP Vertica Analytics Platform (7.0.x) Page 4 of 969

Perform a Partial Data Load 78
Test the Database 78
Optimize Query Performance 78
Complete the Data Load 79
Test the Optimized Database 79
Set Up Incremental (Trickle) Loads 80
Implement Locales for International Data Sets 81
ICU Locale Support 81
Changing DB Locale for a Session 81
Specify the Default Locale for the Database 82
Override the Default Locale for a Session 83
Best Practices forWorking with Locales 83
Server Locale 84
vsql Client 84
ODBC Clients 84
JDBC and ADO.NET Clients 85
Notes and Restrictions 85
Change Transaction Isolation Levels 87
Notes 88
Configuration Parameters 89
Configuring HP Vertica Settings UsingMC 89
Configuring HP Vertica At the Command Line 91
General Parameters 91
TupleMover Parameters 94
EpochManagement Parameters 95
Monitoring Parameters 97
Profiling Parameters 99
Security Parameters 100
Database Designer Parameters 100
Internationalization Parameters 100
Data Collector Parameters 101
Administrator's GuideContents
HP Vertica Analytics Platform (7.0.x) Page 5 of 969

Kerberos Authentication Parameters 102
Designing a Logical Schema 104
UsingMultiple Schemas 105
Multiple Schema Examples 105
UsingMultiple Private Schemas 105
Using Combinations of Private and Shared Schemas 107
Creating Schemas 107
Specifying Objects in Multiple Schemas 108
Setting Search Paths 108
Creating Objects That SpanMultiple Schemas 110
Tables in Schemas 111
About Base Tables 111
Automatic Projection Creation 111
About Temporary Tables 112
Local Temporary Tables 113
Automatic Projection Creation and Characteristics 113
Implementing Views 115
Creating Views 115
Using Views 115
Notes 117
Creating a Database Design 118
What Is a Design? 118
How Database Designer Creates a Design 119
WhoCanRunDatabase Designer 120
Granting and Enabling the DBDUSER Role 120
Allowing the DBDUSER to Run Database Designer UsingManagementConsole 121
Allowing the DBDUSER to Run Database Designer Programmatically 122
DBDUSER Capabilities and Limitations 123
Workflow for Running Database Designer 124
Specifying Parameters for Database Designer 126
Design Name 126
Administrator's GuideContents
HP Vertica Analytics Platform (7.0.x) Page 6 of 969

Design Types 126
Comprehensive Design 126
Incremental Design 127
Optimization Objectives 127
Design Tables with Sample Data 127
Design Queries 128
Query Repository 128
K-Safety for Design 128
Replicated and Unsegmented Projections 129
Replicated Projections 129
Unsegmented Projections 129
Statistics Analysis 130
Building a Design 130
Resetting a Design 131
Deploying a Design 132
Deploying Designs Using Database Designer 132
Deploying Designs Manually 133
How to Create a Design 133
UsingManagement Console to Create a Design 134
Using theWizard to Create a Design 135
Creating a DesignManually 137
Using Administration Tools to Create a Design 140
Creating Custom Designs 142
The Design Process 142
Planning Your Design 143
Design Requirements 143
Determining the Number of Projections to Use 143
Designing for K-Safety 144
Requirements for a K-Safe Physical SchemaDesign 144
Requirements for a Physical SchemaDesign with No K-Safety 145
Designing for Segmentation 145
Administrator's GuideContents
HP Vertica Analytics Platform (7.0.x) Page 7 of 969

Design Fundamentals 146
Writing and Deploying Custom Projections 146
Anatomy of a Projection 146
Column List and Encoding 147
BaseQuery 147
Sort Order 147
Segmentation 148
Designing Superprojections 148
Minimizing Storage Requirements 148
Maximizing Query Performance 149
Designing Replicated Projections for K-Safety 149
Designing Segmented Projections for K-Safety 150
Segmenting Projections 151
Creating Buddy Projections 151
Projection Design for MergeOperations 151
Maximizing Projection Performance 153
Choosing Sort Order: Best Practices 153
Combine RLE and Sort Order 153
Maximize the Advantages of RLE 154
Put Lower Cardinality Column First for Functional Dependencies 154
Sort for Merge Joins 155
Sort on Columns in Important Queries 156
Sort Columns of Equal Cardinality By Size 156
Sort Foreign Key Columns First, From Low to High Distinct Cardinality 156
Prioritizing Column Access Speed 156
Projection Examples 158
New K-Safe=2 Database 158
Creating Segmented Projections Example 158
Creating Unsegmented Projections Example 160
Adding Node to a Database 160
Creating Segmented Projections Example 161
Administrator's GuideContents
HP Vertica Analytics Platform (7.0.x) Page 8 of 969

Creating Unsegmented Projections Example 162
Implementing Security 164
Client Authentication 164
Connection Encryption 164
Client Authorization 165
Implementing Client Authentication 166
Supported Client Authentication Types 166
If YouWant Communication Layer Authentication 167
Password Authentication 168
About Password Creation andModification 168
Default Password Authentication 168
Profiles 168
How YouCreate andModify Profiles 169
Password Expiration 170
Account Locking 170
How to Unlock a Locked Account 170
Password Guidelines 171
What to Use 171
What to Avoid 172
About External Authentication 173
Setting up Your Environment to Create Authentication Records 173
About Local Password Authentication 174
How to Create Authentication Records 174
How to Create Authentication Records 174
If You DoNot Specify a Client AuthenticationMethod 175
Authentication Record Format and Rules 175
Formatting Rules 178
Configuring LDAP Authentication 179
LDAP Bind 179
LDAP Bind and Search 180
Using LDAP Over SSL and TLS 181
Administrator's GuideContents
HP Vertica Analytics Platform (7.0.x) Page 9 of 969

LDAP Anonymous Binding 182
ConfiguringMultiple LDAP Servers 182
Configuring Ident Authentication 182
ClientAuthentication Records for Ident Authentication 183
Installing and Configuring an Ident Server 184
Example Authentication Records 185
Using an IP Range and Trust AuthenticationMethod 185
UsingMultiple Authentication Records 185
Record Order 186
How toModify Authentication Records 186
Using the Administration Tools 186
Using the ClientAuthentication Configuration Parameter 186
Examples 187
Implementing Kerberos Authentication 187
Kerberos Prerequisites 187
Configure HP Vertica for Kerberos Authentication 188
Point machines at the KDC and configure realms 192
Configure Clients for Kerberos Authentication 194
Configure ODBC and vsql Clients on Linux, HP-UX, AIX, MAC OSX, andSolaris 195
Configure ADO.NET, ODBC, and vsql Clients onWindows 197
Windows KDC on Active Directory withWindows built-in Kerberos clientand HP Vertica 197
Linux KDC withWindows-built-in Kerberos client and HP Vertica 198
ConfiguringWindows clients for Kerberos authentication 198
Authenticate and connect clients 198
Configure JDBC Clients on All Platforms 199
Determining the Client AuthenticationMethod 201
Troubleshooting Kerberos Authentication 202
Server's principal name doesn't match the host name 202
JDBC client authentication 204
Working Domain Name Service (DNS) 204
Administrator's GuideContents
HP Vertica Analytics Platform (7.0.x) Page 10 of 969

Clock synchronization 204
Encryption algorithm choices 205
Kerberos passwords 205
Using the ODBC Data Source Configuration utility 205
Implementing SSL 206
Certificate Authority 206
Public/private Keys 206
SSL Prerequisites 207
Prerequisites for SSL Server Authentication and SSL Encryption 207
Optional Prerequisites for SSL Server and Client Mutual Authentication 208
Generating Certifications and Keys 208
JDBC Certificates 211
Generating Certifications and Keys for MC 211
Signed Certificates 211
Self-Signed Certificates 212
Importing a New Certificate toMC 213
To Import a New Certificate 213
Distributing Certifications and Keys 213
Configuring SSL 214
To Enable SSL: 214
Configuring SSL for ODBC Clients 214
SSLMode Parameter 215
SSLKeyFile Parameter 215
SSLCertFile Parameter 215
Configuring SSL for JDBC Clients 215
To Configure JDBC: 215
To Enable the Driver for SSL 216
To Configure Troubleshooting 216
Requiring SSL for Client Connections 217
Managing Users and Privileges 218
About Database Users 219
Administrator's GuideContents
HP Vertica Analytics Platform (7.0.x) Page 11 of 969

Types of Database Users 220
DBADMIN User 220
Object Owner 220
PUBLIC User 221
Creating a Database User 221
Notes 221
Example 221
Locking/unlocking a user's Database Access 222
Changing a user's Password 223
Changing a user's MC Password 223
About MC Users 224
Permission Group Types 224
MC User Types 224
Creating Users and Choosing an AuthenticationMethod 225
Default MC Users 225
Creating anMC User 225
Prerequisites 226
Create a New MC-authenticated User 226
Create a New LDAP-authenticated User 227
How MC Validates New Users 228
ManagingMC Users 228
WhoManages Users 228
What Kind of User Information You CanManage 229
About User Names 229
About Database Privileges 230
Default Privileges for All Users 230
Default Privileges for MC Users 231
Privileges Required for CommonDatabaseOperations 231
Schemas 231
Tables 231
Views 233
Administrator's GuideContents
HP Vertica Analytics Platform (7.0.x) Page 12 of 969

Projections 234
External Procedures 234
Libraries 234
User-Defined Functions 235
Sequences 235
Resource Pools 236
Users/Profiles/Roles 237
Object Visibility 237
I/OOperations 238
Comments 240
Transactions 240
Sessions 241
Tuning Operations 241
Privileges That Can BeGranted onObjects 242
Database Privileges 242
Schema Privileges 243
Schema Privileges and the Search Path 243
Table Privileges 244
Projection Privileges 245
Explicit Projection Creation and Privileges 245
Implicit Projection Creation and Privileges 246
Selecting From Projections 246
Dropping Projections 246
View Privileges 246
Sequence Privileges 247
External Procedure Privileges 248
User-Defined Function Privileges 248
Library Privileges 249
Resource Pool Privileges 249
Storage Location Privileges 249
Role, profile, and User Privileges 250
Administrator's GuideContents
HP Vertica Analytics Platform (7.0.x) Page 13 of 969

Metadata Privileges 251
I/O Privileges 252
Comment Privileges 253
Transaction Privileges 253
Session Privileges 254
Tuning Privileges 254
Granting and Revoking Privileges 254
About Superuser Privileges 254
About SchemaOwner Privileges 255
About Object Owner Privileges 255
How to Grant Privileges 256
How to Revoke Privileges 256
Privilege Ownership Chains 258
Modifying Privileges 260
Changing a Table Owner 260
Notes 260
Example 260
Table Reassignment with Sequences 262
Changing a SequenceOwner 263
Example 263
Viewing Privileges Granted onObjects 264
About Database Roles 267
Role Hierarchies 267
Creating and Using a Role 267
Roles onManagement Console 267
Types of Database Roles 268
DBADMIN Role 268
View a List of Database Superusers 269
DBDUSER Role 269
PSEUDOSUPERUSER Role 270
PUBLIC Role 270
Administrator's GuideContents
HP Vertica Analytics Platform (7.0.x) Page 14 of 969

Example 271
Default Roles for Database Users 271
Notes 272
Using Database Roles 272
Role Hierarchy 273
Example 273
Creating Database Roles 275
Deleting Database Roles 275
Granting Privileges to Roles 275
Example 275
Revoking Privileges From Roles 276
Granting Access to Database Roles 276
Example 277
Revoking Access From Database Roles 278
Example 278
Granting Administrative Access to a Role 279
Example 279
Revoking Administrative Access From aRole 280
Example 280
Enabling Roles 280
Disabling Roles 281
Viewing Enabled and Available Roles 281
Viewing NamedRoles 282
Viewing a user's Role 282
How to View a user's Role 282
Users 283
Roles 284
Grants 284
Viewing User Roles onManagement Console 284
About MC Privileges and Roles 285
MC Permission Groups 285
Administrator's GuideContents
HP Vertica Analytics Platform (7.0.x) Page 15 of 969

MC's Configuration Privileges and Database Access 285
MC Configuration Privileges 286
MC Configuration Privileges By User Role 286
SUPER Role (mc) 288
ADMIN Role (mc) 289
About theMC Database Administrator Role 290
IT Role (mc) 290
About theMC IT (database) Role 291
NONE Role (mc) 291
MC Database Privileges 292
MC Database Privileges By Role 293
ADMIN Role (db) 294
About the ADMIN (MC configuration) Role 295
IT Role (db) 295
About the IT (MC configuration) Role 295
USER Role (db) 296
Granting Database Access toMC Users 296
Prerequisites 296
Grant a Database-Level Role to anMC user: 297
How MC Validates New Users 297
Mapping anMC User to a Database user's Privileges 298
How toMap anMC User to a Database User 298
What If YouMap theWrong Permissions 301
AddingMultiple MC Users to a Database 301
How to Find Out anMC user's Database Role 302
AddingMultiple Users toMC-managed Databases 303
Before You Start 303
How to AddMultiple Users to a Database 304
MC MappingMatrix 304
Using the Administration Tools 307
Running the Administration Tools 307
Administrator's GuideContents
HP Vertica Analytics Platform (7.0.x) Page 16 of 969

First TimeOnly 308
Between Dialogs 308
Using the Administration Tools Interface 309
Enter [Return] 309
OK - Cancel - Help 309
Menu Dialogs 310
List Dialogs 310
Form Dialogs 310
Help Buttons 311
K-Safety Support in Administration Tools 311
Notes for Remote Terminal Users 312
Using the Administration Tools Help 312
In aMenu Dialog 313
In a Dialog Box 314
Scrolling 314
Password Authentication 314
Distributing Changes Made to the Administration Tools Metadata 315
Administration Tools andManagement Console 315
Administration Tools Reference 318
Viewing Database Cluster State 318
Connecting to the Database 319
Starting the Database 320
Starting the Database UsingMC 320
Starting the Database Using the Administration Tools 320
Starting the Database At the Command Line 321
Stopping a Database 321
Error 321
Description 322
Resolution 322
Controlling Sessions 324
Notes 325
Administrator's GuideContents
HP Vertica Analytics Platform (7.0.x) Page 17 of 969

Restarting HP Vertica on Host 326
ConfigurationMenu Item 327
Creating a Database 327
Dropping a Database 329
Notes 329
Viewing a Database 330
Setting the Restart Policy 330
Best Practice for Restoring Failed Hardware 331
Installing External Procedure Executable Files 332
AdvancedMenuOptions 333
Rolling Back Database to the Last Good Epoch 333
Important note: 333
Stopping HP Vertica on Host 334
Killing the HP Vertica Process on Host 335
Upgrading an Enterprise or Evaluation License Key 336
Managing Clusters 337
Using Cluster Management 337
Using the Administration Tools 337
Administration Tools Metadata 337
Writing Administration Tools Scripts 338
Syntax 338
Parameters 338
Tools 339
Using Management Console 349
Connecting toMC 349
Managing Client Connections onMC 350
Managing Database Clusters onMC 351
Create an Empty Database UsingMC 352
How to Create an Empty Database on anMC-managed Cluster 352
Notes 353
Import an Existing Database IntoMC 354
Administrator's GuideContents
HP Vertica Analytics Platform (7.0.x) Page 18 of 969

How to Import an Existing Database on the Cluster 354
UsingMC on an AWS Cluster 355
ManagingMC Settings 355
Modifying Database-Specific Settings 355
ChangingMC or Agent Ports 356
If You Need to Change theMC Default Ports 356
How to Change the Agent Port 356
Change the Agent Port in config.py 356
Change the Agent Port onMC 357
How to Change theMC Port 357
Backing UpMC 357
TroubleshootingManagement Console 359
What You Can diagnose: 359
Viewing theMC Log 359
Exporting the User Audit Log 360
ToManually Export MC User Activity 360
RestartingMC 361
How to Restart MC Through theMC Interface (using Your browser) 361
How to Restart MC At the Command Line 361
Starting over 362
ResettingMC to Pre-Configured State 362
AvoidingMC Self-Signed Certificate Expiration 362
Operating the Database 363
Starting and Stopping the Database 363
Starting the Database 363
Starting the Database UsingMC 363
Starting the Database Using the Administration Tools 363
Starting the Database At the Command Line 364
Stopping the Database 364
Stopping a Running Database UsingMC 365
Stopping a Running Database Using the Administration Tools 365
Administrator's GuideContents
HP Vertica Analytics Platform (7.0.x) Page 19 of 969

Stopping a Running Database At the Command Line 365
Working with the HP Vertica Index Tool 367
Syntax 367
Parameters 368
Permissions 368
Controlling Expression Analysis 368
Performance and CRC 368
Running the Reindex Option 369
Running the CheckCRC Option 370
Handling CheckCRC Errors 371
Running the Checksort Option 371
Viewing Details of Index Tool Results 372
Working with Tables 375
Creating Base Tables 375
Creating Tables Using the /*+direct*/ Clause 375
Automatic Projection Creation 376
Characteristics of Default Automatic Projections 377
Creating a Table Like Another 378
Epochs and Node Recovery 378
Storage Location and Policies for New Tables 379
Simple Example 379
Using CREATE TABLE LIKE 379
Creating Temporary Tables 380
Global Temporary Tables 381
Local Temporary Tables 381
Creating a Temp Table Using the /*+direct*/ Clause 381
Characteristics of Default Automatic Projections 382
Preserving GLOBAL Temporary Table Data for a Transaction or Session 383
Specifying Column Encoding 384
Creating External Tables 384
Required Permissions for External Tables 385
Administrator's GuideContents
HP Vertica Analytics Platform (7.0.x) Page 20 of 969

COPY Statement Definition 385
Developing User-Defined Load (UDL) Functions for External Tables 385
Examples 385
Validating External Tables 386
Limiting theMaximum Number of Exceptions 386
Working with External Tables 386
Managing Resources for External Tables 387
Backing Up and Restoring External Tables 387
Using Sequences and Identity Columns in External Tables 387
Viewing External Table Definitions 387
External Table DMLSupport 387
Using External Table Values 388
Using External Tables 389
Using CREATE EXTERNAL TABLE AS COPY Statement 390
Storing HP Vertica Data in External Tables 390
Using External Tables with User-Defined Load (UDL) Functions 390
Organizing External Table Data 390
Altering Table Definitions 391
External Table Restrictions 391
Exclusive ALTER TABLE Clauses 391
Using Consecutive ALTER TABLE Commands 392
Adding Table Columns 392
Updating Associated Table Views 393
Specifying Default Expressions 393
About Using Volatile Functions 393
Updating Associated Table Views 393
Altering Table Columns 394
Adding Columns with a Default Derived Expression 394
Add a Default Column Value Derived From Another Column 394
Add a Default Column Value Derived From aUDSF 396
Changing a column's Data Type 397
Administrator's GuideContents
HP Vertica Analytics Platform (7.0.x) Page 21 of 969

Examples 397
How to Perform an Illegitimate ColumnConversion 398
Adding Constraints on Columns 400
Adding and Removing NOT NULLConstraints 400
Examples 401
Dropping a Table Column 401
Restrictions 401
Using CASCADE to Force a Drop 401
Examples 402
Moving a Table to Another Schema 403
Changing a Table Owner 403
Notes 404
Example 404
Table Reassignment with Sequences 406
Changing a SequenceOwner 407
Example 407
Renaming Tables 407
Using Rename to Swap Tables Within a Schema 408
Using Named Sequences 409
Types of Incrementing Value Objects 409
Using a Sequence with an Auto_Increment or Identity Column 410
Named Sequence Functions 410
Using DDLCommands and Functions With Named Sequences 411
Creating Sequences 411
Altering Sequences 413
Examples 413
Distributed Sequences 414
Loading Sequences 424
Creating and Instantiating a Sequence 424
Using a Sequence in an INSERT Command 424
Dropping Sequences 425
Administrator's GuideContents
HP Vertica Analytics Platform (7.0.x) Page 22 of 969

Example 425
Synchronizing Table Data with MERGE 425
Optimized Versus Non-OptimizedMERGE 426
Troubleshooting theMERGE Statement 428
Dropping and Truncating Tables 429
Dropping Tables 429
Truncating Tables 429
About Constraints 431
Adding Constraints 432
Adding ColumnConstraints with CREATE TABLE 432
Adding TwoConstraints on a Column 433
Adding a Foreign Key Constraint on a Column 433
AddingMulticolumnConstraints 434
Adding Constraints on Tables with Existing Data 435
Adding and Changing Constraints on Columns Using ALTER TABLE 435
Adding and Dropping NOT NULLColumnConstraints 436
Enforcing Constraints 436
Primary Key Constraints 437
Foreign Key Constraints 437
Examples 438
Unique Constraints 439
Not NULLConstraints 440
Dropping Constraints 441
Notes 441
Enforcing Primary Key and Foreign Key Constraints 443
Enforcing Primary Key Constraints 443
Enforcing Foreign Key Constraints 443
Detecting Constraint Violations Before You Commit Data 443
Detecting Constraint Violations 444
Fixing Constraint Violations 449
Reenabling Error Reporting 452
Administrator's GuideContents
HP Vertica Analytics Platform (7.0.x) Page 23 of 969

Working with Table Partitions 453
Differences Between Partitioning and Segmentation 453
Partition Operations 453
Defining Partitions 454
Table 3: Partitioning Expression and Results 455
Partitioning By Year andMonth 455
Restrictions on Partitioning Expressions 455
Best Practices for Partitioning 456
Dropping Partitions 456
Examples 457
Partitioning and Segmenting Data 458
Partitioning and Data Storage 460
Partitions and ROS Containers 460
Partition Pruning 460
Managing Partitions 460
Notes 462
Partitioning, repartitioning, and Reorganizing Tables 462
Reorganizing Data After Partitioning 463
Monitoring Reorganization 463
Auto Partitioning 464
Examples 464
Eliminating Partitions 466
Making Past Partitions Eligible for Elimination 467
Verifying the ROS Merge 468
Examples 468
Moving Partitions 469
Archiving Steps 470
Preparing andMoving Partitions 470
Creating a Snapshot of the Intermediate Table 470
Copying the Config File to the Storage Location 471
Drop the Intermediate Table 471
Administrator's GuideContents
HP Vertica Analytics Platform (7.0.x) Page 24 of 969

Restoring Archived Partitions 471
Bulk Loading Data 473
Checking Data Format Before or After Loading 474
Converting Files Before Loading Data 475
Checking UTF-8 Compliance After Loading Data 475
Performing the Initial Database Load 475
Extracting Data From an Existing Database 476
Checking for Delimiter Characters in Load Data 476
Moving Data From an Existing Database to HP Vertica Nodes 476
Loading From a Local Hard Disk 477
Loading Over the Network 477
Loading FromWindows 477
Using Load Scripts 477
Using Absolute Paths in a Load Script 478
Running a Load Script 478
Using COPY and COPY LOCAL 479
Copying Data From anHP Vertica Client 479
Transforming Data During Loads 480
Understanding Transformation Requirements 480
Loading FLOAT Values 480
Using Expressions in COPY Statements 480
Handling Expression Errors 481
Transformation Example 481
Deriving Table Columns From Data File Columns 482
Specifying COPY FROMOptions 483
Loading From STDIN 483
Loading From a Specific Path 483
Loading BZIP andGZIP Files 484
Loading withWildcards (glob) ON ANY NODE 484
Loading From a Local Client 484
Choosing a LoadMethod 485
Administrator's GuideContents
HP Vertica Analytics Platform (7.0.x) Page 25 of 969

Loading Directly intoWOS (AUTO) 485
Loading Directly to ROS (DIRECT) 485
Loading Data Incrementally (TRICKLE) 485
Loading DataWithout Committing Results (NOCOMMIT) 486
Using NOCOMMIT to Detect Constraint Violations 486
Using COPY Interactively 486
Canceling a COPY Statement 487
Specifying a COPY Parser 487
Specifying LoadMetadata 488
Interpreting Last Column End of Row Values 489
Using a Single End of Row Definition 489
Using a Delimiter and Record Terminator End of Row Definition 490
Loading UTF-8 Format Data 491
Loading Special Characters As Literals 491
Using a Custom Column Separator (DELIMITER) 491
Using a Custom ColumnOption DELIMITER 492
Defining a Null Value (NULL) 492
Loading NULL Values 493
Filling Columns with Trailing Nulls (TRAILINGNULLCOLS) 494
Attempting to Fill a NOT NULLColumnwith TRAILINGNULLCOLS 495
Changing the Default Escape Character (ESCAPE AS) 495
Eliminating Escape Character Handling 496
Delimiting Characters (ENCLOSED BY) 496
Using ENCLOSED BY for a Single Column 497
Specifying a Custom End of Record String (RECORD TERMINATOR) 497
Examples 498
Loading Native Varchar Data 498
Loading Binary (Native) Data 499
Loading Hexadecimal, Octal, and Bitstring Data 499
Hexadecimal Data 501
Octal Data 501
Administrator's GuideContents
HP Vertica Analytics Platform (7.0.x) Page 26 of 969

BitString Data 501
Examples 502
Loading Fixed-Width Format Data 502
Supported Options for Fixed-Width Data Loads 503
Using Nulls in Fixed-Width Data 503
Defining a Null Character (Statement Level) 503
Defining a Custom Record Terminator 504
Copying Fixed-Width Data 505
Skipping Content in Fixed-Width Data 505
Trimming Characters in Fixed-Width Data Loads 506
Using Padding in Fixed-Width Data Loads 507
Ignoring Columns and Fields in the Load File 507
Using the FILLER Parameter 507
FILLER Parameter Examples 508
Loading Data into Pre-Join Projections 508
Foreign and Primary Key Constraints 509
Concurrent Loads into Pre-Join Projections 510
Using Parallel Load Streams 511
Monitoring COPY Loads andMetrics 512
Using HP Vertica Functions 512
Using the LOAD_STREAMS System Table 512
Using the STREAMNAME Parameter 513
Other LOAD_STREAMS Columns for COPY Metrics 513
Capturing Load Exceptions and Rejections 514
COPY Parameters for Handling Rejections and Exceptions 515
Enforcing Truncating or Rejecting Rows (ENFORCELENGTH) 516
SpecifyingMaximum Rejections Before a Load Fails (REJECTMAX) 516
Aborting Data Loads for Any Error (ABORT ON ERROR) 516
Understanding Row Rejections and Rollback Errors 517
Saving Load Exceptions (EXCEPTIONS) 518
Saving Load Rejections (REJECTED DATA) 519
Administrator's GuideContents
HP Vertica Analytics Platform (7.0.x) Page 27 of 969

Saving Rejected Data to a Table 520
Rejection Records for Table Files 521
Querying a Rejection Records Table 521
Exporting the Rejected Records Table 523
COPY Rejected Data and Exception Files 524
Specifying Rejected Data and Exceptions Files 525
Saving Rejected Data and Exceptions Files to a Single Server 525
Using VSQL Variables for Rejected Data and Exceptions Files 526
COPY LOCALRejection and Exception Files 527
Specifying Rejected Data and Exceptions Files 527
Referential Integrity Load Violation 528
Trickle Loading Data 529
Using INSERT, UPDATE, and DELETE 529
WOS Overflow 529
Copying and Exporting Data 531
Moving Data Directly Between Databases 531
Creating SQL Scripts to Export Data 531
Exporting Data 532
Exporting Identity Columns 532
Examples of Exporting Data 533
Copying Data 534
Importing Identity Columns 534
Examples 535
Using Public and Private IP Networks 536
Identify the Public Network to HP Vertica 536
Identify the Database or Nodes Used for Import/Export 537
Using EXPORT Functions 538
Saving Scripts for Export Functions 538
Exporting the Catalog 539
Function Summary 539
Exporting All Catalog Objects 539
Administrator's GuideContents
HP Vertica Analytics Platform (7.0.x) Page 28 of 969

Projection Considerations 540
Exporting Database Designer Schema and Designs 540
Exporting Table Objects 540
Exporting Tables 541
Function Syntax 542
Exporting All Tables and Related Objects 542
Exporting a List Tables 542
Exporting a Single Table or Object 543
Exporting Objects 543
Function Syntax 544
Exporting All Objects 544
Exporting a List of Objects 545
Exporting a Single Object 546
Bulk Deleting and Purging Data 547
Choosing the Right Technique for Deleting Data 548
Best Practices for DELETE and UPDATE 549
Performance Considerations for DELETE and UPDATE Queries 549
Optimizing DELETEs and UPDATEs for Performance 550
Projection ColumnRequirements for Optimized Deletes 550
Optimized Deletes in Subqueries 550
Projection Sort Order for Optimizing Deletes 551
Purging Deleted Data 553
Setting a Purge Policy 553
Specifying the Time forWhich Delete Data Is Saved 554
Specifying the Number of Epochs That Are Saved 554
Disabling Purge 555
Manually Purging Data 555
Managing the Database 557
Connection Load Balancing 557
Native Connection Load Balancing Overview 557
IPVS Overview 558
Administrator's GuideContents
HP Vertica Analytics Platform (7.0.x) Page 29 of 969

ChoosingWhether to Use Native Connection Load Balancing or IPVS 558
About Native Connection Load Balancing 559
Load Balancing Schemes 560
Enabling and Disabling Native Connection Load Balancing 560
Resetting the Load Balancing State 561
Monitoring Native Connection Load Balancing 561
Determining to which Node a Client Has Connected 562
Connection Load Balancing Using IPVS 563
Configuring HP Vertica Nodes 565
Notes 565
Set Up the Loopback Interface 566
Disable Address Resolution Protocol (ARP) 567
Configuring the Directors 569
Install the HP Vertica IPVS Load Balancer Package 569
Before You Begin 569
If You Are Using Red Hat Enterprise Linux 5.x: 569
If You Are Using Red Hat Enterprise Linux 6.x: 570
Configure the HP Vertica IPVS Load Balancer 570
Public and Private IPs 571
Set up the HP Vertica IPVS Load Balancer Configuration File 572
Connecting to the Virtual IP (VIP) 573
Monitoring Shared Node Connections 574
DeterminingWhere Connections Are Going 575
Virtual IP Connection Problems 577
Issue 577
Resolution 577
Issue 578
Resolution 578
Expected E-mail Messages From the Keepalived Daemon 578
Troubleshooting Keepalived Issues 579
Managing Nodes 581
Administrator's GuideContents
HP Vertica Analytics Platform (7.0.x) Page 30 of 969

Fault Groups 581
About the Fault Group Script 581
Creating Fault Groups 583
Modifying Fault Groups 585
How tomodify a fault group 585
Dropping Fault Groups 587
How to drop a fault group 587
How to remove all fault groups 587
To add nodes back to a fault group 587
Monitoring Fault Groups 588
Monitoring fault groups through system tables 588
Monitoring fault groups throughManagement Console 588
Large Cluster 589
Control nodes on large clusters 589
Control nodes on small clusters 590
Planning a Large Cluster Arrangement 590
Installing a Large Cluster 591
If you want to install a new large cluster 591
Sample rack-based cluster hosts topology 592
If you want to expand an existing cluster 593
Defining and Realigning Control Nodes on an Existing Cluster 593
Rebalancing Large Clusters 595
How to rebalance the cluster 595
How long will rebalance take? 596
Expanding the Database for Large Cluster 596
Monitoring Large Clusters 596
Large Cluster Best Practices 597
Planning the number of control nodes 597
Allocate standby nodes 598
Plan for cluster growth 598
Write custom fault groups 599
Administrator's GuideContents
HP Vertica Analytics Platform (7.0.x) Page 31 of 969

Use segmented projections 599
Use the Database Designer 599
Elastic Cluster 599
The Elastic Cluster Scaling Factor 600
Enabling and Disabling Elastic Cluster 600
Scaling Factor Defaults 600
Viewing Scaling Factor Settings 601
Setting the Scaling Factor 601
Local Data Segmentation 602
Enabling and Disabling Local Segmentation 602
Elastic Cluster Best Practices 603
When to Enable Local Data Segmentation 603
Upgraded Database Consideration 603
Monitoring Elastic Cluster Rebalancing 604
Historical Rebalance Information 604
Adding Nodes 605
Adding Hosts to a Cluster 606
Prerequisites and Restrictions 606
Procedure to Add Hosts 606
Examples: 607
Adding Nodes to a Database 608
To Add Nodes to a Database UsingMC 608
To Add Nodes to a Database Using the Administration Tools: 608
Removing Nodes 610
Lowering the K-Safety Level to Allow for Node Removal 610
Removing Nodes From aDatabase 610
Prerequisites 611
Remove Unused Hosts From the Database UsingMC 611
Remove Unused Hosts From the Database Using the Administration Tools 611
Removing Hosts From aCluster 612
Prerequisites 612
Administrator's GuideContents
HP Vertica Analytics Platform (7.0.x) Page 32 of 969

Procedure to Remove Hosts 612
Replacing Nodes 614
Prerequisites 614
Best Practice for Restoring Failed Hardware 614
Replacing a Node Using the SameName and IP Address 615
Replacing a Failed Node Using a node with Different IP Address 616
Replacing a Functioning Node Using a Different Name and IP Address 617
Using the Administration Tools to Replace Nodes 617
Replace the Original Host with a New Host Using the Administration Tools 617
Using theManagement Console to Replace Nodes 618
Rebalancing Data Across Nodes 620
K-safety and Rebalancing 620
Rebalancing Failure and Projections 620
Permissions 621
Rebalancing Data Using the Administration Tools UI 621
Rebalancing Data UsingManagement Console 622
Rebalancing Data Using SQL Functions 622
Redistributing Configuration Files to Nodes 622
Changing the IP Addresses of an HP Vertica Cluster 623
Stopping and Starting Nodes onMC 625
Managing Disk Space 626
Monitoring Disk Space Usage 626
Adding Disk Space to a Node 626
Replacing Failed Disks 628
Catalog and Data Files 628
Understanding the Catalog Directory 629
Reclaiming Disk Space From Deleted Records 631
Rebuilding a Table 631
Notes 631
Managing TupleMover Operations 633
Understanding the TupleMover 634
Administrator's GuideContents
HP Vertica Analytics Platform (7.0.x) Page 33 of 969

Moveout 634
ROS Containers 635
Mergeout 635
Mergeout of DeletionMarkers 636
Tuning the TupleMover 636
TupleMover Configuration Parameters 637
Resource Pool Settings 638
Loading Data 639
UsingMore Threads 639
Active Data Partitions 639
ManagingWorkloads 641
Statements 641
System Tables 642
The ResourceManager 642
ResourceManager Impact on Query Execution 643
Resource Pool Architecture 644
Modifying and Creating Resource Pools 644
Monitoring Resource Pools and Resource Usage By Queries 644
Examples 644
User Profiles 648
Example 648
Target Memory Determination for Queries in Concurrent Environments 650
Managing Resources At Query Run Time 650
Setting Run-Time Priority for the Resource Pool 651
Prioritizing Queries Within a Resource Pool 651
How to Set Run-Time Priority and Run-Time Priority Threshold 651
Changing Run-Time Priority of a Running Query 652
How ToChange the Run-Time Priority of a Running Query 652
Using CHANGE_RUNTIME_PRIORITY 652
Restoring ResourceManager Defaults 653
Best Practices for ManagingWorkload Resources 654
Administrator's GuideContents
HP Vertica Analytics Platform (7.0.x) Page 34 of 969

Basic Principles for Scalability and Concurrency Tuning 654
Guidelines for Setting Pool Parameters 654
Setting a Run-Time Limit for Queries 659
Example: 660
Using User-Defined Pools and User-Profiles forWorkloadManagement 661
Scenario: Periodic Batch Loads 661
Scenario: The CEOQuery 662
Scenario: Preventing Run-Away Queries 663
Scenario: Restricting Resource Usage of Ad Hoc Query Application 664
Scenario: Setting a Hard Limit on Concurrency For An Application 665
Scenario: HandlingMixedWorkloads (Batch vs. Interactive) 666
Scenario: Setting Priorities onQueries Issued By Different Users 667
Scenario: Continuous Load andQuery 668
Scenario: Prioritizing Short Queries At Run Time 669
Scenario: Dropping the Runtime Priority of LongQueries 669
Tuning the Built-In Pools 671
Scenario: Restricting HP Vertica to TakeOnly 60% of Memory 671
Scenario: Tuning for Recovery 671
Scenario: Tuning for Refresh 671
Scenario: Tuning TupleMover Pool Settings 672
Reducing Query Run Time 672
Real-Time Profiling 673
Managing System Resource Usage 674
Managing Sessions 674
Viewing Sessions 675
Interrupting and Closing Sessions 675
Controlling Sessions 676
Managing Load Streams 677
Working With Storage Locations 679
How HP Vertica Uses Storage Locations 679
Viewing Storage Locations and Policies 680
Administrator's GuideContents
HP Vertica Analytics Platform (7.0.x) Page 35 of 969

Viewing Disk Storage Information 680
Viewing Location Labels 680
Viewing Storage Tiers 681
Viewing Storage Policies 681
Adding Storage Locations 682
Planning Storage Locations 682
Adding the Location 683
Storage Location Subdirectories 684
Adding Labeled Storage Locations 684
Adding a Storage Location for USER Access 685
Altering Storage Location Use 686
USER Storage Location Restrictions 686
Effects of Altering Storage Location Use 686
Altering Location Labels 687
Adding a Location Label 687
Removing a Location Label 687
Effects of Altering a Location Label 688
Creating Storage Policies 688
Creating Policies Based on Storage Performance 689
Storage Levels and Priorities 689
Using the SET_OBJECT_STORAGE_POLICY Function 690
Effects of Creating Storage Policies 690
Moving Data Storage Locations 691
Moving Data StorageWhile Setting a Storage Policy 692
Effects of Moving a Storage Location 692
Clearing Storage Policies 693
Effects on Same-Name Storage Policies 693
Measuring Storage Performance 694
Measuring Performance on a Running HP Vertica Database 695
Measuring Performance Before a Cluster Is Set Up 696
Setting Storage Performance 696
Administrator's GuideContents
HP Vertica Analytics Platform (7.0.x) Page 36 of 969

How HP Vertica Uses Location Performance Settings 696
Using Location Performance Settings With Storage Policies 697
Dropping Storage Locations 697
Altering Storage Locations Before Dropping Them 697
Dropping USER Storage Locations 698
Retiring Storage Locations 698
Restoring Retired Storage Locations 698
Backing Up and Restoring the Database 699
Compatibility Requirements for Using vbr.py 699
Automating Regular Backups 699
Types of Backups 699
Full Backups 700
Object-Level Backups 700
Hard Link Local Backups 701
When to Back up the Database 701
Configuring Backup Hosts 701
Configuring Single-Node Database Hosts for Backup 702
Creating Configuration Files for Backup Hosts 702
Estimating Backup Host Disk Requirements 702
Estimating Log File Disk Requirements 703
Making Backup Hosts Accessible 703
Setting Up Passwordless SSH Access 704
Testing SSH Access 704
Changing the Default SSH Port on Backup Hosts 705
Increasing the SSH Maximum Connection Settings for a Backup Host 705
Copying Rsync and Python to the Backup Hosts 706
Configuring Hard Link Local Backup Hosts 706
Listing Host Names 706
Creating vbr.py Configuration Files 708
Specifying a Backup Name 708
Backing Up the Vertica Configuration File 709
Administrator's GuideContents
HP Vertica Analytics Platform (7.0.x) Page 37 of 969

SavingMultiple Restore Points 709
Specifying Full or Object-Level Backups 709
Entering the User Name 710
Saving the Account Password 710
Specifying the Backup Host and Directory 710
Saving the Configuration File 711
Continuing to Advanced Settings 711
Sample Configuration File 711
Changing the Overwrite Parameter Value 712
Configuring Required VBR Parameters 712
Sample Session Configuring Required Parameters 713
Configuring Advanced VBR Parameters 713
Example of Configuring Advanced Parameters 714
Configuring the Hard Link Local Parameter 714
Restrictions for Backup Encryption Option 715
Example Backup Configuration File 715
Using Hard File Link Local Backups 717
Planning Hard Link Local Backups 717
Specifying Backup Directory Locations 717
Understanding Hard Link Local Backups and Disaster Recovery 718
Creating Full and Incremental Backups 718
Running VbrWithout Optional Commands 719
Best Practices for Creating Backups 719
Object-Level Backups 720
Backup Locations and Storage 720
Saving Incremental Backups 720
When vbr.py Deletes Older Backups 721
Backup Directory Structure and Contents 721
Directory Tree 722
Multiple Restore Points 722
Creating Object-Level Backups 724
Administrator's GuideContents
HP Vertica Analytics Platform (7.0.x) Page 38 of 969

Invoking vbr.py Backup 724
Backup Locations and Naming 724
Best Practices for Object-Level Backups 725
Naming Conventions 725
Creating Backups Concurrently 726
Determining Backup Frequency 726
Understanding Object-Level Backup Contents 726
Making Changes After an Object-Level Backup 727
Understanding the Overwrite Parameter 727
Changing Principal and Dependent Objects 728
Considering Contraint References 728
Configuration Files for Object-Level Backups 728
Backup Epochs 729
Maximum Number of Backups 729
Creating Hard Link Local Backups 729
Specifying the Hard Link Local Backup Location 730
Creating Hard Link Local Backups for Tape Storage 730
Interrupting the Backup Utility 731
Viewing Backups 731
List Backups With vbr.py 731
Monitor database_snapshots 732
Query database_backups 732
Restoring Full Database Backups 733
Restoring theMost Recent Backup 733
Restoring an Archive 734
Attempting to Restore a Node That Is UP 734
Attempting to Restore to an Alternate Cluster 735
Restoring Object-Level Backups 735
Backup Locations 735
Cluster Requirements for Object-Level Restore 736
Restoring Objects to a Changed Cluster Topology 736
Administrator's GuideContents
HP Vertica Analytics Platform (7.0.x) Page 39 of 969

Projection Epoch After Restore 736
Catalog Locks During Backup Restore 736
Catalog Restore Events 737
Restoring Hard Link Local Backups 737
Restoring Full- andObject-Level Hard Link Local Backups 737
Avoiding OID and Epoch Conflicts 737
Transferring Backups to and From Remote Storage 739
Restoring to the SameCluster 740
Removing Backups 740
Deleting Backup Directories 740
Copying the Database to Another Cluster 741
Identifying Node Names for Target Cluster 742
Configuring the Target Cluster 743
Creating a Configuration File for CopyCluster 743
Copying the Database 744
Backup and Restore Utility Reference 745
VBR Utility Reference 745
Syntax 745
Parameters 746
VBR Configuration File Reference 746
[Misc] Miscellaneous Settings 746
[Database] Database Access Settings 748
[Transmission] Data Transmission During Backup Process 749
[Mapping] 750
Recovering the Database 753
Failure Recovery 753
Recovery Scenarios 754
Notes 755
Restarting HP Vertica on a Host 755
Restarting HP Vertica on a Host Using the Administration Tools 756
Restarting HP Vertica on a Host Using theManagement Console 756
Administrator's GuideContents
HP Vertica Analytics Platform (7.0.x) Page 40 of 969

Restarting the Database 756
Recovering the Cluster From a Backup 759
Monitoring Recovery 759
Viewing Log Files on Each Node 759
Viewing the Cluster State and Recover Status 759
Using System Tables toMonitor Recovery 760
Monitoring Cluster Status After Recovery 760
Exporting a Catalog 761
Best Practices for Disaster Recovery 761
Monitoring HP Vertica 763
Monitoring Log Files 763
When a Database Is Running 763
When the Database / Node Is Starting up 763
Rotating Log Files 764
Using Administration Tools Logrotate Utility 764
Manually Rotating Logs 764
Manually Creating Logrotate Scripts 765
Monitoring Process Status (ps) 767
Monitoring Linux Resource Usage 768
Monitoring Disk Space Usage 769
Monitoring Database Size for License Compliance 769
Viewing the Current License State 769
Manually Running an Audit of the Entire Database 770
Targeted Auditing 770
UsingManagement Console toMonitor License Compliance 771
Monitoring Shared Node Connections 771
Monitoring Elastic Cluster Rebalancing 773
Historical Rebalance Information 773
Monitoring Parameters 773
Monitoring Events 776
Event LoggingMechanisms 776
Administrator's GuideContents
HP Vertica Analytics Platform (7.0.x) Page 41 of 969

Event Severity Types 776
Event Data 780
Configuring Event Reporting 783
Configuring Reporting for Syslog 783
Enabling HP Vertica to Trap Events for Syslog 783
Defining Events to Trap for Syslog 784
Defining the SyslogFacility to Use for Reporting 785
Configuring Reporting for SNMP 786
Configuring Event Trapping for SNMP 787
ToConfigure HP Vertica to Trap Events for SNMP 787
To Enable Event Trapping for SNMP 788
ToDefineWhere HP Vertica Send Traps 788
To DefineWhich Events HP Vertica Traps 788
Verifying SNMP Configuration 789
Event Reporting Examples 790
Vertica.log 790
SNMP 790
Syslog 790
Using System Tables 792
Where System Tables Reside 792
How System Tables Are Organized 792
Querying Case-Sensitive Data in System Tables 793
Examples 794
RetainingMonitoring Information 796
Data Collector 796
Where Is DC Information retained? 796
DC Tables 797
Enabling and Disabling Data Collector 797
Viewing Current Data Retention Policy 797
Configuring Data Retention Policies 798
Working with Data Collection Logs 799
Administrator's GuideContents
HP Vertica Analytics Platform (7.0.x) Page 42 of 969

Clearing the Data Collector 800
Flushing Data Collector Logs 801
Monitoring Data Collection Components 801
Related Topics 802
Querying Data Collector Tables 802
Clearing PROJECTION_REFRESHES History 803
Monitoring Query Plan Profiles 804
Monitoring Partition Reorganization 804
Monitoring Resource Pools and Resource Usage By Queries 805
Examples 805
Monitoring Recovery 808
Viewing Log Files on Each Node 808
Viewing the Cluster State and Recover Status 809
Using System Tables toMonitor Recovery 809
Monitoring Cluster Status After Recovery 810
Monitoring HP Vertica UsingMC 811
About Chart Updates 811
ViewingMC HomePage 812
Tasks 812
Recent Databases 813
Monitoring Same-NameDatabases onMC 813
Monitoring Cluster Resources 814
Database 814
Messages 814
Performance 815
CPU/Memory Usage 815
User Query Type Distribution 815
Monitoring Cluster Nodes 816
FilteringWhat You See 816
If You don't SeeWhat You Expect 816
Monitoring Cluster CPU/Memory 817
Administrator's GuideContents
HP Vertica Analytics Platform (7.0.x) Page 43 of 969
Investigating Areas of Concern 817
Monitoring Cluster Performance 817
How to Get Metrics on Your Cluster 817
Node Colors andWhat They Mean 818
Filtering Nodes From the View 818
Monitoring System Resources 819
How up to Date Is the information? 819
Monitoring Query Activity 819
Monitoring Key Events 820
Filtering Chart Results 821
ViewingMore Detail 821
Monitoring Internal Sessions 822
Filtering Chart Results 822
Monitoring User Sessions 822
What Chart Colors Mean 822
Chart Results 823
Monitoring SystemMemory Usage 823
Types of SystemMemory 823
Monitoring System Bottlenecks 824
How MC Gathers System Bottleneck Data 824
The Components MC Reports on 824
How MC Handles Conflicts in Resources 824
Example 825
Monitoring Node Activity 825
MonitoringMC-managed DatabaseMessages 828
Message Severity 829
ViewingMessage Details 829
Search and Export Messages 829
SearchingMC-managed DatabaseMessages 829
ChangingMessage Search Criteria 830
Specifying Date Range Searches 830
Administrator's GuideContents
HP Vertica Analytics Platform (7.0.x) Page 44 of 969

FilteringMessages Client Side 831
ExportingMC-managed DatabaseMessages and Logs 831
MonitoringMC User Activity 834
Background Cleanup of Audit Records 835
Filter and Export Results 836
If You Perform a Factory Reset 836
Analyzing Workloads 837
About theWorkload Analyzer 837
Getting Tuning Recommendations Through an API 837
What andWhen 837
Record the Events 838
Observation Count and Time 839
KnowingWhat to Tune 839
The Tuning Description (recommended action) and Command 839
What a Tuning Operation Costs 839
Examples 839
Getting Recommendations From System Tables 841
UnderstandingWLA's Triggering Events 841
Getting Tuning Recommendations ThroughMC 841
UnderstandingWLA Triggering Conditions 842
Collecting Database Statistics 850
Statistics Used By theQuery Optimizer 851
How Statistics Are Collected 851
Using the ANALYZE ROW COUNTOperation 851
Using ANALYZE_STATISTICS 852
Using ANALYZE_HISTOGRAM 852
Examples 853
How Statistics Are Computed 854
How Statistics Are Reported 854
DeterminingWhen Statistics Were Last Updated 855
Reacting to Stale Statistics 859
Administrator's GuideContents
HP Vertica Analytics Platform (7.0.x) Page 45 of 969

Example 860
Canceling Statistics Collection 861
Best Practices for Statistics Collection 861
When to Gather Full Statistics 862
Save Statistics 863
Using Diagnostic Tools 864
Determining Your Version of HP Vertica 864
Collecting Diagnostics (scrutinize Command) 864
Privileges 868
How to Run Scrutinize 868
How Scrutinize Collects and Packages Diagnostics 868
While Scrutinize Runs 869
After Scrutinize Finishes Running 869
Example 870
How to Upload Scrutinize Results to Support 870
How to Refer to Your Database Cluster 871
Example upload script 871
Examples for the Scrutinize Command 872
How to IncludeGzipped Log Files 872
How to Include aMessage in the Diagnostics Package 872
How to Send Results to Support 873
Collecting Diagnostics (diagnostics Command) 873
Syntax 873
Arguments 873
Using the Diagnostics Utility 874
Examples 874
Exporting a Catalog 875
Exporting Profiling Data 875
Syntax 875
Parameters 876
Example 876
Administrator's GuideContents
HP Vertica Analytics Platform (7.0.x) Page 46 of 969

Understanding Query Plans 877
How to Get Query Plan Information 878
How to save query plan information 879
Viewing EXPLAIN Output in Management Console 880
About the Query Plan inManagement Console 881
Expanding and Collapsing Query Paths in EXPLAIN Output 882
Clearing Query Data 882
Viewing Projection and ColumnMetadata in EXPLAIN output 882
Viewing EXPLAIN Output in vsql 883
About EXPLAIN Output 884
Textual output of query plans 884
Viewing the Statistics Query Plan Output 885
Viewing the Cost and Rows Path 887
Viewing the Projection Path 888
Viewing the Join Path 889
Outer versus inner join 890
Hash andmerge joins 891
Inequality joins 892
Event series joins 893
Viewing the Path ID 893
Viewing the Filter Path 894
Viewing the GROUP BY Paths 895
GROUPBY HASH Query Plan Example 895
GROUPBY PIPELINED Query Plan Example 896
Partially Sorted GROUPBY Query Plan Example 897
Viewing the Sort Path 898
Viewing the Limit Path 899
Viewing the Data Redistribution Path 899
Viewing the Analytic Function Path 900
Viewing Node Down Information 901
Viewing theMERGE Path 903
Administrator's GuideContents
HP Vertica Analytics Platform (7.0.x) Page 47 of 969

Linking EXPLAIN Output to Error Messages and Profiling Information 904
Using the QUERY_PLAN_PROFILES table 906
Profiling Database Performance 907
How to Determine If Profiling Is Enabled 908
How to Enable Profiling 908
How to Disable Profiling 909
About Real-Time Profiling 910
About profiling counters 910
About query plan profiles 910
System tables with profile data 911
What to look for in query profiles 912
Viewing Profile Data in Management Console 912
Expanding and collapsing query path profile data 913
About Profile Data in Management Console 914
Projectionmetadata 914
Query phase duration 915
Profile metrics 916
Execution events 916
Optimizer events 918
Clearing Query Data 919
Viewing Profile Data in vsql 919
How to profile a single statement 919
Real-Time Profiling Example 920
How to Use the Linux watch Command 920
How to Find Out Which Counters are Available 920
Sample views for counter information 921
Running scripts to create the sample views 921
Viewing counter values using the sample views 921
Combining sample views 922
Viewing real-time profile data 922
How to label queries for profiling 923
Administrator's GuideContents
HP Vertica Analytics Platform (7.0.x) Page 48 of 969

Label syntax 923
Profiling query plans 925
What you need for query plan profiling 925
How to get query plan status for small queries 926
How to get query plan status for large queries 927
Improving the readability of QUERY_PLAN_PROFILES output 929
Managing query profile data 930
Configuring data retention policies 930
Reacting to suboptimal query plans 930
About Locales 933
Unicode Character Encoding: UTF-8 (8-bit UCS/Unicode Transformation Format) 933
Locales 933
Notes 933
Locale Aware String Functions 934
UTF-8 String Functions 935
Locale Specification 936
Long Form 936
Syntax 936
Parameters 936
Collation Keyword Parameters 940
Notes 942
Examples 942
Short Form 943
Determining the Short Form of a Locale 943
Specifying a Short Form Locale 943
Supported Locales 944
Locale Restrictions andWorkarounds 955
Appendix: Binary File Formats 959
Creating Native Binary Format Files 959
File Signature 959
ColumnDefinitions 959
Administrator's GuideContents
HP Vertica Analytics Platform (7.0.x) Page 49 of 969

Row Data 962
Example 963
We appreciate your feedback! 969
Administrator's GuideContents
HP Vertica Analytics Platform (7.0.x) Page 50 of 969

Administration OverviewThis document describes the functions performed by an HP Vertica database administrator (DBA).Perform these tasks using only the dedicated database administrator account that was createdwhen you installed HP Vertica. The examples in this documentation set assume that theadministrative account name is dbadmin.
l To perform certain cluster configuration and administration tasks, the DBA (users of theadministrative account) must be able to supply the root password for those hosts. If thisrequirement conflicts with your organization's security policies, these functions must beperformed by your IT staff.
l If you perform administrative functions using a different account from the account providedduring installation, HP Vertica encounters file ownership problems.
l If you share the administrative account password, make sure that only one user runs theAdministration Tools at any time. Otherwise, automatic configuration propagation does notwork correctly.
l The Administration Tools require that the calling user's shell be /bin/bash. Other shells giveunexpected results and are not supported.
Administrator's GuideAdministration Overview
HP Vertica Analytics Platform (7.0.x) Page 51 of 969

Managing LicensesYoumust license HP Vertica in order to use it. Hewlett-Packard supplies your license informationto you in the form of a license file named vlicense.dat, into which the terms of your license areencoded.
To prevent inadvertently introducing special characters (such as line endings or file terminators) intothe license key file, do not open the file in an editor or e-mail client. Though such characters are notalways visible in an editor, their presence invalidates the license.
Copying Enterprise, Evaluation, and Flex ZoneLicense Files
For ease of HP Vertica Enterprise Edition installation, HP recommends that you copy the licensefile to /tmp/vlicense.dat on theAdministration host.
If you have a license for Flex Zone, HP recommends that you copy the license file to/opt/vertica/config/share/license.com.vertica.flextables.key.
Be careful not to alter the license key file in any way when copying the file betweenWindows andLinux, or to any other location. To help prevent applications from trying to alter the file, enclose thelicense file in an archive file (such as a .zip or .tar file).
After copying the license file from one location to another, check that the copied file size is identicalto that of the one you received from HP Vertica.
Obtaining a License Key FileTo obtain an Enterprise Edition, Evaluation, or Flex Zone license key, contact HP Vertica at:http://www.vertica.com/about/contact-us/
Your HP Vertica Community Edition download package includes the Community Edition license,which allows three nodes and 1TB of data. The HP Vertica Community Edition license does notexpire.
Understanding HP Vertica LicensesHP Vertica has flexible licensing terms. It can be licensed on the following bases:
l Term-based (valid until a specific date)
l Raw data size based (valid to store up to some amount of raw data)
l Both term-based and data-size-based
l Unlimited duration and data storage
l Raw data size based and a limit of 3 nodes (HP Vertica Community Edition)
Administrator's GuideManaging Licenses
HP Vertica Analytics Platform (7.0.x) Page 52 of 969

Your license key has your licensing bases encoded into it. If you are unsure of your current license,you can view your license information from within HP Vertica.
License TypesHP Vertica Community Edition. You can download and start using Community Edition for free.The Community Edition license allows customers the following:
l 3 node limit
l 1 terabyte columnar table data limit
l 1 terabyte Flex table data limit
HP Vertica Enterprise Edition. You can purchase the Enterprise Edition license. The EnterpriseEdition license entitles customers to:
l No node limit
l Columnar data, amount specified by the license
l 1 terabyte Flex table data
Flex Zone. Flex Zone is a new offering that is based on the flex tables technology available inversion 7.0. Customers can separately purchase and apply a Flex Zone license to their installation.The Flex Zone license entitles customers to the licensed amount of Flex table data and removesthe 3 node restriction imposed by the Community Edition.
Note that Enterprise Edition customers who purchase Flex Zonemust apply two licenses: theirEnterprise Edition license and their Flex Zone license.
Customers whose prime goal is to work with Flex tables can purchase a Flex Zone license. Whenthey purchase Flex Zone, customers receive a complimentary Enterprise License, which entitlesthem to one terabyte of columnar data and imposes no node limit.
Note that customers who purchase a Flex Zone licensemust apply two licenses: thecomplimentary Enterprise Edition license and their Flex Zone license.
Allowances CommunityEdition
EnterpriseEdition
Enterprise Edition + FlexZone
FlexZone
Node Limit 3 nodes Unlimited Unlimited Unlimited
ColumnarData
1 terabyte Per license Per license 1terabyte
Flex Data 1 terabyte 1 terabyte Per license Perlicense
Administrator's GuideManaging Licenses
HP Vertica Analytics Platform (7.0.x) Page 53 of 969

Installing or Upgrading a License KeyThe steps you follow to apply your HP Vertica license key vary, depending on the type of licenseyou are applying and whether you are upgrading your license. This section describes the following:
l New HP Vertica License Installations
l HP Vertica License Renewals or Upgrades
New HP Vertica License Installations1. Copy the license key file to yourAdministration Host.
2. Ensure the license key's file permissions are set to at least 666 (read and write permissions forall users).
3. Install HP Vertica as described in the Installation Guide if you have not already done so. Theinterface prompts you for the license key file.
4. To install Community Edition, leave the default path blank and press OK. To apply yourevaluation or Enterprise Edition license, enter the absolute path of the license key file youdownloaded to your Administration Host and press OK. The first time you log in as theDatabase Administrator and run theAdministration Tools, the interface prompts you toaccept the End-User License Agreement (EULA).
Note: If you installedManagement Console, theMC administrator can point to thelocation of the license key duringManagement Console configuration.
5. ChooseView EULA to review the EULA.
6. Exit the EULA and choose Accept EULA to officially accept the EULA and continue installingthe license, or chooseReject EULA to reject the EULA and return to the AdvancedMenu.
HP Vertica License Renewals or UpgradesIf your license is expiring or you want your database to grow beyond your licensed data size, youmust renew or upgrade your license. Once you have obtained your renewal or upgraded license keyfile, you can install it using Administration Tools or Management Console.
Administrator's GuideManaging Licenses
HP Vertica Analytics Platform (7.0.x) Page 54 of 969

Uploading or Upgrading a License Key UsingAdministration Tools
1. Copy the license key file to yourAdministration Host.
2. Ensure the license key's file permissions are set to at least 666 (read and write permissions forall users).
3. Start your database, if it is not already running.
4. In the Administration Tools, select Advanced > Upgrade License Key and click OK.
5. Enter the path to your new license key file and click OK. The interface prompts you to acceptthe End-User License Agreement (EULA).
6. ChooseView EULA to review the EULA.
7. Exit the EULA and choose Accept EULA to officially accept the EULA and continue installingthe license, or chooseReject EULA to reject the EULA and return to the Advanced Toolsmenu.
Uploading or Upgrading a License Key UsingManagement Console
You can upload a new license from the Settings page for each database.
Browse to the location of the license key from your local computer (where the web browser isinstalled), upload the file, and save.
Note: As soon as you renew or upgrade your license key from either yourAdministrationHost or Management Console, HP Vertica applies the license update. No further warningsappear.
Flex Zone License Installations1. Install HP Vertica as described in the Installation Guide if you have not already done so.
2. Copy the Flex Zone license key file to yourAdministration Host. HP recommends that youcopy the license file to/opt/vertica/config/share/license.com.vertica.flextables.key.
3. Start your database, if it is not already running.
4. In the Administration Tools, connect to your database.
5. At the vsql prompt, select INSTALL_LICENSE as described in the SQLReferenceManual.
Administrator's GuideManaging Licenses
HP Vertica Analytics Platform (7.0.x) Page 55 of 969

=> SELECT INSTALL_LICENSE('/opt/vertica/config/share/license.com.vertica.flextables.key');
Viewing Your License StatusHP Vertica has several functions to show you your license terms and current status.
Examining Your License KeyUse the DISPLAY_LICENSE SQL function described in the SQLReferenceManual to display thelicense information. This function displays the dates for which your license is valid (or "Perpetual" ifyour license does not expire) and any raw data allowance. For example:
=> SELECT DISPLAY_LICENSE();DISPLAY_LICENSE
----------------------------------------------------HP Vertica Systems, Inc.
1/1/201112/31/20113050TB(1 row)
Or, use the LICENSES table described in the SQLReferenceManual to view information on allyour installed licenses. This table displays your license types, the dates for which your licenses arevalid, and the size and node limits your licenses impose. In the example below, the licenses tabledisplays the Community Edition license and the default license that controls HP Vertica's flex datacapacity.
=> SELECT * FROM licenses; \x
-[ RECORD 1 ]--------+----------------------------------------license_id | 45035996273704986name | verticalicensee | Vertica Community Editionstart_date | 2011-11-22end_date | Perpetualsize | 1TBis_community_edition | tnode_restriction | 3-[ RECORD 2 ]--------+----------------------------------------license_id | 45035996274085644name | com.vertica.flextablelicensee | Vertica Community Edition, Flextablestart_date | 2013-10-29end_date | Perpetualsize | 1TBis_community_edition | tnode_restriction |
Administrator's GuideManaging Licenses
HP Vertica Analytics Platform (7.0.x) Page 56 of 969

Viewing Your License StatusIf your license includes a raw data size allowance, HP Vertica periodically audits your database'ssize to ensure it remains compliant with the license agreement. If you license has an end date, HPVertica also periodically checks to see if the license has expired. You can see the result of thelatest audits using the GET_COMPLIANCE_STATUS function.
GET_COMPLIANCE_STATUS
---------------------------------------------------------------------------------Raw Data Size: 2.00GB +/- 0.003GBLicense Size : 4.000GBUtilization : 50%Audit Time : 2011-03-09 09:54:09.538704+00Compliance Status : The database is in compliance with respect to raw data size.License End Date: 04/06/2011Days Remaining: 28.59
(1 row)
Viewing Your License Status Through MCInformation about license usage is on the Settings page. SeeMonitoring Database Size for LicenseCompliance.
Calculating the Database SizeYou can use your HP Vertica software until your data reaches themaximum raw data size that thelicense agreement provides. This section describes when data is monitored, what data is includedin the estimate, and the general methodology used to produce an estimate. For more informationabout monitoring for data size, seeMonitoring Database Size for License Compliance.
How HP Vertica Estimates Raw Data SizeHP Vertica uses statistical sampling to calculate an accurate estimate of the raw data size of thedatabase. In this context, raw datameans the uncompressed, unfederated data stored in a singleHP Vertica database. For the purpose of license size audit and enforcement, HP Vertica evaluatesthe raw data size as if the data had been exported from the database in text format, rather than ascompressed data.
HP Vertica conducts your database size audit using statistical sampling. This method allows HPVertica to estimate the size of the database without significantly impacting database performance.The trade-off between accuracy and impact on performance is a small margin of error, inherent instatistical sampling. Reports on your database size include themargin of error, so you can assessthe accuracy of the estimate. To learnmore about simple random sampling, see theWikipedia entryfor Simple Random Sample.
Administrator's GuideManaging Licenses
HP Vertica Analytics Platform (7.0.x) Page 57 of 969

Excluding Data From Raw Data Size EstimateNot all data in the HP Vertica database is evaluated as part of the raw data size. Specifically, HPVertica excludes the following data:
l Multiple projections (underlying physical copies) of data from a logical database entity (table).Data appearing in multiple projections of the same table is counted only once.
l Data stored in temporary tables.
l Data accessible through external table definitions.
l Data that has been deleted, but which remains in the database. To understandmore aboutdeleting and purging data, see Purging Deleted Data.
l Data stored in theWOS.
l Data stored in system and work tables such as monitoring tables, Data Collector tables, andDatabase Designer tables.
Evaluating Data Type Footprint SizeThe data sampled for the estimate is treated as if it had been exported from the database in textformat (such as printed from vsql). This means that HP Vertica evaluates the data type footprintsizes as follows:
l Strings and binary types (CHAR, VARCHAR, BINARY, VARBINARY) are counted as theiractual size in bytes using UTF-8 encoding. NULL values are counted as 1-byte values (zerobytes for the NULL, and 1-byte for the delimiter).
l Numeric data types are counted as if they had been printed. Each digit counts as a byte, as doesany decimal point, sign, or scientific notation. For example, -123.456 counts as eight bytes (sixdigits plus the decimal point andminus sign).
l Date/time data types are counted as if they had been converted to text, including any hyphens orother separators. For example, a timestamp column containing the value for noon on July 4th,2011 would be 19 bytes. As text, vsql would print the value as 2011-07-04 12:00:00, which is 19characters, including the space between the date and the time.
Note: Each column has an additional byte for the column delimiter.
Using AUDIT to Estimate Database SizeTo supply amore accurate database size estimate than statistical sampling can provide, use theAUDIT function to perform a full audit. This function has parameters to set both the error_tolerance and confidence_level. Using one or both of these parameters increases or decreasesthe function's performance impact.
Administrator's GuideManaging Licenses
HP Vertica Analytics Platform (7.0.x) Page 58 of 969

For instance, lowering the error_tolerance to zero (0) and raising the confidence_level to 100,provides themost accurate size estimate, and increases the performance impact of calling theAUDIT function. During a detailed, low error-tolerant audit, all of the data in the database is dumpedto a raw format to calculate its size. Since performing a stringent audit can significantly impactdatabase performance, never perform a full audit of a production database. See AUDIT for details.
Note: Unlike estimating raw data size using statistical sampling, a full audit performs SQLqueries on the full database contents, including the contents of theWOS.
Monitoring Database Size for LicenseCompliance
If your HP Vertica license includes a raw data storage allowance, you should regularly monitor thesize of your database. This monitoring allows you to plan to either schedule deleting old data tokeep your database in compliance with your license agreement, or budget for a license upgrade toallow for the continued growth of your database.
Viewing the Current License StateHP Vertica periodically runs an audit of the database size to verify that your database remainscompliant with your license. You can view the results of themost recent audit by calling the GET_COMPLIANCE_STATUS function.
GET_COMPLIANCE_STATUS
---------------------------------------------------------------------------------Raw Data Size: 2.00GB +/- 0.003GBLicense Size : 4.000GBUtilization : 50%Audit Time : 2011-03-09 09:54:09.538704+00Compliance Status : The database is in compliance with respect to raw data size.License End Date: 04/06/2011Days Remaining: 28.59
(1 row)
Periodically running GET_COMPLIANCE_STATUS tomonitor your database's license status isusually enough to ensure that your database remains compliant with your license. If your databasebegins to near its data allowance, youmay want to use the other auditing functions described belowto determine where your database is growing and how recent deletes have affected the size of yourdatabase.
Manually Running an Audit of the Entire DatabaseYou can trigger HP Vertica's automatic audit of your database at any time using the AUDIT_LICENSE_SIZE SQL function. This function triggers the same audit that HP Vertica performsperiodically. The audit runs in the background, so you need to wait for the audit to complete. Youcan then view the audit results using GET_COMPLIANCE_STATUS.
Administrator's GuideManaging Licenses
HP Vertica Analytics Platform (7.0.x) Page 59 of 969

An alternative to AUDIT_LICENSE_SIZE is to use the AUDIT SQL function to audit the size ofyour entire database by passing it an empty string. Unlike AUDIT_LICENSE_SIZE, this functionoperates synchronously, returning when it has estimated the size of the database.
=> SELECT AUDIT('');AUDIT
----------76376696
(1 row)
The size of the database is reported in bytes. The AUDIT function also allows you to control theaccuracy of the estimated database size using additional parameters. See the entry for the AUDITfunction in the SQLReferenceManual for full details
Note: HP Vertica does not count the results of the AUDIT function as an official audit. It takesno license compliance actions based on the results.
Targeted AuditingIf your audits find your database to be unexpectedly large, youmay want to find which schemas,tables, or partitions are using themost storage. You can use the AUDIT function to performtargeted audits of schemas, tables, or partitions by supplying the name of the entity whose size youwant to find. For example, to find the size of the online_sales schema in the VMart exampledatabase, run the following command:
VMart=> SELECT AUDIT('online_sales');AUDIT
----------35716504
(1 row)
You can also change the granularity of an audit to report the size of each entity in a larger entity (forexample, each table in a schema) by using the granularity argument of the AUDIT function. See theAUDIT function's entry in the SQLReferenceManual.
Using Management Console to Monitor LicenseCompliance
You can also get information about raw data storage through theManagement Console. Thisinformation is available in the databaseOverview page, which displays a grid view of thedatabase's overall health.
l The needle in the licensemeter adjusts to reflect the amount used inmegabytes.
l The grace period represents the term portion of the license.
Administrator's GuideManaging Licenses
HP Vertica Analytics Platform (7.0.x) Page 60 of 969

l The Audit button returns the same information as the AUDIT() function in a graphicalrepresentation.
l The Details link within the License grid (next to the Audit button) provides historical informationabout license usage. This page also shows a progress meter of percent used toward yourlicense limit.
Managing License Warnings and Limits
Term License Warnings and ExpirationThe term portion of an HP Vertica license is easy tomanage—you are licensed to use HP Verticauntil a specific date. If the term of your license expires, HP Vertica alerts you with messagesappearing in theAdministration Tools and vsql. For example:
=> CREATE TABLE T (A INT);NOTICE: Vertica license is in its grace periodHINT: Renew at http://www.vertica.com/CREATE TABLE
Contact HP Vertica at http://www.vertica.com/about/contact-us/ as soon as possible to renewyour license, and then install the new license. After the grace period expires, HP Vertica stopsprocessing queries.
Data Size License Warnings and RemediesIf your HP Vertica license includes a raw data size allowance, HP Vertica periodically audits thesize of your database to ensure it remains compliant with the license agreement. For details of thisaudit, see Calculating the Database Size. You should alsomonitor your database size to knowwhen it will approach licensed usage. Monitoring the database size helps you plan to either upgradeyour license to allow for continued database growth or delete data from the database so you remaincompliant with your license. SeeMonitoring Database Size for License Compliance for details.
If your database's size approaches your licensed usage allowance, you will see warnings in theAdministration Tools and vsql. You have two options to eliminate these warnings:
l Upgrade your license to a larger data size allowance.
l Delete data from your database to remain under your licensed raw data size allowance. Thewarnings disappear after HP Vertica's next audit of the database size shows that it is no longerclose to or over the licensed amount. You can alsomanually run a database audit (seeMonitoring Database Size for License Compliance for details).
If your database continues to grow after you receive warnings that its size is approaching yourlicensed size allowance, HP Vertica displays additional warnings in more parts of the system aftera grace period passes.
Administrator's GuideManaging Licenses
HP Vertica Analytics Platform (7.0.x) Page 61 of 969

If Your HP VerticaEnterprise Edition Database SizeExceeds Your Licensed Limits
If your Enterprise Edition database size exceeds your licensed data allowance, all successfulqueries from ODBC and JDBC clients return with a status of SUCCESS_WITH_INFO instead ofthe usual SUCCESS. Themessage sent with the results contains a warning about the databasesize. Your ODBC and JDBC clients should be prepared to handle thesemessages instead ofassuming that successful requests always return SUCCESS.
If Your HP VerticaCommunity Edition Database SizeExceeds Your Licensed Limits
If your Community Edition database size exceeds your licensed data allowance, you will no longerbe able to load or modify data in your database. In addition, you will not be able to delete data fromyour database.
To bring your database under compliance, you can choose to:
l Drop database tables
l Upgrade to HP Vertica Enterprise Edition (or an evaluation license)
Administrator's GuideManaging Licenses
HP Vertica Analytics Platform (7.0.x) Page 62 of 969

Configuring the DatabaseThis section provides information about:
l The Configuration Procedure
l Configuration Parameters
l Designing a logical schema
l Creating the physical schema
You'll also want to set up a security scheme. See Implementing Security.
See also implementing locales for international data sets.
Note: Before you begin this section, HP strongly recommends that you follow the Tutorial inthe Getting Started Guide to quickly familiarize yourself with creating and configuring a fully-functioning example database.
Administrator's GuideConfiguring the Database
HP Vertica Analytics Platform (7.0.x) Page 63 of 969

Configuration ProcedureThis section describes the tasks required to set up an HP Vertica database. It assumes that youhave obtained a valid license key file, installed the HP Vertica rpm package, and run the installationscript as described in the Installation Guide.
You'll complete the configuration procedure using the:
l Administration Tools
If you are unfamiliar withDialog-based user interfaces, read Using the Administration ToolsInterface before you begin. See also the Administration Tools Reference for details.
l vsql interactive interface
l The Database Designer, described fully in Creating a Database Design
Note: Users can also perform certain tasks using theManagement Console. Those tasks willpoint to the appropriate topic.
IMPORTANT NOTESl Follow the configuration procedure in the order presented in this book.
l HP strongly recommends that you first use the Tutorial in the Getting Started Guide toexperiment with creating and configuring a database.
l Although youmay createmore than one database (for example, one for production and one fortesting), youmay create only one active database for each installation of Vertica AnalyticsPlatform
l The generic configuration procedure described here can be used several times during thedevelopment process andmodified each time to fit changing goals. You can omit steps such aspreparing actual data files and sample queries, and run the Database Designer withoutoptimizing for queries. For example, you can create, load, and query a database several timesfor development and testing purposes, then one final time to create and load the productiondatabase.
Administrator's GuideConfiguring the Database
HP Vertica Analytics Platform (7.0.x) Page 64 of 969

Prepare Disk Storage LocationsYoumust create and specify directories in which to store your catalog and data files (physicalschema). You can specify these locations when you install or configure the database, or laterduring database operations.
The directory you specify for your catalog files (the catalog path) is used across all nodes. That is, ifyou specify /home/catalog for your catalog files, HP Vertica will use /home/catalog as the catalogpath on all nodes. The catalog directory should always be separate from any data files.
Note: : Do not use a shared directory for more than one node. Data and catalog directoriesmust be distinct for each node. Multiple nodes must not be allowed to write to the same data orcatalog directory.
The same is true for your data path. If you specify that your data should be stored in /home/data,HP Vertica ensures this is the data path used on all database nodes.
Do not use a single directory to contain both catalog and data files. You can store the catalog anddata directories on different drives, which can be either on drives local to the host (recommended forthe catalog directory) or on a shared storage location, such as an external disk enclosure or aSAN.
Both the catalog and data directories must be owned by the database administrator.
Before you specify a catalog or data path, be sure the parent directory exists on all nodes of yourdatabase. The database creation process in admintools creates the actual directories, but theparent directory must exist on all nodes.
You do not need to specify a disk storage location during installation. However, you can by usingthe --data-dir parameter to the install_vertica script. See Specifying Disk Storage LocationDuring Installation
See Alsol Specifying Disk Storage Location onMC
l Specifying Disk Storage Location During Database Creation
l Configuring Disk Usage to Optimize Performance
l Using Shared StorageWith HP Vertica
Specifying Disk Storage Location During InstallationThere are three ways to specify the disk storage location. You can specify the location when you:
Administrator's GuideConfiguring the Database
HP Vertica Analytics Platform (7.0.x) Page 65 of 969

l Install HP Vertica
l Create a database using the Administration Tools
l Install and configureManagement Console
To Specify the Disk Storage Location When You install:
When you install HP Vertica, the --data_dir parameter in the install_vertica script (seeInstalling with the Script) lets you specify a directory to contain database data and catalog files. Thescript defaults to the Database Administrator's default home directory: /home/dbadmin.
You should replace this default with a directory that has adequate space to hold your data andcatalog files.
Before you create a database, verify that the data and catalog directory exists on each node in thecluster. Also verify that the directory on each node is owned by the database administrator.
Notes
l Catalog and data path names must contain only alphanumeric characters and cannot haveleading space characters. Failure to comply with these restrictions will result in databasecreation failure.
l HP Vertica refuses to overwrite a directory if it appears to be in use by another database.Therefore, if you created a database for evaluation purposes, dropped the database, and want toreuse the database name, make sure that the disk storage location previously used has beencompletely cleaned up. SeeWorkingWith Storage Locations for details.
Specifying Disk Storage Location During DatabaseCreation
When you invoke the Create Database command in theAdministration Tools, a dialog box allowsyou to specify the catalog and data locations. These locations must exist on each host in thecluster andmust be owned by the database administrator.
When you click OK, HP Vertica automatically creates the following subdirectories:
Administrator's GuideConfiguring the Database
HP Vertica Analytics Platform (7.0.x) Page 66 of 969

catalog-pathname/database-name/node-name_catalog/data-pathname/database-name/node-name_data/
For example, if you use the default value (the database administrator's home directory) of/home/dbadmin for the Stock Exchange example database, the catalog and data directories arecreated on each node in the cluster as follows:
/home/dbadmin/Stock_Schema/stock_schema_node1_host01_catalog/home/dbadmin/Stock_Schema/stock_schema_node1_host01_data
Notes
l Catalog and data path names must contain only alphanumeric characters and cannot haveleading space characters. Failure to comply with these restrictions will result in databasecreation failure.
l HP Vertica refuses to overwrite a directory if it appears to be in use by another database.Therefore, if you created a database for evaluation purposes, dropped the database, and want toreuse the database name, make sure that the disk storage location previously used has beencompletely cleaned up. SeeWorkingWith Storage Locations for details.
Specifying Disk Storage Location on MCYou can use theMC interface to specify where you want to store databasemetadata on the clusterin the following ways:
l When you configureMC the first time
l When you create new databases using onMC
SeeConfiguringManagement Console.
Configuring Disk Usage to Optimize PerformanceOnce you have created your initial storage location, you can add additional storage locations to thedatabase later. Not only does this provide additional space, it lets you control disk usage andincrease I/O performance by isolating files that have different I/O or access patterns. For example,consider:
l Isolating execution engine temporary files from data files by creating a separate storage locationfor temp space.
l Creating labeled storage locations and storage policies, in which selected database objects arestored on different storage locations based onmeasured performance statistics or predictedaccess patterns.
SeeWorkingWith Storage Locations for details.
Administrator's GuideConfiguring the Database
HP Vertica Analytics Platform (7.0.x) Page 67 of 969

Using Shared Storage With HP VerticaIf using sharedSAN storage, ensure there is no contention among the nodes for disk space orbandwidth.
l Each host must have its own catalog and data locations. Hosts cannot share catalog or datalocations.
l Configure the storage so that there is enough I/O bandwidth for each node to access the storageindependently.
Viewing Database Storage InformationYou can view node-specific information on your HP Vertica cluster through theManagementConsole. SeeMonitoring HP Vertica UsingMC for details.
Disk Space Requirements for HP VerticaIn addition to actual data stored in the database, HP Vertica requires disk space for several datareorganization operations, such asmergeout andmanaging nodes in the cluster. For best results,HP recommends that disk utilization per node be nomore than sixty percent (60%) for aK-Safe=1database to allow such operations to proceed.
In addition, disk space is temporarily required by certain query execution operators, such as hashjoins and sorts, in the case when theycannot be completed in memory (RAM). Such operatorsmight be encountered during queries, recovery, refreshing projections, and so on. The amount ofdisk space needed (known as temp space) depends on the nature of the queries, amount of data onthe node and number of concurrent users on the system. By default, any unused disk space on thedata disk can be used as temp space. However, HP recommends provisioning temp spaceseparate from data disk space. See Configuring Disk Usage to Optimize Performance.
Disk Space Requirements for Management ConsoleYou can install MC on any node in the cluster, so there are no special disk requirements for MC—other than disk space you would normally allocate for your database cluster. See Disk SpaceRequirements for HP Vertica.
Prepare the Logical Schema ScriptDesigning a logical schema for an HP Vertica database is no different from designing one for anyother SQL database. Details are describedmore fully in Designing a Logical Schema.
To create your logical schema, prepare a SQL script (plain text file, typically with an extension of.sql) that:
Administrator's GuideConfiguring the Database
HP Vertica Analytics Platform (7.0.x) Page 68 of 969
1. Creates additional schemas (as necessary). See UsingMultiple Schemas.
2. Creates the tables and column constraints in your database using the CREATE TABLEcommand.
3. Defines the necessary table constraints using the ALTER TABLE command.
4. Defines any views on the table using the CREATE VIEW command.
You can generate a script file using:
l A schema designer application.
l A schema extracted from an existing database.
l A text editor.
l One of the example database example-name_define_schema.sql scripts as a template. (Seethe example database directories in /opt/vertica/examples.)
In your script file, make sure that:
l Each statement ends with a semicolon.
l You use data types supported by HP Vertica, as described in the SQLReferenceManual.
Once you have created a database, you can test your schema script by executing it as described inCreate the Logical Schema. If you encounter errors, drop all tables, correct the errors, and run thescript again.
Prepare Data FilesPrepare two sets of data files:
l Test data files. Use test files to test the database after the partial data load. If possible, use partof the actual data files to prepare the test data files.
l Actual data files. Once the database has been tested and optimized, use your data files for yourinitial Bulk Loading Data.
How to Name Data FilesName each data file to match the corresponding table in the logical schema. Case does not matter.
Use the extension .tbl or whatever you prefer. For example, if a table is named Stock_Dimension,name the corresponding data file stock_dimension.tbl. When usingmultiple data files, append _nnn (where nnn is a positive integer in the range 001 to 999) to the file name. For example, stock_dimension.tbl_001, stock_dimension.tbl_002, and so on.
Administrator's GuideConfiguring the Database
HP Vertica Analytics Platform (7.0.x) Page 69 of 969

Prepare Load Scripts
Note: You can postpone this step if your goal is to test a logical schema design for validity.
Prepare SQL scripts to load data directly into physical storage using the COPY...DIRECTstatement using vsql, or throughODBC as described in the Programmer's Guide.
You need scripts that load the:
l Large tables
l Small tables
HP recommends that you load large tables usingmultiple files. To test the load process, use files of10GB to 50GB in size. This size provides several advantages:
l You can use one of the data files as a sample data file for theDatabase Designer.
l You can load just enough data to Perform a Partial Data Load before you load the remainder.
l If a single load fails and rolls back, you do not lose an excessive amount of time.
l Once the load process is tested, for multi-terabyte tables, break up the full load in file sizes of250–500GB.
See the Bulk Loading Data and the following additional topics for details:
l Bulk Loading Data
l Using Load Scripts
l Using Parallel Load Streams
l Loading Data into Pre-Join Projections
l Enforcing Constraints
l About Load Errors
Tip: You can use the load scripts included in the example databases in the Getting StartedGuide as templates.
Create an Optional Sample Query ScriptThe purpose of a sample query script is to test your schema and load scripts for errors.
Administrator's GuideConfiguring the Database
HP Vertica Analytics Platform (7.0.x) Page 70 of 969

Include a sample of queries your users are likely to run against the database. If you don't have anyreal queries, just write simple SQL that collects counts on each of your tables. Alternatively, youcan skip this step.
Administrator's GuideConfiguring the Database
HP Vertica Analytics Platform (7.0.x) Page 71 of 969

Create an Empty DatabaseTwo options are available for creating an empty database:
l Using theManagement Console
l UsingAdministration Tools
Creating a Database Name and PasswordDatabase namemust conform to the following rules:
l Be between 1-30 characters
l Begin with a letter
l Follow with any combination of letters (upper and lowercase), numbers, and/or underscores.
Database names are case sensitive; however, HP strongly recommends that you do not createdatabases with the same name that uses different case; for example, do not create a databasecalled mydatabase and another database called MyDataBase.
Database Passwords
Database passwords may contain letters, digits, and certain special characters; however, no non-ASCII Unicode characters may be used. The following table lists special (ASCII) characters thatHP Vertica permits in database passwords. Special characters can appear anywhere within apassword string; for example, mypas$word or $mypassword or mypassword$ are all permitted.
Caution: Using special characters in database passwords that are not listed in the followingtable could cause database instability.
Character Description
# pound sign
! exclamation point
+ plus sign
* asterisk
? questionmark
, comma
. period
Administrator's GuideConfiguring the Database
HP Vertica Analytics Platform (7.0.x) Page 72 of 969

/ forward slash
= equals sign
~ tilde
- minus sign
$ dollar sign
_ underscore
: colon
space
" double quote
' single quote
% percent sign
& ampersand
( parenthesis
) parenthesis
; semicolon
< less than sign
> greater than sign
@ at sign
` back quote
[ square bracket
] square bracket
\ backslash
^ caret
| vertical bar
{ curly bracket
} curly bracket
Administrator's GuideConfiguring the Database
HP Vertica Analytics Platform (7.0.x) Page 73 of 969

See Also
l Password Guidelines
Create an Empty Database Using MCYou can create a new database on an existing HP Vertica cluster through theManagementConsole interface.
Database creation can be a long-running process, lasting fromminutes to hours, depending on thesize of the target database. You can close the web browser during the process and sign back in toMC later; the creation process continues unless an unexpected error occurs. See theNotessection below the procedure on this page.
You currently need to use command line scripts to define the database schema and load data.Refer to the topics in Configuration Procedure. You should also run theDatabase Designer, whichyou access through theAdministration Tools, to create either a comprehensive or incrementaldesign. Consider using the Tutorial in the Getting Started Guide to create a sample database youcan start monitoring immediately.
How to Create an Empty Database on an MC-managed Cluster
1. If you are already on theDatabases and Clusters page, skip to the next step; otherwise:
a. Connect to MC and sign in as anMC administrator.
b. On the Home page, click theDatabases and Clusters task.
2. If no databases exist on the cluster, continue to the next step; otherwise:
a. If a database is running on the cluster on which you want to add a new database, select thedatabase and click Stop.
b. Wait for the running database to have a status of Stopped.
3. Click the cluster on which you want to create the new database and click Create Database.
4. The Create Database wizard opens. Provide the following information:
n Database name and password. See Creating a Database Name and Password for rules.
n Optionally click Advanced to open the advanced settings and change the port and catalog,data, and temporary data paths. By default theMC application/web server port is 5450 andpaths are /home/dbadmin, or whatever you defined for the paths when you ran the ClusterCreationWizard or the install_vertica script. Do not use the default agent port 5444 as anew setting for theMC port. SeeMC Settings > Configuration for port values.
5. Click Continue.
Administrator's GuideConfiguring the Database
HP Vertica Analytics Platform (7.0.x) Page 74 of 969

6. Select nodes to include in the database.
The Database Configuration window opens with the options you provided and a graphicalrepresentation of the nodes appears on the page. By default, all nodes are selected to be part ofthis database (denoted by a green check mark). You can optionally click each node and clearInclude host in new database to exclude that node from the database. Excluded nodes aregray. If you change your mind, click the node and select the Include check box.
7. Click Create in theDatabase Configuration window to create the database on the nodes.
The creation process takes a few moments, after which the database starts and aSuccessmessage appears on the interface.
8. Click OK to close the success message.
MC's Manage page opens and displays the database nodes. Nodes not included in the databaseare colored gray, whichmeans they are standby nodes you can include later. To add nodes to orremove nodes from your HP Vertica cluster, which are not shown in standby mode, youmust runthe install_vertica script.
Notes
l If warnings occur during database creation, nodes will bemarked on the UI with an Alert iconand amessage.
n Warnings do not prevent the database from being created, but you should address warningsafter the database creation process completes by viewing the databaseMessage Centerfrom theMC Home page.
n Failuremessages display on the databaseManage page with a link tomore detailedinformation and a hint with an actionable task that youmust complete before you cancontinue. Problem nodes are colored red for quick identification.
n To view more detailed information about a node in the cluster, double-click the node from theManage page, which opens theNode Details page.
l To createMC users and grant them access to anMC-managed database, see About MC Usersand Creating anMC User.
See Also
l Creating a Cluster UsingMC
l TroubleshootingManagement Console
l RestartingMC
Administrator's GuideConfiguring the Database
HP Vertica Analytics Platform (7.0.x) Page 75 of 969

Create a Database Using Administration Tools1. Run theAdministration Tools from yourAdministration Host as follows:
$ /opt/vertica/bin/admintools
If you are using a remote terminal application, such as PuTTY or a Cygwin bash shell, seeNotes for Remote Terminal Users.
2. Accept the license agreement and specify the location of your license file. SeeManagingLicenses for more information.
This step is necessary only if it is the first time you have run the Administration Tools
3. On theMainMenu, click Configuration Menu, and click OK.
4. On the ConfigurationMenu, click Create Database, and click OK.
5. Enter the name of the database and an optional comment, and click OK.
6. Establish the superuser password for your database.
n To provide a password enter the password and click OK. Confirm the password by enteringit again, and then click OK.
n If you don't want to provide the password, leave it blank and click OK. If you don't set apassword, HP Vertica prompts you to verify that you truly do not want to establish asuperuser password for this database. Click Yes to create the database without a passwordorNo to establish the password.
Caution: If you do not enter a password at this point, the superuser password is set toempty. Unless the database is for evaluation or academic purposes, HP stronglyrecommends that you enter a superuser password. See Creating a Database Name andPassword for guidelines.
7. Select the hosts to include in the database from the list of hosts specified when HP Verticawas installed (install_vertica -s), and click OK.
8. Specify the directories in which to store the data and catalog files, and click OK.
Note: Do not use a shared directory for more than one node. Data and catalog directoriesmust be distinct for each node. Multiple nodes must not be allowed to write to the samedata or catalog directory.
9. Catalog and data pathnames must contain only alphanumeric characters and cannot have
Administrator's GuideConfiguring the Database
HP Vertica Analytics Platform (7.0.x) Page 76 of 969

leading spaces. Failure to comply with these restrictions results in database creation failure.
For example:
Catalog pathname: /home/dbadmin
Data Pathname: /home/dbadmin
10. Review theCurrent Database Definition screen to verify that it represents the database youwant to create, and then click Yes to proceed orNo to modify the database definition.
11. If you click Yes, HP Vertica creates the database you defined and then displays amessage toindicate that the database was successfully created.
Note: : For databases created with 3 or more nodes, HP Vertica automatically sets K-safety to 1 to ensure that the database is fault tolerant in case a node fails. For moreinformation, see the Failure Recovery in the Administrator's Guide andMARK_DESIGN_KSAFE in the SQLReferenceManual.
12. Click OK to acknowledge themessage.
If you receive an error message, see Startup Problems.
Create the Logical Schema1. Connect to the database.
In the Administration Tools MainMenu, click Connect to Database and click OK.
See Connecting to the Database for details.
The vsql welcome script appears:
Administrator's GuideConfiguring the Database
HP Vertica Analytics Platform (7.0.x) Page 77 of 969

Welcome to vsql, the Vertica Analytic Database interactive terminal.Type: \h or \? for help with vsql commands
\g or terminate with semicolon to execute query\q to quit
=>
2. Run the logical schema script
Using the \i meta-command in vsql to run the SQL logical schema script that you preparedearlier.
3. Disconnect from the database
Use the \qmeta-command in vsql to return to the Administration Tools.
Perform a Partial Data LoadHP recommends that for large tables, you perform a partial data load and then test your databasebefore completing a full data load. This load should load a representative amount of data.
1. Load the small tables.
Load the small table data files using the SQL load scripts and data files you prepared earlier.
2. Partially load the large tables.
Load 10GB to 50GB of table data for each table using the SQL load scripts and data files thatyou prepared earlier.
For more information about projections, see Physical Schema in the Concepts Guide.
Test the DatabaseTest the database to verify that it is running as expected.
Check queries for syntax errors and execution times.
1. Use the vsql \timingmeta-command to enable the display of query execution time inmilliseconds.
2. Execute the SQL sample query script that you prepared earlier.
3. Execute several ad hoc queries.
Optimize Query PerformanceOptimizing the database consists of optimizing for compression and tuning for queries. (SeeCreating a Database Design.)
Administrator's GuideConfiguring the Database
HP Vertica Analytics Platform (7.0.x) Page 78 of 969

To optimize the database, use the Database Designer to create and deploy a design for optimizingthe database. See the Tutorial in the Getting Started Guide for an example of using the DatabaseDesigner to create aComprehensive Design.
After you have run the Database Designer, use the techniques described in Optimizing QueryPerformance in the Programmer's Guide to improve the performance of certain types of queries.
Note: The database response time depends on factors such as type and size of the applicationquery, database design, data size and data types stored, available computational power, andnetwork bandwidth. Adding nodes to a database cluster does not necessarily improve thesystem response time for every query, especially if the response time is already short, e.g.,less then 10 seconds, or the response time is not hardware bound.
Complete the Data LoadTo complete the load:
1. Monitor system resource usage
Continue to run the top, free, and df utilities and watch them while your load scripts arerunning (as described inMonitoring Linux Resource Usage). You can do this on any or allnodes in the cluster. Make sure that the system is not swapping excessively (watch kswapd intop) or running out of swap space (watch for a large amount of used swap space in free).
Note: HP Vertica requires a dedicated server. If your loader or other processes take upsignificant amounts of RAM, it can result in swapping.
2. Complete the large table loads
Run the remainder of the large table load scripts.
Test the Optimized DatabaseCheck query execution times to test your optimized design:
1. Use the vsql \timing meta-command to enable the display of query execution time inmilliseconds.
Execute a SQL sample query script to test your schema and load scripts for errors.
Note: Include a sample of queries your users are likely to run against the database. If youdon't have any real queries, just write simple SQL that collects counts on each of yourtables. Alternatively, you can skip this step.
2. Execute several ad hoc queries
Administrator's GuideConfiguring the Database
HP Vertica Analytics Platform (7.0.x) Page 79 of 969

a. RunAdministration Tools and select Connect to Database.
b. Use the \i meta-command to execute the query script; for example:
vmartdb=> \i vmart_query_03.sql customer_name | annual_income------------------+---------------James M. McNulty | 999979Emily G. Vogel | 999998
(2 rows)Time: First fetch (2 rows): 58.411 ms. All rows formatted: 58.448 msvmartdb=> \i vmart_query_06.sqlstore_key | order_number | date_ordered
-----------+--------------+--------------45 | 202416 | 2004-01-04
113 | 66017 | 2004-01-04121 | 251417 | 2004-01-0424 | 250295 | 2004-01-049 | 188567 | 2004-01-04
166 | 36008 | 2004-01-0427 | 150241 | 2004-01-04
148 | 182207 | 2004-01-04198 | 75716 | 2004-01-04
(9 rows)Time: First fetch (9 rows): 25.342 ms. All rows formatted: 25.383 ms
Once the database is optimized, it should run queries efficiently. If you discover queries that youwant to optimize, you canmodify and update the design. See Creating an Incremental DesignUsing Database Designer in the Administrator's Guide.
Set Up Incremental (Trickle) LoadsOnce you have a working database, you can use trickle loading to load new data while concurrentqueries are running.
Trickle load is accomplished by using the COPY command (without the DIRECT keyword) to load10,000 to 100,000 rows per transaction into theWOS. This allows HP Vertica to batchmultipleloads when it writes data to disk. While the COPY command defaults to loading into theWOS, itwill write ROS if theWOS is full.
See Trickle Loading Data for details.
See Alsol COPY
l Loading Data ThroughODBC
Administrator's GuideConfiguring the Database
HP Vertica Analytics Platform (7.0.x) Page 80 of 969

Implement Locales for International Data SetsThe locale is a parameter that defines the user's language, country, and any special variantpreferences, such as collation. HP Vertica uses the locale to determine the behavior of variousstring functions as well for collation for various SQL commands that require ordering andcomparison; for example, GROUP BY, ORDER BY, joins, the analytic ORDER BY clause, and soforth.
By default, the locale for the database is en_US@collation=binary (English US). You canestablish a new default locale that is used for all sessions on the database, as well as overrideindividual sessions with different locales. Additionally the locale can be set throughODBC, JDBC,and ADO.net.
ICU Locale SupportHP Vertica uses the ICU library for locale support; thus, youmust specify locale using the ICULocale syntax. While the locale used by the database session is not derived from the operatingsystem (through the LANG variable), HP Vertica does recommend that you set the LANGappropriately for each node running vsql, as described in the next section.
While ICU library services can specify collation, currency, and calendar preferences, HP Verticasupports only the collation component. Any keywords not relating to collation are rejected.Projections are always collated using the en_US@collation=binary collation regardless of thesession collation. Any locale-specific collation is applied at query time.
The SET DATESTYLE TO ... command provides some aspects of the calendar, but HP Verticasupports only dollars as currency.
Changing DB Locale for a SessionThis examples sets the session locale to Thai.
1. At the OS level for each node running vsql, set the LANG variable to the locale language asfollows:
export LANG=th_TH.UTF-8
Note: If setting the LANG= as noted does not work, OS support for locales may not beinstalled.
2. For each HP Vertica session (from ODBC/JDBC or vsql) set the language locale.
From vsql:
\locale th_TH
Administrator's GuideConfiguring the Database
HP Vertica Analytics Platform (7.0.x) Page 81 of 969

3. From ODBC/JDBC:
"SET LOCALE TO th_TH;"
4. In PUTTY (or ssh terminal), change the settings as follows:
settings > window > translation > UTF-8
5. Click Apply, and Save.
All data being loadedmust be in UTF-8 format, not an ISO format, as described in Loading UTF-8Format Data. Character sets like ISO 8859-1 (Latin1), which are incompatible with UTF-8 are notsupported, so functions like substring do not work correctly for multi-byte characters. Thus, ISOsettings for locale should NOT work correctly. If the translation setting ISO-8859-11:2001(Latin/Thai) works, the data is loaded incorrectly. To convert data correctly, use a utility programsuch as Linux iconv (see theman page).
Note: Themaximum length parameter for VARCHAR andCHAR data type refers to thenumber of octets (bytes) that can be stored in that field and not number of characters. Whenusingmulti-byte UTF-8 characters, size fields to accommodate from 1 to 4 bytes per character,depending on the data
See Alsol Supported Locales
l About Locales
l SET LOCALE
l ICU User Guide
Specify the Default Locale for the DatabaseThe default locale configuration parameter sets the initial locale for every database session oncethe database has been restarted. Sessions may override this value.
To set the local for the database, use the configuration parameter as follows:
SELECT SET_CONFIG_PARAMETER('DefaultSessionLocale' ,'<ICU-locale-identifier>');
For example:
mydb=> SELECT SET_CONFIG_PARAMETER('DefaultSessionLocale','en_GB');
Administrator's GuideConfiguring the Database
HP Vertica Analytics Platform (7.0.x) Page 82 of 969
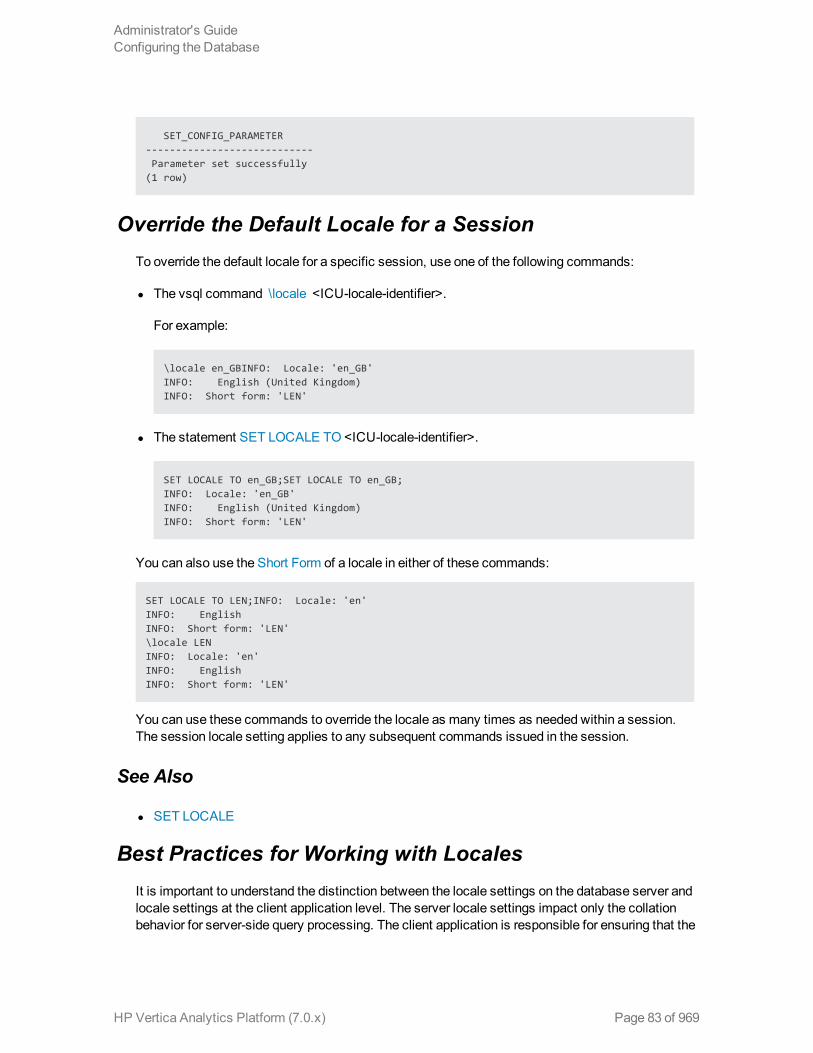
SET_CONFIG_PARAMETER----------------------------Parameter set successfully
(1 row)
Override the Default Locale for a SessionTo override the default locale for a specific session, use one of the following commands:
l The vsql command \locale <ICU-locale-identifier>.
For example:
\locale en_GBINFO: Locale: 'en_GB'INFO: English (United Kingdom)INFO: Short form: 'LEN'
l The statement SET LOCALE TO <ICU-locale-identifier>.
SET LOCALE TO en_GB;SET LOCALE TO en_GB;INFO: Locale: 'en_GB'INFO: English (United Kingdom)INFO: Short form: 'LEN'
You can also use the Short Form of a locale in either of these commands:
SET LOCALE TO LEN;INFO: Locale: 'en'INFO: EnglishINFO: Short form: 'LEN'\locale LENINFO: Locale: 'en'INFO: EnglishINFO: Short form: 'LEN'
You can use these commands to override the locale as many times as needed within a session.The session locale setting applies to any subsequent commands issued in the session.
See Also
l SET LOCALE
Best Practices for Working with LocalesIt is important to understand the distinction between the locale settings on the database server andlocale settings at the client application level. The server locale settings impact only the collationbehavior for server-side query processing. The client application is responsible for ensuring that the
Administrator's GuideConfiguring the Database
HP Vertica Analytics Platform (7.0.x) Page 83 of 969

correct locale is set in order to display the characters correctly. Below are the best practicesrecommended by HP to ensure predictable results:
Server Locale
Server session locale should be set using the set as described in Specify the Default Locale for theDatabase. If using different locales in different session, set the server locale at the start of eachsession from your client.
vsql Client
l If there is no default session locale at database level, the server locale for the session should beset to the desired locale, as described in Override the Default Locale for a Session.
l The locale setting in the terminal emulator where vsql client is run should be set to be equivalentto session locale setting on server side (ICU locale) so data is collated correctly on the serverand displayed correctly on the client.
l All input data for vsql should be in UTF-8 and all output data is encoded in UTF-8
l NonUTF-8 encodings and associated locale values should not be used because they are notsupported.
l Refer to the documentation of your terminal emulator for instructions on setting locale andencoding.
ODBC Clients
l ODBC applications can be either in ANSI or Unicodemode. If Unicode, the encoding used byODBC is UCS-2. If the user application is ANSI, the datamust be in single-byte ASCII, which iscompatible with UTF-8 used on the database server. TheODBC driver converts UCS-2 to UTF-8 when passing to the HP Vertica server and converts data sent by the HP Vertica server fromUTF-8 to UCS-2.
l If the user application is not already in UCS-2, the application is responsible for converting theinput data to UCS-2, or unexpected results could occur. For example:
n On non-UCS-2 data passed to ODBC APIs, when it is interpreted as UCS-2, it could result inan invalid UCS-2 symbol being passed to the APIs, resulting in errors.
n The symbol provided in the alternate encoding could be a valid UCS-2 symbol; in this case,incorrect data is inserted into the database.
l If there is no default session locale at database level, ODBC applications should set the desiredserver session locale using SQLSetConnectAttr (if different from database wide setting) inorder to get expected collation and string functions behavior on the server.
Administrator's GuideConfiguring the Database
HP Vertica Analytics Platform (7.0.x) Page 84 of 969

JDBC and ADO.NET Clients
l JDBC and ADO.NET applications use a UTF-16 character set encoding and are responsible forconverting any non-UTF-16 encoded data to UTF-16. The same cautions apply as for ODBC ifthis encoding is violated.
l The JDBC and ADO.NET drivers convert UTF-16 data to UTF-8 when passing to the HPVertica server and convert data sent by HP Vertica server from UTF-8 to UTF-16.
l If there is no default session locale at the database level, JDBC and ADO.NET applicationsshould set the correct server session locale by executing the SET LOCALE TO command inorder to get expected collation and string functions behavior on the server. See the SETLOCALE command in the SQLReferenceManual.
Notes and Restrictions
Session related:
l The locale setting is session scoped and applies to queries only (no DML/DDL) run in thatsession. You cannot specify a locale for an individual query.
l The default locale for new sessions can be set using a configuration parameter
Query related:
The following restrictions apply when queries are run with locale other than the default en_US@collation=binary:
l MulticolumnNOT IN subqueries are not supported when one or more of the left-side NOT INcolumns is of CHAR or VARCHAR data type. For example:
=> CREATE TABLE test (x VARCHAR(10), y INT);=> SELECT ... FROM test WHERE (x,y) NOT IN (SELECT ...);
ERROR: Multi-expression NOT IN subquery is not supported because a left hand expression could be NULL
Note: An error is reported even if columns test.x and test.y have a "NOT NULL"constraint.
l Correlated HAVING clause subqueries are not supported if the outer query contains a GROUPBY on a CHAR or a VARCHAR column. In the following example, the GROUP BY x in the outerquery causes the error:
=> DROP TABLE test CASCADE;
Administrator's GuideConfiguring the Database
HP Vertica Analytics Platform (7.0.x) Page 85 of 969

=> CREATE TABLE test (x VARCHAR(10));=> SELECT COUNT(*) FROM test t GROUP BY x HAVING x
IN (SELECT x FROM test WHERE t.x||'a' = test.x||'a' );ERROR: subquery uses ungrouped column "t.x" from outer query
l Subqueries that use analytic functions in the HAVING clause are not supported. For example:
=> DROP TABLE test CASCADE;=> CREATE TABLE test (x VARCHAR(10));=> SELECT MAX(x)OVER(PARTITION BY 1 ORDER BY 1)
FROM test GROUP BY x HAVING x IN (SELECT MAX(x) FROM test);ERROR: Analytics query with having clause expression that involves aggregates and subquery is not supported
DML/DDL related:
l SQL identifiers (such as table names, column names, and so on) can use UTF-8 Unicodecharacters. For example, the following CREATE TABLE statement uses the ß (German eszett)in the table name:
=> CREATE TABLE straße(x int, y int);CREATE TABLE
l Projection sort orders aremade according to the default en_US@collation=binary collation.Thus, regardless of the session setting, issuing the following command creates a projectionsorted by col1 according to the binary collation:
=> CREATE PROJECTION p1 AS SELECT * FROM table1 ORDER BY col1;
Note that in such cases, straße and strasse would not be near each other on disk.
Sorting by binary collation alsomeans that sort optimizations do not work in locales other thanbinary. HP Vertica returns the following warning if you create tables or projections in a non-binary locale:
WARNING: Projections are always created and persisted in the default HP Vertica locale. The current locale is de_DE
l When creating pre-join projections, the projection definition query does not respect the locale orcollation setting. This means that when you insert data into the fact table of a pre-join projection,referential integrity checks are not locale or collation aware.
For example:
Administrator's GuideConfiguring the Database
HP Vertica Analytics Platform (7.0.x) Page 86 of 969

\locale LDE_S1 -- German=> CREATE TABLE dim (col1 varchar(20) primary key);=> CREATE TABLE fact (col1 varchar(20) references dim(col1));=> CREATE PROJECTION pj AS SELECT * FROM fact JOIN dim
ON fact.col1 = dim.col1 UNSEGMENTED ALL NODES;=> INSERT INTO dim VALUES('ß');=> COMMIT;
The following INSERT statement fails with a "nonexistent FK" error even though 'ß' is in the dimtable, and in the German locale 'SS' and 'ß' refer to the same character.
=> INSERT INTO fact VALUES('SS');ERROR: Nonexistent foreign key value detected in FK-PK join (fact x dim)using subquery and dim_node0001; value SS
=> => ROLLBACK;=> DROP TABLE dim, fact CASCADE;
l When the locale is non-binary, the collation function is used to transform the input to a binarystring which sorts in the proper order.
This transformation increases the number of bytes required for the input according to thisformula:
result_column_width = input_octet_width * CollationExpansion + 4
CollationExpansion defaults to 5.
l CHAR fields are displayed as fixed length, including any trailing spaces. When CHAR fields areprocessed internally, they are first stripped of trailing spaces. For VARCHAR fields, trailingspaces are usually treated as significant characters; however, trailing spaces are ignored whensorting or comparing either type of character string field using a non-BINARY locale.
Change Transaction Isolation LevelsBy default, HP Vertica uses the READ COMMITTED isolation level for every session. If you prefer,you can change the default isolation level for the database or for a specific session.
To change the isolation level for a specific session, use the SET SESSION CHARACTERISTICScommand.
To change the isolation level for the database, use the TransactionIsolationLevel configurationparameter. Oncemodified, HP Vertica uses the new transaction level for every new session.
The following examples set the default isolation for the database to SERIALIZABLE and then backto READ COMMITTED:
=> SELECT SET_CONFIG_PARAMETER('TransactionIsolationLevel','SERIALIZABLE');=> SELECT SET_CONFIG_PARAMETER('TransactionIsolationLevel','READ COMMITTED');
Administrator's GuideConfiguring the Database
HP Vertica Analytics Platform (7.0.x) Page 87 of 969

Notesl A change to isolation level only applies to future sessions. Existing sessions and their
transactions continue to use the original isolation level.
A transaction retains its isolation level until it completes, even if the session's transactionisolation level changes mid-transaction. HP Vertica internal processes (such as the TupleMover and refresh operations) and DDL operations are always run at SERIALIZABLE isolationlevel to ensure consistency.
See Alsol Transactions
l Configuration Parameters
Administrator's GuideConfiguring the Database
HP Vertica Analytics Platform (7.0.x) Page 88 of 969

Configuration ParametersYou canmodify certain parameters to configure your HP Vertica database using one of thefollowing options:
l Dynamically through theManagement Console browser-based interface
l At the command line directly
l From vsql
Important: Before youmodify a database parameter, review all documentation about theparameter to determine the context under which you can change it. Parameter changes takeeffect after you restart the database.
Configuring HP Vertica Settings Using MCTo change database settings for any MC-managed database, click theSettings tab at the bottomof the Overview, Activity, or Manage pages. The databasemust be running.
The Settings page defaults to parameters in the General category. To change other parameters,click an option from the tab panel on the left.
Some settings require that you restart the database, andMC will prompt you to do so. You canignore the prompt, but those changes will not take effect until after you restart the database.
If you want to change settings that are specific to Management Console, such as changeMC oragent port assignments, seeManagingMC Settings for more information.
Administrator's Guide
HP Vertica Analytics Platform (7.0.x) Page 89 of 969

See Alsol Configuration Parameters
Administrator's Guide
HP Vertica Analytics Platform (7.0.x) Page 90 of 969

Configuring HP Vertica At the Command LineThe tables in this section list parameters for configuring HP Vertica at the command line.
General ParametersThe following table describes the general parameters for configuring HP Vertica.
Parameters Default Description
AnalyzeRowCountInterval 60 seconds Automatically runs every 60 seconds tocollect the number of rows in theprojection and aggregates row countscalculated during loads. See CollectingStatistics.
CompressCatalogOnDisk 0 When enabled (set value to 1 or 2)compresses the size of the catalog ondisk. Values can be:
l 1—Compress checkpoints, but notlogs
l 2—Compress checkpoints and logs
Consider enabling this parameter if thecatalog disk partition is small (<50GB)and themetadata is large (hundreds oftables, partitions, or nodes).
CompressNetworkData 0 When enabled (set to value 1), HPVertica will compress all of the data itsends over the network. This speeds upnetwork traffic at the expense of addedCPU load. You can enable this if youfind that the network is throttling yourdatabase performance.
EnableCooperativeParse 1 Enabled by default. Implements multi-threaded cooperative parsingcapabilities for delimited and fixed-widthloads.
EnableResourcePoolCPUAffinity 1 Enabled by default. When disabled (setvalue to 0), queries run on any CPU,regardless of the CPU_AFFINITY_SET ofthe resource pool.
Administrator's Guide
HP Vertica Analytics Platform (7.0.x) Page 91 of 969
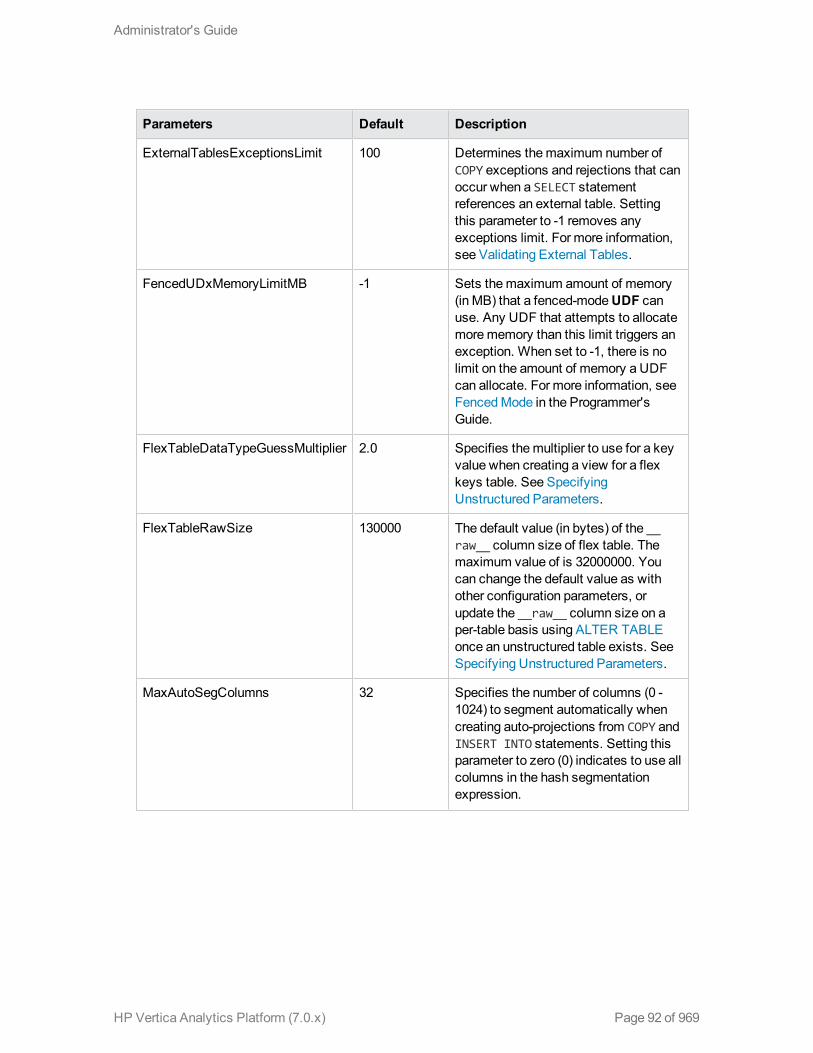
Parameters Default Description
ExternalTablesExceptionsLimit 100 Determines themaximum number ofCOPY exceptions and rejections that canoccur when a SELECT statementreferences an external table. Settingthis parameter to -1 removes anyexceptions limit. For more information,see Validating External Tables.
FencedUDxMemoryLimitMB -1 Sets themaximum amount of memory(in MB) that a fenced-modeUDF canuse. Any UDF that attempts to allocatemorememory than this limit triggers anexception. When set to -1, there is nolimit on the amount of memory a UDFcan allocate. For more information, seeFencedMode in the Programmer'sGuide.
FlexTableDataTypeGuessMultiplier 2.0 Specifies themultiplier to use for a keyvalue when creating a view for a flexkeys table. See SpecifyingUnstructured Parameters.
FlexTableRawSize 130000 The default value (in bytes) of the __raw__ column size of flex table. Themaximum value of is 32000000. Youcan change the default value as withother configuration parameters, orupdate the __raw__ column size on aper-table basis using ALTER TABLEonce an unstructured table exists. SeeSpecifying Unstructured Parameters.
MaxAutoSegColumns 32 Specifies the number of columns (0 -1024) to segment automatically whencreating auto-projections from COPY andINSERT INTO statements. Setting thisparameter to zero (0) indicates to use allcolumns in the hash segmentationexpression.
Administrator's Guide
HP Vertica Analytics Platform (7.0.x) Page 92 of 969
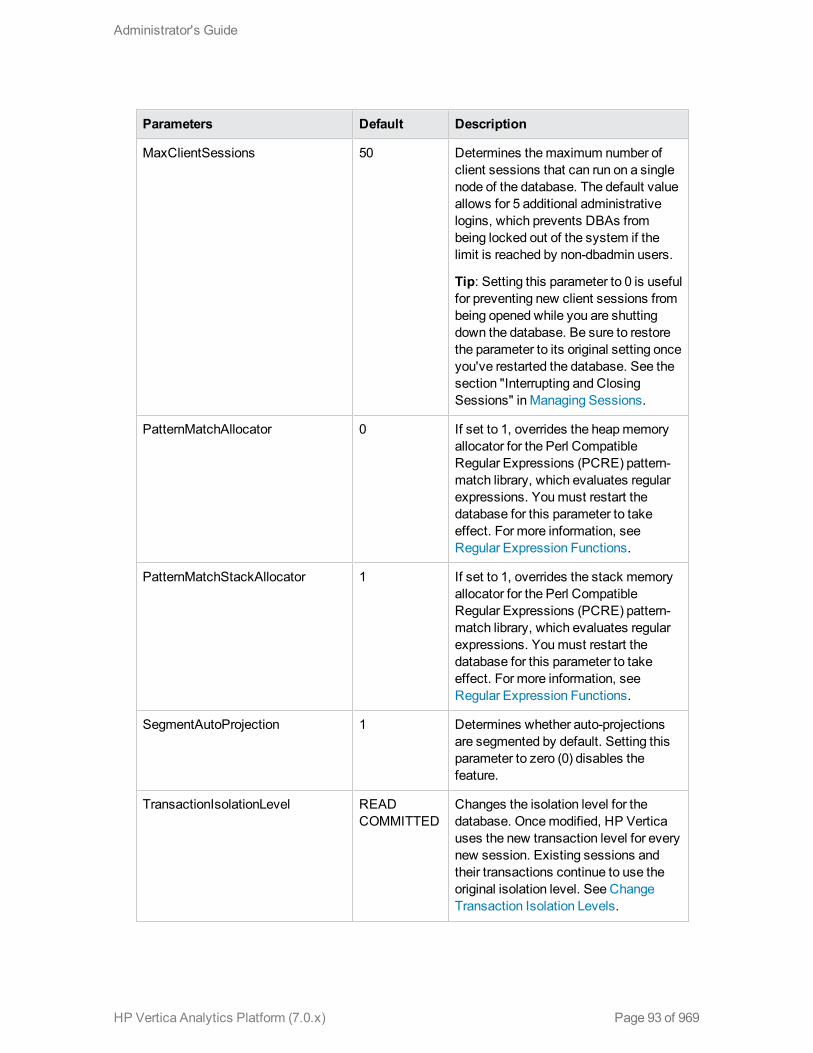
Parameters Default Description
MaxClientSessions 50 Determines themaximum number ofclient sessions that can run on a singlenode of the database. The default valueallows for 5 additional administrativelogins, which prevents DBAs frombeing locked out of the system if thelimit is reached by non-dbadmin users.
Tip: Setting this parameter to 0 is usefulfor preventing new client sessions frombeing opened while you are shuttingdown the database. Be sure to restorethe parameter to its original setting onceyou've restarted the database. See thesection "Interrupting and ClosingSessions" in Managing Sessions.
PatternMatchAllocator 0 If set to 1, overrides the heapmemoryallocator for the Perl CompatibleRegular Expressions (PCRE) pattern-match library, which evaluates regularexpressions. Youmust restart thedatabase for this parameter to takeeffect. For more information, seeRegular Expression Functions.
PatternMatchStackAllocator 1 If set to 1, overrides the stack memoryallocator for the Perl CompatibleRegular Expressions (PCRE) pattern-match library, which evaluates regularexpressions. Youmust restart thedatabase for this parameter to takeeffect. For more information, seeRegular Expression Functions.
SegmentAutoProjection 1 Determines whether auto-projectionsare segmented by default. Setting thisparameter to zero (0) disables thefeature.
TransactionIsolationLevel READCOMMITTED
Changes the isolation level for thedatabase. Oncemodified, HP Verticauses the new transaction level for everynew session. Existing sessions andtheir transactions continue to use theoriginal isolation level. See ChangeTransaction Isolation Levels.
Administrator's Guide
HP Vertica Analytics Platform (7.0.x) Page 93 of 969

Parameters Default Description
TransactionMode READWRITE
Controls whether transactions areread/write or read-only. Read/write isthe default. Existing sessions and theirtransactions continue to use the originalisolation level.
Setting Configuration Parameters
You can set a new value for a configuration parameter with a select statement as follows. Theseexamples illustrate changing the parameters listed in the table:
SELECT SET_CONFIG_PARAMETER ('AnalyzeRowCountInterval',3600);SELECT SET_CONFIG_PARAMETER ('CompressNetworkData',1);SELECT SET_CONFIG_PARAMETER ('ExternalTablesExceptionsLimit',-1);SELECT SET_CONFIG_PARAMETER ('MaxClientSessions', 100);SELECT SET_CONFIG_PARAMETER ('PatternMatchAllocator',1);SELECT SET_CONFIG_PARAMETER ('PatternMatchStackAllocator',0);SELECT SET_CONFIG_PARAMETER ('TransactionIsolationLevel','SERIALIZABLE');SELECT SET_CONFIG_PARAMETER ('TransactionMode','READ ONLY');SELECT SET_CONFIG_PARAMETER ('FlexTableRawSize',16000000);SELECT SET_CONFIG_PARAMETER ('CompressCatalogOnDisk',2);
Tuple Mover ParametersThese parameters control how the Tuple Mover operates.
Parameters Description
ActivePartitionCount Sets the number of partitions, called active partitions, that arecurrently being loaded. For information about how the TupleMover treats active (and inactive) partitions during amergeout operation, see Understanding the TupleMover.
Default Value: 1
Example:
SELECT SET_CONFIG_PARAMETER('ActivePartitionCount', 2);
Administrator's Guide
HP Vertica Analytics Platform (7.0.x) Page 94 of 969

Parameters Description
MergeOutInterval The number of seconds the TupleMover waits betweenchecks for new ROS files tomerge out. If ROS containersare added frequently, youmay need to decrease this value.
Default Value: 600
Example:
SELECT SET_CONFIG_PARAMETER('MergeOutInterval', 1200);
MoveOutInterval The number of seconds the Tuplemover waits betweenchecks for new data in theWOS to move toROS.
Default Value: 300
Example:
SELECT SET_CONFIG_PARAMETER('MoveOutInterval', 600);
MoveOutMaxAgeTime The specified interval (in seconds) after which the tuplemover is forced to write theWOS to disk. The default intervalis 30minutes.
Tip: If you had been running the force_moveout.sh script inprevious releases, you no longer need to run it.
Default Value: 1800
Example:
SELECT SET_CONFIG_PARAMETER('MoveOutMaxAgeTime', 1200);
MoveOutSizePct The percentage of theWOS that can be filled with data beforethe TupleMover performs amoveout operation.
Default Value: 0
Example:
SELECT SET_CONFIG_PARAMETER('MoveOutSizePct', 50);
Epoch Management ParametersThe following table describes the epochmanagement parameters for configuring HP Vertica.
Administrator's Guide
HP Vertica Analytics Platform (7.0.x) Page 95 of 969

Parameters Description
AdvanceAHMInterval Determines how frequently (in seconds) HP Vertica checksthe history retention status. By default theAHM interval isset to 180 seconds (3minutes).
Note: AdvanceAHMInterval cannot be set to a value lessthan the EpochMapInterval.
Default Value: 180
Example:
SELECT SET_CONFIG_PARAMETER('AdvanceAHMInterval', '3600');
EpochMapInterval Determines the granularity of mapping between epochs andtime available to historical queries. When a historicalqueries AT TIME T is issued, HP Verticamaps it to anepoch within a granularity of EpochMapInterval seconds. Itsimilarly affects the time reported for Last Good Epochduring Failure Recovery. Note that it does not affectinternal precision of epochs themselves.
By default, EpochMapInterval is set to 180 seconds (3minutes).
Tip:Decreasing this interval increases the number ofepochs saved on disk. Therefore, youmight want to reducethe HistoryRetentionTime parameter to limit the number ofhistory epochs that HP Vertica retains.
Default Value: 180
Example:
SELECT SET_CONFIG_PARAMETER('EpochMapInterval', '300');
Administrator's Guide
HP Vertica Analytics Platform (7.0.x) Page 96 of 969

Parameters Description
HistoryRetentionTime Determines how long deleted data is saved (in seconds) asa historical reference. The default is 0, whichmeans thatHP Vertica saves historical data only when nodes aredown. Once the specified time has passed since thedelete, the data is eligible to be purged. Use the -1 setting ifyou prefer to use HistoryRetentionEpochs fordetermining which deleted data can be purged.
Note: The default setting of 0 effectively prevents the useof theAdministration Tools 'Roll Back Database to LastGood Epoch' option because theAHM remains close to thecurrent epoch and a rollback is not permitted to an epochprior to the AHM.
Tip: If you rely on the Roll Back option to remove recentlyloaded data, consider setting a day-wide window forremoving loaded data; for example:
SELECT SET_CONFIG_PARAMETER('HistoryRetentionTime', '86400');
Default Value: 0
Example:
SELECT SET_CONFIG_PARAMETER('HistoryRetentionTime', '240');
HistoryRetentionEpochs Specifies the number of historical epochs to save, andtherefore, the amount of deleted data.
Unless you have a reason to limit the number of epochs,HP recommends that you specify the time over whichdelete data is saved. The -1 setting disables thisconfiguration parameter.
If both History parameters are specified,HistoryRetentionTime takes precedence, and if bothparameters are set to -1, all historical data is preserved.
See Setting a Purge Policy.
Default Value: -1
Example:
SELECT SET_CONFIG_PARAMETER('HistoryRetentionEpochs','40');
Monitoring ParametersThe following table describes themonitoring parameters for configuring HP Vertica.
Administrator's Guide
HP Vertica Analytics Platform (7.0.x) Page 97 of 969
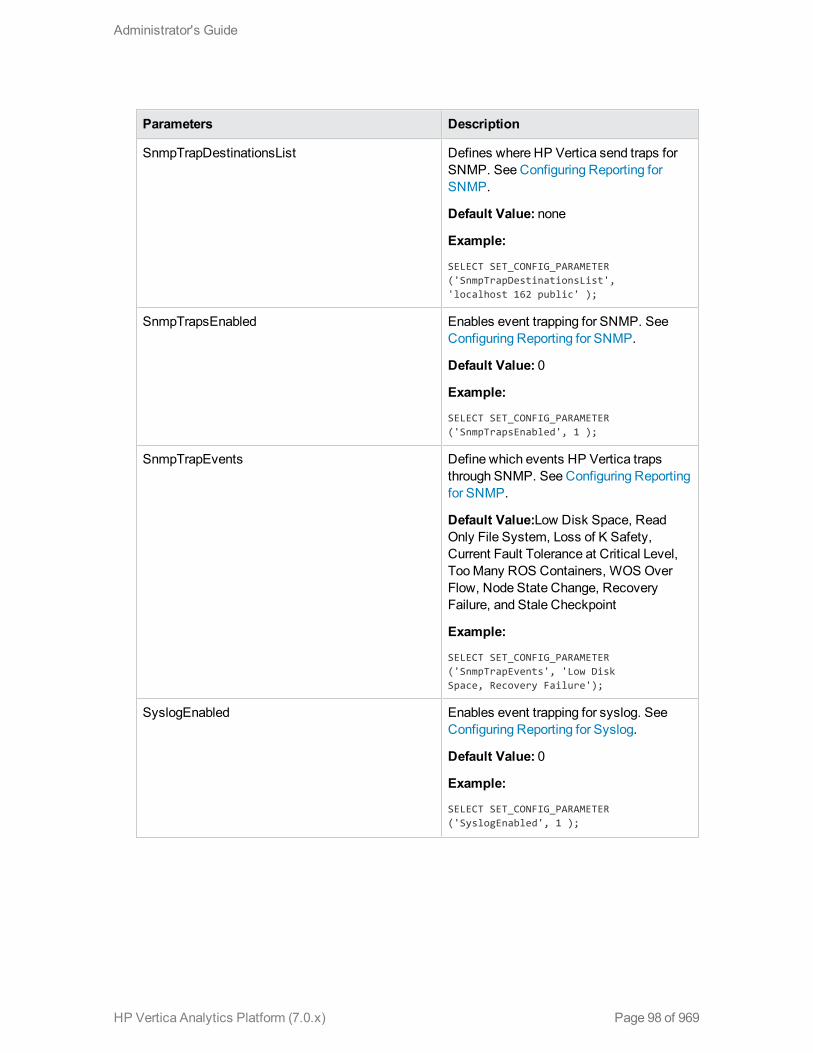
Parameters Description
SnmpTrapDestinationsList Defines where HP Vertica send traps forSNMP. See Configuring Reporting forSNMP.
Default Value: none
Example:
SELECT SET_CONFIG_PARAMETER('SnmpTrapDestinationsList','localhost 162 public' );
SnmpTrapsEnabled Enables event trapping for SNMP. SeeConfiguring Reporting for SNMP.
Default Value: 0
Example:
SELECT SET_CONFIG_PARAMETER('SnmpTrapsEnabled', 1 );
SnmpTrapEvents Define which events HP Vertica trapsthrough SNMP. See Configuring Reportingfor SNMP.
Default Value:Low Disk Space, ReadOnly File System, Loss of K Safety,Current Fault Tolerance at Critical Level,TooMany ROS Containers, WOS OverFlow, Node State Change, RecoveryFailure, and Stale Checkpoint
Example:
SELECT SET_CONFIG_PARAMETER('SnmpTrapEvents', 'Low DiskSpace, Recovery Failure');
SyslogEnabled Enables event trapping for syslog. SeeConfiguring Reporting for Syslog.
Default Value: 0
Example:
SELECT SET_CONFIG_PARAMETER('SyslogEnabled', 1 );
Administrator's Guide
HP Vertica Analytics Platform (7.0.x) Page 98 of 969

Parameters Description
SyslogEvents Defines events that generate a syslogentry. See Configuring Reporting forSyslog.
Default Value: none
Example:
SELECT SET_CONFIG_PARAMETER('SyslogEvents', 'Low DiskSpace, Recovery Failure');
SyslogFacility Defines which SyslogFacility HP Verticauses. See Configuring Reporting forSyslog.
Default Value: user
Example:
SELECT SET_CONFIG_PARAMETER('SyslogFacility' , 'ftp');
Profiling ParametersThe following table describes the profiling parameters for configuring HP Vertica. See ProfilingDatabase Performance for more information on profiling queries.
Parameters Description
GlobalEEProfiling Enables profiling for query execution runs in all sessions,on all nodes.
Default Value: 0
Example:
SELECT SET_CONFIG_PARAMETER('GlobalEEProfiling',1);
GlobalQueryProfiling Enables query profiling for all sessions on all nodes.
Default Value: 0
Example:
SELECT SET_CONFIG_PARAMETER('GlobalQueryProfiling',1);
GlobalSessionProfiling Enables session profiling for all sessions on all nodes.
Default Value: 0
Example:
SELECT SET_CONFIG_PARAMETER('GlobalSessionProfiling',1);
Administrator's Guide
HP Vertica Analytics Platform (7.0.x) Page 99 of 969

Security ParametersThe following table describes the parameters for configuring the client authenticationmethod andenabling SSL for HP Vertica.
Parameters Description
ClientAuthentication Configures client authentication. By default, HP Vertica uses user nameand password (if supplied) to grant access to the database.
The preferredmethod for establishing client authentication is to use theAdministration Tools. See Implementing Client Authentication and Howto Create Authentication Records.
Default Value: local all trust
Example:
SELECT SET_CONFIG_PARAMETER ('ClientAuthentication','hostnossl dbadmin 0.0.0.0/0 trust');
EnableSSL Configures SSL for the server. See Implementing SSL.
Default Value:0
Example:
SELECT SET_CONFIG_PARAMETER('EnableSSL', '1');
See Also
Kerberos Authentication Parameters
Database Designer ParametersThe following table describes the parameters for configuring the HP Vertica Database Designer.
Parameter Description
DBDCollationSampleRowCount
Minimum number of table rows at which Database Designerdiscovers and records correlated columns.
Default value: 4000
Example:
SELECT SET_CONFIGURATION_PARAMETER ('DBDCorrelationSampleRowCount', 3000);
Internationalization ParametersThe following table describes the internationalization parameters for configuring HP Vertica.
Administrator's Guide
HP Vertica Analytics Platform (7.0.x) Page 100 of 969
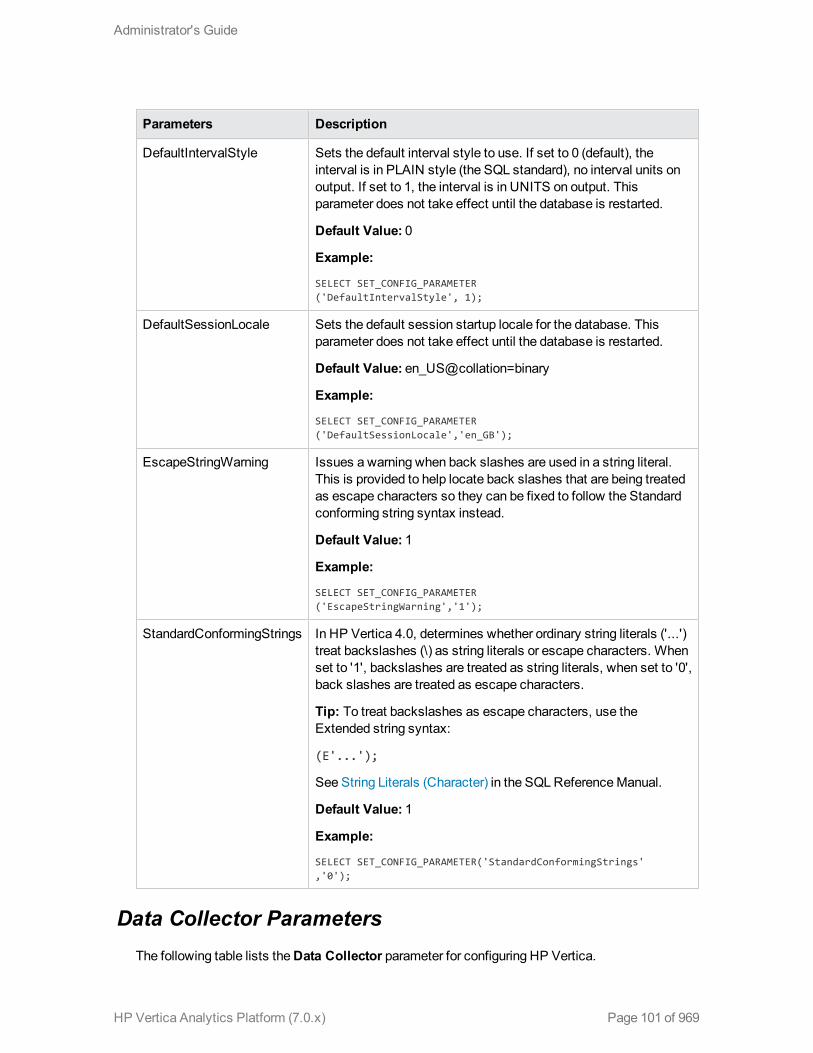
Parameters Description
DefaultIntervalStyle Sets the default interval style to use. If set to 0 (default), theinterval is in PLAIN style (the SQL standard), no interval units onoutput. If set to 1, the interval is in UNITS on output. Thisparameter does not take effect until the database is restarted.
Default Value: 0
Example:
SELECT SET_CONFIG_PARAMETER('DefaultIntervalStyle', 1);
DefaultSessionLocale Sets the default session startup locale for the database. Thisparameter does not take effect until the database is restarted.
Default Value: en_US@collation=binary
Example:
SELECT SET_CONFIG_PARAMETER('DefaultSessionLocale','en_GB');
EscapeStringWarning Issues a warning when back slashes are used in a string literal.This is provided to help locate back slashes that are being treatedas escape characters so they can be fixed to follow the Standardconforming string syntax instead.
Default Value: 1
Example:
SELECT SET_CONFIG_PARAMETER('EscapeStringWarning','1');
StandardConformingStrings In HP Vertica 4.0, determines whether ordinary string literals ('...')treat backslashes (\) as string literals or escape characters. Whenset to '1', backslashes are treated as string literals, when set to '0',back slashes are treated as escape characters.
Tip: To treat backslashes as escape characters, use theExtended string syntax:
(E'...');
See String Literals (Character) in the SQLReferenceManual.
Default Value: 1
Example:
SELECT SET_CONFIG_PARAMETER('StandardConformingStrings','0');
Data Collector ParametersThe following table lists theData Collector parameter for configuring HP Vertica.
Administrator's Guide
HP Vertica Analytics Platform (7.0.x) Page 101 of 969

Parameter Description
EnableDataCollector Enables and disables the Data Collector (theWorkload Analyzer'sinternal diagnostics utility) for all sessions on all nodes. Default is 1,enabled. Use 0 to turn off data collection.
Default value: 1
Example:
SELECT SET_CONFIG_PARAMETER ('EnableDataCollector', 0);
Formore information, see the following topics in the SQLReferenceManual:
l Data Collector Functions
l ANALYZE_WORKLOAD
l V_MONITOR.DATA_COLLECTOR
l V_MONITOR.TUNING_RECOMMENDATIONS
See also the following topics in the Administrator's Guide
l RetainingMonitoring Information
l AnalyzingWorkloads and Tuning Recommendations
l AnalyzingWorkloads ThroughManagement Console and Through an API
Kerberos Authentication ParametersThe following parameters let you configure the HP Vertica principal for Kerberos authentication andspecify the location of the Kerberos keytab file.
Parameter Description
KerberosServiceName Provides the service name portion of the HP Vertica Kerberos principal.By default, this parameter is 'vertica'. For example:vertica/[email protected].
Administrator's Guide
HP Vertica Analytics Platform (7.0.x) Page 102 of 969

Parameter Description
KerberosHostname [Optional] Provides the instance or host name portion of the HP VerticaKerberos principal. For example: vertica/[email protected]
Notes:
l If you omit the optional KerberosHostname parameter, HP Verticauses the return value from the gethostname() function. Assumingeach cluster node has a different host name, those nodes will eachhave a different principal, which youmust manage in that node'skeytab file.
l Consider specifying the KerberosHostname parameter to get asingle, cluster-wide principal that is easier to manage thanmultipleprincipals.
KerberosRealm Provides the realm portion of the HP Vertica Kerberos principal. A realmis the authentication administrative domain and is usually formed inuppercase letters; for example: vertica/[email protected].
KerberosKeytabFile Provides the location of the keytab file that contains credentials for theHP Vertica Kerberos principal. By default, this file is located in /etc.For example: KerberosKeytabFile=/etc/krb5.keytab.
Notes:
l The principal must take the formKerberosServiceName/KerberosHostName@KerberosRealm
l The keytab file must be readable by the file owner who is runningthe process (typically the Linux dbadmin user assigned filepermissions 0600).
Administrator's Guide
HP Vertica Analytics Platform (7.0.x) Page 103 of 969

Designing a Logical SchemaDesigning a logical schema for an HP Vertica database is no different than designing for any otherSQL database. A logical schema consists of objects such as Schemas, Tables, Views andReferential Integrity constraints that are visible to SQL users. HP Vertica supports any relationalschema design of your choice.
Administrator's Guide
HP Vertica Analytics Platform (7.0.x) Page 104 of 969

Using Multiple SchemasUsing a single schema is effective if there is only one database user or if a few users cooperate insharing the database. In many cases, however, it makes sense to use additional schemas to allowusers and their applications to create and access tables in separate namespaces. For example,using additional schemas allows:
l Many users to access the database without interfering with one another.
Individual schemas can be configured to grant specific users access to the schema and itstables while restricting others.
l Third-party applications to create tables that have the same name in different schemas,preventing table collisions.
Unlike other RDBMS, a schema in an HP Vertica database is not a collection of objects bound toone user.
Multiple Schema ExamplesThis section provides examples of when and how youmight want to usemultiple schemas toseparate database users. These examples fall into two categories: usingmultiple private schemasand using a combination of private schemas (i.e. schemas limited to a single user) and sharedschemas (i.e. schemas shared across multiple users).
Using Multiple Private Schemas
Usingmultiple private schemas is an effective way of separating database users from one anotherwhen sensitive information is involved. Typically a user is granted access to only one schema andits contents, thus providing database security at the schema level. Database users can be runningdifferent applications, multiple copies of the same application, or evenmultiple instances of thesame application. This enables you to consolidate applications on one database to reducemanagement overhead and use resources more effectively. The following examples highlight usingmultiple private schemas.
l Using Multiple Schemas to Separate Users and Their Unique Applications
In this example, both database users work for the same company. One user (HRUser) uses aHumanResource (HR) application with access to sensitive personal data, such as salaries,while another user (MedUser) accesses information regarding company healthcare coststhrough a healthcaremanagement application. HRUser should not be able to access companyhealthcare cost information andMedUser should not be able to view personal employee data.
To grant these users access to data they need while restricting them from data they should notsee, two schemas are created with appropriate user access, as follows:
Administrator's Guide
HP Vertica Analytics Platform (7.0.x) Page 105 of 969

n HRSchema—A schema owned by HRUser that is accessed by the HR application.
n HealthSchema—A schema owned by MedUser that is accessed by the healthcaremanagement application.
l Using Multiple Schemas to Support Multitenancy
This example is similar to the last example in that access to sensitive data is limited byseparating users into different schemas. In this case, however, each user is using a virtualinstance of the same application.
An example of this is a retail marketing analytics company that provides data and software as aservice (SaaS) to large retailers to help them determine which promotional methods they use aremost effective at driving customer sales.
In this example, each database user equates to a retailer, and each user only has access to itsown schema. The retail marketing analytics company provides a virtual instance of the sameapplication to each retail customer, and each instance points to the user’s specific schema inwhich to create and update tables. The tables in these schemas use the same names becausethey are created by instances of the same application, but they do not conflict because they arein separate schemas.
Example of schemas in this database could be:
n MartSchema—A schema owned by MartUser, a large department store chain.
n PharmSchema—A schema owned by PharmUser, a large drug store chain.
l Using Multiple Schemas to Migrate to a Newer Version of an Application
Usingmultiple schemas is an effective way of migrating to a new version of a softwareapplication. In this case, a new schema is created to support the new version of the software,and the old schema is kept as long as necessary to support the original version of the software.This is called a “rolling application upgrade.”
For example, a company might use a HR application to store employee data. The followingschemas could be used for the original and updated versions of the software:
n HRSchema—A schema owned by HRUser, the schema user for the original HR application.
n V2HRSchema—A schema owned by V2HRUser, the schema user for the new version of theHR application.
Administrator's Guide
HP Vertica Analytics Platform (7.0.x) Page 106 of 969

Using Combinations of Private and Shared Schemas
The previous examples illustrate cases in which all schemas in the database are private and noinformation is shared between users. However, users might want to share common data. In theretail case, for example, MartUser and PharmUser might want to compare their per store sales of aparticular product against the industry per store sales average. Since this information is an industryaverage and is not specific to any retail chain, it can be placed in a schema on which both users aregranted USAGE privileges. (For more information about schema privileges, see SchemaPrivileges.)
Example of schemas in this database could be:
l MartSchema—A schema owned by MartUser, a large department store chain.
l PharmSchema—A schema owned by PharmUser, a large drug store chain.
l IndustrySchema—A schema owned by DBUser (from the retail marketing analytics company)on which bothMartUser and PharmUser have USAGE privileges. It is unlikely that retailerswould be given any privileges beyond USAGE on the schema and SELECT on one or more of itstables.
Creating SchemasYou can create as many schemas as necessary for your database. For example, you could create aschema for each database user. However, schemas and users are not synonymous as they are inOracle.
Administrator's Guide
HP Vertica Analytics Platform (7.0.x) Page 107 of 969

By default, only a superuser can create a schema or give a user the right to create a schema. (SeeGRANT (Database) in the SQLReferenceManual.)
To create a schema use the CREATE SCHEMA statement, as described in the SQLReferenceManual.
Specifying Objects in Multiple SchemasOnce you create two or more schemas, each SQL statement or functionmust identify the schemaassociated with the object you are referencing. You can specify an object within multiple schemasby:
l Qualifying the object name by using the schema name and object name separated by a dot. Forexample, to specify MyTable, located in Schema1, qualify the name as Schema1.MyTable.
l Using a search path that includes the desired schemas when a referenced object is unqualified.By Setting Search Paths, HP Vertica will automatically search the specified schemas to find theobject.
Setting Search PathsThe search path is a list of schemas where HP Vertica looks for tables and User Defined Functions(UDFs) that are referenced without a schema name. For example, if a statement references a tablenamedCustomers without naming the schema that contains the table, and the search path ispublic, Schema1, and Schema2, HP Vertica first searches the public schema for a table namedCustomers. If it does not find a table namedCustomers in public, it searches Schema1 and thenSchema2.
HP Vertica uses the first table or UDF it finds that matches the unqualified reference. If the table orUDF is not found in any schema in the search path, HP Vertica reports an error.
Note: HP Vertica only searches for tables and UDFs in schemas to which the user has accessprivileges. If the user does not have access to a schema in the search path, HP Vertica silentlyskips the schema. It does not report an error or warning if the user's search path contains oneor more schemas to which the user does not have access privileges. Any schemas in thesearch path that do not exist (for example, schemas that have been deleted since being addedto the search path) are also silently ignored.
The first schema in the search path to which the user has access is called the current schema. Thisis the schemawhere HP Vertica creates tables if a CREATE TABLE statement does not specify aschema name.
The default schema search path is "$user", public, v_catalog, v_monitor, v_internal.
=> SHOW SEARCH_PATH;name | setting
-------------+---------------------------------------------------search_path | "$user", public, v_catalog, v_monitor, v_internal
(1 row)
Administrator's Guide
HP Vertica Analytics Platform (7.0.x) Page 108 of 969

The $user entry in the search path is a placeholder that resolves to the current user name, andpublic references the public schema. The v_catalog and v_monitor schemas contain HPVertica system tables, and the v_internal schema is for HP Vertica's internal use.
Note: HP Vertica always ensures that the v_catalog, v_monitor, and v_internal schemas arepart of the schema search path.
The default search path has HP Vertica search for unqualified tables first in the user’s schema,assuming that a separate schema exists for each user and that the schema uses their user name. Ifsuch a user schema does not exist, or if HP Vertica cannot find the table there, HP Vertica nextsearch the public schema, and then the v_catalog and v_monitor built-in schemas.
A database administrator can set a user's default search schemawhen creating the user by usingthe SEARCH_PATH parameter of the CREATE USER statement. An administrator or the user canchange the user's default search path using the ALTER USER statement's SEARCH_PATHparameter. Changes made to the default search path using ALTER USER affect new usersessions—they do not affect any current sessions.
A user can use the SET SEARCH_PATH statement to override the schema search path for thecurrent session.
Tip: The SET SEARCH_PATH statement is equivalent in function to the CURRENT_SCHEMA statement found in some other databases.
To see the current search path, use the SHOW SEARCH_PATH statement. To view the currentschema, use SELECT CURRENT_SCHEMA(). The function SELECT CURRENT_SCHEMA()also shows the resolved name of $user.
The following example demonstrates displaying and altering the schema search path for the currentuser session:
=> SHOW SEARCH_PATH;name | setting
-------------+---------------------------------------------------search_path | "$user", PUBLIC, v_catalog, v_monitor, v_internal
(1 row)
=> SET SEARCH_PATH TO SchemaA, "$user", public;SET
=> SHOW SEARCH_PATH;name | setting
-------------+------------------------------------------------------------search_path | SchemaA, "$user", public, v_catalog, v_monitor, v_internal
(1 row)
You can use the DEFAULT keyword to reset the schema search path to the default.
=> SET SEARCH_PATH TO DEFAULT;SET=> SHOW SEARCH_PATH;
name | setting
Administrator's Guide
HP Vertica Analytics Platform (7.0.x) Page 109 of 969

-------------+---------------------------------------------------search_path | "$user", public, v_catalog, v_monitor, v_internal
(1 row)
To view the default schema search path for a user, query the search_path column of the V_CATALOG.USERS system table:
=> SELECT search_path from USERS WHERE user_name = 'ExampleUser'; search_path---------------------------------------------------"$user", public, v_catalog, v_monitor, v_internal
(1 row)
=> ALTER USER ExampleUser SEARCH_PATH SchemaA,"$user",public;ALTER USER
=> SELECT search_path from USERS WHERE user_name = 'ExampleUser';search_path
------------------------------------------------------------SchemaA, "$user", public, v_catalog, v_monitor, v_internal
(1 row)
=> SHOW SEARCH_PATH;name | setting
-------------+---------------------------------------------------search_path | "$user", public, v_catalog, v_monitor, v_internal
(1 row)
Note that changing the default search path has no effect ion the user's current session. Even usingthe SET SEARCH_PATH DEFAULT statement does not set the search path to the newly-defineddefault value. It only has an effect in new sessions.
See Also
l System Tables
Creating Objects That Span Multiple SchemasHP Vertica supports views or pre-join projections that reference tables across multiple schemas.For example, a user might need to compare employee salaries to industry averages. In this case,the application would query a shared schema (IndustrySchema) for salary averages in addition toits own private schema (HRSchema) for company-specific salary information.
Administrator's Guide
HP Vertica Analytics Platform (7.0.x) Page 110 of 969

Best Practice:When creating objects that span schemas, use qualified table names. Thisnaming convention avoids confusion if the query path or table structure within the schemaschanges at a later date.
Tables in SchemasIn HP Vertica you can create both base tables and temporary tables, depending on what you aretrying to accomplish. For example, base tables are created in the HP Vertica logical schemawhiletemporary tables are useful for dividing complex query processing into multiple steps.
For more information, see Creating Tables and Creating Temporary Tables.
About Base TablesThe CREATE TABLE statement creates a table in the HP Vertica logical schema. The exampledatabases described in the Getting Started Guide include sample SQL scripts that demonstratethis procedure. For example:
CREATE TABLE vendor_dimension (vendor_key INTEGER NOT NULL PRIMARY KEY,vendor_name VARCHAR(64),vendor_address VARCHAR(64),vendor_city VARCHAR(64),vendor_state CHAR(2),vendor_region VARCHAR(32),deal_size INTEGER,last_deal_update DATE
);
Automatic Projection Creation
To get your database up and running quickly, HP Vertica automatically creates a default projectionfor each table created through the CREATE TABLE and CREATE TEMPORARY TABLEstatements. Each projection created automatically (or manually) includes a base projection name
Administrator's Guide
HP Vertica Analytics Platform (7.0.x) Page 111 of 969

prefix. Youmust use the projection prefix when altering or dropping a projection (ALTERPROJECTION RENAME, DROP PROJECTION).
How you use the CREATE TABLE statement determines when the projection is created:
l If you create a table without providing the projection-related clauses, HP Vertica automaticallycreates a superprojection for the table when you use an INSERT INTO or COPY statement toload data into the table for the first time. The projection is created in the same schema as thetable. Once HP Vertica has created the projection, it loads the data.
l If you use CREATE TABLE AS SELECT to create a table from the results of a query, the tableis created first and a projection is created immediately after, using some of the properties of theunderlying SELECT query.
l (Advanced users only) If you use any of the following parameters, the default projection iscreated immediately upon table creation using the specified properties:
n column-definition (ENCODING encoding-type and ACCESSRANK integer)
n ORDER BY table-column
n hash-segmentation-clause
n UNSEGMENTED { NODE node | ALL NODES }
n KSAFE
Note: Before you define a superprojection in the abovemanner, read Creating CustomDesigns in the Administrator's Guide.
See Also
l Creating Base Tables
l Projection Concepts
l CREATE TABLE
About Temporary TablesA common use case for a temporary table is to divide complex query processing into multiple steps.Typically, a reporting tool holds intermediate results while reports are generated (for example, firstget a result set, then query the result set, and so on). You can also write subqueries.
Note: The default retention when creating temporary tables is ON COMMIT DELETE ROWS,which discards data at transaction completion. The non-default value is ON COMMIT PRESERVEROWS, which discards data when the current session ends.
You create temporary tables Using the CREATE TEMPORARY TABLE statement.
Administrator's Guide
HP Vertica Analytics Platform (7.0.x) Page 112 of 969

Global Temporary Tables
HP Vertica creates global temporary tables in the public schema, with the data contents private tothe transaction or session through which data is inserted.
Global temporary table definitions are accessible to all users and sessions, so that two (or more)users can access the same global table concurrently. However, whenever a user commits or rollsback a transaction, or ends the session, HP Vertica removes the global temporary table dataautomatically, so users see only data specific to their own transactions or session.
Global temporary table definitions persist in the database catalogs until they are removed explicitlythrough a DROP TABLE statement.
Local Temporary Tables
Local temporary tables are created in the V_TEMP_SCHEMA namespace and inserted into the user'ssearch path transparently. Each local temporary table is visible only to the user who creates it, andonly for the duration of the session in which the table is created.
When the session ends, HP Vertica automatically drops the table definition from the databasecatalogs. You cannot preserve non-empty, session-scoped temporary tables using the ONCOMMIT PRESERVE ROWS statement.
Creating local temporary tables is significantly faster than creating regular tables, so you shouldmake use of them whenever possible.
Automatic Projection Creation and Characteristics
Once local or global table exists, HP Vertica creates auto-projections for temporary tableswhenever you load or insert data.
The default auto-projection for a temporary table has the following characteristics:
l It is a superprojection.
l It uses the default encoding-type AUTO.
l It is automatically unsegmented on the initiator node, if you do not specify a hash-segmentation-clause.
l The projection is not pinned.
l Temp tables are not recoverable, so the superprojection is not K-Safe (K-SAFE=0), and youcannot make it so.
Auto-projections are defined by the table properties and creationmethods, as follows:
Administrator's Guide
HP Vertica Analytics Platform (7.0.x) Page 113 of 969

If table... Sort order is... Segmentation is...
Is created from inputstream (COPY orINSERT INTO)
Same as inputstream, if sorted.
On PK column (if any), on all FK columns (ifany), on the first 31 configurable columns ofthe table
Is created from CREATETABLE AS SELECTquery
Same as inputstream, if sorted.
If not sorted,sorted usingfollowing rules.
Same segmentation columns f query output issegmented
The same as the load, if output of query isunsegmented or unknown
Has FK and PKconstraints
FK first, then PKcolumns
PK columns
Has FK constraints only(no PK)
FK first, thenremaining columns
Small data type (< 8 byte) columns first, thenlarge data type columns
Has PK constraints only(no FK)
PK columns PK columns
Has no FK or PKconstraints
On all columns Small data type (< 8 byte) columns first, thenlarge data type columns
Advanced users canmodify the default projection created through the CREATE TEMPORARY TABLEstatement by defining one or more of the following parameters:
l column-definition (temp table) (ENCODING encoding-type and ACCESSRANK integer)
l ORDER BY table-column
l hash-segmentation-clause
l UNSEGMENTED { NODE node | ALL NODES }
l NO PROJECTION
Note: Before you define the superprojection in this manner, read Creating Custom Designs inthe Administrator's Guide.
See Also
l Creating Temporary Tables
l Projection Concepts
l CREATE TEMPORARY TABLE
Administrator's Guide
HP Vertica Analytics Platform (7.0.x) Page 114 of 969
Implementing ViewsA view is a stored query that dynamically accesses and computes data from the database atexecution time. It differs from a projection in that it is notmaterialized: it does not store data ondisk. This means that it doesn't need to be refreshed whenever the data in the underlying tableschange, but it does require additional time to access and compute data.
Views are read-only and they support references to tables, temp tables, and other views. They donot support inserts, deletes, or updates. You can use a view as an abstractionmechanism to:
l Hide the complexity of SELECT statements from users for support or security purposes. Forexample, you could create a view that selects specific columns from specific tables to ensurethat users have easy access to the information they need while restricting them fromconfidential information.
l Encapsulate the details of the structure of your tables, which could change as your applicationevolves, behind a consistent user interface.
Creating ViewsA view contains one or more SELECT statements that reference any combination of one or moretables, temp tables, or views. Additionally, views can specify the column names used to displayresults.
The user who creates the view must be a superuser or have the following privileges:
l CREATE on the schema in which the view is created.
l SELECT on all the tables and views referenced within the view's defining query.
l USAGE on all the schemas that contain the tables and views referenced within the view'sdefining query.
To create a view:
1. Use the CREATE VIEW statement to create the view.
2. Use theGRANT (View) statement to grant users the privilege to use the view.
Note: Once created, a view cannot be actively altered. It can only be deleted and recreated.
Using ViewsViews can be used in the FROM clause of any SQL query or subquery. At execution, HP Verticainternally substitutes the name of the view used in the query with the actual contents of the view.The following example defines a view (ship) and illustrates how a query that refers to the view istransformed internally at execution time.
Administrator's Guide
HP Vertica Analytics Platform (7.0.x) Page 115 of 969

l New view
=> CREATE VIEW ship AS SELECT * FROM public.shipping_dimension;
l Original query
=> SELECT * FROM ship;
l Transformed query
=> SELECT * FROM (SELECT * FROM public.shipping_dimension) AS ship;
Tip: : To use a view, a user must be granted SELECT permissions on the view. SeeGRANT(View).
The following example creates a view named myview that sums all individual incomes ofcustomers listed in the store.store_sales_fact table by state. The results are grouped inascending order by state.
=> CREATE VIEW myview AS SELECT SUM(annual_income), customer_stateFROM public.customer_dimensionWHERE customer_key IN
(SELECT customer_keyFROM store.store_sales_fact)
GROUP BY customer_stateORDER BY customer_state ASC;
The following example uses the myview view with aWHERE clause that limits the results tocombined salaries of greater than 2,000,000,000.
=> SELECT * FROM myview where sum > 2000000000;
SUM | customer_state-------------+----------------
2723441590 | AZ29253817091 | CA4907216137 | CO3769455689 | CT3330524215 | FL4581840709 | IL3310667307 | IN2793284639 | MA5225333668 | MI2128169759 | NV2806150503 | PA2832710696 | TN
Administrator's Guide
HP Vertica Analytics Platform (7.0.x) Page 116 of 969

14215397659 | TX2642551509 | UT
(14 rows)
Notes
If HP Vertica does not have to evaluate an expression that would generate a run-time error in orderto answer a query, the run-time error might not occur. See the following sequence of commands foran example of this scenario.
If you run a query like the following, HP Vertica returns an error:
=> SELECT TO_DATE('F','dd mm yyyy') FROM customer_dimension;ERROR: Invalid input for DD: "F"
Now create a view using the same query. Note that the view gets created when you would expect itto return the same error:
=> CREATE VIEW temp AS SELECT TO_DATE('F','dd mm yyyy')FROM customer_dimension;CREATE VIEW
The view, however, cannot be used in all queries without generating the same error message. Forexample, the following query returns the same error, which is what you would expect:
=> SELECT * FROM temp;ERROR: Invalid input for DD: "F"
When you then issue a COUNT command, the returned rowcount is correct:
=> SELECT COUNT(*) FROM temp;COUNT
-------100
(1 row)
This behavior works as intended. Youmight want to create views that contain subqueries, wherenot every row is intended to pass the predicate.
Administrator's Guide
HP Vertica Analytics Platform (7.0.x) Page 117 of 969

Creating a Database DesignData in HP Vertica is physically stored in projections. When you initially load data into a table usingINSERT, COPY (or COPY LOCAL), HP Vertica creates a default superprojection for the table. Thissuperprojection ensures that all of the data is available for queries. However, thesesuperprojections might not optimize database performance, resulting in slow query performanceand low data compression.
To improve performance, create a physical design for your database that optimizes both queryperformance and data compression. You can use the Database Designer or create this design byhand.
Database Designer is a tool that recommends the design of design (projections) that provide thebest query performance. Using Database Designer minimizes the time you spend onmanualdatabase tuning and provides the ability to re-design the database incrementally to optimize forchanging workloads over time.
Database Designer runs as a background process. If non-superusers are running DatabaseDesigner on, or deploying for the same tables at the same time, Database Designer may not beable to complete.
Tip: HP recommends that you first globally optimize your database using the Comprehensivesetting in Database Designer. If the performance of the comprehensive design is not adequate,you can design custom projections using an incremental design andmanually, as described inCreating Custom Designs.
What Is a Design?A design is a physical storage plan that optimizes query performance. Database Designer usessophisticated strategies to create a design that provides excellent performance for ad-hoc queriesand specific queries while using disk space efficiently. Database Designer bases the design on thefollowing information that you provide:
l Design type (comprehensive or incremental)
l Optimization objective (query, load, or balanced)
l K-safety
l Design queries: Typical queries that you run during normal database operations. Each query canbe assigned a weight that indicates its relative importance so that Database Designer canprioritize it when creating the design. Database Designer groups queries that affect the designthat Database Designer creates in the sameway and considers one weighted query whencreating a design.
l Design tables that contain sample data.
Administrator's Guide
HP Vertica Analytics Platform (7.0.x) Page 118 of 969

l Setting that specifies that Database Designer be guided to create only unsegmentedprojections.
l Setting that specifies that Database Designer analyze statistics before creating the design.
The result of a Database Designer run is:
l A design script that creates the projections for the design in a way that meets the optimizationobjectives and distributes data uniformly across the cluster.
l A deployment script that creates and refreshes the projections for your design. Forcomprehensive designs, the deployment script contains commands that remove non-optimizedprojections. The deployment script includes the full design script.
l A backup script that contains SQL statements to deploy the design that existed on the systembefore deployment. This file is useful in case you need to revert to the pre-deployment design.
While running Database Designer, you can choose to deploy your design automatically after thedeployment script is created, or to deploy it manually, after you have reviewed and tested thedesign. HP Vertica recommends that you test the design on a non-production server beforedeploying the design to your production server.
How Database Designer Creates a DesignDuring the design process, Database Designer analyzes the logical schema definition, sampledata, and sample queries, and creates a physical schema (projections) in the form of a SQL scriptthat you deploy automatically or manually. The script creates aminimal set of superprojections toensure K-safety.
In most cases, the projections that Database Designer creates provide excellent queryperformance within physical constraints while using disk space efficiently. Database Designer:
l Recommends buddy projectionswith the same sort order, which can significantly improveload, recovery, and site node performance. All buddy projections have the same base name sothat they can be identified as a group.
Note: If youmanually create projections, Database Designer recommends a buddy with thesame sort order, if one does not already exist. By default, Database Designer recommendsboth super and non-super segmented projections with a buddy of the same sort order andsegmentation.
l Automatically rebalances data after you add or remove nodes.
l Accepts queries as design input.
l Runs the design and deployment processes in the background.
Administrator's Guide
HP Vertica Analytics Platform (7.0.x) Page 119 of 969

This is useful if you have a large design that you want to run overnight. An active SSH session isnot required, so design/deploy operations continue to run uninterrupted, even if the session isterminated.
l Accepts a file of sample queries for Database Designer to consider when creating a design.Providing this file is optional for comprehensive designs. If you do not provide this file, DatabaseDesigner recommends a generic design that does not consider specific queries. For incrementaldesigns, youmust provide sample queries; the query file can contain up to 100 queries.
l Accepts unlimited queries for a comprehensive design.
l Allows you to analyze column correlations, which the Database Designer and query optimizerexploit to improve data compression and query performance. Correlation analysis typically onlyneeds to be performed once, and only if the table has more thanDBDCorrelationSampleRowCount (default: 4000) rows.
By default, Database Designer does not analyze column correlations. To set the correlationanalyis mode, use DESIGNER_SET_ANALYZE_CORRELATIONS_MODE
l Identifies similar design queries and assigns them a signature. Of queries with the samesignature, Database Designer weights the queries depending on how many have that signatureand considers the weighted query when creating a design.
l Creates projections in a way that minimizes data skew by distributing data uniformly across thecluster.
l Produces higher quality designs by considering UPDATE and DELETE statements, as well asSELECT statements.
l Does not sort, segment, or partition projections on LONGVARBINARY and LONGVARCHARcolumns.
Who Can Run Database DesignerTo use Administration Tools to run Database Designer and create an optimal database design, youmust be a DBADMIN user.
To run Database Designer programmatically or usingManagement Console, youmust be one oftwo types of users:
l DBADMIN user
l Have been assigned the DBDUSER role and be the owner of database tables for which you arecreating a design
Granting and Enabling the DBDUSER RoleFor a non-DBADMIN user to be able to run Database Designer usingManagement Console, followthe steps described in Allowing the DBDUSER to Run Database Designer UsingManagement
Administrator's Guide
HP Vertica Analytics Platform (7.0.x) Page 120 of 969

Console.
For a non-DBADMIN user to be able to run Database Designer programmatically, following thesteps described in Allowing the DBDUSER to Run Database Designer Programmatically.
Important:When you grant the DBDUSER role, make sure to associate a resource pool withthat user to manage resources during Database Designer runs. (For instructions about how toassociate a resource pool with a user, see User Profiles.)
Multiple users can run Database Designer concurrently without interfering with each other orusing up all the cluster resources. When a user runs Database Designer, either using theManagement Console or programmatically, its execution is mostly contained by the user'sresource pool, but may spill over into system resource pools for less-intensive tasks.
Allowing the DBDUSER to Run Database Designer UsingManagement Console
To allow a user with the DBDUSER role to run Database Designer usingManagement Console,you first need to create the user on the HP Vertica server.
As DBADMIN, take these steps on the server:
1. Add a /tmp folder to all cluster nodes.
=> SELECT ADD_LOCATION('/tmp');
2. Create the user who needs access to Database Designer.
=> CREATE USER new_user;
3. Grant the user the privilege to create schemas on the database for which they want to create adesign.
=> GRANT CREATE on new_database TO new_user;
4. Grant the DBDUSER role to the new user.
=> GRANT DBDUSER TO new_user;
5. On all nodes in the cluster, grant the user access to the /tmp folder.
=> GRANT ALL ON LOCATION '/tmp' TO new_user;
6. Grant the new user access to the database schema and its tables.
Administrator's Guide
HP Vertica Analytics Platform (7.0.x) Page 121 of 969

=> GRANT ALL ON SCHEMA user_schema TO new_user;=> GRANT ALL ON ALL TABLES IN SCHEMA user_schema TO new_user;
After you have completed this task, you need to do the following tomap theMC user to the new_user you created in the previous steps:
1. Log in toManagement Console as anMC Super user.
2. Click MC Settings.
3. Click User Management.
4. To create a new MC user, click Add.To use an existingMC user, select the user and clickEdit.
5. Next to theDB access level window, click Add.
6. In theAdd Permissionswindow, do the following:
a. From theChoose a database drop-down list, select the database for which you want theuser to be able to create a design.
b. In theDatabase username field, enter the user name you created on the HP Verticaserver, new_user in this example.
c. In the Database password field, enter the password for the database you selected in stepa.
d. In theRestrict access drop-down list, select the level of MC user you want for this user.
7. Click OK to save your changes.
8. Log out of theMC Super user account.
TheMC user is now mapped to the user that you created on the HP Vertica server. Log in as theMC user and use Database Designer to create an optimized design for your database.
For more information about mappingMC users, seeMapping anMC User to a Database user'sPrivileges.
Allowing the DBDUSER to Run Database DesignerProgrammatically
To allow a user with the DBDUSER role to run Database Designer programmatically, take thesesteps:
Administrator's Guide
HP Vertica Analytics Platform (7.0.x) Page 122 of 969

1. The DBADMIN user must grant the DBDUSER role:
=> GRANT DBDUSER TO <username>;
This role persists until the DBADMIN user revokes it.
2. For a non-DBADMIN user to run the Database Designer programmatically or usingManagement Console, one of the following two steps must happen first:
n If the user's default role is already DBDUSER, skip this step. Otherwise, The user mustenable the DBDUSER role:
=> SET ROLE DBDUSER;
n The DBADMIN must add DBDUSER as the default role for that user:
=> ALTER USER <username> DEFAULT ROLE DBDUSER;
DBDUSER Capabilities and LimitationsThe DBDUSER role has the following capabilities and limitations:
l A DBDUSER cannot create a design with a K-safety less than the system K-safety. If thedesigns violate the current K-safet by not having enough buddy projections for the tables, thedesign does not complete.
l A DBDUSER cannot explicitly change the ancient history mark (AHM), even during deploymentof their design.
When you create a design, you automatically have privileges tomanipulate the design. Other tasksmay require that the DBDUSER have additional privileges:
To... DBDUSER must have...
Add design tables l USAGE privilege on the design table schema
l OWNER privilege on the design table
Add a single design query l Privilege to execute the design query
Add a file of design queries l Read privilege on the storage location that contains thequery file
l Privilege to execute all the queries in the file
Administrator's Guide
HP Vertica Analytics Platform (7.0.x) Page 123 of 969

To... DBDUSER must have...
Add design queries from the resultof a user query
l Privilege to execute the user query
l Privilege to execute each design query retrieved fromthe results of the user query
Create the design and deploymentscripts
l WRITE privilege on the storage location of the designscript
l WRITE privilege on the storage location of thedeployment script
Workflow for Running Database DesignerHP Vertica provides three ways to run Database Designer:
l UsingManagement Console to Create a Design
l Using Administration Tools to Create a Design
l About Running Database Designer Programmatically
The following workflow is common to all these ways to run Database Designer:
Administrator's Guide
HP Vertica Analytics Platform (7.0.x) Page 124 of 969

Administrator's Guide
HP Vertica Analytics Platform (7.0.x) Page 125 of 969

Specifying Parameters for Database DesignerBefore you run Database Designer to create a design, provide information that allows DatabaseDesigner to create the optimal physical schema:
l Design Name
l Design Types
l Optimization Objectives
l Design Tables with Sample Data
l Design Queries
l K-Safety for Design
l Replicated and Unsegmented Projections
l Statistics Analysis
Design NameAll designs that Database Designer creates must have a name that you specify. The design namemust be alphanumeric or underscore (_) characters, and can be nomore than 32 characters long.(Administrative Tools andManagement Console limit the design name to 16 characters.)
The design name becomes part of the files that Database Designer generates, including thedeployment script, allowing the files to be easily associated with a particular Database Designerrun.
Design TypesThe Database Designer can create two distinct design types. The design you choose depends onwhat you are trying to accomplish:
l Comprehensive Design
l Incremental Design
Comprehensive Design
A comprehensive design creates an initial or replacement design for all the tables in the specifiedschemas. Create a comprehensive design when you are creating a new database.
To help Database Designer create an efficient design, load representative data into the tablesbefore you begin the design process. When you load data into a table, HP Vertica creates anunoptimized superprojection so that Database Designer has projections to optimize. If a table hasno data, Database Designer cannot optimize it.
Administrator's Guide
HP Vertica Analytics Platform (7.0.x) Page 126 of 969

Optionally, supply Database Designer with representative queries that you plan to use so DatabaseDesigner can optimize the design for them. If you do not supply any queries, Database Designercreates a generic optimization of the superprojections that minimizes storage, with no query-specific projections.
During a comprehensive design, Database Designer creates deployment scripts that:
l Create new projections to optimize query performance, only when they do not already exist.
l Create replacement buddy projections when Database Designer changes the encoding of pre-existing projections that it has decided to keep.
Incremental Design
An incremental design creates an enhanced design with additional projections, if required, that areoptimized specifically for the queries that you provide. Create an incremental design when you haveone or more queries that you want to optimize.
Optimization ObjectivesWhen creating a design, Database Designer can optimize the design for one of three objectives:
l LoadDatabase Designer creates a design that is optimized for loads, minimizing database size,potentially at the expense of query performance.
l PerformanceDatabase Designer creates a design that is optimized for fast query performance.Because it recommends a design for optimized query performance, this designmightrecommendmore than the Load or Balanced objectives, potentially resulting in a larger databasestorage size.
l Balanced Database Designer creates a design whose objectives are balanced betweendatabase size and query performance.
Design Tables with Sample DataYoumust specify one or more design tables for Database Designer to deploy a design. If yourschema is empty, it does not appear as a design table option.
To create themost efficient projections for your database, load amoderate amount ofrepresentative data into tables before running Database Designer. Database Designer considersthe data in this table when creating the design.
If your design tables have a large amount if data, the Database Designer run takes a long time; ifyour tables have too little data, the design is not optimized. HP Vertica recommends that 10 GB ofsample data is sufficient for creating an optimal design.
If you submit a design table with no data, Database Designer ignores it.
Administrator's Guide
HP Vertica Analytics Platform (7.0.x) Page 127 of 969

Design QueriesIf you supply representative queries that you run on your database to Database Designer, itoptimizes the performance of those queries.
If you are creating an incremental design, youmust supply design queries; if you are creating acomprehensive design, HP Vertica recommends you supply design queries to create an optimaldesign.
Database Designer checks the validity of all queries when you add them to your design and againwhen it builds the design. If a query is invalid, Database Designer ignores it.
Query Repository
UsingManagement Console, you can submit design queries from theQUERY_REQUESTS system table. This is called the query repository.
TheQUERY_REQUESTS table contains queries that users have run recently. For acomprehensive design, you can submit up to 200 queries from theQUERY_REQUESTS table toDatabase Designer to be considered when creating the design. For an incremental design, you cansubmit up to 100 queries from theQUERY_REQUESTS table.
K-Safety for DesignWhen you create a comprehensive design, you can set a K-safety value for your design. Validvalues are 0, 1, and 2, and the value you specify must be less than or equal to the K-safety value ofyour cluster.
The default K-safety is as follows:
l If your cluster has one or two nodes, the default K-safety is 0.
l If your cluster has three or more nodes, the default K-safety is 1. .
For a comprehensive design, you canmake the following changes to the design K-safety beforedeploying the design:
l If your cluster has one or two nodes, you cannot change the K-safety.
l If your cluster has three or four nodes, you change the K-safety to 1 or 0.
l If you cluster has five or more nodes, you can change the K-safety to 2, 1, or 0.
You cannot change the K-safety value of an incremental design. Incremental designs assume theK-safety value of your cluster.
For more information about K-safety, see K-Safety in the Concepts Guide.
Administrator's Guide
HP Vertica Analytics Platform (7.0.x) Page 128 of 969

Replicated and Unsegmented ProjectionsWhen creating a comprehensive design, Database Designer creates projections based on datastatistics and queries. It also reviews the submitted design tables to decide whether projectionsshould be segmented (distributed across the cluster nodes) or replicated (duplicated on all clusternodes).
For detailed information, see the following sections:
l Replicated Projections
l Unsegmented Projections
Replicated Projections
Replication occurs when HP Vertica stores identical copies of data across all nodes in a cluster.
If you are running on a single-node database, all projections are replicated because segmentation isnot possible in a single-node database.
Assuming that largest-row-count equals the number of rows in the design table with the largestnumber of rows, Database Designer recommends that a projection be replicated if any one of thefollowing is true:
l Condition 1: largest-row-count < 1,000000 and number of rows in the table <= 10% of largest-row-count.
l Condition 2: largest-row-count >= 10,000,000 and number of rows in the table <= 1% of largest-row-count.
l Condition 3: The number of rows in the table <= 100,000.
For more information about replication, see High Availability Through Projections in the ConceptsGuide.
Unsegmented Projections
Segmentation occurs when HP Vertica distributes data evenly across multiple database nodes sothat all nodes participate in query execution. Projection segmentation provides high availability andrecovery, and optimizes query execution.
When running Database Designer programmatically or usingManagement Console, you canspecify to allow Database Designer to recommend unsegmented projections in the design. If youdo not specify this, Database Designer recommends only segmented projections.
Database Designer recommends segmented superprojections for large tables when deploying tomultiple node clusters, and recommends replicated superprojections for smaller tables.
Database Designer does not segment projections on:
Administrator's Guide
HP Vertica Analytics Platform (7.0.x) Page 129 of 969
l Single-node clusters
l LONGVARCHAR and LONGVARBINARY columns
Formore information about segmentation, see High Availability Through Projections in theConcepts Guide.
Statistics AnalysisBy default, Database Designer analyzes statistics for the design tables when adding them to thedesign. This option is optional, but HP HP Vertica recommends that you analyze statistics becauseaccurate statistics help Database Designer optimize compression and query performance.
Analyzing statistics takes time and resources. If the current statistics for the design tables are up todate, do not bother analyzing the statistics. When in doubt, analyze the statistics to make sure theyare current.
For more information, see Collecting Statistics.
Building a DesignAfter you have created design tables and loaded data into them, and then specified the parametersyou want Database Designer to use when creating the physical schema, direct Database Designerto create the scripts necessary to build the design.
When you build a database design, HP Vertica generates two scripts:
l Deployment script—<design_name>_deploy.sql—Contains the SQL statements that createprojections for the design you are deploying, deploy the design, and drop unused projections.When the deployment script runs, it creates the optimized design. For details about how to runthis script and deploy the design, see Deploying a Design.
l Design script—<design_name>_design.sql—Contains theCREATE PROJECTION statements that Database Designeruses to create the design. Reviewthis script to make sure you are happy with the design.
The design script is a subset of the deployment script. It serves as a backup of the DDL for theprojections that the deployment script creates.
If you run Database Designer from Administrative Tools,.HP HP Vertica also creates a backupscript named <design_name>_projection_backup_<unique id #>.sql. This script containsSQL statements to deploy the design that existed on the system before deployment. This file isuseful in case you need to revert to the pre-deployment design.
When you create a design usingManagement Console:
l If you submit a large number of queries to your design and build it right immediately, a timingissue could cause the queries not to load before deployment starts. If this occurs, youmay see
Administrator's Guide
HP Vertica Analytics Platform (7.0.x) Page 130 of 969

one of the following errors:
n No queries to optimize for
n No tables to design projections for
To accommodate this timing issue, youmay need to reset the design, check theQueries tab tomake sure the queries have been loaded, and then rebuild the design. Detailed instructions arein:
n Using theWizard to Create a Design
n Creating a DesignManually
l The scripts are deleted when deployment completes. To save a copy of the deployment scriptafter the design is built but before the deployment completes, go to theOutputwindow and copyand paste the SQL statements to a file.
Resetting a DesignYoumust reset a design when:
l You build a design and the output scripts described in Building a Design are not created.
l You build a design but Database Designer cannot complete the design because the queries itexpects are not loaded.
Resetting a design discards all the run-specific information of the previous Database Designerbuild, but retains its configuration (design type, optimization objectives, K-safety, etc.) and tablesand queries.
After you reset a design, review the design to see what changes you need tomake. For example,you can fix errors, change parameters, or check for and add additional tables or queries. Then youcan rebuild the design.
You can only reset a design in Management Console or by using the DESIGNER_RESET_DESIGN function.
Administrator's Guide
HP Vertica Analytics Platform (7.0.x) Page 131 of 969

Deploying a DesignAfter running Database Designer to generate a deployment script, HP Vertica recommends thatyou test your design on a non-production server before you deploy it to your production server.
Both the design and deployment processes run in the background. This is useful if you have a largedesign that you want to run overnight. Because an active SSH session is not required, thedesign/deploy operations continue to run uninterrupted, even if the session is terminated.
Database Designer runs as a background process. Multiple users can run Database Designerconcurrently without interfering with each other or using up all the cluster resources. However, ifmultiple users are deploying a design on the same tables at the same time, Database Designer maynot be able to complete the deployment. To avoid problems, consider the following:
l Schedule potentially conflicting Database Designer processes to run sequentially overnight sothat there are no concurrency problems.
l Avoid scheduling Database Designer runs on the same set of tables at the same time.
There are two ways to deploy your design:
l Deploying Designs Using Database Designer
l Deploying Designs Manually
Deploying Designs Using Database DesignerHP recommends that you run Database Designer and deploy optimized projections right afterloading your tables with sample data because Database Designer provides projections optimizedfor the current state of your database.
If you choose to allow Database Designer to automatically deploy your script during acomprehensive design and are running Administrative Tools, Database Designer creates a backupscript of your database's current design. This script helps you re-create the design of projectionsthat may have been dropped by the new design. The backup script is located in the output directoryyou specified during the design process.
If you choose not to have Database Designer automatically run the deployment script (for example,if you want to maintain projections from a pre-existing deployment), you canmanually run thedeployment script later. See Deploying Designs Manually.
To deploy a design while running Database Designer, do one of the following:
l In Management Console, select the design and click Deploy Design.
l In the Administration Tools, select Deploy design in theDesign Optionswindow.
If you are running Database Designer programmatically, use DESIGNER_RUN_POPULATE_DESIGN_AND_DEPLOY and set the deploy parameter to 'true'.
Administrator's Guide
HP Vertica Analytics Platform (7.0.x) Page 132 of 969

Once you have deployed your design, query the DEPLOY_STATUS system table to see the stepsthat the deployment took:
vmartdb=> SELECT * FROM V_MONITOR.DEPLOY_STATUS;
Deploying Designs ManuallyIf you chose not to have Database Designer deploy your design at design time, you can deploy thedesign later using the deployment script:
1. Make sure that you have a database that contains the same tables and projections as thedatabase on which you ran Database Designer. The database should also contain sampledata.
2. To deploy the projections to a test or production environment, use the following vsql commandto execute the deployment script, where <design_name> is the name of the database design:
=> \i <design_name>_deploy.sql
How to Create a DesignThere are three ways to create a design using Database Designer:
l FromManagement Console, open a database and select theDesign page at the bottom of thewindow.
For details about usingManagement Console to create a design, see UsingManagementConsole to Create a Design
l Programmatically, using the techniques described in About Running Database DesignerProgrammatically in the Programmer's Guide. To run Database Designer programmatically, youmust be a DBADMIN or have been granted the DBDUSER role and enabled that role.
l From the Administration Tools menu, by selectingConfiguration Menu > Run DatabaseDesigner. Youmust be a DBADMIN user to run Database Designer from the AdministrationTools.
For details about using Administration Tools to create a design, see Using Administration Toolsto Create a Design.
The following table shows what Database Designer capabilities are available in each tool:
Database DesignerCapability
ManagementConsole
Running DatabaseDesignerProgrammatically
AdministrativeTools
Create design Yes Yes Yes
Administrator's Guide
HP Vertica Analytics Platform (7.0.x) Page 133 of 969

Database DesignerCapability
ManagementConsole
Running DatabaseDesignerProgrammatically
AdministrativeTools
Design name length (# ofcharacters)
16 32 16
Build design (create designand deployment scripts)
Yes Yes Yes
Create backup script Yes
Set design type(comprehensive orincremental)
Yes Yes Yes
Set optimization objective Yes Yes Yes
Add design tables Yes Yes Yes
Add design queries file Yes Yes Yes
Add single design query Yes
Use query repository Yes Yes
Set K-safety Yes Yes Yes
Analyze statistics Yes Yes Yes
Require all unsegmentedprojections
Yes Yes
View event history Yes Yes
Set correlation analysismode (Default = 0)
Yes
Using Management Console to Create a DesignTo useManagement Console to create an optimized design for your database, youmust be aDBADMIN user or have been assigned the DBDUSER role.
Management Console provides two ways to create a design
l Wizard—This option walks you through the process of configuring a new design. Click BackandNext to navigate through theWizard steps, orCancel to cancel creating a new design.
To learn how to use theWizard to create a design, see Using theWizard to Create a Design.
l Manual—This option creates and saves a design with the default parameters.
To learn how to create a designmanually, see Creating a DesignManually
Administrator's Guide
HP Vertica Analytics Platform (7.0.x) Page 134 of 969

Tip: If you havemany design tables that you want Database Designer to consider, it might beeasier to use theWizard to create your design. In theWizard, you can submit all the tables in aschema at once; creating a designmanually requires that you submit the design tables one at atime.
Using the Wizard to Create a Design
Take these steps to create a design using theManagement Console's Wizard:
1. Log in toManagement Console, select and start your database, and click Design at the bottomof the window. The Database Designer window appears. If there are no existing designs, theNew Designwindow appears.
The left-hand side of the Database Designer window lists the database designs for which youare the owner, with themost recent design you worked on selected. That pane also lists thecurrent status of the design.
Themain pane contains details about the selected design.
Administrator's Guide
HP Vertica Analytics Platform (7.0.x) Page 135 of 969

2. To create a new design, click New Design.
3. Enter a name for your design, and clickWizard.
For more information, see Design Name.
4. Navigate through theWizard using theBack andNext buttons.
5. To build the design immediately after exiting theWizard, on theExecution Optionswindow,select Auto-build.
Important: Hewlett-Packard does not recommend that you auto-deploy the design fromtheWizard. Theremay be a delay in adding the queries to the design, so if the design isdeployed but the queries have not yet loaded, deployment may fail. If this happens, resetthe design, check theQueries tab tomake sure the queries have been loaded, and deploythe design.
Administrator's Guide
HP Vertica Analytics Platform (7.0.x) Page 136 of 969

6. When you have entered all the information, theWizard displays a summary of your choices.Click Submit Design to build your design.
Creating a Design Manually
To create a design using theManagement Console's Wizard, take these steps.
1. Log in toManagement Console, select and start your database, and click Design at the bottomof the window. The Database Designer window appears.
The left-hand side of the Database Designer window lists the database designs for which youare the owner, with themost recent design you worked on highlighted. That pane also lists thecurrent status of the design. Details about themost recent design appears in themain pane.
Themain pane contains details about the selected design.
Administrator's Guide
HP Vertica Analytics Platform (7.0.x) Page 137 of 969
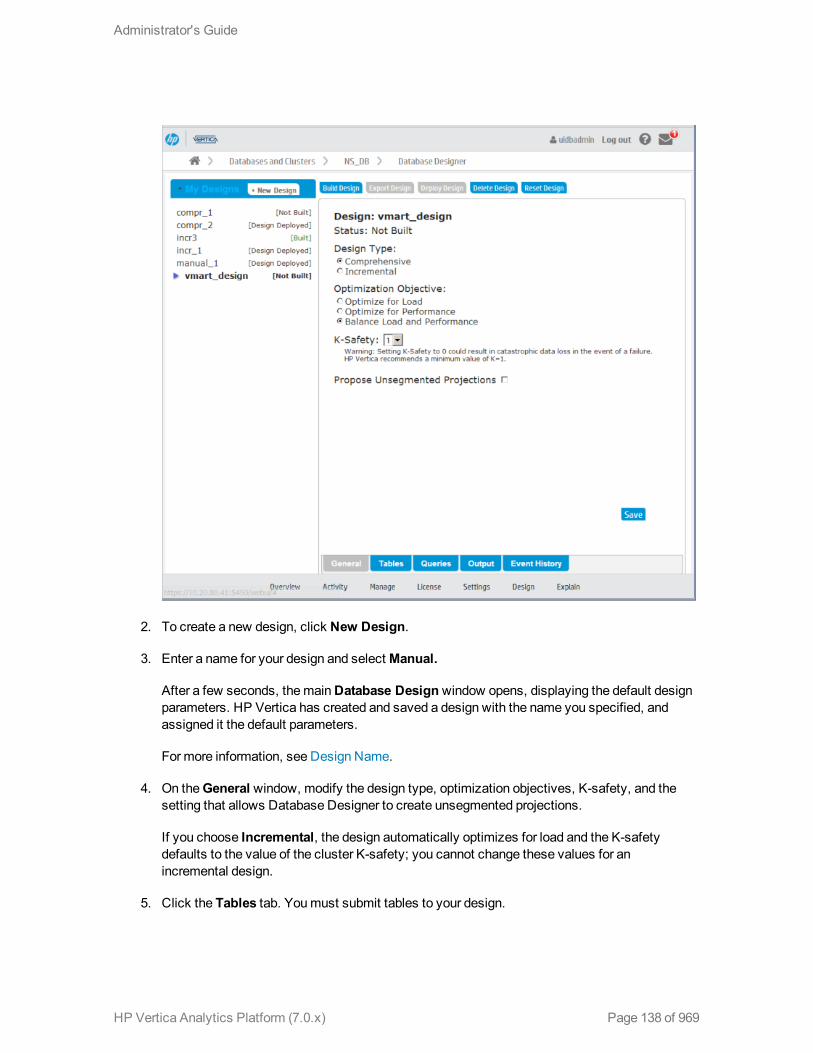
2. To create a new design, click New Design.
3. Enter a name for your design and selectManual.
After a few seconds, themainDatabase Designwindow opens, displaying the default designparameters. HP Vertica has created and saved a design with the name you specified, andassigned it the default parameters.
For more information, see Design Name.
4. On theGeneral window, modify the design type, optimization objectives, K-safety, and thesetting that allows Database Designer to create unsegmented projections.
If you choose Incremental, the design automatically optimizes for load and the K-safetydefaults to the value of the cluster K-safety; you cannot change these values for anincremental design.
5. Click the Tables tab. Youmust submit tables to your design.
Administrator's Guide
HP Vertica Analytics Platform (7.0.x) Page 138 of 969

6. To add tables of sample date to your design, click Add Tables. A list of available tablesappears; select the tables you want and click Save. If you want to remove tables from yourdesign, click the tables you want to remove, and click Remove Selected.
7. Click theQueries tab.To add queries to your design, do one of the following:
n To add queries from theQUERY_REQUESTS system table, click Query Repository,select the desired queries and click Save. All valid queries that you selected appear inthe Querieswindow.
n To add queries from a file, select Choose File. All valid queries in the file that you select areadded to the design and appear in theQuerieswindow.
Database Designer checks the validity of the queries when you add the queries to the designand again when you build the design. If it finds invalid queries, it ignores them.
If you have a large number of queries, it may take time to load them. Make sure that all thequeries you want Database Designer to consider when creating the design are listed in theQuerieswindow.
8. Once you have specified all the parameters for your design, you should build the design. To dothis, select your design and click Build Design.
9. Select Analyze Statistics if you want Database Designer to analyze the statistics beforebuilding the design.
For more information see Statistics Analysis.
10. If you do not need to review the design before deploying it, select Deploy Immediately.Otherwise, leave that option unselected.
11. Click Start. On the left-hand pane, the status of your design displays as Building until it iscomplete.
12. To follow the progress of a build, click Event History. Status messages appear in this windowand you can see the current phase of the build operation. The information in the Event Historytab contains data from theOUTPUT_EVENT_HISTORY system table.
13. When the build completes, the left-hand pane displays Built. To view the deployment script,select your design and click Output.
14. After you deploy the design usingManagement Console, the deployment script is deleted. Tokeep a permanent copy of the deployment script, copy and paste the SQL commands from theOutputwindow to a file.
15. Once you have reviewed your design and are ready to deploy it, select the design and clickDeploy Design.
16. To follow the progress of the deployment, click Event History. Status messages appear in this
Administrator's Guide
HP Vertica Analytics Platform (7.0.x) Page 139 of 969

window and you can see the current phase of the deployment operation.
17. When the deployment completes, the left-hand pane displays Deployment Completed. Toview the deployment script, select your design and click Output.
Your database is now optimized according to the parameters you set.
Using Administration Tools to Create a DesignTo use the Administration Tools interface to create an optimized design for your database, youmust be a DBADMIN user. Follow these steps:
1. Log in as the dbadmin user and start Administration Tools.
2. From themainmenu, start the database for which you want to create a design. The databasemust be running before you can create a design for it.
3. On themainmenu, select Configuration Menu and click OK.
4. On the ConfigurationMenu, select Run Database Designer and click OK.
5. On theSelect a database to designwindow, enter the name of the database for which youare creating a design and click OK.
6. On theEnter the directory for Database Designer outputwindow, enter the full path to thedirectory to contain the design script, deployment script, backup script, and log files, and clickOK.
For information about the scripts, see Building a Design.
7. On theDatabase Designerwindow, enter a name for the design and click OK.
For more information about design names, see Design Name.
8. On the Design Typewindow, choose which type of design to create and click OK.
For a description of the design types, see Design Types
9. TheSelect schema(s) to add to query search pathwindow lists all the schemas in thedatabase that you selected. Select the schemas that contain representative data that you wantDatabase Designer to consider when creating the design and click OK.
For more information about choosing schema and tables to submit to Database Designer, seeDesign Tables with Sample Data.
10. On theOptimization Objectiveswindow, select the objective you want for the databaseoptimization:
Administrator's Guide
HP Vertica Analytics Platform (7.0.x) Page 140 of 969

n Optimize with Queries
Formore information, see Design Queries.
n Update statistics
Formore information see Statistics Analysis.
n Deploy design
Formore information, see Deploying a Design.
For details about these objectives, seeOptimization Objectives.
11. The final window summarizes the choices you havemade and offers you two choices:
n Proceedwith building the design, and deploying it if you specified to deploy it immediately.If you did not specify to deploy, you can review the design and deployment scripts anddeploy themmanually, as described in Deploying Designs Manually.
n Cancel the design and go back to change some of the parameters as needed.
12. Creating a design can take a long time.To cancel a running design from the AdministrationTools window, enterCtrl+C.
To create a design for the VMart example database, see Using Database Designer to Create aComprehensive Design in the Getting Started Guide.
Administrator's Guide
HP Vertica Analytics Platform (7.0.x) Page 141 of 969

Creating Custom DesignsHP strongly recommends that you use the physical schema design produced by DatabaseDesigner, which provides K-safety, excellent query performance, and efficient use of storagespace. If you find that any of your queries are not running as efficiently as you would like, you canuse the Database Designer incremental design process to optimize the database design for thequery.
If the projections created by Database Designer still do not meet your needs, you can write customprojections, from scratch or based on projection designs created by Database Designer.
If you are unfamiliar with writing custom projections, start by modifying an existing designgenerated by Database Designer.
The Design ProcessTo customize an existing design or create a new one, take these steps:
1. Plan the design or designmodification.
As with most successful projects, a good design requires some up-front planning. SeePlanning Your Design.
2. Create or modify projections.
For an overview of the CREATE PROJECTION statement and guidelines for creatingcommon projections, see Design Fundamentals. The CREATE PROJECTION section in theSQLReferenceManual also provides more detail.
3. Deploy the projections to a test environment. SeeWriting and Deploying Custom Projections.
4. Test the projections.
5. Modify the projections as necessary.
6. Once you have finalized the design, deploy the projections to the production environment.
Administrator's Guide
HP Vertica Analytics Platform (7.0.x) Page 142 of 969

Planning Your DesignThe syntax for creating a design is easy for anyone who is familiar with SQL. As with anysuccessful project, however, a successful design requires some initial planning. Before you createyour first design:
l Become familiar with standard design requirements and plan your design to include them. SeeDesign Requirements.
l Determine how many projections you need to include in the design. See Determining theNumber of Projections to Use.
l Determine the type of compression and encoding to use for columns. See Data Encoding andCompression.
l Determine whether or not you want the database to be K-safe. HP Vertica recommends that allproduction databases have aminimum K-safety of one (K=1). Valid K-safety values are 0, 1, and2. See Designing for K-Safety.
Design Requirements
A physical schema design is a script that contains CREATE PROJECTION statements. Thesestatements determine which columns are included in projections and how they are optimized.
If you use Database Designer as a starting point, it automatically creates designs that meet allfundamental design requirements. If you intend to create or modify designs manually, be aware thatall designs must meet the following requirements:
l Every designmust create at least one superprojection for every table in the database that isused by the client application. These projections provide complete coverage that enables usersto perform ad-hoc queries as needed. They can contain joins and they are usually configured tomaximize performance through sort order, compression, and encoding.
l Query-specific projections are optional. If you are satisfied with the performance providedthrough superprojections, you do not need to create additional projections. However, you canmaximize performance by tuning for specific query work loads.
l HP recommends that all production databases have aminimum K-safety of one (K=1) to supporthigh availability and recovery. (K-safety can be set to 0, 1, or 2.) See High Availability ThroughProjections in the Concepts Guide and Designing for K-Safety.
Determining the Number of Projections to Use
In many cases, a design that consists of a set of superprojections (and their buddies) providessatisfactory performance through compression and encoding. This is especially true if the sortorders for the projections have been used tomaximize performance for one or more querypredicates (WHERE clauses).
Administrator's Guide
HP Vertica Analytics Platform (7.0.x) Page 143 of 969
However, youmight want to add additional query-specific projections to increase the performanceof queries that run slowly, are used frequently, or are run as part of business-critical reporting. Thenumber of additional projections (and their buddies) that you create should be determined by:
l Your organization's needs
l The amount of disk space you have available on each node in the cluster
l The amount of time available for loading data into the database
As the number of projections that are tuned for specific queries increases, the performance of thesequeries improves. However, the amount of disk space used and the amount of time required to loaddata increases as well. Therefore, you should create and test designs to determine the optimumnumber of projections for your database configuration. On average, organizations that choose toimplement query-specific projections achieve optimal performance through the addition of a fewquery-specific projections.
Designing for K-Safety
Before creating custom physical schema designs, determine whether you want the database to beK-safe and adhere to the appropriate design requirements for K-safe databases or databases withno K-safety. HP requires that all production databases have aminimum K-safety of one (K=1).Valid K-safety values for production databases are 1 and 2. Non-production databases do not haveto be K-safe and can be set to 0. You can start by creating a physical schema design with no K-safety, and thenmodify it to be K-safe at a later point in time. See High Availability and Recoveryand High Availability Through Projections in the Concepts Guide for an explanation of how HPVertica implements high availability and recovery through replication and segmentation.
Requirements for a K-Safe Physical Schema Design
Database Designer automatically generates designs with a K-safety of 1 for clusters that contain atleast three nodes. (If your cluster has one or two nodes, it generates designs with a K-safety of 0.You canmodify a design created for a three-node (or greater) cluster, and the K-safe requirementsare already set.
If you create custom projections, your physical schema designmust meet the followingrequirements to be able to successfully recover the database in the event of a failure:
l Segmented projections must be segmented across all nodes. Refer to Designing forSegmentation and Designing Segmented Projections for K-Safety.
l Replicated projections must be replicated on all nodes. See Designing Replicated Projectionsfor K-Safety.
l Segmented projections must have K buddy projections (projections that have identical columnsand segmentation criteria, except that corresponding segments are placed on different nodes).
You can use theMARK_DESIGN_KSAFE function to find out whether your schema designmeetsrequirements for K-safety.
Administrator's Guide
HP Vertica Analytics Platform (7.0.x) Page 144 of 969
Requirements for a Physical Schema Design with No K-Safety
If you use Database Designer to generate an comprehensive design that you canmodify and youdo not want the design to be K-safe, set K-safety level to 0 (zero).
If you want to start from scratch, do the following to establishminimal projection requirements for afunctioning database with no K-safety (K=0):
1. Define at least one superprojection for each table in the logical schema.
2. Replicate (define an exact copy of) each dimension table superprojection on each node.
Designing for Segmentation
You segment projections using hash segmentation. Hash segmentation allows you to segment aprojection based on a built-in hash function that provides even distribution of data across multiplenodes, resulting in optimal query execution. In a projection, the data to be hashed consists of one ormore column values, each having a large number of unique values and an acceptable amount ofskew in the value distribution. Primary key columns that meet the criteria could be an excellentchoice for hash segmentation.
Note: For detailed information about using hash segmentation in a projection, see CREATEPROJECTION in the SQLReferenceManual.
When segmenting projections, determine which columns to use to segment the projection. Chooseone or more columns that have a large number of unique data values and acceptable skew in theirdata distribution. Primary key columns are an excellent choice for hash segmentation. The columnsmust be unique across all the tables being used in a query.
Administrator's Guide
HP Vertica Analytics Platform (7.0.x) Page 145 of 969

Design FundamentalsAlthough you can write custom projections from scratch, HP Vertica recommends that you useDatabase Designer to create a design to use as a starting point. This ensures that you haveprojections that meet basic requirements.
Writing and Deploying Custom Projections
Before you write custom projections, be sure to review the topics in Planning Your Design carefully.Failure to follow these considerations can result in non-functional projections.
Tomanually modify or create a projection:
1. Write a script to create the projection, using the CREATE PROJECTION statement.
2. Use the \i meta-command in vsql to run the script.
Note: Youmust have a database loaded with a logical schema.
3. For a K-safe database, use the function SELECT get_projections('table_name') to verifythat the projections were properly created. Good projections are noted as being "safe." Thismeans that the projection has enough buddies to beK-safe.
4. If you added the new projection to a database that already has projections that contain data,you need to update the newly created projection to work with the existing projections. Bydefault, the new projection is out-of-date (not available for query processing) until you refreshit.
5. Use theMAKE_AHM_NOW function to set the Ancient History Mark (AHM) to the greatestallowable epoch (now).
6. Use the DROP_PROJECTION function to drop any previous projections that are no longerneeded.
These projections can waste disk space and reduce load speed if they remain in the database.
7. Run the ANALYZE_STATISTICS function on all projections in the database. This functioncollects and aggregates data samples and storage information from all nodes on which aprojection is stored, and then writes statistics into the catalog. For example:
=>SELECT ANALYZE_STATISTICS ('');
Anatomy of a Projection
The CREATE PROJECTION statement defines the individual elements of a projection, as thefollowing graphic shows.
Administrator's Guide
HP Vertica Analytics Platform (7.0.x) Page 146 of 969
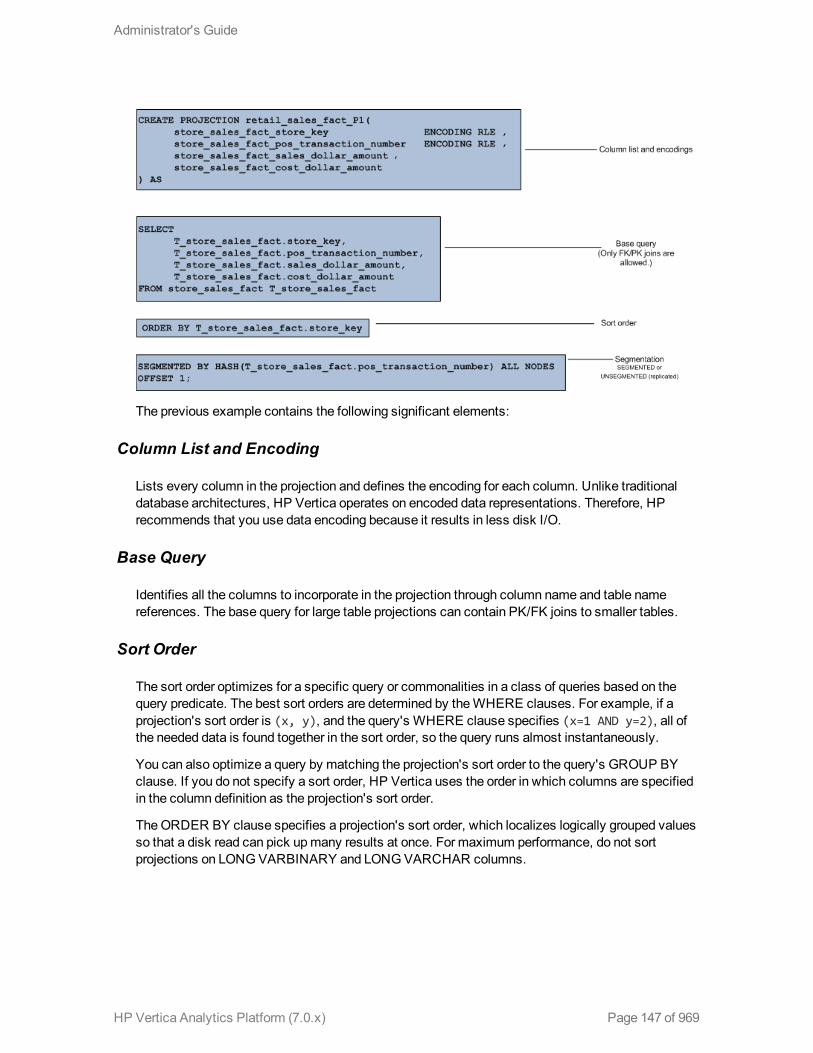
The previous example contains the following significant elements:
Column List and Encoding
Lists every column in the projection and defines the encoding for each column. Unlike traditionaldatabase architectures, HP Vertica operates on encoded data representations. Therefore, HPrecommends that you use data encoding because it results in less disk I/O.
Base Query
Identifies all the columns to incorporate in the projection through column name and table namereferences. The base query for large table projections can contain PK/FK joins to smaller tables.
Sort Order
The sort order optimizes for a specific query or commonalities in a class of queries based on thequery predicate. The best sort orders are determined by theWHERE clauses. For example, if aprojection's sort order is (x, y), and the query's WHERE clause specifies (x=1 AND y=2), all ofthe needed data is found together in the sort order, so the query runs almost instantaneously.
You can also optimize a query by matching the projection's sort order to the query's GROUP BYclause. If you do not specify a sort order, HP Vertica uses the order in which columns are specifiedin the column definition as the projection's sort order.
TheORDER BY clause specifies a projection's sort order, which localizes logically grouped valuesso that a disk read can pick upmany results at once. For maximum performance, do not sortprojections on LONGVARBINARY and LONGVARCHAR columns.
Administrator's Guide
HP Vertica Analytics Platform (7.0.x) Page 147 of 969

Segmentation
The segmentation clause determines whether a projection is segmented across nodes within thedatabase. Segmentation distributes contiguous pieces of projections, called segments, for largeandmedium tables across database nodes. Segmentationmaximizes database performance bydistributing the load. Use SEGMENTED BY HASH to segment large table projections.
For small tables, use the UNSEGMENTED keyword to direct HP Vertica to replicate these tables,rather than segment them. Replication creates and stores identical copies of projections for smalltables across all nodes in the cluster. Replication ensures high availability and recovery.
For maximum performance, do not segment projections on LONGVARBINARY and LONGVARCHAR columns.
Designing Superprojections
Superprojections have the following requirements:
l They must contain every columnwithin the table.
l For a K-safe design, superprojections must either be replicated on all nodes within the databasecluster (for dimension tables) or paired with buddies and segmented across all nodes (for verylarge tables andmedium large tables). See Physical Schema and High Availability ThroughProjections in the Concepts Guide for an overview of projections and how they are stored. SeeDesigning for K-Safety for design specifics.
To providemaximum usability, superprojections need tominimize storage requirements whilemaximizing query performance. To achieve this, the sort order for columns in superprojections isbased on storage requirements and commonly used queries.
Minimizing Storage Requirements
Minimizing storage not only saves on physical resources, it increases performance by requiring thedatabase to perform less disk I/O. Tominimize storage space for a projection:
l Analyze the type of data stored in each projection column and choose themost effectiveencodingmethod. See the CREATE PROJECTION statement and encoding-type in the SQLReferenceManual.
The HP Vertica optimizer gives Run-Length Encoding (RLE) preference, so be sure to use itwhenever appropriate. Run Length Encoding (RLE) replaces sequences (runs) of identicalvalues with a single pair that contains the value and number of occurrences. Therefore, use itonly when the run length is large, such as when sorting low-cardinality columns.
l Prioritize low-cardinality columns in the column sort order. This minimizes the number of rowsthat HP Vertica stores and accesses to retrieve query results.
For more information about minimizing storage requirements, see Choosing Sort Order: BestPractices.
Administrator's Guide
HP Vertica Analytics Platform (7.0.x) Page 148 of 969

Maximizing Query Performance
In addition tominimizing storage requirements, the column sort order facilitates themost commonlyused queries for the table. This means that the column sort order prioritizes the lowest cardinalitycolumns that are actually used in queries. For examples that take into account both storage andquery requirements, see Choosing Sort Order: Best Practices.
Note: Formaximum performance, do not sort projections on LONGVARBINARY and LONGVARCHAR columns.
Projections within a buddy set can all have different sort orders. This enables you tomaximizequery performance for groups of queries with commonWHERE clauses, but different sort orders.If, for example, you have a three-node cluster, your buddy set contains three interrelatedprojections, each having its own sort order.
In a database with a K-safety of 1 or 2, buddy projections are used for data recovery. If a node fails,it queries the other nodes to recover data through buddy projections. (See How Result Sets areStored in the Concepts Guide.) If a projection's buddies use different sort orders, it takes longer torecover the projection because the data has to be resorted during recovery tomatch the sort order ofthe projection. Therefore, consider using identical sort orders for tables that are rarely queried or thatare repeatedly accessed by the same query, and usemultiple sort orders for tables that areaccessed by queries with commonWHERE clauses, but different sort orders.
If you have queries that access multiple tables or you want to maintain the same sort order forprojections within buddy sets, create query-specific projections. Designs that contain projectionsfor specific queries are called optimized designs.
Designing Replicated Projections for K-Safety
If you are creating or modifying a design for a K-safe database, make sure that projections fordimension tables are replicated on each node in the database.
You can accomplish this using a single CREATE PROJECTION command for each dimensiontable. The UNSEGMENTED ALLNODES syntax within the segmentation clause automaticallycreates an unsegmented projection on each node in the database.
When you run your design script, HP Vertica generates a list of nodes based on the number ofnodes in the database and replicates the projection accordingly. Replicated projections have thename:
projection-name_node-name
If, for example, the nodes are namedNODE01, NODE02, and NODE03, the projections are namedABC_NODE01, ABC_NODE02, and ABC_NODE03.
Note: This naming convention can affect functions that provide information about projections,for example, GET_PROJECTIONS or GET_PROJECTION_STATUS, where youmustprovide the name ABC_NODE01 instead of just ABC. To view a list of the nodes in a database,use the View Database command in theAdministration Tools.
Administrator's Guide
HP Vertica Analytics Platform (7.0.x) Page 149 of 969

The following script uses the UNSEGMENTED ALLNODES syntax to create one unsegmentedsuperprojection for the store_dimension table on each node.
CREATE PROJECTION store_dimension( C0_store_dimension_floor_plan_type ENCODING RLE ,C1_store_dimension_photo_processing_type ENCODING RLE ,C2_store_dimension_store_key ,C3_store_dimension_store_name ,C4_store_dimension_store_number ,C5_store_dimension_store_street_address ,C6_store_dimension_store_city ,C7_store_dimension_store_state ,C8_store_dimension_store_region ,C9_store_dimension_financial_service_type ,C10_store_dimension_selling_square_footage ,C11_store_dimension_total_square_footage ,C12_store_dimension_first_open_date ,C13_store_dimension_last_remodel_date )
AS SELECT T_store_dimension.floor_plan_type,T_store_dimension.photo_processing_type,T_store_dimension.store_key,T_store_dimension.store_name,T_store_dimension.store_number,T_store_dimension.store_street_address,T_store_dimension.store_city,T_store_dimension.store_state,T_store_dimension.store_region,T_store_dimension.financial_service_type,T_store_dimension.selling_square_footage,T_store_dimension.total_square_footage,T_store_dimension.first_open_date,T_store_dimension.last_remodel_date
FROM store_dimension T_store_dimensionORDER BY T_store_dimension.floor_plan_type, T_store_dimension.photo_processing_typeUNSEGMENTED ALL NODES;
Note: Large dimension tables can be segmented. A dimension table is considered to be largewhen it is approximately the same size as a fact table.
Designing Segmented Projections for K-Safety
If you are creating or modifying a design for a K-safe database, you need to create K-safeprojections for fact tables and large dimension tables. (A dimension table is considered to be large ifit is similar in size to a fact table.) To accomplish this, youmust:
l Create a segmented projection for each fact and large dimension table.
l Create segmented buddy projections for each of these projections. The total number ofprojections in a buddy set must be two for a K=1 database or three for a K=2 database.
For an overview of segmented projections and their buddies, see Projection Segmentation in theConcepts Guide. For information about designing for K-safety, see Designing for K-Safety andDesigning for Segmentation.
Administrator's Guide
HP Vertica Analytics Platform (7.0.x) Page 150 of 969

Segmenting Projections
To segment a projection, use the segmentation clause to specify the:
l Segmentationmethod to use.
l Column to use to segment the projection.
l Nodes on which to segment the projection. You can segment projections across all the nodes, orjust the number of nodes necessary tomaintain K-safety, either three for a K=1 database or fivefor a K=2 database.
See the CREATE PROJECTION statement in the SQLReferenceManual.
The following segmentation clause uses hash segmentation to segment the projection across allnodes based on the T_retail_sales_fact.pos_transaction_number column:
CREATE PROJECTION retail_sales_fact_P1... SEGMENTED BY HASH(T_retail_sales_fact.pos_transaction_number) ALL NODES;
Creating Buddy Projections
To create a buddy projection, copy the original projection andmodify it as follows:
l Rename it to something similar to the name of the original projection. For example, a projectionnamed retail_sales_fact_P1 could have buddies named retail_sales_fact_P1_B1 andretail_sales_fact_P1_B2.
l Modify the sort order as needed.
l Create an offset to store the segments for the buddy on different nodes. For example, the firstbuddy in a projection set would have an offset of one (OFFSET1;) the second buddy in aprojection set would have an offset of two (OFFSET2;), and so on.
To create a buddy for the projection created in the previous example:
CREATE PROJECTION retail_sales_fact_P1_B1... SEGMENTED BY HASH(T_retail_sales_fact.pos_transaction_number) ALL NODES OFFSET 1;
Projection Design for Merge Operations
The HP Vertica query optimizer automatically picks the best projections to use for queries, but youcan help improve the performance of MERGE operations by ensuring projections are designed foroptimal use.
Good projection design lets HP Vertica choose the faster merge join between the target and sourcetables without having to perform additional sort and data transfer operations.
Administrator's Guide
HP Vertica Analytics Platform (7.0.x) Page 151 of 969

HP recommends that you first useDatabase Designer to generate a comprehensive design andthen customize projections, as needed. Be sure to first review the topics in Planning Your Design.Failure to follow those considerations could result in non-functioning projections.
In the following MERGE statement, HP Vertica inserts and/or updates records from the sourcetable's column b into the target table's column a:
=> MERGE INTO target t USING source s ON t.a = s.b WHEN ....
HP Vertica can use a local merge join if tables target and source use one of the followingprojection designs, where their inputs are pre-sorted through the CREATE PROJECTION ORDER BYclause:
l Replicated projections that are sorted on:
n Column a for target
n Column b for source
l Segmented projections that are identically segmented on:
n Column a for target
n Column b for source
n Corresponding segmented columns
Tip: For best merge performance, the source table should be smaller than the target table.
See Also
l Optimized Versus Non-OptimizedMERGE
l Best Practices for OptimizingMERGE Statements
Administrator's Guide
HP Vertica Analytics Platform (7.0.x) Page 152 of 969

Maximizing Projection Performance
This section explains how to design your projections in order to optimize their performance.
Choosing Sort Order: Best Practices
When choosing sort orders for your projections, HP Vertica has several recommendations that canhelp you achievemaximum query performance, as illustrated in the following examples.
Combine RLE and Sort OrderWhen dealing with predicates on low-cardinality columns, use a combination of RLE and sorting tominimize storage requirements andmaximize query performance.
Suppose you have a students table contain the following values and encoding types:
Column # of Distinct Values Encoded With
gender 2 (M or F) RLE
pass_fail 2 (P or F) RLE
class 4 (freshman, sophomore, junior, or senior) RLE
name 10000 (toomany to list) Auto
Youmight have queries similar to this one:
SELECT name FROM studentsWHERE gender = 'M' AND pass_fail = 'P' AND class = 'senior';
The fastest way to access the data is to work through the low-cardinality columns with the smallestnumber of distinct values before the high-cardinality columns. The following sort order minimizesstorage andmaximizes query performance for queries that have equality restrictions on gender,class, pass_fail, and name. Specify the ORDER BY clause of the projection as follows:
ORDER BY students.gender, students.pass_fail, students.class, students.name
In this example, the gender column is represented by two RLE entries, the pass_fail column isrepresented by four entries, and the class column is represented by 16 entries, regardless of thecardinality of the students table. HP Vertica efficiently finds the set of rows that satisfy all thepredicates, resulting in a huge reduction of search effort for RLE encoded columns that occur earlyin the sort order. Consequently, if you use low-cardinality columns in local predicates, as in theprevious example, put those columns early in the projection sort order, in increasing order of distinctcardinality (that is, in increasing order of the number of distinct values in each column).
Administrator's Guide
HP Vertica Analytics Platform (7.0.x) Page 153 of 969

If you sort this table with student.class first, you improve the performance of queries that restrictonly on the student.class column, and you improve the compression of the student.classcolumn (which contains the largest number of distinct values), but the other columns do notcompress as well. Determining which projection is better depends on the specific queries in yourworkload, and their relative importance.
Storage savings with compression decrease as the cardinality of the column increases; however,storage savings with compression increase as the number of bytes required to store values in thatcolumn increases.
Maximize the Advantages of RLETomaximize the advantages of RLE encoding, use it only when the average run length of a columnis greater than 10 when sorted. For example, suppose you have a table with the following columns,sorted in order of cardinality from low to high:
address.country, address.region, address.state, address.city, address.zipcode
The zipcode columnmight not have 10 sorted entries in a row with the same zip code, so there isprobably no advantage to run-length encoding that column, and it could make compression worse.But there are likely to bemore than 10 countries in a sorted run length, so applying RLE to thecountry column can improve performance.
Put Lower Cardinality Column First forFunctional Dependencies
In general, put columns that you use for local predicates (as in the previous example) earlier in thejoin order to make predicate evaluationmore efficient. In addition, if a lower cardinality column isuniquely determined by a higher cardinality column (like city_id uniquely determining a state_id), itis always better to put the lower cardinality, functionally determined column earlier in the sort orderthan the higher cardinality column.
For example, in the following sort order, the Area_Code column is sorted before the Number columnin the customer_info table:
Administrator's Guide
HP Vertica Analytics Platform (7.0.x) Page 154 of 969

ORDER BY = customer_info.Area_Code, customer_info.Number, customer_info.Address
In the query, put the Area_Code column first, so that only the values in the Number column that startwith 978 are scanned.
SELECT AddressFROM customer_info WHERE Area_Code='978' AND Number='9780123457';
Sort for Merge JoinsWhen processing a join, the HP Vertica optimizer chooses from two algorithms:
l Merge join—If both inputs are pre-sorted on the join column, the optimizer chooses amergejoin, which is faster and uses less memory.
l Hash join—Using the hash join algorithm, HP Vertica uses the smaller (inner) joined table tobuild an in-memory hash table on the join column. A hash join has no sort requirement, but itconsumes morememory because Vertica builds a hash table with the values in the inner table.The optimizer chooses a hash join when projections are not sorted on the join columns.
If both inputs are pre-sorted, merge joins do not have to do any pre-processing, making the joinperform faster. HP Vertica uses the term sort-merge join to refer to the case when at least one ofthe inputs must be sorted prior to themerge join. HP Vertica sorts the inner input side but only if theouter input side is already sorted on the join columns.
To give the Vertica query optimizer the option to use an efficient merge join for a particular join,create projections on both sides of the join that put the join column first in their respectiveprojections. This is primarily important to do if both tables are so large that neither table fits intomemory. If all tables that a table will be joined to can be expected to fit into memory simultaneously,the benefits of merge join over hash join are sufficiently small that it probably isn't worth creating aprojection for any one join column.
Administrator's Guide
HP Vertica Analytics Platform (7.0.x) Page 155 of 969

Sort on Columns in Important QueriesIf you have an important query, one that you run on a regular basis, you can save time by putting thecolumns specified in theWHERE clause or the GROUP BY clause of that query early in the sortorder.
If that query uses a high-cardinality column such as Social Security number, youmay sacrificestorage by placing this column early in the sort order of a projection, but your most important querywill be optimized.
Sort Columns of Equal Cardinality By SizeIf you have two columns of equal cardinality, put the column that is larger first in the sort order. Forexample, a CHAR(20) column takes up 20 bytes, but an INTEGER column takes up 8 bytes. Byputting the CHAR(20) column ahead of the INTEGER column, your projection compresses better.
Sort Foreign Key Columns First, From Low toHigh Distinct Cardinality
Suppose you have a fact table where the first four columns in the sort order make up a foreign keyto another table. For best compression, choose a sort order for the fact table such that the foreignkeys appear first, and in increasing order of distinct cardinality. Other factors also apply to thedesign of projections for fact tables, such as partitioning by a time dimension, if any.
In the following example, the table inventory stores inventory data, and product_key andwarehouse_key are foreign keys to the product_dimension and warehouse_dimension tables:
CREATE TABLE inventory ( date_key INTEGER NOT NULL,product_key INTEGER NOT NULL,warehouse_key INTEGER NOT NULL,...
);ALTER TABLE inventory
ADD CONSTRAINT fk_inventory_warehouse FOREIGN KEY(warehouse_key)REFERENCES warehouse_dimension(warehouse_key);
ALTER TABLE inventoryADD CONSTRAINT fk_inventory_product FOREIGN KEY(product_key)REFERENCES product_dimension(product_key);
The inventory table should be sorted by warehouse_key and then product, since the cardinality ofthe warehouse_key column is probably lower that the cardinality of the product_key.
Prioritizing Column Access Speed
If youmeasure and set the performance of storage locations within your cluster, HP Vertica usesthis information to determine where to store columns based on their rank. For more information, seeSetting Storage Performance.
How Columns are Ranked
Administrator's Guide
HP Vertica Analytics Platform (7.0.x) Page 156 of 969
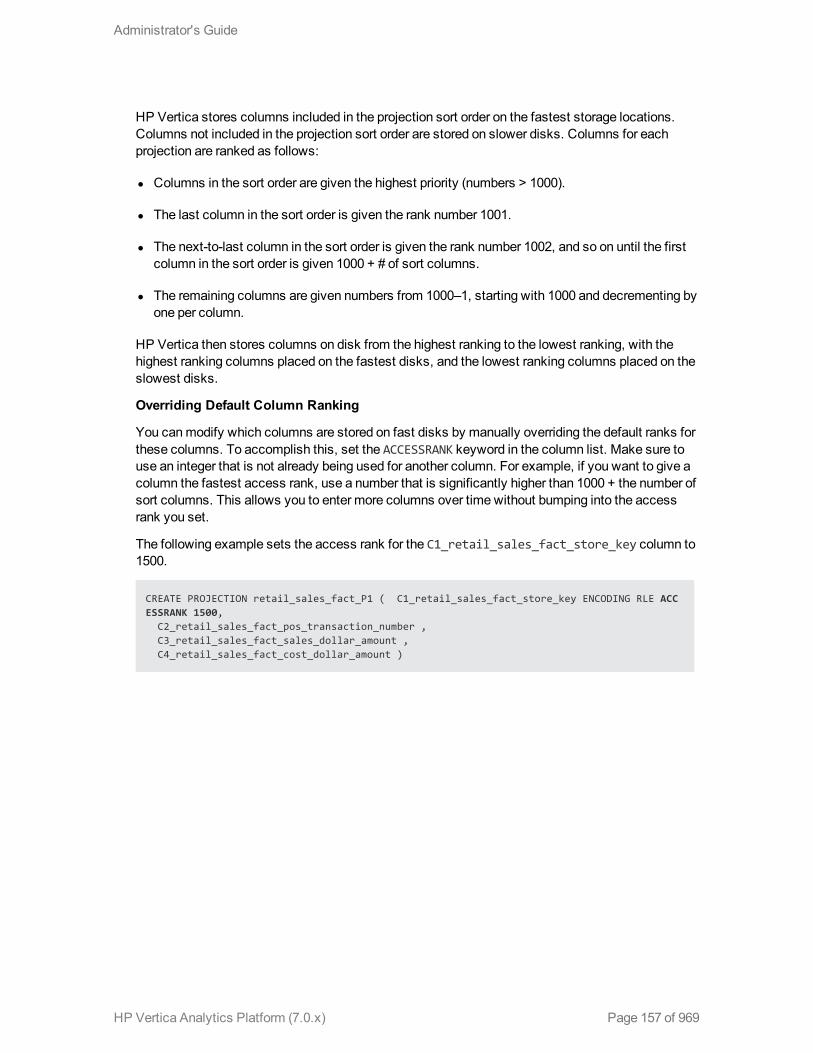
HP Vertica stores columns included in the projection sort order on the fastest storage locations.Columns not included in the projection sort order are stored on slower disks. Columns for eachprojection are ranked as follows:
l Columns in the sort order are given the highest priority (numbers > 1000).
l The last column in the sort order is given the rank number 1001.
l The next-to-last column in the sort order is given the rank number 1002, and so on until the firstcolumn in the sort order is given 1000 + # of sort columns.
l The remaining columns are given numbers from 1000–1, starting with 1000 and decrementing byone per column.
HP Vertica then stores columns on disk from the highest ranking to the lowest ranking, with thehighest ranking columns placed on the fastest disks, and the lowest ranking columns placed on theslowest disks.
Overriding Default Column Ranking
You canmodify which columns are stored on fast disks by manually overriding the default ranks forthese columns. To accomplish this, set the ACCESSRANK keyword in the column list. Make sure touse an integer that is not already being used for another column. For example, if you want to give acolumn the fastest access rank, use a number that is significantly higher than 1000 + the number ofsort columns. This allows you to enter more columns over time without bumping into the accessrank you set.
The following example sets the access rank for the C1_retail_sales_fact_store_key column to1500.
CREATE PROJECTION retail_sales_fact_P1 ( C1_retail_sales_fact_store_key ENCODING RLE ACCESSRANK 1500,
C2_retail_sales_fact_pos_transaction_number ,C3_retail_sales_fact_sales_dollar_amount ,C4_retail_sales_fact_cost_dollar_amount )
Administrator's Guide
HP Vertica Analytics Platform (7.0.x) Page 157 of 969

Projection ExamplesThis section provides examples that show you how to create projections.
New K-Safe=2 Database
In this example, projections are created for a new five-node database with a K-safety of 2. Tosimplify the example, this database contains only two tables: retail_sale_fact and store_dimension. Creating projections for this database consists of creating the following segmented andunsegmented (replicated) superprojections:
l Segmented projections
To support K-safety=2, the database requires three segmented projections (one projection andtwo buddy projections) for each fact table. In this case, it requires three segmented projectionsfor the retail_sale_fact table:
Projection Description
P1 The primary projection for the retail_sale_fact table.
P1_B1 The first buddy projection for P1. This buddy is required to provide K-safety=1.
P1_B2 The second buddy projection for P1. This buddy is required to provide K-safety=2.
l Unsegmented Projections
To support the database, one unsegmented superprojectionmust be created for each dimensiontable on each node. In this case, one unsegmented superprojectionmust be created on eachnode for the store_dimension table:
Node Unsegmented Projection
Node01 store_dimension_Node01
Node02 store_dimension_Node02
Node03 store_dimension_Node03
Node04 store_dimension_Node04
Node05 store_dimension_Node05
Creating Segmented Projections Example
The following SQL script creates the P1 projection and its buddies, P1_B1 and P1_B2, for theretail_sales_fact table. The following syntax is significant:
Administrator's Guide
HP Vertica Analytics Platform (7.0.x) Page 158 of 969
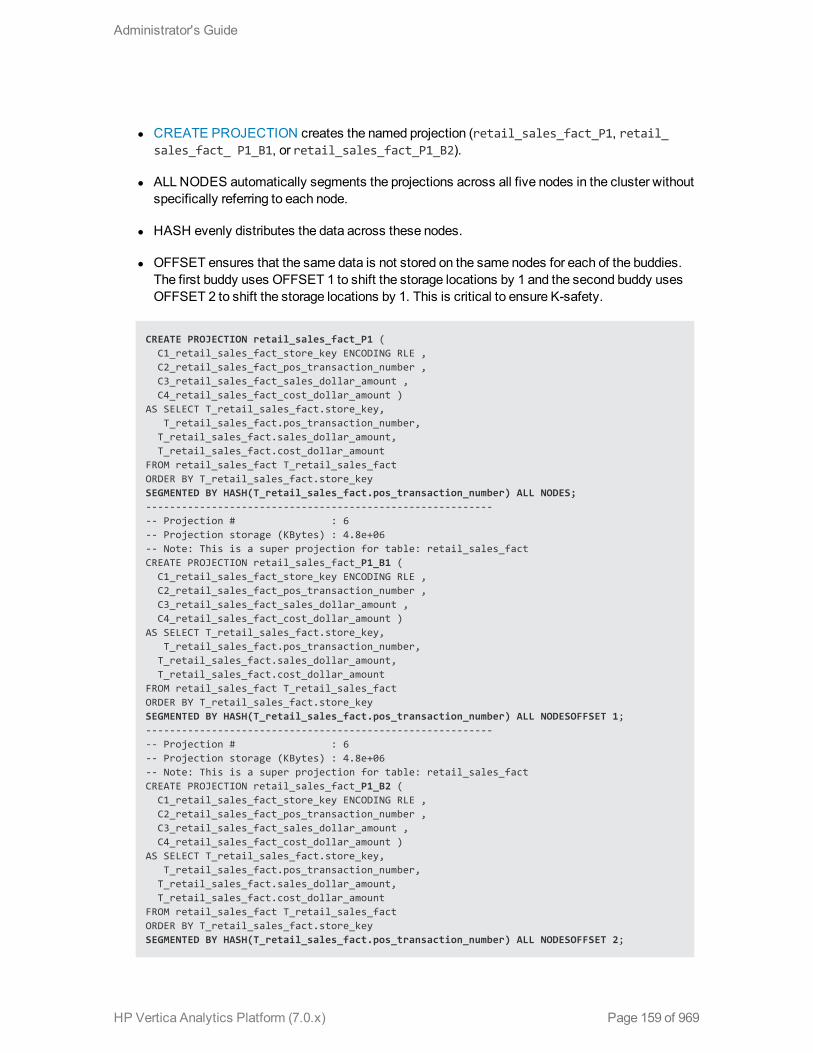
l CREATE PROJECTION creates the named projection (retail_sales_fact_P1, retail_sales_fact_ P1_B1, or retail_sales_fact_P1_B2).
l ALLNODES automatically segments the projections across all five nodes in the cluster withoutspecifically referring to each node.
l HASH evenly distributes the data across these nodes.
l OFFSET ensures that the same data is not stored on the same nodes for each of the buddies.The first buddy uses OFFSET 1 to shift the storage locations by 1 and the second buddy usesOFFSET 2 to shift the storage locations by 1. This is critical to ensure K-safety.
CREATE PROJECTION retail_sales_fact_P1 (C1_retail_sales_fact_store_key ENCODING RLE ,C2_retail_sales_fact_pos_transaction_number ,C3_retail_sales_fact_sales_dollar_amount ,C4_retail_sales_fact_cost_dollar_amount )
AS SELECT T_retail_sales_fact.store_key,T_retail_sales_fact.pos_transaction_number,
T_retail_sales_fact.sales_dollar_amount,T_retail_sales_fact.cost_dollar_amount
FROM retail_sales_fact T_retail_sales_factORDER BY T_retail_sales_fact.store_keySEGMENTED BY HASH(T_retail_sales_fact.pos_transaction_number) ALL NODES;------------------------------------------------------------ Projection # : 6-- Projection storage (KBytes) : 4.8e+06-- Note: This is a super projection for table: retail_sales_factCREATE PROJECTION retail_sales_fact_P1_B1 (
C1_retail_sales_fact_store_key ENCODING RLE ,C2_retail_sales_fact_pos_transaction_number ,C3_retail_sales_fact_sales_dollar_amount ,C4_retail_sales_fact_cost_dollar_amount )
AS SELECT T_retail_sales_fact.store_key,T_retail_sales_fact.pos_transaction_number,
T_retail_sales_fact.sales_dollar_amount,T_retail_sales_fact.cost_dollar_amount
FROM retail_sales_fact T_retail_sales_factORDER BY T_retail_sales_fact.store_keySEGMENTED BY HASH(T_retail_sales_fact.pos_transaction_number) ALL NODESOFFSET 1;------------------------------------------------------------ Projection # : 6-- Projection storage (KBytes) : 4.8e+06-- Note: This is a super projection for table: retail_sales_factCREATE PROJECTION retail_sales_fact_P1_B2 (
C1_retail_sales_fact_store_key ENCODING RLE ,C2_retail_sales_fact_pos_transaction_number ,C3_retail_sales_fact_sales_dollar_amount ,C4_retail_sales_fact_cost_dollar_amount )
AS SELECT T_retail_sales_fact.store_key,T_retail_sales_fact.pos_transaction_number,
T_retail_sales_fact.sales_dollar_amount,T_retail_sales_fact.cost_dollar_amount
FROM retail_sales_fact T_retail_sales_factORDER BY T_retail_sales_fact.store_keySEGMENTED BY HASH(T_retail_sales_fact.pos_transaction_number) ALL NODESOFFSET 2;
Administrator's Guide
HP Vertica Analytics Platform (7.0.x) Page 159 of 969

----------------------------------------------------------
Creating Unsegmented Projections Example
The following script uses the UNSEGMENTED ALLNODES syntax to create one unsegmentedsuperprojection for the store_dimension table on each node.
CREATE PROJECTION store_dimension ( C0_store_dimension_floor_plan_type ENCODING RLE ,C1_store_dimension_photo_processing_type ENCODING RLE ,C2_store_dimension_store_key ,C3_store_dimension_store_name ,C4_store_dimension_store_number ,C5_store_dimension_store_street_address ,C6_store_dimension_store_city ,C7_store_dimension_store_state ,C8_store_dimension_store_region ,C9_store_dimension_financial_service_type ,C10_store_dimension_selling_square_footage ,C11_store_dimension_total_square_footage ,C12_store_dimension_first_open_date ,C13_store_dimension_last_remodel_date )
AS SELECT T_store_dimension.floor_plan_type,T_store_dimension.photo_processing_type,T_store_dimension.store_key,T_store_dimension.store_name,T_store_dimension.store_number,T_store_dimension.store_street_address,T_store_dimension.store_city,T_store_dimension.store_state,T_store_dimension.store_region,T_store_dimension.financial_service_type,T_store_dimension.selling_square_footage,T_store_dimension.total_square_footage,T_store_dimension.first_open_date,T_store_dimension.last_remodel_date
FROM store_dimension T_store_dimensionORDER BY T_store_dimension.floor_plan_type, T_store_dimension.photo_processing_typeUNSEGMENTED ALL NODES;
Adding Node to a Database
In this example, a fourth node (Node04) is being added to a three-node database cluster. Thedatabase contains two tables: retail_sale_fact and store_dimension. It also contains thefollowing segmented and unsegmented (replicated) superprojections:
l Segmented projections
P1 and its buddy, B1, are projections for the retail_sale_fact table. They were created usingthe ALL NODES syntax, so HP Vertica automatically segments the projections across all threenodes.
Administrator's Guide
HP Vertica Analytics Platform (7.0.x) Page 160 of 969

l Unsegmented Projections
Currently three unsegmented superprojections exist for the store_dimension table, one foreach node, as follows:
Node Unsegmented Projection
Node01 store_dimension_Node01
Node02 store_dimension_Node02
Node03 store_dimension_Node03
To support an additional node, replacement projections need to be created for the segmentedprojections, P1 and B1. The new projections could be called P2 and B2, respectively. Additionally, anunsegmented superprojection (store_dimension_Node04) needs to be created for the dimensiontable on the new node (Node04).
Creating Segmented Projections Example
The following SQL script creates the original P1 projection and its buddy, B1, for the retail_sales_fact table. Since the script uses the ALL NODES syntax, creating a new projection that includesthe fourth node is as easy as copying the script and changing the names of the projection and itsbuddy to unique names (for example, P2 for the projection and P2_B2 for its buddy). The names thatneed to be changed are highlighted within the example.
CREATE PROJECTION retail_sales_fact_P1 ( C1_retail_sales_fact_store_key ENCODING RLE , C2_retail_sales_fact_pos_transaction_number , C3_retail_sales_fact_sales_dollar_amount , C4_retail_sales_fact_cost_dollar_amount )
AS SELECT T_retail_sales_fact.store_key, T_retail_sales_fact.pos_transaction_number,
T_retail_sales_fact.sales_dollar_amount,T_retail_sales_fact.cost_dollar_amount
FROM retail_sales_fact T_retail_sales_factORDER BY T_retail_sales_fact.store_keySEGMENTED BY HASH(T_retail_sales_fact.pos_transaction_number) ALL NODES;------------------------------------------------------------ Projection # : 6-- Projection storage (KBytes) : 4.8e+06-- Note: This is a super projection for table: retail_sales_factCREATE PROJECTION retail_sales_fact_P1_B1 ( C1_retail_sales_fact_store_key ENCODING RLE , C2_retail_sales_fact_pos_transaction_number , C3_retail_sales_fact_sales_dollar_amount , C4_retail_sales_fact_cost_dollar_amount )
AS SELECT T_retail_sales_fact.store_key, T_retail_sales_fact.pos_transaction_number,
T_retail_sales_fact.sales_dollar_amount,T_retail_sales_fact.cost_dollar_amount
FROM retail_sales_fact T_retail_sales_factORDER BY T_retail_sales_fact.store_key
Administrator's Guide
HP Vertica Analytics Platform (7.0.x) Page 161 of 969

SEGMENTED BY HASH(T_retail_sales_fact.pos_transaction_number) ALL NODESOFFSET 1;----------------------------------------------------------
Creating Unsegmented Projections Example
The following script used the ALL NODES syntax to create the original three unsegmentedsuperprojections for the store_dimension table, one per node.
The following syntax is significant:
l CREATE PROJECTION creates a superprojection called store_dimension.
l ALLNODES automatically places a complete copy of the superprojection on each of the threeoriginal nodes.
CREATE PROJECTION store_dimension (C0_store_dimension_floor_plan_type ENCODING RLE ,C1_store_dimension_photo_processing_type ENCODING RLE ,C2_store_dimension_store_key ,C3_store_dimension_store_name ,C4_store_dimension_store_number ,C5_store_dimension_store_street_address ,C6_store_dimension_store_city ,C7_store_dimension_store_state ,C8_store_dimension_store_region ,C9_store_dimension_financial_service_type ,C10_store_dimension_selling_square_footage ,C11_store_dimension_total_square_footage ,C12_store_dimension_first_open_date ,C13_store_dimension_last_remodel_date )
AS SELECT T_store_dimension.floor_plan_type,T_store_dimension.photo_processing_type,T_store_dimension.store_key,T_store_dimension.store_name,T_store_dimension.store_number,T_store_dimension.store_street_address,T_store_dimension.store_city,T_store_dimension.store_state,T_store_dimension.store_region,T_store_dimension.financial_service_type,T_store_dimension.selling_square_footage,T_store_dimension.total_square_footage,T_store_dimension.first_open_date,T_store_dimension.last_remodel_date
FROM store_dimension T_store_dimensionORDER BY T_store_dimension.floor_plan_type, T_store_dimension.photo_processing_typeUNSEGMENTED ALL NODES;
To create another copy of the superprojection on the fourth node (Node04), the best approach is tocreate a copy of that projection on Node04 only. This means avoiding the ALL NODES syntax. Thefollowing script shows how to create the fourth superprojection.
The following syntax is significant:
Administrator's Guide
HP Vertica Analytics Platform (7.0.x) Page 162 of 969
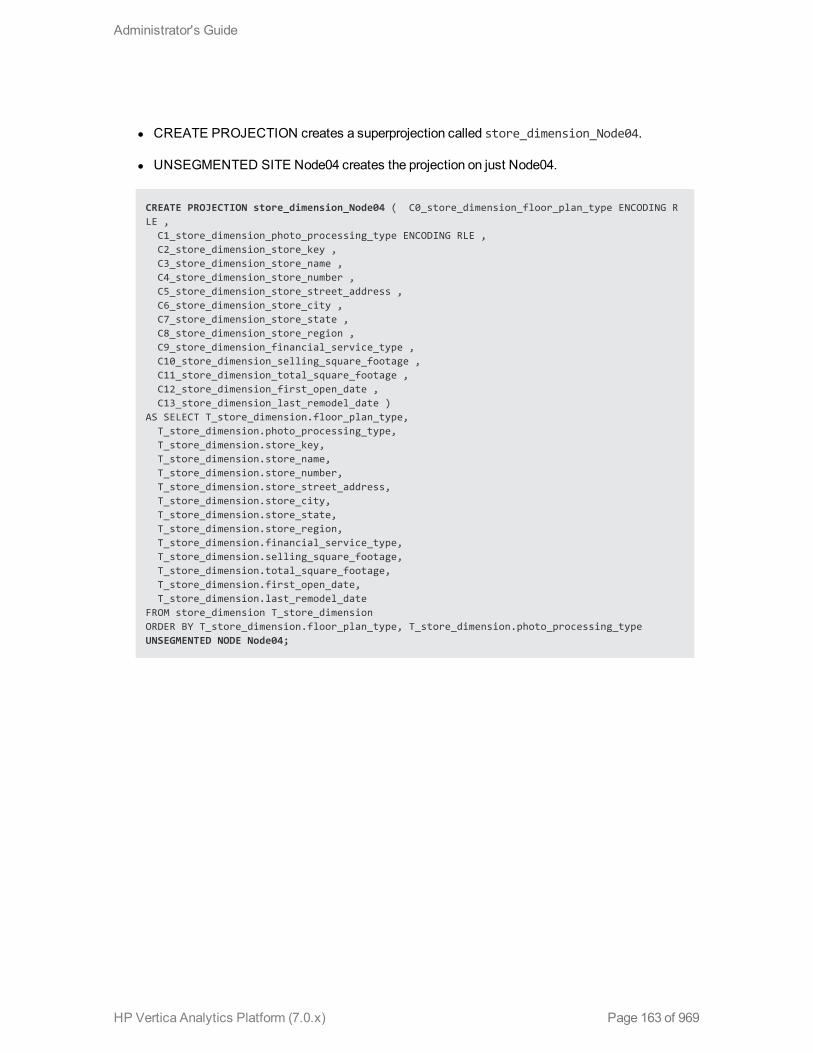
l CREATE PROJECTION creates a superprojection called store_dimension_Node04.
l UNSEGMENTED SITE Node04 creates the projection on just Node04.
CREATE PROJECTION store_dimension_Node04 ( C0_store_dimension_floor_plan_type ENCODING RLE ,
C1_store_dimension_photo_processing_type ENCODING RLE ,C2_store_dimension_store_key ,C3_store_dimension_store_name ,C4_store_dimension_store_number ,C5_store_dimension_store_street_address ,C6_store_dimension_store_city ,C7_store_dimension_store_state ,C8_store_dimension_store_region ,C9_store_dimension_financial_service_type ,C10_store_dimension_selling_square_footage ,C11_store_dimension_total_square_footage ,C12_store_dimension_first_open_date ,C13_store_dimension_last_remodel_date )
AS SELECT T_store_dimension.floor_plan_type,T_store_dimension.photo_processing_type,T_store_dimension.store_key,T_store_dimension.store_name,T_store_dimension.store_number,T_store_dimension.store_street_address,T_store_dimension.store_city,T_store_dimension.store_state,T_store_dimension.store_region,T_store_dimension.financial_service_type,T_store_dimension.selling_square_footage,T_store_dimension.total_square_footage,T_store_dimension.first_open_date,T_store_dimension.last_remodel_date
FROM store_dimension T_store_dimensionORDER BY T_store_dimension.floor_plan_type, T_store_dimension.photo_processing_typeUNSEGMENTED NODE Node04;
Administrator's Guide
HP Vertica Analytics Platform (7.0.x) Page 163 of 969

Implementing SecurityIn HP Vertica, there are three primary security concerns:
l Client authentication prevents unauthorized access to the database
l Connection encryption prevents the interception of data, as well as authenticating the identity ofthe server and the client
l Client authorization (managing users and privileges) controls what users can access andchange in the database
Client AuthenticationTo gain access to HP Vertica, a user or client applicationmust supply the name of a valid useraccount. You can configure HP Vertica to require just a user name, but amore common practice isto require an additional means of authentication, such as a password. There are several ways toimplement this added authentication:
l Password Authentication using passwords stored in the database.
l Authentication using outsidemeans, such as LDAP or Kerberos.
You can use different authenticationmethods based on:
l Connection type
l Client IP address range
l User name for the client that is attempting to access the server
See Implementing Client Authentication.
Connection EncryptionTo secure the connection between the client and the server, you can configure HP Vertica anddatabase clients to use Secure Socket Layer (SSL) to communicate. HP Vertica uses SSL to:
l Authenticate the server so the client can confirm the server's identity. HP Vertica supportsmutual authentication in which the server can also confirm the identity of the client. Thisauthentication helps prevent "man-in-the-middle" attacks.
l Encrypt data sent between the client and database server to significantly reduce the likelihoodthat the data can be read if the connection between the client and server is compromised.
l Verify that data sent between the client and server has not been altered during transmission.
See Implementing SSL.
Administrator's GuideImplementing Security
HP Vertica Analytics Platform (7.0.x) Page 164 of 969

Client AuthorizationDatabase users should have access to just the database resources they need to perform theirtasks. For example, some users need to query only specific sets of data. To prevent unauthorizedaccess to additional data, you can limit their access to just the data that they need to perform theirqueries. Other users should be able to read the data but not be able tomodify or insert new data.Still other users might needmore permissive access, such as the right to create andmodifyschemas, tables, and views or even grant other users access to database resources.
A collection of SQL statements control authorization for the resources users can access. SeeManaging Users and Privileges, in particular About Database Privileges. You can also use roles togrant users access to a set of privileges, rather than directly grant the privileges for each user. SeeAbout Database Roles.
Use theGRANT Statements to assign privileges to users and the REVOKE Statements to repealprivileges. See the SQLReferenceManual for details.
Administrator's GuideImplementing Security
HP Vertica Analytics Platform (7.0.x) Page 165 of 969

Implementing Client AuthenticationWhen a client (the user who runs a client application or the client application itself) connects to theHP Vertica database server, it supplies the HP Vertica database user name to gain access. HPVertica restricts which database users can connect through client authentication, a processwhere the database server establishes the identity of the requesting client and determines whetherthat client is authorized to connect to the HP Vertica server using the supplied credentials.
HP Vertica offers several client authenticationmethods, which you set up using theAdministration Tools (see How to Create Authentication Records). Although you can configureHP Vertica to require just a user name for connections, you likely require more securemeans ofauthentication, such as a password at aminimum.
Supported Client Authentication TypesHP Vertica supports the following types of authentication to prove a client's identity. For informationabout syntax and formatting rules, see Authentication Record Format and Rules.
l Trust authentication—Authorizes any user that connects to the server using a valid user name.
l Reject authentication—Blocks the connection and prevents additional records from beingevaluated for the requesting client.
l Kerberos authentication—Uses a secure, single-sign-on, trusted third-party, mutualauthentication service to connect to HP Vertica using one of the followingmethods:
n krb5 uses theMIT Kerberos APIs (deprecated in HP Vertica7.0. Use the gssmethod).
n gss authentication uses the the GSSAPI standard and provides better compatibility with non-MIT Kerberos implementations, such as for Java andWindows clients.
l Password authentication—Uses either md5 or passwordmethods, which are similar except forthemanner in which the password is sent across the network:
n md5method sends encryptedMD5-hashed passwords over the network, and the serverprovides the client with salt.
n passwordmethod sends passwords over the network in clear text.
l LDAP authentication—Works like password authentication except the ldapmethodauthenticates the client against a Lightweight Directory Access Protocol server.
l Ident-based authentication—Authenticates the client against the username in an Ident server.
Themethod HP Vertica uses to authenticate a particular client connection can be automaticallyselected on the basis of the connection type, client IP address, and user name. See About ExternalAuthentication for more information.
Administrator's GuideImplementing Security
HP Vertica Analytics Platform (7.0.x) Page 166 of 969

If You Want Communication Layer AuthenticationTopics in this section describe authenticationmethods supported at the database server layer. Forcommunication layer authentication between server and client, see Implementing SSL.
Administrator's GuideImplementing Security
HP Vertica Analytics Platform (7.0.x) Page 167 of 969

Password AuthenticationThe simplest method to authenticate a client connection is to assign the user account a passwordin HP Vertica. If a user account has a password set, then the user or client using the account toconnect to the databasemust supply the correct password. If the user account does not have apassword set and HP Vertica is not configured to use another form of client authentication, the useraccount is always allowed to log in.
Passwords are stored in the database in an encrypted format to prevent others from potentiallystealing them. However, the transmission of the password to HP Vertica is in plain text. Thismeans it is possible for a "man in themiddle" attack to intercept the password. To secure the login,consider implementing SSL security or MD5 authentication.
About Password Creation and ModificationA superuser creates passwords for user accounts when he or she runs the CREATE USERstatement. You can add a password afterword by using the ALTER USER statement. To change apassword, use ALTER USER or the vsql \password command. A superuser can set any useraccount's password. Users can change their own passwords.
Tomake password authenticationmore effective, enforce password policies that control how oftenusers are forced to change passwords and the required content of a password. These policies areset using Profiles.
Default Password AuthenticationBy default, the vertica.conf file does not contain any authentication records. When the file isempty, HP Vertica defaults to using password authentication for user accounts that havepasswords.
If you add authenticationmethods to vertica.conf, even for remote hosts, passwordauthentication is disabled. Youmust explicitly enable password authentication. To always enablelocal users to log in using password authentication, you would add the following to thevertica.conf file:
ClientAuthentication = local all password
The above entry allows users logged into a database host to connect to the database using HPVertica-based passwords, rather than some other form of authentication.
ProfilesYou set password policies using profiles. A profile is a group of parameters that sets requirementsfor user passwords. You assign users to a profile to set their password policy.
A profile controls:
Administrator's GuideImplementing Security
HP Vertica Analytics Platform (7.0.x) Page 168 of 969

l How often users must change their passwords.
l How many times users must change their passwords before they can reuse an old password.
l How many times users can fail to log in before their account is locked.
l The required length and content of the password (maximum andminimum amount of charactersand theminimum number of letters, capital letters, lowercase letters, digits, and symbols thatmust be in a password).
You can createmultiple profiles to enforce different password policies for different users. Forexample, youmight decide to create one profile for interactive users that requires them to frequentlychange their passwords and another profile for user accounts that applications use to access thedatabase that aren't required to change passwords.
How You Create and Modify Profiles
You create profiles using the CREATE PROFILE statement and change profiles using ALTERPROFILE. You can assign a user to a profile when you create the user (CREATE USER), orafterwards using the ALTER USER statement. A user can be assigned to only one profile at a time.
All newly-created databases contain an initial profile namedDEFAULT. All database users areassigned to the DEFAULT profile if:
l You do not explicitly assign users a profile when you create them
l You drop the profile to which a user is currently assigned
You can change the policy parameters in the DEFAULT profile, but you cannot delete it.
Note:When upgrading from versions of HP Vertica prior to version 5.0, a DEFAULT profile isadded to each database, and all users are assigned to it.
The profiles you create can inherit some or all of their policy parameters from the DEFAULT profile.When creating a profile using the CREATE PROFILE statement, any parameter you set to thespecial value DEFAULT or any parameter to which you do not assign a value inherits its value fromthe DEFAULT profile. Changing a parameter in the the DEFAULT profile changes that parameter'svalue in every profile that inherited the parameter from DEFAULT.
When you assign users to a profile (or alter an existing profile that has users assigned to it), theprofile's policies for password content (maximum andminimum length, number of specific types ofcharacters) do not have an immediate effect on the users—HP Vertica does not test user'spasswords to ensure they comply with the new password criteria. These settings only affect theusers the next time they change their password. If you want to ensure users comply with the newpassword policy, use the ALTER USER statement to expire user passwords. Users with expiredpasswords are prompted to their change passwords when they next log in.
Note: Only the profile settings for how many failed login attempts trigger Account Locking and
Administrator's GuideImplementing Security
HP Vertica Analytics Platform (7.0.x) Page 169 of 969
how long accounts are locked have an effect on external password authenticationmethodssuch as LDAP or Kerberos. All password complexity, reuse, and lifetime settings have aneffect on passwords managed by HP Vertica only.
See Also
l PROFILES
Password ExpirationUse profiles to control how often users must change their passwords. Initially, the DEFAULT profileis set so that passwords never expire. You can change this default value, or you can createadditional profiles that set time limits for passwords and assign users to them.
When a password expires, the user is required to change his or her password when next logging in,unless the profile to which the user is assigned has a PASSWORD_GRACE_TIME set. In thatcase, the user is allowed to log in after the expiration, but HP Vertica warns about the passwordexpiration. Once the grace period elapses, the user is forced to change their password, unless theyhavemanually changed the password during the grace period.
Password expiration has no effect on any of the user's current sessions.
Note: You can expire a user's password immediately using the ALTER USER statement'sPASSWORD EXPIRE argument. Expiring a password is useful to force users to comply with achange to their password policy, or when setting a new password for users who have forgottentheir old one.
Account LockingOne password policy you can set in a profile is how many consecutive failed login attempts (givingthe wrong password when trying to log in) a user account is allowed before the account is locked.You set this value using the FAILED_LOGIN_ATTEMPTS parameter in the CREATE PROFILE orALTER PROFILE statement.
HP Vertica locks any user account that has more sequential failed login attempts than the value towhich you set FAILED_LOGIN_ATTEMPTS. A locked account is not allowed to log in, even if the usersupplies the correct password.
How to Unlock a Locked Account
There are two ways to unlock an account:
l A superuser canmanually unlock the account using the ALTER USER command.
l HP Vertica automatically unlocks the account after the number of days set in the PASSWORD_LOCK_TIME parameter of the user's profile has passed. However, if this parameter is set to
Administrator's GuideImplementing Security
HP Vertica Analytics Platform (7.0.x) Page 170 of 969

UNLIMITED, the user's account is never automatically unlocked and a superuser must bemanually unlock it.
This lockingmechanism helps prevent dictionary-style brute-force attempts to crack users'passwords.
Note: A superuser account cannot be locked, since it is the only user that can unlockaccounts. For this reason, you should ensure that you choose a very secure password for asuperuser account. See Password Guidelines for suggestions on choosing a secure password.
The following examples demonstrates failing to log in to an account whose profile is set to lockaccounts after three failed tries:
> vsql -U dbuserPassword:vsql: FATAL: Invalid username or password> vsql -U dbuserPassword:vsql: FATAL: Invalid username or password> vsql -U dbuserPassword:vsql: FATAL: The user account "dbuser" is locked due to too many invalid loginsHINT: Please contact the database administrator> vsql -U dbuserPassword:vsql: FATAL: The user account "dbuser" is locked due to too many invalid loginsHINT: Please contact the database administrator
Password GuidelinesFor passwords to be effective, they must be hard to guess. You need to protect passwords from:
l Dictionary-style brute-force attacks
l Users who have knowledge of the password holder (family names, dates of birth, etc.)
Use Profiles to enforce good password practices (password length and required content), andmakesure database users know not to use personal information in their passwords.
What to Use
Consider the following password guidelines, published by the Internet Engineering Task Force(IETF), when you create passwords:
l Usemixed-case characters.
l Use non-alphabetic characters (for example, numeric digits and punctuation).
Administrator's GuideImplementing Security
HP Vertica Analytics Platform (7.0.x) Page 171 of 969

l Use a password that is easy to remember, so you don't need to write it down; for example,i3atSandw1ches! instead of !a#^*!$&D)z.
l Use a password that you can type quickly without having to look at the keyboard.
What to Avoid
Avoid using the following practices to create a password:
l Do not use your login or user name in any form (as-is, reversed, capitalized, doubled, and so on).
l Do not use your first, middle, or last name in any form.
l Do not use your spouse's, partner's, child's, parent's, friend's, or pet's name in any form.
l Do not use other information easily obtained about you, including your date of birth, license platenumber, telephone number, Social Security number, make of your automobile, house address,and so on.
l Do not use a password of all digits or all the same letter.
l Do not use a word contained in English or foreign language dictionaries, spelling lists, acronymor abbreviation lists, or other lists of words.
l Do not use a password that contains fewer than six characters.
l Do not give your password to another person for any reason.
See Also
l Creating a Database Name and Password
Administrator's GuideImplementing Security
HP Vertica Analytics Platform (7.0.x) Page 172 of 969

About External AuthenticationTo help you implement external authenticationmethods, HP Vertica provides an editingenvironment within theAdministration Tools that lets you create, edit, andmaintainauthentication records. The Administration Tools also verifies that the authentication records arecorrectly formed, inserts the records into the vertica.conf configuration file, and implements thechanges on all cluster nodes.
The vertica.conf file supports multiple records, one per line, to provide options for client sessionsthat might require a variety of authenticationmethods. Each record establishes the authenticationmethod to use based on:
l Connection type
l Client IP address range
l User name for the client that is attempting to access the database
For example, you could usemultiple records to have application logins authenticated using HPVertica-based passwords, and interactive users authenticated using LDAP. See ExampleAuthentication Records.
HP Vertica uses the first record with amatching connection type, client address, and user name toauthenticate that connection. If authentication fails, the client is denied access to HP Vertica.Access is also denied if no records match the client session. If, however, there are no records (theDBA did not configure vertica.conf), HP Vertica reverts to using the user name and password (ifcreated) to control client access to the database.
Setting up Your Environment to Create AuthenticationRecords
Editing of vertica.conf is performed by the text editor set in your Linux or UNIX account'sVISUAL or EDITOR environment variable. If you have not specified a text editor, HP Vertica usesthe vim (vi) editor.
To switch your editor from vi to GNU Emacs, run the following command before you run theAdministration Tools:
$ export EDITOR=/usr/bin/emacs
You can also add the above line to the .profile file in your home directory to always useGNUEmacs to edit the authentication records.
Caution: Never edit vertica.conf directly, because Administration Tools performs errorchecking on your entries before adding them to the vertica.conf.
Administrator's GuideImplementing Security
HP Vertica Analytics Platform (7.0.x) Page 173 of 969

About Local Password AuthenticationIf you add authenticationmethods to vertica.conf but still want password authentication to worklocally, youmust explicitly add a password authentication entry. See Password Authentication fordetails.
How to Create Authentication RecordsIn this procedure, you'll use the Administration Tools to specify the authenticationmethods to usefor various client sessions.
How to Create Authentication Records
1. On theMainMenu in theAdministration Tools, select View Database Cluster State, verifythat all cluster nodes are UP, and click OK.
2. Select Configuration Menu, and click OK.
3. On theConfiguration Menu, select Edit Authentication, and click OK.
4. Select the database you want to create authentication records for and click OK.
Your system's default editor opens the vertica.conf file .
5. Enter one or more authentication records.
Tip: See Authentication Record Format and Rules and Authentication Record Format andRules for information about the content and rules required to create a record.
6. When you have finished entering authentication records, exit the editor. For example, in vi,press the Esc key and type :wq to complete your editing session.
The Administration Tools verifies that the records are correctly formed and does one of thefollowing, the first of which prompts you for action:
n If the records are properly formed, they are inserted into the vertica.conf file, and the fileis automatically copied to other nodes in the database cluster. You are prompted to restartthe database. Click OK and go to step 7.
n If the records are not properly formed, amessage describes the problem and gives you theopportunity to: edit your errors (e), exit without saving your changes (a), or save andimplement your changes anyway (s). Saving your changes is not recommended because itcan cause client authentication to fail.
7. Restart the database.
Administrator's GuideImplementing Security
HP Vertica Analytics Platform (7.0.x) Page 174 of 969

If You Do Not Specify a Client Authentication Method
If you do not insert records into the vertica.conf file, HP Vertica defaults to the username andpassword (if supplied) to grant access to the database. If you later add authenticationmethods, theusername/password default is no longer enabled. To continue using password authentication, youmust explicitly add it as described in Password Authentication.
See Also
l How toModify Authentication Records
Authentication Record Format and RulesIf the ClientAuthentication record introduced in Security Parameters does not exist, HP Verticauses the passwordmethod to authenticate client connections. Otherwise, each authenticationrecord takes the following format:
Syntax
ClientAuthentication = connection_type user_name address method
Administrator's GuideImplementing Security
HP Vertica Analytics Platform (7.0.x) Page 175 of 969

Arguments
connection_type The access method the client uses to connect to an instance. Valid values are:
l local—Matches connection attempts made using local domain sockets.When using the local connection type, do not specify the <address>parameter.
l host—Matches connection attempts made using TCP/IP. Connectionattempts can bemade using a plain (non-SSL) or SSL-wrapped TCPsocket.
l hostssl—Matches a SSL TCP connection only.
l hostnossl—Matches a plain TCP socket only.
Notes about client connections:
l Avoid using -h <hostname> from the client if a "local" connection type isspecified and you want to match the client authentication entry.
l Use -h <hostname> from the client if you specify a Kerberos connectionmethod (gss or krb5) connectionmethod.
See the vsql command line option h Hostname --host Hostname.
user_name Identifies the client's user name that match this record. Valid user names are:
l all —Matches all users.
l One ormore specific user names.
The user_name argument accepts either a single value or concatenatedvalues. To concatenate values, use a plus sign between the values, forexample: user1+user2.
Administrator's GuideImplementing Security
HP Vertica Analytics Platform (7.0.x) Page 176 of 969

address Identifies the client machine IP address range that match this record. Use aformat of <IP_Address>/<netmask_value>. Youmust specify the IP addressnumerically, not as domain or host names. HP Vertica supports the followingformats:
l w.x.y.z/<mask_format> (For example, 10.10.0.25/24.)
l Themask length indicates the number of high-order bits of the client IPaddress that must match. Do not insert white space between the IPaddress, the slash (/), and the Classless Inter-Domain Routing (CIDR)mask length.
l Separate dotted-IP address andmask values (For example, 10.10.0.25255.255.255.0.)
l To allow users to connect from any IP address, use the value 0.0.0.0/0.
Note: If you are working with amulti-node cluster, be aware that anyIP/netmask settings in host-based ClientAuthentication parameters (host,hostssl, or hostnossl) must match all nodes in the cluster. This setup allowsthe database owner to authenticate with and administer every node in thecluster. For example, specifying 10.10.0.8/30 would allow a CIDR addressrange of 10.10.0.8–10.10.0.11.
Administrator's GuideImplementing Security
HP Vertica Analytics Platform (7.0.x) Page 177 of 969

method Identifies the authenticationmethod to use for clients that match this record.Use one of the followingmethods:
l trust—Authenticates clients based on valid user names only. Youmightimplement trust if a user connection has already been authenticatedthrough some external means, such as SSL or a firewall.
l reject—Rejects the connection and prevents additional records frombeing evaluated for the client. This method is useful for blocking clients byuser name or IP address.
l gss—Authenticates the client using the GSSAPI standard, allowing forbetter compatibility with non-MIT kerberos implementations, such as JavaandWindows clients. (HP Vertica follows RFC 1964.)
krb5—Authenticates the client using theMIT Kerberos APIs. This methodis deprecated in HP Vertica 7.0. Use the gssmethod for all new records andmodify existing krb5 records to use gss as soon as possible.
l password—Requires that the client supply an unencrypted password forauthentication. Because the password is sent over the network in cleartext, never use this method on untrusted networks.
l md5—Requires that the client supply aMessage-Digest Algorithm 5 (MD5)password across the network for authentication. By default, passwords areencryptedMD5-hashed passwords and the server provides the client withsalt.
l ldap—Authenticates the client against a Lightweight Directory AccessProtocol (LDAP) server. This method is useful if your application usesLDAP to query directory services.
l ident—Authenticates the client using an Ident server (HP Vertica followsRFC 1413). Use this method only when the Ident server is installed on thesame system as the HP Vertica database server.
Formatting Rules
When you create authentication records, be aware of the following formatting rules:
l Only one authentication record is allowed per line.
l Each authentication recordmust be on one line.
l Fields that make up the authentication record can be separated by white space or tabs.
l Other than IP addresses andmask columns, field values cannot contain white space.
l Placemore specific rules (a specific user or IP address) before broader rules (all users or a range
Administrator's GuideImplementing Security
HP Vertica Analytics Platform (7.0.x) Page 178 of 969

of IP addresses).
Note: The order of rules is important. HP Vertica scans the list of rules from top to bottomand uses the first rule that matches the incoming connection.
See Also
l Security Parameters
l How to Create Authentication Records
l Example Authentication Records
Configuring LDAP AuthenticationTo use LDAP as the authenticationmethod to validate user name/password pairs:
l Youmust be connected to one or more preconfigured LDAP servers.
l The LDAP directory must contain a record for each client you need to authenticate.
HP Vertica supports two types of LDAP client authentication:
l LDAP bind
l LDAP bind and search
LDAP Bind
If HP Vertica can create a distinguished name (DN) for a user, specify LDAP as the authenticationmethod by creating an authentication record in the vertica.conf file similar to the following:
ClientAuthentication = host all 10.0.0.0/8 ldap "ldap://ldap.example.com/basedn;cn=;,dc=example,dc=com"
Where:
l Youmust include the URL for the LDAP server in the ClientAuthentication parameter. In thisexample, the URL for the LDAP server is ldap://ldap.example.com. For connections overSSL, use S_HTTP, as in the following example:
ClientAuthentication = local all 10.0.0.0/8 ldap "ldaps://ldap.example.com/basedn;cn=;,dc=qa_domain,dc=com"
Administrator's GuideImplementing Security
HP Vertica Analytics Platform (7.0.x) Page 179 of 969

l The HP Vertica server binds the distinguished name constructed as
prefix username suffix
l Typically, the prefix specifies the common name (cn), and the suffix specifies the remaining partof the DN. For example, the DN for user "jsmith" would be
cn=jsmith,dc=example,dc=com
l If the LDAP server does not find that DN, authentication fails.
l For ODBC, the SQLConnect function sends the user name and password to HP Vertica forauthentication. If the client IP address and user name/password combinationmatches an LDAPClientAuthentication record in vertica.conf, HP Vertica contacts the LDAP server.
l For JDBC, the java.sql.DriverManager.getConnection() function passes the user nameand password to the database for authentication. If the client IP address and username/password combinationmatches an LDAP ClientAuthentication record invertica.conf, HP Vertica contacts the LDAP server.
If you have some of the information needed to create a DN in the authentication record, use theLinux tool ldapsearch to find the DN. ldapsearch opens a connection to an LDAP server,searches the LDAP directory using the specified parameters, and returns the DN if it has enoughinformation and finds amatch.
For example, the following ldapsearch command connects to an LDAP/Active Directory serverand searches for the user. The following command searches the server for user jsmith:
$ ldapsearch -LLL -H -x ldap://ad.example.com -b 'dc=example,dc=com' -D 'DOMAIN\jsmith' -w 'password' "DC=ad,DC=example,DC=com" '(sAMAccountName=jsmith)' dn cn uid
The ldapsearch command returns:
dn: CN=jsmith,OU=Users,DC=ad,DC=example,DC=comcn: jsmith
Using this information, create the ClientAuthentication record for this LDAP/Active Directoryrecord as:
ClientAuthentication = host all 10.0.0.0/8 ldap "ldap://ad.example.com/basedn;cn=;,OU=users,DC=ad,DC=example,DC=com"
LDAP Bind and Search
If HP Vertica does not have enough information to create the DN for a user attempting toauthenticate, the authentication recordmust specify to use LDAP bind and search. For LDAP bindand search authentication, the authentication recordmust contain the word search in the URL ofthe LDAP server, for example:
Administrator's GuideImplementing Security
HP Vertica Analytics Platform (7.0.x) Page 180 of 969

ldap://ldap.example.com/search
WhenHP Vertica sees search in the authentication record, it directs the LDAP server to search fora DN with the information in the record.
The format of an authentication record for LDAP bind and search is:
ClientAuthentication = host all 10.0.0.0/8 ldap"ldap://ldap.example.com/search;
basedn=<root DN>;binddn=<bind DN>;bindpasswd=<password>;searchattribute=<attribute_name>"
In this authentication record:
l basedn: Root DN where the search should begin (required)
l binddn: DN of the user to search for (Default: blank)
l bindpasswd: Password of the binddn user (Default: blank)
l searchattribute: Attribute of the binddn user (Default: UID). Use this parameter to search forthe user namewithin a specific attribute.
l Parameters can appear in any order after search;. They must be separated by semicolons.
l The basedn parameter is required. All other parameters are optional.
l If HP Vertica passes a user name to the LDAP server, that name cannot contain any of thefollowing characters because they have special meaning on the LDAP server:
n Asterisks (*)
n Parentheses ( or )
n Forward slashes (/)
n Backward slashes (\)
Using LDAP Over SSL and TLS
If the schema in the authentication record in vertica.conf is ldaps, the HP Vertica server usesSSL on the specified port, or on the LDAPS port (636). If the LDAP server does not support SSL onthat port, authentication fails.
If the schema record in the authentication record is ldap, the HP Vertica server sends a StartTLSrequest to see if the LDAP server supports TLS on the specified port or on the default LDAP port
Administrator's GuideImplementing Security
HP Vertica Analytics Platform (7.0.x) Page 181 of 969

(389). If the LDAP server does not support TLS on that port, the HP Vertica server proceeds withthe authentication without TLS.
To use LDAP over SSL and TLS, youmust specify the location of your certificate file in yourldap.conf file on all nodes:
TLS_CACERT /full-path-to-ca-certificate-file.crt
LDAP Anonymous Binding
Unless you specifically configure the LDAP server to deny anonymous binds, the underlying LDAPprotocol will not causeMC's Configure Authentication process to fail if you choose "Bindanonymously" for theMC administrator. Before you use anonymous bindings for LDAPauthentication onMC, be sure that your LDAP server is configured to explicitly disable/enable thisoption. For more information, see the article on Infusion Technology Solutions and theOpenLDAPdocumentation on access control.
Configuring Multiple LDAP Servers
In the vertica.conf file, the ClientAuthentication record can contain multiple LDAP URLs,separated by single spaces. The following record instructs the LDAP server to search the entiredirectory (basedn=dc=example,dc=com) for a DN with anOU (office unit) attribute that matchesSales. If the search returns no results or otherwise fails, the LDAP server searches for a DN withthe OU attribute that matches Marketing:
ClientAuthentication = host all 10.0.0.0/8 ldap"ldap://ldap.example.com/search;basedn=dc=example,dc=com; OU=Sales""ldap://ldap.example.com/search;basedn=dc=example,dc=com;OU=Marketing"
Configuring Ident AuthenticationThe Ident protocol, defined in RFC 1413, identifies the system user of a particular connection. Youconfigure HP Vertica client authentication to query an Ident server to see if that system user can login as a certain database user without specifying a password. With this feature, system users canrun automated scripts to execute tasks on the HP Vertica server.
Caution: Ident responses can be easily spoofed by untrusted servers. Ident authenticationshould take place only on local connections, where the Ident server is installed on the samecomputer as the HP Vertica database server.
Administrator's GuideImplementing Security
HP Vertica Analytics Platform (7.0.x) Page 182 of 969

ClientAuthentication Records for Ident Authentication
To configure Ident authentication, the ClientAuthentication record in the vertica.conf filemust have one of the following formats:
ClientAuthentication = local <database_user> ident systemusers=<systemuser1:systemuser2:...> [ continue ]ClientAuthentication = local <database_user> ident [ continue ]
Where:
l local indicates that the Ident server is installed on the same computer as the database, arequirement for Ident authentication on HP Vertica.
l <database_user>: The name of any valid user of the database. To allow the specified systemusers to log in as any database user, use the word all instead of a database user name.
l <systemuser1:systemuser2:...>: Colon-delimited list of system user names.
l continue: Allows system users not specified in the systemusers list to authenticate usingmethods specified in subsequent ClientAuthentication records. The continue keyword canbe used with or without the systemusers list.
The following examples show how to configure Ident authentication in HP Vertica:
l Allow the system's root user to log in to the database as the dbadmin user:
ClientAuthentication = local dbadmin ident systemusers=root
l Allow system users jsmith, tbrown, and root to log in as database user user1:
ClientAuthentication = local user1 ident systemusers=jsmith:tbrown:root
l Allow system user jsmith to log in as any database user:
ClientAuthentication = local all ident systemusers=jsmith
l Allow any system user to log in as the database user of the same name:
ClientAuthentication = local all ident
l Allow any system user to log in as user1:
Administrator's GuideImplementing Security
HP Vertica Analytics Platform (7.0.x) Page 183 of 969

ClientAuthentication = local user1 ident systemusers=*
l Allow the system user backup to log in as dbadmin without a password and allow all othersystem users to log in a dbadmin with a password:
ClientAuthentication = local dbadmin ident systemusers=backup continue, local dbadminpassword
l Allow all system users to log in as the database user with the same namewithout a password,and log in as other database users with a password:
ClientAuthentication = local all ident continue, local all password
Installing and Configuring an Ident Server
To use Ident authentication, youmust install the oidentd server and enable it on your HP Verticaserver. oidentd is an Ident daemon that is compatible with HP Vertica and compliant with RFC1413.
To install and configure oidentd on Red Hat Linux for use with your HP Vertica database, take thesesteps:
1. To install oidentd on Red Hat Linux, run this command:
$ yum install oidentd
Note: The source code and installation instructions for oidentd are available at the oidentdwebsite.
2. For Ident authentication to work, the Ident server must accept IPv6 connections. Tomake surethis happens, you need to start oidentd with the argument -a ::. In the script/etc/init.d/oidentid, change the line
exec="/usr/sbin/oidentd"
to
exec="/usr/sbin/oidentd -a ::"
Administrator's GuideImplementing Security
HP Vertica Analytics Platform (7.0.x) Page 184 of 969

3. Restart the server with the following command:
/etc/init.d/oidentd restart
Example Authentication RecordsThe following examples show several different authentication records.
Using an IP Range and Trust Authentication Method
The following example allows the dbadmin account to connect from any IP address in the range of10.0.0.0 to 10.255.255.255 without a password, as long as the connection is made without usingSSL:
ClientAuthentication = hostnossl dbadmin 10.0.0.0/8 trust
Note: If this is the only authentication record in vertica.conf file, dbadmin will be the onlyuser that is able to log in.
Using Multiple Authentication Records
When the vertica.conf file contains multiple authentication records, HP Vertica scans them fromtop to bottom and uses the first entry that matches the incoming connection to authenticate (orreject) the user. If the user fails to authenticate using themethod specified in the record, HP Verticadenies access to that user. You can use this behavior to include records that enable or rejectspecific connections and end with one or more "catch-all" records. The following exampledemonstrates setting up some specific records, followed by some catch-all records:
ClientAuthentication = host alice 192.168.1.100/32 rejectClientAuthentication = host alice 192.168.1.101/32 trustClientAuthentication = host all 0.0.0.0/0 passwordClientAuthentication = local all password
The first two records apply only to the user alice. If alice attempts to connect from 192.168.1.100,the first record is used to authenticate her, which rejects her connection attempt. If she attempts toconnect from 192.168.1.101, she is allowed to connect automatically. If alice attempts to log infrom any other remote system, the third recordmatches, and shemust enter a password. Finally, ifshe attempts to connect locally from a node in the cluster, the fourth record applies, and she againhas to enter a password to authenticate herself. For all other users, the third and fourth record areused to authenticate them using password authentication. The first two records are ignored, sincetheir user name doesn't match the name in the record.
Administrator's GuideImplementing Security
HP Vertica Analytics Platform (7.0.x) Page 185 of 969

Record Order
The ordering of the records is important. If the order of the records were reversed, so that thewildcard rule was first, the rules that are specific to alice would never be used. The wildcard or localrule would always match, and HP Vertica would use the password authentication, nomatter wherealice connected from.
How to Modify Authentication RecordsTomodify an existing authentication record, use theAdministration Tools or set theClientAuthentication configuration parameter.
Using the Administration Tools
The advantages of using the Administration Tools are:
l You do not have to connect to the database
l The editor verifies that records are correctly formed
l The editor maintains records so they are available to you to edit later
Note: Youmust restart the database to implement your changes.
For information about using the Administration Tools to create and edit authentication records, seeHow to Create Authentication Records.
Using the ClientAuthentication Configuration Parameter
The advantage of using the ClientAuthentication configuration parameter is that the changesare implemented immediately across all nodes within the database cluster. You do not need torestart the database.
However, all the database nodes must be up and youmust connect to the database before you setthis parameter. Most importantly, this method does not verify that records are correctly formed andit does not maintain the records so you canmodify them later.
New authentication records are appended to the list of existing authentication records. Because HPVertica scans the list of records from top to bottom and uses the first record that matches theincoming connection, youmight find your newly-added record does not have an effect if HP Verticaused an earlier record instead.
To configure client authentication through a connection parameter, use the SET_CONFIG_PARAMETERfunction:
=> SELECT SET_CONFIG_PARAMETER('ClientAuthentication,'
Administrator's GuideImplementing Security
HP Vertica Analytics Platform (7.0.x) Page 186 of 969

'connection type user name address method');
When you specify authentication records, make sure to adhere to the following guidelines:
l Fields that make up the record can be separated by white space or tabs
l Other than IP addresses andmask columns, field values cannot contain white space
For more information, see Authentication Record Format and Rules.
Examples
The following example creates an authentication record for the trust method:
=> SELECT SET_CONFIG_PARAMETER('ClientAuthentication','hostnossl dbadmin 0.0.0.0/0 trust');
The following example creates an authentication record for the LDAP method:
=> SELECT SET_CONFIG_PARAMETER('ClientAuthentication', 'host all 10.0.0.0/8ldap "ldap://summit.vertica.com;cn=;,dc=vertica,dc=com"');
The following example specifies three authentication records. In a single command, separate eachauthentication record by a comma:
=> SELECT SET_CONFIG_PARAMETER('ClientAuthentication','hostnossl dbadmin 0.0.0.0/0 trust, hostnossl all 0.0.0.0/0 md5,local all trust');
Implementing Kerberos AuthenticationKerberos authentication is different from user name/password authentication. Instead ofauthenticating each user to each network service, Kerberos uses symmetric encryption through atrusted third party, called the Key Distribution Center (KDC). In this environment, clients andservers validate their authenticity by obtaining a shared secret (ticket) from the KDC, after whichclients and servers can talk to each other directly.
Note: Topics in this section describe how to configure the HP Vertica server and clients forKerberos authentication. This section does not describe how to install, configure, or administera Key Distribution Center. You can obtain the Kerberos 5GSSAPI distribution for youroperating system from theMIT Kerberos Distribution Page.
Kerberos PrerequisitesAt aminimum youmust meet the following requirements to use Kerberos authentication with theHP Vertica server and client drivers.
Administrator's GuideImplementing Security
HP Vertica Analytics Platform (7.0.x) Page 187 of 969

Kerberos server
Your network administrator should have already installed and configured one or more Kerberos KeyDistribution Centers (KDC), and the KDC must be accessible from every node in your VerticaAnalytics Platform cluster.
The KDC must support Kerberos 5 via GSSAPI. For details, see theMIT Kerberos DistributionPage.
Client package
The Kerberos 5 client package contains software that communicates with the KDC server. Thispackage is not included as part of the HP Vertica Analytics Platform installation. If the Kerberos 5client package is not present on your system, youmust download and install it on all clients andservers involved in Kerberos authentication (for example, each HP Vertica and each HP Verticaclient), with the exception of the KDC itself.
Kerberos software is built into Microsoft Windows. If you are using another operating system, youmust obtain and install the client package.
Refer to the Kerberos documentation for installation instructions, such as on theMIT website,including theMIT Kerberos Distribution page.
Client/server identity
Each client (users or applications that will connect to HP Vertica) and the HP Vertica server mustbe configured as Kerberos principals. These principals authenticate using the KDC.
Each client platform has a different security framework, so the steps required to configure andauthenticate against Kerberos differ among clients. See the following topics for more information:
l Configure HP Vertica for Kerberos Authentication
l Configure Clients for Kerberos Authentication.
Configure HP Vertica for Kerberos AuthenticationTo set up HP Vertica for Kerberos authentication, perform a series of short procedures described inthe following sections:
l Install the Kerberos 5 client package
l Create the HP Vertica principal
l Create the keytab
l Specify the location of the keytab file
Administrator's GuideImplementing Security
HP Vertica Analytics Platform (7.0.x) Page 188 of 969

l Point machines at the KDC and configure realms
l Inform HP Vertica about the Kerberos principal
l Configure the authenticationmethod for all clients
l Restart the database
l Get the ticket and authenticate HP Vertica with the KDC
Install the Kerberos 5 client package
See Kerberos Prerequisites.
Create the HP Vertica principal
You can create the Vertica Analytics Platform principal on any machine in the Kerberos realm,though generally, you'll perform this task on the KDC. This section describes how to create theVertica Analytics Platform principal on Linux and Active Directory KDCs.
Creating the Vertica Analytics Platform principal on a Linux KDC
Start the Kerberos 5 database administration utility (kadmin or kadmin.local) to create an VerticaAnalytics Platform principal on a Linux KDC.
l Use kadmin if you are accessing the KDC on a remote server. You can use kadmin on anymachine that has the Kerberos 5 client package installed, as long as you have access to theKerberos administrator's password. When you start kadmin, the utility will prompt you for theKerberos administrator's password. Youmight need root privileges on the client system in orderto run kadmin.
l Use kadmin.local if the KDC is on themachine you're logging in to and you have rootprivileges on that server. Youmight also need tomodify your path to include the location of thekadmin.local command; for example, try setting the following path:/usr/kerberos/sbin/kadmin.local.
The following example creates the principal vertica on the EXAMPLE.COM Kerberos realm:
$ sudo /usr/kerberos/sbin/kadmin.localkadmin.local add_principal vertica/vcluster.example.com
Formore information about the kadmin command, refer to the kadmin documentation.
Creating the Vertica Analytics Platform principal on an Active Directory KDC
To configure Vertica Analytics Platform for Kerberos authentication on Active Directory, you willgenerally canmost likely add the Vertica Analytics Platform server and clients to an existing ActiveDirectory domain. You'll need tomodify the Kerberos configuration file (krb5.conf) on the Vertica
Administrator's GuideImplementing Security
HP Vertica Analytics Platform (7.0.x) Page 189 of 969
Analytics Platform server to make sure all parties support encryption types used by the ActiveDirectory KDC.
If you need to configure encryption on the KDC:
l Open the Local Group Policy Editor (gpedit.msc) and expand Computer Configuration >Windows Settings > Security Settings > Local Policies > Security Options, and double-clickNetwork security: Configure encryption types allowed for Kerberos.
l Refresh the local and Active Directory-basedGroup Policy settings, including security settings,by running the command gpupdate /force
l Use the ktpass command to configure the server principal name for the host or service in ActiveDirectory and generate a .keytab file; for example:
ktpass -out ./host.vcluster.example.com.keytab-princ host/[email protected] vcluster-mapop set -pass <password>-crypto <encryption_type> -ptype <principal_type>
ktpass -out ./vertica.vcluster.example.com.keytab-princ vertica/[email protected] vertica-mapop set -pass <password>-crypto <encryption_type> -ptype <principal_type>
Formore information, see the Technet.Microsoft.com Ktpass page. See also "Create the keytab" below.
You can view a list of the Service Principal Names that a computer has registered with ActiveDirectory by running the setspn –l hostname command, where hostname is the host name ofthe computer object that you want to query; for example:
setspn -L verticaRegistered ServicePrincipalNamefor CN=vertica,CN=Users,EXAMPLE=example,EXAMPLE=comvertica/vcluster.example.com
setspn -L vclusterRegistered ServicePrincipalNamefor CN=vertica,CN=Users,EXAMPLE=example,EXAMPLE=comhost/vcluster.example.com
Create the keytab
The keytab is an encrypted, local copy of the host's key that contains the credentials for the HPVertica principal (its own principal and key), so the HP Vertica server can authenticate itself to theKDC. The keytab is required so that Vertica Analytics Platform doesn’t have to prompt for apassword.
Before you create the keytab file
Administrator's GuideImplementing Security
HP Vertica Analytics Platform (7.0.x) Page 190 of 969

You do not need to create a keytab file on the KDC; however, a keytab entry must reside on eachnode in the HP Vertica cluster. The absolute path to the keytab file must be the same on everycluster node.
You can generate a keytab on any machine in the Kerberos realm that already has the Kerberos 5client package installed, as long as you have access to the Kerberos administrator's password.Then you can copy that file to each Vertica Analytics Platform node.
Generating a keytab file on Linux systems
On Linux, the default location for the keytab file is /etc/krb5.keytab. Youmight need rootprivileges on the client system to run the kadmin utility.
1. To generate a keytab or add a principal to an existing keytab entry, use the ktadd commandfrom the kadmin utility, as in the following example:
$ sudo /usr/kerberos/sbin/kadmin -p vertica/vcluster.example.com -q"ktadd vertica/vcluster.example.com" -r EXAMPLE.COMAuthenticating as principal vertica/vcluster.example.comwith password.
2. Make the keytab file readable by the file owner who is running the process (typically the Linuxdbadmin user); for example, you can change ownership of the files to dbadmin as follows:
$ sudo chown dbadmin *.keytab
Important: In a production environment, youmust control who can access the keytab fileto prevent unauthorized users from impersonating your server.
3. Copy the keytab file to the /etc folder on each cluster node.
After you create the keytab file, you can use the klist command to view keys stored in the file:
$ sudo /usr/kerberos/bin/klist -ke -tKeytab name: FILE:/etc/krb5.keytabKVNO Principal---- -------------------------------------------------
4 vertica/[email protected] vertica/[email protected]
Generating a keytab file for Active Directory
Use the ktutil command to read, write, or edit entries in a Kerberos 5 keytab file. The keytabentries were created in the previous example, and they created a principal name for the host andservice in Active Directory.
1. On any Vertica Analytics Platform node use the ktutil command to read the Kerberos 5keytab file keytab into the current keylist (from the keytab entries you created using ktpass -
Administrator's GuideImplementing Security
HP Vertica Analytics Platform (7.0.x) Page 191 of 969

out):
$ /usr/kerberos/sbin/ktutilktutil: rkt host.vcluster.example.com.keytabktutil: rkt vertica.vcluster.example.com.keytab
ktutil: list
KVNO Principal---- ----------------------------------------------------
3 host/[email protected] vertica/[email protected]
ktutil: wkt vcluster.example.com.keytabktutil: exit
2. Make the keytab file readable by the file owner who is running the process (the administrator)with no permissions for group or other:
$ chmod 600 vcluster.example.com.keytab
3. Copy the keytab file to the catalog directory.
Specify the location of the keytab file
Using the Administration Tools, log in to the database as the database administrator (usuallydbadmin) and set the KerberosKeyTabFile configuration parameter to point to the location of thekeytab file; for example:
> SELECT set_config_parameter('KerberosKeytabFile', '/etc/krb5.keytab');
See Kerberos Authentication Parameters for more information.
Point machines at the KDC and configure realms
Each client and Vertica Analytics Platform server in the Kerberos realm must have a valid,identically-configured Kerberos configuration (krb5.conf) file in order to know how to reach theKDC.
If you useMicrosoft Active Directory, you won't need to perform this step. Refer to the Kerberosdocumentation for your platform for more information about the Kerberos configuration file on ActiveDirectory.
At aminimum, youmust configure the following sections in the krb5.conf file. See the Kerberosdocumentation for information about other sections in this configuration file.
Administrator's GuideImplementing Security
HP Vertica Analytics Platform (7.0.x) Page 192 of 969

l [libdefaults] Settings used by the Kerberos 5 library
l [realms] Realm-specific contact information and settings
l [domain_realm] Maps server hostnames to Kerberos realms
You need to update the /etc/krb5.conf file to reflect your site's Kerberos configuration. Theeasiest way to ensure consistency among all clients/servers in the Kerberos realm is to copy the/etc/krb5.conf file from the KDC to the /etc directory on each HP Vertica cluster node.
Inform HP Vertica about the Kerberos principal
Follow these steps to inform HP Vertica about theKerberosServiceName/KerberosHostname@KerberosRealm principal. This procedure provides anexample principal called vertica/[email protected].
About the host name parameter
If you omit the optional KerberosHostname parameter in Step 2 below, HP Vertica uses the returnvalue from the gethostname() function. Assuming each cluster node has a different host name,those nodes will each have a different principal, which youmust manage in that node's keytab file.HP recommends that you specify the KerberosHostname parameter to get a single, cluster-wideprincipal that is easier to manage thanmultiple principals.
Configure the Vertica Analytics Platform principal parameters
For information about the parameters that you'll set in this procedure, see Kerberos AuthenticationParameters.
1. Log in to the database as an administrator (typically dbadmin) and set the service name for theHP Vertica principal; for example, vertica.
> SELECT set_config_parameter('KerberosServiceName', 'vertica');
2. Optionally provide the instance or hostname portion of the principal; for example, vcluster(see "About the host name parameter" above this procedure):
> SELECT set_config_parameter('KerberosHostname', 'vcluster.example.com');
3. Provide the realm portion of the principal; for example, EXAMPLE.COM:
> SELECT set_config_parameter('KerberosRealm', 'EXAMPLE.COM');
Administrator's GuideImplementing Security
HP Vertica Analytics Platform (7.0.x) Page 193 of 969

Configure the authentication method for all clients
Tomake sure that all clients use the gss Kerberos authenticationmethod, run the followingcommand:
> SELECT set_config_parameter('ClientAuthentication', 'host all 0.0.0.0/0 gss');
Formore information, see Implementing Client Authentication.
Restart the database
For all settings to take effect, youmust restart the database.
Get the ticket and authenticate HP Vertica with the KDC
The example below shows how to get the ticket and authenticate Vertica Analytics Platform withthe KDC using the kinit command. You'll commonly perform this final step from the vsql client.
/etc/krb5.confEXAMPLE.COM = {
kdc = myserver.example.com:11admin_server = myadminserver.example.com:000kpasswd_protocol = SET_CHANGEdefault_domain = example /etc/krb5.conf
}
Calling the kinit utility requests a ticket from the KDC server.
$ kinit [email protected] for [email protected]:
Configure Clients for Kerberos AuthenticationEach supported platform has a different security framework, so the steps required to configure andauthenticate against Kerberos differ among clients.
On the server side, you construct the HP Vertica Kerberos service name principal using this format:
KerberosServiceName/KerberosHostname@KerberosRealm
On the client side, the GSS libraries require the following format for the HP Vertica service principal:
KerberosServiceName@KerberosHostName
The realm portion of the principal can be omitted becauseGSS libraries use the realm name of theconfigured default (KerberosRealm) realm.
Administrator's GuideImplementing Security
HP Vertica Analytics Platform (7.0.x) Page 194 of 969

For information about client connection strings, see the following topics in the Programmer's Guide:
l ODBC DSN Parameters
l JDBC Connection Properties
l ADO.NET Connection Properties
l (vsql) Command Line Options
Note: A few scenarios exist in which HP Vertica server's principal namemight not match thehost name in the connection string. See Troubleshooting Kerberos Authentication for moreinformation.
In This Section
l Configure ODBC and vsql Clients on Linux, HP-UX, AIX, MAC OSX, and Solaris
l Configure ODBC and vsql Clients onWindows and ADO.NET
l Configure JDBC Clients on all Platforms
Configure ODBC and vsql Clients on Linux, HP-UX, AIX, MAC OSX,and Solaris
This topic describes the requirements for configuring anODBC or vsql client on Linux, HP-UX, AIX,MAC OSX, or Solaris.
Install the Kerberos 5 client package
See Kerberos Prerequisites.
Provide clients with a valid Kerberos configuration file
The Kerberos configuration (krb5.conf) file contains Kerberos-specific information, such as how toreach the KDC, default realm name, domain, the path to log files, DNS lookup, encryption types touse, ticket lifetime, and other settings. The default location for the Kerberos configuration file is/etc/krb5.conf.
Each client participating in Kerberos authenticationmust have a valid, identically-configuredkrb5.conf file in order to communicate with the KDC. When configured properly, the client canauthenticate with Kerberos and retrieve a ticket through the kinit utility. Likewise, the server canthen use ktutil to store its credentials in a keytab file
Tip: The easiest way to ensure consistency among clients, Vertica Analytics Platform, andthe KDC is to copy the /etc/krb5.conf file from the KDC to the client's /etc directory.
Administrator's GuideImplementing Security
HP Vertica Analytics Platform (7.0.x) Page 195 of 969

Authenticate and connect clients
ODBC and vsql use the client's ticket established by kinit to perform Kerberos authentication.These clients rely on the security library's default mechanisms to find the ticket file and the andKerberos configuration file.
To authenticate against Kerberos, call the kinit utility to obtain a ticket from the Kerberos KDCserver. The following two examples show how to send the ticket request using ODBC and vsqlclients.
ODBC authentication request/connection
1. On anODBC client, call the kinit utility to acquire a ticket for the kuser user:
$ kinit [email protected] for [email protected]:
2. Connect to HP Vertica and provide the principals in the connection string:
char outStr[100];SQLLEN len;SQLDriverConnect(handle, NULL, "Database=VMart;User=kuser;Server=myserver.example.com;Port=5433;KerberosHostname=vcluster.example.com",SQL_NTS, outStr, &len);
vsql authentication request/connection
If the vsql client is on the samemachine you're connecting to, vsql connects through a UNIXdomain socket and bypasses Kerberos authentication. When you are authenticating with Kerberos,especially if the ClientAuthentication record connection_type is 'local', youmust include the -hhostname option, described in Command Line Options in the Programmer's Guide.
1. On the vsql client, call the kinit utility:
$ kinit [email protected] for [email protected]:
2. Connect to HP Vertica and provide the host and user principals in the connection string:
$ ./vsql -K vcluster.example.com -h myserver.example.com -U kuser
Welcome to vsql, the Vertica Analytic Databaseinteractive terminal.
Type: \h or \? for help with vsql commands\g or terminate with semicolon to execute query\q to quit
Administrator's GuideImplementing Security
HP Vertica Analytics Platform (7.0.x) Page 196 of 969

In the future, when you log in to vsql as kuser, vsql uses your cached ticket without prompting youfor a password.
You can verify the authenticationmethod by querying the SESSIONS system table:
kuser=> SELECT authentication_method FROM sessions;authentication_method
-----------------------GSS-Kerberos(1 row)
See Also
l Kerberos Client/Server Requirements
l ODBC DSN Parameters in the Programmer's Guide
l (vsql) Command Line Options in the Programmer's Guide
Configure ADO.NET, ODBC, and vsql Clients on Windows
The HP Vertica client drivers support theWindows SSPI library for Kerberos authentication.Windows Kerberos configuration is stored in the registry.
You can choose between two different setup scenarios for Kerberos authentication onODBC andvsql clients onWindows and ADO.NET:
l Windows KDC on Active Directory withWindows built-in Kerberos client and HP Vertica
l Linux KDC withWindows-built-in Kerberos client and HP Vertica
Windows KDC on Active Directory with Windows built-in Kerberos client andHP Vertica
Kerberos authentication onWindows is commonly used with Active Directory, Microsoft'senterprise directory service/Kerberos implementation, and is most likely set up by yourorganization's network or IT administrator.
Windows clients have Kerberos authentication built into the authentication process. This meanswhen you log in toWindows from a client machine, and yourWindows instance has beenconfigured to use Kerberos through Active Directory, your login credentials authenticate you to theKerberos server (KDC). There is no additional software to set up. To use Kerberos authenticationonWindows clients, log in as REALM\user.
ADO.NET IntegratedSecurity
When you use the ADO.NET driver to connect to HP Vertica, you can optionally specifyIntegratedSecurity=true in the connection string. This Boolean setting informs the driver toauthenticate the calling user against his or herWindows credentials. As a result, you do not need to
Administrator's GuideImplementing Security
HP Vertica Analytics Platform (7.0.x) Page 197 of 969

include a user name or password in the connection string. If you add a user=<username> entry tothe connection string, the ADO.NET driver ignores it.
Linux KDC with Windows-built-in Kerberos client and HP Vertica
A simpler, but less common scenario is to configureWindows to authenticate against a non-Windows KDC. In this implementation, you use the ksetup utility to point theWindows operatingsystem's native Kerberos capabilities at a non-Active Directory KDC. The act of logging in toWindows obtains a ticket granting ticket, similar to the Active Directory implementation, except inthis case, Windows is internally communicating with a Linux KDC. See theMicrosoft WindowsServer Ksetup page for more information.
Configuring Windows clients for Kerberos authentication
Depending on which implementation you want to configure, refer to one of the following pages ontheMicrosoft Server website:
l To set upWindows clients with Active Directory, refer to Step-by-Step Guide to Kerberos 5(krb5 1.0) Interoperability.
l To set upWindows clients with the ksetup utility, refer to the Ksetup page.
Authenticate and connect clients
This section shows you how to authenticate an ADO.NET and vsql client to the KDC, respectively.
Note: Use the fully-qualified domain name as the server in your connection string; for example,use host.example.com instead of just host.
ADO.NET authentication request/connection
The following example uses the IntegratedSecurity=true, setting, which instructs theADO.NET driver to authenticate the calling user's Windows credentials:
VerticaConnection conn = newVerticaConnection("Database=VMart;Server=host.example.com;Port=5433;IntegratedSecurity=true;KerberosServiceName=vertica;KerberosHostname=vcluster.example.com");conn.open();
vsql authentication request/connection
1. Log in to yourWindows client, for example as EXAMPLE\kuser.
2. Run the vsql client and supply the connection string to HP Vertica:
C:\Users\kuser\Desktop>vsql.exe -h host.example.com -K vcluster -U kuser
Administrator's GuideImplementing Security
HP Vertica Analytics Platform (7.0.x) Page 198 of 969

Welcome to vsql, the Vertica Analytic Database interactive terminal.Type: \h or \? for help with vsql commands\g or terminate with semicolon to execute query\q to quit
See Also
l Kerberos Client/Server Requirements
l vsql Command Line Options in the Programmer's Guide
l ADO.NET Connection Properties in the Programmer's Guide
Configure JDBC Clients on All Platforms
Kerberos authentication on JDBC clients uses JavaTM Authentication and Authorization Service(JAAS) to acquire the initial Kerberos credentials. JAAS is an API framework that hides platform-specific authentication details and provides a consistent interface for other applications.
The client login process is determined by the JAAS Login Configuration File, which containsoptions that specify the authenticationmethod and other settings to use for Kerberos. Optionsallowed in the configuration file are defined by a class called the LoginModule.
The JDBC client principal is crafted as jdbc-username@server-from-connection-string.
About the LoginModule
Many vendors can provide a LoginModule implementation that you can use for Kerberosauthentication, but HP recommends that you use the JAAS public classcom.sun.security.auth.module.Krb5LoginModul provided in the Java Runtime Environment(JRE). The Krb5LoginModule authenticates users using Kerberos protocols and is implementeddifferently on non-Windows andWindows platforms:
l On non-Windows platforms: The Krb5LoginModule defers to a native Kerberos clientimplementation, whichmeans you can use the same /etc/krb5.conf setup as you use toconfigure ODBC and vsql clients on Linux, HP-UX, AIX, MAC OSX, and Solaris platforms.
l On Windows platforms: The Krb5LoginModule uses a custom Kerberos client implementationbundled with the Java Runtime Environment (JRE). Windows settings are stored in a%WINDIR%\krb5.ini file, which has similar syntax and conventions to the non-Windowskrb5.conf file. You can copy a krb5.conf from a non-Windows client to %WINDIR%\krb5.ini.
Documentation for the LoginModules is in the com.sun.security.auth package, and on theKrb5LoginModule web page.
Administrator's GuideImplementing Security
HP Vertica Analytics Platform (7.0.x) Page 199 of 969

Create the JAAS login configuration
The JAASConfigName connection property identifies a specific configuration within a JAASconfiguration that contains the Krb5LoginModule and its settings. The JAASConfigName settinglets multiple JDBC applications with different Kerberos settings coexist on a single host. Thedefault configuration name is verticajdbc.
Note: Carefully construct the JAAS login configuration file. If syntax is incorrect,authentication will fail.
You can configure JAAS-related settings in the java.securitymaster security properties file,which is located in the lib/security directory of the JRE. For more information, see Appendix A inthe JavaTM Authentication and Authorization Service (JAAS) ReferenceGuide.
Create a JDBC login context
The following example creates a login context for Kerberos authentication on a JDBC client thatuses the default JAASConfigName of verticajdbc and specifies that:
l The ticket granting ticket will be obtained from the ticket cache
l The user will not be prompted for a password if credentials can't be obtained from the cache, thekeytab file, or through shared state
verticajdbc {com.sun.security.auth.module.Krb5LoginModulerequireduseTicketCache=truedoNotPrompt=true;
};
JDBC authentication request/connection
You can configure the Krb5LoginModule to use a cached ticket, keytab, or the driver can acquireone automatically if the calling user provides a password.
In the previous example, the login process uses a cached ticket and won't ask for a passwordbecause both useTicketCache and doNotPrompt are set to true. If doNotPrompt=false and youprovide a user name and password during the login process, the driver provides that information tothe LoginModule and calls the kinit utility on your behalf.
1. On a JDBC client, call the kinit utility to acquire a ticket:
kinit [email protected]
If you prefer to use a password instead of calling the kinit utility, see "Have the driver callkinit for you".
Administrator's GuideImplementing Security
HP Vertica Analytics Platform (7.0.x) Page 200 of 969

2. Connect to HP Vertica:
Properties props = new Properties();props.setProperty("user", "kuser");props.setProperty("KerberosServiceName", "vertica");props.setProperty("KerberosHostName", "vcluster.example.com");props.setProperty("JAASConfigName", "verticajdbc");Connection conn = DriverManager.getConnection"jdbc:vertica://myserver.example.com:5433/VMart", props);
Have the driver call kinit for you
If you want to bypass calling the kinit utility yourself but still benefit from encrypted, mutualauthentication, you can optionally pass the driver a clear text password to acquire the ticket fromthe KDC. The password is encrypted when sent across the network. For example,useTicketCache and doNotPrompt are now both false in the example below, whichmeans that thecalling user's credentials will not be obtained through the ticket cache or keytab.
verticajdbc {com.sun.security.auth.module.Krb5LoginModulerequireduseTicketCache=falsedoNotPrompt=false;
};
In the above example, the driver no longer looks for a cached ticket and you don't have to callkinit. Instead, the driver takes the password and user name and calls kinit on your behalf.
Note: The above is an example to demonstrate the flexibility of JAAS.
See Also
l Kerberos Client/Server Requirements
l JDBC Connection Properties in the Programmer's Guide
l JavaTM Authentication and Authorization Service (JAAS) ReferenceGuide (external website)
Determining the Client Authentication MethodTo determine the details behind the type client authentication used for a particular user session,query the V_MONITOR.SESSIONS system table.
The following example output indicates that the GSS Kerberos authenticationmethod is set:
Administrator's GuideImplementing Security
HP Vertica Analytics Platform (7.0.x) Page 201 of 969

> SELECT authentication_method FROM sessions;authentication_method
-----------------------GSS-Kerberos
(1 row)
For a list of possible values in the authentication_method column, see Implementing ClientAuthentication.
Tip: You can also view details about the authenticationmethod by querying the V_MONITOR.USER_SESSIONS system table.
Troubleshooting Kerberos AuthenticationThis topic provides tips to help you avoid and troubleshoot issues related to Kerberos authenticationwith Vertica Analytics Platform.
Server's principal name doesn't match the host name
In some cases during client connection, the HP Vertica server's principal namemight not match thehost name in the connection string. (See also Using the ODBC Data Source Configuration utility inthis topic.)
OnODBC, JDBC, and ADO.NET clients, you set the host name portion of the server's principalusing the KerberosHostName connection string. See the following topics in the Programmer'sGuide:
l ODBC DSN Parameters
l JDBC Connection Properties
l ADO.NET Connection Properties
On vsql clients, you set the host name portion of the server's principal name using the -K KRB HOSTcommand line option, where the default value is specified by the -h switch (the host name of themachine on which the HP Vertica server is running). -K is equivalent to the drivers'KerberosHostName connection string value. See Command Line Options in the Programmer'sGuide.
Principal/host mismatch issues and resolutions
Here are some common scenarios where the server's principal namemight not match the hostnamewith a workaround, when available.
l The KerberosHostName configuration parameter has been overridden.
For example, consider the following connection string:
Administrator's GuideImplementing Security
HP Vertica Analytics Platform (7.0.x) Page 202 of 969

jdbc:vertica://node01.example.com/vmart?user=kuser
Because the above connection string includes no explicit KerberosHostName parameter, thedriver defaults to the host in the URL (node01.example.com). If you overwrote the server-sideKerberosHostName parameter as “abc”, the client would generate an incorrect principal. Toresolve this issue, explicitly set the client’s KerberosHostName to the connection string; forexample:
jdbc:vertica://node01.example.com/vmart?user=kuser&kerberoshostname=abc
l Connection load balancing is enabled, but the node against which the client authenticates mightnot be the node in the connection string.
In this situation, consider setting all nodes to use the same KerberosHostName setting. Whenyou default to the host originally specified in the connection string, load balancing cannotinterfere with Kerberos authentication.
l You have a DNS name that does not match the Kerberos hostname.
For example, imagine a cluster of six servers, where you want hr-servers and finance-servers to connect to different nodes on the Vertica Analytics Platform cluster. Kerberosauthentication, however, occurs on a single (the same) KDC. In this example, the Kerberosservice hostname of the servers is server.example.com, and here's the list of exampleservers:
server1.example.com 192.16.10.11server2.example.com 192.16.10.12server3.example.com 192.16.10.13server4.example.com 192.16.10.14server5.example.com 192.16.10.15server6.example.com 192.16.10.16
Now assume you have the following DNS entries:
finance-servers.example.com 192.168.10.11, 192.168.10.13, 192.168.10.13hr-servers.example.com 192.168.10.14, 192.168.10.15, 192.168.10.16
When you connect to finance-servers.example.com, specify the Kerberos -h hostnameoption as server.example.com and the -K host option for hr-servers.example.com; forexample:
$ vsql -h fianance-servers.example.com -K server.example.com
l You do not have DNS set up on the client machine, so you have to connect by IP only.
Administrator's GuideImplementing Security
HP Vertica Analytics Platform (7.0.x) Page 203 of 969

To resolve this issue, specify the Kerberos -h hostname option for the IP address and the -Khost option for server.example.com; for example:
$ vsql -h 192.168.1.12 -K server.example.com
l There is a load balancer involved (Virtual IP), but there is no DNS name for the VIP.
Specify the Kerberos -h hostname option for the Virtual IP address and the -K host option forserver.example.com; for example:
$ vsql -h <virtual IP> -K server.example.com
l You connect to HP Vertica using an IP address, but there is no host name to construct theKerberos principal name.
l You set the server-side KerberosHostName configuration parameter to a name other than the HPVertica node's host name,but the client can’t determine the host name based on the hostname inthe connection string alone.
JDBC client authentication
If Kerberos authentication fails on a JDBC client, check the JAAS login configuration file for syntaxissues. If syntax is incorrect, authentication will fail.
Working Domain Name Service (DNS)
Make sure that the DNS entries and hosts on the network are all properly configured. Refer to theKerberos documentation for your platform for details.
Clock synchronization
Systems clocks in your network must remain in sync for Kerberos authentication to work properly,so you need to:
l Install NTP on the Kerberos server (KDC)
l Install NTP on each server in your network
l Synchronize system clocks on all machines that participate in the Kerberos realm within a fewminutes of the KDC and each other
Clock skew can be problematic on Linux Virtual Machines that need to sync withWindows TimeService. You can try the following to keep time in sync:
Administrator's GuideImplementing Security
HP Vertica Analytics Platform (7.0.x) Page 204 of 969

1. Use any text editor to open /etc/ntp.conf.
2. Under the Undisciplined Local Clock section, add the IP address for the VerticaAnalytics Platform server and remove existing server entries.
3. Log in to the server as root and set up a cron job to sync time with the added IP address everyhalf hour, or as often as needed; for example:
# 0 */2 * * * /etc/init.d/ntpd restart
4. Alternatively, run the following command to force clock sync immediately:
$ sudo /etc/init.d/ntpd restart
Formore information, see Set Up Time Synchronization in the Installation Guide and the NetworkTime Protocol website.
Encryption algorithm choices
Kerberos is based on symmetric encryption, so be sure that all Kerberos parties involved in theKerberos realm agree on the encryption algorithm to use. If they don't agree, authentication fails.You can review the exceptions in the vertica.log.
On aWindows client, be sure the encryption types match the types set on Active Directory (seeConfigure HP Vertica for Kerberos Authentication).
Be aware that Kerberos is used for securing the log-in process only. After the log-in processcompletes, information travels between client and server without encryption, by default. If you wantto encrypt traffic, use SSL. For details, see Implementing SSL.
Kerberos passwords
If you change your Kerberos password, youmust recreate all of your keytab files.
Using the ODBC Data Source Configuration utility
OnWindows vsql clients, if you use the ODBC Data Source Configuration utility and supply a clientData Source, be sure you enter a Kerberos host name in the Client Settings tab to avoid clientconnection failures with the Vertica Analytics Platform server.
Administrator's GuideImplementing Security
HP Vertica Analytics Platform (7.0.x) Page 205 of 969

Implementing SSLTo ensure privacy and verify data integrity, you can configure HP Vertica and database clients touse Secure Socket Layer (SSL) to communicate and secure the connection between the client andthe server. The SSL protocol uses a trusted third-party called a Certificate Authority (CA), whichmeans that both the owner of a certificate and the party that relies on the certificate trust the CA.
Certificate AuthorityThe CA issues electronic certificates to identify one or both ends of a transaction and to certifyownership of a public key by the name on the certificate.
Public/private KeysA CA issues digital certificates that contain a public key and the identity of the owner.
The public key is available to all users through a publicly-accessible directory, while private keysare confidential to their respective owner. The private/public key pair ensures that the data can beencrypted by one key and decrypted by the other key pair only.
The public and private keys are similar and can be used alternatively; for example, what one keyencrypts, the other key pair can decrypt.
l If encrypted with a public key, can be decrypted by its corresponding private key only
l If encrypted with a private key can be decrypted by its corresponding public key only
For example, if Alice wants to send confidential data to Bob and needs to ensure that only Bob canread it, she will encrypt the data with Bob's public key. Only Bob has access to his correspondingprivate key; therefore, he is the only person who can decrypt Alice's encrypted data back into itsoriginal form, even if someone else gains access to the encrypted data.
HP Vertica uses SSL to:
l Authenticate the server so the client can confirm the server's identity. HP Vertica also supportsmutual authentication in which the server can confirm the identity of the client. Thisauthentication helps preventman-in-the-middle attacks.
l Encrypt data sent between the client and database server to significantly reduce the likelihoodthat the data can be read if the connection between the client and server is compromised.
l Verify that data sent between the client and server has not been altered during transmission.
HP Vertica supports the following authenticationmethods under SSL v3/Transport Layer Security(TLS) 1.0 protocol:
l SSL server authentication—Lets the client confirm the server's identity by verifying that theserver's certificate and public key are valid and were issued by a certificate authority (CA) listed
Administrator's GuideImplementing Security
HP Vertica Analytics Platform (7.0.x) Page 206 of 969

in the client's list of trusted CAs. See "Required Prerequisites for SSL Server Authentication andSSL Encryption" in SSL Prerequisites and Configuring SSL.
l SSL client authentication— (Optional) Lets the server confirm the client's identity by verifyingthat the client's certificate and public key are valid and were issued by a certificate authority(CA) listed in the server's list of trusted CAs. Client authentication is optional because HPVertica can achieve authentication at the application protocol level through user name andpassword credentials. See "Additional Prerequisites for SSL Server and Client MutualAuthentication" in SSL Prerequisites.
l Encryption—Encrypts data sent between the client and database server to significantlyreduce the likelihood that the data can be read if the connection between the client and server iscompromised. Encryption works both ways, regardless of whether SSLClient Authentication isenabled. See "Required Prerequisites for SSL Server Authentication and SSL encryption" inSSL Prerequisites and Configuring SSL.
l Data integrity—Verifies that data sent between the client and server has not been alteredduring transmission.
Note: For server authentication, HP Vertica supports using RSA encryption with ephemeralDiffie-Hellman (DH). DH is the key agreement protocol.
SSL PrerequisitesBefore you implement SSL security, obtain the appropriate certificate signed by a certificateauthority (CA) and private key files and then copy the certificate to your system. (See theOpenSSLdocumentation.) These files must be in Privacy-EnhancedMail (PEM) format.
Prerequisites for SSL Server Authentication and SSLEncryption
Follow these steps to set up SSL authentication of the server by the clients, which is also requiredin order to provide encrypted communication between server and client.
1. On each server host in the cluster, copy the server certificate file (server.crt) and private key(server.key) to the HP Vertica catalog directory. (See Distributing Certifications and Keys.)
The public key contained within the certificate and the corresponding private key allow the SSLconnection to encrypt the data and ensure its integrity.
Note: The server.key file must have read and write permissions for the dbadmin useronly. Do not provide any additional permissions or extend them to any other users. UnderLinux, for example, file permissions would be 0600.
2. If you are usingMutual SSL Authentication, then copy the root.crt file to each client so that
Administrator's GuideImplementing Security
HP Vertica Analytics Platform (7.0.x) Page 207 of 969

the client's can verify the server's certificate. If you are using vsql, copy the file to:/home/dbadmin/.vsql/.
This ability is not available for ODBC clients at this time.
The root.crt file contains either the server's certificate or the CA that issued the server certificate.
Note: If you do not perform this step, the SSL connection is set up and ensures messageintegrity and confidentiality via encryption; however, the client cannot authenticate the serverand is, therefore, susceptible to problems where a fake server with the valid certificate filemasquerades as the real server. If the root.crt is present but does not match the CA used tosign the certificate, the database will not start.
Optional Prerequisites for SSL Server and Client MutualAuthentication
Follow these additional steps to optionally configure authentication of clients by the server.
Setting up client authentication by the server is optional because the server can use alternativetechniques, like database-level password authentication, to verify the client's identity. Follow thesesteps only if you want to have both server and client mutually authenticate themselves with SSLkeys.
1. On each server host in the cluster, copy the root.crt file to the HP Vertica catalog directory.(See Distributing Certifications and Keys.)
The root.crt file has the same name on the client and server. However, these files do notneed to be identical. They would be identical only if the client and server certificates were usedby the same root certificate authority (CA).
2. On each client, copy the client certificate file (client.crt) and private key (client.key) to theclient. If you are using vsql, copy the files to: /home/dbadmin/.vsql/.
If you are using either ODBC or JDBC, you can place the files anywhere on your system andprovide the location in the connection string (ODBC/JDBC) or ODBCINI (ODBC only). SeeConfiguring SSL for ODBC Clients and Configuring SSL for JDBC Clients.
Note: If you're using ODBC, the private key file (client.key) must have read and writepermissions for the dbadmin user only. Do not provide any additional permissions orextend them to any other users. Under Linux, for example, file permissions would be 0600.
Generating Certifications and KeysFor testing purposes, you can create and use simple self-signed certificates. For production, youneed to use certificates signed by a certificate authority (CA) so the client can verify the server'sidentity.
Administrator's GuideImplementing Security
HP Vertica Analytics Platform (7.0.x) Page 208 of 969

This section illustrates how to create certificate authority (CA) keys and self-signed certificates fortesting purposes. It uses the CA private keys to sign "normal" certificates and to generate theserver's and client's private key files. For detailed information about creating signed certificates,refer to the OpenSSL documentation.
The server and client keys can be rooted in different CAs.
1. Create the CA private key:
$>openssl genrsa -des3 -out rootkey.pem
The output file name can vary.
2. Create the CA public certificate:
$>openssl req -new -x509 -key rootkey.pem -out root.crt
The output file name can vary.
Important: The following is an example of the certificate's contents. When you create acertificate, theremust be one unique name (a Distinguished Name (DN)), which isdifferent for each certificate that you create. The examples in this procedure use theOrganizational Unit Name for the DN.
Country Name (2 letter code) [GB]:USState or Province Name (full name) [Berkshire]:MassachusettsLocality Name (e.g., city) [Newbury]:BillericaOrganization Name (e.g., company) [My Company Ltd]:HP VerticaOrganizational Unit Name (e.g., section) []:Support_CACommon Name (e.g., your name or your server's hostname) []:myhostEmail Address []:[email protected]
3. Create the server's private key file:
$>openssl genrsa -out server.key
Note that HP Vertica supports only unencrypted key files, so there is no -des3 argument.
4. Create the server certificate request:
$>openssl req -new -out reqout.txt -key server.key
This step was not required for the CA because CA certificates are self-signed.
Administrator's GuideImplementing Security
HP Vertica Analytics Platform (7.0.x) Page 209 of 969

You are prompted to enter information that is incorporated into your certificate request. In thisexample, the Organizational Unit Name contains the unique DN (Support_server):
Country Name (2 letter code) [GB]:USState or Province Name (full name) [Berkshire]:MassachusettsLocality Name (e.g., city) [Newbury]:BillericaOrganization Name (e.g., company) [My Company Ltd]:HP VerticaOrganizational Unit Name (e.g., section) []:Support_serverCommon Name (e.g., your name or your server's hostname) []:myhostEmail Address []:[email protected]
5. Use the CA private key file to sign the server's certificate:
$>openssl x509 -req -in reqout.txt -days 3650 -sha1 -CAcreateserial -CA root.crt -CAkey rootkey.pem -out server.crt
6. Create the client's private key file:
$>openssl genrsa -out client.key
HP Vertica supports only unencrypted key files, so there is no -des3 argument.
7. Create the client certificate request:
$>openssl req -new -out reqout.txt -key client.key
This step was not required for the CA because CA certificates are self-signed.
You are prompted to enter information that is incorporated into your certificate request. In thisexample, the Organizational Unit Name contains the unique DN (Support_client):
Country Name (2 letter code) [GB]:USState or Province Name (full name) [Berkshire]:MassachusettsLocality Name (e.g., city) [Newbury]:BillericaOrganization Name (e.g., company) [My Company Ltd]:HPOrganizational Unit Name (e.g., section) []:Support_clientCommon Name (e.g., your name or your server's hostname) []:myhostEmail Address []:[email protected]
8. Use the CA private key file to sign the client's certificate:
$>openssl x509 -req -in reqout.txt -days 3650 -sha1 -CAcreateserial -CA root.crt -CAkey rootkey.pem -out client.crt
Administrator's GuideImplementing Security
HP Vertica Analytics Platform (7.0.x) Page 210 of 969

JDBC CertificatesIf you are using JDBC, perform the following steps after you have generated the key and self-signed certificate:
1. Convert the HP Vertica server certificate to a form that JAVA understands:
openssl x509 -in server.crt -out server.crt.der -outform der
2. Create a new truststore and imported the certificate into it:
keytool -keystore verticastore -alias verticasql -import -file server.crt.der
Generating Certifications and Keys for MCA certificate signing request (CSR) is a block of encrypted text that you generate on the server onwhich the certificate will be used. You send the CSR to a certificate authority (CA) in order to applyfor a digital identity certificate. The certificate authority uses the CSR to create your SSL certificatefrom information in your certificate; for example, organization name, common (domain) name, city,country, and so on.
MC uses a combination of OAuth (Open Authorization), Secure Socket Layer (SSL), and locally-encrypted passwords to secure HTTPS requests between a user's browser andMC, as well asbetweenMC and the agents. Authentication occurs throughMC and between agents within thecluster. Agents also authenticate and authorize jobs.
TheMC configuration process sets up SSL automatically, but youmust have the openssl packageinstalled on your Linux environment first.
When you connect to MC through a client browser, HP Vertica assigns each HTTPS request a self-signed certificate, which includes a timestamp. To increase security and protect against passwordreplay attacks, the timestamp is valid for several seconds only, after which it expires.
To avoid being blocked out of MC, synchronize time on the hosts in your HP Vertica cluster, as wellas on theMC host if it resides on a dedicated server. To recover from loss or lack ofsynchronization, resync system time and the Network Time Protocol. See Set Up TimeSynchronization in the Installation Guide. If you want to generate your own certificates and keys forMC, seeGenerating Certifications and Keys for MC.
Signed CertificatesFor production, you need to use certificates that are signed by a certificate authority. You cancreate and submit one now and import the certificate into MC when the certificate returns from theCA.
To generate a new CSR, enter the following command in a terminal window, like vsql:
Administrator's GuideImplementing Security
HP Vertica Analytics Platform (7.0.x) Page 211 of 969

openssl req -new -key /opt/vertica/config/keystore.key -out server.csr
When you press enter, you are prompted to enter information that will be incorporated into yourcertificate request. Some fields contain a default value, which you should change, and some youcan leave blank, like password and optional company name. Enter '.' to leave the field blank.
Important: The keystore.key value for the -key option creates private key for the keystore. Ifyou generate a new key and import it using theManagement Console interface, theMCprocess will not restart properly. You will have to restore the original keystore.jks file andrestart Management Console.
Here's an example of the information contained in the CSR, showing both the default andreplacement values:
Country Name (2 letter code) [GB]:USState or Province Name (full name) [Berkshire]:MassachusettsLocality Name (eg, city) [Newbury]: BillericaOrganization Name (eg, company) [My Company Ltd]:HPOrganizational Unit Name (eg, section) []:Information ManagementCommon Name (eg, your name or your server's hostname) []:console.vertica.comEmail Address []:[email protected]
The CommonName field is the fully qualified domain name of your server. The entry must be anexact match for what you type in your web browser, or you will receive a namemismatch error.
Self-Signed CertificatesIf you want to test your new SSL implementation, you can self-sign a CSR using either a temporarycertificate or your own internal CA, if one is available.
Note: A self-signed certificate will generate a browser-based error notifying you that thesigning certificate authority is unknown and not trusted. For testing purposes, accept the risksand continue.
The following command generate a temporary certificate, which is good for 365 days:
openssl x509 -req -days 365 -in server.csr -signkey /opt/vertica/config/keystore.key -outserver.crt
Here's an example of the command's output to the terminal window:
Signature oksubject=/C=US/ST=Massachusetts/L=Billerica/O=HP/OU=IT/CN=console.vertica.com/[email protected] Private key
You can now import the self-signed key, server.crt, into Management Console.
For additional information about certificates and keys, refer to the following external web sites:
Administrator's GuideImplementing Security
HP Vertica Analytics Platform (7.0.x) Page 212 of 969

Note: At the time of publication, the above links were valid. HP does not control this content,which could change between HP Vertica documentation releases.
See Alsol How to Configure SSL
l Key and Certificate Management Tool
Importing a New Certificate to MCTo generate a new certificate for Management Console, youmust use the keystore.key file,which is located in /opt/vconsole/config on the server on which you installedMC. Any othergenerated key/certificate pair will causeMC to restart incorrectly. You will then have to restore theoriginal keystore.jks file and restart Management Console. SeeGenerating Certifications andKeys for Management Console.
To Import a New Certificate1. Connect to Management Console and log in as an administrator.
2. On the Home page, click MC Settings.
3. In the button panel at left, click SSL certificates.
4. To the right of "Upload a new SSL certificate" click Browse to import the new key.
5. Click Apply.
6. Restart Management Console.
Distributing Certifications and KeysOnce you have created the prerequisite certifications and keys for one host, you can easilydistribute them cluster-wide by using the Administration Tools. Client files cannot be distributedthrough Administration Tools.
To distribute certifications and keys to all hosts in a cluster:
1. Log on to a host that contains the certifications and keys you want to distribute and start theAdministration Tools.
See Using the Administration Tools for information about accessing the Administration Tools.
2. On theMain Menu in the Administration Tools, select Configuration Menu, and click OK.
3. On theConfiguration Menu, select Distribute Config Files, and click OK.
Administrator's GuideImplementing Security
HP Vertica Analytics Platform (7.0.x) Page 213 of 969
4. Select SSL Keys and click OK.
5. Select the database where you want to distribute the files and click OK.
6. Fill in the fields with the directory /home/dbadmin/.vsql/ using the root.crt, server.crtand server.key files to distribute the files.
7. Configure SSL.
Configuring SSLConfigure SSL for each server in the cluster.
To Enable SSL:1. Ensure that you have performed the steps listed in SSL Prerequisites minimally for server
authentication and encryption, and optionally for mutual authentication.
2. Set the EnableSSL parameter to 1. By default, EnableSSL is set to 0 (disabled).
=> SELECT SET_CONFIG_PARAMETER('EnableSSL', '1');
Note: HP Vertica fails to start if SSL has been enabled and the server certificate files(server.crt, server.key) are not in the expected location.
3. Restart the database.
4. If you are using either ODBC or JDBC, configure SSL for the appropriate client:
n Configuring SSL for ODBC Clients
n Configuring SSL for JDBC Clients
vsql automatically attempts tomake connections using SSL. If a connection fails, vsqlattempts tomake a second connection over clear text.
See Alsol Configuration Parameters
Configuring SSL for ODBC ClientsConfiguring SSL for ODBC clients requires that you set the SSLMode parameter. If you want toconfigure optional SSL client authentication, you also need to configure the SSLKeyFile andSSLCertFile parameters.
Administrator's GuideImplementing Security
HP Vertica Analytics Platform (7.0.x) Page 214 of 969

Themethod you use to configure the DSN depends on the type of client operating system you areusing:
l Linux and UNIX—Enter the parameters in the odbc.ini file. See Creating anODBC DSN forLinux, Solaris, AIX, and HP-UX Clients.
l Microsoft Windows —Enter the parameters in theWindows Registry. See Creating anODBCDSN forWindows Clients.
SSLMode Parameter
Set the SSLMode parameter to one of the following for the DSN:
l require—Requires the server to use SSL. If the server cannot provide an encrypted channel,the connection fails.
l prefer (the default)— Prefers the server to use SSL. If the server does not offer an encryptedchannel, the client requests one. The first connection to the database tries to use SSL. If thatfails, a second connection is attempted over a clear channel.
l allow —The first connection to the database tries to use a clear channel. If that fails, a secondconnection is attempted over SSL.
l disable—Never connects to the server using SSL. This setting is typically used fortroubleshooting.
SSLKeyFile Parameter
To configure optional SSL client authentication, set the SSLKeyFile parameter to the file path andname of the client's private key. This key can reside anywhere on the client.
SSLCertFile Parameter
To configure optional SSL client authentication, set the SSLCertFile parameter to the file path andname of the client's public certificate. This file can reside anywhere on the client.
Configuring SSL for JDBC Clients
To Configure JDBC:
1. Enable the driver for SSL.
2. Configure troubleshooting if desired.
Administrator's GuideImplementing Security
HP Vertica Analytics Platform (7.0.x) Page 215 of 969

To Enable the Driver for SSL
For JDBC, the driver must be enabled for SSL. Use a connection parameter when connecting to thedatabase to force a connection using SSL. You can specify a connection parameter within aconnection URL or by using an additional properties object parameter toDriverManager.getConnection.
l Using a Connection URL
The following example forces a connection using SSL by setting the ssl connection parameter totrue:
String url = "jdbc:vertica://VerticaHost://DatabaseName?user=username" + "&password=password&ssl=true";Connection conn = DriverManager.getConnection (url);
Note: If the server is not SSL enabled, the connection fails. This differs from vsql, whichcan try an unencrypted connection.
l Using an Additional Properties Object Parameter
The following code fragment forces a connection using SSL by establishing an ssl connectionproperty:
String url = "jdbc:vertica://VerticaHost/DatabaseName"; Properties props = new Properties();props.setProperty("user", "username"); props.setProperty("password", "password");props.setProperty("ssl", "true");Connection conn = new Connection(url, props);
Note: For compatibility with future versions, specify a value, even though the ssl propertydoes not require that a value be associated with it. Specifying a ssl property, even without avalue of "true," automatically forces a connection using SSL.
To Configure Troubleshooting
To enable troubleshooting, configure the keystore file that contains trusted certificate authority (CA)certificates:
-Djavax.net.debug=ssl-Djavax.net.ssl.trustStore=<keystore file>
In the above command:
Administrator's GuideImplementing Security
HP Vertica Analytics Platform (7.0.x) Page 216 of 969

l Configuring -Djavax.net.debug=ssl is optional.
l The keystore file is the same keystore that was updated as part of Generating Certifications andKeys (JDBC Certificates). Normally, the keystore file is $HOME/.keystore. The keytool utilitytakes server.crt.der and places it in the keystore.
For details, see "Customizing the Default Key and Trust Stores, Store Types, and StorePasswords" on the java.sun.com web site.
Requiring SSL for Client ConnectionsYou can require clients to use SSLwhen connecting to HP Vertica by creating a clientauthentication record for them that has a connection_type of hostssl. You can choose to limitspecific users to only connecting using SSL (useful for specific clients that you know areconnecting through an insecure network connection) or require all clients to use SSL.
See Implementing Client Authentication for more information about creating client authenticationrecords.
Administrator's GuideImplementing Security
HP Vertica Analytics Platform (7.0.x) Page 217 of 969

Managing Users and PrivilegesDatabase users should have access to only the database resources they need to perform theirtasks. For example, most users should be able to read data but not modify or insert new data, whileother users might needmore permissive access, such as the right to create andmodify schemas,tables, and views, as well as rebalance nodes on a cluster and start or stop a database. It is alsopossible to allow certain users to grant other users access to the appropriate database resources.
Client authentication controls what database objects users can access and change in thedatabase. To prevent unauthorized access, a superuser limits access to what is needed, grantingprivileges directly to users or to roles through a series of GRANT statements. Roles can then begranted to users, as well as to other roles.
A Management Console administrator can also grant MC users access to one or more HP Verticadatabases through theMC interface. See About MC Users and About MC Privileges and Roles fordetails.
This section introduces the privilege role model in HP Vertica and describes how to create andmanage users.
See Alsol About Database Privileges
l About Database Roles
l GRANT Statements
l REVOKE Statements
Administrator's GuideManaging Users and Privileges
HP Vertica Analytics Platform (7.0.x) Page 218 of 969

About Database UsersEvery HP Vertica database has one or more users. When users connect to a database, they mustlog on with valid credentials (username and password) that a superuser defined in the database.
Database users own the objects they create in a database, such as tables, procedures, and storagelocations.
Note: By default, users have the right to create temporary tables in a database.
See Alsol Creating a Database User
l CREATE USER
l About MC Users
Administrator's GuideManaging Users and Privileges
HP Vertica Analytics Platform (7.0.x) Page 219 of 969

Types of Database UsersIn an HP Vertica database, there are three types of users:
l Database administrator (DBADMIN)
l Object owner
l Everyone else (PUBLIC)
Note: External to an HP Vertica database, anMC administrator can create users through theManagement Console and grant them database access. See About MC Users for details.
DBADMIN UserWhen you create a new database, a single database administrator account, DBADMIN, isautomatically created along with the PUBLIC role. This database superuser bypasses allpermission checks and has the authority to perform all database operations, such as bypassing allGRANT/REVOKE authorizations and any user granted the PSEUDOSUPERUSER role.
Note: Although the dbadmin user has the same name as the Linux database administratoraccount, do not confuse the concept of a database superuser with Linux superuser (root)privilege; they are not the same. A database superuser cannot have Linux superuser privileges.
The DBADMIN user can start and stop a database without a database password. To connect to thedatabase, a password is required.
See Also
l DBADMIN Role
l PSEUDOSUPERUSER Role
l PUBLIC Role
Object OwnerAn object owner is the user who creates a particular database object and can perform any operationon that object. By default, only an owner (or a superuser) can act on a database object. In order toallow other users to use an object, the owner or superuser must grant privileges to those usersusing one of the GRANT statements.
Note: Object owners are PUBLIC users for objects that other users own.
See About Database Privileges for more information.
Administrator's GuideManaging Users and Privileges
HP Vertica Analytics Platform (7.0.x) Page 220 of 969

PUBLIC UserAll non-DBA (superuser) or object owners are PUBLIC users.
Note: Object owners are PUBLIC users for objects that other users own.
Newly-created users do not have access to schema PUBLIC by default. Make sure to GRANTUSAGE ON SCHEMA PUBLIC to all users you create.
See Also
l PUBLIC Role
Creating a Database UserThis procedure describes how to create a new user on the database.
1. From vsql, connect to the database as a superuser.
2. Issue the CREATE USER statement with optional parameters.
3. Run a series of GRANT statements to grant the new user privileges.
Notesl Newly-created users do not have access to schema PUBLIC by default. Make sure to GRANT
USAGE ON SCHEMA PUBLIC to all users you create
l By default, database users have the right to create temporary tables in the database.
l If you plan to create users onManagement Console, the database user account needs to existbefore you can associate anMC user with the database.
l You can change information about a user, such as his or her password, by using the ALTERUSER statement. If you want to configure a user to not have any password authentication, youcan set the empty password ‘’ in CREATE or ALTER USER statements, or omit theIDENTIFIED BY parameter in CREATE USER.
ExampleThe following series of commands add user Fred to a database with password 'password. Thesecond command grants USAGE privileges to Fred on the public schema:
=> CREATE USER Fred IDENTIFIED BY 'password';=> GRANT USAGE ON SCHEMA PUBLIC to Fred;
User names created with double-quotes are case sensitive. For example:
Administrator's GuideManaging Users and Privileges
HP Vertica Analytics Platform (7.0.x) Page 221 of 969

=> CREATE USER "FrEd1";
In the above example, the logon namemust be an exact match. If the user namewas createdwithout double-quotes (for example, FRED1), then the user can log on as FRED1, FrEd1, fred1,and so on.
ALTER USER and DROP USER syntax is not case sensitive.
See Alsol Granting and Revoking Privileges
l Granting Access to Database Roles
l Creating anMC User
Locking/unlocking a user's Database AccessA superuser canmanually lock an existing database user's account with the ALTER USERstatement. For example, the following command prevents user Fred from logging in to thedatabase:
=> ALTER USER Fred ACCOUNT LOCK;
=> \c - Fred
FATAL 4974: The user account "Fred" is locked
HINT: Please contact the database administrator
To grant Fred database access, use UNLOCK syntax with the ALTER USER command:
=> ALTER USER Fred ACCOUNT UNLOCK;
=> \c - Fred
You are now connected as user "Fred".
Using CREATE USER to lock an accountAlthough not as common, you can create a new user with a locked account; for example, youmightwant to set up an account for a user who doesn't need immediate database access, as in the caseof an employee whowill join the company at a future date.
=> CREATE USER Bob ACCOUNT UNLOCK;
CREATE USER
CREATE USER also supports UNLOCK syntax; however, UNLOCK is the default, so you don'tneed to specify the keyword when you create a new user to whom you want to grant immediatedatabase access.
Administrator's GuideManaging Users and Privileges
HP Vertica Analytics Platform (7.0.x) Page 222 of 969

Locking an account automaticallyInstead of manually locking an account, a superuser can automate account locking by setting amaximum number of failed login attempts through the CREATE PROFILE statement. See Profiles.
Changing a user's PasswordA superuser can change another user's database account, including reset a password, with the theALTER USER statement.
Making changes to a database user account with does not affect current sessions.
=> ALTER USER Fred IDENTIFIED BY 'newpassword';
In the above command, Fred's password is now newpassword.
Note: Non-DBA users can change their own passwords using the IDENTIFIED BY 'new-password' option along with the REPLACE 'old-password' clause. See ALTER USER fordetails.
Changing a user's MC PasswordOnMC, users with ADMIN or IT privileges can reset a user's non-LDAP password from theMCinterface.
Non-LDAP passwords onMC are for MC access only and are not related to a user's logoncredentials on the HP Vertica database.
1. Sign in toManagement Console and navigate toMC Settings > User management.
2. Click to select the user to modify and click Edit.
3. Click Edit password and enter the new password twice.
4. Click OK and then click Save.
Administrator's GuideManaging Users and Privileges
HP Vertica Analytics Platform (7.0.x) Page 223 of 969

About MC UsersUnlike database users, which you create on the HP Vertica database and then grant privileges androles through SQL statements, you createMC users on theManagement Console interface. MCusers are external to the database; their information is stored on an internal database on theMCapplication/web server, and their access to bothMC and toMC-managed databases is controlledby groups of privileges (also referred to as access levels). MC users are not system (Linux) users;they are entries in theMC internal database.
Permission Group TypesThere are two types of permission groups onMC, those that apply to MC configuration and thosethat apply to database access:
l MC configuration privileges aremade up of roles that control what users can configure on theMC, such as modify MC settings, create/import HP Vertica databases, restart MC, create anHP Vertica cluster through theMC interfac, and create andmanageMC users.
l MC database privileges aremade up of roles that control what users can see or do on anMC-managed HP Vertica database, such as view the database cluster state, query and sessionactivity, monitor databasemessages and read log files, replace cluster nodes, and stopdatabases.
If you are usingMC, youmight want to allow one or more users in your organization to configure andmanageMC, and youmight want other users to have database access only. You canmeet theserequirements by creatingMC users and granting them a role from each privileges group. SeeCreating anMC User for details.
MC User TypesThere are four types of role-based users onMC:
l The default superuser administrator (Linux account) who gets created when you install andconfigureMC and oversees the entire MC. See SUPER Role (mc).
l Users who can configure all aspects of MC and control all MC-managed databases. SeeADMIN Role (mc).
l Users who can configure some aspects of MC andmonitor all MC-managed databases. See ITRole (mc).
l Users who cannot configureMC and have access to one or moreMC-managed databases only.See NONE Role (mc).
You create users and grant them privileges (through roles) on theMC Settings page by selectingUser management, to add users who will be authenticated against theMC orAuthentication, toauthenticate MC users through your organization's LDAP repository.
Administrator's GuideManaging Users and Privileges
HP Vertica Analytics Platform (7.0.x) Page 224 of 969

Creating Users and Choosing an AuthenticationMethod
You create users and grant them privileges (through roles) on theMC Settings page, where youcan also choose how to authenticate their access toMC; for example:
l To add users who will be authenticated against theMC, click User Management
l To add users who will be authenticated through your organization's LDAP repository, clickAuthentication
MC supports only onemethod for authentication, so if you chooseMC, all MC users will beauthenticated using their MC login credentials.
Default MC UsersTheMC super account is the only default user. The super or another MC administrator must createall other MC users.
See Alsol Management Console
l About MC Privileges and Roles
l Granting Database Access toMC Users
l Mapping anMC User to a Database user's Privileges
Creating an MC UserMC provides two authentication schemes for MC users: LDAP orMC (internal). Whichmethod youchoose will be themethodMC uses to authenticate allMC users. It is not possible to authenticatesomeMC users against LDAP and other MC users against credentials in the database throughMC.
l MC (internal) authentication. Internal user authorization is specific to theMC itself, where youcreate a user with a username and password combination. This method stores MC userinformation in an internal database on theMC application/web server, and encrypts passwords.Note that theseMC users are not system (Linux) users; they are entries in theMC’s internaldatabase.
l LDAP authentication. All MC users—except for theMC super administrator, which is a Linuxaccount—will be authenticated based on search criteria against your organization's LDAPrepository. MC uses information from LDAP for authentication purposes only and does notmodify LDAP information. Also, MC does not store LDAP passwords but passes them to theLDAP server for authentication.
Instructions for creating new MC users are in this topic.
Administrator's GuideManaging Users and Privileges
HP Vertica Analytics Platform (7.0.x) Page 225 of 969

l If you choseMC authentication, follow the instructions underCreate a new MC-authenticateduser.
l If you chose LDAP authentication, follow the instructions underCreate a new user fromLDAP.
See About MC Users and Configuring LDAP Authentication for more information.
PrerequisitesBefore you create anMC user, you already:
l Created a database directly on the server or through theMC interface, or you imported anexisting database cluster into theMC interface. SeeManaging Database Clusters onMC.
l Created a database user account (source user) on the server, which has the privileges and/orroles you want to map to the new (target) MC user. See Creating a Database User.
l Know what MC privileges you want to grant the new MC user. See About MC Privileges andRoles.
l Are familiar with the concept of mappingMC users to database users.
If you have not yet met the first two above prerequisites, you can still create new MC users; youjust won't be able tomap them to a database until after the database and target database user exist.To grant MC users database access later, seeGranting Database Access toMC Users.
Create a New MC-authenticated User1. Sign in toManagement Console as an administrator and navigate toMC Settings > User
management.
2. Click Add.
3. Enter theMC username.
Note: It is not necessary to give theMC user the exact same name as the database useraccount you'll map theMC user to in Step 7. What matters is that the source databaseuser has privileges and/or roles similar to the database role you want to grant theMC user.Themost likely scenario is that you will mapmultiple MC users to a single database useraccount. SeeMC Database Privileges andMapping anMC User to a Database user'sPrivileges for more information.
4. Let MC generate a password or create one by clickingEdit password. If LDAP has beenconfigured, theMC password field will not appear.
5. Optionally enter the user's e-mail address.
Administrator's GuideManaging Users and Privileges
HP Vertica Analytics Platform (7.0.x) Page 226 of 969

6. Select anMC configuration permissions level. SeeMC Configuration Privileges.
7. Next to the DB access levels section, click Add to grant this user database permissions. Ifyou want to grant access later, proceed to Step 8. If you want to grant database access now,provide the following information:
i. Choose a database. Select a database from the list of MC-discovered (databasesthat were created on or imported into theMC interface).
ii. Database username. Enter an existing database user name or, if the database isrunning, click the ellipses […] to browse for a list of database users, and select aname from the list.
iii. Database password. Enter the password to the database user account (not thisusername's password).
iv. Restricted access. Chose a database level (ADMIN, IT, or USER) for this user.
v. Click OK to close theAdd permissions dialog box.
SeeMapping anMC User to a Database user's Privileges for additional information aboutassociating the two user accounts.
1. Leave the user's Status as enabled (the default). If you need to prevent this user fromaccessingMC, select disabled.
2. Click Add User to finish.
Create a New LDAP-authenticated UserWhen you add a user from LDAP on theMC interface, options on theAdd a new user dialog boxare slightly different from when you create users without LDAP authentication. Because passwordsare store externally (LDAP server) the password field does not appear. AnMC administrator canoverride the default LDAP search string if the user is found in another branch of the tree. TheAdduser field is pre-populated with the default search path entered when LDAP was configured.
1. Sign in toManagement Console and navigate toMC Settings > User management.
2. Click Add and provide the following information:
a. LDAP user name.
b. LDAP search string.
c. User attribute, and click Verify user.
d. User's email address.
e. MC configuration role. NONE is the default. SeeMC Configuration Privileges for details.
Administrator's GuideManaging Users and Privileges
HP Vertica Analytics Platform (7.0.x) Page 227 of 969

f. Database access level. SeeMC Database Privileges for details.
g. Accept or change the default user's Status (enabled).
3. Click Add user.
If you encounter issues when creating new users from LDAP, you'll need to contact yourorganization's IT department.
How MC Validates New UsersAfter you click OK to close the Add permissions dialog box, MC tries to validate the databaseusername and password entered against the selectedMC-managed database or against yourorganization's LDAP directory. If the credentials are found to be invalid, you are asked to re-enterthem.
If the database is not available at the time you create the new user, MC saves theusername/password and prompts for validation when the user accesses the Database and Clusterspage later.
See Alsol ConfiguringMC
l About MC Users
l About MC Privileges and Roles
l Granting Database Access toMC Users
l Creating a Database User
l Mapping anMC User to a Database user's Privileges
l AddingMultiple Users toMC-managed Databases
Managing MC UsersYoumanageMC users through the following pages on theManagement Console interface:
l MC Settings > User management
l MC Settings > Resource access
Who Manages UsersTheMC superuser administrator (SUPER Role (mc)) and users granted ADMIN Role (mc) manageall aspects of users, including their access toMC and toMC-managed databases.
Users granted IT Role (mc) can enable and disable user accounts.
Administrator's GuideManaging Users and Privileges
HP Vertica Analytics Platform (7.0.x) Page 228 of 969

See About MC Users and About MC Privileges and Roles for more information.
Editing anMC user's information follows the same steps as creating a new user, except the user'sinformation will be pre-populated, which you then edit and save.
The only user account you cannot alter or remove from theMC interface is theMC super account.
What Kind of User Information You Can ManageYou can change the following user properties:
l MC password
l Email address. This field is optional; if the user is authenticated against LDAP, the email field ispre-populated with that user's email address if one exists.
l MC Configuration Privileges role
l MC Database Privileges role
You can also change a user's status (enable/disable access toMC) and delete users.
About User NamesAfter you create and save a user, you cannot change that user's MC user name, but you can deletethe user account and create a new user account under a new name. The only thing you lose bydeleting a user account is its audit activity, but MC immediately resumes logging activity under theuser's new account.
See Alsol About MC Users
l About MC Privileges and Roles
Administrator's GuideManaging Users and Privileges
HP Vertica Analytics Platform (7.0.x) Page 229 of 969

About Database PrivilegesWhen a database object is created, such as a schema, table, or view, that object is assigned anowner—the person who executed the CREATE statement. By default, database administrators(superusers) or object owners are the only users who can do anything with the object.
In order to allow other users to use an object, or remove a user's right to use an object, theauthorized user must grant another user privileges on the object.
Privileges are granted (or revoked) through a collection of GRANT/REVOKE statements thatassign the privilege—a type of permission that lets users perform an action on a database object,such as:
l Create a schema
l Create a table (in a schema)
l Create a view
l View (select) data
l Insert, update, or delete table data
l Drop tables or schemas
l Run procedures
Before HP Vertica executes a statement, it determines if the requesting user has the necessaryprivileges to perform the operation.
For more information about the privileges associated with these resources, see Privileges That CanBeGranted onObjects.
Note: HP Vertica logs information about each grant (grantor, grantee, privilege, and so on) inthe V_CATALOG.GRANTS system table.
See Alsol GRANT Statements
l REVOKE Statements
Default Privileges for All UsersTo set theminimum level of privilege for all users, HP Vertica has the special PUBLIC Role, whichit grants to each user automatically. This role is automatically enabled, but the databaseadministrator or a superuser can also grant higher privileges to users separately using GRANTstatements.
The following topics discuss those higher privileges.
Administrator's GuideManaging Users and Privileges
HP Vertica Analytics Platform (7.0.x) Page 230 of 969
Default Privileges for MC UsersPrivileges onManagement Console (MC) aremanaged through roles, which determine a user'saccess toMC and toMC-managed HP Vertica databases through theMC interface. MC privilegesdo not alter or override HP Vertica privileges or roles. See About MC Privileges and Roles fordetails.
Privileges Required for Common DatabaseOperations
This topic lists the required privileges for database objects in HP Vertica.
Unless otherwise noted, superusers can perform all of the operations shown in the following tableswithout any additional privilege requirements. Object owners have the necessary rights to performoperations on their own objects, by default.
SchemasThe PUBLIC schema is present in any newly-created HP Vertica database, and newly-createdusers have only USAGE privilege on PUBLIC. A database superuser must explicitly grant newusers CREATE privileges, as well as grant them individual object privileges so the new users cancreate or look up objects in the PUBLIC schema.
Operation Required Privileges
CREATE SCHEMA CREATE privilege on database
DROP SCHEMA Schema owner
ALTER SCHEMA RENAME CREATE privilege on database
Tables
Operation Required Privileges
CREATE TABLE CREATE privilege on schema
Note:Referencing sequences in the CREATE TABLEstatement requires the following privileges:
l SELECT privilege on sequence object
l USAGE privilege on sequence schema
DROP TABLE USAGE privilege on the schema that contains the table orschema owner
Administrator's GuideManaging Users and Privileges
HP Vertica Analytics Platform (7.0.x) Page 231 of 969

Operation Required Privileges
TRUNCATE TABLE USAGE privilege on the schema that contains the table orschema owner
ALTER TABLE ADD/DROP/RENAME/ALTER-TYPE COLUMN
USAGE privilege on the schema that contains the table
ALTER TABLE ADD/DROP CONSTRAINT USAGE privilege on the schema that contains the table
ALTER TABLE PARTITION (REORGANIZE) USAGE privilege on the schema that contains the table
ALTER TABLE RENAME USAGE and CREATE privilege on the schema thatcontains the table
ALTER TABLE SET SCHEMA l CREATE privilege on new schema
l USAGE privilege on the old schema
SELECT l SELECT privilege on table
l USAGE privilege on schema that contains the table
INSERT l INSERT privilege on table
l USAGE privilege on schema that contains the table
DELETE l DELETE privilege on table
l USAGE privilege on schema that contains the table
l SELECT privilege on the referenced table whenexecuting a DELETE statement that references tablecolumn values in aWHERE or SET clause
UPDATE l UPDATE privilege on table
l USAGE privilege on schema that contains the table
l SELECT privilege on the table when executing anUPDATE statement that references table columnvalues in aWHERE or SET clause
REFERENCES l REFERENCES privilege on table to create foreignkey constraints that reference this table
l USAGE privileges on schema that contains theconstrained table and the source of the foreign k
ANALYZE_STATISTICS() l INSERT/UPDATE/DELETE privilege on table
l USAGE privilege on schema that contains the table
Administrator's GuideManaging Users and Privileges
HP Vertica Analytics Platform (7.0.x) Page 232 of 969

Operation Required Privileges
ANALYZE_HISTOGRAM() l INSERT/UPDATE/DELETE privilege on table
l USAGE privilege on schema that contains the table
DROP_STATISTICS() l INSERT/UPDATE/DELETE privilege on table
l USAGE privilege on schema that contains the table
DROP_PARTITION() USAGE privilege on schema that contains the table
MERGE_PARTITIONS() USAGE privilege on schema that contains the table
Views
Operation Required Privileges
CREATE VIEW l CREATE privilege on the schema to contain a view
l SELECT privileges on base objects (tables/views)
l USAGE privileges on schema that contains the base objects
DROP VIEW USAGE privilege on schema that contains the view or schema owner
SELECT ... FROM VIEW l SELECT privilege on view
l USAGE privilege on the schema that contains the view
Note: Privileges required on base objects for view ownermust be directlygranted, not through roles:
l View ownermust have SELECT ... WITH GRANT OPTION privilegeson the view's base tables or views if non-owner runs a SELECT queryon the view. This privilegemust be directly granted to the owner,notthrough a role.
l View ownermust have SELECT privilege directly granted (not througha role) on a view's base objects (table or view) if owner runs aSELECT query on the view.
Administrator's GuideManaging Users and Privileges
HP Vertica Analytics Platform (7.0.x) Page 233 of 969

Projections
Operation Required Privileges
CREATE PROJECTION l SELECT privilege on base tables
l USAGE privilege on schema that contains base tables or schemaowner
l CREATE privilege on schema to contain the projection
Note: If a projection is implicitly created with the table, no additionalprivilege is needed other than privileges for table creation.
AUTO/DELAYED PROJECTION On projections created during INSERT..SELECT or COPYoperations:
l SELECT privilege on base tables
l USAGE privilege on schema that contains base tables
ALTER PROJECTION RENAME USAGE and CREATE privilege on schema that contains theprojection
DROP PROJECTION USAGE privilege on schema that contains the projection or schemaowner
External Procedures
Operation Required Privileges
CREATE PROCEDURE Superuser
DROP PROCEDURE Superuser
EXECUTE l EXECUTE privilege on procedure
l USAGE privilege on schema that contains theprocedure
Libraries
Operation Required Privileges
CREATE LIBRARY Superuser
DROP LIBRARY Superuser
Administrator's GuideManaging Users and Privileges
HP Vertica Analytics Platform (7.0.x) Page 234 of 969

User-Defined FunctionsThe following abbreviations are used in the UDF table:
l UDF = Scalar
l UDT = Transform
l UDAnF= Analytic
l UDAF = Aggregate
Operation Required Privileges
CREATE FUNCTION (SQL)CREATE FUNCTION (UDF)CREATE TRANSFORM FUNCTION (UDF)CREATE ANALYTIC FUNCTION (UDAnFCREATE AGGREGATE FUNCTION (UDAF)
l CREATE privilege on schema to contain thefunction
l USAGE privilege on base library (if applicable)
DROP FUNCTION DROP TRANSFORM FUNCTIONDROP ANALYTIC FUNCTIONDROP AGGREGATE FUNCTION
l Superuser or function owner
l USAGE privilege on schema that contains thefunction
ALTER FUNCTION RENAME TO USAGE and CREATE privilege on schema thatcontains the function
ALTER FUNCTION SET SCHEMA l USAGE privilege on schema that currentlycontains the function (old schema)
l CREATE privilege on the schema to which thefunction will bemoved (new schema)
EXECUTE (SQL/UDF/UDT/ ADAF/UDAnF) function l EXECUTE privilege on function
l USAGE privilege on schema that contains thefunction
Sequences
Operation Required Privileges
CREATE SEQUENCE CREATE privilege on schema to contain the sequence
Note: Referencing sequence in the CREATE TABLE statementrequires SELECT privilege on sequence object and USAGEprivilege on sequence schema.
Administrator's GuideManaging Users and Privileges
HP Vertica Analytics Platform (7.0.x) Page 235 of 969

Operation Required Privileges
CREATE TABLE with SEQUENCE l SELECT privilege on sequence
l USAGE privilege on sequence schema
DROP SEQUENCE USAGE privilege on schema containing the sequence or schemaowner
ALTER SEQUENCE RENAME TO USAGE and CREATE privileges on schema
ALTER SEQUENCE SET SCHEMA l USAGE privilege on the schema that currently contains thesequence (old schema)
l CREATE privilege on new schema to contain the sequence
CURRVAL()NEXTVAL() l SELECT privilege on sequence
l USAGE privilege on sequence schema
Resource Pools
Operation Required Privileges
CREATE RESOURCE POOL Superuser
ALTER RESOURCE POOL Superuser on the resource pool to alter:
l MAXMEMORYSIZE
l PRIORITY
l QUEUETIMEOUT
UPDATE privilege on the resource pool to alter:
l PLANNEDCONCURRENCY
l SINGLEINITIATOR
l MAXCONCURRENCY
SET SESSION RESOURCE_POOL l USAGE privilege on the resource pool
l Users can only change their own resource pool setting usingALTER USER syntax
DROP RESOURCE POOL Superuser
Administrator's GuideManaging Users and Privileges
HP Vertica Analytics Platform (7.0.x) Page 236 of 969

Users/Profiles/Roles
Operation Required Privileges
CREATE USER
CREATE PROFILE
CREATE ROLE
Superuser
ALTER USER
ALTER PROFILE
ALTER ROLE RENAME
Superuser
DROP USER
DROP PROFILE
DROP ROLE
Superuser
Object VisibilityYou can use one or a combination of vsql \d [pattern] meta commands and SQL system tables toview objects on which you have privileges to view.
l Use \dn [pattern] to view schema names and owners
l Use \dt [pattern] to view all tables in the database, as well as the system table V_CATALOG.TABLES
l Use \dj [pattern] to view projections showing the schema, projection name, owner, and node, aswell as the system table V_CATALOG.PROJECTIONS
OperationRequiredPrivileges
Look up schema At least oneprivilege onschema thatcontains theobject
Administrator's GuideManaging Users and Privileges
HP Vertica Analytics Platform (7.0.x) Page 237 of 969

OperationRequiredPrivileges
Look upObject in Schema or in System Tables USAGEprivilege onschema
At least oneprivilege onany of thefollowingobjects:
TABLE
VIEW
FUNCTION
PROCEDURE
SEQUENCE
Look up Projection At least oneprivilege on allbase tables
USAGEprivilege onschema of allbase table
Look up resource pool SELECTprivilege on theresource pool
Existence of object USAGEprivilege on theschema thatcontains theobject
I/O Operations
Operation Required Privileges
CONNECTDISCONNECT None
Administrator's GuideManaging Users and Privileges
HP Vertica Analytics Platform (7.0.x) Page 238 of 969
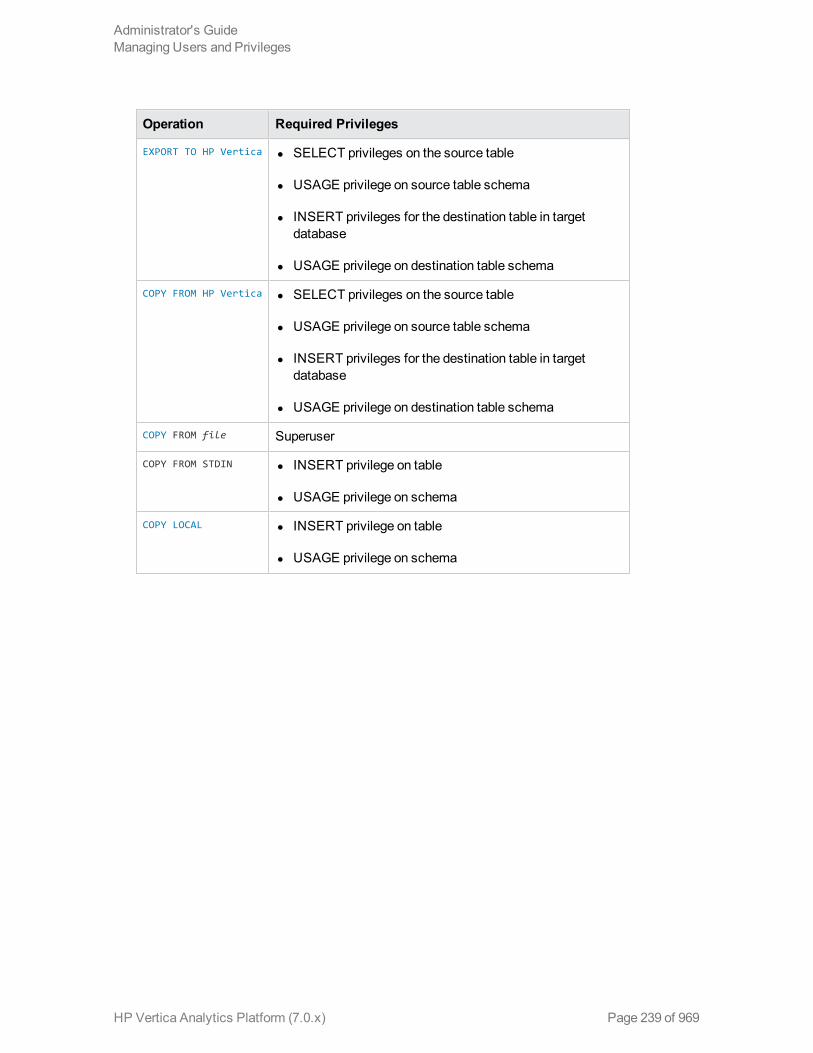
Operation Required Privileges
EXPORT TO HP Vertica l SELECT privileges on the source table
l USAGE privilege on source table schema
l INSERT privileges for the destination table in targetdatabase
l USAGE privilege on destination table schema
COPY FROM HP Vertica l SELECT privileges on the source table
l USAGE privilege on source table schema
l INSERT privileges for the destination table in targetdatabase
l USAGE privilege on destination table schema
COPY FROM file Superuser
COPY FROM STDIN l INSERT privilege on table
l USAGE privilege on schema
COPY LOCAL l INSERT privilege on table
l USAGE privilege on schema
Administrator's GuideManaging Users and Privileges
HP Vertica Analytics Platform (7.0.x) Page 239 of 969

Comments
Operation Required Privileges
COMMENTON { is one of }:
l AGGREGATEFUNCTION
l ANALYTIC FUNCTION
l COLUMN
l CONSTRAINT
l FUNCTION
l LIBRARY
l NODE
l PROJECTION
l SCHEMA
l SEQUENCE
l TABLE
l TRANSFORMFUNCTION
l VIEW
Object owner or superuser
Transactions
Operation Required Privileges
COMMIT None
ROLLBACK None
RELEASE SAVEPOINT None
SAVEPOINT None
Administrator's GuideManaging Users and Privileges
HP Vertica Analytics Platform (7.0.x) Page 240 of 969

Sessions
Operation Required Privileges
SET { is one of }:
l DATESTYLE
l ESCAPE_STRING_WARNING
l INTERVALSTYLE
l LOCALE
l ROLE
l SEARCH_PATH
l SESSION AUTOCOMMIT
l SESSION CHARACTERISTICS
l SESSION MEMORYCAP
l SESSION RESOURCE POOL
l SESSION RUNTIMECAP
l SESSION TEMPSPACE
l STANDARD_CONFORMING_STRINGS
l TIMEZONE
None
SHOW { name | ALL } None
Tuning Operations
Operation Required Privileges
PROFILE Same privileges required to run the query being profiled
EXPLAIN Same privileges required to run the query for which you use the EXPLAIN keyword
Administrator's GuideManaging Users and Privileges
HP Vertica Analytics Platform (7.0.x) Page 241 of 969

Privileges That Can Be Granted on ObjectsThe following table provides an overview of privileges that can be granted on (or revoked from)database objects in HP Vertica:
See Alsol GRANT Statements
l REVOKE Statements
Database PrivilegesOnly a database superuser can create a database. In a new database, the PUBLIC Role is grantedUSAGE on the automatically-created PUBLIC schema. It is up to the superuser to grant furtherprivileges to users and roles.
The only privilege a superuser can grant on the database itself is CREATE, which allows the userto create a new schema in the database. For details on granting and revoking privileges on adatabase, see the GRANT (Database) and REVOKE (Database) topics in the SQLReferenceManual.
Privilege Grantor Description
CREATE Superuser Allows a user to create a schema.
Administrator's GuideManaging Users and Privileges
HP Vertica Analytics Platform (7.0.x) Page 242 of 969

Schema PrivilegesBy default, only a superuser and the schema owner have privileges to create objects within aschema. Additionally, only the schema owner or a superuser can drop or alter a schema. SeeDROP SCHEMA and ALTER SCHEMA.
All new users have only USAGE privilege on the PUBLIC schema, which is present in any newly-created HP Vertica database. A superuser must then explicitly grant these new users CREATEprivileges, as well as grant them individual object privileges, so the new users can create or look upobjects in the PUBLIC schema. Without USAGE privilege, objects in the schema cannot be usedor altered, even by the object owner.
CREATE gives the schema owner or userWITH GRANT OPTION permission to create newobjects in the schema, including renaming an object in the schema ormoving an object into thisschema.
Note: The schema owner is typically the user who creates the schema. However, a superusercan create a schema and assign ownership of the schema to a different user at creation.
All other access to the schema and its objects must be explicitly granted to users or roles by thesuperuser or schema owner. This prevents unauthorized users from accessing the schema and itsobjects. A user can be granted one of the following privileges through theGRANT statement:
Privilege Description
CREATE Allows the user to create new objects within the schema. This includes the ability tocreate a new object, rename existing objects, andmove objects into the schemafrom other schemas.
USAGE Permission to select, access, alter, and drop objects in the schema. The user mustalso be granted access to the individual objects in order to alter them. For example, auser would need to be granted USAGE on the schema and SELECT on a table to beable to select data from a table. You receive an error message if you attempt to querya table that you have SELECT privileges on, but do not have USAGE privileges forthe schema that contains the table.
Schema Privileges and the Search Path
The search path determines to which schema unqualified objects in SQL statements belong.
When a user specifies an object name in a statement without supplying the schema in which theobject exists (called an unqualified object name) HP Vertica has two different behaviors, dependingon whether the object is being accessed or created.
Administrator's GuideManaging Users and Privileges
HP Vertica Analytics Platform (7.0.x) Page 243 of 969

Creating an objectAccessing/altering anobject
When a user creates an object—such as table, view, sequence,procedure, function—with an unqualified name, HP Vertica tries tocreate the object in the current schema (the first schema in theschema search path), returning an error if the schema does not existor if the user does not have CREATE privileges in that schema.
Use the SHOW search_path command to view the current searchpath.
=> SHOW search_path; name | setting-------------+---------------------------------------------------search_path | "$user", public, v_catalog, v_monitor, v_internal
(1 row)
Note: The first schema in the search path is the current schema, andthe $user setting is a placeholder that resolves to the current user'sname.
When a user accesses oralters an object with anunqualified name, thosestatements searchthrough all schemas for amatching object, startingwith the current schema,where:
l The object name in theschemamatches theobject name in thestatement.
l The user has USAGEprivileges on theschema in order toaccess object in it.
l The user has at leastone privilege on theobject.
See Also
l Setting Search Paths
l GRANT (Schema)
l REVOKE (Schema)
Table PrivilegesBy default, only a superuser and the table owner (typically the person who creates a table) haveaccess to a table. The ability to drop or alter a table is also reserved for a superuser or table owner.This privilege cannot be granted to other users.
All other users or roles (including the user who owns the schema, if he or she does not also own thetable) must be explicitly granted usingWITH GRANT OPTION syntax to access the table.
These are the table privileges a superuser or table owner can grant:
Privilege Description
SELECT Permission to run SELECT queries on the table.
Administrator's GuideManaging Users and Privileges
HP Vertica Analytics Platform (7.0.x) Page 244 of 969

Privilege Description
INSERT Permission to INSERT data into the table.
DELETE Permission to DELETE data from the table, as well as SELECT privilege on thetable when executing a DELETE statement that references table column values in aWHERE or SET clause.
UPDATE Permission to UPDATE and change data in the table, as well as SELECT privilegeon the table when executing an UPDATE statement that references table columnvalues in aWHERE or SET clause.
REFERENCES Permission to CREATE foreign key constraints that reference this table.
To use any of the above privileges, the user must also have USAGE privileges on the schema thatcontains the table. See Schema Privileges for details.
Referencing sequence in the CREATE TABLE statement requires the following privileges:
l SELECT privilege on sequence object
l USAGE privilege on sequence schema
For details on granting and revoking table privileges, seeGRANT (Table) and REVOKE (Table) inthe SQLReferenceManual.
Projection PrivilegesBecause projections are the underlying storage construct for tables, they are atypical in that theydo not have an owner or privileges associated with them directly. Instead, the privileges to create,access, or alter a projection are based on the anchor and base tables that the projection references,as well as the schemas that contain them.
To be able run a query involving a projection, a user must have SELECT privileges on the table ortables that the projection references, and USAGE privileges on all the schemas that contain thosetables.
There are two ways to create projection: explicitly and implicitly.
Explicit Projection Creation and Privileges
To explicitly create a projection using the CREATE PROJECTION statement, a user must be asuperuser or owner of the anchor table or have the following privileges:
l CREATE privilege on the schema in which the projection is created
l SELECT on all the base tables referenced by the projection
l USAGE on all the schemas that contain the base tables referenced by the projection
Administrator's GuideManaging Users and Privileges
HP Vertica Analytics Platform (7.0.x) Page 245 of 969

Explicitly-created projections can only be dropped by the table owner on which the projection isbased for a single-table projection, or the owner of the anchor table for pre-join projections.
Implicit Projection Creation and Privileges
Projections get implicitly created when you insert data into a table, an operation that automaticallycreates a superprojection for the table.
Implicitly-created projections do not require any additional privileges to create or drop, other thanprivileges for table creation. Users who can create a table or drop a table can also create and dropthe associated superprojection.
Selecting From Projections
To select from projections requires the following privileges:
l SELECT privilege on each of the base tables
l USAGE privilege on the corresponding containing schemas
HP Vertica does not associate privileges directly with projections since they are the underlyingstorage construct. Privileges may only be granted on the logical storage containers: the tables andviews.
Dropping Projections
Dropping projections are handledmuch the sameway HP Vertica creates them:
l Explicitly with DROP PROJECTION statement
l Implicitly when you drop the table
View PrivilegesBy default, only a superuser and the view owner (typically the person who creates the view) haveaccess to the base object for a view. All other users and roles must be directly granted access tothe view. For example:
l If a non-owner runs a SELECT query on the view, the view ownermust also have SELECT ...WITH GRANT OPTION privileges on the view's base tables or views. This privilegemust bedirectly granted to the owner, rather than through a role.
l If a view owner runs a SELECT query on the view, the ownermust also have SELECT privilegedirectly granted (not through a role) on a view's base objects (table or view).
The only privilege that can be granted to a user or role is SELECT, which allows the user to executeSELECT queries on the view. The user or role also needs to have USAGE privilege on the schemacontaining the view to be able to run queries on the view.
Administrator's GuideManaging Users and Privileges
HP Vertica Analytics Platform (7.0.x) Page 246 of 969

Privilege Description
SELECT Permission to run SELECT queries on the view.
USAGE Permission on the schema that contains the view
For details on granting and revoking view privileges, seeGRANT (View) and REVOKE (View) in theSQLReferenceManual.
Sequence PrivilegesTo create a sequence, a user must have CREATE privileges on schema that contains thesequence. Only the owner and superusers can initially access the sequence. All other users mustbe granted access to the sequence by a superuser or the owner.
Only the sequence owner (typically the person who creates the sequence) or can drop or rename asequence, or change the schema in which the sequence resides:
l DROP SEQUENCE: Only a sequence owner or schema owner can drop a sequence.
l ALTER SEQUENCE RENAME TO: A sequence ownermust have USAGE and CREATEprivileges on the schema that contains the sequence to be renamed.
l ALTER SEQUENCE SET SCHEMA: A sequence ownermust have USAGE privilege on theschema that currently contains the sequence (old schema), as well as CREATE privilege on theschemawhere the sequence will bemoved (new schema).
The following table lists the privileges that can be granted to users or roles on sequences.
The only privilege that can be granted to a user or role is SELECT, which allows the user to useCURRVAL() and NEXTVAL() on sequence and reference in table. The user or role also needs tohave USAGE privilege on the schema containing the sequence.
Privilege Description
SELECT Permission to use CURRVAL() and NEXTVAL() on sequence and reference in table.
USAGE Permissions on the schema that contains the sequence.
Note: Referencing sequence in the CREATE TABLE statement requires SELECT privilege onsequence object and USAGE privilege on sequence schema.
For details on granting and revoking sequence privileges, seeGRANT (Sequence) and REVOKE(Sequence) in the SQLReferenceManual.
See Also
l Using Named Sequences
Administrator's GuideManaging Users and Privileges
HP Vertica Analytics Platform (7.0.x) Page 247 of 969

External Procedure PrivilegesOnly a superuser is allowed to create or drop an external procedure.
By default, users cannot execute external procedures. A superuser must grant users and roles thisright, using the GRANT (Procedure) EXECUTE statement. Additionally, users must have USAGEprivileges on the schema that contains the procedure in order to call it.
Privilege Description
EXECUTE Permission to run an external procedure.
USAGE Permission on the schema that contains the procedure.
For details on granting and revoking external table privileges, seeGRANT (Procedure) andREVOKE (Procedure) in the SQLReferenceManual.
User-Defined Function PrivilegesUser-defined functions (described in CREATE FUNCTION Statements) can be created bysuperusers or users with CREATE privileges on the schema that will contain the function, as wellas USAGE privileges on the base library (if applicable).
Users or roles other than the function owner can use a function only if they have been grantedEXECUTE privileges on it. They must also have USAGE privileges on the schema that containsthe function to be able to call it.
Privilege Description
EXECUTE Permission to call a user-defined function.
USAGE Permission on the schema that contains the function.
l DROP FUNCTION: Only a superuser or function owner can drop the function.
l ALTER FUNCTION RENAME TO: A superuser or function ownermust have USAGE andCREATE privileges on the schema that contains the function to be renamed.
l ALTER FUNCTION SET SCHEMA: A superuser or function ownermust have USAGE privilegeon the schema that currently contains the function (old schema), as well as CREATE privilegeon the schemawhere the function will bemoved (new schema).
For details on granting and revoking user-defined function privileges, see the following topics in theSQLReferenceManual:
l GRANT (User Defined Extension)
l REVOKE (User Defined Extension)
Administrator's GuideManaging Users and Privileges
HP Vertica Analytics Platform (7.0.x) Page 248 of 969
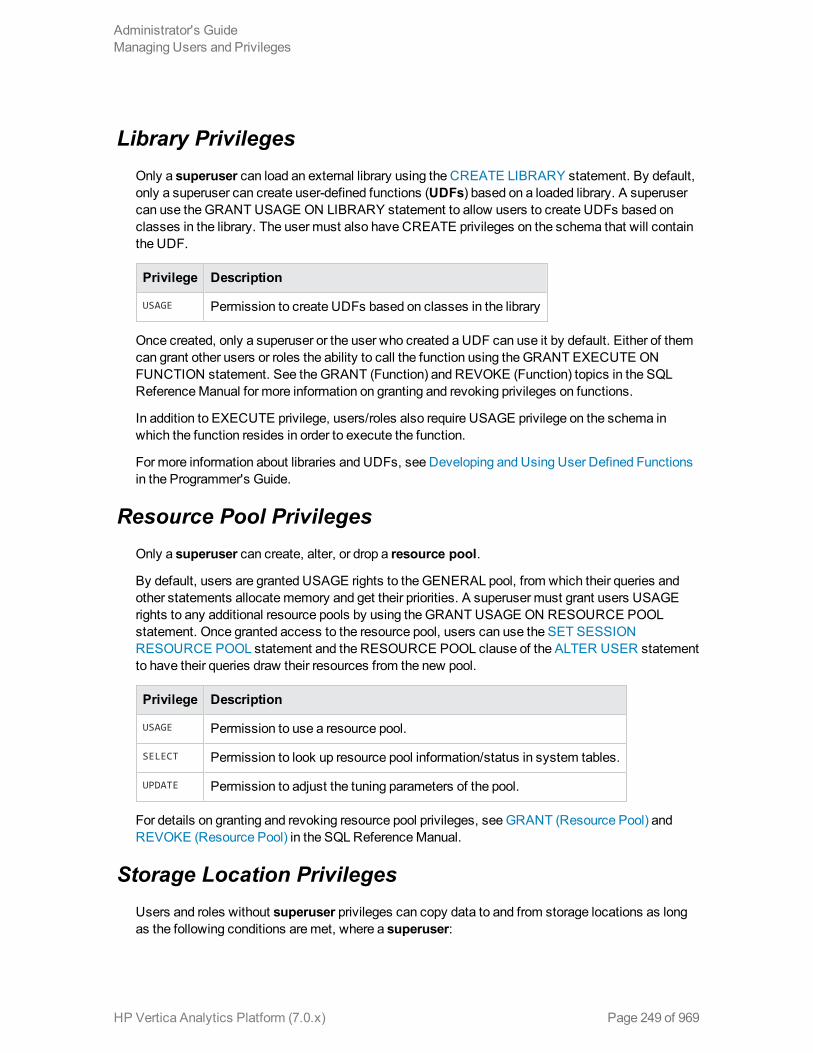
Library PrivilegesOnly a superuser can load an external library using the CREATE LIBRARY statement. By default,only a superuser can create user-defined functions (UDFs) based on a loaded library. A superusercan use theGRANT USAGE ON LIBRARY statement to allow users to create UDFs based onclasses in the library. The user must also have CREATE privileges on the schema that will containthe UDF.
Privilege Description
USAGE Permission to create UDFs based on classes in the library
Once created, only a superuser or the user who created a UDF can use it by default. Either of themcan grant other users or roles the ability to call the function using the GRANT EXECUTE ONFUNCTION statement. See theGRANT (Function) and REVOKE (Function) topics in the SQLReferenceManual for more information on granting and revoking privileges on functions.
In addition to EXECUTE privilege, users/roles also require USAGE privilege on the schema inwhich the function resides in order to execute the function.
For more information about libraries and UDFs, see Developing and Using User Defined Functionsin the Programmer's Guide.
Resource Pool PrivilegesOnly a superuser can create, alter, or drop a resource pool.
By default, users are granted USAGE rights to the GENERAL pool, from which their queries andother statements allocatememory and get their priorities. A superuser must grant users USAGErights to any additional resource pools by using the GRANT USAGE ON RESOURCE POOLstatement. Once granted access to the resource pool, users can use the SET SESSIONRESOURCE POOL statement and the RESOURCE POOL clause of the ALTER USER statementto have their queries draw their resources from the new pool.
Privilege Description
USAGE Permission to use a resource pool.
SELECT Permission to look up resource pool information/status in system tables.
UPDATE Permission to adjust the tuning parameters of the pool.
For details on granting and revoking resource pool privileges, seeGRANT (Resource Pool) andREVOKE (Resource Pool) in the SQLReferenceManual.
Storage Location PrivilegesUsers and roles without superuser privileges can copy data to and from storage locations as longas the following conditions aremet, where a superuser:
Administrator's GuideManaging Users and Privileges
HP Vertica Analytics Platform (7.0.x) Page 249 of 969

1. Creates a a special class of storage location (ADD_LOCATION) specifying the 'USER'argument, which indicates the specified area is accessible to non-dbadmin users.
2. Grants users or roles READ and/orWRITE access to the specified location using the GRANT(Storage Location) statement.
Note: GRANT/REVOKE (Storage Location) statements are applicable only to 'USER'storage locations.
Once such storage locations exist and the appropriate privileges are granted, users and rolesgranted READ privileges can copy data from files in the storage location into a table. Those grantedWRITE privileges can export data from a table to the storage location on which they have beengranted access. WRITE privileges also let users save COPY statement exceptions and rejecteddata files from HP Vertica to the specified storage location.
Only a superuser can add, alter, retire, drop, and restore a location, as well as set andmeasurelocation performance. All non-dbadmin users or roles require READ and/orWRITE permissions onthe location.
Privilege Description
READ Allows the user to copy data from files in the storage location into a table.
WRITE Allows the user to copy data to the specific storage location. Users withWRITEprivileges can also save COPY statement exceptions and rejected data files to thespecified storage location.
See Also
l GRANT (Storage Location)
l StorageManagement Functions
l ADD_LOCATION
Role, profile, and User PrivilegesOnly a superuser can create, alter or drop a:
l role
l profile
l user
By default, only the superuser can grant or revoke a role to another user or role. A user or role can begiven the privilege to grant and revoke a role by using theWITH ADMIN OPTION clause of theGRANT statement.
Administrator's GuideManaging Users and Privileges
HP Vertica Analytics Platform (7.0.x) Page 250 of 969

For details on granting and revoking role privileges, seeGRANT (Role) and REVOKE (Role) in theSQLReferenceManual.
See Also
l CREATE USER
l ALTER USER
l DROP USER
l CREATE PROFILE
l ALTER PROFILE
l DROP PROFILE
l CREATE ROLE
l ALTER ROLE RENAME
l DROP ROLE
Metadata PrivilegesA superuser has unrestricted access to all databasemetadata. Other users have significantlyreduced access tometadata based on their privileges, as follows:
Administrator's GuideManaging Users and Privileges
HP Vertica Analytics Platform (7.0.x) Page 251 of 969

Type ofMetadata User Access
Catalogobjects:
l Tables
l Columns
l Constraints
l Sequences
l ExternalProcedures
l Projections
l ROScontainers
l WOS
Users must possess USAGE privilege on the schema and any type of access(SELECT) or modify privilege on the object to see catalogmetadata about theobject. See also Schema Privileges.
For internal objects like projections, WOS and ROS containers that don't haveaccess privileges directly associated with them, the user must possess therequisite privileges on the associated schema and table objects instead. Forexample, to see whether a table has any data in theWOS, you need to haveUSAGE on the table schema and at least SELECT on the table itself. See alsoTable Privileges and Projection Privileges.
User sessionsand functions,and systemtables relatedto thesesessions
Users can only access information about their own, current sessions.
The following functions provide restricted functionality to users:
l CURRENT_DATABASE
l CURRENT_SCHEMA
l CURRENT_USER
l HAS_TABLE_PRIVILEGE
l SESSION_USER (same as CURRENT_USER)
The system table, SESSIONS, provides restricted functionality to users.
Storagelocations
Users require READ permissions to copy data from storage locations.
Only a superuser can add or retire storage locations.
I/O PrivilegesUsers need no special permissions to connect to and disconnect from anHP Vertica database.
To EXPORT TO andCOPY FROMHP Vertica, the user must have:
Administrator's GuideManaging Users and Privileges
HP Vertica Analytics Platform (7.0.x) Page 252 of 969

l SELECT privileges on the source table
l USAGE privilege on source table schema
l INSERT privileges for the destination table in target database
l USAGE privilege on destination table schema
ToCOPY FROM STDIN and use local COPY a user must have INSERT privileges on the tableand USAGE privilege on schema.
Note: Only a superuser can COPY from file.
Comment PrivilegesA comment lets you add, revise, or remove a textual message to a database object. Youmust bean object owner or superuser in order to COMMENTON one of the following objects:
l COLUMN
l CONSTRAINT
l FUNCTION (including AGGREGATE and ANALYTIC)
l LIBRARY
l NODE
l PROJECTION
l SCHEMA
l SEQUENCE
l TABLE
l TRANSFORM FUNCTION
l VIEW
Other users must have VIEW privileges on an object to view its comments.
Transaction PrivilegesNo special permissions are required for the following database operations:
Administrator's GuideManaging Users and Privileges
HP Vertica Analytics Platform (7.0.x) Page 253 of 969

l COMMIT
l ROLLBACK
l RELEASE SAVEPOINT
l SAVEPOINT
Session PrivilegesNo special permissions are required for users to use the SHOW statement or any of the SETstatements.
Tuning PrivilegesIn order to PROFILE a single SQL statement or returns a query plan's execution strategy tostandard output using the EXPLAIN command, users must have the same privileges that arerequired for them to run the same query without the PROFILE or EXPLAIN keyword.
Granting and Revoking PrivilegesTo grant or revoke a privilege using one of the SQLGRANT or REVOKE statements, the user musthave the following permissions for the GRANT/REVOKE statement to succeed:
l Superuser or privilegeWITH GRANT OPTION
l USAGE privilege on the schema
l Appropriate privileges on the object
The syntax for granting and revoking privileges is different for each database object, such asschema, database, table, view, sequence, procedure, function, resource pool, and so on.
Normally, a superuser first creates a user and then uses GRANT syntax to define the user'sprivileges or roles or both. For example, the following series of statements creates user Carol andgrants Carol access to the apps database in the PUBLIC schema and also lets Carol grantSELECT privileges to other users on the applog table:
=> CREATE USER Carol;=> GRANT USAGE ON SCHEMA PUBLIC to Carol;=> GRANT ALL ON DATABASE apps TO Carol;=> GRANT SELECT ON applog TO Carol WITH GRANT OPTION;
SeeGRANT Statements and REVOKE Statements in the SQLReferenceManual.
About Superuser PrivilegesA superuser (DBADMIN) is the automatically-created database user who has the same name asthe Linux database administrator account and who can bypass all GRANT/REVOKE authorization,
Administrator's GuideManaging Users and Privileges
HP Vertica Analytics Platform (7.0.x) Page 254 of 969

as well as supersede any user that has been granted the PSEUDOSUPERUSER role.
Note: Database superusers are not the same as a Linux superuser with (root) privilege andcannot have Linux superuser privilege.
A superuser can grant privileges on all database object types to other users, as well as grantprivileges to roles. Users who have been granted the role will then gain the privilege as soon asthey enable it.
Superusers may grant or revoke any object privilege on behalf of the object owner, whichmeans asuperuser can grant or revoke the object privilege if the object owner could have granted or revokedthe same object privilege. A superuser may revoke the privilege that an object owner granted, aswell as the reverse.
Since a superuser is acting on behalf of the object owner, the GRANTOR column of V_CATALOG.GRANTS table displays the object owner rather than the superuser who issued theGRANT statement.
A superuser can also alter ownership of table and sequence objects.
See Also
DBADMIN Role
About Schema Owner PrivilegesBy default, the schema owner has privileges to create objects within a schema. Additionally, theschema owner can drop any object in the schema, requiring no additional privilege on the object.
The schema owner is typically the user who creates the schema.
Schema owners cannot access objects in the schema. Access to objects requires the appropriateprivilege at the object level.
All other access to the schema and its objects must be explicitly granted to users or roles by asuperuser or schema owner to prevent unauthorized users from accessing the schema and itsobjects.
See Schema Privileges
About Object Owner PrivilegesThe database, along with every object in it, has an owner. The object owner is usually the personwho created the object, although a superuser can alter ownership of objects, such as table andsequence.
Object owners must have appropriate schema privilege to access, alter, rename, move or drop anyobject it owns without any additional privileges.
An object owner can also:
Administrator's GuideManaging Users and Privileges
HP Vertica Analytics Platform (7.0.x) Page 255 of 969

l Grant privileges on their own object to other users
TheWITH GRANT OPTION clause specifies that a user can grant the permission to otherusers. For example, if user Bob creates a table, Bob can grant privileges on that table to usersTed, Alice, and so on.
l Grant privileges to roles
Users who are granted the role gain the privilege.
How to Grant PrivilegesAs described in Granting and Revoking Privileges, specific users grant privileges using the GRANTstatement with or without the optional WITH GRANT OPTION, which allows the user to grant thesame privileges to other users.
l A superuser can grant privileges on all object types to other users.
l A superuser or object owner can grant privileges to roles. Users who have been granted the rolethen gain the privilege.
l An object owner can grant privileges on the object to other users using the optional WITHGRANT OPTION clause.
l The user needs to have USAGE privilege on schema and appropriate privileges on the object.
When a user grants an explicit list of privileges, such as GRANT INSERT, DELETE, REFERENCES ONapplog TO Bob:
l TheGRANT statement succeeds only if all the roles are granted successfully. If any grantoperation fails, the entire statement rolls back.
l HP Vertica will return ERROR if the user does not have grant options for the privileges listed.
When a user grants ALL privileges, such as GRANT ALL ON applog TO Bob, the statement alwayssucceeds. HP Vertica grants all the privileges on which the grantor has theWITH GRANT OPTIONand skips those privileges without the optional WITH GRANT OPTION.
For example, if the user Bob has delete privileges with the optional grant option on the applog table,only DELETE privileges are granted to Bob, and the statement succeeds:
=> GRANT DELETE ON applog TO Bob WITH GRANT OPTION;GRANT PRIVILEGE
For details, see the GRANT Statements in the SQLReferenceManual.
How to Revoke PrivilegesIn general, ONLY the user who originally granted a privilege can revoke it using a REVOKEstatement. That user must have superuser privilege or have the optional WITH GRANT OPTION
Administrator's GuideManaging Users and Privileges
HP Vertica Analytics Platform (7.0.x) Page 256 of 969

on the privilege. The user alsomust have USAGE privilege on the schema and appropriateprivileges on the object for the REVOKE statement to succeed.
In order to revoke a privilege, this privilegemust have been granted to the specified grantee by thisgrantor before. If HP Vertica finds that to be the case, the above REVOKE statement removes theprivilege (andWITH GRANT OPTION privilege, if supplied) from the grantee. Otherwise, HPVertica prints a NOTICE that the operation failed, as in the following example.
=> REVOKE SELECT ON applog FROM Bob;NOTICE 0: Cannot revoke "SELECT" privilege(s) for relation "applog" that you did not grant to "Bob"REVOKE PRIVILEGE
The above REVOKE statement removes the privilege (andWITH GRANT OPTION privilege, ifapplicable) from the grantee or it prints a notice that the operation failed.
In order to revoke grant option for a privilege, the grantor must have previously granted the grantoption for the privilege to the specified grantee. Otherwise, HP Vertica prints a NOTICE.
The following REVOKE statement removes the GRANT option only but leaves the privilege intact:
=> GRANT INSERT on applog TO Bob WITH GRANT OPTION;GRANT PRIVILEGE=> REVOKE GRANT OPTION FOR INSERT ON applog FROM Bob;REVOKE PRIVILEGE
When a user revokes an explicit list of privileges, such as GRANT INSERT, DELETE, REFERENCESON applog TO Bob:
l The REVOKE statement succeeds only if all the roles are revoked successfully. If any revokeoperation fails, the entire statement rolls back.
l HP Vertica returns ERROR if the user does not have grant options for the privileges listed.
l HP Vertica returns NOTICE when revoking privileges that this user had not been previouslygranted.
When a user revokes ALL privileges, such as REVOKE ALL ON applog TO Bob, the statementalways succeeds. HP Vertica revokes all the privileges on which the grantor has the optional WITHGRANT OPTION and skips those privileges without theWITH GRANT OPTION.
For example, if the user Bob has delete privileges with the optional grant option on the applog table,only grant option is revoked from Bob, and the statement succeeds without NOTICE:
=> REVOKE GRANT OPTION FOR DELETE ON applog FROM Bob;
For details, see the REVOKE Statements in the SQLReferenceManual.
Administrator's GuideManaging Users and Privileges
HP Vertica Analytics Platform (7.0.x) Page 257 of 969

Privilege Ownership ChainsThe ability to revoke privileges on objects can cascade throughout an organization. If the grantoption was revoked from a user, the privilege that this user granted to other users will also berevoked.
If a privilege was granted to a user or role by multiple grantors, to completely revoke this privilegefrom the grantee the privilege has to be revoked by each original grantor. The only exception is asuperuser may revoke privileges granted by an object owner, with the reverse being true, as well.
In the following example, the SELECT privilege on table t1 is granted through a chain of users, froma superuser through User3.
l A superuser grants User1 CREATE privileges on the schema s1:
=> \c - dbadminYou are now connected as user "dbadmin".=> CREATE USER User1;CREATE USER=> CREATE USER User2;CREATE USER=> CREATE USER User3;CREATE USER=> CREATE SCHEMA s1;CREATE SCHEMA=> GRANT USAGE on SCHEMA s1 TO User1, User2, User3;GRANT PRIVILEGE=> CREATE ROLE reviewer;CREATE ROLE=> GRANT CREATE ON SCHEMA s1 TO User1;GRANT PRIVILEGE
l User1 creates new table t1 within schema s1 and then grants SELECTWITH GRANT OPTIONprivilege on s1.t1 to User2:
=> \c - User1You are now connected as user "User1".=> CREATE TABLE s1.t1(id int, sourceID VARCHAR(8));CREATE TABLE=> GRANT SELECT on s1.t1 to User2 WITH GRANT OPTION;GRANT PRIVILEGE
l User2 grants SELECTWITH GRANT OPTION privilege on s1.t1 to User3:
=> \c - User2You are now connected as user "User2".=> GRANT SELECT on s1.t1 to User3 WITH GRANT OPTION;GRANT PRIVILEGE
l User3 grants SELECT privilege on s1.t1 to the reviewer role:
Administrator's GuideManaging Users and Privileges
HP Vertica Analytics Platform (7.0.x) Page 258 of 969

=> \c - User3You are now connected as user "User3".=> GRANT SELECT on s1.t1 to reviewer;GRANT PRIVILEGE
Users cannot revoke privileges upstream in the chain. For example, User2 did not grant privilegeson User1, so when User1 runs the following REVOKE command, HP Vertica rolls back thecommand:
=> \c - User2You are now connected as user "User2".=> REVOKE CREATE ON SCHEMA s1 FROM User1;ROLLBACK 0: "CREATE" privilege(s) for schema "s1" could not be revoked from "User1"
Users can revoke privileges indirectly from users who received privileges through a cascadingchain, like the one shown in the example above. Here, users can use the CASCADE option torevoke privileges from all users "downstream" in the chain. A superuser or User1 can use theCASCADE option to revoke the SELECT privilege on table s1.t1 from all users. For example, asuperuser or User1 can execute the following statement to revoke the SELECT privilege from allusers and roles within the chain:
=> \c - User1You are now connected as user "User1".=> REVOKE SELECT ON s1.t1 FROM User2 CASCADE;REVOKE PRIVILEGE
When a superuser or User1 executes the above statement, the SELECT privilege on table s1.t1 isrevoked from User2, User3, and the reviewer role. TheGRANT privilege is also revoked fromUser2 and User3, which a superuser can verify by querying the V_CATALOG.GRANTS systemtable.
=> SELECT * FROM grants WHERE object_name = 's1' AND grantee ILIKE 'User%';grantor | privileges_description | object_schema | object_name | grantee
---------+------------------------+---------------+-------------+---------dbadmin | USAGE | | s1 | User1dbadmin | USAGE | | s1 | User2dbadmin | USAGE | | s1 | User3
(3 rows)
Administrator's GuideManaging Users and Privileges
HP Vertica Analytics Platform (7.0.x) Page 259 of 969

Modifying PrivilegesA superuser or object owner can use one of the ALTER statements tomodify a privilege, such aschanging a sequence owner or table owner. Reassignment to the new owner does not transfergrants from the original owner to the new owner; grants made by the original owner are dropped.
Changing a Table OwnerThe ability to change table ownership is useful whenmoving a table from one schema to another.Ownership reassignment is also useful when a table owner leaves the company or changes jobresponsibilities. Because you can change the table owner, the tables won't have to be completelyrewritten, you can avoid loss in productivity.
The syntax looks like this:
ALTER TABLE [[db-name.]schema.]table-name OWNER TO new-owner name
In order to alter table ownership, youmust be either the table owner or a superuser.
A change in table ownership transfers just the owner and not privileges; grants made by the originalowner are dropped and all existing privileges on the table are revoked from the previous owner.However, altering the table owner transfers ownership of dependent sequence objects (associatedIDENTITY/AUTO-INCREMENT sequences) but does not transfer ownership of other referencedsequences. See ALTER SEQUENCE for details on transferring sequence ownership.
Notes
l Table privileges are separate from schema privileges; therefore, a table privilege change or tableowner change does not result in any schema privilege change.
l Because projections define the physical representation of the table, HP Vertica does not requireseparate projection owners. The ability to create or drop projections is based on the tableprivileges on which the projection is anchored.
l During the alter operation HP Vertica updates projections anchored on the table owned by theold owner to reflect the new owner. For pre-join projection operations, HP Vertica checks forprivileges on the referenced table.
Example
In this example, user Bob connects to the database, looks up the tables, and transfers ownership oftable t33 from himself to to user Alice.
=> \c - BobYou are now connected as user "Bob".=> \dSchema | Name | Kind | Owner | Comment
--------+--------+-------+---------+---------public | applog | table | dbadmin |
Administrator's GuideManaging Users and Privileges
HP Vertica Analytics Platform (7.0.x) Page 260 of 969

public | t33 | table | Bob |(2 rows)=> ALTER TABLE t33 OWNER TO Alice;ALTER TABLE
Notice that when Bob looks up database tables again, he no longer sees table t33.
=> \d List of tablesList of tables
Schema | Name | Kind | Owner | Comment--------+--------+-------+---------+---------public | applog | table | dbadmin |
(1 row)
When user Alice connects to the database and looks up tables, she sees she is the owner of tablet33.
=> \c - AliceYou are now connected as user "Alice".=> \d
List of tablesSchema | Name | Kind | Owner | Comment
--------+------+-------+-------+---------public | t33 | table | Alice |
(2 rows)
Either Alice or a superuser can transfer table ownership back to Bob. In the following case asuperuser performs the transfer.
=> \c - dbadminYou are now connected as user "dbadmin".=> ALTER TABLE t33 OWNER TO Bob;ALTER TABLE=> \d
List of tablesSchema | Name | Kind | Owner | Comment
--------+----------+-------+---------+---------public | applog | table | dbadmin |public | comments | table | dbadmin |public | t33 | table | Bob |s1 | t1 | table | User1 |
(4 rows)
You can also query the V_CATALOG.TABLES system table to view table and owner information.Note that a change in ownership does not change the table ID.
In the below series of commands, the superuser changes table ownership back to Alice and queriesthe TABLES system table.
=> ALTER TABLE t33 OWNER TO Alice;ALTER TABLE=> SELECT table_schema_id, table_schema, table_id, table_name, owner_id, owner_name FROMtables; table_schema_id | table_schema | table_id | table_name | owner_id
| owner_name-------------------+--------------+-------------------+------------+-------------------+-
Administrator's GuideManaging Users and Privileges
HP Vertica Analytics Platform (7.0.x) Page 261 of 969

-----------45035996273704968 | public | 45035996273713634 | applog | 45035996273704962 |
dbadmin45035996273704968 | public | 45035996273724496 | comments | 45035996273704962 |
dbadmin45035996273730528 | s1 | 45035996273730548 | t1 | 45035996273730516 |
User145035996273704968 | public | 45035996273795846 | t33 | 45035996273724576 |
Alice(5 rows)
Now the superuser changes table ownership back to Bob and queries the TABLES table again.Nothing changes but the owner_name row, from Alice to Bob.
=> ALTER TABLE t33 OWNER TO Bob;ALTER TABLE=> SELECT table_schema_id, table_schema, table_id, table_name, owner_id, owner_name FROMtables;
table_schema_id | table_schema | table_id | table_name | owner_id |owner_name-------------------+--------------+-------------------+------------+-------------------+------------45035996273704968 | public | 45035996273713634 | applog | 45035996273704962 |
dbadmin45035996273704968 | public | 45035996273724496 | comments | 45035996273704962 |
dbadmin45035996273730528 | s1 | 45035996273730548 | t1 | 45035996273730516 |
User145035996273704968 | public | 45035996273793876 | foo | 45035996273724576 |
Alice45035996273704968 | public | 45035996273795846 | t33 | 45035996273714428 |
Bob(5 rows)
Table Reassignment with Sequences
Altering the table owner transfers ownership of only associated IDENTITY/AUTO-INCREMENTsequences but not other reference sequences. For example, in the below series of commands,ownership on sequence s1 does not change:
=> CREATE USER u1;CREATE USER=> CREATE USER u2;CREATE USER=> CREATE SEQUENCE s1 MINVALUE 10 INCREMENT BY 2;CREATE SEQUENCE=> CREATE TABLE t1 (a INT, id INT DEFAULT NEXTVAL('s1'));CREATE TABLE=> CREATE TABLE t2 (a INT, id INT DEFAULT NEXTVAL('s1'));CREATE TABLE=> SELECT sequence_name, owner_name FROM sequences;sequence_name | owner_name
---------------+------------s1 | dbadmin
(1 row)
Administrator's GuideManaging Users and Privileges
HP Vertica Analytics Platform (7.0.x) Page 262 of 969

=> ALTER TABLE t1 OWNER TO u1;ALTER TABLE=> SELECT sequence_name, owner_name FROM sequences;sequence_name | owner_name
---------------+------------s1 | dbadmin
(1 row)=> ALTER TABLE t2 OWNER TO u2;ALTER TABLE=> SELECT sequence_name, owner_name FROM sequences;sequence_name | owner_name
---------------+------------s1 | dbadmin
(1 row)
See Also
l Changing a SequenceOwner
Changing a Sequence OwnerThe ALTER SEQUENCE command lets you change the attributes of an existing sequence. Allchanges take effect immediately, within the same session. Any parameters not set during an ALTERSEQUENCE statement retain their prior settings.
If you need to change sequence ownership, such as if an employee who owns a sequence leavesthe company, you can do so with the following ALTER SEQUENCE syntax:
ALTER SEQUENCE sequence-name OWNER TO new-owner-name;
This operation immediately reassigns the sequence from the current owner to the specified newowner.
Only the sequence owner or a superuser can change ownership, and reassignment does nottransfer grants from the original owner to the new owner; grants made by the original owner aredropped.
Note: Renaming a table owner transfers ownership of dependent sequence objects(associated IDENTITY/AUTO-INCREMENT sequences) but does not transfer ownership of otherreferenced sequences. See Changing a Table Owner.
Example
The following example reassigns sequence ownership from the current owner to user Bob:
=> ALTER SEQUENCE sequential OWNER TO Bob;
See ALTER SEQUENCE in the SQLReferenceManual for details.
Administrator's GuideManaging Users and Privileges
HP Vertica Analytics Platform (7.0.x) Page 263 of 969

Viewing Privileges Granted on ObjectsHP Vertica logs information about privileges granted on various objects, including the grantor andgrantee, in the V_CATALOG.GRANTS system table. The order of columns in the tablecorresponds to the order in which they appear in the GRANT command. An asterisk in the outputmeans the privilege was grantedWITH GRANT OPTION.
The following command queries the GRANTS system table:
=> SELECT * FROM grants ORDER BY grantor, grantee;
grantor | privileges_description | object_schema | object_name| grantee---------+-------------------------------------------------+---------------+-------------+-----------Bob | | | commentor
| Alicedbadmin | CREATE | | schema2
| Bobdbadmin | | | commentor
| Bobdbadmin | | | commentor
| Bobdbadmin | | | logadmin
| Bobdbadmin | USAGE | | general
| Bobdbadmin | INSERT, UPDATE, DELETE, REFERENCES | public | applog
| Bobdbadmin | | | logadmin
| Teddbadmin | USAGE | | general
| Teddbadmin | USAGE | | general
| Suedbadmin | CREATE, CREATE TEMP | | vmart
| Suedbadmin | USAGE | | public
| Suedbadmin | SELECT* | public | applog
| Suedbadmin | USAGE | | general
| Alicedbadmin | INSERT, SELECT | public | comments
| commentordbadmin | INSERT, SELECT | public | applog
| commentordbadmin | | | logwriter
| logadmindbadmin | | | logreader
| logadmindbadmin | DELETE | public | applog
| logadmindbadmin | SELECT | public | applog
| logreader
Administrator's GuideManaging Users and Privileges
HP Vertica Analytics Platform (7.0.x) Page 264 of 969
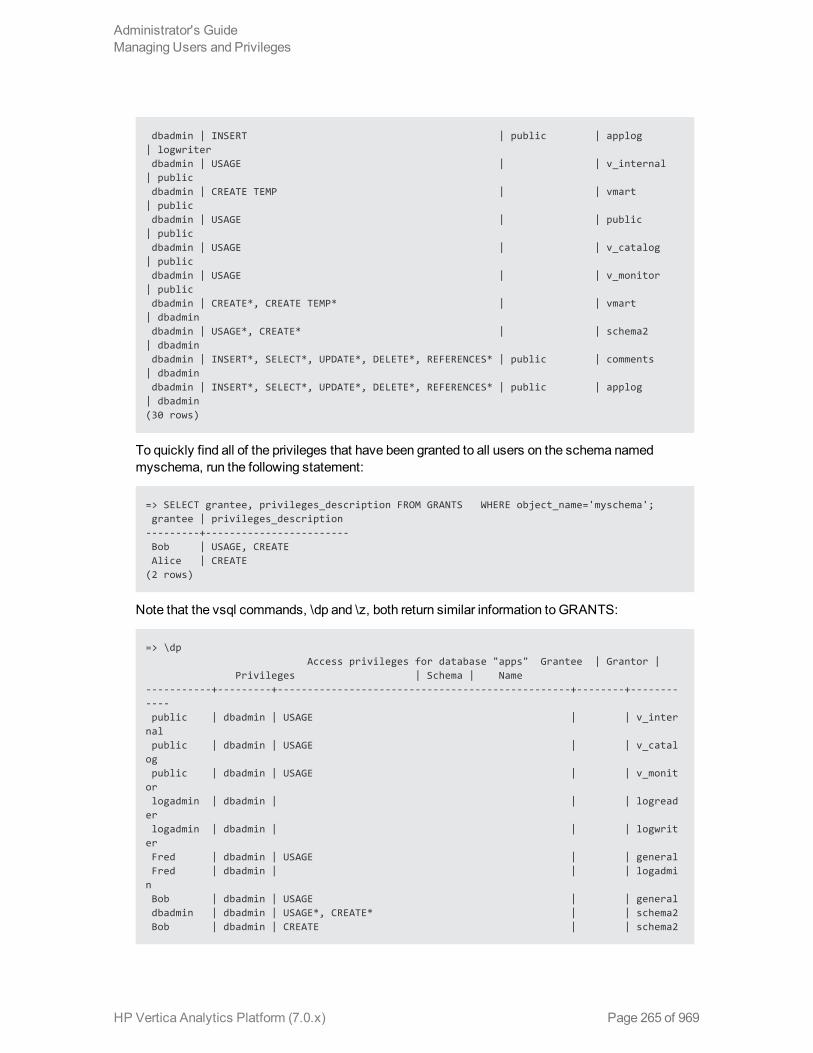
dbadmin | INSERT | public | applog| logwriterdbadmin | USAGE | | v_internal
| publicdbadmin | CREATE TEMP | | vmart
| publicdbadmin | USAGE | | public
| publicdbadmin | USAGE | | v_catalog
| publicdbadmin | USAGE | | v_monitor
| publicdbadmin | CREATE*, CREATE TEMP* | | vmart
| dbadmindbadmin | USAGE*, CREATE* | | schema2
| dbadmindbadmin | INSERT*, SELECT*, UPDATE*, DELETE*, REFERENCES* | public | comments
| dbadmindbadmin | INSERT*, SELECT*, UPDATE*, DELETE*, REFERENCES* | public | applog
| dbadmin(30 rows)
To quickly find all of the privileges that have been granted to all users on the schema namedmyschema, run the following statement:
=> SELECT grantee, privileges_description FROM GRANTS WHERE object_name='myschema';grantee | privileges_description
---------+------------------------Bob | USAGE, CREATEAlice | CREATE
(2 rows)
Note that the vsql commands, \dp and \z, both return similar information to GRANTS:
=> \dpAccess privileges for database "apps" Grantee | Grantor |
Privileges | Schema | Name-----------+---------+-------------------------------------------------+--------+------------public | dbadmin | USAGE | | v_inter
nalpublic | dbadmin | USAGE | | v_catal
ogpublic | dbadmin | USAGE | | v_monit
orlogadmin | dbadmin | | | logread
erlogadmin | dbadmin | | | logwrit
erFred | dbadmin | USAGE | | generalFred | dbadmin | | | logadmi
nBob | dbadmin | USAGE | | generaldbadmin | dbadmin | USAGE*, CREATE* | | schema2Bob | dbadmin | CREATE | | schema2
Administrator's GuideManaging Users and Privileges
HP Vertica Analytics Platform (7.0.x) Page 265 of 969

Sue | dbadmin | USAGE | | generalpublic | dbadmin | USAGE | | publicSue | dbadmin | USAGE | | publicpublic | dbadmin | CREATE TEMP | | appdatdbadmin | dbadmin | CREATE*, CREATE TEMP* | | appdatSue | dbadmin | CREATE, CREATE TEMP | | appdatdbadmin | dbadmin | INSERT*, SELECT*, UPDATE*, DELETE*, REFERENCES* | public | apploglogreader | dbadmin | SELECT | public | apploglogwriter | dbadmin | INSERT | public | apploglogadmin | dbadmin | DELETE | public | applogSue | dbadmin | SELECT* | public | applog
(22 rows)
SeeGRANT Statements in the SQLReferenceManual.
Administrator's GuideManaging Users and Privileges
HP Vertica Analytics Platform (7.0.x) Page 266 of 969

About Database RolesTomakemanaging permissions easier, use roles. A role is a collection of privileges that asuperuser can grant to (or revoke from) one or more users or other roles. Using roles avoids havingtomanually grant sets of privileges user by user. For example, several users might be assigned tothe administrator role. You can grant or revoke privileges to or from the administrator role, and allusers with access to that role are affected by the change.
Note: Users must first enable a role before they gain all of the privileges that have beengranted to it. See Enabling Roles.
Role HierarchiesYou can also use roles to build hierarchies of roles; for example, you can create an administratorrole that has privileges granted non-administrator roles as well as to the privileges granted directlyto the administrator role. See also Role Hierarchy.
Roles do no supersedemanually-granted privileges, so privileges directly assigned to a user are notaltered by roles. Roles just give additional privileges to the user.
Creating and Using a RoleUsing a role follows this general flow:
1. A superuser creates a role using the CREATE ROLE statement.
2. A superuser or object owner grants privileges to the role using one of the GRANT statements.
3. A superuser or users with administrator access to the role grant users and other roles accessto the role.
4. Users granted access to the role use the SET ROLE command to enable that role and gain therole's privileges.
You can do steps 2 and 3 in any order. However, granting access to a role means little until the rolehas privileges granted to it.
Tip: You can query the V_CATALOG system tables ROLES, GRANTS, and USERS to seeany directly-assigned roles; however, these tables do not indicate whether a role is available toa user when roles could be available through other roles (indirectly). See the HAS_ROLE()function for additional information.
Roles on Management ConsoleWhen users sign in to theManagement Console (MC), what they can view or do is governed by MCroles. For details, see About MC Users and About MC Privileges and Roles.
Administrator's GuideManaging Users and Privileges
HP Vertica Analytics Platform (7.0.x) Page 267 of 969
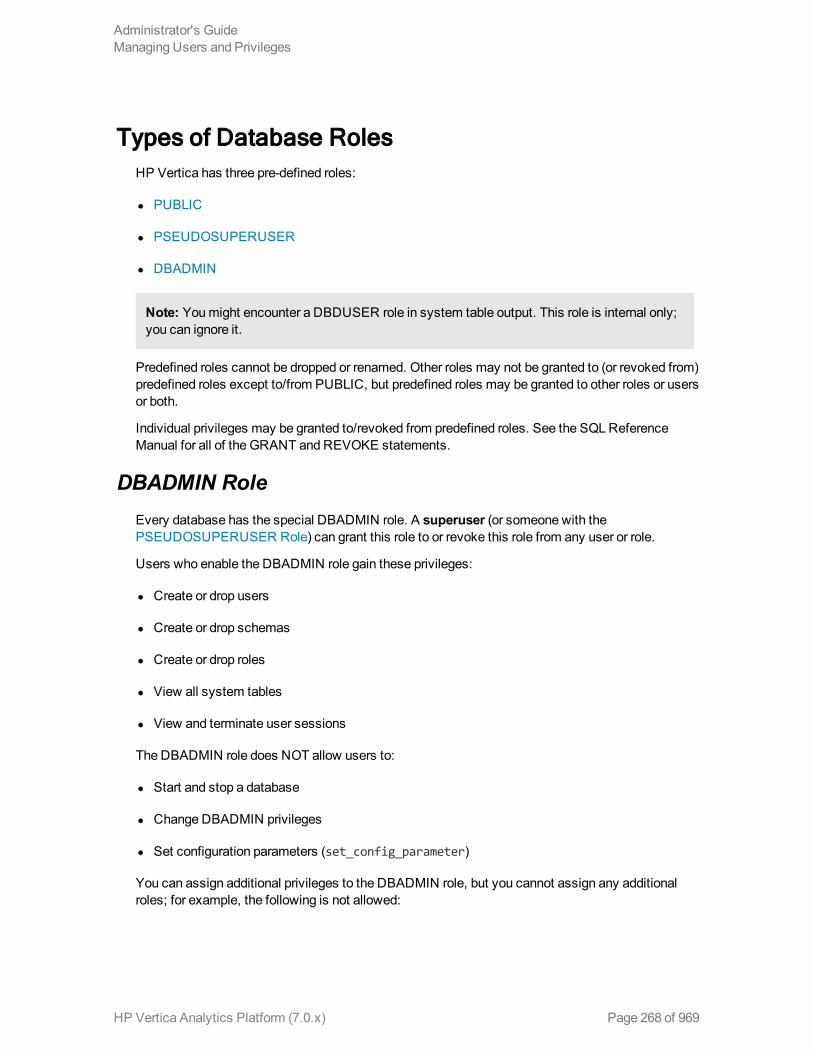
Types of Database RolesHP Vertica has three pre-defined roles:
l PUBLIC
l PSEUDOSUPERUSER
l DBADMIN
Note: Youmight encounter a DBDUSER role in system table output. This role is internal only;you can ignore it.
Predefined roles cannot be dropped or renamed. Other roles may not be granted to (or revoked from)predefined roles except to/from PUBLIC, but predefined roles may be granted to other roles or usersor both.
Individual privileges may be granted to/revoked from predefined roles. See the SQLReferenceManual for all of the GRANT and REVOKE statements.
DBADMIN RoleEvery database has the special DBADMIN role. A superuser (or someone with thePSEUDOSUPERUSER Role) can grant this role to or revoke this role from any user or role.
Users who enable the DBADMIN role gain these privileges:
l Create or drop users
l Create or drop schemas
l Create or drop roles
l View all system tables
l View and terminate user sessions
The DBADMIN role does NOT allow users to:
l Start and stop a database
l Change DBADMIN privileges
l Set configuration parameters (set_config_parameter)
You can assign additional privileges to the DBADMIN role, but you cannot assign any additionalroles; for example, the following is not allowed:
Administrator's GuideManaging Users and Privileges
HP Vertica Analytics Platform (7.0.x) Page 268 of 969
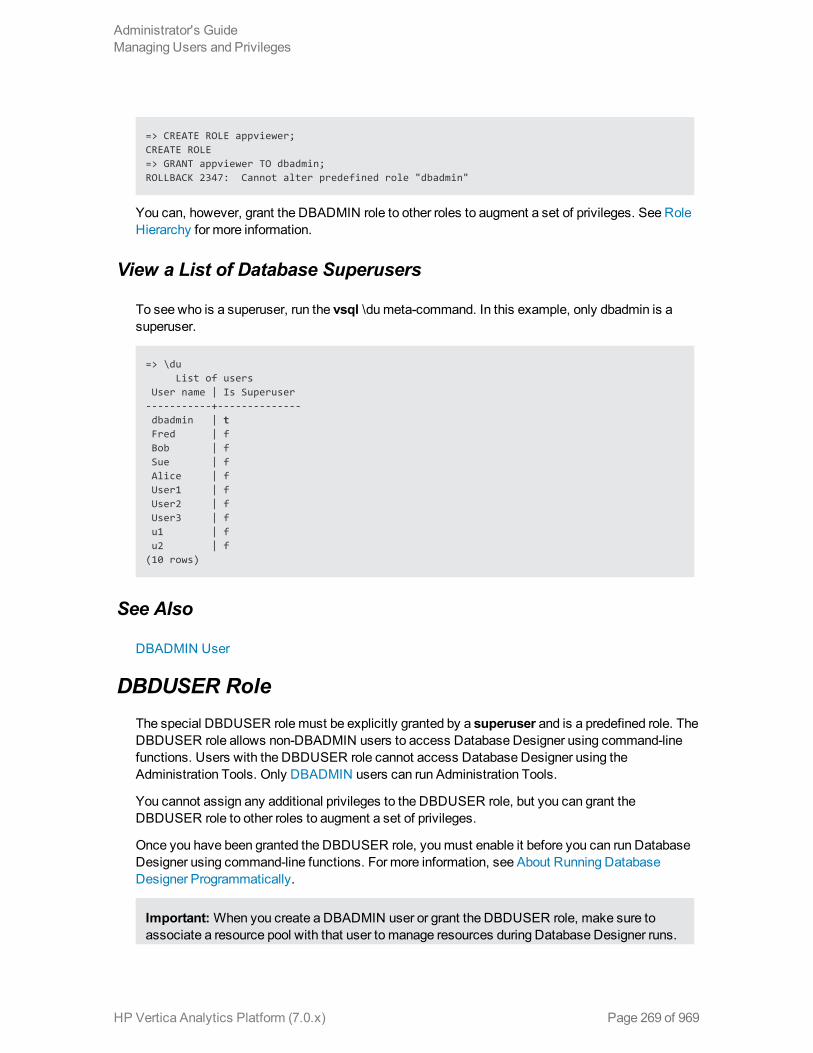
=> CREATE ROLE appviewer;CREATE ROLE=> GRANT appviewer TO dbadmin;ROLLBACK 2347: Cannot alter predefined role "dbadmin"
You can, however, grant the DBADMIN role to other roles to augment a set of privileges. See RoleHierarchy for more information.
View a List of Database Superusers
To see who is a superuser, run the vsql \dumeta-command. In this example, only dbadmin is asuperuser.
=> \duList of users
User name | Is Superuser-----------+--------------dbadmin | tFred | fBob | fSue | fAlice | fUser1 | fUser2 | fUser3 | fu1 | fu2 | f
(10 rows)
See Also
DBADMIN User
DBDUSER RoleThe special DBDUSER rolemust be explicitly granted by a superuser and is a predefined role. TheDBDUSER role allows non-DBADMIN users to access Database Designer using command-linefunctions. Users with the DBDUSER role cannot access Database Designer using theAdministration Tools. Only DBADMIN users can run Administration Tools.
You cannot assign any additional privileges to the DBDUSER role, but you can grant theDBDUSER role to other roles to augment a set of privileges.
Once you have been granted the DBDUSER role, youmust enable it before you can run DatabaseDesigner using command-line functions. For more information, see About Running DatabaseDesigner Programmatically.
Important:When you create a DBADMIN user or grant the DBDUSER role, make sure toassociate a resource pool with that user to manage resources during Database Designer runs.
Administrator's GuideManaging Users and Privileges
HP Vertica Analytics Platform (7.0.x) Page 269 of 969

Multiple users can run Database Designer concurrently without interfering with each other orusing up all the cluster resources. When a user runs Database Designer, either using theAdministration Tools or programmatically, its execution is mostly contained by the user'sresource pool, but may spill over into some system resource pools for less-intensive tasks.
PSEUDOSUPERUSER RoleThe special PSEUDOSUPERUSER role is automatically created in each database. A superuser(or someone with the PSEUDOSUPERUSER role) can grant this role to another user, or revoke therole from another user. The PSEUDOSUPERUSER cannot revoke or change any superuserprivileges.
Users with the PSEUDOSUPERUSER role enabled have all of the privileges of the databasesuperuser, including the ability to:
l Create schemas
l Create and grant privileges to roles
l Bypass all GRANT/REVOKE authorization
l Set user account's passwords
l Lock and unlock user accounts
l Create or drop a UDF library
l Create or drop a UDF function
l Create or drop an external procedure
l Add or edit comments on nodes
l Create or drop password profiles
You can assign additional privileges to the PSEUDOSUPERUSER role, but you cannot assign anyadditional roles; for example, the following is not allowed:
=> CREATE ROLE appviewer;CREATE ROLE=> GRANT appviewer TO pseudosuperuser;ROLLBACK 2347: Cannot alter predefined role "pseudosuperuser"
PUBLIC RoleBy default, every database has the special PUBLIC role. HP Vertica grants this role to each userautomatically, and it is automatically enabled. You grant privileges to this role that every usershould have by default. You can also grant access to roles to PUBLIC, which allows any user toaccess the role using the SET ROLE statement.
Administrator's GuideManaging Users and Privileges
HP Vertica Analytics Platform (7.0.x) Page 270 of 969

Note: The PUBLIC role can never be dropped, nor can it be revoked from users or roles.
Example
In the following example, if the superuser hadn't granted INSERT privileges on the table publicdatato the PUBLIC group, the INSERT statement executed by user bob would fail:
=> CREATE TABLE publicdata (a INT, b VARCHAR);CREATE TABLE=> GRANT INSERT, SELECT ON publicdata TO PUBLIC;GRANT PRIVILEGE=> CREATE PROJECTION publicdataproj AS (SELECT * FROM publicdata);CREATE PROJECTION
dbadmin=> \c - bobYou are now connected as user "bob".
=> INSERT INTO publicdata VALUES (10, 'Hello World');OUTPUT--------
1(1 row)
See Also
PUBLIC User
Default Roles for Database UsersBy default, no roles (other than the default PUBLIC Role) are enabled at the start of a user session.
=> SHOW ENABLED_ROLES;name | setting
---------------+---------enabled roles |
(1 row)
A superuser can set one or more default roles for a user, which are automatically enabled at thestart of the user's session. Setting a default role is a good idea if users normally rely on theprivileges granted by one or more roles to carry out themajority of their tasks. To set a default role,use the DEFAULT ROLE parameter of the ALTER USER statement as superuser:
=> \c vmart appsYou are now connected to database "apps" as user "dbadmin".=> ALTER USER Bob DEFAULT ROLE logadmin;ALTER USER=> \c - Bob;You are now connected as user "Bob"
Administrator's GuideManaging Users and Privileges
HP Vertica Analytics Platform (7.0.x) Page 271 of 969

=> SHOW ENABLED_ROLES;name | setting
---------------+----------enabled roles | logadmin
(1 row)
Notes
l Only roles that the user already has access to can bemade default.
l Unlike granting a role, setting a default role or roles overwrites any previously-set defaults.
l To clear any default roles for a user, use the keyword NONE as the role name in the DEFAULTROLE argument.
l Default roles only take effect at the start of a user session. They do not affect the roles enabledin the user's current session.
l Avoid giving users default roles that have administrative or destructive privileges (thePSEUDOSUPERUSER role or DROP privileges, for example). By forcing users to explicitlyenable these privileges, you can help prevent accidental data loss.
Using Database RolesThere are several steps to using roles:
1. A superuser creates a role using the CREATE ROLE statement.
2. A superuser or object owner grants privileges to the role.
3. A superuser or users with administrator access to the role grant users and other roles accessto the role.
4. Users granted access to the role run the SET ROLE command tomake that role active andgain the role's privileges.
You can do steps 2 and 3 in any order. However, granting access to a role means little until the rolehas privileges granted to it.
Tip: Query system tables ROLES, GRANTS, and USERS to see any directly-assigned roles.Because these tables do not indicate whether a role is available to a user when roles could beavailable through other roles (indirectly), see the HAS_ROLE() function for additionalinformation.
Administrator's GuideManaging Users and Privileges
HP Vertica Analytics Platform (7.0.x) Page 272 of 969

See Alsol About MC Privileges and Roles
Role HierarchyIn addition to granting roles to users, you can also grant roles to other roles. This lets you buildhierarchies of roles, with more privileged roles (an administrator, for example) being assigned all ofthe privileges of lesser-privileged roles (a user of a particular application), in addition to theprivileges you assign to it directly. By organizing your roles this way, any privilege you add to theapplication role (reading or writing to a new table, for example) is automatically made available tothemore-privileged administrator role.
ExampleThe following example creates two roles, assigns them privileges, then assigns them to a newadministrative role.
1. Create new table applog:
=> CREATE TABLE applog (id int, sourceID VARCHAR(32), data TIMESTAMP, event VARCHAR(256));
2. Create a new role called logreader:
=> CREATE ROLE logreader;
3. Grant the logreader role read-only access on the applog table:
=> GRANT SELECT ON applog TO logreader;
4. Create a new role called logwriter:
=> CREATE ROLE logwriter;
5. Grant the logwriter write access on the applog table:
=> GRANT INSERT ON applog to logwriter;
6. Create a new role called logadmin, which will rule the other two roles:
Administrator's GuideManaging Users and Privileges
HP Vertica Analytics Platform (7.0.x) Page 273 of 969

=> CREATE ROLE logadmin;
7. Grant the logadmin role privileges to delete data:
=> GRANT DELETE ON applog to logadmin;
8. Grant the logadmin role privileges to have the same privileges as the logreader and logwriterroles:
=> GRANT logreader, logwriter TO logadmin;
9. Create new user Bob:
=> CREATE USER Bob;
10. Give Bob logadmin privileges:
=> GRANT logadmin TO Bob;
The user Bob can now enable the logadmin role, which also includes the logreader and logwriterroles. Note that Bob cannot enable either the logreader or logwriter role directly. A user can onlyenable explicitly-granted roles.
Hierarchical roles also works with administrative access to a role:
=> GRANT logreader, logwriter TO logadmin WITH ADMIN OPTION;GRANT ROLE=> GRANT logadmin TO Bob;=> \c - bob; -- connect as BobYou are now connected as user "Bob".=> SET ROLE logadmin; -- Enable logadmin roleSET=> GRANT logreader TO Alice;GRANT ROLE
Note that the user Bob only has administrative access to the logreader and logwriter roles throughthe logadmin role. He doesn't have administrative access to the logadmin role, since it wasn'tgranted to him with the optional WITH ADMIN OPTION argument:
=> GRANT logadmin TO Alice;WARNING: Some roles were not grantedGRANT ROLE
For Bob to be able to grant the logadmin role, a superuser would have had to explicitly grant himadministrative access.
Administrator's GuideManaging Users and Privileges
HP Vertica Analytics Platform (7.0.x) Page 274 of 969
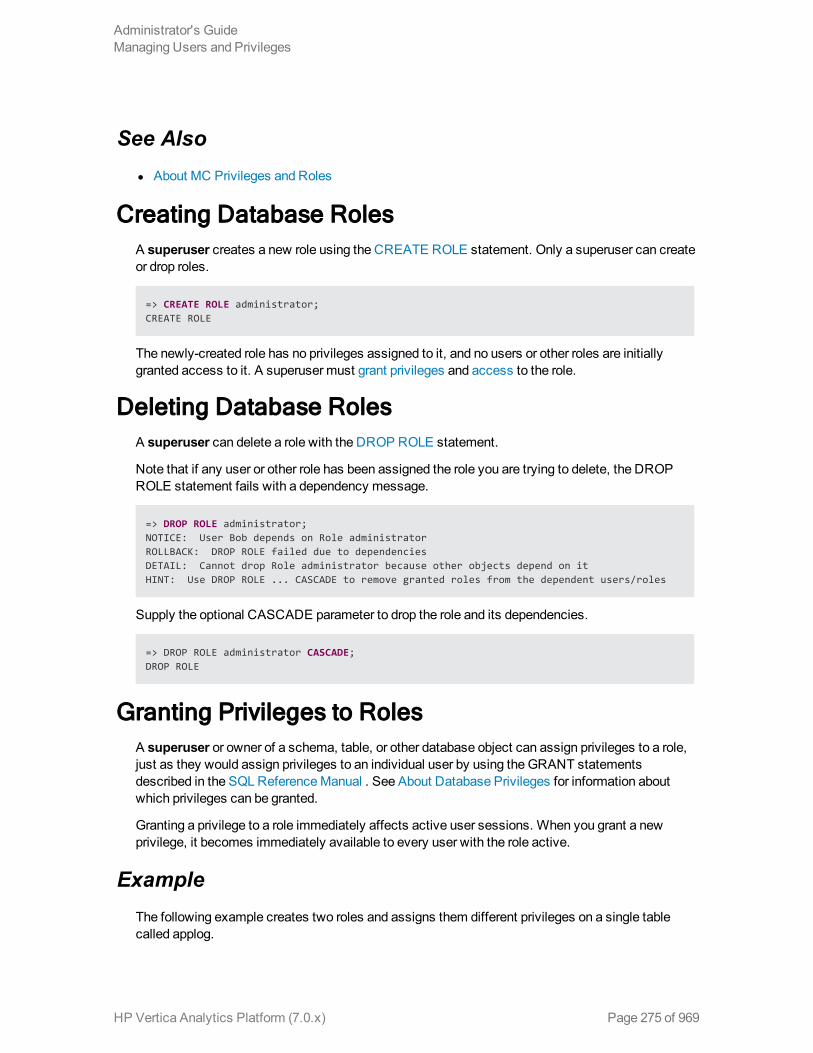
See Alsol About MC Privileges and Roles
Creating Database RolesA superuser creates a new role using the CREATE ROLE statement. Only a superuser can createor drop roles.
=> CREATE ROLE administrator;CREATE ROLE
The newly-created role has no privileges assigned to it, and no users or other roles are initiallygranted access to it. A superuser must grant privileges and access to the role.
Deleting Database RolesA superuser can delete a role with the DROP ROLE statement.
Note that if any user or other role has been assigned the role you are trying to delete, the DROPROLE statement fails with a dependency message.
=> DROP ROLE administrator;NOTICE: User Bob depends on Role administratorROLLBACK: DROP ROLE failed due to dependenciesDETAIL: Cannot drop Role administrator because other objects depend on itHINT: Use DROP ROLE ... CASCADE to remove granted roles from the dependent users/roles
Supply the optional CASCADE parameter to drop the role and its dependencies.
=> DROP ROLE administrator CASCADE;DROP ROLE
Granting Privileges to RolesA superuser or owner of a schema, table, or other database object can assign privileges to a role,just as they would assign privileges to an individual user by using the GRANT statementsdescribed in the SQLReferenceManual . See About Database Privileges for information aboutwhich privileges can be granted.
Granting a privilege to a role immediately affects active user sessions. When you grant a newprivilege, it becomes immediately available to every user with the role active.
ExampleThe following example creates two roles and assigns them different privileges on a single tablecalled applog.
Administrator's GuideManaging Users and Privileges
HP Vertica Analytics Platform (7.0.x) Page 275 of 969

1. Create a table called applog:
=> CREATE TABLE applog (id int, sourceID VARCHAR(32), data TIMESTAMP, event VARCHAR(256));
2. Create a new role called logreader:
=> CREATE ROLE logreader;
3. Assign read-only privileges to the logreader role on table applog:
=> GRANT SELECT ON applog TO logreader;
4. Create a role called logwriter:
=> CREATE ROLE logwriter;
5. Assign write privileges to the logwriter role on table applog:
=> GRANT INSERT ON applog TO logwriter;
See SQLReferenceManual the for the different GRANT statements.
Revoking Privileges From RolesUse one of the REVOKE statements to revoke a privilege from a role.
=> REVOKE INSERT ON applog FROM logwriter;REVOKE PRIVILEGE
Revoking a privilege immediately affects any user sessions that have the role active. When yourevoke a privilege, it is immediately removed from users that rely on the role for the privilege.
See the SQLReferenceManual for the different REVOKE statements.
Granting Access to Database RolesA superuser can assign any role to a user or to another role using the GRANT command. Thesimplest form of this command is:
GRANT role [, ...] TO { user | role } [, ...]
HP Vertica will return a NOTICE if you grant a role with or without admin option, to a grantee whohas already been granted that role. For example:
Administrator's GuideManaging Users and Privileges
HP Vertica Analytics Platform (7.0.x) Page 276 of 969

=> GRANT commenter to Bob;NOTICE 4622: Role "commenter" was already granted to user "Bob"
SeeGRANT (Role) in the SQLReferenceManual for details.
ExampleThe following process illustrates how to create a role called commenter and granting user Bobaccess to that role.
1. Connect to the database as a superuser:
\c - dbadmin
2. Create a table called comments:
=> CREATE TABLE comments (id INT, comment VARCHAR);
3. Create a new role called commenter:
=> CREATE ROLE commenter;
4. Grant privileges to the new role on the comments table:
=> GRANT INSERT, SELECT ON comments TO commenter;
5. Grant the commenter role to user Bob.
=> GRANT commenter TO Bob;
Enable the newly-granted role
1. Connect to the database as user Bob
=> \c - Bob
2. User Bob enables the role:
=> SET ROLE commenter;
Administrator's GuideManaging Users and Privileges
HP Vertica Analytics Platform (7.0.x) Page 277 of 969

3. Now insert some values into the comments table:
=> INSERT INTO comments VALUES (1, 'Hello World');
Based on the privileges granted to Bob by the commenter role, Bob can insert and query thecomments table.
4. Query the comments table:
=> SELECT * FROM comments;id | comment
----+-------------1 | Hello World
(1 row)
5. Commit the transaction:
=> COMMIT;
Note that Bob does not have proper permissions to drop the table:
=> DROP TABLE comments;ROLLBACK 4000: Must be owner of relation comments
See Alsol Granting Database Access toMC Users
Revoking Access From Database RolesA superuser can revoke any role from a user or from another role using the REVOKE command.The simplest form of this command is:
REVOKE role [, ...] FROM { user | role | PUBLIC } [, ...]
SeeREVOKE (Role) in the SQLReferenceManual for details.
ExampleTo revoke access from a role, use the REVOKE (Role) statement:
1. Connect to the database as a superuser:
\c - dbadmin
Administrator's GuideManaging Users and Privileges
HP Vertica Analytics Platform (7.0.x) Page 278 of 969

2. Revoke the commenter role from user Bob:
=> REVOKE commenter FROM bob;
Granting Administrative Access to a RoleA superuser can assign a user or role administrative access to a role by supplying the optionalWITH ADMIN OPTION argument to the GRANT statement. Administrative access allows the userto grant and revoke access to the role for other users (including granting them administrativeaccess). Giving users the ability to grant roles lets a superuser delegate role administration to otherusers.
ExampleThe following example demonstrates granting the user bob administrative access to the commenterrole, then connecting as bob and granting a role to another user.
1. Connect to the database as a superuser (or a user with administrative access):
=> \c - dbadmin
2. Grand administrative options on the commenter role to Bob
=> GRANT commenter TO Bob WITH ADMIN OPTION;
3. Connect to the database as user Bob
=> \c - Bob
4. As user Bob, grant the commenter role to Alice:
=> GRANT commenter TO Alice;
Users with administrative access to a role can also grant other users administrative access:
=> GRANT commenter TO alice WITH ADMIN OPTION;GRANT ROLE
As with all user privilegemodels, database superusers should be cautious when granting any user arole with administrative privileges. For example, if the database superuser grants two users a rolewith administrative privileges, both users can revoke the role of the other user. This example showsgranting the appalling role (with administrative privileges) to users bob and alice. After eachuser has been granted the appadmin role, either use can connect as the other will full privileges.
Administrator's GuideManaging Users and Privileges
HP Vertica Analytics Platform (7.0.x) Page 279 of 969

=> GRANT appadmin TO bob, alice WITH ADMIN OPTION;GRANT ROLE=> \connect - bobYou are now connected as user "bob".=> REVOKE appadmin FROM alice;REVOKE ROLE
Revoking Administrative Access From a RoleA superuser can revoke administrative access from a role using the ADMIN OPTION parameterwith the REVOKE statement. Giving users the ability to revoke roles lets a superuser delegate roleadministration to other users.
ExampleThe following example demonstrates revoking administrative access from Alice for the commenterrole.
1. Connect to the database as a superuser (or a user with administrative access)
\c - dbadmin
2. Issue the REVOKE commandwith ADMIN OPTION parameters:
=> REVOKE ADMIN OPTION FOR commenter FROM alice;
Enabling RolesBy default, roles aren't enabled automatically for a user account. (See Default Roles for DatabaseUsers for a way tomake roles enabled automatically.) Users must explicitly enable a role using theSET ROLE statement. When users enable a role in their session, they gain all of the privilegesassigned to that role. Enabling a role does not affect any other roles that the users have active intheir sessions. They can havemultiple roles enabled simultaneously, gaining the combinedprivileges of all the roles they have enabled, plus any of the privileges that have been granted tothem directly.
=> SELECT * FROM applog;ERROR: permission denied for relation applog
=> SET ROLE logreader;SET
=> SELECT * FROM applog;
id | sourceID | data | event----+----------+----------------------------+--------------------------------------------
Administrator's GuideManaging Users and Privileges
HP Vertica Analytics Platform (7.0.x) Page 280 of 969

--1 | Loader | 2011-03-31 11:00:38.494226 | Error: Failed to open source file2 | Reporter | 2011-03-31 11:00:38.494226 | Warning: Low disk space on volume /scratch-
a(2 rows)
You can enable all of the roles available to your user account using the SET ROLE ALL statement.
=> SET ROLE ALL;SET=> SHOW ENABLED_ROLES;
name | setting---------------+------------------------------enabled roles | logreader, logwriter
(1 row)
See Alsol Viewing a user's Role
Disabling RolesTo disable all roles, use the SET ROLE NONE statement:
=> SET ROLE NONE;SET=> SHOW ENABLED_ROLES;
name | setting---------------+---------enabled roles |
(1 row)
Viewing Enabled and Available RolesYou can list the roles you have enabled in your session using the SHOW ENABLED ROLESstatement:
=> SHOW ENABLED_ROLES;name | setting
---------------+----------enabled roles | logreader
(1 row)
You can find the roles available to your account using the SHOW AVAILABLE ROLES statement:
Bob=> SHOW AVAILABLE_ROLES;name | setting
-----------------+-----------------------------
Administrator's GuideManaging Users and Privileges
HP Vertica Analytics Platform (7.0.x) Page 281 of 969

available roles | logreader, logwriter(1 row)
Viewing Named RolesTo view the names of all roles users can access, along with any roles that have been assigned tothose roles, query the V_CATALOG.ROLES system table.
=> SELECT * FROM roles;role_id | name | assigned_roles
-------------------+-----------------+----------------45035996273704964 | public |45035996273704966 | dbduser |45035996273704968 | dbadmin | dbduser*45035996273704972 | pseudosuperuser | dbadmin*45035996273704974 | logreader |45035996273704976 | logwriter |45035996273704978 | logadmin | logreader, logwriter
(7 rows)
Note: An asterisk (*) in the output means that role was grantedWITH ADMIN OPTION.
Viewing a user's RoleThe HAS_ROLE() function lets you see if a role has been granted to a user.
Non-superusers can check their own role membership using HAS_ROLE('role_name'), but only asuperuser can look up other users' memberships using the user_name parameter. Omitting theuser_name parameter will return role results for the superuser who is calling the function.
How to View a user's RoleIn this example, user Bob wants to see if he's been assigned the logwriter command. The outputreturns boolean value t for true, denoting that Bob is assigned the specified logwriter role:
Bob=> SELECT HAS_ROLE('logwriter');HAS_ROLE
----------t
(1 row)
In this example, a superuser wants to verify that the logadmin role has been granted to user Ted:
dbadmin=> SELECT HAS_ROLE('Ted', 'logadmin');
The output returns boolean value t for true, denoting that Ted is assigned the specified logadminrole:
Administrator's GuideManaging Users and Privileges
HP Vertica Analytics Platform (7.0.x) Page 282 of 969

HAS_ROLE----------t
(1 row)
Note that if a superuser omits the user_name argument, the function looks up that superuser's role.The following output indicates that this superuser is not assigned the logadmin role:
dbadmin=> SELECT HAS_ROLE('logadmin');HAS_ROLE
----------f
(1 row)
Output of the function call with user Alice indicates that she is not granted the logadmin role:
dbadmin=> SELECT HAS_ROLE('Alice', 'logadmin');HAS_ROLE
----------f
(1 row)
To view additional information about users, roles and grants, you can also query the followingsystem tables in the V_CATALOG schema to show directly-assigned roles:
l ROLES
l GRANTS
l USERS
Note that the system tables do not indicate whether a role is available to a user when roles could beavailable through other roles (indirectly). You need to call the HAS_ROLE() function for thatinformation.
UsersThis command returns all columns from the USERS system table:
=> SELECT * FROM users;-[ RECORD 1 ]------------------+---------------------------user_id | 45035996273704962user_name | dbadminis_super_user | tprofile_name | defaultis_locked | flock_time |resource_pool | generalmemory_cap_kb | unlimitedtemp_space_cap_kb | unlimited
Administrator's GuideManaging Users and Privileges
HP Vertica Analytics Platform (7.0.x) Page 283 of 969

run_time_cap | unlimitedall_roles | dbadmin*, pseudosuperuser*default_roles
| dbadmin*, pseudosuperuser*
Note: An asterisk (*) in table output for all_roles and default_roles columns indicates a rolegrantedWITH ADMIN OPTION.
RolesThe following command returns all columns from the ROLES system table:
=> SELECT * FROM roles;name | assigned_roles
-----------------+----------------public |dbadmin | dbduser*pseudosuperuser | dbadmindbduser |
(4 rows)
Note: The dbduser role in output above is internal only; you can ignore it.
GrantsThe following command returns all columns from theGRANTS system table:
=> SELECT * FROM grants;grantor | privileges_description | object_schema | object_name | grantee
---------+------------------------+---------------+-------------+---------dbadmin | USAGE | | public | publicdbadmin | USAGE | | v_internal | publicdbadmin | USAGE | | v_catalog | publicdbadmin | USAGE | | v_monitor | public
(4 rows)
Viewing User Roles on Management ConsoleYou can see anMC user's roles and database resources through theMC Settings > Usermanagement page on theManagement Console interface. For more information, see About MCPrivileges and Roles.
Administrator's GuideManaging Users and Privileges
HP Vertica Analytics Platform (7.0.x) Page 284 of 969

About MC Privileges and RolesAs introduced in About MC Users, you control user access toManagement Console through groupsof privileges (also referred to as access levels) that fall into two types, those that apply to MCconfiguration, and those that apply to MC-managed HP Vertica databases.
MC Permission Groupsl MC configuration privileges aremade up of roles that control what users can configure on the
MC, such as modify MC settings, create/import HP Vertica databases, restart MC, create anHP Vertica cluster through theMC interfac, and create andmanageMC users.
l MC database privileges aremade up of roles that control what users can see or do on anMC-managed HP Vertica database, such as view the database cluster state, query and sessionactivity, monitor databasemessages and read log files, replace cluster nodes, and stopdatabases.
Note:When you grant anMC user a database role, that user inherits the privileges assigned tothe database user account to which theMC user is mapped. For maximum access, use thedbadmin username and password.
MC database privileges cannot alter or override the HP Vertica database user's privileges androles. MC user/database user association is described inMapping anMC User to a Databaseuser's Privileges.
MC's Configuration Privileges and Database AccessThe following table shows MC role-based users and summarizes the levels of access they have ontheMC interface, as well as to any MC-managed databases.
User type MC config permissions MC database permissions
MCadministrators(SUPER andADMIN)
Perform all administrativeoperations onMC, includingconfigure and restart theMCprocess and add, change,and remove all useraccounts.
Automatically inherit the database privileges ofthemain database user account used to set upone or more databases on theMC interface. Bydefault, MC administrators have access to allMC-managed databases.
IT users (IT) Monitor all MC-manageddatabases, view MC-level(non database) messages,logs, and alerts, disable orenable user access toMC,and reset non-LDAP userpasswords.
Inherit no database privileges. Youmust grantthe IT user access to one or moreMC-manageddatabases, which you do by mapping this user tothe database user account. TheMC IT user theninherits the privileges assigned to the databaseuser to which he/she is mapped.
Administrator's GuideManaging Users and Privileges
HP Vertica Analytics Platform (7.0.x) Page 285 of 969
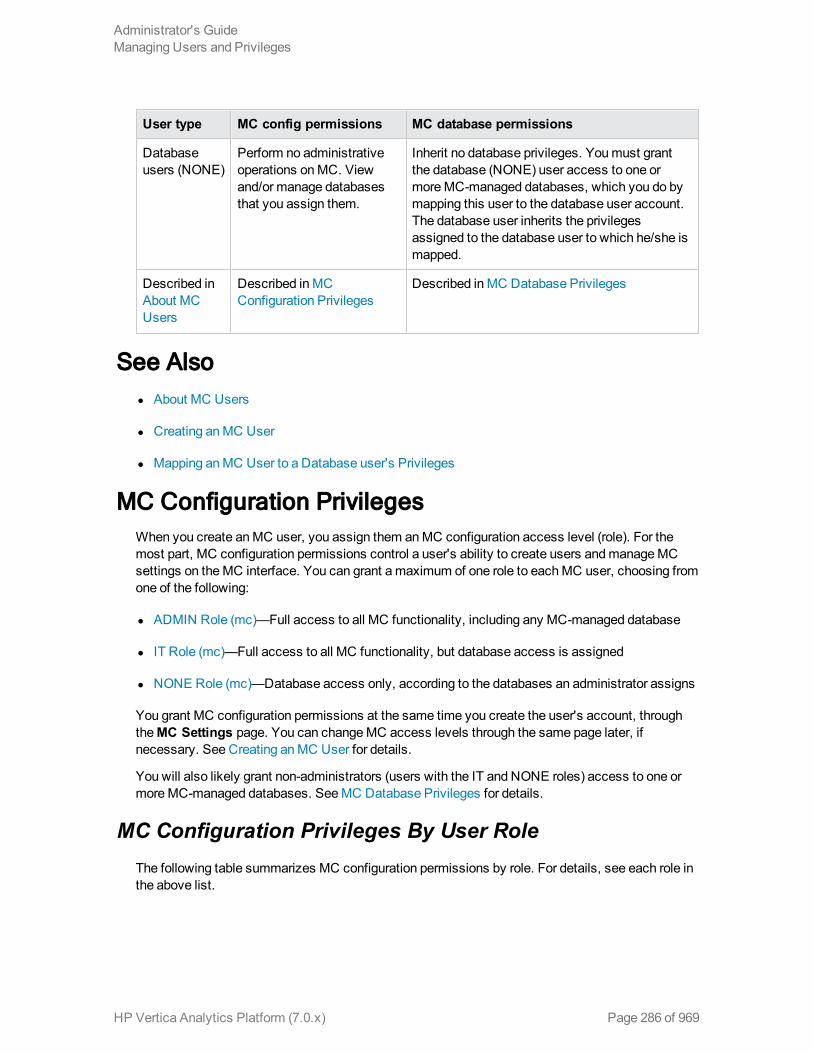
User type MC config permissions MC database permissions
Databaseusers (NONE)
Perform no administrativeoperations onMC. Viewand/or manage databasesthat you assign them.
Inherit no database privileges. Youmust grantthe database (NONE) user access to one ormoreMC-managed databases, which you do bymapping this user to the database user account.The database user inherits the privilegesassigned to the database user to which he/she ismapped.
Described inAbout MCUsers
Described inMCConfiguration Privileges
Described inMC Database Privileges
See Alsol About MC Users
l Creating anMC User
l Mapping anMC User to a Database user's Privileges
MC Configuration PrivilegesWhen you create anMC user, you assign them anMC configuration access level (role). For themost part, MC configuration permissions control a user's ability to create users andmanageMCsettings on theMC interface. You can grant amaximum of one role to eachMC user, choosing fromone of the following:
l ADMIN Role (mc)—Full access to all MC functionality, including any MC-managed database
l IT Role (mc)—Full access to all MC functionality, but database access is assigned
l NONE Role (mc)—Database access only, according to the databases an administrator assigns
You grant MC configuration permissions at the same time you create the user's account, throughtheMC Settings page. You can changeMC access levels through the same page later, ifnecessary. See Creating anMC User for details.
You will also likely grant non-administrators (users with the IT and NONE roles) access to one ormoreMC-managed databases. SeeMC Database Privileges for details.
MC Configuration Privileges By User RoleThe following table summarizes MC configuration permissions by role. For details, see each role inthe above list.
Administrator's GuideManaging Users and Privileges
HP Vertica Analytics Platform (7.0.x) Page 286 of 969
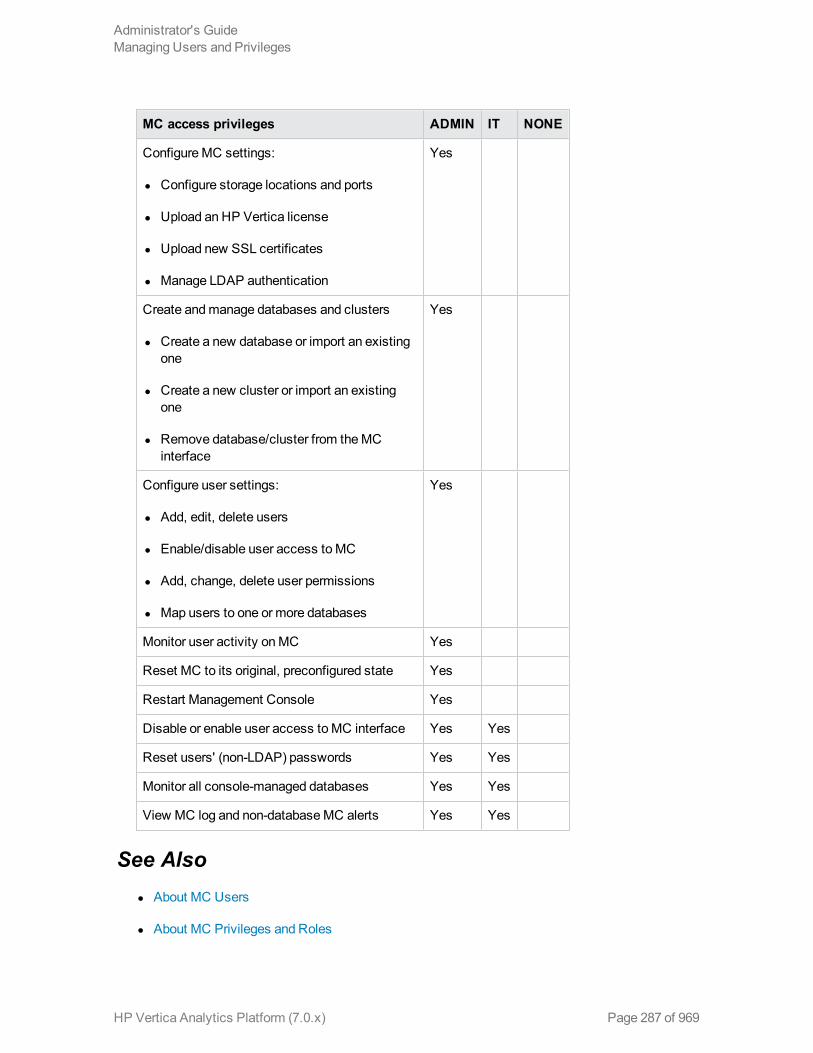
MC access privileges ADMIN IT NONE
ConfigureMC settings:
l Configure storage locations and ports
l Upload an HP Vertica license
l Upload new SSL certificates
l Manage LDAP authentication
Yes
Create andmanage databases and clusters
l Create a new database or import an existingone
l Create a new cluster or import an existingone
l Remove database/cluster from theMCinterface
Yes
Configure user settings:
l Add, edit, delete users
l Enable/disable user access toMC
l Add, change, delete user permissions
l Map users to one or more databases
Yes
Monitor user activity onMC Yes
Reset MC to its original, preconfigured state Yes
Restart Management Console Yes
Disable or enable user access toMC interface Yes Yes
Reset users' (non-LDAP) passwords Yes Yes
Monitor all console-managed databases Yes Yes
View MC log and non-databaseMC alerts Yes Yes
See Alsol About MC Users
l About MC Privileges and Roles
Administrator's GuideManaging Users and Privileges
HP Vertica Analytics Platform (7.0.x) Page 287 of 969

l MC Database Privileges
l Creating anMC User
l Granting Database Access toMC Users
l Mapping anMC User to a Database user's Privileges
SUPER Role (mc)The default superuser administrator, calledSuper on theMC UI, is a Linux user account that getscreated when you install and configureMC. During the configuration process, you can assign theSuper any name you like; it need not be dbadmin.
TheMC SUPER role, a superset of the ADMIN Role (mc), has the following privileges:
l Oversees the entire Management Console, including all MC-managed database clusters
Note: This user inherits the privileges/roles of the user name supplied when importing anHP Vertica database intoMC. HP recommends that you use the database administrator'scredentials.
l Creates the first MC user accounts and assigns them anMC configuration role
l Grants MC users access to one or moreMC-managed HP Vertica databases by assigningMCDatabase Privileges to each user
TheMC super administrator account is unique. Unlike other MC users you create, including otherMC administrators, theMC super account cannot be altered or dropped, and you cannot grant theSUPER role to other MC users. The only property you can change for theMC super is thepassword. Otherwise the SUPER role has the same privileges onMC as the ADMIN Role (mc).
OnMC-managed HP Vertica databases, SUPER has the same privileges as ADMIN Role (db).
TheMC super account does not exist within the LDAP server. This account is also different fromthe special dbadmin account that gets created during an HP Vertica installation, whose privilegesare governed by the DBADMIN Role. The HP Vertica-created dbadmin is a Linux account thatowns the database catalog and storage locations and can bypass database authorization rules,such as creating or dropping schemas, roles, and users. TheMC super does not have the sameprivileges as dbadmin.
See Also
l ConfiguringMC
l About MC Privileges and Roles
Administrator's GuideManaging Users and Privileges
HP Vertica Analytics Platform (7.0.x) Page 288 of 969

l Creating anMC User
l Granting Database Access toMC Users
l AddingMultiple Users toMC-managed Databases
l Mapping anMC User to a Database user's Privileges
l ManagingMC Users
ADMIN Role (mc)This user account is the user who can perform all administrative operations onManagementConsole, including configure and restart theMC process and add, change, and remove all useraccounts. By default, MC administrators inherit the database privileges of themain database useraccount used to set up the database on theMC interface. Therefore, MC administrators haveaccess to all MC-managed databases. Grant the ADMIN role to users you want to beMCadministrators.
The difference between this ADMIN user and the default Linux account, theMC SUPER role, isyou cannot alter or delete theMC SUPER account, and you can't grant the SUPER role to anyother MC users. You can, however, change the access level for other MC administrators, and youcan delete this user's accounts from theMC interface.
The following list highlights privileges granted to the ADMIN role:
l Modify MC settings, such as storage locations and ports, restart theMC process, and reset MCto its original, unconfigured state
l Audit license activity and install/upgrade an HP Vertica license
l Upload a new SSL certificate
l Use LDAP for user authentication
l View theMC log, alerts andmessages
l Add new users andmap them to one or more HP Vertica databases by granting anMCdatabase-level role
l Select a database and addmultiple users at once
l Manage user roles and their access toMC
l Remove users from theMC
l Monitor user activity on theMC interface
l Stop and start any MC-managed database
Administrator's GuideManaging Users and Privileges
HP Vertica Analytics Platform (7.0.x) Page 289 of 969

l Create new databases/clusters and and import existing databases/clusters into MC
l Remove databases/clusters from theMC interface
l View all databases/clusters imported into MC
About the MC Database Administrator Role
There is also anMC database administrator (ADMIN) role that controls a user's access toMC-managed databases. The two ADMIN roles are similar, but they are not the same, and you do notneed to grant users with the ADMIN (mc) role an ADMIN (db) role becauseMC ADMIN usersautomatically inherit all database privileges of themain database user account that was created onor imported into MC.
The following table summarizes the primary difference between the two ADMIN roles, but seeADMIN Role (db) for details specific to MC-managed database administrators.
MC configuration ADMIN role MC database ADMIN role
Perform all administrative operations on theMCitself, including restarting theMC process.Privileges extend tomonitoring all MC-created andimported databases but anything database-relatedbeyond that scope depends on the user's privilegesgranted on the database throughGRANTstatements.
Perform database-specific activities, suchas stop and start the database, andmonitor query and user activity andresources. Other database operationsdepend on that user's privileges on thespecific database. This ADMIN rolecannot configureMC.
See Also
l About MC Privileges and Roles
l ADMIN Role (db)
l Creating anMC User
l Granting Database Access toMC Users
l AddingMultiple Users toMC-managed Databases
l Mapping anMC User to a Database user's Privileges
l ManagingMC Users
IT Role (mc)MC IT users canmonitor all MC-managed databases, view MC-level (non database) messages,logs, and alerts, disable or enable user access toMC, and reset non-LDAP user passwords. Youcan also assignMC IT users specific database privileges, which you do by mapping IT users to a
Administrator's GuideManaging Users and Privileges
HP Vertica Analytics Platform (7.0.x) Page 290 of 969

user on a database. In this way, theMC IT user inherits the privileges assigned to the databaseuser to which he/she is mapped.
About the MC IT (database) Role
There is also an IT database administrator (IT) role that controls a user's access toMC-manageddatabases. If you grant anMC user both IT roles, it means the user can perform some configurationonMC and also has access to one or moreMC-managed databases. The databasemapping is notrequired, but it gives the IT user wider privileges.
The two IT roles are similar, but they are not the same. The following table summarizes the primarydifference between them, but see IT Role (db) for details.
MC configuration IT role MC database IT role
Monitor MC-manageddatabase, view non-databasemessages, andmanage user access
Monitor databases on which the user has privileges, view thedatabase overview and activity pages, monitor the node stateview messages andmark them read/unread, view databasesettings.
Can also bemapped to one or more HP Vertica databases.
See Also
l About MC Privileges and Roles
l IT Role (db)
l Mapping anMC User to a Database user's Privileges
NONE Role (mc)The default role for all newly-created users onMC is NONE, which prevents users granted this rolefrom configuring theMC. When you createMC users with the NONE role, you grant them anMCdatabase-level role. This assignment maps theMC user to a user account on a specific databaseand specifies that the NONE user inherits the database user’s privileges to which he or she ismapped.
Which database-level role you grant this user with NONE privileges—whether ADMIN (db) or IT(db) or USER (db)—depends on the level of access you want the user to have on theMC-manageddatabase. Database roles have no impact on the ADMIN and IT roles at theMC configuration level.
See Also
l About MC Privileges and Roles
l About MC Users
Administrator's GuideManaging Users and Privileges
HP Vertica Analytics Platform (7.0.x) Page 291 of 969

l MC Database Privileges
l ADMIN Role (db)
l IT Role (db)
l USER Role (db)
MC Database PrivilegesWhen you createMC users, you first assign themMC configuration privileges, which controls whatthey can do on theMC itself. In the same user-creation operation, you grant access to one or moreMC-managed databases. MC database access does not give theMC user privileges directly on HPVertica; it provides MC users varying levels of access to assigned database functionality throughtheMC interface.
Assign users anMC database level through one of the following roles:
l ADMIN Role (db)—Full access to all MC-managed databases. Actual privileges ADMINs inheritdepend on the database user account used to create or import the HP Vertica database into theMC interface.
l IT Role (db)—Can start and stop a database but cannot remove it from theMC interface or dropit.
l USER Role (db)—Can only view database information through the databaseOverview andActivities pages but is restricted from viewingmore detailed data.
When you assign anMC database level to anMC user, you need tomap theMC user account to adatabase user account. Mapping lets theMC user inherit the privileges assigned to that databaseuser and ensures that theMC user cannot do or see anything that is not allowed by the privilegesset up for the user account on the server database.
Privileges assigned to the database user always supersede privileges of theMC user if there is aconflict, such as stopping a database. When theMC user logs in to MC, using his or her MC username and password, MC privileges for database-related activities are compared to the userprivileges on the database itself (the account youmapped theMC user to). Only when the user hasbothMC privileges and corresponding database privileges will the operations be exposed to thatuser in theMC interface.
Tip: As a best practice, you should identify, in advance, the appropriate HP Vertica databaseuser account that has privileges and/or roles similar to one of theMC database roles.
See Creating anMC User andMapping anMC User to a Database user's Privileges for moreinformation.
Administrator's GuideManaging Users and Privileges
HP Vertica Analytics Platform (7.0.x) Page 292 of 969

MC Database Privileges By RoleThe following tables summarizes MC configuration-level privileges by user role. The first tableshows the default privileges, and the second table shows, for the ADMIN role only, whichoperations are dependent on the database user account's privileges and/or roles itself.
Default database-level privileges ADMIN IT USER
View messages Yes Yes Yes
Deletemessages andmark read/unread Yes Yes
View databaseOverview page Yes Yes Yes
View database Activity page Yes Yes Yes
View database grid page Yes Yes Yes
Start a database Yes
Stop a node Yes
View node state Yes Yes
View MC settings Yes Yes
Privileges governed by the HP Vertica database user account:
Database-specific privileges ADMIN
Audit license activity Yes
Install new license Yes
ViewWLA tuning recommendations Yes
View database query page Yes
Stop a database Yes
Rebalance a database Yes
Drop a database Yes
Start, replace, add, remove nodes Yes
Modify database settings Yes
Administrator's GuideManaging Users and Privileges
HP Vertica Analytics Platform (7.0.x) Page 293 of 969

See Alsol About MC Users
l About MC Privileges and Roles
l MC Configuration Privileges
ADMIN Role (db)ADMIN is a superuserwith full privileges tomonitor MC-managed database activity andmessages. Other database privileges (such as stop or drop the database) are governed by the useraccount on the HP Vertica database that this ADMIN (db) user is mapped to. ADMIN is themostpermissive role and is a superset of privileges granted to the IT and USER roles.
The ADMIN user has the following database privileges by default:
l View and delete databasemessages
l Mark messages read or unread
l View the database overview (grid) page
l View the database activity page
l Start the database
l View database cluster node state
l View database settings
The followingMC-managed database operations depend on the database user's role that youmapped this ADMIN user to:
l View license information
l Install a new license
l ViewWorkload Analyzer tuning recommendations
l View query activity and loads
l Stop the database
l Rebalance the database
l Add, stop, replace, or remove nodes
l Manage database settings
Administrator's GuideManaging Users and Privileges
HP Vertica Analytics Platform (7.0.x) Page 294 of 969
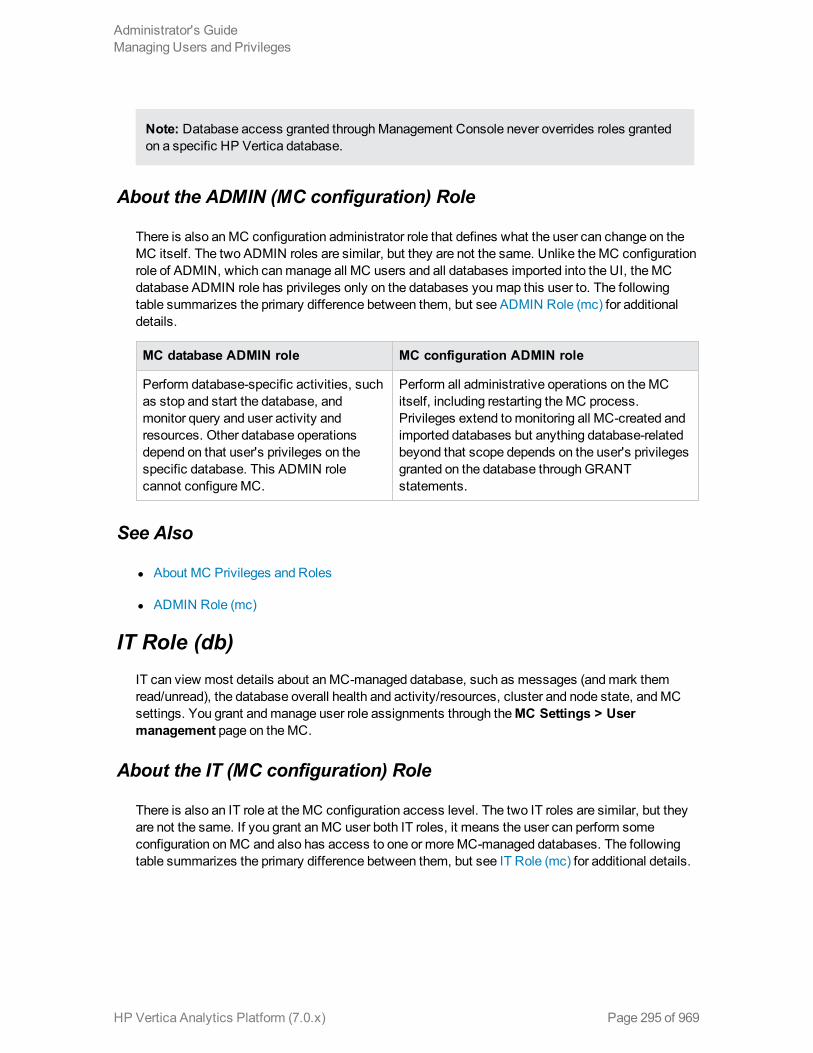
Note: Database access granted throughManagement Console never overrides roles grantedon a specific HP Vertica database.
About the ADMIN (MC configuration) Role
There is also anMC configuration administrator role that defines what the user can change on theMC itself. The two ADMIN roles are similar, but they are not the same. Unlike theMC configurationrole of ADMIN, which canmanage all MC users and all databases imported into the UI, theMCdatabase ADMIN role has privileges only on the databases youmap this user to. The followingtable summarizes the primary difference between them, but see ADMIN Role (mc) for additionaldetails.
MC database ADMIN role MC configuration ADMIN role
Perform database-specific activities, suchas stop and start the database, andmonitor query and user activity andresources. Other database operationsdepend on that user's privileges on thespecific database. This ADMIN rolecannot configureMC.
Perform all administrative operations on theMCitself, including restarting theMC process.Privileges extend tomonitoring all MC-created andimported databases but anything database-relatedbeyond that scope depends on the user's privilegesgranted on the database throughGRANTstatements.
See Also
l About MC Privileges and Roles
l ADMIN Role (mc)
IT Role (db)IT can view most details about anMC-managed database, such as messages (andmark themread/unread), the database overall health and activity/resources, cluster and node state, andMCsettings. You grant andmanage user role assignments through theMC Settings > Usermanagement page on theMC.
About the IT (MC configuration) Role
There is also an IT role at theMC configuration access level. The two IT roles are similar, but theyare not the same. If you grant anMC user both IT roles, it means the user can perform someconfiguration onMC and also has access to one or moreMC-managed databases. The followingtable summarizes the primary difference between them, but see IT Role (mc) for additional details.
Administrator's GuideManaging Users and Privileges
HP Vertica Analytics Platform (7.0.x) Page 295 of 969

MC database IT MC configuration IT
Monitor databases on which the user has privileges, view thedatabase overview and activity pages, monitor the node stateview messages andmark them read/unread, view databasesettings.
Monitor MC-manageddatabase, view non-databasemessages, andmanage useraccess.
See Also
l About MC Privileges and Roles
l IT Role (mc)
l Mapping anMC User to a Database user's Privileges
USER Role (db)USER has limited database privileges, such as viewing database cluster health,activity/resources, andmessages. MC users granted the USER database role might have higherlevels of permission on theMC itself, such as the IT Role (mc). Alternatively, USER users mighthave no (NONE) privileges to configureMC. How you combine the two levels is up to you.
See Also
l About MC Privileges and Roles
l MC Configuration Privileges
l Mapping anMC User to a Database user's Privileges
Granting Database Access to MC UsersIf you did not grant anMC user a database-level role when you created the user account, thisprocedure describes how to do so.
Granting the user anMC database-level role associates theMC user with a database user'sprivileges and ensures that theMC user cannot do or see anything that is not allowed by theprivileges set up for the user account on the server database. When that MC user logs in to MC, hisor her MC privileges for database-related activities are compared to that user's privileges on thedatabase itself. Only when the user has bothMC privileges and corresponding database privilegeswill the operations be exposed in theMC interface. SeeMapping anMC User to a Database user'sPrivileges for examples.
PrerequisitesBefore you grant database access to anMC user, make sure you have read the prerequisites inCreating anMC User.
Administrator's GuideManaging Users and Privileges
HP Vertica Analytics Platform (7.0.x) Page 296 of 969

Grant a Database-Level Role to an MC user:1. Log in toManagement Console as an administrator and navigate toMC Settings > User
management.
2. Select anMC user and click Edit.
3. Verify theMC Configuration Privileges are what you want them to be. NONE is the default.
4. Next to the DB access levels section, click Add and provide the following database accesscredentials:
i. Choose a database. Select a database from the list of MC-discovered (databasesthat were created on or imported into theMC interface).
ii. Database username. Enter an existing database user name or, if the database isrunning, click the ellipses […] to browse for a list of database users, and select aname from the list.
iii. Database password. Enter the password to the database user account (not thisusername's password).
iv. Restricted access. Chose a database level (ADMIN, IT, or USER) for this user.
v. Click OK to close theAdd permissions dialog box.
5. Optionally change the user's Status (enabled is the default).
6. Click Save.
SeeMapping anMC User to a Database user's Privileges for a graphical illustration of how easy itis to map the two user accounts.
How MC Validates New UsersAfter you click OK to close the Add permissions dialog box, MC tries to validate the databaseusername and password entered against the selectedMC-managed database or against yourorganization's LDAP directory. If the credentials are found to be invalid, you are asked to re-enterthem.
If the database is not available at the time you create the new user, MC saves theusername/password and prompts for validation when the user accesses the Database and Clusterspage later.
Administrator's GuideManaging Users and Privileges
HP Vertica Analytics Platform (7.0.x) Page 297 of 969

See Alsol About MC Users
l About MC Privileges and Roles
l Creating anMC User
l Creating a Database User
l AddingMultiple Users toMC-managed Databases
Mapping an MC User to a Database user's PrivilegesDatabasemapping occurs when you link one or moreMC user accounts to a database useraccount. After youmap users, theMC user inherits privileges granted to the database user, up tothe limitations of the user's database access level onMC.
This topic presents the samemapping information as in Granting Database Access toMC Usersbut with graphics. See alsoMC Database Privileges for an introduction to databasemappingthrough theMC interface and details about the different database access roles you can grant to anMC user.
How to Map an MC User to a Database UserThe following series of images shows you how easy it is to map anMC user to a database useraccount from theMC Settings > User management page.
You view the list of MC users so you can see who has what privileges. You notice that user alicehas no database privileges, which would appear under the Resources column.
To give alice database privileges, click to highlight her MC username, click Edit, and theEditexisting user page displays with no resources (databases) assigned toMC user alice.
Administrator's GuideManaging Users and Privileges
HP Vertica Analytics Platform (7.0.x) Page 298 of 969

Click Add, and when theAdd permissions dialog box opens, choose a database from themenu.
In the sameAdd permissions dialog box, after you select a database, you need to enter the username of the database user account that you want to map alice to. To see a list of database usernames, click the ellipses […] and select a name from the list. In this example, you already knowthat database user carol has privileges to stop and start the database, but the alice databaseaccount can only view certain tables. OnMC, you want alice to have similar privileges to carol, soyoumapMC alice to database carol.
Administrator's GuideManaging Users and Privileges
HP Vertica Analytics Platform (7.0.x) Page 299 of 969

After you click OK, remember to assignMC user alice anMC database level. In this case, chooseIT, a role that has permissions to start and stop the selected database.
Enter the database password, click OK , close the confirmation dialog box, and click Save.
That's it.
Administrator's GuideManaging Users and Privileges
HP Vertica Analytics Platform (7.0.x) Page 300 of 969

What If You Map the Wrong PermissionsIn the followingmapping example, if you had granted aliceMC database access level of ADMIN butmapped her to a database account with only USER-type privileges, Alice's access to that databasewould be limited to USER privileges. This is by design. When Alice logs in to MC using her ownuser name and password, MC privileges for her ADMIN-assigned role are compared to the userprivileges on the database itself. Only when the user has bothMC privileges and correspondingdatabase privileges will the appropriate operations be exposed in theMC interface.
Adding Multiple MC Users to a DatabaseIn addition to creating or editingMC users andmapping them to a selected database, you can alsoselect a database and add users to that database on theMC Settings > Resouce access page.
Choose a database from the list, click Add, and select anMC user name, one at a time. Map theMC user to the database user account, and then grant eachMC user the database level you wanthim or her to have.
It is possible you will grant the same database access to several MC users.
Administrator's GuideManaging Users and Privileges
HP Vertica Analytics Platform (7.0.x) Page 301 of 969

SeeGranting Database Access toMC Users andMapping anMC User to a Database user'sPrivileges for details.
How to Find Out an MC user's Database RoleOn the User management page, theResources column lists all of the databases a user is mappedto. It does not, however, display the user's database access level (role).
Administrator's GuideManaging Users and Privileges
HP Vertica Analytics Platform (7.0.x) Page 302 of 969

You can retrieve that information by highlighting a user and clickingEdit. In the dialog box thatopens (shown in example below), Bob's role on themcdb database is ADMIN. You can changeBob's role from this dialog box by clicking Edit and assigning a different database-access role.
Adding Multiple Users to MC-managed DatabasesIf you are administering one or moreMC-managed databases, and several MC users need accessto it, you have two options on theMC Settings page:
l From theUser management option, select each user and grant database access, one user at atime
l From theResource access option, select a database first and add users to it
This procedure describes how to add several users to one database at once. If you want to addusers one at a time, see Creating anMC User.
Before You StartRead the prerequisites in Creating anMC User.
Administrator's GuideManaging Users and Privileges
HP Vertica Analytics Platform (7.0.x) Page 303 of 969

How to Add Multiple Users to a Database1. Log in toMC as an administrator and navigate toMC Settings > Resource access.
2. Choose a database from the list of discovered databases. Selecting the database populates atable with users who already have privileges on the selected database.
3. To add new users, click Add and select theMC username you want to add to the databasefrom the drop-down list.
4. Enter an existingDatabase username on the selected database or click the ellipses button[…] to browse for names. (This is the database account you want to map the selected user to.)
5. Enter the database password (not this username's password).
Note: The database password is generally the dbadmin superuser's password.
6. Choose a database-access role (ADMIN or IT or USER) for this user.
7. Click OK to close the Add access to resource dialog box.
8. Perform steps 3-7 for each user you want to add to the selected database, and then click Save.
See Alsol About MC Users
l About MC Privileges and Roles
l Mapping anMC User to a Database user's Privileges
MC Mapping MatrixThe following table shows the three different MC configuration roles, ADMIN, IT, and NONE,combined with the type of privileges a user granted that role inherits whenmapped to a specificdatabase-level role.
Administrator's GuideManaging Users and Privileges
HP Vertica Analytics Platform (7.0.x) Page 304 of 969

MCconfigurationlevel
MCdatabaselevel The combination lets the user ...
ADMIN Role(mc)
All(implicit)
l Perform all administrative operations onManagement Console,including configure and restart theMC process.
l Maximum access to all databases created and/or imported intotheMC interface—governed by the privileges associated withthe database user account used to set up the database on theMC.
IT Role (mc) ADMINRole (db)
l Monitor MC-managed database activity.
l View non-databasemessages.
l Manage user access (enable/disable).
l Monitor MC-managed database activity andmessages.
l Other database privileges (such as stop or drop the database)are governed by themapped user account on the database itself.
l Automatically inherits all privileges granted to the NONE:ITcombination.
IT Role (mc) IT Role(db)
l Monitor MC-managed database activity.
l View non-databasemessages.
l Manage user access (edit/enable/disable).
l On databases where granted privileges, monitor databaseoverview and activity, monitor node state, view messages andmark them read/unread, view database settings
l Automatically inherits all privileges granted to the IT:USERcombination.
IT Role (mc) USERRole (db)
l Monitor MC-managed database activity
l View non-databasemessages.
l Manage user access (enable/disable).
l Viewing database cluster health, activity/resources, andmessages and alerts.
Administrator's GuideManaging Users and Privileges
HP Vertica Analytics Platform (7.0.x) Page 305 of 969

MCconfigurationlevel
MCdatabaselevel The combination lets the user ...
NONE Role(mc)
ADMINRole (db)
l No privileges tomonitor/modify anything related to theMC itself.
l Monitor MC-managed database activity, node state, andmessages.
l Other database privileges (such as stop or drop the database)are governed by themapped user account on the database itself.
l Automatically inherits all privileges granted to the NONE:ITcombination.
NONE Role(mc)
IT Role(db)
l No privileges tomonitor/modify anything related to theMC itself
l Monitor MC-managed database activity, node state, andsettings.
l View the database overview and activity pages.
l View messages andmark them read/unread.
l Automatically inherits all privileges granted to the NONE:USERcombination.
NONE Role(mc)
USERRole (db)
l No privileges tomonitor/modify anything related to theMC itself.
l View database cluster health, activity/resources, andmessagesand alerts.
Administrator's GuideManaging Users and Privileges
HP Vertica Analytics Platform (7.0.x) Page 306 of 969

Using the Administration ToolsHP Vertica provides a set of tools that allows you to perform administrative tasks quickly andeasily. Most of the database administration tasks in HP Vertica can be done using theAdministration Tools.
Always run the Administration Tools using theDatabase Administrator account on theAdministration host, if possible. Make sure that no other Administration Tools processes arerunning.
If the Administration host is unresponsive, run the Administration Tools on a different node in thecluster. That node permanently takes over the role of Administration host.
A man page is available for admintools. If you are running as the dbadmin user, simply type: manadmintools. If you are running as a different user, type: man -M /opt/vertica/man admintools.
Running the Administration ToolsAt the Linux command line:
$ /opt/vertica/bin/admintools [ -t | --tool ] toolname [ options ]
toolname Is one of the tools described in the Administration Tools Reference.
options -h--help Shows a brief help message and exits.
-a--help_all Lists all command-line subcommands and options as describedinWriting Administration Tools Scripts.
If you omit toolname and options parameters, theMainMenu dialog box appears inside yourconsole or terminal window with a dark blue background and a title on top. The screen capturesused in this documentation set are cropped down to the dialog box itself, as shown below.
Administrator's GuideUsing the Administration Tools
HP Vertica Analytics Platform (7.0.x) Page 307 of 969
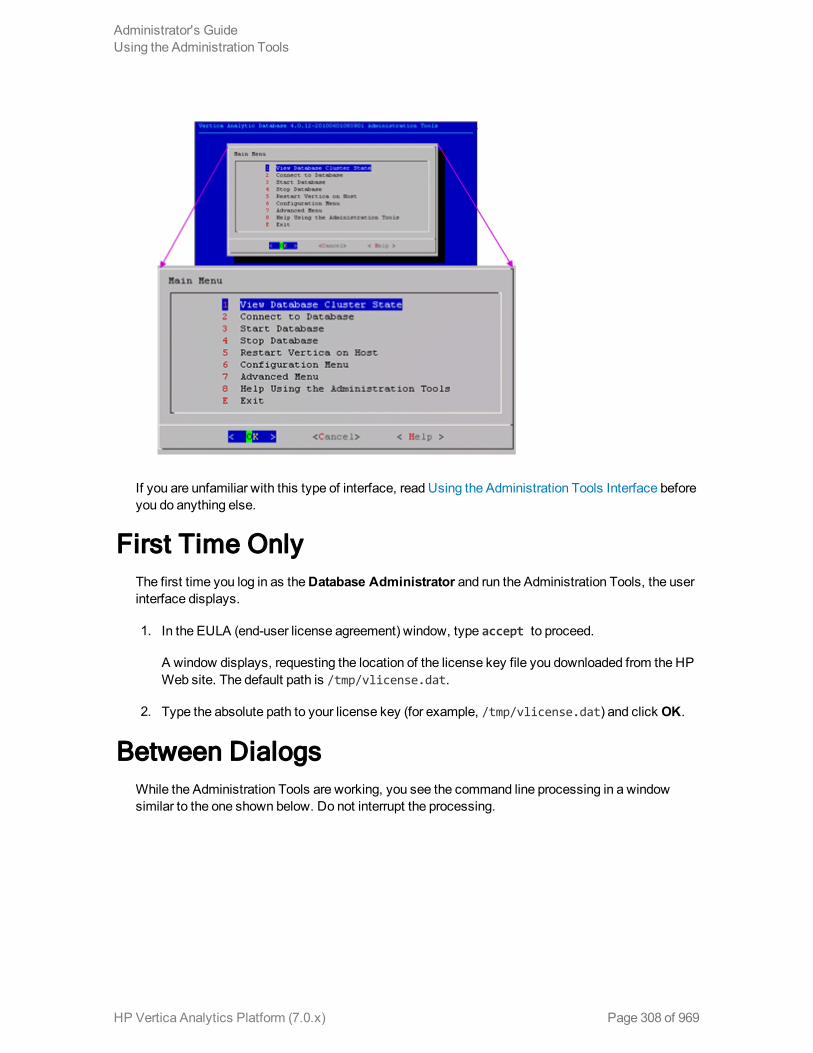
If you are unfamiliar with this type of interface, read Using the Administration Tools Interface beforeyou do anything else.
First Time OnlyThe first time you log in as theDatabase Administrator and run the Administration Tools, the userinterface displays.
1. In the EULA (end-user license agreement) window, type accept to proceed.
A window displays, requesting the location of the license key file you downloaded from the HPWeb site. The default path is /tmp/vlicense.dat.
2. Type the absolute path to your license key (for example, /tmp/vlicense.dat) and click OK.
Between DialogsWhile the Administration Tools are working, you see the command line processing in a windowsimilar to the one shown below. Do not interrupt the processing.
Administrator's GuideUsing the Administration Tools
HP Vertica Analytics Platform (7.0.x) Page 308 of 969

Using the Administration Tools InterfaceThe HP Vertica Administration Tools are implemented usingDialog, a graphical user interface thatworks in terminal (character-cell) windows.The interface responds tomouse clicks in some terminalwindows, particularly local Linux windows, but youmight find that it responds only to keystrokes.Thus, this section describes how to use the Administration Tools using only keystrokes.
Note: This section does not describe every possible combination of keystrokes you can use toaccomplish a particular task. Feel free to experiment and to use whatever keystrokes youprefer.
Enter [Return]In all dialogs, when you are ready to run a command, select a file, or cancel the dialog, press theEnter key. The command descriptions in this section do not explicitly instruct you to press Enter.
OK - Cancel - Help
TheOK, Cancel, and Help buttons arepresent on virtually all dialogs. Use thetab, space bar, or right and left arrowkeys to select an option and then pressEnter. The same keystrokes apply todialogs that present a choice of Yes orNo.
Administrator's GuideUsing the Administration Tools
HP Vertica Analytics Platform (7.0.x) Page 309 of 969
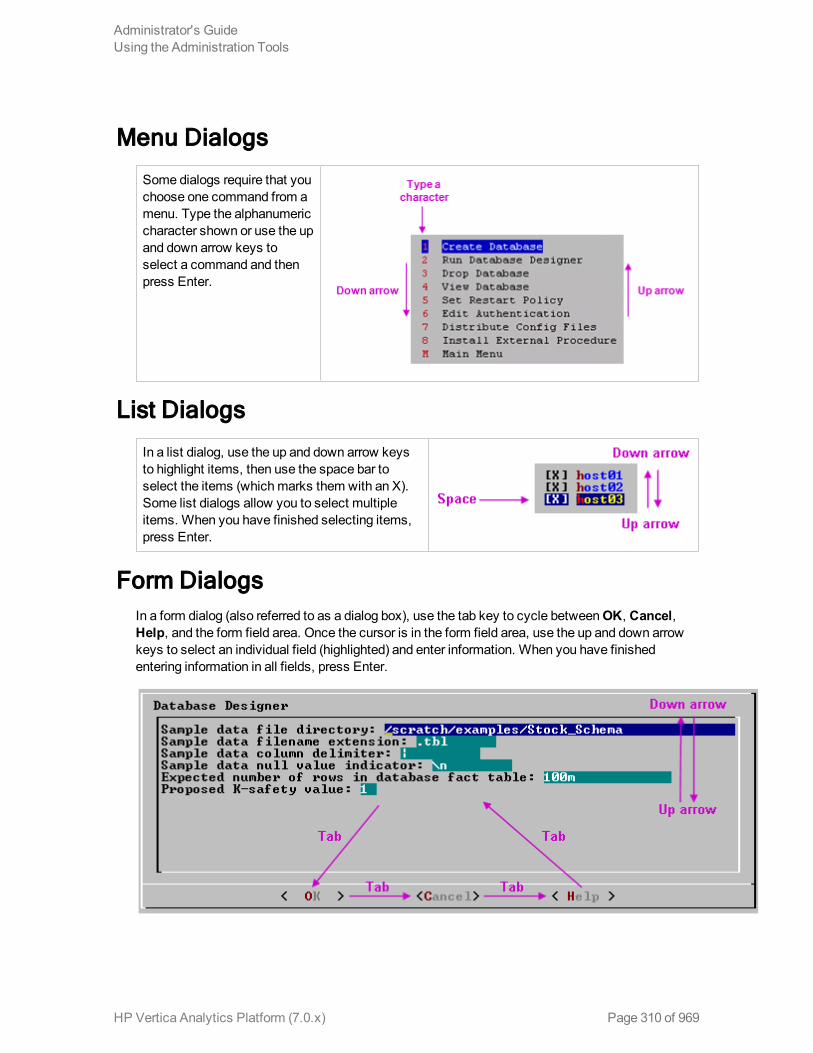
Menu Dialogs
Some dialogs require that youchoose one command from amenu. Type the alphanumericcharacter shown or use the upand down arrow keys toselect a command and thenpress Enter.
List Dialogs
In a list dialog, use the up and down arrow keysto highlight items, then use the space bar toselect the items (whichmarks them with an X).Some list dialogs allow you to select multipleitems. When you have finished selecting items,press Enter.
Form DialogsIn a form dialog (also referred to as a dialog box), use the tab key to cycle betweenOK, Cancel,Help, and the form field area. Once the cursor is in the form field area, use the up and down arrowkeys to select an individual field (highlighted) and enter information. When you have finishedentering information in all fields, press Enter.
Administrator's GuideUsing the Administration Tools
HP Vertica Analytics Platform (7.0.x) Page 310 of 969

Help ButtonsOnline help is provided in the form of text dialogs. If you have trouble viewing the help, see Notesfor Remote Terminal Users in this document.
K-Safety Support in Administration ToolsThe Administration Tools allow certain operations on aK-Safe database, even if some nodes areunresponsive.
The databasemust have beenmarked as K-Safe using theMARK_DESIGN_KSAFE function.
The followingmanagement functions within the Administration Tools are operational when somenodes are unresponsive.
Note: HP Vertica users can perform much of the below functionality using theManagementConsole interface. SeeManagement Console and Administration Tools for details.
l View database cluster state
l Connect to database
l Start database (includingmanual recovery)
l Stop database
l Replace node (assuming node that is down is the one being replaced)
l View database parameters
l Upgrade license key
The following operations work with unresponsive nodes; however, youmight have to repeat theoperation on the failed nodes after they are back in operation:
l Edit authentication
l Distribute config files
l Install external procedure
l (Setting) database parameters
The followingmanagement functions within the Administration Tools require that all nodes be UP inorder to be operational:
l Create database
l Run the Database Designer
Administrator's GuideUsing the Administration Tools
HP Vertica Analytics Platform (7.0.x) Page 311 of 969

l Drop database
l Set restart policy
l Roll back database to Last Good Epoch
Notes for Remote Terminal UsersThe appearance of the graphical interface depends on the color and font settings used by yourterminal window. The screen captures in this document weremade using the default color and fontsettings in a PuTTy terminal application running on aWindows platform.
Note: If you are using a remote terminal application, such as PuTTy or a Cygwin bash shell,make sure your window is at least 81 characters wide and 23 characters high.
If you are using PuTTY, you canmake the Administration Tools look like the screen captures in thisdocument:
1. In a PuTTY window, right click the title area and select Change Settings.
2. Create or load a saved session.
3. In the Category dialog, click Window > Appearance.
4. In the Font settings, click the Change... button.
5. Select Font: Courier New: Regular Size: 10
6. Click Apply.
Repeat these steps for each existing session that you use to run the Administration Tools.
You can also change the translation to support UTF-8:
1. In a PuTTY window, right click the title area and select Change Settings.
2. Create or load a saved session.
3. In the Category dialog, click Window > Translation.
4. In the "Received data assumed to be in which character set" drop-downmenu, select UTF-8.
5. Click Apply.
Using the Administration Tools HelpTheHelp on Using the Administration Tools command displays a help screen about using theAdministration Tools.
Administrator's GuideUsing the Administration Tools
HP Vertica Analytics Platform (7.0.x) Page 312 of 969

Most of the online help in the Administration Tools is context-sensitive. For example, if you useup/down arrows to select a command, press tab tomove to the Help button, and press return, youget help on the selected command.
In a Menu Dialog1. Use the up and down arrow keys to choose the command for which you want help.
2. Use the Tab key tomove the cursor to the Help button.
3. Press Enter (Return).
Administrator's GuideUsing the Administration Tools
HP Vertica Analytics Platform (7.0.x) Page 313 of 969

In a Dialog Box1. Use the up and down arrow keys to choose the field on which you want help.
2. Use the Tab key tomove the cursor to the Help button.
3. Press Enter (Return).
ScrollingSome help files are too long for a single screen. Use the up and down arrow keys to scroll throughthe text.
Password AuthenticationWhen you create a new user with the CREATE USER command, you can configure the passwordor leave it empty. You cannot bypass the password if the user was created with a passwordconfigured. You can change a user's password using the ALTER USER command.
See Implementing Security for more information about controlling database authorization throughpasswords.
Tip: Unless the database is used solely for evaluation purposes, HP recommends that alldatabase users have encrypted passwords.
Administrator's GuideUsing the Administration Tools
HP Vertica Analytics Platform (7.0.x) Page 314 of 969

Distributing Changes Made to theAdministration Tools Metadata
Administration Tools-specific metadata for a failed node will fall out of synchronization with othercluster nodes if youmake the following changes:
l Modify the restart policy
l Add one or more nodes
l Drop one or more nodes.
When you restore the node to the database cluster, you can use the Administration Tools to updatethe node with the latest Administration Tools metadata:
1. Log on to a host that contains themetadata you want to transfer and start the AdministrationTools. (See Using the Administration Tools.)
2. On theMain Menu in the Administration Tools, select Configuration Menu and click OK.
3. On theConfiguration Menu, select Distribute Config Files and click OK.
4. Select AdminTools Meta-Data.
The Administration Tools metadata is distributed to every host in the cluster.
5. Restart the database.
Administration Tools and Management ConsoleYou can perform most database administration tasks using the Administration Tools, but you havethe additional option of using themore visual and dynamic Management Console.
The following table compares the functionality available in both interfaces. Continue to useAdministration Tools and the command line to perform actions not yet supported by ManagementConsole.
HP Vertica FunctionalityManagementConsole
AdministrationTools
Use aWeb interface for the administration of HPVertica
Yes No
Manage/monitor one or more databases and clustersthrough a UI
Yes No
Managemultiple databases on different clusters Yes Yes
Administrator's GuideUsing the Administration Tools
HP Vertica Analytics Platform (7.0.x) Page 315 of 969

HP Vertica FunctionalityManagementConsole
AdministrationTools
View database cluster state Yes Yes
View multiple cluster states Yes No
Connect to the database Yes Yes
Start/stop an existing database Yes Yes
Stop/restart HP Vertica on host Yes Yes
Kill an HP Vertica process on host No Yes
Create one or more databases Yes Yes
View databases Yes Yes
Remove a database from view Yes No
Drop a database Yes Yes
Create a physical schema design (DatabaseDesigner)
No Yes
Modify a physical schema design (DatabaseDesigner)
No Yes
Set the restart policy No Yes
Roll back database to the Last Good Epoch No Yes
Manage clusters (add, replace, remove hosts) Yes Yes
Rebalance data across nodes in the database Yes Yes
Configure database parameters dynamically Yes No
View database activity in relation to physicalresource usage
Yes No
View alerts andmessages dynamically Yes No
View current database size usage statistics Yes No
View database size usage statistics over time Yes No
Upload/upgrade a license file Yes Yes
Warn users about license violation on login Yes Yes
Create, edit, manage, and delete users/userinformation
Yes No
Administrator's GuideUsing the Administration Tools
HP Vertica Analytics Platform (7.0.x) Page 316 of 969

HP Vertica FunctionalityManagementConsole
AdministrationTools
Use LDAP to authenticate users with companycredentials
Yes Yes
Manage user access toMC through roles Yes No
MapManagement Console users to an HP Verticadatabase
Yes No
Enable and disable user access toMC and/or thedatabase
Yes No
Audit user activity on database Yes No
Hide features unavailable to a user through roles Yes No
Generate new user (non-LDAP) passwords Yes No
Management Console Provides some, but Not All of the Functionality Provided By theAdministration Tools. MC Also Provides Functionality Not Available in the Administration Tools.
See Alsol Monitoring HP Vertica UsingManagement Console
Administrator's GuideUsing the Administration Tools
HP Vertica Analytics Platform (7.0.x) Page 317 of 969

Administration Tools Reference
Viewing Database Cluster StateThis tool shows the current state of the nodes in the database.
1. On theMainMenu, select View Database Cluster State, and click OK.The normal state of a running database is ALL UP. The normal state of a stopped database isALL DOWN.
2. If some hosts are UP and someDOWN, restart the specific host that is down usingRestartHP Vertica on Host from the Administration Tools, or you can start the database as describedin Starting and Stopping the Database (unless you have a known node failure and want tocontinue in that state.)
Nodes shown as INITIALIZING or RECOVERING indicate that Failure Recovery is inprogress.
Administrator's GuideUsing the Administration Tools
HP Vertica Analytics Platform (7.0.x) Page 318 of 969

Nodes in other states (such as NEEDS_CATCHUP) are transitional and can be ignored unlessthey persist.
See Alsol AdvancedMenuOptions
l Startup Problems
l Shutdown Problems
Connecting to the DatabaseThis tool connects to a running databasewith vsql. You can use the Administration Tools toconnect to a database from any node within the database while logged in to any user account withaccess privileges. You cannot use the Administration Tools to connect from a host that is not adatabase node. To connect from other hosts, run vsql as described in Connecting From theCommand Line in the Programmer's Guide.
1. On theMainMenu, click Connect to Database, and then click OK.
2. Supply the database password if asked:
Password:
When you create a new user with the CREATE USER command, you can configure thepassword or leave it empty. You cannot bypass the password if the user was created with apassword configured. You can change a user's password using the ALTER USER command.
The Administration Tools connect to the database and transfer control to vsql.
Welcome to vsql, the Vertica Analytic Database interactive terminal.Type: \h or \? for help with vsql commands
\g or terminate with semicolon to execute query\q to quit
=>
SeeUsing vsql for more information.
Note: After entering your password, youmay be prompted to change your password if it hasexpired. See Implementing Client Authentication for details of password security.
Administrator's GuideUsing the Administration Tools
HP Vertica Analytics Platform (7.0.x) Page 319 of 969

See Alsol CREATE USER
l ALTER USER
Starting the DatabaseStarting aK-safe database is supported when up to K nodes are down or unavailable. See FailureRecovery for a discussion on various scenarios encountered during database shutdown, startupand recovery.
You can start a database using any of thesemethods:
l TheManagement Console
l The Administration Tools interface
l The command line
Starting the Database Using MCOnMC's Databases and Clusters page, click a database to select it, and click Start within thedialog box that displays.
Starting the Database Using the Administration Tools1. Open the Administration Tools and select View Database Cluster State tomake sure that all
nodes are down and that no other database is running. If all nodes are not down, see ShutdownProblems.
2. Open the Administration Tools. See Using the Administration Tools for information aboutaccessing the Administration Tools.
3. On theMain Menu, select Start Database,and then select OK.
4. Select the database to start, and then click OK.
Caution: HP strongly recommends that you start only one database at a time. If you startmore than one database at any time, the results are unpredictable. Users could encounterresource conflicts or perform operations in the wrong database.
5. Enter the database password, and then click OK.
6. When prompted that the database started successfully, click OK.
7. Check the log files to make sure that no startup problems occurred.
Administrator's GuideUsing the Administration Tools
HP Vertica Analytics Platform (7.0.x) Page 320 of 969

If the database does not start successfully, see Startup Problems.
Starting the Database At the Command LineIf you use the admintools command line option, start_db(), to start a database, the -p passwordargument is only required during database creation, when you install a new license.
As long as the license is valid, the -p argument is not required to start the database and is silentlyignored, even if you introduce a typo or prematurely press the enter key. This is by design, as thedatabase can only be started by the user who (as part of the verticadba UNIX user group) initiallycreated the database or who has root or su privileges.
If the license were to become invalid, HP Vertica would use the -p password argument to attemptto upgrade the license with the license file stored in /opt/vertica/config/share/license.key.
Following is an example of using start_db on a standalone node:
[dbadmin@localhost ~]$ /opt/vertica/bin/admintools -t start_db -d VMartInfo: no passwordspecified, using none
Node Status: v_vmart_node0001: (DOWN)Node Status: v_vmart_node0001: (DOWN)Node Status: v_vmart_node0001: (DOWN)Node Status: v_vmart_node0001: (DOWN)Node Status: v_vmart_node0001: (DOWN)Node Status: v_vmart_node0001: (DOWN)Node Status: v_vmart_node0001: (DOWN)Node Status: v_vmart_node0001: (DOWN)Node Status: v_vmart_node0001: (UP)
Database VMart started successfully
Stopping a DatabaseThis Administration Tool stops a running database.
1. Use View Database Cluster State tomake sure that all nodes are up. If all nodes are not up,see Restarting HP Vertica on Host.
2. On theMain Menu, select Stop Database, and click OK.
3. Select the database you want to stop, and click OK.
4. Enter the password if asked, and click OK.
5. A message confirms that the database has been successfully stopped. Click OK.
ErrorIf users are connected during shutdown operations, the Administration Tools displays amessagesimilar to the following:
Administrator's GuideUsing the Administration Tools
HP Vertica Analytics Platform (7.0.x) Page 321 of 969

Database Stock_Schema did not appear to stop in the allotted time. NOTICE: Cannot shutdown while users are connected
shutdown-------------------------------Shutdown: aborting shutdown(1 row)If you need to force a database shutdown, use the'Stop HP Vertica on Node' command in the Advanced menu,selecting the appropriate nodes to stop.
DescriptionThemessage indicates that there are active user connections (sessions). SeeManaging Sessionsin the Administrator's Guide for more information.
ResolutionThe following examples were taken from a different database.
1. To see which users are connected, connect to the database and query the SESSIONS systemtable described in the SQLReferenceManual. For example:
=> \pset expandedExpanded display is on.=> SELECT * FROM SESSIONS;
-[ RECORD 1 ] node_name | site01user_name | dbadminclient_hostname | 127.0.0.1:57141login_timestamp | 2009-06-07 14:41:26session_id | rhel5-1-30361:0xd7e3e:994462853transaction_start | 2009-06-07 14:48:54transaction_id | 45035996273741092transaction_description | user dbadmin (select * from session;)statement_start | 2009-06-07 14:53:31statement_id | 0last_statement_duration | 1current_statement | select * from sessions;ssl_state | Noneauthentication_method | Trust-[ RECORD 2 ]node_name | site01user_name | dbadminclient_hostname | 127.0.0.1:57142login_timestamp | 2009-06-07 14:52:55session_id | rhel5-1-30361:0xd83ac:1017578618transaction_start | 2009-06-07 14:53:26transaction_id | 45035996273741096transaction_description | user dbadmin (COPY ClickStream_Fact FROM '/data/clickstream/
1g/ClickStream_Fact.tbl' DELIMITER '|' NULL '\\n' DIRECT;)statement_start | 2009-06-07 14:53:26statement_id | 17179869528
Administrator's GuideUsing the Administration Tools
HP Vertica Analytics Platform (7.0.x) Page 322 of 969
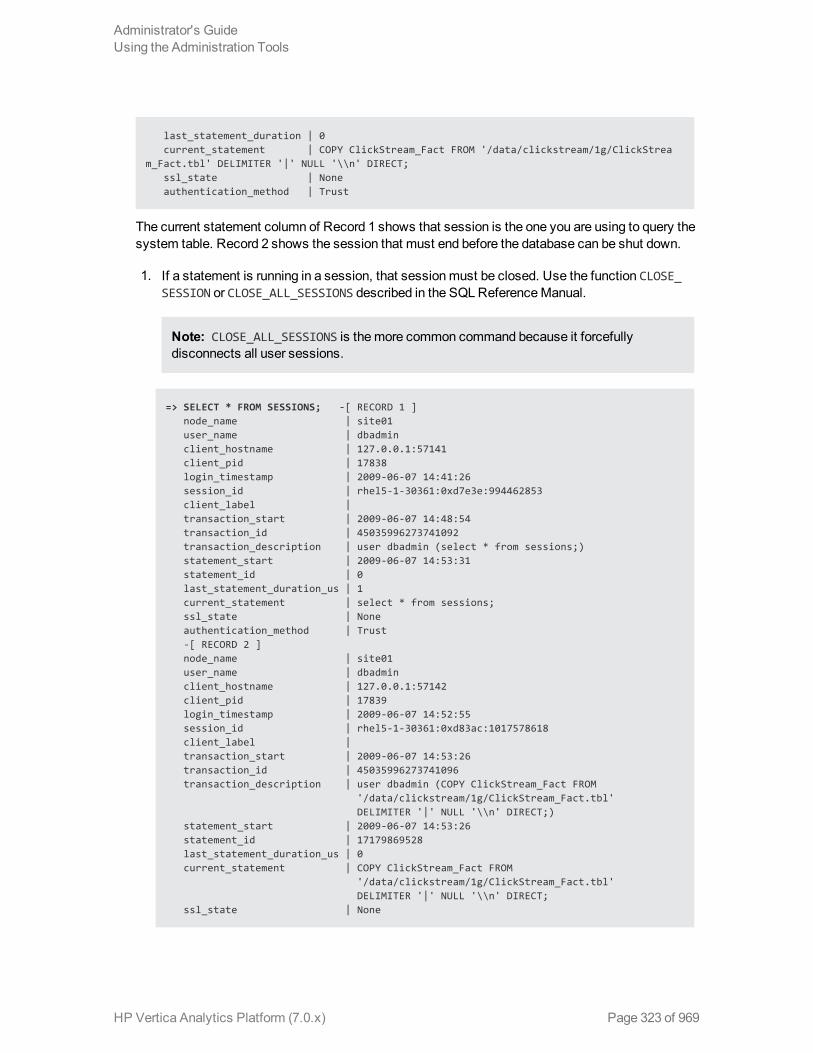
last_statement_duration | 0current_statement | COPY ClickStream_Fact FROM '/data/clickstream/1g/ClickStrea
m_Fact.tbl' DELIMITER '|' NULL '\\n' DIRECT;ssl_state | Noneauthentication_method | Trust
The current statement column of Record 1 shows that session is the one you are using to query thesystem table. Record 2 shows the session that must end before the database can be shut down.
1. If a statement is running in a session, that sessionmust be closed. Use the function CLOSE_SESSION or CLOSE_ALL_SESSIONS described in the SQLReferenceManual.
Note: CLOSE_ALL_SESSIONS is themore common command because it forcefullydisconnects all user sessions.
=> SELECT * FROM SESSIONS; -[ RECORD 1 ]node_name | site01user_name | dbadminclient_hostname | 127.0.0.1:57141client_pid | 17838login_timestamp | 2009-06-07 14:41:26session_id | rhel5-1-30361:0xd7e3e:994462853client_label |transaction_start | 2009-06-07 14:48:54transaction_id | 45035996273741092transaction_description | user dbadmin (select * from sessions;)statement_start | 2009-06-07 14:53:31statement_id | 0last_statement_duration_us | 1current_statement | select * from sessions;ssl_state | Noneauthentication_method | Trust-[ RECORD 2 ]node_name | site01user_name | dbadminclient_hostname | 127.0.0.1:57142client_pid | 17839login_timestamp | 2009-06-07 14:52:55session_id | rhel5-1-30361:0xd83ac:1017578618client_label |transaction_start | 2009-06-07 14:53:26transaction_id | 45035996273741096transaction_description | user dbadmin (COPY ClickStream_Fact FROM
'/data/clickstream/1g/ClickStream_Fact.tbl'DELIMITER '|' NULL '\\n' DIRECT;)
statement_start | 2009-06-07 14:53:26statement_id | 17179869528last_statement_duration_us | 0current_statement | COPY ClickStream_Fact FROM
'/data/clickstream/1g/ClickStream_Fact.tbl'DELIMITER '|' NULL '\\n' DIRECT;
ssl_state | None
Administrator's GuideUsing the Administration Tools
HP Vertica Analytics Platform (7.0.x) Page 323 of 969

authentication_method | Trust=> SELECT CLOSE_SESSION('rhel5-1-30361:0xd83ac:1017578618');-[ RECORD 1 ]close_session | Session close command sent. Check sessions for progress.
=> SELECT * FROM SESSIONS; -[ RECORD 1 ]node_name | site01user_name | dbadminclient_hostname | 127.0.0.1:57141client_pid | 17838login_timestamp | 2009-06-07 14:41:26session_id | rhel5-1-30361:0xd7e3e:994462853client_label |transaction_start | 2009-06-07 14:48:54transaction_id | 45035996273741092transaction_description | user dbadmin (select * from sessions;)statement_start | 2009-06-07 14:54:11statement_id | 0last_statement_duration_us | 98current_statement | select * from sessions;ssl_state | Noneauthentication_method | Trust
2. Query the SESSIONS table again. For example, two columns have changed:
n stmtid is now 0, indicating that no statement is in progress.
n stmt_duration now indicates how long the statement ran in milliseconds before beinginterrupted.
The SELECT statements that call these functions return when the interrupt or closemessagehas been delivered to all nodes, not after the interrupt or close has completed.
3. Query the SESSIONS table again. When the session no longer appears in the SESSION table,disconnect and run the Stop Database command.
Controlling SessionsThe database administrator must be able to disallow new incoming connections in order to shutdown the database. On a busy system, database shutdown is prevented if new sessions connectafter the CLOSE_SESSION or CLOSE_ALL_SESSIONS() command is invoked—and before thedatabase actually shuts down.
One option is for the administrator to issue the SHUTDOWN('true') command, which forces thedatabase to shut down and disallow new connections. See SHUTDOWN in the SQLReferenceManual.
Another option is to modify the MaxClientSessions parameter from its original value to 0, in orderto prevent new non-dbadmin users from connecting to the database.
Administrator's GuideUsing the Administration Tools
HP Vertica Analytics Platform (7.0.x) Page 324 of 969

1. Determine the original value for the MaxClientSessions parameter by querying the V_MONITOR.CONFIGURATIONS_PARAMETERS system table:
=> SELECT CURRENT_VALUE FROM CONFIGURATION_PARAMETERS WHERE parameter_name='MaxClientSessions';
CURRENT_VALUE---------------50
(1 row)
2. Set the MaxClientSessions parameter to 0 to prevent new non-dbadmin connections:
=> SELECT SET_CONFIG_PARAMETER('MaxClientSessions', 0);
Note: The previous command allows up to five administrators to log in.
3. Issue the CLOSE_ALL_SESSIONS() command to remove existing sessions:
=> SELECT CLOSE_ALL_SESSIONS();
4. Query the SESSIONS table:
=> SELECT * FROM SESSIONS;
When the session no longer appears in the SESSIONS table, disconnect and run the StopDatabase command.
5. Restart the database.
6. Restore the MaxClientSessions parameter to its original value:
=> SELECT SET_CONFIG_PARAMETER('MaxClientSessions', 50);
NotesIf the database does not stop successfully, see Shutdown Problems.
You cannot stop databases if your password has expired. TheAdministration Tools displays anerror message if you attempt to do so. You need to change your expired password using vsql beforeyou can shut down a database.
Administrator's GuideUsing the Administration Tools
HP Vertica Analytics Platform (7.0.x) Page 325 of 969

Restarting HP Vertica on HostThis tool restarts the HP Vertica process one or more nodes in a running database. Use this toolwhen a cluster host reboots while the database is running. The spread daemon starts automaticallybut the HP Vertica process does not, thus the node does not automatically rejoin the cluster.
1. On theMainMenu, select View Database Cluster State, and click OK.
2. If one or more nodes are down, select Restart HP Vertica on Host, and click OK.
3. Select the database that contains the host that you want to restart, and click OK.
4. Select the Host that you want to restart, and click OK.
5. Select View Database Cluster State again tomake sure that all nodes are up.
Administrator's GuideUsing the Administration Tools
HP Vertica Analytics Platform (7.0.x) Page 326 of 969

Configuration Menu ItemThe ConfigurationMenu allows you to:
l Create, drop, and view databases
l Use the Database Designer to create or modify a physical schema design
1. On theMainMenu, click Configuration Menu, and then click OK.
Creating a Database1. On theConfiguration Menu, click Create Database and then click OK.
2. Enter the name of the database and an optional comment. Click OK.
3. Enter a password.
If you do not enter a password, you are prompted to indicate whether you want to enter apassword. Click Yes to enter a password orNo to create a database without a superuserpassword.
Caution: If you do not enter a password at this point, superuser password is set to empty.Unless the database is for evaluation or academic purposes, HP strongly recommendsthat you enter a superuser password.
4. If you entered a password, enter the password again.
5. Select the hosts to include in the database. The hosts in this list are the ones that werespecified at installation time (install_vertica -s).
Administrator's GuideUsing the Administration Tools
HP Vertica Analytics Platform (7.0.x) Page 327 of 969

6. Specify the directories in which to store the catalog and data files.
Note: Catalog and data paths must contain only alphanumeric characters and cannothave leading space characters. Failure to comply with these restrictions could result indatabase creation failure.
Note: : Do not use a shared directory for more than one node. Data and catalog directoriesmust be distinct for each node. Multiple nodes must not be allowed to write to the samedata or catalog directory.
7. Check the current database definition for correctness, and click Yes to proceed.
Administrator's GuideUsing the Administration Tools
HP Vertica Analytics Platform (7.0.x) Page 328 of 969
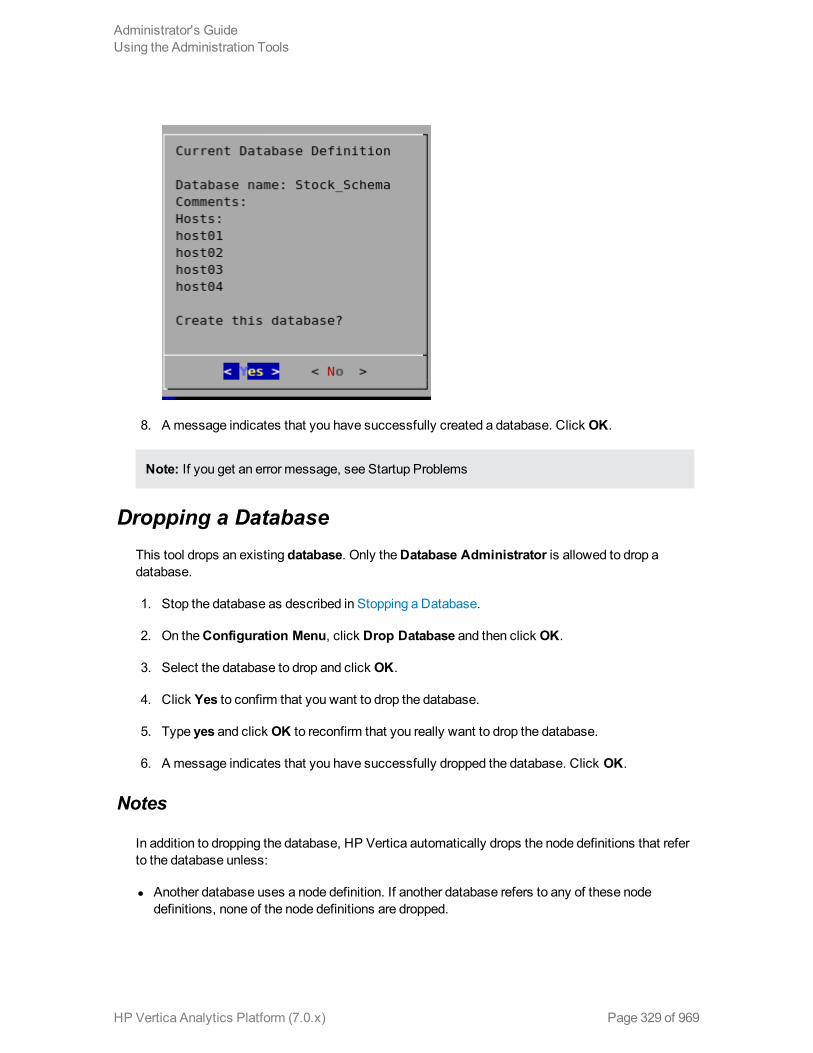
8. A message indicates that you have successfully created a database. Click OK.
Note: If you get an error message, see Startup Problems
Dropping a DatabaseThis tool drops an existing database. Only theDatabase Administrator is allowed to drop adatabase.
1. Stop the database as described in Stopping a Database.
2. On theConfiguration Menu, click Drop Database and then click OK.
3. Select the database to drop and click OK.
4. Click Yes to confirm that you want to drop the database.
5. Type yes and click OK to reconfirm that you really want to drop the database.
6. A message indicates that you have successfully dropped the database. Click OK.
Notes
In addition to dropping the database, HP Vertica automatically drops the node definitions that referto the database unless:
l Another database uses a node definition. If another database refers to any of these nodedefinitions, none of the node definitions are dropped.
Administrator's GuideUsing the Administration Tools
HP Vertica Analytics Platform (7.0.x) Page 329 of 969

l A node definition is the only node defined for the host. (HP Vertica uses node definitions tolocate hosts that are available for database creation, so removing the only node defined for ahost wouldmake the host unavailable for new databases.)
Viewing a DatabaseThis tool displays the characteristics of an existing database.
1. On theConfiguration Menu, select View Database and click OK.
2. Select the database to view.
3. HP Vertica displays the following information about the database:
n The name of the database.
n The name and location of the log file for the database.
n The hosts within the database cluster.
n The value of the restart policy setting.
Note: This setting determines whether nodes within a K-Safe database are restarted whenthey are rebooted. See Setting the Restart Policy.
n The database port.
n The name and location of the catalog directory.
Setting the Restart PolicyThe Restart Policy enables you to determine whether or not nodes in a K-Safe database areautomatically restarted when they are rebooted. Since this feature does not automatically restartnodes if the entire database is DOWN, it is not useful for databases that are not K-Safe.
To set the Restart Policy for a database:
Administrator's GuideUsing the Administration Tools
HP Vertica Analytics Platform (7.0.x) Page 330 of 969
1. Open the Administration Tools.
2. On theMainMenu, select Configuration Menu, and click OK.
3. In the ConfigurationMenu, select Set Restart Policy, and click OK.
4. Select the database for which you want to set the Restart Policy, and click OK.
5. Select one of the following policies for the database:
n Never—Nodes are never restarted automatically.
n K-Safe—Nodes are automatically restarted if the database cluster is still UP. This is thedefault setting.
n Always - Node on a single node database is restarted automatically
6. Click OK.
Best Practice for Restoring Failed Hardware
Following this procedure will prevent HP Vertica frommisdiagnosingmissing disk or badmounts asdata corruptions, which would result in a time-consuming, full-node recovery.
If a server fails due to hardware issues, for example a bad disk or a failed controller, upon repairingthe hardware:
1. Reboot themachine into runlevel 1, which is a root and console-only mode.
Runlevel 1 prevents network connectivity and keeps HP Vertica from attempting to reconnectto the cluster.
2. In runlevel 1, validate that the hardware has been repaired, the controllers are online, and anyRAID recover is able to proceed.
Note: You do not need to initialize RAID recover in runlevel 1; simply validate that it canrecover.
3. Once the hardware is confirmed consistent, only then reboot to runlevel 3 or higher.
At this point, the network activates, and HP Vertica rejoins the cluster and automatically recoversany missing data. Note that, on a single-node database, if any files that were associated with aprojection have been deleted or corrupted, HP Vertica will delete all files associated with thatprojection, which could result in data loss.
Administrator's GuideUsing the Administration Tools
HP Vertica Analytics Platform (7.0.x) Page 331 of 969

Installing External Procedure Executable Files1. Run theAdministration Tools.
$ /opt/vertica/bin/adminTools
2. On the AdminTools Main Menu, click Configuration Menu, and then click OK.
3. On theConfiguration Menu, click Install External Procedure and then click OK.
4. Select the database on which you want to install the external procedure.
5. Either select the file to install or manually type the complete file path, and then click OK.
6. If you are not the superuser, you are prompted to enter your password and click OK.
The Administration Tools automatically create the <database_catalog_path>/proceduresdirectory on each node in the database and installs the external procedure in these directoriesfor you.
7. Click OK in the dialog that indicates that the installation was successful.
Administrator's GuideUsing the Administration Tools
HP Vertica Analytics Platform (7.0.x) Page 332 of 969
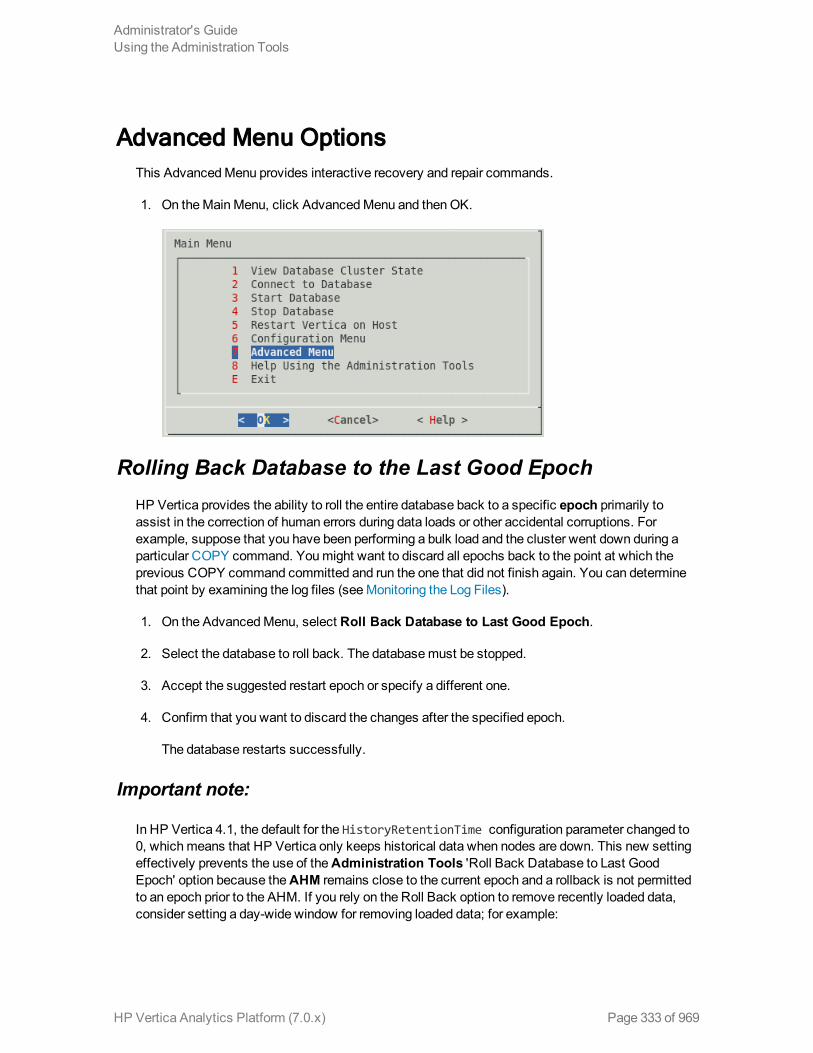
Advanced Menu OptionsThis AdvancedMenu provides interactive recovery and repair commands.
1. On theMainMenu, click AdvancedMenu and thenOK.
Rolling Back Database to the Last Good EpochHP Vertica provides the ability to roll the entire database back to a specific epoch primarily toassist in the correction of human errors during data loads or other accidental corruptions. Forexample, suppose that you have been performing a bulk load and the cluster went down during aparticular COPY command. Youmight want to discard all epochs back to the point at which theprevious COPY command committed and run the one that did not finish again. You can determinethat point by examining the log files (seeMonitoring the Log Files).
1. On the AdvancedMenu, select Roll Back Database to Last Good Epoch.
2. Select the database to roll back. The databasemust be stopped.
3. Accept the suggested restart epoch or specify a different one.
4. Confirm that you want to discard the changes after the specified epoch.
The database restarts successfully.
Important note:
In HP Vertica 4.1, the default for the HistoryRetentionTime configuration parameter changed to0, whichmeans that HP Vertica only keeps historical data when nodes are down. This new settingeffectively prevents the use of theAdministration Tools 'Roll Back Database to Last GoodEpoch' option because theAHM remains close to the current epoch and a rollback is not permittedto an epoch prior to the AHM. If you rely on the Roll Back option to remove recently loaded data,consider setting a day-wide window for removing loaded data; for example:
Administrator's GuideUsing the Administration Tools
HP Vertica Analytics Platform (7.0.x) Page 333 of 969

=> SELECT SET_CONFIG_PARAMETER ('HistoryRetentionTime', '86400');
Stopping HP Vertica on HostThis command attempts to gracefully shut down the HP Vertica process on a single node.
Caution: Do not use this command if you are intending to shut down the entire cluster. UseStop Database instead, which performs a clean shutdown tominimize data loss.
1. On the AdvancedMenu, select Stop HP Vertica on Host and click OK.
2. Select the hosts to stop.
3. Confirm that you want to stop the hosts.
If the command succeeds View Database Cluster State shows that the selected hosts areDOWN.
Administrator's GuideUsing the Administration Tools
HP Vertica Analytics Platform (7.0.x) Page 334 of 969

If the command fails to stop any selected nodes, proceed to Killing HP Vertica Process onHost.
Killing the HP Vertica Process on HostThis command sends a kill signal to the HP Vertica process on a node.
Caution: Do not use this command unless you have already tried Stop Database and Stop HPVertica on Node and both were unsuccessful.
1. On the Advancedmenu, select Kill HP Vertica Process on Host and click OK.
2. Select the hosts on which to kills the HP Vertica process.
3. Confirm that you want to stop the processes.
Administrator's GuideUsing the Administration Tools
HP Vertica Analytics Platform (7.0.x) Page 335 of 969

4. If the command succeeds View Database Cluster State shows that the selected hosts areDOWN.
5. If the command fails to stop any selected processes, see Shutdown Problems.
Upgrading an Enterprise or Evaluation License KeyThe following steps are for HP Vertica Enterprise Edition or evaluation licensed users only. Thiscommand copies a license key file into the database. SeeManaging Licenses for more information.
1. On the Advancedmenu select Upgrade License Key and click OK.
2. Select the database for which to upgrade the license key.
3. Enter the absolute pathname of your downloaded license key file (for example,/tmp/vlicense.dat) and click OK.
4. Click OK when you see amessage that indicates that the upgrade succeeded.
Note: If you are using HP Vertica Community Edition, follow the instructions in HP VerticaLicense Renewals or Upgrades for instructions to upgrade to an HP Vertica Enterprise Editionor evaluation license key.
Administrator's GuideUsing the Administration Tools
HP Vertica Analytics Platform (7.0.x) Page 336 of 969

Managing ClustersCluster Management lets you add, replace, or remove hosts from a database cluster. Theseprocesses are usually part of a larger process of adding, removing, or replacing a database node.
Note: View the database state to verify that it is running. See View Database Cluster State. Ifthe database isn't running, restart it. See Starting the Database.
Using Cluster Management
To use Cluster Management:
1. From theMain Menu, select AdvancedMenu, and then click OK.
2. In the AdvancedMenu, select Cluster Management, and then click OK.
3. Select one of the following, and then click OK.
n Add Hosts to Database: See Adding Hosts to a Database.
n Re-balance Data:SeeRebalancing Data.
n Replace Host: SeeReplacing Hosts.
n Remove Host from Database: SeeRemoving Hosts from aDatabase.
Using the Administration ToolsTheHelp Using the Administration Tools command displays a help screen about using theAdministration Tools.
Most of the online help in the Administration Tools is context-sensitive. For example, if you up theuse up/down arrows to select a command, press tab tomove to the Help button, and press return,you get help on the selected command.
Administration Tools MetadataThe Administration Tools configuration data (metadata) contains information that databases need tostart, such as the hostname/IP address of each participating host in the database cluster.
To facilitate hostname resolution within the Administration Tools, at the command line, and insidethe installation utility, HP Vertica enforces all hostnames you provide through the AdministrationTools to use IP addresses:
Administrator's GuideUsing the Administration Tools
HP Vertica Analytics Platform (7.0.x) Page 337 of 969

l During installation
HP Vertica immediately converts any hostname you provide through command line options --hosts, -add-hosts or --remove-hosts to its IP address equivalent.
n If you provide a hostname during installation that resolves tomultiple IP addresses (such asinmulti-homed systems), the installer prompts you to choose one IP address.
n HP Vertica retains the name you give for messages and prompts only; internally it storesthese hostnames as IP addresses.
l Within the Administration Tools
All hosts are in IP form to allow for direct comparisons (for example db = database =database.verticacorp.com).
l At the command line
HP Vertica converts any hostname value to an IP address that it uses to look up the host in theconfigurationmetadata. If a host has multiple IP addresses that are resolved, HP Vertica testseach IP address to see if it resides in themetadata, choosing the first match. Nomatchindicates that the host is not part of the database cluster.
Metadata is more portable because HP Vertica does not require the names of the hosts in thecluster to be exactly the samewhen you install or upgrade your database.
Writing Administration Tools ScriptsYou can invokemost of the Administration Tools from the command line or a shell script.
Syntax> /opt/vertica/bin/admintools [ -t | --tool ] toolname [ options ]
Note: For convenience, you can add /opt/vertica/bin to your search path.
Parameters
[ --tool | -t ] Instructs the Administration Tools to run the specified tool.
Note: If you use the --no-log option to run the Administration Tools silently, --no-logmust appear before the --tool option.
toolname Name of one of the tools described in the help output below.
[ options ] -h--help Shows a brief help message and exits.
-a--help_all Lists all command-line subcommands andoptions as shown in the Tools section below.
Administrator's GuideUsing the Administration Tools
HP Vertica Analytics Platform (7.0.x) Page 338 of 969

ToolsTo return a description of the tools you can access, issue the following command at a commandprompt:
$ admintools -a
Usage:adminTools [-t | --tool] toolName [options]
Valid tools are:command_hostconfig_nodesconnect_dbcreate_dbdatabase_parametersdb_add_nodedb_remove_nodedb_replace_nodedb_statusdrop_dbedit_authhost_to_nodeinstall_packageinstall_procedurekill_hostkill_nodelist_allnodeslist_dblist_hostlist_nodelist_packageslogrotatenode_maprebalance_datarestart_dbrestart_nodereturn_epochset_restart_policyshow_active_dbstart_dbstop_dbstop_hoststop_nodeuninstall_packageupgrade_license_keyview_cluster
-------------------------------------------------------------------------
Usage: command_host [options]
Options:
-h, --help show this help message and exit
Administrator's GuideUsing the Administration Tools
HP Vertica Analytics Platform (7.0.x) Page 339 of 969

-c CMD, --command=CMD
Command to run
-------------------------------------------------------------------------
Usage: config_nodes [options]
Options:
-h, --help show this help message and exit
-f NODEHOSTFILE, --file=NODEHOSTFILE
File containing list of nodes, hostnames, catalog
path, and datapath (node<whitespace>host<whitespace>ca
talogPath<whitespace>dataPath one per line)
-c, --check Check all nodes to make sure they can interconnect
-s SKIPANALYZENODE, --skipanalyzenode=SKIPANALYZENODE
skipanalyzenode
-------------------------------------------------------------------------
Usage: connect_db [options]
Options:
-h, --help show this help message and exit
-d DB, --database=DB Name of database to connect
-p DBPASSWORD, --password=DBPASSWORD
Database password in single quotes
-------------------------------------------------------------------------
Usage: create_db [options]
Options:
-h, --help show this help message and exit
-s NODES, --hosts=NODES
comma-separated list of hosts to participate in
database
-d DB, --database=DB Name of database to be created
-c CATALOG, --catalog_path=CATALOG
Path of catalog directory[optional] if not using
compat21
-D DATA, --data_path=DATA
Path of data directory[optional] if not using compat21
-p DBPASSWORD, --password=DBPASSWORD
Database password in single quotes [optional]
-l LICENSEFILE, --license=LICENSEFILE
Database license [optional]
-P POLICY, --policy=POLICY
Database restart policy [optional]
Administrator's GuideUsing the Administration Tools
HP Vertica Analytics Platform (7.0.x) Page 340 of 969
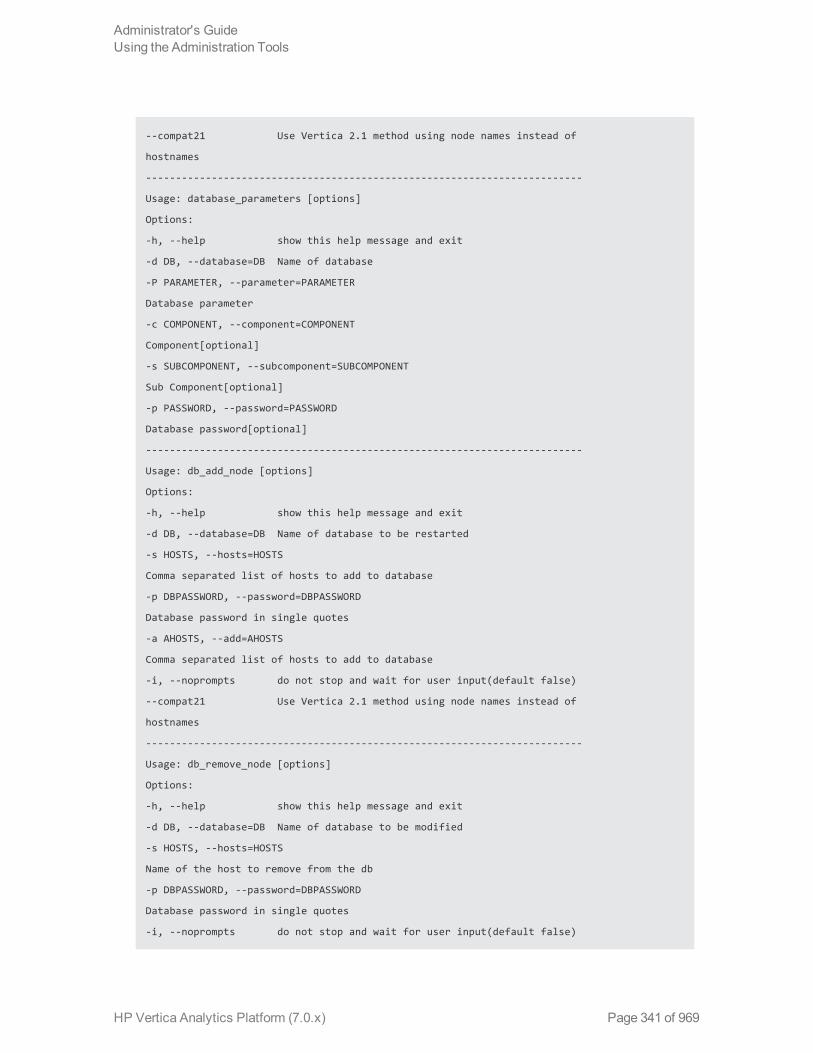
--compat21 Use Vertica 2.1 method using node names instead of
hostnames
-------------------------------------------------------------------------
Usage: database_parameters [options]
Options:
-h, --help show this help message and exit
-d DB, --database=DB Name of database
-P PARAMETER, --parameter=PARAMETER
Database parameter
-c COMPONENT, --component=COMPONENT
Component[optional]
-s SUBCOMPONENT, --subcomponent=SUBCOMPONENT
Sub Component[optional]
-p PASSWORD, --password=PASSWORD
Database password[optional]
-------------------------------------------------------------------------
Usage: db_add_node [options]
Options:
-h, --help show this help message and exit
-d DB, --database=DB Name of database to be restarted
-s HOSTS, --hosts=HOSTS
Comma separated list of hosts to add to database
-p DBPASSWORD, --password=DBPASSWORD
Database password in single quotes
-a AHOSTS, --add=AHOSTS
Comma separated list of hosts to add to database
-i, --noprompts do not stop and wait for user input(default false)
--compat21 Use Vertica 2.1 method using node names instead of
hostnames
-------------------------------------------------------------------------
Usage: db_remove_node [options]
Options:
-h, --help show this help message and exit
-d DB, --database=DB Name of database to be modified
-s HOSTS, --hosts=HOSTS
Name of the host to remove from the db
-p DBPASSWORD, --password=DBPASSWORD
Database password in single quotes
-i, --noprompts do not stop and wait for user input(default false)
Administrator's GuideUsing the Administration Tools
HP Vertica Analytics Platform (7.0.x) Page 341 of 969

--compat21 Use Vertica 2.1 method using node names instead of
hostnames
-------------------------------------------------------------------------
Usage: db_replace_node [options]
Options:
-h, --help show this help message and exit
-d DB, --database=DB Name of database to be restarted
-o ORIGINAL, --original=ORIGINAL
Name of host you wish to replace
-n NEWHOST, --new=NEWHOST
Name of the replacement host
-p DBPASSWORD, --password=DBPASSWORD
Database password in single quotes
-i, --noprompts do not stop and wait for user input(default false)
-------------------------------------------------------------------------
Usage: db_status [options]
Options:
-h, --help show this help message and exit
-s STATUS, --status=STATUS
Database status UP,DOWN or ALL(list running dbs -
UP,list down dbs - DOWN list all dbs - ALL
-------------------------------------------------------------------------
Usage: drop_db [options]
Options:
-h, --help show this help message and exit
-d DB, --database=DB Database to be dropped
-------------------------------------------------------------------------
Usage: edit_auth [options]
Options:
-h, --help show this help message and exit
-d DATABASE, --database=DATABASE
database to edit authentication parameters for
-------------------------------------------------------------------------
Usage: host_to_node [options]
Options:
-h, --help show this help message and exit
-s HOST, --host=HOST comma separated list of hostnames which is to be
converted into its corresponding nodenames
-d DB, --database=DB show only node/host mapping for this database.
Administrator's GuideUsing the Administration Tools
HP Vertica Analytics Platform (7.0.x) Page 342 of 969

-------------------------------------------------------------------------
Usage: install_package [options]
Options:
-h, --help show this help message and exit
-d DBNAME, --dbname=DBNAME
database name
-p PASSWORD, --password=PASSWORD
database admin password
-P PACKAGE, --package=PACKAGE
specify package or 'all' or 'default'
-------------------------------------------------------------------------
Usage: install_procedure [options]
Options:
-h, --help show this help message and exit
-d DBNAME, --database=DBNAME
Name of database for installed procedure
-f PROCPATH, --file=PROCPATH
Path of procedure file to install
-p OWNERPASSWORD, --password=OWNERPASSWORD
Password of procedure file onwer
-------------------------------------------------------------------------
Usage: kill_host [options]
Options:
-h, --help show this help message and exit
-s HOSTS, --hosts=HOSTS
comma-separated list of hosts on which the vertica
process is to be killed using a SIGKILL signal
--compat21 Use Vertica 2.1 method using node names instead of
hostnames
-------------------------------------------------------------------------
Usage: kill_node [options]
Options:
-h, --help show this help message and exit
-s HOSTS, --hosts=HOSTS
comma-separated list of hosts on which the vertica
process is to be killed using a SIGKILL signal
--compat21 Use Vertica 2.1 method using node names instead of
hostnames
-------------------------------------------------------------------------
Administrator's GuideUsing the Administration Tools
HP Vertica Analytics Platform (7.0.x) Page 343 of 969

Usage: list_allnodes [options]
Options:
-h, --help show this help message and exit
-------------------------------------------------------------------------
Usage: list_db [options]
Options:
-h, --help show this help message and exit
-d DB, --database=DB Name of database to be listed
-------------------------------------------------------------------------
Usage: list_host [options]
Options:
-h, --help show this help message and exit
-------------------------------------------------------------------------
Usage: list_node [options]
Options:
-h, --help show this help message and exit
-n NODENAME, --node=NODENAME
Name of the node to be listed
-------------------------------------------------------------------------
Usage: list_packages [options]
Options:
-h, --help show this help message and exit
-d DBNAME, --dbname=DBNAME
database name
-p PASSWORD, --password=PASSWORD
database admin password
-P PACKAGE, --package=PACKAGE
specify package or 'all' or 'default'
-------------------------------------------------------------------------
Usage: logrotateconfig [options]
Options:
-h, --help show this help message and exit
-d DBNAME, --dbname=DBNAME
database name
-r ROTATION, --rotation=ROTATION
set how often the log is rotated.[
daily|weekly|monthly ]
-s MAXLOGSZ, --maxsize=MAXLOGSZ
set maximum log size before rotation is forced.
Administrator's GuideUsing the Administration Tools
HP Vertica Analytics Platform (7.0.x) Page 344 of 969

-k KEEP, --keep=KEEP set # of old logs to keep
-------------------------------------------------------------------------
Usage: node_map [options]
Options:
-h, --help show this help message and exit
-d DB, --database=DB List only data for this database.
-------------------------------------------------------------------------
Usage: rebalance_data [options]
Options:
-h, --help show this help message and exit
-d DBNAME, --dbname=DBNAME
database name
-k KSAFETY, --ksafety=KSAFETY
specify the new k value to use
-p PASSWORD, --password=PASSWORD
--script Don't re-balance the data, just provide a script for
later use.
-------------------------------------------------------------------------
Usage: restart_db [options]
Options:
-h, --help show this help message and exit
-d DB, --database=DB Name of database to be restarted
-e EPOCH, --epoch=EPOCH
Epoch at which the database is to be restarted. If
'last' is given as argument the db is restarted from
the last good epoch.
-p DBPASSWORD, --password=DBPASSWORD
Database password in single quotes
-i, --noprompts do not stop and wait for user input(default false)
-------------------------------------------------------------------------
Usage: restart_node [options]
Options:
-h, --help show this help message and exit
-s NODES, --hosts=NODES
comma-separated list of hosts to be restarted
-d DB, --database=DB Name of database whose node is to be restarted
-p DBPASSWORD, --password=DBPASSWORD
Database password in single quotes
-i, --noprompts do not stop and wait for user input(default false)
Administrator's GuideUsing the Administration Tools
HP Vertica Analytics Platform (7.0.x) Page 345 of 969

-F, --force force the node to start and auto recover if necessary
--compat21 Use Vertica 2.1 method using node names instead of
hostnames
-------------------------------------------------------------------------
Usage: return_epoch [options]
Options:
-h, --help show this help message and exit
-d DB, --database=DB Name of database
-------------------------------------------------------------------------
Usage: set_restart_policy [options]
Options:
-h, --help show this help message and exit
-d DB, --database=DB Name of database for which to set policy
-p POLICY, --policy=POLICY
Restart policy: ('never', 'ksafe', 'always')
-------------------------------------------------------------------------
Usage: show_active_db [options]
Options:
-h, --help show this help message and exit
-------------------------------------------------------------------------
Usage: start_db [options]
Options:
-h, --help show this help message and exit
-d DB, --database=DB Name of database to be started
-p DBPASSWORD, --password=DBPASSWORD
Database password in single quotes
-i, --noprompts do not stop and wait for user input(default false)
-F, --force force the database to start at an epoch before data
consistency problems were detected.
-------------------------------------------------------------------------
Usage: stop_db [options]
Options:
-h, --help show this help message and exit
-d DB, --database=DB Name of database to be stopped
-p DBPASSWORD, --password=DBPASSWORD
Database password in single quotes
-F, --force Force the databases to shutdown, even if users are
connected.
-i, --noprompts do not stop and wait for user input(default false)
Administrator's GuideUsing the Administration Tools
HP Vertica Analytics Platform (7.0.x) Page 346 of 969
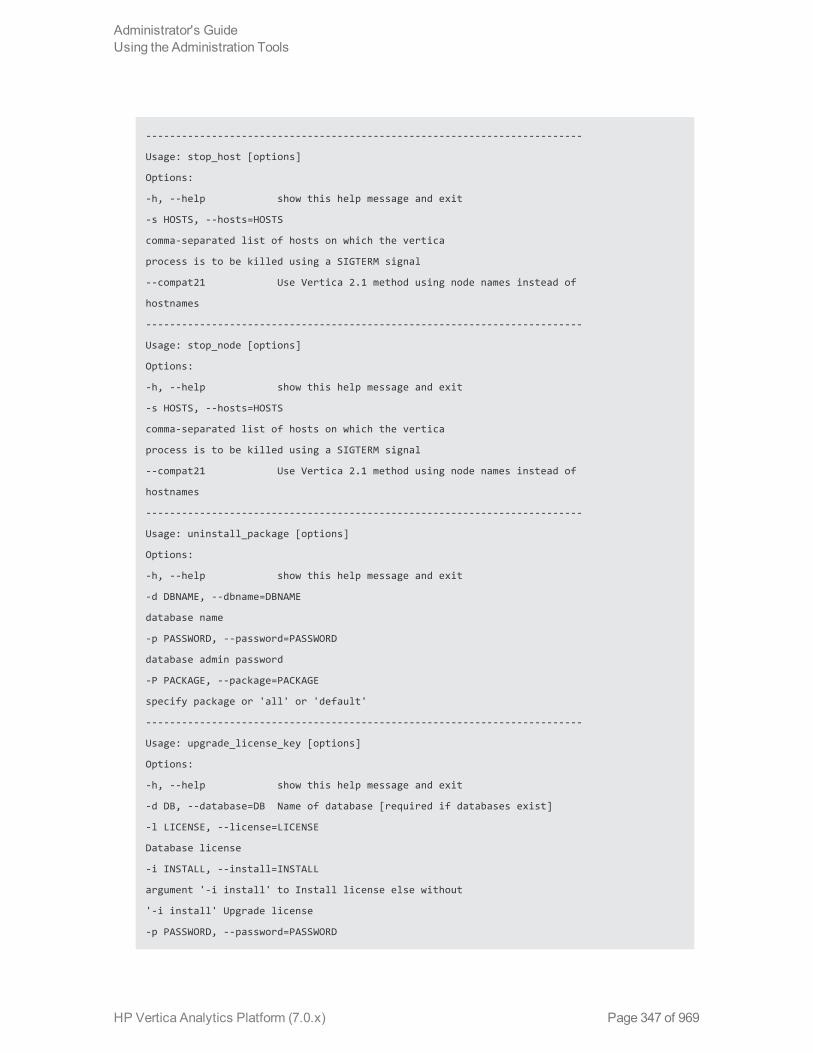
-------------------------------------------------------------------------
Usage: stop_host [options]
Options:
-h, --help show this help message and exit
-s HOSTS, --hosts=HOSTS
comma-separated list of hosts on which the vertica
process is to be killed using a SIGTERM signal
--compat21 Use Vertica 2.1 method using node names instead of
hostnames
-------------------------------------------------------------------------
Usage: stop_node [options]
Options:
-h, --help show this help message and exit
-s HOSTS, --hosts=HOSTS
comma-separated list of hosts on which the vertica
process is to be killed using a SIGTERM signal
--compat21 Use Vertica 2.1 method using node names instead of
hostnames
-------------------------------------------------------------------------
Usage: uninstall_package [options]
Options:
-h, --help show this help message and exit
-d DBNAME, --dbname=DBNAME
database name
-p PASSWORD, --password=PASSWORD
database admin password
-P PACKAGE, --package=PACKAGE
specify package or 'all' or 'default'
-------------------------------------------------------------------------
Usage: upgrade_license_key [options]
Options:
-h, --help show this help message and exit
-d DB, --database=DB Name of database [required if databases exist]
-l LICENSE, --license=LICENSE
Database license
-i INSTALL, --install=INSTALL
argument '-i install' to Install license else without
'-i install' Upgrade license
-p PASSWORD, --password=PASSWORD
Administrator's GuideUsing the Administration Tools
HP Vertica Analytics Platform (7.0.x) Page 347 of 969

Database password[optional]
-------------------------------------------------------------------------
Usage: view_cluster [options]
Options:
-h, --help show this help message and exit
-x, --xpand show the full cluster state, node by node
-d DB, --database=DB filter the output for a single database
Administrator's GuideUsing the Administration Tools
HP Vertica Analytics Platform (7.0.x) Page 348 of 969

Using Management ConsoleMost of the information you need to useMC is available on theMC interface. The topics in thissection augment some areas of theMC interface and provide examples. For an introduction toMCfunctionality, architecture, and security, seeManagement Console in the Concepts Guide.
Management Console provides some, but not all of the functionality that theAdministration Toolsprovides. In addition, MC provides extended functionality not available in the Administration Tools,such as a graphical view of your HP Vertica database and detailedmonitoring charts and graphs,described inMonitoring HP Vertica UsingMC. See Administration Tools andManagement Consolein the Administrator's Guide.
If you have not yet installedMC, see Installing and ConfiguringManagement Console in theInstallation Guide.
Connecting to MCTo connect to Management Console:
1. Open an HTML-5 compliant browser.
2. Enter the IP address or host name of the host on which you installedMC (or any cluster node ifyou installed HP Vertica first), followed by theMC port you assigned when you configuredMC(default 5450).
For example, enter one of:
https://00.00.00.00:5450/
or
https://hostname:5450/
3. When theMC logon dialog appears, enter your MC username and password and click Log in.
Note:WhenMC users log in to theMC interface, MC checks their privileges on HPVerticaData Collector (DC) tables onMC-monitored databases. Based on DC tableprivileges, along with the role assigned theMC user, each user's access to theMC'sOverview, Activity and Node details pages could be limited. See About MC Privileges andRoles for more information.
If you do not have anMC username/password, contact your MC administrator.
Administrator's GuideUsingManagement Console
HP Vertica Analytics Platform (7.0.x) Page 349 of 969

Managing Client Connections on MCEach client session onMC uses a connection from MaxClientSessions, a database configurationparameter that determines themaximum number of sessions that can run on a single databasecluster node. If multiple MC users aremapped to the same database account and are concurrentlymonitoring the Overview and Activity pages, graphs could be slow to update while MC waits for aconnection from the pool.
Tip: You can increase the value for MaxClientSessions on anMC-monitored database to takeextra sessions into account. SeeManaging Sessions for details.
See Alsol Monitoring HP Vertica UsingMC
Administrator's GuideUsingManagement Console
HP Vertica Analytics Platform (7.0.x) Page 350 of 969

Managing Database Clusters on MCTo perform database/cluster-specific tasks on one or moreMC-managed clusters, navigate to theDatabases and Clusters page.
MC administrators see the Import/Create Database Cluster options, while non-administrativeMCusers see only the databases on which they have been assigned the appropriate access levels.Depending on your access level, the database-related operations you can perform on theMCinterface include:
l Create a new database/cluster.
l Import an existing database/cluster into theMC interface.
l Start the database, unless it is already running (green).
l Stop the database, but only if no users are connected.
l Remove the database from theMC interface.
Note: Remove does not drop the database; it leaves it in the cluster, hidden from the UI. Toadd the database back to theMC interface, import it using the IP address of any clusternode. A Remove operation also stops metrics gathering on that database, but statisticsgathering automatically resumes after you re-import.
l Drop the database after you ensure no users are connected. Drop is a permanent action thatdrops the database from the cluster.
l View Database to open theOverview page, a layout that provides a dashboard view into thehealth of your database cluster (node state, storage, performance, CPU/memory, and queryconcurrency). From this page you can drill down intomore detailed database-specificinformation by clicking data points in the graphs.
l View Cluster to open theManage page, which shows all nodes in the cluster, as well as eachnode's state. You can also see a list of monitored databases on the selected cluster and itsstate; for example, a green arrow indicates a database in an UP state. For node-specificinformation, click any node to open the Node Details page.
For more information about what users can see and do onMC, see the following topics:
See Alsol About MC Users
l About MC Privileges and Roles
Administrator's GuideUsingManagement Console
HP Vertica Analytics Platform (7.0.x) Page 351 of 969

Create an Empty Database Using MCYou can create a new database on an existing HP Vertica cluster through theManagementConsole interface.
Database creation can be a long-running process, lasting fromminutes to hours, depending on thesize of the target database. You can close the web browser during the process and sign back in toMC later; the creation process continues unless an unexpected error occurs. See theNotessection below the procedure on this page.
You currently need to use command line scripts to define the database schema and load data.Refer to the topics in Configuration Procedure. You should also run theDatabase Designer, whichyou access through theAdministration Tools, to create either a comprehensive or incrementaldesign. Consider using the Tutorial in the Getting Started Guide to create a sample database youcan start monitoring immediately.
How to Create an Empty Database on an MC-managedCluster
1. If you are already on theDatabases and Clusters page, skip to the next step; otherwise:
a. Connect to MC and sign in as anMC administrator.
b. On the Home page, click theDatabases and Clusters task.
2. If no databases exist on the cluster, continue to the next step; otherwise:
a. If a database is running on the cluster on which you want to add a new database, select thedatabase and click Stop.
b. Wait for the running database to have a status of Stopped.
3. Click the cluster on which you want to create the new database and click Create Database.
4. The Create Database wizard opens. Provide the following information:
n Database name and password. See Creating a Database Name and Password for rules.
n Optionally click Advanced to open the advanced settings and change the port and catalog,data, and temporary data paths. By default theMC application/web server port is 5450 andpaths are /home/dbadmin, or whatever you defined for the paths when you ran the ClusterCreationWizard or the install_vertica script. Do not use the default agent port 5444 as anew setting for theMC port. SeeMC Settings > Configuration for port values.
5. Click Continue.
6. Select nodes to include in the database.
Administrator's GuideUsingManagement Console
HP Vertica Analytics Platform (7.0.x) Page 352 of 969

The Database Configuration window opens with the options you provided and a graphicalrepresentation of the nodes appears on the page. By default, all nodes are selected to be part ofthis database (denoted by a green check mark). You can optionally click each node and clearInclude host in new database to exclude that node from the database. Excluded nodes aregray. If you change your mind, click the node and select the Include check box.
7. Click Create in theDatabase Configuration window to create the database on the nodes.
The creation process takes a few moments, after which the database starts and aSuccessmessage appears on the interface.
8. Click OK to close the success message.
MC's Manage page opens and displays the database nodes. Nodes not included in the databaseare colored gray, whichmeans they are standby nodes you can include later. To add nodes to orremove nodes from your HP Vertica cluster, which are not shown in standby mode, youmust runthe install_vertica script.
Notesl If warnings occur during database creation, nodes will bemarked on the UI with an Alert icon
and amessage.
n Warnings do not prevent the database from being created, but you should address warningsafter the database creation process completes by viewing the databaseMessage Centerfrom theMC Home page.
n Failuremessages display on the databaseManage page with a link tomore detailedinformation and a hint with an actionable task that youmust complete before you cancontinue. Problem nodes are colored red for quick identification.
n To view more detailed information about a node in the cluster, double-click the node from theManage page, which opens theNode Details page.
l To createMC users and grant them access to anMC-managed database, see About MC Usersand Creating anMC User.
See Alsol Creating a Cluster UsingMC
l TroubleshootingManagement Console
l RestartingMC
Administrator's GuideUsingManagement Console
HP Vertica Analytics Platform (7.0.x) Page 353 of 969

Import an Existing Database Into MCIf you have already upgraded your database to the current version of HP Vertica, MC automaticallydiscovers the cluster and any databases installed on it, regardless of whether those databases arecurrently running or are down.
Note: If you haven't created a database and want to create one through theMC, see Create anEmpty Database UsingMC.
How to Import an Existing Database on the ClusterThe following procedure describes how to import anMC-discovered existing database into theMCinterface so you canmonitor it.
1. Connect to Management Console and sign in as anMC administrator.
2. On theMC Home page, click Databases and Clusters.
3. On the Databases and Clusters page, click the cluster cube and click View in the dialog boxthat opens.
4. On the left side of the page, look under the Databases heading and click Import Discovered.
Tip: A runningMC-discoverd databases appears as Monitored, and any non-runningdatabases appear as Discovered. MC supports only one running database on a singlecluster at a time. In the image above, if you want to monitor theMYDB database, youwould need to shut down the DATABASE2 database first.
5. In the Import Database dialog box:
a. Select the database you want to import.
b. Optionally clear auto-discovered databases you don't want to import.
c. Supply the database username and password and click Import.
After Management Console connects to the database it opens theManage page, which provides aview of the cluster nodes. SeeMonitoring Cluster Status for more information.
You perform the import process once per existing database. Next time you connect to ManagementConsole, you'll see your database under the Recent Databases section on the Home page, as wellas on the Databases and Clusters page.
Administrator's GuideUsingManagement Console
HP Vertica Analytics Platform (7.0.x) Page 354 of 969

Using MC on an AWS ClusterIf you are running an AmazonWeb Services (AWS) cluster on HP Vertica 6.1.2, you can install andrunMC tomonitor andmanage your database. You cannot, however, use theMC interface tocreate or import an HP Vertica cluster.
Managing MC SettingsTheMC Settings page allows you to configure properties specific to Management Console. Youcan:
l Change theMC and agent default port assignments
l Upload a new SSL certificate
l Use LDAP for user authentication
l Create new MC users andmap them to anMC-managed database using user credentials on theHP Vertica server
l Install HP Vertica on a cluster of hosts through theMC interface
l Customize the look and feel of MC with themes
Modifying Database-Specific SettingsTo inspect or modify settings related to anMC-managed database, go to the Databases andClusters page. On this page, view a running database, and access that database's Settings pagefrom a tab at the bottom at the page.
Administrator's GuideUsingManagement Console
HP Vertica Analytics Platform (7.0.x) Page 355 of 969

Changing MC or Agent PortsWhen you configureMC, the ConfigurationWizard sets up the following default ports:
l 5450—Used to connect a web browser session toMC and allows communication from HPVertica cluster nodes to theMC application/web server
l 5444—Provides MC-to-node and node-to-node (agent) communications for databasecreate/import andmonitoring activities
If You Need to Change the MC Default PortsA scenario might arise where you need to change the default port assignments for MC or its agents.For example, perhaps one of the default ports is not available on your HP Vertica cluster, or youencounter connection problems betweenMC and the agents. The following topics describe how tochange port assignments for MC or its agents.
See Alsol Ensure Ports Are Available
How to Change the Agent PortChanging the agent port takes place in two steps: at the command line, where youmodify theconfig.py file and through a browser, where youmodify MC settings.
Change the Agent Port in config.py1. Log in as root on any cluster node and change to the agent directory:
# cd /opt/vertica/agent
2. Use any text editor to open config.py.
3. Scroll down to the agent_port = 5444 entry and replace 5444 with a different port number.
4. Save and close the file.
5. Copy config.py to the /opt/vertica/agent directory on all nodes in the cluster.
6. Restart the agent process by running the following command:
# /etc/init.d/vertica_agent restart
7. Repeat (as root) Step 6 on each cluster node where you copied the config.py file.
Administrator's GuideUsingManagement Console
HP Vertica Analytics Platform (7.0.x) Page 356 of 969

Change the Agent Port on MC1. Open a web browser and connect to MC as a user with MC ADMIN privileges.
2. Navigate toMC Settings > Configuration.
3. Change Default HP Vertica agent port from 5444 to the new value you specified in theconfig.py file.
4. Click Apply and click Done.
5. Restart MC soMC can connect to the agent at its new port.
How to Change the MC PortUse this procedure to change the default port for MC's application server from 5450 to a differentvalue.
1. Open a web browser and connect to MC as a user with MC ADMIN privileges.
2. On theMC Home page, navigate toMC Settings > Configuration and change theApplicationserver running port value from 5450 to a new value.
3. In the change-port dialog, click OK.
4. Restart MC.
5. Reconnect your browser session using the new port. For example, if you changed the port from5450 to 5555, use one of the following formats:
https://00.00.00.00:5555/
OR
https://hostname:5555/
Backing Up MCBefore you upgradeMC, HP recommends that you back up your MC metadata (configuration anduser settings) on a storage location external to the server on which you installedMC.
1. On the target server (where you want to storeMC metadata), log on as root or a user with sudoprivileges.
2. Create a backup directory; for example:
Administrator's GuideUsingManagement Console
HP Vertica Analytics Platform (7.0.x) Page 357 of 969

# mkdir /backups/mc/mc-backup-20130425
3. Copy the /opt/vconsole directory to the new backup folder:
# cp –r /opt/vconsole /backups/mc/mc-backup-20130425
Administrator's GuideUsingManagement Console
HP Vertica Analytics Platform (7.0.x) Page 358 of 969

Troubleshooting Management ConsoleTheManagement ConsoleDiagnostics page, which you access from the Home page, helps youresolve issues within theMC process, not the database.
What You Can diagnose:l View Management Console logs, which you can sort by column headings, such as type,
component, or message).
l Search within messages for key words or phrases and search for log entries within a specifictime frame.
l Export databasemessages to a file.
l Reset console parameters to their original configuration.
Caution: Reset removes all data (monitoring and configuration information) from storageand forces you to reconfigureMC as if it were the first time.
l Restart theManagement Console process. When the process completes, you are directed backto the login page.
Viewing the MC LogIf you want to browseMC logs (not database logs), navigate to theDiagnostics > MC Log page.
This page provides a tabular view of the contents at /opt/vconsole/log/mc/mconsole.log,letting youmore easily identify and troubleshoot issues related toMC.
You can sort log entries by clicking the column header and search within messages for key words,phrases, and log entries within a specific time frame. You can also export logmessages to a file.
Administrator's GuideUsingManagement Console
HP Vertica Analytics Platform (7.0.x) Page 359 of 969

See Alsol ExportingMC-managed DatabaseMessages and Logs
Exporting the User Audit LogWhen anMC user makes changes onManagement Console, whether to anMC-managed databaseor to theMC itself, their action generates a log entry that contains data you can export to a file.
If you perform anMC factory reset (restoreMC to its pre-configured state), you automatically havethe opportunity to export audit records before the reset occurs.
To Manually Export MC User Activity1. From theMC Home page, click Diagnostics and then click Audit Log.
2. On the Audit log viewer page, click Export and save the file to a location on the server.
To see what types of user operations the audit logger records, seeMonitoringMC User Activity.
Administrator's GuideUsingManagement Console
HP Vertica Analytics Platform (7.0.x) Page 360 of 969

Restarting MCYoumight need to restart theMC web/application server for a number of reasons, such as after youchange port assignments, use theMC interface to import a new SSL certificate, or if theMCinterface or HP Vertica-related tasks become unresponsive.
RestartingMC requires ADMIN Role (mc) or SUPER Role (mc) privileges.
How to Restart MC Through the MC Interface (using Yourbrowser)
1. Open a web browser and connect to MC as an administrator.
2. OnMC's Home page, click Diagnostics.
3. Click Restart Console and then click OK to continue or Cancel to return to the Diagnosticspage..
TheMC process shuts down for a few seconds and automatically restarts. After the processcompletes, you are directed back to the sign-in page.
How to Restart MC At the Command LineIf you are unable to connect to MC through a web browser for any reason, such as if theMCinterface or HP Vertica-related tasks become unresponsive, you can run the vertica-consoledscript with start, stop, or restart arguments.
Follow these steps to start, stop, or restart MC.
1. As root, open a terminal window on the server on whichMC is installed.
2. Run the vertica-consoled script:
# /etc/init.d/vertica-consoled { stop | start | restart }
stop Stops theMC application/web server.
start Starts theMC application/web server.
Caution: Use start only if you are certain MC is not already running. As a bestpractice, stopMC before you issue the start command.
restart Restarts theMC application/web server. This process will report that the stopdidn't work if MC is not already running.
Administrator's GuideUsingManagement Console
HP Vertica Analytics Platform (7.0.x) Page 361 of 969

Starting overIf you need to returnMC to its original state (a "factory reset"), see ResettingMC to Pre-ConfiguredState.
Resetting MC to Pre-Configured StateIf you decide to reset MC to its original, preconfigured state, you can do so on theDiagnosticspage by clicking Factory Reset.
Tip: Consider trying one of the options described in RestartingMC first.
A factory reset removes all metadata (about a week's worth of databasemonitoring/configurationinformation andMC users) from storage and forces you to reconfigureMC again, as described inConfiguringMC in the Installation Guide.
After you click Factory Reset, you have the chance to export audit records to a file by clicking Yes.If you click No (do not export audit records), the process begins. There is no undo.
Keep the following inmind concerning user accounts and theMC.
l When you first configureMC, during the configuration process you create anMC super user (aLinux account). Issuing a Factory Reset on theMC does not create a new MC super user, nordoes it delete the existingMC super user. When initializing after a Factory Reset, youmustlogon using the original MC super user account.
l Note that, onceMC is configured, you can add users that are specific to MC. Users createdthrough theMC interface areMC specific. When you subsequently change a password throughtheMC, you only change the password for the specific MC user. Passwords external to MC(i.e., system Linux users and HP Vertica database passwords) remain unchanged.
For information onMC users, refer to the sections, Creating anMC User andMC configurationprivileges.
Avoiding MC Self-Signed Certificate ExpirationWhen you connect to MC through a client browser, HP Vertica assigns each HTTPS request a self-signed certificate, which includes a timestamp. To increase security and protect against passwordreplay attacks, the timestamp is valid for several seconds only, after which it expires.
To avoid being blocked out of MC, synchronize time on the hosts in your HP Vertica cluster, as wellas on theMC host if it resides on a dedicated server. To recover from loss or lack ofsynchronization, resync system time and the Network Time Protocol. See Set Up TimeSynchronization in the Installation Guide. If you want to generate your own certificates and keys forMC, seeGenerating Certifications and Keys for MC.
Administrator's GuideUsingManagement Console
HP Vertica Analytics Platform (7.0.x) Page 362 of 969

Operating the Database
Starting and Stopping the DatabaseThis section describes how to start and stop the HP Vertica database using the AdministrationTools, Management Console, or from the command line.
Starting the DatabaseStarting aK-safe database is supported when up to K nodes are down or unavailable. See FailureRecovery for a discussion on various scenarios encountered during database shutdown, startupand recovery.
You can start a database using any of thesemethods:
l TheManagement Console
l The Administration Tools interface
l The command line
Starting the Database Using MCOnMC's Databases and Clusters page, click a database to select it, and click Start within thedialog box that displays.
Starting the Database Using the Administration Tools1. Open the Administration Tools and select View Database Cluster State tomake sure that all
nodes are down and that no other database is running. If all nodes are not down, see ShutdownProblems.
2. Open the Administration Tools. See Using the Administration Tools for information aboutaccessing the Administration Tools.
3. On theMain Menu, select Start Database,and then select OK.
4. Select the database to start, and then click OK.
Caution: HP strongly recommends that you start only one database at a time. If you startmore than one database at any time, the results are unpredictable. Users could encounterresource conflicts or perform operations in the wrong database.
5. Enter the database password, and then click OK.
Administrator's GuideOperating the Database
HP Vertica Analytics Platform (7.0.x) Page 363 of 969

6. When prompted that the database started successfully, click OK.
7. Check the log files to make sure that no startup problems occurred.
If the database does not start successfully, see Startup Problems.
Starting the Database At the Command LineIf you use the admintools command line option, start_db(), to start a database, the -p passwordargument is only required during database creation, when you install a new license.
As long as the license is valid, the -p argument is not required to start the database and is silentlyignored, even if you introduce a typo or prematurely press the enter key. This is by design, as thedatabase can only be started by the user who (as part of the verticadba UNIX user group) initiallycreated the database or who has root or su privileges.
If the license were to become invalid, HP Vertica would use the -p password argument to attemptto upgrade the license with the license file stored in /opt/vertica/config/share/license.key.
Following is an example of using start_db on a standalone node:
[dbadmin@localhost ~]$ /opt/vertica/bin/admintools -t start_db -d VMartInfo: no passwordspecified, using none
Node Status: v_vmart_node0001: (DOWN)Node Status: v_vmart_node0001: (DOWN)Node Status: v_vmart_node0001: (DOWN)Node Status: v_vmart_node0001: (DOWN)Node Status: v_vmart_node0001: (DOWN)Node Status: v_vmart_node0001: (DOWN)Node Status: v_vmart_node0001: (DOWN)Node Status: v_vmart_node0001: (DOWN)Node Status: v_vmart_node0001: (UP)
Database VMart started successfully
Stopping the DatabaseStopping aK-safe database is supported when up to K nodes are down or unavailable. See FailureRecovery for a discussion on various scenarios encountered during database shutdown, startupand recovery.
You can stop a running database using either of thesemethods:
l TheManagement Console
l The Administration Tools interface
Administrator's GuideOperating the Database
HP Vertica Analytics Platform (7.0.x) Page 364 of 969

Stopping a Running Database Using MC1. Log in toMC as anMC administrator and navigate to theManage page tomake sure all nodes
are up. If a node is down, click that node and select Start node in the Node list dialog box.
2. Inform all users that have open connections that the database is going to shut down andinstruct them to close their sessions.
Tip: To check for open sessions, query the V_MONITOR.SESSIONS table. The client_label column returns a value of MC for users who are connected toMC.
3. Still on theManage page, click Stop in the toolbar.
Stopping a Running Database Using the AdministrationTools
1. Use View Database Cluster State tomake sure that all nodes are up. If all nodes are not up,see Restarting a Node.
2. Inform all users that have open connections that the database is going to shut down andinstruct them to close their sessions.
Tip:A simple way to prevent new client sessions from being opened while you are shuttingdown the database is to set theMaxClientSessions configuration parameter to 0. Be sure torestore the parameter to its original setting once you've restarted the database.
=> SELECT SET_CONFIG_PARAMETER ('MaxClientSessions', 0);
3. Close any remaining user sessions. (Use the CLOSE_SESSION and CLOSE_ALL_SESSIONS functions.)
4. Open the Administration Tools. See Using the Administration Tools for information aboutaccessing the Administration Tools.
5. On theMain Menu, select Stop Database, and then click OK.
6. Select the database you want to stop, and click OK.
7. Enter the password if asked, and click OK.
8. When prompted that the database has been successfully stopped, click OK.
Stopping a Running Database At the Command LineIf you use the admintools command line option, stop_db(), to stop a database as follows:
Administrator's GuideOperating the Database
HP Vertica Analytics Platform (7.0.x) Page 365 of 969

[dbadmin@localhost ~]$ /opt/vertica/bin/admintools -t stop_db -d VMartInfo: no password specified, using none
Issuing shutdown command to databaseDatabase VMart stopped successfully
As long as the license is valid, the -p argument is not required to stop the database and is silentlyignored, even if you introduce a typo or press the enter key prematurely. This is by design, as thedatabase can only be stopped by the user who (as part of the verticadba UNIX user group) initiallycreated the database or who has root or su privileges.
If the license were to become invalid, HP Vertica would use the -p password argument to attemptto upgrade the license with the license file stored in /opt/vertica/config/share/license.key.
Administrator's GuideOperating the Database
HP Vertica Analytics Platform (7.0.x) Page 366 of 969

Working with the HP Vertica Index ToolAs of HP Vertica 6.0, there are three Index tool options:
l Reindex
l CheckCRC
l Checksort
Note: The Checksort option is available as of Version 6.0.1.
You use the HP Vertica Reindex option only if you have upgraded HP Vertica 6.0 from an earlierversion. Following an upgrade to 6.0, any new ROSes (including those that the TM generates) willuse the new index format. New installations use the improved index andmaintain CRCautomatically.
You can run each of the HP Vertica Index tool options when the database cluster is down. You canrun the CheckCRC (-v) and Checksort (-I) options with the cluster up or down, as follows:
Index Option Cluster down (per node) Cluster up (per node or all nodes)
Reindex vertica -D catalog_path -i N/A. Node cluster must be down to reindex.
CheckCRC vertica -D catalog_path -v select run_index_tool ('checkcrc')select run_index_tool ('checkcrc', 'true')
Checksort vertica -D catalog_path -I select run_index_tool ('checksort')select run_index_tool ('checksort', 'true')
The HP Vertica Index tool options are accessed through the vertica binary, located in the/opt/vertica/bin directory onmost installations.
Note: Running the Index tool options from the command line outputs progress about toolactivity, but not its results. To review the detailedmessages after running the Index tooloptions, see the indextool.log file, located in the database catalog directory as describedbelow.
Syntax
/opt/vertica/bin/vertica -D catalog_path [-i | -I | -v]
Administrator's GuideOperating the Database
HP Vertica Analytics Platform (7.0.x) Page 367 of 969

Parameters
Parameter Description
-D catalog_path Specifies the catalog directory (-D) on which to run each option.
-i Reindexes the ROSes.
-I Checks the node's ROSes for correct sort order.
-v Calculates a per-block cyclic redundancy check (CRC) on existing datastorage.
Note: Youmust run the reindex option on each cluster node, with the cluster down. You canrun the Index tool in parallel on different nodes.
PermissionsYoumust be a superuser to run the Index tool with any option.
Controlling Expression AnalysisThe expression analysis that occurs as part of the HP Vertica database indexing techniquesimproves overall performance. You can turn off such analysis, but doing so is not recommended.
To control expression analysis:
1. Use add_vertica_options to turn off EE expression analysis:
select add_vertica_options('EE', 'DISABLE_EXPR_ANALYSIS');
2. Display the current value by selecting it as follows:
select show_current_vertica_options();
3. Use clr_vertica_options to enable the expression analysis option:
select clr_vertica_options('EE', 'DISABLE_EXPR_ANALYSIS');
Performance and CRCHP Vertica recognizes that CRC can affect overall database performance. You can turn off theCRC facility, but doing so is not recommended.
To control CRC:
Administrator's GuideOperating the Database
HP Vertica Analytics Platform (7.0.x) Page 368 of 969

1. Change the value of the configuration parameter to zero (0):
select set_config_parameter(‘CheckCRC’, ‘0’);
2. Display the value:
select * from configuration_parameters;
3. To enable CRC. set the parameter to one (1):
select set_config_parameter(‘CheckCRC’, ‘1');
The following sections describe each of the HP Vertica Index tool options and how and when to usethem.
Running the Reindex OptionRun the HP Vertica Reindex option to update each ROS index after upgrading to 6.0. Using thisoption scans all local storage and reindexes the data in all ROSes on the node from which youinvoke the tool, adding several new fields to the ROS data blocks. These fields include the datablock's minimum andmaximum values (min_value and max_value), and the total number of nullsstored in the block (null_count). This option also calculates cyclic redundancy check (CRC)values, and populates the corresponding data block field with the CRC value. The new data blockfields are required before using the CheckCRC or Checksort options. Once ROS data has beenreindexed, you can use either of the other HP Vertica Index tool options.
To reindex ROSes with the database cluster DOWN:
1. From the command line, start the Index tool with -D to specify the catalog directory path, and -i to reindex:
[dbadmin@localhost bin]$ /opt/vertica/bin/vertica -D /home/dbadmin/VMart/v_vmart_node0001_catalog -i
2. The Index tool outputs some general data to the terminal, and writes detailed information to theindextool.log file:
Setting up logger and sessions...Loading catalog...Collecting storage containers...Scanning data on disk...Storages 219/219, bytes 302134347/302134347 100%Committing catalog and SAL changes...[dbadmin@localhost bin]$
Administrator's GuideOperating the Database
HP Vertica Analytics Platform (7.0.x) Page 369 of 969

3. The indextool.log file is located in the database catalog directory:
/home/dbadmin/VMart/v_vmart_node0001_catalog/indextool.log
Running the CheckCRC OptionThe CheckCRC option initially calculates a cyclic redundancy check (CRC) on each block of theexisting data storage. You can run this option only after the ROS has been reindexed. Using thisIndex tool option populates the corresponding ROS data block field with a CRC value. RunningCheckCRC after its first invocation checks for data corruption.
To run CheckCRC when the database cluster is down:
1. From the command line, use the Index tool with -D to specify the catalog directory path, and -vto specify the CheckCRC option.
2. CheckCRC outputs general data such as the following to the terminal, and writes detailedinformation to the indextool.log file:
dbadmin@localhost bin]$ /opt/vertica/bin/vertica -D /home/dbadmin/VMart/v_vmart_node0001_catalog -vSetting up logger and sessions...Loading catalog...Collecting storage containers...Scanning data on disk...Storages 272/272, bytes 302135743/302135743 100%[dbadmin@localhost bin]$
3. The indextool.log file is located in the database catalog directory:
/home/dbadmin/VMart/v_vmart_node0001_catalog/indextool.log
To run CheckCRC when the database is running:
1. From vsql, enter this query to run the check on the initiator node:
select run_index_tool ('checkcrc');
-or-
select run_index_tool ('checkcrc', 'false');
2. Enter this query to run the check on all nodes:
select run_index_tool ('checkcrc', 'true');
Administrator's GuideOperating the Database
HP Vertica Analytics Platform (7.0.x) Page 370 of 969
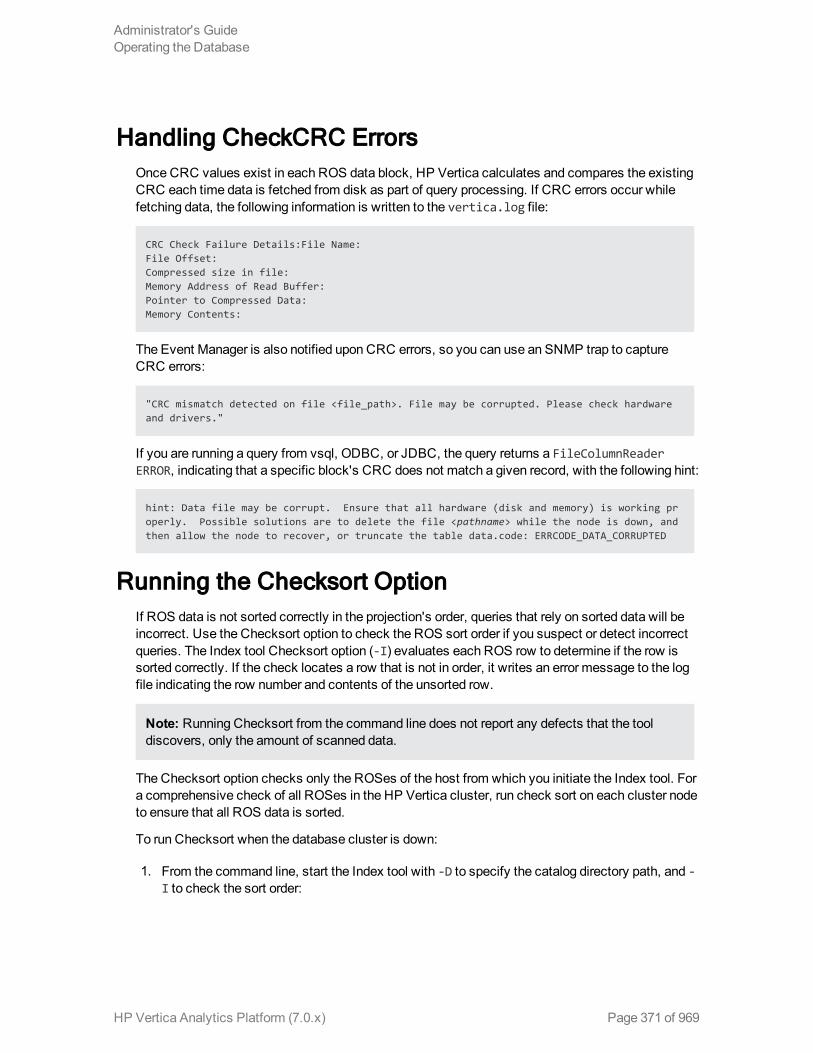
Handling CheckCRC ErrorsOnce CRC values exist in each ROS data block, HP Vertica calculates and compares the existingCRC each time data is fetched from disk as part of query processing. If CRC errors occur whilefetching data, the following information is written to the vertica.log file:
CRC Check Failure Details:File Name:File Offset:Compressed size in file:Memory Address of Read Buffer:Pointer to Compressed Data:Memory Contents:
The Event Manager is also notified upon CRC errors, so you can use an SNMP trap to captureCRC errors:
"CRC mismatch detected on file <file_path>. File may be corrupted. Please check hardwareand drivers."
If you are running a query from vsql, ODBC, or JDBC, the query returns a FileColumnReaderERROR, indicating that a specific block's CRC does not match a given record, with the following hint:
hint: Data file may be corrupt. Ensure that all hardware (disk and memory) is working properly. Possible solutions are to delete the file <pathname> while the node is down, andthen allow the node to recover, or truncate the table data.code: ERRCODE_DATA_CORRUPTED
Running the Checksort OptionIf ROS data is not sorted correctly in the projection's order, queries that rely on sorted data will beincorrect. Use the Checksort option to check the ROS sort order if you suspect or detect incorrectqueries. The Index tool Checksort option (-I) evaluates each ROS row to determine if the row issorted correctly. If the check locates a row that is not in order, it writes an error message to the logfile indicating the row number and contents of the unsorted row.
Note: Running Checksort from the command line does not report any defects that the tooldiscovers, only the amount of scanned data.
The Checksort option checks only the ROSes of the host from which you initiate the Index tool. Fora comprehensive check of all ROSes in the HP Vertica cluster, run check sort on each cluster nodeto ensure that all ROS data is sorted.
To run Checksort when the database cluster is down:
1. From the command line, start the Index tool with -D to specify the catalog directory path, and -I to check the sort order:
Administrator's GuideOperating the Database
HP Vertica Analytics Platform (7.0.x) Page 371 of 969

[dbadmin@localhost bin]$ /opt/vertica/bin/vertica -D /home/dbadmin/VMart/v_vmart_node0001_catalog -I
2. The Index tool outputs some general data to the terminal, and detailed information to theindextool.log file:
Setting up logger and sessions... Loading catalog...Collecting storage containers...Scanning data on disk...Storages 17/17, bytes 1739030582/1739030582 100%
3. The indextool.log file is located in the database catalog directory:
/home/dbadmin/VMart/v_vmart_node0001_catalog/indextool.log
To run Checksort when the database is running:
1. From vsql, enter this query to check the ROS sort order on the initiator node:
select run_index_tool ('checksort');
-or-
select run_index_tool ('checksort', 'false');
2. Enter this query to run the sort check on all nodes:
select run_index_tool ('checksort', 'true');
Viewing Details of Index Tool ResultsWhen running the HP Vertica Index tool options from the command line, the tool writes minimaloutput to STDOUT, and detailed information to the indextool.log file in the database catalogdirectory. When running CheckCRC and Checksort from vsql, results are written to thevertica.log file on the node from which you run the query.
To view the results in the indextool.log file:
1. From the command line, navigate to the indextool.log file, located in the database catalogdirectory.
[15:07:55][vertica-s1]: cd /my_host/databases/check/v_check_node0001_catalog
Administrator's GuideOperating the Database
HP Vertica Analytics Platform (7.0.x) Page 372 of 969

2. For Checksort, all error messages include anOID number and the string 'Sort OrderViolation' as follows:
<INFO> ...on oid 45035996273723545: Sort Order Violation:
3. You can use grep on the indextool.log file to search for the Sort Order Violation string with acommand such as this, which returns the line before each string (-B1), and the four lines thatfollow (-A4):
[15:07:55][vertica-s1]: grep -B1 -A4 'Sort Order Violation:' /my_host/databases/check/v_check_node0001_catalog/indextool.log 2012-06-14 14:07:13.686 unknown:0x7fe1da7a1950 [EE] <INFO> An error occurred when running index tool thread on oid 45035996273723537:Sort Order Violation:Row Position: 624Column Index: 0Last Row: 2576000This Row: 2575000--012-06-14 14:07:13.687 unknown:0x7fe1dafa2950 [EE] <INFO> An error occurred when running index tool thread on oid 45035996273723545:Sort Order Violation:Row Position: 3Column Index: 0Last Row: 4This Row: 2--
To find the relevant projection where the sort violation was found:
1. Query the storage_containers system table using a storage_oid equal to the OID valuelisted in the indextool.log file.
2. Use a query such as this:
=> select * from storage_containers where storage_oid = 45035996273723545;
Administrator's GuideOperating the Database
HP Vertica Analytics Platform (7.0.x) Page 373 of 969

Page 374 of 969HP Vertica Analytics Platform (7.0.x)
Administrator's GuideOperating the Database

Working with Tables
Creating Base TablesThe CREATE TABLE statement creates a table in the HP Vertica logical schema.The exampledatabase described in the Getting Started Guide includes sample SQL scripts that demonstratethis procedure. For example:
CREATE TABLE vendor_dimension ( vendor_key INTEGER NOT NULL PRIMARY KEY,vendor_name VARCHAR(64),vendor_address VARCHAR(64),vendor_city VARCHAR(64),vendor_state CHAR(2),vendor_region VARCHAR(32),deal_size INTEGER,last_deal_update DATE
);
Note: Each table can have amaximum 1600 columns.
Creating Tables Using the /*+direct*/ ClauseYou can use the /* +direct */ clause to create a table or temporary table, saving the tabledirectly to disk (ROS), bypassingmemory (WOS). For example, following is an existing table calledstates:
VMart=> select * from states;State | Bird | Tree | Tax
-------+----------+-------+-----MA | Robin | Maple | 5.7NH | Thrush | Elm | 0NY | Cardinal | Oak | 7.2
(3 rows)
Create a new table, StateBird, with the /*+direct*/ clause in the statement, placing the clausedirectly before the query (select State, Bird from states):
VMart=> create table StateBird as /*+direct*/ select State, Bird from states;CREATE TABLEVMart=> select * from StateBird;State | Bird
-------+----------MA | RobinNH | ThrushNY | Cardinal
(3 rows)
Administrator's GuideWorking with Tables
HP Vertica Analytics Platform (7.0.x) Page 375 of 969

The following example creates a temporary table using the /*+direct*/ clause, along with the ONCOMMIT PRESERVE ROWS directive:
VVMart=> create temp table StateTax ON COMMIT PRESERVE ROWS as /*+direct*/ select State,Tax from states;CREATE TABLEVMart=> select * from StateTax;State | Tax
-------+-----MA | 5.7NH | 0NY | 7.2
(3 rows)
Automatic Projection CreationTo get your database up and running quickly, HP Vertica automatically creates a default projectionfor each table created through the CREATE TABLE and CREATE TEMPORARY TABLEstatements. Each projection created automatically (or manually) includes a base projection nameprefix. Youmust use the projection prefix when altering or dropping a projection (ALTERPROJECTION RENAME, DROP PROJECTION).
How you use the CREATE TABLE statement determines when the projection is created:
l If you create a table without providing the projection-related clauses, HP Vertica automaticallycreates a superprojection for the table when you use an INSERT INTO or COPY statement toload data into the table for the first time. The projection is created in the same schema as thetable. Once HP Vertica has created the projection, it loads the data.
l If you use CREATE TABLE AS SELECT to create a table from the results of a query, the tableis created first and a projection is created immediately after, using some of the properties of theunderlying SELECT query.
l (Advanced users only) If you use any of the following parameters, the default projection iscreated immediately upon table creation using the specified properties:
n column-definition (ENCODING encoding-type and ACCESSRANK integer)
n ORDER BY table-column
n hash-segmentation-clause
n UNSEGMENTED { NODE node | ALL NODES }
n KSAFE
Note: Before you define a superprojection in the abovemanner, read Creating CustomDesigns in the Administrator's Guide.
Administrator's GuideWorking with Tables
HP Vertica Analytics Platform (7.0.x) Page 376 of 969

Characteristics of Default Automatic ProjectionsA default auto-projection has the following characteristics:
l It is a superprojection.
l It uses the default encoding-type AUTO.
l If created as a result of a CREATE TABLE AS SELECT statement, uses the encoding specifiedin the query table.
l Auto-projections use hash segmentation.
l The number of table columns used in the segmentation expression can be configured, using theMaxAutoSegColumns configuration parameter. SeeGeneral Parameters in the Administrator'sGuide. Columns are segmented in this order:
n Short (<8 bytes) data type columns first
n Larger (> 8 byte) data type columns
n Up to 32 columns (default for MaxAutoSegColumns configuration parameter)
n If segmentingmore than 32 columns, use nested hash function
Auto-projections are defined by the table properties and creationmethods, as follows:
If table... Sort order is... Segmentation is...
Is created from inputstream (COPY orINSERT INTO)
Same as inputstream, if sorted.
On PK column (if any), on all FK columns (ifany), on the first 31 configurable columns ofthe table
Is created from CREATETABLE AS SELECTquery
Same as inputstream, if sorted.
If not sorted,sorted usingfollowing rules.
Same segmentation columns f query output issegmented
The same as the load, if output of query isunsegmented or unknown
Has FK and PKconstraints
FK first, then PKcolumns
PK columns
Has FK constraints only(no PK)
FK first, thenremaining columns
Small data type (< 8 byte) columns first, thenlarge data type columns
Has PK constraints only(no FK)
PK columns PK columns
Has no FK or PKconstraints
On all columns Small data type (< 8 byte) columns first, thenlarge data type columns
Administrator's GuideWorking with Tables
HP Vertica Analytics Platform (7.0.x) Page 377 of 969

Default automatic projections and segmentation get your database up and running quickly. HPrecommends that you start with these projections and then use theDatabase Designer to optimizeyour database further. The Database Designer creates projections that optimize your databasebased on the characteristics of the data and, optionally, the queries you use.
See Alsol Creating External Tables
l Projection Concepts
l CREATE TABLE
Creating a Table Like AnotherYou can create a new table based on an existing table using the CREATE TABLE statement with theLIKE existing_table clause, optionally including the projections of the existing table. Creating anew table with the LIKE option replicates the table definition and any storage policy associatedwith the existing table. The statement does not copy any data. Themain purpose of this function isto create an intermediate table into which you canmove partition data, and eventually, archive thedata and drop the intermediate table.
Note: Invoking CREATE TABLEwith its LIKE clause before calling the function tomovepartitions for archiving requires first dropping pre-join-projections or refreshing out-of-dateprojections.
You can optionally use the including projections clause to create a table that will have theexisting table's current and non-pre-join projection definitions whenever you populate the table.Replicated projections are named automatically to avoid conflict with any existing objects, andfollow the same naming conventions as auto projections. You cannot create a new table likeanother if the source table has pre-join- or out-of-date-projections. The statement displays a warningmessage.
Note: HP Vertica does not support using CREATE TABLE new_t LIKE exist_t INCLUDINGPROJECTIONS if exist_t is a temporary table.
Epochs and Node RecoveryThe checkpoint epoch (CPE) for both the source and target projections are updated as ROSes aremoved. The start and end epochs of all storage containers, such as ROSes, aremodified to theagreedmove epoch. When this occurs, the epochs of all columns without an actual data file rewriteadvance the CPE to themove epoch. If any nodes are down during the TMmoveout, they willdetect that there is storage to recover, and will recover from other nodes with the correct epochupon rejoining the cluster.
Administrator's GuideWorking with Tables
HP Vertica Analytics Platform (7.0.x) Page 378 of 969
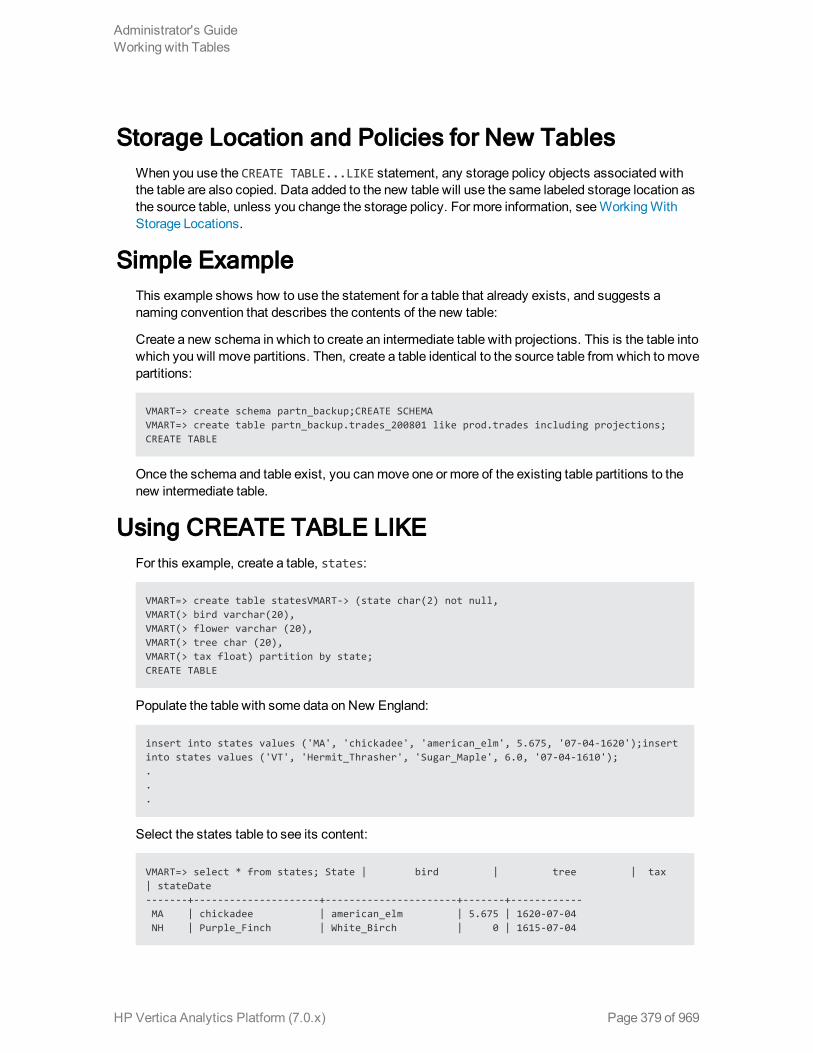
Storage Location and Policies for New TablesWhen you use the CREATE TABLE...LIKE statement, any storage policy objects associated withthe table are also copied. Data added to the new table will use the same labeled storage location asthe source table, unless you change the storage policy. For more information, seeWorkingWithStorage Locations.
Simple ExampleThis example shows how to use the statement for a table that already exists, and suggests anaming convention that describes the contents of the new table:
Create a new schema in which to create an intermediate table with projections. This is the table intowhich you will move partitions. Then, create a table identical to the source table from which tomovepartitions:
VMART=> create schema partn_backup;CREATE SCHEMAVMART=> create table partn_backup.trades_200801 like prod.trades including projections;CREATE TABLE
Once the schema and table exist, you canmove one or more of the existing table partitions to thenew intermediate table.
Using CREATE TABLE LIKEFor this example, create a table, states:
VMART=> create table statesVMART-> (state char(2) not null,VMART(> bird varchar(20),VMART(> flower varchar (20),VMART(> tree char (20),VMART(> tax float) partition by state;CREATE TABLE
Populate the table with some data on New England:
insert into states values ('MA', 'chickadee', 'american_elm', 5.675, '07-04-1620');insertinto states values ('VT', 'Hermit_Thrasher', 'Sugar_Maple', 6.0, '07-04-1610');...
Select the states table to see its content:
VMART=> select * from states; State | bird | tree | tax| stateDate-------+---------------------+----------------------+-------+------------MA | chickadee | american_elm | 5.675 | 1620-07-04NH | Purple_Finch | White_Birch | 0 | 1615-07-04
Administrator's GuideWorking with Tables
HP Vertica Analytics Platform (7.0.x) Page 379 of 969

VT | Hermit_Thrasher | Sugar_maple | 6 | 1618-07-04ME | Black_Cap_Chickadee | Pine_Tree | 5 | 1615-07-04CT | American_Robin | White_Oak | 6.35 | 1618-07-04RI | Rhode_Island_Red | Red_Maple | 5 | 1619-07-04
(6 rows)
View the projections for this table:
VMART=> \dj List of projectionsSchema | Name | Owner | Node | Comment
--------+-------------------+---------+------------------+---------...public | states_b0 | dbadmin | |public | states_b1 | dbadmin | |public | states_p_node0001 | dbadmin | v_vmart_node0001 |public | states_p_node0002 | dbadmin | v_vmart_node0002 |public | states_p_node0003 | dbadmin | v_vmart_node0003 |
Now, create a table like the states table, including projections:
VMART=> create table newstates like states including projections;CREATE TABLEVMART=> select * from newstates;State | bird | tree | tax | stateDate
-------+------+------+-----+-----------(0 rows)
See Alsol Creating Base Tables
l Creating Temporary Tables
l Creating External Tables
l Moving Partitions
l CREATE TABLE
Creating Temporary TablesYou create temporary tables using the CREATE TEMPORARY TABLE statement, specifying thetable as either local or global. You cannot create temporary external tables.
A common use case for a temporary table is to divide complex query processing into multiple steps.Typically, a reporting tool holds intermediate results while reports are generated (for example, firstget a result set, then query the result set, and so on). You can also write subqueries.
Administrator's GuideWorking with Tables
HP Vertica Analytics Platform (7.0.x) Page 380 of 969

Note: The default retention when creating temporary tables is ON COMMIT DELETE ROWS,which discards data at transaction completion. The non-default value is ON COMMIT PRESERVEROWS, which discards data when the current session ends.
Global Temporary TablesHP Vertica creates global temporary tables in the public schema, with the data contents private tothe transaction or session through which data is inserted.
Global temporary table definitions are accessible to all users and sessions, so that two (or more)users can access the same global table concurrently. However, whenever a user commits or rollsback a transaction, or ends the session, HP Vertica removes the global temporary table dataautomatically, so users see only data specific to their own transactions or session.
Global temporary table definitions persist in the database catalogs until they are removed explicitlythrough a DROP TABLE statement.
Local Temporary TablesLocal temporary tables are created in the V_TEMP_SCHEMA namespace and inserted into the user'ssearch path transparently. Each local temporary table is visible only to the user who creates it, andonly for the duration of the session in which the table is created.
When the session ends, HP Vertica automatically drops the table definition from the databasecatalogs. You cannot preserve non-empty, session-scoped temporary tables using the ONCOMMIT PRESERVE ROWS statement.
Creating local temporary tables is significantly faster than creating regular tables, so you shouldmake use of them whenever possible.
Note: You cannot add projections to non-empty, session-scoped temporary tables if youspecify ON COMMIT PRESERVE ROWS. Be sure that projections exist before you load data,as described in the sectionAutomatic Projection Creation in CREATE TABLE. Also, while youcan add projections for tables created with the ON COMMIT DELETE ROWS option, be awarethat you could save the projection but still lose all the data.
Creating a Temp Table Using the /*+direct*/ ClauseYou can use the /* +direct */ clause to create a table or temporary table, saving the tabledirectly to disk (ROS), bypassingmemory (WOS). For example, following is an existing table calledstates:
VMart=> select * from states;State | Bird | Tree | Tax
-------+----------+-------+-----MA | Robin | Maple | 5.7NH | Thrush | Elm | 0NY | Cardinal | Oak | 7.2
Administrator's GuideWorking with Tables
HP Vertica Analytics Platform (7.0.x) Page 381 of 969

(3 rows)
Create a new table, StateBird, with the /*+direct*/ clause in the statement, placing the clausedirectly before the query (select State, Bird from states):
VMart=> create table StateBird as /*+direct*/ select State, Bird from states;CREATE TABLEVMart=> select * from StateBird;State | Bird
-------+----------MA | RobinNH | ThrushNY | Cardinal
(3 rows)
The following example creates a temporary table using the /*+direct*/ clause, along with the ONCOMMIT PRESERVE ROWS directive:
VVMart=> create temp table StateTax ON COMMIT PRESERVE ROWS as /*+direct*/ select State,Tax from states;CREATE TABLEVMart=> select * from StateTax;State | Tax
-------+-----MA | 5.7NH | 0NY | 7.2
(3 rows)
Characteristics of Default Automatic ProjectionsOnce local or global table exists, HP Vertica creates auto-projections for temporary tableswhenever you load or insert data.
The default auto-projection for a temporary table has the following characteristics:
l It is a superprojection.
l It uses the default encoding-type AUTO.
l It is automatically unsegmented on the initiator node, if you do not specify a hash-segmentation-clause.
l The projection is not pinned.
l Temp tables are not recoverable, so the superprojection is not K-Safe (K-SAFE=0), and youcannot make it so.
Auto-projections are defined by the table properties and creationmethods, as follows:
Administrator's GuideWorking with Tables
HP Vertica Analytics Platform (7.0.x) Page 382 of 969

If table... Sort order is... Segmentation is...
Is created from inputstream (COPY orINSERT INTO)
Same as inputstream, if sorted.
On PK column (if any), on all FK columns (ifany), on the first 31 configurable columns ofthe table
Is created from CREATETABLE AS SELECTquery
Same as inputstream, if sorted.
If not sorted,sorted usingfollowing rules.
Same segmentation columns f query output issegmented
The same as the load, if output of query isunsegmented or unknown
Has FK and PKconstraints
FK first, then PKcolumns
PK columns
Has FK constraints only(no PK)
FK first, thenremaining columns
Small data type (< 8 byte) columns first, thenlarge data type columns
Has PK constraints only(no FK)
PK columns PK columns
Has no FK or PKconstraints
On all columns Small data type (< 8 byte) columns first, thenlarge data type columns
Advanced users canmodify the default projection created through the CREATE TEMPORARY TABLEstatement by defining one or more of the following parameters:
l column-definition (temp table) (ENCODING encoding-type and ACCESSRANK integer)
l ORDER BY table-column
l hash-segmentation-clause
l UNSEGMENTED { NODE node | ALL NODES }
l NO PROJECTION
Note: Before you define the superprojection in this manner, read Creating Custom Designs inthe Administrator's Guide.
Preserving GLOBAL Temporary Table Data for aTransaction or Session
You can preserve session-scoped rows in a GLOBAL temporary table for the entire session or forthe current transaction only.
To preserve a temporary table for the transaction, use the ON COMMIT DELETE ROWS clause:
Administrator's GuideWorking with Tables
HP Vertica Analytics Platform (7.0.x) Page 383 of 969

=> CREATE GLOBAL TEMP TABLE temp_table1 (x NUMERIC, y NUMERIC )ON COMMIT DELETE ROWS;
To preserve temporary table data until the end of the session, use the ON COMMIT PRESERVEROWS clause:
=> CREATE GLOBAL TEMP TABLE temp_table2 (x NUMERIC, y NUMERIC )ON COMMIT PRESERVE ROWS;
Specifying Column EncodingYou can specify the encoding type to use per column.
The following example specifies that the superprojection created for the temp table use RLEencoding for the y column:
=> CREATE LOCAL TEMP TABLE temp_table1 (x NUMERIC, y NUMERIC ENCODING RLE )ON COMMIT DELETE ROWS;
The following example specifies that the superprojection created for the temp table use the sortorder specified by the ORDER BY clause, rather than the order of columns in the column list.
=> CREATE GLOBAL TEMP TABLE temp_table1 (x NUMERIC,y NUMERIC ENCODING RLE,b VARCHAR(8),z VARCHAR(8) )
ORDER BY z, x;
See Alsol Projection Concepts
l CREATE TEMPORARY TABLE
l CREATE TABLE
l TRUNCATE TABLE
l DELETE
l ANALYZE_STATISTICS
Creating External TablesYou create an external table using the CREATE EXTERNAL TABLE AS COPY statement. You cannotcreate temporary external tables. For the syntax details to create an external table, see theCREATE EXTERNAL TABLE statement in the SQLReferenceManual.
Administrator's GuideWorking with Tables
HP Vertica Analytics Platform (7.0.x) Page 384 of 969

Note: Each table can have amaximum of 1600 columns.
Required Permissions for External TablesYoumust be a database superuser to create external tables, unless you create a USER-accessiblestorage location (see ADD_LOCATION) and grant user privileges to the location, schema, and soon.
Note: Permission requirements for external tables differ from other tables. To gain full access(including SELECT) to an external table that a user has privileges to create, the databasesuperuser must also grant READ access to the USER-accessible storage location, seeGRANT (Storage Location).
COPY Statement DefinitionWhen you create an external table, table data is not added to the database, and no projections arecreated. Instead, HP Vertica performs a syntactic check of the CREATE EXTERNAL TABLE...statement, and stores the table name and COPY statement definition in the catalog. When aSELECT query references an external table, the stored COPY statement is parsed to obtain thereferenced data. Successfully returning data from the external table requires that the COPYdefinition is correct, and that other dependencies, such as files, nodes, and other resources areaccessible and available at query-time.
For more information about checking the validity of the external table COPY definition, seeValidating External Tables.
Developing User-Defined Load (UDL) Functions forExternal Tables
You can create external tables with your own load functions. For more information about developinguser-defined load functions, see User Defined Load (UDL) and the extended COPY syntax in theSQLReferenceManual.
ExamplesExamples of external table definitions:
CREATE EXTERNAL TABLE ext1 (x integer) AS COPY FROM '/tmp/ext1.dat' DELIMITER ',';CREATE EXTERNAL TABLE ext1 (x integer) AS COPY FROM '/tmp/ext1.dat.bz2' BZIP DELIMITER ',';CREATE EXTERNAL TABLE ext1 (x integer, y integer) AS COPY (x as '5', y) FROM '/tmp/ext1.dat.bz2' BZIP DELIMITER ',';
Administrator's GuideWorking with Tables
HP Vertica Analytics Platform (7.0.x) Page 385 of 969

See Alsol COPY
l CREATE EXTERNAL TABLE AS COPY
Validating External TablesWhen you create an external table, HP Vertica validates the syntax of the CREATE EXTERNALTABLE AS COPY FROM statement. For instance, if you omit a required keyword in the statement(such as FROM), creating the external table fails, as in this example:
VMart=> create external table ext (ts timestamp,d varchar) as copy '/home/dbadmin/designer.log'; ERROR 2778: COPY requires a data source; either a FROM clause or a WITH SOURCE for a user-defined source
Checking other aspects of the COPY definition (such as path statements and node availability)does not occur until a select query references the external table.
To validate that you have successfully created an external table definition, run a select queryreferencing the external table. Check that the returned query data is what you expect. If the querydoes not return data correctly, check the COPY exception and rejected data log files.
Since the COPY definition determines what occurs when you query an external table, obtainingCOPY statement errors can help reveal any underlying problems. For more information aboutCOPY exceptions and rejections, see Capturing Load Exceptions and Rejections.
Limiting the Maximum Number of ExceptionsQuerying external table data with an incorrect COPY FROM statement definition can potentiallyresult in many exceptions. To limit the number of saved exceptions, HP Vertica sets themaximumnumber of reported rejections with the ExternalTablesExceptionsLimit configuration parameter.The default value is 100. Setting the ExternalTablesExceptionsLimit to -1 disables the limit.
For more information about configuration parameters, see Configuration Parameters, andspecifically, General Parameters.
If COPY errors reach themaximum number of exceptions, the external table query continues, butCOPY generates a warning in the vertica.log, and does not report subsequent rejections and/orexceptions.
Note: Using the ExternalTablesExceptionsLimit configuration parameter differs from theCOPY statement REJECTMAX clause. If COPY reaches the number of exceptions defined byREJECTMAX, COPY aborts execution, and does not generate a vertica.logwarning.
Working with External TablesAfter creating external tables, you access them as any other table.
Administrator's GuideWorking with Tables
HP Vertica Analytics Platform (7.0.x) Page 386 of 969

Managing Resources for External TablesExternal tables require minimal additional resources. When you use a select query for an externaltable, HP Vertica uses a small amount of memory when reading external table data, since the tablecontents are not part of your database and are parsed each time the external table is used.
Backing Up and Restoring External TablesSince the data in external tables is managed outside of HP Vertica, only the external tabledefinitions, not the data files, are included in database backups.
Using Sequences and Identity Columns in ExternalTables
The COPY statement definition for external tables can include identity columns and sequences.Whenever a select statement queries the external table, sequences and identity columns are re-evaluated. This results in changing the external table column values, even if the underlying externaltable data remains the same.
Viewing External Table DefinitionsWhen you create an external table, HP Vertica stores the COPY definition statement in the table_definition column of the v_catalog.tables system table.
1. To list all tables, use a select * query, as shown:
select * from v_catalog.tables where table_definition <> '';
2. Use a query such as the following to list the external table definitions (table_definition):
select table_name, table_definition from v_catalog.tables; table_name |table_definition
------------+----------------------------------------------------------------------t1 | COPY FROM 'TMPDIR/external_table.dat' DELIMITER ','t1_copy | COPY FROM 'TMPDIR/external_table.dat' DELIMITER ','t2 | COPY FROM 'TMPDIR/external_table2.dat' DELIMITER ','
(3 rows)
External Table DML SupportFollowing are examples of supported queries, and others that are not:
Administrator's GuideWorking with Tables
HP Vertica Analytics Platform (7.0.x) Page 387 of 969

Supported Unsupported
SELECT * FROM external_table; DELETE FROM external_table WHERE x = 5;
SELECT * FROM external_table where col1=4; INSERT INTO external_table SELECT * FROM ext;
DELETE FROM ext WHERE id IN (SELECT x FROM external_table);
INSERT INTO ext SELECT * FROM external_table; SELECT * FROM external_table for update;
Using External Table ValuesFollowing is a basic example of how you could use the values of an external table.
1. Create and display the contents of a file with some integer values:
[dbadmin@localhost ~]$ more ext.dat12345678101112
2. Create an external table pointing at ext.dat:
VMart=> create external table ext (x integer) as copy from '/home/dbadmin/ext.dat'; CREATE TABLE
3. Select the table contents:
VMart=> select * from ext; x----
12345678
10
Administrator's GuideWorking with Tables
HP Vertica Analytics Platform (7.0.x) Page 388 of 969

1112
(11 rows)
4. Perform evaluation on some external table contents:
VMart=> select ext.x, ext.x + ext.x as double_x from ext where x > 5; x | double_x----+----------
6 | 127 | 148 | 16
10 | 2011 | 2212 | 24
(6 rows)
5. Create a second table (second), also with integer values:
VMart=> create table second (y integer);CREATE TABLE
6. Populate the table with some values:
VMart=> copy second from stdin;Enter data to be copied followed by a newline.End with a backslash and a period on a line by itself.>> 1>> 1>> 3>> 4>> 5>> \.
7. Join the external table (ext) with the table created in HP Vertica, called second:
VMart=> select * from ext join second on x=y; x | y---+---1 | 11 | 13 | 34 | 45 | 5
(5 rows)
Using External TablesExternal tables let you query data stored in files accessible to the HP Vertica database, but notmanaged by it. Creating external tables supplies read-only access through SELECT queries. You
Administrator's GuideWorking with Tables
HP Vertica Analytics Platform (7.0.x) Page 389 of 969

cannot modify external tables through DML commands, such as INSERT, UPDATE, DELETE,andMERGE.
Using CREATE EXTERNAL TABLE AS COPYStatement
You create external tables with the CREATE EXTERNAL TABLE AS COPY... statement, shown in thisbasic example:
CREATE EXTERNAL TABLE tbl(i INT) AS COPY (i) FROM 'path1' ON node1, 'path2' ON node2;
Formore details on the supported options to create an external table, see the CREATEEXTERNAL TABLE statement in the SQLReferenceManual.
The data you specify in the FROM clause of a CREATE EXTERNAL TABLE AS COPY statement canreside in one or more files or directories, and on one or more nodes. After successfully creating anexternal table, HP Vertica stores the table name and its COPY definition. Each time a select queryreferences the external table, HP Vertica parses the COPY statement definition again to accessthe data. Here is a sample select statement:
SELECT * FROM tbl WHERE i > 10;
Storing HP Vertica Data in External TablesWhile there aremany requirements for you to use external table data, one reason is to storeinfrequently-accessed HP Vertica data on low-cost external media. If external storage is a goal atyour site, the process to accomplish that requires exporting the older data to a text file, creating abzip or gzip file of the export data, and saving the compressed file on an NFS disk. You can thencreate an external table to access the data any time it is required.
Using External Tables with User-Defined Load (UDL)Functions
You can also use external tables in conjunction with the UDL functions that you create. For moreinformation about using UDLs, see User Defined Load (UDL) in the Programmer's Guide.
Organizing External Table DataIf the data you store in external tables changes regularly (for instance, eachmonth in the case ofstoring recent historical data), your COPY definition statement can use wildcards tomake parsingthe stored COPY statement definitionmore dynamic. For instance, if you storemonthly data on anNFS mount, you could organizemonthly files within a top-level directory for a calendar year, suchas:
/2012/monthly_archived_data/
Administrator's GuideWorking with Tables
HP Vertica Analytics Platform (7.0.x) Page 390 of 969

In this case, the external table COPY statement will include a wildcard definition such as thefollowing:
CREATE TABLE archive_data (...) AS COPY FROM 'nfs_name/2012/monthly_archived_data/*'
Whenever an HP Vertica query references the external table months, and HP Vertica parses theCOPY statement, all stored data tables in the top-level monthly_archived_data directory aremade accessible to the query.
Altering Table DefinitionsUsing ALTER TABLE syntax, you can respond to your evolving database schema requirements.The ability to change the definition of existing database objects facilitates ongoingmaintenance.Furthermore, most of these options are both fast and efficient for large tables, because theyconsume fewer resources and less storage than having to stage data in a temporary table.
Here are some of the operations you can perform using the ALTER TABLE statement:
l Rename a table
l Add, drop, and rename columns
l Add and drop constraints
l Add table columns with a default derived expression
l Change a column's data type
l Change a table owner
l Rename a table schema
l Move a table to a new schema
l Change, reorganize, and remove table partitions
External Table RestrictionsNot all ALTER TABLE options are applicable for external tables. For instance, you cannot add acolumn to an external table, but you can rename the table:
=> ALTER TABLE mytable RENAME TO mytable2;ALTER TABLE
Exclusive ALTER TABLE ClausesThe following clauses are exclusive, whichmeans you cannot combine them with another ALTERTABLE clause:
Administrator's GuideWorking with Tables
HP Vertica Analytics Platform (7.0.x) Page 391 of 969

l ADD COLUMN
l RENAME COLUMN
l SET SCHEMA
l PARTITION BY
l REORGANIZE
l REMOVE PARTITIONING
l RENAME [ TO ]
l OWNER TO
Note: You can use the ADD constraints and DROP constraints clauses together.
Using Consecutive ALTER TABLE CommandsWith the exception of performing a table rename, complete other ALTER TABLE statementsconsecutively. For example, to addmultiple columns to a table, issue consecutive ALTER TABLEADD COLUMN commands, ending each statement with a semicolon.
For more information about ALTER TABLE syntax and parameters, see the SQLReferenceManual.
Adding Table ColumnsWhen you use the ADD COLUMN syntax as part of altering a table, HP Vertica takes anO lock on thetable until the operation completes. The lock prevents DELETE, UPDATE, INSERT, and COPYstatements from accessing the table, and blocks SELECT statements issued at SERIALIZABLEisolation level, until the operation completes. Each table can have amaximum of 1600 columns.You cannot add columns to a temporary table or to tables that have out-of-date superprojectionswith up-to-date buddies.
The following operations occur as part of adding columns:
l Inserts the default value for existing rows. For example, if the default expression is CURRENT_TIMESTAMP, all rows have the current timestamp.
l Automatically adds the new columnwith a unique projection column name to allsuperprojections of the table.
l Populates the column according to the column-constraint (DEFAULT, for example).
Note: Adding a column to a table does not affect theK-safety of the physical schema design,and you can add columns when nodes are down.
Administrator's GuideWorking with Tables
HP Vertica Analytics Platform (7.0.x) Page 392 of 969

Updating Associated Table ViewsAdding new columns to a table that has an associated view does not update the view's result set,even if the view uses a wildcard (*) to represent all table columns. To incorporate new columns, youmust recreate the view. See CREATE VIEW in the SQLReferenceManual.
Specifying Default ExpressionsWhen you add a new column to a table using ALTER TABLE ADD COLUMN, the default expression forthe new column can evaluate to a user-defined scalar function, a constant, or a derived expressioninvolving other columns of the same table.
The default expression of an ADD COLUMN statement disallows nested queries, or aggregatefunctions. Instead, use the ALTER COLUMN option, described in Altering Table Columns.
About Using Volatile FunctionsYou cannot use a volatile function in the following two scenarios. Attempting to do so causes arollback.
l As the default expression for an ALTER TABLE ADD COLUMN statement:
ALTER TABLE t ADD COLUMN a2 INT DEFAULT my_sequence.nextval;ROLLBACK: VOLATILE functions are not supported in a default expressionALTER TABLE t ADD COLUMN n2 INT DEFAULT my_sequence.currval;ROLLBACK: VOLATILE functions are not supported in a default expressionALTER TABLE t ADD COLUMN c2 INT DEFAULT RANDOM() + 1;ROLLBACK: VOLATILE functions are not supported in a default expression
l As the default expression for an ALTER TABLE ALTER COLUMN statement on an external table:
ALTER TABLE mytable ADD COLUMN a2 FLOAT DEFAULT RANDOM();ROLLBACK 5241: Unsupported access to external tableALTER TABLE mytable ALTER COLUMN x SET DEFAULT RANDOM();ROLLBACK 5241: Unsupported access to external table
You can specify a volatile function as a column default expression using the ALTER TABLE ALTERCOLUMN statement:
ALTER TABLE t ALTER COLUMN a2 SET DEFAULT my_sequence.nextval;
Updating Associated Table ViewsAdding new columns to a table that has an associated view does not update the view's result set,even if the view uses a wildcard (*) to represent all table columns. To incorporate new columns, youmust recreate the view. See CREATE VIEW in the SQLReferenceManual.
Administrator's GuideWorking with Tables
HP Vertica Analytics Platform (7.0.x) Page 393 of 969

Altering Table ColumnsUse ALTER COLUMN syntax to alter an existing table column to change, drop, or establish a defaultexpression for the column. You can also use DROP DEFAULT to remove a default expression.
Any new data that you load after altering a columnwill conform to themodified table definition. Forexample:
l After a DROP COLUMN operation completes, data backed up from the current epoch onwardwill recover without the column. Data recovered from a backup prior to the current epoch will re-add the table column. Because drop operations physically purge object storage and catalogdefinitions (table history) from the table, AT EPOCH (historical) queries return nothing for thedropped column.
l If you change a column's data type from CHAR(8) to CHAR(16) in epoch 10 and you restore thedatabase from epoch 5, the columnwill be CHAR(8) again.
Adding Columns with a Default Derived ExpressionYou can add one or more columns to a table and set the default value as an expression. Theexpression can reference another column in the same table, or be calculated with a user-definedfunction (see Types of UDFs in the Programmer's Guide). You can alter unstructured tables to usea derived expression as described in Altering Unstructured Tables. HP Vertica computes a defaultvalue within a row. This flexibility is useful for adding a column to a large fact table that showsanother view on the data without having to INSERT .. SELECT a large data set.
Adding columns requires anO lock on the table until the add operation completes. This lockprevents DELETE, UPDATE, INSERT, and COPY statements from affecting the table, and blocksSELECT statements issued at SERIALIZABLE isolation level, until the operation completes. Onlythe new data you load after the alter operation completes is derived from the expression.
You cannot include a nested query or an aggregate function as a default expression. The columnmust use a specific expression that involves other elements in the same row.
You cannot specify a default expression that derives data from another derived column. This meansthat if you already have a columnwith a default derived value expression, you cannot add anothercolumnwhose default references the existing column.
Note: You can add a columnwhen nodes are down.
Add a Default Column Value Derived From Another Column
1. Create a sample table called twith timestamp, integer and varchar(10) columns:
=> CREATE TABLE t (a TIMESTAMP, b INT, c VARCHAR(10));
Administrator's GuideWorking with Tables
HP Vertica Analytics Platform (7.0.x) Page 394 of 969

CREATE TABLE=> INSERT INTO t VALUES ('2012-05-14 10:39:25', 2, 'MA');OUTPUT
--------1
(1 row)
2. Use the vsql \d tmeta-command to describe the table:
=> \dtList of Fields by Tables
Schema | Table | Column | Type | Size | Default | Not Null | Primary Key| Foreign Key
--------+-------+--------+-------------+------+---------+----------+-------------+-------------
public | t | a | timestamp | 8 | | f | f|
public | t | b | int | 8 | | f | f|
public | t | c | varchar(10) | 10 | | f | f|
(3 rows)
3. Use ALTER TABLE to add a fourth column that extracts themonth from the timestamp value incolumn a:
=> ALTER TABLE t ADD COLUMN d INTEGER DEFAULT EXTRACT(MONTH FROM a);ALTER TABLE
4. Query table t:
=> select * from t;a | b | c | d
---------------------+---+----+---2012-05-14 10:39:25 | 2 | MA | 5
(1 row)
Column d returns integer 5 (representing the 5thmonth).
5. View the table again to see the new column (d) and its default derived value.
=> \d t List of Fields by TablesSchema | Table | Column | Type | Size | Default | Not Null |
Primary Key | Foreign Key--------+-------+--------+-------------+------+-------------------------+----------+-------------+-------------public | t | a | timestamp | 8 | | f |
Administrator's GuideWorking with Tables
HP Vertica Analytics Platform (7.0.x) Page 395 of 969
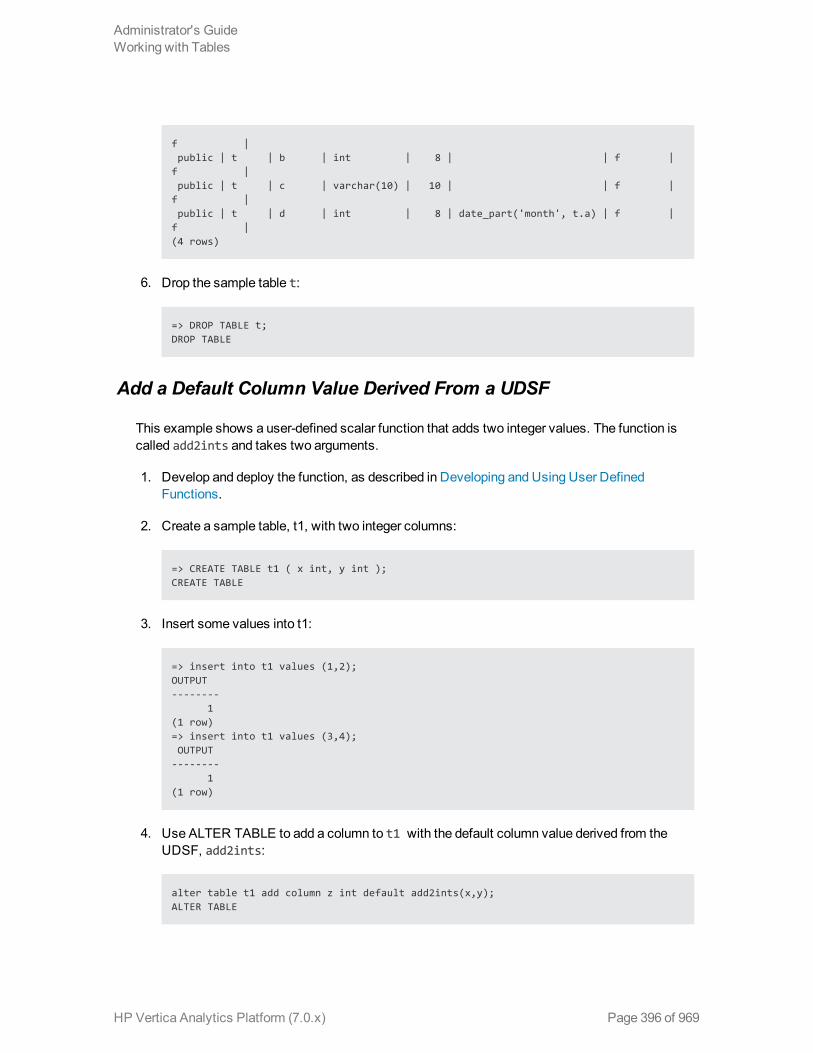
f |public | t | b | int | 8 | | f |
f |public | t | c | varchar(10) | 10 | | f |
f |public | t | d | int | 8 | date_part('month', t.a) | f |
f |(4 rows)
6. Drop the sample table t:
=> DROP TABLE t;DROP TABLE
Add a Default Column Value Derived From a UDSF
This example shows a user-defined scalar function that adds two integer values. The function iscalled add2ints and takes two arguments.
1. Develop and deploy the function, as described in Developing and Using User DefinedFunctions.
2. Create a sample table, t1, with two integer columns:
=> CREATE TABLE t1 ( x int, y int );CREATE TABLE
3. Insert some values into t1:
=> insert into t1 values (1,2);OUTPUT--------
1(1 row)=> insert into t1 values (3,4);OUTPUT
--------1
(1 row)
4. Use ALTER TABLE to add a column to t1 with the default column value derived from theUDSF, add2ints:
alter table t1 add column z int default add2ints(x,y);ALTER TABLE
Administrator's GuideWorking with Tables
HP Vertica Analytics Platform (7.0.x) Page 396 of 969

5. List the new column:
select z from t1;z
----37
(2 rows)
Changing a column's Data TypeYou can changes a table column's data type for any type whose conversion does not requirestorage reorganization. For example, the following types are the conversions that HP Verticasupports:
l Binary types—expansion and contraction but cannot convert between BINARY andVARBINARY types.
l Character types—all conversions allowed, even between CHAR and VARCHAR
l Exact numeric types—INTEGER, INT, BIGINT, TINYINT, INT8, SMALLINT, and allNUMERIC values of scale <=18 and precision 0 are interchangeable. For NUMERIC datatypes, you cannot alter precision, but you can change the scale in the ranges (0-18), (19-37), andso on.
HP Vertica does not allow data type conversion on types that require storage reorganization:
l Boolean type conversion to other types
l DATE/TIME type conversion
l Approximate numeric type conversions
l Between BINARY and VARBINARY types
You can expand (and shrink) columns within the same class of data type, which is useful if youwant to store longer strings in a column. HP Vertica validates the data before it performs theconversion.
For example, if you try to convert a column from varchar(25) to varchar(10) and that column holds astring with 20 characters, the conversion will fail. HP Vertica allow the conversion as long as thatcolumn does not have a string larger than 10 characters.
Examples
The following example expands an existing CHAR column from 5 to 10:
=> CREATE TABLE t (x CHAR, y CHAR(5));CREATE TABLE
Administrator's GuideWorking with Tables
HP Vertica Analytics Platform (7.0.x) Page 397 of 969

=> ALTER TABLE t ALTER COLUMN y SET DATA TYPE CHAR(10);ALTER TABLE=> DROP TABLE t;DROP TABLE
This example illustrates the behavior of a changed column's type. First you set column y's type toVARCHAR(5) and then insert strings with characters that equal 5 and exceed 5:
=> CREATE TABLE t (x VARCHAR, y VARCHAR);CREATE TABLE=> ALTER TABLE t ALTER COLUMN y SET DATA TYPE VARCHAR(5);ALTER TABLE=> INSERT INTO t VALUES ('1232344455','hello');OUTPUT
--------1
(1 row)=> INSERT INTO t VALUES ('1232344455','hello1');ERROR 4797: String of 6 octets is too long for type Varchar(5)=> DROP TABLE t;DROP TABLE
You can also contract the data type's size, as long as that altered column contains no stringsgreater than 5:
=> CREATE TABLE t (x CHAR, y CHAR(10));CREATE TABLE=> ALTER TABLE t ALTER COLUMN y SET DATA TYPE CHAR(5);ALTER TABLE=> DROP TABLE t;DROP TABLE
You cannot convert types between binary and varbinary. For example, the table definition belowcontains two binary columns, so when you try to convert column y to a varbinary type, HP Verticareturns a ROLLBACK message:
=> CREATE TABLE t (x BINARY, y BINARY);CREATE TABLE=> ALTER TABLE t ALTER COLUMN y SET DATA TYPE VARBINARY;--NROLLBACK 2377: Cannot convert column "y" from "binary(1)" to type "varbinary(80)=> DROP TABLE t;DROP TABLE
How to Perform an Illegitimate Column Conversion
The SQL standard disallows an illegitimate column conversion, but you can work around thisrestriction if you need to convert data from a non-SQL database. The following example takes youthrough the process step by step, where you'll manage your own epochs.
Given a sales table with columns id (INT) and price (VARCHAR), assume you want to convertthe VARCHAR column to a NUMERIC field. You'll do this by adding a temporary columnwhosedefault value is derived from the existing price column, rename the column, and then drop theoriginal column.
Administrator's GuideWorking with Tables
HP Vertica Analytics Platform (7.0.x) Page 398 of 969

1. Create the sample table with INTEGER and VARCHAR columns and insert two rows.
=> CREATE TABLE sales(id INT, price VARCHAR) UNSEGMENTED ALL NODES;CREATE TABLE=> INSERT INTO sales VALUES (1, '$50.00');=> INSERT INTO sales VALUES (2, '$100.00');
2. Commit the transaction:
=> COMMIT;COMMIT
3. Query the sales table:
=> SELECT * FROM SALES; id | price----+---------
1 | $50.002 | $100.00
(2 rows)
4. Add column temp_price. This is your temporary column.
=> ALTER TABLE sales ADD COLUMN temp_price NUMERIC DEFAULT SUBSTR(sales.price, 2)::NUMERIC;ALTER TABLE
5. Query the sales table, and you'll see the new temp_price columnwith its derived NUMERICvalues:
=> SELECT * FROM SALES; id | price | temp_price----+---------+---------------------
1 | $50.00 | 50.0000000000000002 | $100.00 | 100.000000000000000
(2 rows)
6. Drop the default expression from that column.
=> ALTER TABLE sales ALTER COLUMN temp_price DROP DEFAULT;ALTER TABLE
7. Advance theAHM:
SELECT advance_epoch(1); advance_epoch---------------New Epoch: 83
(1 row)
Administrator's GuideWorking with Tables
HP Vertica Analytics Platform (7.0.x) Page 399 of 969

8. Manage epochs:
SELECT manage_epoch(); manage_epoch--------------------------------Current Epoch=83, AHM Epoch=82
(1 row)
9. Drop the original price column.
=> ALTER TABLE sales DROP COLUMN price CASCADE;ALTER COLUMN
10. Rename the new (temporary) temp_price column back to its original name, price:
=> ALTER TABLE sales RENAME COLUMN temp_price to price;ALTER COLUMN
11. Query the sales table one last time:
=> SELECT * FROM SALES; id | price----+---------------------
1 | 50.0000000000000002 | 100.000000000000000
(2 rows)
12. Clean up (drop table sales):
=> DROP TABLE sales;DROP TABLE
See ALTER TABLE in the SQLReferenceManual
Adding Constraints on ColumnsTo add constraints on a new column:
1. Use the ALTER TABLE ADD COLUMN clause to add a new table column.
2. Use ALTER TABLE ADD CONSTRAINT to define constraints for the new column.
Adding and Removing NOT NULL ConstraintsUse the[SET | DROP] NOT NULL clause to add (SET) or remove (DROP) a NOT NULL constrainton the column.
When a column is a primary key and you drop the primary key constraint, the column retains theNOT NULL constraint. If you want to allow that column to now contain NULL values, use [DROPNOT NULL] to remove the NOT NULL constraint.
Administrator's GuideWorking with Tables
HP Vertica Analytics Platform (7.0.x) Page 400 of 969

Examples
ALTER TABLE T1 ALTER COLUMN x SET NOT NULL;ALTER TABLE T1 ALTER COLUMN x DROP NOT NULL;
Note: Using the [SET | DROP] NOT NULL clause does not validate whether the column dataconforms to the NOT NULL constraint. Use ANALYZE_CONSTRAINTS to check forconstraint violations in a table.
See Alsol About Constraints
Dropping a Table ColumnWhen you use the ALTER TABLE ... DROP COLUMN statement to drop a column, HP Vertica dropsboth the specified column from the table and theROS containers that correspond to the droppedcolumn.
The syntax looks like this:
ALTER TABLE [[db-name.]schema.]table-name ... | DROP [ COLUMN ] column-name [ CASCADE | RESTRICT ]
Because drop operations physically purge object storage and catalog definitions (table history) fromthe table, AT EPOCH (historical) queries return nothing for the dropped column.
The altered table has the same object ID.
Note: Drop column operations can be fast because these catalog-level changes do not requiredata reorganization, letting you quickly reclaim disk storage.
Restrictionsl At the table level, you cannot drop or alter a primary key column or a column participating in the
table's partitioning clause.
l At the projection level, you cannot drop the first column in a projection's sort order or columnsthat participate in in the segmentation expression of a projection.
l All nodes must be up for the drop operation to succeed.
Using CASCADE to Force a DropYou can work around some of the restrictions by using the CASCADE keyword which enforcesminimal reorganization of the table's definition in order to drop the column. You can use CASCADE
Administrator's GuideWorking with Tables
HP Vertica Analytics Platform (7.0.x) Page 401 of 969

to drop a column if that column fits into one of the scenarios in the following table. Note that in allcases that use CASCADE, HP Vertica tries to drop the projection(s) and will roll back if K-safety iscompromised:
Column todrop ... DROP column CASCADE behavior
Has a constraintof any kind on it
HP Vertica will drop the columnwith CASCADE specified when a FOREIGNKEY constraint depends on a UNIQUE or PRIMARY KEY constraint on thereferenced columns.
Participates inthe projection'ssort order
If you drop a column using the CASCADE keyword, HP Vertica truncates theprojection's sort order up to and including the projection that has been droppedwithout impact on physical storage for other columns and then drops thespecified column. For example if a projection's columns are in sort order(a,b,c), dropping column b causes the projection's sort order to be just (a),omitting column (c).
Participates inONE of thefollowing:
l Is a pre-joinprojection
l Participatesin theprojection'ssegmentationexpression
In these scenarios, HP Vertica drops any non-critical, dependent projections,maintains the superprojection that contains the data, and drops thespecified column. When a pre-join projection contains a column to be droppedwith CASCADE, HP Vertica tries to drop the projection.
Assume, for example, that you have a table with multiple projections andwhere one projection has the column you are trying to drop is part of thesegmentation clause. When you specify CASCADE, the DROP COLUMNstatement tries to implicitly drop the projection that has this column in thesegmentation clause. If it succeeds the transaction completes, but if itviolates k-safety the transaction rolls back.
Although this is a DROP COLUMN ... CASCADE operation (not DROPPROJECTION), HP Vertica could encounter cases when it is not possible todrop a projection's columnwithout reorganizing the projection. In these cases,CASCADE will try to drop the projection itself to maintain data integrity. If K-safety is compromised, the operation rolls back.
ExamplesThe following series of commands successfully drops a BYTEA data type column:
=> CREATE TABLE t (x BYTEA(65000), y BYTEA, z BYTEA(1));CREATE TABLE=> ALTER TABLE t DROP COLUMN y;ALTER TABLE=> SELECT y FROM t;ERROR 2624: Column "y" does not exist=> ALTER TABLE t DROP COLUMN x RESTRICT;ALTER TABLE=> SELECT x FROM t;ERROR 2624: Column "x" does not exist=> SELECT * FROM t;z
Administrator's GuideWorking with Tables
HP Vertica Analytics Platform (7.0.x) Page 402 of 969

---(0 rows)=> DROP TABLE t CASCADE;DROP TABLE
The following series of commands tries to drop a FLOAT(8) column and fails because there are notenough projections tomaintain k-safety.
=> CREATE TABLE t (x FLOAT(8),y FLOAT(08));CREATE TABLE=> ALTER TABLE t DROP COLUMN y RESTRICT;ALTER TABLE=> SELECT y FROM t;ERROR 2624: Column "y" does not exist=> ALTER TABLE t DROP x CASCADE;ROLLBACK 2409: Cannot drop any more columns in t=> DROP TABLE t CASCADE;
Moving a Table to Another SchemaThe ALTER TABLE SET SCHEMA statement moves a table from one schema to another. Moving atable requires that you have CREATE privileges for the destination schema. You canmove only onetable between schemas at a time. You cannot move temporary tables between schemas.
SET SCHEMA has two options, CASCADE and RESTRICT. CASCADE, which is the default, automaticallymoves all projections that are anchored on the source table to the destination schema, regardless ofthe schema in which the projections reside. The RESTRICT optionmoves only projections that areanchored on the source table and which also reside in the same schema.
If a table of the same name or any of the projections that you want to move already exist in the newschema, the statement rolls back and does not move either the table or any projections. To workaround name conflicts:
1. Rename any conflicting table or projections that you want to move.
2. Run the ALTER TABLE SET SCHEMA statement again.
Note: HP Vertica lets youmove system tables to system schemas. Moving system tablescould be necessary to support designs created through theDatabase Designer.
Changing a Table OwnerThe ability to change table ownership is useful whenmoving a table from one schema to another.Ownership reassignment is also useful when a table owner leaves the company or changes jobresponsibilities. Because you can change the table owner, the tables won't have to be completelyrewritten, you can avoid loss in productivity.
The syntax looks like this:
ALTER TABLE [[db-name.]schema.]table-name OWNER TO new-owner name
In order to alter table ownership, youmust be either the table owner or a superuser.
Administrator's GuideWorking with Tables
HP Vertica Analytics Platform (7.0.x) Page 403 of 969

A change in table ownership transfers just the owner and not privileges; grants made by the originalowner are dropped and all existing privileges on the table are revoked from the previous owner.However, altering the table owner transfers ownership of dependent sequence objects (associatedIDENTITY/AUTO-INCREMENT sequences) but does not transfer ownership of other referencedsequences. See ALTER SEQUENCE for details on transferring sequence ownership.
Notesl Table privileges are separate from schema privileges; therefore, a table privilege change or table
owner change does not result in any schema privilege change.
l Because projections define the physical representation of the table, HP Vertica does not requireseparate projection owners. The ability to create or drop projections is based on the tableprivileges on which the projection is anchored.
l During the alter operation HP Vertica updates projections anchored on the table owned by theold owner to reflect the new owner. For pre-join projection operations, HP Vertica checks forprivileges on the referenced table.
ExampleIn this example, user Bob connects to the database, looks up the tables, and transfers ownership oftable t33 from himself to to user Alice.
=> \c - BobYou are now connected as user "Bob".=> \dSchema | Name | Kind | Owner | Comment
--------+--------+-------+---------+---------public | applog | table | dbadmin |public | t33 | table | Bob |
(2 rows)=> ALTER TABLE t33 OWNER TO Alice;ALTER TABLE
Notice that when Bob looks up database tables again, he no longer sees table t33.
=> \d List of tablesList of tables
Schema | Name | Kind | Owner | Comment--------+--------+-------+---------+---------public | applog | table | dbadmin |
(1 row)
When user Alice connects to the database and looks up tables, she sees she is the owner of tablet33.
=> \c - AliceYou are now connected as user "Alice".=> \d
List of tablesSchema | Name | Kind | Owner | Comment
Administrator's GuideWorking with Tables
HP Vertica Analytics Platform (7.0.x) Page 404 of 969

--------+------+-------+-------+---------public | t33 | table | Alice |
(2 rows)
Either Alice or a superuser can transfer table ownership back to Bob. In the following case asuperuser performs the transfer.
=> \c - dbadminYou are now connected as user "dbadmin".=> ALTER TABLE t33 OWNER TO Bob;ALTER TABLE=> \d
List of tablesSchema | Name | Kind | Owner | Comment
--------+----------+-------+---------+---------public | applog | table | dbadmin |public | comments | table | dbadmin |public | t33 | table | Bob |s1 | t1 | table | User1 |
(4 rows)
You can also query the V_CATALOG.TABLES system table to view table and owner information.Note that a change in ownership does not change the table ID.
In the below series of commands, the superuser changes table ownership back to Alice and queriesthe TABLES system table.
=> ALTER TABLE t33 OWNER TO Alice;ALTER TABLE=> SELECT table_schema_id, table_schema, table_id, table_name, owner_id, owner_name FROMtables; table_schema_id | table_schema | table_id | table_name | owner_id
| owner_name-------------------+--------------+-------------------+------------+-------------------+------------45035996273704968 | public | 45035996273713634 | applog | 45035996273704962 |
dbadmin45035996273704968 | public | 45035996273724496 | comments | 45035996273704962 |
dbadmin45035996273730528 | s1 | 45035996273730548 | t1 | 45035996273730516 |
User145035996273704968 | public | 45035996273795846 | t33 | 45035996273724576 |
Alice(5 rows)
Now the superuser changes table ownership back to Bob and queries the TABLES table again.Nothing changes but the owner_name row, from Alice to Bob.
=> ALTER TABLE t33 OWNER TO Bob;ALTER TABLE=> SELECT table_schema_id, table_schema, table_id, table_name, owner_id, owner_name FROMtables;
table_schema_id | table_schema | table_id | table_name | owner_id |owner_name-------------------+--------------+-------------------+------------+-------------------+------------45035996273704968 | public | 45035996273713634 | applog | 45035996273704962 |
dbadmin
Administrator's GuideWorking with Tables
HP Vertica Analytics Platform (7.0.x) Page 405 of 969
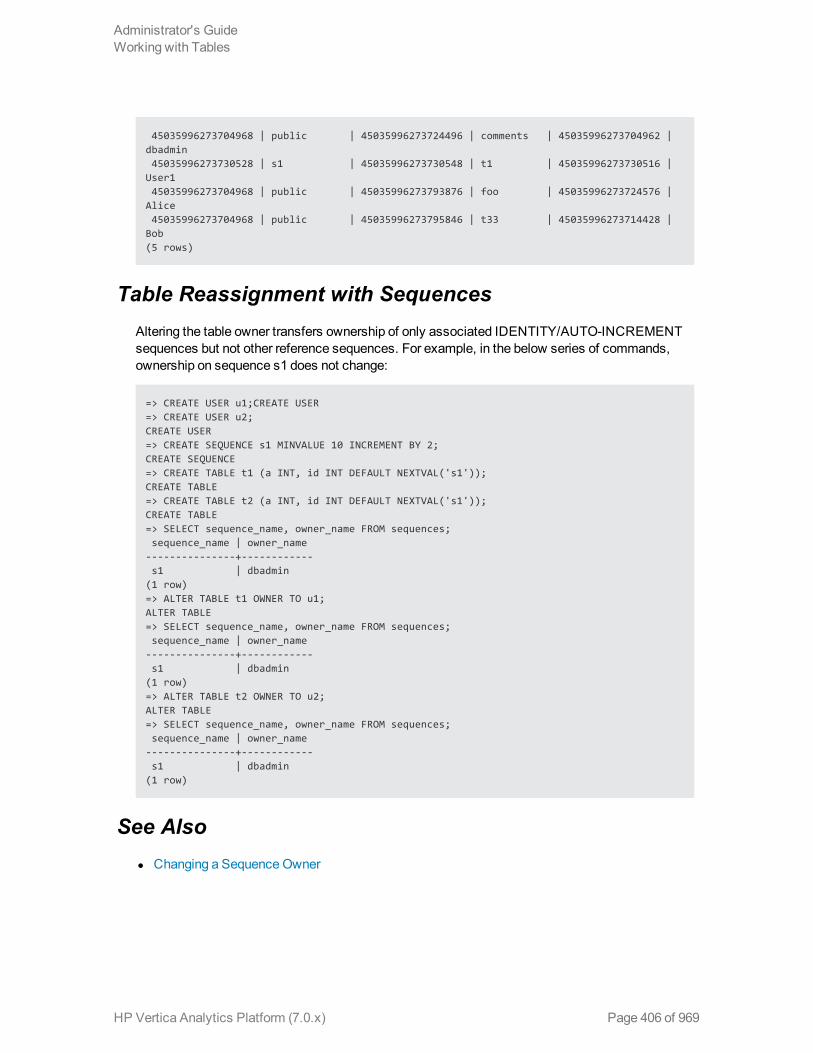
45035996273704968 | public | 45035996273724496 | comments | 45035996273704962 |dbadmin45035996273730528 | s1 | 45035996273730548 | t1 | 45035996273730516 |
User145035996273704968 | public | 45035996273793876 | foo | 45035996273724576 |
Alice45035996273704968 | public | 45035996273795846 | t33 | 45035996273714428 |
Bob(5 rows)
Table Reassignment with SequencesAltering the table owner transfers ownership of only associated IDENTITY/AUTO-INCREMENTsequences but not other reference sequences. For example, in the below series of commands,ownership on sequence s1 does not change:
=> CREATE USER u1;CREATE USER=> CREATE USER u2;CREATE USER=> CREATE SEQUENCE s1 MINVALUE 10 INCREMENT BY 2;CREATE SEQUENCE=> CREATE TABLE t1 (a INT, id INT DEFAULT NEXTVAL('s1'));CREATE TABLE=> CREATE TABLE t2 (a INT, id INT DEFAULT NEXTVAL('s1'));CREATE TABLE=> SELECT sequence_name, owner_name FROM sequences;sequence_name | owner_name
---------------+------------s1 | dbadmin
(1 row)=> ALTER TABLE t1 OWNER TO u1;ALTER TABLE=> SELECT sequence_name, owner_name FROM sequences;sequence_name | owner_name
---------------+------------s1 | dbadmin
(1 row)=> ALTER TABLE t2 OWNER TO u2;ALTER TABLE=> SELECT sequence_name, owner_name FROM sequences;sequence_name | owner_name
---------------+------------s1 | dbadmin
(1 row)
See Alsol Changing a SequenceOwner
Administrator's GuideWorking with Tables
HP Vertica Analytics Platform (7.0.x) Page 406 of 969

Changing a Sequence OwnerThe ALTER SEQUENCE command lets you change the attributes of an existing sequence. Allchanges take effect immediately, within the same session. Any parameters not set during an ALTERSEQUENCE statement retain their prior settings.
If you need to change sequence ownership, such as if an employee who owns a sequence leavesthe company, you can do so with the following ALTER SEQUENCE syntax:
ALTER SEQUENCE sequence-name OWNER TO new-owner-name;
This operation immediately reassigns the sequence from the current owner to the specified newowner.
Only the sequence owner or a superuser can change ownership, and reassignment does nottransfer grants from the original owner to the new owner; grants made by the original owner aredropped.
Note: Renaming a table owner transfers ownership of dependent sequence objects(associated IDENTITY/AUTO-INCREMENT sequences) but does not transfer ownership of otherreferenced sequences. See Changing a Table Owner.
ExampleThe following example reassigns sequence ownership from the current owner to user Bob:
=> ALTER SEQUENCE sequential OWNER TO Bob;
See ALTER SEQUENCE in the SQLReferenceManual for details.
Renaming TablesThe ALTER TABLE RENAME TO statement lets you rename one or more tables. The new table namesmust not exist already.
Renaming tables does not affect existing pre-join projections because pre-join projections refer totables by their unique numeric object IDs (OIDs). Renaming tables also does not change the tableOID.
To rename two or more tables:
1. List the tables to renamewith a comma-delimited list, specifying a schema-name after part ofthe table specification only before the RENAME TO clause:
=> ALTER TABLE S1.T1, S1.T2 RENAME TO U1, U2;
Administrator's GuideWorking with Tables
HP Vertica Analytics Platform (7.0.x) Page 407 of 969

The statement renames the listed tables to their new table names from left to right, matchingthem sequentially, in a one-to-one correspondence.
The RENAME TO parameter is applied atomically so that all tables are renamed, or none of thetables is renamed. For example, if the number of tables to rename does not match the numberof new names, none of the tables is renamed.
2. Do not specify a schema-name as part of the table specification after the RENAME TO clause,since the statement applies to only one schema. The following example generates a syntaxerror:
=> ALTER TABLE S1.T1, S1.T2 RENAME TO S1.U1, S1.U2;
Note: Renaming a table referenced by a view causes the view to fail, unless you createanother table with the previous name to replace the renamed table.
Using Rename to Swap Tables Within a SchemaYou can use the ALTER TABLE RENAME TO statement to swap tables within a schemawithoutactually moving data. You cannot swap tables across schemas.
To swap tables within a schema (example statement is split to explain steps):
1. Enter the names of the tables to swap, followed by a new temporary table placeholder (temps):
=> ALTER TABLE T1, T2, temps
2. Use the RENAME TO clause to swap the tables: T1 to temps, T2 to T1, and temps to T2:
RENAME TO temps, T1, T2;
Administrator's GuideWorking with Tables
HP Vertica Analytics Platform (7.0.x) Page 408 of 969
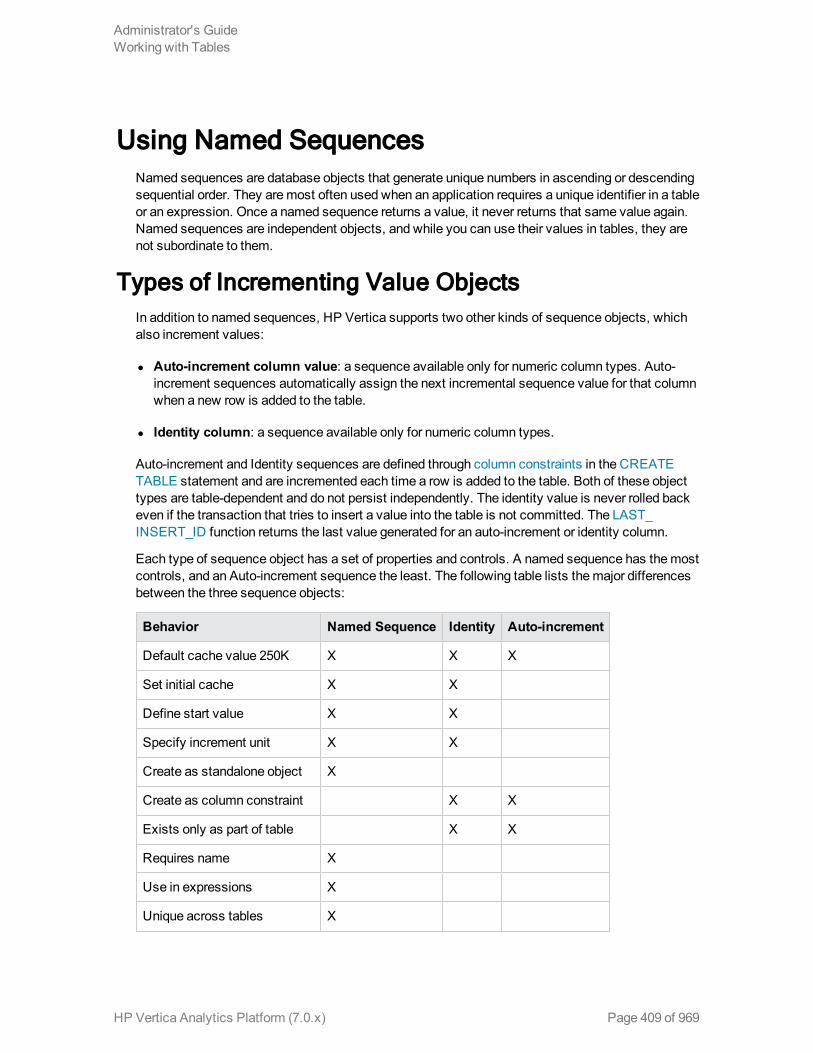
Using Named SequencesNamed sequences are database objects that generate unique numbers in ascending or descendingsequential order. They aremost often used when an application requires a unique identifier in a tableor an expression. Once a named sequence returns a value, it never returns that same value again.Named sequences are independent objects, and while you can use their values in tables, they arenot subordinate to them.
Types of Incrementing Value ObjectsIn addition to named sequences, HP Vertica supports two other kinds of sequence objects, whichalso increment values:
l Auto-increment column value: a sequence available only for numeric column types. Auto-increment sequences automatically assign the next incremental sequence value for that columnwhen a new row is added to the table.
l Identity column: a sequence available only for numeric column types.
Auto-increment and Identity sequences are defined through column constraints in the CREATETABLE statement and are incremented each time a row is added to the table. Both of these objecttypes are table-dependent and do not persist independently. The identity value is never rolled backeven if the transaction that tries to insert a value into the table is not committed. The LAST_INSERT_ID function returns the last value generated for an auto-increment or identity column.
Each type of sequence object has a set of properties and controls. A named sequence has themostcontrols, and an Auto-increment sequence the least. The following table lists themajor differencesbetween the three sequence objects:
Behavior Named Sequence Identity Auto-increment
Default cache value 250K X X X
Set initial cache X X
Define start value X X
Specify increment unit X X
Create as standalone object X
Create as column constraint X X
Exists only as part of table X X
Requires name X
Use in expressions X
Unique across tables X
Administrator's GuideWorking with Tables
HP Vertica Analytics Platform (7.0.x) Page 409 of 969

Behavior Named Sequence Identity Auto-increment
Change parameters X
Move to different schema X
Set to increment or decrement X
Grant privileges to object X
Specify minimum value X
Specify maximum value X
Always starts at 1 X
While sequence object values are guaranteed to be unique, they are not guaranteed to becontiguous. Since sequences are not necessarily contiguous, youmay interpret the returned valuesas missing. For example, two nodes can increment a sequence at different rates. The node with aheavier processing load increments the sequence, but the values are not contiguous with thosebeing incremented on the other node.
Using a Sequence with an Auto_Increment or IdentityColumn
Each table can contain only one auto_increment or identity column. A table can contain both anauto_increment or identity column, and a named sequence, as in the next example, illustratinga table with both types of sequences:
VMart=> CREATE TABLE test2 (id INTEGER NOT NULL UNIQUE,middle INTEGER DEFAULT NEXTVAL('my_seq'),next INT, last auto_increment);
CREATE TABLE
Named Sequence FunctionsWhen you create a named sequence object, you can also specify the increment or decrementvalue. The default is 1. Use these functions with named sequences:
l NEXTVAL—Advances the sequence and returns the next sequence value. This value isincremented for ascending sequences and decremented for descending sequences. The firsttime you call NEXTVAL after creating a sequence, the function sets up the cache in which tostore the sequence values, and returns either the default sequence value, or the start numberyou specified with CREATE SEQUENCE.
l CURRVAL—Returns the LAST value across all nodes returned by a previous invocation ofNEXTVAL in the same session. If there were no calls to NEXTVAL after creating a sequence,the CURRVAL function returns an error:
Administrator's GuideWorking with Tables
HP Vertica Analytics Platform (7.0.x) Page 410 of 969

dbt=> create sequence seq2;CREATE SEQUENCEdbt=> select currval('seq2');ERROR 4700: Sequence seq2 has not been accessed in the session
You can use the NEXTVAL and CURRVAL functions in INSERT and COPY expressions.
Using DDL Commands and Functions With NamedSequences
For details, see the following related statements and functions in the SQLReferenceManual:
Use thisstatement... To...
CREATESEQUENCE
Create a named sequence object.
ALTERSEQUENCE
Alter named sequence parameters, rename a sequence within a schema, ormove a named sequence between schemas.
DROPSEQUENCE
Remove a named sequence object.
GRANTSEQUENCE
Grant user privileges to a named sequence object. See also SequencePrivileges.
Creating SequencesCreate a sequence using the CREATE SEQUENCE statement. All of the parameters (besides asequence name) are optional.
The following example creates an ascending sequence called my_seq, starting at 100:
dbt=> create sequence my_seq START 100;CREATE SEQUENCE
After creating a sequence, youmust call the NEXTVAL function at least once in a session to createa cache for the sequence and its initial value. Subsequently, use NEXTVAL to increment thesequence. Use the CURRVAL function to get the current value.
The following NEXTVAL function instantiates the newly-created my_seq sequence and sets its firstnumber:
=> SELECT NEXTVAL('my_seq');nextval
---------100
Administrator's GuideWorking with Tables
HP Vertica Analytics Platform (7.0.x) Page 411 of 969

(1 row)
If you call CURRVAL before NEXTVAL, the system returns an error:
dbt=> SELECT CURRVAL('my_seq');ERROR 4700: Sequence my_seq has not been accessed in the session
The following command returns the current value of this sequence. Since no other operations havebeen performed on the newly-created sequence, the function returns the expected value of 100:
=> SELECT CURRVAL('my_seq');currval
---------100
(1 row)
The following command increments the sequence value:
=> SELECT NEXTVAL('my_seq');nextval
---------101
(1 row)
Calling the CURRVAL again function returns only the current value:
=> SELECT CURRVAL('my_seq');currval
---------101
(1 row)
The following example shows how to use the my_seq sequence in an INSERT statement.
=> CREATE TABLE customer (lname VARCHAR(25),fname VARCHAR(25),membership_card INTEGER,id INTEGER
);=> INSERT INTO customer VALUES ('Hawkins' ,'John', 072753, NEXTVAL('my_seq'));
Now query the table you just created to confirm that the ID column has been incremented to 102:
=> SELECT * FROM customer;lname | fname | membership_card | id
---------+-------+-----------------+-----Hawkins | John | 72753 | 102
(1 row)
Administrator's GuideWorking with Tables
HP Vertica Analytics Platform (7.0.x) Page 412 of 969

The following example shows how to use a sequence as the default value for an INSERTcommand:
=> CREATE TABLE customer2(id INTEGER DEFAULT NEXTVAL('my_seq'),lname VARCHAR(25),fname VARCHAR(25),membership_card INTEGER
);=> INSERT INTO customer2 VALUES (default,'Carr', 'Mary', 87432);
Now query the table you just created. The ID column has been incremented again to 103:
=> SELECT * FROM customer2;id | lname | fname | membership_card
-----+-------+-------+-----------------103 | Carr | Mary | 87432
(1 row)
The following example shows how to use NEXTVAL in a SELECT statement:
=> SELECT NEXTVAL('my_seq'), lname FROM customer2;NEXTVAL | lname
---------+-------104 | Carr
(1 row)
As you can see, each time you call NEXTVAL(), the value increments.
The CURRVAL() function returns the current value.
Altering SequencesThe ALTER SEQUENCE statement lets you change the attributes of a previously-definedsequence. Changes take effect in the next database session. Any parameters not specifically setin the ALTER SEQUENCE command retain their previous settings.
The ALTER SEQUENCE statement lets you rename an existing sequence, or the schema of asequence, but you cannot combine either of these changes with any other optional parameters.
Note: Using ALTER SEQUENCE to set a START value below the CURRVAL can result induplicate keys.
ExamplesThe following examplemodifies an ascending sequence called my_seq to start at 105:
ALTER SEQUENCE my_seq RESTART WITH 105;
The following examplemoves a sequence from one schema to another:
Administrator's GuideWorking with Tables
HP Vertica Analytics Platform (7.0.x) Page 413 of 969

ALTER SEQUENCE [public.]my_seq SET SCHEMA vmart;
The following example renames a sequence in the Vmart schema:
ALTER SEQUENCE [vmart.]my_seq RENAME TO serial;
Remember that changes occur only after you start a new database session. For example, if youcreate a sequence named my_sequence and start the value at 10, each time you call the NEXTVALfunction, you increment by 1, as in the following series of commands:
CREATE SEQUENCE my_sequence START 10;SELECT NEXTVAL('my_sequence');nextval
---------10
(1 row)SELECT NEXTVAL('my_sequence');nextval
---------11
(1 row)
Now issue the ALTER SEQUENCE statement to assign a new value starting at 50:
ALTER SEQUENCE my_sequence RESTART WITH 50;
When you call the NEXTVAL function, the sequence is incremented again by 1 value:
SELECT NEXTVAL('my_sequence'); NEXTVAL---------
12(1 row)
The sequence starts at 50 only after restarting the database session:
SELECT NEXTVAL('my_sequence'); NEXTVAL---------
50(1 row)
Distributed SequencesWhen you create a sequence object, the CACHE parameter controls the sequence efficiency, bydetermining the number of sequence values each nodemaintains during a session. The defaultcache value is 250K, meaning that each node reserves 250,000 values for each sequence persession.
HP Vertica distributes a session across all nodes. After you create a sequence, the first time anode executes a NEXTVAL() function as part of a SQL statement, the node reserves its own cacheof sequence values. The node thenmaintains that set of values for the current session. Other
Administrator's GuideWorking with Tables
HP Vertica Analytics Platform (7.0.x) Page 414 of 969

nodes executing a NEXTVAL() function will also create andmaintain their own cache of sequencevalues cache.
Note: If any node consumes all of its sequence values, HP Verticamust perform a cataloglock to obtain a new set of values. A catalog lock can be costly in terms of databaseperformance, since certain activities, such as data inserts, cannot occur until HP Verticareleases the lock.
During a session, one node can use its allocated set of sequence values slowly, while another nodeuses its values more quickly. Therefore, the value returned from NEXTVAL in one statement candiffer from the values returned in another statement executed on another node.
Regardless of the number of calls to NEXTVAL and CURRVAL, HP Vertica increments asequence only once per row. If multiple calls to NEXTVAL occur within the same row, the functionreturns the same value. If sequences are used in join statements, HP Vertica increments asequence once for each composite row output by the join.
The current value of a sequence is calculated as follows:
l At the end of every statement, the state of all sequences used in the session is returned to theinitiator node.
l The initiator node calculates themaximum CURRVAL of each sequence across all states on allnodes.
l This maximum value is used as CURRVAL in subsequent statements until another NEXTVALis invoked.
Sequence values in cache can be lost in the following situations:
l If a statement fails after NEXTVAL is called (thereby consuming a sequence value from thecache), the value is lost.
l If a disconnect occurs (for example, dropped session), any remaining values in the cache thathave not been returned through NEXTVAL (unused) are lost.
To recover lost sequence values, you can run an ALTER SEQUENCE command to define a newsequence number generator, which resets the counter to the correct value in the next session.
Note: An elastic projection (a segmented projection created when Elastic Cluster is enabled)created with amodularhash segmentation expression uses hash instead.
The behavior of sequences across HP Vertica nodes is explained in the following examples.
Note: IDENTITY and AUTO_INCREMENT columns behave in a similar manner.
Example 1: The following example, which illustrates sequence distribution, assumes a 3-nodecluster with node01 as the initiator node.
First create a simple table called dist:
Administrator's GuideWorking with Tables
HP Vertica Analytics Platform (7.0.x) Page 415 of 969

CREATE TABLE dist (i INT, j VARCHAR);
Create a projection called oneNode and segment by column i on node01:
CREATE PROJECTION oneNode AS SELECT * FROM dist SEGMENTED BY i NODES node01;
Create a second projection called twoNodes and segment column x by modularhash on node02 andnode03:
CREATE PROJECTION twoNodes AS SELECT * FROM dist SEGMENTED BY MODULARHASH(i) NODES node02, node03;
Create a third projection called threeNodes and segment column i by modularhash on all nodes (1-3):
CREATE PROJECTION threeNodes as SELECT * FROM dist SEGMENTED BY MODULARHASH(i) ALL NODES;
Insert some values:
COPY dist FROM STDIN;1|ONE2|TWO3|THREE4|FOUR5|FIVE6|SIX\.
Query the STORAGE_CONTAINERS table to return the projections on each node:
SELECT node_name, projection_name, total_row_count FROM storage_containers;node_name | projection_name | total_row_count-----------+-----------------+-------------
--node0001 | oneNode | 6 --Contains rows with i=(1,2,3,4,5,6)node0001 | threeNodes | 2 --Contains rows with i=(3,6)node0002 | twoNodes | 3 --Contains rows with i=(2,4,6)node0002 | threeNodes | 2 --Contains rows with i=(1,4)node0003 | twoNodes | 3 --Contains rows with i=(1,3,5)node0003 | threeNodes | 2 --Contains rows with i=(2,5)
(6 rows)
The following table shows the segmentation of rows for projection oneNode:
1 ONE Node012 TWO Node013 THREE Node014 FOUR Node015 FIVE Node016 SIX Node01
The following table shows the segmentation of rows for projection twoNodes:
Administrator's GuideWorking with Tables
HP Vertica Analytics Platform (7.0.x) Page 416 of 969

1 ONE Node032 TWO Node023 THREE Node034 FOUR Node025 FIVE Node036 SIX Node02
The following table shows the segmentation of rows for projection threeNodes:
1 ONE Node022 TWO Node033 THREE Node014 FOUR Node025 FIVE Node036 SIX Node01
Create a sequence and specify a cache of 10. The sequence will cache up to 10 values in memoryfor performance. As per the CREATE SEQUENCE statement, theminimum value is 1 (only onevalue can be generated at a time, for example, no cache).
Example 2: Create a sequence named s1 and specify a cache of 10:
CREATE SEQUENCE s1 cache 10;SELECT s1.nextval, s1.currval, s1.nextval, s1.currval, j FROMoneNode;nextval | currval | nextval | currval | j
---------+---------+---------+---------+-------1 | 1 | 1 | 1 | ONE2 | 2 | 2 | 2 | TWO3 | 3 | 3 | 3 | THREE4 | 4 | 4 | 4 | FOUR5 | 5 | 5 | 5 | FIVE6 | 6 | 6 | 6 | SIX
(6 rows)
The following table illustrates the current state of the sequence for that session. It holds the currentvalue, values remaining (the difference between the current value (6) and the cache (10)), andcache activity. There is no cache activity on node02 or node03.
Sequence Cache State Node01 Node02 Node03
Current value 6 NOCACHE NOCACHE
Remainder 4 NOCACHE NOCACHE
Example 3: Return the current values from twoNodes:
SELECT s1.currval, j FROM twoNodes; currval | j---------+-------
6 | ONE6 | THREE6 | FIVE6 | TWO6 | FOUR6 | SIX
Administrator's GuideWorking with Tables
HP Vertica Analytics Platform (7.0.x) Page 417 of 969

(6 rows)
Example 4:Now call NEXTVAL from threeNodes. The assumption is that node02 holds the cachebefore node03:
SELECT s1.nextval, j from threeNodes; nextval | j---------+-------
101 | ONE201 | TWO
7 | THREE102 | FOUR202 | FIVE
8 | SIX(6 rows)
The following table illustrates the sequence cache state with values on node01, node02, andnode03:
Sequence Cache State Node01 Node02 Node03
Current value 8 102 202
Left 2 8 8
Example 5: Insert values from twoNodes into the destination table:
SELECT s1.currval, j FROM twoNodes; nextval | j---------+-------
202 | ONE202 | TWO202 | THREE202 | FOUR202 | FIVE202 | SIX
(6 rows)
The following table illustrates the sequence cache state:
Sequence Cache State Node01 Node02 Node03
Current value 6 102 202
Left 4 8 8
Example 6: The following command runs on node02 only:
SELECT s1.nextval, j FROM twoNodes WHERE i = 2; nextval | j---------+-----
103 | TWO(1 row)
The following table illustrates the sequence cache state:
Administrator's GuideWorking with Tables
HP Vertica Analytics Platform (7.0.x) Page 418 of 969

Sequence Cache State Node01 Node02 Node03
Current value 6 103 202
Left 4 7 8
Example 7: The following command calls the current value from twoNodes:
SELECT s1.currval, j FROM twoNodes; currval | j---------+-------
103 | ONE103 | TWO103 | THREE103 | FOUR103 | FIVE103 | SIX
(6 rows)
Example 8: This example assume that node02 holds the cache before node03:
SELECT s1.nextval, j FROM twoNodes; nextval | j---------+-------
203 | ONE104 | TWO204 | THREE105 | FOUR205 | FIVE106 | SIX
(6 rows)
The following table illustrates the sequence cache state:
Sequence Cache State Node01 Node02 Node03
Current value 6 106 205
Left 4 6 5
Example 9: The following command calls the current value from oneNode:
SELECT s1.currval, j FROM twoNodes; currval | j---------+-------
205 | ONE205 | TWO205 | THREE205 | FOUR205 | FIVE205 | SIX
(6 rows)
Example 10: This example calls the NEXTVAL function on oneNode:
SELECT s1.nextval, j FROM oneNode; nextval | j
Administrator's GuideWorking with Tables
HP Vertica Analytics Platform (7.0.x) Page 419 of 969

---------+-------7 | ONE8 | TWO9 | THREE
10 | FOUR301 | FIVE302 | SIX
(6 rows)
The following table illustrates the sequence cache state:
Sequence Cache State Node01 Node02 Node03
Current value 302 106 205
Left 8 4 5
Example 11: In this example, twoNodes is the outer table and threeNodes is the inner table to amerge join. threeNodes is resegmented as per twoNodes.
SELECT s1.nextval, j FROM twoNodes JOIN threeNodes ON twoNodes.i = threeNodes.i;
SELECT s1.nextval, j FROM oneNode; nextval | j---------+-------
206 | ONE107 | TWO207 | THREE108 | FOUR208 | FIVE109 | SIX
(6 rows)
The following table illustrates the sequence cache state:
Sequence Cache State Node01 Node02 Node03
Current value 302 109 208
Left 8 1 2
Example 12: This next example shows how sequences work with buddy projections.
--Same sessionDROP TABLE t CASCADE;CREATE TABLE t (i INT, j varchar(20));CREATE PROJECTION threeNodes AS SELECT * FROM tSEGMENTED BY MODULARHASH(i) ALL NODES KSAFE 1;COPY t FROM STDIN;1|ONE2|TWO3|THREE4|FOUR
Administrator's GuideWorking with Tables
HP Vertica Analytics Platform (7.0.x) Page 420 of 969

5|FIVE6|SIX\.SELECT node_name, projection_name, total_row_count FROM storage_containers;node_name | projection_name | total_row_count
-----------+-----------------+-----------------node01 | threeNodes_b0 | 2node03 | threeNodes_b0 | 2node02 | threeNodes_b0 | 2node02 | threeNodes_b1 | 2node01 | threeNodes_b1 | 2node03 | threeNodes_b1 | 2
(6 rows)
The following function call assumes that node02 is down. It is the same session. Node03 takes upthe work of node02:
SELECT s1.nextval, j FROM t; nextval | j---------+-------
401 | ONE402 | TWO305 | THREE403 | FOUR404 | FIVE306 | SIX
(6 rows)
The following table illustrates the sequence cache state:
Sequence Cache State Node01 Node02 Node03
Current value 306 110 404
Left 4 0 6
Example 13: This example starts a new session.
DROP TABLE t CASCADE;CREATE TABLE t (i INT, j VARCHAR);CREATE PROJECTION oneNode AS SELECT * FROM t SEGMENTED BY i NODES node01;CREATE PROJECTION twoNodes AS SELECT * FROM t SEGMENTED BY MODULARHASH(i) NODES node02, node03;CREATE PROJECTION threeNodes AS SELECT * FROM t SEGMENTED BY MODULARHASH(i) ALL NODES;INSERT INTO t values (nextval('s1'), 'ONE');SELECT * FROM t;i | j
-----+-------501 | ONE
(1 rows)
The following table illustrates the sequence cache state:
Administrator's GuideWorking with Tables
HP Vertica Analytics Platform (7.0.x) Page 421 of 969

Sequence Cache State Node01 Node02 Node03
Current value 501 NOCACHE NOCACHE
Left 9 0 0
Example 14:
INSERT INTO t SELECT s1.nextval, 'TWO' FROM twoNodes;SELECT * FROM t; i | j
-----+-------501 | ONE --stored in node01 for oneNode, node02 for twoNodes, node02 for threeNodes601 | TWO --stored in node01 for oneNode, node03 for twoNodes, node01 for threeNodes
(2 rows)
The following table illustrates the sequence cache state:
Sequence Cache State Node01 Node02 Node03
Current value 501 601 NOCACHE
Left 9 9 0
Example 15:
INSERT INTO t select s1.nextval, 'TRE' from threeNodes;SELECT * FROM t;i | j
-----+-------501 | ONE --stored in node01 for oneNode, node02 for twoNodes, node02 for threeNodes601 | TWO --stored in node01 for oneNode, node03 for twoNodes, node01 for threeNodes502 | TRE --stored in node01 for oneNode, node03 for twoNodes, node03 for threeNodes602 | TRE --stored in node01 for oneNode, node02 for twoNodes, node02 for threeNodes
(4 rows)
The following table illustrates the sequence cache state:
Sequence Cache State Node01 Node02 Node03
Current value 502 602 NOCACHE
Left 9 9 0
Example 16:
INSERT INTO t SELECT s1.currval, j FROM threeNodes WHERE i != 502;SELECT * FROM t; i | j
-----+-------501 | ONE --stored in node01 for oneNode, node02 for twoNodes, node02 for threeNodes601 | TWO --stored in node01 for oneNode, node03 for twoNodes, node01 for threeNodes502 | TRE --stored in node01 for oneNode, node03 for twoNodes, node03 for threeNodes602 | TRE --stored in node01 for oneNode, node02 for twoNodes, node02 for threeNodes602 | ONE --stored in node01 for oneNode, node02 for twoNodes, node02 for threeNodes502 | TWO --stored in node01 for oneNode, node03 for twoNodes, node03 for threeNodes
Administrator's GuideWorking with Tables
HP Vertica Analytics Platform (7.0.x) Page 422 of 969
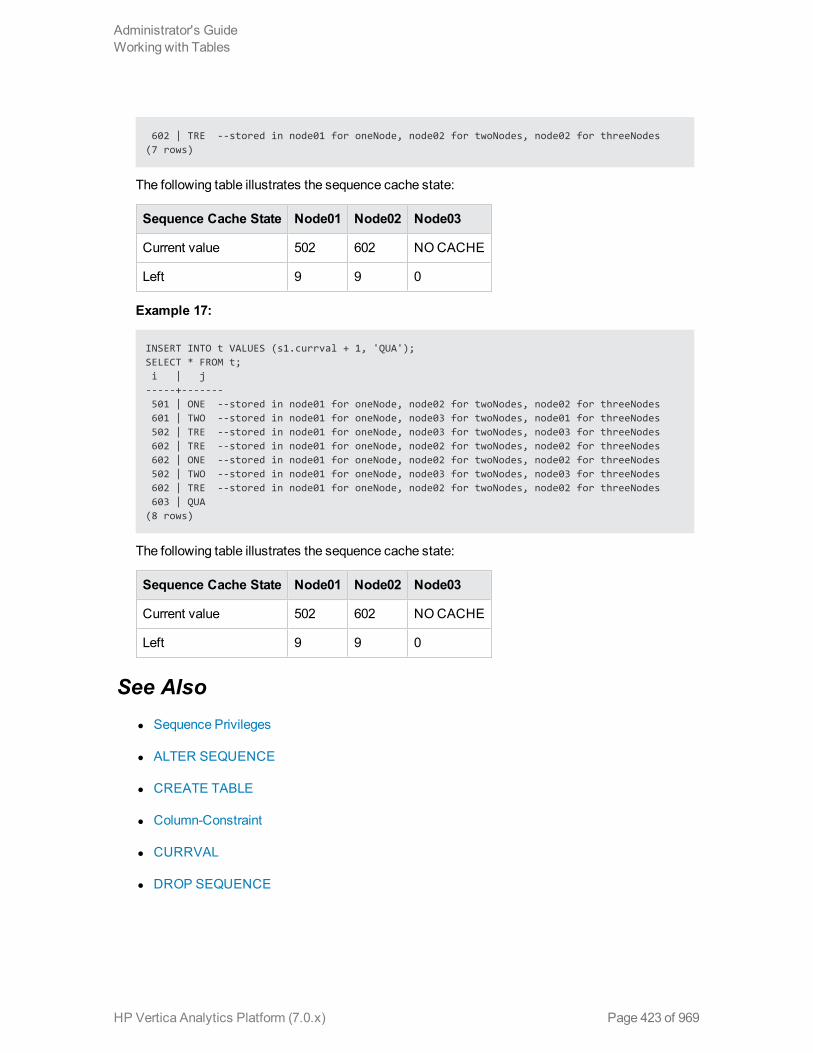
602 | TRE --stored in node01 for oneNode, node02 for twoNodes, node02 for threeNodes(7 rows)
The following table illustrates the sequence cache state:
Sequence Cache State Node01 Node02 Node03
Current value 502 602 NOCACHE
Left 9 9 0
Example 17:
INSERT INTO t VALUES (s1.currval + 1, 'QUA');SELECT * FROM t;i | j
-----+-------501 | ONE --stored in node01 for oneNode, node02 for twoNodes, node02 for threeNodes601 | TWO --stored in node01 for oneNode, node03 for twoNodes, node01 for threeNodes502 | TRE --stored in node01 for oneNode, node03 for twoNodes, node03 for threeNodes602 | TRE --stored in node01 for oneNode, node02 for twoNodes, node02 for threeNodes602 | ONE --stored in node01 for oneNode, node02 for twoNodes, node02 for threeNodes502 | TWO --stored in node01 for oneNode, node03 for twoNodes, node03 for threeNodes602 | TRE --stored in node01 for oneNode, node02 for twoNodes, node02 for threeNodes603 | QUA
(8 rows)
The following table illustrates the sequence cache state:
Sequence Cache State Node01 Node02 Node03
Current value 502 602 NOCACHE
Left 9 9 0
See Alsol Sequence Privileges
l ALTER SEQUENCE
l CREATE TABLE
l Column-Constraint
l CURRVAL
l DROP SEQUENCE
Administrator's GuideWorking with Tables
HP Vertica Analytics Platform (7.0.x) Page 423 of 969

l GRANT (Sequence)
l NEXTVAL
Loading SequencesYou can use a sequence as part of creating a table. The sequencemust already exist, and havebeen instantiated using the NEXTVAL statement.
Creating and Instantiating a SequenceThe following example creates an ascending sequence called my_seq, starting at 100:
dbt=> create sequence my_seq START 100;CREATE SEQUENCE
After creating a sequence, youmust call the NEXTVAL function at least once in a session to createa cache for the sequence and its initial value. Subsequently, use NEXTVAL to increment thesequence. Use the CURRVAL function to get the current value.
The following NEXTVAL function instantiates the newly-created my_seq sequence and sets its firstnumber:
=> SELECT NEXTVAL('my_seq');nextval
---------100
(1 row)
If you call CURRVAL before NEXTVAL, the system returns an error:
dbt=> SELECT CURRVAL('my_seq');ERROR 4700: Sequence my_seq has not been accessed in the session
Using a Sequence in an INSERT CommandUpdate sequence number values by calling the NEXTVAL function, which increments/decrementsthe current sequence and returns the next value. Use CURRVAL to return the current value. Thesefunctions can also be used in INSERT and COPY expressions.
The following example shows how to use a sequence as the default value for an INSERTcommand:
CREATE TABLE customer2( ID INTEGER DEFAULT NEXTVAL('my_seq'),lname VARCHAR(25),fname VARCHAR(25),membership_card INTEGER
Administrator's GuideWorking with Tables
HP Vertica Analytics Platform (7.0.x) Page 424 of 969

);INSERT INTO customer2 VALUES (default,'Carr', 'Mary', 87432);
Now query the table you just created. The column named ID has been incremented by (1) again to104:
SELECT * FROM customer2; ID | lname | fname | membership_card-----+-------+-------+-----------------104 | Carr | Mary | 87432
(1 row)
Dropping SequencesUse the DROP SEQUENCE function to remove a sequence. You cannot drop a sequence:
l If other objects depend on the sequence. The CASCADE keyword is not supported.
l That is used in the default expression of a column until all references to the sequence areremoved from the default expression.
ExampleThe following command drops the sequence named my_sequence:
=> DROP SEQUENCE my_sequence;
Synchronizing Table Data with MERGEThemost convenient way to update, delete, and/or insert table data is using the MERGE statement,where you can combinemultiple operations in a single command. When you write a MERGEstatement, you specify the following:
l A target table—Themaster table that contains existing rows you want to update or insert intousing rows from another (source) table.
l A source table—The table that contains the new and/or changed rows you'll use to update thetarget table.
l A search condition—Themerge join columns, specified in the ON clause, that HP Vertica uses toevaluate each row in the source table to update, delete, and/or insert rows into the target table.
l Additional filters that instruct HP Vertica what to do when the search condition is or is not met.For example, when you use:
n WHEN MATCHED THEN UPDATE clause—HP Vertica updates and/or deletes existing rows inthe target table with data from the source table.
Administrator's GuideWorking with Tables
HP Vertica Analytics Platform (7.0.x) Page 425 of 969

Note: HP Vertica assumes the values in themerge join column are unique. If more thanonematching value is present in either the target or source table's join column, the MERGEstatement could fail with a run-time error. SeeOptimized Versus Non-optimizedMERGEfor more information.
n WHEN NOT MATCHED THEN INSERT clause—HP Vertica inserts into the target table all rowsfrom the source table that do not match any rows in the target table.
Optimized Versus Non-Optimized MERGEBy default, HP Vertica prepares an optimized query plan to improvemerge performance when theMERGE statement and its tables meet certain criteria. If the criteria are not met, MERGE could runwithout optimization or return a run-time error. This section describes scenarios for both optimizedand non-optimizedMERGE.
Conditions for an Optimized MERGEHP Vertica prepares an optimized query plan when all of the following conditions are true:
l The target table's join column has a unique or primary key constraint
l UPDATE and INSERT clauses include every column in the target table
l UPDATE and INSERT clause column attributes are identical
When the above conditions are not met, HP Vertica prepares a non-optimized query plan, andMERGE runs with the same performance as in HP Vertica 6.1 and prior.
Note: The source table's join column does not require a unique or primary key constraint to beeligible for an optimized query plan. Also, the source table can contain more columns than thetarget table, as long as the UPDATE and INSERT clauses use the same columns and the columnattributes are the same.
How to determine if a MERGE statement is eligible for optimization
To determine whether a MERGE statement is eligible for optimization, prefix MERGEwith the EXPLAINkeyword and examine the plan's textual output. (See Viewing theMERGE Query Plan forexamples.) A a Semi path indicates the statement is eligible for optimization, whereas a RightOuter path indicates the statement is ineligible and will run with the same performance as MERGE inprevious releases unless a duplicate merge join key is encountered at query run time.
About duplicate matching values in the join columnEven if the MERGE statement and its tables meet the required criteria for optimization, MERGE couldfail with a run-time error if there are duplicate values in the join column.
Administrator's GuideWorking with Tables
HP Vertica Analytics Platform (7.0.x) Page 426 of 969

WhenHP Vertica prepares an optimized query plan for amerge operation, it enforces strictrequirements for unique and primary key constraints in the MERGE statement's join columns. If youhaven't enforced constraints, MERGE fails under the following scenarios:
l Duplicates in the source table. If HP Vertica finds more than onematching value in the sourcejoin column for a corresponding value in the target table, MERGE fails with a run-time error.
l Duplicates in the target table. If HP Vertica finds more than onematching value in target joincolumn for a corresponding value in the source table, and the target join column has a unique orprimary key constraint, MERGE fails with a run-time error. If the target join column has no suchconstraint, the statement runs without error and without optimization.
Be aware that if you run MERGEmultiple times using the same target and source table, eachstatement run has the potential to introduce duplicate values into the join columns, such as if youuse constants in the UPDATE/INSERT clauses. These duplicates could cause a run-time error thenext time you run MERGE.
To avoid duplicate key errors, be sure to enforce constraints you declare to assure unique values inthemerge join column.
ExamplesThe examples that follow use a simple schema to illustrate some of the conditions under which HPVertica prepares or does not prepare an optimized query plan for MERGE:
CREATE TABLE target(a INT PRIMARY KEY, b INT, c INT) ORDER BY b,a;CREATE TABLE source(a INT, b INT, c INT) ORDER BY b,a;INSERT INTO target VALUES(1,2,3);INSERT INTO target VALUES(2,4,7);INSERT INTO source VALUES(3,4,5);INSERT INTO source VALUES(4,6,9);COMMIT;
Example of an optimized MERGE statement
HP Vertica can prepare an optimized query plan for the following MERGE statement because:
l The target table's join column (ON t.a=s.a) has a primary key constraint
l All columns in the target table (a,b,c) are included in the UPDATE and INSERT clauses
l Columns attributes specified in the UPDATE and INSERT clauses are identical
MERGE INTO target t USING source s ON t.a = s.aWHEN MATCHED THEN UPDATE SET a=s.a, b=s.b, c=s.cWHEN NOT MATCHED THEN INSERT(a,b,c) VALUES(s.a,s.b,s.c);
OUTPUT--------2(1 row)
Administrator's GuideWorking with Tables
HP Vertica Analytics Platform (7.0.x) Page 427 of 969

The output value of 2 indicates success and denotes the number of rows updated/inserted from thesource into the target.
Example of a non-optimized MERGE statement
In the next example, the MERGE statement runs without optimization because the column attributesin the UPDATE/INSERT clauses are not identical. Specifically, the UPDATE clause includes constantsfor columns s.a and s.c and the INSERT clause does not:
MERGE INTO target t USING source s ON t.a = s.aWHEN MATCHED THEN UPDATE SET a=s.a + 1, b=s.b, c=s.c - 1WHEN NOT MATCHED THEN INSERT(a,b,c) VALUES(s.a,s.b,s.c);
Tomake the previous MERGE statement eligible for optimization, rewrite the statement as follows,so the attributes in the UPDATE and INSERT clauses are identical:
MERGE INTO target t USING source s ON t.a = s.aWHEN MATCHED THEN UPDATE SET a=s.a + 1, b=s.b, c=s.c -1WHEN NOT MATCHED THEN INSERT(a,b,c)
VALUES(s.a + 1, s.b, s.c - 1);
Troubleshooting the MERGE StatementHere are a few things to consider so that HP Vertica will prepare an optimized query plan for MERGE,or to check if you encounter run-time errors after you run the MERGE statement.
MERGE performance considerationsYou can help improve the performance of MERGE operations by ensuring projections are designed foroptimal use. See Projection Design for MergeOperations.
You can also improve the chances that HP Vertica prepares an optimized query plan for a MERGEstatement by making sure the statement and its tables meet certain requirements. See thefollowing topics for more information:
l Optimized Versus Non-optimizedMERGE
l Viewing theMERGE Plan
Duplicate values in the merge join keyHP Vertica assumes that the data you want to merge conforms with constraints you declare. Toavoid duplicate key errors, be sure to enforce declared constraints to assure unique values in themerge join column. If the MERGE statement fails with a duplicate key error, youmust correct yourdata.
Also, be aware that if you run MERGEmultiple times with the same target and source tables, youcould introduce duplicate values into the join columns, such as if you use constants in theUPDATE/INSERT clauses. These duplicates could cause a run-time error.
Administrator's GuideWorking with Tables
HP Vertica Analytics Platform (7.0.x) Page 428 of 969

Using MERGE with sequencesIf you are using named sequences, HP Vertica can perform a MERGE operation if you omit thesequence from the query.
You cannot run MERGE on identity/auto-increment columns or on columns that have primary key orforeign key referential integrity constraints, as defined in CREATE TABLE column-constraint syntax.
Dropping and Truncating TablesHP Vertica provides two statements tomanage tables: DROP TABLE and TRUNCATE TABLE.You cannot truncate an external table.
Dropping TablesDropping a table removes its definition from the HP Vertica database. For the syntax details of thisstatement, see DROP TABLE in the SQLReferenceManual.
To drop a table, use the statement as follows:
=> DROP TABLE IF EXISTS mytable;DROP TABLE=> DROP TABLE IF EXISTS mytable; -- Doesn't existNOTICE: Nothing was droppedDROP TABLE
You cannot use the CASCADE option to drop an external table, since the table is read-only, youcannot remove any of its associated files.
Truncating TablesTruncating a table removes all storage associated with the table, but preserves the table definitions.Use TRUNCATE TABLE for testing purposes to remove all table data without having to recreateprojections when you reload table data. For the syntax details of this statement, see TRUNCATETABLE in the SQLReferenceManual. You cannot truncate an external table.
The TRUNCATE TABLE statement commits the entire transaction after statement execution, evenif truncating the table fails. You cannot roll back a TRUNCATE statement.
If the truncated table is a large single (fact) table containing pre-join projections, the projectionsshow zero (0) rows after the transaction completes and the table is ready for data reload.
If the table to truncate is a dimension table, drop the pre-join projections before executing theTRUNCATE TABLE statement. Otherwise, the statement returns the following error:
Cannot truncate a dimension table with pre-joined projections
If the truncated table has out-of-date projections, those projections are cleared andmarked up-to-date after the TRUNCATE TABLE operation completes.
Administrator's GuideWorking with Tables
HP Vertica Analytics Platform (7.0.x) Page 429 of 969

TRUNCATE TABLE takes anO (Owner) lock on the table until the truncation process completes,and the savepoint is then released.
Administrator's GuideWorking with Tables
HP Vertica Analytics Platform (7.0.x) Page 430 of 969

About ConstraintsConstraints specify rules on data that can go into a column. Some examples of constraints are:
l Primary or foreign key
l Uniqueness
l Not NULL
l Default values
l Automatically incremented values
l Values that are generated by the database
Use constraints when you want to ensure the integrity of your data in one or more columns, but beaware that it is your responsibility to ensure data integrity. HP Vertica can use constraints toperform optimizations (such as the optimized MERGE) that assume the data is consistent. Do notdefine constraints on columns unless you expect to keep the data consistent.
Administrator's GuideAbout Constraints
HP Vertica Analytics Platform (7.0.x) Page 431 of 969

Adding ConstraintsAdd constraints on one or more table columns using the following SQL commands:
l CREATE TABLE—Add a constraint on one or more columns.
l ALTER TABLE—Add or drop a constraint on one or more columns.
There are two syntax definitions you can use to add or change a constraint:
l column-constraint—Use this syntax when you add a constraint on a column definition in aCREATE TABLE statement.
l table-constraint—Use this syntax when you add a constraint after a column definition in aCREATE TABLE statement, or when you add, alter, or drop a constraint on a column usingALTER TABLE.
HP Vertica recommends naming a constraint but it is optional; if you specify the CONSTRAINTkeyword, youmust give a name for the constraint.
The examples that follow illustrate several ways of adding constraints. For additional details, see:
l Primary Key Constraints
l Foreign Key Constraints
l Unique Constraints
l Not NULLConstraints
Adding Column Constraints with CREATE TABLEThere are several ways to add a constraint on a column using CREATE TABLE:
l On the column definition using the CONSTRAINT keyword, which requires that you assign aconstraint name, in this example, dim1PK:
CREATE TABLE dim1 ( c1 INTEGER CONSTRAINT dim1PK PRIMARY KEY,c2 INTEGER
);
l On the column definition, omitting the CONSTRAINT keyword. When you omit theCONSTRAINT keyword, you cannot specify a constraint name:
CREATE TABLE dim1 ( c1 INTEGER PRIMARY KEY,c2 INTEGER
Administrator's GuideAbout Constraints
HP Vertica Analytics Platform (7.0.x) Page 432 of 969

);
l After the column definition, using the CONSTRAINT keyword and assigning a name, in thisexample, dim1PK:
CREATE TABLE dim1 ( c1 INTEGER,c2 INTEGER,CONSTRAINT dim1pk PRIMARY KEY(c1)
);
l After the column definition, omitting the CONSTRAINT keyword:
CREATE TABLE dim1 ( c1 INTEGER,c2 INTEGER,PRIMARY KEY(c1)
);
Adding Two Constraints on a ColumnTo addmore than one constraint on a column, specify the constraints one after another when youcreate the table column. For example, the following statement enforces both not NULL and uniqueconstraints on the customer_key column, indicating that the column values cannot be NULL andmust be unique:
CREATE TABLE test1 ( id INTEGER NOT NULL UNIQUE,...
);
Adding a Foreign Key Constraint on a ColumnThere are four ways to add a foreign key constraint on a column using CREATE TABLE. TheFOREIGN KEY keywords are not valid on the column definition, only after the column definition:
l On the column definition, use the CONSTRAINT and REFERENCES keywords and name theconstraint, in this example, fact1dim1PK. This example creates a columnwith a named foreignkey constraint referencing the table (dim1) with the primary key (c1):
CREATE TABLE fact1 ( c1 INTEGER CONSTRAINT fact1dim1FK REFERENCES dim1(c1),c2 INTEGER
);
l On the column definition, omit the CONSTRAINT keyword and use the REFERENCESkeyword with the table name and column:
Administrator's GuideAbout Constraints
HP Vertica Analytics Platform (7.0.x) Page 433 of 969

CREATE TABLE fact1 ( c1 INTEGER REFERENCES dim1(c1),c2 INTEGER
);
l After the column definition, use the CONSTRAINT, FOREIGN KEY, and REFERENCESkeywords and name the constraint:
CREATE TABLE fact1 ( c1 INTEGER,c2 INTEGER,CONSTRAINT fk1 FOREIGN KEY(c1) REFERENCES dim1(c1)
);
l After the column definition, omitting the CONSTRAINT keyword:
CREATE TABLE fact1 ( c1 INTEGER,c2 INTEGER,FOREIGN KEY(c1) REFERENCES dim1(c1)
);
Each of the following ALTER TABLE statements adds a foreign key constraint on an existingcolumn, with and without using the CONSTRAINT keyword:
ALTER TABLE fact2ADD CONSTRAINT fk1 FOREIGN KEY (c1) REFERENCES dim2(c1);
or
ALTER TABLE fact2 ADD FOREIGN KEY (c1) REFERENCES dim2(c1);
For additional details, see Foreign Key Constraints.
Adding Multicolumn ConstraintsThe following example defines a primary key constraint onmultiple columns by first defining thetable columns (c1 and c2), and then specifying both columns in a PRIMARY KEY clause:
CREATE TABLE dim ( c1 INTEGER,c2 INTEGER,PRIMARY KEY (c1, c2)
);
To specify multicolumn (compound) primary keys, the following example uses CREATE TABLE todefine the columns. After creating the table, ALTER TABLE defines the compound primary key andnames it dim2PK:
CREATE TABLE dim2 ( c1 INTEGER,
Administrator's GuideAbout Constraints
HP Vertica Analytics Platform (7.0.x) Page 434 of 969

c2 INTEGER,c3 INTEGER NOT NULL,c4 INTEGER UNIQUE
);ALTER TABLE dim2
ADD CONSTRAINT dim2PK PRIMARY KEY (c1, c2);
In the next example, you define a compound primary key as part of the CREATE TABLEstatement. Then you specify thematching foreign key constraint to table dim2 using CREATETABLE and ALTER TABLE:
CREATE TABLE dim2 ( c1 INTEGER,c2 INTEGER,c3 INTEGER NOT NULL,c4 INTEGER UNIQUE,PRIMARY KEY (c1, c2)
);CREATE TABLE fact2 (
c1 INTEGER,c2 INTEGER,c3 INTEGER NOT NULL,c4 INTEGER UNIQUE
);ALTER TABLE fact2
ADD CONSTRAINT fact2FK FOREIGN KEY (c1, c2) REFERENCES dim2(c1, c2);
Specify a foreign key constraint using a reference to the table that contains the primary key. In theADD CONSTRAINT clause, the REFERENCES column names are optional. The followingALTER TABLE statement is equivalent to the previous ALTER TABLE statement:
ALTER TABLE fact2ADD CONSTRAINT fact2FK FOREIGN KEY (c1, c2) REFERENCES dim2;
Adding Constraints on Tables with Existing DataWhen you add a constraint on a columnwith existing data, HP Vertica does not check to ensurethat the column does not contain invalid values. If your data does not conform to the declaredconstraints, your queries could yield unexpected results.
Use ANALYZE_CONSTRAINTS to check for constraint violations in your column. If you findviolations, use the ALTER COLUMN SET/DROP parameters of the ALTER TABLE statement toapply or remove a constraint on an existing column.
Adding and Changing Constraints on Columns UsingALTER TABLE
The following example uses ALTER TABLE to add a column (b) with not NULL and default 5constraints to a table (test6):
CREATE TABLE test6 (a INT);ALTER TABLE test6 ADD COLUMN b INT DEFAULT 5 NOT NULL;
Administrator's GuideAbout Constraints
HP Vertica Analytics Platform (7.0.x) Page 435 of 969

Use ALTER TABLE with the ALTER COLUMN and SET NOT NULL clauses to add the constrainton column a in table test6:
ALTER TABLE test6 ALTER COLUMN a SET NOT NULL;
Adding and Dropping NOT NULL ColumnConstraints
Use the SET NOT NULL or DROP NOT NULL clause to add or remove a not NULL columnconstraint. Use these clauses to ensure that the column has the proper constraints when you haveadded or removed a primary key constraint on a column, or any time you want to add or remove thenot NULL constraint.
Note: A PRIMARY KEY constraint includes a not NULL constraint, but if you drop thePRIMARY KEY constraint on a column, the not NULL constraint remains on that column.
Examples
ALTER TABLE T1 ALTER COLUMN x SET NOT NULL;ALTER TABLE T1 ALTER COLUMN x DROP NOT NULL;
Formore information, see Altering Table Definitions.
Enforcing ConstraintsTomaximize query performance, HP Vertica checks for primary key and foreign key violationswhen loading into the fact table of a pre-join projection. For more details, see Enforcing PrimaryKey and Foreign Key Constraints.
HP Vertica checks for not NULL constraint violations when loading data, but it does not check forunique constraint violations.
To enforce constraints, load data without committing it using the COPY with NOCOMMIT optionand then perform a post-load check using the ANALYZE_CONSTRAINTS function. If constraintviolations are found, you can roll back the load because you have not committed it. For moredetails, see Detecting Constraint Violations.
See Alsol ALTER TABLE
l CREATE TABLE
l COPY
l ANALYZE_CONSTRAINTS
Administrator's GuideAbout Constraints
HP Vertica Analytics Platform (7.0.x) Page 436 of 969

Primary Key ConstraintsA primary key (PK) is a single column or combination of columns (called a compound key) thatuniquely identifies each row in a table. A primary key constraint contains unique, non-null values.
When you apply the primary key constraint, the not NULL and unique constraints are addedimplicitly. You do not need to specify them when you create the column. However, if you removethe primary key constraint, the not NULL constraint continues to apply to the column. To removethe not NULL constraint after removing the primary key constraint, use the ALTER COLUMNDROP NOT NULL parameter of the ALTER TABLE statement (see Dropping Constraints).
The following statement adds a primary key constraint on the employee_id field:
CREATE TABLE employees ( employee_id INTEGER PRIMARY KEY);
Alternatively, you can add a primary key constraint after the column is created:
CREATE TABLE employees ( employee_id INTEGER);
ALTER TABLE employeesADD PRIMARY KEY (employee_id);
Note: If you specify a primary key constraint using ALTER TABLE, the system returns thefollowingmessage, which is informational only. The primary key constraint is added to thedesignated column.
Note: WARNING 2623: Column "employee_id" definition changed to NOT NULL
Primary keys can also constrain more than one column:
CREATE TABLE employees ( employee_id INTEGER,employee_gender CHAR(1),PRIMARY KEY (employee_id, employee_gender)
);
Foreign Key ConstraintsA foreign key (FK) is a column that is used to join a table to other tables to ensure referentialintegrity of the data. A foreign key constraint requires that a column contain only values from theprimary key column on a specific dimension table.
A columnwith a foreign key constraint can contain NULL values if it does not also have a not NULLconstraint, even though the NULL value does not appear in the PRIMARY KEY column of thedimension table. This allows rows to be inserted into the table even if the foreign key is not yetknown.
Administrator's GuideAbout Constraints
HP Vertica Analytics Platform (7.0.x) Page 437 of 969

In HP Vertica, the fact table's join columns are required to have foreign key constraints in order toparticipate in pre-join projections. If the fact table join column has a foreign key constraint, outerjoin queries produce the same result set as inner join queries.
You can add a FOREIGN KEY constraint solely by referencing the table that contains the primarykey. The columns in the referenced table do not need to be specified explicitly.
ExamplesCreate a table called inventory to store inventory data:
CREATE TABLE inventory ( date_key INTEGER NOT NULL,product_key INTEGER NOT NULL,warehouse_key INTEGER NOT NULL,...
);
Create a table called warehouse to store warehouse information:
CREATE TABLE warehouse ( warehouse_key INTEGER NOT NULL PRIMARY KEY,warehouse_name VARCHAR(20),...
);
To ensure referential integrity between the inventory and warehouse tables, define a foreign keyconstraint called fk_inventory_warehouse on the inventory table that references the warehousetable:
ALTER TABLE inventory ADD CONSTRAINT fk_inventory_warehouse FOREIGN KEY(warehouse_key)REFERENCES warehouse(warehouse_key);
In this example, the inventory table is the referencing table and the warehouse table is thereferenced table.
You can also create the foreign key constraint in the CREATE TABLE statement that creates thewarehouse table, eliminating the need for the ALTER TABLE statement. If you do not specify oneor more columns, the PRIMARY KEY of the referenced table is used:
CREATE TABLE warehouse (warehouse_key INTEGER NOT NULL PRIMARY KEY REFERENCES warehouse,warehouse_name VARCHAR(20),...);
A foreign key can also constrain and referencemultiple columns. The following example usesCREATE TABLE to add a foreign key constraint to a pair of columns:
CREATE TABLE t1 ( c1 INTEGER PRIMARY KEY,c2 INTEGER,c3 INTEGER,FOREIGN KEY (c2, c3) REFERENCES other_table (c1, c2)
);
Administrator's GuideAbout Constraints
HP Vertica Analytics Platform (7.0.x) Page 438 of 969

The following two examples use ALTER TABLE to add a foreign key constraint to a pair ofcolumns. When you use the CONSTRAINT keyword, youmust specify a constraint name:
ALTER TABLE tADD FOREIGN KEY (a, b) REFERENCES other_table(c, d);
ALTER TABLE tADD CONSTRAINT fk_cname FOREIGN KEY (a, b) REFERENCES other_table(c, d);
Note: The FOREIGN KEY keywords are valid only after the column definition, not on thecolumn definition.
Unique ConstraintsUnique constraints ensure that the data contained in a column or a group of columns is unique withrespect to all rows in the table.
Note: If you add a unique constraint to a column and then insert data into that column that isnot unique with respect to other values in that column, HP Vertica inserts the data anyway. Ifyour data does not conform to the declared constraints, your queries could yield unexpectedresults. Use ANALYZE_CONSTRAINTS to check for constraint violations.
There are several ways to add a unique constraint on a column. If you use the CONSTRAINTkeyword, youmust specify a constraint name. The following example adds a UNIQUE constrainton the product_key column and names it product_key_UK:
CREATE TABLE product ( product_key INTEGER NOT NULL CONSTRAINT product_key_UK UNIQUE,...
);
HP Vertica recommends naming constraints, but it is optional:
CREATE TABLE product ( product_key INTEGER NOT NULL UNIQUE,...
);
You can specify the constraint after the column definition, with and without naming it:
CREATE TABLE product ( product_key INTEGER NOT NULL,...,CONSTRAINT product_key_uk UNIQUE (product_key)
);CREATE TABLE product (
product_key INTEGER NOT NULL,...,UNIQUE (product_key)
);
You can also use ALTER TABLE to specify a unique constraint. This example names theconstraint product_key_UK:
Administrator's GuideAbout Constraints
HP Vertica Analytics Platform (7.0.x) Page 439 of 969

ALTER TABLE product ADD CONSTRAINT product_key_UK UNIQUE (product_key);
You can use CREATE TABLE and ALTER TABLE to specify unique constraints onmultiplecolumns. If a unique constraint refers to a group of columns, separate the column names usingcommas. The column listing specifies that the combination of values in the indicated columns isunique across the whole table, though any one of the columns need not be (and ordinarily isn't)unique:
CREATE TABLE dim1 ( c1 INTEGER,c2 INTEGER,c3 INTEGER,
UNIQUE (c1, c2));
Not NULL ConstraintsA not NULL constraint specifies that a column cannot contain a null value. This means that newrows cannot be inserted or updated unless you specify a value for this column.
You can apply the not NULL constraint when you create a column using the CREATE TABLEstatement. You can also add or drop the not NULL constraint to an existing column using,respectively:
l ALTER TABLE t ALTER COLUMN x SET NOT NULL
l ALTER TABLE t ALTER COLUMN x DROP NOT NULL
The not NULL constraint is implicitly applied to a columnwhen you add thePRIMARY KEY (PK)constraint. When you designate a column as a primary key, you do not need to specify the notNULL constraint.
However, if you remove the primary key constraint, the not NULL constraint still applies to thecolumn. Use the ALTER COLUMN x DROP NOT NULL parameter of the ALTER TABLEstatement to drop the not NULL constraint after dropping the primary key constraint.
The following statement enforces a not NULL constraint on the customer_key column, specifyingthat the column cannot accept NULL values.
CREATE TABLE customer ( customer_key INTEGER NOT NULL,...
);
Administrator's GuideAbout Constraints
HP Vertica Analytics Platform (7.0.x) Page 440 of 969

Dropping ConstraintsTo drop named constraints, use the ALTER TABLE command.
The following example drops the constraint factfk2:
=> ALTER TABLE fact2 DROP CONSTRAINT fact2fk;
To drop constraints that you did not assign a name to, query the system table TABLE_CONSTRAINTS, which returns both system-generated and user-named constraint names:
=> SELECT * FROM TABLE_CONSTRAINTS;
If you do not specify a constraint name, HP Vertica assigns a constraint name that is unique to thattable. In the following output, note the system-generated constraint name C_PRIMARY and the user-defined constraint name fk_inventory_date:
-[ RECORD 1 ]--------+--------------------------constraint_id | 45035996273707984constraint_name | C_PRIMARYconstraint_schema_id | 45035996273704966constraint_key_count | 1foreign_key_count | 0table_id | 45035996273707982foreign_table_id | 0constraint_type | p-[ ... ]---------+---------------------------[ RECORD 9 ]--------+--------------------------constraint_id | 45035996273708016constraint_name | fk_inventory_dateconstraint_schema_id | 0constraint_key_count | 1foreign_key_count | 1table_id | 45035996273708014foreign_table_id | 45035996273707994constraint_type | f
Once you know the name of the constraint, you can then drop it using the ALTER TABLEcommand. (If you do not know the table name, use table_id to retrieve table_name from the ALL_TABLES table.)
Notesl Primary key constraints cannot be dropped if there is another table with a foreign key constraint
that references the primary key.
l A foreign key constraint cannot be dropped if there are any pre-join projections on the table.
l Dropping a primary or foreign key constraint does not automatically drop the not NULL constrainton a column. You need tomanually drop this constraint if you no longer want it.
Administrator's GuideAbout Constraints
HP Vertica Analytics Platform (7.0.x) Page 441 of 969

See Alsol ALTER TABLE
Administrator's GuideAbout Constraints
HP Vertica Analytics Platform (7.0.x) Page 442 of 969

Enforcing Primary Key and Foreign KeyConstraints
Enforcing Primary Key ConstraintsHP Vertica does not enforce the uniqueness of primary keys when they are loaded into a table.However, when data is loaded into a table with a pre-joined dimension, or when the table is joined toa dimension table during a query, a key enforcement error could result if there is not exactly onedimension row that matches each foreign key value.
Note: : Consider using sequences or auto-incrementing columns for primary key columns,which guarantees uniqueness and avoids the constraint enforcement problem and associatedoverhead. For more information, see Using Sequences.
Enforcing Foreign Key ConstraintsA table's foreign key constraints are enforced during data load only if there is a pre-join projectionthat has that table as its anchor table. If there no such pre-join projection exists, then it is possibleto load data that causes a constraint violation. Subsequently, a constraint violation error canhappen when:
l An inner join query is processed.
l An outer join is treated as an inner join due to the presence of foreign key.
l A new pre-join projection anchored on the table with the foreign key constraint is refreshed.
Detecting Constraint Violations Before You CommitData
To detect constraint violations, you can load data without committing it using the COPY statementwith the NOCOMMIT option, and then perform a post-load check using the ANALYZE_CONSTRAINTS function. If constraint violations exist, you can roll back the load because youhave not committed it. For more details, see Detecting Constraint Violations.
Administrator's GuideAbout Constraints
HP Vertica Analytics Platform (7.0.x) Page 443 of 969

Detecting Constraint ViolationsThe ANALYZE_CONSTRAINTS() function analyzes and reports on constraint violations within thecurrent schema search path. To check for constraint violations:
l Pass an empty argument to check for violations on all tables within the current schema
l Pass a single table argument to check for violations on the specified table
l Pass two arguments, a table name and a column or list of columns, to check for violations inthose columns
Given the following inputs, HP Vertica returns one row, indicating one violation, because the sameprimary key value (10) was inserted into table t1 twice:
CREATE TABLE t1(c1 INT);ALTER TABLE t1 ADD CONSTRAINT pk_t1 PRIMARY KEY (c1);CREATE PROJECTION t1_p (c1) AS SELECT *
FROM t1 UNSEGMENTED ALL NODES;INSERT INTO t1 values (10);INSERT INTO t1 values (10); --Duplicate primary key value
\xExpanded display is on.
SELECT ANALYZE_CONSTRAINTS('t1');-[ RECORD 1 ]---+--------Schema Name | publicTable Name | t1Column Names | c1Constraint Name | pk_t1Constraint Type | PRIMARYColumn Values | ('10')
If the second INSERT statement above had contained any different value, the result would havebeen 0 rows (no violations).
In the following example, create a table that contains three integer columns, one a unique key andone a primary key:
CREATE TABLE table_1( a INTEGER,b_UK INTEGER UNIQUE,c_PK INTEGER PRIMARY KEY
);
Issue a command that refers to a nonexistent table and column:
SELECT ANALYZE_CONSTRAINTS('a_BB');ERROR: 'a_BB' is not a table name in the current search path
Issue a command that refers to a nonexistent column:
Administrator's GuideAbout Constraints
HP Vertica Analytics Platform (7.0.x) Page 444 of 969

SELECT ANALYZE_CONSTRAINTS('table_1','x');ERROR 41614: Nonexistent columns: 'x '
Insert some values into table table_1 and commit the changes:
INSERT INTO table_1 values (1, 1, 1);COMMIT;
Run ANALYZE_CONSTRAINTS on table table_1. No constraint violations are reported:
SELECT ANALYZE_CONSTRAINTS('table_1');(No rows)
Insert duplicate unique and primary key values and run ANALYZE_CONSTRAINTS on tabletable_1 again. The system shows two violations: one against the primary key and one against theunique key:
INSERT INTO table_1 VALUES (1, 1, 1);COMMIT;SELECT ANALYZE_CONSTRAINTS('table_1');
-[ RECORD 1 ]---+----------Schema Name | publicTable Name | table_1Column Names | b_UKConstraint Name | C_UNIQUEConstraint Type | UNIQUEColumn Values | ('1')-[ RECORD 2 ]---+----------Schema Name | publicTable Name | table_1Column Names | c_PKConstraint Name | C_PRIMARYConstraint Type | PRIMARYColumn Values | ('1')
The following command looks for constraint validations on only the unique key in the table table_1,qualified with its schema name:
=> SELECT ANALYZE_CONSTRAINTS('public.table_1', 'b_UK');
-[ RECORD 1 ]---+---------Schema Name | publicTable Name | table_1Column Names | b_UKConstraint Name | C_UNIQUEConstraint Type | UNIQUEColumn Values | ('1')
(1 row)
Administrator's GuideAbout Constraints
HP Vertica Analytics Platform (7.0.x) Page 445 of 969

The following example shows that you can specify the same columnmore than once; ANALYZE_CONSTRAINTS, however, returns the violation only once:
SELECT ANALYZE_CONSTRAINTS('table_1', 'c_PK, C_PK');-[ RECORD 1 ]---+----------Schema Name | publicTable Name | table_1Column Names | c_PKConstraint Name | C_PRIMARYConstraint Type | PRIMARYColumn Values | ('1')
The following example creates a new table, table_2, and inserts a foreign key and different(character) data types:
CREATE TABLE table_2 (x VARCHAR(3),y_PK VARCHAR(4),z_FK INTEGER REFERENCES table_1(c_PK));
Alter the table to create amulticolumn unique key andmulticolumn foreign key and createsuperprojections:
ALTER TABLE table_2ADD CONSTRAINT table_2_multiuk PRIMARY KEY (x, y_PK);
WARNING 2623: Column "x" definition changed to NOT NULLWARNING 2623: Column "y_PK" definition changed to NOT NULL
The following command inserts amissing foreign key (0) into table dim_1 and commits thechanges:
INSERT INTO table_2 VALUES ('r1', 'Xpk1', 0);COMMIT;
Checking for constraints on the table table_2 in the public schema detects a foreign keyviolation:
=> SELECT ANALYZE_CONSTRAINTS('public.table_2');
-[ RECORD 1 ]---+----------Schema Name | publicTable Name | table_2Column Names | z_FKConstraint Name | C_FOREIGNConstraint Type | FOREIGNColumn Values | ('0')
Now add a duplicate value into the unique key and commit the changes:
INSERT INTO table_2 VALUES ('r2', 'Xpk1', 1);INSERT INTO table_2 VALUES ('r1', 'Xpk1', 1);
Administrator's GuideAbout Constraints
HP Vertica Analytics Platform (7.0.x) Page 446 of 969

COMMIT;
Checking for constraint violations on table table_2 detects the duplicate unique key error:
SELECT ANALYZE_CONSTRAINTS('table_2');-[ RECORD 1 ]---+----------------Schema Name | publicTable Name | table_2Column Names | z_FKConstraint Name | C_FOREIGNConstraint Type | FOREIGNColumn Values | ('0')-[ RECORD 2 ]---+----------------Schema Name | publicTable Name | table_2Column Names | x, y_PKConstraint Name | table_2_multiukConstraint Type | PRIMARYColumn Values | ('r1', 'Xpk1')
Create a table with multicolumn foreign key and create the superprojections:
CREATE TABLE table_3(z_fk1 VARCHAR(3),z_fk2 VARCHAR(4));
ALTER TABLE table_3ADD CONSTRAINT table_3_multifk FOREIGN KEY (z_fk1, z_fk2)
REFERENCES table_2(x, y_PK);
Insert a foreign key that matches a foreign key in table table_2 and commit the changes:
INSERT INTO table_3 VALUES ('r1', 'Xpk1');COMMIT;
Checking for constraints on table table_3 detects no violations:
SELECT ANALYZE_CONSTRAINTS('table_3');(No rows)
Add a value that does not match and commit the change:
INSERT INTO table_3 VALUES ('r1', 'NONE');COMMIT;
Checking for constraints on table dim_2 detects a foreign key violation:
SELECT ANALYZE_CONSTRAINTS('table_3');-[ RECORD 1 ]---+----------------Schema Name | publicTable Name | table_3
Administrator's GuideAbout Constraints
HP Vertica Analytics Platform (7.0.x) Page 447 of 969

Column Names | z_fk1, z_fk2Constraint Name | table_3_multifkConstraint Type | FOREIGNColumn Values | ('r1', 'NONE')
Analyze all constraints on all tables:
SELECT ANALYZE_CONSTRAINTS('');-[ RECORD 1 ]---+----------------Schema Name | publicTable Name | table_3Column Names | z_fk1, z_fk2Constraint Name | table_3_multifkConstraint Type | FOREIGNColumn Values | ('r1', 'NONE')-[ RECORD 2 ]---+----------------Schema Name | publicTable Name | table_2Column Names | x, y_PKConstraint Name | table_2_multiukConstraint Type | PRIMARYColumn Values | ('r1', 'Xpk1')-[ RECORD 3 ]---+----------------Schema Name | publicTable Name | table_2
Column Names | z_FKConstraint Name | C_FOREIGNConstraint Type | FOREIGNColumn Values | ('0')-[ RECORD 4 ]---+----------------Schema Name | publicTable Name | t1Column Names | c1Constraint Name | pk_t1Constraint Type | PRIMARYColumn Values | ('10')-[ RECORD 5 ]---+----------------Schema Name | publicTable Name | table_1Column Names | b_UKConstraint Name | C_UNIQUEConstraint Type | UNIQUEColumn Values | ('1')-[ RECORD 6 ]---+----------------Schema Name | publicTable Name | table_1Column Names | c_PKConstraint Name | C_PRIMARYConstraint Type | PRIMARYColumn Values | ('1')-[ RECORD 7 ]---+----------------Schema Name | publicTable Name | targetColumn Names | aConstraint Name | C_PRIMARY
Administrator's GuideAbout Constraints
HP Vertica Analytics Platform (7.0.x) Page 448 of 969

Constraint Type | PRIMARYColumn Values | ('1')(5 rows)
To quickly clean up your database, issue the following command:
DROP TABLE table_1 CASCADE;DROP TABLE table_2 CASCADE;DROP TABLE table_3 CASCADE;
Fixing Constraint ViolationsWhenHP Vertica finds duplicate primary key or unique values at run time, use the DISABLE_DUPLICATE_KEY_ERROR function to suppress error messaging. Queries execute as though noconstraints are defined on the schema and the effects are session scoped.
Caution:When called, DISABLE_DUPLICATE_KEY_ERROR suppresses data integritychecking and can lead to incorrect query results. Use this function only after you insertduplicate primary keys into a dimension table in the presence of a pre-join projection. Correctthe violations and reenable integrity checking with REENABLE_DUPLICATE_KEY_ERROR.
The following series of commands create a table named dim and the corresponding projection:
CREATE TABLE dim (pk INTEGER PRIMARY KEY, x INTEGER);CREATE PROJECTION dim_p (pk, x) AS SELECT * FROM dim ORDER BY x UNSEGMENTED ALL NODES;
The next two statements create a table named fact and the pre-join projection that joins fact todim.
CREATE TABLE fact(fk INTEGER REFERENCES dim(pk));CREATE PROJECTION prejoin_p (fk, pk, x) AS SELECT * FROM fact, dim WHERE pk=fk ORDER BY x;
The following statements load values into table dim. The last statement inserts a duplicate primarykey value of 1:
INSERT INTO dim values (1,1);INSERT INTO dim values (2,2);INSERT INTO dim values (1,2); --Constraint violationCOMMIT;
Table dim now contains duplicate primary key values, but you cannot delete the violating rowbecause of the presence of the pre-join projection. Any attempt to delete the record results in thefollowing error message:
ROLLBACK: Duplicate primary key detected in FK-PK join Hash-Join (x dim_p), value 1
Administrator's GuideAbout Constraints
HP Vertica Analytics Platform (7.0.x) Page 449 of 969

In order to remove the constraint violation (pk=1), use the following sequence of commands, whichputs the database back into the state just before the duplicate primary key was added.
To remove the violation:
1. Save the original dim rows that match the duplicated primary key:
CREATE TEMP TABLE dim_temp(pk integer, x integer);INSERT INTO dim_temp SELECT * FROM dim WHERE pk=1 AND x=1; -- original dim row
2. Temporarily disable error messaging on duplicate constraint values:
SELECT DISABLE_DUPLICATE_KEY_ERROR();
Caution: Remember that running the DISABLE_DUPLICATE_KEY_ERROR functionsuppresses the enforcement of data integrity checking.
3. Remove the original row that contains duplicate values:
DELETE FROM dim WHERE pk=1;
4. Allow the database to resume data integrity checking:
SELECT REENABLE_DUPLICATE_KEY_ERROR();
5. Reinsert the original values back into the dimension table:
INSERT INTO dim SELECT * from dim_temp;COMMIT;
6. Validate your dimension and fact tables.
If you receive the following error message, it means that the duplicate records you want todelete are not identical. That is, the records contain values that differ in at least one columnthat is not a primary key; for example, (1,1) and (1,2).
ROLLBACK: Delete: could not find a data row to delete (data integrity violation?)
The difference between this message and the rollback message in the previous example is thata fact row contains a foreign key that matches the duplicated primary key, which has beeninserted. A row with values from the fact and dimension table is now in the pre-join projection.In order for the DELETE statement (Step 3 in the following example) to complete successfully,extra predicates are required to identify the original dimension table values (the values that arein the pre-join).
Administrator's GuideAbout Constraints
HP Vertica Analytics Platform (7.0.x) Page 450 of 969

This example is nearly identical to the previous example, except that an additional INSERTstatement joins the fact table to the dimension table by a primary key value of 1:
INSERT INTO dim values (1,1);INSERT INTO dim values (2,2);INSERT INTO fact values (1); -- New insert statement joins fact with dim on primarykey value=1INSERT INTO dim values (1,2); -- Duplicate primary key value=1COMMIT;
To remove the violation:
1. Save the original dim and fact rows that match the duplicated primary key:
CREATE TEMP TABLE dim_temp(pk integer, x integer);CREATE TEMP TABLE fact_temp(fk integer);INSERT INTO dim_temp SELECT * FROM dim WHERE pk=1 AND x=1; -- original dim rowINSERT INTO fact_temp SELECT * FROM fact WHERE fk=1;
2. Temporarily suppresses the enforcement of data integrity checking:
SELECT DISABLE_DUPLICATE_KEY_ERROR();
3. Remove the duplicate primary keys. These steps also implicitly remove all fact rows with thematching foreign key.
4. Remove the original row that contains duplicate values:
DELETE FROM dim WHERE pk=1 AND x=1;
Note: The extra predicate (x=1) specifies removal of the original (1,1) row, rather than thenewly inserted (1,2) values that caused the violation.
5. Remove all remaining rows:
DELETE FROM dim WHERE pk=1;
6. Reenable integrity checking:
SELECT REENABLE_DUPLICATE_KEY_ERROR();
7. Reinsert the original values back into the fact and dimension table:
Administrator's GuideAbout Constraints
HP Vertica Analytics Platform (7.0.x) Page 451 of 969

INSERT INTO dim SELECT * from dim_temp;INSERT INTO fact SELECT * from fact_temp;COMMIT;
8. Validate your dimension and fact tables.
Reenabling Error ReportingIf you ran DISABLE_DUPLICATE_KEY_ERROR to suppress error reporting while fixing duplicatekey violations, you can get incorrect query results going forward. As soon as you fix the violations,run the REENABLE_DUPLICATE_KEY_ERROR function to restore the default behavior of errorreporting.
The effects of this function are session scoped.
Administrator's GuideAbout Constraints
HP Vertica Analytics Platform (7.0.x) Page 452 of 969

Working with Table PartitionsHP Vertica supports data partitioning at the table level, which divides one large table into smallerpieces. Partitions are a table property that apply to all projections for a given table.
A common use for partitions is to split data by time. For instance, if a table contains decades ofdata, you can partition it by year, or by month, if the table has a year of data.
Partitions can improve parallelism during query execution and enable some other optimizations.Partitions segregate data on each node to facilitate dropping partitions. You can drop older datapartitions tomake room for newer data.
Tip:When a storage container has data for a single partition, you can discard that storagelocation (DROP_LOCATION) after dropping the partition using the DROP_PARTITION()function.
Differences Between Partitioning andSegmentation
There is a distinction between partitioning at the table level and segmenting a projection (hash orrange):
l Partitioning—defined by the table for fast data purges and query performance. Tablepartitioning segregates data on each node. You can drop partitions.
l Segmentation—defined by the projection for distributed computing. Segmenting distributesprojection data across multiple nodes in a cluster. Different projections for the same table haveidentical partitioning, but can have different segmentation clauses. See Projection Segmentationin the Concepts Guide.
Bothmethods of storing and organizing data provide opportunities for parallelism during queryprocessing. See also Partitioning and Segmenting Data.
Partition OperationsThe basic operations for working with partitions are as follow:
l Defining Partitions
l Bulk Loading Data, and engaging in other normal operations
l Forcing data partitioning, if needed
l Moving partitions to another table as part of archiving historical data
l Dropping Partitions to drop existing partitions
Administrator's GuideWorking with Table Partitions
HP Vertica Analytics Platform (7.0.x) Page 453 of 969

l Displaying partitionmetadata with the PARTITIONS system table, to display one row perpartition key, per ROS container.
HP Vertica provides the following functions that let youmanage your partitions and obtain additionalinformation about them. See the PartitionManagement Functions in the SQLReferenceManual.
See Alsol Partitioning, repartitioning, and Reorganizing Tables
Defining PartitionsThe first step in defining data partitions is to establish the relationship between the data andpartitions. To illustrate, consider the following table called trade, which contains unpartitioned datafor the trade date (tdate), ticker symbol (tsymbol), and time (ttime).
Table 1: Unpartitioned data
tdate | tsymbol | ttime------------+---------+----------2008-01-02 | AAA | 13:00:002009-02-04 | BBB | 14:30:002010-09-18 | AAA | 09:55:002009-05-06 | AAA | 11:14:302008-12-22 | BBB | 15:30:00
(5 rows)
If you want to discard data once a year, a logical choice is to partition the table by year. The partitionexpression PARTITION BY EXTRACT(year FROM tdate)creates the partitions shown in Table 2:
Table 2: Data partitioned by year
2008 2009 2010
tdate tsymbol ttime---------+---------+---------01/02/08 | AAA | 13:00:0012/22/08 | BBB | 15:30:00
tdate tsymbol ttime---------+---------+---------02/04/09 | BBB | 14:30:0005/06/09 | AAA | 11:14:30
tdate tsymbol ttime---------+---------+---------09/18/10 | AAA | 09:55:00
Unlike some databases, which require you to explicitly define partition boundaries in the CREATETABLE statement, HP Vertica selects a partition for each row based on the result of a partitioningexpression provided in the CREATE TABLE statement. Partitions do not have explicit namesassociated with them. Internally, HP Vertica creates a partition for each distinct value in thePARTITION BY expression.
After you specify a partition expression, HP Vertica processes the data by applying the partitionexpression to each row and then assigning partitions.
The following syntax generates the partitions for this example, with the results shown in Table 3. Itcreates a table called trade, partitioned by year. For additional information, see CREATE TABLEin the SQLReferenceManual.
Administrator's GuideWorking with Table Partitions
HP Vertica Analytics Platform (7.0.x) Page 454 of 969

CREATE TABLE trade ( tdate DATE NOT NULL,tsymbol VARCHAR(8) NOT NULL,ttime TIME)
PARTITION BY EXTRACT (year FROM tdate);CREATE PROJECTION trade_p (tdate, tsymbol, ttime) ASSELECT * FROM tradeORDER BY tdate, tsymbol, ttime UNSEGMENTED ALL NODES;INSERT INTO trade VALUES ('01/02/08' , 'AAA' , '13:00:00');INSERT INTO trade VALUES ('02/04/09' , 'BBB' , '14:30:00');INSERT INTO trade VALUES ('09/18/10' , 'AAA' , '09:55:00');INSERT INTO trade VALUES ('05/06/09' , 'AAA' , '11:14:30');INSERT INTO trade VALUES ('12/22/08' , 'BBB' , '15:30:00');
Table 3: Partitioning Expression and Results
Partitioning By Year and MonthTo partition by both year andmonth, you need a partition expression that pads themonth out to twodigits so the partition keys appear as:
201101 201102201103...201111201112
You can use the following partition expression to partition the table using the year andmonth:
PARTITION BY EXTRACT(year FROM tdate)*100 + EXTRACT(month FROM tdate)
Restrictions on Partitioning Expressionsl The partitioning expression can reference one or more columns from the table.
l The partitioning expression cannot evaluate to NULL for any row, so do not include columns thatallow a NULL value in the CREATE TABLE..PARTITION BY expression.
l Any SQL functions in the partitioning expressionmust be immutable, meaning that they returnthe exact same value regardless of when they are invoked, and independently of session orenvironment settings, such as LOCALE. For example, you cannot use the TO_CHAR function
Administrator's GuideWorking with Table Partitions
HP Vertica Analytics Platform (7.0.x) Page 455 of 969

in a partition expression, because it depends on locale settings, or the RANDOM function, sinceit produces different values at each invocation.
l HP Verticameta-functions cannot be used in partitioning expressions.
l All projections anchored on a table must include all columns referenced in the PARTITION BYexpression; this allows the partition to be calculated.
l You cannot modify partition expressions once a partitioned table is created. If you want modifiedpartition expressions, create a new table with a new PARTITION BY clause, and thenINSERT...SELECT from the old table to the new table. Once your data is partitioned the wayyou want it, you can drop the old table.
Best Practices for Partitioningn While HP Vertica supports amaximum of 1024 partitions, few, if any, organizations will need to
approach that maximum. Fewer partitions are likely to meet your business needs, while alsoensuringmaximum performance. Many customers, for example, partition their data by month,bringing their partition count to 12. HP Vertica recommends you keep the number of partitionsbetween 10 and 20 to achieve excellent performance.
l Do not apply partitioning to tables used as dimension tables in pre-join projections. You canapply partitioning to tables used as large single (fact) tables in pre-join projections.
l Formaximum performance, do not partition projections on LONGVARBINARY and LONGVARCHAR columns.
Dropping PartitionsUse the DROP_PARTITION function to drop a partition. Normally, this is a fast operation thatdiscards all ROS containers that contain data for the partition.
Occasionally, a ROS container contains rows that belong tomore than one partition. For example,this can happen after aMERGE_PARTITIONS operation. In this case, HP Vertica performs a splitoperation to avoid discarding toomuch data. HP Vertica tries to keep data from different partitionssegregated into different ROS containers, but there are a small number of exceptions. For instance,the following operations can result in a ROS container with mixed partitions:
l MERGE_PARTITIONS, whichmerges ROS containers that have data belonging to partitions ina specified partition key range
l Refresh and recovery operations can generate ROS containers with mixed partitions undersome conditions. See Auto Partitioning.
The number of partitions that contain data is restricted by the number of ROS containers that cancomfortably exist in the system.
In general, if a ROS container has data that belongs to n+1 partitions and you want to drop aspecific partition, the DROP_PARTITION operation:
Administrator's GuideWorking with Table Partitions
HP Vertica Analytics Platform (7.0.x) Page 456 of 969

1. Forces the partition of data into two containers where
n one container holds the data that belongs to the partition that is to be dropped
n another container holds the remaining n partitions
2. Drops the specified partition.
DROP_PARTITION forces amoveout if there is data in theWOS (WOS is not partition aware).
DROP_PARTITION acquires an exclusive lock on the table to prevent DELETE | UPDATE |INSERT | COPY statements from affecting the table, as well as any SELECT statements issued atSERIALIZABLE isolation level.
Users must have USAGE privilege on schema that contains the table.
DROP_PARTITION operations cannot be performed on tables with projections that are not up todate (have not been refreshed).
DROP_PARTITION fails if you do not set the optional third parameter to true and it encountersROS's that do not have partition keys.
ExamplesUsing the example schema in Defining Partitions, the following command explicitly drops the 2009partition key from table trade:
SELECT DROP_PARTITION('trade', 2009);DROP_PARTITION
-------------------Partition dropped
(1 row)
Here, the partition key is specified:
SELECT DROP_PARTITION('trade', EXTRACT('year' FROM '2009-01-01'::date));DROP_PARTITION
-------------------Partition dropped
(1 row)
The following example creates a table called dates and partitions the table by year:
CREATE TABLE dates (year INTEGER NOT NULL,month VARCHAR(8) NOT NULL)
PARTITION BY year * 12 + month;
The following statement drops the partition using a constant for Oct 2010 (2010*12 + 10 = 24130):
SELECT DROP_PARTITION('dates', '24130');
Administrator's GuideWorking with Table Partitions
HP Vertica Analytics Platform (7.0.x) Page 457 of 969

DROP_PARTITION-------------------Partition dropped
(1 row)
Alternatively, the expression can be placed in line: SELECT DROP_PARTITION('dates', 2010*12+ 10);
The following command first reorganizes the data if it is unpartitioned and then explicitly drops the2009 partition key from table trade:
SELECT DROP_PARTITION('trade', 2009, false, true);DROP_PARTITION
-------------------Partition dropped
(1 row)
See Alsol DROP_PARTITION
l MERGE_PARTITIONS
Partitioning and Segmenting DataPartitioning and segmentation have completely separate functions in HP Vertica, and oppositegoals regarding data localization. Since other databases often use the terms interchangeably, it isimportant to know the differences.
l Segmentation defines how data is spread among cluster nodes. The goal is to distribute dataevenly across multiple database nodes so that all nodes can participate in query execution.
l Partitioning specifies how data is organized within individual nodes. Partitioning attempts tointroduce hot spots within the node, providing a convenient way to drop data and reclaim the diskspace.
Note: Segmentation is defined by the CREATE PROJECTION statement, and partitioning isdefined by the CREATE TABLE statement. Logically, the partition clause is applied after thesegmentation clause. See the SQLReferenceManual for details.
To further illustrate the differences, partitioning data by year makes sense if you intend to retain anddrop data at the granularity of a year. On the other hand, segmenting the data by year would beinefficient, because the node holding data for the current year would likely answer far more queriesthan the other nodes.
The following diagram illustrates the flow of segmentation and partitioning on a four-node databasecluster:
Administrator's GuideWorking with Table Partitions
HP Vertica Analytics Platform (7.0.x) Page 458 of 969

1. Example table data
2. Data segmented by HASH(order_id)
3. Data segmented by hash across four nodes
4. Data partitioned by year on a single node
While partitioning occurs on all four nodes, the illustration shows partitioned data on one node forsimplicity.
Administrator's GuideWorking with Table Partitions
HP Vertica Analytics Platform (7.0.x) Page 459 of 969

See Alsol Reclaiming Disk Space From Deleted Recordsl
l
l
l
Partitioning and Data Storage
Partitions and ROS Containersl Data is automatically split into partitions during load / refresh / recovery operations.
l The Tuple Movermaintains physical separation of partitions.
l EachROS container contains data for a single partition, though there can bemultiple ROScontainers for a single partition.
Partition PruningWhen a query predicate includes onemoremore columns in the partitioning clause, queries lookonly at relevant ROS containers. See Partition Elimination for details.
Managing PartitionsHP Vertica provides various options to let youmanage andmonitor the partitions you create.
PARTITIONS system tableYou can display partitionmetadata, one row per partition key, perROS container, by querying thePARTITIONS system table.
Given a projection named p1, with three ROS containers, the PARTITIONS table returns threerows:
=> SELECTPARTITION_KEY,PROJECTION_NAME,ROS_ID,ROS_SIZE_BYTES,ROS_ROW_COUNT,NODE_NAME
Administrator's GuideWorking with Table Partitions
HP Vertica Analytics Platform (7.0.x) Page 460 of 969

FROM partitions;PARTITION_KEY | PROJECTION_NAME | ROS_ID | ROS_SIZE_BYTES | ROS_ROW_COUNT |
NODE_NAME---------------+------------------+-------------------+----------------+---------------+-----------------------2008 | trade_p_node0001 | 45035996273740461 | 90 | 1 |
node00012007 | trade_p_node0001 | 45035996273740477 | 99 | 2 |
node00012006 | trade_p_node0001 | 45035996273740493 | 99 | 2 |
node0001(3 rows)
MERGE_PARTITIONS() functionTheMERGE_PARTITIONS() functionmerges partitions between the specified values to a singleROS container and takes the following form:
MERGE_PARTITIONS ( table_name , partition_key_from , partition_key_to )
The edge values of the partition key are included in the range, and partition_key_frommust beless than or equal to partition_key_to. Inclusion of partitions in the range is based on theapplication of less than(<)/greater than(>) operators of the corresponding data type. If partition_key_from is the same as partition_key_to, all ROS containers of the partition key aremergedinto one ROS.
Note:No restrictions are placed on a partition key's data type.
Users must have USAGE privilege on schema that contains the table.
The following series of statements show how tomerge partitions in a table called T1:
=> SELECT MERGE_PARTITIONS('T1', '200', '400');=> SELECT MERGE_PARTITIONS('T1', '800', '800');=> SELECT MERGE_PARTITIONS('T1', 'CA', 'MA');=> SELECT MERGE_PARTITIONS('T1', 'false', 'true');=> SELECT MERGE_PARTITIONS('T1', '06/06/2008', '06/07/2008');=> SELECT MERGE_PARTITIONS('T1', '02:01:10', '04:20:40');=> SELECT MERGE_PARTITIONS('T1', '06/06/2008 02:01:10', '06/07/2008 02:01:10');=> SELECT MERGE_PARTITIONS('T1', '8 hours', '1 day 4 hours 20 seconds');
PARTITION_TABLE() functionThe PARTITION_TABLE() function physically separates partitions into separate containers. OnlyROS containers with more than one distinct value participate in the split.
The following example creates a simple table called states and partitions data by state.
=> CREATE TABLE states (year INTEGER NOT NULL,
Administrator's GuideWorking with Table Partitions
HP Vertica Analytics Platform (7.0.x) Page 461 of 969

state VARCHAR NOT NULL)PARTITION BY state;
=> CREATE PROJECTION states_p (state, year) ASSELECT * FROM statesORDER BY state, year UNSEGMENTED ALL NODES;
Now call the PARTITION_TABLE function to partition table states:
=> SELECT PARTITION_TABLE('states');PARTITION_TABLE
-------------------------------------------------------partition operation for projection 'states_p_node0004'partition operation for projection 'states_p_node0003'partition operation for projection 'states_p_node0002'partition operation for projection 'states_p_node0001'(1 row)
NotesThere are just a few more things worth mentioning to help youmanage your partitions:
l To prevent toomany ROS containers, be aware that delete operations must open all thecontainers; thus, ideally create fewer than 20 partitions and avoid creatingmore than 50.
You can use theMERGE_PARTITIONS() function tomerge old partitions to a single ROScontainer.
l You cannot use non-deterministic functions in a PARTITION BY expression. One example isTIMESTAMPWITH TIME ZONE, because the value depends on user settings.
l A dimension table in a pre-join projection cannot be partitioned.
Partitioning, repartitioning, and ReorganizingTables
Chris wrote this content in the ReferenceManual. I just dragged it into a new topic for the AdminGuide. You probably already reviewed this.
Using the ALTER TABLE statement with its PARTITION BY syntax andthe optional REORGANIZEkeyword partitions or re-partitions a table according to the partition-clause that you define in thestatement. HP Vertica immediately drops any existing partition keys when you execute thestatement.
You can use the PARTITION BY and REORGANIZE keywords separately or together. However, youcannot use these keywords with any other ALTER TABLE clauses.
Partition-clause expressions are limited in the following ways:
Administrator's GuideWorking with Table Partitions
HP Vertica Analytics Platform (7.0.x) Page 462 of 969

l Your partition-clausemust calculate a single non-null value for each row. You can referencemultiple columns, but each row must return a single value.
l You can specify leaf expressions, functions, and operators in the partition clause expression.
l All leaf expressions in the partition clausemust be either constants or columns of the table.
l Aggregate functions and queries are not permitted in the partition-clause expression.
l SQL functions used in the partition-clause expressionmust be immutable.
Partitioning or re-partitioning tables requires USAGE privilege on the schema that contains thetable.
Reorganizing Data After PartitioningPartitioning is not complete until you reorganize the data. The optional REORGANIZE keywordcompletes table partitioning by assigning partition keys. You can use REORGANIZE withPARTITION BY, or as the only keyword in the ALTER TABLE statement for tables that werepreviously altered with the PARTITION BY modifier, but were not reorganized with theREORGANIZE keyword.
If you specify the REORGANIZE keyword, data is partitioned immediately to the new schema as abackground task.
Tip: As a best practice, HP recommends that you reorganize the data while partitioning thetable, using PARTITION BYwith the REORGANIZE keyword. If you do not specifyREORGANIZE, performance for queries, DROP_PARTITION() operations, and noderecovery could be degraded until the data is reorganized. Also, without reorganizing existingdata, new data is stored according to the new partition expression, while the existing datastorage remains unchanged.
Monitoring ReorganizationWhen you use the ALTER TABLE .. REORGANIZE, the operation reorganizes the data in thebackground.
You canmonitor details of the reorganization process by polling the following system tables:
l V_MONITOR.PARTITION_STATUS displays the fraction of each table that is partitionedcorrectly.
l V_MONITOR.PARTITION_REORGANIZE_ERRORS logs any errors issued by thebackground REORGANIZE process.
l V_MONITOR.PARTITIONS displays NULLS in the partition_key column for any ROS's thathave not been reorganized.
Administrator's GuideWorking with Table Partitions
HP Vertica Analytics Platform (7.0.x) Page 463 of 969

Note: The corresponding foreground process to ALTER TABLE ... REORGANIZE isPARTITION_TABLE().
Auto PartitioningHP Vertica attempts to keep data from each partition stored separately. Auto partitioning occurswhen data is written to disk, such as during COPY DIRECT ormoveout operations.
Separate storage provides two benefits: Partitions can be dropped quickly, and partition eliminationcan omit storage that does not need to need not to participate in a query plan.
Note: If you use INSERT...SELECT in a partitioned table, HP Vertica sorts the data beforewriting it to disk, even if the source of the SELECT has the same sort order as the destination.
ExamplesThe examples that follow use this simple schema. First create a table named t1 and partition thedata on the c1 column:
CREATE TABLE t1 ( c1 INT NOT NULL,c2 INT NOT NULL)
SEGMENTED BY c1 ALL NODESPARTITION BY c2;
Create two identically-segmented buddy projections:
CREATE PROJECTION t1_p AS SELECT * FROM t1 SEGMENTED BY HASH(c1) ALL NODES OFFSET 0; CREATE PROJECTION t1_p1 AS SELECT * FROM t1 SEGMENTED BY HASH(c1) ALL NODES OFFSET 1;
Now insert some data:
INSERT INTO t1 VALUES(10,15);INSERT INTO t1 VALUES(20,25);INSERT INTO t1 VALUES(30,35);INSERT INTO t1 VALUES(40,45);
Query the table to verify the inputs:
SELECT * FROM t1; c1 | c2----+----10 | 1520 | 2530 | 3540 | 45
(4 rows)
Now perform amoveout operation on the projections in the table:
Administrator's GuideWorking with Table Partitions
HP Vertica Analytics Platform (7.0.x) Page 464 of 969

SELECT DO_TM_TASK('moveout','t1'); do_tm_task--------------------------------moveout for projection 't1_p1'moveout for projection 't1_p'
(1 row)
Query the PARTITIONS system table, and you'll see that the four partition keys reside on twonodes, each in its ownROS container (see the ros_id column). The PARTITION BY clause wasused on column c2, so HP Vertica auto partitioned the input values during the COPY operation:
SELECT partition_key, projection_name, ros_id, ros_size_bytes, ros_row_count, node_name FROM PARTITIONS WHERE projection_name like 't1_p1';partition_key | projection_name | ros_id | ros_size_bytes | ros_row_count |node_name
---------------+-----------------+-------------------+----------------+---------------+-------------------15 | t1_p1 | 49539595901154617 | 78 | 1 | n
ode000225 | t1_p1 | 54043195528525081 | 78 | 1 | n
ode000335 | t1_p1 | 54043195528525069 | 78 | 1 | n
ode000345 | t1_p1 | 49539595901154605 | 79 | 1 | n
ode0002(4 rows)
HP Vertica does not auto partition when you refresh with the same sort order. If you create a newprojection, HP Vertica returns amessage telling you to refresh the projections; for example:
CREATE PROJECTION t1_p2 AS SELECT * FROM t1 SEGMENTED BY HASH(c1) ALL NODES OFFSET 2;
WARNING: Projection <public.t1_p2> is not available for query processing. Execute theselect start_refresh() function to copy data into this projection.
The projection must have a sufficient number of buddy projections and all nodesmust be up before starting a refresh.
Run the START_REFRESH function:
SELECT START_REFRESH(); start_Refresh----------------------------------------Starting refresh background process.
(1 row)
Query the PARTITIONS system table again. The partition keys now reside in two ROS containers,instead of four, which you can tell by looking at the values in the ros_id column. The ros_row_count column holds the number of rows in the ROS container:
SELECT partition_key, projection_name, ros_id, ros_size_bytes, ros_row_count, node_name FROM PARTITIONS WHERE projection_name like 't1_p2';partition_key | projection_name | ros_id | ros_size_bytes | ros_row_count |
Administrator's GuideWorking with Table Partitions
HP Vertica Analytics Platform (7.0.x) Page 465 of 969

node_name---------------+-----------------+-------------------+----------------+---------------+-------------------15 | t1_p2 | 54043195528525121 | 80 | 2 | n
ode000325 | t1_p2 | 58546795155895541 | 77 | 2 | n
ode000435 | t1_p2 | 58546795155895541 | 77 | 2 | n
ode000445 | t1_p2 | 54043195528525121 | 80 | 2 | n
ode0003(4 rows)
The following commandmore specifically queries ROS information for the partitioned tables. In thisexample, the query counts two ROS containers each on two different nodes for projection t1_p2:
SELECT ros_id, node_name, COUNT(*) FROM PARTITIONS WHERE projection_name LIKE 't1_p2' GROUP BY ros_id, node_name;
ros_id | node_name | COUNT-------------------+-----------+-------54043195528525121 | node0003 | 258546795155895541 | node0004 | 2
(2 rows)
This command returns a result of four ROS containers on two different nodes for projection t1_p1:
SELECT ros_id,node_name, COUNT(*) FROM PARTITIONS WHERE projection_name LIKE 't1_p1' GROUP BY ros_id, node_name;
ros_id | node_name | COUNT-------------------+-----------+-------49539595901154605 | node0002 | 149539595901154617 | node0002 | 154043195528525069 | node0003 | 154043195528525081 | node0003 | 1
(4 rows)
See Alsol
l
l
Eliminating PartitionsIf theROS containers of partitioned tables are not needed, HP Vertica can eliminate the containersfrom being processed during query execution. To eliminate ROS containers, HP Vertica comparesquery predicates to partition-relatedmetadata.
Administrator's GuideWorking with Table Partitions
HP Vertica Analytics Platform (7.0.x) Page 466 of 969

Each ROS partition expression columnmaintains theminimum andmaximum values of data storedin that ROS, and HP Vertica uses thosemin/max values to potentially eliminate ROS containersfrom query planning. Partitions that cannot contain matching values are not scanned. For example,if a ROS does not contain data that satisfies a given query predicate, the optimizer eliminates(prunes) that ROS from the query plan. After non-participating ROS containers have beeneliminated, queries that use partitioned tables runmore quickly.
Note: Partition pruning occurs at query run time and requires a query predicate on thepartitioning column.
Assume a table that is partitioned by year (2007, 2008, 2009) into three ROS containers, one foreach year. Given the following series of commands, the two ROS containers that contain data for2007 and 2008 fall outside the boundaries of the requested year (2009) and get eliminated.
=> CREATE TABLE ... PARTITION BY EXTRACT(year FROM date);=> SELECT ... WHERE date = '12-2-2009';
On any database that has been upgraded from version 3.5, or earlier, ROS containers are ineligiblefor partition elimination because they do not contain theminimum/maximum partition key valuesrequired. These ROS containers need to be recreated or merged by the Tuple Mover.
Making Past Partitions Eligible for EliminationThe following procedure lets youmake past partitions eligible for elimination. The easiest way toguarantee that all ROS containers are eligible is to:
1. Create a new fact table with the same projections as the existing table.
2. Use INSERT..SELECT to populate the new table.
3. Drop the original table and rename the new table.
If there is not enough disk space for a second copy of the fact table, an alternative is to:
Administrator's GuideWorking with Table Partitions
HP Vertica Analytics Platform (7.0.x) Page 467 of 969

1. Verify that the TupleMover has finished all post-upgrade work; for example, when the followingcommand shows nomergeout activity:
=> SELECT * FROM TUPLE_MOVER_OPERATIONS;
2. Identify which partitions need to bemerged to get the ROS minimum/maximum values byrunning the following command:
=> SELECT DISTINCT table_schema, projection_name, partition_key FROM partitions pLEFT OUTER JOIN vs_ros_min_max_values v
ON p.ros_id = v.delidWHERE v.min_value IS null;
3. Insert a record into each partition that has ineligible ROS containers and commit.
4. Delete each inserted record and commit again.
At this point, the TupleMover automatically merges ROS containers from past partitions.
Verifying the ROS Merge1. Query the TUPLE_MOVER_OPERATIONS table again:
=> SELECT * FROM TUPLE_MOVER_OPERATIONS;
2. Check again for any partitions that need to bemerged:
=> SELECT DISTINCT table_schema, projection_name, partition_key FROM partitions pLEFT OUTER JOIN vs_ros_min_max_values v
ON p.ros_id = v.rosidWHERE v.min_value IS null;
ExamplesAssume a table that is partitioned by time and will use queries that restrict data on time.
CREATE TABLE time ( tdate DATE NOT NULL,tnum INTEGER)
PARTITION BY EXTRACT(year FROM tdate);CREATE PROJECTION time_p (tdate, tnum) ASSELECT * FROM timeORDER BY tdate, tnum UNSEGMENTED ALL NODES;
Note: Projection sort order has no effect on partition elimination.
Administrator's GuideWorking with Table Partitions
HP Vertica Analytics Platform (7.0.x) Page 468 of 969

INSERT INTO time VALUES ('03/15/04' , 1); INSERT INTO time VALUES ('03/15/05' , 2);INSERT INTO time VALUES ('03/15/06' , 3);INSERT INTO time VALUES ('03/15/06' , 4);
The data inserted in the previous series of commands would be loaded into three ROS containers,one per year, since that is how the data is partitioned:
SELECT * FROM time ORDER BY tnum; tdate | tnum------------+------2004-03-15 | 1 --ROS1 (min 03/01/04, max 03/15/04)2005-03-15 | 2 --ROS2 (min 03/15/05, max 03/15/05)2006-03-15 | 3 --ROS3 (min 03/15/06, max 03/15/06)2006-03-15 | 4 --ROS3 (min 03/15/06, max 03/15/06)
(4 rows)
Here's what happens when you query the time table:
l In the this query, HP Vertica can eliminate ROS2 because it is only looking for year 2004:
=> SELECT COUNT(*) FROM time WHERE tdate = '05/07/2004';
l In the next query, HP Vertica can eliminate both ROS1 and ROS3:
=> SELECT COUNT(*) FROM time WHERE tdate = '10/07/2005';
l The following query has an additional predicate on the tnum column for which nominimum/maximum values aremaintained. In addition, the use of logical operator OR is notsupported, so no ROS elimination occurs:
=> SELECT COUNT(*) FROM time WHERE tdate = '05/07/2004' OR tnum = 7;
Moving PartitionsYou canmove partitions from one table to another using theMOVE_PARTITIONS_TO_TABLEfunction. Use this function as part of creating offline archives of older partitions. By movingpartitions from one table to an intermediate table, you can then create a backup of the new table,and drop the partition. If you need the historical data later, you can restore the archived partitions,described in Restoring Archived Partitions.
If the target table does not exist, theMOVE_PARTITIONS_TO_TABLE function creates a tabledefinition using the CREATE TABLE statement with its LIKE clause. Creating a table with the LIKEclause is performed as a DDL operation. HP Vertica does not copy any data from the source table,and the new table is not connected to its source in any way. The CREATE TABLE statement withthe LIKE clause does not copy contraints, automatic values (such as a sequences and identityvalues), or a default values. Corresponding columns will exist in the new table with the same typeas the source table, but the columns will not have constraints or automatic values.
Administrator's GuideWorking with Table Partitions
HP Vertica Analytics Platform (7.0.x) Page 469 of 969

Archiving StepsThese are the steps required to archive partitions:
1. Prepare andmove the partitions with theMOVE_PARTITIONS_TO_TABLE function
2. Create an object-level snapshot of the intermediate table
3. Drop the intermediate table
The next sections describe the archiving steps.
Preparing and Moving PartitionsBeforemoving partitions to another table, be sure to:
l Create a separate schema for the intermediate table
l Check that the name you plan to use does not conflict with an existing table name
l Use a name that represents the partition values you aremoving
l Keep each partition in a different backup table
When you have created a separate schema for the intermediate table, call theMOVE_PARTITIONS_TO_TABLE function.
If you call MOVE_PARTITIONS_TO_TABLE and the destination table does not exist, the function willcreate the table automatically:
VMART=> SELECT MOVE_PARTITIONS_TO_TABLE ('prod_trades','200801','200801','partn_backup.trades_200801');
MOVE_PARTITIONS_TO_TABLE---------------------------------------------------------------------------1 distinct partition values moved at epoch 15. Effective move epoch: 14.
(1 row)
Creating a Snapshot of the Intermediate TableCreating an object-level snapshot of the intermediate table containing the partitions you want toarchive requires a vbr.py configuration file.
These are the two steps to create an object-level snapshot of an intermediate table so you can thendrop the table:
Administrator's GuideWorking with Table Partitions
HP Vertica Analytics Platform (7.0.x) Page 470 of 969

1. As a best practice, HP Vertica recommends that you create a full database snapshot first,since you can only restore object-level snapshots into the original database. However, creatinga full snapshot is not a requirement.
2. Create an object-level snapshot of the intermediate table.
For details of setting up backup hosts, creating a configuration file, and taking a snapshot, seeBacking Up and Restoring the Database.
Copying the Config File to the Storage LocationWhen vbr.py creates the partition snapshot, it copies it to the archive storage locationautomatically.
HP Vertica recommends that you also copy the configuration file for the partition snapshot to thestorage location. You can do this automatically by entering y to the Backup verticaconfigurations? question when creating the configuration file for the snapshot.
Drop the Intermediate TableYou can drop the intermediate table into which youmoved partitions to archive, as described inDropping and Truncating Tables. Dropping the intermediate table maintains database K-safety,keeping aminimum K+1 copies of the data, andmore if additional projections exist.
See Alsol
Restoring Archived PartitionsYou can restore partitions that you previously moved to an intermediate table, archived as anobject-level snapshot, and then dropped.
Note: Restoring an archived partition requires that the original table definition has not changedsince the partition was archived and dropped. If you have changed the table definition, you canonly restore an archived partition using INSERT/SELECT statements, which are not describedhere.
These are the steps to restoring archived partitions:
1. Restore the snapshot of the intermediate table you saved when youmoved one or morepartitions to archive (seeMoving Partitions).
2. Move the restored partitions from the intermediate table to the original table.
3. Drop the intermediate table.
Administrator's GuideWorking with Table Partitions
HP Vertica Analytics Platform (7.0.x) Page 471 of 969

See Alsol
Administrator's GuideWorking with Table Partitions
HP Vertica Analytics Platform (7.0.x) Page 472 of 969

Bulk Loading DataThis section describes different methods for bulk loading data into an HP Vertica database usingthe COPY statement. In its basic form, use COPY as follows:
COPY to_table FROM data_source
The COPY statement loads data from a file stored on the host or client (or in a data stream) into adatabase table. You can pass the COPY statement many different parameters to define variousoptions such as:
l The format of the incoming data
l Metadata about the data load
l Which parser COPY should use
l Load data over parallel load streams
l How to transform data as it is loaded
l How to handle errors
HP Vertica's hybrid storagemodel provides a great deal of flexibility for loading andmanaging data.
Administrator's GuideBulk Loading Data
HP Vertica Analytics Platform (7.0.x) Page 473 of 969
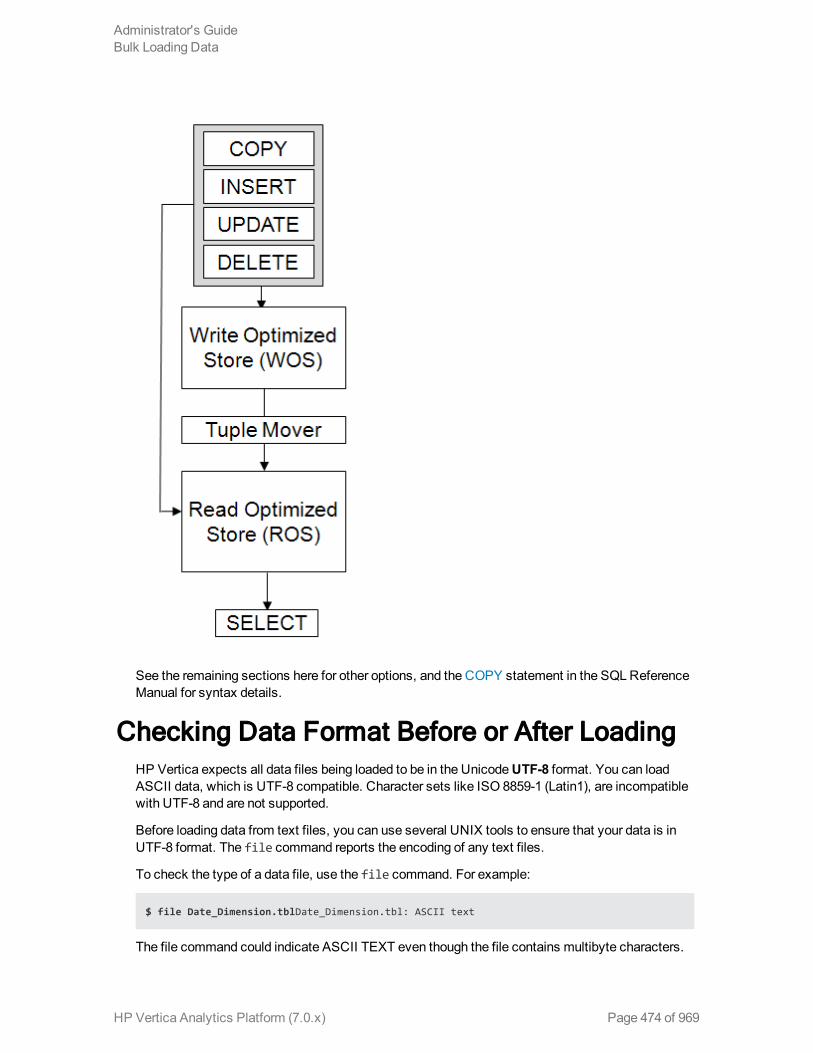
See the remaining sections here for other options, and the COPY statement in the SQLReferenceManual for syntax details.
Checking Data Format Before or After LoadingHP Vertica expects all data files being loaded to be in the UnicodeUTF-8 format. You can loadASCII data, which is UTF-8 compatible. Character sets like ISO 8859-1 (Latin1), are incompatiblewith UTF-8 and are not supported.
Before loading data from text files, you can use several UNIX tools to ensure that your data is inUTF-8 format. The file command reports the encoding of any text files.
To check the type of a data file, use the file command. For example:
$ file Date_Dimension.tblDate_Dimension.tbl: ASCII text
The file command could indicate ASCII TEXT even though the file contains multibyte characters.
Administrator's GuideBulk Loading Data
HP Vertica Analytics Platform (7.0.x) Page 474 of 969

To check for multibyte characters in an ASCII file, use the wc command. For example:
$ wc Date_Dimension.tbl 1828 5484 221822 Date_Dimension.tbl
If the wc command returns an error such as Invalid or incomplete multibyte or widecharacter, the data file is using an incompatible character set.
This example describes files that are not UTF-8 data files. Two text files have filenames startingwith the string data. To check their format, use the file command as follows:
$ file data* data1.txt: Little-endian UTF-16 Unicode textdata2.txt: ISO-8859 text
The results indicate that neither of the files is in UTF-8 format.
Converting Files Before Loading DataTo convert files before loading them into HP Vertica, use the iconvUNIX command. For example,to convert the data2.txt file from the previous example, use the iconv command as follows:
iconv -f ISO88599 -t utf-8 data2.txt > data2-utf8.txt
See theman pages for file and iconv for more information.
Checking UTF-8 Compliance After Loading DataAfter loading data, use the ISUTF8 function to verify that all of the string-based data in the table is inUTF-8 format. For example, if you loaded data into a table named nametable that has a VARCHARcolumn named name, you can use this statement to verify that all of the strings are UTF-8 encoded:
=> SELECT name FROM nametable WHERE ISUTF8(name) = FALSE;
If all of the strings are in UTF-8 format, the query should not return any rows.
Performing the Initial Database LoadTo perform the initial database load, use COPY with its DIRECT parameter from vsql.
Tip: HP Vertica supports multiple schema types. If you have a star schema, load the smallertables before you load the largest tables.
Only a superuser can use the COPY statement to bulk load data. Two exceptions to the superuserrequirement are to:
1. Run COPY to load from a stream on the host (such as STDIN) rather than a file (see StreamingData via JDBC).
Administrator's GuideBulk Loading Data
HP Vertica Analytics Platform (7.0.x) Page 475 of 969

2. Use the COPY statement with the FROM LOCAL option.
A non-superuser can also perform a standard batch insert using a prepared statement, whichinvokes COPY to load data as a background task.
Extracting Data From an Existing DatabaseIf possible, export the data in text form to a local file or attached disk. When working with largeamounts of load data (> 500GB), HP recommends that you test the load process using smaller loadfiles as described in Configuration Procedure to avoid compatibility or file formatting issues.
ETL products typically useODBC or JDBC to extract data, which gives them program-level accesstomodify load file column values, as needed.
Database systems typically provide a variety of export methods.
Tip: To export data from anOracle database, run a SELECT query in Oracle’s SQL*Pluscommand line query tool using a specified column delimiter, suppressed headers, and so forth.Redirect the output to a local file.
Smaller tables generally fit into a single load file. Split any large tables into 250-500GB load files.For example, a 10 TB fact table will require 20-40 load files to maintain performance.
Checking for Delimiter Characters in Load DataThe default delimiter for the COPY statement is a vertical bar (|). Before loading your data, makesure that no CHAR(N) or VARCHAR(N) data values include the delimiter character.
To test for the existence of a specific character in a column, use a query such as this:
SELECT COUNT(*) FROM T WHERE X LIKE '%|%'
If only a few rows contain |, you can eliminate them from the load file using aWHERE clause andload them separately using a different delimiter.
Tip: : For loading data from anOracle database, use aWHERE clause to avoid problem rowsin themain load file, and the negatedWHERE clause with REGEX_REPLACE for problemrows.
Moving Data From an Existing Database to HPVertica Nodes
Tomove data from an existing database to HP Vertica, consider using:
l USB 2.0 (or possibly SATA) disks
l A fast local network connection
Administrator's GuideBulk Loading Data
HP Vertica Analytics Platform (7.0.x) Page 476 of 969

Deliver chunks of data to the different HP Vertica nodes by connecting the transport disk or bywriting files from network copy.
Loading From a Local Hard DiskUSB 2.0 disks can deliver data at about 30MB per second, or 108GB per hour. USB 2.0 disks areeasy to use for transporting data from Linux to Linux. Set up an ext3 filesystem on the disk andwrite large files there. Linux 2.6 has USB plug-and-play support, so a USB 2.0 disk is instantlyusable on various Linux systems.
For other UNIX variants, if there is no common filesystem format available, use the disk without afilesystem to copy a single large file. For example:
$ cp bigfile /dev/sdc1
Even without a filesystem on the disk, plug-and-play support still works on Linux to provide a devicenode for the disk. To find out the assigned device, plug in the disk and enter:
$ dmesg | tail -40
SATA disks are usually internal, but can be external, or unmounted safely if they are internal.
Loading Over the NetworkA 1Gbps (gigabits per second) network can deliver about 50MB/s, or 180GB/hr. HP Vertica canload about 30-50GB/hour/node for a 1-Ksafe projection design. Therefore, you should use adedicated 1Gbps LAN. Using a LAN with a performance that is < 1Gbps will be proportionallyslower. HP Vertica recommends not loading data across an external network, because the delaysover distance slow down the TCP protocol to a small fraction of its available bandwidth, evenwithout competing traffic.
Note: The actual load rates you obtain can be higher or lower depending on the properties ofthe data, number of columns, number of projections, and hardware and network speeds. Loadspeeds can be further improved by usingmultiple parallel streams.
Loading From WindowsUseNTFS for loading files directly fromWindows to Linux. Although RedHat Linux as originallyinstalled can readWindows FAT32 file systems, this is not recommended.
Using Load ScriptsYou can write and run a load script for the COPY statement using a simple text-delimited fileformat. For information about other load formats see Specifying a COPY Parser. HP Verticarecommends that you load the smaller tables before the largest tables. To check data formatsbefore loading, see Checking Data Format Before or After Loading.
Administrator's GuideBulk Loading Data
HP Vertica Analytics Platform (7.0.x) Page 477 of 969

Using Absolute Paths in a Load ScriptUnless you are using the COPY FROM LOCAL statement, using COPY on a remote client requires anabsolute path for a data file. You cannot use relative paths on a remote client. For a load script, youcan use vsql variables to specify the locations of data files relative to your Linux working directory.
To use vsql variables to specify data file locations:
1. Create a vsql variable containing your Linux current directory.
\set t_pwd `pwd`
2. Create another vsql variable that uses a path relative to the Linux current directory variable fora specific data file.
\set input_file '\'':t_pwd'/Date_Dimension.tbl\''
3. Use the second variable in the COPY statement:
COPY Date_Dimension FROM :input_file DELIMITER '|';
4. Repeat steps 2 and 3 to load all data files.
Note: COPY FROM LOCAL does not require an absolute path for data files. You can usepaths that are relative to the client's running directory.
Running a Load ScriptYou can run a load script on any host, as long as the data files are on that host.
1. Change your Linux working directory to the location of the data files.
$ cd /opt/vertica/doc/retail_example_database
2. Run the Administration Tools.
$ /opt/vertica/bin/admintools
3. Connect to the database.
4. Run the load script.
Administrator's GuideBulk Loading Data
HP Vertica Analytics Platform (7.0.x) Page 478 of 969

Using COPY and COPY LOCALThe COPY statement bulk loads data into an HP Vertica database. You can initiate loading one ormore files or pipes on a cluster host. You can load directly from a client system, too, using theCOPY statement with its FROM LOCAL option.
COPY lets you load parsed or computed data. Parsed data is from a table or schema using one ormore columns, and computed data is calculated with a column expression on one or more columnvalues.
COPY invokes different parsers depending on the format you specify:
l Delimited text (the default parser format, but not specified)
l Native binary (NATIVE) (not supported with COPY LOCAL)
l Native varchar (NATIVE VARCHAR) (not supported with COPY LOCAL)
l Fixed-width data (FIXEDWIDTH)
COPY has many options, which you combine tomake importing data flexible. For detailed syntaxfor the various options see the SQLReferenceManual. For example:
For this option... See this section...
Read uncompressed data, or data compressed with GZIP or BZIP. Specifying COPY FROMOptions
Insert data into theWOS (memory) or directly into theROS (disk). Choosing a LoadMethod
Set parameters such as data delimiters and quote characters forthe entire load operation or, for specific columns.
Loading UTF-8 FormatData
Transform data before inserting it into the database. Transforming Data DuringLoads
Copying Data From an HP Vertica ClientUse COPY LOCAL to load files on a client to the HP Vertica database. For example, to copy aGZIPfile from your local client, use a command such as this:
=> COPY store.store_dimension FROM LOCAL '/usr/files/my_data/input_file' GZIP;
You can use a comma-separated list to loadmultiple files of the same compression type. COPYlocal then concatenates the files into a single file, so you cannot combine files with differentcompression types in the list. When listingmultiple files, be sure to specify the type of every inputfile, such as BZIP, as shown:
COPY simple_table FROM LOCAL 'input_file.bz' BZIP, 'input_file.bz' BZIP;
Administrator's GuideBulk Loading Data
HP Vertica Analytics Platform (7.0.x) Page 479 of 969

You can load on a client (LOCAL) from STDIN, as follows:
COPY simple_table FROM LOCAL STDIN;
Transforming Data During LoadsTo promote a consistent database and reduce the need for scripts to transform data at the source,HP Vertica lets you transform data as part of loading it into the target database. Transforming dataduring loads is useful for computing values to insert into a target database column from othercolumns in the source database.
To transform data during load, use the following syntax to specify the target column for which youwant to compute values, as an expression:
COPY [ [database-name.]schema-name.]table [( [Column as Expression] / column[FORMAT 'format']
[ ,...])]FROM ...
Understanding Transformation RequirementsWhen transforming data during loads, the COPY statement must contain at least one parsed column.The parsed column can be a FILLER column. (See Ignoring Columns and Fields in the Load File formore information about using fillers.)
Specify only RAW data in the parsed column source data. If you specify nulls in that RAW data, thecolumns are evaluated with the same rules as for SQL statement expressions.
You can intersperse parsed and computed columns in a COPY statement.
Loading FLOAT ValuesHP Vertica parses floating-point values internally. COPY does not require you to cast floatsexplicitly, unless you need to transform the values for another reason. For more information, seeDOUBLE PRECISION (FLOAT).
Using Expressions in COPY StatementsThe expression you use in a COPY statement can be as simple as a single column or as complex asa case expression for multiple columns. You can specify multiple columns in a COPY expression,and havemultiple COPY expressions refer to the same parsed column. You can specify COPYexpressions for columns of all supported data types.
COPY expressions can usemany HP Vertica-supported SQL functions, operators, constants,NULLs, and comments, including these functions:
l Date/time
l Formatting Functions
Administrator's GuideBulk Loading Data
HP Vertica Analytics Platform (7.0.x) Page 480 of 969

l String
l Null-handling
l System information
COPY expressions cannot use SQLmeta functions (HP Vertica-specific), analytic functions,aggregate functions, or computed columns.
For computed columns, all parsed columns in the expressionmust be listed in the COPY statement.Do not specify FORMAT or RAW in the source data for a computed column.
Expressions used in a COPY statement can contain only constants. The return data type of theexpressionmust be coercible to that of the target column. Parsed column parameters are alsocoerced tomatch the expression.
Handling Expression ErrorsErrors that occur in COPY expressions are treated as SQL errors, not parse errors. When a parseerrors occur, COPY rejects the row and adds a copy of the row to the rejected data file. COPY alsoadds amessage to the exceptions file describing why the row was rejected. For example, <DBMS_SHORT> does not implicitly cast data types during parsing. If a typemismatch occurs between thedata being loaded and a column type (such as loading a text value for a FLOAT column), COPYrejects the row, but continues processing.
COPY expression errors are treated as SQL errors and cause the entire load to rollback. Forexample, if the COPY statement has an expression with a transform function, and a syntax erroroccurs in the function, the entire load is rolled back. The HP Vertica-specific log file will include theSQL error message, but the reason for the rollback is not obvious without researching the log.
Transformation ExampleFollowing is a small transformation example.
1. Create a table and corresponding projection.
CREATE TABLE t ( year VARCHAR(10),month VARCHAR(10),day VARCHAR(10),k timestamp
);CREATE PROJECTION tp (
year,month,day,k)
AS SELECT * from t;
Administrator's GuideBulk Loading Data
HP Vertica Analytics Platform (7.0.x) Page 481 of 969

2. Use COPY to copy the table, computing values for the year, month, and day columns in thetarget database, based on the timestamp columns in the source table.
3. Load the parsed column, timestamp, from the source data to the target database.
COPY t(year AS TO_CHAR(k, 'YYYY'),month AS TO_CHAR(k, 'Month'),day AS TO_CHAR(k, 'DD'),k FORMAT 'YYYY-MM-DD') FROM STDIN NO COMMIT;
2009-06-171979-06-302007-11-26\.
4. Select the table contents to see the results:
SELECT * FROM t;year | month | day | k
------+-----------+-----+---------------------2009 | June | 17 | 2009-06-17 00:00:001979 | June | 30 | 1979-06-30 00:00:002007 | November | 26 | 2007-11-26 00:00:00
(3 rows)
Deriving Table Columns From Data File ColumnsYou can use COPY to derive a table column from the data file to load.
The next example illustrates how to use the year, month, and day columns from the source input toderive and load the value for the TIMESTAMP column in the target database.
1. Create a table and corresponding projection:
=> CREATE TABLE t (k TIMESTAMP);=> CREATE PROJECTION tp (k) AS SELECT * FROM t;
2. Use COPY with the FILLER keyword to skip the year, month, and day columns from thesource file.
=> COPY t(year FILLER VARCHAR(10),month FILLER VARCHAR(10),day FILLER VARCHAR(10),k AS TO_DATE(YEAR || MONTH || DAY, 'YYYYMMDD') )
FROM STDIN NO COMMIT;>> 2009|06|17>> 1979|06|30>> 2007|11|26>> \.
Administrator's GuideBulk Loading Data
HP Vertica Analytics Platform (7.0.x) Page 482 of 969

3. Select from the copied table to see the results:
=> SELECT * FROM t;k
---------------------2009-06-17 00:00:001979-06-30 00:00:002007-11-26 00:00:00
(3 rows)
See also Using Sequences for how to generate an auto-incrementing value for columns.
See the COPY statement in the SQLReferenceManual for further information.
Specifying COPY FROM OptionsEach COPY statement requires a FROM option to indicate the location of the file or files beingloaded. This syntax snippet shows the available FROM keywords, and their associated file formatoptions:
FROM { STDIN ...... [ BZIP | GZIP | UNCOMPRESSED ]...| 'pathToData' [ ON nodename | ON ANY NODE ]...... [ BZIP | GZIP | UNCOMPRESSED ] [, ...]...| LOCAL STDIN | 'pathToData'...... [ BZIP | GZIP | UNCOMPRESSED ] [, ...]}
Each of the FROM keywords lets you optionally specify the format of the load file asUNCOMPRESSED, BZIP, or GZIP.
Note:When using COPY in conjunction with a CREATE EXTERNAL TABLE statement, youcannot use the COPY FROM STDIN or LOCAL options.
Loading From STDINUsing STDIN for the FROM option lets you load uncompressed data, bzip, or gzip files.
Loading From a Specific PathUse the 'pathToData' option to indicate the location of the load file, optionally indicating a nodename or ON ANY NODE to indicate which node (or nodes) should parse the load file. You can load oneor more files in the supported formats: UNCOMPRESSED, BZIP, or GZIP.
Note: Using the ON ANY NODE clause indicates that the source file to load is on all of thenodes, so COPY opens the file and parses it from any node in the cluster. Be sure that thesource file you specify is available and accessible on each cluster node.
Administrator's GuideBulk Loading Data
HP Vertica Analytics Platform (7.0.x) Page 483 of 969

If pathToData resolves to a storage location, and the user invoking COPY is not a superuser, theseare the required permissions:
l The storage locationmust have been created with the USER option (see ADD_LOCATION)
l The user must already have been granted READ access to the storage location where the file(s)exist, as described in GRANT (Storage Location)
Further, if a non-superuser invokes COPY from a storage location to which she has privileges, HPVertica also checks any symbolic links (symlinks) the user has to ensure no symlink can access anarea to which the user has not been granted privileges.
Loading BZIP and GZIP FilesYou can load compressed files (BZIP andGZIP). Youmust indicate the BZIP or GZIP format foreach file when loadingmultiple files. For example, this statement copies a BZIP file into the flextable twitter, using the fjsonparser:
VMART=> copy twitter from '/server1/TWITTER/tweets1.json.bz2' BZIP parser fjsonparser() direct;Rows Loaded
-------------172094
(1 row)
Loading with Wildcards (glob) ON ANY NODECOPY fully supports the ON ANY NODE clause with a wildcard (glob). You can invoke COPY for alarge number of files in a shared directory with a single statement such as this:
COPY myTable FROM '/mydirectory/ofmanyfiles/*.dat' ON ANY NODE
Using a wildcard with the ON ANY NODE clause expands the file list on the initiator node, and thendistributes the individual files among all nodes, evenly distributing the COPY workload across theentire cluster.
Loading From a Local ClientTo bulk load data from a client, and without requiring database superuser privileges, use the COPYFROM LOCAL option. You can load from either STDIN, or a specific path, but not from a specificnode (or ON ANY NODE), since you are loading from the client. All local files are loaded and parsedserially with each COPY statement, so you cannot perform parallel loads with the LOCAL option.See Using Parallel Load Streams.
You can load one or more files in the supported formats: UNCOMPRESSED, BZIP, or GZIP.
For specific information about saving rejected data and exceptions files when using COPY fromLOCAL, see Capturing Load Exceptions and Rejections.
Administrator's GuideBulk Loading Data
HP Vertica Analytics Platform (7.0.x) Page 484 of 969

Choosing a Load MethodDepending on what data you are loading, COPY statement has these loadmethod options:
LoadMethod Description and Use
AUTO Loads data intoWOS. Use the default COPY loadmethod for smaller bulk loads.
DIRECT Loads data directly intoROS containers. Use the DIRECT loadmethod for largebulk loads (100MB ormore).
TRICKLE Loads only intoWOS. Use for frequent incremental loads, after the initial bulk load iscomplete.
Note: COPY ignores any loadmethod you specify as part of creating an external table.
Loading Directly into WOS (AUTO)This is the default loadmethod. If you do not specify a load option, COPY uses the AUTOmethodto load data intoWOS (Write Optimized Store in memory). The default method is good for smallerbulk loads (< 100MB). OnceWOS is full, COPY continues loading directly toROS (ReadOptimized Store on disk) containers.
Loading Directly to ROS (DIRECT)Use the DIRECT keyword in the COPY statement to bypass loading data intoWOS, and instead,load data directly into ROS containers. The DIRECT option is best suited for loading large amountsof data (100MB ormore) at a time. Using DIRECT for many loads of smaller data sets results inmany ROS containers, which have to be combined later.
COPY a FROM stdin DIRECT;COPY b FROM LOCAL STDIN DIRECT;
Note: A large initial bulk load can temporarily affect query performance while HP Verticaorganizes the data.
Loading Data Incrementally (TRICKLE)Use the TRICKLE load option to load data incrementally after the initial bulk load is complete. Trickleloading loads data only into theWOS. If theWOS becomes full, an error occurs and the entire dataload is rolled back. Use this option only when you have a finely-tuned load andmoveout process sothat you are sure there is room in theWOS for the data you are loading. This option is more efficientthan AUTOwhen loading data into partitioned tables.
For other details on trickle-loading data andWOS Overflow into the ROS, see Trickle Loading.
Administrator's GuideBulk Loading Data
HP Vertica Analytics Platform (7.0.x) Page 485 of 969

Loading Data Without Committing Results (NOCOMMIT)
Use the NO COMMIT option with COPY (unless the tables are temp tables) to perform a bulk loadtransaction without automatically committing the results. This option is useful for executingmultipleCOPY commands in a single transaction.
For example, the following set of COPY ... NOCOMMIT statements performs several copystatements sequentially, and then commits them all. In this way, all of the copied data is eithercommitted or rolled back as a single transaction.
COPY... NO COMMIT;COPY... NO COMMIT;COPY... NO COMMIT;COPY X FROM LOCAL NO COMMIT;COMMIT;
Using a single transaction for multiple COPY statements also allows HP Vertica to load the datamore efficiently since it can combine the larger amounts of data frommultiple COPY statementsinto fewerROS containers.
HP recommends that you COMMIT or ROLLBACK the current transaction before you use COPY.
You can combine NO COMMITwithmost other existing COPY options, but not theREJECTED DATA AS TABLE option. The standard transaction semantics apply. If a transaction is inprogress that was initiated by a statement other than COPY (such as INSERT), using COPY with NOCOMMIT adds rows to the existing transaction, rather than starting a new one. The previousstatements are NOT committed.
Note: NOCOMMIT is ignored when COPY is part of the CREATE EXTERNAL TABLE FROMCOPY statement.
Using NO COMMIT to Detect Constraint ViolationsYou can use the NO COMMIT option to detect constraint violations as part of the load process.
HP Vertica checks for constraint violations when running a query, but not when loading data. Todetect constraint violations, load data with the NOCOMMIT keyword and then test the load usingANALYZE_CONSTRAINTS. If you find any constraint violations, you can roll back the loadbecause you have not committed it.
See Detecting Constraint Violations for detailed instructions.
Using COPY InteractivelyHP Vertica recommends using the COPY statement in one or more script files, as described inUsing Load Scripts. You can also use commands such as the following interactively by piping a
Administrator's GuideBulk Loading Data
HP Vertica Analytics Platform (7.0.x) Page 486 of 969

text file to vsql and executing COPY (or COPY FROM LOCAL) statement with the standard inputstream as the input file. For example:
$ cat fact_table.tbl | vsql -c "COPY FACT_TABLE FROM STDIN DELIMITER '|' DIRECT";$ cat fact_table.tbl | vsql -c "COPY FACT_TABLE FROM LOCAL STDIN DELIMITER '|' DIRECT";
Canceling a COPY StatementIf you cancel a bulk data load, the COPY statement rolls back all rows that it attempted to load.
Specifying a COPY ParserBy default, COPY uses the DELIMITER parser to load raw data into the database. Raw input datamust be in UTF-8, delimited text format. Data is compressed and encoded for efficient storage. Ifyour raw data does not consist primarily of delimited text, specify the parser COPY should use toalignmost closely with the load data:
l NATIVE
l NATIVE VARCHAR
l FIXEDWIDTH
Note: You do not specify the DELIMITER parser directly; absence of a specific parserindicates the default.
Two other parsers are available specifically to load unstructured data into flex tables, as describedin the Using Flex Table Parsers section of the Flex Tables Guide:
l FJSONPARSER
l FDELIMITEDPARSER
While these two parsers are for use with flex tables, you can also use them with columnar tables, tomake loading datamore flexible. For instance, you can load JSON data into a columnar table in oneload, and delimited data into the same table in another. The Flex Tables Guide describes this usecase and presents an example.
Using a different parser for your data can improve load performance. If delimited input data includesbinary data types, COPY translates the data on input. See Using Load Scripts and Loading Binary(Native) Data for examples. You can also load binary data, but only if it adheres to the COPY formatrequirements, described in Creating Native Binary Format Files.
You cannot mix raw data types that require different parsers (such as NATIVE and FIXEDWIDTH)in a single bulk load COPY statement. To check data formats before (or after) loading, seeChecking Data Format Before or After Loading.
Administrator's GuideBulk Loading Data
HP Vertica Analytics Platform (7.0.x) Page 487 of 969

Specifying Load MetadataIn addition to choosing a parser option, COPY supports other options to determine how to handlethe raw load data. These options are considered loadmetadata, and you can specify metadataoptions at different parts of the COPY statement as follows:
Metadata OptionAs a Column or ExpressionOption
As aCOLUMNOPTION
As a FROMLevel Option
DELIMITER X X X
ENCLOSED BY X X X
ESCAPE AS X X X
NULL X X X
TRIM X X
RECORDTERMINATOR
X
SKIP X
SKIP BYTES X (Fixed-widthonly)
TRAILINGNULLCOLS
X
The following precedence rules apply to all data loads:
l All column-level parameters override statement-level parameters.
l COPY uses the statement-level parameter if you do not specify a column-level parameter.
l COPY uses the default metadata values for the DELIMITER, ENCLOSED BY, ESCAPE AS,and NULL options if you do not specify them at either the statement- or column-level.
When you specify any metadata options, COPY uses the parser to produce the best results andstores the raw data and its correspondingmetadata in the following formats:
Raw data format Metadata Format Parser
UTF-8 UTF-8 DELIMITER
Binary Binary NATIVE
UTF-8 Binary NATIVE VARCHAR
UTF-8 UTF-8 FIXEDWIDTH
Administrator's GuideBulk Loading Data
HP Vertica Analytics Platform (7.0.x) Page 488 of 969

See Alsol COPY
Interpreting Last Column End of Row ValuesWhen bulk-loading delimited text data using the default parser (DELIMITED), the last column end ofrow value can be any of the following:
l Record terminator
l EOF designator
l Delimiter and a record terminator
Note: The FIXEDWIDTH parser always requires exactly a record terminator. No otherpermutations work.
For example, given a three-column table, the following input rows for a COPY statement using acomma (,) delimiter are each valid:
1,1,11,1,1,1,1,1,1,,
The following examples illustrate how COPY can interpret different last column end of data rowvalues.
Using a Single End of Row DefinitionTo see how COPY interprets a single end of row definition:
1. Create a two-column table two_col, specifying column bwith a default value of 5:
VMart=> create table two_col (a int, b int DEFAULT 5);CREATE TABLE
2. COPY the two_col table using a comma (,) delimiter, and enter values for only one column (asa single, multi-line entry):
VMart=> copy two_col from stdin delimiter ',';Enter data to be copied followed by a newline.End with a backslash and a period on a line by itself.>> 1,
Administrator's GuideBulk Loading Data
HP Vertica Analytics Platform (7.0.x) Page 489 of 969

>> 1,>> \.
The COPY statement complete successfully.
3. Query table two_col, to display the two NULL values for column b as blank:
VMart=> select * from two_col; a | b---+---1 |1 |
(2 rows)
Here, COPY expects two values for each column, but gets only one. Each input value is followedby a delimiter (,), and an implicit record terminator (a newline character, \n). You supply a recordterminator with the ENTER or RETURN key. This character is not represented on the screen.
In this case, the delimiter (,) and record terminator ( \n) are handled independently. COPY interpretsthe delimiter (,) to indicate the end of one value, and the record terminator (\n) to specify the end ofthe column row. Since no value follows the delimiter, COPY supplies an empty string before therecord terminator. By default, the empty string signifies a NULL, which is a valid column value.
Using a Delimiter and Record Terminator End of RowDefinition
To use a delimiter and record terminator together as an end of row definition:
1. Copy column a (a) of the two_col table, using a comma delimiter again, and enter two values:
VMart=> copy two_col (a) from stdin delimiter ',';Enter data to be copied followed bya newline.End with a backslash and a period on a line by itself.>> 2,>> 2,>> \.
The COPY statement again completes successfully.
2. Query table two_col to see that column b now includes two rows with its default value (5):
VMart=> select * from two_col; a | b---+---1 |1 |2 | 5 2 | 5
(4 rows)
Administrator's GuideBulk Loading Data
HP Vertica Analytics Platform (7.0.x) Page 490 of 969

In this example, COPY expects values for only one column, because of the column (a) directive.As such, COPY interprets the delimiter and record terminator together as a single, valid, lastcolumn end of row definition. Before parsing incoming data, COPY populates column bwith itsdefault value, because the table definition has two columns and the COPY statement supplies onlyone. This example populates the second columnwith its default column list value, while theprevious example used the supplied input data.
Loading UTF-8 Format DataYou can specify these parameters at either a statement or column basis:
l ENCLOSED BY
l ESCAPE AS
l NULL
l DELIMITER
Loading Special Characters As LiteralsThe default COPY statement escape key is a backslash (\). By preceding any special characterwith an escape character, COPY interprets the character that follows literally, and copies it into thedatabase. These are the special characters that you escape to load them as literals:
Special Character COPY Statement Usage
Vertical bar (|) Default COPY ... DELIMITER character
Empty string ('') Default COPY ... NULL string.
Backslash (\) Default COPY ... ESC character.
Newline and other control characters Various
To use a special character as a literal, prefix it with an escape character. For example, to include aliteral backslash (\) in the loaded data (such as when including a file path), use two backslashes(\\). COPY removes the escape character from the input when it loads escaped characters.
Using a Custom Column Separator (DELIMITER)The default COPY delimiter is a vertical bar (|). The DELIMITER is a single ASCII character usedto separate columns within each record of a file. Between two delimiters, COPY interprets all stringdata in load files as characters. Do not enclose character strings in quotes, since quote charactersare also treated as literals between delimiters.
You can define a different delimiter using any ASCII value in the range E'\000' to E'\177'inclusive. For instance, if you are loadingCSV data files, and the files use a comma (,) character asa delimiter, you can change the default delimiter to a comma. You cannot use the same characterfor both the DELIMITER and NULL options.
Administrator's GuideBulk Loading Data
HP Vertica Analytics Platform (7.0.x) Page 491 of 969

If the delimiter character is among a string of data values, use the ESCAPE AS character (\ bydefault) to indicate that the delimiter should be treated as a literal.
The COPY statement accepts empty values (two consecutive delimiters) as valid input data forCHAR and VARCHAR data types. COPY stores empty columns as an empty string (''). Anempty string is not equivalent to a NULL string.
To indicate a non-printing delimiter character (such as a tab), specify the character in extendedstring syntax (E'...'). If your database has StandardConformingStrings enabled, use a Unicodestring literal (U&'...'). For example, use either E'\t' or U&'\0009' to specify tab as thedelimiter.
Using a Custom Column Option DELIMITERThis example, redefines the default delimiter through the COLUMN OPTION parameter.
1. Create a simple table.
=> CREATE TABLE t( pk INT,col1 VARCHAR(10),col2 VARCHAR(10),col3 VARCHAR(10),col4 TIMESTAMP);
2. Use the COLUMN OPTION parameter to change the col1 default delimiter to a tilde (~).
=> COPY t COLUMN OPTION(col1 DELIMITER '~') FROM STDIN NO COMMIT;>> 1|ee~gg|yy|1999-12-12>> \.=> SELECT * FROM t;pk | col1 | col2 | col3 | col4
----+------+------+------+---------------------1 | ee | gg | yy | 1999-12-12 00:00:00
(1 row)
Defining a Null Value (NULL)The default NULL value for COPY is an empty string (''). You can specify a NULL as any ASCIIvalue in the range E'\001' to E'\177' inclusive (any ASCII character except NUL: E'\000'). Youcannot use the same character for both the DELIMITER and NULL options.
When NULL is an empty string (''), use quotes to insert an empty string instead of a NULL. Forexample, using NULL " ENCLOSED BY '"':
l 1||3— Inserts a NULL in the second column.
l 1|""|3— Inserts an empty string instead of a NULL in the second columns.
To input an empty or literal string, use quotes (ENCLOSED BY); for example:
Administrator's GuideBulk Loading Data
HP Vertica Analytics Platform (7.0.x) Page 492 of 969

NULL ''NULL 'literal'
A NULL is case-insensitive andmust be the only value between the data field delimiters. Forexample, if the null string is NULL and the delimiter is the default vertical bar (|):
|NULL| indicates a null value.
| NULL | does not indicate a null value.
When you use the COPY command in a script, youmust substitute a double-backslash for each nullstring that includes a backslash. For example, the scripts used to load the example databasecontain:
COPY ... NULL E'\\n' ...
Loading NULL ValuesYou can specify NULL by entering fields without content into a data file, using a field delimiter.
For example, given the default delimiter (|) and default NULL (empty string) definition, COPYinserts the following input data:
| | 1| 2 | 34 | | 56 | |
into the table as follows:
(null, null, 1)(null, 2, 3)(4, null, 5)(6, null, null)
If NULL is set as a literal ('null'), COPY inserts the following inputs:
null | null | 1null | 2 | 34 | null | 56 | null | null
as follows:
(null, null, 1)(null, 2, 3)(4, null, 5)(6, null, null)
Administrator's GuideBulk Loading Data
HP Vertica Analytics Platform (7.0.x) Page 493 of 969

Filling Columns with Trailing Nulls (TRAILINGNULLCOLS)
Loading data using the TRAILING NULLCOLS option inserts NULL values into any columns withoutdata. Before inserting TRAILING NULLCOLS, HP Vertica verifies that the column does not have aNOT NULL constraint.
To use the TRAILING NULLCOLS parameter to handle inserts with fewer values than data columns:
1. Create a table:
=> CREATE TABLE z ( a INT,b INT,c INT );
2. Insert some values into the table:
=> INSERT INTO z VALUES (1, 2, 3);
3. Query table z to see the inputs:
=> SELECT * FROM z; a | b | c---+---+---1 | 2 | 3
(1 row)
4. Insert two rows of data from STDIN, using TRAILINGNULLCOLS:
=> COPY z FROM STDIN TRAILING NULLCOLS;>> 4 | 5 | 6>> 7 | 8>> \.
5. Query table z again to see the results. Using TRAILINGNULLCOLS, the COPY statementcorrectly handled the third row of column c, which had no value:
=> SELECT * FROM z; a | b | c---+---+---1 | 2 | 34 | 5 | 67 | 8 |
(3 rows)
Administrator's GuideBulk Loading Data
HP Vertica Analytics Platform (7.0.x) Page 494 of 969

Attempting to Fill a NOT NULL Column with TRAILINGNULLCOLS
You cannot use TRAILINGNULLCOLS on a column that has a NOT NULL constraint. Forinstance:
1. Create a table n, declaring column bwith a NOT NULL constraint:
=> CREATE TABLE n ( a INT,b INT NOT NULL,c INT );
2. Insert some table values:
=> INSERT INTO n VALUES (1, 2, 3);=> SELECT * FROM n;a | b | c
---+---+---1 | 2 | 3
(1 row)
3. Use COPY with TRAILINGNULLCOLS on table n to see the COPY error due to the columnconstraint:
=> COPY n FROM STDIN trailing nullcols abort on error;Enter data to be copied followed by a newline.End with a backslash and a period on a line by itself.>> 4 | 5 | 6>> 7 | 8>> 9>> \.ERROR: COPY: Input record 3 has been rejected (Cannot set trailing column to NULL ascolumn 2 (b) is NOT NULL)
4. Query the table to see that the COPY statement values were rejected:
=> SELECT * FROM n; a | b | c---+---+---1 | 2 | 3
(1 row)
Changing the Default Escape Character (ESCAPE AS)The default escape character is a backslash (\). To change the default to a different character, usethe ESCAPE AS option. To use an alternative escape character:
=> COPY mytable FROM '/data/input.txt' ESCAPE AS E('\001');
Administrator's GuideBulk Loading Data
HP Vertica Analytics Platform (7.0.x) Page 495 of 969

You can set the escape character to be any ASCII value value in the range E'\001' to E'\177'inclusive.
Eliminating Escape Character HandlingIf you do not want any escape character and want to prevent any characters from being interpretedas escape sequences, use the NO ESCAPE option as part of the COPY statement.
Delimiting Characters (ENCLOSED BY)The COPY ENCLOSED BY parameter lets you set an ASCII character to delimit characters to embedin string values. You can use any ASCII value in the range E'\001' to E'\177' inclusive (anyASCII character except NULL: E'\000') for the ENCLOSED BY value. Using double quotationmarks(") is themost commonly used quotation character. For instance, the following parameter specifiesthat input data to the COPY statement is enclosed within double quotes:
ENCLOSED BY '"'
With the following input (using the default DELIMITER (|) character), specifying:
"vertica | value"
Results in:
l Column 1 containing "vertica
l Column 2 containing value"
Notice the double quotes (") before vertica and after value.
Using the following sample input data as follows, columns are distributed as shown:
"1", "vertica,value", ",", "'"
col1 | col2 | col3 | col4------+---------------+------+-----1 | vertica,value | , | '
(1 row)
Alternatively, write the above example using any ASCII character of your choosing:
~1~, ~vertica,value~, ~,~, ~'~
If you use a single quote ('), rather than double quotes (") as the ENCLOSED BY character, youmustescape it using extended string syntax, a Unicode literal string (if StandardConformingStrings isenabled), or by using four single quotes:
ENCLOSED BY E'\''ENCLOSED BY U&'\0027'ENCLOSED BY ''''
Administrator's GuideBulk Loading Data
HP Vertica Analytics Platform (7.0.x) Page 496 of 969

Using any of the definitions means the following input is properly parsed:
'1', 'vertica,value', ',', '\''
See String Literals (Character) for an explanation of the string literal formats you can use to specifythe ENCLOSED BY parameter.
Use the ESCAPE AS character to embed the ENCLOSED BY delimiter within character string values.For example, using the default ESCAPE AS character (\) and double quote as the ENCLOSED BYcharacter, the following input returns "vertica":
"\"vertica\""
Using ENCLOSED BY for a Single ColumnThe following example uses double quotes to enclose a single column (rather than the entire row).The COPY statement also specifies a comma (,) as the delimiter.
=> COPY Retail.Dim (Dno, Dname ENCLOSED BY '"', Dstore) FROM '/home/dbadmin/dim3.txt'DELIMITER ','EXCEPTIONS '/home/dbadmin/exp.txt';
This example correctly loads data such as:
123,"Smith, John",9832
Specifying a Custom End of Record String (RECORDTERMINATOR)
To specify the literal character string that indicates the end of a data file record, use the RECORDTERMINATOR parameter, followed by the string to use. If you do not specify a value, then HP Verticaattempts to determine the correct line ending, accepting either just a linefeed (E'\n') common onUNIX systems, or a carriage return and linefeed (E'\r\n') common onWindows platforms.
For example, if your file contains comma-separated values terminated by line feeds that you wantto maintain, use the RECORD TERMINATOR option to specify an alternative value:
=> COPY mytable FROM STDIN DELIMITER ',' RECORD TERMINATOR E'\n';
To specify the RECORD TERMINATOR as non-printing characters, use either the extended stringsyntax or Unicode string literals. The following table lists some common record terminatorcharacters. See String Literals for an explanation of the literal string formats.
Extended String Syntax Unicode Literal StringDescription ASCII Decimal
E'\b' U&'\0008' Backspace 8
Administrator's GuideBulk Loading Data
HP Vertica Analytics Platform (7.0.x) Page 497 of 969

E'\t' U&'\0009' Horizontal tab 9
E'\n' U&'\000a' Linefeed 10
E'\f' U&'\000c' Formfeed 12
E'\r' U&'\000d' Carriage return 13
E'\\' U&'\005c' Backslash 92
If you use the RECORD TERMINATOR option to specify a custom value, be sure the input file matchesthe value. Otherwise, youmay get inconsistent data loads.
Note: The record terminator cannot be the same as DELIMITER, NULL, ESCAPE,or ENCLOSEDBY.
If using JDBC, HP recommends that you use the following value for the RECORD TERMINATOR:
System.getProperty("line.separator")
ExamplesThe following examples use a comma (,) as the DELIMITER for readability.
,1,2,3,,1,2,31,2,3,
Leading (,1) and trailing (3,) delimiters are ignored. Thus, the rows all have three columns.
123,'\\n',\\n,456 Using a non-default null string, the row is interpreted as:
123newline\n456
123,this\, that\, or the other,something else,456
The row would be interpreted as:
123this, that, or the othersomething else456
Loading Native Varchar DataUse the NATIVE VARCHAR parser option when the raw data consists primarily of CHAR orVARCHAR data. COPY performs the conversion to the actual table data types on the databaseserver. This option with COPY LOCAL is not supported.
Administrator's GuideBulk Loading Data
HP Vertica Analytics Platform (7.0.x) Page 498 of 969

Using NATIVE VARCHAR does not provide the same efficiency as NATIVE. However, NATIVEVARCHAR precludes the need to use delimiters or to escape special characters, such as quotes,which canmake working with client applications easier.
Note: NATIVE VARCHAR does not support concatenated BZIP andGZIP files.
Batch data inserts performed through the HP Vertica ODBC and JDBC drivers automatically useeither the NATIVE BINARY or NATIVE VARCHAR formats. ODBC and JDBC use NATIVEBINARY if the application data types match the actual table data types exactly (includingmaximumlengths of CHAR/VARCHAR and precision/scale of numeric data types), which provide the bestpossible load performance. If there is any data typemismatch, NATIVE VARCHAR is used.
Loading Binary (Native) DataYou can load binary data using the NATIVE parser option, except with COPY LOCAL, which doesnot support this option. Since binary-format data does not require the use and processing ofdelimiters, it precludes the need to convert integers, dates, and timestamps from text to their nativestorage format, and improves load performance over delimited data. All binary-format files mustadhere to the formatting specifications described in Appendix: Binary File Formats.
Native binary format data files are typically larger than their delimited text format counterparts, souse GZIP or BZIP to compress the data before loading it. NATIVE BINARY does not supportconcatenated BZIP andGZIP files. You can load native (binary) format files when developing plug-ins to ETL applications, and completing batch insert commands with ODBC and JDBC.
Note: TheODBC client driver does not perform any data validation. When loading native(binary) format data with the ODBC client driver, your application should validate the binarydata format before loading to confirm that it conforms to the HP Vertica specifications.
There is no copy format to load binary data byte-for-byte because the column and record separatorsin the data would have to be escaped. Binary data type values are padded and translated on input,and also in the functions, operators, and casts supported.
Loading Hexadecimal, Octal, and Bitstring DataYou can use hexadecimal, octal, and bitstring formats only to load binary columns. To specifythese column formats, use the COPY statement's FORMAT options:
l Hexadecimal
l Octal
l Bitstring
The following examples illustrate how to use the FORMAT option.
Administrator's GuideBulk Loading Data
HP Vertica Analytics Platform (7.0.x) Page 499 of 969

1. Create a table:
=> CREATE TABLE t( oct VARBINARY(5),hex VARBINARY(5),bitstring VARBINARY(5) );
2. Create the projection:
=> CREATE PROJECTION t_p(oct, hex, bitstring) AS SELECT * FROM t;
3. Use the COPY command from STDIN (not a file), specifying each of the formats:
=> COPY t (oct FORMAT 'octal', hex FORMAT 'hex',bitstring FORMAT 'bitstring')
FROM STDIN DELIMITER ',';
4. Enter the data to load, ending the statement with a backslash (\) and a period (.) on a separateline:
>> 141142143144145,0x6162636465,0110000101100010011000110110010001100101>> \.
5. Use a select query on table t to view the input values results:
=> SELECT * FROM t;oct | hex | bitstring-------+-------+-----------abcde | abcde | abcde(1 row)
COPY uses the same default format to load binary data, as used to input binary data. Since thebackslash character ('\') is the default escape character, youmust escape octal input values. Forexample, enter the byte '\141' as '\\141'.
Note: If you enter an escape character followed by an invalid octal digit or an escape characterbeing escaped, COPY returns an error.
On input, COPY translates string data as follows:
l Uses the HEX_TO_BINARY function to translate from hexadecimal representation to binary.
l Uses the BITSTRING_TO_BINARY function to translate from bitstring representation to binary.
Both functions take a VARCHAR argument and return a VARBINARY value.
Administrator's GuideBulk Loading Data
HP Vertica Analytics Platform (7.0.x) Page 500 of 969

You can also use the escape character to represent the (decimal) byte 92 by escaping it twice; forexample, '\\\\'. Note that vsql inputs the escaped backslash as four backslashes. Equivalentinputs are hex value '0x5c' and octal value '\134' (134 = 1 x 8^2 + 3 x 8^1 + 4 x 8^0 = 92).
You can load a delimiter value if you escape it with a backslash. For example, given delimiter '|','\\001\|\\002' is loaded as {1,124,2}, which can also be represented in octal format as'\\001\\174\\002'.
If you insert a value with more bytes than fit into the target column, COPY returns an error. Forexample, if column c1 is VARBINARY(1):
=> INSERT INTO t (c1) values ('ab'); ERROR: 2-byte value too long for type Varbinary(1)
If you implicitly or explicitly cast a value with more bytes than fit the target data type, COPY silentlytruncates the data. For example:
=> SELECT 'abcd'::binary(2); binary--------ab
(1 row)
Hexadecimal DataThe optional '0x' prefix indicates that a value is hexadecimal, not decimal, although not allhexadecimal values use A-F; for example, 5396. COPY ignores the 0x prefix when loading the inputdata.
If there are an odd number of characters in the hexadecimal value, the first character is treated asthe low nibble of the first (furthest to the left) byte.
Octal DataLoading octal format data requires that each byte be represented by a three-digit octal code. Thefirst digit must be in the range [0,3] and the second and third digits must both be in the range [0,7].
If the length of an octal value is not amultiple of three, or if one of the three digits is not in the properrange, the value is invalid and COPY rejects the row in which the value appears. If you supply aninvalid octal value, COPY returns an error. For example:
SELECT '\\000\\387'::binary(8);ERROR: invalid input syntax for type binary
Rows that contain binary values with invalid octal representations are also rejected. For example,COPY rejects '\\008' because '\\ 008' is not a valid octal number.
BitString DataLoading bitstring data requires that each character must be zero (0) or one (1), in multiples of eightcharacters. If the bitstring value is not amultiple of eight characters, COPY treats the first n
Administrator's GuideBulk Loading Data
HP Vertica Analytics Platform (7.0.x) Page 501 of 969

characters as the low bits of the first byte (furthest to the left), where n is the remainder of thevalue's length, divided by eight.
ExamplesThe following example shows VARBINARY HEX_TO_BINARY(VARCHAR) and VARCHAR TO_HEX(VARBINARY) usage.
1. Create table t and and its projection with binary columns:
=> CREATE TABLE t (c BINARY(1));=> CREATE PROJECTION t_p (c) AS SELECT c FROM t;
2. Insert minimum andmaximum byte values, including an IP address represented as a characterstring:
=> INSERT INTO t values(HEX_TO_BINARY('0x00')); => INSERT INTO t values(HEX_TO_BINARY('0xFF'));=> INSERT INTO t values (V6_ATON('2001:DB8::8:800:200C:417A'));
Use the TO_HEX function to format binary values in hexadecimal on output:
=> SELECT TO_HEX(c) FROM t;to_hex--------00ff20
(3 rows)
See Alsol COPY
l Binary Data Types
l Formatting Functions
l ASCII
Loading Fixed-Width Format DataUse the FIXEDWIDTH parser option to bulk load fixed-width data. Youmust specify the COLSIZESoption values to specify the number of bytes for each column. The definition of the table you areloading (COPY table f (x, y, z)) determines the number of COLSIZES values to declare.
To load fixed-width data, use the COLSIZES option to specify the number of bytes for each inputcolumn. If any records do not have values, COPY inserts one or more null characters to equal thespecified number of bytes. The last record in a fixed-width data file must include a record terminatorto determine the end of the load data.
Administrator's GuideBulk Loading Data
HP Vertica Analytics Platform (7.0.x) Page 502 of 969

Supported Options for Fixed-Width Data LoadsLoading fixed-width data supports the options listed in the COPY Option Summary.
These options are not supported:
l DELIMITER
l ENCLOSED BY
l ESCAPE AS
l TRAILING NULLCOLS
Using Nulls in Fixed-Width DataThe default NULL string for a fixed-width load cannot be an empty string, and instead, consists ofall spaces. The number of spaces depends on the columnwidth declared with the COLSIZES(integer, [,...]) option.
For fixed-width loads, the NULL definition depends on whether you specify NULL at the column orstatement level, as follows:
l Statement level—NULLmust be defined as a single-character. The default (or custom) NULLcharacter is repeated for the entire width of the column.
l Column Level—NULLmust be defined as a string whose lengthmatches the columnwidth.
For fixed-width loads, if the input data column has fewer values than the specified column size,COPY inserts NULL characters. The number of NULLs must match the declared columnwidth. Ifyou specify a NULL string at the column level, COPY matches the string with the columnwidth.
Note: To turn off NULLs, use the NULL AS option and specify NULL AS ''.
Defining a Null Character (Statement Level)1. Create a two-column table (fw):
VMart=> create table fw(co int, ci int);CREATE TABLE
2. Copy the table, specifying null as 'N', and enter some data:
VMart=> copy fw from STDIN fixedwidth colsizes(2,2) null as 'N' no commit;Enter datato be copied followed by a newline.
Administrator's GuideBulk Loading Data
HP Vertica Analytics Platform (7.0.x) Page 503 of 969

End with a backslash and a period on a line by itself.>> NN12>> 23NN>> NNNN>> nnnn>> \.
3. Select all (*) from the table:
VMart=> select * from fw;co | ci
----+----| 12
23 ||||
(5 rows)
Defining a Custom Record TerminatorTo define a record terminator other than the COPY default when loading fixed-width data, takethese steps:
1. Create a table, fw, with two columns, co and ci:
VMart=> create table fw(co int, ci int);CREATE TABLE
2. Copy table fw, specifying two 2-byte column sizes, and specifying a comma (,) as the recordterminator:
VMart=> copy fw from STDIN fixedwidth colsizes(2,2) record terminator ',';Enter datato be copied followed by a newline.End with a backslash and a period on a line by itself.>> 1234,1444,6666>> \.
3. Select all (*) from the table:
VMart=> select * from fw; co | ci----+----12 | 3414 | 44
(2 rows)
Administrator's GuideBulk Loading Data
HP Vertica Analytics Platform (7.0.x) Page 504 of 969

The SELECT output indicates only two values. COPY rejected the third value (6666) because itwas not followed by a comma (,) record terminator. Fixed-width data requires a trailing recordterminator only if you explicitly specify a record terminator explicitly.
Copying Fixed-Width DataUse COPY FIXEDWIDTH COLSIZES (n [,...) to load files into an HP Vertica database. By default,all spaces are NULLs. For example, in the simple case:
=> create table mytest(co int, ci int);=> create projection mytest_p1 as select * from mytest segmented by hash(co) all nodes;=> create projection mytest_p2 as select * from mytest segmented by hash(co) all nodes offset 1;=> copy mytest(co,ci) from STDIN fixedwidth colsizes(6,4) no commit;=> select * from mytest order by co;co | ci
----+----(0 rows)
Skipping Content in Fixed-Width DataThe COPY statement has two options to skip input data. The SKIP BYTES option is only for fixed-width data loads:
SKIP BYTES total Skips the total number (integer) of bytes from the input data.
SKIP records Skips the number (integer) of records you specify.
This example uses SKIP BYTES to skip 10 bytes when loading a fixed-width table with two columns(4 and 6 bytes):
1. Copy a table, using SKIP BYTES to skip 10 bytes of input data:
VMart=> copy fw from stdin fixedwidth colsizes (4,6) SKIP BYTES 10;Enter data to be copied followed by a newline.End with a backslash and a period on a line by itself.>> 2222666666>> 1111999999>> 1632641282>> \.
2. Select all (*) from the table:
VMart=> select * from fw order by co; co | ci------+--------1111 | 9999991632 | 641282
(2 rows)
The select output indicates that COPY skipped the first 10 bytes of load data, as directed.
Administrator's GuideBulk Loading Data
HP Vertica Analytics Platform (7.0.x) Page 505 of 969

This example uses SKIPwhen loading a fixed-width (4,6) table to skip one (1) record of input data:
1. Copy a table, using SKIP to skip 1 record of input data:
VMart=> copy fw from stdin fixedwidth colsizes (4,6) SKIP 1;Enter data to be copied followed by a newline.End with a backslash and a period on a line by itself.>> 2222666666>> 1111999999>> 1632641282>> \.
2. Select all (*) from the table:
VMart=> select * from fw order by co; co | ci------+--------1111 | 9999991632 | 641282
(2 rows)
The SELECT output indicates that COPY skipped the first record of load data, as directed.
Trimming Characters in Fixed-Width Data LoadsUse the TRIM option to trim a character. TRIM accepts a single-byte character, which is trimmed atthe beginning and end of the data. For fixed-width data loads, when you specify a TRIM character,COPY first checks to see if the row is NULL. If the row is not null, COPY trims the character(s).The next example instructs COPY to trim the character A, and shows the results. Only the last twolines entered comply to the specified (4, 6) fixed width:
1. Copy table fw, specifying the TRIM character, A:
VMart=> copy fw from stdin fixedwidth colsizes(4,6) TRIM 'A';Enter data to be copied followed by a newline.End with a backslash and a period on a line by itself.>> A2222A444444>> 2222A444444>> A22A444444>> A22AA4444A>> \.
2. Select all (*) from the table:
VMart=> select * from fw order by co;co | ci
----+--------22 | 4444
Administrator's GuideBulk Loading Data
HP Vertica Analytics Platform (7.0.x) Page 506 of 969

22 | 444444(2 rows)
Using Padding in Fixed-Width Data LoadsBy default, the padding character is ' ' (a single space). The padding behavior for fixed-width dataloads is similar to how a space is treated in other formats, differing by data type as follows:
Datatype Padding
Integer Leading and trailing spaces
Bool Leading and trailing spaces
Float Leading and trailing spaces
[var]Binary None. All characters are significant.
[Var]Char Trailing spaces if string is too large
DateIntervalTimeTimestampTimestampTZTimeTZ
None. All characters are significant. The COPY statement uses an internalalgorithm to parse these data types.
Date (formatted) Use the COPY FORMAT option string tomatch the expected column length.
Numerics Leading and trailing spaces
Ignoring Columns and Fields in the Load FileWhen bulk loading data, your source datamay contain a column that does not exist in thedestination table. Use the FILLER option to have COPY ignore an input column and the fields itcontains when a corresponding column does not exist in the destination table. You can also useFILLER to transform data through derivation from the source into the destination. Use FILLER for:
l Omitting columns that you do not want to transfer into a table.
l Transforming data from a source column and then loading the transformed data to thedestination table, without loading the original, untransformed source column (parsed column).(See Transforming Data During Loads.)
Using the FILLER ParameterYour COPY statement expressions can contain one or more filler columns. You can use anynumber of filler columns in the expression. The only restriction is that at least one columnmust notbe a filler column. You cannot specify target table columns as filler, regardless of whether they arein the column list.
Administrator's GuideBulk Loading Data
HP Vertica Analytics Platform (7.0.x) Page 507 of 969

A data file can consist entirely of filler columns, indicating that all data in a file can be loaded intofiller columns and then transformed and loaded into table columns. The filler columnmust be aparsed column, not a computed column. Also, the name of the filler columnmust be unique withinboth the source file and the destination table. Youmust specify the data type of the filler column aspart of the FILLER parameter.
FILLER Parameter ExamplesYou can specify all parser parameters for filler columns, and all statement level parser parametersapply to filler columns.
To ignore a column, use the COPY statement FILLER parameter, followed by its data type. Thenext example creates a table with one column, and then copies it using two filler parameters. Sincethe second filler column is not part of any expression, it is discarded:
create table t (k timestamp);copy t(y FILLER date FORMAT 'YYYY-MM-DD', t FILLER varchar(10), k as y) from STDIN no commit;2009-06-17|2009-06-17\.
The following example derives and loads the value for the timestamp column in the target databasefrom the year, month, and day columns in the source input. The year, month, and day columns arenot loaded because the FILLER parameter specifies to skip each of those columns:
CREATE TABLE t (k TIMESTAMP);CREATE PROJECTION tp (k) AS SELECT * FROM t;COPY t(year FILLER VARCHAR(10),
month FILLER VARCHAR(10),day FILLER VARCHAR(10),k AS TO_DATE(YEAR || MONTH || DAY, 'YYYYMMDD'))
FROM STDIN NO COMMIT;2009|06|171979|06|302007|11|26\.SELECT * FROM t;
k---------------------2009-06-17 00:00:001979-06-30 00:00:002007-11-26 00:00:00
(3 rows)
See the COPY statement in the SQLReferenceManual for more information about syntax andusage.
Loading Data into Pre-Join ProjectionsA pre-join projection stores rows of a fact table joined with rows of dimension tables. Storing pre-joinprojections improves query performance, since the join does not occur when you query the data, butis already stored.
Administrator's GuideBulk Loading Data
HP Vertica Analytics Platform (7.0.x) Page 508 of 969

To insert a row into the fact table of a pre-join projection, the associated values of the dimensiontable's columns must be looked up. Thus, an insert into a pre-join projection shares some of thequalities of a query. The following sections describe the behaviors associated with loading data intopre-join projections.
Foreign and Primary Key ConstraintsTo ensure referential integrity, foreign and primary key constraints are enforced on inserts into facttables of pre-join projections. If a fact row attempts to reference a row that does not exist in thedimension table, the load is automatically rolled back. The load is also rolled back if a fact rowreferences more than one dimension row.
Note: Unless it also has a NOT NULL constraint, a columnwith a FOREIGN KEY constraintcan contain a NULL value even though the dimension table's primary key column does notcontain a NULL value. This allows for records to be inserted into the fact table even though theforeign key in the dimension table is not yet known.
The following tables and SQL examples highlight these concepts.
l Fact Table:Employees
l Dimension Table:HealthPlans
l Pre-join Projection: Joins Employees to HealthPlans using the PlanID column
CREATE PROJECTION EMP_HEALTH (EmployeeID, FirstName, LastName, Type)AS (SELECT EmployeeID, FirstName, LastName,
Type FROM Employees, HealthPlansWHERE Employees.HealthPlanID = HealthPlans.PlanID)
Employees (Fact Table)
EmployeeID(PK) FirstName LastName PlanID(FK)---------------+-----------+----------+------------1000 | David | Taylor | 011001 | Sunil | Ray | 021002 | Janet | Hildreth | 021003 | Pequan | Lee | 01
HealthPlans (Dimension Table)
PlanID(PK) Description Type-----------+-------------+-------01 | PlanOne | HMO02 | PlanTwo | PPO
The following sequence of commands generate amissing foreign key error that results in a rollbackbecause the reference is to a non-existent dimension row.
Administrator's GuideBulk Loading Data
HP Vertica Analytics Platform (7.0.x) Page 509 of 969

INSERT INTO Employees (EmployeeID, First, Last, PlanID) VALUES (1004, 'Ben', 'Smith', 04);
The following sequence of commands generate a foreign key error that results in a rollback becausea duplicate row in the HealthPlans dimension table is referenced by an insert in the Employees facttable. The error occurs when the Employees fact table references the HealthPlans dimension table.
INSERT INTO HealthPlan VALUES(02, 'MyPlan', 'PPO');INSERT INTO Employee VALUES(1005, 'Juan', 'Hernandez', 02);
Concurrent Loads into Pre-Join ProjectionsHP Vertica supports concurrent inserts where two transactions can simultaneously insert rows intothe same table. A transaction inserting records into a pre-join projection can run concurrently withanother transaction inserting records into either the fact table or a dimension table of the pre-joinprojection. A load into a pre-join projection cannot run concurrently with updates or deletes on eitherthe fact or the dimension tables.
When concurrently loading fact and dimension tables, the state of the dimension tables is fixed atthe start of the insert or load into the fact table. Rows that are added to a dimension table after thestart of an insert or load into a fact table are not available for joining because they are not visible tothe fact table. The client is responsible for ensuring that all values in dimension tables are presentbefore issuing the insert or load statement.
The following examples illustrate these behaviors.
l Fact Table:Sales
l Dimension Table:Employees
l Pre-join Projection: sales join employees on sales.seller=employees.empno
Success
Session A Session B Description
INSERT INTO EMPLOYEES (EMPNO, NAME) VALUES(1, 'Bob');
COPY INTO SALES (AMT, SELLER)5000 | 13500 | 1...
Records loaded bythis COPY commandall refer to Bob's sales(SELLER = 1)
INSERT INTO EMPLOYEES (EMPNO, NAME)VALUES(2,'Frank');
Administrator's GuideBulk Loading Data
HP Vertica Analytics Platform (7.0.x) Page 510 of 969

Session A Session B Description
7234 | 1 COPY INTO SALES (AMT,SELLER)50 | 275 | 2...
Records loaded bythis COPY commandall refer to Frank'ssales (SELLER = 2).
COMMIT; COMMIT; Both transactions aresuccessful.
Failure
Session A Session B Description
INSERT INTO EMPLOYEES (EMPNO, NAME)1 | Bob
2 | Terry COPY INTO SALES (AMT,SELLER)5000 | 1
The transaction inSession B fails becausethe value inserted into thedimension table inSession A was not visiblebefore the COPY into thepre-join in Session B wasinitiated.
Using Parallel Load StreamsYou can use COPY for multiple parallel load streams to load an HP Vertica database. COPYLOCAL parses files serially, and does not support parallel load streams.
These are the options for parallel load streams:
l Issuemultiple separate COPY statements to load different files from different nodes.
This option lets you use vsql, ODBC, ADO.net, or JDBC. You can load server-side files, orclient-side files using the COPY from LOCAL statement.
l Issue a single multi-node COPY command that loads different files from different nodesspecifying the nodename option for each file.
l Issue a single multi-node COPY command that loads different files from any node, using the ONANY NODE option.
l Use the COPY x WITH SOURCE PloadDelimitedSource option to parallel load using all coreson the server node on which the file resides.
Files can be of different formats, such as BZIP, GZIP, and others. Themulti-node option is notavailable with the COPY from LOCAL parameter.
Administrator's GuideBulk Loading Data
HP Vertica Analytics Platform (7.0.x) Page 511 of 969

The single multi-node COPY options (nodename | ON ANY NODE) are possible only using the vsqlcommand, and not all COPY options support this behavior. However, using this method to copydata can result in significantly higher performance and efficient resource usage.
See COPY in the SQLReferenceManual for syntax details.
While there is no restriction to the number of files you can load, the optimal number of load streamsdepends on several factors, including the number of nodes, the physical and logical schemas, hostprocessors, memory, disk space, and so forth. Toomany load streams can cause systems to runout of memory. See Best Practices for ManagingWorkload Resources for advice on configuringload streams.
Monitoring COPY Loads and MetricsYou can check COPY loads using:
l HP Vertica functions
l LOAD_STREAMS system table
Using HP Vertica FunctionsTwometa-functions return COPY metrics for the number of accepted or rejected rows from aCOPY statement:
1. To get the number of accepted rows, use the GET_NUM_ACCEPTED_ROWS function:
VMart=> select get_num_accepted_rows();get_num_accepted_rows
-----------------------11
(1 row)
2. To check the number of rejected rows, use the GET_NUM_REJECTED_ROWS function:
VMart=> select get_num_rejected_rows();get_num_rejected_rows
-----------------------0
(1 row)
Using the LOAD_STREAMS System TableHP Vertica includes a set of system tables that includemonitoring information, as described inUsing System Tables. The LOAD_STREAMS system table includes information about load streammetrics from COPY and COPY FROM VERTICA statements, so you can query table values to getCOPY metrics.
To see all table columns:
Administrator's GuideBulk Loading Data
HP Vertica Analytics Platform (7.0.x) Page 512 of 969

VMart=> select * from load_streams;
Using the STREAM NAME ParameterUsing the STREAMNAME parameter as part of the COPY statement labels COPY streamsexplicitly so they are easier to identify in the LOAD_STREAMS system table.
To use the STREAM NAME parameter:
=> COPY mytable FROM myfile DELIMITER '|' DIRECT STREAM NAME 'My stream name';
The LOAD_STREAMS system table includes stream names for every COPY statement that takesmore than 1-second to run. The 1-second duration includes the time to plan and execute thestatement.
HP Verticamaintains system tablemetrics until they reach a designated size quota (in kilobytes).The quota is set through internal processes and cannot be set or viewed directly.
Other LOAD_STREAMS Columns for COPY MetricsThese LOAD_STREAMS table column values depend on the load status:
l ACCEPTED_ROW_COUNT
l REJECTED_ROW_COUNT
l PARSE_COMPLETE_PERCENT
l SORT_COMPLETE_PERCENT
When a COPY statement using the DIRECT option is in progress, the ACCEPTED_ROW_COUNT field canincrease to themaximum number of rows in the input file as the rows are being parsed.
If COPY reads input data frommultiple named pipes, the PARSE_COMPLETE_PERCENT field willremain at zero (0) until all named pipes return anEOF. While COPY awaits an EOF frommultiplepipes, it may seem to be hung. Before canceling the COPY statement, however, check yoursystem CPU and disk accesses to see if any activity is in progress.
In a typical load, PARSE_COMPLETE_PERCENT can either increase slowly to 100%, or jump to 100%quickly if you are loading from named pipes or STDIN, while SORT_COMPLETE_PERCENT is at 0.Once PARSE_COMPLETE_PERCENT reaches 100%, SORT_COMPLETE_PERCENT increases to 100%.Depending on the data sizes, a significant lag can occur between the time PARSE_COMPLETE_PERCENT reaches 100% and the time SORT_COMPLETE_PERCENT begins to increase.
This example sets the VSQL expanded display, and then selects various columns of data from theLOAD_STREAMS system table:
=> \pset expandedExpanded display is on.=> SELECT stream_name, table_name, load_start, accepted_row_count,
Administrator's GuideBulk Loading Data
HP Vertica Analytics Platform (7.0.x) Page 513 of 969

rejected_row_count, read_bytes, unsorted_row_count, sorted_row_count,sort_complete_percent FROM load_streams;
-[ RECORD 1 ]----------+---------------------------stream_name | fact-13table_name | factload_start | 2010-12-28 15:07:41.132053accepted_row_count | 900rejected_row_count | 100read_bytes | 11975input_file_size_bytes | 0parse_complete_percent | 0unsorted_row_count | 3600sorted_row_count | 3600sort_complete_percent | 100
See the SQLReferenceManual for other meta-function details.
See the Programmer's Guide for client-specific documentation.
Capturing Load Exceptions and RejectionsRejected data occurs during the parsing phase of data loads. A COPY operation can encounter otherproblems and failures during different load phases, but rejections consist only of parse errors.
Rejections always have a reason, which you can view as part of the rejection by including both theREJECTED DATA and EXCEPTIONS clauses with the COPY statement (see "Capturing LoadExceptions and Rejections").
There aremany reasons why parsing load data could result in a rejected data row. Following are afew examples of parsing errors that cause a rejected row:
l Unsupported parsing options
l Incorrect data types for the table into which data is being loaded
l Malformed context for the parser in use
l Missing delimiters
The COPY statement automatically saves the rejected data (a copy of the row that failed to load),and load exceptions (a text message describing why that row did not load) to individual files. Bydefault, HP Vertica saves both files in the database catalog subdirectory, CopyErrorLogs; forexample:
v_mart_node003_catalog\CopyErrorLogs\trans-STDIN-copy-from-exceptions.1v_mart_node003_catalog\CopyErrorLogs\trans-STDIN-copy-from-rejected-data.1
You can use the COPY parameters REJECTED DATA and EXCEPTIONS to save one, or both, files to afile location of your choice.
Administrator's GuideBulk Loading Data
HP Vertica Analytics Platform (7.0.x) Page 514 of 969

COPY Parameters for Handling Rejections andExceptions
Several optional parameters let you determine how strictly the COPY statement handles the rejectionit encounters when loading data. For example, you can have COPY fail when it encounters a singlerejection or permit a specific number of rejected rows before the load fails. Two COPY arguments,REJECTED DATA and EXCEPTIONS, are designed to work together for these purposes.
This section describes the parameters you use to specify the rejections file or table of your choice,and to control load exception handling.
Specifying Where to Save Rejected Data Rows
When you use the REJECTED DATA path argument, you specify one or both of the following:
l The path and file in which to save rejected data.
The rejected data file includes only the rejected records themselves. If you want to see thereason each record was rejected, youmust also specify the EXCEPTIONS path option. Thereasons for rejection are written to a separate file.
l The name of the table into which rejected data rows are saved.
Including the AS TABLE clause creates reject_table and populates it with both the rejectedrecord and the reason for rejection. You can then query the table to access rejected datainformation. For more information, see Saving Load Rejections.
For COPY LOCAL operations, the rejected data file must reside on the client.
If path resolves to a storage location and the user invoking COPY is not a superuser, the followingpermissions are required:
l The storage locationmust have been created with the USER usage type (see ADD_LOCATION).
l The user must already have been granted access to the storage location where the files exist, asdescribed in GRANT (Storage Location).
Saving the Reason for the Rejected Data Row
An EXCEPTIONS file stores the reason each rejected record was rejected during the parsing phase.To save this file, include the EXCEPTIONS clause in the COPY statement and specify the file name orabsolute path for the file.
Note: You cannot specify an EXCEPTIONS file if you are using the REJECTED DATA..AS TABLEclause. See Saving Load Exceptions (EXCEPTIONS).
If you are running COPY LOCAL operations, the file must reside on the client.
If path resolves to a storage location and the user invoking COPY is not a superuser, the followingpermissions are required:
Administrator's GuideBulk Loading Data
HP Vertica Analytics Platform (7.0.x) Page 515 of 969

l The storage locationmust have been created with the USER usage type (see ADD_LOCATION).
l The user must already have been granted access to the storage location where the files exist, asdescribed in GRANT (Storage Location).
Enforcing Truncating or Rejecting Rows(ENFORCELENGTH)
The ENFORCELENGTH parameter determines whether COPY truncates or rejects rows of data typeCHAR, VARCHAR, BINARY, and VARBINARYwhen they do not fit the target table. By default, COPYtruncates offending rows of these data types without rejecting them.
For example, if you omit the ENFORCELENGTH argument and load 'abc' into a table columnspecified as VARCHAR(2), COPY truncates the value to 'ab' and loads it. If you load the same valuewith the ENFORCELENGTH parameter, COPY rejects the 'abc' value, rather than truncating it.
Note: HP Vertica supports NATIVE and NATIVE VARCHAR values up to 65K. If any valueexceeds this limit, COPY rejects the row, even when ENFORCELENGTH is not in use.
Specifying Maximum Rejections Before a Load Fails(REJECTMAX)
The REJECTMAX parameter specifies themaximum number of logical records that can be rejectedbefore a load fails. A rejected row consists of the data that caused an exception and could not beparsed into the corresponding data type during a bulk load. Rejected data does not indicatereferential constraints.
When the number of rejected records will be greater than the REJECTMAX value (REJECTMAX+1), theload fails. If you do not specify a value for REJECTMAX, or if the value is 0, COPY allows an unlimitednumber of exceptions to occur.
Note: COPY does not accumulate rejected records across files or nodes while data is loading. Ifone rejected data file exceeds themaximum reject number, the entire load fails.
Aborting Data Loads for Any Error (ABORT ONERROR)
Using the ABORT ON ERROR argument is themost restrictive way to load data, because noexceptions or rejections are allowed. A COPY operation stops if any row is rejected. No data isloaded and HP Vertica rolls back the command.
If you use the ABORT ON ERROR as part of a CREATE EXTERNAL TABLE AS COPY FROM statement,the option is used whenever a query references the external table. The offending error is saved inthe COPY exceptions or rejected data file.
Administrator's GuideBulk Loading Data
HP Vertica Analytics Platform (7.0.x) Page 516 of 969

Understanding Row Rejections and Rollback ErrorsDepending on the type of error that COPY encounters, HP Vertica does one of the following:
l Rejects the offending row and loads the other rows into the table
l Rolls back the entire COPY statement without loading any data
Note: If you specify ABORT ON ERRORwith the COPY command, the load automatically rollsback if any row causes an exception. The offending row or error is written to the applicableexceptions or rejected data file or to a rejections table, if specified.
The following table summarizes the difference between a rejected row or rollback. See also theexample following the table.
Rejects offending row Rolls back entire load
WhenHP Vertica encounters an error parsingrecords in the input file, it rejects the offendingrow and continues the load.
Rows are rejected if they contain any of thefollowing:
l Incompatible data types
l Missing fields
l Missing delimiters
When HP Vertica rolls back a COPY statement,the command fails without loading data.
The following conditions cause a load rollback:
l Server-side errors, such as lack of memory
l Violations of primary key or foreign keyconstraints
l Loading NULL data into a NOT NULL column
Example: Rejection versus Rollback
This example illustrates what happens when HP Vertica can't parse a row to the requested datatype. For example, in the following COPY statement, "a::INT + b::INT" is a SQL expression inwhich "a" and "b" are derived values:
=> CREATE TABLE t (i INT);=> COPY t (a FILLER VARCHAR, b FILLER VARCHAR, i AS a::INT + b::INT)
FROM STDIN;Enter data to be copied followed by a newline.End with a backslash and a period on a line by itself.>> cat|dog>> \.
Vertica Analytics Platform cannot parse the row to the requested data type and rejects the row:
ERROR 2827: Could not convert "cat" from column "*FILLER*".a to an int8
Administrator's GuideBulk Loading Data
HP Vertica Analytics Platform (7.0.x) Page 517 of 969

If "a" were 'cat' and "b" 'dog', the expression 'cat'::INT + 'dog'::INTwould return an errorand the COPY statement would fail (roll back) without loading any data.
=> SELECT 'cat'::INT + 'dog'::INT;ERROR 3681: Invalid input syntax for integer: "cat"
The following statement would also roll back because Vertica Analytics Platform can't parse therow to the requested data type:
=> COPY t (a FILLER VARCHAR, i AS a::INT) FROM STDIN;
However, in the following COPY statement, Vertica Analytics Platform rejects only the offending rowwithout rolling back the statement. Instead of evaluating the 'cat' row as a VARCHAR type, ittried to parse 'cat' directly as an INTEGER.
=> COPY t (a FILLER INT, i AS a) FROM STDIN;
In the case of the above statement, the load parser (unlike the expression evaluator) rejects the rowif it contains a field that can't be parsed to the requested data type.
Saving Load Exceptions (EXCEPTIONS)COPY exceptions consist of informational messages describing why a row of data could not beparsed. The optional EXCEPTIONS parameter lets you specify a file to which COPYwrites exceptions.If you do not use this parameter, COPY saves exception files to the following default location:
catalog_dir/CopyErrorLogs/tablename-filename-of-source-copy-from-exceptions
catalog_dir The database catalog files directory
tablename-filename- of-source The namesof the table and data file
-copy-from-exceptions The file suffix appended to the table and source file name
Note: Using the REJECTED DATA parameter with the AS TABLE clause is mutually exclusivewith specifying a load Exceptions file. Since the exceptions messages are included in therejected data table, COPY does not permit both options and displays this error if you try to usethem:
ERROR 0: Cannot specify both an exceptions file and a rejected table in the same statement
The optional EXCEPTIONS parameter lets you specify a file of your choice to which COPYwrites loadexceptions. The EXCEPTIONS file indicates the input line number and the reason for each datarecord exception in this format:
COPY: Input record number in <pathofinputfile> has been rejected (reason). Please see pathtorejectfile, record recordnum for the rejected record.
Administrator's GuideBulk Loading Data
HP Vertica Analytics Platform (7.0.x) Page 518 of 969

If copying from STDIN, the filename-of-source is STDIN.
Note: You can use specific rejected data and exceptions files with one or more of the files youare loading. Separate consecutive rejected data and exception file names with a comma (,) inthe COPY statement.
Youmust specify a filename in the path to loadmultiple input files. Keep inmind that long tablenames combined with long data file names can exceed the operating system's maximum length(typically 255 characters). To work around file names exceeding themaximum length, use a pathfor the exceptions file that differs from the default path; for example, \tmp\<shorter-file-name>.
For all data loads (except for COPY LOCAL), COPY behaves as follows:
No Exceptions file specified... Exceptions file specified...
For one data source file(pathToData or STDIN), allinformation stored as one file inthe default directory.
For one data file, the path is treated as a file, and COPYstores all information in this file. If the path is not a file,COPY returns an error.
For multiple data files, allinformation stored as separatefiles, one for each data file indefault directory.
For multiple data files, the path is treated as a directory andCOPY stores all information in separate files, one for eachdata file. If path is not a directory, COPY returns an error.
Exceptions files are not stored on the initiator node.
You can specify only one path per node. If you specify morethan one path per node, COPY returns an error.
Saving Load Rejections (REJECTED DATA)COPY rejections are the data rows from the load file that caused a parser exception and did not load.
The optional REJECTED DATA parameter lets you specify either a file or table to which COPYwritesrejected data records. If you omit this parameter, COPY saves rejected data files to the followinglocation without saving a table:
catalog_dir/CopyErrorLogs/tablename-filename-of-source-copy-from-rejections
catalog_dir The database catalog files directory
tablename-filename-of-source The namesof the table and data file
-copy-from-rejections The file suffix appended to the table and source file name
Once a rejections file exists, you can review its contents to resolve any load problems and reloadthe data. If you save rejected data to a table, you can query the table to see both exceptions and therejected data.
If copying from STDIN, the filename of source is STDIN.
Administrator's GuideBulk Loading Data
HP Vertica Analytics Platform (7.0.x) Page 519 of 969

Note: You can use specific rejected data and exceptions files with one or more of the files youare loading. Separate consecutive rejected data and exception file names with a comma (,) inthe COPY statement. Do not use the ON ANY NODE option with rejected data and exceptionsfiles, because ON ANY NODE is applicable only to the load file.
When you loadmultiple input files, youmust specify a file name in the path. Keep inmind that longinput file names, combined with rejected data file names, can exceed the operating system'smaximum length (typically 255 characters). To work around file names exceeding themaximumlength, use a path for the rejected data file that differs from the default path; for example,\tmp\<shorter-file-name>.
For all data loads (except for COPY LOCAL), COPY behaves as follows:
No rejected data file specified... Rejected data file specified...
For one data source file(pathToData or STDIN), allinformation stored as one file in thedefault directory.
For one data file, the path is interpreted as a file, and COPYstores all rejected data in this file. If the path is not a file,COPY returns an error.
For multiple data files, allinformation stored as separatefiles, one for each data file in thedefault directory.
For multiple data files, the path is treated as a directory andCOPY stores all information in separate files, one for eachdata file. If path is not a directory, COPY returns an error.
Rejected data files are not shipped to the initiator node.
Only one path per node is accepted. If more than one isprovided, COPY returns an error.
Saving Rejected Data to a TableUsing the REJECTED DATA parameter with the AS TABLE clause lets you specify a table in which tosave the data. The capability to save rejected data is on by default. If you want to keep savingrejected data to a file, do not use the AS TABLE clause.
When you use the AS TABLE clause, HP Vertica creates a new table if one does not exist. If noparsing rejections occur during a load, the table exists but is empty. The next time you load data,HP Vertica appends any rejected rows to the existing table.
The load rejection tables are a special type of table with the following capabilities and limitations:
l Support SELECT statements
l Can use DROP TABLE
l Cannot be created outside of a COPY statement
Administrator's GuideBulk Loading Data
HP Vertica Analytics Platform (7.0.x) Page 520 of 969

l Do not support DML andDDL activities
l Are not K-safe
Tomake the data in a rejected table K-safe, you can do one of the following:
l Write a CREATE TABLE..AS statement, such as this example:
CREATE TABLE new_table AS SELECT * FROM rejected_table;
l Create a table to store rejected records, and run INSERT..SELECT operations into the new table
If you use COPY NO COMMIT
If you include the NO COMMIT and REJECTED DATA AS TABLE clauses in your COPY statement andthe reject_table does not already exist, Vertica Analytics Platform saves the rejected-data tableas a LOCAL TEMP table and returns amessage that a LOCAL TEMP table is being created.
Rejected-data tables are especially useful for Extract-Load-Transform workflows (where you'lllikely use temporary tables more frequently) by letting you quickly load data and identify whichrecords failed to load due to a parsing error. If you load data into a temporary table that you createdusing the ON COMMIT DELETE clause, the COPY operation won't commit, even if you specify the ONCOMMIT DELETE clause.
Rejection Records for Table FilesIn the current implementation, the rejected records used to populate a table are also saved to a filein the default rejected data file directory:
catalog_dir/CopyErrorLogs/CopyRejectedRecords
The file contents differ from the rejected data files that COPY saves by default. The rejected recordsfor table files contain rejected data and the reason for the rejection (exceptions), along with otherdata columns, described next. HP Vertica suggests that you periodically log in to each server anddrop the rejections tables that you no longer need.
Querying a Rejection Records TableTo use the AS TABLE clause:
1. Create a sample table in which to load data:
dbs=> CREATE TABLE loader(a INT)CREATE TABLE
2. Use the COPY statement to load values, and save any rejected rows to a table called loader_rejects:
Administrator's GuideBulk Loading Data
HP Vertica Analytics Platform (7.0.x) Page 521 of 969

dbs=> COPY loader FROM STDIN REJECTED DATA AS table "loader_rejects";Enter data to be copied followed by a newline.End with a backslash and a period on a line by itself.>> 1>> 2>> 3>> 4>> a>> b>> c>> \.
3. Query the loader table after loading data into it directly. Notice only four (4) values exist:
dbs=> SELECT * FROM loader;Value-------1234(4 rows)
4. Query the loader_rejects table to see its column rows. The following example lists onerecord from the table (althoughmore exist):
dbs=> \xExpanded display is on.dbs=> SELECT * FROM loader_rejects;-[ RECORD 1 ]-------------+--------------------------------------------node_name | v_dbs_node0001file_name |session_id | engvmqa2401-12617:0x1cb0statement_id | 1batch_number | 0row_number | 5rejected_data | arejected_data_orig_length | 1rejected_reason | Invalid integer format 'a' for column 1 (a)-[ RECORD 2 ]-------------+--------------------------------------------
The rejection data table has the following columns:
Column Data Type Description
node_name VARCHAR The name of the HP Vertica node on which the inputload file was located.
file_name VARCHAR The name of the file being loaded, which applies if youloaded a file (as opposed to using STDIN).
Administrator's GuideBulk Loading Data
HP Vertica Analytics Platform (7.0.x) Page 522 of 969

session_id VARCHAR The session ID number in which the COPY statementoccurred.
transaction_id INTEGER Identifier for the transaction within the session, if any;otherwise NULL.
statement_id INTEGER The unique identification number of the statementwithin the transaction that included the rejected data.
Tip: You can use the session_id,transaction_id, and statement_id columns tocreate joins with many system tables. Forexample, if you join against the QUERY_REQUESTStable using those three columns, the QUERY_REQUESTS.REQUEST column contains the actualCOPY statement (as a string) used to load thisdata.
batch_number INTEGER INTERNALUSE. Represents which batch (chunk)the data comes from.
row_number INTEGER The rejected row number from the input file.
rejected_data LONG VARCHAR The actual load data.
rejected_data_orig_length
INTEGER The length of the rejected data.
rejected_reason VARCHAR The error that caused the rejected row. This columnreturns the samemessage that would exist in the loadexceptions file, if you saved exceptions to a file,rather than to a table.
Exporting the Rejected Records TableYou can export the contents of the rejected_data column to a file, correct the rejected rows, andload the corrected rows from the updated file.
To export rejected records:
1. Create a sample table:
dbs=> create table t (i int);CREATE TABLE
2. Copy data directly into the table, using a table to store rejected data:
Administrator's GuideBulk Loading Data
HP Vertica Analytics Platform (7.0.x) Page 523 of 969

dbs=> copy t from stdin rejected data as table "t_rejects";Enter data to be copied followed by a newline.End with a backslash and a period on a line by itself.>> 1>> 2>> 3>> 4>> a>> b>> c>> \.
3. Show only tuples and set the output format:
dbs=> \tShowing only tuples.dbs=> \aOutput format is unaligned.
4. Output to a file (rejected.txt):
dbs=> \o rejected.txtdbs=> select rejected_data from t_rejects;dbs=> \o
5. Use the catcommand on the saved file:
dbs=> \! cat rejected.txtabcdbs=>
After a file exists, you can fix load errors and use the corrected file as load input to the COPYstatement.
COPY Rejected Data and Exception FilesWhen executing amulti-node COPY statement, each node processes part of the load data. If the loadsucceeds, all parser rejections that occur during the node's load processing are written to thatnode's specific rejected data and exceptions files. If the load fails, the file contents can beincomplete, or empty.
Both rejected data and exceptions files are saved and stored on a per-node basis. This exampleuses multiple files as COPY inputs. Since the statement does not include either the REJECTED DATAor EXCEPTIONS parameters, rejected data and exceptions files are written to the default location, thedatabase catalog subdirectory, CopyErrorLogs, on each node:
Administrator's GuideBulk Loading Data
HP Vertica Analytics Platform (7.0.x) Page 524 of 969

\set dir `pwd`/data/ \set remote_dir /vertica/test_dev/tmp_ms/\set file1 '''':dir'C1_large_tbl.dat'''\set file2 '''':dir'C2_large_tbl.dat'''\set file3 '''':remote_dir'C3_large_tbl.dat'''\set file4 '''':remote_dir'C4_large_tbl.dat'''
COPY large_tbl FROM :file1 ON site01, :file2 ON site01,:file3 ON site02,:file4 ON site02
DELIMITER '|';
Note: Always use the COPY statement REJECTED DATA and EXCEPTIONS parameters to saveload rejections. Using the RETURNREJECTED parameter is supported only for internal use by theJDBC andODBC drivers. HP Vertica's internal-use options can change without notice.
Specifying Rejected Data and Exceptions FilesThe optional COPY REJECTED DATA and EXCEPTIONS parameters 'path' element lets you specify anon-default path in which to store the files.
If path resolves to a storage location, and the user invoking COPY is not a superuser, these are therequired permissions:
l The storage locationmust have been created (or altered) with the USER option (see ADD_LOCATION and ALTER_LOCATION_USE)
l The user must already have been granted READ access to the storage location where the file(s)exist, as described in GRANT (Storage Location)
Both parameters also have an optional ON nodename clause that uses the specified path:
...[ EXCEPTIONS 'path' [ ON nodename ] [, ...] ]...[ REJECTED DATA 'path' [ ON nodename ][, ...] ]
While 'path' specifies the location of the rejected data and exceptions files (with their correspondingparameters), the optional ON nodename clausemoves any existing rejected data amd exceptionfiles on the node to the specified path on the same node.
Saving Rejected Data and Exceptions Files to a SingleServer
The COPY statement does not have a facility to merge exception and rejected data files after COPYprocessing is complete. To see the contents of exception and rejected data files requires logging onand viewing each node's specific files.
Note: If you want to save all exceptions and rejected data files on a network host, be sure togive each node's files unique names, so different cluster nodes do not overwrite other nodes'
Administrator's GuideBulk Loading Data
HP Vertica Analytics Platform (7.0.x) Page 525 of 969

files. For instance, if you set up a server with two directories, such as /vertica/exceptionsand /vertica/rejections, be sure the corresponding file names for each HP Vertica clusternode identify each node, such as node01_exceptions.txt and node02_exceptions.txt, andso on. In this way, each cluster node's files will reside in one directory, and be easilydistinguishable.
Using VSQL Variables for Rejected Data and ExceptionsFiles
This example uses vsql variables to specify the path and file names to use with the exceptionsand rejected data parameters (except_s1 and reject_s1). The COPY statement specifies asingle input file (large_tbl) on the initiator node:
\set dir `pwd`/data/ \set file1 '''':dir'C1_large_tbl.dat'''\set except_s1 '''':dir'exceptions'''\set reject_s1 '''':dir'rejections'''
COPY large_tbl FROM :file1 ON site01DELIMITER '|'REJECTED DATA :reject_s1 ON site01EXCEPTIONS :except_s1 ON site01;
This example uses variables to specify exception and rejected date files (except_s2 and reject_s2) on a remote node. The COPY statement consists of a single input file on a remote node(site02):
\set remote_dir /vertica/test_dev/tmp_ms/\set except_s2 '''':remote_dir'exceptions'''\set reject_s2 '''':remote_dir'rejections'''
COPY large_tbl FROM :file1 ON site02DELIMITER '|'REJECTED DATA :reject_s2 ON site02EXCEPTIONS :except_s2 ON site02;
This example uses variables to specify that the exception and rejected data files are on a remotenode (indicated by :remote_dir). The inputs to the COPY statement consist of multiple data fileson two nodes (site01 and site02). The exceptions and rejected data options use ONnodename clause with the vsql variables to indicate where the files reside (site01 and site02):
\set dir `pwd`/data/ \set remote_dir /vertica/test_dev/tmp_ms/\set except_s1 '''':dir''''\set reject_s1 '''':dir''''\set except_s2 '''':remote_dir''''\set reject_s2 '''':remote_dir''''
COPY large_tbl FROM :file1 ON site01, :file2 ON site01,:file3 ON site02,:file4 ON site02
DELIMITER '|'REJECTED DATA :reject_s1 ON site01, :reject_s2 ON site02EXCEPTIONS :except_s1 ON site01, :except_s2 ON site02;
Administrator's GuideBulk Loading Data
HP Vertica Analytics Platform (7.0.x) Page 526 of 969

COPY LOCAL Rejection and Exception FilesInvoking COPY LOCAL (or COPY LOCAL FROM STDIN) does not automatically create rejecteddata and exceptions files. This behavior differs from using COPY, which saves both filesautomatically, regardless of whether you use the optional REJECTED DATA and EXCEPTIONSparameters to specify either file explicitly.
Use the REJECTED DATA and EXCEPTIONS parameters with COPY LOCAL and COPY LOCALFROM STDIN to save the corresponding output files on the client. If you do not use these options,rejected data parsing events (and the exceptions that describe them) are not retained, even if theyoccur.
You can loadmultiple input files using COPY LOCAL (or COPY LOCAL FROM STDIN). If you alsouse the REJECTED DATA and EXCEPTIONS options, the statement writes rejected rows andexceptions and to separate files. The respective files contain all rejected rows and correspondingexceptions, respectively, regardless of how many input files were loaded.
Note: Because COPY LOCAL (and COPY LOCAL FROM STDIN)must write any rejectedrows and exceptions to the client, you cannot use the [ON nodename ] clause with either therejected data or exceptions options.
Specifying Rejected Data and Exceptions FilesTo save any rejected data and their exceptions to files:
1. In the COPY LOCAL (and COPY LOCAL FROM STDIN) statement, use the REJECTED DATA'path' and the EXCEPTIONS 'path' parameters, respectively.
2. Specify two different file names for the two options. You cannot use one file for both theREJECTED DATA and the EXCEPTIONS.
3. When you invoke COPY LOCAL or COPY LOCAL FROM STDIN, the files you specify neednot pre-exist. If they do, COPY LOCALmust be able to overwrite them.
You can specify the path and file names with vsql variables:
\set rejected ../except_reject/copyLocal.rejected\set exceptions ../except_reject/copyLocal.exceptions
Note: COPY LOCAL does not support storing rejected data in a table, as you can when using theCOPY statement.
When you use the COPY LOCAL or COPY LOCAL FROM STDIN statement, specify the variablenames for the files with their corresponding parameters:
COPY large_tbl FROM LOCAL rejected data :rejected exceptions :exceptions;
Administrator's GuideBulk Loading Data
HP Vertica Analytics Platform (7.0.x) Page 527 of 969

COPY large_tbl FROM LOCAL STDIN rejected data :rejected exceptions :exceptions;
Referential Integrity Load ViolationHP Vertica checks for constraint violations when queries are executed, not when loading data.
If you have a pre-joined projection defined on the table being loaded, HP Vertica checks forconstraint violations (duplicate primary keys or non-existent foreign keys) during the join operationand reports errors. If there are no pre-joined projections, HP Vertica performs no such checks.
To avoid constraint violations, you can load data without committing it and then use the ANALYZE_CONSTRAINTS function to perform a post-load check of your data. If the function finds constraintviolations, you can roll back the bulk load because you have not committed it.
See Alsol Detecting Constraint Violations
l COPY
l ANALYZE_CONSTRAINTS
Administrator's GuideBulk Loading Data
HP Vertica Analytics Platform (7.0.x) Page 528 of 969

Trickle Loading DataOnce you have a working database and have bulk loaded your initial data, you can use trickleloading to load additional data on an ongoing basis. By default, HP Vertica uses the transactionisolation level of READ COMMITTED, which allows users to see themost recently committed datawithout holding any locks. This allows new data to be loaded while concurrent queries are running.
See Change Transaction Isolation Levels.
Using INSERT, UPDATE, and DELETEThe SQL datamanipulation language (DML) commands INSERT, UPDATE, and DELETE performthe same functions that they do in any ACID compliant database. The INSERT statement istypically used to load individual rows into physical memory or load a table using INSERT ASSELECT. UPDATE and DELETE are used tomodify the data.
You can intermix the INSERT, UPDATE, and DELETE commands. HP Vertica follows the SQL-92transactionmodel. In other words, you do not have to explicitly start a transaction but youmust usea COMMIT or ROLLBACK command (or COPY) to end a transaction. Canceling a DML statementcauses the effect of the statement to be rolled back.
HP Vertica differs from traditional databases in two ways:
l DELETE does not actually delete data from disk storage; it marks rows as deleted so that theycan be found by historical queries.
l UPDATE writes two rows: one with new data and onemarked for deletion.
Like COPY, by default, INSERT, UPDATE and DELETE commands write the data to theWOSand on overflow write to the ROS. For large INSERTS or UPDATES, you can use the DIRECTkeyword to force HP Vertica to write rows directly to the ROS. Loading large number of rows assingle row inserts are not recommended for performance reasons. Use COPY instead.
WOS OverflowTheWOS exists to allow HP Vertica to efficiently batch small loads into larger ones for I/Opurposes. Loading to theWOS is fast because the work of sorting, encoding, and writing to disk isdeferred and performed in the background by the TupleMover's moveout process. Since theWOShas a finite amount of available space, it can fill up and force HP Vertica to spill small loads directlyto disk. While no data is lost or rejected when theWOS gets full, it can result in wasted I/Obandwidth. Thus, follow the Tuning the TupleMover guidelines to avoidWOS overflow.
Administrator's GuideTrickle Loading Data
HP Vertica Analytics Platform (7.0.x) Page 529 of 969

Page 530 of 969HP Vertica Analytics Platform (7.0.x)
Administrator's GuideTrickle Loading Data

Copying and Exporting DataHP Vertica can easily import data from and export data to other HP Vertica databases. Importingand exporting data is useful for common tasks such as moving data back and forth between adevelopment or test database and a production database, or between databases that have differentpurposes but need to share data on a regular basis.
Moving Data Directly Between DatabasesTwo statements move data to and from another HP Vertica database:
l COPY FROM VERTICA
l EXPORT TOVERTICA
To execute either of these statements requires first creating a connection to the other HP Verticadatabase.
Creating SQL Scripts to Export DataThree functions return a SQL script you can use to export database objects to recreate elsewhere:
l EXPORT_CATALOG
l EXPORT_OBJECTS
l EXPORT_TABLES
While copying and exporting data is similar to Backing Up and Restoring the Database, you shoulduse them for different purposes, outlined below:
TaskBackup andRestore
COPY and EXPORTStatements
Back up or restore an entire database, or incrementalchanges
YES NO
Manage database objects (a single table or selectedtable rows)
YES YES
Use external locations to back up and restore yourdatabase
YES NO
Use direct connections between two databases NO YES
Use external shell scripts to back up and restore yourdatabase
YES NO
Use SQL commands to incorporate copy and exporttasks into DB operations
NO YES
Administrator's GuideCopying and Exporting Data
HP Vertica Analytics Platform (7.0.x) Page 531 of 969

The following sections explain how you import and export data between HP Vertica databases.
When importing from or exporting to an HP Vertica database, you can connect only to a databasethat uses trusted- (username-only) or password-based authentication, as described inImplementing Security. Neither LDAP nor SSL authentication is supported.
Exporting DataYou can export data from an earlier HP Vertica release, as long as the earlier release is a version ofthe last major release. For instance, for Version 6.x, you can export data from any version of 5.x,but not from 4.x.
You can export a table, specific columns in a table, or the results of a SELECT statement toanother HP Vertica database. The table in the target database receiving the exported datamustalready exist, and have columns that match (or can be coerced into) the data types of the columnsyou are exporting.
Exported data is always written in AUTOmode.
When loading data using AUTOmode, HP Vertica inserts the data first into theWOS. If theWOS isfull, then HP Vertica inserts the data directly intoROS. See the COPY statement for more details.
Exporting data fails if either side of the connection is a single-node cluster installed to localhost oryou do not specify a host name or IP address.
Exporting is a three-step process:
1. Use the CONNECT SQL statement to connect to the target database that will receive yourexported data.
2. Use the EXPORT SQL statement to export the data. If you want to export multiple tables or theresults of multiple SELECT statements, you need to usemultiple EXPORT statements. Allstatements will use the same connection to the target database.
3. When you are finished exporting data, use the DISCONNECT SQL statement to disconnectfrom the target database.
See the entries for CONNECT, EXPORT, and DISCONNECT statements in the SQLReferenceManual for syntax details.
Exporting Identity ColumnsWhen you use the EXPORT TOVERTICA statement, HP Vertica exports Identity (and Auto-increment) columns as they are defined in the source data. The Identity column value does notincrement automatically, and requires that you use ALTER SEQUENCE tomake updates.
Export Identity (and Auto-increment) columns as follows:
l If source and destination tables have an Identity column, you do not need to list them.
l If source has an Identity column, but not the destination, specify both the source and destinationcolumns.
Administrator's GuideCopying and Exporting Data
HP Vertica Analytics Platform (7.0.x) Page 532 of 969

Note: In earlier releases, Identity columns were ignored. Now, failure to list which Identitycolumns to export can cause an error, because the Identity column is not ignored and will beinterpreted as missing in the destination table.
The default behavior for EXPORT TOVERTICA is to let you export Identity columns by specifyingthem directly in the source table. To disable this behavior globally, set theCopyFromVerticaWithIdentity configuration parameter, described in Configuration Parameters.
Examples of Exporting DataThe following example demonstrates using the three-step process listed above to export data.
First, open the connection to the other database, then perform a simple export of an entire table toan identical table in the target database.
=> CONNECT TO VERTICA testdb USER dbadmin PASSWORD '' ON 'VertTest01',5433;CONNECT=> EXPORT TO VERTICA testdb.customer_dimension FROM customer_dimension;Rows Exported---------------
23416(1 row)
The following statement demonstrates exporting a portion of a table using a simple SELECTstatement.
=> EXPORT TO VERTICA testdb.ma_customers AS SELECT customer_key, customer_name, annual_income-> FROM customer_dimension WHERE customer_state = 'MA';Rows Exported---------------
3429(1 row)
This statement exports several columns from one table to several different columns in the targetdatabase table using column lists. Remember that when supplying both a source and destinationcolumn list, the number of columns must match.
=> EXPORT TO VERTICA testdb.people (name, gender, age) FROM customer_dimension-> (customer_name, customer_gender, customer_age);Rows Exported---------------
23416(1 row)
You can export tables (or columns) containing Identity and Auto-increment values, but thesequence values are not incremented automatically at their destination.
You can also use the EXPORT TOVERTICA statement with a SELECT AT EPOCH LATESTexpression to include data from the latest committed DML transaction.
Disconnect from the database when the export is complete:
Administrator's GuideCopying and Exporting Data
HP Vertica Analytics Platform (7.0.x) Page 533 of 969

=> DISCONNECT testdb;DISCONNECT
Note: Closing your session also closes the database connection. However, it is a goodpractice to explicitly close the connection to the other database, both to free up resources andto prevent issues with other SQL scripts youmay run in your session. Always closing theconnection prevents potential errors if you run a script in the same session that attempts toopen a connection to the same database, since each session can only have one connection toa particular database at a time.
Copying DataYou can import a table or specific columns in a table from another HP Vertica database. The tablereceiving the copied datamust already exist, and have columns that match (or can be coerced into)the data types of the columns you are copying from the other database. You can import data froman earlier HP Vertica release, as long as the earlier release is a version of the last major release. Forinstance, for Version 6.x, you can import data from any version of 5.x, but not from 4.x.
Importing and exporting data fails if either side of the connection is a single-node cluster installed tolocalhost, or you do not specify a host name or IP address.
Importing is a three-step process:
1. Use the CONNECT SQL statement to connect to the source database containing the data youwant to import.
2. Use the COPY FROM VERTICA SQL statement to import the data. If you want to importmultiple tables, you need to usemultiple COPY FROM VERTICA statements. They all use thesame connection to the source database.
3. When you are finished importing data, use the DISCONNECT SQL statement to disconnectfrom the source database.
See the entries for CONNECT, COPY FROM VERTICA, and DISCONNECT statements in theSQLReferenceManual for syntax details.
Importing Identity ColumnsYou can import Identity (and Auto-increment) columns as follows:
l If source and destination tables have an Identity column, you do not need to list them.
l If source has an Identity column, but not the destination, specify both the source and destinationcolumns.
Note: In earlier releases, Identity columns were ignored. Now, failure to list which Identitycolumns to export can cause an error, because the Identity column is not ignored and will be
Administrator's GuideCopying and Exporting Data
HP Vertica Analytics Platform (7.0.x) Page 534 of 969

interpreted as missing in the destination table.
After importing the columns, the Identity column values do not increment automatically. UseALTER SEQUENCE tomake updates.
The default behavior for this statement is to import Identity (and Auto-increment) columns byspecifying them directly in the source table. To disable this behavior globally, set theCopyFromVerticaWithIdentity configuration parameter, described in Configuration Parameters.
ExamplesThis example demonstrates connecting to another database, copying the contents of an entire tablefrom the source database to an identically-defined table in the current database directly intoROS,and then closing the connection.
=> CONNECT TO VERTICA vmart USER dbadmin PASSWORD '' ON 'VertTest01',5433;CONNECT=> COPY customer_dimension FROM VERTICA vmart.customer_dimension DIRECT;Rows Loaded
-------------500000
(1 row)=> DISCONNECT vmart;DISCONNECT
This example demonstrates copying several columns from a table in the source database into atable in the local database.
=> CONNECT TO VERTICA vmart USER dbadmin PASSWORD '' ON 'VertTest01',5433;CONNECT=> COPY people (name, gender, age) FROM VERTICA-> vmart.customer_dimension (customer_name, customer_gender,-> customer_age);Rows Loaded
-------------500000
(1 row)=> DISCONNECT vmart;DISCONNECT
You can copy tables (or columns) containing Identity and Auto-increment values, but the sequencevalues are not incremented automatically at their destination.
Administrator's GuideCopying and Exporting Data
HP Vertica Analytics Platform (7.0.x) Page 535 of 969

Using Public and Private IP NetworksIn many configurations, HP Vertica cluster hosts use two network IP addresses as follows:
l A private address for communication between the cluster hosts.
l A public IP address for communication with for client connections.
By default, importing from and exporting to another HP Vertica database uses the private network.
To use the public network address for copy and export activities, configure the system to use thepublic network to support exporting to or importing from another HP Vertica cluster:
l Identify the Public Network to HP Vertica
l Identify the Database or Nodes Used for Import/Export
Identify the Public Network to HP VerticaTo be able to import to or export from a public network, HP Vertica needs to be aware of the IPaddresses of the nodes or clusters on the public network that will be used for import/exportactivities. Your public network might be configured in either of these ways:
l Public network IP addresses reside on the same subnet (create a subnet)
l Public network IP addresses are onmultiple subnets (create a network interface)
To identify public network IP addresses residing on the same subnet:
l Use the CREATE SUBNET statement provide your subnet with a name and to identify thesubnet routing prefix.
To identify public network IP addresses residing on multiple subnets:
l Use the CREATE NETWORK INTERFACE statement to configure import/export from specificnodes in the HP Vertica cluster.
After you've identified the subnet or network interface to be used for import/export, youmustIdentify the DatabaseOr Nodes Used For Impor/tExport.
See Alsol CREATE SUBNET
l ALTER SUBNET
l DROP SUBNET
l CREATE NETWORK INTERFACE
Administrator's GuideCopying and Exporting Data
HP Vertica Analytics Platform (7.0.x) Page 536 of 969

l ALTER NETWORK INTERFACE
l DROP NETWORK INTERFACE
Identify the Database or Nodes Used forImport/Export
Once you've identified the public network to HP Vertica, you can configure databases and nodes touse the public network for import/export. You can configure by:
l Specifying a subnet for the database.
l Specifying a network interface for each node in the database.
To Configure a Database to Import/Export on the Public Network-
l Use the ALTER DATABASE statement to specify the subnet name of the public network. Whenyou do so, all nodes in the database will automatically use the network interface on the subnetfor import/export operations.
To Configure Each Individual Node to Import/Export on a Public Network:
l Use the ALTER NODE statement to specify the network interface of the public network on eachindividual node.
See Alsol ALTER DATABASE
l CREATE SUBNET
l CREATE NETWORK INTERFACE
l V_MONITOR_NETWORK INTERFACES
Administrator's GuideCopying and Exporting Data
HP Vertica Analytics Platform (7.0.x) Page 537 of 969

Using EXPORT FunctionsHP Vertica provides several EXPORT_ functions that let you recreate a database, or specificschemas and tables, in a target database. For example, you can use the EXPORT_ functions totransfer some or all of the designs and objects you create in a development or test environment to aproduction database.
The EXPORT_ functions create SQL scripts that you can run to generate the exported databasedesigns or objects. These functions serve different purposes to the export statements, COPYFROM VERTICA (pull data) and EXPORT TOVERTICA (push data). These statements transferdata directly from source to target database across a network connection between both. They aredynamic actions and do not generate SQL scripts.
The EXPORT_ functions appear in the following table. Depending on what you need to export, youcan use one or more of the functions. EXPORT_CATALOG creates themost comprehensive SQLscript, while EXPORT_TABLES and EXPORT_OBJECTS are subsets of that function to narrowthe export scope.
Use thisfunction... To recreate...
EXPORT_CATALOG
These catalog items:
l An existing schema design, tables, projections, constraints, and views
l The Database Designer-created schema design, tables, projections,constraints, and views
l A design on a different cluster.
EXPORT_TABLES
Non-virtual objects up to, and including, the schema of one or more tables.
EXPORT_OBJECTS
Catalog objects in order dependency for replication.
The designs and object definitions that the script creates depend on the EXPORT_ function scopeyou specify. The following sections give examples of the commands and output for each functionand the scopes it supports.
Saving Scripts for Export FunctionsAll of the examples in this section were generated using the standard HP Vertica VMARTdatabase, with some additional test objects and tables. One output directory was created for allSQL scripts that the functions created:
/home/dbadmin/xtest
Administrator's GuideCopying and Exporting Data
HP Vertica Analytics Platform (7.0.x) Page 538 of 969

If you specify the destination argument as an empty string (''), the function writes the exportresults to STDOUT.
Note: A superuser can export all available database output to a file with the EXPORT_functions. For a non-superuser, the EXPORT_ functions generate a script containing only theobjects to which the user has access.
Exporting the CatalogExporting the catalog is useful to quickly move a database design to another cluster. TheEXPORT_CATALOG function generates a SQL script to run on a different cluster to replicate thephysical schema design of the source database. You choose what to export by specifying theexport scope:
To export... Enter this scope...
Schemas, tables, constraints, views, and projections. DESIGN(This is the default scope.)
All design objects and system objects created in DatabaseDesigner, such as design contexts and their tables.
DESIGN ALL
All tables, constraints, and projections. TABLES
Function SummaryHere is the function syntax, described in EXPORT_CATALOG in the SQLReferenceManual:
EXPORT_CATALOG ( [ 'destination' ] , [ 'scope' ] )
Exporting All Catalog ObjectsUse the DESIGN scope to export all design elements of a source database in order dependency.This scope exports all catalog objects in theirOID (unique object ID) order, including schemas,tables, constraints, views, and projections. This is themost comprehensive export scope, withoutthe Database Designer elements, if they exist.
Note: The result of this function yields the same SQL script as EXPORT_OBJECTS usedwith an empty string ('') as its scope.
VMart=> select export_catalog('/home/dbadmin/xtest/sql_cat_design.sql','DESIGN');export_catalog
-------------------------------------Catalog data exported successfully
(1 row)
Administrator's GuideCopying and Exporting Data
HP Vertica Analytics Platform (7.0.x) Page 539 of 969

The SQL script includes the following types of statements, each needed to provision a newdatabase:
l CREATE SCHEMA
l CREATE TABLE
l CREATE VIEW
l CREATE SEQUENCE
l CREATE PROJECTION (with ORDER BY and SEGMENTED BY)
l ALTER TABLE (to add constraints)
l PARTITION BY
Projection ConsiderationsIf a projection to export was created with no ORDER BY clause, the SQL script reflects the defaultbehavior for projections. <DB_SHORT> implicitly creates projections using a sort order based onthe SELECT columns in the projection definition. The EXPORT_CATALOG script reflects thisbehavior.
The EXPORT_CATALOG script is portable as long as all projections were generated usingUNSEGMENTED ALLNODES or SEGMENTED ALLNODES.
Exporting Database Designer Schema and DesignsUse the DESIGN ALL scope to generate a script to recreate all design elements of a sourcedatabase and the design and system objects that were created by the Database Designer:
VMart=> select export_catalog('/home/dbadmin/xtest/sql_cat_design_all.sql','DESIGN_ALL');export_catalog
-------------------------------------Catalog data exported successfully
(1 row)
Exporting Table ObjectsUse the TABLES scope to generate a script to recreate all schemas tables, constraints, andsequences:
VMart=> select export_catalog('/home/dbadmin/xtest/sql_cat_tables.sql','TABLES');export_catalog
-------------------------------------Catalog data exported successfully
(1 row)
The SQL script includes the following types of statements:
Administrator's GuideCopying and Exporting Data
HP Vertica Analytics Platform (7.0.x) Page 540 of 969

l CREATE SCHEMA
l CREATE TABLE
l ALTER TABLE (to add constraints)
l CREATE SEQUENCE
See Alsol EXPORT_CATALOG
l EXPORT_OBJECTS
l EXPORT_TABLES
l Exporting Tables
l Exporting Objects
Exporting TablesUse the EXPORT_TABLES function to recreate one or more tables, and related objects, on adifferent cluster. Specify one of the following options to determine the scope:
To export... Use this scope...
All non-virtual objects to which the user has access, includingconstraints.
An empty string (' ')
One or more named objects, such as tables or sequences in one ormore schemas. You can optionally qualify the schemawith adatabase prefix, myvertica.myschema.newtable.
A comma-delimited list ofitems:'myschema.newtable,yourschema.oldtable'
A named database object in the current search path. You canspecify a schema, table, or sequence. If the object is a schema,the script includes non-virtual objects to which the user hasaccess.
A single object, 'myschema'
The SQL script includes only the non-virtual objects to which the current user has access.
Note: You cannot export a view with this function, even if a list includes the view relations.Specifying a view namewill not issue a warning, but the view will not exist in the SQL script.Use EXPORT_OBJECTS.
Administrator's GuideCopying and Exporting Data
HP Vertica Analytics Platform (7.0.x) Page 541 of 969

Function Syntax
EXPORT_TABLES ( [ 'destination' ] , [ 'scope' ] )
Formore information, see EXPORT_TABLES in the SQLReferenceManual.
Exporting All Tables and Related ObjectsSpecify an empty string ('') for the scope to export all tables and their related objects.
VMart=> select export_tables('/home/dbadmin/xtest/sql_tables_empty.sql','');export_tables
-------------------------------------Catalog data exported successfully
(1 row)
The SQL script includes the following types of statements, depending on what is required torecreate the tables and any related objects (such as sequences):
l CREATE SCHEMA
l CREATE TABLE
l ALTER TABLE (to add constraints)
l CREATE SEQUENCE
l PARTITION BY
Exporting a List TablesUse EXPORT_TABLE with a comma-separated list of objects, including tables, views, orschemas:
VMart=> select export_tables('/home/dbadmin/xtest/sql_tables_del.sql','public.student, public.test7');
export_tables-------------------------------------Catalog data exported successfully
(1 row)
The SQL script includes the following types of statements, depending on what is required to createthe list of objects:
l CREATE SCHEMA
l CREATE TABLE
Administrator's GuideCopying and Exporting Data
HP Vertica Analytics Platform (7.0.x) Page 542 of 969

l ALTER TABLE (to add constraints)
l CREATE SEQUENCE
Exporting a Single Table or ObjectUse the EXPORT_TABLES function to export one or more database table objects.
This example exports a named sequence, my_seq, qualifying the sequence with the schema name(public):
VMart=> select export_tables('/home/dbadmin/xtest/export_one_sequence.sql', 'public.my_seq');
export_tables-------------------------------------Catalog data exported successfully
(1 row)
Following are the contents of the export_one_sequence.sql output file using a more command:
[dbadmin@node01 xtest]$ more export_one_sequence.sqlCREATE SEQUENCE public.my_seq ;
Exporting ObjectsUse EXPORT_OBJECTS function to recreate the exported objects. Specify one of the followingoptions to determine the scope:
To export... Use this scope...
All non-virtual objects to which the user has access, includingconstraints.
An empty string (' ')
One or more named objects, such as tables or views in one ormore schemas. You can optionally qualify the schemawith adatabase prefix, myvertica.myschema.newtable.
A comma-delimited list ofitems:'myschema.newtable,yourschema.oldtable'
A named database object in the current search path. You canspecify a schema, table, or view. If the object is a schema, thescript includes non-virtual objects to which the user has access.
A single object, 'myschema'
The SQL script includes only the non-virtual objects to which the current user has access.
The EXPORT_OBJECTS function always attempts to recreate projection statements with theKSAFE clauses that existed in the original definitions, or with OFFSET clauses, if they did not.
Administrator's GuideCopying and Exporting Data
HP Vertica Analytics Platform (7.0.x) Page 543 of 969

Function Syntax
EXPORT_OBJECTS( [ 'destination' ] , [ 'scope' ] , [ 'ksafe' ] )
Formore information, see EXPORT_OBJECTS in the SQLReferenceManual.
Exporting All ObjectsSpecify an empty string ('') for the scope to export all non-virtual objects from the source databasein order dependency. Running the generated SQL script on another cluster creates all referencedobjects and their dependent objects.
By default, this function includes the KSAFE argument as true, so the script includes the MARK_DESIGN_KSAFE statement. Using this function is useful to run the generated SQL script in a newdatabase so it will inherit the K-safety value of the original database.
Note: The result of this function yields the same SQL script as EXPORT_CATALOGwith aDESIGN scope.
VMart=> select export_objects('/home/dbadmin/xtest/sql_objects_all.sql','', 'true');export_objects
-------------------------------------Catalog data exported successfully
(1 row)
The SQL script includes the following types of statements:
l CREATE SCHEMA
l CREATE TABLE
l CREATE VIEW
l CREATE SEQUENCE
l CREATE PROJECTION (with ORDER BY and SEGMENTED BY)
l ALTER TABLE (to add constraints)
l PARTITION BY
Here is a snippet from the start of the output SQL file, and the end, showing the KSAFE statement:
CREATE SCHEMA store;CREATE SCHEMA online_sales;CREATE SEQUENCE public.my_seq ;CREATE TABLE public.customer_dimension(
Administrator's GuideCopying and Exporting Data
HP Vertica Analytics Platform (7.0.x) Page 544 of 969

customer_key int NOT NULL,customer_type varchar(16),customer_name varchar(256),customer_gender varchar(8),title varchar(8),household_id int,
.
.
.);...SELECT MARK_DESIGN_KSAFE(0);
Exporting a List of ObjectsUse a comma-separated list of objects as the function scope. The list can include one or moretables, sequences, and views in the same, or different schemas, depending on how you qualify theobject name. For instance, specify a table from one schema, and a view from another(schema2.view1).
The SQL script includes the following types of statements, depending on what objects you includein the list:
l CREATE SCHEMA
l CREATE TABLE
l ALTER TABLE (to add constraints)
l CREATE VIEW
l CREATE SEQUENCE
If you specify a view without its dependencies, the function displays aWARNING. The SQL scriptincludes a CREATE statement for the dependent object, but will be unable to create it without thenecessary relations:
VMart=> select export_objects('nameObjectsList', 'test2, tt, my_seq, v2' );WARNING 0: View public.v2 depends on other relations
export_objects-------------------------------------Catalog data exported successfully
(1 row)
This example includes the KSAFE argument explicitly:
VMart=> select export_objects('/home/dbadmin/xtest/sql_objects_table_view_KSAFE.sql','v1,test7', 'true');
export_objects
Administrator's GuideCopying and Exporting Data
HP Vertica Analytics Platform (7.0.x) Page 545 of 969

-------------------------------------Catalog data exported successfully
(1 row)
Here are the contents of the output file of the example, showing the sample table test7 and the v1view:
CREATE TABLE public.test7(
a int,c int NOT NULL DEFAULT 4,bb int
);CREATE VIEW public.v1 ASSELECT tt.aFROM public.tt;
SELECT MARK_DESIGN_KSAFE(0);
Exporting a Single ObjectSpecify a single database object as the function scope. The object can be a schema, table,sequence, or view. The function exports all non-virtual objects associated with the one you specify.
VMart=> select export_objects('/home/dbadmin/xtest/sql_objects_viewobject_KSAFE.sql','v1', 'KSAFE');
export_objects-------------------------------------Catalog data exported successfully
(1 row)
The output file contains the v1 view:
CREATE VIEW public.v1 ASSELECT tt.aFROM public.tt;
SELECT MARK_DESIGN_KSAFE(0);
Administrator's GuideCopying and Exporting Data
HP Vertica Analytics Platform (7.0.x) Page 546 of 969

Bulk Deleting and Purging DataHP Vertica provides multiple techniques to remove data from the database in bulk.
Command Description
DROPTABLE
Permanently removes a table and its definition. Optionally removes associatedviews and projections as well.
DELETEFROMTABLE
Marks rows with delete vectors and stores them so data can be rolled back to aprevious epoch. The datamust eventually be purged before the database canreclaim disk space. See Purging Deleted Data.
TRUNCATETABLE
Removes all storage and history associated with a table. The table structure ispreserved for future use. The results of this command cannot be rolled back.
DROP_PARTITION
Removes one partition from a partitioned table. Each partition contains a relatedsubset of data in the table. Partitioned data can be dropped efficiently, andprovides query performance benefits. SeeWorking with Table Partitions.
The following table provides a quick reference for the different delete operations you can use. The"Saves History" column indicates whether data can be rolled back to an earlier epoch and queried ata later time.
Syntax PerformanceCommitsTx
SavesHistory
DELETE FROM base_table Normal No Yes
DELETE FROM temp_table High No No
DELETE FROM base_table WHERE Normal No Yes
DELETE FROM temp_table WHERE Normal No Yes
DELETE FROM temp_table WHERE temp_table ON COMMIT PRESERVEROWS
Normal No Yes
DELETE FROM temp_table WHERE temp_table ON COMMIT DELETEROWS
High Yes No
DROP base_table High Yes No
TRUNCATE base_table High Yes No
TRUNCATE temp_table High Yes No
DROP PARTITION High Yes No
Administrator's GuideBulk Deleting and Purging Data
HP Vertica Analytics Platform (7.0.x) Page 547 of 969
Choosing the Right Technique for Deleting Datal To delete both table data and definitions and start from scratch, use the DROP TABLE
[CASCADE] command.
l To drop data, while preserving table definitions so that you can quickly and easily reload data,use TRUNCATE TABLE. Note that unlike DELETE, TRUNCATE does not have tomark eachrow with delete vectors, so it runs muchmore quickly.
l To perform bulk delete operations on a regular basis, HP Vertica recommends using Partitioning.
l To perform occasional small deletes or updates with the option to roll back or review history, useDELETE FROM TABLE. See Best Practices for DELETE and UPDATE.
For details on syntax and usage, see DELETE, DROP TABLE, TRUNCATE TABLE, CREATETABLE and DROP_PARTITION in the SQLReferenceManual.
Administrator's GuideBulk Deleting and Purging Data
HP Vertica Analytics Platform (7.0.x) Page 548 of 969
Best Practices for DELETE and UPDATEHP Vertica is optimized for query-intensive workloads, so DELETE and UPDATE queries might notachieve the same level of performance as other queries. DELETE and UPDATE operations go to theWOS by default, but if the data is sufficiently large and would not fit in memory, HP Verticaautomatically switches to using theROS. See Using INSERT, UPDATE, and DELETE.
The topics that follow discuss best practices when using DELETE and UPDATE operations in HPVertica.
Performance Considerations for DELETE andUPDATE Queries
To improve the performance of your DELETE and UPDATE queries, consider the following issues:
l Query performance after large deletes—A large number of (unpurged) deleted rows cannegatively affect query performance.
To eliminate rows that have been deleted from the result, a query must do extra processing. If10% ormore of the total rows in a table have been deleted, the performance of a query on thetable degrades. However, your experiencemay vary depending on the size of the table, the tabledefinition, and the query. If a table has a large number of deleted rows, consider purging thoserows to improve performance. For more information on purging, see Purging Deleted Data.
l Recovery performance—Recovery is the action required for a cluster to restore K-safety aftera crash. Large numbers of deleted records can degrade the performance of a recovery. Toimprove recovery performance, purge the deleted rows. For more information on purging, seePurging Deleted Data.
l Concurrency—DELETE and UPDATE take exclusive locks on the table. Only one DELETE orUPDATE transaction on a table can be in progress at a time and only when no loads (or INSERTs)are in progress. DELETEs and UPDATEs on different tables can be run concurrently.
l Pre-join projections—Avoid pre-joining dimension tables that are frequently updated. DELETEand UPDATE operations on pre-join projections cascade to the fact table, causing large DELETE orUPDATE operations.
For detailed tips about improving DELETE and UPDATE performance, seeOptimizing DELETEs andUPDATEs for Performance.
Caution: HP Vertica does not remove deleted data immediately but keeps it as history for thepurposes of historical query. A large amount of history can result in slower queryperformance. For information about how to configure the appropriate amount of history toretain, see Purging Deleted Data.
Administrator's GuideBulk Deleting and Purging Data
HP Vertica Analytics Platform (7.0.x) Page 549 of 969

Optimizing DELETEs and UPDATEs for PerformanceThe process of optimizing DELETE and UPDATE queries is the same for both operations. Somesimple steps can increase the query performance by tens to hundreds of times. The followingsections describe several ways to improve projection design and improve DELETE and UPDATEqueries to significantly increase DELETE and UPDATE performance.
Note: For large bulk deletion, HP Vertica recommends using Partitioned Tables wherepossible because they provide the best DELETE performance and improve query performance.
Projection Column Requirements for Optimized DeletesWhen all columns required by the DELETE or UPDATE predicate are present in a projection, theprojection is optimized for DELETEs and UPDATEs. DELETE and UPDATE operations on suchprojections are significantly faster than on non-optimized projections. Both simple and pre-joinprojections can be optimized.
For example, consider the following table and projections:
CREATE TABLE t (a INTEGER, b INTEGER, c INTEGER);CREATE PROJECTION p1 (a, b, c) AS SELECT * FROM t ORDER BY a;CREATE PROJECTION p2 (a, c) AS SELECT a, c FROM t ORDER BY c, a;
In the following query, both p1 and p2 are eligible for DELETE and UPDATE optimization becausecolumn a is available:
DELETE from t WHERE a = 1;
In the following example, only projection p1 is eligible for DELETE and UPDATE optimization becausethe b column is not available in p2:
DELETE from t WHERE b = 1;
Optimized Deletes in SubqueriesTo be eligible for DELETE optimization, all target table columns referenced in a DELETE or UPDATEstatement's WHERE clausemust be in the projection definition.
For example, the following simple schema has two tables and three projections:
CREATE TABLE tb1 (a INT, b INT, c INT, d INT);CREATE TABLE tb2 (g INT, h INT, i INT, j INT);
The first projection references all columns in tb1 and sorts on column a:
Administrator's GuideBulk Deleting and Purging Data
HP Vertica Analytics Platform (7.0.x) Page 550 of 969

CREATE PROJECTION tb1_p AS SELECT a, b, c, d FROM tb1 ORDER BY a;
The buddy projection references and sorts on column a in tb1:
CREATE PROJECTION tb1_p_2 AS SELECT a FROM tb1 ORDER BY a;
This projection references all columns in tb2 and sorts on column i:
CREATE PROJECTION tb2_p AS SELECT g, h, i, j FROM tb2 ORDER BY i;
Consider the following DML statement, which references tb1.a in its WHERE clause. Since bothprojections on tb1 contain column a, both are eligible for the optimized DELETE:
DELETE FROM tb1 WHERE tb1.a IN (SELECT tb2.i FROM tb2);
RestrictionsOptimized DELETEs are not supported under the following conditions:
l With pre-join projections on nodes that are down
l With replicated and pre-join projections if subqueries reference the target table. For example, thefollowing syntax is not supported:
DELETE FROM tb1 WHERE tb1.a IN (SELECT e FROM tb2, tb2 WHERE tb2.e = tb1.e);
l With subqueries that do not returnmultiple rows. For example, the following syntax is notsupported:
DELETE FROM tb1 WHERE tb1.a = (SELECT k from tb2);
Projection Sort Order for Optimizing DeletesDesign your projections so that frequently-used DELETE or UPDATE predicate columns appear in thesort order of all projections for large DELETEs and UPDATEs.
For example, supposemost of the DELETE queries you perform on a projection look like thefollowing:
DELETE from t where time_key < '1-1-2007'
To optimize the DELETEs, make time_key appear in the ORDER BY clause of all your projections.This schema design results in better performance of the DELETE operation.
Administrator's GuideBulk Deleting and Purging Data
HP Vertica Analytics Platform (7.0.x) Page 551 of 969

In addition, add additional sort columns to the sort order such that each combination of the sort keyvalues uniquely identifies a row or a small set of rows. For more information, see Choosing SortOrder: Best Practices. To analyze projections for sort order issues, use the EVALUATE_DELETE_PERFORMANCE function.
Administrator's GuideBulk Deleting and Purging Data
HP Vertica Analytics Platform (7.0.x) Page 552 of 969

Purging Deleted DataIn HP Vertica, delete operations do not remove rows from physical storage. Unlikemostdatabases, the DELETE command in HP Verticamarks rows as deleted so that they remainavailable to historical queries. These deleted rows are called historical data. Retention ofhistorical data also applies to the UPDATE command, which is actually a combined DELETE andINSERT operation.
The cost of retaining deleted data in physical storage can bemeasured in terms of:
l Disk space for the deleted rows and deletemarkers
l A performance penalty for reading and skipping over deleted data
A purge operation permanently removes deleted data from physical storage so that the disk spacecan be reused. HP Vertica gives you the ability to control how much deleted data is retained in thephysical storage used by your database by performing a purge operation using one of the followingtechniques:
l Setting a Purge Policy
l Manually Purging Data
Bothmethods set theAncient History Mark (AHM), which is an epoch that represents the timeuntil which history is retained. History older than the AHM are eligible for purge.
Note: Large delete and purge operations in HP Vertica could take a long time to complete, souse them sparingly. If your application requires deleting data on a regular basis, such as bymonth or year, HP recommends that you design tables that take advantage of tablepartitioning. If partitioning tables is not suitable, consider the procedure described in Rebuildinga Table. The ALTER TABLE..RENAME command lets you build a new table from the old table,drop the old table, and rename the new table in its place.
Setting a Purge PolicyThe preferredmethod for purging data is to establish a policy that determines which deleted data iseligible to be purged. Eligible data is automatically purged when the Tuple Mover performsmergeout operations.
HP Vertica provides twomethods for determining when deleted data is eligible to be purged:
l Specifying the time for which delete data is saved
l Specifying the number of epochs that are saved
Administrator's GuideBulk Deleting and Purging Data
HP Vertica Analytics Platform (7.0.x) Page 553 of 969

Specifying the Time for Which Delete Data Is SavedSpecifying the time for which delete data is saved is the preferredmethod for determining whichdeleted data can be purged. By default, HP Vertica saves historical data only when nodes aredown.
To change the the specified time for saving deleted data, use the HistoryRetentionTimeconfiguration parameter:
=> SELECT SET_CONFIG_PARAMETER('HistoryRetentionTime', '{ <seconds> | -1 }' );
In the above syntax:
l seconds is the amount of time (in seconds) for which to save deleted data.
l -1 indicates that you do not want to use the HistoryRetentionTime configuration parameter todetermine which deleted data is eligible to be purged. Use this setting if you prefer to use theother method (HistoryRetentionEpochs) for determining which deleted data can be purged.
The following example sets the history epoch retention level to 240 seconds:
=> SELECT SET_CONFIG_PARAMETER('HistoryRetentionTime', '240');
Specifying the Number of Epochs That Are SavedUnless you have a reason to limit the number of epochs, HP recommends that you specify the timeover which delete data is saved.
To specify the number of historical epoch to save through the HistoryRetentionEpochsconfiguration parameter:
1. Turn off the HistoryRetentionTime configuration parameter:
=> SELECT SET_CONFIG_PARAMETER('HistoryRetentionTime', '-1');
2. Set the history epoch retention level through the HistoryRetentionEpochs configurationparameter:
=> SELECT SET_CONFIG_PARAMETER('HistoryRetentionEpochs', '{<num_epochs>|-1}');
n num_epochs is the number of historical epochs to save.
n -1 indicates that you do not want to use the HistoryRetentionEpochs configurationparameter to trim historical epochs from the epochmap. By default,HistoryRetentionEpochs is set to -1.
The following example sets the number of historical epochs to save to 40:
Administrator's GuideBulk Deleting and Purging Data
HP Vertica Analytics Platform (7.0.x) Page 554 of 969

=> SELECT SET_CONFIG_PARAMETER('HistoryRetentionEpochs', '40');
Modifications are immediately implemented across all nodes within the database cluster. You donot need to restart the database.
Note: If both HistoryRetentionTime and HistoryRetentionEpochs are specified,HistoryRetentionTime takes precedence.
See EpochManagement Parameters for additional details.
Disabling PurgeIf you want to preserve all historical data, set the value of both historical epoch retention parametersto -1, as follows:
=> SELECT SET_CONFIG_PARAMETER('HistoryRetentionTime', '-1');=> SELECT SET_CONFIG_PARAMETER('HistoryRetentionEpochs', '-1');
Manually Purging DataManually purging deleted data consists of the following series of steps:
1. Determine the point in time to which you want to purge deleted data.
2. Set the Ancient History Mark (AHM) to this point in time using one of the following SQLfunctions (described in the SQLReferenceManual):
n SET_AHM_TIME() sets the AHM to the epoch that includes the specified TIMESTAMPvalue on the initiator node.
n SET_AHM_EPOCH() sets the AHM to the specified epoch.
n GET_AHM_TIME() returns a TIMESTAMP value representing the AHM.
n GET_AHM_EPOCH() returns the number of the epoch in which the AHM is located.
n MAKE_AHM_NOW() sets the AHM to the greatest allowable value (now), and lets you droppre-existing projections. This purges all deleted data.
When you use SET_AHM_TIME or GET_AHM_TIME, keep inmind that the timestamp youspecify is mapped to an epoch, which has (by default) a three-minute granularity. Thus, if youspecify an AHM time of '2008-01-01 00:00:00.00' the resulting purge could permanentlyremove as much as the first threeminutes of 2008, or could fail to remove the last threeminutes of 2007.
Administrator's GuideBulk Deleting and Purging Data
HP Vertica Analytics Platform (7.0.x) Page 555 of 969

Note: The system prevents you from setting the AHM beyond the point at which it wouldprevent recovery in the event of a node failure.
3. Manually initiate a purge using one of the following SQL functions (described in the SQLReferenceManual):
n PURGE_PROJECTION() purges a specified projection.
n PURGE_TABLE() purges all projections on the specified table.
n PURGE() purges all projections in the physical schema.
4. The Tuple Mover performs amergeout operation to purge the data.
Note: Manual purge operations can take a long time.
Administrator's GuideBulk Deleting and Purging Data
HP Vertica Analytics Platform (7.0.x) Page 556 of 969

Managing the DatabaseThis section describes how tomanage the HP Vertica database, including:
l Connection Load Balancing
l Managing Nodes
l Adding Disk Space to a Node
l Managing TupleMover Operations
l ManagingWorkloads
Connection Load BalancingEach client connection to a host in the HP Vertica cluster requires a small overhead inmemory andprocessor time. If many clients connect to a single host, this overhead can begin to affect theperformance of the database. You can attempt to spread the overhead of client connections bydictating that certain clients connect to specific hosts in the cluster. However, this manualbalancing becomes difficult as new clients and hosts are added to your environment.
Connection load balancing helps automatically spread the overhead caused by client connectionsacross the cluster by having hosts redirect client connections to other hosts. By redirectingconnections, the overhead from client connections is spread across the cluster without having tomanually assign particular hosts to individual clients. Clients can connect to a small handful ofhosts, and they are naturally redirected to other hosts in the cluster.
There are two ways you can implement load balancing on your HP Vertica cluster:
l Native connection load balancing is a feature built into the HP Vertica server and client librariesthat redirect client connections at the application level.
l Internet Protocol Virtual Server (IPVS) is software that can be installed on several hosts in theHP Vertica cluster that provides connection load balancing at the network level.
In most situations, you should use native connection load balancing instead of IPVS. The followingsections explain each option in detail and explain their benefits.
Native Connection Load Balancing OverviewNative connection load balancing is a feature built into the Vertica Analytics Platform server andclient libraries as well as vsql. Both the server and the client need to enable load balancing for it tofunction. If connection load balancing is enabled, a host in the database cluster can redirect aclient's attempt to it to another currently-active host in the cluster. This redirection is based on aload balancing policy. This redirection can only take place once, so a client is not bounced from onehost to another.
Administrator's GuideManaging the Database
HP Vertica Analytics Platform (7.0.x) Page 557 of 969

Since native connection load balancing is incorporated into the HP Vertica client libraries, any clientapplication that connects to HP Vertica transparently takes advantage of it simply by setting aconnection parameter.
For more about native connection load balancing, see About Native Connection Load Balancing.
IPVS OverviewIPVS is a feature of the Linux kernel which lets a single host act as a gateway to an entire cluster ofhosts. The load balancing host creates a virtual IP address on the network. When a client connectsto the virtual IP address, the IPVS load balancer transparently redirects the connection to one of thehosts in the cluster. For more on IPVS, see Connection Load Balancing Using IPVS.
Choosing Whether to Use Native Connection LoadBalancing or IPVS
Native connection load balancing several advantages over IPVS. Native connection load balancingis:
l Easy to set up. All that is required is that the client and server enable connection load balancing.IPVS requires the configuration of several additional software packages and the network.
l Easily overridden in cases where you need to connect to a specific host (for example, whenusing the COPY statement to load a file a specific host's filesystem).
l Less at risk of host failures affecting connection load balancing. IPVS is limited to amaster anda backup server. All hosts in HP Vertica are capable of redirecting connections for connectionload balancing. As long as HP Vertica is running, it can perform connection load balancing.
l Less memory and CPU intensive than running a separate IPVS process on several databasehosts.
l IPVS hurts load performance, since there is an additional network hop from the IPVS server to ahost in the database. Using native connection load balancing, clients connect directly to hosts inthe Vertica Analytics Platform cluster.
l Supported by HP. Currently, IPVS is not being actively supported.
l Is supported on all Linux platforms supported by HP Vertica. HP only supplies IPVS installationpackages on RedHat. IPVS has known compatibility issues with Debian-based Linuxdistributions.
There are a few cases where IPVS may bemore suitable:
l Restrictive firewalls between the clients and the hosts in the database cluster can interfere withnative connection load balancing. In order for native connection load balancing to work, clientsmust be able to access every host in the HP Vertica cluster. Any firewall between the hosts andthe clients must be configured to allow connections to the HP Vertica database. Otherwise, a
Administrator's GuideManaging the Database
HP Vertica Analytics Platform (7.0.x) Page 558 of 969

client could be redirected to a host that it cannot access. IPVS can be configured so that thevirtual IP address clients use to connect is outside of the firewall while the hosts can be behindthe firewall.
l Since native connection load balancing works at the application level, clients must opt-in to havetheir connections load balanced. Because it works at the network protocol level, IPVS can forceconnections to be balanced.
How you choose to implement connection load balancing depends on your network environment.Since native load connection balancing is easier to implement, you should use it unless yournetwork configuration requires that clients be separated from the hosts in the HP Vertica databaseby a firewall.
About Native Connection Load BalancingNative connection load balancing is a feature built into the HP Vertica server and client libraries thathelps spread the CPU andmemory overhead caused by client connections across the hosts in thedatabase. It can prevent hosts from becoming burdened by havingmany client connections whileother hosts in the cluster do not.
Native connection load balancing only has an effect when it is enabled by both the server and theclient. When both have enabled native connection load balancing, the following process takes placewhenever the client attempts to open a connection to HP Vertica::
1. The client connects to a host in the database cluster, with a connection parameter indicatingthat it is requesting a load-balanced connection.
2. The host chooses a host from the list of currently up hosts in the database based on the currentload balancing scheme (see below).
3. The host tells the client which host it has selected to handle the client's connection.
4. If the host chose another host in the database to handle the client connection, the clientdisconnects from the initial host. Otherwise, the client jumps to step 6.
5. The client establishes a connection to the host that will handle its connection. The client setsthis second connection request so that the second host does not interpret the connection as arequest for load balancing.
6. The client connection proceeds as usual, (negotiating encryption if the connection hasSSL enabled, and proceeding to authenticating the user ).
This entire process is transparent to the client application. The client driver automaticallydisconnects from the initial host and reconnects to the host selected for load balancing.
Administrator's GuideManaging the Database
HP Vertica Analytics Platform (7.0.x) Page 559 of 969
Notesl Native connection load balancing works with the ADO.NET driver's connection pooling. The
connection the client makes to the initial host and the final connection to the load balanced hostused pooled connections if they are available.
l For client applications using the JDBC andODBC driver in conjunction with third-partyconnection pooling solutions, the initial connection is not pooled since it is not a full clientconnection. The final connection is pooled, since it is a standard client connection.
l The client libraries include a failover feature that allow them to connect to backup hosts if thehost specified in the connection properties is unreachable. When using native connection loadbalancing, this failover feature is only used for the initial connection to the database. If the hostto which the client was redirected does not respond to the client's connection request, the clientdoes not attempt to connect to a backup host and instead returns a connection error to the user.Since clients are only redirected to hosts that are known to be up, this sort of connection failureshould only occur if the targeted host happened to go down at the samemoment the client isredirected to it. See ADO.NET Connection Failover, JDBC Connection Failover, andODBCConnection Failover in the Programmer's Guide for more information.
Load Balancing SchemesThe load balancing scheme controls how a host selects which host to handle a client connection.There are three available schemes:
l NONE: Disables native connection load balancing. This is the default setting.
l ROUNDROBIN: Chooses the next host from a circular list of currently up hosts in the database(i.e. node #1, node #2, node #3, etc. until it wraps back to node #1 again). Each host in thecluster maintains its own pointer to the next host in the circular list, rather than there being asingle cluster-wide state.
l RANDOM: Chooses a host at random from the list of currently up hosts in the cluster.
You set the native connection load balancing scheme using the SET_LOAD_BALANCE_POLICYfunction. See Enabling and Disabling Native Connection Load Balancing for instructions.
Related TasksEnabling and Disabling Native Connection Load Balancing 560Monitoring Native Connection Load Balancing 561
Enabling and Disabling Native Connection LoadBalancing
Only a database superuser can enable or disable native connection load balancing. To enable ordisable load balancing, use the SET_LOAD_BALANCE_POLICY function to set the load balancepolicy. Setting the load balance policy to anything other than 'NONE' enables load balancing on the
Administrator's GuideManaging the Database
HP Vertica Analytics Platform (7.0.x) Page 560 of 969

server. The following example enables native connection load balancing by setting the loadbalancing policy to ROUNDROBIN.
=> SELECT SET_LOAD_BALANCE_POLICY('ROUNDROBIN');SET_LOAD_BALANCE_POLICY
--------------------------------------------------------------------------------Successfully changed the client initiator load balancing policy to: roundrobin(1 row)
To disable native connection load balancing, use SET_LOAD_BALANCE_POLICY to set thepolicy to 'NONE':
=> SELECT SET_LOAD_BALANCE_POLICY('NONE');SET_LOAD_BALANCE_POLICY--------------------------------------------------------------------------Successfully changed the client initiator load balancing policy to: none(1 row)
Note: By default, client connections are not load balanced, even when connection loadbalancing is enabled on the server. Clients must set a connection parameter to indicates theyare willing to have their connection request load balanced. See Enabling Native ConnectionLoad Balancing in ADO.NET, Enabling Native Connection Load Balancing in JDBC andEnabling Native Connection Load Balancing in ODBC in the Programmer's Guide for moreinformation.
Resetting the Load Balancing StateWhen the load balancing policy is ROUNDROBIN, each host in the HP Vertica cluster maintainsits own state of which host it will select to handle the next client connection. You can reset thisstate to its initial value (usually, the host with the lowest-node id) using the RESET_LOAD_BALANCE_POLICY function:
=> SELECT RESET_LOAD_BALANCE_POLICY();RESET_LOAD_BALANCE_POLICY-------------------------------------------------------------------------Successfully reset stateful client load balance policies: "roundrobin".(1 row)
Related InformationAbout Native Connection Load Balancing 559
Related TasksMonitoring Native Connection Load Balancing 561
Monitoring Native Connection Load BalancingQuery the LOAD_BALANCE_POLICY column of the V_MONITOR.DATABASES to determine thestate of native connection load balancing on your server:
Administrator's GuideManaging the Database
HP Vertica Analytics Platform (7.0.x) Page 561 of 969

=> SELECT LOAD_BALANCE_POLICY FROM V_CATALOG.DATABASES;LOAD_BALANCE_POLICY---------------------roundrobin(1 row)
Determining to which Node a Client Has ConnectedA client can determine the node to which is has connected by querying the NODE_NAME columnof the V_MONITOR.CURRENT_SESSION table:
=> SELECT NODE_NAME FROM V_MONITOR.CURRENT_SESSION;NODE_NAME------------------v_vmart_node0002(1 row)
Related InformationAbout Native Connection Load Balancing 559
Related TasksEnabling and Disabling Native Connection Load Balancing 560
Administrator's GuideManaging the Database
HP Vertica Analytics Platform (7.0.x) Page 562 of 969
Connection Load Balancing Using IPVSThe IP Virtual Server (IPVS) provides network-protocol-level connection load balancing. Whenused with an HP Vertica database cluster, it is installed on two database hosts.
IPVS is made up of the following components:
l The Virtual IP (VIP): The IP address that is accessed by all client connections.
l Real server IPs (RIP): The IP addresses of client network interfaces used for connectingdatabase clients to the database engine.
l Cluster: A cluster of real HP Vertica servers (nodes).
l Virtual server: The single point of entry that provides access to a cluster, based on dynamicnode selection.
The IPVS load balancer is two node stand-by redundancy only. The IPVS redundancy model isdifferent than that of the HP Vertica Analytic Database. See Failure Recovery for details on HPVertica redundancy.
Client connections made through the Virtual IP (VIP) aremanaged by a primary (master) directornode, which is one of the real server nodes (RIP). Themaster director handles the routing ofrequests by determining which node has the fewest connections and sending connections to thatnode. If the director node fails for any reason, a failover (slave) director takes over request routinguntil the primary (master) director comes back online.
For example, if a user connects to node03 in a three-node cluster and node03 fails, the currenttransaction rolls back, the client connection fails, and a connectionmust be reestablished onanother node.
The following graphic illustrates a three-node database cluster where all nodes share a single VIP.The cluster contains amaster director (node01), a slave director (node02), and an additional host(node03) that together provide theminimum configuration for high availability (K-safety). In thissetup (and in the configuration and examples that follow), node01 and node02 play dual roles asIPVS directors and HP Vertica nodes.
Administrator's GuideManaging the Database
HP Vertica Analytics Platform (7.0.x) Page 563 of 969

Notesl Load balancing on a VIP is supported for Linux Red Hat Enterprise Linux 5 and 6, 64-bit.
l HP Verticamust be installed on each node in the cluster; the database can be installed on anynode, but only one database can be running on an HP Vertica cluster at a time.
l Although a 0 K-safety (two-node) design is supported, HP strongly recommends that you createthe load-balancing network using aminimum three-node cluster with K-safety set to 1. This wayif one node fails, the database stays up. See Designing for K-Safety for details.
l When K-safety is set to 1, locate the IPVS master and slave on HP Vertica database nodes thatcomprise a buddy projections pair. This is the best way to ensure high-availability load-balancing. See High Availability Through Projections for details on buddy projections.
l If the node that is the IPVS master fails completely, the slave IPVS takes over load balancing.However, if themaster only partially fails (i.e., it loses some of its processes but the node is stillup), youmay have tomodify IP addresses to direct network traffic to the slave node.Alternatively, you can try to restart the processes on themaster.
l Subsequent topics in this section describe how to set up two directors (master and slave), butyou can set upmore than two directors. See the Keepalived User Guide for details. See also theLinux Virtual ServerWeb site.
Administrator's GuideManaging the Database
HP Vertica Analytics Platform (7.0.x) Page 564 of 969

Configuring HP Vertica NodesThis section describes how to configure an HP Vertica cluster of nodes for load balancing. You'llset up two directors in amaster/slave configuration and include a third node forK-safety.
AN HP Vertica cluster designed for load balancing uses the following configuration:
l Real IP (RIP) address is the public interface and includes:
n Themaster director/node, which handles the routing of requests. Themaster is collocatedwith one of the database cluster nodes
n The slave director/node, which communicates with themaster and takes over routingrequests in the event of amaster node failure. The slave is collocated with another databasecluster node
n nodes database cluster, such as at least one failover node to provide theminimum configurationfor high availability. (K-safety).
l Virtual IP (VIP) address (generally assigned to eth0 in Linux) is the public network interfaceover which database clients connect.
Note: The VIP must be public so that clients outside the cluster can contact it.
Once you have set up an HP Vertica cluster and created a database, you can choose the nodesthat will be directors. To achieve the best high-availability load balancing result when K-safety is setto 1, ensure that the IPVS master node and the slave node are located on HP Vertica databasenodes with a buddy projections pair. (See High Availability Through Projections for information onbuddy projections.)
The instructions in this section use the following node configuration:
Pre-configured IP Node assignment Public IPs Private IPs
VIP shared among all nodes 10.10.51.180
RIP master director node01 10.10.51.55 192.168.51.1
RIP slave director node02 10.10.51.56 192.168.51.2
RIP failover node node03 10.10.51.57 192.168.51.3
Notesl In the above table, the private IPs determine which node to send a request to. They are not the
same as the RIPs.
l The VIP must be on the same subnet as the nodes in the HP Vertica cluster.
Administrator's GuideManaging the Database
HP Vertica Analytics Platform (7.0.x) Page 565 of 969

l Both themaster and slave nodes (node01 and node02 in this section) require additionalinstallation and configuration, as described in Configuring the Directors.
l Use the command $ cat /etc/hosts to display a list of all hosts in your cluster
The following external web sites might be useful. The links worked at the last date of publication,but HP Vertica does not manage this content.
See Alsol Linux Virtual ServerWeb site
l LVS-HOWTOPage
l Keepalived.conf(5) man page
l ipvsadmman page
Set Up the Loopback InterfaceThis procedure sets up the loopback (lo) interface with an alias on each node.
1. Log in as root on themaster director (node01):
$ su - root
2. Use the text editor of your choice to open ifcfg-lo:
[root@node01]# vi /etc/sysconfig/network-scripts/ifcfg-lo
3. Set up the loopback adapter with an alias for the VIP by adding the following block to the end ofthe file:
## vip deviceDEVICE=lo:0IPADDR=10.10.51.180NETMASK=255.255.255.255ONBOOT=yesNAME=loopback
Note:When you add the above block to your file, be careful not to overwrite the127.0.0.1 parameter, which is required for proper system operations.
4. Start the device:
Administrator's GuideManaging the Database
HP Vertica Analytics Platform (7.0.x) Page 566 of 969

[root@node01]# ifup lo:0
5. Repeat steps 1-4 on each node in the HP Vertica cluster.
Disable Address Resolution Protocol (ARP)This procedure disables ARP (Address Resolution Protocol) for the VIP.
1. On themaster director (node01), log in as root:
$ su - root
2. Use the text editor of your choice to open the sysctl configuration file:
[root@node01]# vi /etc/sysctl.conf
3. Add the following block to the end of the file:
#LVSnet.ipv4.conf.eth0.arp_ignore =1net.ipv4.conf.eth0.arp_announce = 2# Enables packet forwardingnet.ipv4.ip_forward =1
Note: For additional details, refer to the LVS-HOWTOPage. Youmight also refer to theLinux Virtual ServerWiki page for information on using arp_announce/arp_ignore todisable the Address Resolution Protocol.
4. Use ifconfig to verify that the interface is on the same subnet as the VIP:
[root@node01]# /sbin/ifconfig
In the following output, the eth0 inet addr is the VIP, and subnet 51matches the private RIPunder the eth1 heading:
eth0 Link encap:Ethernet HWaddr 84:2B:2B:55:4B:BE inet addr:10.10.51.55 Bcast:10.10.51.255 Mask:255.255.255.0
inet6 addr: fe80::862b:2bff:fe55:4bbe/64 Scope:LinkUP BROADCAST RUNNING MULTICAST MTU:1500 Metric:1RX packets:91694543 errors:0 dropped:0 overruns:0 frame:0TX packets:373212 errors:0 dropped:0 overruns:0 carrier:0collisions:0 txqueuelen:1000RX bytes:49294294011 (45.9 GiB) TX bytes:66149943 (63.0 MiB)
Administrator's GuideManaging the Database
HP Vertica Analytics Platform (7.0.x) Page 567 of 969

Interrupt:15 Memory:da000000-da012800eth1 Link encap:Ethernet HWaddr 84:2B:2B:55:4B:BF
inet addr:192.168.51.55 Bcast:192.168.51.255 Mask:255.255.255.0inet6 addr: fe80::862b:2bff:fe55:4bbf/64 Scope:LinkUP BROADCAST RUNNING MULTICAST MTU:1500 Metric:1RX packets:937079543 errors:0 dropped:2780 overruns:0 frame:0TX packets:477401433 errors:0 dropped:0 overruns:0 carrier:0collisions:0 txqueuelen:1000RX bytes:449050544237 (418.2 GiB) TX bytes:46302821625 (43.1 GiB)Interrupt:14 Memory:dc000000-dc012800
lo Link encap:Local Loopbackinet addr:127.0.0.1 Mask:255.0.0.0inet6 addr: ::1/128 Scope:HostUP LOOPBACK RUNNING MTU:16436 Metric:1RX packets:6604 errors:0 dropped:0 overruns:0 frame:0TX packets:6604 errors:0 dropped:0 overruns:0 carrier:0collisions:0 txqueuelen:0RX bytes:21956498 (20.9 MiB) TX bytes:21956498 (20.9 MiB)
lo:0 Link encap:Local Loopbackinet addr:10.10.51.180 Mask:255.255.255.255UP LOOPBACK RUNNING MTU:16436 Metric:1
5. Use ifconfig to verify that the loopback interface is up:
[root@node01]# /sbin/ifconfig lo:0
You should see output similar to the following:
lo:0 Link encap:Local Loopback inet addr:10.10.51.180 Mask:255.255.255.255UP LOOPBACK RUNNING MTU:16436 Metric:1
If you do not see UP LOOPBACK RUNNING, bring up the loopback interface:
[root@node01]# /sbin/ifup lo
6. Issue the following command to commit changes to the kernel from the configuration file:
[root@node01]# /sbin/sysctl -p
7. Repeat steps 1-6 on all nodes in the HP Vertica cluster.
Administrator's GuideManaging the Database
HP Vertica Analytics Platform (7.0.x) Page 568 of 969

Configuring the DirectorsNow you are ready to install the HP Vertica IPVS Load Balancer package and configure themaster(node01) and slave (node02) directors.
Install the HP Vertica IPVS Load Balancer PackageThe following instructions describe how to download and install the HP Vertica IPVS Load Balancerpackage for Red Hat Enterprise Linux 5 and RedHat Enterprise Linux 6.
Note: For illustrative purposes only, this procedure uses node01 for themaster director andnode02 for the slave director.
Before You Begin
Before installing IPVS, youmust:
l Install HP Vertica
l Create a database cluster
If You Are Using Red Hat Enterprise Linux 5.x:
Make sure you have downloaded and installed the HP Vertica Analytics Database RPM and theIPVS Load Balancer package for Red Hat Enterprise Linux 5.
1. On themaster director (node01) log in as root:
$ su - root
2. Download the IPVS Load Balancer package for Red Hat Enterprise Linux 5 from themy.vertica.com website to a location on themaster server, such as to /tmp.
3. Change directory to the location of the downloaded file:
# cd /tmp
4. Install (or upgrade) the Load Balancer package using the rpm -Uvh command.
The following is an example for the Red Hat Linux package only; package names name couldchange between releases:
Administrator's GuideManaging the Database
HP Vertica Analytics Platform (7.0.x) Page 569 of 969

# rpm -Uvh vertica-ipvs-load-balancer-<current-version>.x86_64.RHEL5.rpm
5. Repeat steps 1-4 on the slave director (node02).
If You Are Using Red Hat Enterprise Linux 6.x:
Make sure you have downloaded and installed the HP Vertica Analytics Database RPM and theIPVS Load Balancer package for Red Hat Enterprise Linux 6.
1. On themaster director (node01) log in as root:
$ su - root
2. Download the IPVS Load Balancer package for Red Hat Enterprise Linux 6 from themy.vertica.com website to a location on themaster server, such as to /tmp.
3. Change directory to the location of the downloaded file:
# cd /tmp
4. Run this command as root:
/sbin/modprobe ip_vs
5. Verify that ip_vs is loaded correctly using this command:
lsmod | grep ip_vs
6. Install (or upgrade) the Load Balancer package using the rpm -Uvh command.
The following is an example for the Red Hat Linux package only; package names name couldchange between releases:
# rpm -Uvh vertica-ipvs-load-balancer-<current-version>.x86_64.RHEL6.rpm
7. Repeat steps 1-6 on the slave director (node02).
Configure the HP Vertica IPVS Load BalancerHP Vertica provides a script called configure-keepalived.pl in the IPVS Load Balancerpackage. The script is located in /sbin, and if you run it with no options it prints a usage summary:
Administrator's GuideManaging the Database
HP Vertica Analytics Platform (7.0.x) Page 570 of 969

--ripips | Comma separated list of HP Vertica nodes; public IPs (e.g., 10.10.50.116,etc.)--priv_ips | Comma separated list of HP Vertica nodes; private IPs (e.g., 192.168.51.116, etc.)--ripport | Port on which HP Vertica runs. Default is 5433--iface | Public ethernet interface HP Vertica is configured to use (e.g., eth0)--emailto | Address that should get alerts (e.g., [email protected])--emailfrom | Address that mail should come from (e.g., [email protected])--mailserver | E-mail server IP or hostname (e.g., mail.server.com)--master | If this director is the master (default), specify --master--slave | If this director is the slave, specify --slave--authpass | Password for keepalived--vip | Virtual IP address (e.g., 10.10.51.180)--delayloop | Seconds keepalived waits between healthchecks. Default is 2--algo | Sets the algorithm to use: rr, wrr, lc (default), wlc, lblc, lblcr, dh, sh, sed, nq--kind | Sets the routing method to use. Default is DR.--priority | By default, master has priority of 100 and the backup (slave) has priority of 50
For details about each of these parameters, refer to the ipvsadm(8) - Linux man page.
Public and Private IPs
If your cluster uses private interfaces for spread cluster communication, you need to use the --priv_ips switch to enter the private IP addresses that correspond to the public IP addresses (or RIPs).The IPVS keepalive daemon uses these private IPs to determine when a node has left the cluster.
The IP host ID of the RIPs must correspond to the IP host ID of the private interfaces. For example,given the following IP address mappings:
Public Private (for spread)10.10.50.116 192.168.51.11610.10.50.117 192.168.51.11710.10.50.118 192.168.51.118
You need to enter the IP addresses in the following order:
--ripips 10.10.50.116,10.10.50.117,10.10.50.118--priv_ips 192.168.51.116,192.168.51.117,192.168.51.118
Youmust use IP addresses, not node names, or the spread.pl script could fail.
If you do not specify private interfaces, HP Vertica uses the public RIPs for theMISC check, asshown in step 3 below.
Administrator's GuideManaging the Database
HP Vertica Analytics Platform (7.0.x) Page 571 of 969

Set up the HP Vertica IPVS Load Balancer Configuration File
1. On themaster director (node01) log in as root:
$ su - root
2. Run the HP-supplied configuration script with the appropriate switches; for example:
# /sbin/configure-keepalived.pl --ripips 10.10.50.116,10.10.50.117,10.10.50.118--priv_ips 192.168.51.116,192.168.51.117,192.168.51.118--ripport 5433--iface eth0--emailto [email protected] [email protected] mail.server.com--master--authpass password--vip 10.10.51.180--delayloop 2--algo lc--kind DR--priority 100
Caution: The --authpass (password) switchmust be the same on both themaster andslave directors.
3. Check the keepalived.conf file to verify private and public IP settings for the --ripips and --priv_ips switches andmake sure the real_server IP address is public.
# cat /etc/keepalived/keepalived.conf
An entry in the keepalived.conf file would resemble the following:
real_server 10.10.50.116 5433 {MISC_CHECK {
misc_path "/etc/keepalived/check.pl 192.168.51.116"}
}
4. Start spread:
# /etc/init.d/spread.pl start
Administrator's GuideManaging the Database
HP Vertica Analytics Platform (7.0.x) Page 572 of 969

The spread.pl script writes to the check.txt file, which is is rewritten to include only theremaining nodes in the event of a node failure. Thus, the virtual server knows to stop sendingvsql requests to the failed node.
5. Start keepalived on node01:
# /etc/init.d/keepalived start
6. If not already started, start sendmail to allow mail messages to be sent by the directors:
# /etc/init.d/sendmail start
7. Repeat steps 1-5 on the slave director (node02), using the same switches, except(IMPORTANT) replace the --master switch with the --slave switch.
Note: Tip: Use a lower priority for the slave --priority switch. HP currently suggests 50.
# /sbin/configure-keepalived.pl--ripips 10.10.50.116,10.10.50.117,10.10.50.118--priv_ips 192.168.51.116,192.168.51.117,192.168.51.118--ripport 5433--iface eth0--emailto [email protected] [email protected] mail.server.com--slave--authpass password--vip 10.10.51.180--delayloop 2--algo lc--kind DR--priority 100
See Also
l Keepalived.conf(5) -Linux man page
Connecting to the Virtual IP (VIP)To connect to the Virtual IP address using vsql, issue a command similar to the following. The IPaddress, which could also be a DNS address, is the VIP that is shared among all nodes in the HPVertica cluster.
$ /opt/vertica/bin/vsql -h 10.10.51.180 -U dbadmin
Administrator's GuideManaging the Database
HP Vertica Analytics Platform (7.0.x) Page 573 of 969

To verify connection distribution over multiple nodes, repeat the following statement multiple timesand observe connection distribution in an lc (least amount of connections) fashion.
$ vsql -h <VIP> -c "SELECT node_name FROM sessions"
Replace <VIP> in the above script with the IP address of your virtual server; for example:
$ vsql -h 10.10.51.180 -c "SELECT node_name FROM sessions" node_name-----------------v_ipvs_node01v_ipvs_node02v_ipvs_node03
(3 rows)
Monitoring Shared Node ConnectionsIf you want to monitor which nodes are sharing connections, view the check.txt file by issuing thefollowing command at a shell prompt:
# watch cat /etc/keepalived/check.txtEvery 2.0s: cat /etc/keepalived/check.txt Wed Nov3 10:02:20 2010
N192168051057N192168051056N192168051055
The check.txt is a file located in the /etc/keepalived/ directory, and it gets updated when yousubmit changes to the kernel using sysctl -p, described in Disable the Address ResolutionProtocol (ARP). For example, the spread.pl script (see Configuring the Directors), writes to thecheck.txt file, which is thenmodified to include only the remaining nodes in the event of a nodefailure. Thus, the virtual server knows to stop sending vsql requests to the failed node.
You can also look for messages by issuing the following command at a shell prompt:
# tail -f /var/log/messagesNov 3 09:21:00 p6 Keepalived: Starting Keepalived v1.1.17 (05/17,2010)Nov 3 09:21:00 p6Keepalived: Starting Healthcheck child process, pid=32468Nov 3 09:21:00 p6 Keepalived: Starting VRRP child process, pid=32469Nov 3 09:21:00 p6 Keepalived_healthcheckers: Using LinkWatch kernel netlink reflector...Nov 3 09:21:00 p6 Keepalived_vrrp: Using LinkWatch kernel netlink reflector...Nov 3 09:21:00 p6 Keepalived_healthcheckers: Netlink reflector reports IP 10.10.51.55 addedNov 3 09:21:00 p6 Keepalived_vrrp: Netlink reflector reports IP 10.10.51.55 addedNov 3 09:21:00 p6 Keepalived_healthcheckers: Netlink reflector reports IP 192.168.51.55addedNov 3 09:21:00 p6 Keepalived_vrrp: Netlink reflector reports IP 192.168.51.55 addedNov 3 09:21:00 p6 Keepalived_vrrp: Registering Kernel netlink reflectorNov 3 09:21:00 p6 Keepalived_healthcheckers: Registering Kernel netlink reflectorNov 3 09:21:00 p6 Keepalived_vrrp: Registering Kernel netlink command channelNov 3 09:21:00 p6 Keepalived_vrrp: Registering gratuitous ARP shared channelNov 3 09:21:00 p6 Keepalived_healthcheckers: Registering Kernel netlink command channelNov 3 09:21:00 p6 Keepalived_vrrp: Opening file '/etc/keepalived/keepalived.conf'.Nov 3 09:21:00 p6 Keepalived_healthcheckers: Opening file
Administrator's GuideManaging the Database
HP Vertica Analytics Platform (7.0.x) Page 574 of 969

'/etc/keepalived/keepalived.conf'.Nov 3 09:21:00 p6 Keepalived_vrrp: Configuration is using : 63730 BytesNov 3 09:21:00 p6 Keepalived_healthcheckers: Configuration is using : 16211 BytesNov 3 09:21:00 p6 Keepalived_healthcheckers: Activating healthcheckers for service [10.10.51.55:5433]Nov 3 09:21:00 p6 Keepalived_healthcheckers: Activating healthcheckers for service [10.10.51.56:5433]Nov 3 09:21:00 p6 Keepalived_healthcheckers: Activating healthcheckers for service [10.10.51.57:5433]Nov 3 09:21:00 p6 Keepalived_vrrp: VRRP sockpool: [ifindex(2), proto(112), fd(10,11)]Nov 3 09:21:01 p6 Keepalived_healthcheckers: Misc check to [10.10.51.56] for [/etc/keepalived/check.pl 192.168.51.56] failed.Nov 3 09:21:01 p6 Keepalived_healthcheckers: Removing service [10.10.51.56:5433] from VS[10.10.51.180:5433]Nov 3 09:21:01 p6 Keepalived_healthcheckers: Remote SMTP server [127.0.0.1:25] connected.Nov 3 09:21:01 p6 Keepalived_healthcheckers: Misc check to [10.10.51.55] for [/etc/keepalived/check.pl 192.168.51.55] failed.Nov 3 09:21:01 p6 Keepalived_healthcheckers: Removing service [10.10.51.55:5433] from VS[10.10.51.180:5433]Nov 3 09:21:01 p6 Keepalived_healthcheckers: Remote SMTP server [127.0.0.1:25] connected.Nov 3 09:21:01 p6 Keepalived_healthcheckers: Misc check to [10.10.51.57] for [/etc/keepalived/check.pl 192.168.51.57] failed.Nov 3 09:21:01 p6 Keepalived_healthcheckers: Removing service [10.10.51.57:5433] from VS[10.10.51.180:5433]Nov 3 09:21:01 p6 Keepalived_healthcheckers: Remote SMTP server [127.0.0.1:25] connected.Nov 3 09:21:01 p6 Keepalived_healthcheckers: SMTP alert successfully sent.Nov 3 09:21:10 p6 Keepalived_vrrp: VRRP_Instance(VI_1) Transition to MASTER STATENov 3 09:21:20 p6 Keepalived_vrrp: VRRP_Instance(VI_1) Entering MASTER STATENov 3 09:21:20 p6 Keepalived_vrrp: VRRP_Instance(VI_1) setting protocol VIPs.Nov 3 09:21:20 p6 Keepalived_vrrp: VRRP_Instance(VI_1) Sending gratuitous ARPs on eth0 for 10.10.51.180Nov 3 09:21:20 p6 Keepalived_healthcheckers: Netlink reflector reports IP 10.10.51.180 addedNov 3 09:21:20 p6 Keepalived_vrrp: Remote SMTP server [127.0.0.1:25] connected.Nov 3 09:21:20 p6 Keepalived_vrrp: Netlink reflector reports IP 10.10.51.180 addedNov 3 09:21:20 p6 Keepalived_vrrp: SMTP alert successfully sent.Nov 3 09:21:25 p6 Keepalived_vrrp: VRRP_Instance(VI_1) Sending gratuitous ARPs on eth0 for 10.10.51.1
Determining Where Connections Are GoingIpvsadm is the user code interface to the IP Virtual Server. It is used to set up, maintain, or inspectthe virtual server table in the Linux kernel.
If you want to identify where user connections are going, install ipvsadm.
1. Log in to themaster director (node01) as root:
$ su - root
Administrator's GuideManaging the Database
HP Vertica Analytics Platform (7.0.x) Page 575 of 969

2. Install ipvsadm:
[root@node01]# yum install ipvsadmLoading "installonlyn" pluginSetting up Install ProcessSetting up repositoriesReading repository metadata in from local filesParsing package install argumentsResolving Dependencies--> Populating transaction set with selected packages. Please wait.---> Downloading header for ipvsadm to pack into transaction set.ipvsadm-1.24-10.x86_64.rp 100% |=========================| 6.6 kB 00:00---> Package ipvsadm.x86_64 0:1.24-10 set to be updated--> Running transaction checkDependencies Resolved=============================================================================Package Arch Version Repository Size
=============================================================================Installing:ipvsadm x86_64 1.24-10 base 32 k
Transaction Summary=============================================================================Install 1 Package(s)Update 0 Package(s)Remove 0 Package(s)Total download size: 32 kIs this ok [y/N]: yDownloading Packages:(1/1): ipvsadm-1.24-10.x8 100% |=========================| 32 kB 00:00Running Transaction TestFinished Transaction TestTransaction Test SucceededRunning Transaction
Installing: ipvsadm ######################### [1/1]Installed: ipvsadm.x86_64 0:1.24-10Complete!
3. Run ipvsadm:
[root@node01 ~]# ipvsadmIP Virtual Server version 1.2.1 (size=4096)Prot LocalAddress:Port Scheduler Flags
-> RemoteAddress:Port Forward Weight ActiveConn InActConnTCP vs-wks1.verticacorp.com:pyrr lc
-> node03.verticacorp.com:pyr Route 1 1 8-> node02.verticacorp.com:pyr Route 1 0 8-> node01.verticacorp.com:pyr Local 1 0 8
See Alsol ipvsadmman page
Administrator's GuideManaging the Database
HP Vertica Analytics Platform (7.0.x) Page 576 of 969

Virtual IP Connection Problems
IssueUsers cannot connect to the database through the Virtual IP (VIP) address.
Resolution1. Check if spread is running:
$ ps ax | grep spread
11895 ? S<s 4:30 /opt/vertica/spread/sbin/spread -n N192168051055 -c/opt/vertica/config/vspread.conf
29617 pts/3 S+ 0:00 grep spread
a. If spread is not running, start spread as root or using sudo:
[root@node01]# /etc/init.d/spreadd start
b. If spread is running, restart spread as root or using sudo:
[root@node01]# /etc/init.d/spreadd restart
c. Check the spread status as root or using sudo:
[root@node01]# /etc/init.d/spreadd status
d. Issue the ifconfig command to check the current IP addresses of the hosts, and verifythat those IP addresses are listed in /opt/vertica/config/vspread.conf.
[root@node01]# ifconfig
If spread fails to start, examine the following files for problems:
/tmp/spread*.log
/var/log/spreadd.log
Permission problems and syntax problems are identified in the log files.
2. Check if keepalived is running:
Administrator's GuideManaging the Database
HP Vertica Analytics Platform (7.0.x) Page 577 of 969

$ ps ax | grep keepalived29622 pts/3 S+ 0:00 grep keepalived
a. If keepalived is not running, start keepalived as root or using sudo:
# /etc/init.d/keepalived start
b. If keepalived is running, restart keepalived as root or using sudo:
# /etc/init.d/keepalived restart
IssueUsers cannot connect to the database.
ResolutionTry to telnet to the VIP and port:
# telnet 10.10.51.180 5433
If telnet reports no route to host, recheck your /etc/keepalived/keepalived.conf file to makesure you entered the correct VIP and RIPs.
Errors and informational messages from the keepalived daemon are written to the/var/log/messages file, so check themessages file first:
# tail -f /var/log/messagesMay 18 09:04:32 dell02 Keepalived_vrrp: VRRP_Instance(VI_1) Sending gratuitousARPs on eth0 for 10.10.10.100May 18 09:04:32 dell02 avahi-daemon[3191]: Registering new address record for10.10.10.100 on eth0.May 18 09:04:32 dell02 Keepalived_healthcheckers: Netlink reflector reports IP10.10.10.100 added
Expected E-mail Messages From the Keepalived Daemonl Upon startup:
Subject: [node01] VRRP Instance VI_1 - Entering MASTER state=> VRRP Instance is now owning VRRP VIPs <=
l When a node fails:
Administrator's GuideManaging the Database
HP Vertica Analytics Platform (7.0.x) Page 578 of 969

Subject:[node01] Realserver 10.10.10.1:5433 - DOWN=> MISC CHECK failed on service <=
l When a node comes back up:
Subject: [node02] Realserver 10.10.10.1:5433 - UP=> MISC CHECK succeed on service <=
Troubleshooting Keepalived IssuesIf there are connection or other issues related to the Virtual IP server and Keepalived, try some ofthe following tips:
l Set KEEPALIVED_OPTIONS="-D -d" in the /etc/sysconfig/keepalived file to enable bothdebugmode and dump configuration.
l Monitor the system log in /var/log/messages. If keepalived.conf is incorrect, the onlyindication is in themessages log file. For example:
$ tail /var/log/messages
Errors and informational messages from the keepalived daemon are also written to the/var/log/messages files.
l Type ip addr list and see the configured VIP addresses for eth0. For example:
1: lo: <LOOPBACK,UP,LOWER_UP> mtu 16436 qdisc noqueue link/loopback 00:00:00:00:00:00 brd 00:00:00:00:00:00
inet 127.0.0.1/8 scope host loinet 10.10.51.180/32 brd 127.255.255.255 scope global lo:0inet6 ::1/128 scope host
valid_lft forever preferred_lft forever2: eth0: <BROADCAST,MULTICAST,UP,LOWER_UP> mtu 1500 qdisc pfifo_fast qlen 1000
link/ether 84:2b:2b:55:4b:be brd ff:ff:ff:ff:ff:ffinet 10.10.51.55/24 brd 10.10.51.255 scope global eth0inet6 fe80::862b:2bff:fe55:4bbe/64 scope link
valid_lft forever preferred_lft forever3: eth1: <BROADCAST,MULTICAST,UP,LOWER_UP> mtu 1500 qdisc pfifo_fast qlen 1000
link/ether 84:2b:2b:55:4b:bf brd ff:ff:ff:ff:ff:ffinet 192.168.51.55/24 brd 192.168.51.255 scope global eth1inet6 fe80::862b:2bff:fe55:4bbf/64 scope link
valid_lft forever preferred_lft forever4: sit0: <NOARP> mtu 1480 qdisc noop
link/sit 0.0.0.0 brd 0.0.0.0
l Check iptables and notice the PREROUTING rule on the BACKUP (slave) director. Eventhough ipvsadm has a complete list of real servers tomanage, it does not route anything as theprerouting rule redirects packets to the loopback interface.
Administrator's GuideManaging the Database
HP Vertica Analytics Platform (7.0.x) Page 579 of 969

# /sbin/iptables -t nat -n -LChain PREROUTING (policy ACCEPT)target prot opt source destinationChain POSTROUTING (policy ACCEPT)target prot opt source destinationChain OUTPUT (policy ACCEPT)target prot opt source destination
Note: On some kernels, the nat tables does not show by default without the -t parameter,and -n is used to avoid long DNS lookups. See the iptables(8) - Linux man page for details.
l During failover, it is normal to expect delay in new connection establishment until the slave nodetakes control. The delay could be several minutes depending on the load on the cluster. If youcannot connect to the database, try to telnet to the VIP and port:
# telnet 10.10.51.180 5433
If telnet reports no route to host, recheck the keepalived configuration file(/etc/keepalived/keepalived.conf) to make sure you entered the correct VIP and RIPs.
Administrator's GuideManaging the Database
HP Vertica Analytics Platform (7.0.x) Page 580 of 969

Managing NodesHP Vertica provides the ability to add, remove, and replace nodes on a live cluster that is activelyprocessing queries. This ability lets you scale the database without interrupting users.
Fault GroupsFault groups provide a way for you to configure Vertica Analytics Platform for your physical clusterlayout. Vertica Analytics Platform automatically creates fault groups around control nodes in largecluster arrangements, placing nodes that share a control node into the same fault group.
Consider defining your own fault groups specific to your cluster's physical layout if you want to:
l Influence the placement of control nodes in the cluster
l Reduce the impact of correlated failures inherent in your environment; for example, bydescribing your rack layout, Vertica Analytics Platform could tolerate a rack failure
Vertica Analytics Platform supports complex, hierarchical fault groups of different shapes and sizesand provides a fault group script (DDL generator), SQL statements, system tables, and othermonitoring tools. Fault groups are also tightly integrated with elastic and large cluster layouts toprovide the cluster flexibility and reliability you expect from Vertica Analytics Platform.
See AlsoSeeHigh Availability through Fault Groups in the Concepts Guide for a conceptual overview of faultgroups with a cluster topology example.
About the Fault Group ScriptTo help you create fault groups, Vertica Analytics Platform provides a script called fault_group_ddl_generator.py in the /opt/vertica/scripts directory. This script generates theSQL statements you'll run to create fault groups for your cluster. The script does not create faultgroups for you.
Create a fault group input file
Use any text editor to create a fault group input file for the targeted cluster. You'll then pass theinput file to the fault_group_ddl_generator.py script, which the script will use to output thecommands you'll run.
The fault group input file must adhere to the following format:
Administrator's GuideManaging the Database
HP Vertica Analytics Platform (7.0.x) Page 581 of 969

First line in the template
The first line is for the parent (top-level) fault groups only, delimited by spaces; for example:
rack1 rack2 rack3 rack4
Remaining lines in template
The format for each subsequent line includes a parent fault group, followed by an equals sign (=)and then includes any combination of one or more nodes, fault groups, virtual machine severs orvirtual machine hosts. The objects going into a parent fault group are delimited by spaces; forexample:
<parent> = <child_1> <child_2> <child...>
After the first row of parent fault groups, the order in which you write the group descriptions does notmatter; however, all fault groups that you define in this file must refer back to a parent fault group,either directly or by being the child of a fault group that is the child of a parent fault group.
To place, for example, B into A and both C and D into B, the format would be as follows:
A = BB = C D
In the above example, B is a child of A and a parent of both C and D.
Example input file
The following input file is an example only. In your file, the node* names will represent nodes in thecluster, such as v_vmartdb_node0001, v_vmartd_node0002, and so on.
rack1 rack2 rack3 rack4rack1 = node1 node2 node3 node4rack2 = node5 node6 node7 node8rack3 = node9 vm3_1vm3_1 = node10 node11 node12vm4_1 = node13 node14vm4_2 = node15 node16rack4 = vm4_1 vm4_2
Here's the example output returned by the script, which you can also pipe to a file and save for lateruse:
ALTER DATABASE vmartd DROP ALL FAULT GROUP;CREATE FAULT GROUP rack1;ALTER FAULT GROUP rack1 ADD NODE node1;ALTER FAULT GROUP rack1 ADD NODE node2;ALTER FAULT GROUP rack1 ADD NODE node3;ALTER FAULT GROUP rack1 ADD NODE node4;CREATE FAULT GROUP rack2;ALTER FAULT GROUP rack2 ADD NODE node5;ALTER FAULT GROUP rack2 ADD NODE node6;
Administrator's GuideManaging the Database
HP Vertica Analytics Platform (7.0.x) Page 582 of 969

ALTER FAULT GROUP rack2 ADD NODE node7;ALTER FAULT GROUP rack2 ADD NODE node8;CREATE FAULT GROUP rack3;ALTER FAULT GROUP rack3 ADD NODE node9;CREATE FAULT GROUP vm3_1;ALTER FAULT GROUP vm3_1 ADD NODE node10;ALTER FAULT GROUP vm3_1 ADD NODE node11;ALTER FAULT GROUP vm3_1 ADD NODE node12;ALTER FAULT GROUP rack3 ADD FAULT GROUP vm3_1;CREATE FAULT GROUP rack4;CREATE FAULT GROUP vm4_1;ALTER FAULT GROUP vm4_1 ADD NODE node13;ALTER FAULT GROUP vm4_1 ADD NODE node14;ALTER FAULT GROUP rack4 ADD FAULT GROUP vm4_1;CREATE FAULT GROUP vm4_2;ALTER FAULT GROUP vm4_2 ADD NODE node15;ALTER FAULT GROUP vm4_2 ADD NODE node16;ALTER FAULT GROUP rack4 ADD FAULT GROUP vm4_2;
Formore information, see Creating Fault Groups.
About Automatic Fault Groups
If you do not use the /opt/vertica/scripts/fault_group_ddl_generator.py helper script andSQL statements to create fault groups, Vertica Analytics Platform creates automatic fault groupsfor you in order to create the correct control node assignments for the cluster layout.
All nodes that share the same control node reside in the same automatic fault group.
Ephemeral nodes are not included in automatic or user-defined fault groups because they hold nodata.
Creating Fault GroupsWhen you define fault groups, Vertica Analytics Platform distributes data segments across thecluster so the cluster can tolerate large-scale failures inherent in your environment, such as thefailure of a rack or amachine that might be hostingmultiple virtual machine nodes.
Fault groups prerequisites
l Defining fault groups requires careful and thorough network planning. Youmust have a solidunderstanding of your network topology before you define fault groups.
l Vertica Analytics Platform must already be installed or upgraded and youmust have alreadycreated a database.
l To create fault groups, youmust be a superuser.
Administrator's GuideManaging the Database
HP Vertica Analytics Platform (7.0.x) Page 583 of 969
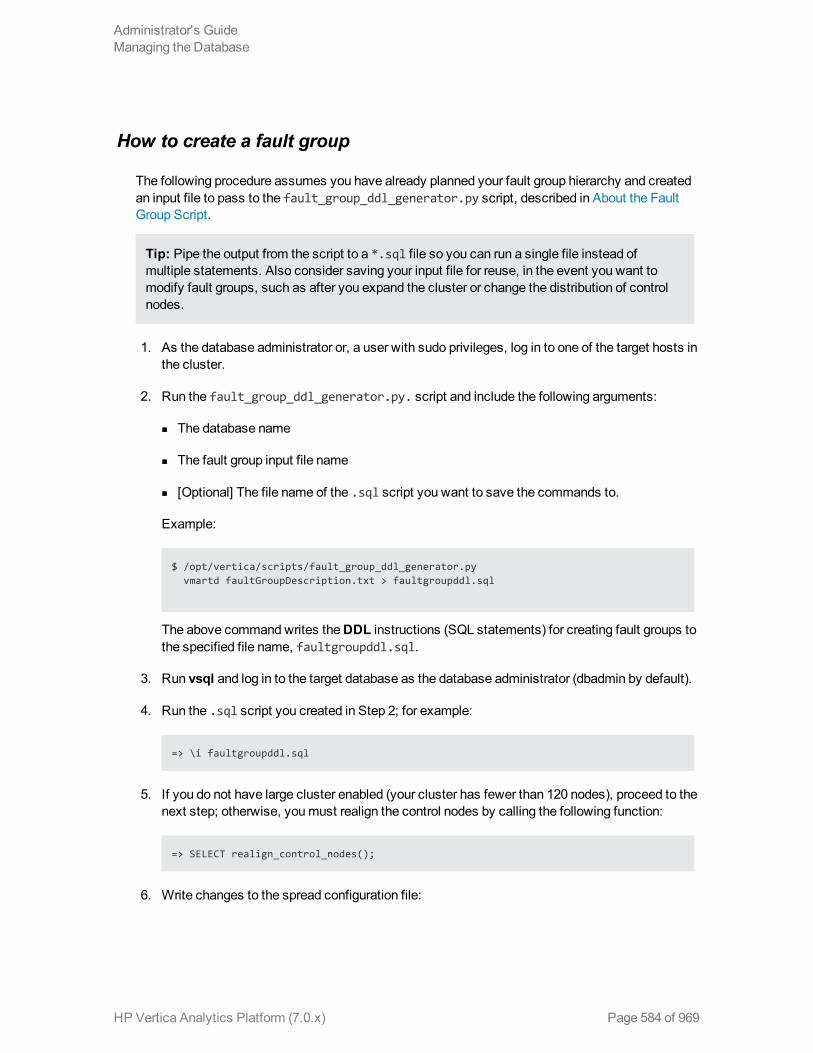
How to create a fault group
The following procedure assumes you have already planned your fault group hierarchy and createdan input file to pass to the fault_group_ddl_generator.py script, described in About the FaultGroup Script.
Tip: Pipe the output from the script to a *.sql file so you can run a single file instead ofmultiple statements. Also consider saving your input file for reuse, in the event you want tomodify fault groups, such as after you expand the cluster or change the distribution of controlnodes.
1. As the database administrator or, a user with sudo privileges, log in to one of the target hosts inthe cluster.
2. Run the fault_group_ddl_generator.py. script and include the following arguments:
n The database name
n The fault group input file name
n [Optional] The file name of the .sql script you want to save the commands to.
Example:
$ /opt/vertica/scripts/fault_group_ddl_generator.pyvmartd faultGroupDescription.txt > faultgroupddl.sql
The above commandwrites theDDL instructions (SQL statements) for creating fault groups tothe specified file name, faultgroupddl.sql.
3. Run vsql and log in to the target database as the database administrator (dbadmin by default).
4. Run the .sql script you created in Step 2; for example:
=> \i faultgroupddl.sql
5. If you do not have large cluster enabled (your cluster has fewer than 120 nodes), proceed to thenext step; otherwise, youmust realign the control nodes by calling the following function:
=> SELECT realign_control_nodes();
6. Write changes to the spread configuration file:
Administrator's GuideManaging the Database
HP Vertica Analytics Platform (7.0.x) Page 584 of 969

=> SELECT reload_spread(true);
7. Use theAdministration Tools to restart the database.
8. Save changes to the cluster's data layout by calling the following function:
=> SELECT rebalance_cluster();
See Also
For syntax on each of the fault group statements, see the following topics in the SQLReferenceManual:
l Cluster Management Functions
l CREATE FAULT GROUP
l ALTER FAULT GROUP
l DROP FAULT GROUP
l ALTER DATABASE
Modifying Fault GroupsYou'll modify fault groups when you want to:
l Add a fault group to another fault group
l Remove a fault group from another fault group
l Add one or more nodes to a fault group
l Remove one or more nodes from a fault group (in which case the node is left without a parentfault group)
l Rename a fault group
How to modify a fault group
Before youmodify existing fault groups, carefully plan the new layout andmodify the input templatefile you created for the targeted cluster (see About the Fault Group Script and Creating FaultGroups).
Administrator's GuideManaging the Database
HP Vertica Analytics Platform (7.0.x) Page 585 of 969

1. As a user with sudo privileges, log in to one of the target hosts.
2. Run the fault groups python script and supply the following:
n The database name
n The fault group input file name
n [Optional] The file name of the .sql script you want to create
Example:
$ /opt/vertica/scripts/fault_group_ddl_generator.pyvmartd ModifiedFaultGroupTemp.txt > faultgroupddl.sql
The above commandwrites theDDL instructions (SQL statements) for creating fault groups tothe specified file name, faultgroupddl.sql.
3. Run vsql and log in to the specified database as the database administrator (default dbadmin).
4. Run the .sql script you created in the step 2; for example:
=> \i faultgroupddl.sql
5. If you do not have large cluster enabled, skip this step; otherwise, realign the control nodes bycalling the following function:
=> SELECT realign_control_nodes();
6. Restart the spread process to write changes to the spread configuration file:
=> SELECT reload_spread(true);
7. Use theAdministration Tools to restart the database.
8. Save changes to the cluster's data layout by calling the following function:
=> SELECT rebalance_cluster();
See Also
For syntax, see the following topics in the SQLReferenceManual:
Administrator's GuideManaging the Database
HP Vertica Analytics Platform (7.0.x) Page 586 of 969

l ALTER FAULT GROUP
l ALTER DATABASE
l Cluster Management Functions
Dropping Fault GroupsWhen you remove a fault group from the cluster, the operation removes the specified fault groupand its child fault groups, placing all nodes under the parent of the dropped fault group. To see thecurrent fault group hierarchy in the cluster, query the FAULT_GROUPS system table.
How to drop a fault group
Use the DROP FAULT GROUP statement to remove a fault group from the cluster. The followingexample drops the group2 fault group:
vmartdb=> DROP FAULT GROUP group2;DROP FAULT GROUP
How to remove all fault groups
Use the ALTER DATABASE statement to drops all fault groups, along with any child fault groups, fromthe specified database cluster.
The following command drops all fault groups from the vmartdb database:
vmartdb=> ALTER DATABASE exampledb DROP ALL FAULT GROUP;ALTER DATABASE
To add nodes back to a fault group
To add a node back to a fault group, youmust manually re-assign it to a new or existing fault groupusing CREATE FAULT GROUP and ALTER FAULT GROUP..ADD NODE statements.
See Also
l DROP FAULT GROUP
l CREATE FAULT GROUP
l ALTER FAULT GROUP..ADD NODE
Administrator's GuideManaging the Database
HP Vertica Analytics Platform (7.0.x) Page 587 of 969

Monitoring Fault GroupsYou canmonitor fault groups using Vertica Analytics Platform system tables or through theManagement Console interface.
Monitoring fault groups through system tables
Use the following system tables to observe information about your fault groups as well as clustervulnerabilities, such as the nodes the cluster cannot lose without the database going down:
l V_CATALOG.FAULT_GROUPS—View the hierarchy of all fault groups in the cluster.
l V_CATALOG.CLUSTER_LAYOUT—Observe the actual arrangement of the nodesparticipating in the data business and the fault groups that affect them. Ephemeral nodes are notshown in the cluster layout ring because they hold no data.
Monitoring fault groups through Management Console
AnMC administrator canmonitor and highlight fault groups of interest by following these steps:
1. Click the running database you want to monitor and click Manage in the task bar.
2. Open the Fault Group Viewmenu and select the fault groups you want to view.
3. Optionally hide nodes that are not in the selected fault group to focus on fault groups of interest.
Nodes in a fault group have colored bubble attached to the upper left corner of the node. Each faultgroup has a unique color (until the number of fault groups exceeds the number of colors available, inwhich caseMC recycles previously-used colors).
Vertica Analytics Platform supports complex, hierarchical fault groups of different shapes andsizes, soMC displays multiple fault group participation as a stack of different-colored bubbles,where the higher bubbles represent a lower-tiered fault group, whichmeans that bubble is closer tothe root, or parent, fault group, not the child or grandchild fault group. See High Availability throughFault Groups in the Concepts Guide for information about fault group hierarchy.
Example: simple fault group hierarchy
The following image shows two tiers of nodes in three fault groups with no nodes hidden. Althoughfault groups are designed for large clusters, the cluster shown below is intentionally small to make iteasier to view details
If information in the node details box is hard to read, increase the zoom level.
Administrator's GuideManaging the Database
HP Vertica Analytics Platform (7.0.x) Page 588 of 969

Large ClusterTo support scaling of existing clusters into large clusters and improve control messageperformance, Vertica Analytics Platform delegates control message responsibilities to a subset ofVertica Analytics Platform nodes, called control nodes. Control nodes communicate with eachother. Other cluster nodes are assigned to a control node, which they use for control messagecommunications.
Note: A large cluster arrangement is tightly integrated with elastic cluster and fault groups toprovide the cluster flexibility and reliability that you expect from Vertica Analytics Platform.See High Availability With Fault Groups in the Concepts Guide for details.
Control nodes on large clustersOn clusters of 120 or more nodes, a large cluster layout is necessary and enabled by default.Vertica Analytics Platform makes automatic control node assignments unless you use one of thefollowing options:
Administrator's GuideManaging the Database
HP Vertica Analytics Platform (7.0.x) Page 589 of 969

If you want to ... Do this
Install a new cluster before you create adatabase
Run the Vertica Analytics Platform installationscript with the --large-cluster <integer>aarguments. See the following topics for details:
l Installing HP Vertica with the install_verticaScript in the Installation Guide
l Installing a Large Cluster in this guide
Expand an existing cluster for pre-existingdatabases
Use cluster management functions described inDefining and Realigning Control Nodes on anExisting Cluster
Change control nodes on an existing cluster Use cluster management functions described inDefining and Realigning Control Nodes on anExisting Cluster
Influence the placement of control nodes inyour cluster's physical layout
Define fault groups to configure Vertica AnalyticsPlatform for your physical cluster layout. SeeFault Groups for details.
Control nodes on small clustersIf your cluster has fewer than 120 nodes, large cluster is neither neccsary nor automatically applied.As a result, all nodes are control nodes. However, Vertica Analytics Platform lets you define controlnodes on any sized cluster. Some environments, such as cloud deployments that might havehigher network latency, could benefit from a smaller number of control nodes.
For details, see Planning a Large Cluster Arrangement and Installing a Large Cluster.
Planning a Large Cluster ArrangementIn a large cluster layout, nodes form a correlated failure group, governed by their control node (thenode that runs control messaging/spread). If a control node fails, all nodes in its host group also fail.
Planning the number of control nodes
Configuring a large cluster requires careful and thorough network planning. Youmust have a solidunderstanding of your network topology before you configure the cluster.
To asses how many cluster nodes should be control nodes, use the square root of the total numberof nodes expected to be in the database cluster to help satisfy both dataK-Safety and rack faulttolerance for the cluster. Depending on the result, youmight need to adjust the number of controlnodes to account for your physical hardware/rack count. For example, if you have 121 nodes (with aresult of 11), and your nodes will be distributed across 8 racks, youmight want to increase thenumber of control nodes to 16 so you have two control nodes per rack.
Administrator's GuideManaging the Database
HP Vertica Analytics Platform (7.0.x) Page 590 of 969

Specifying the number of control nodes
Vertica Analytics Platform provides different tools to let you define the number of control nodes,depending on your current configuration, described in Installing a Large Cluster.
Consider the following scenarios in which cluster nodes are spread out among three racks:
l If you have three control nodes and all other nodes are evenly distributed among the three racks,you could set up one control node per rack.
l If you have five control nodes and three racks, you could specify two control nodes on two rackseach and one control node on the final rack.
l If you have four control nodes and one rack has twice as many nodes as the other racks, youcould specify two control nodes on the larger rack and one control node each on the other tworacks, if applicable.
Installing a Large ClusterWhether you are forming a new large cluster (adding all nodes for the first time) or scaling anexisting cluster to a large cluster, Vertica Analytics Platform provides twomethods that let youspecify the number of control nodes (the nodes that run control messaging). See the followingsections:
l If you want to install a new large cluster
l If you want to expand an existing cluster
If you want to install a new large cluster
On new cluster formations, where you are adding nodes for the first time by running the install_vertica script, you can specify that you want a large-cluster installation by passing the VerticaAnalytics Platform installation script the --large-cluster <integer> argument. VerticaAnalytics Platform selects the first <integer> number of hosts from the --hosts list (commaseparated list of hosts) as control nodes and assigns the other hosts from the list to a control nodebased on a round-robin model.
Note: The size of the --hosts host list determines a large cluster layout, not the number ofnodes you include in the database. If you specify 120 or more hosts in the list, and you do notspecifically enable large cluster by providing the --large-cluster argument, VerticaAnalytics Platform enables a large cluster arrangement and configures control nodes for you.
To help ensure that control nodes and their assigned nodes are aligned for the highest possible faulttolerance, youmust list the hosts in the in the --hosts host_list in the proper order. Forexample, if you have four sets of hosts on four racks, the first four nodes in the --hosts host_listmust be one host from each rack so you have one control node per rack. Then the list mustconsist of four hosts from each rack in line with the first four hosts. You'll continue to use this
Administrator's GuideManaging the Database
HP Vertica Analytics Platform (7.0.x) Page 591 of 969

pattern of host listing for all targeted hosts. See Sample rack-based cluster hosts topology belowfor examples.
Tip: If you pass the --large-cluster argument a DEFAULT value instead of an <integer>value, Vertica Analytics Platform calculates a number of control nodes based on the totalnumber of nodes specified in the host_list argument.
For more information, see the following topics:
l Planning a Large Cluster Arrangement
l Installing HP Vertica with the install_vertica Script in the Installation Guide
Sample rack-based cluster hosts topology
This example shows a simplemulti-rack cluster layout, in which cluster nodes are evenlydistributed across three racks, where each rack has one control node.
In the above example:
Administrator's GuideManaging the Database
HP Vertica Analytics Platform (7.0.x) Page 592 of 969

l Rack-1, Rack-2, and Rack-3 aremanaged by a single network switch
l Host-1_1, Host-1_2, and Host-1_3 are control nodes
l All hosts on Rack-1 are assigned to control node Host-1_1
l Hosts on Rack-2 are assigned to control node Host-1_2
l Hosts on Rack-3 are assigned to control node Host-1_3
In this scenario, if control node Host-1_1 or Rack-1 fails, the nodes in Rack-1 can communicatewith control node Host-2_1, and the database stays up.
In the following install_vertica script fragment, note the order of the hosts in the --hosts listargument. The final arguments in the sample specifically enable large cluster and provide thenumber of control nodes (3):
... install_vertica --hosts Host-1-1,Host-1-2,Host-1-3,Host-2-1,Host-2-2,Host-2-3,Host-3-1,Host-3-2,Host-3-3,Host-4-1,Host-4-2,Host-4-3,Host-5-1,Host-5-2,Host-5-3 -rpm <vertica-package-name> <other required options> --large-cluster 3
After the installation process completes, use theAdministration Tools to create a database, anoperation that generate an Vertica Analytics Platform database cluster environment with threecontrol nodes, along with their respective associated hosts that reside on the same racks as thecontrol node.
If you want to expand an existing cluster
When you add a node to an existing cluster, Vertica Analytics Platform places the new node in anappropriate location within the cluster ring and assigns it to a control node, based on the cluster'scurrent allocations.
To provide youmore flexibility and control over which nodes run spread, you can use the SET_CONTROL_SET_SIZE(integer) function. This function works like the installation script's --large-cluster <integer> option. See Defining and Realigning Control Nodes on an Existing Cluster fordetails.
Important: The Vertica Analytics Platform installation script cannot alter the database cluster.
Defining and Realigning Control Nodes on an ExistingCluster
This topic describes how to set up or change control node assignments on an existing cluster usinga series of cluster management functions. It assumes you already know how many control nodesthe cluster needs for failover safety. See Planning a Large Cluster Arrangement.
Note: If you are adding nodes for the first time, run the Vertica Analytics Platform installation
Administrator's GuideManaging the Database
HP Vertica Analytics Platform (7.0.x) Page 593 of 969

script using the --large-cluster <integer> argument. See Installing HP Vertica with theinstall_vertica Script in the Installation Guide.
The procedure below makes the following changes to the cluster:
l Specifies the number of nodes that run control messaging (spread).
l Assigns each non-control cluster node to a control node.
l Saves the new layout to the spread configuration file.
l Redistributes data across the cluster and ensures fault tolerance is realized.
How to set up control nodes on an existing cluster
Perform the following steps when you change the cluster—such as after adding, removing, orswapping nodes—to ensure the cluster maintains adequate control messaging distribution forfailover safety. For more details , see "Control node assignment/realignment" in Large Cluster BestPractices.
1. As the database administrator, log in to theAdministration Tools and connect to thedatabase.
2. Call the SET_CONTROL_SET_SIZE(integer) function with an integer argument to specify thenumber of control nodes; for example, 4:
=> SELECT SET_CONTROL_SET_SIZE(4);
3. Call the REALIGN_CONTROL_NODES() function without arguments; for example:
=> SELECT REALIGN_CONTROL_NODES();
4. Call the RELOAD_SPREAD(true) function to save changes to the spread configuration file:
=> SELECT RELOAD_SPREAD(true);
5. After the RELOAD_SPREAD() operation finishes, log back in to theAdministration Tools, andrestart the database.
6. Call the REBALANCE_CLUSTER() function to ensure data is distributed across the cluster:
=> SELECT REBALANCE_CLUSTER();
Administrator's GuideManaging the Database
HP Vertica Analytics Platform (7.0.x) Page 594 of 969

Important: Youmust run REBALANCE_CLUSTER() for fault tolerance to be realized. Seealso Rebalancing Large Clusters.
See Also
l Cluster Management Functions in the SQLReferenceManual
l Fault Groups
Rebalancing Large ClustersA rebalance operation redistributes your database projections' data across all nodes, ensures datais distributed correctly based on fault groups and large cluster automatic fault groups, refreshesprojections, sets theAncient History Mark, and drops projections that are no longer needed.
When to rebalance the cluster
Rebalancing is useful (or necessary) after you:
l Mark one or more nodes as ephemeral in preparation of removing them from the cluster.
l Add one or more nodes to the cluster, so that HP Vertica can populate the empty nodes withdata.
l Remove one or more nodes from the cluster, so Vertica Analytics Platform can redistribute thedata among the remaining nodes.
l Change the scaling factor, which determines the number of storage containers used to store aprojection across the database.
l Set the control node size or realign control nodes on a large cluster layout.
l Specify more than 120 nodes in your initial Vertica Analytics Platform cluster configuration.
l Add nodes to or remove nodes from a fault group.
Youmust be a database administrator to rebalance data across the cluster.
How to rebalance the cluster
You rebalance the cluster using SQL functions, in particular the REBALANCE_CLUSTER()function.Call REBALANCE_CLUSTER() after you have completed the last add/remove operation.
Administrator's GuideManaging the Database
HP Vertica Analytics Platform (7.0.x) Page 595 of 969

How long will rebalance take?
A rebalance operation can take some time, depending on the number of projections and the amountof data they contain. HP recommends that you allow the process to complete uninterrupted. If youmust cancel the operation, call the CANCEL_REBALANCE_CLUSTER() function.
See Also
l Rebalancing Data Using SQL Functions
l Rebalancing Data Across Nodes
l Rebalancing Data Using the Administration Tools UI
Expanding the Database for Large ClusterIf you have an existing database cluster that you want to expand to a large cluster (more than 120nodes), follow these steps:
1. Log in to theAdministration Tools as the database administrator and stop the database.
2. As root or a user with sudo privileges, open a BASH shell and run the install_vertica script withthe --add-hosts argument, providing a comma-separated list of hosts you want to add to anexisting HP Vertica cluster. See Installing HP Vertica with the install_vertica Script in theInstallation Guide.
3. Exit the shell and re-establish a vsql connection as the database administrator.
4. Log in to the Administration Tools and start the database.
5. Use the Administration Tools AdvancedMenu > Cluster Management > Add Hosts option toadd the standby hosts you created in Step 2.
6. Run SET_CONTROL_SET_SIZE(integer) to specify the number of control nodes you want onthe cluster. See Defining and Realigning Control Nodes on an Existing Cluster.
7. Optionally create fault groups to further define the layout of the control nodes within thephysical cluster. See Fault Groups.
Monitoring Large ClustersYou canmonitor large cluster traits by querying the following system tables:
l V_CATALOG.LARGE_CLUSTER_CONFIGURATION_STATUS—Shows the current spreadhosts and the control designations in the Catalog so you can see if they match.
l V_MONITOR.CRITICAL_HOSTS—Lists the hosts whose failure would cause the database to
Administrator's GuideManaging the Database
HP Vertica Analytics Platform (7.0.x) Page 596 of 969

become unsafe and force a shutdown.
Tip: The CRITICAL_HOSTS view is especially useful for large cluster arrangements. Fornon-large clusters, query the CRITICAL_NODES table.
Youmight also want to monitor the following tables:
l V_CATALOG.FAULT_GROUPS—Provides information about views created on the databasecluster
l V_CATALOG.CLUSTER_LAYOUT—Shows the relative position of the actual arrangement ofthe nodes participating in the data business and the fault groups that affect them.
Note: Ephemeral nodes do not appear in this view (or in the cluster layout ring) becausethey hold no resident data.
Large Cluster Best PracticesKeep the following best practices in mind when planning andmanaging a large clusterimplementation.
Planning the number of control nodes
To asses how many cluster nodes should be control nodes, use the square root of the total numberof nodes expected to be in the database cluster to help satisfy both dataK-Safety and rack faulttolerance for the cluster. Depending on the result, youmight need to adjust the number of controlnodes to account for your physical hardware/rack count. For example, if you have 121 nodes (with aresult of 11), and your nodes will be distributed across 8 racks, youmight want to increase thenumber of control nodes to 16 so you have two control nodes per rack.
See Planning a Large Cluster Arrangement.
Control node assignment/realignment
After you specify the number of control nodes, youmust update the control host's (spread)configuration files to reflect the catalog change. Some cluster management functions might requireyou to run other functions or restart the database or both.
If, for example, you drop a control node, cluster nodes that point to it are reassigned to anothercontrol node. If that node fails, all the nodes assigned to it also fail, so you need to use theAdministration Tools to restart the database. In this scenario, you'd call the REALIGN_CONTROL_NODES() and RELOAD_SPREAD(true) functions, which notify nodes of the changes and realign faultgroups. Calling RELOAD_SPREAD(true) connects an existing cluster node to a newly-assignedcontrol node. On the other hand, if you run REALIGN_CONTROL_NODES()multiple times in a row, thelayout does not change beyond the initial setup, so you don't need to restart the database. But if you
Administrator's GuideManaging the Database
HP Vertica Analytics Platform (7.0.x) Page 597 of 969

add or drop a node and then run REALIGN_CONTROL_NODES(), the function call could changemanynode assignments.
Here's what happens with the control node assignments when you add or drop nodes, whetherthose nodes are control nodes or non-control nodes:
l If you add a cluster node—Vertica Analytics Platform assigns a control node to the newly-added node based on the current cluster configuration. If the new node joins a fault group, it isassigned to a control node from that fault group and requires a database restart to reconnect tothat control node.
l If you drop a non-control node—Vertica Analytics Platform quietly drops the cluster node.This operation could change the cluster and spread layout, so you should always callREBALANCE_CLUSTER() after you drop a node.
l If you drop a control node—All nodes assigned to the control node go down. In large clusterimplementations, however, the database remains up because the down nodes are not buddieswith other cluster nodes.
After you drop a control node, you'll have (n-1) control nodes. Youmust call REALIGN_CONTROL_NODES() to reset the cluster so it has n control nodes, whichmight or might not be the samenumber as before you dropped the control node. Remaining nodes are assigned new controlnodes. In this operation, Vertica Analytics Platform makes control node assignments based onthe cluster layout. When it makes the new assignments, it respects user-defined fault groups, ifany, which you can view by querying the V_CATALOG.CLUSTER_LAYOUT system table, a view thatalso lets you see the proposed new layout for nodes in the cluster. If you want to influence thelayout of control nodes in the cluster, you should define fault groups.
For more information, see Defining and Realigning Control Nodes on an Existing Cluster andRebalancing Large Clusters.
Allocate standby nodes
Have as many standby nodes available as you can, ideally on racks you are already using in thecluster. If a node suffers a non-transient failure, use theAdministration Tools "ReplaceHost" utility to swap in a standby node.
Standby node availability is especially important for control nodes. If you are swapping a nodethat's a control node, all nodes assigned to the control node's host grouping will need to be takenoffline while you swap in the standby node. For details on node replacement, see Replacing Nodes.
Plan for cluster growth
If you plan to expand an existing cluster to 120 or more nodes, you can configure the number ofcontrol nodes for the cluster after you add the new nodes. See Defining and Realigning ControlNodes.
Administrator's GuideManaging the Database
HP Vertica Analytics Platform (7.0.x) Page 598 of 969

Write custom fault groups
When you deploy a large cluster, Vertica Analytics Platform automatically creates fault groupsaround control nodes, placing nodes that share a control node into the same fault group.Alternatively, you can specify which cluster nodes should reside in a particular correlated failuregroup and share a control node. See High Availability through Fault Groups in the Concepts Guide.
Use segmented projections
On large cluster setups, minimize the use of unsegmented projections in favor of segmentedprojections. When you use segmented projections, Vertica Analytics Platform creates buddyprojections and distributes copies of segmented projections across database nodes. If a nodefails, data remains available on the other cluster nodes.
Use the Database Designer
HP recommends that you use theDatabase Designer to create your physical schema. If youchoose to design projections manually, you should segment large tables across all database nodesand replicate (unsegment) small table projections on all database nodes.
Elastic ClusterYou can scale your cluster up or down tomeet the needs of your database. Themost common caseis to add nodes to your database cluster to accommodatemore data and provide better queryperformance. However, you can scale down your cluster if you find that it is overprovisioned or ifyou need to divert hardware for other uses.
You scale your cluster by adding or removing nodes. Nodes can be added or removed withouthaving to shut down or restart the database. After adding a node or before removing a node, HPVertica begins a rebalancing process that moves data around the cluster to populate the new nodesor move data off of nodes about to be removed from the database. During this process datamayalso be exchanged between nodes that are not being added or removed tomaintain robustintelligent K-safety. If HP Vertica determines that the data cannot be rebalanced in a single iterationdue to a lack of disk space, then the rebalance is done inmultiple iterations.
To helpmake data rebalancing due to cluster scalingmore efficient, HP Vertica locally segmentsdata storage on each node so it can be easily moved to other nodes in the cluster. When a newnode is added to the cluster, existing nodes in the cluster give up some of their data segments topopulate the new node and exchange segments to keep the number of nodes that any one nodedepends upon to aminimum. This strategy keeps to aminimum the number of nodes that maybecome critical when a node fails (seeCritical Nodes/K-safety). When a node is being removedfrom the cluster, all of its storage containers aremoved to other nodes in the cluster (which alsorelocates data segments tominimize nodes that may become critical when a node fails). Thismethod of breaking data into portable segments is referred to as elastic cluster, since it makesenlarging or shrinking the cluster easier.
Administrator's GuideManaging the Database
HP Vertica Analytics Platform (7.0.x) Page 599 of 969

The alternative to elastic cluster is to resegment all of the data in the projection and redistribute it toall of the nodes in the database evenly any time a node is added or removed. This method requiresmore processing andmore disk space, since it requires all of the data in all projections toessentially be dumped and reloaded.
The Elastic Cluster Scaling FactorIn new installs, each node has a "scaling factor" number of local segments. Rebalance efficientlyredistributes data by relocating local segments provided that, after nodes are added or removed,there are sufficient local segments in the cluster to redistribute the data evenly (determined byMAXIMUM_SKEW_PERCENT). For example, if the scaling factor = 8, and there are initially 5nodes, then there are a total of 40 local segments cluster wide. If two additional nodes are added tobring the total to 7 nodes, relocating local segments would place 5 such segments on 2 nodes and 6such segments on 5 nodes, which is roughly a 20% skew. Rebalance chooses this course of actiononly if the resulting skew is less than the allowed threshold, as determined by MAXIMUM_SKEW_PERCENT. Otherwise, segmentation space (and hence data, if uniformly distributed over thisspace) is evenly distributed among the 7 nodes and new local segment boundaries are drawn foreach node, such that each node again has 8 local segments.
Note: By default, the scaling factor only has an effect while HP Vertica rebalances thedatabase. While rebalancing, each node breaks the projection segments it contains intostorage containers, which it thenmoves to other nodes if necessary. After rebalancing, thedata is recombined intoROS containers. It is possible to have HP Vertica always group datainto storage containers. See Local Data Segmentation for more information.
Enabling and Disabling Elastic ClusterYou enable and disable elastic cluster using functions. See the entries for the ENABLE_ELASTIC_CLUSTER and DISABLE_ELASTIC_CLUSTER functions in the SQLReferenceManual.
Note: An elastic projection (a segmented projection created when Elastic Cluster is enabled)created with amodularhash segmentation expression uses hash instead.
Query the ELASTIC_CLUSTER system table to determine if elastic cluster is enabled:
=> select is_enabled from ELASTIC_CLUSTER;is_enabled------------t
(1 row)
Scaling Factor DefaultsThe default scaling factor is "4" for new installs of HP Vertica and for upgraded install of HP Verticathat had local segments disabled. Versions of HP Vertica prior to 6.0 had local segments disabledby default. The scaling factor is not changed during upgrade on databases upgraded to version 6.0 iflocal segments were enabled.
Administrator's GuideManaging the Database
HP Vertica Analytics Platform (7.0.x) Page 600 of 969

Note: Databases created with versions of HP Vertica earlier than version 5.0 have a scalingfactor of 0, which disables elastic cluster. This ensures that HP Vertica handles projectionsegmentation the way it did prior to version 5.0. If you want your older database to have betterscaling performance, you need tomanually set a scaling factor to enable the new storagesegmenting behavior.
Viewing Scaling Factor SettingsTo view the scaling factor, query the ELASTIC_CLUSTER table:
=> SELECT scaling_factor FROM ELASTIC_CLUSTER;scaling_factor---------------
4(1 row)
=> SELECT SET_SCALING_FACTOR(6);SET_SCALING_FACTOR
--------------------SET
(1 row)
=> SELECT scaling_factor FROM ELASTIC_CLUSTER;scaling_factor
---------------6
(1 row)
Setting the Scaling FactorThe scaling factor determines the number of storage containers used to store a projection acrossthe database. Use the SET_SCALING_FACTOR function to change your database's scalingfactor. The scaling factor can be an integer between 1 and 32.
Note: Setting the scaling factor value too high can cause nodes to create toomany smallcontainer files, greatly reducing efficiency and potentially causing a "ToomanyROS containers" error (also known as "ROS pushback"). The scaling factor should be set highenough so that rebalance can transfer local segments to satisfy the skew threshold, but smallenough that the number of storage containers does not exceed ROS pushback. The number ofstorage containers should be greater than or equal to the number of partitions multiplied by thenumber local of segments (# storage containers >= # partitions * # local segments).
=> SELECT SET_SCALING_FACTOR(12);SET_SCALING_FACTOR--------------------SET
(1 row)
Administrator's GuideManaging the Database
HP Vertica Analytics Platform (7.0.x) Page 601 of 969
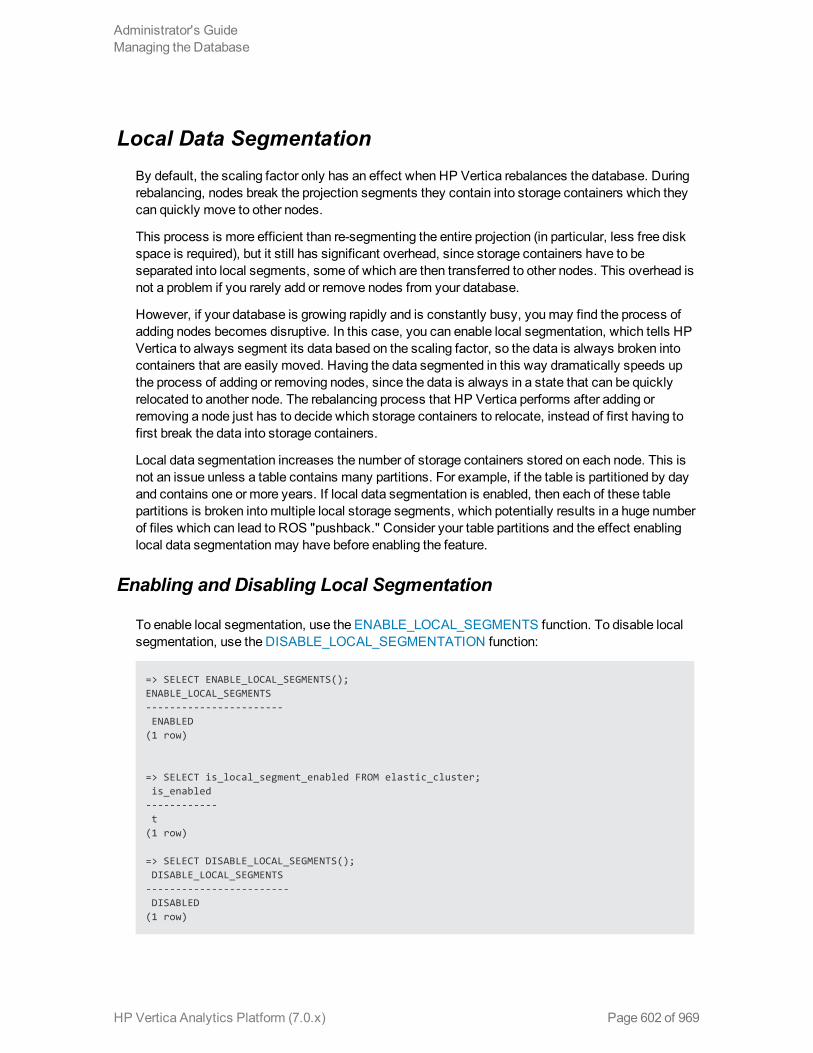
Local Data SegmentationBy default, the scaling factor only has an effect when HP Vertica rebalances the database. Duringrebalancing, nodes break the projection segments they contain into storage containers which theycan quickly move to other nodes.
This process is more efficient than re-segmenting the entire projection (in particular, less free diskspace is required), but it still has significant overhead, since storage containers have to beseparated into local segments, some of which are then transferred to other nodes. This overhead isnot a problem if you rarely add or remove nodes from your database.
However, if your database is growing rapidly and is constantly busy, youmay find the process ofadding nodes becomes disruptive. In this case, you can enable local segmentation, which tells HPVertica to always segment its data based on the scaling factor, so the data is always broken intocontainers that are easily moved. Having the data segmented in this way dramatically speeds upthe process of adding or removing nodes, since the data is always in a state that can be quicklyrelocated to another node. The rebalancing process that HP Vertica performs after adding orremoving a node just has to decide which storage containers to relocate, instead of first having tofirst break the data into storage containers.
Local data segmentation increases the number of storage containers stored on each node. This isnot an issue unless a table contains many partitions. For example, if the table is partitioned by dayand contains one or more years. If local data segmentation is enabled, then each of these tablepartitions is broken intomultiple local storage segments, which potentially results in a huge numberof files which can lead to ROS "pushback." Consider your table partitions and the effect enablinglocal data segmentationmay have before enabling the feature.
Enabling and Disabling Local Segmentation
To enable local segmentation, use the ENABLE_LOCAL_SEGMENTS function. To disable localsegmentation, use the DISABLE_LOCAL_SEGMENTATION function:
=> SELECT ENABLE_LOCAL_SEGMENTS();ENABLE_LOCAL_SEGMENTS-----------------------ENABLED
(1 row)
=> SELECT is_local_segment_enabled FROM elastic_cluster;is_enabled
------------t
(1 row)
=> SELECT DISABLE_LOCAL_SEGMENTS();DISABLE_LOCAL_SEGMENTS
------------------------DISABLED
(1 row)
Administrator's GuideManaging the Database
HP Vertica Analytics Platform (7.0.x) Page 602 of 969

=> SELECT is_local_segment_enabled FROM ELASTIC_CLUSTER;is_enabled
------------f
(1 row)
Elastic Cluster Best PracticesThe following are some best practices with regard to local segmentation and upgrading pre-5.0databases.
Note: You should always perform a database backup before and after performing any of theoperations discussed in this topic. You need to back up before changing any elastic cluster orlocal segmentation settings to guard against a hardware failure causing the rebalance processto leave the database in an unusable state. You should perform a full backup of the databaseafter the rebalance procedure to avoid having to rebalance the database again if you need torestore from a backup.
When to Enable Local Data Segmentation
Local Data Segmentation can significantly speed up the process of resizing your cluster. Youshould enable local data segmentation if
l your database does not contain tables with hundreds partitions.
l the number of nodes in the database cluster is a power of two.
l you plan to expand or contract the size of your cluster.
Local segmentation can result in an excessive number of storage containers with tables that havehundreds of partitions, or in clusters with a non-power-of-two number of nodes. If your database hasthese two features, take care when enabling local segmentation.
Upgraded Database Consideration
Databases created using a version of HP Vertica earlier than version 5.0 do not have elastic clusterenabled by default. If you expect to expand or contract the database in the future, youmay benefitfrom enabling elastic cluster by setting a scaling factor. There are two strategies you can follow:
l Enable elastic cluster now, and rebalance the database. This may take a significant amount oftime to complete,. andmake consume up to 50% of the free disk space on the nodes in thedatabase, since all of the segmented projections are re-written. However, afterwards, addingand removing nodes will take less time.
Administrator's GuideManaging the Database
HP Vertica Analytics Platform (7.0.x) Page 603 of 969

l Wait until you need to resize the cluster, then enable elastic cluster just before adding orremoving nodes. Changing the setting does not make the resizing of the cluster any faster, butlater resize operations will be faster.
Whichmethod you choose depends on your specific circumstances. If youmight resize yourdatabase on short notice (for example, youmay need to load a very large amount of data at once),you can choose to schedule the downtime needed to enable elastic cluster and rebalance thedatabase to enable elastic cluster sooner, so the actual add or remove node process will occurfaster.
If you choose to enable elastic cluster for your database, you should consider whether you want toenable local data segmentation at the same time. If you choose to enable local data segmentationat a later time, you will need to rebalance the database again, which is a lengthy process.
Monitoring Elastic Cluster RebalancingHP Vertica includes system tables that can be used tomonitor the rebalance status of an elasticcluster and gain general insight to the status of elastic cluster on your nodes.
l The REBALANCE_TABLE_STATUS table provides general information about a rebalance. Itshows, for each table, the amount of data that has been separated, the amount that is currentlybeing separated, and the amount to be separated. It also shows the amount of data transferred,the amount that is currently being transferred, and the remaining amount to be transferred (or anestimate if storage is not separated).
Note: If multiple rebalancemethods were used for a single table (for example, the table hasunsegmented and segmented projections), the table may appear multiple times - once foreach rebalancemethod.
l REBALANCE_PROJECTION_STATUS can be used to gainmore insight into the details for aparticular projection that is being rebalanced. It provides the same type of information as above,but in terms of a projection instead of a table.
In each table, separated_percent and transferred_percent can be used to determine overallprogress.
Historical Rebalance Information
Historical information about work completed is retained, so use the predicate "where is_latest" torestrict the output to only themost recent or current rebalance activity. The historical datamayinclude information about dropped projections or tables. If a table or projection has been droppedand information about the anchor table is not available, then NULL is displayed for the table_id and"<unknown>" is displayed for the table_name. Information on dropped tables is still useful, forexample, in providing justification for the duration of a task.
Administrator's GuideManaging the Database
HP Vertica Analytics Platform (7.0.x) Page 604 of 969

Adding NodesThere aremany reasons for adding one or more nodes to an installation of HP Vertica:
l Increase system performance. Add additional nodes due to a high query load or load latency orincrease disk space without adding storage locations to existing nodes.
Note: The database response time depends on factors such as type and size of the applicationquery, database design, data size and data types stored, available computational power, andnetwork bandwidth. Adding nodes to a database cluster does not necessarily improve thesystem response time for every query, especially if the response time is already short, e.g.,less then 10 seconds, or the response time is not hardware bound.
l Make the database K-safe (K-safety=1) or increase K-safety to 2. See Failure Recovery fordetails.
l Swap a node for maintenance. Use a sparemachine to temporarily take over the activities ofan existing node that needs maintenance. The node that requires maintenance is known aheadof time so that when it is temporarily removed from service, the cluster is not vulnerable toadditional node failures.
l Replace a node. Permanently add a node to remove obsolete or malfunctioning hardware.
Important: : If you installed HP Vertica on a single node without specifying the IP address orhostname (or you used localhost), you cannot expand the cluster. Youmust reinstall HPVertica and specify an IP address or hostname that is not localhost/127.0.0.1.
Adding nodes consists of the following general tasks:
1. Back up the database.
HP strongly recommends that you back up the database before you perform this significantoperation because it entails creating new projections, refreshing them, and then deleting the oldprojections. See Backing Up and Restoring the Database for more information.
The process of migrating the projection design to include the additional nodes could take awhile; however during this time, all user activity on the database can proceed normally, usingthe old projections.
2. Configure the hosts you want to add to the cluster.
See Before you Install HP Vertica in the Installation Guide. You will also need to edit the hostsconfiguration file on all of the existing nodes in the cluster to ensure they can resolve the newhost.
3. Add one or more hosts to the cluster.
4. Add the hosts you added to the cluster (in step 3) to the database.
Administrator's GuideManaging the Database
HP Vertica Analytics Platform (7.0.x) Page 605 of 969

Note:When you add a "host" to the database, it becomes a "node." You can add nodes toyour database using either theAdministration Tools or theManagement Console (SeeMonitoring HP Vertica UsingManagement Console.)
After you add one or more nodes to the database, HP Vertica automatically distributes updatedconfiguration files to the rest of the nodes in the cluster and starts the process of rebalancing data inthe cluster. See Rebalancing Data Across Nodes for details.
Adding Hosts to a ClusterAfter you have backed up the database and configured the hosts you want to add to the cluster, youcan now add hosts to the cluster using the update_vertica script.
You can useMC to add standby nodes to a database, but you cannot add hosts to a cluster usingMC.
Prerequisites and Restrictions
l If you installed HP Vertica on a single node without specifying the IP address or hostname (youused localhost), it is not possible to expand the cluster. Youmust reinstall HP Vertica andspecify an IP address or hostname.
l If your database has more than one node already, you can add a node without stopping theserver. However, if you are adding a node to a single-node installation, then youmust shut downboth the database and spread. If you do not, the system returns an error like the following:
$ sudo /opt/vertica/sbin/update_vertica --add-hosts node05 --rpm vertica_7.0.x.x86_64.RHEL5.rpmVertica 7.0.x Installation ToolStarting installation tasks...Getting system information for cluster (this may take a while)....Spread is running on ['node01']. HP Vertica and spread must be stopped before adding nodes to a 1 node cluster.Use the admin tools to stop the database, if running, then use the following command to stop spread:
/etc/init.d/spread stop (as root or with sudo)Installation completed with errors.Installation failed.
Procedure to Add Hosts
From one of the existing cluster hosts, run the update_vertica script with aminimum of the --add-hosts host(s) parameter (where host(s) is the hostname or IP address of the system(s) that youare adding to the cluster) and the --rpm or --deb parameter:
# /opt/vertica/sbin/update_vertica --add-hosts host(s) --rpm package
Administrator's GuideManaging the Database
HP Vertica Analytics Platform (7.0.x) Page 606 of 969

Note: See Installing with the Script for the full list of parameters. Youmust also provide thesame options you used when originally installing the cluster.
The update_vertica script uses all the same options as install_vertica and:
l Installs the HP Vertica RPM on the new host.
l Performs post-installation checks, including RPM version and N-way network connectivitychecks.
l Modifies spread to encompass the larger cluster.
l Configures the Administration Tools to work with the larger cluster.
Important Tips:
l A host can be specified by the hostname or IP address of the system you are adding to thecluster. However, internally HP Vertica stores all host addresses as IP addresses.
l Do not use include spaces in the hostname/IP address list provided with --add-hosts if youspecifiedmore than one host.
l If a package is specified with --rpm/--deb, and that package is newer than the one currentlyinstalled on the existing cluster, then, HP Vertica first installs the new package on the existingcluster hosts before the newly-added hosts.
l Use the same command line parameters for the database administrator username, password,and directory path you used when you installed the cluster originally. Alternatively, you cancreate a properties file to save the parameters during install and then re-using it on subsequentinstall and update operations. See Installing HP Vertica Silently.
l If you are installing using sudo, the database administrator user (dbadmin) must already exist onthe hosts you are adding andmust be configured with passwords and home directory pathsidentical to the existing hosts. HP Vertica sets up passwordless ssh from existing hosts to thenew hosts, if needed.
l If you initially used the --point-to-point option to configure spread to use direct, point-to-pointcommunication between nodes on the subnet, then use the --point-to-point option wheneveryou run install_vertica or update_vertica. Otherwise, your cluster's configuration isreverted to the default (broadcast), whichmay impact future databases.
Examples:
--add-hosts host01 --rpm--add-hosts 192.168.233.101--add-hosts host02,host03
Administrator's GuideManaging the Database
HP Vertica Analytics Platform (7.0.x) Page 607 of 969

Adding Nodes to a DatabaseOnce you have added one or more hosts to the cluster, you can add them as nodes to the database.
You can add nodes to a database using either thesemethods:
l TheManagement Console interface
l The Administration Tools interface
To Add Nodes to a Database Using MC
Only nodes in STANDBY state are eligible for addition. STANDBY nodes are nodes included in thecluster but not yet assigned to the database.
You add nodes to a database onMC's Manage page. Click the node you want to act upon, and thenclick Add node in the Node List.
When you add a node, the node icon in the cluster view changes color from gray (empty) to green asthe node comes online. Additionally, a task list displays detailed progress of the node additionprocess.
To Add Nodes to a Database Using the Administration Tools:
1. Open the Administration Tools. (See Using the Administration Tools.)
2. On theMain Menu, select View Database Cluster State to verify that the database isrunning. If it is not, start it.
3. From theMain Menu, select Advanced Tools Menu and click OK.
4. In theAdvanced Menu, select Cluster Management and click OK.
5. In theCluster Managementmenu, select Add Host(s) and click OK.
6. Select the database to which you want to add one or more hosts, and then select OK.
A list of unused hosts is displayed.
7. Select the hosts you want to add to the database and click OK.
8. When prompted, click Yes to confirm that you want to add the hosts.
9. When prompted, enter the password for the database, and then select OK.
10. When prompted that the hosts were successfully added, select OK.
Administrator's GuideManaging the Database
HP Vertica Analytics Platform (7.0.x) Page 608 of 969

11. HP Vertica now automatically starts the rebalancing process to populate the new node withdata. When prompted, enter the path to a temporary directory that the Database Designer canuse to rebalance the data in the database and select OK.
12. Either press enter to accept the default K-Safety value, or enter a new higher value for thedatabase and select OK.
13. Select whether HP Vertica should immediately start rebalancing the database, or whether itshould create a script to rebalance the database later. You should select the option toautomatically start rebalancing unless you want to delay rebalancing until a time when thedatabase has a lower load. If you choose to automatically rebalance the database, the script isstill created and saved where you can use it later.
14. Review the summary of the rebalancing process and select Proceed.
15. If you chose to automatically rebalance, the rebalance process runs. If you chose to create ascript, the script is generated and saved. In either case, you are shown a success screen, andprompted to select OK to end the Add Node process.
Administrator's GuideManaging the Database
HP Vertica Analytics Platform (7.0.x) Page 609 of 969

Removing NodesAlthough less common than adding a node, permanently removing a node is useful if the hostsystem is obsolete or over-provisioned.
Note: You cannot remove nodes if your cluster would not have theminimum number of nodesrequired tomaintain your database's current K-safety level (3 nodes for a database with a K-safety level of 1, and 5 nodes for a K-safety level of 2). If you really wish to remove the node ornodes from the database, you first must reduce the K-safety level of your database.
Removing one or more nodes consists of the following general steps:
1. Back up the database.
HP recommends that you back up the database before performing this significant operationbecause it entails creating new projections, deleting old projections, and reloading data.
2. Lower the K-safety of your database if the cluster will not be large enough to support its currentlevel of K-safety after you remove nodes.
3. Remove the hosts from the database.
4. Remove the nodes from the cluster if they are not used by any other databases.
Lowering the K-Safety Level to Allow for Node RemovalA database with a K-Safety level of 1 requires at least three nodes to operate, and a database with aK-Safety level 2 requires at least 5 nodes to operate. To remove a node from a cluster that is at theminimum number of nodes for its database's K-Safety level, youmust first lower the K-Safety levelusing theMARK_DESIGN_KSAFE function.
Note: HP does not recommend lowering the K-safety level of a database to 0, since doing soeliminates HP Vertica's fault tolerance features. You should only use this procedure tomovefrom a K-safety level of 2 to 1.
To lower the K-Safety level of the database:
1. Connect to the database, either through the Administration Tools or via vsql.
2. Enter the command: SELECT MARK_DESIGN_KSAFE(n);where n is the new K-Safety level forthe database (0 if you are reducing the cluster to below 3 nodes, 1 if you are reducing thecluster to 3 or 4 nodes).
Removing Nodes From a DatabaseYou can remove nodes from a database using either thesemethods:
Administrator's GuideManaging the Database
HP Vertica Analytics Platform (7.0.x) Page 610 of 969

l TheManagement Console interface
l The Administration Tools interface
Prerequisites
l The nodemust be empty, in other words there should be no projections referring to the node.Ensure you have followed the steps listed in Removing Nodes tomodify your database design.
l The databasemust be UP.
l You cannot drop nodes that are critical forK-safety. See Lowering the K-Safety Level to Allowfor Node Removal.
Remove Unused Hosts From the Database Using MC
You remove nodes from a database cluster onMC's Manage page. Click the node you want to actupon, and then click Remove node in the Node List.
UsingMC, you can remove only nodes that are part of the database cluster and which show a stateof DOWN (red). When you remove a node, its color changes from red to clear andMC updates itsstate to STANDBY. You can add STANDBY nodes back to the database later.
Remove Unused Hosts From the Database Using theAdministration Tools
To remove unused hosts from the database using the Administration Tools:
1. Open the Administration Tools. See Using the Administration Tools for information aboutaccessing the Administration Tools.
2. On theMain Menu, select View Database Cluster State to verify that the database isrunning. If the database isn't running, start it.
3. From theMain Menu, select Advanced Tools Menu, and then select OK.
4. In theAdvancedmenu, select Cluster Management, and then select OK.
5. In theCluster Managementmenu, select Remove Host(s) from Database, and then selectOK.
6. When warned that youmust redesign your database and create projections that exclude thehosts you are going to drop, select Yes.
7. Select the database from which you want to remove the hosts, and then select OK.
Administrator's GuideManaging the Database
HP Vertica Analytics Platform (7.0.x) Page 611 of 969

A list of all the hosts that are currently being used is displayed.
8. Select the hosts you want to remove from the database, and then select OK.
9. When prompted, select OK to confirm that you want to remove the hosts. HP Vertica beginsthe process of rebalancing the database and removing the node or nodes.
10. When informed that the hosts were successfully removed, select OK.
Removing Hosts From a ClusterIf a host that you removed from the database is not used by any other database, you can remove itfrom the cluster using the update_vertica script. You can leave the database running (UP) duringthis operation.
You can remove hosts from a database on theMC interface, but you cannot remove those hostsfrom a cluster.
Prerequisites
The host must not be used by any database
Procedure to Remove Hosts
From one of the hosts in the cluster, run update_vertica with the –-remove-hosts switchandprovide a comma-separated list of hosts to remove from an existing HP Vertica cluster. A host canbe specified by the hostname or IP address of the system.:
# /opt/vertica/sbin/update_vertica ---remove-hosts host
For example:
# /opt/vertica/sbin/update_vertica --remove-hosts host01
Note: See Installing with the Script for the full list of parameters.
The update_vertica script uses all the same options as install_vertica and:
l Modifies the spread tomatch the smaller cluster.
l Configures theAdministration Tools to work with the smaller cluster.
Important Tips:
l Do not include spaces in the hostname list provided with --remove-hosts if you specifiedmorethan one host.
Administrator's GuideManaging the Database
HP Vertica Analytics Platform (7.0.x) Page 612 of 969

l If a new RPM is specified with --rpm, then HP Vertica will first install it on the existing clusterhosts before proceeding.
l Use the same command line parameters as those used when you installed the original cluster.Specifically if you used non-default values for the database administrator username, password,or directory path, provide the samewhen you remove hosts; otherwise; the procedure fails.Consider creating a properties file in which you save the parameters during the installation,which you can reuse on subsequent install and update operations. See Installing HP VerticaSilently.
Examples:
--remove-hosts host01--remove-hosts 192.168.233.101-R host01
Administrator's GuideManaging the Database
HP Vertica Analytics Platform (7.0.x) Page 613 of 969
Replacing NodesIf you have aK-Safe database, you can replace nodes, as necessary, without bringing the systemdown. For example, youmight want to replace an existing node if you:
l Need to repair an existing host system that no longer functions and restore it to the cluster
l Want to exchange an existing host system for another more powerful system
Note: HP Vertica does not support replacing a node on a K-safe=0 database. Use theprocedures to add and remove nodes instead.
The process you use to replace a node depends on whether you are replacing the node with:
l A host that uses the same name and IP address
l A host that uses a different name and IP address
Prerequisitesl Configure the replacement hosts for HP Vertica. See Before you Install HP Vertica in the
Installation Guide.
l Read the Important Tips sections under Adding Hosts to a Cluster and Removing Hosts From aCluster.
l Ensure that the database administrator user exists on the new host and is configured identicallyto the existing hosts. HP Vertica will setup passwordless ssh as needed.
l Ensure that directories for Catalog Path, Data Path, and any storage locations are added to thedatabase when you create it and/or aremounted correctly on the new host and have read andwrite access permissions for the database administrator user. Also ensure that there issufficient disk space.
l Follow the best practice procedure below for introducing the failed hardware back into the clusterto avoid spurious full-node rebuilds.
Best Practice for Restoring Failed HardwareFollowing this procedure will prevent HP Vertica frommisdiagnosingmissing disk or badmounts asdata corruptions, which would result in a time-consuming, full-node recovery.
If a server fails due to hardware issues, for example a bad disk or a failed controller, upon repairingthe hardware:
Administrator's GuideManaging the Database
HP Vertica Analytics Platform (7.0.x) Page 614 of 969

1. Reboot themachine into runlevel 1, which is a root and console-only mode.
Runlevel 1 prevents network connectivity and keeps HP Vertica from attempting to reconnectto the cluster.
2. In runlevel 1, validate that the hardware has been repaired, the controllers are online, and anyRAID recover is able to proceed.
Note: You do not need to initialize RAID recover in runlevel 1; simply validate that it canrecover.
3. Once the hardware is confirmed consistent, only then reboot to runlevel 3 or higher.
At this point, the network activates, and HP Vertica rejoins the cluster and automatically recoversany missing data. Note that, on a single-node database, if any files that were associated with aprojection have been deleted or corrupted, HP Vertica will delete all files associated with thatprojection, which could result in data loss.
Replacing a Node Using the Same Name and IP AddressTo replace a node with a host system that has the same IP address and host name as the original:
1. Backing Up and Restoring the Database.
2. From a functioning node in the cluster, run the install_vertica script with the -s and -rparameters. Additionally, use the same additional install parameters that were used when thecluster was originally installed.
# /opt/vertica/sbin/install_vertica --hosts host --rpm rpm_package
Where host is the hostname or IP address of the system you are restoring to the cluster; forexample:
--hosts host01--hosts 192.168.233.101
--rpm is the name of the rpm package; for example --rpm vertica_7.0.x.x86_64.RHEL5.rpm
The installation script verifies system configuration and that HP Vertica, spread, and theAdministration Tools metadata are installed on the host.
3. On the new node, create catalog and data directories (unless they both reside in the same top-level directory, then you just need to create the one directory). These are the same top-leveldirectories you specified when creating the database.
Administrator's GuideManaging the Database
HP Vertica Analytics Platform (7.0.x) Page 615 of 969
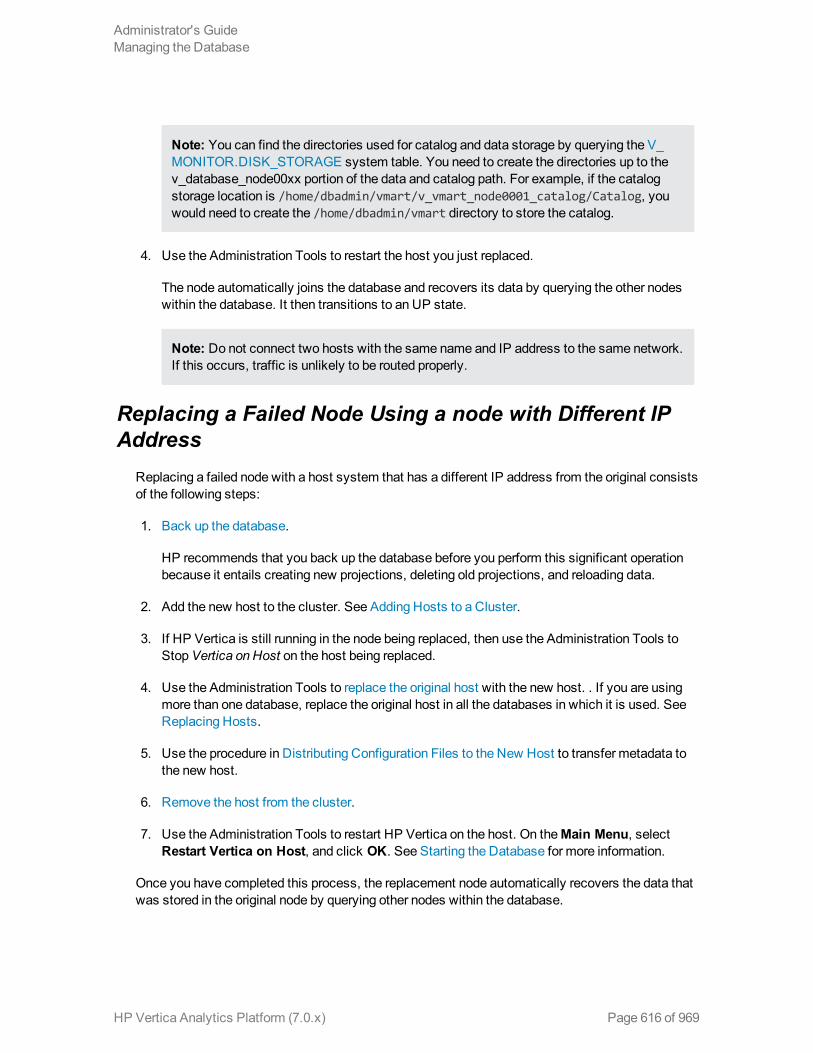
Note: You can find the directories used for catalog and data storage by querying the V_MONITOR.DISK_STORAGE system table. You need to create the directories up to thev_database_node00xx portion of the data and catalog path. For example, if the catalogstorage location is /home/dbadmin/vmart/v_vmart_node0001_catalog/Catalog, youwould need to create the /home/dbadmin/vmart directory to store the catalog.
4. Use the Administration Tools to restart the host you just replaced.
The node automatically joins the database and recovers its data by querying the other nodeswithin the database. It then transitions to an UP state.
Note: Do not connect two hosts with the same name and IP address to the same network.If this occurs, traffic is unlikely to be routed properly.
Replacing a Failed Node Using a node with Different IPAddress
Replacing a failed node with a host system that has a different IP address from the original consistsof the following steps:
1. Back up the database.
HP recommends that you back up the database before you perform this significant operationbecause it entails creating new projections, deleting old projections, and reloading data.
2. Add the new host to the cluster. See Adding Hosts to a Cluster.
3. If HP Vertica is still running in the node being replaced, then use the Administration Tools toStopVertica on Host on the host being replaced.
4. Use the Administration Tools to replace the original host with the new host. . If you are usingmore than one database, replace the original host in all the databases in which it is used. SeeReplacing Hosts.
5. Use the procedure in Distributing Configuration Files to the New Host to transfer metadata tothe new host.
6. Remove the host from the cluster.
7. Use the Administration Tools to restart HP Vertica on the host. On theMain Menu, selectRestart Vertica on Host, and click OK. See Starting the Database for more information.
Once you have completed this process, the replacement node automatically recovers the data thatwas stored in the original node by querying other nodes within the database.
Administrator's GuideManaging the Database
HP Vertica Analytics Platform (7.0.x) Page 616 of 969

Replacing a Functioning Node Using a Different Nameand IP Address
Replacing a node with a host system that has a different IP address and host name from the originalconsists of the following general steps:
1. Back up the database.
HP recommends that you back up the database before you perform this significant operationbecause it entails creating new projections, deleting old projections, and reloading data.
2. Add the replacement hosts to the cluster.
At this point, both the original host that you want to remove and the new replacement host aremembers of the cluster.
3. Use the Administration Tools to StopVertica on Host on the host being replaced.
4. Use the Administration Tools to replace the original host with the new host. If you are usingmore than one database, replace the original host in all the databases in which it is used. SeeReplacing Hosts.
5. Remove the host from the cluster.
6. Restart HP Vertica on the host.
Once you have completed this process, the replacement node automatically recovers the data thatwas stored in the original node by querying the other nodes within the database. It then transitionsto an UP state.
Note: If you do not remove the original host from the cluster and you attempt to restart thedatabase, the host is not invited to join the database because its node address does not matchthe new address stored in the database catalog. Therefore, it remains in the INITIALIZINGstate.
Using the Administration Tools to Replace NodesIf you are replacing a node with a host that uses a different name and IP address, use theAdministration Tools to replace the original host with the new host. Alternatively, you can use theManagement Console to replace a node.
Replace the Original Host with a New Host Using theAdministration Tools
To replace the original host with a new host using the Administration Tools:
Administrator's GuideManaging the Database
HP Vertica Analytics Platform (7.0.x) Page 617 of 969

1. Back up the database. See Backing Up and Restoring the Database.
2. From a node that is up, and is not going to be replaced, open theAdministration Tools.
3. On theMain Menu, select View Database Cluster State to verify that the database isrunning. If it’s not running, use the Start Database command on theMainMenu to restart it.
4. On theMain Menu, select Advanced Menu.
5. In theAdvanced Menu, select Stop HP Vertica on Host.
6. Select the host you want to replace, and then click OK to stop the node.
7. When prompted if you want to stop the host, select Yes.
8. In theAdvanced Menu, select Cluster Management, and then click OK.
9. In theCluster Managementmenu, select Replace Host, and then click OK.
10. Select the database that contains the host you want to replace, and then click OK.
A list of all the hosts that are currently being used displays.
11. Select the host you want to replace, and then click OK.
12. Select the host you want to use as the replacement, and then click OK.
13. When prompted, enter the password for the database, and then click OK.
14. When prompted, click Yes to confirm that you want to replace the host.
15. When prompted that the host was successfully replaced, click OK.
16. In theMain Menu, select View Database Cluster State to verify that all the hosts are running.Youmight need to start HP Vertica on the host you just replaced. UseRestart Vertica onHost.
The node enters a RECOVERING state.
Caution: If you are using aK-Safe database, keep inmind that the recovering node counts asone node down even though it might not yet contain a complete copy of the data. This meansthat if you have a database in which K safety=1, the current fault tolerance for your database isat a critical level. If you lose onemore node, the database shuts down. Be sure that you do notstop any other nodes.
Using the Management Console to Replace NodesOn theMC Manage page, you can quickly replace a DOWN node in the database by selecting oneof the STANDBY nodes in the cluster.
Administrator's GuideManaging the Database
HP Vertica Analytics Platform (7.0.x) Page 618 of 969

A DOWN node shows up as a red node in the cluster. Click the DOWN node and the Replace nodebutton in the Node List becomes activated, as long as there is at least one node in the cluster that isnot participating in the database. The STANDBY node will be your replacement node for the nodeyou want to retire; it will appear gray (empty) until it has been added to the database, when it turnsgreen.
Tip: You can resize the Node List by clicking its margins and dragging to the size you want.
When you highlight a node and click Replace, MC provides a list of possible STANDBY nodes touse as a replacement. After you select the replacement node, the process begins. A nodereplacement could be a long-running task.
MC transitions the DOWN node to a STANDBY state, while the node you selected as thereplacement will assume the identity of the original node, using the same node name, and will bestarted.
Assuming a successful startup, the new node will appear orange with a status of RECOVERINGuntil the recovery procedure is complete. When the recovery process completes, the replacementnode will turn green and show a state of UP.
Administrator's GuideManaging the Database
HP Vertica Analytics Platform (7.0.x) Page 619 of 969

Rebalancing Data Across NodesHP Vertica automatically rebalances your database when adding or removing nodes. You can alsomanually trigger a rebalance using the Administration Tools or using SQL functions. Users canrebalance data across nodes through theManagement Console interface (seeRebalancing DataUsingManagement Console for details).
Whether you start the rebalance process manually or automatically, the process occurs in thefollowing steps:
l For segmented projections, HP Vertica creates new (renamed), segmented projections that areidentical in structure to the existing projections, but which have their data distributed across allnodes. The rebalance process then refreshes all new projections, sets the Ancient History Mark(AHM) to the greatest allowable epoch (now), and drops all of the old segmented projections. Allnew buddy projections have the same base name so they can be identified as a group.
Note: HP Vertica does not maintain custom projection segmentations defined with aspecific node list. Node rebalancing distributes data across all nodes, regardless of anycustom definitions.
l For unsegmented projections, leaves existing projections unmodified, creates new projectionson the new nodes, and refreshes them.
l After the data has been rebalanced, HP Vertica drops:
n Duplicate buddy projections with the same offset
n Duplicate replicated projections on the same node
K-safety and RebalancingBefore data rebalancing completes, HP Vertica operates with the existingK-safe value. Afterrebalancing completes, HP Vertica operates with the K-safe value specified during the rebalanceoperation.
You canmaintain existing K-safety or specify a new value (0 to 2) for themodified database cluster.HP Vertica does not support downgrading K-safety and returns a warning if you attempt to reduce itfrom its current value: Design k-safety cannot be less than system k-safety level. Formore information, see Lowering the K-Safety Level to Allow for Node Removal.
Rebalancing Failure and ProjectionsIf a failure occurs while rebalancing the database, you can rebalance again. If the cause of thefailure has been resolved, the rebalance operation continues from where it failed. However, a faileddata rebalance can result in projections becoming out of date, so that they cannot be removedautomatically.
To locate any such projections, query the V_CATALOG.PROJECTIONS system table as follows:
Administrator's GuideManaging the Database
HP Vertica Analytics Platform (7.0.x) Page 620 of 969

=> SELECT projection_name, anchor_table_name, is_prejoin,is_up_to_dateFROM projectionsWHERE is_up_to_date = false;
To remove out-of-date projections, use the DROP PROJECTION function.
PermissionsOnly the superuser has permissions to rebalance data.
Rebalancing Data Using the Administration Tools UITo rebalance the data in your database:
1. Open the Administration Tools. (See Using the Administration Tools.)
2. On theMain Menu, select View Database Cluster State to verify that the database isrunning. If it is not, start it.
3. From theMain Menu, select Advanced Tools Menu and click OK.
4. In theAdvanced Menu, select Cluster Management and click OK.
5. In theCluster Managementmenu, select Re-balance Data and click OK.
6. Select the database you want to rebalance, and then select OK.
7. Enter the directory for the Database Designer outputs (for example /tmp) and click OK.
8. Accept the proposedK-safety value or provide a new value. Valid values are 0 to 2.
9. Review themessage and click Proceed to begin rebalancing data.
The Database Designer modifies existing projections to rebalance data across all databasenodes with the K-safety you provided. A script to rebalance data, which you can runmanuallyat a later time, is also generated and resides in the path you specified; for example/tmp/extend_catalog_rebalance.sql.
Important: Rebalancing data can take some time, depending on the number of projectionsand the amount of data they contain. HP recommends that you allow the process tocomplete. If youmust cancel the operation, use Ctrl+C.
The terminal window notifies you when the rebalancing operation is complete.
10. Press Enter to return to the Administration Tools.
Administrator's GuideManaging the Database
HP Vertica Analytics Platform (7.0.x) Page 621 of 969
Rebalancing Data Using Management ConsoleHP Vertica automatically rebalances the database after you add or remove nodes. If, however, younotice data skew where one node shows more activity than another (for example, most queriesprocessing data on a single node), you canmanually rebalance the database usingMC if thatdatabase is imported into theMC interface.
On theManage page, click Rebalance in the toolbar to initiate the rebalance operation.
During a rebalance, you cannot perform any other activities on the database cluster, such as start,stop, add, or remove nodes.
Rebalancing Data Using SQL FunctionsThere are three SQL functions that let youmanually control the data rebalancing process. You canuse these functions to run a rebalance from a script scheduled to run at an off-peak time, rather thanhaving tomanually trigger a rebalance through the Administration Tools.
These functions are:
l REBALANCE_CLUSTER()
l START_REBALANCE_CLUSTER()
l CANCEL_REBALANCE_CLUSTER()
For more information and examples of using these functions, see their entries in the SQLReferenceManual.
Redistributing Configuration Files to NodesThe add and remove node processes automatically redistribute the HP Vertica configuration files.Youmay rarely need to redistribute the configuration files to help resolve configuration issues.
To distribute configuration files to a host:
1. Log on to a host that contains these files and start the Administration Tools.
See Using the Administration Tools for information about accessing the Administration Tools.
2. On theMain Menu in the Administration Tools, select Configuration Menu and click OK.
3. On theConfiguration Menu, select Distribute Config Files and click OK.
4. Select Database Configuration.
5. Select the database in which you want to distribute the files and click OK.
Administrator's GuideManaging the Database
HP Vertica Analytics Platform (7.0.x) Page 622 of 969

The vertica.conf file is distributed to all the other hosts in the database. If it previously existedon a host, it is overwritten.
6. On theConfiguration Menu, select Distribute Config Files and click OK.
7. Select SSL Keys.
The certifications and keys for the host are distributed to all the other hosts in the database. Ifthey previously existed on a host, they are overwritten.
8. On theConfiguration Menu, select Distribute Config Files and click OK.
Select AdminTools Meta-Data.
The Administration Tools metadata is distributed to every host in the cluster.
9. Restart the database.
Changing the IP Addresses of an HP Vertica ClusterThis section describes how to change the IP addresses of the nodes in an HP Vertica cluster.
Note: This process requires that you stop the database on all nodes, then subsequently stopthe database on individual nodes as you update IP addresses.
These instructions assume you will make the standard OS changes to change the IPs (for example,updating /etc/hosts) in Step 4 of this procedure. These instructions detail only the HP Vertica-specific IP changes. Consult the documentation for your particular OS platform for details onchanging the IP address of the host.
To change the IP address of one or more nodes in a cluster:
1. Before changing the IP address on the Host, back up the following three files on all nodes:
n /opt/vertica/config/admintools.conf
n /opt/vertica/config/vspread.conf
n /etc/sysconfig/spreadd
2. Stop HP Vertica on all nodes.
3. As root, on each node, stop spread by using the following command:
/etc/init.d/spreadd stop
4. Change the IP addresses of the hosts as required by your operating system platform.
5. On each node edit /opt/vertica/config/admintools.conf and change the IPs as required.
Administrator's GuideManaging the Database
HP Vertica Analytics Platform (7.0.x) Page 623 of 969
You can use sed to change each IP in the file, for example to change 10.10.81.8 to192.168.150.108 issue the command:
sed -i 's/10.10.81.8/192.168.150.108/g' /opt/vertica/config/admintools.conf
6. On each node edit /opt/vertica/config/vspread.conf:
a. Change the old IPs to the new IPs as required.
b. Locate the N number for each IP and change it to match the new IP. For example, if the oldIP is 10.10.81.8, then the corresponding N number is N010010081008. N numbers consistof 3 digits for each IP number segment, padded with zeros when appropriate (10 becomes010, 8 become 008, etc.). If the new IP address is 192.168.150.255, then the newcorresponding N number is N192168250255.
7. On each node edit /etc/sysconfig/spreadd and change the N number to that node's new Nnumber as you specified in vspread.conf.
8. As root, on each node start spread by using the following command:
/etc/init.d/spreadd start
9. Start the database.
10. Run vsql.
11. In vsql, issue the following query to verify the new IP has been updated:
select host_name from host_resources;
You can also verify IPs with the following shell commands:
n cat /var/log/spreadd.log
n admintools -t list_host
n cat /etc/hosts
12. Update the database to use the new IPs for reporting node status:
a. In vsql, issue the command select node_name, node_address from v_catalog.nodes; to show you the current node names configured.
b. For each node in the result, change the hostname to the new IP address. Note: the nodemust be down to change the IP using the alter node command. Youmust bring the nodedown before altering theNODE_NAME property for that node:
o Bring the node down that you are going to update (don't bring down the node from whichyou are using vsql!). You can bring down the node from the initiator node usingadmintools. For example:admintools -t stop_node -s 192.168.150.255
Administrator's GuideManaging the Database
HP Vertica Analytics Platform (7.0.x) Page 624 of 969

o Update the IP address by issuing the command: alter node NODE_NAME ishostname 'new.ip.address'; where NODE_NAME is the node_name andnew.ip.address is the new IP address of that node.
o Bring the node back up, check it's status in the nodes table (select node_name,node_state from nodes;), and wait for that node's status to beUP. You can useadmintools from the initiator node to restart the node. Youmust provide the databasename. For example:admintools -t restart_node -s 192.168.150.255 -d VMart
o Repeat the process for the next node in the result. After all nodes have been updatedexcept the node from which you are using vsql, log out of vsql, then log into vsql fromanother node and update the IP address for the node from which you were previouslyusing vsql.
Stopping and Starting Nodes on MCYou can start and stop one or more database nodes through theManage page by clicking a specificnode to select it and then clicking the Start or Stop button in the Node List.
Note: The Stop and Start buttons in the toolbar start and stop the database, not individualnodes.
On theDatabases and Clusters page, youmust click a database first to select it. To stop or start anode on that database, click theView button. You'll be directed to the Overview page. ClickManage in the applet panel at the bottom of the page and you'll be directed to the database nodeview.
The Start and Stop database buttons are always active, but the node Start and Stop buttons areactive only when one or more nodes of the same status are selected; for example, all nodes are UPor DOWN.
After you click a Start or Stop button, Management Console updates the status andmessage iconsfor the nodes or databases you are starting or stopping.
Administrator's GuideManaging the Database
HP Vertica Analytics Platform (7.0.x) Page 625 of 969

Managing Disk SpaceHP Vertica detects and reports low disk space conditions in the log file so that the issue can beaddressed before serious problems occur. It also detects and reports low disk space conditions viaSNMP traps if enabled.
Critical disk space issues are reported sooner than other issues. For example, running out ofcatalog space is fatal; therefore, HP Vertica reports the condition earlier than less criticalconditions. To avoid database corruption when the disk space falls beyond a certain threshold, HPVertica begins to reject transactions that update the catalog or data.
Caution: A low disk space report indicates one or more hosts are running low on disk space orhave a failing disk. It is imperative to addmore disk space (or replace a failing disk) as soon aspossible.
When HP Vertica reports a low disk space condition, use the DISK_RESOURCE_REJECTIONSsystem table to determine the types of disk space requests that are being rejected and the hosts onwhich they are being rejected.
These and the other Using System Tables system tables are described in detail in the SQLReferenceManual.
To add disk space, see Adding Disk Space to a Node. To replace a failed disk, see ReplacingFailed Disks.
Monitoring Disk Space UsageYou can use these system tables tomonitor disk space usage on your cluster:
System table Description
DISK_STORAGE Monitors the amount of disk storage used by the database on each node.
COLUMN_STORAGE Monitors the amount of disk storage used by each column of eachprojection on each node.
PROJECTION_STORAGE Monitors the amount of disk storage used by each projection on each node.
Adding Disk Space to a NodeThis procedure describes how to add disk space to a node in the HP Vertica cluster.
Note: If you are adding disk space tomultiple nodes in the cluster, then use the followingprocedure for each node, one node at a time.
To add disk space to a node:
Administrator's GuideManaging the Database
HP Vertica Analytics Platform (7.0.x) Page 626 of 969
1. If youmust shut down the hardware to which you are adding disk space, then first shut downHP Vertica on the host where disk space is being added.
2. Add the new disk to the system as required by the hardware environment. Boot the hardware ifit is was shut down.
3. Partition, format, andmount the new disk, as required by the hardware environment.
4. Create a data directory path on the new volume.
For example:
mkdir –p /myNewPath/myDB/host01_data2/
5. If you shut down the hardware, then restart HP Vertica on the host.
6. Open a database connection to HP Vertica and add a storage location to add the new datadirectory path. If you are connecting from a different host than the one on which you addedstorage, then specify the node in ADD_LOCATION, otherwise ADD_LOCATION assumesyou are referring to the local host.
See Adding Storage Locations in this guide and the ADD_LOCATION function in the SQLReferenceManual.
Note: ADD_LOCATION is a local command, whichmust be run on each node to whichspace is added.
Administrator's GuideManaging the Database
HP Vertica Analytics Platform (7.0.x) Page 627 of 969

Replacing Failed DisksIf the disk on which the data or catalog directory resides fails, causing full or partial disk loss,perform the following steps:
1. Replace the disk and recreate the data or catalog directory.
2. Distribute the configuration file (vertica.conf) to the new host. See Distributing ConfigurationFiles to the New Host for details.
3. Restart the HP Vertica on the host, as described in Restart Vertica OnHost.
See Catalog and Data Files for information about finding your DATABASE_HOME_DIR.
Catalog and Data FilesFor the recovery process to complete successfully, it is essential that catalog and data files be inthe proper directories.
In HP Vertica, the catalog is a set of files that contains information (metadata) about the objects ina database, such as the nodes, tables, constraints, and projections. The catalog files are replicatedon all nodes in a cluster, while the data files are unique to each node. These files are installed bydefault in the following directories:
/DATABASE_HOME_DIR/DATABASE_NAME/v_db_nodexxxx_catalog/ /DATABASE_HOME_DIR/DATABASE_NAME/v_db_nodexxxx_catalog/
Note: DATABASE_HOME_DIR is the path, which you can see from the Administration Tools.See Using the Administration Tools in the Administrator's Guide for details on using theinterface.
To view the path of your database:
1. Run theAdministration Tools.
$ /opt/vertica/bin/admintools
2. From theMainMenu, select Configuration Menu and click OK.
3. Select View Database and click OK.
4. Select the database you want would like to view and click OK to see the database profile.
See Understanding the Catalog Directory for an explanation of the contents of the catalog directory.
Administrator's GuideManaging the Database
HP Vertica Analytics Platform (7.0.x) Page 628 of 969

Understanding the Catalog DirectoryThe catalog directory stores metadata and support files for your database. Some of the files withinthis directory can help you troubleshoot data load or other database issues. See Catalog and DataFiles for instructions on locating your database's catalog directory. By default, it is located in thedatabase directory. For example, if you created the VMart database in the database administrator'saccount, the path to the catalog directory is:
/home/dbadmin/VMart/v_vmart_nodennnn_catalog
where nodennnn is the name of the node you are logged into. The name of the catalog directory isunique for each node, althoughmost of the contents of the catalog directory are identical on eachnode.
The following table explains the files and directories that may appear in the catalog directory.
Note: Do not change or delete any of the files in the catalog directory unless asked to do so byHP Vertica support.
File or Directory Description
bootstrap-catalog.log A log file generated as the HP Vertica server initially createsthe database (in which case, the log file is only created on thenode used to create the database) and whenever the databaseis restored from a backup.
Catalog/ Contains catalog information about the database, such ascheckpoints.
CopyErrorLogs/ The default location for the COPY exceptions and rejectionsfiles generated when data in a bulk load cannot be inserted intothe database. See Capturing Load Exceptions and Rejectionsfor more information.
DataCollector/ Log files generated by theData Collector.
debug_log.conf Debugging information configuration file. For HP use only.
Epoch.log Used during recovery to indicate the latest epoch thatcontains a complete set of data.
ErrorReport.txt A stack trace written by HP Vertica if the server process exitsunexpectedly.
Administrator's GuideManaging the Database
HP Vertica Analytics Platform (7.0.x) Page 629 of 969

File or Directory Description
Libraries/ Contains user defined library files that have been loaded intothe database See Developing and Using User DefinedFunctions in the Programmer's Guide. Do not change or deletethese libraries through the file system. Instead, use theCREATE LIBRARY, DROP LIBRARY, and ALTERLIBRARY statements.
Snapshots/ The location where backup snapshots are stored. See UsingDatabase Snapshots for more information.
tmp/ A temporary directory used by HP Vertica's internalprocesses.
UDxLogs/ Log files written by user defined functions that run in fencedmode. See FencedMode in the Programmer's Guide for moreinformation.
vertica.conf The primary configuration file for HP Vertica. If you changeany configuration parameter from its default value with theset_config_parameter() function, the changes arecontained in this file.
vertica.log Themain log file generated by the HP Vertica server process.
vertica.pid The process ID and path to the catalog directory of the HPVertica server process running on this node.
Administrator's GuideManaging the Database
HP Vertica Analytics Platform (7.0.x) Page 630 of 969

Reclaiming Disk Space From Deleted RecordsYou can reclaim the disk space held by deleted records by purging the deleted records, rebuildingthe table or dropping a partition.
Rebuilding a TableWhen it is necessary to do large-scale disk reclamation operations, consider rebuilding the table byfollowing sequence of operations:
1. Create a new table.
2. Create projections for the new table.
3. Populate the new table using INSERT ... SELECT to copy the desired table from the old table.
4. Drop the old table and its projections.
5. Use ALTER TABLE ... RENAME to give the new table the name of the old table.
Notes
l Youmust have enough disk space to contain the old and new projections at the same time. Ifnecessary, you can drop some of the old projections before loading the new table. Youmust,however, retain at least one superprojection of the old table (or two buddy superprojections tomaintain K-safety) until the new table is loaded. (See Prepare Disk Storage Locations in theInstallation Guide for disk space requirements.)
l You can specify different names for the new projections or use the ALTER PROJECTION ...RENAME command to change the names of the old projections.
l The relationship between tables and projections does not depend on object names. Instead, itdepends on object identifiers that are not affected by rename operations. Thus, if you rename atable, its projections continue to work normally.
l Manually purging a table continues to retain history for rows deleted after the Ancient HistoryMark. Rebuilding the table results in purging all the history of the table, whichmeans you cannotdo historical queries on any older epoch.
l Rather than dropping the old table in Step 4, youmight rename it to a different name and use it asa backup copy. Note, however, that youmust have sufficient disk space.
Administrator's GuideManaging the Database
HP Vertica Analytics Platform (7.0.x) Page 631 of 969

Page 632 of 969HP Vertica Analytics Platform (7.0.x)
Administrator's GuideManaging the Database

Managing Tuple Mover OperationsThe TupleMover (TM) is the HP Vertica database optimizer component that moves data frommemory (WOS) to disk (ROS). The TM also combines small ROS containers into larger ones, andpurges deleted data. Duringmoveout operations, the TM is also responsible for adhering to anystorage policies that are in effect for the storage location. The TupleMover runs in the background,performing some tasks automatically (ATM) at time intervals determined by its configurationparameters. For information about changing the TM configuration parameters, see TupleMoverParameters in the Administrator's Guide for further information.
Under ordinary circumstances, the operations performed by the TM are automatic and transparent,and are therefore of little or no concern to the database administrator. However, when loading data,certain conditions require that you stop the TupleMover, perform some operations manually, andrestart it. Also, the COPY statement AUTO, DIRECT, and TRICKLE parameters specify how datais loaded (directly into ROS orWOS). See Choosing a LoadMethod, for more information.
This section discusses TupleMover operations and how to perform TM tasks manually.
Administrator's Guide
HP Vertica Analytics Platform (7.0.x) Page 633 of 969

Understanding the Tuple MoverThe TupleMover performs two operations:
l Moveout
l Mergeout
Each of these operations occurs at different intervals across all nodes. The tuple mover runsindependently on each node, ensuring that storage is managed appropriately even in the event ofdata skew.
MoveoutMoveout operations move data frommemory (WOS) into a new ROS container. A moveout"flushes" all historical data from theWOS to the ROS.
Administrator's Guide
HP Vertica Analytics Platform (7.0.x) Page 634 of 969
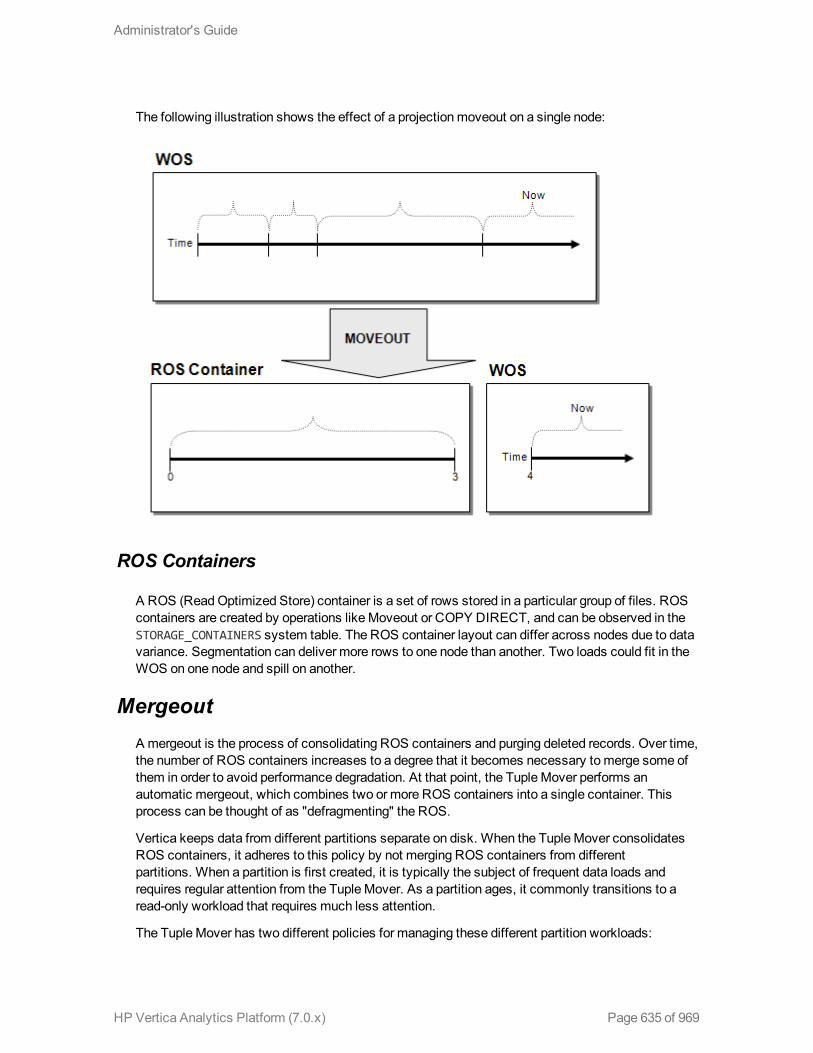
The following illustration shows the effect of a projectionmoveout on a single node:
ROS Containers
A ROS (ReadOptimized Store) container is a set of rows stored in a particular group of files. ROScontainers are created by operations likeMoveout or COPY DIRECT, and can be observed in theSTORAGE_CONTAINERS system table. The ROS container layout can differ across nodes due to datavariance. Segmentation can deliver more rows to one node than another. Two loads could fit in theWOS on one node and spill on another.
MergeoutA mergeout is the process of consolidating ROS containers and purging deleted records. Over time,the number of ROS containers increases to a degree that it becomes necessary tomerge some ofthem in order to avoid performance degradation. At that point, the TupleMover performs anautomatic mergeout, which combines two or more ROS containers into a single container. Thisprocess can be thought of as "defragmenting" the ROS.
Vertica keeps data from different partitions separate on disk. When the TupleMover consolidatesROS containers, it adheres to this policy by not merging ROS containers from differentpartitions. When a partition is first created, it is typically the subject of frequent data loads andrequires regular attention from the TupleMover. As a partition ages, it commonly transitions to aread-only workload that requires much less attention.
The TupleMover has two different policies for managing these different partition workloads:
Administrator's Guide
HP Vertica Analytics Platform (7.0.x) Page 635 of 969
l Active partitions are loaded or modified frequently. The TupleMover uses a STRATA mergeoutpolicy that keeps a collection of ROS container sizes tominimize the number of times anyindividual tuple is subjected tomergeout. The ActivePartitionCount parameter identifies howmany partitions are being actively loaded.
l Inactive partitions are very infrequently loaded or modified. The TupleMover consolidates theROS containers to aminimal set while avoidingmerging containers whose size exceedsMaxMrgOutROSSizeMB.
Partitions are not explicitly marked by the user as active or inactive; instead, the TupleMover usesthe following algorithm to order the partitions from oldest to newest:
l If one partition was created before the other partition, it is older.
l If two partitions were created at the same time, but one partition was last updated earlier thanthe other partition, it is older.
l If two partitions were created and last updated at the same time, the partition with the smallerkey is considered older.
If you perform amanual mergeout using the DO_TM_TASK function, all partitions are consolidated intothe smallest possible number of containers, regardless of the value of the ActivePartitionCountparameter.
Mergeout of Deletion Markers
When you delete data from the database, HP Vertica does not remove it. Instead, it marks the dataas deleted. Usingmany DELETE statements tomark a small number of rows relative to the size ofthe table can result in creation of many small containers to hold these deletionmarks. Each of thesecontainers consumes resources, so a large number of these containers can impact performance,especially during recovery.
After it performs amergeout, the TupleMover looks for deletionmarker containers that hold fewentries. If it finds some, it merges them together into a single larger container. This process helpslower the overhead of tracking deleted data by freeing resources used by the individual containers.It does not purge or otherwise affect the deleted data—it just consolidates the deletionmarkcontainers for greater efficiency.
Note: You can see the number and size of the containers holding the deletionmarks byviewing the V_MONITOR.DELETE_VECTORS system table.
Tuning the Tuple MoverThe Tuple Mover comes preconfigured to work for most commonworkloads. However there aresome situations in which tuning the tuple mover behavior is required. You do so by changing itsconfiguration parameters. The following section explains the parameters that tune the TupleMover,and the remainder of this section explains how to use them for several situations.
Administrator's Guide
HP Vertica Analytics Platform (7.0.x) Page 636 of 969

Tuple Mover Configuration ParametersThe following configuration parameters control how the TupleMover operates. You can use them toadjust its operation to suit your needs, as described in the following sections.
Parameters Description
ActivePartitionCount Sets the number of partitions, called active partitions, that arecurrently being loaded. For information about how the TupleMover treats active (and inactive) partitions during amergeout operation, see Understanding the TupleMover.
Default Value: 1
Example:
SELECT SET_CONFIG_PARAMETER('ActivePartitionCount', 2);
MergeOutInterval The number of seconds the TupleMover waits betweenchecks for new ROS files tomerge out. If ROS containersare added frequently, youmay need to decrease this value.
Default Value: 600
Example:
SELECT SET_CONFIG_PARAMETER('MergeOutInterval', 1200);
MoveOutInterval The number of seconds the Tuplemover waits betweenchecks for new data in theWOS to move toROS.
Default Value: 300
Example:
SELECT SET_CONFIG_PARAMETER('MoveOutInterval', 600);
MoveOutMaxAgeTime The specified interval (in seconds) after which the tuplemover is forced to write theWOS to disk. The default intervalis 30minutes.
Tip: If you had been running the force_moveout.sh script inprevious releases, you no longer need to run it.
Default Value: 1800
Example:
SELECT SET_CONFIG_PARAMETER('MoveOutMaxAgeTime', 1200);
Administrator's Guide
HP Vertica Analytics Platform (7.0.x) Page 637 of 969

Parameters Description
MoveOutSizePct The percentage of theWOS that can be filled with data beforethe TupleMover performs amoveout operation.
Default Value: 0
Example:
SELECT SET_CONFIG_PARAMETER('MoveOutSizePct', 50);
Resource Pool SettingsThe Tuple Mover draws its resources from the TM resource pool. Addingmore resources (RAM) tothis pool, and changing its concurrency setting, canmake the TupleMover more effective in dealingwith high load rates.
The TM resource pool concurrency setting, PLANNEDCONCURRENCY, determines how many mergescan occur simultaneously throughmultiple threads. As a side effect of the concurrency setting, theTupleMover dedicates some threads to aggressively address small ROS containers, while otherthreads are reserved to work only onmerges of ROS containers in the lower strata.
For the TM pool, PLANNEDCONCURRENCYmust be proportional to the size of the RAM, the CPU, andthe storage subsystem. Depending on the storage type, if you increase PLANNEDCONCURRENCY forthe TupleMover threads, youmight create a storage I/O bottleneck. Monitor the storagesubsystem; if it becomes saturated with long I/O queues, more than two I/O queues, and longlatency in read and write, adjust the PLANNEDCONCURRENCY parameter to keep the storagesubsystem resources below saturation level. In addition, youmight need to:
l Partition storage data files
l Adjust block-size optimization on storage subsystems such as RAID 5 or RAID 10
l Identify the optimal number of disks in the RAID array
The following statement illustrates how to increase the size of the TM resource pool and set theconcurrency settings for the pool:
=> ALTER RESOURCE POOL tm MEMORYSIZE '4G' PLANNEDCONCURRENCY 4 MAXCONCURRENCY 5;
The WOSDATA resource pool settings also indirectly affect the TupleMover. In automatic mode,INSERT and COPY commands use the concurrency setting to determine whether data is smallenough to store inWOS or if it should be written to ROS. Therefore, set this value to be the numberof concurrent loads you expect to perform in your database. The WOSDATA resource pool alsodetermines how much RAM theWOS can use.
=> ALTER RESOURCE POOL wosdata MAXMEMORYSIZE '4G' PLANNEDCONCURRENCY 3;
SeeManagingWorkloads and Resource Pool Architecture in this guide and ALTER RESOURCEPOOL and Built-in Pools in the SQLReferenceManual.
Administrator's Guide
HP Vertica Analytics Platform (7.0.x) Page 638 of 969

Loading DataHP Vertica automatically decides whether the data should be placed inWOS or stored directly inROS containers based on the amount of data processed by a COPY or INSERT command. HPVertica stores large loads directly to disk and stores smaller loads in memory, which it later movesto disk.
For low-latency access to data, use small loads. The automatic TupleMover settings are the bestoption for handling such smaller loads. One exception is for single-node deployments, where asystem failure would cause in-memory data to be lost. In this case, youmight want to force all dataloads to go directly to disk.
For high load rates, youmight want the TupleMover to check for jobs more frequently by changingthe MergeOutInterval and MoveOutInterval configuration parameters. Reduce theMoveOutInterval if you expect the peak load rate to fill theWOS quickly. ReduceMergeOutInterval if you anticipate performingmany DIRECT loads or inserts.
See COPY and INSERT in the SQLReferenceManual
Using More ThreadsIf your database is receiving a large volume of data to load or if it is performingmany DIRECT loadsor inserts, consider allowing the TupleMover to perform more operations concurrently by increasingthe TM resource pool until the it can keep up with the anticipated peak load rate. For example:
=> ALTER RESOURCE POOL TM MEMORYSIZE '4G' PLANNEDCONCURRENCY 4 MAXCONCURRENCY 5;
See ALTER RESOURCE POOL and Built-in Pools in the SQLReferenceManual.
Active Data PartitionsBy default, the TupleMover assumes that all loads and updates for partitioned tables are going tothe same active partition. For example, if a table is partitioned by month, the TupleMover expectsthat after the start of a new month, no data is loaded into the partition for the prior month.
If loads and updates occur to more than one partition, set the ActivePartitionCount parameter toreflect the number of partitions that will be loading data. For example, if your database receives datafor the current month as well as updates to the prior month, set ActivePartitionCount to 2. Fortables partitioned by non-temporal attributes, set ActivePartitionCount to reflect the number ofpartitions that will be loaded simultaneously.
See Table Partitioning in this guide.
See Alsol Best Practices for ManagingWorkload Resources
Administrator's Guide
HP Vertica Analytics Platform (7.0.x) Page 639 of 969

Page 640 of 969HP Vertica Analytics Platform (7.0.x)
Administrator's Guide

Managing WorkloadsHP Vertica provides a sophisticated resourcemanagement scheme that allows diverse, concurrentworkloads to run efficiently on the database. For basic operations, the built-in GENERAL pool ispre-configured based on RAM andmachine cores, but you can customized this pool to handlespecific concurrency requirements.
You can also define new resource pools that you configure to limit memory usage, concurrency,and query priority. You can then optionally restrict each database user to use a specific resourcepool, which control memory resources used by their requests.
User-defined pools are useful if you have competing resource requirements across differentclasses of workloads. Example scenarios include:
l A large batch job takes up all server resources, leaving small jobs that update a web page tostarve, which can degrade user experience.
In this scenario, you can create a resource pool to handle web page requests and ensure usersget resources they need. Another option is to create a limited resource pool for the batch job, sothe job cannot use up all system resources.
l A certain application has lower priority than other applications, and you would like to limit theamount of memory and number of concurrent users for the low-priority application.
In this scenario, you could create a resource pool with an upper limit on the query's memory andassociate the pool with users of the low-priority application.
You can also use resource pools to manage resources assigned to running queries. You can assigna run-time priority to a resource pool, as well as a threshold to assign different priorities to querieswith different durations. SeeManaging Resources At Query Run Time for more information.
For detailed syntax of creating andmanaging resource pools see the following topics in the SQLReferenceManual:
Statementsl ALTER RESOURCE POOL alters a resource pool.
l ALTER USER associates a user with the RESOURCE POOL andMEMORYCAP parameters.
l CREATE RESOURCE POOL creates a resource pool.
l CREATE USER adds a name to the list of authorized database users and specifies that user'sRESOURCE POOL andMEMORYCAP parameters.
l DROP RESOURCE POOL drops a user-created resource pool.
l SET SESSION MEMORYCAP sets the limit on amount of memory that any request issued by
Administrator's Guide
HP Vertica Analytics Platform (7.0.x) Page 641 of 969

the session can consume.
l SET SESSION RESOURCE POOL associates a user session with specified resource pool.
System Tablesl RESOURCE_ACQUISITIONS provides details of resources (memory, open file handles,
threads) acquired by each request for each resource pool in the system.
l RESOURCE_POOL_DEFAULTS (systab) lists default values for parameters in each internaland user-defined resource pool.
l RESOURCE_POOL_STATUS provides configuration settings of the various resource pools inthe system, including internal pools.
l RESOURCE_POOLS displays information about the parameters the resource pool wasconfigured with.
l RESOURCE_QUEUES provides information about requests pending for various resourcepools.
l RESOURCE_REJECTIONS monitors requests for resources that are rejected by theResource Manager.
l RESOURCE_REJECTION_DETAILS records an entry for each resource request that HPVertica denies. This is useful for determining if there are resource space issues, as well aswhich users/pools encounter problems
l SYSTEM_RESOURCE_USAGE provides history about system resources, such as memory,CPU, network, disk, I/O.
See Alsol Managing Resources At Query Run Time
l AnalyzingWorkloads
The Resource ManagerOn a single-user environment, the system can devote all resources to a single query, getting themost efficient execution for that one query. More likely, your environment needs to run severalqueries at once, which can cause tension between providing each query themaximum amount ofresources (fastest run time) and servingmultiple queries simultaneously with a reasonable run time.
The HP Vertica ResourceManager (RM) lets you resolve this tension, while ensuring that everyquery is eventually serviced and that true system limits are respected at all times.
For example, when the system experiences resource pressure, the ResourceManager might queuequeries until the resources become available or a timeout value is reached. In addition, when you
Administrator's Guide
HP Vertica Analytics Platform (7.0.x) Page 642 of 969
configure various RM settings, you can tune each query's target memory based on the expectednumber of concurrent queries running against the system.
This section discusses the detailed architecture and operation of the ResourceManager.
Resource Manager Impact on Query ExecutionThe ResourceManager (RM) impacts individual query execution in various ways. When a query issubmitted to the database, the following series of events occur:
1. The query is parsed, optimized to determine an execution plan, and distributed to theparticipating nodes.
2. The ResourceManager is invoked on each node to estimate resources required to run thequery and compare that with the resources currently in use. One of the following will occur:
n If thememory required by the query alone would exceed themachine's physical memory,the query is rejected - it cannot possibly run. Outside of significantly under-provisionednodes, this case is very unlikely.
n If the resource requirements are not currently available, the query is queued. The query willremain on the queue until either sufficient resources are freed up and the query runs or thequery times out and is rejected.
n Otherwise the query is allowed to run.
3. The query starts running when all participating nodes allow it to run.
Note: Once the query is running, the ResourceManager further manages resource allocationusing RUNTIMEPRIORITY and RUNTIMEPRIORITYTHRESHOLD parameters for the resource pool.SeeManaging Resources At Query Run Time for more information.
Apportioning resources for a specific query and themaximum number of queries allowed to rundepends on the resource pool configuration. See Resource Pool Architecture.
On each node, no resources are reserved or held while the query is in the queue. However, multi-node queries queued on some nodes will hold resources on the other nodes. HP Verticamakesevery effort to avoid deadlocks in this situation.
Administrator's Guide
HP Vertica Analytics Platform (7.0.x) Page 643 of 969

Resource Pool ArchitectureThe ResourceManager handles resources as one or more resource pools, which are a pre-allocatedsubset of the system resources with an associated queue.
HP Vertica is preconfigured with a set of built-in pools that allocate resources to different requesttypes, where the GENERAL pool allows for a certain concurrency level based on the RAM andcores in themachines.
Modifying and Creating Resource PoolsYou can configure the build-in GENERAL pool based on actual concurrency and performancerequirements, as described in Guidelines for Setting Pool Parameters. You can also create custompools to handle various classes of workloads and optionally restrict user requests to your custompools.
You create a pool using the CREATE RESOURCE POOL command. See the SQLReferenceManual for details.
Monitoring Resource Pools and Resource Usage ByQueries
The Linux top command can be used to determine the overall CPU usage and I/O waits across thesystem. However, resident memory size indicated by top is not a good indicator of actual memoryuse or reservation because of file system caching and so forth. Instead, HP Vertica providesseveral monitoring tables that provide detailed information about resource pools, their currentmemory usage, resources requested and acquired by various requests and the state of the queues.
The RESOURCE_POOLS table lets you view various resource pools defined in the system (bothinternal and user-defined), and the RESOURCE_POOL_STATUS table lets you view the currentstate of the resource pools.
Examples
The following command returns the various resource pools defined in the system.
VMart=> SELECT name, memorysize, maxmemorysize FROM V_CATALOG.RESOURCE_POOLS;
name | memorysize | maxmemorysize----------+------------+---------------general | | Special: 95%sysquery | 64M |sysdata | 100M | 10%wosdata | 0% | 25%tm | 200M |refresh | 0% |recovery | 0% |dbd | 0% |
Administrator's Guide
HP Vertica Analytics Platform (7.0.x) Page 644 of 969

jvm | 0% | 10%(9 rows)
To see only the user-defined resource pools, you can limit your query to return records where IS_INTERNAL is false.
Note: The user-defined pools below are used as examples in subsequent sections related toWorkloadManagement.
The following command returns information on user-defined resource pools:
=> SELECT name, memorysize, maxmemorysize, priority, maxconcurrencyFROM V_CATALOG.RESOURCE_POOLS where is_internal ='f';
name | memorysize | maxmemorysize | priority | maxconcurrency--------------+------------+---------------+----------+----------------load_pool | 0% | | 10 |ceo_pool | 250M | | 10 |ad hoc_pool | 200M | 200M | 0 |billing_pool | 0% | | 0 | 3web_pool | 25M | | 10 | 5batch_pool | 150M | 150M | 0 | 10dept1_pool | 0% | | 5 |dept2_pool | 0% | | 8 |
(8 rows)
The queries borrow memory from the GENERAL pool and show the amount of memory in use from theGENERAL pool.
The following command uses the V_MONITOR.RESOURCE_POOL_STATUS table to return the currentstate of all resource pools on node0001:
=>\x
Expanded display is on
=> SELECT pool_name, memory_size_kb, memory_size_actual_kb, memory_inuse_kb,general_memory_borrowed_kb,running_query_countFROM V_MONITOR.RESOURCE_POOL_STATUS where node_name ilike '%node0001';
-[ RECORD 1 ]--------------+---------pool_name | generalmemory_size_kb | 2983177memory_size_actual_kb | 2983177memory_inuse_kb | 0general_memory_borrowed_kb | 0running_query_count | 0-[ RECORD 2 ]--------------+---------pool_name | sysquerymemory_size_kb | 65536memory_size_actual_kb | 65536memory_inuse_kb | 0general_memory_borrowed_kb | 0running_query_count | 0
Administrator's Guide
HP Vertica Analytics Platform (7.0.x) Page 645 of 969

-[ RECORD 3 ]--------------+---------pool_name | sysdatamemory_size_kb | 102400memory_size_actual_kb | 102400memory_inuse_kb | 4096general_memory_borrowed_kb | 0running_query_count | 0-[ RECORD 4 ]--------------+---------pool_name | wosdatamemory_size_kb | 0memory_size_actual_kb | 0memory_inuse_kb | 0general_memory_borrowed_kb | 0running_query_count | 0-[ RECORD 5 ]--------------+---------pool_name | tmmemory_size_kb | 204800memory_size_actual_kb | 204800memory_inuse_kb | 0general_memory_borrowed_kb | 0running_query_count | 0-[ RECORD 6 ]--------------+---------pool_name | refreshmemory_size_kb | 0memory_size_actual_kb | 0memory_inuse_kb | 0general_memory_borrowed_kb | 0running_query_count | 0-[ RECORD 7 ]--------------+---------pool_name | recoverymemory_size_kb | 0memory_size_actual_kb | 0memory_inuse_kb | 0general_memory_borrowed_kb | 0running_query_count | 0-[ RECORD 8 ]--------------+---------pool_name | dbdmemory_size_kb | 0memory_size_actual_kb | 0memory_inuse_kb | 0general_memory_borrowed_kb | 0running_query_count | 0-[ RECORD 9 ]--------------+---------pool_name | jvmmemory_size_kb | 0memory_size_actual_kb | 0memory_inuse_kb | 0general_memory_borrowed_kb | 0running_query_count | 0
The following command uses the V_MONITOR.RESOURCE_ACQUISITIONS table to show allresources granted to the queries that are currently running:
Note:While running vmart_query_04.sql from the VMart example database, notice that thequery uses memory_inuse_kb = 708504 from the GENERAL pool.
Administrator's Guide
HP Vertica Analytics Platform (7.0.x) Page 646 of 969

=> SELECT pool_name, thread_count, open_file_handle_count, memory_inuse_kb,queue_entry_timestamp, acquisition_timestampFROM V_MONITOR.RESOURCE_ACQUISITIONS WHERE node_name ILIKE '%node0001';
-[ RECORD 1 ]----------+------------------------------pool_name | sysquerythread_count | 4open_file_handle_count | 0memory_inuse_kb | 4103queue_entry_timestamp | 2013-12-05 07:07:08.815362-05acquisition_timestamp | 2013-12-05 07:07:08.815367-05-[ RECORD 2 ]----------+------------------------------...-[ RECORD 8 ]----------+------------------------------pool_name | generalthread_count | 12open_file_handle_count | 18memory_inuse_kb | 708504queue_entry_timestamp | 2013-12-04 12:55:38.566614-05acquisition_timestamp | 2013-12-04 12:55:38.566623-05-[ RECORD 9 ]----------+------------------------------...
To determine how long a query waits in the queue before it is admitted to run, you can get thedifference between the acquisition_timestamp and the queue_entry_timestamp using a querylike the following:
=> SELECT pool_name, queue_entry_timestamp, acquisition_timestamp,(acquisition_timestamp-queue_entry_timestamp) AS 'queue wait'
FROM V_MONITOR.RESOURCE_ACQUISITIONS WHERE node_name ILIKE '%node0001';
-[ RECORD 1 ]---------+------------------------------pool_name | sysqueryqueue_entry_timestamp | 2013-12-05 07:07:08.815362-05acquisition_timestamp | 2013-12-05 07:07:08.815367-05queue wait | 00:00:00.000005-[ RECORD 2 ]---------+------------------------------pool_name | sysqueryqueue_entry_timestamp | 2013-12-05 07:07:14.714412-05acquisition_timestamp | 2013-12-05 07:07:14.714417-05queue wait | 00:00:00.000005-[ RECORD 3 ]---------+------------------------------pool_name | sysqueryqueue_entry_timestamp | 2013-12-05 07:09:57.238521-05acquisition_timestamp | 2013-12-05 07:09:57.281708-05queue wait | 00:00:00.043187-[ RECORD 4 ]---------+------------------------------...
See the SQLReferenceManual for detailed descriptions of themonitoring tables described in thistopic.
Administrator's Guide
HP Vertica Analytics Platform (7.0.x) Page 647 of 969

User ProfilesUser profiles are attributes associated with a user that control that user's access to several systemresources. These resources include:
l Resource pool to which a user is assigned (RESOURCE POOL)
l Maximum amount of memory a user's session can use (MEMORYCAP)
l Maximum amount of temporary file storage a user's session can use (TEMPSPACECAP)
l Maximum amount of time a user's query can run (RUNTIMECAP)
You can set these attributes with the CREATE USER statement andmodify the attributes laterwith ALTER USER.
Two strategies limit a user's access to resources: Setting attributes on the user directly to controlresource use, or assigning the user to a resource pool. The first method lets you fine tune individualusers, while the secondmakes it easier to groupmany users together and set their collectiveresource usage.
The following examples illustrate how to set a user's resource pool attributes. For additionalexamples, see the scenarios described in Using User-Defined Pools and User-Profiles forWorkloadManagement.
Example
Set the user's RESOURCE POOL attribute to assign the user to a resource pool. To create a usernamed user1who has access to the resource pool my_pool, use the command:
=> CREATE USER user1 RESOURCE POOL my_pool;
To limit the amount of memory for a user without designating a pool, set the user's MEMORYCAP toeither a particular unit or a percentage of the total memory available. For example, to create a usernamed user2whose sessions are limited to using 200MBs memory each, use the command:
=> CREATE USER user2 MEMORYCAP '200M';
To limit the time a user's queries are allowed to run, set the RUNTIMECAP attribute. To preventqueries for user2 from runningmore than fiveminutes, use this command:
=> ALTER USER user2 RUNTIMECAP '5 minutes';
To limit the amount of temporary disk space that the user's sessions can use, set theTEMPSPACECAP to either a particular size or a percentage of temporary disk space available. Forexample, the next statement creates user3, and limits her to using 1GB of temporary space:
Administrator's Guide
HP Vertica Analytics Platform (7.0.x) Page 648 of 969
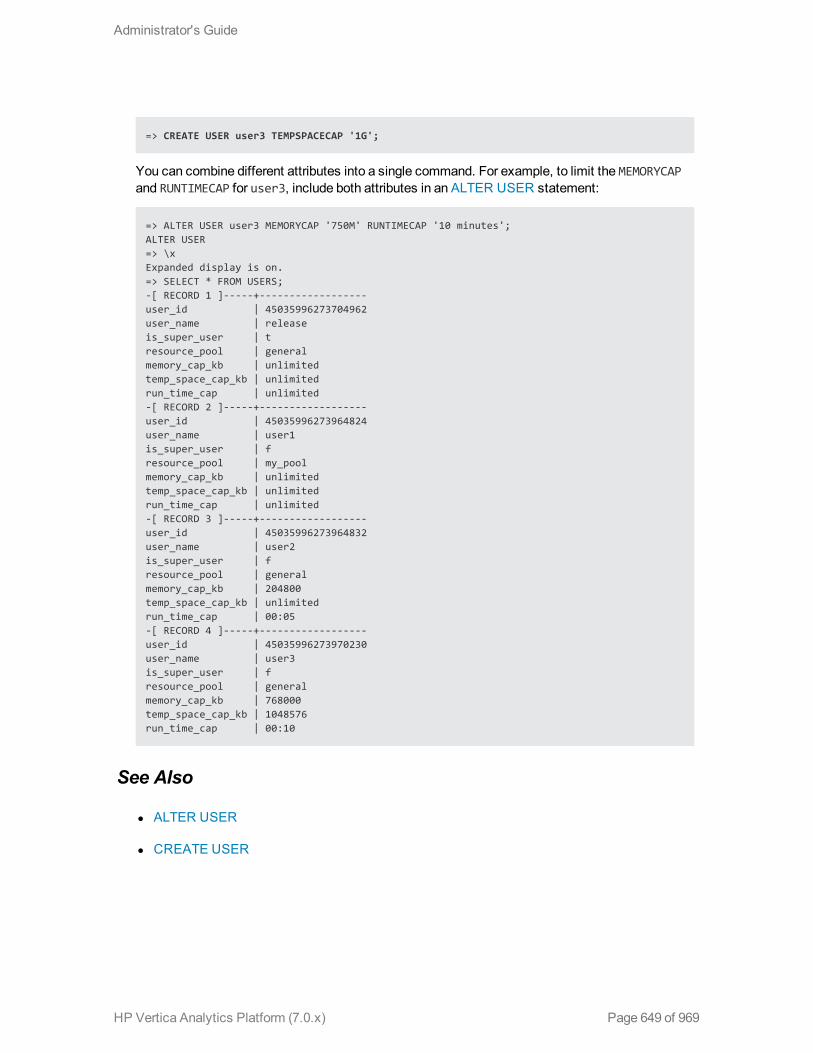
=> CREATE USER user3 TEMPSPACECAP '1G';
You can combine different attributes into a single command. For example, to limit the MEMORYCAPand RUNTIMECAP for user3, include both attributes in an ALTER USER statement:
=> ALTER USER user3 MEMORYCAP '750M' RUNTIMECAP '10 minutes';ALTER USER=> \xExpanded display is on.=> SELECT * FROM USERS;-[ RECORD 1 ]-----+------------------user_id | 45035996273704962user_name | releaseis_super_user | tresource_pool | generalmemory_cap_kb | unlimitedtemp_space_cap_kb | unlimitedrun_time_cap | unlimited-[ RECORD 2 ]-----+------------------user_id | 45035996273964824user_name | user1is_super_user | fresource_pool | my_poolmemory_cap_kb | unlimitedtemp_space_cap_kb | unlimitedrun_time_cap | unlimited-[ RECORD 3 ]-----+------------------user_id | 45035996273964832user_name | user2is_super_user | fresource_pool | generalmemory_cap_kb | 204800temp_space_cap_kb | unlimitedrun_time_cap | 00:05-[ RECORD 4 ]-----+------------------user_id | 45035996273970230user_name | user3is_super_user | fresource_pool | generalmemory_cap_kb | 768000temp_space_cap_kb | 1048576run_time_cap | 00:10
See Also
l ALTER USER
l CREATE USER
Administrator's Guide
HP Vertica Analytics Platform (7.0.x) Page 649 of 969

Target Memory Determination for Queries in ConcurrentEnvironments
The resource pool parameters of MEMORYSIZE and PLANNEDCONCURRENCY (CREATERESOURCE POOL in the SQLReferenceManual) provide the options that let you tune the targetmemory allocated to queries. The query_budget_kb column in the V_MONITOR.RESOURCE_POOL_STATUS system table shows the target memory for queries executed on the associatedpool. Normally, queries do not require any specific tuning, but if needed, the general formula forcomputing query_budget_kb is as follows:
l If MEMORYSIZE is set to 0, in which case the pool borrows all memory as needed from theGENERAL pool, the target amount of memory for the query is calculated using the QueueingThreshold of the GENERAL pool / PLANNEDCONCURRENCY.
l If the resource pool for the query has theMEMORYSIZE parameter set, and the pool isstandalone (i.e. cannot borrow from General pool) then the target memory is to use the amount ofmemory in the Queueing Threshold of the pool / PLANNEDCONCURRENCY.
l Otherwise, if MEMORYSIZE is set but the pool is not standalone, the target memory is set toMEMORYSIZE / PLANNEDCONCURRENCY of the pool.
Therefore, by carefully tuning theMEMORYSIZE and PLANNEDCONCURRENCY parameters, itis possible to restrict the amount of memory used by a query to a desired size.
See Also
l User Profiles
l RESOURCE_POOL_STATUS
Managing Resources At Query Run TimeThe ResourceManager estimates the resources required for queries to run, and then determineswhen to run queries and when to queue them.
The ResourceManager also lets youmanage resources that are assigned to queries that arealready running using either of thesemethods:
l Setting Run-Time Priority for the Resource Pool--Use resource pool parameters to set the runtime priority for queries running within the resource pool.
l Changing Run-Time Priority of a Running Query--Manually change the run time priority of arunning query.
Administrator's Guide
HP Vertica Analytics Platform (7.0.x) Page 650 of 969

Setting Run-Time Priority for the Resource PoolFor each resource pool, you canmanage resources that are assigned to queries that are alreadyrunning. You assign each resource pool a run-time priority of HIGH, MEDIUM, or LOW. Thesesettings determine the amount of run-time resources (such as CPU and I/O bandwidth) assigned toqueries in the resource pool when they run. Queries in a resource pool with a HIGH priority areassigned greater runtime resources than those in resource pools with MEDIUM or LOW runtimepriorities.
Prioritizing Queries Within a Resource Pool
While run-time priority helps tomanage resources for the resource pool, theremay be instanceswhere you want some flexibility within a resource pool. For instance, youmay want to ensure thatvery short queries run at a high priority, while also ensuring that all other queries run at amedium orlow priority.
The ResourceManager allows you this flexibility by letting you set a run-time priority threshold forthe resource pool. With this threshold, you specify a time limit (in seconds) by which a query mustfinish before it is assigned the runtime priority of the resource pool. All queries begin running with aHIGH priority; once a query's duration exceeds the time limit specified in the run-time prioritythreshold, it is assigned the run-time priority of the resource pool.
How to Set Run-Time Priority and Run-Time Priority Threshold
You specify run-time priority and run-time priority threshold when creating or modifying a resourcepool. In the CREATE RESOURCE POOL or ALTER RESOURCE POOL statements, use theseparameters:
Parameter Description
RUNTIMEPRIORITY Determines the amount of run-time resources (CPU, I/O bandwidth)the ResourceManager should dedicate to queries already running inthe resource pool. Valid values are:
l HIGH
l MEDIUM
l LOW
Queries with a HIGH run-time priority are givenmore CPU and I/Oresources than those with a MEDIUM or LOW run-time priority.
RUNTIMEPRIORITYTHRESHOLD Specifies a time limit (in seconds) by which a query must finishbefore the ResourceManager assigns to it the RUNTIMEPRIORITY ofthe resource pool. All queries begin runnng at a HIGH priority. Whena query's duration exceeds this threshold, it is assigned theRUNTIMEPRIORITY of the resource pool.
Administrator's Guide
HP Vertica Analytics Platform (7.0.x) Page 651 of 969

See Also
l CREATE RESOURCE POOL
l ALTER RESOURCE POOL
Changing Run-Time Priority of a Running QueryThe CHANGE_CURRENT_STATEMENT_RUNTIME_PRIORITY function allows you to change a query'srun-time priority. When you run this function, you specify only the transaction ID and the run-timepriority value you want to assign. HP Vertica changes the priority of the query that is currentlyrunning within the transaction.
Note: You cannot change the run-time priority of a query that has not yet begun executing.
Database administrators can change the run-time priority of any query to any level. Users canchange the run-time priority of only their own queries. In addition, users cannot raise the run-timepriority of a query to a level higher than that of the resource pools.
How To Change the Run-Time Priority of a Running Query
1. Use the following statement to see the run-time priority of all queries running in the session.Note the transaction ID for the query you want to change; youmust specify the transaction IDto change the priority of the current query:
SELECT transaction_id, runtime_priority, transaction_description from SESSIONS;
2. Run the CHANGE_CURRENT_STATEMENT_RUNTIME_PRIORITY meta-function, specifying thetransaction ID for the query whose run-time priority you want to change:
SELECT CHANGE_CURRENT_STATEMENT_RUNTIME_PRIORITY(45035996273705748, 'low')
Using CHANGE_RUNTIME_PRIORITY
The CHANGE_RUNTIME_PRIORITY function allows you to change the priority of a runningquery. Introduced in a previous release, this function required you to specify both the transaction IDand the statement ID of the query whose priority you wanted to change. With the introduction ofCHANGE_CURRENT_STATEMENT_RUNTIME_PRIORITY, you no longer need to specify the statement ID,and should therefore begin using CHANGE_CURRENT_STATEMENT_RUNTIME_PRIORITYinstead.
CHANGE_RUNTIME_PRIORITY will be removed in a future release. However, if you choose touse this function, you can avoid specifying the query statement ID by setting the statement IDvalue to NULL.
Administrator's Guide
HP Vertica Analytics Platform (7.0.x) Page 652 of 969

See Also
l CHANGE_CURRENT_STATEMENT_RUNTIME_PRIORITY
l CHANGE_RUNTIME_PRIORITY
Restoring Resource Manager DefaultsThe system table V_CATALOG.RESOURCE_POOL_DEFAULTS stores default values for allparameters for all built-in and user-defined resource pools.
If you have changed the value of any parameter in any of your resource pools and want to restore itto its default, you can simply alter the table and set the parameter to DEFAULT. For example, thefollowing statement sets the RUNTIMEPRIORITY for the resource pool sysquery back to itsdefault value:
VMart=> ALTER RESOURCE POOL sysquery RUNTIMEPRIORITY DEFAULT;
See Alsol RESOURCE_POOL_DEFAULTS
Administrator's Guide
HP Vertica Analytics Platform (7.0.x) Page 653 of 969

Best Practices for Managing Workload ResourcesThis section provides general guidelines and best practices on how to set up and tune resourcepools for various common scenarios.
Note: The exact settings for the pool parameters are heavily dependent on your query mix,data size, hardware configuration, and concurrency requirements. HP recommends performingyour own experiments to determine the optimal configuration for your system.
Basic Principles for Scalability and Concurrency TuningAnHP Vertica database runs on a cluster of commodity hardware. All loads and queries runningagainst the database take up system resources, such as CPU, memory, disk I/O bandwidth, filehandles, and so forth. The performance (run time) of a given query depends on how much resourceit has been allocated.
When runningmore than one query concurrently on the system, both queries are sharing theresources; therefore, each query could take longer to run than if it was running by itself. In anefficient and scalable system, if a query takes up all the resources on themachine and runs in Xtime, then running two such queries would double the run time of each query to 2X. If the query runsin > 2X, the system is not linearly scalable, and if the query runs in < 2X then the single query waswasteful in its use of resources. Note that the above is true as long as the query obtains theminimum resources necessary for it to run and is limited by CPU cycles. Instead, if the systembecomes bottlenecked so the query does not get enough of a particular resource to run, then thesystem has reached a limit. In order to increase concurrency in such cases, the systemmust beexpanded by addingmore of that resource.
In practice, HP Vertica should achieve near linear scalability in run times, with increasingconcurrency, until a system resource limit is reached. When adequate concurrency is reachedwithout hitting bottlenecks, then the system can be considered as ideally sized for the workload.
Note: Typically HP Vertica queries on segmented tables run onmultiple (likely all) nodes of thecluster. Addingmore nodes generally improves the run time of the query almost linearly.
Guidelines for Setting Pool ParametersThis section provides guidelines on setting the various parameters of any resource pool. You shouldtune resource pools only to address specific workload issues. The default configuration is designedfor a balanced, high throughput environment. See Using User-Defined Pools and User-Profiles forWorkloadManagement for examples of situations where youmight want to create your own pools.
Administrator's Guide
HP Vertica Analytics Platform (7.0.x) Page 654 of 969

Note: Consider the following computational resources of your database cluster nodes to ensurethat your pool parameter settings optimize the performance of the resource pools:
l CPU
l RAM
l Storage subsystems
l Network bandwidth
Parameter Guideline
MEMORYSIZE Ignore if tuning the GENERAL pool.
For other pools, you can leave the setting to the default (0%), whichallows the pool to borrow memory from theGeneral pool, as needed.Consider setting this in the following situations:
l To set asidememory for exclusive use of requests issued to thatpool. This memory then cannot be used for other purposes, even ifthere are no requests made to that pool.
l In combination with PLANNEDCONCURRENCY, to tune thememoryused by a certain query to a certain size, where applicable. This isfor expert use only.
See Target Memory Determination for Queries in ConcurrentEnvironments.
MAXMEMORYSIZE Ignore if tuning the GENERAL pool.
For other pools, use this parameter to set up the resource pool as astandalone pool or to limit how muchmemory the resource pool canborrow from the GENERAL pool. This provides amechanism to enforcea hard limit on thememory usage by certain classes of workload; forexample, loads should take up nomore than 4GB of total availablememory.
See Scenario: Restricting resource usage and concurrency of ad-hocapplication
EXECUTIONPARALLELISM Use this parameter to limit the number of threads that would be usedto process any single query issued in this resource pool. Reducingthis parameter may increase the throughput of short queries issued inthe pool, especially if the queries are executed concurrently. If youchoose the default of AUTO, HP Vertica sets this value for you. Ifyou choose tomanually set this parameter, set it to a value between1 and the number of cores.
Administrator's Guide
HP Vertica Analytics Platform (7.0.x) Page 655 of 969

PRIORITY Use this parameter to prioritize the use of GENERAL pool resources,either by requests made directly to the GENERAL pool, or by requestsmade to other pools borrowingmemory from the GENERAL pool.
The PRIORITY for internal pools (SYSQUERY, RECOVERY, and TM)ranges from –110 to 110. Administrator-created pools have aPRIORITY range of –100 to 100. Internal pools should always have ahigher priority than created pools.
Pool PRIORITY is relative; a pool with a higher PRIORITY value hasthe same increased access to pool resources as a pool with a lowerPRIORITY value, regardless of the difference between their PRIORITYvalues.
When you install HP Vertica, requests made to the RECOVERY poolhave highest priority out of the box so that HP Vertica canexpeditiously provide resources to recover nodes that are down.
Note: The PRIORITY setting has nomeaning for a standalone pool,which does not borrow memory from the GENERAL pool. Seeexamples in Scenario: Periodic Batch Loads and Scenario: SettingPriorities onQueries Issued By Different Users.
RUNTIMEPRIORITY Use this parameter to set the priority for running queries in thisresource pool. Any query with a duration that exceeds the value in theRUNTIMEPRIORITYTHRESHOLD property will be assigned therun-time priority you specify here.
l If you want to ensure that short queries will always run at a highpriority, set the RUNTIMEPRIORITY parameter to MEDIUM orLOW and set the RUNTIMEPRIORITYTHRESHOLD to a small numberthat will accommodate your short queries.
l If you want all queries in the resource pool to always run a thespecified value, set the RUNTIMEPRIORITY parameter to HIGH,MEDIUM, or LOW and also set the RUNTIMEPRIORITYTHRESHOLDto 0. Setting RUNTIMEPRIORITYTHRESHOLD to 0 effectively turnsoff the RUNTIMEPRIORITYTHRESHOLD feature. All queries will runwith the RUNTIMEPRIORITY of the resource pool.
RUNTIMEPRIORITYTHRESHOLD [Default: 2] Use this parameter to specify the duration (in seconds) ofqueries that should always run with HIGH run-time priority. Becauseall queries begin running with a RUNTIMEPRIORITY of HIGH,queries that finish within the specified threshold will run at a HIGHpriority; all other queries will be assigned the runtime priority assignedto the resource pool.
To disable this feature, set the RUNTIMEPRIORITYTHRESHOLDto 0.
Administrator's Guide
HP Vertica Analytics Platform (7.0.x) Page 656 of 969

QUEUETIMEOUT Use this parameter to change the timeout of the pool from the 5-minute default.
The timeout can be customized if you need different queuingdurations for different classes of workloads. For example, long-running batch workloads could be configured to run on a pool withhigh timeout values, possibly unlimited, since completion of the taskis more critical than response time.
For interactive application queries, the timeouts could be set to low or0 to ensure application gets an immediate error if the query cannotrun.
Note:Bemindful that increased timeouts will lead to longer queuelengths and will not necessarily improve the overall throughput of thesystem.
Administrator's Guide
HP Vertica Analytics Platform (7.0.x) Page 657 of 969

PLANNEDCONCURRENCY This parameter specifies the typical number of queries runningconcurrently in the system. Set PLANNEDCONCURRENCY to AUTO tospecify that HP Vertica should calculate this number. HP Verticatakes the lower of these two values:
l Number of cores
l Memory/2GB
Theminimum value for PLANNEDCONCURRENCY is 4.
HP Vertica advises changing this value only after evaluatingperformance over a period of time.
The TupleMover draws its resources from the TM pool. For the TMpool, the PLANNEDCONCURRENCY parameter must be proportional to thesize of the RAM, the CPU, and the storage subsystem. Dependingon the storage type, if you increase PLANNEDCONCURRENCY for theTupleMover threads, youmight create storage I/O bottleneck.Monitor the storage subsystem; if it becomes saturated with long I/Oqueues, more than two I/O queues, and long latency in read andwrite, adjust the PLANNEDCONCURRENCY parameter to keep the storagesubsystem resources below saturation level. In addition, youmightneed to:
l Partition storage data files
l Adjust block-size optimization on storage subsystems such asRAID 5 or RAID 10
Identify the optimal number of disks in the RAID array.
Notes:
l Consider the tradeoff between giving each query its maximumamount of resources and allowingmany concurrent queries to runin a reasonable amount of time. For more information, see TargetMemory Determination for Queries in Concurrent Environments.
l This parameter can be used in combination with MEMORYSIZEto tune thememory used by a query down to a specific size.
l For clusters where the number of cores differs on different nodes,AUTO can apply differently on each node. Distributed queries runlike theminimal effective planned concurrency. Single nodequeries run with the planned concurrency of the initiator.
l If you created or upgraded your database in 4.0 or 4.1, thePLANNEDCONCURRENCY setting on the GENERAL pool defaults to atoo-small value for machines with large numbers of cores. To
Administrator's Guide
HP Vertica Analytics Platform (7.0.x) Page 658 of 969

adjust to amore appropriate value:
=> ALTER RESOURCE POOL general PLANNEDCONCURRENCY<#cores>;
This parameter only needs to be set if you created a databasebefore 4.1, patchset 1.
MAXCONCURRENCY Use this parameter if you want to impose a hard limit on the numberof concurrent requests that are allowed to run against any pool,including the GENERAL pool.
Instead of limiting this at the pool level, it is also possible to limit atthe connection level usingMaxClientSessions.
RUNTIMECAP Use this parameter to prevent runaway queries. This parameter setsthemaximum amount of time any query on the pool can execute. SetRUNTIMECAP using interval, such as '1 minute' or '100 seconds' (seeInterval Values for details). This value cannot exceed one year.Setting this value to NONE means there is no time limit on queriesrunning on the pool. If the user or session also has a RUNTIMECAP,the shorter limit applies.
SINGLEINITIATOR This parameter is included for backwards compatibility only. Do notchange the default (false) value.
CPUAFFINITYSET Use this parameter if you want to pin the execution of queries in thisresource pool to a specified subset of CPUs in the cluster. All nodesin the cluster must have the same number of CPUs. To determine thenumber of CPUs on a node, issue the command: lscpu | grep"^CPU(s)".
This parameter is supported only on user-defined resource pools.However, you limit the CPUs available to the general resource poolsby creating a user-defined resource pool that has exclusive use ofone or more CPU resources.
CPUAFFINITYMODE Use this parameter to specify if the resource pool has exclusive orshared use of the pinned CPUs defined in CPUAFFINITYSET.
See Also
l CREATE RESOURCE POOL
l ALTER RESOURCE POOL
Setting a Run-Time Limit for QueriesYou can set a limit for the amount of time a query is allowed to run using the RUNTIMECAPparameter. You can set this parameter for a:
Administrator's Guide
HP Vertica Analytics Platform (7.0.x) Page 659 of 969

l User, in the user's profile (See CREATE USER)
l Resource pool (See CREATE RESOURCE POOL)
l Session (See SET SESSION RUNTIMECAP)
In all cases, you set this parameter as an interval value, and the value cannot exceed one year.When RUNTIMECAP has been set for two or more of these levels, HP Vertica always uses theshortest value.
Example:
l User1 is assigned to the ad_hoc_queries resource pool
l RUNTIMECAP for User1 is set to 1 hour
l RUNTIMECAP for the ad_hoc_queries resource pool is set to 30minutes
In this example, HP Vertica terminates any of User1's queries if they surpass the 30-minuteRUNTIMECAP for the resource pool.
See Also
l RESOURCE_POOLS
Administrator's Guide
HP Vertica Analytics Platform (7.0.x) Page 660 of 969

Using User-Defined Pools and User-Profiles for WorkloadManagement
The scenarios in this section describe some of themost commonworkload-management issuesand provide solutions with examples.
Scenario: Periodic Batch Loads
Scenario
You do batch loads every night, or occasionally (infrequently) during the day. When loads arerunning, it is acceptable to reduce resource usage by queries, but at all other times you want allresources to be available to queries.
Solution
Create a separate resource pool for loads with a higher priority than the preconfigured setting on thebuild-in GENERAL pool.
In this scenario, nightly loads get preference when borrowingmemory from theGENERAL pool.When loads are not running, all memory is automatically available for queries.
Note: If you are using theWOS, tune the PLANNEDCONCURRENCY parameter of theWOSDATA pool to the number of concurrent loads. This ensures that AUTO spill to ROS isconfigured in an optimal fashion.
Example
Create a resource pool with the PRIORITY of the pool set higher than the GENERAL pool.
For example, to create a pool designated for loads that has a higher priority then the GENERALpool, set load_pool with a priority of 10:
=> CREATE RESOURCE POOL load_pool PRIORITY 10;
Edit theWOSDATA pool PLANNEDCONCURRENCY:
=> ALTER RESOURCE POOL WOSDATA PLANNEDCONCURRENCY 6;
Modify the user's resource pool:
=> ALTER USER load_user RESOURCE POOL load_pool;
Administrator's Guide
HP Vertica Analytics Platform (7.0.x) Page 661 of 969

Scenario: The CEO Query
Scenario
The CEO runs a report every Monday at 9AM, and you want to be sure that the report always runs.
Solution
To ensure that a certain query or class of queries always gets resources, you could create adedicated pool for it as follows:
1. Using the PROFILE command, run the query that the CEO runs every week to determine howmuchmemory should be allocated:
=> PROFILE SELECT DISTINCT s.product_key, p.product_description-> FROM store.store_sales_fact s, public.product_dimension p-> WHERE s.product_key = p.product_key AND s.product_version = p.product_version-> AND s.store_key IN (-> SELECT store_key FROM store.store_dimension-> WHERE store_state = 'MA')-> ORDER BY s.product_key;
2. At the end of the query, the system returns a notice with resource usage:
NOTICE: Statement is being profiled.HINT: select * from v_monitor.execution_engine_profiles wheretransaction_id=45035996273751349 and statement_id=6;NOTICE: Initiator memory estimate for query: [on pool general: 1723648 KB,minimum: 355920 KB]
3. Create a resource pool with MEMORYSIZE reported by the above hint to ensure that the CEOquery has at least this memory reserved for it:
=> CREATE RESOURCE POOL ceo_pool MEMORYSIZE '1800M' PRIORITY 10;CREATE RESOURCE POOL=> \xExpanded display is on.=> SELECT * FROM resource_pools WHERE name = 'ceo_pool';-[ RECORD 1 ]-------+-------------name | ceo_poolis_internal | fmemorysize | 1800Mmaxmemorysize |priority | 10queuetimeout | 300plannedconcurrency | 4
Administrator's Guide
HP Vertica Analytics Platform (7.0.x) Page 662 of 969

maxconcurrency |singleinitiator | f
4. Assuming the CEO report user already exists, associate this user with the above resource poolusing ALTER USER statement.
=> ALTER USER ceo_user RESOURCE POOL ceo_pool;
5. Issue the following command to confirm that the ceo_user is associated with the ceo_pool:
=> SELECT * FROM users WHERE user_name ='ceo_user';-[ RECORD 1 ]-+------------------user_id | 45035996273713548user_name | ceo_useris_super_user | fresource_pool | ceo_poolmemory_cap_kb | unlimited
If the CEO query memory usage is too large, you can ask the ResourceManager to reduce it to fitwithin a certain budget. See Target Memory Determination for Queries in Concurrent Environments.
Scenario: Preventing Run-Away Queries
Scenario
Joe, a business analyst often runs big reports in themiddle of the day that take up the wholemachine's resources.You want to prevent Joe from usingmore than 100MB of memory, and youwant to also limit Joe's queries to run for less than 2 hours.
Solution
User Profiles provides a solution to this scenario. To restrict the amount of memory Joe can use atone time, set aMEMORYCAP for Joe to 100MB using the ALTER USER command. To limit theamount of time that Joe's query can run, set a RUNTIMECAP to 2 hours using the same command.If any query run by Joe takes upmore than its cap, HP Vertica rejects the query.
If you have a whole class of users whose queries you need to limit, you can also create a resourcepool for them and set RUNTIMECAP for the resource pool. When youmove these users to theresource pool, HP Vertica limits all queries for these users to the RUNTIMECAP you specified forthe resource pool.
Example
=> ALTER USER analyst_user MEMORYCAP '100M' RUNTIMECAP '2 hours';
Administrator's Guide
HP Vertica Analytics Platform (7.0.x) Page 663 of 969

If Joe attempts to run a query that exceeds 100MB, the system returns an error that the requestexceeds thememory session limit, such as the following example:
\i vmart_query_04.sqlvsql:vmart_query_04.sql:12: ERROR: Insufficient resources to initiate planon pool general [Request exceeds memory session limit: 137669KB > 102400KB]
Only the system database administrator (dbadmin) can increase only theMEMORYCAP setting.Users cannot increase their ownMEMORYCAP settings and will see an error like the following ifthey attempt to edit their MEMORYCAP or RUNTIMECAP settings:
ALTER USER analyst_user MEMORYCAP '135M';ROLLBACK: permission denied
Scenario: Restricting Resource Usage of Ad Hoc Query Application
Scenario
You recently made your data warehouse available to a large group of users who are not experiencedSQL users. Some of the users run reports that operate on a large number of rows and overwhelmthe system. You want to throttle usage of the system by these users.
Solution
The simplest solution is to create a standalone resource pool for the ad hoc applications so that thetotal MEMORYSIZE is fixed. Recall that in a standalone pool, MAXMEMORYSIZE is set equal toMEMORYSIZE so nomemory can be borrowed from theGENERAL pool. Associate this user poolwith the database user(s) from which the application uses to connect to the database. In addition,set RUNTIMECAP to limit themaximum duration of an ad hoc query.
Other solutions include limiting thememory usage of individual users such as in the Scenario:Preventing Run-Away Queries.
Tip: Besides adding limits such as the above, it is also a great idea to train the user communityon writing good SQL.
Example
To create a standalone resource pool for the ad hoc users, set theMEMORYSIZE equal to theMAXMEMORYSIZE:
=> CREATE RESOURCE POOL adhoc_pool MEMORYSIZE '200M' MAXMEMORYSIZE '200M' PRIORITY 0 QUEUETIMEOUT 300 PLANNEDCONCURRENCY 4;=> SELECT pool_name, memory_size_kb, queueing_threshold_kb
FROM V_MONITOR.RESOURCE_POOL_STATUS wWHERE is_standalone = 'true' AND is_internal = 'false';
Administrator's Guide
HP Vertica Analytics Platform (7.0.x) Page 664 of 969

pool_name | memory_size_kb | queueing_threshold_kb------------+----------------+-----------------------adhoc_pool | 204800 | 153600
(1 row)
After the pool has been created, associate the ad hoc users with the adhoc_pool:
=> ALTER USER app1_user RESOURCE POOL adhoc_pool;=> ALTER RESOURCE POOL adhoc_pool MEMORYSIZE '10M' MAXMEMORYSIZE '10M';\i vmart_query_04.sqlvsql:vmart_query_04.sql:12: ERROR: Insufficient resources to initiate planon pool adhoc_pool [Request Too Large:Memory(KB)Exceeded: Requested = 84528, Free = 10240 (Limit = 10240, Used = 0)]
The query will not borrow memory from theGENERAL pool and gets rejected with a 'Request TooLarge' message.
Scenario: Setting a Hard Limit on Concurrency For An Application
Scenario
For billing purposes, analyst Jane would like to impose a hard limit on concurrency for thisapplication. How can she achieve this?
Solution
The simplest solution is to create a separate resource pool for the users of that application and setits MAXCONCURRENCY to the desired concurrency level. Any queries beyondMAXCONCURRENCY are queued.
Tip: HP recommends leaving PLANNEDCONCURRENCY to the default level so the queriesget their maximum amount of resources. The system as a whole thus runs with the highestefficiency.
Example
In this example, there are four billing users associated with the billing pool. The objective is to set ahard limit on the resource pool so amaximum of three concurrent queries can be executed at onetime. All other queries will queue and complete as resources are freed.
=> CREATE RESOURCE POOL billing_pool MAXCONCURRENCY 3 QUEUETIMEOUT 2;=> CREATE USER bill1_user RESOURCE POOL billing_pool;=> CREATE USER bill2_user RESOURCE POOL billing_pool;=> CREATE USER bill3_user RESOURCE POOL billing_pool;=> CREATE USER bill4_user RESOURCE POOL billing_pool;=> \x
Administrator's Guide
HP Vertica Analytics Platform (7.0.x) Page 665 of 969
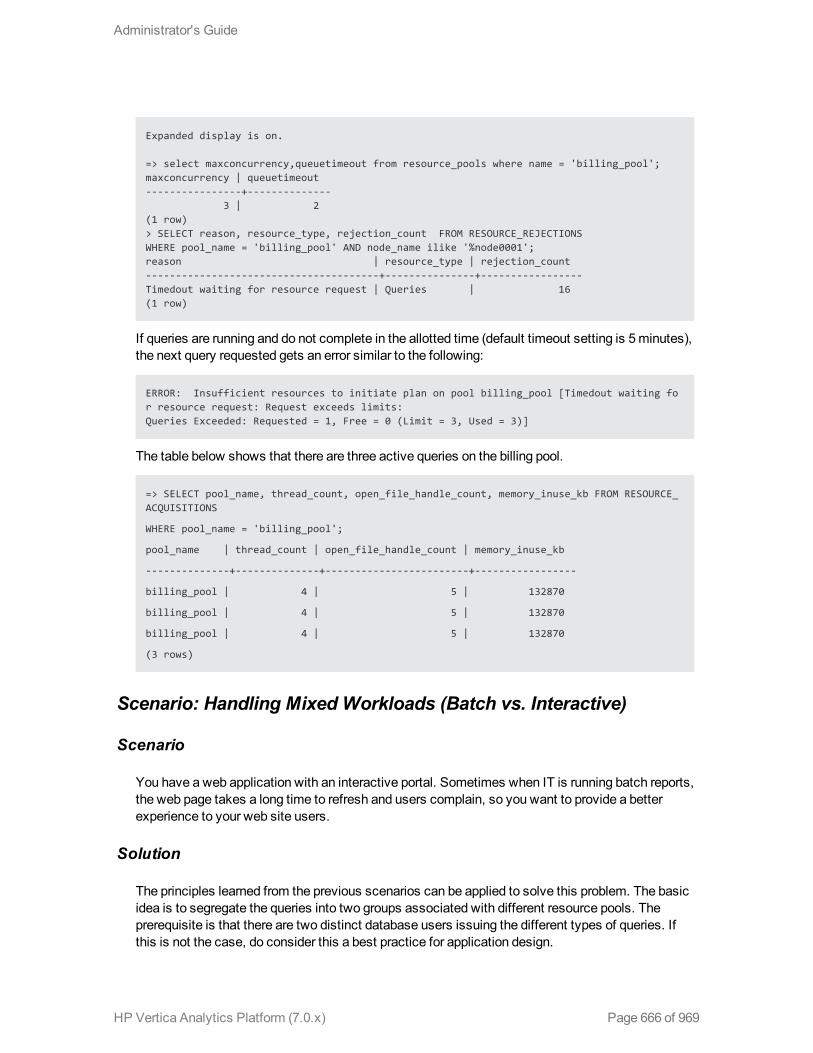
Expanded display is on.
=> select maxconcurrency,queuetimeout from resource_pools where name = 'billing_pool';maxconcurrency | queuetimeout----------------+--------------
3 | 2(1 row)> SELECT reason, resource_type, rejection_count FROM RESOURCE_REJECTIONSWHERE pool_name = 'billing_pool' AND node_name ilike '%node0001';reason | resource_type | rejection_count---------------------------------------+---------------+-----------------Timedout waiting for resource request | Queries | 16(1 row)
If queries are running and do not complete in the allotted time (default timeout setting is 5minutes),the next query requested gets an error similar to the following:
ERROR: Insufficient resources to initiate plan on pool billing_pool [Timedout waiting for resource request: Request exceeds limits:Queries Exceeded: Requested = 1, Free = 0 (Limit = 3, Used = 3)]
The table below shows that there are three active queries on the billing pool.
=> SELECT pool_name, thread_count, open_file_handle_count, memory_inuse_kb FROM RESOURCE_ACQUISITIONS
WHERE pool_name = 'billing_pool';
pool_name | thread_count | open_file_handle_count | memory_inuse_kb
--------------+--------------+------------------------+-----------------
billing_pool | 4 | 5 | 132870
billing_pool | 4 | 5 | 132870
billing_pool | 4 | 5 | 132870
(3 rows)
Scenario: Handling Mixed Workloads (Batch vs. Interactive)
Scenario
You have a web application with an interactive portal. Sometimes when IT is running batch reports,the web page takes a long time to refresh and users complain, so you want to provide a betterexperience to your web site users.
Solution
The principles learned from the previous scenarios can be applied to solve this problem. The basicidea is to segregate the queries into two groups associated with different resource pools. Theprerequisite is that there are two distinct database users issuing the different types of queries. Ifthis is not the case, do consider this a best practice for application design.
Administrator's Guide
HP Vertica Analytics Platform (7.0.x) Page 666 of 969

METHOD 1:Create a dedicated pool for the web page refresh queries where you:
1. Size the pool based on the average resource needs of the queries and expected number ofconcurrent queries issued from the portal.
2. Associate this pool with the database user that runs the web site queries. (See Scenario: TheCEOQuery for detailed procedure on creating a dedicated pool.)
3. This ensures that the web site queries always run and never queue behind the large batch jobs.Leave the batch jobs to run off the GENERAL pool.
For example, the following pool is based on the average resources needed for the queriesrunning from the web and the expected number of concurrent queries. It also has a higherPRIORITY to the web queries over any running batch jobs and assumes the queries are beingtuned to take 250M each:
CREATE RESOURCE POOL web_pool MEMORYSIZE '250M' MAXMEMORYSIZE NONE PRIORITY 10 MAXCONCURRENCY 5 PLANNEDCONCURRENCY 1
METHOD 2:Create a standalone pool to limit the batch reports down to a fixedmemory size somemory is always left available for other purposes. (See Scenario: Restricting Resource Usage ofAd Hoc Query Application.)
For example:
CREATE RESOURCE POOL batch_pool MEMORYSIZE '4G' MAXMEMORYSIZE '4G' MAXCONCURRENCY 10:
The same principle can be applied if you have three or more distinct classes of workloads.
Scenario: Setting Priorities on Queries Issued By Different Users
Scenario
Youwould like user queries from one department to have a higher priority than queries from anotherdepartment.
Solution
The solution is similar to themixed workload case. In this scenario, you do not limit resource usage;you set different priorities. To do so, create two different pools, each with MEMORYSIZE=0% anda different PRIORITY parameter. Both pools borrow from theGENERAL pool, however whencompeting for resources, the priority determine the order in which each pool's request is granted.For example:
=> CREATE RESOURCE POOL dept1_pool PRIORITY 5;=> CREATE RESOURCE POOL dept2_pool PRIORITY 8;
Administrator's Guide
HP Vertica Analytics Platform (7.0.x) Page 667 of 969

If you find this solution to be insufficient, or if one department's queries continuously starvesanother department’s users, you could add a reservation for each pool by settingMEMORYSIZE sosomememory is guaranteed to be available for each department.
For example, since both resources are using the GENERAL pool for memory, you could allocatesomememory to each resource pool by using the ALTER RESOURCE POOL command to changetheMEMORYSIZE for each pool:
=> ALTER RESOURCE POOL dept1_pool MEMORYSIZE '100M';=> ALTER RESOURCE POOL dept2_pool MEMORYSIZE '150M';
Scenario: Continuous Load and Query
Scenario
Youwant your application to run continuous load streams, but many have up concurrent querystreams. You want to ensure that performance is predictable.
Solution
The solution to this scenario will depend on your query mix; however, below are the general steps totake:
1. Determine the number of continuous load streams required. This may be related to the desiredload rate if a single stream does not provide adequate throughput, or may bemore directlyrelated to the number of sources of data to load. Also determine if automatic storage is best, orif DIRECT is required. Create a dedicated resource pool for the loads, and associate it with thedatabase user that will perform them. See CREATE RESOURCE POOL for details.
In general, the concurrency settings for the load pool should be less than the number of coresper node. Unless the source processes are slow, it is more efficient to dedicatemorememoryper load, and have additional loads queue. Adjust the load pool's QUEUETIMEOUT setting ifqueuing is expected.
2. If using automatic targeting of COPY and INSERT, set the PLANNEDCONCURRENCYparameter of theWOSDATA pool to the number of concurrent loads expected. Also, setMEMORYSIZE of theWOS to the expected size of the loaded data to ensure that small loadsdon't spill toROS immediately. See Built-In Pools for details.
3. Run the load workload for a while and observe whether the load performance is as expected. Ifthe TupleMover is not tuned adequately to cover the load behavior, see Tuning the TupleMover in Administrator's Guide.
4. If there is more than one kind of query in the system (say some queries that must be answeredquickly for interactive users, and others that are part of a batch reporting process), follow theadvice in Scenario: HandlingMixedWorkloads.
Administrator's Guide
HP Vertica Analytics Platform (7.0.x) Page 668 of 969

5. Let the queries run and observe the performance. If some classes of queries are not getting thedesired performance, then it may be necessary to tune the GENERAL pool as outlined inScenario: Restricting Resource Usage of Ad Hoc Query Application, or to create furtherdedicated resource pools for those queries. See Scenario: The CEOQuery and Scenario:HandlingMixedWorkloads.
See the sections onManagingWorkloads and CREATE RESOURCE POOL for additional detailsand tips for obtaining predictable results in mixed workload environments.
Scenario: Prioritizing Short Queries At Run Time
Scenario
You recently created a resource pool for users who are not experienced with SQL and whofrequently run ad hoc reports. You havemanaged resource allocation by creating a standaloneresource pool that will prevent these queries for borrowing resources from theGENERAL pool, butnow you want to manage resources at run time and ensure that short queries always run with a highpriority and are never queued as a result of limited run-time resources.
Solution
Set the RUNTIMEPRIORITY for the resource pool to MEDIUM or LOW. Set theRUNTIMEPRIORITYTHRESHOLD for the resource pool to the duration of queries you want to ensurealways run at a high priority. For instance, if you set this value to 5, all queries that complete within5 seconds will run at high priority. Any other query that exceeds 5 seconds will drop down to theRUNTIMEPRIORITY assigned to the resource pool (MEDIUM or LOW).
Example
To ensure that all queries with a duration of less than 5 seconds always run at a high priority, modifyadhoc_pool as follows:
l Set the RUNTIMEPRIORITY toMEDIUM
l Set the RUNTIMETHRESHOLD to 5
=> ALTER RESOURCE POOL ad_hoc_pool RUNTIMEPRIORITY medium RUNTIMEPRIORITYTHRESHOLD 5;
Scenario: Dropping the Runtime Priority of Long Queries
Scenario
Youwant most queries in a resource pool to run at a HIGH runtime priority; however, you'd like tobe able to drop jobs longer than 1 hour to a lower priority.
Administrator's Guide
HP Vertica Analytics Platform (7.0.x) Page 669 of 969

Solution
Set the RUNTIMEPRIORITY for the resource pool to LOW and set theRUNTIMEPRIORITYTHRESHOLD to a number that cuts off only the longest jobs.
Example
To ensure that all queries with a duration of more than 3600 seconds (1 hour) are assigned a lowruntime priority, modify the resource pool as follows:
l Set the RUNTIMEPRIORITY to LOW.
l Set the RUNTIMETHRESHOLD to 3600
=> ALTER RESOURCE POOL ad_hoc_pool RUNTIMEPRIORITY low RUNTIMEPRIORITYTHRESHOLD 3600;
Administrator's Guide
HP Vertica Analytics Platform (7.0.x) Page 670 of 969

Tuning the Built-In PoolsThe scenarios in this section describe how to tune the built-in pools.
Scenario: Restricting HP Vertica to Take Only 60% of Memory
Scenario
You have a single node application that embeds HP Vertica, and some portion of the RAM needs tobe devoted to the application process. In this scenario, you want to limit HP Vertica to use only60% of the available RAM.
Solution
Set theMAXMEMORYSIZE parameter of the GENERAL pool to the desiredmemory size. SeeResource Pool Architecture for a discussion on resource limits.
Scenario: Tuning for Recovery
Scenario
You have a large database that contains a single large table with two projections, and with defaultsettings, recovery is taking too long. You want to give recovery morememory to improve speed.
Solution
Set the PLANNEDCONCURRENCY andMAXCONCURRENCY setting of the recovery pool to 1so that recovery can take as muchmemory as possible from theGENERAL pool and run only onethread at once.
Note: This setting could slow down other queries in your system.
Scenario: Tuning for Refresh
Scenario
When a refresh operation is running, system performance is affected and user queries get rejected.You want to reduce thememory usage of the refresh job.
Solution
Set theMEMORYSIZE parameter of the refresh pool to a fixed value. The ResourceManager thentunes the refresh query to only use this amount of memory.
Administrator's Guide
HP Vertica Analytics Platform (7.0.x) Page 671 of 969
Tip: Remember to reset the refresh pool MEMORYSIZE back to 0% after the refresh operationcompletes somemory can be used for other operations.
Scenario: Tuning Tuple Mover Pool Settings
Scenario
During loads, you occasionally notice spikes in the number of ROS containers, and you would liketomake the Tuple Movermore aggressive.
Solution
Increase theMAXCONCURRENCY parameter of the TM pool to 3 or higher. This setting ensuresthat the TupleMover can runmore than onemergeout thread, so if a largemergeout is in progress,smaller ROS containers can also bemerged, thus preventing a buildup of ROS containers.
Reducing Query Run TimeThe run time of queries depends on the complexity of the query, the number of operators in the plan,data volumes, and projection design. If the system is bottlenecked on either I/O or CPU, queriescould runmore slowly than expected. In most cases, high CPU usage can be alleviated by betterprojection design, and high I/O is usually due to contention because of operations like joins andsorts that spill to disk. However, there is no single solution to fix high CPU or high I/O usage, soqueries must be examined and tuned individually.
Two primary ways to determine why a query is slow are:
l Examine the query plan using the EXPLAIN command
l Examine the execution profile by querying the EXECUTION_ENGINE_PROFILES systemtable
Examining the query plan usually reveals one or moremore of the following:
l Suboptimal sort order of a projection
l Cases where predicate evaluation occurs on an unsorted or unencoded column
Note: Although you cannot see that a partitioned hash join occurred in the plan, you can seethat when the optimizer chose a hash join.
l Presence of group by hash rather than pipeline
See Creating Custom Designs to understand projection design techniques. The Database Designerautomatically applies these techniques to suggest optimal designs for queries.
Administrator's Guide
HP Vertica Analytics Platform (7.0.x) Page 672 of 969

Real-Time Profiling
HP Vertica provides profilingmechanisms that let you determine how well the database isperforming. For example, HP Vertica can collect profiling data for a single statement, a singlesession, or for all sessions on all nodes.
Real-time profiling is always "on", without profiling being explicitly enabled.
For details, see in the Profiling Database Performance Administrator's Guide and, in particular:
l Profiling a Single Statement
l About Real-Time Profiling
l Viewing Profiling Data
l Viewing real-time profile data
See Also
l EXECUTION_ENGINE_PROFILES
Administrator's Guide
HP Vertica Analytics Platform (7.0.x) Page 673 of 969

Managing System Resource UsageYou can use the Using System Tables to track overall resource usage on your cluster. These andthe other system tables are described in the SQLReferenceManual.
If your queries are experiencing errors due to resource unavailability, you can use the followingsystem tables to obtain more details:
System Table Description
RESOURCE_REJECTIONS
Monitors requests for resources that are rejected by theResourceManager.
DISK_RESOURCE_REJECTIONS
Monitors requests for resources that are rejected due to disk spaceshortages. SeeManaging Disk Space for more information.
When requests for resources of a certain type are being rejected, do one of the following:
l Increase the resources available on the node by addingmorememory, more disk space, and soon. SeeManaging Disk Space.
l Reduce the demand for the resource by reducing the number of users on the system (seeManaging Sessions), rescheduling operations, and so on.
The LAST_REJECTED_VALUE field in RESOURCE_REJECTIONS indicates the cause of theproblem. For example:
l Themessage Usage of a single requests exceeds high limitmeans that the systemdoes not have enough of the resource available for the single request. A common exampleoccurs when the file handle limit is set too low and you are loading a table with a large number ofcolumns.
l Themessage Timed out or Canceled waiting for resource reservation usuallymeans that there is toomuch contention for the resource because the hardware platform cannotsupport the number of concurrent users using it.
See Alsol Guidelines for Setting Pool Parameters
Managing SessionsHP Vertica provides powerful methods for database administrators to view and control sessions.Themethods vary according to the type of session:
l External (user) sessions are initiated by vsql or programmatic (ODBC or JDBC) connectionsand have associated client state.
Administrator's Guide
HP Vertica Analytics Platform (7.0.x) Page 674 of 969

l Internal (system) sessions are initiated by the HP Vertica database process and have no clientstate.
You can view a list of currently active sessions (including internal sessions) and can interrupt orclose external sessions when necessary, particularly when shutting down the database.
By default HP Vertica allows 50 client sessions and an additional 5 administrator sessions. Youcanmodify connection settings with the MaxClientSessions parameter. For example, to increasethe number of MaxClientSessions to 100, issue the following command at a vsql prompt:
=> SELECT SET_CONFIG_PARAMETER('MaxClientSessions', 100);
To prevent new non-dbadmin sessions from connecting, set MaxClientSessions to 0:
=> SELECT SET_CONFIG_PARAMETER('MaxClientSessions', 0);
Viewing Sessions
HP Vertica provides the SESSIONS table to view the session status of your database. SESSIONScontains information about external sessions and returns one row per session. This table isdescribed in the SQLReferenceManual.
Note: Superuser has unrestricted access to all databasemetadata. Users have significantlyreduced access tometadata based on their privileges. SeeMetadata Privileges.
Interrupting and Closing Sessions
l Interrupting a running statement returns an enclosing session to an idle state, meaning nostatements or transactions are running, no locks are held, and the database is doing no work onbehalf of the session. If no statement is running, you get an error.
l Closing a session interrupts the session and disposes of all state related to the session,including client socket connections for external sessions.
These actions are provided in the form of SQL functions, described in the SQLReferenceManual:
l INTERRUPT_STATEMENT
l CLOSE_SESSION
l CLOSE_ALL_SESSIONS
l SHUTDOWN
SELECT statements that call these functions return when the interrupt or closemessage has beendelivered to all nodes, not after the interrupt or close has completed. This means theremight be a
Administrator's Guide
HP Vertica Analytics Platform (7.0.x) Page 675 of 969

delay after the statement returns and the interrupt or close taking effect throughout the cluster. Todetermine if the session or transaction has ended, you canmonitor the SESSIONS system table.
Controlling Sessions
The database administrator must be able to disallow new incoming connections in order to shutdown the database. On a busy system, database shutdown is prevented if new sessions connectafter the CLOSE_SESSION or CLOSE_ALL_SESSIONS() command is invoked—and before thedatabase actually shuts down.
One option is for the administrator to issue the SHUTDOWN('true') command, which forces thedatabase to shut down and disallow new connections. See SHUTDOWN in the SQLReferenceManual.
Another option is to modify the MaxClientSessions parameter from its original value to 0, in orderto prevent new non-dbadmin users from connecting to the database.
1. Determine the original value for the MaxClientSessions parameter by querying the V_MONITOR.CONFIGURATIONS_PARAMETERS system table:
=> SELECT CURRENT_VALUE FROM CONFIGURATION_PARAMETERS WHERE parameter_name='MaxClientSessions';
CURRENT_VALUE---------------50
(1 row)
2. Set the MaxClientSessions parameter to 0 to prevent new non-dbadmin connections:
=> SELECT SET_CONFIG_PARAMETER('MaxClientSessions', 0);
Note: The previous command allows up to five administrators to log in.
3. Issue the CLOSE_ALL_SESSIONS() command to remove existing sessions:
=> SELECT CLOSE_ALL_SESSIONS();
4. Query the SESSIONS table:
=> SELECT * FROM SESSIONS;
When the session no longer appears in the SESSIONS table, disconnect and run the StopDatabase command.
5. Restart the database.
Administrator's Guide
HP Vertica Analytics Platform (7.0.x) Page 676 of 969

6. Restore the MaxClientSessions parameter to its original value:
=> SELECT SET_CONFIG_PARAMETER('MaxClientSessions', 50);
Administrator's Guide
SQLReferenceManual
See Also
l Configuration Parameters
l Stopping a Database
l Shutdown Problems
l CONFIGURATION_PARAMETERS
l CLOSE_ALL_SESSIONS
l CLOSE_SESSION
l INTERRUPT_STATEMENT
l SESSIONS
l SHUTDOWN
Managing Load StreamsYou can use the Using System Tables to keep track of data being loaded on your cluster.
System Table Description
LOAD_STREAMS Monitors loadmetrics for each load stream on each node.
These and the other SQLMonitoring API system tables are described in detail in the SQLReferenceManual.
When a COPY statement using the DIRECT option is in progress, the ACCEPTED_ROW_COUNT field canincrease to themaximum number of rows in the input file as the rows are being parsed.
If COPY reads input data frommultiple named pipes, the PARSE_COMPLETE_PERCENT field willremain at zero (0) until all named pipes return anEOF. While COPY awaits an EOF frommultiplepipes, it may seem to be hung. Before canceling the COPY statement, however, check yoursystem CPU and disk accesses to see if any activity is in progress.
In a typical load, PARSE_COMPLETE_PERCENT can either increase slowly to 100%, or jump to 100%quickly if you are loading from named pipes or STDIN, while SORT_COMPLETE_PERCENT is at 0.
Administrator's Guide
HP Vertica Analytics Platform (7.0.x) Page 677 of 969

Once PARSE_COMPLETE_PERCENT reaches 100%, SORT_COMPLETE_PERCENT increases to 100%.Depending on the data sizes, a significant lag can occur between the time PARSE_COMPLETE_PERCENT reaches 100% and the time SORT_COMPLETE_PERCENT begins to increase.
Administrator's Guide
HP Vertica Analytics Platform (7.0.x) Page 678 of 969
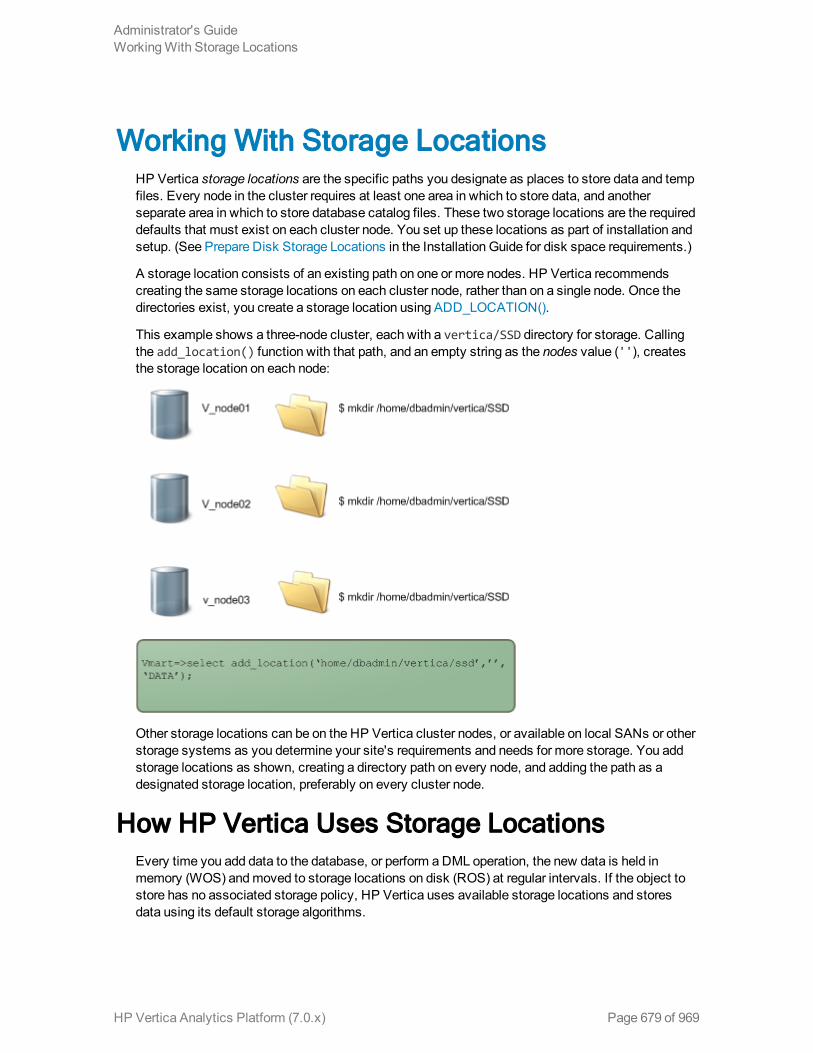
Working With Storage LocationsHP Vertica storage locations are the specific paths you designate as places to store data and tempfiles. Every node in the cluster requires at least one area in which to store data, and anotherseparate area in which to store database catalog files. These two storage locations are the requireddefaults that must exist on each cluster node. You set up these locations as part of installation andsetup. (See Prepare Disk Storage Locations in the Installation Guide for disk space requirements.)
A storage location consists of an existing path on one or more nodes. HP Vertica recommendscreating the same storage locations on each cluster node, rather than on a single node. Once thedirectories exist, you create a storage location using ADD_LOCATION().
This example shows a three-node cluster, each with a vertica/SSD directory for storage. Callingthe add_location() function with that path, and an empty string as the nodes value (''), createsthe storage location on each node:
Other storage locations can be on the HP Vertica cluster nodes, or available on local SANs or otherstorage systems as you determine your site's requirements and needs for more storage. You addstorage locations as shown, creating a directory path on every node, and adding the path as adesignated storage location, preferably on every cluster node.
How HP Vertica Uses Storage LocationsEvery time you add data to the database, or perform aDML operation, the new data is held inmemory (WOS) andmoved to storage locations on disk (ROS) at regular intervals. If the object tostore has no associated storage policy, HP Vertica uses available storage locations and storesdata using its default storage algorithms.
Administrator's GuideWorkingWith Storage Locations
HP Vertica Analytics Platform (7.0.x) Page 679 of 969

If the object to store has a storage policy, HP Vertica stores the object's data at the default labeledlocation. See Creating Storage Policies.
If storage locations are no longer required at your site, you can retire or drop them, as described inRetiring Storage Locations and Dropping Storage Locations.
Viewing Storage Locations and PoliciesYou canmonitor information about available storage, location labels, and your site's current storagepolicies.
Viewing Disk Storage InformationQuery the V_MONITOR.DISK_STORAGE system table for disk storage information on eachdatabase node. For more information, seeMonitoring Using System Tables and Altering StorageLocation Use.
Note: The V_MONITOR.DISK_STORAGE system table includes a CATALOG annotation,indicating that the location is used to store catalog files. You cannot add or remove a catalogstorage location. HP Vertica creates andmanages this storage location internally, and the areaexists in the same location on each cluster node.
Viewing Location LabelsThree system tables have information about storage location labels in their location_labelscolumns:
l storage_containers
l storage_locations
l partitions
Use a query such as the following for relevant columns of the storage_containers system table:
VMART=> select node_name,projection_name, location_label from v_monitor.storage_containers;
node_name | projection_name | location_label------------------+----------------------+-----------------v_vmart_node0001 | states_p_node0001 |v_vmart_node0001 | states_p_node0001 |v_vmart_node0001 | t1_b1 |v_vmart_node0001 | newstates_b0 | FAST3v_vmart_node0001 | newstates_b0 | FAST3v_vmart_node0001 | newstates_b1 | FAST3v_vmart_node0001 | newstates_b1 | FAST3v_vmart_node0001 | newstates_b1 | FAST3...
Administrator's GuideWorkingWith Storage Locations
HP Vertica Analytics Platform (7.0.x) Page 680 of 969

Use a query such as the following for columns of the v_catalog.storage_locations system_table:
VMart=> select node_name, location_path, location_usage, location_label from storage_locations;
node_name | location_path | location_usage | location_label------------------+-------------------------------------------+----------------+----------------v_vmart_node0001 | /home/dbadmin/VMart/v_vmart_node0001_data | DATA,TEMP |v_vmart_node0001 | home/dbadmin/SSD/schemas | DATA |v_vmart_node0001 | /home/dbadmin/SSD/tables | DATA | SSDv_vmart_node0001 | /home/dbadmin/SSD/schemas | DATA | Schemav_vmart_node0002 | /home/dbadmin/VMart/v_vmart_node0002_data | DATA,TEMP |v_vmart_node0002 | /home/dbadmin/SSD/tables | DATA |v_vmart_node0002 | /home/dbadmin/SSD/schemas | DATA |v_vmart_node0003 | /home/dbadmin/VMart/v_vmart_node0003_data | DATA,TEMP |v_vmart_node0003 | /home/dbadmin/SSD/tables | DATA |v_vmart_node0003 | /home/dbadmin/SSD/schemas | DATA |
(10 rows)
Use a query such as the following for columns of the v_monitor.partitions system table:
VMART=> select partition_key, projection_name, location_label from v_monitor.partitions;partition_key | projection_name | location_label
---------------+----------------------+---------------NH | states_b0 | FAST3MA | states_b0 | FAST3VT | states_b1 | FAST3ME | states_b1 | FAST3CT | states_b1 | FAST3...
Viewing Storage TiersQuery the storage_tiers system table to see the labeled and unlabeld storage containers andinformation about both:
VMart=> select * from v_monitor.storage_tiers;location_label | node_count | location_count | ros_container_count | total_occupied_size
----------------+------------+----------------+---------------------+---------------------
| 1 | 2 | 17 | 297039391SSD | 1 | 1 | 9 | 1506Schema | 1 | 1 | 0 | 0
(3 rows)
Viewing Storage PoliciesQuery the storage_policies system table to view the current storage policy in place.
Administrator's GuideWorkingWith Storage Locations
HP Vertica Analytics Platform (7.0.x) Page 681 of 969

VMART=> select * from v_monitor.storage_policies; schema_name | object_name | policy_details | location_label-------------+-------------+------------------+-----------------
| public | Schema | F4 public | lineorder | Partition [4, 4] | M3(2 rows)
Adding Storage LocationsConfiguring new storage locations provides additional space, and lets you control what type of datato store at a location. You can add a new storage location from one node to another node, or from asingle node to all cluster nodes. Do not use a shared directory on one node for other cluster nodes toaccess.
You can add and configure storage locations (other than the required defaults) to provide additionalstorage for these purposes:
l Isolating execution engine temporary files from data files.
l Creating labeled locations to use in storage policies.
l Creating a storage locations based on predicted or measured access patterns.
l Creating USER storage locations for specific users or user groups.
Planning Storage LocationsAdding a storage location requires minimal planning:
l Verify that the directory you plan to use for a storage location destination is an empty directorywith write permissions for the HP Vertica process.
l Plan the labels to use if you want to label the location as you create it.
l Determine the type of information to store in the storage location:
n DATA—Persistent data and temp table data
n TEMP—Temporary files that are generated and dumped to disk such as those generated bysort, group by, join, and so on
n DATA,TEMP—Both data and temp files (the default)
n USER—Gives access to non-dbadmin users so they can use the storage location afterbeing granted read or write privileges. You cannot assign this location type for use in astorage policy.
Tip: Storing temp and data files in different storage locations is advantageous because the
Administrator's GuideWorkingWith Storage Locations
HP Vertica Analytics Platform (7.0.x) Page 682 of 969

two types of data have different disk I/O access patterns. Temp data is distributed acrosslocations based on available storage space, while data can be stored on different storagelocations based on predicted or measured access patterns.
Adding the LocationMake a directory at the path to use for storage. For example:
$ mkdir /home/dbadmin/storage/SSD
HP Vertica recommends that you create the same directory path on each cluster node. This is thepath to use when creating a storage location.
Use the ADD_LOCATION() function add a storage location.
1. Specify the new data directory path to the host, the node where the location is available(optional), and the type of information to be stored. If you specify the node as an empty string(''), the function creates the storage locations on all cluster nodes in a single transaction.
Note: For user access (non-dbadmin users), youmust create the storage location with theUSER usage type. You cannot change an existing storage location to have USERaccess. Once a USER storage location exists, you can grant one or more users access tothe area. User areas can store only data files, not temp files. You cannot assign a USERstorage location to a storage policy.
The following example adds a location available on all nodes to store only data:
SELECT ADD_LOCATION ('/secondVerticaStorageLocation/' , '' , 'DATA');
The following example adds a location that is available on only the initiator node to store dataand temporary files:
SELECT ADD_LOCATION ('/secondVerticaStorageLocation/');
2. If you are using a storage location for data files and want to create ranked storage locations,where columns are stored on different disks based on their measured performance, you shouldfirst:
a. Measure the performance of the storage location.
b. Set the performance of the storage location.
Note: Once a storage location exists, you can alter the type of information it stores, with some
Administrator's GuideWorkingWith Storage Locations
HP Vertica Analytics Platform (7.0.x) Page 683 of 969

restrictions. See Altering Storage Location Use.
Storage Location SubdirectoriesYou cannot create a storage location in a subdirectory of an existing location. For example, if youcreate a storage location at one location, you cannot add a second storage location in asubdirectory of the first:
dbt=> select add_location ('/myvertica/Test/KMM','','DATA','SSD');add_location
------------------------------------------/myvertica/Test/KMM added.
(1 row)dbt=> select add_location ('/myvertica/Test/KMM/SSD','','DATA','SSD');ERROR 5615: Location [/myvertica/Test/KMM/SSD] conflicts with existing location [/myvertica/Test/KMM] on node v_node0001ERROR 5615: Location [/myvertica/Test/KMM/SSD] conflicts with existing location [/myvertica/Test/KMM] on node v_node0002ERROR 5615: Location [/myvertica/Test/KMM/SSD] conflicts with existing location [/myvertica/Test/KMM] on node v_node0003
Adding Labeled Storage LocationsYou can add a storage location with a descriptive label. You use labeled locations to set up storagepolicies for your site. See Creating Storage Policies.
This example creates a storage location on v_vmart_node0002with the label SSD:
VMART=> select add_location ('/home/dbadmin/SSD/schemas','v_vmart_node0002', 'data', 'SSD');
add_location-------------------------------------/home/dbadmin/SSD/schemas added.(1 row)
This example adds a new DATA storage location with a label, SSD. The label identifies the locationwhen you create storage policies. Specifying the node parameter as an empty string adds thestorage location to all cluster nodes in a single transaction:
VMART=> select add_location ('home/dbadmin/SSD/schemas', '', 'DATA', 'SSD');add_location
---------------------------------home/dbadmin/SSD/schemas added.
(1 row)
The new storage location is listed in the v_monitor.disk_storage system table:
VMART=> select * from v_monitor.disk_storage;..
Administrator's GuideWorkingWith Storage Locations
HP Vertica Analytics Platform (7.0.x) Page 684 of 969

.-[ RECORD 7 ]-----------+-----------------------------------------------------node_name | v_vmart_node0002storage_path | /home/dbadmin/SSD/schemasstorage_usage | DATArank | 0throughput | 0latency | 0storage_status | Activedisk_block_size_bytes | 4096disk_space_used_blocks | 1549437disk_space_used_mb | 6053disk_space_free_blocks | 13380004disk_space_free_mb | 52265disk_space_free_percent | 89%...
Adding a Storage Location for USER AccessYou can create USER storage locations for a non-dbadmin user to access the storage locationonce granted appropriate privileges.
The following examples create a storage location, BillyBobStore, with a USER usage parameter,on node v_mcdb_node0007:
dbadmin=> SELECT ADD_LOCATION('/home/dbadmin/UserStorage/BillyBobStore','v_mcdb_node0007', 'USER');
ADD_LOCATION-------------------------------------------/home/dbadmin/UserStorage/BillyBobStore' added.
(1 row)
Note: A data location can already exist and be in use before you identify it as a storage locationwith the ADD_LOCATION function. For instance, as a superuser, you can set up an area in whichto store and test external tables. When you are ready for user BOB to access the location, youadd a storage location at the path you used for testing and grant BOB the required privileges.
The following example grants user BillyBobREAD/WRITE permissions to the /BillyBobStorelocation:
dbadmin=> GRANT ALL ON LOCATION '/home/dbadmin/UserStorage/BillyBobStore' TO BillyBob;GRANT PRIVILEGE
Formore information about configuring user privileges, seeManaging Users and Privileges in theAdministrator's Guide and theGRANT (Storage Location) and REVOKE (Storage Location)functions in the SQLReferenceManual.
Administrator's GuideWorkingWith Storage Locations
HP Vertica Analytics Platform (7.0.x) Page 685 of 969

Altering Storage Location UseYou canmake changes to the type of files that HP Vertica stores at a storage location, with theserestrictions:
l Labeled locations can be used only to store DATA files.
l You cannot change labeled storage to TEMP or DATA, or TEMP.
l Storage locations created with the USER option can store only DATA files.
Tomodify a storage location, use the ALTER_LOCATION_USE function.
This example alters the storage location on v_vmartdb_node0004 to store only data files:
=> SELECT ALTER_LOCATION_USE ('/thirdVerticaStorageLocation/' , 'v_vmartdb_node0004' , 'DATA');
USER Storage Location RestrictionsYou cannot change a storage location from aUSER usage type if you created the location that way,or to a USER type if you did not. You can change a USER storage location to specify DATA(storing TEMP files is not supported). However, doing so does not affect the primary objective of aUSER storage location, to be accessible by non-dbadmin users with assigned privileges.
Effects of Altering Storage Location UseBefore altering a storage location use type, at least one locationmust remain for storing data andtemp files on a node. Data and temp files can be stored in the same, or separate, storage locations.
Altering an existing storage location has the following effects:
Alter usefrom:
Tostoreonly: Has this effect:
Temp and datafiles (or Dataonly)
Tempfiles
Data content eventually merged out throughATM, per its policies.Youcan alsomerge out data from the storage locationmanually using DO_TM_TASK.
The location stores only temp files from that point forward.
Temp and datafiles (or Temponly)
Datafiles
Continues to run all statements that use temp files (such as queriesand loads).
Subsequent statements no longer use the changed storage location fortemp files, and the location stores only data files from that pointforward.
Administrator's GuideWorkingWith Storage Locations
HP Vertica Analytics Platform (7.0.x) Page 686 of 969

Altering Location LabelsYou can add a label to an unlabeled storage location, change an existing label, or remove a label byspecifying an empty string for the location-label parameter. You can also use this function toperform cluster-wide operations, by specifying an empty string for the function's node parameter('').
Note: If you label an existing storage location that already contains data, and then include thelabeled location in one or more storage policies, existing data could bemoved. If theATMdetermines data stored on a labeled location does not comply with a storage policy, the ATMmoves the data elsewhere.
Adding a Location LabelTo alter a location label, use the ALTER_LOCATION_LABEL function. The illustration shows howto add a location label, ('SSD'), to the existing storage locations on all cluster nodes (''):
Removing a Location LabelThe next example removes the SSD label for the storage location on all nodes by specifying emptystrings ('') for both node and location_label parameters:
VMART=> select alter_location_label('/home/dbadmin/SSD/tables','', '');alter_location_label
Administrator's GuideWorkingWith Storage Locations
HP Vertica Analytics Platform (7.0.x) Page 687 of 969

------------------------------------------/home/dbadmin/SSD/tables label changed.
(1 row)
Note: You cannot remove a location label if the name being removed is used in a storagepolicy, and the location from which you are removing the label is the last available storage forits associated objects.
Effects of Altering a Location LabelAltering a location label has the following effects:
Alterlabel: To: Has this effect:
Noname
Newlabel
Lets you use the labeled storage within a storage policy. See note aboveregarding data storage beingmoved to other locations if you add a label to astorage location with existing data.
Existingname
Newname
You can use the new label in a storage policy. If the existing name is used in astorage policy, you cannot change the label.
Existingname
Noname
You cannot use an unlabeled storage in a storage policy. If the existing nameis used in a storage policy, you cannot remove the label.
Creating Storage PoliciesYou create a storage policy to associate a database object with a labeled storage location usingthe SET_OBJECT_STORAGE_POLICY function. Once a storage policy exists, HP Vertica uses thelabeled location as the default storage location for the object data. Storage policies let youdetermine where to store your critical data. For example, you can create a storage location with thelabel SSD representing the fastest available storage on the cluster nodes, and then create storagepolicies to associate tables with that labeled location. One storage policy can exist per databaseobject.
Note: You cannot include temporary files in storage policies. Storage policies are for use onlywith data files, and only on storage locations for DATA, not USER locations.
You can create a storage policy for any database object (database, schemas, tables, and partitionranges). Each time data is loaded and updated, HP Vertica checks to see whether the object has astorage policy. If it does, HP Vertica automatically uses the labeled storage location. If no storagepolicy exists for an object, or its parent entities, data storage processing continues using standardstorage algorithms on available storage locations. If all storage locations are labeled, HP Verticauses one of them.
Administrator's GuideWorkingWith Storage Locations
HP Vertica Analytics Platform (7.0.x) Page 688 of 969

Creating one or more storage policies does not require that policies exist for all database objects. Asite can support objects with or without storage policies. You can add storage policies for a discreteset of priority objects, and let other objects exist without a policy, so they use available storage.
Creating Policies Based on Storage PerformanceYou canmeasure the performance of any disk storage location (seeMeasuring StoragePerformance). Then, using the performancemeasurements, set the storage location performance.HP Vertica uses the performancemeasurements you set to rank its storage locations and, throughranking, to determine which key projection columns to store on higher performing locations, asdescribed in Setting Storage Performance.
If you have already set the performance of your site's storage locations, and decide to use storagepolicies, any storage location with an associated policy has a higher priority than the storageranking setting.
Storage Levels and PrioritiesHP Vertica assigns storage levels to database objects. The database is the highest storage level(since nothing exists above the database level), and partitionmin_ andmax_key ranges areconsidered the lowest level objects. In addition to storage levels, storage priorities exist. The lowerthe storage level of an object, the higher its storage priority.
Consider this example of database objects, listed in storage level order, with the highest level,Sales database, first:
Object Storage Level Storage Policy Storage Priority Labeled Location
Sales (database) Highest YES Lower STANDARD
Region (schema) Medium NO Medium N/A
Income (table) Lower YES Higher/highest FAST
Month (partitions) Lowest NO Highest N/A
Storage policies exist for the database and table objects, with default storage on the locationsSTANDARD and FAST, respectively.
When TM operations occur, such as moveout andmergeout, table data has the highest priority (inthis case). The TMmoves data from ROS toWOS to the FAST labeled location.
Any schema data changes are prioritized after table data. Since the Region schema has no storagepolicy, HP Vertica searches up the storage levels for a policy. In this case, that is the Salesdatabase itself. If a database storage policy is in effect, Region schema data is moved from ROStoWOS to the STANDARD storage location, using its parent object's default storage location.
If the Sales database object had no storage policy, the TM operations would use existing storagelocations andmechanisms.
Administrator's GuideWorkingWith Storage Locations
HP Vertica Analytics Platform (7.0.x) Page 689 of 969

Using the SET_OBJECT_STORAGE_POLICYFunction
To set a storage policy, use the SET_OBJECT_STORAGE_POLICY function.
This example sets a storage policy for the table states to use the storage labeled SSD as its defaultlocation:
VMART=> select set_object_storage_policy ('states', 'SSD');set_object_storage_policy
-----------------------------------Default storage policy set.
(1 row)
You can query existing storage policies, listed in the location_label column of the v_monitor.storage_containers system table:
VMART=> select node_name, projection_name, storage_type, location_label from v_monitor.storage_containers;
node_name | projection_name | storage_type | location_label------------------+----------------------+--------------+---------------v_vmart_node0001 | states_p_node0001 | ROS |v_vmart_node0001 | states_p_node0001 | ROS |v_vmart_node0001 | t1_b1 | ROS |v_vmart_node0001 | newstates_b0 | ROS | LEVEL3v_vmart_node0001 | newstates_b0 | ROS | LEVEL3v_vmart_node0001 | newstates_b1 | ROS | LEVEL3v_vmart_node0001 | newstates_b1 | ROS | LEVEL3v_vmart_node0001 | newstates_b1 | ROS | LEVEL3v_vmart_node0001 | states_p_v1_node0001 | ROS | LEVEL3v_vmart_node0001 | states_p_v1_node0001 | ROS | LEVEL3v_vmart_node0001 | states_p_v1_node0001 | ROS | LEVEL3v_vmart_node0001 | states_p_v1_node0001 | ROS | LEVEL3v_vmart_node0001 | states_p_v1_node0001 | ROS | LEVEL3v_vmart_node0001 | states_p_v1_node0001 | ROS | LEVEL3v_vmart_node0001 | states_b0 | ROS | SSDv_vmart_node0001 | states_b0 | ROS | SSDv_vmart_node0001 | states_b1 | ROS | SSDv_vmart_node0001 | states_b1 | ROS | SSDv_vmart_node0001 | states_b1 | ROS | SSD
.
.
.
Effects of Creating Storage PoliciesCreating storage policies has the following effects:
Administrator's GuideWorkingWith Storage Locations
HP Vertica Analytics Platform (7.0.x) Page 690 of 969

Createpolicyfor... Storage effect:
Database The highest storage level and the lowest storage priority. This is the default policywhen no lower-level or higher priority policies exist. At storage time, HP Vertica usesthe database policy for all objects without storage policies.
Schema Themid-level storage, also with amedium priority, compared to lower storage levelobjects. If a table's schema has no policy, the TM searches the next higher level, thedatabase, using that policy, if it exists. If it does not, the TM uses existing storagemechanisms.
Table A lower storage level than a schema, with the highest storage priority, if no policyexists for the table's partition key ranges. If a table has no storage policy, HP Verticachecks the next higher storage level (the schema) for a policy and uses that. If theschema has no policy, it checks the next higher level, the database, and uses that. Ifno database policy exists, the TM uses existing storagemechanisms.
Partitionmin_keyandmax_keyranges
The lowest level policy that can be in effect. During storage processing, partition keyranges with a policy have the highest priority. If no policy exists, the parent table ischecked, and so on as described for the other database objects.
Moving Data Storage LocationsYou can use the SET_OBJECT_STORAGE_POLICY function tomove data storage from an existinglocation (labeled or not) to another labeled location. Using this function accomplishes two tasks:
1. Creates a new storage policy for the object.
-or-
Updates an existing policy to the target labeled location.
2. Moves all existing data for the specified object(s) to the target storage location.
Moving existing data occurs as part of the next TMmoveout activity. Alternatively, you can enforcethe datamove to occur in the current transaction using the function's force_storage_moveparameter.
Before actually moving the object to the target storage location, HP Vertica calculates the requiredstorage and checks available space at the target. If there is insufficient free space, the functiongenerates an error and stops execution. The function does not attempt to find sufficient storage atanother location.
Note: Checking available space on the new target location before starting tomove data cannotguarantee space will continue to exist during amove execution. However, checking target
Administrator's GuideWorkingWith Storage Locations
HP Vertica Analytics Platform (7.0.x) Page 691 of 969

space does prevent attempts tomove any data if insufficient space is available.
Moving Data Storage While Setting a Storage PolicyYou can use the SET_OBJECT_STORAGE_POLICY function to update an existing storage policy, orcreate a new policy, andmove object data to a new or different labeled storage location. Thefollowing example uses the function to set a storage policy for the table object states, and tomovethe table's existing stored data to the labeled location, SSD. You force themove to occur during thefunction transaction by specifying the last parameter as true:
VMart=> select set_object_storage_policy('states', 'SSD', 'true');set_object_storage_policy
------------------------------------------------------------------------------------------------Object storage policy set.
Task: moving storages(Table: public.states) (Projection: public.states_p1)(Table: public.states) (Projection: public.states_p2)(Table: public.states) (Projection: public.states_p3)(1 row)
Note: Moving an object's current storage to a new target is a cluster-wide operation, so afailure on any node results in a warningmessage. The function then attempts to continueexecuting on other cluster nodes.
You can view the storage policies that are in effect:
VMart=> select * from storage_policies;schema_name | object_name | policy_details | location_label
-------------+-------------+----------------+----------------public | states | Table | SSD
(1 row)
Effects of Moving a Storage LocationMoving an object from one labeled storage location to another has the following effects:
Administrator's GuideWorkingWith Storage Locations
HP Vertica Analytics Platform (7.0.x) Page 692 of 969

Object type: Effect:
Schema or table If data storage exists, moves data from source to target destination. Sourcedata can reside on a labeled or unlabeled storage location, but will bemovedto specified labeled location.
Cluster nodes unavailable when existing data is copied are updated by theTM when they rejoin the cluster (unless you enforce datamoving as part ofthe function transaction, specifying last parameter as true).
If a storage policy was in effect, the default storage location changes fromthe source to target location for all future TM operations, such as moveoutandmergeout activities.
Table withspecified partitionmin-keys andmax_keys
Sets a policy or moves existing data only for the key_min and key_maxranges. Separate partition key ranges can have different storage policiesfrom other ranges, or from the parent table.
Clearing Storage PoliciesYou can clear a storage policy by object name after you have defined storage policies. To seeexisting policies, query the storage_policies system table, described in Viewing StorageLocations and Policies.
To clear a storage policy, use the CLEAR_OBJECT_STORAGE_POLICY function, specifying theobject name associated with the labeled location:
release=> select clear_object_storage_policy('lineorder'); clear_object_storage_policy ----------------------------------- Default storage policy cleared.(1 row)
Effects on Same-Name Storage PoliciesThe effects of clearing a storage policy depend on which policy you clear.
For example, consider the following storage. The table lineorder has a storage policy for defaultstorage to the location label F2, and the table's partition ranges, also lineorder objects, havestorage policies for other default storage locations:
release=> select * from v_monitor.storage_policies; schema_name | object_name | policy_details | location_label------------------+-------------------+------------------+----------------
| public | Schema | F4public | lineorder | Table | F2
public | lineorder | Partition [0, 0] | F1 public | lineorder | Partition [1, 1] | F2 public | lineorder | Partition [2, 2] | F4
Administrator's GuideWorkingWith Storage Locations
HP Vertica Analytics Platform (7.0.x) Page 693 of 969

public | lineorder | Partition [3, 3] | M1 public | lineorder | Partition [4, 4] | M3(7 rows)
For this example, clearing the storage policy for an objected named lineorder, removes the policyfor the table, while retaining storage policies for its partitions, which have their own policies.
The function determines which lineorder object policy to clear because no partition range valuesare specified in the function call:
release=> select clear_object_storage_policy('lineorder');clear_object_storage_policy
------------------------------------- Default storage policy cleared.(1 row)release=> select * from v_monitor.storage_policies; schema_name | object_name | policy_details | location_label-------------+-------------+------------------+----------------
| public | Schema | F4 public | lineorder | Partition [0, 0] | F1 public | lineorder | Partition [1, 1] | F2 public | lineorder | Partition [2, 2] | F4 public | lineorder | Partition [3, 3] | M1 public | lineorder | Partition [4, 4] | M3(6 rows)
Further, using a partition key range with the lineorder object name clears the storage policy foronly the specified partition range(s). The storage policy for the parent table objects, and otherpartition ranges persist:
release=> select clear_object_storage_policy ('lineorder','0','3');clear_object_storage_policy
------------------------------------- Default storage policy cleared.(1 row)release=> select * from storage_policies; schema_name | object_name | policy_details | location_label-------------+-------------+------------------+----------------
| public | Schema | F4public | lineorder | Table | F2
public | lineorder | Partition [4, 4] | M3(2 rows)
Measuring Storage PerformanceHP Vertica lets youmeasure disk I/O performance on any storage location at your site. You canuse the returnedmeasurements to set performance so that it has a rank. Depending on your storageneeds, you can also use performance to determine the storage locations to use for critical data aspart of your site's storage policies. Storage performancemeasurements are applicable only toDATA storage locations, not temporary storage locations.
Administrator's GuideWorkingWith Storage Locations
HP Vertica Analytics Platform (7.0.x) Page 694 of 969

Measuring storage location performance calculates the time it takes to read and write 1MB of datafrom the disk, which equates to:
IO time = time to read/write 1MB + time to seek = 1/throughput + 1/Latency
l Throughput is the average throughput of sequential reads/writes (units in MB per second)
l Latency is for random reads only in seeks (units in seeks per second)
Thus, the I/O time of a faster storage location is less than a slower storage location.
Note: Measuring storage location performance requires extensive disk I/O, which is aresource-intensive operation. Consider starting this operation when fewer other operations arerunning.
HP Vertica has two ways tomeasure storage location performance, depending on whether thedatabase is running. Bothmethods return the throughput and latency for the storage location.Record or capture the throughput and latency information so you can use it to set the locationperformance (see Setting Storage Performance).
Measuring Performance on a Running HP VerticaDatabase
Use theMEASURE_LOCATION_PERFORMANCE() function tomeasure performance for astorage location when the database is running. This function has the following requirements:
l The storage pathmust already exist in the database.
l You need RAM*2 free space available in a storage location tomeasure its performance. Forexample, if you have 16GB RAM, you need 32GB of available disk space. If you do not haveenough disk space, the function errors out.
Use the system table DISK_STORAGE to obtain information about disk storage on each databasenode.
The following examplemeasures the performance of a storage location on v_vmartdb_node0004:
=> SELECT MEASURE_LOCATION_PERFORMANCE('/secondVerticaStorageLocation/','v_vmartdb_node0004');WARNING: measure_location_performance can take a long time. Please check logs for progress
measure_location_performance--------------------------------------------------Throughput : 122 MB/sec. Latency : 140 seeks/sec
Administrator's GuideWorkingWith Storage Locations
HP Vertica Analytics Platform (7.0.x) Page 695 of 969

Measuring Performance Before a Cluster Is Set UpYou canmeasure disk performance before setting up a cluster. This is useful for verifying that thedisk is functioning within normal parameters. This method requires only that HP Vertica beinstalled.
Tomeasure disk performance, use the following vsql command:
opt/vertica/bin/vertica -m <path to disk mount>
For example:
opt/vertica/bin/vertica -m /secondVerticaStorageLocation/node0004_data
Setting Storage PerformanceYou can use themeasurements returned from theMEASURE_LOCATION_PERFORMANCEfunction as input values to the SET_LOCATION_PERFORMANCE() function.
Note: Youmust set the throughput and latency parameters of this function to 1 or more.
The following example sets the performance of a storage location on v_vmartdb_node0004 to athroughput of 122MB/second and a latency of 140 seeks/second. These were the values returnedfor this location from theMEASURE_LOCATION_PERFORMANCE function.
=> SELECT SET_LOCATION_PERFORMANCE(v_vmartdb_node0004','/secondVerticaStorageLocation/','122','140');
How HP Vertica Uses Location Performance SettingsOnce set, HP Vertica automatically uses performance data to rank storage locations whenever itstores projection columns.
HP Vertica stores columns included in the projection sort order on the fastest storage locations.Columns not included in the projection sort order are stored on slower disks. Columns for eachprojection are ranked as follows:
l Columns in the sort order are given the highest priority (numbers > 1000).
l The last column in the sort order is given the rank number 1001.
l The next-to-last column in the sort order is given the rank number 1002, and so on until the firstcolumn in the sort order is given 1000 + # of sort columns.
l The remaining columns are given numbers from 1000–1, starting with 1000 and decrementing byone per column.
Administrator's GuideWorkingWith Storage Locations
HP Vertica Analytics Platform (7.0.x) Page 696 of 969

HP Vertica then stores columns on disk from the highest ranking to the lowest ranking, with thehighest ranking columns placed on the fastest disks, and the lowest ranking columns placed on theslowest disks.
Using Location Performance Settings With StoragePolicies
After measuring location performance, and setting it in the HP Vertica database, you can also usethe performance results to determine the fastest storage to use in your storage policies. Thelocations with the highest performance can be set as the default locations for critical data. Slowerlocations can become default locations for older, or less-important data, or may not require policiesat all if you do not want to specify default locations.
Data is stored as follows, depending on whether a storage policy exists:
StoragePolicy Label
#Locations HP Vertica Action
No No Multiple Uses ranking (as described), choosing a location from alllocations that exist.
Yes Yes Single Uses that storage location exclusively.
Yes Yes Multiple Ranks storage (as described) among all same-name labeledlocations.
Dropping Storage LocationsTo drop a storage location, use the DROP_LOCATION() function. The following example drops astorage location on v_vmartdb_node0002 that was used to store temp files:
=> SELECT DROP_LOCATION('/secondVerticaStorageLocation/' , 'v_vmartdb_node0002');
Dropping a storage location is a permanent operation and cannot be undone. When you drop astorage location, the operation cascades to associated objects including any granted privileges tothe storage. If the storage was being used for external table access, subsequent queries on theexternal table will fail with a COPY COMMAND FAILED message.
Since dropping a storage location cannot be undone, HP recommends that you consider first retiringa storage location (see Retiring Storage Locations). Retiring a storage location before dropping itlets you verify that there will be no adverse effects on any data access. Additionally, you canrestore a retired storage location (see Restoring Retired Storage Locations).
Altering Storage Locations Before Dropping ThemYou can drop only storage locations containing temp files. If you alter a storage location to theTEMP usage type so that you can drop it, and data files still exist on the storage, HP Vertica
Administrator's GuideWorkingWith Storage Locations
HP Vertica Analytics Platform (7.0.x) Page 697 of 969

prevents you from dropping the storage location. Deleting data files does not clear the storagelocation, and can result in database corruption. To handle a storage area containing data files sothat you can drop it, use one of these options:
l Manually merge out the data files
l Wait for theATM to mergeout the data files automatically
l Manually drop partitions
Dropping USER Storage LocationsStorage locations that you create with the USER usage type can contain only data files, not tempfiles. However, unlike a storage location not designated for USER access, you can drop a USERlocation, regardless of any remaining data files.
Retiring Storage LocationsTo retire a storage location, use the RETIRE_LOCATION() function.
The following example retires a storage location on v_vmartdb_node0004:
=> SELECT RETIRE_LOCATION('/secondHP VerticaStorageLocation/' , 'v_vmartdb_node0004');
Retiring a location prevents HP Vertica from storing data or temp files to it, but does not remove theactual location. Any data previously stored on the retired location is eventually merged out by theAutomatic Tuple Mover (ATM) per its policies.
Note: You cannot retire a location if it is used in a storage policy, and is the last availablestorage for its associated objects.
Data and temp files can be stored in one, or separate, storage locations. If the location you areretiring was used to store temp files only, you can remove it. See Dropping Storage Locations.
Restoring Retired Storage LocationsYou can restore a previously retired storage location that continues to be used in queries. Oncerestored, HP Vertica re-ranks the storage location and uses the restored location to process queriesas determined by its rank.
Use the RESTORE_LOCATION() function to restore a retired storage location.
The following example restores a retired storage location on v_vmartdb_node0004:
=> SELECT RESTORE_LOCATION('/secondHP VerticaStorageLocation/' , 'v_vmartdb_node0004');
Administrator's GuideWorkingWith Storage Locations
HP Vertica Analytics Platform (7.0.x) Page 698 of 969

Backing Up and Restoring the DatabaseCreating regular database backups is an important part of basic maintenance tasks at your site.HPVertica supplies a comprehensive utility, the vbr.py Python script. The utility lets you back up,restore, list backups, and copy your database to another cluster. You can create full andincremental database backups, as well as backups of schemas or tables (object-level backups) foruse with amultitenant database. Once a full backup exists, you can restore one or more objectsfrom the backup, or the entire database as required.
Using vbr.py, you can save your data to a variety of locations:
l A local directory on the nodes in the cluster
l One ormore hosts outside of the cluster
l A different HP Vertica cluster (effectively cloning your database)
Note: Saving a database backup on a different cluster does not provide Disaster Recovery.The cloned database you create with vbr.py is entirely separate from the original, and is notkept in sync with the database from which it is cloned.
Compatibility Requirements for Using vbr.pyCreating backups with vbr.py requires restoring backups with the same utility. The vbr.py scriptsupports creating and restoring backups between 6.x versions. Object-level backups were notsupported before HP Vertica 6.x.
HP Vertica does not support restoring a backup created in 5.x after you have upgraded to 6.x.
The backup and restore scripts used in 5.x and earlier, backup.sh and restore.sh, are obsolete.The vbr.py utility is incompatible with these scripts. If you created backups using the obsoletebackup.sh script, youmust restore them with restore.sh.
Automating Regular BackupsThe vbr.py utility helps to automate backing up your database, because you can configure vbrwith the required runtime parameters in a script. The ability to configure runtime parametersfacilitates adding the utility to a cron or other task scheduler to fully automate regular databasebackups.
Types of BackupsThe vbr.pyutility supports several kinds of backups:
Administrator's GuideBacking Up and Restoring the Database
HP Vertica Analytics Platform (7.0.x) Page 699 of 969

l Full backups
l Object-level backups
l Hard link local backups
You can refer to full or object-level backups by a user-defined descriptive name, such asFullDBSnap, Schema1Bak, Table1Bak, and so on.
Note: This section uses backup as a noun (create a full backup), and back up as amulti-wordverb (be sure to back up the database).
Full BackupsA full backup is a complete copy of the database catalog, its schemas, tables, and other objects. Itis a consistent image, or snapshot, of the database at the time the backup occurred. You can use afull backup for disaster recovery to restore a damaged or incomplete database. You can also restoreobjects from a full backup .
Once a full backup exists, vbr.py creates incremental backups as successive snapshots followingthe full-backup, consisting of new or changed data since the last full, or incremental, backupoccurred.
Archives consist of a collection of same-name backups. Each archive can have a different retentionpolicy. For example, if TBak is the name of an object-level backup of table T, and you create a dailybackup each week, the seven backups are part of the TBak archive. Keeping a backup archive letsyou revert back to any one of the saved backups.
Full and object-level backups reside on backup hosts, the computer system(s) on which backupsand archives are stored. For more information about backup hosts, see Configuring Backup Hosts.
Backups are saved in a specific backup location, the directory on a backup host. This location cancomprisemultiple backups, including associated archives. All backups in the same backup locationshare data files (through hard links). The backups are also compatible, meaning that you canrestore any object-level backup from the same location, after restoring a full database backup.
Object-Level BackupsAn object-level backup consists of one or more schemas or tables, or a group of such objects. Theconglomerate parts of the object-level backup do not contain the entire database. Once an object-level backup exists, you can restore all of its contents, but not individually. You can restore one ormore objects from a full backup.
Object level backups consist of three object types:
Selective objects Objects you choose to be part of an object-level backup. For example,if you specify tables T1 and T2 to include in an object-level backup,they are the selected objects.
Administrator's GuideBacking Up and Restoring the Database
HP Vertica Analytics Platform (7.0.x) Page 700 of 969

Dependent objects Objects that must be included as part of an object-level backup due todependencies. For example, to create an object-level backup thatincludes a table with a foreign key, vbr.py automatically includes theprimary key table due to table constraints. Projections anchored on atable in the selected objects are also dependent objects.
Principal objects The objects on which both selected and dependent objects depend arecalled principal objects. For example, each table and projection has anowner, and each is a principal object.
In earlier Vertica versions, object-level backups could not exist because a backup alwayscontained the entire database.
Hard Link Local BackupsA hard link local backup is a full or object-level backup consisting of a complete copy of thedatabase catalog, and a set of hard file links to corresponding data files. A hard link local backupmust be saved on the file system used by the catalog and database files.
When to Back up the DatabaseIn addition to any guidelines established by your corporation, HP Vertica recommends that youback up your database:
l Before you upgrade HP Vertica to another release.
l Before you drop a partition.
l After you load a large volume of data.
l If the epoch in the latest backup is earlier than the current ancient history mark (AHM).
l Before and after you add, remove, or replace nodes in your database cluster.
l After recovering a cluster from a crash.
Note:When you restore a full database backup, youmust restore to a cluster that is identicalto the one on which you created the backup. For this reason, always create a new full backupafter adding, removing, or replacing nodes.
Ideally, create regular backups to back up your data. You can run the HP Vertica vbr.py from acron job or other task scheduler.
Configuring Backup HostsThe vbr.py utility lets you back up your database to one or more hosts (called backup hosts), thatcan be outside of your database cluster. Using backup hosts external to your database clusterfacilitates offsite data backups.
Administrator's GuideBacking Up and Restoring the Database
HP Vertica Analytics Platform (7.0.x) Page 701 of 969

Note: You can use one or more backup hosts to back up your database. Use the vbr.pyconfiguration file to specify which backup host each node in your cluster should use. SeeBackup Configuration Options for details.
Before you back up to hosts outside of the local cluster, configure the target backup locations towork with the vbr.py utility. The backup hosts you usemust:
l Have sufficient backup disk space.
l Be accessible from your database cluster.
l Have passwordless SSH access for the database administrator account.
l Test SSH between cluster nodes and backup node(s).
l Have a copy of the same versions of Python and rsync that were installed by the HP Verticainstaller.
Note: The version of rsync included in the HP Vertica installer supports a combinedmaximum500 full- and object-level backups at one backup location. All backup hosts must use the rsyncversion supplied with HP Vertica 6.0.
Configuring Single-Node Database Hosts for BackupInstalling HP Vertica on a single-node database host automatically sets up the node withpasswordless SSH access, as the installation does for cluster nodes. Instructions for performingthis stepmanually are available in the Installation Guide section, Enable Secure Shell (SSH)Logins.
The vbr.py utility requires that all database hosts (including single-node hosts) and backup locationhosts have passwordless SSH access, and fulfill other necessary requirements, described in thissection.
Creating Configuration Files for Backup HostsCreate separate configuration files for full- or object-level backups, using distinct names for eachconfiguration file. Also, use the same node, backup host, and directory location pairs. The backupdirectory location should be used for the backups from only one database.
Note: If possible, for optimal network performance when creating a backup, HP Verticarecommends having each node in the cluster use a dedicated backup host.
Estimating Backup Host Disk RequirementsWherever you plan to save data backups, consider the disk requirements for incremental backupsat your site. Also, if you usemore than one archive, it potentially requires more disk space.
Administrator's GuideBacking Up and Restoring the Database
HP Vertica Analytics Platform (7.0.x) Page 702 of 969

Regardless of the specifics of your site's backup schedule and retention requirements, HP Verticarecommends that each backup host has space for at least twice the database footprint size.
To estimate the database size from the used_bytes column of the storage_containers systemtable:
VMart=> select sum(used_bytes) as total_size from v_monitor.storage_containers;total_size------------
302135743(1 row)
If your site uses multiple backup host locations, you can estimate the database size requirementsper node with a query such as the following, substituting a backup host name for node_name:
select node_name,sum(used_bytes) as size_in_bytes from v_monitor.storage_containers groupby node_name;
Estimating Log File Disk RequirementsWhen you run the vbr.py--setupconfig command to create the configuration file and configureadvanced parameters (see Configuring Advanced VBR Parameters), one of the parameters istempDir. This parameter specifies the backup host location where vbr.pywrites its log files, andsome other temp files (of negligible size). The default location is the /tmp/vbr directory on eachbackup host. You can change the default location by specifying a different path in the configurationfile.
The temporary storage directory also contains local log files describing the progress, throughput,and any errors encountered for each node. Each time you run vbr.py, the script creates a separatelog file, so the directory size increases over time, depending on how frequently you run the utility.The utility stores older log files in separate subdirectories, each namedwith a timestamp. When thevbr.py utility is executing, it updates the current log file each second with one line of information,so the log file size is proportional to the actual backup transfer size. As a rough estimate, a one-hourbackup will populate the log file with 3600 lines, or approximately 100KB. HP Vertica recommendsallotting 1GB disk space on each backup host for the vbr.py log files.
The vbr.py log files are not removed automatically, so delete older log files manually as necessary.
Making Backup Hosts AccessibleTomake the backup hosts accessible to your source database cluster, add each of the backuphosts to the hosts file of all your database nodes, unless you plan on using IP addresses.
Any firewalls between the source database nodes and the target backup hosts must allowconnections for SSH and rsync.
The backup hosts must be running the same Linux distribution and have the same processorarchitecture as your database nodes, because eachmust have identical versions of rsync andPython as those supplied in the HP Vertica installation package.
Administrator's GuideBacking Up and Restoring the Database
HP Vertica Analytics Platform (7.0.x) Page 703 of 969

Setting Up Passwordless SSH AccessTo access a backup host, the database superuser must meet two requirements to run the vbr.pyutility:
l Have an account on each backup host, with write permissions to the backup directory
l Have passwordless SSH access from each cluster host to the corresponding backup host
How you fulfill these requirements depends on your platform and infrastructure.
If your site does not use a centralized login system (such as LDAP), you can usually add a userwith the useradd command, or through aGUI administration tool. See the documentation for yourLinux distribution for details.
If your platform supports it, you can enable passwordless SSH logins using the ssh-copy-idcommand to copy a database superuser's SSH identity file to the backup location from one of yourdatabase nodes. For example, to copy the SSH identity file from a node to a backup host namedbackup01:
> ssh-copy-id -i dbadmin@backup01|Password:
Try logging into themachine with "ssh 'dbadmin@backup01'", and check the contents of the~/.ssh/authorized_keysfile to make sure you have not added extra keys that you were notexpecting.
> ssh backup01Last login: Mon May 23 11:44:23 2011 from host01
Repeat the steps to copy a superuser's SSH identity to all backup hosts you will use to back upyour database.
After copying a superuser's SSH identity, you should be able to log in to the backup host from anyof the nodes in the cluster without being prompted for a password.
Testing SSH AccessA best practice after setting up passwordless SSH is to test the SSH connection on each clusternode, and the backup host.
To test that passwordless SSH is working correctly:
1. Log into each cluster node and SSH to and from all other cluster nodes. Add the key to theRSA store as noted above.
2. If you cannot SSH to and from all nodes without entering a password, SSH is not properly setup.
3. To set up correctly, see Enable Secure Shell (SSH) Logins, in the Installation Guide.
Administrator's GuideBacking Up and Restoring the Database
HP Vertica Analytics Platform (7.0.x) Page 704 of 969

Changing the Default SSH Port on Backup HostsInternally, the vbr.py utility uses the default SSH port 22. If your backup hosts are using SSH on adifferent port, you can override the default by manually adding the ssh_port_backup parameter asfollows:
1. Open the backup configuration file (backup_file.ini) in your favorite editor.
2. Find the Transmission section.
3. Add the ssh_port_backup parameter to the section, specifying with the backup hosts' SSHport number:
[Transmission]encrypt = Falsechecksum = Falseport_rsync = 50000ssh_port_backup = 25
4. Save the configuration file.
Note: The vbr.py utility supports a non-default SSH port with the backup task, but not withcopycluster.
Increasing the SSH Maximum Connection Settingsfor a Backup Host
If your configuration requires backing upmultiple nodes to one backup host (n:1), increase thenumber of concurrent SSH connections to the SSH daemon (sshd). By default, the number ofconcurrent SSH connections on each host is 10, as set in the sshd_config file with theMaxStartups keyword. The MaxStartups value for each backup host should be greater than thetotal number of hosts being backed up.
To increase the MaxStartups value:
1. Log on as root to access the config file.
2. Open the SSH configuration file (/etc/ssh/sshd_config) in your favorite editor.
3. Locate the #MaxStartups parameter and increase the value.
4. Save the file.
5. Exit from root.
Administrator's GuideBacking Up and Restoring the Database
HP Vertica Analytics Platform (7.0.x) Page 705 of 969
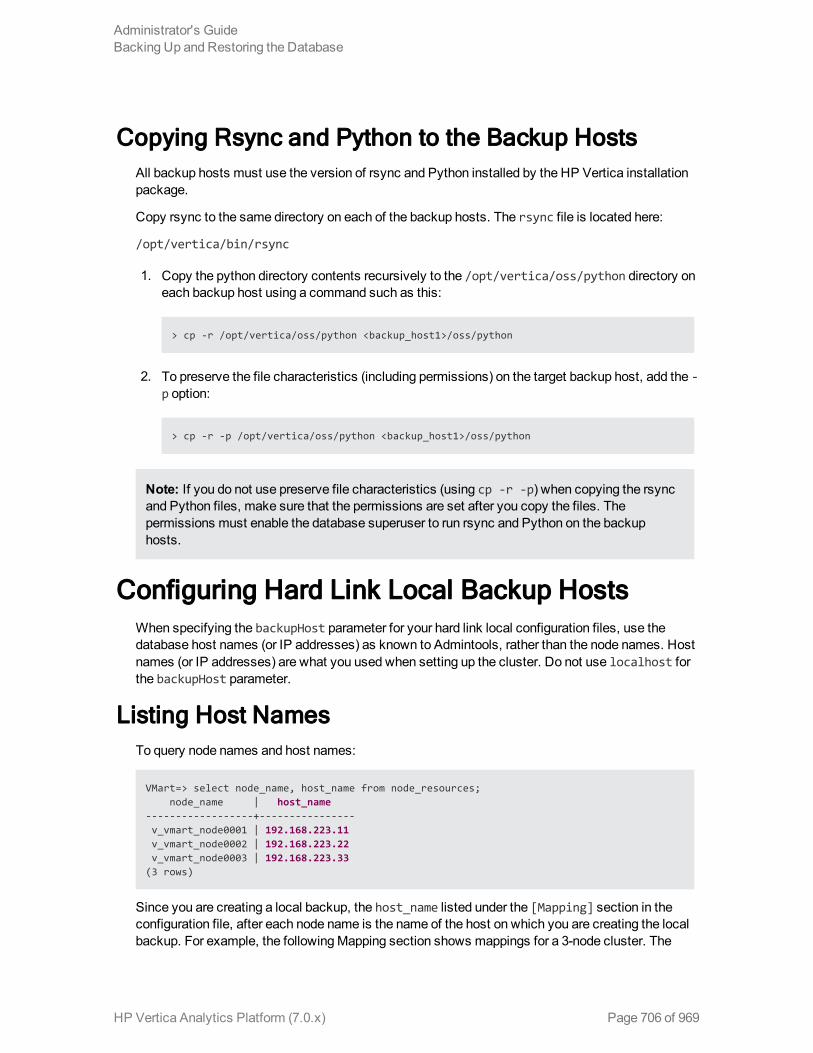
Copying Rsync and Python to the Backup HostsAll backup hosts must use the version of rsync and Python installed by the HP Vertica installationpackage.
Copy rsync to the same directory on each of the backup hosts. The rsync file is located here:
/opt/vertica/bin/rsync
1. Copy the python directory contents recursively to the /opt/vertica/oss/python directory oneach backup host using a command such as this:
> cp -r /opt/vertica/oss/python <backup_host1>/oss/python
2. To preserve the file characteristics (including permissions) on the target backup host, add the -p option:
> cp -r -p /opt/vertica/oss/python <backup_host1>/oss/python
Note: If you do not use preserve file characteristics (using cp -r -p) when copying the rsyncand Python files, make sure that the permissions are set after you copy the files. Thepermissions must enable the database superuser to run rsync and Python on the backuphosts.
Configuring Hard Link Local Backup HostsWhen specifying the backupHost parameter for your hard link local configuration files, use thedatabase host names (or IP addresses) as known to Admintools, rather than the node names. Hostnames (or IP addresses) are what you used when setting up the cluster. Do not use localhost forthe backupHost parameter.
Listing Host NamesTo query node names and host names:
VMart=> select node_name, host_name from node_resources;node_name | host_name
------------------+----------------v_vmart_node0001 | 192.168.223.11v_vmart_node0002 | 192.168.223.22v_vmart_node0003 | 192.168.223.33
(3 rows)
Since you are creating a local backup, the host_name listed under the [Mapping] section in theconfiguration file, after each node name is the name of the host on which you are creating the localbackup. For example, the followingMapping section shows mappings for a 3-node cluster. The
Administrator's GuideBacking Up and Restoring the Database
HP Vertica Analytics Platform (7.0.x) Page 706 of 969

backupHost value you supplied when creating the configuration file is the name of the cluster host(192.168.223.33) you are using as the hard link local backup host for the cluster:
[Mapping]v_vmart_node0001 = 192.168.223.33:/home/dbadmin/data/backupsv_vmart_node0002 = 192.168.223.33:/home/dbadmin/data/backupsv_vmart_node0003 = 192.168.223.33:/home/dbadmin/data/backups
Administrator's GuideBacking Up and Restoring the Database
HP Vertica Analytics Platform (7.0.x) Page 707 of 969

Creating vbr.py Configuration FilesThe vbr.py utility uses a configuration file for the information required to back up and restore a full-or object-level backup, or to copy a cluster. You cannot run vbr.pywithout a configuration file,since no default file exists. You can create a configuration file using the instructions in this section,or copy and edit an existing configuration file, and save the changes to a different file name.
Note: Youmust be logged on as dbadmin, not root, to create the vbr configuration file.
To create a configuration file, enter this command:
> /opt/vertica/bin/vbr.py --setupconfig
The script prompts you to answer several questions, as shown in the following summarizedexample:
[dbadmin@localhost ~]$ /opt/vertica/bin/vbr.py --setupconfigSnapshot name (backup_snapshot): fullbakBackup vertica configurations? (n) [y/n]: yNumber of restore points (1): 3Specify objects (no default):Vertica user name (dbadmin):Save password to avoid runtime prompt? (n) [y/n]: yPassword to save in vbr config file (no default):Node v_vmart_node0001Backup host name (no default): 127.0.0.1Backup directory (no default): /home/dbadmin/backupsConfig file name (fullbak1.ini):Change advanced settings? (n) [y/n]: nSaved vbr configuration to fullbak1.ini.
The following sections describe the information you supply.
Specifying a Backup NameSpecify the name of the backup vbr.pywill create:
Snapshot name (backup_snapshot):
You cannot leave this blank. Choose a name that clearly identifies the backup. The name is used inthe directory tree structure that vbr.py creates for each node. You do not need to add dates to thebackup name, since date and time indicators are added automatically in backup subdirectories.
Create different configuration files with specific backup names for full- and object-level backups,but use the same backup directory for both types of backups. For example, the configuration file for
Administrator's GuideBacking Up and Restoring the Database
HP Vertica Analytics Platform (7.0.x) Page 708 of 969

a full database backup, called fullbak.iniwould have these snapshotName and backupDirparameter values:
snapshotName=fullbakbackupDir=/home/dbadmin/data/backups
The configuration file for the object-level backup, called objectbak.ini, would have theseparameter values:
snapshotName=objectbakbackupDir=/home/dbadmin/data/backups
Backing Up the Vertica Configuration FileEnter y to include a copy of the vertica.conf file in the backup. The file is not saved by default:
Backup vertica configurations? (n) [y/n]:
The vertica.conf file contains configuration parameters you have changed. The file is stored inthe catalog directory. Press Enter to accept the default, or n to omit the file explicitly.
Saving Multiple Restore PointsSpecify how many backups to save as a number of restore points:
Number of restore points (1):
The default value is 1, indicating that vbr.py always retains one additional restore point. Savingmultiple restore points gives you the option to recover from one of several backups. For example,specifying 3 results in eventually having 1 current backup, and 3 backup archives. The value youenter here is stored as the restorePointLimit parameter in the vbr.py configuration file.
For more information about how vbr.py organizes the backup and archives in the backup directory,see Backup Directory Structure and Contents.
Specifying Full or Object-Level BackupsIndicate whether you want to create a full- or object-level backup:
Specify objects (no default):
Press Enter to continue creating a configuration file for a full database backup.
Enter the names of one or more schemas or tables to create an object-level backup configurationfile. Separate each namewith a comma (,). The objects you enter are listed in the Objectsparameter of the configuration file.
Administrator's GuideBacking Up and Restoring the Database
HP Vertica Analytics Platform (7.0.x) Page 709 of 969

Entering the User NameEnter the user name of the person who will invoke vbr.py:
Vertica user name (dbadmin):
Press Enter to leave this blank and accept the default user name dbadmin. Enter another username if you have assigned dbadmin privileges to a different user.
Saving the Account PasswordSpecify whether vbr.pywill prompt for an account password at runtime:
Save password to avoid runtime prompt? (n) [y/n]:
Press Enter to accept the default (n) and continue. Since you are not saving the password in theconfiguration file, youmust enter it when you run vbr.py.
To save your password in the configuration file, enter y. The utility prompts for you to enter thepassword, but does not display the text as you type:
Password to save in vbr config file (no default):
The parameter name in the configuration file indicating whether to prompt for a password isdbPromptForPassword.
Specifying the Backup Host and DirectoryThe utility lists each node name for your cluster. Enter the backup host name and directory for eachcluster node at the prompts:
Node v_vmart_node0001Backup host name (no default):Backup directory (no default):
No defaults exist for either the host name or the backup directory.
In the configuration file, all cluster nodes are listed by name under the [Mapping] section, eachcontaining a line that includes the cluster node, backup host, and backup directory location:
[Mapping]v_vmart_node0001 = 127.0.0.1:/home/dbadmin/backups
Administrator's GuideBacking Up and Restoring the Database
HP Vertica Analytics Platform (7.0.x) Page 710 of 969

Saving the Configuration FileEnter a configuration file name of your choice, or press (Enter to save the configuration file with itsdefault name:
Config file name (fullbak.ini):
The default name consists of the backup name you supplied (fullbak in this example), with an.ini file extension. The vbr.py utility confirms that it saved the file:
Saved vbr configuration to fullbak.ini.
NOTE:Since the backup configuration file is typically stored on the cluster you are backing up,VERTICA recommends that you also save a copy of the configuration file on the backup host.In this way, the configuration file will be available if the cluster node is lost.
Continuing to Advanced SettingsTo continue with advanced configuration settings, enter y to continue:
Change advanced settings? (n) [y/n]:
SeeConfiguring Advanced VBR Parameters for more information.
To continue without advanced settings and to save the configuration file with the information youjust entered, press Enter.
Sample Configuration FileFollowing are the contents of the fullbak.ini configuration file created from the entries used inthis example. Notice that any account password (mydbpassword) you supplied when running thescript is stored as plain text, and is not concealed in any way:
[Misc]snapshotName = fullbakverticaConfig = TruerestorePointLimit = 3
[Database]dbName = VMartdbUser = dbadmindbPassword = mydbpassword
[Transmission]
[Mapping]v_vmart_node0001 = 127.0.0.1:/home/dbadmin/backups
Administrator's GuideBacking Up and Restoring the Database
HP Vertica Analytics Platform (7.0.x) Page 711 of 969

Changing the Overwrite Parameter ValueYou can also specify an overwrite parameter in the configuration file once the file exists. Theoverwrite parameter is associated only with restoring object-level backups. For more information,see Creating Object-Level Backups.
Configuring Required VBR ParametersTo invoke the vbr.py utility to create a configuration file, enter this command:
> /opt/vertica/bin/vbr.py --setupconfig
The utility prompts you to answer the questions listed in the following table. Each is followed by itsdefault value, if any exists. Type Enter to accept a default value. For more information about thequestions and their values, see the Creating vbr.py Configuration Files.
The second table column lists the name of the parameter associated with the question, as it will bestored in the configuration file. See also the VBR Configuration File Reference:
Snapshot name: [snapshotName] snapshotName
Backup Vertica configurations? (n)[y/n] verticaConfig
Number of restore points? (1): restorePointLimit
Specify objects (no default): objects
Vertica user name (current user): dbUser
Save password to avoid runtime prompt (n) [y/n] dbPromptForPassword
Password to save in vbr config file (no default): dbPassword
Backup host name (no default): backupHost
Backup directory (no default): backupDir
Config file name (no default): N/A
Change advanced settings? (n) [y/n]: N/A
To change any advanced parameters, enter y at the last question, Change advanced settings?.
After successfully completing all of the required questions, vbr.py generates a configuration filewith the information you supplied. Create separate configuration files for a full backup, and for eachobject-level backup. Use distinct backup names in each configuration file.
When the setup completes processing, enter a configuration file name. Use this file namewhen yourun the --task backup or other commands. The utility uses the configuration file contents for bothbackup and restore tasks, as well as for the --copycluster task, described in Copying theDatabase to Another Cluster.
Administrator's GuideBacking Up and Restoring the Database
HP Vertica Analytics Platform (7.0.x) Page 712 of 969

If you do not successfully complete all of the required questions, vbr.py lists error messages andhints, but does not create a configuration file. You can then run the --setupconfig command againto respecify any missing or incorrect information.
Sample Session Configuring Required ParametersFollowing is a test session showing the required configuration file parameters. The utility detectsthe HP Vertica node names in the cluster, so you do not have to supply them (v_example_node0001, v_example_node0002, and v_exampledb_node0003):
> /opt/vertica/bin/vbr.py --setupconfigSnapshot name (snapshotName): ExampleBackupBackup Vertica configurations? (n) [y/n] yNumber of restore points? (1): 5Specify objects (no default): dim, dim2Vertica user name (current_user): dbadminSave password to avoid runtime prompt? (n)[y/n]: yPassword to save in vbr config file (no default): mypw234Node v_example_node0001Backup host name (no default): backup01Backup directory (no default): /home/dbadmin/backupsNode v_exampledb_node0002Backup host name: backup02Backup directory: /home/dbadmin/backupsNode v_exampledb_node0003Backup host name: backup03Backup directory: /home/dbadmin/backupsConfig file name: exampleBackup.iniChange advanced settings? (n)[y/n]: nSaved vbr configuration to ExampleBackup.ini.
Configuring Advanced VBR ParametersWhen you use vbr.py to create your configuration file, you can configure advanced parametersafter configuring the required ones. To invoke utility initially, enter this command:
> /opt/vertica/bin/vbr.py --setupconfig
To continue from advanced settings after completing the Required parameter options, enter y to thelast question:
Change advanced settings? (n)[y/n]: y
Following is a list of the advanced parameter questions, their default values, and the name of theassociated parameter, which will be in the completed configuration file.
Type Enter to accept the default value for any parameter. For more details, see the VBRConfiguration File Reference:
Administrator's GuideBacking Up and Restoring the Database
HP Vertica Analytics Platform (7.0.x) Page 713 of 969

Questions and default valueConfigurationparameter
Temp directory (/tmp/vbr): tempDir
Number of times to retry? (2): retryCount
Seconds between retry attempts (1): retryDelay
Encrypt data during transmission? (n) [y/n]: encrypt
Use checksum for data integrity (not file date and size)? (n) [y/n]: checksum
Port number for rsync daemon (50000): port_rsync
Transfer bandwidth limit in KBps or 0 for unlimited (0): bwlimit
Note: For additional information about the tempDir configuration parameter, see ConfiguringBackup Hosts.
Example of Configuring Advanced ParametersFollowing is a test session providing some of the advanced configuration file parameters, startingafter the required parameters:
Change advanced settings? (n)[y/n]: yTemp directory (/tmp/vbr):Number of times to retry backup? (2): 5Seconds between retry attempts? (1): 3Encrypt data during transmission? (n) [y/n] nUse checksum for data integrity (not file date and size)? (n)[y/n]: nPort number for Rsync daemon (50000):Transfer bandwidth limit in KBPS or 0 for unlimited (0): 0Saved vbr configuration to exampleBackup.ini.
Configuring the Hard Link Local ParameterCreating hard link local backups requires manually adding the hardLinkLocal=True parameter tothe [Transmission] section of the vbr.py configuration file.
Note: To create a local backup without hard file links, omit the hardLinkLocal=Trueparameter from the configuration file. Specify the backupDir parameter as a location on thesame file system as the database catalog and data files. Then, the vbr.py utility creates abackup by copying the files, even when they are located on the same file system.
Generating a configuration file with the vbr.py --setupconfig always includes a[Transmission] section. If you have an existing vbr.py configuration file (backup_name.ini),add the hardLinkLocal parameter to the [Transmission] section.
Administrator's GuideBacking Up and Restoring the Database
HP Vertica Analytics Platform (7.0.x) Page 714 of 969

1. For a configuration filewithout advanced options, add the parameter as the sole entry in the[Transmission] section:
[Transmission]hardLinkLocal = True
2. Save the configuration file.
-or-
1. For a configuration filewith advanced options, add the hardLinkLocal parameter as the lastentry in the [Transmission] section:
[Transmission]encrypt = Falsechecksum = Falseport_rsync = 50000bwlimit = 0hardLinkLocal = True
2. Save the configuration file.
Restrictions for Backup Encryption OptionThe encrypt parameter is one of the advanced vbr.py configuration file options. However, youcannot use encryption when creating a hard link local backup. If you hardlinkLocal=true to aconfiguration file that includes encrypt=true, vbr.py issues a warning, but ignores the encryptionparameter.
Example Backup Configuration FileThe following example configuration file shows most of the options described in ConfiguringRequired VBR Parameters and Configuring Advanced VBR Parameters. Each node is backed up toa corresponding non-cluster host (except for hard-link local backups). SeeCreating Hard Link LocalBackups.
[Misc]; Section headings are enclosed by square brackets.; Comments have leading semicolons.; Option and values are separated by an equal sign.snapshotName = exampleBackup; For simplicity, use the same temp directory location on; all backup hosts. The utility must be able to write to this; directory.tempDir = /tmp/vbr; Vertica binary directory should be the location of; vsql & bootstrap. By default it's /opt/vertica/bin;verticaBinDir =
Administrator's GuideBacking Up and Restoring the Database
HP Vertica Analytics Platform (7.0.x) Page 715 of 969

; include vertica configuration in the backupverticaConfig = True; how many times to rety operations if some error occurs.retryCount = 5retryDelay = 1restorePointLimit = 5
[Database]; db parametersdbName = exampleDBdbUser = dbadmindbPassword = password; if this parameter is True, vbr will prompt user for db password every timedbPromptForPassword = False
[Transmission]encrypt = Falsechecksum = Falseport_rsync = 50000; bandwidth limit in KBPS, 0 for unlimitedbwlimit = 0
[Mapping]; backupDir ignored for copy cluster taskv_exampledb_node0001 = backup01:/home/dbadmin/backupsv_exampledb_node0002 = backup02:/home/dbadmin/backupsv_exampledb_node0003 = backup03:/home/dbadmin/backups
Administrator's GuideBacking Up and Restoring the Database
HP Vertica Analytics Platform (7.0.x) Page 716 of 969

Using Hard File Link Local BackupsYou can use the vbr.py utility hardLinkLocal option to create a full-, or object-level, backup withhard file links on a local database host.
Creating hard link local backups can provide the following advantages over a remote host backup:
l Speed—Hard link local backups are significantly faster than a remote host backup. In a hardlink local backup, vbr.py does not copy files (as long as the backup directory exists on thesame file system as the database catalog and data directories).
l Reduced network activities —The hard link local backupminimizes network load because itdoes not require rsync to copy files to a remote backup host.
l Less disk space—Since the backup includes a copy of the catalog and hard file links, the localbackup uses significantly less disk space than a backup with copies of database data files.However, since a hard link local backup saves a full copy of the catalog each time you runvbr.py, the disk size will increase with the catalog size over time.
Hard link local backups are useful during experimental designs and development cycles. Databasedesigners and developers can create hard link local object backups of schemas and tables on aregular schedule during design and development phases. If any new developments areunsuccessful, developers can restore one or more objects easily and efficiently.
Note: Running vbr.py does not affect active database applications. The vbr.py utilitysupports creating backups while concurrently running applications executing DML statements,including COPY, INSERT, UPDATE, DELETE, and SELECT.
Planning Hard Link Local BackupsIf you plan to use hard link local backups as a standard site procedure, consider storing all of thedata files on one file system per node when designing the overall database setup and hardwareconfiguration. Such a configuration has the advantage of being set up for hard link local backupsautomatically. However, using one file system per node to support hard link local backups doespreclude the use of external storage locations on separate file systems.
Specifying Backup Directory LocationsThe backupDir parameter of the configuration file specifies the location of the top-level backupdirectory. Hard link local backups require that the backup directory be located on the same Linux filesystem as the database data and catalog files. The Linux operating system cannot create hard filelinks to another file system.
Do not create the hard link local backup directory in a database data storage location. For example,as a best practice, the database data directory should not be at the top level of the file system, suchas this:
Administrator's Guide
HP Vertica Analytics Platform (7.0.x) Page 717 of 969

/home/dbadmin/data/VMart/v_vmart_node0001
Instead, HP Vertica recommends adding another subdirectory for data above the database level,such as in this example:
/home/dbadmin/data/dbdata/VMart/v_vmart_node0001
You can then create the hard link local backups subdirectory as a peer of the data directory you justcreated, such as in this example:
/home/dbadmin/data/backups/home/dbadmin/data/dbdata
Formore information about how vbr.py creates directories for backups and archives, see BackupDirectory Structure and Contents.
Understanding Hard Link Local Backups andDisaster Recovery
Hard link local backups are only as reliable as the disk on which they are stored. If the local diskbecomes corrupt, so does the hard link local backup. In this case, you will be unable to restore thedatabase from the hard link local backup, since it is also corrupt.
All sites shouldmaintain full backups externally for disaster recovery. Since hard link local backupsdo not actually copy any database files, HP Vertica strongly recommends that you not use hard linklocal backups as the solemeans of recovery, unless the backups are copied to tape or otherexternal media, as described in Creating Hard Link Local Backups.
Creating Full and Incremental BackupsBefore you create a database backup, ensure the following:
l Your database is running. It is unnecessary for all nodes to be up in aK-safe database.However, any nodes that are down are not backed up.
l All of the backup hosts are up and available (see Configuring Backup Hosts).
l The backup host (either on the database cluster or not) has sufficient disk space to store thebackups
l The user account of whoever starts the utility (dbadmin, or other) has write access to the targetdirectories on the host backup location.
Run the vbr.py script from a terminal using the database administrator account from an initiatornode in your database cluster. You cannot run the utility as root.
Administrator's Guide
HP Vertica Analytics Platform (7.0.x) Page 718 of 969

Note: If you have upgraded from HP Vertica 5.x to 6.x, backups created with 5.x areincompatible with 6.x. Once you have created new backups with the 6.x vbr.py utility,consider removing older backups created with 5.x.
Running Vbr Without Optional CommandsYou can run the vbr.pywith only its required commands:
l --task backup
l --config-file config_file
If your configuration file does not contain the database administrator password, vbr.py promptsyou to enter the password, but does not display what you type:
[dbadmin@node02 ~]$ vbr.py --task backup --config-file nuvmartbak.iniEnter vertica password for user dbadmin:Preparing...Found Database port: 5433...
The utility requires no further interaction after you invoke it.
To run the vbr.py utility:
1. Use the --task backup and --config-file filename directives as shown in this example:
> vbr.py --task backup --config-file myconfig.ini Copying...[==================================================] 100%All child processes terminated successfully.Committing changes on all backup sites...backup done!
By default, there is no screen output, other than the progress bar. To include additionalprogress information, use the --debug option, with a value between 1 – 3.
2. If the utility does not locate the configuration you specify, it fails with an error and exits.
Best Practices for Creating BackupsWhen creating backup configuration files:
l Create separate configuration files to create full- and object-level backups
l Use the same backup host directory location for both kinds of backups
l For best network performance, use one backup host per cluster node
Administrator's Guide
HP Vertica Analytics Platform (7.0.x) Page 719 of 969

l Use one directory on each backup-node to store successive backups
l For future reference, append themajor Vertica version number to the configuration file name(mybackup76x)
Using the same backup host directory location for full- and object-level backups results in thebackups sharing disk space and being compatible when performing a restore. Each cluster nodemust also use the same directory location on its designated backup host.
The selected objects of a backup can include one or more schemas or tables, or a combination ofboth. For example, you can include schema S1 and tables T1 and T2 in an object-level backup.Multiple backups can be combined into a single backup. A schema-level backup can be integratedwith a database backup (and a table backup integrated with a schema-level backup, and so on).
Object-Level BackupsAfter you create a full backup, you can create object-level backups, as described in CreatingObject-Level Backups.
To see existing full and incremental backups, see Viewing Backups.
Backup Locations and StorageBackups are stored in the directory you specify in the configuration file. The directory containing thebackup has a subdirectory for each node backed up to that location. In turn, that area contains asubdirectory with the name of the backup, or multiple backup names, appended with the date andtime if you are keepingmore than one backup. The backup name reflects the snapshotNameparameter value in the configuration file. See the Backup Directory Structure and Contents forfurther information.
Saving Incremental BackupsEach time you back up your database with the same configuration file, vbr.py creates anincremental backup, copying new storage containers, which can include data that existed the lasttime you backed up the database, along with new and changed data since then. By default, vbr.pysaves one archive backup, unless you set the restorePointLimit parameter value in theconfiguration file to a value greater than 1.
For creating backup files, vbr.py uses the following directory naming conventions:
snapshotname_archivedate_timestamp
snapshotname The value of the snapshotName parameter in the configuration file. This is the name used asa prefix to the container directory on the backup host.
Administrator's Guide
HP Vertica Analytics Platform (7.0.x) Page 720 of 969
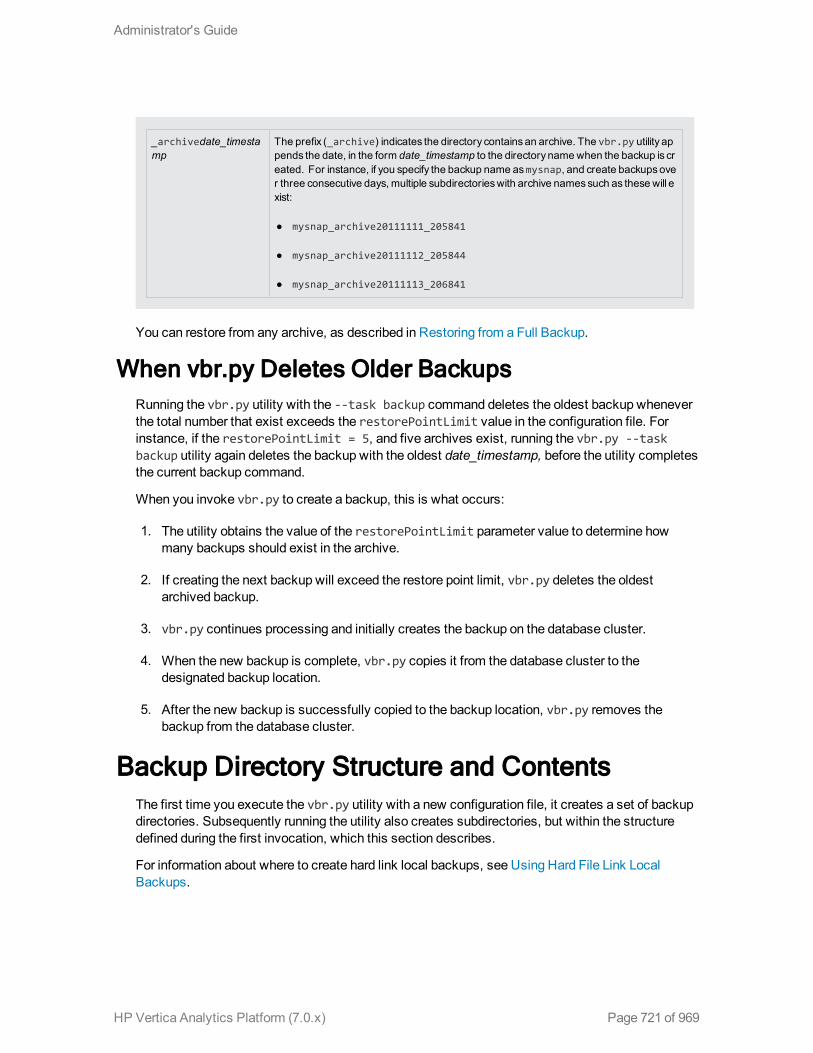
_archivedate_timestamp
The prefix (_archive) indicates the directory contains an archive. The vbr.py utility appends the date, in the form date_timestamp to the directory namewhen the backup is created. For instance, if you specify the backup name asmysnap, and create backupsover three consecutive days, multiple subdirectorieswith archive namessuch as these will exist:
l mysnap_archive20111111_205841
l mysnap_archive20111112_205844
l mysnap_archive20111113_206841
You can restore from any archive, as described in Restoring from a Full Backup.
When vbr.py Deletes Older BackupsRunning the vbr.py utility with the --task backup command deletes the oldest backup wheneverthe total number that exist exceeds the restorePointLimit value in the configuration file. Forinstance, if the restorePointLimit = 5, and five archives exist, running the vbr.py --taskbackup utility again deletes the backup with the oldest date_timestamp, before the utility completesthe current backup command.
When you invoke vbr.py to create a backup, this is what occurs:
1. The utility obtains the value of the restorePointLimit parameter value to determine howmany backups should exist in the archive.
2. If creating the next backup will exceed the restore point limit, vbr.py deletes the oldestarchived backup.
3. vbr.py continues processing and initially creates the backup on the database cluster.
4. When the new backup is complete, vbr.py copies it from the database cluster to thedesignated backup location.
5. After the new backup is successfully copied to the backup location, vbr.py removes thebackup from the database cluster.
Backup Directory Structure and ContentsThe first time you execute the vbr.py utility with a new configuration file, it creates a set of backupdirectories. Subsequently running the utility also creates subdirectories, but within the structuredefined during the first invocation, which this section describes.
For information about where to create hard link local backups, see Using Hard File Link LocalBackups.
Administrator's Guide
HP Vertica Analytics Platform (7.0.x) Page 721 of 969

Directory TreeThe directory structure starts at the location you specify as the backupDir parameter value. In thatdirectory, vbr.py creates the top-level backup subdirectory using the snapshotName value in theconfiguration file. The default configuration file name consists of the snapshotName value, with an.ini suffix. You can use any valid file name for the configuration file, or change the name once thefile exists. Throughout this example, the backup name is objectbak, and the configuration filename is objectbak.ini.
l The top level directory starts with the backup name you specified in the snapshotNameparameter value, and creates a structure based on the cluster nodes listed in the configurationfile. In the following example, the configuration file parameter snapshotName=objectbak, andthe three dbNode parameters specified are v_vmart_node0001, v_vmart_node0002, and v_vmart_node0003:
l When you create a backup, for each designated node, vbr.py creates a subdirectory below thenode directory, also named by the snapshotName parameter value for the backup name:
Multiple Restore PointsEach time you invoke vbr.py to create a new backup, the utility verifies the restorePointLimitvalue.
l If the value is greater than 1, the utility checks to see how many backups and archives exist ineach node's backup name subdirectory. If no archive files exist, the utility creates the firstbackup in a new subdirectory with the backup name, one per node.
l The backup name subdirectory for each node also contains a home subdirectory that includestwo important files, backupname.info and backupname.txt. Among other information, thesefiles contain the archive OID of each backup (unique across all nodes), and the backup epoch:
Administrator's Guide
HP Vertica Analytics Platform (7.0.x) Page 722 of 969

l The next time you create a backup using the same configuration file, the restorePointLimitvalue is verified again.If vbr.py is to save another backup, it gets the OID from the info file ofthe existing backup, and saves that previous backup to a new directory. The new directory forthe last backup is then an archive, namedwith the backup name (objectbak in this example),and the OID suffix _archivedatestamp_timestamp.
l The following example lists the backup directory, objectbak, with subdirectories for each node.Each node then has one subdirectory for the backup (objectbak) and a peer subdirectory for thefirst archive:
l Thereafter, each time you create a backup, the utility continues this process until the number ofbackups and archives together equal the restorePointLimit value. Then, vbr.py deletes theoldest archive backup, and saves a new backup.
Once you savemultiple backups, you can restore directly from the archive of your choice, asdescribed in Restoring Full Database Backups.
Administrator's Guide
HP Vertica Analytics Platform (7.0.x) Page 723 of 969

Creating Object-Level BackupsYou can create object-level backups consisting of one or more schemas and tables. Object-levelbackups are especially useful for multi-tenanted database sites. For example, an internationalairport could use amulti-tenanted database to represent different airlines in its schemas. Then,tables couldmaintain various types of information for the airline, including ARRIVALS,DEPARTURES, and PASSENGER information. With such an organization, creating object-levelbackups of the specific schemas would let you restore by airline tenant, or any other important datasegment.
Note: You cannot restore part of an object-level backup; youmust restore the entire backup.For example, if you create an object-level backup containing two schemas, schema1 andschema2, and later want to restore schema1, you cannot do so without also restoring schema2.To restore a single object, you can create a single object backup.
There are two configuration file parameters used explicitly with object-level backups, and describedin the section VBR Configuration File Reference:
l Object
l Overwrite
For more information about creating configuration files for full- or object-level backups, seeConfiguring Required VBR Parameters.
Invoking vbr.py BackupAfter creating the configuration file specifying which objects to backup, you can create an objectbackup. The following command uses the objectbak.ini configuration file:
[dbadmin@node01 ~]$ vbr.py --task backup --config-file objectbak.iniPreparing...Found Database port: 5433Copying...[==================================================] 100%All child processes terminated successfully.Committing changes on all backup sites...backup done![dbadmin@node01 ~]$
Backup Locations and NamingYou can use one top-level backup directory to store both full- and object-level backups. For moreinformation about directory usage for backups, see Backup Directory Structure and Contents.
Note: Youmust use unique names for full- and object-level backups stored at one location.Otherwise, creating successive backups will overwrite the previous version.
Administrator's Guide
HP Vertica Analytics Platform (7.0.x) Page 724 of 969

To see existing full- and object-level backups, see Viewing Backups.
Best Practices for Object-Level BackupsTo create one or more object-level backups, create a configuration file specifying the backuplocation, the object-level backup name, and a list of objects to include (one or more schemas andtables). When creating configuration backup files:
l Create one configuration file for each object-level backup
l Create a different configuration file to create a full database backup
l For best network performance, use one backup host per cluster node
l Use one directory on each backup-node to store successive backups
l For future reference, append themajor Vertica version number to the configuration file name(mybackup7x)
Using the same backup host directory location for full- and object-level backups results in thebackups sharing disk space and being compatible when performing a restore. Each cluster nodemust also use the same directory location on its designated backup host.
The selected objects of a backup can include one or more schemas or tables, or a combination ofboth. For example, you can include schema S1 and tables T1 and T2 in an object-level backup.Multiple backups can be combined into a single backup. A schema-level backup can be integratedwith a database backup (and a table backup integrated with a schema-level backup, and so on).
Naming ConventionsGive each object-level backup configuration file a distinct and descriptive name. For instance, atthe airport terminal, schema-based backup configuration files use a naming convention with anairline prefix, followed by further description, such as:
AIR1_daily_arrivals_snapshot
AIR2_hourly_arrivals_snapshot
AIR2_hourly_departures_snapshot
AIR3_daily_departures_snapshot
Once database and object-based backups exist, you can recover the backup of your choice. Formore information, see Restoring Object-Level Backups.
Note: Do not change object names in an object-level configuration file once a backup alreadyexists. When the backup name and backup locations are the same, even if you change theobjects listed in the configuration file, the later backup overwrites the first so you cannotrestore from the earlier backup. Instead, create a different configuration file.
Administrator's Guide
HP Vertica Analytics Platform (7.0.x) Page 725 of 969

Creating Backups ConcurrentlyIn amulti-tenanted database, you need to create object-level snapshots concurrently. For example,at the airport terminal, AIR1 and AIR2 both need schema snapshots each hour. To accomplish thisgoal without concurrently backing up the same snapshot, the vbr.py utility currently permits onlyone instance of the backup script per initiator node.
Due to this present behavior, HP Vertica suggests the following:
l Assign one initiator node to create backup for a given tenant.
l Give each object backup initiated on a different node a unique backup name.
l Start the backup script on different initiator nodes to create their specific tenant backupsconcurrently.
Determining Backup FrequencyHP Vertica recommends a best practice of taking frequent backups to avoid backup bloating ifdatabase contents diverge in significant ways.
Always take backups after any event that significantly modifies the database, such as performing arebalance. Mixingmany backups with significant differences can weaken data k-safety, such astaking backups before a rebalance, and again after the rebalance when the backups are all part ofone archive.
Understanding Object-Level Backup ContentsWhile a full database backup contains a complete collection of the database data files, with thecatalog and all of its objects, an object-level backup comprises only the elements necessary torestore the schema or table, including the selected, dependent, and principal objects (see Types ofBackups). In summary, an object-level backup includes the following contents:
l Storage: Data files belonging to the specified object (s)
l Metadata: Including the cluster topology, timestamp, epoch, AHM, and so on
l Catalog snippet: persistent catalog objects serialized into the principal and dependent objects
Some of the elements that comprise AIR2, for instance, include its parent schema, tables, namedsequences, primary key and foreign key constraints, and so on. To create such a backup, vbr.pyscript saves the objects directly associated with the table, along with any dependencies, such asforeign key (FK) tables, and creates an object map from which to restore the backup.
Note: Because the data in local temp tables persists only within a session, local temporarytables are excluded when you create an object-level schema. For global temporary tables,vbr.py stores the table's definition.
Administrator's Guide
HP Vertica Analytics Platform (7.0.x) Page 726 of 969
Making Changes After an Object-Level BackupAfter creating an object-level backup, dropping schemas and tables from the databasemeans theobjects will also be dropped from subsequent backups. If you do not save an archive of the objectbackup, such objects could be lost permanently.
Changing a table name after creating a table backup will not persist after restoring the backup. Ifyou a drop a user after a backup, and the user is the owner of any selected or dependent objects,restoring the backup also restores the user.
If you drop a table (t1), and then create a new table, also called t1, restoring an object backupcauses an error. While tables in the backup and the current database have identical names, theirobject identification numbers (OIDs) differ.
To restore a dropped table from a backup:
1. Rename the newly created table from t1 to t2.
2. Restore the backup containing t1.
K-safety may have increased after an object backup. If this occurs, a backup restore will fail if anytable in the backup has insufficient projections.
Understanding the Overwrite ParameterThe configuration file Overwrite parameter determines what happens during an object-level restorewhen two objects have identical OIDs. The overwrite parameter has a default value set internallyto vbr.py.
To change the default setting for the overwrite parameter, youmust add it to the configuration fileexplicitly. It is not included as a question or prompt when running vbr.py to create a configurationfile.
Overwrite applies to any objects associated with the schema and table saved in the backup(including users and named sequences), whoseOIDs remain the same. For instance, consider thisuse of overwriting in a backup:
1. Create an object backup of mytable.
2. After the backup, rename mytable to mytable2.
3. Restoring the backup causes mytable to overwrite mytable2 (Overwrite=true).
The overwrite occurs because although the table names differ, their OIDs do not.
Conversely, creating a new table of the same name (with a different OID) is handled differently.
1. Create a table backup of mytable.
2. Dropmytable.
Administrator's Guide
HP Vertica Analytics Platform (7.0.x) Page 727 of 969

3. Create a new table, calledmytable.
4. Restoring the backup does NOT overwrite the table, and causes an error, since there is anOIDconflict.
Changing Principal and Dependent ObjectsIf you create a backup and then drop a principal object, restoring the backup restores the principalobject. For example, if you drop the owner of a table included in a backup, restoring the snapshotrecreates the user, along with any permissions that existed when the backup was taken.
Adding dependent objects after backing up a parent object will drop the dependent objects when theparent is restored. For example, restore will drop a constraint or a projection added to a table afterthe table backup, as will columns added to a table, or tables added to a schema.
Identity and auto-increment sequences are dependent objects, since they cannot exist without theirtables. Such objects are backed up along with the tables on which they depend.
Named sequences are not dependent objects, since they exist autonomously. A named sequenceremains after dropping the table in which the sequence is used. In this case, the named sequence isa principal object that must be backed up with the table and regenerated if it does not already existwhen you restore the table. If the sequence does exist, it is used, unmodified. Sequence valuescould repeat, if you restore the full database and then restore a table backup to a newer epoch.
Considering Contraint ReferencesYoumust backup all database objects that are related through constraints. For example, a schemawith tables whose constraints reference only tables in the same schema can be backed up, but aschema containing a table with an FK/PK constraint on a table in another schema cannot, unlessyou include the other schema in the list of selected objects.
Configuration Files for Object-Level BackupsThe vbr.py utility automatically associates configurations with different backup names, but thesame backup location.
Always create a cluster-wide configuration file and one or more object-level configuration filespointing to the same backup location. Storage between backups is shared, so you will not havemultiple copies of the same data. For object-level backups, using the same backup location causesvbr.py to encounter fewer OID conflict prevention techniques and have less problems whenrestoring the backup.
By using cluster and object configuration files with the same backup location, the utility includesadditional provisions to ensure that the object-level backups can be used following a full clusterrestore. One scenario to complete a full cluster restore is to use a full database backup to bootstrapthe cluster. Once the cluster is operational again, you can restore themost recent object-levelbackups for schemas and tables.
Note: Attempting to restore a full database using an object-level configuration file fails,
Administrator's Guide
HP Vertica Analytics Platform (7.0.x) Page 728 of 969
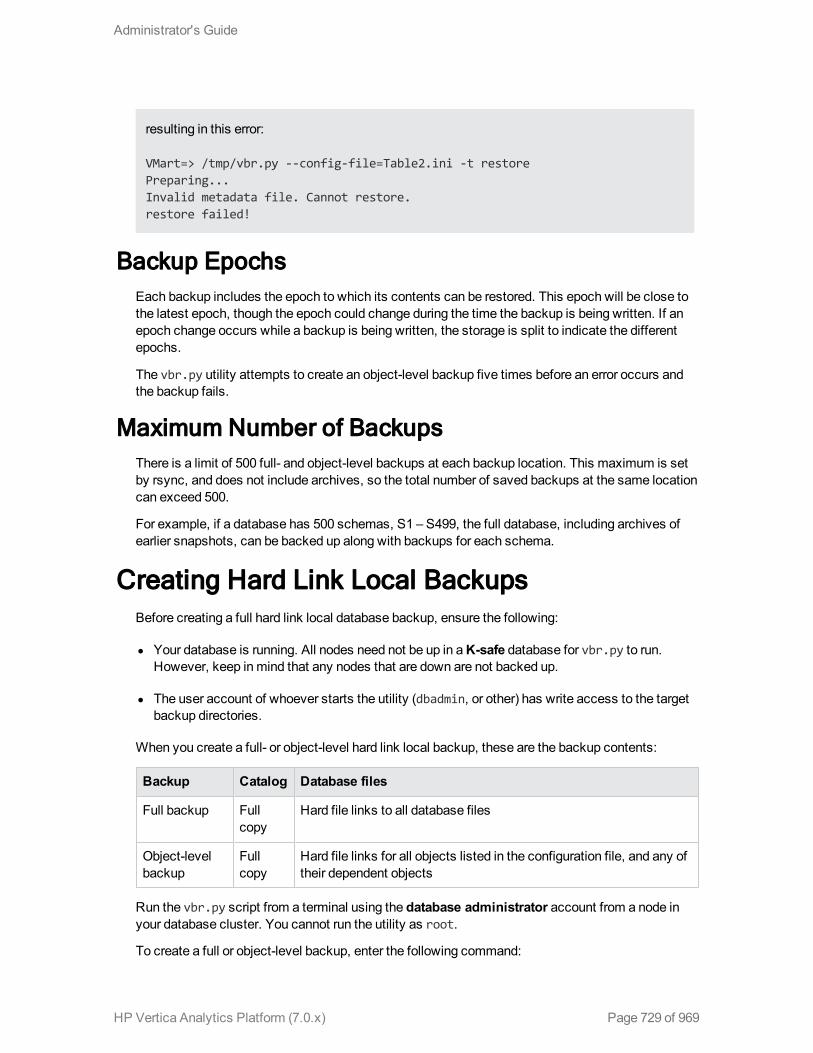
resulting in this error:
VMart=> /tmp/vbr.py --config-file=Table2.ini -t restorePreparing...Invalid metadata file. Cannot restore.restore failed!
Backup EpochsEach backup includes the epoch to which its contents can be restored. This epoch will be close tothe latest epoch, though the epoch could change during the time the backup is being written. If anepoch change occurs while a backup is being written, the storage is split to indicate the differentepochs.
The vbr.py utility attempts to create an object-level backup five times before an error occurs andthe backup fails.
Maximum Number of BackupsThere is a limit of 500 full- and object-level backups at each backup location. This maximum is setby rsync, and does not include archives, so the total number of saved backups at the same locationcan exceed 500.
For example, if a database has 500 schemas, S1 – S499, the full database, including archives ofearlier snapshots, can be backed up along with backups for each schema.
Creating Hard Link Local BackupsBefore creating a full hard link local database backup, ensure the following:
l Your database is running. All nodes need not be up in aK-safe database for vbr.py to run.However, keep inmind that any nodes that are down are not backed up.
l The user account of whoever starts the utility (dbadmin, or other) has write access to the targetbackup directories.
When you create a full- or object-level hard link local backup, these are the backup contents:
Backup Catalog Database files
Full backup Fullcopy
Hard file links to all database files
Object-levelbackup
Fullcopy
Hard file links for all objects listed in the configuration file, and any oftheir dependent objects
Run the vbr.py script from a terminal using the database administrator account from a node inyour database cluster. You cannot run the utility as root.
To create a full or object-level backup, enter the following command:
Administrator's Guide
HP Vertica Analytics Platform (7.0.x) Page 729 of 969

> /opt/vertica/bin/vbr.py --task backup --config fullbak.ini
Note:While not required, HP Vertica recommends that you first create a full backup beforecreating any object-level backups.
Specifying the Hard Link Local Backup LocationIf you add the hardLinkLocal=True parameter to the configuration file, but specify a backupdirectory on a different node, vbr.py issues a warningmessage and stops processing the backup.Change the configuration file to include a backup directory on the same host and file system as thedatabase and catalog files, and run the backup utility again.
If you add the hardLinkLocal=True parameter but specify a backup destination directory on adifferent file system from the database and catalog files, but on the same node, vbr.py issues awarningmessage and proceeds with the backup by copying the files on the node from one filesystem to the other.
Creating Hard Link Local Backups for Tape StorageYou can use hard link local backups as a stagingmechanism to backup to tape or other forms ofstoragemedia. You can also use the hard link local backup to restore the hard file links to thedatabase files.
The following steps present a simplified approach to saving, and then restoring, hard link localbackups from tape storage:
1. Create a configuration file using a command such as this:
/opt/vertica/bin/vbr.py --setupconfig
2. Edit the configuration file (localbak.ini in this example) to include the hardLinkLocal=Trueparameter in the [Transmission] section.
3. Run the backup utility with the configuration file:
/opt/vertica/bin/vbr.py --task backup --config-file localbak.ini
4. Copy the hard link local backup directory with a separate process (not vbr.py) to tape or otherexternal media.
5. If the database becomes corrupted, create the directory structure that existed when youcreated the hard link local backup.
6. Transfer the backup files from tape to their original backup directory.
7. Using the configuration file you used to create the hard link local backup (Step 3), restore the
Administrator's Guide
HP Vertica Analytics Platform (7.0.x) Page 730 of 969

database using the following command:
/opt/vertica/bin/vbr.py --task restore --config-file localbak.ini
When you restore from a hard link local backup (copied from tape), vbr.py creates hard linksfrom the backup files to the database directory, if possible, again saving significant disk space,and time.
Interrupting the Backup UtilityTo cancel a backup, use Ctrl+C or send a SIGINT to the Python process running the backup utility.The utility stops the backup procedure after it has completed copying the data.
The files generated by an interrupted backup process remain in the target backup location directory.The next backup process picks up where the interrupted process left off.
Backup operations are atomic, so that interrupting a backup operation does not affect the previousbackup. The previous backup is replaced only as the very last step of backing up your database.
The restore or copy-cluster operations overwrite the database catalog directory, so interruptingeither of these processes leaves the database unusable until you restart the process and allow it tofinish.
Viewing BackupsThese are the ways to view backups:
1. Using vbr.py, list the backups that reside on the local or remote backup host (requires aconfiguration file).
2. Monitor backup information while vbr.py is executing, as described in the DATABASE_SNAPSHOTS system table description in the SQLReferenceManual.
3. View historical information about backups with the DATABASE_BACKUPS system table.
Note: Since the database_backups system table contains historical information, it is notupdated when you delete the backups, as described in Removing Backups.
List Backups With vbr.pyTo list backups on the backup hosts, use the vbr.py --listbackup task, with a specificconfiguration file. The following example uses an object-level configuration file, table2bak.ini,which results in listing the table object backup, test2:
dbadmin@node01 temp]$ /opt/vertica/bin/vbr.py --task listbackup --config-file /home/dbadmin/table2bak.ini
Administrator's Guide
HP Vertica Analytics Platform (7.0.x) Page 731 of 969

Found 1 backup(s) with given config file /home/dbadmin/table2bak.ini.backup epoch objects hosts(nodes)
table2bak_20130516_072002 180 test2 v_vmart_node0001(192.168.223.33), v_vmart_node0002(192.168.223.33), v_vmart_node0003(192.168.223.33)
The vbr.py output information includes the backupOID, the epoch, which object(s) (if applicable)were backed up, and the backup host (192.168.223.33) used for each node. The identifierappended to the backup name (20130516_072002 in this example), is the value you need whenspecifying an archive to restore.
Monitor database_snapshotsYou canmonitor the backups while vbr.py is in process. The following examples show the systemtable while a single host node is being backed up:
VMart=> select * from database_snapshots;
node_name | snapshot_name | is_durable_snapshot | total_size_bytes | storage_cost_bytes | acquisition_timestamp-----------------+---------------+---------------------+------------------+--------------------+------------------------v_vmart_node0001 | fullbak | t | 299089541 | 863439 | 2013-09-04 14:15:23-07(1 row)
Query database_backupsUse the following query to list historical information about backups. The objects column listswhich objects were backed up in object-level backups. However, do not use the backup_timestamp value when restoring an archive. Use the values in the vbr.py --task listbackup,described in the previous section when restoring an archive.
VMart=> select * from v_monitor.database_backups;-[ RECORD 1 ]----+------------------------------backup_timestamp | 2013-05-10 14:41:12.673381-04node_name | v_vmart_node0003snapshot_name | schemabakbackup_epoch | 174node_count | 3objects | public, store, online_sales-[ RECORD 2 ]----+------------------------------backup_timestamp | 2013-05-13 11:17:30.913176-04node_name | v_vmart_node0003snapshot_name | kantibakbackup_epoch | 175node_count | 3objects |-[ RECORD 13 ]---+------------------------------backup_timestamp | 2013-05-16 07:02:23.721657-04node_name | v_vmart_node0003
Administrator's Guide
HP Vertica Analytics Platform (7.0.x) Page 732 of 969

snapshot_name | objectbakbackup_epoch | 180node_count | 3objects | test, test2-[ RECORD 14 ]---+------------------------------backup_timestamp | 2013-05-16 07:19:44.952884-04node_name | v_vmart_node0003snapshot_name | table1bakbackup_epoch | 180node_count | 3objects | test-[ RECORD 15 ]---+------------------------------backup_timestamp | 2013-05-16 07:20:18.585076-04node_name | v_vmart_node0003snapshot_name | table2bakbackup_epoch | 180node_count | 3objects | test2
Restoring Full Database BackupsTo restore a full database backup, youmust ensure that:
l The database is down. You cannot restore a full backup when the database is running.
l All of the backup hosts are up and available.
l The backup directory exists and contains the backups from which to restore.
l The cluster to which you are restoring the backup has the same number of hosts as the one usedto create the backup. The node names and the IP addresses must also be identical.
l The database you are restoringmust already exist on the cluster to which you are restoring data.The database can be completely empty without any data or schema. As long as the databasenamematches the name in the backup, and all of the node names match the names of the nodesin the configuration file, you can restore to it.
You can use only a full database backup to restore a database from scratch. If you have savedmultiple backup archives, you can restore from either the last backup, or a specific archive.
When you restore a full database backup, OIDs from each backup (including all archives) in thesame backup are injected into the restored catalog of the full database backup. Additionally, theOID generator and current epoch are set to the respectivemaximumOID and epoch from the fulldatabase backup.
For information about monitoring database restoration, seeMonitoring Recovery.
Restoring the Most Recent BackupTo perform a full database restore, the cluster must be DOWN. When a node or cluster is DOWNthe expected use case is to return the cluster to its most recent state, by restoring a full database
Administrator's Guide
HP Vertica Analytics Platform (7.0.x) Page 733 of 969

backup. You can restore any full database backup from the archive by identifying the name in theconfiguration file.
To begin a full database restore, log in using the database administrator's account. You cannotrun the utility as root.
To restore from themost recent backup, use the configuration file used to create the backup,specifying vbr.pywith the --task restore. If your configuration file does not contain the databasesuperuser password, the utility prompts you to enter it at run time.
The following example uses the db.ini configuration file, which includes the superuser'spassword:
> vbr.py --task restore --config-file db.iniCopying...1871652633 out of 1871652633, 100%All child processes terminated successfully.restore done!
You can restore a snapshot only to the database from which it was taken. You cannot restore asnapshot into an empty database.
Restoring an ArchiveIf you savedmultiple backups, you can specify a specific archive to restore. To list the archivesthat exist to choose one to restore, use the vbr.py --listbackup task, with a specificconfiguration file. For more information, see Viewing Backups.
To restore from one of several archives:
1. Log in using the database administrator's account. You cannot run the utility as root.
Invoke the utility with the --task restore command, the configuration file with which youcreated the backup, followed by the --archive parameter with the date_timestamp suffix ofthe directory name to identify which archive to restore. For example:
> vbr.py --task restore --config-file fullbak.ini --archive=20121111_205841
2. The vbr.py utility restores the snapshot.
The --archive parameter identifies the archive subdirectory, in this example, created on 11-11-2012 (_archive20121111), at time 205841 (20:58:41). You need specify only the the _archivesuffix , because the configuration file identifies the snapshot name of the subdirectory, and the OIDidentifier indicates the backup is an archive.
Attempting to Restore a Node That Is UPDuring a full database restore, the nodemust be DOWN. If you start the restore process and thenode is UP, vbr.py displays the followingmessage:
Administrator's Guide
HP Vertica Analytics Platform (7.0.x) Page 734 of 969

doc:tests/doc/tools $ vbr.py --config-file=doc.ini -t restore --nodes=v_doc_node0001Warning: trying to restore to an UP clusterWarning: Node state of v_doc_node0001 is UP; node must be DOWN for restore; ignoring restore on this node.Nothing to dorestore done!
To restore the node, first bring it down, and then run the utility again.
Attempting to Restore to an Alternate ClusterYou can restore a full backupONLY to a cluster with the node names and IP addresses used tocreate the backup. The vbr.py utility does NOT support restoring a full database backup to analternate cluster with different host names and IP addresses.
Attempting to restore a full backup to an alternate cluster when the source database is accessiblecan render the source database unusable. The backup you are restoring contains critical referencesto the source database and uses that information during the restore process.
Restoring Object-Level BackupsTo restore an object-level backup to the database from which it was taken, the databasemust beUP. The vbr.py configuration file you use for the restore task specifies the backup to restore, asdescribed in Creating Object-Level Backups. To restore a full database backup, see Restoring FullDatabase Backups. You cannot restore any object-level backup into an empty database.
Note: You cannot restore part of an object-level backup; youmust restore the entire backup.For example, if you create an object-level backup containing two schemas, schema1 andschema2, and later want to restore schema1, you cannot do so without also restoring schema2.To restore a single object, you can create a single object backup.
Backup LocationsBackups created in the same backup location are compatible. After restoring a full databasebackup, you can restore object-level backups saved in the same backup location as the full backup.
Note: Using different backup locations in which to create full- or object-level backups results inincompatible object-level backups. Attempting to restore an object-level backup after restoringa full database will fail.
Restoring an object-level backup does not affect any schemas or tables that were not included inthe original backup you are restoring. For instance, in amulti-tenanted database, if you createschema backups for each of four different tenants, restoring one tenant schema does not overwritethe other three.
Administrator's Guide
HP Vertica Analytics Platform (7.0.x) Page 735 of 969

Cluster Requirements for Object-Level RestoreTo restore from a full database backup, the cluster must be DOWN. To restorefrom an object-levelbackup, the database cluster must be UP.
After successfully restoring from a full database backup, after the cluster is UP, you can restorefrom an object-level backup, as long as it was created in the same backup location as the fullbackup you just restored.
Regardless of the node states when a backup was taken, you do not have tomanage node statesbefore restoring an object-level backup. Any node that is DOWN when you restore an object-levelbackup is updated when the node rejoins the cluster and comes UP after an object-level restore.
You restore a backup by name. An archive can comprisemultiple snapshots, including both full-and object-level backups.
Restoring Objects to a Changed Cluster TopologyUnlike restoring from a full database backup, vbr.py supports restoring object-level backups afteradding nodes to the cluster. Any nodes that were not in the cluster when you created the object-level backup will be updated as necessary when vbr.py restores the backup.
You cannot restore an object-level backup after removing nodes, altering node names, or changingIP addresses. Trying to restore an object-level backup after such changes causes vbr.py to failand display this message:
Preparing...Topology changed after backup; cannot restore.restore failed!
Projection Epoch After RestoreAll object-level backup and restore events are treated as DDL events. If a table does not participatein an object-level backup, possibly due to a node being down, restoring the backup has this effecton the projection:
l Its epoch is reset to 0
l It must recover any data that it does not have (by comparing epochs and other recoveryprocedures)
For more information, see Failure Recovery.
Catalog Locks During Backup RestoreAs with other databases, HP Verticatransactions follow strict lockingmechanisms tomaintain dataintegrity. For more information about session-scoped transaction locking, see"Transactions" onpage 1 in the Concepts Guideand the system table column descriptions in "LOCK_USAGE" onpage 1 of the SQLReferenceManual.
Administrator's Guide
HP Vertica Analytics Platform (7.0.x) Page 736 of 969

When restoring an object-level backup into a cluster that is UP, vbr.py begins by copying data andmanaging storage containers, potentially splitting the containers if necessary. While copying andmanaging data is the largest part of the restore process, it does not require any database locks.
After completing the first part of the process, vbr.py requires a table object lock (O-lock), and thena global catalog lock (GCLX). If other database operations already have locks on any associatedtables, the restore process is blocked until the locks are released.
Once the restore process obtains a table O-lock, vbr.py blocks other operations that require a lockon the same table. To guarantee catalog consistency, processes can hold a GCLX for aminimalduration. When the restore locks are in effect, any concurrent table modifications are blocked untilthe locks are released. Database system operations, such as the tuple mover (TM) transferringdata frommemory to disk, are canceled to allow the object-level restore to proceed.
Catalog Restore EventsEach object-level backup includes a section of the database catalog, called a snippet, whichcontains the selected objects, their dependent objects, and principal objects. The catalog snippet issimilar in format to the database catalog, but consists of a subset representing the objectinformation. Objects being restored can be read from the catalog snippet and used to update theglobal and local catalogs.
Each object from a restored backup is updated in the catalog. If the object no longer exists, vbr.pyadds the object to the catalog. Any dependent objects that are not in the backup are dropped fromthe catalog.
The vbr.py utility uses existing dependency verificationmethods to check the catalog, and adds arestore event to the catalog for each restored table. That event also includes the epoch at which theevent occurred. Any node that misses the restore event will recover projections anchored on thegiven table.
A DML statement that references an object being restoredmust wait for the restore to completebefore being able to lock the table. If a DML statement is in progress when the restore attempts toplace anO-lock on the table, the DML statement must finish before the restore can complete.
Restoring Hard Link Local BackupsThis section describes issues around restoring from hard link local full- and object-level backups.
Restoring Full- and Object-Level Hard Link LocalBackups
If you have created both full- and object-level backups and the database fails, first restore the fulldatabase backup. You can then restore from the object-level backups.
Avoiding OID and Epoch ConflictsIf you create full- and object-level backups in the same backup directory (recommended), when yourestore a full backup, vbr.py determines the latest OID and epoch of the object-level backups aswell.
Administrator's Guide
HP Vertica Analytics Platform (7.0.x) Page 737 of 969

Consider the following scenario:
1. Create a full hard link local backup in backup directory /home/dbadmin/backups, withconfiguration file mybak.ini:
[dbadmin@node01 ~]$ /opt/vertica/bin/vbr.py --task backup --config-file mybak.ini
2. Create an object-level hard link local backup for Table1 using the same backup directory, withconfiguration file table1bak.ini:
[dbadmin@node01 ~]$ /opt/vertica/bin/vbr.py --task backup --config-file table1bak.ini
3. Create an object-level hard link local backup for Table2, using the same backup directory, withconfiguration file table2bak.ini.
[dbadmin@node01 ~]$ /opt/vertica/bin/vbr.py --task backup --config-file table2bak.ini
After creating these hard link local backups, using the /backups directory, the following directorystructure exists:
Given this situation, the following occurs when you need to restore from a hard link local backup:
l When restoring a full DB (when table1 and table2 backups exist in the same backupdirectory), vbr.py detects themaximum object ID (OID) and epochs from the object-level table
Administrator's Guide
HP Vertica Analytics Platform (7.0.x) Page 738 of 969

backups and sets them in the restored database. This prevents OID and epoch conflicts fromoccurring when object-level backups are restored after the newly restored database.
l If the database and object-level table backups are not in the same backup directory, vbr.pyreverts themaximumOID and epoch for a full database restore back to the table OID and epoch.Further attempts to restore either table1 or table2 backups will then fail, preventing anypotential conflicts.
Transferring Backups to and From Remote StorageOnce a full hard link local backup exists, you can use a utility (other than vbr.py) to transfer thebackup to another storagemedia, such as tape. Transferring hard link local backups to anotherstoragemediamay copy the data files associated with the hard file links. The external media willthen contain copies of the files.
Complete the following steps to restore hard link local backups from external media:
1. If the original backup directory no longer exists on one or more local backup host nodes,recreate the directory. The directory structure into which you restore hard link backup filesmust be identical to what existed when the backup was created. For example, if you createdhard link local backups at the following backup directory, then recreate that directory structure:
/home/dbadmin/backups/localbak
2. Copy the backup files to their original backup directory, as specified for each node in theconfiguration file with the backupHost and backupDir parameters. For example, thisconfiguration file shows the backupDir parameter for v_vmart_node0001:
[Mapping0]dbNode = v_vmart_node0001backupHost = node03backupDir = /home/dbadmin/backups/localbak
3. To restore the latest version of the backup, move the backup files to this directory:
/home/dbadmin/backups/localbak/node_name/snapshotname
4. To restore a different backup version, move the backup files to this directory:
/home/dbadmin/backups/localbak/node_name/snapshotname_archivedate_timestamp
5. When the backup files are returned to their original backup directory, use the originalconfiguration file to invoke vbr.py as follows:
>/opt/vertica/bin/vbr.py --task restore --config-file localbak.ini
Administrator's Guide
HP Vertica Analytics Platform (7.0.x) Page 739 of 969

If the physical files are restored from tape into the correct directories, and you use theconfiguration file that specifies hardLinkLocal = true, restoring the backup succeeds.
Note: You can use a different directory when you return the backup files to the hard link localbackup host. However, youmust also change the backupDir parameter value in theconfiguration file before restoring the backup.
Restoring to the Same ClusterRestoring a database on the same cluster from a full-database backup consists of following thesesteps:
1. Stopping the Database you intend to restore.
Note: If you restore data to a single node, the node has already stopped. You do not needto stop the database.
2. Restoring Full Database Backups.
3. Starting the database, see Starting the Database (admintools) .
Note: If you restored all the nodes using the backup, you are using amanual recoverymethod, as described in Failure Recovery. Administration Tools returns themessage,"Database startup failed," after you attempt to restart the database and then offers torestart the database from an earlier epoch. Click Yes.
4. After the database starts, connect to it through the Administration Tools or MC and verify that itwas successfully restored by running some queries.
Removing BackupsTo remove existing backups:
1. Use vbr.py --task listbackup to identify the backup and archive names that reside on thelocal or remote backup host (requires a configuration file).
2. Delete the backup directories.
Deleting Backup DirectoriesRemoving existing local or remote backup host backups requires deleting the backup directory. Forexample, to remove the sample table2bak backup in the following example:
Administrator's Guide
HP Vertica Analytics Platform (7.0.x) Page 740 of 969

dbadmin@node01 temp]$ /opt/vertica/bin/vbr.py --task listbackup --config-file /home/dbadmin/table2bak.iniFound 1 backup(s) with given config file /home/dbadmin/table2bak.ini.backup epoch objects hosts(nodes)
table2bak_20130516_072002 180 test2 v_vmart_node0001(192.168.223.33), v_vmart_node0002(192.168.223.33), v_vmart_node0003(192.168.223.33)
1. Get these parameter values from the configuration file:
n snapshotName
n backupHost
n backupDir
2. Also note the dbNode parameter values, indicating which nodes were backed up.
3. Connect to the backup host.
4. Navigate to the backup directory (the backupDir parameter value in the configuration file).
5. To delete all backups, delete the top-level snapshot directory
-or-
6. To delete an archive, navigate to the subdirectory for each database node, located below thetop-level snapshot directory, and delete the archive directory.
Copying the Database to Another ClusterYou can use the vbr.py utility to copy the entire database to another HP Vertica cluster. Thisfeaturemakes it easy to perform tasks such as copying a database between a development and aproduction environment. Copying your database to another cluster is essentially a simultaneousbackup and restore— the data is backed up from the source database cluster and restored to thedestination cluster in a single operation.
The directory locations for the HP Vertica catalog , data, and temp directories must be identical onthe source and target database. Use the following vsql query to see the source database directorylocations. This example sets expanded display for illustrative purposes, and lists the columns ofmost interest, node_name, storage_path, and storage_usage.
VMart=> \xExpanded display is on.VMart=> select node_name,storage_path, storage_usage from disk_storage;-[ RECORD 1 ]-+-----------------------------------------------------node_name | v_vmart_node0001storage_path | /home/dbadmin/VMart/v_vmart_node0001_catalog/Catalogstorage_usage | CATALOG-[ RECORD 2 ]-+-----------------------------------------------------node_name | v_vmart_node0001
Administrator's Guide
HP Vertica Analytics Platform (7.0.x) Page 741 of 969

storage_path | /home/dbadmin/VMart/v_vmart_node0001_datastorage_usage | DATA,TEMP-[ RECORD 3 ]-+-----------------------------------------------------node_name | v_vmart_node0001storage_path | home/dbadmin/SSD/schemasstorage_usage | DATA-[ RECORD 4 ]-+-----------------------------------------------------node_name | v_vmart_node0001storage_path | /home/dbadmin/SSD/tablesstorage_usage | DATA-[ RECORD 5 ]-+-----------------------------------------------------node_name | v_vmart_node0001storage_path | /home/dbadmin/SSD/schemasstorage_usage | DATA-[ RECORD 6 ]-+-----------------------------------------------------node_name | v_vmart_node0002storage_path | /home/dbadmin/VMart/v_vmart_node0002_catalog/Catalogstorage_usage | CATALOG-[ RECORD 7 ]-+-----------------------------------------------------node_name | v_vmart_node0002storage_path | /home/dbadmin/VMart/v_vmart_node0002_datastorage_usage | DATA,TEMP-[ RECORD 8 ]-+-----------------------------------------------------node_name | v_vmart_node0002storage_path | /home/dbadmin/SSD/tablesstorage_usage | DATA...
Notice the directory paths for the Catalog, Data, and Tempstorage. These paths are the same on allnodes in the source database, andmust be the same in the target database.
Note: Copying a database to another cluster overwrites any existing data on the target cluster.If the target data is identical to the source database, data is not transferred again. However, ifthe target cluster contains data you want to retain, create a full database backup beforeinvoking the copycluster vbr.py task.
Identifying Node Names for Target ClusterYou need to know the exact names that Admintools supplied to all nodes in the source databasebefore configuring the target cluster.
To see the node names, run a query such as this:
VMART=> select node_name from nodes;node_name
------------------v_vmart_node0001v_vmart_node0002v_vmart_node0003
(3 rows)
-or-
Administrator's Guide
HP Vertica Analytics Platform (7.0.x) Page 742 of 969

To run Admintools from the command line, enter a command such as this for the VMart database:
$ /opt/vertica/bin/admintools -t node_map -d VMARTDATABASE | NODENAME | HOSTNAME-----------------------------------------------VMART | v_vmart_node0001 | 192.168.223.xxVMART | v_vmart_node0002 | 192.168.223.yyVMART | v_vmart_node0003 | 192.168.223.zz
Configuring the Target ClusterConfigure the target to allow the source database to connect to it and restore the database. Thetarget cluster must:
l Have the same number of nodes the source cluster.
l Have a database with the same name as the source database. The target database can becompletely empty.
l Have the same node names as the source cluster. The nodes names listed in the NODESsystem tables on both clusters must match.
l Be accessible from the source cluster.
l Have the same database administrator account, and all nodes must allow a databaseadministrator of the source cluster to login through SSH without a password.
Note: Having passwordless access within the cluster is not the same as havingpasswordless access between clusters. The SSH ID of the administrator account on thesource cluster is likely not the same as the SSH ID of the administrator account on thetarget cluster. You need to configure each host in the target cluster to accept the SSHauthentication of the source cluster. See Configuring Backup Hosts for more information.
l Have adequate disk space for the vbr.py --task copycluster command to complete.
Creating a Configuration File for CopyClusterYoumust create a configuration file specifically for copying your database to another cluster. In theconfiguration file, specify the host names of nodes in the target cluster as the backup hosts. Whenusing the copycluster command, the vbr.py requires that you define the backupHost, but ignoresthe backupDir option, and always stores the data in the catalog and data directories of the targetdatabase.
You cannot use an object-level backup with the copycluster command. Youmust use a fulldatabase backup.
The following example configuration file is set up to copy a database on a three node cluster (v_vmart_node0001, v_vmart_node0002, and v_vmart_node0003) to another cluster consisting ofnodes named test-host01, test-host02, and test-host03.
Administrator's Guide
HP Vertica Analytics Platform (7.0.x) Page 743 of 969

[Misc]snapshotName = CopyVmartverticaConfig = FalserestorePointLimit = 5tempDir = /tmp/vbrretryCount = 5retryDelay = 1
[Database]dbName = vmartdbUser = dbadmindbPassword = passworddbPromptForPassword = False
[Transmission]encrypt = Falsechecksum = Falseport_rsync = 50000bwlimit = 0
[Mapping]; backupDir is not used for cluster copyv_vmart_node0001= test-host01:/home/dbadmin/backupsv_vmart_node0002= test-host02:/home/dbadmin/backupsv_vmart_node0003= test-host03:/home/dbadmin/backups
Copying the DatabaseThe target cluster must be stopped before you invoke copycluster.
To copy the cluster, run vbr.py from a node in the source database using the databaseadministrator account, passing the --task copycluster --config-file CopyVmart.inicommand.
The following example demonstrates copying a cluster using a configuration file located in thecurrent directory.
> vbr.py --config-file CopyVmart.ini --task copyclusterCopying...1871652633 out of 1871652633, 100%All child processes terminated successfully.copycluster done!
Administrator's Guide
HP Vertica Analytics Platform (7.0.x) Page 744 of 969

Backup and Restore Utility ReferenceThis section provides reference information about both the vbr.py utility commands, and itsassociated configuration file parameters.
VBR Utility ReferenceThe HP Verticavbr.py utility lets you back up and restore either the full database, or one or moreschema and table objects of interest. You can also copy a cluster and list backups you createdpreviously. The utility is located in the HP Vertica binary directory (/opt/vertica/bin/vbr.py onmost installations).
Syntax/opt/vertica/bin/vbr.py { command }... [ --archive file ]... [ --config-file file ]... [ --debug <em+>level</em>]... [ --nodes node1 [, noden, ...] ]... [ --showconfig ]
Where command is one of the following:
FullCommand Short Command Description
--help -h Shows a brief usage guide for the command.
--setupconfig
Asks a series of questions and generates a configurationfile. See Configuring the Backup Script for details.
--task {backup| copycluster| listbackup| restore }
-t Performs the specified task:
l backup creates a full-database, or object-level backup,depending on what you have specified in theconfiguration file
l copycluster copies the database to another HPVertica cluster.
l listbackup displays the existing backups associatedwith the configuration file you supply. Use theinformation in this display to get the name of a snapshotyou want to restore. See Restoring Full DatabaseBackups, and Restoring Object-Level Backups.
l restoreRestores a full- or object-level databasebackup. Requires a configuration file.
Administrator's Guide
HP Vertica Analytics Platform (7.0.x) Page 745 of 969

Parameters
Parameter Description
--archive file Used with --task backup or --task restore commands, specifies thename of the archive backup to create (backup) or restore. Use this optionwith the restore commandwhen you have savedmore than one restorepoint, using a command such as:
> vbr.py --task restore --config-file myconfig.ini --archive=snapDB20111114_205841
See the restorePointLimit parameter in Backup Configuration Optionsfor details of savingmultiple backups.
--config-file file Indicates the configuration file to use. If this file does not exist, an erroroccurs and the utility cannot continue. The file parameter can be absoluteor relative path to the location from which you start the backup utility.
--nodes node1[,...] Specifies the node or nodes (in a comma-separated list if more than onenode exists), on which to perform a vbr.py task. The nodes in the list arethe same names in theMapping section of the configuration file. See VBRConfiguration File Reference for details.
Caution: If you create a backup for only some nodes in the cluster, youare creating a partial database backup. Partial backups can result in lostdata if not used correctly. Do not try to restore the entire database clusterfrom a partial database backup created from a subset of the nodes.
--debug level Indicates the level of debuggingmessages (from 0 to 3) that the vbr.pyutility provides. Level 3 has themost verbose debuggingmessages, whilelevel 0 supplies nomessages. The default value when running the utility islevel 0 (no output).
--showconfig The configuration values being used to perform the task. The parametersare shown in a raw JSON format before vbr.py starts processing.
VBR Configuration File ReferenceThe configuration file options are grouped into sections within the configuration file. The followingtables describe each parameter section.
[Misc] Miscellaneous SettingsThis section collects basic settings, including the name and location of the backup. The sectionalso indicates whether you are keepingmore than a single backup file, as specified by the(restorePointLimit parameter.
Administrator's Guide
HP Vertica Analytics Platform (7.0.x) Page 746 of 969

Parameter Default Configuration question and Description
snapshotName snapshotName Specifies the name of the top-level directory vbr.pycreates for the full or object-level backup. AsnapshotName can include only alphanumeric characters,including:
l a— z
l A – Z
l 0 – 9
l period (.)
l hyphen (-)
l underscore (_)
tempDir /tmp Specifies an absolute path to a temporary storage area onthe cluster nodes. The vbr.py utility uses this directoryas a temporary location while it is copying files from thesource cluster node to the destination backup location.See Configuring Backup Hosts for further information.
Note: The tmp pathmust be the same on all nodes in thecluster.
verticaBinDir /opt/vertica/bin Specifies a full path to the HP Vertica binary directory, ifthe path is something other than the default.
verticaConfig False Indicates whether the HP Vertica configuration file isincluded in the backup, in addition to the database data.See Creating vbr.py Configuration Files.
restorePointLimit 1 Specifies the number of backups to retain. For example,if you set restorePointLimit=3, there will be amaximum of three backups, in addition to themost recentbackup. By default, HP Verticamaintains a singlearchive. Savingmultiple backups lets you back upincrementally. Enter a value from 1 - 99.
If you set restorePointLimit to more than 1, you cansavemultiple archive snapshots to the same location,with the benefit that storage common tomultiplesnapshots is shared (through hard links). In this case,each snapshot begins with the same prefix but has aunique time and date suffix, such as follows:
mysnapshot_archive20111111_205841
Administrator's Guide
HP Vertica Analytics Platform (7.0.x) Page 747 of 969

Parameter Default Configuration question and Description
objects None Specifies whether vbr.py creates a full or object-levelbackup. If you do not specify any objects, vbr.pycreates a full backup. Otherwise, specify the objectnames (schemas or tables) to include in a backup. Toenter more than one object, enter multiple names in acomma-separated list.
Object names can include UTF-8 alphanumericcharacters (as for the snapshotName parameter, above).Object names cannot include escape characters, singlequote (') or double quote (") characters.
To use non-alphanumeric characters, use a backslash (\)followed by a hex value. For instance, if the table name isa my table (my followed by a space character, thentable), enter the object name as follows:
objects=my\20table
overwrite True Specifies whether to overwrite an object of the samenamewhen restoring a schema- or table-level snapshot.This parameter is related only to schema or tablesnapshots. By default, conflicting objects are overwrittenwhen you restore a snapshot and an conflict betweenobject IDs (OIDs) occurs. To prevent the snapshot fromoverwriting the schema or table while restoring thesnapshot, set this parameter to false in the related object-specific snapshot configuration file.
NOTE: This parameter is not included in the configurationfile you create, even if you specify one or more values forthe preceding objects parameter, and the default valueis in use when restoring a snapshot. To change theoverwrite default value, edit your configuration filebefore restoring the snapshot, and enter overwrite =false in the file's [MISC] section.
retryCount 2 Indicates the number of times the backup operationattempts to complete execution after an error occurs. Ifthe failure continues to occur after the number of retryattempts, the utility reports an error and stopsprocessing.
retryDelay 1 Defines the number of seconds to wait between backupretry attempts in the event of a failure.
[Database] Database Access SettingsSets options for accessing the database.
Administrator's Guide
HP Vertica Analytics Platform (7.0.x) Page 748 of 969

Parameter Default Description
dbName N/A Specifies the name of the database to back up. If you do notsupply a database name, the vbr.py utility selects thecurrent database to back up.
HP Vertica recommends that you provide a database name.
dbUser Currentusername
Identifies the login name of the person who can run vbr.py tocreate a snapshot, or perform other tasks. The vbr.py utilityobtains this information automatically as the current user ofthe person who invoked the --setupconfig command. Youmust be logged on as the database administrator to backup the database.
dbPromptForPassword True Controls whether the utility prompts for a password. If youset this parameter to False (indicating no prompt at run time),then youmust also enter the database administratorpassword in the dbPassword parameter. If you do not supplya password in the configuration file, the utility prompts for oneat run time.
dbPassword None Identifies the database administrator's password. Enter apassword if you set dbPromptForPassword to False, sothat you will not be prompted at runtime, and the utility needsno further intervention.
The vbr.py utility saves your password as plain text. Do notinclude a password unless you are confident that nounauthorized personnel have access to the vbr.pyconfiguration file.
Note:You cannot enter an empty string for the dbPasswordin the configuration file. If a superuser's password consists ofan empty string (not recommended), youmust set thedbPromptForPassword parameter to True, leave thedbPassword option blank, and enter the empty string at theprompt each time you run the backup utility.
[Transmission] Data Transmission During BackupProcess
Sets options for transmitting the data when using backup hosts.
Administrator's Guide
HP Vertica Analytics Platform (7.0.x) Page 749 of 969

Parameter Default Description
encrypt False Controls whether the transmitted data is encrypted while it is beingcopied to the target backup location. Choose this option if you areperforming a backup over an untrusted network (for example,backing up to a remote host across the Internet).
Note:Encrypting data transmission causes significant processingoverhead and slows transfer. One of the processor cores of eachdatabase node is consumed during the encryption process. Use thisoption only if you are concerned about the security of the networkused when transmitting backup data.
checksum False Controls whether the vbr.py utility has rsync use themd5checksum to determine whether files are identical before and afternetwork transmission. By default, rsync does not performchecksum. Instead, it performs minimal file checking, confirmingthat the file size and time of last modification are identical before andafter transmission.
Note:Calculating checksum values increases processor usageduring the backup process. For more details, seeWikipedia rsync.
port_rsync 50000 Changes the default port number for the rsync protocol. Change thisvalue if the default rsync port is in use on your cluster, or you needrsync to use another port to avoid a firewall restriction.
bwlimit 0 Indicates the transfer bandwidth limit (in KBs per second) for datatransmission on each node in the database. If you do not specify avalue, then no limit is imposed.
hardLinkLocal False Creates a full- or object-level backup using hard file links on the localfile system, rather than copying database files to a remote backuphost. Add this configuration parameter manually to the Transactionsection of the configuration file, as described in Configuring the HardLink Local Parameter.
ssh_port_backup
22 Overrides the default SSH port setting (22) for the backup hosts.Enter the required SSH port for your site.
Changing the default SSH port is supported only when using thebackup and restore tasks. Using a non-default SSH port with thecopycluster task is not supported.
NOTE: This parameter is not included in the configuration fileautomatically. See Configuring Backup Hosts to enter the parametermanually.
[Mapping]There is one [Mapping] section for all of the nodes in your database cluster. The sectionmust existin your configuration file, since it specifies all database nodes being included in the backup, along
Administrator's Guide
HP Vertica Analytics Platform (7.0.x) Page 750 of 969

with the backup host and directory for each node.
NOTE: Previous configuration files used separatemapping sections for each database node.While vbr.py continues to support that format, you cannot combine formats. If you edit anexisting configuration file to add aMapping in the current style, youmust combine informationfrom all existingMappings into the new section. Alternatively, you can use vbr.pywith the --task=create-config option to generate a new configuration file, as described in Creatingvbr.py Configuration Files.
In the following example, the Mapping section indicates a single node to be backed up (v_vmart_node0001). The node is assigned to the backup host (127.0.0.1), and the backup directory(/home/dbadmin/backups). Notice that, even though this example is for a single node cluster, andthe backup host and the database node are the same system, you specify them differently. Thebackup host and directory specifications use a colon (:) as a separator:
[Mapping]v_vmart_node0001 = 127.0.0.1:/home/dbadmin/backups
While the configuration file [Mapping] section no longer uses named parameters, the elements ofthe simplified format continue to represent the following parameters:
dbNode = backupHost:backupDir
Parameter Default Description
backupHost None Indicates the target host name or IP address on which to store thisnode's backup. The backupHost name is different from dbNode, alsodescribed in this table.
When you create a configuration file to copy the database to another HPVertica cluster (with the copycluster task), supply the host name of anode in the target cluster.
backupDir None Identifies the full path to the directory on the backup host or node wherethe backup will be stored. This directory must already exist when yourun the utility with the --task backup option, andmust be writable bythe user account used to run the backup utility. This setting is not usedfor the copycluster command.
dbNode None The name of the database node, as recognized by HP Vertica. This isnot the node's host name, but rather the nameHP Vertica usesinternally to identify the node, usually in the form of:
v_databasename_node00xx
To find database node names in your cluster, query the node_namecolumn of the NODES system table.
Administrator's Guide
HP Vertica Analytics Platform (7.0.x) Page 751 of 969

Page 752 of 969HP Vertica Analytics Platform (7.0.x)
Administrator's Guide

Recovering the DatabaseRecovering a database can consist of any of the following:
l Restarting HP Vertica on a host
l Restarting the Database
l Recovering the Cluster From a Backup
l Replacing Failed Disks
l Copying the Database to Another Cluster
l Exporting a Catalog for support purposes.
You canmonitor a recovery in progress by viewing logmessages posted to the vertica.log file oneach host.
See Alsol Failure Recovery
Failure RecoveryRecovery is the process of restoring the database to a fully functional state after one or more nodesin the system has experienced a software- or hardware-related failure. HP Vertica recovers nodesby querying replicas of the data stored on other nodes. For example, a hardware failure can cause anode to lose database objects or to miss changes made to the database (INSERTs, UPDATEs,and so on) while offline. When the node comes back online, it recovers lost objects and catches upwith changes by querying the other nodes.
K-safety is ameasure of fault tolerance in the database cluster. The value K represents the numberof replicas of the data in the database that exist in the database cluster. These replicas allow othernodes to take over for failed nodes, allowing the database to continue running while still ensuringdata integrity. If more than K nodes in the database fail, some of the data in the databasemaybecome unavailable. In that case, the database is considered unsafe and automatically shutsdown.
It is possible for an HP Vertica database to havemore than K nodes fail and still continue runningsafely, because the database continues to run as long as every data segment is available on atleast one functioning cluster node. Potentially, up to half the nodes in a database with a K-safetylevel of 1 could fail without causing the database to shut down. As long as the data on each failednode is available from another active node, the database continues to run.
Note: If half or more of the nodes in the database cluster fail, the database will automatically
Administrator's GuideRecovering the Database
HP Vertica Analytics Platform (7.0.x) Page 753 of 969

shut down even if all of the data in the database is technically available from replicas. Thisbehavior prevents issues due to network partitioning.
In HP Vertica, the value of K can be zero (0), one (1), or two (2). The physical schema designmustmeet certain requirements. To create designs that are K-safe, HP recommends using theDatabaseDesigner.
Note: : You canmonitor the cluster state through theView Database Cluster statemenuoption.
Recovery ScenariosRecovery comes into play when a node or the database is started. Depending upon how the node ordatabase was shut down, and how it is restored, there are three possibilities for a K-Safe database:
l Recovery of failed nodes: One or more nodes have failed, but the database continues to runsince the remaining nodes in the database are able to fill in for the failed nodes. The failed nodescan be restarted through the Administration Tools using the Restart HP Vertica on host option.The nodes being restarted have a RECOVERING status while they rebuild some of the datafrom the remaining nodes. Once rebuilding is finished, the nodes transition to an UP status. Thedatabase can continue to commit transactions during the recovery process, except for a shortperiod at the end of the recovery process.
l Recovery after a Clean Shutdown: The database had been shut down cleanly via theAdministration Tools Stop Database option. In this case, the database should be restarted usingthe Start Database option. Upon restart all nodes that were 'UP' at the time of shutdownimmediately transition to 'UP'. It is possible that at the time of shutdown, the database had oneor more failed nodes. If these nodes are now available, they go through the 'RECOVERING'state as described in 'Recovery of failed nodes" case above.
l Recovery after an Unclean Shutdown (Manual Recovery): The database was not shut downcleanly, whichmeans that the database became unsafe due to a failure. In this case, thedatabase possibly did not write all the data from theWOS to disk. There are several reasons forunclean shutdowns, such as:
n A critical node failed, leaving part of the database's data unavailable.
n A site-wide event, such as a power failure that causes all nodes to reboot.
n HP Vertica processes on the nodes exited due to a software or hardware failure.
When the database is started through the Administration Tools Start Database option, recoverydetermines that a normal startup is not possible. It goes on to determine a point in time in whichthe data was consistent on all nodes. This is called the Last Good Epoch. As part of StartDatabase processing, the administrator is prompted to accept recovery with the suggestedepoch. If accepted, the database recovers and any data changes made after the Last GoodEpoch are lost. If not accepted, startup is aborted and the database is not started on any of thenodes.
Administrator's GuideRecovering the Database
HP Vertica Analytics Platform (7.0.x) Page 754 of 969
Instead of accepting the given epoch, the administrator can instead choose to recover from abackup or select an epoch for an even earlier point using the Roll Back Database to Last GoodEpoch option in the Administration Tools AdvancedMenu. This is useful in special situations, forexample if the failure occurs during a batch of loads, for which it is easier to go back to thebeginning of the batch, rather than starting in themiddle, even though some of the work must berepeated. In most scenarios, it is sufficient and recommended to accept the given epoch.
Notesl In HP Vertica 5.0, manual recovery is possible as long as the nodes that are being started can
supply all of the partition segments in the database. This means that more than K nodes canremain down at startup, and the database can still successfully start as long as all of the data isavailable from the remaining nodes in the cluster.
l In HP Vertica 4.1, the default for the HistoryRetentionTime configuration parameter changedto 0, whichmeans that HP Vertica only keeps historical data when nodes are down. This defaultsetting effectively prevents the use of theAdministration Tools 'Roll Back Database to LastGood Epoch' option because theAHM remains close to the current epoch and a rollback is notpermitted to an epoch prior to the AHM. If you rely on the Roll Back option to remove recentlyloaded data, consider setting a day-wide window for removing loaded data; for example:
=> SELECT SET_CONFIG_PARAMETER ('HistoryRetentionTime', '86400');
See EpochManagement Parameters in the Administrator's Guide.
l Starting in 4.0, manual recovery is possible even if up to K nodes are out of commission; forexample, physically removed for repair or not reachable at the time of recovery. Once the nodesare back in commission, they recover and rejoin the cluster, as described in the "Recovery afterfailure of up to K nodes" section above.
l IMPORTANT:When a node is down, it can take a full minute or more for the HP Verticaprocesses to time out during its attempt to form a cluster whenmanual recovery is needed. Waitapproximately oneminute until the system returns themanual recovery prompt. Do not pressCTRL-C during database startup.
See Alsol High Availability and Recovery
Restarting HP Vertica on a HostWhen one node in a running database cluster fails, or if any files from the catalog or data directoriesare lost from any one of the nodes, you can check the status of failed nodes using either theAdministration Tools or theManagement Console.
Administrator's GuideRecovering the Database
HP Vertica Analytics Platform (7.0.x) Page 755 of 969

Restarting HP Vertica on a Host Using theAdministration Tools
1. RunAdministration Tools.
2. From theMainMenu, select Restart HP Vertica on Host and click OK.
3. Select the database host you want to recover and click OK.
Note: Youmight see additional nodes in the list, which are used internally by theAdministration Tools. You can safely ignore these nodes.
4. Verify recovery state by selectingView Database Cluster State from theMain Menu.
After the database is fully recovered, you can check the status at any time by selectingViewDatabase Cluster State from the Administration Tools Main Menu.
Restarting HP Vertica on a Host Using theManagement Console
1. Connect to a cluster node (or the host on whichMC is installed).
2. Open a browser and connect to MC as anMC administrator.
3. On theMC Home page, double-click the running database under theRecent Databasessection.
4. Within theOverview page, look at the node status under the Database sub-section and see ifall nodes are up. The status will indicate how many nodes are up, critical, down, recovering, orother.
5. If a node is down, click Manage at the bottom of the page and inspect the graph. A failed nodewill appear in red.
6. Click the failed node to select it and in the Node List, click theStart node button.
Restarting the DatabaseIf you lose the HP Vertica process onmore than one node (for example, due to power loss), or if theservers are shut downwithout properly shutting down the HP Vertica database first, the databasecluster indicates that it did not shut down gracefully the next time you start it.
The database automatically detects when the cluster was last in a consistent state and then shutsdown, at which point an administrator can restart it.
From theMainMenu in theAdministration Tools:
Administrator's GuideRecovering the Database
HP Vertica Analytics Platform (7.0.x) Page 756 of 969

1. Verify that the database has been stopped by clickingStop Database.
A message displays: No databases owned by <dbadmin> are running
2. Start the database by selectingStart Database from theMainMenu.
3. Select the database you want to restart and click OK.
If you are starting the database after an unclean shutdown, messages display, which indicatethat the startup failed. Press RETURN to continue with the recovery process.
An epoch represents committed changes to the data stored in a database between twospecific points in time. When starting the database, HP Vertica searches for last good epoch.
4. Upon determining the last good epoch, you are prompted to verify that you want to start thedatabase from the good epoch date. Select Yes to continue with the recovery.
Administrator's GuideRecovering the Database
HP Vertica Analytics Platform (7.0.x) Page 757 of 969
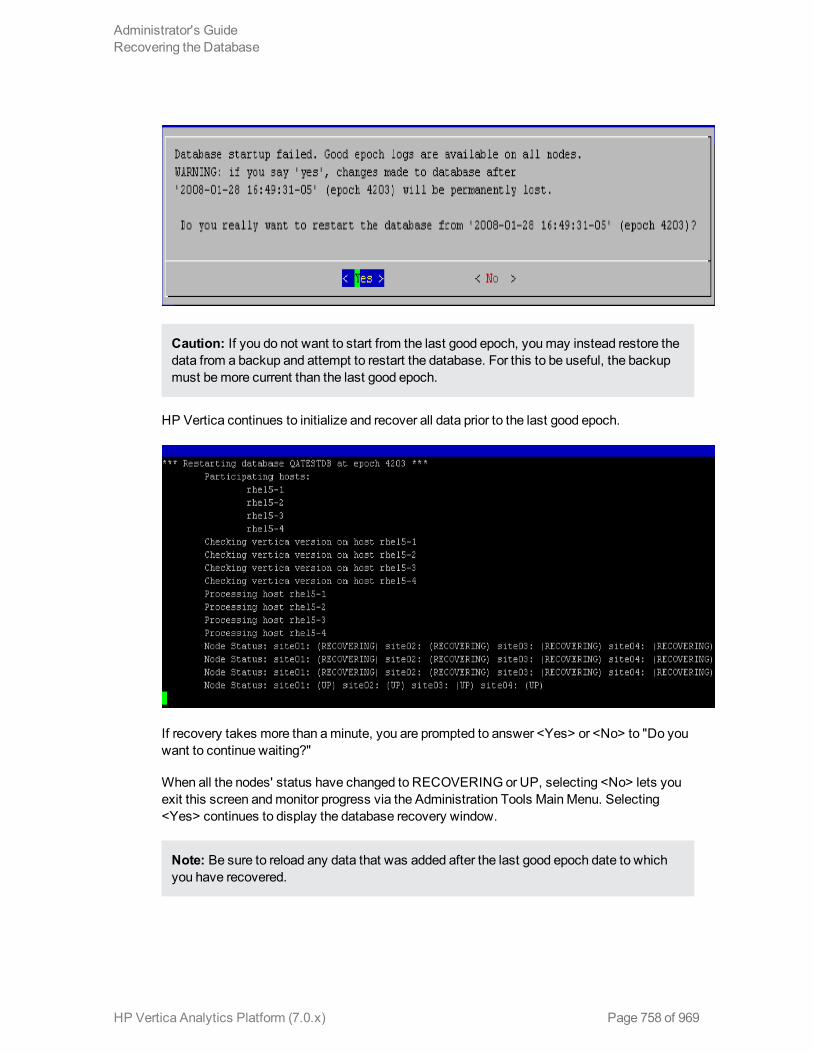
Caution: If you do not want to start from the last good epoch, youmay instead restore thedata from a backup and attempt to restart the database. For this to be useful, the backupmust bemore current than the last good epoch.
HP Vertica continues to initialize and recover all data prior to the last good epoch.
If recovery takes more than aminute, you are prompted to answer <Yes> or <No> to "Do youwant to continue waiting?"
When all the nodes' status have changed to RECOVERING or UP, selecting <No> lets youexit this screen andmonitor progress via the Administration Tools MainMenu. Selecting<Yes> continues to display the database recovery window.
Note: Be sure to reload any data that was added after the last good epoch date to whichyou have recovered.
Administrator's GuideRecovering the Database
HP Vertica Analytics Platform (7.0.x) Page 758 of 969

Recovering the Cluster From a BackupTo recover a cluster from a backup, refer to the following topics in this guide:
l Backing Up the Database (vbr.py)
l Restoring Full Database Backups
Monitoring RecoveryThere are several ways tomonitor database recovery:
l Log files on each host
l Admintools (View Database Cluster State)
l System tables
This section describes the different ways tomonitor recovery.
Viewing Log Files on Each NodeDuring database recovery, HP Vertica adds logging information to the vertica.log on each host.Eachmessage is identified with a [Recover]string.
Use the tail command tomonitor recovery progress by viewing the relevant status messages, asfollows.
$ tail -f catalog-path/database-name/node-name_catalog/vertica.log
01/23/08 10:35:31 thr:Recover:0x2a98700970 [Recover] <INFO> Changing host node01startup state from INITIALIZING to RECOVERING
01/23/08 10:35:31 thr:CatchUp:0x1724b80 [Recover] <INFO> Recovering to specifiedepoch 0x120b6
01/23/08 10:35:31 thr:CatchUp:0x1724b80 [Recover] <INFO> Running 1 split queries
01/23/08 10:35:31 thr:CatchUp:0x1724b80 [Recover] <INFO> Running query: ALTERPROJECTION proj_tradesquotes_0 SPLIT node01 FROM 73911;
Viewing the Cluster State and Recover StatusUse the admintools view_cluster tool from the command line to see the cluster state:
$ /opt/vertica/bin/admintools -t view_clusterDB | Host | State---------+--------------+------------<data_base> | 112.17.31.10 | RECOVERING
Administrator's GuideRecovering the Database
HP Vertica Analytics Platform (7.0.x) Page 759 of 969

<data_base> | 112.17.31.11 | UP<data_base> | 112.17.31.12 | UP<data_base> | 112.17.31.17 | UP________________________________
Using System Tables to Monitor RecoveryUse the following system tables tomonitor recover:
l RECOVERY_STATUS
l PROJECTION_RECOVERIES
Specifically, the recovery_status system table includes information about the node that is recovering, the epoch being recovered, thecurrent recovery phase, and running status:
=>select node_name, recover_epoch, recovery_phase, current_completed, is_running from recovery_status;node_name | recover_epoch | recovery_phase | current_completed | is_running-----------+---------------+-------------------+-------------------+--------------node01 | | | 0 | fnode02 | 0 | historical pass 1 | 0 | tnode03 | 1 | current | 0 | f
The projection_recoveries system tablemaintains history of projection recoveries. To checkthe recovery status, you can summarize the data for the recovering node, and run the same queryseveral times to see if the counts change. Differing counts indicate that the recovery is working andin the process of recovering all missing data.
=> select node_name, status , progress from projection_recoveries;node_name | status | progress-----------------------+-------------+---------v_<data_base>_node0001 | running | 61
To see a single record from the projection_recoveries system table, add limit 1 to the query.
Monitoring Cluster Status After RecoveryWhen recovery has completed:
1. Launch Administration Tools.
2. From theMainMenu, select View Database Cluster State and click OK.
The utility reports your node's status as UP.
Note: You can alsomonitor the state of your database nodes on theManagement ConsoleOverview page under the Database section, which tells you the number of nodes that are up,critical, recovering, or down. To get node-specific information, click Manage at the bottom of
Administrator's GuideRecovering the Database
HP Vertica Analytics Platform (7.0.x) Page 760 of 969
the page.
See Alsol Monitoring HP Vertica
Exporting a CatalogWhen you export a catalog you can quickly move a catalog to another cluster. Exporting a catalogtransfers schemas, tables, constraints, projections, and views. System tables are not exported.
Exporting catalogs can also be useful for support purposes.
See the EXPORT_CATALOG function in the SQLReferenceManual for details.
Best Practices for Disaster RecoveryTo protect your database from site failures caused by catastrophic disasters, maintain an off-sitereplica of your database to provide a standby. In case of disaster, you can switch database usersover to the standby database. The amount of data loss between a disaster and fail over to theoffsite replica depends on how frequently you save a full database backup.
The solution to employ for disaster recover depends upon two factors that youmust determine foryour application:
l Recovery point objective (RPO): How much data loss can your organization tolerate upon adisaster recovery?
l Recovery time objective (RTO):How quickly do you need to recover the database following adisaster?
Depending on your RPO and RTO, HP Vertica recommends choosing from the following solutions:
1. Dual-load:During each load process for the database, simultaneously load a seconddatabase. You can achieve this easily with off-the-shelf ETL software.
2. Periodic Incremental Backups: Use the procedure described in Copying the Database toAnother Cluster to periodically copy the data to the target database. Remember that the scriptcopies only files that have changed.
3. Replication solutions provided by Storage Vendors: If you are using a SAN, evaluate yourstorage vendor's replication (SRDF) solutions.
The following table summarizes the RPO, RTO, and the pros and cons of each approach:
Dual Load Periodic Incremental Storage Replication
RPO Up to theminute data Up to the last backup Recover to theminute
Administrator's GuideRecovering the Database
HP Vertica Analytics Platform (7.0.x) Page 761 of 969

Dual Load Periodic Incremental Storage Replication
RTOAvailable at all times Available except when backup
in progressAvailable at all times
Pros
l Standby database can havedifferent configuration
l Can use the standbydatabase for queries
l Built-in scripts
l High performance due tocompressed file transfers
Transparent to thedatabase
Cons
l Possibly incur additionalETL licenses
l Requires application logicto handle errors
Need identical standbysystem
l More expensive
l Media corruptionsare also replicated
Administrator's GuideRecovering the Database
HP Vertica Analytics Platform (7.0.x) Page 762 of 969

Monitoring HP VerticaThis section describes some of the ways in which you canmonitor the health of your HP Verticadatabase.
Monitoring Log Files
When a Database Is RunningWhen an HP Vertica database is running, each node in the clusterwrites messages into a filenamed vertica.log. For example, the Tuple Mover and the transactionmanager write INFOmessages into vertica.log at specific intervals even when there is noWOS activity.
Tomonitor a running database in real time:
1. Log in to the database administrator account on any or all nodes in the cluster.
2. In a terminal window (such as vsql) enter:
$ tail -f catalog-path/database-name/node-name_catalog/vertica.log
catalog-path
The catalog pathname specified when you created the database. See Creating aDatabase in the Administrator's Guide.
database-name
The database name (case sensitive)
node-name
The node name, as specified in the database definition. See Viewing a Database inthe Administrator's Guide.
When the Database / Node Is Starting upDuring startup before the vertica log has been initialized to write messages, each node in the clusterwrites messages into a file named dbLog. This log is useful to diagnose situations where databasefails to start before it can write messages into vertica.log. The dblog can be found at thefollowing path, using catalog-path and database-name as described above:
catalog-path/database-name/dbLog
See Alsol Rotating Log Files
Administrator's GuideMonitoring HP Vertica
HP Vertica Analytics Platform (7.0.x) Page 763 of 969

Rotating Log FilesThe logrotate utility, which is included with most Linux distributions, helps simplify log fileadministration on systems that generatemany log files. Logrotate allows for automatic rotation,compression, removal, andmailing of log files and can be configured to perform these tasks atspecific intervals or when the log file reaches a particular size.
If logrotate is present when HP Vertica is installed (which is typical for most Linux distributions),then HP Vertica automatically sets logrotate to look for configuration files in the/opt/vertica/config/logrotate directory. The utility also creates the file vertica in the/etc/logrotate.d/ directory, which includes the line:
include /opt/vertica/config/logrotate
If logrotate is not present but installed at a later time, either reinstall the HP Vertica RPM on everynode in the cluster or add a file in the /etc/logrotate.d/ directory that instructs logrotate toinclude the logrotate directory contents. For example:
1. Create the file /etc/logrotate.d/vertica.
2. Add the following line:
include /opt/vertica/config/logrotate
When a database is created, HP Vertica creates database-specific logrotate configurations whichare used by the logrotate utility. For example, a file /opt/vertica/config/logrotate/<dbname>is created for each individual database.
Using Administration Tools Logrotate UtilityThe administration tools provide a logrotate option to help configure logrotate scripts for a databaseand to distribute it across the cluster. Only a few basic options are supported - how often to rotatelogs, low large the log can get before rotation and how long to keep the logs. For other options, youcanmanually create logrotate scripts as described later in this topic.
Example:
The following example sets up log rotation on a weekly schedule and keeps for 3months (12 logs).
$ admintools -t logrotate -d <dbname> -r weekly -k 12
SeeWriting Administration Tools Scripts for full usage description.
Manually Rotating LogsTo perform manual log rotation, use the following procedure to implement a custom log rotationprocess. No logmessages are lost during the procedure.
Administrator's GuideMonitoring HP Vertica
HP Vertica Analytics Platform (7.0.x) Page 764 of 969

1. Rename or archive the vertica.log file that is produced. For example:
$ mv vertica.log vertica.log.1
2. Send the HP Vertica process the USR1 signal. For example:
$ killall -USR1 vertica
or
$ ps -ef | grep -i vertica$ kill -USR1 process-id
Manually Creating Logrotate ScriptsIf your needs are not met by the administration tools logrotate utility, youmay create your ownscripts. The following script is an example:
/mydb/site01_catalog/vertica.log { # rotate weeklyweekly# and keep for 52 weeksrotate 52# no complaining if vertica did not start yetmissingok# compress log after rotationcompress# no creating a new empty log, vertica will do thatnocreate# if set, only rotates when log size is greater than Xsize 10M# delete files after 90 days (not all logrotate pkgs support this keyword)# maxage 90# signal vertica to reopen and create the logpostrotate
kill -USR1 `head -1 /mydb/site01_catalog/vertica.pid 2> /dev/null` 2> /dev/null ||true
endscript}
The following script is an example of the typical default setting for the dbLog file:
/mydb/dbLog {# rotate weeklyweekly# and keep for 52 weeksrotate 52# no complaining if vertica did not start yetmissingok
Administrator's GuideMonitoring HP Vertica
HP Vertica Analytics Platform (7.0.x) Page 765 of 969

# compress log after rotationcompress# this log is stdout, so rotate by copying it aside and truncatingcopytruncate
}
For details about additional settings, issue the man logrotate command.
See Alsol Monitoring Log Files
Administrator's GuideMonitoring HP Vertica
HP Vertica Analytics Platform (7.0.x) Page 766 of 969

Monitoring Process Status (ps)You can use ps to monitor the database and Spread processes running on each node in the cluster.For example:
$ ps aux | grep /opt/vertica/bin/vertica$ ps aux | grep /opt/vertica/sbin/spread
You should see one HP Vertica process and one Spread process on each node for commonconfigurations. Tomonitor Administration Tools and connector processes:
$ ps aux | grep vertica
There can bemany connection processes but only one Administration Tools process.
Administrator's GuideMonitoring HP Vertica
HP Vertica Analytics Platform (7.0.x) Page 767 of 969

Monitoring Linux Resource UsageYou shouldmonitor system resource usage on any or all nodes in the cluster. You can use SystemActivity Reporting (SAR) tomonitor resource usage.
HP recommends that you install pstack and sysstat to helpmonitor Linux resources. TheSYSSTAT package contains utilities for monitoring system performance and usage activity,such as sar, as well as tools you can schedule via cron to collect performance and activitydata. See the SYSSTATWeb page for details.
The pstack utility lets you print a stack trace of a running process. See the PSTACK manpagefor details.
1. Log in to the database administrator account on any node.
2. Run the top utility
$ top
A high CPU percentage in top indicates that HP Vertica is CPU-bound. For example:
top - 11:44:28 up 53 days, 23:47, 9 users, load average: 0.91, 0.97, 0.81Tasks: 123 total, 1 running, 122 sleeping, 0 stopped, 0 zombieCpu(s): 26.9%us, 1.3%sy, 0.0%ni, 71.8%id, 0.0%wa, 0.0%hi, 0.0%si, 0.0%stMem: 4053136 total, 3882020k used, 171116 free, 407688 buffersSwap: 4192956 total, 176k used, 4192780 free, 1526436 cached
PID USER PR NI VIRT RES SHR S %CPU %MEM TIME+ COMMAND13703 dbadmin 1 0 1374m 678m 55m S 99.9 17.1 6:21.70 vertica2606 root 16 0 32152 11m 2508 S 1.0 0.3 0:16.97 X
1 root 16 0 4748 552 456 S 0.0 0.0 0:01.51 init2 root RT -5 0 0 0 S 0.0 0.0 0:04.92 migration/03 root 34 19 0 0 0 S 0.0 0.0 0:11.75 ksoftirqd/0
...
Some possible reasons for high CPU usage are:
n The Tuple Mover runs automatically and thus consumes CPU time even if there are noconnections to the database.
n The pdflush process (a set of worker threads for writing back dirty filesystem data) isconsuming a great deal of CPU time, possibly driving up the load. Adding RAM appears tomake the problem worse. Log in to root and change the Linux parameter swappiness to 0.
# echo 0 > /proc/sys/vm/swappiness
n Some information sources:
Administrator's GuideMonitoring HP Vertica
HP Vertica Analytics Platform (7.0.x) Page 768 of 969

RedHat
Indiana University Unix Systems Support Group
3. Run the iostat utility. A high idle time in top at the same time as a high rate of blocks read iniostat indicates that HP Vertica is disk-bound. For example:
$ /usr/bin/iostatLinux 2.6.18-164.el5 (qa01) 02/05/2011avg-cpu: %user %nice %system %iowait %steal %idle
0.77 2.32 0.76 0.68 0.00 95.47Device: tps Blk_read/s Blk_wrtn/s Blk_read Blk_wrtnhda 0.37 3.40 10.37 2117723 6464640sda 0.46 1.94 18.96 1208130 11816472sdb 0.26 1.79 15.69 1114792 9781840sdc 0.24 1.80 16.06 1119304 10010328sdd 0.22 1.79 15.52 1117472 9676200md0 8.37 7.31 66.23 4554834 41284840
Monitoring Disk Space UsageYou can use these system tables tomonitor disk space usage on your cluster:
System table Description
DISK_STORAGE Monitors the amount of disk storage used by the database on each node.
COLUMN_STORAGE Monitors the amount of disk storage used by each column of eachprojection on each node.
PROJECTION_STORAGE Monitors the amount of disk storage used by each projection on each node.
SeeManaging Disk Space for more information.
Monitoring Database Size for LicenseCompliance
If your HP Vertica license includes a raw data storage allowance, you should regularly monitor thesize of your database. This monitoring allows you to plan to either schedule deleting old data tokeep your database in compliance with your license agreement, or budget for a license upgrade toallow for the continued growth of your database.
Viewing the Current License StateHP Vertica periodically runs an audit of the database size to verify that your database remainscompliant with your license. You can view the results of themost recent audit by calling the GET_COMPLIANCE_STATUS function.
Administrator's GuideMonitoring HP Vertica
HP Vertica Analytics Platform (7.0.x) Page 769 of 969

GET_COMPLIANCE_STATUS
---------------------------------------------------------------------------------Raw Data Size: 2.00GB +/- 0.003GBLicense Size : 4.000GBUtilization : 50%Audit Time : 2011-03-09 09:54:09.538704+00Compliance Status : The database is in compliance with respect to raw data size.License End Date: 04/06/2011Days Remaining: 28.59
(1 row)
Periodically running GET_COMPLIANCE_STATUS tomonitor your database's license status isusually enough to ensure that your database remains compliant with your license. If your databasebegins to near its data allowance, youmay want to use the other auditing functions described belowto determine where your database is growing and how recent deletes have affected the size of yourdatabase.
Manually Running an Audit of the Entire DatabaseYou can trigger HP Vertica's automatic audit of your database at any time using the AUDIT_LICENSE_SIZE SQL function. This function triggers the same audit that HP Vertica performsperiodically. The audit runs in the background, so you need to wait for the audit to complete. Youcan then view the audit results using GET_COMPLIANCE_STATUS.
An alternative to AUDIT_LICENSE_SIZE is to use the AUDIT SQL function to audit the size ofyour entire database by passing it an empty string. Unlike AUDIT_LICENSE_SIZE, this functionoperates synchronously, returning when it has estimated the size of the database.
=> SELECT AUDIT('');AUDIT
----------76376696
(1 row)
The size of the database is reported in bytes. The AUDIT function also allows you to control theaccuracy of the estimated database size using additional parameters. See the entry for the AUDITfunction in the SQLReferenceManual for full details
Note: HP Vertica does not count the results of the AUDIT function as an official audit. It takesno license compliance actions based on the results.
Targeted AuditingIf your audits find your database to be unexpectedly large, youmay want to find which schemas,tables, or partitions are using themost storage. You can use the AUDIT function to performtargeted audits of schemas, tables, or partitions by supplying the name of the entity whose size youwant to find. For example, to find the size of the online_sales schema in the VMart exampledatabase, run the following command:
Administrator's GuideMonitoring HP Vertica
HP Vertica Analytics Platform (7.0.x) Page 770 of 969

VMart=> SELECT AUDIT('online_sales');AUDIT
----------35716504
(1 row)
You can also change the granularity of an audit to report the size of each entity in a larger entity (forexample, each table in a schema) by using the granularity argument of the AUDIT function. See theAUDIT function's entry in the SQLReferenceManual.
Using Management Console to Monitor LicenseCompliance
You can also get information about raw data storage through theManagement Console. Thisinformation is available in the databaseOverview page, which displays a grid view of thedatabase's overall health.
l The needle in the licensemeter adjusts to reflect the amount used inmegabytes.
l The grace period represents the term portion of the license.
l The Audit button returns the same information as the AUDIT() function in a graphicalrepresentation.
l The Details link within the License grid (next to the Audit button) provides historical informationabout license usage. This page also shows a progress meter of percent used toward yourlicense limit.
Monitoring Shared Node ConnectionsIf you want to monitor which nodes are sharing connections, view the check.txt file by issuing thefollowing command at a shell prompt:
# watch cat /etc/keepalived/check.txtEvery 2.0s: cat /etc/keepalived/check.txt Wed Nov3 10:02:20 2010
N192168051057N192168051056N192168051055
The check.txt is a file located in the /etc/keepalived/ directory, and it gets updated when yousubmit changes to the kernel using sysctl -p, described in Disable the Address ResolutionProtocol (ARP). For example, the spread.pl script (see Configuring the Directors), writes to thecheck.txt file, which is thenmodified to include only the remaining nodes in the event of a nodefailure. Thus, the virtual server knows to stop sending vsql requests to the failed node.
You can also look for messages by issuing the following command at a shell prompt:
# tail -f /var/log/messages
Administrator's GuideMonitoring HP Vertica
HP Vertica Analytics Platform (7.0.x) Page 771 of 969

Nov 3 09:21:00 p6 Keepalived: Starting Keepalived v1.1.17 (05/17,2010)Nov 3 09:21:00 p6Keepalived: Starting Healthcheck child process, pid=32468Nov 3 09:21:00 p6 Keepalived: Starting VRRP child process, pid=32469Nov 3 09:21:00 p6 Keepalived_healthcheckers: Using LinkWatch kernel netlink reflector...Nov 3 09:21:00 p6 Keepalived_vrrp: Using LinkWatch kernel netlink reflector...Nov 3 09:21:00 p6 Keepalived_healthcheckers: Netlink reflector reports IP 10.10.51.55 addedNov 3 09:21:00 p6 Keepalived_vrrp: Netlink reflector reports IP 10.10.51.55 addedNov 3 09:21:00 p6 Keepalived_healthcheckers: Netlink reflector reports IP 192.168.51.55addedNov 3 09:21:00 p6 Keepalived_vrrp: Netlink reflector reports IP 192.168.51.55 addedNov 3 09:21:00 p6 Keepalived_vrrp: Registering Kernel netlink reflectorNov 3 09:21:00 p6 Keepalived_healthcheckers: Registering Kernel netlink reflectorNov 3 09:21:00 p6 Keepalived_vrrp: Registering Kernel netlink command channelNov 3 09:21:00 p6 Keepalived_vrrp: Registering gratuitous ARP shared channelNov 3 09:21:00 p6 Keepalived_healthcheckers: Registering Kernel netlink command channelNov 3 09:21:00 p6 Keepalived_vrrp: Opening file '/etc/keepalived/keepalived.conf'.Nov 3 09:21:00 p6 Keepalived_healthcheckers: Opening file '/etc/keepalived/keepalived.conf'.Nov 3 09:21:00 p6 Keepalived_vrrp: Configuration is using : 63730 BytesNov 3 09:21:00 p6 Keepalived_healthcheckers: Configuration is using : 16211 BytesNov 3 09:21:00 p6 Keepalived_healthcheckers: Activating healthcheckers for service [10.10.51.55:5433]Nov 3 09:21:00 p6 Keepalived_healthcheckers: Activating healthcheckers for service [10.10.51.56:5433]Nov 3 09:21:00 p6 Keepalived_healthcheckers: Activating healthcheckers for service [10.10.51.57:5433]Nov 3 09:21:00 p6 Keepalived_vrrp: VRRP sockpool: [ifindex(2), proto(112), fd(10,11)]Nov 3 09:21:01 p6 Keepalived_healthcheckers: Misc check to [10.10.51.56] for [/etc/keepalived/check.pl 192.168.51.56] failed.Nov 3 09:21:01 p6 Keepalived_healthcheckers: Removing service [10.10.51.56:5433] from VS[10.10.51.180:5433]Nov 3 09:21:01 p6 Keepalived_healthcheckers: Remote SMTP server [127.0.0.1:25] connected.Nov 3 09:21:01 p6 Keepalived_healthcheckers: Misc check to [10.10.51.55] for [/etc/keepalived/check.pl 192.168.51.55] failed.Nov 3 09:21:01 p6 Keepalived_healthcheckers: Removing service [10.10.51.55:5433] from VS[10.10.51.180:5433]Nov 3 09:21:01 p6 Keepalived_healthcheckers: Remote SMTP server [127.0.0.1:25] connected.Nov 3 09:21:01 p6 Keepalived_healthcheckers: Misc check to [10.10.51.57] for [/etc/keepalived/check.pl 192.168.51.57] failed.Nov 3 09:21:01 p6 Keepalived_healthcheckers: Removing service [10.10.51.57:5433] from VS[10.10.51.180:5433]Nov 3 09:21:01 p6 Keepalived_healthcheckers: Remote SMTP server [127.0.0.1:25] connected.Nov 3 09:21:01 p6 Keepalived_healthcheckers: SMTP alert successfully sent.Nov 3 09:21:10 p6 Keepalived_vrrp: VRRP_Instance(VI_1) Transition to MASTER STATENov 3 09:21:20 p6 Keepalived_vrrp: VRRP_Instance(VI_1) Entering MASTER STATENov 3 09:21:20 p6 Keepalived_vrrp: VRRP_Instance(VI_1) setting protocol VIPs.Nov 3 09:21:20 p6 Keepalived_vrrp: VRRP_Instance(VI_1) Sending gratuitous ARPs on eth0 for 10.10.51.180Nov 3 09:21:20 p6 Keepalived_healthcheckers: Netlink reflector reports IP 10.10.51.180 addedNov 3 09:21:20 p6 Keepalived_vrrp: Remote SMTP server [127.0.0.1:25] connected.Nov 3 09:21:20 p6 Keepalived_vrrp: Netlink reflector reports IP 10.10.51.180 addedNov 3 09:21:20 p6 Keepalived_vrrp: SMTP alert successfully sent.Nov 3 09:21:25 p6 Keepalived_vrrp: VRRP_Instance(VI_1) Sending gratuitous ARPs on eth0
Administrator's GuideMonitoring HP Vertica
HP Vertica Analytics Platform (7.0.x) Page 772 of 969
for 10.10.51.1
Monitoring Elastic Cluster RebalancingHP Vertica includes system tables that can be used tomonitor the rebalance status of an elasticcluster and gain general insight to the status of elastic cluster on your nodes.
l The REBALANCE_TABLE_STATUS table provides general information about a rebalance. Itshows, for each table, the amount of data that has been separated, the amount that is currentlybeing separated, and the amount to be separated. It also shows the amount of data transferred,the amount that is currently being transferred, and the remaining amount to be transferred (or anestimate if storage is not separated).
Note: If multiple rebalancemethods were used for a single table (for example, the table hasunsegmented and segmented projections), the table may appear multiple times - once foreach rebalancemethod.
l REBALANCE_PROJECTION_STATUS can be used to gainmore insight into the details for aparticular projection that is being rebalanced. It provides the same type of information as above,but in terms of a projection instead of a table.
In each table, separated_percent and transferred_percent can be used to determine overallprogress.
Historical Rebalance InformationHistorical information about work completed is retained, so use the predicate "where is_latest" torestrict the output to only themost recent or current rebalance activity. The historical datamayinclude information about dropped projections or tables. If a table or projection has been droppedand information about the anchor table is not available, then NULL is displayed for the table_id and"<unknown>" is displayed for the table_name. Information on dropped tables is still useful, forexample, in providing justification for the duration of a task.
Monitoring ParametersThe following table describes themonitoring parameters for configuring HP Vertica.
Administrator's GuideMonitoring HP Vertica
HP Vertica Analytics Platform (7.0.x) Page 773 of 969

Parameters Description
SnmpTrapDestinationsList Defines where HP Vertica send traps forSNMP. See Configuring Reporting forSNMP.
Default Value: none
Example:
SELECT SET_CONFIG_PARAMETER('SnmpTrapDestinationsList','localhost 162 public' );
SnmpTrapsEnabled Enables event trapping for SNMP. SeeConfiguring Reporting for SNMP.
Default Value: 0
Example:
SELECT SET_CONFIG_PARAMETER('SnmpTrapsEnabled', 1 );
SnmpTrapEvents Define which events HP Vertica trapsthrough SNMP. See Configuring Reportingfor SNMP.
Default Value:Low Disk Space, ReadOnly File System, Loss of K Safety,Current Fault Tolerance at Critical Level,TooMany ROS Containers, WOS OverFlow, Node State Change, RecoveryFailure, and Stale Checkpoint
Example:
SELECT SET_CONFIG_PARAMETER('SnmpTrapEvents', 'Low DiskSpace, Recovery Failure');
SyslogEnabled Enables event trapping for syslog. SeeConfiguring Reporting for Syslog.
Default Value: 0
Example:
SELECT SET_CONFIG_PARAMETER('SyslogEnabled', 1 );
Administrator's GuideMonitoring HP Vertica
HP Vertica Analytics Platform (7.0.x) Page 774 of 969

Parameters Description
SyslogEvents Defines events that generate a syslogentry. See Configuring Reporting forSyslog.
Default Value: none
Example:
SELECT SET_CONFIG_PARAMETER('SyslogEvents', 'Low DiskSpace, Recovery Failure');
SyslogFacility Defines which SyslogFacility HP Verticauses. See Configuring Reporting forSyslog.
Default Value: user
Example:
SELECT SET_CONFIG_PARAMETER('SyslogFacility' , 'ftp');
Administrator's GuideMonitoring HP Vertica
HP Vertica Analytics Platform (7.0.x) Page 775 of 969

Monitoring EventsTo help youmonitor your database system, HP Vertica traps and logs significant events that affectdatabase performance and functionality if you do not address their root causes. This sectiondescribes where events are logged, the types of events that HP Vertica logs, how to respond tothese events, the information that HP Vertica provides for these events, and how to configure eventmonitoring.
Event Logging MechanismsHP Vertica posts events to the followingmechanisms:
Mechanism Description
vertica.log All events are automatically posted to vertica.log. SeeMonitoring the LogFiles.
ACTIVE_EVENTS This SQL system table provides information about all open events. See UsingSystem Tables and ACTIVE_EVENTS.
SNMP To post traps to SNMP, enable global reporting in addition to each individualevent you want trapped. See Configuring Event Reporting.
Syslog To log events to syslog, enable event reporting for each individual event youwant logged. See Configuring Event Reporting.
Event Severity TypesEvent names are sensitive to case and spaces. HP Vertica logs the following events:
Administrator's GuideMonitoring HP Vertica
HP Vertica Analytics Platform (7.0.x) Page 776 of 969

EventName
EventType Description Action
Low DiskSpace
0 The database is running out of diskspace or a disk is failing or there is aI/O hardware failure.
It is imperative that you addmoredisk space or replace the failingdisk or hardware as soon aspossible.
Check dmesg to see what causedthe problem.
Also, use the DISK_RESOURCE_REJECTIONS system table todetermine the types of disk spacerequests that are being rejected andthe hosts on which they are beingrejected. SeeManaging DiskSpace within the DatabaseAdministrator’s Guide for moreinformation about low disk space.
ReadOnlyFileSystem
1 The database does not have writeaccess to the file system for thedata or catalog paths. This cansometimes occur if Linux remountsa drive due to a kernel issue.
Modify the privileges on the filesystem to give the database writeaccess.
Loss Of KSafety
2 The database is no longerK-Safe because there areinsufficient nodes functioning withinthe cluster. Loss ofK-safety causes the database toshut down.
In a four-node cluster, for example,K-safety=1. If one node fails, thefault tolerance is at a critical level. Iftwo nodes fail, the system loses K-safety.
If a system shuts down due to lossof K-safety, you need to recover thesystem. See Failure Recovery inthe Administrator's Guide.
CurrentFaultToleranceat CriticalLevel
3 One or more nodes in the clusterhave failed. If the database losesonemore node, it is no longer K-Safe and it shuts down. (Forexample, a four-node cluster is nolonger K-safe if two nodes fail.)
Restore any nodes that have failedor been shut down.
Administrator's GuideMonitoring HP Vertica
HP Vertica Analytics Platform (7.0.x) Page 777 of 969

EventName
EventType Description Action
TooManyROSContainers
4 Due to heavy data load conditions,there are toomany ROS containers.This occurs when the TupleMoverfalls behind in performingmergeoutoperations. The resulting excessnumber of ROS containers canexhaust all available systemresources. To prevent this, HPVertica automatically rolls back alltransactions that would load datauntil the TupleMover has time tocatch up.
Youmight need to adjust the TupleMover's configuration parametersto compensate for the load patternor rate. See Tuning the TupleMoverin the Administrator's Guide fordetails.
You can query the TUPLE_MOVER_OPERATIONS table tomonitormergeout activity.However, the TupleMover does notimmediately start a mergeout whena projection reaches the limit ofROS containers, so youmay notsee amergeout in progress whenreceiving this error.
If waiting for amergeout does notresolve the error, the problemprobably is related to insufficientRAM.. A good rule of thumb is thatsystem RAM inMB divided by 6times the number of columns in thelargest table should be greater than10. For example, for a 100 columntable you would want at least 6GBof RAM (6144MB / (6 * 100) =10.24) to handle continuous loads.
WOS OverFlow
5 TheWOS cannot hold all the datathat you are attempting to load. Thismeans that the copy fails and thetransaction rolls back.
Note: This event does not occur inHP Vertica 4.0 or later.
Consider loading the data to disk(ROS) instead of memory (WOS) orsplitting the fact table load file intomultiple pieces and then performingmultiple loads in sequence.
Youmight also consider making theTupleMover's moveout operationmore aggressive. See Tuning theTupleMover in Administrator'sGuide.
Node StateChange
6 The node state has changed. Check the status of the node.
Administrator's GuideMonitoring HP Vertica
HP Vertica Analytics Platform (7.0.x) Page 778 of 969
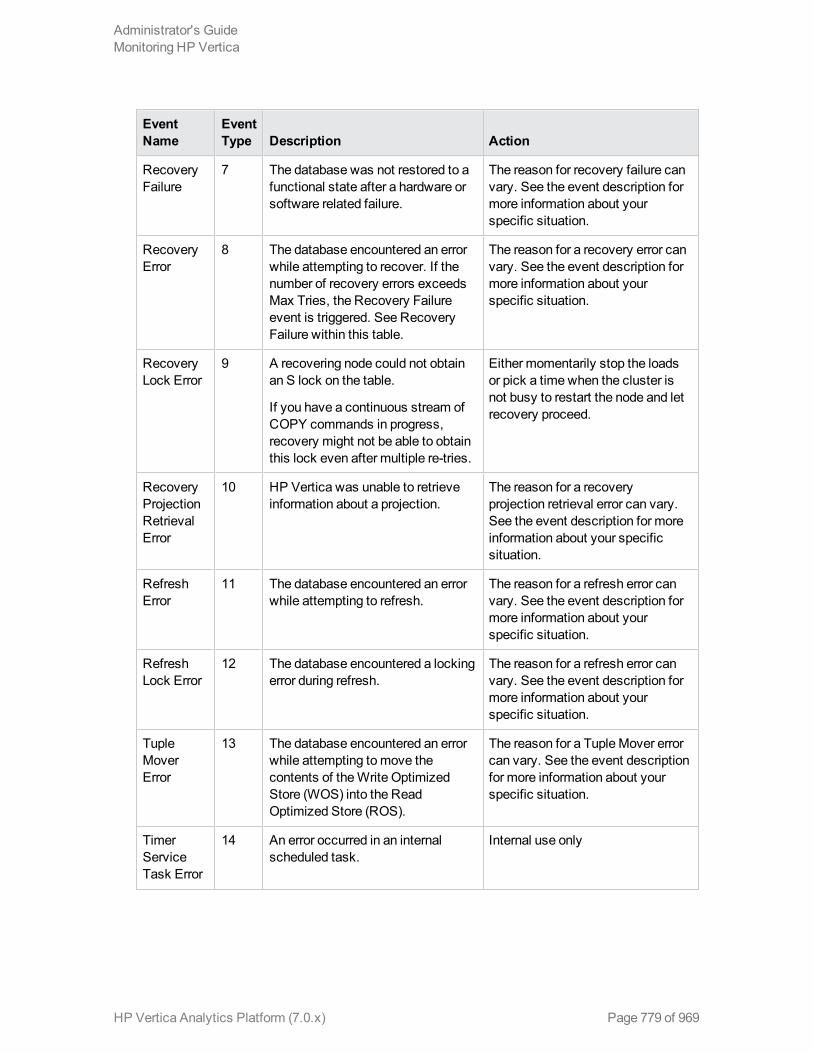
EventName
EventType Description Action
RecoveryFailure
7 The database was not restored to afunctional state after a hardware orsoftware related failure.
The reason for recovery failure canvary. See the event description formore information about yourspecific situation.
RecoveryError
8 The database encountered an errorwhile attempting to recover. If thenumber of recovery errors exceedsMax Tries, the Recovery Failureevent is triggered. See RecoveryFailure within this table.
The reason for a recovery error canvary. See the event description formore information about yourspecific situation.
RecoveryLock Error
9 A recovering node could not obtainan S lock on the table.
If you have a continuous stream ofCOPY commands in progress,recovery might not be able to obtainthis lock even after multiple re-tries.
Either momentarily stop the loadsor pick a time when the cluster isnot busy to restart the node and letrecovery proceed.
RecoveryProjectionRetrievalError
10 HP Vertica was unable to retrieveinformation about a projection.
The reason for a recoveryprojection retrieval error can vary.See the event description for moreinformation about your specificsituation.
RefreshError
11 The database encountered an errorwhile attempting to refresh.
The reason for a refresh error canvary. See the event description formore information about yourspecific situation.
RefreshLock Error
12 The database encountered a lockingerror during refresh.
The reason for a refresh error canvary. See the event description formore information about yourspecific situation.
TupleMoverError
13 The database encountered an errorwhile attempting tomove thecontents of theWrite OptimizedStore (WOS) into the ReadOptimized Store (ROS).
The reason for a TupleMover errorcan vary. See the event descriptionfor more information about yourspecific situation.
TimerServiceTask Error
14 An error occurred in an internalscheduled task.
Internal use only
Administrator's GuideMonitoring HP Vertica
HP Vertica Analytics Platform (7.0.x) Page 779 of 969

EventName
EventType Description Action
StaleCheckpoint
15 Data in theWOS has not beencompletely moved out in a timelymanner. An UNSAFE shutdowncould require reloading a significantamount of data.
Be sure that Moveout operationsare executing successfully. Checkthe vertica.log files for errorsrelated toMoveout.
Event DataTo help you interpret and solve the issue that triggered an event, each event provides a variety ofdata, depending upon the event loggingmechanism used.
The following table describes the event data and indicates where it is used.
vertica.log
ACTIVE_EVENTS(columnnames) SNMP Syslog Description
N/A NODE_NAME N/A N/A The nodewhere theeventoccurred.
Event Code EVENT_CODE Event Type Event Code A numeric IDthat indicatesthe type ofevent. SeeEvent Typesin theprevioustable for a listof event typecodes.
Event Id EVENT_ID Event OID Event Id A uniquenumeric IDthat identifiesthe specificevent.
Administrator's GuideMonitoring HP Vertica
HP Vertica Analytics Platform (7.0.x) Page 780 of 969

vertica.log
ACTIVE_EVENTS(columnnames) SNMP Syslog Description
Event Severity EVENT_
SEVERITY
EventSeverity
Event Severity The severityof the eventfrom highestto lowest.These eventsare based onstandardsyslogseveritytypes:
0 –Emergency
1 – Alert
2 –Critical
3 – Error
4 – Warning
5 – Notice
6 – Info
7 – Debug
PostedTimestamp EVENT_
POSTED_
TIMESTAMP
N/A PostedTimestamp The year,month, day,and time theevent wasreported.Time isprovided asmilitary time.
Administrator's GuideMonitoring HP Vertica
HP Vertica Analytics Platform (7.0.x) Page 781 of 969

vertica.log
ACTIVE_EVENTS(columnnames) SNMP Syslog Description
ExpirationTimestamp EVENT_
EXPIRATION
N/A ExpirationTimestamp The time atwhich thiseventexpires. If thesame eventis postedagain prior toits expirationtime, thisfield getsupdated to anewexpirationtime.
EventCodeDescription EVENT_CODE_
DESCRIPTION
Description EventCodeDescription A briefdescription ofthe event anddetailspertinent tothe specificsituation.
ProblemDescription EVENT_PROBLEM_
DESCRIPTION
EventShortDescription
ProblemDescription A genericdescription ofthe event.
N/A REPORTING_
NODE
NodeName
N/A The name ofthe nodewithin thecluster thatreported theevent.
DatabaseName N/A DatabaseName
DatabaseName The name ofthe databasethat isimpacted bythe event.
Administrator's GuideMonitoring HP Vertica
HP Vertica Analytics Platform (7.0.x) Page 782 of 969

vertica.log
ACTIVE_EVENTS(columnnames) SNMP Syslog Description
N/A N/A Host Name Hostname The name ofthe hostwithin thecluster thatreported theevent.
N/A N/A EventStatus
N/A The status ofthe event. Itcan be either:
1 – Open
2 – Clear
Configuring Event ReportingEvent reporting is automatically configured for vertica.log, and current events are automaticallyposted to the ACTIVE_EVENTS system table. You can also configure HP Vertica to post events tosyslog and SNMP.
Configuring Reporting for SyslogSyslog is a network-logging utility that issues, stores, and processes meaningful logmessages. Itis designed so DBAs can keepmachines up and running, and it is a useful way to getheterogeneous data into a single data repository.
To log events to syslog, enable event reporting for each individual event you want logged.Messages are logged, by default, in /var/log/messages.
Configuring event reporting to syslog consists of:
1. Enabling HP Vertica to trap events for syslog.
2. Defining which events HP Vertica traps for syslog.
HP strongly suggests that you trap the Stale Checkpoint event.
3. Defining which syslog facility to use.
Enabling HP Vertica to Trap Events for Syslog
To enable event trapping for syslog, issue the following SQL command:
Administrator's GuideMonitoring HP Vertica
HP Vertica Analytics Platform (7.0.x) Page 783 of 969

=> SELECT SET_CONFIG_PARAMETER('SyslogEnabled', 1 );SET_CONFIG_PARAMETER
----------------------------Parameter set successfully
(1 row)
To disable event trapping for syslog, issue the following SQL command:
=> SELECT SET_CONFIG_PARAMETER('SyslogEnabled', 0 );SET_CONFIG_PARAMETER
----------------------------Parameter set successfully
(1 row)
Defining Events to Trap for Syslog
To define events that generate a syslog entry, issue the following SQL command, where Event_Name is one of the events described in the list below the command:
=> SELECT SET_CONFIG_PARAMETER('SyslogEvents', 'Event_Name' , 'Event_Name');SET_CONFIG_PARAMETER
----------------------------Parameter set successfully
(1 row)
l Low Disk Space
l ReadOnly File System
l Loss Of K Safety
l Current Fault Tolerance at Critical Level
l TooMany ROS Containers
l WOS Over Flow
l Node State Change
l Recovery Failure
l Recovery Error
l Recovery Lock Error
l Recovery Projection Retrieval Error
l Refresh Error
Administrator's GuideMonitoring HP Vertica
HP Vertica Analytics Platform (7.0.x) Page 784 of 969

l Refresh Lock Error
l TupleMover Error
l Timer Service Task Error
l Stale Checkpoint
The following example generates a syslog entry for low disk space and recovery failure:
=> SELECT SET_CONFIG_PARAMETER('SyslogEvents', 'Low Disk Space, Recovery Failure');SET_CONFIG_PARAMETER
----------------------------Parameter set successfully
(1 row)
Defining the SyslogFacility to Use for Reporting
The syslogmechanism allows for several different general classifications of loggingmessages,called facilities. Typically, all authentication-relatedmessages are logged with the auth (orauthpriv) facility. Thesemessages are intended to be secure and hidden from unauthorized eyes.Normal operational messages are logged with the daemon facility, which is the collector thatreceives and optionally stores messages.
The SyslogFacility directive allows all loggingmessages to be directed to a different facility thanthe default. When the directive is used, all logging is done using the specified facility, bothauthentication (secure) and otherwise.
To define which SyslogFacility HP Vertica uses, issue the following SQL command:
=> SELECT SET_CONFIG_PARAMETER('SyslogFacility' , 'Facility_Name');
Where the facility-level argument <Facility_Name> is one of the following:
l auth l uucp (UUCPsubsystem)
l authpriv (Linux only) l local0 (local use 0)
l cron l local1 (local use 1)
l daemon l local2 (local use 2)
l ftp (Linux only) l local3 (local use 3)
l lpr (line printer subsystem) l local4 (local use 4)
l mail (mail system) l local5 (local use 5)
Administrator's GuideMonitoring HP Vertica
HP Vertica Analytics Platform (7.0.x) Page 785 of 969

l news (network newssubsystem)
l local6 (local use 6)
l user (default system) l local7 (local use 7)
See Also
l Event Reporting Examples
l Configuration Parameters
Configuring Reporting for SNMPConfiguring event reporting for SNMP consists of:
1. Configuring HP Vertica to enable event trapping for SNMP as described below.
2. Importing the HP VerticaManagement Information Base (MIB) file into the SNMP monitoringdevice.
The HP VerticaMIB file allows the SNMP trap receiver to understand the traps it receives fromHP Vertica. This, in turn, allows you to configure the actions it takes when it receives traps.
HP Vertica supports the SNMP V1 trap protocol, and it is located in/opt/vertica/sbin/VERTICA-MIB. See the documentation for your SNMP monitoring device formore information about importingMIB files.
3. Configuring the SNMP trap receiver to handle traps from HP Vertica.
SNMP trap receiver configuration differs greatly from vendor to vendor. As such, the directionspresented here for configuring the SNMP trap receiver to handle traps from HP Vertica aregeneric.
HP Vertica traps are single, generic traps that contain several fields of identifying information.These fields equate to the event data described inMonitoring Events. However, the formatused for the field names differs slightly. Under SNMP, the field names contain no spaces.Also, field names are pre-pended with “vert”. For example, Event Severity becomesvertEventSeverity.
When configuring your trap receiver, be sure to use the same hostname, port, and communitystring you used to configure event trapping in HP Vertica.
Examples of network management providers:
n HP Software Network NodeManager
n IBM Tivoli
Administrator's GuideMonitoring HP Vertica
HP Vertica Analytics Platform (7.0.x) Page 786 of 969

n AdventNet
n Net-SNMP (Open Source)
n Nagios (Open Source)
n OpenNMS (Open Source)
See Also
l Configuration Parameters
Configuring Event Trapping for SNMPThe following events are trapped by default when you configure HP Vertica to trap events forSNMP:
l Low Disk Space
l ReadOnly File
l System
l Loss of K Safety
l Current Fault Tolerance at Critical Level
l TooMany ROS Containers
l WOS Over Flow
l Node State Change
l Recovery Failure
l Stale Checkpoint
To Configure HP Vertica to Trap Events for SNMP
1. Enable HP Vertica to trap events for SNMP.
2. Define where HP Vertica sends the traps.
3. Optionally redefine which SNMP events HP Vertica traps.
Note: After you complete steps 1 and 2 above, HP Vertica automatically traps the defaultSNMP events. Only perform step 3 if you want to redefine which SNMP events are trapped.
Administrator's GuideMonitoring HP Vertica
HP Vertica Analytics Platform (7.0.x) Page 787 of 969

HP strongly suggests that you trap the Stale Checkpoint event even if you decide to reduce thenumber events HP Vertica traps for SNMP. The setting has no effect on traps sent to the log.All events are trapped to the log.
To Enable Event Trapping for SNMP
Use the following SQL command:
=> SELECT SET_CONFIG_PARAMETER('SnmpTrapsEnabled', 1 );
To Define Where HP Vertica Send Traps
Use the following SQL command, where Host_name and port identify the computer where SNMPresides, and CommunityString acts like a password to control HP Vertica's access to the server:
=> SELECT SET_CONFIG_PARAMETER('SnmpTrapDestinationsList','host_name port CommunityString' );
For example:
=> SELECT SET_CONFIG_PARAMETER('SnmpTrapDestinationsList','localhost 162 public' );
You can also specify multiple destinations by specifying a list of destinations, separated bycommas:
=> SELECT SET_CONFIG_PARAMETER('SnmpTrapDestinationsList','host_name1 port1 CommunityString1,hostname2 port2 CommunityString2' );
Note: : Settingmultiple destinations sends any SNMP trap notification to all destinationslisted.
To Define Which Events HP Vertica Traps
Use the following SQL command, where Event_Name is one of the events in the list below thecommand:
=> SELECT SET_CONFIG_PARAMETER('SnmpTrapEvents', 'Event_Name, Event_Name');
l Low Disk Space
l ReadOnly File System
Administrator's GuideMonitoring HP Vertica
HP Vertica Analytics Platform (7.0.x) Page 788 of 969

l Loss Of K Safety
l Current Fault Tolerance at Critical Level
l TooMany ROS Containers
l WOS Over Flow
l Node State Change
l Recovery Failure
l Recovery Error
l Recovery Lock Error
l Recovery Projection Retrieval Error
l Refresh Error
l TupleMover Error
l Stale Checkpoint
Note: The above values are case sensitive.
The following is an example that uses two different event names:
=> SELECT SET_CONFIG_PARAMETER('SnmpTrapEvents', 'Low Disk Space, RecoveryFailure');
Verifying SNMP ConfigurationTo create a set of test events that checks SNMP configuration:
1. Set up SNMP trap handlers to catch HP Vertica events.
2. Test your setup with the following command:
SELECT SNMP_TRAP_TEST();SNMP_TRAP_TEST
--------------------------Completed SNMP Trap Test
(1 row)
Administrator's GuideMonitoring HP Vertica
HP Vertica Analytics Platform (7.0.x) Page 789 of 969

Event Reporting Examples
Vertica.logThe following example illustrates a TooMany ROS Containers event posted and cleared withinvertica.log:
08/14/08 15:07:59 thr:nameless:0x45a08940 [INFO] Event Posted: Event Code:4 Event Id:0 Event Severity: Warning [4] PostedTimestamp:2008-08-14 15:07:59.253729 ExpirationTimestamp: 2008-08-14 15:08:29.253729EventCodeDescription: Too Many ROS Containers ProblemDescription:Too many ROS containers exist on this node. DatabaseName: QATESTDBHostname: fc6-1.verticacorp.com08/14/08 15:08:54 thr:Ageout Events:0x2aaab0015e70 [INFO] Event Cleared:Event Code:4 Event Id:0 Event Severity: Warning [4] PostedTimestamp:2008-08-14 15:07:59.253729 ExpirationTimestamp: 2008-08-14 15:08:53.012669EventCodeDescription: Too Many ROS Containers ProblemDescription:Too many ROS containers exist on this node. DatabaseName: QATESTDBHostname: fc6-1.verticacorp.com
SNMPThe following example illustrates a TooMany ROS Containers event posted to SNMP:
Version: 1, type: TRAPREQUESTEnterprise OID: .1.3.6.1.4.1.31207.2.0.1Trap agent: 72.0.0.0Generic trap: ENTERPRISESPECIFIC (6)Specific trap: 0.1.3.6.1.4.1.31207.1.1 ---> 4.1.3.6.1.4.1.31207.1.2 ---> 0.1.3.6.1.4.1.31207.1.3 ---> 2008-08-14 11:30:26.121292.1.3.6.1.4.1.31207.1.4 ---> 4.1.3.6.1.4.1.31207.1.5 ---> 1.1.3.6.1.4.1.31207.1.6 ---> site01.1.3.6.1.4.1.31207.1.7 ---> suse10-1.1.3.6.1.4.1.31207.1.8 ---> Too many ROS containers exist on this node..1.3.6.1.4.1.31207.1.9 ---> QATESTDB.1.3.6.1.4.1.31207.1.10 ---> Too Many ROS Containers
SyslogThe following example illustrates a TooMany ROS Containers event posted and cleared withinsyslog:
Aug 14 15:07:59 fc6-1 vertica: Event Posted: Event Code:4 Event Id:0 Event Severity: Warning [4] PostedTimestamp: 2008-08-14 15:07:59.253729 ExpirationTimestamp:2008-08-14 15:08:29.253729 EventCodeDescription: Too Many ROS Containers ProblemDescription:Too many ROS containers exist on this node. DatabaseName: QATESTDB Hostname: fc6-
Administrator's GuideMonitoring HP Vertica
HP Vertica Analytics Platform (7.0.x) Page 790 of 969

1.verticacorp.comAug 14 15:08:54 fc6-1 vertica: Event Cleared: Event Code:4 Event Id:0 Event Severity:Warning [4] PostedTimestamp: 2008-08-14 15:07:59.253729 ExpirationTimestamp:2008-08-14 15:08:53.012669 EventCodeDescription: Too Many ROS Containers ProblemDescription:Too many ROS containers exist on this node. DatabaseName: QATESTDB Hostname: fc6-1.verticacorp.com
Administrator's GuideMonitoring HP Vertica
HP Vertica Analytics Platform (7.0.x) Page 791 of 969

Using System TablesHP Vertica provides an API (application programming interface) for monitoring various features andfunctions within a database in the form of system tables. These tables provide a robust, stable setof views that let youmonitor information about your system's resources, background processes,workload, and performance, allowing you tomore efficiently profile, diagnose, and view historicaldata equivalent to load streams, query profiles, tuple mover operations, andmore. Because HPVertica collects and retains this information automatically, you don't have tomanually set anything.
You can write queries against system tables with full SELECT support the sameway you performquery operations on base and temporary tables. You can query system tables using expressions,predicates, aggregates, analytics, subqueries, and joins. You can also save system table queryresults into a user table for future analysis. For example, the following query creates a table,mynode, selecting three node-related columns from the V_CATALOG.NODES system table:
VMart=> CREATE TABLE mynode AS SELECT node_name, node_state, node_addressFROM nodes;CREATE TABLEVMart=> SELECT * FROM mynode;
node_name | node_state | node_address------------------+------------+----------------v_vmart_node0001 | UP | 192.168.223.11
(1 row)
Note: You cannot query system tables if the database cluster is in a recovering state. Thedatabase refuses connection requests and cannot bemonitored. HP Vertica also does notsupport DDL andDML operations on system tables.
Where System Tables ResideSystem tables are grouped into the following schemas:
l V_CATALOG — information about persistent objects in the catalog
l V_MONITOR — information about transient system state
These schemas reside in the default search path so there is no need to specify schema.table inyour queries unless you change the search path to exclude V_MONITOR or V_CATALOG or both.
The system tables that make up themonitoring API are described fully in the SQLReferenceManual. You can also use the following command to view all the system tables and their schema:
SELECT * FROM system_tables ORDER BY table_schema, table_name;
How System Tables Are OrganizedMost of the tables are grouped into the following areas:
Administrator's GuideMonitoring HP Vertica
HP Vertica Analytics Platform (7.0.x) Page 792 of 969

l System information
l System resources
l Background processes
l Workload and performance
HP Vertica reserves somememory to helpmonitor busy systems. Using simple system tablequeries makes it easier to troubleshoot issues. See also SYSQUERY and SYSDATA pools under Built-inpools topic in SQLReferenceManual.
Note: You can use external monitoring tools or scripts to query the system tables and act uponthe information, as necessary. For example, when a host failure causes theK-safety level tofall below the desired level, the tool or script can notify the database administrator and/orappropriate IT personnel of the change, typically in the form of an e-mail.
Querying Case-Sensitive Data in System TablesSome system table datamight be stored inmixed case. For example, HP Vertica stores mixed-case identifier names the way you specify them in the CREATE statement, even though case isignored when you reference them in queries. When these object names appear as data in thesystem tables, you'll encounter errors if you use the equality (=) predicate because the casemustmatch the stored identifier. In particular, V_CATALOG.TABLES.TABLE_SCHEMA and V_CATALOG.TABLES.TABLE_NAME columns are case sensitive with equality predicates.
If you don't know how the identifiers are stored, use the case-insensitive operator ILIKE instead ofequality predicates.
For example, given the following schema:
=> CREATE SCHEMA SS;=> CREATE TABLE SS.TT (c1 int);=> CREATE PROJECTION SS.TTP1 AS SELECT * FROM ss.tt UNSEGMENTED ALL NODES;=> INSERT INTO ss.tt VALUES (1);
If you run a query using the = predicate, HP Vertica returns 0 rows:
=> SELECT table_schema, table_name FROM v_catalog.tables WHERE table_schema ='ss';table_schema | table_name--------------+------------(0 rows)
Using the case-insensitive ILIKE predicate returns the expected results:
=> SELECT table_schema, table_name FROM v_catalog.tables WHERE table_schema ILIKE 'ss';table_schema | table_name--------------+------------SS | TT
Administrator's GuideMonitoring HP Vertica
HP Vertica Analytics Platform (7.0.x) Page 793 of 969

(1 row)
ExamplesThe following query uses the VMart example database (see Introducing the VMart ExampleDatabase) to obtain the number of rows and size occupied by each table in the database.
=> SELECT t.table_name AS table_name,SUM(ps.wos_row_count + ps.ros_row_count) AS row_count,SUM(ps.wos_used_bytes + ps.ros_used_bytes) AS byte_count
FROM tables tJOIN projections p ON t.table_id = p.anchor_table_idJOIN projection_storage ps on p.projection_name = ps.projection_nameWHERE (ps.wos_used_bytes + ps.ros_used_bytes) > 500000GROUP BY t.table_nameORDER BY byte_count DESC;
table_name | row_count | byte_count--------------------+-----------+------------online_sales_fact | 5000000 | 171987438store_sales_fact | 5000000 | 108844666store_orders_fact | 300000 | 9240800product_dimension | 60000 | 2327964customer_dimension | 50000 | 2165897inventory_fact | 300000 | 2045900
(6 rows)
The rest of the examples illustrate simple ways to use system tables in queries.
=> SELECT table_name FROM columns WHERE data_type ILIKE 'Numeric' GROUP BYtable_name;table_name------------n1
(1 row)=> SELECT current_epoch, designed_fault_tolerance, current_fault_toleranceFROM SYSTEM;current_epoch | designed_fault_tolerance | current_fault_tolerance
---------------+--------------------------+-------------------------492 | 1 | 1
(1 row)=> SELECT node_name, total_user_session_count, executed_query_count FROMquery_metrics;node_name | total_user_session_count | executed_query_count
-----------+--------------------------+----------------------node01 | 53 | 42node02 | 53 | 0node03 | 42 | 120node04 | 53 | 0
(4 rows)=> SELECT table_schema FROM primary_keys;table_schema
--------------public
Administrator's GuideMonitoring HP Vertica
HP Vertica Analytics Platform (7.0.x) Page 794 of 969

publicpublicpublicpublicpublicpublicpublicpublicstoreonline_salesonline_sales
(12 rows)
Administrator's GuideMonitoring HP Vertica
HP Vertica Analytics Platform (7.0.x) Page 795 of 969

Retaining Monitoring InformationWhen you query an HP Vertica system table (described in Using System Tables), you can getinformation about currently running queries, the state of various components, and other run-timeinformation. During query execution, HP Vertica examines the current state of the system andreturns information in the result set.
Data CollectorHP Vertica also provides a utility called the Data Collector (DC), which collects and retains historyof important system activities and records essential performance and resource utilization counters.
Data Collector extends system table functionality by:
l Providing a framework for recording events
l Making the information available in system tables
l Requiring few configuration parameter tweaks
l Having negligible impact on performance
You can use the information the Data Collector retains to query the past state of system tables andextract aggregate information, as well as do the following:
l Seewhat actions users have taken
l Locate performance bottlenecks
l Identify potential improvements to HP Vertica configuration
DC does not collect data for nodes that are down, so no historical data would be available for thatnode.
Data Collector works in conjunction with theWorkload Analyzer (WLA), an advisor tool thatintelligently monitors the performance of SQL queries and workloads and recommends tuningactions based on observations of the actual workload history. See AnalyzingWorkloads for moreinformation about WLA.
Where Is DC Information retained?Collected data is stored on disk in the DataCollector directory under the HP Vertica /catalog path.This directory also contains instructions on how to load themonitoring data into another HP Verticadatabase. SeeWorking with Data Collection Logs for details.
DC retains the data it gathers based on retention policies, which a superuser can configure. SeeConfiguring Data Retention Policies.
Data Collector is on by default, but a superuser can disable it if performance issues arise. See DataCollector Parameters and Enabling and Disabling Data Collector.
Administrator's GuideMonitoring HP Vertica
HP Vertica Analytics Platform (7.0.x) Page 796 of 969

DC Tables
Caution: Data Collector tables (prefixed by dc_) reside in the V_INTERNAL schema and areprovided for informational purposes only. They are provided as-is and are subject to removal orchange without notice. If you use Data Collector tables in scripts or monitoring tools, youmightneed to change your scripts and tools after an HP Vertica upgrade. HP recommends that youuse theWorkload Analyzer instead of accessing the Data Collector tables directly.
See Alsol Data Collector Functions
l DATA_COLLECTOR
l ANALYZE_WORKLOAD
l TUNING_RECOMMENDATIONS
Enabling and Disabling Data CollectorData Collector is on by default and retains information for all sessions. If performance issuesarise, a superuser can disable Data Collector at any time, such as if performance issues arise.
To disable the Data Collector:
=> SELECT SET_CONFIG_PARAMETER('EnableDataCollector', '0');
To re-enable the Data Collector:
=> SELECT SET_CONFIG_PARAMETER('EnableDataCollector', '1');
See Alsol Data Collector Parameters
Viewing Current Data Retention PolicyTo view the current retention policy for aData Collector component, use the GET_DATA_COLLECTOR_POLICY() function and supply the component name as the function's argument.
To retrieve a list of all current component names, query the V_MONITOR.DATA_COLLECTORsystem table, which returns Data Collector components, their current retention policies, andstatistics about how much data is retained. For example:
mcdb=> \xExpanded display is on.
Administrator's GuideMonitoring HP Vertica
HP Vertica Analytics Platform (7.0.x) Page 797 of 969

mcdb=> SELECT * from data_collector;-[ RECORD 1 ]----------+-------------------------------------------------------------------------------------------node_name | v_mcdb_node0001component | AllocationPoolStatisticstable_name | dc_allocation_pool_statisticsdescription | Information about global memory pools, which generally cannot berecovered without restartaccess_restricted | tin_db_log | fin_vertica_log | fmemory_buffer_size_kb | 64disk_size_kb | 256record_too_big_errors | 0lost_buffers | 0lost_records | 0retired_files | 1429retired_records | 647358current_memory_records | 0current_disk_records | 1493current_memory_bytes | 0current_disk_bytes | 215737first_time | 2012-11-30 07:04:30.000726-05last_time | 2012-11-30 07:16:56.000631-05kb_per_day | 24377.3198211312-[ RECORD 2 ]----------+-------------------------------------------------------------------------------------------
The following command returns the retention policy for a specific component, NodeState.
=> SELECT get_data_collector_policy('NodeState');
The results let you know that 10KB is retained inmemory and 100KB on disk:
get_data_collector_policy------------------------------------------10KB kept in memory, 100KB kept on disk.
(1 row)
Configuring Data Retention PoliciesData Collector retention policies hold the following information:
l Which component to monitor
l How muchmemory to retain
l How much disk space to retain
A superuser canmodify policies, such as change the amount of data to retain, by invoking theSET_DATA_COLLECTOR_POLICY() function, as follows:
SET_DATA_COLLECTOR_POLICY('component', 'memoryKB', 'diskKB' )
Administrator's GuideMonitoring HP Vertica
HP Vertica Analytics Platform (7.0.x) Page 798 of 969

The SET_DATA_COLLECTOR_POLICY() function sets the retention policy for the specifiedcomponent on all nodes, and lets you specify memory and disk size to retain in kilobytes. Failednodes receive the new setting when they rejoin the cluster.
For example, the following statement specifies that the NodeState component be allocated 50KBof memory and 250KB of disk space:
=> SELECT SET_DATA_COLLECTOR_POLICY('NodeState', '50', '250');SET_DATA_COLLECTOR_POLICY
---------------------------SET
(1 row)
Before you change a retention policy, you can view the current setting by calling the GET_DATA_COLLECTOR_POLICY() function.
You can also use the GET_DATA_COLLECTOR_POLICY() function to verify changed settings.For example, the following query retrieves a brief statement about the retention policy for theNodeState component:
=> SELECT GET_DATA_COLLECTOR_POLICY('NodeState');GET_DATA_COLLECTOR_POLICY
------------------------------------------50KB kept in memory, 250KB kept on disk.
(1 row)
Tip: If you do not know the name of a component, you can query the V_MONITOR.DATA_COLLECTOR system table to get a a full list. For example, the following query returns allcurrent Data Collector components and a description of each: => SELECT DISTINCTcomponent, description FROM data_collector ORDER BY 1 ASC;
See Alsol GET_DATA_COLLECTOR_POLICY
l SET_DATA_COLLECTOR_POLICY
Working with Data Collection LogsUpon startup, an HP Vertica database creates a DataCollector directory within the /catalogdirectory.
The DataCollector directory holds the disk-based data collection logs, where retained data is kept infiles named <component>.<timestamp>.log. HP Verticamight maintain several log files, percomponent, at any given time. SeeQuerying Data Collector Tables for an example of how to viewthis information.
Also upon startup, HP Vertica creates two additional files, per component, in the DataCollectordirectory. These are SQL files that contain examples on how to load Data Collector data intoanother HP Vertica instance. These files are:
Administrator's GuideMonitoring HP Vertica
HP Vertica Analytics Platform (7.0.x) Page 799 of 969
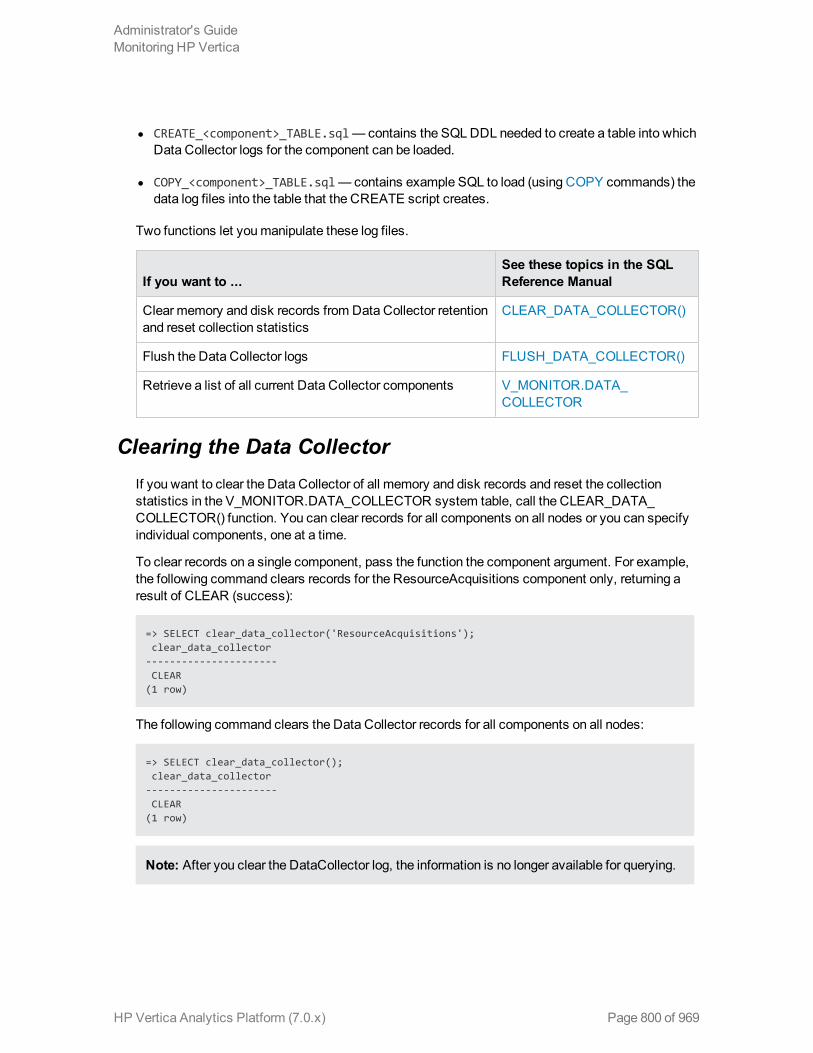
l CREATE_<component>_TABLE.sql—contains the SQLDDL needed to create a table into whichData Collector logs for the component can be loaded.
l COPY_<component>_TABLE.sql—contains example SQL to load (using COPY commands) thedata log files into the table that the CREATE script creates.
Two functions let youmanipulate these log files.
If you want to ...See these topics in the SQLReference Manual
Clear memory and disk records from Data Collector retentionand reset collection statistics
CLEAR_DATA_COLLECTOR()
Flush the Data Collector logs FLUSH_DATA_COLLECTOR()
Retrieve a list of all current Data Collector components V_MONITOR.DATA_COLLECTOR
Clearing the Data CollectorIf you want to clear the Data Collector of all memory and disk records and reset the collectionstatistics in the V_MONITOR.DATA_COLLECTOR system table, call the CLEAR_DATA_COLLECTOR() function. You can clear records for all components on all nodes or you can specifyindividual components, one at a time.
To clear records on a single component, pass the function the component argument. For example,the following command clears records for the ResourceAcquisitions component only, returning aresult of CLEAR (success):
=> SELECT clear_data_collector('ResourceAcquisitions');clear_data_collector
----------------------CLEAR
(1 row)
The following command clears the Data Collector records for all components on all nodes:
=> SELECT clear_data_collector();clear_data_collector
----------------------CLEAR
(1 row)
Note: After you clear the DataCollector log, the information is no longer available for querying.
Administrator's GuideMonitoring HP Vertica
HP Vertica Analytics Platform (7.0.x) Page 800 of 969

Flushing Data Collector LogsIf you want to flush Data Collector information for all components or for an individual component,use the FLUSH_DATA_COLLECTOR() function. This function waits until memory logs aremovedto disk and flushes the Data Collector, synchronizing the log with the disk storage:
To flush data collection for all components on all nodes:
=> SELECT flush_data_collector();flush_data_collector
----------------------FLUSH
(1 row)
To flush records on a single component, pass a component argument to the function. For example,the following command flushes the ResourceAcquisitions component:
=> SELECT flush_data_collector('ResourceAcquisitions');flush_data_collector
----------------------FLUSH
(1 row)
See Alsol Data Collector Functions
l DATA_COLLECTOR
Monitoring Data Collection ComponentsQuery the V_MONITOR.DATA_COLLECTOR system table to get a list of Data Collectorcomponents, their current retention policies, and statistics about how much data is retained andhow much has been discarded for various reasons. DATA_COLLECTOR also calculates theapproximate collection rate, to aid in sizing calculations.
The following is a simple query that returns all the columns in this system table. See V_MONITOR.DATA_COLLECTOR in the SQLReferenceManual for additional details.
=> \xExpanded display is on.=> SELECT * FROM data_collector;-[ RECORD 1 ]----------+-------------------------------------------node_name | v_vmartdb_node0001component | AllocationPoolStatisticstable_name | dc_allocation_pool_statisticsdescription | Information about global memory pools, ...in_db_log | fin_vertica_log | fmemory_buffer_size_kb | 64
Administrator's GuideMonitoring HP Vertica
HP Vertica Analytics Platform (7.0.x) Page 801 of 969

disk_size_kb | 256record_too_big_errors | 0lost_buffers | 0lost_records | 0retired_files | 120retired_records | 53196current_memory_records | 0current_disk_records | 1454current_memory_bytes | 0current_disk_bytes | 214468first_time | 2011-05-26 12:25:52.001109-04last_time | 2011-05-26 12:31:55.002762-04kb_per_day | 49640.4151810525-[ RECORD 2 ]----------+-------------------------------------------...
Related TopicsV_MONITOR.DATA_COLLECTOR andData Collector Functions in the SQLReferenceManual
RetainingMonitoring Information and How HP Vertica Calculates Database Size in this guide
Querying Data Collector Tables
Caution: Data Collector tables (prefixed by dc_) reside in the V_INTERNAL schema and areprovided for informational purposes only. They are provided as-is and are subject to removal orchange without notice. If you use Data Collector tables in scripts or monitoring tools, youmightneed to change your scripts and tools after an HP Vertica upgrade. HP recommends that youuse theWorkload Analyzer instead of accessing the Data Collector tables directly.
Here's one useful example you can use to check on the state of your database. Upon startup, theHP Vertica database creates, under its catalog directory, a DataCollector directory. This directoryholds the disk-based data collection logs. Themain data is kept in files named<component>.<timestamp>.log.
When you start your database an entry is created in the dc_startups table. The following is theresult of querying this table.
=> SELECT * FROM dc_startups;-[ RECORD 1 ]----+-----------------------------------------------------------time | 2011-05-26 17:35:40.588589-04node_name | v_vmartdb_node0001version | Vertica Analytic Database v5.0.4-20110526command_line | /opt/vertica/bin/vertica -C vmartdb -D /home/vmartdb/
| catalog/vmartdb/v_vmartdb_node0001_catalog -h| 10.10.50.123 -p 5608
codename | 5.0build_tag | vertica(v5.0.4-20110526) built by root@build2 from trunk@69652 on 'Thu
| May 26 3:37:18 2011' $BuildId$build_type | 64-bit Optimized Build
Administrator's GuideMonitoring HP Vertica
HP Vertica Analytics Platform (7.0.x) Page 802 of 969

compiler_version | 4.1.1 20070105 (Red Hat 5.1.1-52)server_locale | UTF-8database_path | /home/vmartdb/catalog/vmartdb/v_vmartdb_node0001_catalogalt_host_name | 10.10.50.123alt_node_name |start_epoch |-[ RECORD 2 ]----+-----------------------------------------------------------time | 2011-05-26 17:35:40.218999-04node_name | v_vmartdb_node0004version | Vertica Analytic Database v5.0.4-20110526command_line | /opt/vertica/bin/vertica -C vmartdb -D /home/vmartdb/
| catalog/vmartdb/v_vmartdb_node0004_catalog -h| 10.10.50.126 -p 5608
codename | 5.0build_tag | vertica(v5.0.4-20110526) built by root@build2 from trunk@69652 on 'Thu
| May 26 3:37:18 2011' $BuildId$build_type | 64-bit Optimized Buildcompiler_version | 4.1.1 20070105 (Red Hat 5.1.1-52)server_locale | UTF-8database_path | /home/vmartdb/catalog/vmartdb/v_vmartdb_node0004_catalogalt_host_name | 10.10.50.126alt_node_name |start_epoch |-[ RECORD 3 ]----+-----------------------------------------------------------time | 2011-05-26 17:35:40.931353-04node_name | v_vmartdb_node0003version | Vertica Analytic Database v5.0.4-20110526command_line | /opt/vertica/bin/vertica -C vmartdb -D /home/vmartdb/
| catalog/vmartdb /v_vmartdb_node0003_catalog -h| 10.10.50.125 -p 5608
codename | 5.0build_tag | vertica(v5.0.4-20110526) built by root@build2 from trunk@69652 on 'Thu
| May 26 3:37:18 2011' $BuildId$build_type | 64-bit Optimized Buildcompiler_version | 4.1.1 20070105 (Red Hat 5.1.1-52)server_locale | UTF-8database_path | /home/vmartdb/catalog/vmartdb/v_vmartdb_node0003_catalogalt_host_name | 10.10.50.125alt_node_name |start_epoch |-[ RECORD 4 ]----+-----------------------------------------------------------------------
Clearing PROJECTION_REFRESHES HistoryInformation about a refresh operation—whether successful or unsuccessful—is maintained in thePROJECTION_REFRESHES system table until either the CLEAR_PROJECTION_REFRESHES() function is executed or the storage quota for the table is exceeded. ThePROJECTION_REFRESHES.IS_EXECUTING column returns a boolean value that indicates whether therefresh is currently running (t) or occurred in the past (f).
To immediately purge this information, use the CLEAR_PROJECTION_REFRESHES() function:
=> SELECT clear_projection_refreshes();clear_projection_refreshes
Administrator's GuideMonitoring HP Vertica
HP Vertica Analytics Platform (7.0.x) Page 803 of 969

----------------------------CLEAR
(1 row)
Note: Only the rows where the PROJECTION_REFRESHES.IS_EXECUTING column equals falseare cleared.
See Alsol CLEAR_PROJECTION_REFRESHES
l PROJECTION_REFRESHES
Monitoring Query Plan ProfilesTomonitor real-time flow of data through a query plan, query the V_MONITOR.QUERY_PLAN_PROFILES system table. Information returned by this table is useful for letting you know what aquery didwhen, which occurs throughout a plan in a series of steps, called paths.
See Profiling query plans for more information.
Monitoring Partition ReorganizationWhen you use the ALTER TABLE .. REORGANIZE, the operation reorganizes the data in thebackground.
You canmonitor details of the reorganization process by polling the following system tables:
l V_MONITOR.PARTITION_STATUS displays the fraction of each table that is partitionedcorrectly.
l V_MONITOR.PARTITION_REORGANIZE_ERRORS logs any errors issued by thebackground REORGANIZE process.
l V_MONITOR.PARTITIONS displays NULLS in the partition_key column for any ROS's thathave not been reorganized.
Note: The corresponding foreground process to ALTER TABLE ... REORGANIZE isPARTITION_TABLE().
Partitioning, repartitioning, and Reorganizing Tables for more information.
Administrator's GuideMonitoring HP Vertica
HP Vertica Analytics Platform (7.0.x) Page 804 of 969
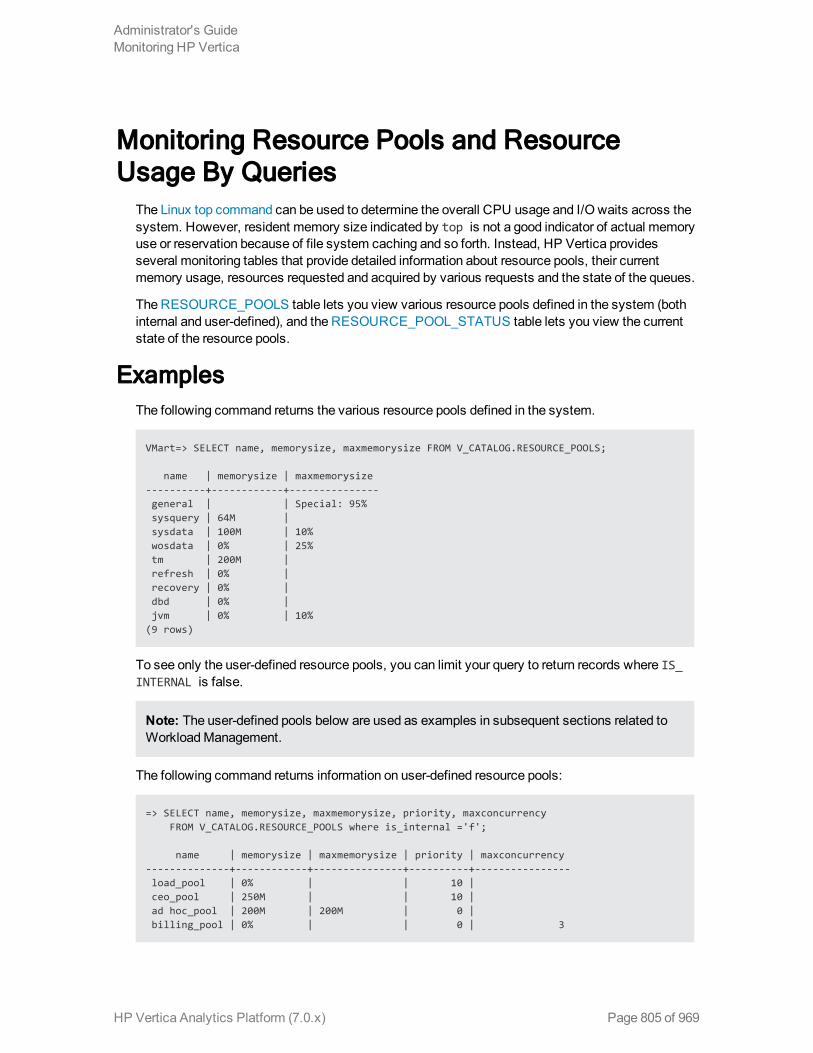
Monitoring Resource Pools and ResourceUsage By Queries
The Linux top command can be used to determine the overall CPU usage and I/O waits across thesystem. However, resident memory size indicated by top is not a good indicator of actual memoryuse or reservation because of file system caching and so forth. Instead, HP Vertica providesseveral monitoring tables that provide detailed information about resource pools, their currentmemory usage, resources requested and acquired by various requests and the state of the queues.
The RESOURCE_POOLS table lets you view various resource pools defined in the system (bothinternal and user-defined), and the RESOURCE_POOL_STATUS table lets you view the currentstate of the resource pools.
ExamplesThe following command returns the various resource pools defined in the system.
VMart=> SELECT name, memorysize, maxmemorysize FROM V_CATALOG.RESOURCE_POOLS;
name | memorysize | maxmemorysize----------+------------+---------------general | | Special: 95%sysquery | 64M |sysdata | 100M | 10%wosdata | 0% | 25%tm | 200M |refresh | 0% |recovery | 0% |dbd | 0% |jvm | 0% | 10%
(9 rows)
To see only the user-defined resource pools, you can limit your query to return records where IS_INTERNAL is false.
Note: The user-defined pools below are used as examples in subsequent sections related toWorkloadManagement.
The following command returns information on user-defined resource pools:
=> SELECT name, memorysize, maxmemorysize, priority, maxconcurrencyFROM V_CATALOG.RESOURCE_POOLS where is_internal ='f';
name | memorysize | maxmemorysize | priority | maxconcurrency--------------+------------+---------------+----------+----------------load_pool | 0% | | 10 |ceo_pool | 250M | | 10 |ad hoc_pool | 200M | 200M | 0 |billing_pool | 0% | | 0 | 3
Administrator's GuideMonitoring HP Vertica
HP Vertica Analytics Platform (7.0.x) Page 805 of 969

web_pool | 25M | | 10 | 5batch_pool | 150M | 150M | 0 | 10dept1_pool | 0% | | 5 |dept2_pool | 0% | | 8 |
(8 rows)
The queries borrow memory from the GENERAL pool and show the amount of memory in use from theGENERAL pool.
The following command uses the V_MONITOR.RESOURCE_POOL_STATUS table to return the currentstate of all resource pools on node0001:
=>\x
Expanded display is on
=> SELECT pool_name, memory_size_kb, memory_size_actual_kb, memory_inuse_kb,general_memory_borrowed_kb,running_query_countFROM V_MONITOR.RESOURCE_POOL_STATUS where node_name ilike '%node0001';
-[ RECORD 1 ]--------------+---------pool_name | generalmemory_size_kb | 2983177memory_size_actual_kb | 2983177memory_inuse_kb | 0general_memory_borrowed_kb | 0running_query_count | 0-[ RECORD 2 ]--------------+---------pool_name | sysquerymemory_size_kb | 65536memory_size_actual_kb | 65536memory_inuse_kb | 0general_memory_borrowed_kb | 0running_query_count | 0-[ RECORD 3 ]--------------+---------pool_name | sysdatamemory_size_kb | 102400memory_size_actual_kb | 102400memory_inuse_kb | 4096general_memory_borrowed_kb | 0running_query_count | 0-[ RECORD 4 ]--------------+---------pool_name | wosdatamemory_size_kb | 0memory_size_actual_kb | 0memory_inuse_kb | 0general_memory_borrowed_kb | 0running_query_count | 0-[ RECORD 5 ]--------------+---------pool_name | tmmemory_size_kb | 204800memory_size_actual_kb | 204800memory_inuse_kb | 0general_memory_borrowed_kb | 0running_query_count | 0-[ RECORD 6 ]--------------+---------pool_name | refresh
Administrator's GuideMonitoring HP Vertica
HP Vertica Analytics Platform (7.0.x) Page 806 of 969

memory_size_kb | 0memory_size_actual_kb | 0memory_inuse_kb | 0general_memory_borrowed_kb | 0running_query_count | 0-[ RECORD 7 ]--------------+---------pool_name | recoverymemory_size_kb | 0memory_size_actual_kb | 0memory_inuse_kb | 0general_memory_borrowed_kb | 0running_query_count | 0-[ RECORD 8 ]--------------+---------pool_name | dbdmemory_size_kb | 0memory_size_actual_kb | 0memory_inuse_kb | 0general_memory_borrowed_kb | 0running_query_count | 0-[ RECORD 9 ]--------------+---------pool_name | jvmmemory_size_kb | 0memory_size_actual_kb | 0memory_inuse_kb | 0general_memory_borrowed_kb | 0running_query_count | 0
The following command uses the V_MONITOR.RESOURCE_ACQUISITIONS table to show allresources granted to the queries that are currently running:
Note:While running vmart_query_04.sql from the VMart example database, notice that thequery uses memory_inuse_kb = 708504 from the GENERAL pool.
=> SELECT pool_name, thread_count, open_file_handle_count, memory_inuse_kb,queue_entry_timestamp, acquisition_timestampFROM V_MONITOR.RESOURCE_ACQUISITIONS WHERE node_name ILIKE '%node0001';
-[ RECORD 1 ]----------+------------------------------pool_name | sysquerythread_count | 4open_file_handle_count | 0memory_inuse_kb | 4103queue_entry_timestamp | 2013-12-05 07:07:08.815362-05acquisition_timestamp | 2013-12-05 07:07:08.815367-05-[ RECORD 2 ]----------+------------------------------...-[ RECORD 8 ]----------+------------------------------pool_name | generalthread_count | 12open_file_handle_count | 18memory_inuse_kb | 708504queue_entry_timestamp | 2013-12-04 12:55:38.566614-05acquisition_timestamp | 2013-12-04 12:55:38.566623-05-[ RECORD 9 ]----------+------------------------------
Administrator's GuideMonitoring HP Vertica
HP Vertica Analytics Platform (7.0.x) Page 807 of 969

...
To determine how long a query waits in the queue before it is admitted to run, you can get thedifference between the acquisition_timestamp and the queue_entry_timestamp using a querylike the following:
=> SELECT pool_name, queue_entry_timestamp, acquisition_timestamp,(acquisition_timestamp-queue_entry_timestamp) AS 'queue wait'
FROM V_MONITOR.RESOURCE_ACQUISITIONS WHERE node_name ILIKE '%node0001';
-[ RECORD 1 ]---------+------------------------------pool_name | sysqueryqueue_entry_timestamp | 2013-12-05 07:07:08.815362-05acquisition_timestamp | 2013-12-05 07:07:08.815367-05queue wait | 00:00:00.000005-[ RECORD 2 ]---------+------------------------------pool_name | sysqueryqueue_entry_timestamp | 2013-12-05 07:07:14.714412-05acquisition_timestamp | 2013-12-05 07:07:14.714417-05queue wait | 00:00:00.000005-[ RECORD 3 ]---------+------------------------------pool_name | sysqueryqueue_entry_timestamp | 2013-12-05 07:09:57.238521-05acquisition_timestamp | 2013-12-05 07:09:57.281708-05queue wait | 00:00:00.043187-[ RECORD 4 ]---------+------------------------------...
See the SQLReferenceManual for detailed descriptions of themonitoring tables described in thistopic.
Monitoring RecoveryThere are several ways tomonitor database recovery:
l Log files on each host
l Admintools (View Database Cluster State)
l System tables
This section describes the different ways tomonitor recovery.
Viewing Log Files on Each NodeDuring database recovery, HP Vertica adds logging information to the vertica.log on each host.Eachmessage is identified with a [Recover]string.
Use the tail command tomonitor recovery progress by viewing the relevant status messages, asfollows.
$ tail -f catalog-path/database-name/node-name_catalog/vertica.log
Administrator's GuideMonitoring HP Vertica
HP Vertica Analytics Platform (7.0.x) Page 808 of 969

01/23/08 10:35:31 thr:Recover:0x2a98700970 [Recover] <INFO> Changing host node01startup state from INITIALIZING to RECOVERING
01/23/08 10:35:31 thr:CatchUp:0x1724b80 [Recover] <INFO> Recovering to specifiedepoch 0x120b6
01/23/08 10:35:31 thr:CatchUp:0x1724b80 [Recover] <INFO> Running 1 split queries
01/23/08 10:35:31 thr:CatchUp:0x1724b80 [Recover] <INFO> Running query: ALTERPROJECTION proj_tradesquotes_0 SPLIT node01 FROM 73911;
Viewing the Cluster State and Recover StatusUse the admintools view_cluster tool from the command line to see the cluster state:
$ /opt/vertica/bin/admintools -t view_clusterDB | Host | State---------+--------------+------------<data_base> | 112.17.31.10 | RECOVERING<data_base> | 112.17.31.11 | UP<data_base> | 112.17.31.12 | UP<data_base> | 112.17.31.17 | UP________________________________
Using System Tables to Monitor RecoveryUse the following system tables tomonitor recover:
l RECOVERY_STATUS
l PROJECTION_RECOVERIES
Specifically, the recovery_status system table includes information about the node that is recovering, the epoch being recovered, thecurrent recovery phase, and running status:
=>select node_name, recover_epoch, recovery_phase, current_completed, is_running from recovery_status;node_name | recover_epoch | recovery_phase | current_completed | is_running-----------+---------------+-------------------+-------------------+--------------node01 | | | 0 | fnode02 | 0 | historical pass 1 | 0 | tnode03 | 1 | current | 0 | f
The projection_recoveries system tablemaintains history of projection recoveries. To checkthe recovery status, you can summarize the data for the recovering node, and run the same queryseveral times to see if the counts change. Differing counts indicate that the recovery is working andin the process of recovering all missing data.
=> select node_name, status , progress from projection_recoveries;node_name | status | progress-----------------------+-------------+---------v_<data_base>_node0001 | running | 61
Administrator's GuideMonitoring HP Vertica
HP Vertica Analytics Platform (7.0.x) Page 809 of 969

To see a single record from the projection_recoveries system table, add limit 1 to the query.
Monitoring Cluster Status After RecoveryWhen recovery has completed:
1. Launch Administration Tools.
2. From theMainMenu, select View Database Cluster State and click OK.
The utility reports your node's status as UP.
Note: You can alsomonitor the state of your database nodes on theManagement ConsoleOverview page under the Database section, which tells you the number of nodes that are up,critical, recovering, or down. To get node-specific information, click Manage at the bottom ofthe page.
See Alsol Monitoring HP Vertica
Administrator's GuideMonitoring HP Vertica
HP Vertica Analytics Platform (7.0.x) Page 810 of 969

Monitoring HP Vertica Using MCManagement Console gathers and retains history of important system activities about your MC-managed database cluster, such as performance and resource utilization. You can useMC chartsto locate performance bottlenecks on a particular node, to identify potential improvements to HPVertica configuration, and as a reference for what actions users have taken on theMC interface.
Note: MC directly queries Data Collector tables on theMC-monitored databases themselves.SeeManagement Console Architecture in the Concepts Guide.
The following list describes some of the areas you canmonitor and troubleshoot through theMCinterface:
l Multiple database cluster states and key performance indicators that report on the cluster'soverall health
l Information on individual cluster nodes specific to resources
l Database activity in relation to CPU/memory, networking, and disk I/O usage
l Query concurrency and internal/user sessions that report on important events in time
l Cluster-widemessages
l Database and agent log entries
l MC user activity (what users are doing while logged in toMC)
l Issues related to theMC process
l Error handling and feedback
About Chart UpdatesMC charts update dynamically with text, color, andmessages Management Console receives fromthe agents on the database cluster. This information can help you quickly resolve problems.
Each client session onMC uses a connection from MaxClientSessions, a database configurationparameter that determines themaximum number of sessions that can run on a single databasecluster node. If multiple MC users aremapped to the same database account and are concurrentlymonitoring the Overview and Activity pages, graphs could be slow to update while MC waits for aconnection from the pool.
Tip: You can increase the value for MaxClientSessions on anMC-monitored database to takeextra sessions into account. SeeManaging Sessions for details.
Administrator's GuideMonitoring HP Vertica
HP Vertica Analytics Platform (7.0.x) Page 811 of 969
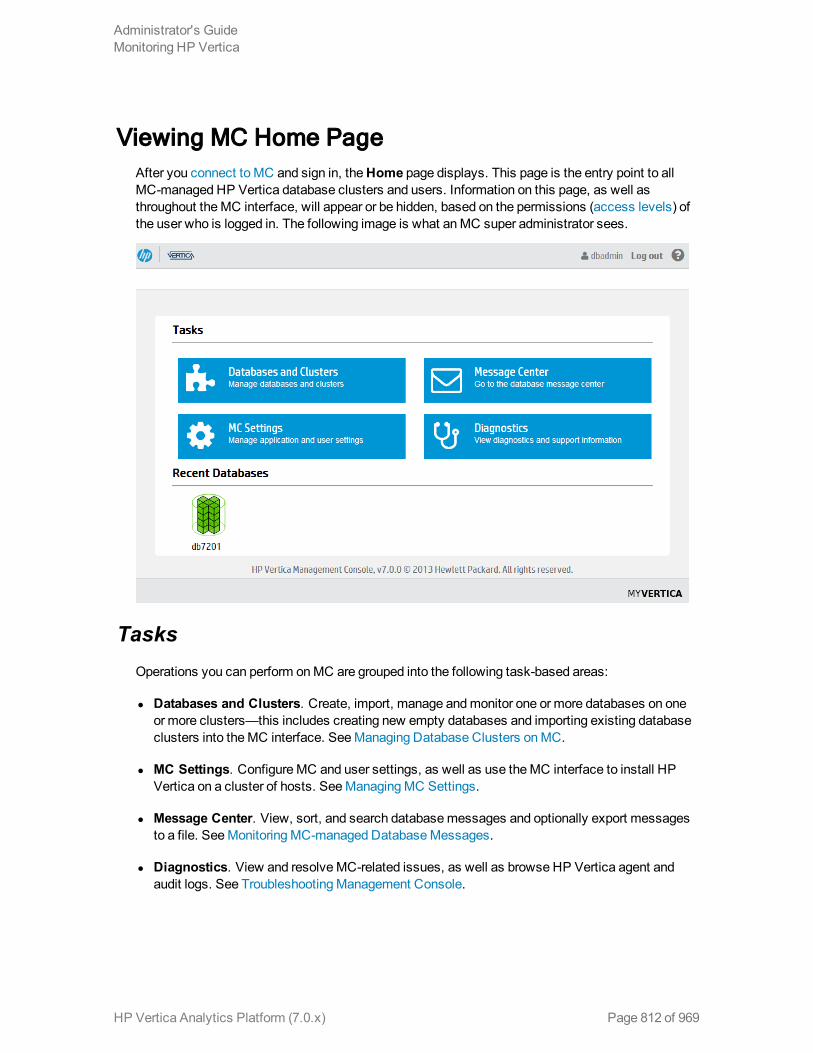
Viewing MC Home PageAfter you connect to MC and sign in, theHome page displays. This page is the entry point to allMC-managed HP Vertica database clusters and users. Information on this page, as well asthroughout theMC interface, will appear or be hidden, based on the permissions (access levels) ofthe user who is logged in. The following image is what anMC super administrator sees.
TasksOperations you can perform onMC are grouped into the following task-based areas:
l Databases and Clusters. Create, import, manage andmonitor one or more databases on oneor more clusters—this includes creating new empty databases and importing existing databaseclusters into theMC interface. SeeManaging Database Clusters onMC.
l MC Settings. ConfigureMC and user settings, as well as use theMC interface to install HPVertica on a cluster of hosts. SeeManagingMC Settings.
l Message Center. View, sort, and search databasemessages and optionally export messagesto a file. SeeMonitoringMC-managed DatabaseMessages.
l Diagnostics. View and resolveMC-related issues, as well as browse HP Vertica agent andaudit logs. See TroubleshootingManagement Console.
Administrator's GuideMonitoring HP Vertica
HP Vertica Analytics Platform (7.0.x) Page 812 of 969

Recent DatabasesThe area directly below Tasks displays all databases that you created on or imported into theMCinterface. You can install one or more databases, on the same cluster or on different clusters, butyou can have only one database running on a single cluster at a time. UP databases appear in greenand DOWN databases are red. An empty space under Recent Databases means that you have notyet created or imported a database into theMC interface.
Monitoring Same-Name Databases on MCIf you aremonitoring two databases with identical names on different clusters, you can determinewhich database is associated with which cluster by clicking the database icon onMC's Databasesand Clusters page to view its dialog box. Information in the dialog displays the cluster on which theselected database is associated.
Administrator's GuideMonitoring HP Vertica
HP Vertica Analytics Platform (7.0.x) Page 813 of 969

Monitoring Cluster ResourcesFor a dynamic, "dashboard" view of your MC-managed database cluster—including resources(CPU andmemory), distribution of query type, query performance, and a summary of databasemessages by message type—monitor theMC Overview page. Information on this page updatesevery minute, but you can postpone updates by clearing Auto Refresh Charts in the toolbar.
The following image shows all activity on an example cluster and represents what a user with MCdatabase administrator (ADMIN (db)) privileges sees. See About MC Users for more informationabout theMC privilegemodel.
TheMC Overview dashboard displays information about the following cluster functionality.
DatabaseThe Database subsection summarizes general information about the selected database cluster.Content in this area changes only if the database or node state changes; for example if the statechanges from Up to Initializing or Recovering, states that indicate a recovery operation is inprogress. See Failure Recovery for more information.
MessagesTheMessages subsection displays counts for database-relatedmessages, by severity type, andlets you quickly identify anything that requires immediate attention. To open theMessage Center,click the Details link. SeeMonitoringMC-managed DatabaseMessages.
Administrator's GuideMonitoring HP Vertica
HP Vertica Analytics Platform (7.0.x) Page 814 of 969

PerformanceIf your queries are performing suboptimally, thePerformance subsection on theOverview pagecould help you identify issues by providing results from the last Workload Analyzer (WLA) run. WLAanalyzes system information retained in SQL system tables and provides tuning recommendationsthrough a SQL command you can run, along with the cost (low, medium, or high) of running thecommand. Workload Analyzer begins 60 seconds after MC starts and then runs once per day. Ifyou want WLA to analyze your system workload/queries immediately, click Analyze. SeeAnalyzingWorkloads for more information about this utility.
CPU/Memory UsageThe CPU/Memory subsection provides a graph-based overview of cluster resources during the lasthour. The chart displays the number of nodes in the database cluster and plots average and per-node percentages for both CPU andmemory. Click a data point (that represents a node), and theNode Details page opens. SeeMonitoring Cluster CPU/Memory for more information.
User Query Type DistributionTheQuery Distribution chart provides an overview of user and system query activity and reports thetype of operation that ran, whichMC gathers from the production database. Hover your cursor overchart points for more details. To zoom, adjust the slider bar at the bottom of the chart around an areaof interest. Double clicking any point in the graph opens the Activity page. SeeMonitoring DatabaseActivity for further details.
See Alsol Monitoring Cluster Performance
Administrator's GuideMonitoring HP Vertica
HP Vertica Analytics Platform (7.0.x) Page 815 of 969

Monitoring Cluster NodesFor a visual overview of all cluster nodes, click the running database on the Databases andClusters page and then click theManage tab at the bottom of the page to open the cluster statuspage.
The cluster status page displays the nodes in your cluster. Healthy nodes appear green. A smallarrow to the right of the points upward to indicate the node is up. A node in a critical state appearsyellow, and a warning symbol appears over the arrow. Nodes that are down appear red, with a redarrow to the right pointing downwards. You can get information about a particular node by clicking it,an action that opens the node details page.
Filtering What You See
If you have a large cluster, where it might be difficult to view dozens to hundreds of nodes on theMC interface, you can filter what you see. The Zoom filter shows more or less detail on the clusteroverall, and the Health Filter lets you view specific node activity; for example, you can slide the barall the way to the right to show only nodes that are down. A message next to the health filterindicates how many nodes in the cluster are hidden from view.
On this page, you can perform the following actions on your database cluster:
l Add, remove and replace nodes
l Rebalance data across all nodes
l Stop or start (or restart) the database
l Refresh the view from informationMC gathers from the production database
l View key performance indicators (KPI) on node state, CPU, memory, and storage utilization(seeMonitoring Cluster Performance for details)
Note: Starting, stopping, adding, and dropping nodes and rebalancing data across nodesworks with the same functionality and restrictions as those same tasks performed through theAdministration Tools.
If You don't See What You Expect
If the cluster grid does not accurately reflect the current state of the database (for example if theMCinterface shows a node in INITIALIZING state, but when you use the Administration Tools to ViewDatabase Cluster State, you see that all nodes are UP), click the Refresh button in the toolbar.Doing so forces MC to immediately synchronize with the agents and updateMC with new data.
Don't press the F5 key, which redisplays the page using data fromMC and ignores data from theagent. It can take several seconds for MC to enable all database action buttons.
Administrator's GuideMonitoring HP Vertica
HP Vertica Analytics Platform (7.0.x) Page 816 of 969

See Also
l Monitoring Node Activity
Monitoring Cluster CPU/MemoryOn theMC Overview page, theCPU/Memory subsection provides a graph-based overview ofcluster resources during the last hour, which lets you quickly monitor resource distribution acrossnodes.
This chart plots average and per-node percentages for both CPU andmemory with updates everyminute—unless you clear Auto Refresh Charts in the toolbar. You can also filter what the chartdisplays by clicking components in the legend at the bottom of the subsection to show/hide thosecomponents. Yellow data points represent individual nodes in the cluster at that point in time.
Investigating Areas of Concern
While viewing cluster resources, youmight wonder why resources among nodes become skewed.To zoom in, use your mouse to drag around the problem area surrounding the time block of interes.
After you release themouse, the chart refreshes to display amore detailed view of the selectedarea. If you hover your cursor over the node that looks like it's consuming themost resources, adialog box summarizes that node's percent usage.
For more information, click a data point (node) on the graph to openMC's node details page. Toreturn to the previous view, click Reset zoom.
See Also
l Monitoring Node Activity
Monitoring Cluster PerformanceKey Performance Indicators (KPIs) are a type of performancemeasurement that let you quicklyview the health of your database cluster throughMC's Manage page. Thesemetrics, whichdetermine a node's color, make it easy for you to quickly identify problem nodes.
Metrics on the database are computed and averaged over the latest 30 seconds of activity anddynamically updated on the cluster grid.
How to Get Metrics on Your Cluster
To view metrics for a particular state, click themenu next to theKPI View label at the bottom of theManage page, and select a state.
MC reports KPI scores for:
Administrator's GuideMonitoring HP Vertica
HP Vertica Analytics Platform (7.0.x) Page 817 of 969

l Node state—(default view) shows node status (up, down, k-safety critical) by color; you canfilter which nodes appear on the page by sliding the health filter from left to right
l CPU Utilization—average CPU utilization
l Memory Utilization—average percent RAM used
l Storage Utilization—average percent storage used
After youmake a selection, there is a brief delay while MC transmits information back to therequesting client. You can also click Sync in the toolbar to force synchronization betweenMC andthe client.
Node Colors and What They Mean
Nodes in the database cluster appear in color. Green is themost healthy and red is the leasthealthy, with varying color values in between.
Each node has an attached information dialog box that summarizes its score. It is the score'sposition within a range of 0 (healthiest) to 100 (least healthy) that determines the node's color bias.Color bias means that, depending on the value of the health score, the final color could be slightlybiased; for example, a node with score 0 will bemore green than than a node with a score of 32,which is still within the green range but influenced by the next base color, which is yellow. Similarly,a node with a score of 80 appears as a dull shade of red, because it is influenced by orange.
MC computes scores for each node's color bias as follows:
l 0-33: green and shades of green
l 34-66: yellow and shades of yellow
l 67-100: red and shades of red shades
If the unhealthy node were to consume additional resources, its color would change from a dullorange-red to a brighter red.
Filtering Nodes From the View
The health filter is the slider in the lower left area of page. You can slide it left to right to show or hidenodes; for example, youmight want to hide nodes with a score smaller that a certain value so the UIdisplays only the unhealthy nodes that require immediate attention. Wherever you land on thehealth filter, an informational message appears to the right of the filter, indicating how many nodesare hidden from view.
Administrator's GuideMonitoring HP Vertica
HP Vertica Analytics Platform (7.0.x) Page 818 of 969
Filtering is useful if you havemany nodes and want to see only the ones that need attention, so youcan quickly resolve issues on them.
Monitoring System ResourcesMC's Activity page provides immediate visual insight into potential problem areas by giving yougraph-based views of query performance by runtime inmilliseconds, current load rates, real-timehardware andmemory impacts, the type of query or operation that the user or system ran,concurrently-running processes, and system bottlenecks on nodes.
Select one of the following charts in the toolbar menu:
l Queries
l Internal Sessions
l User Sessions
l Memory Usage
l Bottleneck Usage
How up to Date Is the information?System-level activity charts automatically update every fiveminutes, unless you clear AutoRefresh in the toolbar. Depending on your system, it could take several moments for the charts todisplay when you first access the page or change the kind of resource you want to view.
Monitoring Query ActivityTheQueries chart displays information about query concurrency and average resource usage forCPU/memory, network activity, and disk I/O percent based onmaximum rated bandwidth.
Administrator's GuideMonitoring HP Vertica
HP Vertica Analytics Platform (7.0.x) Page 819 of 969

Hover over a data point for more information about percent usage for each of the resource types.
If you click a data point, MC opens a details page for that point in time, summarizing the number ofuser queries and system queries. This page can help you identify long-running queries, along withthe query type. You can sort table columns and export the report to a file.
Monitoring Key Events
On themain Queries page, MC reports when a key event occurred, such as aWorkload Analyzer orrebalance operation, by posting aWLA (Workload Analyzer) and/orRBL (rebalance) label on theresource section of the chart.
Administrator's GuideMonitoring HP Vertica
HP Vertica Analytics Platform (7.0.x) Page 820 of 969

Filtering Chart Results
The default query concurrency is over the last hour. The chart automatically refreshes every fiveminutes, unless you clear the Auto Refresh option in the toolbar. You can filter results for 1 hour, 1day, or up to 1 week, along with corresponding average resource usage. You can also click differentresources in the legend to show or hide those resources.
To return to themain Queries page, use the slider bar or click the 1h button.
Viewing More Detail
To zoom in for detail, click-drag themouse around a section or use the sliding selector bar at thebottom of the chart. After the detailed area displays, hover your cursor over a data point to view theresources anchored to that point in time.
For more detail about user or system queries, click a data point on one of the peaks. A Detail pageopens to provide information about the queries in tabular format, including the query type, sessionID, node name, query type, date, time, and the actual query that ran.
The bottom of the page indicates the number of queries it is showing on the current page, withPrevious and Next buttons to navigate through the pages. You can sort the columns and exportcontents of the table to a file.
To return to themain Queries page, click <database name> Activity in the navigation bar.
Administrator's GuideMonitoring HP Vertica
HP Vertica Analytics Platform (7.0.x) Page 821 of 969

Monitoring Internal SessionsThe Internal Sessions chart provides information about HP Vertica system activities, such as TupleMover and rebalance cluster operations, along with their corresponding resources, such asCPU/memory, networking, and disk I/O percent used.
Hover your cursor over a bar for more information. A dialog box appears and provides details.
Filtering Chart Results
You can filter what the chart displays by selecting options for the following components. As youfilter, theRecords Requested number changes:
l Category—Filter which internal session types (moveout, mergeout, rebalance cluster) appear inthe graph. The number in parentheses indicates how many sessions are running on thatoperation.
l Session duration—Lists time, in milliseconds, for all sessions that appear on the graph. Theminimum/maximum values on which you can filter (0 ms to nms) represent theminimum/maximum elapsed times within all sessions currently displayed on the graph. Afteryou choose a value, the chart refreshes to show only the internal sessions that were greater thanor equal to the value you select.
l Records requested—Represents the total combined sessions for the Category and SessionDuration filters.
Monitoring User SessionsThe User Sessions chart provides information about HP Vertica user activities for all userconnections open toMC.
What Chart Colors Mean
Sessions are divided into two colors, yellow and blue.
l Yellow bars represent user (system) sessions. If you click a yellow bar, MC opens a Detail pagethat shows all queries that ran or are still running within that session.
l Blue bars represent user requests (transactions within the session). If you click a blue section inthe graph, MC opens a Detail page that includes information for that query request only.
When you hover your mouse over a transaction bar, a dialog box provides summary informationabout that request, such as which user ran the query, how long the transaction took to complete,or whether the transaction is still running.
Administrator's GuideMonitoring HP Vertica
HP Vertica Analytics Platform (7.0.x) Page 822 of 969

Chart Results
Extremely busy systems will show a lot of activity on the interface, perhaps more than you caninterpret at a glance. You can filter session results by selecting a smaller number of records, aspecific user, or by changing the session duration (how long a session took to run).
As you apply filters, the Records requested number changes to represent the total combinedsessions based on your filters:
l Show records—decide how many records to show in increments of 10.
l User—select the user for which you want to show sessions.
l Session duration—list time, in milliseconds, for all the sessions that appear on the graph. Theminimum/maximum values on which you can filter (0 ms to nms) represent theminimum/maximum elapsed times within all sessions currently displayed on the graph. Afteryou choose a value, the chart refreshes to show only the sessions that were greater than orequal to the value you select.
l Records requested—represents the total combined user sessions for the User and Sessionduration filters.
Monitoring System Memory UsageTheMemory Usage chart shows how systemmemory is used on individual nodes over time.Information the chart displays is stored based onData Collector retention policies, which asuperuser can configure. See Configuring Data Retention Policies.
The first time you access theMemory Usage chart, MC displays the first node in the cluster. MCremembers the node you last viewed and displays that node when you access the Activity pageagain. To choose a different node, select one from the Nodes drop-down list at the bottom of thechart. The chart automatically refreshes every fiveminutes unless you disable the Auto Refreshoption.
Tip: On busy systems, the Node list might cover part of the graph you want to see. You canmove the list out of the way by dragging it to another area on the page.
Types of System Memory
TheMemory Usage chart displays a stacking area for the followingmemory types:
l swap
l free
l fcache (file cache)
Administrator's GuideMonitoring HP Vertica
HP Vertica Analytics Platform (7.0.x) Page 823 of 969

l buffer
l other (memory in use by all other processes running on the system besides themain Verticaprocess, such as theMC process or agents)
l HP Vertica
l rcache (HP Vertica ROS cache)
l catalog
When you hover over a data point, a dialog box displays percentage of memory used during thattime period for the selected node.
Monitoring System BottlenecksThe System Bottlenecks chart helps you quickly locate performance bottlenecks on a particularnode. The first time you access the Activity page, MC displays the first node in the cluster. Tochoose a different node, select one from the Nodes drop-down list at the bottom of the chart.
How MC Gathers System Bottleneck Data
Every 15minutes, MC takes themaximum percent values from various system resources andplots a single line with a data point for the component that used the highest resources at that point intime. When a different component uses the highest resources, MC displays a new data point andchanges the line color to make the change in resources obvious. Very busy databases can causefrequent changes in the top resources consumed, so youmight notice heavy chart activity.
The Components MC Reports on
MC reports maximum percent values for the following system components:
l Average percent CPU usage
l Average percent memory usage
l Maximum percent disk I/O usage
l Percent data sent over the network (TX)
l Percent data received over the network (RX)
How MC Handles Conflicts in Resources
If MC encounters twometrics with the samemaximum percent value, it displays one at random. Iftwometrics are very close in value, MC displays the higher of the two.
Administrator's GuideMonitoring HP Vertica
HP Vertica Analytics Platform (7.0.x) Page 824 of 969

Note: The System Bottlenecks chart reports what MC identifies as themost problematicresource during a given time interval. This chart is meant to be a starting point for furtherinvestigation and cannot represent everything going on in the system.
Example
The following image shows that, over the last three hours, themost-used resources on the selectednode were disk I/O, CPU, andmemory. Line colors map to the components in the legend.
According to the above chart, just before 07:40 themaximum resources used changed from CPU tomemory, denoted by a change from green to pink and a new data point. The following imageprovides a closeup of the change.
Monitoring Node ActivityIf a node fails on anMC-managed cluster or you notice one node is using higher resources thanother cluster nodes—which youmight observe whenmonitoring the Overview page—open theManage page and click the node you want to investigate.
The Node Details page opens and provides summary information for the node (state, name, totalmemory, and so on), as well as resources the selected node has been consuming for the last threehours, such as average CPU, memory, disk I/O percent usage, network consumption in kilobytes,and the percentage of disk storage the running queries have been using. You can also browse andexport log-level data from AgentTools and Vertica log files. MC retains amaximum of 2000 logrecords.
Administrator's GuideMonitoring HP Vertica
HP Vertica Analytics Platform (7.0.x) Page 825 of 969

For amore detailed view of node activity, use themouse to drag-select around a problem area inone of the graphs, such as the large spike in network traffic in the above image. Then hover over thehigh data point for a summary.
Administrator's GuideMonitoring HP Vertica
HP Vertica Analytics Platform (7.0.x) Page 826 of 969

See Alsol Monitoring Cluster Resources
l Monitoring Cluster Performance
Administrator's GuideMonitoring HP Vertica
HP Vertica Analytics Platform (7.0.x) Page 827 of 969

Monitoring MC-managed Database MessagesYou can view an overview of your database-relatedmessages on theOverview page.
If you click the Details link MC opens theMessage Center, which lists up to 500 of themostcurrent messages and reports on the following database-related conditions:
l Low disk space
l Read-only file system
l Loss of K-safety
l Current fault tolerance at critical level
l Toomany ROS containers
l WOS overflow
l Change in node state
l Recovery error
l Recovery failure
l Recovery lock error
l Recovery projection retrieval error
l Refresh error
l Refresh lock error
Administrator's GuideMonitoring HP Vertica
HP Vertica Analytics Platform (7.0.x) Page 828 of 969

l Workload Analyzer operations
l Tuple Mover error
l Timer service task error
l Last Good Epoch (LGE) lag
l License size compliance
l License term compliance
Message SeverityMessages are color coded to represent the level of severity. For example:
l Red - Emergency, Alert, and Critical
l Orange - Error
l Yellow -Warning
l Green - Notice
l Blue - Informational
The icons that correspond with amessage on the interface use the same color conventions.
Viewing Message DetailsWithin theMessage Center, if you click the arrow next to amessage, you can get more informationabout the issue, which can help you determine what action to take, if any.
Tip: You can also query the V_MONITOR.EVENT_CONFIGURATIONS table to getinformation about events. See the SQLReferenceManual for details.
Search and Export MessagesYou can also search and sort databasemessages, mark messages read/unread and delete them,filter messages by message type, and export messages.
Searching MC-managed Database MessagesTheManagement ConsoleMessage Center displays the 500most recent databasemessages,starting with themost recent record. If fewer than than 500 records exist, MC displays all of them. Ifmore than 500 exist, MC returns amessage letting you know that only themost recent 500 entriesare being shown, so you have the option to filter.
Administrator's GuideMonitoring HP Vertica
HP Vertica Analytics Platform (7.0.x) Page 829 of 969

By default, MC reports on all message types (Emergency, Alert, Critical, Error, Warning, Notice)except Info. If you want to view Infomessages, youmust select that type, but because Infomessages could quickly reach the 500-message limit, theMessage Center might not have room toshow other message types. You can filter what message types theMessage Center returns.
Changing Message Search Criteria
To specify whichmessages to retrieve, click Change Search and choose a date range, one ormoremessage types, or one or moremessage types within a specific date range.
After you click OK, theMessage Center returns up to 500messages and updates the toolbar withyour search criteria. By default, theMessage Center displays, "showing recent entries, all alerttypes," but if you requested specific message types the toolbar displays "alert types filtered." Thetoolbar will also show the date range if you supplied one.
Specifying Date Range Searches
For date range searches, MC starts at the beginning of the time range and either returns allmessages up to the specified end time or 500messages, whichever comes first. You can filtermessage searches on the following date ranges:
l Any date-to-date period, including hour andminute
l Any time period up to now (forward searches)
l Any time period before now (backward searches)
Based on the likelihood that MC will findmore than 500messages, a date search from <date> to<now> will return a different set of messages than it would from a “search recent entries” request.
Administrator's GuideMonitoring HP Vertica
HP Vertica Analytics Platform (7.0.x) Page 830 of 969

After you specify a date range, click Done to close the calendar, and then click OK to see theresults in theMessage Center.
Filtering Messages Client Side
In a selection pane at the bottom of theMessage Center page, you can further refine search resultsthrough the client interface.
Client-side filtering works only onmessages that MC has already returned, whether you can seethem or not. If you select or clear message types in this filter, the toolbar status does not change.Client-side selections also do not change based on the choices youmake in your server-sidesearch. The goal of client-side filtering is to let you further refine server-side results.
Exporting MC-managed Database Messages and LogsYou can export the contents of databasemessages, log details, query details, andMC user activityto a file. Information comes directly from theMC interface. This means that if the last fiveminutesof vertica.log information displays on the interface, you can save that fiveminutes of data to afile, not the entire vertica.log, for whichMC retains amaximum of 2000 records.
Before you can export messages/logs, you first need to search search the logs. Exported log fileshave a .log extension and contain all records found within the time range you specify for thesearch. See SearchingMC-managed DatabaseMessages for additional details.
Administrator's GuideMonitoring HP Vertica
HP Vertica Analytics Platform (7.0.x) Page 831 of 969

Depending on how you set your browser preferences, when you export messages you can view theoutput immediately or specify a location to save the file. System-generated filenames include atimestamp for uniqueness. If you notice a slight discrepancy between results on theMC interfaceand the contents of an exported file, this is becauseMC handles log searching (both viewing andexporting) by theminute, and a discrepancy can occur if new information comes in for the searchrange's endminute.
The following table shows, by record type, theMC pages that contain content you can export, thename of the system-generated file, and what that file's output contains:
Messagetype
Where youcan export onMC System-generated filename
Contents ofexported file
All db-relatedmessagetypes
MessageCenter page
vertica-alerts-<timestamp>.csv Exports messages intheMessage Centerto a .csv file.Message contentsare saved under thefollowing headings:
l Create time
l Severity
l Database
l Summary (ofmessage)
l Description (moredetails)
MC logfiles
Diagnosticspage
mconsole-<timestamp>.log Exports MC logsearch results fromMC to a .log fileunder the followingheadings:
l Time
l Type (messageseverity)
l Component (suchas TM, Txn,Recover, and soon)
l Message
Administrator's GuideMonitoring HP Vertica
HP Vertica Analytics Platform (7.0.x) Page 832 of 969

Messagetype
Where youcan export onMC System-generated filename
Contents ofexported file
Verticalogs
Manage page
Double-clickany node to getto the detailsand then clickthe VerticaLogtab.
vertica-vertica-<db>-<timestamp>.log Exports vertica logsearch results fromMC to a .log fileunder the followingheadings:
l Time
l Type (messageseverity)
l Component (suchas TM, Txn,Recover, and soon)
l Message
Agentlogs
Manage page
Click any nodeto get to thedetails andthen click theAgentToolsLog tab.
vertica-agent-<db>-<timestamp>.log Exports agent logsearch results fromMC to a .log fileunder the followingheadings:
l Time
l Type (messageseverity)
l Component (suchas TM, Txn,Recover, and soon)
l Message
Administrator's GuideMonitoring HP Vertica
HP Vertica Analytics Platform (7.0.x) Page 833 of 969

Messagetype
Where youcan export onMC System-generated filename
Contents ofexported file
Querydetails
Activity page
Click anyquery spike inthe graph to getto the Detailpage.
vertica-querydetails-<db>-<timestamp>.dat Exports query detailsfor the databasebetween<timestamp> and<timestamp> as atab-delimited .dat file.Content is savedunder the followingheadings:
l Query type
l Session ID
l Node name
l Started
l Elapsed
l User name
l Request/Query
MC useractivity
Diagnosticspage
Click the AuditLog task
vertica_audit<timestamp>.csv Exports MC user-activity results to a.csv file. Content issaved under thefollowing headings:
l Time
l MC User
l Resource
l Target User
l Client IP
l Activity
Monitoring MC User ActivityWhen anMC user makes changes on theMC interface, whether to anMC-managed database or totheMC itself, their action generates a log entry that records a timestamp, theMC user name, the
Administrator's GuideMonitoring HP Vertica
HP Vertica Analytics Platform (7.0.x) Page 834 of 969
database and client host (if applicable), and the operation the user performed. Youmonitor useractivity on theDiagnostics > Audit Log page.
MC records the following types of user operations:
l User log-on/log-off activities
l Database creation
l Database connection through the console interface
l Start/stop a database
l Remove a database from the console view
l Drop a database
l Database rebalance across the cluster
l License activity views on a database, as well as new license uploads
l Workload Analyzer views on a database
l Database password changes
l Database settings changes (individual settings are tracked in the audit record)
l Syncing the database with the cluster (who clicked Sync on grid view)
l Query detail viewings of a database
l Node changes (add, start, stop, replace)
l Usermanagement (add, edit, enable, disable, delete)
l LDAP authentication (enable/disable)
l Management Console setting changes (individual settings are tracked in the audit record)
l SSL certificate uploads
l Message deletion and number deleted
l Console restart from the browser interface
l Factory reset from the browser interface
Background Cleanup of Audit RecordsAn internal MC job starts every day and, if required, clears audit records that exceed a specifiedtimeframe and size. The default is 90 days and 2K in log size. MC clears whichever limit is firstreached.
Administrator's GuideMonitoring HP Vertica
HP Vertica Analytics Platform (7.0.x) Page 835 of 969

You can adjust the time and size limits by editing the following lines in the/opt/vconsole/config/console.properties file:
vertica.audit.maxDays=90vertica.audit.maxRecords=2000
Filter and Export ResultsYou canmanipulate the output of the audit log by sorting column headings, scrolling through the log,refining your search to a specific date/time and you can export audit contents to a file.
If you want to export the log, see Exporting the User Audit Log.
If You Perform a Factory ResetIf you perform a factory reset onMC's Diagnostics page (restore it to its pre-configured state), MCprompts you to export audit records before the reset occurs.
Administrator's GuideMonitoring HP Vertica
HP Vertica Analytics Platform (7.0.x) Page 836 of 969

Analyzing WorkloadsIf your queries are performing suboptimally, you can get tuning recommendations for them, as wellas for hints about optimizing database objects, by using theWorkload Analyzer (WLA).
About the Workload AnalyzerTheWorkload Analyzer is an HP Vertica utility that analyzes system information held in SQLsystem tables. WLA intelligently monitors the performance of your SQL queries, workload history,resources, and configurations to identify the root causes of poor query performance.
WLA returns a set of tuning recommendations, which is based on a combination of statistics,system and data collector events, and database/table/projection design. These recommendationslet you quickly and easily tune query performance without needing sophisticated skills.
You run theWorkload Analyzer:
l By calling the ANALYZE_WORKLOAD() function
l Through theManagement Console interface
See UnderstandingWLA Triggering Conditions for themost common triggering conditions andrecommendations.
Getting Tuning Recommendations Through anAPI
You can get Workload Analyzer to return tuning recommendations for queries and database objectsby calling the ANALYZE_WORKLOAD() function and passing it arguments that tell WLA exactlywhat and when to analyze.
What and WhenThe 'scope' argument tells WLA what to analyze:
l An empty string ('') returns recommendations for all database objects
l 'table_name' returns recommendations related to the specified table
l 'schema_name' returns recommendations on all database objects in the specified schema
The 'since_time' argument tells WLA when by limiting recommendations from all events that youspecified in 'scope' since the time you specify in this argument, up to the current system status. Ifyou omit the since_time parameter, ANALYZE_WORKLOAD returns recommendations on eventssince the last recorded time that you called ANALYZE_WORKLOAD().
Youmust explicitly cast strings that you use for the since_time parameter to TIMESTAMP orTIMESTAMPTZ. The following statements show four different ways of expressing the same query
Administrator's GuideAnalyzingWorkloads
HP Vertica Analytics Platform (7.0.x) Page 837 of 969

using different formats for the since_time parameter. All four queries return the same result forworkloads on table t1 since October 4, 2010.
=> SELECT ANALYZE_WORKLOAD('t1', TIMESTAMP '2010-10-04 11:18:15');=> SELECT ANALYZE_WORKLOAD('t1', '2010-10-04 11:18:15'::TIMESTAMPTZ);=> SELECT ANALYZE_WORKLOAD('t1', 'October 4, 2010'::TIMESTAMP);=> SELECT ANALYZE_WORKLOAD('t1', '10-04-10'::TIMESTAMPTZ);
Record the EventsInstead of supplying a specific time, you can instruct WLA to record this particular call ofWORKLOAD_ANALYZER() in the system by supplying an optional 'true' parameter along with thescope. The default value is false (do not record). If recorded, subsequent calls to ANALYZE_WORKLOAD analyze only the events that have occurred since this recorded time, ignoring all priorevents.
For example, the following statement runs WLA and returns recommendations for all databaseobjects in all schemas and records this analysis invocation.
=> SELECT ANALYZE_WORKLOAD('', true);
The next invocation of ANALYZE_WORKLOAD() will analyze events from this point forward.
Administrator's GuideAnalyzingWorkloads
HP Vertica Analytics Platform (7.0.x) Page 838 of 969

Observation Count and TimeThe observation_count column returns an integer that represents the total number of events WLAobserved for this tuning recommendation, so in each case above, WLA is making its firstrecommendation. Null results in the observation_time columns mean only that therecommendations are from the current system status instead of from a prior event.
Knowing What to TuneThe tuning_parameter column returns the object on whichWLA recommends that you apply thetuning action. The parameter of release in the example above notifies the DBA to set a passwordfor user release.
The Tuning Description (recommended action) andCommand
Workload Analyzer's output returns a brief description of tasks you should consider in the tuning_description column, along with a SQL command you can run, where appropriate, in the tuning_command column. In the above fragment for RECORDS 1 and 2, WLA recommends that you runtheDatabase Designer on two tables and consider setting a user's password in record 3. Note thatRECORD 3 also provides the ALTER USER command to run because the tuning action is a SQLcommand.
What a Tuning Operation CostsThe output in the tuning_cost column is based on the type of tuning recommendationWLA hasmade. It can be low, medium or high:
l A LOW cost has minimal impact on resources from running the tuning command. You canperform the tuning operation at any time, like changing the user's password in Record 3 above.
l A MEDIUM cost has moderate impact on resources from running the tuning command
l A HIGH cost has maximum impact on resources from running the tuning command. Dependingon the size of your database or table, consider running high-cost operations after hours insteadof during peak load times.
ExamplesThe following statement tells WLA to analyze all events for a table named locations:
=> SELECT ANALYZE_WORKLOAD('locations');
The recommendation s that you run the Database Designer on the table, an operation that,depending on the size of the locations table, could potentially have a high cost, so youmight wantto run Database Designer after hours.
Administrator's GuideAnalyzingWorkloads
HP Vertica Analytics Platform (7.0.x) Page 839 of 969

-[ RECORD 1 ]----------+------------------------------------------------observation_count | 1first_observation_time |last_observation_time |tuning_parameter | public.locationstuning_description | run database designer on table public.locationstuning_command |tuning_cost | HIGH
The following statement analyzes workloads on all tables in the VMart example datbase (seeIntroducing the VMart Example Database) since one week before today:
=> SELECT ANALYZE_WORKLOAD('', NOW() - INTERVAL '1 week');
Workload Analyzer found two issues which are described below the sample output.
-[ RECORD 1 ]----------+------------------------------------------------------observation_count | 4first_observation_time | 2012-02-17 13:57:17.799003-04last_observation_time | 2011-04-22 12:05:26.856456-04tuning_parameter | store.store_orders_fact.date_orderedtuning_description | analyze statistics on table column store.store_orders_fact.date_orderedtuning_command | select analyze_statistics('store.store_orders_fact.date_ordered');tuning_cost | MEDIUM-[ RECORD 2 ]---------+------------------------------------------------------...-[ RECORD 14 ]---------+-----------------------------------------------------observation_count | 2first_observation_time | 2012-02-19 17:52:03.022644-04last_observation_time | 2012-02-19 17:52:03.02301-04tuning_parameter | SELECT x FROM t WHERE x > (SELECT SUM(DISTINCT x) FROM
| t GROUP BY y) OR x < 9;tuning_description | consider incremental design on querytuning_command |tuning_cost | HIGH
In RECORD 1, the date_ordered column in the store.store_orders_fact table likely hasstale statistics, soWLA suggests running ANALYZE_STATISTICS() on that column. The functionoutput also returns the query to run. For example:
=> SELECT ANALYZE_STATISTICS('store.store_orders_fact.date_ordered');
In RECORD 14, WLA identifies an underperforming query and recommends that you use theDatabase Designer to run an incremental design. This information is shown in the tuning_parameter column. Note that the potential cost of running this operation is HIGH.
This statement analyzes workloads on all tables two days before today (now):
=> SELECT ANALYZE_WORKLOAD('', NOW() - '2 DAYS'::INTERVAL);
Administrator's GuideAnalyzingWorkloads
HP Vertica Analytics Platform (7.0.x) Page 840 of 969

Getting Recommendations From System TablesYou can also get tuning recommendations by querying system table V_MONITOR.TUNING_RECOMMENDATIONS, which returns tuning recommendation results from the last ANALYZE_WORKLOAD() call.
=> SELECT * FROM tuning_recommendations;
System information that WLA uses for its recommendations is held in SQL system tables, soquerying the TUNING_RECOMMENDATIONS system table does not run theWorkload Analyzer.
Understanding WLA's Triggering EventsFor information about what operations triggerWLA tomake a tuning recommendation, seeUnderstandingWLA Triggering Conditions.
See Alsol Collecting Database Statistics
Getting Tuning Recommendations Through MCOnMC, theWorkload Analyzer automatically begins monitoring data oneminute after theMCprocess starts. WLA then runs once per day, or immediately after you add a database to theMCinterface, where it continually gathers data in the background, as long as the database is running. Ifyou haven't created a database yet, or if the database is down, WLA does nothing until thedatabase is back up.
WLA recommendations are available on theMC Overview page, which is the 3x2 grid that providesa snapshot of the database, cluster, performance, alerts, jobs, and license activity.
The tuning recommendations are in the Performance subsection, along with their cost
The following image shows a short list of WLA tuning recommendations. In the output, WLAsuggests that you run the ANALYZE_STATISTICS() function on specific columns in four differenttables and provides the cost estimate of running these operations. WLA also advises that you runthe Database Designer on one of the tables.
Note that the cost of running Database Designer is HIGH. When you see a high cost, youmightwant to run the recommended tuning action after hours. For additional information about tuningrecommendations and cost see ANALYZE_WORKLOAD() in the SQLReferenceManual.
Administrator's GuideAnalyzingWorkloads
HP Vertica Analytics Platform (7.0.x) Page 841 of 969

Management Console displays five recommendations per page and includes amessage at bottomleft, which lets you know where you are within the total number of recommendations; for example,"Showing n-nn of nn entries." Depending on the total number of recommendations, you canmoveforward and backward through them by clicking the arrows at bottom right.
Tip: You can force theWLA task to run immediately by clickingAnalyze over the Costcolumn.
For additional information about tuning recommendations and their triggering event, seeUnderstandingWLA Triggering Conditions.
See Alsol Getting Tuning Recommendations Through an API
l ANALYZE_WORKLOAD
Understanding WLA Triggering ConditionsWorkload Analyzer (WLA)monitors suspicious system activity andmakes recommendationsbased on its observations. When you runWorkload Analyzer, the utility returns the followinginformation:
l The tuning description
l The objects on whichWLA applies tuning action
l The suggested SQL command for you to run (where appropriate)
In rare circumstances, tuning recommendationWLA proposes might not resolve the underlyingproblem. Because youmight occasionally need help understandingWLA's recommendations, the
Administrator's GuideAnalyzingWorkloads
HP Vertica Analytics Platform (7.0.x) Page 842 of 969

following table lists some of themost common triggering conditions, along with therecommendations to resolve the issue and a pointer to more information, when available.
Thetriggeringcondition What to do about it
Where to getmoreinformation
Internalconfiguration parameteris not thesameacrossnodes.
Reset configuration parameter.
SELECT set_config_parameter ('parameter ','new_value');
See SET_CONFIG_PARAMETER in the SQLReferenceManual
Administrator's GuideAnalyzingWorkloads
HP Vertica Analytics Platform (7.0.x) Page 843 of 969

Thetriggeringcondition What to do about it
Where to getmoreinformation
An unusedprojectionmeets thefollowingconditions:
l Noqueriesonprojection formorethan 30days but,projection'sanchortable hasbeenqueriedmorethan 10times
l Projection'sanchortable isnot atemp orsystemtable
l Projection's tableis notsmall,wherethenumberof bytesof diskstoragein use by
Drop the projection (projection-name).
DROP PROJECTION public.T1_fact_super_P1_B1;
See thefollowingtopics in theSQLReferenceManual:
l DROPPROJECTION
l PROJECTION_STORAGE
l PROJECTIONS
l TABLES
Administrator's GuideAnalyzingWorkloads
HP Vertica Analytics Platform (7.0.x) Page 844 of 969

Thetriggeringcondition What to do about it
Where to getmoreinformation
theprojection (used_bytes) ismorethan 10M
User withdbadmin/pseudosuperuser rolehas emptypassword.
Set the password for user.
ALTER USER (user) IDENTIFIED BY ('new_password');
See ALTERUSER in theSQLReferenceManual
Table withtoomanypartitioncount.
Alter the table's partition expression.
ALTER TABLE (schema.table) PARTITION BY (new_partition_expression) REORGANIZE;
See ALTERTABLE in theSQLReferenceManual
LGEthresholdsetting islower thanthe defaultsetting.
Workload Analyzer does not trigger a tuning recommendation forthis scenario unless you altered settings and/or services underthe guidance of technical support.
TupleMover'sMoveOutIntervalparameter isset greaterthan thedefaultsetting.
Decrease theMoveOutInterval configuration parameter setting.
SELECT set_config_parameter('MoveOutInterval',default_value);
See thefollowingtopics:
l MonitoringEvents
l TupleMoverParameters
l ACTIVE_EVENTSin the SQLReferenceManual
Administrator's GuideAnalyzingWorkloads
HP Vertica Analytics Platform (7.0.x) Page 845 of 969

Thetriggeringcondition What to do about it
Where to getmoreinformation
TupleMoverhas beendisabled.
Workload Analyzer does not trigger a tuning recommendation forthis scenario unless you altered settings and/or services underthe guidance of technical support.
TooManyROScontainerssince thelastmergeoutoperation;configurationparametersare setlower thanthe default.
Workload Analyzer does not trigger a tuning recommendation forthis scenario unless you altered settings and/or services underthe guidance of technical support.
TooManyROScontainerssince thelastmergeoutoperation;the TMMergeoutservice isdisabled.
Workload Analyzer does not trigger a tuning recommendation forthis scenario unless you altered settings and/or services underthe guidance of technical support.
Administrator's GuideAnalyzingWorkloads
HP Vertica Analytics Platform (7.0.x) Page 846 of 969

Thetriggeringcondition What to do about it
Where to getmoreinformation
AverageCPU usageexceeds95% for 20minutes.
Check system processes or change the settings forPLANNEDCONCURRENCY and/or MAXCONCURRENCY forthe RESOURCE POOL.
See thefollowingtopics:
l Guidelinesfor SettingPoolParameters
l ALTERRESOURCE POOLand Built-InPoolConfiguration in theSQLReferenceManual
Partitionedtable data isnot fullyreorganizedafterrepartitioning.
Reorganize data in partitioned table public.T1.
ALTER TABLE public.T1 REORGANIZE;
See ALTERTABLE in theSQLReferenceManual
Table hasmultiplepartitionkeys withinthe sameROScontainer.
Reorganize data in partitioned table public.T1.
ALTER TABLE public.T1 REORGANIZE;
See ALTERTABLE in theSQLReferenceManual
Administrator's GuideAnalyzingWorkloads
HP Vertica Analytics Platform (7.0.x) Page 847 of 969

Thetriggeringcondition What to do about it
Where to getmoreinformation
Excessiveswapactivity;averagememoryusageexceeds99% for 10minutes.
Check system processes
A table doesnot haveanyDatabaseDesigner-designedprojections.
Run database designer on table public.T1. See CreatinganIncrementalDesign Usingthe
Statisticsare stale (nohistogram orpredicatefalls outsidehistogram).
Run ANALYZE_STATISTICS() on table columnpublic.<table>.<column>
SELECT analyze_statistics ('public.t.a');
See thefollowingtopics:
l ANALYZE_STATISTICS() in theSQLReferenceManual
l CollectingStatisticsin thisguide
Datadistributioninsegmentedprojection isskewed.
Re-segment projection public.t_super on high-cardinality column(s).
SeeDesigning forSegmentation.
Administrator's GuideAnalyzingWorkloads
HP Vertica Analytics Platform (7.0.x) Page 848 of 969

Thetriggeringcondition What to do about it
Where to getmoreinformation
GROUP BYspill event.
Consider running an incremental design on query. See CreatinganIncrementalDesignDesign Usingthe
See Alsol ANALYZE_WORKLOAD
Administrator's GuideAnalyzingWorkloads
HP Vertica Analytics Platform (7.0.x) Page 849 of 969

Collecting Database StatisticsThe HP Vertica cost-based query optimizer relies on representative statistics on the data, which ituses to determine the final plan to execute a query.
Various optimizer decisions rely on having up-to-date statistics, where it chooses between:
l Multiple eligible projections to answer the query
l The best order in which to perform joins
l Plans involving different algorithms, such as hash join/merge join or group by hash/group bypipelined operations
l Data distribution algorithms, such as broadcast and re-segmentation
Without reasonably accurate statistics, the optimizer could choose a suboptimal projection or asuboptimal join order for a query.
To understand how HP Vertica collects statistics, consider the following common scenario:
Scenario:You have a large table into which you load timestamp on an ongoing basis (hourly, daily,etc.). Then you run queries that select the recently-loaded rows from that table.
How the optimizer decides on a plan:You load days 1 through 15 into the table and run theANALYZE_STATISTICS() function. When you next run a query that requests yesterday's data byfiltering on the timestamp column, the optimizer chooses an optimized plan. If on the next day, youload day 16 data and run the same query—but you do not run ANALYZE_STATISTICS() again—theoptimizer might conclude that the predicate results in only one row being returned because the daterange falls outside the histogram range and the data becomes stale. When the optimizer detectsthat statistics are not current for a particular predicate (such as when a timestamp predicate isoutside a histogram's boundary), HP Vertica plans those queries using other considerations, suchas FK-PK constraints, when available.
Resolution:Run ANALYZE_STATISTICS() after you load new data,or day 16 in this example.You can also look for statistics in the EXPLAIN plan; for example, when statistics are off outside ahistogram's boundaries, the EXPLAIN plan is annotated with a status. See Reacting to StaleStatistics for details.
See the SQLReferenceManual for additional details about functions and system tables describedin the topics in this section.
For information about how to... See ...
Collect a fixed-size statistical data sampling ANALYZE_HISTOGRAM()
Collect a specified percentage of disk data sampling ANALYZE_STATISTICS()
Run a utility that analyzes information held in system tables andreturns query tuning recommendations
ANALYZE_WORKLOAD()
Generate an XML file that contains statistics for the database EXPORT_STATISTICS()
Administrator's GuideCollecting Database Statistics
HP Vertica Analytics Platform (7.0.x) Page 850 of 969

For information about how to... See ...
Import statistics from the XML file generated by the EXPORT_STATISTICS command
IMPORT_STATISTICS()
Remove statistics for a table and optionally specify the categoryof statistics to drop
DROP_STATISTICS()
Monitor information about projection columns, such as encodingtype, sort order, type of statistics, and the time at which columnsstatistics were last updated
V_CATALOG.PROJECTION_COLUMNS
Statistics Used By the Query OptimizerHP Vertica uses the estimated values of the following statistics in its cost model:
l Number of rows in the table
l Number of distinct values of each column (cardinality)
l Minimum/maximum values of each column
l An equi-height histogram of the distribution of values each column
l Space occupied by the column on disk
Note: The HP Vertica query optimizer and theDatabase Designer both use the same set ofstatistics. When there are ties, the optimizer chooses the projection that was created first.
How Statistics Are CollectedStatistics collection is a cluster-wide operation that accesses data using a historical query (atepoch latest) without any locks. Once computed, statistics are stored in the catalog and replicatedon all nodes. The storage operation requires a brief, exclusive lock on the catalog, similar to when aDDL operation occurs. In fact, these operations require a COMMIT for the current transaction.
HP Vertica provides three ways tomanually collect statistics:
l ANALYZE ROW COUNT
l ANALYZE_STATISTICS
l ANALYZE_HISTOGRAM
Using the ANALYZE ROW COUNT OperationThe ANALYZE ROW COUNT is a lightweight operation that automatically collects the number of rowsin a projection every 60 seconds to collect aminimal set of statistics and aggregate row counts
Administrator's GuideCollecting Database Statistics
HP Vertica Analytics Platform (7.0.x) Page 851 of 969

calculated during loads. You can use the AnalyzeRowCountInterval configuration parameter tochange the default collection interval (60 seconds). See Configuration Parameters for additionalinformation.
To change the 60-second interval to 1 hour (3600 seconds), use the following command:
=> SELECT SET_CONFIG_PARAMETER('AnalyzeRowCountInterval', 3600);
To reset the interval to the default of 1 minute (60 seconds):
=> SELECT SET_CONFIG_PARAMETER('AnalyzeRowCountInterval', 60);
You can also invoke this functionmanually using the DO_TM_TASK ('analyze_row_count')function.
Using ANALYZE_STATISTICSThe ANALYZE_STATISTICS function computes full statistics on all objects, or on a per-table orper-column basis. Youmust invoke this function explicitly.
The ANALYZE_STATISTICS() function:
l Lets you analyze tables on a per-column basis for improved performance.
l Performs faster data sampling, which expedites the analysis of relatively small tables with alarge number of columns.
l Includes data fromWOS.
l Recognizes deleted data, instead of ignoring delete markers.
l Lets you cancel the functionmid analysis by issuing CTRL-C on vsql or invoking theINTERRUPT_STATEMENT() function.
l Records the last time statistics were run for a table so that subsequent calls to the function canbe optimized. See V_CATALOG.PROJECTION_COLUMNS for details.
Using ANALYZE_HISTOGRAMANALYZE_STATISTICS() is an alias for ANALYZE_HISTOGRAM(). The difference between thetwo functions is that ANALYZE_HISTOGRAM lets you specify what percentage of data to readfrom disk, so you havemore control over deciding between sample accuracy and speed.
The ANALYZE_HISTOGRAM percent parameter specifies the amount of column data (from 1 - 100%)that the function reads from disk. The default value is 10%, but you can use this parameter tospecify a smaller or larger percentage. Changing the percent value affects both the data collectiontime and the histogram accuracy:
Administrator's GuideCollecting Database Statistics
HP Vertica Analytics Platform (7.0.x) Page 852 of 969

l A smaller percent value reads less data off disk. Data collection is faster than with a largervalue, but histogram accuracy decreases, since the function samples less data.
l A larger percent value reads more data off disk. Data collection takes longer than for a smallervalue, but the histogram accuracy increases, since the function samples a larger percentage ofcollected data.
Regardless of the percent parameter value, ANALYZE_HISTOGRAM uses at most 128K (128,000)rows of column data. This sample size (128K) consistently creates an accurate representation ofthe sample data, even for columns with more than 1,000,000 rows. The function constructs ahistogram for a column by randomly selecting from the collected data. If the percent value youspecify equates to less than 128K rows, the function rounds the number to at least 128K rows, soenough data to sample is read from disk. If a column has less than 128K rows, ANALYZE_HISTOGRAM reads all rows from disk and analyzes the entire column.
Note: The sample data collected in a sample range is not indicative of how data should bedistributed.
Following are some examples of different size columns with the ANALYZE_HISTOGRAM percentparameter set to the different values:
Column Size Percent Read from disk Sampled rows
<128K rows 20 All rows Entire column
400,000 rows 10 128,000 128K rows
4,000,000 rows 10 400,000 128K rows
Note: If the column that you specify for the ANALYZE_HISTOGRAM function is first in aprojection's sort order, the function reads all data from disk to avoid a biased sample.
ExamplesIn this example, the ANALYZE_STATISTICS() function reads 10 percent of the disk data. This isthe static default value for this function. The function returns 0 for success:
=> SELECT ANALYZE_STATISTICS('shipping_dimension.shipping_key');ANALYZE_STATISTICS
--------------------0
(1 row)
This example uses ANALYZE_HISTOGRAM () without specifying a percentage value. Since thisfunction has a default value of 10 percent, it returns the identical data as the ANALYZE_STATISTICS() function, and returns 0 for success:
Administrator's GuideCollecting Database Statistics
HP Vertica Analytics Platform (7.0.x) Page 853 of 969

=> SELECT ANALYZE_HISTOGRAM('shipping_dimension.shipping_key');ANALYZE_HISTOGRAM
-------------------0
(1 row)
This example uses ANALYZE_HISTOGRAM (), specifying its percent parameter as 100, indicatingit will read the entire disk to gather data. After the function performs a full column scan, it returns 0for success:
=> SELECT ANALYZE_HISTOGRAM('shipping_dimension.shipping_key', 100);ANALYZE_HISTOGRAM
-------------------0
(1 row)
In this command, only 0.1% (1/1000) of the disk is read:
=> SELECT ANALYZE_HISTOGRAM('shipping_dimension.shipping_key', 0.1);ANALYZE_HISTOGRAM
-------------------0
(1 row)
How Statistics Are ComputedHP Vertica does not compute statistics incrementally or update full statistics during loadoperations.
For large tables that exceed 250,000 rows, histograms for minimum, maximum, and column valuedistribution are calculated on a sampled subset of rows. The default maximum number of samplesfor each column is approximately 2^17 (131702) samples, or the number of rows that fit in 1GB ofmemory, whichever is smaller. For example, there could be fewer samples used for largeVARCHAR columns.
HP Vertica does not provide a configuration setting to change the number of samples for analysis.However, you can decide between a faster or more accurate data sampling by specifying whatpercentage of data to read from disk, from 1 to 100 (a full table scan).
See ANALYZE_HISTOGRAM() in the SQLReferenceManual and How Statistics Are Collected forinformation about using the ANALYZE_HISTOGRAM function.
How Statistics Are ReportedHP Vertica supplies hints about statistics in a couple ways:
Administrator's GuideCollecting Database Statistics
HP Vertica Analytics Platform (7.0.x) Page 854 of 969

l The EXPLAIN plan is annotated with a status. See Reacting to Stale Statistics.
l The last time ANALYZE_STATISTICS() was run for a table is recorded, so that subsequentcalls to the function are optimized. This is useful during the database design process because ifthe Database Designer does not collect statistics when adding design tables, it generates awarning indicating that statistics are old. You can then decide whether to run ANALYZE_STATISTICS before you proceed with the design.
Two columns in the V_CATALOG.PROJECTION_COLUMNS system table capture statisticalinformation, as follows:
l STATISTICS_TYPE—Returns the type of statistics the column contains (NONE,ROWCOUNT or FULL).
l STATISTICS_COLLECTION_TIME—Returns the last time statistics were collected in thistable.
Determining When Statistics Were LastUpdated
The V_CATALOG.PROJECTION_COLUMNS system table returns information about projectioncolumns, including the type of statistics, and the the time at which column statistics were lastupdated.
The following example illustrates how you can examine the run status for statistics on your tables.
On a single-node cluster, the following sample schema defines a table named trades, which groupsthe highly-correlated columns bid and ask and stores the stock column separately:
=> CREATE TABLE trades (stock CHAR(5), bid INT, ask INT);=> CREATE PROJECTION trades_p (stock ENCODING RLE, GROUPED(bid ENCODING
DELTAVAL, ask)) AS (SELECT * FROM trades) ORDER BY stock, bid;=> INSERT INTO trades VALUES('acme', 10, 20);=> COMMIT;
Query the PROJECTION_COLUMNS table for table trades:
=> \xExpanded display is on.=> SELECT * FROM PROJECTION_COLUMNS WHERE table_name = 'trades';
Notice that the statistics_type column returns NONE for all three columns in the trades table.Also, there is no value in the statistics_updated_timestamp field because statistics have notyet been run on this table.
-[ RECORD 1 ]----------------+--------------------projection_id | 45035996273718838projection_name | trades_p
Administrator's GuideCollecting Database Statistics
HP Vertica Analytics Platform (7.0.x) Page 855 of 969

projection_column_name | stockcolumn_position | 0sort_position | 0column_id | 45035996273718840data_type | char(5)encoding_type | RLEaccess_rank | 0group_id | 0table_schema | publictable_id | 45035996273718836table_name | tradestable_column_id | 45035996273718836-1table_column_name | stockstatistics_type | NONEstatistics_updated_timestamp |-[ RECORD 2 ]----------------+--------------------projection_id | 45035996273718838projection_name | trades_pprojection_column_name | bidcolumn_position | 1sort_position | 1column_id | 45035996273718842data_type | intencoding_type | DELTAVALaccess_rank | 0group_id | 45035996273718844table_schema | publictable_id | 45035996273718836table_name | tradestable_column_id | 45035996273718836-2table_column_name | bidstatistics_type | NONEstatistics_updated_timestamp |-[ RECORD 3 ]----------------+--------------------projection_id | 45035996273718838projection_name | trades_pprojection_column_name | askcolumn_position | 2sort_position |column_id | 45035996273718846data_type | intencoding_type | AUTOaccess_rank | 0group_id | 45035996273718844table_schema | publictable_id | 45035996273718836table_name | tradestable_column_id | 45035996273718836-3table_column_name | askstatistics_type | NONEstatistics_updated_timestamp |
Now run statistics on the stock column:
=> SELECT ANALYZE_STATISTICS('trades.stock');
The system returns 0 for success:
Administrator's GuideCollecting Database Statistics
HP Vertica Analytics Platform (7.0.x) Page 856 of 969

-[ RECORD 1 ]------+--ANALYZE_STATISTICS | 0
Now query PROJECTION_COLUMNS again:
=> SELECT * FROM PROJECTION_COLUMNS where table_name = 'trades';
This time, statistics_type changes to FULL for the trades.stock column (representing fullstatistics were run), and the statistics_updated_timestamp column returns the time the stockcolumns statistics were updated. The timestamp for the bid and ask columns have not changedbecause statistics were not run on those columns. Also, the bid and ask columns changed fromNONE to ROWCOUNT. This is because HP Vertica automatically updates ROWCOUNTstatistics from time to time. The statistics are created by looking at existing catalogmetadata.
-[ RECORD 1 ]----------------+------------------------------projection_id | 45035996273718838projection_name | trades_pprojection_column_name | stockcolumn_position | 0sort_position | 0column_id | 45035996273718840data_type | char(5)encoding_type | RLEaccess_rank | 0group_id | 0table_schema | publictable_id | 45035996273718836table_name | tradestable_column_id | 45035996273718836-1table_column_name | stockstatistics_type | FULLstatistics_updated_timestamp | 2012-12-08 13:52:04.178294-05-[ RECORD 2 ]----------------+------------------------------projection_id | 45035996273718838projection_name | trades_pprojection_column_name | bidcolumn_position | 1sort_position | 1column_id | 45035996273718842data_type | intencoding_type | DELTAVALaccess_rank | 0group_id | 45035996273718844table_schema | publictable_id | 45035996273718836table_name | tradestable_column_id | 45035996273718836-2table_column_name | bidstatistics_type | ROWCOUNTstatistics_updated_timestamp | 2012-12-08 13:51:20.016465-05-[ RECORD 3 ]----------------+------------------------------projection_id | 45035996273718838projection_name | trades_pprojection_column_name | ask
Administrator's GuideCollecting Database Statistics
HP Vertica Analytics Platform (7.0.x) Page 857 of 969

column_position | 2sort_position |column_id | 45035996273718846data_type | intencoding_type | AUTOaccess_rank | 0group_id | 45035996273718844table_schema | publictable_id | 45035996273718836table_name | tradestable_column_id | 45035996273718836-3table_column_name | askstatistics_type | ROWCOUNTstatistics_updated_timestamp | 2012-12-08 13:51:20.016475-05
If you run statistics on the bid column and then query this system table again, only RECORD 2 isupdated:
=> SELECT ANALYZE_STATISTICS('trades.bid');-[ RECORD 1 ]------+--ANALYZE_STATISTICS | 0=> SELECT * FROM PROJECTION_COLUMNS where table_name = 'trades';-[ RECORD 1 ]----------------+------------------------------projection_id | 45035996273718838projection_name | trades_pprojection_column_name | stockcolumn_position | 0sort_position | 0column_id | 45035996273718840data_type | char(5)encoding_type | RLEaccess_rank | 0group_id | 0table_schema | publictable_id | 45035996273718836table_name | tradestable_column_id | 45035996273718836-1table_column_name | stockstatistics_type | FULLstatistics_updated_timestamp | 2012-12-08 13:52:04.178294-05-[ RECORD 2 ]----------------+------------------------------projection_id | 45035996273718838projection_name | trades_pprojection_column_name | bidcolumn_position | 1sort_position | 1column_id | 45035996273718842data_type | intencoding_type | DELTAVALaccess_rank | 0group_id | 45035996273718844table_schema | publictable_id | 45035996273718836table_name | tradestable_column_id | 45035996273718836-2table_column_name | bid
Administrator's GuideCollecting Database Statistics
HP Vertica Analytics Platform (7.0.x) Page 858 of 969

statistics_type | FULLstatistics_updated_timestamp | 2012-12-08 13:53:23.438447-05-[ RECORD 3 ]----------------+------------------------------projection_id | 45035996273718838projection_name | trades_pprojection_column_name | askcolumn_position | 2sort_position |column_id | 45035996273718846data_type | intencoding_type | AUTOaccess_rank | 0group_id | 45035996273718844table_schema | publictable_id | 45035996273718836table_name | tradestable_column_id | 45035996273718836-3table_column_name | askstatistics_type | ROWCOUNTstatistics_updated_timestamp | 2012-12-08 13:51:20.016475-05
You can quickly query just the timestamp column to see when the columns were updated:
=> \xExpanded display is off.=> SELECT ANALYZE_STATISTICS('trades');ANALYZE_STATISTICS
--------------------0
(1 row)=> SELECT projection_column_name, statistics_type,
statistics_updated_timestampFROM PROJECTION_COLUMNS where table_name = 'trades';
projection_column_name | statistics_type | statistics_updated_timestamp------------------------+-----------------+-------------------------------stock | FULL | 2012-12-08 13:54:27.428622-05bid | FULL | 2012-12-08 13:54:27.428632-05ask | FULL | 2012-12-08 13:54:27.428639-05
(3 rows)
See V_CATALOG.PROJECTION_COLUMNS in the SQLReferenceManual for more information.
Reacting to Stale StatisticsDuring predicate selectivity estimation, the query optimizer can identify when histograms are notavailable or are out of date. If the value in the predicate is outside the histogram's maximum range,the statistics are stale. If no histograms are available, then no statistics are available to the plan.
When the optimizer detects stale or no statistics, such as when it encounters a column predicatefor which it has no histogram, the optimizer takes these actions:
l Generates amessage (and log), recommending that you run ANALYZE_STATISTICS().
l Annotates EXPLAIN plans with a statistics entry.
Administrator's GuideCollecting Database Statistics
HP Vertica Analytics Platform (7.0.x) Page 859 of 969
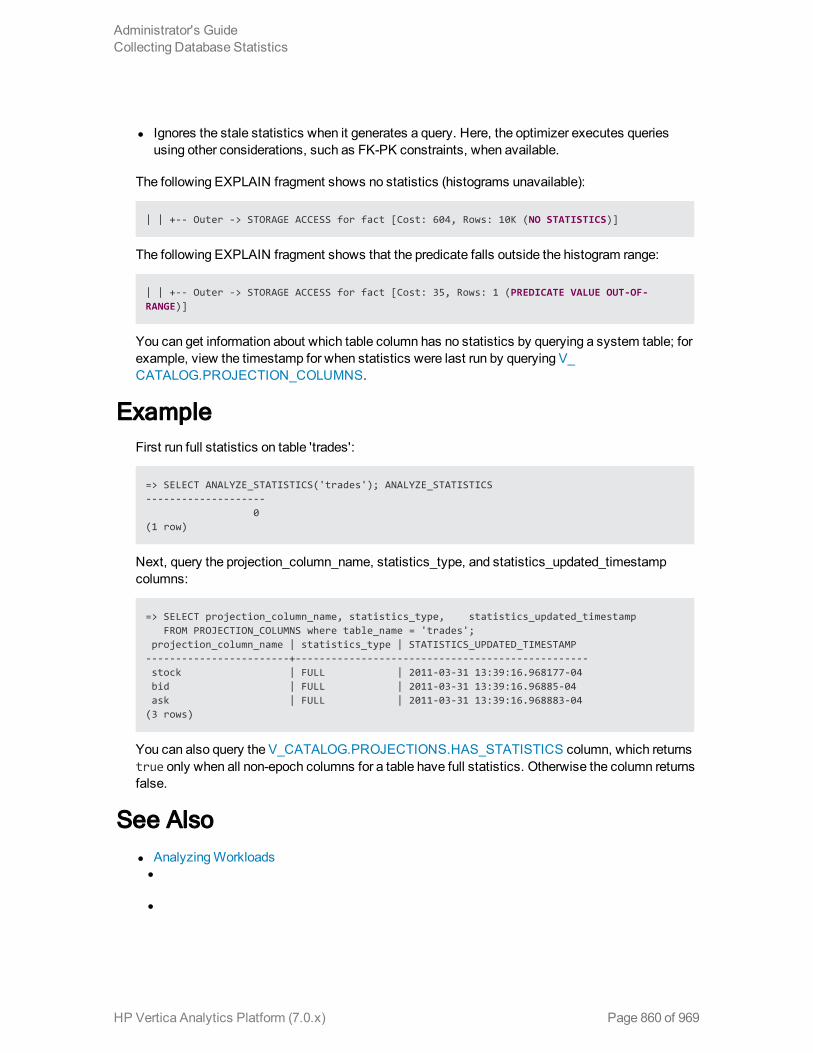
l Ignores the stale statistics when it generates a query. Here, the optimizer executes queriesusing other considerations, such as FK-PK constraints, when available.
The following EXPLAIN fragment shows no statistics (histograms unavailable):
| | +-- Outer -> STORAGE ACCESS for fact [Cost: 604, Rows: 10K (NO STATISTICS)]
The following EXPLAIN fragment shows that the predicate falls outside the histogram range:
| | +-- Outer -> STORAGE ACCESS for fact [Cost: 35, Rows: 1 (PREDICATE VALUE OUT-OF-RANGE)]
You can get information about which table column has no statistics by querying a system table; forexample, view the timestamp for when statistics were last run by querying V_CATALOG.PROJECTION_COLUMNS.
ExampleFirst run full statistics on table 'trades':
=> SELECT ANALYZE_STATISTICS('trades'); ANALYZE_STATISTICS--------------------
0(1 row)
Next, query the projection_column_name, statistics_type, and statistics_updated_timestampcolumns:
=> SELECT projection_column_name, statistics_type, statistics_updated_timestampFROM PROJECTION_COLUMNS where table_name = 'trades';
projection_column_name | statistics_type | STATISTICS_UPDATED_TIMESTAMP------------------------+-------------------------------------------------stock | FULL | 2011-03-31 13:39:16.968177-04bid | FULL | 2011-03-31 13:39:16.96885-04ask | FULL | 2011-03-31 13:39:16.968883-04
(3 rows)
You can also query the V_CATALOG.PROJECTIONS.HAS_STATISTICS column, which returnstrue only when all non-epoch columns for a table have full statistics. Otherwise the column returnsfalse.
See Alsol AnalyzingWorkloadsl
l
Administrator's GuideCollecting Database Statistics
HP Vertica Analytics Platform (7.0.x) Page 860 of 969

Canceling Statistics CollectionTo cancel statistics collectionmid analysis, execute CTRL-C on vsql or call the INTERRUPT_STATEMENT() function.
If you want to remove statistics for the specified table or type, call the DROP_STATISTICS()function.
Caution: After you drop statistics, it can be time consuming to regenerate them.
Best Practices for Statistics CollectionThe query optimizer requires representative statistics in order to choose the best query plan. Formost applications, statistics need not be accurate to theminute. The ANALYZE ROW COUNToperation automatically collects partial statistics and supplies sufficient data for many optimizerchoices. You can also invoke this operation by calling the DO_TM_TASK () function and passing itthe 'analyze_row_count' argument. For example, the following command analyzes the row count onthe Vmart Schema database:
vmart=> SELECT DO_TM_TASK('analyze_row_count');DO_TM_TASK---------------------------------------------
------------------------------------------row count analyze for projection 'call_center_dimension_DBD_27_seg_temp_init_temp_init'row count analyze for projection 'call_center_dimension_DBD_28_seg_temp_init_temp_init'row count analyze for projection 'online_page_dimension_DBD_25_seg_temp_init_temp_init'row count analyze for projection 'online_page_dimension_DBD_26_seg_temp_init_temp_init'row count analyze for projection 'online_sales_fact_DBD_29_seg_temp_init_temp_init'row count analyze for projection 'online_sales_fact_DBD_30_seg_temp_init_temp_init'row count analyze for projection 'customer_dimension_DBD_1_seg_temp_init_temp_init'row count analyze for projection 'customer_dimension_DBD_2_seg_temp_init_temp_init'row count analyze for projection 'date_dimension_DBD_7_seg_temp_init_temp_init'row count analyze for projection 'date_dimension_DBD_8_seg_temp_init_temp_init'row count analyze for projection 'employee_dimension_DBD_11_seg_temp_init_temp_init'row count analyze for projection 'employee_dimension_DBD_12_seg_temp_init_temp_init'row count analyze for projection 'inventory_fact_DBD_17_seg_temp_init_temp_init'row count analyze for projection 'inventory_fact_DBD_18_seg_temp_init_temp_init'row count analyze for projection 'product_dimension_DBD_3_seg_temp_init_temp_init'row count analyze for projection 'product_dimension_DBD_4_seg_temp_init_temp_init'row count analyze for projection 'promotion_dimension_DBD_5_seg_temp_init_temp_init'row count analyze for projection 'promotion_dimension_DBD_6_seg_temp_init_temp_init'row count analyze for projection 'shipping_dimension_DBD_13_seg_temp_init_temp_init'row count analyze for projection 'shipping_dimension_DBD_14_seg_temp_init_temp_init'row count analyze for projection 'vendor_dimension_DBD_10_seg_temp_init_temp_init'row count analyze for projection 'vendor_dimension_DBD_9_seg_temp_init_temp_init'row count analyze for projection 'warehouse_dimension_DBD_15_seg_temp_init_temp_init'row count analyze for projection 'warehouse_dimension_DBD_16_seg_temp_init_temp_init'row count analyze for projection 'store_dimension_DBD_19_seg_temp_init_temp_init'row count analyze for projection 'store_dimension_DBD_20_seg_temp_init_temp_init'row count analyze for projection 'store_orders_fact_DBD_23_seg_temp_init_temp_init'row count analyze for projection 'store_orders_fact_DBD_24_seg_temp_init_temp_init'row count analyze for projection 'store_sales_fact_DBD_21_seg_temp_init_temp_init'
Administrator's GuideCollecting Database Statistics
HP Vertica Analytics Platform (7.0.x) Page 861 of 969

row count analyze for projection 'store_sales_fact_DBD_22_seg_temp_init_temp_init'(1 row)
Running full ANALYZE_STATISTICS on a table is an efficient but potentially long-runningoperation that analyzes each unique column exactly once across all projections. You an run itconcurrently with queries and loads in a production environment.
When to Gather Full StatisticsBecause statistics gathering consumes resources (CPU andmemory) from queries and loads, HPrecommends that you run full ANALYZE_STATISTICS() under the following conditions:
l The table is first loaded (see Bulk Loading Data).
l A new projection using a newly-loaded table is created and refreshed. Projections that have nodata never have full statistics. Use the PROJECTION_STORAGE system table to see if yourprojection contains data.
l The number of rows in the table changes by 50%.
l Theminimum/maximum values in the table's columns change by 50%.
l New primary key values are added to tables with referential integrity constraints. When thisoccurs, both the primary key and foreign key tables should be reanalyzed.
l The relative table size, compared to tables it is being joined to, changes materially. For example,a table becomes only five times larger than the other, when it was previously 50 times larger.
l There is a significant deviation in the distribution of data, which necessitates recalculatinghistograms. For example, an event causes abnormally high levels of trading for a particularstock. This is application specific.
l There is a down-time window when the database is not in active use.
Tip: You can analyze statistics on a single table column, rather than on the entire table.Running statistics on a single important column (such as the predicate column) is useful forlarge tables, which could take a long time to compute. It's also a good idea to run statistics on acolumn after you use ALTER TABLE to add or change a column.
Also consider using the ANALYZE_HISTOGRAM() function. Whereas ANALYZE_STATISTICSuses a fixed value of 10 percent for the proportion of disk reads, ANALYZE_HISTOGRAM lets youspecify what percent of the disk to read. You can also diagnose and resolvemany statistics-relatedissues by calling the ANALYZE_WORKLOAD() function, which returns tuning recommendations.
If you update statistics and find that the query still performs poorly, run your query through theDatabase Designer and choose incremental as the design type. See Creating an IncrementalDesign Using the .
Administrator's GuideCollecting Database Statistics
HP Vertica Analytics Platform (7.0.x) Page 862 of 969

Save StatisticsOnce your system is running well, HP recommends that you save exported statistics for all tables.In the unlikely scenario that statistics changes impact optimizer plans, particularly after an upgrade,you can always revert back to the exported statistics. See Importing, exporting andmodifyingstatistics for details.
The following topics in the SQLReferenceManual:
See Alsol AnalyzingWorkloads
l Collecting Database Statistics
l DeterminingWhen Statistics Were Last Updated
l Reacting to Stale Statisticsl
l
l
l
l
Administrator's GuideCollecting Database Statistics
HP Vertica Analytics Platform (7.0.x) Page 863 of 969

Using Diagnostic ToolsHP provides several diagnostic tools. In this section, you'll learn how to identify which version ofHP Vertica you are running, use the diagnostics tools, and export a catalog and profiling data.
Determining Your Version of HP VerticaTo determine which version of HP Vertica is installed on a host, log in to that host and type:
$ rpm -qa | grep vertica
The command returns the name of the installed package, which contains the version and buildnumbers. The following example indicates that both HP Vertica 7.0.x andManagement Console7.0.x are running on the targeted host:
[dbadmin@myhost01 ~]$ rpm -qa | grep verticavertica-7.0.0-0vertica-console-7.0.0-0.x86_64
When you are logged in to your Vertica Analytics Platform database, you can also run a query forthe version only, by running the following command:
dbadmin=> SELECT version();version
---------------------------------------------Vertica Analytic Database v7.0.0-0
(1 row)
Collecting Diagnostics (scrutinize Command)The diagnostics script, scrutinize, collects a broad range of diagnostic information from all thenodes in the Vertica Analytics Platform environment, such as:
l Host diagnostics
l Log files from the installation process, the database, and the administration tools (e.g.,vertica.log, dbLog, admintools.log)
l Unstructured HP Vertica logs
l Structured database event information
l License size
l System table information, such as queries executed and their run time
Administrator's GuideUsing Diagnostic Tools
HP Vertica Analytics Platform (7.0.x) Page 864 of 969

l Catalogmetadata, such as statistics
Note: Although scrutinizemight collect individual values stored in statistics, the scriptdoes not gather samples of actual data in the database.
l Host configuration data
l Run-time state (number of nodes up or down)
l Database schema
l Backup information
l Important error messages
Syntax/opt/vertica/bin/scrutinize [ arguments ... ]
Command Line ArgumentsThe following table provides both a long form and short form for most arguments.
Arguments Description
--help,-h
Outputs all scrutinize arguments to the console.
--local_diags,-s
[Default all hosts] If you use this argument, scrutinize gathersdiagnostics for the specified host. Query the V_MONITOR.NODE_RESOURCES system table for information about hosts in yourcluster.
Administrator's GuideUsing Diagnostic Tools
HP Vertica Analytics Platform (7.0.x) Page 865 of 969

Arguments Description
--database dbname,-d dbname
Gathers diagnostics for the specified database. If your databasehas a password, youmust also supply the -P PASSWORDargument. If you omit the --database argument, scrutinizecollects diagnostics on the running database; otherwise:
l If no database is running but that database is defined in theAdministration Toolsmetadata, scrutinize collectsdiagnostics on the stopped database.
l If more than one database is defined but none is running,scrutinize returns an error. Youmust supply the --databaseargument for the appropriate database.
l If multiple databases are running (unsupported in productionenvironments), scrutinize returns an error. Only onedatabase can be running during diagnostics collection.
Tip: Always use the --database argument if you havemorethan one database defined on the cluster.
--hosts HOST_LIST,-n HOST_LIST
[Default all cluster hosts] Gathers diagnostics for the specifiedhosts.
--message MESSAGE,-m MESSAGE
[Default nomessage] Include a user-suppliedmessage in thediagnostics output file, such as the reason forgathering/submitting diagnostics, along with a support-suppliedcase number, or anything that might help your Vertica AnalyticsPlatform support contact troubleshoot your case. There is nocharacter limit. Themessage argument accepts the followinginputs:
l --message "my message"
l --message PROMPT
l --message "/path/to/file"
See scrutinize Examples for different inputs using the --message argument.
--output_dir OUTPUT_DIR,-o OUTPUT_DIR
[Default current directory] Redirects output to a location that isdifferent from the current directory.
Administrator's GuideUsing Diagnostic Tools
HP Vertica Analytics Platform (7.0.x) Page 866 of 969
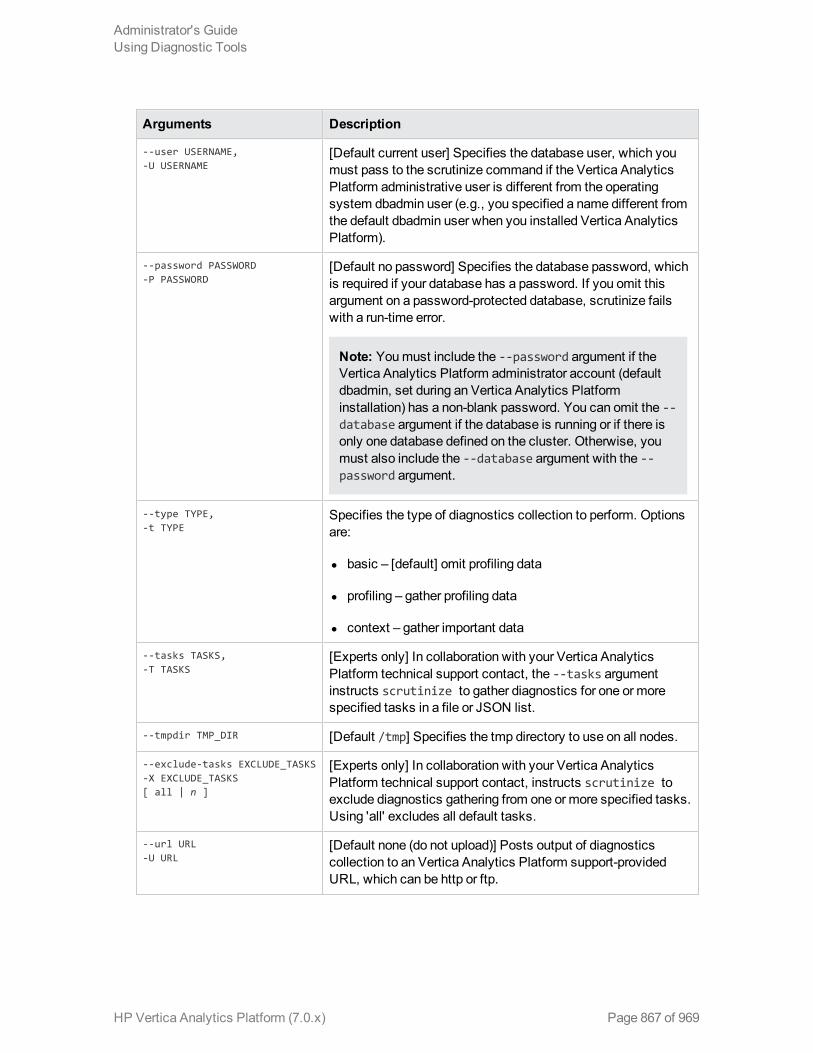
Arguments Description
--user USERNAME,-U USERNAME
[Default current user] Specifies the database user, which youmust pass to the scrutinize command if the Vertica AnalyticsPlatform administrative user is different from the operatingsystem dbadmin user (e.g., you specified a name different fromthe default dbadmin user when you installed Vertica AnalyticsPlatform).
--password PASSWORD-P PASSWORD
[Default no password] Specifies the database password, whichis required if your database has a password. If you omit thisargument on a password-protected database, scrutinize failswith a run-time error.
Note: Youmust include the --password argument if theVertica Analytics Platform administrator account (defaultdbadmin, set during an Vertica Analytics Platforminstallation) has a non-blank password. You can omit the --database argument if the database is running or if there isonly one database defined on the cluster. Otherwise, youmust also include the --database argument with the --password argument.
--type TYPE,-t TYPE
Specifies the type of diagnostics collection to perform. Optionsare:
l basic – [default] omit profiling data
l profiling – gather profiling data
l context – gather important data
--tasks TASKS,-T TASKS
[Experts only] In collaboration with your Vertica AnalyticsPlatform technical support contact, the --tasks argumentinstructs scrutinize to gather diagnostics for one or morespecified tasks in a file or JSON list.
--tmpdir TMP_DIR [Default /tmp] Specifies the tmp directory to use on all nodes.
--exclude-tasks EXCLUDE_TASKS-X EXCLUDE_TASKS[ all | n ]
[Experts only] In collaboration with your Vertica AnalyticsPlatform technical support contact, instructs scrutinize toexclude diagnostics gathering from one or more specified tasks.Using 'all' excludes all default tasks.
--url URL-U URL
[Default none (do not upload)] Posts output of diagnosticscollection to an Vertica Analytics Platform support-providedURL, which can be http or ftp.
Administrator's GuideUsing Diagnostic Tools
HP Vertica Analytics Platform (7.0.x) Page 867 of 969

Arguments Description
--include_gzlogs NUMGZ-z[ all | n ]
[Default 1] Includes n number of gzipped vertica.log-*.gzfiles within the VerticaScrutinize file. To collect all logs,specify 'all.'
PrivilegesThe database administrator runs scrutinize. If you use root when the dbadmin user exists, thesystem returns an error like the following:
[root@host01 ~]# /opt/vertica/bin/scrutinizeRoot user is not allowed to use this tool.Try again as the DB administrative user.
The root user can run scrutinize if the dbadmin account has not yet been created and you need tocollect diagnostics on the HP Vertica installation process.
How to Run ScrutinizeAlthough the database does not need to be running, scrutinize gathers more comprehensiveinformation if the database is up, which it does with minimal disruption to operations.
To collect general diagnostics about your Vertica Analytics Platform environment, run scrutinizewithout arguments:
$ /opt/vertica/bin/scrutinize
In this scenario, the script collects a broad range of diagnostic information from all the nodes in thecluster, described in Collecting Diagnostics (scrutinize Command). While such output candiagnosemost issues, it intentionally lacks minute profiling data in order to reduce the upload size.
If you want to limit the information scrutinize collects, pass one or more arguments to the script.Typically, your Vertica Analytics Platform support contact will provide you with arguments,including the upload URL.
How Scrutinize Collects and Packages DiagnosticsWhen you run scrutinize, the script performs the following operations:
1. Collects information from nodes in the database cluster
2. Stages diagnostics data on individual nodes
3. Moves diagnostics data from cluster nodes to the initiator node (the server where you ran thescript)
4. Packages individual files on the initiator node into the final, tree-structured
Administrator's GuideUsing Diagnostic Tools
HP Vertica Analytics Platform (7.0.x) Page 868 of 969

VerticaScrutinize*.zip file, which is saved to the current directory, although you canspecify a different directory with the --output_dir argument.
Files take the following name, where the <timestamp> portion is denoted in yyyymmddh24mmssformat, a naming convention that changes with each subsequent scrutinize run; for example:
VerticaScrutinize.<timestamp>.zipVerticaScrutinize.20130118132609.zipVerticaScrutinize.20130131143508.zip
While Scrutinize RunsAs scrutinize runs, it sends the following information to the terminal window:
l User
l Database
l Location of the diagnostics output file
l Other information, depending on the arguments you pass to the script
The following example output is similar to what youmight see, depending on the arguments youprovide:
Vertica Scrutinize Report-----------------------------Result Dir: /home/dbadmin/VerticaScrutinize.20131126081105User: dbadminDatabase: mcdbRunning remote worker on v_mcdb_node0001 @ /tmp/VerticaScrutinizeLocal.20131126081105/v_mcdb_node0001Running remote worker on v_mcdb_node0003 @ /tmp/VerticaScrutinizeLocal.20131126081105/v_mcdb_node0003Running remote worker on v_mcdb_node0004 @ /tmp/VerticaScrutinizeLocal.20131126081105/v_mcdb_node0004Cleaning up on node v_mcdb_node0001 (10.20.300.003)Cleaning up on node v_mcdb_node0003 (10.20.300.004)Cleaning up on node v_mcdb_node0004 (10.20.300.005)Gathered diagnostics forCustomer: Vertica Systems, Inc.Database designation: FAMOUS GOLDTimestamp: 20131126081105All results are stored in /home/dbadmin/VerticaScrutinize.20131126081105.zip
After Scrutinize Finishes RunningAt the end of diagnostics collection, scrutinize displays a "All results are stored in <path>"message. This path is the location of the VerticaScrutinize*.zip file. If you passed the --urlupload argument to the script, each node that is participating in diagnostics collection will upload
Administrator's GuideUsing Diagnostic Tools
HP Vertica Analytics Platform (7.0.x) Page 869 of 969

diagnostics information directly through that URL. See How to Upload Scrutinize Results toSupport.
ExampleThe following image illustrates the tree-like structure of the VerticaScrutinize*.zip file for fulldiagnostics collection (no arguments). Note that the file was saved to and opened on aWindowssystem.
l The top panel shows the top-level contents of the VerticaScrutinize*.zip file, including filenames and size. The <node>-context.tgz files, which are on each node in the databasecluster, are kept small to optimize upload speed. For example, if you specify the --url uploadargument, each node posts the files directly to the url, sending the smaller context file first.
l The bottom panel provides an expanded view of a <node>-context.tgz file to show the typesof information scrutinize collects for context.
How to Upload Scrutinize Results to SupportIn most cases, your technical support contact will provide arguments for you to run with thescrutinize script, including the --url (upload) value.
Before you can run scrutinize with --url:
Administrator's GuideUsing Diagnostic Tools
HP Vertica Analytics Platform (7.0.x) Page 870 of 969

l The cURL programmust be installed and in the path for the database administrator user who isrunning scrutinize
l Each node in the cluster must be able tomake an http or ftp connection directly to the Internet
When you use the --url argument:
l Scrutinize avoids collecting results into a single VerticaScrutinize<timestamp>.zip file
l Each node posts the files directly to the url, where a smaller "context" file is posted first, whichmeans support might be able to look at high-level information while waiting for the larger, morecomplete, download to finish. See How Scrutinize Collects and Packages Diagnostics for anexample of a context file.
How to Refer to Your Database ClusterVertica Analytics Platform provides a way for you to refer to the cluster you're gathering diagnosticson when you contact support.
Toward the end of scrutinize output to the terminal window is a section called "Gathereddiagnostics for", and within this section is a "Database designation" notation. For example, inthe sample output that follows, the database designation is called FAMOUS GOLD. This title israndomly generated and assigned based on your HP Vertica license and the database creationtime.
Vertica Scrutinize Report-----------------------------Result Dir: /home/dbadmin/VerticaScrutinize.20131126081105...Gathered diagnostics forCustomer: Vertica Systems, Inc.Database designation: FAMOUS GOLDTimestamp: 20131126081105...
The database designation gives you and technical support a point of reference, so you can quicklyidentify and refer to the database cluster being analyzed. The naming convention is particularlyuseful if you havemultiple databases on the same cluster or same-name databases on differentclusters.
The database designation name remains the same until you drop the database. Therefore, use thesame namewhen you contact technical support. If you create a new database and run scrutinize onit, the script assigns a new randomly-generated designation name for the new database.
Example upload scriptThe following command is a generic upload example, which gathers all diagnostics on the clusterand posts output from the collection to the support-provided URL:
Administrator's GuideUsing Diagnostic Tools
HP Vertica Analytics Platform (7.0.x) Page 871 of 969

$ /opt/vertica/bin/scrutinize --password mypassword --url "ftp://user:[email protected]/"
For additional examples, see scrutinize Examples
Examples for the Scrutinize CommandThis section provides additional examples for running the scrutinize command.
How to Include Gzipped Log FilesThe following command gathers diagnostics on themcdb database and instructs the script toinclude the threemost recent gzipped log files:
$ /opt/vertica/bin/scrutinize --database mcdb --password dbpassword--include_gzlogs 3
The samplemcdb database has a password, so the scrutinize commandmust include the --password argument. If you omit --password on password-protected databases, Vertica AnalyticsPlatform returns an error message like the following:
No vertica process appears to be queryable with given settings:vsql:FATAL 3781: Invalid username or password
How to Include a Message in the Diagnostics PackageThe followingmessage-type commands use the --message argument to illustrate different waysyou can includemessage text in your diagnostics file.
Note: Always include your support case number in themessage file.
l Use --message with double-quoted text to includes that message in the VerticaScrutinizeoutput file; for example:
/opt/vertica/bin/scrutinize --message "my support case number and message"
l Use --messagewith the PROMPT keyword, and scrutinize reads input until you type a period [.] ona line by itself to end themessage. Scrutinize then writes themessage to theVerticaScrutinize file; for example:
/opt/vertica/bin/scrutinize --message PROMPTEnter reason for collecting diagnostics; end with '.' on a line by itself:
Administrator's GuideUsing Diagnostic Tools
HP Vertica Analytics Platform (7.0.x) Page 872 of 969

Query performance degradation noticed around 9AM EST on Saturday.Vertica Scrutinize Report-----------------------------Result Dir: /home/dbadmin/VerticaScrutinize.20131126083311...
l Use --messagewith a double-quoted path to include contents of the specifiedmessage file inVerticaScrutinize file output; for example:
/opt/vertica/bin/scrutinize --message "/path/to/file/mycaseno-messagetosupport"
How to Send Results to SupportSeeHow to Upload Scrutinize Results to Support
Collecting Diagnostics (diagnostics Command)When you run the diagnostics utility with one or more parameters, information about your databaseand host configuration is exported to a .zip file.
Syntax/opt/vertica/bin/diagnostics [ argument ... ]
Arguments
-h --help Shows a helpmessage that contains all commands forthe diagnostics utility and exits.
-l --listdbs Lists running and non-running databases.
-s --local_diags Gathers diagnostics for local host only.
-d dbname--database dbname Gathers information about the specified database.
-o OUTPUT_DIR--output_dir OUTPUT_DIR Redirects output to a location other than the default/opt/vertica/log.
-n HOST_LIST,--hosts HOST_LIST Gathers diagnostics for the specified hosts.
-z [ all | n ] Specifies how many vertica.log.*.gz files to includein diagnostics. The default is 1.
Administrator's GuideUsing Diagnostic Tools
HP Vertica Analytics Platform (7.0.x) Page 873 of 969
Using the Diagnostics UtilityRunning /opt/vertica/bin/diagnosticswithout arguments gathers information on all databasesand all nodes in the HP Vertica cluster.
When the diagnostics utility finishes running, it reports amessage with the location of the .zip file,which is in /opt/vertica/log/HP VerticaDiagnostics.<date>.zip. The <date> variable isautomatically assigned a unique ID that represents the date and time you ran diagnostics. This IDchanges with each diagnostics run; for example, here is the command and resulting filename for adiagnostics run on themcdb database:
$ /opt/vertica/bin/diagnostics -d mcdbVerticaDiagnostics.20130117075507.zip
If youmakemultiple calls to diagnostics, the utility creates a new file with a different <date> field sothat it does not overwrite results from the previous call. For example, if I ran the same command afew moments later, the filename is as follows:
VerticaDiagnostics.20130117075900.zip
Both the -d <dbname> and -n <host list> parameters are required to gather the HP Vertica log froma specific node. The -d parameter is useful if you havemultiple databases on the same cluster. Ifyou omit -d from the command, diagnostics doesn't know which database you want to examine andgathers host-level information only.
To include all *.gz files in diagnostics (including all databases on all hosts), use the -z allparameter; otherwise specify the number of files you want (for example, the last 5 *.gz files). Thegzipped log files are included in the order in which they were last modified, with themost recentfirst.
The diagnostics utility uses a diagnostics-<username>.log file instead of the adminTools-<username>.log file for logging to allow for improved readability of log files collected duringdiagnostics. You will find both the diagnostics-<username>.log and adminTools-<username>.log files in the /opt/vertica/log/ directory.
Tip: If you are having trouble with an installation, run the diagnostics utility as root or sudo. SeeRunning Diagnostics Utility for failed Installation. For other situations, run the diagnosticsutility as the database administrator.
ExamplesThe following command uses the -l parameter, which returns a list of running and non-runningdatabases and notifies you where you can find the output file:
[dbadmin@host01 ~]$ /opt/vertica/bin/diagnostics -lRunning Diagnostics as user: dbadminVertica Diagnostics Report
Administrator's GuideUsing Diagnostic Tools
HP Vertica Analytics Platform (7.0.x) Page 874 of 969

-----------------------------Using VSQL: /opt/vertica/bin/vsqlResult Dir: /opt/vertica/log/VerticaDiagnostics.20130116111121Listing databases...
Running database: mcdbNon Running database: vmartNon Running database: myotherdbNon Running database: onenode
All results are stored in /opt/vertica/log/VerticaDiagnostics.20130116111121.zip
The following command gathers diagnostics information for the PROD01 database on host01 andhost02:
$ /opt/vertica/bin/diagnostics -n host01.acme.com,host02.acme.com -d PROD01
This command includes all vertica*.gz files in the diagnostics output for the PROD01 database:
$ /opt/vertica/bin/diagnostics -d PROD01 -z all
This command includes only the last three .gz files for the PROD01 database in the diagnostics:
$ /opt/vertica/bin/diagnostics -d PROD01 -z 3
Exporting a CatalogWhen you export a catalog you can quickly move a catalog to another cluster. Exporting a catalogtransfers schemas, tables, constraints, projections, and views. System tables are not exported.
Exporting catalogs can also be useful for support purposes.
See the EXPORT_CATALOG function in the SQLReferenceManual for details.
Exporting Profiling DataThe diagnostics audit script gathers system table contents, design, and planning objects from arunning database and exports the data into a file named ./diag_dump_<timestamp>.tar.gz,where <timestamp> denotes when you ran the script.
If you run the script without parameters, you will be prompted for a database password.
Syntax/opt/vertica/scripts/collect_diag_dump.sh [ command... ]
Administrator's GuideUsing Diagnostic Tools
HP Vertica Analytics Platform (7.0.x) Page 875 of 969
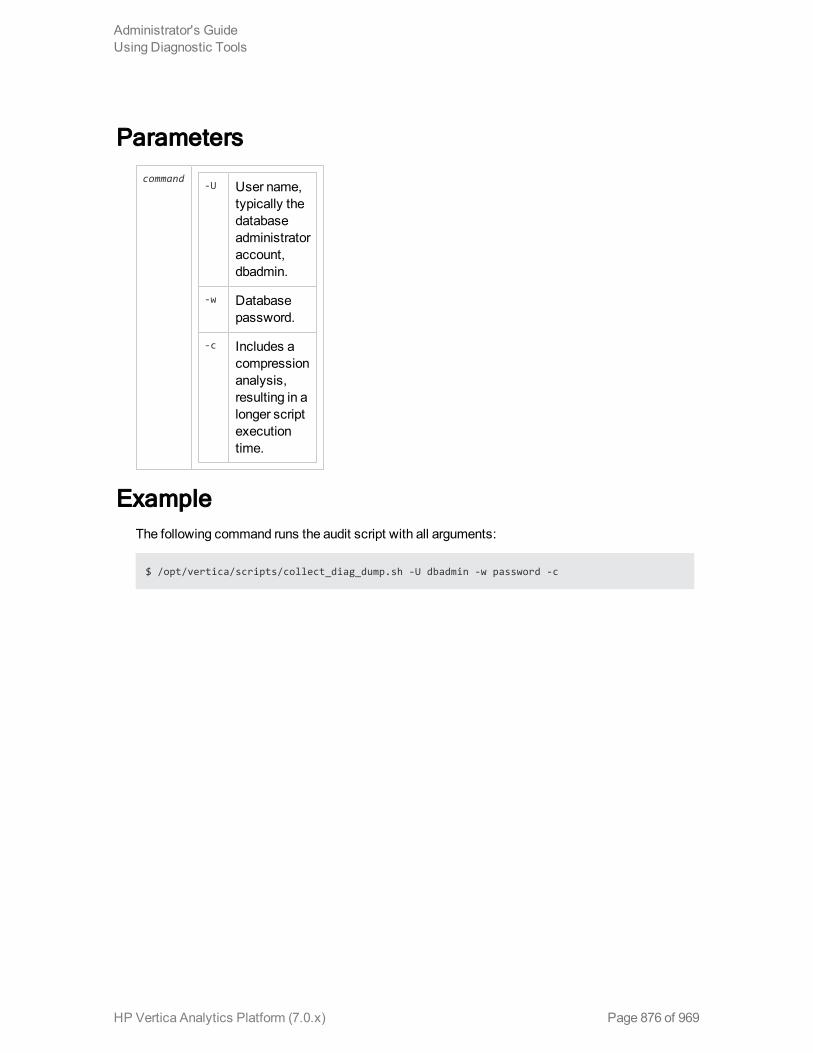
Parameters
command-U User name,
typically thedatabaseadministratoraccount,dbadmin.
-w Databasepassword.
-c Includes acompressionanalysis,resulting in alonger scriptexecutiontime.
ExampleThe following command runs the audit script with all arguments:
$ /opt/vertica/scripts/collect_diag_dump.sh -U dbadmin -w password -c
Administrator's GuideUsing Diagnostic Tools
HP Vertica Analytics Platform (7.0.x) Page 876 of 969

Understanding Query PlansA query plan is a sequence of step-like paths that the HP Vertica cost-based query optimizerselects to access or alter information in your HP Vertica database.
HP Vertica can execute a query in many different ways to achieve the same results. The queryoptimizer evaluates the possible plans it can use and returns what it considers to be the bestalternative, which is usually a query plan with the lowest cost.
CostCost is an estimate of the resources that the query plan will use for its execution strategy, such asdata distribution statistics, CPU, disk, memory, network, data segmentation across cluster nodes,and so on. Although such resources correlate to query run time, they are not an estimate of runtime. For example, if Plan1 costs more than Plan2, the optimizer estimates that Plan2 will take lesstime to run. Cost does not mean that if Pan1 costs two times more than Plan2, the optimizerestimates that Plan2 will take half the time to run.
The optimizer does not compute cost across queries. For example, if you run a plan for Query1 anda plan for Query2, a higher cost in Query2 does not indicate that Query2 will take longer thanQuery1.
StatisticsMany important optimizer decisions rely on statistics, which the query optimizer uses to determinethe final plan to execute a query. Therefore, it is important that statistics be up to date. Withoutreasonably accurate statistics, the optimizer could choose a suboptimal plan, whichmight affectquery performance.
HP Vertica uses the following statistics to calculate the lowest query plan cost and to create plancandidates:
l Number of rows in the table
l Number of distinct values of each column (cardinality)
l Minimum/maximum values of each column
l A histogram of the distribution of values in each column
l Disk space that the column occupies
The optimizer also considers the following:
l The access path with the fewest expected I/O operations and lowest CPU, memory, andnetwork usage
l Multiple eligible projections to answer the query
Administrator's GuideUnderstanding Query Plans
HP Vertica Analytics Platform (7.0.x) Page 877 of 969

l Join types of differing algorithms (hash join/merge join or group by hash/group by pipelined)
l The order in which to perform joins
l Query predicates
l Data re-distribution algorithms (broadcast and re-segmentation) across nodes in the cluster
HP Vertica provides hints about statistics through the query plan, which is annotated with astatistics status. See Viewing the Statistics Query Plan Output.
See AlsoCollecting Database Statistics
How to Get Query Plan InformationYou can get information about query plans in three ways:
l Run the EXPLAIN command in front of the query text.
To view query plan information, preface the query with the EXPLAIN command, as in thefollowing example:
=> EXPLAIN SELECT customer_name, customer_state FROM customer_dimensionWHERE customer_state in ('MA','NH') AND customer_gender = 'Male'ORDER BY customer_name LIMIT 10;
The output from a query plan is presented in a tree-like structure, where each step (path)represents a single operation in the database that the optimizer uses for its execution strategy.The following example output is based on the previous query:
------------------------ QUERY PLAN DESCRIPTION: -----------------------EXPLAIN SELECTcustomer_name,customer_stateFROM customer_dimensionWHERE customer_state in ('MA','NH')AND customer_gender = 'Male'ORDER BY customer_nameLIMIT 10;Access Path:+-SELECT LIMIT 10 [Cost: 370, Rows: 10] (PATH ID: 0)| Output Only: 10 tuples| Execute on: Query Initiator| +---> SORT [Cost: 370, Rows: 544] (PATH ID: 1)| | Order: customer_dimension.customer_name ASC| | Output Only: 10 tuples
Administrator's GuideUnderstanding Query Plans
HP Vertica Analytics Platform (7.0.x) Page 878 of 969

| | Execute on: Query Initiator| | +---> STORAGE ACCESS for customer_dimension [Cost: 331, Rows: 544] (PATH ID: 2)| | | Projection: public.customer_dimension_DBD_1_rep_vmartdb_design_vmartdb_des
ign_node0001| | | Materialize: customer_dimension.customer_state, customer_dimension.custome
r_name| | | Filter: (customer_dimension.customer_gender = 'Male')| | | Filter: (customer_dimension.customer_state = ANY (ARRAY['MA', 'NH']))| | | Execute on: Query Initiator
l Query the QUERY_PLAN_PROFILING system table.
To observe the real-time flow of data through the plan, query the V_MONITOR.QUERY_PLAN_PROFILES system table. For details, see Profiling query plans.
l Use theManagement ConsoleExplain option.
TheManagement Console can display query plans and profile data. For details, see:
n Viewing EXPLAIN Output in Management Console
n Viewing Profile Data in Management Console
See Alsol About EXPLAIN Output
l EXPLAIN
l QUERY_PLAN_PROFILES
How to save query plan informationTo save query plan information to a file, use the vsql \o command by following these steps:
1. Turn on saving output to a file using the \o command.
vmartdb=> \o /home/dbadmin/my-plan-output
2. Run the query using the EXPLAIN command.
vmartdb=> EXPLAIN SELECT * FROM customer_dimension;
Administrator's GuideUnderstanding Query Plans
HP Vertica Analytics Platform (7.0.x) Page 879 of 969

3. Turn off saving output to a file using the \o command.
vmartdb=> \o
If you do not turn off the \o command, HP Vertica continues to save output to the file that youspecify. New output is appended to the previous output. The \o command captures all EXPLAINoutput in the file until you issue the \o command again.
Viewing EXPLAIN Output in ManagementConsole
Management Console allows you to view the EXPLAIN output (query plan) for a single query,allowing you to:
l Review the EXPLAIN output in an easy-to-read format.
l Display details about the projections and columns accessed by the query directly from theEXPLAIN output.
After you select a database, there are two ways to view the EXPLAIN output usingManagementConsole.
To focus on specific areas of the database activity, such as spikes in CPU usage, take thesesteps:
1. For the database you have selected, click Activity at the bottom of theManagement Consolewindow.
2. Select Queries from the drop-down list at the top of the page.
You can also access query plans forUser Sessions andUser Query Phases data byselecting that item on the drop-down list.
3. Click the spot on the activity graph for which you want to view the query plan.
The activity detail window appears.
4. In theView Plan column, click Explain next to the command for which you want to view thequery plan. Only certain queries, like SELECT, INSERT, DELETE, and UPDATE, haveEXPLAIN plans.
TheExplainwindow opens with the query you selected in the text box. HP Vertica reruns thequery and when it completes, the EXPLAIN output for that query loads in the window, belowthe query.
To review the EXPLAIN output for a specific query, take these steps:
Administrator's GuideUnderstanding Query Plans
HP Vertica Analytics Platform (7.0.x) Page 880 of 969

1. Select the database for the query whose query plan you want to see.
2. Click Explain at the bottom of theManagement Console window.
TheExplainwindow opens. The text box is empty because you have not selected a query.
3. Type or paste the query text into that box. Do not enter the word EXPLAIN before the query.Ifyou do enter the EXPLAIN keyword, a syntax error occurs.
If your query uses incorrect syntax or if you enter more than one query, an error occurs.
4. Click Explain Plan.
HP Vertica reruns the query and when it completes, the query plan displays below the querytext box.
About the Query Plan in Management ConsoleWhen you select a query on the activity details page or enter a query manually by clickingExplainPlan, the following window appears with the query text and EXPLAIN output, as in the followingimage.
On this window, you can perform the following tasks related to the query you entered:
Administrator's GuideUnderstanding Query Plans
HP Vertica Analytics Platform (7.0.x) Page 881 of 969

l Expanding and Collapsing Query Paths in EXPLAIN Output
l Viewing Projection and ColumnMetadata in EXPLAIN output
l Clearing Query Data
l Viewing Profile Data in Management Console
Expanding and Collapsing Query Paths inEXPLAIN Output
When you have a query on the EXPLAIN window, the full EXPLAIN output displays in the lower-lefthalf of the window. The EXPLAIN path output can be lengthy, so collapse path information that isuninteresting, or expand only those paths that you want to focus on.
l To collapse all the query paths in order to see a summary of each path in the EXPLAIN output,click Collapse All.
l To expand all the query paths to display the path details, click Expand All.
l To expand an individual query path so you can see details about that path, click the first line ofthe path information. Click the first line again to collapse the path data.
For details about the EXPLAIN output, see About EXPLAIN Output.
Clearing Query DataWhen you have finished reviewing the current query data, click Clear All to clear the query text anddata. Alternatively, to display information about another query, enter the query text and clickExplain Plan orProfile Query.
Viewing Projection and Column Metadata inEXPLAIN output
In theManagement Console on the EXPLAIN window, when the query paths are expanded, theProjection line contains a projection name and theMaterialize line contains one or more columnnames.
To view metadata for a projection or a column, click the object name. A pop-up window displays themetadata. The following image on the left shows example projectionmetadata and the image on theright shows example columnmetadata.
Note: Most system tables do not havemetadata.
Administrator's GuideUnderstanding Query Plans
HP Vertica Analytics Platform (7.0.x) Page 882 of 969

When you are done viewing themetadata, close the pop-up window.
Viewing EXPLAIN Output in vsqlTo view the query plan in vsql, preface the SQL command with the EXPLAIN keyword, as in thefollowing example:
=> EXPLAIN SELECT customer_name, customer_state-> FROM customer_dimension-> WHERE customer_state IN ('MA','NH')-> ORDER BY customer_name;
QUERY PLAN
----------------------------------------------------------------------------QUERY PLAN DESCRIPTION:------------------------------
EXPLAIN SELECT customer_name, customer_stateFROM customer_dimensionWHERE customer_state IN ('MA','NH')ORDER BY customer_name;
Access Path:+-SORT [Cost: 2K, Rows: 50K (NO STATISTICS)] (PATH ID: 1)| Order: customer_dimension.customer_name ASC| Execute on: All Nodes| +---> STORAGE ACCESS for customer_dimension [Cost: 235, Rows: 50K (NO STATISTICS)] (PATH ID: 2)| | Projection: public.customer_dimension_b0| | Materialize: customer_dimension.customer_state, customer_dimension.customer_name| | Filter: (customer_dimension.customer_state = ANY (ARRAY['MA', 'NH']))| | Execute on: All Nodes
Administrator's GuideUnderstanding Query Plans
HP Vertica Analytics Platform (7.0.x) Page 883 of 969

About EXPLAIN OutputThe EXPLAIN command returns the execution strategy for the optimizer's query plan and providesinformation that lets you see the optimizer decisions.
EXPLAIN output documents the choices the optimizer has made. If you think your query is notperforming as it should, run the query through the Database Designer.
Note: Formore information see:
l Incremental Design
l Reducing Run-time of Queries
Textual output of query plansTextual output from a query plan is presented in in a tree-like structure, where each step (path)represents a single operation in the database that the optimizer uses for its execution. Dependingon the query and database schema, the output provides the following information:
l Tables referenced by the statement
l The estimated cost of the optimization
l Estimated row cardinality
l The Path ID, an integer that links to error messages and profiling counters, making it easier foryou to troubleshoot performance issues
l Data operations such as SORT, FILTER, LIMIT, andGROUP BY
l The chosen projections
l Information about statistics, such as if they are current or out of range
l Algorithms chosen for operations into the query, such as HASH/MERGE orGROUPBY HASH/GROUPBY PIPELINED
l Data re-distribution (broadcast, segmentation) across nodes in the cluster
ExampleIn the example EXPLAIN output that follows, the optimizer processes the query in three steps,which are identified by path IDs:
1. Path ID 2: STORAGE ACCESS and FILTER
2. Path ID 1: SORT
Administrator's GuideUnderstanding Query Plans
HP Vertica Analytics Platform (7.0.x) Page 884 of 969

3. Path ID 0: LIMIT
Note: A STORAGE ACCESS operation can scanmore than the columns in the select list; forexample, columns referenced inWHERE clause, and so on.
The following table shows which portions of the query the three steps align with:
Path Associated part of query
STORAGE ACCESS
FILTER
SELECT customer_name, customer_stateWHERE customer_state in ('MA','NH')AND customer_gender = 'Male'
SORT ORDER BY customer_name
LIMIT LIMIT 10;
Viewing the Statistics Query Plan OutputIf table statistics are stale or you haven't collected statistics, the optimizer might not choose thebest plan for a query. HP Vertica recommends that you gather full statistics on a table whenever:
l The table is first bulk loaded.
l A new projection using that table is created and refreshed.
Administrator's GuideUnderstanding Query Plans
HP Vertica Analytics Platform (7.0.x) Page 885 of 969
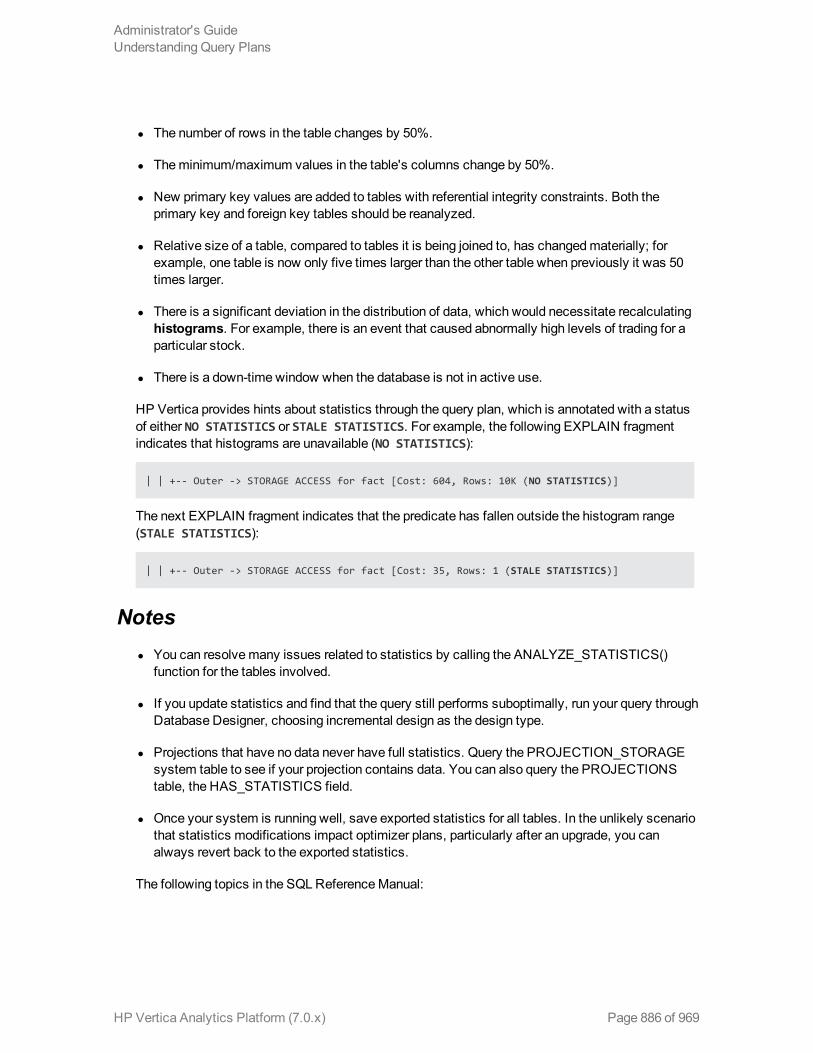
l The number of rows in the table changes by 50%.
l Theminimum/maximum values in the table's columns change by 50%.
l New primary key values are added to tables with referential integrity constraints. Both theprimary key and foreign key tables should be reanalyzed.
l Relative size of a table, compared to tables it is being joined to, has changedmaterially; forexample, one table is now only five times larger than the other table when previously it was 50times larger.
l There is a significant deviation in the distribution of data, which would necessitate recalculatinghistograms. For example, there is an event that caused abnormally high levels of trading for aparticular stock.
l There is a down-time window when the database is not in active use.
HP Vertica provides hints about statistics through the query plan, which is annotated with a statusof either NO STATISTICS or STALE STATISTICS. For example, the following EXPLAIN fragmentindicates that histograms are unavailable (NO STATISTICS):
| | +-- Outer -> STORAGE ACCESS for fact [Cost: 604, Rows: 10K (NO STATISTICS)]
The next EXPLAIN fragment indicates that the predicate has fallen outside the histogram range(STALE STATISTICS):
| | +-- Outer -> STORAGE ACCESS for fact [Cost: 35, Rows: 1 (STALE STATISTICS)]
Notesl You can resolvemany issues related to statistics by calling the ANALYZE_STATISTICS()
function for the tables involved.
l If you update statistics and find that the query still performs suboptimally, run your query throughDatabase Designer, choosing incremental design as the design type.
l Projections that have no data never have full statistics. Query the PROJECTION_STORAGEsystem table to see if your projection contains data. You can also query the PROJECTIONStable, the HAS_STATISTICS field.
l Once your system is running well, save exported statistics for all tables. In the unlikely scenariothat statistics modifications impact optimizer plans, particularly after an upgrade, you canalways revert back to the exported statistics.
The following topics in the SQLReferenceManual:
Administrator's GuideUnderstanding Query Plans
HP Vertica Analytics Platform (7.0.x) Page 886 of 969

See Alsol Collecting Database Statistics
l DeterminingWhen Statistics Were Last Updated
l Reacting to Stale Statistics
l Creating an Incremental Design Using Database Designer
l Optimizing Query Performance
l ANALYZE_STATISTICS
l PROJECTION_COLUMNS
l PROJECTION_STORAGE
l PROJECTIONS
Viewing the Cost and Rows PathOne of the first items you'll see in query plan output is Cost.
The following EXPLAIN output shows theCost operator:
Access Path: +-SELECT LIMIT 10 [Cost: 370, Rows: 10] (PATH ID: 0)| Output Only: 10 tuples| Execute on: Query Initiator| +---> SORT [Cost: 370, Rows: 544] (PATH ID: 1)| | Order: customer_dimension.customer_name ASC| | Output Only: 10 tuples| | Execute on: Query Initiator| | +---> STORAGE ACCESS for customer_dimension [Cost: 331, Rows: 544] (PATH ID: 2)| | | Projection: public.customer_dimension_DBD_1_rep_vmartdb_design_vmartdb_desig
n_node0001| | | Materialize: customer_dimension.customer_state, customer_dimension.customer_n
ame| | | Filter: (customer_dimension.customer_gender = 'Male')| | | Filter: (customer_dimension.customer_state = ANY (ARRAY['MA', 'NH']))| | | Execute on: Query Initiator
The Row operator is the number of rows the optimizer estimates the query will return. Letters afternumbers refer to the units of measure (K=thousand, M=million, B=billion, T=trillion), so the outputfor the following query indicates that the number of rows to return is 50 thousand.
=> EXPLAIN SELECT customer_gender FROM customer_dimension;Access Path:+-STORAGE ACCESS for customer_dimension [Cost: 17, Rows: 50K (3 RLE)] (PATH ID: 1)| Projection: public.customer_dimension_DBD_1_rep_vmartdb_design_vmartdb_design_node000
1
Administrator's GuideUnderstanding Query Plans
HP Vertica Analytics Platform (7.0.x) Page 887 of 969

| Materialize: customer_dimension.customer_gender| Execute on: Query Initiator
The reference to (3 RLE) in the STORAGE ACCESS pathmeans that the optimizer estimates thatthe storage access operator returns 50K rows. Because the column is run-length encoded (RLE),the real number of RLE rows returned is only three rows:
l 1 row for female
l 1 row for male
l 1 row that represents unknown (NULL) gender
Note: SeeUnderstanding Query Plans for additional information about how the optimizerestimates cost.
Viewing the Projection PathYou can see which projections the optimizer chose for the query plan by looking at theProjection path in the textual output:
EXPLAIN SELECTcustomer_name,customer_state
FROM customer_dimensionWHERE customer_state in ('MA','NH')AND customer_gender = 'Male'ORDER BY customer_nameLIMIT 10;Access Path:+-SELECT LIMIT 10 [Cost: 370, Rows: 10] (PATH ID: 0)| Output Only: 10 tuples| Execute on: Query Initiator| +---> SORT [Cost: 370, Rows: 544] (PATH ID: 1)| | Order: customer_dimension.customer_name ASC| | Output Only: 10 tuples| | Execute on: Query Initiator| | +---> STORAGE ACCESS for customer_dimension [Cost: 331, Rows: 544] (PATH ID: 2)| | | Projection: public.customer_dimension_DBD_1_rep_vmart_vmart_node0001| | | Materialize: customer_dimension.customer_state, customer_dimension.customer_n
ame| | | Filter: (customer_dimension.customer_gender = 'Male')| | | Filter: (customer_dimension.customer_state = ANY (ARRAY['MA', 'NH']))| | | Execute on: Query Initiator
The query optimizer automatically picks the best projections, but without reasonably accuratestatistics, the optimizer could choose a suboptimal projection or join order for a query. For details,see Collecting Statistics.
HP Vertica considers which projection to choose for a plan by considering the following aspects:
Administrator's GuideUnderstanding Query Plans
HP Vertica Analytics Platform (7.0.x) Page 888 of 969
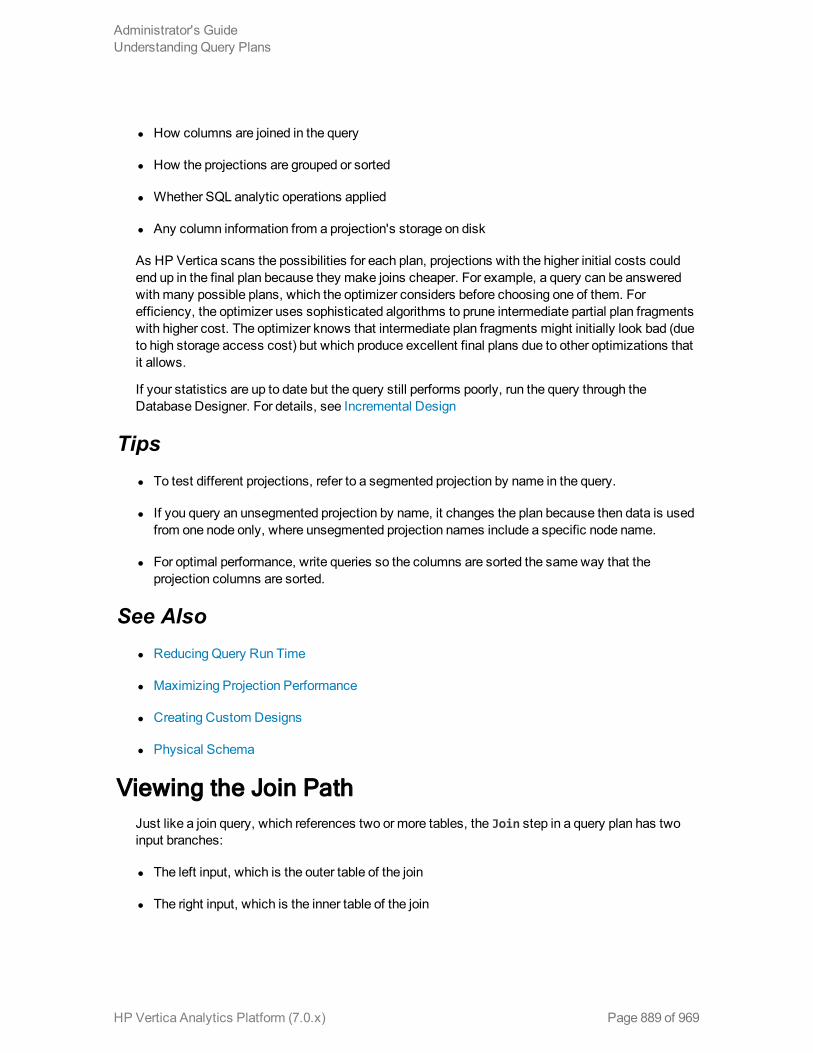
l How columns are joined in the query
l How the projections are grouped or sorted
l Whether SQL analytic operations applied
l Any column information from a projection's storage on disk
As HP Vertica scans the possibilities for each plan, projections with the higher initial costs couldend up in the final plan because they make joins cheaper. For example, a query can be answeredwith many possible plans, which the optimizer considers before choosing one of them. Forefficiency, the optimizer uses sophisticated algorithms to prune intermediate partial plan fragmentswith higher cost. The optimizer knows that intermediate plan fragments might initially look bad (dueto high storage access cost) but which produce excellent final plans due to other optimizations thatit allows.
If your statistics are up to date but the query still performs poorly, run the query through theDatabase Designer. For details, see Incremental Design
Tipsl To test different projections, refer to a segmented projection by name in the query.
l If you query an unsegmented projection by name, it changes the plan because then data is usedfrom one node only, where unsegmented projection names include a specific node name.
l For optimal performance, write queries so the columns are sorted the sameway that theprojection columns are sorted.
See Alsol Reducing Query Run Time
l Maximizing Projection Performance
l Creating Custom Designs
l Physical Schema
Viewing the Join PathJust like a join query, which references two or more tables, the Join step in a query plan has twoinput branches:
l The left input, which is the outer table of the join
l The right input, which is the inner table of the join
Administrator's GuideUnderstanding Query Plans
HP Vertica Analytics Platform (7.0.x) Page 889 of 969

In the following query, the T1 table is the left input because it is on the left side of the JOINkeyword, and the T2 table is the right input, because it is on the right side of the JOIN keyword:
SELECT * FROM T1 JOIN T2 ON T1.x = T2.x;
Outer versus inner joinQuery performance is better if the small table is used as the inner input to the join. The queryoptimizer automatically reorders the inputs to joins to ensure that this is the case unless the join inquestion is an outer join.
The following example shows a query and its plan for a left outer join:
=> EXPLAIN SELECT CD.annual_income,OSI.sale_date_key-> FROM online_sales.online_sales_fact OSI-> LEFT OUTER JOIN customer_dimension CD ON CD.customer_key = OSI.customer_key;Access Path:+-JOIN HASH [LeftOuter] [Cost: 4K, Rows: 5M] (PATH ID: 1)| Join Cond: (CD.customer_key = OSI.customer_key)| Materialize at Output: OSI.sale_date_key| Execute on: All Nodes| +-- Outer -> STORAGE ACCESS for OSI [Cost: 3K, Rows: 5M] (PATH ID: 2)| | Projection: online_sales.online_sales_fact_DBD_12_seg_vmartdb_design_vmartdb_de
sign| | Materialize: OSI.customer_key| | Execute on: All Nodes| +-- Inner -> STORAGE ACCESS for CD [Cost: 264, Rows: 50K] (PATH ID: 3)| | Projection: public.customer_dimension_DBD_1_rep_vmartdb_design_vmartdb_design_n
ode0001| | Materialize: CD.annual_income, CD.customer_key| | Execute on: All Nodes
The following example shows a query and its plan for a full outer join:
=> EXPLAIN SELECT CD.annual_income,OSI.sale_date_key-> FROM online_sales.online_sales_fact OSI-> FULL OUTER JOIN customer_dimension CD ON CD.customer_key = OSI.customer_key;Access Path:+-JOIN HASH [FullOuter] [Cost: 18K, Rows: 5M] (PATH ID: 1) Outer (RESEGMENT) Inner (FILT
ER)| Join Cond: (CD.customer_key = OSI.customer_key)| Execute on: All Nodes| +-- Outer -> STORAGE ACCESS for OSI [Cost: 3K, Rows: 5M] (PATH ID: 2)| | Projection: online_sales.online_sales_fact_DBD_12_seg_vmartdb_design_vmartdb_de
sign| | Materialize: OSI.sale_date_key, OSI.customer_key| | Execute on: All Nodes| +-- Inner -> STORAGE ACCESS for CD [Cost: 264, Rows: 50K] (PATH ID: 3)| | Projection: public.customer_dimension_DBD_1_rep_vmartdb_design_vmartdb_design_n
ode0001| | Materialize: CD.annual_income, CD.customer_key| | Execute on: All Nodes
Administrator's GuideUnderstanding Query Plans
HP Vertica Analytics Platform (7.0.x) Page 890 of 969

Hash and merge joinsHP Vertica has two join algorithms to choose from: merge join and hash join. The optimizerautomatically chooses themost appropriate algorithm, given the query and projections in a system.
For the following query, the optimizer chooses a hash join.
=> EXPLAIN SELECT CD.annual_income,OSI.sale_date_key-> FROM online_sales.online_sales_fact OSI-> INNER JOIN customer_dimension CD ON CD.customer_key = OSI.customer_key;Access Path:+-JOIN HASH [Cost: 4K, Rows: 5M] (PATH ID: 1)| Join Cond: (CD.customer_key = OSI.customer_key)| Materialize at Output: OSI.sale_date_key| Execute on: All Nodes| +-- Outer -> STORAGE ACCESS for OSI [Cost: 3K, Rows: 5M] (PATH ID: 2)| | Projection: online_sales.online_sales_fact_DBD_12_seg_vmartdb_design_vmartdb_de
sign| | Materialize: OSI.customer_key| | Execute on: All Nodes| +-- Inner -> STORAGE ACCESS for CD [Cost: 264, Rows: 50K] (PATH ID: 3)| | Projection: public.customer_dimension_DBD_1_rep_vmartdb_design_vmartdb_design_n
ode0001| | Materialize: CD.annual_income, CD.customer_key| | Execute on: All Nodes
Tip: If you get a hash join when you are expecting amerge join, it means that at least one ofthe projections is not sorted on the join column (for example, customer_key in the precedingquery). To facilitate amerge join, youmight need to create different projections that are sortedon the join columns.
In the next example, the optimizer chooses amerge join. The optimizer's first pass performs amerge join because the inputs are presorted, and then it performs a hash join.
=> EXPLAIN SELECT count(*) FROM online_sales.online_sales_fact OSI-> INNER JOIN customer_dimension CD ON CD.customer_key = OSI.customer_key-> INNER JOIN product_dimension PD ON PD.product_key = OSI.product_key;Access Path:+-GROUPBY NOTHING [Cost: 8K, Rows: 1] (PATH ID: 1)| Aggregates: count(*)| Execute on: All Nodes| +---> JOIN HASH [Cost: 7K, Rows: 5M] (PATH ID: 2)| | Join Cond: (PD.product_key = OSI.product_key)| | Materialize at Input: OSI.product_key| | Execute on: All Nodes| | +-- Outer -> JOIN MERGEJOIN(inputs presorted) [Cost: 4K, Rows: 5M] (PATH ID: 3)| | | Join Cond: (CD.customer_key = OSI.customer_key)| | | Execute on: All Nodes| | | +-- Outer -> STORAGE ACCESS for OSI [Cost: 3K, Rows: 5M] (PATH ID: 4)| | | | Projection: online_sales.online_sales_fact_DBD_12_seg_vmartdb_design_vmartd
b_design| | | | Materialize: OSI.customer_key
Administrator's GuideUnderstanding Query Plans
HP Vertica Analytics Platform (7.0.x) Page 891 of 969

| | | | Execute on: All Nodes| | | +-- Inner -> STORAGE ACCESS for CD [Cost: 132, Rows: 50K] (PATH ID: 5)| | | | Projection: public.customer_dimension_DBD_1_rep_vmartdb_design_vmartdb_desi
gn_node0001| | | | Materialize: CD.customer_key| | | | Execute on: All Nodes| | +-- Inner -> STORAGE ACCESS for PD [Cost: 152, Rows: 60K] (PATH ID: 6)| | | Projection: public.product_dimension_DBD_2_rep_vmartdb_design_vmartdb_design_
node0001| | | Materialize: PD.product_key| | | Execute on: All Nodes
Inequality joinsHP Vertica processes joins with equality predicates very efficiently. The EXPLAIN plan showsequality join predicates as join condition (Join Cond).
=> EXPLAIN SELECT CD.annual_income, OSI.sale_date_key-> FROM online_sales.online_sales_fact OSI-> INNER JOIN customer_dimension CD-> ON CD.customer_key = OSI.customer_key;Access Path:+-JOIN HASH [Cost: 4K, Rows: 5M] (PATH ID: 1)| Join Cond: (CD.customer_key = OSI.customer_key)| Materialize at Output: OSI.sale_date_key| Execute on: All Nodes| +-- Outer -> STORAGE ACCESS for OSI [Cost: 3K, Rows: 5M] (PATH ID: 2)| | Projection: online_sales.online_sales_fact_DBD_12_seg_vmartdb_design_vmartdb_de
sign| | Materialize: OSI.customer_key| | Execute on: All Nodes| +-- Inner -> STORAGE ACCESS for CD [Cost: 264, Rows: 50K] (PATH ID: 3)| | Projection: public.customer_dimension_DBD_1_rep_vmartdb_design_vmartdb_design_n
ode0001| | Materialize: CD.annual_income, CD.customer_key| | Execute on: All Nodes
However, inequality joins are treated like cross joins and can run less efficiently, which you can seeby the change in cost between the two queries:
=> EXPLAIN SELECT CD.annual_income, OSI.sale_date_key-> FROM online_sales.online_sales_fact OSI-> INNER JOIN customer_dimension CD-> ON CD.customer_key < OSI.customer_key;Access Path:+-JOIN HASH [Cost: 98M, Rows: 5M] (PATH ID: 1)| Join Filter: (CD.customer_key < OSI.customer_key)| Materialize at Output: CD.annual_income| Execute on: All Nodes| +-- Outer -> STORAGE ACCESS for CD [Cost: 132, Rows: 50K] (PATH ID: 2)| | Projection: public.customer_dimension_DBD_1_rep_vmartdb_design_vmartdb_design_n
ode0001| | Materialize: CD.customer_key
Administrator's GuideUnderstanding Query Plans
HP Vertica Analytics Platform (7.0.x) Page 892 of 969

| | Execute on: All Nodes| +-- Inner -> STORAGE ACCESS for OSI [Cost: 3K, Rows: 5M] (PATH ID: 3)| | Projection: online_sales.online_sales_fact_DBD_12_seg_vmartdb_design_vmartdb_de
sign| | Materialize: OSI.sale_date_key, OSI.customer_key| | Execute on: All Nodes
Event series joinsEvent series joins are denoted by the INTERPOLATED path.
=> EXPLAIN SELECT * FROM hTicks h FULL OUTER JOIN aTicks a -> ON (h.time INTERPOLATE PREVIOUSAccess Path:+-JOIN (INTERPOLATED) [FullOuter] [Cost: 31, Rows: 4 (NO STATISTICS)] (PATH ID: 1)
Outer (SORT ON JOIN KEY) Inner (SORT ON JOIN KEY)| Join Cond: (h."time" = a."time")| Execute on: Query Initiator| +-- Outer -> STORAGE ACCESS for h [Cost: 15, Rows: 4 (NO STATISTICS)] (PATH ID: 2)| | Projection: public.hTicks_node0004| | Materialize: h.stock, h."time", h.price| | Execute on: Query Initiator| +-- Inner -> STORAGE ACCESS for a [Cost: 15, Rows: 4 (NO STATISTICS)] (PATH ID: 3)| | Projection: public.aTicks_node0004| | Materialize: a.stock, a."time", a.price| | Execute on: Query Initiator
Viewing the Path IDThe PATH ID is a unique identifier that HP Vertica assigns to each operation (path) within a queryplan. The same ID is shared among
l EXPLAIN plans
l Join error messages
l EXECUTION_ENGINE_PROFILES system table
l QUERY_PLAN_PROFILES system table
This ID allows you to trace issues to their root cause.
Note: Formore information, see Linking EXPLAIN Output to Error Messages and ProfilingInformation for more information.
Here's an example of EXPLAIN output, showing the path ID for each path in the optimizer's queryplan.
=> EXPLAIN SELECT * FROM fact JOIN dim ON x=y JOIN ext on y=z;
Administrator's GuideUnderstanding Query Plans
HP Vertica Analytics Platform (7.0.x) Page 893 of 969

Access Path:+-JOIN MERGEJOIN(inputs presorted) [Cost: 815, Rows: 10K (NO STATISTICS)] (PATH ID: 1)| Join Cond: (dim.y = ext.z)| Materialize at Output: fact.x| Execute on: All Nodes| +-- Outer -> JOIN MERGEJOIN(inputs presorted) [Cost: 408, Rows: 10K (NO STATISTICS)]
(PATH ID: 2)| | Join Cond: (fact.x = dim.y)| | Execute on: All Nodes| | +-- Outer -> STORAGE ACCESS for fact [Cost: 202, Rows: 10K (NO STATISTICS)] (PATH
ID: 3)| | | Projection: public.fact_super| | | Materialize: fact.x| | | Execute on: All Nodes| | +-- Inner -> STORAGE ACCESS for dim [Cost: 202, Rows: 10K (NO STATISTICS)] (PATH ID:
4)| | | Projection: public.dim_super| | | Materialize: dim.y| | | Execute on: All Nodes| +-- Inner -> STORAGE ACCESS for ext [Cost: 202, Rows: 10K (NO STATISTICS)] (PATH ID: 5
)| | Projection: public.ext_super| | Materialize: ext.z| | Execute on: All Nodes
Viewing the Filter PathThe Filter step evaluates predicates on a single table. It accepts a set of rows, eliminates someof them (based on the criteria you provide in your query), and returns the rest. For example, theoptimizer can filter local data of a join input that will be joined with another re-segmented join input.
The following statement queries the customer_dimension table and uses theWHERE clause tofilter the results only for male customers in Massachusetts and New Hampshire.
EXPLAIN SELECTCD.customer_name,CD.customer_state,AVG(CD.customer_age) AS avg_age,COUNT(*) AS count
FROM customer_dimension CDWHERE CD.customer_state in ('MA','NH') AND CD.customer_gender = 'Male'GROUP BY CD.customer_state, CD.customer_name;
The query plan output is as follows:
Access Path:+-GROUPBY HASH [Cost: 378, Rows: 544] (PATH ID: 1)| Aggregates: sum_float(CD.customer_age), count(CD.customer_age), count(*)| Group By: CD.customer_state, CD.customer_name| Execute on: Query Initiator| +---> STORAGE ACCESS for CD [Cost: 372, Rows: 544] (PATH ID: 2)| | Projection: public.customer_dimension_DBD_1_rep_vmartdb_design_vmartdb_design_n
ode0001
Administrator's GuideUnderstanding Query Plans
HP Vertica Analytics Platform (7.0.x) Page 894 of 969

| | Materialize: CD.customer_state, CD.customer_name, CD.customer_age| | Filter: (CD.customer_gender = 'Male')| | Filter: (CD.customer_state = ANY (ARRAY['MA', 'NH']))| | Execute on: Query Initiator
Viewing the GROUP BY PathsA GROUP BY operation has three algorithms:
l GROUPBY PIPELINED requires that inputs be presorted on the columns specified in the group,whichmeans that HP Vertica need only retain data in the current group inmemory. GROUPBYPIPELINED operations are preferred because they are generally faster and require less memorythanGROUPBY HASH. GROUPBY PIPELINED is especially useful for queries that processlarge numbers of high-cardinality group by columns or DISTINCT aggregates.
l GROUPBY HASH input is not sorted by the group columns, so HP Vertica builds a hash tableon those group columns in order to process the aggregates and group by expressions.
l Partially sorted GROUPBY leverages the sort order of one or more GROUP BY columns, whichmay or may not include DISTINCT aggregate columns, such as COUNT(DISTINCT ...) or SUM(DISTINCT ...). This algorithm uses smaller hash tables, which reduces the possibility ofhash tables spilling to temporary files on disk.
The optimizer chooses the faster GROUP BY PIPELINED over GROUP BY HASH if the certainconditions aremet.
Note: For details, see Avoiding GROUPBY HASH with Projection Design in the Programmer'sGuide.
For examples of query plans that identify the GROUP BY algorithm, see:
l GROUPBY HASH Query Plan Example
l GROUPBY PIPELINED Query Plan Example
l Partially sorted GROUPBY EXPLAIN plan example
GROUPBY HASH Query Plan ExampleHere's an example of how GROUPBY HASH operations look in EXPLAIN output.
=> EXPLAIN SELECT COUNT(DISTINCT annual_income)FROM customer_dimensionWHERE customer_region='NorthWest';
The output shows that the optimizer chose the less efficient GROUPBY HASH path, whichmeansthe projection was not presorted on the annual_income column. If such a projection is available,the optimizer would choose theGROUPBY PIPELINED algorithm.
Administrator's GuideUnderstanding Query Plans
HP Vertica Analytics Platform (7.0.x) Page 895 of 969

Access Path:+-GROUPBY NOTHING [Cost: 256, Rows: 1 (NO STATISTICS)] (PATH ID: 1)| Aggregates: count(DISTINCT customer_dimension.annual_income)| +---> GROUPBY HASH (LOCAL RESEGMENT GROUPS) [Cost: 253, Rows: 10K (NO STATISTICS)] (PATH ID: 2)| | Group By: customer_dimension.annual_income| | +---> STORAGE ACCESS for customer_dimension [Cost: 227, Rows: 50K (NO STATISTICS)] (PATH ID: 3)| | | Projection: public.customer_dimension_super| | | Materialize: customer_dimension.annual_income| | | Filter: (customer_dimension.customer_region = 'NorthWest'...
GROUPBY PIPELINED Query Plan ExampleIf you have a projection that is already sorted on the customer_gender column, the optimizerchooses the faster GROUPBY PIPELINED operation:
=> EXPLAIN SELECT COUNT(distinct customer_gender) from customer_dimension;Access Path:+-GROUPBY NOTHING [Cost: 22, Rows: 1] (PATH ID: 1)| Aggregates: count(DISTINCT customer_dimension.customer_gender)| Execute on: Query Initiator| +---> GROUPBY PIPELINED [Cost: 20, Rows: 10K] (PATH ID: 2)| | Group By: customer_dimension.customer_gender| | Execute on: Query Initiator| | +---> STORAGE ACCESS for customer_dimension [Cost: 17, Rows: 50K (3 RLE)] (PATH ID:
3)| | | Projection: public.customer_dimension_DBD_1_rep_vmartdb_design_vmartdb_desig
n_node0001| | | Materialize: customer_dimension.customer_gender| | | Execute on: Query Initiator
Similarly, the use of an equality predicate, such as in the following query, preserves GROUPBYPIPELINED:
=> EXPLAIN SELECT COUNT(DISTINCT annual_income) FROM customer_dimensionWHERE customer_gender = 'Female';
Access Path: +-GROUPBY NOTHING [Cost: 161, Rows: 1] (PATH ID: 1)| Aggregates: count(DISTINCT customer_dimension.annual_income)| +---> GROUPBY PIPELINED [Cost: 158, Rows: 10K] (PATH ID: 2)| | Group By: customer_dimension.annual_income| | +---> STORAGE ACCESS for customer_dimension [Cost: 144, Rows: 47K] (PATH ID: 3)| | | Projection: public.customer_dimension_DBD_1_rep_vmartdb_design_vmartdb_desig
n_node0001| | | Materialize: customer_dimension.annual_income| | | Filter: (customer_dimension.customer_gender = 'Female')
Tip: If EXPLAIN reports GROUPBY HASH, modify the projection design to force it to useGROUPBY PIPELINED.
Administrator's GuideUnderstanding Query Plans
HP Vertica Analytics Platform (7.0.x) Page 896 of 969

Partially Sorted GROUPBY Query Plan ExampleThe following example shows the query plan that uses partially sorted GROUPBY. To try thisexample, take these steps to create and populate tables in the VMart database and then generatethe query plan:
$ cd /opt/Vertica/examples/VMart_Schema$ ls vmart_gen$ vsql-- create and populate the example tables from the .tbl files=>\i vmart_create_schema.sql=>\i vmart_load_data.sql-- verify table population=> SELECT COUNT(*) FROM store.store_sales_fact;COUNT
---------5000000(1 row)=> CREATE PROJECTION store.store_sales_fact_by_store_and_date ASSELECT * FROM store.store_sales_fact fORDER BY f.store_key, f.date_key;=> SELECT START_REFRESH(); -- wait a few seconds before running queries
The query plan shows that optimizer uses the partially sorted GROUPBY optimization because theGROUP BY column, store_key, is one of the sort columns in the projection, store.store_sales_fact_by_store_and_date, and contains more than one call to a COUNT or SUM function with theDISTINCT keyword. The partially sorted GROUPBY optimization can have a significant impact onthe performance of such queries.
VMart=> EXPLAIN SELECT COUNT(distinct customer_key) AS cntd_cust,store_key,COUNT(DISTINCT product_key) AS cntd_prod,COUNT(DISTINCT promotion_key) AS cntd_promo,SUM(sales_dollar_amount) AS sum_sales_dollar,SUM(cost_dollar_amount) AS sum_cost_dollar
FROM store.store_sales_factGROUP BY store_keyORDER BY cntd_cust DESCLIMIT 25;
Access Path:
+-SELECT LIMIT 25 [Cost: 43K, Rows: 25 (NO STATISTICS)] (PATH ID: 0)| Output Only: 25 tuples| +---> SORT [TOPK] [Cost: 43K, Rows: 10K (NO STATISTICS)] (PATH ID: 1)| | Order: "Sqry$_1".cntd_cust DESC| | Output Only: 25 tuples| | +---> JOIN MERGEJOIN(inputs presorted) [Cost: 43K, Rows: 10K (NO STATISTICS)] (PATH ID: 2)| | | Join Cond: ("Sqry$_2".store_key <=> "Sqry$_3".store_key)| | | +-- Outer -> JOIN MERGEJOIN(inputs presorted) [Cost: 32K, Rows: 10K (NO STATISTICS)] (PATH ID: 3)| | | | Join Cond: ("Sqry$_1".store_key <=> "Sqry$_2".store_key)| | | | +-- Outer -> SELECT [Cost: 22K, Rows: 10K (NO STATISTICS)] (PATH ID: 4)
Administrator's GuideUnderstanding Query Plans
HP Vertica Analytics Platform (7.0.x) Page 897 of 969

| | | | | +---> GROUPBY HASH (SORT OUTPUT) (LOCAL RESEGMENT GROUPS) [Cost: 22K, Rows: 10K(NO STATISTICS)] (PATH ID: 5)| | | | | Aggregates: count(DISTINCT store_sales_fact.customer_key), sum(<SVAR>), sum(<SVAR>)| | | | | | Group By: store_sales_fact.store_key| | | | | | Partially sorted keys: 1| | | | | | +---> GROUPBY HASH (LOCAL RESEGMENT GROUPS) [Cost: 22K, Rows: 10K (NO STATISTICS)] (PATH ID: 6)| | | | | | | Aggregates: sum(store_sales_fact.sales_dollar_amount), sum(store_sales_fact.cost_dollar_amount)| | | | | | | Group By: store_sales_fact.store_key, store_sales_fact.customer_key| | | | | | | Partially sorted keys: 1| | | | | | | +---> STORAGE ACCESS for store_sales_fact [Cost: 18K, Rows: 5M (NO STATISTICS)] (PATH ID: 7)...
Viewing the Sort PathThe SORT operator sorts the data according to a specified list of columns. The EXPLAIN outputindicates the sort expressions and if the sort order is ascending (ASC) or descending (DESC).
For example, the following query plan shows the column list nature of the SORT operator:
EXPLAIN SELECTCD.customer_name,CD.customer_state,AVG(CD.customer_age) AS avg_age,COUNT(*) AS count
FROM customer_dimension CDWHERE CD.customer_state in ('MA','NH')
AND CD.customer_gender = 'Male'GROUP BY CD.customer_state, CD.customer_nameORDER BY avg_age, customer_name;Access Path:+-SORT [Cost: 422, Rows: 544] (PATH ID: 1)| Order: (<SVAR> / float8(<SVAR>)) ASC, CD.customer_name ASC| Execute on: Query Initiator| +---> GROUPBY HASH [Cost: 378, Rows: 544] (PATH ID: 2)| | Aggregates: sum_float(CD.customer_age), count(CD.customer_age), count(*)| | Group By: CD.customer_state, CD.customer_name| | Execute on: Query Initiator| | +---> STORAGE ACCESS for CD [Cost: 372, Rows: 544] (PATH ID: 3)| | | Projection: public.customer_dimension_DBD_1_rep_vmart_vmart_node0001| | | Materialize: CD.customer_state, CD.customer_name, CD.customer_age| | | Filter: (CD.customer_gender = 'Male')| | | Filter: (CD.customer_state = ANY (ARRAY['MA', 'NH']))| | | Execute on: Query Initiator
If you change the sort order to descending, the change appears in the query plan:
EXPLAIN SELECTCD.customer_name,CD.customer_state,AVG(CD.customer_age) AS avg_age,
Administrator's GuideUnderstanding Query Plans
HP Vertica Analytics Platform (7.0.x) Page 898 of 969

COUNT(*) AS countFROM customer_dimension CDWHERE CD.customer_state in ('MA','NH')
AND CD.customer_gender = 'Male'GROUP BY CD.customer_state, CD.customer_nameORDER BY avg_age DESC, customer_name;Access Path:+-SORT [Cost: 422, Rows: 544] (PATH ID: 1)| Order: (<SVAR> / float8(<SVAR>)) DESC, CD.customer_name ASC| Execute on: Query Initiator| +---> GROUPBY HASH [Cost: 378, Rows: 544] (PATH ID: 2)| | Aggregates: sum_float(CD.customer_age), count(CD.customer_age), count(*)| | Group By: CD.customer_state, CD.customer_name| | Execute on: Query Initiator| | +---> STORAGE ACCESS for CD [Cost: 372, Rows: 544] (PATH ID: 3)| | | Projection: public.customer_dimension_DBD_1_rep_vmart_vmart_node0001| | | Materialize: CD.customer_state, CD.customer_name, CD.customer_age| | | Filter: (CD.customer_gender = 'Male')| | | Filter: (CD.customer_state = ANY (ARRAY['MA', 'NH']))| | | Execute on: Query Initiator
Viewing the Limit PathThe LIMIT path restricts the number of result rows based on the LIMIT clause in the query. Usingthe LIMIT clause in queries with thousands of rows could increase query performance.
The optimizer pushes the LIMIT operation down as far as possible in queries. A single LIMIT clausein the query could generatemultiple Output Only annotations on the plan.
=> EXPLAIN SELECT COUNT(DISTINCT annual_income) FROM customer_dimension LIMIT 10;Access Path:+-SELECT LIMIT 10 [Cost: 161, Rows: 10] (PATH ID: 0)| Output Only: 10 tuples| +---> GROUPBY NOTHING [Cost: 161, Rows: 1] (PATH ID: 1)| | Aggregates: count(DISTINCT customer_dimension.annual_income)| | Output Only: 10 tuples| | +---> GROUPBY HASH (SORT OUTPUT) [Cost: 158, Rows: 10K] (PATH ID: 2)| | | Group By: customer_dimension.annual_income| | | +---> STORAGE ACCESS for customer_dimension [Cost: 132, Rows: 50K] (PATH ID: 3)| | | | Projection: public.customer_dimension_DBD_1_rep_vmartdb_design_vmartdb_desi
gn_node0001| | | | Materialize: customer_dimension.annual_income
Viewing the Data Redistribution PathThe optimizer broadcasts or resegments data, as needed.
Broadcasting sends a complete copy of an intermediate result to all nodes in the cluster. Broadcastis used for joins when
l One table is very small (usually the inner table) compared to the other
l HP Vertica can avoid other large upstream resegmentation operations
Administrator's GuideUnderstanding Query Plans
HP Vertica Analytics Platform (7.0.x) Page 899 of 969

l Outer join or subquery semantics require one side of the join to be replicated
Resegmentation takes an existing projection or intermediate relation and segments the data evenlyto each node in the cluster. At the end of the resegmentation operation, every row from the inputrelation is on exactly one node. Resegmentation is the operation usedmost often for distributedjoins in HP Vertica if the data is not already segmented for local joins. See Using IdenticallySegmented Projections in the Programmer's Guide.
Resegment example
=> CREATE TABLE T1 (a INT, b INT) SEGMENTED BY HASH(a) ALL NODES;=> CREATE TABLE T2 (x INT, y INT) SEGMENTED BY HASH(x) ALL NODES;=> EXPLAIN SELECT * FROM T1 JOIN T2 ON T1.a = T2.y;
------------------------------ QUERY PLAN DESCRIPTION: ------------------------------Access Path:+-JOIN HASH [Cost: 639, Rows: 10K (NO STATISTICS)] (PATH ID: 1) Inner (RESEGMENT)| Join Cond: (T1.a = T2.y)| Materialize at Output: T1.b| Execute on: All Nodes| +-- Outer -> STORAGE ACCESS for T1 [Cost: 151, Rows: 10K (NO STATISTICS)] (PATH ID: 2)| | Projection: public.T1_b0| | Materialize: T1.a| | Execute on: All Nodes| +-- Inner -> STORAGE ACCESS for T2 [Cost: 302, Rows: 10K (NO STATISTICS)] (PATH ID: 3)| | Projection: public.T2_b0| | Materialize: T2.x, T2.y| | Execute on: All Nodes
Broadcast example
=> EXPLAIN SELECT * FROM T1 LEFT JOIN T2 ON T1.a > T2.y;Access Path:+-JOIN HASH [LeftOuter] [Cost: 40K, Rows: 10K (NO STATISTICS)] (PATH ID: 1) Inner (BROAD
CAST)| Join Filter: (T1.a > T2.y)| Materialize at Output: T1.b| Execute on: All Nodes| +-- Outer -> STORAGE ACCESS for T1 [Cost: 151, Rows: 10K (NO STATISTICS)] (PATH ID: 2)| | Projection: public.T1_b0| | Materialize: T1.a| | Execute on: All Nodes| +-- Inner -> STORAGE ACCESS for T2 [Cost: 302, Rows: 10K (NO STATISTICS)] (PATH ID: 3)| | Projection: public.T2_b0| | Materialize: T2.x, T2.y| | Execute on: All Nodes
Viewing the Analytic Function PathHP Vertica attempts to optimizemultiple SQL-99 Analytic Functions from the same query bygrouping them together under theAnalytical Groups area that appears on the ORDER BY and
Administrator's GuideUnderstanding Query Plans
HP Vertica Analytics Platform (7.0.x) Page 900 of 969

PARTITION BY clauses.
For each analytical group, HP Vertica performs a distributed sort and resegment of the data, ifnecessary.
You can tell how many sorts and resegments are required based on the query plan.
For example, the following query plan shows that the FIRST_VALUE() and LAST_VALUE()functions are in the same analytic group because their OVER clause is the same. In contrast,ROW_NUMBER() has a different ORDER BY clause, so it is in a different analytic group. Sinceboth groups share the same PARTITION BY deal_stage clause, the data does not need to beresegmented between groups :
EXPLAIN SELECTfirst_value(deal_size) OVER (PARTITION BY deal_stageORDER BY deal_size),last_value(deal_size) OVER (PARTITION BY deal_stageORDER BY deal_size),row_number() OVER (PARTITION BY deal_stageORDER BY largest_bill_amount)FROM customer_dimension;
Access Path:+-ANALYTICAL [Cost: 1K, Rows: 50K] (PATH ID: 1)| Analytic Group| Functions: row_number()| Group Sort: customer_dimension.deal_stage ASC, customer_dimension.largest_bill_amoun
t ASC NULLS LAST| Analytic Group| Functions: first_value(), last_value()| Group Filter: customer_dimension.deal_stage| Group Sort: customer_dimension.deal_stage ASC, customer_dimension.deal_size ASC NULL
S LAST| Execute on: All Nodes| +---> STORAGE ACCESS for customer_dimension [Cost: 263, Rows: 50K]
(PATH ID: 2)| | Projection: public.customer_dimension_DBD_1_rep_vmart_vmart_node0001| | Materialize: customer_dimension.largest_bill_amount,
customer_dimension.deal_stage, customer_dimension.deal_size| | Execute on: All Nodes
See AlsoTheWindow OVER() Clause
Viewing Node Down InformationHP Vertica provides performance optimization when cluster nodes fail by distributing the work ofthe down nodes uniformly among available nodes throughout the cluster.
When a node in your cluster is down, the query plan identifies which node the query will execute on.To help you quickly identify down nodes on large clusters, EXPLAIN output lists up to a total of sixnodes, if the number of running nodes is less than or equal to six, and lists only the down nodes ifthe number of running nodes is more than six.
Administrator's GuideUnderstanding Query Plans
HP Vertica Analytics Platform (7.0.x) Page 901 of 969

Note: The node that is executing a query for a down node is not necessarily node each timeyou run the query.
The following table provides more detail:
Node state EXPLAIN output
If all nodes are up, the EXPLAIN output indicatesAll Nodes.
Execute on: All Nodes
If fewer than 6 nodes are up, EXPLAIN lists therunning nodes, up to a total of 6.
Execute on: [node_list].
If more than 6 nodes are up, EXPLAIN lists only thenon-running nodes.
Execute on: All Nodes Except [node_list]
If the node list contains non-ephemeral nodes, theEXPLAIN output indicates All Permanent Nodes.
Execute on: All Permanent Nodes
If the path is being run on the query initiator, theEXPLAIN output indicates Query Initiator.
Execute on: Query Initiator
ExamplesIn the following example, the down node is v_vmart_node0005, and the node v_vmart_node0006will execute this run of the query.
=> EXPLAIN SELECT * FROM test;QUERY PLAN
-----------------------------------------------------------------------------QUERY PLAN DESCRIPTION:------------------------------EXPLAIN SELECT * FROM my1table;Access Path:+-STORAGE ACCESS for my1table [Cost: 10, Rows: 2] (PATH ID: 1)| Projection: public.my1table_b0| Materialize: my1table.c1, my1table.c2| Execute on: All Except v_vmart_node0005+-STORAGE ACCESS for my1table (REPLACEMENT FOR DOWN NODE) [Cost: 66, Rows: 2]| Projection: public.my1table_b1| Materialize: my1table.c1, my1table.c2| Execute on: v_vmart_node0006
The All Permanent Nodes output in the following example fragment denotes that the node list isfor permanent (non-ephemeral) nodes only:
=> EXPLAIN SELECT * FROM my2table;Access Path:+-STORAGE ACCESS for my2table [Cost: 18, Rows:6 (NO STATISTICS)] (PATH ID: 1)| Projection: public.my2tablee_b0
Administrator's GuideUnderstanding Query Plans
HP Vertica Analytics Platform (7.0.x) Page 902 of 969

| Materialize: my2table.x, my2table.y, my2table.z| Execute on: All Permanent Nodes
Viewing the MERGE PathBy default, HP Vertica prepares an optimized query plan for a MERGE statement if the statement andits tables meet the criteria described in Optimized Versus Non-OptimizedMERGE.
How to Use EXPLAIN to Look for an Optimized QueryPlan for MERGE
Run MERGEwith the EXPLAIN keyword. After the plan output displays, scroll past the GraphVizformat and look for the [Semi] path, as shown in the following sample fragment. Semi means HPVertica will prepare an optimized query plan for the MERGE statement.
...Access Path:+-DML DELETE [Cost: 0, Rows: 0]| Target Projection: public.A_b1 (DELETE ON CONTAINER)| Target Prep:| Execute on: All Nodes| +---> JOIN MERGEJOIN(inputs presorted) [Semi] [Cost: 6, Rows: 1 (NO STATISTICS)] (PATHID: 1)
Inner (RESEGMENT)| | Join Cond: (A.a1 = VAL(2))| | Execute on: All Nodes| | +-- Outer -> STORAGE ACCESS for A [Cost: 2, Rows: 2 (NO STATISTICS)] (PATH ID: 2)...
WhenHP Vertica prepares a non-optimized execution plan for a MERGE statement, a RightOuterpath appears in the plan's textual output, such as in the following fragment.
...Access Path: +-DML MERGE| Target Projection: public.locations_b1| Target Projection: public.locations_b0| Target Prep:| Execute on: All Nodes| +---> JOIN MERGEJOIN(inputs presorted) [RightOuter] [Cost: 28, Rows: 3 (NO STATISTIC
S)] (PATH ID: 1) Outer (RESEGMENT) Inner (RESEGMENT)| | Join Cond: (locations.user_id = VAL(2)) AND (locations.location_x = VAL(2)) AND
(locations.location_y = VAL(2))| | Execute on: All Nodes| | +-- Outer -> STORAGE ACCESS for <No Alias> [Cost: 15, Rows: 2 (NO STATISTICS)] (PATH
ID: 2)...
Administrator's GuideUnderstanding Query Plans
HP Vertica Analytics Platform (7.0.x) Page 903 of 969

How to Use grep to Look for an Optimized Query Plan forMERGE
To see if MERGEwill run with optimization, grep for 'Semi' before you run the EXPLAIN statementand look for the [Semi] path in the output, as in the following fragment.
> \o | grep 'Semi'> EXPLAIN MERGE INTO a USING c ON a1 = c1
WHEN MATCHED THEN UPDATE SET a1 = c1, a2=c2,a3=c3WHEN NOT MATCHED THEN INSERT(a1,a2,a3) VALUES(c1,c2,c3); | +---> JOIN MERGEJOIN(inputs
presorted) [Semi] [Cost: 6, Rows: 1 (NO STATISTICS)] (PATH ID: 1)Inner (RESEGMENT)
> \o
Another way to see if HP Vertica will prepare an optimized query plan for MERGE is to grep for thenon-optimizedMERGE path, 'RightOuter'. A null result after the EXPLAIN statement, such as inthe following example, means the MERGE statement will likely run with an optimized plan.
> \o | grep 'RightOuter'> EXPLAIN MERGE INTO a USING c ON a1 = c1
WHEN MATCHED THEN UPDATE SET a1 = c1, a2=c2,a3=c3WHEN NOT MATCHED THEN INSERT (a1,a2,a3) VALUES(c1,c2,c3);
> \o
Linking EXPLAIN Output to Error Messages andProfiling Information
The PATH ID is a unique identifier that HP Vertica assigns to each operation (path) within a queryplan. The same ID is shared among:
l EXPLAIN output
l Join error messages
l EXECUTION_ENGINE_PROFILES system table
l QUERY_PLAN_PROFILES system table
This allows you to quickly trace issues to their root cause.
If a query returns a join error similar to the following examples, you can preface the query withEXPLAIN and look for PATH ID n in the output to see which join in the query had the problem.
ERROR: Join inner did not fit in memory ((B x A)using B_sp and A_sp (PATH ID: 1))
ERROR: Nonexistent foreign key value detected in FK-PK join
Administrator's GuideUnderstanding Query Plans
HP Vertica Analytics Platform (7.0.x) Page 904 of 969
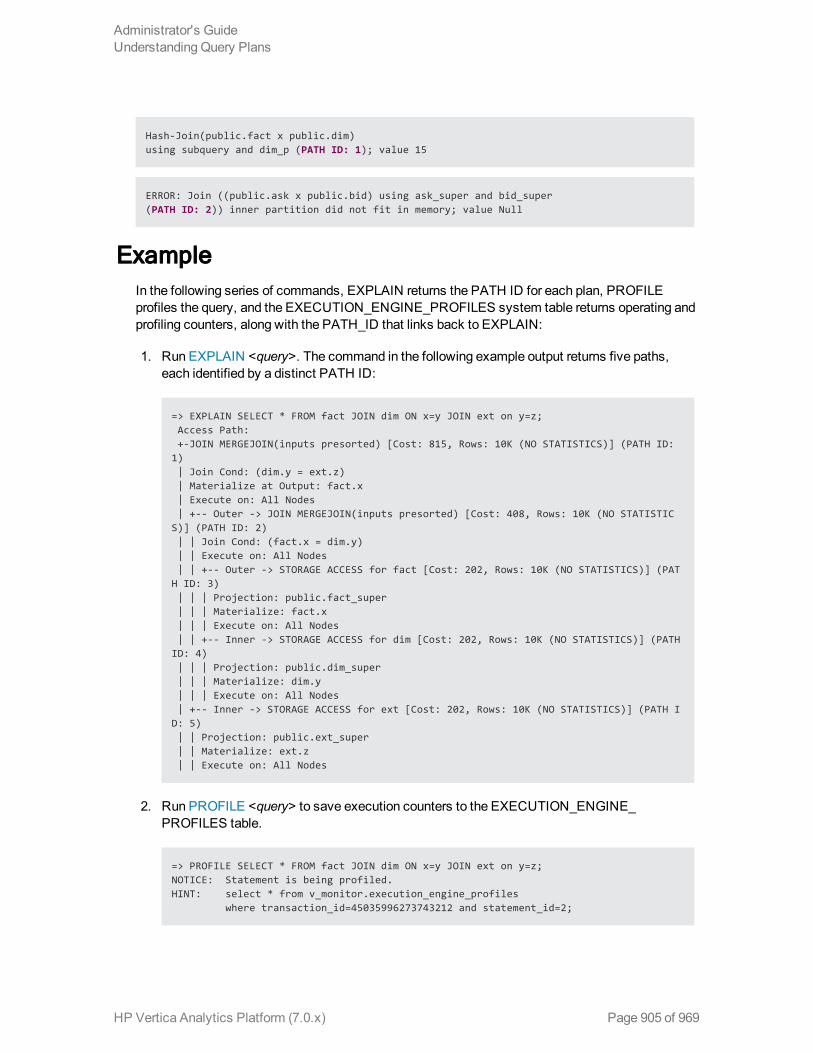
Hash-Join(public.fact x public.dim)using subquery and dim_p (PATH ID: 1); value 15
ERROR: Join ((public.ask x public.bid) using ask_super and bid_super(PATH ID: 2)) inner partition did not fit in memory; value Null
ExampleIn the following series of commands, EXPLAIN returns the PATH ID for each plan, PROFILEprofiles the query, and the EXECUTION_ENGINE_PROFILES system table returns operating andprofiling counters, along with the PATH_ID that links back to EXPLAIN:
1. Run EXPLAIN <query>. The command in the following example output returns five paths,each identified by a distinct PATH ID:
=> EXPLAIN SELECT * FROM fact JOIN dim ON x=y JOIN ext on y=z;Access Path:+-JOIN MERGEJOIN(inputs presorted) [Cost: 815, Rows: 10K (NO STATISTICS)] (PATH ID:
1)| Join Cond: (dim.y = ext.z)| Materialize at Output: fact.x| Execute on: All Nodes| +-- Outer -> JOIN MERGEJOIN(inputs presorted) [Cost: 408, Rows: 10K (NO STATISTIC
S)] (PATH ID: 2)| | Join Cond: (fact.x = dim.y)| | Execute on: All Nodes| | +-- Outer -> STORAGE ACCESS for fact [Cost: 202, Rows: 10K (NO STATISTICS)] (PAT
H ID: 3)| | | Projection: public.fact_super| | | Materialize: fact.x| | | Execute on: All Nodes| | +-- Inner -> STORAGE ACCESS for dim [Cost: 202, Rows: 10K (NO STATISTICS)] (PATH
ID: 4)| | | Projection: public.dim_super| | | Materialize: dim.y| | | Execute on: All Nodes| +-- Inner -> STORAGE ACCESS for ext [Cost: 202, Rows: 10K (NO STATISTICS)] (PATH I
D: 5)| | Projection: public.ext_super| | Materialize: ext.z| | Execute on: All Nodes
2. Run PROFILE <query> to save execution counters to the EXECUTION_ENGINE_PROFILES table.
=> PROFILE SELECT * FROM fact JOIN dim ON x=y JOIN ext on y=z;NOTICE: Statement is being profiled.HINT: select * from v_monitor.execution_engine_profiles
where transaction_id=45035996273743212 and statement_id=2;
Administrator's GuideUnderstanding Query Plans
HP Vertica Analytics Platform (7.0.x) Page 905 of 969

NOTICE: Initiator memory for query: [on pool sysquery: 16384 KB, minimum: 6020 KB]NOTICE: Total memory required by query: [16384 KB]
3. Query the EXECUTION_ENGINE_PROFILES system table for the join operations and PATHID. The output refers to PATH IDs 1 and 2 in the EXPLAIN output.
=> SELECT node_name, operator_name, counter_name, path_idFROM execution_engine_profilesWHERE operator_name LIKE 'Join%' AND counter_name LIKE '%rows%';
node_name | operator_name | counter_name | path_id-----------+------------------+-------------------------+---------e0 | JoinManyFewMerge | rows produced | 1e0 | JoinManyFewMerge | rle rows produced | 1e0 | JoinManyFewMerge | estimated rows produced | 1e0 | JoinManyFewMerge | rows produced | 2e0 | JoinManyFewMerge | rle rows produced | 2e0 | JoinManyFewMerge | estimated rows produced | 2e1 | JoinManyFewMerge | rows produced | 1e1 | JoinManyFewMerge | rle rows produced | 1e1 | JoinManyFewMerge | estimated rows produced | 1e1 | JoinManyFewMerge | rows produced | 2e1 | JoinManyFewMerge | rle rows produced | 2e1 | JoinManyFewMerge | estimated rows produced | 2initiator | JoinManyFewMerge | rows produced | 1initiator | JoinManyFewMerge | rle rows produced | 1initiator | JoinManyFewMerge | estimated rows produced | 1initiator | JoinManyFewMerge | rows produced | 2initiator | JoinManyFewMerge | rle rows produced | 2initiator | JoinManyFewMerge | estimated rows produced | 2
(18 rows)
Using the QUERY_PLAN_PROFILES tableTheQUERY_PLAN_PROFILES system table contains real-time status for each path in a queryplan, where each PATH ID provides the following information:
l Clock time the query spent on a particular path in the plan
l CPU resources used on that path
l Memory used
l Disk/network I/O done
l Path status (started/completed)
l Whether the query is running or finished running
Administrator's GuideUnderstanding Query Plans
HP Vertica Analytics Platform (7.0.x) Page 906 of 969

Profiling Database PerformanceTo determine where time is spent during query execution, profile the queries. Unlike the EXPLAINplan, where the cost and row counts are estimates, the counters and plans from query profile reflectwhat really happened and let you consider some of the following:
l Projection design issues such as segmentation and sort order
l If the query is network bound
l How muchmemory each operator allocated
l If a query rewrite might speed up the query
l How many threads are executing for each operator
l How the data has flowed through each operator at different points in time over the life of thequery
Real-time profiling is always "on"; you do not need to explicitly enable it.
Profile data is available for:
l Any query that has been explicitly profiled
l Any query that is currently executing
Profile data is saved in the following system tables:
l EXECUTION_ENGINE_PROFILES—Provides detailed information about the execution run ofeach query.
l QUERY_PROFILESandQUERY_PLAN_PROFILES—Provides general information aboutqueries that have executed, such as the query strings used and the duration of the queries.
l SESSION_PROFILES—Provides basic session parameters and lock timeout data.
If profiling is not enabled, HP Vertica does not save the data in EXECUTION_ENGINE_PROFILES, but some data is saved in QUERY_PROFILES., QUERY_PLAN_PROFILES, andSESSION_PROFILES.
HP Vertica continues tomake enhancements to the EXECUTION_ENGINE_PROFILES systemtable and theWorkload Analyzer, but the profilingmethods described in this section are still avaluable tool for gaining insight into what happens during execution time.
Use the following functions to get query profile data:
l Profiling Functions
l SET_CONFIG_PARAMETER()
Administrator's GuideProfiling Database Performance
HP Vertica Analytics Platform (7.0.x) Page 907 of 969

How to Determine If Profiling Is EnabledTo determine if profiling is enabled, use the following command:
=> SELECT SHOW_PROFILING_CONFIG()SHOW_PROFILING_CONFIG------------------------------------------Session Profiling: Local off, Global onEE Profiling: Local off, Global onQuery Profiling: Local off, Global on
(1 row)
You can enable profiling in the following ways:
l Set local profiling using the Profiling Functions.
l Set global profiling using the SET_CONFIG_PARAMETER() function.
How to Enable ProfilingTo enable profiling for the current session, call the ENABLE_PROFILING function and pass it theprofile type, which can be one of the following:
l session—Enables profiling basic session parameters and lock timeout data.
l query—Enables profiling for general information about queries that ran, such as the querystrings used and the duration of queries.
l ee—Enables profiling for query execution runs.
To enable profiling for all sessions on all nodes, call the SET_CONFIG_PARAMETER() function,as in the following command:
=> SELECT SET_CONFIG_PARAMETER( 'global-type', 1 )
global-type can be one of the following:
l GlobalSessionProfiling—Enables profiling for sessions.
l GlobalQueryProfiling—Enables profiling for queries.
l GlobalEEProfiling—Enables profiling for query execution runs.
ExamplesThe following statement enables profiling for the execution run of each query:
=> SELECT ENABLE_PROFILING('ee');
Administrator's GuideProfiling Database Performance
HP Vertica Analytics Platform (7.0.x) Page 908 of 969

ENABLE_PROFILING----------------------EE Profiling Enabled
(1 row)
The following statement enables query profiling for all sessions and nodes:
=> SELECT SET_CONFIG_PARAMETER('GlobalSessionProfiling',1);
How to Disable ProfilingTo disable profiling for the current session, call the DISABLE_PROFILING function:
=> SELECT DISABLE_PROFILING( 'profiling-type' )
profiling-type can be one of the following:
l session—Disables profiling basic session parameters and lock time out data.
l query—Disables profiling for general information about queries that ran, such as the querystrings used and the duration of queries.
l ee—Disables profiling for query execution runs.
To disable profiling for all sessions on all nodes, call the SET_CONFIG_PARAMETER function:
=> SELECT SET_CONFIG_PARAMETER( 'global-type', 0 )
global-type can be one of the following:
l GlobalSessionProfiling—Disables profiling for sessions.
l GlobalEEProfiling—Disables profiling for query execution runs.
l GlobalQueryProfiling—Disables profiling for queries.
ExampleThe following command disables profiling on query execution runs:
=> SELECT DISABLE_PROFILING('ee');DISABLE_PROFILING
-----------------------EE Profiling Disabled
(1 row)
The following command disables query profiling for all sessions and nodes:
Administrator's GuideProfiling Database Performance
HP Vertica Analytics Platform (7.0.x) Page 909 of 969

=> SELECT SET_CONFIG_PARAMETER('GlobalSessionProfiling',0); SET_CONFIG_PARAMETER----------------------------Parameter set successfully
(1 row)
About Real-Time ProfilingReal-time profiling provides a way tomonitor long-running queries while they are executing.
Real-time profiling counters are available for all currently executing statements—including internaloperations such asmergeout, recovery, and refresh—but only while the statements areexecuting. Unless you explicitly enabled profiling using the keyword PROFILE or ENABLE_PROFILING, profiling counters are not available after the statement completes.
Tip: To view real-time profiling data, queries need, at aminimum, the transaction_id for thetransaction of interest. If multiple statements have been executed within the transaction, youalso need the Statement_id. The transaction IDs for internal operations are in thevertica.log files.
About profiling countersThe EXECUTION_ENGINE_PROFILES system table contains available profiling counters forinternal operations and user statements. Some of themost useful counters are:
l Execution time (µs)
l Rows produced
l Total merge phases
l Completedmerge phases
l Current size of temp files (bytes)
About query plan profilesIf you want to know how much time a query spent on a particular operation in a query plan, you canobserve the real-time flow of data through the plan by querying the QUERY_PLAN_PROFILESsystem table. See Profiling query plans.
ExampleTomonitor a refresh operation that was initiated on node0001, find the “select start_refresh()”entry in the vertica.log file on node0001. You'll see something similar to the following logfragment, where the transaction ID for this recovery operation is a0000000000227:
Administrator's GuideProfiling Database Performance
HP Vertica Analytics Platform (7.0.x) Page 910 of 969

2011-04-21 13:34:56.494 Refresh:0xb9ab5e0 [Refresh] <INFO> Refreshing projection public.fact_p from buddy 2011-04-21 13:34:56.494 Refresh:0xb9ab5e0 [Refresh] <INFO> Refreshing projection public.fact_p from buddy, historical epochs 0-12, oid 450359962737131642011-04-21 13:34:56.497 nameless:0xb972330 [Txn] <INFO> Begin Txn: a0000000000227 'Refresh through recovery'2011-04-21 13:34:56.497 nameless:0xb972330 [Command] <INFO> Performing refresh through recovery on projection fact_p (45035996273713164) 0-122011-04-21 13:34:56.497 nameless:0xb972330 <LOG> @v_db_node0001: 00000: Recover alterSpec45035996273713164 0-122011-04-21 13:34:56.500 nameless:0xb972330 [Command] <INFO> (a0000000000227) Executing the recovery plan
Tomonitor the profiling counters, you can run a command like the following:
=> SELECT * FROM execution_engine_profilesWHERE TO_HEX(transaction_id)='a000000000027'AND counter_name = 'execution time (us)'ORDER BY node_name, counter_value DESC;
In this example, find the operators with the largest execution time on each node:
=> SELECT node_name, operator_name, counter_value execution_time_usFROM v_monitor.execution_engine_profilesWHERE counter_name='execution time (us)'ORDER BY node_name, counter_value DESC;
You can use the Linux watch command tomonitor long-running queries with one-second updates:
WATCH -n 1 -d "vsql -c \"select node_name, operator_name,counter_value execution_time_us ... \""
See Alsol Profiling query plans
System tables with profile dataThe system tables for profiling are as follows:
Virtual Table Description
EXECUTION_ENGINE_PROFILES Provides profile information for query execution runs.
QUERY_PLAN_PROFILES Provides real-time status for each path in a query plan.
QUERY_PROFILES Provides profile information for queries.
SESSION_PROFILES Provides profile information for sessions.
Administrator's GuideProfiling Database Performance
HP Vertica Analytics Platform (7.0.x) Page 911 of 969

What to look for in query profilesProfile data can show data skew, when some nodes are processingmore data than others. Therows produced counter in the EXECUTION_ENGINE_PROFILES table shows how many rowshave been processed by each operator. Comparing the rows produced across all nodes for a givenoperator reveals if there is a data skew issue.
Note: Some of the profiling operators shown in EXECUTION_ENGINE_PROFILES aregeneric, such as Join. The EXPLAIN plan includes more details about the specific join that isexecuting.
Viewing Profile Data in Management ConsoleManagement Console allows you to view profile data about a single query, allowing you to:
l Review the profile data in an easy-to-read format.
l View details about projections metadata, execution events, and optimizer events.
l Quickly identify how much time was spent in each phase of query execution and which phasestook themost amount of time.
After you select the database you want to work with, there are two ways to view the profile datausingManagement Console:
To focus on specific areas of the database activity, such as spikes in CPU usage, take thesesteps:
1. For the database you have selected, click Activity at the bottom of theManagement Consolewindow.
2. Select Queries from the drop-down list at the top of the page.
You can also access the profile data forUser Sessions andUser Query Phases data if youselect those options on the drop-down list.
3. Click the spot on the graph for which you want to view the query plan.
The activity detail window appears.
4. in theView Plan column, click Profile next to the command for which you want to view thequery plan. Only certain queries, like SELECT, INSERT, UPDATE, and DELETE, have profiledata.
TheExplainwindow opens. The query you selected appears in the text box. HP Vertica rerunsthe query and when it completes, the profile data andmetrics for that query loads in thewindow, below the query.
Administrator's GuideProfiling Database Performance
HP Vertica Analytics Platform (7.0.x) Page 912 of 969

To review the profile data for a specific query, take these steps:
2. Select the database for the query you want to profile.
3. Click Explain at the bottom of theManagement Console window.
TheExplainwindow opens. The text box is empty because you have not selected a query.
4. Type or paste the query text into the text box.
5. Click Profile Query.
HP Vertica reruns the query. An error occurs if:
n The query is invalid.
n The query begins with a comment.
n The query contains hints.
If you enter more than one query, Management Console profiles only the first query.
Note:While HP Vertica is re-executing and profiling the query, aCancel Profiling buttonis enabled for a short time, allowing you to cancel the profiling task. If theCancelProfiling button is disabled, theManagement Console does not have the properinformation to cancel the query or the query is no longer running in the database. You cancancel the profiling task only when theCancel Profiling button is enabled.
When processing completes, the profile data andmetrics display below the text box. The piechart shows data for each phase of the query plan, andmetrics for each query path appear nextto the query path in the query plan.
Expanding and collapsing query path profile dataWhen you have a query on the EXPLAIN window, the profile data displays in the right-hand side ofthe lower half of the window. The query path information can be lengthy, so you can collapse pathinformation that is uninteresting, or expand paths that you want to focus on.
l To collapse all the query paths, click Collapse All.
l To expand all the query paths, click Expand All.
l To expand an individual query path so you can see details about that step in processing thequery, click the first line of the path information. Click the first line again to collapse the pathdata.
For information about what the profile datameans, see About Profile Data in Management Console.
Administrator's GuideProfiling Database Performance
HP Vertica Analytics Platform (7.0.x) Page 913 of 969

About Profile Data in Management ConsoleAfter you request EXPLAIN and profile data for a specific query, theManagement Console Explainpage looks as follows:
There are several kinds of profile data you can review on theManagement ConsoleExplain page:
l Projectionmetadata
l Query phase duration
l Profile metrics
l Execution events
l Optimizer events
The projectionmetadata, execution events, and optimizer events data are only available after youprofile the query.
Projection metadataTo view projectionmetadata for a specific projection, click the projection name in theEXPLAIN output. Metadata for that projection opens in a pop-up window.
To view projection data for all projections accessed by that query, click theView ProjectionMetadata button at the top of the page. Themetadata for all projections opens in a new browserwindow.
Administrator's GuideProfiling Database Performance
HP Vertica Analytics Platform (7.0.x) Page 914 of 969

Note: If theView Projection Metadatabutton is not enabled, click Profile Query to retrievethe profile data, including the projectionmetadata.
The projectionmetadata includes the following information:
l Projection ID
l Schema name
l Whether or not it is a superprojection
l Whether or not it is a pre-join projection.
l Whether or not it is segmented
l Whether or not it is up to date
l Whether or not it has statistics
l IDs of the nodes the projection is stored on
l Sort columns
l Owner name
l Anchor table name
To display a SQL script that can recreate the projection on a different cluster, click Click to getexport data to the right of any projection. This script is identical to the output of the EXPORT_OBJECTS function. The SQL script opens in a pop-up window.
Copy and paste the command from this window, and click Closewhen finished. When you finishreviewing the projectionmetadata, close the browser window.
Query phase durationThe pie chart in the upper-right corner of theExplainwindow shows what percentage of total queryprocessing was spent in each phase of processing the query.
The phases included in the pie chart (when applicable) are:
l Plan
l InitPlan
l SerializePlan
l PopulateVirtualProjection
l PreparePlan
Administrator's GuideProfiling Database Performance
HP Vertica Analytics Platform (7.0.x) Page 915 of 969

l CompilePlan
l ExecutePlan
l AbandonPlan
Hover over the slices on the pie chart or over the names of the phases in the box to get theapproximate number of milliseconds (ms) used during each phase.
Note: The time data in the profile metrics might not match the times in the query phaseduration because the query phase duration graph uses the longest execution time for a givenphase from all the nodes. Further noisemay be added through network latency, which is nottaken into account in these calculations.
Profile metricsThe area to the right of each query path contains profile metrics for that path.
l Disk—Bytes of data accessed from disks by each query path. If none of the query pathsaccessed the disk data, all the values are 0.
l Memory—Bytes of data accessed frommemory by each query path.
l Sent—Bytes of data sent across the cluster by this query path.
l Received—Bytes of data received across the cluster by this query path.
l Time—Number of milliseconds (ms) that this query path took to process on a given node. Thesum of this data does not match the total time it tooks to execute the query becausemany tasksare executed in parallel on different nodes.
Note: The time data in the profile metrics might not match the times in the Query phaseduration data because the query phase duration graph uses the longest execution time for agiven phase from all the nodes. Further noisemay be added through network latency, whichis not taken into account in these calculations.
Execution eventsTo help youmonitor your database system, HP Vertica logs significant events that affect databaseperformance and functionality.Click View Execution Events to see information about the eventsthat took place while the query was executed.
Note: If theView Execution Events button is not enabled, click Profile Query to retrievethe profile data, including the execution events.
Administrator's GuideProfiling Database Performance
HP Vertica Analytics Platform (7.0.x) Page 916 of 969

The arrows on the header of each column allow you to sort the table in ascending or descendingorder of that column.
The execution events are described in the following table.
Event characteristic Details
Time Clock time when the event took place.
Node name Name of the node for which information is listed
Session ID Identifier of the session for which profile information is captured
User ID Identifier of the user who initiated the query
Request ID Unique identifier of the query request in the user session.
Event type Type of event processed by the execution engine. Examples include butare not limited to:
l PREDICATE OUTSIDE HISTOGRAM
l NOHISTOGRAM
l MEMORY LIMIT HIT
l GROUP_BY_SPILLED
l JOIN_SPILLED
l PARTITIONS_ELIMINATED
l MERGE_CONVERTED_TO_UNION
Event description Generic description of the event
Operator name Name of the Execution Engine component that generated the event.Examples include but are not limited to:
l DataSource
l DataTarget
l NetworkSend
l NetworkRecv
l StorageUnion
Values from theOperator name and Path ID columns let you tie a queryevent back to a particular operator in the EXPLAIN plan. If the event didnot come from a specific operator, this column is NULL.
Administrator's GuideProfiling Database Performance
HP Vertica Analytics Platform (7.0.x) Page 917 of 969

Path ID Unique identifier that HP Vertica assigns to a query operation or a pathin a query plan. If the event did not come from a specific operator, thiscolumn is NULL.
Event OID A unique ID that identifies the specific event.
Event details A brief description of the event and details pertinent to the specificsituation.
Suggested action Recommended actions (if any) to improve query processing.
Optimizer eventsTo help youmonitor your database system, HP Vertica logs significant events that affect databaseperformance and functionality.Click View Optimizer Events to see information about the eventsthat took place while the optimizer was planning the query.
Note: If theView Optimizer Events button is not enabled, click Profile Query to retrieve theprofile data, including the optimizer events.
The arrows on the header of each column allow you to sort the table in ascending or descendingorder of that column.
The optimizer events are described in the following table.
Event characteristic Details
Time Clock time when the event took place.
Node name Name of the node for which information is listed.
Session ID Identifier of the session for which profile information is captured.
User ID Identifier of the user who initiated the query.
Request ID Unique identifier of the query request in the user session.
Event type Type of event processed by the optimizer.
Event description Generic description of the event.
Event OID A unique ID that identifies the specific event.
Event details A brief description of the event and details pertinent to the specificsituation.
Suggested action Recommended actions (if any) to improve query processing.
Administrator's GuideProfiling Database Performance
HP Vertica Analytics Platform (7.0.x) Page 918 of 969

Clearing Query DataWhen you have finished reviewing the current query data, click Clear All to clear the query text anddata. Alternatively, to display information about another query, enter the query text and clickExplain Plan orProfile Query.
Viewing Profile Data in vsqlThere are several ways to view profile data using vsql commands:
l How to profile a single statement
l How to save query plan information
l Sample views for counter information
l About Real-Time Profiling
l How to label queries for profiling
How to profile a single statementTo profile a single statement, add the PROFILE keyword to the beginning of the statement, whichsaves profiling information for future analysis:
=> PROFILE SELECT customer_name, annual_incomeFROM public.customer_dimensionWHERE (customer_gender, annual_income) IN (SELECT customer_gender, MAX(annual_income)FROM public.customer_dimensionGROUP BY customer_gender);
While a query is executing, a notice and hint display in the terminal window. For example, thepreceding query returns the following:
NOTICE 4788: Statement is being profiledHINT: Select * from v_monitor.execution_engine_profiles where transaction_id=45035996273726389 and statement_id=10;NOTICE 3557: Initiator memory for query: [on pool general: 732168 KB, minimum: 451218 KB]NOTICE 5077: Total memory required by query: [732168 KB]customer_name | annual_income
-----------------+---------------James M. McNulty | 999979Emily G. Vogel | 999998(2 rows)
Tip: Use the statement returned by the hint as a starting point for reviewing the query'sprofiling data, such as to see what counters are available.
Administrator's GuideProfiling Database Performance
HP Vertica Analytics Platform (7.0.x) Page 919 of 969

Real-Time Profiling ExampleThe following sample statement requests the operators with the largest execution time on eachnode:
=> SELECT node_name, operator_name, counter_valueexecution_time_usFROM v_monitor.execution_engine_profilesWHERE counter_name='execution time (us)'ORDER BY node_name, counter_value DESC;
How to Use the Linux watch CommandYou can use the Linux watch command tomonitor long-running queries with one-second updates;for example:
WATCH -n 1 -d "vsql-c \"select node_name, operator_name, counter_valueexecution_time_us... \""
How to Find Out Which Counters are AvailableHP Vertica keeps track of the following counters during query execution:
=> SELECT DISTINCT(counter_name) FROM EXECUTION_ENGINE_PROFILES;counter_name
-----------------------------------------------------estimated rows producedbytes spilledrle rows producedjoin inner current size of temp files (bytes)request wait (us)start timeintermediate rows to processproducer wait (us)rows segmentedconsumer stall (us)bytes sentrows sentjoin inner completed merge phasesencoded bytes receivedcumulative size of raw temp data (bytes)end timebytes read from cachetotal merge phasesrows pruned by valindexcumulative size of temp files (bytes)output queue wait (us)rows to processinput queue wait (us)rows processedmemory allocated (bytes)
Administrator's GuideProfiling Database Performance
HP Vertica Analytics Platform (7.0.x) Page 920 of 969

join inner cumulative size of temp files (bytes)current size of temp files (bytes)join inner cumulative size of raw temp data (bytes)bytes receivedfile handlesbytes read from diskjoin inner total merge phasescompleted merge phasesmemory reserved (bytes)clock time (us)response wait (us)network wait (us)rows receivedencoded bytes sentexecution time (us)producer stall (us)buffers spilledrows produced
(43 rows)
Sample views for counter informationThe EXECUTION_ENGINE_PROFILES table contains the data for each profiling counter as a rowwithin the table. For example, the execution time (us) counter is in one row, and the rows producedcounter is in a second row. Since there aremany different profiling counters, many rows of profilingdata exist for each operator. Some sample views are installed by default to simplify the viewing ofprofiling counters.
Running scripts to create the sample viewsThe following script creates the v_demo schema and places the views in that schema.
/opt/vertica/scripts/demo_eeprof_view.sql
Viewing counter values using the sample viewsThere is one view for each of the profiling counters to simplify viewing of a single counter value. Forexample, to view the execution time for all operators, issue the following command from thedatabase:
=> SELECT * FROM v_demo.eeprof_execution_time_us;
To view all counter values available for all profiled queries:
=> SELECT * FROM v_demo.eeprof_counters;
To select all distinct operators available for all profiled queries:
Administrator's GuideProfiling Database Performance
HP Vertica Analytics Platform (7.0.x) Page 921 of 969

=> SELECT * FROM v_demo.eeprof_operators;
Combining sample viewsThese views can be combined:
=> SELECT * FROM v_demo.eeprof_execution_time_usNATURAL LEFT OUTER JOIN v_demo.eeprof_rows_produced;
To view the execution time and rows produced for a specific transaction and statement_id rankedby execution time on each node:
=> SELECT * FROM v_demo.eeprof_execution_time_us_rankWHERE transaction_id=45035996273709699AND statement_id=1ORDER BY transaction_id, statement_id, node_name, rk;
To view the top five operators by execution time on each node:
=> SELECT * FROM v_demo.eeprof_execution_time_us_rankWHERE transaction_id=45035996273709699AND statement_id=1 AND rk<=5ORDER BY transaction_id, statement_id, node_name, rk;
Viewing real-time profile dataYou can query real-time profiling data during execution runs for a long-running query or otheroperation. The demo view v_demo.eeprof_execution_time_us_rank is helpful for viewing thecurrent top five operators by execution time prior to the query completing:
=> SELECT * FROM v_demo.eeprof_execution_time_us_rankWHERE transaction_id=45035996273709699 AND statement_id=1 AND rk<=5ORDER BY transaction_id, statement_id, node_name, rk;
The Linux watch command is useful for long-running queries or long-running internal operations byobserving which part of the query plan is currently active:
=> watch -d -n 2 “vsql -c \”=> SELECT * FROM v_demo.eeprof_execution_time_us_rank
WHERE transaction_id=45035996273709699 AND statement_id=1 AND rk<=5ORDER BY transaction_id, statement_id, node_name, rk;\” ”
This watch command executes the query every two seconds and highlights the differencesbetween successive updates.
Tip: Using watch is a convenient way tomonitor the currently executing operators within the
Administrator's GuideProfiling Database Performance
HP Vertica Analytics Platform (7.0.x) Page 922 of 969

plan on each nodes in the HP Vertica cluster. watch is also a convenient way tomonitorworkloads that might be unbalanced between nodes. For example, if some nodes become idlewhile other nodes are still active. Such imbalances could be caused by data skews or byhardware issues.
See Alsol Profiling query plans
How to label queries for profilingTo quickly identify queries for profiling and debugging, you can pass a user-defined label to an HPVertica query as a hint.
Query labels must have the following characteristics:
l All characters must be alphanumeric with any number of underscores (_) and dollar signs ($)
l Themaximum label length is 128 octets
l The label cannot contain space characters
l The first character cannot be numeric
Label syntaxLabels take the following form:
/*+label(label_name)*/
You can use optional spaces before and after the plus sign in label hints (between the /* and the +).For example, HP Vertica accepts each of the following directives:
/*+label(label_name)*//* + label(label_name)*//*+ label(label_name)*//*+label(label_name) */
ExampleHere's an example of some simple label hints and their associated queries:
SELECT /*+label(myselectquery)*/ COUNT(*) FROM t;INSERT /*+label(myinsertquery)*/ INTO t VALUES(1);UPDATE /*+label(myupdatequery)*/ t SET a = 2 WHERE a = 1;DELETE /*+label(mydeletequery)*/ FROM t WHERE a = 1;SELECT /*+ label(abc123) */table_name FROM system_tables LIMIT 5;
Administrator's GuideProfiling Database Performance
HP Vertica Analytics Platform (7.0.x) Page 923 of 969

After you added a label to one or more queries, query the QUERY_PROFILES system table to seewhich queries ran with your supplied labels.
TheQUERY_PROFILES system table IDENTIFIER column returns the user-defined label that youpreviously assigned to a query. Here's an example of the table's putput using the query lables
=> SELECT identifier, query FROM query_profiles;identifier | query
---------------+-----------------------------------------------------------myselectquery | SELECT /*+label(myselectquery)*/ COUNT(*) FROM t;myinsertquery | INSERT /*+label(myinsertquery)*/ INTO t VALUES(1);myupdatequery | UPDATE /*+label(myupdatequery)*/ t SET a = 2 WHERE a = 1;mydeletequery | DELETE /*+label(mydeletequery)*/ FROM t WHERE a = 1;
| SELECT identifier, query from query_profiles;(5 rows)
Administrator's GuideProfiling Database Performance
HP Vertica Analytics Platform (7.0.x) Page 924 of 969

Profiling query plansTomonitor real-time flow of data through a query plan, query the V_MONITOR.QUERY_PLAN_PROFILES system table. Information returned by this table is useful for letting you know what aquery didwhen, which occurs throughout a plan in a series of steps, called paths. Each path has anassociated PATH ID, as illustrated in the following EXPLAIN command fragment.
The same PATH ID is shared among EXPLAIN plans, join error messages, and EXECUTION_ENGINE_PROFILES andQUERY_PLAN_PROFILES system tables, making it easy to quicklytrace issues to their root cause.
For each PATH ID, the QUERY_PLAN_PROFILES system table provides a high-level summaryof:
l The time a particular query operation took to execute
l How muchmemory that path's operation consumed
l Size of data sent/received over the network
l Whether the path operation is executing
For example, youmight observe that a GROUP BY HASH operation executed in 0.2 seconds using100MB of memory.
Note: Real-time status is available in QUERY_PLAN_PROFILES system table output only; itis not available in EXPLAIN plan output.
What you need for query plan profilingIn order to view real-time profiling data, you need, at aminimum, the transaction_id for thetransaction you want to monitor. If multiple statements executed in the same transaction, you alsoneed the statement_id. You can get both statement and transaction IDs by issuing the PROFILE<query> command, as well as by querying the CURRENT_SESSION system table, as in thefollowing example:
=> SELECT transaction_id, statement_id from current_session;transaction_id | statement_id
-------------------+--------------45035996273955001 | 4
Administrator's GuideProfiling Database Performance
HP Vertica Analytics Platform (7.0.x) Page 925 of 969

(1 row)
Transaction IDs for internal operations, such asmergeout, recovery, and refresh, are stored in thevertica.log files.
See Alsol Understanding Query Plans
l Collecting Database Statistics
l AnalyzingWorkloads
How to get query plan status for small queriesReal-time profiling counters, stored in the EXECUTION_ENGINE_PROFILES system table, areavailable for all currently executing statements—including internal operations, such as amergeout.
Profiling counters are available after query execution has completed if any of the followingconditions are true:
l The query was run via the PROFILE <query> command
l Systemwide profiling has been enabled through the ENABLE_PROFILING() function
l The query took longer than two seconds to run
Profiling counters are saved in the EXECUTION_ENGINE_PROFILES system table until thestorage quota has been exceeded.
Here's an example:
1. Profile the query to get the transaction_id and statement_id from from EXECUTION_ENGINE_PROFILES; for example:
=> PROFILE SELECT * FROM t1 JOIN t2 ON t1.x = t2.y;NOTICE 4788: Statement is being profiledHINT: Select * from v_monitor.execution_engine_profiles where transaction_id=45035996273955065 and statement_id=4;NOTICE 3557: Initiator memory for query: [on pool general: 248544 KB, minimum: 248544 KB]NOTICE 5077: Total memory required by query: [248544 KB]x | y | z
---+---+-------3 | 3 | three
(1 row)
2. Query the QUERY_PLAN_PROFILES system table.
Administrator's GuideProfiling Database Performance
HP Vertica Analytics Platform (7.0.x) Page 926 of 969

Note: For best results, sort on the transaction_id, statement_id, path_id, and path_line_index columns.
=> SELECT ... FROM query_plan_profilesWHERE transaction_id=45035996273955065 and statement_id=4;ORDER BY transaction_id, statement_id, path_id, path_line_index;
How to get query plan status for large queriesReal-time profiling is designed tomonitor large (long-running) queries. Take the following steps tomonitor plans for large queries:
1. Get the statement and transaction IDs for the query plan you want to profile by querying theCURRENT_SESSION system table:
=> SELECT transaction_id, statement_id from current_session;transaction_id | statement_id
-------------------+--------------45035996273955001 | 4
(1 row)
2. Run the query:
=> SELECT * FROM t1 JOIN t2 ON x=y JOIN ext on y=z;
3. Query the QUERY_PLAN_PROFILES system table, and sort on the transaction_id,statement_id, path_id, and path_line_index columns.
=> SELECT ... FROM query_plan_profilesWHERE transaction_id=45035996273955001 and statement_id=4
ORDER BY transaction_id, statement_id, path_id, path_line_index;
You can also use the Linux watch command tomonitor long-running queries with two-secondupdates. See Viewing real-time profile data.
Example
The following series of commands creates a table for a long-running query and then runs theQUERY_PLAN_PROFILES system table:
=> CREATE TABLE longq(x int);CREATE TABLE=> COPY longq FROM STDIN;
Administrator's GuideProfiling Database Performance
HP Vertica Analytics Platform (7.0.x) Page 927 of 969

Enter data to be copied followed by a newline.End with a backslash and a period on a line by itself.>> 1>> 2>> 3>> 4>> 5>> 6>> 7>> 8>> 9>> 10>> \.=> INSERT INTO longq SELECT f1.x+f2.x+f3.x+f4.x+f5.x+f6.x+f7.x
FROM longq f1CROSS JOIN longq f2CROSS JOIN longq f3CROSS JOIN longq f4CROSS JOIN longq f5CROSS JOIN longq f6CROSS JOIN longq f7;
OUTPUT----------10000000
(1 row)=> COMMIT;COMMIT
Suppress query output on the terminal window by using the vsql \o command:
=> \o /home/dbadmin/longQprof
Query the new table:
=> SELECT * FROM longq;
Get the transaction and statement IDs:
=> SELECT transaction_id, statement_id from current_session;transaction_id | statement_id
-------------------+--------------45035996273955021 | 4
(1 row)
Turn off the \o command so that HP Vertica continues to save query plan information to the file youspecified. Alternatively, leave it on and examine the file after you query the QUERY_PLAN_PROFILES system table.
=> \o
Query the QUERY_PLAN_PROFILES system table;
Administrator's GuideProfiling Database Performance
HP Vertica Analytics Platform (7.0.x) Page 928 of 969

=> SELECTtransaction_id,statement_id,path_id,path_line_index,is_executing,running_time,path_line
FROM query_plan_profilesWHERE transaction_id=45035996273955021 AND statement_id=4ORDER BY transaction_id, statement_id, path_id, path_line_index;
Improving the readability of QUERY_PLAN_PROFILESoutput
Output from theQUERY_PLAN_PROFILES table can be very wide because of the path_linecolumn, so for best results and optimal readability, when you query the QUERY_PLAN_PROFILES table, consider using one or more of the followingmethods:
l Sort the system table output by transaction_id, statement_id, path_id, and path_line_index, as in this example:
=> SELECT ... FROM query_plan_profilesWHERE ...
ORDER BY transaction_id, statement_id, path_id, path_line_index;
l Consider using column aliases to decrease columnwidth, as in the following sample query:
=> SELECT statement_id AS sid, path_id AS id, path_line_index AS order,is_started AS start, is_completed AS end, is_executing AS exe,running_time AS run, memory_allocated_bytes AS mem,read_from_disk_bytes AS read, received_bytes AS rec,sent_bytes AS sent, FROM query_plan_profilesWHERE transaction_id=45035996273910558 AND statement_id=3ORDER BY transaction_id, statement_id, path_id, path_line_index;;
l Suppress output from the screen and save profiling data to a file by using the vsql \o command.For example:
a. Turn on the \o command.
=> \o /home/dbadmin/long-queries
b. Run the query using the EXPLAIN command.
=> EXPLAIN SELECT * FROM customer_dimension;
Administrator's GuideProfiling Database Performance
HP Vertica Analytics Platform (7.0.x) Page 929 of 969

c. Turn off the \o command.
=> \o
SeeHow to save query plan information for details.
Managing query profile dataHP Vertica retains data for queries until the storage quota for the table is exceeded, when itautomatically purges the oldest queries tomake room for new ones. You can clear profiled data bymanually calling one of the following functions:
l CLEAR_PROFILING() clears profiled data frommemory. For example, the following commandclears profiling for general query-run information, such as the query strings used and the durationof queries.
=> SELECT CLEAR_PROFILING('query');
l CLEAR_DATA_COLLECTOR() clears all memory and disk records on the Data Collector tablesand functions and resets collection statistics in the V_MONITOR.DATA_COLLECTOR systemtable.
l FLUSH_DATA_COLLECTOR() waits until memory logs aremoved to disk and then flushes theData Collector, synchronizing the DataCollector log with the disk storage.
Configuring data retention policies
HP Vertica retains the historical data it gathers based on retention policies, which a superuser canconfigure. See RetainingMonitoring Information.
Reacting to suboptimal query plansIf profiling uncovers a suboptimal query, invoking one of the following functions might help:
l ANALYZE_WORKLOAD() analyzes system information held in system tables and providestuning recommendations that are based on a combination of statistics, system and datacollector events, and database-table-projection design.
l ANALYZE_STATISTICS() and ANALYZE_HISTOGRAM() both collect and aggregates datasamples and storage information from all nodes that store projections associated with thespecified table or columnwith one primary difference:
n ANALYZE_STATISTICS uses a fixed-size statistical data sampling (10% per disk). Thisfunction returns results quickly, but it is less accurate than using ANALYZE_HISTOGRAM toget a larger sampling of disk data.
Administrator's GuideProfiling Database Performance
HP Vertica Analytics Platform (7.0.x) Page 930 of 969

n ANALYZE_HISTOGRAM takes a user-specified percentage of disk data sampling (from 1 -100). If you analyzemore than 10 percent data per disk, this function returns more accuratedata than ANALYZE_STATISTICS, but it takes proportionately longer to return statistics.
You can also run your query through the Database Designer. See Creating an Incremental DesignUsing the .
Administrator's GuideProfiling Database Performance
HP Vertica Analytics Platform (7.0.x) Page 931 of 969

Page 932 of 969HP Vertica Analytics Platform (7.0.x)
Administrator's GuideProfiling Database Performance

About LocalesHP Vertica supports the following internationalization features:
Unicode Character Encoding: UTF-8 (8-bitUCS/Unicode Transformation Format)
UTF-8 is an abbreviation for Unicode Transformation Format-8 (where 8 equals 8-bit) and is avariable-length character encoding for Unicode created by Ken Thompson and Rob Pike. UTF-8can represent any universal character in the Unicode standard, yet the initial encoding of bytecodes and character assignments for UTF-8 is coincident with ASCII (requiring little or no changefor software that handles ASCII but preserves other values).
All input data received by the database server is expected to be in UTF-8, and all data output by HPVertica is in UTF-8. TheODBC API operates on data in UCS-2 onWindows systems, and normallyUTF-8 on Linux systems. (A UTF-16ODBC driver is available for use with the DataDirect ODBCmanager.) JDBC and ADO.NET APIs operate on data in UTF-16. The client drivers automaticallyconvert data to and from UTF-8 when sending to and receiving data from HP Vertica using APIcalls. The drivers do not transform data loaded by executing a COPY or COPY LOCAL statement.
LocalesThe locale is a parameter that defines the user's language, country, and any special variantpreferences, such as collation. HP Vertica uses the locale to determine the behavior of variousstring functions as well for collation for various SQL commands that require ordering andcomparison; for example, GROUP BY, ORDER BY, joins, the analytic ORDER BY clause, and soforth.
By default, the locale for the database is en_US@collation=binary (English US). You canestablish a new default locale that is used for all sessions on the database, as well as overrideindividual sessions with different locales. Additionally the locale can be set throughODBC, JDBC,and ADO.net.
See the following topics in the Administrator's Guide
l Implement Locales for International Data Sets
l Supported Locales
l Appendix
Notesl Projections are always collated using the en_US@collation=binary collation regardless of the
session collation. Any locale-specific collation is applied at query time.
Administrator's GuideAbout Locales
HP Vertica Analytics Platform (7.0.x) Page 933 of 969

l Themaximum length parameter for VARCHAR andCHAR data type refers to the number ofoctets (bytes) that can be stored in that field and not number of characters. When usingmulti-byte UTF-8 characters, the fields must be sized to accommodate from 1 to 4 bytes percharacter, depending on the data.
l When the locale is non-binary, the collation function is used to transform the input to a binarystring which sorts in the proper order.
This transformation increases the number of bytes required for the input according to thisformula:
result_column_width = input_octet_width * CollationExpansion + 4
CollationExpansion defaults to 5.
Locale Aware String FunctionsHP Vertica provides string functions to support internationalization. Unless otherwise specified,these string functions can optionally specify whether VARCHAR arguments should be interpretedas octet (byte) sequences, or as (locale-aware) sequences of characters. You do this by adding"USINGOCTETS" and "USINGCHARACTERS" (default) as a parameter to the function. Thefollowing is the full list of string functions that are locale aware:
l BTRIM removes the longest string consisting only of specified characters from the start and endof a string.
l CHARACTER_LENGTH returns an integer value representing the number of characters oroctets in a string.
l GREATEST returns the largest value in a list of expressions.
l GREATESTB returns its greatest argument, using binary ordering, not UTF-8 characterordering.
l INITCAP capitalizes first letter of each alphanumeric word and puts the rest in lowercase.
l INSTR searches string for substring and returns an integer indicating the position of thecharacter in string that is the first character of this occurrence.
l LEAST returns the smallest value in a list of expressions.
l LEASTB returns its least argument, using binary ordering, not UTF-8 character ordering.
l LEFT returns the specified characters from the left side of a string.
l LENGTH takes one argument as an input and returns returns an integer value representing thenumber of characters in a string.
Administrator's GuideAbout Locales
HP Vertica Analytics Platform (7.0.x) Page 934 of 969

l LTRIM returns a VARCHAR value representing a string with leading blanks removed from theleft side (beginning).
l OVERLAY returns a VARCHAR value representing a string having had a substring replaced byanother string.
l OVERLAYB returns an octet value representing a string having had a substring replaced byanother string.
l REPLACE replaces all occurrences of characters in a string with another set of characters.
l RIGHT returns the length right-most characters of string.
l SUBSTR returns a VARCHAR value representing a substring of a specified string.
l SUBSTRB returns a byte value representing a substring of a specified string.
l SUBSTRING given a value, a position, and an optional length, returns a value representing asubstring of the specified string at the given position.
l TRANSLATE replaces individual characters in string_to_replacewith other characters.
l UPPER returns a VARCHAR value containing the argument converted to uppercase letters.
UTF-8 String FunctionsStarting in Release 5.1, the following string functions treat the the VARCHAR arguments as UTF-8strings (when "USINGOCTETS" is not specified) regardless of the locale setting.
l LOWER returns a VARCHAR value containing the argument converted to lowercase letters.
l UPPER returns a VARCHAR value containing the argument converted to uppercase letters.
l INITCAP capitalizes first letter of each alphanumeric word and puts the rest in lowercase.
l INSTR searches string for substring and returns an integer indicating the position of thecharacter in string that is the first character of this occurrence.
l SPLIT_PART splits string on the delimiter and returns the location of the beginning of the givenfield (counting from one).
l POSITION returns an integer value representing the character location of a specified substringwith a string (counting from one).
l STRPOS returns an integer value representing the character location of a specified substringwithin a string (counting from one).
Administrator's GuideAbout Locales
HP Vertica Analytics Platform (7.0.x) Page 935 of 969

Locale SpecificationThe locale is a parameter that defines the user's language, country, and any special variantpreferences, such as collation. HP Vertica uses the locale to determine the behavior of variousstring functions as well for collation for various SQL commands that require ordering andcomparison; for example, GROUP BY, ORDER BY, joins, the analytic ORDER BY clause, and soforth.
By default, the locale for the database is en_US@collation=binary (English US). You canestablish a new default locale that is used for all sessions on the database, as well as overrideindividual sessions with different locales. Additionally the locale can be set throughODBC, JDBC,and ADO.net.
HP Vertica locale specifications follow a subset of the Unicode LDML standard as implemented bythe ICU library.
Locales are specified using long or short forms.
Long FormThe long form uses full keyname pair/value names.
Syntax[language][_script][_country][_variant][@keyword=type[;keyword=type]...]
Note: Only collation-related keywords are supported by HP Vertica 4.0.
Parameters
language A two- or three-letter lowercase code for a particular language. For example, Spanishis "es", English is "en" and French is "fr". The two-letter language code uses the ISO-639 standard.
_script An optional four-letter script code that follows the language code. If specified, it shouldbe a valid script code as listed on the Unicode ISO 15924 Registry.
_country A specific language convention within a generic language for a specific country orregion. For example, French is spoken inmany countries, but the currencies aredifferent in each country. To allow for these differences among specific geographical,political, or cultural regions, locales are specified by two-letter, uppercase codes. Forexample, "FR" represents France and "CA" represents Canada. The two letter countrycode uses the ISO-3166 standard.
Administrator's GuideAbout Locales
HP Vertica Analytics Platform (7.0.x) Page 936 of 969

_variant Differences may also appear in language conventions used within the same country.For example, the Euro currency is used in several European countries while theindividual country's currency is still in circulation. To handle variations inside alanguage and country pair, add a third code, the variant code. The variant code isarbitrary and completely application-specific. ICU adds "_EURO" to its localedesignations for locales that support the Euro currency. Variants can have any numberof underscored key words. For example, "EURO_WIN" is a variant for the Eurocurrency on aWindows computer.
Another use of the variant code is to designate the Collation (sorting order) of a locale.For instance, the "es__TRADITIONAL" locale uses the traditional sorting order whichis different from the default modern sorting of Spanish.
Administrator's GuideAbout Locales
HP Vertica Analytics Platform (7.0.x) Page 937 of 969

keyword Use optional keywords and their values to specify collation order and currency insteadof variants (as desired). If used, keywords must be unique, but their order is notsignificant. If a keyword is unknown or unsupported an error is reported. Keywords andvalues are not case sensitive.
HP Vertica supports the following keywords:
Administrator's GuideAbout Locales
HP Vertica Analytics Platform (7.0.x) Page 938 of 969

KeywordShortform Description
collation K If present, the collation keywordmodifies how the collationservice searches through the locale data when instantiating acollator. Collation supports the following values:
l big5han—Pinyin ordering for Latin, big5 charset ordering forCJK characters (used in Chinese).
l dict — For a dictionary-style ordering (such as in Sinhala).
l direct —Hindi variant.
l gb2312/gb2312han—Pinyin ordering for Latin, gb2312hancharset ordering for CJK characters (used in Chinese).
l phonebook —For a phonebook-style ordering (such as inGerman).
l pinyin—Pinyin ordering for Latin and for CJK characters;that is, an ordering for CJK characters based on a character-by-character transliteration into a pinyin (used in Chinese).
l reformed—Reformed collation (such as in Swedish).
l standard—The default ordering for each language. For rootit is [UCA] order; for each other locale it is the same as UCA(Unicode Collation Algorithm) ordering except forappropriate modifications to certain characters for thatlanguage. The following are additional choices for certainlocales; they have effect only in certain locales.
l stroke—Pinyin ordering for Latin, stroke order for CJKcharacters (used in Chinese) not supported.
l traditional — For a traditional-style ordering (such as inSpanish).
l unihan—Pinyin ordering for Latin, Unihan radical-strokeordering for CJK characters (used in Chinese) notsupported.
l binary — the HP Vertica default, providing UTF-8 octetordering, compatible with HP Vertica 3.5.
l
Administrator's GuideAbout Locales
HP Vertica Analytics Platform (7.0.x) Page 939 of 969

Collation Keyword ParametersThe following parameters support the collation keyword:
ParameterShortform Description
colstrength S Sets the default strength for comparison. This feature is localedependant.
Values can be any of the following:
l 1 (primary)— Ignores case and accents. Only primarydifferences are used during comparison. For example, "a"versus "z".
l 2 (secondary)— Ignores case. Only secondary and abovedifferences are considered for comparison. For example,different accented forms of the same base letter ("a" versus"\u00E4").
l 3 (tertiary)— Is the default. Only tertiary and abovedifferences are considered for comparison. Tertiarycomparisons are typically used to evaluate casedifferences. For example "Z" versus "z".
l 4 (quarternary)—Used with Hiragana, for example.
l 5 (identical)—All differences are considered significantduring comparison.
colAlternate A Sets alternate handling for variable weights, as described inUCA.
Values can be any of the following:
l Non-ignorable (short form N or D)
l Shifted (short form S)
Administrator's GuideAbout Locales
HP Vertica Analytics Platform (7.0.x) Page 940 of 969

ParameterShortform Description
colBackwards F For Latin with accents, this parameter determines whichaccents are sorted. It sets the comparison for the second levelto be backwards.
Note: colBackwards is automatically set for French accents.
If on (short form O), then the normal UCA algorithm is used. Ifoff (short form X), then all strings that are in Fast C or DNormalization Form (FCD http://unicode.org/notes/tn5/#FCD-Test) sort correctly, but others do not necessarily sortcorrectly. So it should only be set off if the the strings to becompared are in FCD.
colNormalization N If on (short form O), then the normal UCA algorithm is used. Ifoff (short form X), all strings that are in [FCD] sort correctly, butothers won't necessarily sort correctly. So it should only be setoff if the strings to be compared are in FCD.
colCaseLevel E If set to on (short form O), a level consisting only of casecharacteristics is inserted in front of tertiary level. To ignoreaccents but take cases into account, set strength to primaryand case level to on. If set to off (short form X), this level isomitted.
colCaseFirst C If set to upper (short form U), causes upper case to sort beforelower case. If set to lower (short form L)), lower case sortsbefore upper case. This is useful for locales that have alreadysupported ordering but require different order of cases. Itaffects case and tertiary levels.
If set to off (short form X), tertiary weights are not affected.
colHiraganaQuarternary H Controls special treatment of Hiragana code points onquaternary level. If turned on (short form O), Hiraganacodepoints get lower values than all the other non-variablecode points. The strengthmust be greater or equal thanquaternary for this attribute to take effect. If turned off (shortform X), Hiragana letters are treated normally.
colNumeric D If set to on, any sequence of Decimal Digits (General_Category = Nd in the [UCD]) is sorted at a primary level with itsnumeric value. For example, "A-21" < "A-123".
variableTop B If set to on, any sequence of Decimal Digits (General_Category = Nd in the [UCD]) is sorted at a primary level with itsnumeric value. For example, "A-21" < "A-123".
Administrator's GuideAbout Locales
HP Vertica Analytics Platform (7.0.x) Page 941 of 969

Notesl Locale specification strings are case insensitive. The following are all equivalent: en_us, EN_
US, and En_uS.
l You can substitute underscores with hyphens. For example: [-script]
l The ICU library works by adding options, such as S=1 separately after the long-form locale hasbeen accepted. HP Vertica has extended its long-form processing to accept options askeywords, as suggested by the Unicode Consortium.
l Collations may default to root, the ICU default collation.
l Incorrect locale strings are accepted if the prefix can be resolved to a known locale version.
For example, the following works because the language can be resolved:
\locale en_XXINFO: Locale: 'en_XX'INFO: English (XX)INFO: Short form: 'LEN'
l The following does not work because the language cannot be resolved:
\locale xx_XXxx_XX: invalid locale identifier
l Invalid values of the collation keyword and its synonyms do not cause an error. For example, thefollowing does not generate an error. It simply ignores the invalid value:
\locale en_GB@collation=xyzINFO: Locale: 'en_GB@collation=xyz'INFO: English (United Kingdom, collation=xyz)INFO: Short form: 'LEN'
l POSIX-type locales, such as en_US.UTF-8 work to some extent in that the encoding part "UTF-8" is ignored.
l HP Vertica 4.0 uses the icu4c-4_2_1 library to support basic locale/collation processing withsome extensions as noted here. This does not yet meet the current standard for localeprocessing, http://tools.ietf.org/html/rfc5646.
l To learnmore about collation options, consult http://www.unicode.org/reports/tr35/#Locale_Extension_Key_and_Type_Data.
ExamplesThe following specifies a locale for english as used in the United States:
Administrator's GuideAbout Locales
HP Vertica Analytics Platform (7.0.x) Page 942 of 969

en_US
The following specifies a locale for english as used in the United Kingdom:
en_GB
The following specifies a locale for German as used in Deutschland and uses phonebook-stylecollation.
\locale de_DE@collation=phonebookINFO: Locale: 'de_DE@collation=phonebook'INFO: German (Germany, collation=Phonebook Sort Order)INFO: Deutsch (Deutschland, Sortierung=Telefonbuch-Sortierregeln)INFO: Short form: 'KPHONEBOOK_LDE'
The following specifies a locale for German as used in Deutschland. It uses phonebook-stylecollation with a strength of secondary.
\locale de_DE@collation=phonebook;colStrength=secondaryINFO: Locale: 'de_DE@collation=phonebook'INFO: German (Germany, collation=Phonebook Sort Order)INFO: Deutsch (Deutschland, Sortierung=Telefonbuch-Sortierregeln)INFO: Short form: 'KPHONEBOOK_LDE_S2'
Short FormHP Vertica accepts locales in short form. You can use the short form to specify the locale andkeyname pair/value names.
Determining the Short Form of a LocaleTo determine the short form for a locale, type in the long form and view the last line of INFO, asfollows:
\locale frINFO: Locale: 'fr'INFO: FrenchINFO: françaisINFO: Short form: 'LFR'
Specifying a Short Form LocaleThe following example specifies the en (English) locale:
\locale LENINFO: Locale: 'en'INFO: EnglishINFO: Short form: 'LEN'
Administrator's GuideAbout Locales
HP Vertica Analytics Platform (7.0.x) Page 943 of 969
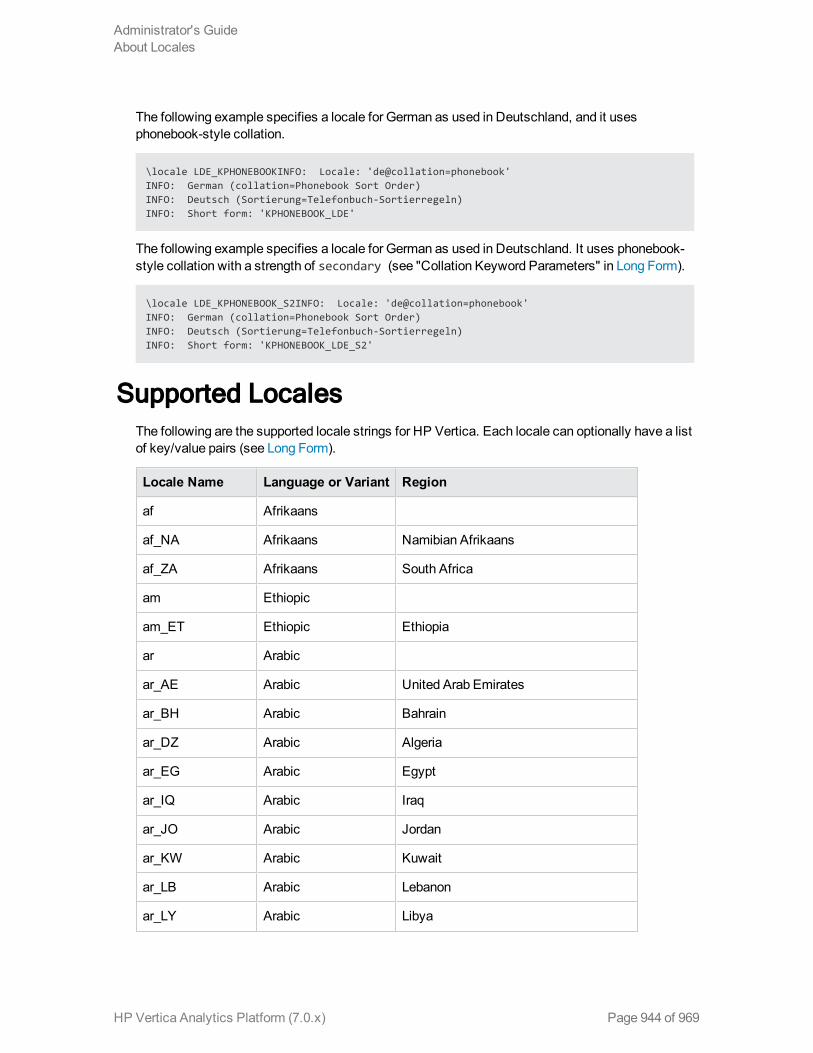
The following example specifies a locale for German as used in Deutschland, and it usesphonebook-style collation.
\locale LDE_KPHONEBOOKINFO: Locale: 'de@collation=phonebook'INFO: German (collation=Phonebook Sort Order)INFO: Deutsch (Sortierung=Telefonbuch-Sortierregeln)INFO: Short form: 'KPHONEBOOK_LDE'
The following example specifies a locale for German as used in Deutschland. It uses phonebook-style collation with a strength of secondary (see "Collation Keyword Parameters" in Long Form).
\locale LDE_KPHONEBOOK_S2INFO: Locale: 'de@collation=phonebook'INFO: German (collation=Phonebook Sort Order)INFO: Deutsch (Sortierung=Telefonbuch-Sortierregeln)INFO: Short form: 'KPHONEBOOK_LDE_S2'
Supported LocalesThe following are the supported locale strings for HP Vertica. Each locale can optionally have a listof key/value pairs (see Long Form).
Locale Name Language or Variant Region
af Afrikaans
af_NA Afrikaans Namibian Afrikaans
af_ZA Afrikaans South Africa
am Ethiopic
am_ET Ethiopic Ethiopia
ar Arabic
ar_AE Arabic United Arab Emirates
ar_BH Arabic Bahrain
ar_DZ Arabic Algeria
ar_EG Arabic Egypt
ar_IQ Arabic Iraq
ar_JO Arabic Jordan
ar_KW Arabic Kuwait
ar_LB Arabic Lebanon
ar_LY Arabic Libya
Administrator's GuideAbout Locales
HP Vertica Analytics Platform (7.0.x) Page 944 of 969

Locale Name Language or Variant Region
ar_MA Arabic Morocco
ar_OM Arabic Oman
ar_QA Arabic Qatar
ar_SA Arabic Saudi Arabia
ar_SD Arabic Sudan
ar_SY Arabic Syria
ar_TN Arabic Tunisia
ar_YE Arabic Yemen
as Assamese
as_IN Assamese India
az Azerbaijani
az_Cyrl Azerbaijani Cyrillic
az_Cyrl_AZ Azerbaijani Azerbaijan Cyrillic
az_Latn Azerbaijani Latin
az_Latn_AZ Azerbaijani Azerbaijan Latin
be Belarusian
be_BY Belarusian Belarus
bg Bulgarian
bg_BG Bulgarian Bulgaria
bn Bengali
bn_BD Bengali Bangladesh
bn_IN Bengali India
bo Tibetan
bo_CN Tibetan PR China
bo_IN Tibetan India
ca Catalan
ca_ES Catalan Spain
Administrator's GuideAbout Locales
HP Vertica Analytics Platform (7.0.x) Page 945 of 969

Locale Name Language or Variant Region
cs Czech
cs_CZ Czech Czech Republic
cy Welsh
cy_GB Welsh United Kingdom
da Danish
da_DK Danish Denmark
de German
de_AT German Austria
de_BE German Belgium
de_CH German Switzerland
de_DE German Germany
de_LI German Liechtenstein
de_LU German Luxembourg
el Greek
el_CY Greek Cyprus
el_GR Greek Greece
en English
en_AU English Australia
en_BE English Belgium
en_BW English Botswana
en_BZ English Belize
en_CA English Canada
en_GB English United Kingdom
en_HK English Hong Kong S.A.R. of China
en_IE English Ireland
en_IN English India
en_JM English Jamaica
Administrator's GuideAbout Locales
HP Vertica Analytics Platform (7.0.x) Page 946 of 969

Locale Name Language or Variant Region
en_MH English Marshall Islands
en_MT English Malta
en_NA English Namibia
en_NZ English New Zealand
en_PH English Philippines
en_PK English Pakistan
en_SG English Singapore
en_TT English Trinidad and Tobago
en_US_POSIX English United States Posix
en_VI English U.S. Virgin Islands
en_ZA English Zimbabwe or South Africa
en_ZW English Zimbabwe
eo Esperanto
es Spanish
es_AR Spanish Argentina
es_BO Spanish Bolivia
es_CL Spanish Chile
es_CO Spanish Columbia
es_CR Spanish Costa Rica
es_DO Spanish Dominican Republic
es_EC Spanish Ecuador
es_ES Spanish Spain
es_GT Spanish Guatemala
es_HN Spanish Honduras
es_MX Spanish Mexico
es_NI Spanish Nicaragua
es_PA Spanish Panama
Administrator's GuideAbout Locales
HP Vertica Analytics Platform (7.0.x) Page 947 of 969

Locale Name Language or Variant Region
es_PE Spanish Peru
es_PR Spanish Puerto Rico
es_PY Spanish Paraguay
es_SV Spanish El Salvador
es_US Spanish United States
es_UY Spanish Uruguay
es_VE Spanish Venezuela
et Estonian
et_EE Estonian Estonia
eu Basque Spain
eu_ES Basque Spain
fa Persian
fa_AF Persian Afghanistan
fa_IR Persian Iran
fi Finnish
fi_FI Finnish Finland
fo Faroese
fo_FO Faroese Faroe Islands
fr French
fr_BE French Belgium
fr_CA French Canada
fr_CH French Switzerland
fr_FR French France
fr_LU French Luxembourg
fr_MC French Monaco
fr_SN French Senegal
ga Gaelic
Administrator's GuideAbout Locales
HP Vertica Analytics Platform (7.0.x) Page 948 of 969

Locale Name Language or Variant Region
ga_IE Gaelic Ireland
gl Gallegan
gl_ES Gallegan Spain
gsw German
gsw_CH German Switzerland
gu Gujurati
gu_IN Gujurati India
gv Manx
gv_GB Manx United Kingdom
ha Hausa
ha_Latn Hausa Latin
ha_Latn_GH Hausa Ghana (Latin)
ha_Latn_NE Hausa Niger (Latin)
ha_Latn_NG Hausa Nigeria (Latin)
haw Hawaiian Hawaiian
haw_US Hawaiian United States
he Hebrew
he_IL Hebrew Israel
hi Hindi
hi_IN Hindi India
hr Croation
hr_HR Croation Croatia
hu Hungarian
hu_HU Hungarian Hungary
hy Armenian
hy_AM Armenian Armenia
hy_AM_REVISED Armenian Revised Armenia
Administrator's GuideAbout Locales
HP Vertica Analytics Platform (7.0.x) Page 949 of 969

Locale Name Language or Variant Region
id Indonesian
id_ID Indonesian Indonesia
ii Sichuan
ii_CN Sichuan Yi
is Icelandic
is_IS Icelandic Iceland
it Italian
it_CH Italian Switzerland
it_IT Italian Italy
ja Japanese
ja_JP Japanese Japan
ka Georgian
ka_GE Georgian Georgia
kk Kazakh
kk_Cyrl Kazakh Cyrillic
kk_Cyrl_KZ Kazakh Kazakhstan (Cyrillic)
kl Kalaallisut
kl_GL Kalaallisut Greenland
km Khmer
km_KH Khmer Cambodia
kn Kannada
kn-IN Kannada India
ko Korean
ko_KR Korean Korea
kok Konkani
kok_IN Konkani India
kw Cornish
Administrator's GuideAbout Locales
HP Vertica Analytics Platform (7.0.x) Page 950 of 969

Locale Name Language or Variant Region
kw_GB Cornish United Kingdom
lt Lithuanian
lt_LT Lithuanian Lithuania
lv Latvian
lv_LV Latvian Latvia
mk Macedonian
mk_MK Macedonian Macedonia
ml Malayalam
ml_IN Malayalam India
mr Marathi
mr_IN Marathi India
ms Malay
ms_BN Malay Brunei
ms_MY Malay Malaysia
mt Maltese
mt_MT Maltese Malta
nb Norwegian Bokml
nb_NO Norwegian Bokml Norway
ne Nepali
ne_IN Nepali India
ne_NP Nepali Nepal
nl Dutch
nl_BE Dutch Belgium
nl_NL Dutch Netherlands
nn Norwegian nynorsk
nn_NO Norwegian nynorsk Norway
om Oromo
Administrator's GuideAbout Locales
HP Vertica Analytics Platform (7.0.x) Page 951 of 969

Locale Name Language or Variant Region
om_ET Oromo Ethiopia
om_KE Oromo Kenya
or Oriya
or_IN Oriya India
pa Punjabi
pa_Arab Punjabi Arabic
pa_Arab_PK Punjabi Pakistan (Arabic)
pa_Guru Punjabi Gurmukhi
pa_Guru_IN Punjabi India (Gurmukhi)
pl Polish
pl_PL Polish Poland
ps Pashto
ps_AF Pashto Afghanistan
pt Portuguese
pt_BR Portuguese Brazil
pt_PT Portuguese Portugal
ro Romanian
ro_MD Romanian Moldavia
ro_RO Romanian Romania
ru Russian
ru_RU Russian Russia
ru_UA Russian Ukraine
si Sinhala
si_LK Sinhala Sri Lanka
sk Slovak
sk_SK Slovak Slovakia
sl Slovenian
Administrator's GuideAbout Locales
HP Vertica Analytics Platform (7.0.x) Page 952 of 969

Locale Name Language or Variant Region
sl_SL Slovenian Slovenia
so Somali
so_DJ Somali Djibouti
so_ET Somali Ethiopia
so_KE Somali Kenya
so_SO Somali Somalia
sq Albanian
sq_AL Albanian Albania
sr Serbian
sr_Cyrl Serbian Cyrillic
sr_Cyrl_BA Serbian Bosnia and Herzegovina (Cyrillic)
sr_Cyrl_ME Serbian Montenegro (Cyrillic)
sr_Cyrl_RS Serbian Serbia (Cyrillic)
sr_Latn Serbian Latin
sr_Latn_BA Serbian Bosnia and Herzegovina (Latin)
sr_Latn_ME Serbian Montenegro (Latin)
sr_Latn_RS Serbian Serbia (Latin)
sv Swedish
sv_FI Swedish Finland
sv_SE Swedish Sweden
sw Swahili
sw_KE Swahili Kenya
sw_TZ Swahili Tanzania
ta Tamil
ta_IN Tamil India
te Telugu
te_IN Telugu India
Administrator's GuideAbout Locales
HP Vertica Analytics Platform (7.0.x) Page 953 of 969

Locale Name Language or Variant Region
th Thai
th_TH Thai Thailand
ti Tigrinya
ti_ER Tigrinya Eritrea
ti_ET Tigrinya Ethiopia
tr Turkish
tr_TR Turkish Turkey
uk Ukrainian
uk_UA Ukrainian Ukraine
ur Urdu
ur_IN Urdu India
ur_PK Urdu Pakistan
uz Uzbek
uz_Arab Uzbek Arabic
uz_Arab_AF Uzbek Afghanistan (Arabic)
uz_Cryl Uzbek Cyrillic
uz_Cryl_UZ Uzbek Uzbekistan (Cyrillic)
uz_Latin Uzbek Latin
us_Latin_UZ Uzbekistan (Latin)
vi Vietnamese
vi_VN Vietnamese Vietnam
zh Chinese
zh_Hans Chinese Simplified Han
zh_Hans_CN Chinese China (Simplified Han)
zh_Hans_HK Chinese Hong Kong SAR China (Simplified Han)
zh_Hans_MO Chinese Macao SAR China (Simplified Han)
zh_Hans_SG Chinese Singapore (Simplified Han)
Administrator's GuideAbout Locales
HP Vertica Analytics Platform (7.0.x) Page 954 of 969

Locale Name Language or Variant Region
zh_Hant Chinese Traditional Han
zh_Hant_HK Chinese Hong Kong SAR China (Traditional Han)
zh_Hant_MO Chinese Macao SAR China (Traditional Han)
zh_Hant_TW Chinese Taiwan (Traditional Han)
zu Zulu
zu_ZA Zulu South Africa
Locale Restrictions and WorkaroundsThe following list contains the known restrictions for locales for international data sets.
Session related:
l The locale setting is session scoped and applies to queries only (no DML/DDL) run in thatsession. You cannot specify a locale for an individual query.
l The default locale for new sessions can be set using a configuration parameter
Query related:
The following restrictions apply when queries are run with locale other than the default en_US@collation=binary:
l MulticolumnNOT IN subqueries are not supported when one or more of the left-side NOT INcolumns is of CHAR or VARCHAR data type. For example:
=> CREATE TABLE test (x VARCHAR(10), y INT);=> SELECT ... FROM test WHERE (x,y) NOT IN (SELECT ...);
ERROR: Multi-expression NOT IN subquery is not supported because a left hand expression could be NULL
Note: An error is reported even if columns test.x and test.y have a "NOT NULL"constraint.
l Correlated HAVING clause subqueries are not supported if the outer query contains a GROUPBY on a CHAR or a VARCHAR column. In the following example, the GROUP BY x in the outerquery causes the error:
=> DROP TABLE test CASCADE;=> CREATE TABLE test (x VARCHAR(10));
Administrator's GuideAbout Locales
HP Vertica Analytics Platform (7.0.x) Page 955 of 969

=> SELECT COUNT(*) FROM test t GROUP BY x HAVING xIN (SELECT x FROM test WHERE t.x||'a' = test.x||'a' );
ERROR: subquery uses ungrouped column "t.x" from outer query
l Subqueries that use analytic functions in the HAVING clause are not supported. For example:
=> DROP TABLE test CASCADE;=> CREATE TABLE test (x VARCHAR(10));=> SELECT MAX(x)OVER(PARTITION BY 1 ORDER BY 1)
FROM test GROUP BY x HAVING x IN (SELECT MAX(x) FROM test);ERROR: Analytics query with having clause expression that involves aggregates and subquery is not supported
DML/DDL related:
l SQL identifiers (such as table names, column names, and so on) can use UTF-8 Unicodecharacters. For example, the following CREATE TABLE statement uses the ß (German eszett)in the table name:
=> CREATE TABLE straße(x int, y int);CREATE TABLE
l Projection sort orders aremade according to the default en_US@collation=binary collation.Thus, regardless of the session setting, issuing the following command creates a projectionsorted by col1 according to the binary collation:
=> CREATE PROJECTION p1 AS SELECT * FROM table1 ORDER BY col1;
Note that in such cases, straße and strasse would not be near each other on disk.
Sorting by binary collation alsomeans that sort optimizations do not work in locales other thanbinary. HP Vertica returns the following warning if you create tables or projections in a non-binary locale:
WARNING: Projections are always created and persisted in the default HP Vertica locale. The current locale is de_DE
l When creating pre-join projections, the projection definition query does not respect the locale orcollation setting. This means that when you insert data into the fact table of a pre-join projection,referential integrity checks are not locale or collation aware.
For example:
Administrator's GuideAbout Locales
HP Vertica Analytics Platform (7.0.x) Page 956 of 969

\locale LDE_S1 -- German=> CREATE TABLE dim (col1 varchar(20) primary key);=> CREATE TABLE fact (col1 varchar(20) references dim(col1));=> CREATE PROJECTION pj AS SELECT * FROM fact JOIN dim
ON fact.col1 = dim.col1 UNSEGMENTED ALL NODES;=> INSERT INTO dim VALUES('ß');=> COMMIT;
The following INSERT statement fails with a "nonexistent FK" error even though 'ß' is in the dimtable, and in the German locale 'SS' and 'ß' refer to the same character.
=> INSERT INTO fact VALUES('SS');ERROR: Nonexistent foreign key value detected in FK-PK join (fact x dim)using subquery and dim_node0001; value SS
=> => ROLLBACK;=> DROP TABLE dim, fact CASCADE;
l When the locale is non-binary, the collation function is used to transform the input to a binarystring which sorts in the proper order.
This transformation increases the number of bytes required for the input according to thisformula:
result_column_width = input_octet_width * CollationExpansion + 4
CollationExpansion defaults to 5.
l CHAR fields are displayed as fixed length, including any trailing spaces. When CHAR fields areprocessed internally, they are first stripped of trailing spaces. For VARCHAR fields, trailingspaces are usually treated as significant characters; however, trailing spaces are ignored whensorting or comparing either type of character string field using a non-BINARY locale.
Administrator's GuideAbout Locales
HP Vertica Analytics Platform (7.0.x) Page 957 of 969

Page 958 of 969HP Vertica Analytics Platform (7.0.x)
Administrator's GuideAbout Locales

Appendix: Binary File Formats
Creating Native Binary Format FilesUsing COPY to load data with the NATIVE parser requires that the input data files adhere to theformat described below. All NATIVE files must contain:
1. A file signature.
2. A set of column size definitions.
3. The rows of data.
Note: You cannot mix Binary and ASCII source files in the sameCOPY statement.
File SignatureThe first part of a NATIVE binary file consists of a file signature. The contents of the signature arefixed, and listed in the following table.
Byte Offset 0 1 2 3 4 5 6 7 8 9 10
Hex Value 4E 41 54 49 56 45 0A FF 0D 0A 00
Text Literals N A T I V E E'\n' E'\317' E'\r' E'\n' E'\000'
The purpose of the required signature is to ensure that the file has neither been corrupted by a non-8-bit file transfer, nor stripped of carriage returns, linefeeds, or null values. If the signature is intact,HP Vertica determines that the file has not been corrupted.
Column DefinitionsFollowing the file signature, the file must define the widths of each column in the file as follows.
ByteOffset
Length(bytes) Description Comments
11 4 Header arealength
32-bit integer in little-endian format that contains the lengthin bytes of remaining in the header, not including itself. Thisis the number of bytes from the end of this value to the startof the row data.
Administrator's GuideAppendix: Binary File Formats
HP Vertica Analytics Platform (7.0.x) Page 959 of 969

ByteOffset
Length(bytes) Description Comments
15 2 NATIVE fileversion
16-bit integer in little-endian format containing the versionnumber of the NATIVE file format. The only valid value iscurrently 1. Future changes to the format could be assigneddifferent version numbers tomaintain backwardcompatibility.
17 1 Filler Always 0.
18 2 Number ofcolumns
16-bit integer in little-endian format that contains the numberof columns in each row in the file.
20+ 4 bytes foreachcolumn ofdata in thetable
Columnwidths
Array of 32-bit integers in little-endian format that define thewidth of each column in the row. Variable-width columnshave a value of -1 (0xFF 0xFF 0xFF 0xFF).
Note: All integers in NATIVE files are in little-endian format (least significant byte first).
The width of each column is determined by the data type it contains. The following table explainsthe columnwidth needed for each data type, along with the data encoding.
Data TypeLength(bytes) Column Content
INTEGER 1, 2, 4, 8 8-, 16-, 32-, and 64-bit integers are supported. All multi-bytevalues are stored in little-endian format.
Note:All values for a columnmust be the width you specify here.If you set the length of an INTEGER column to be 4 bytes, thenall of the values you supply for that columnmust be 32-bitintegers.
BOOLEAN 1 0 for false, 1 for true.
FLOAT 8 Encoded in IEEE-754 format.
CHAR User-specified
l Strings shorter than the specified lengthmust be right-paddedwith spaces (E'\040').
l Strings are not null-terminated.
l Character encoding is UTF-8.
l UTF-8 strings can contain multi-byte characters. Therefore,number of characters in the stringmay not equal the numberof bytes.
Administrator's GuideAppendix: Binary File Formats
HP Vertica Analytics Platform (7.0.x) Page 960 of 969

Data TypeLength(bytes) Column Content
VARCHAR 4-byteinteger(length) +data
The columnwidth for a VARCHAR column is always -1 to signalthat it contains variable-length data.
l Each VARCHAR column value starts with a 32-bit integerthat contains the number of bytes in the string.
l The stringmust not be null-terminated.
l Character encodingmust be UTF-8.
l Remember that UTF-8 strings can contain multi-bytecharacters. Therefore, number of characters in the stringmaynot equal the number of bytes.
DATE 8 64-bit integer in little-endian format containing the Julian daysince Jan 01 2000 (J2451545)
TIME 8 64-bit integer in little-endian format containing the number ofmicroseconds sincemidnight in the UTC time zone.
TIMETZ 8 64-bit value where
l Upper 40 bits contain the number of microseconds sincemidnight.
l Lower 24 bits contain time zone as the UTC offset inmicroseconds calculated as follows: Time zone is logicallyfrom -24hrs to +24hrs from UTC. Instead it is representedhere as a number between 0hrs to 48hrs. Therefore, 24hrsshould be added to the actual time zone to calculate it.
Each portion is stored in little-endian format (5 bytes followed by3 bytes).
TIMESTAMP 8 64-bit integer in little-endian format containing the number ofmicroseconds since Julian day: Jan 01 2000 00:00:00.
TIMESTAMPTZ 8 A 64-bit integer in little-endian format containing the number ofmicroseconds since Julian day: Jan 01 2000 00:00:00 in the UTCtimezone.
INTERVAL 8 64-bit integer in little-endian format containing the number ofmicroseconds in the interval.
Administrator's GuideAppendix: Binary File Formats
HP Vertica Analytics Platform (7.0.x) Page 961 of 969
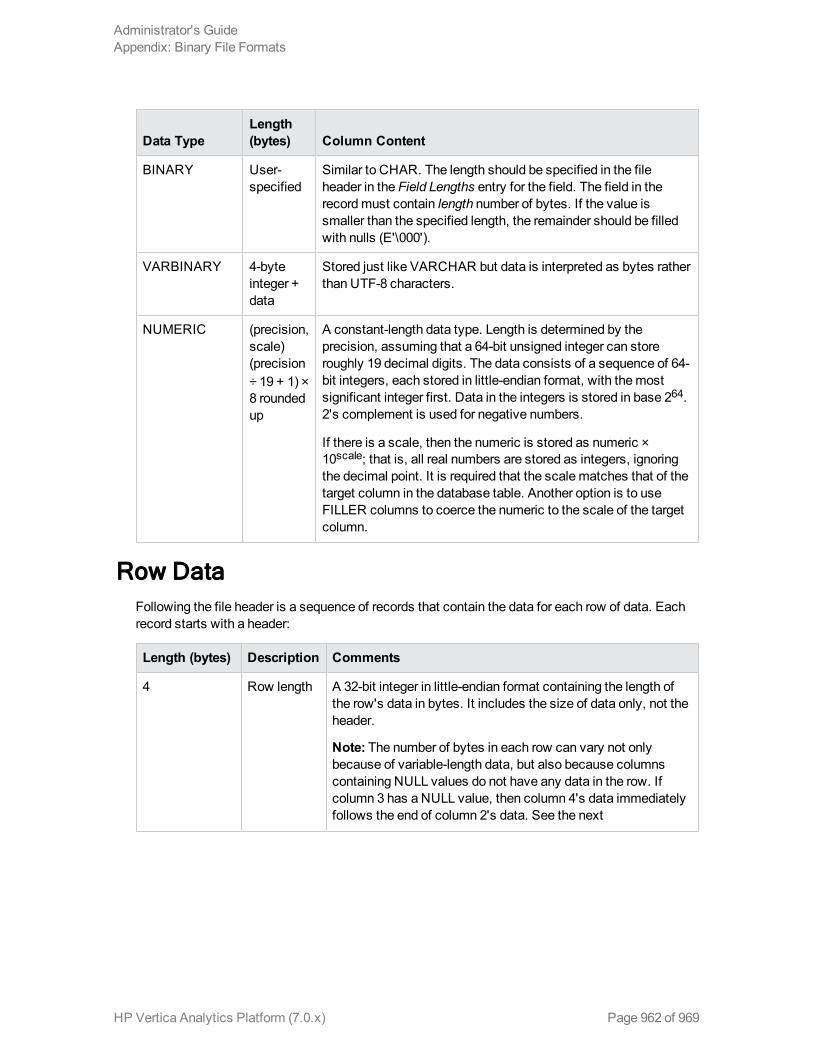
Data TypeLength(bytes) Column Content
BINARY User-specified
Similar to CHAR. The length should be specified in the fileheader in the Field Lengths entry for the field. The field in therecordmust contain length number of bytes. If the value issmaller than the specified length, the remainder should be filledwith nulls (E'\000').
VARBINARY 4-byteinteger +data
Stored just like VARCHAR but data is interpreted as bytes ratherthan UTF-8 characters.
NUMERIC (precision,scale)(precision÷ 19 + 1) ×8 roundedup
A constant-length data type. Length is determined by theprecision, assuming that a 64-bit unsigned integer can storeroughly 19 decimal digits. The data consists of a sequence of 64-bit integers, each stored in little-endian format, with themostsignificant integer first. Data in the integers is stored in base 264.2's complement is used for negative numbers.
If there is a scale, then the numeric is stored as numeric ×10scale; that is, all real numbers are stored as integers, ignoringthe decimal point. It is required that the scalematches that of thetarget column in the database table. Another option is to useFILLER columns to coerce the numeric to the scale of the targetcolumn.
Row DataFollowing the file header is a sequence of records that contain the data for each row of data. Eachrecord starts with a header:
Length (bytes) Description Comments
4 Row length A 32-bit integer in little-endian format containing the length ofthe row's data in bytes. It includes the size of data only, not theheader.
Note: The number of bytes in each row can vary not onlybecause of variable-length data, but also because columnscontaining NULL values do not have any data in the row. Ifcolumn 3 has a NULL value, then column 4's data immediatelyfollows the end of column 2's data. See the next
Administrator's GuideAppendix: Binary File Formats
HP Vertica Analytics Platform (7.0.x) Page 962 of 969

Length (bytes) Description Comments
Number ofcolumns ÷ 8rounded up(CEILING(NumFields /( sizeof(uint8) * 8)); )
Null valuebit field
A series of bytes whose bits indicate whether a columncontains a NULL. Themost significant bit of the first byteindicates whether the first column in this row contains a NULL,the next most significant bit indicates whether the next columncontains a NULL, and so on. If a bit is 1 (true) then the columncontains a NULL, and there is no value for the column in thedata for the row.
Following the record header is the column values for the row. There is no separator characters forthese values. Their location in the row of data is calculated based on where the previous column'sdata ended. Most data types have a fixed width, so their location is easy to determine. Variable-width values (such as VARCHAR and VARBINARY) start with a count of the number of bytes thevalue contains.
See the table in the previous section for details on how each data type's value is stored in the row'sdata.
ExampleThe example below demonstrates creating a table and loading a NATIVE file that contains a singlerow of data. The table contains all possible data types.
=> CREATE TABLE allTypes (INTCOL INTEGER, FLOATCOL FLOAT,CHARCOL CHAR(10),VARCHARCOL VARCHAR,BOOLCOL BOOLEAN,DATECOL DATE,TIMESTAMPCOL TIMESTAMP,TIMESTAMPTZCOL TIMESTAMPTZ,TIMECOL TIME,TIMETZCOL TIMETZ,VARBINCOL VARBINARY,BINCOL BINARY,NUMCOL NUMERIC(38,0),
INTERVALCOL INTERVAL);
=> COPY allTypes FROM '/home/dbadmin/allTypes.bin' NATIVE DIRECT;=> \pset expandedExpanded display is on.=> SELECT * from allTypes;-[ RECORD 1 ]--+------------------------INTCOL | 1FLOATCOL | -1.11CHARCOL | oneVARCHARCOL | ONEBOOLCOL | tDATECOL | 1999-01-08TIMESTAMPCOL | 1999-02-23 03:11:52.35TIMESTAMPTZCOL | 1999-01-08 07:04:37-05TIMECOL | 07:09:23
Administrator's GuideAppendix: Binary File Formats
HP Vertica Analytics Platform (7.0.x) Page 963 of 969

TIMETZCOL | 15:12:34-04VARBINCOL | \253\315BINCOL | \253NUMCOL | 1234532INTERVALCOL | 03:03:03
The content of the allTypes.bin file appears below as a raw hex dump:
4E 41 54 49 56 45 0A FF 0D 0A 00 3D 00 00 00 01 00 00 0E 0008 00 00 00 08 00 00 00 0A 0000 00 FF FF FF FF 01 00 00 0008 00 00 00 08 00 00 00 08 00 00 00 08 00 00 00 08 00 00 00FF FF FF FF 03 00 00 00 18 00 00 00 08 00 00 00 73 00 00 0000 00 01 00 00 00 00 00 00 00 C3 F5 28 5C 8F C2 F1 BF 6F 6E65 20 20 20 20 20 20 20 03 00 00 00 4F 4E 45 01 9A FE FF FFFF FF FF FF 30 85 B3 4F 7E E7 FF FF 40 1F 3E 64 E8 E3 FF FFC0 2E 98 FF 05 00 00 00 D0 97 01 80 F0 79 F0 10 02 00 00 00AB CD AB CD 00 00 00 00 00 00 00 00 00 00 00 00 00 00 00 0000 64 D6 12 00 00 00 00 00 C0 47 A3 8E 02 00 00 00
The following table breaks this file down into each of is components, and describes the values itcontains.
Hex Values Description Value
4E 41 54 49 5645 0A FF 0D 0A00
Signature NATIVE\n\317\r\n\000
3D 00 00 00 Header arealength
61 bytes
01 00 Native file formatversion
Version 1
00 Filler value 0
0E 00 Number ofcolumns
14 columns
08 00 00 00 Width of column1 (INTEGER)
8 bytes
08 00 00 00 Width of column2 (FLOAT)
8 bytes
0A 00 00 00 Width of column3 (CHAR(10))
10 bytes
FF FF FF FF Width of column4 (VARCHAR)
-1 (variable width column)
Administrator's GuideAppendix: Binary File Formats
HP Vertica Analytics Platform (7.0.x) Page 964 of 969

Hex Values Description Value
01 00 00 00 Width of column5 (BOOLEAN)
1 bytes
08 00 00 00 Width of column6 (DATE)
8 bytes
08 00 00 00 Width of column7 (TIMESTAMP)
8 bytes
08 00 00 00 Width of column8(TIMESTAMPTZ)
8 bytes
08 00 00 00 Width of column9 (TIME)
8 bytes
08 00 00 00 Width of column10 (TIMETZ)
8 bytes
FF FF FF FF Width of column11(VARBINARY)
-1 (variable width column)
03 00 00 00 Width of column12 (BINARY)
3 bytes
18 00 00 00 Width of column13 (NUMERIC)
24 bytes. The size is calculated by dividing 38 (theprecision specified for the numeric column) by 19 (thenumber of digits each 64-bit chunk can represent) andadding 1. 38 ÷ 19 + 1 = 3. thenmultiply by eight to getthe number of bytes needed. 3 × 8 = 24 bytes.
08 00 00 00 Width of column14 (INTERVAL).last portion of theheader section.
8 bytes
73 00 00 00 Number of bytesof data for thefirst row. this isthe start of thefirst row of data.
115 bytes
00 00 Bit field for thenull valuescontained in thefirst row of data
The row contains no null values.
Administrator's GuideAppendix: Binary File Formats
HP Vertica Analytics Platform (7.0.x) Page 965 of 969

Hex Values Description Value
01 00 00 00 0000 00 00
Value for 64-bitINTEGERcolumn
1
C3 F5 28 5C 8FC2 F1 BF
Value for theFLOAT column
-1.11
6F 6E 65 20 2020 20 20 20 20
Value for theCHAR(10)column
"one " (paddedWith 7 spaces to fill the full 10characters for the column)
03 00 00 00 The number ofbytes in thefollowingVARCHARvalue.
3 bytes
4F 4E 45 The value for theVARCHARcolumn
"one"
01 The value for theBOOLEANcolumn
True
9A FE FF FF FFFF FF FF
The value for theDATE column
1999-01-08
30 85 B3 4F 7EE7 FF FF
The value for theTIMESTAMPcolumn
1999-02-23 03:11:52.35
40 1F 3E 64 E8E3 FF FF
The value for theTIMESTAMPTZcolumn
1999-01-08 07:04:37-05
C0 2E 98 FF 0500 00 00
The value for theTIME column
07:09:23
D0 97 01 80 F079 F0 10
The value for theTIMETZ column
15:12:34-05
02 00 00 00 The number ofbytes in thefollowingVARBINARYvalue
2 bytes
Administrator's GuideAppendix: Binary File Formats
HP Vertica Analytics Platform (7.0.x) Page 966 of 969

Hex Values Description Value
AB CD The value for theVARBINARYcolumn
Binary data (\253\315 as octal values)
AB CD 00 The value for theBINARY column
Binary data (\253\315\000 as octal values)
00 00 00 00 0000 00 00 00 0000 00 00 00 0000 00 64 D6 1200 00 00 00 00
The value for theNUMERICcolumn
1234532
C0 47 A3 8E 0200 00 00
The value for theINTERVALcolumn
03:03:03
See Alsol
Administrator's GuideAppendix: Binary File Formats
HP Vertica Analytics Platform (7.0.x) Page 967 of 969

Page 968 of 969HP Vertica Analytics Platform (7.0.x)
Administrator's GuideAppendix: Binary File Formats

We appreciate your feedback!If you have comments about this document, you can contact the documentation team by email. Ifan email client is configured on this system, click the link above and an email window opens withthe following information in the subject line:
Feedback on Administrator's Guide (Vertica Analytics Platform 7.0.x)
Just add your feedback to the email and click send.
If no email client is available, copy the information above to a new message in a webmail client,and send your feedback to [email protected].
HP Vertica Analytics Platform (7.0.x) Page 969 of 969