HP-UX IPSec version A.01.06 Administrator's Guide - CiteSeerX
237
HP-UX IPSec version A.01.06 Administrator’s Guide HP-UX 11i Version 2 Edition E0703 HP Networking Customer Order Number: J4256-90003 Manufacturing Part Number : J4256-90003 07/03 United States © Copyright 2003 Hewlett-Packard Development Company L.P.
-
Upload
khangminh22 -
Category
Documents
-
view
0 -
download
0
Transcript of HP-UX IPSec version A.01.06 Administrator's Guide - CiteSeerX

HP-UX IPSec version A.01.06 Administrator’s Guide
HP-UX 11i Version 2
Edition E0703
HP Networking
Customer Order Number: J4256-90003
Manufacturing Part Number : J4256-90003
07/03
United States
© Copyright 2003 Hewlett-Packard Development Company L.P.
Legal Notices The information in this document is subject to change without notice.
Hewlett-Packard makes no warranty of any kind with regard to this manual, including, but not limited to, the implied warranties of merchantability and fitness for a particular purpose. Hewlett-Packard shall not be held liable for errors contained herein or direct, indirect, special, incidental or consequential damages in connection with the furnishing, performance, or use of this material.
Warranty
A copy of the specific warranty terms applicable to your Hewlett-Packard product and replacement parts can be obtained from your local Sales and Service Office.
U.S. Government License
Proprietary computer software. Valid license from HP required for possession, use or copying. Consistent with FAR 12.211 and 12.212, Commercial Computer Software, Computer Software Documentation, and Technical Data for Commercial Items are licensed to the U.S. Government under vendor's standard commercial license.
Copyright Notice
Copyright 1999-2003 Hewlett-Packard Development Company L.P. All rights reserved. Reproduction, adaptation, or translation of this document without prior written permission is prohibited, except as allowed under the copyright laws.
Copyright Notice
Copyright 2003 Hewlett-Packard Development Company L.P. Reproduction, adaptation, or translation of this document without prior written permission is prohibited, except as allowed under the copyright laws.
Trademark Notice
UNIX is a registered trademark of The Open Group.
ii
Contents
Preface: About This Document
1. HP-UX IPSec OverviewIntroduction . . . . . . . . . . . . . . . . . . . . . . . . . . . . . . . . . . . . . . . . . . . . . . . . . . . . . . . . . . . . 3Authentication Header (AH) . . . . . . . . . . . . . . . . . . . . . . . . . . . . . . . . . . . . . . . . . . . . . . . 5
Transport and Tunnel Modes. . . . . . . . . . . . . . . . . . . . . . . . . . . . . . . . . . . . . . . . . . . . . 6Encapsulating Security Payload (ESP). . . . . . . . . . . . . . . . . . . . . . . . . . . . . . . . . . . . . . . 9
ESP Encryption. . . . . . . . . . . . . . . . . . . . . . . . . . . . . . . . . . . . . . . . . . . . . . . . . . . . . . . . 9ESP with Authentication and Encryption. . . . . . . . . . . . . . . . . . . . . . . . . . . . . . . . . . 12
Internet Key Exchange (IKE) . . . . . . . . . . . . . . . . . . . . . . . . . . . . . . . . . . . . . . . . . . . . . 14IKE Automatic Keying . . . . . . . . . . . . . . . . . . . . . . . . . . . . . . . . . . . . . . . . . . . . . . . . . 14Security Associations (SAs) and IKE Phases . . . . . . . . . . . . . . . . . . . . . . . . . . . . . . . 14Re-using Negotiations . . . . . . . . . . . . . . . . . . . . . . . . . . . . . . . . . . . . . . . . . . . . . . . . . 15Generating Shared Keys: Diffie-Hellman . . . . . . . . . . . . . . . . . . . . . . . . . . . . . . . . . . 15IKE Primary Authentication . . . . . . . . . . . . . . . . . . . . . . . . . . . . . . . . . . . . . . . . . . . . 16
HP-UX IPSec Topologies . . . . . . . . . . . . . . . . . . . . . . . . . . . . . . . . . . . . . . . . . . . . . . . . . 18End-to-End Topology . . . . . . . . . . . . . . . . . . . . . . . . . . . . . . . . . . . . . . . . . . . . . . . . . . 18End-to-Gateway Topology. . . . . . . . . . . . . . . . . . . . . . . . . . . . . . . . . . . . . . . . . . . . . . . 18End-to-End Tunnel Topology . . . . . . . . . . . . . . . . . . . . . . . . . . . . . . . . . . . . . . . . . . . . 19Gateway-to-Gateway Topology . . . . . . . . . . . . . . . . . . . . . . . . . . . . . . . . . . . . . . . . . . . 20
2. Installing HP-UX IPSec HP-UX IPSec Product Requirements . . . . . . . . . . . . . . . . . . . . . . . . . . . . . . . . . . . . . . . 23Step 1: Verifying HP-UX IPSec Installation and Configuration Prerequisites . . . . . . 24Step 2: Completing HP-UX IPSec Worksheets . . . . . . . . . . . . . . . . . . . . . . . . . . . . . . . . 25Step 3: Loading the HP-UX IPSec Software . . . . . . . . . . . . . . . . . . . . . . . . . . . . . . . . . 26Step 4: Setting the HP-UX IPSec Password . . . . . . . . . . . . . . . . . . . . . . . . . . . . . . . . . . 28
Re-establishing the HP-UX IPSec Password. . . . . . . . . . . . . . . . . . . . . . . . . . . . . . . . 28
3. Configuring HP-UX IPSec Overview. . . . . . . . . . . . . . . . . . . . . . . . . . . . . . . . . . . . . . . . . . . . . . . . . . . . . . . . . . . . . . 31Step 1: Starting the ipsec_mgr Configuration Utility . . . . . . . . . . . . . . . . . . . . . . . . . . 33Step 2A: Configuring the IPSec Policy Filter . . . . . . . . . . . . . . . . . . . . . . . . . . . . . . . . . 35Step 2B: Configuring the IPSec Policy Transform List . . . . . . . . . . . . . . . . . . . . . . . . . 40Step 2C: Configuring the ISAKMP Policy Name . . . . . . . . . . . . . . . . . . . . . . . . . . . . . . 45Step 3: Configuring the ISAKMP Policy . . . . . . . . . . . . . . . . . . . . . . . . . . . . . . . . . . . . . 47Step 4: Configuring a Tunnel . . . . . . . . . . . . . . . . . . . . . . . . . . . . . . . . . . . . . . . . . . . . . 50Step 5: Configuring a Preshared Key . . . . . . . . . . . . . . . . . . . . . . . . . . . . . . . . . . . . . . . 56
iii

Contents
Step 6: Configuring Certificates . . . . . . . . . . . . . . . . . . . . . . . . . . . . . . . . . . . . . . . . . . . 58Step 7: Configuring Boot-up Options . . . . . . . . . . . . . . . . . . . . . . . . . . . . . . . . . . . . . . . 59Step 8: Verifying the Configuration . . . . . . . . . . . . . . . . . . . . . . . . . . . . . . . . . . . . . . . . 60Step 9: Printing Formatted IPSec and ISAKMP Policies . . . . . . . . . . . . . . . . . . . . . . . 64
4. Using Certificates with HP-UX IPSec Overview. . . . . . . . . . . . . . . . . . . . . . . . . . . . . . . . . . . . . . . . . . . . . . . . . . . . . . . . . . . . . . 67
Security Certificates and Public Key Cryptography. . . . . . . . . . . . . . . . . . . . . . . . . . 67Digital Signatures. . . . . . . . . . . . . . . . . . . . . . . . . . . . . . . . . . . . . . . . . . . . . . . . . . . . . 68IKE Public Key Distribution . . . . . . . . . . . . . . . . . . . . . . . . . . . . . . . . . . . . . . . . . . . . 68Requirements . . . . . . . . . . . . . . . . . . . . . . . . . . . . . . . . . . . . . . . . . . . . . . . . . . . . . . . . 69
Using VeriSign Certificates . . . . . . . . . . . . . . . . . . . . . . . . . . . . . . . . . . . . . . . . . . . . . . . 70VeriSign Certificate Tasks . . . . . . . . . . . . . . . . . . . . . . . . . . . . . . . . . . . . . . . . . . . . . . 71Step 1: Verifying Prerequisites . . . . . . . . . . . . . . . . . . . . . . . . . . . . . . . . . . . . . . . . . . 72Step 2: Configuring Web Proxy Server Parameters . . . . . . . . . . . . . . . . . . . . . . . . . . 73Step 3: Registering the Administrator . . . . . . . . . . . . . . . . . . . . . . . . . . . . . . . . . . . . 74Step 4: Requesting and Receiving Certificates . . . . . . . . . . . . . . . . . . . . . . . . . . . . . . 74
Using Baltimore Certificates. . . . . . . . . . . . . . . . . . . . . . . . . . . . . . . . . . . . . . . . . . . . . . 78Baltimore Certificate Tasks . . . . . . . . . . . . . . . . . . . . . . . . . . . . . . . . . . . . . . . . . . . . . 78Step 1: Verifying Prerequisites . . . . . . . . . . . . . . . . . . . . . . . . . . . . . . . . . . . . . . . . . . 78Step 2: Requesting the Baltimore Certificate . . . . . . . . . . . . . . . . . . . . . . . . . . . . . . . 80Step 3: Configuring the Baltimore Certificate . . . . . . . . . . . . . . . . . . . . . . . . . . . . . . 81
Configuring Certificate IDs . . . . . . . . . . . . . . . . . . . . . . . . . . . . . . . . . . . . . . . . . . . . . . . 86Retrieving the Certificate Revocation List (CRL) . . . . . . . . . . . . . . . . . . . . . . . . . . . . . 88
VeriSign . . . . . . . . . . . . . . . . . . . . . . . . . . . . . . . . . . . . . . . . . . . . . . . . . . . . . . . . . . . . . 88Baltimore. . . . . . . . . . . . . . . . . . . . . . . . . . . . . . . . . . . . . . . . . . . . . . . . . . . . . . . . . . . . 88Manually Retrieving a CRL for VeriSign or Baltimore . . . . . . . . . . . . . . . . . . . . . . . 89
5. Troubleshooting HP-UX IPSecIPSec Operation . . . . . . . . . . . . . . . . . . . . . . . . . . . . . . . . . . . . . . . . . . . . . . . . . . . . . . . . 93
Establishing Security Associations (SAs) . . . . . . . . . . . . . . . . . . . . . . . . . . . . . . . . . . 93Internal Processing. . . . . . . . . . . . . . . . . . . . . . . . . . . . . . . . . . . . . . . . . . . . . . . . . . . . 95
Troubleshooting Utilities Overview . . . . . . . . . . . . . . . . . . . . . . . . . . . . . . . . . . . . . . . . 99Troubleshooting Hints . . . . . . . . . . . . . . . . . . . . . . . . . . . . . . . . . . . . . . . . . . . . . . . . . . 101
Status Check . . . . . . . . . . . . . . . . . . . . . . . . . . . . . . . . . . . . . . . . . . . . . . . . . . . . . . . . 101Isolating HP-UX IPSec Problems from Upper-layer Problems . . . . . . . . . . . . . . . . 102
iv

Contents
Checking Policy Configuration. . . . . . . . . . . . . . . . . . . . . . . . . . . . . . . . . . . . . . . . . . 103Configuring HP-UX IPSec Auditing . . . . . . . . . . . . . . . . . . . . . . . . . . . . . . . . . . . . . 103
Reporting Problems . . . . . . . . . . . . . . . . . . . . . . . . . . . . . . . . . . . . . . . . . . . . . . . . . . . . 105Troubleshooting Scenarios. . . . . . . . . . . . . . . . . . . . . . . . . . . . . . . . . . . . . . . . . . . . . . . 107
Autoboot is Not Working Properly . . . . . . . . . . . . . . . . . . . . . . . . . . . . . . . . . . . . . . . 107HP-UX IPSec Incorrectly Passes Packets . . . . . . . . . . . . . . . . . . . . . . . . . . . . . . . . . 108HP-UX IPSec Incorrectly Attempts to Encrypt/Authenticate Packets . . . . . . . . . . 109HP-UX IPSec Attempts to Encrypt/Authenticate and Fails. . . . . . . . . . . . . . . . . . . 110ISAKMP/MM SA Negotiation Fails (Main Mode processing failed, MM negotiation timeout) . . . . . . . . . . . . . . . . . . . . . . . . . . . . . . . . . . . . . . . . . . . . . . . . . . . . . . . . . . . . 111ISAKMP Primary Authentication with Preshared Key Fails . . . . . . . . . . . . . . . . . 113ISAKMP Primary Authentication Fails with Certificates . . . . . . . . . . . . . . . . . . . . 114User Cannot Get a Local VeriSign Certificate . . . . . . . . . . . . . . . . . . . . . . . . . . . . . 115ISAKMP/MM SA Negotiation Succeeded, IPSec/QM SA Negotiation Failed (Quick Mode processing failed, QM negotiation timeout) . . . . . . . . . . . . . . . . . . . . . . . . . . 117
6. IPFilter and IPSec IPFilter and IPSec Basics . . . . . . . . . . . . . . . . . . . . . . . . . . . . . . . . . . . . . . . . . . . . . . . 121IPSec UDP Negotiation . . . . . . . . . . . . . . . . . . . . . . . . . . . . . . . . . . . . . . . . . . . . . . . . . 123When Traffic Appears to be Blocked . . . . . . . . . . . . . . . . . . . . . . . . . . . . . . . . . . . . . . . 125Allowing Protocol 50 and Protocol 51 Traffic . . . . . . . . . . . . . . . . . . . . . . . . . . . . . . . . 126IPSec Gateways . . . . . . . . . . . . . . . . . . . . . . . . . . . . . . . . . . . . . . . . . . . . . . . . . . . . . . . 128
7. HP-UX IPSec and LinuxLimitations of HP-UX IPSec Interoperating with Linux FreeSwan . . . . . . . . . . . . . . 131Configuration Example . . . . . . . . . . . . . . . . . . . . . . . . . . . . . . . . . . . . . . . . . . . . . . . . . 132
A. Product SpecificationsIPSec RFCs. . . . . . . . . . . . . . . . . . . . . . . . . . . . . . . . . . . . . . . . . . . . . . . . . . . . . . . . . . . 135Product Restrictions. . . . . . . . . . . . . . . . . . . . . . . . . . . . . . . . . . . . . . . . . . . . . . . . . . . . 136
ISAKMP Limitations . . . . . . . . . . . . . . . . . . . . . . . . . . . . . . . . . . . . . . . . . . . . . . . . . 137IPv4 ICMP Messages . . . . . . . . . . . . . . . . . . . . . . . . . . . . . . . . . . . . . . . . . . . . . . . . . 138IPv6 ICMP Messages . . . . . . . . . . . . . . . . . . . . . . . . . . . . . . . . . . . . . . . . . . . . . . . . . 139
B. HP-UX IPSec Configuration ExamplesExample 1: telnet Between Two Systems. . . . . . . . . . . . . . . . . . . . . . . . . . . . . . . . . . . 143
Apple System Configuration . . . . . . . . . . . . . . . . . . . . . . . . . . . . . . . . . . . . . . . . . . . 143Banana System Configuration. . . . . . . . . . . . . . . . . . . . . . . . . . . . . . . . . . . . . . . . . . 149
v
Contents
Example 2: Authenticated ESP with Exceptions . . . . . . . . . . . . . . . . . . . . . . . . . . . . . 154Carrot IPSec Policies . . . . . . . . . . . . . . . . . . . . . . . . . . . . . . . . . . . . . . . . . . . . . . . . . 155
C. HP-UX IPSec Configuration WorksheetsIPSec Policy Worksheet . . . . . . . . . . . . . . . . . . . . . . . . . . . . . . . . . . . . . . . . . . . . . . . . . 163ISAKMP Policy Worksheet . . . . . . . . . . . . . . . . . . . . . . . . . . . . . . . . . . . . . . . . . . . . . . 167Preshared Keys Worksheet . . . . . . . . . . . . . . . . . . . . . . . . . . . . . . . . . . . . . . . . . . . . . . 169VeriSign Certificate Worksheet . . . . . . . . . . . . . . . . . . . . . . . . . . . . . . . . . . . . . . . . . . . 170Baltimore Certificate Worksheet. . . . . . . . . . . . . . . . . . . . . . . . . . . . . . . . . . . . . . . . . . 172
D. Configuration ReferenceConfiguration Reference . . . . . . . . . . . . . . . . . . . . . . . . . . . . . . . . . . . . . . . . . . . . . . . . 177
Name . . . . . . . . . . . . . . . . . . . . . . . . . . . . . . . . . . . . . . . . . . . . . . . . . . . . . . . . . . . . . . 178Exclusive . . . . . . . . . . . . . . . . . . . . . . . . . . . . . . . . . . . . . . . . . . . . . . . . . . . . . . . . . . . 178Policy Type . . . . . . . . . . . . . . . . . . . . . . . . . . . . . . . . . . . . . . . . . . . . . . . . . . . . . . . . . 179Filters . . . . . . . . . . . . . . . . . . . . . . . . . . . . . . . . . . . . . . . . . . . . . . . . . . . . . . . . . . . . . 179Transform List . . . . . . . . . . . . . . . . . . . . . . . . . . . . . . . . . . . . . . . . . . . . . . . . . . . . . . 182ISAKMP Policy Name. . . . . . . . . . . . . . . . . . . . . . . . . . . . . . . . . . . . . . . . . . . . . . . . . 187Certificate ID Types and Values . . . . . . . . . . . . . . . . . . . . . . . . . . . . . . . . . . . . . . . . 188
E. Troubleshooting Tools Referenceipsec_admin . . . . . . . . . . . . . . . . . . . . . . . . . . . . . . . . . . . . . . . . . . . . . . . . . . . . . . . . . . 193ipsec_report . . . . . . . . . . . . . . . . . . . . . . . . . . . . . . . . . . . . . . . . . . . . . . . . . . . . . . . . . . 198
Examples . . . . . . . . . . . . . . . . . . . . . . . . . . . . . . . . . . . . . . . . . . . . . . . . . . . . . . . . . . . 199ipsec_policy . . . . . . . . . . . . . . . . . . . . . . . . . . . . . . . . . . . . . . . . . . . . . . . . . . . . . . . . . . 211
vi

Preface: About This Document This document describes how to install, configure, and troubleshoot HP-UX IPSec.
The document printing date and part number indicate the document’s current edition. The printing date will change when a new edition is printed. Minor changes may be made at reprint without changing the printing date. The document part number will change when extensive changes are made.
Document updates may be issued between editions to correct errors or document product changes. To ensure that you receive the updated or new editions, you should subscribe to the appropriate product support service. See your HP sales representative for details.
The latest version of this document can be found on line at docs.hp.com.
Intended AudienceThis document is intended for system and network administrators responsible for installing, configuring, and managing HP-UX IPSec. Administrators are expected to have knowledge of HP-UX and networking concepts, commands, and configuration.
This document is not a tutorial.
New and Changed Documentation in This EditionInformation about features and requirements that are not applicable to the A.01.06 release was removed.
Information from the Concepts chapter is now in the Chapter 1, “HP-UX IPSec Overview,” and Chapter 4, “Using Certificates with HP-UX IPSec.” chapters.
Product specifications from the Preface and Installation sections are now in Chapter A, “Product Specifications.”
The configuration examples in Appendix B, HP-UX IPSec Configuration Examples, are now presented as images of the configuration screens instead of completed worksheets.
vii
n
2
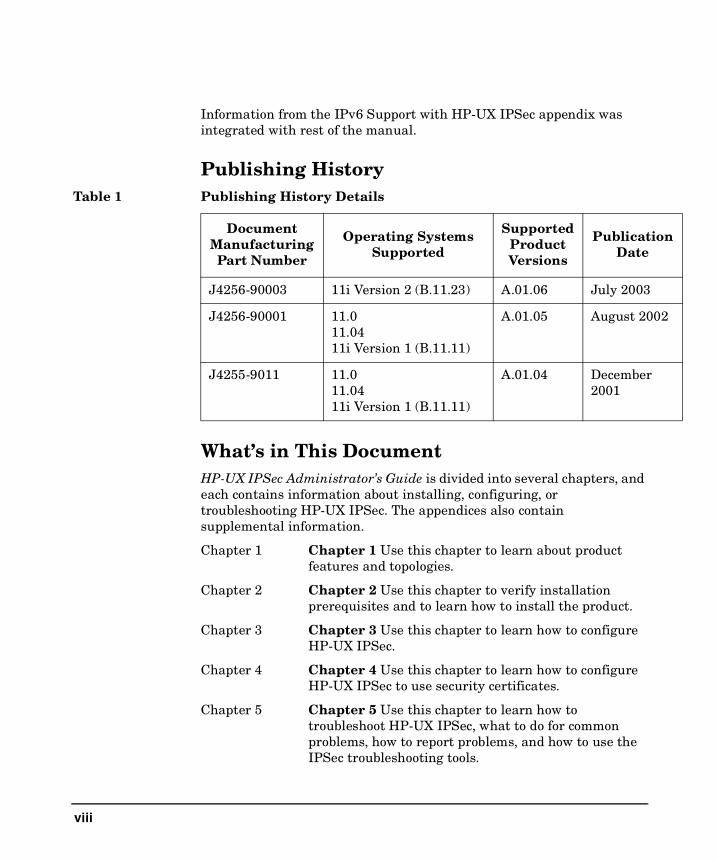
Information from the IPv6 Support with HP-UX IPSec appendix was integrated with rest of the manual.
Publishing History
What’s in This DocumentHP-UX IPSec Administrator’s Guide is divided into several chapters, and each contains information about installing, configuring, or troubleshooting HP-UX IPSec. The appendices also contain supplemental information.
Chapter 1 Chapter 1 Use this chapter to learn about product features and topologies.
Chapter 2 Chapter 2 Use this chapter to verify installation prerequisites and to learn how to install the product.
Chapter 3 Chapter 3 Use this chapter to learn how to configure HP-UX IPSec.
Chapter 4 Chapter 4 Use this chapter to learn how to configure HP-UX IPSec to use security certificates.
Chapter 5 Chapter 5 Use this chapter to learn how to troubleshoot HP-UX IPSec, what to do for common problems, how to report problems, and how to use the IPSec troubleshooting tools.
Table 1 Publishing History Details
Document Manufacturing Part Number
Operating Systems Supported
Supported Product Versions
PublicatioDate
J4256-90003 11i Version 2 (B.11.23) A.01.06 July 2003
J4256-90001 11.011.0411i Version 1 (B.11.11)
A.01.05 August 200
J4255-9011 11.011.0411i Version 1 (B.11.11)
A.01.04 December 2001
viii
Chapter 6 Chapter 6 Use this chapter to learn how to use HP-UX IPSec with IPFilter.
Chapter 7 Chapter 7 Use this chapter to learn how to use HP-UX IPSec with Linux FreeSwan.
Appendix A Chapter A Use this appendix to learn the product specifications: supported RFCs, product limitations and restrictions.
Appendix B Appendix B Use this appendix to see configuration parameters for two simple topologies.
Appendix C Appendix C Use the worksheets in this appendix as templates for your configuration worksheets.
Appendix D Appendix D Use this appendix to learn more about the configuration process.
Appendix E Appendix E Use this appendix to learn more about how to use HP-UX IPSec troubleshooting utilities and how to interpret the output from these utilities.
Typographical ConventionsThis document uses the following conventions.
audit (5) An HP-UX man page. In this example, audit is the name and 5 is the section in the HP-UX Reference. On the web and on the Instant Information CD, it may be a hot link to the man page itself. From the HP-UX command line, you can enter “man audit” or “man 5 audit” to view the man page. See man (1).
Book Title The title of a book. On the web and on the Instant Information CD, it may be a hot link to the book itself.
KeyCap The name of a keyboard key. Note that Return and Enter both refer to the same key.
Emphasis Text that is emphasized.
Bold Text that is strongly emphasized.
Bold The defined use of an important word or phrase.
ComputerOut Text displayed by the computer.
UserInput Commands and other text that you type.
ix
Command A command name or qualified command phrase.
variable The name of a variable that you may replace in a command or function or information in a display that represents several possible values.
[ ] The contents are optional in formats and command descriptions. If the contents are a list separated by |, you must choose one of the items.
{ } The contents are required in formats and command descriptions. If the contents are a list separated by |, you must choose one of the items.
... The preceding element may be repeated an arbitrary number of times.
| Separates items in a list of choices.
Related DocumentsAdditional information about HP-UX IPSec can be found on docs.hp.com in the Internet and Security Solutions collection under HP-UX IPSec at:
http://www.docs.hp.com/hpux/index/index.html#HP-UX%20IPSec
Other documents in this collection include:
HP-UX IPSec A.01.06 Release Notes
HP-UX IPSec Sizing and Performance
HP Encourages Your CommentsHP encourages your comments concerning this document. We are truly committed to providing documentation that meets your needs.
Please send comments to: [email protected]
Please include document title, manufacturing part number, and any comment, error found, or suggestion for improvement you have concerning this document. Also, please include what we did right so we can incorporate it into other documents.
x
OpenSSL Copyright NoticeHP-UX IPSec includes software developed by the OpenSSL Project for use in the OpenSSL Toolkit. (http://www.openssl.org/)
NOTE HP-UX IPSec uses specific portions of OpenSSL code to enable support for the Baltimore PKI. HP-UX IPSec does not contain a complete version of OpenSSL software. HP does not support the use of the complete OpenSSL software package with HP-UX IPSec.
Copyright (c) 1998-2001 The OpenSSL Project. All rights reserved.
Redistribution and use in source and binary forms, with or without modification, are permitted provided that the following conditions are met:
1. Redistributions of source code must retain the above copyright notice, this list of conditions and the following disclaimer.
2. Redistributions in binary form must reproduce the above copyright notice, this list of conditions and the following disclaimer in the documentation and/or other materials provided with the distribution.
3. All advertising materials mentioning features or use of this software must display the following acknowledgment: “This product includes software developed by the OpenSSL Project for use in the OpenSSL Toolkit. (http://www.openssl.org/)”
4. The names “OpenSSL Toolkit” and “OpenSSL Project” must not be used to endorse or promote products derived from this software without prior written permission. For written permission, please contact [email protected].
5. Products derived from this software may not be called “OpenSSL” nor may “OpenSSL” appear in their names without prior written permission of the OpenSSL Project.
6. Redistributions of any form whatsoever must retain the following acknowledgment: “This product includes software developed by the OpenSSL Project for use in the OpenSSL Toolkit (http://www.openssl.org/)”
xi

THIS SOFTWARE IS PROVIDED BY THE OpenSSL PROJECT ``AS IS” AND ANY EXPRESSED OR IMPLIED WARRANTIES, INCLUDING, BUT NOT LIMITED TO, THE IMPLIED WARRANTIES OF MERCHANTABILITY AND FITNESS FOR A PARTICULAR PURPOSE ARE DISCLAIMED. IN NO EVENT SHALL THE OpenSSL PROJECT OR ITS CONTRIBUTORS BE LIABLE FOR ANY DIRECT, INDIRECT, INCIDENTAL, SPECIAL, EXEMPLARY, OR CONSEQUENTIAL DAMAGES (INCLUDING, BUT NOT LIMITED TO, PROCUREMENT OF SUBSTITUTE GOODS OR SERVICES; LOSS OF USE, DATA, OR PROFITS; OR BUSINESS INTERRUPTION) HOWEVER CAUSED AND ON ANY THEORY OF LIABILITY, WHETHER IN CONTRACT, STRICT LIABILITY, OR TORT (INCLUDING NEGLIGENCE OR OTHERWISE) ARISING IN ANY WAY OUT OF THE USE OF THIS SOFTWARE, EVEN IF ADVISED OF THE POSSIBILITY OF SUCH DAMAGE.
This product includes cryptographic software written by Eric Young ([email protected]). This product includes software written by Tim Hudson ([email protected]).
Original SSLeay License
Copyright (C) 1995-1998 Eric Young ([email protected]) All rights reserved.
This package is an SSL implementation written by Eric Young ([email protected]). The implementation was written so as to conform with Netscape SSL.
This library is free for commercial and non-commercial use as long as the following conditions are adhered to. The following conditions apply to all code found in this distribution, be it the RC4, RSA, lhash, DES, etc., code; not just the SSL code. The SSL documentation included with this distribution is covered by the same copyright terms except that the holder is Tim Hudson ([email protected]).
Copyright remains Eric Young’s, and as such any Copyright notices in the code are not to be removed. If this package is used in a product, Eric Young should be given attribution as the author of the parts of the library used. This can be in the form of a textual message at program startup or in documentation (online or textual) provided with the package.
Redistribution and use in source and binary forms, with or without modification, are permitted provided that the following conditions are met:
xii
1. Redistributions of source code must retain the copyright notice, this list of conditions and the following disclaimer.
2. Redistributions in binary form must reproduce the above copyright notice, this list of conditions and the following disclaimer in the documentation and/or other materials provided with the distribution.
3. All advertising materials mentioning features or use of this software must display the following acknowledgment: “This product includes cryptographic software written by Eric Young ([email protected])”
The word ‘cryptographic’ can be left out if the routines from the library being used are not cryptographic related :-).
4. If you include any Windows specific code (or a derivative thereof) from the apps directory (application code) you must include an acknowledgment:
“This product includes software written by Tim Hudson ([email protected])”
THIS SOFTWARE IS PROVIDED BY ERIC YOUNG ``AS IS” AND ANY EXPRESS OR IMPLIED WARRANTIES, INCLUDING, BUT NOT LIMITED TO, THE IMPLIED WARRANTIES OF MERCHANTABILITY AND FITNESS FOR A PARTICULAR PURPOSE ARE DISCLAIMED. IN NO EVENT SHALL THE AUTHOR OR CONTRIBUTORS BE LIABLE FOR ANY DIRECT, INDIRECT, INCIDENTAL, SPECIAL, EXEMPLARY, OR CONSEQUENTIAL DAMAGES (INCLUDING, BUT NOT LIMITED TO, PROCUREMENT OF SUBSTITUTE GOODS OR SERVICES; LOSS OF USE, DATA, OR PROFITS; OR BUSINESS INTERRUPTION) HOWEVER CAUSED AND ON ANY THEORY OF LIABILITY, WHETHER IN CONTRACT, STRICT LIABILITY, OR TORT (INCLUDING NEGLIGENCE OR OTHERWISE) ARISING IN ANY WAY OUT OF THE USE OF THIS SOFTWARE, EVEN IF ADVISED OF THE POSSIBILITY OF SUCH DAMAGE.
The licence and distribution terms for any publicly available version or derivative of this code cannot be changed. i.e. this code cannot simply be copied and put under another distribution licence [including the GNU Public Licence.]
xiii

xiv

1 HP-UX IPSec Overview
Chapter 1 1

HP-UX IPSec Overview
This chapter describes HP-UX IPSec features and topologies. It contains the following sections:
• “Introduction” on page 3
• “Authentication Header (AH)” on page 5
• “Encapsulating Security Payload (ESP)” on page 9
• “Internet Key Exchange (IKE)” on page 14
• “HP-UX IPSec Topologies” on page 18
Chapter 12

HP-UX IPSec OverviewIntroduction
IntroductionThe IP security (IPSec) protocol suite was defined by the Internet Engineering Task Force (IETF) to provide security for IP networks. The IPSec protocol suite provides the following security services for IP networks:
• Data Integrity
Guarantee data consistency; prevent unauthorized creation, modification, or deletion of data between source and destination.
• Authentication
Ensure that the data received is the same as the data sent and that the claimed sender is the actual sender.
• Confidentiality
Provide data privacy such that only the intended recipients of the data know what is being sent. The sender encrypts (encodes) the data using an encryption algorithm and key (bit string). The output is ciphertext that is difficult to decode without knowing the key.
• Application-transparent Security
IPSec security headers are inserted between the standard IP protocol header and the upper-layer data (such as a TCP packet). Any network service that uses IP (such as telnet, FTP or sendmail) or user application that uses IP (TCP BSD Socket or XTI Streams application) can use IPSec without modification.
IPSec traffic can also pass transparently through existing IP routers.
IPSec functionality can be divided into the following categories:
• Authentication Header (AH) for data integrity and authentication.
• Encapsulating Security Payload (ESP) header for data confidentiality, data integrity, and data authentication. The ESP header also includes a sequence number that provides a form of replay protection.
Chapter 1 3
HP-UX IPSec OverviewIntroduction
• Internet Key Exchange (IKE) protocol, for generating and distributing cryptography keys for ESP and AH. IKE also authenticates the identity of the remote system, so AH and authenticated ESP with IKE keys provides data origin authentication.
Chapter 14

HP-UX IPSec OverviewAuthentication Header (AH)
Authentication Header (AH)The IPSec Authentication Header (AH) provides integrity and authentication but no privacy--the IP data is not encrypted. The AH contains an authentication value based on a symmetric-key hash function.
Symmetric key hash functions are a type of cryptographic hash function that take the data and a key as input to generate an authentication value. Cryptographic hash functions are usually one-way functions, so that starting with a hash output value, it is difficult to create an input value that would generate the same output value. This makes it difficult for a third party to intercept a message and replace it with a new message that would generate the same authentication value.
Symmetric key hash functions are also known as shared key hash functions because the sender and receiver must use the same (symmetric) key for the hash functions. In addition, the key must only be known by the sender and receiver, so this class of hash functions is sometimes referred to as secret key hash functions.
In the example below, the sender uses the plaintext and shared secret key to calculate an authentication value and sends the authentication value with the plaintext. The recipient computes its own authentication value using the same shared secret key and the plaintext. The recipient then compares the result with the transmitted authentication value. If
Chapter 1 5

HP-UX IPSec OverviewAuthentication Header (AH)
the values match, the recipient is assured that the sender knows the same secret key, confirming the identity of the sender. The recipient is also assured that the data was not altered during transit.
Figure 1-1 Symmetric Key Authentication
HP-UX IPSec supports the following algorithms for AH:
• HMAC-SHA1 (Hashed Message Authentication Code-Secure Hash Algorithm 1, 128-bit key)
• HMAC-MD5 (HMAC-Message Digest 5, 160-bit key)
Transport and Tunnel Modes
The IPSec headers (AH and ESP) can be used in transport mode or tunnel mode.
Transport Mode
In transport mode, IPSec inserts the AH header after the IP header. The IP data and header are used to calculate the AH authentication value. Mutable fields in the IP header (fields that need to change in transit), such as “hop count,” and “time to live,” are assigned a zero value before IPSec calculates the authentication value, so the actual value of the mutable fields are not authenticated.
Plaintext
hash
authenticationvalue
authenticationvalue
Plaintext
Plaintext
Shared Key
authenticationvalue
hash
(compare)
Shared Key
Host A Host B
Chapter 16
HP-UX IPSec OverviewAuthentication Header (AH)
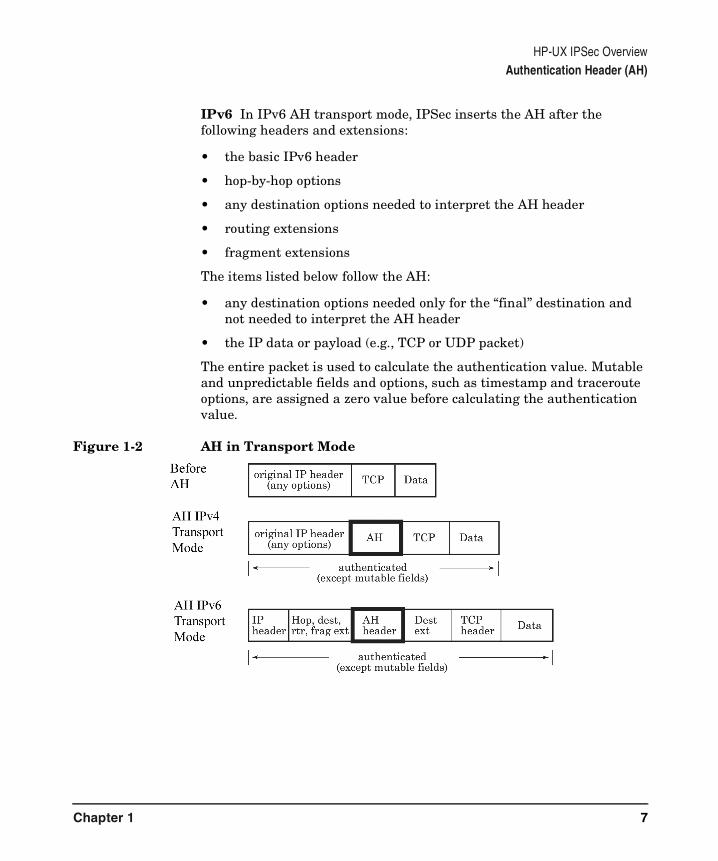
IPv6 In IPv6 AH transport mode, IPSec inserts the AH after the following headers and extensions:
• the basic IPv6 header
• hop-by-hop options
• any destination options needed to interpret the AH header
• routing extensions
• fragment extensions
The items listed below follow the AH:
• any destination options needed only for the “final” destination and not needed to interpret the AH header
• the IP data or payload (e.g., TCP or UDP packet)
The entire packet is used to calculate the authentication value. Mutable and unpredictable fields and options, such as timestamp and traceroute options, are assigned a zero value before calculating the authentication value.
Figure 1-2 AH in Transport Mode
Chapter 1 7

HP-UX IPSec OverviewAuthentication Header (AH)
Tunnel Mode
In tunnel mode, IPSec encloses, or encapsulates, the original IP datagram, including the original IP header, within a second IP datagram. All of the original IP datagram, including all fields of the original header, is authenticated.
IPv6 In IPv6 AH tunnel mode, the packet layout is the same as IPv4 AH tunnel mode, except that the original and new (outer) IP headers may include header extensions.
Figure 1-3 AH in Tunnel Mode
Chapter 18
HP-UX IPSec OverviewEncapsulating Security Payload (ESP)
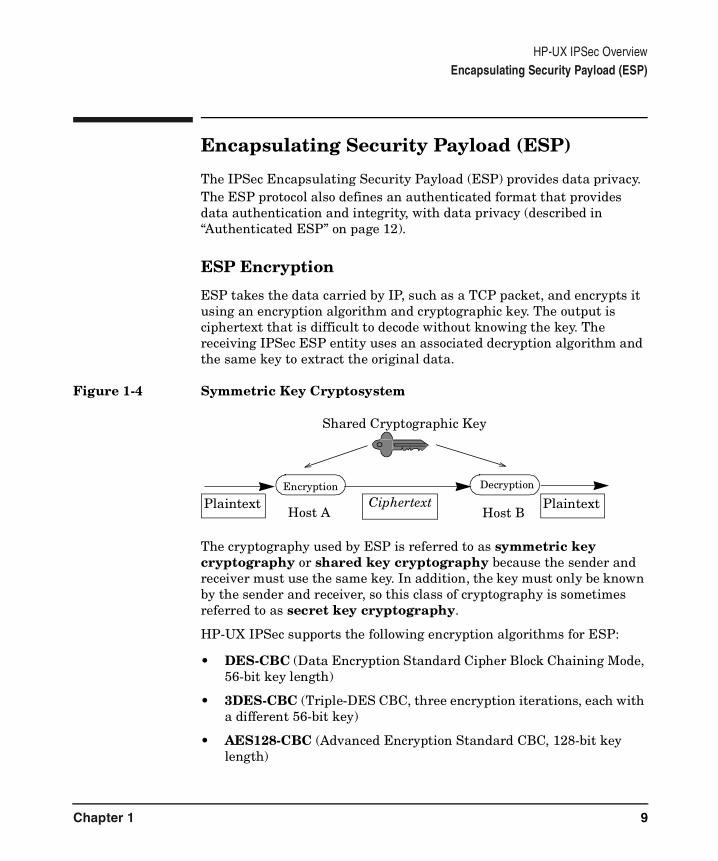
Encapsulating Security Payload (ESP)
The IPSec Encapsulating Security Payload (ESP) provides data privacy. The ESP protocol also defines an authenticated format that provides data authentication and integrity, with data privacy (described in “Authenticated ESP” on page 12).
ESP Encryption
ESP takes the data carried by IP, such as a TCP packet, and encrypts it using an encryption algorithm and cryptographic key. The output is ciphertext that is difficult to decode without knowing the key. The receiving IPSec ESP entity uses an associated decryption algorithm and the same key to extract the original data.
Figure 1-4 Symmetric Key Cryptosystem
The cryptography used by ESP is referred to as symmetric key cryptography or shared key cryptography because the sender and receiver must use the same key. In addition, the key must only be known by the sender and receiver, so this class of cryptography is sometimes referred to as secret key cryptography.
HP-UX IPSec supports the following encryption algorithms for ESP:
• DES-CBC (Data Encryption Standard Cipher Block Chaining Mode, 56-bit key length)
• 3DES-CBC (Triple-DES CBC, three encryption iterations, each with a different 56-bit key)
• AES128-CBC (Advanced Encryption Standard CBC, 128-bit key length)
Plaintext
Shared Cryptographic Key
Encryption
CiphertextDecryption
Host BHost APlaintext
Chapter 1 9

HP-UX IPSec OverviewEncapsulating Security Payload (ESP)
AES128-CBC is the most secure form of encryption for HP-UX IPSec. AES128-CBC encryption throughput rates are comparable to or better than DES-CBC and 3DES-CBC. For more information about HP-UX IPSec performance, refer to the HP-UX IPSec Sizing and Performance document available at www.docs.hp.com.
DES-CBC has been cracked (data encoded by DES has been decoded by a third party).
For added security, use ESP with authentication, as described in “ESP with Authentication and Encryption” on page 12.
Transport and Tunnel Modes
The ESP header can be used in transport mode or tunnel mode.
Transport Mode In transport mode, the original IP header is followed by the ESP header. Only the upper-layer (e.g., TCP, UDP, IGMP) is encrypted. The IP header is not encrypted.
IPv6 In IPv6 ESP transport mode, IPSec inserts the ESP header after the following headers and extensions:
• the basic IPv6 header
• hop-by-hop options
• any destination options needed to interpret the ESP header
• routing extensions
• fragment extensions
The items listed below follow the ESP header and are encrypted:
• any destination options needed only for the “final” destination and not needed to interpret the ESP header
Chapter 110

HP-UX IPSec OverviewEncapsulating Security Payload (ESP)
• the IP data or payload (e.g., TCP or UDP packet)
Figure 1-5 ESP Encryption in Transport Mode
Tunnel Mode In tunnel mode, IPSec encloses, or encapsulates, the original IP datagram, including the original IP header, within a second IP datagram. All of the original IP datagram, including the original header, is encrypted. If ESP is used in tunnel mode on gateways, the outer, unencrypted IP header will contain the IP addresses of the gateways, and the inner, encrypted IP header will contain the ultimate IP source and destination addresses. This prevents eavesdroppers from detecting or analyzing traffic between the ultimate source and destination addresses.
IPv6 In IPv6 ESP tunnel mode, the packet layout is the same as IPv4 ESP tunnel mode, except that the original and new (outer) IP headers may include header extensions.
Figure 1-6 ESP in Tunnel Mode
Chapter 1 11
HP-UX IPSec OverviewEncapsulating Security Payload (ESP)
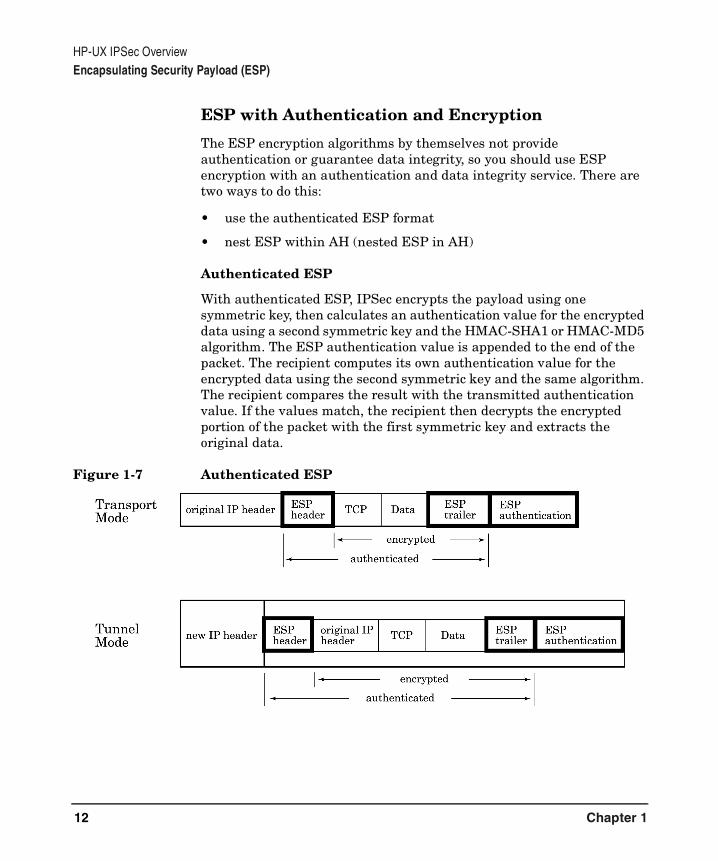
ESP with Authentication and Encryption
The ESP encryption algorithms by themselves not provide authentication or guarantee data integrity, so you should use ESP encryption with an authentication and data integrity service. There are two ways to do this:
• use the authenticated ESP format
• nest ESP within AH (nested ESP in AH)
Authenticated ESP
With authenticated ESP, IPSec encrypts the payload using one symmetric key, then calculates an authentication value for the encrypted data using a second symmetric key and the HMAC-SHA1 or HMAC-MD5 algorithm. The ESP authentication value is appended to the end of the packet. The recipient computes its own authentication value for the encrypted data using the second symmetric key and the same algorithm. The recipient compares the result with the transmitted authentication value. If the values match, the recipient then decrypts the encrypted portion of the packet with the first symmetric key and extracts the original data.
Figure 1-7 Authenticated ESP
Chapter 112

HP-UX IPSec OverviewEncapsulating Security Payload (ESP)
Nested ESP in AH
An ESP packet can be nested within an AH packet. For example, a 3DES-CBC ESP packet can be nested within an HMAC-MD5 packet. IPSec uses 3DES-CBC to build an ESP packet with the payload data encrypted using a symmetric key. IPSec then nests the ESP packet within an AH packet, using a second symmetric key. All the contents of the packet are authenticated, except the mutable fields of the IP header.
IPv6
The packet layouts and procedures for authenticated ESP and nested ESP in AH are the same for IPv6, except that the IP headers may include header extensions.
Figure 1-8 Nested ESP in AH
Chapter 1 13

HP-UX IPSec OverviewInternet Key Exchange (IKE)
Internet Key Exchange (IKE)Before IPSec sends authenticated or encrypted IP data, both the sender and receiver must agree on the protocols, encryption algorithms and keys to use. HP-UX IPSec uses the Internet Key Exchange (IKE) protocol to negotiate the protocols, encryption algorithms and encryption keys used. The IKE protocol also provides primary authentication - verifying the identity of the remote system before negotiating the encryption algorithm and keys.
The IKE protocol is a hybrid of three other protocols: ISAKMP (Internet Security Association and Key Management Protocol), Oakley, and SKEME (Versatile Secure Key Exchange Mechanism for Internet). ISAKMP provides a framework for authentication and key exchange, but does not define them (neither authentication nor key exchange). The Oakley protocol describes a series of modes for key exchange and the SKEME protocol defines key exchange techniques.
IKE Automatic Keying
The IKE protocol also allows HP-UX IPSec to dynamically negotiate new keys rather than exposing the same key for long periods. You can configure key lifetimes based on time or number of bytes sent.
Security Associations (SAs) and IKE Phases
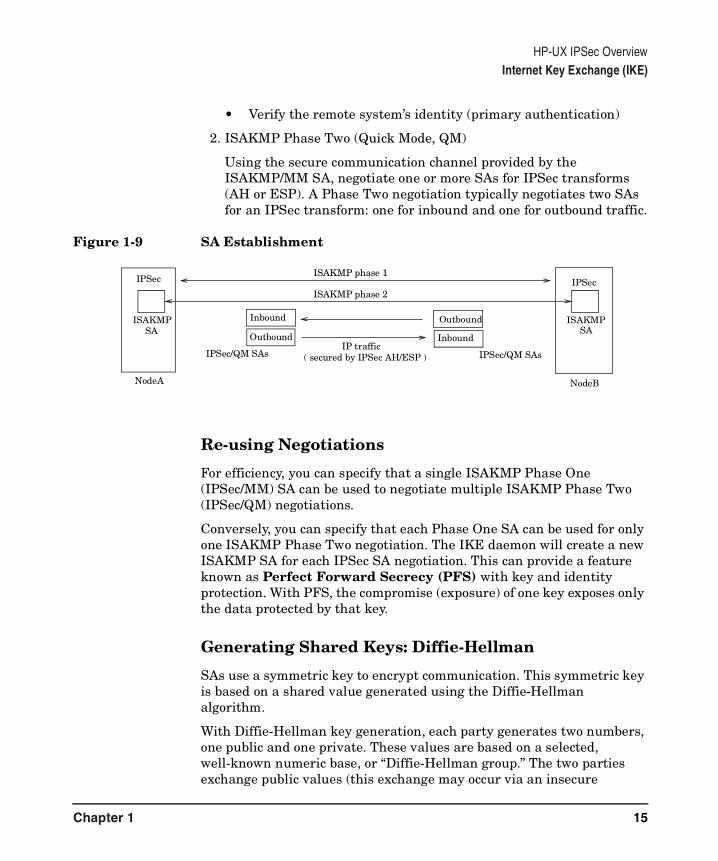
A Security Association (SA) is a secure communication channel and its parameters, such as the encryption algorithm, keys and lifetime. There are two SA negotiation phases within ISAKMP, which are sometimes referred to by the Oakley modes used to establish the SAs. The general flow of the IKE protocol is as follows:
1. ISAKMP Phase One (Main Mode, MM)
• Negotiate and establish an ISAKMP SA, a secure communication channel for further IKE communication.
The two systems generate a Diffie-Hellman shared value (described below) that is used as the base for a symmetric (shared) key, and further IKE communication is encrypted using this symmetric key.
Chapter 114
HP-UX IPSec OverviewInternet Key Exchange (IKE)
• Verify the remote system’s identity (primary authentication)
2. ISAKMP Phase Two (Quick Mode, QM)
Using the secure communication channel provided by the ISAKMP/MM SA, negotiate one or more SAs for IPSec transforms (AH or ESP). A Phase Two negotiation typically negotiates two SAs for an IPSec transform: one for inbound and one for outbound traffic.
Figure 1-9 SA Establishment
Re-using Negotiations
For efficiency, you can specify that a single ISAKMP Phase One (IPSec/MM) SA can be used to negotiate multiple ISAKMP Phase Two (IPSec/QM) negotiations.
Conversely, you can specify that each Phase One SA can be used for only one ISAKMP Phase Two negotiation. The IKE daemon will create a new ISAKMP SA for each IPSec SA negotiation. This can provide a feature known as Perfect Forward Secrecy (PFS) with key and identity protection. With PFS, the compromise (exposure) of one key exposes only the data protected by that key.
Generating Shared Keys: Diffie-Hellman
SAs use a symmetric key to encrypt communication. This symmetric key is based on a shared value generated using the Diffie-Hellman algorithm.
With Diffie-Hellman key generation, each party generates two numbers, one public and one private. These values are based on a selected, well-known numeric base, or “Diffie-Hellman group.” The two parties exchange public values (this exchange may occur via an insecure
ISAKMP phase 1
ISAKMPSA
ISAKMPSA
IPSec/QM SAsIPSec/QM SAs
Outbound
Outbound
Inbound
Inbound
ISAKMP phase 2
NodeA NodeB
IPSecIPSec
IP traffic( secured by IPSec AH/ESP )
Chapter 1 15

HP-UX IPSec OverviewInternet Key Exchange (IKE)
channel). Each party then uses its private value and the other party’s public value to generate a new value. Because of the mathematical properties of the numbers, each party will generate the same value, which can then be used as a symmetric key.
Figure 1-10 Diffie-Hellman Key Generation
Diffie-Hellman is vulnerable to attacks where a third-party intercepts messages between the sender and receiver and assumes the identity of the other party. Because of this, Diffie-Hellman is used with some form of authentication to ensure that symmetric keys are established between correct parties.
In summary, if two entities use the same, well-known Diffie-Hellman group, they can publicly exchange values and generate the same shared value that they can use as a symmetric key, or use as a base for a symmetric key. Diffie-Hellman should be used with some form of authentication.
IKE Primary Authentication
IKE must authenticate the identities of the systems using the Diffie-Hellman algorithm. This process is known as primary authentication. HP-UX IPSec IKE can use two primary authentication methods:
PublicValue
PublicValue
PrivateValue
PrivateValue
SharedSecretValue
SharedSecretValue
A B
=
Private Value Acombined withPublic Value B
Private Value Bcombined withPublic Value A
Step 1 A & B select Diffie-Hellman Group
Node A Node B
Step 2
Step 3
Chapter 116

HP-UX IPSec OverviewInternet Key Exchange (IKE)
• Preshared keys
• Digital Signatures
IKE Preshared Key Authentication
With preshared key authentication, you must manually configure the same, shared symmetric key on both systems, a preshared key. The preshared key is used only for the primary authentication. The two negotiating entities then generate dynamic shared keys for the IKE SAs and IPSec/QM SAs.
Preshared keys do not require a Certificate Authority or Public Key Infrastructure.
Digital Signatures
Digital signatures are based on security certificates, and are managed using a Public Key Infrastructure (PKI). For more information on using certificate-based authentication for IKE, refer to Chapter 4, “Using Certificates with HP-UX IPSec,” on page 65.
Chapter 1 17

HP-UX IPSec OverviewHP-UX IPSec Topologies
HP-UX IPSec TopologiesIPSec can be employed between hosts (that is, end nodes), between gateways, or between a host and a gateway in an IP network. HP-UX IPSec can only be installed on end nodes. Installing HP-UX IPSec on a gateway node is not supported.
End-to-End Topology
Two end hosts can run HP-UX IPSec locally to protect communication between them, with or without intermediate gateways.
Figure 1-11 IPSec End-to-End Topology
End-to-Gateway Topology
In situations where the local subnet is a trusted network, HP-UX IPSec can be employed between an end host system and the gateway to provide security services between these systems, thereby creating a secure Virtual Private Network (VPN).
Secure channel
Internet
HostA HostBHP-UX IPSec HP-UX IPSec
Chapter 118

HP-UX IPSec OverviewHP-UX IPSec Topologies
Figure 1-12 End Host-to-Gateway (VPN) Topology
NOTE In an End-to-Gateway topology, the gateway cannot be an HP-UX system.
Figure 1-13 End-to-Gateway IPSec Topology
End-to-End Tunnel Topology
Two end hosts with HP-UX IPSec protection can configure a tunnel policy that securely protects traffic between them. The tunnel adds extra protection; an intruder cannot see the real IP headers of packets traveling between the hosts.
Secure channel
Internet
HostAHP-UX IPSec
Tunnel
Non-HPGateway
IPSec
Host BNo IPSec
Non-secure channel
Chapter 1 19

HP-UX IPSec OverviewHP-UX IPSec Topologies
End-to-end tunnel topology is commonly used in an iSCSI environment.
Figure 1-14 End-to-End Tunnel Topology
Gateway-to-Gateway Topology
Two hosts each reside upon insecure networks (such as insecure intranets). These hosts need to communicate securely over an insecure public network (such as the Internet). HP-UX IPSec can be used over a tunnel between two (non-HP) IPSec gateways to provide additional end-to-end security.
Figure 1-15 IPSec Gateway-to-Gateway Topology
Secure channel
Internet
GatewayIPSec
Tunnel
HostXHP-UX IPSec
Non-HPGateway
IPSec
Non-HPHostAHP-UX IPSec
Chapter 120
2 Installing HP-UX IPSec
Chapter 2 21

Installing HP-UX IPSec
This chapter describes installation prerequisites and procedures for installing HP-UX IPSec software. It contains the following sections:
• “HP-UX IPSec Product Requirements” on page 23
• “Step 1: Verifying HP-UX IPSec Installation and Configuration Prerequisites” on page 24
• “Step 2: Completing HP-UX IPSec Worksheets” on page 25
• “Step 3: Loading the HP-UX IPSec Software” on page 26
• “Step 4: Setting the HP-UX IPSec Password” on page 28
Chapter 222

Installing HP-UX IPSecHP-UX IPSec Product Requirements
HP-UX IPSec Product RequirementsPrior to installing the HP-UX IPSec product, check that your system can accommodate the following product requirements.
Memory Requirements
The total size of the memory required (run-time only) for the HP-UX IPSec product is: 1 Mbyte.
Disk Requirements
The total size of the disk space required (run-time only) for the HP-UX IPSec product is 16 Mbytes. Requirements for variable-length user files are listed below:
• Policy file: minimum of 2019 bytes per policy file. Alternate or test policy files should be stored in a separate directory. The default file is: /var/adm/ipsec/policies.txt.
• Audit file: This file can grow very fast if Informative auditing is turned on. HP recommends 1 Mbyte for the Alerts and Errors level of logging, 5 Mbytes for the Warnings level, and 200 or more Mbytes for the Informative message level. Informative auditing could generate 3–5 Mbytes per hour. Audit files should be kept in a separate directory or file system. The default directory is: /var/adm/ipsec/.
Configuration Utility Requirements
The HP-UX IPSec configuration utility, ipsec_mgr, requires a graphical display device. This can be a graphics monitor, an X terminal display, a PC with X Server software installed, or a Linux workstation running an X Server.
Chapter 2 23

Installing HP-UX IPSecStep 1: Verifying HP-UX IPSec Installation and Configuration Prerequisites
Step 1: Verifying HP-UX IPSec Installation and Configuration Prerequisites
1. Verify that the operating system version is HP-UX 11i version 2.
To obtain information about the OS, execute the command:
uname -a
2. Check the latest HP-UX IPSec release note for patch information.
To obtain information about a patch, execute the command:
swlist -i
3. Fill out the appropriate HP-UX IPSec Configuration worksheets in Appendix C, “HP-UX IPSec Configuration Worksheets,” on page 161. Additional information on configuration parameters is available in the online help of ipsec_mgr, the HP-UX IPSec configuration GUI.
4. Be sure you have root access and are designated the network security administrator.
5. Be sure you have access to a graphical display, either on your system, a remote HP-UX workstation, or a remote display device.
6. If you are using RSA signature for ISAKMP authentication, ensure that you are registered and can communicate with a certificate authority.
For a VeriSign CA, you must set up a VeriSign ON-SITE account. For information on how to do this, contact VeriSign at www.verisign.com. See “Using VeriSign Certificates” on page 70.
For a Baltimore CA, see “Using Baltimore Certificates” on page 78.
Chapter 224
Installing HP-UX IPSecStep 2: Completing HP-UX IPSec Worksheets
Step 2: Completing HP-UX IPSec WorksheetsBefore beginning the installation and configuration procedures, fill out the configuration worksheets in Appendix C, “HP-UX IPSec Configuration Worksheets,” on page 161.
1. Fill out the IPSec Policy Worksheet.
2. Fill out the ISAKMP Worksheet.
3. Fill out either the Preshared Keys Worksheet or the Certificate Worksheet.
Fill out the Preshared Keys Worksheet if you selected Preshared Keys as your ISAKMP authentication algorithm. If you selected RSA signature, fill out the Certificate Worksheet.
Chapter 2 25

Installing HP-UX IPSecStep 3: Loading the HP-UX IPSec Software
Step 3: Loading the HP-UX IPSec Software Follow the steps below to load HP-UX IPSec software using the HP-UX swinstall program.
1. Log in as root.
2. Insert the HP-UX IPSec disk into the appropriate drive, or locate the directory into which you downloaded the software from HP Software Depot.
3. Run the swinstall program using the command:
swinstall
This opens the Software Selection window and the Specify Source window.
If you need additional information about the Specify Source window, click the Help button on the window.
4. On the Specify Source window, change the Source Host Name if necessary.
Enter the mount point of the drive in the Source Depot Path field and click OK to return to the Software Selection window.
The Software Selection window now contains a list of available software bundles to install.
5. Highlight the HP-UX IPSec software for your system type.
6. Choose Mark for Install from the Actions menu to choose the product to be installed. With the exception of the man pages and user’s manual, you must install the complete IPSec product.
7. Choose Install from the Actions menu to begin product installation and open the Install Analysis window.
8. Click OK in the Install Analysis window when the Status field displays a Ready message.
9. Click Yes in the Confirmation window to confirm that you want to install the software. swinstall displays the Install window.
Read processing data while the software is being installed. When the Status field indicates Ready, the Note window opens.
Chapter 226

Installing HP-UX IPSecStep 3: Loading the HP-UX IPSec Software
swinstall loads the fileset, runs the control scripts for the fileset, and builds the kernel. Estimated time for processing: 3 to 5 minutes.
10. Click OK on the Note window to reboot the system.
The user interface disappears and the system reboots.
11. When the system reboots, check the log files in /var/adm/sw/swinstall.log and /var/adm/sw/swagent.log to make sure the installation was successful.
NOTE Do not run the HP-UX IPSec product when the system is booted in single-user mode.
Go to Step 4: Setting the HP-UX IPSec Password.
Chapter 2 27

Installing HP-UX IPSecStep 4: Setting the HP-UX IPSec Password
Step 4: Setting the HP-UX IPSec PasswordPrior to running the ipsec_mgr configuration GUI or any other HP-UX IPSec utility, you must set the HP-UX IPSec password. This password is used to control access to the HP-UX IPSec utilities and to encrypt HP-UX IPSec files.
To set the password, run the following command:
ipsec_admin -newpasswd
The password must be at least 15 characters long and can contain spaces.
If you run the ipsec_admin command without first setting the password, the following prompt appears:
Establishing IPSec password, enter IPSec password:
Set the password at the prompt.
Re-establishing the HP-UX IPSec Password
If you have forgotten the IPSec password, use the following procedure to re-establish it:
1. Print a formatted, ASCII version of the IPSec and ISAKMP policy configuration data. To do this, run ipsec_mgr and select Print Policies from the File menu.
2. Remove /var/adm/ipsec/.ipsec_info from your system.
3. Revoke any certificates from the Certificate Authority (CA).
4. Re-install the product.
5. Follow the instructions above to set the HP-UX IPSec password.
6. Recreate the lost configuration data.
Chapter 228
3 Configuring HP-UX IPSec
Chapter 3 29

Configuring HP-UX IPSec
This chapter describes how to configure HP-UX IPSec, including preshared key configuration. If you are using RSA signature authentication for IKE, you must also refer to Chapter 4, “Using Certificates with HP-UX IPSec,” on page 65 for instructions on configuring certificates. This chapter contains the following sections:
• “Overview” on page 31
• “Step 1: Starting the ipsec_mgr Configuration Utility” on page 33
• “Step 2A: Configuring the IPSec Policy Filter” on page 35
• “Step 2B: Configuring the IPSec Policy Transform List” on page 40
• “Step 2C: Configuring the ISAKMP Policy Name” on page 45
• “Step 3: Configuring the ISAKMP Policy” on page 47
• “Step 4: Configuring a Tunnel” on page 50
• “Step 5: Configuring a Preshared Key” on page 56
• “Step 7: Configuring Boot-up Options” on page 59
• “Step 8: Verifying the Configuration” on page 60
• “Step 9: Printing Formatted IPSec and ISAKMP Policies” on page 64
Chapter 330

Configuring HP-UX IPSecOverview
OverviewThere are five main configuration areas: IPSec policies, ISAKMP policies, preshared keys, security certificates (certificates and certificate IDs), and boot options.
Although you can configure these components in any order, HP recommends that you use the following procedure to configure IPSec:
1. Start the ipsec_mgr configuration utility.
2. Configure IPSec policies.
An IPSec policy specifies the actions or transformations performed on IP packets traveling between IPSec systems. The main components of an IPSec policy are:
a. IP packet filter (IP address, protocol, and port information)
b. Transform (action) list
c. ISAKMP policy name
When an IP packet is initially sent or received, HP-UX IPSec uses the IP packet filters to select an IPSec policy. IPSec then takes an action according to the contents of the transform list. If the action is to authenticate or encrypt the packet, the ISAKMP policy is used to establish an ISAKMP Security Association (SA), so that IPSec SAs can be established for authentication or encryption.
3. Configure ISAKMP policies.
An ISAKMP policy defines the parameters used when negotiating an ISAKMP SA. These include the authentication and encryption algorithms, and the primary authentication method such as preshared keys or a certificate-based method, such as RSA signatures.
4. Configure the IPSec tunnel, if you are using a tunnel.
5. Configure preshared keys, if you are using preshared keys for IKE authentication.
6. Configure security certificates and certificate IDs, if you are using RSA signatures for IKE authentication. This procedure is described in Chapter 4, “Using Certificates with HP-UX IPSec,” on page 65.
Chapter 3 31
Configuring HP-UX IPSecOverview
7. Configure boot-up options. The boot-up options allow you to configure HP-UX IPSec to automatically start at system boot-up time and to specify general operating parameters.
8. Verify the configuration.
9. Print formatted IPSec and ISAKMP policies.
NOTE HP-UX IPSec cannot be configured to selectively encrypt or authenticate services with dynamically assigned port numbers, such as the Network File Service (NFS) mountd, lockd, and statd services.
HP-UX IPSec also cannot be used to authenticate or encrypt IP packets with broadcast, subnet broadcast, multicast, or anycast IP addresses.
Chapter 332
Configuring HP-UX IPSecStep 1: Starting the ipsec_mgr Configuration Utility
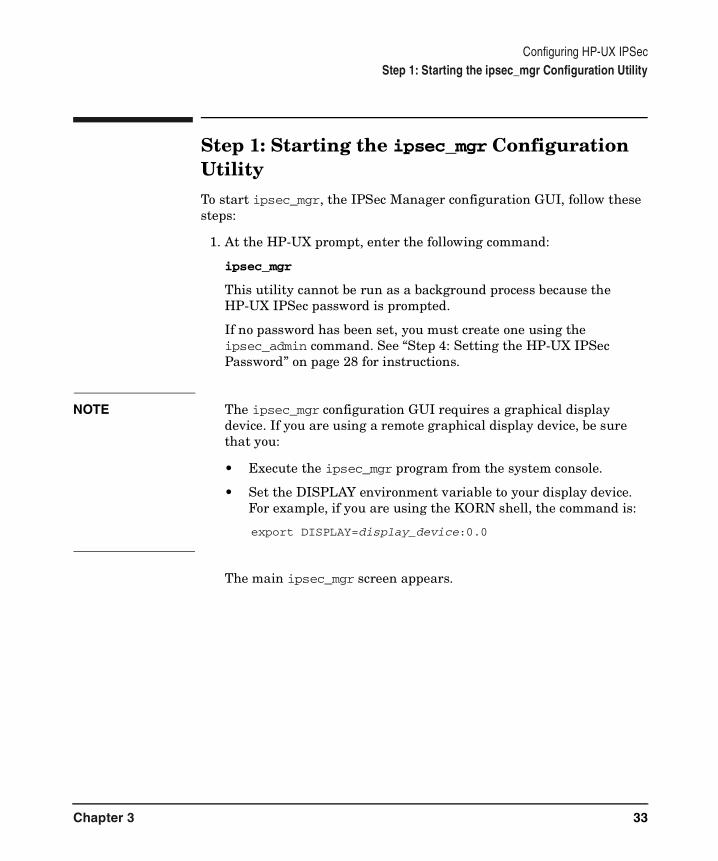
Step 1: Starting the ipsec_mgr Configuration UtilityTo start ipsec_mgr, the IPSec Manager configuration GUI, follow these steps:
1. At the HP-UX prompt, enter the following command:
ipsec_mgr
This utility cannot be run as a background process because the HP-UX IPSec password is prompted.
If no password has been set, you must create one using the ipsec_admin command. See “Step 4: Setting the HP-UX IPSec Password” on page 28 for instructions.
NOTE The ipsec_mgr configuration GUI requires a graphical display device. If you are using a remote graphical display device, be sure that you:
• Execute the ipsec_mgr program from the system console.
• Set the DISPLAY environment variable to your display device. For example, if you are using the KORN shell, the command is:
export DISPLAY=display_device:0.0
The main ipsec_mgr screen appears.
Chapter 3 33

Configuring HP-UX IPSecStep 1: Starting the ipsec_mgr Configuration Utility
2. Select the IPSec Policies tab on the ipsec_mgr screen to display existing HP-UX IPSec policies.
The configuration files for HP-UX IPSec are stored in the /var/adm/ipsec directory. They include:
• policies.txt (the default file for IPSec policies; not encrypted)
• pskeys.text (encrypted)
• certstatus.txt (not encrypted)
• cainfo.txt (not encrypted)
• certs.txt (not encrypted)
• various control files (encrypted)
Alternate (multiple) policy files can exist for the policies.txt file only. You can open a previously created IPSec policy file by choosing Open from the File menu.
3. Go on to Step 2A: Configuring the IPSec Policy Filter.
Chapter 334

Configuring HP-UX IPSecStep 2A: Configuring the IPSec Policy Filter
Step 2A: Configuring the IPSec Policy Filter
1. Click Create on the ipsec_mgr screen to create a new IPSec policy.
Chapter 3 35

Configuring HP-UX IPSecStep 2A: Configuring the IPSec Policy Filter
The Create IPSec Policy screen appears.
For detailed information about the fields on this screen, see Appendix D, “Configuration Reference,” on page 175 or click Help at the bottom of the screen.
Chapter 336

Configuring HP-UX IPSecStep 2A: Configuring the IPSec Policy Filter
2. In the Name field, enter a name that uniquely identifies this IPSec policy. The name is not case-sensitive.
3. Click the Exclusive checkbox if you want to specify session-based keying. Leave the Exclusive checkbox unchecked if you want to specify host-based keying.
You can select session-based keying (check the Exclusive checkbox) only if the transform list does not contain Discard or Pass as the transform policy.
You must use session-based keying if the transform for the policy is not Pass or Discard, and the remote prefix length indicates a subnet (value of less than 32 for IPv4 or value of less than 128 for IPv6) or if the remote IP address is a wildcard (*). In this case, the Exclusive checkbox is selected and unmodifiable (grayed out).
4. Select the Policy Type (hashed or ordered) for this HP-UX IPSec policy. For more information, refer to “Policy Type” on page 179.
5. Enter the IP Address and Prefix Length of your local system. You can use an IPv4 address or an IPv6 address. The local IP address must be in the same format (IPv4 or IPv6) as the remote IP address.
The local IP address cannot be a broadcast, subnet broadcast, multicast, or anycast address.
NOTE Unspecified IPv6 addresses are not supported by IPSec. However, the :: notation can be used within a specified IPv6 address to denote a number of zeros (0) within the address. For example, fe80::2222:3333:4444:5555 is understood by IPSec to be the same as fe80:0:0:0:2222:3333:4444:5555.
The Prefix Length field is disabled if the IP address is a wildcard *. Otherwise, it becomes enabled and is preset to the default of 32 bits if the local address is in IPv4 format or 128 bits if the local address is in IPv6 format.
The Prefix Length indicates the number of bits that must match when comparing an IP address of a packet to the IP address in the policy.
Chapter 3 37

Configuring HP-UX IPSecStep 2A: Configuring the IPSec Policy Filter
For IPv4 addresses, a Prefix Length of 32 bits indicates that all the bits in both addresses must match. This Prefix Length value is equivalent to an address mask of 255.255.255.255.
For IPv6 addresses, a Prefix Length of 128 bits indicates that all the bits in both addresses must match.
6. Enter the IP Address and Prefix Length of your remote system. You can use an IPv4 address or an IPv6 address. The remote IP address must be in the same format (IPv4 or IPv6) as the local IP address.
The remote IP address cannot be a broadcast, subnet broadcast, multicast, or anycast address.
Unspecified IPv6 addresses are not supported by IPSec. However, the :: notation can be used within a specified IPv6 address to denote a number of zeros (0) within the address.
The Prefix Length field is disabled if the IP address is a wildcard *. Otherwise, it becomes enabled and is preset to the default of 32 if the remote address is in IPv4 format or 128 if the remote address is in IPv6 format.
NOTE The remote IP address cannot be an IP address assigned to the local host.
7. Check the Configure Policy Based on Service checkbox to configure the service and ports automatically. Choose the service you want to configure from the Service list. Specify whether the direction is inbound or outbound in the Direction list.
If you do not select Configure Policy Based on Service, you must select a protocol, and enter the local and remote port numbers. In addition, the Apply to IP Datagrams subarea will be configurable. By default, the Local to Remote box will be checked (the policy will apply to packets that originate from the local system) and Remote to Local box will be checked (the policy will also apply to packets that originate from the remote system).
Chapter 338
Configuring HP-UX IPSecStep 2A: Configuring the IPSec Policy Filter
NOTE If you are using IPv6 addresses, you cannot choose the IGMP protocol. Additionally, you cannot choose the ICMP protocol except in specific, limited circumstances. See Appendix D, “Configuration Reference,” on page 175 or the online help for more information.
8. Go on to Step 2B: Configuring the IPSec Policy Transform List.
Chapter 3 39

Configuring HP-UX IPSecStep 2B: Configuring the IPSec Policy Transform List
Step 2B: Configuring the IPSec Policy Transform List
1. Continue to the IPSec Transform List in the Create IPSec Policy screen and click Edit to modify the list.
Chapter 340

Configuring HP-UX IPSecStep 2B: Configuring the IPSec Policy Transform List
2. On the Transform List, choose the transport transform or transforms you want to use for this policy.
HP-UX IPSec applies the transforms you configure to the packets that use this IPSec policy. Transforms perform actions such as encryption and authentication of packets.
Authenticated ESP transforms are listed as ESP transforms with both an encryption algorithm and an authentication algorithm, such as ESP-AES-HMAC-MD5.
At least one transform must match a transform configured on the remote system.
The transforms in this list are the transport transforms and are applicable to the end-to-end transport between the source and destination addresses. If you are using a tunnel, you also configure tunnel transforms that are applicable to the packets within the tunnel. You configure tunnel transforms in the Tunnel Transform List, described in“Step 4: Configuring a Tunnel” on page 50.
NOTE If you are configuring an end-to-end tunnel, you must choose pass as the transform for the IPSec policy. See “Step 4: Configuring a Tunnel” on page 50 for more information.
For more information about the function of a specific transform and how transforms are negotiated, see Appendix D, “Configuration Reference,” on page 175 or the online help.
Chapter 3 41

Configuring HP-UX IPSecStep 2B: Configuring the IPSec Policy Transform List
a. Click on a transform in the Transform box to select it.
b. Click Add to move the transform to the Transform List box.
c. If you want to create a nested AH and an ESP transform, use hold down the CTRL key and click to select an AH transform and an ESP transform in the Transform box. Use this procedure to create a nested AH and ESP transform configuration. Click Add to move the transforms to the Transform List box.
d. You can configure multiple AH transforms (up to 2), multiple ESP transforms (up to 8), or a single nested AH and ESP transform. Use the procedure in steps C and D to add multiple AH or ESP transforms to the Transform List box.
The order in which you add transforms to the Transform List
Chapter 342

Configuring HP-UX IPSecStep 2B: Configuring the IPSec Policy Transform List
box is the order used for preference by the IPSec policy. The first selected transforms will have the highest preference, the second selected transform will have the second highest preference, and so on.
AES is the most secure form of encryption. For added security, use AES in an authenticated ESP transform, such as ESP-AES-HMAC-SHA1.
3. If you add a transform to the Transform List box, you can choose Edit Lifetimes on the Edit Transform List window to modify the lifetimes of the transform. Otherwise, HP-UX IPSec will use the system’s default lifetimes (28,000 seconds). This value must fall within the following range: 300 second minimum to 28,800 second (8 hours) maximum. After modifying the lifetime(s), click OK to return to the Edit Transform List screen. Click OK again to return to the Create IPSec Policy screen.
System Default Transform Lifetimes
You can also configure the system-wide default lifetimes for the transforms. To do this, go to the Options menu. Select System, then Transform Lifetimes. Select lifetime values as described in step 3 above.
Chapter 3 43

Configuring HP-UX IPSecStep 2B: Configuring the IPSec Policy Transform List
4. If the transform is Discard, or is Pass and you do not want to configure an IPSec tunnel, click OK to save the IPSec policy. Return to “Step 2A: Configuring the IPSec Policy Filter” on page 35 to continue configuring IPSec policies, or go to Step 7: Configuring Boot-up Options, or click Exit to leave ipsec_mgr.
If the transform list contains an AH or ESP transform, go on to Step 2C: Configuring the ISAKMP Policy Name.
If the transform is Pass and you want to configure an IPSec tunnel, go on to “Step 4: Configuring a Tunnel” on page 50.
Chapter 344

Configuring HP-UX IPSecStep 2C: Configuring the ISAKMP Policy Name
Step 2C: Configuring the ISAKMP Policy Name
1. If the Transform list contains an action other than Pass or Discard, go to ISAKMP Policy on the Create IPSec Policy screen.
Chapter 3 45
Configuring HP-UX IPSecStep 2C: Configuring the ISAKMP Policy Name
You can only configure an ISAKMP policy if you have chosen a transform other than Pass or Discard. The ISAKMP Policy subarea is disabled if the IPSec Transform List contains discard or pass.
2. Specify the name of an ISAKMP policy for the IPSec policy. You can view or edit an existing ISAKMP policy, or you can create a new ISAKMP policy.
NOTE If you are defining several IPSec policies with the same remote IP address, then you must use the same ISAKMP policy for these IPSec policies.
3. Go on to Step 3: Configuring the ISAKMP Policy
Chapter 346

Configuring HP-UX IPSecStep 3: Configuring the ISAKMP Policy
Step 3: Configuring the ISAKMP Policy
1. To create an ISAKMP policy, click Create in the ISAKMP Policy area.
Chapter 3 47

Configuring HP-UX IPSecStep 3: Configuring the ISAKMP Policy
2. The Create ISAKMP Policy screen appears.
3. In the Name field, enter a unique name for the ISAKMP policy.
To modify the parameters for the Default ISAKMP policy, click the Default checkbox.
4. Enter the Lifetime value in seconds. The default value is 28800 (8 hours). The value must fall between the 600 seconds and 12 hours (43,200 seconds).
5. Enter the Max Quick Modes value. The default value is 100. For perfect forward secrecy (PFS) for keys and identities, enter 1 in the Max Quick Modes field.
If the value of Max Quick Modes is 1, IKE provides PFS for the IPSec SA keys and the identities of the ISAKMP negotiating parties (and identities of any parties for which the ISAKAMP parties are acting as proxies). With PFS, the exposure of one key permits access only to
Chapter 348

Configuring HP-UX IPSecStep 3: Configuring the ISAKMP Policy
data protected by that key. When PFS is configured, the IKE daemon creates a new ISAKMP SA for each IPSec SA negotiation and performs a Diffie-Hellman exchange for each IPSec SA negotiation.
6. Select an Oakley Group. The default group is MODP(1). MODP(1) uses 768 bits for an exponent, while MODP (2) uses 1024 bits. This is sometimes referred to as the Diffie-Hellman group and must match the value configured on the remote system.
7. Select the appropriate Hash algorithm from the Hash menu. This must match the algorithm configured on the remote system.
8. Select the appropriate Encryption algorithm from the Encryption menu. This must match the algorithm configured on the remote system.
9. Select the appropriate Authentication algorithm from the Authentication menu. This must match the algorithm configured on the remote system.
If you select preshared key, you must configure a preshared key for the remote system, as described in “Step 5: Configuring a Preshared Key” on page 56.
If you select RSA signature, you must configure the local system to use security certificates, as described in Chapter 4, “Using Certificates with HP-UX IPSec,” on page 65.
10. Click OK to save the policy and return to the Create IPSec Policy screen.
11. If you do not want to configure an IPSec tunnel, click OK to save the IPSec policy. Go on to Step 5: Configuring a Preshared Key or Chapter 4, “Using Certificates with HP-UX IPSec,” on page 65. If you do not need to configure a preshared key or a certificate, return to Step 2A: Configuring the IPSec Policy Filter to continue configuring IPSec policies, or go to Step 7: Configuring Boot-up Options, or click Exit to leave ipsec_mgr. You do not have to go to the ISAKMP policy tab if you have already defined the ISAKMP policy in Step 3: Configuring the ISAKMP Policy.
If you want to configure an IPSec tunnel, go on to Step 4: Configuring a Tunnel.
Chapter 3 49

Configuring HP-UX IPSecStep 4: Configuring a Tunnel
Step 4: Configuring a TunnelIf your IPSec traffic needs to go through a specific gateway, you must configure a tunnel. HP-UX IPSec supports both end-to-gateway and end-to-end tunnels.
End-to-Gateway Tunnel
In an end-to-gateway tunnel, the outer IP packet header contains the addresses of the local end host and the gateway. The inner IP packet header contains the addresses of the local end host and the remote end host. Using ipsec_mgr, you can configure a transport transform in the IPSec Transform List to be used between the local and remote end hosts, and a tunnel transform in the Tunnel Transform List to be used between the local end host and the gateway (tunnel endpoint).
End-to-End Tunnel
In an end-to-end tunnel, the tunnel endpoint is the same as the remote end host IP. Therefore, the outer IP addresses and the inner IP addresses are the same. You must configure Pass in the IPSec Transform List. You must also configure a transform that is not Pass or Discard in the Tunnel Transform List.
IPv4 and IPv6 Restrictions
HP-UX IPSec tunnel mode supports IPv4 to IPv4 using an IPv4 secure router, and IPv6 to IPv6 using an IPv6 secure router only. Using an IPv6 router with IPv4 start and endpoint or an IPv4 router with IPv6 start and endpoints is not supported.
NOTE The Tunnel checkbox is disabled if the Transform List is set to Discard.
Chapter 350

Configuring HP-UX IPSecStep 4: Configuring a Tunnel
1. To configure a tunnel, click the Tunnel checkbox.
a. Enter a Tunnel Endpoint. This is the IP address for the gateway for an end-to-gateway tunnel or the IP address of the end host (the same as the remote IP address) for an end-to-end
Chapter 3 51

Configuring HP-UX IPSecStep 4: Configuring a Tunnel
tunnel. This address can be in IPv4 or IPv6 format, but must be in the same format (IPv4 or IPv6) as the local and remote IP addresses. You can configure another HP-UX IPSec system as the Tunnel Endpoint only if you are configuring an end-to-end tunnel. (An IPSec tunnel can have HP-UX systems at both endpoints only if it is an end-to-end tunnel.)
b. Select the tunnel transform that will be used between the local host and the tunnel node. This transform cannot be Pass or Discard.
If you are configuring an end-to-gateway tunnel (the tunnel endpoint IP address is different from the remote IP address for the IPSec policy), you can configure a different transform for the tunnel than you did for the transport transform between the local and remote system.
If you are configuring an end-to-end tunnel (the tunnel endpoint IP address is the same as the remote IP address for the IPSec policy), you must choose Pass for the IPSec policy transform. The tunnel transform can be anything other than Pass or Discard.
NOTE The tunnel endpoint cannot be an IP address assigned to the local host.
Chapter 352
Configuring HP-UX IPSecStep 4: Configuring a Tunnel
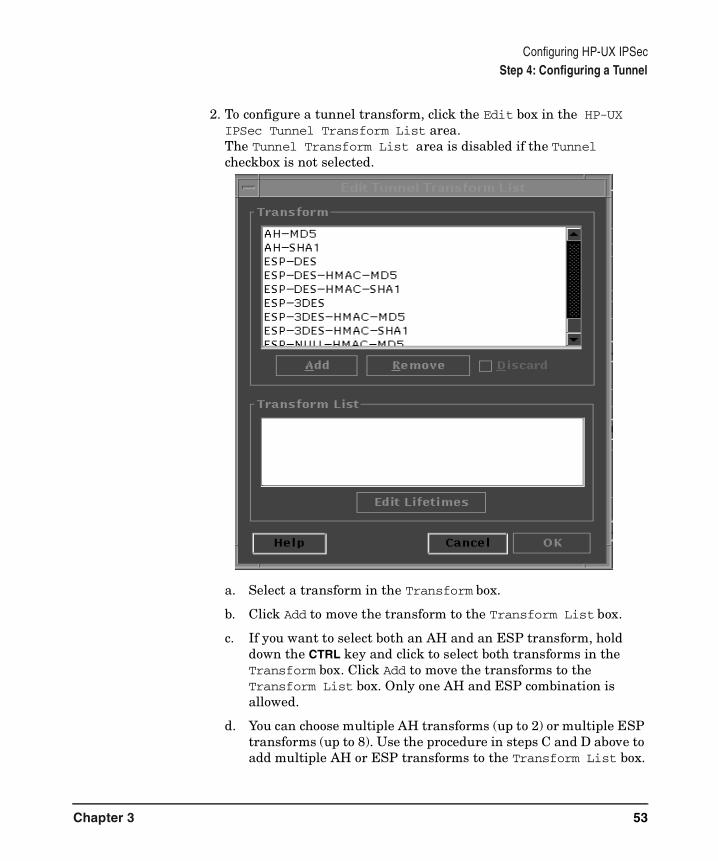
2. To configure a tunnel transform, click the Edit box in the HP-UX IPSec Tunnel Transform List area.The Tunnel Transform List area is disabled if the Tunnel checkbox is not selected.
a. Select a transform in the Transform box.
b. Click Add to move the transform to the Transform List box.
c. If you want to select both an AH and an ESP transform, hold down the CTRL key and click to select both transforms in the Transform box. Click Add to move the transforms to the Transform List box. Only one AH and ESP combination is allowed.
d. You can choose multiple AH transforms (up to 2) or multiple ESP transforms (up to 8). Use the procedure in steps C and D above to add multiple AH or ESP transforms to the Transform List box.
Chapter 3 53
Configuring HP-UX IPSecStep 4: Configuring a Tunnel
The order in which you add transforms to the Transform List is the order used for preference by the IPSec policy. The first selected transforms will have the highest preference, the second selected transform will have the second highest preference, and so on.
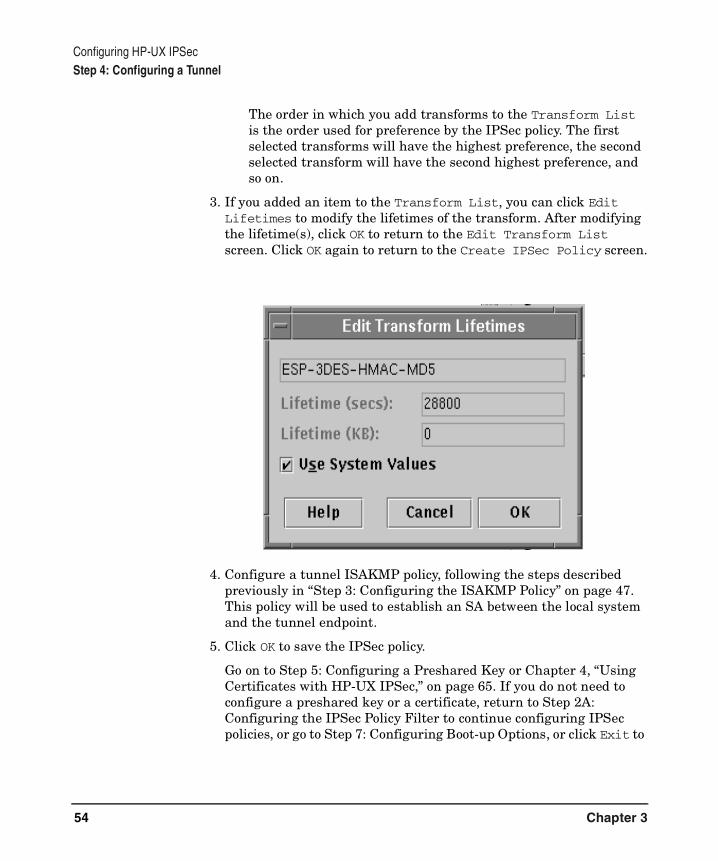
3. If you added an item to the Transform List, you can click Edit Lifetimes to modify the lifetimes of the transform. After modifying the lifetime(s), click OK to return to the Edit Transform List screen. Click OK again to return to the Create IPSec Policy screen.
4. Configure a tunnel ISAKMP policy, following the steps described previously in “Step 3: Configuring the ISAKMP Policy” on page 47. This policy will be used to establish an SA between the local system and the tunnel endpoint.
5. Click OK to save the IPSec policy.
Go on to Step 5: Configuring a Preshared Key or Chapter 4, “Using Certificates with HP-UX IPSec,” on page 65. If you do not need to configure a preshared key or a certificate, return to Step 2A: Configuring the IPSec Policy Filter to continue configuring IPSec policies, or go to Step 7: Configuring Boot-up Options, or click Exit to
Chapter 354

Configuring HP-UX IPSecStep 4: Configuring a Tunnel
leave ipsec_mgr. You do not have to go to the ISAKMP policy tab if you have already defined the ISAKMP policy in Step 3: Configuring the ISAKMP Policy.
Chapter 3 55

Configuring HP-UX IPSecStep 5: Configuring a Preshared Key
Step 5: Configuring a Preshared KeyComplete this step only if you selected Preshared Key as your ISAKMP authentication algorithm in “Step 3: Configuring the ISAKMP Policy” on page 47. If not, go to Chapter 4, “Using Certificates with HP-UX IPSec,” on page 65.
1. Click the Preshared Key tab at the top of the ipsec_mgr screen to display the current preshared keys.
Chapter 356

Configuring HP-UX IPSecStep 5: Configuring a Preshared Key
2. Click Create on the Preshared Keys screen. The Create ISAKMP Preshared Key screen appears.
3. Enter the Remote IP Address for your preshared key. This is the IP address of the remote system that will share this preshared key and use it for authentication with the local system.
4. Enter a key in the field. If you have a key stored in a text file, click the From File checkbox and click the Browse button to locate and load the key file. Alternately, you can hand-enter a key in the blank field.
A preshared key must match the corresponding key configured on the remote system to compete authentication between the two systems.
5. Click OK to save the preshared key.
If you are using RSA signatures for IKE authentication, go to Chapter 4, “Using Certificates with HP-UX IPSec,” on page 65. Otherwise, go on to Chapter , “Step 7: Configuring Boot-up Options,” on page 59.
Chapter 3 57

Configuring HP-UX IPSecStep 6: Configuring Certificates
Step 6: Configuring CertificatesRefer to Chapter 4, “Using Certificates with HP-UX IPSec,” on page 65 for information on configuring certificate information if you are using RSA signatures for IKE authentication. After you have configured certificate information, go on to “Step 7: Configuring Boot-up Options” on page 59.
Chapter 358

Configuring HP-UX IPSecStep 7: Configuring Boot-up Options
Step 7: Configuring Boot-up OptionsFollow the steps below to configure IPSec boot-up options.
1. Select Boot-up Options from the Options menu. The Boot-Up Options screen appears.
To automatically enable IPSec when the system boots:
a. Click the Enable IPSec at Boot-up checkbox.
b. Enter the full path of the policy configuration file used for IPSec startup in the Policy Filename field. The default is /var/adm/ipsec/policies.txt.
c. Enter the Audit Level. The default is Error. Refer to the ipsec_admin (1M) man page (online and in Appendix E) for descriptions of the audit levels.
d. Enter the Audit Directory. HP-UX IPSec will create audit files in this directory. The default is /var/adm/ipsec.
e. Click OK to save the boot-up configuration.
CAUTION If this is a first time installation or a new installation of a patch or a product release, you must run ipsec_admin -start before you reboot the system.
2. Go on to Step 8: Verifying the Configuration.
Chapter 3 59

Configuring HP-UX IPSecStep 8: Verifying the Configuration
Step 8: Verifying the ConfigurationFollow the steps below to verify your installation of HP-UX IPSec.
1. Start HP-UX IPSec with following command:
ipsec_admin -start
You will be prompted for the HP-UX IPSec password.
The default policy file is /var/adm/ipsec/policies.txt. Use the -p option with the ipsec_admin -start command to specify an alternate policy file if necessary.
The command to stop HP-UX IPSec is:
ipsec_admin -stop
2. Check the status of HP-UX IPSec using the following command:
ipsec_admin -status
You will see a display similar to the following:
----------------- IPSec Status Report -----------------
secauditd program: Running and respondingsecpolicyd program: Running and respondingikmpd program: Running and respondingIPSec kernel: UpIPSec Audit level: ErrorIPSec Audit file: /var/adm/ipsec/auditThu-Dec-24-15-21-49-1998.logMax Audit file size: 100 KBytesIPSec Policy file: /var/adm/ipsec/policies.txtLevel 4 tracing: None
-------------- End of IPSec Status Report -------------
During normal operation, the status of the secauditd, secpolicyd and ikmpd programs will be Running and responding and the status of the IPSec kernel will be Up.
3. Verify IPSec policies with pass or discard transforms.
To verify proper operation of IPSec policies with Pass or Discard actions in the transform list, generate network traffic that matches the IPSec policy packet filter or that matches the IPSec policy IP address, port, and protocol parameters.
Chapter 360
Configuring HP-UX IPSecStep 8: Verifying the Configuration
Run the following command to determine the action taken by HP-UX IPSec.
ipsec_report -cache
Search the command output for the entry with the matching source and destination IP addresses, source and destination port numbers, and protocol. Check the value of the Filter field. This is the action taken by HP-UX IPSec. Match the transform configured for the IPSec policy pass or discard).
For more information on the ipsec_report command, refer to the ipsec_report (1M) man page (online and in Appendix E).
4. Verify IPSec policies with AH or ESP transforms.
To verify proper operation of IPSec policies with AH or ESP transforms, generate network traffic that matches the IPSec policy’s packet filter or that matches the IPSec policy’s IP address, port, and protocol parameters.
After doing so, run the following commands:
ipsec_report -policy
ipsec_report -sad
Or, run:
ipsec_report -all
From the output of ipsec_report, you can verify the status of the outbound IPSec SA for the packets using the IPSec policy you are verifying.
To verify the inbound IPSec SA, you must get the SPI (Security Parameters Index) established on the remote system for its corresponding outbound IPSec SA.
Check the Hashed or Ordered Policy Rule output (-policy output) for entries that correspond to the IPSec policy you are verifying.
There will be multiple entries for each IPSec policy. Find an outbound entry. The outbound entry for the policy you are verifying should have a Security Parameters Index (SPI), such as SPI (hex): BE882:
Rule ID: telnet_in Cookie: 3 State: ReadySrc IP Addr: 15.1.1.1 Prefix Length: 32 Src Port number:23
Chapter 3 61

Configuring HP-UX IPSecStep 8: Verifying the Configuration
Dst IP Addr: 15.2.2.2 Prefix Length: 32 Dst Port number: *Network Protocol: * Direction: outboundFilter: SecureShared SA: YesNumber of SA(s) Needed: 1Number of SA(s) Created: 1Kernel Requests Queued: 0-- SA Number 1 --Security Association Type: ESPEncryption Algorithm: 3DES-CBCAuthentication Algorithm: NoneSPI (hex): BE882SPI updated: ISAKMP
Next, check the SA database output (-sad output) for the SA with the corresponding SPI:
------------- Security Association ----------------
Sequence number: 1SPI (hex): BE882 State: MATURE
Security Association Type: ESP with 3DES-CBC encryption and No authentication
Src IP Addr: 15.1.1.1 Dst IP Addr: 15.2.2.2--- Current Lifetimes ---
bytes processed: 6256addtime (seconds): 3usetime (seconds): 30
--- Hard Lifetimes ---bytes processed: 0
addtime (seconds): 28800usetime (seconds): 28800
On this system, there are only two IPSec SAs. The information for the second IPSec SA corresponds to inbound traffic from the remote system (the source address is 15.2.2.2), so we can assume that this second SA corresponds to the inbound traffic for the policy.
----------- Security Association ------------------------Sequence number: 2SPI (hex): 13BDB7 State: MATURESecurity Association Type: ESP with 3DES-CBC encryption and No authenticationSrc IP Addr: 15.2.2.2 Dst IP Addr: 15.1.1.1--- Current Lifetimes ---
bytes processed: 6344addtime (seconds): 31
Chapter 362

Configuring HP-UX IPSecStep 8: Verifying the Configuration
usetime (seconds): 30--- Hard Lifetimes ---
bytes processed: 0addtime (seconds): 28800usetime (seconds): 28800
For more information on the ipsec_report command, refer to the ipsec_report (1M) man page (online and in Appendix E).
Go on to Step 9: Printing Formatted IPSec and ISAKMP Policies.
Chapter 3 63

Configuring HP-UX IPSecStep 9: Printing Formatted IPSec and ISAKMP Policies
Step 9: Printing Formatted IPSec and ISAKMP Policies To print a formatted, ASCII version of the IPSec and ISAKMP policies, select Print Policies from the File menu on the ipsec_mgr screen.
HP recommends that you print your IPSec and ISAKMP policies for reference.
Chapter 364
4 Using Certificates with HP-UX IPSec
Chapter 4 65

Using Certificates with HP-UX IPSec
This chapter describes how to use security certificates with HP-UX IPSec. It contains the following sections:
• “Overview” on page 67
• “Using VeriSign Certificates” on page 70
• “Using Baltimore Certificates” on page 78
• “Configuring Certificate IDs” on page 86
• “Retrieving the Certificate Revocation List (CRL)” on page 88
NOTE HP-UX IPSec version A.01.06 does not support Entrust certificates. Do not select the Entrust tab in the ipsec_mgr interface.
Chapter 466
Using Certificates with HP-UX IPSecOverview
OverviewYou must use security certificates if you are using digital signatures (RSA signatures) for IKE authentication. HP-UX IPSec uses the certificates to obtain cryptography keys for digital signatures and to verify the digital signatures. If you are not using digital signatures for IKE authentication, you can skip this chapter.
Security Certificates and Public Key Cryptography
Security certificates are used for public key cryptography, also referred to as asymmetric key cryptography. Public key cryptography uses a pair of related, but different keys. One key, the private key, is associated with a specific system or entity and is kept secret; the other key is the public key and can be distributed freely. The public and private keys are mathematically related so that data encrypted with the public key can only be decrypted with the private key.
Public Key Distribution
With asymmetric key cryptography, the public key can be freely distributed over a non-secure communication channel.
However, there must be some assurance that a particular public key is the actual public key of the entity with which you want to communicate. This is usually done by distributing public keys in the form of public-key certificates, commonly referred to as security certificates.
Security Certificates
A security certificate associates (or binds) a public key with a particular person, device, or other entity. The certificate is issued by an entity, in whom users have put their trust, called a certificate authority (CA) that guarantees or confirms the identity of the holder (person, device, or other entity) of the corresponding private key. The CA digitally signs the certificate with the CA’s private key, so the certificate can be verified using the CA’s public key.
The format for security certificates (public-key certificates) is defined by the International Organization for Standardization (ISO) X.509 standard, Version 3.
Chapter 4 67
Using Certificates with HP-UX IPSecOverview
Certificates are issued with a specific lifetime, defined by a start date/time and an expiration date/time. However, situations can arise, such as a compromised key value, that necessitate the revocation of the certificate. In this case, the certificate authority can revoke the certificate. This is accomplished by including the certificate’s serial number on a Certificate Revocation List (CRL) updated and published on a regular basis by the CA and made available to certificate users.
Digital Signatures
With digital signatures, the sender uses its private key to create a digital signature value, and sends the digital signature with the data. The recipient uses the sender’s public key and the data to verify the digital signature.
There are different methods to generate and verify the digital signature. In one method, the sender generates a one-way hash value and encrypts it with its private key to form the digital signature. The recipient uses the sender’s public key to decrypt the digital signature and extract the hash value; it then generates its own hash value and compares the hash values. In another method, the sender uses its private key and the data as input to a keyed secure hash algorithm that outputs the digital signature. The receiver uses the data, the sender's public key and the digital signature as input to a verification algorithm that verifies the digital signature.
One difference between a digital signature and a symmetric-key hash value is that only the holder of the private key can generate the digital signature, while either holder of a symmetric key can generate a symmetric-key hash value. Since only the private key holder can generate the digital signature, a digital signature also provides non-repudiation which makes it difficult for the sender to deny sending the message.
IKE Public Key Distribution
IKE primary authentication with digital signatures requires that the IKE initiator and responder obtain the other entity’s public key, using security certificates. This may be done as part of the IKE negotiation - the two entities may exchange certificates at the beginning of the IKE negotiation. Alternatively, this may be done independent of the IKE
Chapter 468
Using Certificates with HP-UX IPSecOverview
negotiation and each entity may get the other entity’s certificate from a CA or certificate directory service. The method used varies according to the CA used and the services provided by the CA.
Requirements
To use security certificates, your topology must meet the following requirements:
• The systems using certificates must use IPv4 addresses for IPSec. HP-UX IPSec does not support IKE digital signature authentication with IPv6 addresses.
• The security certificates must be administered using one of the following PKI products:
— VeriSign OnSite for VPNs
— Baltimore UniCERT 3.5 package
• All security certificates must be administered using a PKI product from the same vendor. When you configure HP-UX IPSec, you must configure only one PKI vendor for all security certificate operations.
Chapter 4 69
Using Certificates with HP-UX IPSecUsing VeriSign Certificates
Using VeriSign CertificatesThere are three main components in the VeriSign OnSite architecture.
• A VeriSign OnSite Server, which is located at a VeriSign data center, and administered by VeriSign. The Onsite Server acts as the Certificate Authority (CA) and creates and manages certificates and Certificate Revocation Lists (CRLs).
• A local OnSite Administrator, a person located at the your site who approves client's requests for certificates and may ask the OnSite Server to revoke a client's certificate. The OnSite Administrator communicates with the OnSite Server through the VeriSign OnSite Control Center Website.
• Clients located at your site who request, get and use certificates. For HP-UX IPSec, a client is a system that uses a certificate-based primary authentication method for IKE, such as RSA signatures. Each system must request and get a certificate before starting the HP-UX IPSec subsystem that uses RSA signature-based authentication.
To perform this task, use the ipsec_mgr program to request and receive certificates from the OnSite Server.
Chapter 470

Using Certificates with HP-UX IPSecUsing VeriSign Certificates
NOTE All HP-UX IPSec systems using VeriSign certificates must have IPv4 addresses. HP-UX IPSec does not support the use of IPv6 addresses with certificates.
Figure 4-1 VeriSign Symmetric Key Cryptosystem
VeriSign Certificate Tasks
To use VeriSign certificates, you must complete the following tasks:
Step 1. Complete and verify the prerequisite requirements.
Step 2. Configure web proxy server parameters if you will use a web proxy to access the VeriSign OnSite server. You must do this on each HP-UX IPSec system using VeriSign certificates.
Step 3. Register the OnSite Administrator. You only need to do this once, regardless of the number of IPSec systems using VeriSign certificates.
Step 4. Request and retrieve a VeriSign certificate. You must do this on each HP-UX IPSec system using VeriSign certificates.
Chapter 4 71
Using Certificates with HP-UX IPSecUsing VeriSign Certificates
Step 5. Configure certificate IDs if you have a multi-homed system or are using certificates to authenticate multi-homed systems or systems from other vendors. This task is described in “Configuring Certificate IDs” on page 86.
Step 6. Configure your system to automatically retrieve the Certificate Revocation List (CRL), or manually retrieve the CRL. This task is described in “Retrieving the Certificate Revocation List (CRL)” on page 88.
Step 1: Verifying Prerequisites
Prior to configuring the HP-UX IPSec product with VeriSign certificate authentication, you will need to:
1. Purchase the VeriSign OnSite for VPNs product from VeriSign (www.verisign.com).
2. Assign a local VeriSign OnSite Administrator.
3. Ensure that the system used by the VeriSign OnSite Administrator meets the VeriSign hardware and software requirements listed below. For the very latest VeriSign hardware and software requirements, check the VeriSign OnSite documentation.
• Netscape or Internet Explorer browser version 4.0 or later, enabled for secure Hypertext Transfer Protocol (SHTTP)
• An available serial port for a smart card reader (VeriSign provides the smart card)
• E-mail or browser application that supports the S/MIME protocol
4. Verify that the HP-UX IPSec systems and the system used by the VeriSign OnSite Administrator can exchange HTTP packets with the VeriSign OnSite server. Depending on your network topology and access to external sites, this can be done with a web proxy server or with direct access to the VeriSign OnSite Server.
If you will use a web proxy server, get the following information about the proxy server:
• Hostname of the proxy server
• Port number on which the proxy server receives internal requests
Chapter 472

Using Certificates with HP-UX IPSecUsing VeriSign Certificates
• User name for the proxy server, if the proxy server requires user name and password authentication
• Password for the proxy server, if the proxy server requires user name and password authentication
Step 2: Configuring Web Proxy Server Parameters
If you need to use a web proxy server to access the VeriSign OnSite server, use the following procedure to configure web proxy server information for ipsec_mgr.
1. Click on the ipsec_mgr Options menu. Select System, then Proxy Information.
The Proxy Server Settings window opens.
Complete the fields with the parameters for your web proxy server:
a. Local Hostname: hostname of the proxy server
b. Local Port: port number on which the proxy server receives internal requests
c. User Name: the user name for the proxy server, if the proxy server requires user name and password authentication
d. Password: the password for the proxy server, if the proxy server requires user name and password authentication
2. Click OK. The ipsec_mgr program saves the proxy server settings.
Chapter 4 73

Using Certificates with HP-UX IPSecUsing VeriSign Certificates
Step 3: Registering the Administrator
The VeriSign OnSite Administrator registers with VeriSign through the URL that VeriSign provides for a VeriSign OnSite Control Center. Follow the instructions provided by VeriSign, with the following additional provisions.
1. Record the DNS domain name entered in the Administrator’s application. This DNS domain name entered in the Administrator's application must match the DNS name that the IPSec Administrator will enter in the ipsec_mgr GUI when requesting a certificate.
(The DNS domain name in the Administrator's application determines the domain for which the OnSite Administrator can approve and revoke certificates.)
2. The number of certificates must be equal the number of IPSec systems that will be using certificate-based primary authentication for IKE (such as RSA signatures).
Step 4: Requesting and Receiving Certificates
Each HP-UX IPSec system that will use a certificate-based primary authentication method for IKE must request and get its own certificate before starting the HP-UX IPSec subsystem.
Make sure the number of certificates accommodates the number of HP-UX IPSec systems using VeriSign for IKE primary authentication. Each system needs only one certificate for HP-UX IPSec, even if the system has multiple IP addresses.
To request and receive a VeriSign certificate with HP-UX IPSec:
1. Select Certificate Authority from the ipsec_mgr Options menu.
Chapter 474
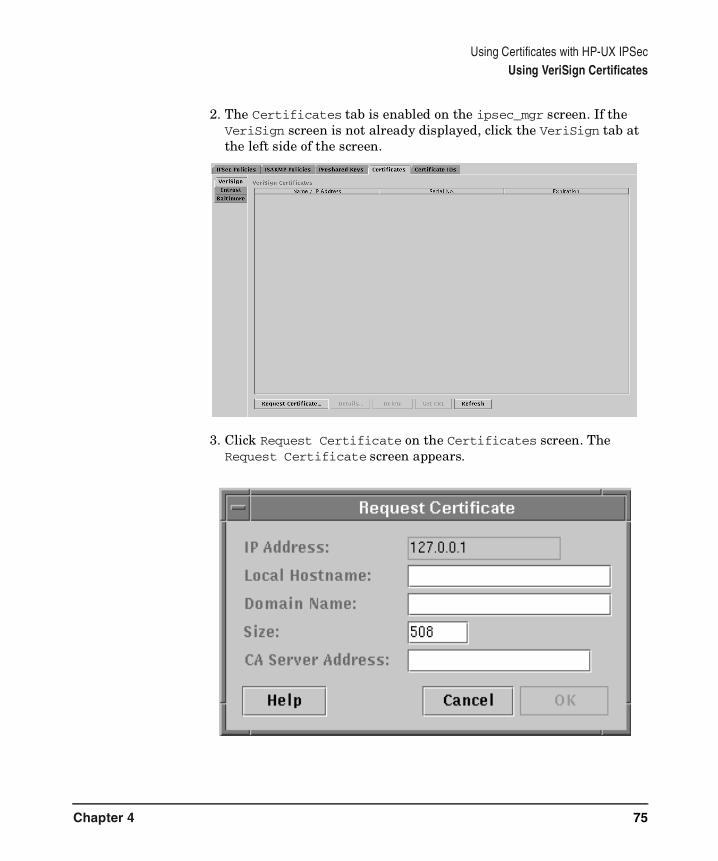
Using Certificates with HP-UX IPSecUsing VeriSign Certificates
2. The Certificates tab is enabled on the ipsec_mgr screen. If the VeriSign screen is not already displayed, click the VeriSign tab at the left side of the screen.
3. Click Request Certificate on the Certificates screen. The Request Certificate screen appears.
Chapter 4 75

Using Certificates with HP-UX IPSecUsing VeriSign Certificates
4. Enter the interface IP address for the certificate being created in the IP Address field. This value is preset to 127.0.0.1 since creation is for ‘local’ certificates only.
5. Enter the Local Hostname for the certificate.
6. Enter the Domain Name for the certificate.
7. Enter the Size of the certificate.
8. Enter the CA Server Address you received from VeriSign.
9. Click OK. Your request is automatically sent to VeriSign for processing.
10. When the request for the certificate is made, GUI displays a message window: “Your certificate request is pending.”
In addition, the Request Certificate button changes to Check on Request.
11. The local OnSite Administrator receives an email notification that a client has requested a certificate.
12. The OnSite Administrator uses the VeriSign OnSite Control Center Website to process the request by selecting Process Requests from the Certificate Management menu. The OnSite Administrator can approve or reject the request.
Chapter 476
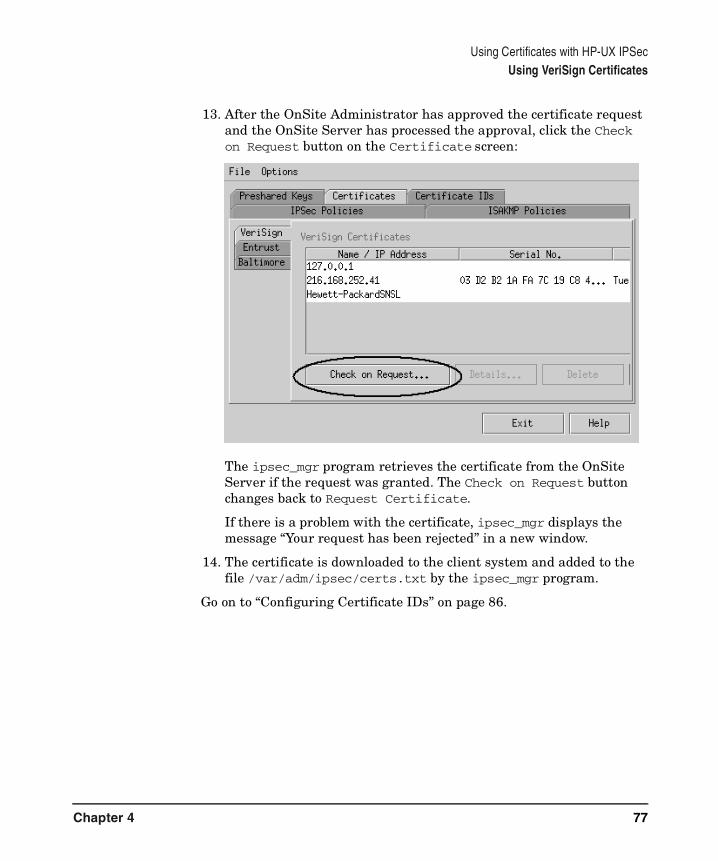
Using Certificates with HP-UX IPSecUsing VeriSign Certificates
13. After the OnSite Administrator has approved the certificate request and the OnSite Server has processed the approval, click the Check on Request button on the Certificate screen:
The ipsec_mgr program retrieves the certificate from the OnSite Server if the request was granted. The Check on Request button changes back to Request Certificate.
If there is a problem with the certificate, ipsec_mgr displays the message “Your request has been rejected” in a new window.
14. The certificate is downloaded to the client system and added to the file /var/adm/ipsec/certs.txt by the ipsec_mgr program.
Go on to “Configuring Certificate IDs” on page 86.
Chapter 4 77

Using Certificates with HP-UX IPSecUsing Baltimore Certificates
Using Baltimore CertificatesIf you are using the Baltimore CA for authentication with IPSec, you must first purchase the Baltimore UniCERT 3.5 package. For more information about any of the prerequisites below, see the documentation you received from Baltimore.
Baltimore Certificate Tasks
To use Baltimore certificates, you must complete the following tasks:
Step 1. Complete and verify the prerequisite requirements.
Step 2. Request a Baltimore certificate from the Baltimore CA Administrator and transfer the certificate file to the HP-UX IPSec system. You must do this for each HP-UX IPSec system using Baltimore certificates.
Step 3. Configure the Baltimore certificate on the HP-UX IPSec system using ipsec_mgr. The ipsec_mgr program will extract information from the certificate file for IPSec.
Step 4. Configure certificate IDs if you have a multi-homed system or are using certificates to authenticate multi-homed systems or systems from other vendors. This task is described in “Configuring Certificate IDs” on page 86.
Step 5. Configure your system to automatically retrieve the Certificate Revocation List (CRL), or manually retrieve the CRL. This task is described in “Retrieving the Certificate Revocation List (CRL)” on page 88.
Step 1: Verifying Prerequisites
NOTE All HP-UX IPSec systems using Baltimore certificates must have IPv4 addresses. HP-UX IPSec does not support the use of IPv6 addresses with certificates.
Before you request Baltimore certificates for IPSec systems, you must:
Chapter 478

Using Certificates with HP-UX IPSecUsing Baltimore Certificates
1. Make sure all components of the Baltimore CA are installed and available. See your Baltimore documentation for installation and configuration instructions.
NOTE You do not need to install any Baltimore software on the IPSec hosts that will use Baltimore certificates.
2. Set up the PKI structure on the Baltimore CA host. The PKI structure is a part of the Certificate Authority Operator (CAO) component.
3. Enable LDAP.
4. In the CAO->CA Attributes->Certificate CRL and Directory Options tab, be sure that the IDP Extension on CRLs/ARLs is critical option is selected.
NOTE HP-UX IPSec does not support the use of Certificate Distribution Points (CDPs) with Baltimore certificates.
5. Set up a policy or policies in the UniCERT CAO component for use when requesting certificates for IPSec hosts. The policy must contain the following fields:
• IP address (mandatory for HP-UX IPSec systems)
• DNS (Fully Qualified Domain Name)
• Key Size: 1024
• Key Type: RSA
• Key Usage: Digital Signature
• Certificate Interval Start
• Certificate Interval End
• Common Name
• Org Unit
• Organization
• Country Code
Chapter 4 79

Using Certificates with HP-UX IPSecUsing Baltimore Certificates
Step 2: Requesting the Baltimore Certificate
Before you configure a Baltimore certificate using ipsec_mgr, you must obtain a PKCS#12 file from the Baltimore Certificate Authority. The Baltimore CA Administrator at your site must use the Face to Face method to request the certificate, and must note certain information during the request and retrieval process. To request a certificate as the Baltimore CA Administrator:
1. Start the RA component of the UniCERT software. Once it is running, start the RAO component.
2. On the initial RAO screen, you must choose the Face to Face option.
3. Choose Register New User to request a new certificate. Next, choose a policy set up for requesting IPSec certificates.
4. Fill out any fields on the certificate request form that are not defaulted. Click Accept when the request form is complete.
Make a note of the Distinguished Name fields (common name, organizational unit, organization, and country). The IPSec Administrator may need this information to complete the IPSec configuration.
5. Choose PKCS#12 as the format for the Secret Key. You must choose this format for certificates used by IPSec.
6. Create a passphrase for the PKCS#12 file.
Make a note of this passphrase; the IPSec Administrator will use it to import the certificate into IPSec.
7. Save the PKCS#12 file (use the p12 extension) with the secret key to disk.
Make a note of the full path to the PKCS#12 file. Later the IPSec Administrator will need to install this file on the IPSec host.
8. Later, go back to the RAO and choose Collect Reply from Last Request to retrieve the certificate.
9. Choose to save the certificate to a File.
10. Choose PKCS#12 encoded certificate as the format in which to save the certificate.
Chapter 480

Using Certificates with HP-UX IPSecUsing Baltimore Certificates
11. Save the certificate to the same file you saved the request with the secret key.
The message Do you want to replace this file will appear. Select Yes. The file is not replaced; the new information is appended to the original file.
The PKCS#12 file is encrypted and contains key information used by the HP-UX IPSec IKE daemon to register with the Baltimore PKI and perform certificate operations.
NOTE Once the PKCS#12 file is complete, you must transfer it from its saved location to the IPSec host that will use the certificate. When you save the file to the new location on the IPSec host, be sure to note the full path to the file. This path is necessary to import the certificate into IPSec.
Step 3: Configuring the Baltimore Certificate
Prior to entering information into the Baltimore certificate screens, you must have received a PKCS#12 file from the Baltimore Certificate Authority, that includes the CA Certificate, User Private Key, and User Certificate information. In addition, you must have the passphrase used to protect the PKCS#12 file from the Baltimore Administrator. For instructions on obtaining a PKCS#12 file, see “Step 1: Verifying Prerequisites” on page 78.
1. Choose Certificate Authority from the Options menu.
Chapter 4 81

Using Certificates with HP-UX IPSecUsing Baltimore Certificates
2. The Certificates tab is enabled on the main ipsec_mgr screen. If the Baltimore window is not already displayed, click the Baltimore tab at the left side of the screen.
3. Click Import Cert to import the certificate contained in the PKCS#12 file.
Chapter 482

Using Certificates with HP-UX IPSecUsing Baltimore Certificates
The Baltimore Certificate Import screen appears.
4. Enter the IP address of the CA provided by the Baltimore CA Administrator into the CA’s IP Address field.
5. Enter the full path for the PKCS#12 file you received from the Baltimore CA Administrator into the File Name field. You can use the Browse button to locate the PKCS#12 file if you do not know the full path.
6. Enter the passphrase provided to you by the Baltimore CA Administrator into the Passphrase field. This must be the same passphrase used to secure the PKCS#12 file.
7. If you plan to use the Baltimore CRL, follow the steps below to fill out the CRL server information. HP recommends that you use the CRL provided by the CA if you choose to use certificates.
Chapter 4 83
Using Certificates with HP-UX IPSecUsing Baltimore Certificates
a. Enter the server name or IP address of the LDAP server where the Certificate Revocation List (CRL) for the Baltimore PKI is stored.
b. Enter the TCP port number used for connecting to the LDAP server where the CRL is stored.
The standard port number for an LDAP server is 389.
c. Enter the search base values for the CRL for the CA. The search base is not case sensitive.
You can obtain the search base values from your LDAP Administrator. The search base is the suffix configured to store all certificates and CRLs in the LDAP directory.
These values form path or part of a path combined with the search filter values to the location of the CRL on the LDAP server. The values of the search base and the search filter may form the certificate distinguishedName. If that is the case, the search will be faster.
The following are examples of search base values. Please note that the syntax of these examples is precise, including delimiting commas between attributes and lack of other punctuation.
• ou=ipsec, o=hp, c=US
• o=hp, c=US
• c=US
d. Enter the search filter values for the CRL. The search filter is not case sensitive.
You can obtain search filter values from your LDAP Administrator. These values should form the second part of a path, beginning with the search base, to the location of the CRL on the LDAP server.
The values of the search base and the search filter may combine to form the certificate distinguishedName (DN). If this is the case, the search will be faster. If the search base and search filter form the DN, they must not overlap. For example, the value o=HP can be a part of the search base value or the search filter value, but not both.
Chapter 484

Using Certificates with HP-UX IPSecUsing Baltimore Certificates
The following are examples of search filter values. Each example corresponds to the search base example in step C. Please note that the syntax of these examples is precise, including delimiting commas between attributes and lack of other punctuation.
• cn=unicertpki1
• cn=unicertpki1, ou=ipsec
• cn=unicertpki1, ou=ipsec, o=hp
8. Click OK. The certificate configuration is saved.
Go on to “Configuring Certificate IDs” on page 86.
Chapter 4 85
Using Certificates with HP-UX IPSecConfiguring Certificate IDs
Configuring Certificate IDsHP-UX IPSec uses certificate ID information to verify the identity that the remote system sends as part of the ISAKMP negotiation. HP-UX IPSec then matches the information in the remote system’s certificate.
HP-UX IPSec uses the IP address of the remote system, from the destination address in the ISAKMP negotiation IP packet, to select the certificate ID entry. IPSec then checks that the ID type and value match what the remote system sends in an ISAKMP ID payload. IPSec also checks that the value matches the corresponding information in the remote system’s certificate.
An HP-UX IPSec system always sends an IP address ID type, with a local IP address as the ID value.
You do not need to configure any certificate IDs if you only use certificate-based authentication with single-address HP-UX systems. You must configure certificate IDs if you use certificate-based authentication with the following types of systems:
• Other vendors’ systems that do not send IPv4 addresses in the ISAKMP ID payload and security certificate. For example, Microsoft systems use the Subject DN (Distinguished Name) as the ID type.
• Multi-homed systems. If a system is multi-homed (has multiple IP addresses), you must configure a certificate ID for each IPv4 address of the system, with the ID type set to IPv4 and the ID value set to the IP address in the system’s certificate as the SubjectAlternativeName. You must configure the same entries on the remote systems that will use certificate-based authentication to communicate with this system.
Follow these steps to configure a certificate ID:
1. On the Certificate ID tab, click Create.
Chapter 486
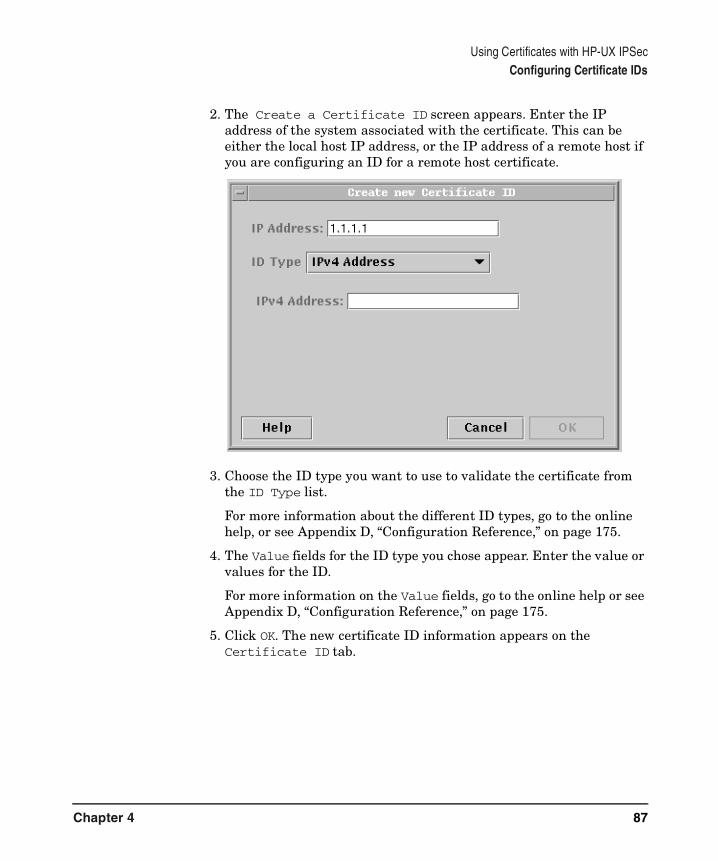
Using Certificates with HP-UX IPSecConfiguring Certificate IDs
2. The Create a Certificate ID screen appears. Enter the IP address of the system associated with the certificate. This can be either the local host IP address, or the IP address of a remote host if you are configuring an ID for a remote host certificate.
3. Choose the ID type you want to use to validate the certificate from the ID Type list.
For more information about the different ID types, go to the online help, or see Appendix D, “Configuration Reference,” on page 175.
4. The Value fields for the ID type you chose appear. Enter the value or values for the ID.
For more information on the Value fields, go to the online help or see Appendix D, “Configuration Reference,” on page 175.
5. Click OK. The new certificate ID information appears on the Certificate ID tab.
Chapter 4 87

Using Certificates with HP-UX IPSecRetrieving the Certificate Revocation List (CRL)
Retrieving the Certificate Revocation List (CRL)If you are using VeriSign or Baltimore certificates, you must add an entry to the root user’s crontab file, located in /var/spool/cron/crontabs/root to periodically retrieve the Certificate Revocation List (CRL) from the VeriSign or Baltimore Certificate Authority. Alternately, you can manually retrieve the CRL using ipsec_mgr.
VeriSign
Add the following two lines to the root user’s crontab file.
# Retrieve the CRL from the Certificate Authority (for HP-UX IPSec)
[min] [hr] [mon_day] [month] [wkday] /var/adm/ipsec_gui/cron/crl.cron
The fields in brackets are placeholders. Replace them with appropriate values when you enter the lines into the crontab file.
For example, to retrieve the CRL every hour on the hour, add the following two lines and execute the crontab command to the root crontab file:
# Retrieve the CRL from the Certificate Authority (for HP-UX IPSec)
0 * * * * /var/adm/ipsec_gui/cron/crl.cron.
crontab /var/spool/cron/crontabs/root
For more information regarding cron jobs and the crontab file format, refer to the cron(1M) and crontab(1) man pages.
Baltimore
Add the following two lines to the root user’s crontab file.
# Retrieve the CRL from the Certificate Authority (for HP-UX IPSec)
Chapter 488

Using Certificates with HP-UX IPSecRetrieving the Certificate Revocation List (CRL)
[min] [hr] [mon_day] [month] [wkday] /var/adm/ipsec_gui/cron/baltimoreCRL.cron
The fields in brackets are placeholders. Replace them with appropriate values when you enter the lines into the crontab file.
For example, to retrieve the CRL every hour on the hour, add the following two lines and execute the crontab command to the root crontab file:
# Retrieve the CRL from the Certificate Authority (for HP-UX IPSec)
0 * * * * /var/adm/ipsec_gui/cron/baltimoreCRL.cron.
crontab /var/spool/cron/crontabs/root
For more information regarding cron jobs and the crontab file format, refer to the cron (1M) and crontab (1) man pages.
Manually Retrieving a CRL for VeriSign or Baltimore
Use the following procedure to manually retrieve a CRL:
1. Click Get CRL on the Certificates tab of ipsec_mgr.
Chapter 4 89

Using Certificates with HP-UX IPSecRetrieving the Certificate Revocation List (CRL)
2. A screen appears that tells you to wait for the system to retrieve the CRL.
3. Once the IPSec system has retrieved the CRL, a success message appears.
Chapter 490

5 Troubleshooting HP-UX IPSec
Chapter 5 91

Troubleshooting HP-UX IPSec
This chapter describes the procedures to troubleshoot HP-UX IPSec software.
It contains the following sections:
• “IPSec Operation” on page 93
• “Troubleshooting Utilities Overview” on page 99
• “Troubleshooting Hints” on page 101
• “Reporting Problems” on page 105
• “Troubleshooting Scenarios” on page 107
Chapter 592

Troubleshooting HP-UX IPSecIPSec Operation
IPSec OperationTo troubleshoot HP-UX IPSec, it is useful to understand a few key points about its operation. This section contains high-level descriptions of how IPSec establishes Security Associations (SAs) and how IPSec processes packets.
Establishing Security Associations (SAs)
Figure 5-1
Before IPSec can authenticate or encrypt an IP packet using an IPSec transformation—an Authentication Header (AH) or Encapsulating Security Payload (ESP)—IPSec must establish SAs with the remote system. You can think of the SAs as security sessions, where the two systems agree on the type of authentication and encryption, the encryption keys and other parameters. The procedure for establishing SAs is described below:
1. Authenticate Identities
Each system authenticates the other system's identity, using preshared keys or a certificate-based method: RSA signature. This is part of the establishment of an ISAKMP or Main Mode SA (ISAKMP/MM SA), as described in the next step.
Authenticate Each Peer’s Identity
Establish IPSec/QM SAs
Establish ISAKMP/MM SA2
3
1
System A System B
Chapter 5 93
Troubleshooting HP-UX IPSecIPSec Operation
2. Establish ISAKMP/MM SA
The two systems complete the establishment of the ISAKMP/MM SA. The ISAKMP/MM SA is the “master” SA that the two systems use as a secure channel to negotiate the SAs for AH and/or ESP packets.
3. Establish IPSec/QM SAs
Once an ISAKMP/MM SA is established, the two systems have a secure channel for negotiating IPSec or Quick Mode SAs (IPSec/QM SAs). The IPSec/QM SAs determine the HP-UX IPSec transformation(s) used (AH and/or ESP), the encryption keys for AH/ESP and other parameters. Two IPSec/QM SAs are established: one for packets from the local system to the remote system and one for packets from the remote system to the local system.
Note that one ISAKMP/MM SA can be used to negotiate multiple pairs of IPSec/QM SAs.
Chapter 594

Troubleshooting HP-UX IPSecIPSec Operation
Internal Processing
This section provides an a high-level description of how HP-UX IPSec processes packets. This information is useful to further troubleshoot HP-UX IPSec and analyze the data reported by the HP-UX IPSec troubleshooting tools.
Figure 5-2 Outbound Processing
Outbound Data
1. Query the Kernel Policy Engine
HP-UX IPSec first checks the kernel policy engine cache for an existing decision on the action to take (secure, drop, or pass in clear text) for the packet based on the IP addresses, protocol and port numbers. If the action is secure (use an Authentication Header, AH or use an Encapsulating Security Payload, ESP), there may be a reference to an existing IPSec/QM SA that can be used.
2. Query the Policy Manager Daemon
If no match is found in the policy engine cache, the Policy Manager daemon is queried for the policy and action (secure, drop, or pass in clear text) to take.
IKE Daemon
Policy Engine
Policy Manager
Kernel
Daemon
SA Engine
2
3 4
5 1
ISAKMPPolicy DB
(secpolicyd) (ikmpd)
SA DB
Policy EngineCache SA DB
IPSec
Chapter 5 95
Troubleshooting HP-UX IPSecIPSec Operation
The Policy Manager checks the hashed IPSec policies first and tries to find the policy with the IP packet filter that best matches the packet. The best match is the filter that matches the packet and has the largest number of hashable fields that match the packet. If multiple filters have the same number of hashable fields that match the packet, HP-UX IPSec selects the first of these policies according to the order in the configuration file.
If HP-UX IPSec finds no match in the hashed IPSec policies, it then sequentially searches the ordered IPSec policies for the first policy with an IP packet filter that matches the packet. If no match is found in the ordered policies, HP-UX IPSec uses the default IPSec policy.
If the transform (action) specified in the matching IPSec policy is to encrypt or authenticate the IP packets using AH or ESP, IPSec SAs may already exist for the policy. The new packet can use the existing IPSec/QM SAs if the IP addresses, ports and protocols match. The new packet can also use the existing IPSec/QM SAs if both IP addresses match and host-based keying is enabled (the Exclusive bit is not set for the policy). Otherwise, new IPSec/QM SAs are established.
3. Establish an ISAKMP/MM SA
If the transform (action) specified in the matching IPSec policy is to encrypt or authenticate the IP packets using AH or ESP and no IPSec Security Associations already exist, the IKE daemon (ikpmd) must establish an IPSec/QM SA. Before establishing an IPSec/QM SA, the IKE daemon must establish an ISAKMP/MM SA with the remote system if none exists.
For the ISAKMP/MM SA to be successfully established, both systems must authenticate the identity of the other system (primary authentication). This is done using preshared keys, or a method using security certificates and public-key encryption: RSA signatures.
In addition, both systems must use the same Oakley group (Diffie-Hellman initial values), and agree on the authentication algorithm and encryption algorithm used for the ISAKMP/MM SA. They must also negotiate an SA lifetime.
4. Establish IPSec/QM SAs
Chapter 596

Troubleshooting HP-UX IPSecIPSec Operation
Once the ISAKMP/MM SA is established, the IKE daemon uses the secured channel to establish IPSec/QM SAs with its peers. Two IPSec/QM SAs are established: one for packets from the local system to the remote system, and one for packets from the remote system to the local system.
For the IPSec/QM SAs to be successfully established, both systems must agree on the type of transform (AH, ESP), including the authentication or encryption algorithm used. They must also negotiate SA lifetimes.
5. Add IPSec/QM SAs to the Kernel SA Database
The IPSec/QM SAs are added to the kernel SA database by the IKE daemon. Each SA includes an SPI (Security Parameters Index) a number assigned by the receiving system to reference the SA. The SPI for outbound data is assigned by the remote system, while the SPI for the inbound data is established by the local system. The SPI is included in the AH or ESP header so that the destination system can process inbound packets with the correct SA parameters including encryption key(s).
Inbound Data
• AH or ESP Packet
If the inbound packet has an Authentication Header (AH) and/or an Encapsulating Security Payload (ESP), HP-UX IPSec checks the kernel SA database for inbound packets for an entry with the same SPI and source IP address. If one exists, it uses the information in the SA to properly decrypt or authenticate the packet. If the inbound packet has multiple SPIs (multiple transforms), HP-UX IPSec searches the kernel SA database for each SPI.
If no matching entry exists, this is an error and HP-UX IPSec sends an audit message to the audit daemon. HP-UX IPSec discards the packet.
• Clear Text Packet
If the inbound packet has no AH or ESP (it is a normal IP packet in clear text), HP-UX IPSec must still determine whether the packet should be dropped or passed in clear text. HP-UX IPSec checks the kernel policy engine cache for an existing decision on the action to take (drop or pass in clear text) for the packet based on the IP addresses, protocol, and port numbers. If the action is to apply an AH
Chapter 5 97
Troubleshooting HP-UX IPSecIPSec Operation
or ESP transform, HP-UX IPSec sends an audit message to the audit daemon. This is because the remote system should have established IPSec/QM SAs before sending the packet.
If no cache entry exists, HP-UX IPSec queries the policy manager daemon for the appropriate action according to the IPSec policy with the filter that best matches the packet (or the default policy, if no filters match). Again, if the action is to apply an AH or ESP transform, HP-UX IPSec discards the packet and sends an audit message to the audit daemon.
Chapter 598

Troubleshooting HP-UX IPSecTroubleshooting Utilities Overview
Troubleshooting Utilities OverviewHP-UX IPSec provides three troubleshooting utilities:
ipsec_admin returns status information and allows the administrator to change the audit level, audit file directory, audit file size, and enable or disable level 4 (TCP, UDP, IGMP) data tracing.
ipsec_policy allows the administrator to determine which IPSec policy will be used for a given packet.
ipsec_report reports HP-UX IPSec operating parameters and displays the contents of audit files.
Refer to Appendix E, “Troubleshooting Tools Reference,” on page 191 for more information on how to use these utilities and how to interpret the output from these utilities.
Table 5-1 HP-UX IPSec Tasks and Utilities
Task Utility
Get status of HP-UX IPSec components
ipsec_admin -status
Test which IPSec policy matches packet
ipsec_policy
Change audit level ipsec_admin -auditlvl [alert|error|warning|informative]
Change audit file directory ipsec_admin -audit audit_directory
Get name of current audit file ipsec_admin -status
Display contents of audit file ipsec_report -audit audit_file
Enable level four data tracing ipsec_admin -traceon [tcp|udp|igmp|all]
Chapter 5 99
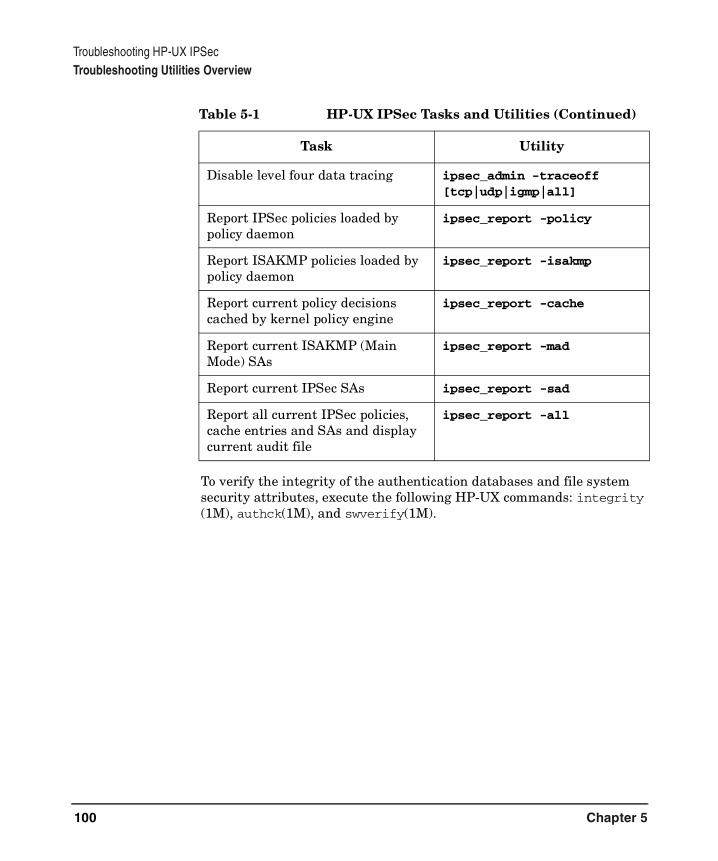
Troubleshooting HP-UX IPSecTroubleshooting Utilities Overview
To verify the integrity of the authentication databases and file system security attributes, execute the following HP-UX commands: integrity (1M), authck(1M), and swverify(1M).
Disable level four data tracing ipsec_admin -traceoff [tcp|udp|igmp|all]
Report IPSec policies loaded by policy daemon
ipsec_report -policy
Report ISAKMP policies loaded by policy daemon
ipsec_report -isakmp
Report current policy decisions cached by kernel policy engine
ipsec_report -cache
Report current ISAKMP (Main Mode) SAs
ipsec_report -mad
Report current IPSec SAs ipsec_report -sad
Report all current IPSec policies, cache entries and SAs and display current audit file
ipsec_report -all
Table 5-1 HP-UX IPSec Tasks and Utilities (Continued)
Task Utility
Chapter 5100
Troubleshooting HP-UX IPSecTroubleshooting Hints
Troubleshooting HintsProcedures to obtain basic troubleshooting information are shown below. These procedures include a status check using the ipsec_admin and ipsec_report commands, isolating upper-layer problems, checking the policy configuration, and configuring HP-UX IPSec auditing.
Status Check
HP-UX IPSec has five main modules:
• IKE (ISAKMP/Oakley) daemon (ikmpd)
• Policy daemon (secpolicyd)
• Audit daemon (secauditd)
• Kernel Policy engine
• Kernel Security Association engine
The following command verifies the status of these modules:
ipsec_admin -status
This command sends status check messages to the IPSec daemons and checks kernel parameters to see if the kernel IPSec components are enabled.
You can also use the following command to get status information:
ipsec_report -all
This command will show some HP-UX IPSec activity even if there is no peer system running HP-UX IPSec. It will:
• Query the policy daemon and report the IPSec and ISAKMP policies that have been configured by the user and loaded by the policy daemon. You can also do this by entering the following command:
ipsec_report -policy.
• Query the kernel policy engine and report the contents of its cache. The cache records the most recent decisions that the kernel policy engine has made for the traffic that has passed in and out of the system. If there is no IPSec peer, the kernel policy engine still reports all packets that have been sent or received by the system (including
Chapter 5 101
Troubleshooting HP-UX IPSecTroubleshooting Hints
broadcast packets) by five-tuple (source IP address, destination IP address, protocol, source port, destination port) and the action taken—even if the action was to pass the packet in clear text, according to the configuration. You can also do this by entering the following command:
ipsec_report -cache
Query the IKE daemon for ISAKMP/MM SAs. If there is no peer IPSec system or no IPSec traffic, the IKE daemon will respond that there are no ISAKMP/MM SAs to report. You can also do this by entering the following command:
ipsec_report -mad
• Query the kernel Security Association (SA) engine for active IPSec/QM SAs on this system. If there is no peer IPSec system and/or no active IPSec/QM SAs, the kernel SA engine will respond that there are no IPSec/QM SAs to report. You can also do this by entering the command:
ipsec_report -sad
• Format and display the contents of the current audit file. You can also do this by entering the following command:
ipsec_report -audit audit_file
Isolating HP-UX IPSec Problems from Upper-layer Problems
If you are unsure whether an application problem is being caused by HP-UX IPSec, you can still enable layer 4 (TCP, UDP, IGMP) tracing. This will capture outbound data packets before they are encrypted by HP-UX IPSec and inbound packets after they are decrypted by HP-UX IPSec.
Because layer 4 tracing provides a possible security breach, it is disabled when HP-UX IPSec is started and can only be enabled using the ipsec_admin utility, which requires root capability and the HP-UX IPSec administrator password.
To enable layer 4 tracing, use the following command:
ipsec_admin -traceon [ tcp | udp | igmp | all ]
Chapter 5102
Troubleshooting HP-UX IPSecTroubleshooting Hints
Tracing output will go to /var/adm/ipsec/nettl.TRC0 and /var/adm/ipsec/nettl.TRC1 if nettl tracing is not already enabled. If it is, the trace files will be those already in use by nettl.
Checking Policy Configuration
You can use the ipsec_policy command to check which IPSec policy will be used for a given outbound packet. For example, on system 15.1.1.1, first determine which policy would be used for outbound telnet requests to 15.2.2.2. Use the following command:
ipsec_policy -sa 15.1.1.1 -sp 1024 -da 15.2.2.2 -dp 23 -p tcp
Next, determine which policy would be used for inbound telnet requests to 15.1.1.1 from system 15.2.2.2. Use the following command:
ipsec_policy -sa 15.1.1.1 -sp 23 -da 15.2.2.2 -dp 1024 -p tcp
Note that since ipsec_policy can only be used for outbound packets, the source IP address (-sa) in both examples is the address of the system on which the administrator is executing ipsec_policy (15.1.1.1). Refer to the ipsec_policy(1M) man page.
NOTE Both examples shown above include a dummy user-space port number (1024) for the client port.
Configuring HP-UX IPSec Auditing
Follow the steps below to record HP-UX IPSec audit trail security activity.
1. Determine the name of the audit directory if you do not wish to use the default. The default directory is /var/adm/ipsec/.
2. Determine the audit level for the HP-UX IPSec subsystem. The default audit level is Error. The Error audit level provides notification of Alert and Error events. The other audit levels are: Alert, Warning and Informative. Refer to the ipsec_admin (1M) man page online or in Appendix D for a detailed description of each audit level.
Chapter 5 103
Troubleshooting HP-UX IPSecTroubleshooting Hints
3. At the HP-UX prompt, set the auditing parameters by running:
ipsec_admin -au audit_directory -al audit_level
where audit _level can be alert, error, warning, or informative. A selected audit level includes all the previous audit levels.
The audit levels are shown in ascending order. If you set the audit level to a higher level, all lower levels are also included. For example, if you set the audit level to informative, the audit daemon also records all alert, error and warning messages.
The default audit level is error, which includes alert messages.
The informative audit level will generate numerous entries and should only be set for troubleshooting.
Audit Files and Directory
By default, the audit daemon will create a new audit file when the size reaches 100 Kbytes. The audit daemon will continue creating new audit files until the file system for the audit directory are full. For this reason, you may want to mount the audit directory on a separate file system.
The default audit directory is /var/adm/ipsec.
Displaying Audit Files
You must use the ipsec_report utility to view audit files.
First, determine the current audit file:
ipsec_admin -status
Then use the -audit option of ipsec_report to display the file:
ipsec_report -audit audit_file
Chapter 5104

Troubleshooting HP-UX IPSecReporting Problems
Reporting ProblemsBe sure to include the following information when reporting problems:
• A complete description of the problem and any error messages. Include information about:
— the local system (IP addresses)
— IP addresses of relevant remote systems
— routing table information (netstat -rn output) if appropriate
Also include a description of what works as well as what does not work.
• Output from ipsec_admin -status.
• Output from ipsec_report -all.
• Output from ipsec_policy. Specify as many parameters as you can (source IP address, source port, destination IP address, destination port, protocol).
• If the problem may be caused by the transport or application layer, enable layer four tracing (ipsec_admin -traceon), recreate the problem, and then disable tracing (ipsec_admin -traceoff). Trace output will be sent to /var/admin/ipsec/nettl.TRC0 and /var/admin/ipsec/nettl.TRC, if nettl tracing is not already enabled and directed to another file set.
NOTE IP and ICMP tracing are still available when IPSec is running. Packets secured with AH are still in clear text and the packet contents are still visible through a nettl trace. The output format using netfmt can only be parsed for the IP header. The netfmt utility displays any data following the IP header as hexadecimal values.
• Relevant configuration files.
HP-UX IPSec security policy file:
/var/adm/ipsec/policies.txt (default)
Chapter 5 105
Troubleshooting HP-UX IPSecReporting Problems
For a formatted listing of the IPSec and ISAKMP policies, choose Print Policies from the ipsec_mgr File menu to print the policy files.
Security certificate files, if you are using them:
/var/adm/ipsec/cainfo.txt
/var/adm/ipsec/certs.txt
IP configuration file:
/etc/rc.config.d/netconf
• If you are using preshared keys, include a screen capture of the Preshared Keys screen, or other documentation of your preshared keys.
• If the problem is reproducible, recreate it with the audit level set to informative.
• Run the following ndd commands:
ndd -get /dev/ip ip_ipsec_polist
ndd -get /dev/ip ip_ipsec_salist
ndd -get /dev/ip ip_ipsec_status
Chapter 5106

Troubleshooting HP-UX IPSecTroubleshooting Scenarios
Troubleshooting ScenariosThis section contains information about the following common troubleshooting scenarios, including their symptoms and resolutions:
• “Autoboot is Not Working Properly” on page 107
• “HP-UX IPSec Incorrectly Passes Packets” on page 108
• “HP-UX IPSec Incorrectly Attempts to Encrypt/Authenticate Packets” on page 109
• “HP-UX IPSec Attempts to Encrypt/Authenticate and Fails” on page 110
• “ISAKMP/MM SA Negotiation Fails (Main Mode processing failed, MM negotiation timeout)” on page 111
• “ISAKMP Primary Authentication with Preshared Key Fails” on page 113
• “ISAKMP Primary Authentication Fails with Certificates” on page 114
• “User Cannot Get a Local VeriSign Certificate” on page 115
• “ISAKMP/MM SA Negotiation Succeeded, IPSec/QM SA Negotiation Failed (Quick Mode processing failed, QM negotiation timeout)” on page 117
Autoboot is Not Working Properly
Problem
Autoboot fails.
Symptoms
HP-UX IPSec does not automatically start at system boot-up time.
Solution
Use the following procedure:
Step 1. Set the HP-UX IPSec password using the ipsec_admin -newpasswd command.
Chapter 5 107

Troubleshooting HP-UX IPSecTroubleshooting Scenarios
Step 2. Run ipsec_mgr and set the Enable IPSec at Boot-up option from the Boot-up Options in the Options menu.
Step 3. Check that your configuration file is valid.
Step 4. Execute the ipsec_admin -start command.
Step 5. Reboot the system.
If you still have problems after following the troubleshooting procedure, contact your HP representative.
If HP-UX IPSec is not using the IPSec policy you expected, check for errors in the configuration file, such is incorrect IP addresses. Check the order of the IPSec policies—the order affects how HP-UX IPSec selects policies. See “How HP-UX IPSec Selects Policies” on page 179 for more information.
HP-UX IPSec Incorrectly Passes Packets
Problem
IPSec is incorrectly allowing packets to pass through instead of authenticating, encrypting, or discarding the packets.
Symptoms
No error message or interruptions to user service, but no SAs are established, or IPSec is passing packets that should be discarded to upper layers.
Solution
Run the following commands:
ipsec_report -policy (check for IPSec/QM SAs)
ipsec_report -sad (check for IPSec/QM SAs)
ipsec_policy (determine the policy being used)
Check the configuration file.
Chapter 5108

Troubleshooting HP-UX IPSecTroubleshooting Scenarios
Details
If HP-UX IPSec is misconfigured to pass packets that it should authenticate or encrypt, there will be no obvious external symptoms. Check that HP-UX IPSec actually established SAs and is encrypting/authenticating what you want. Check for IPSec/QM SAs using the following commands:
ipsec_report -sad ipsec_report -policy
If there are no SAs for the IP packets that you expect and no user error, HP-UX IPSec is probably misconfigured and passing packets it should not. Check to see which IPSec policy is being used by running ipsec_policy. You can also use the cookie from the ipsec_report -cache entry for the packet to find the matching ipsec_report -policy entry.
Check the configuration file for incorrect addresses, order, or other incorrect information.
HP-UX IPSec Incorrectly Attempts to Encrypt/Authenticate Packets
Problem
IPSec is attempting to encrypt or authenticate (apply a transform) packets that should not be encrypted or authenticated.
Symptoms
Link errors (unable to connect) on traffic that should not be encrypted/authenticated.
Solution
Run the following commands:
ping, linkloop (check connectivity)ipsec_policy (determine the policy being used)Check the configuration file.
Chapter 5 109

Troubleshooting HP-UX IPSecTroubleshooting Scenarios
Details
If HP-UX IPSec is misconfigured to encrypt and/or authenticate packets that it should not and the peer system is not configured to use HP-UX IPSec encryption/authentication, you will consistently get connection errors (unable to connect or connection timed out).
Check connectivity to the remote system using /etc/ping and the linkloop utilities.
Verify which IPSec policy is being used with the ipsec_policy command and check the configuration file.
HP-UX IPSec Attempts to Encrypt/Authenticate and Fails
Problem
IPSec attempts to encrypt/authenticate packets and fails.
Symptoms
Link errors (unable to connect) and ipsec_report -sad shows no IPSec/QM SAs.
Solution
Determine if ISAKMP/MM SA negotiations are succeeding. Run the following commands:
ipsec_report -madipsec_report -audit file
Check for Main Mode processing failed, MM negotiation timeout error messages in the log file.
Details
If HP-UX IPSec is configured to encrypt/authenticate but failing, it will appear as a connection error (unable to connect or connection timed out) to the user.
If users are consistently getting connection errors for traffic that should use HP-UX IPSec for encryption or authentication, check for IPSec/QM SAs using the following commands:
Chapter 5110

Troubleshooting HP-UX IPSecTroubleshooting Scenarios
ipsec_report -sad ipsec_report -policy
Determine if IPSec is successfully creating the ISAKMP/MM SA. Check for ISAKMP/MM SAs using the following command:
ipsec_report -mad
If there is no ISAKMP/MM SA, HP-UX IPSec may have created an ISAKMP/MM SA but deleted it when the IPSec/QM SA negotiation failed. Check the audit log for failed attempts to establish ISAKMP/MM SAs using the following command:
ipsec_report -audit /var/adm/ipsec/auditdateinfo.log
Check the log file for Main Mode processing failed error entries such as the following:
Msg: 31 From: IKMPD LVL: ERROR Date: Wed Oct 31 11:44:10 2001Event: Main Mode processing failed
Also check the log file for MM negotiation timeout error entries such as the following:
Msg: 413 From: IKMPD Lvl: ERROR Date: Fri Mar 15 07:14:18 2002Event: MM negotiation timeout, src 15.2.2.2
If there is a mismatch in ISAKMP policies, some IKE daemons simply do not respond to negotiation attempts. This causes a MM negotiation timeout error on the connecting system.
ISAKMP/MM SA Negotiation Fails (Main Mode processing failed, MM negotiation timeout)
Problem
ISAKMP/MM SA negotiation fails.
Symptoms
The output from ipsec_report -mad output does not show the ISAKMP/MM SA. The audit log contains a Main Mode processing failed or MM negotiation timeout error entry.
Chapter 5 111

Troubleshooting HP-UX IPSecTroubleshooting Scenarios
Solution
Determine whether the ISAKMP/MM SA is absent because the ISAKMP/MM negotiation failed or because the successfully negotiated ISAKMP/MM SA was deleted when an IPSec/QM negotiation failed.
Run the following commands:
ipsec_admin -auditlvl informative (or debug)
ipsec_report -audit audit_file_name
ipsec_admin trace (check for packets to and from UDP port 500)
Details
If there is no ISAKMP/MM SA to the remote system, the ISAKMP/MM SA negotiation may be failing.
If IPSec/QM negotiations fail, the remote IKE sends the HP-UX IKE daemon notification that the negotiation failed. The HP-UX IKE daemon then notifies the peer IKE daemon that it wants to delete the ISAKMP/MM SA that was used for the failed IPSec/QM negotiation.
Determine whether or not the ISAKMP/MM SA is being established by checking the audit log file. Error entries with the message Main Mode processing failed indicate that the ISAKMP/MM SA is not being established. Informative entries with the message MM negotiation complete with the peer ip_address indicate that the ISAKMP/MM SA is being established.
The message QM negotiation timeout, mess ID hhhh may indicate that there is an IPSec transform proposal mismatch (the IKE peer may not respond if it receives an unacceptable transform proposal, which causes a timeout).
If the ISAKMP/MM negotiation was successful but the ISAKMP/MM SA was deleted later because an IPSec/QM negotiation failed, go on to “ISAKMP/MM SA Negotiation Succeeded, IPSec/QM SA Negotiation Failed (Quick Mode processing failed, QM negotiation timeout)” on page 117.
If the ISAKMP/MM SA is not being established:
Run the following command:
ipsec_policy (determine ISAKMP policy)
Chapter 5112

Troubleshooting HP-UX IPSecTroubleshooting Scenarios
Check which ISAKMP policy is being used with the ipsec_policy utility. The ISAKMP policy actually used may not be the same ISAKMP policy specified in the IPSec policy, so be sure to check this in the ipsec_policy output.
Check the ISAKMP policy parameter against the remote systems parameters:
• Oakley Group
• Hash
• Encryption
• (Primary) Authentication
Check the audit file for error messages such as MM negotiation timeout. This may indicate a connectivity problem with the remote system. However, some ISAKMP responders will not respond if the initiating system sends an unacceptable SA proposal, which will also cause a timeout.
Enable a nettl level 4 trace using the command ipsec _admin -traceon or get a line analyzer trace and verify that the packets are being sent and received by the correct systems. Check whether the remote ISAKMP/IKE entity is responding. ISAKMP always uses UDP port 500 to receive and send ISAKMP packets.
ISAKMP Primary Authentication with Preshared Key Fails
Problem
ISAKMP primary authentication with preshared key fails.
Symptoms
Output from ipsec_report -mad does not show the ISAKMP/MM SA. The audit log contains a Main Mode process failed message.
Solution
Verify that the preshared key values match. Check the key format on the remote system (ASCII or hex); HP-UX IPSec always configures preshared keys as ASCII values. Check the audit file.
Chapter 5 113

Troubleshooting HP-UX IPSecTroubleshooting Scenarios
ISAKMP Primary Authentication Fails with Certificates
Problem
Certificate-based (RSA signature) primary authentication fails.
Symptoms
Output from ipsec -mad does not show the ISAKMP/MM SA. The audit log contains a Main Mode processing failed error message.
Solution
Check the audit file for an expired certificate, revoked certificate, or certificate encoding problems. Try preshared key authentication.
Run ipsec_mgr and check for a certificate for the remote system in /var/adm/ipsec/certs.txt (VeriSign) or /var/adm/ipsec/.Bcerts (Baltimore).
Check for the /var/adm/ipsec/javabeans.txt (VeriSign) or /var/adm/ipsec/.Bsec file (Baltimore).
Details
Check the audit log for messages indicating that the local or remote system’s certificate has expired, has been revoked, or has X.509 encoding errors.
You can also try using preshared keys for primary authentication. You will need to configure the same preshared key on both systems.
Check that you have a certificate for the remote system. As part of the IKE dialog, the remote system should send its certificate to the local system. The IKE daemon stores a copy of the certificate in /var/adm/ipsec/certs.txt (VeriSign) or /var/adm/ipsec/.Bcerts (Baltimore). However, these files are encrypted and can only be viewed with ipsec_mgr. Check the expiration date for the local and remote system certificates.
Check that the /var/adm/ipsec/javabeans.txt file (VeriSign) or the /var/adm/ipsec/.Bsec file (Baltimore) has not been deleted. If the applicable file has been deleted, either restore it from a backup or recreate it by re-importing the certificate.
Chapter 5114

Troubleshooting HP-UX IPSecTroubleshooting Scenarios
For VeriSign, check that the entry in the certs.txt file for the local system is complete by using ipsec_mgr to examine the certificates in detail. If you have requested a VeriSign certificate but have not completed the process of importing the certificate into IPSec, you will find an entry in the /var/adm/ipsec/certs.txt or /var/adm/ipsec/.Bcerts file for the local system, but there will be no certificate.
User Cannot Get a Local VeriSign Certificate
Problem
User cannot get a local VeriSign certificate.
Symptoms
User can not get a certificate using ipsec_mgr. ipsec_mgr shows no certificate entry or an incomplete entry. The audit file shows the following error: Unable to obtain public/private key pair!
Solution
Check stdout for ipsec_mgr errors. Check the VeriSign OnSite Administrator’s Control Center for a pending request or existing certificate. Check the web proxy configuration (run ipsec_mgr, click on the Options menu, select System, then select Proxy Information). You may need to reset /var/adm/ipsec/cainfo.txt; remove /var/adm/ipsec/javabeans.txt, /var/adm/ipsec/certs.txt; revoke the old certificate, and restart the registration procedure.
Details
If you cannot get a VeriSign certificate or if you forget to retrieve the certificate after you request it, ipsec_mgr may show a certificate entry for the local system. However, if you click Details the entry will be incomplete (there will be no information other than the IP address). When you attempt to initiate an ISAKMP/MM SA, it will fail and you will see errors similar to the following in the log file:
Msg: 201 From: IKMPD Lvl: ERROR Date: Mon Mar 11 16:19:39 2002Event: Unable to obtain public/private key pair!Msg: 202 From: IKMPD Lvl: ERROR Date Mon Mar 11 16:19:39 2002Event: Process contruct error 0x1Msg: 203 From IKMPD Lvl: ERROR Date Mon Mar 11 16:19:39 2002Event: Main Mode processing failed
Chapter 5 115
Troubleshooting HP-UX IPSecTroubleshooting Scenarios
If ipsec_mgr has problems retrieving a VeriSign certificate, it will write errors to the stdout device for ipsec_mgr (the device from which ipsec_mgr was started). The ipsec_mgr does not log errors using the HP-UX IPSec daemon.
If you request a VeriSign certificate using ipsec_mgr and ipsec_mgr cannot retrieve the certificate (the Check on Request operation fails), it is possible that the OnSite Administrator has not yet approved your certificate request. Have the OnSite Administrator use the VeriSign Control Center to check for pending requests. If the OnSite Administrator did not receive a request for approval, verify communication with the VeriSign CA. If you are using a web proxy server to access the VeriSign CA, verify the proxy server configuration (run ipsec_mgr, click on the Options menu, select System, then select Proxy Information).
Have the OnSite Administrator use the View Certificates area of the Control Center to check for an existing certificate. If a certificate already exists for your system, the VeriSign CA rejects any requests for a new certificate.
Restarting Registration If VeriSign registration fails, the associated files may be left in an unusable state. You must reset them before trying to reregister. To do this, change the pending field in /var/adm/ipsec/cainfo.txt to false and verify that the VeriSign domain name and CA address are correct, as follows:
begin verisignpending: falsedomain: name_of_domaincaserver: VeriSign_CA_address
You must also delete the /var/adm/ipsec/javabeans.txt and /var/adm/ipsec/certs.txt files.
Check the OnSite Administrator’s Control Center for an already existing certificate request or certificate, and deny or revoke it before restarting the registration process.
Chapter 5116

Troubleshooting HP-UX IPSecTroubleshooting Scenarios
ISAKMP/MM SA Negotiation Succeeded, IPSec/QM SA Negotiation Failed (Quick Mode processing failed, QM negotiation timeout)
Problem
ISAKMP/MM SA negotiation succeeded, ISAKMP/MM SA established, but IPSec/QM SA negotiation failed.
Symptoms
Output from ipsec_report -sad does not show IPSec/QM SAs and the audit log contains Quick Mode processing failed or QM negotiation timeout error messages.
Solution
Run ipsec_policy to determine the IPSec policy. Check the transform list and lifetimes. Check the audit file.
Details
If the ISAKMP/MM SA negotiation succeeded but the IPSec/QM SA negotiation failed, you will probably not see any ISAKMP/MM SAs in the output of the ipsec_report -mad command. This is because the HP-UX IPSec IKE daemon tears down an ISAKMP/MM SA if an IPSec/QM SA negotiation fails. To be sure that the ISAKMP/MM negotiation succeeded and that IKE actually attempted to negotiate the IPSec/QM SA, look for Quick Mode processing failed or QM negotiation timeout error messages in the audit file. A QM negotiation timeout error usually indicates that the remote system did not agree with the IPSec/QM SA proposal and chose not to respond.
Check which IPSec policy is being used with the ipsec_policy command. Check the IPSec policy configurations for mismatches.
Chapter 5 117

Troubleshooting HP-UX IPSecTroubleshooting Scenarios
Chapter 5118

6 IPFilter and IPSec
Chapter 6 119

IPFilter and IPSec
This chapter describes how HP-UX IPFilter and IPSec/9000 work together. It contains the following sections:
• “IPFilter and IPSec Basics” on page 121
• “IPSec UDP Negotiation” on page 123
• “When Traffic Appears to be Blocked” on page 125
• “Allowing Protocol 50 and Protocol 51 Traffic” on page 126
• “IPSec Gateways” on page 128
Chapter 6120

IPFilter and IPSecIPFilter and IPSec Basics
IPFilter and IPSec BasicsIPSec and IPFilter will not panic or corrupt each other. However, there are situations in which one product might block traffic for the other. The following figure shows the positions of IPFilter and IPSec in the network stack:
Figure 6-1 IPFilter and IPSec
IPFilter, which is below IPSec in the networking stack, filters network packets before they reach IPSec. You can have both IPFilter and IPSec configured and running on a machine without them negatively affecting each other.
Figure 6-2 Scenario One
In Scenario One above, you have IPFilter and IPSec on machine A with IPFilter blocking packets from machine B and IPSec encrypting packets from machine C. When a packet arrives at machine A, IPFilter checks to see if it is from machine B, and, if so, blocks the packet. If not, the packet continues up the stack to IPSec. IPSec checks to see if it is from machine C. If so, the packet arrives encrypted.
IPSec
IPFilter
B <---------------> A <-----------------> C
(IPSec)(IPFilter) (IPSec)
Chapter 6 121
IPFilter and IPSecIPFilter and IPSec Basics
There is no overlap in the configurations of IPFilter and IPSec in this network topology, so there are no conflicts in Scenario One.
CAUTION IPSec and NAT are not compatible. If you are using HP-UX IPFilter with IPSec, do not use NAT functionality.
Chapter 6122

IPFilter and IPSecIPSec UDP Negotiation
IPSec UDP NegotiationYou can configure IPSec and IPFilter so that there is some overlap in the configurations. However, you must be sure the overlapping configurations do not block each other.
IPSec negotiates between two machines on a connection using the UDP protocol from port 500 to port 500.
If the IPFilter configuration is so broad that it is blocking all UDP traffic, then IPSec cannot complete negotiations. When an IPSec negotiation is not completed, the encrypted packets are not received. If this happens, you will see an IPSec error on the initiating side of “MM negotiation timeout.”
To let IPSec complete negotiations, configure IPFilter to let the IPSec negotiation packets through.
Figure 6-3 Scenario Two
In Scenario Two, IPFilter is configured to block UDP traffic on machine A, you want all TCP traffic to pass through, and, from machine B on the network, you want all TCP traffic encrypted. Machine A has IP address 10.10.10.10 and machine B has IP address 15.15.15.15.
As the TCP traffic with machine B must by encrypted, you configure IPSec on both machines using ipsec_mgr, the HP-UX IPSec configuration program. To do so, use the IP addresses to specify that the TCP traffic is to be encrypted.
IPSec <---------------> TCP <-----------------> IPSec
A B10.10.10.10 15.15.15.15
IPFilter
-----UDP-----
Chapter 6 123

IPFilter and IPSecIPSec UDP Negotiation
When TCP traffic is initiated from A to B or from B to A, IPSec on both machines communicates through a UDP/500 connection. You must configure IPFilter on machine A to let this traffic through. To do so, add the following rules to your configuration:
pass in quick proto UDP from 15.15.15.15 port = 500 to 10.10.10.10 port = 500pass out quick proto UDP from 10.10.10.10 port = 500 to 15.15.15.15 port = 500block in proto UDPblock out proto UDP
These rules let IPSec traffic pass correctly.
>>Begin Here>>
NOTE You must configure IPFilter to pass traffic both in and out on UDP port 500 for IPSec to work properly.
Chapter 6124

IPFilter and IPSecWhen Traffic Appears to be Blocked
When Traffic Appears to be BlockedIn the following scenario there is overlap in the configurations of IPFilter and IPSec. To get this negotiation through, you must configure IPFilter rules to let TCP traffic through.
Figure 6-4 Scenario Three
In Scenario Three, IPSec is configured to encrypt TCP traffic between machine A and machine B and IPFilter is configured to block all TCP traffic with the following rules:
block in proto TCPblock out proto TCP
IPSec <---------------> TCP <-----------------> IPSec
A B10.10.10.10 15.15.15.15
IPFilter
---TCP-----
Chapter 6 125
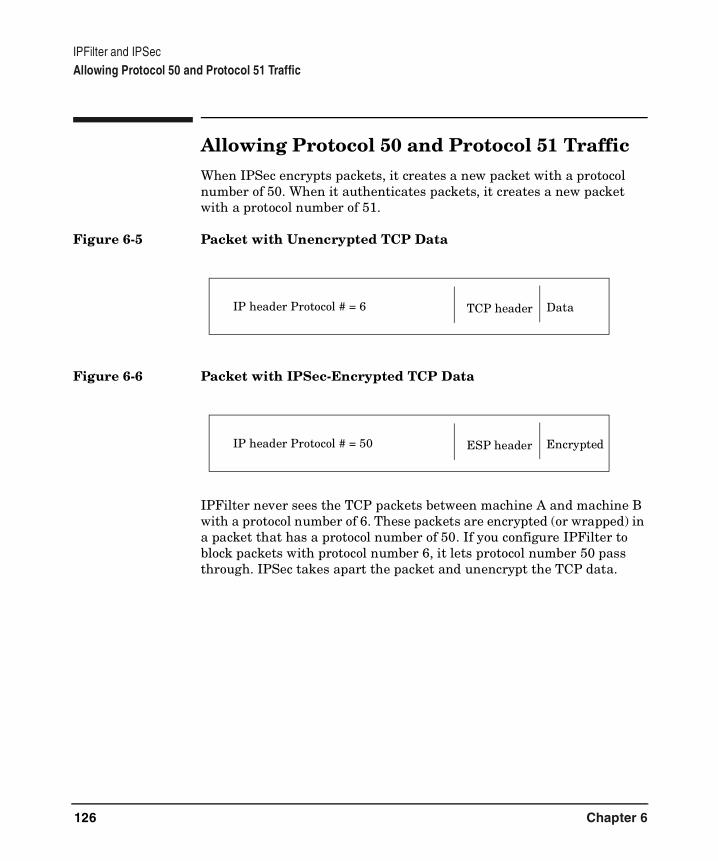
IPFilter and IPSecAllowing Protocol 50 and Protocol 51 Traffic
Allowing Protocol 50 and Protocol 51 TrafficWhen IPSec encrypts packets, it creates a new packet with a protocol number of 50. When it authenticates packets, it creates a new packet with a protocol number of 51.
Figure 6-5 Packet with Unencrypted TCP Data
Figure 6-6 Packet with IPSec-Encrypted TCP Data
IPFilter never sees the TCP packets between machine A and machine B with a protocol number of 6. These packets are encrypted (or wrapped) in a packet that has a protocol number of 50. If you configure IPFilter to block packets with protocol number 6, it lets protocol number 50 pass through. IPSec takes apart the packet and unencrypt the TCP data.
TCP header DataIP header Protocol # = 6
ESP header EncryptedIP header Protocol # = 50
Chapter 6126

IPFilter and IPSecAllowing Protocol 50 and Protocol 51 Traffic
If the IPFilter configuration is so broad that it blocks protocol 50 or protocol 51 traffic, then IPSec traffic will not get through.
Figure 6-7 Scenario Four
In Scenario Four, IPSec is configured to encrypt TCP traffic between the two machines and IPFilter is configured to block non-TCP traffic. IPFilter rules are also configured to let UDP/500 traffic pass on machine B.
# IPSec hole with machine B pass in quick proto UDP from 15.15.15.15 port 500 to 10.10.10.10 port = 500 pass out quick proto UDP from 10.10.10.10 port 500 to 15.15.15.15 port = 500 # Let in encrypted IPSec traffic pass in quick proto 50 from 15.15.15.15 to 10.10.10.10pass out quick proto 50 from 10.10.10.10 to 15.15.15.15# Allow TCP traffic to/from anywhere pass in quick proto TCP pass out quick proto TCP # Block all other traffic to/from anywhere block in from any to any block out from any to any
NOTE If IPSec is configured to do authentication rather than encryption, you must configure IPFilter to let protocol 51 traffic pass.
IPSec <---------------> TCP <-----------------> IPSec
A B10.10.10.10 15.15.15.15
IPFilter
-----block !TCP-----
Chapter 6 127

IPFilter and IPSecIPSec Gateways
IPSec GatewaysYou can configure IPSec to encrypt and authenticate traffic to a gateway between two end hosts. A configuration that encrypts IPSec packets to a gateway is called an IPSec tunnel.
IPFilter can coexist with IPSec tunnels with out conflict. However, you must configure IPFilter to allow IPSec traffic with the gateway instead of the end node. The IPFilter rules for the UDP/500 and protocol 50/51 traffic must be passed to and from the gateway IP address rather than the end node IP address.
Chapter 6128

7 HP-UX IPSec and Linux
Chapter 7 129

HP-UX IPSec and Linux
This chapter includes the following information about HP-UX interoperation with Linux FreeSwan:
• “Limitations of HP-UX IPSec Interoperating with Linux FreeSwan” on page 131
• “Configuration Example” on page 132
Chapter 7130

HP-UX IPSec and LinuxLimitations of HP-UX IPSec Interoperating with Linux FreeSwan
Limitations of HP-UX IPSec Interoperating with Linux FreeSwanHP-UX IPSec can be configured to interoperate with Linux FreeSwan version 1.96.
The following are limitations of Linux FreeSwan that affect interoperability with HP-UX IPSec:
• Linux FreeSwan does not support DES encryption. You must use 3DES or AES encryption.
• Linux FreeSwan does not support port and protocol specified IPSec rules. You must configure the HP-UX IPSec rules with a * (wildcard, all traffic included) for port and protocol. See “Step 2A: Configuring the IPSec Policy Filter” on page 35 for details on configuring HP-UX IPSec rules.
The following is a limitation of HP-UX IPSec that affects interoperability with Linux FreeSwan:
• HP-UX IPSec does not support Perfect Forward Secrecy (PFS) for keys only. By default, Linux FreeSwan is configured to use PFS for keys only. You must explicitly turn off PFS (pfs=no) when configuring the Linux FreeSwan system to interoperate with HP-UX.
Chapter 7 131

HP-UX IPSec and LinuxConfiguration Example
Configuration ExampleThe following is an example of a Linux FreeSwan configuration in /etc/ipsec.conf. The file is properly configured to interoperate with HP-UX IPSec using preshared key authentication:
conn_hp_sample
type=transportleft=192.12.12.23leftnexthop=192.12.12.1right=192.12.13.7rightnexthop=192.12.13.1auto=addcompress=noauth=espauthby=secretpfs=noesp=3des-sha1-96
NOTE compress and pfs must both be set to no in the Linux FreeSwan configuration. HP-UX IPSec does not support IP compression or PFS.
Chapter 7132

A Product Specifications
Appendix A 133

Product Specifications
This appendix lists the HP-UX IPSec product specifications. This chapter contains the following sections:
• “IPSec RFCs” on page 135
• “Product Restrictions” on page 136
Appendix A134

Product SpecificationsIPSec RFCs
IPSec RFCsThe HP-UX IPSec product is based on the IPSec RFCs listed below:
Table A-1
RFC Number RFC Title
RFC 2401 Security Architecture for the Internet Protocol
RFC 2402 IP Authentication Header
RFC 2403 The Use of HMAC-MD5-96 within ESP and AH
RFC 2404 The Use of HMAC-SHA-1-96 within ESP and AH
RFC 2405 The ESP DES-DES Cipher Algorithm with Explicit IV
RFC 2406 IP Encapsulating Security Payload (ESP)
RFC 2407 The Internet IP Security Domain of Interpretation for ISAKMP
RFC 2408 Internet Security Association and Key Management Protocol (ISAKMP)
RFC 2409 The Internet Key Exchange (IKE)
RFC 2410 The NULL Encryption Algorithm and Its Use with IPSec
RFC 2411 IP Security Document Roadmap
RFC 2412 The OAKLEY Key Determination Protocol
Appendix A 135

Product SpecificationsProduct Restrictions
Product RestrictionsHP-UX IPSec product restrictions are described below:
• HP-UX IPSec systems cannot act as IP or IPSec gateways (when HP-UX IPSec is running, the system will not forward IP or IPSec packets).
• HP-UX IPSec does not support security for multiple destination addresses (i.e. broadcast, subnet broadcast, multicast, and anycast addresses).
• You cannot selectively encrypt or authenticate services that use dynamic ports, such as NFS (Network File System) mountd, NFS lockd, and NIS (Network Information Service).
• Manual keying is not supported but is provided for diagnostic purposes only as a contributed tool under:
/usr/contrib/bin/ipsec_diag
• HP-UX IPSec supports Perfect Forward Secrecy (PFS) for keys and identities (the IKE daemon can be configured to create a new ISAKMP/MM SA for each IPSec/QM negotiation). HP-UX IPSec does not support PFS for keys only (the IKE daemon would use the ISAKMP/MM SA for multiple IPSec/QM negotiations and perform a Diffie-Hellman key exchange for each IPSec/QM negotiation).
• If an HP-UX IPSec system crashes and the system had previously established ISAKMP SA(s) with peer IPSec system(s), the peer IPSec system(s) will not be able to use any existing ISAKMP and IPSec SAs to initiate communication with the rebooted IPSec system.
If the IPSec SA(s) are configured to be “Shared” (host-based), the peer system will not be able to initiate any communication with the rebooted system that would use the same IPSec SAs until the existing IPSec SAs expire.
If the IPSec SA(s) are configured to be “Exclusive” (session-based), then the peer system will be able to initiate IPSec encrypted or authenticated communication with the rebooted system only if the ISAKMP SA(s) are configured to use PFS (Perfect Forward Secrecy) until the ISAKMP SA expires.
Appendix A136

Product SpecificationsProduct Restrictions
ISAKMP Limitations
ISAKMP limitations and constraints are described below:
• For Main Mode (MM) and Quick Mode (QM) transaction exchanges, a single transaction request will timeout after 25 seconds (5 attempts at 5 second intervals) which in turn will timeout or terminate the transaction negotiation.
When timeouts occur, they usually occur during heavy network traffic congestion. It is the responsibility of the application to try to re-establish the connection after a connection establishment failure.
• Secondary IP addresses configured for a single interface card require that you configure a route to each peer IPSec system where the secondary IP address is specified as the gateway to the remote system.
For example: if Node A has IP address 15.1.1.1 and the Node B has IP addresses 16.2.2.2 (address for the primary interface, lanx:0, such as lan0:0) and 16.3.3.3 (address for the secondary interface, lan0:1) the network administrator must add the following host route on the Node B:
route add host 15.1.1.1 16.3.3.3
• The current product supports the PFS of both IPSec SA keys and the identity of the ISAKMP negotiating peers. The current product does not support the PFS for only the IPSec keys.
• For IPv6 systems, the only type of ISAKMP authentication supported is preshared keys.
When using certificate-based ISAKMP authentication (RSA signatures), HP-UX IPSec checks that the identity sent by the other node in the Main Mode (MM) negotiation matches information in the other node’s certificate. HP-UX IPSec always sends its local IP address as its identity in MM exchanges. HP-UX IPSec accepts the following identification types from nodes it communicates with:
— IPv4 address (ID_IPV4_ADDR)
— Fully Qualified Domain Name (ID_FQDN)
— User-Fully Qualified Domain Name (ID_USER_FQDN)
— X.509 Subject Distinguished Name (DN, ID_DER_ASN1_DN)
Appendix A 137

Product SpecificationsProduct Restrictions
IPv4 ICMP Messages
Discarding or requiring IPv4 ICMP messages (Internet Control Message Protocol messages, IP protocol value 1) to be encrypted or authenticated may cause connectivity problems. Normal network operation may require IP to exchange ICMP messages between end-to-end hosts and between an end host and an IP gateway (including router devices). IP may need to exchange ICMP packets with gateway nodes even though no user (end-to-end) services are being used to the gateways.
Be careful when configuring the default IPSec policy or IPSec policies that affect entire subnets, because you may inadvertently cause ICMP messages to be discarded. You may also inadvertently require ICMP messages being transmitted or received from a non-IPSec gateway or router to be authenticated or encrypted, which will also cause ICMP packets to be discarded.
IP uses ICMP messages to transmit error and control information, such as in the following situations:
• IP may periodically send ICMP Echo messages to gateways to determine if the gateway is up (“Gateway Probes”). If no response is received, the gateway is marked “Dead” in the IP routing table.
This feature is controlled by the IP kernel parameter ip_ire_gw_probe. By default, this feature is enabled on all HP-UX systems. Refer to the ndd man page for information on checking or changing this parameter value.
• IP may use ICMP Echo messages with the “Don’t Fragment” flag and ICMP Destination Unreachable messages with the “Fragmentation Needed” flag to set the Path Maximum Transmission Unit (Path MTU).
This feature is controlled by the IP kernel parameter ip_pmtu_strategy. Refer to the ndd man page for information on checking or changing this parameter value.
• IP may send ICMP Redirect messages to redirect traffic to a different gateway.
The transmission of ICMP Redirect messages is controlled by the IP kernel parameter ip_send_redirects. By default, this feature is enabled on all HP-UX systems. Refer to the ndd man page for information on checking or changing this parameter value.
Appendix A138

Product SpecificationsProduct Restrictions
• IP may send ICMP Source Quench messages to request the source system to decrease its transmission rate.
The transmission of ICMP Source Quench messages is controlled by the IP kernel parameter ip_send_source_quench. By default, this feature is enabled on all HP-UX systems. Refer to the ndd man page for information on checking or changing this parameter value.
IPv6 ICMP Messages
To ensure proper operation of IPv6 networks, HP-UX IPSec always allows the following ICMPv6 messages to pass in clear text:
• Router Solicitation
• Router Advertisement
• Neighbor Solicitation
• Neighbor Advertisement
• Redirect
• Destination Unreachable
• Packet Too Big
• Time Exceeded
• Parameter Problem
• Router Renumbering
You can configure HP-UX IPSec policies to authenticate, encrypt, pass, or discard the following ICMPv6 messages:
• Echo Request
• Echo Reply
Appendix A 139

Product SpecificationsProduct Restrictions
Appendix A140

B HP-UX IPSec Configuration Examples
Appendix B 141

HP-UX IPSec Configuration Examples
This chapter provides configuration examples for two topologies:
• “Example 1: telnet Between Two Systems” on page 143 shows example HP-UX IPSec configuration screens to encrypt and authenticate all telnet traffic between two systems.
• “Example 2: Authenticated ESP with Exceptions” on page 154shows example HP-UX IPSec configuration screens of an HP-UX IPSec closed secure network that communicates with one system outside the network (Potato). You will use authenticated ESP (AES with HMAC-SHA1) for all IP packets to and from Potato. You will also use authenticated ESP (AES with HMAC-SHA1) between all the nodes on this network, except for ICMP packets, which will pass in clear text.
Appendix B142

HP-UX IPSec Configuration ExamplesExample 1: telnet Between Two Systems
Example 1: telnet Between Two SystemsScenario
You have two systems, Apple (15.1.1.1) and Banana (15.2.2.2). You want to use authenticated ESP with AES encryption and SHA-1 authentication for all telnet traffic from Apple to Banana, and for all telnet traffic from Banana to Apple. All other network traffic will pass in clear text.
You do not have a Public Key Infrastructure, so you can use only preshared keys for ISAKMP primary authentication.
You will use the default values for most parameters, such as the Security Association Lifetimes.
Apple System Configuration
IPSec Policies
On Apple, you must configure two IPSec policies. The first IPSec policy (telnetAB) is for outbound telnet requests from Apple to Banana (users on Apple using the telnet service to Banana). Note that since the telnet clients on Apple may use any non-reserved TCP port number, ipsec_mgr will set the local port number to an asterisk (“*”) to indicate any port number. The remote port number will be 23, the well-known port for the telnet service.
Figure B-1 Example 1: telnet AB
bananaapple
telnet client(port varies)
telnetd(always port 23)
“telnet banana”
Appendix B 143

HP-UX IPSec Configuration ExamplesExample 1: telnet Between Two Systems
The second IPSec policy (telnetBA) is for inbound telnet requests from Banana to Apple (users on Banana using the telnet service to Apple). Note that since the telnet clients on Banana may use any non-reserved TCP port number, ipsec_mgr will set the remote port number will be an asterisk (“*”) to indicate any port number. The local port number will be 23, the well-known port for the telnet service.
Figure B-2 Example 1: telnet BA
Both IPSec policies telnetAB and telnetBA use the ISAKMP default policy.
In addition, you must modify the default IPSec policy to pass all other traffic in clear text.
bananaapple
telnetd(port 23)
telnet client(port varies)
“telnet apple”
Appendix B144

HP-UX IPSec Configuration ExamplesExample 1: telnet Between Two Systems
telnetAB IPSec Policy on Apple System
Appendix B 145

HP-UX IPSec Configuration ExamplesExample 1: telnet Between Two Systems
telnetBA Policy on Apple System
Appendix B146

HP-UX IPSec Configuration ExamplesExample 1: telnet Between Two Systems
default IPSec Policy on Apple System
Appendix B 147
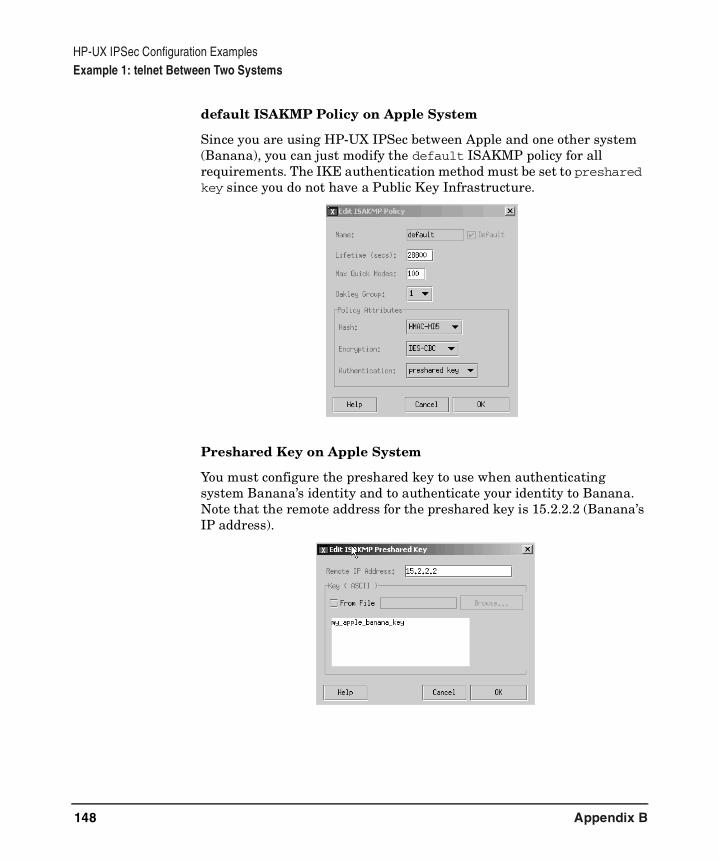
HP-UX IPSec Configuration ExamplesExample 1: telnet Between Two Systems
default ISAKMP Policy on Apple System
Since you are using HP-UX IPSec between Apple and one other system (Banana), you can just modify the default ISAKMP policy for all requirements. The IKE authentication method must be set to preshared key since you do not have a Public Key Infrastructure.
Preshared Key on Apple System
You must configure the preshared key to use when authenticating system Banana’s identity and to authenticate your identity to Banana. Note that the remote address for the preshared key is 15.2.2.2 (Banana’s IP address).
Appendix B148

HP-UX IPSec Configuration ExamplesExample 1: telnet Between Two Systems
Banana System Configuration
The configuration on Banana is the mirror-image of the configuration on Apple. Note that the remote address for the preshared key is 15.1.1.1 (Apple’s IP address) and the preshared key matches the key configured on Apple for Banana.
Appendix B 149

HP-UX IPSec Configuration ExamplesExample 1: telnet Between Two Systems
telnetAB IPSec Policy on Banana System
Appendix B150

HP-UX IPSec Configuration ExamplesExample 1: telnet Between Two Systems
telnetBA IPSec Policy on Banana System
Appendix B 151

HP-UX IPSec Configuration ExamplesExample 1: telnet Between Two Systems
default IPSec Policy on Banana System
The default IPSec policy is the same as the Apple default IPSec policy.
Appendix B152
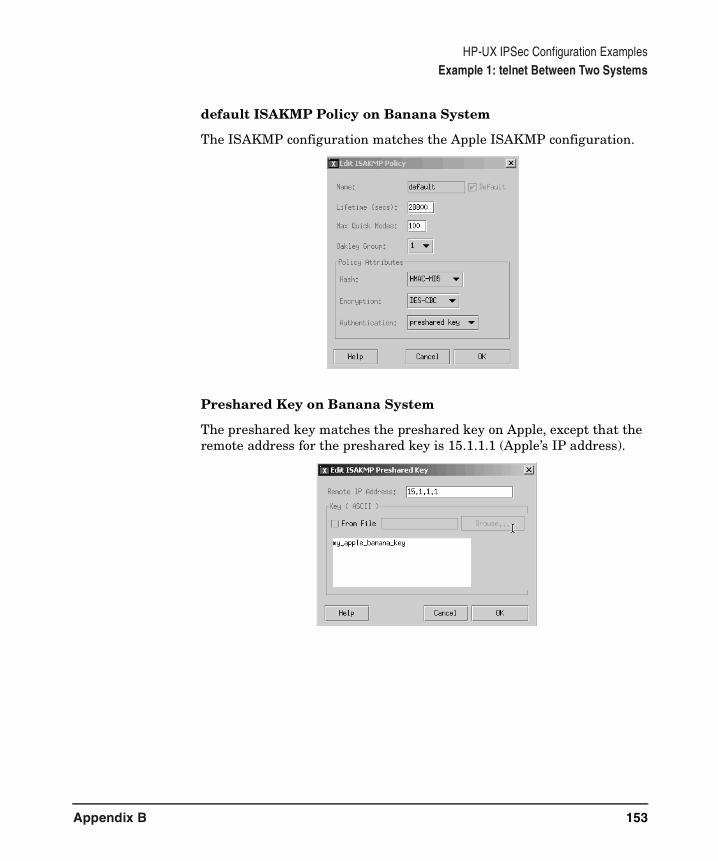
HP-UX IPSec Configuration ExamplesExample 1: telnet Between Two Systems
default ISAKMP Policy on Banana System
The ISAKMP configuration matches the Apple ISAKMP configuration.
Preshared Key on Banana System
The preshared key matches the preshared key on Apple, except that the remote address for the preshared key is 15.1.1.1 (Apple’s IP address).
Appendix B 153

HP-UX IPSec Configuration ExamplesExample 2: Authenticated ESP with Exceptions
Example 2: Authenticated ESP with ExceptionsYou have a system, Carrot, on a LAN with the network address 192.1.1.*. You want to limit access to this LAN from outside nodes.
There is one system outside the LAN with IPSec, Potato, that you will allow to communicate with the nodes in your network using AES with SHA1. All other packets from external nodes will be discarded.
All nodes within the LAN have HP-UX IPSec installed, except for internal routers. You want encrypted ESP (AES with SHA1) for all IP packets between the nodes on this LAN, except ICMP packets to and from the routers, which you will allow to pass in clear text.
Except for the above specifications, you will use the default values for most parameters (such as Security Association Lifetimes).
Figure B-3 Example 2: Network IPSec Policy with Exceptions
IPSec
192.1.1.1
IPSec
192.1.1.2
IPSec
192.1.1.3
IPSec
192.1.1.4
IPSec
Potato
No IPSecPass in clear text
IPSec ESP-AESHMAC-SHA1
193.3.3.3
No IPSec
router
. . .
Carrot
Appendix B154
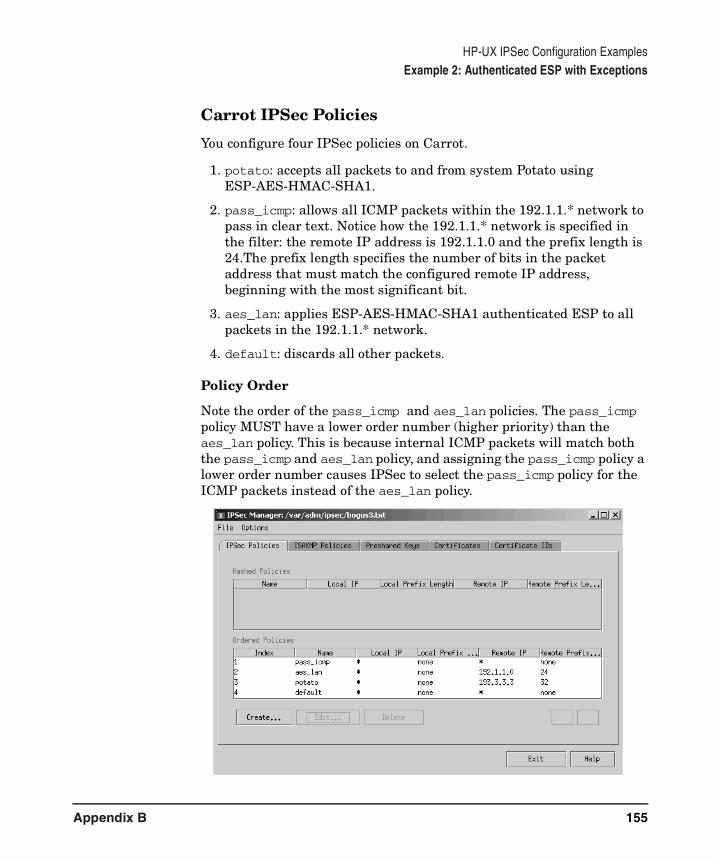
HP-UX IPSec Configuration ExamplesExample 2: Authenticated ESP with Exceptions
Carrot IPSec Policies
You configure four IPSec policies on Carrot.
1. potato: accepts all packets to and from system Potato using ESP-AES-HMAC-SHA1.
2. pass_icmp: allows all ICMP packets within the 192.1.1.* network to pass in clear text. Notice how the 192.1.1.* network is specified in the filter: the remote IP address is 192.1.1.0 and the prefix length is 24.The prefix length specifies the number of bits in the packet address that must match the configured remote IP address, beginning with the most significant bit.
3. aes_lan: applies ESP-AES-HMAC-SHA1 authenticated ESP to all packets in the 192.1.1.* network.
4. default: discards all other packets.
Policy Order
Note the order of the pass_icmp and aes_lan policies. The pass_icmp policy MUST have a lower order number (higher priority) than the aes_lan policy. This is because internal ICMP packets will match both the pass_icmp and aes_lan policy, and assigning the pass_icmp policy a lower order number causes IPSec to select the pass_icmp policy for the ICMP packets instead of the aes_lan policy.
Appendix B 155

HP-UX IPSec Configuration ExamplesExample 2: Authenticated ESP with Exceptions
pass_icmp IPSec Policy
Appendix B156
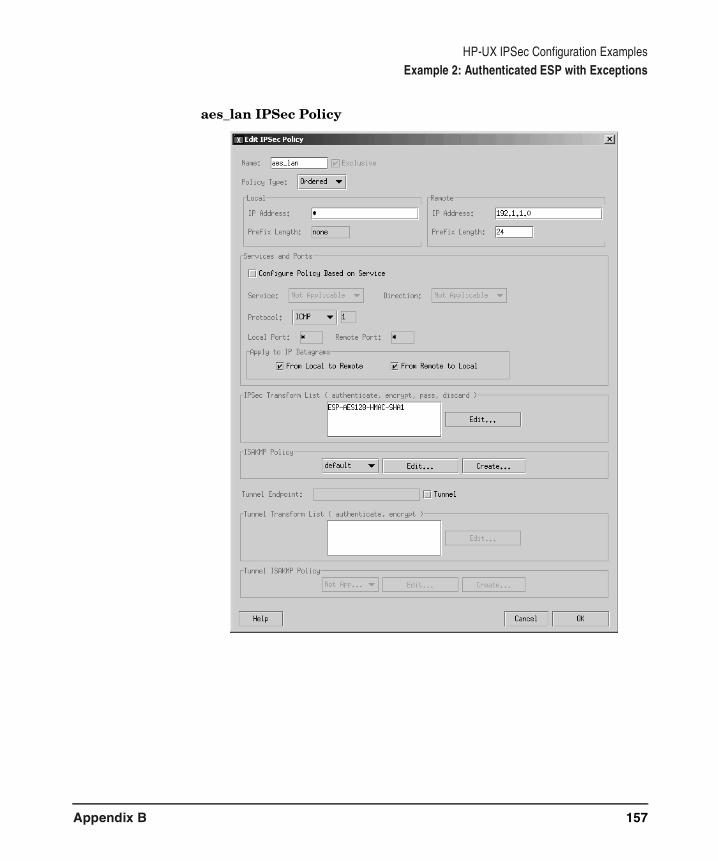
HP-UX IPSec Configuration ExamplesExample 2: Authenticated ESP with Exceptions
aes_lan IPSec Policy
Appendix B 157

HP-UX IPSec Configuration ExamplesExample 2: Authenticated ESP with Exceptions
potato IPSec Policy
Appendix B158

HP-UX IPSec Configuration ExamplesExample 2: Authenticated ESP with Exceptions
default IPSec Policy
You modify the default IPSec policy to discard all packets, since it will only be used for packets from outside your network other than packets from Potato.
Appendix B 159

HP-UX IPSec Configuration ExamplesExample 2: Authenticated ESP with Exceptions
ISAKMP Policy
Since there are several remote nodes that you will need to authenticate for IKE, you may want to use certificate-based authentication (RSA signatures) instead of preshared keys for IKE. This would require you to install a Public Key Infrastructure (PKI) product from a third-party vendor, but would eliminate the need to configure a preshared key for each other remote IPSec node in the network. It may be difficult to use a PKI with the external system, Potato, so you could configure IPSec to use preshared keys for Potato, and RSA signatures for all other IPSec nodes. To do this, you would configure two ISAKMP policies: one using preshared keys (isakmp_preshared_keys, for example), and one using RSA signatures (isakmp_rsa, for example). You would specify the name of the ISAKMP preshared keys policy (isakmp_preshared_keys) in the potato IPSec policy, and specify the name of the ISAKMP RSA signatures policy (isakmp_rsa) in the aes_lan policy.
Preshared Keys
If you are not using RSA signatures for IKE authentication, you must configure a preshared key for each remote IPSec system. Each remote system must configure a preshared key for the system Carrot.
Appendix B160

C HP-UX IPSec Configuration Worksheets
Appendix C 161

HP-UX IPSec Configuration Worksheets
This appendix contains the worksheets you need to fill out before you configure HP-UX IPSec. It includes the following worksheets:
• “IPSec Policy Worksheet” on page 163
• “ISAKMP Policy Worksheet” on page 167
• “Preshared Keys Worksheet” on page 169
• “VeriSign Certificate Worksheet” on page 170
• “Baltimore Certificate Worksheet” on page 172
Appendix C162

HP-UX IPSec Configuration WorksheetsIPSec Policy Worksheet
IPSec Policy WorksheetListed below are the parameters for IPSec policy configuration. For additional information about individual parameters, refer to the online help system in the ipsec_mgr program.
Table C-1
IPSec Policy Worksheet
Date:
Installed by:
System name:
HP-UX version:
Table C-2
Description of Configuration Items
Configuration ValueFill In or Circle Value Below
Name:
Policy Type:Default: Ordered
Ordered orHashed
Ordered Policy Number:
Local IP Address:Default:* (any)
Local Prefix Length:Range (IPv4): 0 to 32 Range (IPv6): 0 to 128
Remote IP Address:Default:* (any)
Remote Prefix Length:
Range (IPv4): 0-32Range (IPv6): 0-128
Appendix C 163

HP-UX IPSec Configuration WorksheetsIPSec Policy Worksheet
Table C-3
Configure Policy Based on Service (Y/N). If Y is selected, complete section A below. If N is selected, complete section B
below.
A Description of Configuration Items
Configuration ValueFill In or Circle Value Below
Service DNS-TCP, DNS-UDP, FTP data, FTP control, http-TCP, http-UDP, NTP, rexd, rlogin, who, remsh, remote print, SMTP, telnet, TFTP
Direction:
Default: Both
Inbound or Outbound
B Description of Configuration Items
Configuration Value
Fill In or Circle Value Below
Protocol
Default: all
all, TCP, UDP, ICMP, IGMP or other
Local Port
Range: 1-65535 for TCP and UDP
Remote Port:
Default: 1-65535 for TCP and UDP
Apply to IP Packets
Default: Both
From Local to Remote
From Remote to Local
Appendix C164

HP-UX IPSec Configuration WorksheetsIPSec Policy Worksheet
Table C-4
Order IPSec Policy Transform Lifetime (secs)
Lifetime (kbs)
pass,
discard
AH-MD5
AH-SHA1
ESP-DES
ESP-DES-HMAC-MD5
ESP-DES-HMAC-SHA1
ESP-3DES
ESP-3DES-HMAC-MD5
ESP-3DES-HMAC-SHA1
ESP-AES
ESP-AES-HMAC-MD5
ESP-AES-HMAC-SHA1
ESP-NULL-HMAC-MD5
ESP-NULL-HMAC-SHA1
Table C-5
Description of Configuration Items
Configuration ValueFill In or Circle Value Below
IPSec Policy Tunnel ISAKMP Policy
IPSec Policy Tunnel Endpoint
Appendix C 165

HP-UX IPSec Configuration WorksheetsIPSec Policy Worksheet
Table C-6
Order IPSec Policy Tunnel Transform
Lifetime (secs)
Lifetime (kbs)
AH-MD5
AH-SHA1
ESP-DES
ESP-DES-HMAC-MD5
ESP-DES-HMAC-SHA1
ESP-3DES
ESP-3DES-HMAC-MD5
ESP-3DES-HMAC-SHA1
ESP-AES
ESP-AES-HMAC-MD5
ESP-AES-HMAC-SHA1
ESP-NULL-HMAC-MD5
ESP-NULL-HMAC-SHA1
Appendix C166
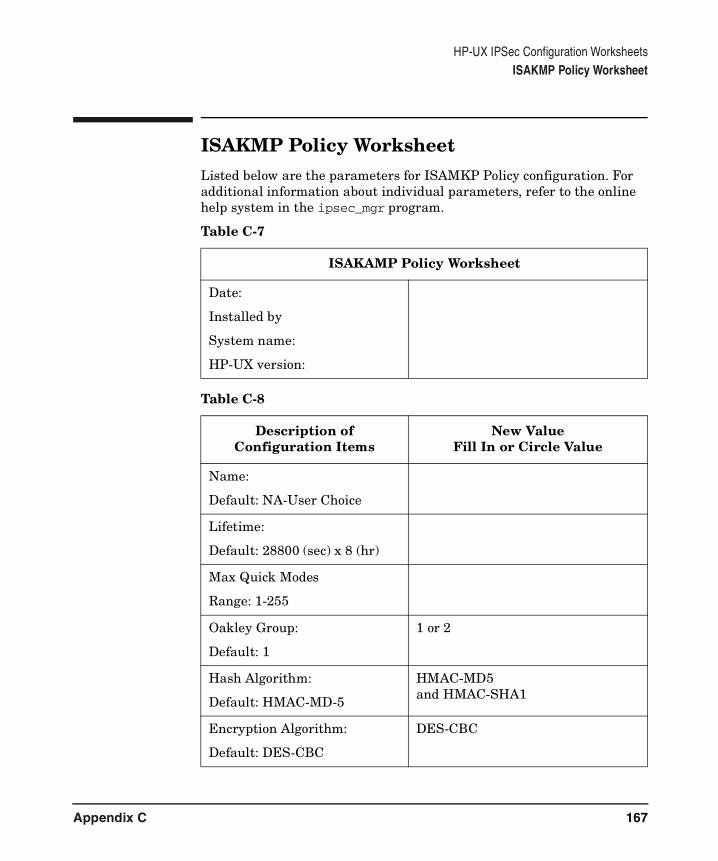
HP-UX IPSec Configuration WorksheetsISAKMP Policy Worksheet
ISAKMP Policy WorksheetListed below are the parameters for ISAMKP Policy configuration. For additional information about individual parameters, refer to the online help system in the ipsec_mgr program.
Table C-7
ISAKAMP Policy Worksheet
Date:
Installed by
System name:
HP-UX version:
Table C-8
Description of Configuration Items
New ValueFill In or Circle Value
Name:
Default: NA-User Choice
Lifetime:
Default: 28800 (sec) x 8 (hr)
Max Quick Modes
Range: 1-255
Oakley Group:
Default: 1
1 or 2
Hash Algorithm:
Default: HMAC-MD-5
HMAC-MD5 and HMAC-SHA1
Encryption Algorithm:
Default: DES-CBC
DES-CBC
Appendix C 167

HP-UX IPSec Configuration WorksheetsISAKMP Policy Worksheet
Authentication Algorithm:
Default:preshared key
preshared keyRSA signature
Table C-8 (Continued)
Description of Configuration Items
New ValueFill In or Circle Value
Appendix C168
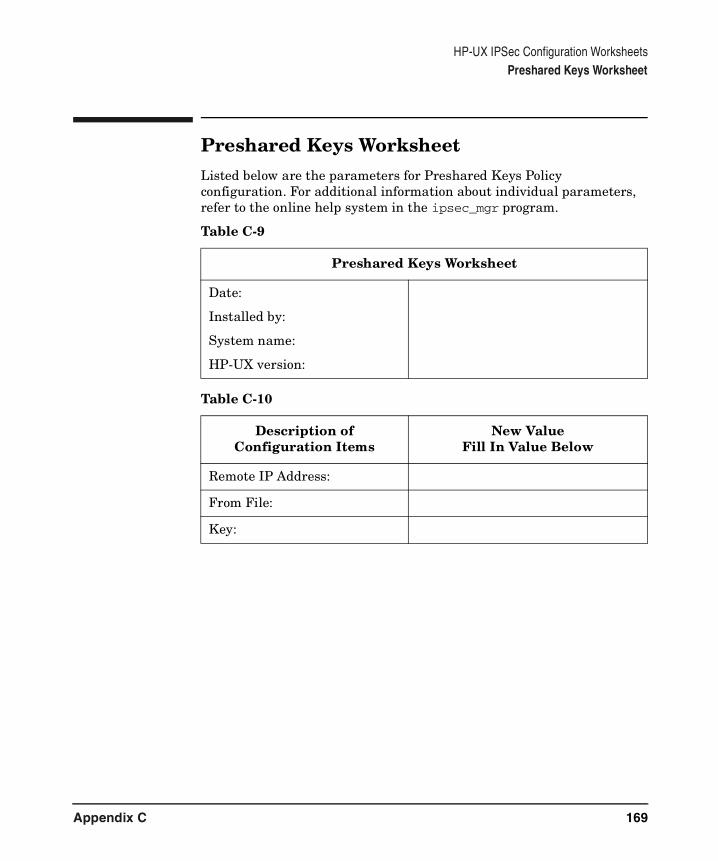
HP-UX IPSec Configuration WorksheetsPreshared Keys Worksheet
Preshared Keys WorksheetListed below are the parameters for Preshared Keys Policy configuration. For additional information about individual parameters, refer to the online help system in the ipsec_mgr program.
Table C-9
Preshared Keys Worksheet
Date:
Installed by:
System name:
HP-UX version:
Table C-10
Description of Configuration Items
New ValueFill In Value Below
Remote IP Address:
From File:
Key:
Appendix C 169
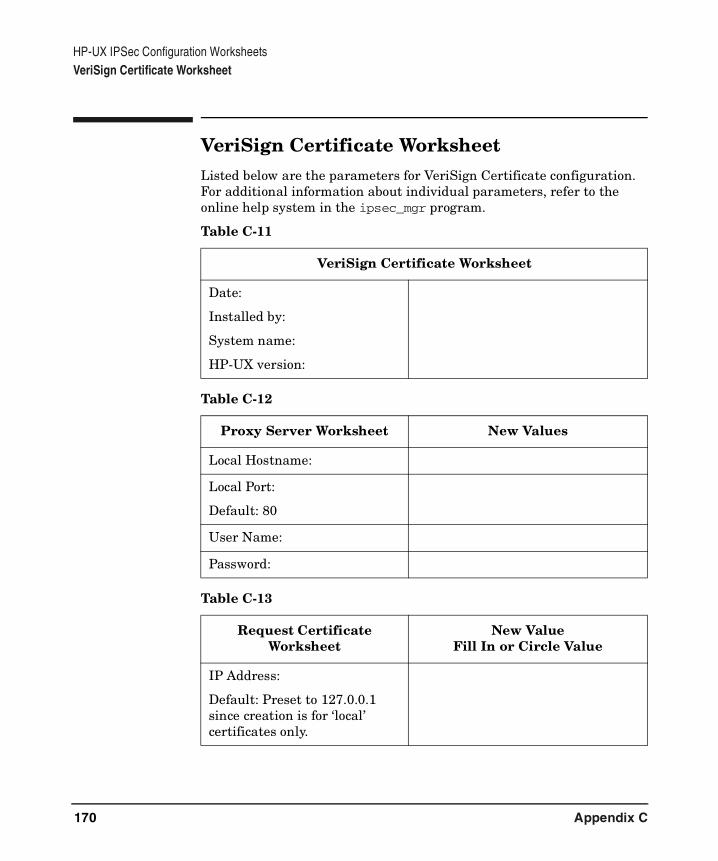
HP-UX IPSec Configuration WorksheetsVeriSign Certificate Worksheet
VeriSign Certificate WorksheetListed below are the parameters for VeriSign Certificate configuration. For additional information about individual parameters, refer to the online help system in the ipsec_mgr program.
Table C-11
VeriSign Certificate Worksheet
Date:
Installed by:
System name:
HP-UX version:
Table C-12
Proxy Server Worksheet New Values
Local Hostname:
Local Port:
Default: 80
User Name:
Password:
Table C-13
Request Certificate Worksheet
New ValueFill In or Circle Value
IP Address:
Default: Preset to 127.0.0.1 since creation is for ‘local’ certificates only.
Appendix C170
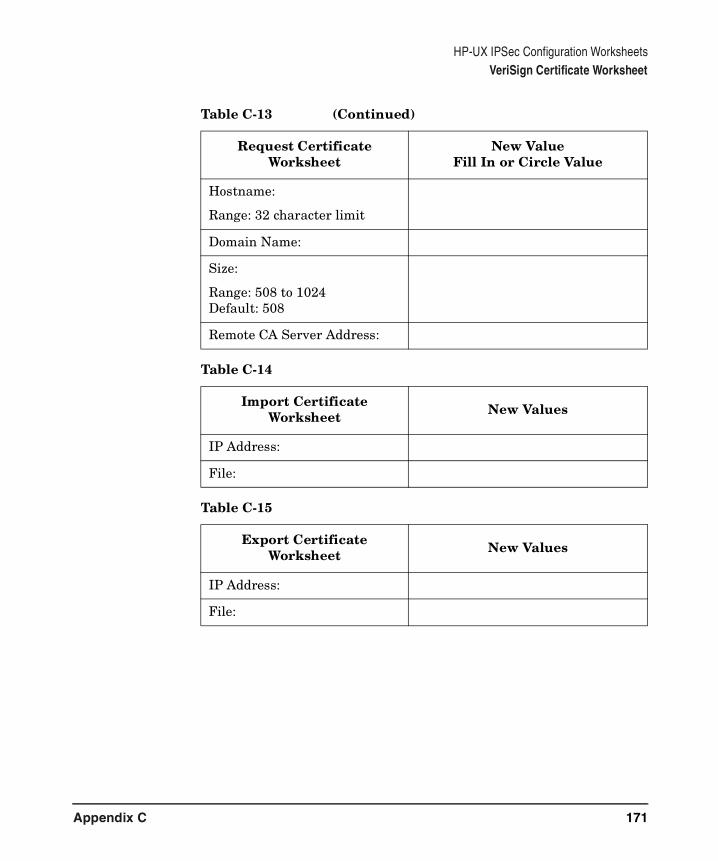
HP-UX IPSec Configuration WorksheetsVeriSign Certificate Worksheet
Hostname:
Range: 32 character limit
Domain Name:
Size:
Range: 508 to 1024Default: 508
Remote CA Server Address:
Table C-14
Import Certificate Worksheet New Values
IP Address:
File:
Table C-15
Export Certificate Worksheet New Values
IP Address:
File:
Table C-13 (Continued)
Request Certificate Worksheet
New ValueFill In or Circle Value
Appendix C 171

HP-UX IPSec Configuration WorksheetsBaltimore Certificate Worksheet
Baltimore Certificate WorksheetListed below are the parameters for Baltimore Certificate configuration. For additional information about individual parameters, refer to the online help system in the ipsec_mgr program.
Table C-16
Baltimore Certificate Worksheet
Date:
Installed by:
System name:
HP-UX version:
Table C-17
Description of Configuration Items
New ValueFill In or Circle Value
CA’s IP Address:(Obtain from Baltimore Administrator)
Baltimore PKCS#12 File:
Local path of the Baltimore PKCS#12 file.
Passphrase: (Obtain from Baltimore Administrator)
LDAP Server Name/IP Address:(optional; obtain from Baltimore Administrator)
Appendix C172

HP-UX IPSec Configuration WorksheetsBaltimore Certificate Worksheet
Port Number:
Default: 389
(optional; obtain from Baltimore Administrator)
CRL Search Base value:
(optional; obtain from Baltimore Administrator)
CRL Search Filter value:
(optional; obtain from Baltimore Administrator)
Table C-17 (Continued)
Description of Configuration Items
New ValueFill In or Circle Value
Appendix C 173

HP-UX IPSec Configuration WorksheetsBaltimore Certificate Worksheet
Appendix C174

D Configuration Reference
Appendix D 175
Configuration Reference
This chapter provides detailed reference information for each field in the HP-UX IPSec configuration GUI. It contains the following sections:
• “Configuration Reference” on page 177
Appendix D176

Configuration ReferenceConfiguration Reference
Configuration ReferenceIPSec policies specify the actions or transformations that will be applied to IP packets. An IPSec policy includes an IP packet filter and a transform (action) list. When IP packets are initially sent or received, HP-UX IPSec uses the IP packet filters to select an IPSec policy. It then takes the action specified in the transform list.
The configuration reference describes each configurable element of an IPSec policy in detail. For detailed procedures on configuring an IPSec policy, see Chapter 3, “Configuring HP-UX IPSec,” on page 29.
Below is the Create IPSec Policy screen.
The main components of an IPSec policy are described in the following sections.
Appendix D 177

Configuration ReferenceConfiguration Reference
Name
A unique identifier for the policy.
There is one reserved IPSec policy name: default. IPSec uses the default policy for any IP packets that do not match the filters of any other IPSec policy in the database. The default policy is pre-created for you and you cannot delete it. However, you can modify the IPSec Transform List for the default policy from Pass to Discard or vice-versa.
Exclusive
Use this flag to configure SAs to be shared (host-based keying) or exclusive (session-based keying). The default is host-based keying. Check Exclusive to select session-based keying.
You can select session-based keying (check Exclusive ) only if the transform list does not contain Discard or Pass as the transform policy.
You must use session-based keying if the transform for the policy is not Pass or Discard and the remote prefix length indicates a subnet (value of less than 32 for IPv4 or value of less than 128 for IPv6) or if the remote IP address is a wildcard (*). In this case, Exclusive is selected and unmodifiable (checkbox is grayed out).
NOTE If IPSec is configured with a transform that is not Pass or Discard, and the remote IP address is a subnet, then IPSec automatically selects the Exclusive flag. The checkbox is selected and unmodifiable (grayed out).
Host-based keying allows multiple connections, or sessions, between two systems to share the same two SAs created by HP-UX IPSec. With host-based keying, all IP packets that use the same IPSec policy between the same host pair (the source IP address and destination IP address are the same) will share the same IPSec/QM SA pair.
With session-based keying, a different pair of IPSec/QM SAs are used per connection or session. All the packets with the same source IP address, destination IP address, network protocol, source port, and destination port will share the same IPSec/QM SA pair. Session-based keying incurs more overhead but allows for a more secure or private connection.
Appendix D178

Configuration ReferenceConfiguration Reference
Policy Type
IPSec policies can be placed in a Hashed List or an Ordered List.
To place a policy in the Hashed List, the policy filter must have at least one IP address (local or remote) or port (local or remote) specification that is hashable. A hashable specification has a single, non-expandable value.
How HP-UX IPSec Selects Policies
When HP-UX IPSec searches for an IPSec policy to use for an IP packet, it first searches the Hashed List for the policy with the IP packet filter that best matches the packet. The best match is the filter that matches the packet and has the largest number of hashable fields (up to 4) that match the packet. If multiple filters have the same number of hashable fields that match the packet, HP-UX IPSec selects the first of these policies according to the order in the configuration file.
If HP-UX IPSec finds no match in the Hashed List, it then sequentially searches the Ordered List for the first policy with an IP packet filter that matches the packet. If no match is found in the Ordered List, HP-UX IPSec uses the default IPSec policy
NOTE To change the order of the policies in the Ordered List on the Create IPSec Policy screen, select the policy you want to move, then click the up or down arrow on the right-hand side of the screen.
The advantage of a Hashed List search is that it takes less time to find a policy that matches an IP packet than searching sequentially through an Ordered List. The advantage of an Ordered List search is that the IPSec Administrator controls the order in which the policies are searched.
The IPSec policy database can contain hashed policies, ordered policies, or a combination of hashed and ordered policies.
Filters
The combination of the Protocol, Local IP Address, Local Prefix Length, Local Port, Remote IP Address, Remote Prefix Length, and Remote Port fields define an IP packet filter. HP-UX IPSec uses this filter to select the IPSec policy to use for an IP packet.
Appendix D 179

Configuration ReferenceConfiguration Reference
You will have the choice of configuring your policy automatically based on a service type such as telnet or configuring it manually. When you configure a policy based on service type, the service field in ipsec_mgr automatically displays a list of possible services. After choosing a service, you must also choose either an inbound or outbound direction. Once you choose a service, the Protocol, Local Port, Remote Port, From Local to Remote, and From Remote to Local fields are filled in automatically with the appropriate values for the service.
If you are configuring manually, you must configure the Protocol, Local Port, Remote Port, From Local to Remote, and From Remote to Local fields manually.
HP-UX IPSec then checks the Transform List to determine what action to take.
By default, the transform is applied in both directions to:
• Packets from the local address and port to the remote address and port
• Packets from the remote address and port to the local address and port
You can restrict the IPSec policy so that the transform is only applied to packets in one direction using the option in the Apply to IP Datagrams area.
CAUTION Discarding or requiring ICMP messages (Internet Control Message Protocol messages, protocol value 1) to be encrypted or authenticated may cause connectivity problems.
Be careful when configuring the default IPSec policy or IPSec policies that affect entire subnets because you may inadvertently cause ICMP messages to be discarded. You may also inadvertantly require ICMP messages being transmitted or received from a non-IPSec gateway or router to be authenticated or encrypted, which will cause ICMP packets to be discarded.
See “HP-UX IPSec Product Requirements” on page 23 for more information.
Filter Example
Appendix D180
Configuration ReferenceConfiguration Reference
On node 192.168.1.1, you want to specify that all telnet traffic to and from the 192.0.0.0 subnet is encrypted using ESP-DES. In other words, you want to use DES encryption when a user on the local system telnets to a node on the 192.0.0.0 subnet and you also want to use DES encryption when a user on the 192.0.0.0 subnet telnets to the local node. To do so, you must create two IPSec policies.
• The first policy specifies a filter for telnet requests from the local node to nodes on the 192.0.0.0 subnet:
Service: telnet Direction: Outbound
Local Remote
IP Address 192.168.1.1 IP Address 192.0.0.0
Prefix Length: 32 Prefix Length: 8
Protocol: TCP
Port: * Port: 23
Apply to IP Datagrams
X From Local to Remote
X From Remote to Local
The local port number is a * (wildcard) because the telnet clients will use any non-reserved TCP port.
The remote port number is 23 because telnet daemons (telnetd) receive incoming requests on TCP port 23.
For Direction, you specify both Local to Remote and From Remote to Local. This ensures that HP-UX IPSec encrypts telnet requests from the local client to the remote telnet daemon and replies from the remote telnet daemon to local telnet clients.
Specify ESP-DES for the HP-UX IPSec Transform.
• The second IPSec policy specifies a filter for telnet requests from clients on the 192.0.0.0 subnet to the local node:
Appendix D 181

Configuration ReferenceConfiguration Reference
Service: telnet Direction: Inbound
Local Remote
IP Address 192.168.1.1 IP Address 192.0.0.0
Prefix Length: 32 Prefix Length: 8
Protocol: TCP
Port: 23 Port: *
Apply to IP Datagrams
X From Local to Remote
X From Remote to Local
In this filter, the local port number is 23 (the telnet port). The remote port is a * (Wildcard) because the remote telnet clients will use any non-reserved TCP port.
Specify ESP-DES for the HP-UX IPSec Transform.
Apply to IP Datagrams
By default, an IPSec policy applies to IP datagrams in both directions.
• Packets from the local address and port to the remote address and port.
• Packets from the remote address and port to the local address and port.
You can restrict the IPSec policy so that the transform is only applied to datagrams in one direction.
Transform List
A transform list, which defines the action HP-UX IPSec applies to packets using the IPSec policy:
Appendix D182

Configuration ReferenceConfiguration Reference
• Discard the packet
• Let it pass with no alteration or
• Apply authentication and/or encryption.
The transform list is used when negotiating IPSec Security Associations (SAs) with the remote system. Configure the transform list so that it will be accepted by the remote system during negotiations.
The order of the entries in the transform list is significant. The first transform is the most preferable and the last transform is the least preferable. The GUI adds new transforms to the end of the list.
Valid combinations:
• A list that contains only Pass or Discard
• A list that contains up to 2 AH transforms
• A list that contains up to 8 ESP transforms
• A list that contains one single AH&ESP (ESP nested inside of AH) transform
If you combine transformations to form a nested transform (AH&ESP), the lifetime values must all be set to the same value.
Creating Nested Transforms
To create nested transforms, you must first select at least two transforms from the Transform window. To do so, first select one AH transform, then press CTRL and select one ESP transform.
This will nest the two transforms and place the new transform on the Transform List screen.
Authentication Algorithms
These algorithms are used to provide the authentication value used in an IPSec Authentication Header (AH).
The AH provides data integrity, system-level authentication, and can provide anti-replay protection.
AH-MD5
Hashed Message Authentication Code (HMAC) using RSAs Message Digest-5. (128 bit message digest encrypted with a 128 bit key.)
Appendix D 183

Configuration ReferenceConfiguration Reference
AH-SHA1
HMAC using the Secure Hash Algorithm-l. (160 bit digest encrypted with 160 bit key.)
Encryption Algorithms
These algorithms are used to encrypt the IP payload for an IPSec Encapsulating Security Payload (ESP). The ESP provides confidentiality (encryption).
In addition, there are authenticated ESP algorithms, which include an encryption algorithm and an authentication algorithm. The authentication algorithm is used to compute an Integrity Check Value (ICV) to authenticate the ESP header and IP data. The ICV does not authenticate the original IP header unless tunnelling is used.
ESP-DES
ESP using Data Encryption Standard Cipher Block Chaining (CBC) Mode encryption, with a 56 bit key.
NOTE DES has been cracked (data encoded using DES has been decoded by a third party).
ESP-DES-HMAC-MD5
Authenticated ESP using DES-CBC encryption and HMAC-MD5 to generate an Integrity Check Value (ICV) for authentication.
ESP-DES-HMAC-SHA1
Authenticated ESP using DES-CBC encryption and HMAC-SHA1 to generate with an ICV.
ESP-3DES
ESP using triple DES-CBC encryption (three encryption iterations, each with a different 56-bit key).
ESP-3DES-HMAC-MD5
Authenticated ESP using 3DES-CBC encryption and HMAC-MD5 to generate an ICV.
ESP-3DES-HMAC-SHA1
Appendix D184
Configuration ReferenceConfiguration Reference
Authenticated ESP using 3DES-CBC encryption and HMAC-SHA1 to generate an ICV.
ESP-AES128
Authenticated ESP using AES128 encryption.
NOTE AES provides the most secure encryption, with the system performance comparable to or better than DES and 3DES.
ESP-AES128-HMAC-MD5
Authenticated ESP using AES128 encryption and HMAC-MD5 to generate an ICV.
ESP-AES128-HMAC-SHA1
Authenticated ESP using AES128 encryption and HMAC-SHA1 to generate an ICV.
ESP-NULL-HMAC-MD5
ESP header and trailer, but nothing is encrypted. An ICV is generated using HMAC-MD5.
ESP-NULL-HMAC-SHA1
ESP header and trailer, but nothing is encrypted. An ICV is generated using HMAC-SHA1.
NOTE If you are configuring an HP-UX IPSec system to interoperate with a Linux FreeSwan system, you can use 3DES encryption or AES encryption with the appropriate FreeSwan crypto algorithm patch. Linux FreeSwan does not support DES encryption.
Transform Lifetime Values
You can edit the preferred lifetimes associated with the transform you selected if the specified algorithm in the transform list is used. The actual lifetimes used depends on negotiations with the remote system.
Appendix D 185

Configuration ReferenceConfiguration Reference
If the local system initiates the IPSec negotiations, the ISAKMP daemon will send the preferred lifetime to the remote system. The remote system may process this value in any manner according to the IPSec protocol specification.
If the remote system initiates the IPSec negotiations, the ISAKMP daemon will accept the lifetime sent by the remote system, within the range specified by the IPSec protocol.
The lifetime values will be linked to the system-wide lifetime values configured for this transform algorithm, if you check Use System Values on the Edit Transform Lifetimes screen. Any changes to the system-wide lifetime values for this transform algorithm will affect all the IPSec policies referencing this transform.
Nested AH and ESP Transforms
You can create a nested AH and ESP transform by using CTRL + click to select both an authentication (AH) transform and an encryption (ESP) transform and clicking Add.
For example, you can create the combination HMAC-MD5 & DES-CBC. With this combination, HP-UX IPSec will use DES-CBC to build an ESP with the IP data encrypted. HP-UX IPSec will then nest this within an AH transform, using HMAC-MD5 to authenticate the ESP and the entire IP packet, including the immutable fields of the original IP header.
This differs from a DES-CBC-HMAC-MD5 transform, which is an authenticated ESP transform which only adds an IP header. The DES-CBC-HMAC-MD5 transform authenticates only the ESP header and IP data, and does not authenticate the original IP header unless tunnelling is used.
Comparative Key Lengths
Below is a table showing the key lengths of AH and ESP algorithms. In general, the longer the key length, the more secure the encryption algorithm will be. The encryption algorithms (DES, 3DES, AES) with longer key lengths, however, are also slower.
Table D-1
Algorithm Key Length
ESP-DES 56
Appendix D186

Configuration ReferenceConfiguration Reference
3DES (Triple-DES) uses three independent 56-bit keys. The data is encrypted in three stages: it is encrypted using key1, decrypted using key2, and encrypted again using key3.
AES with HP-UX IPSec supports 128-bit keys. AES encryption is stronger than that of 3DES. In addition, processing speed is faster with AES, comparable to or better than that of DES encryption.
HMAC-SHA1 generates a 160-bit message digest and uses a 160-bit shared secret key to encrypt the digest.
HMAC-MD5 generates a 128-bit message digest and uses a 128-bit shared secret key to encrypt the digest.
ISAKMP Policy Name
This is the name of the ISAKMP policy to use with this IPSec policy. If an IPSec policy’s Transform List specifies any authentication or encryption, HP-UX IPSec must establish an IPSec/QM SA with the remote system to negotiate the parameters for the authentication or encryption, including encryption key information.
These negotiations require a secure channel, which is provided by an ISAKMP/MM SA. If there is no active ISAKMP/MM SA with the remote system, HP-UX IPSec will establish a new one according to the ISAKMP policy specified in the IPSec policy.
Do not specify an ISAKMP policy if the transform list contains Discard or Pass (there is no encryption or authentication).
In an ISAKMP policy, you define the parameters for the ISAKMP/MM SA. The ISAKMP SA uses the Diffie-Hellman method to create a secure channel from publicly-exchanged information. HP-UX IPSec then uses this secure channel to negotiate IPSec/QM SAs. In the ISAKMP policy,
ESP-3DES 168 (3 x 56)
ESP-AES 128
AH-MD5 128
AH-SHA1 160
Table D-1 (Continued)
Algorithm Key Length
Appendix D 187

Configuration ReferenceConfiguration Reference
you define Diffie-Hellman parameters, how you will perform the ISAKMP/Oakley primary authentication (preshared key, certificate-based RSA digital signature), and what type of authentication and encryption to use for the ISAKMP/Oakley dialogue.
NOTE The same ISAKMP policy must be used if multiple IPSec policies reference the same remote IP address.
Certificate ID Types and Values
You may need to create an ID if you are using certificate-based authentication (RSA signatures) for ISAKMP.
If you are configuring an HP-to-HP connection using certificates, you do not need to create certificate IDs. Both HP hosts must have single IP addresses and the IP address of the machine must match the IP address of the certificate on that host.
If you are configuring an HP-to-other connection using certificates, you must configure a certificate ID for the “other” host’s certificate.
Certificate ID Types
IPv4 Address
The IP address of the system the certificate is associated with, as it is recorded in the certificate file.
FQDN
The Fully Qualified Domain Name (FQDN) of the subject of the certificate, as recorded in the certificate file.
User-FQDN
The User-Fully Qualified Domain Name (User-FQDN) of the subject of the certificate, as recorded in the certificate file.
Subject DN
The Subject distinguishedName (Subject DN) of the subject of the certificate, as recorded in the certificate file.
Appendix D188

Configuration ReferenceConfiguration Reference
Certificate ID Values
IPv4 Address
The IP address of the system the certificate is associated with, as it is recorded in the certificate file. This address must be in standard dot notation.
FQDN
The Fully Qualified Domain Name (FQDN), also known as the Domain Name Server (DNS), of the subject of the certificate, as recorded in the certificate file. The FQDN must be in ASCII format. For example, myhost.hp.com.
User-FQDN
The User-Fully Qualified Domain Name (User-FQDN) of the subject of the certificate, as recorded in the certificate file. The User-FQDN must be in SMTP mail address format. For example: [email protected].
Subject DN
The Subject distinguishedName (Subject DN) consists of the following values:
commonName: The commonName of the Subject DN is printable string format. This field is required. Commas are not accepted as part of this value. The size of this value must not exceed 64 bytes.
organization: The organization of the Subject DN, for example Hewlett-Packard. This field is required. Commas are not accepted as part of this value. The size of this value must not exceed 64 bytes.
country: The two-character ISO 3166-1 code for the country listed in the Subject DN, for example US for United States of America. This field is required. Commas are not accepted as part of this value. The size of this value must not exceed 64 bytes.
organizationalUnit: The organizationalUnit for the Subject DN, for example Marketing. This field is optional. Commas are not accepted as part of this value. The size of this value must not exceed 64 bytes.
Appendix D 189

Configuration ReferenceConfiguration Reference
Appendix D190

E Troubleshooting Tools Reference
Appendix E 191
Troubleshooting Tools Reference
This appendix contains reference information about the following HP-UX IPSec troubleshooting tools:
• “ipsec_admin” on page 193
• “ipsec_report” on page 198
• “ipsec_policy” on page 211
Appendix E192

Troubleshooting Tools Referenceipsec_admin
ipsec_admin NAME
The HP-UX IPSec Administration Program is used to administer HP-UX IPSec.
SYNOPSIS
/usr/sbin/ipsec_admin -start
/usr/sbin/ipsec_admin -policy policy_file
/usr/sbin/ipsec_admin -stop
/usr/sbin/ipsec_admin -status
/usr/sbin/ipsec_admin -newpasswd password
/usr/sbin/ipsec_admin -audit audit_directory
/usr/sbin/ipsec_admin -auditlvl [alert|error|warning|informative|debug|]
/usr/sbin/ipsec_admin -maxsize max_audit_file_size
/usr/sbin/ipsec_admin -traceon [tcp|udp|igmp|all]
/usr/sbin/ipsec_admin -traceoff [tcp|udp|igmp|all]
/usr/sbin/ipsec_admin -flushsa
/usr/sbin/ipsec_admin -flushp
/usr/sbin/ipsec_admin -deletesa remote_ip_address
DESCRIPTION
ipsec_admin is an administration program that provides HP-UX IPSec system administration tasks such as starting and stopping the HP-UX IPSec subsystem and getting status on the HP-UX IPSec subsystem. The HP-UX IPSec subsystem includes the user-space key management daemon, audit daemon, policy daemon, and the HP-UX IPSec kernel portion.
At any time, the Security Administrator can also:
Appendix E 193

Troubleshooting Tools Referenceipsec_admin
• Change the audit level
• Change the audit directory
• Get status of the HP-UX IPSec subsystem
• Enable or disable Level 4 tracing for TCP, UDP or IGMP
• Change the HP-UX IPSec password
ipsec_admin requires the optional HP-UX IPSec software. ipsec_admin can only be run by the root user and is protected by the HP-UX IPSec password. The HP-UX IPSec password must be entered from the keyboard (it cannot be redirected from a file).
OPTIONS
ipsec_admin recognizes the following command-line options and arguments.
-start (Abbr: -st)
Starts the HP-UX IPSec subsystem, including all user-space daemons.
-policy policy_file (Abbr.: -p)
Specifies the Security Policy file other than the default file to use when the HP-UX IPSec subsystem is started. Default is /var/adm/ipsec/policies.text.
-stop (Abbr.: -sp)
Stops the HP-UX IPSec subsystem which includes all user-space daemons.
-status (Abbr.: -s)
Reports the current status of the HP-UX IPSec subsystem. The report will display the current state of HP-UX IPSec (active or not active). If active, the HP-UX IPSec daemons that are currently running and the Audit and Policy files in use are also displayed. Also any Level 4 tracing is displayed.
-newpasswd password (Abbr.: -np)
Appendix E194
Troubleshooting Tools Referenceipsec_admin
Changes password for HP-UX IPSec password protected programs and files. The password must be at least 15 characters. Once the HP-UX IPSec password has been established, this option is valid only if the HP-UX IPSec subsystem is running.
-audit audit_directory (Abbr.: -au)
Specifies the Audit directory other than the default directory to use when the HP-UX IPSec subsystem is started. Default is /var/adm/ipsec.
This option is also valid with the -start option.
-auditlvl (Abbr.: -al)
Changes the Audit level for the HP-UX IPSec subsystem. The levels are shown in ascending order. Higher audit levels include all lower levels. Default Audit level is error which includes alert messages. A definition of each class is shown below.
• Alert. These messages include security violations and attacks, password violations, errors that may prevent correct operation of the product, any error condition that is not recoverable, authentication problems, major security changes, unknown message types, and changing of the HP-UX IPSec password or audit level.
• Error. These messages include recoverable error conditions, syntax errors, unsupported features, bad packets, and unknown message types.
• Warning. These messages provide notification to the user about non-intrusive security events.
• Informative. These messages provide detailed event logging for debugging and troubleshooting purposes.
This option is also valid with the -start option.
-maxsize (Abbr.:-m)
Specifies the maximum size in kilobytes of an Audit file before a new one is created. The default is 100 kbytes.
This option is also valid with the -start option.
Appendix E 195

Troubleshooting Tools Referenceipsec_admin
-traceon (Abbr.:-tn)
Enables Level 4 tracing for TCP, UDP, or IGMP. If ALL is selected, then all three protocols are traced. ipsec_admin uses nettl to enable Level 4 tracing. Tracing output is directed to /var/admin/ipsec/nettl.TRCC0 and /var/adm/ipsec/nettl.TRC1 if nettl is not already enabled for tracing. If it is, then the trace file would be the one already started by nettl.
This option is also valid with the -start option.
-traceoff (Abbr.: -tf)
Disable any Level 4 tracing enabled with the -traceon option.
-flushsa (Abbr.: -fa)
This option allows the Security Administrator to flush all of the ISAKMP/MM SAs and IPSec/QM SAs. It can also be used to clear the SA database without restarting HP-UX IPSec.
This option is automatically executed when the user executes the -stop option.
-flushp (Abbr.: -fp)
This option allows the Security Administrator to flush the Security Policy data base kept by the Policy daemon and the kernel policy engine during startup.
This option is automatically executed when the user executes the -stop option.
-deletesa (Abbr.: -da)
This option allows the Security Administrator to delete the ISAKMP MM SA and IPSec/QM SAs for a given remote_IP_address.
EXAMPLE
ipsec_admin -s
----------------- IPSec Status Report -----------------
Appendix E196
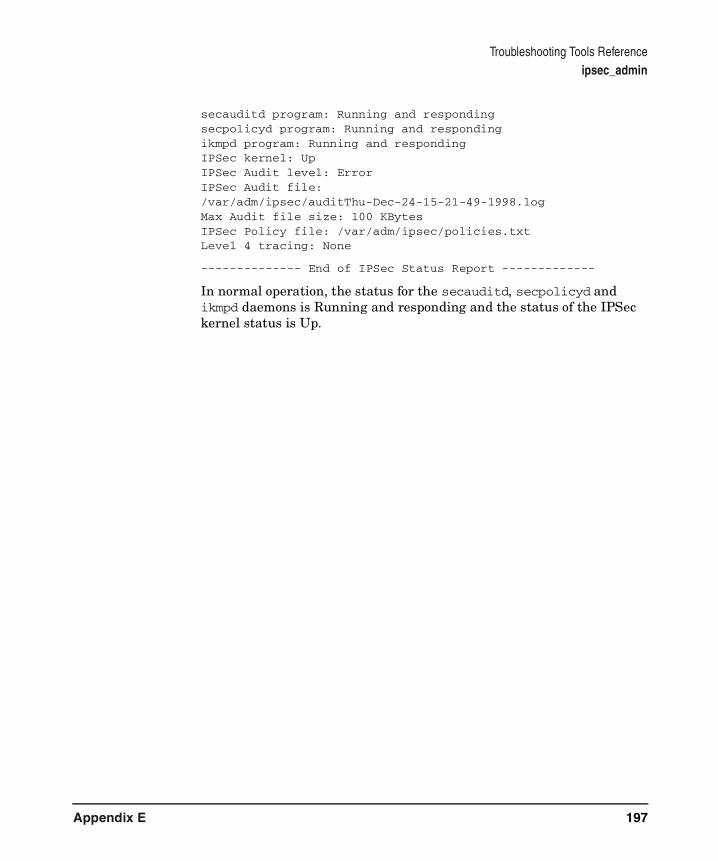
Troubleshooting Tools Referenceipsec_admin
secauditd program: Running and respondingsecpolicyd program: Running and respondingikmpd program: Running and respondingIPSec kernel: UpIPSec Audit level: ErrorIPSec Audit file: /var/adm/ipsec/auditThu-Dec-24-15-21-49-1998.logMax Audit file size: 100 KBytesIPSec Policy file: /var/adm/ipsec/policies.txtLevel 4 tracing: None
-------------- End of IPSec Status Report -------------
In normal operation, the status for the secauditd, secpolicyd and ikmpd daemons is Running and responding and the status of the IPSec kernel status is Up.
Appendix E 197
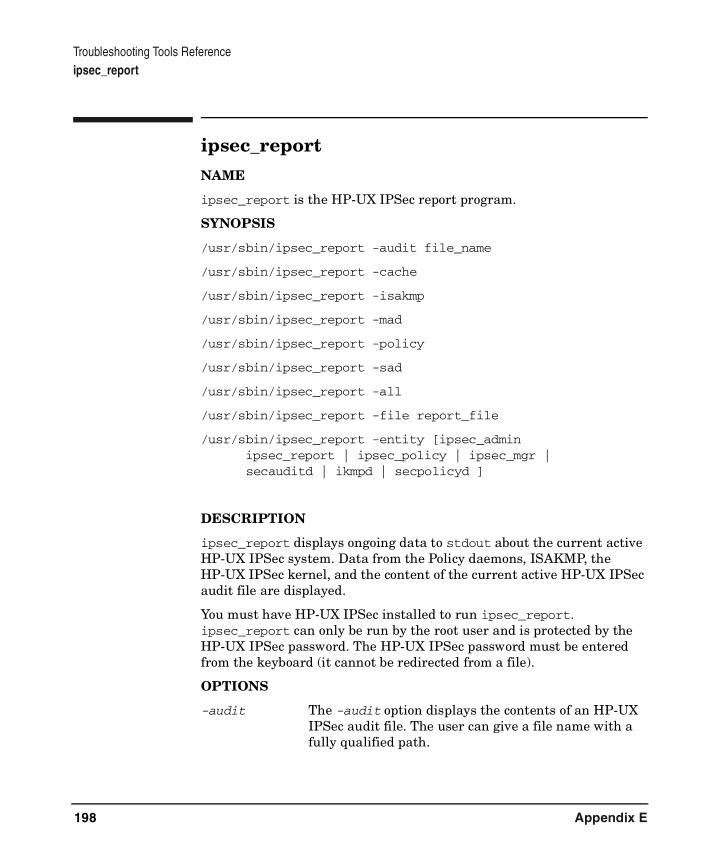
Troubleshooting Tools Referenceipsec_report
ipsec_report NAME
ipsec_report is the HP-UX IPSec report program.
SYNOPSIS
/usr/sbin/ipsec_report -audit file_name
/usr/sbin/ipsec_report -cache
/usr/sbin/ipsec_report -isakmp
/usr/sbin/ipsec_report -mad
/usr/sbin/ipsec_report -policy
/usr/sbin/ipsec_report -sad
/usr/sbin/ipsec_report -all
/usr/sbin/ipsec_report -file report_file
/usr/sbin/ipsec_report -entity [ipsec_admin ipsec_report | ipsec_policy | ipsec_mgr |
secauditd | ikmpd | secpolicyd ]
DESCRIPTION
ipsec_report displays ongoing data to stdout about the current active HP-UX IPSec system. Data from the Policy daemons, ISAKMP, the HP-UX IPSec kernel, and the content of the current active HP-UX IPSec audit file are displayed.
You must have HP-UX IPSec installed to run ipsec_report. ipsec_report can only be run by the root user and is protected by the HP-UX IPSec password. The HP-UX IPSec password must be entered from the keyboard (it cannot be redirected from a file).
OPTIONS
-audit The -audit option displays the contents of an HP-UX IPSec audit file. The user can give a file name with a fully qualified path.
Appendix E198

Troubleshooting Tools Referenceipsec_report
-cache The -cache option displays the Policy Rules cached in the kernel by the kernel Policy Engine.
-isakmp The -isakmp option displays the ISAKMP Policies kept by the Policy daemon.
-mad The -mad option displays the ongoing ISAKMP/MM SAs kept by IKE daemon.
-policy The -policy option displays the IPSec Policies kept by the Policy daemon.
-sad The -sad option displays the current HP-UX IPSec/QM SAs kept by the kernel Security Association Engine.
-file The -file option redirects all report output to a report file. If the report file already exists the file will be overwritten. If not, the file is created.
-entity The -entity option allows you to display information about the specified module.
Examples
The following excerpts of command outputs are from a system with IP address 192.6.1.1 and reflect activity for a telnet session to address 192.6.1.2.
Example: ipsec_report -policy
ipsec_report -policy
--------------------- Hash Policy Rule -----------------------Rule ID: udp_port500Hash Table: Src Port Cookie: 1Src IP Addr: * Src Port number: 500Dst IP Addr: * Dst Port number: 500Network Protocol: UDP Direction: inboundFilter: Pass : :------------------ Ordered Policy Rule -----------------------Rule ID: telnet_outCookie: 3 State: ReadySrc IP Addr: 192.6.1.1 Prefix Length: 32 Src Port number: *Dst IP Addr: 192.6.1.2 Prefix Length: 32 Dst Port number: 23
Appendix E 199

Troubleshooting Tools Referenceipsec_report
Network Protocol: TCP Direction: outboundFilter: SecureShared SA: YesNumber of SA(s) Needed: 1Number of SA(s) Created: 1Kernel Requests Queued: 0-- SA Number 1 -- Security Association Type: ESP Encryption Algorithm: 3DES-CBC Authentication Algorithm: None SPI (hex): BE882 SPI updated: ISAKMP
The -policy option displays information about the IPSec policies that were configured by the HP-UX IPSec administrator and loaded by the HP-UX IPSec policy daemon. For each IPSec policy, the Policy Manager actually stores multiple rules, which are similar to IPSec policies, except that they are unidirectional. Therefore, bi-directional IPSec policies generate an inbound rule and an outbound rule. The rule entries are Hash or Ordered according to the type of IPSec policy that generated the entry. Hash IPSec policies will have multiple rule entries according to the number of hashable fields in the policy.
Fields are defined as follows:
Rule ID An integer used internally by HP-UX IPSec to index the entries.
Hash Table (For Hash Policy Rules only.) The hash table that contains this entry. There are four hash tables: Src Address (source IP address), Dst Address (destination IP address), Src Port (source port) and Dst Port (destination port). A hash IPSec Policy will have a rule entry in each hash table for which it has a hashable value (non-expandable value with no wildcard or address range).
Cookie An integer used to cross-reference entries in the cache and policy (rule) tables kept by the Policy daemon. All entries based on the same IPSec policy will have the same cookie value.
Src IP Address
The source IP address.
Src Port number
Appendix E200
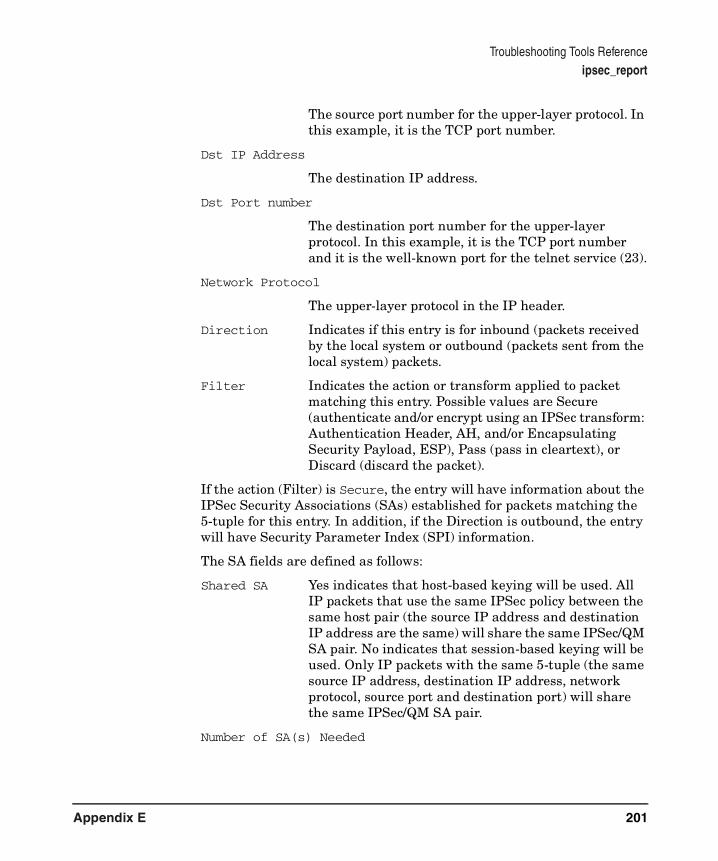
Troubleshooting Tools Referenceipsec_report
The source port number for the upper-layer protocol. In this example, it is the TCP port number.
Dst IP Address
The destination IP address.
Dst Port number
The destination port number for the upper-layer protocol. In this example, it is the TCP port number and it is the well-known port for the telnet service (23).
Network Protocol
The upper-layer protocol in the IP header.
Direction Indicates if this entry is for inbound (packets received by the local system or outbound (packets sent from the local system) packets.
Filter Indicates the action or transform applied to packet matching this entry. Possible values are Secure (authenticate and/or encrypt using an IPSec transform: Authentication Header, AH, and/or Encapsulating Security Payload, ESP), Pass (pass in cleartext), or Discard (discard the packet).
If the action (Filter) is Secure, the entry will have information about the IPSec Security Associations (SAs) established for packets matching the 5-tuple for this entry. In addition, if the Direction is outbound, the entry will have Security Parameter Index (SPI) information.
The SA fields are defined as follows:
Shared SA Yes indicates that host-based keying will be used. All IP packets that use the same IPSec policy between the same host pair (the source IP address and destination IP address are the same) will share the same IPSec/QM SA pair. No indicates that session-based keying will be used. Only IP packets with the same 5-tuple (the same source IP address, destination IP address, network protocol, source port and destination port) will share the same IPSec/QM SA pair.
Number of SA(s) Needed
Appendix E 201

Troubleshooting Tools Referenceipsec_report
The number of IPSec/QM SAs required for an IP packet that uses this policy entry. Normally, only one SA is needed. However, a packet with a nested transform (an ESP nested within an AH) or one that is sent through a tunnel would require multiple SAs.
Number of SA(s) Created
(This field is only present for non-shared SA entries.) This indicates the number of IPSec/QM SAs actually created with the peer node. When negotiations are complete, this number should match the “Number of SA(s) Needed”.
Kernel Requests Queued
(This field is only present for outbound entries.) This is the number of pending requests from the kernel to form IPSec/QM SAs using this policy. Once the SA(s) are established, the queued kernel requests are processed and the number of Kernel Requests Queued will go down to 0.
SA Number Internal index for the SA for this packet. Normally, there is only one SA and this label is SA Number 1. However, a packet with a nested transform (an ESP nested within an AH) or one that is sent through a tunnel would require multiple SAs.
Security Association Type
Indicates the IPSec transform for this SA. Possible values are AH (Authentication Header) and ESP (Encapsulating Security Payload).
Encryption Algorithm
(This field is only present if the Security Association Type is ESP.) The encryption algorithm used for the SA, as negotiated with the remote system.
Authentication Algorithm
The authentication algorithm used for the SA, as negotiated with the remote system.
Appendix E202

Troubleshooting Tools Referenceipsec_report
SPI (This field is only present for outbound, shared SA entries.) The Security Parameters Index (SPI). The SPI is included in the IPSec AH or ESP protocol header transmitted to the remote system. The SPI is also used to index IPSec/QM SA entries in the kernel Security Association database.
The inbound rule entries will not contain SPI information because the system will receive these packets with a Security Parameters Index (SPI) in the Authentication Header (AH) or Encapsulating Security Payload (ESP) header. HP-UX IPSec will use the SPI to find an entry in the kernel Security Association database and not query the Policy Manager for these packets.
SPI updated (This field is only present for outbound, shared SA entries.) Indicates the HP-UX IPSec module that provided the SA parameter information (always ISAKMP).
Example: ipsec_report -isakmp
ipsec_report -isakmp
------------------- Default ISAKMP Rule ----------------------Rule ID: defaultRule Type: Default Cookie: 2824Group Type: 1 Authentication Method: PresharedKeysAuthentication Algorithm: HMAC-MD5 Encryption Algorithm:DES-CBCNumber of Quick Modes: 100 Lifetime (seconds): 28800
The -isakmp option displays the ISAKMP Policies that were configured by the HP-UX IPSec administrator and loaded by the HP-UX IPSec Policy daemon.
Fields are defined as follows:
Rule ID The name of the ISAKMP policy, as configured.
Rule Type The type of rule. Default indicates the default ISAKMP policy. Otherwise, the rule type is ISAKMP.
Cookie An integer used internally by HP-UX IPSec to identify this policy.
Appendix E 203

Troubleshooting Tools Referenceipsec_report
Group Type The Oakley Group, which determines the numeric base for values used in the Diffie-Hellman exchange of the ISAKMP protocol. Possible values are defined in the Oakley Key Determination protocol specification (RFC 2412) and include 1 (768-bit prime, Modular Exponentiation, MODP) and 2 (1024-bit prime, MODP).
Authentication Method
The method used by the two ISAKMP entities to verify each other's identity, also known as primary authentication. Possible values are Preshared Keys and RSA signature
Authentication Algorithm
The algorithm used to authenticate the ISAKMP protocol messages after the initial exchange.
Encryption Algorithm
The algorithm used to encrypt the ISAKMP protocol messages after the initial exchange.
Number of Quick Modes
The configured maximum number of Quick Mode negotiations per ISAKMP/MM SA (each Quick Mode negotiation results in a pair of IPSec/QM SAs).
Lifetime The configured preferred maximum lifetime to use for the ISAKMP/MM SA, in seconds. The actual maximum lifetime used is negotiated with the remote ISAKMP entity.
Example: ipsec_report -cache
ipsec_report -cache
---------------------Cache Policy Rule -----------------------Cache Policy Record: 7 Cookie: 3Src IP Address: 192.6.1.1 Src Port number: 49182Dst IP Address: 192.6.1.2 Dst Port number: 23Network Protocol: TCP Direction: outboundFilter: Secur-- SA Number 1 --
Appendix E204

Troubleshooting Tools Referenceipsec_report
State: SA Created Security Association Type: ESP Tunnel SA: No SPI (hex): BE882 Src IP Address: 192.6.1.1 Dst IP Address: 192.6.1.2
The -cache option displays the Cache Policy Rules. The Cache Policy Rules are maintained by the Kernel Policy Engine and record the action (Filter) to be taken for IP packets that match the 5-tuple (source IP address and port, destination IP address and port, and protocol) and direction.
Note that there are no entries for inbound IP packets that have been authenticated or encrypted using IPSec Authentication Headers (AH) or Encapsulating Security Payload (ESP). This is because the system will receive these packets with a Security Parameters Index (SPI) in the AH or ESP header. HP-UX IPSec will use the SPI to find an entry in the kernel Security Association database and not query the Kernel Policy Engine for these packets.
Fields are defined as follows:
Cache Policy Record
An integer used internally by HP-UX IPSec to index the entries.
Cookie An integer used to cross-reference entries in the cache and policy tables kept by the Policy daemon. All cache entries based on the same IPSec policy will have the same cookie value.
Src IP Address
The source IP address.
Src Port number
The source port number for the upper-layer protocol. In this example, it is the TCP port number.
Dst IP Address
The destination IP address.
Dst Port number
Appendix E 205
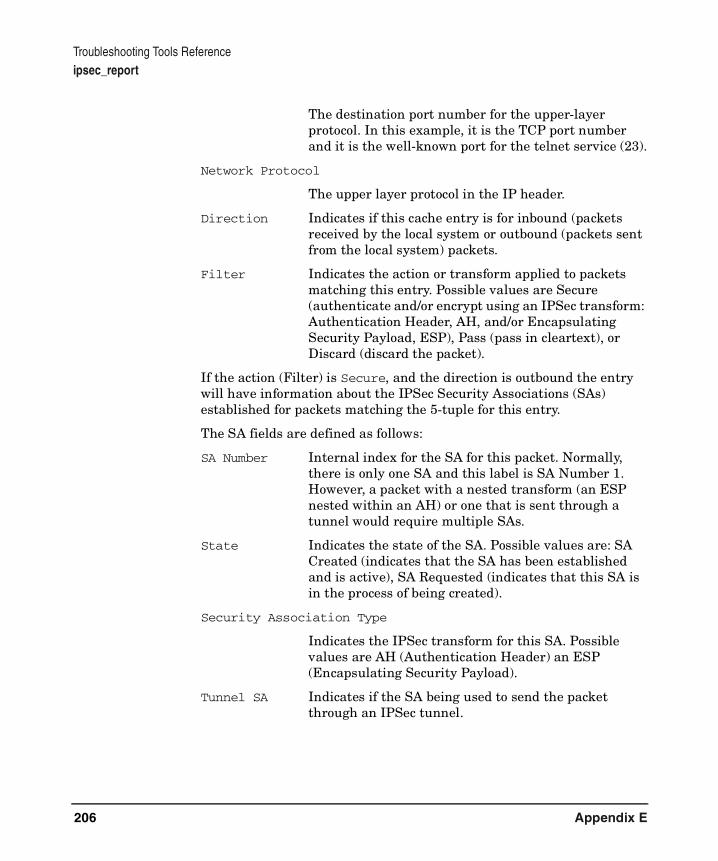
Troubleshooting Tools Referenceipsec_report
The destination port number for the upper-layer protocol. In this example, it is the TCP port number and it is the well-known port for the telnet service (23).
Network Protocol
The upper layer protocol in the IP header.
Direction Indicates if this cache entry is for inbound (packets received by the local system or outbound (packets sent from the local system) packets.
Filter Indicates the action or transform applied to packets matching this entry. Possible values are Secure (authenticate and/or encrypt using an IPSec transform: Authentication Header, AH, and/or Encapsulating Security Payload, ESP), Pass (pass in cleartext), or Discard (discard the packet).
If the action (Filter) is Secure, and the direction is outbound the entry will have information about the IPSec Security Associations (SAs) established for packets matching the 5-tuple for this entry.
The SA fields are defined as follows:
SA Number Internal index for the SA for this packet. Normally, there is only one SA and this label is SA Number 1. However, a packet with a nested transform (an ESP nested within an AH) or one that is sent through a tunnel would require multiple SAs.
State Indicates the state of the SA. Possible values are: SA Created (indicates that the SA has been established and is active), SA Requested (indicates that this SA is in the process of being created).
Security Association Type
Indicates the IPSec transform for this SA. Possible values are AH (Authentication Header) an ESP (Encapsulating Security Payload).
Tunnel SA Indicates if the SA being used to send the packet through an IPSec tunnel.
Appendix E206

Troubleshooting Tools Referenceipsec_report
SPI The Security Parameters Index (SPI). The SPI is included in the IPSec AH or ESP protocol header transmitted to the remote system. The SPI is also used to index IPSec/QM SA entries in the kernel Security Association database.
Src IP Address
The source IP address that will be used in the IP header. This may be different than the original source IP address if tunnelling is being used.
Dst IP Address
The destination IP address that will be used in the IP header. This may be different than the original destination IP address if tunnelling is being used.
Example: ipsec_report -sad
ipsec_report -sad
------------------- Security Association --------------------Sequence number: 1SPI (hex): BE882 State: MATURESecurity Association Type: ESP with 3DES-CBC encryption and No authenticationSrc IP Addr: 192.6.1.1 Dst IP Addr: 192.6.1.2 Current Lifetimes bytes processed: 6256 addtime (seconds): 32 usetime (seconds): 30 Hard Lifetimes bytes processed: 0 addtime (seconds): 28800 usetime (seconds): 28800
------------------- Security Association --------------------Sequence number: 2SPI (hex): 13BDB7 State: MATURESecurity Association Type: ESP with 3DES-CBC encryption and No authenticationSrc IP Addr: 192.6.1.2 Dst IP Addr: 192.6.1.1 Current Lifetimes bytes processed: 6344 addtime (seconds): 31 usetime (seconds): 30
Appendix E 207

Troubleshooting Tools Referenceipsec_report
Hard Lifetimes bytes processed: 0 addtime (seconds): 28800 usetime (seconds): 28800
The -sad option displays information about the IPSec Security Associations, as maintained by the kernel Security Association Engine in the SA database.
Fields are defined as follows:
Sequence Number
An integer used internally by the SA engine to index the entries.
SPI The Security Parameters Index (SPI). For outbound SAs (the source IP address is a local address), the SPI is selected by the remote system and is included in the outbound IPSec AH or ESP protocol header. For inbound SAs, this is the SPI selected by the local system and is used to find the correct SA when the local system receives a packet with an IPSec AH or ESP header.
State The state of the IPSec/QM SA. Possible values are Mature (the SA is established and available for use), Larval (the SA is being established), and Dead (the SA is expired and not usable).
Security Association Type
Indicates the type of transform, such as AH (Authentication Header) or ESP (Encapsulating Security Payload), and the authentication or encryption algorithm used.
Src IP Addr The source IP address for the SA.
Dst IP Addr The destination IP address for the SA.
Current Lifetimes
The current lifetime for the SA, as measured by the amount of data sent and received (bytes processed), number of seconds since the SA was added to the database (addtime) or the number of seconds since the SA was first used to transmit or receive data (usetime).
Appendix E208

Troubleshooting Tools Referenceipsec_report
Hard Lifetimes The maximum lifetimes for the SA, as negotiated with the remote system. These are measured by the amount of data sent or received (bytes processed), number of seconds since the SA was added to the database (addtime) or the number of seconds since the SA was first used to transmit or receive data (usetime). If any of the three values is exceeded, the SA is deleted and a new SA must be established if there is more data to send. Note that a value of 0 for bytes processed indicates that the number of bytes processed is ignored (there is no maximum lifetime based on bytes sent or received).
Example: ipsec_report -mad
ipsec_report -mad
-------------------- ISAKMP Main Mode SA ---------------------Sequence number: 1Role: Initiator Remote IP Address: 192.6.1.2Oakley Group: 1 Authentication Method: Preshared KeysAuthentication Algorithm: HMAC-MD5 Encryption Algorithm:DES-CBCQuick Modes Processed: 1 Lifetime (seconds): 28800
The -mad option displays the ISAKMP Main Mode SA entries, which contain information about ISAKMP or “Main Mode” Security Associations (SAs) established by the IKE daemon (ikmpd).
Fields are defined as follows:
Sequence Number An integer used internally by the IKE daemon to index the entries.
Role Indicates if the local system initiated the ISAKMP/MM SA (Initiator) or responded to a remote request to establish the ISAKMP/MM SA (Responder).
Oakley Group The Oakley Group determines the numeric base for values used in the Diffie-Hellman exchange of the ISAKMP protocol. Possible values are defined in the Oakley Key Determination protocol specification (RFC 2412) and include 1 (768-bit prime, Modular Exponentiation, MODP) and 2 (1024-bit prime, MODP).
Appendix E 209

Troubleshooting Tools Referenceipsec_report
Authentication Method
The method used by the two ISAKMP entities to verify each other's identity, also known as primary authentication. Possible values include Preshared Keys and RSA signature.
Authentication Algorithm
The algorithm used to authenticate the ISAKMP protocol messages after the initial exchange.
Encryption Algorithm
The algorithm used to encrypt the ISAKMP protocol messages after the initial exchange.
Quick Modes Processed
This indicates the number times the ISAKMP/MM SA was used to negotiate a pair of IPSec/QM SAs (each Quick Mode negotiation results in a pair of IPSec/QM SAs).
Lifetime The maximum lifetime for the ISAKMP/MM SA, in seconds, as negotiated with the remote ISAKMP entity. If this lifetime is exceeded, the ISAKMP/MM SA is deleted.
Appendix E210
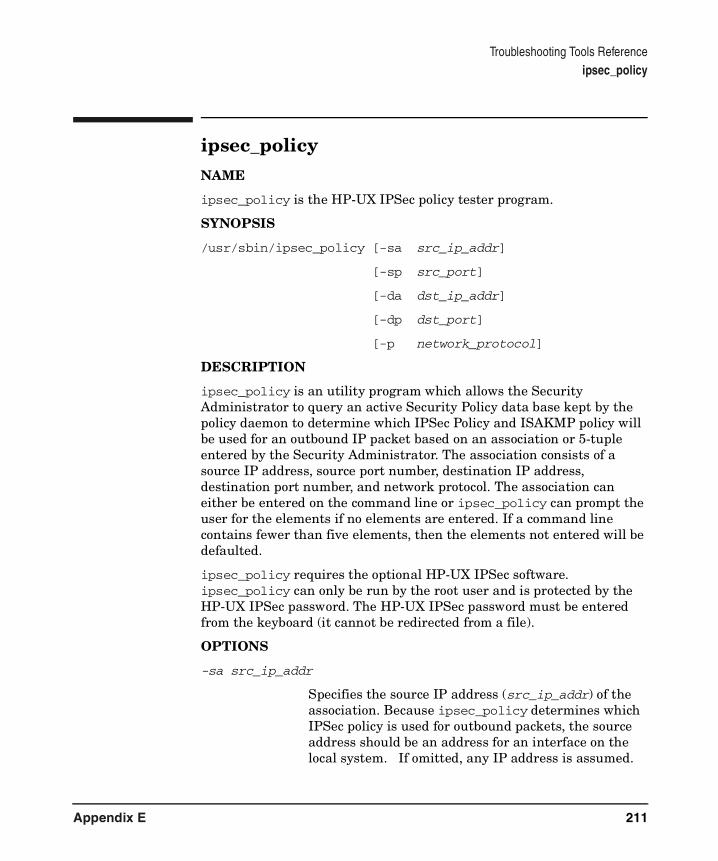
Troubleshooting Tools Referenceipsec_policy
ipsec_policy NAME
ipsec_policy is the HP-UX IPSec policy tester program.
SYNOPSIS
/usr/sbin/ipsec_policy [-sa src_ip_addr]
[-sp src_port]
[-da dst_ip_addr]
[-dp dst_port]
[-p network_protocol]
DESCRIPTION
ipsec_policy is an utility program which allows the Security Administrator to query an active Security Policy data base kept by the policy daemon to determine which IPSec Policy and ISAKMP policy will be used for an outbound IP packet based on an association or 5-tuple entered by the Security Administrator. The association consists of a source IP address, source port number, destination IP address, destination port number, and network protocol. The association can either be entered on the command line or ipsec_policy can prompt the user for the elements if no elements are entered. If a command line contains fewer than five elements, then the elements not entered will be defaulted.
ipsec_policy requires the optional HP-UX IPSec software. ipsec_policy can only be run by the root user and is protected by the HP-UX IPSec password. The HP-UX IPSec password must be entered from the keyboard (it cannot be redirected from a file).
OPTIONS
-sa src_ip_addr
Specifies the source IP address (src_ip_addr) of the association. Because ipsec_policy determines which IPSec policy is used for outbound packets, the source address should be an address for an interface on the local system. If omitted, any IP address is assumed.
Appendix E 211

Troubleshooting Tools Referenceipsec_policy
-sp src_port Specifies the source port number (src_port) of the association. src_port must be an unsigned number in the range from 1 to 65535. If omitted, any port number is assumed.
If you are making a query for an outbound client-server application where the client port number can be any user-space port, such as telnet, you may want to specify a dummy user-space port number for the source port such as 1024.
-da dst_ip_addr
Specifies the destination IP address (dst_ip_addr) of the association. If omitted, any IP address is assumed.
If you are making a query for an outbound client-server application where the client port number can be any user-space port (such as telnet), you may want to specify a dummy user-space port number for the destination port such as 1024.
-dp dst_port Specifies the destination IP address (dst_port) of the association. dst_port must be an unsigned number in the range from 1 to 65535. If omitted, any port number is assumed.
If you are making a query for an outbound client-server application where the client port number can be any user-space port, such as telnet, you may want to specify a dummy user-space port number for the source port such as 1024.
-p network_protocol
Specifies the network protocol of the association. Valid values for network_protocol are TCP, UDP, ICMP, or IGMP. If omitted, any network protocol is assumed.
EXAMPLES
1. On system A (15.1.1.1), you want to determine which policy will be used for outbound telnet traffic to system B (15.2.2.2) or when local users telnet to system B. Since the telnet clients on system A will use any unused user-space TCP port and the telnet daemons on system B will use TCP port 23, you would use the following command:
Appendix E212
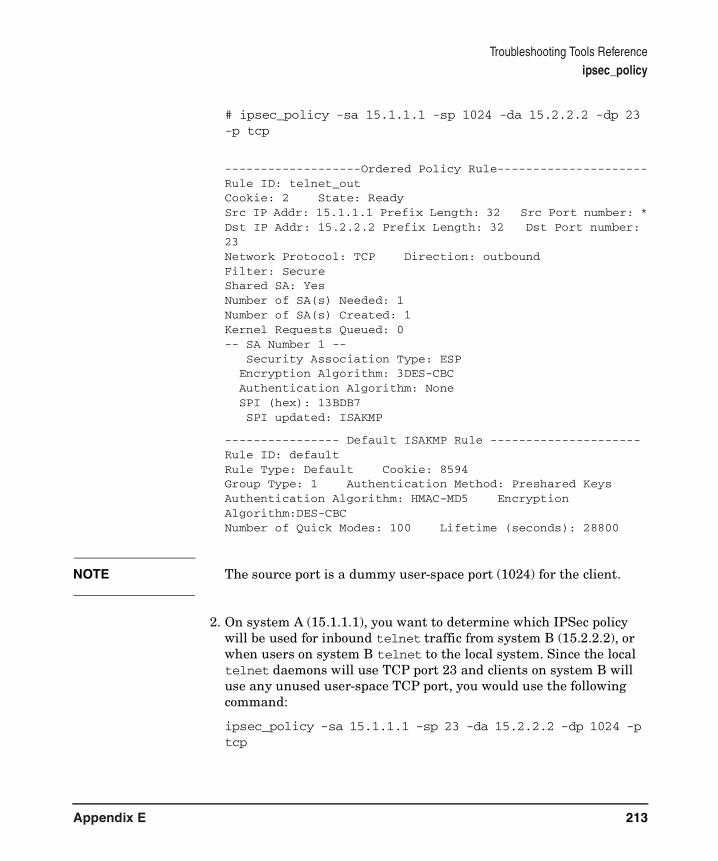
Troubleshooting Tools Referenceipsec_policy
# ipsec_policy -sa 15.1.1.1 -sp 1024 -da 15.2.2.2 -dp 23 -p tcp
-------------------Ordered Policy Rule---------------------Rule ID: telnet_outCookie: 2 State: ReadySrc IP Addr: 15.1.1.1 Prefix Length: 32 Src Port number: *Dst IP Addr: 15.2.2.2 Prefix Length: 32 Dst Port number: 23Network Protocol: TCP Direction: outboundFilter: SecureShared SA: YesNumber of SA(s) Needed: 1Number of SA(s) Created: 1Kernel Requests Queued: 0-- SA Number 1 -- Security Association Type: ESP Encryption Algorithm: 3DES-CBC Authentication Algorithm: None SPI (hex): 13BDB7 SPI updated: ISAKMP
---------------- Default ISAKMP Rule ---------------------Rule ID: defaultRule Type: Default Cookie: 8594Group Type: 1 Authentication Method: Preshared KeysAuthentication Algorithm: HMAC-MD5 Encryption Algorithm:DES-CBCNumber of Quick Modes: 100 Lifetime (seconds): 28800
NOTE The source port is a dummy user-space port (1024) for the client.
2. On system A (15.1.1.1), you want to determine which IPSec policy will be used for inbound telnet traffic from system B (15.2.2.2), or when users on system B telnet to the local system. Since the local telnet daemons will use TCP port 23 and clients on system B will use any unused user-space TCP port, you would use the following command:
ipsec_policy -sa 15.1.1.1 -sp 23 -da 15.2.2.2 -dp 1024 -p tcp
Appendix E 213
Troubleshooting Tools Referenceipsec_policy
NOTE Since ipsec_policy determines the policy used for outbound packets, the query is formulated for replies from system A to system B. The source address is 15.1.1.1. The destination port is a dummy user-space port (1024) for the client.
Appendix E214

Glossary
3DES Triple Data Encryption Standard. Uses a 168-bit key for symmetric key block encryption. It is suitable for encrypting large amounts of data. Last certified by the US government (NIST) as a standard in 1999. It must be re-certified every 5 years.
AES Advanced Encryption Standard. Uses a symmetric key block encryption. HP-UX IPSec supports AES with a 128-bit key. AES is suitable for encrypting large amounts of data. Last certified by the US government (NIST) as a standard in 2001. It must be re-certified every 5 years.
AH See Authentication Header
Authentication Header (AH) The AH provides data integrity, system-level authentication and can provide anti-replay protection.
Authentication The process of verifying a user's identity or integrity of data, or the identity of the party that sent data.
Asymmetric keys, public/private keys
Based on cryptography algorithms where data can be encrypted with a public key but only decrypted with the corresponding private key. In addition, data encrypted by a private key can be decrypted with the corresponding public key with the assurance that only the given private key could have encrypted the data.
CA See Certificate Authority
Certificate A security certificate associates (or binds) a public key with a principal--a particular person, device, or other entity. The security certificate is issued by an entity, in whom users have put their trust, called a certificate authority (CA) that guarantees or
confirms the identity of the holder (person, device, or other entity) of the corresponding private key. The CA digitally signs the certificate with the CA’s private key, so the certificate can be verified using the CA’s public key.
The format for public-key certificates is defined by the International Organization for Standardization (ISO) X.509 standard, Version 3.
Certificate Authority (CA) Certificate authority is a trusted third party that authenticates users and issues certificates. In addition to establishing trust in the binding between a user’s public key and other security-related information in a certificate, the CA digitally signs the certificate information using its private key.
Certificate Revocation List (CRL)
Certificates are issued with a specific lifetime, defined by a start date/time and an expiration date/time. However, situations can arise, such as a compromised key value, that necessitate the revocation of the certificate. In this case, the certificate authority can revoke the certificate. This is accomplished by including the certificate’s serial number on a Certificate Revocation List (CRL) updated and published on a regular basis by the CA and made available to certificate users.
CRL: See Certificate Revocation List
DES Data Encryption Standard. Uses a 56-bit key for symmetric key block encryption. It is suitable for encrypting large amounts of data. Last certified by the US government (NIST) as a standard in 1999. It must be re-certified every 5 years.
Glossary 215
GlossaryDiffie-Hellman
DES has been cracked (data encoded using DES has been decoded by a third party).
Diffie-Hellman Method to generate a symmetric key where two parties can publicly exchange values and generate the same symmetric key. Start with prime p and generator g, which may be publicly known (typically these numbers are from a well-known “Diffie-Hellman Group”). Each party selects a private value (a and b) and generates a public value (g**a mod p) and (g**b mod p). They exchange the public values. Each party then uses its private value and the other party's public value to generate the same symmetric key, (g**a)**b mod p and (g**b)**a mod p, which both evaluate to g**(a*b) mod p for future communication.
The Diffie-Hellman method must be combined with authentication to prevent man-in-the-middle or third party attacks (spoofing) attacks. Typically, it's combined with public/private key certificates (when sending the public value, each party signs the public value with its private key and includes a certificate).
Encryption The process of converting data from one format to another.
Encapsulating Security Payload (ESP)
The ESP provides confidentiality (encryption) and an anti-replay service. It should be used with authentication, either with the optional ESP authentication field (authenticated ESP) or nested in an Authentication Header message. Authenticated ESP also provides data origin authentication and connectionless integrity. When used in tunnel mode, ESP also provides limited traffic flow confidentiality.
ESP See Encapsulating Security Payload
Filter A term used to refer to preferences in encryption, authentication, compression and protocol etc. for a particular end-user system.
Hashed Rules The Security Policy database contains a hashed list of policy rules and an ordered list of policy rules. Entries in the hash list contain qualified selectors that can be hashed upon easily such as a source or destination address that has a single IP address without any network mask. The advantage of a hash list is that it takes less time to find an entry that matches a security policy query then if you had to search sequentially through an ordered list.
HMAC Hashed Message Authentication Code. See also MAC.
ISAKMP HP supports the Internet Security Association and Key Management Protocol (ISAKMP) in conjunction with the Oakley Key Exchange Protocol to establish an authenticated key exchange. ISAKMP defines procedures and packet formats to establish a security association between two negotiating entities.
IKE The Internet Key Exchange (IKE) protocol is used before the ESP or AH protocol exchanges to determine which encryption and/or authentication services will be used. IKE also manages the distribution and update of the symmetric (shared) encryption keys used by ESP and AH.
The IKE protocol is a hybrid of three other protocols: ISAKMP (Internet Security Association and Key Management Protocol), Oakley and SKEME. ISAKMP provides a framework for authentication and key
Glossary216
GlossaryRSA
exchange, but does not define the actual key exchange. (ISAKMP) defines most of the message format, with non-specific key-exchange information fields). The Oakley Key Determination protocol and SKEME protocol define key exchange techniques.
IPSec Policy IPSec Policies specify the rules according to which data is transferred securely. An IPSec policy needs to encapsulate transform information for both authentication and encryption.
MAC A message authentication code (MAC) is an authentication tag, also called a checksum, derived by application of an authentication scheme, together with a secret key, to a message. MACs are computed and verified with the same key so they can only be verified by the intended receiver, unlike digital signatures.
Hash function-based MACs (HMACS) use a key or keys in conjunction with a hash function to produce a checksum that is appended to the message. An example is the keyed-MD5 method of message authentication.
MACs can also be derived from block ciphers. The DES-CBC MAC is a widely used US and international standard. The basic idea is to encrypt the message blocks using DES CBC and output the final black in the ciphertext as the checksum.
MD5 (Message Digest-5). Authentication algorithm developed by RSA. MD5 generates a 128-bit message digest using a 128-bit key. IPSec truncates the message digest to 96 bits.
Oakley Oakley is a key exchange protocol which works within the ISAKMP framework to generate authenticated keying material for use with other security services.
Ordered Rules The IPSec policy database contains a hashed list of policy rules and an ordered list of policy rules. Entries in the ordered list are ordered in the way the IPSec Administrator entered them in the IPSec policy file.
Policy A generic term used to refer to methods used in authentication, encryption, and compression.
Perfect Forward Secrecy (PFS) With Perfect Forward Secrecy the exposure of one key permits access only to data protected by that key. HP-UX IPSec supports PFS for keys and identities (the IKE daemon can be configured to create a new ISAKMP/MM SA for each IPSec/QM negotiation). HP-UX IPSec does not support PFS for keys only (the ISAKMP/MM SA is re-used for multiple IPSec/QM negotiations, with a new Diffie-Hellman key exchange for each IPSec/QM negotiation).
Preshared Key An ASCII string agreed upon by two systems for encryption or authentication. HP-UX IPSec supports the use of preshared keys for IKE (Primary) authentication (authenticating the peer’s identity when generating the dynamic keys with Diffie-Hellman).
RSA (Rivest, Shamir, and Adelman) Public/private key cryptosystem that can be used for privacy (encryption) and authentication (signatures). For encryption, system A can send data encrypted with system B's public key. Only system B's private key can decrypt the data. For authentication, system A sends data with a
Glossary 217

GlossarySHA1
signature - a digest or hash encrypted with system A's private key. To verify, system B uses system A's public key to decrypt the signature and compare the decrypted hash or digest to the digest or hash that it computes for the message.
SHA1 (Secure Hash Algorithm-1). Authentication algorithm that generates a 160-bit message digest using a 160-bit key. IPSec truncates the message digest to 96 bits.
Transforms IPSec transforms are portions of IPSec polices. The transforms define the action(s) to be taken on the data, such as passing the data in clear text, discarding the data, encrypting the data using ESP, or authenticating the data using AH. They encapsulate the algorithm information needed to authenticate, encrypt and optionally compress packets during data transfer.
SA See Security Association
Security Association (SA) A secure communication channel and its parameters, such as encryption method, keys and lifetime.
Glossary218

Numerics3DES (Triple Data Encryption Standard), 9,
215configuring, 42configuring for tunnel, 52
AAdvanced Encryption Standard
See AESadvanced troubleshooting, 95AES (Advanced Encryption Standard), 9, 215
configuring, 42configuring for tunnel, 52Linux interoperability, 185
AH (Authentication Header)algorithms, 6, 183configuring, 42configuring for tunnel, 52definition, 215description, 5negotiation, 93processing, 97RFC, 135
asymmetric key, 67public/private, 215
audit file, 104, 117audit level
changing, 99, 193, 195default, 103definitions, 195setting, 59
auditing, 99, 103authenticated ESP (Encapsulating Security
Payload), 12authentication, 215
algorithms, 6, 183IKE primary, 17methods, 17with ESP (Encapsulating Security
Payload), 12Authentication Header
See AH
BBaltimore
certificate request, 80certificate worksheet, 172configuration, 78configure certificate, 81
configuring, 81CRL, 88prerequisites, 78requesting a certificate, 80
boot-up options, 59
Ccertificate, 67
authority, 70, 215Baltimore, 78configuring, 81configuring a certificate ID, 86definition, 215VeriSign OnSite, 70worksheet, 170, 172
certificate IDconfiguring, 86, 188types and values, 188
Certificate Revocation List (CRL), 68, 215Baltimore, 88retrieval, 88VeriSign, 70, 88
certificatesconfiguring IKE to use, 49definition, 67how they work, 67ID types accepted, 137IPv6 with, 137
clear text packet, 97components, 31configuration
example, 143, 154network IPSec policy with exception, 155telnet, 143
reference, 177worksheets, 25
configuration fileslocation, 34
configuration utility requirements, 23configuring
auditing, 103bootup options, 59certificates, 81GUI display requirements, 33IPSec policy, 35
overview, 32steps, 33
prerequisites, 24pre-shared keys, 56
219

services, 32transforms, 40
end-to-end tunnel, 41VeriSign certificates, 74
CRLSee Certificate Revocation List
CRON job, 88cron(1M), 88
DData Encryption Standard
See DESdefault policy, 178DES (Data Encryption Standard), 9, 215
configuring, 42configuring for tunnel, 52RFC, 135
Diffie-Hellman, 14, 15, 112, 216Diffie-Hellman group, 216
configuring, 49digital signature, 17direction specification, 182disk requirements, 23DISPLAY environment variable, 33
EEncapsulating Security Payload
See ESPencryption
algorithms, 9, 184definition, 216keys, 93Linux interoperability, 185most secure, 184
end-to-end topology, 18end-to-end tunnel
configuring IPSec transforms, 41end-to-end tunnel topology, 19end-to-gateway topology, 18ESP (Encapsulating Security Payload)
algorithms, 9, 184configuring, 42configuring for tunnel, 52definition, 216negotiation, 93processing, 97RFC, 135tunnel mode, 11with authentication, 12
exclusive flag, 178
Ffilter
configuring, 35definition, 179, 216example, 180
Ggateway-to-gateway topology, 20
Hhash
symmetric keydescription, 5
hashedlist, 95, 179rules, 216
host-based keying, 37host-to-gateway configuration, 19host-to-gateway topology
See end-to-gateway topologyhost-to-host topology
See end-to-end topology
IICMP message
common messages used, 138ICMP messages
discarding with IPv4, 138ICMPv6 messages, 139IGMP
configuration restriction, 39IKE (Internet Key Exchange)
description, 14protocol, 216public key distribution, 68RFC, 135
installingloading software, 26overview, 56prerequisites, 24verifying, 60
Internet Control Message Protocol messages. See ICMP messages
Internet Security Association and Key Management Protocol
seeinteroperability
IPFilter, 121IP
220
protocol 50 and 51 for IPSec, 126IP address
limitations in IPSec policies, 37wildcard, 37
IPFilterallowing IPSec traffic through the firewall,
125bidirectional configuration for IPSec, 124blocked traffic, 125configuration for IPSec IKE negotiation,
123debugging blocked IPSec traffic, 125IPSec gateway, 128use with IPSec, 121
IPSec, 217daemons, 101ipsec_admin, 193ipsec_policy, 211ipsec_report, 198ISAKMP, 45, 47operation, 93overview, 3RFCs, 135SA, 93Security Association, 96
IPSec Managerlaunching, 33
IPSec password, 28IPSec policy
components, 177configuring, 35
overview, 31definition, 32, 217displaying existing policies, 34exclusive flag, 177filter, 35, 179name, 177printing, 64, 106transforms, 40tunnel, 51worksheet, 163
IPSec policy fieldsconfigure policy based on service, 38exclusive, 37IP address, 37name, 36policy type, 37prefix length, 37
definition, 37
transform list, 40ipsec_admin, 28, 60, 99, 103, 193ipsec_mgr, 70
launching, 33ipsec_policy, 99, 103, 211ipsec_report, 61, 99, 101, 104, 112, 198IPv6
certificates, 71, 78documentation, 132filter configuration, 37, 178ICMPv6 messages, 139overview, 131tunnel configuration, 52
ISAKMP, 14limitations, 136policy, 45, 47policy name, 187protocol, 216RFC, 135SA, 93, 96, 102, 112
ISAKMP policydefinition, 31printing, 64, 106worksheet, 167
Kkernel
policy engine, 95SA database, 97
keyasymmetric, 67lengths, 186private, 67public, 67shared, 5, 9, 15, 17symmetric, 9
key management, 14keying, dynamic, 14
Llifetimes, 117, 185limitations
IP addresses, 37link errors, 111Linux
AES (Advanced Encryption Standard), 185encryption options, 185
loading software, 26
221
MMAC, 217manual keying, 136MD5
configuring, 42configuring for tunnel, 52RFC, 135
memory requirements, 23
Nndd, 106nested ESP (Encapsulating Security
Payload) in AH (Authentication Header), 13
nested transforms, 183netstat, 105
OOakley, 14
modes, 14protocol, 217
RFC, 135Oakley group
configuring, 49ordered
list, 179rules, 217
Ppassword
re-establishing if forgotten, 28setting, 28
patch dependencies, 24Virtual Vault, 24
Perfect Forward Secrecy, 15, 217configuring, 48restrictions, 136
PFSSee Perfect Forward Secrecy
policydefinition, 217manager daemon, 95name, 177printing, 64type, 179
port numbers, 32preshared keys, 17
configuring, 56, 64configuring IKE to use, 49
definition, 217worksheet, 169
printingIPSec policies, 64ISAKMP policies, 64policies, 64, 106
product limitations, 136ISAKMP, 136
product requirements, 23configuration utility, 23
product requirmentsdisk, 23memory, 23
proxy server, 38, 46configuration, 73
public key, 17, 67
Rreporting problems, 105RFCs, 135RSA cryptosystem, 217RSA signatures
configuring IKE to use, 49
SSA
See Security AssociationSecurity Association, 14, 62, 93, 96, 100, 218security certificates
See certificatesSecurity Parameters Index, 61, 97security policy database, 179session-based keying, 37SHA1
configuring, 42configuring for tunnel, 52RFC, 135
shared key, 5, 9shared keys, 15single-user mode, 27SKEME, 14software
loading, 26SPI
See Security Parameters Indexstatus
IPSec/9000 subsystem, 101, 193report, 60
subnetsconfiguring policies for
222
ICMP messages, 138swinstall(1M), 26swlist(1M), 24symmetric key, 9
Ttelnet
example, 143, 181, 212port number, 143
tools survey, 99topologies, 18
end-to-end, 18end-to-end tunnel, 19gateway-to-gateway, 20
topologyend-to-gateway, 18
tracingdisabling, 99enabling, 99layer 4, 102, 105, 193
transformaction, 95combination, 42configuring, 40definition, 218discard, 60ipsec operation, 94list, 117, 180pass, 60verify, 61
transform list, 182transport mode, 10
AH (Authentication Header), 6troubleshooting
advanced, 95hints, 101ipsec, 93scenarios, 101
tunnelconfiguring, 51end-to-end topology, 19transform list, 53
tunnel modeAH (Authentication Header), 8ESP (Encapsulating Security Payload), 11
UUDP
port for IPSec, 123
uname(1), 24unsupported features
lockd, 136manual keying, 136multiple destination addresses, 136NFS, 136NIS, 136PFS, 137
Vverifying the installation, 60VeriSign
certificate request, 74configuration, 71CRL, 88prerequisites, 72proxy server
configuration, 73registering the Administrator, 74
VeriSign OnSiteadmininistrator, 72and ipsec_mgr, 70architecture, 70components, 70
Virtual Vaultpatch dependencies, 24
VPNend-to-gateway topology, 18
Wweb proxy server
See proxy server, 73worksheets, 25
filling out, 25
223