CRM.Web Administrator's Guide - Version 13.2.0 - Aurea ...
888
CRM.Web Administrator's Guide Version 13.2.0
-
Upload
khangminh22 -
Category
Documents
-
view
0 -
download
0
Transcript of CRM.Web Administrator's Guide - Version 13.2.0 - Aurea ...

CRM.Web Administrator's GuideVersion 13.2.0

NoticesCopyright © 2004–2021. Aurea Software, Inc. (“Aurea”). All Rights Reserved. Thesematerials and all Aurea products are copyrighted and all r ights are reserved by Aurea.
This document is proprietary and confidential to Aurea and is available only undera valid non-disclosure agreement. No part of this document may be disclosed inany manner to a third par ty without the prior written consent of Aurea. The informationin these materials is for informational purposes only and Aurea assumes no respon-sibility for any errors that may appear therein. Aurea reserves the right to revisethis information and to make changes from time to time to the content hereof withoutobligation of Aurea to notify any person of such revisions or changes.
You are hereby placed on notice that the software, its related technology and servicesmay be covered by one or more United States (“US”) and non-US patents. A listingthat associates patented and patent-pending products included in the software,software updates, their related technology and services with one or more patentnumbers is available for you and the general public’s access at https://markings.ip-dynamics.ai/esw/ (the “Patent Notice”) without charge. The association of products-to-patent numbers at the Patent Notice may not be an exclusive listing of associa-tions, and other unlisted patents or pending patents may also be associated withthe products. Likewise, the patents or pending patents may also be associated withunlisted products. You agree to regularly review the products-to-patent number(s)association at the Patent Notice to check for updates.
Aurea and Aurea Software are registered trademarks of Aurea Software, Inc. in theUnited States and/or other countries. Additional Aurea trademarks, including regis-tered trademarks, are available at: https://www.aurea.com/legal/trademarks/. Jiveis a registered trademark of Jive Software, Inc. in the United States and/or othercountries. Additional Jive trademarks, including registered trademarks, are availableat: https://www.jivesoftware.com/legal/.
Notices

Table of Contents
Preface............................................................................................................9About this documentation.....................................................................................................................9
Notation conventions.............................................................................................................................9
Aurea global support...........................................................................................................................10
Chapter 1: Overview...................................................................................11CRM.Web Introduction........................................................................................................................11
Support.................................................................................................................................................11
CRM.Web Package.............................................................................................................................12
Customizing Aurea CRM.Web............................................................................................................13
General Information............................................................................................................................14
Access Rights...........................................................................................................................14
CRM.Server...............................................................................................................................15
Customizing Styles...................................................................................................................15
Field Names and IDs................................................................................................................17
Invalidate Cache.......................................................................................................................18
Info Area IDs.............................................................................................................................19
Link Fields and Reference Texts.............................................................................................19
Link IDs......................................................................................................................................19
Logging......................................................................................................................................22
Plug-ins......................................................................................................................................24
Syntax........................................................................................................................................25
User Settings............................................................................................................................25
Chapter 2: Configuring CRM.....................................................................27Aurea CRM.Web Administration........................................................................................................27
Application Settings..................................................................................................................28
System Configuration...............................................................................................................29
SDK............................................................................................................................................30
Reps...........................................................................................................................................31
Logins........................................................................................................................................31
Station.......................................................................................................................................32
Catalog Maintenance...............................................................................................................33
Mass Data Operations..............................................................................................................39
Import........................................................................................................................................43
Jobs & Logs..............................................................................................................................47
Field Help..................................................................................................................................50
Texts...........................................................................................................................................50

Language...................................................................................................................................52
Managing Checked Out Documents.......................................................................................52
Variables....................................................................................................................................53
CRM.Designer Maintenance....................................................................................................56
Data Model................................................................................................................................57
CRM.Designer.....................................................................................................................................60
Integration of CRM.Designer & Aurea CRM.Web..................................................................60
Using CRM.Designer................................................................................................................63
Logging Changes of CRM.Designer Items.............................................................................69
Providing the Enterprise Serial Key to CRM.Designer..........................................................72
Users and Configurations...................................................................................................................74
Configurations...........................................................................................................................74
Users | Configurations..............................................................................................................78
Web Configuration...............................................................................................................................87
Setting Values of Web Configuration Parameters..................................................................88
Parameter Types.......................................................................................................................89
Customizing Web Configuration Parameters.........................................................................90
Configuration Layouts..............................................................................................................93
Web Configuration Parameters...............................................................................................93
Languages and Texts........................................................................................................................172
Languages...............................................................................................................................173
Texts.........................................................................................................................................176
Uploading and Downloading Texts........................................................................................185
Info Area Customizations.................................................................................................................186
Field Groups...........................................................................................................................188
Table Captions........................................................................................................................265
Alternate Field Labels............................................................................................................270
Custom Field Labels and Inputs............................................................................................271
Configuring Line Breaks and Truncating Texts.....................................................................271
Custom Links..........................................................................................................................274
Link Names.............................................................................................................................274
Info Area Labels......................................................................................................................275
Virtual Info Areas....................................................................................................................275
Navigation Customizations...............................................................................................................287
Defining an Action..................................................................................................................287
Default Action..........................................................................................................................289
Menus......................................................................................................................................290
Buttons....................................................................................................................................304
Headers...................................................................................................................................321
Quick Search...........................................................................................................................346
Chapter 3: Using CRM..............................................................................350Action Templates...............................................................................................................................350
Expand....................................................................................................................................351

Search.....................................................................................................................................364
Tree..........................................................................................................................................381
JavaScript................................................................................................................................391
ShowForm...............................................................................................................................393
AnalysisEdit............................................................................................................................394
AnalysisRun............................................................................................................................395
AnalysisSelect / QuerySelect................................................................................................398
BuyingCenter..........................................................................................................................399
Calendar..................................................................................................................................402
CircleOfInfluence....................................................................................................................403
CreateRelation........................................................................................................................408
DayWeekPlanning..................................................................................................................410
DefaultValue............................................................................................................................415
DispatchingDashboard...........................................................................................................416
ExecuteReport........................................................................................................................423
HierarchicalCatalogTreeView................................................................................................424
HierarchicalCircleOfInfluence................................................................................................426
HierarchicalSerialEntry..........................................................................................................427
MailMerge................................................................................................................................430
MarketingCalendar.................................................................................................................432
Message..................................................................................................................................434
NewSiblingRecord..................................................................................................................434
QueryReport...........................................................................................................................436
QueryRun................................................................................................................................441
RedirectPage..........................................................................................................................444
RelationTreeView....................................................................................................................446
ResourcesView.......................................................................................................................448
SearchPhoneEmail.................................................................................................................453
SerialEntry..............................................................................................................................454
Timeline...................................................................................................................................475
Trigger......................................................................................................................................475
URL..........................................................................................................................................479
VisitPlanning...........................................................................................................................479
Workflow..................................................................................................................................485
Filter | Query | Analysis....................................................................................................................487
Filters.......................................................................................................................................488
Format Types for Queries and Analyses..............................................................................492
Queries....................................................................................................................................493
Advanced Filter Criteria.........................................................................................................504
Dynamic Filters.......................................................................................................................509
Analyses..................................................................................................................................513
Timelines.................................................................................................................................538
Key Performance Indicators (Aurea Enterprise)..................................................................543
Chart Types.............................................................................................................................545
Processes..........................................................................................................................................547

Process Elements...................................................................................................................548
Designing a Process..............................................................................................................572
Calling a Process....................................................................................................................575
Cancelling a Process.............................................................................................................575
Action Templates within Processes.......................................................................................576
Process Ask Configuration....................................................................................................582
Standard Process Steps........................................................................................................590
Examples.................................................................................................................................591
Forms.................................................................................................................................................621
Form Designer........................................................................................................................622
Defining a Header/Title for a Form.......................................................................................630
Displaying the Total Number of Result Records in a List View...........................................631
Testing Your Forms.................................................................................................................631
Displaying Forms in Aurea CRM.Web..................................................................................632
Dashboards.............................................................................................................................632
LiveTile Widget.......................................................................................................................635
Showing/Hiding the Default Text of DateInput Widget.........................................................635
Enterprise Features..........................................................................................................................636
Aurea CRM Add-in for Microsoft Word.................................................................................637
Cloud Backup Service............................................................................................................642
Change Notifications Service................................................................................................654
Google Analytics Integration.................................................................................................658
Aurea Campaign Manager (formerly Lyris HQ) Integration................................................669
Launching Fat Clients Using Aurea CRM.............................................................................687
Channels Output Cache Framework.....................................................................................691
KPI Definition (Enterprise CRM)...........................................................................................701
Packages............................................................................................................................................711
Defining a Package................................................................................................................712
1-Click Package Management...............................................................................................714
Transferring Packages............................................................................................................715
Administration....................................................................................................................................717
Images.....................................................................................................................................717
Catalogs..................................................................................................................................720
Roles & CRM Processes.......................................................................................................727
Delete Units............................................................................................................................738
Consistency Check.................................................................................................................742
Configuration Validator...........................................................................................................744
Compare Field Controls.........................................................................................................746
Authentication.........................................................................................................................748
Settings...................................................................................................................................750
Chapter 4: Other Programs and Functions...........................................752Affiliation View...................................................................................................................................752
Configuration Units.................................................................................................................754

Alternative Condition for Affiliation View..............................................................................757
Campaign Graph...............................................................................................................................758
Creating/Updating Records From email Signatures/Websites......................................................758
Configuration Units.................................................................................................................759
CRM.bulkloader.................................................................................................................................760
Downloading Configuration Data from the CRM.Designer Database................................761
Uploading Configuration Data to the CRM.Designer Database.........................................764
Maintenance............................................................................................................................768
Data Model, CRM Processes, Roles and Catalogs.............................................................772
Data Model References.........................................................................................................779
Aurea CRM Data Model Upgrade Implications on Synchronized Catalogs.......................781
CRM.bulkloader Command Line Parameters.......................................................................782
Bulkloader Database configuration settings........................................................................791
CRM.launcher(Enterprise)................................................................................................................793
Installing CRM.launcher.........................................................................................................793
Configuring the CRM.launcher..............................................................................................808
CRM.launcher Logging and Debugging Reports.................................................................816
Troubleshooting CRM.launcher issues.................................................................................817
Communication with Aurea CRM.Web..................................................................................820
CRM.launcher communication with CRM.phone plugin......................................................822
CRM.launcher communication with Document plugin.........................................................822
CRM.launcher Languages.....................................................................................................823
CRM.Phone........................................................................................................................................824
Displaying a Record's History..........................................................................................................824
Displaying Bing Maps in Related Areas and Forms.......................................................................826
Configuring a Map Panel.......................................................................................................828
Documents.........................................................................................................................................829
Access Rights.........................................................................................................................829
Configuring MIME Types........................................................................................................830
Uploading Documents............................................................................................................830
Document fields......................................................................................................................831
Document Check-Out/-In.......................................................................................................832
Context Menus and Menu Actions........................................................................................833
emails.................................................................................................................................................835
Send As email.........................................................................................................................835
Notify Rep...............................................................................................................................837
email Reply.............................................................................................................................839
External Address Check...................................................................................................................840
Favorites.............................................................................................................................................842
Letters & Mail Merge.........................................................................................................................843
Mail Merge Configuration.......................................................................................................844
Quick Campaigns...................................................................................................................845
Mail Merge Letters Based on Marketing Activities..............................................................849
File Name Variables...............................................................................................................850
Document Caching & Performance Considerations............................................................852

Merging Companies and Persons....................................................................................................852
Merging Properties (BTB only)........................................................................................................854
Refreshing Data after C(R)UD Events............................................................................................854
Support for Database Transactions.................................................................................................855
Tuning the Performance of the Notification Engine........................................................................856
XML Exports & Reporting.................................................................................................................856
XML Output.............................................................................................................................857
Export Options........................................................................................................................858
XSL Transformations..............................................................................................................862
Creating Aurea CRM win Reports in Aurea CRM.Web.......................................................863
Customer Admin Mode.....................................................................................................................865
Creating SelfAdmin Configurations.......................................................................................868
Defining and Assigning a Customer Admin Role.................................................................870
EditDetailsControl...................................................................................................................871
Base Customizing.............................................................................................................................873
Extending Field/Header Groups Defined in Base................................................................875
Virtual Info Areas & Core Customizing.................................................................................876
Appendix A: Data Types in Aurea CRM..................................................877
Appendix B: Effectiveness of Rights and Configuration Changes...878
Appendix C: AQL – Aurea Query Language.........................................881AQL Syntax........................................................................................................................................882
Example.............................................................................................................................................884
Filtering by Catalog Values...............................................................................................................885
Appendix D: URL Parameters..................................................................887

PrefaceFor details, see the following topics:
• About this documentation
• Notation conventions
• Aurea global support
About this documentationThis guide is par t of the documentation set for Aurea CRM.
Notation conventionsThis document uses the following notation conventions:
MeaningConvention
Fixed-width font indicates code, path names, file names, envi-ronment variable names, parameter names, command names,machine names, URLs.
Fixed-width
Bold Fixed-width font is used to indicate user input or toemphasize cer tain lines of code.
Bold Fixed-width
Italic Fixed-width font indicates a placeholder for which youmust supply a value.
Italic Fixed-width
Bold sans serif typeface indicates the names of graphic userinterface elements such as dialog boxes, buttons, and fields.
Bold Sans serif
In text, italic serif typeface indicates the first use of an impor-tant term. The term is defined in the glossary.
Italic serif
Underlined text in command lines and parameter descriptionsindicate that you only have to enter the underlined part of thecommand or parameter name. For example, if you usethe-LOGFILE parameter in a command, you only need to enter-LOGF.
Underlined
Brackets enclose optional arguments.[ ]
Braces enclose two or more items. You can specify only oneof the enclosed items. Vertical bars represent OR separators.For example, you can specify a or b or c.
{ a | b | c }
9AUREA CONFIDENTIAL

MeaningConvention
Three consecutive periods indicate that you can repeat theimmediately previous item. In code examples, they can behorizontal or ver tical to indicate omissions.
...
An angle bracket between two menu items indicates that youshould choose an item from a menu. For example, the notationFile > > Exit means: "Open the File menu and choose Exit."
Menu > Choice
Links to related information in other chapters or documents areindicated using the >> symbol.
>>
Aurea global supportIf you encounter a problem while using an Aurea product or require assistance withdownloading the software or upgrading a product release, please open a ticket onAurea Support Central. Preferably, search the ar ticles on the Aurea KnowledgeBase for solutions to your issues before opening a ticket.
Information about the support organization is available on Support Central, as arethe Support Guide and Escalation Guide. The product documentation, other product-related information, and setup files are also available on Support Central.
For information about purchasing an upgrade or professional services, contact youraccount executive. If you do not know who your account executive is, or for otherqueries, contact us through our website.
10AUREA CONFIDENTIAL
Preface

1OverviewCustomer Relationship Management provides you with a comprehensive CRMexperience from the initial contact with the client to offering optimal support andtargeted services.
CRM.Web IntroductionAurea Customer Relationship Management is a CRM solution with end-to-endcapabilities for sales and marketing.
Aurea CRM creates a one-stop-shop that delivers a compact overview of team ac-tivities, sales pipelines, and key performance indicators so you can set prioritiesand make informed decisions.
CRM.Web is the administration platform that allows users to design, manage, andcontrol the CRM solution from a single interface.
Our business solutions cater to the demands of businesses of all sizes, providingservices to both small departments and multinational corporations. All marketing,sales, and service processes are depicted in the system, helping you provide yourclients with a comprehensive CRM experience from the initial contact with a clientto offering optimal support and targeted services.
Aurea CRM can be deployed without any programming knowledge and configuredto meet your internal processes.
For more information about Aurea CRM, see the product documentation in AureaSupport Central. While planning for an installation or upgrade of Aurea CRM, referto the system requirements.
For any upgrade or purchase inquiries, please consult your account executive.
SupportContact the Aurea Support Center by opening a call on our web site if you encounterany problems with Aurea CRM products that you cannot solve or want to report apotential bug.
Feature requests and consulting services are not par t of the services provided bythe Support Center; ideas for new features can be submitted at http://support.au-rea.com/, consulting requests is forwarded to the respective department for process-ing, and is invoiced accordingly.
11AUREA CONFIDENTIAL

Support Center
email: email:[email protected]
Web site: https://support.aurea.com
When opening a call, ensure to include the following information:
• A precise description of the problem (including screenshots, log files or otherinformation that helps understand and reproduce the problem).
• Information on the version of Aurea CRM you are using and any patches you haveapplied, as well as information on any add-ons.
• Information on your Aurea CRM version can be found in the About Box or in theSystem information (Patch Info link). This information is also stored in therespective installation directories in the file <product>_Patch_History.txt.
A more detailed description of what information should be provided when openinga call can be found directly in the Call Management area of the web site.
CRM.Web PackageThe CRM suite brings you add-ons and other extensions to enhance its capabilities.In this topic, there is a list of all available components.
Your Aurea CRM.Web package contains:
• Aurea CRM.Web
• SQL scripts to create or upgrade a CRM.Designer database
• CRM.Designer
• The out-of-the-box configuration of Aurea CRM.Web consisting of XML files thatcontain the default designer configuration ("UPDATE_DEFAULT") andCRM.Bulkloader used to upload the contents of these files to the CRM.Designerdatabase.
This manual covers the following:
• Administrator functions in Aurea CRM.Web
• Description of CRM.Designer functionality and usage
• Customization of Aurea CRM.Web using CRM.Designer
Additional information is provided in the following manuals:
• For details on installing Aurea CRM.Web and CRM.Designer, see Aurea CRM.WebInstallation Guide.
• For information on the user interface and underlying functionality of AureaCRM.Web, see Aurea CRM.Interface Administrator Guide.
• For details on the Aurea CRM business logic, see Aurea CRM.Web BusinessLogic User Guide for your ver tical.
12AUREA CONFIDENTIAL
Chapter 1: Overview

• For information on CRM.Phone, see CRM.Phone Administrator Guide.
• The administration and configuration of core functions are described in theCRM.Core Administrator Guide.
• For details on the meaning and functionality of specific database fields, refer tothe field help.
• For information about client and server-side programming concepts.
Information on the structure of the Aurea CRM database (tables, fields, indices,etc.) can be found in the Data Model (in the Aurea CRM.Win Maintenance module).You can also output the database structure as text or XML files. For fur ther informa-tion see mmba.exe Parameters in the CRM.Core Administrator Guide.
All available documentation can be found on the Aurea CRM support page athttps://support.aurea.com
If not mentioned otherwise, all examples in this manual apply to the BTB vertical.
Customizing Aurea CRM.WebAurea CRM.Web allows administrators to customize and extend the functionalitiesof CRM.Web to adapt to the differences in uses and processes of your par ticularorganization.
There are different ways to implement customization:
• Customize the application using CRM.Designer. For fur ther information,see CRM.Designer on page 60.
• Extend the client functionality by adding JavaScript code.
• Extend the server-side framework of Aurea CRM.Web.
• Customize Aurea CRM's core functionality by editing or extending the Aurea CRMdata model, defining access rights and defining triggers and background workflows.For fur ther information, consult the CRM.Core Administrator Guide.
Using triggers and workflows has the advantage that less add-on programmingis required and that triggers and workflows are automatically migrated from oneversion to the next.
The order of these methods reflects the complexity of using them. While it is rathersimple to use CRM.Designer to customize the application, there may be advancedfeatures that cannot be implemented with this tool. To implement such features youmay have to use JavaScript code.
13AUREA CONFIDENTIAL
Customizing Aurea CRM.Web

For information on more advanced customizations, e.g., adding .ASPX pages withserver-side code, extending the underlying data model by adding complex vir tuallinks or custom fields, or transferring data from the server to the client in a way thatis not supported out-of-the-box, see the Aurea CRM.Web Developer Guide. In addi-tion, you can extend the server's business logic via add-on programming in C# orany other .NET programming language.
General InformationThe following chapters contain information that you should keep in mind whileworking with Aurea CRM.Web and CRM.Designer.
Access RightsUse access rights to control permissions for users.
CRM.Web offers administrator a detailed control over which parameters and config-urations user have the right to modify or not. Access right help to define differentpermissions to different groups inside your organization such as managers, admin-istrator, supervisors, sales representatives, etc. The same permissions can be givento external business partners to whom you may grant access to CRM.Web.
Changes to access rights defined in the Aurea CRM.Win Rights module are onlyapplied after refreshing the application using the Settings > Invalidate Cache .For fur ther information, consult Effectiveness of Rights and Configuration Changeson page 878.
Access rights defined in the Aurea CRM.Win Rights module do not apply toCRM.Designer.
The I9 info area is used to save the user's roaming settings and is required by AureaCRM.Web. Do not lock I9 or set it to read-only. Denying access to the Company FIinfo area also locks the I9 info area. For fur ther information, see User Settings onpage 25 section.
When the I9 info area is locked, a user cannot loggin into Aurea CRM.Web as illus-trated in the screenshot below:
14AUREA CONFIDENTIAL
Chapter 1: Overview

To provide login access to CRM.Web for a user, while denying access to the FI in-foarea, you should detach Company info area from the Implicit Rights settings ofWWW Interest Configuration (II) and WWW Interest (I9) info areas. See thescreenshot below.
For more information on access rights, see the chapter Defining Access Rights inthe CRM.Core Administrator Guide.
CRM.ServerAurea CRM.Web uses CRM.Server for background operations like calculations,executing marketing activities, mass data operations, stock-taking, and forasynchronously processing background queries.
For CRM.Server to work for Aurea CRM.Web, you need to specify the rep ID of theCRM.Server user in the UpdateServer.RepID Web Configuration parameter. Forfur ther information see UpdateServer.RepID. CRM.Web then creates To-dos tasksfor background processing for this rep.
For details on setting up CRM.Server, see the CRM.Server section in the CRM.CoreAdministrator Guide.
Customizing StylesYou can customize the look of Aurea CRM.Web such as color scheme, fonts etc.by creating new CSS files stylesheet.
The out-of-the-box style is called update and consists of the following files:
..\styles\update.theme\*.css containing constants like color scheme, fontsetc.
..\styles\update\*.css
..\images\update\*.png
The CSS files for pages and widgets are imported into the main CSS file using the@import rule:
15AUREA CONFIDENTIAL
General Information

@import url(" ../update/update.css ");
Note: Do not modify the CSS files delivered by Aurea software since these filesmay be replaced by newer versions when installing e.g. a hotfix.
The CSS files are automatically compiled and compressed whenever a CSS filechanges. You can force the update by deleting the contents of the folder..\styles\.compiled.
To apply your custom style to Aurea CRM.Web, set the Style Web Configurationparameter. For fur ther information see Style.
You can set the color of the CRM.Web page header by setting the CSS propertyu8-color-brand to the required value. If you are using custom CSS setup, you canuse this property in your CSS file to override the default page header color. Forexample, to get a blue color in the page header, you can set the following values:
!u8-color-accent = #6C97CE;
!u8-color-brand = !u8-color-accent
The resulting page header would look like this:
For details on creating custom styles and themes, CSS sprites, and how to changethe color coding of calendar items contact the Aurea Support Portal at https://sup-port.aurea.com.
Aurea CRM.Web on Tablet Devices
An additional derived theme update.touchable.theme allows Aurea CRM.Web to beused on tablets devices. It contains larger user interface elements, more spacing,etc.
If you already use your custom theme, use the following naming convention to createa custom touchable theme from it. Create a derived theme in the folder “..\styles”using the naming convention <standard theme>.touchable.theme. For example,mycustom.touchable.theme.
16AUREA CONFIDENTIAL
Chapter 1: Overview

The touchable theme does not necessarily need to contain a complete set of CSSfiles. Instead, create a new constants.css containing different constants formargins and spacing, etc. Refer to ..\styles\update.touchable.theme forexamples.
The touchable theme is automatically used on tablet devices, i.e., you do not needto set it via the Style Web Configuration parameter. If no <standardtheme>.touchable style is available, <standard theme> is used as a fallback.
For devices supporting both mouse and touch gestures, users can choose whichtheme to use via the dynamic menu item D_ToggleTouchableTheme (Use touch layout)in $System. If no touchable style is found, D_ToggleTouchableTheme is not displayed.The user's selection is stored in the local settings. For fur ther information see UserSettings on page 25.
Alternatively you can set the theme via URL parameter:
http://<my web address>/crm/start?theme=update.touchable
Field Names and IDsSet Fields Names and IDs to identify fields in the CRM database.
The fields in the Aurea CRM database are identified by the following numbers/IDs:
UsageDescriptionXML Out-put
NoneSequential field numberingin the data model
fnrField num-ber
Used to reference fields inCRM.Designer: All AureaCRM.Web and CRM.Designerwidgets containing a field selec-tion display the ver tical-specificunique field IDs.
vertical-specific uniquefield ID
fidField ID
Used for template development(base template)
Base field IDcidBase fieldID
When specifying fields, as in a parameter definition, you can either enter the uniquefield ID or the XML name. The XML name is vertical-independent.
Note: Aurea recommends using XML names.
17AUREA CONFIDENTIAL
General Information

Wherever JSON or JavaScript is used, you need to enclose strings in single ordouble quotes, e.g., {property1: "value"}. In JSON, property names need to beenclosed in quotes as well, e.g. {"property1": "value"}. Therefore when referencingXML names in JavaScript expressions, you should always enclose them in doublequotes.
To output field IDs and XML names:
• In CRM.Designer the Field Control Editor displays both XML name and ID for theselected field. For additional information, see Field Attributes on page 221.
• Star t mmba.exe with the parameters --writedbstr --xmlfieldnames. For fur therinformation, check the mmba.exe parameters in the CRM.Core AdministratorGuide.
The mm_dbstr.txt file in the ..\system\db folder lists all info areas and theirfields. For example:
2 ; Last Name; FName; character; 80; ; ; ; ; LastName
• The XML name of the Last name field in KP is "LastName".
• The field ID of this field is "2".
• Alternatively, look up this information in the data model. Open Aurea CRM.Winand go to theMaintenance module). To display XML names, select the desiredinfo area and click in the Text column. Select Display resource texts from thecontext menu on the Texts page.
Note: When adding fields or creating new info areas, make sure you enter XMLnames for your fields. For fur ther information, see the Data Model in the CRM.CoreAdministrator Guide.
Invalidate CacheInvalidating cache ensures that all configuration units cached on the server areremoved. The next time a client requests a configuration unit, the most recent versionis available.
Modifications of configuration units are not immediately visible to web clients. Forfur ther informatin see Integration of CRM.Designer & Aurea CRM.Web on page 60.
To ensure that all clients get the current content:
1. Go to the the Settings menu (ID_NET_SERVICES).
2. Select the menu item Invalidate Cache (ID_NET_INVALIDATECACHE).
Note: Since action parameters are saved in the URL, you need to re-execute theaction after invalidating the cache to make sure all your changes are applied.
18AUREA CONFIDENTIAL
Chapter 1: Overview

Note: Because Invalidate Cache is a very expensive operation on the server,access to it has been restricted via the CRM Process Configuration (in the AureaCRM win Rights module): ID_NET_INVALIDATECACHE is available for the SU and userswho have access to the CRM process 1.5.1.101. "Web Administration" (CRM processID 50050040). This CRM process is disabled by default.
Info Area IDsInfo areas are identified by their 2 or 4 letter ID.
To identify info areas:
• For info areas defined in the Aurea CRM data model e.g. FI, KP, C001 etc. seeData Model in the CRM.Core Administrator Guide.
• VXXX for vir tual info areas, see the Vir tual Info Areas on page 275.
Link Fields and Reference TextsUse the configuration to define custom reference texts.
Wherever a record contains a link to another record, the link field contains therecord's reference text. You can define custom reference texts in the Configurationinfo area MC Data Model category, Reference Text option. For additional informa-tion, see Configuration Info Area in the CRM.Core Administrator Guide.
Link IDsCreate relationships between different Info Area with multiple links.
In Aurea CRM's generic data model, it is possible to define multiple links betweentwo info areas. For Example, you can link two different persons to one project, asthe project leader and the project assistant.
Numeric IDs identify links. The first link to an info area always has link ID zero: thisis the default link. Additional links to the same info area (DUPLICATE), have ID 1,ID 2, etc.
19AUREA CONFIDENTIAL
General Information

You can find the number ranges for link IDs based on their type and context. See Link IDs in the CRM.Core Administrator Guide.
To identify the correct link when e.g. creating a query in CRM.Designer, you needto specify the link ID. For fur ther information, see Specifying Link IDs on page 20.
To prevent users from selecting the wrong link (e.g. in the Modify List Fields dialog),you can define meaningful Link Names to be displayed in Aurea CRM.Web insteadof the numeric link IDs. For additional information, see Link Names on page 274.
Specifying Link IDsCRM.Web allows you to specify Link IDs using CRM.Designer.
You may need to specify the link ID in CRM.Designer when configuring the followingunits:
• Expand configurations (Parent Relations and Breadcrumb Parent). See ExpandConfiguration on page 352
• Field groups (Add Linked Fields functionality). See Add Linked Fields on page216
• SearchSubList and ExpandChildren headers (when configuring the sub-info areas).See Related Data area (Header Info Areas) on page 329
Note: If you configure sub-lists for an info area that is linked to the parent via ageneric link. For example, the Document Links (D3), To-Do (TD) or Messages(MD) info areas, you always have to specify the link ID 127.
• Query definition (adding info areas). See Defining Queries on page 496
• Table captions (when using linked fields). See Configuring a Table Caption onpage 266
• Timelines. See Configuring a Timeline on page 540
• TreeView configurations (parent link selection). See TreeView Configuration onpage 381
• Linked Records in a Process Ask configuration. See Process Ask Configurationon page 582. (In this case you need to enter the link ID using $LINK, e.g.,$Link[KP:1]. See Link Names in JavaScript on page 22.)
Note: You only need to specify the link ID if you want to use another than thedefault link.
To specify a link ID:
1. Check LinkID.
2. Select the desired link from the drop-down list.
20AUREA CONFIDENTIAL
Chapter 1: Overview
If both the source and the destination info area are known, only the allowed Link-IDs between these two info areas are displayed in a drop-down list.
Most pages offer a toggle option to select a link ID or manually enter it: Either
Text/Selection links or (text input)/ (catalog input) icons (see examples be-low).
Note: The text and selection fields are not bound to each other. Therefore, makesure you clear the value/selection before switching to the other input method toavoid saving an undesired link ID.
Note: If no context is available when defining a configuration unit (e.g., a timeline),you need to manually enter the link ID. See Link IDs on page 19.
Examples
• Adding an info area to a query using another than the default link:
Click on the Text link to enter a link ID manually:
• Adding a linked field to the table caption KM:
Click to enter a link ID manually:
21AUREA CONFIDENTIAL
General Information

Link Names in JavaScriptWhen using Javascript, you need specific parameters to identify link relations.
To specify link relations in JavaScript, use the following parameters:
• $Parent: Reads the parent record.
• $Children: Reads all child records. Specify $Children[<infoAreaID] to determinefrom which info area the child records are read, e.g., $Children[Y2] gets theopportunity par ticipants linked to an opportunity.
• $Link: Specifies the link to be used, e.g., $Link[KP:1] reads all person recordslinked via the link with ID 1.
• $RelatedCompany/$RelatedPerson/$RelatedHuman: Reads the target FI/KP/PErecord for a relationship record. Example in UPDATE_DEFAULT: The menu actionA_GotoRelatedPerson in M_Relationship_TreeView is used to access a related KPrecord from a relationship record.
• $GenericLink
• $CustomLink
• $CurrentRep
LoggingLog files are an essential source of information when troubleshooting issues orauditing the system for specific functionalities.
By default, the server logs are written to the following files:
• CRM.Designer: ..\web.data\log\designer.log
• Aurea CRM.Web: ..\web.data\log\web.log
For details on logging on the server, see Server Log in the Aurea CRM.Web Instal-lation Guide.
Client LogUse the client log to troubleshoot issues with CRM.Web and to create bug reports.
Star t Aurea CRM.Web or CRM.Designer with the URL parameter ?debug to displaythe client log.
Use CTRL+F to search the log.
Filtering the Client Log
You can filter entries in the client log by selecting Log > Filter.
22AUREA CONFIDENTIAL
Chapter 1: Overview

Click Apply Filter to apply your filter. Click Clear Filter to reset.
Syntax:
+<facility name> or -<facility name> (separate multiple expressions by comma)
You can identify the available facilities via the tooltips that are displayed on mouse-over the time entry at the beginning of each line.
Examples:
+process
The client log displays only process-related entries.
-process
The client log displays everything except process-related entries.
+process, +notifications
The client log displays process-related entries and notifications.
<300
Defines the log level. Only errors and warnings are visible in the client log. Use thefollowing numeric values for log levels: error = 100, warning = 200, notice = 250,informational = 300.
Adding Screenshots and Comments
You can insert screenshots and comments into the client log. Click on the elementfor which you want to inser t a screenshot or comment. A horizontal dashed line isdisplayed.
To insert screenshots:
1. Create screenshots and save them. Supported formats: PNG, JPG, BMP, etc. -all formats supported by your browser.
2. Drag one or more screenshots onto the client log window.
23AUREA CONFIDENTIAL
General Information

Alternatively, when using Google Chrome, you can paste an image from the clip-board using Crtl+V.
To add a comment:
1. Click View > Comments.
2. Enter the comment in the Comment field.
3. Click Add Comment.
The screenshot/comment is inser ted at the dashed line. Comments are marked ***Begin/End Comment ***. If you did not select any element in the log, the screen-shot/comment is inser ted at the end of the client log.
To search for comments:
1. Enter +comment as filter expression.
To remove screenshots and comments:
1. Click the (Delete) icon displayed for the element on mouse-over.
Creating a Bug Report
To include information from the client log when submitting support calls:
1. Click Report Bug! to create a bug report containing the log (with your screenshotsand comments) as a download.
Attach this file to your support call.
Plug-insCRM.Web uses plug-ins to communicate with third-party applications.
Aurea CRM.Web needs to communicate with applications outside the browsersandbox for some of its functions. For example, MS Office and CRM.Phone. UseCRM.Launcher and/or plug-ins to provide functionalities specific to the externalapplication. Some functionalities are listed below:
• Document check-in/-out, editing and mail merge functions for MS Word.
• Using CRM.Phone with Aurea CRM.Web.
Note: CRM.Launcher handles communications with external applications. If yourbrowser's version is from before 2014, using the NPAPI (Netscape Plugin APIs),you should switch to the latest version of the browser. Aurea CRM no longer supportsNPAPI.
More information on the currently used versions of the plug-ins and/orCRM.launcher can be found on the System Information page on Aurea CRM.Web.Go to Settings > System Information .
24AUREA CONFIDENTIAL
Chapter 1: Overview

Installation on the client
Users are offered a download link when they first access a function that requires aplug-in or CRM.Launcher. Clicking on the link downloads the appropriate file fromthe server and automatically star ts the installation.
On the server the files are located at:
..\data\plugins\update.web.client.msi
..\data\plugins\CRM.launcher.exe
Note: The CRM.launcher setup requires .NET framework 4.5. If .NET framework4.5 is already installed on the client, setup can be executed within the user context.Otherwise, the setup installs .NET framework 4.5. This installation requiresadministrator rights.
SyntaxThis topic contains general information on using JavaScript in CRM.Designer
Wherever JSON or JavaScript is used, you need to put strings in (single or double)quotes, e.g., {property1: "value"}. In JSON property names need to be put intoquotes as well, e.g., {"property1": "value"}.
Note that property names specified in JavaScript and JSON (e.g. in a record selector)are case-sensitive (searchLinkId, infoAreaId, uid).
Aurea CRM.Web contains built-in functions to convert native JavaScript values intostrings or vice-versa, enabling you to deal with different field types:
• u8.services.catalogs, see the ar ticle “How to work with catalogs” athttps://support.aurea.com
• u8.services.typeConverter, see the ar ticle “The Type Converter Service” athttps://support.aurea.com
For fur ther information on using JavaScript in CRM.Designer, contact Aurea SupportPortal at https://support.aurea.com
User SettingsUser settings are saved between sessions according to their types.
User settings are automatically saved between sessions:
• Roaming settings are saved in the Aurea CRM database (in the I9 info area).These settings are used on all clients whenever a user re-accesses the respectivepage, e.g.. search settings, sor t order of a list, filter sets, etc.
• Local settings are saved in the browser's local storage on the client. Thesesettings are client-specific, e.g., the size and position of a popup, the view settingsof a dashboard panel, etc.
25AUREA CONFIDENTIAL
General Information

Additional information for developers is available in the ar ticle “How to Deal withUser Settings” at https://support.aurea.com.
26AUREA CONFIDENTIAL
Chapter 1: Overview

2Configuring CRMUse CRM.Designer to provide custom configuration to meet and facilitate yourinternal processes.
Aurea CRM.Web AdministrationUse the setting and administration tab to configure the CRM console.
CRM.Web gives administrators excellent control over the settings and administrationof the CRM console. Admins can manage the feature available and configure themto facilitate the day-to-day administrative tasks.
Use the Settings menu to access Aurea CRM.Web's administrative functions.
The menu ID_NET_WEBDESIGNER is available for the SU (Super User) and users whohave access to the CRM process Web Administration CRM process ID 50050040.This CRM process is disabled by default.
The following chapters describe the contents and functionality of the Settings menuas configured in UPDATE_DEFAULT.
For information on Portfolio, Portfolio Configuration, and Exchange Rate, seethe Web Business Logic User Guide.
27AUREA CONFIDENTIAL

Application SettingsThe Application Settings section controls layout, handling of documents, queryparameters, and analyses.
To configure the appearance of Aurea CRM.Web and the default behavior of specificactions, select Settings > Application Settings.
Note:
• The Application Settings menu item ID_NET_APPCONFIGURATION is available forthe SU (Super User) and users who have access to the CRM process 1.5.1.4.19
Application Configuration CRM process ID 50050050. This CRM process is disabledby default.
• As shown in the screenshot above, some settings only take effect upon restar tingAurea CRM.Web.
For more details on these settings, see Web Configuration Parameters on page 93.
In CRM.Designer you can define which tabs and settings are displayed as Applica-tion Settings. For fur ther information, see Configuration Layouts on page 93.
28AUREA CONFIDENTIAL
Chapter 2: Configuring CRM

System ConfigurationThe System Configuration section holds the fields to configure the parameters forlog files, documents, emails, system settings, offline sync, and Data Model.
To configure the system setting such logging, email behavior, etc. select Settings> System Configuration.
Note:
• The System Settings menu item ID_NET_SYSTEMCONFIGURATION is available forthe SU (Super User) and users who have access to the CRM process 1.5.1.4.21
System Configuration CRM process ID 50050080. This CRM process is disabledby default.
• Some settings only take effect upon restar ting Aurea CRM.Web.
• Be careful when changing these parameters. If configured in a wrong way, par tsof Aurea CRM.Web might not work correctly. Therefore, only the administratorSU should change these parameters during customization.
For more details on these settings, see Web Configuration Parameters on page 93.
In CRM.Designer you can define which tabs and settings are displayed as SystemConfiguration section. For fur ther details, see Configuration Layouts on page 93.
29AUREA CONFIDENTIAL
Aurea CRM.Web Administration

SDKUse the SDK page to explore and test the functionality of the available widgets inCRM.Web
The SDK section contains samples of all widgets available in Aurea CRM.Web. Usethe SDK page to explore and test the functionality of these widgets, without repeat-edly having to access CRM.Designer or re-write code.
To access the SDK sections go to Settings > Maintenance > Reps .
To reset the examples provided on the SDK page, you need to delete the browserhistory.
30AUREA CONFIDENTIAL
Chapter 2: Configuring CRM

RepsThe Rep info area allows administrators to emulate their internal company structure,such as employees, groups, and resources.
Select Settings > Maintenance > Reps to access the Rep info area ID.
Administrators can use the Rep info area to:
• Create new rep records.
• Search for an existing rep.
• Add/change rep data like telephone profile, contact information, etc.
• Access and configure a rep's login. For fur ther details, see Logins on page 31.
• Assign roles to reps. For fur ther information, see Role-Based Access.
• Define a rep's special skills, e.g., fields of specialization, knowledge of productsetc.
• Assign reps to temporary organizational groups via the Group Allocation GZ infoarea.
For detailed information on the Rep info area and its sub-info areas, see Rep in theCRM.Core Administrator Guide.
Note: The Reps menu item ID_NET_REP_SEARCH is available for the SU and userswho have access to the Rep info area ID and to the CRM process 1.5.2.2.104 RepCRM process ID 50000670. The Rep CRM process is disabled by default.
LoginsThe Logins section allows the administrator to apply module access rights, passwordsettings, and lock policies
Select Settings > Maintenance > Login to manage logins for Aurea CRM users.
31AUREA CONFIDENTIAL
Aurea CRM.Web Administration

You can:
• Change login data, such as user name, password, module access rights, passwordsettings, etc.
• Delete existing logins.
To create a new login for a rep, you need to access the Rep record and selectConfigure Login from the context menu.
For more information, see Configuring Logins in the CRM.Core AdministratorGuide.
Note:
• The Logins menu item ID_NET_LOGIN_SEARCH is available for the SU (Super User)and users who have access to the Login File info area (US).
• By default, users, except the SU, can only create/update/delete their login (US)record. Only the Password (US:38) and Encrypted Password (US:47) fields canbe updated.. For logins of other users, only the following field values are displayed:No., User name, Alias, and Added on StNo.
• Access to all US records is controlled via the CRM process 1.5.2.2.1.6. ManageLogins CRM process ID 70000310.
• The Manage Logins CRM process is disabled by default.
• Make sure you enable the Manage Logins CRM process for the SPECIAL user'srep record if it is not the SU. Otherwise, Aurea CRM.Web users cannot changetheir password at login. For fur ther details see Special User in the AureaCRM.Web Installation Guide.
StationA station in Aurea CRM is the equivalent of a database. Each station is assigned astation number, which is used to track the source of data and coordinatecommunication between stations.
Select Settings > Maintenance > Station > Stations to access the Station (AS)infoarea. Use Settings > Maintenance > Station > Station Configurations toaccess the Station Configuration (T0) infoarea.
32AUREA CONFIDENTIAL
Chapter 2: Configuring CRM

You can:
• Define stations. For fur ther details, see Defining a Station in the CRM.Core Ad-ministrator Guide.
• Assign languages to stations. For fur ther information, see Language on page 52and Assigning Languages in the CRM.Core Administrator Guide.
• Define station configuration settings. For fur ther details, see StationConfiguration in the CRM.Core Administrator Guide.
All available settings are also described in the online field help.
Note: The Station and Stations menu items ID_NET_Stations and ID_NET_Stationare available for the SU and users who have access to the CRM process 1.5.1.2.100.
Station CRM process ID 2502000.
The Station Configuration menu item ID_NET_STATIONCONFIGURATION and sub-listare available for the SU and users who have access to the CRM process 1.5.1.4.6.
Station configuration CRM process ID 3117000.
The Station Language sub-list is available for the SU and users who have accessto the CRM process 1.5.2.3.2. Station Language CRM process ID 3100000.
These CRM processes are enabled by default.
Catalog MaintenanceUse Catalog Maintenance to edit variable catalogs.
Catalogs are lists of predefined values you can select when entering data.
33AUREA CONFIDENTIAL
Aurea CRM.Web Administration

The catalog maintenance feature is accessible from the Settings > Maintenance> Catalog Maintenance menu ID_NET_CatalogMaintenance. Besides, it is availableas a link Go to Catalog Maintenance in the Find or Add Catalog Value popupwhen clicking on Add in a catalog field.
Note:
• The ID_NET_CatalogMaintenance menu item is available for the SU and users whohave access to the Catalog info area (KA) and to the CRM process 1.5.2.1.1.
Catalog Maintenance CRM process ID 312600?.
• The Go to Catalog Maintenance link is available for the SU and users who haveaccess to the CRM process 1.5.2.1.1. Catalog Maintenance CRM process ID
312600?.
• The Catalog Maintenance CRM process is disabled by default.
For more information on catalogs and access rights, see Catalogs and Access Rightson page 36.
For details on catalogs and catalog maintenance in Aurea CRM.Win, see Catalogsin the CRM.Core Administrator Guide.
The Catalog Maintenance feature in Aurea CRM.Web allows users to:
• Modify existing catalog texts and external keys (in all languages except the catalogbase language).
• Lock/unlock catalog values.
• Sort catalog values.
• Add new catalog values.
• Add descriptions for catalog values.
• Define the availability of catalog values (valid from/to).
34AUREA CONFIDENTIAL
Chapter 2: Configuring CRM

Note:
• This functionality is only available on the catalog maintenance stationAut.Cat.Maintenance checked in the Station record (AS). For fur ther details,see Station on page 32.
• If the Catalog Maintenance page is called from another station than the catalogmaintenance station, an error message is displayed.
The following actions can only be performed in Aurea CRM.Win:
• Delete catalog values.
• Merge catalog values.
• Modify existing catalog texts and external keys in the base language.
• Enter new or modify existing tenant numbers.
Searching for Catalog ValuesThe Search feature of the Catalog Maintenance info area helps to locate catalogsbased on a number, external key or text.
To search for catalog values:
1. Enter search criteria for the catalog values you want to change:
• Info Area and Catalog: If no info area is selected, all available catalogs arelisted in the Catalog field. If an info area is chosen only the catalogs used inthe selected info area are listed.
• Search catalog values by:
• TenNo
• Ext. Key
• Text
These fields support wildcard search. The values accepted are star (*) andinterrogation mark (?).
• Languages: Select the languages you want to search. The Languages.Editableand Languages.Visible Web Configuration parameters determine, whichlanguages are editable/visible. For fur ther information, see Languages.Ed-itable/Languages.Visible.
Languages.Editable and Languages.Visible do not apply to the SU, i.e., theSU can view/edit all languages.
Your selection determines the language columns displayed in the search results.The base language and the active user's login language are checked by default.The base language cannot be unchecked.
35AUREA CONFIDENTIAL
Aurea CRM.Web Administration

Note: You need to specify either catalog, external key, or text at least.
If the catalog maintenance is accessed from a catalog field, Info Area and Catalogare automatically entered.
By default, the search results are sor ted by catalog code.
The search results always display the TenNo and Parent catalog value columns.The Catalog column is displayed only if the resulting catalog values come fromdifferent catalogs, i.e., if no catalog was selected as search criterion. Ext. Key,Sort number, and Lock are displayed per language. If a catalog value doesn't existin a language, the respective fields remain empty.
Catalogs and Access RightsLock catalogs for Aurea CRM.Web users via the rights definition, tenant rights, orthe Lock checkboxes in Catalog Maintenance.
In the Search mask info areas, catalogs and languages are displayed according tothe user's access rights.
On the Catalog Maintenance page, access rights apply as follows:
• Info areas with Deny Access in the active user's rights definition are not shownin the Info Area drop-down list.
• Catalogs with Deny Access are not displayed in the Catalog drop-down list.
• Catalogs with Deny New: When selecting a catalog with Deny New, the catalogis displayed with a wavy red underline. Clicking on New displays a message.
• Catalogs with Deny Update: When selecting a catalog with Deny Update, thecatalog is displayed with a wavy red underline. Clicking on Edit displays amessage.
In the Search Results list, catalog values that are locked in the active user's rightsdefinition Deny Access are displayed read-only and with all Lock checkboxeschecked. Deny New and Deny Update r ights settings for catalog values lead tocorresponding error messages.
Note: By default, search queries automatically include all associated fields in thearray fields used for catalogs. To ensure that the search result displays only thefields specified in the query set the Query.DisableAutoAddArrayFields parameterto true. For more information, see Query.DisableAutoAddArrayFields.
For more details on access rights for catalogs, see Defining Access Rights forVariable Catalogs in the CRM.Core Administrator Guide.
36AUREA CONFIDENTIAL
Chapter 2: Configuring CRM

Locking and Unlocking Catalog ValuesLocking catalog values hides them from catalog fields in Aurea CRM.Web.
If a catalog value was selected before it was locked, the value is displayed grayedout in the drop-down list and cannot be selected.
To lock or unlock one or more values for all languages:
1. Select the catalog values from the search results list.
2. Select Lock/Unlock selected from the context menu.
To lock or unlock catalog values for one language:
1. Select the catalog value from the search results list.
2. Click Edit.
3. Check or uncheck Lock for the desired language.
For information on the behavior of catalog locks within language hierarchies. Fordetails, see Catalogs in the CRM.Core Administrator Guide.
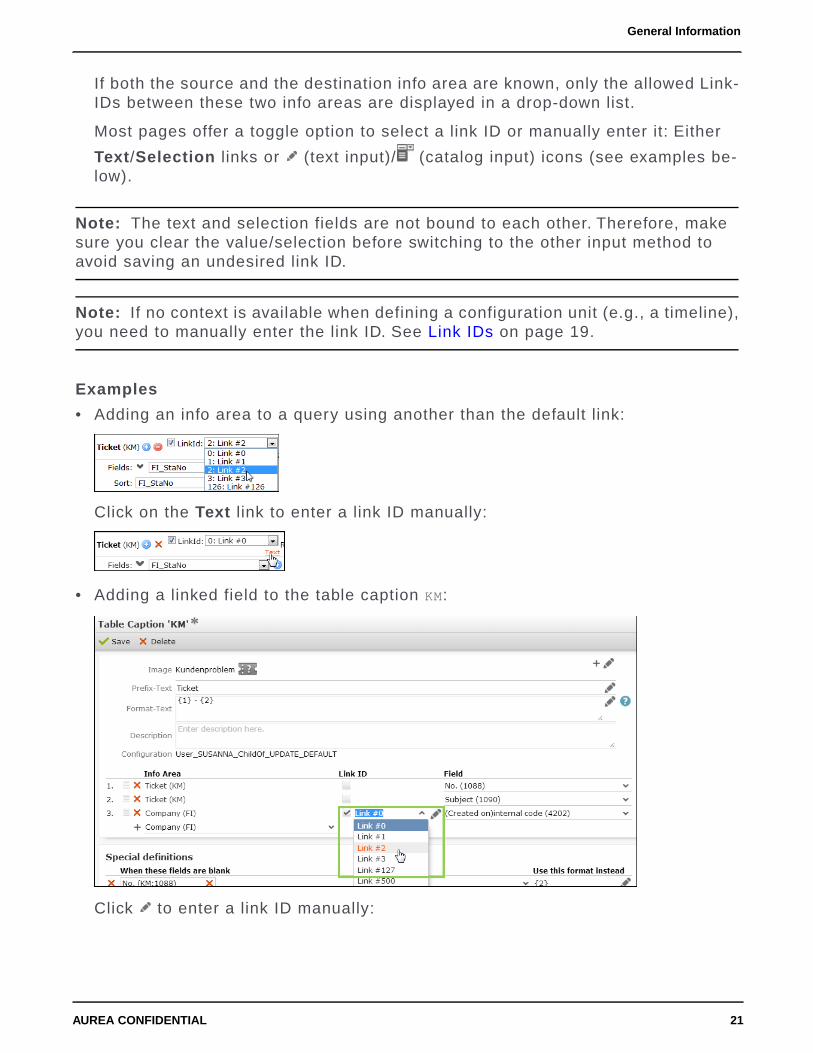
Editing Catalog ValuesUse the Catalog Maintenance info area to edit catalog values.
To edit catalog values, double-click a record in the search results list or select arecord and click Edit. You might need to select the catalog first if you searchedby Text or Ext.Key only.
The Edit value dialog lists the info areas where the respective catalog is used, andthe parent catalog value, if applicable.
For the catalog value in the base language, only Sort number and Lock can bechanged.
37AUREA CONFIDENTIAL
Aurea CRM.Web Administration
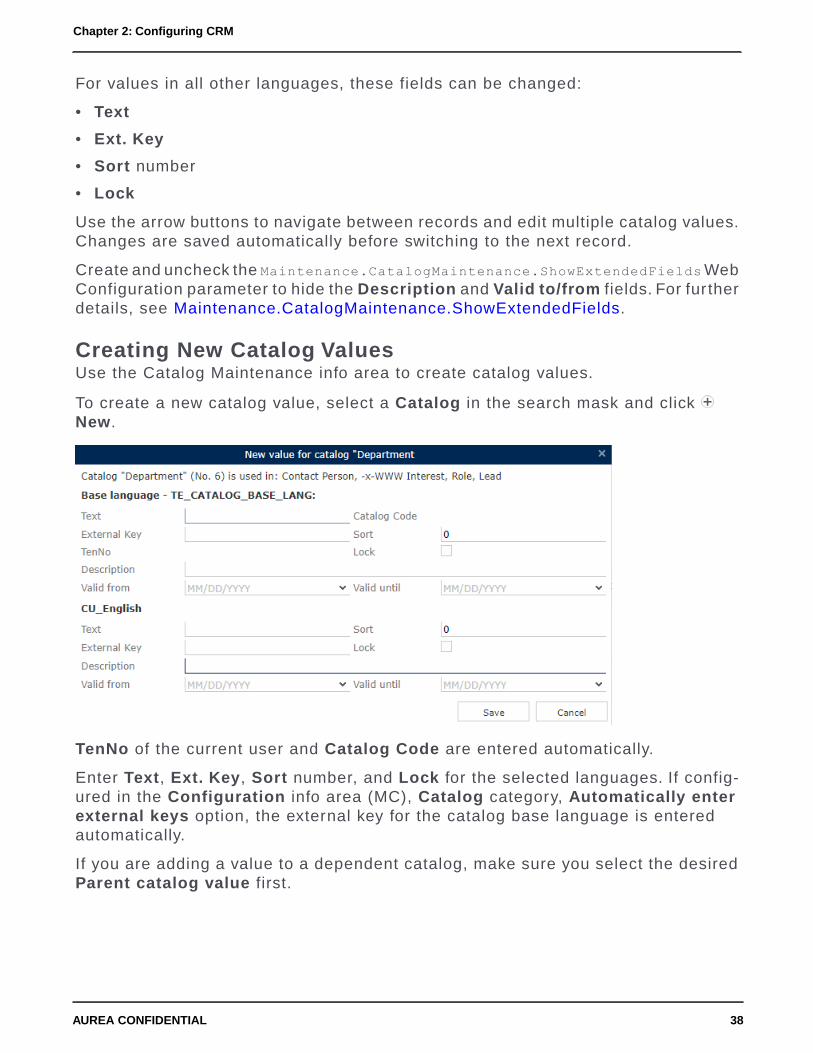
For values in all other languages, these fields can be changed:
• Text
• Ext. Key
• Sort number
• Lock
Use the arrow buttons to navigate between records and edit multiple catalog values.Changes are saved automatically before switching to the next record.
Create and uncheck the Maintenance.CatalogMaintenance.ShowExtendedFieldsWebConfiguration parameter to hide the Description and Valid to/from fields. For fur therdetails, see Maintenance.CatalogMaintenance.ShowExtendedFields.
Creating New Catalog ValuesUse the Catalog Maintenance info area to create catalog values.
To create a new catalog value, select a Catalog in the search mask and click New.
TenNo of the current user and Catalog Code are entered automatically.
Enter Text, Ext. Key, Sort number, and Lock for the selected languages. If config-ured in the Configuration info area (MC), Catalog category, Automatically enterexternal keys option, the external key for the catalog base language is enteredautomatically.
If you are adding a value to a dependent catalog, make sure you select the desiredParent catalog value first.
38AUREA CONFIDENTIAL
Chapter 2: Configuring CRM
To allow the maintenance of catalog values in a multiple language environment,providing the catalog value in both the catalog base language and the current loginlanguage is a precondition. Therefore, users that are logged on to Aurea CRM.Webin another language than the base language, and are allowed to add catalog values,are compelled to provide new catalog values in both the base language and theircurrent login language.
Mass Data OperationsUse Mass Data Operations to update or delete a large number of records. Forexample, when replacing one rep with another in all companies in a specific region.
The Mass Data Operations menu item the ID_NET_BulkOperations parameter isavailable when the following conditions are met:
• The Web Configuration parameter UpdateServer.RepID is defined. For fur therdetails, see UpdateServer.RepID.
• The user has access to the CRM processes 1.5.2.8.1.1 Update CRM processes
3200000 and CRM processes 1.5.2.8.1.2 Delete CRM processes 3202000 . BothCRM processes are enabled by default.
To update or delete records using Mass Data Operations:
1. Select Settings > Maintenance > Mass Data Operations .
2. Select the info area where you want to change records.
39AUREA CONFIDENTIAL
Aurea CRM.Web Administration

Users can only select info areas for which a Search&List configuration <in-foAreaId> exists in the current designer configuration hierarchy, and for whichthey have sufficient access rights. Access rights are taken into account as follows:
• Deny Access: The info area is not displayed in the drop-down list.
• Deny Upd: The info area is listed, but the Edit button, in the results header, isdisabled.
• Deny Deletion: The info area is listed, but the Delete button is disabled.
Note: The Do not display the info area used to define filters and queries(web) flag Rights definition > Additional Settings is not taken into account.
3. Click Show Search.
4. Enter the desired search criteria and/or define a filter for the records you wantto change.
The user's search settings are saved between sessions. The search settings formass data operations are saved separately, i.e., the global search settings arenot used or changed. For fur ther details, see Remember Search Settings. TheSearch.RememberDynamicFieldsWeb Configuration parameter is taken into account.For fur ther information see Search.RememberDynamicField.
5. Click Start Search.
6. Check the search results and redefine your criteria if necessary.
Once the server returns the total number of result rows, it displays in the resultheader. Check if the number of results matches the expected number of recordsto be updated or deleted.
You can change the contents of the list by clicking Modify List fields. Yourchanges are saved in the roaming settings. For fur ther information, see UserSettings on page 25.
You can display MiniDetails and QuickViews for the result records. You can notedit single records.
7. Once you are sure about the result set, select the desired mass data operation:
• Edit
• Delete
• Delete without Communication
These buttons are configured in the SearchResults header of header groupBulkOperations only Edit and Delete in UPDATE_DEFAULT configuration.
Note: All operations apply to the currently executed search, i.e., changing a searchcriterion without again executing the search is not taken into account.
40AUREA CONFIDENTIAL
Chapter 2: Configuring CRM

EditUse Mass Data Operations to update a large number of records.
To update the result records:
1. Once you are sure that the search result contains only records you want to edit,click on Edit in the search results header.
The Mass Data Update dialog contains the same functionality as the Edit multiplerecords dialog Bulk Editor. For fur ther information, see A_MultiEdit.
2. By default, all editable fields from the results list are displayed. Click on Addfields to change the fields list.
The following fields are not displayed in the Mass Data Update dialog:
• Decoded fields (Z-fields).
• Custom fields defined in customFields.xml.
• Fields flagged as Vir tualCore, i.e., vir tual fields with fixed IDs from 4200 to4230, e.g., Created by ID. For fur ther details, see Fields with Fixed IDs in theCRM.Core Administrator Guide in the 2nd table.
• Fields defined as read-only in the data model or via field attribute.
• Fields locked via access rights field rights and conditional field rights.
3. Make the desired changes: Changing a field value automatically checks thecheckbox. Unchecking the checkbox resets the field value. Check the checkboxwithout entering a value to delete a field's content.
4. Click Start mass update to launch the updating process: Once you confirm themessage Start mass data modification?, a CRM.Server to-do (type 14) is created.For fur ther details, see CRM.Server To-Dos on page 42.
Delete and Delete without CommunicationUse Mass Data Operations to delete a large number of records.
To delete the result records:
1. Once you are sure that the search result contains only records you want to delete,click on Delete in the search results header.
41AUREA CONFIDENTIAL
Aurea CRM.Web Administration

If you select Delete without Communication, which is not configured in UP-DATE_DEFAULT, the deletion is not communicated to other stations, i.e., therecords are only deleted locally. For fur ther details see Communicating deletedrecords in the Aurea CRM.Win Administrator Guide.
Note: Delete without Communication is disregarded for info areas for whichthe Mark as Deleted option is enabled in the rights definition. For records in suchinfo areas the DelCd. is activated instead.
2. The Start mass data deletion? message is displayed. Once you confirm withOK, a CRM.Server to-do (type 15 or 16) is created. For fur ther information,see CRM.Server To-Dos on page 42.
CRM.Server To-DosFor each mass data operation CRM.Server creates a To-Do record that is executedaccording to the settings configured for maintenance jobs.
The text of the To-Do contains the following:
• Edit: 14;<infoAreaId>;<optional sequence> e.g. 14;FI or 14;MA;2d
• Delete: 15;<infoAreaId>;<optional sequence> e.g. 15;FI or 15;NO;3m
• Delete without Communication: 16;<infoAreaId>;<optional sequence> e.g.16;FI
<optional sequence>: Use this optional parameter to perform mass data operationsperiodically. Format: 3d = every 3 days, 2m = every 2 months - case-insensitive,see examples above. In order to be able to use this functionality, you have tocreate a dialog where the To-Do text and the due/end dates can be entered.
Use the Web Configuration parameter Maintenance.BulkExecutionStart to schedulemass data operations for a specific time, see Maintenance.BulkExecutionStar t.Otherwise, the CRM.Server To-Do is added to the queue. CRM.Server executespolls for new To-Dos once a minute.
The search criteria and the fields and values to be changed for Edit are stored intwo XML files query.xml and defaultvalues.xml and linked to the To-Do record.
All records that meet the defined conditions at the moment CRM.Server executesthe query are updated or deleted.
Note: The To-Dos are executed within the user context, i.e., they are performedusing the access rights of the user who defined and launched the mass dataoperation.
42AUREA CONFIDENTIAL
Chapter 2: Configuring CRM

The update or deletion processes are logged in the Process Tracking (T3) info areafor module "server". The Text field contains the rep ID of the user that star ted themass data operation.
After the update or deletion process has been completed, you receive a message.
Errors are logged in the massdata_log.txt file stored in the Aurea CRM database.The log file is linked to the message: For each record that could not be processed,it contains a line <error number>: <reference text> | <update protocol web URL
to record>.
For a list of error codes and their meaning, see CRM.Core Administrator Guide.
ImportUse the Import module to exchange data between Aurea CRM and external systemssuch as databases, spreadsheets, etc.
Select Settings > Maintenance > Import to import data into the Aurea CRMdatabase. The import formats must be defined in Aurea CRM.Win. For fur ther details,see Import/Export in the Aurea CRM.Win Administrator Guide. Only file-basedformats are supported in Aurea CRM.Web.
Note: The Import menu item SimpleImport is available for the SU and for userswho have access to the CRM process 1.5.3.1.8. Import CRM process ID 3604000.
You can also configure an Import button, e.g., into the FI SearchResults header toallow users to import data into specific info areas. The Import button is assignedto the "Import" CRM process as well.
The menu item and button use the SimpleImport action template. If the action isexecuted in the context of an info area e. g., the Company search the import formatsare automatically filtered to display only formats containing fields from that infoarea. If no context can be determined, e.g., in headers of custom forms, you canexplicitly specify an info area using the infoAreaId input argument.
Executing the ImportExecute the import job using the Import page on the Maintenance section or theImport button in a specific info area.
To import data:
1. Select Settings > Maintenance > Import or click on an Import button in aSearch header, if configured.
43AUREA CONFIDENTIAL
Aurea CRM.Web Administration

2. Select an import Format. All file-based import formats are listed.
If the import is star ted from an info area or with infoAreaId defined in the action,only the import formats containing this info area are listed.
The selected format is saved in the current user's roaming settings, see UserSettings on page 25.
The fields and import settings Separator and Field format areas are displayed,indicating the required structure of the import file. For detailed information on theimport settings. for fur ther details, see File Format in the Aurea CRM.Win Admin-istrator Guide.
A check mark in the Transformation column indicates that a transformation isdefined for the field, see Transforming Field Contents in the Aurea CRM.WinAdministrator Guide.
44AUREA CONFIDENTIAL
Chapter 2: Configuring CRM
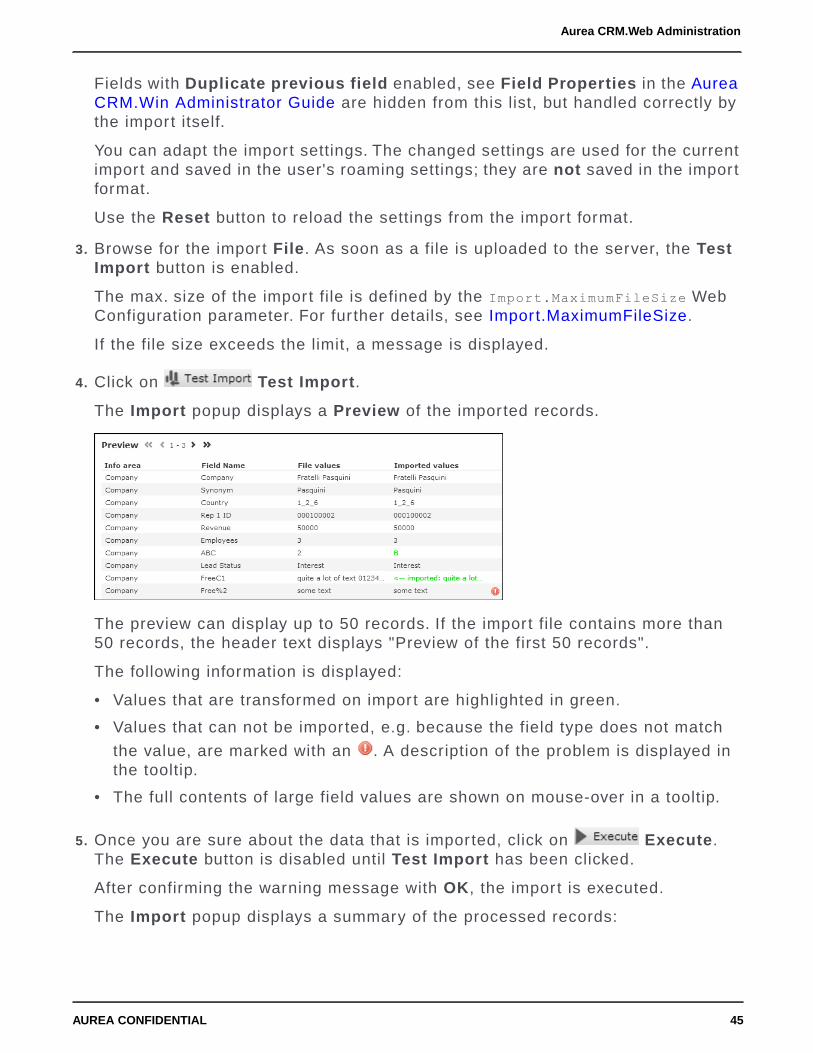
Fields with Duplicate previous field enabled, see Field Properties in the AureaCRM.Win Administrator Guide are hidden from this list, but handled correctly bythe import itself.
You can adapt the import settings. The changed settings are used for the currentimport and saved in the user's roaming settings; they are not saved in the importformat.
Use the Reset button to reload the settings from the import format.
3. Browse for the import File. As soon as a file is uploaded to the server, the TestImport button is enabled.
The max. size of the import file is defined by the Import.MaximumFileSize WebConfiguration parameter. For fur ther details, see Import.MaximumFileSize.
If the file size exceeds the limit, a message is displayed.
4. Click on Test Import.
The Import popup displays a Preview of the imported records.
The preview can display up to 50 records. If the import file contains more than50 records, the header text displays "Preview of the first 50 records".
The following information is displayed:
• Values that are transformed on import are highlighted in green.
• Values that can not be imported, e.g. because the field type does not match
the value, are marked with an . A description of the problem is displayed inthe tooltip.
• The full contents of large field values are shown on mouse-over in a tooltip.
5. Once you are sure about the data that is imported, click on Execute.The Execute button is disabled until Test Import has been clicked.
After confirming the warning message with OK, the import is executed.
The Import popup displays a summary of the processed records:
45AUREA CONFIDENTIAL
Aurea CRM.Web Administration

This information is also written to the Communication Log record C3 that iscreated for each import. For fur ther details, see Communication Log on page 47.
6. Click on Show Log to display the Communication Log record. TheShow Log button is disabled until the import has been executed.
Note: The Show Log button is assigned to the CRM process 1.5.2.8.2.2.
Communication Log CRM process ID 33030000. The CRM process is enabled bydefault.
If errors occur during import, Import Results records C5 are created and linkedto the corresponding C3 record.
One C5 record per error is created. If no errors occur, no C5 records are created.
For import errors where a record could not be updated, you can select Open Af-fected Record from the context menu to display the record.
You can view the Communication Log and Import Results records via Adminis-tration > Jobs & Logs > Communication Log and the corresponding sub-list.
For detailed information on error codes and messages, see General Error Codesand Import/Export Error Codes in the CRM.Core Administrator Guide.
46AUREA CONFIDENTIAL
Chapter 2: Configuring CRM

Jobs & LogsThis section holds information about communication log, process tracking, and jobmanager.
Communication LogThe Communication Log info area C3 contains information on all communicationprocesses between stations as well as on all imports.
Select Settings > Maintenance > Jobs & Logs > Communication Log to accessthe info area.
Note: The Communication Log menu item ID_NET_CommLog is available for the SUand users who have access to the CRM process 1.5.2.8.2.2. Communication LogCRM process ID 33030000. The CRM process is enabled by default.
You can export a communication log as an HTML report by selecting Create Reportfrom the context menu A_ExportComProtocol in M_ComProtocol.
A_ExportComProtocol calls an ExecuteReport action that uses a report format calledComProtocolForCurStation name argument, no quotes. For fur ther details,see ExecuteReport on page 423.
This report format is not par t of Aurea CRM but must be created in Aurea CRM.Win.
47AUREA CONFIDENTIAL
Aurea CRM.Web Administration

For more details on Aurea CRM.Win reports, see Creating Aurea CRM win Reportsin Aurea CRM.Web on page 863 and Defining Report Formats in the Aurea CRMWin User Manual.
For fur ther information about communication log, see Communication Logs andLogging the Import in the Aurea CRM Win Administrator Guide.
Note: The ExecuteReport action and the XSL transformation are part of AureaCRM.Web. Once you define the report format as indicated by the screenshot above,A_ExportComProtocol creates the report.
Process TrackingThe Process Tracking info area is used to track critical processes that affect theAurea CRM database to prevent multiple users from concurrently star ting a processthat can only be executed once.
Select Settings > Maintenance > Jobs & Logs > Process Tracking ID_NET_Pro-
cessTracking to view process tracking (T3) records.
48AUREA CONFIDENTIAL
Chapter 2: Configuring CRM

To search processes by type, you can use various predefined filters under Addmore.
Use the Active flag to filter for active processes only. This vir tual field can only beused in Search controls; in all other control types this field has no function.
The SearchResults header contains a CleanupActiveProcesses button Repairactive processes that allows you to end invalid processes. For details, see Repair-ing Processes in the CRM.Core Administrator Guide.
Note: The ID_NET_ProcessTracking menu item is only available for the SU andusers who have access to the CRM process 1.5.5.1.3. Process Tracking CRM process
ID 3120000.
The CleanupActiveProcesses button is only available for the SU and users who haveaccess to CRM process 1.5.2.6.2.1. Repair active processes CRM process ID
70000280.
The Repair active processes CRM process is disabled by default.
Job ManagerUse Job Manager to view currently active server jobs.
Select Settings > Maintenance > Jobs & Logs > Job Manager to see activeserver jobs. The following jobs are displayed:
• Synchronization jobs with Aurea CRM.Web offline clients that are currently beingexecuted.
• Synchronization jobs that are queued for future execution
Select Remove from queue from the context menu to remove a pending job.
Note: The Job Manager menu item ID_NET_JOBMANAGER is available for the SU andusers who have access to the CRM process 1.5.2.6.5 Job Manager CRM process
ID 50022000. This CRM process is disabled by default.
49AUREA CONFIDENTIAL
Aurea CRM.Web Administration

Field HelpThe field help contains information on all fields in the database. Field help isdisplayed as context-sensitive help tooltip in Aurea CRM.Web when the user hoversthe mouse over a field label.
To edit the field help:
1. Select Settings > Maintenance > Field Help to access the Field Help info area(FH).
Note: The Field Help menu item ID_NET_FIELDHELP is available for SU and userswho have access to the FH info area and the CRM process 1.5.1.7.2 Field Help CRMprocess ID 3136000.
For details on editing the field help, see Field Help in CRM.Core AdministratorGuide.
TextsThe Text info area (04) is used to manage custom texts in the Aurea CRM database.
Texts that have been defined in the CRM.Designer database cannot be managedin the Text info area, see Texts on page 176.
50AUREA CONFIDENTIAL
Chapter 2: Configuring CRM

Select Settings > Maintenance > Texts to access the Text info area (04).
Note: The Texts menu item ID_NET_TEXTSEARCH is available for the SU and userswho have access to the Text info area (04) and to CRM process 1.5.2.3.3. TextCRM process ID 3211???.
For the menu action ID_NET_TEXTSEARCH the current user's login language is definedas the Text info area's default language field no. 4 Language No., parameterLOGINLANGUAGE in UPDATE_DEFAULTDefaultFieldValues 4:LOGINLANGUAGE.Thereforethe user's current login language is automatically entered in the text search Lan-guage No. field.
The sub-list displays all translations of the selected text. The translations are linkedvia the 04_1_StaNo and 04_1_SerNo unique fields key for translated texts.
51AUREA CONFIDENTIAL
Aurea CRM.Web Administration

Use the New Text in Other Language A_NewTextReferenced menu item to add newtranslations to an existing text.
Note: Use CRM.Translation tool to manage the translation of larger amounts ofcustomized texts, see CRM.Translation tool in the CRM.Core Administrator Guide.
LanguageDefine all languages used by Aurea CRM in the Language info area and assign allstations the necessary languages.
Select Settings > Maintenance > Language to access the Language info area(00) where you can define languages and language variants. For fur ther details,see Languages in the CRM.Core Administrator Guide.
Note: The Language menu item ID_NET_Language is available for the SU and userswho have access to the CRM process 1.5.2.3.1. Language CRM process ID 3122000.The CRM process is enabled by default.
You can assign languages to stations via the sub-list of the Station info area. Forfur ther details, see Station on page 32.
Managing Checked Out DocumentsThe Manage Checked Out Documents info area offers an overview of all documentscurrently checked out.
To obtain an overview of all checked out documents, select Settings > Maintenance> Manage Checked Out Documents : A list of all documents currently checked outby any rep is displayed.
You can undo the check-out of any document by selecting Undo Check Out fromthe record's context menu.
For information on documents in Aurea CRM.Web, see Documents on page 829.
52AUREA CONFIDENTIAL
Chapter 2: Configuring CRM

VariablesUse the Variable info area to define variables with values that change according tothe current rep's data such as country, tenant, etc.
Use the Settings > Maintenance > Variable info area to define variables withvalues that change according to the current rep's data. For details, see Variablesin the CRM.Core Administrator Guide.
These variables can be used in workflows, triggers, and reports. In XML reports the<variables/> section lists all variable values valid in the current context EmitVari-ables=true. For fur ther information, see XML Exports & Reporting on page 856.
Variables can also be used in filters and queries defined in CRM.Designer withsyntax: $VAR(<variable name>). For fur ther details, see Using Variable Expressionson page 505. They cannot be used when defining filters and queries in AureaCRM.Web.
For information on using variable values in processes, see ReadVariablesDat-aProvider on page 569.
To access the Variable info area:
Select Settings > Maintenance > Variables .
Note: The Variables menu item ID_NET_VARIABLES is available for the SU and userswho have access to the Variable info area (Z5).
53AUREA CONFIDENTIAL
Aurea CRM.Web Administration
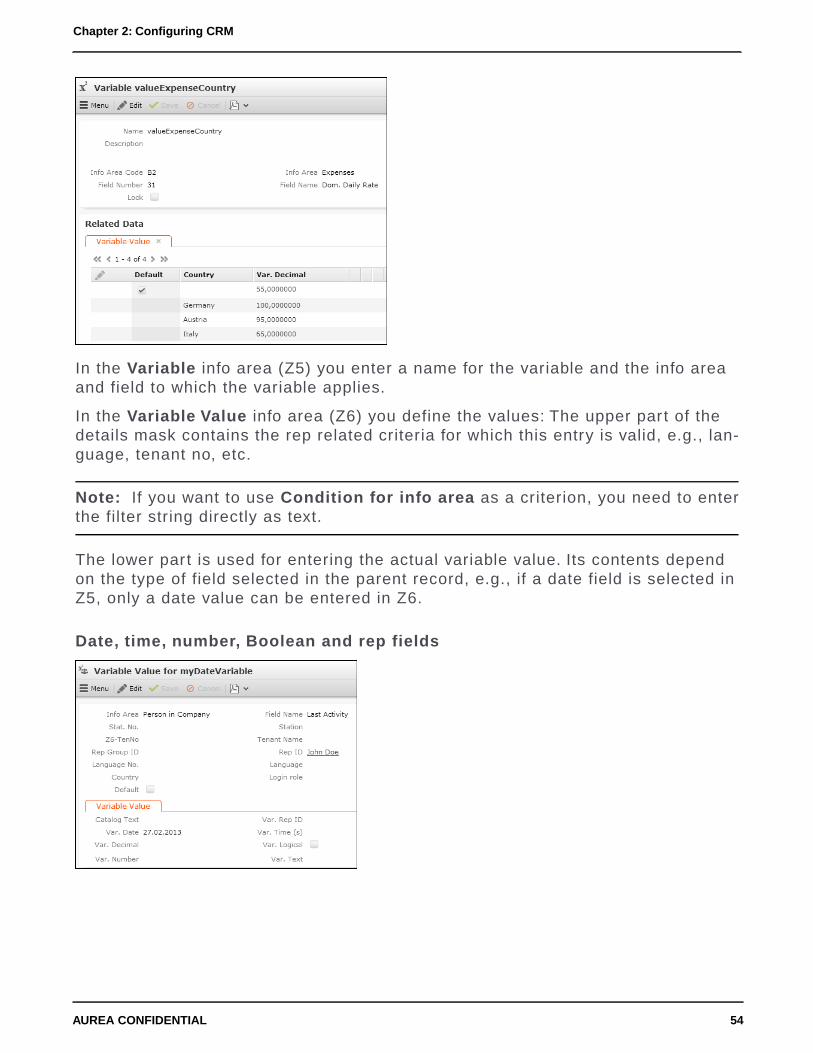
In the Variable info area (Z5) you enter a name for the variable and the info areaand field to which the variable applies.
In the Variable Value info area (Z6) you define the values: The upper par t of thedetails mask contains the rep related criteria for which this entry is valid, e.g., lan-guage, tenant no, etc.
Note: If you want to use Condition for info area as a criterion, you need to enterthe filter string directly as text.
The lower par t is used for entering the actual variable value. Its contents dependon the type of field selected in the parent record, e.g., if a date field is selected inZ5, only a date value can be entered in Z6.
Date, time, number, Boolean and rep fields
54AUREA CONFIDENTIAL
Chapter 2: Configuring CRM

Variable catalog fields
The Catalog Text field accesses the Catalog info area (KA) where you can selectthe desired catalog value. The parent catalog value, if applicable, is automaticallyentered according to the field selected in Z6. Due to a UI restriction you need tosave the record before selecting a catalog value.
Note: The Details control Z6_VarCat field group needs to contain the fields 41CatalogNo and 15 V_PCode for the catalog search to work.
Fixed catalog fields
Enter the number of the desired catalog value. The value is entered automaticallyafter saving the record.
55AUREA CONFIDENTIAL
Aurea CRM.Web Administration

Generic link fields
To use the generic link field Link as a variable value in Z6, you need to define aSelect-Function for that field, see Select-Function on page 240 and selectRecordfor Generic Link Fields on page 253.
CRM.Designer MaintenanceUse CRM.Designer Maintenance to update the CRM.Designer database with thecurrent catalogs, data model, CRM processes, and roles as defined in the AureaCRM database.
Select Settings > Maintenance > CRM.Designer Maintenance to access the infoarea.
The functionality of CRM.Designer Maintenance is the same as described forCRM.Bulkloader. For details, see Data Model, CRM Processes, Roles and Catalogson page 772.
The page consists of the following tabs, which are assigned to the following CRMprocesses:
• Catalogs: Allows you to update the catalog information in the CRM.Designerdatabase with new and changed catalog values. For fur ther information, see Up-dating Catalogs on page 778. The Catalogs tab is assigned to CRM process
1.5.2.1.4. Designer: Catalogs CRM process ID 50050090.
• Data Model: Allows you to transfer the current Aurea CRM data model to theCRM.Designer database. For details, see Updating the Data Model on page 775.
56AUREA CONFIDENTIAL
Chapter 2: Configuring CRM
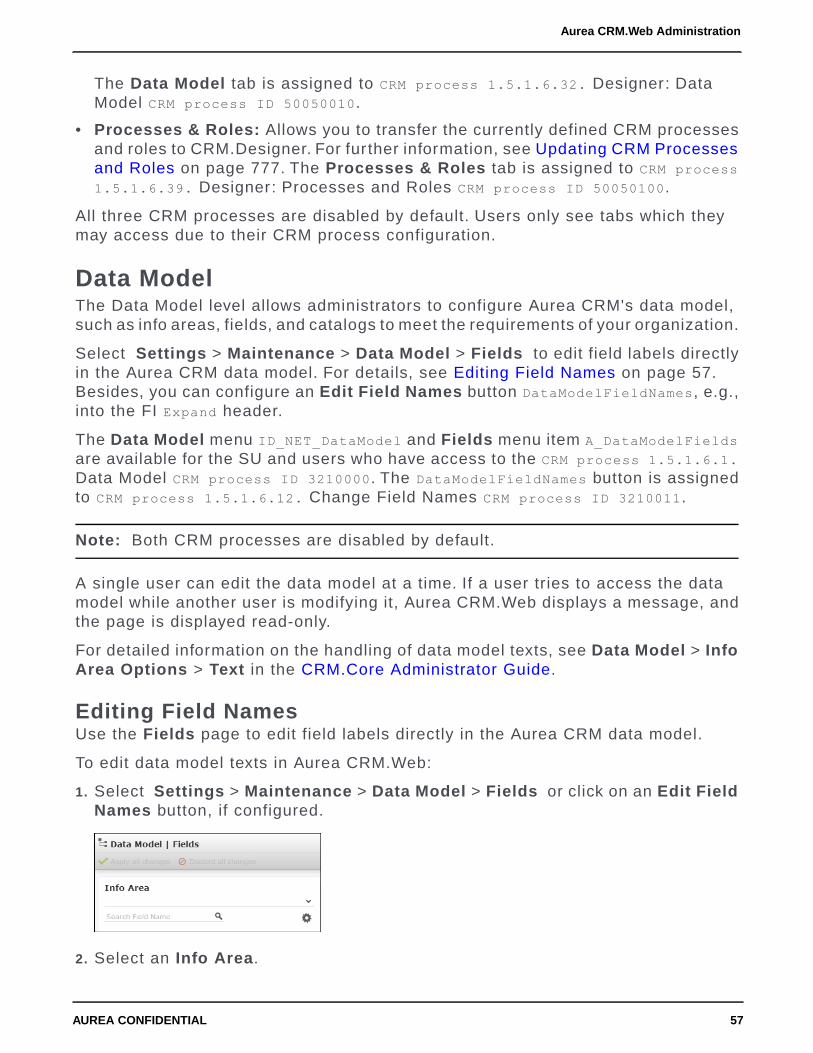
The Data Model tab is assigned to CRM process 1.5.1.6.32. Designer: DataModel CRM process ID 50050010.
• Processes & Roles: Allows you to transfer the currently defined CRM processesand roles to CRM.Designer. For fur ther information, see Updating CRM Processesand Roles on page 777. The Processes & Roles tab is assigned to CRM process
1.5.1.6.39. Designer: Processes and Roles CRM process ID 50050100.
All three CRM processes are disabled by default. Users only see tabs which theymay access due to their CRM process configuration.
Data ModelThe Data Model level allows administrators to configure Aurea CRM's data model,such as info areas, fields, and catalogs to meet the requirements of your organization.
Select Settings > Maintenance > Data Model > Fields to edit field labels directlyin the Aurea CRM data model. For details, see Editing Field Names on page 57.Besides, you can configure an Edit Field Names button DataModelFieldNames, e.g.,into the FI Expand header.
The Data Model menu ID_NET_DataModel and Fields menu item A_DataModelFieldsare available for the SU and users who have access to the CRM process 1.5.1.6.1.
Data Model CRM process ID 3210000. The DataModelFieldNames button is assignedto CRM process 1.5.1.6.12. Change Field Names CRM process ID 3210011.
Note: Both CRM processes are disabled by default.
A single user can edit the data model at a time. If a user tries to access the datamodel while another user is modifying it, Aurea CRM.Web displays a message, andthe page is displayed read-only.
For detailed information on the handling of data model texts, see Data Model > InfoArea Options > Text in the CRM.Core Administrator Guide.
Editing Field NamesUse the Fields page to edit field labels directly in the Aurea CRM data model.
To edit data model texts in Aurea CRM.Web:
1. Select Settings > Maintenance > Data Model > Fields or click on an Edit FieldNames button, if configured.
2. Select an Info Area.
57AUREA CONFIDENTIAL
Aurea CRM.Web Administration

If the page was accessed from an info area via an Edit Field Names button, thecurrent info area is preselected.
All fields of the info area are listed. Fields with Deny Access in the current user'saccess rights definition are not listed.
Click on to select which columns are displayed: No., Field Name, Field Type,and XML Name.
Search for and select a field.
The right par t of the screen displays the following:
• Data model information concerning the info area like number of fields, indices,and links.
Note: The number of links displayed here may differ from the number of linksdisplayed in the CRM.Core data model accessed via the Aurea CRM.WinMaintenance module. Links marked as hidden are not counted in AureaCRM.Web. Links to, e.g., rep fields are counted in Aurea CRM.Web but not inAurea CRM.Win. Aurea CRM.Web reverse links, i.e., links from child to parentare counted for the parent info area as well.
• Data model information concerning the field, such as XML name, field no. andtype. For fur ther details, see Data Types in Aurea CRM on page 877.
• A collapsible Texts area containing the field labels.
Note: The Texts area is assigned to CRM process 1.5.1.6.12. Change FieldNames CRM process ID 3210011.
3. Enter the desired texts. Changed fields are marked with a '*' character in the fieldlist.
58AUREA CONFIDENTIAL
Chapter 2: Configuring CRM

The displayed/editable languages are determined by the Languages.Visible andLanguages.EditableWeb Configuration parameters. for details, see Languages.Ed-itable/Languages.Visible. (Defaults: display = all, edit = current language.)
Languages.Editable and Languages.Visible do not apply to the SU, i.e., the SUcan view/edit all languages.
The text input provides a full-text "find as you type" search to search for existingtexts in the data model. If you select an existing text, all available translationsare entered as well.
You can also reuse existing texts by entering placeholders for field names, infoarea names, catalogs and catalog values:
• {[FI,2]} ... text of field 2 in the Company info area
• To reference an info area name, use the field number 4240: Enter {[FI, 4240]}
to get "Company".
• {[FIX4,0]} ... text of the fixed catalog Activity Type, value 0 "Telephone"
• {[VAR,2]} ... text of the variable catalog Country
• You can also use a reference within a text, e.g., "My {[FI,2]} (Private)".
Note: To use a reference for all languages, enter it in theLanguage-independent field.
4. Click Apply all changes to update the data model texts. Or click on Discard allchanges to clear all changes.
5. The changes are applied as follows:
• The Aurea CRM Data Model is updated with all texts and translations enteredby the user.
• The CRM.Designer database is updated in the maintenance user's languageor if undefined in the current user's language. All field names are updated inthis language, not only the changed fields.
Note: CRM.Web highly recommends defining a dedicated maintenance userand enter a language in this user's rep record to avoid updating theCRM.Designer database in the wrong language, see Maintenance User in theAurea CRM Web Installation Guide.
59AUREA CONFIDENTIAL
Aurea CRM.Web Administration
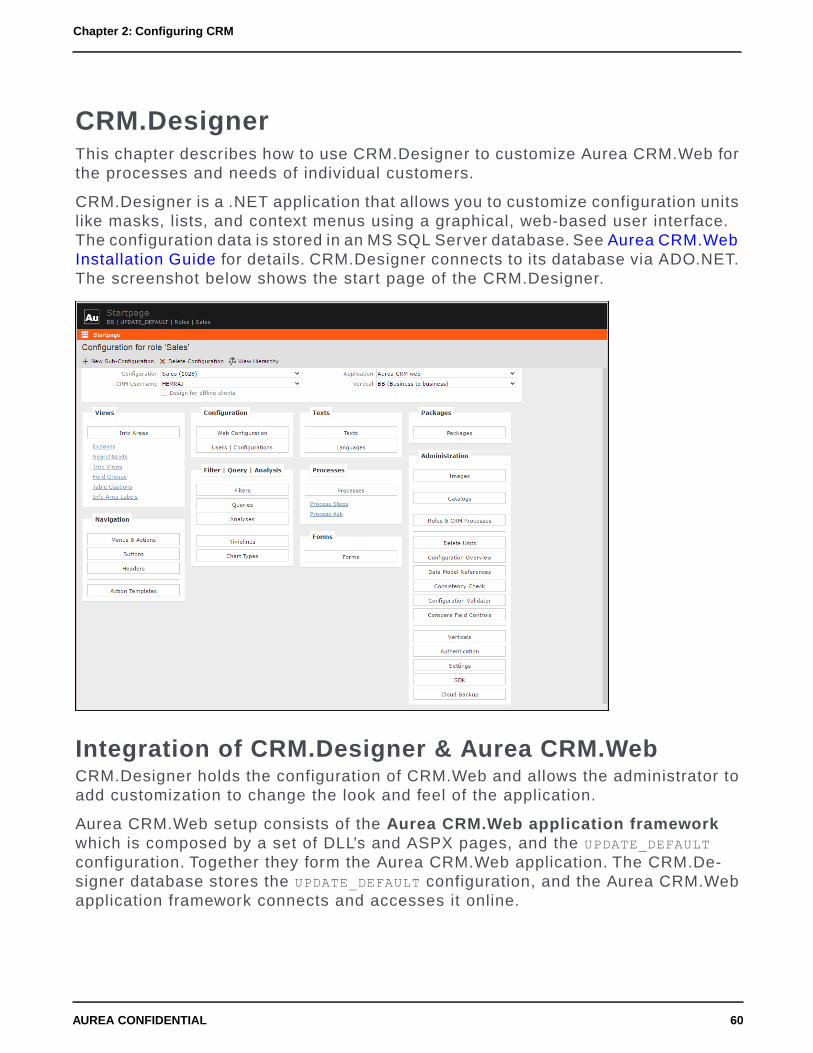
CRM.DesignerThis chapter describes how to use CRM.Designer to customize Aurea CRM.Web forthe processes and needs of individual customers.
CRM.Designer is a .NET application that allows you to customize configuration unitslike masks, lists, and context menus using a graphical, web-based user interface.The configuration data is stored in an MS SQL Server database. See Aurea CRM.WebInstallation Guide for details. CRM.Designer connects to its database via ADO.NET.The screenshot below shows the star t page of the CRM.Designer.
Integration of CRM.Designer & Aurea CRM.WebCRM.Designer holds the configuration of CRM.Web and allows the administrator toadd customization to change the look and feel of the application.
Aurea CRM.Web setup consists of the Aurea CRM.Web application frameworkwhich is composed by a set of DLL’s and ASPX pages, and the UPDATE_DEFAULTconfiguration. Together they form the Aurea CRM.Web application. The CRM.De-signer database stores the UPDATE_DEFAULT configuration, and the Aurea CRM.Webapplication framework connects and accesses it online.
60AUREA CONFIDENTIAL
Chapter 2: Configuring CRM

If you want to change the contents or functionality of info area views, navigation,processes, texts or many other areas of the application, you must define your con-figuration derived from the default and implement your changes in the databasewith CRM.Designer.
How does it work?
Aurea CRM.Web needs online access to the CRM.Designer database usingADO.NET for MS SQL. The connection string is read from the settings.xml filestored on update.configuration/OleDbDsn. Aurea CRM.Web reads the neces-sary data from the CRM.Designer database and caches it in its application cache.
The update.Configuration.dll reads data from the CRM.Designer databaseand converts it into XML. The XML files are converted into local objects which areused to control Aurea CRM.Web interface.
Checking XML files
To check the XML files, you need to specify the XMLFilePath entry in the set-tings.xml file pointing to a valid directory on your system, with appropriate rightsfor the ASP.NET user and set the WriteToFile entry to true.
<update.configuration>[...]<WriteToFile>true</WriteToFile><XMLFilePath>C:xml</XMLFilePath>
The XML files are then written to this file path.
Using Debugging Mode
In a debugging mode, you can set the <ConfigurationFromDB> entry to false. Theresult is an offline mode where Aurea CRM.Web uses the XML files instead of theCRM.Designer database. All functions that write data to CRM.Designer, e.g., listsettings, does not work.
Using Cache Invalidation
Aurea CRM.Web caches data from the CRM.Designer database. Because of that,modifications of configuration units made in CRM.Designer are not immediatelyvisible to web clients. To ensure that all web clients get the current content, restar tthe application by recycling the application pool, or restar ting the web server usingiisreset.
Alternatively, you can select menu item Invalidate Cache ID_NET_INVALIDATECACHEto invalidate all configuration units cached on the server. For fur ther information,see Invalidate Cache on page 18. The next time a client requests a configurationunit, it receives the most recent version.
By default, invalidating the cache is also reload Aurea CRM.Web in the browser.To prevent it set the parameter ResetSession of menu action ID_NET_INVALIDATECACHEto 0. However, this does not invalidate the configuration units cached on the client,e.g., Web Configuration parameters.
61AUREA CONFIDENTIAL
CRM.Designer

For some configuration unit types, such as list fields, queries, analyses, and WebConfiguration parameters the server-side cache is invalidated automatically.
Working with Customer Admin Mode
Customers using a SaaS environment can set up a special Customer Admin Modeallowing administrative users of Aurea CRM.Web, to perform small customizationsthemselves. In this scenario, CRM.Designer is accessed from within Aurea CRM.Web.See Customer Admin Mode on page 865 for fur ther details.
Installing the DatabaseFollow the instructions on this topic to install the CRM.Designer database for thefirst time.
If you do not have a CRM.Designer database yet, and is making a fresh install, thisis the supported way to create a designer database:
1. Create the database and upload the root configuration UPDATE_DEFAULT usingCRM.bulkloader. For fur ther details, see CRM.bulkloader on page 760.
2. Import the data model from the Aurea CRM database.
3. Upload the sub-configurations using CRM.bulkloader.
Note: If you already have a CRM.Designer database, you should always updatethe data model information of CRM.Designer before you upload sub-configurations.
For information on how to install or upgrade the CRM.Designer database, the defaultconfiguration, and CRM.Designer, see the Setting Up the CRM.Designer Databasein the Aurea CRM Web Installation Guide.
Limitations of CRM.DesignerCRM.Designer is available only in English and should be used only by administrators.
CRM.Designer is a developer tool to edit the contents of the CRM.Designer database.The target group is technical personnel, like administrators. It is not designed forusers of Aurea CRM.Web.
CRM.Designer is only available in English.
Aurea CRM Legacy Forms are deprecated and no longer supported by Aurea inversion 8 and above. Forms like LastQueryResult and related menu items are notsupported in versions after U7. You are requested to move to the new Forms onpage 621.
62AUREA CONFIDENTIAL
Chapter 2: Configuring CRM

Using CRM.DesignerCRM.Designer allows administrators to have granular control of configuration andthe look and feel of CRM.Web. Use CRM.Designer to customize the application toadapt to your business environment.
Aurea CRM.Web is shipped with standard configuration called UPDATE_DEFAULT. Thisdefault configuration allows you to revert to the original application configuration atany time. You cannot change or delete the UPDATE_DEFAULT configuration. Only de-rived configurations can be edited. All customizations have to be done in sub-con-figurations of this default configuration.
Creating a New Configuration
You can either directly select the Configuration you want to modify, or you set itby selecting the CRM Username of the configuration you want to change. See Usersand Configurations on page 74 for fur ther information.
Click New Sub-Configuration to create a new configuration derived from an existingone. For more details, see Creating a New Configuration on page 75.
Working with Existing Configuration
To customize elements of the Aurea CRM.Web application, you can change existingconfiguration units. For fur ther details, see Designing Configuration Units on page64. Configuration units are identified and referenced by their name and searchedin the configuration hierarchy from bottom to top, i.e., from the user's configurationto UPDATE_DEFAULT.
The main window of CRM.Designer allows you to select the Application, the Vertical,the CRM username, and the Configuration you want to view or edit.
A Configuration Unit can be one of the following:
• Field group containing field controls defining which fields should be displayed ona search mask, a list or a details mask for a specific info area
• Text that is used in Aurea CRM.Web
• Menu, sub-menu or menu action of a context menu or the application menu
• Buttons
• Headers
• Action templates
• Processes
• Forms
• Queries
63AUREA CONFIDENTIAL
CRM.Designer

• Filters
• Analysis
• Etc.
Using AQL Syntax
CRM.Designer allows you to define and edit queries and filters using the AQL syntax.See AQL Syntax on page 882 for details. You can also edit the AQL syntax in theAQL editor.
Before you change an existing configuration unit, you have to copy the unit to yourconfiguration. By copying a unit, you take control of this unit. Subsequent changesof this unit in a parent configuration are not reflected in your Aurea CRM.Web ap-plication.
Naming Conventions in CRM.Designer
Use <InfoAreaId> as the name for the default configuration unit for the info area.For example, FI is the name of the default Search&List configuration, field group,table caption, etc. used for the Company info area.
Deleting a Configuration
Click the Delete Configuration button to remove an existing configuration. A popupmessage displays requesting a confirmation. Click Ok to confirm the deletion. Formore details, see Deleting a Configuration on page 76.
Designing Configuration UnitsUse CRM.Desginer to edit or create a configuration unit.
To edit or create a configuration unit:
1. On the CRM.Designer main page select the desired configuration or username.
2. Select the unit type by clicking the respective button, e.g., Headers, Buttons, or
Info Areas. All CRM.Designer pages are also accessible via the button.
3. Many pages in CRM.Designer offer a full-text "find as you type" search featureto find the item you want to edit quickly. Enter par t of a configuration unit's nameto filter the list of available items.
64AUREA CONFIDENTIAL
Chapter 2: Configuring CRM

The search results are grouped by configuration, having the current configuration
at the top. Click no groups, to reset grouping. Configuration units that belongto the current configuration and, are therefore editable, are highlighted in bothviews.
4. To edit an existing configuration unit:
• Click View to view the definition of an item.
• Click Copy to copy an item from a parent configuration to the configuration
you are currently designing. Or click , if available, on theconfiguration unit's details page.
• Click Edit to edit an item. Detailed information on all available settings forthe various configuration units can be found in this book.
• Click Delete to delete an item.
Note: You can only edit and delete items belonging to the current configuration.
If you delete an item from your configuration and an item with the same nameexists in your parent configuration, the item from the parent configuration be-comes valid in your configuration.
5. To create a new configuration unit, enter a name and click New. Or select anexisting definition under Copy from before clicking New.
65AUREA CONFIDENTIAL
CRM.Designer

Note:
• The name identifies each configuration item. This name is unique within thevertical and the configuration within the configuration unit type.
• It is highly recommended to use the info area ID as the name for the defaultconfiguration item in the info area, e.g., FI is the default Search&List configurationused for the Company info area. For fur ther information, see Naming Conventionin CRM.Designer in Using CRM.Designer on page 63.
Help Icons
Many pages in CRM.Designer offer help icons providing information for the currentcontext, including syntax information, available options, etc.
Adding DescriptionsUse the Description field to document the configuration unit you changed or created.
You can resize the Description field using the button.
Note: Restriction: Resizing the Description field is currently not supported byIE10.
The descriptions are displayed on the overview pages as well. Use the Show De-scriptions checkbox to show or hide the descriptions.
66AUREA CONFIDENTIAL
Chapter 2: Configuring CRM

Displaying ReferencesThe Referenced by section on button, header group, menu action, and table captionconfiguration pages displays all configuration units where the button, header, ormenu action is currently used.
It is useful when you need to find all the instances that an item is used or when youplan to replace or remove all the instances.
See the examples below:
• Buttons:
Headers belonging to a Header Group are listed as <header group>.<header>,e.g., A1.Expand or DEFAULT.Expand, special headers by their name only, e.g.,Calendar.
• Header groups:
• Menu actions:
• Process Ask configurations:
67AUREA CONFIDENTIAL
CRM.Designer

Note: The usage information for processes and process steps can be displayedvia the Show Usage button.
• Table captions:
Clicking on a link navigates to the respective configuration unit.
Note: Only selected references from certain configuration units are displayed. TheReferenced by section does not show if a configuration unit is used in a form orthe code.
Showing or Hiding Arguments and Field AttributesUse the Show and Hide buttons to control the display of argument and field attributes.
When defining an action or process step, use the or Show all arguments orHide empty arguments buttons to toggle between views and add new arguments.The following input arguments are visible by default:
• Mandatory arguments that are not read-only.
• Arguments that have another than the default value.
All other arguments are hidden and can be displayed by clicking Show all argu-ments.
When creating a new action or process step, all input arguments are visible by de-fault.
The same buttons are used for showing or hiding field attributes in the Field ControlEditor. The default is Show all attributes.
Check-in and Checkout SupportThe Check-in and Checkout feature aler ts the user that the same item was modifiedpreviously by another user.
When multiple users are updating the same CRM.Designer element within a specifiedtime frame the last user to update the element overrides the changes made by theprevious user. Check-in and checkout support aler ts the last user about the changesmade by another user and gives him a choice of overriding the previous configurationchanges. This feature ensures that the appropriate entry is made in the CRM.De-signer.
68AUREA CONFIDENTIAL
Chapter 2: Configuring CRM

Note: If the updates to the designer element are the same, then the user is notprompted about the previous change.
See an example in the screenshot below:
Logging Changes of CRM.Designer ItemsCRM. Designer allows you to generate log files to audit changes done in the system.
Change HistoryUse the Change History log file for auditing the history of changes applied to theCRM.Designer database.
All changes made to configuration units are saved in the PORTAL_UNITHISTORY tableof the CRM.Designer database.
Popup window Reason For Change
For units belonging to a configuration that is not a user configuration, i.e., a config-uration with an ID < 100,000, a change reason must be entered with a minimum ofsix characters. Otherwise, the configuration unit cannot be saved.
Clicking Apply saves the changes and the reason, clicking Cancel returns to theconfiguration unit definition without saving.
You can use the Markdown syntax to format your text. For fur ther information, seehttp://en.wikipedia.org/wiki/Markdown.
69AUREA CONFIDENTIAL
CRM.Designer

You can disable the Reason for Change popup for specific configurations by addingthe following parameters to CRM.Designer's settings.xml file:<update.configuration.designer>
[...]<DisableReasonForChange><ConfigName>Test_Config</ConfigName><ConfigName>Another_Test_Config</ConfigName></DisableReasonForChange></update.configuration.designer>
You cannot disable the Reason for Change popup for the configurations deliveredby Aurea CRM: UPDATE_DEFAULT, UPDATE_DEFAULT Offline, UNITTEST_DEFAULT, up-date.tablet and all configurations whose names star t with TE_, i.e., all configurationsbelonging to an industry solution.
Note: The configuration names are case-sensitive.
Recent Changes Panel
The change history is displayed at the bottom of each page in the Recent Changespanel. The fifteen most recent changes are shown.
For information on how to display all changes, and filter them by date or configura-tion, see the ar ticle “How to Analyze the CRM.Designer Change History”https://support.aurea.com.
The change history contains the following information:
• When: Timestamp of the change.
• Operation: Type of change (Create, Copy, Update, Delete)
• Who: The user who performed the change, see Authentication on page 748.
• Details: Information about the change, either automatically created or the Reasonfor Change text entered by the user (for non-user configurations).
70AUREA CONFIDENTIAL
Chapter 2: Configuring CRM

The Recent Change panel is available for the following configuration units:
• Menus• Action templates
• Processes• Analyses
• Process Asks• Buttons
• Process steps• CRM.Designer Logins
• Queries• CRM.Designer Settings
• Search&List configurations• Expand configurations
• Table captions• Field controls
• Text groups• Field groups
• Texts (on the respective text grouppage)
• Filters
• Timelines• Forms
• TreeView configurations• Header groups
• Web Configuration parameters (s. be-low)
• Headers
• Menu actions
Some of these pages, e.g., form designer, and field control editor offer a
button instead of the panel. The list of changes is displayed in apopup in this case.
On the Web Configuration page, an icon is displayed for each parameter,showing the changes in a popup.
Statement LogActivate an SQL statement protocol to log changes made to the CRM.Designerdatabase from both Aurea CRM.Web and CRM.Designer components.
The SQL statement protocol logs UPDATE, DELETE and INSERT statements aswell as calls to stored procedures.
71AUREA CONFIDENTIAL
CRM.Designer

Note: Activating the statement log may have a negative impact on the system per-formance.
To activate the statement protocol, add <StatementProtocol Enabled="true" /> tothe <update.configuration> section of CRM.Designer's settings.xml file.
The resulting log is located in the CRM.Designer database in the tables PORTAL_PRO-TOCOL and PORTAL_PROTOCOL_PARAM. The table PORTAL_PROTOCOL contains the SQLstatement and, if applicable, the user ID. For each SQL statement, the PORTAL_PRO-TOCOL_PARAM table includes a row for each parameter value.
The user ID is only logged if EnableAnonymousAccess is disabled. For fur therdetails, see Settings on page 750.
Providing the Enterprise Serial Key to CRM.DesignerProvide the Enterprise Serial Key when upgrading to an Enterprise License to enablethe extra features available.
Use CRM.Designer maintenance setup to facilitate this process. Perform the followingsteps to provide the enterprise serial key :
1. Upgrade the Aurea CRM to the latest version.
Note: Enterprise features are supported from CRM version 9.1.0 onwards.
2. Replace the serial number that is saved in the CRM.Win installation directory in…\system\sys\Serialnumber.txt file.
3. Initiate CRM.Designer to the new enterprise serial key using one of these methods:CRM.Designer maintenance setup or Update the settings.xml file for theCRM.Designer described below:
• CRM.Designer maintenance setup
1. Double click and open the CRM.Designer program. The CRM.DesignerInstallshield Wizard displays.
72AUREA CONFIDENTIAL
Chapter 2: Configuring CRM

2. Click Next. The Serial Number page displays.
3. Enter the Enterprise Serial Number and click Next to continue with themaintenance setup.
• Update the settings.xml file for the CRM.Designer
1. Edit the settings.xml file located in the runtime\designer\settingsfolder.
2. Enter the <serial> sub-element of the <update.configuration> element. Itshould look as shown below.<update.configuration><OleDbDsn>&designerDsn;</OleDbDsn><VersionCheckOff>true</VersionCheckOff><Serial>XXXX-XXXX-XXXX-XXXX-XXXX-XXXX-XXXX-XXXX</Serial></update.configuration>
73AUREA CONFIDENTIAL
CRM.Designer

4. Confirm the serial key change by performing the following steps:
a. Run mmcfg.exe located in the \system\exe directory. Confirm the messagestating that the license rights have changed with ‘Yes’.
b. The window should display the new serial key and the License Type fieldshould show Enterprise. See the screenshot below:
5. Restar t the CRM server application pool.
6. Login to the CRM.Web. The star t page of the web now shows the mark [Enterprise].
Users and ConfigurationsThis section describes how CRM.Designer configurations work and how to controlassign configuration to users.
ConfigurationsAurea CRM.Web is cer tified and shipped with Aurea CRM's standard configurationcalled UPDATE_DEFAULT. This default configuration allows you to revert to theoriginal application configuration at any time.
Each user has his configuration derived from the customer’s sub-configuration:
Use UPDATE_DEFAULT as the base for defining your customized configurations. If youcreate an empty customized configuration, this configuration is logically equal toits parent because it inherits the configuration units from the parent configuration.
Note: Note that you cannot change or delete the UPDATE_DEFAULT configuration.Only derived configurations can be edited. All customizations have to be done insub-configurations of this default configuration.
74AUREA CONFIDENTIAL
Chapter 2: Configuring CRM
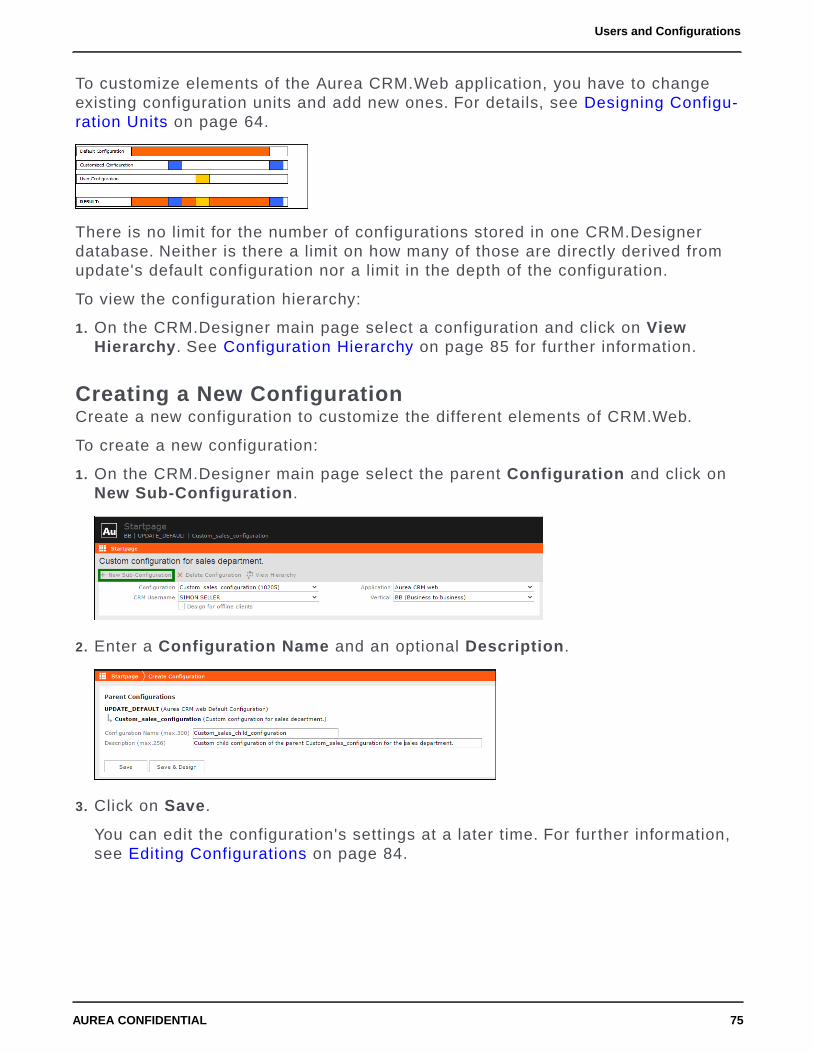
To customize elements of the Aurea CRM.Web application, you have to changeexisting configuration units and add new ones. For details, see Designing Configu-ration Units on page 64.
There is no limit for the number of configurations stored in one CRM.Designerdatabase. Neither is there a limit on how many of those are directly derived fromupdate's default configuration nor a limit in the depth of the configuration.
To view the configuration hierarchy:
1. On the CRM.Designer main page select a configuration and click on ViewHierarchy. See Configuration Hierarchy on page 85 for fur ther information.
Creating a New ConfigurationCreate a new configuration to customize the different elements of CRM.Web.
To create a new configuration:
1. On the CRM.Designer main page select the parent Configuration and click onNew Sub-Configuration.
2. Enter a Configuration Name and an optional Description.
3. Click on Save.
You can edit the configuration's settings at a later time. For fur ther information,see Editing Configurations on page 84.
75AUREA CONFIDENTIAL
Users and Configurations

Deleting a ConfigurationAdministrators can delete configurations that are no longer in use.
You can delete an existing configuration from the database if
• either the configuration has no sub-configurations.
• or all sub-configurations of this configuration do not have ID references to itemsof the configuration you want to delete.
Note: You cannot delete Aurea's default configurations.
If a configuration you want to delete has sub-configurations, it is strongly recom-mended to delete those first or not to delete such a configuration at all.
To delete a configuration:
1. On the CRM.Designer main page, select a Configuration and click DeleteConfiguration.
2. A confirmation popup is displayed: If you confirm with Yes – Delete Configuration,the following changes are applied to the CRM.Designer database:
• All configuration units of this configuration are deleted.
• The configuration IDs of all texts of text groups of the parent configurationsare set to NULL.
• All sub-configurations of the deleted configuration get its parent as their newparent.
• The configuration itself is deleted.
Configuration OverviewCRM.Designer main page offers an overview of the different settings available.
To access the configuration overview:
1. On the CRM.Designer main page in the Administration area, click ConfigurationOverview to display an overview of all elements filters, queries, field groups,menus, headers, etc. defined in the current configuration.
76AUREA CONFIDENTIAL
Chapter 2: Configuring CRM

2. Click on an item to navigate to the respective configuration unit.
To control the maximum number of units displayed in a configuration overview page,use the element ConfigurationOverviewMaxUnitsToDisplay in the settings.xmlfile located in the runtime\designer\settings folder. The default maximumnumber of units displayed is 100.
For example, to increase the maximum units displayed to 200 add the element tothe settings.xml, as shown below:
<update.configuration.designer>...
<ConfigurationOverviewMaxUnitsToDisplay>200</ConfigurationOverviewMax-UnitsToDisplay>
...</update.configuration.designer>
77AUREA CONFIDENTIAL
Users and Configurations

Transferring Configurations to Another CRM.DesignerDatabaseYou can transfer configuration data as XML files to other CRM.Designer databasesusing CRM.Bulkloader:
During the transfer you can move:
• configurations
• configuration units
• the complete database
To transfer a configuration:
1. Create a directory for the XML files.
2. Download the desired configuration to this directory. For fur ther details, seeDownloading Configuration Data from the CRM.Designer Database on page 761.
3. Create a configuration with the same name in the target database. Theconfiguration should have the same parents as in the source database. If such aconfiguration already exists, it is overwritten on upload.
4. Upload the XML files containing the configuration to the target database. Forfur ther information, see Uploading Configuration Data to the CRM.DesignerDatabase on page 764.
Note: Users, languages, logins, and authentication settings are not transferred viaconfigurations or packages; you need to create a database dump to transport theseitems.
For more information about transferring Configuration Units, see Packages onpage 711.
For fur ther details on how to transfer the complete database, see Database Dumpon page 767.
Users | ConfigurationsUse the Configuration area to manage CRM.Designer configurations and assignusers and groups to configurations.
Fastpath: Main Page: Configuration > Users | Configurations
78AUREA CONFIDENTIAL
Chapter 2: Configuring CRM

Note: The Users | Configurations page is configuration-independent andvertical-independent.
The Users | Configurations page consists of two views selectable via radio buttons:
• The Users view allows you to create users and user groups and assignconfigurations to them. For fur ther information, see Users View on page 80.
• The Configurations view lists all existing configurations. See ConfigurationsView on page 83 for details.
The configuration hierarchy is either fixed, i.e., it can only be changed explicitly ordynamic, i.e., the configuration is determined by the current organizational groupof the rep.
Fixed Configurations:
Changes of the configuration for the default user, the user's group, or a par ticipationof this user in a User Group do not affect the user’s configuration hierarchy. Thisis the default option.
If a user logs on to Aurea CRM.Web, the following checks are applied to determinethe configuration for that user:
• If the user already has an entry on the Users | Configurations page, thatconfiguration is applied.
• If there is no entry on the Users | Configurations page, but an entry for the userexists in the User Groups section, that configuration is applied.
• If no entry is found for the user or his group, the DefaultUser determines theconfiguration. The DefaultUser configuration is also used for the login page.
79AUREA CONFIDENTIAL
Users and Configurations

Dynamic Configurations:
When using dynamic configurations, i.e., dynamic parent is checked for a user,the user is always assigned the configuration that is defined for his current organi-zational group, as set in the Org. Group ID field in the rep record, independent ofthe configuration assigned in CRM.Designer.
If no configuration corresponding to the organizational group exists, the DefaultUserconfiguration is applied.
Users ViewThe Users view lists all currently defined users with their Configuration andApplication.
The Users | Configurations page offers two views, the user and configuration view.When you select the User view the screen below appears with the following sections:
• Default Users: The DefaultUser is used for users for whom no configuration isfound.
• User Groups: You can assign a configuration to an organizational group. Usersthat belong to that group use this configuration. Users are assigned toorganizational groups via the Org. Group ID field in the Rep info area ID:2.
80AUREA CONFIDENTIAL
Chapter 2: Configuring CRM

To create a user group entry:
1. Enter the group's Rep/Group ID number (ID:0) as User Group ID: Skip theleading zeros and prefix the ID with a '#'.
2. Click Add.
3. Select a Configuration and Application for the group.
• User: Users that have their configuration are listed here. You can manually adda user by entering his Aurea CRM login name as User Name. Select aConfiguration and Application for the user.
The On change option defines whether a new configuration, with the current config-uration as its parent, is automatically created when the user changes his settingsin Aurea CRM.Web. The default for Default Users and User Groups is to createnew config. For fur ther details, see Editing Users on page 81.
In a standard environment, assign your customized configuration explicitly to theDefaultUser, with On change set to create new config. See Automatically CreatingUser Configurations on page 82 for fur ther information.
Note: By default, the SU (Super User) has the UPDATE_DEFAULT configurationassigned. If the SU needs to be able to change his configuration, e.g., modify listfields in Aurea CRM.Web, a different configuration must be assigned to this user.
Editing UsersThe edit user feature allows administrators to select a different configuration andto assign a dynamic parent to the user.
To edit a user's configuration settings:
1. Open the CRM.Designer and go the Users | Configurations page.
2. Check the Users view radio button
3. Click on Edit beside the desired user.
The following settings are available:
• Configuration: Select the configuration you want to assign to the user.
81AUREA CONFIDENTIAL
Users and Configurations

Only configurations for the current Application are available. To assign aconfiguration, you need to create a new user first.
• Create new config on change: This setting determines the On Change setting.
• If checked, a new configuration with the current configuration as its parentis automatically created when the user changes his settings in AureaCRM.Web On change = create new config.
Use this setting for configurations that are automatically assigned to usersand that should not be changed from within Aurea CRM.Web.
Check this setting for configurations assigned to the default user and to usergroups.
• If unchecked, the user's changes are saved in the current configuration Onchange = modify config.
Use this setting for configurations that users should be able to change directlyfrom within Aurea CRM.Web.
• Dynamic parent: If checked, the user is always assigned the configuration thatis defined for his current organizational group as set in the Org. Group ID fieldin the rep record, independent of the configuration assigned in CRM.Designer.
If no configuration corresponding to the organizational group exists, the Defaul-tUser configuration is applied.
4. Click on Save.
Besides, the page offers the following links to configurations:
• Click on the Edit link to edit the current configuration's settings. For details,see Editing Configurations on page 84.
• Click on the Design link to return to the CRM.Designer main page and view ordesign the current configuration. See Designing Configuration Units on page 64for fur ther information.
• Click on a link under Parents to view or design the respective configuration.
Automatically Creating User ConfigurationsUser configurations are automatically created when Aurea CRM.Web modifies datain the CRM.Designer database to store changes in the user configuration, definelists or store private queries or analyses.
To automatically create users and configurations as children of your customizedparent configuration:
1. Set the configuration of the DefaultUser to your customized configuration in theDefault Users section of the Users | Configurations page.
2. Check Create new config on change.
82AUREA CONFIDENTIAL
Chapter 2: Configuring CRM

For any user who logs on to Aurea CRM.Web for the first time and changes, e.g.,a list definition, a user and configuration is automatically created in CRM.Designer.The user's configuration is created with your customized configuration as parent.
If you are using group configurations, the same mechanism is applied if the groupconfiguration is set to Create new config on change.
For the administrator, when using the SU (Super User) account, the On changesetting is ignored to ensure that the administrator always changes his current con-figuration. If the administrator has the parent configuration as his configuration,changing this configuration influences all users.
If you do not want the administrator to change configuration data for all users, createan extra user and configuration for the SU.
Configurations ViewThe configuration view lists all currently defined configurations with their parentconfiguration and the users that use them
The Users | Configurations page offers two views, the user and the configurationview. When you select the Configuration view the screen below appears with thefollowing sections:
• Root Configurations: The default configurations delivered with the Aurea CRMproduct.
• Group Configurations: Group configurations and configurations that weremanually created. For details, see Creating a New Configuration on page 75.
• User Configurations: Configurations that have been created for a specific user,either manually or automatically by a user changing, for example, a list in AureaCRM.Web.
83AUREA CONFIDENTIAL
Users and Configurations
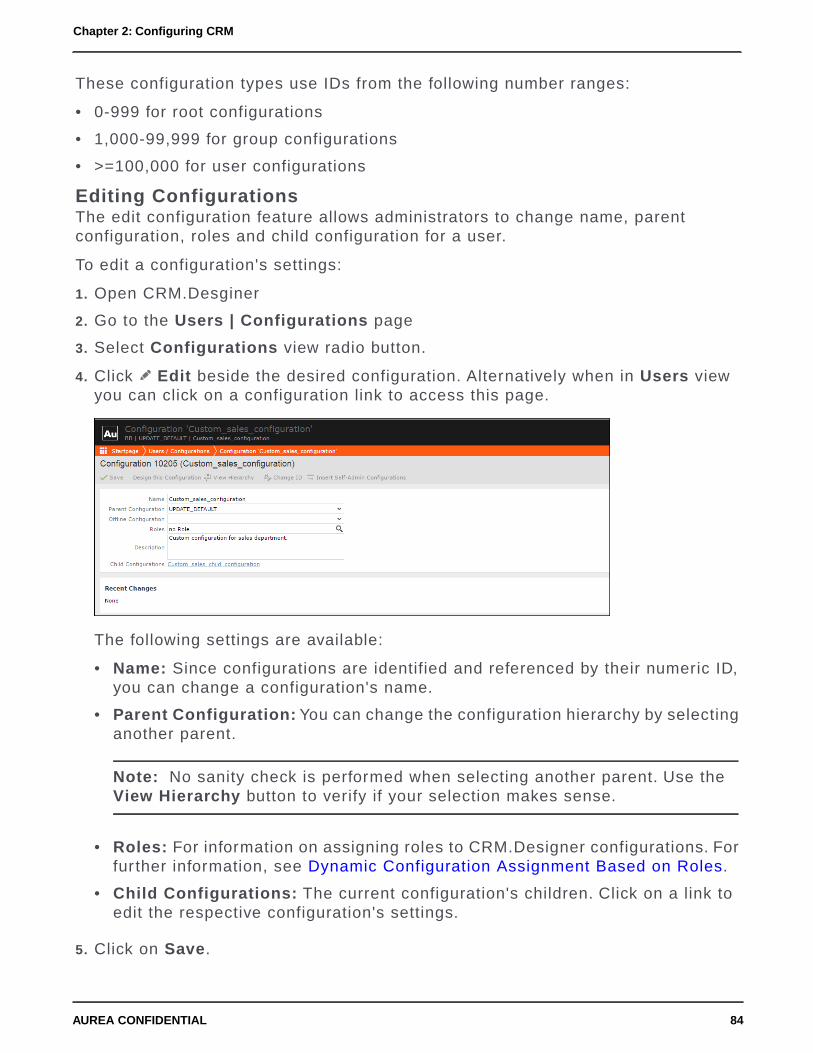
These configuration types use IDs from the following number ranges:
• 0-999 for root configurations
• 1,000-99,999 for group configurations
• >=100,000 for user configurations
Editing ConfigurationsThe edit configuration feature allows administrators to change name, parentconfiguration, roles and child configuration for a user.
To edit a configuration's settings:
1. Open CRM.Desginer
2. Go to the Users | Configurations page
3. Select Configurations view radio button.
4. Click Edit beside the desired configuration. Alternatively when in Users viewyou can click on a configuration link to access this page.
The following settings are available:
• Name: Since configurations are identified and referenced by their numeric ID,you can change a configuration's name.
• Parent Configuration: You can change the configuration hierarchy by selectinganother parent.
Note: No sanity check is performed when selecting another parent. Use theView Hierarchy button to verify if your selection makes sense.
• Roles: For information on assigning roles to CRM.Designer configurations. Forfur ther information, see Dynamic Configuration Assignment Based on Roles.
• Child Configurations: The current configuration's children. Click on a link toedit the respective configuration's settings.
5. Click on Save.
84AUREA CONFIDENTIAL
Chapter 2: Configuring CRM

In addition, the page offers the following buttons:
• Click on Design this Configuration to view or design the current configuration.More details at Designing Configuration Units on page 64.
• Click on View Hierarchy to display the configuration hierarchy. See ConfigurationHierarchy on page 85 for details.
• Click on Change ID to assign a new numeric ID to the configuration. For fur therinformation, see Changing Configuration IDs on page 85.
• Click on Insert Self-Admin Configurations if you are setting up customer adminmode, e.g., in a SaaS environment. See Creating SelfAdmin Configurations onpage 868 for more information.
Note: The Change ID and Insert Self-Admin Configurations buttons are notavailable for user configurations IDs >= 100,000.
Configuration HierarchyThe configuration hierarchy displays all parents and children of the currentconfiguration.
User configurations, which IDs >= 100,000 are not displayed.
The View Hierarchy button is available on the CRM.Designer main page and whenediting a configuration's settings. See Editing Configurations on page 84 for fur therdetails.
Clicking on Edit in a configuration bubble closes the popup and switches to theCRM.Designer main page with that configuration active.
Double-clicking a configuration displays the hierarchy for that configuration.
Changing Configuration IDsUse the Change ID button to create number ranges for configuration IDs.
CRM.Designer configurations are identified and referenced by their numeric ID. Usethe Change ID button to create number ranges for configuration IDs and to shiftconfigurations when inserting SelfAdmin configurations. For fur ther information,see Creating SelfAdmin Configurations on page 868.
85AUREA CONFIDENTIAL
Users and Configurations

Note: It is strongly recommended to back up the CRM.Designer database beforechanging configuration IDs.
You need access to the complete configuration hierarchy to be able to use thisfeature, i.e., your authentication settings must be set to Configuration = all. Fordetails, see Authentication on page 748.
To change a configuration's ID:
1. On the Edit configuration page click Change ID.
Note: This button is not available for user configurations IDs >= 100,000.
The Change configuration ID popup is displayed.
The current ID is displayed as New configuration ID.
2. Enter the desired ID.
Note: You can not enter an ID >= 100,000.
3. Determine how configurations with higher IDs should be handled:
• Update configurations with higher IDs: If checked, all configurations withhigher IDs are listed below providing a preview of the new IDs.
• Leave the following gap between the new configuration IDs: Creates thenew IDs with the specified gap. the default: is 10.
4. Click OK.
86AUREA CONFIDENTIAL
Chapter 2: Configuring CRM
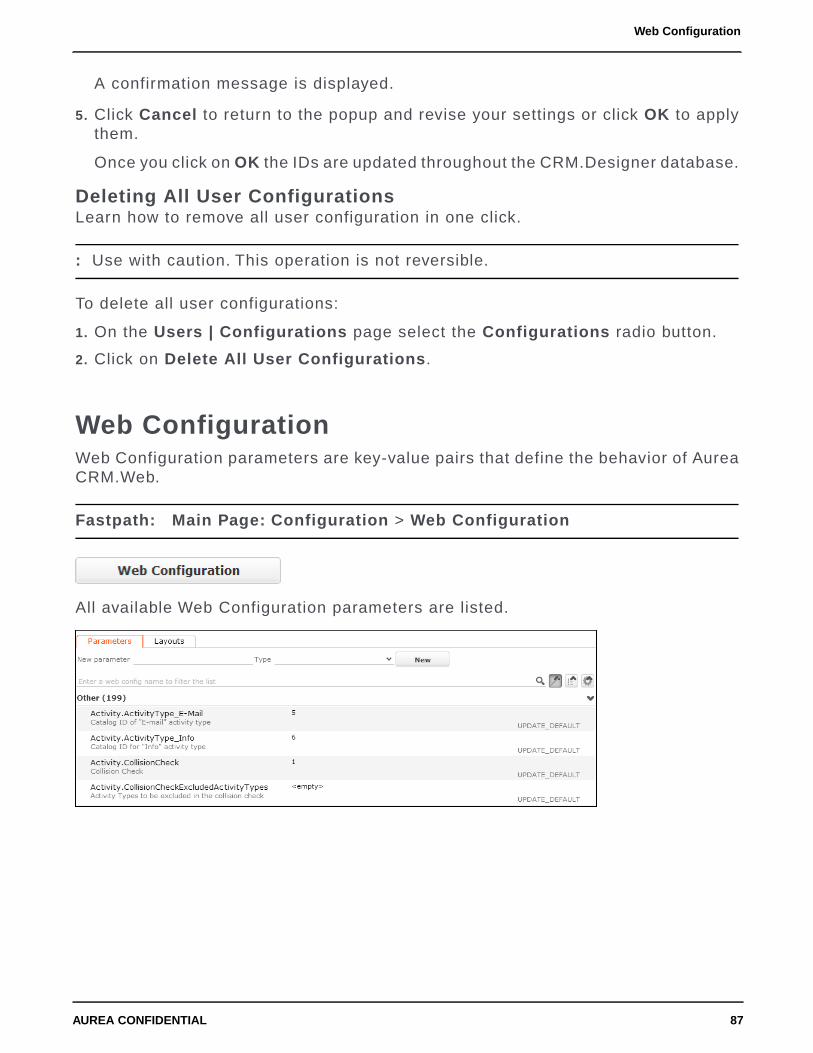
A confirmation message is displayed.
5. Click Cancel to return to the popup and revise your settings or click OK to applythem.
Once you click on OK the IDs are updated throughout the CRM.Designer database.
Deleting All User ConfigurationsLearn how to remove all user configuration in one click.
: Use with caution. This operation is not reversible.
To delete all user configurations:
1. On the Users | Configurations page select the Configurations radio button.
2. Click on Delete All User Configurations.
Web ConfigurationWeb Configuration parameters are key-value pairs that define the behavior of AureaCRM.Web.
Fastpath: Main Page: Configuration > Web Configuration
All available Web Configuration parameters are listed.
87AUREA CONFIDENTIAL
Web Configuration

On the Parameters tab, you can:
• Search for a parameter and thus filter the list.
• Group parameters by topic or by configuration:
• Click group by parameter to sor t parameters by their group, e.g., Activity,Calendar, etc.
• Click group by config to sor t parameters by the configuration in which itsvalue is saved.
• Click no groups to reset sor ting.
Parameters that do not belong to a group are listed under Other, deleted param-eters under Deleted at the end of the list.
• Navigate between parameters using the arrow and tab keys.
• Change a parameter's value. See Setting Values of Web Configuration Parameterson page 88.
• Create new parameters. See Creating Web Configuration Parameters.
• Customize parameters and values. See Modifying Web Configuration Parameters
• Delete parameters. See Deleted Web Configuration Parameters.
On the Layouts tab, you can design configuration layouts to allow users to changesome settings directly in Aurea CRM.Web. See Configuration Layouts on page 93.
For a list of all Web Configuration parameters as defined in UPDATE_DEFAULT, see WebConfiguration Parameters on page 93.
Setting Values of Web Configuration ParametersCRM.Designer allows administrators to edit the parameter of the CRM.Webconfiguration.
Each Web Configuration parameter without an assigned value in the current config-uration inherits the value from the parent configuration.
To change the value of a Web Configuration parameter:
1. Search for the parameter you want to change.
88AUREA CONFIDENTIAL
Chapter 2: Configuring CRM

The following information is displayed per list entry:
• the parameter's name
• the parameter's label, i.e., Display Name
• the current value, if available
• the configuration where the value is currently defined
2. Enter the desired value. The input control depends on the parameter's type sucha text field, drop-down list, etc. For details, see Parameter Types on page 89.
The changed value is automatically saved as soon as you leave the entry field.
3. Click Edit to view or edit the parameter's properties or values for parametersoffering predefined values like Combobox, etc. For fur ther information, see Mod-ifying Web Configuration Parameters.
Click Delete to remove the parameter from the current configuration.
Click Clear to remove the parameter's value from the current configuration.This resets the parameter to the value of the parent configuration.
Click Info to display the parameter's change history. See Change History onpage 69.
Parameter TypesReview this list to see all the parameters types ready for use in the CRM.Webconfiguration.
The following Web Configuration parameter types are available:
• Catalog for displaying catalog values in a drop-down list. Web Configurationparameters of type Catalog reference a catalog field from the Aurea CRMdatabase, e.g., Locale.BaseCurrency gets its values from the Currency field inthe Exchange Rate info area WK.
• Character.
• Checkbox for Boolean parameters.
89AUREA CONFIDENTIAL
Web Configuration

• Checkboxes for selecting multiple values.
• Combo:Config for displaying a drop-down list containing all available designerconfigurations.
• Combo:WriteConfig for displaying a drop-down list containing all writable designerconfigurations.
• Combobox for displaying values in a drop-down list. For parameters of typeCombobox containing up to three values. The values are displayed as radiobuttons.
• List for entering multiple values as text comma-separated.
• Number.
• Radiobutton for choosing between two values.
• JSON Use this to type handle extra files on the server and make sure they getcopied between the different environments. It shows an edit icon at the end ofthe row that offers a code mirror editor for convenient data input or viewing. Thisfunction is similar to the Hook function in Field controls.
Customizing Web Configuration ParametersThis section describes the customization available in CRM configuration.
You can create, modify or delete web configuration parameters as per your needs.
Creating Web Configuration Parameters
To create a new Web Configuration parameter:
1. On the Web Configuration page enter a parameter name in the New parameterfield.
To make use to the group by config capability of the Web Configurationpage, comply with the naming convention <prefix>.<property> e.g., Calen-dar.myProperty. <prefix> is used as group header.
2. Select a parameter Type. For fur ther details, see Parameter Types on page 89.
3. Click New.
The parameter is created in the current configuration.
90AUREA CONFIDENTIAL
Chapter 2: Configuring CRM
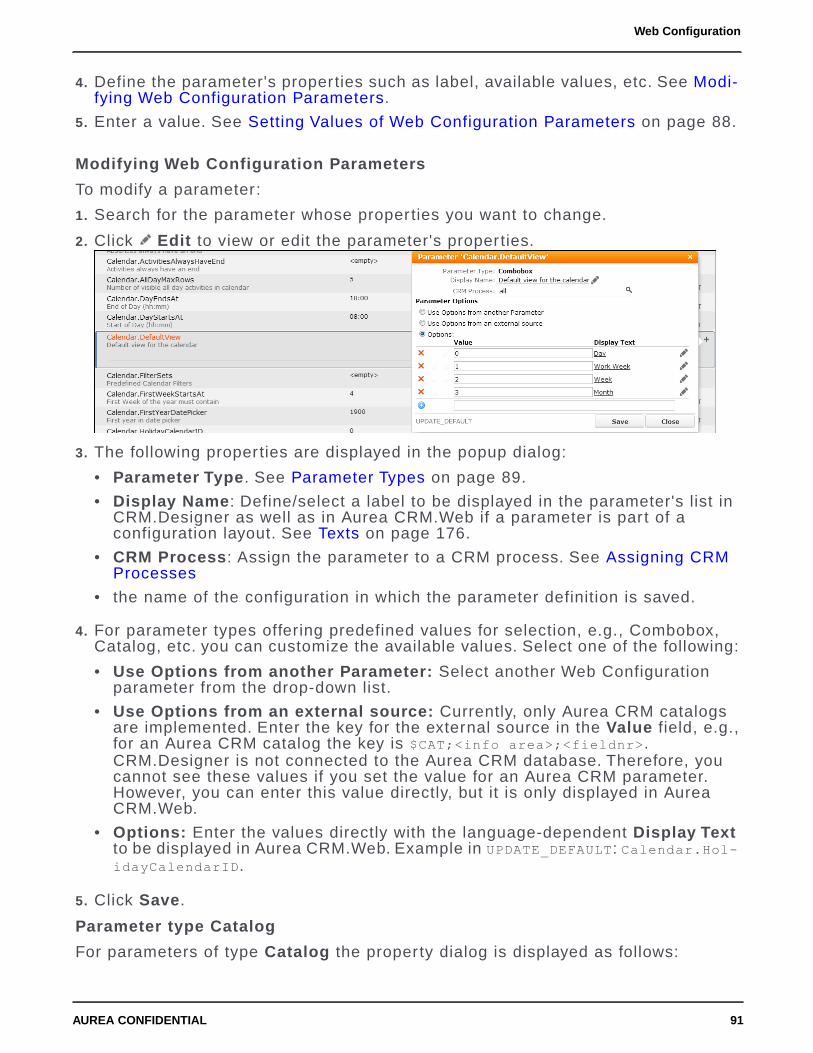
4. Define the parameter's properties such as label, available values, etc. See Modi-fying Web Configuration Parameters.
5. Enter a value. See Setting Values of Web Configuration Parameters on page 88.
Modifying Web Configuration Parameters
To modify a parameter:
1. Search for the parameter whose properties you want to change.
2. Click Edit to view or edit the parameter's properties.
3. The following properties are displayed in the popup dialog:
• Parameter Type. See Parameter Types on page 89.
• Display Name: Define/select a label to be displayed in the parameter's list inCRM.Designer as well as in Aurea CRM.Web if a parameter is par t of aconfiguration layout. See Texts on page 176.
• CRM Process: Assign the parameter to a CRM process. See Assigning CRMProcesses
• the name of the configuration in which the parameter definition is saved.
4. For parameter types offering predefined values for selection, e.g., Combobox,Catalog, etc. you can customize the available values. Select one of the following:
• Use Options from another Parameter: Select another Web Configurationparameter from the drop-down list.
• Use Options from an external source: Currently, only Aurea CRM catalogsare implemented. Enter the key for the external source in the Value field, e.g.,for an Aurea CRM catalog the key is $CAT;<info area>;<fieldnr>.CRM.Designer is not connected to the Aurea CRM database. Therefore, youcannot see these values if you set the value for an Aurea CRM parameter.However, you can enter this value directly, but it is only displayed in AureaCRM.Web.
• Options: Enter the values directly with the language-dependent Display Textto be displayed in Aurea CRM.Web. Example in UPDATE_DEFAULT: Calendar.Hol-idayCalendarID.
5. Click Save.
Parameter type Catalog
For parameters of type Catalog the property dialog is displayed as follows:
91AUREA CONFIDENTIAL
Web Configuration

Select the Info Area and Field of the catalog whose values you want to use.
The Catalog parameter type allows you to use catalog values which were synchro-nized using default language plus tenant number as input arguments for actions,e.g., as defaultValues in an ExpandNew action or defaultFieldValues or fixedField-Values in a Search action. for details, see defaultFields/defaultValues, fixedField-Values and defaultFieldValues. For more information on synchronizing catalogs,see Catalog Value Synchronization.
Syntax: $<WebConfigParameterName>
Example:
1. Create a Web Configuration parameter of type Catalog named CountryAustria.
2. Assign the value Austria to the parameter.
3. Use the Web Configuration parameter in the action, e.g. defaultValues =$CountryAustria in an ExpandNew action.
You need to create a Web Configuration parameter for each catalog value you wantto use as a default value.
Since you can define a Web Configuration parameter's value once and use it multipletimes, you can change it consistently in a central place at any time.
Deleted Web Configuration Parameters
If a value was defined for a Web Configuration parameter and the parameter deletedafterward, this value is still valid, because it is not deleted physically and the keycan be called from inside the code. Deleted parameters that still have a value arelisted in an extra group Deleted at the end of the parameter list. Values of deletedparameters can still be changed.
If you find deleted parameters that you still need, you have to re-create the respectiveWeb Configuration parameter.
To delete definitively a Web Configuration parameter that is no longer used anywherein the code:
1. Delete the parameter's value by clicking Clear,
2. Delete the parameter itself by clicking Delete.
Note: This applies only to the configuration where a parameter is defined. If youclick Delete in a child configuration, the parameter is reset to the value in itsparent configuration. For more information, seeSetting Values of Web ConfigurationParameters on page 88.
92AUREA CONFIDENTIAL
Chapter 2: Configuring CRM

Configuration LayoutsUse the layouts tab to design configuration layouts allowing users to change somesettings directly in Aurea CRM.Web.
A configuration layout groups several Web Configuration parameters by topic.
UPDATE_DEFAULT contains three configuration layouts (called using the UserCon-figuration action template):
• User Configuration: Contains parameters that are available for the standarduser. See User Configuration in the Aurea CRM.Web User Interface documentation.
• System Configuration: Only the administrator should change these settings.See System Configuration on page 29.
• Application Configuration: Only the administrator should change these settings.See Application Settings on page 28.
You can edit the existing layouts such as add/remove/rearrange parameters orcreate new ones. See Designing Configuration Units on page 64.
Web Configuration ParametersThe following chapters list all available Web Configuration parameters.
Activity ParametersThis topic holds the Activity parameters.
Activity.ActivityType_email
Description: The catalog value ID of an activity of type email.
Default: BTB = 5
93AUREA CONFIDENTIAL
Web Configuration

Type: Checkbox
Activity.ActivityType_Inf
Description: The catalog value ID of an activity of type Info.
Default: BTB= 6
Type: Checkbox
Activity.CollisionCheck
Description: Activates the collision check for appointments Activities (MA) andAbsences (A3). The collision check works for Expand and List views.
If checked, the Scheduling dialog is automatically opened if the main rep alreadyhas another appointment during the same time.
To disable the collision check for cer tain appointment types, see Activity.Colli-sionCheckExcludedActivityTypes.
Default: Checked
Type: Checkbox
Activity.CollisionCheckExcludedActivityTypes
Description: Determines which activity types do not tr igger the collision check.The collision check functionality usually only makes sense for cer tain activity typeslike visits or events, but not for emails or faxes as an example, .
Enter a comma-separated list of catalog value IDs from the Activity Type catalogto be ignored by the collision check. Emails are excluded from the collision check.
Default: BTB = 5
Type: List
Activity.ImagePrefix
Description: Defines the prefix used for registering activity type icons in the designerdatabase.
Defaults:
BTB: CAT_CONTCT_BTB_, FS: CAT_CONTACT_FS_
OTC: CAT_CONTACT_
Type: List
Analysis ParametersThis topic holds the Activity parameters.
Analysis.CaseSensitiveCriteria
Description: If checked, the input the user provides for filters is case-sensitive.
Default: Unchecked
94AUREA CONFIDENTIAL
Chapter 2: Configuring CRM

Type: Checkbox
Analysis.CountFormatting
Description: Defines the number of decimal places for Count values in analyses.
Default: #,0, i.e., no decimal places
Type: Character
Analysis.DateCategories
Description: Defines which date segmentation options are available:
Separate multiple entries by a comma. Users see the categories in the order theyare defined here.
For fur ther information, see Analysis Date Categories on page 532.
Default: DateMonthly,DateQuarterly,DateYearly,$
Type: List
Analysis.MaxRecords
Description: Defines the maximum number of records read for the base query ofan analysis. If the number of rows returned exceeds this value, a message is dis-played.
Enter -1 for All.
Default: 1000
Type: Number
Analysis.EnableFusionChartsNumberFormat
Description: Applies the Fusion Chart's number formatting to analysis charts insteadof the standard CRM datamodel number formatting.
Default: Undefined
Type: CheckBox
Analysis.RegardEmptyValues
Description: If you use a text field or a variable catalog as an analysis categoryand Analysis.RegardEmptyValues is checked, all values – including empty ones –are regarded by the analysis. To ignore empty catalog values, uncheck the param-eter.
This parameter is not par t of UPDATE_DEFAULT but needs to be created if required.
Default: Unchecked
Type: Checkbox
95AUREA CONFIDENTIAL
Web Configuration

Analysis.Rights
Defines the user's rights for loading, saving and executing analyses. Same optionsas for the Query.Rights parameter, see Query.Rights.
If set to disabled, the Analysis page in Aurea CRM.Web is not available. However,analyses that are directly integrated into a menu can still be executed, e.g., theSales Funnel in the BTB version.
Default: All
Type: Combobox
Analysis.ShowLockedCatalogValues
Description: Use this parameter to define whether catalog values locked via theMaintenance module are displayed in analyses. The following options are available.
Default: Display Locked Catalog Values
Type: Combobox
Analysis.ResultGrid.PageSize
Description: Defines the number of result rows displayed in the table grid view ofan analysis result page. It is par t of the UPDATE_DEFAULT configuration.
Default: 10
Type: Number
Analysis.SkipDuplicateEntries
Description: Defines whether the duplicate entries are skipped or not. If set to True,the record id in the duplicate record is the same and hence skipped in the sum cal-culation. If set to False, the duplicate record fetched in AQL is maintained as aunique record by generating unique record id.This is resulting in counting each entryin the count (default behaviour of any analysis).
Default: False
Type: Checkbox
Buying Center ParameterThis topic holds information about Buying Center parameter.
BuyingCenter.MissingRoles.Y1.Definition
Description: This parameter specifies the path and name of a JSON file containingthe definition of missing roles used by the Buying Center Wall.
Specify the path relative to the application path, e.g.:
data\settings\crm\BuyingCenter_MissingRoles_Y1.json.js
This parameter is undefined in UPDATE_DEFAULT, and no JSON file is delivered out-of-the-box since the Participation catalog determining the roles is a variable catalogand, therefore, different for every project.
96AUREA CONFIDENTIAL
Chapter 2: Configuring CRM

For examples and a complete description of the required JSON structure and sup-ported placeholders, see the ar ticle “How to Configure Missing Roles for BuyingCenter” at https://support.aurea.com.
Default: Undefined
Type: Character
Calendar ParametersUse the following parameters to configure Aurea CRM.Web's scheduling featuresas well as the display of calendar items such as Activities, Tasks, Absences, andTo-Dos.
These settings can have a positive effect on the performance of your system, asthey reduce the load on your server.
Calendar.AbsencesAlwaysHaveEnd
Description: If set, only absences with a valid end date are displayed in the calendar.This improves calendar performance.
Default: False
Type: Checkbox
Calendar.ActivitiesAlwaysHaveEnd
Description: If set, only activities with a valid end date are displayed in the calendar.This improves calendar performance
Default: False
Type: Checkbox
Calendar.AllDayMaxRows
Description: Defines how many all-day appointments, i.e., activity, absence, andtask records are shown at the top of the calendar. If more all-day appointments exist,the list is truncated and +<n> more is displayed. This parameter applies to Day,Work Week, and Week views only.
Default: 5
Type: Number
Calendar.DayEndsAt
Description: Defines the end time of the work day in the Calendar, DispatchingDashboard, and Resources view.
Default: 18:00
Type: Character
Calendar.DayStartsAt
Description: Defines the star t time of the work day in the Calendar, DispatchingDashboard, and Resources view.
97AUREA CONFIDENTIAL
Web Configuration

Default: 08:00
Type: Character
Calendar.DefaultView
Defines the Calendar default view: Day, Work Week, Week, and Month. This settingis overruled by the user's selection.
Default: No value
Type: Combobox
Calendar.FilterSets
Description: Specifies options for filtering calendar items. Define each entry youwant to offer in the calendar's Filter drop-down list as a parameter value. For details,see Modifying Web Configuration Parameters.
These filters are listed in the calendar's Filter drop-down list above the user-definedfilters.
98AUREA CONFIDENTIAL
Chapter 2: Configuring CRM

The name displayed in the drop-down list is the language-dependent text enteredin the Display Text column. See Texts on page 176 for fur ther information.
Syntax:
Define the values using the following syntax:
<Alias>:<InfoAreaId>[.<FilterName>],<InfoAreaId>[.<FilterName>],...
Alias: unique name to identify the filter option.
InfoAreaId: the ID of the concerned info area.
Filtername (optional): an actual filter's name as defined on the Filter page. If Fil-tername is omitted, all records of the specified info area are displayed. Use thisfunctionality to filter calendar items per info area, e.g. specify ContactsToDos:MA,TDto only display Activities (MA) and To-Dos (TD).
Examples:
• All:MA,A1,A3,TD
If the user selects this filter, all calendar items (i.e. records from the info areasMA, A1, A3 and TD) are displayed in the calendar.
• ContactsToDos:MA,TD
Only activities and to-dos are displayed.
• OutOfOffice:MA.MyVisitsAndEvents,A3.MyAbsences
Only activities of type visit and event, and absences are displayed.
Note:
• Filter and rep sets created by users are saved in the Aurea CRM database.
• Filter sets defined as values of the Calendar.FilterSets parameter are saved inthe CRM.Designer database.
• Filters are always saved in the CRM.Designer database. for details, see DefiningFilters on page 489.
Default: Undefined
Type: Combobox
Calendar.FirstWeekStartsAt
Description: Defines which day in January must be within of the first week of theyear.
Default: 4th January
Type: Combobox
Calendar.FirstYearDatePicker
Description: Defines the first year displayed in the date picker.
Default: 1900
99AUREA CONFIDENTIAL
Web Configuration

Type: Number
Calendar.HolidayCalendarID
Description: Defines the holidays that are highlighted in the calendar and datepicker. To add more holiday calendars to the drop-down list, add the desired calendarIDs as new values. For details, see Modifying Web Configuration Parameters.
The holiday calendars need to be configured in the Configuration info area (MC).For details on calendar definitions and a list of IDs, see Configuration Info Areain the CRM.Core Administrator Guide (Calendar category, Holidays option).
In addition, Calendar.HolidayCalendarID contains the value Use calendar of rep.If this value is selected, the calendar defined in the current user's Rep record (ID)is used.
For changes to take effect, users need to log on again.
Default: International
Type: Combobox
Calendar.LastYearDatePicker
Description: Defines the last year displayed in the date picker.
Default: Undefined.
Type: Number
Calendar.ShowAllReps
Description: If checked, users may select displaying the calendar items for all repsat once using an extra All checkbox in the Reps and Rep Groups dialog of thecalendar.
Default: Unchecked
Type: Checkbox
Calendar.SidebarItems
Description: Determines which upcoming items are displayed in the calendarsidebar: My Next Appointments, My To-Dos, My Next Tasks, My Absences. Checkor uncheck the checkboxes to show or hide these areas from the calendar sidebar.
Default: All checked
Type: Checkboxes
Calendar.SidebarMaxRecords
Description: Determines the number of upcoming items such as activities, to-dos,etc., to be listed in the Calendar sidebar.
Default: 5
Type: Number
100AUREA CONFIDENTIAL
Chapter 2: Configuring CRM

Calendar.TasksAlwaysHaveEnd
Description: If set, only tasks with a valid end date are displayed in the calendar.This improves calendar performance.
Default: FalseType: Checkboxes
Calendar.TodosAlwaysHaveEnd
Description: If set, only to-dos with a valid end date are displayed in the calendar.This improves calendar performance.
Default: False
Type: Checkboxes
Calendar.WeekSelectedDays
Description: The number of days that are displayed in the calendar if the user clickson a week number in the date picker. This setting is taken into account by the Cal-endar and Daily & Weekly Planning pages.
Default: 5
Type: Number
Calendar.WeekStartsAt
Description: Determines the weekday with which the week star ts.This setting appliesto both the 5- and 7-day view in the calendar, the mini calendar and the date pickerstar t.
The values Sunday and Monday are defined in UPDATE_DEFAULT. To define otherweekdays, add more values to the Calendar.WeekStartsAt definition. For details,see Modifying Web Configuration Parameters. Valid values are numbers betweenzero and six as showing in the table below:
Table 1: Weekdays numbering
NumberDay
0Sunday
1Monday
2Tuesday
3Wednesday
4Thursday
5Friday
6Saturday
Default: Monday
Type: Combobox
101AUREA CONFIDENTIAL
Web Configuration

Calendar.RememberLastView
Description: If enabled, it opens calendars using the last view selected by the user.
Default: Unchecked
Type: Checkbox
Change Notification ParametersThis topic holds the Change Notification parameters.
EMail.ChangeNotification.From
Description: Specify a valid company email address to send the email change no-tifications.
Default: No value
Type: String
EMail.ChangeNotification.Body
Description: Defines the format of the body of the email change notification. Youcan modify the default value, specified below.
<p>As requested, you are receiving a notification for a change done to therecord {0}. </p>
<p>To open the record in Aurea CRM please click on the link below.</p><br/>
<a href='{1}' title='{2}'>{2}<a/>
Note: You can modify the text content, but all the format parameters in curly bracesshould be retained. The parameter {0} fetches the record name.
Default: Undefined
Type: String
102AUREA CONFIDENTIAL
Chapter 2: Configuring CRM

EMail.ChangeNotification.Subject
Description: Specify a subject format for the email change notifications. The defaultvalue is specified below.<h1>You have a new notification for {0}</h1>
Note: You can modify the text content, but all the format parameters in curly bracesshould be retained. The parameter {0} fetches the record name.
Default: Undefined
Type: String
EMail.ChangeNotification.MaximumEmailSendAttempts
Description: Specify the number of resend attempts for the email change notification,in the case of consecutive mail delivery failures.
Default: 3
Type: Number
Watchlist.AvailableInfoAreas
Description: Contains the comma-separated list of inforareas that are enabled forwatchlist subscriptions. This list is made available in the combobox in the searchpages for watchlist subscriptions and change notifications.
Default: FI, KP, CP, A1, AK, AP
Type: List
Watchlist.RecentNotifications.PeriodInDays
Description: Specifies the period in days to display change notifications by the newchange notifications widget in the dashboard.
Default: 30
Type: Number
Database ParametersThis topic holds the Database parameters.
Database.AssociationMode.Default
Description: Determines the initial state of the global switch for the Affiliation View.For details, see Affiliation View on page 752.
Available values:
• IncludeConfigured: The Affiliation View checkbox in $System is checked. Childrecords of the configured info areas are displayed for all affiliates.
• Exclude: The Affiliation View checkbox is unchecked.
The user's selection overrules this initial default setting.
103AUREA CONFIDENTIAL
Web Configuration
Default: Undefined
Type: Character
Database.HintModeList
Description: Globally determines the behavior of database hints for lists.
Default: Undefined
Type: Combobox
Database.HintModeQuery
Description: Globally determines the behavior of database hints for queries.
Default: No value
Type: Combobox
Database.SortCollation
Description: Determines the sor t collation to be used for the database, e.g.,SQL_Latin1_General_CP1_CI_AS, German_phonebook_CI_AS, etc.
Default: Undefined
Type: String
Designer Configuration ParametersThis topic holds information about Configuration parameters.
DesignerConfiguration.AccessPublicParentConfigurations
Description: If checked, users can select analyses, queries and filters from parentconfigurations of DesignerConfiguration.PublicSaveConfiguration as well.
Default: Unchecked
Type: Checkbox
DesignerConfiguration.PublicSaveConfiguration
Description: Defines to which configuration public queries and analyses are saved.Set this value for users allowing them to save public analyses and public queries ifthe Query.SaveTo option is set to CRM.Designer. See Query.SaveTo for more infor-mation.
If undefined, public queries and analyses are stored in the highest writable configu-ration within the user's configuration hierarchy.
Note: This integer value is downloaded and uploaded as it is. You may have toadjust this value each time you import your configuration from XML files containingdata from another CRM.Designer database.
Default: Undefined
104AUREA CONFIDENTIAL
Chapter 2: Configuring CRM

Type: Combo: WriteConfig
Document ParametersThis topic holds the Document parameters.
Document.AutoUpload
Description: If a user opens a document via Open Document or Check Out &Edit, for MS Office documents, he is asked upon closing the modified document ifit should be uploaded to the Aurea CRM database. Document.AutoUpload defineswhether users should also be prompted for automatically uploading a non-MS Officedocument like PDF, TXT, etc., after editing. When the option is checked the user isprompt for automatic upload. Otherwise, the user needs to upload manually suchdocuments.
Default: Checked
Type: Checkbox
Document.DefaultContentDisposition
Description: Defines how a document is displayed on the page. There is two optionavailable:
ResultValue
The document is not opened in the browser but with the associ-ated program.
Attachment
The document is opened in the browser.Inline
See the next parameter for the possible combinations.
Default: Attachment
Type: Combobox
Document.TargetForOpening
Description: Defines in which window the document appears. There are two optionsavailable:
ResultValue
The document is displayed inside Aurea CRM.Web.CurrentWindow
A new window is opened to display the document.NewWindow
Default: CurrentWindow
Type: Combobox
Using this and the previous parameters the following combinations are possible:
105AUREA CONFIDENTIAL
Web Configuration

Document.DefaultContentDisposition
InlineAttachment
If the browser canhandle the file, Au-rea CRM.Web navi-gates the workframeto the downloadedfile and displays it.If not, the same be-havior as with at-tachment is used.
Regardless of thesettings of Docu-ment.TargetForOpen-ing, the browserhas its defaultdownload-behavior(standard "Do youwant to open/savethis file" dialog).
CurrentWindowDocument.Target-ForOpening
If the browser canhandle the file, anew window isopened, displayingthe file. If not, thesame behavior aswith attachment isused.
NewWindow
Document.MailMergeCache
Description: Check this parameter to set mail merge documents to be cached.Uncheck the option to disable cache.
For more information, see Document Caching & Performance Considerations onpage 852.
Default: Checked
Type: Checkbox
Document.OverwriteMode
Description: Defines the action taken when a user tries to overwrite an existingdocument. Available values:
• Never overwrite existing documents
• Prompt before overwriting documents
• Always overwrite existing documents
Default: Never overwrite existing documents
Type: Combobox
Document.UploadFieldGroup.D1/D2
Description: Use the parameters Document.UploadFieldGroup.D1 and Document.Up-loadFieldGroup.D2 to specify the field group used for the Upload Documents dialog.If undefined, the default field groups D1.Upload and D2.Upload are used. For details,see Special Field Groups Naming Conventions on page 190.
Default: Undefined
106AUREA CONFIDENTIAL
Chapter 2: Configuring CRM

Type: Character
Email ParametersThis topic holds information about Email parameters.
EMail.AttachmentsExcludedContentTypes
Description: Allows you to limit the email attachments to cer tain content types, forthe Send as Email and Notify Rep functionality. For details, see Notify Rep onpage 837 and Send As email on page 835.
For example, enter application/pdf,text/xml as parameter values, to exclude PDFand XML documents from the attachments list in the Notify Rep and Send As Emaildialog.
Default: Undefined
Type: Character
EMail.AttachmentsExcludedDocumentClasses
Description: Allows you to limit the attachments offered for Notify Rep to cer taindocument classes. For details, see Notify Rep on page 837.
Enter Spam, Internal to exclude documents classified as spam or internal, via theDocument Class field in D1 from the attachments list in the Notify Rep dialog.
Default: Undefined
Type: Character
EMail.AttachmentsMaxSizeInKB
Description: Determines the allowed maximum size for email attachments, measuredin KB, when sending server-side emails.
Default: No value
Type: Number
EMail.AutoSendOnNew
Description: Defines whether an email is sent immediately from the server afteradding a new activity, or whether the user's email client opens to allow the operationto proceed.
Default: Undefined
Type: Checkbox
EMail.BodyFieldID
Description: By default, the Text field of an activity record (MA) is used as theemail body when sending an email from Aurea CRM.Web. To use a different fieldfrom MA, specify its XML name or unique field ID in EMail.BodyFieldID.
Default: No value
Type: Character
107AUREA CONFIDENTIAL
Web Configuration

EMail.ClientSide.MailEncoding
Description: Use this parameter to set a different encoding system when sendingemails with special characters.
Examples for valid code pages are:
Greek (Windows)1253Japanese (Shift-JIS)932
Turkish (Windows)1254Central European (Win-dows)
1250
Japanese (JIS-Allow 1 byteKana)
50221Cyrillic (Windows)1251
Korean (ISO)50225Western European (Win-dows)
1252
Default: 1252
Type: Character
EMail.ClientSide.ProtocolMaxLength
Description: Determines the maximum length of messages when sending client-side emails using the mailto: protocol. For fur ther details, see EMail.SendingMethod.If an email message exceeds the specified value, the message is truncated and anotification is displayed.
Set this parameter to the value appropriate for your default email program.
If the email contains the current record as a link, as when using the Notify Rep,Insert Aurea CRM.Web link option, the link takes precedence over the email text.First, the text is truncated; if the mailto-string still exceeds the defined maximumlength, the link is truncated as well.
Default: <= 0, 200
Type: Number
EMail.EnableWebLink
Description: If checked, users can choose to inser t a link to Aurea CRM.Web whenusing the Notify Rep function for server-side emails.
If emails are sent from the client, the link is inser ted automatically.
Default: Checked
Type: Checkbox
108AUREA CONFIDENTIAL
Chapter 2: Configuring CRM

EMail.NotifyRep.WebLinkInitialState
Description: If checked, the Insert Aurea CRM.Web link checkbox is checked bydefault in the Notify Rep dialog when a user opens the dialog for the first time. Ifthe user decides not to inser t the web link and deselects it, then that setting is usedfor subsequent notifications.
Default: Unchecked
Type: Checkbox
EMail.EnableWinLink
Description: If checked, users can choose to inser t a link to Aurea CRM win whenusing the Notify Rep function with server-side emails. If emails are sent from theclient side, the link is inser ted automatically.
Default: Unchecked
Type: Checkbox
EMail.ExcludeCurrentUser
Description: Controls whether the current user is added to the internal recipients'list when sending emails.
Default: Unchecked
Type: Checkbox
EMail.FallbackToCompany
Description: If checked, the Company address is used for Person recipients thathave no email address. Otherwise, there is no fallback and persons without an emailaddress do not get an email.
Default: Unchecked
Type: Checkbox
EMail.From
Description: Defines whether the sender From: of an email is the currently logged-in user or the rep entered in the Rep ID field of the activity record. Using the record'srep as the email sender allows emails to be sent on behalf of. Using the currentuser prevents it.
Default: Record's Rep
Type: Combobox
109AUREA CONFIDENTIAL
Web Configuration

EMail.IconAction
Description: Defines the action taken when a user clicks on an email address onview mode or the Send email icon edit mode of an email field in a Company orPerson record. The following values are available:
• Open email
• Add activity
• Ask user
Default: Ask user
Type: Combobox
EMail.NotifyRep.BodyFieldIDs
Description: Determines the fields to be used as email body text by the Notify Repfunctionality. For more details, see Notify Rep on page 837.
By default, only a field with the XML name Text is used. Use this parameter tospecify other text fields.
Syntax
<InfoAreaId>:<fieldId>,<InfoAreaId>:<fieldId>,...
You can specify either unique field IDs or XML field names as <fieldId>.
Example
A1:7001,PR:7023,FI:7005
The field specified here overrules a field with the XML name Text. One field per infoarea is supported. If more than one field is specified for an info area, the first fieldis used.
Default: Undefined
Type: Character
EMail.SendCopyToRep
Description: When an activity record is sent by email, whether and how the currentrep is included in the email's recipients is defined by this parameter.
Default: CC
Type: Combobox
EMail.SendDeliveryNotification
Description: If checked, a delivery receipt is requested when sending server-sideemails. For fur ther details, see http://www.ietf.org/rfc/rfc3461.txt. If this parameteris checked, the Request a delivery receipt check box in the Notify Rep dialog isinitially checked.
Default: Unchecked
Type: Checkbox
110AUREA CONFIDENTIAL
Chapter 2: Configuring CRM

EMail.SendingMethod
Description: Select whether emails are sent from the server or the client.
If emails are sent from the server, attachments linked to the activity record are sentas well, and Unicode characters are transferred correctly. However, the email issent with the exact text of the activity record, and no editing is allowed. Furthermore,is not displayed in the user's outbox.
If emails are sent from the client, documents linked to the activity record are notautomatically sent as attachments.
Notes for sending client-side emails:
• The number of characters that can be exported from the Text field of an activityrecord in Aurea CRM.Web to your mail client is limited by the operating systemand the mail client software. If the limit is exceeded, Aurea CRM web displays anotification and the text is truncated with "...". Use the EMail.ClientSide.Proto-colMaxLength Web Configuration parameter to configure the maximum length ofemail texts.
• If you want to send texts with unlimited length, you have to send server-sideemails.
• Special characters in email addresses are supported only with Microsoft Outlook2007 or higher and with Lotus Notes 7 or higher.
• The mailto: protocol does not support HTML-formatted text. For details, seehttp://tools.ietf.org/html/rfc2368. Therefore you cannot define an HTML field inEMail.BodyFieldID when sending client-side e- mails. Specify the linked plaintext field instead, see HTML Fields on page 219.
Note for sending server-side emails:
You need to define a valid mail server in the Mail Server section of the settings.xmlfile to be able to send server-side emails. For fur ther details, see Mail Server inthe Aurea CRM.Web Installation Guide.
Default: Server
Type: Combobox
EMail.SendReadNotification
Description: If checked, a read receipt is requested when sending server-sideemails. For details, see http://www.rfc-editor.org/rfc/rfc3798.txt. If this parameteris checked, the Request a read receipt check box in the Notify Rep dialog is ini-tially checked.
Default: Unchecked
Type: Checkbox
EMail.SendRecordNotification
Description: If checked, the Email Notification should include external recipients.
Default: Unchecked
Type: Checkbox
111AUREA CONFIDENTIAL
Web Configuration

EMail.SendWithoutConfirmation
Description: If checked, the email is sent without any fur ther user input, i.e., noconfirmation dialog is displayed.
This parameter applies to server-side emails only.
Default: Unchecked
Type: Checkbox
EMail.Separator
Description: Defines the separators used in the To:, CC:, BCC: fields of emailprograms, e.g., semicolon in Outlook and comma in Lotus Notes. The same separatoris used in the Participant fields in the Activity info area.
Default: Semicolon
Type: Checkbox
Error Handling ParameterThis topic holds the Error Handling parameter.
ErrorHandling.Textgroups
Description: Comma-separated list of text groups that contain the language-specificerror messages used by Aurea CRM.Web.
Default: net_error_texts, net_component_error_texts, net_customfield_texts
Type: List
Expand ParametersThis topic holds the Expand parameters.
Expand.AddressCheck.InfoAreas
Description: To determine for which info areas the external address should beperformed, provide a comma-separated list of info area IDs, e.g., FI, KP, see ExternalAddress Check on page 840.
Default: Undefined
Type: List
Expand.FieldHook
Description: If you enter a field hook in this field, the hook function is executedeach time a field is changed in any Expand view, except for fields that have an ex-plicit hook function defined in the field attributes. For details, see Hook Functionon page 238.
Default: Undefined
Type: Character
112AUREA CONFIDENTIAL
Chapter 2: Configuring CRM

Expand.InitialValuesFromLastInput
Description: This parameter defines the behavior when creating new records: De-pending on this setting, some or all values from the last data entry, i.e., the previ-ously added new record are used for the ExpandNew action automatically. Availablevalues:
• Do not transfer the last input
• Use all values from last entry
• Use Admin-defined values from last entry
Default: Do not transfer the last input
Type: Combobox
Expand.PanelReorderingAllowed
Description:If checked, users can rearrange the panels on in an Expand view usingdrag & drop.
Default: Checked
Type: Checkbox
Expand.SignatureParsingModes
Description: Defines the available parsing modes for the signature parser. Fordetails, see Creating/Updating Records From email Signatures/Websites on page758.
Add the modes o.modus as values, see Modifying Web Configuration Parameters.Set a mode as the initial default.
Default: Undefined
Type: Combobox
ExpandViewExtrasWidget. DoNotHideIfEmpty
Description: Check this parameter to disable auto-hiding of records displayed inthe expanded Extras Widget view.
Default: Checked
Type: Checkbox
Expand.RespectFieldAlignment
Description: Select this parameter to ensure that any alignment format specifiedon numeric fields in the data model are rendered accordingly when the field valuesare displayed in CRM.Web.
Default: Unchecked
Type: Checkbox
113AUREA CONFIDENTIAL
Web Configuration

Expand.ValidationSummaryPosition
Description: Use this parameter to customize the positioning of a validation messagefor all Expand actions. For example, saving a record results in a validation messageabout the save action. You can select one of three positions: Top; Bottom; Hidden.This value is applied to all Expand actions globally.
Note: To customize the positioning of a specific action, use the Expand actionparameter. For details, see validationSummaryPosition.
Default: Top
Type: Combobox
Expand.ExpandHeaderPosition
Description: Use this parameter to customize the positioning of the Expand header.You can select one of two options: Top and Bottom.
Default: Top
Type: Combobox
Export ParametersThis topic holds information about Export parameters.
Export.CSV.Separator
Description: Defines the separator for CSV files.
Default: Tab
Type: Combobox
Export.EmitRepNames
Description: By default, when a list or query contains rep ID fields with field typeuid, these fields are transformed to include the rep name as string when displayingand exporting the list or query result. The same logic applies to par ticipant fields.
If you want to export the IDs instead, set Export.EmitRepNames to false.
You can specify this option per report by using the Export.EmitRepNames exportoption, see Export Options on page 858.
Default: Undefined
Type: Character
Export.MaxRecords
Description: Defines the maximum number of records to export. Enter -1 to set thevalue to All.
Default: 1000
Type: Number
114AUREA CONFIDENTIAL
Chapter 2: Configuring CRM

Export.QueryEncoding
Description: Defines the character encoding for exporting queries, e.g., Export.En-coding=UTF-16. This setting is used as a fallback for reports where there is nocharacter encoding specified in the action.
Default: Undefined
Type: Character
Export.ShowCombinedArrayFields
Description: If a query field is of the type Array, then on exporting the query result,all the fields in the Array are exported. Set this parameter to false to prevent all thefields from getting exported.
For example, on exporting the result of the query select (CoType, Company, Coun-try) from (FI), all the fields of the array [Co.Type, Co.Type2, Co.Type3, Co.Type4,Co.Type5] are exported. To prevent this, set this parameter to false, in which caseonly Co.Type is exported.
Default: True
Type: Boolean
Export.SingleListRecord
Description: If only one record is selected in a list and the user clicks on an exportbutton, all currently visible records are exported. For fur ther information, see Ex-port/Report Buttons on page 310.
Check Export.SingleListRecord to offer the possibility to export only the selectedrecord.
Default: Unchecked
Type: Checkbox
Export.Type
Description: Defines the type for data exports used for the Export buttons DirectExport and Direct Export All. The options available are:
• CSV
• XML
For fur ther information, see Export/Report Buttons on page 310.
Default: CSV
Type: Combobox
Export.WinReportAlwaysInMemory
Description: If checked, the Aurea CRM win report is created in-memory, insteadof as a file. For details, see Creating Aurea CRM win Reports in Aurea CRM.Webon page 863.
115AUREA CONFIDENTIAL
Web Configuration

Use Export.WinReportMemoryThreshold to specify a maximum file size used for in-memory creation, For fur ther information, see the next parameter.
Default: Unchecked
Type: Checkbox
Export.WinReportMemoryThreshold
Description: Defines the maximum file size used for in-memory creation of AureaCRM.Win reports. Value in KB.
If Export.WinReportAlwaysInMemory is checked and the defined Export.WinReport-MemoryThreshold is exceeded; the report creation is aborted with an error message.
Default: 256
Type: Number
Export.Xml.EmitConfiguration
Description: If checked, additional information like field types and labels is includedin the exported XML file.
...<Configuration UnitType="update.Configuration.Contracts.FieldControl"
ControlName="Details" UnitId="5442" InfoAreaId="FI"><Tabs>...<Tab TabIndex="4">
<Caption>Classification</Caption><Fields>
<Field Index="35" InfoAreaId="FI" TabNr="4"><FieldAttributes>
<FieldAttribute Id="35" Edit-Mode="15">CAT_ABC_{javascript:($['VALUE'] || '').toUpperCase();}</FieldAt-tribute>
</FieldAttributes></Field>
...
You can specify this option per report by using the Export.Xml.EmitConfigurationexport option. For fur ther information, see Export Options on page 858.
Default: Undefined
Type: Checkbox
Export.Xml.EmitLineBreaks
Description: By default, if a field contains line breaks, these line breaks are export-ed.
If you want to export data that is to be processed by some third-party system thatdoes not support line breaks, uncheck Export.Xml.EmitLineBreaks.
You can specify this option per report by using the EmitLineBreaks export option.For details, see Export Options on page 858.
Default: Checked
Type: Checkbox
116AUREA CONFIDENTIAL
Chapter 2: Configuring CRM

Export.Xml.ExportPhysicalInfoAreaIds
Description: By default, exported XML contains the actual info area ID and XMLname of vir tual info areas, see XML Export of Vir tual Info Areas on page 280.
To export the physical info area ID and XML name instead, create and check theWeb Configuration parameter Export.Xml.ExportPhysicalInfoAreaIds.
You can specify this option per report by using the Export.Xml.ExportPhysicalIn-foAreaIds export option. See Export Options on page 858 for details.
Default: Undefined
Type: Checkbox
Reporting.Pdf.EnableAsianFont
Set this parameter to true to enable the use of Asian fonts to generate PDF reportsfor export. This allows the use of Chinese, Japanese, and Korean alphabets. AureaCRM.Web uses Verdana fonts to generate PDF reports.
Default: False
Type: Checkbox
Favorites ParameterThis topic holds the Favorites parameter.
Favorites.InfoAreas
Description: Determines for which info areas users can create favorites.
Defaults:
BTB: FI,KP,PE,OJ,Y1,CM
FS/OTC: FI,KP,PE,Y1,CM
Note: Only records from info areas whose key consists of station number plus serialnumber can be added as favorites.
To enable the user to add a favorite for these info areas, you also need to add themenu action D_Favorites to the respective context menu. For details, see Favoriteson page 842.
Type: List
117AUREA CONFIDENTIAL
Web Configuration

Geolocation ParameterThis topic holds the Geolocation parameter
Geolocation.FindAddressStrategy
Description: Determines the fallback behavior for displaying Bing Maps for mapsin child records, e.g., MA. For details, see Displaying Bing Maps in Related Areasand Forms on page 826. The following values are available:
• Returns the first record which has address fields
• Returns the first record with address fields that are not empty
Note: A change to this parameter only takes effect with the next login.
Default: Undefined
Type: Combobox
Google Analytics ParametersThis topic holds information about Google Analytics Parameters.
For detailed descriptions and purpose of the Google Analytics web configurationparameters, see Configuring the Google Analytics Tracker on page 660.
GoogleAnalytics.CRMInstanceID
Description: Specify a unique string to identify unique members or departments inyour organization. The parameter is then tagged to the custom reports generated.
Default: Undefined
Type: Catalog
GoogleAnalytics.CustomDimension.Infoarea
Description: Specify a value in the format <Dimension><index number>. The indexnumber is the index value of the Infoarea dimension configured in the Google Ana-lytics tracker. See Configuring Custom Dimensions in the CRM Designer. For exam-ple, an index number of 1, has a value of dimension1.
Default: Undefined
Type: Catalog
Note: This parameter is not par t of UPDATE_DEFAULT and needs to be created if youwant to use it.
GoogleAnalytics.CustomDimension.CRMVersion
Description: Specify a value in the format <Dimension><index number>. The indexnumber is the index value of the CRM Version dimension configured in the GoogleAnalytics tracker. For example, an index number of 3, has a value of dimension3.
118AUREA CONFIDENTIAL
Chapter 2: Configuring CRM

Default: Undefined
Type: Catalog
GoogleAnalytics.CustomDimension.InstanceID
Description: Specify a value in the format <Dimension><index number>. The indexnumber is the index value of the InstanceID dimension configured in the GoogleAnalytics tracker. For example, an index number of 4, has a value of dimension4.
Default:Undefined
Type: Catalog
GoogleAnalytics.CustomDimension.UserID
Description: Specify a value in the format <Dimension><index number>. The indexnumber is the index value of the UserID dimension configured in the Google Analyticstracker. For example, an index number of 5, has a value of dimension5.
Default:Undefined
Type: Catalog
GoogleAnalytics.CustomDimension.View
Description: Specify a value in the format <Dimension><index number>. The indexnumber is the index value of the View dimension configured in the Google Analyticstracker. For example, an index number of 2, has a value of dimension2.
Default: Undefined
Type: Catalog
GoogleAnalytics.CustomerTrackerID
Description: Specify the tracker ID generated by Google Analytics for the trackerproperty configured for your instance of Aurea CRM. See Configuring the GoogleAnalytics Tracker on page 660.
Default: Undefined
Type: Catalog
GoogleAnalytics.MainTrackerEnabled
Description: You can use this parameter as follow:
• Set the value to true, if you want your CRM.Web instance to be tracked by thedefault Google Analytics tracker provided by Aurea.
• Set this value to false, if you have an enterprise license for Aurea CRM.Web andwant to set up your custom Google Analytics tracker.
Note: You can only use the default Google Analytics tracker provided by Aurea,if you have a standard license.
119AUREA CONFIDENTIAL
Web Configuration

Default: Unchecked
Type: Checkbox
GoogleAnalytics.SendUserID
Description: Set this value to true if you want to send the user name with trackerdata.
Default: Unchecked
Type: Checkbox
Header ParametersThis topic holds information about Header Parameter.
Header.KeepGroupTopElement
Disables the storing of the last selected button in a Button Group, >> GroupingButtons on page 328. The first button of the group is always displayed.
This parameter is not par t of UPDATE_DEFAULT but needs to be created as Char-acter if required. Set the value to "true" or "1" to activate this option.
Type: Character
Widget.Header.View.Options
This parameter is used to configure the Header's default view options.Widget.Header.View.Options = {"showPaging": true}
// default value:Widget.Header.View.Options = {"showPaging": "if-required"}
Type: JSON
History ParametersUse the following parameters to customize Aurea CRM.Web's history feature.
History.Contents
Description: Defines which type of information is displayed in Aurea CRM.Web'sbrowsing history. The options are:
• All
• Only record-related
• Only page-related
Default: All
Type: Combobox
120AUREA CONFIDENTIAL
Chapter 2: Configuring CRM

History.MaxPopupEntries
Description: Specifies the maximum number of historical entries per popup menuitem. You can use this in combination with the History.MaxEntries parameter toget better control on the historical records that is maintained for a CRM.Web appli-cation running in the browser.
Note: History.MaxPopupEntries parameter is recommended to be smaller thanHistory.MaxEntries.
Default:
Type: Number
History.MaxEntries
Description: Defines the maximum number of entries in Aurea CRM.Web's browsinghistory.
Default: 10
Type: Number
History.Persist
Description: If checked, Aurea CRM.Web's browsing history is saved betweensessions. The history data is saved in the user's roaming settings.
Note: History is only saved if a session is ended by logging out.
Default: Unchecked
Type: Checkbox
History.RecordHistory.MaxItems
Description: Use this parameter to control the number of items maintained in arecord's history.
Default: 10
Type: Number
Import ParameterThis topic holds information about Import parameter.
Import.MaximumFileSize
Defines the maximum allowed size for import files in MB. See Import on page 43for details.
121AUREA CONFIDENTIAL
Web Configuration

You need to configure the web.config to allow a file size larger than 4 MB for theparameter setting to take effect. To set the file size in the web.config file:<httpRuntime requestValidationMode="4.5" maxRequestLength="10240" target-Framework="4.5" />
<security><requestFiltering><!-- limit the maximum request size to 10MB --><requestLimits maxAllowedContentLength="10485760" /></requestFiltering>
</security>
ASP.NET defaults are:
• maxRequestLength: 4096KB (4 MB)
• maxAllowedContentLength: 30000000 bytes (30 MB)
For more information, see:
• http://msdn.microsoft.com/en-us/library/e1f13641(v=vs.85).aspx
• http://msdn.microsoft.com/en-us/library/ms689462(v=vs.90).aspx
Default: 4
Type: Number
Jobs ParametersThis topic holds information about Jobs parameters.
Jobs.PollingInterval
Description: Defines the polling interval, in minutes, for new To-Dos, Messages,and Reminders. The time stamp of the last check is saved in the user's roamingsettings. If a user logs on for the very first time, the login date/time is used instead.
You can specify -1 to completely turn off polling, or 0 to check for new records onlyonce after the user logs in.
Default: 30
Type: Number
Jobs.SessionCheckInterval
Description: You can define this parameter to periodically check on a job sessionand prevent a job session from timing out. The value is provided in seconds.
Default: 5
Type: Number
122AUREA CONFIDENTIAL
Chapter 2: Configuring CRM

Language ParametersThis topic holds information about the Language parameters.
Languages.Editable/Languages.Visible
Description: These parameters determine which languages are visible and editablein Aurea CRM.Web. The settings apply to the following areas:
• Multi-Language Fields on page 221
• Languages in the catalog maintenance, see Catalog Maintenance on page 33:
• Languages.Visible determines which language checkboxes are displayed onthe search form.
• Languages.Editable determines for which languages the user can update Textand External Key.
• Editing field names. See Data Model on page 57 for fur ther information.
Specify the desired languages, in the format Language No. from the Language(00) info area, see Language on page 52. Enter 0 to configure language-independent.Enter -1 to get all defined languages.
Defaults if undefined:
Languages.Editable: Only texts in the current user's login language are editable.
Languages.Visible: All available texts are visible.
Note: Languages.Editable and Languages.Visible do not apply to the SU (SuperUser), i.e., the SU can view and edit all languages.
Default: Undefined
Type: Character
List ParametersThis topic holds information about List parameters.
List.AutoOpenMiniDetails
Description: If checked, the list header offers an icon allowing users to open theMiniDetails section of all search result records with one click.
Default: Checked
Type: Checkbox
List.ListParams/List.SubList.ListParams
Description: These parameters allow the global definition of list and sub-list param-eters. The settings can be overridden for individual sub-lists and lists.
For information on the available list and sub-list parameters, see ListParams onpage 374.
123AUREA CONFIDENTIAL
Web Configuration
Syntax:
<Name>,<Value>;<Name2>,<Value2>; etc.
Example:
canEdit,false;cachedMode,true;
Default: Undefined
Type: Character
List.SubList.ActivationHotKey
Description: Defines the hotkey for activating the Related Data area.
Default: Alt+0
Type: Character
List.SubList.DefaultAction
Description: The parameter defines the default action that is called when a userdouble-clicks an item in a sub-list. For more details, see Default Action on page 289.
Default: A_ShowDefaultAction
Type: Character
List.SubList.DefaultMenu
Description: Defines the default context menu used in sub-lists. The default valuedisplays the info area default menu for each sub-list.
Default: %%
Type: Character
List.TruncateTextsInList
Description: If set to true, the texts in list headers and list rows are truncated, andan ellipses (...) is added to indicate the omission of text. Tooltips display the completetext with an icon to copy the text. If set to false the text is wrapped. This parameteris par t of UPDATE_DEFAULT.
Default: False
Type: Checkbox
Catalog.ArrayMultipleSelector
Description: The parameter allows the selection of an item in a catalog list of itemsin a catalog array multiple times. If this property is set to false, the item is removedfrom the list of items displayed. The default value is true. This parameter is par t ofUPDATE_DEFAULT.
Default: False
Type: Checkbox
124AUREA CONFIDENTIAL
Chapter 2: Configuring CRM

HideNotUsedFields
Description: Setting this parameter to true hides the fields not used in the ModifyList Fields and Query definitions.
Default: False
Type: Checkbox
Locale ParametersUse the following parameters to configure number, date, and time formats used inAurea CRM.Web.
The server's locale settings are used as defaults.
Note: Type Checking: Aurea CRM.Web prevents users from entering date, timeor numbers in an incorrect format. The following user inputs are possible whenediting fields in lists and masks:
• Numeric Fields (type short and float): numbers 0-9 as well as % and -, plus thedefined Locale.Number.DecimalSeparator and Locale.Number.ThousandsSeparator.
• Date Fields: numbers 0-9 plus the defined Locale.Date.Separator.
• Time Fields: numbers 0-9 plus the defined Locale.Time.Separator. If Lo-cale.Time.DisplayFormat is set to 12-hour format, a, p, m, and space are validas well.
Note: No logical checks are performed in Aurea CRM.Web, i.e., if a user enterse.g., February 31st as a date, he does not get a message upon saving the record.
Locale.BaseCurrency
Description: Defines the base currency used.
Note: The selected value of the currency catalog is passed to the core interface,which performs the conversion during the log-in process. Thus, if a user changesthis value, he needs to log off and on again to activate the new setting.
Default: Undefined
Type: Catalog
Locale.Date.DisplayFormat
Description:
Defines the display format of dates.
125AUREA CONFIDENTIAL
Web Configuration

Note: Date auto-completion, which adds the current year to a date the user enters,is only available for formats where the year is at the end, i.e., DMY and MDY.
When the default value is set to "Server", it means that the settings of the applicationpool identity user are applied.
Default: Server
Type: Combobox
Locale.Date.Separator
Description: Defines the character used to separate the values in the date.
Default: Server
Type: Combobox
Locale.LCID
Description: Defines the language ID.
Default: Server
Type: Combobox
Locale.Number.DecimalSeparator
Description: Defines the character used as the decimal separator for numeric values.
Default: Server
Type: Combobox
Locale.Number.ThousandsSeparator
Description: Defines the character used as digit grouping symbol for numeric values.
Default: Server
Type: Combobox
Locale.Time.DisplayFormat
Description: Defines the format used to display the time.
Default: Server
Type: Combobox
Locale.Time.Separator
Description: Defines the character used as "time separator", e.g., the colon in11:48:51.
Default: Server
Type: Combobox
126AUREA CONFIDENTIAL
Chapter 2: Configuring CRM

Locale.Time.Timezone
Description: Defines the time zone in which the user is located.
Available values:
• Server: The time zone of the web server is used.
• Client: Aurea CRM.Web determines the time zone currently used by the client. Ifno valid time zone is found, "Server" is used as a fallback.
Note: The client's time zone is only determined at login.
• All existing time zones.
Default: Server
Type: Combobox
Login ParameterThis topic holds information about the Login parameter.
Login.EnableLoginInDefaultLanguage
Description:
When checked for the default user's configuration that is used for the login page,the option My Default Language text group login_text is displayed in the languageselection drop-down list. See Login Page Languages on page 175 for more details.
By selecting this option, the user can star t Aurea CRM.Web in his default language,i.e., the language entered in his Rep record. For fur ther details, see Reps on page31.
Note: If this option is checked and the user's login language is not explicitly set,the user is logged on in Aurea CRM.Web's default language, as per settings.xml(Aurea CRM.Web) in the Aurea CRM.Web Installation Guide.
Default: Unchecked
Type: Checkbox
Lyris ParametersFor more detailed descriptions of the parameters, see Configuring Lyris HQ on page676.
Lyris.Enabled
Set this parameter to true to enable Lyris features in Aurea CRM. Default value isfalse.
Type: CheckBox
127AUREA CONFIDENTIAL
Web Configuration

Lyris.SyncMiddlewareUri
Specify the URI of the Lyris Sync Middleware’s Active MQ endpoint. The URI shouldalso include the port number. For example, tcp://52.204.45.159:61616.
Type: String
Lyris.SyncMiddlewareUsername
The username for authenticating with the Lyris Sync Middleware configured at theURL specified in the parameter: Lyris.SyncMiddlewareUri. For example,MQ2014000029. You can provide the username or Aurea support can provide one,when you place a request. For more information on the ordering process, see Order-ing Access to the ACM SyncMiddleware.
Type: String
Lyris.SyncMiddlewarePassword
The password for authenticating with the Lyris Sync Middleware configured at theURL specified in the parameter: Lyris.SyncMiddlewareUri. For example,MQabc12345911. For more information on the ordering process, see Ordering Accessto the ACM SyncMiddleware.
Type: String
Lyris.SegmentGeneratedNotificationEmail
The email address that receives an information message from Lyris, when Lyriscompletes the generation of a segment requested by Aurea CRM.
Type: String
Lyris.TriggerOnLyrisMessageDeleted
The name of the trigger to be executed by Aurea CRM, when an event notifying thedeletion of a Lyris message is received by Lyris Sync Middleware consumer.
Type: String
Lyris.TriggerOnLyrisContactBounced
Specify the name of the trigger to be executed by Aurea CRM, when a target groupmember’s contact status is set to Bounced in Lyris. For detailed information ontriggers and how to define them, see Triggers in the CRM.core Administrator Guide.
Type: String
Lyris.DoubleOptinMapping
Specify the value to enable the mapping of Lyris demographics to CRM fields usedto create and update CRM records during the processing of ContactDataUpdateMes-sage with DoubleOptin. The specified value should have the format:infoAreaId:demographicId=fieldId,demographicId=fieldId|infoAreaId
An example value would be FI:1=5,2=8|KP:1=4,2=19,3=8|PE:1=2,2=7.
128AUREA CONFIDENTIAL
Chapter 2: Configuring CRM
When a new recipient subscribes to a Lyris HQ mailing list on the Lyris HQ Landingpage, he get a confirmation message before being added to the Mailing list. CRMadds contact to corresponding infoarea and not add to Target group, if the DoubleOp-tion parameter is used. He is added to the appropriate info are based on the followingheuristics:
1. Add the recipient to the Company contact if a Company contains the recipient asa contact email address.
2. If Company doesn't exist, then CRM.Web checks if a Company with the domainexists.
3. If Company with the domain exists, it checks if there is a PersonInCompany witha contact email of the recipient.
4. If PersonInCompany doesn't exist, the recipient is added to it.
5. If the Company with email or domain doesn't exist, CRM.Web checks if there isPerson (PE) with contact email address of the recipient.
6. If Person doesn't exist, the recipient is added to the Person info area.
The DemographicID is defined in Lyris HQ and fieldID is defined in the ACRM in-foarea. The types of DemographicID and fieldId should be of compatible types andare listed below:
1. String=String
2. String=Catalog value
3. Date=Date
4. Number=Number
Type: Character
Lyris.ActivityExecutionDemographicId
Specify the demographics ID, CRM is required to provide when requesting demo-graphics to be created for the CRM fields, in Lyris. For more information on retrievingthis value from Lyris HQ, see Getting Lyris Web Configuration Parameter Valuesfrom Lyris HQ
Type: multi select
Lyris.Host
Specify the URL of the server hosting the Lyris API. It should be either an IP addressor a fully qualified name of the machine hosting Lyris HQ API. Example value,elabs14.com.
For more information on retrieving this value from Lyris HQ, see Getting Lyris WebConfiguration Parameter Values from Lyris HQ.
Type: String
Lyris.APIPassword
Specify the authentication password to use, when Aurea CRM makes an API requestto Lyris. For more information on retrieving this value from Lyris HQ, see GettingLyris Web Configuration Parameter Values from Lyris HQ.
129AUREA CONFIDENTIAL
Web Configuration

Type: String
Lyris.MailingListNamePrefix
Specify a prefix with which a new mailing list id is created in Lyris. A mailing list iscreated, when Aurea CRM transfers a marketing activity to Lyris.
Type: String
Lyris.MailingListUrlTemplate
Specify the string template used by Aurea CRM to generate the URL of a mailinglist entity created by Lyris. The mailing list is created by Lyris on demand, whenAurea CRM transfers a marketing activity to Lyris. You can provide one of the fol-lowing:
1. https://Lyrishq.net – In this case the user is forwarded to the Lyris HQ dashboardand he has to find the required maling list object.
2. https://<Lyris.Host>/v3/mailing_list.html?NEXTPAGE=mailing_list_view&setmlcookie=on&mlid={lyrisMailingListId}
• Where <Lyris.Host> is the value of the Emaillab domain name set in theLyris.Host web configuration parameter described above.
The specified template value should contain the placeholder tag {lyrisMessageId}which is replaced by the Lyris message id generated by Lyris. A sample value ishttps://www.elabs14.com/v3/mailing_list.html?NEXTPAGE=mailing_list_view&setml-cookie=on&mlid=385.
Note: Click on the Lyris mailing list link generated in Aurea CRM. This opens therequired mailing list in Lyris Emaillabs, if the following conditions are satisfied:
1. You have already logged into Lyris HQ at https://lyrishq.net.
2. An instance of Emaillabs is already launched from Lyris HQ.
If the above conditions are not satisfied then you are directed to the login page athttps://lyrishq.net.
Type: String
Lyris.MessageUrlTemplate
Specify the string template used by Aurea CRM to generate the URL of a messageentity created by Lyris. The message is created by Lyris on demand from AureaCRM. You can provide one of the following:
1. https://Lyrishq.net – In this case the user is forwarded to the Lyris HQ dashboardand he has to find the required maling list object.
2. https://<Lyris.Host>/v3/mailing_list.html?NEXTPAGE=mailing_list_view&setml-cookie=on&mid={lyrisMessageId}
Where <Lyris.Host> is the value of the Emaillab domain name set in the Lyris.Hostweb configuration parameter described above.
130AUREA CONFIDENTIAL
Chapter 2: Configuring CRM

The specified template value should contain the placeholder tag {lyrisMessageId}which is replaced by the Lyris message id generated by Lyris. A sample value ishttps://ip-172-30-90-193.ec2.internal/v3/mailing_list.html?NEXTPAGE=mail-ing_list_view&setmlcookie=on&mlid=459.
Note: Clicking on the Lyris message link generated in Aurea CRM opens the requiredmessage in Lyris Emaillabs, if the following conditions are satisfied:
1. You have already logged into Lyris HQ at https://lyrishq.net.
2. An instance of Emaillabs is already launched from Lyris HQ.
If the above conditions are not satisfied then you are directed to the login page athttps://lyrishq.net.
Type: String
Lyris.SegmentUrlTemplate
This web configuration parameter is used to enable the administrator to configurethe URL template that is used by ACRM to construct a URL that leads to the UI pagewhere a Lyris segment is displayed.
This URL is used for the creation of an anchor link that is displayed in the 3rd stepof "Transfer of Target group to Lyris" process (see Configuring target group creationand scheduling). This enables the user to view the corresponding segment in LyrisUI on a single click. For fur ther details on configuring Lyris HQ, see ConfiguringLyris HQ on page 676.
The template URL stored in Lyris.SegmentUrlTemplate supports two placeholders:
• {lyrisSegmentId}: This placeholder exist inside Lyris.SegmentUrlTemplate andis replaced during the construction of the URL by the Lyris segment ID.
• {mailingListId}: This placeholder may or may not exist inLyris.SegmentUrlTemplate as it is not mandatory. If it exists, it is replaced by themailing list ID during the construction of the URL. If it is not present in the templatethen it is just ignored.
You can use one of the following two strings in the template to be used by CRM ingenerating the URL of a segment in Lyris:
• https://Lyrishq.net – This takes the user to the Lyris HQ dashboard, where heneeds to find the required maling list object.
• https://<Lyris.Host>/v3/mailing_list.html?NEXTPAGE=mailing_list_filter_cre-ate&ID={lyrisSegmentId}, where <Lyris.Host> is the value of the domain nameset in the Lyris.Host web configuration parameter as described in the abovesection. The specified template value should contain the placeholder tag {lyris-SegmentId} as explained above. For example, https://ip-172-30-90-193.ec2.internal/v3/mailing_list.html?NEXTPAGE=mailing_list_filter_cre-ate&ID=459.
Note: The following conditions must be met to open the required message in Lyriss, when you click on the Lyris segment link generated in Aurea CRM:
• You must be logged into Lyris HQ at https://lyrishq.net.
• An instance of Emaillabs is already launched from Lyris HQ.
131AUREA CONFIDENTIAL
Web Configuration

If the above conditions are not met, the user is redirected to the login page athttps://lyrishq.net.
Type: String
Lyris.SiteID
Specify the site id, a lyris parameter that is sent as part of all API requests by AureaCRM. For more information on retrieving this value from Lyris HQ, see Getting LyrisWeb Configuration Parameter Values from Lyris HQ.
Type: String
Lyris.TriggerOnLyrisContactBounced
Specify the name of the trigger to be executed by Aurea CRM, when a target groupmember’s contact status is set to Bounced in Lyris. For detailed information ontriggers and how to define them, see Triggers in the CRM.core Administrator Guide.
Type: String
Lyris.TriggerOnLyrisContactUnsubscribed
Specify the name of the trigger to be executed by Aurea CRM, when a target groupmember’s contact status is set to Unsubscribed in Lyris. For detailed informationon triggers and how to define them, >> Triggers in the CRM.core AdministratorGuide.
Type: String
Lyris.DemographicOptionsLanguage
The language in which the demographics are created in Lyris. Valid values are: ger,eng, fre, spa, por, nld, dan, ita, cze, hun, slk, pol, gre, ukr, sln, rus, swe, fin, nor,tur, cro, ser, ron, jpn, chn, kor, bul, tha, and alb.
Type: String
Maintenance ParametersThis topic holds information about the Maintenance parameters.
Maintenance.BulkExecutionStart
Description: Specifies the time (hh:mm) for mass data operation to-dos to be pro-cessed.
Default: Undefined
Type: Character
Maintenance.CatalogMaintenance.ShowExtendedFields
Description: If unchecked, the additional catalog maintenance fields Descriptionand Valid from/to of the Catalog info area (KA) are hidden from in the Edit valuedialog. For fur ther details, see Editing Catalog Values on page 37.
132AUREA CONFIDENTIAL
Chapter 2: Configuring CRM

If unchecked, the additional catalog maintenance fields and the valid from/to catalog.
This parameter is not par t of UPDATE_DEFAULT but needs to be created as Checkboxif required.
Default: Undefined
Type: Checkbox
Maintenance.CheckForSystemLocksInterval
Description: Defines how often Aurea CRM.Web polls the server for system locksfor the current user. The value is set in minutes. For fur ther details, see SystemLocks in the CRM.Core Administrator Guide.
Default: 4
Type: Number
Marketing ParametersThis topic holds information about the Marketing parameters.
Marketing.ControlFileSeparators
Important: Internal parameter - do not change!
Marketing.MarketingCalendar.ContextMenus
Description: Defines the context menus used in Marketing Calendar.
Default: Empty
Type: Character
Marketing.QuickCampaign.RecordsType
Description: Defines whether activity (default) or mailing records are created forquick campaigns. For fur ther details, see Quick Campaigns on page 845.
Default: Empty
Type: Combobox
Marketing.QuickCampaign.WarningLimit
Description: Defines the limit above which a warning about a large number ofrecords displays when creating a quick campaign.
Default: Empty
Type: Number
MarketingActivityMessageBuilder.UseDefaultEmailMessageBuilder
Description: Enable this parameter to allow the of use the default email messagebuilder for Marketing activities.
133AUREA CONFIDENTIAL
Web Configuration

Default: Unchecked
Type: Checkbox
MarketingCalendar.FilterSets
Description: Enable the predefined Marketing Calendar filters. See MarketingCal-endar on page 432 for fur ther details. These filters are listed in the marketing calen-dar's Filter drop-down list.
Filter sets for the marketing calendar are defined as described for calendar filtersets. For fur ther details, see Calendar.FilterSets.
Default: Empty
Type: Combobox
Campaign Designer ParametersThis topic holds information about the Campaign Designer parameters.
CampaignDesigner.AKExpandMask
Description: Defines the expand mask to be used for editing AK values in theCampaign Designer.
Default: AK.Designer
Type: Character
CampaignDesigner.CMExpandMask
Description: Defines the expand mask to be used for editing CM values in theCampaign Designer.
Default: AK.Designer
Type: Character
CampaignDesigner.ExecutionStatePolling
Description: Specifies the polling timeout interval, measured in milliseconds, tocheck the state of a marketing activity execution until the marketing activity executionis complete.
Default: 2500
Type: Integer
Matchup ParametersUse the following parameters to configure the match-up behavior when creating newrecords in Aurea CRM.Web.
Matchup.BusinessLogic
Description: Defines whether the match-up logic applied when identifying duplicaterecords is the logic used in Aurea CRM.Web ("web") or the logic used in AureaCRM.Win ("core").
134AUREA CONFIDENTIAL
Chapter 2: Configuring CRM

If "web" is selected, the fields defined in the info area Matchup control are comparedwhen matching up records. For fur ther details, see Matchup control.
If "core" is selected, the settings in the Configuration info area (MC) determinewhether the internal logic or an external third-party application is used.
Note: Since the internal match-up logic of Aurea CRM win is only available for theinfo areas Company, Person and Property (BTB only), the option "core" withoutdefining an external application should only be used if the match-up is solelyconfigured for these info areas otherwise errors occur.
Default: Web
Type: Combobox
Matchup.DuplicateMaxRows
Description: Defines the maximum number of possible duplicated rows shown aftermatch-up.
Default: Empty
Type: Number
Matchup.PersonsInCompanyOnly
Description: If checked, the person match-up takes into account only persons fromthe company for which the user wants to create a new record. By default, the match-up is performed globally.
Default: Unchecked
Type: Checkbox
Menu ParameterThis topic holds information about the Menu parameter.
Menu.Delay
Description: Determines the delay in milliseconds for opening sub-menus on mouse-hover.
Default: 200
Type: Number
Notification ParametersThis topic holds information about the Notification parameter.
All notification parameters are measured in seconds. When the timeout = 0 the no-tification does not fade out:. Users must manually exit such notifications.
For more information on facilities, see the ar ticle “The Notification Service” athttps://support.aurea.com.
135AUREA CONFIDENTIAL
Web Configuration

Notification.TimeoutError/Information/Warning
Description: Defines the timeout before hiding error messages displayed in theInbox.
To define notification timeouts per facility, define and set the Notification.TimeoutWeb Configuration parameters using the following syntax:
Notification.TimeoutError.<FacilityName>
Default: 0
Type: Number
Notification.Information
Description: Defines the timeout before hiding informational messages displayedin the Inbox.
To define notification timeouts per facility, define and set the Notification.TimeoutWeb Configuration parameters using the following syntax:
Notification.TimeoutInformation.<FacilityName>
Default: 3
Type: Number
Notification.Warning
Description: Defines the timeout before hiding warning messages displayed in theInbox.
To define notification timeouts per facility, define and set the Notification.TimeoutWeb Configuration parameters using the following syntax:
Notification.TimeoutWarning.<FacilityName>
Default: 10
Type: Number
Offline ParametersLearn to use Offline Parameters to configure Aurea CRM.Web Offline.
Information on how to configure Aurea CRM.Web offline can be found on WebConfiguration Parameters in the Aurea CRM.Web Offline Installation & TechnicalGuide.
Offline.IncludeRootConfigurationInSync
Description: Enables the inclusion of root in the offline synchronization.
Default: Checked
Type: Checkbox
136AUREA CONFIDENTIAL
Chapter 2: Configuring CRM

Offline.MaxTimeLimitForSync
Description: Defines the maximum number of hours before the user is promptedto synchronize.
Default: 24
Type: Number
Offline.ShipDataModel
Description: Allows the export of the Data Model.
Default: Empty
Type: Checkbox
Phone ParametersUse the following parameters to configure the behavior of telephone fields and ofCRM.Phone.
To learn more about Phone Parameters, see CRM.Phone on page 824.
Note: Fields are defined as telephone fields in the data model. For example,Telephone column, Type "Telephone" and "Cell phone". For fur ther details, seeData Model in the CRM.Core Administrator Guide.
Phone.ActivateBrowserOnCall
If checked, an aler t message is generated and the browser is activated and broughtto the foreground when a call comes in.
Note: The browser may not always be brought to the foreground as it depends onthe user's local system and browser settings.
Default: Unchecked
Type: Checkbox
Phone.AutoSuggestFormat
Defines the formatting of country and area codes displayed as a ghost text in phoneand fax fields (Expand and List view in Edit mode).
If you define the format as "+{countryCode}({areaCode})" the following ghost textis displayed:
137AUREA CONFIDENTIAL
Web Configuration

Note: Telephone fields (and the mapping of country/area code fields) are definedin the data model, >> Data Model in the CRM.Core Administrator Guide (Info AreaOptions > Telephone).
Note: When creating new records the country and the area codes are only enteredupon saving the record. Workaround: Define a Hook Function for the Country Codefield (updating the country code as soon as the user selects a Country) and adaptthe Select-Function for Postal Code to also update the Area Code field. Examplein UPDATE_DEFAULT: FI details control.
The formatting of country and area codes (leading zeros, plus sign) as defined inthe respective fields is stripped before the formatting defined with Phone.AutoSug-gestFormat is applied.
To ensure the trimming of trailing blanks, you can define a format string like"+{countryCode}({areaCode}) {number}". The placeholder {number} is replaced withnothing thus preventing the former trailing blank from being trimmed. Later it maybe replaced with the telephone number of the company (e.g. for person records).
If Phone.AutoSuggestFormat is undefined, no ghost text is displayed.
Type: Character
Phone.EmailSearchListGroups
Description: This field group(s) is used for the result listing the phone & emailSearch.
Default: FI.EmailPhone,KP.EmailPhone,PE.EmailPhone
Type: Character
Phone.FastCopyEnabled
Description: If checked, the phone icon displayed next to a phone field (in Expandview in Edit mode) offers a context menu (M_Telephone) that allows the user tochoose between dialing the number (A_DialNumber) or copying the number from theCRM.Phone toolbar to the field (A_CopyNumber). For more information, see CopyingNumbers in Aurea CRM.Web in the CRM.Phone User Manual.
Default: Unchecked
Type: Checkbox
Phone.IncomingCallAction
Description: Defines the action carried out when an incoming call is answered byCRM.phone. Available values:
• Do Nothing: No action is carried out in Aurea CRM.Web.
• Popup Question (default): Asks the user if he wants to open the URL or launchthe process defined in their phone profile. For details, see Special Aurea CRM.Weboptions in the CRM.phone Administrator Guide.
• Automatic URL Redirect: Directly opens the URL or launches the process (definedin the phone profile) upon answering an incoming call.
138AUREA CONFIDENTIAL
Chapter 2: Configuring CRM

Type: Combobox
Phone.OpenIncomingInNewTab
Description: If checked (default), the defined action for incoming call is executedin a new tab.
Default: Checked
Type: Checkbox.
Phone.ShowOnCall
Description: If checked, the phone toolbar is displayed if collapsed upon incomingcalls.
Default: Checked
Type: Checkbox.
TelephoneField.DisableLink
Description: If checked, disables the display of links in the Aurea CRM telephonefields in expand views or lists.
Default: Checked
Type: Checkbox.
Phone.PhoneBook.CacheMaxRecord
Description: If checked, disables the display of links in the Aurea CRM telephonefields in expand views or lists.
Default: Checked
Type: Checkbox.
Phone.PhoneBook.CacheSetting
Use this parameter to specify the caching behavior of the CRM.Web handler forCRM.Phone profiles. You can specify one of the following values:
• -1: Set this value to disable caching.
• 0: Set this value to enable caching on demand. This ensures that CRM.Phoneprofiles are not retrieved in bulk from the database but the records are retrievedand stored in the cache, only on receiving a request for a user’s phone profile.
• 1 and above: Set this value to enable caching and retrieve the specified numberof records from the database initially.
Default: 3000
Type: Number
139AUREA CONFIDENTIAL
Web Configuration

Process ParametersThis topic holds information about Process parameters.
Process.DefaultAction
Description: Defines the default action that is called when the user double-clicksa list item on a search page within a process. For fur ther details, see Default Actionon page 289.
Default: A_Select
Type: Character
Process.DefaultMenu
Description: Defines the default menu for list records on a search page within aprocess.
Default: M_Wizard
Type: Character
Query ParametersUse the following parameters to configure the definition and behavior of queries inAurea CRM.Web.
Query.OptionalColumns
Description: Allows you to specify additional field ids to display in query selectorresults list. For example, specifying {'ID': [11,12,0] } displays the additionalfields: Last Name, First Name, and Rep/Group ID.
Default: Empty
Type: JSON
Query.BackgroundExecutionStart
Description: Allows you to define a star t time for processing asynchronous querieson the server. For fur ther details, see Background Queries on page 502. This allowsthe processing of background queries to be scheduled for off-peak hours to avoidperformance issues.
Enter the desired star t time using the format hh:mm e.g. "23:00".
Default: Empty
Type: Character
140AUREA CONFIDENTIAL
Chapter 2: Configuring CRM

Query.CountRecords
Description: The count feature does not execute the query itself but counts therows that would be returned. This operation is resource-consuming for the serverand thus Query.CountRecords should be activated with care and set to a sensiblelimit e.g. "500".
• If this parameter is set to 0, the count feature is disabled, i.e. the button is not available.
• If set to any value > 0 (e.g. "500"), the button is available in theQuery and QueryFooter headers and the message "> x rows" is displayed if morerows exist.
• Use this setting to restrict the number of result rows. If fewer result rows are re-turned, they are displayed. If more result rows are returned, a message is dis-played instead of the rows.
• Enter –1 for no limit.
Default: 0
Type: Number
Query.FieldsSortOrder
Description: Determines the sor t order of the field selection dialogs when definingfilters and queries in Aurea CRM.Web: "alphanumeric" or "by id". This setting definesthe default behavior and is overruled by the user's sor t and column order settings.
Default: Alphanumeric
Type: Combobox
Note: Order clause (sor t) in queries is parsed based on the info areas order in thequery so, Order (sor t) fields is rearranged by CRM if it is not in the correct order.For instance, in the following query :
select ('FI.SAP-No', AddressType, CompanyName, Country, ZipCode)
from (ZA)plus (FI)orderby ('FI.SAP-No', AddressType)
The actual sor t order is "AddressType" then "FI.SAP-No" because "AddressType"is from the first info area (ZA) and "FI.SAP-No" from the second one.
Query.HideSystemFields
Description: By default, system fields (Created on, DelCd etc.) are not visiblewhen defining filters and queries. For fur ther details, see System Fields in theCRM.Core Administrator Guide.
If you define Query.HideSystemFields and set it to false (= unchecked), systemfields are displayed when defining filters and queries.
This parameter is not par t of UPDATE_DEFAULT but needs to be created if required.
141AUREA CONFIDENTIAL
Web Configuration

Default: Unchecked
Type: Checkbox
Query.ImportantInfoAreas
Description: Defines the info areas and their order that are displayed as QuickLinks in the info area selection dialog when creating new queries.
Default: "FI,KP,MA,Y1" in the BTB vertical, "FI,KP,MA" for the OTC and FS verticals
Type: List
Query.LoadFrom
Description: Defines from which databases – Aurea CRM and/or CRM.Designer –Aurea CRM.Web loads queries. For fur ther details, see Storing Queries on page495.
Available values:
• Aurea CRM: Aurea CRM.Web loads queries from the Aurea CRM database only.
• CRM.Designer: Aurea CRM.Web loads queries from the CRM.Designer databaseonly.
• both: Aurea CRM.Web loads queries first from the Aurea CRM database and thenfrom the CRM.Designer database.
• both, CRM.Designer first: Aurea CRM.Web loads queries first from theCRM.Designer database and then from the Aurea CRM database.
Default: both, CRM.Designer first
Type: Combobox
Query.MaxRecords
Description: Defines the maximum number of records that can be returned by aquery.
Enter "-1" for "All".
Default: 1000
142AUREA CONFIDENTIAL
Chapter 2: Configuring CRM

Type: Number
Query.NumberOfResults.Default
Description: Number of records of the query result that are displayed at once.Possible values: any number (e.g. 20,50,100...), "search" or "all".
This setting affects the QueryResult in the query editor, the QueryRun page and theQueryResultPresenter widget in forms. (Restriction for QueryRun: Query.NumberOfRe-sults.Default overrules the maxRows argument, i.e. its value is used for calculatingthe page size.)
If undefined, the value of the Web Configuration parameter Search.MaxResults isused. For fur ther information, see Search.MaxResults.
Default: 50
Type: Number
Query.NumberOfResults.DefaultForRun
Description: Defines the default value for the number of records Max. Rows drop-down list returned by a query execution. Enter "-1" for "All".
Default: 100
Type: Number
Query.NumberOfResults.Steps
Description: Steps for record count returned by a query. Users can choose betweenthese steps when they execute queries. Enter "-1" for "All".
Default: 20,50,100,1000,10000
Type: List
Query.Parameters
Description: With this parameter, you can prevent users from exporting and/orsaving the results of a query. Available values:
• Disable exporting of query results
• Disable saving of query results
Default: Undefined
Type: Checkboxes
143AUREA CONFIDENTIAL
Web Configuration

Query.Rights
Description: Defines the user's rights for loading, saving and executing queries.Available values:
• disabled: Queries are not available.
• readonly: Allows the user to execute predefined queries.
• read+define: Allows the user to edit and create queries and save them as privatequeries.
• all (default): Grants full access rights. The user can also create and savepublic queries.
Default: all
Type: Combobox
Query.SaveDateExpressionWithoutEvaluation
Description: Enable this parameter to ensure that data expressions in a UQLstatement are not evaluated, before saving the UQL statement to the database. Thisis useful when you are using expressions in a date condition. For example, with thisoption enabled, the expression $??##+1m is not evaluated and is stored as it is inthe FT table.
Note: Date expressions are not directly supported by the CRM.Core. You can usethese queries only with .Net framework components.
Default: Unchecked
Type: Checkbox
Query.SaveTo
Description: Defines to which databases a query defined in Aurea CRM.Web issaved. For fur ther details, see Storing Queries on page 495. Available values:
• Aurea CRM: Aurea CRM.Web loads queries from the Aurea CRM database only.
• CRM.Designer: Aurea CRM.Web loads queries from the CRM.Designer databaseonly.
• both databases: Aurea CRM.Web loads queries first from the Aurea CRM databaseand then from the CRM.Designer database.
• both, CRM.Designer first: Aurea CRM.Web loads queries first from theCRM.Designer database and then from the Aurea CRM database.
Default: Aurea CRM
Type: Combobox
Query.ShowParameterMissingWarning
Description: Enable this parameter to validate a query’s fields for required values.If a query’s field is missing a value a warning message pops up informing the userabout the empty fields.
144AUREA CONFIDENTIAL
Chapter 2: Configuring CRM

Default: Checked
Type: Checkbox
Query.ShowVirtualFields
Description: If checked, fields flagged as Vir tualCore (i.e. vir tual fields with fixedIDs from 4200 to 4230, e.g. Created by ID) are available for filter and query defini-tions in Aurea CRM.Web. For fur ther details, see Fields with Fixed IDs in theCRM.Core Administrator Guide (2nd table).
If unchecked, those fields are hidden.
Note: Regardless of this setting, the Number of records (RecCount) field (4230) isalways displayed for queries of type WITH SUMMED, PLUS SUMMED and HAVING.Reference fields (Z-fields) are never available for filter and query definitions in AureaCRM.Web. However, they can be defined as output fields in queries.
The Query.ShowVirtualFields setting also applies to the fields displayed in theViewAllFields dialog. For fur ther details, see ViewAllFields on page 319.
Default: Checked
Type: Checkboxes
Query.DisableAutoAddArrayFields
Description: Check this option to prevent all the fields present in an array field toshow up in a query result. This ensures that only the array fields specified in a queryfilter are diplayed.
Note: By default, queries are automatically adapted to include all associated fieldsof the specified array field.
Default: Unchecked
Type: Checkboxes
Query Analysis ParametersThis topic holds information about Query Analysis parameters.
Query_Analysis.RememberLastSearch
Description: If checked, the last search criteria input by the user are automaticallyentered in query and analysis search masks.
Default: Checked
Type: Checkbox
145AUREA CONFIDENTIAL
Web Configuration

Query_Analysis.ShowLockedCatalogValues
Description: Use this parameter to define whether catalog values locked via theMaintenance module or via tenant rights are available when defining filters, queriesand analyses. Set Query_Analysis.ShowLockedCatalogValues to Display LockedCatalog Values to allow users to select locked catalog values, otherwise set it toHide Locked Catalog Values.
The following table shows whether locked catalog values are displayed (Y | N), andthe effect of Query_Analysis.ShowLockedCatalogValues (Show | Hide):
CommentHideShowWhere
NNSearch
YYList (Viewmode)
The value is grayed out in the drop-down listYYList (Editmode)
The value is grayed out in the drop-down listYYExpand
NYFilter
NYQuery
YYQuery Snap-shot
For analyses, you can override Query_Analy-sis.ShowLockedCatalogValues using Analy-sis.ShowLockedCatalogValues. For fur ther details, seeAnalysis.ShowLockedCatalogValues.
NYAnalysis
Default: Display Locked Catalog Values
Type: Combobox
QuickSearch ParametersThis topic holds information about QuickSearch parameters
QuickSearch.Definition
Description: Specifies the path and name to a configuration-specific quick searchdefinition. For fur ther details, see Quick Search on page 346. Specify the path relativeto the application path.
If the path is invalid or the file doesn't exist, the Quick Search is not displayed anda message is written to the client log.
146AUREA CONFIDENTIAL
Chapter 2: Configuring CRM

Change QuickSearch.Definition to undefined (empty), to completely hide the QuickSearch.
Default: data\settings\QuickSearch.json.js
Type: Character
Record ParametersThis topic holds information about Record parameters
Record.DefaultAction
Description: Defines the default action that is called when a record is clicked. Forfur ther details, see Default Action on page 289.
Default: A_Expand
Type: Character
Record.History.Slim
Description: If set to true, the record history (H0) only displays a sub-set ofcolumns. For fur ther details, see Displaying a Record's History on page 824. The ID,Windows User Name, Windows Computer Name and Application columns arehidden.
Default: Unchecked.
Type: Checkbox
DoNotJumpToNewRecord
Description: Support of the new Tree View configuration option DoNotJump-ToNewRecord is added.
If set to true, the record tree node does not switch content in case that a new recordis added in the same info area. The list of records is kept in the content area andno details of newly added record are shown:
147AUREA CONFIDENTIAL
Web Configuration

The option can have a value of true or false. If the value is blank it defaults tofalse.
Default: False
Type: Widget Options
RecordSelector ParametersThis topic holds information about the RecordSelector parameters.
RecordSelector.EnableDeleteLink
Description: If checked, a Remove Link button is displayed next to link fieldsin Expand view allowing users to remove previously selected link records.
Default: Checked
Type: Checkbox
Header.EnableRecordSelectorHeaderButtons
Description: Enable this parameter to display the buttons added to a record selectorheader of an info area. By default this parameter is not enabled and buttons addedto a record selector header are not displayed.
Default: Disabled
Type: Check Box
RecordSelector.GenericInfoAreas/ RecordSelector.InfoAreasWithGenericLinks
Description: RecordSelector.InfoAreasWithGenericLinks determines which infoareas can be linked to other info areas via generic links.
RecordSelector.GenericInfoAreas determines the info areas that can be accessedvia generic links from the info areas defined under RecordSelector.InfoAreasWith-GenericLinks.
These parameters control the use of generic links in the query designer. For example,a Task (A1) can be linked to any other info area using a link field. If you do not wantto show all info areas in the query designer you may use these parameters.
148AUREA CONFIDENTIAL
Chapter 2: Configuring CRM

For all info areas that are listed in RecordSelector.InfoAreasWithGenericLinks,all RecordSelector.GenericInfoAreas are offered as link info areas and vice versa.
For both parameters enter the info area IDs separated by comma.
RecordSelector.GenericInfoAreas also globally defines the info area selection(context menu) for generic link fields: The setting is used for all generic link fieldsthat have no Select-Function defined. For fur ther details, see selectRecord forGeneric Link Fields on page 253.
Note: A link field's context menu only lists info areas that meet the following condi-tions:
• The info area's key consists of station number plus serial number.
• The user has read access.
• A Search&List configuration exists.
Examples:
RecordSelector.InfoAreasWithGenericLinks = A1
RecordSelector.GenericInfoAreas = MA,CM,KM
Tasks can be linked to activities, campaigns and tickets in the query designer.
Default: Undefined
Type: List
RecordSelector.ShowSelectorIfDefined
Description: By default, the record selector icon is not displayed for read-onlyfields, i.e., fields with either data model field property = readonly or CRM.Designerfield attribute Readonly = true.
If this parameter is checked and a Select-Function is defined for a field, the recordselector icon is displayed regardless of a read-only setting. For fur ther details onSelect-Function, see Select-Function on page 240.
Use this feature e.g. to indicate read-only link fields that actually copy data to othereditable fields or to let users reassign parent records if required.
Note: If a user has no update rights for an info area, no record selector icons are displayed, regardless of RecordSelector.ShowSelectorIfDefined.
Default: Checked
Type: Checkbox
149AUREA CONFIDENTIAL
Web Configuration

RelationshipHierarchy ParametersThis topic holds infotmation about RelationshipHiearchy parameter.
RelationshipHierarchy.MaxRecursionDepth
Description: By default the recursion depth for the relationship hierarchy is 20. Forfur ther details, see RelationTreeView on page 446. Use this parameter to reduce thenumber of levels displayed in the relationship tree (recommended when performanceproblems occur).
This parameter is not a par t of UPDATE_DEFAULT but needs to be created asnumber if required.
Default: Undefined
Type: Number
Rep ParametersThis topic holds information about Rep parameter
Rep.ABCStrings
Description: Letters offered as links in the rep picker dialog ("ABC bar"). Separatemultiple values by comma.
If undefined, the language-dependent text no.58 from the text group RepUtils_textis used.
In order to display only the All option, you have to delete the values in theRep.ABCStrings parameter AND the text no.58 from the RepUtils_text Text Group.
Default: A,B,C,D,E,F,G,H,I,J,K,L,M,N,O,P,Q,R,S,T,U,V,W,X,Y,Z
Type: List
Rep.AutocompleteCharacters
Description: Defines the required number of characters for the auto-completionfunction to star t when entering a name into a rep field.
Default: 1
Type: Number
Rep.Dialog.AvailableViews
Description: Defines the available tabs in the rep picker dialog.
Group assignments via the ID Org. Group field and via the Group Allocation (GZ)info area are taken into account. For fur ther details, see Rep in the CRM.Core Ad-ministrator Guide.
150AUREA CONFIDENTIAL
Chapter 2: Configuring CRM

Reps, groups and resources are displayed depending on the context, e.g. the MAParticipants fields list reps, groups and resources, the ID Deputy field only listsreps.
Available values:
• Tree View: Lists all organizational groups with their assigned reps. Hierarchicalgroups are not taken into account, i.e. all groups are listed on the first level re-gardless of the hierarchical structure of the groups.
• List View: Lists all reps in alphabetical order.
• Tree View (hierarchical): Lists reps according to the rep hierarchy. For fur therdetails, see Rep Hierarchy in the CRM.Core Administrator Guide.
• Tree View (organizationally grouped): Lists all organizational groups with theirassigned reps. Hierarchical groups are taken into account. If a rep is assignedto multiple groups (via GZ), the rep is displayed below all relevant group nodes.
Rep HierarchyGroup HierarchyTree
"Flat" TreeList
Default: List View, Tree View (organizationally grouped)
Type: Checkboxes
Rep.Dialog.DefaultView
Description: Defines the active tab of the rep picker dialog.
Available values:
• Tree View
• List View
• Tree View (hierarchical)
• Tree View (organizationally grouped)
Default: List View
Type: Combobox
151AUREA CONFIDENTIAL
Web Configuration

Rep.Dialog.HierarchyTree.ShowAssignedOnly
Description: Check this parameter to hide the No group node in the rep picker inthe hierarchy tree view. Reps that don't belong to a group are not displayed in thehierarchical rep tree.
Default: Unchecked
Type: Checkbox
Rep.Dialog.List.MaxResults
Description: Determines the maximum number of reps displayed in the list view ofthe rep picker. If more reps exist, "…" is added at the end and can be clicked todisplay more reps. Rep.Dialog.List.MaxResults applies to search results as wellas to the user's selection of a letter or All from the ABC bar.
Default: 150
Type: Number
Rep.Dialog.Tree.MaxResults
Description: Determines the maximum number of reps displayed in a tree nodewhen the rep picker is expanded. If more reps exist in the organizational group, "…"is added at the end and can be clicked to display more reps.
Default: 30
Type: Number
Rep.DisplayInternal
Description: By default, reps flagged as Internal in the Rep info area are not dis-played in the rep picker and the auto-completion results. Use the Rep.DisplayInter-nal parameter if you want users to see internal reps.
This parameter is not par t of UPDATE_DEFAULT but needs to be created asCheckbox if required.
Default: Undefined
Type: Checkbox
Rep.DownloadOptions
Description: Determines which reps are transferred to the client and thus availablefor selection. Available values:
• Download All: All reps are downloaded from the server. Inactive reps are availableand can be used for defining filter criteria (searches, filters, queries). They arenot selectable in rep fields when creating/editing a record.
Use the Rep.HideInactiveInSearch web Configuration parameter to disable inactivereps when defining filter criteria, i.e. same behavior as for rep fields in records.For fur ther details, see Rep.HideInactiveInSearch.
• Exclude inactive reps: Reps flagged as Inactive (in the Rep info area) are notdownloaded.
152AUREA CONFIDENTIAL
Chapter 2: Configuring CRM
Note: Reps that are not accessible due to restricted access rights (defined in theAurea CRM.win Rights module) are never downloaded.
Note: The Rep.DownloadOptions parameter affects rep groups as well.
Default: Download All
Type: Combobox
Rep.HideInactiveInSearch
Description: If set to true, inactive reps are no longer available (selectable) whendefining filter criteria (searches, filters, queries).
This parameter is not par t of UPDATE_DEFAULT but needs to be created asCheckbox, if required.
Default: Undefined
Type: Checkbox
Rep.MaxAutocompleteResults
Description: Limits the number of entries displayed in the auto-complete box forreps. If more than Rep.MaxAutocompleteResults reps match the input string "…" isdisplayed at the end of the list.
Default: 50
Type: Number
Rep.RepSetSettings
Description: Use this parameter to hide one or more options in the Reps and RepGroups dialog of the calendar. Available values:
• Hide option "CurrentRep"
• Hide option "Group"
• Hide option "Group Leader"
• Hide option "Deputy"
• Hide option "All"
Default: Undefined
Type: Checkboxes
Resource View ParametersThis topic holds information about Resource View Parameters
ResourceView.FilterSets
Description: Defines the predefined filters offered in the sidebar of the Resourcespage and the Dispatching Dashboard. For more information. For fur ther details,see Calendar.FilterSets.
153AUREA CONFIDENTIAL
Web Configuration

This parameter is not par t of UPDATE_DEFAULT but needs to be created as Com-bobox if required.
Default: Undefined
Type: Combobox
ResourceView.ShowHiddenItems
Description: If checked, the hidden activity records are displayed as little dots whenthe selected time scale is too large.
You can overrule the default setting by setting the Show hidden items flag in theResource View settings.
This setting applies to the Resources view and the Dispatching Dashboard.
Default: Unchecked
Type: Checkbox
Sales ParametersThis topic holds information about Sales Parameters
Sales.TerritoryManagement.InfoAreas
Description: Determines the info areas for which the territory allocation is calculated.If this parameter is not set, "FI,KP" is used as default for both versions.
Default: "FI,KP,OJ" (BTB), "FI, KP" (FS)
Type: List
Schema ParametersThis topic holds information about Schema Parameters
Schema.EnableLiveCalculations
Description: Use this parameter to enable the calculation of fields values basedon core business logic upon editing the field instead of upon saving the record. Toenable calculations for specific info areas, enter a comma-separated list of info areaIDs. To globally enable calculations, enter '*'.
Examples for core calculations:
• When entering the Postal Code field e.g. for a company, the City is automaticallyentered using the information retrieved from City (OR) info area.
• When changing the star t time of an activity (MA), the end time is modifiedaccordingly ensuring that the duration remains unchanged.
If disabled (i.e. Schema.EnableLiveCalculations = undefined), you need to definee.g. field hooks for updating such fields immediately.
For more information, see the ar ticle “How to Enable CRM.Core live calculationsfor Aurea CRM” in https://support.aurea.com.
Default: Disabled
154AUREA CONFIDENTIAL
Chapter 2: Configuring CRM

Type: Character
Search ParametersThis topic holds information about Search Parameters
GlobalSearch.AddWildCardAt
Description: You can control the automatic addition of wildcards to a search keyusing this parameter. Global search function splits the words in a search term sep-arated by space into keys. For each search key wildcards are added before and/orafter the search key based on the configuration defined using this parameter.
You can select one of the following options:
• None—wild card entries are not added to the search keys.
• Start—wild card entries are added at the beginning of a search key.
• End—wild card entries are added at the end of a search key.
• Both—wild card entries are added at the beginning and end of a search key. Thisis the default behaviour of the global search function.
Default: Both
Type: Radiobutton
Search.AlwaysReadNumRecords
Description: If this parameter is set to a value other than zero, regardless of therequested count of records the server always requests <Search.AlwaysReadNum-Records> records from the database. If more records exist for the entered searchcriteria, a message is displayed "More than <Search.AlwaysReadNumRecords>matching records; please refine your search.".
Use this setting to restrict the number of search results and for Oracle databasesto work around the ROWNUM problem with ROWNUM being applied before sor ting.For fur ther details, Oracle: ROWNUM is applied before ORDER BY in the AureaCRM.Web Installation Guide.
Default: 0
Type: Number
Search.AutoExpandOnSingleHit
Description: If this parameter is checked and a search returns exactly one record,the search results list is not displayed but the default action is automatically executedfor the record. For fur ther details, see Default Action on page 289.
You can override this setting for individual Search actions via the action parameterautoExpandOnSingleHit=<true|false>. For fur ther details, see autoExpandOnSin-gleHit.
Default: Not checked
Type: Checkbox
155AUREA CONFIDENTIAL
Web Configuration
Search.AutoStartWhenLinked
Description: Determines the auto search behavior of linked searches (but only ifthe autoSearch parameter in the Search action is not set). For fur ther details, seeautoSearch.
If checked, the search is automatically star ted if a link record is passed to the searchview.
Default: Checked
Type: Checkbox
Search.ClearSearch
Description: Determines which options are available for clearing search criteria/re-setting a search. For fur ther details, see Resetting a Search. Enable/disable thefollowing options:
• Clear search criteria
• Reset search settings
Use the Search.ShowSettingsButton Web Configuration parameter to globally en-able/disable the reset options on search pages. For fur ther details,see Search.ShowSettingsButton.
Default: Both enabled
Type: Checkboxes
Search.CopyCriteriaOnNew
Description: If enabled, values in the search mask are automatically transferred tothe Expand view when creating a new record from the search results.
Note: If Search.CopyCriteriaOnNew is enabled, then the 1st catalog value is copiedinto the expand view.
For a search value to be transferred, the respective field must be part of the Detailscontrol used by the ExpandNew action. Values from an enhanced search field arewritten to the field for which the Enhanced Search Field attribute is defined.
Ranges are not copied (e.g. the From/To PC range in the company search).
Values are not transferred if the field in the Expand view is read-only.
Default values, and values from copy fields and empty values specified in the Ex-pandNew action via the copySourceFields/copyTargetFields and emptyFields argu-ments overrule values that are transferred from the search.
For searches with autoSearch = true no values are transferred.
Search criteria are stored per info area in the current session. Expiration time isset to 5 minutes.
Default: Enabled
Type: Checkbox
156AUREA CONFIDENTIAL
Chapter 2: Configuring CRM

Search.FlavorSelectDefaultAction
Description: Defines the default action that is called when double-clicking a recordin the search results of a process or record selector. For fur ther details, see DefaultAction on page 289.
Default: A_Select
Type: Character
Search.FlavorSelectMenu
Description: Defines the default context menu used for the search results of aprocess or record selector.
Default: M_Select
Type: Character
Search.HideMoreFields
Description: Allows you to disable the More Fields … option from the Add more… drop down menu in a search control for all info areas by setting the parameterto true.
Default: False
Type: Boolean
Search.MaxResults
Description: Default number of records displayed in search results lists and in sub-lists.
Note: The value specified here is displayed as default in the search mask’s Max.Records/Page drop-down list.
Note: This parameter does not apply to the Quick Links list.
Default: 10
Type: Number
Search.NoFilterDefinition
Description: Globally restricts the usage of filters to the selection of predefinedfilters.
If checked, the More Filters entry is removed from the Add more drop-down list onall Search pages. Users can only select predefined filters and can no longer createor edit any filters in Aurea CRM.Web.
This parameter is not par t of UPDATE_DEFAULT but needs to be created asCheckbox if required.
Default: Undefined
157AUREA CONFIDENTIAL
Web Configuration
Type: Checkbox
Search.NotCompanyRelated
Description: A list of info areas where the Company-Related check box is notdisplayed in the search mask, when items of that info area are displayed linked toa company.
Default: The following defaults are used:
• BTB: IB, Y1, ZA, BQ, AU
• FS: AU
• OTC: AU,VG,IB,PS,LS,KK,ST,WM,AB,FK,SA,TM,VF,WK
Type: List
Search.PhoneEmailMaxResults
Description: Defines the maximum number of results returned by the Phone &email Search.
Note: Since the ID_NET_PHONEEMAILSEARCH menu action has CachedMode enabledby default, all of these results are transferred to the client to allow paging in theresult list) Therefore, update recommends not to specify to high a value.
Default: 500
Type: Number
Search.RestoreSearchOnBrowserBack
Description: Use this parameter to enable the use of the BackButton (Previousbutton) on opening a result record page to return to the info area’s search page,with the search result list and search conditions restored to the previous searchcontext. This parameter works with the Search.RememberDynamicFilter andSearch.RememberDynamicFields parameters defined below.
Default:
Type: Checkbox
Search.Result.FocusHotKey
Description: Defines a hotkey to automatically select the first row of a search result.This also activates the respective search sub-list.
Default: Alt+L
Type: Character
Search.ShowClearSearchButton
Description: Enable this parameter to display the Clear Search button globallyacross all info areas providing search capabilities. This button allows the user toclear all search criteria (default and user-defined search values and filters) fromthe search mask.
158AUREA CONFIDENTIAL
Chapter 2: Configuring CRM

Default: Unchecked
Type: Checkbox
Search.ShowResetSearchButton
Description: Enable this parameter to display the Reset Search button globallyacross all info areas providing search capabilities. Users can use this button to clearadditional search fields and remove added filters, clear search values or reset todefault field values if applicable. It also clears the search results.
Default: Unchecked
Type: Checkbox
Search.ShowSettingsButton
Description: Determines if the Clear (and Reset) options are available on searchpages. For fur ther details, see Resetting a Search.
If undefined (default) or checked, the Clear (and Reset) options are available onall search pages. If unchecked, they are hidden.
Use the Search.ClearSearchWeb Configuration parameter to determine which options(Clear and/or Reset) should be available. For fur ther details, seeSearch.ClearSearch.
Default: Undefined
Type: Checkbox
Search.ShowOwnItems
Description: If set to true, the With Me checkbox is added to all search forms.Users can select this checkbox to search for their owned items.
Note: The checkbox is hidden if the info area does not contain non-vir tual rep orparticipant fields.
Default: Unchecked
Type: Checkbox
Remember Search OptionsThis topic holds information about Remember Search Options
Web configuration parameters used to configure search behaviors related to howthe system remembers search have been enhanced.
Search views are structured as follow:
159AUREA CONFIDENTIAL
Web Configuration

CRM.Web version 11.5.0 and later have two parameters renamed:
• Search.RememberSearch is renamed to Search.RememberDynamicFields
• Search.RememberFilter is renamed to Search.RememberDynamicFilters
Users can change these configuration parameters using their User Configurationview, checking or unchecking to enable or disable the correspondent options.
The following tables show all the possible combinations of web configuration andtheir behaviors:
160AUREA CONFIDENTIAL
Chapter 2: Configuring CRM
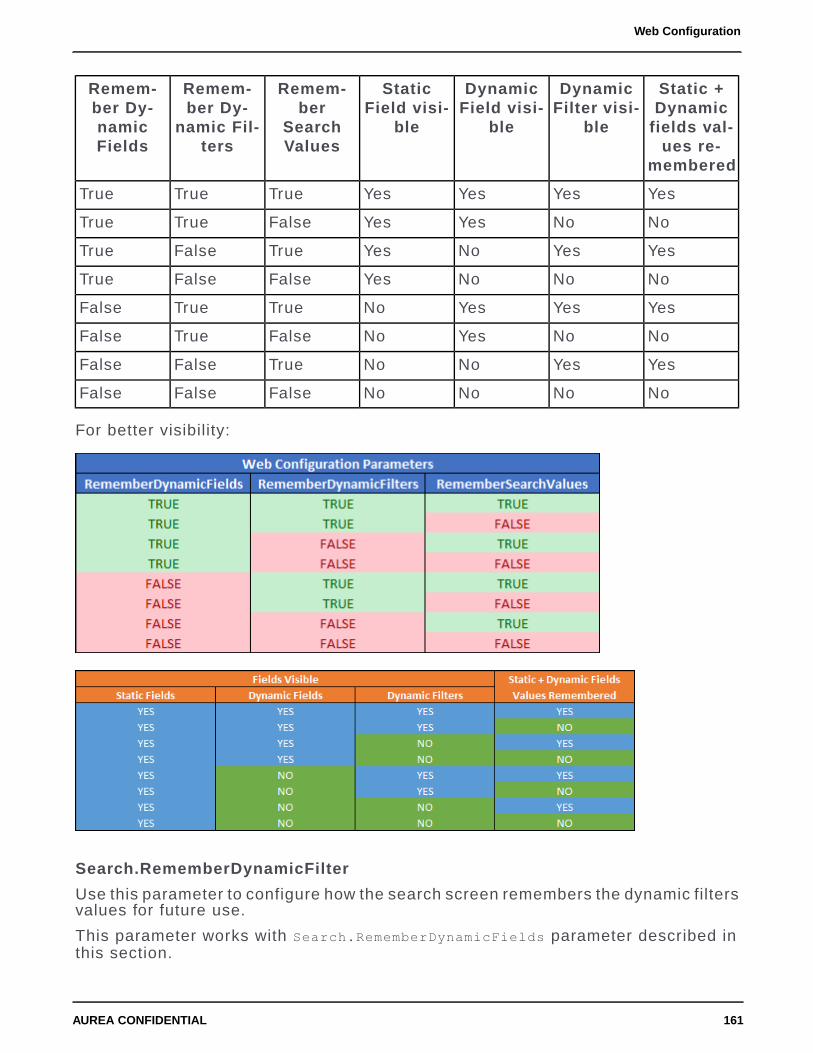
Static +Dynamic
fields val-ues re-
membered
DynamicFilter visi-
ble
DynamicField visi-
ble
StaticField visi-
ble
Remem-ber
SearchValues
Remem-ber Dy-
namic Fil-ters
Remem-ber Dy-namicFields
YesYesYesYesTrueTrueTrue
NoNoYesYesFalseTrueTrue
YesYesNoYesTrueFalseTrue
NoNoNoYesFalseFalseTrue
YesYesYesNoTrueTrueFalse
NoNoYesNoFalseTrueFalse
YesYesNoNoTrueFalseFalse
NoNoNoNoFalseFalseFalse
For better visibility:
Search.RememberDynamicFilter
Use this parameter to configure how the search screen remembers the dynamic filtersvalues for future use.
This parameter works with Search.RememberDynamicFields parameter described inthis section.
161AUREA CONFIDENTIAL
Web Configuration

The default value for this parameter is true.
If you want the search screen to remember only the values of the default filter fields,then set Search.RememberDynamicFilters to true and Search.RememberDynamicFieldto true.
If you want the search screen to remember values of only the dynamic fields butnot the filter fields used, then set Search.RememberDynamicFilters to false andSearch.RememberDynamicField to true.
Default: Checked
Type: Checkbox
Search.RememberDynamicField
Use this parameter to configure how the search screen remembers the dynamicfield values for future use.
If checked (default), the user's search settings, including catalog filters are savedbetween sessions in the user's roaming settings). For more information see Remem-ber Search Settings.
The default value for this parameter is true.
Uncheck this parameter if you want to reset all searches once the user leaves thepage. To override this setting for a specific search action, use the rememberSearchparameter. For more information, see rememberSearch.
This parameter is used along with Search.RememberSearchValues to ensure that thevalues set for a filter are also remembered across search sessions. For more infor-mation, see Search.RememberSearchValues.
Note: If you later re-activate the "remember search settings" behavior (and theusers have not reset their browser cache), their last search settings is reloadedfrom the user's roaming settings.
Default: Checked
Type: Checkbox
Search.RememberSearchValues
Use this parameter to configure how the search screen remembers the search valuesfor future use.
Enable this parameter to ensure that values set for the search filters are saved andpresented to the user during the next search session. By default, this parameter isunchecked and the values set in the search mask are not stored between searchsessions.
The default value for this parameter is true.
This parameter is used along with the Search.RememberDynamicFields to ensurethat the search mask used in a previous search is also remembered. For more infor-mation, see Search.RememberDynamicField.
162AUREA CONFIDENTIAL
Chapter 2: Configuring CRM

Note: This option requires the parameter Search.RememberDynamicField to beactive. For more information see Search.RememberDynamicField.
Default: Unchecked
Type: Checkbox
Security ParametersThis topic holds information about Security Parameters
Security.HidePathInformation
Use this parameter to hide or display the document path in the System Informationpage. By default this parameter is set to True and the document path is hidden. Formore information see, Security Settings > Hiding Document Path in System in-formation in the Web Installation Guide.
Default: Checked
Type: Checkbox
SerialEntry ParametersThis topic holds information about Security Parameters
SerialEntry.<Name>Filter
Description: Defines which filters are displayed in the options form, and the initiallyselected filter for the quick add <Name>. For fur ther details, see name.
The action parameter filterType overrides the initial value specified in SerialEn-try.<Name>Filter. For fur ther details, see filterType.
The following SerialEntry.<Name>Filter parameters are defined in UPDATE_DE-FAULT:
BTB version:
SerialEntry.DefaultFilter
Default: None Selected
Type: Radio button
SerialEntry.OfferFilter
Default: None Selected
Type: List
SerialEntry.OrderFilter
Default: All
Type: List
163AUREA CONFIDENTIAL
Web Configuration

OTC version:
SerialEntry.DefaultFilter
Default: None Selected
Type: Radio button
SerialEntry.InstalledBaseFilter
Default: None Selected
Type: Radio button
SerialEntry.OfferFilter
Default: None Selected
Type: List
SerialEntry.OfferFilter.SpecialOffer
Default: Special Offer
Type: Radio button
SerialEntry.OrderFilter
Default: All
Type: List
SerialEntry.OrderFilter.SpecialOffer
Default: Special Offer
Type: Radio button
SerialEntry.POSFilter
Default: All
Type: List
SerialEntry.ProductDiscussionFilter
Default: None Selected
Type: Radio button
SerialEntry.PromotionalMaterialFilter
Default: None Selected
Type: Radio button
SerialEntry.RefundingFilter
Default: None Selected
Type: List
SerialEntry.SampleFilter
Default: None Selected
Type: Radio button
SerialEntry.StockControlFilter
164AUREA CONFIDENTIAL
Chapter 2: Configuring CRM
Default: None Selected
Type: Radio button
System ParametersThis topic holds information about System Parameters
Use the following parameters to configure system settings for Aurea CRM.Web.
System.CompiledScripts
Description: If checked, all JavaScript files are combined ("compiled") into onelarge script. Loading just this one large script is much faster than loading many in-dividual small ones.
The compiled scripts named $<name>.compiled.js are created in the..\scripts\.compiled\ folder of your Aurea CRM.Web installation. Please notethat every configuration can have a different set of global scripts, therefore morethan one compiled script may exist in your installation.
In order to create the compiled script, the user "NETWORK SERVICE" must haveMODIFY rights on the ..\scripts\.compiled\ folder (the setup procedure ofAurea CRM.Web takes care of this). If the compiled script cannot be created (dueto insufficient rights), Aurea CRM.Web defaults to the standard behavior of loadingeach script individually.
Note: It is NOT automatically determined whether a compiled script is still up-to-date(i.e. the script is not automatically re-created on demand). Hence, if you change ascript or add a new global script, you need to manually delete the compiled scripts(the scripts are then re-created upon the next access of a web client). When updatingyour installation, the compiled scripts are automatically deleted by the setup routine.
Note: Hint: If you are a developer and therefore change your scripts frequently,we recommend disabling the compiled scripts feature in your user configuration.
General information on how to add scripts to extend Aurea CRM.Web, see the ar ticle“Scripts” at https://support.aurea.com.
Default: Checked
Type: Checkbox
System.Debug
Description: If checked, the client log is displayed with LogLevel Error. For fur therdetails, see Client Log on page 22 . Use the URL parameter ?debug for LogLevelDebug. For fur ther details, see URL Parameters on page 887.
If you use CRM.phone, log messages prefixed with PhoneInfo are displayed in theclient log showing the initialization of the phone toolbar.
Default: Unchecked
Type: Checkbox
165AUREA CONFIDENTIAL
Web Configuration

System.LauncherPort
Description: The port used by CRM.launcher to connect to the browser (default ="18188").
You can set System.LauncherPort to any valid free port if you want the clients touse CRM.launcher for document and telephony functionalities. For fur ther details,see CRM.launcher(Enterprise) on page 793.
If set to "-1", the "old" Aurea CRM.Web client browser plug-in (np.up-date.web.client.dll) is installed and used instead. For fur ther details, seePlug-ins on page 24.
Default: 18188
Type: Textbox
System.ShowAdminHelp
Description: If checked, the online field help additionally displays the contents ofthe Administrator Information field.
For more information, see Field Help on page 50.
Default: Unchecked
Type: Checkbox
TableCaption ParametersThis topic holds information about TableCaption Parameters
TableCaptions.DisableCache
Description: Defines the info areas whose table captions should be requested fromthe server and thus refreshed every time a header control is drawn. Enter the desiredinfo area IDs separated by commas.
Enter "ALL" to reload data for all info areas. This may have a negative impact onthe system performance.
Default: no value
Type: List
Tree ParametersThis topic holds information about Tree Parameters
Tree.DefaultNodeSettings
Description: Use this parameter to define global settings for all Tree views. Availablevalues:
• Displays the number of records for a group node: Globally sets the Display-Count flag. For fur ther details, see Node Settings.
• Show the symbol for expanding a branch only if the brach actually containsrecords: Globally sets the CheckChildren flag.
166AUREA CONFIDENTIAL
Chapter 2: Configuring CRM

This global setting override the individual tree configurations.
Default: Unchecked
Type: Checkboxes
Tree.ListDefaultAction
Description: If a user clicks on an info area node in a Tree view, the Search maskplus results are displayed. Tree.ListDefaultAction defines what happens whenthe user double-clicks a result record in the list. For fur ther details, see DefaultAction on page 289.
Available values:
• Default Action for Info Area The default action of the info area defined in theExpand configuration is executed.
• SearchAndList Default Action The default action defined in the Search&Listconfiguration is executed.
• Select Record in Treeview An Expand view of the record is displayed in theTree view and the corresponding tree node is selected (A_TreeDefault).
If Tree.ListDefaultAction is undefined, the default action of the info area definedin the Expand configuration is executed.
Default: Undefined
Type: Combobox
UpdateServer ParametersThis topic holds information about UpdateServer Parameters
UpdateServer.EventEvaluationStartDate
Description: By default, the calculations of topics & lectures and accommodations& venues are performed without any date restriction. For fur ther details, see Evalu-ating Events in the Web Business Logic User Guide. To take into account onlyrecords after a cer tain date, enter the desired date in UpdateServer.EventEvalua-tionStartDate (format YYYYMMDD).
Default: Undefined
Type: Character
UpdateServer.RepID
Description: Enter the rep ID of the CRM.server user as UpdateServer.RepID (e.g."010001677"). For fur ther details, see CRM.Server on page 15. To-dos for back-ground processing are then created for this rep.
If UpdateServer.RepID is not defined, the following items are not displayed in AureaCRM.Web:
• ID_NET_CALCULATE_ACCOMODATION_VENUE_EVALUATION
• ID_NET_CALCULATE_TOPIC_LECTURE_EVALUATION
167AUREA CONFIDENTIAL
Web Configuration

• Query_RunInBackground and Query_RunInBackground_CSV buttons. For fur therdetails, see Query Background Processing Buttons on page 318.
• ID_NET_BulkOperations. For fur ther details, see Mass Data Operations on page39.
The following items are displayed as inactive (grayed out):
• CreateTargetGroup and CreateMarketingActivity buttons. For fur ther details,see Marketing Activity Buttons on page 316.
Note: When CRM.server processes marketing activity executions, the querydefined in the marketing activity execution (AD) record is run with the accessrights of the rep defined by the Sel. User ID field. For fur ther details, seeAutomatically Executing Activities in the Aurea CRM win User Manual.
Note: If you are transporting campaign templates from one server to anotherensure that the field-5 station number of the info area is set to the current server.
Default: 1000200287
Type: Character
Visit Planning ParametersThis topic holds information about Visit Planning Parameters
VisitPlanning.FilterSets
Description: Specifies options for filtering the items displayed on the Visit Planningmap. For fur ther details, see VisitPlanning on page 479. These filters are listed in
the (Settings) drop-down list.
Filter sets for Visit Planning are defined as described for calendar filter sets. Forfur ther details, see Calendar.FilterSets.
VisitPlanning.SuggestionsDateFormat
Description: Visit Planning suggested dates are displayed in the format this param-eter is set. You can use the following conventions to set this parameter:
• D: Shows a single digit date less than 10.
• DD: Shows the date as a double digit. For example, 03.
• DDD: Shows the name of the day. For example, SU for a Sunday.
Note: The names of the days are taken from the respective texts already definedin the designer.
• M: Shows a single digit month less than 10.
• MM: Shows the date as a double digit. For example, 04 for April.
• MMM: Shows the name of the month. For example, Feb for February.
168AUREA CONFIDENTIAL
Chapter 2: Configuring CRM

Note: The names of the months are taken from the respective texts alreadydefined in the designer.
• YY: Shows the last two dgits of the year. For example, 17 of the year 2017.
• YYYY: Shows the four digits of the year. For example, 2017.
Using the above naming convention, if you set the parameter to the value MMM DDof YYYY, the suggested date displayed for visit planning is Feb 07 of 2017.
The names of the days and months are taken from the respective texts already de-fined in the designer.
Other Web Configuration ParametersThis topic holds information about other miscellaneous web configuration parameters
StartPage
Description: Specifies the page displayed after login. Select a menu action fromthe drop-down list.
You can add any (context-free) menu action to the list. For fur ther details,see Modifying Web Configuration Parameters. Users can select their star t page viaSettings > User Settings > Layout > Startpage.
Default: ID_NET_STARTPAGE_GENERAL
Type: Combobox
Style
Description: Determines the style sheet used by Aurea CRM.Web. Available value:update
To apply a project-specific style, you need to add another option to Style. For fur therdetails, see Modifying Web Configuration Parameters. Enter the name of the foldercontaining the custom style as Value. For fur ther details, see Customizing Styleson page 15.
Type: Combobox
DefaultLayout
Description: Use this parameter to enforce a default layout view for all clients loggingin to CRM.Web from any device.
Important: This configuration applies to all users. It is not possible to have separateconfiguration per user, as the layout template selection happens from the loginpage.
Default: None Selected
Type: RadioButton
169AUREA CONFIDENTIAL
Web Configuration

Options:
• None—allows CRM.Web to automatically determine the device type and load therequired layout.
• Standard—enforces the standard layout for all clients logging into CRM.Web fromany device type.
• Touch—enforces the touch device layout for all clients logging into CRM.Webfrom any device type.
For example, if you wish to ensure that all clients get the standard layout on loggingin to CRM.Web and not the touch layout, then set this parameter to Standard. Aclient can override this configuration setting by setting the URL parametertouch=true/false as described in URL Parameters on page 887.
Note: The layout view is loaded in the following order of priority:
1. Layout specified by the URL parameter touch. For more information, see URLParameters on page 887.
2. DefaultLayout web configuration parameter described above.
3. If the above two are not specified CRM.Web uses autodetection to determine thelayout view to load.
HttpRequest.EnableHttpGetMethod
Description: Enable this option to convert all HTTP requests to GET requests whichallows for browser caching.
Note: If this is enabled, you should increase the maxUrl and MaxQueryString IISRequest Limits and Http Runtime maxQueryStringLength in the web.config forIIS.
Default: Unchecked
Type: Checkbox
VirtualInfoArea.List.ReadMode
Description: This parameter defines the default behavior of vir tual info areas inlists (Search Result Sets, SearchSubLists, ExpandChildren and ListView-Widgetsin Forms). For fur ther details, see vir tualInfoAreaReadMode on page 285.
170AUREA CONFIDENTIAL
Chapter 2: Configuring CRM

This parameter is not par t of UPDATE_DEFAULT but needs to be created as Char-acter or Combobox if required.
VirtualInfoArea.Query.ReadMode
Description: This parameter defines the default behavior of vir tual info areas inqueries (query snapshot, saved queries, queries in forms and the QueryRun action).For fur ther details, see vir tualInfoAreaReadMode on page 285.
This parameter is not par t of UPDATE_DEFAULT but needs to be created as Char-acter or Combobox if required.
Widget.GridEditorOptions
Description: Use this parameter to configure the grid editor's default options. Forexample, setting it to continueEditAfterSave to false alters the default behaviourof serial entry grid editors, of reverting back to edit mode after editing and savingan entry.
Default: Undefined
Type: JSON
CKEditor.EnableImagePlugin
Description: Use this parameter to inser t and edit images on your CRM instance.
Check to enable this feature for inser ting and editing images.
Uncheck to disable the feature and restrict adding or editing images. On disablingthis option, any existing image cannot be modified.
Default: Unchecked
Type: Checkbox
Browser.RefreshCurrentTabInsteadCurrentPage
Description: Use this parameter to control how CRM.Web reacts on attempts torefresh a page from the keyboard using F5 and Ctrl-R keys.
When this parameter is enabled and there is some active tab on the page, only thetab is refreshed. If there is no active tab, the entire page is refreshed.
When the parameter is disabled, the whole page is refreshed.
171AUREA CONFIDENTIAL
Web Configuration

Default: Unchecked
Type: Checkbox
Sync.SkipLinkedFields
Description: Use this parameter to exclude z-fields and Linked InfoAreas whenpreparing the dataset for CRM.Pad.
This parameter is disabled by default. Enable it to improve performance when gen-erating the dataset.
Default: Disabled
Type: Boolean
Sync.SkipChildInfoAreasAndFieldRights
Description: Use this parameter to exclude child InfoAreas when preparing thedataset for CRM.Pad and to stop checking for fields rights.
This parameter is disabled by default. Enable it to improve performance when gen-erating the dataset.
Default: Disabled
Type: Boolean
Languages and TextsDefine your language preference and custom texts for Aurea CRM.Web UI.
You can manage texts for Aurea CRM.Web UI elements (field labels, menu items,messages etc.) for all available languages in CRM.Designer, as well as define loginlanguages for Aurea CRM.Web.
172AUREA CONFIDENTIAL
Chapter 2: Configuring CRM

LanguagesSet your preferred language on Language setting page.
Fastpath: Main Page: Texts > Languages
Note: Not all languages listed on CRM.Designer's Language Settings page maybe available for your service pack and ver tical. For a list of available languages perproduct and ver tical, see https://support.aurea.com.
Global Language SettingsUse the Global Language Settings page to define languages available in theCRM.Designer database.
You can use the Global Language Settings page to define which languages areavailable in the CRM.Designer database based on the corresponding update.CRMlanguage ID (CRM Language).
The settings specified here are saved in the "Language Default" configuration. Tospecify configuration-specific settings, use the Language Settings page (Save inconfiguration flag). For fur ther details, see Language Settings on page 174.
To define a language in CRM.Designer:
1. On the CRM.Designer main page click Languages > Global Language Settings.
2. Enter a name and click (Add).
3. Check Active for active languages. This setting can be changed insub-configurations (Language Settings page).
173AUREA CONFIDENTIAL
Languages and Texts

When downloading a configuration using CRM.bulkloader, the language selectiondialog reflects this setting, i.e. active languages are checked by default in theAvailable Languages list. For fur ther details, see Downloading ConfigurationData from the CRM.Designer Database on page 761.
Languages flagged as inactive in the Global Language Settings are alsodeactivated as login languages. For fur ther details, see Login Page Languageson page 175.
4. Enter the Aurea CRM language ID in the CRM Language field. For a list of validAurea CRM language IDs. For fur ther details, see Language IDs in the CRM.CoreAdministrator Guide.
5. If you use language variants ("vir tual languages") you need to define yoursub-languages here as well: Enter the Language No. from the Language infoarea in the CRM Sub-Language field. For fur ther details, see Language on page52.
6. For deeper hierarchies, select the Parent Language for each sub-language.
Note: The limit of 16 hierarchy levels does not apply to CRM.Designer.
Fallback scenarios: If a text does not exist for a sub-language, the text from theparent language is used. If a text does not exist in any parent language, the defaulttext is used.
7. Click Save.
Note: If cyclic dependencies have been defined, an error message is displayedand the changes are not saved.
Creating a language in Global Language Settings automatically creates it as alogin page language. For fur ther details, see Login Page Languages on page 175.
If you delete an existing language definition, all texts of that languages are deletedas well.
Language SettingsYou can store translations of texts in as many available languages as you want inyour CRM.Designer database.
You can store translations of texts in as many languages as you want in yourCRM.Designer database.
On the Language Settings page you can change the settings for your configuration:
174AUREA CONFIDENTIAL
Chapter 2: Configuring CRM

Check the Save in Configuration check box to define whether you want to savethe settings for that language in your configuration or inherit the settings from itsparent configuration. The settings of the "Language Default" are applied if nothingis defined. For fur thee details, see Global Language Settings on page 173.
If Save in Configuration is checked, you can change three options for a language:
• Editable: If unchecked, you cannot define, change or delete translations for thislanguage.
• Active: Checked for active languages in this configuration. When downloadingthe configuration or a package from it via CRM.bulkloader, this flag is exportedas well. This ensures that inactive languages remains inactive after import (i.e.configuration/package upload).
Note: To globally define which languages are active, use the Active flag on theGlobal Language Settings page.
• Visible: If unchecked, the language is hidden from the configuration. You canonly see it in the language settings.
Login Page LanguagesHere you can define the language choice for users on the login page.
Define which languages users can choose from the login page:
175AUREA CONFIDENTIAL
Languages and Texts

Make sure you define the login page languages in the configuration that is assignedto the "DefaultUser".
To activate a language, check the Active box. This is the same flag as in the globallanguage settings. For fur ther details, see Global Language Settings on page 173.
The Description is the text that is displayed in the Language drop-down list on thelogin page. The Display Order Nr. defines the sor t order of the languages.
Note: If Description is undefined, the language is not displayed in the drop-downlist on the login page.
Check the Login.EnableLoginInDefaultLanguage Web Configuration parameter (inthe default user's configuration), to additionally offer My Default Language as thefirst option in the Language drop-down list. For fur ther details, see Login.EnableL-oginInDefaultLanguage.
TextsHere you can define texts for the various configuration units.
You can define texts (labels, table captions, texts in processes, messages etc.) forthe various configuration units. For fur ther details, see Defining Texts for Configu-ration Units on page 177. The texts are saved in the CRM.Designer database.
Fastpath: Main Page: Texts > Texts
For fur ther details, see Text Groups on page 178 and Editing Texts on page 180.
You can add translations for all available languages to provide language-dependentprocess help and texts. For fur ther details see Languages on page 173 and TranslatingTexts on page 183.
176AUREA CONFIDENTIAL
Chapter 2: Configuring CRM

Defining Texts for Configuration UnitsLearn to define texts for configuration units.
When defining a configuration unit, you need to define custom texts for UI elementse.g names for panels in a Details control, menu entries, labels on buttons, help textsand messages in processes etc.
The text fields access the texts stored in the CRM.Designer database.
To define a text:
1. Enter the desired text in the text field (e.g. Label).
Most text fields offer a full-text "find as you type" search to search for existingtexts in all text groups.
Note: Text fields in CRM.Designer and the text search drop-down list alwaysdisplay the language-independent Default Text. Therefore you can only searchfor texts defined as Default Text. For fur ther details, see Editing Texts on page180.
The drop-down list displays the meaning, text group and configuration of the text.The search results are sor ted by configuration (current configuration first).
2. If available, select the desired text. Reusing existing texts helps reducingtranslation costs for your project.
If the desired text does not exist, click (Edit text).
Your text is automatically copied to the field beside Add Text.You can edit your text here. Press Enter to inser t line breaks (e.g. when definingtable captions).
177AUREA CONFIDENTIAL
Languages and Texts

3. Select another Textgroup if applicable. Text groups that are par t of the currentconfiguration are displayed in bold in the drop-down list. The selected text groupis remembered per context (form, button, field group etc.) in the browser cache.
If you are adding a text to a text group that does not yet exist in your configuration,a new text group is created in your configuration. Naming: Current user name (orconfiguration name for non-user-specific configuration units) plus parent textgroup name.
Note: The text group name is limited to 50 characters. If the newly created textgroup's name exceeds that amount, you need to select another text group or addthe text to a text group already present in your configuration.
4. Click Add Text.
The text is added to the selected text group.
To edit the text (or to add translations immediately), click (Edit text) besidethe Text field. For fur ther details, see Editing Texts on page 180.
5. Click Select.
6. Save the configuration unit.
Referencing Texts in JavaScriptLearn to reference texts in javascript.
Use the following syntax to reference texts in JavaScript (e.g. for multilingual textmetrics in processes):
$t(TXT_<textgroup>_<number>)
<textgroup> ...the name of the text group
<number> ...the text's number (Nr column)
Text GroupsLearn to manage texts in CRM.Designer.
Texts are organized in text groups.
On the CRM.Designer main page click Texts to display the Text Groups page.
178AUREA CONFIDENTIAL
Chapter 2: Configuring CRM

All text groups are displayed listing their name, whether the text group applies onlyto a cer tain ver tical, and for which (top-level) configuration this text group is valid.Check Show Descriptions to display a description for the contents of the text groupif available.
• Click on a text group to display all strings defined for that group. For fur therdetails, see Editing Texts on page 180.
If you own the text group you can edit its properties, add new texts, delete thetext group and edit texts for a specific language via the links displayed on thepage.
• Click Create a New Text Group to create custom text groups. The maximumamount of characters for a text group name is 50.
• Click Search to search for text strings in a specific language or for a text ID.
179AUREA CONFIDENTIAL
Languages and Texts

Note: The search is performed with regard to the current configuration hierarchy,taking copied texts into account.
• Click Languages to manage texts by language. For fur ther details, see Viewingall Strings for one Language on page 183.
Editing TextsLearn to edit texts on CRM.Designer.
You can edit texts
• In the corresponding text field. For fur ther details, see Defining Texts for Config-uration Units on page 177.
• By selecting a text group.
• By searching for a specific string.
You can only edit texts that belong to the current configuration.
180AUREA CONFIDENTIAL
Chapter 2: Configuring CRM

To edit a text:
1. Click on its Id. Click Copy Text if the text does not already belong to yourconfiguration.
You can modify the Default Text and all translations.
The Default Text is used for:
• displaying texts in CRM.Designer
• languages for which no translation exist (Is Default = checked)
Note: When creating a new text you must always define the Default Text.
2. Click the Change button beside the default text to modify the default text:
3. Enter the desired text.
4. Use the Meaning field to provide e.g. context information for clarification whena translation agency has to work with these texts. For fur ther details, see Trans-lating Texts on page 183.
5. Enable Sealed to prevent a text from being translated; sealed texts are ignoredby CRM.translation tool, i.e. they not exported and not updated on import. Forfur ther details, see CRM.translation tool in the CRM.Core Administrator Guide.
181AUREA CONFIDENTIAL
Languages and Texts

6. Click Save.
7. To edit language-specific texts (i.e. a translation), click Change beside the desiredlanguage.
8. To delete texts, click Delete beside the desired entry.
Note: For texts from a parent configuration you cannot delete the default textbut only individual translations.
If you click the Delete button next to a specific language, the corresponding textis deleted and the default text is used instead.
Before a text is actually deleted, you get a confirmation dialog to avoid accidentaldeletions:
Placeholders in TextsLearn to use placeholders in texts.
You can use placeholders in texts. For example: enter "Save {FI}" to get "SaveCompany".
For details, see the ar ticle “How to work with place holder in texts” at https://sup-port.aurea.com.
182AUREA CONFIDENTIAL
Chapter 2: Configuring CRM

Translating TextsLearn to manage the translation of customized texts.
Use CRM.translation tool to manage the translation of customized texts. You canexport untranslated catalog values and texts from both the Aurea CRM andCRM.Designer databases. Once the texts have been translated, you can importthem into the same or another database. For fur ther information, see CRM.translationtool in the CRM.Core Administrator Guide.
Logging the Usage of CRM.Designer TextsLearn to log the usage of CRM.Designer Texts.
When translating CRM.Designer texts, it is helpful to know which texts are actuallyused in the customer's project and which texts are never displayed. Thus you canreduce translation effor t and costs by only submitting used texts for translation.
To log the actual usage of CRM.Designer texts:
1. Add <TextUsageLogger>true</TextUsageLogger> to Aurea CRM.Web's set-tings.xml file (section <update.web>).
This logs each access to Aurea CRM.Web's text cache. The information is writtento the PORTAL_APPLICATION_TEXTUSAGE table in the CRM.Designer database.
The nr column of PORTAL_APPLICATION_TEXTUSAGE contains the text ID. If nr contains'NULL', the entire text group (textgroupid column) is used. Unused text groups arenot listed.
CRM.translation tool exports this information along with the texts (CSV outputonly): The number of times the text was requested by Aurea CRM.Web is written tothe UsageWebInstallation column of the output file.
Note: Turning on text logging slows down the application! Therefore, only use thissetting until you have gathered enough data to be able to assume that all par ts ofyour customized Aurea CRM.Web have been accessed at least once.
Note: Do not enable text logging on an Aurea CRM.Web offline client. Since noCRM.Designer database is present on Aurea CRM.Web offline clients, activatingthis setting makes Aurea CRM.Web offline unusable.
Viewing all Strings for one LanguageLearn to view all Strings for one Language.
Click Languages on the Text Groups page to view texts per language.
183AUREA CONFIDENTIAL
Languages and Texts

All available languages are listed.
• by Textgroup: All text groups are listed displaying information on how manystrings have already been translated to the selected language. Selecting a textgroup displays all texts:
Strings that are already translated are editable. Untranslated strings are displayedread-only. Uncheck Default to enter a translation. Uncheck all Default checkboxes by clicking the Make all active link and then enter the translations. CheckDefault to delete a translation.
• Single Texts: Lists all texts (from all text groups) for which a translation to theselected language exists. Click on a TextId to edit a text. For fur ther details, seeEditing Texts on page 180.
• Analysis: Displays a statistical overview of texts and words existing for thatlanguage.
• Untranslated: Lists all untranslated strings for the selected language.
184AUREA CONFIDENTIAL
Chapter 2: Configuring CRM

Uploading and Downloading TextsLearn how to upload and download texts.
This section describes the bulk download and upload of texts. These concepts areuseful to understand how to change texts and translations to ensure that they arecorrectly transferred using XML files.
There are two types of uploads:
• Entire uploads of a configuration: Text groups are added and modified, textsare added, modified and deleted, and also translations are added.
Note: It is strongly recommended that at least the two standard languages(English and German) are included in upload packs.
• Language packs: Only contain one language. Language packs only add, modifyor delete translated texts. A text that is not included in the destination databasebut in the language pack is not added with the upload.
Note: update recommends using CRM.translation tool (instead ofCRM.bulkloader) to manage the translation of texts in the CRM.Designer database.For fur ther details, see Translating Texts on page 183.
The text owner defines which texts are up- or downloaded by supplying the config-uration ID of the text group and the configuration ID of the text itself:
• All texts of a text group and the corresponding translations of a configuration isdownloaded, even if another configuration has taken ownership of some textsand changed them.
• If you take ownership of a text belonging to the default configuration(UPDATE_DEFAULT) and change it, downloading this configuration includes thechanged text. When you upload this configuration to another CRM.Designerdatabase, the changed text is owned by the default configuration.
• All texts owned by the configuration are downloaded and uploaded, even if it doesnot own the text group. When you upload such a configuration, it keeps ownershipof the text in the destination database.
• A changed language translation is not owned by the changing configuration andtherefore not downloaded and uploaded. But the translation is downloaded anduploaded by the configuration that owns the text.
185AUREA CONFIDENTIAL
Languages and Texts

Dest.Transl.Own-ership
Dest. TextOwnership
TransferredConfigura-tion
Lang. TransOwnership
Text Owner-ship
Text groupOwnership
AAAAAA
AAABBA
AAABAA
--BAAA
BBBBBA
--BBAA
(- = the text / translation is not transferred)
The ownership of a text in the destination database determines whether the text orlanguage translation is transferred. A text or translation is not transferred when thetext or translation is owned by a configuration with a higher ID in the destinationdatabase.
When you upload a configuration, language translations sometimes become invalid.They are deleted if the default text is changed. For example, you have a defaulttext "Search Company" in your configuration with the German translation "FirmaSuchen" assigned. Then you upload a configuration that changes the default textto "Company Search" but does not provide a German translation for this text, theGerman translation is deleted from the destination database. It is invalidated by thechange of its default text.
Info Area CustomizationsLearn to use the Views area of CRM.Designer to customize displays on AureaCRM.Web.
Use the Views area of CRM.Designer to customize the way records are displayedin Aurea CRM.Web. Example - a record's Details control, a Search & List configura-tion etc.
186AUREA CONFIDENTIAL
Chapter 2: Configuring CRM

1. Click Info Areas.
2. Search for the info area you want to customize.
3. Click (Edit).
All info area-specific configuration units are listed.
187AUREA CONFIDENTIAL
Info Area Customizations

You can design the following configuration units:
• Search pages. For more information, see Search&List Configuration on page 365.
• Expand pages. For more information, see Expand Configuration on page 352.
• Tree view pages. For more information, see TreeView Configuration on page 381.
• Table captions used in headers, links, Tree views etc. For more information,see Table Captions on page 265.
• Field groups and controls defining list, search and details masks. For moreinformation, see Field Groups on page 188.
• Headers. For more information, see Headers on page 321.
• Custom field labels. For more information, see Alternate Field Labels on page270.
• Descriptive link names. For more information, see Link Names on page 274.
• Alternative info area names (only from the CRM.Designer main page and the AllInfo Areas page). For more information, see Info Area Labels on page 275.
For fur ther details, see Designing Configuration Units on page 64
Field GroupsThe configuration of masks and lists is organized in field groups.
A field group contains one or more field controls, i.e. the configurations of a detailsview, a list, a search mask etc. for the selected info area.
If you want to use your own field definitions, copy the control definition you want tomodify to your configuration. For more information, see Designing ConfigurationUnits on page 64.
For field groups you own, you can copy Details, List and Search controls from otherconfigurations (Copy from drop-down list).
188AUREA CONFIDENTIAL
Chapter 2: Configuring CRM

You can also extend Details and Default controls without the need to copy the parentdefinition to your configuration. For fur ther details, see Extending a Control on page206.
Depending on the field control type a control definition may consist of the following:(For details, see Field Control Types on page 195)
• fields
• sort fields (e.g. in a List control)
• panels (e.g. in a Details control)
• a panel may be displayed as a tab or group. For fur ther details, see ConfiguringPanels on page 207.
• panels have panel attributes. For fur ther details, see Panel Attributes on page208.
• general attributes. For fur ther details, see Control Attributes on page 200.
• column widths for list controls. For fur ther details, see List control.
• field attributes. For fur ther details, see Field Attributes on page 221.
189AUREA CONFIDENTIAL
Info Area Customizations

Special Field Groups Naming ConventionsLearn about the Special Field Groups Naming Conventions.
UPDATE_DEFAULT contains the following special field groups:
• D1.Upload/D2.Upload (in the respective Document info area): Contains the defaultDetails controls used for the Upload Document dialog for document fields. Thisis required in order to display the Keyword field on the Upload Document dialog.To change the Upload Document dialog either edit these controls or define newones and use the Web Configuration parameters Document.UploadField-Group.D1/D2. For fur ther details, see Document.UploadFieldGroup.D1/D2.
These definitions are not used in the Upload Document dialog of the Documentinfo areas themselves.
For best results, define Columns=1 for the Upload Document dialog's Detailscontrol. For fur ther details, see columns on page 201.
• FI.Address/ID.Address/KP.Address etc.: Contains the MiniDetails control usedby the address popup in the Bing Map. For fur ther details, see Displaying BingMaps in Related Areas and Forms on page 826.
• FI.EmailPhone/KP.EmailPhone/PE.EmailPhone: The List control configures theresults list of the Phone & email Search. The usage of these field groups isconfigured by the Phone.EmailSearchListGroups Web Configuration parameter.For fur ther details, see Phone.EmailSearchListGroups.
• FIMergeOverview/KPMergeOverview/PEMergeOverview/CPMergeOverview: Containsthe Details control used for displaying the source and target records in the mergeoverview. For fur ther details, see Merging Companies and Persons on page 852.These Details controls only support one column.
• MA.EmailReps: The Details control is used to determine the internal recipientswhen sending an appointment via email. For fur ther details, see email Reply onpage 839.
• MA.ReplyFields / MB.ReplyFields: The Details control is used to determine thecopy fields for new MA and/or MB records created by the email Reply function.For fur ther details, see email Reply on page 839.
• OJMergeOverview: Defines the merge overview for the property merge (BTB only).For fur ther details, see Merging Properties (BTB only) on page 854.
• Y2.BuyingCenter: The Details control defines the items displayed on the BuyingCenter Wall. For fur ther details, see BuyingCenter on page 399.
• <InfoAreaId>.VisitPlanning:The MiniDetails control defines the details displayedin the Visit Planning side bar (defined for FI/KP/MA/PE/SV). For fur ther details,see VisitPlanning on page 479.
190AUREA CONFIDENTIAL
Chapter 2: Configuring CRM

Some more field groups can be defined for special views or functions. Use the fol-lowing naming conventions:
• <InfoAreaId>.AddressCheck: The Details and List controls are used for the ExternalAddress Check dialog. For fur ther details, see External Address Check on page840.
If undefined, the upfields defined in the MC entry (External Address category,Parameters option) are used as a fallback. If no upfields are defined, the fieldsactually updated in the record are displayed.
• <InfoAreaId>.Cal: The Details control is used for the popup view of calendaritems (fallback: <InfoAreaId>Cal). UPDATE_DEFAULT contains A1Cal, A3Cal,MACal and TDCal.
• <InfoAreaId>.NotifyReps: The Details control is used to determine the internalrecipients for the Notify Rep functionality. For fur ther details, see Notify Rep onpage 837.
• <InfoAreaId>.Query: Since it is not always possible to set a "deny access" rightfor fields that users do not need when defining lists, filters or queries, you canexplicitly state which fields are available to users:
1. Define a field group called <InfoAreaId>.Query.
2. Add all desired fields to the List control of that field group.
In Aurea CRM.Web users see only those fields when defining lists, filters, queryconditions and choosing query output fields for that info area.
• <InfoAreaId>Questionnaire: The Details control is displayed on top of the Surveypage. For fur ther details, see Surveys in the Web Business Logic User Guide.UPDATE_DEFAULT contains F3Questionnaire, FIQuestionnaire and KPQuestion-naire.
• <InfoAreaId>.QuickView: The Details control is used for the QuickView. For fur therdetails, see QuickView.
• <InfoAreaId>.Report: Defines the fields to be output in exports and reports(Details and List control). You need to specify this alternative field group in therespective control definition. For fur ther details, see ExportFieldgroup on page201 and ReportFieldgroup on page 202.
Example: If you define KP.Report as ExportFieldgroup in the KP Details control,the fields defined in KP.Report are output when exporting from an Expand or Treeview of a person record.
Note: In lists this alternative field group is only used with the Direct Export All
and Direct XslReport All Excel buttons. For fur ther details, see Export/ReportButtons on page 310.
191AUREA CONFIDENTIAL
Info Area Customizations

• <InfoAreaId>.SerialEntry: The List and MiniDetails controls define the items listand MiniDetails of a quick add page. For fur ther details, see SerialEntry on page454.
• <InfoAreaId>.SerialEntry.Totals: The List control defines the list of the totalspopup (fallbacks: <InfoAreaId>.SerialEntry and <ChildInfoAreaId>).
• <InfoAreaId>.SerialEntry.RelatedForm: The Details control defines read-onlydetails for the items of the quick add list.
• <InfoAreaId>.Signature: The List control defines the mapping for the signatureparser and the contents of the Copy from Signature or Website dialog. Forfur ther details, see Creating/Updating Records From email Signatures/Websiteson page 758.
Customizing a ControlLearn how to customize controls.
To customize a control (e.g. the Details control from field group FI):
1. Navigate to the desired field group (info area FI > field group FI).
2. Open the definition of the desired control by clicking (Edit).
Or, if the control belongs to a parent configuration:
a. Click (View) to view the control definition.
b. Click to copy the control definition to your configuration.
192AUREA CONFIDENTIAL
Chapter 2: Configuring CRM

The Field Control Editor contains the following elements:
• Search field: Enter a field name or par t of it or a field number to filter the fieldlist or search for a specific field.
• Field list: All fields of the selected info area are listed. Fields that are currentlyincluded in the control are displayed bold. Clicking on such a field highlightsall occurrences of the field in the control definition (i.e. the central par t of theField Control Editor).
Fields are displayed with their name, data type and unique ID. For fur ther de-tails, see Field Names and IDs on page 17 and Data Types in Aurea CRM onpage 877.
At the end of the field list non-field elements (caption, separator etc.) andcombined fields you defined are listed. For fur ther details, see Non-Field Ele-ments on page 210 and Add Combined Field on page 214.
• Panels/Fields/Sort Fields: Depending on the control (Details, MiniDetails, Listetc.) all panels/fields/sor t fields currently defined for this control are listed on
193AUREA CONFIDENTIAL
Info Area Customizations
the central par t of the screen. For fur ther details, see Configuring Panels onpage 207.
• Attribute list: Depending on the control and the selected element (panel, field,sor t field) all available settings and attributes are displayed on the right par tof the screen.
You can resize the three parts of the screen by dragging the border with themouse.
3. Add, rearrange and remove fields using drag & drop. Use the Shift and Ctrl keysto select multiple fields.
• Add fields by dragging them from the field list to the desired panel.
• Rearranging/moving fields: Change the field order inside a panel or drag fieldsto another panel.
• Use Ctrl+drag&drop to copy one or more fields from one panel to another. Thefield(s) are copied with all their attributes.
• Remove fields from a panel by pressing Del or by dragging them to the fieldlist on the left par t of the screen.
• You can modify the fields and sor t fields defined for other controls (MiniDetails,List etc.) by drag & drop as well.
• You can add additional elements like separators, free text etc. to your panels.For fur ther details, see Non-Field Elements on page 210.
• Click Add Combined Field to create "combined" fields e.g. displaying theaddress of a company or a person's full name (Details, MiniDetails only). Forfur ther details, see Add Combined Field on page 214.
• Click Add Linked Fields to add fields from linked info areas. For fur ther details,see Add Linked Fields on page 216.
4. Define additional settings for the control, the panel or field. For fur ther details,see Control Attributes on page 200, Configuring Panels on page 207 and Field At-tributes on page 221.
5. Click (Save) to save your changes.
To discard your changes, click (Delete): If the parent configuration containsa control with the same name, your configuration reverts to this definition.
For Details controls changed by users inAurea CRM.Web, you can click
to reset the control definition. For fur ther details, see DetailsControls Extended by Users.
To view the differences between control definitions from different configurations onone screen, use the Compare Field Controls option in Administration area. Forfur ther details, see Compare Field Controls on page 746.
194AUREA CONFIDENTIAL
Chapter 2: Configuring CRM

Field Control TypesLearn about the field control types.
The following field control types are available:
Details Control
Used to create the "mask" for the ExpandNew, the Expand and the TreeView page.For details on Expand and TreeView configurations and the related action templates.For fur ther details, see Expand on page 578 and Tree on page 381.
For example - You can define for the panel layout which fields are displayed.
List Control
The List control defines the fields used in the results list of a search. For details onthe Search&List configuration and Search action template. For fur ther details, seeSearch.
• The Fields area contains the fields (columns) to be displayed in the list.
Note: A list control must always contain at least one field of the info area forwhich it is defined. Having only linked fields in a list results in an error in AureaCRM.Web.
• Click on the area header to define the column widths:
195AUREA CONFIDENTIAL
Info Area Customizations

If no column widths are entered, the percentages are calculated based on thefield lengths in the data model.
Column widths are inherited from parent configurations. If fields are added to thechild configuration, the required space is subtracted equally from all existingcolumn widths.
• The Sort Fields area contains the fields used for sor ting the records. List entriescan be sor ted either ascending or descending.
Note: When sorting by a time field, the corresponding date is always taken intoaccount as well. You cannot sor t by time independent of date.
Note: When a user sor ts a list by clicking into a column header, the last sor tcriterion is appended as a secondary criterion to the new one. If more than onesort field is defined for a list, only the first one is appended as the secondarycriterion.
Note: If no sor t criteria are applied to the data in the list (or sor t criteria thatproduce more results that rows in the list), the order in which data is returnedfrom the database is ambiguous. i.e. if a lot of records that are "equal concerningthe sor t criterion" exist, the database returns these in an arbitrary manner – thus,the results the database delivers may differ whether e.g. 10 or 50 results aredisplayed, and it is also possible that the same results are returned again whenthe user pages through the list.A feasible workaround when such problems occuris to define more specific sor t fields.
Search Control
The Search control defines the fields on a search mask. For details on theSearch&List configuration and Search action template. For fur ther details, seeSearch.
196AUREA CONFIDENTIAL
Chapter 2: Configuring CRM

To define a Search control:
• Add the desired default search fields to panel No.1. These fields are shown asthe default search mask.
Note: Decoded fields (Z-fields) are not displayed on search masks.
• Any fields you add to a panel > 1 are displayed in the Add more drop-down listof the search mask.
• To search in several fields at once, use the Enhanced Search Field field attribute.For fur ther details, see Enhanced Search Field on page 237.
• To hide the With me check box, add the showOwnItems control attribute and setit to false. For fur ther details, see Control Attributes on page 200.
You can prevent specific users or groups from adding more fields to search froman info area. To do this:
• Define the search control as described in the steps above.
• Disable the More Fields … option from the Add more … drop down menu bysetting the web configuration parameter Search.HideMoreFields to true. For moreinformation, see Search.HideMoreFieldsSearch.HideMoreFields. The screenshotbelow shows the More Fields … option is not longer available from the Add more… drop down menu.
Search Context
197AUREA CONFIDENTIAL
Info Area Customizations

When linking records, users can select whether they want to search for records inthe whole database or within the current context. For fields with a Select-Functionthis search context is determined as follows:
1. SearchContext as specified in the Select-Function. For fur ther details, see Syntax.
2. SearchContext as specified in the Search control's control attributes. For fur therdetails, see SearchContext on page 203.
3. If no SearchContext definition is found.
• the source record is used
• when linking records of the same info area, the search context is the sourcerecord's parent record (Example: linking a ticket to a ticket via the Predecessorfield).
After deleting a link it is necessary to save the record to reset the search context.
Matchup Control
If a match-up function is defined for an info area (i.e. a match-up button is configuredin the respective New header, see New), data of a new record is compared with ex-isting records to avoid duplicates. Examples in UPDATE_DEFAULT: FI, KP,AU.
The Matchup control defines which fields are compared when matching up records.
For information on fur ther configuring the match-up functionality. For fur ther details,see Matchup Parameters on page 134 and PhoneticMatchupFieldnames on page 202.
MatchupList Control
The MatchupList control defines the list of similar records displayed on the Match-up dialog.
198AUREA CONFIDENTIAL
Chapter 2: Configuring CRM

Information on customizing the options displayed on the Match-up dialog, see thearticle at “How to Project Specific Match up Configuration” at https://support.au-rea.com.
MiniDetails Control
The MiniDetails control provides a short read-only view without tabs, containingadditional information for a record (e.g. for each list item, you can get informationon additional fields by expanding the MiniDetails). If no MiniDetails are defined foran info area, the fields from the first tab of the Details control are displayed instead.
The MiniDetails view is available integrated into lists, in processes, in page headersetc.
Note: Link fields are automatically displayed as hyperlinks. Exception: If a link fieldcannot be resolved e.g. because it is not a direct link but one traversing multipleinfo areas, only the value but no link is displayed.
Note: Fields from linked info areas that are added to the MiniDetails using the AddLinked Fields function are not displayed as hyperlinks by default: Check the Hyper-
199AUREA CONFIDENTIAL
Info Area Customizations

link field attribute to display such a field as a hyperlink. For fur ther details, see AddLinked Fields on page 216 and Hyperlink on page 224.
Default Control
In each field group you can create a Default control. The Default control containsall fields of an info area. This allows you to define default field attributes for allmodes (Search, New, Update etc.) and for all fields of an info area, which are usedin all controls that have no specific field attribute definitions for a field. for fur therdetails, see Field Attributes on page 221.
Even if a field is not displayed on a control, this can be helpful in case you changethe content of the control in Aurea CRM.Web (e.g. the List control) and you want toprovide some default behavior for a field.
Control AttributesLearn about Control Attributes.
To change the general attributes of a control, click on a blank part of the FieldControl Editor or clear any previous selection by Ctrl+Click. The available settingsare displayed on the right par t of the screen:
• Extends Parent: You can extend Details and Default controls without the needto copy the parent definition to your configuration. For fur ther details, see Extend-ing a Control on page 206.
• Attributes: You can define additional properties for the entire control, e. g. thenumber columns and column widths.
To define a control attribute:
1. Enter the name (key) of the attribute.
2. Click (Add).
3. Enter the value of the control attribute.
Or click (Edit in Popup), enter the value in the code box and click Apply.
4. Save the control definition.
To delete an attribute click (Delete).
columnWidthsDefines the column widths.
Defines the column widths for this control. Enter the desired widths in px or aspercentages separated by comma, e.g. "200px,15%,100px,150px".
200AUREA CONFIDENTIAL
Chapter 2: Configuring CRM

You need to enter the widths for label and field separately, i.e. for a control withtwo columns you need to enter four values. For fur ther details, see columns on page201
Thus, "200px,15%,100px,150px" configures the following widths:
• 200px for the label of the first column
• 15% (of the total width) for the field of the first column
• 100px for the label of the second column
• 150px for the field of the second column
If you defined columns = 3 and enter only 4 values in columnWidths, the widths forthe last column are calculated automatically.
Note: Settings for individual fields (Colspan, All Columns, No Label) do not alterthe width calculation, i.e. in the example above the first column would still have200px + 15%.
columnsDefines the default number of columns.
Defines the default number of columns for the current control (Details, Search andMiniDetails).
Default = 2
Label and text of a field count as one column.
You can define the columns attribute for the entire control and for specific panels.For fur ther details, see Panel Attributes on page 208. The panel attribute overrulesthe control attribute.
EditLinkedFieldsDefines fields to make them editable.
In Details and List controls linked fields are read-only by default. For fur ther details,see Add Linked Fields on page 216. Define EditLinkedFields=true to make themeditable.
Default = False
Note: Use the Readonly field attribute to control which linked fields are actuallyeditable/read-only, e.g. to make sure users cannot change a company name byediting the linked company field in a person list.
ExportFieldgroupDefined for exporting data.
You can specify an alternate field group to be used for exporting data from a list,tree or expand view of this field group.
201AUREA CONFIDENTIAL
Info Area Customizations

labelsAboveFieldsDefined to make labels to be displayed above fields.
If set to true, field names are displayed above the fields in one column instead ofdisplaying them in front of the fields. You can specify this attribute for an entireDetails or Minidetails control or for specific panels of a Details control. For fur therdetails, see Panel Attributes on page 208.
Note: This attribute is mainly intended for single column layouts. However, the AllColumns, Colspan and Rowspan field attributes are supported.
Note: If you set this for a widget, it is always displayed using the slim layout. Forexample, you can set it for the ContactTimes widget to get a slim layout display.
PhoneticMatchupFieldnamesDefines fields used for phonetic match-up.
This attribute is available for the Matchup control only. For fur ther details,see Matchup control.
PhoneticMatchupFieldnames defines which fields are used for phonetic match-up,e.g. to match up O'Neal with O'Neill.
Note: The fields specified here must be part of the respective Matchup control.
Note: For the fields specified here a phonetic index must exist in the database.For fur ther details, see Index in the CRM.Core Administrator Guide (index fieldproperty PHONETIC).
Specify the XML names of the fields to be used for the phonetic match-up (e.g."LastName"), without quotes and separated by commas. If set to "*", all fields thatare part of a phonetic index are taken into account.
Note: The fields are searched in the order they are defined. The first field containinga value is used for the actual phonetic match-up.
ReportFieldgroupDefines an alternate fields group for creating reports.
You can specify an alternate field group to be used for creating reports for a list,tree or expand view of this field group. These results have more detailed informationin a report than on screen where the additional information is usually only a clickaway.
202AUREA CONFIDENTIAL
Chapter 2: Configuring CRM

SearchContextDefines a context-based search for linking records.
Use the SearchContext attribute to configure a context-based search for linkingrecords. For fur ther details, see Search Context.
If a SearchContext is defined, users can select whether they want to search forrecords in the whole database or within the current context when linking records byusing . Searching in the current context only returns results that are linked to aparent record of the current record (e.g. when linking a ticket to another ticket).Users get a drop-down list in the search mask where they can select the Context(the list entries using the default table caption of the corresponding record).
To configure the context-based search, define the SearchContext attribute for theSearch control of the desired field group (i.e. the field group of the info area whereyou want to search for records). This definition is used as a default for all link fieldsto the respective info area. You can also define a search context within a specificSelect-Function function. For fur ther details, see Syntax.
Example
The search context defined for the Ticket info area (KM) {items:[null,"KP","FI"]}is used when linking a ticket to an activity (MA), to another ticket or an installedbase (IB).
The following info areas are involved:
• <sourceInfoArea>: the info area of the details mask (e.g. MA,IB or KM)
• <linkInfoArea>: the info area used as the link record of the search (e.g. FI orKP)
• <infoArea>: the info area from which a record is selected (e.g. KM)
Syntax
Define the SearchContext attribute using the JSON syntax (See http://www.json.org):
{items:[<item1>,<item2>,...,null]}
where
<itemX> = <linkInfoArea>
or (complex version offering more possibilities like link ID and alternate label)
<itemX> = {infoAreaId:<linkInfoArea>,
linkId:<linkId>,sourceLinkId:<sourceLinkId>,
sourceLinkName:<sourceLinkName>,label:<label>}
Specify <itemX> = null for searching the entire database.
The last entry provided in the SearchContext attribute is the one selected by defaultin the Context drop-down list of the Search mask.
203AUREA CONFIDENTIAL
Info Area Customizations

Available options:
The ID of the info area used as the link record for the search(e.g. "FI").
infoAreaId: <linkIn-
foArea>
The link ID used to read the link record (e.g. {in-foAreaId:"KP",linkId:2}).
You always need to specify the infoAreaId as well.
linkId:<linkId>
or
sourceLinkId:
<sourceLinkId>
The link's name in the format $Link[<in-foAreaId>:<linkId>],
e.g. "$Link[FI:1]"
sourceLinkName:
<sourceLinkName>
Specifies an alternate label for the entry in the drop-downlist, e.g.{sourceLinkName: "$Link[KP:2]", label: "Contact
Person"} for the second person link in KM.
If not specified, the default table caption is used.
You can reference (multilingual) texts from the CRM.Design-er database by specifying TXT_<textgroup>_<number>, e.g.{infoAreaId: "KP", label: "TXT_Admin_Text_5"}
label:<label>
Use this option if there is no direct link in the context forthe desired info area, but it can be retrieved as a parent linkof the linked record.
Example (s. below): Getting only marketing activities (AK)linked to the same campaign (CM).
parentInfoAreaId:
<parentInfoArea>
Note: sourceLinkId and sourceLinkName can only be used if the argument linkUid(or searchUid) is passed to the search page.
Use the SDK page to test your definitions: Search > Search Form.
Examples:
{items:[null,"KP","FI"]} … entire database, person, and company context (defaultselection)
{items:["FI","KP",{infoAreaId:"KP",linkId:2},null]} … company, person (defaultlink), person (Link ID 2), and entire database (default selection)
{items: ["FI"]} ... the search context is fixed, i.e. no drop-down list is displayed:the search returns only records linked to the parent company
204AUREA CONFIDENTIAL
Chapter 2: Configuring CRM
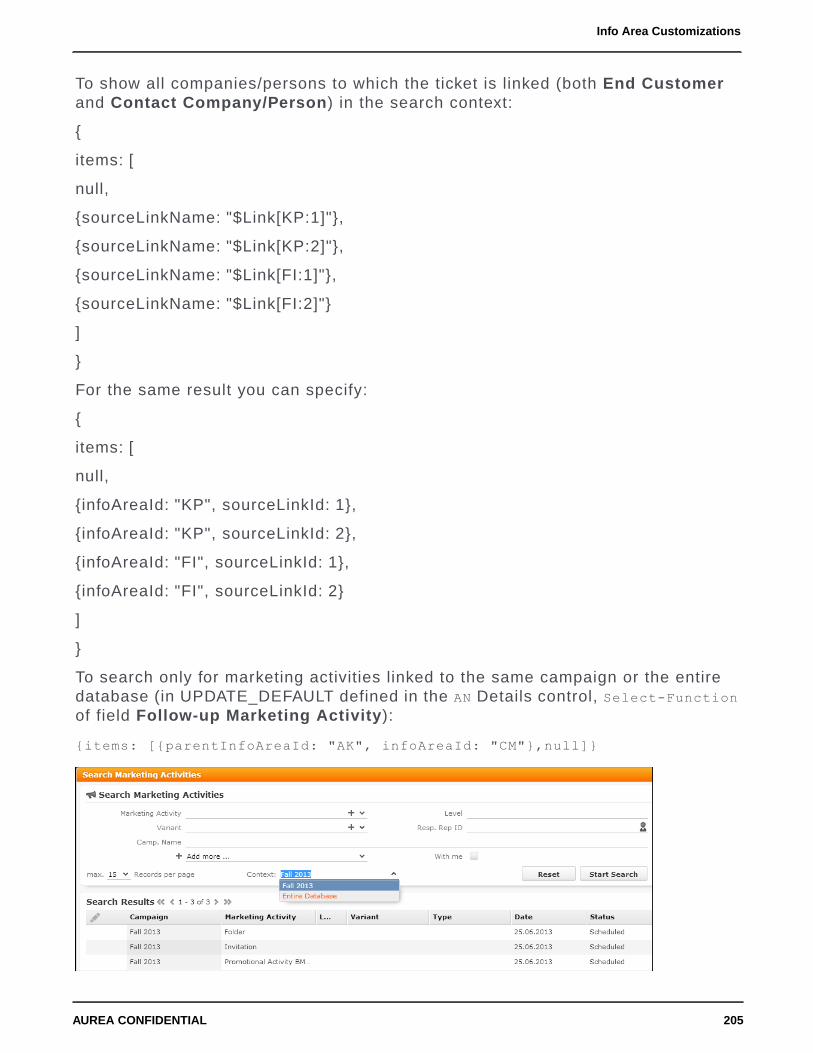
To show all companies/persons to which the ticket is linked (both End Customerand Contact Company/Person) in the search context:
{
items: [
null,
{sourceLinkName: "$Link[KP:1]"},
{sourceLinkName: "$Link[KP:2]"},
{sourceLinkName: "$Link[FI:1]"},
{sourceLinkName: "$Link[FI:2]"}
]
}
For the same result you can specify:
{
items: [
null,
{infoAreaId: "KP", sourceLinkId: 1},
{infoAreaId: "KP", sourceLinkId: 2},
{infoAreaId: "FI", sourceLinkId: 1},
{infoAreaId: "FI", sourceLinkId: 2}
]
}
To search only for marketing activities linked to the same campaign or the entiredatabase (in UPDATE_DEFAULT defined in the AN Details control, Select-Functionof field Follow-up Marketing Activity):
{items: [{parentInfoAreaId: "AK", infoAreaId: "CM"},null]}
205AUREA CONFIDENTIAL
Info Area Customizations
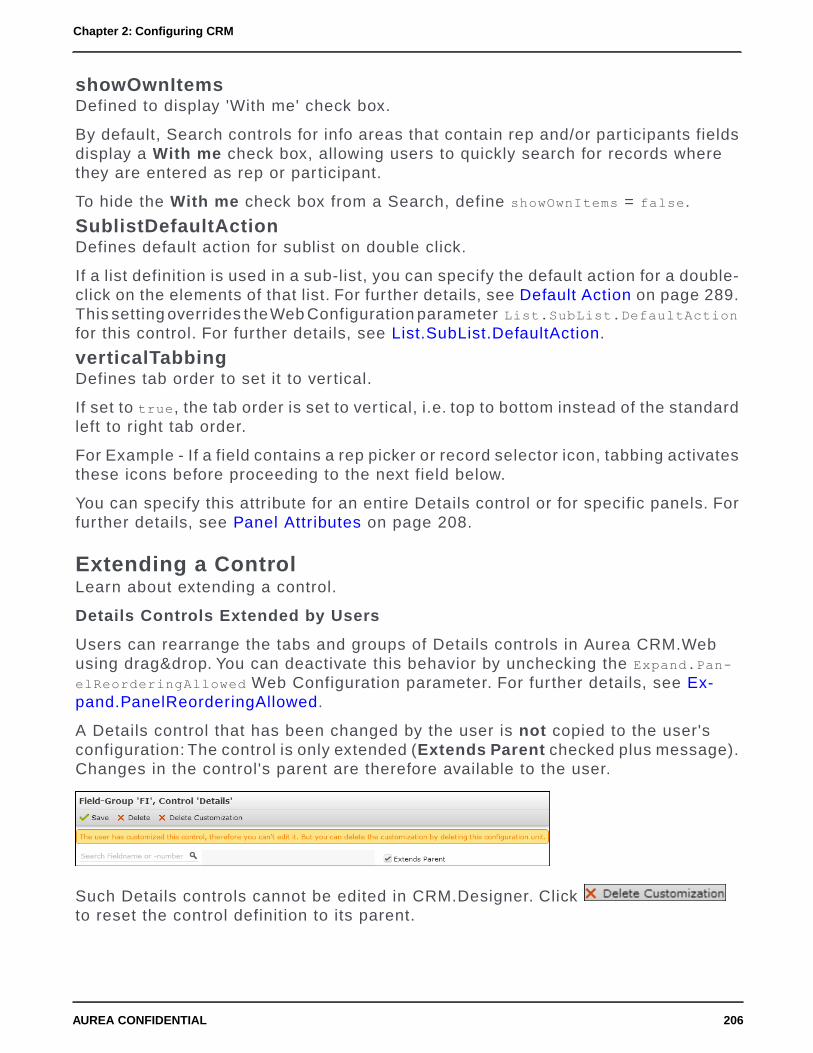
showOwnItemsDefined to display 'With me' check box.
By default, Search controls for info areas that contain rep and/or par ticipants fieldsdisplay a With me check box, allowing users to quickly search for records wherethey are entered as rep or par ticipant.
To hide the With me check box from a Search, define showOwnItems = false.
SublistDefaultActionDefines default action for sublist on double click.
If a list definition is used in a sub-list, you can specify the default action for a double-click on the elements of that list. For fur ther details, see Default Action on page 289.This setting overrides the Web Configuration parameter List.SubList.DefaultAction
for this control. For fur ther details, see List.SubList.DefaultAction.
verticalTabbingDefines tab order to set it to ver tical.
If set to true, the tab order is set to ver tical, i.e. top to bottom instead of the standardleft to right tab order.
For Example - If a field contains a rep picker or record selector icon, tabbing activatesthese icons before proceeding to the next field below.
You can specify this attribute for an entire Details control or for specific panels. Forfur ther details, see Panel Attributes on page 208.
Extending a ControlLearn about extending a control.
Details Controls Extended by Users
Users can rearrange the tabs and groups of Details controls in Aurea CRM.Webusing drag&drop. You can deactivate this behavior by unchecking the Expand.Pan-elReorderingAllowed Web Configuration parameter. For fur ther details, see Ex-pand.PanelReorderingAllowed.
A Details control that has been changed by the user is not copied to the user'sconfiguration: The control is only extended (Extends Parent checked plus message).Changes in the control's parent are therefore available to the user.
Such Details controls cannot be edited in CRM.Designer. Click to reset the control definition to its parent.
206AUREA CONFIDENTIAL
Chapter 2: Configuring CRM

If the control was already customized before the user changed it, no message is
displayed, but the button is available.
To offer users the possibility to reset the layout of a Details control in Aurea
CRM.Web, you can configure the ResetFormLayout button into the respectiveExpand header. For fur ther details, see ResetFormLayout on page 318.
Configuring PanelsLearn to configure panels.
Fields displayed on Details controls are organized in panels displayed as tabs andgroups. The Field Control Editor lists all panels defined for a control on the centralpar t of the screen.
Rearranging PanelsLearn to rearrange the order of panels.
Use drag&drop to change the order of panels in your control definition. Use the Ctrlkey to move multiple panels.
To nest tabs/groups in a group:
1. Create a new (empty) panel.
2. Use drag&drop to add existing tabs/groups to this panel.
Nesting tabs/groups in tabs is not supported.
3. Use non-field elements (e.g. Captions, Texts) to fur ther structure panels. Forfur ther details, see Non-Field Elements on page 210.
207AUREA CONFIDENTIAL
Info Area Customizations

Adding a New PanelLearn to add a new panel to field control editor.
In the Field Control Editor click Add Panel to add a new panel. The new panel isadded (as group) at the end of the panel list. Add fields using drag&drop and definethe desired settings. For fur ther details, see Panel Attributes on page 208.
Deleting a PanelLearn to delete a panel.
To delete a panel, click on (Delete) in the header of the respective panel.
Panel AttributesLearn to edit the panel attributes.
208AUREA CONFIDENTIAL
Chapter 2: Configuring CRM

To change the settings of a panel, click on the panel's header. Use the Panel Editoron the right par t of the screen to edit the panel's attributes:
• Label: The text displayed on the tab/as header of the group. The texts are savedin the net_configtab_text text group. For fur ther details, see Texts on page 50.Group names are only visible if more than one group exists.
• Name: The name of the panel (i.e. the panel's ID).
In the panel list Label and Name are displayed in each panel's header.
• Display as Group: Checked for groups, unchecked for tabs. Check this optionto create a group.
Nested panels are always displayed as groups.
In the panel list tabs are indicated by the , groups by the icon.
• Add Fields to Panel: When creating a group from a tab, enter the panel to whichthe content of this tab is to be appended. The fields of the tab are appended atthe end of the tab/group.
If you don't specify a panel, the fields are appended at the end of the first panel.
• CRM Processes: Assign one or more CRM processes to the panel. For fur therdetails, see Roles & CRM Processes on page 727.
You can specify additional attributes by clicking (Add) and entering a name andvalue. Available attributes:
collapsed
Defines the initial state of group panels in a Details control. If set to true the groupis initially displayed in collapsed state. This setting is overruled by the user's settings.
This setting is ignored for tab panels but is applied as soon as the user changes atab panel to a group panel via drag&drop.
columns
Defines the default number of columns for the selected panel. Label and text of afield count as one column.
Default = 2
labelsAboveFields
If set to true, field names are displayed above the fields in one column instead ofdisplaying them in front of the fields.
verticalTabbing
If set to true, the tab order is set to ver tical (top to bottom) instead of the standardleft to right tab order.
209AUREA CONFIDENTIAL
Info Area Customizations

Note: You can define the columns, labelsAboveFields and verticalTabbingattributes for the entire control and for specific panels. The panel attribute overrulesthe control attribute. For fur ther details, see Control Attributes on page 200
Non-Field ElementsLearn to add non-fields elements to control definition.
You can structure the information displayed on Details, MiniDetails and Searchcontrols by adding the following "non-field" elements to your control definitions:
• Line Feed: Inser ts a line break as follows:
• If the Line Feed element is inser ted in another than the first column, the fieldafter the line break is moved to the next row.
• If inser ted in the first column (i.e. at the beginning of a row), it is ignored.
• If inser ted with the All columns field attribute checked, an empty row (blankline) is created at this position. This functionality is not supported if the Linefeed element is par t of a combined field.
• If used inside a combined field without additional attributes the line feed spansthe same number of columns as the combined field itself Default: 1 column
• Caption: Inser ts a caption text followed by a line break. The caption text is definedby the Label attribute. To display multiple captions in one row, use the One Column
field attribute.
• Text: Inser ts any kind of text. The text itself is defined by the Label attribute.
If a text requires more than the available space, the entire text is displayed in atool tip.
• Separator: Inser ts a horizontal separation line across all columns.
210AUREA CONFIDENTIAL
Chapter 2: Configuring CRM

Non-field elements are listed at the end of the Field list. You can add them to apanel just like fields (using drag&drop).
AttributesLearn about the attributes supported by non-fields element.
Non-field elements support the following attributes:
• Hide Field on page 224
• Hide if predecessor/successor is empty: These attributes hide a non-fieldelement if the field before or after it is empty. Use this for combined fields to onlyshow the comma in "1040 Vienna, Austria" if the Country field contains a value.For fur ther details, see Add Combined Field on page 214.
Note: The Hide if predecessor/successor is empty attributes are only supportedfor combined fields (in read-only mode).
The Line Feed element also supports:
• All Columns on page 223 (details above)
The Caption and Text elements also support:
• Label: Define the text for the Caption or Text element here. The texts are savedin the net_alternate_field_labels text group. For fur ther details, see Texts onpage 50.
• All Columns on page 223
• One Column on page 226
• Colspan on page 228
• Rowspan on page 234
ModesLearn about edit and update modes.
You can display non-field elements in Details controls depending on the mode (De-tails (All), New or Update). For fur ther details, see Field Attributes on page 221.
Example New/Update Mode
This allows you to provide different help texts for creating a new record and for up-dating a record.
For this example two text elements were added to an FI Details control.
The first text is displayed in all modes:
211AUREA CONFIDENTIAL
Info Area Customizations

The second text is displayed in New mode and hidden in Update mode:
Result in New mode:
Result in Update mode:
Example Edit/View Mode
In addition, you can also display different non-field elements for Edit and View modeby using combined fields.
212AUREA CONFIDENTIAL
Chapter 2: Configuring CRM

To display different non-field elements for Edit and View mode you can use a com-bined field and add different non-field elements to the Edit and to the ReadOnlypanel. For fur ther details, see Add Combined Field on page 214.
This example extends the FI Details control from the above example.
The combined field is displayed in Update mode and hidden in New mode:
The Edit panel:
The text to be displayed when in Edit mode:
The ReadOnly panel with the text to be displayed when in View mode:
Result in Edit mode:
Result in View mode:
213AUREA CONFIDENTIAL
Info Area Customizations
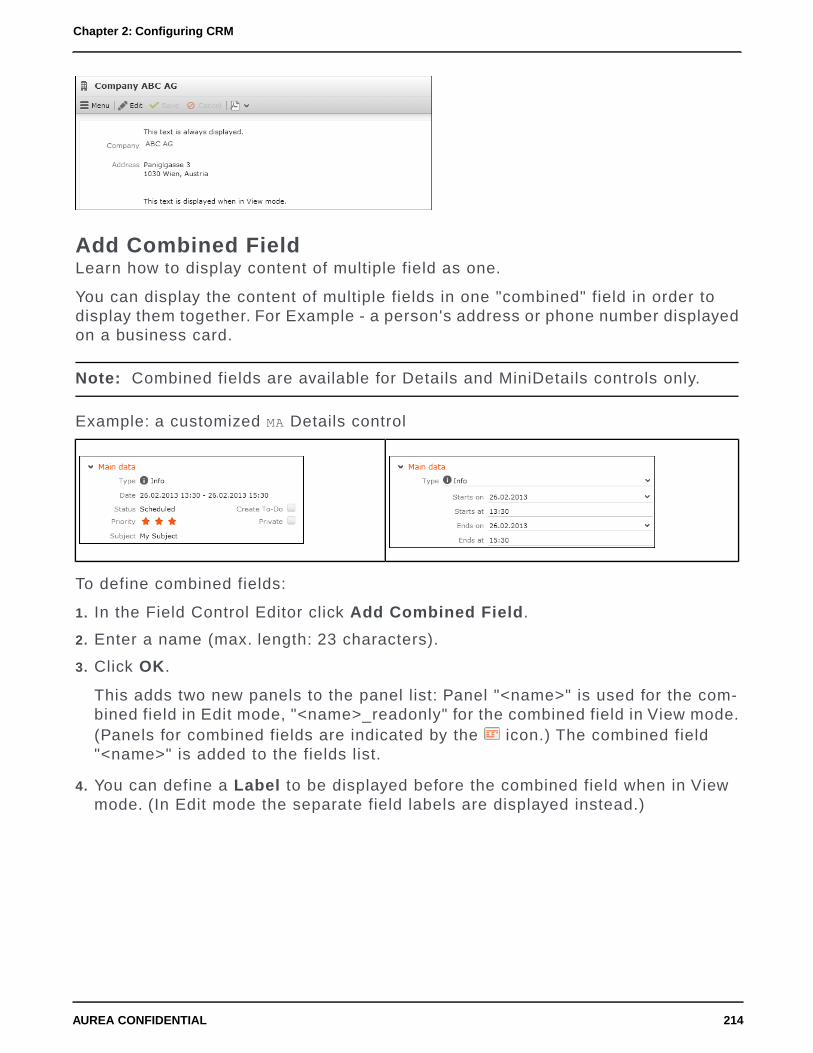
Add Combined FieldLearn how to display content of multiple field as one.
You can display the content of multiple fields in one "combined" field in order todisplay them together. For Example - a person's address or phone number displayedon a business card.
Note: Combined fields are available for Details and MiniDetails controls only.
Example: a customized MA Details control
To define combined fields:
1. In the Field Control Editor click Add Combined Field.
2. Enter a name (max. length: 23 characters).
3. Click OK.
This adds two new panels to the panel list: Panel "<name>" is used for the com-bined field in Edit mode, "<name>_readonly" for the combined field in View mode.(Panels for combined fields are indicated by the icon.) The combined field"<name>" is added to the fields list.
4. You can define a Label to be displayed before the combined field when in Viewmode. (In Edit mode the separate field labels are displayed instead.)
214AUREA CONFIDENTIAL
Chapter 2: Configuring CRM

5. Add the fields you want to combine (e.g. Starts on, Starts at, Ends on and Endsat):
• For Details controls add fields to both the Edit and the Read-only versions ofthe combined field.
• For MiniDetails controls only the Read-only definition is used. (Panel "<name>"is ignored.)
• Add non-field elements to the Read-only definition to fur ther structure thedisplay when in View mode. For fur ther details, see Non-Field Elements onpage 210. Define Text elements containing a space, a slash, dash etc. to controlthe spacing of the combined field.
Use panel attributes like Hide if successor is empty to e.g. hide the dash ifthe activity record (in the example above) contains no End Date/Time:
Note: In Edit mode the Line Feed elements are removed; all fields from thecombined field definition are listed in one column.
Note: If you add non-field elements that are not supported for combined fields(e.g. Caption) a warning is written to the client log.
• You can set field attributes for individual fields of a combined field definition.For fur ther details, see Field Attributes on page 221. Please note that not allfield attributes make sense in View mode and that combined fields in Edit modeare always displayed in one column.
Note: If all fields contained in a combined field are defined as read-only (viaaccess rights definition or field attribute), the combined field is displayed as inView mode.
• For a combined field itself only a sub-set of field attributes is available (Allcolumns, Colspan etc.)
6. The combined field is listed at the end of the field list. Add it to the desired panel(s)by using drag&drop.
215AUREA CONFIDENTIAL
Info Area Customizations

Note: When creating a report for records from an info area where combined fieldshave been defined, the fields are output individually with their label and value, i.e.not in the formatting defined in the Details control.
Add Linked FieldsLearn to add linked fields from related infor areas.
You can add fields from related info areas (N:1- and 1:1-links) to a control (Examplein UPDATE_DEFAULT: the KP List control contains the Company field from FI).
Note: Add Linked Fields is available for the Details, List and Search controls, butnot for Matchup or Default.
Note: Using linked fields may impact the performance. If applicable, use Z-fieldsinstead.
To prevent changes to a parent record, linked fields are read-only by default in Listand Details controls. Define the control attribute EditLinkedFields=true to makelinked fields editable. For fur ther details, see EditLinkedFields on page 201. If youuse this setting you can still use the Readonly field attribute to control which linkedfields are actually editable/read-only.
Linked fields display "N/A" if they are empty due to a non-existent linked record(e.g. KP fields on an MA Details control if the MA record is linked to an FI recordonly). You can change this text by editing text no. 8 in text group common_text.
To add linked fields:
1. In the Field Control Editor click Add Linked Fields.
216AUREA CONFIDENTIAL
Chapter 2: Configuring CRM

2. Select the info area from which you want to add a field.
• show linked: All info areas are listed to which the current info area is linkedvia N:1- or 1:1-link.
• show all: All available info areas are displayed in the Info Areas list.
All fields of the selected info area are listed.
3. Check the Link ID check box, if you want to use another than the default link.Select the desired link. For fur ther details, see Link IDs on page 19.
4. Enter a search string to filter the list of available fields.
5. Select one or more fields (Ctrl) from the list.
6. Under Add selected fields to click on (Add) next to the panel to which youwant to add the field(s).
Click (Delete) to remove a field.
7. Click Add Fields to add the fields to the control definition, otherwise click Cancel.
8. Save the control definition.
Syntax:
<Fieldname>(<type>/<fieldnumber>)(<InfoAreaId>#<link id if != default
link>:<fieldnumber>)
Examples:
Company (C/2) (FI) ...to show a Person 's Company on the KP List control
Tel 1(C/6) (KP#2:6) ...to show the Contact Person 's phone number on the KMDetails control
217AUREA CONFIDENTIAL
Info Area Customizations

Edit Linked FieldsLearn to edit linked fields.
You can add fields from related info areas (N:1- and 1:1-links) to a control (Examplein UPDATE_DEFAULT: the KP List control contains the Company field from FI).
Linked Fields can be edited, but only under cer tain circumstances:
• The Linked field must be placed on the root panel. It does not work if it is createdin some other panel.
• Ensure that the current info area already has value saved for it to be able to editthe linked fields. For example, if you want to edit linked fields for a company andyou added linked fields to City, you must first ensure that you have created acompany with a city and saved it.
Input Widget for Array FieldsLearn to configure array fields defined in the data model.
In Details, List and MiniDetails controls you can configure array fields defined inthe data model to be displayed using a ListInput widget. To access the widget, goto >> Inputs > ListInput on the SDK page.
This enables users to quickly enter data using the keyboard to navigate betweenthe fields of the array.
To configure the ListInput widget:
1. Add the first field of an array to the desired control (e.g. Co. Type and Sector inthe FI Details control).
218AUREA CONFIDENTIAL
Chapter 2: Configuring CRM

The array is displayed as one field with the label of the first field of the array.Each value is displayed in a small rectangle. A ghost text indicates the numberof available fields in the array. In View mode the values are listed separated bycomma.
Note: If you add another field or more field of the array, the default field widgetis used (drop-down list etc.).
Supported field types: variable catalog, fixed catalog, text, rep input for Participantfields only - see below.
For fixed catalogs the image is displayed as well (if defined). The Small Image
Template field attribute must be defined. For fur ther details, see Small Image Tem-plate on page 234.
The Participant fields in the Activity info area use the ListInput widget by default.In this case, the number of possible values is not restricted. The separator is deter-mined by the EMail.Separator Web Configuration parameter. For fur ther details,see EMail.Separator.
Restricting the Number of Items in an Array FieldLearn how to restrict the number of items that can be defined in the field.
In some cases, you may want to restrict the number of items that can be defined inthe field details mask of an array field. To define the maximum number of items thatcan be selected from an array field set the arrayFieldMaxItems value in the extendedoptions for a ListInput widget.
The following sample configuration below restricts the number of fields in the arrayfield to one item:{ 'widgetOptions': { 'arrayFieldMaxItems': 1 } }
HTML FieldsLearn about HTML fields in Aurea CRM.Web.
You can create HTML fields to store HTML-formatted text in the Aurea CRM database.This may be used to send HTML-formatted emails out of Aurea CRM.Web. For fur therdetails, see Send As email on page 835.
Create a field of type "html-text" e.g. in the activity info area (MA). For fur ther details,see Data Model and Aurea CRM Field Types in the CRM.Core Administrator Guide.
HTML fields are supported for Details and MiniDetails controls. In MiniDetails theHTML-formatted text is displayed as in View mode. HTML fields are not supportedin lists. Use the linked plain text field in List controls instead.
Note: Make sure you use the plain text field in search forms and as queryparameters. Otherwise users may not be able to find their search terms due to HTMLtags in the text.
219AUREA CONFIDENTIAL
Info Area Customizations

Note: Restriction: Entering text into an HTML field via copy/paste from MS Wordis not supported when using Firefox. In this case all formatting tags are copied asplain text.
In Edit mode the HTML field offers a WYSIWYG HTML editor for entering formattedtext.
HTML fields support the Multi Line field attribute (min. 6 lines). For fur ther details,see Multi Line on page 232.
If you specify an HTML field configured in MA in the EMail.BodyFieldID Web Con-figuration parameter, Send As email sends HTML-formatted emails. For fur therdetails, see EMail.BodyFieldID. This is only supported for sending server-side emails.For fur ther details, see EMail.SendingMethod.
Using HTML fields in reports is only supported for HTML reports. For other outputformats you need to either use the linked plain text field or create an appropriateXSL transformation.
To configure HTML-formatted signatures:
1. In the Rep info area (ID) create a new field of type "html-text" linked to the existingSignature field. For fur ther details, see Data Model and Aurea CRM Field Typesin the CRM.Core Administrator Guide.
2. Enter each rep's signature as HTML-formatted text. Or add the HTML field to theID Expand view, thus enabling users to define their signatures on their own.
3. Check the Add Rep Signature field attribute e.g. for the HTML field in the activityinfo area (from the above example). For fur ther details, see Add Rep Signatureon page 223.
4. The (Add Signature) icon is displayed in the HTML Editor's toolbar when inEdit mode, allowing the user to inser t his signature as HTML-formatted text.
220AUREA CONFIDENTIAL
Chapter 2: Configuring CRM

Multi-Language FieldsLearn to add multi-language fields to info areas.
You can add multi-language fields to info areas in order to display and enter datain multiple languages. Multi-language fields are implemented by default for the fol-lowing info areas: Answer (F3), Field Help (FH), Question (F2) and Question-naire/Portfolio (F1).
For details on defining and using multi-language fields. For fur ther details, seeMulti-language Fields in the CRM.Core Administrator Guide.
Field AttributesLearn about field attributes.
Field attributes define additional properties for fields displayed in masks and lists.You can define field attributes to display a field without label or as hyperlink etc.,to perform special checks on a field, or to apply special functions.
You can specify field attributes for all controls except the Matchup control.
Note: Field attributes are applied on top of the attributes determined by the user'saccess rights (e.g., you can set a field to read-only even when a user is allowed toedit it according to his access rights) and on top of style sheet settings (e.g. youcan specify Colspan and Rowspan per field).
Fields for which attributes are defined, are displayed in orange (except in the Defaultcontrol).
If a field control definition contains multiple occurrences of the same field, you candefine different field attributes for each occurrence.
Note: Defining different field attributes for multiple occurrences of the same fieldis supported for all controls except Default and Matchup.
221AUREA CONFIDENTIAL
Info Area Customizations

Note: Defining different field attributes is not supported for linked fields.
To customize a field:
1. Select a field in the central par t of the Field Control Editor.
The current settings for the selected field are displayed on the right par t of theField Control Editor. (The field's name, XML name, ID and type are output at thetop. For fur ther details, see Field Names and IDs on page 17 and Data Types inAurea CRM on page 877.)
The attributes list contains only attributes available for the current context, i.e.depending on control type and field type. Example: The Document field attributeis only available for text fields (type C), the Enhanced Search Field attribute isonly available for Search controls, etc. For the Default control field attributes arefiltered by field type only. Attributes are not filtered by mode.
For a complete list, see the ar ticle “Relevant Field Attributes for Aurea CRM” athttps://support.aurea.com.
Use the / (Show all attributes / Hide empty attributes) buttons to togglebetween displaying all available and the currently defined attributes.
2. Define the following:
• Label: You can define alternate field labels here, e.g. when adding a field twicefor entering ranges (From/To postal code). The texts are saved in thenet_alternate_field_labels text group. For fur ther details, see Texts on page176. This label overrules field names defined globally on the Alternate FieldLabels page. For fur ther details, see Alternate Field Labels on page 270.
• Tool Tip: currently no function - on mouse-over field labels tooltips display thefield help. If no field help exists for a field, the tooltip displays the field labeland the max. number of characters. For fur ther details, see Field Help on page50.
• Function: You can enter e.g. a comparison function for a field. The FI Searchcontrol in e.g. uses operators for entering a Postal Code range:
Valid operator combinations:
">" and "<"
">=" and "<"
">" and "<="
">=" and "<="
222AUREA CONFIDENTIAL
Chapter 2: Configuring CRM
Default is "="
Click on (Edit functions) to view and edit all functions definedfor the fields of a control in one popup. The popup lists all fields plus theirfunctions, if defined.
• Modes: Select the mode for which a field attribute setting applies:
• For Details controls you can define different sets of field attributes for New,Update or generally (Details (All)).
• For Default controls you can define different sets of field attributes for all"modes": All Controls, Details (All), New, Update, View (for MiniDetailscontrols), Search (for Search controls) and List (for List and MatchupListcontrols).
• For the other controls the mode is fixed.
• Set Field Attributes as described in the following chapters.
3. Save the control definition.
Use the Default control to define default field attributes for all fields of an info area:These definitions are used by all controls that have no specific field attributes defi-nition for a field. For fur ther details, see Default control.
Add Rep SignatureLearn about add rep signature attribute.
Use this attribute to allow users to inser t their signature as defined in the Rep infoarea into the field (e.g. for email activities). Example in UPDATE_DEFAULT: Textfield in field group MA.
If checked, an (Add Signature) icon is displayed beside the text (or HTML) fieldwhen in Edit mode (Expand view only).
Note: This attribute is only supported for text and html fields.
For information on adding HTML-formatted signatures. For fur ther details, see HTMLFields on page 219.
All ColumnsLearn about All Columns attribute.
If checked, the field value is displayed across all columns (i.e. the entire row) inde-pendently of of its actual length.
Note: Fields defined as more than 80 and less than 256 characters in the datamodel are automatically displayed across all columns unless a contrary field attribute(e.g. Colspan) is defined.
223AUREA CONFIDENTIAL
Info Area Customizations

Auto-Wildcard SearchLearn about Auto-Wildcard Search attribute.
If checked, a wildcard character (*) is automatically added at the end of the searchstring for this field. This parameter applies to character fields used in searches.
For the wildCardEnclose option. For fur ther details, see Extended Options on page228.
DocumentLearn about Document attribute.
Use this attribute to turn a text field into a document field. For fur ther details,see Document fields on page 831.
In Edit mode a record selector icon is displayed next to the field for users to uploaddocuments or images.
In View mode and in MiniDetails view the document is displayed as a link and candirectly be opened by clicking on the link.
Note: Document fields defined in the data model ("Document" property checked.For fur ther details, see Data Model in the CRM.Core Administrator Guide) containthe described functionality without the Document field attribute being set.
For more information on documents in Aurea CRM.Web. For fur ther details,see Documents on page 829.
Hide FieldLearn about Hide Field attribute.
The field is hidden (no field label and field value is displayed).
List controls: Fields with Hide Field enabled are also hidden from the Modify ListFields dialog.
HyperlinkLearn about Hyperlink attribute.
If checked, the field value is displayed as a hyperlink in View mode. In Edit mode,
the Open Web Site icon is displayed beside the field. Clicking the link or the iconopens the website entered in the field in a new browser window or tab (dependingon the website).
Note: For fields for which "Hyperlink" property is set in the data model, you do notneed to check the Hyperlink field attribute.
You can define icons as hyperlinks (e.g. to link to a company's social media account).For fur ther details, see Large Image Template on page 231.
224AUREA CONFIDENTIAL
Chapter 2: Configuring CRM
MailLearn about Mail attribute.
The field value is displayed as a "MailTo:"-hyperlink in View mode. In Edit mode,the email icon is displayed beside the field. When the link or icon is clicked, anew email message is created for the address in the field.
Note: For fields for which "email" property is set in the data model, you do not needto check the Mail field attribute.
Must-FieldLearn about Must-Field attribute.
Use this attribute for Search and Details controls to determine that a field ismandatory (and must not be empty). For Details controls in Edit mode, the Must-Field attribute can be set separately for New and Update mode.
For fields defined as mandatory in the data model (field property "must") or via theaccess rights definition you do not need to set the Must-Field field attribute.
Note: To ensure consistent behavior across all clients, update recommends definingmandatory fields via the access rights definition in the Aurea CRM win Rightsmodule.
When defining mandatory fields in the Aurea CRM win Rights module (Fields col-umn):
• Check Deny Deletion to define a field as mandatory when in Edit/Update mode.
Note: If the value of a field (on a Details control) with Deny Deletion is deleted,a message is displayed. In List controls the original value is restored upon savingthe record and no message is displayed.
• Check Mand. Field to define a field as mandatory when in Edit/New mode.
Concerning mandatory fields on Details controls:
• If the mandatory field is par t of a group, the group is expanded on save.
• Mandatory fields are not highlighted when in View mode.
• The names of tabs in Details controls containing mandatory fields are highlightedas bold *. The tab is activated on save if no value was entered.
225AUREA CONFIDENTIAL
Info Area Customizations

To customize the formatting of tab labels, change the settings for class .u8-tabs-item-must.u8-tabs-item in the tabs.css (located in ..\styles\update\base).
• Per default, an asterisk (*) is displayed in front of the label of a mandatory field,and an exclamation mark (!) is displayed in front of the label of a field that mustnot be deleted.
The characters used for indicating mandatory field and fields with deny deletion(* and !) are defined in texts number 4 and 5 of the text group common_text. Forfur ther details, see Texts on page 176.
If you want to display another character or string for mandatory fields, you justneed to modify these texts in your configuration.
To customize the formatting of must field labels, change the settings for class.u8-fields-must in the expand.css file (located in ..\styles\up-date\crm\widgets).
No LabelLearn about No Label attribute.
If checked, the field's label is not displayed.
No Multi LineLearn about No Multi Line attribute.
If checked, the field is not displayed as a multi-line field, even if the width exceedsthe limit for multi-line fields (256 characters).
One ColumnLearn about One Column attribute.
If checked, the field value is displayed in one column even if its width exceeds thelimit for one column field.
Note: Fields defined as less than 80 characters in the data model are automaticallydisplayed as one column fields unless a contrary field detail (e.g. All Columns) isdefined.
Password FieldLearn about Password Field attribute.
If enabled, the field value is displayed in password style (****).
Note: This field attribute is not supported by multi-line fields.
Phonetic Search CheckedLearn about Phonetic Search Checked attribute.
Defines that the phonetic search is active ( ) when the search is opened.
226AUREA CONFIDENTIAL
Chapter 2: Configuring CRM

Phonetic Search EnabledLearn about Phonetic Search Enabled attribute.
The field can be searched using a phonetic search algorithm.
An additional icon is displayed beside the field, allowing the user to select whetherhe wants to search for this field's value phonetically. For a description of the pho-netic search algorithm. For fur ther details, see Phonetic Search in the Web BusinessLogic User Guide.
Make sure you check this attribute for only one field of the Search control.
Note: For the field for which you check this attribute a phonetic index for must bedefined in the data model, see Index in the CRM.Core Administrator Guide (indexfield property PHONETIC).Do not enable the phonetic search for enhanced searchfields. For fur ther details, see Enhanced Search Field on page 237.
PlaceholderLearn about Placeholder attribute.
Unused fields can be defined as placeholders for more freedom in the design ofDetails controls.
If a field is defined as Placeholder, its label and content are hidden: This space isempty and the next field does not move up. For placeholder fields, you can alsospecify a RowSpan. For fur ther details, see Rowspan on page 234.
Note: To add an empty space at the end of row in a Details control, use the non-fieldelement Line Feed. For fur ther details, see Non-Field Elements on page 210.
Note: Fields flagged as Placeholder are not exported (exception: export as XML- fieldplaceholder attribute).
ReadonlyLearn about Readonly attribute.
If checked, the field is read-only and cannot be changed by the user.
For fields defined as read-only in the access rights definition (Fields column > DenyUpdate) you do not need to set the Readonly field attribute.
Fields with Deny New in the access rights definition are displayed as read-only inEdit/New mode. In Edit/Update mode users may enter a value but the field is resetto empty on save.
227AUREA CONFIDENTIAL
Info Area Customizations

Select Field for Applying Last ValueLearn about Select Field for Applying Last Value attribute.
If a new record is created and the Web Configuration Parameter Expand.InitialVal-uesFromLastInput is set to "Use admin-defined values from last data entry", thevalues of fields with this attribute checked are used for the ExpandNew action. Forfur ther details, see Expand.InitialValuesFromLastInput.
ColspanLearn about Colspan attribute.
Defines the number of columns that the field value uses - Details, Search andMiniDetails controls.
Label and text of a field count as one column.
To use Colspan for fields that would by default be displayed across the whole maskdue to their field length, you need to check the One Column field attribute as well.For fur ther details, see One Column on page 226.
Extended OptionsLearn about Extended Options attribute.
The following options are available:
• showOnlyForAffiliations: Use this option to provide additional information whenthe Affiliation View is active. For fur ther details, see Affiliation View on page 752.
Example: Add Company as a linked field to an Activity (MA) sub-list and defineshowOnlyForAffiliations=true for this field. Thus Company is only displayedwhen the Affiliation View is active and MA records for various affiliated companiesare listed.
In the Modify List Fields dialog fields with showOnlyForAffiliations=true aredisplayed with status "hidden" when the Affiliation View is not active.
Note: The Hide Field attribute overrules showOnlyForAffiliations=true.
• UseRootRecord: To display the titles of the D3 SubList entries as links, defineUseRootRecord=true under Extended Options. Use this in order to be able to opena reconstructed serial letter document by clicking the field "Title" from D1 in a listof document links (D3).
• wildCardEnclose: If the Auto-Wildcard Search field attribute is enabled a wildcardcharacter * is added at the end of the search string. Specifying wildCardEn-close=true as extended option adds the wildcard character before and after thesearch string. For fur ther details, see Auto-Wildcard Search on page 224.
228AUREA CONFIDENTIAL
Chapter 2: Configuring CRM
Note: Using a wildcard character before and after the search string may resultin a severe performance decrease, especially for large amounts of data, andshould thus only be enabled if absolutely necessary.
• autoComplete: Auto-completion of field attributes is disabled if you set this valueto “autoComplete=false”.
• actionNoFocus: Set this extension option to true to ensure that on pressing theTAB key the input focus moves to the next field in the tab order. If this option isnot set on a field then the focus moves to the magnifier and clear selection actionicons before moving on to the next field. This requires multiple TAB key pressesfor the user to move focus to the next field.
• useWildcardForOrgGroup - Use this option for Participant Id fields to controlorganizational group rep addition to a filter. If it is set to true, organizationalgroup Rep Id is added as a wildcard to enable search by Rep Id only. The followingis an example extended option setting:{widgetOptions : {useWildcardForOrgGroup : true}}
Use semicolons to separate multiple Extended Options.
ImageLearn about Image attribute.
If a control contains a document field with the Image attribute checked, users canupload image files and display a preview (e.g. to show pictures of products in theItem Master info area (AR)). For fur ther details, see Uploading Documents on page830.
Note: The Image attribute only works for document fields defined in the data model("Document" property checked). For fur ther details, see Data Model in the CRM.CoreAdministrator Guide.
Note: For uploading and previewing images, Aurea CRM.Web requires local accessto these images - therefore, Aurea CRM.Web must be added to the browser's "TrustedSites".
Note: Using large images and displaying images in lists with many results maylead to performance problems.
Valid parameters for the Image attribute:
229AUREA CONFIDENTIAL
Info Area Customizations
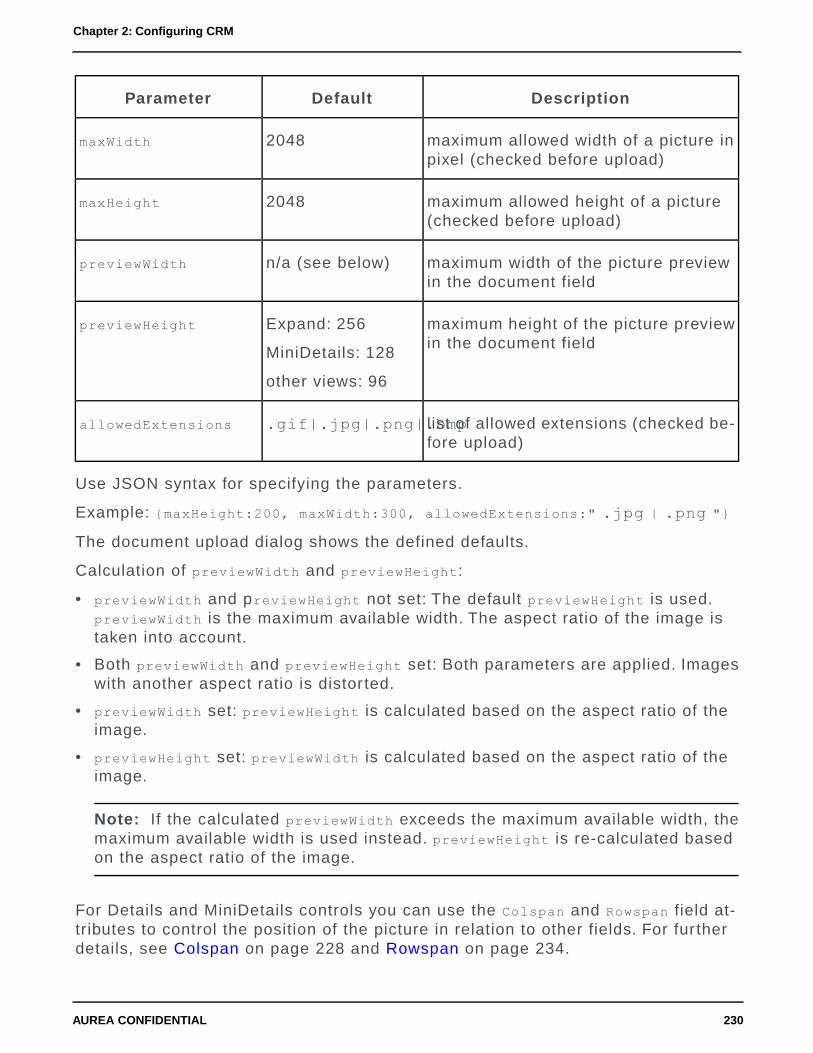
DescriptionDefaultParameter
maximum allowed width of a picture inpixel (checked before upload)
2048maxWidth
maximum allowed height of a picture(checked before upload)
2048maxHeight
maximum width of the picture previewin the document field
n/a (see below)previewWidth
maximum height of the picture previewin the document field
Expand: 256
MiniDetails: 128
other views: 96
previewHeight
list of allowed extensions (checked be-fore upload)
.gif|.jpg|.png|.bmpallowedExtensions
Use JSON syntax for specifying the parameters.
Example: {maxHeight:200, maxWidth:300, allowedExtensions:" .jpg | .png "}
The document upload dialog shows the defined defaults.
Calculation of previewWidth and previewHeight:
• previewWidth and previewHeight not set: The default previewHeight is used.previewWidth is the maximum available width. The aspect ratio of the image istaken into account.
• Both previewWidth and previewHeight set: Both parameters are applied. Imageswith another aspect ratio is distor ted.
• previewWidth set: previewHeight is calculated based on the aspect ratio of theimage.
• previewHeight set: previewWidth is calculated based on the aspect ratio of theimage.
Note: If the calculated previewWidth exceeds the maximum available width, themaximum available width is used instead. previewHeight is re-calculated basedon the aspect ratio of the image.
For Details and MiniDetails controls you can use the Colspan and Rowspan field at-tributes to control the position of the picture in relation to other fields. For fur therdetails, see Colspan on page 228 and Rowspan on page 234.
230AUREA CONFIDENTIAL
Chapter 2: Configuring CRM

Note: When using Rowspan for an image field on a multi-column mask, the ver ticalalignment of the elements (without Rowspan defined) next to the picture is handleddifferently by different browsers.
Large Image TemplateLearn about Large Image Template attribute.
Displays an image depending on a field value in a separate area beside Details andMiniDetails controls. To display images in lists, use the Render Hook field attribute.For fur ther details, see Render Hook on page 239.
Syntax:
Specify the name of an image registered in CRM.Designer plus {VALUE} as place-holder for the field's value. For fur ther details, see Images on page 717
<image_name>_{VALUE}
Use JavaScript expressions to get and transform the value.
Large Image Template (and Small Image Template) support character, catalog andboolean values.
If you define Large Image Template for a hyperlink field defined in the data modelor via field attribute, users can click on the icon to open the linked page (e.g. toaccess a company's social media pages). For fur ther details, see Hyperlink on page224.
Examples:
Small Image Template = CAT_CONTACT_BTB_{VALUE}
231AUREA CONFIDENTIAL
Info Area Customizations

Displays the images associated with the different values of the Activity Type catalog.The images are registered as CAT_CONTACT_BTB_0 to CAT_CONTACT_BTB_7 for the firsteight catalog entries.
Large Image Template = CAT_AQ_{VALUE}
Displays the image for a company's current Lead Status. The images are registeredas CAT_AQ_0 to CAT_AQ_6 for the first seven catalog entries.
Large Image Template = CAT_ABC_{javascript:($['VALUE'] || '').toUpperCase();}
Displays the image for a company's current ABC rating. The images are registeredas CAT_ABC_A, CAT_ABC_B and CAT_ABC_C. For letters other than A, B or C no imageis displayed.
Large Image Template = private_{javascript:u8.services.typeConverter.to-
Boolean($['VALUE'])}_value
Displays different images depending on the state of the Boolean field Private inMA. You need to create and register the images (private_true_value and pri-vate_false_value) for this example, as they are not par t of UPDATE_DEFAULT.
Large Image Template = SocialNetwork_Facebook{javascript:$['VAL-
UE']?"":"_doNothing";}
Displays the Facebook icon (registered as SocialNetwork_Facebook), if the Facebookfield contains an address. If the Facebook field is empty no icon is displayed, unlessyou registered an image called SocialNetwork_Facebook_doNothing indicating thatno address is available.
Multi LineLearn about Multi Line attribute.
Use this attribute to display a field as a multi-line field.
Note: Fields defined as more than 256 characters in the data model areautomatically displayed as multi-line fields unless a contrasting field attribute is set.
Enter the number of lines as parameter, e.g. Multi Line = 3. To allow users tocomfortably view the entire field contents even if the number of visible lines is ex-ceeded, you can specify additional parameters as JSON, e.g. Multi Line = {lines:
3, allowExpand: true, expanded: true}.
232AUREA CONFIDENTIAL
Chapter 2: Configuring CRM

DescriptionTypeName
The number of visible lines.intlines
If set to true, an Expand/Collapse toggle button
is displayed beside the field, allowing the userto display the entire field content.
BooleanallowExpand
If set to true, the field is displayed expanded, i.e.all lines are visible. expanded only works if allow-Expand is set to true.
Booleanexpanded
Note: The JSON is supported for Details and MiniDetails controls for text and HTMLfields.
Note: All multi-line text fields configured in MiniDetails controls are expanded bydefault.
Rep FilterLearn about Rep Filter attribute.
Use this field attribute to implement a fixed filter for a specific rep field. The filteris applied in the rep picker (all views) and when using auto-completion.
You can specify the filter with or without prefix:
Rep Filter = myEmployees
Rep Filter = ID.myEmployees
Only filters defined for the Rep info area (ID) are taken into account. Filters definedfor other info areas are ignored. However you can define a filter with conditions ona linked info area, e.g. GZ. For fur ther details, see Defining Filters on page 489.
The filter is applied to ID records of all types (rep, group, resources). Add a conditionon the Type field (ID:68), to determine which types are taken into account. Example:To see all available groups and filter only employees by Country:
233AUREA CONFIDENTIAL
Info Area Customizations

You can use the Rep Filter attribute for rep and participant fields on Details, Listand Search controls.
The filter name (without prefix) is displayed in the rep picker's title bar. The Favoritesnode in the rep picker is hidden.
For par ticipant fields (e.g. Participant ID in MA) the record's main rep is listed aswell, regardless of whether this rep meets the filter conditions or not.
For Participant ID fields you can control the addition of the organizational group'sRep to the filter using the extended option useWildcardForOrgGroup. For fur therdetails, see Extended Options.
RowspanLearn about Rowspan attribute.
Defines the number of rows used by the field value - Details, Search and MiniDetailscontrols.
Note: When using Rowspan for an image field on a multi-column mask, the ver ticalalignment of the elements (without Rowspan defined) next to the picture is handleddifferently between browsers. For fur ther details, see Image on page 229.
Small Image TemplateLearn about Small Image Template attribute.
Displays an image in front of a field depending on the field value.
For information on syntax and examples. For fur ther details, see Large ImageTemplate on page 231.
Delete LinkLearn about Delete Link attribute.
To clear a link field, users need to click the Remove Link button (beside therecord selector button ). For details on when (Remove Link) is displayed, seeSelect-Function on page 240.
Field contents that were copied via the copyFields property of a Select-Function,are automatically cleared/changed when the respective link is removed or changed.
234AUREA CONFIDENTIAL
Chapter 2: Configuring CRM

Use the Delete Link attribute to define a specific Delete function to be called bythe Remove Link button , e.g. to
• clear/reset field values when deleting/changing a link (no matter if a Select-Function was defined or not)
• change the content of fields previously filled by a Select-Function
• provide a custom JavaScript function.
Note: After deleting a link it is necessary to save the record to reset the searchcontext. For fur ther details, see Search Context
Note: For non-link fields the Delete Link attribute is only supported if a Select-Function is defined as well, i.e. you cannot use Delete Link to clear e.g. Streetwhen deleting Company in FI: You would have to define a trigger for that instead.
Note: If you use the Delete Function to clear/reset a field that was not copied viacopyFields, you also need to explicitly specify the fields copied with copyFields inthe Delete Function.
Syntax:
DescriptionTypeName
delete functionfunctionclearFields
The ID or XML name of the field(s) to becleared/reset.
int or stringfieldIds
The new value of the field. Use this property to reseta field to some default value.
stringvalue
Examples:
To clear the contents of the Info Area Code and Field Number fields in Z5:
Definition for Info Area Code (Z5/8):
clearFields({
fieldIds: ["TableId","FieldId"],
value: {"TableId": "", "FieldId": "-1"}
});
Definition for Field Number (Z5/9):
235AUREA CONFIDENTIAL
Info Area Customizations
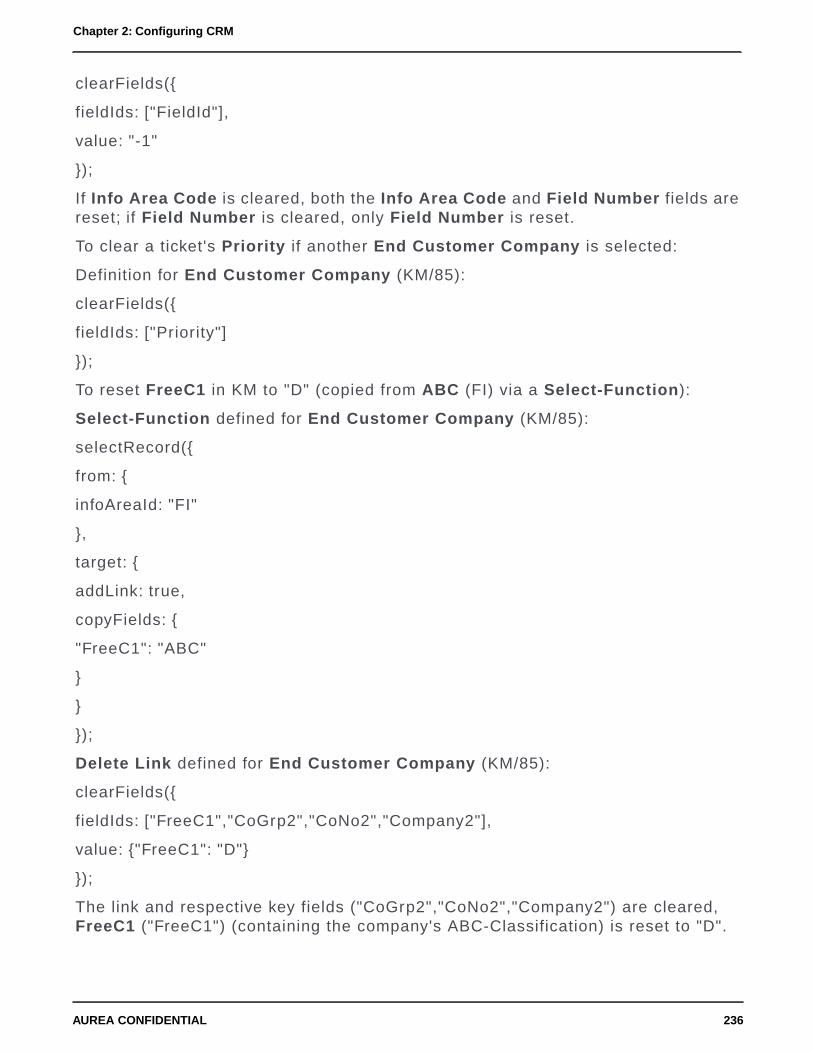
clearFields({
fieldIds: ["FieldId"],
value: "-1"
});
If Info Area Code is cleared, both the Info Area Code and Field Number fields arereset; if Field Number is cleared, only Field Number is reset.
To clear a ticket's Priority if another End Customer Company is selected:
Definition for End Customer Company (KM/85):
clearFields({
fieldIds: ["Priority"]
});
To reset FreeC1 in KM to "D" (copied from ABC (FI) via a Select-Function):
Select-Function defined for End Customer Company (KM/85):
selectRecord({
from: {
infoAreaId: "FI"
},
target: {
addLink: true,
copyFields: {
"FreeC1": "ABC"
}
}
});
Delete Link defined for End Customer Company (KM/85):
clearFields({
fieldIds: ["FreeC1","CoGrp2","CoNo2","Company2"],
value: {"FreeC1": "D"}
});
The link and respective key fields ("CoGrp2","CoNo2","Company2") are cleared,FreeC1 ("FreeC1") (containing the company's ABC-Classification) is reset to "D".
236AUREA CONFIDENTIAL
Chapter 2: Configuring CRM
Enhanced Search FieldLearn about Enhanced Search Field attribute.
Use this attribute in Search controls to define a custom search field that searchesthe contents of several fields of an info area (e.g. the three email fields or the fourtelephone fields in KP). The search criteria can be combined by logical AND or OR.Additional search criteria added by the user (fields and filters under Add more ...)are AND-combined with the enhanced search field.
You can define any field of the current info area as an enhanced search field. (Youmay want to specify a Label indicating the fields functionality.) The field itself isnot used in the search: You need to specify all search fields in the attribute.
Syntax
{searchFields: [comma-separated list of fields], type: ["multi" (de-
fault)|"combined"]}
You can specify either unique field IDs or XML names.
You can search numeric fields, text fields and variable catalog fields.
Depending on the value of type, the search criteria are combined by logical ANDor OR:
{searchFields:["FreeC1","FreeC2","FreeC3"], type: "multi" }
When entering the search term "Test" the resulting filter is F74='Test' OR F75='Test'
OR F76='Test'.
{searchFields:["FirstName","LastName"], type: "combined" }
Depending on the user input the resulting filter is:
• search term "John Doe": (F3='John' AND F2='Doe') OR (F2='John' AND F3='Doe')
• search term "John,Doe": (F3='John' AND F2='Doe')
• search term "John": F3='John' OR F2='John
Superfluous whitespace is trimmed, i.e. searching for "John , Doe" gets the sameresult as searching for "John,Doe".
Note: A field defined as an enhanced search field may not be used as a "normal"search field as well: If you define e.g. the Company field in FI as an enhancedsearch field, you can not add it again as a normal field.
Example
To search for tickets by No., Subject and Problem Group, in the KM Search controldefine the following for the No. field:
1. Check Auto-Wildcard Search.
2. Check Enhanced Search Field and enter
237AUREA CONFIDENTIAL
Info Area Customizations

{searchFields:["No","Title","ProblemGroup"], type:"multi"}
3. Change the field's Label to "Ticket".
Hook FunctionLearn about Hook Function attribute.
Use the Hook Function field attribute to define "field hooks" that perform calculationsbased on one or more field values.
Field hooks are small JavaScript functions that are executed whenever values offields change. Field hooks are executed after the value entered by the user is writtento the model (i.e. after validation and conversion).
Syntax
For information on the syntax, on handling different field types, on implementingasynchronous Hook Functions etc, see the ar ticle “How to Define Field Hooks” athttps://support.aurea.com.
Examples
Aurea CRM.Web contains an out-of-the-box function calculating the correct durationand unit depending on star t date/time and end date/time. (You can use this functionfor any info area containing the respective fields). The following field hook is config-ured for the MA Details control in UPDATE_DEFAULT as an example:
var fieldNames = {
star tDate: "Date",
star tTime: "Time",
endDate: "EndDate",
endTime: "EndTime",
duration: "Duration",
unit: "Unit"
};
u8.services.collaboration.updateDurationUnit($, fieldNames);
In the Property info area (OJ), you can define field hooks to set the ABC field to"A" whenever the Reference field is checked and to uncheck Reference if theProject Status field is set to "Lost".
To implement this you need to define two field hooks (in the OJ Details control):
Reference field:
var valuesAsBoolean = $.getNativeValue("Reference"); // true or false
238AUREA CONFIDENTIAL
Chapter 2: Configuring CRM

if (valuesAsBoolean === true)
$.setValue("ABC","A");
Project Status field:
var catCode = $.getValue("ProjectStatus");
if (catCode == 2) // lost
$.setValue("Reference",false);
Render HookLearn about Render Hook attribute.
Use the Render Hook attribute to define conditional formatting (colors, icons, styles)for fields depending on a field's value.
Note: Render hooks defined for a field that is par t of a combined field always applyto the entire combined field. For fur ther details, see Add Combined Field on page214.In forms render hooks apply only to the respective cell (not to an entire widget).For fur ther details, see Forms on page 621.
The provided Render Hook is executed as JavaScript code (without any transforma-tion) – thus, you can use standard JavaScript syntax.
The following functions are available:
DescriptionFunction
Changes a field's background color.setBackgroundColor
Changes a field's font color.setColor
Defines the background color of the element hostingthe widget, e.g. the list row.
setContextBackgroundColor
Adds an image in front of the field value.imageAdd
Replaces the field value by an image.imageReplace
Changes the field attributes corresponding to the CSSstyle.
addClass
239AUREA CONFIDENTIAL
Info Area Customizations

For detailed information on the syntax and some examples. For fur ther details, seeDefining Render Hooks on page 244.
Select-FunctionLearn about Select-Function attribute.
The following functions are available:
• selectRecord: To link a record to the current record, users click on the recordselector icon beside the link field and search for records according to the settingsyou specified in the Select-Function. For fur ther details, see Defining selec-tRecord Functions on page 249.
• findAsYouType: To link a record to the current record, users type a search stringinto the link field and get all matches in a drop-down list according to the settingsyou specified in the Select-Function. For fur ther details, see Defining findAsY-ouType Functions on page 253.
Note: selectRecord and findAsYouType functions are supported for Details andList controls.
• selectFormat: Users can select a format. For fur ther details, see Defining select-Format Functions on page 262.
• selectInfoAreaId/selectFieldId: Users can pick an info area and field. Forfur ther details, see Defining selectInfoAreaId and selectFieldId Functions on page264.
• In addition, you can call any custom JavaScript select/deselect function via theSelect-Function attribute. For more information, see the ar ticle “How to createa custom selector” at https://support.aurea.com.
Standard link fields (Z-fields) that are configured into a Details or List control auto-matically display the record selector icon . This provides users with the possibilityto search for and select a record that is then linked to the current record (Examplein UPDATE_DEFAULT: the End Customer Company field in the Ticket info area).
The Select-Function attribute extends the behavior and functionality of link fields:It defines which records from which info area can be selected and how the relationis set after a record has been selected. It also allows fields to be filled with valuesfrom a linked record. (Examples in UPDATE_DEFAULT: the Postal Code field inthe Company info area, the Predecessor field in the Ticket info area etc.)
Example: The Predecessor field in the Ticket info area has the following Select-Function defined (KM Details control):selectRecord({from:{infoAreaId: "KM",searchContext:{items:
240AUREA CONFIDENTIAL
Chapter 2: Configuring CRM

[null,"KP","FI"
]}
},target:{71: 6,72: 7,addLink: true
}})
The selected record is then linked to the current record. The record's reference textis written to the link field. You can define custom reference texts in the Configurationinfo area (MC) (Data Model category, Reference Text option). For fur ther details,see Configuration Info Area in the CRM.Core Administrator Guide.
When in View mode, clicking on the link opens the default view of the linked record,click and hold opens the QuickView.
If a link is changed (because the user selects a different record), data is reset.
To clear a link field, users need to click the Remove Link button (beside therecord selector button). The Remove Link button is displayed if the following con-ditions are met:
To clear/reset field values when deleting/changing a link, you can define a customDelete function. For fur ther details, see Delete Link on page 234.
Note: Both the record selector and remove link buttons are displayed only whenin Edit mode.
Note: By default, reference fields that are marked as read-only (either in the AureaCRM data model or in CRM.Designer via the Readonly field attribute, see Readonlyon page 227) never display a record selector button . You can override this behaviorby setting the Web Configuration parameter RecordSelector.ShowSelectorIfDefinedto true and explicitly specifying a Select-Function for the desired reference fields,see RecordSelector.ShowSelectorIfDefined. The record selector icon is thendisplayed regardless of the above mentioned read-only settings.
Note: In this case, it is the administrator’s responsibility to ensure that the Select-Function "makes sense" and fills the required (key) fields. This possibility increasesAurea CRM.Web’s flexibility and may e.g. be used to let users reassign parentrecords if required.
241AUREA CONFIDENTIAL
Info Area Customizations

Note: User's access rights settings are only checked for the field where the Select-Function is defined (not for the fields contained in the function).
Note: If a user has no update rights for an info area, no record selectors aredisplayed.
WidgetLearn about Widget attribute.
Use this attribute to assign another than the default field widget to a specific field.
The following built-in special field input widgets are available:
• RangeInput: Displays a slider widget for percentage fields.
The slider widget is used for all percentage fields.
To disable the percentage slider for a field, define widget = TextField.
Define this in the Default control for percentage fields where users are supposedto enter floating point values.
• PercentField: All predefined percentage fields in the data model are decimalfields and automatically signed. In Aurea CRM.Web they use the RangeInputwidget by default. To support the input of negative percentage values via theslider widget, use the PercentField factory (for those fields where negative valuesare actually used).
For information on the available options for PercentField, see the ar ticle “HOWTOconfigure percentage fields” at https://support.aurea.com.
• RatingInput: Graphically displays a row of values. Users can select a value byclicking on an icon.
• CatalogRatingInput: Graphically displays catalog values. Users can select acatalog value by clicking on the respective icon.
• ValuePicker and FieldValuePicker: Use these widgets to display an image for afield value and allow users to pick another value by clicking on the image.
242AUREA CONFIDENTIAL
Chapter 2: Configuring CRM

You can implement this for text fields (ValuePicker) and catalog fields (FieldVal-uePicker). For a complete description of all available settings, see the ar ticle“How to Configure the Field ValuePicker” at https://support.aurea.com.
Note: The factories for these widgets are called ArrayPickerField for the Val-uePicker widget and CatalogPickerField for the FieldValuePicker widget.Restriction: ValuePicker and FieldValuePicker widgets are not supported inList controls. The (textual) field values are displayed as a fallback.
Syntax
Enter one of the following:
• the widget type (i.e. widget's name), e.g. RangeInput
• the name of the widget factory, e.g. UserWidgetFactory
• the widget type plus additional options, e.g. {type: "UserWidget", options:
{text:"City"}}
• the factory plus additional options, e.g.{factory: "UserWidgetFactory", options:
{widgetText:"PostalCode"}}
For more details, see the ar ticle “How to Configure a different widget for a field” athttps://support.aurea.com.
If the widget factory definition contains definitions for specific fields, the widget isautomatically used (i.e. in that case you do not need to set the field attribute).
For more information on defining custom widgets, see the ar ticles “How to create afield widget” and “How to Register a field widget” at https://support.aurea.com.
Examples
To configure the CatalogRatingInput widget for the Activity Type field in the MADetails control:
{type: "CatalogRatingInput", // widget name - mandatoryoptions: {infoAreaId: "MA", // info area - mandatoryfieldId: "Contact", // field name or id - mandatoryshowValue: true, // if value text is visibleimageTemplate: "CAT_CONTACT_BTB_{VALUE}" // image}
}
243AUREA CONFIDENTIAL
Info Area Customizations

To enter the Service Level of a ticket (KM) using a star rating:
{ type: "CatalogRatingInput", // widget nameoptions: {infoAreaId: "KM",fieldId: "ServiceLevel",showValue: true,style: "stars" // "plain", "boxes", "stars", "stars-in-boxes"
}}
To use the FieldValuePicker widget for the Lead Status field (FI:38):
Since the FieldValuePicker and ValuePicker widgets are using the Large ImageTemplate field attribute as a fallback (for their own imageTemplate attribute), youcan define the following for FI:38:
Set the Large Image Template field attribute to CAT_AQ_{VALUE} (already defined inUPDATE_DEFAULT).
Define Widget as
{
factory: "CatalogPickerField"
}
Note: Make sure you define your widgets for both View and Edit modes.
Refer to the SDK page for more sample configurations and information on validoptions for all built-in widgets: Inputs > RangeInput, RatingInput, CatalogRating-Input. Since the SDK page already "knows" which widget is used, make sure youonly enter the {} expression after options:. The value picker widgets can be foundat ValuePicker > ValuePicker, FieldValuePicker.
All field input widgets are also available when defining forms.
Defining Render HooksLearn about Render Hook field attribute.
The Render Hook field attribute is used to style the current cell (list cell or maskfield) and/or the current context.
244AUREA CONFIDENTIAL
Chapter 2: Configuring CRM

Syntax
Returns the value of a field with the givenXML name and from the record with thegiven alias, if present.
$.getValue() without any parametersreturns the value of the current field, i.e.the field for which the render hook is de-fined.
$.getValue(["<XmlFieldName>"[,"<Alias>"]])
XML name of the field<XmlFieldName>
Used to get values from parent records:
If the default link is used, specify the infoarea ID (e.g. "MA").
If another link is used, specify info areaID + link ID (e.g. "FI1", "FI2"), see LinkIDs on page 19.
<Alias>
Note: $.getValue() always returns the field content as provided by the core.Therefore, when using other than text fields, you need to use a conversion functionor escape e.g. number formatting by a replace statement. When using catalog fieldsyou need to specify the catalog code instead of the catalog value.
Note: To get a field's value as provided by the core, use alert($.getValue("<XML-FieldName>"));
Sets the formatting of a field.$.<StyleFunction(<StyleParameter>)>;
Sets the font color of the field's value.$.setColor("<color>")
Sets the background color of the field.$.setBackgroundColor("<color>")
Sets the background color of the field'scontext.
$.setContextBackgroundColor("<col-or>")
JavaScript color name (e.g. "red") orhexadecimal color code e.g. ("#ff0000").
<color>
Adds an image in front of the field value.$.imageAdd("<imageName>", "<size>")
Replaces the field value by an image.$.imageReplace("<imageName>")
245AUREA CONFIDENTIAL
Info Area Customizations

Name of an image file in ..\im-ages\<theme e.g. update>\, e.g. "im-age.png"
<imageName>
This optional parameter for $.imageAddallows you to specify an image size (e.g.$.imageAdd("CAT_AQ_" + $.getValue(),"xs");).
Possible values:
"xs" ... 14x14"s" ... 16x16nothing ...32x32"lg" ... 48x48"xl" ... 64x64
<size>
Note: A PNG file with the specified suffix (*-xs.png) must be available in..\images\<theme>, otherwise nothing is displayed. For more information, seethe ar ticle “Image Naming Guidelines” at https://support.aurea.com.
Specifies a CSS class to be applied to the field.$.addClass("<ClassName>")
Name of the CSS style and path to the CSS file rela-tive to the application path separated by comma,e.g. "myBoldStyle","../styles/cus-tom.theme/custom.css"
<ClassName>
Render Hook definitions containing syntax errors are ignored and a message iswritten to the client log.
You can define Render Hook functions for all field types.
Note: Highlighting Boolean fields: Use $.setBackgroundColor (since the checkbox itself is an image and its color can therefore not be changed using $.setColor).
Render Hook functions work for List, Expand/Quick and Minidetails views in bothView and Edit mode. Exceptions: imageAdd and imageReplace only work for Listand Minidetails views and only in View mode.
You can only set conditions for fields that are par t of the control's configuration:The rendering function is not activated if either the field where the Render Hook isdefined or the comparison field(s) used in the JavaScript code are not configuredin the current view. Therefore, if a condition uses a field from a linked info area,you need to configure this field into the control as a (hidden) linked field. For fur therdetails, see Add Linked Fields on page 216.
Example
To set the formatting of a field:
$.setColor("white");$.setBackgroundColor("black");
246AUREA CONFIDENTIAL
Chapter 2: Configuring CRM

To define conditional formatting for a field:
• If the Postal Code field of a company (XML name: "ZipCode") is empty orundefined, set the background color to red:if (!$.getValue("ZipCode"))
{$.setBackgroundColor("red");}
• For person records, if the Postal Code of the parent company has a value between1000 and 1999, set the context background color to pale green:if ($.getValue("ZipCode","FI")>=1000 &&
$.getValue("ZipCode","FI")<2000){$.setContextBackgroundColor("#CCFACC");}
• If a company's Postal Code has the value "1040", set the font color to red, in allother cases set it to blue:if ($.getValue("ZipCode")==1040)
{$.setColor("green");}else{$.setColor("blue");}
• If a company's Revenue field has exactly the value "1.000.000", set the font colorto red; if it has a value below 1.000.000, set the background color to grey; if ithas a value above 1.000.000, display an image in front of the value:var _strText = $.getValue("Revenue").replace(/\./g, "" );
var _revenue = parseInt(_strText);
if (_revenue == 1000000) {$.setColor("red");};if (_revenue < 1000000) {$.setBackgroundColor("grey");};if (_revenue > 1000000) {$.imageAdd("ico_Sales.png");};
• Set the font color, if the Subject of an activity contains a cer tain string:var _searchFor = "update"
var _string = $.getValue().toLowerCase();StringContains = _string.indexOf(_searchFor) != -1;
if (StringContains) {$.setColor("green");}
• Set the background color of a ticket's Priority field for open tickets only (i.e. fieldStatus (XML name "AccSwitch") != "Closed"):if ($.getValue("AccSwitch")!=2)
{if ($.getValue()==1)$.setBackgroundColor("#dd0000");else if ($.getValue()==3)$.setColor("#00dd00");}
To define conditional formatting based on catalog values you need to specify thevalue's code/external key/ID:
• Set the font color depending on a company's country:if ($.getValue("Country")=="2")
{$.setColor("blue");}Since the codes of variable catalogs may not be unique in your
environment, you can define a render hook using external keys instead:var code = $.getValue();
var catalogField = u8.services.schema.getField("FI", "Country");
var externalKey =u8.services.catalogs.codeToExternalKey(catalogField, code);
247AUREA CONFIDENTIAL
Info Area Customizations

if (externalKey == "100_2_42") {$.setColor("blue");}
• Add icons to the Activity Type field e.g. in MA's MiniDetails view:var _cnt = $.getValue("Contact");
switch (_cnt) {case "0":{$.imageAdd("u8-contacttype-phone-xs.png");}break;case "1":{$.imageAdd("u8-contacttype-visit-xs.png");}break;case "5":{$.imageAdd("u8-contacttype-email-xs.png");}break;default:{$.imageAdd("u8-contacttype-event-xs.png");}break;}
• Add an exclamation mark to the Subject field for tickets with Priority "high":if($.getValue("Priority")==1)
$.imageAdd("u8-participationtype-required-xs.png");else $.imageAdd("u8-shim.png");
To define conditional formatting based on a Boolean field:
• Different coloring for true/false:if ($.getValue("FreeL1") == u8.session.localeSettings.booleanTrue)
{$.setColor("blue");}else{$.setColor("grey");}
• Display an icon for recurring activities (as configured in the MA List control inUPDATE_DEFAULT):var isSerialContact =u8.services.typeConverter.toBoolean($.getValue("IsSerialContact"));
$.imageAdd(isSerialContact ? "ico_recurring.png" : "shim.png");
To define conditional formatting per rep (e.g. for the activity list):var _rep=$.getValue("Rep");
if ( _rep == u8.session.identity.repName){$.setContextBackgroundColor("yellow");}else{$.setContextBackgroundColor("white");}if (_rep == "Administrator"){$.setContextBackgroundColor("red");}
Available functions for identifying the current rep. For fur ther details, see u8.ses-sion.identity.
Render Hooks with date/time:
• Display scheduled activities for today and older in another color:var dtToday = new Date();
var u8date =u8.services.typeConverter.toDate($.getValue("Date"));
248AUREA CONFIDENTIAL
Chapter 2: Configuring CRM

if (u8date <= dtToday && $.getValue("Status")=="0"){$.setContextBackgroundColor("#ffc000");}
• Comparing dates: To set a different row color for To-Dos linked to Activities withDate (MA) = Star tDate (TD) define the following for the Starts on field in TD.(Don't forget to configure the Starts on field from MA into the TD List control.)var _getMAStartDt = $.getValue("Date","MA");
var _TDStartDt = $.getValue();if (_getMAStartDt == _TDStartDt)
{$.setContextBackgroundColor("yellow");}
• Comparing times (by extracting the time from a date field):var _todayDt = new Date().stripTime();
var _freeD1 =u8.services.typeConverter.toDate($.getValue()).stripTime();
if (_todayDt.getTime() == _freeD1.getTime()){$.setBackgroundColor("blue");$.setColor("white");}
To manipulate the contents of a text field, e.g to truncate the document key infor-mation when listing checked out documents define the following for the Text fieldin the T3.Documents List and Details controls:var text = $.getText();
text = text.substring(0, text.indexOf("<"));$.setText(text);
Using customized CSS definitions: Create a CSS file with custom CSS classes.Import your CSS file into your main CSS file. For fur ther details, see CustomizingStyles on page 15. Use your CSS classes in your Render Hook definitions, e.g. inFI:if ($.getValue("ZipCode") == "1040"){$.addClass("myCustomCSSClass","../styles/custom.theme/custom.css");}
Note: Border styles are not displayed correctly in Google Chrome.
Defining selectRecord FunctionsLearn to define selectRecord function.
To define a selectRecord function:
1. In the Field Control Editor select a standard or generic link field. For fur therdetails, see Customizing a Control on page 192.
2. Select the desired Mode. For fur ther details, see Field Attributes on page 221.
3. Define a Select-Function selectRecord for the selected field.
The available functions and their options are described in the following topics.
selectRecord for Standard Link FieldsLearn about selectRecord function for Standard Link Fields.
Syntax
Use the syntax described in the ar ticle “How to Use Record Selector” athttps://support.aurea.com.
249AUREA CONFIDENTIAL
Info Area Customizations

Note:
• Use XML names in (double) quotes for specifying fields.
• To copy the text value of a catalog, use "" and prefix the field number with a "T"e.g. "T5".
• If defined, the search context is displayed in a drop-down list on the search mask.For fur ther details, see Search Context. Use the same syntax as described forthe SearchContext control attribute. For fur ther details, see SearchContext onpage 203.
• When searching in the same info area as the current record (e.g. the Predecessorfields in KM and IB), the search context is automatically created, even if notspecified in the Select-Function: The drop-down list contains "Entire database"plus the parent record(s) of the current record).
• filterFields parameter: Filters on decoded fields (Z-fields) are not supported.
• Use the SDK page to test your selectors: Selectors > Select Records
ExampleLinking a marketing activity record to an activity (-> Marketing Activity fieldin MA)selectRecord({
from: {infoAreaId: "AK"},target: {addLink: true}});
250AUREA CONFIDENTIAL
Chapter 2: Configuring CRM

Selecting a Postal Code when creating/editing a company record (Postal Codefield in FI){
from: {infoAreaId: "OR",searchAndListName: "OR-Link",filterFields:{Country: {source: "target",fieldId: "Country"},FromPC: {source: "target",fieldId: "ZipCode",compareOperator: "<="},ToPC:{source: "target",fieldId: "ZipCode",compareOperator: ">="}}},target:{copyFields:{Country: "Country",ZipCode: "FromPC",City: "City",AreaCode: "TelPrefix"}}});
This definition uses a specific Search control definition ("OR-Link"). After selectinga record the values for Postal Code, City, Country and Area Code are copied fromOR to the corresponding fields in FI (copyFields).Selecting an Activity template with Live Calculations (Using the delayChangeNo-tification parameter)
The following sample shows the usage of the delayChangeNotification parameter.This is useful when the copyFields is used with Live Calculations. The field valuesare evaluated everytime the field change event is fired and overwrites the valuesalready set in the previous fields. This parameter ensures that the change event istriggered after all the fields are set.
251AUREA CONFIDENTIAL
Info Area Customizations

In the sample shown below, default-values trigger is used in MA that sets the star tof the activity to current day and time and sets the end time of the activity after aduration of one hour. It also uses a Activity Template (A031) that uses a durationthat is different from the default value trigger. By using the delayChangeNotificationparameter, you can ensure that when a new activity is created using the template,the end time of the activity is set according to the template and not the default valuetrigger.selectRecord({
from: {infoAreaId: "A031",useAutoSearch: true},target: {delayChangeNotification: true,addLink: true,copyFields: {"6005": "6002","3": "7001", //start at"6": "7002", //end at"4": "F7004", //duration"5": "7005" //unit,}},findAsYouType:{searchFields:[6000],textFields:[6000,7001,7002]}});
FS version - Selecting a bank account for a product (Bank A/C Details fielde.g. in KT)selectRecord({
from: {infoAreaId: "BV",searchContext: {items: ["FI"]}},target: {copyFields: {"SortCode": "SortCode","Institute": "Institute","Branch": "Branch","AcNo": "AcNo","BankDetailsStatNo": "StatNo","BankDetailsSeqNo": "SeqNo"},}});
Only bank accounts linked to the same company as the product can be selected(searchContext).
252AUREA CONFIDENTIAL
Chapter 2: Configuring CRM

selectRecord for Generic Link FieldsLearn about selectRecord function for Generic Link Fields.
Defining a selectRecord function for a generic link field provides the user with acontext menu where he can select the info area from which to pick a record.
1. Use the infoAreaIds parameter to define the content of the context menu. Forfur ther details, see Syntax.
Example: the Link field in the Task info area (A1) (as defined in UPDATE_DE-FAULT):selectRecord({from:{infoAreaIds:["CM","KM"
]}
});
This defines the following context menu (using the standard table captions for themenu entries' labels):
The user can link a task to records from the Campaign or Ticket info area.
Generic link fields with no selectRecord function defined display a context menulisting all available info areas. Use the RecordSelector.GenericInfoAreas WebConfiguration parameter to define a subset of info areas globally. For fur ther details,see RecordSelector.GenericInfoAreas/ RecordSelector.InfoAreasWithGenericLinks.
Note: The context menu only lists info areas that meet the following conditions:*the info area's key is StatNo+SerNo,* the user has read access,* a Search&Listconfiguration exists.
Defining findAsYouType FunctionsLearn about findAsYouType Functions.
FindAsYouType enables users to directly type a search string into link fields. Thematches are displayed as a drop-down list. By selecting an entry the records arelinked according to the settings specified in the Select-Function.
253AUREA CONFIDENTIAL
Info Area Customizations

You can define Select-Functions with findAsYouType for standard link fields. Inaddition, you can define global findAsYouType functions per info area. For fur therdetails, see Global Definition of FindAsYouType on page 503. A global FindAsYouTypedefinition is used for all link fields that point to the respective info area and for whichno specific Select-Function has been defined.
Note: FindAsYouType only supports text, number and variable catalog fields (FieldTypes C,L,S,K, see Data Types in Aurea CRM on page 877) as search fields. Thesefield types may be combined in one definition (as both searchFields and textFields).
Note: Fixed catalogs and hierarchical catalogs are not supported.
Note: Field types that are not supported are ignored and a warning is written tothe client log.
Note: For the output fields (parameter textFields) there is no restriction: All fieldtypes are valid.
Text and catalog fields support a substring and wildcard search (e.g. where (Country
= "Au*")). Number fields only return exact matches, i.e. searching for "100" doesnot return "1000" or "3100". Searching for number ranges requires the definition ofa query, e.g. with condition where (Revenue>'$parValue'), see Syntax (parameterquery).
FindAsYouType for Standard Link FieldsLearn about FindAsYouType function for Standard Link Fields.
To configure FindAsYouType for a standard link field:
In the Field Control Editor select a standard link field and define a Select-FunctionselectRecord() using the findAsYouType property. This provides users with thepossibility to type a search string into the link field and select a record from thedrop-down list that is then linked to the current record.
254AUREA CONFIDENTIAL
Chapter 2: Configuring CRM

Syntax
Use the following syntax, described in the ar ticle, “How to configure Find as youtype” at https://support.aurea.com.
• parameter searchFields - valid field types: text, number and variable catalogfields (Field Types C,L,S,K, see Data Types in Aurea CRM on page 877).
• text and catalog fields support substring/wildcard search (e.g. where (Country ="Au*"))
• parameter textFields - valid field types: all - the output fields as shown in thesearch results drop-down list
• parameter maxRows - if more entries are found "..." is displayed at the end of thedrop-down list
• parameter query - The name of the query to be used for findAsYouType. If thisparameter is provided, the parameters searchFields and textFields are ignored.The output fields displayed in the drop-down list are determined by the query'soutput fields.
• The parameters link and searchContext are not supported for FindAsYouTypefunctions.
Note: Link fields to which a (global or specific) FindAsYouType definition applies,are displayed as editable. If an invalid/erroneous FindAsYouType definition is appliedto a field, this field is displayed as read-only and an error message is written to theclient log.
Example
Searching for a company to be defined for the Contact Company field in the Ticketinfo area.selectRecord({from:{infoAreaId:"FI"},
findAsYouType:{searchFields:["Company","Synonym","Country"],textFields:["Company","Street","ZipCode","City","Country"],maxRows:20}
})
Typing part of the company's name, synonym or country lists the company plus itsaddress details. The results in the drop-down list are limited to 20.
255AUREA CONFIDENTIAL
Info Area Customizations

Defining selectRecordWithCondition FunctionsLearn about selectRecordWithCondition Functions.
Below is the full structure of the record select object.
selectRecord({from: {
filter: "",filterFields: {},fixedFilterName: "",sourceCopyFieldGroupName: "",infoAreaId: "",infoAreaIds: [],link: {
infoAreaId: "",recordId:"",linkId: 0
},relationName: ""searchAndListName: "",searchContext: {
items: []},selectionMode: "",showFilters: false,useAutoSearch: true}
target: {addLink: true,copyFields: {},freeInput: true,infoAreaId: "",links: []
}});
Many properties are optional or only work in cer tain combinations. Please refer tothe parameters sections below for details:
from / object
This parameter is mandatory, and sets the SearchView and its behaviour up. Itcontains one or more of the subsequent properties.
selectRecord({ from: {} });
infoAreaId / string
This property (only) is mandatory and defines the info area to select records from.If the property 'searchAndListName' (see below) is not set, it is used for getting theSearchAndList-Configuration.
selectRecord({ from: { ... infoAreaId: "FI", ... } });
infoAreaIds / string[]
This property can be used to define multiple InfoAreas to select records from. Alter-natively, the property 'infoAreaId' can be used the same way. Depending on thenumber of info areas, the user is able to select the info area from a context menuor from a popup list (if >5 info areas). After the user selected the info area, thecorresponding search is shown.
256AUREA CONFIDENTIAL
Chapter 2: Configuring CRM

selectRecord({ from: { ... infoAreaIds: [ // the user is asked to selectbetween a company and a person to select "FI", "KP" ], ... } });
infoAreas / object[]
Similar to infoAreaIds this property can be used to define multiple info areas to selectrecords from. However, this property allows users to specify the name of a specialSearch&List configuration to be used by the record selector.
selectRecord({ from: { ... infoAreas: [ // the user is asked to select be-tween a company, a person and a ticket { infoAreaId: "FI", searchAndListName:"MySpecialCompanySearch" }, { infoAreaId: "KP", searchAndListName: "MySpe-cialPersonSearch" }, { infoAreaId: "KM" }, "PR" ], …... } });
link / object
Defines the parent record. If set, only records linked to this record can be selected.
selectRecord({ from: { ... link: { // Only records linked with linkId '0'to the record defined in 'recordId' of infoArea 'FI' can be selected in-foAreaId: "FI", recordId: "0x0123456789876543", linkId: 0 }, ... } });
searchAndListName / string
The name of the SearchAndList-Configuration (as defined in update CRMesigner)to use for the selection.
selectRecord({ from: { ... searchAndListName: "KPSub", ... } });
Note: If not set, the above property 'infoAreaId' is used for retrieving a configuration.
filterFields / dictionary
This parameter defines:
• which fields of the search form should be prefilled
• where do the values used for prefilling come from
• whether the user is allowed to change those fields
This is accomplished by defining the target field by its name or ID and assigning ita value. This value could be another fieldname or -number, which means that thecontent of this field in the source (e.g. the Expand View) is copied to the desiredfield in the target, the Search View.
Alternatively, instead of another fieldname or number, there is the possibility toapply a more complex object, telling the RecordSelector if e.g. a fixed text is usedto prefill, or the content of a linked field.
selectRecord({ from: { ... filterFields: {
1: 2, // The value of the field with number '2' is copied from the ExpandView tofield '1' in the SearchView
2: "FieldName", // The value of the field with name 'FieldName' is copied from theExpandView to field '2' in the SearchView
257AUREA CONFIDENTIAL
Info Area Customizations

FieldName1: "3", // The value of the field with number '3' ('' 'Note''': it is also possibleto write field-number as strings) is copied // from the ExpandView to field 'Field-Name1' in the SearchView
FieldName2: "FieldName", // The value of the field with name 'FieldName' is copiedfrom the ExpandView to field // 'FieldName2' in the SearchView
FieldName3:{ // The text 'FixedText' is copied to field 'FieldName3' and set readonly
value: "FixedText", // The text to copy
isFixed: true // If true, the user cannot edit this field in the SearchForm
},
4: { // The field 'FieldName' of the ExpandView is copied to field '4' of theSearchView and set readonly
source: "target", // The field is copied from source 'target', what is (mostly) theExpandView
fieldId: "FieldName", // The name or number of the field to copy.
// (note: you can also use the dot notation to specify linked field ids
// eg: FI.2 or FI.Company. Note that this linked field must be on the expand formwhich the field is read)
isFixed: true,
compareOperator: "=" // The operator used to identify which field in the searchcontrol receives the value.
// A field with this fieldId and operator must already exist in the search control usedby the selector,
// except for the equals operator. if not specified, the "=" is used. Equals operatormatchs against
// either a fieldId with no operator or a fieldId with "=" operator in the search control.
} // ' ' 'Note''': If property 'value' is not set, 'source' and 'fieldId' are mandatory!
"FreeC2": { source: "target", fieldId: "FI#2.Company" } // The Company fieldfrom the second FI record associated with the current record
// has its Company field contents set in the FreeC2 search field.
// The number after the # is the link id.
}, ... });
8.2 The filter values in filterFields now overrides the values remembered from aprevious search. To disable this behavior you can set property important to false.
selectRecord({ ... filterFields: { "FreeD1": { fieldId: "Revenue", important:false } } ...
258AUREA CONFIDENTIAL
Chapter 2: Configuring CRM
searchContext / object
If a search context is provided, users of update.CRM web can select whether theywant to search the whole database or only in the current context. Searching in thecurrent context only returns results that are linked to a link record of the currentrecord. If configured accordingly, users get a drop-down list in the search formwhere they can select the context (in which the last item of this list is always theentry to be selected first).
selectRecord({ from: {
searchContext: { items: [ "FI", // show only records linked to the company (usingthe default link)
{ infoAreaId: "KP", linkId: 2 }, // show only records linked to the person linkedwith linkId 2.
{ parentInfoAreaId: "KP", infoAreaId: "FI" }, // show only records linked tothe company going over the indirect person link
null // show records from the entire database
] } ... } });
Note: the special setting of parentInfoAreaId can be used if there is no direct linkin the context for the desired info area, but it can be retrieved as a link of the linkedrecord.
selectionMode / string
Defines how records can be selected. Possible values are:
• Single: Select a single record, close the Search popup afterwards, and continuewith copying values, if specified.
• Multi: Select one ore more records, close the Search popup afterwards, andcontinue with copying values, if specified.
selectRecord({ from: { ... selectionMode: "single", ... } });
useAutoSearch / Boolean
If set to true, the search star ts immediatly after the Search View is completely cre-ated.
Default value is false.selectRecord({ from: { ... useAutoSearch: true, ... } });
showFilters / boolean
If set to false, there is no possibility to define and/or use filters in the Search View.
Default value is true.selectRecord({ from: { ... showFilters: false, ... } });
259AUREA CONFIDENTIAL
Info Area Customizations

filter / string
Pre-sets a filter in the Search View, but as a 'suggestion' which can be changed bythe user.selectRecord({ from: { ... filter: "FI.MyCompanyFilter", // The name as definedin designer or web ... } });
fixedFilterName / string
Presets a filter to the Search View which cannot be changed by the user.selectRecord({ from: { ... fixedFilterName: "FI.MyCompanyFilter", // The name asdefined in designer or web ... } });
sourceCopyFieldGroupName / string
Defines the Field Group from which the List control is used for determining whichfields to read from the target record to create additional filter parameter values.selectRecord({ from: { ... sourceCopyFieldGroupName: "FI.MyCompanyFieldGroup", ...} });
relationName / string
Defines the relation to another record. Used with parameter 'link'. TODOselectRecord({
from: {...relationName: "$Parent"...
}});
target / object
This parameter is optional and defines how the selected record(s) is/are treated. Itcontains one ore more of the subsequent (optional) properties.selectRecord({
from: {...
},target: {
...}
});
infoAreaId / string
Defines the info area of the record currently active in the Expand View.
Note: Do not set infoAreaId for selectors defined for link fields! Setting infoAreaIdon target tells the selector engine to ignore the link of the field for which the the
260AUREA CONFIDENTIAL
Chapter 2: Configuring CRM

selector is defined. As a consequence the record reference string is not copied intothe target field.
selectRecord({from: {
...},target: {
...infoAreaId: "KP",...
}});
copyFields / dictionary
Defines which fields of the selected record(s) are copied to the ExpandView.
The syntax and definition is quite similar to the property 'filterFields' of parameter'from', except 'copyFields' does not support 'complex' definitions.selectRecord({
from: {...
},target: {...copyFields: {1: 1, // The value of the field '1' of the selected record is copied to field
'1' in the Expand View2: "FieldName", // The value of the field 'FieldName' of the selected record
is copied to field '2' in the Expand View3: "$Reference", // The value of the evaluated reference text of the selected
record will be copied to field '3' in the Expand ViewFieldName1: "3", // The value of the field '3' ('''Note''': Again,
field-numbers can also be strings!) of the selected record// is copied to field 'FieldName1' in the Expand View
FieldName2: "FieldName", // The value of the field 'FieldName' of the selectedrecord is copied to field 'FieldName2' in the Expand View
FieldName3: "$Reference", // The value of the evaluated reference text of theselected record will be copied to field 'FieldName3' in the Expand View
4: { value: "your value" }, // The 'value' property will be copied to thefield '4' in the Expand View FieldName4: { value: "your value" }, // ...}, ... }});
261AUREA CONFIDENTIAL
Info Area Customizations

copyInfoAreaFields / dictionary
Provides the ability to define info area related copyFields. Usually you need this ifyou have defined multiple infoAreaIds (or infoAreas) in from.selectRecord({
from: {...
},target: {
...copyInfoAreaFields: {PE: {// same object notation as for 'copyFields'
},CP: {// same object notation as for 'copyFields'
}},...
}});
target / object
Defining selectFormat FunctionsLearn to define selectFormat function.
The selectFormat function provides the user with the possibility to select one ormore formats (e.g. phone profile, trigger, query, default values etc). Define a Select-Function selectFormat for the desired field.
Example: In the Telephone Profiles field in the Rep info area (ID) users can selectone or more phone profiles.selectFormat({
formatType: 48,includePublicFormats: true,selectionMode: "multi"
});
Syntax
DescriptionTypeName
The unique field ID or XML name of the field towhich the format name is copied. (default: fieldIdfor which this formatSelector is defined)
int orstring
fieldId
The number representing the type of formats to se-lect from.
You can find the format numbers in the mm_fixcat-no_custom.txt file (created by star ting mmba.exewith the --writeres parameter, >> mmba.exe Pa-rameters in the CRM.Core Administrator Guide):catalog no. 36 "Type (Format)".
intformatType
262AUREA CONFIDENTIAL
Chapter 2: Configuring CRM

DescriptionTypeName
If true formats from the current user are shown.(default: true)
boolincludePrivateFor-mats
If true formats from other users are shown. (default:false)
boolincludePublicFormats
The info area abbreviation for which a format shouldbe shown (e.g. "MA" to list only formats defined forthe Activity info area)
stringfilter
The unique field ID or XML name of the field thatcontains the info area abbreviation by which to filter.Only applied when filter is not set. Only formatsdefined for that info area is available. (Example inUPDATE_DEFAULT: Used for selecting the correctdefault values format in Question (F2) field DefaultValues.
int orstring
filterFieldId
The initially selected format(s). In case of multiselectthe format names have to be semicolon-separated.(default: currently entered value of the field with idfieldId)
stringformatName
An optional string used for filtering the format byname (wildcards are supported), e.g. "My*" to listonly formats whose name star ts with "My".
stringfilterFormatName
If set to "multi" multiple formats can be selected.stringselectionMode
Examples
To select a private query format (i.e. owned by the current user):selectFormat({
formatType: 32});
To select private and public formats of type "DefaultValuesForInfoAreas" definedfor the Activity info area (MA):selectFormat({
formatType: 36,includePublicFormats: true,filter: "MA"
});
To select multiple private and public formats of type "DefaultValuesForInfoAreas"defined for the info area entered in field no. 5:selectFormat({
formatType: 36,includePublicFormats: true,filterFieldId: 5,selectionMode: "multi"
});
263AUREA CONFIDENTIAL
Info Area Customizations

Defining selectInfoAreaId and selectFieldId FunctionsLearn to define selectInfoAreaId and selectFieldId Functions.
The selectInfoAreaId and selectFieldId functions provide users with the possibil-ity to select an info area and then a field from this info area (Examples in UP-DATE_DEFAULT: C4, F2, Z5).
To implement this functionality define two Select-Functions for the desired fields:
• selectInfoAreaId allows the user to select an info area.
• selectFieldId allows the user to select a field from the info area specified byselectInfoAreaId.
Syntax
DescriptionTypeName
select-functionfunc-tion
selectIn-foAreaId
This parameter is optional and sets up the Info Area se-lection dialog and its behavior. It contains the following(optional) property.
objectfrom
The info area ID of a parent info area. If specified onlychildren of this info area can be selected.
stringinfoAreaId
This parameter is optional and defines how the selectedinfo area is treated. It contains one or more of the follow-ing (optional) properties.
objecttarget
The unique field ID or XML name of the field that receivesthe info area ID. If not present the ID of the field theSelect-Function is defined for is used.
int orstring
fieldId
The unique field ID or XML name of a field that is clearedwhen another info area is selected.
int orstring
fieldIdToClear
DescriptionTypeName
select-functionfunc-tion
selectFieldId
264AUREA CONFIDENTIAL
Chapter 2: Configuring CRM

DescriptionTypeName
This parameter is mandatory, and sets up the Field se-lection dialog and its behavior. It contains followingproperties.
Note: You must specify either infoaAreaFieldId or in-foAreaId for the select-function to work.
objectfrom
The ID of the info area to select the field from.stringinfoAreaId
The unique field ID or XML name of the field containingthe ID of the info area to select the field from.
int orstring
infoAreaFieldId
This parameter is optional and defines how the selectedfield is treated. It contains the following (optional) prop-er ty.
objecttarget
The unique field ID or XML name of the field that receivesthe info area ID. If not present the ID of the field for whichthe Select-Function is defined is used.
int orstring
fieldId
Example
To select an info area and write it's ID to the field (defined for the Info Area fieldin the Question info area (F2)):selectInfoAreaId({
target: {fieldIdToClear:"Field"}})
To select a field from the info area specified in the Info Area field (XML name "File"):selectFieldId({
from: {infoAreaFieldId:"File"}})
Table CaptionsA table caption is a short identification for a record, like first name and last namefor a person or the company name for a company.
Aurea CRM.Web uses table captions in Tree views, in processes, for calendar items,favorites, as header texts for Search and Expand pages using the {RECORD} place-holder, in the breadcrumbs, as parent link information on Expand pages and inRecordListBox widgets in forms.
265AUREA CONFIDENTIAL
Info Area Customizations
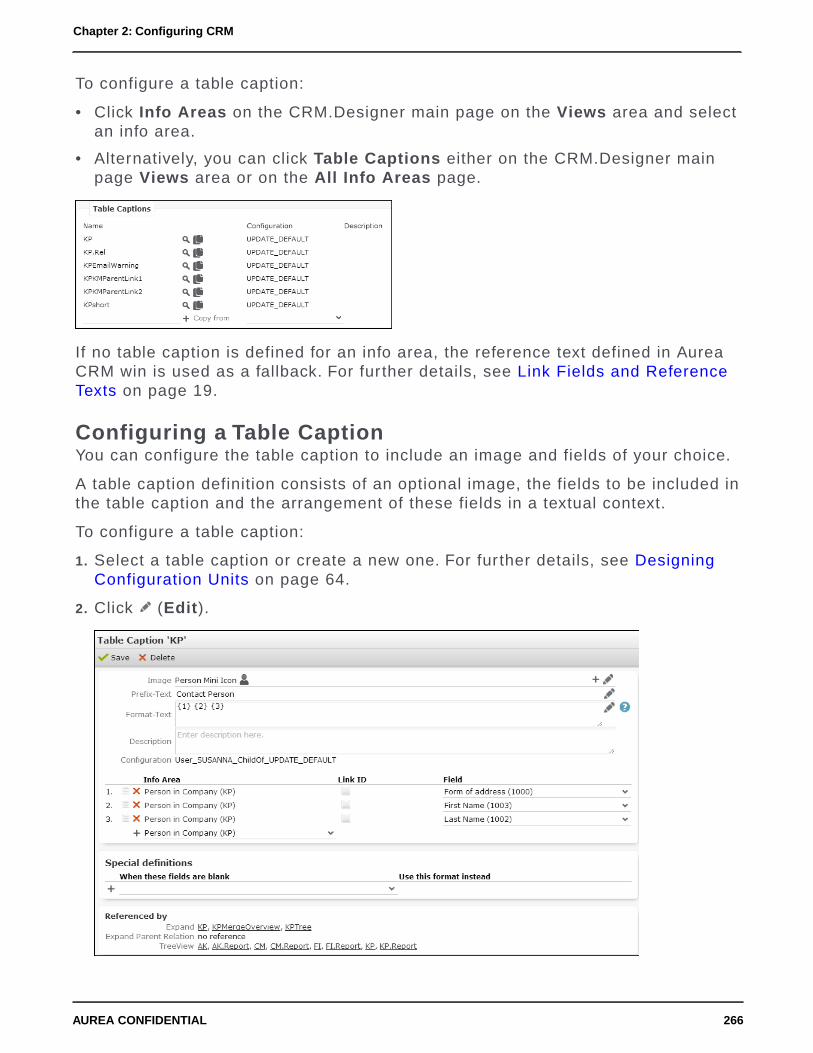
To configure a table caption:
• Click Info Areas on the CRM.Designer main page on the Views area and selectan info area.
• Alternatively, you can click Table Captions either on the CRM.Designer mainpage Views area or on the All Info Areas page.
If no table caption is defined for an info area, the reference text defined in AureaCRM win is used as a fallback. For fur ther details, see Link Fields and ReferenceTexts on page 19.
Configuring a Table CaptionYou can configure the table caption to include an image and fields of your choice.
A table caption definition consists of an optional image, the fields to be included inthe table caption and the arrangement of these fields in a textual context.
To configure a table caption:
1. Select a table caption or create a new one. For fur ther details, see DesigningConfiguration Units on page 64.
2. Click (Edit).
266AUREA CONFIDENTIAL
Chapter 2: Configuring CRM

3. Specify the Fields whose values you want to display in the table caption. Thefields are numbered automatically. Enter these numbers in Format-Text asplaceholders {1}, {2}, {3} etc.
To reorder fields, click (Drag&Drop) in the respective row and drag it to thedesired position.
If you use multi-line fields in table captions, the line breaks are automaticallyapplied if the table caption is displayed in a header. Restriction: The Companyfield in FI only supports three line breaks. Additional lines are appended to thefourth line when displaying the table caption in a header.
You can add fields from the current info area and from linked parent info areas.If you want to use another than the default link, enable the Link ID check boxand select/enter the desired link ID. For fur ther details, see Specifying Link IDson page 20
Note: Adding fields from parent info areas may lead to performance problems.
4. Specify the following:
• Image (optional): The name of the image displayed left of the table caption.
• Click (Add) to select a fixed image.
• Click (Edit) to define conditions for an image to be displayed, e.g.CAT_AQ_{1} or CAT_ABC_{javascript:($['1'] || '').toUpperCase();}, 1referring to the first field defined under Fields. The image is displayed basedon the field's value. Use the same syntax as described for the Large Image
Template field attribute. For fur ther details, see Large Image Template onpage 231.
Note: Conditional images are supported for RecordListBox and LiveTilewidgets only.
The image(s) must be registered in CRM.Designer. For fur ther details, seeImages on page 717.
• Prefix-Text (optional): Used to display the record type, e.g. "Contact Person"for KP. The prefix text is used on Expand pages but not in the Tree view wherethe record type is defined by the tree's parent node.
• Format-Text: The text of the table caption using the placeholders {1}, {2},{3} etc. for the fields specified under Fields. For fur ther details, see TableCaption Syntax on page 268. Example: For the fields Last Name (3), First Name(2) and Company (4) define the Format-Text "{2} {3} of {4}" to display "JohnDoe of Aurea software" in the table caption for KP.
267AUREA CONFIDENTIAL
Info Area Customizations

Define/re-use the multilingual CRM.Designer texts for Prefix-Text and Format-Text. For fur ther details, see Texts on page 50.
• Description: Add an internal description (only visible in CRM.Designer).
5. You can add Special definitions (i.e. alternative table captions) in case one ormore fields you use do not contain a value. Example: If a person record does notcontain a First Name the Format-Text "{1} {3} of {4}" is used instead: “ContactPerson Mr. Doe of Aurea Software”.
Alternatively you can use the conditional placeholder {?} in the Format-Text. Forfur ther details, see Table Caption Syntax on page 268.
Table Caption SyntaxHere you can learn to use Table caption syntax.
Use the following syntax:
• Use placeholders for field values: {<number>}.
Example: For the fields Last Name (1), First Name (2) and Company (3) definethe Format-Text "{2} {1} of {3}" to display "John Doe of Aurea Software" in thetable caption for KP.
• Separation characters (space, colon, comma, semicolon, dash, parentheses etc.)are omitted if the previous and/or next field does not have a value.
• Use the Enter key to inser t a carriage return.
If the widget using the table caption supports it, line breaks in the table captiontext are preserved when the text is displayed in Aurea CRM.Web. Example - up-coming items in the calendar's sidebar, tooltips for items in the Resources view.
In tab titles and calendar items, only the first line of a multi-line table caption isdisplayed.
• Use the conditional placeholder {?} to cover different strings in case one or morefield values are empty.
Example: Defining "{?}Address: {1} {2}, {3}\n{?}Phone: {4}" e.g. for FI results ine.g. "Phone: +43-1-87855" if the address fields are empty.
For more details and examples, see the ar ticle “Table Caption Syntax” athttps://support.aurea.com.
268AUREA CONFIDENTIAL
Chapter 2: Configuring CRM

Special Table Captions (Naming Conventions)This topic discusses the naming conventions for items using special table captions.
Some items use special table captions. Use the following naming conventions todefine table captions for these items:
• <InfoAreaId>.Associations: Defines the contents of the tooltip displayed for theconnecting lines (PB.Associations) and the labels of the company/person bubbles(FI/PE/KP/CP.Associations) in the Select Affiliates dialog. See Affiliation Viewon page 752. Fallback: <InfoAreaId>.
• <InfoAreaId>.Calendar: Defines the table captions for calendar items (Activities(MA), Absences (A3), Tasks (A1), To-Dos (TD)). Fallback: <InfoAreaId>Calendar- if this does not exist either, the default table caption <InfoAreaId> is used.
For appointments in the month view, the star t time precedes the table caption:
<InfoAreaId>.Calendar (and <InfoAreaId>Calendar) are also used for the itemsin the Resources view and in the Dispatching Dashboard (MA, A3).
• <InfoAreaId>.CoI: Defines the labels, tooltips and contents of the RecordListBoxfor the relationship graph (CircleOfInfluence widget). See CircleOfInfluence onpage 403. Fallback: <InfoAreaId>.
• <InfoAreaId>.CoI.Hierarchy: The default table caption used for the hierarchicalcircle of influence sidebar is PB.CoI.Hierarchy. See HierarchicalCircleOfInfluenceon page 426 .Fallbacks: <InfoAreaId>.CoI, <InfoAreaId>.
• <InfoAreaId>.Graph: Defines the table captions for items in the campaign graph(CM, AK, AN). See Campaign Graph on page 758. Fallback: <InfoAreaId>.
• <InfoAreaId>.MarketingCalendar: Defines the table captions for items in themarketing calendar (CM, AK, VR). See MarketingCalendar on page 432. Fallback:<InfoAreaId>.
• <InfoAreaID>.Participants: For each activity, the persons and companiesparticipating are displayed in a separate list. See ExpandOptions. By default, thetext defined in the info area's default table caption (i.e. FI or KP) is used. Todisplay different table captions in the participants list, define a table captionnamed <InfoAreaID>.Participants (for FI and/or KP). Fallbacks:<InfoAreaID>Par-ticipants, <InfoAreaID>.
• <InfoAreaId>QuickLinks: If a table caption QuickLinks is defined for an infoarea,this table caption is used instead of the default table caption, see Favorites onpage 585.
• <InfoAreaId>.Rel: Defines table captions used for the individual nodes of therelationship hierarchy tree, e.g. KPRel for persons. See RelationTreeView on page446. Fallback: <infoAreaId>.
• <InfoAreaId>.Relation/<InfoAreaId>.ReciprocalRelation: Defines which field(s)from the Relationship level info area are used in the preview text on the Cre-
269AUREA CONFIDENTIAL
Info Area Customizations

ateRelation form. See CreateRelation on page 408. BTB: BL.Relation/BL.Recip-rocalRelation; OTC/FS: B5.Relation/B5.ReciprocalRelation.
• <InfoAreaId>.ResourceView: Defines the table captions used for activities (MA)and absences (A3) displayed in the Dispatching Dashboard and Resources view.Fallbacks: <InfoAreaId>.Calendar, <InfoAreaId>.
• <InfoAreaId>.SerialEntry.<Name>: Defines the text in the Related Data area forquick add pages, e.g. FI.SerialEntry.Offer. See SerialEntry on page 454.
• <InfoAreaId>.SerialEntry.RelatedList: Defines the list items of the RelatedData area for quick add pages, e.g. UP.SerialEntry.RelatedList.
• <InfoAreaId>.Sidebar: Defines the table captions for upcoming items on theCalendar sidebar (Activities (MA), Absences (A3), Tasks (A1), To-Dos (TD)).Fallbacks: <InfoAreaId>.Calendar, <InfoAreaId>.
• <InfoAreaId>.VisitPlanning: Defines the table captions for the Visit Planningpage (defined for AF/KP/FI/PE/SV/SX). See VisitPlanning on page 479.
• Y2.BuyingCenter: Defines the table captions for suggested participants on theBuying Center Wall. See BuyingCenter on page 399.
Alternate Field LabelsUse the Alternate Field Labels page to change field names for your configurationand its children.
Field names are defined in the data model. Use the Aurea CRM win Maintenancemodule to change field names for the entire database.
To define Alternate Field Labels:
On the CRM.Designer main page (in the Views area), click Info Areas.
1. Click Info Areas on the CRM.Designer main page in the Views area.
2. Select the desired info area.
3. Click (Edit) in the Alternate Field Labels area. All fields of the selected infoarea are listed.
4. Enter the desired field names. For fur ther details, see Designing ConfigurationUnits on page 64 and Editing Texts on page 180.
5. Click Save.
270AUREA CONFIDENTIAL
Chapter 2: Configuring CRM

Field label changes are applied to all controls and all field lists (e.g. when selectingfields in the Query Editor).
Labels you define in individual control definitions overrule the alternate field label.For fur ther details, see Field Attributes on page 221.
Custom Field Labels and InputsCustomize the field labels and field inputs using custom CSS classes.
You can customize the field labels and field inputs using custom CSS classes viathe Extended options. The extended options available for field label and field inputvalues are labelCssClass and fieldCssClass. The usage of these options are shownbelow:{labelCssClass: 'custom-label-class',fieldCssClass: 'custom-field-class'}
The following sample CSS shows the class implementation for the option classesdefined above:.custom-label-class{font-weight: bold;}.custom-label-class > div > span{color: red;font-size: 15pt;}
.custom-field-class,
.custom-field-class input,
.custom-field-class textarea{font-weight: bold;color: blue !important;font-size: 15pt;}
Configuring Line Breaks and Truncating TextsDisplay texts with line breaks, truncated, or wrapped, in a list header and list rowfield of a search result or query result.
You can configure a list view to display text with line breaks, truncated, or wrapped,in a list header and list row field of a search result or query result.
To truncate text set the List.TruncateTextsInLists configuration parameter to true.For more informaton, see List.TruncateTextsInList.
271AUREA CONFIDENTIAL
Info Area Customizations

To wrap the texts in a list view header or row, perform the following steps:
1. Copy a custom CSS file to the \web\styles\custom.theme folder with thecontent shown below. In this case lets call it custom.css..multiLineCell{
white-space: normal !important;}
2. Import the above CSS file in update.css located in the same location(\web\styles\cus-
tom.theme).
3. In the CRM.Designer go to the Field Group for the target expand.
4. Select the header or row field whose text content should contain a line break.
5. In the panel on the right, check the Render Hook option, and add $.addClass("mul-tiLineCell") in the expression box.
272AUREA CONFIDENTIAL
Chapter 2: Configuring CRM

6. Save the Field Group then invalidate the cache to apply the new configuration.The resulting field should have line breaks as shown in the sample screenshotbelow:
273AUREA CONFIDENTIAL
Info Area Customizations

Custom LinksCustom links are not supported anymore.
Update7 CustomLinks, defined in the file customLinks.xml, are obsolete and arenot supported anymore.
Please use the following alternatives:
• Generic Data Model Links
• Dynamic Filters
Link NamesCRM.Designer allows you to define easily comprehensible descriptions for any linkrelation to be displayed in Aurea CRM.Web.
If more than one link to an info area exists, users need to select the link to be used.Example - when creating a query for that info area.
Note: Some info areas can have more one link to it. Example - The Ticket infoarea (KM) contains four links to the Company (FI).
Since the default syntax for link relations provided by the data model may be quitecryptic for average users, the Link Names page of CRM.Designer allows you todefine easily comprehensible descriptions for any link relation to be displayed inAurea CRM.Web. These names are used in filter and query definitions and in theModify List Fields dialog.
To define link names:
1. Click Info Areas on the CRM.Designer main page Views area.
2. Search for and double click the desired info area.
3. Click (Edit) in the Link Names area. For fur ther details, see Designing Config-uration Units on page 64.
All available links are listed with their ID and relation type as defined in the datamodel. For fur ther details, see Link IDs on page 19 and Data Model in theCRM.Core Administrator Guide.
274AUREA CONFIDENTIAL
Chapter 2: Configuring CRM
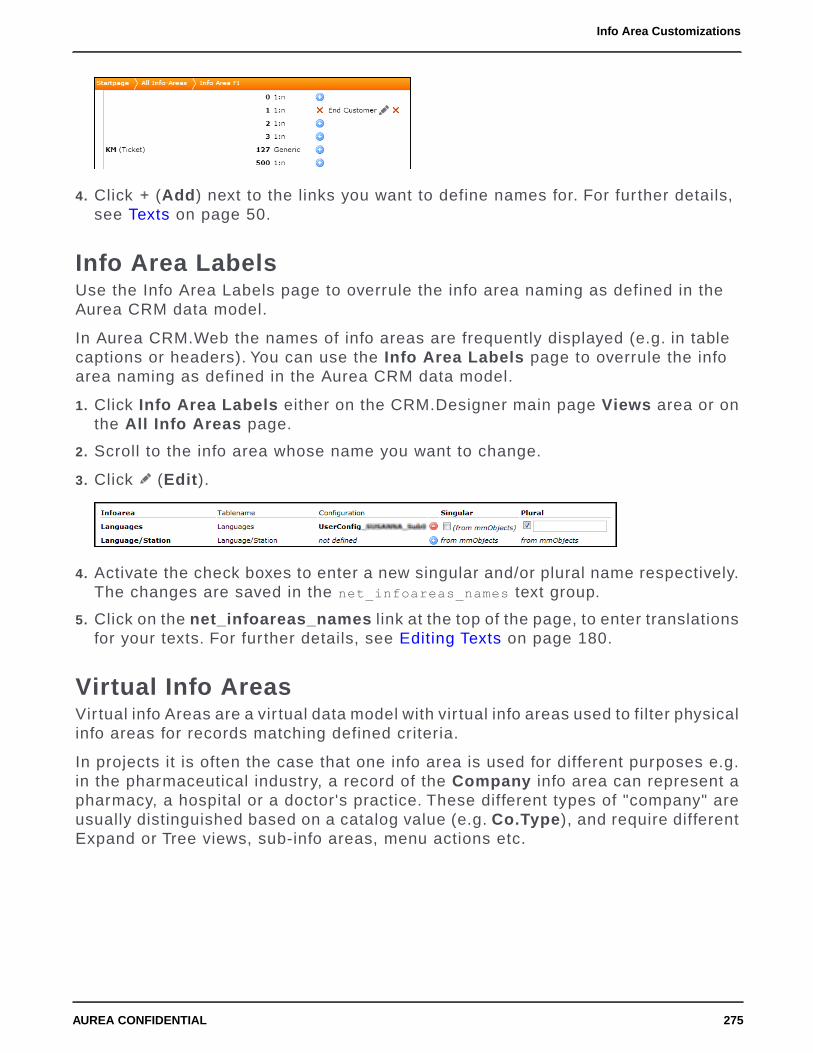
4. Click (Add) next to the links you want to define names for. For fur ther details,see Texts on page 50.
Info Area LabelsUse the Info Area Labels page to overrule the info area naming as defined in theAurea CRM data model.
In Aurea CRM.Web the names of info areas are frequently displayed (e.g. in tablecaptions or headers). You can use the Info Area Labels page to overrule the infoarea naming as defined in the Aurea CRM data model.
1. Click Info Area Labels either on the CRM.Designer main page Views area or onthe All Info Areas page.
2. Scroll to the info area whose name you want to change.
3. Click (Edit).
4. Activate the check boxes to enter a new singular and/or plural name respectively.The changes are saved in the net_infoareas_names text group.
5. Click on the net_infoareas_names link at the top of the page, to enter translationsfor your texts. For fur ther details, see Editing Texts on page 180.
Virtual Info AreasVir tual info Areas are a vir tual data model with vir tual info areas used to filter physicalinfo areas for records matching defined criteria.
In projects it is often the case that one info area is used for different purposes e.g.in the pharmaceutical industry, a record of the Company info area can represent apharmacy, a hospital or a doctor's practice. These different types of "company" areusually distinguished based on a catalog value (e.g. Co.Type), and require differentExpand or Tree views, sub-info areas, menu actions etc.
275AUREA CONFIDENTIAL
Info Area Customizations

To meet those requirements you can create a "vir tual data model" with vir tual infoareas used to filter "physical" info areas for records matching defined criteria. Forfur ther details, see Creating Vir tual Info Areas on page 277. This provides an easyway to work with different representations of one info area in Aurea CRM.Web. Forfur ther details, see Vir tual Info Areas in Aurea CRM.Web on page 282.
Differences between physical and vir tual info areas:
Virtual Info AreaPhysical Info Area
Does not exist in the Aurea CRMdatabase but uses an existing physicalinfo area
Exists in the Aurea CRM database (e.g.FI, KP, C005)
Is accessible only in Aurea CRM.Web andCRM.Designer
Is accessible for all clients
Is defined in the settings.xml fileIs defined in the data model (in the AureaCRM win Maintenance module)
276AUREA CONFIDENTIAL
Chapter 2: Configuring CRM

Creating Virtual Info AreasCreate Vir tual info areas to work with different representations of an info area inAurea CRM.Web.
To create vir tual info area you have to define them in the <DataBase> section of the<update.crm.base> section of the settings.xml file. The following example appliesto the OTC version:<update.crm.base>...<DataBase>...<VirtualSchema><InfoArea infoAreaId='VHOS' physicalInfoAreaId='FI' fieldId='28' fieldType='K'
value='Hospital' name='Hospital/Clinic' /><InfoArea infoAreaId='VDOC' physicalInfoAreaId='FI' fieldId='28' fieldType='K'
value='Doctor' name='Doctor' /><InfoArea infoAreaId='VPHA' physicalInfoAreaId='FI' fieldId='28' fieldType='K'
value='Pharmacy' name='Pharmacy' />...
</VirtualSchema>...</DataBase>
...</update.crm.base>
The definition of a vir tual info area consists of:
• a 4-digit info area ID, star ting with "V" followed by three alphanumeric characters,e.g. infoAreaId='VFI1'.
• the physical info area ID, defining in which database table the records of thevir tual info area are stored, e.g. physicalInfoAreaId='FI'.
• the filter criterion defined for a field from the physical info area, determining whichrecords of the physical info area belong to this vir tual info area, e.g. fieldId='5'fieldType='K' value='Austria'.
• By default, vir tual info areas use the XML name of their physical info area. Usethe (optional) name attribute to define an individual XML name for the vir tual infoarea, e.g. name='CompanyAUT'.
• To define a ver tical-specific vir tual info area, set the (optional) coreMode attributeto "ver tical" or "false", e.g. coreMode='vertical'. For fur ther details, see Vir tualInfo Areas & Core Customizing on page 876. If coreMode is undefined, the vir tualinfo area is created in the Base ver tical.
Note: If a vir tual info area has been defined as "Base", you cannot revert it to"ver tical" at any later time.
Use CRM.bulkloader to upload the vir tual info area definition into the CRM.Designerdatabase. For fur ther details, see Updating the Data Model on page 775.
277AUREA CONFIDENTIAL
Info Area Customizations

SyntaxSyntax for creating vir tual info areas.
There are two possibilities for defining the filter criteria for vir tual info areas. ThefieldId attribute has always to be defined.
Note: Supported field types for criteria definition: All except hierarchical catalog,array and rep fields, >> Supported Field Types on page 278.
Long Syntax
You can define the filter criteria in an extra <IdentFields> section:<VirtualSchema><InfoArea infoAreaId='VHOS' physicalInfoAreaId='FI' name='Hospital/Clinic'><IdentFields><VarCatIdentField fieldId='142' fieldType='K' value='Hospital' /><VarCatIdentField fieldId='142' fieldType='K' code='1' />
</IdentFields></InfoArea>
</VirtualSchema>
Short Syntax
You can define the filter criteria inside the vir tual info area definition. The definitionof the criterion consists of the id, type and value of the field of the physical infoarea, that is used to filter records for the vir tual info area.<VirtualSchema><InfoArea infoAreaId='VHOS' physicalInfoAreaId='FI' fieldId='142' fieldType='K'
value='Hospital' name='Hospital/Clinic' /></VirtualSchema>
Supported Field TypesSyntax for supported field type for vir tual info areas.
To define filter criteria for vir tual info areas, use the following syntax depending onthe field type:
Fixed catalogs
FixCatIdentField (long syntax) / fieldType='X' (short syntax) determine that thefollowing field is a fixed catalog. To define the criteria, specify code='<CatalogCode>'.
• Long syntax:
<FixCatIdentField fieldId='…' code='Catalog Code' />
• Short syntax:
<InfoArea='…' fieldId='…' fieldType='X' code='Catalog Code' />
Alternatively you can specify the catalog value in the base language by definingvalue='<value>'.
278AUREA CONFIDENTIAL
Chapter 2: Configuring CRM

Variable catalogs
VarCatIdentField (long) / fieldType='K' (short) determine that the following fieldis a variable catalog. To define the criteria, you need to specify either the value,code or extkey of the catalog value.
• Long syntax:<VarCatIdentField fieldId='…' value='Text in catalog base language' tenantNo='…'/>
<VarCatIdentField fieldId='…' code='Catalog Code' /><VarCatIdentField fieldId='…' extkey='External Key' />
• Short syntax:<InfoArea='…' fieldId='…' fieldType='K' value='Text in catalog base language'tenantNo='…' /><InfoArea='…' fieldId='…' fieldType='K' code='Catalog Code' /><InfoArea='…' fieldId='…' fieldType='K' extkey='External Key' />
Note: The tenantNo attribute is optional (default = 0).
Note: Empty catalog values are not supported as criteria.
Note: Regardless of whether you use value, code or extkey, the text of each catalogvalue must be unique in each language (i.e. you must not have two entries with thesame text in one catalog).
Note: Since the catalog code is station dependent, a vir tual data model using codesfor variable catalogs cannot be transported to other instances.
Boolean
BooleanIdentField (long ) / fieldType='L' (short) determine that the following fieldis a Boolean field.
• Long syntax
<BooleanIdentField fieldId='…' value='true/false' />
• Short syntax
<InfoArea='…' fieldId='…' fieldType='L' value='true/false' />
Other
IdentField (long syntax) has to be defined for all other supported field types. Whenusing the short syntax no field type definition is necessary.
• Long syntax
<IdentField fieldId='…' value='…' >
• Short syntax
279AUREA CONFIDENTIAL
Info Area Customizations

<InfoArea='…' fieldId='…' value='…' >
XML Export of Virtual Info AreasBy default, exported XML contains the actual info area ID and XML name of vir tualinfo areas.
To export the physical info area ID and XML name instead, define the Web Config-uration parameter Export.Xml.ExportPhysicalInfoAreaIds (Type: character) andset its value to "true". For fur ther details, see Export.Xml.ExportPhysicalInfoAreaIds.
Example:
• Default XML export (Export.Xml.ExportPhysicalInfoAreaIds not defined):
<fieldtableshort="VDOC"tablename="Doctor"fieldno="2"fieldname="Company"
…>
• Export.Xml.ExportPhysicalInfoAreaIds="true":
<field tableshort="FI" tablename="Company" fieldno="2" fieldname="Company"
…>
You can specify this option for individual report buttons by using the Export.Xml.Ex-portPhysicalInfoAreaIds export option. For fur ther details, see Export Options onpage 858.
Virtual Info Areas in CRM.DesignerInformation on the use of Vir tual Info Areas in Aurea CRM.Designer.
Use CRM.bulkloader to upload the vir tual info area definition into the CRM.Designerdatabase. For fur ther details, see Updating the Data Model on page 775.
In CRM.Designer, vir tual info areas appear exactly like physical info areas (i.e. withthe same fields and links) and can be configured in the same way.
You can define the following designer units for vir tual info areas:
• Info Area Label (used e.g. in headers) in singular and plural
• Alternate Field Labels
• Expand configurations incl. info area default settings
• Table Captions
• TreeView configurations
• Search&List configurations
• Field Groups
• Headers
280AUREA CONFIDENTIAL
Chapter 2: Configuring CRM

You can also use a vir tual info area in all info area-dependent configuration units:
• Filters
• Queries
• Analyses
• Sub-lists
• TreeView branches
• Expand configuration: Parent Links and Breadcrumb Trail
• Timelines
All links except the "identity" link, i.e. the link to itself point to physical info areas,therefore at some locations (e.g. ) links to vir tual info areas are not included in thedefault link info areas shown in CRM.Designer. Example - Add Linked Fields. Inthis case select the show all option to display them.
To display images for vir tual info areas (e.g. in a header), register them as IN-FOAREA_VXXX. For fur ther details, see Images on page 717. These images can bereferenced by {INFOAREAIMAGE}. For fur ther details, see Header Attributes on page326.
281AUREA CONFIDENTIAL
Info Area Customizations

Virtual Info Areas in Aurea CRM.WebThis topic has information about using Vir tual Info Areas in Aurea CRM.Web.
Vir tual info areas are used in Aurea CRM.Web as follows:
No Use of Virtual InfoArea (physical info area
instead)
Configurable Use of VirtualInfo Area
Automatic Use of VirtualInfo Area
• Table caption
• Menus used in pagesother than list or query
• Context menu in queries
• Context menu in lists
• Expand Page
• TreeView Page
• Info Area Default Action
• Info Area Default Menu
• etc.
The following sections describe the behavior of Aurea CRM.Web when vir tual infoareas are used.
Search&List, SearchSubList, ListView Widget
The Search&List configuration defined in the Search action is applied as follows:
• If the Search&List configuration for a vir tual info area is defined, only the recordsmatching the respective filter criteria are displayed. Thus vir tual info areas canbe used instead of fixed filters.
• If the Search&List configuration for a physical info area is defined, all records ofthat info area are displayed regardless of whether they match a criterion of avir tual info area or not.
Example: A vir tual info area VHOS for companies (FI) that are hospitals is defined.Searching in VHOS returns only hospitals, while searching in FI returns all companyrecords, regardless of whether these are doctors, hospitals etc.
Context Menu
The context menu of the list is either the menu explicitly defined in the Search&Listconfiguration (e.g. M_Company) or the default menu matching the info area of therecord. For fur ther details, see Search&List Configuration on page 365.
If "Default" is defined for the menu in the Search&List configuration, the contextmenu for lists and sub-lists is determined according to the defined virtualIn-foAreaReadMode. For fur ther details, see vir tualInfoAreaReadMode on page 285.
282AUREA CONFIDENTIAL
Chapter 2: Configuring CRM

The context menu displayed for records in SearchSubLists is determined as follows:
1. The SearchSubList header contains SubListParams for all defined sub-info areas.The SubListParam virtualInfoArea.ReadMode defines the behavior of the contextmenu per sub-info area.
2. The Search action template contains SubListParams defining the behavior ofsub-lists. The SubListParam virtualInfoArea.ReadMode defined here is appliedto all sub-lists.
3. The Search action template input argument virtualInfoAreaReadMode defines thebehavior for the result set and all sublists.
4. The Web Configuration parameter virtualInfoArea.List.ReadMode defines thecontext menu behavior for all lists.
Filters
Vir tual info areas are also used as filter namespaces. Therefore filters defined forthe physical info area (e.g. FI) are not visible in a Search&List defined for a vir tualinfo area (e.g. VDOC) and vice versa. For fur ther details, see filterNameSpace.
MiniDetails
MiniDetails are always read from the configuration of the specified, physical or vir-tual, info area.
Expand New
When creating a record in a vir tual info area, the criteria defined in the vir tual datamodel are automatically applied as fixed defaults and saved to the new record.
If the fields used as criteria are displayed on the Details control, they are automati-cally filled when the user selects New. However, the user may change those fieldvalues and therefore create records for other than the vir tual info area. To preventthis, check the Readonly field attribute for those fields. For fur ther details,see Readonly on page 227.
Example: A vir tual info area VAUT for companies with Country='Austria' is defined.If a user creates a new record in VAUT, the Country field is automatically set to"Austria" and cannot be changed.
Expand, TreeView
The Expand and TreeView action templates automatically determine whether thereis a matching vir tual info area and use it. All controls on an Expand/TreeView actiontemplate use the vir tual info area as well. Therefore table captions and contextmenus are read from the vir tual info area definition.
If no Expand/TreeView configuration for a vir tual info area exists, the configurationof the physical info area is used as fallback.
If a record is changed in a way that the criteria don't match the vir tual info areadefinition anymore, the Expand view falls back to the physical info area.
TreeView table captions
If a TreeView contains nodes for both the vir tual and the physical info area, recordsof the vir tual info area are displayed in both nodes.
283AUREA CONFIDENTIAL
Info Area Customizations

Each record (regardless of the node it is listed in) compares its info area with theinfo area defined in the TreeView configuration:
• If they match, the defined table caption is used (if no table caption is defined thebase table caption is used).
• If the info areas don't match (i.e. for vir tual info area records listed in the physicalinfo area's node), the base table caption (e.g. VMA1) is used.
Thus if a physical info area lists records from both the vir tual and the physical infoarea, they can be distinguished using different table captions.
ExpandChildren
The context menu displayed for records in ExpandChildren is determined accordingto the defined virtualInfoAreaReadMode. For fur ther details, see vir tualInfoAreaRead-Mode on page 285.
1. The ExpandChildren header contains SubListParams for all defined child infoareas. The SubListParam virtualInfoArea.ReadMode defines the context menubehavior per child info area.
2. The Web Configuration parameter virtualInfoArea.List.ReadMode defines thecontext menu behavior for all sub-lists.
Favorites
Since favorites are stored in the Aurea CRM database, they necessarily containonly a reference to the physical info area. Therefore you can not explicitly managefavorites of a vir tual info area: If you add such a record to your favorites, it is dis-played both below the physical and the vir tual info area.
Example: If you add a VDOC record to your favorites, it is visible for the FI favoritesand for the VDOC favorites.
For favorites, the table caption of the configured info area is always displayed.
Link Records
Aurea CRM.Web accepts link records from the physical as well as from one of therelated vir tual info areas.
284AUREA CONFIDENTIAL
Chapter 2: Configuring CRM

Queries
When defining queries, users can select vir tual info areas just like physical info areas.You can even define separate field lists (i.e. VXXX.Query field groups) per vir tualinfo area. For fur ther details, see Special Field Groups Naming Conventions onpage 190.
The context menus used for queries and for saved query results are determined bythe current setting of the Web Configuration parameter virtualInfoArea.Query.Read-Mode and/or the defined action template arguments. For fur ther details, see vir tual-InfoAreaReadMode on page 285.
When saving a query in the Aurea CRM data base (Web Configuration parameterQuery.SaveTo set to "Aurea CRM/both"), the query is automatically re-formatted to"physical info area + condition on criterion field"). Thus, queries defined with vir tualinfo areas can also be used by CRM.server. For fur ther details, see CRM.Server onpage 15.
Default Action, Default Menu
When the default menu or default action of a record is requested, the matching vir-tual info area's definition is used.
virtualInfoAreaReadModeInformation on the use of Vir tual Info Areas in ReadMode.
Use the virtualInfoAreaReadMode parameter to determine whether vir tual info areasare used for context menus in the result rows of queries and lists.
This setting only applies, if the context menu of the Search&List configuration isset to "Default" (respectively undefined in SearchSubList/ExpandChildren headersand ListView widgets). Otherwise the explicitly defined menu is used. For fur therdetails, see Search&List, SearchSubList, ListView Widget.
virtualInfoAreaReadMode has the following options:
• Static: Each results row has exactly the info area (i.e. the context menu andcolumn header) that was requested in the search/query. In this case, each rowhas the same context menu.
Example: When you search for FI, the FI context menu (M_Company) is alwaysdisplayed, even if the record returned matches the definition of a vir tual info area.
• Dynamic (defaul): Each results row reflects the matching (vir tual or physical) infoarea. Therefore each row may have a different context menu (since the InfoAreadefault menu is displayed).
Example: If you run a query for FI, the context menu of each FI record is the onematching the respective vir tual info area.
The actual syntax for the virtualInfoAreaReadMode parameter depends on the belowcontext:
285AUREA CONFIDENTIAL
Info Area Customizations

Web Configuration parameters
To define the global behavior of lists and queries use the following Web Configurationparameters:
VirtualInfoArea.List.ReadMode
This parameter defines the default behavior for lists search results sets, SearchSub-Lists, ExpandChildren and ListView widgets in forms.
VirtualInfoArea.Query.ReadMode
This parameter defines the default behavior for queries (query snapshot, savedqueries, queries in forms and the QueryRun action template).
Note: These parameters are not par t of UPDATE_DEFAULT but need to be createdas Character or Combobox if required. For fur ther details, see Creating Web Con-figuration Parameters.
Search Action Template
In addition to the VirtualInfoArea.List.ReadMode Web Configuration parameterthere are three possibilities to define virtualInfoAreaReadMode in a Search action:
• Add a new parameter virtualInfoAreaReadMode to define the behavior for theresult set and all sublists.
• Define virtualInfoArea.ReadMode in listParams to define the behavior only forthe result list.
• Define virtualInfoArea.ReadMode in subListParams to define the behavior onlyfor the sub-lists.
SearchSublist / ExpandChildren Header
In SearchSublist and ExpandChildren headers the SubListParam virtualIn-foArea.ReadMode defines the behavior of the context menu per child info area.
Query Designer Action Template
There are two possibilities to define virtualInfoAreaReadMode in the Query Designeraction template.
• Use the virtualInfoAreaReadMode input argument, to define the behavior for theresult set and all sub-lists.
• Or define in virtualInfoArea.ReadMode in the listParams to define the behavioronly for the result list.
286AUREA CONFIDENTIAL
Chapter 2: Configuring CRM

QueryRun Action Template
There are two possibilities to define virtualInfoAreaReadMode in the QueryRun actiontemplate.
• Use the virtualInfoAreaReadMode input argument to define the behavior for theresult set and all sub-lists.
• Or define in virtualInfoArea.ReadMode in the listParams to define the behavioronly for the result list.
Query in Form
The QueryResultPresenter widget contains the parameter virtualInfoAreaReadModeto define the behavior of the query result list.
Navigation CustomizationsUse the Navigation area of CRM.Designer to customize access to pages andfunctions in Aurea CRM.Web.
You can configure the following:
• Menus and Menu actions,see Menus on page 290.
• Buttons on page 304
• Headers on page 321
Action templates are used to configure the actions called by menu items and buttons.For fur ther details, see Action Templates on page 350.
Furthermore, actions are called within processes used to guide users to complextasks in Aurea CRM.Web. For fur ther details, see Processes on page 547.
Defining an ActionConfigure the action templates specific to your need.
All actions carried out in Aurea CRM.Web are based on action templates, whichneed to configured according to the specific action you want to execute. Action pa-rameters (input arguments) can be mandatory (Example - the searchAndListNameargument specifying the Search&List configuration of a Search action) or optional(Example - an optional link record for a search).
287AUREA CONFIDENTIAL
Navigation Customizations

Actions templates are used for menu actions, buttons and within processes. Basedon the action template definition, some actions can only be called for cer tain contexts.Example - only from the application menu or from within a process.
Example: The menu action A_AllAppointments (configured e.g. in the S_KPAll menu)lists all activities linked to e.g. a person record. It calls a Search action and passesthe parent record (link) and a Search&List configuration (searchAndListName) tothe page.
To define an action:
1. Click (Edit) in the Action field of the menu action/button/process step definition.
2. Select an Action Template.
The input and output arguments containing a default value are listed.
3. Use the / (Show all arguments/Hide empty arguments) buttons to togglebetween views and add new arguments.
4. Define the action's Input Arguments, e.g. the name of the Search&Listconfiguration to be used for a Search action.
Note: For a list of valid input arguments, see the parameter lists in the ActionTemplates chapter, e.g. for the Search action. For fur ther details, see SearchAction Parameters on page 369.
5. If you are defining a process step, define the action's Output Arguments.
Predefined output arguments: Use uid and uids to get one or more selectedrecords (e.g. in the Search and QueryRun actions), or use uid to get a newly cre-ated record from an ExpandNew action.
288AUREA CONFIDENTIAL
Chapter 2: Configuring CRM

6. Click (Add) to add custom arguments (both input and output arguments).
7. Click Apply and Save.
Default ActionUse default action for a consistent behavior across the application.
You can define a default action used in Expand, List and Tree views providing aconsistent behavior across the application when a user does one of the following:
• double-click on list or sub-list rows
• click on a link in a header
• click on a link in a record (in List, Expand, Minidetails view) and in the ParentData area of Expand views
Note: Click and hold on a link in a record or in the Parent Data area of Expandviews opens the QuickView. For fur ther details, see QuickView.
Note: Clicking on a link in a Rep ID field always opens the QuickView.
• double-click on calendar items
• click on a link to a record in an email (Notify Rep functionality)
The listed actions actually call the action D_Default which executes the default actionaccording to the context (info area, Search or Expand view etc.).
An info area's default action is defined in the InfoArea Default-Action field in theinfo area's default Expand configuration (i.e. the configuration with the same nameas the info area ID, Example - MA for activities), see Expand Configuration on page352. The menu action specified there is used for all actions listed above exceptdouble-click on list or sub-list rows (see below).
If you do not specify an InfoArea Default-Action (i.e. "default" selected) for an infoarea, the menu action defined in the Record.DefaultAction Web Configuration pa-rameter is used, see Record.DefaultAction. If Record.DefaultAction is not defined,A_Expand is used, see A_Expand.
For double-clicks in lists or sub-list, D_Default calls the default action as definedin the respective Search&List configuration. If undefined, the info area default actionas defined in the default Expand configuration is used with the same fallbacks asdescribed above.
To use the default action in a context menu, configure the menu action A_ShowDe-faultAction, see A_ShowDefaultAction.
289AUREA CONFIDENTIAL
Navigation Customizations

Note: Do NOT specify A_ShowDefaultAction as an info area's default action or inthe Record.DefaultAction Web Configuration parameter. This results in an infiniteloop.
To automatically use the default action for single search hits, check the Search.Au-toExpandOnSingleHit Web Configuration parameter or set autoExpandOnSingle-Hit=true as input argument for individual Search actions (Example - ID_COMPA-NY_SEARCH). For fur ther details, see Search.AutoExpandOnSingleHit.
You can define a common default action used for all sub-lists using the List.Sub-List.DefaultAction Web Configuration parameter. For fur ther details,see List.SubList.DefaultAction.
In Tree views double-clicking a record in the search results lists selects the nodeof the clicked record in the tree and loads the record without leaving the Tree view.Double-clicking a record in the tree actually calls the action A_TreeDefault executingthe command "Tree/DefaultAction" that selects the tree node corresponding to thecurrent list record. To globally change this default behavior use the Tree.ListDe-faultAction Web Configuration parameter. For fur ther details, see Tree.ListDefault-Action. A_TreeDefault is par t of M_DefaultTree which you can use as context menufor records in Tree views (Search&List configuration or sub-list).
To use the default action for a recordListBox widget in a form, set the commandproperty to Actions/Default. For fur ther details, see Forms on page 621.
The uid of the selected record is automatically passed as command argument. Al-ternatively, you can define any onDblClick event.
MenusUse menu page to customize menus and menu actions.
The Menus page allows you to customize the menus and menu actions used inAurea CRM.Web.
290AUREA CONFIDENTIAL
Chapter 2: Configuring CRM

Aurea CRM.Web uses two different menu types:
• application menus (the menus and menu items) in Aurea CRM.Web's navigationpane. For fur ther details, see Application Menu on page 291
• context menus displayed for specific records, info areas etc. For fur ther details,see Context Menus on page 292.
Note: Re-using custom menus and menu actions defined in update.seven: You cancreate new menus and menu actions with the same name as an existing menu(action) if you copy the unit from an existing unit. E.g. if (in update.seven) you copiedthe entire application menu (FRLEFT_NET) to your custom configuration, you canoverwrite Aurea CRM.Web's $Main by creating a new menu called $Main with CopyFrom set to FRLEFT_NET.
Application MenuConfiguring Application Menu.
To configure Aurea CRM.Web's navigation pane:
1. On the CRM.Designer main page, click Menus & Actions.
2. Switch to the Application Menus tab.
3. Configure the desired menus and menu actions. For fur ther details, see Configuringa Menu on page 292 and Menu Actions on page 295.
You can not define menu actions that need context information (i.e. a parentrecord) for the application menu. You need to configure a process instead (e.g.New Activity). For fur ther details, see Processes on page 547.
You can configure the following items for the navigation pane:
• $System: The Aurea CRM menu .
• $Main: The contents of Aurea CRM.Web's application menu plus CRM.phone (ifinstalled), History, Favorites (incl. Quick Links) and Notifications.
Customize the application menu by configuring sub-menus and menu actions. Forfur ther details, see Configuring a Menu on page 292 and Menu Actions on page295.
Note: To hide a menu or menu item from the navigation pane, disable the Visiblecheck box for this menu or menu action.
• $QuickLinks: Configures the content of the Quick Links. Add the menu actionsyou want to display in the "My Quick Links" area of the Favorites panel (same
functionality as (Modify Quick Links) in Aurea CRM.Web).
291AUREA CONFIDENTIAL
Navigation Customizations

Context MenusConfiguring Context Menu.
To configure a context menu:
1. On the CRM.Designer main page in the Navigation area, click Menus & Actions.
2. Switch to the Context Menus tab.
3. Select the desired context menu or create a new one. For fur ther details,see Designing Configuration Units on page 64 and Configuring a Menu on page292.
You can extend existing context menus without the need to copy the parent defi-nition to your configuration. For fur ther details, see Extending a Menu on page294.
4. Add the context menu to the Expand, Search&List configurations etc. where youwant it to be available.
Configuring a MenuLearn to configure a Menu.
To configure a menu:
1. Select a menu or create a new one. For fur ther details, see Designing Configura-tion Units on page 64.
292AUREA CONFIDENTIAL
Chapter 2: Configuring CRM

2. Specify the following:
• Text: The menu's label. The text is (also) visible for sub-menus and when amenu is called from a list row (search results, query results).
Note: Without Text the menu is not displayed.
• CRM Processes: Assign one or more CRM processes to the menu. For fur therdetails, see Roles & CRM Processes on page 727.
• Info Area: Use this option to hide the menu depending on the current user'saccess rights (defined in the Aurea CRM win Rights module). Enter one ormore info area IDs (separated by semicolon): If the current user has no accessrights for the specified info area (Deny Access), the menu is hidden.
• QuickLink-Context: only used for menu actions
• Image: An optional image displayed left of the menu's label. The image mustbe registered in CRM.Designer. For fur ther details, see Images on page 717.
• Visible: Shows or hides the menu in a parent menu.
293AUREA CONFIDENTIAL
Navigation Customizations

Note: Even with Visible unchecked, the menu is still displayed where it isdirectly referenced by Aurea CRM.Web. Therefore, it is not recommended toset application root menus or main context menus to invisible.
• Main Menu: Only used in CRM.Designer. Checked for parent menus, uncheckedfor sub-menus.
• Header Text: The caption of a context menu, only visible for root menus, butnot for sub-menus.
• Default Action: only used for menu actions
• Description: Add an internal description (only visible in CRM.Designer).
The right par t of the page lists all sub-menus and menu actions currently config-ured for the menu.
3. Select a menu or menu action in the list below and click Add Menu/Action to addan existing menu or menu action.
To reorder the menu items, click (Drag&Drop) in the respective row and dragthe item to the desired position.
Use A_Separator to inser t a separator line between menu items.
4. Enter a name and click New Action or New Menu to create a new sub-menu ormenu action. For fur ther details, see Menu Actions on page 295.
Note: While the new menu or action is immediately created, you must click theSave button before editing the new menu or action. Otherwise the reference tothe new menu can be lost.
5. Click Save.
Extending a MenuLearn to extend a Menu.
Instead of copying an existing menu to your configuration, you can just extend themenu and thus make sure that changes to the parent configuration is reflected afterthe next update.
To extend a menu:
1. Select the desired menu from the Application Menus or Context Menus tab.
2. On the menu definition page click Extend.
3. Add the desired menu actions.
294AUREA CONFIDENTIAL
Chapter 2: Configuring CRM

Menu ActionsLearn to define Menu actions.
A menu action consists of an action template plus input arguments defining the actionto be carried out when the menu item is selected, e.g. open a search page, createa new record, launch a process etc.
Configuring a Menu Action
To configure a menu action:
1. Select a menu action from the Application Menu Actions or Context MenuActions tab or create a new one. For fur ther details, see Designing ConfigurationUnits on page 64 and Configuring a Menu on page 292.
2. Specify the following:
• Text: The label of the menu action.
Note: Without Text the menu action is not displayed.
• CRM Processes: Assign one or more CRM processes to the menu action. Forfur ther details, see Roles & CRM Processes on page 727.
• Info Area: Use this option to hide the menu action depending e.g. on the currentuser's access rights. For a complete documentation of all possible settings,see the ar ticle “How to hide menu items” at https://support.aurea.com.
Note: Conditional access rights are not taken into account.
Note: To hide buttons depending on access rights, specify a menu action inthe buttons configuration (instead of a page call). For fur ther details,see Configuring a Button on page 305.
295AUREA CONFIDENTIAL
Navigation Customizations

Enter one or more of the following values (separated by semicolon):
• <InfoAreaId>: Hides the menu if the current user has no access rights forthe specified info area (Deny Access).
• <InfoAreaId>:<new | update| delete | view>: Defines which access rightsare required for the menu action to be displayed. Separate multiple valuesby comma.
Example: FI:update,new defines that only users with the right to change andcreate companies sees this menu action.
• INFO: For general menu actions like A_Delete you can specify INFO or a '.'instead of <InfoAreaId> to reference the info area whose access rightsdefinition is read.
For Expand configurations, the info area is determined based on the infoarea of the currently displayed record.
For Search&List configurations, the info area is determined based on thevalue specified in the Info Area field of the root menu, i.e. the menu thatcontains this menu action. Example: Adding INFO:delete to A_Delete hidesthe Delete menu item if its root menu (e.g. M_Company, M_Person, etc.) hasInfo Area defined.
• -QuickView: Hides the menu action from the QuickView. For fur ther details,see QuickView.
• QuickLink-Context: Enter the <InfoAreaId> of an info area, to display favoritesand recently used records (i.e. the browsing history) from that info area as asub-menu of the menu item.
If a table caption <InfoAreaId>QuickLinks is defined for the info area, this tablecaption is used for displaying the menu entries (fallback: <InfoAreaId>).
Records from vir tual info areas are listed under both their physical parent andthe vir tual info area. For fur ther details, see Favorites on page 585.
• Image: An optional image displayed left of the menu action's label. The imagemust be registered in CRM.Designer. For fur ther details, see Images on page717.
• Visible: Uncheck this option to hide the menu action in Aurea CRM.Web.
• Action: Define the action to be executed by selecting the menu item. For fur therdetails, see Defining an Action on page 287.
• Description: Add an internal description (only visible in CRM.Designer).
296AUREA CONFIDENTIAL
Chapter 2: Configuring CRM

Dynamic Menu Actions
Use dynamic menu actions in context menus to provide consistent user experience.Example: Using D_Expand and D_ExpandTree (instead of A_Expand and A_ExpandTree)displays the respective menu items depending on the context:
• Both Tab View and TreeView are visible for records in List view.
• Tab View (D_Expand) is hidden for a record in Expand view.
• Tree View (D_ExpandTree) is hidden for a record in Tree view.
In addition to these menu actions defined in UPDATE_DEFAULT you can use thefollowing naming convention when defining dynamic menu actions: *Open*In*<View>where <View> may be either ExpandView, TreeView or SearchView. If a record is al-ready displayed in the corresponding view, the menu action is hidden from thecontext menu. Examples:A_OpenCompanyInExpandView, A_OpenRecordInCompanyTree-View etc.
Standard Menus and Menu ActionsLearn about the re-usable menu in Aurea.CRM.
UPDATE_DEFAULT contains a number of re-usable menu actions:
• standard menus used for various info areas. For fur ther details, see StandardMenus on page 297
• common menu actions like A_NotifyRep, that can be used in any menu. For fur therdetails, see Common Menu Actions on page 298
• special menu actions like D_CopyOfferToOrder, that only make sense in a cer taincontext. For fur ther details, see Special Menus and Menu Actions on page 300.
Note: Some menus and menu actions are described in other chapters of this book.
Standard MenusLearn to create customized multi select context menu.
M_MultiSelect
This context menu is displayed when multiple records have been selected in a listor sub-list. By default, M_MultiSelect contains the menu actions A_MultiDelete (fordeleting the selected records) and A_MultiEdit (for editing multiple records). Forfur ther details, see A_MultiEdit.
You can create a customized multi-select context menu named XXX.MultiSelect tobe used for a specific Search&List configuration (XXX being the name of the standardcontext menu specified in the Search&List configuration). For fur ther details, seeSearch&List Configuration on page 365. This context menu is then automaticallyused, e.g. M_Company.MultiSelect instead of M_Company.
297AUREA CONFIDENTIAL
Navigation Customizations

If multiple rows are selected in a query result that contains more than one info area,a context menu containing all respective multi-select context menus is automaticallycreated:
Common Menu ActionsFind the list of Common Menu Actions in this topic.
Following are the common menu actions:
A_All<infoAreaID>
These menu actions navigate to a linked search listing records of <infoAreaID> thatare linked to the current record.
A_Delete
Deletes the current record.
A_Expand
Displays an Expand view of the current record.
A_ExpandInNewTab
Displays an Expand view of the current record in a new tab.
A_ExpandTree
Displays a tree view of the current record.
A_MailMerge
This is the standard menu action for creating letters from records in Aurea CRM.Web.For fur ther details, see Mail Merge Configuration on page 844. It calls the MailMergeaction and creates a letter by merging record data into a document template. Forfur ther details, see MailMerge on page 430.
A_New<infoAreaID>
These menu actions call an ExpandNew action for the respective info area.
A_NotifyRep
Executes the default action for the current record, e.g. displays an Expand or Treeview. For fur ther details, see Default Action on page 289.
298AUREA CONFIDENTIAL
Chapter 2: Configuring CRM

A_ShowDefaultAction
Executes the default action for the current record, e.g. displays an Expand or Treeview. For fur ther details, see Default Action on page 289.
D_Expand
Displays an Expand view of the current record. The D_Expand menu action is auto-matically hidden from the menu if the current view is an Expand view already.
In UPDATE_DEFAULT the dynamic menu actions D_Expand and D_ExpandTree areused in the M_Company and M_Person menus (instead of A_Expand and A_ExpandTree).
D_ExpandTree
Displays a Tree view of the current record. The D_ExpandTree menu action is auto-matically hidden from the menu if the current view is a Tree view already.
In UPDATE_DEFAULT the dynamic menu actions D_Expand and D_ExpandTree areused in the M_Company and M_Person menus (instead of A_Expand and A_ExpandTree).
D_OpenLinked
This dynamic menu action displays the parent record(s) of the current record anal-ogous to the Parent Data area below an Expand view. For fur ther details, see Ex-pandOptions. This enables user to easily access parent records e.g. from within alist.
Which parent records are displayed in the sub-menu is determined by the Expandconfiguration of the selected record (View Parent Relations). For fur ther details,see Expand Configuration on page 352.
Example: If D_OpenLinked is configured into the context menu of MA (M_Appoint-ments), all parent records linked to an activity are displayed under Go to Related.
In UPDATE_DEFAULT D_OpenLinked is configured e.g. in M_Relationship, M_Rela-tionship_Expand and S_KPAll.
299AUREA CONFIDENTIAL
Navigation Customizations

ID_NET_EMPTY_TAB
Opens a new empty tab.
Special Menus and Menu ActionsFind the list of Special Menus and Menu Actions in this topic.
Following are the Special Menus and Menu Actions:
A_AnalysisDefaultAction
Defines the action that is executed when the user double-clicks on a result row onthe Analysis search page.
Default = open and run the analysis.
A_MultiEdit
Opens the Edit multiple records dialog ("Bulk Editor"). Clicking (Edit) in the listheader when multiple rows are selected calls A_MultiEdit as well.
The Edit multiple records dialog displays all editable fields contained in the list.When called from a query result, the dialog displays all editable fields defined inthe respective info area's default list control. Example - for companies the list controlfrom the FI field group.
The following fields are not displayed in the Edit multiple records dialog:
• decoded fields (Z-fields)
• custom fields defined in customFields.xml
• fields flagged as Vir tualCore (i.e. vir tual fields with fixed IDs from 4200 to 4230,e.g. Created by ID). For fur ther details, see Fields with Fixed IDs in the CRM.CoreAdministrator Guide (2nd table).
• fields defined as read-only in the data model or via field attribute.
Changing a field value automatically checks the check box. Unchecking the checkbox resets the field value. For hierarchical catalogs, the parent catalog is displayedas well. If both parent and child catalog are changed, resetting the change of eitherparent or child value resets the other value automatically.
In UPDATE_DEFAULT A_MultiEdit is configured in the M_MultiSelect and theM_Company.MultiSelect and M_Person.MultiSelect context menus. For fur ther details,see M_MultiSelect.
300AUREA CONFIDENTIAL
Chapter 2: Configuring CRM

Aurea CRM uses transactions when editing multiple records in a list. For fur therdetails, see Support for Database Transactions on page 855. If an error occurs whileediting multiple records (Example - a restriction due to a conditional field right), allchanges are reversed (roll-back) and a message is displayed.
D_Campaign_Approval
D_Campaign_Approval is configured in M_Campaign in UPDATE_DEFAULT. It allowsthe rep entered as Budget Approved by ID to accept/reject an event (budget ap-proval).
• Selecting the sub-entry Positive results in the following:
• CM Budget approval on is set to the current date.
• TD Participation Status is set to "Accepted".
• TD Status is set to "Completed".
• Selecting the sub-entry Negative results in the following:
• CM Budget approval on is set to empty.
• TD Participation Status is set to "Denied".
• TD Status remains "Open".
This dynamic menu action is only displayed for campaign records with pending ap-proval and for the specified rep.
For more details, see Approving Events in the Web Business Logic User Guide.
D_Campaign_Verification
D_Campaign_Verification is configured in M_Campaign in UPDATE_DEFAULT. It al-lows the rep entered as Verified by ID to accept/reject an event (legal approval).
• Selecting the sub-entry Positive results in the following:
• CM Verified on is set to the current date.
• TD Participation Status is set to "Accepted".
• TD Status is set to "Completed".
• Selecting the sub-entry Negative results in the following:
• CM Verified on is set to empty.
• TD Participation Status is set to "Denied".
• TD Status remains "Open".
This dynamic menu action is only displayed for campaign records with pending ap-proval and for the specified rep.
For more details, see Approving Events in the Web Business Logic User Guide.
301AUREA CONFIDENTIAL
Navigation Customizations

D_CopyOfferToOrder
Copies an Offer (PR) plus Offer Items and Participants to an Order (PR). Thisdynamic menu action is par t of the M_Offer context menu in BTB and OTC. It isdisplayed if the offer is linked to an FI record and hidden for offers linked to a PErecord because offers must be linked to a company.
The menu action calls the JavaScript action template with the following input argu-ments:
• $function: u8.services.businessObjects.copy, see u8.services.businessOb-jects.copy.
• uid: Record
• destinationInfoAreaId: AU
Similar menu actions: A_CopyOfferToWR (copies Offers to Service Contracts (WR))and A_CopyOfferFromServiceContract (creates Offers from Service Contracts).
D_NewAppointment_My(_FI)
D_NewAppointment_My and D_NewAppointment_My_FI are configured in M_CalNew (NewCalendar Entry) in UPDATE_DEFAULT. They allow creating an activity for thecurrently logged-in user or his company.
These menu actions are automatically hidden for the SU if no KP record is assigned.
D_Questionaire
D_Questionaire is configured in M_Appointments and M_Tasks in UPDATE_DEFAULT.It is only active if a questionnaire is actually linked to the activity (MA) or work order(AF) record.
For information on defining questionnaires and conducting surveys, see Surveys inthe Web Business Logic User Guide.
For information on how to star t a survey from another info area than MA or AF (e.g.Y1), see the ar ticle “How to configure Surveys for any info area” at https://support.au-rea.com.
ID_NET_CALC_TERRITORYALLOCATION
In UPDATE_DEFAULT (BTB and FS) the menu action ID_NET_CALC_TERRITORYALLO-CATION is configured in the ID_NET_PROCESSES menu (Sales > Calculate territoryallocation).
ID_NET_CALC_TERRITORYALLOCATION creates a CRM.server to-do (Type = 12) to cre-ate/update the territory allocations. For fur ther details, see CRM.Server on page15.
For details on territory management, see Business Logic Manual.
The Web Configuration parameter Sales.TerritoryManagement.InfoAreas controlswhich info areas are included in the calculation. For fur ther details, see Sales.Ter-ritoryManagement.InfoAreas.
302AUREA CONFIDENTIAL
Chapter 2: Configuring CRM

ID_NET_CALCULATE_ACCOMODATION_VENUE_EVALUATION
In UPDATE_DEFAULT the menu action ID_NET_CALCULATE_ACCOMODATION_VENUE_EVAL-UATION is configured in the ID_NET_MARKETING menu (Marketing > Calculate accom-modation & venue evaluation). The menu action is only displayed if the WebConfiguration parameter UpdateServer.RepID is defined. For fur ther details,see UpdateServer.RepID.
ID_NET_CALCULATE_ACCOMODATION_VENUE_EVALUATION creates a CRM.server to-do(Type = 10) calculating the average of all event ratings (accommodation and venue).For fur ther details, see CRM.Server on page 15.
Use the Web Configuration parameter UpdateServer.EventEvaluationStartDate todefine a campaign star t date: Only campaigns that star t after the specified date aretaken into account. For fur ther details, see UpdateServer.EventEvaluationStar tDate.If undefined, the average is calculated for all campaigns in the database.
For details, see Evaluating Events in the Web Business Logic User Guide.
ID_NET_CALCULATE_TOPIC_LECTURE_EVALUATION
In UPDATE_DEFAULT the menu action ID_NET_CALCULATE_TOPIC_LECTURE_EVALUATIONis configured in the ID_NET_MARKETING menu (Marketing > Calculate lecture subject& speaker evaluation). The menu action is only displayed if the Web Configurationparameter UpdateServer.RepID is defined. For fur ther details, see UpdateServ-er.RepID.
ID_NET_CALCULATE_TOPIC_LECTURE_EVALUATION creates a CRM.server to-do (Type =11) calculating the average of all event ratings (lecture and speaker). For fur therdetails, see CRM.Server on page 15.
Use the Web Configuration parameter UpdateServer.EventEvaluationStartDate todefine a campaign star t date: Only campaigns that star t after the specified date aretaken into account. For fur ther details, see UpdateServer.EventEvaluationStar tDate.If undefined, the average is calculated for all campaigns in the database.
For details, see Evaluating Events in the Web Business Logic User Guide.
ID_NET_STOCKTAKING
In UPDATE_DEFAULT (BTB and FS) the menu action ID_NET_STOCKTAKING is config-ured in the ID_NET_PROCESSES menu (Sales > Stock Taking).
ID_NET_STOCKTAKING displays a dialog where the user selects a stock taking formatand enters a time frame. Clicking OK creates a CRM.server to-do to create an in-ventory. For fur ther details, see CRM.Server on page 15. For details on stocks andstock taking, see Web Business Logic User Guide.
303AUREA CONFIDENTIAL
Navigation Customizations

ID_NET_TD_BACKGROUND_QUERIES
In UPDATE_DEFAULT the menu action ID_NET_TD_BACKGROUND_QUERIES is configuredin the ID_NET_QUERIES_AND_STATISTICS menu (Queries & Analyses > BackgroundQueries). To allow users to access the to-do records of background queries easilyvia the application menu,
1. create a filter with condition "Rep/Group ID = <UpdateServer.RepID>"
2. assign this filter to the ID_NET_TD_BACKGROUND_QUERIES menu action.
M_Tasks
The context menu for Tasks (A1) M_Tasks contains dynamic sub-menus and menuitems allowing the user to change the status of To-Do records (TD) linked to a task.
The menu is displayed if the following conditions are met:
• Create To-Do is checked.
• The current rep is defined as required participant.
• The task's Status is "Open".
As soon as all to-dos linked to a task are set to "Completed", the task's status isset to "Completed" as well and the menu items are no longer displayed.
For details on the business logic, see Changing the Status of a Task in the WebBusiness Logic User Guide.
ButtonsLearn to create buttons and manage them in CRM.Designer.
Like menu actions, buttons execute actions defined in CRM.Designer. You can eitherassign an existing menu action to the button or create a new action based on anaction template. For fur ther details, see Configuring a Button on page 305.
On the CRM.Designer main page, click Buttons to create and modify buttons usedin Aurea CRM.Web.
304AUREA CONFIDENTIAL
Chapter 2: Configuring CRM

The Buttons page displays the button's icon and name, the configuration it belongsto and its hot-key, if defined. Buttons are usually configured into headers(see Headers on page 321 and Header Buttons on page 327) but can also be used informs, see Forms on page 621.
Note: To determine which buttons are displayed in list rows you need to specifylistParams in the respective action. For fur ther details, see ListParams on page 374(hideControlColumns | showContextMenu | showMiniDetails | showQuickViewAction).
Configuring a ButtonLearn to configure a button.
To configure a button:
1. Select a button or create a new one. For fur ther details, see Designing Configu-ration Units on page 64.
305AUREA CONFIDENTIAL
Navigation Customizations

The following settings are available:
• Label: The button's name either displayed as a tool-tip or as text on the button,depending on the header configuration. For fur ther details, see Header Attributeson page 326 (Buttons with Text option).
• Image: The button’s icon. The image must be registered in CRM.Designer. Forfur ther details, see Images on page 717.
• Action: Define the action to be executed by clicking the button.
• Select Menu Action to call an already defined menu action. For fur therdetails, see Menu Actions on page 295.
• Select Action Template to define a new action based on an action template.For fur ther details, see Defining an Action on page 287.
Note: To show or hide buttons depending on the user's access rights, youneed to specify a menu action that is configured accordingly. For fur ther details,see Menu Actions on page 295 (Info Area option).
• Hot-Key: the hotkey or keyboard shortcut for activating the button.
You need to manually enter the hotkey definition in the Hot-Key textbox, sincejust pressing the respective key combination has no effect. Use the followingsyntax:
• Ctrl/Alt/Shift as modifiers
• F2 to F12 for function keys
• combine the individual elements with "+"
Examples: Shift+Alt+G, Ctrl+S, F7, Shift+F6, Ctrl+#49
306AUREA CONFIDENTIAL
Chapter 2: Configuring CRM

The following hotkeys are not supported:
• F1 and any combination with F1 (Ctrl+F1, Alt+F1, Shift+F1)
• Alt+F4
Function keys with browser-specific functions (e. g. F3, F5 etc.) should notbe used as well.
The defined keyboard shortcut is displayed in the button's tooltip.
Note: For buttons in groups no tooltip is displayed. For fur ther details,see Grouping Buttons on page 328.
• Query State Action: Determines under which conditions the button is active.Specify a menu action containing an appropriate JavaScript function to flexiblycontrol whether the button is enabled or disabled. If the JavaScript functionreturns false the button is enabled, if it returns true the button is disabled(grayed out).
Alternatively, an object in form {disabled:<true|false>, done:<true|false>}
can be returned, where the disabled-property is interpreted as before and thedone-property signalizes whether the periodic re-querying of the state shouldbe stopped.
UPDATE_DEFAULT contains the following standard JavaScript functions to beused with Query State Action:
• C_OneRowSelected: the button is enabled if exactly one row is selected.
• C_OneRowSelectedOrNoList: the button is enabled if exactly one row isselected or if used in an Expand or Tree header.
• C_NoRowSelected: the button is enabled if no row is selected.
• C_RowsSelected: the button is enabled if one or more rows are selected
• Check_VirtualInfoArea: the button is disabled if used in the header of avir tual info area (example in UPDATE_DEFAULT: DefaultValuesDefinebutton.
In addition, you can use the QueryStateBinding action template to enable/disablebuttons using bindings. Examples in UPDATE_DEFAULT:
• C_SocialInbox_CanAssignPerson (used to enable/disable the SE_AssignPersonbutton)
• C_SocialInbox_CanRespond (used for the SE_Respond and SE_Invite buttons)
307AUREA CONFIDENTIAL
Navigation Customizations

• CRM Processes: Assign one or more CRM processes to the button. For fur therdetails, see Roles & CRM Processes on page 727.
• Help Text: Add a description of the button's purpose. The Help Text is displayedin the button's tooltip (in a new line).
The default text group for button tooltips is ButtonHelp.
You can use the Markdown syntax to format your help text. for fur ther detailson Markdown syntax, see http://en.wikipedia.org/wiki/Markdown.
• Description: Add an internal description (only visible in CRM.Designer).
• Hide button in QuickView: If checked, the button is hidden from the QuickView.For fur ther details, see QuickView.
• Hide button text: The button is displayed without its label, i.e. only the iconis visible. A tooltip with the button text is displayed on mouse-over.
• Owner Draw Button: Do not modify! This option is checked for buttons thatare displayed as drop-down lists in specific headers (e.g. the rep/filter setdrop-down lists in the Calendar sidebar). This option is for internal use only:Do not change this setting.
• Disable button: If checked, the button is displayed inactive (grayed out).
• Hide button: If checked, the button is not visible for the users even if it isconfigured e.g. in a header. The next button to the right moves up and takesthe place of the hidden button (thus avoiding a gap).
2. Click Save.
For information on how to configure toggle buttons, see the ar ticle “How to togglebuttons in a header” at https://support.aurea.com.
Toggle button examples in UPDATE_DEFAULT: Toggles(M_CalendarViews), Tog-gles(M_AnalysisResultViews) and Toggles(M_MarketingCalendarInfoAreas).
Standard ButtonsFind the list of standard buttons in this topic.
Below is the list of standard buttons:
CancelEditUse this button to exit from edit mode of a form.
The CancelEdit button allows users to switch a form from Edit to View mode. Adir ty check is displayed allowing the user to return to Edit mode and save hischanges. The button calls the Command action with the Command argument set toCancel.
308AUREA CONFIDENTIAL
Chapter 2: Configuring CRM

Copy/Paste RecordUse these buttons to copy and paste records.
UPDATE_DEFAULT contains a Copy Record and Paste Record button allowingusers to copy a record and create a new one by pasting the data from the clipboard.To do this, add the Copy Record button to the Expand header and the Paste Recordbutton to the New header of the desired info area. For fur ther details, see StandardHeaders on page 337.
The buttons calls the Command action with the Command argument set to Clipboard/Copyand Clipboard/Paste respectively.
Copy/Paste Record and Access Rights
Depending on the defined access rights and field attributes pasting a record fromthe clipboard results in the following behavior:
The Paste Record button is deactivated if
• the Expand view is in View mode
• the clipboard does not contain a record from the same (base) info area
• the Expand view is in Edit mode but the user has insufficient update rights.
These conditions are checked again when the paste command is handled.
Field values are not pasted if:
• the field is not par t of the Details control
• the field is a Z-field
• the field in the Details control has the Readonly attribute set to true.
• the field is set to read-only in the data model (Fields > Properties > "readonly")
• the user does not have sufficient conditional access rights for the field (in Newmode: Deny New, in Update mode: Deny Update when updating a value or DenyDeletion when deleting a value).
DefaultValuesDefineUse this button to define the values for new records that are created.
The DefaultValuesDefine button allows users to define default values for creatingnew records. It calls the DefaultValues action. For fur ther details, see DefaultValueon page 415.
In UPDATE_DEFAULT the DefaultValuesDefine button is configured into the MASearchResults header.
The DefaultValuesDefine button is disabled by default when used in the header ofa vir tual info area (Query State Action = Check_VirtualInfoArea).
309AUREA CONFIDENTIAL
Navigation Customizations

DuplicateRowUse this to quickly duplicate a selected row.
The DuplicateRow button can be configured into SearchResults headers and intothe special header SerialEntry.List for quick add configurations: It allows usersto duplicate the selected list row (i.e. create an identical copy of the selected record,including all link fields etc.). The default hotkey for this button is Ctrl+Shift+V.
Alternatively, you can configure the menu action A_DuplicateRecord into the desiredcontext menu(s).
When duplicating a record in a list, the list refreshes and the duplicated record isautomatically displayed in Edit mode with focus on the first editable field, providedthat this new record appears within the list's currently displayed records (i.e. if youduplicate the last list row, the newly created record is not par t of the current pageso you do not see it in Edit mode). When duplicating a record in another view, thenewly created record is displayed in its default view (e.g. Expand view).
This feature was especially developed for quick add pages, but can be used in anylist if required. For fur ther details, see SerialEntry on page 454.
EditUse this button to make the form editable.
The Edit button allows user to switch a form from View to Edit mode. The buttoncalls the Command action with the Command argument set to Edit.
EmailReplyUse this button to reply to email from within Aurea CRM.Web.
The EmailReply button allows users to reply to email activities from within AureaCRM.Web. This can be done by clicking the EmailReply button or pressing Ctrl+Ra new email activity is created and linked to the original email activity. Users canwrite the email and then send it by using the OpenAppointmentEmail button
. For fur ther details, see OpenAppointmentEmail on page 318 and SendAs email on page 835.
In UPDATE_DEFAULT the EmailReply button is configured into the MAEmail Expandheader which is used in the corresponding alternative Expand configuration for emailactivities. For fur ther details, see Alternative Expand Configurations. Thus theEmailReply button is available only for Activity records of type "email".
Export/Report ButtonsLearn to create report in different formats using this button.
Aurea CRM.Web users can export data from Aurea CRM.Web to different file formats.Example - Microsoft Excel or PDF. For more information on XML exports and reports,see XML Exports & Reporting on page 856.
310AUREA CONFIDENTIAL
Chapter 2: Configuring CRM

The following export/report formats are available (marked Y) in the specified context(list, expand, tree, query, analysis grid):
Analysis GridQueryTreeExpandListFormat
YYNYYCSV
YYNYYXML
YYYYYHTML
YYYYYPDF
YYNNYMicrosoft Excel
YYNYYMicrosoft Word
Note: For Microsoft Excel/Word reports to work, Microsoft Office 2010 or higher isrequired.
Note: If an Expand view contains combined fields, they are exported as defined inthe Edit mode configuration. For fur ther details, see Add Combined Field on page214.
Note: If a list contains an array field (e.g. SIC 1 in FI), all fields from the array areexported. To export only those fields from the array that you actually use, set DenyAccess for the undesired fields of the array. For fur ther details, see Access Rightson page 829.
The export/report formats available in a cer tain context depends on the export/reportbuttons configured in the respective header.
All export/report buttons call the Command action template with Command = Export.Fur ther settings (export options, XSL transformation, plug-in) are specified in theCommandArguments parameter. For fur ther details, see Export/Report Action Definitionon page 314. Use the maxRows parameter to determine the maximum number of rowsactually fetched from the server. For fur ther details, see Export/Report Action Defi-nition on page 314.
311AUREA CONFIDENTIAL
Navigation Customizations
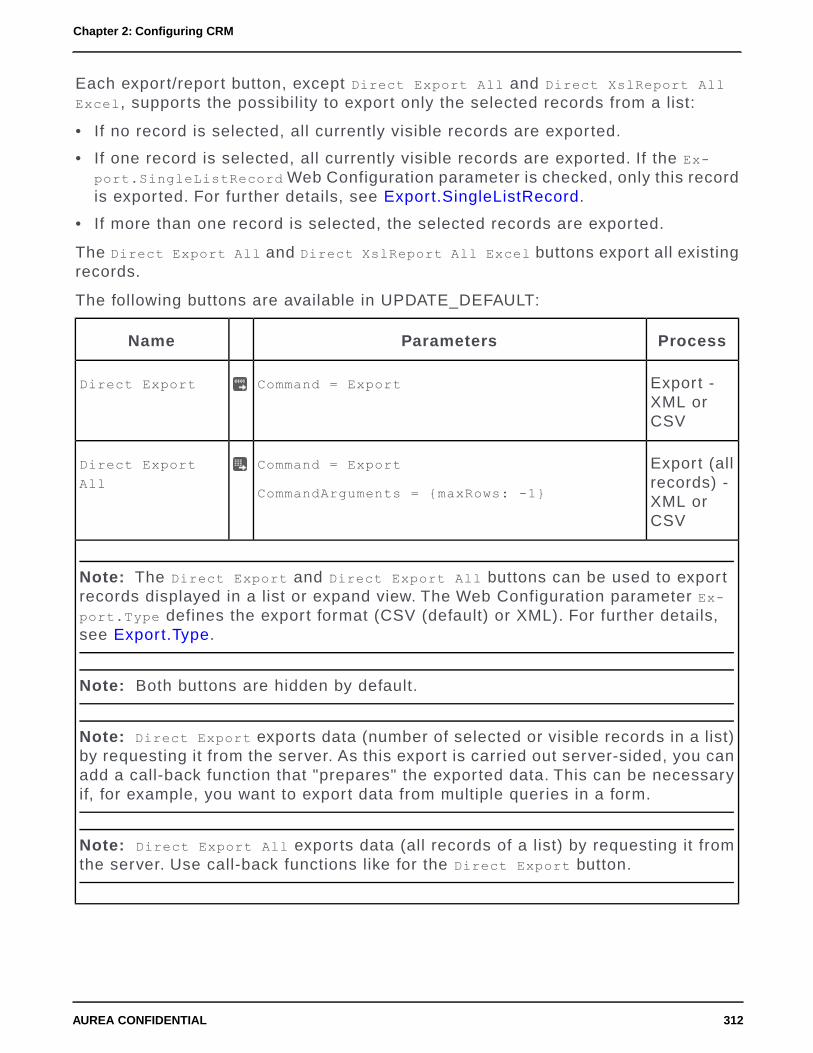
Each export/report button, except Direct Export All and Direct XslReport All
Excel, supports the possibility to export only the selected records from a list:
• If no record is selected, all currently visible records are exported.
• If one record is selected, all currently visible records are exported. If the Ex-port.SingleListRecord Web Configuration parameter is checked, only this recordis exported. For fur ther details, see Export.SingleListRecord.
• If more than one record is selected, the selected records are exported.
The Direct Export All and Direct XslReport All Excel buttons export all existingrecords.
The following buttons are available in UPDATE_DEFAULT:
ProcessParametersName
Export -XML orCSV
Command = ExportDirect Export
Export (allrecords) -XML orCSV
Command = Export
CommandArguments = {maxRows: -1}
Direct Export
All
Note: The Direct Export and Direct Export All buttons can be used to exportrecords displayed in a list or expand view. The Web Configuration parameter Ex-port.Type defines the export format (CSV (default) or XML). For fur ther details,see Export.Type.
Note: Both buttons are hidden by default.
Note: Direct Export exports data (number of selected or visible records in a list)by requesting it from the server. As this export is carried out server-sided, you canadd a call-back function that "prepares" the exported data. This can be necessaryif, for example, you want to export data from multiple queries in a form.
Note: Direct Export All exports data (all records of a list) by requesting it fromthe server. Use call-back functions like for the Direct Export button.
312AUREA CONFIDENTIAL
Chapter 2: Configuring CRM

ProcessParametersName
MS ExcelReport (allrecords)
Command = Export
CommandArguments = {maxRows: -1, report:"Ex-
portExcel[EmitXmlNativeFormat=true]"}
Direct XslReport
All Excel
MS ExcelReport
Command = Export
CommandArguments = {report: "ExportEx-
cel[EmitXmlNativeFormat=true]"}
Direct XslReport
Excel
Note: Export.Xml.EmitNativeFormat=true ensures that data types are correctlymapped from Aurea CRM to Microsoft Excel, >> . Numeric fields (long, short, float)are mapped to "Number" in Excel, date fields to "DateTime" and logical fields to"Boolean". All other field types are passed as strings (also time fields, since Excel'sXML format does not support time without date).
HTML Re-port/Ex-pand
Command = Export
CommandArguments = {report:"ExportExpand-
Html[Target=_blank;ContentDisposition=in-
line]"}
Direct XslReport
HTML/Expand
HTML Re-port/List
Command = Export
CommandArguments = {report:"Ex-
portListHtml[Target=_blank;ContentDisposi-
tion=inline]"}
Direct XslReport
HTML/List
HTML Re-port/Tree
Command = Export
CommandArguments = {report:"ExportTree-
Html[Target=_blank;ContentDisposition=in-
line]"}
Direct XslReport
HTML/Tree
PDF Re-port/Ex-pand
Command = Export
CommandArguments = {report: "ExportExpand-
Pdf[Export.Xml.FatClientCompatible=true],For-
mat.application/pdf"}
Direct XslReport
PDF/Expand
PDF Re-port/List
Command = Export
CommandArguments = {report:"ExportList-
Pdf,Format.application/pdf"}
Direct XslReport
PDF/List
313AUREA CONFIDENTIAL
Navigation Customizations

ProcessParametersName
PDF Re-port/Tree
Command = Export
CommandArguments = {report:"Export-
TreePdf,Format.application/pdf"}
Direct XslReport
PDF/Tree
Note: For information on Aurea CRM's PDF reporting plug-in, see the ar ticle “Howto use the reporting PDF plug-in” at https://support.aurea.com.
MS WordReport/Ex-pand
Command = Export
CommandArguments = {report:"ExportExpand-
Wordml"}
Direct XslReport
WordML/Expand
MS WordRe-port/List
Command = Export
CommandArguments = {report:"ExportList-
Wordml"}
Direct XslReport
WordML/List
In addition, you can create buttons (or menu actions) that execute a specific queryand create a report from the results without displaying the result rows first. For fur therdetails, see QueryReport on page 436.
Export/Report Action DefinitionLearn to define action of Export/Report button.
Each export/report buttons calls the Command action with Command = Export. Fur thersettings are specified by the CommandArguments parameter, e.g. {maxRows: -1, re-
port:"ExportExcel[EmitXmlNativeFormat=true]"}.
The CommandArguments parameter supports the following parameters:
maxRows
Determines the maximum number of records to be exported.
maxRows is mandatory when defining Export All buttons (Direct Export All and Di-rect XslReport All Excel in UPDATE_DEFAULT).
maxRows is applied as follows:
• if undefined, the Export All action (e.g. Direct Export All) is executed as e.g.Direct Export, i.e. only the selected records are exported.
• if defined (e.g. {maxRows: 500}), this value is used.
• if set to {maxRows: -1}, the value of the Export.MaxRecords Web Configurationparameter is used. For fur ther details, see Export.MaxRecords.
314AUREA CONFIDENTIAL
Chapter 2: Configuring CRM

report
Determines export options, the XSL transformation and plug-in defining the type,layout and content of the export or report.
Syntax:
{report: "<XSLT>[<export option1>;<export option2>;etc.],Format.<mimetype>[<plug-in parameter1>;<plug-in parameter2>;etc.]"}
For a list of available export options, see Export Options on page 858.
For a list of available parameters for the PDF plug-in, see the ar ticle “How to usethe reporting PDF plug-in, additional PDF plug-in parameter” at https://support.au-rea.com.
Export options can be passed with and without transformations. The options,transformations and plug-ins are separated by comma. Additional options fortransformations and plug-ins can be specified in square brackets following thetransformation/plug-in. Options inside square brackets must be separated with asemicolon.
The options specified with (only!) the first transformation are applied to the wholereport as well as to the first transformation: Therefore writing
{report:"Export.Encoding:UTF-8,ExportExcel [Export.Xml.EmitNativeFor-mat=true]"}
is the same as writing
{report:"ExportExcel[Export.Encoding:UTF-8; Export.Xml.EmitNativeFor-mat=true]"}
Examples:
without transformation:
{report: "Export.Xml.EmitConfiguration=true, Export.Xml.EmitCatalogs=true"}
with transformation:
{report:"ExportExpandHtml[Target=_blank; ContentDisposition=inline]"}
with plug-in:
{report:"ExportListPdf,Format.application/pdf[FontFile=%WINDIR%\\Fonts\\ar-ial.ttf]"}
with transformation and plug-in:{report:"ExportListPdf[Export.Xml.EmitConfiguration=true;Export.Xml.EmitConditions=true],
Format.application/pdf[EncryptionPassword=update;EncryptionPermissions=8;EncryptionStrength=true]"}
LegendLearn about the Legend button and its configuration.
The Legend button is configured in the following special headers: CalendarHeader,DayWeekPlanningCalendar, DispatchingDashboard, MarketingCalendarHeader, Re-sourcePlanHeader and VisitPlanning.
315AUREA CONFIDENTIAL
Navigation Customizations

It displays the meaning of the color coding of the items displayed in the respectiveview, e.g. activities by type in the calendar or items by info area in the marketingcalendar etc.
The colors are defined in the ..\styles \<theme>\crm\colors.css file. Forfur ther details, see Customizing Styles on page 15.
For information on changing the color coding of items, see the ar ticle “How to Cus-tomize the Color Coding of Calendar Items” at https://support.aurea.com.
In the marketing calendar the colors defined for the calendar are used as follows:
Color from calendarItem Status
u8-color-calendar-item-scheduledScheduled
u8-color-calendar-item-superiorIn Progress
u8-color-calendar-item-doneCompleted
u8-color-calendar-item-missedCanceled
u8-color-calendar-item-nostateArchive
u8-color-calendar-item-infoTemplate
u8-color-calendar-item-faxBudget Approval
Marketing Activity ButtonsLearn to create target groups and marketing activities.
The CreateTargetGroup and CreateMarketingActivity buttons configured in the AKand AD Expand headers in UPDATE_DEFAULT allow to manually star t the creationof target groups and marketing activities.
These buttons are active if the following conditions are met:
• The Web Configuration parameter UpdateServer.RepID is defined. For fur therdetails, see UpdateServer.RepID.
• An Execution (Marketing Activity) record (AD) exists for this marketing activity.
For details on the business logic, see Creating a Target Group and Executing aMarketing Activity in the Web Business Logic User Guide (https://help.au-rea.com/crm/crm-web-bl-btb/crm-web-bl-otc/dita/topics/c_web_bl_btb-1_1-Aurea-CRM-web_crm.html).
316AUREA CONFIDENTIAL
Chapter 2: Configuring CRM

Note: To provide timely feedback on the generated records, set the polling intervalfor messages to a few minutes. For fur ther details, see Jobs.PollingInterval.
NewCommandUse this to create a new record from tree view.
The NewCommand button allows users to create new records from inside a Tree viewwithout leaving the Tree view. For fur ther details, see Tree on page 381.
The NewCommand button is configured in the Base ver tical and is therefore availablein all ver ticals. In UPDATE_DEFAULT it is used in various SearchResults andSearchResultsLinked headers (Example - in header group MATree). For fur ther details,see Headers for TreeViews.
Note: Creating new Document Link records (D3) inside the tree is not supported.
A corresponding menu action A_TreeNew is configured in M_TreeChildren (the defaultcontext menu used for the info area nodes of a tree). For fur ther details, see InfoArea Settings.
Clicking on NewCommand calls the command "New" that executes the ExpandNew actionfor the current info area.
You can use the NewCommand button in all headers of record lists (i.e. not only inTree views): SearchResults, SearchResultsLinked, SearchSubList, SubList.
When used in a Tree view, the "New" command is executed as follows:
• If the info area is a tree node, the ExpandNew page is displayed inside the Treeview.
• If the info area is not a tree node, the ExpandNew action is executed in a new tab.
NewSiblingRecordUse this button to create sibling record.
The NewSiblingRecord button allows users to create a new record star ting fromthe Expand or List view of a record of the same info area. Example - create a newMA record while viewing an existing MA record. The new record is created with thesame parent link(s) (Example - FI and PE) as the current record. Additional fieldvalues (Example - additional links) can be passed to the new record via "copy fields".For fur ther details, see NewSiblingRecord on page 317.
317AUREA CONFIDENTIAL
Navigation Customizations

OpenAppointmentEmailuse this button to e-mail activity records.
The OpenAppointmentEmail button , which is configured into the MAExpand header in UPDATE_DEFAULT, allows users to send activity records viaemail. For fur ther details, see Send As email on page 835.
Query Background Processing ButtonsUse this button for background processing of queries.
The Query_RunInBackground button configured in the specialheaders Query and QueryFooter in UPDATE_DEFAULT allows the background pro-cessing of queries by CRM.server. For fur ther details, see Background Queries onpage 502.
Once the query results are retrieved and stored as a query snapshot, the user isnotified with a message that his query results are available.
Analogous, the Query_RunInBackground_CSV button allowsthe background creation of a CSV file containing the query results. CRM.servercreates a D1 document that is linked (via a D3-link) to the message the user receivesupon completion.
Note: If this button is used, no query snapshot is created but only the CSV file.
To allow users to directly create a CSV file with the query results, you need toconfigure the Query_RunInBackground_CSV button into the Query and/or QueryFooterheader(s).
RefreshThis button is used to refresh.
The Refresh button can be used e.g to refresh the items list on quick add pages.For fur ther details, see SerialEntry on page 454. Add the Refresh button to the re-spective SerialEntry.List header (e.g. for PR) to allow recalculating e.g. discountsbased on changed quantities.
ResetFormLayoutUse this button to reset the layout to parent configuration.
The ResetFormLayout button (Reset Layout) allows users to revert Details controlsthey rearranged using drag&drop to the original layout as defined in the current(parent) configuration. For fur ther details, see Details Controls Extended by Users.
318AUREA CONFIDENTIAL
Chapter 2: Configuring CRM

Clicking Reset Layout removes the control's extension in CRM.Designer.
SaveYou can save changes to a record using this button.
The Save button allows users to save changes of a record. The button calls theCommand action with the Command argument set to Save.
ShowMenuLearn the use of ShowMenu button.
The ShowMenu button allows users to open an info area's context menu in Expandviews.
SumTotalThe SumTotal button calculates the sum for numeric fields in a list.
You can configure the SumTotal button into any SearchResults header. For fur therdetails, see SearchResults/SearchResultsLinked/SearchResultsSelect. TheQueryResult header contains this button by default.
The SumTotal button is only active if all search or query result records are displayedon the current page because the calculation is performed on the client and wouldotherwise lead to falsified results.
ViewAllFieldsYou can view and edit all fields of a current record using ViewAllFields.
The ViewAllFields button allows users to view and edit all fields of thecurrent record independent of the current field control definition. The ViewAllFieldsbutton calls the u8.Crm.Widgets.ExpandAllFieldsPopup.open function.
You can configure the ViewAllFields button for Expand, Tree and List views. Alter-natively, you can configure the A_ViewAllFields menu action into an info area'scontext menu.
By default, the ViewAllFields button is visible for administrative users only, i.e.users with access to the CRM process 1.5.1.3.108 "All Fields" (CRM process IDB_500000840).
The ViewAllFields button is only active if exactly one record is selected.
Query State Action = C_OneRowSelectedOrNoList.
319AUREA CONFIDENTIAL
Navigation Customizations

In the All Fields dialog users can
• enter new values or change existing ones according to his access rights as definedin the Aurea CRM win Rights module (see below).
• sor t the fields by name or number
• toggle between all fields, fields containing a value and modified fields
• display the following additional information:
• field number and "base" field number
• field label
• field type. For fur ther details, see Data Types in Aurea CRM on page 877
• catalog number for catalog fields
• field length (e.g. number of allowed characters for text fields)
• date of last modification
Changing a field value automatically checks the check box. Unchecking the checkbox resets the field value. Click (Reset) to undo all changes. For hierarchicalcatalogs, if both parent and child catalog are changed, resetting the change of eitherparent or child value resets the other value automatically.
Mandatory fields (Deny Deletion in the rights definition) are highlighted.
Note: The Readonly and Must-Field field attributes (as defined in CRM.Designer)have no effect on the All Fields dialog.
320AUREA CONFIDENTIAL
Chapter 2: Configuring CRM

The following fields are displayed read-only:
• links to parent records. (Links to additional records can be edited via the recordselector .)
• other decoded fields (e.g. rep fields)
• fields defined as read-only in the Aurea CRM win Rights module (Deny Update).
• the system fields Created on (4010), Updated on (4011), Added on StNo. (4012),DelCd. (4013) and CmCd. (4014) are displayed read-only for all users except theSU. For more information, see System Fields in the CRM.Core AdministratorGuide (https://help.aurea.com/crm/crm-core-admin-guide/crm-core-admin-guide/dita/topics/c_core_admin-6_7-System-Fields_crm.html).
• system fields with ID >= 4015 (Created at, Updated at etc.) are not editable evenfor the SU.
The following fields are hidden:
• fields with Deny Access defined in the Aurea CRM win Rights module
• custom fields (defined in CustomFields.xml)
• fields flagged as Vir tualCore are hidden if the Query.ShowVirtualFields WebConfiguration parameter is set to false. For fur ther details, see Query.ShowVir-tualFields.
HeadersYou can know about headers in Aurea CRM and how to configure them in designer.
Each page in Aurea CRM.Web contains one or more headers, e.g. the companysearch contains a Search, SearchResults and SearchSubList header (Related Data).
321AUREA CONFIDENTIAL
Navigation Customizations

There are two types of headers:
• Standard headers providing the standard header functionality of pages in AureaCRM.Web, e.g. Search, Expand, ExpandChildren etc., see Standard Headers onpage 337. Standard headers are always info area-specific.
• Special headers providing some special functionality, e.g. the various headersfor the Calendar page or the Participants header for MA, see Special Headerson page 342. Special headers can be info area-specific or info area-independent.
322AUREA CONFIDENTIAL
Chapter 2: Configuring CRM

Info area-specific headers are "collected" in header groups. For fur ther details,see Header Groups on page 323. If a header is not defined in a header group, thecorresponding header from the DEFAULT header group is used. For fur ther details,see DEFAULT Header Group.
Headers are assigned to pages in their respective configurations (see ExpandConfiguration on page 352) or via other headers. For details, see Related Data area(Header Info Areas) on page 329.
Header GroupsThe configuration of info area-specific headers is organized in Header Groups.
A header group contains one or more headers, e.g. the Search, Expand, SearchRe-sults headers for the selected info area. For fur ther details, see Designing Config-uration Units on page 64.
The following screenshot shows the header groups defined in the infoarea F1.
If a header is not defined in a header group, the corresponding header from theDEFAULT header group is used. For fur ther details, see DEFAULT Header Group.
The following screenshot shows the different headers in the F1 header group:
323AUREA CONFIDENTIAL
Navigation Customizations

DEFAULT Header Group
The DEFAULT header group contains minimum/standard header definitions validfor each info area. These headers are used as a fallback for info areas for whichno header (group) is defined.
Examples:
The Expand header of the DEFAULT header group contains Edit/Save/Cancel andthe various buttons for creating reports - this header is used by all info areas.
The Search header of the DEFAULT header group contains the following Formattext:{INFOAREAIMAGE} Search {INFOS} - this is also applicable for all info areas.
Naming Conventions
The default header group used for an info area is called <InfoAreaId>, e.g. FI isthe default header group for the Company info area.
To define headers for specific views or functions (e.g. headers to be used in theTree view or special headers to be used for displaying calendar items), use thefollowing naming conventions:
• <InfoAreaId>.Calendar: The Expand header configures the buttons for the calendarpopup view for this info area, e.g. MA.Calendar.
• <InfoAreaId>.SerialEntry: The page header for quick add pages, see SerialEntryon page 454.
• <InfoAreaId>.SerialEntry.List: The header of the item list on quick add pages.
• <InfoAreaId>.SerialEntry.SubList/SerialEntry.RelatedHeader: The headersconfiguring the Related Area of a quick add page.
• Y1.BuyingCenter: Used by the Buying Center Wall, see BuyingCenter on page399. The Expand header configures the page's header, the ExpandChildren headerconfigures the page's related data area.
324AUREA CONFIDENTIAL
Chapter 2: Configuring CRM

Configuring a HeaderLearn to configure header in this topic.
To configure a header:
1. Click Headers on the CRM.Designer main page (Navigation area) and select aninfo area.
2. Point at the header you want to configure, the Copy Header From Parent
Configuration ( ) button appears.
3. Click ( ). The edit and delete buttons appear.
4. Click Edit ( ). The configuration page displays.
5. Depending on the header, you can configure the following:
• general attributes (Text, Image etc.), see Header Attributes on page 326
• buttons calling specific functions, see Header Buttons on page 327
• Related Infoarea for Search and Expand views (SearchSubList, ExpandChildren),see Related Data area (Header Info Areas) on page 329
• the links area below an Expand view (ExpandOptions), see Header Links onpage 333
• extended page headers (e.g. for the Tree view) displaying more record details,see Page Headers on page 334
For examples of all header types and styles, see Headers on the SDK page.
325AUREA CONFIDENTIAL
Navigation Customizations

Header AttributesLearn how to configure header attribute.
For each header you can define:
• Text: The text displayed in the header, e.g. {INFOAREAIMAGE} Search {INFOS}.Enclose placeholders in {}.
Use the following placeholders:
• {RECORD}: The current record's table caption, see Table Captions on page 265.Use {RECORD:<Table Caption Name>} to specify another than the default tablecaption.
• {RECORDLINK}: Like {RECORD}, but as a link to that record. Clicking the linkexecutes the info area's default action.
• {RECORD[param]}: The table caption of the record whose uid is passed as param.
• {RECORDLINK[param]}: A link to the record whose uid is passed as param.
• {NORECORD:text}: A text (or text ID) to be displayed in the header. Use{NORECORD:text} together with {RECORD} in process headers.
• {IMAGE:imagename}: An image with the specified name. The image must beregistered in CRM.Designer, see Images on page 717
• {INFOAREAIMAGE}: Displays the info area's default image. The image must beregistered in CRM.Designer as INFOAREA_<InfoAreaId>.
Use {INFOAREAIMAGE[:size]} to specify the size: "n" for 24x24 px or "s" for16x16 px.
• {INFO}: The name of the current info area.
• {INFOs}: The plural name of the current info area as defined on the Info AreaLabels page, see Info Area Labels on page 275.
• {<InfoAreaId>}: The name of an info area.
• {<InfoAreaId>s}: The plural name of an info area as defined on the Info AreaLabels page.
• {SUBINFOS}: A drop-down list with configured sub-info areas, see Related Dataarea (Header Info Areas) on page 329.
• {LINKS}: The configured links displaying related data, see ExpandOptions.
• Image: The name of the image displayed left of the header text. The image mustbe registered in CRM.Designer, see Images on page 717.
Note: Headers support only one image: The image defined in Image overridesthe image defined in Text. If no Image is defined and the Text contains the table
326AUREA CONFIDENTIAL
Chapter 2: Configuring CRM

caption of a record ({RECORD}): If the table caption contains an image definition,this image is displayed.
• Show buttons with text: If checked, buttons are displayed with their definedlabel text, otherwise only the button image is displayed, see Header Buttons onpage 327.
• Show buttons in extra line: If checked, buttons are displayed in a separate line,i.e. below the header text.
• Use plain style (no borders): The header is displayed without the bottom line.
• Use page header style: Uses a style without background color.
This style is automatically applied, if a header actually is the header of a page,e.g. a Search header.
• Fixed tab width (SublistTabWidth): currently no function
Header ButtonsLearn to configure buttons into headers.
To configure buttons into headers (Example: MA SearchResults header):
1. Select a button from the drop-down list.
2. Click (Add).
3. Click on a button's name to change its settings, see Configuring a Button on page305. To create a new button, you have to switch to the Buttons page ofCRM.Designer.
327AUREA CONFIDENTIAL
Navigation Customizations

Use the / buttons to rearrange the order of the buttons.
Use separator and group elements to structure the buttons displayed in theheader, see Grouping Buttons on page 328.
Grouping ButtonsLearn to group buttons to avoid clutter on the user interface.
You can group several buttons configured in a header to achieve a less cluttereduser interface without removing functionality. Example: The various report buttonsare grouped in the default SearchResults header in UPDATE_DEFAULT.
Note: Buttons with the attribute Owner Draw Buttons cannot be part of a buttongroup.
Group Start/End
You can create a group of buttons using the invisible Group Start and Group End
buttons: All buttons in between are part of the group. The first button is displayedby default.
Use Group Start (with Text) to the display the button text of the first button orGroup Start (without Text) to hide it. The texts of the buttons in the drop-downlist are always displayed.
Users can select the other buttons from a drop-down list. The user's choice is stored,making the last used button visible by default.
To disable this behavior, create the Web Configuration parameter Header.KeepGroup-TopElement (type: Character). For fur ther details, see Header.KeepGroupTopElement.Set it to "true" or "1" to disable the storing of the last selection: The first button ofthe group is then always displayed on top.
Group Start (Menu)
Alternatively you can use the Group Start (Menu) button to create a button group.
This displays a context menu button . All buttons configured below the GroupStart (Menu) button are part of that context menu.
328AUREA CONFIDENTIAL
Chapter 2: Configuring CRM
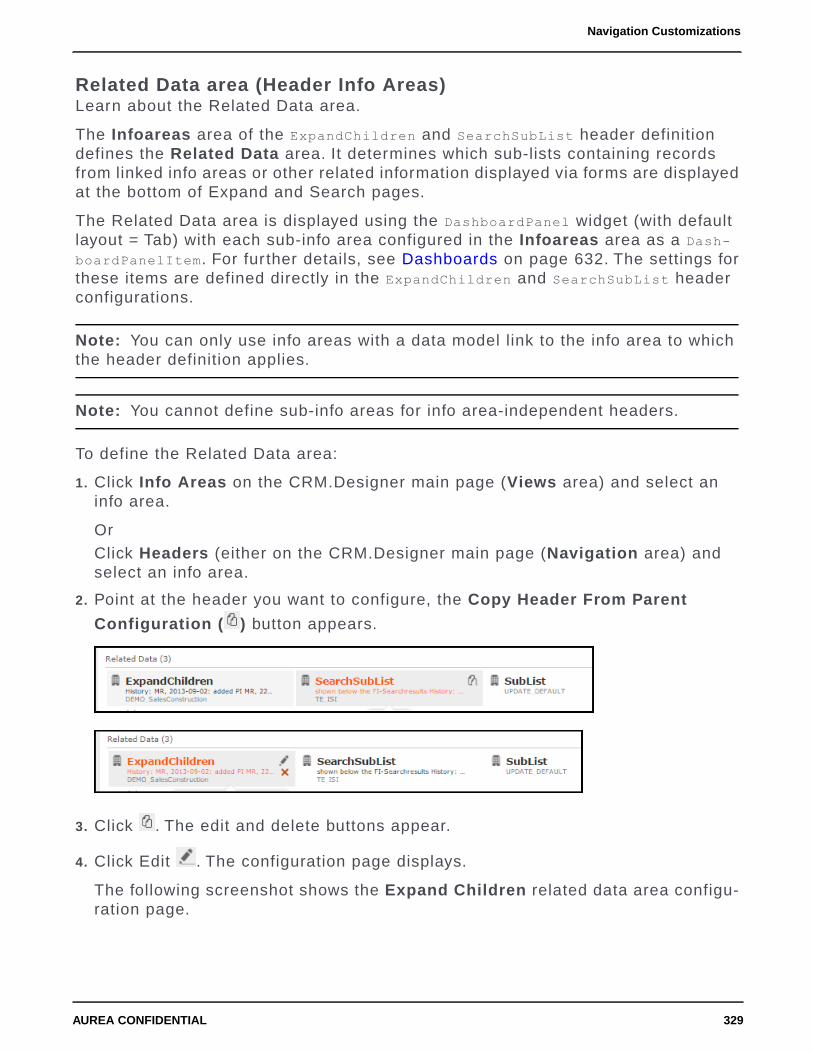
Related Data area (Header Info Areas)Learn about the Related Data area.
The Infoareas area of the ExpandChildren and SearchSubList header definitiondefines the Related Data area. It determines which sub-lists containing recordsfrom linked info areas or other related information displayed via forms are displayedat the bottom of Expand and Search pages.
The Related Data area is displayed using the DashboardPanel widget (with defaultlayout = Tab) with each sub-info area configured in the Infoareas area as a Dash-boardPanelItem. For fur ther details, see Dashboards on page 632. The settings forthese items are defined directly in the ExpandChildren and SearchSubList headerconfigurations.
Note: You can only use info areas with a data model link to the info area to whichthe header definition applies.
Note: You cannot define sub-info areas for info area-independent headers.
To define the Related Data area:
1. Click Info Areas on the CRM.Designer main page (Views area) and select aninfo area.
Or
Click Headers (either on the CRM.Designer main page (Navigation area) andselect an info area.
2. Point at the header you want to configure, the Copy Header From Parent
Configuration ( ) button appears.
3. Click . The edit and delete buttons appear.
4. Click Edit . The configuration page displays.
The following screenshot shows the Expand Children related data area configu-ration page.
329AUREA CONFIDENTIAL
Navigation Customizations
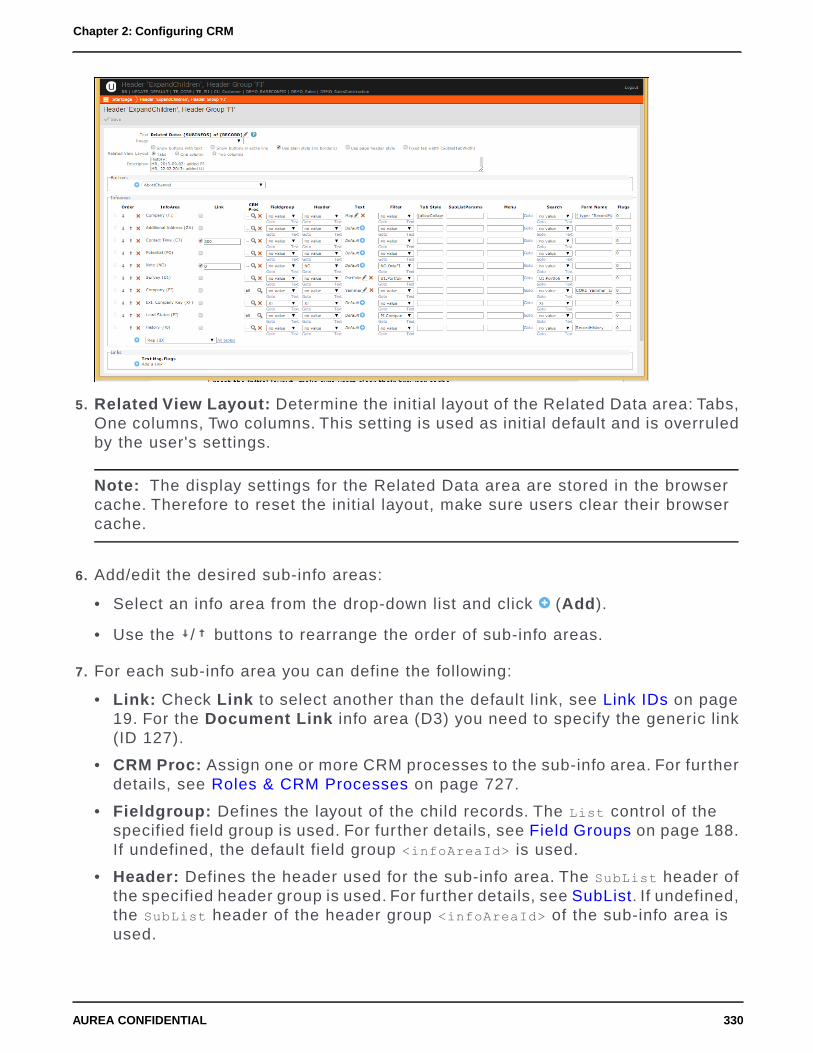
5. Related View Layout: Determine the initial layout of the Related Data area: Tabs,One columns, Two columns. This setting is used as initial default and is overruledby the user's settings.
Note: The display settings for the Related Data area are stored in the browsercache. Therefore to reset the initial layout, make sure users clear their browsercache.
6. Add/edit the desired sub-info areas:
• Select an info area from the drop-down list and click (Add).
• Use the / buttons to rearrange the order of sub-info areas.
7. For each sub-info area you can define the following:
• Link: Check Link to select another than the default link, see Link IDs on page19. For the Document Link info area (D3) you need to specify the generic link(ID 127).
• CRM Proc: Assign one or more CRM processes to the sub-info area. For fur therdetails, see Roles & CRM Processes on page 727.
• Fieldgroup: Defines the layout of the child records. The List control of thespecified field group is used. For fur ther details, see Field Groups on page 188.If undefined, the default field group <infoAreaId> is used.
• Header: Defines the header used for the sub-info area. The SubList header ofthe specified header group is used. For fur ther details, see SubList. If undefined,the SubList header of the header group <infoAreaId> of the sub-info area isused.
330AUREA CONFIDENTIAL
Chapter 2: Configuring CRM

• Text: Defines a label for the sub-info area. If undefined, the info area name(plural) is used. Use this for filtered sub-lists or for a special relation likedisplaying "sub-projects" of a project.
• Filter: You can specify a filter to filter the child records.
Alternatively, you can enter a link name, see Link Names in JavaScript on page22. Example: If you specify $Link[FI] for the MA sub-info area of the PR Ex-pandChildren header, the Activity sub-list contains all activities linked to thecompany and not just those linked to the current offer record.
Note: You can either specify a filter or a link name. A combination of both isnot possible.
• Tab Style: Defines display options for the sub-info areas (i.e. DashboardPan-elItems) using the JSON syntax, e.g. {allowRemove: false,allowCollapse:
true}.
The following options are available:
• allowCollapse: If set to true, the user can collapse the item (default: true).
• allowRemove: If set to true, the user can remove the item (default: true).
• collapsed: Determines the initial state (collapsed | expanded) of the item(default: false).
• visible: Determines whether the item is initially visible (default: true).
Tab Style also allows you to specify a CSS class to color-code a tab. MultipleCSS classes can be separated by a space.
To ensure that the assigned style is always visible (and not just when the tabis active), add !important to the style elements, for example:.tab_MyRedText{font-weight: bold !important;color: #b40202 !important;}
Note: The TabStyle field is limited to 50 characters.
• SubListParams: Defines the appearance and behavior of the sub-list. Forfur ther details, see ListParams on page 374.
Note: SubListParams defined in the header are overridden by the correspondingsubListParams defined in the Search action. For fur ther details, see Search.
331AUREA CONFIDENTIAL
Navigation Customizations

• Menu: Defines the context menu displayed for the records in the sub-list. Forfur ther details, see Context Menus on page 292. If undefined, the context menuspecified in the respective Search&List configuration is used.
• Search: The name of the Search&List configuration used for the sub-info area.For fur ther details, see Search&List Configuration on page 365.
• Form Name: A form or widget to be displayed. You can enter one of thefollowing:
• a form's name, e.g. RecordHistory. For fur ther details, see Displaying aRecord's History on page 824
• a JavaScript object specifying a form with at least a property formName, e.g.{formName: "MyForm",<more properties>}
• a JavaScript object specifying a widget, e.g. {type: "RecordMap", options:
{size: {height: 400}}}
In addition you can specify under which conditions the Related Data area dis-plays records using the infoAreaID property, e.g. {formName: "SerialEntry.Of-
fer.RelatedForm", infoAreaId: "+"} - this displays the Related Data area ofthe generic Offer quick add page (BTB) regardless of which record is selectedin the list.
For more information, syntax and examples, see the ar ticle “How to define re-lated view” at https://support.aurea.com.
• Flags: Defines additional settings. The following options are available:
• ENABLECONFIG (1): Allows the user to configure the sub-list.
• COMPANYRELATED (2): Only for sub-lists of a linked company. If this flag isset, only records that are directly linked to the company are displayed, recordslinked to a person in that company are not displayed. (Use this e.g. for a MAsub-list to only display company-related activities).
• CHILDRELATION (4): Lists all children of an info area that has a hierarchydefined. Example in UPDATE_DEFAULT: The ExpandChildren header for A1contains a tab listing sub-tasks.
Flags can be combined by adding them. 5 would mean that flags 1 and 4 areset.
The following screenshot shows the resulting headers in the Search Companiespage. In the Related Data area it is displaying the google map showing the locationof the selected company.
332AUREA CONFIDENTIAL
Chapter 2: Configuring CRM

Header LinksHeader links are used in the ExpandOptions header to define what is displayedbelow the details mask of an Expand page.
The following screenshot shows the MA ExpandOptions header configuration page.The header’s Links area shows the three links added for Participants, Parent Data,and Related Data.
The following screenshot shows the result of the configuration where the three linkedareas Participants, Parent Data, and Related Data are displayed in the activitywindow of a user.
333AUREA CONFIDENTIAL
Navigation Customizations

Define {LINKS} as the header's Text. The {LINKS} placeholder is replaced by theoptions defined under Links.
For each link option, you need to define the following:
• Text: The text to be displayed as a link.
• Msg.: If a user clicks a link, the header calls the page's message call-back functionto handle the click. The following messages are available on the Expand page:
• Message "0": Displays Processes & Links, i.e. the parent records of the currentrecord and their context menus.
• Message "1": Displays Related Data using the ExpandChildren header withthe related sub-info areas. For fur ther details, see Related Data area (HeaderInfo Areas) on page 329.
• Message "2": Displays Participants of an activity if selected.
• Flags: If all flags are set to zero, the link with Message "0" (Processes & Links)assigned is opened by default when the user loads the page. If you want anotherlink option to be opened by default, set the flag of this option to "1". In the exampleabove, Participants is the option which is displayed when the page is opened.
Page HeadersUse page headers to display important information about a parent record, in orderto provide context information.
A page header consists of a header text, read-only record information (MiniDetailsview) and optional buttons displayed in an extra row or as a context menu.
The following screenshot shows the FI Tree page header of a Company view.
334AUREA CONFIDENTIAL
Chapter 2: Configuring CRM
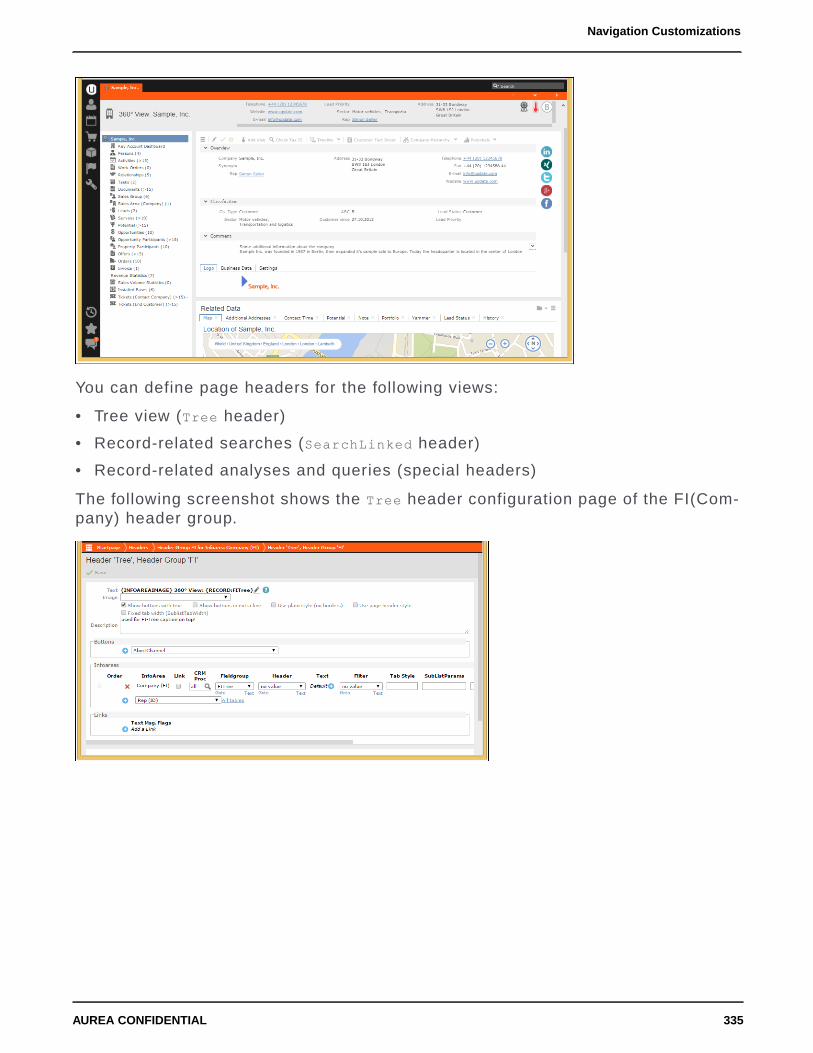
You can define page headers for the following views:
• Tree view (Tree header)
• Record-related searches (SearchLinked header)
• Record-related analyses and queries (special headers)
The following screenshot shows the Tree header configuration page of the FI(Com-pany) header group.
335AUREA CONFIDENTIAL
Navigation Customizations

To configure a page header:
1. Text: If undefined, the default table caption is used. You can either reference aspecific table caption (Example in UPDATE_DEFAULT: {INFOAREAIMAGE} 360°
View: {RECORD:FITree} for the Tree header for FI) or enter a header Text. Forfur ther details, see Header Attributes on page 326 and Table Captions on page265.
If taken from the table caption the header text supports line breaks and differentformatting for the 1st and subsequent lines. For fur ther details, see Table Captionson page 265.
Text overrules the table caption.
If you specify an Image, this overrides the image defined in the Text.
2. Infoareas: To configure the read-only details for the page header, specify an infoarea with a Fieldgroup: The MiniDetails control definition of that field group isused (FITree in the above example).
Images, fields with/without labels and icons are supported. For fur ther details,see Field Attributes on page 221. Optional graphical elements defined by the LargeImage Template field attribute are displayed side by side instead of below eachother For fur ther details, see Large Image Template on page 231.
Note: Restriction: The MiniDetails control used in the page header may nothave more than 4 rows.
336AUREA CONFIDENTIAL
Chapter 2: Configuring CRM

3. Buttons: If Show buttons in extra line is disabled, they are grouped in a contextmenu in the bottom right corner of the header. If Show buttons in extra line isenabled, they are displayed as buttons in a second row.
Note: If neither a table caption with line breaks nor an info area is defined, a"normal" header is displayed.
Standard HeadersFind the list of standard headers in this topic.
Below is the list of standard headers:
Search/SearchLinked
Search pages displays the Search or SearchLinked header at the top of the page.
If a Search page is not linked to a record (e.g. the Company search called from theapplication menu), the Search header is used.
The SearchLinked header is used for linked searches, i.e. a link to parent record isdefined in the Search action. For fur ther details, see link/linkId. Example: All MAlinked to the current FI in a Tree view:
As you can define placeholders in the header text (see Header Attributes on page326 ), the definitions of these headers are info area-independent, i.e. the Search andSearchLinked headers from the DEFAULT header group can be used. For fur therdetails, see DEFAULT Header Group.
337AUREA CONFIDENTIAL
Navigation Customizations

SearchResults/SearchResultsLinked/SearchResultsSelect
The SearchResults header is displayed between the search mask and the resultslist. For linked searches, the SearchResultsLinked header is used, if available.
Fallback: SearchResults
This header usually contains the text "Search Results" and allows users to navigatewithin the result list. This header may also contain buttons. For fur ther details,see Header Buttons on page 327. If the user clicks a button in the SearchResultsheader, the button's action is executed on the record(s) selected in the list. Thelinked record (or parent record) referenced in the action is the page's (optional)linked record. For a more detailed explanation, see Defining an Action on page 287.
The SearchResults header contains a standard New button to create a new recordof the same type with the same link (if a linked record exists). This button uses callsthe ExpandNew action with the infoAreaId parameter for the record's info area andthe link parameter as link for the new record. For fur ther details, see Expand onpage 578.
When using this standard New button in the SearchResults header, you cannot usethat header for both a search star ted from the application menu and a searchstar ted from a context menu for most info areas: Child info areas need a linkedrecord, e.g. a company or person, which is not available from the application menu.In this case you need two different SearchResults headers: one for the action calledfrom the context menu containing the standard New button, and one when the pageis called from the application menu containing a New button launching a processor not containing a button.
To implement two different headers, either define two Search&List configurationsor define an alternate SearchResults header in the Search action.
Example in UPDATE_DEFAULT: When creating a new activity (MA) from the appli-cation menu, the SearchResults header of header group MA is used. The New buttonin this header launches the NewAppointment process, where the user has to selecta parent record for the activity.
When creating a new activity from a context menu (e.g. via A_AllAppointments inM_Company), the SearchResults header of header group MA-KP,FI is used. Thisheader contains the standard New button described above.
338AUREA CONFIDENTIAL
Chapter 2: Configuring CRM

If a Search action is called within a process and no special SearchResults headeris defined replacing the standard SearchResults header, the SearchResultsSelectheader is used.
Example in UPDATE_DEFAULT: The SearchResultsSelect header in header groupKP contains two buttons: The WizardNew button fires event 2, the WizardSearchVia-Company button fires event 3.
SearchSubList
The SearchSubList header is displayed below the search results
list.
It controls which related data (e.g. linked info areas) is displayed when a recordfrom the search results list is select and how the sub-lists (i.e. records from childinfo areas) are displayed. For fur ther details, see Related Data area (Header InfoAreas) on page 329. The header text and buttons for each sub-info area are definedper sub-info area in the corresponding SubList headers. For fur ther details,see SubList.
SubList
The SubList header defines the buttons available for sub-lists.
The layout of the sub-list rows is defined in the Infoareas section of the SearchRe-sults or ExpandChildren header of the parent info area (Fieldgroup property). Forfur ther details, see Related Data area (Header Info Areas) on page 329.
339AUREA CONFIDENTIAL
Navigation Customizations

New
The New header is displayed when creating new records. Expand action template inNew mode.
The default text is "New <Info Area>", e.g. "New Company".
A generic New header containing a Save button is defined in the DEFAULT headergroup. For fur ther details, see DEFAULT Header Group. The New header has theShow buttons with text and Show buttons in extra line check boxes checked:The buttons are displayed in a separate line with the button text visible.
For some info areas a special New header with a Match-up button is used instead.This calls the match-up function instead of simply saving the new record. Examplesin UPDATE_DEFAULT: FI, KP.
To include the linked record in the header text, you need separate New headers forlinked info areas. This is not defined in the UPDATE_DEFAULT configuration, be-cause the link is always displayed below the details control (Parent Data). For fur therdetails, see ExpandOptions.
Expand
Expand pages display the Expand header at the top of the page.
ExpandChildren
The ExpandChildren header is displayed below the Expand view when Related Datais selected.
340AUREA CONFIDENTIAL
Chapter 2: Configuring CRM

It controls which related data (e.g. linked info areas) is displayed and how the sub-lists (i.e. records from child info areas) are displayed. For fur ther details, see RelatedData area (Header Info Areas) on page 329. The header text and buttons for eachsub-info area are defined per sub-info area in the corresponding SubList headers.For fur ther details, see SubList.
ExpandOptions
The ExpandOptions header defines the Related Data area below the details mask,allowing the user to view related records in the lower half of the page. You candisplay Parent Data, i.e. the parent links of the record and their context menu, orRelated Data containing available sub-lists. For appointments the Participantsarea is available as well.
For information on configuring the ExpandOptions header, see Header Links on page333.
For information on configuring the buttons for the Participants area, see ParticipantsHeader (MA).
The parent records that are displayed in the Parent Data area is determined by theExpand configuration of the current record (View Parent Relations), see ExpandConfiguration on page 352.
Headers for TreeViews
At the top of a Tree page, the Tree header is displayed similar to the Expand headerof Expand pages.
341AUREA CONFIDENTIAL
Navigation Customizations

When clicking on an info area node in the tree, a Search view for this info area isdisplayed using the SearchLinked and SearchResultsLinked headers from theheader group specified in the corresponding Search&List configuration. For fur therdetails, see SearchResults/SearchResultsLinked/SearchResultsSelect and Info AreaSettings. If no SearchResultsLinked header is defined, the SearchResults headeris used as a fallback.
When clicking on an existing record in the tree, an Expand view with data of thatrecord is displayed using the Expand header from the header group specified in thecorresponding Expand configuration. For fur ther details, see Expand on page 578and Record Settings.
When creating a new record from within the tree, the New header from the headergroup specified in the corresponding Expand configuration is used. For fur ther details,see New and NewCommand on page 317.
SimpleList
The SimpleList header is used for the section headers in the Favorites popup, inthe Checked Out Documents popup list and as header of Most Recently Used listson Process Ask pages.
The default text is "{INFOAREAIMAGE} {INFOS}".
Special HeadersSpecial headers are the special functionality header.
Special headers provide some special functionality, e.g. the various headers for theCalendar page or the Participants header for MA.
Special headers can be info area-specific (Participants header for MA, variousspecial headers for quick add pages etc.) or info area-independent (headers usedby the calendar, headers for processes etc.).
342AUREA CONFIDENTIAL
Chapter 2: Configuring CRM

Below are the list of special headers:
Analysis Headers
• AnalysisHeader: Contains the text and buttons for the Analysis Editor.
• AnalysisHeaderRecord: Used instead of AnalysisHeader, if the analysis was calledfrom a record's context menu. This Header displays the text "Analysis <name>for <record>" instead of just "Analysis <name>".
• AnalysisFooter: Contains the AnalysisEdit_Run button in the bottom right cornerof the Analysis Editor.
• AnalysisResult: The analysis result's header containing the name of the analysisand the Show Chart and Show Table toggle buttons (Toggles(M_AnalysisRe-sultViews)).
• AnalysisResultRecord: Used (instead of AnalysisResult) if a link record is passedto the analysis result. For fur ther details, see link/linkId.
Calendar Headers
CalendarAdjustments
This special header controls the filter options on the Calendar sidebar. It containsthe RepSets and FilterSets buttons for displaying the rep and filter set drop-downlists.
Any other button configured in this header is not be visible.
CalendarHeader/DayWeekPlanningCalendar
These special headers contain the buttons to control the calendar view (Day, WorkWeek, etc. configured by Toggles(M_CalendarViews)) for the Calendar and theDay&Week Planning pages respectively. For fur ther details, see Calendar on page402 and DayWeekPlanning on page 410.
Users can select multiple appointment records on the Calendar/Day&Week Planningpages: You can add buttons for exporting these records or launching a process thatmakes use of the selected records. For fur ther details, see ProcessAsk Action Pa-rameters. If no appointment record is selected, all records of the current view areused for the export/process.
343AUREA CONFIDENTIAL
Navigation Customizations

The column names for exports from the Calendar/Day&Week Planning pages areconfigured in the calendar_export_text Text Group. For fur ther details, see Textson page 176.
CalendarSidebar
This special header contains the upcoming items definition for the Calendar sidebar,specifying which Activities, To-Dos, Tasks and Absences are listed on the sidebar.
The following settings are available:
• Text: Defines the caption to be displayed above the list, e.g. "My next activities"for MA.
• Filter: Select a Filter for each info area to determine which records are displayed(default XX.Sidebar for all four info areas).
You can set the filters to be used via the Web Configuration parameter as well(by defining the options as <InfoAreaId>.<filtername>). The filters defined inthe CalendarSidebar header overrule the filters defined in the Calendar.Side-barItems Web Configuration parameter.
• SubListParams: Define the sor t order of the upcoming items using the JSONsyntax. For fur ther details, see http://www.json.org.
Examples
ascending:
{"sortFields":["DueDate","DueTime"]}
descending:
{"sortFields":["-DueDate","-DueTime"]}
Use the Web Configuration parameter Calendar.SidebarItems to determine whichupcoming items are displayed in the calendar sidebar. For fur ther details, see Cal-endar.SidebarItems. Removing them from the header definition has no effect.
Table captions for upcoming calendar items: <InfoAreaId>.Sidebar
Fallback: <InfoAreaId>.Calendar - if this does not exist either, the default tablecaption <InfoAreaId> is used.
Use the Web Configuration parameter Calendar.SidebarMaxRecords to determinethe number of upcoming items to be listed. For fur ther details, see Calendar.Side-barMaxRecords.
CircleOfInfluence
This special header is used by the relationship graph (Circle Of Influence). For fur therdetails, see CircleOfInfluence.
344AUREA CONFIDENTIAL
Chapter 2: Configuring CRM

NotificationCenter
The special header NotificationCenter contains the configuration of AureaCRM.Web's Notification Center ("Inbox").
The sub info areas in the header definition define which tabs are shown in the Inbox(default: A1, ER, MD, TD). The order of the sub info area definitions determines theorder of the tabs. The definition of the System tab (for displaying system notifica-tions) uses a dummy info area that is replaced by the Form parameter.
The value specified in the Web Configuration parameter Jobs.PollingIntervaldetermines the interval for polling for new Messages/Reminders/Tasks/To-Dos. Forfur ther details, see Jobs.PollingInterval.
The timeout for displaying notifications can be configured per notification type usingthe Web Configuration parameters Notification.TimeoutError, Notification.Time-outInformation and Notification.TimeoutWarning. For fur ther details, see Notifi-cation.TimeoutError/Information/Warning.
For details on customizing notifications in Aurea CRM.Web (subject, text, target,facility, severity etc.), see the ar ticle “The Notification service” at https://sup-port.aurea.com.
Participants Header (MA)
The special header Participants configured in header groups MA, MATree, MAEmailetc. contains the buttons displayed in the Participants area of activity (MA) records.
Questionnaire
This special header is used by the Survey page (surveyconduct.aspx). By default,the header text consists of the name of the survey plus description (Text field inF1).
RelatedDashboardPanel
This special header contains the buttons allowing users to customize the RelatedData area for Search and Expand views. For fur ther details, see Related Data area(Header Info Areas) on page 329. For Expand views these buttons are automaticallyappended to the ExpandOptions header.
345AUREA CONFIDENTIAL
Navigation Customizations
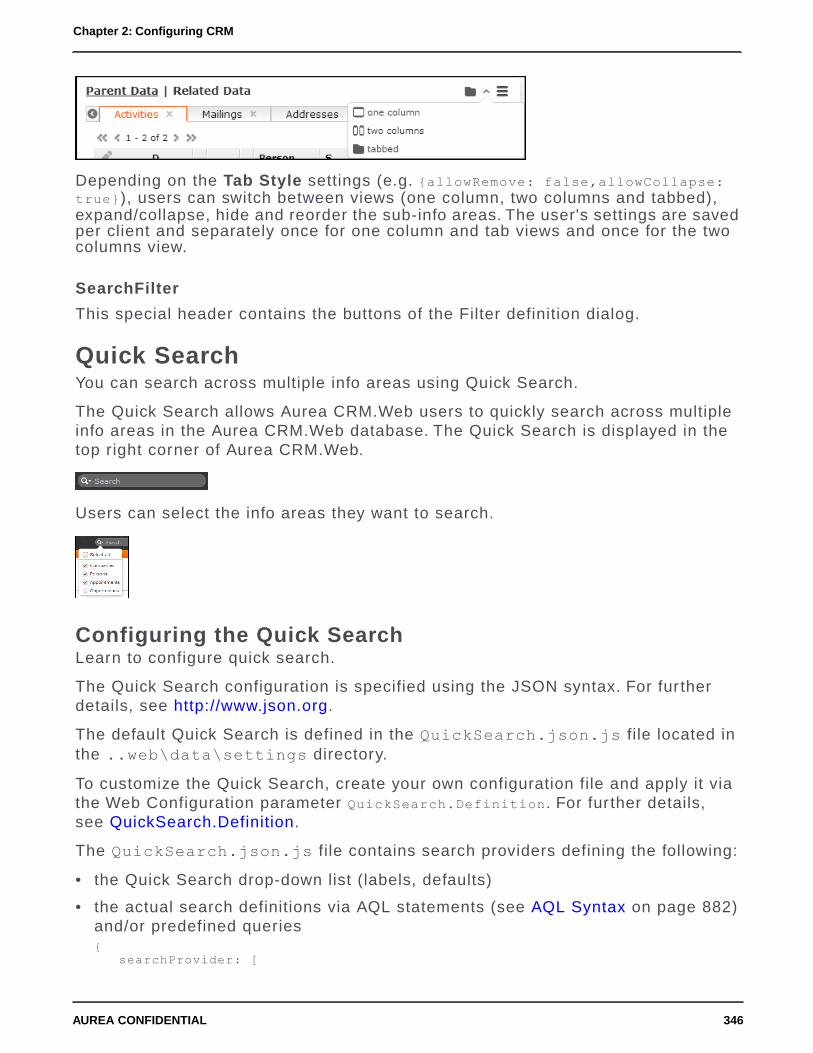
Depending on the Tab Style settings (e.g. {allowRemove: false,allowCollapse:true}), users can switch between views (one column, two columns and tabbed),expand/collapse, hide and reorder the sub-info areas. The user's settings are savedper client and separately once for one column and tab views and once for the twocolumns view.
SearchFilter
This special header contains the buttons of the Filter definition dialog.
Quick SearchYou can search across multiple info areas using Quick Search.
The Quick Search allows Aurea CRM.Web users to quickly search across multipleinfo areas in the Aurea CRM.Web database. The Quick Search is displayed in thetop right corner of Aurea CRM.Web.
Users can select the info areas they want to search.
Configuring the Quick SearchLearn to configure quick search.
The Quick Search configuration is specified using the JSON syntax. For fur therdetails, see http://www.json.org.
The default Quick Search is defined in the QuickSearch.json.js file located inthe ..web\data\settings directory.
To customize the Quick Search, create your own configuration file and apply it viathe Web Configuration parameter QuickSearch.Definition. For fur ther details,see QuickSearch.Definition.
The QuickSearch.json.js file contains search providers defining the following:
• the Quick Search drop-down list (labels, defaults)
• the actual search definitions via AQL statements (see AQL Syntax on page 882)and/or predefined queries{
searchProvider: [
346AUREA CONFIDENTIAL
Chapter 2: Configuring CRM
new u8.Crm.SearchProvider({isActive: true,label: u8.services.schema.idToLabelPlural("FI"),useFirstSearchTermForAllParameters: true,query: new u8.Crm.QueryCommand({
statement: "select (Company, City, Country) from (FI as root) where(Company = '$parValue' or Synonym = '$parValue' or Country = '$parValue')",
catalogValueEncoding: "Text"})}),new u8.Crm.SearchProvider({
isActive: true,label: u8.services.schema.idToLabelPlural("MA"),maxRows: 10,query: new u8.Crm.QueryCommand({
name: "QuickSearchPredefinedQueryName"})})
]}
Each search provider specifies an entry of the Quick Search drop-down list (i.e. aninfo area to be searched). The Select all option is hard-coded and cannot be re-moved.
In the BTB vertical the standard Quick Search definition contains FI, KP, MA andY1. Y1 is not searched by default. The standard definitions for the OTC and FSverticals contain FI,KP and MA.
Note: Info areas that are locked in the current user's access rights definition arenot searched.
The following parameters are used:
DescriptionTypeName
Determines if the search provider is used bydefault (i.e. the entry in the Quick Search drop-down list is checked).
Default: false
booleanisActive
Sets the title of the quick search result for theprovider.
stringlabel
347AUREA CONFIDENTIAL
Navigation Customizations

DescriptionTypeName
Optional: The maximum number of rows to bedisplayed as a search result.
Default: 5.
If more than <maxRows> records are found, thetitle displays (<maxRows>+) as a hyperlink.
Clicking on the link displays all search resultsin a QueryRun page.
intmaxRows
If set to true, the first search term entered isused for all search fields, e.g. to handlesearches for person names consistently.
Default: false
booleanuseFirst-
SearchTermForAll-
Parameters
The query that is executed (define the queryas <name> or <statement>).
u8.Crm.QueryCommandquery
The name of a predefined query.stringname
The query statement specified using AQL,see AQL Syntax on page 882. (The $parValueobject contains the search string entered bythe user).
$parValue automatically adds a wildcard * atthe end of the search string (string*). To en-close the search string in wildcards (*string*),use *$parValue in the query statement.
Note: *$parValue is only supported by textfields and only in AQL queries (i.e. not in pre-defined queries).
stringstatement
The Quick Search definition only supports text, number and variable catalog fields.These field types may be combined in one definition (in both the search and outputfields. If an unsupported field type is used, a warning is written to the client log.
348AUREA CONFIDENTIAL
Chapter 2: Configuring CRM

To hide the Quick Search, remove the value (path and file name) from the Quick-Search.Definition Web Configuration parameter or remove all searchProviderdefinitions from the *.js file.
Note: Since the Quick Search queries multiple fields from multiple info areas, makesure to use indexed fields and limit the amount of info areas and fields to avoidperformance problems.
349AUREA CONFIDENTIAL
Navigation Customizations

3Using CRMCRM.Web is easy to use and offers numerous features to facilitate your dailyactivities.
Action TemplatesLearn about the various action template and their configuration and uses.
On the CRM.Designer main page, click the Action Templates button to display allavailable action templates.
The Callable from setting determines in which context an action template can beused, e.g. "Application menu, context menu or process", "Data Provider". Accordingto this setting the action templates are listed in the Action Template drop-downlist.
Example - when configuring a menu action. For fur ther details, see Defining an Actionon page 287.
350AUREA CONFIDENTIAL
Chapter 3: Using CRM

Note: Legacy action templates from update.seven are flagged as deprecated. Whencustomizing an action that uses a deprecated action template, this action templateis displayed at the end of the list of available action templates prefixed with an "!".Change the action to use a valid Aurea CRM action template instead.
Note: Legacy action templates exist for migration reasons only and should no longerbe used with Aurea CRM.Web, as very limited bug fixing and no new features areprovided.
The following chapters provide information about Aurea CRM.Web's standard actiontemplates and their parameters.
ExpandThe Expand action template allows a record to be displayed in details view.
The Expand action template (expand.aspx) can be used for actions defined formenu entries, buttons and within processes. For fur ther details, see Defining anAction on page 287. The contents and functionality of an Expand page is configuredvia the Expand configuration referenced in the action. For fur ther details, see ExpandConfiguration on page 352.
The Expand action's functionality (show, new, update etc.) is determined by the modeparameter. For fur ther details, see mode.
351AUREA CONFIDENTIAL
Action Templates

UPDATE_DEFAULT contains predefined action templates for "show" and "new"modes:
• Expand: Displays a record for a given info area and record ID in details view.
Note: Set relationName to $Parent to display a record's parent record.
• ExpandNew: Creates a new record from a given info area with up to two optionallinked records.
Expand ConfigurationLearn about the use of Expand Configuration
The Expand configuration is used for displaying the following views of a record:
• Expand view (Tab view)
• QuickView - a read-only popup view of the record.
• Popup Expand view - an editable popup view of the record, in UPDATE_DEFAULTe.g. used for calendar items. For fur ther details, see createNewPopup.
• read-only Expand view on Process Ask pages. For fur ther details, see ProcessAskon page 579.
352AUREA CONFIDENTIAL
Chapter 3: Using CRM

The following naming conventions are used for Expand configurations:
• When a record is opened in Quick View, the Expand configuration <In-foAreaId>.QuickView is used.
Fallback: <InfoAreaId>.
• The Expand view of a calendar item opens as a popup (single click on the item'sicon): The Expand configuration used for this popup is <InfoAreaId>.Calendar .UPDATE_DEFAULT contains the following definitions: A1Cal, A3Cal, MACal, TDCal
Fallback <InfoAreaId>Cal - if this does not exist either, <InfoAreaId> is used.
An Expand configuration consists of the following items:
• Field group: Defines the layout of the details view. The Details control of thespecified field group is used. For fur ther details, see Field Groups on page 188.
• Header group: Defines the header group of the Expand or New header dependingon the mode (see mode) displayed above the details control. For fur ther details,see Standard Headers on page 337. The ExpandOptions header of this headergroup defines the display options for the bottom half of the window. The Expand-Children header of this header group defines which related data (e.g. linked infoareas) is displayed.
• Table caption: Defines the texts displayed in the header. For fur ther details,see Table Captions on page 265. Define table captions when using alternate expanddefinitions to display different header texts depending on the record type. Forfur ther details, see Alternative Expand Configurations.
• Menu: Defines the context menu displayed for the record. For fur ther details,see Context Menus on page 292.
• InfoArea Default Action: Defines the default action that is executed when a userdouble-clicks on a record in a list or clicks on a link in a header. For fur ther details,see Default Action on page 289. Define the default action for each info area in thedefault Expand configuration (i.e. the configuration with the same name as theinfo area ID e.g. MA for activities).
If you do not specify an InfoArea Default-Action (i.e. "default" selected), theaction defined in the Record.DefaultAction Web Configuration parameter is used.For fur ther details, see Record.DefaultAction.
Note: Do not define A_ShowDefaultAction as default action. This results in aninfinite loop.
• InfoArea Default-Menu: Defines the info area's default menu. This menu is usedas a fallback for lists and sub-lists. The Expand page always uses the menuselected under Menu.
• Description: An internal description only visible in CRM.Designer.
• View Parent Relations: Contains the parent records of the current record.
353AUREA CONFIDENTIAL
Action Templates

The existence of each configured parent relation is checked on the server. If arecord is linked to a parent record, the link to this parent is displayed in the ParentData area and in D_OpenLinked, if configured. For fur ther details, see ExpandOp-tions and D_OpenLinked.
Note: To display the records of the Parent Data area as links and with contextmenus and icons, you need to define Expand configurations for those info areas. Ifno Expand configuration exists, the parent records are displayed as text using theinfo area's default table caption if no table caption exists, the reference text definedin Aurea CRM win is used.
Note: If both Person (PE) and Person in Company (KP) are defined as parentrelations and if a person is linked to a company, KP is displayed. Otherwise PE isdisplayed.
• Breadcrumb-Parent: Allows you to define the parent info area that is shown inthe breadcrumb trail since breadcrumbs are hierarchical, you can specify onlyone parent.
Further parent info areas are determined automatically from the data model and/orthe breadcrumb definition of the parent info areas. If you do not specify aBreadcrumb-Parent, no breadcrumb trail is visible. The breadcrumb trail displaysthe standard table caption of the selected info area unless you specify a differentTablecaption-Name. Use the LinkId to specify another than the default link. Forfur ther details, see Specifying Link IDs on page 20.
Note: If "Person in Company (KP)" is selected as breadcrumb parent and no KPrecord is found, the person record (PE) is automatically used instead.
• Alternatives: Allows the implementation of "filter masks" i.e. different masksdepending on the values of the current record. For fur ther details, see AlternativeExpand Configurations.
QuickView
The QuickView consists of a read-only popup view of a record.
354AUREA CONFIDENTIAL
Chapter 3: Using CRM
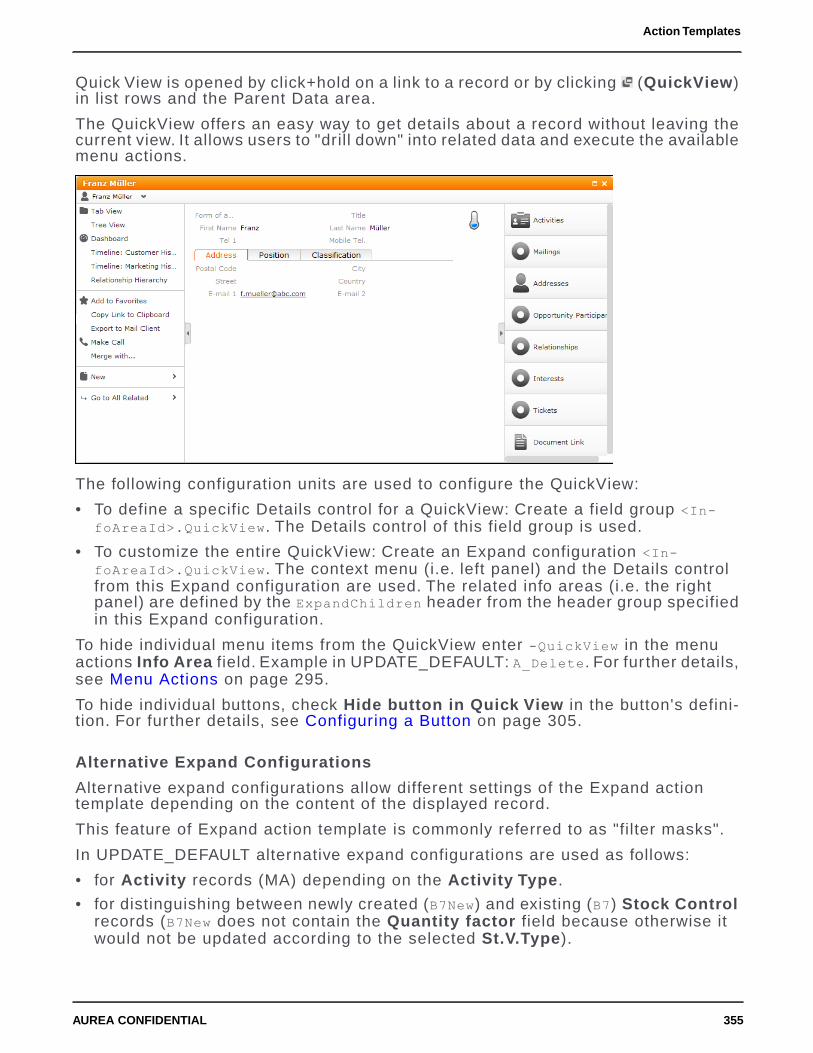
Quick View is opened by click+hold on a link to a record or by clicking (QuickView)in list rows and the Parent Data area.
The QuickView offers an easy way to get details about a record without leaving thecurrent view. It allows users to "drill down" into related data and execute the availablemenu actions.
The following configuration units are used to configure the QuickView:
• To define a specific Details control for a QuickView: Create a field group <In-foAreaId>.QuickView. The Details control of this field group is used.
• To customize the entire QuickView: Create an Expand configuration <In-foAreaId>.QuickView. The context menu (i.e. left panel) and the Details controlfrom this Expand configuration are used. The related info areas (i.e. the rightpanel) are defined by the ExpandChildren header from the header group specifiedin this Expand configuration.
To hide individual menu items from the QuickView enter -QuickView in the menuactions Info Area field. Example in UPDATE_DEFAULT: A_Delete. For fur ther details,see Menu Actions on page 295.
To hide individual buttons, check Hide button in Quick View in the button's defini-tion. For fur ther details, see Configuring a Button on page 305.
Alternative Expand Configurations
Alternative expand configurations allow different settings of the Expand actiontemplate depending on the content of the displayed record.
This feature of Expand action template is commonly referred to as "filter masks".
In UPDATE_DEFAULT alternative expand configurations are used as follows:
• for Activity records (MA) depending on the Activity Type.
• for distinguishing between newly created (B7New) and existing (B7) Stock Controlrecords (B7New does not contain the Quantity factor field because otherwise itwould not be updated according to the selected St.V.Type).
355AUREA CONFIDENTIAL
Action Templates

To define alternate expand configuration, at least two Expand configurations for aninfo area must exist (e.g. MATel and MALetter).
1. Select a field from the Add Condition for this Field drop-down list.
2. Click to define the conditions to be met and assign the alternative Expandconfiguration.
Use the variables $curRep, $curDay and $curTenant as comparison values for rep,date and tenant fields.
Use the button to combine multiple criteria.
The conditions are checked in the order they are defined.
• Use the and buttons to change their order.
The following operators are available (Cmp drop-down list):
These operators support neither wildcards nor regular expressions(thus a condition company name = u* does not return all companiesstar ting with u but only companies where the name literally is u*).
If you need to use wildcards, you have to use LIKE with regularexpressions.
=,>=,<=,<,>,<>
LIKE supports only regular expressions (attention: case-sensitivesyntax).
E.g. to find all companies star ting with an uppercase U, you haveto specify the regular expression LIKE ^U.*. To find all companynames star ting with U, regarless of case, use LIKE ^[uU].*.
For the valid regular expression syntax. For fur ther details,see http://msdn.microsoft.com/en-us/library/ae5bf541(v=vs.100).as-px.
LIKE
Note: If you create "circular" alternative definitions (i.e. configurations referencingeach other), the configuration where the circle is closed is the one that is applied.Example: If the definitions are "in configuration FI: if country = Austria use theFIAustria configuration" and "in configuration FIAustria: if company name star ts withU use the FI configuration", there is a circular reference for companies from Austriawhose name star ts with U. In this case, the loop closes with the second condition,thus the FI configuration is applied to the mask.
Expand Action ParametersLearn about the input arguments supported by the Expand Action Parameters.
The Expand action supports the following input arguments:
356AUREA CONFIDENTIAL
Chapter 3: Using CRM

expandName
The name of the Expand configuration. For fur ther details, see Expand Configurationon page 352.
If undefined, the Expand configuration <infoAreaId> is used. This is the defaultExpand configuration for the info area from which the action is called.
uid
The unique ID of the record to be displayed.
The uid consists of a record's infoAreaID plus recordID, thus uniquely identifyingthe record in the database.
Possible values:
• Record: Displays the current record.
• Linked: Displays the parent record of the current record.
Example
Selecting a person from the sub-list of a company record (Related Data):
Record displays an Expand view of the selected person record.
Linked displays an Expand view of the selected person's parent company.
mode
The mode of the Expand view:
• New: Expand view for creating a new record (as used in the ExpandNew actiontemplate). For fur ther details, see ExpandNew Action Parameters on page 362.
• NewMy: Depending on the parent record (see link/linkId/link2/linkId2) the newrecord is created as follows:
• parent FI: The new record is created as a child of the current user's companyrecord (u8.session.identity.companyUid)
• parent KP: The new record is created as a child of the current user's personrecord (u8.session.identity.personUid)
• any other parent: fallback to mode=New
Example in UPDATE_DEFAULT: D_NewAppointment_My and D_NewAppoint-ment_My_FI in M_CalNew called by the New Calendar Entry button. These menuactions create new activities for the current user and the current user's companyrespectively.
• NewOrShow: Expand view for creating a new record or updating an existing one.Use this mode for 1:1 links only, in situations where only one linked record isallowed, example - for a marketing activity (AK) only one execution record (AD)may exist. In addition, you need to pass a link record to the expand action. Forfur ther details, see link/linkId/link2/linkId2.
357AUREA CONFIDENTIAL
Action Templates

• Show: Expand view that allows users to update an existing record (default). Forfur ther details, see Expand Action Parameters on page 356
• Update: Expand view for updating an existing record with values specified in theaction. Use the following parameters to create Expand actions with mode = Update:
• copySourceFields/copyTargetFields
• defaultFields/defaultValues
• emptyFields
• autoSave
Note: For Expand actions with mode = Update CRM.Core default values (i.e.default values defined in the Aurea CRM win Rights module) are not appliedand plausibility check triggers are not executed.
relationName
The link relation used to determine the record to be displayed.
Enter $Parent to display a record's parent record.
Enter $GenericLink to display a generic link record.
Other possible values:$RelatedCompany, $RelatedHuman, $RelatedPerson, $RelatedAp-pointment. For fur ther details, see Link Names in JavaScript on page 22.
scripts
A comma-separated list of one or more (local) JavaScript files to be loaded to thepage.
gotoAfterSave
Defines the view to be displayed or menu action to be performed after saving. Thisoverrides default.
Syntax - Menu:<menu action>
Example: Menu:A_ExpandTree opens a record's Tree view after saving.
history
If set to none, the page is not added to the (page-related) browsing history.
Default: None
saveProvider
The name of the provider that is used to save the records in the Expand view. Usethis parameter to specify your own ASPX-page if you want to use a different channel.
358AUREA CONFIDENTIAL
Chapter 3: Using CRM
emptyFields
Only for Expand pages with mode=Show or Update. A comma-separated list of fields(<field name or number>) whose contents are to be cleared upon updating therecord.
createNewTab
Controls whether an action is executed in a new tab. The following values areavailable:
• false: To create a new tab Ctrl+Click has to be used.
• true: The action (example - displaying a record or opening the calendar) is alwaysexecuted in a new tab.
The tab title is retrieved from the header as defined in the action (example -headerGroupName in a Tree action). If no header is found, the label of the buttonor menu item that called page is used instead. For more details, see the ar ticle“How to set the Title of a Tab”, see https://support.aurea.com.
To specify if and how the new tab should be reused if the same action is calledagain, use the following syntax (JSON):
{"reuseId": "<tabId>", "reuseRecord": true, "refresh": true}
reuseId: Executes the action in a tab with the specified ID. <TabId> can be anyname you choose. If no tab with such an ID exists, a new tab is created, otherwiseAurea CRM.Web switches to the existing tab.
reuseRecord: For generic menu actions like A_Expand or A_ExpandTree, where youneed a different ID for each record, you can specify "reuseRecord": true. Example:For A_Expand in M_Company this would open each company in a separate tab. But ifthe user tries to expand a company which is already open, the respective tab isactivated instead.
refresh: Defines whether the re-used tab is not only brought into the foregroundbut also refreshed. Example: {"reuseId":"ExpandView","refresh":true} for anexpand action refreshes the tab to always display the current record.
Default: False
Note: If a menu action with a definition for createNewTab (example - {"reuseId":"myTabId", "refresh": true}) is executed via Ctrl+Click these parameters areused as well.
Note: To automatically close a tab, define the parameter onProceed as inputargument and set it to $back, >> onProceed. This closes the tab if the user clicksSave after editing a record in a new tab, and automatically navigates back to theprevious tab.
createNewPopup
If set to true, the action (example - A_Expand) is executed in a popup. If set to falseor undefined, the action is executed on the current page.
359AUREA CONFIDENTIAL
Action Templates
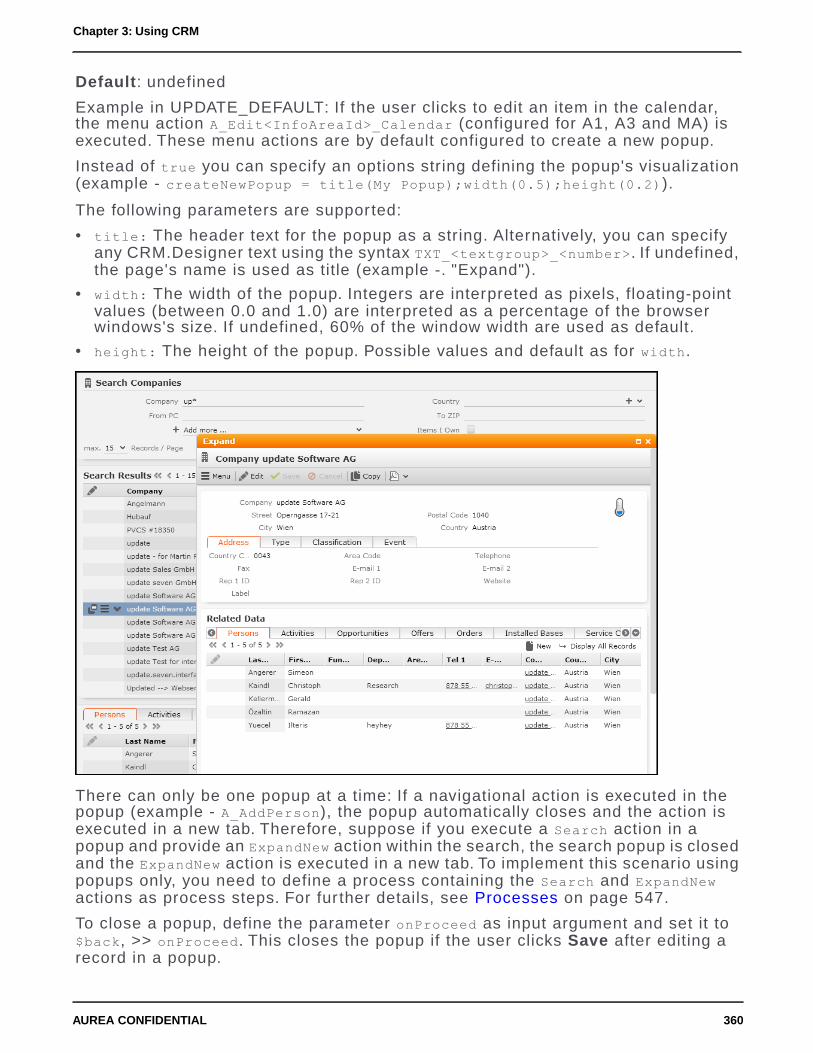
Default: undefined
Example in UPDATE_DEFAULT: If the user clicks to edit an item in the calendar,the menu action A_Edit<InfoAreaId>_Calendar (configured for A1, A3 and MA) isexecuted. These menu actions are by default configured to create a new popup.
Instead of true you can specify an options string defining the popup's visualization(example - createNewPopup = title(My Popup);width(0.5);height(0.2)).
The following parameters are supported:
• title: The header text for the popup as a string. Alternatively, you can specifyany CRM.Designer text using the syntax TXT_<textgroup>_<number>. If undefined,the page's name is used as title (example -. "Expand").
• width: The width of the popup. Integers are interpreted as pixels, floating-pointvalues (between 0.0 and 1.0) are interpreted as a percentage of the browserwindows's size. If undefined, 60% of the window width are used as default.
• height: The height of the popup. Possible values and default as for width.
There can only be one popup at a time: If a navigational action is executed in thepopup (example - A_AddPerson), the popup automatically closes and the action isexecuted in a new tab. Therefore, suppose if you execute a Search action in apopup and provide an ExpandNew action within the search, the search popup is closedand the ExpandNew action is executed in a new tab. To implement this scenario usingpopups only, you need to define a process containing the Search and ExpandNewactions as process steps. For fur ther details, see Processes on page 547.
To close a popup, define the parameter onProceed as input argument and set it to$back, >> onProceed. This closes the popup if the user clicks Save after editing arecord in a popup.
360AUREA CONFIDENTIAL
Chapter 3: Using CRM

You can define createNewPopup for all navigational actions, i.e. any action referringto a URL.
Note: Creating a new tab via Crtl+Click or createNewTab always takes precedenceover createNewPopup.
viewMode
Determines the view mode of the page.
Available values: Edit, Read.
Default:Read.
Users can switch from View to Edit mode by clicking the Edit button. For fur therdetails, see Edit on page 41 .
initialTab
Determines the active tab of the Details control when initially displaying a record inExpand view.
Specify the tab number (0-based). Example - initialTab = 3 activates the four thtab of the Details control.
initialSubListTab
Determines the active sub-list tab when initially displaying a record in Expand view.
You can specify either the tab number (0-based) or the info area ID: initialSubList-Tab,3 activates the four th sub-list tab upon opening the page, initialSubListTab,MAactivates the Activities sub-list.
Note: It is recommended to use the info area ID since this continues to work evenif the tab order is changed at some later point in the project.
fieldGroupName
Allows you to use a different field group than configured in the Expand configuration.
proceed
Set this argument to off in order to prevent the page from proceeding after a suc-cessful save or delete.
onProceed
Use/define the onProceed parameter to control a page's behavior when its proceed()method is called.
361AUREA CONFIDENTIAL
Action Templates

Defining onProceed = $back results in the following behavior:
• If createNewPopup = true is defined for the action, the popup closes. For fur therdetails, see createNewPopup.
• If createNewTab = true is defined for the action, the tab closes and AureaCRM.Web navigates back to the previous tab.
• If neither createNewPopup nor createNewTab is set to true, the last page of thecurrent tab is loaded again.
validationSummaryPosition
Use this parameter to control the positioning of a validation message for an action.For example, saving a record results in a validation message about the save action.You can select one of three positions: Top; Bottom; Hidden.
Note: This parameter is used to control action-specific validation messages. Forglobal control of validation message for all actions use the web configuration param-eter Expand.ValidationSummaryPosition.
Type: Value-Optional
Expand.RefreshCurrentTabOnSave
When the content of an Expand template is saved, it reloads the current tab. Thus,all related child data is refreshed automatically without the need to reload the page.
Type: Boolean
Default: False
ExpandNew Action ParametersLearn about the ExpandNew Action Parameters.
In addition to the parameters listed under Expand Action Parameters on page 356,the ExpandNew action (mode=New) supports the following input arguments:
infoAreaId
The info area where the record is created.
This parameter is mandatory for ExpandNew actions.
link/linkId/link2/linkId2
link: Record to which the new record is linked (Record or Linked).
linkId: ID of the link used for link. This parameter is only relevant if multiple linksbetween two info areas exist in the data model (example - multiple FI-links in KM).For fur ther details, see Link IDs on page 19.
Use link2 and linkId2 to specify a second link record.
Default=-1.
362AUREA CONFIDENTIAL
Chapter 3: Using CRM

linkRelationName
The name of a relation used to determine the link record, example - $Parent. Forfur ther details, see Link Names in JavaScript on page 22.
copyUid
Defines the record from which data is copied to the new record (Record or Linked).copySourceFields and copyTargetFields specify which field values are actuallycopied and where to.
Example in UPDATE_DEFAULT: creating follow-up activities (ExpandNew action instep CreateFollowUpContact->UpdatePredecessorContact of process NewFollowUpAp-pointment).
Note: If copySourceFields and copyTargetFields are specified but copyUid is notspecified, the data is taken from the record specified in link.
copySourceFields/copyTargetFields
Comma-separated lists of fields whose values are copied to the details view of thenew record. copySourceFields contains the fields from the source record (copyUid),copyTargetFields contains the target fields.
Syntax
copySourceFields: A comma-separated list of fields (<field name or number>) re-ferring to the info area specified in copyUid) or the syntax <infoAreaId>.<fieldId>(example - FI.City) to copy fields from a parent info area.
copyTargetFields: A comma-separated list of fields that receive the values fromcopySourceFields.
Examples
copySourceFields = City
Copies the value of the City field if copyUid refers to a related company record.
copySourceFields = FI.City
Copies the value of the City field from FI no matter whether copyUid (or link) referto a related company record.
Creating a new person (KP) in a company (FI):
copySourceFields = !Country
copyTargetFields = FreeC1
This copies the text value of the Country catalog into the new person's FreeC1field.
Note: When using field IDs: To copy the text of a catalog value, add a "t" in frontof the field ID (example - FI.t5).
363AUREA CONFIDENTIAL
Action Templates

Note: When using XML names: To copy the text of a catalog value, add a "!" infront of the field name (example - FI.!Country).
Note: To copy a catalog value from one catalog field to another catalog field (thatuses the same catalog), enter just the field name or ID (example - FI.Country)
Note: Copying a catalog value to a different catalog is not supported.
autoSave
If set to true the record is automatically saved after the Expand view has beencreated.
Note: The match-up is not executed if this option is enabled.
Note: You have to define default values for any mandatory fields, otherwise therecord cannot be saved.
Default: false
onCancel
Use the onCancel parameter to control a New page's behavior when the user cancelsthe creation of a new record (by clicking Cancel or pressing the ESC key).
Defining onCancel = $back (default) results in the following behavior:
• If createNewPopup = true is defined for the ExpandNew action, the popup closes.For fur ther details, see createNewPopup.
• If createNewTab = true is defined for the action, the tab is closed.
• If neither createNewPopup nor createNewTab is set to true, the last page of thecurrent tab is loaded again.
You can use this parameter for ExpandNew pages in Tree views as well.
SearchThe Search action template allows users to search for records in an info area.
The Search action template (search.aspx) allows users to search for records inan info area, either linked or not linked to a parent record. The search results aredisplayed in a list offering a context menu for each record. If configured, recordscan be edited directly in the list, and the page displays a sub-list of info areas thatare dependent of the selected record.
364AUREA CONFIDENTIAL
Chapter 3: Using CRM

The Search action template can be used for actions defined for menu entries, buttonsand within processes. For fur ther details, see Defining an Action on page 287. Thecontents and functionality of a Search page is configured via the Search&List con-figuration referenced in the action. For fur ther details, see Search&List Configurationon page 365.
Search&List ConfigurationLearn about the Search&List Configuration in CRM.
A Search&List configuration consists of the following items:
• Field Group: Defines the layout of the search mask and list rows. The Searchand List controls of the specified field group are used. For fur ther details,see Search control and List control.
• Header Group: Defines the header group of the headers used on the page. Forfur ther details, see Standard Headers on page 337.
365AUREA CONFIDENTIAL
Action Templates

• Context Menu: Defines the context menu displayed for the search result rows.For fur ther details, see Context Menus on page 292. The menu specified here isalso used as a fallback for records displayed in sub-lists.
• Default Action: Defines the default action used for a double-click on a row in thesearch results list. For fur ther details, see Default Action on page 289. If undefined,the InfoArea Default Action specified in the info area's default Expandconfiguration is used as a fallback.
Note: If used within a process, the context menu and the default action settingsdefined here are replaced by the defaults for processes: default context menuM_Wizard and default action A_Select configurable via the Process.DefaultMenu andProcess.DefaultAction Web Configuration parameters. For fur ther details,see Process.DefaultMenu and Process.DefaultAction.
• Description: An internal description (only visible in CRM.Designer).
• Help-ID: Allows you to define a name which can be referenced in thehelpmap.xml for the context-sensitive help (example - <HelpID>De-tails</HelpID>).
For linked searches a special logic is implemented for determining the Search&Listconfiguration:
If a Search&List configuration named XX is called and info area XX is linked to theinfo area YY, the Search&List configuration is determined as follows: XX-YY (example- MA-AK), fallback XX.
If you explicitly enter a name (example - MyMA or MA.Tree), this Search&List config-uration is used. However, if the specified Search&List configuration is not found,the XX-YY (fallback XX) logic is applied.
In the table caption for the search page the default table caption for the linked infoarea is used. For MiniDetails, the MiniDetails control of the default field group isused.
Remember Search Settings
By default, the user's search settings are saved between sessions in the user'sroaming settings. For fur ther details, see User Settings on page 25. Users can reset
the search settings for a specific search by clicking on (Settings) > Clear/Resetsearch settings. For fur ther details, see Resetting a Search.
To globally turn off the "remember search settings" feature, uncheck theSearch.RememberDynamicFields Web Configuration parameter. For fur ther details,see Search.RememberDynamicField. To override this setting for a specific searchaction, use the rememberSearch parameter. For fur ther details, see rememberSearch.To ensure that values set in the search mask are remembered enable theSearch.RememberSearchValues web configuration parameter, see Search.Remem-berSearchValues.
366AUREA CONFIDENTIAL
Chapter 3: Using CRM

The application-wide saving of search settings is determined by the context of thesearch. The context is defined by the Search&List configuration and the assignedflavor, an optional action parameter. By default, only one flavor "Select" is available.It is automatically assigned to a Search&List configuration when called from withina process.
Example:
The search settings for the person search called via ID_NET_PERSON_SEARCH aresaved as "Search/KP".
The search setting for the person search called from within the New Activity processare saved as "Search/KP/Select".
You can assign any other flavor to a custom search action (by defining the flavoraction parameter) to save the search settings for this action in a separate container.
Resetting a Search
By default, the info area-specific searches (i.e. searches for which a Search&List
configuration and/or Search action exists) can be reset by clicking on (Settings)> Clear/Reset search settings:
Note: In addition to these options you can also provide Clear Search and ResetSearchh buttons beside the Start Search button by enabling the Search.Show-ClearSearchButton and Search.ShowResetSearchButton web configurationparameters. These are global options and are applied across all info areas providingsearch capabilities. For more information, see Search.ShowClearSearchButton andSearch.ShowResetSearchButton.
Generic searches are searches without info area context. Example - Queries,Analyses, etc. They only offer the Clear search settings option since you can notspecify predefined search settings like defaultFilterName etc. Therefore there isnothing to reset a generic search to.
The reset/clear options work as follows:
• Clear search settings (A_ClearSearch): Selecting this option clears all searchcriteria (default and user-defined search values and filters) from the search mask.
Additional search fields are not removed but the search values are cleared.
• Reset search settings (A_ResetSearch): Selecting this option restores thesettings as defined in the Search action (search fields, defaultFilterName, de-faultFieldValues).
Additional search fields and filters are removed, search values are cleared orreset to defaultFieldValues if applicable.
367AUREA CONFIDENTIAL
Action Templates

In both cases fixed search criteria (fixedFilterName and fixedFieldValues) areretained.
The availability of the reset/clear options is controlled via Web Configuration param-eters:
Enabling the Search.ShowSettingsButton Web Configuration parameter adds a
SearchSettings button to all info area-specific search pages and a SearchSet-tingsGeneric button to all other search pages. For fur ther details,see Search.ShowSettingsButton.
Note: The SearchSettings and SearchSettingsGeneric buttons are hard-coded;you can not remove such a button from a specific search since it is not visible inthe header definition.
Note: If a search page's header already contains a , Settings button (i.e. a buttonwith a name ending with _Settings), SearchSettings / SearchSettingsGeneric isnot used.
The SearchSettings and SearchSettingsGeneric buttons call the menus M_Search-Settings and M_SearchSettingsGeneric respectively.
M_SearchSettings contains the menu actions A_ClearSearch and A_ResetSearch,M_SearchSettingsGeneric only contains A_ResetSearch.
Enabling/disabling the options of the Search.ClearSearch Web Configuration param-eter determines the availability of A_ClearSearch and A_ResetSearch. For fur therdetails, see Search.ClearSearch.
Displaying Deleted RecordsDeleted records are not displayed by default for all info areas.
To allow users to view deleted records in a search list perform the following:
1. Ensure that the required info area records are marked as deleted. This ensuresthat the deleting a record from the info area is only marked as deleted in thedatabase, but is not physically deleted from the database. For more informationon this task, see Rights Module > Rights > Mark as Deleted in the Aurea CRMWin Administration Guide (https://help.aurea.com/crm/crm-win-admin-guide/crm-win-admin-guide/dita/topics/c_win_adm-1_1-Intoduction_crm.html).
2. Add the DisplayDeletedRecords button to the search results header for therequired info area. For information on adding and configuring an action button,see Buttons on page 304 Navigation Customization > Buttons in the Aurea CRMWeb Administration Guide (https://help.aurea.com/crm/crm-web-administrator-guide/index.html). The following screenshot shows the button added to the SearchResults Header group of the Company (FI) info area.
368AUREA CONFIDENTIAL
Chapter 3: Using CRM

3. The Search results list pane for the configured info area displays theDisplayDeletedRecords button. Clicking the button displays the deleted records.The deleted records displayed are greyed out and cannot be viewed or edited.The following screenshot shows the button and the deleted record (SchwermetallStück gmbh) visible in the result list.
Search Action ParametersLearn about the input arguments supported by the Search Action Parameters.
The Search action supports the following input arguments:
fixedFilterName
Allows you to specify a fixed filter which is applied to the search and cannot bechanged by the user. The filter name is not visible for the user.
Note: Filters have to be referenced as <InfoAreaId>.<FilterName> in the actiondefinition (e. g. KP.Filter1).
369AUREA CONFIDENTIAL
Action Templates

fixedFieldValues
Fixed field values for the search. This cannot be changed by the user.
Syntax: <fieldId>:<value>
• You can specify either field IDs or XML names as <fieldId>.
• Separate multiple items by semicolons.
• If <value> is a string, it must be enclosed in double quotes. Do not use doublequotes when specifying catalog codes.
Example (for a FI search):Company:"my search string";Country:#2;Rep2ID:"$cur-Rep"
• The specified fields must be part of the respective Search control, otherwise theyare ignored.
• To enter the current rep: <fieldId>:"$curRep"
• To enter the current rep's group: <fieldId>:"$curOrgGroup"
• To enter the current date: <fieldId>:"$curDay"
• To enter the number of the current user's login language: <fieldId>:LOGINLANGUAGE
• To set a value for a catalog field: <fieldId>:#<catalogCode>
For hierarchical catalogs you can enter <fieldId>:#<childCode>~#<parentCode>
Example: For a Ticket (KM) Search action you can define
Problem:#3~#1
instead of
ProblemGroup:#1;Problem:#3
• To set a value for a variable catalog field using the external key: <field-Id>:EXT:<external key>
Example: ProblemGroup:EXT:1_324_2
• To set the value of a Boolean field enter true or false.
• If you want to enter a value from a linked record into a field in the search mask,use the syntax <targetFieldId>:<infoAreaId>.<fieldId>
Example: When searching for all mailings (BR) that were sent to a person (KP)and want to specify the mailing channel based on the person's preferred channel,enter Channel:KP.PreferredChannel in the Search action for mailings used in theperson context menu.
• If you have a field from a linked info area in your search mask, you canautomatically enter a value using <infoAreaId>.<fieldId>:<value>
Example: To search only for persons with specific interests, enter IT.Interest-Grp:#2 in the person Search action
searchAndListName
The name of the Search&List configuration to be used.
370AUREA CONFIDENTIAL
Chapter 3: Using CRM

If undefined or not found, the Search&List configuration <infoAreaId> is used. Thisis the default Search&List configuration for the info area from which the action iscalled. For linked searches a special logic is implemented for determining theSearch&List configuration. For fur ther details, see Search&List Configuration onpage 365.
defaultFilterName
Allows you to specify a filter which is applied to the search by default. Users arestill able to select another filter unless disableFilter = true.
Note: Filters have to be referenced as <InfoAreaId>.<FilterName> in the action(e. g. "KP.Filter1"). In Aurea CRM.Web they are then displayed as <FilterName> (e.g. "Filter1").
createNewTab
See createNewTab in Expand Action Parameters on page 356.
filterNameSpace
Defines a namespace for the filters available on the Search page.
To use an info area multiple times, it is common to apply a fixed filter when callingSearch pages. If you do not want users to see all filters defined for an info area butonly those applicable to the context of the current Search page, you can define aprefix in filterNamespace. Users only see filters whose name begins with this prefixin the Add more drop-down list.
Syntax: <InfoAreaId>.<Namespace>.<FilterName>
Example: If you have two filters "FI.usage1.myFilter" and "FI.usage2.anotherFilter",and specify "usage1" as the filterNamespace of a Search page, the user only sees"myFilter" in the Add more drop-down list of this Search page.
Note: If you work with filter namespaces, you should define filterNamespace forall your Search pages, otherwise filters are displayed including the namespace.
disableFilter
Disables the filter selection and definition functionality for the user. Both the prede-fined filters and the More Filters entry are removed from the Add more drop-downlist of the Search page.
Note: To globally restrict working with filters to predefined filters only, create andcheck a Web Configuration parameter called Search.NoFilterDefinition (type:Checkbox): This removes the More Filters entry from the Add more drop-down liston all Search pages. For fur ther details, see Search.NoFilterDefinition. Users mayonly select predefined filters and can no longer create or edit any filters in AureaCRM.Web.
371AUREA CONFIDENTIAL
Action Templates

link/linkId
link: Optional parent record of the search results (for linked searches, example -all MA records linked to a KP): Record or Linked.
linkId: ID of the link used for link (default=-1 i.e. the default link). This parameteris only relevant if multiple links between two info areas exist in the data model (ex-ample - mulitple FI-links in KM). For fur ther details, see Link IDs on page 19.
scripts
A comma-separated list of one or more (local) JavaScript files to be loaded to thepage.
showSearch
If set to true, the search mask is visible. If set to false, it is displayed collapsedand can be expanded by clicking .
Default: true
relationName
Name of the relation to the parent/child records, for example $Children for hierar-chical info areas like OJ in the BTB vertical.
Possible values:
• $Parent: Reads the "logical" parent record, example - the parent record of asub-ticket is a ticket etc.
• $ParentLink: Reads the parent record as defined in the data model.
• $Children: Reads the children of a record, example - all MA records of a KP.
selectionMode
Determines if users can select multiple rows from the list and thus perform actionon multiple list items at once. The following values are available:
• Single: Selecting multiple list items is disabled.
• Multi: Selecting multiple list items is enabled (default).
Default: Multi
listParams
Additional list parameters separated by semicolon: key,value;key,value; etc. Fordurther details, see ListParams on page 374.
autoSearch
If set to true, the search is immediately executed when the user opens the page.
372AUREA CONFIDENTIAL
Chapter 3: Using CRM

Auto-search does not happen when the user updates a filter in the search mask. Ifyou want auto-search to be activated when a filter is updated in the search mask,you have to set autoApplyFilter to true.
Default = false
defaultFieldValues
Default field values for the search that can be changed by the user. Syntax. Forfur ther details, see fixedFieldValues.
Syntax for entering ranges and functions: <fieldId>:<value>:<operator>
Example: MA.Date:TODAY-7:>=;MA.Date:TODAY+14:<=
To avoid that a default value is overwritten by the user's search settings (see Re-member Search Settings), use the following syntax: !<fieldId>:<value>
Example: !Street="Default Street"
defaultsUid
The uid of the record from which defaultFieldValues are read: Record or Linked.If undefined, the link argument is used as a fallback.
maxRows
Determines the maximum number of results returned by the search. This parameteroverrides the global value specified in the Search.MaxResults Web Configurationparameter. For fur ther details, see Search.MaxResults.
Note: The value specified here is displayed as default in the search mask’s Max.Records/Page drop-down list.
subListParams
Additional list parameters for sub-lists separated by semicolon:key,value;key,value;etc. For fur ther details, see ListParams on page 374.
Note: The subListParams defined in the Search action override the correspondingSubListParams defined for individual sub-lists in SearchSubList headers. For fur therdetails, see Related Data area (Header Info Areas) on page 329.
createNewPopup
See createNewPopup.
autoExpandOnSingleHit
If set to true and the search returns exactly one record, the search results list isnot displayed but the default action is automatically executed for the record. Forfur ther details, see Default Action on page 289.
373AUREA CONFIDENTIAL
Action Templates

This setting overrides the global setting defined in the Search.AutoExpandOnSingleHitWeb Configuration parameter. For fur ther details, see Search.AutoExpandOnSingle-Hit.
Default = false
sourceCopyFieldGroupName
The name of the field group used to define a dynamic filter for the search. The filtervalues are defined as functions in the List control. For fur ther details, see DynamicFilters on page 509.
flavor
Use this input argument to customize the behavior (example - default action, menuetc.) of a specific search view (example - in a process).
Available values:
• Auto
• Select: A search view with flavor Auto gets the flavor Select if used within aprocess or record selector. If used within a record selector, the buttons configuredin the SearchResults header are hidden.
• Search: You can use this flavor to display the buttons configured in theSearchResults header when using the search view in a process or form.
Alternatively you can configure the buttons in the SearchResultsSelect header.In this case the buttons are available both in processes and record selectors thatcall this search view.
To make sure header buttons are displayed in a search view configured in a form,you can set SearchView > resultHeader > view > showButtons to true.
Default: Auto
sourceUid
The record from which values are read for dynamic filters. For fur ther details,see Dynamic Filters on page 509. If undefined, link is used as a fallback.
rememberSearch
Add this argument and set it to true or false to override the global setting of theSearch.RememberDynamicFieds Web Configuration parameter. For fur ther details,see Remember Search Settings.
ListParamsThis topic has information on how to specify additional parameters to control thebehavior of lists and sub-lists.
The listParams and subListParams arguments allow you to specify additional pa-rameters to control the behavior of lists and sub-lists.
Syntax:
374AUREA CONFIDENTIAL
Chapter 3: Using CRM

<Name>,<Value>;<Name2>,<Value2>; etc.
Example:
canEdit,false;cachedMode,true;
To use listParams with JavaScript in a form, use the syntax oParameter.ListParams= "singleClickEdit,true"; (no spaces inside the quotes).
Note: If not stated otherwise, the parameters described in this chapter can be usedfor configuring both lists and sub-lists.
Note: Since lists are also used in contexts other than the Search action template,some parameters are only useful when applied to these other contexts.
Use the Web Configuration parameters List.ListParams and List.SubList.List-Params to define global settings applying to all lists/sub-lists. For fur ther details,see List.ListParams/List.SubList.ListParams.
The ListParams action supports the following input arguments:
allowColumnReordering
If set to false, users cannot change the order of list columns.
allowColumnResizing
If set to false, users cannot resize list columns.
allowEditOnClick
If set to false, users cannot switch to Edit mode by "slow double-click".
allowSorting
If set to false, users cannot sor t the list.
autoSelect
If set to true, the first list row is automatically selected.
autoApplyFilter
If set to true, the search is immediately executed when the user updates a filter inthe search mask. It is dependent upon on the autoSearch search action parameterand is active only when the autoSearch function is set to true.
This parameter can be applied to an action template and specific search masks. Itcan also be applied globally using the Web Configuration parameters List.List-Params to define global settings across all lists. For more information, see List.List-Params/List.SubList.ListParams.
375AUREA CONFIDENTIAL
Action Templates

Default = false
cachedMode
If set to true, lists are cached on the client. This allows results to be sor ted by de-coded fields (Z-fields). Example - the company or person link fields in the TargetGroup (Marketing Activity) info area.
In addition, since all results are transferred to the client, the total number ofmatches is displayed in the search results header (example - "1 - 10 of 54") thusoverruling the showCount setting. For fur ther details, see showCount.
Note: Use cachedMode,true only if your users really need this kind of sor ting whichis not supported by the server. When a list is cached on the client, you cannotselectively export data since the server does not know about the client's sor ting. Inaddition, with client-side caching enabled, all search results are transferred to theclient at once. Thus, only activate this feature for info areas where you are surethat searches returns a limited number of results.
If a user changes the sor ting of a list cached on the client, changes are not appliedimmediately. In that case the search needs to be star ted again.
In UPDATE_DEFAULT cachedMode is set to true for the Target Group (MarketingActivity) info area (AG) (Search action defined for menu A_GotoAG).
canEdit
If set to false, records cannot be edited in a list. If set to true, the list is editable,also in processes.
Default: true for "standard" lists, false for lists within processes.
collapseInvisibleRows
If set to true, the list height shrinks to its actual size depending on the number ofresult records. If set to, the list keeps its size regardless of the actual number ofdisplayed records.
Example
A list containing two result rows and max. Records per page is set to 10:
• collapseInvisibleRows,true results in a list that is 2 rows high
• collapseInvisibleRows,false results in a list that is 10 rows high.
Default: false
defaultAction
Use this parameter to execute another than the default action, when the user double-clicks a row. You can:
• specify the name of a menu action. Example - A_ExpandTree
• specify the name of a custom JavaScript function
376AUREA CONFIDENTIAL
Chapter 3: Using CRM
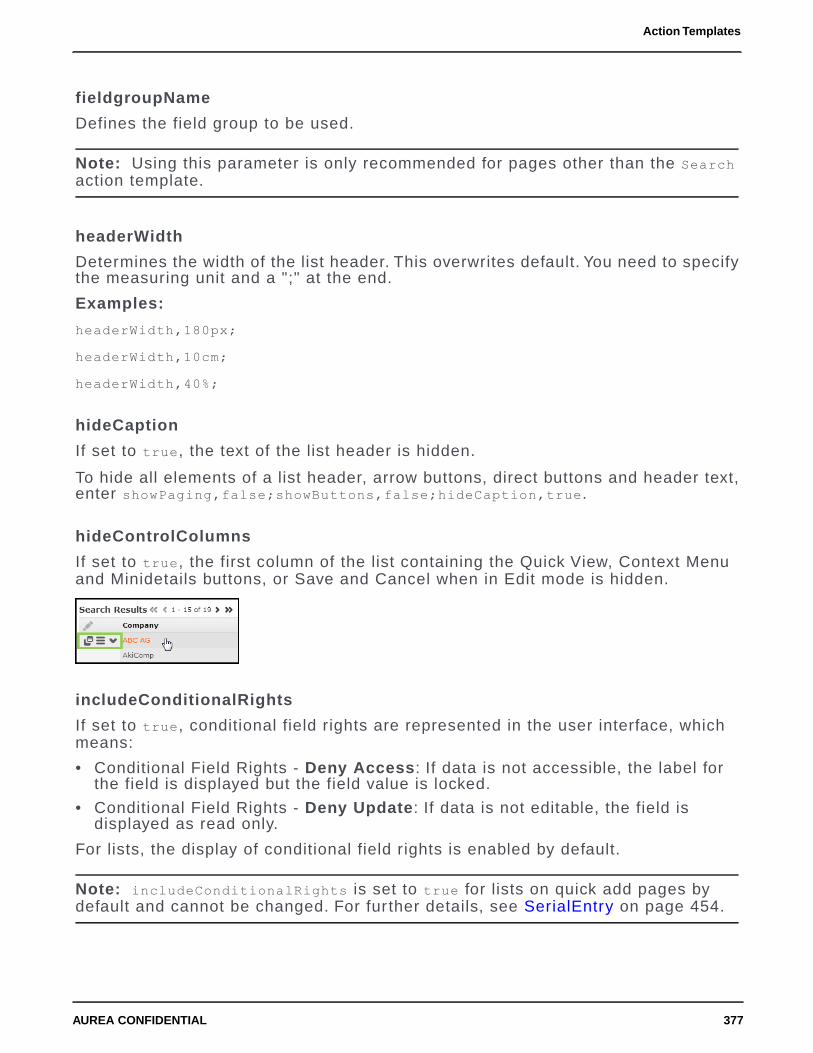
fieldgroupName
Defines the field group to be used.
Note: Using this parameter is only recommended for pages other than the Searchaction template.
headerWidth
Determines the width of the list header. This overwrites default. You need to specifythe measuring unit and a ";" at the end.
Examples:
headerWidth,180px;
headerWidth,10cm;
headerWidth,40%;
hideCaption
If set to true, the text of the list header is hidden.
To hide all elements of a list header, arrow buttons, direct buttons and header text,enter showPaging,false;showButtons,false;hideCaption,true.
hideControlColumns
If set to true, the first column of the list containing the Quick View, Context Menuand Minidetails buttons, or Save and Cancel when in Edit mode is hidden.
includeConditionalRights
If set to true, conditional field rights are represented in the user interface, whichmeans:
• Conditional Field Rights - Deny Access: If data is not accessible, the label forthe field is displayed but the field value is locked.
• Conditional Field Rights - Deny Update: If data is not editable, the field isdisplayed as read only.
For lists, the display of conditional field rights is enabled by default.
Note: includeConditionalRights is set to true for lists on quick add pages bydefault and cannot be changed. For fur ther details, see SerialEntry on page 454.
377AUREA CONFIDENTIAL
Action Templates

Note: Important information regarding includeConditionalRights and Performance:
• Conditional field rights affects the performance of list creation (because for eachrecord in the list, an extra round-trip to the server is required). Thus, Aurearecommends disabling the display of conditional field rights in case you haveunexpected performance degrade when loading large amount of data. To do so,add includeConditionalRights,false to the listParams argument of the Searchaction and/or to the corresponding header definition for sub-lists.
• Conditional field rights are applied in any case, independent of their representationin the user interface using the above-mentioned parameter, i.e. if includeCondi-tionalRights is set to false, the user cannot save field values in fields whereconditional field rights apply.
• To set the includeConditionalRights parameter, when you are using SearchViewwidget on a Form, go to “SearchView -> resultModel” to find and set the parameter.
initialTab
Determines which sub-list tab is active when a page is initially called. You canspecify either the tab number (0-based) or the info area ID: initialTab,3 activatesthe four th sub-list tab upon opening the page, initialTab,MA activates the Activitiessub-list.
Note: This parameter is intended for search sub-lists only. For sub-lists in Expandviews you need to use the initialSubListTab action parameter. For fur ther details,see initialSubListTab.
Note: It is recommended to specify the info area ID instead of the tab number sincethis continues to work even if the tab order is changed at some later point in theproject.
maxRows
Set maxRows,<number> to define the maximum number of records shown in a sub-list. For fur ther details, see Related Data area (Header Info Areas) on page 329. IfmaxRows is defined in a header, the Web Configuration parameter Search.MaxResultsdoes not have any effect. For fur ther details, see Search.MaxResults.
Note: This parameter is intended for sub-lists only.
selectionMode
Determines if users can select multiple rows from the list and thus perform actionon multiple list items at once. The following values are available:
• Single: Selecting multiple list items is disabled.
• Multi: Selecting multiple list items is enabled.
Default: Multi
378AUREA CONFIDENTIAL
Chapter 3: Using CRM

showButtons
If set to false, the buttons in the list header are not displayed.
showCount
Allows the number of search results to be displayed. If more records than specifiedwith showCount are found, the user is informed that more than <limit> results exist.Example - "Search Results 1 – 10 of > 100".
Specify showCount,<limit> (example - showCount,50) in the ListParams of any desiredlist or sub-list or globally using the List.ListParams/List.SubList.ListParams WebConfiguration parameters. For fur ther details, see List.ListParams/List.SubList.List-Params.
In UPDATE_DEFAULT showCount is globally set to "50" via the List.ListParamsWeb Configuration parameter.
Note: The maximum limit is showCount,100. If a larger number is specified, 100 isused as the limit and a message is written to the client log.
Note: Performance considerations: To determine the number of search results,<limit> records are read for each search even if only, say, 10 records are displayedto the user. If you experience performance issues using this feature, try loweringthe limit.
showLinks
If set to true, link fields pointing to other info areas are displayed as hyperlinks inlists.
Default: true
showMenu
If set to true, the Display Menu button is displayed in sub-list rows calling thecontext menu defined in the Search&List configuration, fallback: InfoArea Default-Menu from the info area's default Expand configuration. If set to false, the DisplayMenu button is hidden, i.e. no context menu can be displayed for sub-list rows.
Specify showMenu,<MenuName> to display another than the default context menu (ex-ample - showMenu,M_Person).
showMiniDetails
If set to false, the Display Details button is hidden from the sub-list row, i.e.no MiniDetails can be displayed for sub-list rows.
379AUREA CONFIDENTIAL
Action Templates

showPaging
Determines the display of number of records plus arrow buttons to browse throughthe list. By default, number of records plus arrow buttons are hidden. Availablevalues:
• showPaging,true: The number of records plus arrow buttons are displayed aboveand below the list.
• showPaging,top: The paging is displayed only above the list.
• showPaging,bottom: The paging is displayed only below the list.
Note: If defined as listParam, only true,false and bottom are supported.
To show the paging for query snapshots:
You need to define listparams = showPaging,true; directly in the QueryResultSe-tOpen action used by A_QueryResultSetRun in UPDATE_DEFAULT. The List.List-Params Web Configuration parameter is not taken into account by the QueryResult-SetOpen action.
showQuickViewAction
If set to false, the QuickView button is hidden from the sub-list row.
Define showQuickViewAction,false in the List.SubList.ListParams Web Configu-ration parameter to hide the QuickView button from the Parent Data list.
showSumLine
If set to true, the sum total of the list is displayed immediately when opening aSearch page.
Condition for showing the sum total: At least one result with at least one fieldthat can be totaled is returned. The field has to be of data type S or L without the"no sum" property being set in the data model.
Values are summed per page. If a value is changed, the sum total is recalculatedimmediately.
In UPDATE_DEFAULT showSumLine is set to true for the Offer and Order info areas(menu actions ID_NET_OFFER and ID_NET_ORDER_SEARCH).
singleClickEdit
If set to true, users can switch to the list's Edit mode with a single click instead ofthe default double click.
virtualInfoArea.ReadMode
Determines whether vir tual info areas are used for context menus of list rows(static | dynamic). For fur ther details, see vir tualInfoAreaReadMode on page 285.
380AUREA CONFIDENTIAL
Chapter 3: Using CRM

TreeThe Tree action template allows user to display a Tree view of a record and itschildren.
The Tree action template (tree.aspx) allows user to display a Tree view of a recordand its children. The tree displays all existing sub-levels.
The Tree action template can be used for actions defined for menu entries, buttonsand within processes. For fur ther details, see Defining an Action on page 287.
Example in UPDATE_DEFAULT: D_ExpandTree in M_Company.
The contents and functionality of a Tree view is configured via the TreeView config-uration referenced in the action. For fur ther details, see TreeView Configuration onpage 381.
The Tree view uses the Details control for displaying record details. For fur ther de-tails, see Details control. Therefore the Tree view supports the same functionalityas the Expand view of a record, example - displaying activity par ticipants, sub-lists,filter masks, match-up for new records, exports, reports, etc.
Note: Filter masks in a Tree view do not support different CSS styles. For fur therdetails, see Alternative Expand Configurations.
TreeView ConfigurationDefines the nodes of a tree.
The TreeView configuration defines the nodes of the tree, which sibling or child infoareas are displayed in the tree view of a record.
381AUREA CONFIDENTIAL
Action Templates

To define a Tree view (seeDesigning Configuration Units on page 64):
1. Click to add a new node (i.e. sub-info area) to the tree.
2. Select the desired info area under Info Area Settings > Info Area.
• show linked: Lists all info areas linked to the new node's current parent infoarea.
• show all: Lists all available info areas.
Enable the Link ID check box and select/enter a link ID, if you want to useanother than the default link. For fur ther details, see Specifying Link IDs onpage 20.
382AUREA CONFIDENTIAL
Chapter 3: Using CRM

3. Click on an info area to define settings for this node. All available settings for theselected node are displayed in the right par t of the page:
• general settings for the selected node. For fur ther details, see Info Area Set-tings.
• settings configuring the appearance and behavior of the node. For fur therdetails, see Node Settings.
• settings for the records listed for the node. For fur ther details, see RecordSettings.
4. Arrange the sub-info areas of your tree:
• Use the Decrease/Increase Indent buttons to move nodes to another hierarchylevel, i.e. change the parent info area. Example: Create a node for the Activityinfo area below the Person in Company info area to display person-relatedactivity records.
• To reorder nodes, click (Drag&Drop) in the respective row and drag it tothe desired position. Child nodes of the selected node are automatically movedas well.
While dragging the selected node, valid drop locations are displayed in blue.Nodes can only be dragged to the same hierarchy level. To change the inden-tation, use the Decrease/Increase Indent buttons as described above.
The topmost node (i.e. the tree's parent) is displayed in bold and cannot bemoved or deleted.
• Click (Delete) to delete a node. Child nodes are deleted as well.
Note:
• If a sub-info area has no valid link to its parent, a message is displayed onmouse-over and the info area ID is displayed with a wavy red underline. You canstill save the definition. Drag the info area to a valid position or create the requiredlink in the data model.
• For sub-info areas with no valid link to their parent node the tree displays allavailable records in Aurea CRM.Web.
Info Area Settings
383AUREA CONFIDENTIAL
Action Templates

The general definition of a tree node (i.e. sub-info area) consists of the followingsettings:
• Info Area: Select the info area you want to define as a tree node. For fur therdetails, see TreeView Configuration on page 381.
With the tree view you can also navigate up and down hierarchies. For fur therdetails, see walkUpToRootRecord. Hierarchy trees are implemented for the infoareas A1, OJ, KM, IB, and MA. Select "Special: Parent" as child info area tonavigate up the hierarchy, and "Special: Children" to navigate down. The config-ured table caption and menu settings for this node are ignored for the "Special"settings, they are taken from the parent instead.
• Link ID: Enable the Link ID check box and enter the link ID, if you want to useanother than the default link. For fur ther details, see Link IDs on page 19.
• Relation Name: If you have defined a custom link between two info areas, youcan enter the name of this vir tual relation, which is then displayed in the tree.
• CRM Processes: Assign one or more CRM processes to the tree node. For fur therdetails, see Roles & CRM Processes on page 727.
• Info Area Label: You can specify a label for the node (default: the plural of infoarea's name).
Table captions for the records listed in the tree are defined in the Record Settingsarea. For fur ther details, see Record Settings.
• Record Filter: Select a filter to filter the records displayed under this node.
• Info Area Filter: Select a filter to hide tree nodes based on field values from theparent record. Example: Define and select a filter to only show the Activity (MA)node if the parent company meets the condition (RepID='$curRep' ORRep2ID='$curRep') AND ABC='A'.
384AUREA CONFIDENTIAL
Chapter 3: Using CRM

All filters defined for the parent info area are listed.
Note: Filters with more than one info area and parameterized filters (i.e. filtersrequiring user input) are not supported. If such a filter is used, it is ignored anda message is written to the client log.
Note: If the value of a criteria field is changed by the user, he has to manuallyrefresh the page in order to see the refreshed tree.
• Sorting: Defines the sor t order for the records in the node. Use the followingsyntax:
• Sort ascending: <field name or number> example - Date for the Starts on fieldof an activity (MA)
• Sort descending: !<field name or number> example - !Date for the Starts onfield of an activity (MA)
• Comma-separate multiple sor t fields: example - !Date,Contact
• Record Count: Defines the number of records displayed for the node, i.e. howmany records are displayed when initially expanding an info area node. If morerecords exist, an additional node "…" is shown below. Clicking on "…" displaysthe next <Record Count> records.
• Node Menu: Defines the info area node's context menu. The following menusand menu actions are available:
• M_TreeChildren: Contains all three menu actions, A_ShowALL, A_TreeList andA_TreeNew.
• M_TreeChildrenNoNew: Contains A_ShowAll and A_TreeList.
• M_TreeChildrenNewOrEdit: Contains A_TreeNewOrEdit. This is used for 1:1children analogous to an Expand view with mode = NewOrShow. For fur ther details,see mode. Example in UPDATE_DEFAULT: AD node in TreeView AK.
• A_ShowAll: Expands the info area node, thus displaying all child records.
• A_TreeList: Leaves the tree view to display the node's child records on aSearch&List page.
• A_TreeNew: Allows users to add new records as children of that node linked tothe parent record without leaving the tree view. The SearchResults headercontains a NewCommand button doing the same. For fur ther details, see NewCom-mand on page 317.
• Search&List: Defines the Search&List configuration to be used when clicking onthe info area node. For fur ther details, see Search&List Configuration on page365.By default, the search area is collapsed, only the actual results are visible.Clicking a list item displays the corresponding sub-list.
• Widget Options: Use this field to pass additional parameters to the displayedwidget (SearchView or the form specified under Form).
All properties for the selected widget as available in the Form Designer can beused. Define the widget with all desired properties in the Form Designer and copythe properties from the source view to this field.
385AUREA CONFIDENTIAL
Action Templates

Examples:{"viewOptions": {"list": {"grid": { "showMenu": true, "showMiniDetails": false}}}}
{"form": { "useAutoSearch": false }, "showSearchForm": true}
• Form: Allows you to provide the name of a custom widget or form to be displayedwhen clicking on the node (with $Record representing the current record).
Node Settings
This setting is for appearance and behavior of a tree node.
Use the following settings to configure the appearance and behavior of a tree node:
• Check Children: The symbol for expanding a node is only displayed if thebranch actually contains records. (To gather this information, the tree view triesto load the first record of the branch).
• Company-related: Only company-related records are displayed for this node.For example, use this flag to show only activities linked directly to the companyinstead of appointments linked to persons of that company.
• Disable Tweaks: This flag is only relevant when listing activities (MA) for acompany or person: If checked, only MA records linked directly to the parentrecord are displayed but activities linked via the Activity Participants info area(MB) are ignored.
• Expand: When the tree is loaded, all branches with this flag are automaticallyexpanded (i.e. <Record Count> records are read and displayed).
• Expand Records: When the tree is loaded, all branches with this flag plus therecords within are automatically expanded (i.e. their sub-info areas are displayed).
• Hide Group Node: The group node is hidden, and records contained in this nodeare displayed directly under the parent node.
• Hide Records: The records of this node are not displayed.
• No Records: Allows you to define group nodes that contain group nodesthemselves it is recommended to assign no menu if this flag is set.
• Readonly: Defines whether the details mask of a tree's record is editable or not.For fur ther details, see viewMode.
• Show Count: Displays the number of records for that node. If more than <RecordCount> records are found, the user is only informed that there are more than<Record Count> records.
• Hide GroupNode Without Children: Hides this group node in the tree view, ifthe group node does not have any child record to display. For example, a Ticket,Sales Group, or Activity node is hidden if it does not have any records to display.
Examples
386AUREA CONFIDENTIAL
Chapter 3: Using CRM

ResultFlagResultFlag
Expand Recordsfor persons
Expand for persons
Check Children ex-ample - for orders
Show Count forpersons
No Records forpersons
Hide Groupnodefor persons
Hide Records andHide Groupnode
Use this combina-tion to show docu-ments linked to arecord via D3 as ifthey were directlyassociated with therecord.
Example in UP-DATE_DEFAULT:Treeview FI
D3: Parent: FI |Link-ID: 127 | Flags:Hide Records D1:Parent: D3 | Flags:Hide Groupnode
You can define anInfoArea LabelText for the D3node renamingDocument Link ex-ample - to "Docu-ments".
387AUREA CONFIDENTIAL
Action Templates

Record Settings
Use the following settings to configure the appearance and behavior of the recordslisted under the selected node:
• Context Menu: Defines the menu displayed for each record of this info area. Youcan use the same menu as specified in the Expand configuration for that infoarea. Alternatively, you can use M_DefaultTree or define a special menu e.g. toavoid leaving the tree view. If undefined, the user can only view or edit a recorddepending on the node settings. For fur ther details, see Node Settings.
• Expand: Defines which Expand configuration is used for displaying a record. Ifundefined, the default Expand configuration <infoAreaId> is used.
• Table Caption: Select the table caption to be used for all records of this info areaand this branch (Default = <InfoAreaID>).
You can use any table caption defined for the info area – this allows you to useanother than the default table caption, e.g. if the default table caption is too longor contains redundant information already visible in the tree like the name of thecompany in a KP table caption.
• Widget Options: Use this field to pass additional parameters to the displayedwidget, ExpandView or the form specified under Form.
All properties for the selected widget as available in the Form Designer can beused. (Hint: Define the widget with all desired properties in the Form Designerand copy the properties from the source view to this field.)
Example: { "viewMode": "Edit" }
• Form: Allows you to provide the name of a custom widget or form to be displayedwhen clicking on the node (with $Record representing the current record). TheForm parameter allows to configure the tree view e.g. to open an external websitein the area next to the tree.
Tree Action ParametersLearn about the Tree Action Paramaters.
To call a Tree view from a context menu or a button, define the Tree action with itstreeViewName and the record used as root (uid). If no TreeView configuration isspecified, the default TreeView configuration <infoAreaId> is used.
If a TreeView configuration belongs to an info area other than the info area of therecord passed to the tree, not the tree root but the record passed to the tree is au-tomatically highlighted and expanded if configured that way. This allows you e.g.to call a company tree view configuration from the person context menu, and havethe tree expanded so that the person is highlighted within the tree.
The Tree action supports the following input arguments:
388AUREA CONFIDENTIAL
Chapter 3: Using CRM

treeViewName
The name of the TreeView configuration. For fur ther details, see TreeView Configu-ration on page 381.
If undefined, the TreeView configuration <infoAreaId> is used. The TreeView con-figuration for the info area from which the action is called.
You can use the prefix %% as a placeholder for the info area: Thus, e.g. instead ofdefining different actions for IBHierarchyTree and KMHierarchyTree, you can defineone action (A_HierarchyTree in UPDATE_DEFAULT) specifying %%HierarchyTreeas treeViewName.
uid
The record to be displayed as the tree's root node.
This parameter is mandatory.
Record: The current record is displayed as the tree's root node.
Linked: The parent record of the current record is displayed as the tree's root node.
link
Record to which the tree's root record is linked (Record, Linked or undefined).
Defines the link to the parent record, only used if the specified record acts as a linkrecord to the tree’s root record.
linkId
The ID of the link used for link. This parameter is only relevant if multiple datamodel links between two info areas exist (example - multiple FI-links in KM). Forfur ther details, see Link IDs on page 19.
Default=-1, which corresponds to the default link
headerGroupName
Defines the header group for the Tree header.
You can use the prefix %% as a placeholder for the info area: Thus, for example in-stead of defining different actions using IBHierarchyHeader and KMHierarchyHeader,you can define one action (A_HierarchyTree in UPDATE_DEFAULT) specifying%%HierarchyHeader as headerGroupName.
The Expand headers for the tree's sub-info areas are taken from the header groupspecified in the sub-info areas' Expand configurations. For fur ther details, see RecordSettings.
viewMode
The initial view mode of the Expand views accessed from the tree. Available values:Edit, Read.
389AUREA CONFIDENTIAL
Action Templates

This parameter overrules the standard behavior, i.e. the Expand view of tree noderecords being displayed read-only or editable according to the TreeView configuration(Readonly flag). For fur ther details, see Node Settings.
If viewMode=Read, all details masks are displayed read-only, regardless of theTreeView configuration. However, if the Expand header contains an Edit button, theuser can manually switch to Edit mode if the tree view configuration does not alsodefine the details as read-only.
Default: Read
expandOptions
Determines the active Details control and sub-list tabs when initially displaying arecord in Tree view.
Syntax:
<Name>,<Value>;<Name2>,<Value2>;
The following settings are available:
• initialTab,<0-based number>: Determines the initially active Details control tab.
• initialSubListTab,<0-based number or info area ID>: Determines the initiallyactive sub-list tab.
Note: It is recommended to use the info area ID for initialSubListTab since thiscontinues to work even if the tab order is changed at some later point in the project.
Examples:
• initialTab,2;initialSubListTab,3; initially activates the 3rd tab of the Detailscontrol and the 4th sub-list tab.
• initialTab,2;initialSubListTab,MA; initially activates the 3rd tab of the Detailscontrol and the (first) Activities sub-list.
walkUpToRootRecord
If set to 1, the tree is defined as a hierarchy tree to display e.g. a ticket with its sub-tickets: The root record of the tree is determined from the chain of parent recordsstar ting at the record defined by uid.
Hierarchy trees are supported for the following info areas: A1, OJ, KM, IB, and MA.
Note: If an item references itself, it is only displayed once in the hierarchy.
createNewTab
See createNewTab in Expand Action Parameters on page 356.
createNewPopup
See createNewPopup.
390AUREA CONFIDENTIAL
Chapter 3: Using CRM

history
The page is not added to the page-related browsing history. This parameter cannotbe changed.
relationName
See relationName.
JavaScriptUse the JavaScript action template to implement custom functions on the client(buttons, menu actions, process steps).
The JavaScript action template is a vir tual page not based on a physical file. Thefollowing JavaScript action templates are available:
• JavaScript: Calls a JavaScript function.
• JavaScriptWithCallback: Calls a JavaScript function. On completion the callbackis called.
For information on the supported input arguments, see the ar ticle “How to Use theActions Service” at https://support.aurea.com.
In addition, the JavaScript and JavaScriptWithCallback action templates supportthe recordSet argument, see the ar ticle “How to execute JavaScript on a set ofrecords” at https://support.aurea.com.
For information on loading scripts into Aurea CRM web at star tup, see the ar ticle“Scripts” at https://support.aurea.com.
Out-of-the-Box JavaScript FunctionsLearn about the Out-of-the-Box JavaScript Functions.
Following are the list of Out-of-the-Box JavaScript Functions:
u8.services.businessObjects.copy
Use this JavaScript function to copy information between info areas. In UPDATE_DE-FAULT this function is used in D_CopyOfferToOrder (BTB and OTC), A_CopyOfferToWRand A_CopyOfferFromServiceContract both BTB only. For fur ther details,see D_CopyOfferToOrder.
Use the Copy Fields options in the Configuration info area (MC) to determinewhich fields are copied, see Configuration Info Area in the CRM.Core AdministratorGuide.
u8.services.lru.clear();
Use this JavaScript function to delete Aurea CRM.Web's browsing history. an exampleof doing this is by defining an application menu entry.
u8.services.lru.clear(); deletes the complete history (pages and records).
391AUREA CONFIDENTIAL
Action Templates

u8.services.lru.clear(type); deletes the history for the type specified:
• u8.services.lru.clear("Page"); for deleting the pages
• u8.services.lru.clear("Record"); for deleting the records from the browsinghistory
u8.session.identity
Use the following functions to identify the current rep (example - for render hooks,process metrics etc.):
• u8.session.identity.repId gets the current user's Rep ID as an integer value.
• u8.session.identity.repName gets the current user's Rep name (e.g. "John Doe").
• u8.session.identity.userName gets the current user's login name (e.g. "JOHN")
• u8.session.identity.isSuperUser is true if the current user is the SU.
Reloading Custom Javascripts in the CRM ClientLearn how to reload custom javascripts from cache in CRM client.
CRM client javascript files are cached in the browser until the CRM application isupgraded to the next version. You can also ensure that your custom CRM Clientjavascript files are cached in user browser only for the duration of the IIS applicationpool lifecycle and are forcefully reloaded upon IIS application pool recycle. This isan optional feature and is disabled by default.
To enable this feature enable the <JavaScriptVersioning> parameter in the set-tings.xml file, see the sample configuration below:<update.web>
<JavaScriptVersioning>ApplicationVersion</ JavaScriptVersioning ></update.web>
ApplicationVersion (default)—ensures that the javascript files are reloaded whentheir version number changes. Use this option if you do not change the customjavascript frequently.
Note: The javascipt files have the version number in the ApplicationVersion tag.For example, ApplicationVersion: script.js?v10.2.0.
ApplicationStartTime—The star t time is set to the time when the application poolis reset. Use this option if you often change your custom javascripts.
Note: The javascipt files have the star t time in the ApplicationStartTime tag. Forexample, ApplicationStartTime: script.js?123456789.
392AUREA CONFIDENTIAL
Chapter 3: Using CRM

ShowFormShowForm action template is used to display custom forms.
The ShowForm action template (form.aspx) allows you to display custom forms. Forfur ther details, see Forms on page 621.
ShowForm Action ParametersList of input arguments for ShowForm Action Parameters.
The ShowForm action supports the following input arguments:
createNewTab
See createNewTab in Expand Action Parameters on page 356.
createNewPopup
See createNewPopup.
FormName
The name of the form you want to display. For fur ther details, see Forms on page621.
This parameter is mandatory.
HeaderName
An optional header for the form. You can specify any special header of the typespecified in HeaderType.
HeaderType
The type of the header specified in HeaderName.
Enter the name of a header group or "Special" for an info area-independent specialheader.
InfoArea / RecID
The uid of a record (Record or Linked). For fur ther details, see uid.
Options
Option string for JavaScript evaluation.
scripts
A comma-separated list of one or more (local) JavaScript files to be loaded to thepage.
393AUREA CONFIDENTIAL
Action Templates

Textgroups
Additional text groups (comma-separated).
pageTitle
The title of the page. This page title is only used if HeaderName is undefined. Forfur ther details, see HeaderName. The pageTitle action parameter overrides thepageTitle attribute defined in the form.
For more information, see Defining a Header/Title for a Form on page 630.
WaitUntilCreated
If set to true, an empty page is display until the form is entirely created and all dataloaded. If set to false, the form is immediately displayed and the loading processis visible for the user.
Define WaitUntilCreated = false for complex forms with lots of widgets and datato load.
For best user experience, complex widgets contained in e.g. a DashboardPanelshould have a custom width set via CSS properties; this prevents a 'jumpy' loadingprocess.
Default: true
AnalysisEditThe AnalysisEdit action template (analysis.aspx) is used to create, edit andexecute analyses. Example in UPDATE_DEFAULT: The menu action ID_NET_MAN-AGESTATISTICS (New Analysis) in ID_NET_QUERIES_AND_STATISTICS.
394AUREA CONFIDENTIAL
Chapter 3: Using CRM

AnalysisEdit Action ParametersList of input arguments for AnalysisEdit Action Parameters.
The AnalysisEdit action supports the following input arguments (all optional):
name
The name of the analysis.
scope
Defines which kind of analysis is to be used (if two analyses with the same nameexist): Public or Private.
autostart
If set to true, the analysis is automatically executed.
link/linkId
Defines the context for the analysis' execution: The uid of a record to be used aslink record when executing the analysis.
Use linkId (optional) to specify another than the default link.
autoLoadSettings
Determines if the analysis settings are stored and loaded when executing the anal-ysis and how it is done.
Available values: "all", "defaultValues", "category", "fields". Separate multipleentries by comma.
If defined, a copy of the analysis containing the most recent settings selected in thesettings editor is saved. When the analysis is executed later, these settings is re-stored.
AnalysisRunThe AnalysisRun action template (analysisrun.aspx) executes a predefinedanalysis.
Example in UPDATE_DEFAULT: The menu action ID_SALESFUNNEL in ID_NET_PRO-CESSES displays the Sales Funnel analysis.
395AUREA CONFIDENTIAL
Action Templates

AnalysisRun Action ParametersList of input arguments for AnalysisRun Action Parameters.
The AnalysisRun action supports the following input arguments:
name
The name of the analysis to be executed.
This parameter is mandatory.
scope
Defines which kind of analysis is to be used if two analyses with the same nameexist: Public or Private.
autoStart
If set to true, the analysis is automatically executed.
chartType
Specify the name of a chart type (e.g. Bar3D) determining the default chart typeselection on the Analysis page. It can be changed by the user. For fur ther details,see Chart Types on page 545.
fixedChartType
Determines the chart type to be displayed. It cannot be changed by the user. Forfur ther details, see Chart Types on page 545.
396AUREA CONFIDENTIAL
Chapter 3: Using CRM
link/linkId
Defines the context for the analysis' execution: The uid of a record to be used aslink record when executing the analysis.
Use linkId (optional) to specify another than the default link.
headerName
Name of an optional special header to be displayed.
showGrid
If set to false, the Show Table button is hidden from the Analysis page.
showChart
If set to false, the Show Chart button is hidden from the Analysis page.
showSettings
If set to true, the settings editor is displayed on the Analysis page allowing usersto modify the analysis. Use showCategory, showValues, showCurrency and showFil-ters. Ssee below sections to show/hide single elements of the settings editor.
showSettings overrules collapseSettingsEditor. For fur ther details, see collaps-eSettingsEditor.
view
Determines the initial view of the Analysis page: grid or chart.
showCategory
If set to false, the Category area is hidden from the settings editor.
showValues
If set to false, the Values area is hidden from the settings editor.
showCurrency
If set to false, the Currency area is hidden from the settings editor.
showFilters
If set to false, the Filter area is hidden from the settings editor.
showChartLegend
If set to true, the Show Legend check box is checked by default.
397AUREA CONFIDENTIAL
Action Templates

showChartValues
If set to true, the Show Values check box is checked by default.
hideSelector
If set to false, the chart selector is hidden from the analysis page.
collapseSettingsEditor
Defines the initial state of the settings editor: If set to true, the settings editor isinitially hidden.
showSettings overrules collapseSettingsEditor. For fur ther details, see showSet-tings.
Default: false.
pageSize
Use/add this parameter to determine the number of result rows displayed in the tableview of an analysis result page.
Default: 10.
AnalysisSelect / QuerySelectThe AnalysisSelect and QuerySelect action templates are used to select and executeanalyses and queries respectively.
Examples in UPDATE_DEFAULT: ID_NET_QUERIES_AND_STATISTICS contains themenu action ID_NET_SELECTANALYSIS and ID_NET_QUERY_FORMAT allowing users tosearch for, select and execute analyses and queries.
The AnalysisSelect and QuerySelect actions support the following input arguments:
• an optional link record, see link/linkId.
• Unlike for other Search actions, autoSearch is enabled for the Query and Analysissearches. Set autoSearch to false to disable the automatic search.
Note: Auto-search does not happen when the user updates a filter in an Analysisor Query. If you want auto-search to be activated when the user updates a filter,you have to set autoApplyFilter to true.
398AUREA CONFIDENTIAL
Chapter 3: Using CRM

BuyingCenterThe BuyingCenter action template (BuyingCenter.aspx) is used to create a"Buying Center Wall" for opportunities providing a graphical overview of allopportunity par ticipants, their roles and their attitude.
For general information on opportunity par ticipants, see Opportunities in the WebBusiness Logic User Guide.
In UPDATE_DEFAULT the BuyingCenter action is called by the A_BuyingCenterY1context menu action (Buying Center) configured in M_Opportunity.
All Opportunity Participant (Y2) records currently linked to the opportunity aredisplayed as sticky notes on the "wall". The available columns and sor ting are definedin the action, see BuyingCenter Action Parameters on page 401. The (collapsible)related data area at the bottom of the page displays fur ther records linked to theopportunity (competitors and activities in UPDATE_DEFAULT).
While in View mode, users can drag&drop the items on the wall. In addition theycan add items using the options configured in the (collapsible) side bar. Items canbe edited directly on the wall. Changes are applied immediately, example - changingthe attitude of a par ticipant moves the item to another column, changing the roleupdates the color of the item etc.
Use the SDK page to test all elements of the Buying Center Wall.
399AUREA CONFIDENTIAL
Action Templates

Configuration UnitsLearn about the configuration units of Buying centre wall.
The Buying Center Wall consists of the following configuration units:
• The context menu action A_BuyingCenterY1 with action BuyingCenter. For detailson the available action parameters, see BuyingCenter Action Parameters on page401.
A_BuyingCenterY1 is assigned to CRM process 1.2.4. "Opportunity Management"(CRM process ID 70000100).
• The header group Y1.BuyingCenter contains the following definitions:
• the Expand header configures the page header using the MiniDetails control offield group Y1.BuyingCenter.
• the ExpandChildren header configures the page's related data area displayingrecords from info areas Opportunity Competitor (Y3) and Activity (MA) inUPDATE_DEFAULT.
• The side bar contains the following elements:
• A (hard-coded) New Participant button launching the NewParticipantForOppor-tunity process. This process is par t of UPDATE_DEFAULT and allows users tosearch for a company/person and add it as an opportunity par ticipant.
• The Suggested Participants drop-down list allowing the user to select fromsuggested participants. Example - persons from the company linked to theopportunity, par ticipants from activities linked to the opportunity etc. Thesuggestions are created by executing queries.
The available options are configured in UPDATE_DEFAULT as menu actions inthe M_BuyingCenterParticipantSuggestionsY1 context menu. You can customizethe options by adding queries that filter the results.
For a complete description of these options and their configuration, see the ar ticle“How to configure suggested participants in the Buying center” at https://support.au-rea.com.
• If configured, the side bar also lists missing required and optional roles. Therecord count is updated as the user adds/removes/changes participant items.
Missing roles are configured via a JSON file on the server. The location of thefile must be specified in the BuyingCenter.MissingRoles.Y1.Definition WebConfiguration parameter. For fur ther details, see BuyingCenter.Missin-gRoles.Y1.Definition.
400AUREA CONFIDENTIAL
Chapter 3: Using CRM

If undefined (default), this element is hidden from the side bar.
Note: No missing roles JSON file is delivered with Aurea CRM.Web since the"Participation" catalog determining the roles is a variable catalog and thereforedifferent for every project.
For an example and a complete description of the required JSON structure andsupported placeholders, see the ar ticle “How to configure Missing Roles for Buyingcenter” at https://support.aurea.com.
• The items on the wall are configured by the Y2.BuyingCenter Expand configuration:This Expand configuration references the Y2.BuyingCenter table caption, fieldgroup and header group.
The Details control of field group Y2.BuyingCenter defines the look and contentsof the items. The coloring of the items is based on the "Participation" catalog(implemented using a render hook for field Text (Y2:29)). The Influence fielduses a FieldValuePicker widget.
• The static texts for the Buying Center Wall are defined in the BuyingCenter textgroup.
BuyingCenter Action ParametersSupported BuyingCenter Action Parameters.
The BuyingCenter action supports the following input arguments:
uid
The record for which participants should be displayed (Record or Linked). Currentlyonly opportunity records are supported.
This parameter is mandatory.
participantInfoAreaId
The info area of the participants. Currently only Y2 is supported.
This parameter is mandatory.
participantLinkId
The link ID used to read participant records linked to the opportunity. This parameteris only relevant if multiple links between two info areas exist in the data model. forfur ther details, see Link IDs on page 19.
Default: -1
401AUREA CONFIDENTIAL
Action Templates

participantCatalogField
The catalog field (<field name or number>) whose values are used as categories(i.e. columns) of the buying center wall. A_BuyingCenterY1 as defined in UPDATE_DE-FAULT uses the Attitude field (Y2:7, XML name "Position").
This parameter is mandatory.
participantFilterName
You can specify a fixed filter for Y2. Example - to hide participants that have beeninactive for more than a year.
participantSortFields
Allows you to specify a sor t order for the items displayed on the wall.
Specify one or more fields (<field name or number>) from Y2. In UPDATE_DEFAULTthe Participation field (Y2:6) is used.
Separate multiple fields by comma. Prefix a field with "-" (or "+") to define descend-ing/ascending sor ting.
Default: ascending.
suggestionsPageSize
Defines the number of visible rows in the RecordListBox displaying suggestions.
Default: 10.
createNewTab
See createNewTab in Expand Action Parameters on page 356.
CalendarLearn about the calender action templates.
The Calendar action template (calendar.aspx) is used by the menu actionID_NET_CALENDAR in UPDATE_DEFAULT.
Calendar Action ParametersSupported Calendar Action Parameters.
The Calendar action supports the following input arguments:
uid
The record ID for a record to be displayed in the calendar, if the action is calledfrom the MA context menu and uid=Record, the calendar opens to the date of theappointment record it was called from.
402AUREA CONFIDENTIAL
Chapter 3: Using CRM

DefaultFilterSet
Name of a filter set which is applied if the user has not yet selected a filter or filterset himself.
For information on the syntax, see Calendar.FilterSets.
FilterSet
Name of a filter set which is applied to filter items displayed in the calendar. Itcannot be changed by the user.
For information on the syntax, see Calendar.FilterSets.
createNewTab
See createNewTab in Expand Action Parameters on page 356.
menuName
Name of a menu to be used when clicking the New Calendar Entry button insteadof M_CalNew.
fixedFilterNames
Allows you to specify fixed filters which are applied to the calendar and cannot bechanged by the user analogous to fixedFilterName in the Search action.
You can specify one filter for each supported info area (A1, A3, MA and TD). Entera comma-separated list of filters. Example - MA.NoEmail, A1.OnlyOpen.
If the user selects or defines a filter set, the criteria are combined by logical AND.
CircleOfInfluenceYou can visualize the relationship between companies and persons usingCircleOfInfluence action template.
The CircleOfInfluence action template (circleofinfluence.aspx) is used tovisualize the relationships between companies and persons in an interactive rela-tionship graph using the CircleOfInfluence widget.
403AUREA CONFIDENTIAL
Action Templates

In UPDATE_DEFAULT the CircleOfInfluence action is called by the A_CircleOfIn-fluence context menu action (Relationship Network) configured in M_Company andM_Person.
All companies/persons (FI, KP, PE, CP) with a relationship (PB record) to the currentrecord are taken into account. The nodes represent company/person records, thelines represent the relationship records.
You can define which records are displayed by defining a fixed filter for the action.For fur ther details, see fixedFilterName.
If a node has more than 10 sub-nodes, two nodes with < and > are displayed allowingthe user to "page" to the next 10 related companies/persons.
Users can expand/collapse fur ther levels of the graph by clicking on a node. Youcan define the number of initially expanded levels via the level action parameter.For fur ther details, see level. The nodes are color-coded per level, i.e. dependingon how remotely they are related the center node.
The left par t of the page (collapsible) lists all relationships for the currently selectednode.
Use the SDK page to test the CircleOfInfluence widget.
To display the CircleOfInfluence widget in a sub-list panel (SearchSubList andExpandChildren header), enter the following as Form Name (see Related Data area(Header Info Areas) on page 329):
{type: "CircleOfInfluence", options: { size: { height: 400 } } }
404AUREA CONFIDENTIAL
Chapter 3: Using CRM

Configuration UnitsLearn about configuring Circle of Influence action template.
The Circle of Influence consists of the following configuration units:
• The context menu action A_CircleOfInfluence with action CircleOfInfluence.For details on the available action parameters. For fur ther details, see CircleOfIn-fluence Action Parameters on page 406.
A_CircleOfInfluence is assigned to CRM process 1.4.2.2.107. "Relationship hi-erarchy" (CRM process ID 50001410).
• The special header CircleOfInfluence containing the following:
• "Circle of influence for {RECORD}" as header text. The info area default tablecaptions (for FI, KP etc.) are used. Use {RECORD:<Table Caption Name>} tospecify another than the default table caption.
• A New Relationship button (CoINewRelation) calling the CreateRelation processin a popup for the currently selected node. If no record is selected, the buttonis disabled.
• The Cross Links check box (CoIToggleCrossLinks) allowing users to turn on/offthe displaying of multiple nodes for the same record
Example: If a person is related to a company and this company is related toanother company to which the person is also related, the person is displayedas a child node of both companies.
If the Cross Links check box is enabled, the person is only displayed as relatedto the root company (continuous line) and the relationship to the other companyis indicated by a dotted line to the same person node.
You can define an initial default via the showCrossLinks action parameter. Forfur ther details, see showCrossLinks.
405AUREA CONFIDENTIAL
Action Templates

The header is displayed using page header style. It is not configurable.
• Special table captions <InfoAreaId>.CoI (fallback: <InfoAreaId>) configure thefollowing:
• The nodes use (the first line of) <InfoAreaId>.CoI, e.g. FI.CoI
• The lines connecting the nodes display PB.CoI in a tooltip (on mouse-over)
• The header of the RecordListBox (left par t of the page) uses <InfoAreaId>.CoIfor the currently selected node. Multi-line table captions are supported.
• For the list of relationships PB.CoI is used.
CircleOfInfluence Action ParametersSupported CircleOfInfluence Action Parameters.
The CircleOfInfluence action supports the following input arguments:
uid
The record to be displayed as the graph's central node (root node).
This parameter is mandatory.
Record: The current record is displayed as the central node.
Linked: The parent record of the current record is displayed as the central node.
fixedFilterName
Allows you to specify a fixed filter, for PB, which is applied to the relationship graph.Example - filtering the nodes by Relationship type. The filter is applied to both therelationship graph and the list of relationship records.
In addition to defining filter criteria on PB, you can also filter PB records by criteriafrom FI, PE, etc. See the below examples for details.
Note: The filter is not applied when creating/updating a relationship. Users needto refresh the page to see the changes.
Examples
1. Relationship view for company "ABC AG" without a filter:
406AUREA CONFIDENTIAL
Chapter 3: Using CRM

2. Relationship view filtered by Relationship type:Private relationships are notdisplayed. In this case the person linked to Mr. Michael Manager:
3. Relationship view filtered by criteria from FI and PE:
Add FI and PE as "child" info areas of PB and use the reverse link (link ID 1) toread the target records of the PB record. Otherwise the filter criteria would be appliedto the selected node instead.
If you define conditions for more than one sub-info area, make sure you check Op-tional.
407AUREA CONFIDENTIAL
Action Templates
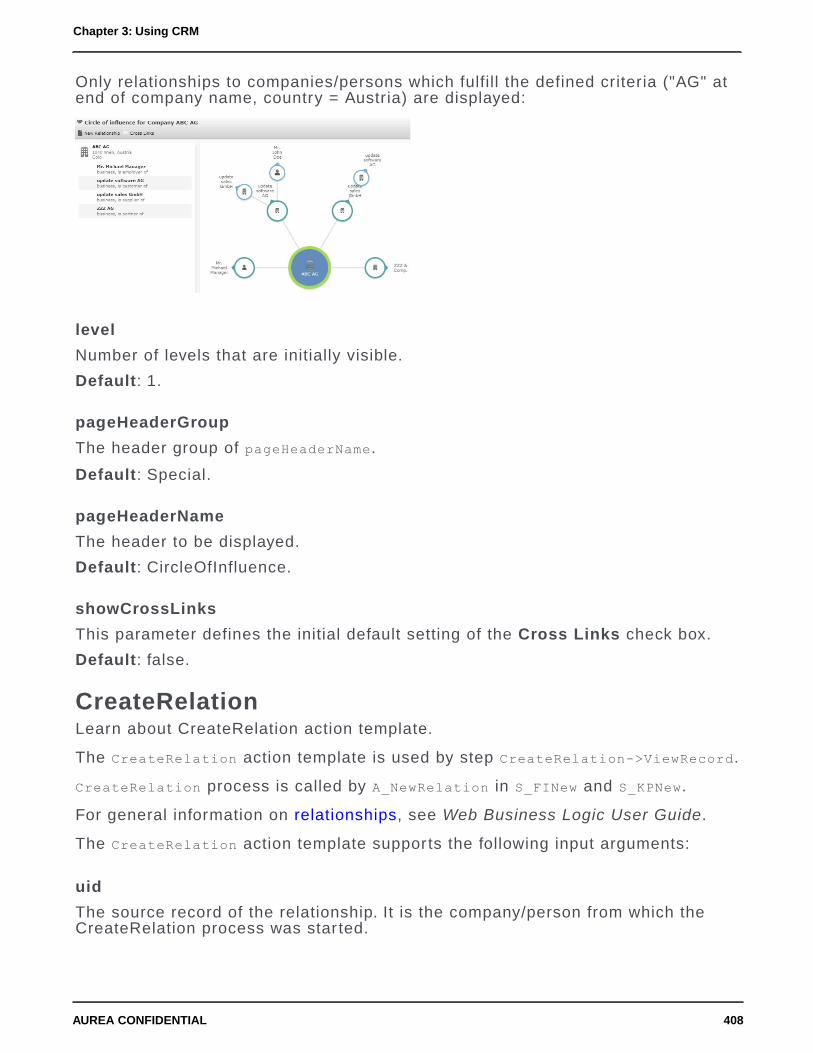
Only relationships to companies/persons which fulfill the defined criteria ("AG" atend of company name, country = Austria) are displayed:
level
Number of levels that are initially visible.
Default: 1.
pageHeaderGroup
The header group of pageHeaderName.
Default: Special.
pageHeaderName
The header to be displayed.
Default: CircleOfInfluence.
showCrossLinks
This parameter defines the initial default setting of the Cross Links check box.
Default: false.
CreateRelationLearn about CreateRelation action template.
The CreateRelation action template is used by step CreateRelation->ViewRecord.
CreateRelation process is called by A_NewRelation in S_FINew and S_KPNew.
For general information on relationships, see Web Business Logic User Guide.
The CreateRelation action template supports the following input arguments:
uid
The source record of the relationship. It is the company/person from which theCreateRelation process was star ted.
408AUREA CONFIDENTIAL
Chapter 3: Using CRM

uid2
The target record of the relationship.
formName
The CreateRelation form allows the users to select or define the relationship. TheCreateRelation action template supports the following output argument:
relationUid
The newly created relationship record (PB).
The CreateRelation form is configured as follows:
• The Predefined tab consists of a SearchView widget using the search and listcontrols from field group BL (B5 for OTC and FS). You can customize the searchby defining fixedFieldValues, a filter etc. The SearchView widget allows usersto select a relationship from the Relationship Level info area (BL/B5).
The Relationship Level info area is accessible via Settings > Maintenance >Relationship Level in UPDATE_DEFAULT (implemented in the Base ver tical forinfo area 0BL). This allows users to create/manage relationship level records di-rectly in Aurea CRM.Web. Both the menu item and the New button (in the page'sSearchResults header) are assigned to CRM process 1.4.2.2.107 "Relationshiphierarchy" (CRM process ID 50001410).
• The contents of the Customize tab are defined in the form, allowing users todefine custom relationships by e.g. just selecting a Relationship type.
Selecting a record (or entering a value on the Customize tab) updates the previewtext at the bottom of the page. (Double-clicking a record creates the relationshiprecord.)
The preview text is created as follows:
409AUREA CONFIDENTIAL
Action Templates

BTB:
<uid1> + relationship_text_4 + BL.Relation table caption + relationship_text_5+ <uid2>
<uid2> + relationship_text_4 + BL.ReciprocalRelation table caption + relation-ship_text_5 + <uid1>
OTC/FS:
<uid1> + relationship_text_4 + B5.Relation + relationship_text_5 + <uid2>
<uid2> + relationship_text_4 + B5.ReciprocalRelation + relationship_text_5 +<uid1>
In UPDATE_DEFAULT the table captions use field BL:1 and BL:5 (B5:1 and B5:5).Depending on which field(s) from BL/B5 you want to display and which catalog valuesare present in your environment, change the table captions and/or the texts (no. 4and 5 of text group relationship_text) in order to provide a helpful preview text.
DayWeekPlanningLearn about the DayWeek Planning action template.
The DayWeekPlanning action template (DayWeekPlanning.aspx) is used by themenu action ID_NET_DAYWEEKPLANNING in UPDATE_DEFAULT.
410AUREA CONFIDENTIAL
Chapter 3: Using CRM

The Daily & Weekly Planning page consists of a Search page with the Calendardisplayed below. It allows users to plan activities: The user searches for relevantrecords and then drags any record onto the calendar to create an activity. If multiplerecords are selected, the activity records are created in the order of selection.
Daily & Weekly Planning is possible for companies, persons, and any info area thathas a company and/or person as a parent record. In UPDATE_DEFAULT, Daily &Weekly Planning is configured for FI, KP, PE (FS only) and SB (OTC only).
To make especially visit planning easier, it is also possible to display the contacttimes of the selected company or person in the calendar. For other info areas, thecontact times of the parent person or company can be displayed.
Note: By default, Aurea CRM.Web uses the Contact Time info area (CT) to displaycontact times on the Daily & Weekly Planning page. For fur ther details, see con-tactTimeTypes.
Note: If the contact times are stored differently in your project, you can implementa custom contact times provider, see the ar ticle “How to Implement a custom contacttimes provider” at https://support.aurea.com.
Daily & Weekly Planning consists of the following configuration units:
• The menu action ID_NET_DAYWEEKPLANNING with action DayWeekPlanning. For details,see DayWeekPlanning Action Parameters on page 412.
• The special header DayWeekPlanning contains the drop-down list (InfoAreaSetsbutton) that allows users to choose the info area in which they want to search.The contents of the drop-down list is configured by the searchAndListName actionparameter. For fur ther details, see searchAndListName.
The user's choice in which info area he wants to search is stored in the user'sroaming settings. For fur ther details, see User Settings on page 25.
• The area to filter the displayed calendar items is configured by the special headerCalendarAdjustments. For fur ther details, see CalendarAdjustments.
• The Activity Defaults area is defined by the special header DayWeekPlanningDe-faultValues containing text plus an optional image and the field group MADayWeek-PlanningDefaults: The Details control of this field group contains the fields offeredin the Activity Defaults area. The control needs to be set to one column viacontrol attribute. For fur ther details, see columns on page 201. Use the default-FieldValuesForMA action parameter if you want to enter activity defaults. Forfur ther details, see defaultFieldValuesForMA. Use defaultFieldValuesForMA tooverrule the default activity duration of 1 hour.
• Above the calendar area, the special header DayWeekPlanningCalendar containinga subset of the elements from the CalendarHeader is displayed. For fur ther details,see CalendarHeader/DayWeekPlanningCalendar.
411AUREA CONFIDENTIAL
Action Templates

To allow users to switch from Calendar to Day & Week Planning and vice versa,the buttons Calendar and DayWeekPlanning are configured in these headers.
Note: The Web Configuration parameter Search.AutoExpandOnSingleHit is ignoredfor Day & Week Planning. The default action is not executed when only one searchresult is found on this page. For fur ther details, see Search.AutoExpandOnSingleHit.
DayWeekPlanning Action ParametersSupported dayweekplanning action parameters.
The DayWeekPlanning action supports the following input arguments:
searchAndListName
Defines the info areas that are available for users to select and search in. Specifythe info areas and (optional) the Search&List configurations separated by semicolon.This parameter is mandatory.
Defaults:
• BTB: KP;FI
• FS: PE;KP;FI
• OTC: KP;FI;SB
Syntax:
infoAreaId:searchAndList;...
Example:
FI:FISearchAndList;KP:KPSearchAndList
The defined info areas are offered in a drop-down list in the top right corner of thepage. The first entry is used as default when opening the page for the first time.The entries are sor ted alphabetically.
If you defined info areas that are not children of FI and/or KP (e.g. AR), an errormessage is written to the client log.
maxRows
Defines the maximum number of results returned by the search.
defaultFieldValuesForMA
Allows you to define Activity Defaults displayed on the left below the calendar filterswhich are used when creating new activity records. The defaults can be changedby the user.
Syntax:
412AUREA CONFIDENTIAL
Chapter 3: Using CRM

<field name or number>:"<value>";...
Example:
Contact:"#1";Duration:"30";Unit:"#2" sets the Activity Type to "Visit" and thedefault duration to 30 minutes
Note: Values for the fields Starts on, Starts at, Rep ID and Participants ID arenot retrieved from the defaults: If present, they are ignored. Starts on and Startsat are set according to where the user drops the record. The current user is alwaysset as rep and participant.
showSearch
If set to true, the search mask is visible. If set to false, it is displayed collapsedand can be expanded by clicking .
Default: true.
autoSearch
If set to true, the search is immediately executed when the user opens the page.
Auto-search does not happen when the user updates a filter in the search mask. Ifyou want auto-search to be activated when a filter is updated in the search mask,you have to set autoApplyFilter to true.
Default: false
defaultFieldValues
Defines fields that have a default value within the search, which the user can change,separated by semicolon. You can define default values for all info areas defined insearchAndListName.
Syntax:
<infoAreaId>.<field name or number>:"<value>";...
• To fill a field with the current rep, enter fieldName:REP
• To fill a field with the current date, enter fieldName:TODAY
Use operators (<=,=>) to define date ranges and functions
Syntax: fieldName:Value:Operator
• To set a value for a catalog field, enter fieldName:"#catalog_ID"
Example:
KP.RepID:REP;PR.Date:TODAY-14;MA.Contact:"#3";MA.Date:TODAY-7:>=;MA.Date:TODAY+14:<=
413AUREA CONFIDENTIAL
Action Templates

This sets the search masks as follows:
• Person: Rep ID = the current rep
• Offer: Date = the current date minus 14 days
• Activity: Activity Type = Event, Date from = the current date minus seven days,Date to = the current date plus 14 days
fixedFieldValues
Defines fields that have a fixed value within the search which the user cannot change.You can define fixed values for all info areas defined in searchAndListName. Usethe syntax as described for defaultFieldValues.
disableFilter
Disables the filter selection and definition functionality for the user. Both the prede-fined filters and the More Filters entry are removed from the Add more drop-downlist of the Search page.
Note: To globally restrict working with filters to predefined filters only, create andcheck a Web Configuration parameter called Search.NoFilterDefinition (type:Checkbox). This removes the More Filters entry from the Add more drop-down liston all Search pages. For fur ther details, see Search.NoFilterDefinition. Users mayonly select predefined filters and can no longer create or edit any filters in AureaCRM.Web.
defaultFilterName
Allows you to specify a filter which is applied to the search by default. Users arestill able to select another filter unless disableFilter = true.
Note: Filters have to be referenced as <InfoAreaId>.<FilterName> in the action(example - "KP.Filter1"). In Aurea CRM.Web they are then displayed as <FilterName>(example - "Filter1").
fixedFilterName
Allows you to specify a fixed filter which is applied to the search and cannot bechanged by the user. The filter name is not visible for the user.
Note: Filters have to be referenced as <InfoAreaId>.<FilterName> in the actiondefinition (example - KP.Filter1).
listParams
Defines the behavior of the search results list. For fur ther details, see ListParamson page 374.
Note: selectionMode is not supported in the DayWeekPlanning action template.
414AUREA CONFIDENTIAL
Chapter 3: Using CRM

linkOfMAToSource
When creating activity records for info areas other than Company or Person, exam-ple - a Ticket, the link to the ticket record is not automatically added to the newlycreated activity. Records of these info areas are by default only used to determinethe company and/or person record(s) for which the activity is created.
Use the linkOfMAToSource parameter to add links from the activity record to theseinfo areas.
Syntax (JSON): {infoAreaId:linkId,infoAreaId:linkId,…}
Note: Each info area may only be used once in this structure.
Example: {KM:-1;IB:-1}
This creates links to ticket and installed base records using the default link. Forfur ther details, see Link IDs on page 19. The links are displayed under Parent Datain the activity record's Expand view.
contactTimeTypes
Defines the Type of Contact Time (CT) that is taken into account when displayingcontact times.
If contactTimeTypes is undefined, the contact times are only displayed if CT recordsexists for exactly one Type. If contact times for more than one type are configured,no contact times are displayed.
Syntax
<catalog value ID>
<info area ID>=<catalog value ID>
Separate multiple entries by comma.
Examples
2
The contact times of Type "Reachability" are displayed for companies and persons.
FI=1,KP=2
The contact times of Type "Visiting Times" are displayed for companies and of Type"Reachability" for persons.
DefaultValueUse DefaultValue action template to define default values in Aurea CRM.Web.
The DefaultValue action template is called by the DefaultValuesDefine button inUPDATE_DEFAULT.
Example: MA SearchResults header.
415AUREA CONFIDENTIAL
Action Templates

For fur ther details, see DefaultValuesDefine on page 309. It is used for defining defaultvalues in Aurea CRM.Web. The default values are saved in a format of type "InfoArea Default Values".
Note: Default values defined in the Aurea CRM win Rights module take precedenceover the defaults defined via the DefaultValuesDefine button in Aurea CRM.Web.
DefaultValue Action ParametersSupported default value action parameters.
The DefaultValue action supports the following input arguments:
InfoAreaId
The info area for which default values are defined. Enter javascript:$['uid'].in-foAreaId to determine the InfoAreaId based on the context, i.e. the current record.
DefaultValuesFormatName
Name of a default values format to be loaded. The loaded default values can bechanged by the user.
FieldGroupName
Name of the field group used: The Details control of this field group is used fordefining the default values format.
DispatchingDashboardLearn about the DispatchingDashboard action template in this topic.
The DispatchingDashboard action template (DispatchingDashboard.aspx) isused by the application menu action ID_NET_DISPATCHING_DASHBOARD and the contextmenu action A_AssignTicket in UPDATE_DEFAULT.
416AUREA CONFIDENTIAL
Chapter 3: Using CRM

The Dispatching Dashboard allows the assignment of open tickets to - servicetechnicians or support employees as well as to resources like meeting rooms orspecial tools required to fix the problem.
Working hours (global and individual) are displayed as described for the Resourcesview. For fur ther details, see ResourcesView on page 448.
The Dispatching Dashboard page consists of a Search page with the Resourceview displayed below. Dragging one or more ticket records (KM) onto the Resourceview creates activity records (MA) linked to the respective ticket.
When called via A_AssignTicket the search results only contain the ticket from whichthe action was called (search context = new ticket).
Activity records that would be hidden when selecting a large time scale, can bedisplayed as small dots by checking the ResourceView.ShowHiddenItems Web Con-figuration parameter. For fur ther details, see ResourceView.ShowHiddenItems.Users can change this default by setting/removing the Show hidden items flag inthe Resource View Settings.
Multiple activities belonging to the same ticket and activities belonging to hierarchicaltickets (Predecessor field) are highlighted with an orange underline when a ticketor a related activity is selected.
You can update existing hierarchical tickets with a link to the respective root ticket(KM_2_StaNo/SerNo/Link fields) via a CRM.server to-do (type 18). For fur ther de-tails, see To-Do Types in the CRM.Core Administrator Guide.
417AUREA CONFIDENTIAL
Action Templates

The MA records are created as follows:
• The MA rep is the rep the ticket record was dropped on.
• Date and time is calculated from the position where the ticket was dropped.
• The MA record is linked to the KM record (via the respective link fields in MA).
• The MA is linked to the same company/person for which the ticket was created.
• More MA fields can be automatically entered based on the defaultFieldValues-ForMA action parameter. For fur ther details, see defaultFieldValuesForMA.
• The MA record's duration is calculated based on the Service Duration (KM:117)of the ticket. Users can overwrite this default by changing the Activity Defaults.
To update ticket records once they are dropped onto the Resources view you needto create an appropriate trigger. Example - to set the status to "in progress".
The user's settings (rep set, filter set, grouping criterion and activity defaults) arestored client-independently using the settings service.
Configuration UnitsLearn about Dispatching Dashboard configuration units.
The Dispatching Dashboard configuration consists of the following configurationunits:
• The menu actions ID_NET_CALENDAR and A_AssignTicket with action Dispatching-Dashboard. For details on the available action parameters. For fur ther details,see DispatchingDashboard Action Parameters on page 421.
• The Search&List configuration, specified via the searchAndListName actionparameter, defining the upper par t of the page. For fur ther details,see searchAndListName.
• The special header DispatchingDashboard containing a DuplicateRecord and aResourcePlanSettingsEdit button by default. The DuplicateRecord button allowsusers to duplicate an activity record in order to split the processing of a ticketinto multiple activities. The DuplicateRecord button is only active if one recordis selected.
• The items displayed in the Resource view use the table captions MA.ResourceView(and A3.ResourceView). For small items and multi-line table captions the completetable caption is displayed in the tooltip.
• The sidebar contains the date picker, drop-down lists for filter and rep sets andthe Group reps by drop-down list. The additional options Ticket-Related Repsand Combine Skills & Rep Set allow fur ther filtering for the appropriate reps andresources. For fur ther details, see Filtering Reps for Dispatching on page 419
You can create a Web Configuration parameter ResourceView.FilterSets to offerpredefined filter sets. For fur ther details, see ResourceView.FilterSets.
418AUREA CONFIDENTIAL
Chapter 3: Using CRM

You can customize the Group reps by drop-down list via the repGroupingOptionsaction parameter. For fur ther details, see repGroupingOptions.
• The Activity Defaults area allows users to enter default values for the activityrecords to be created (example -. the Activity Type). It is defined by the specialheader DayWeekPlanningDefaultValues containing text plus an optional imageand the field group MADispatchingDashboardDefaults: The Details control of thisfield group contains the fields offered in the Activity Defaults area. The controlneeds to be set to one column via control attribute. For fur ther details, see columnson page 201.
Use the defaultFieldValuesForMA action parameter to predefine activity defaults.For fur ther details, see defaultFieldValuesForMA.
Note:
• Settings made by the user in the Activity Defaults area overrule the automaticMA duration calculation (based on the Service Duration of the ticket) andvalues entered via defaultFieldValuesForMA.
• Values for the MA fields Starts on, Starts at, Rep and Participants are notretrieved from the defaults (if entered, they are ignored). Starts on and Startsat are set according to where the user drops the ticket record.
• Context menus: M_ResourcesRepMenu, M_ResourcesRepMenu.MultiSelect
Filtering Reps for DispatchingLearn about Filtering Reps for Dispatching.
Users have the following possibilities to filter the reps displayed on the DispatchingDashboard:
• Reps and Rep Sets: Users can select reps and/or define rep sets via the (Repsand Rep Sets) button (analogous to the Calendar).
Note: Max. 50 reps can be displayed. If the user's selection contains more than50 reps, a message is displayed.
• Ticket-Related Reps: If checked, the rep list is filtered for reps with theappropriate skills. The selection from Reps and Rep Sets is disregarded in thiscase.
419AUREA CONFIDENTIAL
Action Templates

Note: To filter for ticket-related reps you need to define Dispatching options(Resources category) in the Configuration info area (MC). Fr fur ther details,see Configuration Info Area in the CRM.Core Administrator Guide.
• Combine Skills&Rep Set: This option is only displayed, if Ticket-Related Repsis checked. It allows users to combine rep filter and skill: This results in a subsetof reps from the selected rep set. Only reps from the selected rep set with theskill required for the any ticket selected in the list are displayed.
You can define the initial setting for Ticket-Related Reps and Combine Skills&RepSet via the corresponding action parameters. For fur ther details, see ticketRelate-dReps and combineSkillsAndGroup.
Displaying Record Lists/Details for the DispatchingDashboardLearn to Display Record Lists/Details for the Dispatching Dashboard.
420AUREA CONFIDENTIAL
Chapter 3: Using CRM

UPDATE_DEFAULT contains an Example.DispatchingDashboard form that allowsyou to display a list of records for the selected rep / an Expand view of the selectedactivity record below a DispatchingDashboard widget.
For details, see Displaying Record Lists/Details for a Resource View on page 452.
DispatchingDashboard Action ParametersSupported DispatchingDashboard Action Parameters.
The DispatchingDashboard action supports the following input arguments:
combineSkillsAndGroup
If set to true, the Combine Skills&Rep Set option is checked when first calling theDispatching Dashboard.
Default: false.
ticketRelatedReps
If set to true, the Ticket-Related Reps option is checked when first calling theDispatching Dashboard.
Default:false.
refreshListAfterDrop
If set to true, the ticket list is refreshed each time a ticket is dropped onto a resourceblock.
This allows you to automatically remove already dispatched tickets from the searchresults list. This requires additional project customizing: Define a trigger that writesto some field in KM as soon as the MA is created, and define a filter for the KM listfiltering for that field's value.
Default: False
repGroupingOptions
Defines the content and initial value of the Group reps by drop-down list usingJSON.
Syntax. For fur ther details, see RepGroupingOptions.
copyFields
Field values to be copied from the ticket to the activity.
Syntax:
<field name or number in KM>:<field name or number in MA>;
Separate multiple entries by semicolon.
Example:
Title:Subject;ProblemDescription:Text
421AUREA CONFIDENTIAL
Action Templates

defaultFieldValuesForMA
Allows you to define Activity Defaults displayed on the left below the filter optionswhich are used when creating activity records. The defaults can be changed by theuser.
Syntax:
<field name or number>:"<value>";...
Example:
Contact:"#1";Purpose:"#2" sets the Activity Type to "Visit" and the Purpose to"Support".
Note: Values for the MA fields Starts on, Starts at, Rep and Participants are notretrieved from the defaults (if entered, they are ignored). Starts on and Starts atare set according to where the user drops the ticket record.
defaultFilterName
Allows you to specify a filter which is applied to the ticket search by default. Usersare still able to select another filter unless disableFilter = true.
fixedFilterName
Allows you to specify a fixed filter which is applied to the ticket search and cannotbe changed by the user. The filter name is not visible for the user.
link
Parent record for the ticket search: Record or Linked. This parameter is used whencalling the Dispatching Dashboard from a ticket record via A_AssignTicket in UP-DATE_DEFAULT.
listParams
Additional list parameters separated by semicolon: key,value;key,value; etc. Forfur ther details, see ListParams on page 374
searchAndListName
The name of the Search&List configuration to be used.
If undefined or not found, the KM Search&List configuration is used
maxRows
Defines the maximum number of results returned by the search.
showSearch
If set to true, the search mask is visible. If set to false, it is displayed collapsedand can be expanded by clicking .
422AUREA CONFIDENTIAL
Chapter 3: Using CRM

Default: True
autoSearch
If set to true, the search is immediately executed when the user opens the page.
Auto-search does not happen when the user updates a filter in the search mask. Ifyou want auto-search to be activated when a filter is updated in the search mask,you have to set autoApplyFilter to true.
Default: false
defaultFieldValues
Default field values for the ticket search can be changed by the user.
Syntax: <infoAreaId>.<field name or number>:"<value>";
fixedFieldValues
Fixed field values for the search can not be changed by the user.
Syntax: <infoAreaId>.<field name or number>:"<value>";
disableFilter
Disables the filter selection and definition functionality for the user.
showNewButton
When using the DispatchingDashboard action within a process add the showNewButtonparameter and set it to false to hide the New Activity button, since launching aprocess inside a process is not supported.
ExecuteReportUse execute report action template to display report.
The ExecuteReport action template is used for displaying reports defined in AureaCRM win. For fur ther details, see Creating Aurea CRM win Reports in AureaCRM.Web on page 863.
ExecuteReport Action ParametersSupported ExecuteReport Action Parameters
The ExecuteReport action supports the following input arguments:
name
The name of the report format to be used. For information on Aurea CRM win reports.For fur ther details, see Defining Report Formats in the Aurea CRM win User Manual.
This parameter is mandatory.
423AUREA CONFIDENTIAL
Action Templates
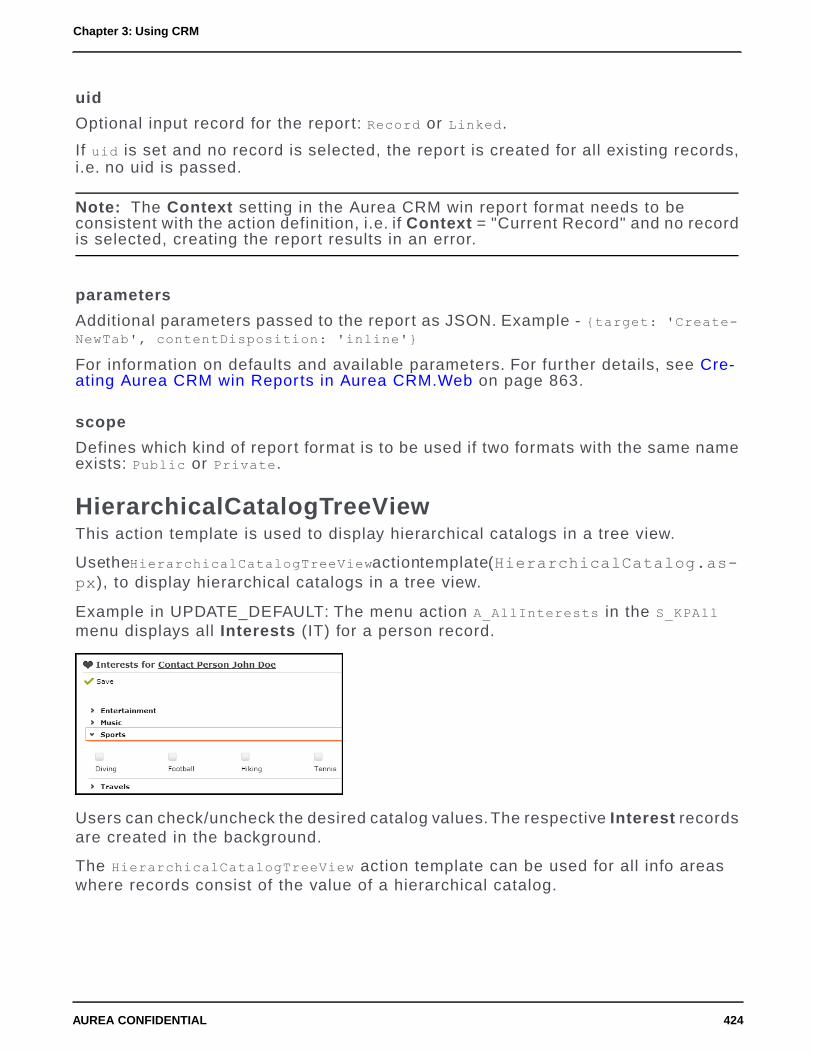
uid
Optional input record for the report: Record or Linked.
If uid is set and no record is selected, the report is created for all existing records,i.e. no uid is passed.
Note: The Context setting in the Aurea CRM win report format needs to beconsistent with the action definition, i.e. if Context = "Current Record" and no recordis selected, creating the report results in an error.
parameters
Additional parameters passed to the report as JSON. Example - {target: 'Create-NewTab', contentDisposition: 'inline'}
For information on defaults and available parameters. For fur ther details, see Cre-ating Aurea CRM win Reports in Aurea CRM.Web on page 863.
scope
Defines which kind of report format is to be used if two formats with the same nameexists: Public or Private.
HierarchicalCatalogTreeViewThis action template is used to display hierarchical catalogs in a tree view.
Use the HierarchicalCatalogTreeView action template (HierarchicalCatalog.as-px), to display hierarchical catalogs in a tree view.
Example in UPDATE_DEFAULT: The menu action A_AllInterests in the S_KPAllmenu displays all Interests (IT) for a person record.
Users can check/uncheck the desired catalog values. The respective Interest recordsare created in the background.
The HierarchicalCatalogTreeView action template can be used for all info areaswhere records consist of the value of a hierarchical catalog.
424AUREA CONFIDENTIAL
Chapter 3: Using CRM

HierarchicalCatalogTreeView Action ParametersSupported HierarchicalCatalogTreeView Action Parameters.
The HierarchicalCatalogTreeView action supports the following input arguments:
ChildCatalog
The field number of the child catalog. It is mandatory.
ColumnCount
Determines the number of columns, per row, displaying the child catalog values.
Default: 5.
CompanyRelated
If set to true for a company-related tree view, only records linked directly to thecompany, but not to a person, are displayed. Example - for all interests of a company,true means that only interests exclusively linked to the company are displayed,while false lists interests linked to persons as well.
Default: false.
ExpandAll
If set to true, all parent catalog values (example - interest groups) are expandedincluding those where no child value (example - interest) is currently selected.
Default: false.
HeaderGroupName
The header group of HeaderName.
HeaderName
An optional header for the tree. You can specify any special header from Header-GroupName.
InfoArea/RecID
Record to which the new record is linked (mandatory): Record | Linked.
LinkInfoArea
The info area of the new record (mandatory). Example - IT.
425AUREA CONFIDENTIAL
Action Templates

HierarchicalCircleOfInfluenceUse HierarchicalCircleOfInfluence action template to visualize corporate structuresin an interactive relationship graph.
The HierarchicalCircleOfInfluence action template can be used to visualize cor-porate structures - a network of branch offices, the structure of hospital departments,etc. - in an interactive relationship graph. The CircleOfInfluence widget (circle-ofinfluence.aspx) is used (see CircleOfInfluence), but only PB records thatdefine the corporate structure are taken into account.
Relationships are defined as belonging to a corporate structure via the Relationshiphierarchy flag in the Relationship Level info area (BL/B5), see Relationships andCorporate Structure in the Web Business Logic User Guide.
The root of the corporate structure, i.e. the topmost record in the hierarchy is alwaysdisplayed in the center of the graph, no matter which record is currently selected.If more than one root record is found, i.e. if the corporate structure is defined erro-neously, an error message is displayed.
The sidebar contains the following items:
• All companies/persons (FI, KP, PE, CP) that are related to the selected node aschildren in the corporate hierarchy
The special table caption PB.CoI.Hierarchy is used (fallbacks: PB.CoI, PB).
• If the selected node is a company, the persons (KP) in this company are listedas well.
The special table caption KP.CoI is used (fallback: KP).
426AUREA CONFIDENTIAL
Chapter 3: Using CRM

For information on the functionality of the CircleOfInfluence widget, on the config-uration units and the action parameters involved, see CircleOfInfluence.
Since corporate structures are defined in the database, UPDATE_DEFAULT doesnot contain a menu action using the HierarchicalCircleOfInfluence action template.
The level argument is not used by the HierarchicalCircleOfInfluence actiontemplate. The fixedFilterName argument only accepts filters on PB.
HierarchicalCircleOfInfluence supports the following additional argument:
hierarchyIndexLearn to define hierarchyIndex.
You can define up to 10 different corporate structures via Z5 variables (CORE::INDI-RECT-PB-LINK-TREE-0 to 9). Use the hierarchyIndex parameter to specify whichcorporate structure should be read and displayed. If more than one structure isfound and hierarchyIndex is undefined, a message is displayed and the corporatestructure with index 0 is used.
HierarchicalSerialEntryUse HierarchicalSerialEntry to implement 'quick add pages' that contain a hierarchicalitem master tree.
The HierarchicalSerialEntry action template (hierarchicalserialentry.aspx)allows the implementation of quick add pages that contain a hierarchical item mastertree visualizing product hierarchies (item structures). This allows users to selectitems from the tree instead of searching for item names or numbers.
Note: The HierarchicalSerialEntry action template can only be used for genericquick add configurations.
Product hierarchies are defined in the Item Structure (IS) info area in AureaCRM.Web accessible as a sub-list of the Item Master (AR) info area. For detailedinformation on defining product hierarchies, see Item Structure in the Web BusinessLogic User Guide.
For general information on how to configure quick add pages, see SerialEntry onpage 454.
For additional background information, see the ar ticle “Hierarchical Serial Entry” athttps://support.aurea.com.
427AUREA CONFIDENTIAL
Action Templates

The item structure to be read for displaying the item master tree is determined bythe action definition by specifying an item number or uid. For fur ther details, seeHierarchicalSerialEntry Action Parameters on page 428. The item names displayedas tree nodes are read from the Item Master field in IS (IS:35).
Depending on the node selected in the tree, the items list is filtered for the respectivesub-items. Additional criteria from the item search are combined by logical AND.
You can apply filters to both the tree and the list, e.g. to only display parent nodesin the tree (hierarchyNodeFilter) and actual items in the list (fixedFilter). Forfur ther details, see hierarchyNodeFilter.
The selection in the tree is taken into account if All is selected. Selecting any otherfilter option (example - Overview) clears the selection in the tree.
To reset the items list while another filter option is selected, users can click on De-select above the tree. This clears the selection and displays the items accordingto the selected filter option and search criteria regardless of whether the items arepart of the item structure or not.
Since item structures are defined in the database, UPDATE_DEFAULT does notcontain a menu action using the HierarchicalSerialEntry action template.
Use the SDK page to test you hierarchical quick add configurations: SDK > Seri-alEntry > HierarchicalSerialEntry.
HierarchicalSerialEntry Action ParametersSupported HierarchicalSerialEntry Action Parameters.
The HierarchicalSerialEntry action template supports the same input argumentsas SerialEntry. For fur ther details, see SerialEntry Action Parameters on page 462.In addition, you need to at least specify the root record for the item structure to beread.
428AUREA CONFIDENTIAL
Chapter 3: Using CRM

Example
HierarchicalSerialEntry supports the following additional input arguments:
hierarchyRootId
The root record of the hierarchy. Specify the Item No. (AR:0) of the root item of theproduct hierarchy you want to display.
Alternatively you can specify a generic root record. For fur ther details, see hierar-chyRootUid.
hierarchyInfoAreaId
The info area of the hierarchy. Currently only AR is supported.
You must specify hierarchyInfoAreaId if you use hierarchyRootId.
hierarchyRootUid
You can specify the uid of the root of the hierarchy instead of hierarchyRootId plushierarchInfoAreaId: Record or Linked.
Use hierarchyRootUid to implement one HierarchicalSerialEntry for multiple itemstructures e.g. in a process.
hierarchyNodeFilter
Allows you to filter the tree view. The filter must be defined for the same info areaas determined by hierarchyInfoAreaId or hierarchyRootUid.
Example
Filtering the item tree and list for the above example using the Item Structure flag(AR:52). Precondition: The Item Structure flag is set for all AR records that areparent nodes and disabled for AR records representing actual items.
The tree displays only parent nodes, the list displays the actual items for the cur-rently selected node.
429AUREA CONFIDENTIAL
Action Templates

hierarchyNodeSortFields
llows you to specify the sor t order for the item master tree. By default, the items inthe tree are sor ted by serial number (AR-SerNo).
Specify one or more fields (<field name or number>) from AR. Separate multiplefields by comma. Prefix a field with "-" (or "+") to define descending/ascendingsorting.
Default: ascending.
Example: hierarchyNodeSortFields = ItemName,-ItemNo
If a field specified here does not exist in the data model, an error message is writtento the client log.
hierarchyRelationFilter
Allows you to filter the tree view by criteria defined on IS.
hierarchyIndex
You can define up to 10 different item structures via Z5 variables (CORE::INDIRECT-IS-LINK-TREE-0 to 9). Use the hierarchyIndex parameter to specify which itemstructure should be read and displayed. If more than one structure is found andhierarchyIndex is undefined, a message is displayed and the item structure withindex 0 is used.
MailMergeUse MailMerge for creating letters from Aurea CRM.
The MailMerge action template is used by the menu action A_MailMerge in UP-DATE_DEFAULT. It is used for creating letters from Aurea CRM records using theu8.services.documents.mailmerge function. For fur ther details, see Mail MergeConfiguration on page 844.
MailMerge Action ParametersThe MailMerge action supports the following input arguments:
430AUREA CONFIDENTIAL
Chapter 3: Using CRM

uid
Defines from which record the data for the merge fields in the document templateis taken and to which record the resulting document(s) is/are linked.
Available values:
• Record: The uid of the current record
• Linked: The uid of the record linked to the current record
This parameter is mandatory.
linkId
Defines the link that is used to access the document generated and uploaded byMailMerge to the database. This ensures that rights restriction on the database doesnot prevent the user from accessing the document generated using MailMerge.
saveMode
Defines whether and how the resulting document(s) are uploaded to the Aurea CRMdatabase.
Available values:
• None: Same as if left blank. The user is prompted to choose an upload action.
• Link: The resulting file(s) are created as a D1 record and linked to the recorddefined in parameter uid via D3 .
• DoNotSave: The resulting file(s) are not uploaded at all, just displayed to the user.
Default: Link
formatName
Defines the word processor format to be used for creating the letter(s). If left empty,a selection dialog is displayed allowing the user to select any available word proces-sor format.
You can specify the name of any defined word processor format.
formatFilter
If formatName is empty, use this parameter to filter the word processor formats dis-played in the format selection dialog.
You can specify any filter string and use wildcards (example - up*).
Specifying a filter string enables you to display only word processor formats thatare suitable for the current info area, provided you use an adequate naming schemefor the format names.
background
If set, the whole letter creation process is done in the background and the user justreceives a message of the result.
431AUREA CONFIDENTIAL
Action Templates

Possible values: <empty> | true | false
This setting overrules the Create in Background option in the word processor format,see Defining Word Processor Formats.
Default: empty.
MarketingCalendarLearn about MarketingCalendar action template.
The MarketingCalendar action template (MarketingCalendar.aspx) is used bythe ID_NET_MARKETINGCALENDAR menu action (ID_NET_CAMPAIGN_MGMT menu) in UP-DATE_DEFAULT.
The Marketing Calendar provides a calendar-like overview of campaigns (CM),marketing activities (AK) and sales cycles (VR) for the selected time frame allowingusers to move and resize items.
Note: To implement restrictions on moving marketing activities when movingcampaigns (e.g. only move marketing activities with Status = "Scheduled"), youneed to configure the appropriate update rights.
By default, items can be edited via double-click. Marketing activities without an enddate are displayed with duration = 1 day.
Campaigns and sales cycles are sor ted alphabetically. The sor ting of marketingactivities depends on where they are displayed:
• If displayed alone, they are sor ted alphabetically.
• If displayed linked to sales cycles or campaigns, they are sor ted by star t date.For this case custom sorting can be defined in the action. For fur ther details,see sor tFieldAK.
432AUREA CONFIDENTIAL
Chapter 3: Using CRM

The marketing calendar consists of the following configuration units:
• The ID_NET_MARKETINGCALENDAR menu action. For fur ther details, see Marketing-Calendar Action Parameters on page 433.
ID_NET_MARKETINGCALENDAR is assigned to CRM process 1.3.1.2.1. "MarketingCalendar" (CRM process ID 700?).
• The special header MarketingCalendarHeader containing the following:
• Toggle buttons to display campaigns or sales cycles with their linked marketingactivities, or marketing activities only. It is configured by Toggles(M_Marketing-CalendarViews).
• A toggle button that determines whether to move linked records (i.e. marketingactivities) when moving a campaign.
• A settings button allowing the user to select the color coding scheme of thedisplayed items by info area or status.
• A legend button explaining the currently active color coding. For fur ther details,see Legend on page 315.
In addition, campaign and sales cycle items use bold text in order to distinguishthem from marketing activities.
• A slider to adjust the zoom level of the calendar view.
• The items displayed in the marketing calendar use the table captions <in-foAreaId>.MarketingCalendar (fallback <infoAreaId>). For small items andmulti-line table captions the complete table caption is displayed in the tooltip.
• The sidebar contains the date picker and the filter set button, analogous to thecalendar. Default filters can be configured in the action. For fur ther details,see defaultFilterSet.
The user's settings toggle button states, color coding and filters are stored in theuser's roaming settings. For fur ther details, see User Settings on page 25.
MarketingCalendar Action ParametersSupported MarketingCalendar Action Parameters.
The MarketingCalendar action supports the following input arguments:
createNewTab
See createNewTab.
defaultFilterSet
Name of a filter set which is applied if the user has not yet defined/selected a filteror filter set himself.
For information on the syntax, see MarketingCalendar.FilterSets.
433AUREA CONFIDENTIAL
Action Templates

fixedFilterNames
Allows you to specify fixed filters which are applied to the marketing calendar andcannot be changed by the user.
You can specify one filter for each supported info area (CM, AK and VR). Enter acomma-separated list of filters. Example -CM.NoTemplates,AK.NoTem-plates,VR.NoTemplates. These fixed filters are defined in UPDATE_DEFAULT tohide campaigns etc. marked as "Template".
If the user selects or defines a filter set, the criteria are combined by logical AND.
sortFieldAK
Allows you to specify sor t fields for sor ting the marketing activities when displayedas children of campaigns or sales cycles.
Enter the desired field name or number. Separate multiple fields by comma. Usethe prefix "+" for ascending and "-" for descending sor t order. No prefix means as-cending.
Example
sortFieldAK = +Level,-Date
MessageLearn about message action template.
Use the Message action template to display a message on a page.
The Message action template supports the following input arguments:
• Message: A comma-separated list of parameters with arbitrary names that ispassed to the URL.
<param1>,<param2>,...
Create each of these parameters as new input arguments and enter the desiredtext. You can enter the text directly or reference texts from the CRM.Designerdatabase (TXT_<textgroup>_<number>).
• Style: Use this parameter to control the layout of the message. If undefined (orset to Normal), the defined texts are appended to each other.
Available values: Normal, BulletList, NumberedList, Table.
NewSiblingRecordLearn about the NewSiblingRecord action template.
The NewSiblingRecord action template is used to create a new child record linkedto the same parent as the current record without having to navigate to the parentrecord first. Example - create a new MA record while viewing an existing MA record(Expand and List view).
434AUREA CONFIDENTIAL
Chapter 3: Using CRM

The NewSiblingRecord action automatically passes the required parent link informa-tion from the existing record to the new sibling record, e.g. creating a new MAstar ting from an MA record that is linked to a KP automatically transfers the companyand person keys to the new record. To pass additional links or any other field valuesto the new record, define "copy fields" in the action specified in actionName. Seeexample below.
In UPDATE_DEFAULT the NewSiblingRecord action is used by the A_NewSiblin-gRecord and A_NewSiblingTicketRecord menu actions. Two buttons use these menuactions: NewSiblingRecord and NewSiblingTicketRecord.
Example - To implement this for MA (and without passing on any additional links),you only need to add the NewSiblingRecord button to the MA Expand header.
The NewSiblingRecord action template supports the following input arguments:
uid
The record for which a sibling record is created. It is the current record.
actionName
The action that actually creates the new sibling record, e.g. A_NewSiblingRecordEx-ecute which calls an ExpandNew action. For fur ther details, see Expand on page 578.
fieldGroupName
An optional field group to be used instead of the info area's default field group<infoAreaId>.
linkNames
A comma-separated list of info area IDs specifying which additional link(s) shouldbe used for the new record.
Example: linkNames = KM,KP|PE|FI uses the link to KM and the first link to KP orPE or FI.
Note: The specified links must be present in the Parent Data section of the sourcerecord's Expand view. For fur ther details, see Expand Configuration on page 352(View Parent Relations).
Note: Make sure the action specified in actionName can handle the result oflinkNames. Otherwise use "copy fields" (copyUid/copySourceFields/copyTargetFields)instead to pass the desired link information to the new record (see example below).
Example: New Ticket with multiple FI/KP links
Creating a sibling ticket using the out-of-the-box A_NewSiblingTicketRecord menuactions uses the source ticket's default link, which is the ticket's direct parent forthe other company/person links as well (End Customer, Contact and Billing).
435AUREA CONFIDENTIAL
Action Templates

To use the additional links from the source ticket in the new sibling record, definecopy fields in the action entered as actionName, e. g. A_NewSiblingTicketRecordEx-ecute:
Make sure you add all required key fields (example - 81-84 for the End CustomerCompany and Person links) as well as the reference fields (example - 85 and 86).Adding the latter ensures that the user sees which company/person is used whilecreating the record. Without those fields the correct links are displayed only aftersaving the new record.
If you want the new record to be automatically saved, set the autoSave parameterto true. For fur ther details, see autoSave.
QueryReportThe QueryReport action template can be used for actions defined for menu entries,buttons and within processes.
The QueryReport action template calls a JavaScript function (u8.services.queries.ex-ecuteExportFromAction) that allows users to create a report based on a query exe-cuted in the background.
436AUREA CONFIDENTIAL
Chapter 3: Using CRM

The QueryReport action template can be used for actions defined for menu entries,buttons and within processes.
The QueryReport action automatically detects parameterized queries: In this casea popup is displayed allowing the user to enter the parameter(s). For fur ther details,see Parameterized Queries on page 500. Clicking Start Query in the popup executesthe query using the specified parameters and creates the report as defined in theQueryReport action.
For general information on reports in Aurea CRM.Web, see XML Exports & Reportingon page 856.
QueryReport Action ParametersSupported QueryReport Action Parameters.
The QueryReport action supports the following input arguments:
link
Defines the context for the query's execution: If set to Record, the current record ispassed to the query as a parameter. If undefined, the query is executed withoutcontext.
query
The name of the query to be executed in the background.
This parameter is mandatory.
437AUREA CONFIDENTIAL
Action Templates

scope
Defines which kind of query is to be used if two queries with the same name exist:Public or Private.
This parameter is supported by both QueryRun and Query Designer actions.
reportName
The name of the transformation (*.XSLT file) to be used for generating the reportfrom the exported XML, e.g. ExportListHtml.
The reportName argument can contain additional export options, e.g. ExportExpand-Pdf[Export.Xml.FatClientCompatible=true], Format.application/pdf to use anAurea CRM win-compatible schema and a PDF plug-in.
For details on the syntax and all available options, see and Export Options on page858.
If undefined, an XML export without transformation is generated.
contentDisposition
Defines the way a report is presented:
• inline: The browser tries to display the report results in the current browserwindow.
• attachment: The browser asks the user to save the report results or open themin a separate window.
With contentDisposition=inline a targetFrame has to be specified for the reportto be displayed in. For fur ther details, see targetFrame.
Default: attachment
Note: The browser's default behavior may overrule your contentDiposition / tar-getFrame settings. example - opening a report in a new tab instead of inline.
targetFrame
The frame in which the report is displayed if contentDisposition=inline.
You can define the following:
• If undefined, the report is opened in the current worker window.
• If set to the name of a window, the report is opened in the respective window.
• If set to _blank, the report is opened in a new window or browser tab, dependingon the browser settings.
• If set to CreateNewTab, the report is opened in a new tab in Aurea CRM.Web.
• If set to ReUse("MyTabName"), the report is opened in the specified tab of AureaCRM.Web.
438AUREA CONFIDENTIAL
Chapter 3: Using CRM

To display a report in a form, use the FormFrame widget. Use the widget's name pa-rameter to specify a name for the iframe where you want to display the report, e.g."myIframe". Example - In the action definition, for a button on the form, define tar-getFrame = myIframe.
caption
Defines a name for the report. The semantics of this caption depends on the trans-formation itself, it can be written to the meta-data of the document, used as a filename etc.
exportFatClientCompatible
Determines the XML schema used by the export:
• true: the XML export uses a Aurea CRM win-compatible schema.
• false: the XML export uses the Aurea CRM.Web schema. This is the default.
Show/Hide the Export Query Results dialogLearn to show and hide the Export Query Results dialog.
When a user exports a query result item, CRM.Web pops the Export Query Resultsdialog by default. The user can specify the number of records to be exportedand provide other parameter values. You can use the noUi parameter in theQueryReport action template to show or hide the Export Query Results dialog.
The following screenshot shows the Export Query Results dialog.
To prevent the Export Query Results dialog from popping up, perform the followingsteps in the CRM.Designer:
1. Create or open the query report menu item in the required info area. The followingscreenshot shows the My Query Report menu for the M_Company infoarea.
439AUREA CONFIDENTIAL
Action Templates

2. Select QueryReport action template in the Action field and click . The Actionfor Menu My Query Report dialog displays.
3. In the Input Arguments section, enter noUi in the text field and click +.
The noUI parameter is added to the input arguments list. Enter true as the pa-rameter value.
Note: Entering false displays the Export Query Results dialog. This is also thedefault behaviour if this parameter is not defined.
440AUREA CONFIDENTIAL
Chapter 3: Using CRM

4. Click Apply and then click Save.
5. Enter a description in the Reason for Change dialog. Click Save.
6. Login to CRM.Web application and click Settings > Invalidate Cache .
7. Run a search on the Company infoarea and from the context menu of a searchresult list item, select My Query Report.
The Export Query Results dialog does not show up.
QueryRunTo create predefined queries use QueryRun action template.
The QueryRun action template (queryrun.aspx) allows users to execute a predefinedquery in Aurea CRM.Web.
The QueryRun action template can be used for context menu actions with a linkedrecord or for application menu actions.
The QueryRun action automatically detects parameterized queries. In this case aform is displayed allowing the user to enter the parameter(s). For fur ther details,see Parameterized Queries on page 500. Clicking Start Query executes the queryusing the specified parameters.
The QueryRun action can therefore be used as a search page for multiple info areas.
For parameterized queries containing a sub-info area without output fields, the entiresub-info area is eliminated from the query if the user does not enter at least oneparameter for that info area.
The ID_NET_QUERIES application menu action uses the Query Designer action allowingusers to create/edit queries in Aurea CRM.Web. The Query Designer action supportsa subset of the QueryRun action's parameters as indicated below.
For both QueryRun and Query Designer actions you can define listParams as addi-tional input arguments. For fur ther details, see ListParams on page 374.
If no listParams are defined in the action, the global listParams specified in theList.ListParams Web Configuration parameter are applied. For fur ther details,see List.ListParams/List.SubList.ListParams.
441AUREA CONFIDENTIAL
Action Templates

QueryRun Action ParametersSupported QueryRun Action Parameters
The QueryRun action supports the following input arguments:
scope
Defines which kind of query is to be used if two queries with the same name exist:Public or Private.
This parameter is supported by both QueryRun and Query Designer actions.
query
The name of the query.
This parameter is supported by both QueryRun and Query Designer actions.
For QueryRun actions this parameter is mandatory.
maxRows
Defines the maximum number of result rows per page.
Default: 50.
form
Defines the form displayed for parameterized queries.
Default: QueryParametersTemplate.
headerGroupName
The type of the header specified in headerName.
Enter the name of a header group or "Special" for an info area-independent specialheader.
headerName
Defines the optional header.
hideContextMenu
If set to true, no context menu is displayed for the result records.
Default: = false.
link/linkId
link: Optional parent record of the query results: Record or Linked.
442AUREA CONFIDENTIAL
Chapter 3: Using CRM

linkId: ID of the link used for link. This parameter is only relevant if multiple linksbetween two info areas exist in the data model (example - mulitple FI-links in KM).For fur ther details, see Link IDs on page 19.
These parameters are supported by both QueryRun and Query Designer actions.
Default=-1
menu
Defines the menu displayed for the result rows. By default, this menu contains themenu of the default expand configuration of each info area contained in the queryresult.
resultHeaderGroupName
The type of the header specified in resultHeaderName.
Enter the name of a header group or "Special" for an info area-independent specialheader.
resultHeaderName
Defines the optional header displayed above the result list.
disableDefaultAction
If set to true, double-clicking on a result row does not execute the default action.For fur ther details, see Default Action on page 289.
Default: false.
selectionMode
Determines if users can select multiple rows from the list and thus perform actionon multiple list items at once. The following values are available:
• Single: Selecting multiple list items is disabled.
• Multi: Selecting multiple list items is enabled.
Default: Multi
virtualInfoAreaReadMode
Determines whether vir tual info areas are used for context menus of query resultrows (static | dynamic). For fur ther details, vir tualInfoAreaReadMode on page 285.
This parameter is supported by both QueryRun and Query Designer actions.
catalogParametersAsText
Enter a comma-separated list of catalogs (example K2,K7) to be using text inputinstead of catalog input allowing users to enter catalog values as text strings inparameterized queries to allow sub-string searches.
443AUREA CONFIDENTIAL
Action Templates

Note: Restriction: Only variable catalogs are supported.
This parameter is supported by both QueryRun and Query Designer actions. In addi-tion, you can use this parameter for QueryParameterForm and QueryResultPresenterwidgets.
RedirectPageLearn about the RedirectPage action template.
Use the RedirectPage action template to open a custom page with custom recorddata (not just a uid). Use this action when data or pages from another system areintegrated into Aurea CRM.Web and, therefore, the external record key is required.Example - for displaying external web pages that require additional parameters.
The RedirectPage action template can be used for for actions defined for menu en-tries, buttons and within processes.
To prevent phishing attacks when opening an external page, you can define ablack/white list in the settings.xml thus ensuring that a RedirectPage actioncannot be redirected to a harmful site. For fur ther details, see Security Settings inthe Aurea CRM.Web Installation Guide.
RedirectPage Action ParametersSupported RedirectPage Action Parameters
The RedirectPage action template supports the following input arguments:
URLPage
The address of the called page either absolute or relative to Aurea CRM.Web's ap-plication directory.
URLParameters
The parameters passed to the page specified in URLPage.
The address of page called by the RedirectPage action is built from URLPage + URL-Parameters after replacing the placeholders of URLParameters.
You can use the following placeholders:
• up to six records:
• Record #1 (InfoArea/RecID) with the "1st record" parameter
• Record #2 (InfoArea2/RecID2) with the "2nd record" parameter
• Record #3 (InfoArea3/RecID3) with the "3rd record" parameter
• Record #4 (ParentInfoArea4) is a parent record of the 1st record with a givenParent info area
444AUREA CONFIDENTIAL
Chapter 3: Using CRM

• Record #5 (ParentInfoArea5) is a parent record of the 2nd record with a givenParent info area
• Record #6 (ParentInfoArea6) is a parent record of the 3rd record with a givenParent info area
• field values:
Use the syntax {RecordIndex:FieldID};
example {1:2}; for field number 2 of Record #1.
Use {RecordIndex:EXT:ExtSystemName} to get the external key of a record for thespecified external system.
• information on the currently logged-in user:
• $curRepName; - rep name
• $curUser; - login name
• $curTenantName; - tenant name
• $curRepEmail1; and $curRepEmail2; - email address of the user (ID:Email1and ID:Email2 respectively)
• in addition, you can use all available $cur expressions. For fur ther details,see Using Variable Expressions on page 505.
Join multiple parameters with "&".
Examples
{1:2};&{1:5};
Passes fields 2 and 5 of record #1 in the URL
{1:2};&$curRepName;
Passes fields 2 of record #1 and the name of the currently logged-in rep.
For additional information, see the ar ticle “How to use Redirect Page” athttps://support.aurea.com.
Target
Determines where the page specified in URLPage is opened, e.g. _new.
445AUREA CONFIDENTIAL
Action Templates

CatalogValueEncoding
Defines how the contents of catalog fields are encoded. Available values: Text, Nu-meric , TextInBaseLanguage
Default: Numeric
RelationTreeViewUse RelationTreeView action template to visualize the relationships betweencompanies and persons as a hierarchical tree.
The RelationTreeView action template (relationtree.aspx) is used to visualizethe relationships between companies and persons as a hierarchical tree.
In UPDATE_DEFAULT it is called by the A_RelationHierarchy (Relationship Hier-archy) context menu action configured in M_Company and by A_RelationHierarchyKPin M_Person.
The individual nodes of the relationship tree use the table caption <InfoAreaId>.Rel,e.g. KP.Rel in UPDATE_DEFAULT. Fallback: <InfoAreaId>.
By default, the recursion depth for the relationship hierarchy tree is 20. To reducethe number of levels displayed in the relationship tree (example - for performancereasons), create and set the RelationshipHierarchy.MaxRecursionDepth WebConfiguration parameter. For fur ther details, see RelationshipHierarchy.MaxRecur-sionDepth. To specify the number of loaded and expanded levels for individual rela-tionship trees, use the ExpandLevel action parameter. For fur ther details, see Ex-pandLevel.
Note: The relationship hierarchy is currently not supported for PE.
446AUREA CONFIDENTIAL
Chapter 3: Using CRM

RelationTreeView Action ParametersSupported RelationTreeView Action Parameters.
The RelationTreeView action supports the following input arguments:
CheckRights
If set to true, the user's access rights are taken into account when displaying therelationship hierarchy.
Nodes that are locked due to the user's access rights can not be expanded and nocontext menu is displayed. For such nodes text no.7 from the relationship_texttext group is displayed.
Default: false.
ExpandLevel
Determines how many levels of the relationship tree are initially loaded and expand-ed. Deeper levels are retrieved from the server and expanded, when the user clickson a branch.
ExpandLevel = -1 loads and expands the entire tree upon opening the page.
ExpandLevel = 0 displays the tree completely collapsed.
Default: -1
ExpandFI
Setting this to the custom expand results in the Company (FI) infoarea's relatedentity to be displayed only when the relationship entity node is selected in the rela-tionship tree heirarchy view.
Note: If this is not set, then on opening the relationship view all the related entitiesare displayed.
ExpandKP
Setting this to a custom expand, results in the PersonInCompany (KP) infoarea'srelated entity to be displayed only when the relationship entity node is selected inthe relationship tree hierarchy view.
Note: If this is not set, then on opening the relationship view all the related entitiesare displayed.
ExpandPB
Setting this to a custom expand, results in the Relationship (PB) infoarea's relatedentity to be displayed only when the relationship entity node is selected in the rela-tionship tree heirarchy view.
447AUREA CONFIDENTIAL
Action Templates

Note: If this is not set, then on opening the relationship view all the related entitiesare displayed.
InfoArea / RecID
The root record of the hierarchy tree: Record or Linked.
MenuFI
Determines the context menu used for company records.
Default: M_Company.
MenuKP
Determines the context menu used for person records.
Default: M_Person.
MenuPB
Determines the context menu used for relationship records.
Default: M_Relationship.
Reciprocal
If set to true, reciprocal relations are displayed as well.
Default: false.
RelationTreeType
Determines the type of relationship displayed in the tree. Available values: Company-Overview, CompanyRelated and PersonRelated.
This parameter is mandatory.
Default: CompanyOverview
Note: PersonRelated is only supported if the root record is a person record (KP orPE).
ResourcesViewUse resourceview action template to display activities for selected resources.
The ResourcesView action template (resourcesView.aspx) is used by the menuaction ID_NET_CALENDAR in UPDATE_DEFAULT (Collaboration > Resources).
448AUREA CONFIDENTIAL
Chapter 3: Using CRM

The Resources page displays activities (MA) and absences (A3) for the selectedreps. Reps of type "Employee" and "Resource" are listed according to the selectedfilter/rep set and group. Max. 50 reps can be displayed. If the user's selection con-tains more than 50 reps, a message is displayed.
Items can be rescheduled and reassigned using drag&drop.
Working hours are displayed as follows:
• Working hours are defined globally via the Calendar.DayStartsAt and Calen-dar.DayEndsAt Web Configuration parameters.
• Weekends are grayed out by default.
• To define individual working hours for reps: In the rep's ID record check Individualwork hours (ID:105) and enter the rep's working hours in the fields ID:29 to ID:56.
Entering no individual working hours for a specific weekday creates a day off, i.e.this day is grayed out for this rep.
If you enter individual working hours on a Saturday or Sunday, weekends are notgrayed out for this rep.
• Individual working hours overrule the global working hours defined via Calen-dar.DayStartsAt and Calendar.DayEndsAt.
The user's settings, rep set, filter set, grouping criterion and date range, are storedclient-independently using the settings service.
Items that would be hidden when selecting a large time scale, can be displayed assmall dots by checking the ResourceView.ShowHiddenItems Web Configuration pa-rameter. For fur ther details, see ResourceView.ShowHiddenItems. Users can changethis default by setting/removing the Show hidden items flag in the Resource ViewSettings.
449AUREA CONFIDENTIAL
Action Templates

Configuration UnitsLearn about the configuration unit of ResourcesView action templates.
The Resources view consists of the following configuration units:
• The menu action ID_NET_CALENDAR with action ResourcesView. For fur ther details,see ResourcesView Action Parameters on page 450.
• The sidebar contains the date picker, drop-down lists for filter and rep setsanalogous to the calendar and the Group reps by drop-down list.
You can create a Web Configuration parameter ResourceView.FilterSets to offerpredefined filter sets.
You can customize the Group reps by drop-down list via the RepGroupingOptions
action parameter. For fur ther details, see RepGroupingOptions.
• The items displayed in the Resources view use the table captions MA.ResourceViewand A3.ResourceView. For small items and multi-line table captions the completetable caption is displayed in the tooltip.
• Context menus: M_ResourcesRepMenu, M_ResourcesRepMenu.MultiSelect
ResourcesView Action ParametersSupported ResourcesView Action Parameters.
The ResourcesView action supports the following input arguments:
createNewTab
See createNewTab in Expand Action Parameters on page 356.
RepGroupingOptions
Defines the content and initial value of the Group reps by drop-down list usingJSON.
Default configuration:{"items":[{"textId": "TXT_net_resourceplan_text_3"},{"text": "Department", "key": 1, "infoAreaId": "ID", "fieldIds": [2],
"tableCaption": "IDGroup"},{"text": "Country", "key": 2, "infoAreaId": "ID", "fieldIds": [13]},{"text": "Skill", "key": 3, "infoAreaId": "SI", "fieldIds": ["ItemName",
"ProblemGroup"]}],"selectedIndex": 0
}
450AUREA CONFIDENTIAL
Chapter 3: Using CRM

Syntax
"items" defines the entries of the drop-down list.
"selectedIndex" defines the inital value.
The following optional properties are supported:
DescriptionProperty
Label of the list entry.text
Text group and ID of the language-dependent text, see Texts onpage 50.
textId
The unique key used by the drop-down list to restore the selectedvalue when returning to the Resources page. If used, infoAreaIdand fieldIds must be defined.
key
The info area of the fields used for grouping. If used, key andfieldIds must be defined.
infoAreaId
Field IDs or XML names used for grouping. If used key and in-foAreaId must be defined.
fieldIds
The table caption used to display the rep groups. If undefined, thecaption is assembled from the defined fieldIds in the defined order.
tableCaption
Note: If you want to reset RepGroupingOptions to undefined, you cannot do this inthe action definition: You need to delete the definition from the action template itself.
ForceCurrentRep
If set to true, the Resource page is opened showing only the current rep insteadof the previously selected rep set.
Use this parameter when displaying a Resource view on a form, e.g. on a star t page.
Default: false
showNewButton
See showNewButton.
451AUREA CONFIDENTIAL
Action Templates

Displaying Record Lists/Details for a Resource ViewUse forms to display a record list/record details for items selected in a ResourceView or a Dispatching Dashboard.
You can display a record list/record details for items selected in a Resource Viewor a Dispatching Dashboard by using forms.
UPDATE_DEFAULT contains the following sample forms:
• Example.DispatchingDashboard
• Example.ResourceView
Create a ShowForm action calling one of these forms. For implementation detailsconcerning the sample forms, see the ar ticle “How to use the resource view in aForm” at https://support.aurea.com.
Clicking on an item (i.e. an activity record) displays an Expand view of that record.
Clicking in a row (i.e. on a rep) displays a list of activity records for that rep. Forfur ther details, see Displaying Record Lists/Details for the Dispatching Dashboardon page 420 for a screenshot. If the number of rows exceeds the page's size, defineshowPaging = true for the RecordListBox widget.
452AUREA CONFIDENTIAL
Chapter 3: Using CRM

SearchPhoneEmailLearn about the SearchPhoneEmail action template.
The SearchPhoneEmail action template (SearchPhoneEmail.aspx) is used by theID_NET_PHONEEMAILSEARCH menu action in UPDATE_DEFAULT (Accounts > Phone& email Search).
The results list of the Phone & email Search is configured by the List control of fieldgroup <InfoAreaId>.EmailPhone (example - FI.EmailPhone).
SearchPhoneEmail Action ParametersSupported SearchPhoneEmail action parameters.
The SearchPhoneEmail action supports the following input arguments:
cachedMode
If set to true, lists are cached on the client. For fur ther details, see cachedMode.
Default: true
listParams
Additional list parameters separated by semicolon: key,value;key,value; etc. Forfur ther details, see ListParams on page 374.
originalNumber
If set to true, the Original Number check box is initially checked.
453AUREA CONFIDENTIAL
Action Templates

Default: true.
EmailSearch
When creating a custom URL use the custom parameter EmailSearch to pass anemail address.
The email address field is dynamically added to the form when this parameter isused.
SerialEntryTo implement quick add pages use serialEntry action template.
The SerialEntry action template (serialentry.aspx) allows the implementationof quick add pages. The quick add functionality provides users with the possibilityto quickly create a number of child records, e.g. offer items (AP) for an offer (PR).
Quick add pages can be configured for any info area with a parent and a "copy infoarea" linked as follows:
Example:
454AUREA CONFIDENTIAL
Chapter 3: Using CRM

In this example, the quick add functionality creates offer item records for an offergetting item information (name, number, product group etc.) from the item master(AR).
In UPDATE_DEFAULT the SerialEntry action template is used for the followingquick add pages:
• BTB version: Generic quick add configurations for Offers (PR) and Orders (AU)(called by Quick Add (Items) in the respective context menu):
• A_SerialEntryAP in M_Offer
• A_SerialEntryUP in M_Order
• OTC version. For fur ther details, see Quick Add Configurations (OTC) on page467.
Use the SDK page to test you quick add configurations: SDK > SerialEntry.
Configuration UnitsLearn about the configuration unit of serialEntry action templates.
A quick add page consists of the following configuration units:
• The SerialEntry action called from the parent info area's context menu. Fordetails on the action parameters, see SerialEntry Action Parameters on page 462.
• The following headers:
DescriptionHeader
The quick add page's header displaying data from the parentrecord, example - special header SerialEntry from header groupPR. For fur ther details, see headerGroupName.
You can configure an extended page header for this. For fur therdetails, see Page Headers on page 334.
Page header
The header of the item list containing a (Delete) and (if con-
figured) a (Duplicate Row) button (see DuplicateRow on page310), example - special header SerialEntry.List from headergroup PR.
List header
455AUREA CONFIDENTIAL
Action Templates

DescriptionHeader
For the selected row in the item list a sub-list is displayed. Thesub-list is defined by the parent info area's sub-list header, ex-ample - SerialEntry.SubList from header group PR.
The sub-list can display a form, example - SerialEntry.Offer.Re-latedForm (see below).
Sub-list header
The header of the recent items list in the Related Data area,example - SerialEntry.RelatedHeader from header group PR.
It contains a link to display the recent items's parent record,example - Show offer.
Related header
• The following forms:
456AUREA CONFIDENTIAL
Chapter 3: Using CRM

DescriptionForm
Contains the filter buttons displayed above the search (default:All, Overview, Last Entries). The available filters and defaultselection are defined by the SerialEntry.<Name>Filter WebConfiguration parameter specified in the dataSource componentof the form. For fur ther details, see SerialEntry.<Name>Filter.
If defined, the action parameter filterType overrides the initialvalue specified in the Web Configuration parameter.
To completely hide the options form, set the action parametershowOptions to false.
The Last Entries filter is configured by action parameter recent-FilterOptions. For fur ther details, see recentFilterOptions.
Options form
Defines the contents of the "Shopping Cart", example - SerialEn-try.Offer.Totals:
The values are updated with every user input based on a query.
To bind the output columns of the query to the widgets in the totalsform, the XML name of the fields has to be used in a binding ex-pression prefixed with "#".
A maximum number of three label-value pairs can be configured.
The I'm done buttons raises a ProceedOrClose command. Thisallows a quick add page to be used inside a process (Proceed)as well as stand-alone (Close).
Totals form
Related form
457AUREA CONFIDENTIAL
Action Templates

DescriptionForm
Defines the Related Data area of the items list, example - Seri-alEntry.Offer.RelatedForm.
You need to specify the form in the quick add page's sub-listheader (see above).
The form can display read-only details from the parent, child andcopy records configured via the respective Expand configurations,example - AP.SerialEntry.RelatedForm.
If an item has already been offered to the current company, theserecent items are listed below the Details control.
For implementation details, see the ar ticle “Serial Entry RelatedArea” at https://support.aurea.com
• The SerialEntry.<Name>Filter Web Configuration parameter defining whichfilters (buttons) are displayed in the options form and the initially selected filter.For fur ther details, see SerialEntry.<Name>Filter.
• The query used to calculate the content of the totals form, example - SerialEn-try.Offer.Totals.
• The query used to calculate the recent items displayed in the Related Data area,example - SerialEntry.Offer.RelatedForm.
• The following field controls:
458AUREA CONFIDENTIAL
Chapter 3: Using CRM

DescriptionControl
The Search control containing search fields from the copy infoarea, example - the Search control from field group AR. For fur-ther details, see searchFieldGroupName.
The search cannot be collapsed.
Search
The List control defining the items list, example - the List controlfrom field group AP.SerialEntry. For fur ther details, see listField-GroupName.
The List control contains fields from the copy info area (example- Item No. and Item Name from AR as linked fields) and fromthe child info area (example - Quantity, Selling Price and Dis-count (%) from AP).
Entering values creates the child records, example - the orderitems.
These order item rows display a shopping car t image. You canchange the image by adding a field control attribute "Shopping-CartImage" = "te-img-myshoppingcart". The value of this at-tribute must be the name of a CSS sprite image.
Clicking on the shopping car t displays a Quick View of the childrecord.
The items list contains a sum totals row that automatically calcu-lates the sum totals of the (numeric) values entered.
Fields from the child info area are editable according to the user'saccess rights.
List
459AUREA CONFIDENTIAL
Action Templates
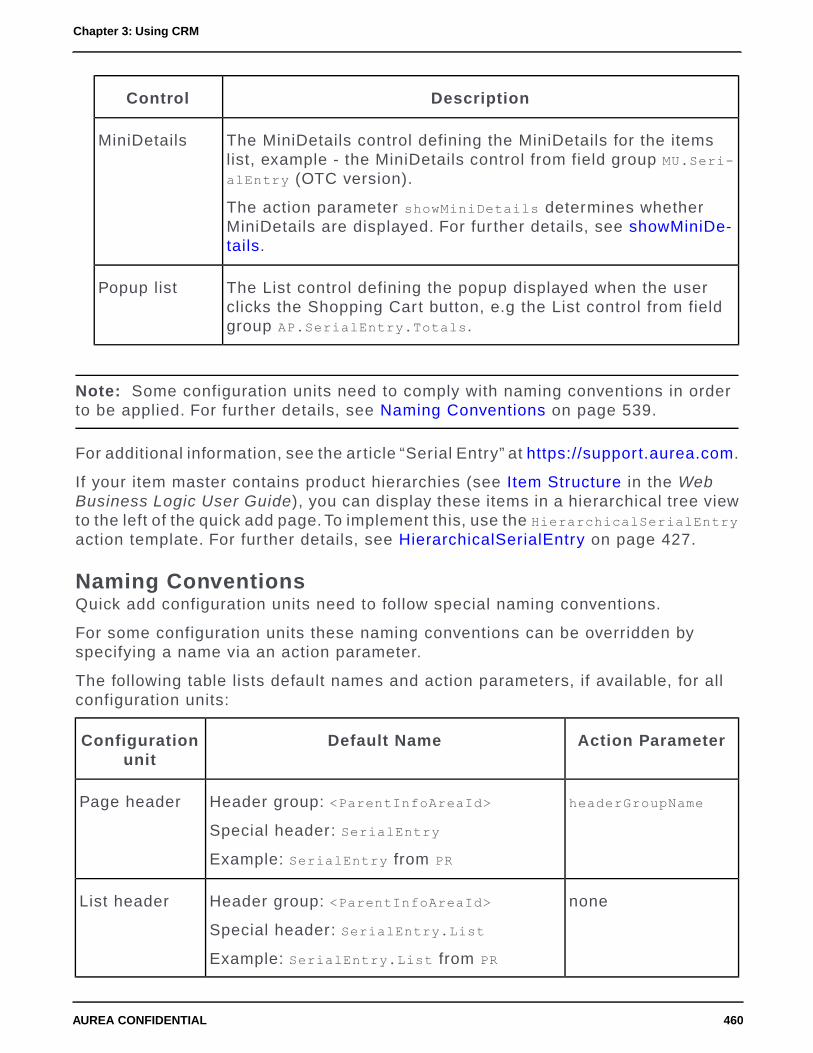
DescriptionControl
The MiniDetails control defining the MiniDetails for the itemslist, example - the MiniDetails control from field group MU.Seri-alEntry (OTC version).
The action parameter showMiniDetails determines whetherMiniDetails are displayed. For fur ther details, see showMiniDe-tails.
MiniDetails
The List control defining the popup displayed when the userclicks the Shopping Cart button, e.g the List control from fieldgroup AP.SerialEntry.Totals.
Popup list
Note: Some configuration units need to comply with naming conventions in orderto be applied. For fur ther details, see Naming Conventions on page 539.
For additional information, see the ar ticle “Serial Entry” at https://support.aurea.com.
If your item master contains product hierarchies (see Item Structure in the WebBusiness Logic User Guide), you can display these items in a hierarchical tree viewto the left of the quick add page. To implement this, use the HierarchicalSerialEntryaction template. For fur ther details, see HierarchicalSerialEntry on page 427.
Naming ConventionsQuick add configuration units need to follow special naming conventions.
For some configuration units these naming conventions can be overridden byspecifying a name via an action parameter.
The following table lists default names and action parameters, if available, for allconfiguration units:
Action ParameterDefault NameConfigurationunit
headerGroupNameHeader group: <ParentInfoAreaId>
Special header: SerialEntry
Example: SerialEntry from PR
Page header
noneHeader group: <ParentInfoAreaId>
Special header: SerialEntry.List
Example: SerialEntry.List from PR
List header
460AUREA CONFIDENTIAL
Chapter 3: Using CRM

Action ParameterDefault NameConfigurationunit
noneHeader group: <ParentInfoAreaId>
Special header: SerialEntry.SubList
Example: SerialEntry.SubList from PR
Sub-list header
noneHeader group: <ParentInfoAreaId>
Special header: SerialEntry.RelatedHeader
Example: SerialEntry.RelatedHeader fromPR
Related header
optionsFormNameSerialEntry.<Type>.Options
See name for possible values of <Type>.
Example: SerialEntry.Default.Options
Options form
totalsFormNameSerialEntry.<Type>.Totals
Example: SerialEntry.Offer.Totals
Totals form
noneSerialEntry.<Type>.Totals
Example: SerialEntry.Offer.Totals
Totals Query
noneSerialEntry.<Type>.RelatedForm
Example: SerialEntry.Offer.RelatedForm
Related form
searchFieldGroup-
Name
Field group: <CopyInfoAreaId>
Example: Search control from AR
Search control
listFieldGroupNameField group:<ChildInfoAreaId>.SerialEntry
Example: List control from AP.SerialEntry
List control
noneField group: <ChildInfoAreaId>.SerialEn-try.Totals
fallbacks: <ChildInfoAreaId>.SerialEntryand <ChildInfoAreaId>
Example: List control from AP.SerialEn-try.Totals
Popup List con-trol
461AUREA CONFIDENTIAL
Action Templates

SerialEntry Action ParametersSupported serial entry action parameters.
The SerialEntry action supports the following input arguments:
name
Defines the name or type of the quick add configuration.
Syntax:
For generic quick add configurations enter <name>(<copyInfoAreaId>=><childIn-foAreaID>).
For special quick add implementations as defined in the OTC vertical specify thetype by entering <name>.
If name does not contain an expression in parentheses, the definition is interpretedas a quick add type. The following quick add types are supported:
StockControlPOSDefault (used for genericquick add configurations)
ProductDiscussionOffer
SampleOrder
Examples:
BTB:
A quick add configuration named Offer of type Default, that creates offer items (AP)linked to items in the item master (AR):
name = Offer(AR=>AP)
OTC:
Special quick add implementations:
name = Offer
name = Sample
uid
The quick add page's parent record. Example - the offer for which items are created.
listFieldGroupName
The name of the field group whose List control is used for the item list.
462AUREA CONFIDENTIAL
Chapter 3: Using CRM

If undefined, the default is used. For fur ther details, see Naming Conventions onpage 539.
filterType
Defines the initially selected filter of the options form.
The following filters are supported depending on the quick add configuration's type:
Supported fortypes
DescriptionfilterType
allno filter is applied(undefined)
Default, Offer, Or-der, POS, ProductDiscussion, Sample
The grid displays all currently existing childrecords (example - order items), i.e. all itemsfor which a quantity has been entered.
Note: Items without Item No. are not listed inthis view.
Overview
Default, POSThe grid displays items linked to the last n par-ent records.
n is defined by recentFilterOptions.
Last
OrderItems from the last n orders.
n is defined by recentFilterOptions.
LastOrder
SampleItems defined as samples (info area MK).Sample
Order, POS, Sam-ple
Items from a special offer (info area AT).Action
Order, POSItems linked to a valid listing record (LS).Listing
OrderItems belonging to the same sales organization(via VA and VB) as the parent record.
SalesOrgani-zation
463AUREA CONFIDENTIAL
Action Templates

For information on the business logic involved. For fur ther details, see Web BusinessLogic User Guide.
filterType overrides the initial value specified in the SerialEntry.<Name>FilterWeb Configuration parameter. For fur ther details, see SerialEntry.<Name>Filter.
headerGroupName
Defines the header group for the quick add page displaying information from theparent record specified by uid.
If undefined, the default is used. For fur ther details, see Naming Conventions onpage 539.
optionsFormName
The name of the form containing the filter options for the quick add page, example- SerialEntry.Default.Options.
If undefined, the default is used. For fur ther details, see Naming Conventions onpage 539.
copySourceFields
A comma-separated list of fields (<field name or number>) to be copied from thesource record (example - from AR) to the target (child) record (example - to AP).
Example: defaultFields = ItemNo,ItemName,Department,ProdGrp,Product.
copyTargetFields
The target fields for the fields specified in copySourceFields.
searchFieldGroupName
The name of the field group whose Search control is used for item search. The infoarea to be search is always the copy info area, example - AR.
If undefined, the default is used. For fur ther details, see Naming Conventions onpage 539.
totalsFormName
The name of the form containing the overview of currently added items (ShoppingCart), example - SerialEntry.Offer.Totals.
464AUREA CONFIDENTIAL
Chapter 3: Using CRM

If undefined, the default is used. For fur ther details, see Naming Conventions onpage 539 .
showOptions
If set to false, the options form is hidden.
Default: true.
autoSearch
If set to true, the search is immediately executed when the user opens the quickadd page.
Auto-search does not happen when the user updates a filter in the search mask. Ifyou want auto-search to be activated when a filter is updated in the search mask,you have to set autoApplyFilter to true.
Default: True
fixedFilter
Specifies a fixed filter which is applied to the search and cannot be changed by theuser.
The filter is AND-combined with the selected filter option (Overview, Last Entriesetc.).
recentFilterOptions
Defines which items are listed when Last Entries is selected.
Syntax:
ParentInfoAreaId,DateField,HistoryLength
ParentInfoAreaId is the parent of the serial entries parent info area, example - FIfor Offers.
If ParentInfoAreaId is set to "", FI is used as default.
If ParentInfoAreaId is set to "-", no parent link is used.
If DateField is set to "", a field named "Date" is used as default. If no Date fieldexists, the first date field of the info area is used.
Example:
recentFilterOptions = FI,OfferDate,3
The Last Entries filter displays all offer items from the three most recent offerslinked to the same company as the current offer. The most recent offers are deter-mined using the Offer Date field.
465AUREA CONFIDENTIAL
Action Templates
showMiniDetails
If set to false, no MiniDetails can be displayed in the item list.
Default: true.
ignoredFieldsOnDuplicate
A comma-separated list of fields (<field name or number>) to be ignored when arow is duplicated. For fur ther details, see DuplicateRow on page 310.
Syntax:
[ "<field name or number>", "<field name or number>", ... ]
Example:
[ "Send", "Issued", ... ]
Example in UPDATE_DEFAULT (OTC): ignoredFieldsOnDuplicate = ["Quantity"]is defined in A_OrderPositions to allow for duplicating rows of orders with severaldelivery dates (Order Delivery Items info area (LP)).
ignoredLinksOnDuplicate
A list of links to be ignored when a row is duplicated. For fur ther details, see Dupli-cateRow on page 310.
Syntax:
[{ "infoAreaId": "<infoAreaId>", "linkId": <linkId> }, { "infoAreaId":"<infoAreaId>", "linkId": <linkId> }, ... ]
Example:
ignoredLinksOnDuplicate = [{ "infoAreaId": "LP", "linkId": 0 }, { "in-foAreaId": "SP", "linkId": 0 }]
Example in UPDATE_DEFAULT (OTC): ignoredLinksOnDuplicate = [{ "in-foAreaId": "LP", "linkId": 0 }] is defined in A_OrderPositions to allow for du-plicating rows of orders with several delivery dates (Order Delivery Items info area(LP)).
searchDefaultFieldValues
Default field values for the item search. It can be changed by the user. Use thesame syntax as described for the Search action template. For fur ther details,see fixedFieldValues.
The info area to be searched (example - AR) must be explicitly specified insearchInfoAreaId, otherwise searchDefaultFieldValues is ignored.
searchFixedFieldValues
Fixed field values for the item search. It can not be changed by the user. Use thesame syntax as described for the Search action template. For fur ther details,see fixedFieldValues.
466AUREA CONFIDENTIAL
Chapter 3: Using CRM

The info area to be searched (example - AR) must be explicitly specified insearchInfoAreaId, otherwise searchDefaultFieldValues is ignored.
searchInfoAreaId
The info area of the item search (example - AR).
You must specify searchInfoAreaId if you want to define default/fixed search valuesin searchDefaultFieldValues / searchFixedFieldValues.
sourceCopyFieldGroupName
The name of the field group used to define a dynamic filter for the item search. Thefilter values are defined as functions in the List control. For fur ther details, DynamicFilters on page 509.
The record from which the values are read is defined by uid.
Note: Dynamic filters are only supported by generic quick add configurations.
disableFilter
Add this argument and set it to true to disable the filter selection and definitionfunctionality for the item search.
showRelatedView
Add this argument and set it to false to hide the Related Data area.
Quick Add Configurations (OTC)This topic has information about quick add pages.
The OTC vertical contains quick add pages for the following info areas:
MenuMenu ActionChildParent
M_OfferA_OfferSerialEntryOffer Item (AP)Offer (PR)
M_OrderA_OrderPositionsOrder Item(UP)
Order (AU)
M_RefundingA_RefundingSerialEntryRefunding Item(VP)
Refunding(VG)
M_AppointmentsA_MeetingSPPProduct Discus-sion Item (BG)
Activity(MA)
467AUREA CONFIDENTIAL
Action Templates

MenuMenu ActionChildParent
M_POSA_POSSerialEntryPOS MonitoringItem (PP)
POS Moni-toring (PS)
M_Company, M_Promo-
tionalMaterial
A_PromotionalMaterialSeri-
alEntry
PromotionalMaterial (WM)
Company(FI)
M_AppointmentsD_SampleSample (MU)Person (PE)
M_StockControlA_StockSerialEntryStock ControlItem (BP)
Stock Con-trol (BV)
M_InstBaseA_InstBaseSerialEntryInstalled BaseItem (IP)
InstalledBase (IB)
For information on the involved business logic (Order, Offer, POS, Samples, etc.).For fur ther details, see Web Business Logic OTC User Guide.
The quick add pages for Refunding, Promotional Material and Installed Base usethe generic implementation as described above. The following topics describe someof the special quick add configuration types implemented in the OTC vertical.
OrderLearn about the serial entry action template - Order.
The SerialEntry action having name = Order is called via A_OrderPositions (QuickAdd (Order Items)) in M_Order.
Note: The Offer quick add page is configured analogously with configuration unitsfor PR and AP.
Configuration Units
The Order quick add page consists of the following configuration units:
• Page header SerialEntry of header group AU
• Options form SerialEntry.Order.Options
468AUREA CONFIDENTIAL
Chapter 3: Using CRM

The available filter buttons and default selection are defined via the SerialEn-try.OrderFilter Web Configuration parameter. For fur ther details, see SerialEn-try.<Name>Filter.
If Listing is selected, the company relationship hierarchy is displayed in a drop-down list below the filter buttons allowing users to select the desired listing path.The Inheritance - Quick Add configuration parameter (Listing category) in theConfiguration info area (MC) determines which relationship type is used. Forfur ther details, see Configuration Info Area in the CRM.Core Administrator Guide.
For more information on listings (inheritance, external system, etc.). For fur therdetails, see Web Business Logic OTC User Guide.
For orders that are directly linked to a special offer (AT), i.e. without a marketingactivity, the options form (and Web Configuration parameter) SerialEntry.Or-der.Options.SpecialOffer is used. Only the Overview and Special Offer filterbuttons are available in this case.
• Totals form SerialEntry.Order.Totals (shopping car t)
• Search control from field group AR.SerialEntry
Note: The business logic determines which fields are copied from AR to UP.Therefore the copySourceFields and copyTargetFields action parameters are notused for the Order quick add page.
• List header SerialEntry.List from header group AU containing a (Delete) and
(Duplicate Row) button. For fur ther details, see DuplicateRow on page 310.
When duplicating UP rows all linked delivery items (LP) are copied as well.
• List control from field group UP.SerialEntry defining the items list and the popuplist:
469AUREA CONFIDENTIAL
Action Templates

For the Scale of discount field a special widgetis used, displaying the available volumes anddiscounts in a drop-down list as <Volume From>- <Volume Up To>: <Discount vol. in kind>(<Discount>%). The values are taken from theSpecial Offer Quantity Scale info area (AM).The selected value (Volume From) is written tothe Quantity field. To disable this functionalityset the Do not apply scale of discount configu-ration parameter (General Settings category) inthe Configuration info area (MC).
For the Lot No. field a special widget is used,displaying the available lots and their quantitiesin a drop-down list as <LotNo.>: <Quantity>.
For the Quantity field (UP:20) the widget Seri-alEntryDeliveriesValues is used. It is configuredvia the Widget field attribute. If multiple Deliveryrecords (LD) are linked to an order, the Quantityfield displays a field for each delivery date.
To use the same widget for the Discount vol. in kind field (UP:139) as well, addit to the UP.SerialEntry List control and define Widget = SerialEntryDeliveries-Values for that field.
• MiniDetails control from field group UP.SerialEntry
• The Related Data area is defined by SerialEntry.Order.RelatedForm, SerialEn-try.RelatedHeader of header group AU and the SerialEntry.ShowOrder button.
POSLearn about the serial entry action template - POS.
The SerialEntry action (with name = POS) is called via A_POSSerialEntry (QuickAdd (Items)) in M_POS.
Configuration Units
The POS quick add page consists of the following configuration units:
• Page header SerialEntry of header group PS
• Options form SerialEntry.POS.Options
470AUREA CONFIDENTIAL
Chapter 3: Using CRM

The available filter buttons and default selection are defined via the SerialEn-try.POSFilter Web Configuration parameter. For fur ther details, see SerialEn-try.<Name>Filter.
If Listing is selected, the company relationship hierarchy is displayed in a drop-down list below the filter buttons allowing users to select the desired listing path.The Inheritance - Quick Add configuration parameter (Listing category) in theConfiguration info area (MC) determines which relationship type is used, seeConfiguration Info Area in the CRM.Core Administrator Guide.
For more information on listings (inheritance, external system etc.), see WebBusiness Logic OTC User Guide.
• Totals form SerialEntry.POS.Totals
• Search control from field group AR.SerialEntryPOS.
Note: The business logic determines which fields are copied from LS and AT toPP. From AR additional fields (ItemNo,ItemName,Segment,ProdCat,Brand,Grade)are copied via the copySourceFields and copyTargetFields action parameters.
• List header SerialEntry.List from header group PS containing a (Delete) and
(Duplicate Row) button. For fur ther details, see DuplicateRow on page 310.
• List control from field group PP.SerialEntry defining the items list and the popuplist:
• MiniDetails control from field group PP.SerialEntry
• The Related Data area is defined by SerialEntry.POS.RelatedForm, SerialEn-try.RelatedHeader of header group PS and the SerialEntry.ShowPOS button.
Product DiscussionLearn about the serial entry action template - Product Discussion.
The SerialEntry action (with name = ProductDiscussion) is called via A_MeetingSPP(Quick Add (Product Discussions)) in M_Appointments.
471AUREA CONFIDENTIAL
Action Templates

Configuration Units
The Product Discussion quick add page consists of the following configuration units:
• Page header SerialEntry of header group BG
• Options form SerialEntry.ProductDiscussion.Options
The All and Overview buttons and default selection are defined via the SerialEn-try.ProductDiscussionFilter Web Configuration parameter. For fur ther details,see SerialEntry.<Name>Filter.
Additional filter buttons are automatically created based on the values of the fixedcatalog Type used in the Product Discussion Definition info area (SR). Perdefault, this catalog contains the values Focus Product and Standard FocusProduct. If you create additional custom values for the Type catalog, the valuesare displayed in the options form as additional filter buttons.
Each of these filter buttons loads the SP records linked to an SR record of theselected Type.
• Totals form SerialEntry.ProductDiscussion.Totals
• Search control from field group SP.SerialEntry
Note: The copy fields are configured via the copySourceFields and copyTarget-Fields action parameters.
• List header SerialEntry.List from header group BG containing a (Delete)button.
• List control from field group BG.SerialEntry defining the items list and the popuplist:
• No MiniDetails are configured for the Product Discussion quick add page.
• The Related Data area is defined by SerialEntry.ProductDiscussion.RelatedForm,SerialEntry.RelatedHeader of header group BG, and the SerialEntry.ShowActiv-ity button.
SampleLearn about the serial entry action template - POS.
Sample (MU) records are linked to persons (PE). The item master (AR) is the copyinfo area.
472AUREA CONFIDENTIAL
Chapter 3: Using CRM

The SerialEntry action (with name = Sample) is called via D_Sample (Quick Add(Samples)) in M_Appointments from person-related activity records.
Configuration Units
The Sample quick add page consists of the following configuration units:
• Page header SerialEntry of header group MU
• Options form SerialEntry.Sample.Options
The available filter buttons and default selection are defined via the SerialEn-try.SampleFilter Web Configuration parameter. For fur ther details, see SerialEn-try.<Name>Filter.
In addition the options form contains the fields Business Area (AZ:1) and Startsat (MA:0).Totals form SerialEntry.Sample.Totals (shopping car t)
• Search control from field group AR.SerialEntry
Note: The business logic determines which fields are copied from AR to MU.Therefore the copySourceFields and copyTargetFields action parameters arenot used for the Sample quick add page.
• List header SerialEntry.List from header group MU containing a (Delete) and
(Duplicate Row) button. For fur ther details, see DuplicateRow on page 310.
When duplicating MU rows the values for Issued and Send are not copied.
• List control from field group MU.SerialEntry defining the items list and the popuplist:
The Available Quota field is recalculated based on the definition in the SampleCode info area (MK) every time the user enters quantities in Issued or Send.Use the Quota exceeded configuration parameter (Sample category) in theConfiguration info area (MC) to determine whether users can exceed the availablequota, see Configuration Info Area in the CRM.Core Administrator Guide. If Quota
473AUREA CONFIDENTIAL
Action Templates

exceeded is unchecked, values that exceed the available quota cannot be savedand a message is displayed.
For the Lot No. field a special widget is used, displaying theavailable lots and their quantities in a drop-down list as <LotNo.>:<Quantity>.
If the quantities should not be displayed, set the Lots withoutquantities configuration parameter (Inventory category) in theConfiguration info area (MC).
• MiniDetails control from field group MU.SerialEntry:
• No Related Data area is configured for the Samples quick add page.
Action ParametersLearn about serial entry action parameters.
Use/create the following additional action parameters to control which items arelisted on the quick add page:
ShowZeroQuota
If set to false, items with Available Quota <= 0 are hidden from the list. If set totrue and MC configuration parameter Quota exceeded is checked, items withAvailable Quota <= 0 are listed.
ShowZeroStock
If set to false, items for which the current rep has 0 or negative stock for the respec-tive lot numbers are hidden from the list. Thus lots with 0 available can not be se-lected for creating new MU records.
ShowNoStock
If set to false, items for which the current rep has no stock record for the respectivelot numbers are hidden from the list. If set to true, the list displays all availableitems regardless of their lot numbers and the current rep's actual stocks.
Default: treu
Note: These settings apply to the Sample and Special Offer views only. TheOverview and the totals form (shopping car t) always list all currently existing MUrecords.
474AUREA CONFIDENTIAL
Chapter 3: Using CRM

For details on sample quotas and stock control, see Web Business Logic OTC UserGuide.
TimelineUse the timeline action template to visualize customer history.
The Timeline action template (timeline.aspx) allows users to visualize a customerhistory, i.e. to display a specific set of child records (activities, offers etc.) e.g. fora selected company along a time line.
Examples in UPDATE_DEFAULT: A_AccountTimeline (in M_Company and M_Person),A_MarketingTimeline (in M_Person).
The type of child records and their graphic representation (icons, borders) are de-termined via the Timeline configuration referenced in the action. For fur ther details,see Timelines on page 538.
Timeline Action ParametersSupported timeline action parameters.
The Timeline action supports the following input arguments:
uid
The uid of the timeline's parent record: Record or Linked.
This record uid is used as a link record when querying for the records to be shownon the timeline.
name
Name of the Timeline configuration. For fur ther details, see Configuring a Timelineon page 540.
zoom
The initial zoom level of the timeline. Available options: month, quarter, year, all.
Users can zoom in/out via arrow buttons and scroll wheel. The maximum zoom levelis 10 years, minimum 7 days.
Default: quarter
TriggerThe Trigger action template allows you to call a trigger via menu entries, buttonsand within processes.
The Trigger action template calling the javascript:u8.services.businessObjects.ex-ecuteTrigger function allows a non-interactive trigger to be executed in AureaCRM.Web. For fur ther details, see Executing Non-Interactive Triggers in AureaCRM.Web on page 476.
475AUREA CONFIDENTIAL
Action Templates

The Trigger action template allows you to call a trigger via menu entries, buttonsand within processes. To execute a trigger for multiple records selected in lists orsub-lists, either add the trigger as a button or as a menu action in the correspondingM_MultiSelect context menu. For fur ther details, see M_MultiSelect.
For detailed information on triggers and how to define them. For fur ther details, seeTriggers in the CRM.Core Administrator Guide.
For more information on executing triggers in Aurea CRM.Web, see the ar ticle “Howto execute Trigggers” at https://support.aurea.com.
Executing Non-Interactive Triggers in Aurea CRM.WebLearn to execute Non-Interactive Triggers in Aurea CRM.Web.
For the trigger actions "Add New", "Edit/Update" and "Delete", all affected recordsare returned. If for example a trigger deletes a company, the result contains thedeleted company plus all dependent records that were deleted as well. The resultalso contains records that were modified by follow-up triggers. The result can beprocessed by a JavaScript function. All other trigger actions do not return a resultsince they do not modify records.
The following triggers/trigger actions are supported in Aurea CRM.Web:
CommentSupported in Au-rea CRM.Web?
Trigger
NoShow
Affected records are returned as result.YesAdd New
Affected records are returned as result.YesEdit/Update
Affected records are returned as result.YesDelete
Attention: The program call happens on theserver, the program which is called runsdirectly in the process of IIS (without userinterface and interaction possibilities).Thus, if you use this kind of trigger youhave to make sure that the program you callcan run fully automated without a user inter-face.
No result is returned.
YesProgram Call
476AUREA CONFIDENTIAL
Chapter 3: Using CRM
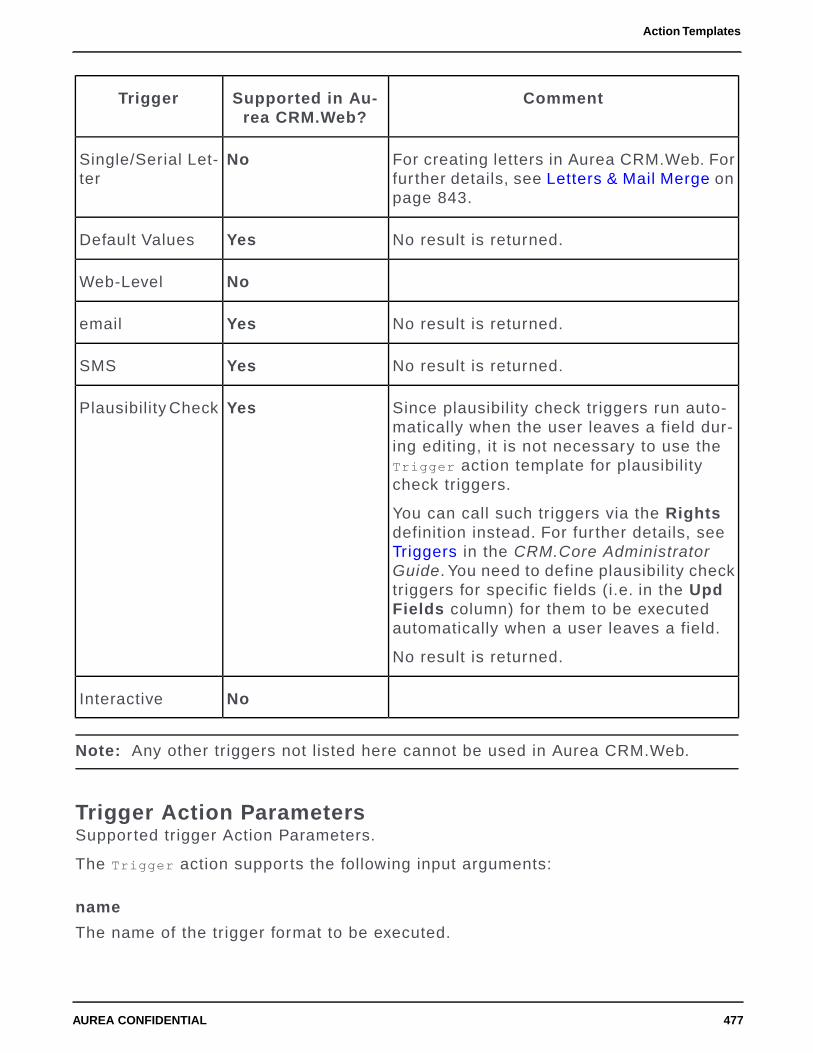
CommentSupported in Au-rea CRM.Web?
Trigger
For creating letters in Aurea CRM.Web. Forfur ther details, see Letters & Mail Merge onpage 843.
NoSingle/Serial Let-ter
No result is returned.YesDefault Values
NoWeb-Level
No result is returned.Yesemail
No result is returned.YesSMS
Since plausibility check triggers run auto-matically when the user leaves a field dur-ing editing, it is not necessary to use theTrigger action template for plausibilitycheck triggers.
You can call such triggers via the Rightsdefinition instead. For fur ther details, seeTriggers in the CRM.Core AdministratorGuide. You need to define plausibility checktriggers for specific fields (i.e. in the UpdFields column) for them to be executedautomatically when a user leaves a field.
No result is returned.
YesPlausibility Check
NoInteractive
Note: Any other triggers not listed here cannot be used in Aurea CRM.Web.
Trigger Action ParametersSupported trigger Action Parameters.
The Trigger action supports the following input arguments:
name
The name of the trigger format to be executed.
477AUREA CONFIDENTIAL
Action Templates

uid
The uid of an optional record passed to the trigger.
recordSet
Defines for which records from a list or sub-list the trigger is executed: selected,all or visible.
Optionally, the selection can be fur ther filtered by adding either an info area ID or"Root" in []. Example: selected[Root]
If you specify "Root" only the root record of each row is included in the record set.
If you specify an info area ID, only records belonging to that info area are includedin the record set.
Default: selected
infoAreaId
Determines the trigger's "context" which is the info area on which the trigger is ex-ecuted.
Use this parameter if you have specified neither uid nor recordSet. Example it canbe used for a trigger that creates a new to-do record, specify infoAreaId = TD.
refreshAfterExecution
If set to true, any visible view (list, sub-list, expand) containing records that havebeen changed by an executed trigger or workflow is refreshed immediately.
Default: true
Note: If a trigger calls another trigger (defined in the currently active rightsdefinition), changes performed by that follow-up trigger may not be immediatelyreflected in the current view.
callbackFunction
This argument defines an optional callback function that is called after the executionof a trigger or workflow.
You can specify:
• a custom JavaScript function
• a framework function
• an inline function
Syntax
To call a custom JavaScript or framework function enter the function name:
javascript:triggerCallbackFunction
478AUREA CONFIDENTIAL
Chapter 3: Using CRM

To call an inline function enter the JavaScript code:javascript:function(sender, args) {alert("this is a trigger callback function");}
callback
A marker parameter for the framework entered automatically if a callback is requiredfor the execution.
URLLearn about the URL action templates.
Use the URL action template to call an URL from Aurea CRM.Web Example - to displayan external website.
The URL action template can be used for actions defined for application menu entries.
The URL action template supports the following input arguments:
Target
See Target.
URL
See URLPage.
If you want to open an external page that requires additional parameters like arecord ID, use the RedirectPage action template instead. For fur ther details,see RedirectPage on page 444.
To prevent phishing attacks when opening an external page, you can define ablack/white list in the settings.xml thus ensuring that an URL action cannot beredirected to a harmful site. For fur ther details, see Security Settings in the AureaCRM.Web Installation Guide(https://help.aurea.com/crm/crm-web-install-guide/crm-web-install-guide/dita/topics/c_web_install-1_1-Introduction_crm.html).
VisitPlanningLearn to plan routes on an interactive map.
The VisitPlanning action template is used to create a location-based visit planningpage allowing users to plan routes based on their own location and the locations oftheir customers on an interactive map.
479AUREA CONFIDENTIAL
Action Templates

In UPDATE_DEFAULT the VisitPlanning action is called by the VisitPlanningapplication menu action configured in ID_NET_APPOINTMENT_MGMT (Collaboration >Visit Planning). In addition, the A_VisitPlanningFromCustomer context menu actionis available in the context menus for companies and persons (M_Company, M_Person).
Based on the information saved in the Aurea CRM database (location, working/open-ing hours, ABC ratings, open work orders etc. For fur ther details, see Default Valueson page 481) Visit Planning provides the following functionality:
• Creation of suggestions for customer visits for the selected rep: Visit suggestionsare created as Suggestion (SV) records that are displayed as pins on the mapand items in the time line above the map. Existing activity (MA) records for theselected rep and day are displayed as well.
For any issues on the route warning about idle times, a visit being outside openinghours etc.) Annotation (SX) records are created and are displayed within theroute using different icons based on the value in the Annotation quality field(SX:5).
• Users can manually adjust the route as follows:
• edit suggestions directly in the map
• rearrange items using drag&drop on the time line
• add/remove persons/companies by selecting Add to/Remove from Route fromthe context menu (M_VisitPlanning).
Driving times and annotations are updated accordingly. Other pins in the routeare not changed.
• Optimization of manually created routes by clicking the Optimize button, seethe ar ticle “Visit planning optimization” at https://support.aurea.com.
480AUREA CONFIDENTIAL
Chapter 3: Using CRM

Existing MA records are not changed by the optimizer.
• Creation of activities: Clicking on the Save as visits button creates MA recordsof type "Visit" from the suggestions on the map. The SV records are deletedautomatically.
The star ting point of the route is not turned into an MA record. A route's star tingpoint is defined by the Starting location flag (SV:12). Make sure this is nevermanually changed (example - via the Readonly field attribute).
For a detailed description of the use interface and functionality, see Visit Planningin the Web Business Logic User Guide (https://help.aurea.com/crm/crm-web-bl-btb/crm-web-bl-otc/dita/topics/c_web_bl_btb-1_1-Aurea-CRM-web_crm.html).
For a complete description of the Visit Planning algorithm, see the ar ticle “Visitplanning optimization” at https://support.aurea.com
Use the SDK page to test all elements of the Visit Planning page.
Default ValuesLearn about the default values in Visitplanning action template.
Visit planning is not functional out-of-the-box. The following minimum customizationsmust be in place for the feature to work.
Manual visit planning:
• A valid Bing license key must be specified in the License key configurationparameter (Geo Coordinates category) in the Configuration info area (MC), seeConfiguration Info Area in the CRM.Core Administrator Guide.
• Location data (i.e. geographic coordinates) for your reps and customers must beavailable. They should be entered in the respective Latitude and Longitudefields. For fur ther details, see Location. For fur ther details, see Geo-Coordinatesin the CRM.Core Administrator Guide.
Generation of suggestions:
• You need to define queries for visit candidates and planned visits that need tobe referenced via Z5 variables. For fur ther details, see Variables and Queries.
• The info areas to be searched and the default time frame for creating suggestionsare defined in the action. For fur ther details, see VisitPlanning Action Parameterson page 484.
Rep
The (Select Rep) button in the page header allows selecting another rep.
The selected rep's name is displayed in the header and in the info text in the NewSuggestions dialog.
481AUREA CONFIDENTIAL
Action Templates

Note: Since important par ts of the Visit Planning configuration depend on Z5variables, you need to take into account that variables are always evaluated forthe currently logged-in rep. E.g. if a variable value depends on the rep's country,a rep from one country cannot correct planning for reps from another country.
Default: currently logged-in rep
Location
For customer records (companies and persons) to be considered by the Visit Plan-ning, their location must be present in the database, entered in the respective Lati-tude and Longitude fields.
The rep's star ting point is specified in the New Suggestions dialog (Start from andStart next day from drop-down lists). Available values:
• "Home" : The star ting point is read from the Latitude and Longitude fields in theselected rep's ID record.
• "Office": The coordinates of the selected rep's linked FI record are used.
• Last Visit: The coordinates of the location of the last MA record (last 3 days,maximum) are used. The location to be used is determined in the following order:FI > KP > PE.
When optimizing the route using the Optimize button, the first visit (MA or SV) ofthe day is always used as star ting point.
Default: Home
Working Hours / Contact Times
Rep
Suggestions are created within the rep's working hours as defined in the rep's Rep(ID) record by checking Individual work hours (ID:105) and entering the workinghours in the fields ID:29 to ID:56. If no individual working hours are defined for arep, the settings defined in the Calendar.DayStartsAt / Calendar.DayEndsAt WebConfiguration parameters are used as a fallback. For fur ther details, see CalendarParameters on page 97.
Customer
Contact times (CT) defined for companies and persons are taken into account. Ifno contact times have been specified for a company or person, Aurea CRM assumesthe customer is available any time during the rep's working hours. No annotation iscreated in that case.
As for reps the Calendar.DayStartsAt / Calendar.DayEndsAt Web Configurationparameters are used as a fallback.
In addition to working hours/contact times, public holidays as specified in Calen-dar.HolidayCalendarID) and company holidays as defined in CT:27/28 are takeninto account.
Default working hour: 8 AM to 6 PM
Default contact time: during working hour.
482AUREA CONFIDENTIAL
Chapter 3: Using CRM

Variables and Queries
Suggestions for the selected rep and time frame are calculated based on the follow-ing:
• a query determining already planned activities that are par t of the route,
• a query determining the "candidates" for visits based on values like ABC, targetvs. actual visits etc.
• additional parameters like default visit length, weighting, break time betweenvisits.
These settings are referenced via Z5 variables. For fur ther details, see Variableson page 53.
The variables referencing the two queries must be defined:
• VisitPlanning.Query.Candidates
• VisitPlanning.Query.Planned
For the optional variables appropriate defaults are in place if undefined.
Configuration UnitsLearn about configuring units for visit planning page.
The Visit Planning page consists of the following configuration units:
• The application menu action VisitPlanning and context menu action A_VisitPlan-ningFromCustomer with action VisitPlanning. For details on the available actionparameters. For fur ther details, see VisitPlanning Action Parameters on page 484.
Both menu actions are assigned to CRM process 1.2.6.2. "Visit Preparation" (CRMprocess ID 70000320).
• The special header VisitPlanning containing the following buttons:
• A (Select Rep) button allowing the user to select another rep.
• A (Settings) button allowing the user to filter the items (companies and persons)displayed on the map. Analogous to Calendar filter sets, you can provide defaultfilters sets for your users via the VisitPlanning.FilterSets Web Configurationparameter. For fur ther details, see VisitPlanning.FilterSets.
In addition, you can specify fixed filters in the action. For fur ther details,see customerInfoAreasFilter.
The filter criteria are also taken into account when Aurea CRM calculates sugges-tions.
Information about the selected rep and active filter sets is displayed in the NewSuggestions dialog.
• A legend button explaining the color coding and icons on the map. For fur therdetails, see Legend on page 315.
483AUREA CONFIDENTIAL
Action Templates

• Toggle buttons allowing the user to toggle between the Map and Calendar view.
• The (collapsible) side bar contains the following elements:
• a date picker
• the suggestions area:
• (New suggestions): Calls the New Suggestions dialog. Star t and end dateis configurable in the action. Star ting location is "Home" by default. For fur therdetails, see Location.
• (Discard all suggestions): Deletes all SV (and SX) records for the currentlyselected rep.
• Save as visits: Creates MA records from the SV records.
• Optimize: Optimizes the currently planned route, see the ar ticle Visit PlanningOptimization at https://support.aurea.com.
• information on the currently selected item, pin or time line item, configured bythe MiniDetails controls of field groups FI/KP/MA/PE/SV.VisitPlanning.
• The table captions that are used in the side bar, map area and time line mustfollow the same naming convention (AF/KP/FI/PE/SV/SX.VisitPlanning are definedin UPDATE_DEFAULT).
• The static texts for the Visit Planning page are defined in the VisitPlanning textgroup.
VisitPlanning Action ParametersSupported VisitPlanning Action Parameters.
The VisitPlanning action supports the following input arguments (all optional):
uid
An optional record to be included in the map (Record or Linked). This argument isused if the action is called from a company or person.
customerInfoAreas
A comma-separated list of info area IDs specifying from which info areas visit sug-gestions are created.
Default: FI,KP,PE.
484AUREA CONFIDENTIAL
Chapter 3: Using CRM

customerInfoAreasFilter
Allows you to specify fixed filters per info area (comma-separated).
defaultSuggestionStart
Determines the star t date used in the New Suggestions dialog. You can specify afixed date or a date expression. For fur ther details, see Using Variable Expressionson page 505
Default: $curDay+1
This setting defines the initial default when first accessing the Visit Planning page.Afterwards the date selected by the user is saved in his roaming settings. For fur therdetails, see User Settings on page 25.
defaultSuggestionDuration
Determines the end date used in the New Suggestions dialog in days (1 to 31).
Default: 1.
WorkflowThe Workflow action template allows you to call a workflow via menu entries, buttonsand within processes.
The Workflow action template, by calling the javascript:u8.services.businessOb-jects.executeWorkflow function, allows a non-interactive (or background) workflowto be executed in Aurea CRM.Web. For fur ther details, see Executing Non-InteractiveWorkflows in Aurea CRM.Web on page 485.
The Workflow action template allows you to call a workflow via menu entries, buttonsand within processes.
For detailed information on workflows and how to define them, see Aurea CRM au-tomator documentation.
Note: This feature only works for workflows that read records. It is not intendedfor workflows that modify records.
Executing Non-Interactive Workflows in Aurea CRM.WebLearn about Non-Interactive Workflows in Aurea CRM.Web.
A workflow you want to call via the Workflow action template must meet the followingconditions:
• the workflow contains no user interface elements
• no user interaction is needed during the workflow's execution
• the workflow is executed in the background, i.e. Hidden is checked in theworkflow’s settings.
485AUREA CONFIDENTIAL
Action Templates

When calling a workflow via a button in a SearchResults header, use the QueryState Action setting in the button's definition to control when the button is active(one/many/no records selected in the list). For fur ther details, see Configuring aButton on page 305.
Workflow calls and results are written to the server log in debug mode. If an erroroccurs, a message is written to the client log, see Core Error Codes for Other AureaCRM Products in the CRM.Core Administrator Guide.
Workflow Action ParametersSupported Workflow Action parameters.
The Workflow action supports the following input arguments:
name
The name of the workflow format to be executed.
uid/uid2
The uid of one or two optional records passed to the workflow.
parameters
Parameters passed to the workflow.
Syntax:javascript:[{name: "sParam", values: ["string parameter"]},{name: "fParam", values: ["32.55"]},{name: "iParam", values: ["3542"]}]
callback
A marker parameter for the framework entered automatically if a callback is requiredfor the execution.
refreshAfterExecution
If set to true, any visible view (list, sub-list, expand) containing records that havebeen changed by an executed trigger or workflow is refreshed immediately.
Default: true
Note: If a trigger calls another trigger (defined in the currently active rightsdefinition), changes performed by that follow-up trigger may not be immediatelyreflected in the current view.
recordSet
Defines for which records from a list or sub-list the workflow is executed. Same asfor triggers. For fur ther details, see recordSet.
486AUREA CONFIDENTIAL
Chapter 3: Using CRM
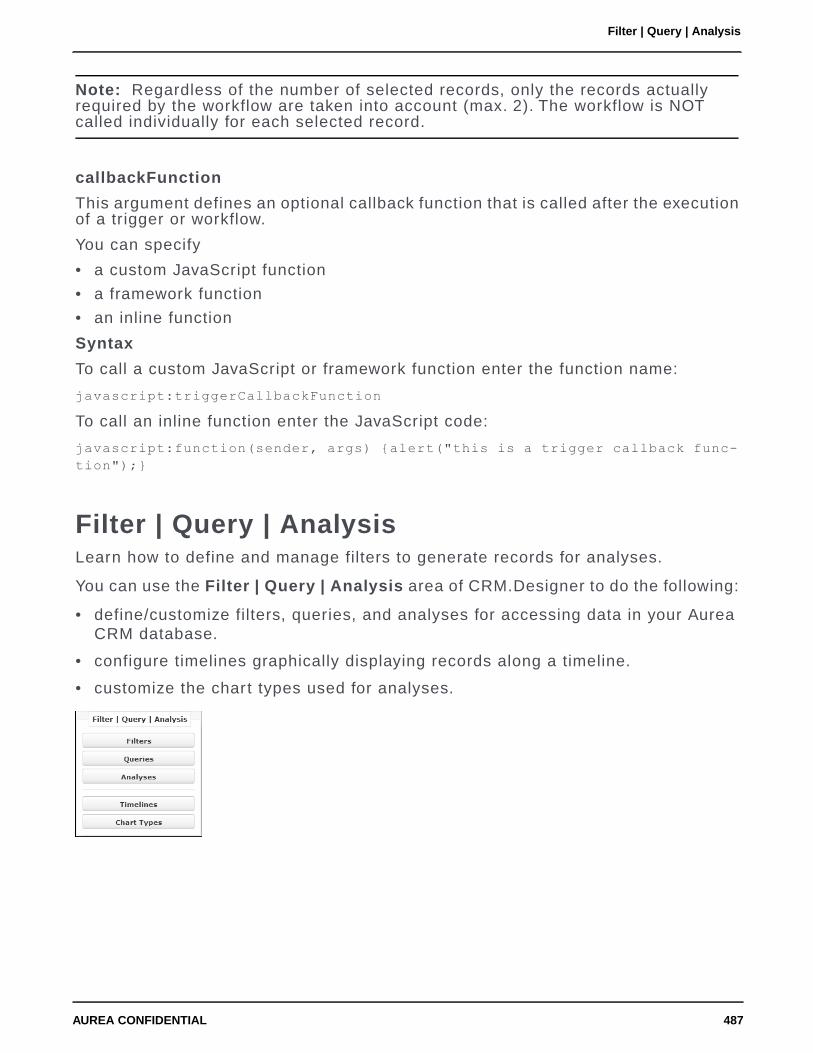
Note: Regardless of the number of selected records, only the records actuallyrequired by the workflow are taken into account (max. 2). The workflow is NOTcalled individually for each selected record.
callbackFunction
This argument defines an optional callback function that is called after the executionof a trigger or workflow.
You can specify
• a custom JavaScript function
• a framework function
• an inline function
Syntax
To call a custom JavaScript or framework function enter the function name:
javascript:triggerCallbackFunction
To call an inline function enter the JavaScript code:
javascript:function(sender, args) {alert("this is a trigger callback func-tion");}
Filter | Query | AnalysisLearn how to define and manage filters to generate records for analyses.
You can use the Filter | Query | Analysis area of CRM.Designer to do the following:
• define/customize filters, queries, and analyses for accessing data in your AureaCRM database.
• configure timelines graphically displaying records along a timeline.
• customize the chart types used for analyses.
487AUREA CONFIDENTIAL
Filter | Query | Analysis

FiltersFilters are used to filter data by defining conditions.
In Aurea CRM.Web, filters can be used and defined on:
• Search pages via the Add more feature
• Calendar and Resources pages by clicking (Define filters and filter sets)
To define/customize filters in CRM.Designer:
1. Go to CRM.Designer main page.
2. Click Filters . All Filter page is displayed.
For fur ther details, see Designing Configuration Units on page 64.
A filter definition consists of an info area and optional related info areas and filtercriteria. For fur ther details, see Defining Filters on page 489. Unlike queries, filtersdo not have output and sor t fields. For fur ther details, see Queries on page 493.
Filters are saved as configuration units in the current user's configuration. They arealways stored in and loaded from the CRM.Designer database. Filters defined inparent configurations are visible in both Aurea CRM.Web and CRM.Designer. Userscan simply use and change them, and save them to their configuration.
Use the Readonly and/or Invisible in lists flags in the filter definition in CRM.De-signer, to hide a filter and/or prevent users from changing it.
488AUREA CONFIDENTIAL
Chapter 3: Using CRM

In Aurea CRM.Web users can define filters for all info areas to which they haveaccess rights. To restrict the list of available info areas without generally denyingaccess to an info area:
1. In the Rights module, click in the Additional settings per info area cell of thedesired info area.
2. Check the Do not display the info area used to define filters and queries(web) check box.
For more information, see Rights in the CRM.Core Administrator Guide.
Users can still use filters containing info areas that they cannot select themselves.However, if a user removes such an info area from the filter definition, he cannotadd it again due to his rights restrictions.
In CRM.Designer you can define filters regardless of your access rights.
Defining FiltersDefining filters in Aurea CRM.
In Aurea CRM.Web and the CRM.Designer you can define and edit filters using theAQL syntax. For fur ther details, see AQL Syntax on page 882 and Filters in the AureaCRM.Web User Interface documentation. You can also edit the AQL syntax in theAQL editor.
To define a filter in CRM.Designer:
1. Enter a Name.
2. Select the root info area from the Infoarea drop-down list.
3. Click New.
The info area ID of the root info area is automatically added to the filter's nameas a prefix uniquely identifying the filter in CRM.Designer. Example - FI.MyFilterThe prefix is not displayed when selecting the filter in Aurea CRM.Web.
4. Click (Edit).
489AUREA CONFIDENTIAL
Filter | Query | Analysis

5. Specify the following:
• Display-Text (optional): You can enter a multilingual name for the filter. Thisname is used when selecting filters in Aurea CRM.Web. The text is saved inthe net_filternames text group. For fur ther details, see Texts on page 176.
• Readonly: If checked, users cannot edit the filter in Aurea CRM.Web.
• Invisible in lists: If checked, users cannot select the filter in Aurea CRM.Web.If unchecked, users can select and edit the filter. Visible filters from parentconfigurations are read-only.
• Description: Add an internal description visible in CRM.Designer only.
6. Filter: Define the filter criteria:
a. Select a field and click (Add).
Note: Filters on decoded fields (Z-fields) are not supported. For fur ther details,see Data Types in Aurea CRM on page 877.
b. Select an operator from the drop-down list.
c. Enter a value, a variable expression or function and click (Add). For fur therdetails, see Advanced Filter Criteria on page 504.
For catalog values you can either enter the text in the default language or thecatalog code (as #<code>). In addition, you can search by external key (#xk:)or by (par t of) the value's description (#desc:). For a complete description ofthe syntax plus examples, see Filtering by Catalog Values on page 885.
For synchronized catalogs (see Updating Catalogs on page 778 and CatalogValue Synchronization) you can select the value from the drop-down list:
To filter by values from hierarchical catalogs, define the filter for the child cat-alog and define the parent and child value as values:
Note: The AQL notation using "~" is not supported in CRM.Designer.
490AUREA CONFIDENTIAL
Chapter 3: Using CRM

Note: For hierarchical catalog values, the parent catalog value must be thesame for all values of one filter node. You need to enter different parent catalogvalues as multiple nodes.
7. To add a related info area, click (Add) beside the root info area and select thedesired info area.
a. Specify the following:
• LinkId: If you want to use another than the default link, specify the LinkId.For fur ther details, see Link IDs on page 19.
• Max Rows: Defines how many linked records are read for each parent.
• Optional: Check Optional to display the root record only if a related recordexists in at least one of the sub-info areas.
b. Select the desired Relation type:
• HAVING: Returns the root record only if at least one related record exists.
• WITHOUT: Returns the root record only if no related record exists.
c. Define filter criteria for the related info area(s) if applicable, e.g. to filter forcompanies with at least one Activity record of type "Telephone" on the dayafter tomorrow.
8. Click Save.
AQL syntax for the above example is visible in the AQL editor, as shown below:select from (FI)where (ABC="A" AND RepID="$curRep")with (MA as FIMA)
where (Contact="#0" AND Date="$curDay+2d")
Note: The maximum number of filters is 1000 for a single query.
491AUREA CONFIDENTIAL
Filter | Query | Analysis

Working with filter for multiple info areasConfiguring to use multiple filters in a selectRecord function when two or more infoareas exists.
To use multiple filters in a selectRecord function when two or more info areas existthe following configuration is required.
To enable multiple filters with more than one info area:
1. Use CRM.Designer to create filters for two different info areas. For example -FI.CompanyCity and KP.ContactName.
2. In CRM.Designer add text field with selected record in some third info area filledgroup control search. For example, select record for filter in FI and KP as shownbelow:
selectRecord({from: {showFilter:true,infoareas:[{infoAreaId: "FI", filter: "FI.CompanyCity"}, {infoAreaId:
"KP", filter: "KP.ContactName"}],useAutoSearch:true }});
3. Open CRM.web and locate the info area where the search field is added. Use theselected text field to search for Company and FI.CompanyCity. In case you searchfor Contact Person, the KP.Company name is also applied to the search.
Format Types for Queries and AnalysesFormat type used for queries and analyses.
The following format types are used for queries and analyses:
• Private: The definition is stored per user.
• Public: The definition is shared by all users. If the definitions are stored in theCRM.Designer database, they are stored in the highest writable parentconfiguration.
• All: The standard designer logic is applied. For an analysis name, all private, allpublic and all analyses defined above the configuration for public analyses aresearched.
Queries can be saved in the CRM.Designer and/or Aurea CRM database. For fur therdetails, see Storing Queries on page 495.
Queries are divided into public queries available for all users and private queriesthat only belong to one user.
492AUREA CONFIDENTIAL
Chapter 3: Using CRM

For queries stored in the Aurea CRM database, this difference is stored in the formatfor public queries the User field is empty. Queries that are stored in/loaded fromthe CRM.Designer database, the definition whether a query is private or public de-pends on the following:
• For loading queries, all queries in the user configuration are private and all queriesin one of the parent configurations are public.
• For saving queries, private queries are stored in the current configuration andpublic queries are stored in the highest writable parent configuration.
A configuration structure allowing users to load and save private and public queriesis shown in the following graphic:
Analyses are always saved in the CRM.Designer database, even if the underlyingquery comes from the Aurea CRM database. Public analyses (defined in AureaCRM.Web) are stored in the highest writable parent configuration.
Use the DesignerConfiguration.PublicSaveConfiguration Web Configuration pa-rameter to define the configuration where public queries and analyses are stored.For fur ther details, see DesignerConfiguration.PublicSaveConfiguration.
Note: If the parent configuration of the user configuration is read-only, the usergets an error message when trying to save a public query or analysis to theCRM.Designer database.
QueriesLearn about the advance way of accessing data by using queries.
Queries provide an advanced way of accessing data. The user can select the fieldsof an info area that can be seen, the filters that are applied to those info areas andhow the result is sor ted.
To define/customize queries in CRM.Designer, click Queries on the CRM.Designermain page. For fur ther details, see Designing Configuration Units on page 64 and
Defining Queries on page 496 .
493AUREA CONFIDENTIAL
Filter | Query | Analysis

In Aurea CRM.Web queries are used for/by:
• In the Query Designer users can execute predefined or saved queries, modifyor create new queries according to the assigned query rights. For fur ther details,see Query.Rights.
• Analyses are based on queries. For fur ther details, see Defining Analyses onpage 515.
• Forms (e.g. dashboards for star t pages) can contain e.g. a QueryResultPresenterwidget executing a query and displaying the count of returned records. For fur therdetails, see Forms on page 621.
• The QueryRun action template executes a query and displays the query results.For fur ther details, see QueryRun on page 441.
• The QueryReport action template executes a query in the background and displaysa report using the query results. For fur ther details, see QueryReport on page436.
• CRM.server uses queries to create target groups for marketing activities. Forfur ther details, see Mail Merge Letters Based on Marketing Activities on page 849.
In addition, CRM.server can generate query snapshots or a CSV export of queryresults in the background. For fur ther details, see Background Queries on page502.
Use the SDK page to explore the functionality of all query-related widgets: SDK >Query.
Queries and Access RightsIn Aurea CRM.Web users can define queries for all info areas to which they haveaccess rights.
In CRM.Designer you can define queries containing any info area regardless of theaccess rights of your users. If a query contains locked info areas all elements exceptthe ones that are locked are returned. This means a locked info area appears inAurea CRM.Web as if no data is available.
494AUREA CONFIDENTIAL
Chapter 3: Using CRM
Example - You may prepare a report containing data from Company, Person, Ac-tivity and Offer for all users regardless of their individual access rights and theOffer info area may be locked for some users. Hence, the report contains no datafor Offer info area for the blocked users.
Note: If the root of the query is affected by the rights definition, e.g. because itcontains a WITH condition for a locked child info area, no data is returned.
To restrict the list of available info areas without generally denying access to aninfo area:
1. In the Rights module, click in the Additional settings per info area cell of thedesired info area
2. Check the Do not display the info area used to define filters and queries(web) check box.
For more information, see Rights in the Aurea CRM win Administrator Guide.
Users can still use queries containing info areas that they cannot select themselves.However, if a user removes such an info area from the filter definition, he cannotadd it again due to his rights restrictions.
If a query contains a field that is locked in the current access rights definition (DenyAccess on field level), the field is displayed with "Access denied" in the OutputFields list. The locked field can not be selected for defining a condition. However,when defining the condition as AQL any field can be used.
Storing QueriesThis topic has information about saving and loading queries.
The Query.LoadFrom and Query.SaveTo Web Configuration parameters determinefrom where queries are loaded and where they are saved. For fur ther details,see Query.LoadFrom and Query.SaveTo.
Depending on the Query.SaveTo Web Configuration parameter queries defined inAurea CRM.Web are saved
• as formats of type "query" in the Aurea CRM database (default)
• as configuration units in the CRM.Designer database
• as both
495AUREA CONFIDENTIAL
Filter | Query | Analysis

Queries defined in Aurea CRM.Web can be saved as either "public" or "private".For fur ther details, see Format Types for Queries and Analyses on page 492:
• Private queries are saved in the current user's configuration if Query.SaveTo ="CRM.Designer" or under the current user's name if Query.SaveTo = "Aurea CRM".
• Public queries are saved in the current user's highest writable parent configurationor in the configuration specified in the DesignerConfiguration.PublicSaveConfig-uration Web Configuration parameter if Query.SaveTo = "CRM.Designer" orwithout a user name (if Query.SaveTo = "update.CRM". For fur ther details, seeDesignerConfiguration.PublicSaveConfiguration.
Queries defined in CRM.Designer are always saved as configuration units in theCRM.Designer database.
The queries that are available for users in Aurea CRM.Web depends on theQuery.LoadFrom Web Configuration parameter.
Default: "both, CRM.Designer first", i.e. the query is first searched in the CRM.De-signer database, and if not found, it is loaded from the Aurea CRM database.
It is recommended that queries that are defined for customization purposes (to displaya query result, an analysis or query results on generic form) are stored in theCRM.Designer database. Thus, the query is also transferred with the referencingobjects during a bulk download and upload.
If you define all queries (and analyses) that are directly referenced in the configura-tion in CRM.Designer, you can set both Query.LoadFrom and Query.SaveTo to "up-date.CRM". Users does not see the queries and analyses used by the configurationwhen they search for queries and analyses in Aurea CRM.Web.
Queries that are executed in batch operations by CRM.server (e.g. Marketing Activ-ity Execution) require the default setting Query.SaveTo = update.CRM.
Defining QueriesLearn how to define queries in Aurea CRM.
In Aurea CRM.Web and CRM.Designer you can define and edit queries using theAQL syntax, see AQL Syntax on page 882 and Queries in the Aurea CRM.Web UserInterface documentation.
To define a query in CRM.Designer:
1. Select a query or create a new one. For fur ther details, see Designing Configura-tion Units on page 64.
When creating a new query you need to select the root info area first:
496AUREA CONFIDENTIAL
Chapter 3: Using CRM

2. Specify the following:
• Readonly: If checked, users cannot edit the query in Aurea CRM.Web.
• Invisible in lists: If checked, users cannot select the query in Aurea CRM.Web.
Note: Use these settings for queries called via menu actions or used bypredefined analyses. Alternatively, you can use the Query.Rights WebConfiguration parameter to determine whether users can execute and/or editpredefined queries. For fur ther details, see Query.Rights.
• Include Associations: Determines whether affiliations should be taken intoaccount. For fur ther details, see Global Switch / Query-Specific Switch.
• CRM Processes: Assign one or more CRM processes to the query. For fur therdetails, see Roles & CRM Processes on page 727.
• Description: Add an internal description (only visible in CRM.designer).
• Used by Mail Merge: Select this option to make the query appear on thetemplate document used for Mail merge.
497AUREA CONFIDENTIAL
Filter | Query | Analysis

Note:
• The flag Use for Mail Merge is automatically set by the system when a queryis used by Office Add-in
• The flag Use for Mail Merge is explicitly set by users in the Query Definitionscreen.
Note: On deleting a query with flag Use for Mail Merge set, the followingadditional pop-up message is shown:
This query is selected to be used with Word Single- & Serial Letters.Deletion of the Query can cause different Word Templates stop working.Do you still want to delete the 'ExampleQuery' query?
3. Fields: Define the query's output fields.
Note: By default, rep ID fields (field type "uid") are transformed to contain therep name (string) when displaying and exporting a query result. To get the repID instead, use the Export.EmitRepNames Web Configuration parameter or exportoption. For fur ther details, see Export.EmitRepNames.
After adding your fields, you can expand them using the button to define whichfields is shown as links to records by checking desired the Link-Field boxes.
Link fields are displayed like hyperlinks when a user executes a query or analysis,on the QueryRun page for queries used in forms and in analysis results.
The link opens the info area the field is defined for. If a Z-field (i.e. a read-onlyfield consisting of several fields from another info area) is defined as a link, thisassociated info area is opened when a user clicks on the link. In the example thelink to the Z-field Person opens the Person (KP) record.
498AUREA CONFIDENTIAL
Chapter 3: Using CRM
4. Sort: Define the query's sor t fields. Click asc to change the sor t order to descand vice versa.
5. Filter: Define the filter criteria. For fur ther details, see Defining Filters on page489, Parameterized Queries on page 500 and Advanced Filter Criteria on page 504.
Note: Filters on decoded fields (Z-fields) are not supported. For fur ther details,see Data Types in Aurea CRM on page 877.
6. To add a (child) info area, click (Add) beside the root info area and select thedesired info area. Specify the following:
• LinkId: If you want to use another than the default link, specify the LinkId. Forfur ther details, see Link IDs on page 19.
• Max Rows: Defines how many linked child records are read for each parent.
• Optional: Check Optional to display the parent record only if a child recordexists in at least one of the sub-info areas.
7. Select the desired Relation type:
• WITH: Returns the parent record only if at least one child record exists.
• WITHOUT: Returns the parent record only if no child record exists; allowsadvanced conditions on the child records to be defined.
• PLUS: Returns the parent record even if no child record exists. (This allows toimplement the UNION operator from SQL.)
• WITH SUMMED: Returns the parent record only if at least one child record exists;aggregates data from child records.
• PLUS SUMMED: Returns the parent record even if no child record exists;aggregates data from child records.
• HAVING: Returns the parent record only if at least one child record exists; allowsadvanced conditions on the child records to be defined.
The query definition in CRM.Designer also supports extended conditions, butit does not include Aurea CRM.Web's restrictions on extended conditions.Therefore, you must define queries that can actually be executed.
Extended conditions can only be used for tables that are related with the"HAVING" or "WITHOUT" types. For these types, you can use the SUM andCOUNT fields at the end of the field list. Do not mix standard conditions andextended conditions and combine them with "AND".
8. Define output fields, sor t fields and filter criteria for the child info areas asapplicable.
9. Click Save.
499AUREA CONFIDENTIAL
Filter | Query | Analysis

Queries defined in CRM.Designer are always saved as configuration units in theCRM.Designer database.
AQL syntax for the above example is visible in the AQL editor and is shown below:select (Company, Country, ZipCode, Employees, Revenue, FIMA.Contact, FIMA.Date,FIMA.Time, FIMA.Duration, FIMA.Unit, FIMA.Subject, FIMA.Person) from (FI)where (ABC="A")with (MA as FIMA)where (RepID="$curRep" OR ParticipantID="$curRep")orderby (Company, FIMA.Contact, FIMA.Date)
Parameterized QueriesParameterized queries require input at runtime.
Parameterized queries are queries that require user input. Use the placeholder$parValue for fields the user has to enter when executing the query. The screenshotbelow shows a new query “MyQuery” in the CRM.Designer.
In Aurea CRM.Web these fields are displayed as input fields in the respective queryform Query Designer, QueryRun and QueryReport actions. See the screenshot below:
Using One Value in Multiple Conditions
500AUREA CONFIDENTIAL
Chapter 3: Using CRM

You can define parameterized queries where the same value is used by multipleconditions. The user only has to input the value once. Use placeholders e.g. called$parValue<number> for fields the user has to enter when executing the query. Thevalue specified by the user is applied to all occurrences of $parValue<number>.
Example
AQL syntax for the above example:select (Company, Country, RepID, Rep2ID, Upd, FIKP.Sex, FIKP.FirstName,FIKP.LastName, FIKP.RepID, FIKP.Country, FIMA.Contact, FIMA.Date, FIMA.Time,FIMA.Upd) from (FI)where ((Upd>='$parValue2' OR RepID='$parValue1' OR Rep2ID='$parValue1') ANDCountry='$parValue3')plus (KP as FIKP)where (RepID='$parValue1' OR Country='$parValue3')plus (MA as FIMA)where (Upd>='$parValue2')orderby (Company, FIKP.LastName, FIMA.Date, FIMA.Time)
Users only see one field per placeholder:
The provided criteria are applied to all occurrences of the placeholder. Dependingon the query definition (AND/OR, relation between info areas) the condition mustbe fulfilled by all fields using the same placeholder or not.
501AUREA CONFIDENTIAL
Filter | Query | Analysis

Make sure you do not apply a $parValue<number> placeholder to fields of differenttypes. No validation takes place when saving the query.
Specifying $parValue<number> for a hierarchical catalog automatically adds an inputfield for the parent catalog. However, using the same $parValue<number> for parentand child catalog results in an error.
Note: The placeholder $parValue is not affected by this feature, i.e. each occurrenceof $parValue creates an extra input field for the user.
Background QueriesYou can execute complex queries in the background and continue working on AureaCRM.
By clicking users can execute queries asynchronously in the
background in addition to executing queries immediately via . Whenrunning a query in the background, the user can continue to work in Aurea CRM.Web.The query is executed on the server. When finished the user gets a notification thathe can now access the query snapshot.
Note: Executing queries in the background is recommended for long-running complexqueries.
To enable the processing of background queries, CRM.server must be up and runningon the server. For fur ther details, see CRM.Server on page 15.
The rep ID of the CRM.server user must be specified in the UpdateServer.RepIDWeb Configuration parameter because the to-dos for background processing arecreated for that rep. For fur ther details, see UpdateServer.RepID.
The Web Configuration parameter Jobs.PollingInterval defines the time intervalin which the existence of new query snapshots is periodically checked. For fur therdetails, see Jobs.PollingInterval.
The Web Configuration parameter Query.BackgroundExecutionStart allows you tospecify a time in the format hh:mm for asynchronous queries to be processed on theserver. For fur ther details, see Query.BackgroundExecutionStar t. That way theprocessing of background queries can be scheduled for off-peak hours in caseperformance issues arise.
502AUREA CONFIDENTIAL
Chapter 3: Using CRM

CRM.server is notified about new background queries via To-Do records that areautomatically created by Aurea CRM.Web. The query is saved as a D1 document(*.xml) linked to the to-do record. CRM.server processes the query with the rightsof the rep that has sent the query and then saves the result in a query snapshot,and finally creates a Message record for the user. The message contains a link tothe To-Do which now has the status "completed". The to-do contains a link to thequery snapshot. The XML document is automatically deleted after completion.
Users can access the to-dos created for background queries via Queries & Analyses> Background Queries. For fur ther details, see ID_NET_TD_BACK-GROUND_QUERIES.
In UPDATE_DEFAULT the special headers Query and QueryFooter contain the
button.
If you add the button to those headers, users can createa CSV file containing the query results. The file is stored in the Document info area(D1) and linked to the Message via a D3-link.
Note: With Create CSV File in Background the resulting records are not storedas a query snapshot but in the CSV file only.
Note: If the created CSV file exceeds a cer tain size, the decompression of the file(when transferring it from the database to the client) is not performed in memorybut via the file system.
For information on the background query buttons and their configuration. For fur therdetails, seeQuery Background Processing Buttons on page 318.
Global Definition of FindAsYouTypeThe FindAsYouType definition is used for all link fields that point to the respectiveinfo area.
You can define FindAsYouType globally by defining a query <InfoAreaId>.FindAsY-ouType. Examples in UPDATE_DEFAULT: FI.FindAsYouType, MA.FindAsYouType,AR.FindAsYouType etc. This FindAsYouType definition is used for all link fields thatpoint to the respective info area and for which no Select-Function has been defined.For fur ther details, see Select-Function on page 240.
Note: FindAsYouType only supports text, number and variable catalog fields assearch fields (Field Types C,L,S,K). For fur ther details, see Data Types in AureaCRM on page 877). Fields that are not supported are ignored and a warning is writtento the client log. For output fields there is no restriction: All field types are valid.
503AUREA CONFIDENTIAL
Filter | Query | Analysis

Note: Link fields to which a global or specific FindAsYouType definition applies,are displayed as editable. If an invalid/erroneous FindAsYouType definition is definedfor a field, this field is displayed as read-only.
Note: FindAsYouType is only supported for standard link fields, i.e. not for genericlinks.
Text and catalog fields support a substring and wildcard search. Number fields onlyreturn exact matches, i.e. searching for "100" does not return "1000" or "3100". Tosearch for number ranges you need to define a query with condition. For example,where (Revenue>'$parValue').
Example
select (Company, City, Country) from (FI)where (Company="$parValue" OR Synonym="$parValue" OR City="$parValue" ORStreet="$parValue")orderby (Company)
This FindAsYouType definition (FI.FindAsYouType in UPDATE_DEFAULT) is usede.g. in the End Customer Company field of the Ticket (KM) info area (if no otherSelect-Function has been defined for this field). If the user types part of a company'sname and/or address in this field, a drop-down list containing all hits in the formCompany | City | Country is displayed.
Advanced Filter CriteriaHere is the list of Advanced Filter Criteria that you can define in Aurea CRM.Web.
The following advanced filter criteria are available:
Comparing Field ValuesFilter criteria to compare field values.
You can compare the values of different fields within one info area provided thesefields have the same data type. For fur ther details, see Data Types in Aurea CRMon page 877.
504AUREA CONFIDENTIAL
Chapter 3: Using CRM

To compare the values of different fields, do the following:
1. Select a field from the drop-down list.
2. Click (Add Field).
3. Select the second field.
4. Click (Add).
5. Select the desired operator.
The following comparisons are possible:
• date fields with date fields
• time fields with time fields
• rep fields with rep fields
• numerical fields with numerical fields
• text fields with text fields
• logical fields with logical fields
• catalog fields only if two or more fields are associated with the same catalog
Note: CRM.Designer does not perform any checks whether the compared fieldsare of the same type.
Using Variable ExpressionsUse of variable expression when defining filter criteria.
You can use variable expressions when defining filter criteria:
1. Select a field from the list
2. Click (Add).
3. Select an operator.
4. Enter the desired variable in the field after the operator.
5. Click (Add).
505AUREA CONFIDENTIAL
Filter | Query | Analysis

The following variable expressions are available:
• $curDay: today's date
• $curfdYear: the first day of the current year
• $curfdQuarter: the first day of the current quarter
• $curfdMonth: the first day of the current month
• $curfdWeek: the first day of the current week
• $curYearFY: the first day of the current business year
• $curLastLogin: the date of the current rep's last login
Note: $curLastLogin only works in Aurea CRM.Web, not in Aurea CRM win, andcan therefore not be used for queries that are processed by CRM.server.
You can add or subtract days, weeks etc. from these dates, e. g. $curDay+1y+1dresults in tomorrow one year from now. Available abbreviations: d (day), w (week),m (month), q (quarter), y (year).
• $curTimeMin: the current time in format HH:MM
• $curTimeSec: the current time in format HH:MM:SS
• $curTimeMs: the current time in format HH:MM:SS:mmm
Note: $curTimeMin, $curTimeSec and $curTimeMs can only be used dependingon the time field's format. For fur ther details, see Aurea CRM Field Types in theCRM.Core Administrator Guide.
• $curRep: the currently logged in rep
• $curOrgGroup: the Org.group of the currently logged in rep
• $curGroup: the Org.group plus group allocation(s) of the currently logged in rep
• $curAllGroups: Returns organizational group and all groups allocated to currentlogged in rep (without checking field datatype).
Note: $curGroup returns only organizational group if "supplied db field" is singular.$curAllGroups returns all group assignment & allocations in all conditions andignores the field details in its query.
• $curMyLeader: the group leader of the Org.group of currently logged in rep
506AUREA CONFIDENTIAL
Chapter 3: Using CRM

• $curLeader: all groups where currently logged in rep is group leader
• $curMyDeputy: the deputy of the currently logged in rep
• $curDeputy: all records where the currently logged in rep is the deputy
• $curSuperior: the supervisor of the currently logged in rep
• $curSupLine: the current superior line
• $curExtGroup: all groups in the rep's extended group, i.e. the group entered inthe Org. Group field and all groups directly allocated to this group in the GroupAllocation info area.
Note: $curGroup, $curExtGroup, $curLeader and $curDeputy cannot be used fordefault values since they potentially return more than one result. These variablesare currently also not available for defining conditions in Aurea CRM.Web.
• $curTenant: the tenant of the currently logged in rep
• $cur(<infoAreaId>,<fieldId>): You can access any field value of the currentrep from the info areas Rep (ID) and Station (AS), as well as the info area RepAdditional Info (AZ) in the OTC vertical.
Note: Currently only rep fields are supported.
Example: RepID = $cur(ID,72) compares the content of the field RepID (e.g. inMA) with the superior of the currently logged in user as defined in the Rep infoarea.
In addition, you can use custom variables defined in the Variables info area (Z5)for defining filter criteria. For fur ther details, see Variables on page 53.
Syntax: $VAR(<variable name>)
For more information, see the ar ticle “Current Expressions” at https://support.au-rea.com.
Using Wildcards in Date FieldsUsing wildcards for defining conditions on date fields.
When using wildcards for defining conditions on date fields use the Aurea CRMformat YYYYMMDD (e.g. "????0523").
You can also define filters and queries for the current day, month or year. In thiscase, use the format $YYYYMMDD. Possible placeholders are # for the current date or? for any date.
Note: You can use literal character values of ‘*‘ and ‘?’ using the escape sequences‘\*’ and ‘\?’.
507AUREA CONFIDENTIAL
Filter | Query | Analysis
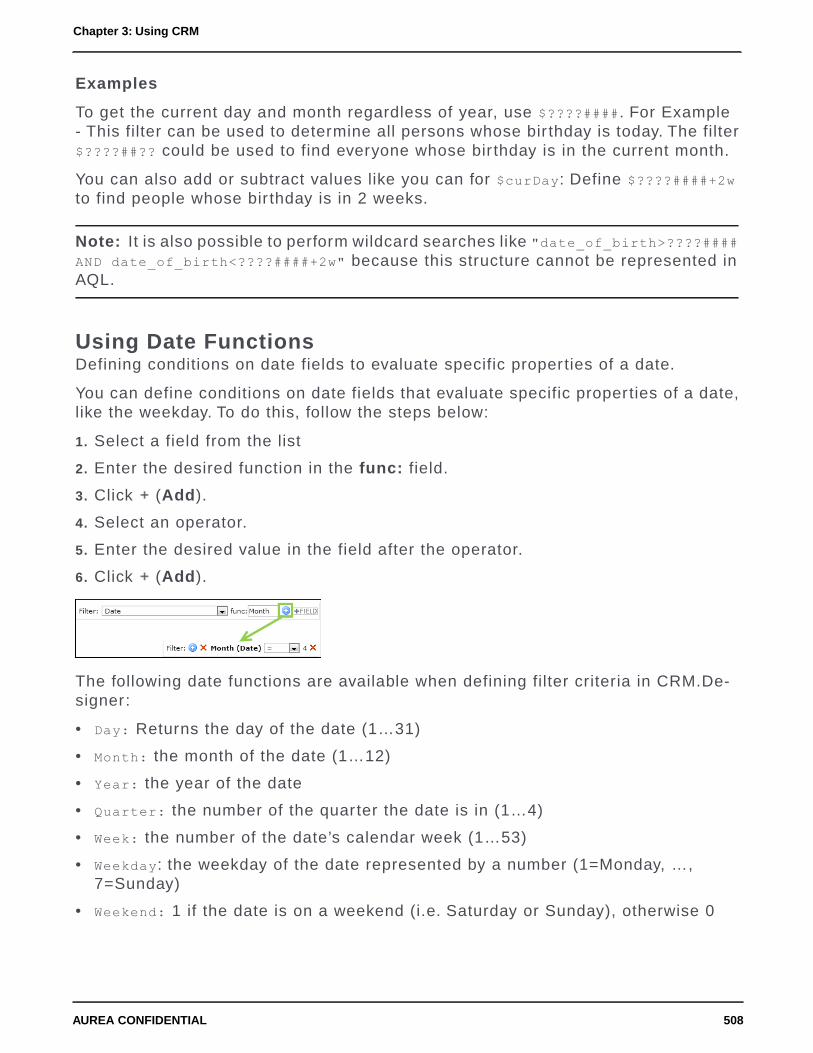
Examples
To get the current day and month regardless of year, use $????####. For Example- This filter can be used to determine all persons whose bir thday is today. The filter$????##?? could be used to find everyone whose bir thday is in the current month.
You can also add or subtract values like you can for $curDay: Define $????####+2wto find people whose bir thday is in 2 weeks.
Note: It is also possible to perform wildcard searches like "date_of_birth>????####AND date_of_birth<????####+2w" because this structure cannot be represented inAQL.
Using Date FunctionsDefining conditions on date fields to evaluate specific properties of a date.
You can define conditions on date fields that evaluate specific properties of a date,like the weekday. To do this, follow the steps below:
1. Select a field from the list
2. Enter the desired function in the func: field.
3. Click (Add).
4. Select an operator.
5. Enter the desired value in the field after the operator.
6. Click (Add).
The following date functions are available when defining filter criteria in CRM.De-signer:
• Day: Returns the day of the date (1…31)
• Month: the month of the date (1…12)
• Year: the year of the date
• Quarter: the number of the quarter the date is in (1…4)
• Week: the number of the date’s calendar week (1…53)
• Weekday: the weekday of the date represented by a number (1=Monday, …,7=Sunday)
• Weekend: 1 if the date is on a weekend (i.e. Saturday or Sunday), otherwise 0
508AUREA CONFIDENTIAL
Chapter 3: Using CRM

Note: Date functions cannot be used in conjunction with variable expressions like$curDay, $curMonth, etc. However, a filter to check e.g. if the month of a date fieldis equal to the current month can easily be realized using $????##?? as thecomparison value (for the operators "=" and "<>" only). For fur ther details, see UsingWildcards in Date Fields on page 507.
Dynamic FiltersThis section lists the configuration units/areas where Dynamic Filters are available.
Configure dynamic filters to filter search results based on values retrieved from theparent record. For Example - to filter the item list of the offer quick add page basedon a value from the offer.
Filter criteria from the dynamic filter and additional search criteria defined by theuser are combined by a logical AND.
You can define dynamic filters for linked searches, record selectors and genericquick add pages. For fur ther details, see Examples.
Configuring a Dynamic FilterLearn to configure a dynamic filter.
To configure a dynamic filter:
1. Create a field group for the source info area, i.e. the info area from which thefilter values are retrieved.
2. Create a List control and add the field(s) you want to use as filter values.
3. Enter a parameter name as Function. (You can enter any text (without spaces),but best practice is using the field's XML name.)
4. Define the filter.
5. Add the above defined parameter as filter value (using the syntax $par<name>).
Note: Date/time calculations with $par expressions are currently not supported.
6. Add the field group and filter to the action configuration:
• the field group as sourceCopyFieldGroupName
• the filter as fixedFilterName.
For more details, see the examples below:
Search
Searching for persons with the same Country as the parent company via a buttonin the FI Expand header:
509AUREA CONFIDENTIAL
Filter | Query | Analysis

Field group for sourceCopyFieldGroupName: e.g. FI.DynamicFilter - List control:
Filter definition for fixedFilterName, e.g. KP.CountryFI:
Search action defined for a new button in the FI Expand header:
In this case, the parent record is defined by link. You can use the sourceUid param-eter to pass another parent.
Clicking on the button opens a linked search that automatically displays only linkedKP records with the same country as the parent FI record.
If the user enters additional search criteria, they are combined by logical AND.
Related Data
The above example can also be implemented for sub-lists:
FI SearchSublist and ExpandChildren headers
Enter sourceCopyFieldGroupName,FI.DynamicFilter as SubListParams.
The KP sub-lists for FI are filtered by the country of the parent company.
Examples in UPDATE_DEFAULT:
• The Text (04) sub-lists display all available translations of a text record.Configured in the SearchSublist and ExpandChildren headers of header group04 with Filter 04.BaseLanguageFilter using field group 04.AllTexts.
• The Station configuration (T0) sub-list contains only the record defined for theselected station (AS). Configured in the SearchSublist and ExpandChildren
510AUREA CONFIDENTIAL
Chapter 3: Using CRM

headers of header group AS with Filter T0.ForStation using field group AS.Param-etersForT0.
Quick Add
Generic quick add page for offers - filtering the item list by the parent record'sProduct Group:
Field group for sourceCopyFieldGroupName: e.g. PR.DynamicFilter - List control:
Filter definition for fixedFilterName, e.g. AR.ProdGrPR:
SerialEntry action e.g. defined for A_SerialEntryAP:
The item list displays only items (AR) with the same product group as the parentoffer (PR).
Record Selector
Record selector for the Event Location field in the Marketing Activity (AK) infoarea - filtering for companies with the same Country as the marketing activity:
Field group for sourceCopyFieldGroupName: e.g. AK.DynamicFilter - List control:
Filter definition for fixedFilterName, e.g. FI.CountryAK:
511AUREA CONFIDENTIAL
Filter | Query | Analysis

Select-Function defined for the Event Location field in the AK Details control:selectRecord({from:{infoAreaId: "FI",useAutoSearch: true,fixedFilterName: "FI.CountryAK",sourceCopyFieldGroupName: "AK.DynamicFilter"
}});
Clicking on the record selector icon opens a linked search that automatically dis-plays only FI records with the same country as the current AK record.
If the user enters additional search criteria, they are combined by logical AND.
Dynamic Filtering in the Tree ViewLearn to configure a dynamic filter in the Tree View.
You can filter the child nodes displayed based on the field value of a parent node.To do this you have to perform the first four steps as described in Configuring aDynamic Filter on page 509. Then set the parameter $relationNameAndParametersin the Relation Name field in the Info Area Settings of the child node. This param-eter takes the relation name and the list of field values to compare with the parentinfo area. It can take any number of field values to compare. You can also passlinked parent records field values into the RecordFilter as parameters.
The following show the sample usage of the $relationNameAndParameters parameter:
• $relationNameAndParameters=[,51,37]—empty relation name and the fieldnumbers as parameters.
• $relationNameAndParameters=[$RelatedCompany,51,37]—parent company relationname and the field numbers as parameters.
The following example shows the configuration of a dynamic filter to show only theOffer Item that is par t of an Offer to a company. This ensures only the Offer Itemslinked to the Company record is be displayed under the Opportunity node and notall the offers made to the parent company.
1. Add a new filter for the PR tree node named PR.Custom.
512AUREA CONFIDENTIAL
Chapter 3: Using CRM

2. Set the PR tree node under Opportunity Y1 as shown in the screenshot
below:
3. Set the Record Filter field to PR.Custom as shown in the screenshot above.
Note: You can also pass linked parent records field values into RecordFilter asparameters.
4. Set the Relationship Name field to the parameter $relationNameAndParame-ters=[$RelatedCompany,51,37] as shown in the screenshot in step 2.
AnalysesHere is a guide on how to define analyses in update.CRM web.
This topic describes the configuration of all elements related to Analyses inCRM.Designer. Analyses allow to aggregate query data, ad hoc, at the time of theirexecution and display graphics Example - the Sales Funnel.
513AUREA CONFIDENTIAL
Filter | Query | Analysis

To define/customize analyses in CRM.Designer:
1. Go to CRM.Designer main page.
2. Click Analyses to display the Analyses page.
3. Click to view an Analyses. Click to edit an Analyses
Use the SDK page to explore the functionality of all analysis-related widgets: SDK> Analysis.
Storing AnalysesThis topic has information about storing of analyses.
Analyses are always saved in the CRM.Designer database. For fur ther details, seeFormat Types for Queries and Analyses on page 492. Public analyses defined inAurea CRM.Web are stored in the highest writable parent configuration.
Note: If the parent configuration of the user configuration is read-only, the usergets an error message when trying to save a public analysis.
514AUREA CONFIDENTIAL
Chapter 3: Using CRM

Defining AnalysesLearn to define analyses in CRM.Designer.
To define an analysis in CRM.Designer:
1. Select an analysis or create a new one. For fur ther details, see Designing Config-uration Units on page 64.
2. Specify the following:
• Based on Query: Defines which query is executed for the analysis. This queryis read-only if it is stored in the Aurea CRM database. It is recommended tostore your queries in the Aurea CRM database (default). For fur ther details,see Storing Queries on page 495. Click Update to load the latest version of thequery.
• Max. Count of Bars: Defines how many bars (or pie segments) are containedin the analysis. If the selected category results in more values than defined inthe Max. Count of Bars, the bars with the smallest values are grouped into an"other" value (unless otherwise specified in the definition for the category, i.e.NoOther option checked).
• CRM Processes: Assign one or more CRM processes to the analysis. Forfur ther details, see Roles & CRM Processes on page 727.
• Description: Add an internal description only visible in CRM.Designer.
• Readonly in update.web: If checked, users cannot edit the analysis in AureaCRM.Web.
• Invisible in web-lists: If checked, users cannot select the analysis in AureaCRM.Web.
Note: Use the Read-only and Invisible settings for analyses called via menuactions etc. Alternatively, you can use the Analysis.Rights Web Configurationparameter to determine whether users can execute and/or edit predefinedanalyses. For fur ther details, see Analysis.Rights.
• Type/Value fixed: If checked, the user cannot change the predefined resultcolumns in Aurea CRM.Web.
• All Column on X-Categories: Check to display an additional column containingthe sum total for additional categories. For fur ther details, see Using an Addi-tional Category on the x-Axis.
515AUREA CONFIDENTIAL
Filter | Query | Analysis

• No Sum Line: Hides the sum total row in the analysis results.
• Query: Defines where the query is searched depending on the format type. Forfur ther details, see Format Types for Queries and Analyses on page 492. Set itto "All" for predefined analyses.
3. Define the category (x-axis), value (y-axis) and filter fields for the analysis. Thefields are taken from the selected query's output fields.
• Category fields (x-axis): Check CriteriaField for all fields you want to use toaggregate data by (e.g. Country). These fields can be selected from theCategory drop-down list and used for drill-down.
Category fields can be of type character, date, catalog or Boolean. If you selecta date field, the data is not grouped by its exact value. The date range is slicedinto a fixed amount of result rows, each containing a date range of the samesize.
Specify additional settings if applicable. For fur ther details, see Settings forCategory Fields on page 519.
• Value fields (y-axis): Check ValueField for all fields that can be aggregated(e.g. Total Prod. Value). Only numeric fields can be selected.
516AUREA CONFIDENTIAL
Chapter 3: Using CRM

Specify additional settings if applicable. For fur ther details, see Settings forValue Fields on page 521.
• Filter fields: Check AdditionalCriteria for fields used to filter the analysisresult (e.g. Completion Date). Filter fields can be of type character, date orcatalog.
Specify additional settings if applicable. For fur ther details, see Settings forFilter Fields on page 521.
4. Specify defaults:
• CriteriaDefault: Select the default category field.
• Weight: Select the (percentage) field used for weighted values (defined by theWeightedField option).
• Currency: If your analysis contains currency-dependent value fields (definedby the DependentOnCurrency option), select a currency field. The currencyspecified in this field is used for the analysis. If the selected currency fieldcontains another than the destination currency, values are converted using thecurrency conversion rate stored in the Aurea CRM database.
If the query contains more than one currency field, you can select differentcurrency fields. These fields depend on the record containing the currency-dependent field. Select the AlternateCurrencyField option for a field of thatinfo area. For example, the SalesFunnel analysis defined in UPDATE_DEFAULThas currency fields and currency dependent-fields in the Opportunity recordand in the Opportunity Product record. The currency field in the OpportunityProduct record is defined as AlternateCurrencyField and is used for currency-dependent value fields instead of the Opportunities currency field. Do not usemore than one currency in an opportunity.
5. Configure the list view of the analysis result.
For each field you want to display in the results list define the following:
• List-Nr.: The position of the column in the list.
• List-Width: The column width in percent.
If undefined, no results list is available (menu item Display Details hidden).
6. Define the default result columns for the analysis in the Default Values area:
517AUREA CONFIDENTIAL
Filter | Query | Analysis

a. Select the aggregation type (Sum, Count, Average, Minimum, Maximum).
b. Select the desired value.
c. Click (Add).
The sum total row at the bottom of the results column in Aurea CRM.Web displaysthe total result according to the selected aggregation type (e.g. the sum total for"Sum", the highest maximum value for "Maximum" etc.
In the sum total row each result record is taken into account only once even if itis used in several result rows, i.e. if a category field from a child record is used.Example in UPDATE_DEFAULT: SalesFunnel analysis - for Count (Opportunity)per Y5-Product Group the sum total does not necessarily have to correspond tothe sum of the values of this column.
Note: The sum total row is not available in the drill-through details view.
Note: Default values are also used if Type/Value fixed is set for the analysis,or the displayed analysis in Aurea CRM.Web has no controller.
Note: If you remove a field you use as default value from the query, the reference
is lost:
7. Define additional values (calculations, parameters) if applicable. For fur therdetails, see Additional Values on page 522.
8. Click Save.
To display an analysis in Aurea CRM.Web, create a menu action or include theanalysis in a form e.g. a dashboard (AnalysisResult widget). For fur ther details,see AnalysisRun on page 395 and Forms on page 621.
518AUREA CONFIDENTIAL
Chapter 3: Using CRM

Settings for Category FieldsLearn about the settings for category fields.
You can define the following additional settings for category fields CriteriaField:
• DoNotSortBars: Disables sor ting the result rows in descending order. Used fordate criteria where the date ranges are displayed in chronological order and forcatalog values that have a chronological significance like opportunity levels.
• ShowAllBars: Used in conjunction with DoNotSortBars to display all bars, evenif the value of the bar is "0". ShowAllBars disables the Max. Count of Barssetting.
• NoOther: Hides the "other" value (if Max. Count of Bars < available values).The values from "other" are taken into account in the sum total line however.
• XCategory: Defines a category field as additional category to be displayed onthe x-axis, e.g. to display revenue data split by country in one analysis resultinstead of drilling down. For fur ther details, see Using an Additional Category onthe x-Axis.
• Slices: Only valid for date and numeric fields. The value entered here overridesthe Max. Count of bars default setting when aggregating the analysis by thiscolumn. (Use this setting to create e.g. quarterly slices of results. Alternatively,you can define Explicit Analysis-Categories. Example in UPDATE_DEFAULT:Percentage_10Sliced. For fur ther details, see Explicit Analysis Categories onpage 527.)
Note: The "slicing" of date and numeric results only works if no controller isdisplayed in the analysis.
• Category: Applies an explicit analysis category to the field. Example - to splitdates by year. For fur ther details, see Explicit Analysis Categories on page 527.
Using an Additional Category on the x-Axis
It is possible to specify an additional category that is used on the x-axis of ananalysis. To do so,
• Check one second field in the XCategory column in the analysis definition.
• If you check All Column on X-Categories, an additional column containing thesum total for each value is displayed in the analysis.
• If ShowAllBars is checked, all values of the catalog or the explicit category aredisplayed whether they contain a value or not.
• If DoNotSortBars is checked, the sor t order is determined by the order of theexplicit category values or the catalog code. If these are not applicable, the sor torder depends on the displayed text.
519AUREA CONFIDENTIAL
Filter | Query | Analysis

Note: This functionality is supported for catalogs and explicit categories, for allother field types field-specific conversions (e.g. from rep to rep id) are notimplemented.
Note: Additional values are currently not supported as additional x-categories.
Examples
Company analysis with values "Sum Revenue" and "Count Companies" per Sectorand Country:
Result in Aurea CRM.Web:
The header is split in two rows listing the values per sector (in the "all" column) andper country.
520AUREA CONFIDENTIAL
Chapter 3: Using CRM

Company analysis with values "Sum Revenue" and "Count Companies" per countryand half-year (using an explicit date category applied to FreeD1, see Explicit Anal-ysis Categories on page 527).
Result in Aurea CRM.Web:
Settings for Value FieldsLearn about the settings for Value fields.
You can define the following additional settings for value fields (ValueField):
• DependentOnCurrency: Indicates a currency-dependent value and must beconverted if the resulting currency does not match the currency in the selectedCurrency field.
• WeigthedField: Indicates that the value must be weighted using the percentagevalue specified in the Weight field.
Settings for Filter FieldsLearn about the settings for filter fields.
You can define the following additional settings for value fields (AdditionalCriteria):
• ReadAll: Even if the user selects a value for a criterion, the criterion is not sentto the server but evaluated on the client. Therefore, if the analysis was executed
521AUREA CONFIDENTIAL
Filter | Query | Analysis

once, and the criteria are changed afterwards, these changes do not result inanother request to the server.
• MustSelect: Defines a mandatory additional criterion forcing the user to selecta value to run the analysis.
• Defaultvalue: Defines the default value for an additional criterion. You can usethe following variable expressions:
• $curRep
• $curDay
• $curWeek
• $curMonth
• $curYear
You can add or subtract days, weeks etc. from these dates, e. g. $curDay+1y+1dresults in tomorrow one year from now. Available abbreviations: d (day), w(week), m (month), q (quarter), y (year).
Note: For catalog values, you can either specify the catalog code(Example- 2)or $<WebConfigParameterName> if you want to use catalog synchronization. Forfur ther details, see Modifying Web Configuration Parameters.
• Default-End: Used to select the default end date in the date criterion. Supportsthe same variables as for Defaultvalue.
Additional ValuesLearn the use of additional values in defining Analyses.
Additional values are used to calculate the value(s) of one or more fields of a record.
To define an additional value, specify the following:
• Valuename: The additional value is referenced with this name, e. g. in thedrop-down list for default values.
• Valuetype: The type of the additional value. At present, only "computed" additionalvalues are available.
• Parameter: The formula to calculate the value. Use $<infoAreaID>[<field name
or number>] to reference field values.
Example: $Y1[FreeN1]*2 multiplies field FreeN1 of info area Y1 by 2.
522AUREA CONFIDENTIAL
Chapter 3: Using CRM

The field must be part of the underlying query. If the query contains a field multipletimes, reference it using $Y1 [0] [FreeN1] and $Y1 [1] [FreeN1].
For more information on the syntax and the available functions. For fur ther details,see Analysis Functions on page 533. For more examples, see Examples on page525.
• Display-Text: An optional language-dependent text used in the value selectionbox in Aurea CRM.Web for this additional value. If undefined, Valuename is used.
• Fixed Stat-Type: Allows you to specify a fixed calculation type ("Sum", "Count","Average" etc.). This disables the Type selection in Aurea CRM.Web (in the Adda value dialog).
• Options: Allows you to define options for the additional value. Separate multipleoptions by semicolon.
The following options are available:
• Format: An optional format definition. Use # for the value and ,<number> forthe desired number of decimal places. You can also add any desired characteryou want to display.
If no formatting is specified, # (i.e. the value) is assumed. If a formatting defi-nition without # is present, the value is always added at the first place.
Example: Format(#%,1) outputs values with one decimal place and a %-characterafter the value.
Note: If a (numeric) value has no Format defined, it is displayed as floatingpoint number with 2 decimal places. To output a value e.g. without decimal
523AUREA CONFIDENTIAL
Filter | Query | Analysis

places, you have to define it as additional value with Format(#,0) in the Optionsfield.Z-fields (e.g. 2nd currency fields) do not support number formatting.
In Aurea CRM.Web additional values can be selected as analysis categoriesand/or analysis value, depending on the following parameter(s) of the Optionscolumn:
• IsColumn: The additional value can be selected as a value.
• IsCategory: The additional value can be selected as a category.
You can also specify true or false for IsColumn and IsCategory, e.g. IsCol-umn(false). Defaults: IsColumn(true) and IsCategory(false). If you specifyIsCategory(true), IsColumn is automatically set to false unless explicitly de-fined otherwise.
Note: If you use additional values as categories, other options likeDoNotSortBars have no effect. The sor t order is always determined by thedisplayed text.
• DefaultCategory: The additional value is the default category.
• NoChart: The values for this column are displayed in the list but not in the chartview of the analysis.
• Cumulate: Displays accumulated values in the results column. The sum totalrow displays the highest accumulated value (instead of the sum total).
• ComputeSum: Calculates the sum total row for additional values (for allaggregation types) using the specified formula. (Without ComputeSum the formulais only applied to the result rows and the sum total row is calculated by theanalysis engine.)
The following analysis functions can be used in combination with ComputeSum:$SUM, $COUNT, $COUNTALL, $COUNTX, $STATIC, $SUMCAT, $SUMCATX, $SUMCATDISTINCT,$PERCENT. For fur ther details, see Analysis Functions on page 533.
If you specify ComputeSum for rolling date categories (Example in UPDATE_DE-FAULT: DateMonthlyRoll6), each value is considered exactly once.
Additional values can also be used when working with array catalog fields: If anadditional value with Option IsCategory returns an array of values, the record iscounted for each of these category values (i.e. potentially the record is taken intoaccount by multiple rows).
Example: "Sector" catalog of Company (in BTB): [$!FI[29],$!FI[30],$!FI[31]]
524AUREA CONFIDENTIAL
Chapter 3: Using CRM

To evaluate additional values once per row:
By default, additional values are evaluated per record. For values where all recordsin a category should deliver the same result (e.g. number of records or sum of avalue across one category), you can change this behavior: Define a fixed aggregationby setting the Fixed Stat-Type to "Static" or specify IsStatic in Options.
Note: Using Fixed Stat-Type "Static" disables the Type selection in Aurea CRM.Web(in the Add a value dialog).
Note: Additional categories (XCategory) are ignored when using static values.
ExamplesSome examples for your reference.
Company analysis with "Revenue per Employee" as value (IsColumn option):
1. Define an additional value that divides Revenue (36) by Employees (37):
Parameter = $FI[36]/$FI[37]
2. Define this value as default value.
Result in Aurea CRM.Web:
525AUREA CONFIDENTIAL
Filter | Query | Analysis

Company analysis with ABC classification partitioned by the number ofemployees as category (IsCategory(true) option):
1. Define an additional value for ABC by company size (splitting the number ofemployees in small, medium and large):
Parameter = $FI[37]<40?$!FI[35]+" (small:0-39)":$FI[37]<100?$!FI[35]+"(middle:40-99)":$!FI[35]+" (large:>= 100)"
Result in Aurea CRM.Web:
Company analysis accumulating revenue data split by ABC classification (Cu-mulate option):
1. Define the ABC field as (additional) XCategory. For fur ther details, see Usingan Additional Category on the x-Axis.
2. Check All Column on X-Categories.
3. Define an additional value accumulating the revenue values:
4. Define this value as default value.
Result in Aurea CRM.Web:
526AUREA CONFIDENTIAL
Chapter 3: Using CRM

Explicit Analysis CategoriesUse explicit analysis categories to aggregate data based on arbitrary criteria likenumber or date ranges or sets of catalog values.
Explicit analysis categories allow you to define "vir tual catalogs" based on catalogs,dates and numeric data. These definitions can be hierarchical.
You can define/customize explicit analysis categories on the Analyses page. Forfur ther details, see Defining Explicit Analysis Categories on page 529.
You can define explicit analysis categories for the following field types:
• Numeric fields:
• Date fields: Use the date format YYYYMMDD. For more details. For fur therdetails, see Analysis Date Categories on page 532.
527AUREA CONFIDENTIAL
Filter | Query | Analysis

• Catalog fields: Check Catalog-Browsing and select the desired info area andcatalog field. Enter a catalog value from a synchronized catalog either by clicking
on the button or by entering the catalog code in the text field. For fur ther details,see Catalogs on page 720.
Note: Multiple criteria are combined with OR.
• Rep fields: You can use $curRep for rep ID fields (not rep Z-fields).
Examples:
Deal Size: category based on a numeric value.
528AUREA CONFIDENTIAL
Chapter 3: Using CRM

Value < 1000Small
Value < 10000Medium
otherLarge
Regions: category based on the country catalog.
NL, BEL, LUXBenelux
D, A, CHDACH
CZ, SLO, H, PL, …CEE
otherother
Defining Explicit Analysis CategoriesHere you can learn how to define Explicit Analysis Categories.
To define an explicit analysis category:
1. Select an explicit analysis category or create a new one. For fur ther details,see Designing Configuration Units on page 64.
2. Specify the following:
• Label: The multilingual name of the category. This name is displayed in AureaCRM.Web (in the Category drop-down list and in Drill down/up menus) instead
529AUREA CONFIDENTIAL
Filter | Query | Analysis

of the underlying field name. The texts are saved in the statcategory_textstext group. For fur ther details, see Texts on page 176.
• Other Label: Values that do not match the defined criteria are automaticallyaggregated in an "Other" column. You can define a label for this column here.
• Catalog-Browsing: Check to define explicit analysis categories based oncatalog values.
Select the desired info area and catalog field.
Note: As explicit analysis categories are not bound to a specific field,CRM.Designer does not automatically know for which field this category isdefined and whether this field value is based on a catalog. With this option,you can manually select a catalog-bound field if you want to entercatalog-synchronized values.
Note: As soon as at least one catalog-synchronized value is stored in thecategory, CRM.Designer automatically displays one field that references thiscatalog. Even if it is not the field you selected, it is the same catalog!
3. Click (New Value) to add the desired values.
Each value consists of:
• Value: Uniquely identifies the value.
• Label: The multilingual name of the value. The texts are saved in the statcat-egory_texts text group This name is displayed as column header in AureaCRM.Web. If you do not specify a Label, the value is omitted in analysis resultsbased on this category.
• Sub-Category: Offered for drill-downs if this explicit analysis category is thecurrent category, or the value for this vir tual category is fixed due to a previousdrill-down.
Each value of the underlying category field belongs to one defined category valueor the "other" category. The category values are checked from top to bottom. Avalue belongs to the second category value if it matches the criteria for that valueand it does not belong to the first category value.
4. Click (New Criteria) to specify the range of values of the underlying categoryfield for the value you are defining. Multiple criteria are combined with OR.
530AUREA CONFIDENTIAL
Chapter 3: Using CRM

You can use variable expressions for dates ($curDay, $curQuarter+1q etc.),see Using Variable Expressions. Use e.g. YYYY as a placeholder. (You cannot usewildcard expressions with $#### here. For more information on defining date cat-egories. For fur ther details, see Analysis Date Categories on page 532.
5. Click Save.
Using Explicit Analysis CategoriesHere you can learn how to use Explicit Analysis Categories.
To apply an explicit analysis category to a field:
• Enter the name of the explicit analysis category in the Category column (e.g. theDateRange category from the above example): Users can select the category inthe Category drop-down list in Aurea CRM.Web. Sub-categories and underlyingcatalogs can be used for drill-downs.
• If you check CriteriaField in addition, the explicit analysis category can be usedfor drill-down.
• If you check XCategory in addition, you can use the explicit analysis categoryas additional category to be displayed on the x-axis, see Using an AdditionalCategory on the x-Axis.
• If you set the explicit category as the default category in CriteriaDefault, userscan only select the category specified in Category. To define an explicit categoryas the default category and still allow users to choose another category,additionally check CategoryNotMandatory.
531AUREA CONFIDENTIAL
Filter | Query | Analysis

Analysis Date CategoriesLearn to aggregate results into defined time spans.
In analyses that use a date field as root category users can not only analyze databy the actual date value of a field but also aggregate the result into defined timespans. Example - Date(monthly).
Note: A drill-down inside a date category (e.g. show quarters if this year) is notpossible.
UPDATE_DEFAULT contains the following explicit analysis categories for datesegmentation:
DateMonthly, DateQuarterly, DateYearly.
The Web Configuration parameter Analysis.DateCategories defines which datesegmentation options are available for users. For fur ther details, see Analysis.Date-Categories.
You can add custom date categories if required. For fur ther details, see DefiningExplicit Analysis Categories on page 529.
532AUREA CONFIDENTIAL
Chapter 3: Using CRM

Specify dates using the format YYYYMMDD.
Use YYYY as placeholder for comparison values.
Use {YEAR} as placeholder for the year in the label text.
Analysis FunctionsLearn about analysis function.
When defining additional values you can use special aggregation functions to calcu-late the value, see Additional Values on page 522.
Enter the formula to calculate the value in the Parameter field:
Syntax for referencing field values: $<infoAreaID>[<field name or number>]
The field must be part of the underlying query.
Use $Y1 [0] [FreeN1] and $Y1 [1] [FreeN1] for multiple occurrences of a field.
UPDATE_DEFAULT contains the following analysis functions:
• $BETWEEN([cmpval, minval, maxval, trueval, falseval]): Returns recordswithin a cer tain range. A cmpval between minval and maxval (including the bounds)returns trueval, everything else returns falseval.
Examples:Sales opportunities within the first half-year of 2012:$BETWEEN([u8.services.typeConverter.dateToString(($!Y1[CompletDate]),{format: "YYYYMMDD"}),"20120101","20120630",$Y1[TotalProdValue],0])
For more information on the dateToString function, see the ar ticle “The TypeConverter Service” at https://support.aurea.com.
>Contact records with costs between 1000 and 1500: $BE-TWEEN([$MA[7],"1000","1500",$MA[59],0])
533AUREA CONFIDENTIAL
Filter | Query | Analysis

Note: Note: If a query calculates average values (e. g. average costs), the costsare divided by the total costs of all records in the category.
• $COUNT(value): Returns the sum of different record for a record (e.g. number ofopportunities per company).
• $COUNTX(value): returns the number of records per XCategory and Category.
• $CURRCONV(value): Returns the value corrected by a conversion factor (if acurrency column is specified).
• $MAX(param): Returns the maximum value of all values passed in param. param isa JavaScript array of n values with the syntax [value1,value2,…].
Example:$MAX([$Y1[TotalProdValue],$Y1[WtdTotalProdValue],$Y1[OPWtdTotal-ProdValue]])
• $MIN(param): Returns the minimum value of all values passed in param (samesyntax as $MAX).
• $PERCENT(value): Returns the percentage of the value in the current row comparedto the summed value over all rows. $PERCENT(value) is short for val-ue*100/$SUM(value).
• $SUM(value): Returns the sum of the value over all rows independently of thecategory.
• $SUMCAT(value): Returns the sum of a value within a category.
Example: Analysis of AK with MA with Y1 calculating the average marketing ac-tivity cost per opportunity for each category:Average $SUM-
CAT($AK[37])/Math.pow($COUNT($Y1),2)
• $SUMCATDISTINCT(param1, param2):
Where param1 is a JavaScript array of N values with the syntax [value1,val-ue2,…,valueN] and param2 is a category.
The function returns the sum of distinct values in an array for a category. It worksthe same way as $SUMCAT if the values are numeric and returns the sum of avalue within a category.
If the argument is an array and the array has only one element, then the value isadded as value for key 'const', and indicates a static value.
If the argument is an Array with more than one element, the function tries to addvalues for distinct keys or categories defined in param 2.
Example 1: $SUMCATDISTINCT([$FI[5],$FI]) returns the sum of all unique FIrecords for field #5, and if a n:1 linked table like MA is used in the same formulawith multiple MA records pointing to the same FI, then each FI is summed justonce.
534AUREA CONFIDENTIAL
Chapter 3: Using CRM

Example 2: If the search result set were to have a list of 3 records containing theitem name and number of items in an order: {25, item1}, {30, item2}, {40, item1}.Then applying the function on the array returns a result set containing {65, item1},{30, item2}.
• $SUMCATX(value): returns the sum per XCategory and Category.
• $WEIGHTCONV(value): Returns the value corrected by a weight factor (if a weightcolumn is specified).
You can add custom analysis functions on the Analyses page:
Analysis functions are defined by a name and its JavaScript class name.
Questionnaire Analysis
UPDATE_DEFAULT contains the configuration of a survey results analysis (answersper question).
The left par t of the page lists all questions of the selected questionnaire. Questionrecords with New Section checked are displayed as group headers. Question recordswith Do not display (F2:23) checked are not listed.
Note: You may need to adjust the value of the Analysis.MaxRecords WebConfiguration parameter to ensure that all results are displayed, see Analy-sis.MaxRecords.
535AUREA CONFIDENTIAL
Filter | Query | Analysis

Clicking on a question displays the analysis chart of the answers. For textual answers(Edit Answer checkded) a list of answers is displayed instead of the analysis chart.This list is configured by the List control of field group U2.Analysis.
For information on defining questionnaires and conducting surveys, see Surveysin the Web Business Logic User Guide.
Questionnaire Analysis consists of the following configuration units:
• The Questionnaire Analysis is called by menu item A_QuestionnaireAnalysisin the M_QuestionnaireView context menu (Collaboration > Questionnaire >Questionnaire Analysis). This calls a ShowForm action displaying the Question-naireAnalysis form.
• The QuestionnaireAnalysis form consists of a header and a QuestionnaireAnal-ysis widget containing the configuration of the list of questions and the analysischart.
You can configure/change defaults for the following chart properties via the FormDesigner (answerAnalysis parameters for widget QuestionnaireAnalysis):chartType, fixedChartType, hideSelector, showLegend, showValues, showEditor.The fieldGroupName parameter allows you to specify another field group for thetextual answers list.
• The QuestionnaireAnalysis widget uses the following queries:
• Questionnaire_SurveyResults providing the data for the list.
• Questionnaire_SurveyAnswers providing data for the analysis chart.
The QuestionnaireAnalysis widget uses the following analyses:
Bubble Chart Analyses
536AUREA CONFIDENTIAL
Chapter 3: Using CRM
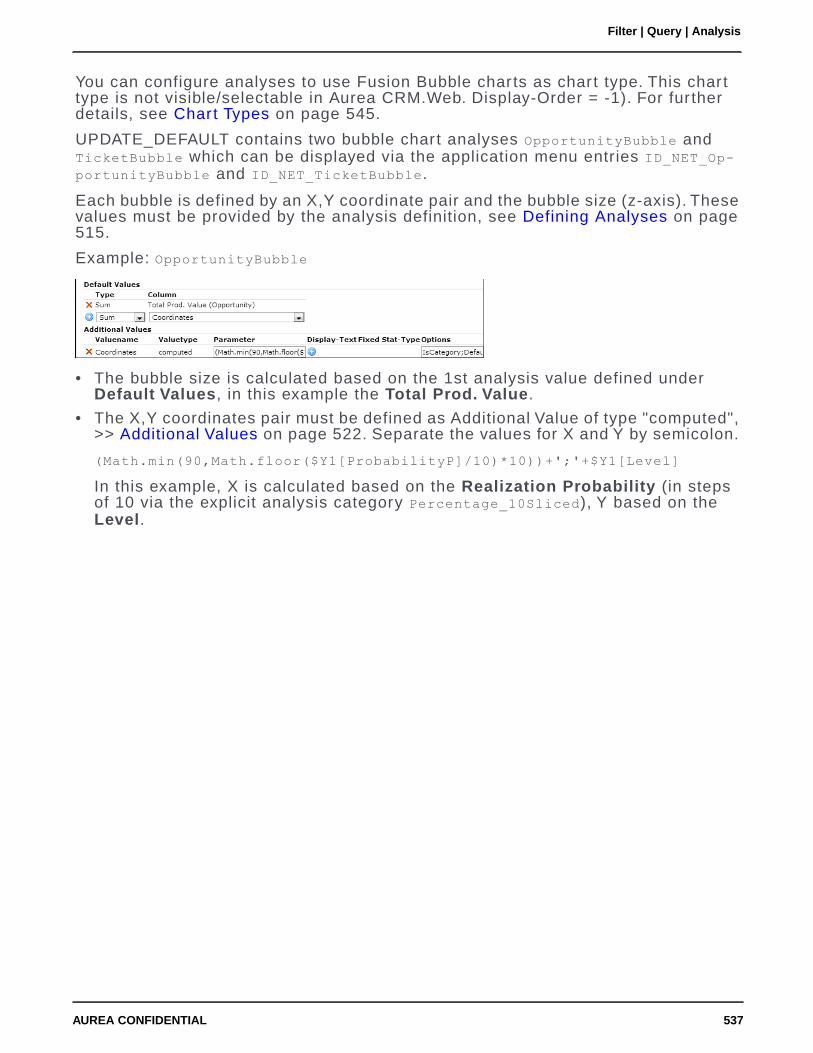
You can configure analyses to use Fusion Bubble charts as chart type. This charttype is not visible/selectable in Aurea CRM.Web. Display-Order = -1). For fur therdetails, see Chart Types on page 545.
UPDATE_DEFAULT contains two bubble chart analyses OpportunityBubble andTicketBubble which can be displayed via the application menu entries ID_NET_Op-portunityBubble and ID_NET_TicketBubble.
Each bubble is defined by an X,Y coordinate pair and the bubble size (z-axis). Thesevalues must be provided by the analysis definition, see Defining Analyses on page515.
Example: OpportunityBubble
• The bubble size is calculated based on the 1st analysis value defined underDefault Values, in this example the Total Prod. Value.
• The X,Y coordinates pair must be defined as Additional Value of type "computed",>> Additional Values on page 522. Separate the values for X and Y by semicolon.
(Math.min(90,Math.floor($Y1[ProbabilityP]/10)*10))+';'+$Y1[Level]
In this example, X is calculated based on the Realization Probability (in stepsof 10 via the explicit analysis category Percentage_10Sliced), Y based on theLevel.
537AUREA CONFIDENTIAL
Filter | Query | Analysis

TimelinesUse timeline to visualize customer history in a graphical representation.
A timeline is a tool for visualizing a customer history. For example - a timeline candisplay marketing activities, visits and offers linked to a company or person. Itconsists of a graphical representation of several records from different info areaslinked to a parent record.
The Timeline view is called using the Timeline action template. For fur ther details,see Timeline on page 475. Examples in UPDATE_DEFAULT: A_AccountTimeline inM_Company and M_Person, A_MarketingTimeline in M_Person.
The Timeline widget is also available in the Forms Designer. For fur ther details,see Forms on page 621.
The timeline requires a valid record uid used as parent when querying for the recordsto be shown on the timeline. The timeline can display records from all info areasthat contain at least one field of type "date".
A timeline page consists of the actual timeline with the child records displayed as"bubbles", a RecordListBox listing all records contained in the selected bubble andan Expand view of the record selected from the list. For fur ther details, see Config-uration Units on page 539. If the selected bubble contains only one record, an Expandview of this record is displayed instead of a list.
The type of child records and their graphic representation (icons, borders) are de-termined via the Timeline configuration (referenced in the action). For fur ther details,see Configuring a Timeline on page 540.
538AUREA CONFIDENTIAL
Chapter 3: Using CRM

Use the SDK page to test your timelines: SDK > Timeline.
Configuration UnitsThis topic explains about Configuration Units in Aurea.CRM web.
A timeline consists of the following configuration units:
• a page header is a special header Timeline in UPDATE_DEFAULT, containingthe zoom options and the TimelineAddInsight button allowing users to add notes.These notes are saved as Note records (NO) linked to the timeline's parent.Example - FI. (Make sure that the parent record of your timeline is linked to theNO info area.)
• a Timeline configuration. For fur ther details, see Configuring a Timeline on page540
• Expand configurations for the info areas contained in the Timeline configurationused to display selected records in the Related Data area.
• table captions for the records displayed in the bubbles. If the table caption containsan image, this is displayed as well.
• table captions for the records displayed in the list
The names of these configuration units are derived from the name of the Timelineconfiguration. For fur ther details, see Naming Conventions on page 539.
Naming ConventionsThis topic explains about Naming Conventions in Aurea.CRM web.
Configuration units for timelines need to follow special naming conventions usingthe name of the Timeline configuration which is referenced by the action parametername.
The following table lists default names and action parameters (if available) for allconfiguration units:
539AUREA CONFIDENTIAL
Filter | Query | Analysis
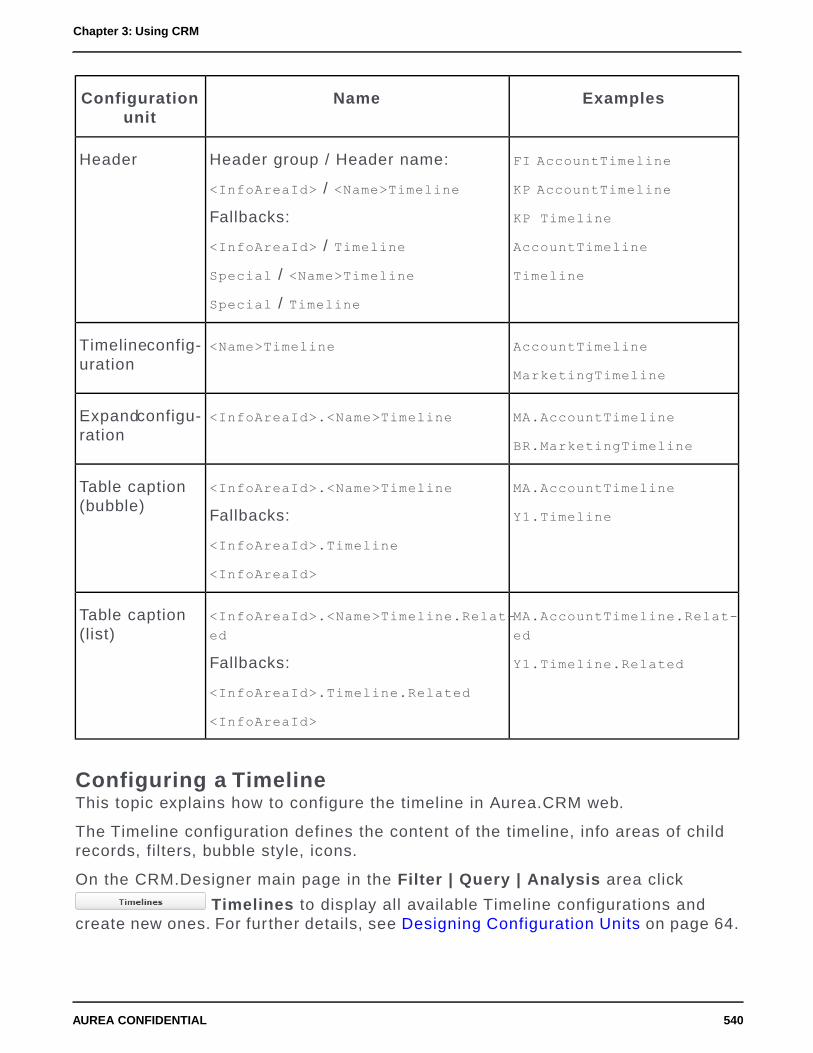
ExamplesNameConfigurationunit
FI AccountTimeline
KP AccountTimeline
KP Timeline
AccountTimeline
Timeline
Header group / Header name:
<InfoAreaId> / <Name>Timeline
Fallbacks:
<InfoAreaId> / Timeline
Special / <Name>Timeline
Special / Timeline
Header
AccountTimeline
MarketingTimeline
<Name>TimelineTimeline config-uration
MA.AccountTimeline
BR.MarketingTimeline
<InfoAreaId>.<Name>TimelineExpand configu-ration
MA.AccountTimeline
Y1.Timeline
<InfoAreaId>.<Name>Timeline
Fallbacks:
<InfoAreaId>.Timeline
<InfoAreaId>
Table caption(bubble)
MA.AccountTimeline.Relat-
ed
Y1.Timeline.Related
<InfoAreaId>.<Name>Timeline.Relat-
ed
Fallbacks:
<InfoAreaId>.Timeline.Related
<InfoAreaId>
Table caption(list)
Configuring a TimelineThis topic explains how to configure the timeline in Aurea.CRM web.
The Timeline configuration defines the content of the timeline, info areas of childrecords, filters, bubble style, icons.
On the CRM.Designer main page in the Filter | Query | Analysis area click
Timelines to display all available Timeline configurations andcreate new ones. For fur ther details, see Designing Configuration Units on page 64.
540AUREA CONFIDENTIAL
Chapter 3: Using CRM

To configure a timeline:
1. Select an info area from the drop-down list and click (Add). The timeline candisplay records from all info areas that contain at least one field of type "date".
2. For each info area you can define the following:
• Link ID: Check Link ID to specify another than the default link. For fur therdetails, see Link IDs on page 19.
• Date Field (mandatory): Select the date field that is used to calculate therecord's position on the timeline. Only date fields from the selected info areaare available.
• Filter: Select a filter to filter timeline items, e.g. MA.Contacts_Done. Only filtersdefined for the selected info area are available.
• Criterion Field: Define criteria for displaying images in the bubble and/orapplying a specific border color depending on a field value, e.g. activity typeimages for activity bubbles, red border for opportunity bubbles if Status = lostetc.
The input method and available operators depend on the field type and theselected operator:
• Catalog fields: If the catalog is synchronized (see Catalog Value Synchro-
nization), you can toggle between text input ( ) and catalog input ( ),otherwise you need to enter the value's code as text. In this example MA:Typehas been synchronized, PR:Status has not:
541AUREA CONFIDENTIAL
Filter | Query | Analysis

• Number fields: If you select a number field, you can use the "range" operator:
You can use variable expressions like $curDay etc. For fur ther details,see Using Variable Expressions on page 505.
• Image: Specify an image to be displayed in the bubble (in addition to an infoarea image configured in the table caption). Depending on the selected operatoryou can
• set an image for a specific field value, e.g. if Status = 2 show CAT_ZF_1.
• If you select "global" as operator you can use the Small Image Template
syntax: <image_name>_{VALUE}
Example: Defining CAT_CONTACT_BTB_{Contact} for the Type field in MA dis-plays the activity type image in the bubble.
• Css/Border Color: Specify the bubble border color using the hexadecimal colorcode e.g. (#ff0000) or by providing a CSS class (e.g. selected, open etc.) or .
For a list of available predefined bubble styles (CSS classes), see the ar ticle“How to Configure the Timeline” at https://support.aurea.com.
Note: For a selected criterion field and its comparison value you can defineboth an image and a border color (in one row).
To reorder items, click (Drag&Drop) in the respective row and drag it to thedesired position.
Note: Both info areas and criterion fields can be added more than once.
To make the timeline available in Aurea CRM.Web configure a Timeline actionreferencing the Timeline configuration. For fur ther details, see Timeline on page475.
542AUREA CONFIDENTIAL
Chapter 3: Using CRM

Key Performance Indicators (Aurea Enterprise)An overview of the Key Performance Indicators dashboard.
The KPI dashboard provides a quick measure of your business metrics primarilyfocusing on customer development and management. It shows the current state ofyour sales for existing and new customers. This would be very useful in monitoringopen calls, new customers of interest and other related information without havingto be informed by email.
The following screenshot shows the KPI dashboard.
The queries that correspond to the KPI metrics displayed to the CRM users are de-fined in the CRM.Designer as shown in the screenshot below:
543AUREA CONFIDENTIAL
Filter | Query | Analysis

You can configure the KPI Dashboard queries according to the requirements of yourusers and customers. For example, you may have to set the values of some param-eters that can vary for different users. The following screenshot shows the ordersize value that can be set as required for the Customers With Orders metric dis-played on the dashboard.
The following screenshot shows the KPI related Analyses available for use out ofthe box.
544AUREA CONFIDENTIAL
Chapter 3: Using CRM

To develop a new Analysis for the KPI dashboard using the existing KPI Analysesas templates, perform the following:
1. Create a copy of the required KPI Analyses you want use as a suitable template.
2. Edit and change the Analyses according to the new requirements.
3. Save it with a new name.
4. Apply the new Analyses into the KPIDashboard form. The following screenshotshows the KPIDashboard form. For more information on working with forms, seeForms on page 621.
Note: All items in the KPIDashboard form are by default linked to the properCRM processes, but they can be configured and adapted.
Chart TypesDefine a new chart type suitable for every purpose.
Aurea CRM.Web uses FusionCharts for the graphical display of analysis results.For fur ther details, see AnalysisRun on page 395.
On the CRM.Designer main page in the Filter | Query | Analysis area click
Chart Types to display all available chart types.
545AUREA CONFIDENTIAL
Filter | Query | Analysis

You can edit existing chart types or create new ones. For fur ther details, see De-signing Configuration Units on page 64.
The following settings are available:
• Label: The text in the chart type drop-down list.
The texts are saved in the net_charttype_text Text Group. For fur ther details,see Texts on page 176.
• Renderer: The charting engine used: "FusionChart".
• RendererOptions: The default settings for all chart types are saved in the fusion-Charts_template.json.js file located in the ..\web\data directory. Enter anotherfile name to provide your own settings file.
Alternatively you can use the Options field to specify renderer options (see below).
Information on all available settings and renderer options. For fur ther details,see http://docs.fusioncharts.com/charts/ (section "Chart XML API").
• Display-Order: Determines the order in which the chart types are displayed inthe chart type drop-down list. Set the Display-Order to "-1" to hide a chart typefrom the drop-down list. Charts with Display-Order =-1 are labeled as "not
546AUREA CONFIDENTIAL
Chapter 3: Using CRM

selectable" on the Chart Types page (e.g. Funnel, Bubble). Such chart typescannot be selected by users in Aurea CRM.Web.
• Options: Displays the file used for the selected chart type. Here you can enteradditional renderer options or change existing ones thus overruling the definitionin the file specified in RendererOptions.
Detailed information on defining chart types, see the ar ticle “How to Define a NewFusion Chart Type” at https://support.aurea.com.
Use the SDK page to fur ther explore the charts functionality: SDK > Charts.
ProcessesUse processes to guide users through complex task in Aurea CRM.Web.
Processes are defined as:
• a simple task completed within one user session, like creating a new record withselecting a parent record first (example in UPDATE_DEFAULT: NewAppointment).
• a complex task spanning many user sessions, e.g. the opportunity process whichstar ts with identifying an opportunity and ends weeks or months later with creatingan offer (example in UPDATE_DEFAULT: MergeRecords).
You can either use and customize the processes and steps defined in UPDATE_DE-FAULT or create your own custom processes. For fur ther details, see Process Ele-ments on page 548 and Designing a Process on page 572.
547AUREA CONFIDENTIAL
Processes

Process ElementsLearn about the process elements.
A process consists of the following elements:
• The process itself containing at least the process's name and (if the processdoes not contain phases) an initial step. For fur ther details, see Process on page550.
• To make the process available in Aurea CRM.Web you need to define an action(e.g. a menu action or a button) calling the process via the Process actiontemplate. For fur ther details, see Calling a Process on page 575.
• You can divide complex processes into process phases allowing the user to exitthe process and resume it at a later time. For fur ther details, see Phase on page551.
A process can consist of phases or just some steps. A phase always consists ofone or more steps.
• Each process or phase consists of one or more process steps containing theaction to be executed, e.g. ChooseInfoAreaForContact->SelectRecord being theinitial step of the NewAppointment process. For fur ther details, see Step on page555.
• You can create sub-steps that execute a number of steps themselves, e.g. theSelectPerson step called by the ExecuteSelectRecordSubStep action allowing theuser to search for or create a person record in an existing or new company. Forfur ther details, see ExecuteSelectRecordSubStep on page 581.
Note: Steps and sub-steps can be (re-)used in multiple processes.
• Each step calls an action (e.g. a ProcessAsk, Search or Expand action). For fur therdetails, see Action on page 559.
548AUREA CONFIDENTIAL
Chapter 3: Using CRM

Any supported action can be used (Callable from setting in the action template).
• For each step you need to define dispatching rules, i.e. conditions or eventsleading to the next step, e.g. button A calls step X, button B calls step Y. Forfur ther details, see Dispatching on page 560.
A step automatically dispatches to the next step, if the defined conditions aremet.
You can allow the user to cancel the process at any step and roll back to statebefore the star t of the process. For fur ther details, see Cancelling a Process onpage 575.
• You can define data providers containing values from process-internal or externalsources, e.g. a parent record for a newly created record. These data providerscan be accessed at various points during the execution of a process (e.g. processstorage, output message etc.). For fur ther details, see Data Providers on page562.
• You can define validation criteria that must be met before the next step can beexecuted, e.g. at least one record must be selected for the MergeRecords processto star t (as defined in the process's initial step PrepareForeMerge->DisplayMer-geOverview). For fur ther details, see Validation on page 571.
• For each process element you can add
• a Description for internal use in CRM.Designer. For fur ther details, see AddingDescriptions on page 66
• a Help Text displayed as a tool-tip providing user assistance during theprocess's execution. The texts are saved in the ProcessHelp Text Group. Forfur ther details, see Texts on page 176. You can use the Markdown syntax toformat your help text, see http://en.wikipedia.org/wiki/Markdown.
Note: To get correct line breaks in your help texts, make sure you use thefollowing syntax:
• - for closing a paragraph, enter two newlines, i.e. press return,
• - to create a line break, enter at least two spaces and press return.
• For processes and phases you can define metrics to graphically (or textually)display the progress of the process or phase. For fur ther details, see Metrics onpage 571.
The sample processes described at the end of this section contain examples of mostof the process elements. For fur ther details, see Examples on page 591.
549AUREA CONFIDENTIAL
Processes

ProcessThe process is the star ting point for a series of steps that need to be executed tocomplete a task.
A process's configuration consists of the following settings:
• Process: The name of the process. Used as input argument name in the Processaction template. For fur ther details, see Calling a Process on page 575.
• CRM Process: Assign the process to a CRM process. For fur ther details,see Assigning CRM Processes.
• Header: An optional header for the process. Define an info area-independentspecial header. For fur ther details, see Special Headers on page 342. Supportedplaceholders:
• {INFOAREAIMAGE}
• {RECORD}
• {RECORDLINK}
• {INFO}
• {INFOS}
550AUREA CONFIDENTIAL
Chapter 3: Using CRM

Example: If you define {INFOAREAIMAGE} Follow-up activity ({RECORD}) asheader text for the special header NewFollowUpAppointment, the header of theNewFollowUpAppointment process is displayed as follows:
• Description (optional): Add an internal description (only visible in CRM.Designer).
• Help Text (optional): Add a description of what the process is supposed to do.The Help Text is displayed as a tool-tip when positioning the mouse over theheader text or clicking on the header.
• Initial Step: The process step to be called when the process is launched.
If a process contains phases, the initial step from the active phase is used. If noactive phase is found, the initial step from the process is used as a fallback.
• Process Phases (optional): The phases of which the process consists. For fur therdetails, see Phase on page 551.
• Data Providers (optional): Used to access values that are used during theexecution of the process. For fur ther details, see Data Providers on page 562.Available internal data providers: Input Message, Process Storage. You can addcustom external data providers. For fur ther details, see External Data Providerson page 564.
• Process Storage Variables (optional): Variables that are available for all phases,steps and metrics during the entire life cycle of the process. For fur ther details,see Process Storage Variables on page 570.
• Process Metrics (optional): Use metrics to display the progress of a process.For fur ther details, see Metrics on page 571.
PhaseLearn to divide complex process into phases.
You can divide complex processes into several phases, e.g. "Identification", "Qual-ification", "Cover Buying Center" etc. in the opportunity process. The user can exitmulti-phase processes and resume at the same point at a later time.
Note: Phases can not be reused.
For examples, see Phase CreateY1 and Phase AddY2.
Phases are displayed (as arrows) in the process header. The user can click on thearrows to switch between phases (if configured). Each phase arrow contains thephase name and metrics (if defined). Help texts (phase, step and metrics help) aredisplayed a tooltip.
551AUREA CONFIDENTIAL
Processes

If a process contains a lot of phases, you can display past and/or inactive phasesin a "collapsed" state by setting the collapseInactivePhases and collapsePastPhasesparameters of the Process action. For fur ther details, see Process Action Parame-ters. Thus users do not have to scroll to access all phase arrows.
Example: Both collapseInactivePhases and collapsePastPhases are set to true.
A collapsed phase arrow only displays the first character of the phase label. Thecomplete label and the phase help are displayed in the tool tip. The phase metricsand metrics help is not displayed.
Defining Phases
To define a phase:
1. Switch to the desired process.
2. Under Process Phases click on (Add).
3. Define the phase:
552AUREA CONFIDENTIAL
Chapter 3: Using CRM

A phase's configuration consists of the following settings:
• Phase Name: The name by which the phase is referenced in the process (onlyvisible in CRM.Designer).
• Disable navigation to preceeding phases: Check to disable navigation to aprevious phase in a process regardless of the conditions defined under Thisphase can be activated if.
• Description (optional): Add an internal description (only visible inCRM.Designer).
• Help Text (optional): Add a description of what happens in this phase. TheHelp Text is displayed as a tool-tip when positioning the mouse over the phasearrow. If a Help Text for the current step exists and the step belongs to thephase, the step help is displayed below the phase help.
• Phase Label: The text displayed on the phase arrow in Aurea CRM.Web.
• Initial Step: The process step to be called when the phase is initially activated.
At process star tup, the property Initial Step is used to determine the initialstep of a process: The first phase where both the conditions defined under Thisphase is active if... and This phase can be activated if... evaluate to truedetermines the actual initial step of the process.
• View Template (optional): currently not implemented
• This phase is active if...: Conditions that determine whether the phase isactive. Multiple conditions are combined using AND.
A phase is active if all conditions defined under This phase is active if...evaluate to true.
The currently active phase is displayed colored with a bold label:
Inactive phases that cannot be activated are displayed in gray:
553AUREA CONFIDENTIAL
Processes

To get information about the active process phase (e.g. for a dispatching con-dition), use the getActivePhase() method. You can use the method getAc-tivePhase() wherever the process editor allows entering JavaScript expressions,for instance in the dispatching condition of a process step.
The return value of this method (getActivePhase()) is an object containing theproperties and methods shown in the following table:
Note: The return value can also be "null" if no phase is currently active.
DescriptionField
A description of the phase (non localized - for documen-tation only).
description
A text containing help for users executing the process.helpText
An array of metrics to be evaluated for this phase.metrics
The name of the phase (non localized - for documentationonly).
name
A number used to order the phases.nr
The name of the process step associated with this phase.stepName
A text describing this phase.text
The name of a widget used to display this process phase.view
The conditions determining if this phase is currently ac-tive.
activateConditions
The conditions determining if this phase can become theactive phase.
canActivateCondi-tions
returns true if the phase is currently active.isActive()
returns true if the phase can be activated.canActivate()
Example for a dispatching condition based on the name of the active phase:process.getActivePhase().name == "SelectCustomer"
• This phase can be activated if...: Conditions that determine whether the phasecan be activated (i.e. clicked by the user). Multiple conditions are combinedusing AND.
During the execution of a process, the user can click on a phase. This navigatesthe process to the Initial Step associated with this phase, if all conditions de-fined under This phase can be activated if... evaluate to true. The step re-ceives the original process input as its input message ($in).
Inactive phases that can be activated are displayed with a bold label:
554AUREA CONFIDENTIAL
Chapter 3: Using CRM

Note: For conditions in phases only values from the Process Storage and fromcustom data providers are available. For fur ther details, see Data Providers onpage 562.
• Phase Metrics (optional): Use metrics to display the progress within a phase(e.g. display "<#>% completed"). For fur ther details, see Metrics on page 571.Phase metrics are displayed below the phase label. You can add an additionalHelp Text explaining the meaning of the metric.
StepSteps are the building units of each phase or process.
A process step is one part in a sequence of steps that define a Process on page550.
Each process or process phase consists of one or more process steps. Steps aredisplayed in the work frame of the current tab.
A process step contains the actual action to be performed:
• a user interface representation, e.g. "Show from xy"
• a background operation, e.g. "Execute workflow z"
• a dispatching operation, e.g. "if x do A, else do B"
A process step is not linked to a process and can therefore be reused in multipleprocesses. For fur ther details, see Examples on page 591.
555AUREA CONFIDENTIAL
Processes

A step's configuration consists of the following settings:
• Name: The name of the step.
• Description (optional): Add an internal description (only visible in CRM.Designer).
• Help Text (optional): Add a description of what happens in this step. The HelpText is displayed as a tool-tip below the phase help. If the process does notcontain phases, the Help Text is not displayed.
• Data Providers: Used to access values used by the step. For fur ther details,see Data Providers on page 562. All internal data providers are available.
You can add custom external data providers, to get e.g. the result of a query orvalues from a record. For fur ther details, see External Data Providers on page564.
556AUREA CONFIDENTIAL
Chapter 3: Using CRM

• Action: The action to be executed by this step. For fur ther details, see Action onpage 559.
Use the action template $nop to define an invisible "dispatching step". For fur therdetails, see $nop on page 581. The purpose of a dispatching step is to determinewhich step is to be executed next. For fur ther details, see Dispatching on page560.
• Input Arguments: The input arguments for the selected action. For fur ther details,see Action on page 559.
• Validation: Define conditions that must be met to complete the step and callDispatching. For fur ther details, see Validation on page 571. Multiple conditionsare combined using AND. You can define an Error Text to be displayed in AureaCRM.Web if validation fails.
• Output Arguments: Output arguments defined in the action are displayedread-only (argument name plus description) in the Action Template OutputArguments section.
You can define additional output arguments in the Output Arguments section,e.g. to update the process storage. Target data providers: same as for Input Ar-guments.
• Dispatching: Defines what happens after the step is completed, i.e. the nextstep. For fur ther details, see Dispatching on page 560. The step associated withthe first condition that evaluates to true is executed.
If no dispatching conditions are defined or if none of the defined dispatchingconditions evaluates to true, the process ends with this step.
Defining Steps
You can define new process steps
• on the Step page
• directly in the dispatching area of an existing step
To create a new step directly in the dispatching area:
1. Click (New Step). Enter Name and Template.
557AUREA CONFIDENTIAL
Processes

2. Click New. Or close the popup to cancel step creation.
3. Click (Edit step arguments) to view and edit the input arguments for the nextstep.
4. Enter an argument name and click (Add) or click to display all availabledefault arguments.
5. For the arguments you want to pass from the current step ($out) to the next step($in) select "Step" as Source. For example, to pass the selected uid from thecurrent step as link for the next step.
In the action definition of the next step you can get these values by simply select-ing "Input Message" as source and "as is" as value. For fur ther details, see Actionon page 559.
Note: The next step's input arguments are not automatically retrieved from theprevious step. If you do not select "Input Message" and "as is", the actiontemplate's defaults (source = Constant Value) is used, e.g. selectionMode =multi for a Search action.
6. Enter the desired Value: You can toggle between text input ( ) and a drop-downlist of available values ( ).
7. Click Apply.
8. Save the step definition.
9. Click (Go to step) to fur ther define the next step (data providers, actiondefinition, dispatching). For steps that do not exist in the database (listed with"not defined yet"), the Edit icon is grayed out.
558AUREA CONFIDENTIAL
Chapter 3: Using CRM

ActionActions are defined on a step to be performed as a par t of a process.
In a process step you define an action to be executed in this step. For fur ther details,see Defining an Action on page 287.
An action's configuration consists of the following settings:
• Action Template: The action template used for this action. You can use anyavailable action template.
• End process with this action: If checked, the process ends when this action iscompleted.
• Input Arguments: The action's input arguments. Once you select an Action, theInput Arguments section is populated with the selected action template'sparameters. For fur ther details, see Action Templates on page 350 and ActionTemplates within Processes on page 576.
An input argument is defined by Name, Source and Value.
An argument value can be
• a value from a data provider: You can access values from data providers usingJavaScript snippets (e.g. $.get('uid')). for fur ther details, see Syntax andExamples on page 591.
• a constant value: Specify e.g. the name of a configuration unit, the maxRowsvalue for a list etc. Constant values are not treated as JavaScript, thereforeyou do not need to put strings in quotes.
You can toggle between text input ( ) and a drop-down list of available values
( ).
Available data providers (Source):
• Constant Value, e.g. the name of a Process Ask configuration
• Process Storage, e.g. a link record to be used as parent in the current step
• Input Message, e.g. an argument passed from the previous step
559AUREA CONFIDENTIAL
Processes

• Step
• custom data providers, to get e.g. a field value from a record, see Step CreateY1
If the data provider "Input Message" is selected, the fixed text "as is" is displayed,indicating that whatever is passed as argument from a previous step ($out) istaken as it is and turned into an argument name ($in). For fur ther details, see StepCreateY2.
Clicking in an "as is" row allows you to enter an expression (default:$.get('<argumentname>')).
To define additional input arguments (e.g. to perform naming conversions): Entera Name and click (Add).
• Output Arguments: The action's Output Arguments. The output of the actionis always written to $step.
If you need additional output arguments, define them in the Output Argumentssection of the step definition. For fur ther details, see Step on page 555.
DispatchingLearn to define rules for steps using Dispatching.
In the Dispatching section of the step definition you define rules for the next stepto be executed. For fur ther details, see Defining Dispatching Rules.
The conditions defined here are checked one after the other. The step associatedwith the first condition that evaluates to true is executed.
To reorder the dispatching rules, click (Drag&Drop) in the respective row anddrag it to the desired position.
Dispatching rules can be based on
• a method, e.g. process.isSubStep()
• any condition, e.g. a specific record must be available: !!$.get('companyUid')
• a command, i.e. the user selects a record or clicks a button in the page headeror a button, record or link on a Process Ask page. For fur ther details, see Dis-patching Based on Commands.
560AUREA CONFIDENTIAL
Chapter 3: Using CRM
Defining Dispatching Rules
To define a dispatching rule and next step:
1. Condition: Enter a JavaScript expression to be evaluated. If there is only onepossible next step, just enter "true".
If your condition requires values from multiple data providers, you can accessthese values using the predefined variables process or step.
Example: $.get('uid') || process.get('myDataProvider.uid')
2. Click (Add).
3. Source: Select the data provider containing the values used by the condition.Available data providers:
• Constant Value
• Process Storage
• Input Message
• Step: For commands you must always select "Step".
• custom data providers
4. Next Step: Select or create the step to be called if the dispatching condition ismet. For fur ther details, see Defining Steps.
Dispatching Based on Commands
To define a dispatching rule for default commands use the following syntax (Con-dition):$.get('command') == 'Select'$.get('command') == 'Save'$.get('command') == 'New'$.get('command') == 'CancelProcess'etc.
If you use a form with a RecordListBox widget in a process, use the command prop-er ty of the widget: command = Proceed<...> calls the next step.
For buttons, records or links on a Process Ask page you need to enter an EventNo. in the Process Ask Configuration on page 582. In the dispatching definition theseevents are referenced as$.get('command')=='Event1'$.get('command')=='Event2'
If you want to use custom buttons in a process, you need to use the proceedmethod, i.e. the command for the button must follow the naming convention 'Pro-ceed<Name>'.
Button definition:Action Template: CommandCommand: Proceed.ButtonA
Dispatching condition:$.get('command') == 'Proceed.ButtonA'
561AUREA CONFIDENTIAL
Processes

Data ProvidersUse data providers to gather the necessary information for a process and to passinformation from one process step to another.
Data providers can access values from process-internal or external sources. Duringthe execution of the process these values can be used
• to get arguments for actions
• in dispatching and phase conditions
• to define validation criteria
• to display process (and phase) metrics
Internal Data ProvidersLearn about the built-in Internal Data Providers available for process, phase or step.
Internal data providers are not configurable. They are created automatically duringthe execution of the process.
Depending on the context (process, phase, step) the following built-in data providersare available:
• Process Storage ($process): The process storage is available during the wholeprocess. Use the process storage to share data between process steps. For fur therdetails, see Process Storage Variables on page 570.
• Step Storage ($step): The step storage is a temporary storage available onlywithin a step. The step storage contains the output of the action executed in thisstep and builds the basis for decisions made during validation and dispatching.
• Input Message ($in): The input message contains the process step's input, e.g.the uid of the record from which the process was launched.
• Output Message ($out): The output message contains the step's output, e.g. theuid of a newly created record.
Usually the input of a process step is the output of its predecessor step. For fur therdetails, see Dispatching on page 560.
The initial process step receives the input from the process, which in turn formsthe initial input message from the arguments passed to the process action tem-plate.
562AUREA CONFIDENTIAL
Chapter 3: Using CRM

Syntax
To access the values stored in a data provider when defining phases/steps/metrics,select the data provider from the Source drop-down list and enter a JavaScript ex-pression like $.get('uid').
$ always represents the selected data provider.
Example: $.get('curY1Uid') gets the record stored in the variable curY1Uid in$process.
Use JavaScript to define conditions based on these values, e.g.$.get('curY2Count')==0?0:1
For more syntax examples, see Examples on page 591.
The process engine provides access to the values in data providers through smallJavaScript expressions like the following:
$.get("uid")
Javascript expressions are not limited to accessing values in data providers but arealso in variety of other situations, such as:
• Conditions for dispatching
• Conditions for process phase activation (canActivate/isActive)
• Input-/output-arguments for actions
• Validators
• Metrics
• Process storage entries
Exception: For output arguments of an action, $ always refers to data provider$step (which contains the output of the action). The data provider selected in thedrop-down list acts as the target data provider, that receives the value of the ex-pression.
In addition to the variable $ accessing the selected data provider there are twopredefined variables that can be used in expressions:
• process: Refers to the process storage
• step: Refers to the current step (only available if the expression is executed inthe context of a process step e.g. for dispatching)
563AUREA CONFIDENTIAL
Processes

Use process and step to access the values of all data providers when definingoutput arguments and Process Ask pages, >> Process Ask Configuration on page582.
Examples:
Internal Data Provider
• process.get('curOpportunityUid')
• step.get('uid')
ReadRecordDataProvider
• step.get('curCompanyInfo.$').get('Name')
Gets the company name of a record specified in curCompanyInfo.
ExecuteQueryDataProvider
• step.get('curActivityCount.$').getNumberOfRows()
Gets the number of result rows from a query defined in curActivityCount.
Note: For external data providers, you need to specify .$ at the end of the stringto "simulate" the $ that represents the source.
External Data ProvidersLearn about the customized External Data Providers for process, phase or step.
You can create custom data providers to get values from external sources, e.g. theresult of a query or the value of a field in the database.
To create a custom data provider:
1. In the Data Provider section of a step or process enter a Name.
2. Click (Add).
3. Click (Edit).
4. Select an Action Template. The available action templates are described in thefollowing chapters.
564AUREA CONFIDENTIAL
Chapter 3: Using CRM

5. Define the Input Arguments, e.g. the queryStatement for an ExecuteQueryDat-aProvider.
6. Click Apply.
7. Save the step or process.
For custom data providers using ExecuteQueryDataProvider and ReadRecordDat-aProvider you can define conditions by adding a $if argument. If the condition de-fined in $if evaluate to false, no data is provided.
Example: $if = !!$.get('uid')
In this case the data provider only returns a result, if the uid is passed to the process.Create a process storage variable containing a fallback value if the condition eval-uates to false: $.get('<value>')||<fallback value>
ExecuteQueryDataProviderLearn about the External Data Providers - ExecuteQueryDataProvider.
The ExecuteQueryDataProvider executes a query and returns the query results.
The ExecuteQueryDataProvider action template supports the following input argu-ments:
565AUREA CONFIDENTIAL
Processes

query
The query to execute. The query must be saved in the CRM.Designer.
queryStatement
The query statement to execute. Use the AQL syntax to define the query. For fur therdetails, see AQL Syntax on page 882.
Note: You need to specify either query or queryStatement.
maxRows
The maximum number of rows to read.
skipRows
The number of rows to skip.
link
An optional link record to read child records, e.g. the opportunity par ticipants (Y2)of the opportunity (Y1) specified by link.
catalogValueEncoding
Indicates how catalog values are encoded: Numeric, Text or TextInBaseLanguage.
timeout
Timeout (in ms) for this query. If the query takes longer, it is aborted.
countRows
If set to a non-empty value, the result only contains the number of rows instead ofthe actual query result.
Note: You need to explicitly initialize this data provider in the step where you wantto use it: Add an input argument (with value 'null') that uses the data provider assource. For example, see Step EvalY2Count.
The result of a data provider using the ExecuteQueryDataProvider action consistsof a list of rows containing values from the Aurea CRM database. You can accessthe information stored in the result to use in your process:
$.getNumberOfRows()
Gets the number of rows currently in the result set. The maximum number of resultrows is determined by maxRows.
$.getRowAt(0).values[0]
Gets the 1st value from the 1st row in the result set.
566AUREA CONFIDENTIAL
Chapter 3: Using CRM

$.getTotalNumberOfRows();
Gets the total number of rows in a result set. (You need to set countRows = truefor this to work.)
For an example, see Step EvalY2Count.ReadConditionalRightsDataProviderLearn about the External Data Providers - ReadConditionalRightsDataProvider.
Use the ReadConditionalRightsDataProvider to determine which conditional accessrights (info area and field rights) are currently applied to a record.
The ReadConditionalRightsDataProvider only checks for conditional r ights. Todetermine the currently applied "fixed" rights as well, you need to use methods likeu8.Crm.Schema.InfoAreaSchema.canUpdate(), u8.Crm.Schema.FieldSchema.can-Delete() etc.
The ReadConditionalRightsDataProvider action template supports the followinginput argument:
uid
The record for which the conditional rights should be determined.
fieldIds
A comma-separated list of fields (XML names or numbers) for which the conditionalrights should be determined. If undefined, the conditional rights are checked on infoarea level only.
types
A comma-separated list of rights "types" to be checked: CheckViewRight, CheckUpda-teRight, CheckDeleteRight or CheckNewRight. If undefined, the data provider checksfor conditional rights of all types.
Use the following syntax to access the results:
Determines the conditional update right on fieldno. 12.
$.canUpdate(12)
Determines the conditional view right on field"Gender".
$.canView("Gender")
Determines the info area conditional delete right.$.canDelete()
Retrieves the message (Description field from therights definition) for the conditional update right onfield no. 5.
$.getUpdateRight(5).message
567AUREA CONFIDENTIAL
Processes

Note: In order to be able call the methods canCreate, canView, canUpdate andcanDelete, make sure that all r ights and fields have been loaded , otherwise theresults may be inaccurate.
ReadRecordDataProviderLearn about the External Data Providers - ReadRecordDataProvider.
The ReadRecordDataProvider reads data from a single record in the Aurea CRMdatabase.
The ReadRecordDataProvider action template supports the following input arguments:
uid (mandatory)
The uid of the record to be read.
fields (mandatory)
A comma-separated list of fields (<field name or number>) to be read.
linkName (optional)
Name of a link relation. If defined, the specified link is followed from the given uidand the linked record is read.
Examples for linkName:
reads the linked company$Link[FI]
reads the linked person$Link[KP]
reads the linked person using link ID 2, see Link IDs on page 19$Link[KP:2]
reads the linked person, or if the person does not exist the linkedcompany
$Link[KP;FI]
The result of a data provider using the ReadRecordDataProvider action consists ofthe value(s) of the field(s) specified in fields. To access these values, enter$.get('<field name or number> ').
For an example, see Step CreateY1.
568AUREA CONFIDENTIAL
Chapter 3: Using CRM
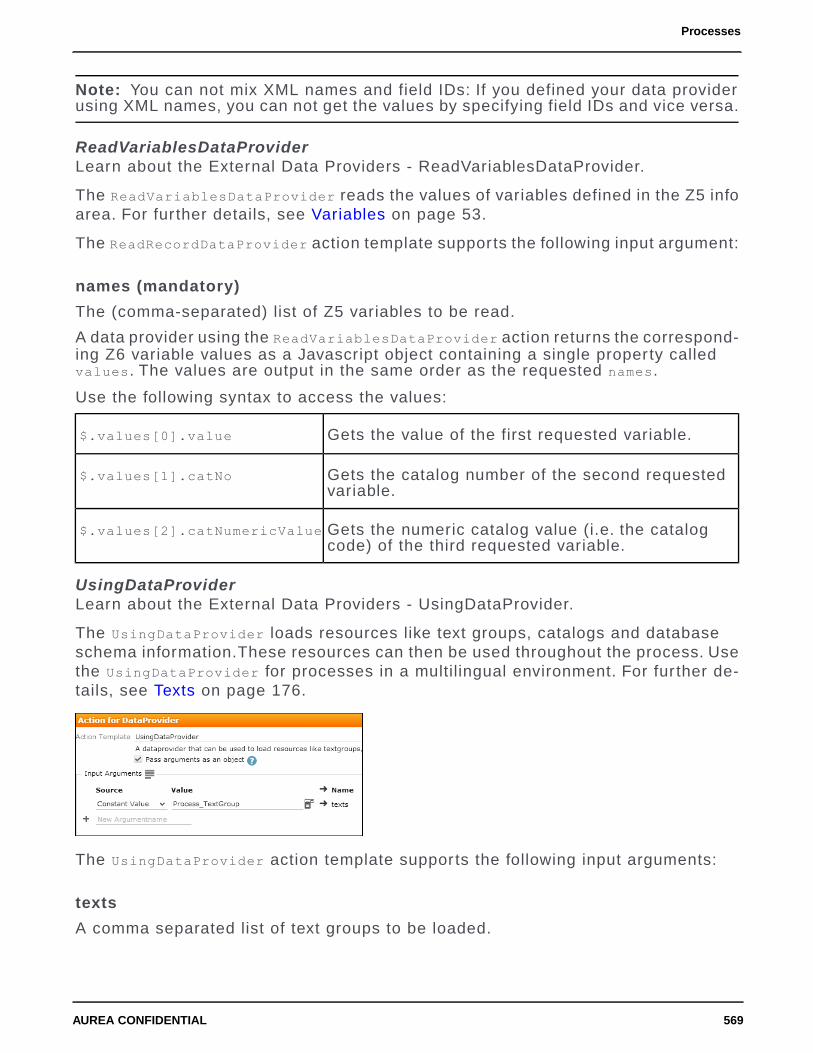
Note: You can not mix XML names and field IDs: If you defined your data providerusing XML names, you can not get the values by specifying field IDs and vice versa.
ReadVariablesDataProviderLearn about the External Data Providers - ReadVariablesDataProvider.
The ReadVariablesDataProvider reads the values of variables defined in the Z5 infoarea. For fur ther details, see Variables on page 53.
The ReadRecordDataProvider action template supports the following input argument:
names (mandatory)
The (comma-separated) list of Z5 variables to be read.
A data provider using the ReadVariablesDataProvider action returns the correspond-ing Z6 variable values as a Javascript object containing a single property calledvalues. The values are output in the same order as the requested names.
Use the following syntax to access the values:
Gets the value of the first requested variable.$.values[0].value
Gets the catalog number of the second requestedvariable.
$.values[1].catNo
Gets the numeric catalog value (i.e. the catalogcode) of the third requested variable.
$.values[2].catNumericValue
UsingDataProviderLearn about the External Data Providers - UsingDataProvider.
The UsingDataProvider loads resources like text groups, catalogs and databaseschema information.These resources can then be used throughout the process. Usethe UsingDataProvider for processes in a multilingual environment. For fur ther de-tails, see Texts on page 176.
The UsingDataProvider action template supports the following input arguments:
texts
A comma separated list of text groups to be loaded.
569AUREA CONFIDENTIAL
Processes

schema
A comma separated list of info area IDs.
The result of a data provider using the UsingDataProvider action consists e.g. inaccess to all texts of the specified text group(s). To display such texts within theprocess (e.g. in metrics or as labels on a Process Ask page), you have to read itfrom the data provider by entering $t('TXT_<text group>_<text number>').
Example: $t("TXT_MyTextGroup_3") loads text number 3 from text group MyTextGroup.
For an example, see Process NewOpportunityForCompany
Process Storage VariablesLearn about the Process Storage Variables
When a process is launched, it creates the process storage as defined in the ProcessStorage Variables section of the process configurationFor fur ther details, seeProcess on page 550.
A process storage variable is defined by Name, Data Provider and Value.
You can define variables for any type of data: record uids, query results, field values,the answer from a web service etc.
The process storage is always created and updated at runtime. Exception: Constantvalues (Data Provider "none") are only loaded at process star tup. (To access "his-torical" data in your process, you need to write it to a field in the database.)
Since the process storage is reloaded with every process step, defining a lot ofprocess storage variables may affect the performance. Therefore, use the processstorage only for values that you really need throughout the entire process.
Available data providers:
• Input Message ($in): All process storage variables with source $in must have avalue. If a value is missing the process is terminated with an error.
• Custom external data providers, if defined. For fur ther details, see External DataProviders on page 564
• none: fixed values or functions
570AUREA CONFIDENTIAL
Chapter 3: Using CRM

Accessing the process storage:
• Phases have read-only access to the process storage: You can use values fromthe process storage to determine the phase's current state and for displayingphase metrics. For examples, see Phase CreateY1 and Phase AddY2
• Steps can both read from and write to the process storage. For an example,see Step CreateY1.
ValidationIn the Validation section of a step definition you can define conditions that must bemet to complete the step.
The conditions are checked one after the other. If all are met, then Dispatching onpage 560 is called. If a condition evaluates to false, the Error Text is displayed.
To define a validation condition:
1. Enter a condition and click (Add).
2. Select the data source used by the condition. Available data providers:
• Process Storage
• Input Message
• Output Message
• Step
3. Define an Error Text to be displayed in Aurea CRM.Web if the condition evaluatesto false.
Note: For steps calling an Expand action you need to define mandatory fields viathe Must-Field field attribute or the Aurea CRM win Rights module, since thevalidation is only called after saving the record.
MetricsLearn to provide a context for a process and phase metrics.
You can define process and phase metrics (text and/or graphics) to provide a "wheream I and what's my status" context for the user. E.g. if the goal of a phase is tocreate activities, the number of needed activities to reach the next phase can bedisplayed as a phase metric of type "Text".
571AUREA CONFIDENTIAL
Processes

To define metrics:
1. Select a View, i.e. the type of metric you want to display.
2. Select a Data Providers on page 562. Available data providers:
• for process metrics: none, Input Message, Process Storage, custom dataproviders
• for phase metrics: none, Process Storage, custom data providers
3. Enter a Value or a condition using JavaScript, e.g. !!$.get('curY1Uid')?100:0for a "PercentageTrafficLight" metric
4. You can define an (optional) Help Text to provide an explanation of the displayedmetrics. The Help Text is displayed on mouse-over for metrics contained in phasearrows, and on both mouse-over or click for phase metrics displayed on the rightside of the header.
Each defined metric is displayed in an extra row.
The following views are available:
• Html: Displays text with HTML tags e.g. <BR>.
• Image: Displays images depending on a condition.
• Percentage: Displays percentage values.
• PercentageTrafficLight: Displays a traffic light image based on percentage values(red: 0-33 | yellow: 34-66 | green: >66).
• Text: Displays text.
• TrafficLight: Displays a traffic light image (0: red | 1: yellow | 2: green | -1: notraffic light).
To display multilingual texts (in Html and Text metrics) define and use a customdata provider with the UsingDataProvider action template. For fur ther details,see UsingDataProvider on page 569.
Designing a ProcessLearn how to design a process.
Before you start
Design the flow of the entire process "on paper":
• Define the goal of the process.
• Identify the necessary steps.
572AUREA CONFIDENTIAL
Chapter 3: Using CRM

• Define the result of each step.
• Decide if the process should be completed in one session or if you want users tobe able to exit the process and resume it at a later time.
• If the process spans multiple user sessions, define the necessary phases.
• If you split the process into phases, define the entry and exit criteria for eachphase.
• If using phases, define how users get from one phase to the next (automaticallyor by clicking on a phase)
• Identify the necessary input arguments (e.g. a parent record) and user input forthe process, the phases and steps.
• Decide on adequate data providers: Identify the variables you need to store inthe process storage. Define custom data providers instead of entering complexexpressions at various point of the process (extendability, performance).
• For each step identify the user interaction needed for step dispatching (Select,Save, custom buttons).
• Decide on helpful metrics to display for the process and the phases.
Identify reusable configuration units:
• Use process steps already defined in UPDATE_DEFAULT
• If you need to create a new step, identify an existing step to copy from
• Click on the Processes and Steps pages to display the usage of aprocess or step.
For processes a list of buttons and menu actions calling the process is displayed.For steps a list of processes, phases, steps and sub-steps calling the step is dis-played. Click on a link to switch to the respective configuration unit.
For Multi-Phase Processes
Decide on the general flow.
573AUREA CONFIDENTIAL
Processes

You can define phases as blocks returning to an evaluation step $phase where thecurrently active phase is (re-)evaluated:
You can define a loop with each phase returning to a central process ask page whicheither allows the user to select the next phase or just displays the items relevantfor the next phase:
574AUREA CONFIDENTIAL
Chapter 3: Using CRM
While designing the process
• Click on the Processes and Steps pages to display the elements andflow of a process (star ting with the current step).
• Use the Description fields of the various configuration units to document theirpurpose, open issues, changes etc.
For information on actually defining a process, phases and steps, see Examples onpage 591.
Errors occurring during the execution of a process (syntax errors, faulty storagedefinition, circular dependencies between data providers etc.) are written to theclient log (debug mode). Enter "+process" as filter to display only process-relatedentries.
Calling a ProcessLean how to call a process to launch it.
For users to be able to launch a process in Aurea CRM.Web, you need to assignan action using the Process action template to a menu item or button. For fur therdetails, see Process on page 550. For examples, see Examples on page 591.
You can also star t a process from within another process by calling the Processaction from a process stepFor fur ther details, see Step on page 555.
Cancelling a ProcessLean how to cancel a process in this topic.
You can allow your users to cancel a process at any step of the process. The systemis returned to the state it was in before the process is called. To do this you needto bind the command cancelProcess to the Process action template of a menu orbutton. Then call the dispatch condition $.getCommand('command')='CancelProcess'on a process step to allow the user to cancel the process.
The following screenshot shows the configuration of a button to cancel a process.
Binding the CancelProcess command to a Process action template of the button.
575AUREA CONFIDENTIAL
Processes

The following screenshot shows the configuration of the dispatch rule on a processstep to cancel the process.
For information on assigning an action to the Process action template, see Processon page 576. For more information on dispatching, see Dispatching on page 560.
Action Templates within ProcessesLearn about the Action Templates within Processes
The following chapters describe the usage of action templates within processes.
ProcessLearn about Process action template within processes.
Use the Process action template (process.aspx) to call a process (via a menuitem or button). For fur ther details, see Calling a Process on page 575.
You can also star t a process from within another process by calling the Processaction from a process step. For fur ther details, see Step on page 555.
Process Action Parameters
The Process action template supports the following input arguments:
name
The name of the process to be launched, e.g. NewAppointment, MergeRecords etc.
576AUREA CONFIDENTIAL
Chapter 3: Using CRM

uid
The record from which the process is launched. The record's uid is passed to theprocess's input message and used as input argument for the initial step. For fur therdetails, see Data Providers on page 562.
Record: the current record.
Linked: the parent record of the current record.
link
An optional link record passed to the process's input message (Record or Linked).
processState
Set to "RequireEnabled". Cannot be changed.
The process called by this action must be available the current user's role, otherwiseit can not be executed. For fur ther details, see Roles & CRM Processes on page727.
createNewTab
See createNewTab.
createNewPopup
Starts the process in a popup. For fur ther details, see createNewPopup.
recordSet
When star ting a process from a list, query or the calendar you may want to passmore than one record to the process. To do this define the recordSet attribute.Available values:
The record set is written to the Input Message ($in) of the process.
To get the contents of the record set (e.g. as process storage variable) use$.get('recordSet')
To filter the contents of a record set, you can specify one or more info area IDs:
$.get('recordSet').getRecordSet('MA') // only activity records
$.get('recordSet').getRecordSet('MA', 'KM') // only activities and tickets
To get a list of all uids stored in the record set enter:
$.get('recordSet').getUids()
To read a single record from the record set use the following syntax:
$.get('recordSet').getUids()[<recordIndex>]
Example:
$.get('recordSet').getUids()[0]
577AUREA CONFIDENTIAL
Processes

You can list records from a record set on a Process Ask page by using the Recordsitem, For fur ther details, see Records on page 589.
collapseInactivePhases
If set to true, phases that can not be activated by the user are displayed collapsed.
Default: false.
collapsePastPhases
SearchLearn about search action template within processes.
Use the Search action template within a process to let users select an existing recordfrom a specific info area (optional: linked to a parent record). You need to call theSearch action from a process step, see Step on page 555.
ExpandLearn to use Expand Action template within processes.
Use the Expand action template within a process to let users view/edit an existingrecord or create a new one. You can call the Expand action from a process step or(read-only) from within a Process Ask configuration. For fur ther details, see Stepon page 555 and Expand View on page 585.
578AUREA CONFIDENTIAL
Chapter 3: Using CRM
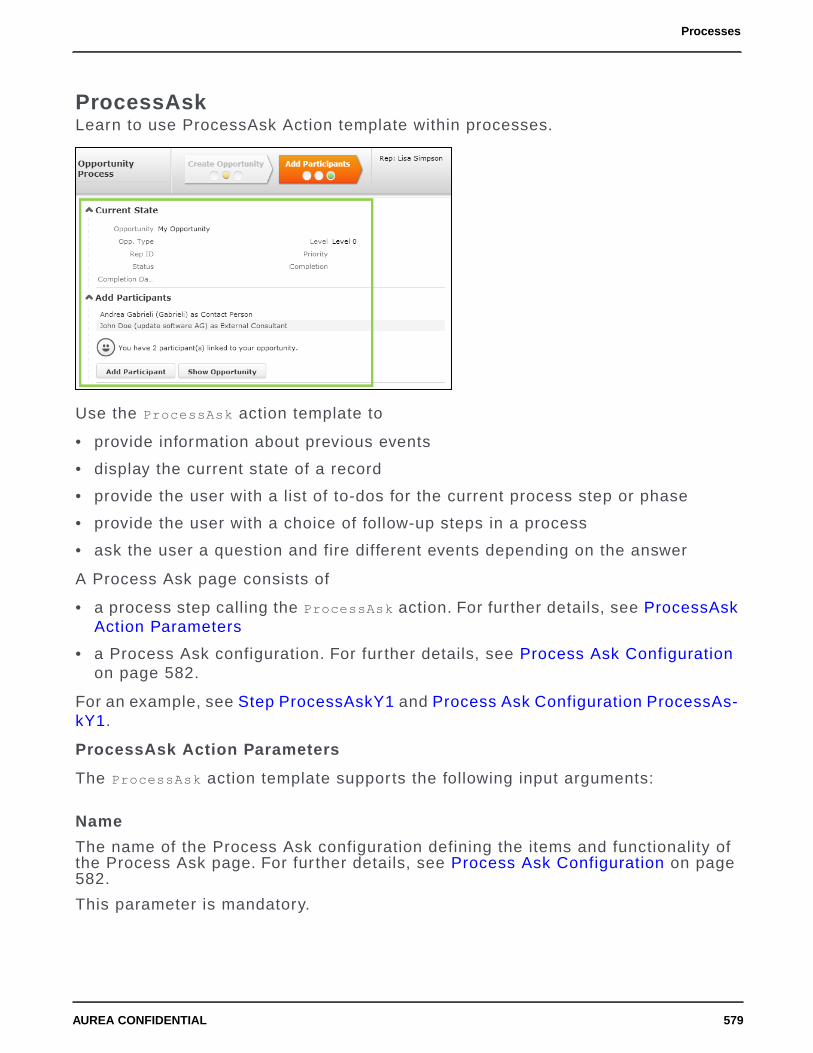
ProcessAskLearn to use ProcessAsk Action template within processes.
Use the ProcessAsk action template to
• provide information about previous events
• display the current state of a record
• provide the user with a list of to-dos for the current process step or phase
• provide the user with a choice of follow-up steps in a process
• ask the user a question and fire different events depending on the answer
A Process Ask page consists of
• a process step calling the ProcessAsk action. For fur ther details, see ProcessAskAction Parameters
• a Process Ask configuration. For fur ther details, see Process Ask Configurationon page 582.
For an example, see Step ProcessAskY1 and Process Ask Configuration ProcessAs-kY1.
ProcessAsk Action Parameters
The ProcessAsk action template supports the following input arguments:
Name
The name of the Process Ask configuration defining the items and functionality ofthe Process Ask page. For fur ther details, see Process Ask Configuration on page582.
This parameter is mandatory.
579AUREA CONFIDENTIAL
Processes

uid/uid1-3
The uid of a record. Use uid1-3 to pass additional records.
The first uid specified in the ProcessAsk action is automatically used for an ExpandView item in the Process Ask configuration. (If you have more than one ExpandView item on your Process Ask page, you need to specify the required uids as pa-rameter of each Expand View. For fur ther details, see Expand View on page 585.)
To pass more than four records to a Process Ask page use the recordSet argumentdescribed below.
To use the records passed with uid/uid1-3 in texts on the Process Ask page(see Process Ask Configuration on page 582) the following placeholders are available:
• {RECORD} the table caption of the record passed with uid
• {INFOAREA} the name of the record's info area
• {INFOAREAS} the plural of the info area name
The values of RECORD, RECORD1 etc. (i.e. the table captions) are passed to the outputmessage of the Process Ask: You can get these values (e.g. to display in metrics)from $step via the expression $.get('record'), $.get('record1') etc.
FormName
The name of a form to be displayed instead of the Process Ask page. If both Nameand FormName are specified, FormName is used.
NewInfoArea
The info area ID to be used for the placeholders {INFOAREA} and {INFOAREAS}.
If undefined, uid is used as a fallback.
Scripts
Scripts to be loaded on the page.
recordSet
If you want to display more than four records on a Process Ask page in a Recordsitem use the recordSet argument.
At process star tup the record set is written to the Input Message using the recordSetargument of Process, described in ProcessAsk Action Parameters. You can thencreate a process storage variable containing the record set. In the ProcessAsk stepget the records from the process storage by entering e.g. $.get('myRecordSet').
For more information, see Records on page 589.
For an example, see Passing Multiple Records to a Process Ask page on page 620
580AUREA CONFIDENTIAL
Chapter 3: Using CRM

ExecuteSubStepLearn to use ExecuteSubStep Action template within processes.
Use the ExecuteSubStep action template to call sub-steps for executing routine tasks(e.g. creating a child record) or to call another process.
The ExecuteSubStep action template supports the following input arguments:
name
The sub-step to be executed.
processName
The (sub-) process to be launched.
You must specify either name or processName.
ExecuteSubStep has no default output arguments.
ExecuteSelectRecordSubStepLearn to use ExecuteSelectRecordSubStep Action template within processes.
Use the ExecuteSelectRecordSubStep action template to call sub-steps for executingroutine tasks like selecting a record and creating it if it does not exist.
Example: the SelectCompany->Return step called by the ExecuteSelectRecordSubStepaction allowing the user to search for or create a company, see Step SelectFIForY1.
The ExecuteSelectRecordSubStep action template supports the following input argu-ment:
name
The sub-step to be executed.
Default output argument of ExecuteSelectRecordSubStep:
uid
The uid of the selected record.
$nopLearn to use $nop Action template within processes.
Use the $nop action template to define background steps (without user interface)to:
• recalculate values (evaluation step) for dispatching purposes
• initialize a data provider
For an example, see Step EvalY2Count.
581AUREA CONFIDENTIAL
Processes

Process Ask ConfigurationThe Process Ask Configuration defines the items to be displayed on a ProcessAskpage.
The Process Ask Configuration defines the items to be displayed on a ProcessAskpage.
To define a Process Ask configuration:
1. On the CRM.Designer main page in the Processes area click Process Ask.
All available Process Ask configurations are listed. You can add, copy, delete orview configurations. For fur ther details, see Designing Configuration Units onpage 64.
2. Define all necessary items for your Process Ask page in the order you want todisplay them.
The available items and their mandatory and optional settings are described inthe following chapters.
Note: The maximum length of the Parameters field is 128 characters.
Note: The maximum length of the TableCaptionName field is 28 characters.
You can assign one or more CRM processes to each item (except for if...end ifitems). For fur ther details, see Roles & CRM Processes on page 727
To prevent empty lists from being displayed on a ProcessAsk page, use thehideIfEmpty property. Example: Define {infoAreaId: "KP", hideIfEmpty: true}
as Parameters for a favorites item, to completely hide this item if no KP favoritesare available.
582AUREA CONFIDENTIAL
Chapter 3: Using CRM

To reorder items, click (Drag&Drop) in the respective row and drag it to thedesired position.
3. Click Save.
4. Enter the Process Ask configuration as Name in the ProcessAsk action definition.
To access parameters and values from the process and step storage:
• {url:param}: All input arguments from the ProcessAsk action are written to theURL. You can access these parameters via {url:'urlParamName'}. You can useURL parameters wherever text can be entered in the Process Ask configuration.
Example: '{url: uid1}' gets the uid specified by input argument uid1.
URL parameters can contain process variables, Web Configuration parametersetc. - anything that is passed from the ProcessAsk action template. For more ex-amples, see Process Ask Configuration ProcessAskY1
Note: Using URL parameters makes a Process Ask configuration reusable anddata provider-independent.
• To access the process or step storage use process.get('param') andstep.get('param'), where param is the name of a parameter in the process orstep storage. For fur ther details, see Syntax.
• You can use the following placeholders within texts or parameters:
• {RECORD}: Displays the table caption of the record specified by input argumentuid. It is available for all other uids as well: {RECORD1} is replaced by the tablecaption of uid1 etc.
• {INFOAREA}: Displays the name of the info area of uid, e.g. "Company" if therecord specified by uid is a company record. Also available for uid1-3.
• {INFOAREAS}: Same as {INFOAREA} but in plural, e.g. "Companies".
ButtonYou can define possible answers as buttons.
Users choose an answer by clicking on a button.
Specify the following:
• Event No.: The number of the event to be fired if the user clicks the button. Theactual events are defined in the Dispatching area of the step definition, seeDispatching on page 560.
583AUREA CONFIDENTIAL
Processes
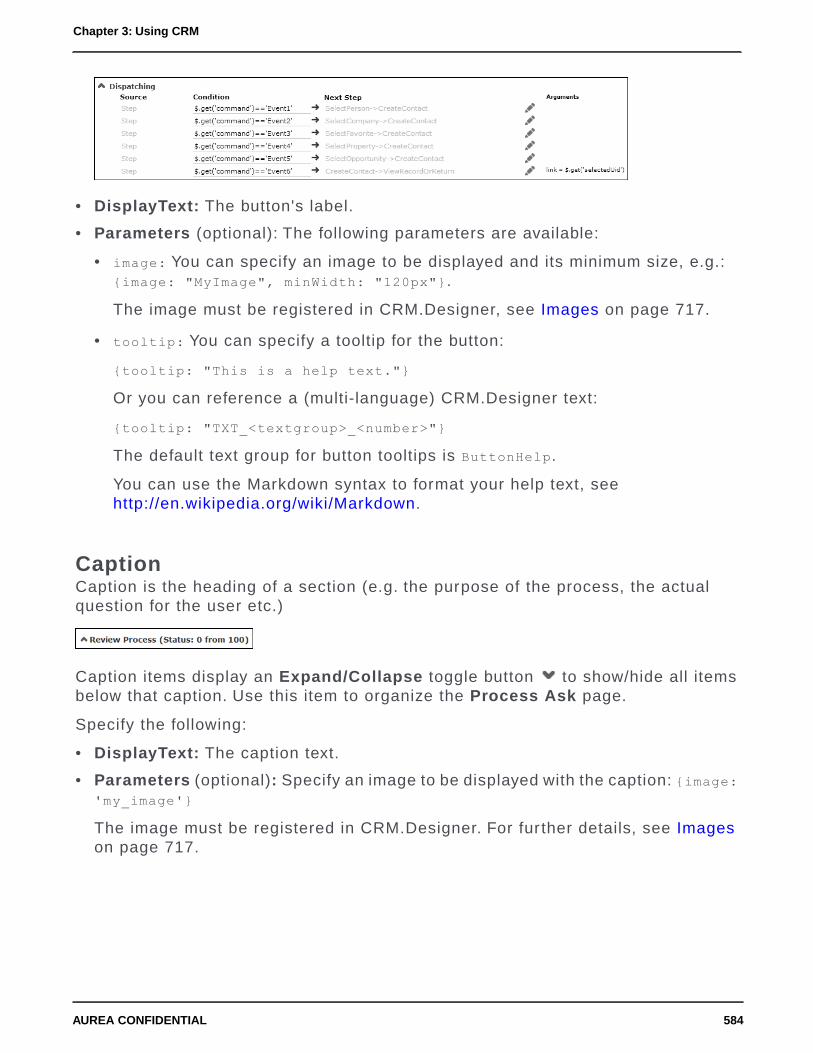
• DisplayText: The button's label.
• Parameters (optional): The following parameters are available:
• image: You can specify an image to be displayed and its minimum size, e.g.:{image: "MyImage", minWidth: "120px"}.
The image must be registered in CRM.Designer, see Images on page 717.
• tooltip: You can specify a tooltip for the button:
{tooltip: "This is a help text."}
Or you can reference a (multi-language) CRM.Designer text:
{tooltip: "TXT_<textgroup>_<number>"}
The default text group for button tooltips is ButtonHelp.
You can use the Markdown syntax to format your help text, seehttp://en.wikipedia.org/wiki/Markdown.
CaptionCaption is the heading of a section (e.g. the purpose of the process, the actualquestion for the user etc.)
Caption items display an Expand/Collapse toggle button to show/hide all itemsbelow that caption. Use this item to organize the Process Ask page.
Specify the following:
• DisplayText: The caption text.
• Parameters (optional): Specify an image to be displayed with the caption: {image:'my_image'}
The image must be registered in CRM.Designer. For fur ther details, see Imageson page 717.
584AUREA CONFIDENTIAL
Chapter 3: Using CRM

Expand ViewDisplays the details of a record (e.g. to provide information on the context of theprocess).
The Expand view is read-only, all editing functions are disabled. You can combineinformation from multiple records and info areas by defining multiple Expand Viewitems.
If you passed a uid to the ProcessAsk action, you don't need to specify it here. Thefirst uid from the ProcessAsk is used. Otherwise you must specify the uid in theParameters field.
Syntax
{model: {uid: <uid>, <param>: <value>,...}}
If you specify only parameters for the model-property, i.e. only Expand action param-eters (e.g. uid and expandName, see Expand Action Parameters on page 356) you canuse
{uid: <uid>, <param>: <value>,...}
Example:
{uid: <uid>, expandName: '<nameOfAExpandConfiguration>'}.
You can specify <uid> as one of the following:
• as URL-Parameter, e.g. '{url:uid}' or '{url:uid2}'
• as value from the process storage, e.g. process.get('myUid')
• hard-coded, e.g. {infoAreaId: "FI", recordId: "x00000064000009f9"} or"FI;x00000064000009f9"
FavoritesDisplays a list of Favorites records for the user to choose from. Double-clicking arecord fires the event.
Specify the following:
• Event No.: The number of the event to be fired if the user selects a record. Theactual event is defined in the Dispatching area of the step definition.
• DisplayText: The heading of the record list.
585AUREA CONFIDENTIAL
Processes

• TableCaptionName: The name of the table caption to be used for displaying therecords.
• Max. rows: The maximum number of records to be displayed.
Note: If you don't specify Max. rows for an item, the value specified in theSearch.MaxResults Web Configuration parameter is used instead. For fur therdetails, see Search.MaxResults.
• Parameters (mandatory): The info area from which to display the favorites.
If...End IfAllows you to define conditional par ts of the Process Ask action template (e.g. touse the same Process Ask configuration for multiple process phases).
All items between an If and End If item are displayed only if the expression passedin the Parameters field evaluates to true. If you don't define any condition in theParameters field, this evaluates to true as well.
You can embed if-loops within other if-loops.
Syntax
{url:<variable>} >= <value>
process.get('<variable>') == true
LinkYou can define possible answers as hyperlinks. Users choose an answer by clickingon a link.
You can define possible answers as hyperlinks. Users choose an answer by clickingon a link.
You can specify an event or an action for a Link item. If you specify an event, youcan use Link items to call process steps (allowing the users to navigate betweensteps).
586AUREA CONFIDENTIAL
Chapter 3: Using CRM

Specify the following:
• Event No.: The number of the event to be fired if the user clicks on the link. Theactual event is defined in the Dispatching area of the step definition.
• DisplayText: The hyperlink's text.
• Action: The action to be executed if the user clicks on the link.
Note: If both Event No. and Action are specified for a Link item, only the actionis used.
• Parameters (optional): Specify an image to be displayed with the link: {image:'my_image'}
The image must be registered in CRM.Designer. For fur ther details, see Imageson page 717.
You can define variable images depending on some value (e.g. {image:'COMPLE-TION_{url:part1Image}'} or directly enter conditions for an image in the Param-eters field.
Linked RecordsDisplays a list of linked records for the user to choose from. Double-clicking a recordfires the event.
Specify the following:
• Event No.: The number of the event to be fired if the user selects a record. Theactual event is defined in the Dispatching area of the step definition.
• DisplayText: The heading of the record list.
• TableCaptionName: The name of the table caption to be used for displaying therecords. (If not defined, the default table caption of the info area specified by thelink relation in Parameters is used.)
• Max. rows: The maximum number of records to be displayed.
Note: If you don't specify Max. rows for an item, the value specified in theSearch.MaxResults Web Configuration parameter is used instead,see Search.MaxResults.
• Parameters (mandatory): The link to be used, e.g. $Link[FI] or $Children.
For possible values of <linkName>, see Link Names in JavaScript on page 22.
587AUREA CONFIDENTIAL
Processes

Note: The link is always read in relation to the first uid from the ProcessAskaction.
In addition to the linkName parameter you can specify any parameter supportedfor the RecordListBox widget. You can e.g. use filterName to filter the list oflinked records.
Examples:
{linkName: '$Children[Y2]', showGridHeader: false, grid:{emptyGridTextAl-
ign: 'left'}}
{linkName:'$Children[KM]',filterName:"KM.myFilter"}
For the complete example, see Step ProcessAskY1 and Process Ask ConfigurationProcessAskY1.
Most Recently UsedLists the records from the History for the user to choose from. Double-clicking arecord fires the event.
Specify the following:
• Event No.: The number of the event to be fired if the user selects a record. Theactual event is defined in the Dispatching area of the step definition.
• DisplayText: The heading of the record list.
• TableCaptionName: The name of the table caption(s) to be used for displayingthe records. If undefined, the info area's default table caption(s) are used.
• Max. rows: The maximum number of records to be displayed.
Note: If you don't specify Max. rows for an item, the value specified in theSearch.MaxResults Web Configuration parameter is used instead,see Search.MaxResults.
• Parameters (optional): The info area from which to display records. If undefined,all records from the History are displayed.
588AUREA CONFIDENTIAL
Chapter 3: Using CRM

RecordsIf multiple records are passed to the ProcessAsk via uid, uid1-3 and recordSet youcan use the Records item to list these records on the Process Ask page.
Specify the following:
• DisplayText: The heading of the record list.
• TableCaptionName: The name of the table caption to be used for displaying therecords. (If undefined, the default table captions are used.) If no table captionexists for a record, the record is not displayed.
• Max. rows: The maximum number of records to be displayed.
Note: If you don't specify Max. rows for an item, the value specified in theSearch.MaxResults Web Configuration parameter is used instead. For fur therdetails, see Search.MaxResults.
• Parameters: Specify which records are listed (no brackets, no quotes):
• RECORDS The records from uid, uid1, uid2 and uid3 are listed.
• RECORDLIST The records from recordSet are listed.
• RECORDLISTS Both the records from uid, uid1-3 and recordSet are listed.
If undefined, RECORDLISTS is used.
For an example, see Passing Multiple Records to a Process Ask page on page 620.
SeparatorInser ts a separator line.
Step CaptionDisplays bold text e.g. to highlight important information or to ask the user a question.
Specify the following:
• DisplayText: The text.
• Parameters (optional): Specify an image to be displayed with the step caption:{image: 'my_image'}
589AUREA CONFIDENTIAL
Processes

The image must be registered in CRM.Designer, see Images on page 717.
TextAny kind of text (e.g. the description of an action to be performed by the user).
Specify the following:
• DisplayText: The text.
You can use URL-Parameters to access variable values, e.g. "You have{url:Y2Count} par ticipant(s) linked to your opportunity.". You can not access theprocess storage in text items. Therefore you need to define all required informationas input arguments of the ProcessAsk action.
You can also use the following placeholders: {RECORD}, {INFOAREA} and {INFOAR-EAS}, >> .
• Parameters (optional): Specify an image to be displayed with the text: {image:'my_image'}
The image must be registered in CRM.Designer. For fur ther details, see Imageson page 717.
You can define variable images depending on some value (e.g. {image:'CAT_ZF_{url:Y2State}'} shows a different smiley depending on the currentvalue of Y2State). For a complete example, see Step ProcessAskY1 and ProcessAsk Configuration ProcessAskY1.
You can also directly enter conditions for an image in the Parameters field.
Use images (bullets and numbers) if you want to create a formatted list. (Enteringthe bullets or numbers directly in the text diminishes the re-usability of texts.)
Note: Use empty Text items to control the ver tical spacing on your page.
Standard Process StepsUPDATE_DEFAULT contains some standard process steps useful for navigatingwithin a process.
Those standard process steps are:
$cancel
Use $cancel to end a process: Aurea CRM.Web navigates back to the page fromwhich the process was star ted. If the process was executed in a popup, the popupis closed, if the process is executed in a new tab, the tab is closed.
590AUREA CONFIDENTIAL
Chapter 3: Using CRM

$exit
Use $exit to end a process without navigation: The last (interactive) process stepis displayed.
$phase
Use the $phase step to navigate to the initial step of the active phase. It automati-cally re-evaluates all phase conditions and thus determines the active phase.
$return
Use $return to return from sub-steps: Define $return as Next Step to call the stepfrom which the current step is called. Example in UPDATE_DEFAULT: Dispatchingof step SelectCompany->Return.
ViewRecord->Exit
Use this step to end a process.
This step calls the ViewRecord action with input argument uid executing the defaultaction for the record and ending the process.
ExamplesExamples for Processes.
Below are few examples for your reference:
NewActivityForPersonAn example for a simple process.
This is an example for a simple process that creates an activity record (MA) for aperson (KP) in a company (FI). The process contains no header, no phases, metricsetc.
The process is star ted from the application menu, i.e. without context.
The following graphic displays the process flow, the steps and which actions theycall.
591AUREA CONFIDENTIAL
Processes

The following chapters list the necessary configuration units.
Process NewActivityForPerson
On the CRM.Designer main page, click Processes to access all available processconfigurations and define new processes.
To define a process:
1. Select the Initial Step of the process. If you divide your process in multiplephases, this initial step is used as a fallback if no active phase is found.
For this example create a new process called NewActivityForPerson.
2. Select the Initial Step SelectFI.
Note: You need to create the steps before you can select them.
Once you have selected a step you can click (Edit) to edit the step.
592AUREA CONFIDENTIAL
Chapter 3: Using CRM

Step SelectFI
593AUREA CONFIDENTIAL
Processes

1. Create a step called SelectFI.
2. Select the action (Search) and define its input arguments.
The search results automatically use the context menu M_Wizard containing theaction A_Select which allows users to select a record.
3. Define the Dispatching:
a. Enter the condition: $.get('command')=='Select'
Selecting a record navigates to the next step.
b. Select "Step" as data provider (Source).
4. Select or create the Next Step:
a. Under Next Step click (New Step).
b. Enter "SelectKP" as Name.
594AUREA CONFIDENTIAL
Chapter 3: Using CRM

c. Select the Search action template as Template.
d. Click New.
5. Define the input arguments for SelectKP.
To pass the uid of the selected FI record to the next step as link:
a. Under Arguments click (Edit step arguments).
b. For the arguments you want to get from $out select "Step" as Source.
c. Select the desired Value (in this case uid) from the drop-down list.
d. Click Apply.
6. Save the step definition.
595AUREA CONFIDENTIAL
Processes

Step SelectKP
1. Create a step called SelectKP.
Since the step's input argument link comes from the dispatching definition of theprevious step, you only need to select "Input Message" as Source and select "asis" from the Value drop-down list.
2. Define the dispatching as described for SelectFI.
596AUREA CONFIDENTIAL
Chapter 3: Using CRM

Step CreateMA
1. Create a step called CreateMA.
2. Select the action (ExpandNew) and define its input arguments (again taking link"as is" from the previous step).
3. Check End process with this action.
Once the user saves the new MA record the process ends with displaying an Ex-pand view of the record.
597AUREA CONFIDENTIAL
Processes

Menu Action ID_NET_Process_ActivityForPerson
1. To call your process create an application menu action ID_NET_Process_Activi-tyForPerson in ID_NET_APPOINTMENT_MGMT. For fur ther details, see Configuring aMenu on page 292.
2. Select Process as Action Template.
3. Enter the name of the process as input argument name.
NewOpportunityForCompanyAn example for a slightly complex process.
This is an example for a slightly more complex process that creates an opportunity(Y1) for a company (FI) and allows users to add opportunity par ticipants (Y2) at alater time. The process consists of two phases, it contains a header, a Process Askconfiguration and (phase) metrics and uses different data providers and processstorage variables.
The process can be called from both the application menu and an existing opportu-nity's context menu.
The following graphic displays the process flow, the phases and steps and whichactions they call.
598AUREA CONFIDENTIAL
Chapter 3: Using CRM

The following chapters list the necessary configuration units.
599AUREA CONFIDENTIAL
Processes

Process NewOpportunityForCompany
600AUREA CONFIDENTIAL
Chapter 3: Using CRM

1. Create a new process called NewOpportunityForCompany.
Since your process contains phases you do not need to specify an Initial Step.
2. The Header drop-down list lists all info area-independent special headers.
3. For the process metrics define a custom Data Provider curTexts loading the textgroup containing the multilingual texts used in the process.
a. Enter a Name.
b. Define an Action using the built-in external data provider UsingDataProvider.For fur ther details, see UsingDataProvider on page 569.
c. Enter the name of the desired text group as argument texts.
d. Click Apply.
4. Define following process storage variables:
• curFIUid: The uid of the company record for which the opportunity is created.
If the process is star ted from the context menu of an existing opportunity thecompany uid is not needed and not passed to the process.
601AUREA CONFIDENTIAL
Processes

If the process is star ted from the application menu, the uid comes from theinitial step where the user selects a company. For fur ther details, see StepSelectFIForY1.
This is handled automatically by the process, you do not need to define condi-tions in this case.
• curY1Uid: The uid of the opportunity record.
If the process is star ted from the context menu, the uid comes from the currentopportunity, therefore Data Provider = Input Message ($.get('uid')).
If the process is star ted from the application menu, the uid comes from the stepwhere the user creates a new opportunity. For fur ther details, see Step Cre-ateY1.
• curY2Count: This variable is calculated by an evaluation step and used for theProcessAsk page. For fur ther details, see Step EvalY2Count and Step Proces-sAskY1. Therefore initial value = 0. Since curY2Count is accessed at differentpoints of the process, it must be defined in the process storage.
• repMetric: $t('TXT_Process_TextGroup_0') gets text number 0 of text groupProcess_TextGroup. Syntax,. For fur ther details, see Referencing Texts inJavaScript on page 178. The text group has been loaded by the custom DataProvider curTexts.
• curRepName: The name of the current rep. Available functions for identifying thecurrent rep. For fur ther details, see u8.session.identity.
5. To display the text "Rep: <current rep>" as a process metric, a multilingual labeland a variable value are combined as $.get('repMetric')+$.get('curRepName').In an English-only environment you could just define "Rep: "+$.get('curRepName')instead.
repMetric has been defined as a process storage variable because texts fromdifferent data providers can not be combined in one value definition.
Alternatively, you could define two text metrics, one getting the label directly fromdata provider curTexts and the second getting the rep name from the processstorage.
In this case the texts are displayed in two lines.
Phase CreateY1
Define the first phase (selecting a company and creating an opportunity):
1. Under Process Phases click (Add).
602AUREA CONFIDENTIAL
Chapter 3: Using CRM

2. Enter a Phase Name.
3. Enter a Phase Label. This is displayed on the phase arrow.
4. Select the phase's Initial Step. For fur ther details, see >> Step SelectFIForY1.
Note: You need to create the steps before you can select them.
Once you have selected a step you can click (Edit) to edit the step.
5. Define the conditions for the phase to be active: !$.get('curY1Uid')
Phase CreateY1 is only active/can only be activated if no opportunity exists, i.e.if called from the context menu of an opportunity, the process automatically star tswith phase AddY2.
6. Define a phase metric using the PercentageTrafficLight View with Value!!$.get('curY1Uid')?50:0
Once an opportunity uid is present in the process storage, the traffic light changesto yellow.
7. Click Apply.
8. You need to (re-)save the process, otherwise the phase definition is lost.
Phase AddY2
Define the second phase (adding opportunity par ticipants):
603AUREA CONFIDENTIAL
Processes

• Initial Step:. For fur ther details, see Step EvalY2Count
• Condition: !!$.get('curY1Uid')
Phase AddY2 is active/can be activated if an opportunity exists.
• Phase metric: $.get('curY2Count')==0?0:100
The traffic light changes to green as soon as at least one opportunity par ticipanthas been added (curY2Count > 0).
Each time the phase is activated, the process storage variable curY2Count is (re-)calculated by the phase's initial step EvalY2Count.
604AUREA CONFIDENTIAL
Chapter 3: Using CRM
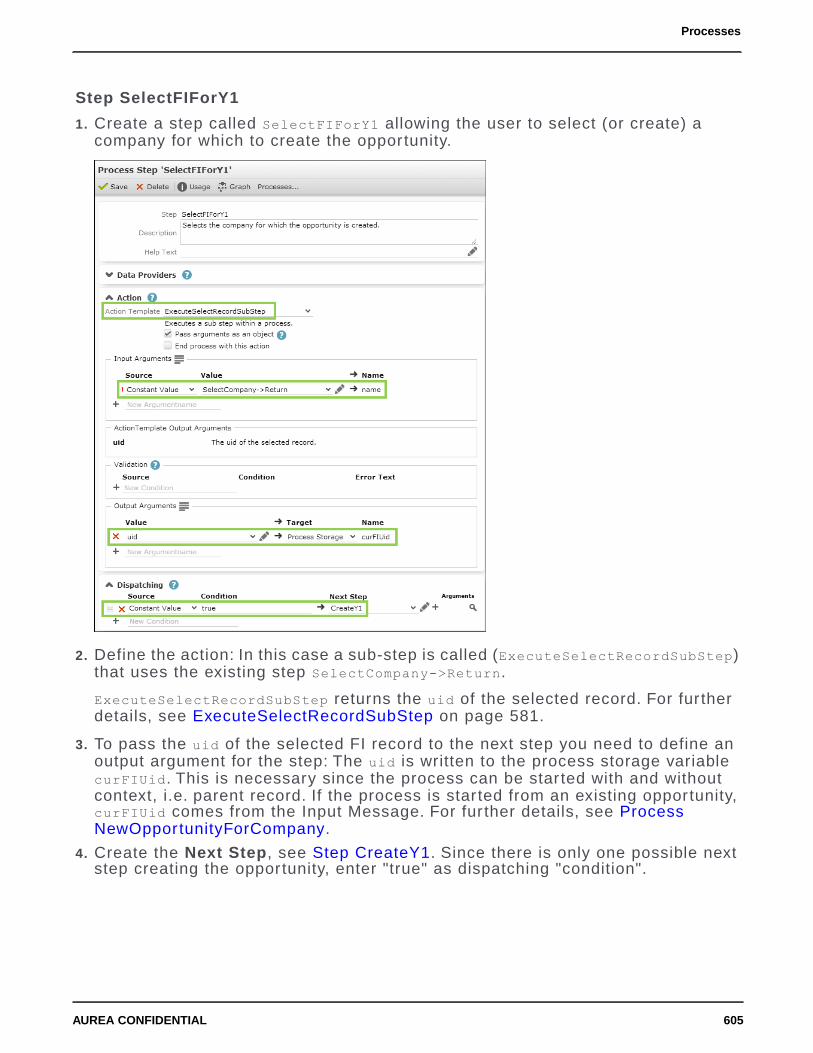
Step SelectFIForY1
1. Create a step called SelectFIForY1 allowing the user to select (or create) acompany for which to create the opportunity.
2. Define the action: In this case a sub-step is called (ExecuteSelectRecordSubStep)that uses the existing step SelectCompany->Return.
ExecuteSelectRecordSubStep returns the uid of the selected record. For fur therdetails, see ExecuteSelectRecordSubStep on page 581.
3. To pass the uid of the selected FI record to the next step you need to define anoutput argument for the step: The uid is written to the process storage variablecurFIUid. This is necessary since the process can be star ted with and withoutcontext, i.e. parent record. If the process is star ted from an existing opportunity,curFIUid comes from the Input Message. For fur ther details, see ProcessNewOpportunityForCompany.
4. Create the Next Step, see Step CreateY1. Since there is only one possible nextstep creating the opportunity, enter "true" as dispatching "condition".
605AUREA CONFIDENTIAL
Processes

Step CreateY1
606AUREA CONFIDENTIAL
Chapter 3: Using CRM

1. Create a step called CreateY1 allowing the user to create a new opportunity.
2. Select the action (ExpandNew) and define its input arguments:
• infoAreaID: Y1
• link: Since the process can be star ted with and without context, the opportuni-ty's parent (FI) must come from the process storage: $.get('curFIUid')
3. To read the RepID from FI and write it to RepID in Y1 you need to define a customdata provider curFIRep for this step:
a. Enter a Name.
b. Define an Action using the built-in external data provider ReadRecordDat-aProvider. For fur ther details, see ReadRecordDataProvider on page 568.
607AUREA CONFIDENTIAL
Processes

c. Get the uid of the record to read from the process storage: $.get('curFIUid')
d. Enter the IDs or XML names of the fields to be read.
e. Click Apply.
4. Define the input arguments defaultValues and defaultFields. For fur ther details,see defaultFields/defaultValues.
• Get defaultValues from the custom data provider curFIRep: $.get('RepID')
• Enter the IDs or XML names of the target fields as defaultFields
5. To pass the uid of the created Y1 record to the next step you need to define anoutput argument for the step: The uid is written to the process storage variablecurY1Uid. This is necessary since the process can be star ted with and withoutcontext, i.e. parent record. If the process is star ted from an existing opportunity,curY1Uid comes from the Input Message. For fur ther details, see ProcessNewOpportunityForCompany.
6. Define the Dispatching:
a. Enter the condition: $.get('command')=='Save'
Saving the record navigates to the next step.
b. Select "Step" as data provider (Source).
c. Create the Next Step, see Step ProcessAskY1.
608AUREA CONFIDENTIAL
Chapter 3: Using CRM

Step ProcessAskY1
609AUREA CONFIDENTIAL
Processes

1. Create a step called ProcessAskY1 displaying the previously created opportunityand ask the user to create opportunity par ticipants. For fur ther details, see Pro-cessAsk on page 579. As soon as at least one participant is added, the user canexit the process.
2. Select the action (ProcessAsk) and define its input arguments:
• The name of the Process Ask configuration ProcessAskY1. For fur ther details,see Process Ask Configuration ProcessAskY1
Get the necessary parameters for the Process Ask page from the process storage:
• the opportunity record's uid for the Expand view
• the current par ticipants count (Y2Count) for the text
• Y2State evaluating if the minimum number of par ticipants has been reached -only then the process can be completed.
3. Define the Dispatching depending on the buttons defined in the Process Askconfiguration:
• Event 1: The user clicks the Add Participant button. This calls CreateY2 asNext Step.
610AUREA CONFIDENTIAL
Chapter 3: Using CRM

• Event 2: The user clicks the Show Opportunity button. This calls ViewRecord->Exit and ends the process. For fur ther details, see ViewRecord->Exit.
Since a ProcessAsk step does not provide uid as output argument you need toget the uid for ViewRecord->Exit from the process storage:
611AUREA CONFIDENTIAL
Processes

Step SelectKPForY2
612AUREA CONFIDENTIAL
Chapter 3: Using CRM

1. Create a step called SelectKPForY2 allowing the user to select (or create) a personto be added as opportunity par ticipant.
2. Define the action: Analogous to SelectFIForY1 a sub-step is called (ExecuteSe-lectRecordSubStep) that uses the existing step SelectPerson->Return. It returnsthe uid of the selected person record.
3. Define the Dispatching: Since there is only one possible next step (creating theopportunity par ticipant), enter "true".
4. Create the next step, see Step CreateY2. Pass the uid of the selected personand the opportunity (parent of opportunity par ticipant) to CreateY2:
a. Click (Edit step arguments).
You get the person record from the current step.
You need to get the opportunity from the process storage because the processan be star ted with and without context.
b. Click Apply.
613AUREA CONFIDENTIAL
Processes

5. Save the step definition.
Step CreateY2
1. Create a step called CreateY2 allowing the user to create a new opportunity par-ticipant.
2. Select the action (ExpandNew) and define its input arguments:
• infoAreaID: Y2
• link: the link to the person
• link2: the link to the opportunity
Since link and link2 come from the dispatching definition of the previous step,you only need to select "Input Message" as Source and select "as is" from theValue drop-down list.
3. Define the Dispatching:
a. Enter the condition: $.get('command')=='Save'
Saving the record navigates to the next step.
b. Select "Step" as data provider (Source).
c. Create the Next Step, see Step EvalY2Count.
614AUREA CONFIDENTIAL
Chapter 3: Using CRM

Step EvalY2Count
615AUREA CONFIDENTIAL
Processes

1. Create a step called EvalY2Count to calculate the current number of opportunityparticipants. As soon as at least one participant is added, the user can exit theprocess.
2. Select $nop as Action Template: EvalY2Count is an evaluation step executed inthe background. For fur ther details, see $nop on page 581. It just recalculates thecurrent par ticipant count and leads back to the Process Ask page which is updatedwith the result.
3. To get the current par ticipants count you need to run a query. Define a customdata provider curY2 using the built-in external data provider ExecuteQueryDat-aProvider. For fur ther details, see ExecuteQueryDataProvider on page 565.
• Enter the queryStatement: select (Opportunity, FirstName, LastName) from(Y2)
616AUREA CONFIDENTIAL
Chapter 3: Using CRM

• Enter the parent link for the query getting the opportunity record from theprocess storage: $.get('curY1Uid')
4. You need to explicitly initialize this data provider: Add an input argument for the$nop action that uses curY2 as source. You can enter any name as argumentname (curY2Initialize in this example).
5. To pass the current par ticipants count (i.e. the number of result rows) to the nextstep you need to define an output argument writing the result to the processstorage variable curY2Count: Define step.get('curY2.$').getNumberOfRows() asValue. This returns the number of rows in the current query result from dataprovider curY2. For more functions, see ExecuteQueryDataProvider on page 565.
6. Define the Dispatching: This invisible evaluation step always returns to theProcess Ask page, see Step ProcessAskY1.
Process Ask Configuration ProcessAskY1
The Process Ask configuration defines the items to be displayed on the ProcessAsk page displayed by step ProcessAskY1. For fur ther details, see Step ProcessAs-kY1.
1. Create a Process Ask configuration called ProcessAskY1.
617AUREA CONFIDENTIAL
Processes

2. Add the desired elements (Caption, Expand View, Text, Separators, Buttons). Forfur ther details, see Process Ask Configuration on page 582.
You can pass most of the parameters as URL-parameters since they are definedas input arguments of ProcessAsk action in step Step ProcessAskY1.
• Expand View: {expandName:'Y1.Process'}. You do not need to specify uidhere, since it is automatically passed from the ProcessAsk action. For fur therdetails, see Expand View on page 585.
• Linked Records: Specify a TableCaptionName to determine from which infoarea the linked records are read. Specify the link relation to be used ($Children)under Parameters. For fur ther details, see Linked Records on page 587.
• Text:
• The DisplayText uses the Y2Count argument: "You have {url:Y2Count}participant(s) linked to your opportunity". For fur ther details, see Text onpage 590.
• The image (specified under Parameters) uses the Y2State (0 or moreparticipants) argument: {image: 'CAT_ZF_ {url:Y2State} '}
(The images used are called CAT_ZF_0 and CAT_ZF_1.)
• Button: Here you define the buttons triggering the events for the dispatchingof step ProcessAskY1. For fur ther details, see Button on page 583.
The second button (Show Opportunity) is only displayed, if at least one oppor-tunity par ticipant has been added: {url: Y2Count }>0. For fur ther details,see If...End If on page 586.
618AUREA CONFIDENTIAL
Chapter 3: Using CRM
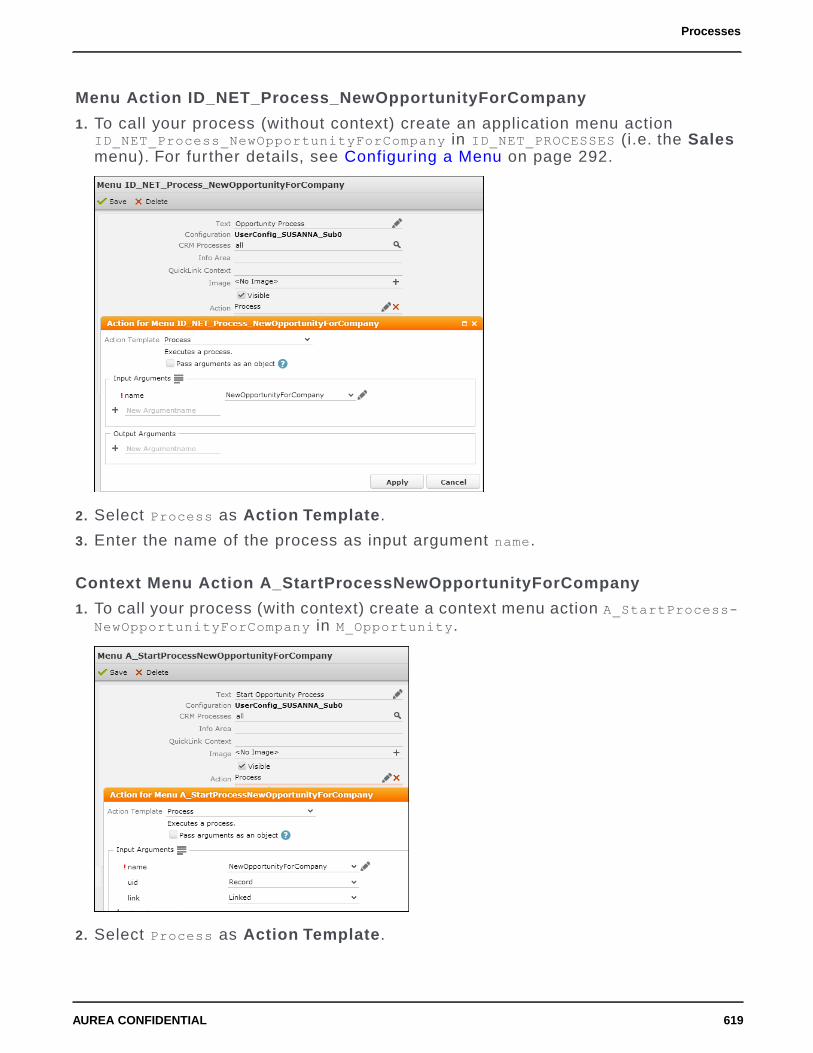
Menu Action ID_NET_Process_NewOpportunityForCompany
1. To call your process (without context) create an application menu actionID_NET_Process_NewOpportunityForCompany in ID_NET_PROCESSES (i.e. the Salesmenu). For fur ther details, see Configuring a Menu on page 292.
2. Select Process as Action Template.
3. Enter the name of the process as input argument name.
Context Menu Action A_StartProcessNewOpportunityForCompany
1. To call your process (with context) create a context menu action A_StartProcess-NewOpportunityForCompany in M_Opportunity.
2. Select Process as Action Template.
619AUREA CONFIDENTIAL
Processes

3. Enter the name of the process as input argument name.
4. Define uid as Record (i.e. the opportunity record to star t the process for). Definelink as Linked (i.e. the parent company of the opportunity).
This writes these two records to the input message of the process.
If star ted from the context menu, the process automatically jumps to the secondphase because of the conditions you defined for that phase (!!$.get('curY1Uid')).For fur ther details, see Phase AddY2.
Passing Multiple Records to a Process Ask pageLearn about passing multiple records to a Process Ask page.
A process launched from the calendar's context menu M_CalNew.
Action definition:
Process definition (passing the records to a process storage variable and filteringfor MA and A1 records):
Step definition (getting the recordSet argument from the process storage):
620AUREA CONFIDENTIAL
Chapter 3: Using CRM

Process Ask configuration with Records item (no parameter specified, i.e.RECORDLISTS):
The process is called from the Calendar. All visible records are written to the InputMessage as recordSet. The process storage variable filters for MA and A1. Sinceno uid or uid1-3 arguments were specified, only the records from recordSet aredisplayed:
FormsCreate custom forms as per your need.
You can create custom forms to be used for various purposes. Example - as star tpage or within a process.
621AUREA CONFIDENTIAL
Forms

On the CRM.Designer main page, click Forms to display all existing forms and toaccess the Form Designer.
The following topics provide a short overview of forms and the Form Designer.
For more information, see the ar ticle”Form Designer” at https://support.aurea.com.
Important: Please note that Aurea CRM Legacy Forms are deprecated and nolonger supported by Aurea in version 8 and above. Forms like LastQueryResult andrelated menu items are not supported in versions after U7.
You are requested to move to the new Forms described in this chapter. The LegacyForms capability in the CRM.Designer is also removed soon.
Form DesignerAn overview of form designer.
To get star ted designing forms using the Form Designer, read HOWTO Use theForm Designer to get a quick overview in terms of structure, handling, features andother interesting information.
622AUREA CONFIDENTIAL
Chapter 3: Using CRM

The Form Designer consists of the following areas:
• Tool Box: Lists all available widgets and components. For fur ther details, seeTool Box on page 623. Enter a filter string in the field above the list to search foran element.
• Preview: Displays the current form. Use drag&drop to add elements to the form.For fur ther details, see Arranging Elements on a Form on page 624.
• Property Grid: Lists all supported settings for the selected element. For fur therdetails, see Property Grid on page 625.
• Tree View: Displays the elements of the current form hierarchically. Select anelement in the Tree View to edit it's properties.
You can resize the areas of the Form Designer by dragging the border with themouse.
For each element in the Tool Box and the Property Grid you can display an explana-tory tooltip on mouse-over. The tooltip also contains links to the respective page inthe Aurea CRM.Web SDK Client Reference located at https://support.au-rea.com/sdk/reference/. In addition, miscellaneous hints and examples can be foundhere. For fur ther details, see Hints on page 628.
In the code, elements are referenced by the name - "Button". The elements you addto your form are named automatically as "Button 1", "Button 2", ….…."Button x".
The name of the currently selected element is displayed as a link above the PropertyGrid. Click on the link to change the name.
Use the Source View/Design View buttons to toggle between code and WYSIWYGview.
Tool BoxKnow about the toolbox used to create forms.
The Tool Box contains the following items:
• Panel Widgets: Widgets used for structuring a form. The following panel widgetsare available:
Contains a stack of cards where exactly oneis visible.
CardPanel
Displays its children in columns or as tabs. Forfur ther details, see Dashboards on page 632.
DashboardPanel
623AUREA CONFIDENTIAL
Forms

Lays out its child elements in a dock layout,arranging them either horizontally or ver tically.Dock panels are not dynamically resized ac-cording to their content, therefore make sureyou specify at least the height property.
DockPanel
Simply appends one child element after theother in a <DIV> element.
FlowPanel
Encloses a widget with a group element.GroupPanel
Displays a tabbed widget, allowing users toswitch between the tabs.
TabPanel
Lays out its child elements in an HTML <table>element.
TablePanel
• Generic Widgets: Widgets that can be used independent of records and otherCRM-specific data. For Example - field schemata or entries of the CRM.Designerdatabase, Button, TextInput, Image.
Generic widgets are displayed in the preview area exactly as they are displayedin the Aurea CRM.Web user interface.
For a list of available generic widgets, see the ar ticle “Form Designer Widgets”at https://support.aurea.com.
• CRM-specific Widgets: Widgets that are directly related to CRM data. Forexample, the ExpandView widget can only be displayed based on a record.
For CRM-specific widgets no WYSIWYG preview is available.
For a list of available CRM-specific widgets, see the ar ticle “Form Designer Wid-gets” at https://support.aurea.com.
• Components: Components are not assigned to a specific widget but to the entireform. They are used to access additional data sources.
For a list of available components, see the ar ticle “Form Designer Widgets” athttps://support.aurea.com.
Arranging Elements on a FormHere you can learn how to arrange elements on a form.
The Preview area displays the current form.
624AUREA CONFIDENTIAL
Chapter 3: Using CRM

To edit the form:
1. Use drag&drop to add elements from the Tool Box to the form.
When dragging the element over the form, all valid locations for the elements aredisplayed in light blue. The border of the current target panel is highlighted inorange. The location where the element would be positioned when releasing it,is displayed in orange.
2. Select an element of the form (in the Tree View) to display its controls:
• Click (Drag&Drop) to move the element to another position.
• Click (Delete) to remove the element from the form.
• Click (Context Menu) to display the elements context menu, containing theactions Cut and Copy.
If a widget has been cut or copied, any empty container area you select in the
form displays a (Paste) button, allowing you to paste the copied/cut elementat that position.
To create containers to paste elements to, you need to add child panel widgetsto your form. For Example - Block Element or Row and Column
3. Define all necessary settings for the widgets on your form. For more details, seeProperty Grid on page 625.
Property GridThe Property Grid lists all supported parameters for the selected element.
The meaning and possible values of each parameter is described in the tooltip. ForCRM-specific widgets you can also refer to the Aurea CRM.Web SDK Client Refer-ence located at https://support.aurea.com/sdk/reference/ and to the correspondingaction templates and their input arguments. For fur ther details, see Action Templateson page 350.
625AUREA CONFIDENTIAL
Forms

For text fields of the Property Grid you can click (Select text) and access themultilingual CRM.Designer texts (e.g. for labels). For fur ther details, see Texts onpage 176. In the Property Grid CRM.Designer texts are displayed as{TXT_<textgroup>_<number>}. The Preview displays the text in the default language.You can combine CRM.Designer texts and plain text. Example - to add punctuation:{TXT_<textgroup>_<number>} : {TXT_<textgroup>_<number>}.
For each parameter the context menu offers options to reset the value (Reset todefault, Set to <null>).
Note: Opening a property group by clicking on the resets any default valuesinside the group to undefined. If you want to undo your changes, make sure youselect Reset to default (from the context menu) for the properties group. Otherwisethe widget may no longer work.
Note: The same applies to unused bindings: Instead of clearing the value, selectRemove binding from the context menu.
Click Apply to see your changes in the Preview pane. The settings of the DOM El-ement tab are immediately applied to the Preview as well.
626AUREA CONFIDENTIAL
Chapter 3: Using CRM

Widget tab
The Widget tab contains all supported parame-ters controlling the behavior of the widget.
Mandatory parameters are highlighted andtagged with *.
For each parameter the default value is dis-played.
Use the context menu option Set from bindingto enable data binding. For fur ther details,see Data Binding on page 628.
DOM Element tab
The DOM Element tab contains options tochange the visualization of the widget. You candefine:
• Attributes (attr)
• CSS parameters (css)
All available DOM Elements are supported.
Events tab
Use the Events tab to define actions for prede-fined events. The list of predefined events isfixed for each widget and cannot be changed(i.e. for the Button widget only an onClick eventis available).
To define an action:
1. Define a new value.
2. Click (Edit).
3. You can:
• Execute an action: Enter the name of a(menu) action as defined in CRM.Designer.
• Execute a javascript function: Defineyour function in the code box.
4. Click OK.
5. Use the (Drag&Drop) buttons to reordervalues.
627AUREA CONFIDENTIAL
Forms

Unit tab
Use the Unit tab to assign a CRM process to each widget. For fur ther details,see Assigning CRM Processes.
Data BindingData binding is used to define the interaction of widgets in forms.
For a detailed description, see the ar ticle “Data Binding in Forms” at https://sup-port.aurea.com.
For examples, see the Examples section in the ar ticle “Forms” at https://support.au-rea.com.
HintsHere are the list of supported widgets that can be used on a form.
Calendar Widget
Depending on the context you may want to hide the New Calendar Entry buttonwhen using the calendar widget on a form:
• Set the header > showNewButton property to false.
To specify another menu to be displayed when clicking the New Calendar Entrybutton:
• Use the menuItem property to specify another than the default menu M_CalNew.
Getting a Tree's Root Record in a Form
In order to get the uid of the tree's root record in a form you have to use a bindingwhere Source = "#rootUid". Example in UPDATE_DEFAULT: RecordHistory widget.
Grouping Radio Buttons/Toggle Buttons on a Form
Use the groupName and groupValue properties to manage the value of a group ofradio buttons or toggle buttons. Radio/toggle buttons with the same groupName areconsidered as grouped. This means activating a button from a group deacitvatesthe other buttons in the group. Use the groupValue property to pass the value ofcurrently selected button to some other widget.
628AUREA CONFIDENTIAL
Chapter 3: Using CRM

Example:"radioButton1": {"type": "RadioButton","options": { "groupName": "groupradio1", "value": "0" },"binding": [{"sourcePath": [ "#radio1" ],"targetPath": [ "@groupValue" ]}
]},"radioButton2": {"type": "RadioButton","options": { "groupName": "groupradio1", "value": "1" },"binding": [{"sourcePath": [ "#radio1" ],"targetPath": [ "@groupValue" ]}
]}
Example in UPDATE_DEFAULT: The Daily/Weekly radio buttons on the Recurringform.
List Widgets
All properties used to configure the functionality and appearance (header, defaultaction, menu, etc.) of the various list widgets (SearchView, RecordListBox,QueryResultPresenter, etc.) can be found in the grid property group.
ListView Widget
When defining forms with "hierarchical" lists (e.g. to display records from FI, KPand MA) you can hide ListView widgets for which no parent record is selected:
1. Check the hideIfNoLink property.
2. Also check autoLoad. Otherwise the ListView widget's header would still bedisplayed.
hideIfNoLink is also available for the RecordListBox widget.
RecordListBox Widget
When using a RecordListBox widget in a DashboardPanel and wanting to hide theDashboardPanelItem in case the RecordListBox contains no results:
1. Set the hideItemsIfEmpty property of the DashboardPanel widget to true. Forfur ther details, see Configuring Dashboards.
2. Set the hideIfEmpty property of the RecordListBox to true.
RecordTreeView
To use a RecordTreeView widget in a form:
• make sure to specify a root record for the tree by setting a valid uid,
• set a height under css, otherwise the widget is not displayed.
629AUREA CONFIDENTIAL
Forms

SearchView Widget
To hide the With me button:
• Set the form > showOwnItems property to false.
Note: To set the includeConditionalRights parameter, when you are usingSearchView widget on a Form, go to SearchView -> resultModel to find and set theparameter.
To manage the search history for two SearchView widgets which use the sameSearch&List configuration:
• Use the form > historyNamespace property. This saves separate search historiesfor each widget.
You need to define a unique value for historyNamespace for each SearchViewwidget if you use two searches with the same Search&List configuration but e.g.different fixed filters on one form. Otherwise, the second filter is never appliedas the searches share the same cache.
Defining a Header/Title for a FormRules for defining header for a form.
To define headers/titles for your forms:
• Use the HeaderName parameter in the ShowForm action, to display any specialheader as the form's header. For fur ther details, see HeaderName.
The header is then also used as title if the form is displayed in a tab.
• When displaying forms in a tab you can define a pageTitle attribute for the entireform. This attribute is only used if no HeaderName is specified in the action.
• Alternatively you can use the pageTitle parameter in the ShowForm action.pageTitle is only used if HeaderName is undefined. The pageTitle action parameteroverrides the pageTitle attribute defined in the form.
• When displaying forms in a popup (without using the ShowForm action), you canadd a Header widget to your form and check the updatePopupTitle parameter.The header is then displayed in the popup's title bar.
• If no header is found (and pageTitle undefined), the label of the button or menuitem that called form is used as tab/popup title, see the ar ticle “How to Set theTitle of a Tab” at https://support.aurea.com.
630AUREA CONFIDENTIAL
Chapter 3: Using CRM

Displaying the Total Number of Result Records in aList ViewListView widget configuration to display the number of result records in a searchresult list view.
You can configure the ListView widget to display the number of result records in asearch result list view. This header usually contains the text Results followed by acount of the number of records available in the search result. It also contains thelist browser buttons and allows users to navigate within the result list.
For example, the screenshot above shows the star t page with a custom form todisplay the Search results for company records. The results header shows
. By default it shows the number of records remaining in the N+format .
If you wish to show the total number of records available in the search result, youhave to set the countRows parameter in the ListView widget to true. The followingsample star t page form configured in the Designer produces the result as shown inthe screenshot above:"listView9": {
"type": "ListView","options": {
"model": { "fieldControlType": "List", "fieldGroupName": "FI","fixedFilterName": "",
"pageSize": 5, "infoAreaId": "FI" },"autoLoad": true,"showPaging": true,"countRows": true
},
Testing Your FormsUse these steps to test your newly created forms.
Use the SDK page to test your forms:
1. Go to SDK > Forms.
2. Select From Configuration.
631AUREA CONFIDENTIAL
Forms

3. Enter the Form name as defined in CRM.Designer.
4. Click Create.
Displaying Forms in Aurea CRM.WebDifferent ways to display forms in Aurea CRM.Web.
You can display your forms:
• using the ShowForm action defined for menu entries, buttons and within processes.For fur ther details, see ShowForm on page 393.
• in sub-lists. For fur ther details, see Related Data area (Header Info Areas) onpage 329.
• in Tree View nodes. For fur ther details, see Record Settings and Info Area Set-tings.
• on ProcessAsk pages. For fur ther details, see FormName.
DashboardsDashboards display different kinds of information - appointments, analyses, recordlists - on one page.
Dashboards can be used as star t pages for specific users or user groups.
632AUREA CONFIDENTIAL
Chapter 3: Using CRM

Users can switch between views (one column, two columns and tabbed), expand/col-lapse and reorder the areas of the dashboard. The user's settings are saved perclient, allowing users to arrange their dashboards differently e.g. on a tablet PCand a notebook. The user's settings are saved separately once for the one columnand tab views and once for the two columns view.
Use the DashboardPanel widget to configure dashboards. For fur ther details,see Configuring Dashboards.
633AUREA CONFIDENTIAL
Forms

To configure a dashboard:
1. Add the DashboardPanel widget as root widget to your form. The DashboardPanelwidget can be added to any kind of panel widget as well.
By default, a two-column grid containing placeholders is created. Use the layoutattribute to set/change this default (1Column | 2Columns | Tab).
The DashboardPanel widget uses the special header DashboardPanel containingthe buttons for switching between views, hiding items and resetting the dashboard.
To configure an additional custom header (e.g. a personalized text like "Welcome{identity:repName}!" on a star t page), define a special header and enter it asHeaderName in the ShowForm action. For fur ther details, see ShowForm on page393 and Placeholders in Texts on page 182.
2. Enter a settingsName: This name is used as storage key for the user customiza-tions rearrange panels, selected view etc.
3. Add the desired items to the grid. For fur ther details, see Arranging Elements ona Form on page 624. You can use any kind of widget: CRM widgets, panel widgets,generic widgets like buttons etc.
Each item is created inside a DashboardPanelItem, i.e. a specific area of thedashboard. Use panel widgets to add multiple items to one DashboardPanelItem.
• To reorder items, select the widget contained in the DashboardPanelItem and
use the (Drag&Drop) button.
• To hide items that contain no data (e.g. due to rights restrictions or an assignedCRM process), set the hideItemsIfEmpty property to true.
Note: Hiding empty items may impact performance because it requires pre-loading all widgets.
4. To edit the DashboardPanelItem 's settings, select one of it's items.
5. Define a label to be displayed as the caption of the respective area of the dash-board.
634AUREA CONFIDENTIAL
Chapter 3: Using CRM

LiveTile WidgetThe LiveTile Widget is a slide show of various kinds of items which has a captionwith placeholders and image based on the amount of displayed items.
Use the LiveTile widget on a star t page, to display important information as wellas an, optional, slide show of table captions. The records are displayed based ona query or query statement queryName or queryStatement property.
The header contains a QuickView button, allowing the user to open the queryresult in a popup, configurable via property action. The same action is executedwhen clicking on the icon displaying the amount of records.
If the query returns no results and the hideIfEmpty property is set to true, the widgetis not displayed. If the query returns more than maxResults, a + sign is added tothe amount icon.
Clicking on an item executes the default action, e.g. opens an Expand view of theticket record. The info area's default context menu (i.e. the context menu definedas Info Area Default Menu in the info area's default Expand configuration) is dis-played for the items.
For details on configuring LiveTile widgets, see the ar ticle “How to Use the LiveTile Widget” at https://support.aurea.com.
For information on how to display images in the table captions depending on a fieldvalue. For fur ther details, see Configuring a Table Caption on page 266.
Use the SDK page to test your LiveTile widgets: SDK > LiveTile.
Showing/Hiding the Default Text of DateInput WidgetA DateInput Widget is a Generic Widget for selecting a date.
Generic Widgets can be used independently of records and other CRM-specific data(e.g. field schema or entries in the designer database). The visualization of thesewidgets in the designer preview is identical to the visualization on the web user in-terface, which makes them easy to configure and customize.
The following example describes how to show or hide the default text of a DataInputWidget, based on the web configuration parameter DateInput.showDefaultText,Designer Form settings, and Field Group settings. The default text for the DateInputWidget is displayed in the format (date format string).
635AUREA CONFIDENTIAL
Forms

When the web configuration parameter DateInput.showDefaultText is set to true:
• Using Designer Form settings:
• If the DateInput widget in the designer form has the property showDefaultTextis set to true, then the default text for the widget is displayed. If the propertyis set to false then the property is not displayed.
• If the designer form does not have the property showDefaultText, then thedefault text for the widget is displayed.
• Using Field Group settings:
• If the field group has the extended option showDefaultText set to true, thenthe default text for the widget is displayed, else if the extended option is setto false the default text is not displayed.
• If the field group does not have the extended option showDefaultText, then thedefault text for the widget is displayed.
When the web configuration parameter DateInput.showDefaultText is set to false:
• Using Designer Form settings:
• If the DateInput widget in the designer form has the property showDefaultTextset to true, then the default text for the widget is displayed. If the property isset to false then the property is not displayed.
• If the designer form does not have the property showDefaultText, then thedefault text for the widget is not displayed.
• Using Field Group settings:
• If the field group has the extended option showDefaultText set to true, thenthe default text for the widget is displayed, else if the extended option is setto false the default text is not displayed.
• If the field group does not have the extended option showDefaultText, then thedefault text for the widget is displayed.
Enterprise FeaturesThe Enterprise license of CRM offers special features and add-ons to enhance CRMcapabilities.
Following are the special features and add-ons offered by Aurea CRM to Enterpriseusers:
636AUREA CONFIDENTIAL
Chapter 3: Using CRM

Aurea CRM Add-in for Microsoft WordLearn about the Microsoft Word Add-in for Aurea CRM.
Aurea CRM add-in for Microsoft Word allows CRM users to create documents basedon templates that meet the corporate CI guidelines and enrich the documents withcontent from the CRM.
Note: You need to have the Enterprise License setup on Aurea CRM to work withthe Word add-in.
CRM administrator and users can create template documents that can be used forvarious recurring tasks. Some of the tasks for different user roles include the follow-ing:
• A Sales representative could create and maintain template documents for offerletters, order sheets, email etc. Use the different information in the CRM systemto enrich the document.
• Marketing personnel could create new templates to meet the latest customerinteraction guidelines. Create templates for marketing campaigns sent by lettersor flyers using information from the CRM.
• Service representatives can create solution documents or other documents fordifferent services and use the CRM information in those documents.
• Field service representatives can create service report documents at the customersite along with the current ticket.
• All users can ensure that customers receive information in their preferred language.
Note: To send an email in a language other than the default languages, you shoulduse UTF-16 encoding for the template document. For example, to send an email inCyrillic, encode the template document in UTF-16. You can use any text editor thatsupports UTF-16, to encode the template document.
The Aurea CRM word add-in supports the following features:
• Allows you to use the same set of methods used by Aurea CRM.Web.
• Template documents can use fields that are used to store information in AureaCRM.
• Serial and single letter fields can be easily integrated into the templates usingdrag and drop features.
637AUREA CONFIDENTIAL
Enterprise Features

Installing Aurea CRM Add-in for Microsoft Word
Aurea CRM Add-in for MS Word is developed as a VSTO Add-in. Visual Studio Toolsfor Office (VSTO) Add-ins use the ClickOnce deployment solution which automati-cally updates your users' installation of CRM Add-in for Word on their machines.The recommended way to install Aurea CRM Word Add-in is to use a network sharedlocation containing the latest installation package. As a CRM administrator youshould set up a central shared location for the CRM Add-in for Word installationpackage. Using this process ensures that the latest version of the CRM Add-in forWord is automatically upgraded to the latest version. CRM users only have to installit once using the shared central location.
Important: ClickOnce installation checks this location for all subsequent updates.Ensure that you update this location with the latest package to ensure automaticupdates.
If your organization cannot provide a shared location, the Aurea CRM add-in forWord installation package can be found on the Aurea CRM customer support site.
To install the Aurea CRM add-in for Word:
1. Browse to the network shared central location you have set up.
OrUnzip the package OfficeAddins_<versionNo>_full.zip. The <versionNo> is thelatest version available on the customer support site.
2. Double click aurea.office.word.vsto file in the shared location or the unzippedfolder. The Microsoft Office Customization Installer window opens.
The installer verifies the publisher, in this case Aurea CRM, and then displaysthe following window.
638AUREA CONFIDENTIAL
Chapter 3: Using CRM

3. Click Install. The Installing Office Customization message displays.
4. The window automatically closes on successful installation.
5. Start Microsoft Word and open a blank document, the Aurea CRM menu itemshould be visible.
6. Click the Aurea CRM menu.
7. To work with the plugin you have to be connected to Aurea CRM. Click Settingsto open the connection dialog.
639AUREA CONFIDENTIAL
Enterprise Features

8. Enter the following details in the connection dialog:
a. Enter the URL of the Aurea CRM server.
b. Enter your Username and Password.
c. Select the language you prefer to work on Aurea CRM.
9. Click Log In.
10.Now you can use the CRM Word Add-in to create templates for your documents.
Setting-up Upgrade location for the Aurea CRM Add-in for Microsoft Word
Aurea CRM Add-in for MS Word is developed as a VSTO Add-in. Visual Studio Toolsfor Office (VSTO) Add-ins use the ClickOnce deployment solution which automati-cally updates your CRM Add-in for Word. This requires that you publish Aurea CRMAdd-in to a network shared central location. Users can install the latest version fromthis location once, all subsequent upgrades then happens automatically. Publishinga new version to this location automatically updates all CRM Add-in for Word installedfrom this location.
Note: If there are multiple users on a machine, then each user has to install hisown version of CRM Add-in for MS Word. This is a limitation of the ClickOncesolution.
The following steps illustrate how to publish the latest version of word Add-in to thecentral location:
1. Unzip the package OfficeAddins_<version>_release.zip.
2. Create a network shared central location that is accessible to your users andcopy the files in the unzipped folder to this location.
640AUREA CONFIDENTIAL
Chapter 3: Using CRM

3. Instruct your users to access this folder and install CRM Add-in for Word usingthe aurea.office.word.vsto file. Installing from this folder is required only once,after this the updates happens automatically.
4. When a new version of CRM Add-in for word is released, unzip the new Of-ficeAddins_<version>_release.zip package and copy the files in the unzippedfolder to the same network shared central location.
5. Select Replace the files in the destination when you prompted to overwrite thefiles.
6. The Application Files folder contains the new version as well as the olderversions.
7. When the user star ts up Microsoft Word the next time,
Note: ClickOnce installer checks for updates once in every seven days.
Note: The network shared folder should be accessible to the MS Word user forthe automatic updates to work.
8. If the user wants a new version before the seven days check, he can go to theshared folder and update his current installation by using the aurea.of-fice.word.vsto file.
641AUREA CONFIDENTIAL
Enterprise Features

Troubleshooting the Aurea CRM Add-in for Microsoft Word
Sometimes the Aurea CRM add-in for Word installation may fail with an error mes-sage as shown in the following screenshot:
To resolve the issue, try the following solutions:
• Solution 1:
1. Unzip the package OfficeAddins_8.4.0.0_release.zip.
2. Right click setup.exe and select Run as Administrator.
3. Continue with the installation from step 3, as described in the section above(Installing Aurea CRM Add-in for Microsoft Word).
• Solution 2:
1. Rename file C:\Program Files (x86)\Common Files\Mi-crosoft\Shared\VSTO\10.0 \VSTOInstaller.exe.Config to Old-VS-TOInstaller.exe.Config.
2. Continue with the installation from step 3, as described in the section above(Installing Aurea CRM Add-in for Microsoft Word).
• Solution 3:
1. Rename file C:\Program Files (x86)\Common Files\Mi-crosoft\Shared\VSTO\10.0 \VSTOInstaller.exe.Config to Old-VS-TOInstaller.exe.Config.
2. Unzip the package OfficeAddins_8.4.0.0_release.zip.
3. Right click setup.exe and select Run as Administrator.
4. Continue with the installation from step 3, as described in the section above(Installing Aurea CRM Add-in for Microsoft Word).
Cloud Backup ServiceLearn about the Cloud Backup Service in Aurea CRM.
Aurea CRM cloud backup service allows you to perform a Full backup and restoreof the Aurea CRM data. The backup data includes the data for the following compo-nents:
• CRM.Win
• CRM.Web
• CRM Designer data
642AUREA CONFIDENTIAL
Chapter 3: Using CRM

• CRM database
• CRM Designer database
The backup service provides password protection and proper encryption of the data.It allows you to schedule the data backup on a daily, weekly, and monthly basis.You can view and selectively restore data from the backup instances.
Working with Cloud Backup ServiceLearn to configure and manage Cloud Backup Service.
This Enterprise only feature allows you to configure the backup and restore servicesfrom the CRM.Designer interface. The following screenshot shows the CloudBackup option in the designer.
The Cloud Backup page (see the screenshot below) provides the following tabs:
• Backups – This tab shows all the backups performed on the CRM and allows youto trigger a restore operation from a listed backup. It also shows the status ofcurrent operations in progress.
• Scheduler – This tab allows you to schedule a backup or restore operation. Youcan configure the following schedules:
• Once – This operation is triggered only once at the set time and date.
• Daily – This operation is trigerred daily at the set time.
643AUREA CONFIDENTIAL
Enterprise Features

• Weekly – This operation is triggered weekly for the set days and time.
• Monthly – This operation is triggered monthly for the set months, dates, andtimes.
• Settings – This tab allows you to select the storage provider you want to use forthe backup and restore operations.
• Agents – This tab allows you to provide the URL, por t number and other detailsof the Backup Agent that is responsible for collecting packages, encrypting,packaging, and uploading backups to the cloud backup service.
• On-Demand Access – Provides access to cloud-based development and testenvironments for Aurea CRM and is available for SAAS customers. Customerscan use these environments in the following scenarios:
• Disaster recovery
• Trying new versions of Aurea CRM before performing an actual upgrade.
• Easily share their environments with Aurea Global Support for troubleshooting.
Scheduling a Backup and Restore operationLearn to schedule a Backup and Restore operation.
To schedule a backup or restore operation perform the following:
1. Click on the Cloud Backup option on the star t page of the designer. The CloudBackup page opens.
2. Click on the Scheduler tab. The Scheduler tab opens.
3. Select the operation type from the Operation drop-down list. Available operationsare Backup and Restore.
4. Select the operation schedule using the Trigger Type drop-down list.
644AUREA CONFIDENTIAL
Chapter 3: Using CRM

To set up a once only backup operation, perform the following steps:
a. Select Once from the Trigger Type field.
b. Select the scheduled date from the Starts on date field.
c. Enter the time to trigger the operation in the Starts at text field. The formatshould be in <hours>:<minutes> form. For example, in the image above totrigger the operation at 4.36 PM, enter the value 14:26.
d. Click New, to add a new entry in the list of scheduled items. The Task Triggercolumn should have the entry in the form <operation type> Once at <date>
<time>. For above example, it has the entry “Backup Once at 2016-04-18 16:36”.
To schedule a daily backup operation, perform the following steps:
a. Select Daily from the Trigger Type field.
b. Select the scheduled star t date from the Starts on date field.
c. Select the scheduled end date from the Ends on date field.
d. Enter the time to trigger the daily operation in the Starts at text field. Theformat should be in <hours>:<minutes> form. For example, in the image aboveto trigger the operation daily at 4.36 PM, enter the value 14:26.
e. Click New, to add a new entry in the list of scheduled items.
The Task Trigger column should have the entry in the form <operation type>
Daily at <time> until <End Date>. For example, “Backup Daily at 16:36 until2016-04-23 00:00”.
To schedule a weekly backup operation, perform the following steps:
a. Select Weekly from the Trigger Type field.
b. Select the scheduled star t date from the Starts on date field.
c. Select the scheduled end date from the Ends on date field.
d. Enter the time to trigger the daily operation in the Starts at text field. Theformat should be in <hours>:<minutes> form. For example, in the image aboveto trigger the operation daily at 4.36 PM, enter the value 14:26.
e. From the Week Days field, select the days of the week you want to trigger theoperation.
f. Click New, to add a new entry in the list of scheduled items.
The Task Trigger column should have the entry in the form <operation type>
weekly at <time> on days <weekday1>, <weekday2> etc until <End Date>
00:00. For example, “Backup weekly at 16:36 on days Monday, Friday until2016-04-23 00:00”.
645AUREA CONFIDENTIAL
Enterprise Features

To schedule a monthly backup operation, perform the following steps:
a. Select Monthly from the Trigger Type field.
b. Select the scheduled star t date from the Starts on date field.
c. Select the scheduled end date from the Ends on date field.
d. Enter the time to trigger the daily operation in the Starts at text field. Theformat should be in <hours>:<minutes> form. For example, in the image aboveto trigger the operation daily at 4.36 PM, enter the value 14:26.
e. From the Months field, select the months of the year you want to trigger theoperation.
f. From the Month days field select the days of each selected month you want totrigger the operation.
g. Click New, to add a new entry in the list of scheduled items.
The Task Trigger column should have the entry in the form <operation type>
Monthly at <time> on a day <date1>, <date2>, <date3> etc of <month1>,
<month2>, <month3> etc until <end date> 00:00. For example, “BackupMonthly at 16:37 on a day 5, 12, 19, 26, 30 of May, June, July, August until2016-08-31 00:00”.
Configuring the Storage SettingsLearn to set-up the storage settings.
To configure the storage settings, perform the following tasks:
1. Click on the Cloud Backup option on the star t page of the designer. The CloudBackup page opens.
2. Click on the Settings tab. The Settings tab opens.
3. Select the Storage Type from the list:
• Aurea Cloud – Uploads backups to the Aurea CloudService, which efficientlystores backups in the cloud. Aurea CloudService can both upload and restorethe backups saved earlier.
• Hot swap - Allows you to send backups to a third par ty backup agent service,which restores the backup remotely, such that another instance can serve onlyas backup destination, not the source. Use this option in failover scenarios, tohave a hot instance in standby.
646AUREA CONFIDENTIAL
Chapter 3: Using CRM
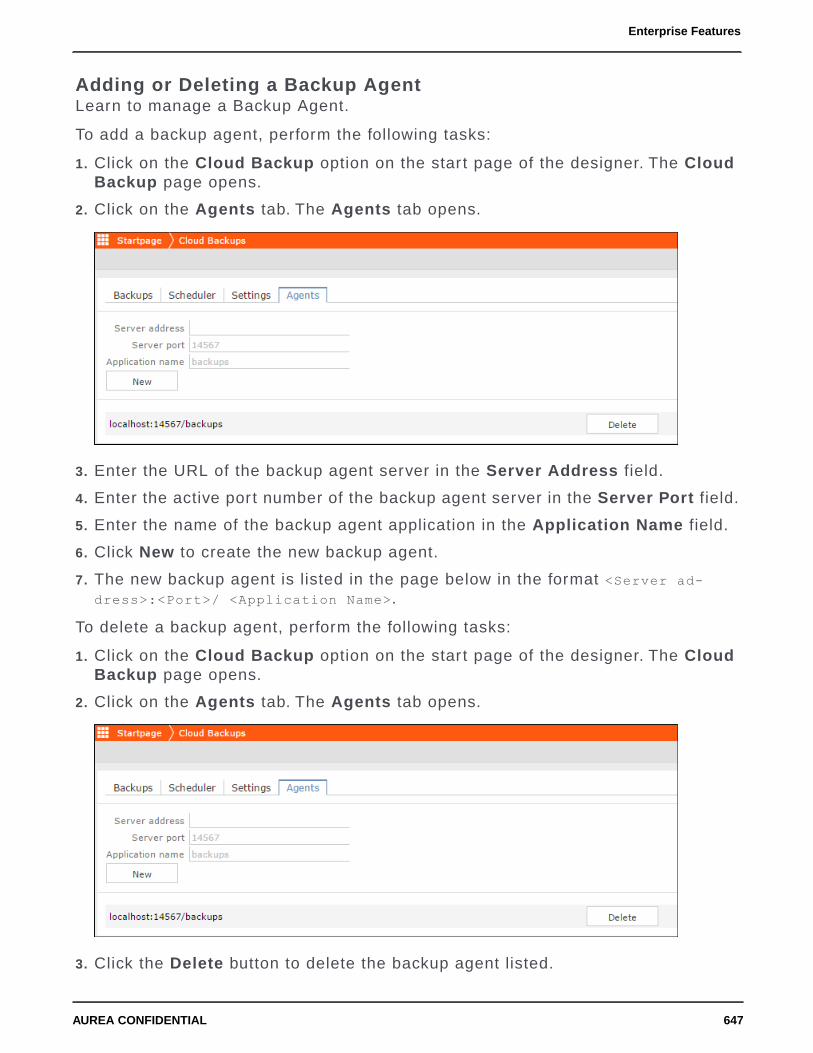
Adding or Deleting a Backup AgentLearn to manage a Backup Agent.
To add a backup agent, perform the following tasks:
1. Click on the Cloud Backup option on the star t page of the designer. The CloudBackup page opens.
2. Click on the Agents tab. The Agents tab opens.
3. Enter the URL of the backup agent server in the Server Address field.
4. Enter the active port number of the backup agent server in the Server Port field.
5. Enter the name of the backup agent application in the Application Name field.
6. Click New to create the new backup agent.
7. The new backup agent is listed in the page below in the format <Server ad-
dress>:<Port>/ <Application Name>.
To delete a backup agent, perform the following tasks:
1. Click on the Cloud Backup option on the star t page of the designer. The CloudBackup page opens.
2. Click on the Agents tab. The Agents tab opens.
3. Click the Delete button to delete the backup agent listed.
647AUREA CONFIDENTIAL
Enterprise Features

Restoring a Backup InstanceLearn how to restore a Backup Instance.
All the backup instances are listed in the Backups tab. The backup list provides thefollowing information about the backup instances:
• Name – The name of the backup instance. This is in the format: Full backup
<date> <start time>.zip. For example, Full backup 2016-04-18 13-31-17.zip.
• Created – The date and time the backup was completed.
• Status – The backup can be in one of two states:
• Hot – This means that the backup package is ready for restoration. All recentpackages less than 7 days old are in a hot state and ready for restoration.
• Cold – This means that the backup package is more than 7 days old and itneeds to be downloaded from the long term cold storage server (for example,Glacier) and made ready for restoration. This process is called warmup. It takesat least 4 hours for a backup package to be downloaded at
To restore a backup data, perform the following tasks:
1. Click on the Cloud Backup option on the star t page of the designer. The CloudBackup page opens
2. Click on the Backups tab. The Backups tab opens.
3. To restore a backup data, perform the following:
• If the listed backup is in a hot state then click Restore to restore the backupdata.
• If the listed backup is in a cold state then click Warmup and Restore to restorethe backup data.
On-Demand AccessAurea CRM provides on demand access to cloud based development and testenvironments.
You can use the test environments in the following scenarios:
• Disaster recovery
• Trying new versions of Aurea CRM before performing an actual upgrade.
• Easily share their environments with Aurea Global Support for troubleshooting.
The following features are provided by Aurea CRM On-Demand access:
• CRM.Designer allows you to create, star t, stop, and delete these environmentsfor all the CRM verticals.
• You can access these environments using predefined links and all communicationwith these environments are secured using SSL (Secured Socket Layer).
648AUREA CONFIDENTIAL
Chapter 3: Using CRM

• You can define the backup using the cloud backup feature provided in theCRM.Designer.
• You can use these environments with or without the backup data. You can usethe environment using a backup and specify the version number you want to use.
• You can only get the CRM.Web and CRM.Designer functionality using these envi-ronments.
The following security measures are taken when creating a test environment:
• All users except for SU and WWW are deactivated in the test environments.
• You can create anonymized databases from the backups when creating a testenvironment. Data can be masked at the infoarea or field level.
The following screenshot shows a sample On-Demand Access page on theCRM.Designer.
The On-Demand Access page consists of three sections: Backups; Application;Test Environment. A brief description of each is provided below.
Backups
This section of the page displays the list of backups available and created previously.You have to select a backup for use in creating the test environment. For more in-formation on creating and working with backups, see Scheduling a Backup and Re-store operation on page 644.
Application
649AUREA CONFIDENTIAL
Enterprise Features

This section allows you to create the test environment. You can configure your testenvironment by specifying different properties like using the application data fromthe backup, create an empty database or use the database present in the backup,the version number of the CRM that is used as well as the ver tical type of the appli-cations created in the test environment.
• You can only create one test environment with a specific configuration. If you tryto create more than one test environment using the same configuration, errormessage is received.
• If you are creating a test environment that uses the applications and the databasefrom the backup then the test environment created is restricted to the version ofthe CRM used to create the backup.
• Test environments have a limited life span and expires after a cer tain number ofhours.
• All the test environments are deployed to the cloud infrastructure maintained byAurea Software.
Test Environment
This section lists the test environments created. You can see configuration detailsof the test environment. It also provides you with controls to star t, stop and deletethe test environments and the generated links to the CRM.Web and CRM.Designercreated in the test environment.
Creating a Test EnvironmentLearn how to create a Test Environment.
To create a new test environment, perform the following steps:
1. Click the checkbox besides the backup listed in the Backup section.
Note: The backup source should be in a hot state and ready for deployment. Formore information, see Restoring a Backup Instance on page 648.
Note: You have to select a backup to create a test environment.
2. Select the Application to be created from the following options:
• Get Specific Version – Use this option if you want to create a test environmentwithout any of the customizations created in the backup.
• Get app from backup – Use this options if you want to import the customizationscreated in the CRM server from which the backup was created.
Note: You cannot use the database from the backup if you want to use aspecific version of the CRM server in the test environment.
650AUREA CONFIDENTIAL
Chapter 3: Using CRM

3. Select the Database option that you want to specify from the following options:
• Empty Database – select this option to create a test environment with emptydatabase.
• Original Database from backup – select this option if you want to import thedata from the backup to the test environment database.
Note: If you are importing the customizations in the backup then you cannotuse a specific version of the CRM to create the test environment.
• Anonymized database from backup – use this option if you want to importthe database from the backup but you do not want cer tain data to be visible.For more information on anonymizing the data, see Anonymizing the BackupDatabase on page 652.
4. Select the Version of the CRM servers with which you want to create the testenvironment from the drop-down list.
5. Select the required Industry Vertical configuration for the CRM servers in the testenvironment. You can select from the following options: B2B; B2C; and F2C.
Note: The above two options is disabled if you have opted to import thecustomizations and the database or anonymized database from the backup.
6. Click New. The new test environment creation is initialized and it is listed in theTest Environment section of this page. The Status column shows Initializationin the screenshot below. And the Actions column has the Delete button activated.Click Delete, if you wish to stop creating the test environment.
Once the initialization is complete, the status of the test environment createdchanges to Up. It also shows the lifespan of the test environment (in hours) beforeit is terminated. The Links column contains links to the CRM.Web andCRM.Designer created in the test environment. The Actions column nows has theStop and Delete buttons. See the screenshot below.
7. Click on the CRM or Designer link to open the server in a new tab. The followingscreenshot shows the CRM.web server login window in a new tab.
651AUREA CONFIDENTIAL
Enterprise Features

Notice the URL, it uses the SSL to establish the connection to the CRM.Web inthe test environment. It is of the format https://<unique token>.<domain
name>/web/crm/start. The unique token ensures that you always connect to thecorrect instance of the test environment. The domain name is specified by the<CrmWebUrl> configuration element. For more information on configuration, seeConfiguring the On-Demand Access settings on page 654.
8. Click the Stop button to stop the test environment. The Start button gets activated.
9. Click the Delete button to delete the test environment. The Status of the testenvironment changes to Deleted.
Anonymizing the Backup DatabaseLearn to make your Backup Database Anonymous.
Anonymizing the database allows you to create a test environment and load thedatabase from your backup, while restricting sensitive data from being visible to theuser. This is very useful when you want allow Aurea support teams to troubleshootthe issues on your CRM environment, while preserving the integrity of your sensitivedata.
You can anonymize data in the database at two levels of data hierarchy:
• Anonymize the infoarea by anonymizing the table for the infoarea.
• Anonymize specific fields in the infoarea by selecting the required fields in thetable.
652AUREA CONFIDENTIAL
Chapter 3: Using CRM

To anonymize data in your database, perform the following steps:
1. Select the Anonymized database from backup option in the Database column.The database table is displayed at the bottom of the screen. See the screenshotbelow.
2. You can select the infoarea that you want to anonymize by selecting the checkboxunder the Anonymize Table column for the info area. In this example, we selectthe Company infoarea as we do not want to share the Company details of ourcustomers.
3. You can also selectively anonymize the fields of an infoarea by selecting thecheckbox under the Anonymize Field column. The list of all available fields in theinfoarea are displayed to the right of the Anonymize table. In the followingscreenshot all the fields of the Person infoarea is displayed.
4. Select the fields you want to anonymize by click the checkbox to the right of thefield. The selected fields is not anonymized and is not visible in the test environ-ment.
653AUREA CONFIDENTIAL
Enterprise Features

Configuring the On-Demand Access settingsLearn to set-up Aurea CRM for On-Demand Access settings.
You have to configure the <update.configuration> element in the settings.xmlfile for the CRM.Designer in the CRM server installation location. The following ele-ments need to be set:
• <CrmWebUrl> - The URL for the Aurea CRM.Web application.
• <CrmWebUserName> - The CRM.Web super user username that is used to connectto the test environment server.
• <CrmWebPassword> - The password for the CRM.Web user.
Change Notifications ServiceAurea CRM change notification service allows a user to be notified about changesto records and events of interest.
The user can track changes on his dashboard, as well as use other notification typeslike Email, Popup, and Record. The user can add items of interest to his personalwatchlist.
In order to enable change notifications on a record, you should add the M_Watchlistmenu to the corresponding infoarea’s menu entries. This ensures that the Watchlistmenu is added to the context menu of the record’s infoarea.
The following screenshot shows the M_Watchlist menu, which is par t of the UP-DATE_DEFAULT configuration. The Referenced by section of the window showsthe Infoarea menu that point to this watchlist menu. In the screenshot below, theM_Company menu for the Company infoarea contains the M_Watchlist menu.
To add the watchlist to an infoarea menu, open the infoarea’s menu entry and addM_watchlist to its Menu Entries. The following screenshot of M_Company menushows the M_Watchlist menu added to the list of its Menu entries.
654AUREA CONFIDENTIAL
Chapter 3: Using CRM

After adding the Watchlist menu to an infoarea menu, you have to add the infoareato the list subscribed infoareas to the web configuration parameter Watchlist.Avail-ableInfoAreas. This list is made available in the infoarea combo box in the searchpages for watchlist subscriptions and change notifications.
The change notification service is based on a change notification engine. The changenotification engine uses a database that is independent of the designer database.When a notification item is created for the first time, the notification engine createsthe required database automatically. The databases supported out of the box areOracle and MySQL databases.
Aurea CRM server uses ASP.NET SignalR library to push change notifications tothe connected web clients as soon as a change notification is generated. This en-sures that change notifications are delivered in real time.
Watchlist and NotificationsAurea CRM users can set up their personal watchlist of items to be notified aboutchanges.
For example, an accounts manager might be interested in knowing when a changeoccurs with his key accounts and he can add the accounts to his watchlist and setthe notification types.
The following screenshot shows the list of watchlist items subscribed by all users:
655AUREA CONFIDENTIAL
Enterprise Features

For a given record or infoarea the Watchlist context menu initially allows you to adda watchlist item. For example, the screenshot below shows the Add Item toWatchlist and View all Watchers sub-menu item for the Company infoarea.
After adding an item to the watchlist the Watchlist context menu allows you to performthe following tasks:
• Delete items from the watchlist.
• View all watchers.
• Deactivate watchlist items.
• View change notifications.
• Edit watchlist item.
656AUREA CONFIDENTIAL
Chapter 3: Using CRM

• See the screenshot below:
•
A notification is generated when one of the following condition is fulfilled:
• A notification request is set for any change to the record of interest and a changeis made to the record.
• A notification request is set for changes made to specific fields of a record andone or more of the specified fields are changed.
The following screenshot shows the change notifications visible on the Dashboard:
The Recent Notifications widget on the dashboard displays the recent change no-tifications generated for a cer tain number of days excluding the notifications gener-ated today. The number of days is set in the web configuration parameter Watch-list.RecentNotifications.PeriodInDays.
The following screenshot shows a popup change notification:
657AUREA CONFIDENTIAL
Enterprise Features
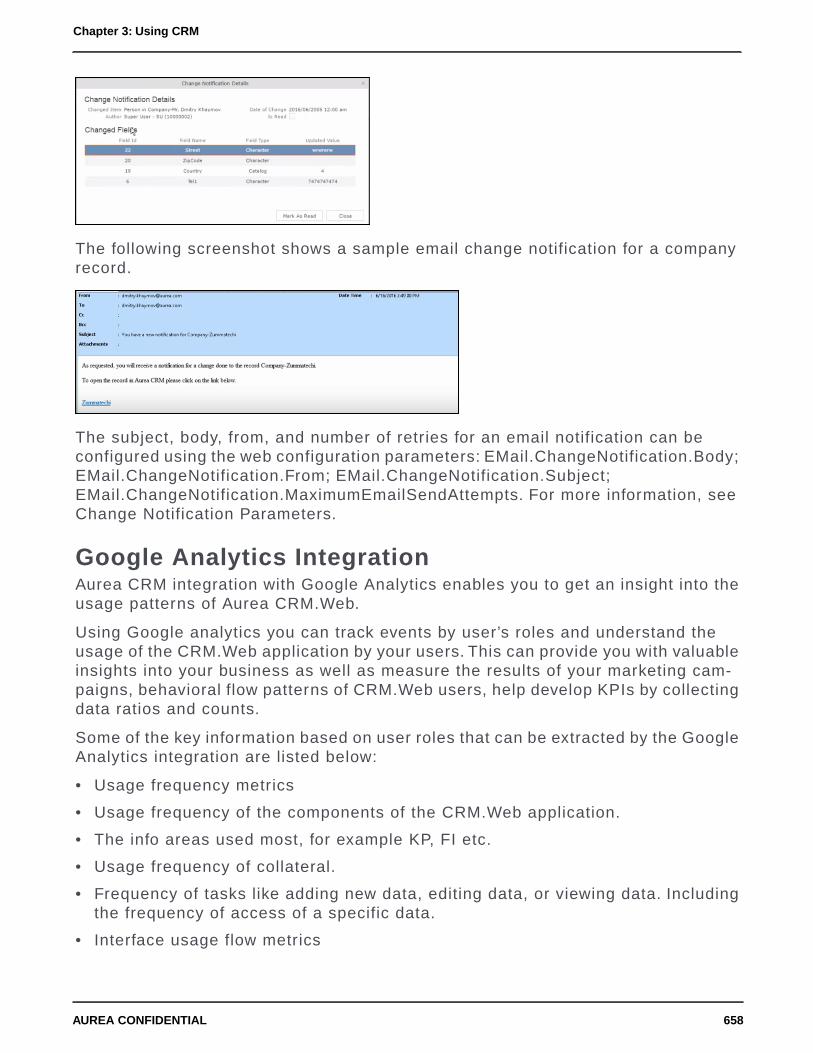
The following screenshot shows a sample email change notification for a companyrecord.
The subject, body, from, and number of retries for an email notification can beconfigured using the web configuration parameters: EMail.ChangeNotification.Body;EMail.ChangeNotification.From; EMail.ChangeNotification.Subject;EMail.ChangeNotification.MaximumEmailSendAttempts. For more information, seeChange Notification Parameters.
Google Analytics IntegrationAurea CRM integration with Google Analytics enables you to get an insight into theusage patterns of Aurea CRM.Web.
Using Google analytics you can track events by user’s roles and understand theusage of the CRM.Web application by your users. This can provide you with valuableinsights into your business as well as measure the results of your marketing cam-paigns, behavioral flow patterns of CRM.Web users, help develop KPIs by collectingdata ratios and counts.
Some of the key information based on user roles that can be extracted by the GoogleAnalytics integration are listed below:
• Usage frequency metrics
• Usage frequency of the components of the CRM.Web application.
• The info areas used most, for example KP, FI etc.
• Usage frequency of collateral.
• Frequency of tasks like adding new data, editing data, or viewing data. Includingthe frequency of access of a specific data.
• Interface usage flow metrics
658AUREA CONFIDENTIAL
Chapter 3: Using CRM
• Behavior flows that show how users move to their target screens.
• Real time information on events triggered by users.
• Usage metrics
• Understand users with different roles and where they spend their time.
• Average time on a specific action (creating a quota, updating forecast, etc.).
• Time spent on data entry?
• Time spent on a cer tain process (preparing a search, campaign design, creatingor updating records)?
• Time spent on searching for items - can we see if the searches are repetitive orcommon?
• Some examples of frequency of action and events for a given user role:
• How often do sales reps search for items?
• How often do sales reps create records and activities?
• How often do marketing managers access reports? And which reports?
Note: Enterprise users can use their own Google Analytics tracker and can fur thercustomize the tracked components. Standard users of Aurea CRM can use GoogleAnalytics tracker provided by Aurea and have the option to turn it off.
The following screenshots show the metrics captured on screen events, user ses-sions, and screen behavior flows of the CRM.Web users by Google analytics.
The following screenshot shows a Behavior report on the Average Time on Pageversus the Bounce Rate. This report allows you to drill down to specific pages. Thedrill down path ALL » PAGE PATH LEVEL 1: /OTC.updateCRM_web/ » PAGEPATH LEVEL 2: /crm/ » is visible at the top of the page. You can also select othermetrics to compare or view user behavior on a single metric. As well as other capa-bilities.
659AUREA CONFIDENTIAL
Enterprise Features

Configuring the Google Analytics TrackerLearn to set-up the Google Analytics Tracker.
To track the CRM.Web application using Google Analytics, you can:
1. Use the main tracker provided by Aurea CRM. This tracks all aspects of CRM.Webapplication. Use the GoogleAnalytics.MainTrackerEnabled parameter to enabletracking by Google Analytics tracker provided by Aurea. Tracking for CRM.Webapplication is disabled by default.
2. Enterprise customers can use their own Google Analytics tracker and they canspecify if the user ids should or should not be sent to the tracker.
To configure your own instance of Google Analytics tracker, perform the followingsteps:
Note: These instructions are a minimal subset of configurations possible for GoogleAnalytics. Refer to the Google Analytics Help Center for detailed instructions andpossibilities.
1. Disable tracking by Google Analytics tracker provided by Aurea by setting theparameter GoogleAnalytics.MainTrackerEnabled to false.
2. Open the Google Analytics home page configured for your organization.
3. Select the Admin tab. The Administrator page displays.
660AUREA CONFIDENTIAL
Chapter 3: Using CRM

Create a new property
1. Under the PROPERTY column, select Create New Property from the drop downlist. The New Property page displays.
This page allows you to create the tracking id for your Aurea CRM.Web application.The tracking allows google analytics to track the data on your Aurea CRM site.Click the Website button and provide the following details:
• Website Name: The name of the website configuration you are creating forAurea CRM.
• Website URL: The URL of your Aurea CRM.Web application.
• Industry Category: Select the category of your industry.
• Reporting Time Zone: Select your country to set the time zone.
Note: In the following sample screenshots we use the website name Aurea toconfigure the remaining properties.
2. Click Get Tracking ID. The new tracking id for the new property is generated.The new property is now visible under the drop down list under the Propertycolumn in the admin page.
661AUREA CONFIDENTIAL
Enterprise Features

Edit the property settings for the new property
1. Select the new property name from the drop down list in the PROPERTY Column.
2. Click Property Settings. The Property Settings page displays.
662AUREA CONFIDENTIAL
Chapter 3: Using CRM

Configure the basic and advanced properties listed on this page as required.
• Click Save. The Administrator page opens again.
User Management settings
• Click User Management node in the PROPERTY column. You can add users andassign them access permissions from this page. Click Save.
Configure and retrieve tracking information
1. Expand the Tracking info node in the PROPERTY column. Click Tracking Code.This page provides the following:
a. You can retrieve the Tracking ID for the Aurea CRM tracking instance. Youhave to configure this value in the Aurea CRM Designer.
b. You can get the Tracking code that you have to embed in the Aurea CRM Webpages that you want to track.
663AUREA CONFIDENTIAL
Enterprise Features

Note: Refer to the Google Analytics Help Center for more information.
Configuring Custom DimensionsLearn to configure Custom Dimensions in Google Analytics.
A Dimension in Google Analytics is an ar tifact that captures data accessed on yourweb application. Google Analytics provides you with default dimensions to captureand analyze most data. But it does not capture Aurea CRM specific data. In orderto capture CRM data, for example Infoarea of the data retrieved by your users, youhave to provide your own custom dimensions. Aurea provides a few custom dimen-sions to capture some of the Aurea CRM data. The following custom dimensionsare provided by Aurea:
• Infoarea
• View
• CRMVersion
• InstanceID
• UserID
To add more custom dimensions specific to your requirements, please contact Aureasupport (email:[email protected]).
To use the custom dimensions provided by Aurea CRM:
1. Create the custom dimensions in the tracker.
2. Configure the custom dimensions in the CRM Designer to allow Google Analyticsto track the data for the custom dimensions.
Creating Custom Dimensions in the Tracker
To configure a custom dimension follow these steps:
1. Open the Google Analytics tracker page for your organization.
2. Select the Admin tab. The Administrator page displays.
664AUREA CONFIDENTIAL
Chapter 3: Using CRM

3. Expand the Custom Definitions node in PROPERTY column.
4. Click Custom Dimensions. The Custom Dimensions page displays.
5. Click New Custom Dimension. The Add New Custom Dimension page displays.
665AUREA CONFIDENTIAL
Enterprise Features

Enter the following information:
• Name: Enter a name for the custom dimension.
• Scope: Specify the level, when you want to star t tracking.
• Active: To activate and star t collecting data.
6. Click Create. The Created Custom Dimensions page displays.
Code snippets to be used in the CRM code to capture the required CRM data isprovided.
7. Click Done. The Custom dimension is created.
Configuring Custom Dimensions in the CRM Designer
After configuring all the Aurea supplied custom dimensions in the Google Analyticstracker in your organization’s account, you have to set them up for tracking in theCRM Designer. The following screenshot shows the custom dimensions page in theGoogle tracker.
Each of the custom dimension configured has an index value associated, shown inthe table above. To configure the custom dimension in CRM Designer, you have toset the value of the corresponding web configuration parameter for the custom di-mension in the format dimension<index>. The web configuration prameters for acustom dimension is of the format GoogleAnalytics.CustomDimension.<custom di-mension name>
666AUREA CONFIDENTIAL
Chapter 3: Using CRM

For example, in the screenshot above, the custom dimension Infoarea has the indexvalue of 1. The corresponding web configuration parameter for custom dimension,Infoarea is GoogleAnalytics.CustomDimension.Infoarea and its value is set to dimen-sion1.
The following screenshot shows the web configuration parameter configured for thecustom dimensions shown in the Google Tracker screenshot above. For more infor-mation, see Google Analytics Parameters on page 118
Creating a new Custom Report using Custom DimensionsGoogle Analytics allows you to create custom reports. You can use the customdimensions in these reports.
To create a custom report, perform the following steps:
1. Open the Google Analytics tracker page for your organization.
2. Select the Customization tab. The Customization page displays.
3. Click New Custom Report. The Create Custom Report page displays.
4. Click the Flat Table button.
5. Click + add dimensions. The drop down list opens.
6. Expand the Custom Dimension node and select CRMInstanceID.
7. Repeat steps 5 and 6 and add the custom dimension CRMVersion.
667AUREA CONFIDENTIAL
Enterprise Features

8. Click + add metric. The drop down list opens.
9. Enter search for and select the Time on Page metric. The metric is added to thepage.
10.Click Save. The custom report is created.
11.Click Add to Dashboard. The Add to Dashboard window pops up.
12.Select the check box on the table row.
13.Click Add to Dashboard. The report is added to the specified dashboard in tableformat. See the dashboard screenshot below. The total time spent on all thepages, by all users of each of the different CRM server versions are displayed inthe table.
668AUREA CONFIDENTIAL
Chapter 3: Using CRM
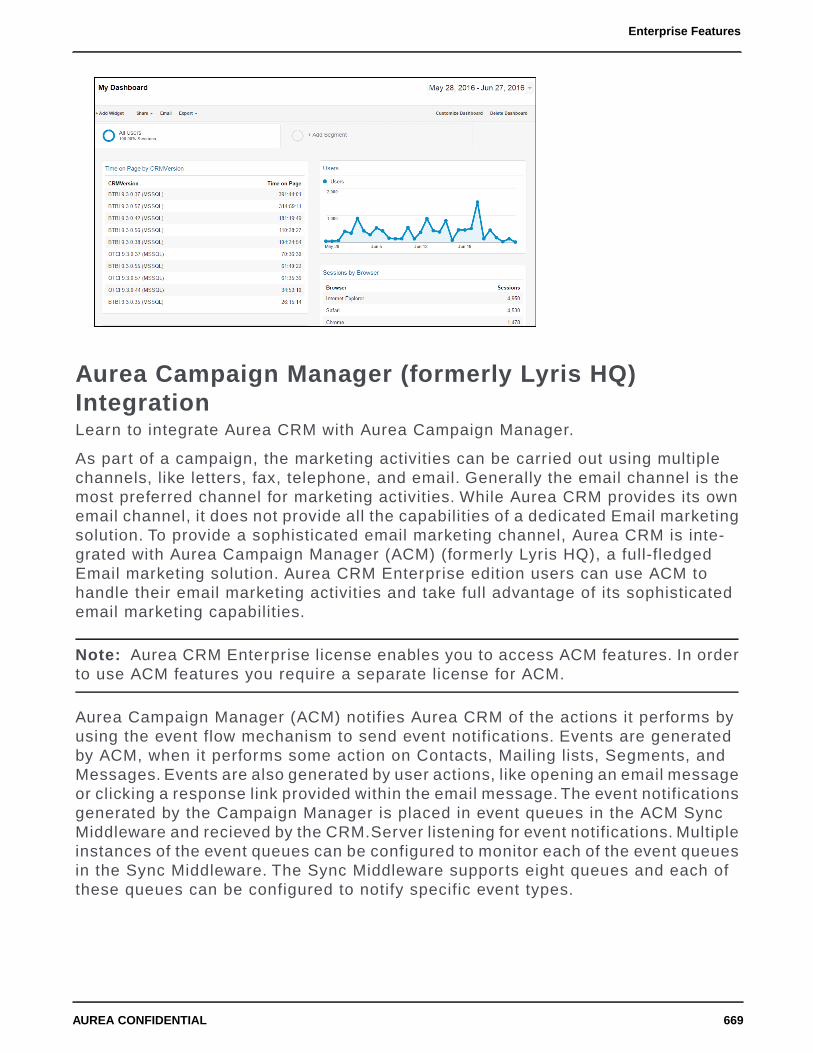
Aurea Campaign Manager (formerly Lyris HQ)IntegrationLearn to integrate Aurea CRM with Aurea Campaign Manager.
As part of a campaign, the marketing activities can be carried out using multiplechannels, like letters, fax, telephone, and email. Generally the email channel is themost preferred channel for marketing activities. While Aurea CRM provides its ownemail channel, it does not provide all the capabilities of a dedicated Email marketingsolution. To provide a sophisticated email marketing channel, Aurea CRM is inte-grated with Aurea Campaign Manager (ACM) (formerly Lyris HQ), a full-fledgedEmail marketing solution. Aurea CRM Enterprise edition users can use ACM tohandle their email marketing activities and take full advantage of its sophisticatedemail marketing capabilities.
Note: Aurea CRM Enterprise license enables you to access ACM features. In orderto use ACM features you require a separate license for ACM.
Aurea Campaign Manager (ACM) notifies Aurea CRM of the actions it performs byusing the event flow mechanism to send event notifications. Events are generatedby ACM, when it performs some action on Contacts, Mailing lists, Segments, andMessages. Events are also generated by user actions, like opening an email messageor clicking a response link provided within the email message. The event notificationsgenerated by the Campaign Manager is placed in event queues in the ACM SyncMiddleware and recieved by the CRM.Server listening for event notifications. Multipleinstances of the event queues can be configured to monitor each of the event queuesin the Sync Middleware. The Sync Middleware supports eight queues and each ofthese queues can be configured to notify specific event types.
669AUREA CONFIDENTIAL
Enterprise Features

Note: To enable ACM you have to set the Lyris.Enabled parameter to true. Thisparameter should be set in the configuration that corresponds to the CRM.Serveruser, and should be set in the users.xml file. The CRM Server Plugin for SyncMid-dleware uses the above credantials to access the SyncMIddleware credentialsconfigured in the CRM.Designer database. For more information on setting the userdetails, see Configuring CRM Server to listen to the SyncMiddleWare MessageQueues on page 672.
ACM Sync Middleware OverviewCRM.Server has a plugin for the ACM Sync Middleware that allows it to listen toevent notifications posted on the event queues hosted by the ACM Sync Middleware.
The Sync Middleware URI and the authentication details are configured in the fol-lowing web configuration parameters in the designer: Lyris.SyncMiddlewareUri;Lyris.SyncMiddlewareUsername; and Lyris.SyncMiddlewarePassword. For more in-formation on these parameters, see Lyris Parameters on page 127.
The ACM Sync Middleware uses the Java Messaging System to publish eventmessages. You can configure multiple instances of CRM.Server to listen to one ormore event queues. There are 8 event queues maintained by the ACM Sync Middle-ware. The event queues handled by the CRM.Server instance is configured usingthe <update.PlugIns.Lyris.SyncMiddleware.Consumer> element in the settings.serv-er.xml file for the CRM.Server instance. The <consume> child node contains thename of the event queue the CRM.Server instance listens to.
The event queue name should have the following format:
<ORGANISATION UID>.VirtualTopic.<EVENT NAME>
For example, the following screenshot shows the configured event queues:
Where the Organization UID has the value 26589cf-... -377pa2. To get the <Orga-nization UID> for your organization, see Ordering Access to the ACM SyncMiddle-ware.<consume>vm0000a88a.VirtualTopic.Contact.Updated</consume>
670AUREA CONFIDENTIAL
Chapter 3: Using CRM

The following event names are supported:
• Contact.Updated—for example, Consumer.Lyris_EndPoint.VirtualTopic.Con-tact.Updated.
• Contact.Upload.Status—for example, Consumer.Lyris_EndPoint.VirtualTopic.Con-tact.Upload.Status.
• MailingList.Updated—for example, Consumer.Lyris_EndPoint.VirtualTopic.Mail-ingList.Updated.
• Message.Status—for example, Consumer.Lyris_EndPoint.VirtualTopic.Mes-sage.Status.
• Messge.Deleted—for example, Consumer.Lyris_EndPoint.VirtualTopic.Mes-sage.Deleted.
• Message.Updated—for example, Consumer.Lyris_EndPoint.VirtualTopic.Mes-sage.Updated .
• Segment.Generated—for example, Consumer.Lyris_EndPoint.VirtualTopic.Seg-ment.Generated.
Important: Always ensure that a queue name is unique for each CRM.Serverinstance. If more than one instance of the CRM.Server is configured to monitor thesame queue, then a message retrieved by one instance is not available to the otherinstance and results in inconsistent results, missed events etc.
The following configuration settings shows the CRM.Server instance listening todifferent message queues (in the red box).
Note: The CRM.Server plugin configuration in the red ellipse, shows the plugintype settings required for the ACM Sync Middleware.
671AUREA CONFIDENTIAL
Enterprise Features

Ordering Access to the ACM SyncMiddleware
You can place your request for the ACM SyncMiddleWare details from https://sup-port.aurea.com/. Ensure that you provide the Aurea support group with the followinginformation:
• Your preferred Lyris Organization UID or proper Lyris HQ Organization name.
You should receive the following information from support on the ACM SyncMiddle-ware and Lyris API:
• Organization UID
• Lyris.SyncMiddlewareUri
• Lyris.SyncMiddlewareUsername
• Lyris.SyncMiddlewarePassword
• Lyris.Host
• Lyris.APIPassword
Configuring Bi-directional Communication between ACRMand ACMLearn to set up bi-directional Communication between ACRM and ACM.
To setup bi-directional communication between Aurea Campaign Manager and AureaCRM, you have to configure the following:
1. Configure Aurea CRM with the ACM SyncMiddleware information, to enable theCRM Server to listen to message events from ACM, see Ordering Access to theACM SyncMiddleware.
2. Configure the ACM Web configuration parameters in the CRM designer to enableACRM to communicate with Lyris using API calls. Lyris Parameter should becorrectly configured in the CRM Sub-configuration created in the CRM.Designer,and are pointing to the correct ACM. For more information on configuring LyrisParameters in the CRM.Designer, see Configuring Lyris HQ on page 676.
Configuring CRM Server to listen to the SyncMiddleWare MessageQueuesLearn to set-up CRM Server to listen to the SyncMiddleWare Message Queues.
Before you perform the setup, ensure the following conditions are met:
1. ACRM Enterprise version should be 10.2.0 or higher.
2. CRM Server should be up and running.
3. Ensure that you have all the ACM SyncMiddleware details with you. For moreinformation on ordering the access to the SyncMIddleware, see Ordering Accessto the ACM SyncMiddleware.
672AUREA CONFIDENTIAL
Chapter 3: Using CRM

Perform the following steps:
1. Configure the CRM Server user in user.xml located at <CRM.Web VerticalRoot>\web\system \settings directory. The CRM Server user should haveaccess to the CRM.server module and the Configuration module. The user shouldalso be defined as CRM.server Rep ID in web configuration to ensure that ToDosare assigned to the user. See the screenshot below, where type=” Server”:
Note: It is not mandatory to use SU (super user). Any user having access toCRM.server module account to the Configuration module can be added here. Theuser should also be defined as a CRM.server Rep ID in CRM.Web configuration.
2. Set the CRM Server users Rep ID in web configuration parameter UpdateServ-er.RepID. See the screenshot below:
For more information, see UpdateServer.RepID.
3. Update the < appSettings > element in the update.Server.exe.config file locatedat <CRM.Web Vertical Root>\web\system\settings directory to point to the correctpath of file settings.server.xml.
673AUREA CONFIDENTIAL
Enterprise Features
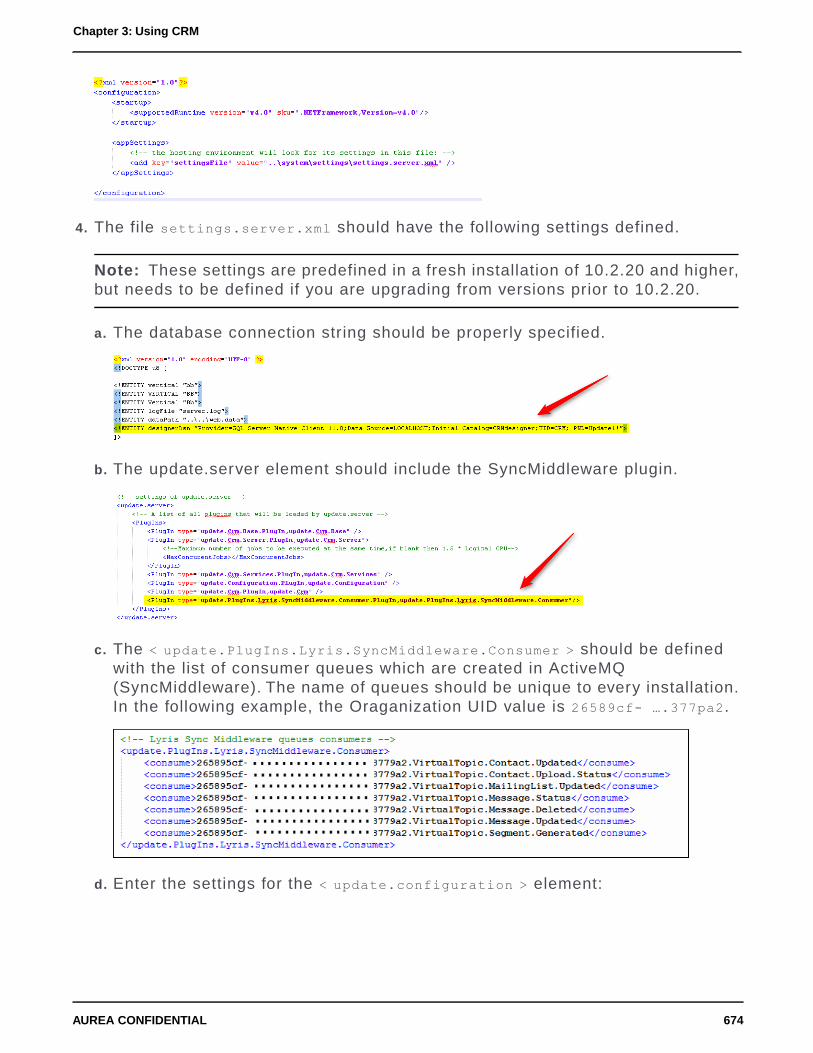
4. The file settings.server.xml should have the following settings defined.
Note: These settings are predefined in a fresh installation of 10.2.20 and higher,but needs to be defined if you are upgrading from versions prior to 10.2.20.
a. The database connection string should be properly specified.
b. The update.server element should include the SyncMiddleware plugin.
c. The < update.PlugIns.Lyris.SyncMiddleware.Consumer > should be definedwith the list of consumer queues which are created in ActiveMQ(SyncMiddleware). The name of queues should be unique to every installation.In the following example, the Oraganization UID value is 26589cf- ….377pa2.
d. Enter the settings for the < update.configuration > element:
674AUREA CONFIDENTIAL
Chapter 3: Using CRM

e. Set up update.server as a windows service.
a. Open a command prompt with administrative privileges and change directoryto <CRM.Web Vertical Root>\web\bin.
b. Run the following command:update.server.exe --install --name "update.server"
c. The service named update.server should appear in the list of windowsservices.
d. Start the service. If all the settings are configured properly the Status shouldchange to ‘Running’.
f. To configure the server error log files perform the following steps:
a. To troubleshoot errrors in the server setup, set the loglevel attribute to Debugin the <Logging> element in the settings.server.xml files. See the screenshotbelow:
b. The following log entry in the log file is a confirmation that the value set inthe web configuration parameter Lyris.SyncMiddleUri is working.
675AUREA CONFIDENTIAL
Enterprise Features
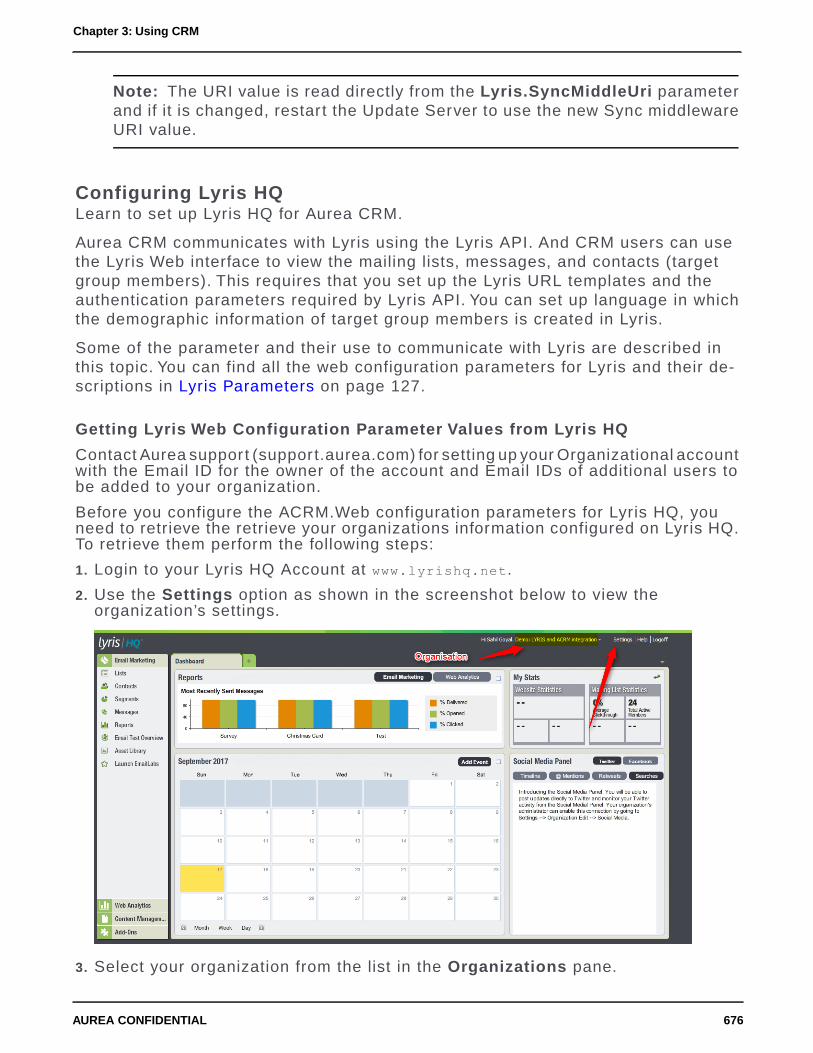
Note: The URI value is read directly from the Lyris.SyncMiddleUri parameterand if it is changed, restar t the Update Server to use the new Sync middlewareURI value.
Configuring Lyris HQLearn to set up Lyris HQ for Aurea CRM.
Aurea CRM communicates with Lyris using the Lyris API. And CRM users can usethe Lyris Web interface to view the mailing lists, messages, and contacts (targetgroup members). This requires that you set up the Lyris URL templates and theauthentication parameters required by Lyris API. You can set up language in whichthe demographic information of target group members is created in Lyris.
Some of the parameter and their use to communicate with Lyris are described inthis topic. You can find all the web configuration parameters for Lyris and their de-scriptions in Lyris Parameters on page 127.
Getting Lyris Web Configuration Parameter Values from Lyris HQ
Contact Aurea support (support.aurea.com) for setting up your Organizational accountwith the Email ID for the owner of the account and Email IDs of additional users tobe added to your organization.
Before you configure the ACRM.Web configuration parameters for Lyris HQ, youneed to retrieve the retrieve your organizations information configured on Lyris HQ.To retrieve them perform the following steps:
1. Login to your Lyris HQ Account at www.lyrishq.net.
2. Use the Settings option as shown in the screenshot below to view theorganization’s settings.
3. Select your organization from the list in the Organizations pane.
676AUREA CONFIDENTIAL
Chapter 3: Using CRM

4. The Lyris.SiteID configuration parameter value can be found in the Site ID fieldin the Organizational Details windows.
5. Click Edit on the top right corner of the Organizatonal Details window. You canset the API Password for the organization in the Edit Organization pane. Thisvalue is provided in the web configuration parameter Lyris.APIPassword.
677AUREA CONFIDENTIAL
Enterprise Features

6. Click Launch EmailLabs in the Email Marketing pane to the left of the page.The EmailLabs page displays. The domain name displayed in the URL for thepage is the value that is required to set the web configuration parameterLyris.Host.
In the screenshot below, the domain value is elabs12.com.
678AUREA CONFIDENTIAL
Chapter 3: Using CRM

Note: The value of the Lyris parameter Lyris.Host is used to configure the valuesof the following Lyris web configuration parameters:
• Lyris.MailingListUrlTemplate
• Lyris.MessageUrlTemplate
• Lyris.SegmentUrlTemplate
7. Set the value of the web configuration parameter, Lyris.ActivityExecutionIdDe-mographicId. Click Contacts in the left pane. Then select More Actions > ManageAttributes in the resulting Email Marketing – Contacts page.
679AUREA CONFIDENTIAL
Enterprise Features

8. In the resulting Attribute Management dialog, create a new attribute with thename ActivityExecutionIdDemographicId of type Multiple Select List. The IDgenerated for this attribute should be added to the Lyris.ActivityExecutionId-DemographicId web configuration parameter.
9. Edit the attribute Lyris.TargetGroupTransferMaxChunkSize. It determines themaximum number of contacts that can be transferred to a mailing list created inLyris. Set it to a large number if the target group number is more.
Configuring Lyris, Lyris Host, and Lyris API details
In order to use Lyris as an email marketing tool it has to be first enabled using theLyris.Enabled web configuration parameter. Setting this to true is the first configu-ration step to star t using Lyris from Aurea CRM.
All communication with Lyris is done using the Lyris API. The host address used byAurea CRM to communicate with Lyris API is provided using the Lyris.Host param-eter. All API calls are made against the URL format. Lyris.Host should be eitheran IP address or a fully qualified name of the machine hosting Lyris HQ API.
Authentication password for a Lyris API connection is provided in the parameterLyris.APIPassword.
All API requests passed by Aurea CRM to the Lyris host needs to carry a site id.This is a Lyris requirement and is configured in the parameter Lyris.SiteID.
Configuring Mailing list name prefix
To transfer a marketing activity to Lyris, a mailing list and a message is created byLyris for that marketing activity. The Lyris.SuggestedMailingListNamePrefix param-eter takes a prefix value that is used by Aurea CRM to suggest a name for themailing list. It is displayed when the user chooses to create a new mailing list.Custom configurations for each user of CRM system can also be used to providespecific prefix to differentiate between CRM users. The user can overwrite thesuggested name along with the prefix during the creation of a new mailing list.
680AUREA CONFIDENTIAL
Chapter 3: Using CRM

Configuring Lyris URL Templates
When a user transfers a marketing activity to Lyris, a mailing list and a messagetemplate are created on Lyris. Different marketing activities can use the samemailing lists, to differentiate between them, Lyris generates a segment for eachmarketing activity. This helps it to associate the target groups associated with thesame mailing list used by different marketing activities.
On successful creation of these entities on Lyris, Aurea CRM creates the URLs toaccess these instances on Lyris. The user can click on these links to navigate tothe instances on Lyris. To access the mailing lists, messages and segments, Lyrisexpects these URL to have a cer tain format.
The parameters Lyris.MailingListURLTemplate, Lyris.MessageURLTemplate, andLyris.SegmentUrlTemplate contain the URL templates used by Aurea CRM to gen-erate the URLs to acess the mailing list, message, and segment instances on Lyris.
The following is a sample of the mailing list URL.https://ip-172-30-90-193.ec2.internal/v3/mailing_list.html?NEXTPAGE=mailing_list_view&setmlcookie=on&mlid={lyrisMailingListId}
The id generated by Lyris when it creates the mailing list is returned to Aurea.CRMand inserted in the {lyrisMailingListId} placeholder.
Similarly, the following is a sample of the message URL,https://ip-172-30-90-193.ec2.internal/v3/mailing_list_message_view.html?
setmlcookie=on&mlid={lyrisMailingListId}&mid={lyrisMessageId}
The message id as returned by Lyris API on successful creation of a message duringmarketing activity transfer to Lyris, is inser ted in the {lyrisMessageId} placeholder.
Configuring target group creation and scheduling
When the target group for a marketing activity is transferred to Lyris, the demograph-ics created for cer tain catalog values like country, date format, and greetings arecreated according to the demographics language specified in the Lyris.Demograph-icOptionsLanguage parameter. Valid values are: ger, eng, fre, spa, por, nld, dan,ita, cze, hun, slk, pol, gre, ukr, sln, rus, swe, fin, nor, tur, cro, ser, ron, jpn, chn,kor, bul, tha, and alb. For example, if you set the value to "ger" the demographiccreated for the CRM field Country in Lyris has Deutschland.
When CRM requests Lyris to create the required demographics for the CRM fieldsin Lyris, it has to provide the demographics ID to the Lyris API, this value shouldbe provided in the parameter Lyris.ActivityExecutionDemographicId.
To ensure that the transfer of target groups to the Lyris server happens successfully,CRM schedules the transfer of a cer tain number of items in the target group at atime. The value of the chunk to be transferred at a time can be specified inLyris.TargetGroupTransferMaxChunkSize.
Configuring Standard Editor to display Lyris Icon for Target Group Members
Lyris features available in Aurea CRM are accessible from the Campaign Designer,as well as the standard editors for marketing activities. However, the state of targetgroup entities in terms of Lyris is not shown by default in the target group searchlist for standard editors. In order to enable an extra (custom) column that is capableof showing the Lyris icon in those target group entities already transferred to Lyris,perform the following steps in a List control of an AG field group:
681AUREA CONFIDENTIAL
Enterprise Features
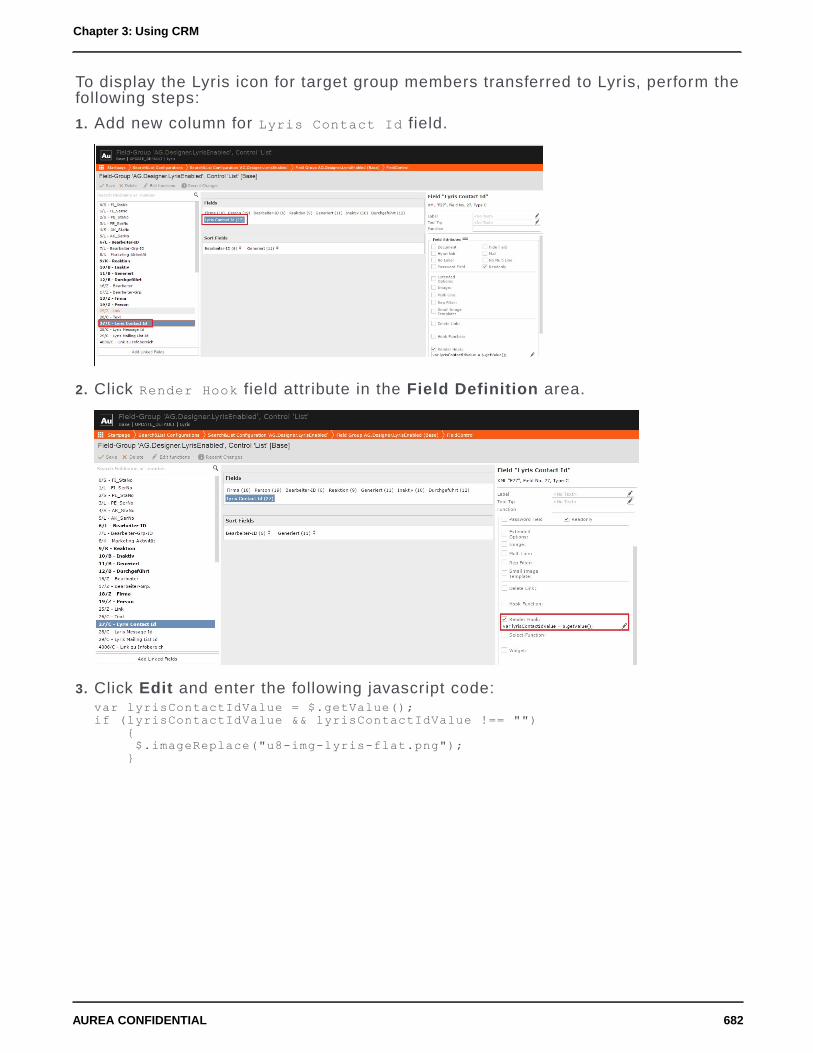
To display the Lyris icon for target group members transferred to Lyris, perform thefollowing steps:
1. Add new column for Lyris Contact Id field.
2. Click Render Hook field attribute in the Field Definition area.
3. Click Edit and enter the following javascript code:var lyrisContactIdValue = $.getValue();if (lyrisContactIdValue && lyrisContactIdValue !== "")
{$.imageReplace("u8-img-lyris-flat.png");
}
682AUREA CONFIDENTIAL
Chapter 3: Using CRM

ACM Event notificationLearn about the ACM event notification.
ACM sends the following event notifications when the Contact status of target groupmember changes:
• Trashed - A target group member is set to Trashed state in ACM.
• Bounced – A target group member is set to Bounced state in ACM.
• Unsubscribed – A target group member unsubscribes in ACM.
• Active - A target group member is set to Active state in ACM.
ACM sends the following event notifications on the status of the Email messagesfor a marketing activity:
• Email Sent – When ACM sends the marketing email message to a target groupmember.
• Email Delivered – When ACM delivers marketing activity email message to theinbox of a target group member.
• Email Opened – When the target group member opens the email message forthe marketing activity.
• Email Bounced – When the email for a target group member could not be deliveredfor some reason.
Other event notifications from ACM:
• URL Click Event – When a user clicks on a response URL link in a marketingactivity email message.
• Update Boolean Field – When the value of a property (demographic) of typeBoolean (checkbox), of a target group member in ACM is updated.
683AUREA CONFIDENTIAL
Enterprise Features

• Update Date Field – When the value of a property (demographic), of type Date,of a target group member in ACM is updated. For example, the Date of Bir th valueof a target group member in ACM is updated.
• Update Text Field – When the value of a property (demographic), of type textor text area, of a target group member in ACM is updated. For example, the FirstName value of a contact in ACM is updated.
• Update Catalog field – When the value of a property (demographic), of type Se-lect List, of a target group member in ACM is updated. For example, the Countryfield of a target group member in ACM is updated.
Some of the log messages generated by Aurea CRM after processing the eventnotification are shown below:
Contact Trashed event
When a target group member’s status is set to Trashed in Lyris, a notification isgenerated for the responsible Rep of the marketing activity. The target groupmember in CRM is set to the inactive status. The notification message contains in-formation about the CRM target group member that was set to inactive status. AureaCRM on processing the contact trashed event, logs the following:
Contact Active event
When an inactive (or trashed) target group member is set to Active in ACM, a noti-fication is sent to the responsible rep of the marketing activity. The target groupmember in CRM is set to the active status. The notification message contains infor-mation about the CRM target group member that is set to the active status. AureaCRM on processing the contact active event, logs the following:
Contact Bounced event
When ACM changes the status of a contact to bounced, the event is received byAurea CRM and it executes a predefined named trigger. You can define the triggerlogic based on your business requirement. The name of the trigger can be specifiedin the Web configuation parameter Lyris.TriggerOnLyrisContactBounced parameter.If the parameter is empty then no trigger is executed by CRM and the event is ig-nored. For a description of the parameter, see Lyris Parameters on page 127.
Aurea CRM on receiving this event, executes the configured trigger and logs the
following:
684AUREA CONFIDENTIAL
Chapter 3: Using CRM

Contact Unsubscribed Event
When Lyris changes the status of a contact to Unsubscribed, the event is recievedby Aurea CRM and it executes a predfined named trigger. You can define the triggerlogic based on your business requirements. The name of the trigger can be specifiedin the Web configuration parameter Lyris.TriggerOnLyrisContactUnsubscribedparameter. If the parameter is empty then no trigger is executed by CRM and theevent is ignored. For a description of the parameter, see Lyris Parameters on page127.
URL Click Events
Aurea CRM marketing activity email messages generated by ACM can contain re-sponse URL links to capture response from the target group members. When a re-cipient clicks on an URL, ACM generates an Email click event. On receiving theEmail click event from the ACM Sync Middleware, Aurea CRM records the responsein the Mailings (BR) info area record for the target group member, for each marketingactivity.
The following screenshot shows the log generated in the CRM.Server log file onreceiving the Email click event notification:
The message shows that the Mailing record was updated to record the first responsefrom the recipient, a click action on the response URL: www.lyris.com?response=ac-cepted.
An email message recipient can send multiple responses configured for a marketingactivity. If the user sends the same response multiple times, they are ignored. Thefollowing screenshot shows the server log, for the third response from this recipientbeing a duplicate, as the response is already recorded. Hence, the Mailing recordis not updated.
If there are more than five responses configured for a marketing activity, and if theuser clicks on all the reponse URLs then reponse event after the 5th response areignored. Similarly, click events generated when recipients click on URLs in a messagethat are not mapped to a response are ignored. The appropriate log entries arecreated in the server log.
685AUREA CONFIDENTIAL
Enterprise Features

Events with faulty data
When Aurea CRM receives an event with faulty data and is unable to process itfur ther, it creates a task for the rep associated with the marketing activity for whichthe event was generated. The task provides information about the faulty data andenables the Rep to take appropriate actions.
Events generated with invalid data also generate appropriate log messages that isuseful in undersanding the type of invalid data and provide meaningful clues abouthe fault. Some of these invalid data scenarios are listed below:
• Invalid Message ID
• Invalid Mailing list ID
• Invalid Site ID
• Invalid Boolean field value
• Invalid catalog field value
• Click event notifications generated for recipients who are not members of AureaCRM.
The following screenshot shows a log generated on receiving a faulty data. It indi-cates that a contact’s demographic value for the country field was updated to Greece,but the corresponding Aurea CRM field could not be updated because Greece isnot a valid value, as it is not par t of the country catalog in CRM. This raises a taskfor the Rep responsible for the marketing activity. The Rep can then manually addGreece to the country catalog and update the target group member’s country field.
The following screenshot shows that Aurea CRM could no find the target group en-tity to update the target group member’s demographic details, because the mailinglist ID for the target group member could not be found.
686AUREA CONFIDENTIAL
Chapter 3: Using CRM

Launching Fat Clients Using Aurea CRMAurea CRM allows you to launch third par ty application on the user’s machine usingthe CRM.launcher.
Aurea CRM uses the CRM.launcher to launch any third par ty fat client applicationfrom the command shell and also pass parameter values to the application. The fatclient application should be registered with Aurea CRM designer and also installedlocally on the client machine.
Configuring a Fat client application in the CRM.Designer
Feature is implemented using action templates. You have to create a button anddefine the action using the action template DesktopAppLauncher. For more informa-tion on creating and configuring buttons, see Buttons.
To configure a fat client launcher in the CRM.Designer, perform the following steps:
1. Click Buttons on the CRM.Designer Start page.
The Buttons page displays.
2. Create a new button and open the button for editing.
The screenshot below, shows the New Activity button properties page.
Provide all the required information for the fields. For more information on workingwith buttons, see the chapter Buttons. The button is configured as part of themarketing activity CRM process and is displayed on the marketing activity searchpage.
3. Click in the Action field. The Action for Button <Name> page displays.
687AUREA CONFIDENTIAL
Enterprise Features

4. Select the Action Template radio button.
5. From the dropdown list, select the required fat client action template from thefollowing:
• DesktopAppLauncher—allows you to configure a fat client application availableon the users’s system to be launched.
• WebAppLauncher—allows you to configure a web application URL. This isopened in the user’s default browser.
6. Configure the action template selected.
• If you select DesktopAppLauncher action template, the Action for Button<Name> page is populated as shown below.
Enter the following input arguments for the desktop fat client:
• Application path—specify the path to the application on the desktop.
• CommandLineArgs—specify the parameters and their values that can bepassed to the application on the command shell.
• If you select WebAppLauncher action template, the Action for Button <Name>page is populated as shown below.
688AUREA CONFIDENTIAL
Chapter 3: Using CRM

Enter the following input arguments for the web application fat client:
• URL—specify the URL to the web application.
Note: You can specify the following variables in the commandline arguments orthe URL values for the fat client action templates. Their actual values is substitutedat runtime when the launcher is opening the web url or launching the desktopapplication. See below for more information.
7. Click Apply. The action template is saved.
8. Click Save. The button configuration is saved.
The following variables can be used in the action template definitions of a button:
• {crm.repId}—provides the id value of the Rep.
• {crm.repName}—provides the name of the Rep.
• {crm.userName}—provides the name of the current user logged into AureaCRM.Web.
• {crm.isSuperUser}—sets to true, if the current user is a super user, else sets tofalse.
• {crm.orgGroupId}—provides the groupid of the user,
• {crm.tenantName}—provides the tenant Name.
• {crm.tenantNo}—provides the tenant Number.
• {crm.stationNumber}—provides the station number of the current user.
• {crm.vertical}—provides the ver tical type of the current Aurea CRM installation.
• {crm.applicationName}—provides the name of the application being launched.
• {crm.isOfflineClient}—sets to true if the current user is logged into an offlineclient, else sets to false.
Some examples of commandline values for the DesktopAppLauncher are providedin table below:
CommandLineArgsApplicationPath
-i Ethernet -kC:\Program Files\Wire-shark\wireshark
a -t7z C:\Users\Administrator\Down-loads\7ztest\files.7z C:\Users\Adminis-trator\Downloads\7ztest\*.docx
7z
-o uat:user_dlts:User 0 (DLT=147),http,0,,0,C:\Program Files\Wire-shark\wireshark
{crm.stationNumber} {crm.userName}%TESTAPP-PATH%/testapp.exe
689AUREA CONFIDENTIAL
Enterprise Features

Some examples of URLs for the WebAppLauncher action template are providedbelow:
• http://www.google.com?q=aurea crm
• http://localhost/displaycrmattributes?stationnumber={stationNumber}
Note: Notice the use of the stationNumber variable in the URL.
The following screenshots show the base template of the DesktopAppLauncher actiontemplate.
The following screenshot shows the base template of the WebAppLauncher actiontemplate.
690AUREA CONFIDENTIAL
Chapter 3: Using CRM

Channels Output Cache FrameworkLearn how to reduces the CRM server workload and improve the response time inhigh latent networks.
Aurea CRM.Web (Enterprise) provides output caching framework that reduces theCRM server workload and improve the response time in HIGH latent networks, byallowing you to cache the CRM web server output. Output cache framework takescare of server side caching and sets the appropriate client side (response) headersfor a data channel decorated with cache output attribute.
Channel output cache framework decorates each channel's methods with CacheOut-putAttribute attribute to make the method's output cacheable on server and clientby design. To override the inbuilt cache output properties, you have to enable outputcaching first (disabled by default) and then override the CacheOutputAttributeproperties using a channel's output cache configuration placed in the applicationconfiguration file, web.config in Aurea CRM application. In the web.config file,the cache output configuration is placed under the section update.web.channelOut-putCaching of type ChannelOutputCachingConfigurationSection.
Note: A Channel refers to the pipeline used to retrieve configuration data, calendardata, data from the database, and similar information required for the various oper-ations defined in the CRM server.
The following example shows the channel definition for a channel type with thecache output attribute elements defined in an external file (channelsOutput-Caching.config).<section name="update.web.channelOutputCaching"type="update.Web.Base.Contracts.Caching.Configuration.ChannelOutputCachingConfigurationSection, update.Web.Base.Contracts"/>...<update.web.channelOutputCachingconfigSource="Configs\channelsOutputCaching.config"/>
Note: Using configSource attribute to reference an external configuration file iskept web.config clean and uncluttered.
The following example provides the output cache configuration elements for theFormChannel and configurationChannel channel types in the configuration file.<update.web.channelOutputCaching enabled="true">
<channels><channel channelType="update.Configuration.Web.Channels.FormChannel,
update.Configuration.Web" methodName="Get" enabled="false" /><channel channelType="update.Configuration.Web.Channels.ConfigurationChannel,
update.Configuration.Web" methodName="GetTexts" enabled="true" noCache="true"clientTimeSpan="3600" serverTimeSpan="3600" mustRevalidate="true"anonymousOnly="false" private="true" excludeQueryStringFromCacheKey="false"/>
</channels></update.web.channelOutputCaching>
691AUREA CONFIDENTIAL
Enterprise Features

The cache output elements should be defined for each of the different data channeltypes for which you wish to enable client and server side caching for the output fromdifferent method calls. The different channel configuration attributes are describedbelow:
• channelType—specify the channel type whose output is to be cached. Mandatoryelement. For the list of channel types that support caching, see the table below.
• enabled—enable or disable caching the output of the channel. Enabled by default.
• methodName—specify the name of the method whose output is to be cached.Mandatory element. See the table below to get the names of methods that supportcaching in the list of channel types.
• anonymousOnly—cache enabled only for requests when Thread.CurrentPrincipleis not set. Default value is true.
• clientTimeSpan—time (in seconds) for which a response is cached on the clientside. This corresponds to the HTTP Cache-Control general-header'scache-request-directive max-age (in seconds).
• serverTimeSpan—time (in seconds) for which a response is cached on the serverside.
• private—ensures that a response is cached by the browser on the client side butis not cached by any intermediate caches like a proxy server. This correspondsto the HTTP Cache-Control general-header's cache-response-directive private.
• mustRevalidate—ensures that the cache entry is not used after it becomes stale,when responding to a subsequent request without first revalidating it with theorigin server. This corresponds to the HTTP Cache-Control general-header'scache-response-directive must-revalidate.
• excludeQueryStringFromCacheKey—ensures that cache does not vary by querystringvalues. Default value is true.
The following table lists the channel types and the method names that support theoutput caching. The corresponding HTTP method is also pointed out.
692AUREA CONFIDENTIAL
Chapter 3: Using CRM

HTTPMethod
ImplementationMethod NameChannel Type
Get
Only client caching is supported.
Supported HTTP Cache-Control direc-tives:
• cache-request-directive: max-age (inseconds).
• cache-response-directive: privateand must-revalidate.
GetSystemInfoAdministration
Channel
Get
Only client caching is supported.
Supported HTTP Cache-Control direc-tives:
• cache-request-directive: max-age (inseconds).
• cache-response-directive: privateand must-revalidate.
GetAnalysisAnalysisChan-
nel
Get
Only client caching is supported.
Supported HTTP Cache-Control direc-tives:
• cache-request-directive: max-age (inseconds).
• cache-response-directive: privateand must-revalidate.
GetSettingsAnalysisChan-
nel
Get
Only client caching is supported.
Supported HTTP Cache-Control direc-tives:
• cache-request-directive: max-age (inseconds).
• cache-response-directive: privateand must-revalidate.
GetLogin Set-
tings
Application
Channel
693AUREA CONFIDENTIAL
Enterprise Features

HTTPMethod
ImplementationMethod NameChannel Type
Get
Only client caching is supported.
Supported HTTP Cache-Control direc-tives:
• cache-request-directive: max-age (inseconds).
• cache-response-directive: privateand must-revalidate.
GetStartupDa-
ta
Application
Channel
Get
Server side caching (with ETag support)and client caching supported.
Supported HTTP Cache-Control direc-tives:
• cache-request-directive: max-age (inseconds).
• cache-response-directive: privateand must-revalidate.
GetItemCalendarChan-
nel
Get
Server side caching (with ETag support)and client caching supported.
Supported HTTP Cache-Control direc-tives:
• cache-request-directive: max-age (inseconds)
• cache-response-directive: privateand must-revalidate.
GetItemsCalendarChan-
nel
Get
Server side caching (with ETag support)and client caching supported.
Supported HTTP Cache-Control direc-tives:
• cache-request-directive: max-age (inseconds)
• cache-response-directive: privateand must-revalidate.
GetStartOfCalendarChan-
nel
694AUREA CONFIDENTIAL
Chapter 3: Using CRM

HTTPMethod
ImplementationMethod NameChannel Type
Get
Server side caching (with ETag support)and client caching supported.
Supported HTTP Cache-Control direc-tives:
• cache-request-directive: max-age (inseconds)
• cache-response-directive: privateand must-revalidate.
GetCatalogsCatalogChannel
Get
Server side caching (with ETag support)and client caching supported.
Supported HTTP Cache-Control direc-tives:
• cache-request-directive: max-age (inseconds)
• cache-response-directive: privateand must-revalidate.
GetHolidaysCollaboration
Channel
Get
Only client side caching supported.
Supported HTTP Cache-Control direc-tives:
• cache-request-directive: max-age (inseconds)
• cache-response-directive: privateand must-revalidate.
GetActionItemConfiguration
Channel
Get
Server side caching (with ETag support)and client side caching supported.
Supported HTTP Cache-Control direc-tives:
• cache-request-directive: max-age (inseconds)
• cache-response-directive: privateand must-revalidate.
GetChartTypesConfiguration
Channel
695AUREA CONFIDENTIAL
Enterprise Features

HTTPMethod
ImplementationMethod NameChannel Type
Get
Server side caching (with ETag support)and client caching supported.
Supported HTTP Cache-Control direc-tives:
• cache-request-directive: max-age (inseconds)
• cache-response-directive: privateand must-revalidate.
GetTextKeysConfiguration
Channel
Get
Server side caching (with ETag support)and client caching supported.
Supported HTTP Cache-Control direc-tives:
• cache-request-directive: max-age (inseconds)
• cache-response-directive: privateand must-revalidate.
GetTextsConfiguration
Channel
Get
Server side caching (with ETag support)and client caching supported.
Supported HTTP Cache-Control direc-tives:
• cache-request-directive: max-age (inseconds)
• cache-response-directive: privateand must-revalidate.
IsFavoriteFavorites
Channel
Get
Server side caching (with ETag support)and client caching supported.
Supported HTTP Cache-Control direc-tives:
• cache-request-directive: max-age (inseconds)
• cache-response-directive: privateand must-revalidate.
GetFormChannel
696AUREA CONFIDENTIAL
Chapter 3: Using CRM

HTTPMethod
ImplementationMethod NameChannel Type
Get
Server side caching (with ETag support)and client caching supported.
Supported HTTP Cache-Control direc-tives:
• cache-request-directive: max-age (inseconds)
• cache-response-directive: privateand must-revalidate.
GetHeaderHeadersChannel
GetNo cachePollJobsChannel
Get
Server side caching (with ETag support)and client caching supported.
Supported HTTP Cache-Control direc-tives:
• cache-request-directive: max-age (inseconds)
• cache-response-directive: privateand must-revalidate.
GetDefaultAc-
tionMenusChannel
Get
Only client side caching.
Supported HTTP Cache-Control direc-tives:
• cache-request-directive: max-age (inseconds)
• cache-response-directive: privateand must-revalidate.
GetMenuMenusChannel
Get
Server side caching (with ETag support)and client caching supported.
Supported HTTP Cache-Control direc-tives:
• cache-request-directive: max-age (inseconds)
• cache-response-directive: privateand must-revalidate.
GetQuick-
SearchMenusChannel
697AUREA CONFIDENTIAL
Enterprise Features

HTTPMethod
ImplementationMethod NameChannel Type
Get
Server side caching (with ETag support)and client caching supported.
Supported HTTP Cache-Control direc-tives:
• cache-request-directive: max-age (inseconds)
• cache-response-directive: privateand must-revalidate.
GetExpression
ValuesQueryChannel
Get
Server side caching (with ETag support)and client caching supported.
Supported HTTP Cache-Control direc-tives:
• cache-request-directive: max-age (inseconds)
• cache-response-directive: privateand must-revalidate.
GetFilterQueryChannel
Get
Server side caching (with ETag support)and client caching supported.
Supported HTTP Cache-Control direc-tives:
• cache-request-directive: max-age (inseconds)
• cache-response-directive: privateand must-revalidate.
GetFilter
ListQueryChannel
Get
Server side caching (with ETag support)and client caching supported.
Supported HTTP Cache-Control direc-tives:
• cache-request-directive: max-age (inseconds)
• cache-response-directive: privateand must-revalidate.
GetFiltersQueryChannel
698AUREA CONFIDENTIAL
Chapter 3: Using CRM

HTTPMethod
ImplementationMethod NameChannel Type
Get
Only client side caching.
Supported HTTP Cache-Control direc-tives:
• cache-request-directive: max-age (inseconds)
• cache-response-directive: privateand must-revalidate.
GetFilterSetsQueryChannel
Get
Server side caching (with ETag support)and client caching supported.
Supported HTTP Cache-Control direc-tives:
• cache-request-directive: max-age (inseconds)
• cache-response-directive: privateand must-revalidate.
GetQueryQueryChannel
Get
Server side caching (with ETag support)and client caching supported.
Supported HTTP Cache-Control direc-tives:
• cache-request-directive: max-age (inseconds)
• cache-response-directive: privateand must-revalidate.
GetRepSetsRepsChannel
Get
Server side caching (with ETag support)and client caching supported.
Supported HTTP Cache-Control direc-tives:
• cache-request-directive: max-age (inseconds)
• cache-response-directive: privateand must-revalidate.
ReadRepsChannel
699AUREA CONFIDENTIAL
Enterprise Features

HTTPMethod
ImplementationMethod NameChannel Type
Get
Server side caching (with ETag support)and client caching supported.
Supported HTTP Cache-Control direc-tives:
• cache-request-directive: max-age (inseconds)
• cache-response-directive: privateand must-revalidate.
ReadManyRepsChannel
Get
Only Client side caching supported.
Supported HTTP Cache-Control direc-tives:
• cache-request-directive: max-age (inseconds)
• cache-response-directive: privateand must-revalidate.
GetInfoArea
SchemasSchemaChannel
Get
Only Client side caching supported.
Supported HTTP Cache-Control direc-tives:
• cache-request-directive: max-age (inseconds)
• cache-response-directive: privateand must-revalidate.
GetQuick
SearchesSearchChannel
Get
Only Client side caching supported.
Supported HTTP Cache-Control direc-tives:
• cache-request-directive: max-age (inseconds)
• cache-response-directive: privateand must-revalidate.
FindSettingsChan-
nel
700AUREA CONFIDENTIAL
Chapter 3: Using CRM

HTTPMethod
ImplementationMethod NameChannel Type
Get
Only Client side caching supported.
Supported HTTP Cache-Control direc-tives:
• cache-request-directive: max-age (inseconds)
• cache-response-directive: privateand must-revalidate.
LoadSettingsChan-
nel
PostOnly server side caching supported.ReadTableCaptions
Channel
PostOnly server side caching supported.ReadBatchTableCaptions
Channel
Get
Server side caching (with ETag support)and client caching supported.
Supported HTTP Cache-Control direc-tives:
• cache-request-directive: max-age (inseconds)
• cache-response-directive: privateand must-revalidate.
GetTypesTypesChannel
KPI Definition (Enterprise CRM)A KPI definition provides a quick measure of your business metrics primarily focusingon key targets and objectives of your business.
For example, you can calculate the current state of your sales for existing and newcustomers. This would be very useful in monitoring open calls, new customers ofinterest and other related information without having to be informed by email.
A KPI definition record allows you to specify operations on specific field of an infoarea and calculate the required metrics. You can specify target values to be achievedand measure the percentage of target achieved and the standard deviation from thetarget by scheduling the KPI definition to perform the calculation for specified timeperiods. For example, you could specify that the KPI calculation is performed “perweek” and the calculation would consider the required field values for the previousweek once the definition is executed.
701AUREA CONFIDENTIAL
Enterprise Features

The following example illustrates how the KPI calculations are performed for differentcalculation periods (assuming the KPI calculation is scheduled to star t on May 10th2017):
• Per Hour - The KPI value is calculated for the previous 60 minutes from thescheduled time.
• Per Day – The KPI value is calculated for the previous 24 hours from the scheduleddate and time.
• Per Week – The KPI value is calculated for the previous week: April 30th to May7th.
• Per Month - The KPI value is calculated for the previous month: April 1st to April30th.
• Per Quarter – The KPI value is calculated for the previous quarter: Jan 1st toMarch 31st.
• Per Year - The KPI value is calculated for the previous year: Jan 1st to December31st 2016.
You can use the following operations in a KPI definition to generate the requiredvalues: Add; Average; Count; Divide; Maximum; Minimum; Multiply; Subtract; andSum.
As an administrator you can allow the CRM.web users to access one or more of thefollowing menu items by creating appropriate roles and assigning them to the users.
1. Create and schedule a new KPI definition: Administration > KPI > New Schedule.
2. Search for scheduled KPI definitions: Administration > KPI > Search Schedules.
3. Search the results of the KPI runs performed: Administration > KPI > SearchResults.
Note: If you do not find one or more of these in the KPI, contact your CRM.Webadministrator to assign the appropriate role.
702AUREA CONFIDENTIAL
Chapter 3: Using CRM

Creating a New KPI DefinitionLearn to create a new KPI definition.
To define and schedule a new KPI definition, perform the following steps:
703AUREA CONFIDENTIAL
Enterprise Features

1. Select the Administration > KPI > New Schedule menu. The New: Definition
page displays.
2. Provide the KPI definition by entering the following values in the Definition section:
• Name: Enter a name for the definition.
• Target Value: The expected target value for the KPI calculation.
• Calculation Period: The time periods for which the target values are calculated.You can select the following from the drop-down list:
• Per Hour—calculates the KPI value for the previous 60 minutes from thescheduled time.
• Per Day—calculates the KPI value for the previous 24 hours from thescheduled date and time.
• Per Week—calculates the KPI value for the previous full week (Monday –Sunday) before generation.
• Per Month—calculates the KPI value for the previous full month beforegeneration.
• Per Quarter—calculates the KPI value for the previous full quarter beforegeneration.
• Per Year—the calculation is always done for the previous full year beforegeneration.
Note: The records selected for the calculation are the ones that have beencreated or updated in the specified Calculation Period. They are determinedusing the Created On(date), Created at(time), Updated on(date), and Updatedat (time) fields of a record.
• Info Area: Select the Infoarea that contains the field of interest for the KPIcalculation.
• Field Id: Select the field of interest from the drop-down list.
704AUREA CONFIDENTIAL
Chapter 3: Using CRM

• Calculation Method: Select the type of calculation you want to perform fromthe drop-down list. The methods available depend on the type of the field youselect. The following lists the possible values available: Add; Average; Count;Divide; Maximum; Minimum; Multiply; Subtract; and Sum.
Note: The Count method does not require a Field Id to be specified, as it onlycounts the number of records.
• Operand Value: Specify an operand value desired. For example, if you selectdivide as the calculation method, you have to specify the value of the divisor.
Note: An operand is only required for the Add, Divide, Multiply, and Subtractcalculation methods.
705AUREA CONFIDENTIAL
Enterprise Features

3. Scheduling involves setting the star t date and time for the definition as basic re-quirement to star t running the KPI definition and calculating the required values.You can also re-schedule a new run of the definition by setting some of the valuesin this section. The fields in the Scheduling section are described below:
• Start Date: Specify the scheduled date to star t the KPI calculation.
• Start Time: Select the time of the day to star t the KPI calculation.
• Duration: Specify the duration for which this calculation should be executed.If the calculation exceeds the specified duration then it is aborted.
• Duration Units: Specify the units of the duration. Select from the following:Sec, Min, Hour(s), and Day(s).
• Repeats: To set a repetition pattern for the rescheduled execution of the defi-nition. You can select from the following options: Daily; Weekly; Monthly;Quarterly; Yearly.
Note: If you select Weekly then you can optionally specify the weekday in theRepeats On field.
• Repeats On: Specify the optional weekday on which the execution pattern isrepeated. You can select from Monday to Sunday.
• Interval: An integer value that amplifies the repetition pattern selected in theRepeats field. For example, if you have the Star t Date set to 2017.03.31, Re-peats to Weekly, Interval to 2 and Repeats On to Thursday, next execution isset to 2017.04.13 which is Thursday 2 weeks from star t date.
• Starts On: Specify the date on which the repeated executions of the definitionstar ts. o Ends On: Specify the date on which the repeated executions of thedefinition stops. o Ends After: Specify the number of times the KPI executionis rescheduled.
Note: The Ends On date is checked first and if the deadline is crossed thenthe rescheduled execution is stopped. This takes priority over the Ends After.
4. The Next Run section displays the date and time for when this definition isscheduled to be run again. These values are automatically populated by AureaCRM. Opening this record at a later time should show when the next run of thedefinition is scheduled.
5. Click Save. The new definition is created and scheduled.
706AUREA CONFIDENTIAL
Chapter 3: Using CRM

6. You can add additional conditions to the definition. The definition is executedonly when all the
conditions are satisfied.
To add conditions to the definition, perform the following:
a. Select the Definition Condition tab in the Related Data section.
b. Click New Condition. The New: Definition Condition page displays.
Note: The Info Area field is populated with the value you selected for the KPIdefinition. This is because a KPI definition can be defined for only one infoareaand cannot span multiple infoareas.
In the sample screenshot, the condition is being set for a definition on the Ac-tivity infoarea and we set the condition to ensure that the KPI definition calcu-lation only considers activities that star t on a specific date.
c. Select the field that you want to set the condition on, from the Field Id drop-down list.
d. Select the operator you want to apply on the field, from the Operator drop-down list. The type of operators available depends on the type of field selected.In this case we selected a date field and the operators available would: lessthan, greater than, between, and equals.
e. Select the required date in the Value1 field. The number of fields to be popu-lated again depends on the type of the operator. For example, if you select theoperator between, then you have to specify two dates to select the activitiesthat star t in this date range.
f. Click Save.
707AUREA CONFIDENTIAL
Enterprise Features

7. You can view the list of definitions scheduled to run in the future, you can searchfor them in the To- Dos search window.
To view the scheduled definitions in the queue, perform the following:
a. Select the Calendar > To-Dos menu.
b. Select the type of To-Do from the Type drop-down list. In this case it is Calcu-late.
c. Select the status if the To-Do from the Status drop-down list. In this case it isOpen.
d. Click Start Search. The scheduled definitions display in the Search Resultslist.
Searching for KPI DefinitionsLearn how to search for KPI Definitions.
To search for existing KPI definitions, perform the following:
1. Select Administration > KPI > Search Schedules .
The Search Definition page displays.
2. You can filter the search result by providing relevant values in the fields provided.For example, provide the infoarea in the search filter to find all KPI calculationsdefined for that infoarea.
3. Click Start Search.
The search results display.
4. Double click on the required item in the result list to open the Definition page.
708AUREA CONFIDENTIAL
Chapter 3: Using CRM
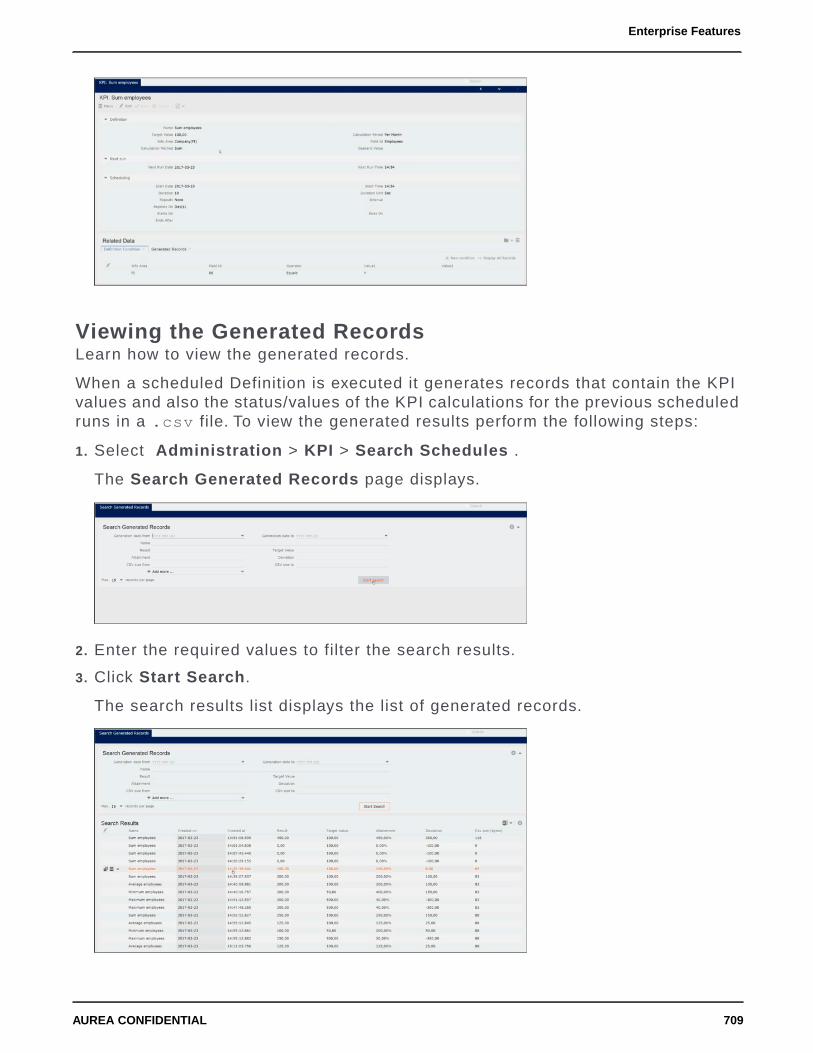
Viewing the Generated RecordsLearn how to view the generated records.
When a scheduled Definition is executed it generates records that contain the KPIvalues and also the status/values of the KPI calculations for the previous scheduledruns in a .csv file. To view the generated results perform the following steps:
1. Select Administration > KPI > Search Schedules .
The Search Generated Records page displays.
2. Enter the required values to filter the search results.
3. Click Start Search.
The search results list displays the list of generated records.
709AUREA CONFIDENTIAL
Enterprise Features

4. Double click the required record.
The result record for the KPI calculation displays the following details:
• Name: The name of the KPI definition.
• Result: The KPI value calculated according to the definition for the selectedtime period.
• Attainment: The percentage value of the KPI result versus the expected targetvalue.
• Target Value: The expected target value for the KPI result specified in thetarget definition.
• Deviation: The standard deviation of the KPI result from the target value.
• CSV size (bytes): The size of the CSV file generated that contains the detailsof all the infoarea records considered in calculating the target value.
5. Click the link to the generated CSV file listed in the Document Links tab underParent Data. The document is downloaded to your local system.
6. Open the downloaded CSV file and open it in a spreadsheet editor.
The spreadsheet shows three columns containing values for the infoarea, theRecord Id, and the infoarea field used to calculate the KPI. In this instance itshows the record ids of the records from the infoarea whose Employees fieldvalue was used to calculate the total number of employees in all the companies.
If the KPI definition also has conditions defined, then the fields used in the conditionsare added to the CSV file following the field used in the definition. For example, ifthere are two conditions defined then there is two more columns for the two fieldsused in the conditions.
710AUREA CONFIDENTIAL
Chapter 3: Using CRM

PackagesA CRM.Designer package consists of a set of configuration units defined in oneCRM.Designer configuration.
A package is defined within CRM.Designer and can then be downloaded and uploadedas XML files using CRM.bulkloader. For fur ther details, see CRM.bulkloader on page760.
Contrary to uploading complete configurations (see Transferring Configurations toAnother CRM.Designer Database on page 78), it is not necessary to upload apackage into a configuration with the same name: You can select the target config-uration before uploading.
Note: Package uploads are data model-bound: The target database must have thesame data model as the source database at least concerning the tables, fields andlinks used in the package. Currently there is no data model mapping implemented.
Note: After upgrading the CRM.Designer database (see Maintenance on page 768)you need to re-generate (download again) all packages, otherwise changes doneby CRM.bulkloader is lost in the target database.
Use packages to
• transfer specific configuration units instead of a complete configuration.
• re-use parts of a customization as one logical package for various projects giventhat the data model concerning the package content is the same in the sourceand target databases.
• copy configuration units from one configuration to another within the sameCRM.Designer database.
Export & Import configuration units definedin a package to other configurations withinthe same or different databases:
Transferring a subset of a configuration:
711AUREA CONFIDENTIAL
Packages

Defining a PackageLearn to define a package in CRM.Designer.
On the CRM.Designer main page in the Packages area, click Packages.
All packages defined for the current configuration are listed. Imported packages areflagged as Imported.
To define a package:
1. Select a package or create a new one. For fur ther details, see Designing Config-uration Units on page 64.
The Editable field indicates whether the package is editable or not.
712AUREA CONFIDENTIAL
Chapter 3: Using CRM

If a package was imported, it is by default not editable to ensure its "upgradeabil-ity". To take ownership of an imported package, click Take Ownership. If youtake ownership of a package, you can edit it but you cannot upload an updateddefinition of this package or package data to your configuration anymore.
2. Select the desired Unit type, its Name (and Subunit name, if applicable). Forfur ther details, see Dependent Units and Sub-Units on page 713. Only configurationunits defined in the current configuration are available.
You can add a description for each item.
3. Click (Add).
Uncheck Export for a configuration unit to temporarily remove it from the package.
Dependent Units and Sub-UnitsLearn about adding dependent units and sub-units to package.
In general, dependent units must be manually added to a package.
Examples: If you add a process to the package you need to manually add all requiredprocess steps as well. If you add a menu to the package, you need to explicitly addall menu actions as well.
Adding sub-units (field controls and headers) to a package:
If you add a field control or a header to a package without adding the fieldgroup/header group to which the control/header belongs, the field group/headergroup is not automatically created when importing the package. If the fieldgroup/header group does not exist in the target database, the subunits are not im-ported. The package displays "not in configuration" for those units in CRM.Designer.
In order to correctly transfer sub-units, you must own the field group/header groupthey belong to and explicitly add the group to the package as well.
Handling text references:
All text references used by the configuration units in the package are implicitlyadded and therefore automatically exported and imported with the package.
Note: Texts defined in another configuration are not exported within the package- only the reference is exported and imported, and uses the same text defined bytextgroup and textid in the destination database. Please be aware that you cannotdefine whether a text shall be imported or not unless the text is explicitly includedin the package.
713AUREA CONFIDENTIAL
Packages
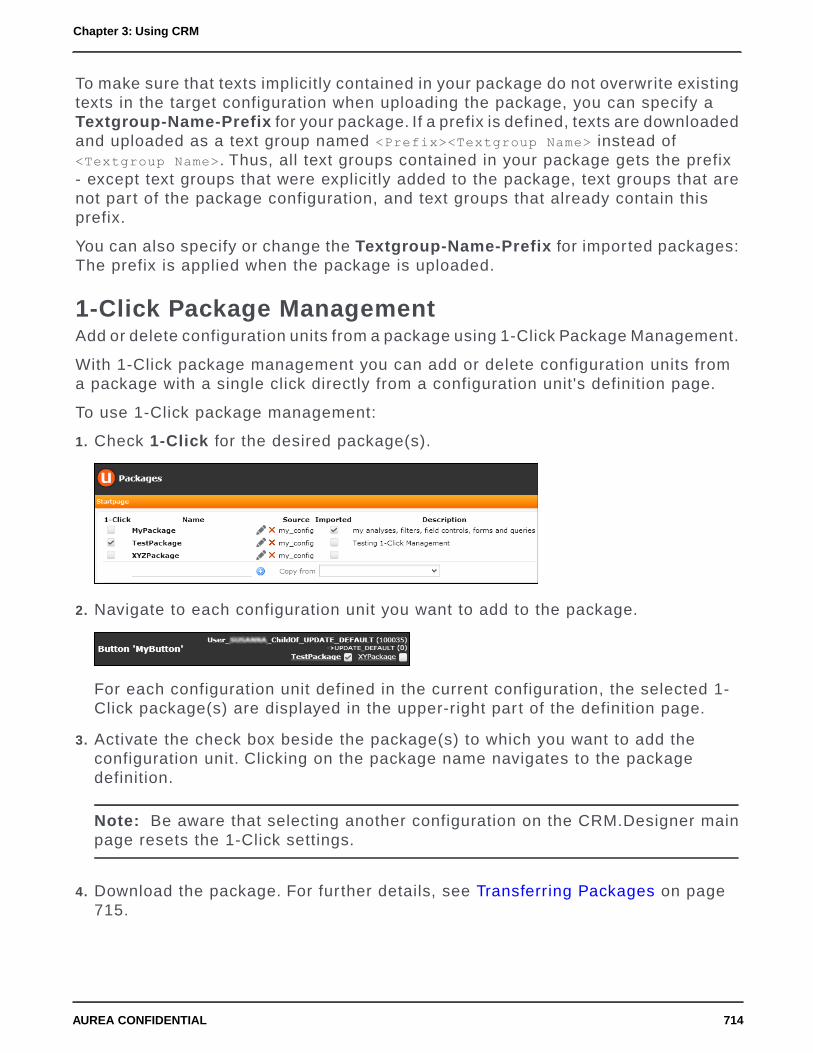
To make sure that texts implicitly contained in your package do not overwrite existingtexts in the target configuration when uploading the package, you can specify aTextgroup-Name-Prefix for your package. If a prefix is defined, texts are downloadedand uploaded as a text group named <Prefix><Textgroup Name> instead of<Textgroup Name>. Thus, all text groups contained in your package gets the prefix- except text groups that were explicitly added to the package, text groups that arenot par t of the package configuration, and text groups that already contain thisprefix.
You can also specify or change the Textgroup-Name-Prefix for imported packages:The prefix is applied when the package is uploaded.
1-Click Package ManagementAdd or delete configuration units from a package using 1-Click Package Management.
With 1-Click package management you can add or delete configuration units froma package with a single click directly from a configuration unit's definition page.
To use 1-Click package management:
1. Check 1-Click for the desired package(s).
2. Navigate to each configuration unit you want to add to the package.
For each configuration unit defined in the current configuration, the selected 1-Click package(s) are displayed in the upper-right par t of the definition page.
3. Activate the check box beside the package(s) to which you want to add theconfiguration unit. Clicking on the package name navigates to the packagedefinition.
Note: Be aware that selecting another configuration on the CRM.Designer mainpage resets the 1-Click settings.
4. Download the package. For fur ther details, see Transferring Packages on page715.
714AUREA CONFIDENTIAL
Chapter 3: Using CRM

Transferring PackagesLearn how to transfer packages.
To transfer a package:
1. Create a directory for the XML files.
2. Download the desired package to this directory. For fur ther details, see Download-ing Configuration Data from the CRM.Designer Database on page 761.
3. Upload the XML files containing the package to the target database and/orconfiguration. For fur ther details, see Uploading Configuration Data to theCRM.Designer Database on page 764.
Check Only upload package definition when uploading a package for the firsttime:
• If you upload a package to a configuration that has no package definition ofthis package yet, everything contained in the package is transferred to thatconfiguration. This means that all configuration units of the target configurationthat also exist in the package are replaced by the package definition (example- if you have an analysis named "MyScore" defined in your configuration, andthe package contains an analysis of the same name, the analysis from thepackage overwrites the one already existing in your configuration).
• If you upload just the package definition, only the package definition but notits content is added to the configuration. After uploading a package definition,you can use CRM.Designer to decide for each configuration unit from thepackage whether it should be imported or not. For fur ther details, see EditingImported Package Definitions on page 716.
Once you have decided which units of the package should be imported, youcan import the package itself with CRM.bulkloader without checking Only uploadpackage definition this time.
715AUREA CONFIDENTIAL
Packages

Note: Data Model Considerations: When downloading a package, only tables andfields that are actually used by the package are exported. When importing a package,the same rules as for sub-configurations are applied. For fur ther details, see Upload-ing a Sub-Configuration on page 768. This means that tables and fields contained inthe package which are unknown to the target CRM.Designer database are addedto the data model information but are marked as "deleted".
Editing Imported Package DefinitionsLearn to edit imported package definitions.
Import a package definition (Only upload package definition option) instead ofthe actual package, in order to be able to check the results before actually overwritingexisting configuration units.
View the imported package definition in CRM.Designer (Packages page):
In this example, a package definition is imported to a configuration where the Detailscontrol for the FI info area and a query named MyOpportunities already exist. Theother units do not yet exist in the configuration because only the package definitionis uploaded.
1. Uncheck Import for those configuration units which you do not want to overwrite.
In this example, the query definition which already exists in the current configura-tion is kept (Import unchecked), the FI Details control is overwritten.
2. Save the package definition.
3. Upload the package again without Only upload package definition to actuallyimport the package contents.
If the package itself had been uploaded (instead the package definition), both thequery and the field control would have been overwritten.
716AUREA CONFIDENTIAL
Chapter 3: Using CRM

AdministrationLearn to configure administration on aurea CRM.
The Administration area contains various functions for administrating theCRM.Designer database.
Here you can:
• Register images to be used by configuration units. For fur ther details, see Imageson page 717.
• Manage catalog values used in the CRM.Designer database. For fur ther details,see Catalogs on page 720.
• Manage the assignment of CRM processes and roles to configuration units. Forfur ther details, see Roles & CRM Processes on page 727.
• View, verify and delete configuration units. For fur ther details, see Delete Unitson page 738, Consistency Check on page 742, Configuration Validator on page 744etc.
• Configure access to CRM.Designer. For fur ther details, see Authentication onpage 748.
ImagesThis topic defines how to deal with images in update.CRM web.
The Images page of CRM.Designer allows you to "register" images in theCRM.Designer database by specifying a logical and physical name. These imagescan then be included in table captions, headers, buttons, used for catalog values,etc.
717AUREA CONFIDENTIAL
Administration

On the CRM.Designer main page in the Administration area, click the Imagesbutton to open the Images page.
A list of all available images is displayed:
To add/change images in Aurea CRM.Web:
1. Create the image as PNG.
Depending on where you want to use an image, the following image sizes arerequired:
"normal" size - used in thenavigation bar and in ex-tended page headers
32x32 px
small - used by headerbuttons and icons
s16x16 px
extra small - used bymenu items
xs14x14 px
The image sizes are specified by "decorators" in the file name (example - myimage-s.png is the small version of myimage.png). For more information on imagenaming” see the ar ticle “Image Naming Guidelines” at https://support.aurea.com.
If a required image size does not exist (example - -s for a button), the image isnot displayed. Therefore make sure you add at least the -s and -xs version ofyour custom images.Depending on where you want to use an image, the followingimage sizes are required:
2. Copy the files to the required location (..\images\<theme>). For fur ther details,see Customizing Styles on page 15.
718AUREA CONFIDENTIAL
Chapter 3: Using CRM
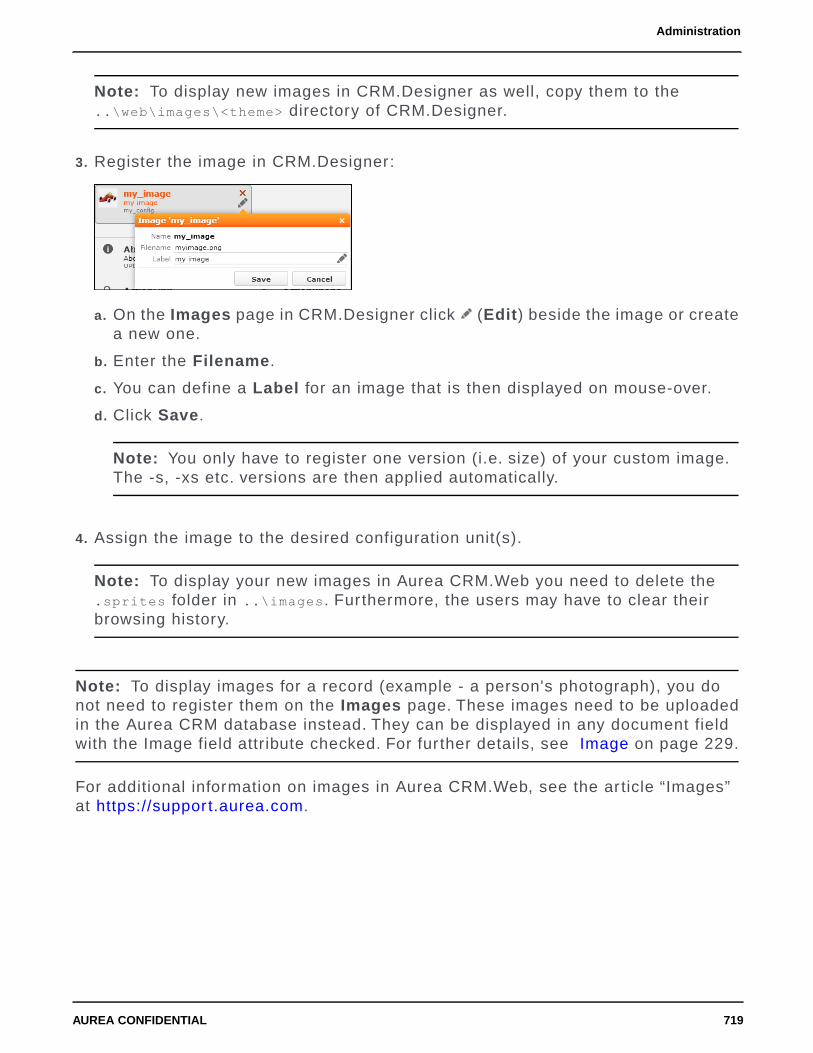
Note: To display new images in CRM.Designer as well, copy them to the..\web\images\<theme> directory of CRM.Designer.
3. Register the image in CRM.Designer:
a. On the Images page in CRM.Designer click (Edit) beside the image or createa new one.
b. Enter the Filename.
c. You can define a Label for an image that is then displayed on mouse-over.
d. Click Save.
Note: You only have to register one version (i.e. size) of your custom image.The -s, -xs etc. versions are then applied automatically.
4. Assign the image to the desired configuration unit(s).
Note: To display your new images in Aurea CRM.Web you need to delete the.sprites folder in ..\images. Fur thermore, the users may have to clear theirbrowsing history.
Note: To display images for a record (example - a person's photograph), you donot need to register them on the Images page. These images need to be uploadedin the Aurea CRM database instead. They can be displayed in any document fieldwith the Image field attribute checked. For fur ther details, see Image on page 229.
For additional information on images in Aurea CRM.Web, see the ar ticle “Images”at https://support.aurea.com.
719AUREA CONFIDENTIAL
Administration

Customizing the Company Logo on the Start PageLearn to customize company logo on the star t page.
The default star t page defined by form Startpage displays the image Logo (u8-lo-go.png).
To display a custom company logo on the star t page:
1. Add the desired image to the image directory (..\images\update).
2. Copy Logo to your configuration and enter the file name of your company logo.
CatalogsLearn about catalog in CRM.
Catalog Value Synchronization
Catalog values have four representations in Aurea CRM:
• Catalog code: A numeric ID defining a catalog value within a catalog for a specificAurea CRM database. If the catalog has a parent catalog, the number is uniquewithin all catalog values that have the same parent.
For fixed catalogs, the numeric ID uniquely defines a value throughout all AureaCRM databases.
• Catalog text: Can be language-dependent and can contain the tenant number.
• Catalog text in the catalog default language plus the tenant number: The"primary key" uniquely identifying a catalog value for multiple databases as longas catalog values are not changed using the Aurea CRM catalog maintenance. Ifthe catalog has a parent catalog, the parent value also must be known.
• External key: The external key of the catalog value which is optional. Uniquelyidentifies catalog values throughout the system.
720AUREA CONFIDENTIAL
Chapter 3: Using CRM

The external key can be used as a unique catalog ID which does not change whentransporting the catalogs between different stations (example - development, testand live station). For fur ther details, see Catalogs in the CRM.Core AdministratorGuide (https://help.aurea.com/crm/crm-core-admin-guide/crm-core-admin-guide/dita/topics/c_core_admin-1_1-Introduction_crm.html).
To automatically create external keys when adding catalog values, enable theAutomatically enter external keys configuration entry (Configuration info area(MC), Catalog category).
If you apply a CRM.Designer configuration containing catalog values to anotherAurea CRM database, you experience problems if you work with the catalog codeor catalog text.
In some cases, if you specify a catalog value, CRM.Designer offers you the synchro-nization of that catalog by text in catalog base language plus tenant number andyou are safe throughout the Aurea CRM database.
These cases are:
• Filter values in queries and filters
• Alternate Expand configurations
• Analysis categories
• Web Configuration parameter values based on catalog values
• Timeline configurations
Example (Defining a filter):
1. Add a catalog field to the filter definition.
2. Click on (Catalog Input).
• Select the upper radio button to enter the catalog value as text (<text> or#<code>). For fur ther details, see Filtering by Catalog Values on page 885.
• Select the lower radio button (default) to select a synchronized catalog valuefrom the drop-down list.
721AUREA CONFIDENTIAL
Administration

If a catalog has not yet been synchronized, the drop-down list only displays thecatalog's number. If the desired value is not contained in the drop-down list, thecatalog values from the CRM.Designer database might not reflect the entire currentcontent of the catalog. In both cases, update the catalog using CRM.bulkloader.For fur ther details, see Updating Catalogs on page 778.
In all other cases, when only Aurea CRM.Web recognizes values as catalog values,example - copySourceFields in an Expand action, you must work around this issuewith a different solution.
For this feature, CRM.Designer must have a copy of the catalog values in the defaultlanguage plus the tenant number in its database. It assigns a catalog value ID (mustbe unique in each CRM.Designer database) to each entry. Single catalog valuesare automatically copied if you save a query or filter in the database using AureaCRM.Web.
Use CRM.bulkloader to copy entire catalogs to the CRM.Designer database. Forfur ther details, see Updating Catalogs on page 778.
Since the CRM.Designer caches the data model information, update recommendsthat you perform an application reset (IIS reset or application pool recycling) afterupdating catalogs.
Please note that CRM.Designer's catalog synchronization feature is affected by adata model upgrade if a catalog was completely deleted from the data model – seeAurea CRM Data Model Upgrade Implications on Synchronized Catalogs on page781 for more information.
If you transfer a CRM.Designer configuration to another CRM.Designer database,all catalog values used in this configuration are transferred and catalog-value-IDsare adjusted accordingly. If a configuration unit with such a catalog value is accessed,the catalog code is defined by a catalog lookup using the text in the catalog baselanguage plus tenant number in the destination Aurea CRM database.
As catalog content is cached in CRM.Designer, you can press F5 or open a newbrowser window to see the changes.
CRM.Designer Catalog MaintenanceLearn to maintain catalog using Aurea CRM Designer.
If you want to modify catalogs using the Aurea CRM catalog maintenance, this isthe supported way to ensure that you have valid catalog information in theCRM.Designer:
1. Perform a normal catalog synchronization using CRM.bulkloader.
2. Perform the text changes in the Aurea CRM catalog maintenance.
3. Perform catalog synchronization by code or CRM.bulkloader.
722AUREA CONFIDENTIAL
Chapter 3: Using CRM

Note: Catalog entries are not merged or deleted during this process – you have todo this manually as described in this section.
Catalog values which were modified with the Aurea CRM win Maintenance moduleusing the catalog maintenance tool is inser ted as new values into the CRM.Designerwhen synchronized, and the old values is not removed! Catalogs in the CRM.Designerdatabase can be maintained in the Catalogs section of the designer.
After clicking the Catalogs button on the designer main page, you get a list of allcatalogs that are currently stored in the CRM.Designer database.
For each catalog, you see
• CatNr: the catalog number.
• CatName: the catalog name.
• Parent: the number of the parent catalog only applicable for hierarchical catalogs.
• Last Synch: date and time when this catalog was last synchronized.
• ValueCount: number of catalog entries contained in the catalog.
723AUREA CONFIDENTIAL
Administration

• Fields: number of fields in various info areas where this catalog is used. Using
the button you get more detailed information which info areas and fields areaffected.
• Refs(all): number of times this catalog is referenced in the designer e.g. in aquery in all configurations.
• Refs(Config-Tree): number of references of the catalog within the currentconfiguration and its parent configurations
• Refs(Config): number of references of the catalog within the current configuration
If you click on the button, you get detailed information about the selected catalog:
For each catalog you can select the Synchronization mode defining how a catalogvalue stored in CRM.Designer is "linked" to a catalog value in the Aurea CRMdatabase (when the catalog value is used by a configuration unit in Aurea CRM.Weband when synchronizing catalogs):
• Text/Tenant: Catalog values are linked if they have the same text in the defaultcatalog language plus either the same tenant number or no tenant number.
• Ext. Key: Catalog values are linked if they have the same external key.
• Auto (default): Uses Ext. Key if all catalog values in both systems have anexternal key, otherwise Text/Tenant.
Note: Synchronization by external key is useful if catalog values are created onmore than one station (example - development, test and live station). If the text inthe catalog default language is changed , catalog values can still be synchronizedvia the external key.
On the catalog details page, you see whether the catalog has a parent catalog andin which info area it is used for which fields. In addition, for each catalog entry yousee:
• CatValId: the catalog entry’s ID.
• A drop-down list where you can specify an action that should be applied to thiscatalog entry (see below for details)
724AUREA CONFIDENTIAL
Chapter 3: Using CRM
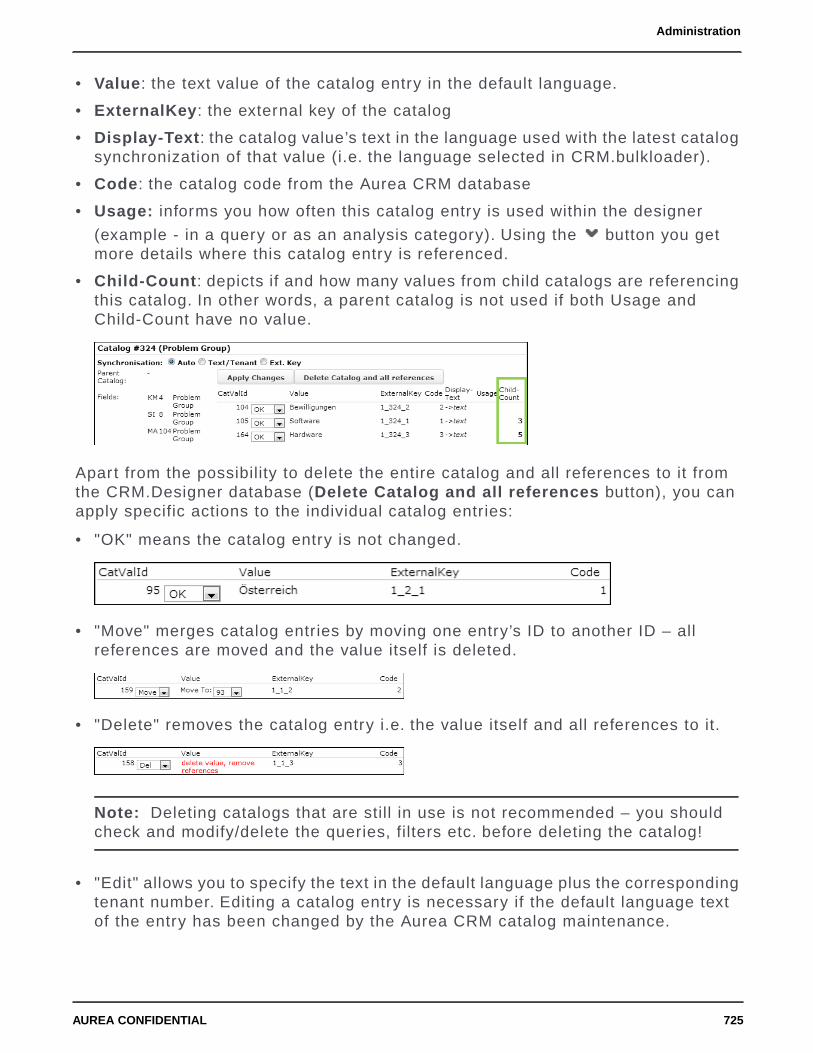
• Value: the text value of the catalog entry in the default language.
• ExternalKey: the external key of the catalog
• Display-Text: the catalog value’s text in the language used with the latest catalogsynchronization of that value (i.e. the language selected in CRM.bulkloader).
• Code: the catalog code from the Aurea CRM database
• Usage: informs you how often this catalog entry is used within the designer
(example - in a query or as an analysis category). Using the button you getmore details where this catalog entry is referenced.
• Child-Count: depicts if and how many values from child catalogs are referencingthis catalog. In other words, a parent catalog is not used if both Usage andChild-Count have no value.
Apart from the possibility to delete the entire catalog and all references to it fromthe CRM.Designer database (Delete Catalog and all references button), you canapply specific actions to the individual catalog entries:
• "OK" means the catalog entry is not changed.
• "Move" merges catalog entries by moving one entry’s ID to another ID – allreferences are moved and the value itself is deleted.
• "Delete" removes the catalog entry i.e. the value itself and all references to it.
Note: Deleting catalogs that are still in use is not recommended – you shouldcheck and modify/delete the queries, filters etc. before deleting the catalog!
• "Edit" allows you to specify the text in the default language plus the correspondingtenant number. Editing a catalog entry is necessary if the default language textof the entry has been changed by the Aurea CRM catalog maintenance.
725AUREA CONFIDENTIAL
Administration

Catalog Maintenance Tasks and Supported WaysOverview of Catalog Maintenance Tasks and Supported Ways to Reflect Changesin the CRM.Designer Database
• Editing a catalog value: You may either manually change the catalog text valueusing "Edit" in the "Catalogs" section of the CRM.Designer( see Catalog Mainte-nance Tasks and Supported Ways on page 726), or you can synchronize afterwardsfollowed by a "Move" to the new value.
• manually change the catalog text value using "Edit" in the Catalogs section ofthe designer (see Catalog Maintenance Tasks and Supported Ways on page726) , or
• synchronize afterwards (i.e. after using the Aurea CRM catalog maintenance)and perform a "Move" to the new value
Another way – recommended for multiple changes – is to
• Moving a catalog value: Perform the same "Move" action you did in the AureaCRM catalog maintenance in the Catalogs section of the CRM.Designer, too.
• Deleting a catalog value: Perform the same "Delete" action you did in the AureaCRM catalog maintenance in the Catalogs section of the CRM.Designer, too.Before you do so, it is highly recommended to check – and manually change –all references to catalog values (e.g. filters, mask fields, etc.) that is deleted!
Note: Removing catalog references: A catalog reference in the CRM.Designerdatabase is stored beside a "normal value" which normally would be the catalogcode. When a value with a catalog reference is evaluated, this "normal value" isignored. If you delete the catalog value to which a reference points, the referenceis deleted and the stored "normal value" becomes valid again.
Removing Unreferenced Catalog Values
726AUREA CONFIDENTIAL
Chapter 3: Using CRM

The more variable catalog values are synchronized to the CRM.Designer database,the longer the application star t of Aurea CRM.Web takes.
1. On the Catalogs page click Delete all unreferenced values to remove allunreferenced catalog values from the CRM.Designer database with a single click.
Roles & CRM ProcessesLearn how to make the access to user interface elements simple by the use of Roles& CRM Processes.
The concept of roles & CRM processes makes the administration of access to cer tainelements (mainly user interface elements) of the CRM suite easier. And configurationadjustments need only be performed once for many users at the same time. If youhave configured role- and CRM process-based access, then the system adjusts itselfwith regards to functionality to the CRM processes that are defined and linked withthe role after the user has logged on.
Example: If you don't want your users to use the Person info area (PE) becauseyou are only dealing with persons in companies (KP), lock CRM process "Person"(CRM process ID 2470000); all related UI elements is hidden.
A role defines tasks, properties and most importantly access rights of a user. Rolescan be assigned to many different users and thus lower the configuration effor t. ACRM process describes a series of individual actions that are carried out step-by-step to achieve a business or operative target.
An example for a role would be "marketing employee" and an example for a CRMprocess would be "execution of a campaign". Depending on the role(s) with whicha user logs on to Aurea CRM, he has different CRM processes and possibly differentaccess rights at his disposal.
More information regarding the concept of roles & CRM processes can be found inthe CRM.Core Administrator Guide (https://help.aurea.com/crm/crm-core-admin-guide/crm-core-admin-guide/dita/topics/c_core_admin-1_1-Introduction_crm.html).
CRM processes and roles are defined exclusively in the Rights module in AureaCRM win, see CRM Process Configuration in the CRM.Core Administrator Guide(https://help.aurea.com/crm/crm-core-admin-guide/crm-core-admin-guide/dita/top-ics/c_core_admin-1_1-Introduction_crm.html). In the process tree only values havingthe setting "web" or "win / web" are relevant for Aurea CRM.Web. If your users useAurea CRM.Web exclusively, you can hide "win"-only CRM processes for a betteroverview.
To add a new CRM process for Aurea CRM.Web, you need to check web and entera Process ID. This can be any character string and should ideally be descriptive.For fur ther details, see Adding New CRM Processes in the CRM.Core AdministratorGuide (https://help.aurea.com/crm/crm-core-admin-guide/crm-core-admin-guide/di-ta/topics/c_core_admin-1_1-Introduction_crm.html).
727AUREA CONFIDENTIAL
Administration

Roles & CRM process defined in the Rights module must be transferred to the de-signer database so that they can be used in CRM.Designer.
Roles in Aurea CRM.WebLearn about roles, their configuration and assignment in Aurea CRM.
Role-Based Access
You have the following possibilities to assign roles to a user:
• You can assign roles to users as fixed "rep roles":
1. Select Administration > Reps to access the Rep info area (ID). For fur therdetails, see Reps on page 31.
2. Search for the rep you want to assign a role to.
3. Select New Rep role from the context menu.
4. Select the desired Login role.
5. Check Active.
The assigned role is always active when the user logs on and cannot be changedby the user.
• You can assign several roles to a rep for the user to choose from when loggingon:
If a user checks Select Roles under More Options on the login dialog, he canselect from his assigned roles after providing his login credentials.
• Rep roles with Active checked cannot be deselected.
• Rep roles with Default checked are automatically checked in the selection list.
728AUREA CONFIDENTIAL
Chapter 3: Using CRM

Note: To allow users the access the Select Roles check box on the login dialog,the settings.xml file must contain <CanChangeRoles>true</CanChangeRoles>in the <update.web> section.
Note: Roles already be provided in the URL are not displayed in the role selectiondialog.
• Rep roles can be passed as URL parameters (example -. if single sign-on isconfigured).
To pass the role in the URL, specify the name(s) of the role(s). Separate multipleroles by comma.
Example: http://<my web address>/crm/start?roles=Admin,Sales
If a role's name contains special characters (example -. Umlauts), these need tobe URL-encoded.
• It is also possible to define in a rep role that access to the CRM processes therole contains is granted exclusively read-only. For fur ther details, see Read-OnlyCRM Processes on page 732.
Changes in the assignment of rep roles (fixed and optional) are applied as follows:The rep's roles are refreshed only after logout+login.
• without role selection at login: After the time specified in Cat. refresh frq. in theStation configuration info area
Default: 30 min.
• with role selection at login: Immediately after login.
Information about Active Roles
The menu item Settings > System Information lists all roles that are active for thecurrently logged-in user.
The SDK page, CRMProcessesandRoles provides an overview over the CRM pro-cesses by state, displaying their availability (Read Only/Disabled/Enabled) accordingto the active role(s) as well as the current info area rights settings. For fur ther details,see SDK on page 30.
The server log (web.log) contains information with which roles and CRM processesa session was star ted when a user logs on. To get these log entries, set thelogLevel attribute to "Debug" in the settings.xml.
For more information on the server log, see Server Log in the Aurea CRM.Web In-stallation Guide (https://help.aurea.com/crm/crm-web-install-guide/crm-web-install-guide/dita/topics/c_web_install-1_1-Introduction_crm.html).
Dynamic Configuration Assignment Based on Roles
Roles can be assigned to designer configurations. In that case, a user’s configurationhierarchy is dynamically determined based on the roles with which he logs on.
Example: Initial situation – designer Configuration
729AUREA CONFIDENTIAL
Administration

User Simon logs on with the role "Sales"– he gets his "normal" configuration treesince there is no configuration assignedto this role:
User Simon logs on with the role "CallCenter"– configuration 17 (Call Center)is dynamically added to the configura-tion tree:
To assign a role to a configuration:
1. On the CRM.Designer main page click Users | Configurations.
2. Select the Configuration radio button.
3. Click (Edit) beside the desired User / Group Configuration.
730AUREA CONFIDENTIAL
Chapter 3: Using CRM

4. In the Roles field click (Select CRM process).
Use CRM.bulkloader to import the currently defined roles into CRM.Designer. Forfur ther details, see Updating CRM Processes and Roles on page 777.
5. Select the desired roles.
6. Click OK.
7. Save.
For each parent configuration of the current configuration it is determined whetherfor the current role there is a directly dependent configuration that is assigned tothe current role. If this is the case, the role configuration is inser ted in the configu-ration tree between these two configurations. If there is more than one role assignedto a session, this happens for each role in the order of their priorities.
For all role configurations determined that way it is also necessary to check recur-sively if the direct sub-configuration has the same role assigned and in case thewhole configuration branch is inser ted dynamically.
Each configuration can only exist once in the configuration tree if it exists more thanonce, only the last occurrence is taken into account.
CRM Processes in Aurea CRM.WebLearn about CRM process and their assignment rules.
You can assign CRM processes as defined in the Rights module to individual userinterface elements. For fur ther details, see Assigning CRM Processes. When a userlogs on with a role, he sees only those elements in Aurea CRM.Web that he is al-lowed to see based on the CRM process definition. Elements that have no CRMprocess assigned are always visible unless they are hidden based on a rights re-striction.
CRM processes can be assigned to the following configuration units:
• menus (context and application menu as well as the assignment to a parent menu)
• menu actions
• buttons
• tabs/groups in a Details control
• tabs in sub-lists (Header configuration for SearchSublist and ExpandChildren)
731AUREA CONFIDENTIAL
Administration

• nodes in a Tree view
• items in forms (panels, tabs, rows, cards, buttons etc.)
• queries and analyses
• Web Configuration parameters
• processes
• items on ProcessAsk pages (except If...End If)
In UPDATE_DEFAULT CRM processes are assigned to menus, menu actions andbuttons.
Note: Quick Search entries cannot be controlled by assigning CRM processes. Youmay want to define the Quick Search per role using the QuickSearch.DefinitionWeb Configuration parameter. For fur ther details, see QuickSearch.Definition.
Note: To hide/lock part of a global Quick Search definition, you can use the rightsdefinition (locked info areas are not available in the Quick Search), or if you use aglobal CRM Process Configuration where all CRM processes are locked by defaultyou can unlock the desired CRM processes per role and thus restrict the QuickSearch to the corresponding info areas.
The SDK page ,CRMProcessesandRoles, provides an overview over the CRMprocesses by state, displaying their availability (Read Only/Disabled/Enabled) ac-cording to the active role(s) as well as the current info area rights settings. Forfur ther details, see SDK on page 30.
Read-Only CRM ProcessesLearn about Read-Only CRM process.
A rep role can define that a user has just read-only access to the CRM processescontained in the role. If a CRM process is read-only, the user cannot modify anydata, and fur thermore all "dependent" elements are also read-only (i.e. the read-only property is handed down).
Example - If access to marketing campaigns is read-only and a user opens a cam-paign in details view, not only the campaign but all dependent areas like marketingactivities, tasks etc. are read-only as well. This applies even if the user in principlehas the right to modify tasks: As soon as he "enters" a read-only CRM process allpossibilities contained therein are also read-only.
By default, menu entries and buttons for creating records (no matter if directly orvia a process) are hidden when the user is inside a read-only CRM process.
Visibility of designer units based on CRM processes:
732AUREA CONFIDENTIAL
Chapter 3: Using CRM
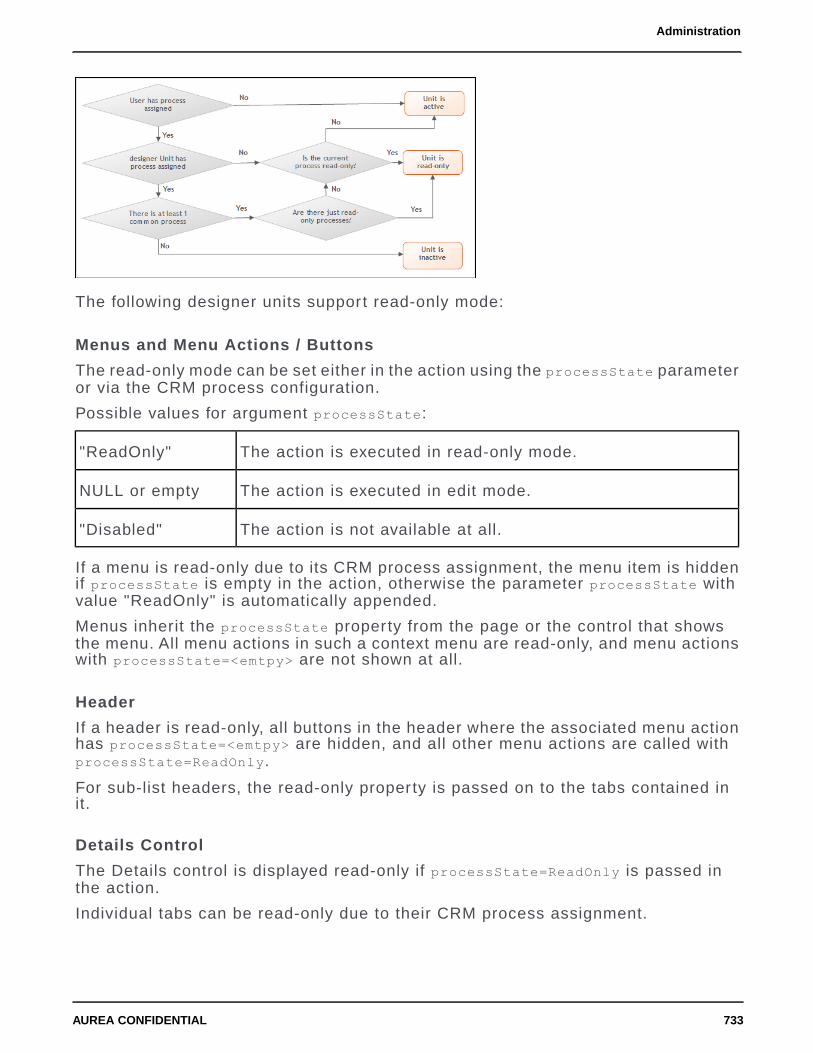
The following designer units support read-only mode:
Menus and Menu Actions / Buttons
The read-only mode can be set either in the action using the processState parameteror via the CRM process configuration.
Possible values for argument processState:
The action is executed in read-only mode."ReadOnly"
The action is executed in edit mode.NULL or empty
The action is not available at all."Disabled"
If a menu is read-only due to its CRM process assignment, the menu item is hiddenif processState is empty in the action, otherwise the parameter processState withvalue "ReadOnly" is automatically appended.
Menus inherit the processState property from the page or the control that showsthe menu. All menu actions in such a context menu are read-only, and menu actionswith processState=<emtpy> are not shown at all.
Header
If a header is read-only, all buttons in the header where the associated menu actionhas processState=<emtpy> are hidden, and all other menu actions are called withprocessState=ReadOnly.
For sub-list headers, the read-only property is passed on to the tabs contained init.
Details Control
The Details control is displayed read-only if processState=ReadOnly is passed inthe action.
Individual tabs can be read-only due to their CRM process assignment.
733AUREA CONFIDENTIAL
Administration

List Control
Users cannot edit data in a list if processState=ReadOnly is passed in the action.
Treeview Control
The Treeview control and dependent controls are displayed read-only if pro-cessState=ReadOnly is passed in the action.
If individual info areas in the tree are read-only because of their CRM process as-signment, the whole branch is read-only from there on.
Form
Individual widgets of a form are read-only if the assigned CRM processes are onlyavailable as read-only (Unit tab).
The whole form is read-only if the menu is read-only because of the CRM processdefinition (URL parameter ReadOnly). If the action calling the form has pro-cessState=ReadOnly, the form is read-only as well.
The whole form is read-only if it is located in a tab of a header with pro-cessState=ReadOnly.
Attention: read-only does not mean that the input controls are automatically nolonger editable. It just means that the ReadOnly flag is passed on to the GenericControls using the oAddInfo object so that these controls can react accordingly. Bydefault, the read-only functionality is available for the following controls: DetailsCon-trol, ListControl, SearchAndListControl, HeaderControl, TreeControl.
Note: The CRM processes where the user has just read-only access are determinedright after login.
Roles & CRM Processes in CRM.DesignerLearn about Roles & CRM Processes in CRM.Designer.
Transport of Rformoles, CRM Processes and Assignments
The roles and CRM processes defined in the Rights module need to be transferredto the CRM.Designer database to be available for use in both CRM.Designer andAurea CRM.Web. To do this use CRM.bulkloader with the option Data Model, CRMProcesses, Roles and Catalogs. For fur ther details, see Updating CRM Processesand Roles on page 777.
CRM process assignments of designer units are transported when exporting/importingdesigner configurations or packages. The assignment of roles to a configuration isalso exported, but is only imported if the configuration does not have a differentrole assigned in the target database.
734AUREA CONFIDENTIAL
Chapter 3: Using CRM

Assigning CRM Processes
All configuration units where CRM processes can be assigned offer the CRM processtree in CRM.Designer. All selected CRM processes are listed at the top under SelectCRM Processes – if you click on such a CRM process, the corresponding positionin the process tree is expanded.
The Core CRM Processes section contains all CRM processes that were transferredfrom the Aurea CRM database. If imported CRM processes are not (yet) known tothe designer database, they are imported and displayed as designer CRM Process-es. CRM Process Groups exist to make the assignment of multiple CRM processeseasier: if you select more than one CRM process, a CRM process group is automat-ically created (with # at the beginning) containing these CRM processes. Thus it ispossible to assign the same group of CRM processes to other units quickly andeasily. It is also possible to manually create CRM Process Groups.
Use the search field to search for a CRM process. You can search by name or IDand use wildcards (*,?).
Note: You can use literal character values of ‘*‘ and ‘?’ using the escape sequences‘\*’ and ‘\?’.
To assign a CRM process to a configuration unit, activate the corresponding checkbox in the CRM process tree.
If two CRM processes are assigned to a configuration unit and only one of them islocked, the configuration unit is available, since a user can log on with two differentroles.
Assigning Roles
For assigning roles to designer configurations, see Dynamic Configuration Assign-ment Based on Roles.
735AUREA CONFIDENTIAL
Administration

Overview of Assigned Roles & CRM ProcessesIn this topic learn to have an overview of the role and CRM process assigned.
On the CRM.Designer main page (Processes area), click the Roles & CRM Pro-cesses button to open the Roles & CRM Processes overview: This page displayswhich configuration unit has a role and/or a CRM process assigned in the currentconfiguration.
The Roles & CRM Processes tree contains the following nodes:
• Core CRM Processes/Roles: All CRM processes/roles available in theCRM.Designer database are listed.
• designer CRM Processes/Roles: CRM processes/Roles deleted in the Rightsmodule are not deleted when updating CRM processes and roles viaCRM.bulkloader but moved to the designer CRM Processes/Roles node.
• CRM Process Groups: If more than one CRM process is assigned to aconfiguration unit, a CRM process group is automatically created (with # at thebeginning) containing these CRM processes. Click (Add) to manually create anew group.
736AUREA CONFIDENTIAL
Chapter 3: Using CRM

Use the search field to search for a CRM process or role. You can search by nameor ID and use wildcards (*,?).
Note: You can use literal character values of ‘*‘ and ‘?’ using the escape sequences‘\*’ and ‘\?’.
Once you select an entry in the tree the overview displays the following information:
• Type, ID and Name of the CRM process/role
• Assignments tab:
• Direct Assignment: All configuration units where the selected CRM processis directly – and as the only CRM process - assigned to.
• All Assignments: If multiple CRM processes are assigned to a configurationunit (i.e. the unit is active if a user has access to any one of these CRMprocesses), the unit is only listed when All Assignments is selected togetherwith the direct assignments.
The same logic applies to roles.
737AUREA CONFIDENTIAL
Administration

• Parents tab: For Core CRM processes, the Parents tab lists the parents of theselected CRM process.
• Children tab: For CRM process groups, the Children tab lists the CRM processesbelonging to this group.
Delete UnitsUse the Delete Units page to delete configuration units.
Delete Units page are used to delete configuration units from the current configu-ration and/or its child configurations.
Example - Using Delete Units you can remove user customizations from child con-figurations, thus ensuring that changes in the parent configuration are applied toall child configurations.
On the CRM.Designer main page in the Administration area, click the Delete Unitsbutton to open the Delete Units page.
Note: If you have authentication enabled (see Authentication on page 748), theDelete Units button is only available for users from User Group "Administrator"and "Power User".
You can delete configuration units:
• from the current CRM.Designer database, see Local Deletion.
• from another CRM.Designer database using CRM.bulkloader, see Remote Deletion.
Example: If you change the value of a Web Configuration parameter and want tomake sure that all sub-configurations use this new value, you can either ensure thisby deleting the configuration unit from the sub-configurations if you work on yourlocal CRM.Designer database (Local Deletion), or you can define that the unit isdeleted when the configuration is transported to another database i.e. uploadedusing CRM.bulkloader (Remote Deletion).
738AUREA CONFIDENTIAL
Chapter 3: Using CRM

Unit deletion is supported for the following configuration units and sub-units:
• Timeline• Link Name• Field Group• Action Template
• TreeView• Menu Item• Field Label• Analysis
• Web Configuration Layout• Process• Filter• Analysis Catego-ry
• Web Configuration Param-eter
• Process Ask• Form• Analysis Func-tion
• Web Configuration Value• Process Step• Header• Button
• Query• Header Group• Chart Type
• Search&List• Image• Expand
• Table Caption• Info Area La-bel
• Field Control
Local Deletion
Use the Local Deletion tab to delete configuration units from the current CRM.De-signer database.
1. On the CRM.Designer main page, select the desired parent configuration.
2. Click Delete Units.
739AUREA CONFIDENTIAL
Administration
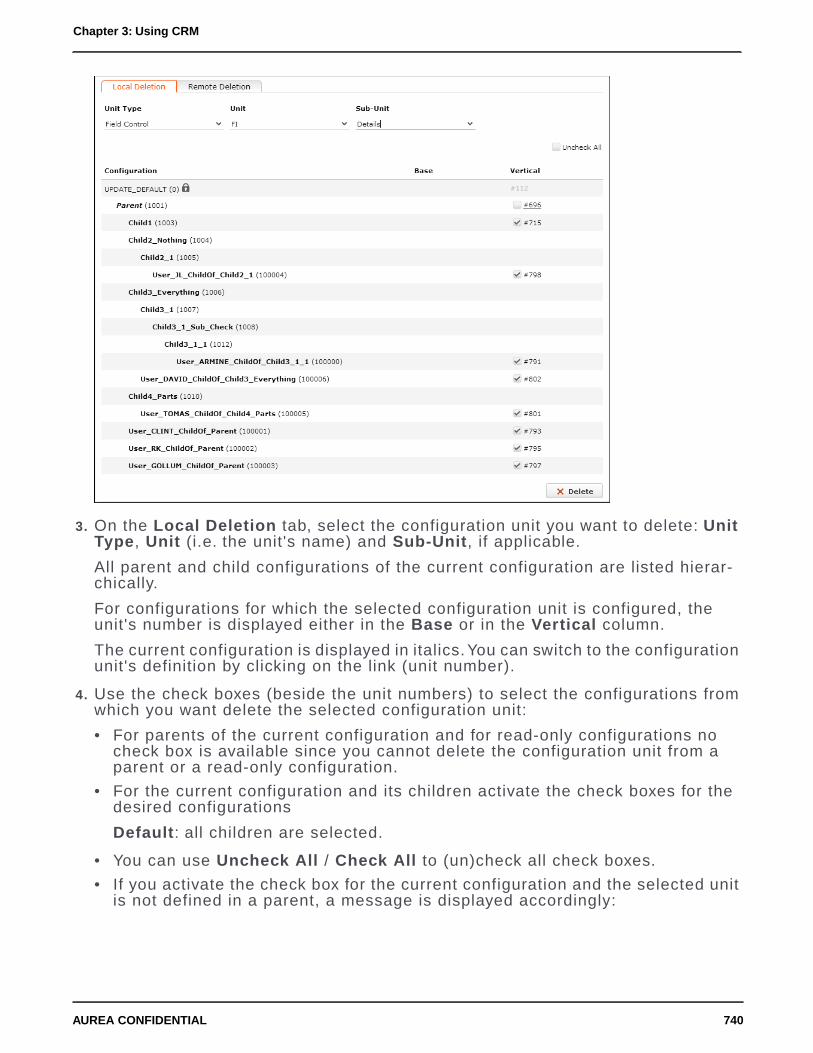
3. On the Local Deletion tab, select the configuration unit you want to delete: UnitType, Unit (i.e. the unit's name) and Sub-Unit, if applicable.
All parent and child configurations of the current configuration are listed hierar-chically.
For configurations for which the selected configuration unit is configured, theunit's number is displayed either in the Base or in the Vertical column.
The current configuration is displayed in italics. You can switch to the configurationunit's definition by clicking on the link (unit number).
4. Use the check boxes (beside the unit numbers) to select the configurations fromwhich you want delete the selected configuration unit:
• For parents of the current configuration and for read-only configurations nocheck box is available since you cannot delete the configuration unit from aparent or a read-only configuration.
• For the current configuration and its children activate the check boxes for thedesired configurations
Default: all children are selected.
• You can use Uncheck All / Check All to (un)check all check boxes.
• If you activate the check box for the current configuration and the selected unitis not defined in a parent, a message is displayed accordingly:
740AUREA CONFIDENTIAL
Chapter 3: Using CRM

5. Click Delete to delete the selected configuration unit from the selectedconfigurations.
Remote Deletion
Use the Remote Deletion tab to delete configuration units from another CRM.De-signer database by uploading a configuration via CRM.bulkloader.
Remote deletion procedure:
You change/delete configuration units from your custom parent configuration in thecurrent CRM.Designer database, e.g. the development system. When deploying thecustomization to the productive system, you define Remote Deletion entries for theoutdated / no longer used configuration entries. When uploading the parent config-uration to the CRM.Designer database of the productive system, the defined unitsare deleted.
To remote-delete configuration units:
1. On the CRM.Designer main page, select the desired parent configuration.
2. Click Delete Units.
3. On the Remote Deletion tab, select the configuration unit you want to delete:Unit Type, Unit (i.e. the unit's name) and Sub-Unit, if applicable.
If the configuration unit has already been deleted from the current database, click (Edit) and manually enter the name of the desired Unit (and Sub-Unit).
741AUREA CONFIDENTIAL
Administration

4. Check Delete also in current configuration, if you want to remove the selectedconfiguration unit from the parent configuration as well. If unchecked, the unit isonly removed from the current configuration's child configurations.
Note: Before you activate this check box, make sure you really do not need theunit anymore or that this unit is defined in a parent of the current configuration.
5. Click (Add) to add the Remote Delete entry. The creation date and time aresaved as a time stamp (Date on the Remote Deletion page).
Click (Delete) to delete an entry. Check Disable single-delete confirmationmessage box to disable the message box being displayed each time is clicked.
6. Once you have defined all configuration units you want to delete, download theconfiguration using CRM.bulkloader. For fur ther details, see CRM.bulkloader onpage 760.
7. Upon uploading the configuration to the target database, the configuration unitsare deleted from all child configurations of the uploaded configuration andoptionally from the configuration itself - Delete also in current configurationoption.
Note: Configuration units are only deleted once based on the time stamp: Therefore,units are only deleted the first time a configuration with a respective Remote Deleteentry is uploaded. Items created or copied after this first upload is not deleted, ifyou upload the configuration again.
Note: If you want to again delete an item previously set for deletion, you have tocreate another Remote Delete entry. You can delete the first one, if required.
Consistency CheckLearn about Consistency Check in Aurea CRM.
You can check the consistency of a configuration in the current database. Theconsistency check is executed on data located in the TMP tables of the CRM.De-signer database – this means that the check is either applied to a configuration thatwas just exported with CRM.bulkloader, or to a configuration that was imported intothe TMP tables but not into the database yet. The consistency check also works forpackages.
On the CRM.Designer main page in the Administration area, click the ConsistencyCheck button.
742AUREA CONFIDENTIAL
Chapter 3: Using CRM

To perform the consistency check for a configuration in your current database:
1. Export the configuration or package you want to check with CRM.bulkloader. Forfur ther details, see Downloading Configuration Data from the CRM.DesignerDatabase on page 761.
2. On the Consistency Check page select the configuration you want to check,which checks to perform and the sor t order of the results by unit type or checktype.
3. Click Start.
To perform the consistency check on the target database for an imported configu-ration or package:
1. Import the configuration (or package) with CRM.bulkloader. Make sure that theDo not import data (only fill TMP tables) option is checked!
2. In CRM.Designer (target database) select the configuration you uploaded.
If you uploaded a package, select the target configuration to where the packageis uploaded.
The following types of checks are available:
• Text References: This check reports invalid text references or references thatcannot be found in the destination database.
• Parent References: Field controls, headers and texts belong to parent units thatneed not necessarily be in the same configuration. To upload a control from afield group that is not in the current configuration, the parent configuration andthe field group must exist in the destination database; the same applies to headersand texts.
This check reports field controls, headers and texts that cannot be uploaded.
• Case Sensitivity: This check reports whether all unit names are unique a incase-insensitive database (i.e. it lists all configuration units that is duplicatedwhen treated case-insensitive).
Note: This check does not report units on (case-insensitive) SQL databases.
743AUREA CONFIDENTIAL
Administration

• Empty Names: This check reports whether empty unit names (i.e. unit nameshaving the value null or having only blanks as value) exist.
• Trailing Blanks: This check reports unit names that end with one or more blanksbecause these trailing whitespaces may get lost on bulk XML transport becausesuch names should be avoided.
Configuration ValidatorUse the Configuration Validator to identify faulty configuration units, migration andconfiguration issues in the selected configuration.
On the CRM.Designer main page in the Administration area, click the ConfigurationValidator button.
.
The page lists two types of problems:
• Migration issues (with ID Mxxxx): Configuration units that are broken or usedeprecated properties, syntax etc. due to migrating an update.seven designerdatabase to Aurea CRM.
• Configuration issues (with ID Cxxxx): General configuration issues, e.g. a buttonreferencing an action template that was deleted from the database.
744AUREA CONFIDENTIAL
Chapter 3: Using CRM

The configuration units are listed by type. You can filter for specific configurationunits using the search field.
Use the / (Expand/Collapse) buttons to expand/collapse the whole list or allentries of a group (= unit type).
You can filter for errors only by clicking on the icon beside the search field.
Each issue is displayed in a "bubble" containing the following information:
• Problem type (and description):
Error, i.e. action required: The unit is broken and needs to be fixed manually.
Warning, i.e. action suggested: The unit is still working but uses e.g. depre-cated syntax.
• On mouse-over the icon the issue's ID (and a help text) is displayed:
For detailed documentation (description and solution) of all issues (listed by thisID), see the ar ticle “Issues Reference” at https://support.aurea.com
• A link to a related ar ticle (if available) in the Aurea CRM.Web Developer Guidelocated at https://support.aurea.com.
• The number of configuration units concerned ("x issues").
• Clicking on a bubble expands it and displays a link to each configuration unit thatneeds to be fixed.
The link also displays the affected field (name and number), if applicable, e.g.for render hooks and select-functions.
• For migration issues that cannot be solved a (Delete) button is displayed insidethe bubble:
Clicking (Delete) deletes the designer unit from the configuration. This function-ality is available for the Item Attributes field attribute (issue M0035) and forlegacy styles (M0009).
745AUREA CONFIDENTIAL
Administration

Click (Export validation issues) to export the list as Configuration issues.csv.
The export file contains the following information:
• Unit Type: Button, Menu Item, Field Control, etc.
• Unit Name: The configuration unit's name as defined in CRM.Designer.
• Sub-Unit Name: For field controls, the the control type and field name are writtento this column.
• Additional info: The actual attribute definition (select function, render hookdefinition etc.) causing the problem.
• Severity: Warning or Error.
• Code: The issue's ID (Cxxxx or Mxxxx).
• Message: The text from the bubble describing the issue.
Compare Field ControlsLearn about Compare Field Controls on Aurea CRM.
Use the Compare Configurations options to compare field control definitions fromdifferent configurations.
To compare control definitions:
1. On the CRM.Designer main page select a configuration.
2. In the Administration area click the Compare Configurations button.
3. Select the Field Group and Control type for the left control.
4. Select the configuration you want to compare under Control 2.
5. The Field Group is automatically selected, but can be changed.
6. Select the Control type for the second control.
Note: The Field Group and Control drop-down lists only contain items that aredefined in the selected configuration.
Note: You can not compare Default controls.
746AUREA CONFIDENTIAL
Chapter 3: Using CRM

The controls are displayed side by side. Panels are compared by Name, fields byID. The following information is available:
• : The element (panel or field) has been added.
• : The element has been deleted.
• : The element has been modified.
• : The element has been moved.
On mouse-over a tooltip displays information on the change, e.g. which field at-tribute was changed etc.
• When selecting an element (panel or field) that was edited, the element's attributesare displayed.
• When selecting an element, all occurrences of the element are highlighted witha colored border. The elements that are currently compared are highlighted witha colored background.
The Compare Configurations page supports the 1-click package functionality (forthe current configuration, i.e. Control 1). For fur ther details, see 1-Click PackageManagement on page 714.
747AUREA CONFIDENTIAL
Administration

AuthenticationEnable authentication to restrict access to CRM.Designer.
To enable authentication to restrict access to CRM.Designer, see Settings on page750. For information on enabling single sign-on for CRM.Designer, see the ar ticle“How to Enable SSO in the CRM.Designer” at https://support.aurea.com.
On the CRM.Designer main page in the Administration area, click Authenticationto manage CRM.Designer logins.
Note: Aurea software strongly recommends enabling CRM.Designer authenticationfor security reasons as well as for providing meaningful output in the change history.For fur ther details, see Change History on page 69.
You can define the following:
• Name: CRM.Designer login name (max. 8 characters, not case-sensitive).
Note: Star ting with SP2 login names must be unique. If your CRM.Designerdatabase contains multiple logins with the same name, only the login with thelowest ID is kept when upgrading to SP2.
• Password: (Re-)set passwords. Passwords are case-sensitive.
• Configuration: Specify the configuration a user is allowed to modify.
• Configuration Mode: Define whether a user is allowed to change only thespecified Configuration ("this configuration"), only child configurations of thespecified configuration ("children only"), or both ("with children").
Note: For "children only" mode, users can see but not modify parentconfigurations.
748AUREA CONFIDENTIAL
Chapter 3: Using CRM

• Vertical: Defines the ver tical version(s) for which a user is allowed to changeconfigurations.
• User Group: Depending on the User Group the CRM.Designer main page displaysa sub-set of available options, >> Login-Dependent CRM.Designer Main Page onpage 749.
Logins and authentication settings are stored in the PORTAL_LOGIN table in theCRM.Designer database.
If authentication is enabled, a login screen is displayed when accessing CRM.De-signer (except with single sign-on enabled) and a Logout link is displayed inCRM.Designer's header:
Alternatively (in a scenario with anonymous access enabled), you can define a fixedconfiguration and configuration mode via CRM.Designer's settings.xml(<FixedConfigId> and <ConfigMode> tags).
Login-Dependent CRM.Designer Main PageLearn about Login-Dependent CRM.Designer Main Page.
Depending on the User Group of a login, the user sees a sub-set of options on theCRM.Designer main page. This enables you to implement scenarios where there isa central CRM.Designer administration with full access to all CRM.Designer functionsand additional country-specific administration with restricted access.
The following user groups are available:
• Administrator: These users can access all items on the CRM.Designer mainpage.
• Power User: Can access all items except Authentication and Settings.
• User: Can access only the most commonly used and (relatively) easy to configureitems.
749AUREA CONFIDENTIAL
Administration

Administrators from this user group need less intensive training compared to ad-ministrators working in the other modes, and the risk of damaging a configurationis lower.
• Customer: Can only access the Field Groups page. This user group is used forcustomer administrators in an SaaS environment. For fur ther details, see CustomerAdmin Mode on page 865.
SettingsUse the Settings page of CRM.Designer to enable/disable authentication.
On the CRM.Designer main page in the Administration area, click the Settingsbutton to open the Settings page.
If Enable Anonymous Access is checked (or undefined), CRM.Designer is acces-sible without login.
If Enable Anonymous Access is not checked, only users specified on the Authen-tication page are allowed to access CRM.Designer.
The setting is saved in the PORTAL_SETTINGS table.
750AUREA CONFIDENTIAL
Chapter 3: Using CRM

Note: To apply a change of Enable Anonymous Access, you need to recycleCRM.Designer's application pool.
Alternatively, you can control access to CRM.Designer by commenting out the <En-ableAnonymousAccess /> entry in the settings.xml file. The setting in the set-tings.xml is overruled by the setting in the CRM.Designer database.
751AUREA CONFIDENTIAL
Administration

4Other Programs and FunctionsExplore additional capabilities offered by Aurea CRM solution.
Following are the additional feature offered by Aurea CRM:
Affiliation ViewThe Affiliation View allows users to view data linked to a set of companies and/orpersons.
Example - All health packages subscribed by the members of a family.
To activate this functionality, you need to:
• activate CRM process 1.4.1.4.7. "Affiliations" (CRM process ID 70000260): Thisenables all necessary UI elements in Aurea CRM.Web. For fur ther details,see Configuration Units on page 754.
• specify the info areas (linked to FI, PE or KP) from which collective data shouldbe displayed via an MC entry (Affiliations category, Applies to the followinginfo areas option). For fur ther details, see Configuration Info Area in the CRM.CoreAdministrator Guide.
Affiliations are defined via Relationship records (PB). By default, the Affiliate flagin the PB record defines a related company/person as an affiliate. For fur ther details,see Alternative Condition for Affiliation View on page 757.
Indirect links (IDs 26000-27999) allow reading child records of companies/personsbased on these PB records. For fur ther details, see Link IDs in the CRM.Core Ad-ministrator Guide.
For general information on relationships, see Web Business Logic User Guide.
Users can add/remove companies and persons (FI, KP, PE and CP records) to/fromaffiliation and immediately refresh the page. Selecting a record in the graph andclicking on Add to Affiliation sets the Affiliate flag in the PB record. (Selecting arecord and clicking Remove from Affiliation removes the flag. Multiple selections(via Ctrl+Click) is supported.
752AUREA CONFIDENTIAL
Chapter 4: Other Programs and Functions

After clicking Close&Refresh, the user sees child records (e.g. activities) for allmembers of the current affiliation in the Related Data area of Expand and List views,in Tree and Timeline views:
Important: Affiliation View is an option that effects all queries in CRM Web. Heavyqueries (because of a lot of links) combined with cascading update from triggerscan cause transactions to lock each other. Queries involving a lot of records withmultiple table concentations on every page slows down the performance of theCRM.Web application. To improve the performance you need to create indexes andoptimize them. Sorted queries requires sor ted indexes on relevant fields.
Note: MSSQL suffers from a performance degradation for cer tain types of querieswhen affiliation view is enabled. In such cases, using queries that force merge joins
753AUREA CONFIDENTIAL
Affiliation View

by using the OPTION (MERGE JOIN) query hint is useful. If you are using the PB-MBjoin then enable the MSSQL specific MC core configuration parameter Enable merge
join query hint for MB join with PB performance flag to improve performance.For more information on setting this parameter, see Configuration Info Area in theCRM Core Administrator Guide.
You can define fields to be displayed in sub-lists only when the Affiliation View isactive by defining showOnlyForAffiliations=true as Extended Option. This allowsyou to provide context information, e.g. the affiliated company to which the activityis actually related. For fur ther details, see Extended Options on page 228.
Configuration UnitsThis topic describe the items available for users with access to the CRM process1.4.1.4.7. "Affiliations" - CRM process ID 70000260.
All texts are defined in the Associations text group.
Global Switch / Query-Specific Switch
The Aurea CRM menu ($System) contains the dynamic menu item D_ToggleAssocia-tionView (Affiliation View), allowing the user to globally switch the Affiliation Viewon or off.
To determine the initial default state of the global switch, create and set theDatabase.AssociationMode.Default Web Configuration parameter,see Database.AssociationMode.Default. The user's selection overrules this default.
The user's selection is saved between sessions (in the user's roaming settings),see User Settings on page 25.
The Query Editor in Aurea CRM.Web as well as in CRM.Designer contains a separateInclude Affiliations switch. This enables users to define and execute queries inde-pendently of the state of the global switch.
754AUREA CONFIDENTIAL
Chapter 4: Other Programs and Functions

The global switch can have the following states:
• checked: IncludeConfigured, i.e. records from the info areas specified in the MCentry Affiliations category, Applies to the following info areas option are readfor all members of an affiliation (instead of just the current company/person).
• unchecked: Default, i.e. affiliations are not taken into account when displayingchild records.
The query-specific switch can have the following states:
• Pass-through (question mark): Default; when the query is executed the settingof the global switch takes effect.
• checked: IncludeConfigured, i.e. the query is executed taking affiliations intoaccount (for the child info areas specified in the MC entry), i.e. the indirect PBlinks (link IDs 26000-27999) are used instead of the links defined in the querystatement and regardless of the current setting of the global switch.
• unchecked: Exclude, i.e. the query is executed using the links specified in thequery statement.
For background queries the setting to be used is retrieved from the state of theglobal and query-specific switches at the moment of submitting the query. It is storedin the XML file as a numeric value:
• <UseAssociations> 2 </UseAssociations> = IncludeConfigured
• <UseAssociations> 4 </UseAssociations> = Exclude
• If pass-through is set with the global switch unchecked or unavailable, no <Use-Associations> tag is saved, i.e. the links specified in the query statement areused.
Select Affiliates (Button and Dialog)
The FI and PE Expand headers contain the (Select Affiliates) buttonSelectAssociationMembersGraph which calls the A_SelectAssociationMembersGraphcontext menu action.
Clicking the button opens the Select Affiliates popup displaying the current recordand all companies/persons linked to it via a relationship record. The graph uses theCircleOfInfluence widget (limited to one level, i.e. "relationships of relationships"are not displayed).
755AUREA CONFIDENTIAL
Affiliation View

To filter the displayed records (e.g. by relationship type), add a fixedFilterNameargument to the menu action containing a filter on PB. For fur ther details,see fixedFilterName.
The header displays the default table caption and MiniDetails for the currently se-lected record (not configurable).
The header buttons AddToAssociation and RemoveFromAssociation allow users toadd/remove companies/persons to/from the association.
On mouse-over the lines connecting the items the PB.Associations table captionis displayed in a tooltip (fallback: PB).
The labels of the company/person bubbles are defined by FI/PE/KP/CP.Associationstable captions (fallback: FI, KP, etc.)
Clicking Close&Refresh saves the defined affiliates and refreshes the working area.
Clicking Close saves the defined affiliates without refreshing the working area.
Select Affiliates List
To display a list of PB records instead of the graph, you can use the A_SelectAsso-ciationMembers menu action.
Note: This menu action is deprecated. Use A_SelectAssociationMembersGraphinstead.
756AUREA CONFIDENTIAL
Chapter 4: Other Programs and Functions
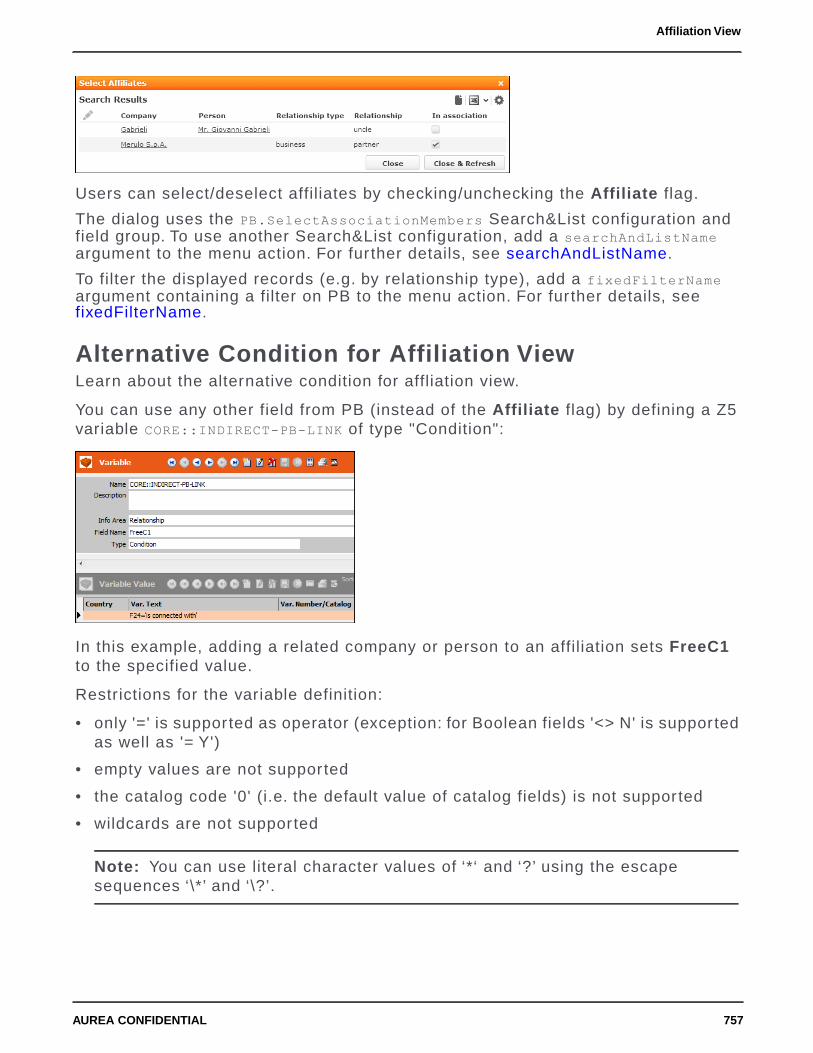
Users can select/deselect affiliates by checking/unchecking the Affiliate flag.
The dialog uses the PB.SelectAssociationMembers Search&List configuration andfield group. To use another Search&List configuration, add a searchAndListNameargument to the menu action. For fur ther details, see searchAndListName.
To filter the displayed records (e.g. by relationship type), add a fixedFilterNameargument containing a filter on PB to the menu action. For fur ther details, see fixedFilterName.
Alternative Condition for Affiliation ViewLearn about the alternative condition for affliation view.
You can use any other field from PB (instead of the Affiliate flag) by defining a Z5variable CORE::INDIRECT-PB-LINK of type "Condition":
In this example, adding a related company or person to an affiliation sets FreeC1to the specified value.
Restrictions for the variable definition:
• only '=' is supported as operator (exception: for Boolean fields '<> N' is supportedas well as '= Y')
• empty values are not supported
• the catalog code '0' (i.e. the default value of catalog fields) is not supported
• wildcards are not supported
Note: You can use literal character values of ‘*‘ and ‘?’ using the escapesequences ‘\*’ and ‘\?’.
757AUREA CONFIDENTIAL
Affiliation View

Campaign GraphThe CampaignGraph widget displays a CRM campaign and all its marketing activities,responses and follow-up marketing activities in a graphical, hierachical way.
For campaigns and marketing activities the Graph tab (configured in both theSearchSubList and ExpandChildren headers of CM and AK) displays a graph of theselected campaign containing the campaign, its marketing activities and responses.
Each item displays the xs info area image (see Images on page 717) and a tablecaption. You can define special table captions <InfoAreaId>.Graph to be displayedfor the items of the graph (CM, AK, AN).
For information on the CampaignGraph widget, see the ar ticle “How to use CampaignGraph” at https://support.aurea.com.
Creating/Updating Records From emailSignatures/WebsitesThis topic describes the configuration and extension possibilities of the SignatureParser functionality in Aurea.CRM
You can configure a button allowing users to create/update company/person recordsdirectly from email signatures or websites.
Note: The actual signature parser is not par t of Aurea CRM.Web but must beimplemented separately (using either your own parsing logic or obtaining a signatureparser from a third par ty provider).
758AUREA CONFIDENTIAL
Chapter 4: Other Programs and Functions

The parsing results (key/value pairs as JSON) are mapped to fields in the AureaCRM database via field functions.
Users copy a signature or address information from the source. In Aurea CRM.Web(e.g. in the New header for FI) they click a button (Create from signature in theabove example) calling the Copy from Signature or Website dialog. For fur therdetails, see Configuration Units on page 759. Pasting the signature/imprint in thetext field and clicking Analyze calls the parser. The result is displayed in the fieldsbelow the text box.
Users can manually correct the mapping between values and fields.
Invalid catalog values are marked with a red exclamation mark (plus tooltip) allowingthe user to select an existing catalog value or create a new one.
Clicking on Apply transfers the values to the record. (Empty values are not trans-ferred.)
Configuration UnitsLearn to configure signature parsers.
To make the signature parser available in Aurea CRM.Web, the following configura-tion units are required:
Signature Parser Action
Create a button with action template Command set to DataQuality/SignatureParser.Add it to the desired headers, e.g. the New and Expand headers for FI, PE etc.
Note: Buttons calling the signature parser action are only active when in Edit mode.
759AUREA CONFIDENTIAL
Creating/Updating Records From email Signatures/Websites

Field Mapping
Create a field group <infoAreaId>.Signature containing a List control.
This List control defines
• the mapping between the parsing result and the fields in the Aurea CRM database:Enter the key of the respective value as Function for each field in the control.
• the fields displayed in the Copy from Signature or Website dialog.
Supported field types: character, fixed/variable catalog, numeric
Note: Hierarchical catalogs are not supported.
Parsing Modes
If you use multiple signature parsers (e.g. per language, or one parser for companydata, one for person data, etc.), create a Web Configuration parameter Expand.Sig-natureParsingModes as Combobox and add your parsing modes as values. For fur therdetails, see Expand.SignatureParsingModes.
Users can select the desired parsing mode from the Use rules for drop-down list.
CRM.bulkloaderLearn to use CRM.bulkuploader to perform a variety of tasks.
Use CRM.bulkloader (..\designer\database\update.bulkloader.exe) to
• up-/download CRM.Designer configurations (XML files) and packages
• create or upgrade the CRM.Designer database
• update the CRM.Designer database with the current data model, CRM processes,roles and catalogs from the Aurea CRM database.
760AUREA CONFIDENTIAL
Chapter 4: Other Programs and Functions

Check Save program settings to save the selected options (file paths, databaseconnection settings etc.) between sessions. The password is encrypted. The settingsare saved per user and version at:
%USERPROFILE%\AppData\Local\update_Software_AG\update.bulkload-er.*\version\user.config
You can access all CRM.bulkloader functions via the command line. For fur therdetails, see CRM.bulkloader Command Line Parameters on page 782.
All actions performed by CRM.bulkloader are logged in the update.bulkload-er.log file located in the ..\designer\database directory.
Downloading Configuration Data from theCRM.Designer DatabaseLearn to download Configuration Data from the CRM.Designer Database.
You can download CRM.Designer configurations, packages (see Packages on page711) or a complete CRM.Designer database ("database dump") from your CRM.De-signer database as XML files.
To download configuration data from the CRM.Designer database:
1. On the CRM.bulkloader main page select Download data from the designerdatabase.
2. Click Next.
761AUREA CONFIDENTIAL
CRM.bulkloader

3. Enter the connection settings to your CRM.Designer database:
• Server: Name of the server where the CRM.Designer database is located. Enter"localhost" or "(local)" if you operate on a local database.
• Database: Name of the CRM.Designer database
• User name/Password: Account of the database owner, i.e. user with "db_owner"rights for the CRM.Designer database.
• Single Sign-In: If checked, you are connected using the credentials of yourcurrent Windows login. (The User name and Password fields are disabled.)
• DB Timeout: The database timeout in seconds.
4. Click Next.
5. Enter the path to the Output folder (for the XML files containing the configuration)or browse to the desired location.
Note: The output folder must already exist.
762AUREA CONFIDENTIAL
Chapter 4: Other Programs and Functions

6. Select the desired download function:
• Download all (complete database dump): Creates a complete database dump,i.e. downloads the contents of a whole CRM.Designer database You can createdatabase dumps for analysis or debugging purposes. You can also upload adatabase dump to another (empty) CRM.Designer database. For fur ther details,see Database Dump on page 767.
• Download data model: Downloads the Aurea CRM data model as currentlypresent in your CRM.Designer database.
• Download a vertical \ configuration (default): Downloads the selected Verticaland Configuration.
If packages are defined in the selected ver tical and configuration, the Pack-age check box is checked and you can select a package to download. For fur therdetails, see Packages on page 711.
Note: If you try to download a configuration from an invalid or outdatedCRM.Designer database, you are automatically redirected to maintenance mode.For fur ther details, see Maintenance on page 768.
7. Click Next.
8. Select the languages you want to include in the configuration (or package)download. The default selection reflects the Active flag on the Global LanguageSettings page. For fur ther details, see Global Language Settings on page 173.
Note: Download at least two languages, even if you need one. The additionallanguage does not have a significant impact on the size of the XML files and thesoftware. If the XML files contain only one language, on uploading CRM.bulkloaderassumes that you are uploading a language pack. For fur ther details, see Upload-ing and Downloading Texts on page 185.
763AUREA CONFIDENTIAL
CRM.bulkloader

9. Click Download. The download process is launched. A dialog box displays theprogress of the download.
10.When the upload is completed, a message is displayed. Click OK.
Uploading Configuration Data to the CRM.DesignerDatabaseLearn to upload Configuration Data from the CRM.Designer Database.
You can upload CRM.Designer configurations, packages (see Packages on page711) or a complete CRM.Designer database ("database dump") to your CRM.Designerdatabase.
Note: It is strongly recommended to back up the CRM.Designer database beforeuploading configuration data.
To upload configuration data to the CRM.Designer database:
1. On the CRM.bulkloader main page select Upload data into the designerdatabase.
2. Click Next.
3. Enter the connection settings to your CRM.Designer database as described above.For fur ther details, see Downloading Configuration Data from the CRM.DesignerDatabase on page 761.
4. Click Next.
764AUREA CONFIDENTIAL
Chapter 4: Other Programs and Functions

5. Enter the path to the XML Input folder (containing the configuration as XML files)or browse to the desired location.
6. Select the desired upload function:
• Do not import data (only fill TMP tables): Uploads the configuration intotemporary tables only. The XML files are uploaded into temporary tables tocheck the results before overwriting an existing configuration. For fur ther details,see Consistency Check on page 742. To finally upload the configuration, selectUpload configuration.
• Upload data model: Used when first installing Aurea CRM.Web andCRM.Designer. For fur ther details, see Setting Up the CRM.Designer Databasein the Aurea CRM.Web Installation Guide.
• Upload configuration (default): Uploads the configuration (located in the XMLInput folder) into your CRM.Designer database. If you selected Do not importdata (only fill TMP tables) for a previous upload, Upload configurationuploads the configuration from the TMP tables.
• Upload package into configuration: Uploads a package or a packagedefinition. For fur ther details, see Packages on page 711.
• Upload Dump (requires empty database): Uploads a complete databasedump. For fur ther details, see Database Dump on page 767. This option is onlyavailable for empty CRM.Designer databases.
Note: If you try to upload a configuration to an invalid or outdated CRM.Designerdatabase, you are automatically redirected to maintenance mode. For fur therdetails, see Maintenance on page 768.
Note: If you try to upload a configuration that does not exist in the targetdatabase, the system confirms whether the new configuration should be createdby CRM.bulkloader. Example - when transferring a configuration from your testenvironment to your production system.
765AUREA CONFIDENTIAL
CRM.bulkloader

However, configurations are created only if its parent configuration already existsin the target database.
Note: If more than one configuration with the same name as the configurationyou are trying to upload exists, the operation is aborted with an error message.
7. Click Upload. A confirmation message displayed the database connection andthe items that is uploaded.
Note: It is strongly recommended to back up the CRM.Designer database beforeuploading configuration data.
8. Click OK. The upload process is launched. A dialog box displays the progress ofthe upload. The upload process can take a few minutes depending on the amountof data, the speed of the machines and network, etc.
9. When the upload is completed, a message is displayed. Click OK.
766AUREA CONFIDENTIAL
Chapter 4: Other Programs and Functions

Database DumpLearn to create database dump.
When downloading data from a CRM.Designer database, you can also select todownload a complete database dump, i.e. the contents of a whole CRM.Designerdatabase e.g. to provide information for a support call.
You can upload such a database dump into an empty CRM.Designer database:
1. Create a database dump with CRM.bulkloader. For fur ther details, see DownloadingConfiguration Data from the CRM.Designer Database on page 761 (Download all(complete database dump) option).
2. Upload the dump into a new (empty) database:
• When uploading via CRM.bulkloader UI you are first asked to create thedatabase structure:
Select Create Designer Database Structure.
Click Next.
Select Upload data into the designer database, see Uploading Configuration Datato the CRM.Designer Database on page 764 (Upload Dump (requires emptydatabase) option).
Note: The dump upload feature is only available for empty databases: Do not uploadthe UPDATE_DEFAULT configuration (or any other root configuration) beforeuploading a database dump.
767AUREA CONFIDENTIAL
CRM.bulkloader

Uploading a Root ConfigurationLearn to upload a root configuration.
When a root configuration is imported, the data model in the CRM.Designer databaseis upgraded - but no deletion of tables and fields takes place because standard rootconfigurations typically do not contain generic fields.
If tables/fields are contained in the root configuration, but not in the CRM.Designerdatabase, they are automatically added using the next free table ID/field ID. Theroot configuration to be imported is then migrated to match the data model in thedestination designer database.
As with importing a data model, deleted fields are reused if contained in the importedconfiguration.
Uploading a Sub-ConfigurationLearn to upload a sub-configuration.
When a sub configuration is imported, the data model of the designer is not affected.Instead, the imported data is "migrated" to the data model of the destinationCRM.Designer database.
Importing a sub configuration works similar to importing a root configuration – thedifference is that tables and fields which are not known to the destination designerdatabase are created (using the next free table ID/field ID) and marked as deleted(since these fields are not valid for the current data model).
MaintenanceUse the CRM.bulkloader maintenance mode to create or upgrade your CRM.Designerdatabase.
Note: Creating or upgrading a database changes the structure of the selecteddatabase. Therefore, it is strongly recommended to back up the CRM.Designerdatabase before upgrading it.
Note: Before upgrading the CRM.Designer database you need to restar t the webapplication (iisreset).
Note: Concerning packages: After upgrading the CRM.Designer database you needto re-generate all packages (i.e. download them again), otherwise changes doneby CRM.bulkloader is lost in the target database.
768AUREA CONFIDENTIAL
Chapter 4: Other Programs and Functions

Note: When upgrading from an update.seven designer database, CRM.bulkloaderperforms a few "clean-up" operations; for details, see Migration Guide from Version7 to Version 8 available from https://support.aurea.com (core (win) section).
1. On the CRM.bulkloader main page select Maintenance.
2. Click Next.
3. Enter the connection settings to your CRM.Designer database:
• Server: Name of the server where the CRM.Designer database is located. Enter"localhost" or "(local)" if you operate on a local database.
• Database: Name of the CRM.Designer database
• User name/Password: Account of the database owner, i.e. user with "db_owner"rights for the CRM.Designer database
• DB Timeout: The database timeout in seconds.
4. Click Next. CRM.bulkloader analyses the database. Depending on the result, oneof the following screens is displayed:
• The database is not a valid CRM.Designer database:
769AUREA CONFIDENTIAL
CRM.bulkloader

1. Click Create Designer Database Structure.
CRM.bulkloader executes built-in SQL scripts creating the database:
Once the database and database structure has been created, a message isdisplayed.
770AUREA CONFIDENTIAL
Chapter 4: Other Programs and Functions

2. Click OK.
3. Click Next to return to the CRM.bulkloader main page.
• The database is a valid CRM.Designer database but from a previous version:
Note: It is strongly recommended to back up the CRM.Designer databasebefore upgrading it. Before upgrading the CRM.Designer database you needto restar t the web server (iisreset).
Click Upgrade Designer Database Structure. CRM.bulkloader upgrades thedatabase.
• The database is up to date:
1. Click OK to return to the CRM.bulkloader main page.
771AUREA CONFIDENTIAL
CRM.bulkloader

2. Click Upgrade Stored Procedures to upgrade the stored procedures.
Data Model, CRM Processes, Roles and CatalogsUse CRM.bulkloader to update the CRM.Designer database with the current datamodel, CRM processes, roles and catalogs from the Aurea CRM database.
Note: It is strongly recommended to back up the CRM.Designer database beforeupdating it.
All information depending on formats (data model, rights etc.) in Aurea CRM win isonly applied to Aurea CRM.Web after refreshing the formats (default: 30 min). Toapply these changes immediately, you need to restar t your application pool.
1. On the CRM.bulkloader main page select Data Model, CRM Processes, Rolesand Catalogs.
2. Click Next.
772AUREA CONFIDENTIAL
Chapter 4: Other Programs and Functions

3. Enter your Aurea CRM login data:
• User name: Enter your Aurea CRM login name.
• Password: Enter your password.
• Single Sign-In: If checked, you are logged on with the credentials of yourcurrent Windows login. (Neither User name nor Password have to be entered.)
Note: For CRM.bulkloader to work with single sign-on, change the configurationfile ..\crm.services\web.config as follows: Change the value of theclientCredentialType attribute from "None" to "Windows".
• Language: The language for the info area and field names of the data model.If you select "Users default language", the language entered in the user's reprecord is used. (If undefined, "ger" is used as fallback.)
The data model is transferred to CRM.Designer in the selected language. Thissetting does not apply to catalogs: Catalog values are transferred in the catalogbase language.
Note: If a maintenance user is defined, the login is performed with this user'scredentials (and language). For fur ther details, see Maintenance User in the AureaCRM.Web Installation Guide.
773AUREA CONFIDENTIAL
CRM.bulkloader

Note: update highly recommends defining a dedicated maintenance user andenter a language in this user's rep record to avoid updating the CRM.Designerdatabase in the wrong language.
• CRM.Designer Web Service URL: Enter the path to the Aurea CRM.Web webservice. The web service is located at <web url>/crm.services/.
4. Click Login.
5. After successful authentication click Next.
774AUREA CONFIDENTIAL
Chapter 4: Other Programs and Functions

6. Select the desired function:
• Updating the Data Model on page 775
• Updating CRM Processes and Roles on page 777
• Updating Catalogs on page 778
7. Click Finish to return to the CRM.bulkloader main page.
Note: Since CRM.Designer caches the data model information, updaterecommends that you perform an application reset (IIS reset or application poolrecycling) after updating the data model.
Updating the Data ModelLearn to update the Data Model.
In order to be able to configure Aurea CRM.Web for the current Aurea CRM datamodel, you need to transfer it to CRM.Designer.
Note: Before updating the data model, update recommends recycling the applicationpool of Aurea CRM.Web (or iisreset).
1. On the Data Model tab click Update Data Model.
775AUREA CONFIDENTIAL
CRM.bulkloader

Note: If you want to fill the temporary tables without updating the data model,enable Fill temporary tables only before clicking Update Data Model. The optionis only necessary if you got a timeout error while trying to update the data model.For fur ther details, see Manually Upgrading the CRM.Designer Data Model.
The current Aurea CRM data model is transferred to CRM.Designer:
• New tables and fields are added with the next unused table ID / field ID.
• Deleted tables and fields that are not referenced within the entire CRM.Designerdatabase are deleted from the database.
• When deleting fields that are par t of a field control definition, these fields are notdeleted from the control and therefore from CRM.Designer.
• References to tables or fields that do not exist in the imported data modelreferences a deleted field after upgrading.
• If a table or field which is currently marked as deleted in the CRM.Designerdatabase is contained in the newly imported data model, then this deletion markis cleared. This means that no new field is created, but instead, references tothat field become valid again. Since more than one deleted table or field point tothe same "logic field" (i.e. same info area, same unique field ID), the entry withthe lowest table ID/field ID may be always reactivated.
Manually Upgrading the CRM.Designer Data Model
If upgrading the CRM.Designer data model via CRM.bulkloader maintenance failsdue to a timeout, you can re-star t the upgrade with the Fill temporary tables onlyoption enabled and then manually star t the PORTAL_UPGRADE_MMINFO stored procedure,with the ver tical ID as parameter (1 = BtB; 2 = FS; 3 = OtC).
The upgrade applies the following actions to the database:
1. Activate tables marked as "deleted" if they are contained in the imported datamodel.
Note: A deleted table is only activated if there is no active table with the sameinfo area ID, and if there is no table with the same info area that has a lower tableID.
2. Clear info area for duplicate deleted tables (set info area ID to blank).
3. Mark tables that are not included in the destination data model as "deleted".
4. Inser t new tables.
5. Activate fields marked as "deleted" if they are contained in the imported datamodel.
6. Clear unique field ID of duplicate deleted fields.
7. Mark fields that are not included in the destination data model as "deleted".
776AUREA CONFIDENTIAL
Chapter 4: Other Programs and Functions

8. Inser t new fields (if a new field has a unique field ID that is not already used asfield ID, the new field is inser ted with unique field ID = field ID).
9. Modify catalog tables according to the imported data model. Catalogs that nolonger exist (i.e. catalogs that are not referenced at all or only referenced fromfields that are marked "deleted") - are deleted and all references are removed.
10.All fields marked as "deleted" that are not referenced in the entire CRM.Designerdatabase are deleted
11.All tables marked as "deleted" that are not referenced in the entire CRM.Designerdatabase (and do not contain any referenced "deleted" fields) are deleted.
Updating CRM Processes and RolesLearn to update the CRM Processes and Roles.
To assign configuration units to CRM processes and roles, you need to transfer thecurrently defined CRM processes and roles to CRM.Designer.
1. Select what you want to update:
• all: Both CRM processes and roles are updated.
• only processes: Only CRM processes are updated.
• only roles: Only roles are updated.
Note: Check Fill temporary tables only to only fill the temporary tables withoutupdating the CRM processes and roles in CRM.Designer. This allows you to ver-ify the changes before actually modifying existing data.
2. Click Update.
The currently defined CRM processes and roles are transferred to CRM.Designer.For fur ther details, see Roles & CRM Processes in CRM.Designer on page 734.
777AUREA CONFIDENTIAL
CRM.bulkloader

CRM processes and roles that have been deleted in Aurea CRM are handled asfollows in CRM.Designer:
• Deleted processes are moved to the designer CRM Processes node.
• Deleted roles are moved to the designer Roles node.
• Deleted groups are deleted for good.
For more information, see Overview of Assigned Roles & CRM Processes on page736.
Updating CatalogsLearn to update the Catalogs.
To use the catalog values (instead of numeric catalog codes or IDs) as input supportin CRM.Designer, you need to transfer the catalog values to CRM.Designer. Catalogvalues are transferred to CRM.Designer in the catalog base language.
When using variable catalog values in CRM.Designer e.g. in filters, default valuesetc., you have to synchronize these catalogs because the codes of catalog valuesare not unique across stations. For fur ther details, see Catalogs in the CRM.CoreAdministrator Guide.
Since fixed catalogs have unique IDs, synchronizing fixed catalogs is optional andonly necessary if you want a more comfortable way to enter a fixed catalog valuein CRM.Designer, e.g. when defining filters or queries. For fur ther details,see Defining Filters on page 489.
To update catalog information in CRM.Designer:
1. Update the data model, see Updating the Data Model on page 775.
2. Update the catalogs:
Only catalogs that are actually used by a field in the data model are listed andtherefore updated.
Uses: Number of fields that refer to the catalog.
778AUREA CONFIDENTIAL
Chapter 4: Other Programs and Functions

Synch: Last time the catalog was transferred to CRM.Designer.
3. Check Show all catalogs e.g. to display newly created catalogs that have notyet been transferred to CRM.Designer. Check fixed to display and select fixedcatalogs as well.
4. Select the catalogs you want to update by activating their check boxes.
Note: You should only synchronize catalogs whose values you actually use inCRM.Designer (or in your add-on programming).
Note: Synchronizing all catalogs (Check all option) is not necessary and notrecommended as it just prolongs loading times.
5. The option Synchronize catalogs by code allows text changes made by theAurea CRM catalog maintenance to be reflected in the CRM.Designer. If thisoption is not checked, catalog entries that do not exist in the CRM.Designer (=same default text and same tenant number) are created and entries that exist buthave a different code are corrected. If this option is checked, entries that do notexist in the CRM.Designer (= same catalog code) are created and entries thathave the same code, but different text and/or tenant number, are changed.
Note: If you are using external keys for variable catalogs (recommendedprocedure), the Synchronize catalogs by code option has no effect as the catalogvalues are always synchronized by external key.
6. Click Update selected catalogs.
The values of the selected catalogs are transferred to CRM.Designer.
Deleted catalogs and catalog values are not deleted from the CRM.Designerdatabase. You need to deleted them manually, see CRM.Designer Catalog Mainte-nance on page 722.
Data Model ReferencesLearn about Data Model References.
When a configuration is exported with CRM.bulkloader, the entire data model is alsowritten to the CRM.bulkloader XML files – this means that tables and fields that aremarked as deleted but referenced within the exported configuration are exportedas well. Tables and fields that are marked as deleted and not referenced within theexported configuration are not exported.
779AUREA CONFIDENTIAL
CRM.bulkloader

You might face problems when importing configurations to another CRM.Designerdatabase if your configuration has multiple references to different deleted tablesthat have the same info area ID, or fields that have the same unique field ID. Toavoid this problem, check the Data Model References section of the CRM.Designerto show all references to tables or fields that are marked as "deleted".
Although it is not necessary to completely remove references to deleted tables andfields for the export / import to work properly, it is highly recommended to clearyour configurations from such references – they may cause unpredictable behaviorof the configured application.
When a configuration is imported the following steps take place to adjust the datamodels of the designer database and the imported configuration:
1. (only for root configurations) Clear the "deleted" flag from tables that are containedin the imported root configuration but are marked as deleted in the CRM.Designerdatabase
2. Add tables that are only contained in the imported configuration. If a rootconfiguration is imported, the tables are imported (and the "deleted" flag is setdepending on the flag’s state in the imported configuration), for sub configurationsthey are always imported marked as deleted.
3. (only for root configurations) Clear the "deleted" flag for fields that are containedin the imported root configuration but are marked as deleted in the CRM.Designerdatabase
4. Add fields that are only contained in the imported configuration (as with tables,either marked "deleted" or not for root configurations, and always flagged "deleted"for sub configurations). If possible, the fields are added with unique field ID =field ID.
5. (only for root configurations) Field Information (name, type, catalog number, …)is updated for existing fields
6. All table and field references in the configuration to be imported are changed sothey match the data model in the destination designer.
780AUREA CONFIDENTIAL
Chapter 4: Other Programs and Functions

Aurea CRM Data Model Upgrade Implications onSynchronized CatalogsLearn about the data model upgrade implications on Synchronized Catalogs.
CRM.Designer's catalog synchronization feature is affected by a data model upgradeif a catalog was completely deleted from the data model (i.e. if no fields are refer-encing the catalog anymore). Synchronization feature to store catalogs and valuesin the CRM.Designer database to provide a safe reference to catalog values. Forfur ther details, see Catalog Value Synchronization.
In this case, a catalog is deleted from table PORTAL_CATALOG, and all values of thiscatalog are also removed from PORTAL_CATALOG_VALUES. In addition, all referencesof catalog values are removed from the database.
Note: This has the side effect that instead of the synchronized catalog values, thetext values is used in queries and filter of Aurea CRM.Web, leading to unpredictableand wrong results! Thus when deleting a catalog, you should always make sure tomanually correct those filters and queries that made use of it!
The deletion of all catalog values for catalogs that are not referenced anymoremeans that all references to values of this catalog in the CRM.Designer are perma-nently destroyed.
Synchronized catalog values are offered for the following features within CRM.De-signer:
• Filter values in Queries and Filters (table PORTAL_QUERY_FILTERVALUES)
• Web Configuration Values based on catalogs (table PORTAL_WEBCONFIG_VALUE)
• Analysis Categories (table PORTAL_STAT_CATEGORY_CRIT)
• Alternate Expand Configurations (table PORTAL_TABLECONFIG_COND)
The catalog synchronization feature writes all values of a catalog to the CRM.De-signer database (if they are not already there). After synchronizing a catalog, theCRM.Designer contains
1. all values that are currently stored in the catalog, and
2. all values that are not stored in the catalog anymore but where known to theCRM.Designer prior to the synchronization.
Please note that catalog values which were modified with the Aurea CRM catalogmaintenance (in Aurea CRM win Maintenance module) is inser ted as new valuesinto the CRM.Designer database, and the old values is not removed!
Catalogs in the CRM.Designer database are maintained on the Catalogs page ofCRM.Designer. For fur ther details, see CRM.Designer Catalog Maintenance on page722.
781AUREA CONFIDENTIAL
CRM.bulkloader
CRM.bulkloader Command Line ParametersLearn about CRM.bulkloader Command Line Parameters.
<bulkloaders>'s functions can be accessed via the command line.
Use the following syntax:
update.bulkloader <Operation> <Command> [options]
Below operations can be performed:
Download: Downloads designer configurations from your CRM.Designerdatabase
Syntax: update.BulkLoader Download <Command> <-vertical> <-configname> <-languages> <-packageid> <-packagename> <Connection> [Options]
Parameters for the Download operation:
782AUREA CONFIDENTIAL
Chapter 4: Other Programs and Functions

DescriptionName
All|Config|Package|DataModel<Command>
Downloads a complete database dump, i.e. the contents ofa whole CRM.Designer database.
All
Downloads a specific CRM.Designer configuration.Config
Use the following options with Config:
-vertical:<VerticalName> ...the name of the ver tical(Base|BB|BC|FS)
Note: -vertical overrides the ver tical specified in the set-tings.xml file (-configFile).
-configName:<ConfigName> ...the name of the configuration(e.g. UserConfig_XY_Sub0)
-languages:"<Languages>" ...comma-separated list of lan-guages to download (e.g. "English,German"). If undefined,all available languages are exported.
Note: Hidden languages (Visible unchecked on the Lan-guage Settings page) are not exported.
Note: Download at least two languages, even if you onlyneed one. The additional language does not have significantimpact on the size of the XML files and the software. If theXML files contain only one language, upon uploadCRM.bulkloader assumes that you are uploading a languagepack.
783AUREA CONFIDENTIAL
CRM.bulkloader

DescriptionName
Downloads a specific package from a given configuration.
Use the following options with Package:
-vertical:<VerticalName>
-configName:<ConfigName> ...the name of the configurationwhere the package is defined
-languages:"<Languages>"
-packageid:<packageId> ...the numeric package ID
-packagename:<PackageName> ...the name of the package
Note: You need to specify either -packageid or -packagename.If both are defined, -packageid is used.
Package
Downloads the Aurea CRM data model as currently presentin the CRM.Designer database.
Use the -vertical:<VerticalName> option with DataModel.
DataModel
Specify the connection to the CRM.Designer database.<Connection>
The connection string to the CRM.Designer database, e.g.-datasource:"Data Source=<DBserver>;Initial Cata-log=<DB>;UID=<loginName>; PWD=<plaintextpassword>"
To use single sign-on you need to specify the DSN:
Example: DSN for SQL driver with single sign-on enabled:
-datasource:"Provider=SQLOLEDB;Data Source=mysqlserv-er;InitialCatalog=mydatabase;IntegratedSecurity=SSPI;"
For information on how to enable single sign-on, refer to thedocumentation of your database driver.
-datasource:"<con-nection string>"
The settings.xml file containing the connection string(designerDsn) and default download folder (<XMLFilePath>),e.g. -configFile:" c:\updateCRM\bb\web\system\set-tings\settings.xml "
Note: You need to specify either -datasource or -configFile.If both are defined, -configFile is used.
-config-File:"<path>"
[Options]
784AUREA CONFIDENTIAL
Chapter 4: Other Programs and Functions
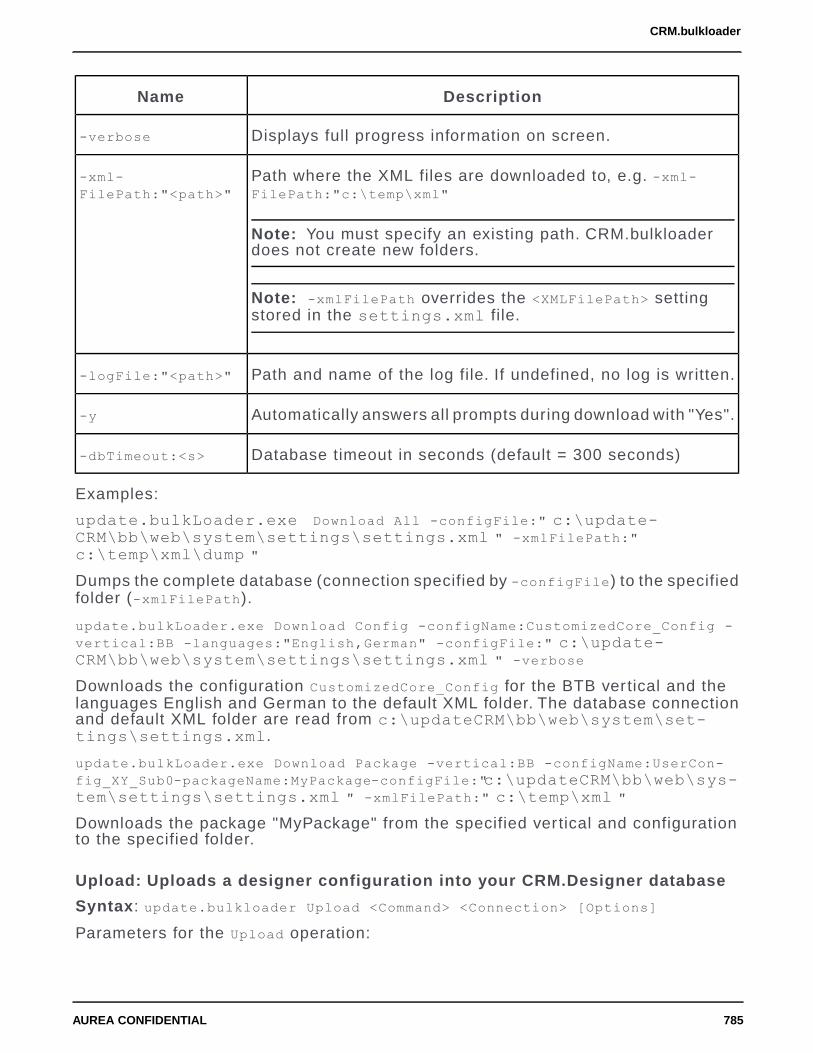
DescriptionName
Displays full progress information on screen.-verbose
Path where the XML files are downloaded to, e.g. -xml-FilePath:"c:\temp\xml"
Note: You must specify an existing path. CRM.bulkloaderdoes not create new folders.
Note: -xmlFilePath overrides the <XMLFilePath> settingstored in the settings.xml file.
-xml-FilePath:"<path>"
Path and name of the log file. If undefined, no log is written.-logFile:"<path>"
Automatically answers all prompts during download with "Yes".-y
Database timeout in seconds (default = 300 seconds)-dbTimeout:<s>
Examples:
update.bulkLoader.exe Download All -configFile:" c:\update-CRM\bb\web\system\settings\settings.xml " -xmlFilePath:"c:\temp\xml\dump "
Dumps the complete database (connection specified by -configFile) to the specifiedfolder (-xmlFilePath).
update.bulkLoader.exe Download Config -configName:CustomizedCore_Config -vertical:BB -languages:"English,German" -configFile:" c:\update-CRM\bb\web\system\settings\settings.xml " -verbose
Downloads the configuration CustomizedCore_Config for the BTB vertical and thelanguages English and German to the default XML folder. The database connectionand default XML folder are read from c:\updateCRM\bb\web\system\set-tings\settings.xml.
update.bulkLoader.exe Download Package -vertical:BB -configName:UserCon-fig_XY_Sub0-packageName:MyPackage-configFile:"c:\updateCRM\bb\web\sys-tem\settings\settings.xml " -xmlFilePath:" c:\temp\xml "
Downloads the package "MyPackage" from the specified ver tical and configurationto the specified folder.
Upload: Uploads a designer configuration into your CRM.Designer database
Syntax: update.bulkloader Upload <Command> <Connection> [Options]
Parameters for the Upload operation:
785AUREA CONFIDENTIAL
CRM.bulkloader

DescriptionName
Temporary|Final|Package|DataModel|Dump|CreateDB<Command>
The configuration is only uploaded to temporary tables(TMP_PORTAL*).
Temporary
The configuration is uploaded directly into the PORTAL* tables.Final
Uploads a CRM.Designer package into a configuration.Package
Use the following options with Package:
-ConfigName:<ConfigName> ...the name of the configuration towhich the package is uploaded
-OnlyDefinition ...if specified, only the package definition isuploaded.
Uploads the Aurea CRM data model into the CRM.Designerdatabase.
DataModel
Creates the database structure and uploads a database dump(only works with an empty database).
Dump
Creates the CRM.Designer database structure.CreateDB
Specify the connection to the target database.<Connection>
The connection string to the CRM.Designer database, e.g.-datasource:"Data Source=<DBserver>;Initial Cata-log=<DB>;UID=<user name>; PWD=<plaintextpassword>"
-datasource:"<con-nection string>"
The settings.xml file containing the connection string (design-erDsn) and default upload folder (<XMLFilePath>), e.g. -con-figFile:"c:\updateCRM\bb\web\system\settings\set-tings.xml"
-config-File:"<path>"
Note: You need to specify either -datasource or -configFile.If both are defined, -configFile is used.
[Options]
Displays full progress information on screen.-verbose
786AUREA CONFIDENTIAL
Chapter 4: Other Programs and Functions

DescriptionName
Path to the configuration files to upload, e.g. -xml-FilePath:"c:\updateCRM\bb\designer_Configuration\SubCon-figuration\MyConfig"
Note: -xmlFilePath overrides the <XMLFilePath> settingstored in the settings.xml file.
-xml-FilePath:"<path>"
Path and name of the log file. If undefined, no log is written.-logFile:"<path>"
Automatically answers all prompts during upload with "Yes".-y
Database timeout in seconds (default = 300 seconds)-dbTimeout:<s>
Creates a non-existing configuration on upload, if possible.
A configuration can only be created if its parent configurationalready exists in the target database.
-c
Examples
update.bulkloader.exe Upload Final -configFile:" c:\update-CRM\bb\web\system\settings\settings.xml " -verbose -y
Uploads a configuration using the XmlFilePath and database credentials defined inthe settings.xml specified by -configFile.
update.bulkloader.exe Upload Dump -configFile:" c:\update-CRM\bb\web\system\settings\settings.xml " -xmlFilePath:"c:\update-CRM\designer\myDump "
Uploads a database dump located at the path specified by -xmlFilePath to thedatabase specified by -configFile.
Note: It is strongly recommended to back up the CRM.Designer database beforeuploading configuration data.
Datamodel: Updates the CRM.Designer database with the current data model,CRM processes, roles and catalogs from the Aurea CRM database
Syntax: update.bulkloader DataModel <Command> <Connection> [UpdateOptions][CatalogOptions] [ProcessOptions] [Options]
Parameters for the Datamodel operation:
787AUREA CONFIDENTIAL
CRM.bulkloader

DescriptionName
Update|Catalog|Process<Command>
Updates the CRM.Designer database with the current AureaCRM data model.
Update
Updates the CRM.Designer database with the catalogs current-ly defined in Aurea CRM.
Catalog
Updates the CRM.Designer database with the CRM processesand roles currently defined in Aurea CRM.
Process
<Connection>
The path to the designer web service, e.g. http://local-host/update/crm.services
-serviceUri:<Uri>
The Aurea CRM user name used to log on to the designer webservice.
-user:<name>
The password used for login to the designer web service.-password:
<plaintextpass-word>
The language used for login to the designer web service.(e.g.eng or ger). If undefined, eng is used as default.
-language:<lan-guage>
For the three-character language codes, >> Language IDs inthe CRM.Core Administrator Guide.
Use with the Update command.[UpdateOptions]
Fills only the temporary tables.-temponly
Use with the Catalog command.[CatalogOptions]
Comma-separated list of variable catalogs to synchronize.Enter * for all.
-variable:<list>
Comma-separated list of fixed catalogs to synchronize. Enter* for all.
-fixed:<list>
Synchronizes catalogs by code.-bycode
788AUREA CONFIDENTIAL
Chapter 4: Other Programs and Functions

DescriptionName
Use with the Process command. If undefined, both CRM pro-cesses and roles are updated.
[ProcessOptions]
Fills only the temporary tables.-temponly
Updates CRM processes only.-processes
Updates roles only.-roles
[Options]
Enables single sign-on. -user and -password are ignored.-single
Path and name of the log file. If undefined, no log is written.-logFile:"<path>"
Automatically answers all prompts with "Yes".-y
Maintenance: Creates or upgrades the CRM.Designer database
Syntax: update.bulkloader Maintenance <Command> <Connection> [Options]
Parameters for the Maintenance operation:
789AUREA CONFIDENTIAL
CRM.bulkloader

DescriptionName
CreateDb|UpgradeDb|StoredProcedures<Command>
Creates the CRM.Designer database structure.CreateDB
Upgrades the CRM.Designer database structure to the currentversion.
UpgradeDB
Re-creates the stored procedures.StoredProcedures
Re-creates the TMP tables.UpgradeTmp
Specify the connection to the CRM.Designer database.<Connection>
The connection string to the CRM.Designer database, e.g.-datasource:"Data Source=<DBserver>;Initial Cata-log=<DB>;UID=<loginName>; PWD=<plaintextpassword>"
-datasource:
"<connectionstring>"
The settings.xml file containing the connection string (design-erDsn), e.g. -configFile:"c:\updateCRM\bb\web\system\set-tings\settings.xml"
You need to specify either -datasource or -configFile. If bothare defined, -configFile is used.
-config-File:"<path>"
[Options]
Displays full progress information on screen.-verbose
Path and name of the log file. If undefined, no log is written.-log-File:"<path>"
Automatically answers all prompts with "Yes".-y
Database timeout in seconds (default = 300 seconds)-dbTimeout:<s>
Note: It is strongly recommended to back up the CRM.Designer database beforeupgrading the database structure.
790AUREA CONFIDENTIAL
Chapter 4: Other Programs and Functions

Bulkloader Database configuration settingsLearn about the settings to be performed in the bulkloader configuration file.
Do the following settings in the applicationSettings node of the update.BulkLoad-er.exe.config file:
DatabaseConnectionProvider: used to change the database connection provider asthe default provider used is SQLOLEDB.
ConnectionStringParameters: used to pass extra connection string parameters toconnect to the database based on the supported parameters for the connectionprovider.
791AUREA CONFIDENTIAL
CRM.bulkloader

792AUREA CONFIDENTIAL
Chapter 4: Other Programs and Functions

CRM.launcher(Enterprise)Learn about the standalone CRM.launcher feature available on Enterprise edition.
CRM.launcher is a stand-alone Windows executable (communicating with AureaCRM.Web via secure web sockets) that allows performing actions that requirecommunication with applications "outside the browser sandbox", i.e. MS Office andCRM.phone.
Once installed on the client, CRM.launcher acts as a host for plug-ins providing thefollowing functions:
• Document check-in/-out, editing, mail merge and quick campaigns
• Using CRM.phone with Aurea CRM.Web
• Aurea CRM.Web offline
The plug-ins are loaded as defined in the update.launcher.exe.config file:<PlugIns><!--<PlugIn type="update.Launcher.Offline.PlugIn,update.Launcher.Offline"required="true" />--><PlugIn type="update.Launcher.WebBrowser.PlugIn,update.Launcher.WebBrows-
er" required="false" /><PlugIn type="update.Launcher.RemoteControl.PlugIn,update.Launcher.Re-
moteControl" required="false" /><PlugIn type="update.Launcher.Documents.PlugIn,update.Launcher.Documents"required="false" />
<PlugIn type="update.Launcher.Phone.PlugIn,update.Launcher.Phone" re-quired="false" /></PlugIns>
CRM.Launcher can connect to CRM Server via non-transparent firewalls providedby third par ties. It does this by authenticating once using the propreitary mechanismof the firewall provider and then saving the authentication cookies for subsequentconnections. For more information, see
The saved authentication cookies are also used by CRM Web Offline to connect tothe CRM server through the same firewalls. For information on CRM.launcher inconnection with Aurea CRM.Web offline, see Aurea CRM.Web offline InstallationGuide.
Installing CRM.launcherLearn to install the CRM.launcher.
You can install CRM.launcher for the following environments:
• Single user environment
• Shared mode environment
793AUREA CONFIDENTIAL
CRM.launcher(Enterprise)
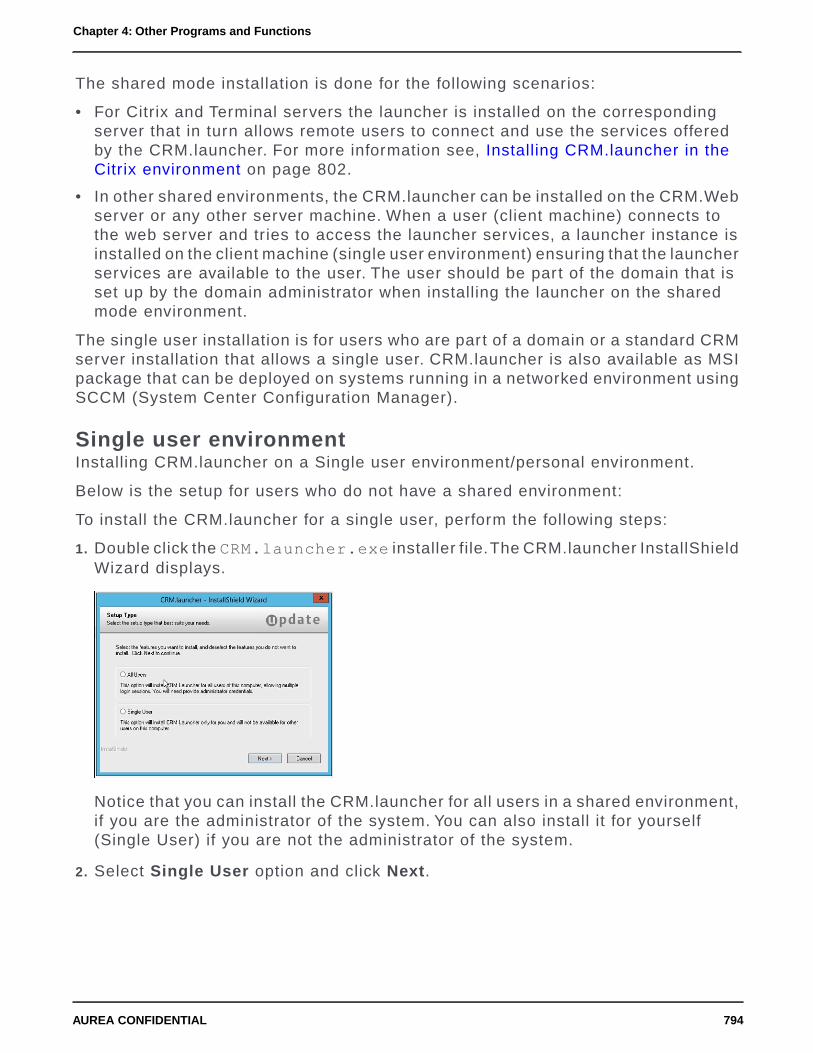
The shared mode installation is done for the following scenarios:
• For Citrix and Terminal servers the launcher is installed on the correspondingserver that in turn allows remote users to connect and use the services offeredby the CRM.launcher. For more information see, Installing CRM.launcher in theCitrix environment on page 802.
• In other shared environments, the CRM.launcher can be installed on the CRM.Webserver or any other server machine. When a user (client machine) connects tothe web server and tries to access the launcher services, a launcher instance isinstalled on the client machine (single user environment) ensuring that the launcherservices are available to the user. The user should be part of the domain that isset up by the domain administrator when installing the launcher on the sharedmode environment.
The single user installation is for users who are part of a domain or a standard CRMserver installation that allows a single user. CRM.launcher is also available as MSIpackage that can be deployed on systems running in a networked environment usingSCCM (System Center Configuration Manager).
Single user environmentInstalling CRM.launcher on a Single user environment/personal environment.
Below is the setup for users who do not have a shared environment:
To install the CRM.launcher for a single user, perform the following steps:
1. Double click the CRM.launcher.exe installer file.The CRM.launcher InstallShieldWizard displays.
Notice that you can install the CRM.launcher for all users in a shared environment,if you are the administrator of the system. You can also install it for yourself(Single User) if you are not the administrator of the system.
2. Select Single User option and click Next.
794AUREA CONFIDENTIAL
Chapter 4: Other Programs and Functions

3. The InstallShield Wizard star ts the installation without requiring any fur ther inputs.
4. After installation is complete, the Setup Completed page displays.
5. Click Finish to complete the installation.
Note: The CRM.launcher is installed in the AppData\local\up-date.CRM\CRM.launcher folder. The CRM.launcher is automatically star tedwhen the user is logs into the system.
6. The CRM.launcher also installs a cer tificate which is used to authenticate withthe CRM.Web server.
795AUREA CONFIDENTIAL
CRM.launcher(Enterprise)

Note: The default cer tificate type X.509 and is issued by Aurea. You can alsouse external cer tificates issued by other cer tification providers. If you want to usethird par ty cer tificates then set the path to the cer tificates in the configurationfiles. For more information on configuration files, see Configuring theCRM.launcher.
Deploying CRM.Launcher using SCCM
CRM.launcher is available as an MSI package for installation in a single user mode.This allows organizations to safely deploy CRM.launcher on user machines usingMicrosoft SCCM (System Center Configuration Manager). This method provides acontrolled centralized method of installing, uninstalling, and upgradingCRM.launcher on target systems. For more information, see Deploying ApplicationsUsing SCCM.
Shared EnvironmentIn a shared environment, the CRM.launcher can be installed for all the users whouse the system.
The application is installed in the Program Files folder. All communication with theAurea.CRM.Web is handled through a named pipe server.
Note: Using CRM.launcher for multiple user login sessions is an enterprise featureand is available only for enterprise editions of Aurea CRM installations. While youcan install it for all users, if you do not have an enterprise license then only theadmin can use the CRM.launcher.
To install the CRM.launcher for all users in a shared environment, perform the fol-lowing steps:
1. Double click the CRM.launcher.exe installer file.
The InstallShield wizard displays.
796AUREA CONFIDENTIAL
Chapter 4: Other Programs and Functions

Notice that you can install the CRM.launcher for all users in a shared environment,if you are the administrator of the system. You can also install it for yourself(Single User) if you are not the administrator of the system.
2. Select All Users and click Next, the CRM Launcher Sevice window displays.
The CRM.launcher application is installed as a windows service. The windowsservice acts as a proxy for all CRM.launcher sessions for all users.
Note: Only a user belonging to the administrator group can install theCRM.launcher for all users.
3. Enter the User name in the format <Windows domain name>\<username>.Alternatively, click Browse, the Browse for a User Account window displays.
You can enter the administrator username and password for this system if youare a system administrator user.
If you are a domain administrator group user, then perform the following steps togrant access to all the domain users. The launcher is installed as a system service.
• In the Browse for a User Account window, click the Browse button for theDomain or Server text box. And select the required domain or server from theSelect Domain or Server window. Click OK.
797AUREA CONFIDENTIAL
CRM.launcher(Enterprise)
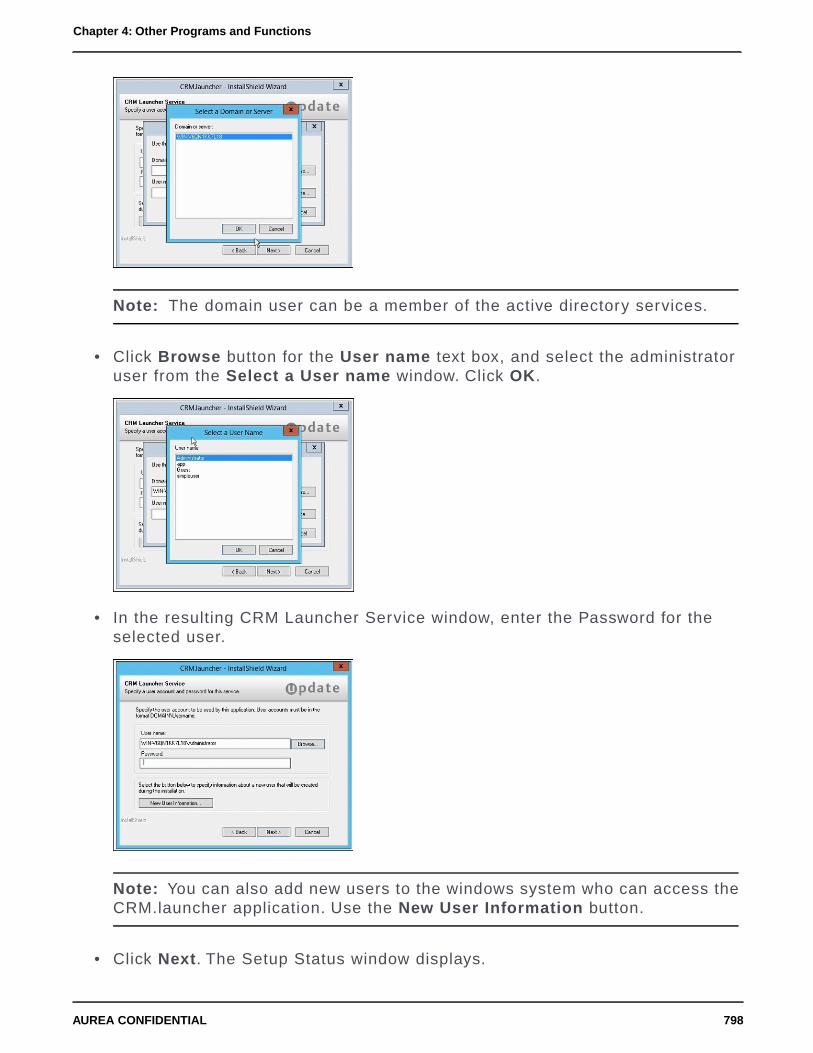
Note: The domain user can be a member of the active directory services.
• Click Browse button for the User name text box, and select the administratoruser from the Select a User name window. Click OK.
• In the resulting CRM Launcher Service window, enter the Password for theselected user.
Note: You can also add new users to the windows system who can access theCRM.launcher application. Use the New User Information button.
• Click Next. The Setup Status window displays.
798AUREA CONFIDENTIAL
Chapter 4: Other Programs and Functions

4. Click Finish to complete the installation.
Note: It is star ted when the user logs into an Aurea.CRM.Web application andtries to star t a plugin that requires CRM.launcher. The user is then asked toactivate the CRM.launcher application on his system by clicking the link providedin a message window of the web browser.
5. The CRM.launcher server is star ted immediatly on installation as a windowsservice. The star tup type for the service is set to automatic.
799AUREA CONFIDENTIAL
CRM.launcher(Enterprise)

6. When a domain user initially connects to the CRM.Web server a cer tificate isinstalled on his system which is used for authentication with the CRM.Web server.
7. The CRM.launcher also installs a cer tificate which is used to authenticate withthe CRM.Web server.
Note: The default cer tificate type X.509 and is issued by Aurea. You can alsouse external cer tificates issued by other cer tification providers. If you want to usethird par ty cer tificates then set the path to the cer tificates in the configurationfiles. For more information on configuration files, see Configuring theCRM.launcher.
Silent Mode Installation (commandline and batch files)You can install CRM.launcher in silent mode by running the installer from acommandline shell or a batch file using the -–silent option.
Note: If you run the installer from the commandline shell without the –silent option,then the installation wizard dialog is launched.
The installer also takes the following options:
• --mode—specify if the installation is for a single user, all users, or for a sharedenvironment (for example, Citrix XenDesk or a Terminal Server).
Note: If this option is not specified, the default value SINGLE is assumed.
It takes the following values:
• ALL — installs CRM.launcher for all users configured on the system
800AUREA CONFIDENTIAL
Chapter 4: Other Programs and Functions

Note: This mode assumes administrator rights for the installer.
• SINGLE — installs CRM.launcher for the current user
Note: This mode assumes the current user.
• SHARED — installs CRM.launcher as a windows service in a shared environmentsuch as Citrix XenDesktop or Microsoft Terminal Services
Note: In this mode, CRM.launcher installer creates a Launcher Windows servicethat runs under a service-user account. And the username and password optionsare mandatory. Sometimes, in a shared environment like Citrix, credential forthe launcher service-user is set up after the installation. For such cases, usethe --ignorecredential option to avoid having to provide the username andpassword. You can also use the --nostart option to prevent the automaticrestar t of Luncher after installation.
• --username—specify the name of the user account used to execute the launcherinstaller. This account is used to run the launcher service.
• --password—specify the password for the user account used to execute theCRM.launcher installer.
• --i—specify the path to the installation folder.
• --nostart—use this option to prevent the Launcher from star ting after installation.This is useful when a software distribution tool is used to install CRM.launcher.
• --ignorecredential—use this option only for SHARED mode installation. Thisinstalls CRM.Launcher as a service using the default local system account. Theservice-user and credentials can be setup later.
Note: After the silent installation, the sc command can be used to change theservice-user details. See the following example:
• sc stop "CRMLauncherServer"
• sc config "CRMLauncherServer" obj= ".\CrmServiceUser" password= "crmser-
vice- password"
• sc start "CRMLauncherServer"
801AUREA CONFIDENTIAL
CRM.launcher(Enterprise)

Some examples of Silent mode installationTo install CRM.launcher in silent mode, in a shared environment, use the followingin a command shell:CRM.launcher.exe --silent --mode=SHARED --username=Administrator --password=hG&4e%km
--i=C: \Aurea\CRM\launcher
To install CRM.launcher in silent mode, in a shared environment, and service-userdetails to be provided after the installation, use the following in a command shell:CRM.launcher.exe --silent --mode=SHARED --ignorecredential --i=C:\Aurea\CRM\launcher--nostart
Installing CRM.launcher in the Citrix environmentIn the Citrix environment, the CRM.Launcher is installed only once in shared modeon the Vir tual Delivery Agent.
The Vir tual Delivery agent then presents the CRM.launcher instance to each of thedifferent Citrix client users connecting to the Store front. When the user requestsan action from CRM.web that requires the CRM.launcher, the launcher service run-ning in the background is invoked.
Note: Sometimes a popup appears on the CRM.Web with a link to star t the Launcherservice. This only happens when the CRM.launcher service is not already running.The reasons could be if the launcher service is restar ted and the communicationbetween the CRM.Web and the CRM.launcher breaks down. Or the Citrix user islogging in for the first time to the Store front.
The following screenshot shows a typical Citrix environment:
802AUREA CONFIDENTIAL
Chapter 4: Other Programs and Functions

The following description outlines the roles of the different players in the Citrix en-vironment interacting with CRM.Launcher:
• Domain Controller—this is the primary domain controller in the Citrix environmentand every other machine is a member of this domain.
• Xen Desktop Server—Citrix XenDesktop configured with StoreFront to providevir tual desktops for clients. Both, Aurea CRM.Web and the SQL Server Databasecould be installed here or on seperate servers.
• Vir tual Delivery Agent—the base desktop that is presented to the user throughStore front. CRM.launcher enterprise should be installed here. The CRM.launcherservice is running using a domain account. Ensure that the X.509 cer tificate isinstalled for this account. The cer tificate is installed by the CRM.launcher client.
• Clients—these Citrix client users connect to StoreFront using the Citrix Receiverweb plugin.
To install the CRM.launcher in a Citrix environment, perform the following steps:
1. Login to the Vir tual Delivery Agent.
2. Run the CRM.launcher installer as an administrator.
3. Install the CRM.launcher in shared mode using a local account. For instructionson installing CRM.launcher in shared mode environments, see Shared Environmenton page .
4. After installing CRM.launcher open the local services page and select theCRM.launcher Server, as shown in the screenshot below.
5. Double click the CRM.launcher Server and to open the properties window.
6. Now configure the CRM.launcher Server to star t with a domain account. Enterthe account name and Password.
7. Restar t the CRM.launcher server.
803AUREA CONFIDENTIAL
CRM.launcher(Enterprise)
8. The CRM.launcher service is now available to all client users in the configuredCitrix domain.
9. After installing the CRM.launcher Server, run the CRM.launcher client. Thisensures that the cer tificates required by the CRM.launcher service and client areinstalled on the vir tual delivery agent. For more information on configuring thecertificates, see Certificate Configuration.
Upgrading the CRM.launcherLearn how to upgrade the CRM.launcher.
If you already have a previous version of CRM.launcher installed, then running thenew installer detects the previous installation and upgrade the previous installationautomatically. There is no need to uninstall the previous version and re-install thenew version.
In the case of weboffline system, when you run the CRM.launcher installer it detectsthe previous weboffline installation and shows a message box with the warning “Inorder to upgrade the Launcher you need to use a newer web offline installer.” Inthis case you can enforce, just the launcher upgrade by using silent mode commandline installation, with the following command options:
• MigrateLauncher – forces the upgrade of the launcher with out upgradingweboffline.
• Vertical=<VERTICAL NAME> - Specify the appropriate edition of the CRM.Webvertical for which the CRM.launcher is being upgraded, from the following ver ticals:BTB, FS, OTC.
For example, to force upgrade the CRM.launcher for a BTB vertical edition, withoutupgrading the weboffline, use the following command: CRM.webOffline_in-staller.exe –MigrateLauncher –Vertical=BTB .
If you are upgrading the weboffline installer, the weboffline installer opens in amaintenance mode and allows you to reinstall or remove the current version ofCRM.launcher.
Installation on the domain user (client) machineInstalling CRM.launcher on client machine.
Non-administrative domain users are offered a download link when they first accessa function that requires CRM.launcher. Clicking on the link downloads the installationfile from the server and automatically star ts the installation. The CRM.launcher isnot installed as a service on the user’s machine but only as a program that isstar ted up automatically when the machine star ts up.
On the server the setup file is located at: “<CRM launcher root>\..\data\plu-gins\ CRM.launcher.exe ” by default.
For information on customizing the setup, see the ar ticle “How to Customize the setup of CRM.Launcher” https://support.aurea.com.
804AUREA CONFIDENTIAL
Chapter 4: Other Programs and Functions

Note: The CRM.launcher setup requires .NET framework 4.5. If .NET framework4.5 is already installed on the client, setup can be executed within the user context.Otherwise setup installs .NET framework 4.5. This installation requires administratorrights.CRM.launcher does not support "vir tualizations" of shared desktops, i.e. itrequires a vir tual desktop integration where networking is dedicated per vir tualmachine, and IP addresses and ports are not shared with other users. Restriction:If the setup is executed from within Internet Explorer 10, no log file is created.(Workaround: If setup is star ted manually in the download folder, LauncherSet-up.log is created in the same directory.)
For more information on installing CRM.launcher, see Installing CRM.launcher onpage 793.
Once the setup is finished, CRM.launcher is star ted and the user is prompted toinstall a cer tificate that is necessary for a secure web socket communication. Theprompt is displayed every time CRM.launcher is star ted until the cer tificate is in-stalled.
For information on enabling the cer tificate for Mozilla Firefox, see the ar ticle“CRM.Launcher Firefox” at https://support.aurea.com.
Information on the currently used version of CRM.launcher can be found on AureaCRM.Web's System Information page (Settings > System Information).
Configuring CRM.launcher on user machines
As long as CRM.launcher is running, an icon is displayed in the system tray. Right-or double-clicking on the icon opens the context menu.
Available options:
• Check for updates: Checks if the version installed on the client is up-to-date,i.e. the same as on the server, and prompts the user to install patches if available,see Updating CRM.launcher.
You can hide this menu item by setting <EnableManualUpdates> to false in theupdate.launcher.exe.config file.If the installation of a patch is aborted by the user, the first menu entry readsResume Patching instead: This allows the user to resume the patching process.
• Settings: The following options are available:
805AUREA CONFIDENTIAL
CRM.launcher(Enterprise)

• General: Allows users to select a language, see CRM.launcher Languages onpage 823.
• Troubleshooting: Allows users to create a bug report, see Creating a BugReport on page 807.
• Connectivity: Allows users to set another por t used for the connection betweenCRM.launcher and the browser (default: 18188).
• About CRM.launcher: Displays CRM.launcher's version number.
• Exit: Exits CRM.launcher.
Updating CRM.launcher
CRM.launcher periodically checks for updates on the server and informs the userif an update is available. A short summary of the found files is displayed and theuser is and asked for confirmation. The user is also informed upfront about possibleconnectivity losses and advised about fur ther actions before continuing with theupdate (e.g. a warning stating that open documents have to be uploaded manually).Once all files are downloaded and the update has been successfully installed,CRM.launcher restar ts itself and reconnects to Aurea CRM.Web.
CRM.launcher searches for new patches in the <GlobalPatchDirectory> on theserver (default path:..\web.data\GlobalPatchDirectory).The <GlobalPatchDi-rectory> is defined in the offline.xml file located at ..\system\settings.
806AUREA CONFIDENTIAL
Chapter 4: Other Programs and Functions

*.zip files are unpacked in the root installation folder, executables are executedprovided they meet the security guidelines: The <PatchingSettings> section in theupdate.launcher.exe.config file needs to be configured, and the files haveto be signed with a valid cer tificate.
For details, see the ar ticles “CRM.Launcher 8.2 Feature Pack, self patching” and“How to Configure Patching Settings for CRM Launcher” at https://support.aurea.com.
Executables need to be placed in the root folder. They are executed with the locationof update.launcher.exe as working directory. Executables in subfolders is not exe-cuted.
Patches must comply with the following naming conventions:
• File names must star t with "launcher_".
• To enable patching of different versions on the client, you can use the words"from", "to" and "any" in the file name.
CRM.launcher patches are processed in numeric order (i.e. star ting with the lowestto_<version> number).
Creating a Bug ReportLearn about creating bug report for issues with CRM.launcher.
If there is an issue with one of the CRM.launcher plug-ins or with the update process,users can create a bug report containing all of CRM.launcher's settings files andlogs (Settings > Troubleshooting or by clicking Create Bug Report directly onthe error screen).
The report is created as a *.zip package that users can then send to the adminis-trator.
For troubleshooting information, see the ar ticle “Trouble Shooting CRM.launcher8.2 Feature Pack” at https://support.aurea.com.
807AUREA CONFIDENTIAL
CRM.launcher(Enterprise)

Configuring the CRM.launcherLearn to configure the CRM.launcher.
The configuration file Update.Launcher.NamedPipeServer.exe.config containsthe configuration settings for the CRM.launcher server installation. For individualusers machines the configuration file update.launcher.exe.config containsthe configuration settings for the CRM.launcher. The logging and cer tificate config-uration are discussed in the below:
Persisting User-session Data in Shared EnvironmentsLearn about Persisting User-session Data in a shared environments in CRM.launcher.
In a shared environment, the CRM.LauncherNamedPipe service needs to identifyand communicate with multiple Launcher user-client instances. For each client in-stance, CRM.Web generates a unique id (UUID) and persists the UUID by storingit in the US infoarea. Similarly, the UUID session received by the Launcher clientinstance is stored in a secure location in the shared environment. By persisting theUUID on CRM.Web and the CRM.Launcher clients, the Launcher session is resumedwhen the user logs back to the shared environment. The UUID received by the cor-responding Launcher client instance is stored in a location that is not cleared bythe session manager of the shared environment, when the user logs off.
For example, the Citrix session manager cleans up the local storage used by allapplications that ran in a Citrix user-client's session, including CRM.Launcher’sdata like the UUID, stored locally. CRM.Launcher stores the client session data andfiles in a folder location that is specified by the <UserProfilePath> parameter definedin update.launcher.exe.config file. If this parameter isnot defined then a defaultpath %userprofile%\AureaCRM is used. See the example configuration below:<update.net>
<update.launcher><UserProfilePath>%userprofile%\AureaCRM</UserProfilePath>
Logging ConfigurationLearn to configure logging on CRM.launcher.
The following screenshot shows the update.Launcher.NamedPipeServ-er.exe.config file with the loglevel attribute set to “warning” and the filepaththat points to the launcher_server.log file.
808AUREA CONFIDENTIAL
Chapter 4: Other Programs and Functions

The following sample code provides the logging configuration details:<update.net>...
<update.lib><Logging><Channel logLevel="Warning" writerName="writer" formatterName="formatter" /><Writer filePath="%PRODUCTFOLDER%\log\launcher_server.log" name="writer"
maxSizeKB="8192" closeOnIdleTimeout="5"type="update.Lib.Logging.Writers.FileLogWriter,update.Lib" />
<Formatter name="formatter"type="update.Lib.Logging.Formatters.DefaultLogFormatter,update.Lib" /></Logging>
</update.lib></update.net>
CRM.launcher allows the following log levels:
• NoLogging – Nothing is written to the log file.
• Emergency – The system is unusable.
• Aler t – Actions requiring immediate attention are logged.
• Critical – Only critical conditions are recorded in the log file.
• Errors – Only errors are written to the log file.
• Warning – Only warnings are written to the log file.
• Notice – Normal but significant conditions are written to the log file.
• Info – Errors, Warning, and information messages are written to the log file.
• Debug – Everything is written to the log file.
Certificate ConfigurationLearn to configure cer tificates on CRM.launcher.
Aurea CRM uses the the default cer tificate type X.509 and is issued by Aurea. Asan administrator you can also use external X.509 cer tificate issued by other cer tifi-cation providers. If you want to use third par ty cer tificates then you have to installthe third par ty cer tificates on the server machine running launcher and also theclient machines that connect to the CRM server.
To configure third par ty X.509 cer tificates, set the path to the cer tificates in theconfiguration file. The following screenshot shows the external cer tificate mycer-tificate.pfx located at the location c:\mycertificates\. Also, notice theURL format.
809AUREA CONFIDENTIAL
CRM.launcher(Enterprise)

The following code sample shows the configuration setup in the Update.Launch-er.NamedPipeServer.exe.config configuration file.<update.net>...
<update.launcher>...
<PlugIns>
<PlugIn type="update.Launcher.WebBrowser.PlugIn,update.Launcher.WebBrowser"required="false" >
<Url>wss://www.xyz.com:8181</Url><Certificate>c:\mycertificates\mycertificate.pfx</Certificate>
</Plugin></PlugIns></update.launcher></update.net>
Note: The cer tificate must have intended purpose "Server Authentication" and itscanonical name must match the host name in wss://<url>. The URL is the oneconfigured for CRM.launcher. For example, in the example above www.xyz.com.
Configuring Aurea CRM.Web to use wss:// or ws:// connection protocol
To provide a wss:// (WebSocket Secure) or ws:// (WebSocket) connection pro-tocol for CRM.Launcher connecting to Aurea CRM Web, use the web configurationparameter System.LauncherUrl. The parameter provides three possible connectionoptions, listed below:
• System.LauncherUrl is not set - This is the default state and in such a case theLauncher URL is automatically set to wss://localhost:<System.LauncherPort>.This provides a WebSocket secure connection for the Launcher, even if AureaCRM Web server provides an insecure HTTP connection.
• System.LauncherUrl is set to an abolute protocol - Set it to an absolute protocolwss:// to ensure that the Launcher always uses a WebSocket Secure connectionprotocol. Aurea recommends that you use this approach if you intend to use ahostname other than localhost and custom certificates.
• System.LauncherUrl is set to a relative protocol - Set it to a relative protocolURL star ting with two slashes, for example, //www.xyz.com:8181. The protocolrelative Launcher URL is prefixed with wss: if the CRM Web server provides aHTTPS (HTTP Secure) connection or prefixed with ws: (WebSocket connection) ifthe CRM Web server provides a plain HTTP connection.
810AUREA CONFIDENTIAL
Chapter 4: Other Programs and Functions
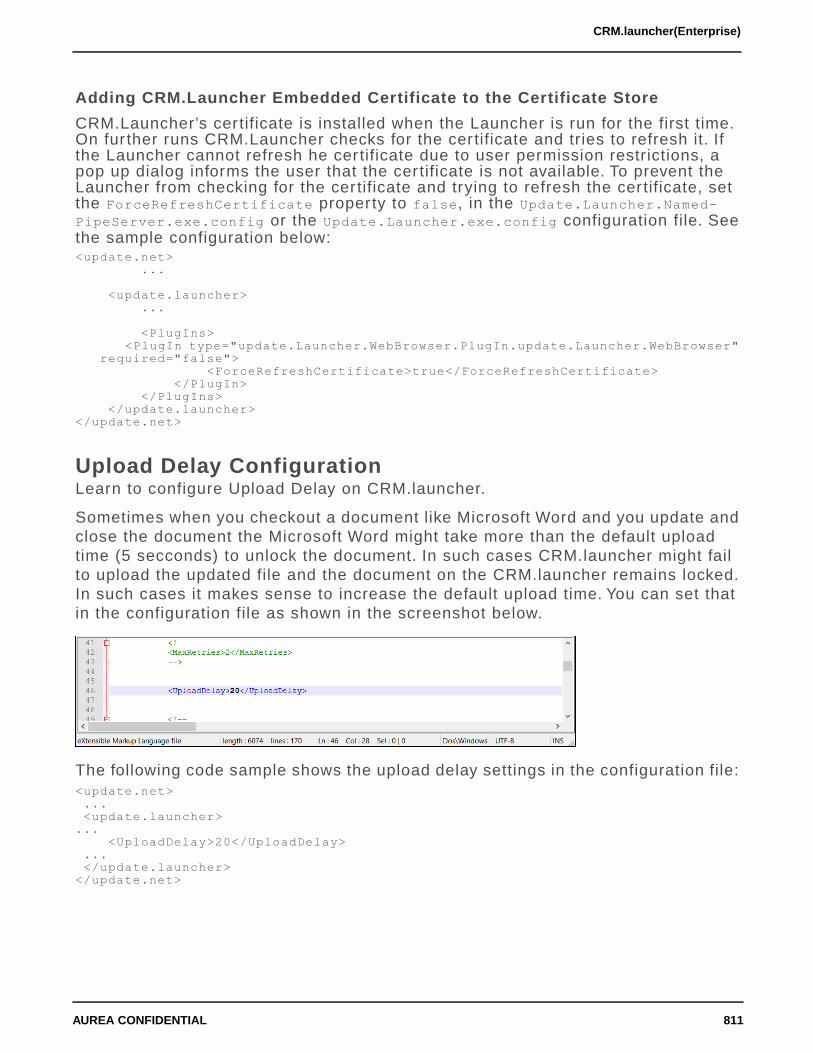
Adding CRM.Launcher Embedded Certificate to the Certificate Store
CRM.Launcher’s cer tificate is installed when the Launcher is run for the first time.On fur ther runs CRM.Launcher checks for the cer tificate and tries to refresh it. Ifthe Launcher cannot refresh he cer tificate due to user permission restrictions, apop up dialog informs the user that the cer tificate is not available. To prevent theLauncher from checking for the cer tificate and trying to refresh the cer tificate, setthe ForceRefreshCertificate property to false, in the Update.Launcher.Named-PipeServer.exe.config or the Update.Launcher.exe.config configuration file. Seethe sample configuration below:<update.net>
...
<update.launcher>...
<PlugIns><PlugIn type="update.Launcher.WebBrowser.PlugIn.update.Launcher.WebBrowser"
required="false"><ForceRefreshCertificate>true</ForceRefreshCertificate>
</PlugIn></PlugIns>
</update.launcher></update.net>
Upload Delay ConfigurationLearn to configure Upload Delay on CRM.launcher.
Sometimes when you checkout a document like Microsoft Word and you update andclose the document the Microsoft Word might take more than the default uploadtime (5 secconds) to unlock the document. In such cases CRM.launcher might failto upload the updated file and the document on the CRM.launcher remains locked.In such cases it makes sense to increase the default upload time. You can set thatin the configuration file as shown in the screenshot below.
The following code sample shows the upload delay settings in the configuration file:<update.net>...<update.launcher>
...<UploadDelay>20</UploadDelay>
...</update.launcher>
</update.net>
811AUREA CONFIDENTIAL
CRM.launcher(Enterprise)

Configuring certificate handshake security featureLearn to configure the enhanced cer tificate handshake security feature onCRM.launcher.
System administrators can configure the enhanced cer tificate handshake securityfeature supported by Aurea.CRM to ensure secure communication between CRM.Weband CRM.Launcher. This ensures that only CRM.web signed commands initiatedand authorized by both the system administrator and user can be executed byCRM.launcher.
To configure the enhanced cer tificate handshake security feature, perform the fol-lowing steps:
1. Ensure you have administrative access to the following:
• to Aurea CRM.web deployed on a target host
• to all the client hosts deploying CRM.launcher
2. Ensure you have a cer tificate for both signing and encryption (with key exchangeto establish public and private keys between the CRM.launcher host and theCRM.Web host).
• You require a cer tificate container (folder) on the CRM.Web host for the privatekey.
• Public key for deployment on the clients hosting CRM.launcher.
• Configure the CRM.Web and CRM.launcher host machines to synchronize timeonline, between varying time zones. Local NTP servers may be used.
3. Cetificates can be obtained by one of the following methods:
• Purchase a signed cer tificate from a cer tification authority, such as VeriSign,Inc.
• Prepare your own self signed cer tificates. This procedure uses a self signedcertificate. To create your own self signed cer tificate in a windows powershell,run the New-SelfSignedCertificate command with the following options:New-SelfSignedCertificate -FriendlyName "CRM Launcher Handshake Certificate"-Type Custom
-Subject "CN=CRM Launcher" -KeySpec KeyExchange -KeyUsageDigitalSignature,DataEncipherment
-KeyAlgorithm RSA -KeyLength 2048 -HashAlgorithm "SHA256"-CertStoreLocation
"Cert:\CurrentUser\My" -NotAfter (Get-Date).AddYears(99) -Provider"Microsoft Enhanced RSA and
AES Cryptographic Provider"
Note: : Run this command on the CRM.launcher host and change the value ofthe CertStoreLocation option to the current user’s personal cer tificate containerfolder. You can also customize the other options according to your needs. Fora synopsis of the command, see New-SelfSignedCertificate.
812AUREA CONFIDENTIAL
Chapter 4: Other Programs and Functions

This command generates a cer tificate valid for 99 years from current date andplace the cer tificate into the Current User’s personal cer tificate storage. Youcan then export both private and public keys from it to secure the CRM Launchercommunication.
Note down the cer tificate thumbprint as it is required for configuring CRM.Weband CRM.launcher. For more information, see How to: Retrieve the Thumbprintof a Certificate.
4. Deploy the private key to the CRM.Web host and the public key to theCRM.launcher host machines.
The private key must be deployed to the TrustedPeople of LocalMachine cer tificatesecure windows store of the machine hosting CRM.Web. To allow the windowsprocesses running the CRM application pool access to the private key perfom theconfigurations described in the following ar ticle: How to: Make X.509 CertificatesAccessible to WCF. For example, you can use the following windows batch com-mand to grant IIS_USRS group read access to stored private cer tificate:for /F %f in ('FindPrivateKey.exe TrustedPeople LocalMachine -t "CEERTIFICATETHUMB-PRINT
HERE" -a') do icacls %f /grant BUILTIN\IIS_IUSRS:R
Similarly, the public key must be deployed to TrustedPeople of LocalMachinecertificate windows store of client machines hosting CRM.launcher.
Note: The FindPrivateKey.exe tool helps you to find the location and name ofthe private key file associated with a specific X.509 cer tificate in the cer tificatestore. This program needs to be compiled from the sample source code providedas part of the Windows Communication Foundation framework.
5. Configure CRM.Web and CRM.launcher with the cer tificate thumbprint values.
a. To configure CRM.Web, add the thumbprint to the web.config file as shownbelow.<appSettings>...<add key="AuthenticationCertificateThumbprint"
value="CERTIFICATE THUMBPRINT HERE" /></appSettings>
b. To configure the CRM.launcher, add the cer tificate thumbprint to theupdate.Launcher.exe.config and update.Launcher.NamedPipeServer.exe.config(ifCRM.Launcher is used in a shared mode service) files as shown below:<update.net>
<update.launcher>...<AuthenticationCertificateThumbprint>CERTIFICATE THUMBPRINTHERE</AuthenticationCertificateThumbprint></update.launcher></update.net>
Note: The Thumbprint must be entered using uppercase letters.
813AUREA CONFIDENTIAL
CRM.launcher(Enterprise)

6. Restar t the CRM.launcher client manually or the CRM.launcher service if youhave installed it as a service.
7. CRM.launcher now establishes secure cer tificate handshake negotiation andallows user actions without the use of the authorization request popup dialog.
Note: If for some reason secure handshake negotiation is not possible,unauthorized user actions is denied and no popus are presented either.
Launcher Support for External Login via FirewallsLearn about CRM.launcher for external third par ty users.
Organizations not only allow users to connect to CRM.Web from within their intranetsbut also allow external users to connect over the internet via non-transparent fire-walls. To authenticate the external users they use their proxy or domain servers aswell as external third-party providers.
Third-party providers allow organizations to customize and use their web interfaceto authenticate external users. CRM.Launcher supports authenticating externalusers by displaying their customized login forms in a pop-up window.
A sample screenshot is shown below:
814AUREA CONFIDENTIAL
Chapter 4: Other Programs and Functions

To enable CRM.Launcher to authenticate users as described above, set theShowWebLoginPopup property in the Launcher's application configuration file:<configuration>
<update.net><update.launcher>
<ShowWebLoginPopup>true</ShowWebLoginPopup></update.launcher>
</update.net></configuration>
As CRM.Launcher needs to communicate with the server several times and to preventshowing this popup every time a request to the server is served, it can re-use thecookies received in the first response after a successful login. To save these cookiesfor all future logins, set the SaveAuthenticationCookies property in the Launcher'sapplication configuration file:<configuration>
<update.net><update.launcher>
<SaveAuthenticationCookies>true</SaveAuthenticationCookies></update.launcher>
</update.net></configuration>
Controlling payload sizeCRM.Launcher allows users to have full control over the payload size using themaxJsonLength property in the Launcher's application configuration file.
The QuickCampaign feature works better with small to medium set of records. Alarge set of records may lead to performance issues.
Note: Implement the changes to the launcher config file for both the client and theserver
Add the following parameters to the config file:
<system.web.extensions><scripting>
<webServices><jsonSerialization maxJsonLength="50000000"></jsonSerialization>
</webServices></scripting>
</system.web.extensions>
The value of the maxJsonLength attribute is maximum size in bytes of serialized/de-serialized Json content. It is used to pack and unpack payload during communicationbetween Launcher client and Launcher server.
815AUREA CONFIDENTIAL
CRM.launcher(Enterprise)

CRM.launcher Logging and Debugging ReportsLearn how to fetch loggin and debugging reports for CRM.launcher.
The CRM.launcher allows its different applications and the Windows server servicesto store and transmit logs for bug reports. It creates the following log files:
• Personal Log files: The CRM.launcher application log files for a user’s sessionare stored in a user’s personal data folder.
• Shared log files: The CRM.launcher Windows service log files are stored in theProgram Files folder and shared between all users.
• Bug report files: The bug report functionality of the CRM.launcher collects all therelevant log files and creates a zip file.
• Log levels for application and server: CRM.launcher configuration file allows thedifferent logging levels to be configured for the application and the Windowsservice.
Creating the CRM.launcher debugging reports
To create a CRM.launcher debugging report, perform the following steps:
1. Right click on CRM.launcher icon in the task bar and select Settings. TheCRM.launcher Settings window is displayed.
2. Click the Troubleshooting tab on the left.
3. Click on Create Bug Report. The Bug Report – Options window displays.
4. Enter the name and path to save the zip file. Select Log files to include all thelog files and click OK. The Bug Report summary displays.
816AUREA CONFIDENTIAL
Chapter 4: Other Programs and Functions

5. Click OK to complete the debugging report generation.
Troubleshooting CRM.launcher issuesLearn to troubleshoot CRM.launcher issues.
Below are the commonly observed issues with the CRM.launcher and their solutions:
Certificate errors
Sometimes the CRM.launcher cannot authenticate itself with the CRM.Web serverbecause of faulty cer tificates. This could be one of two reasons:
1. A security policy might be preventing the launcher from getting and adding thecorrect cer tificate to the windows cer tificate manager.
2. CRM.launcher has an old cer tificate from a previous launcher version.
Solution:Delete the current cer tificate from the "Windows Certificates Manager",and restar t the CRM.launcher. It should acquire the latest cer tificate and use it forauthentication.
817AUREA CONFIDENTIAL
CRM.launcher(Enterprise)

The following error messages related to cer tificate errors are listed below alongwith the reasons and solutions:
• Message - “Cannot load external cer tificate <path to pfx file set in .config file>”
Reason – This message is issued when you are using your own cer tificates andthe pfx cannot be accessed or does not exist.
Solution – Ensure that the .config file for the CRM.launcher contains the correctpath to the cer tificates. For more information on configuration files, see Configuringthe CRM.launcher.
• Message – “Cannot load embedded cer tificate.”
Reason – This can be caused by a faulty installer, which did not have the defaultcer tificate embedded in it.
Solution – Reinstall the CRM.launcher using the latest copy from the supportsite.
• Message – “Failed to add CRM.launcher embedded cer tificate to the cer tificatestore. <detailed description>.”
Reason – The <detailed description> usually contains the reason for this kind oferror and can vary from system to system. Two reasons commonly encounteredare described below and solutions provided:
1. The user that is running the CRM.launcher has limited rights and cannot addthe cer tificate to the cer tificate store.
2. The user cancels the cer tificate installation from the confirmation dialog box.
Solution – Check the detailed description provided and check with your systemadministrator for a solution as these errors are system specific. For the two rea-sons listed above, the solutions are as follows:
1. Expand the rights of the user to include permissions to add the cer tificate tothe cer tificate store.
2. Reinstall the CRM.launcher and ensure that you accept the installation of thecertificate.
Port Conflicts
The default por t used by CRM.launcher is 18188. If you are getting a por t conflict,you can change the default por t to another that does conflict with other applications.
To change the port settings perform the following:
1. Right click on the CRM.launcher icon ( ) in the system tray. It displays the contextmenu.
2. Select Settings. The CRM.launcher settings window opens.
818AUREA CONFIDENTIAL
Chapter 4: Other Programs and Functions
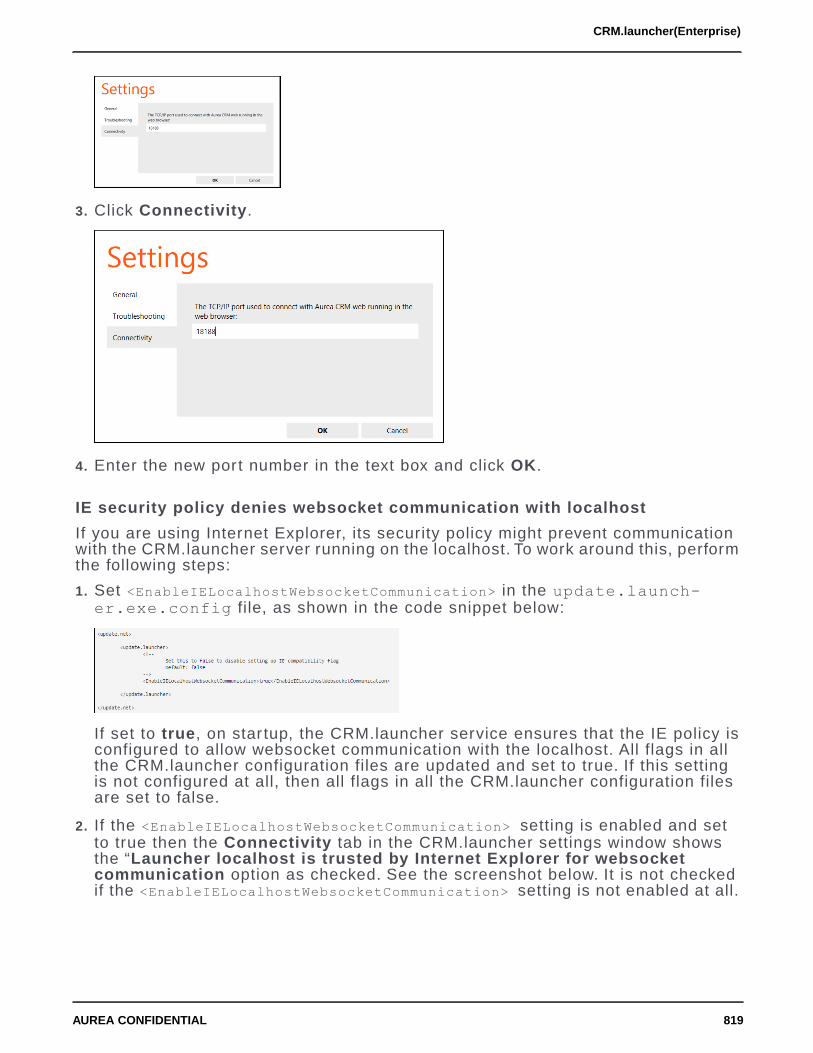
3. Click Connectivity.
4. Enter the new port number in the text box and click OK.
IE security policy denies websocket communication with localhost
If you are using Internet Explorer, its security policy might prevent communicationwith the CRM.launcher server running on the localhost. To work around this, performthe following steps:
1. Set <EnableIELocalhostWebsocketCommunication> in the update.launch-er.exe.config file, as shown in the code snippet below:
If set to true, on star tup, the CRM.launcher service ensures that the IE policy isconfigured to allow websocket communication with the localhost. All flags in allthe CRM.launcher configuration files are updated and set to true. If this settingis not configured at all, then all flags in all the CRM.launcher configuration filesare set to false.
2. If the <EnableIELocalhostWebsocketCommunication> setting is enabled and setto true then the Connectivity tab in the CRM.launcher settings window showsthe “Launcher localhost is trusted by Internet Explorer for websocketcommunication option as checked. See the screenshot below. It is not checkedif the <EnableIELocalhostWebsocketCommunication> setting is not enabled at all.
819AUREA CONFIDENTIAL
CRM.launcher(Enterprise)

Note: To open the Settings window, right click on the CRM.launcher client icon
( ) running in the system tray, and select Settings….
If you wish to disable or enable websocket communication between the InternetExplorer and the localhost then you can do it from the above settings window byunchecking and checking the the Launcher localhost is trusted by Internet Ex-plorer for websocket communication option in the settings window. This is validonly for the current session. In the next session, when the CRM.launcher serviceis star ted up, the configured setting is activated again. For example, if the <EnableIE-LocalhostWebsocketCommunication> setting is enabled and set to true and you haddisabled websocket communication with localhost by unckecking the option in theSettings window, then the new session has the websocket communication enabled.
Communication with Aurea CRM.WebCRM.launcher communication with Aurea CRM.Web.
The CRM.launcher performs the following tasks to mediate communication betweenthe browser running in a shared environment and Aurea CRM.Web application:
• It maintains different unique identifiers to distinguish between user’s web browserlogin sessions.
• It allows the user to activate the CRM.launcher session from the web browser.
• If the user closes the web browser and re-opens the browser again, theCRM.launcher gets the unique identifier for the user’s previous session.
• The CRM.launcher is independent of the Windows service. In case theCRM.launcher is not launched as a windows service, a user can still launch theCRM.launcher server for this session.
820AUREA CONFIDENTIAL
Chapter 4: Other Programs and Functions

Note: The user has to be a par t of the administrator group, in order to be ableto star t the service.
• CRM.launcher service for multiple users is not activated for the standard versionof Aurea CRM.Web application. This is only allowed for the Enterprise version ofAurea CRM web application.
Note: If multiple users try to activate CRM.launcher session from the Standardversion of Aurea CRM, the following message is displayed: Multiple login sessionsfor CRM.launcher is an enterprise feature only. To use this funcationality, pleaseupgrade your system to an enterprise edition.
CRM.launcher and Aurea CRM.Web communicate over a secure Web Socket sub-protocol named WAMP. For fur ther details, see http://wamp.ws. The communicationonly accepts a secure connection. Therefore the user has to install a cer tificatewhen CRM.launcher is first star ted.
For more information, see the ar ticle “CRM.Launcher and Security” at https://sup-port.aurea.com.
To enable the communication between CRM.launcher and Aurea CRM.Web, bothproducts need to know which port to use (default: 18188).
For Aurea CRM.Web the port is configured via the System.LauncherPort Web Con-figuration parameter. For fur ther details, see System.LauncherPort in the Web Ad-ministrator's Guide. This por t needs to match the port configured for CRM.launcher:
• Users can configure the port in CRM.launcher's Settings dialog (Connectivitytab). The configured port is saved in the user.config file that is used forCRM.launcher. The user.config file is located in in the root directory of theinstallation, i.e. the same location as update.Launcher.exe (default:%localap-pdata%/update.CRM).
• If you don't want users to be able to change this setting, specify the port in theupdate.launcher.exe.config file as follows:<update.launcher>[...]
<!-- The list of plug-ins to be loaded by CRM.launcher --><PlugIns><!--<PlugIn type="update.Launcher.Offline.PlugIn,update.Launcher.Offline"
required="true" />--><PlugIn type="update.Launcher.WebBrowser.PlugIn,update.Launcher.WebBrowser"
required="false" /><Url>wss://localhost:11771</Url>
<PlugIntype="update.Launcher.RemoteControl.PlugIn,update.Launcher.RemoteControl"required="false" />
<PlugIn type="update.Launcher.Documents.PlugIn,update.Launcher.Documents"required="false" />
<PlugIn type="update.Launcher.Phone.PlugIn,update.Launcher.Phone"required="false" />
821AUREA CONFIDENTIAL
CRM.launcher(Enterprise)

</PlugIns></update.launcher>
CRM.launcher communication with CRM.phone pluginCRM.launcher allows the CRM.phone plugin to work on with a single user or withshared user environments.
For each user session of the CRM.phone plugin, the CRM.launcher stores the user’ssession information in user’s local AppData folder. The CRM.phone plugin usersession data include the logging files and call events like ringing event etc. TheCRM.launcher performs the following tasks:
• The CRM.launcher allows the CRM.phone plugin to work and store its data andconfiguration files.
• For a shared environment, the CRM.launcher also allows the CRM.phone pluginto store and work with data and configuration files stored in the Program Files
folder.
• The CRM.launcher helps the CRM.phone plugin to distinguish between the differentuser sessions. The CRM.phone creates events for each user session and theseevents need to be linked to the correct user session, when multiple users areusing the CRM.phone plugin. For example, an incoming call events need to beredirected to the correct user’s CRM.phone session by the CRM.launcher.Similarly, it would associate a user’s outgoing call events to the correct CRM.phonesession of the user.
CRM.launcher communication with Document pluginCRM.launcher allows the CRM Document plugin to allow multiple user sessions towork with the Document plugin.
When a user opens a document to work with it, CRM.launcher associates the filewith the specific user’s session and locks the file and closes the file associated withthe user’s session. CRM.launcher registers the correct document event, opens thedocument with the correct application and maintains the document events with thecorrect user’s document session. CRM.launcher locks the files being opened andprevents conflicts between users opening and updating the same files.
Note: CRM.Launcher cannot work with files whose filename (including extension)along with the filepath exceeds 256 characters.
822AUREA CONFIDENTIAL
Chapter 4: Other Programs and Functions

For a document session, CRM.launcher performs the following:
• CRM.launcher allows the Document plugin to work and store its document eventdata and configuration files.
• For a shared environment, the CRM.launcher also allows the Document plugin tostore and work with event data and configuration files stored in the Program Files
folder.
• CRM.launcher helps the Document plugin to distinguish between the differentuser sessions. The Document plugin creates events for each user session andthese events need to be linked to the correct user session, when multiple usersare using the Document plugin.
CRM.launcher LanguagesBy default, CRM.launcher uses the same language as the user's operating systemprovided that this is a supported language, otherwise English is used.
User can change the language used by CRM.launcher via Settings > General >Language.
The user's language selection is saved per user in %LocalAppData%.
The UI strings and messages displayed by CRM.launcher are read from XML fileslocated at <launcher_InstallDir>\Resources\Texts.
To add a language, create an update.launcher.Texts.<language>.xml file in thisfolder. You need to enter the ISO 639-2 three-letter code as <language>, e.g. up-date.launcher.Texts.fra.xml.
823AUREA CONFIDENTIAL
CRM.launcher(Enterprise)

Use the SDL Passolo XML format:<?xml version="1.0" encoding="utf-8" ?><pslXMLExportImport><pslTransList Id="" Source-Language="en" Target-Language="en"><Entry Id="ButtonCancel" Origin="" Comment="" ><![CDATA[Cancel]]></Entry><Entry Id="ButtonClose" Origin="" Comment="" ><![CDATA[Close]]></Entry><Entry Id="ButtonOk" Origin="" Comment="" ><![CDATA[OK]]></Entry>[...]
</pslTransList></pslXMLExportImport>
Additional CRM.launcher languages need to be deployed as global CRM.launcherpatch. For fur ther details, see Updating CRM.launcher.
CRM.PhoneLearn about the CRM.Phone.
For detailed information on CRM.Phone, see CRM.Phone User Guide and CRM.PhoneAdministrator Guide.
Fields are defined as telephone fields in the data model. For example, Telephonecolumn, Type "Telephone" and "Cell phone". For fur ther details, see Data Model inthe CRM.Core Administrator Guide.
Aurea CRM.Web works with CRM.Phone using CRM.launcher. See CRM.launcher(En-terprise) for details.
If CRM.Phone is not installed, Aurea CRM.Web uses the tel: protocol for phonenumbers.
Displaying a Record's HistoryTrack changes to records in the history info area of Aurea CRM.
In the History info area (H0) Aurea CRM tracks who made which changes to arecord, and when. This provides an overview of the history of the record. For generalinformation, see History in the CRM.Core Administrator Guide.
In Aurea CRM.Web the history can be displayed in the Related Data area of arecord.
824AUREA CONFIDENTIAL
Chapter 4: Other Programs and Functions

To reduce the columns displayed in the history sub-list enable the Record.Histo-ry.Slim Web Configuration parameter, see Record.History.Slim.
UPDATE_DEFAULT contains sample implementations of the history for the followinginfo areas:
• BTB: Installed Base (IB),
• FS: Product Overview (PU)
• OTC: Sample (MU)
To enable the history for an info area:
1. Aurea CRM win Rights module: Enable the history for the desired info areas inthe Rights module by checking the History column. For fur ther details, see En-abling the History in the CRM.Core Administrator Guide.
To display the history for Expand and Search&List views, adjust the header config-uration of the info areas for which you want to display the history:
1. Add the info area History (H0) to the respective ExpandChildren and SearchSub-List headers. For fur ther details, see Related Data area (Header Info Areas) onpage 329.
2. Specify the RecordHistory form in the Form column.
825AUREA CONFIDENTIAL
Displaying a Record's History

To display the history for a Tree view, add a new node for the tree's root info area:
The special header RecordHistory contains the buttons for changing the historyview (Most Recent Changes | All Changes). You can specify the default in theRecordHistory form's definition: view=<OverviewChanges | OverviewAllChanged-
Fields> (default = OverviewChanges, i.e. Most Recent Changes). For fur ther details,see Forms on page 621.
Displaying Bing Maps in Related Areas and FormsIt is possible to display records from Aurea CRM in Bing Maps by defining a mappanel (using the RecordMap widget) for the Related Area and in forms.
UPDATE_DEFAULT contains sample configurations for FI, KP, ZA and OJ (BTBonly). for fur ther details, see Configuring a Map Panel on page 828.
Note: The CRM process 1.5.2.5.2 "Geography" (CRM process ID 70000130) towhich the map panels configured in UPDATE_DEFAULT are assigned, is disabledby default (since accessing a map panel without a valid Bing Maps license resultsin an error).
For information on the configuration steps required in CRM.Core (license key, querystring format etc.).
826AUREA CONFIDENTIAL
Chapter 4: Other Programs and Functions

You can configure map panels for all info areas the contain geographic coordinatefields and/or (default) address fields.
If a record contains geographic coordinates, the map uses them. Otherwise, theaddress fields of the record are used. Aurea CRM.Web does not automatically cal-culate geographic coordinates based on address fields.
To define other than the default address fields (Country, ZipCode, City, Street) tobe used for the map, use the Field Mapping configuration parameter (Geo Coordi-nates category) in the Configuration info area (MC), see Configuration Info Areain the CRM.Core Administrator Guide. Use the Query format parameter to definethe format of the query using these custom fields.
If a map is configured in a child info area (that does not contain address fields), thegeographic coordinates or address to be used is determined in the following order:FI > KP > PE. Example: A map in MA uses the data from PE only if no KP/CP existsfor that person.
You can change this default fallback behavior for child info areas via the Geoloca-tion.FindAddressStrategy Web Configuration parameter, see Geolocation.FindAd-dressStrategy.
827AUREA CONFIDENTIAL
Displaying Bing Maps in Related Areas and Forms

Displaying a map for MA: If a rep of type "Resource" (i.e. a meeting room etc.) isadded as Participant to a MA record, the address of this resource is used for themap, if available. If more than one resource is added as Participant, the first re-source with valid address data is used.
Configuring a Map PanelLearn to configure a Map panel.
The configuration of a map panel consists of
• the integration of the RecordMap widget in a SearchSublist or ExpandChildrenheader or in a form,
• a MiniDetails control definition in field group <InfoAreaID>.Address for therespective info area (fallback: <InfoAreaID>).
To configure a maps panel for the Related Area (e.g. the ExpandChildren headerfor FI as configured in UPDATE_DEFAULT):
1. Add the info area of the records you want to display on the map to the ExpandChil-dren header, see Related Data area (Header Info Areas) on page 329.
2. Enter a name for the tab (or panel) in the Text field.
3. Define the map panel in the Form Name field using the RecordMap widget:{type: "RecordMap"
}
4. Create a field group <InfoAreaID>.Address for the info area and define theMiniDetails control (e.g. field group FI.Address in UPDATE_DEFAULT). Thiscontrol is used for the popup in the Bing Map. The header of the popup displaysthe info area's default table caption.
To use the RecordMap widget in a form:
The RecordMap widget is available in the Form Designer (under CRM-specific wid-gets). It accepts one or more record uids as value. For fur ther details, see DataBinding on page 628.
Examples:
828AUREA CONFIDENTIAL
Chapter 4: Other Programs and Functions
$component(url).@uid
This binds the RecordMap widget to a record selected e.g. in a RecordListBox.
$widget(listView1).@selection(rowsUid)
This binds the widget to multiple records selected in a ListView.
Note: For information on all available options for the RecordMap widget, see the“How to Use Maps” at https://support.aurea.com.
DocumentsLearn to work with documents in Aurea CRM.
The default info area for uploading documents is the Documents info area (D1),i.e. record for newly uploaded documents are created in D1. The Customer Docu-ments info area (D2) is only used for existing D2 records. No new D2 records canbe created.
If uploaded from the Related Data area of a parent record (or from within a documentfield), the document is created in D1 and linked to its parent via D3.
For general information on documents in Aurea CRM, see Aurea CRM win UserManual.
For information on Document Management, see Aurea CRM.Web Business LogicUser Guide.
The following topics provide information on working with documents in AureaCRM.Web:
Access RightsLearn to define rights for document info areas.
Defining access rights for Document info areas (D1/D2/D3):
• Users need Update r ights for D1 for the record selector icon to be displayed,i.e. if Deny Update is defined for D1, users can neither edit existing nor uploadnew documents in document fields or the Document info area itself.
• If Deny Access is defined for D1, document fields display "Access denied" andD3 records are not displayed.
• To hide all D3 SubLists, define Deny Access for the D3 info area.
For fur ther details, see Rights in the CRM.Core Administrator Guide.
829AUREA CONFIDENTIAL
Documents

Configuring MIME TypesLearn to configure MIME type.
For users to be able to work with different document types (DOC, DOCX, RTF, PDF,etc.) in Aurea CRM.Web the file extensions must be registered on the web server:To do this, you need to configure the corresponding MIME types.
There are two possibilities to configure the MIME types:
• The required MIME types must be added to the Windows registry on the webserver (in HKLM\HKEY_CLASSES_ROOT\MIME\Database\Content Type andHKLM\HKEY_CLASSES_ROOT\[.extension]).
• In addition, you can define MIME types in the MimeTypes.xml which is referencedvia the settings.xml file's <update.web> section. (Both files are located at..\system\settings).
The most common MIME types are already part of the delivered MimeTypes.xml.
Uploading DocumentsLearn to upload on Aurea CRM.Web.
Users can upload local documents into Aurea CRM.Web via Collaboration > Docu-ments > New or from the Related Data area of a record (Document Links tab >New > Upload new document).
For fur ther details, see Saving Documents in the Database in the Web BusinessLogic User Guide.
By default, only one file can be uploaded at a time. You can enable uploading mul-tiple files in the Configuration info area (MC) (Documents category, Allow multiplefile uploads/drag&drop option). For fur ther details, see Configuration Info Area inthe CRM.Core Administrator Guide. If this option is enabled, users can also linkmultiple existing documents to a record (Document Links tab > New > Existingupdate.CRM document).
Note: Document fields never support multiple selection.
To modify the Upload Document dialog, see Special Field Groups Naming Conven-tions on page 190 and Document.UploadFieldGroup.D1/D2. The values you entere.g. as Keyword in the Upload Document dialog are applied to all uploaded files.
830AUREA CONFIDENTIAL
Chapter 4: Other Programs and Functions
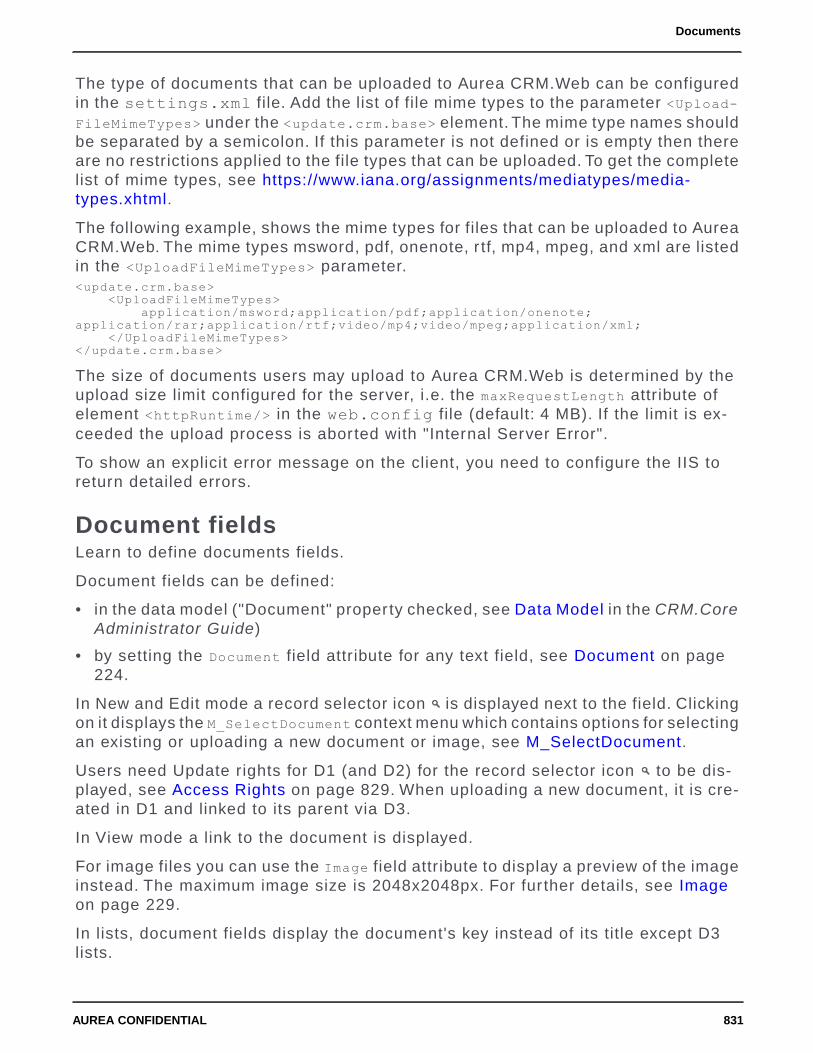
The type of documents that can be uploaded to Aurea CRM.Web can be configuredin the settings.xml file. Add the list of file mime types to the parameter <Upload-FileMimeTypes> under the <update.crm.base> element. The mime type names shouldbe separated by a semicolon. If this parameter is not defined or is empty then thereare no restrictions applied to the file types that can be uploaded. To get the completelist of mime types, see https://www.iana.org/assignments/mediatypes/media-types.xhtml.
The following example, shows the mime types for files that can be uploaded to AureaCRM.Web. The mime types msword, pdf, onenote, r tf, mp4, mpeg, and xml are listedin the <UploadFileMimeTypes> parameter.<update.crm.base>
<UploadFileMimeTypes>application/msword;application/pdf;application/onenote;
application/rar;application/rtf;video/mp4;video/mpeg;application/xml;</UploadFileMimeTypes>
</update.crm.base>
The size of documents users may upload to Aurea CRM.Web is determined by theupload size limit configured for the server, i.e. the maxRequestLength attribute ofelement <httpRuntime/> in the web.config file (default: 4 MB). If the limit is ex-ceeded the upload process is aborted with "Internal Server Error".
To show an explicit error message on the client, you need to configure the IIS toreturn detailed errors.
Document fieldsLearn to define documents fields.
Document fields can be defined:
• in the data model ("Document" property checked, see Data Model in the CRM.CoreAdministrator Guide)
• by setting the Document field attribute for any text field, see Document on page224.
In New and Edit mode a record selector icon is displayed next to the field. Clickingon it displays the M_SelectDocument context menu which contains options for selectingan existing or uploading a new document or image, see M_SelectDocument.
Users need Update rights for D1 (and D2) for the record selector icon to be dis-played, see Access Rights on page 829. When uploading a new document, it is cre-ated in D1 and linked to its parent via D3.
In View mode a link to the document is displayed.
For image files you can use the Image field attribute to display a preview of the imageinstead. The maximum image size is 2048x2048px. For fur ther details, see Imageon page 229.
In lists, document fields display the document's key instead of its title except D3lists.
831AUREA CONFIDENTIAL
Documents

To display the titles of the D3 SubList entries as links, check the Extended Options
attribute and define UseRootRecord=true. For fur ther details, see Extended Optionson page 228.
Document Check-Out/-InTo prevent multiple users from editing the same document at once, users can checkout a document and thus lock it for other users.
This functionality is handled by a plug-in, see CRM.launcher(Enterprise) on page793.
Documents are checked out using the D_Document_Edit menu action (in M_Documentsfor D1 and D2 and in M_ExpandLinked_Delete for D3 records), see M_Documents.
The application used for opening documents is determined by the Edit associationof the file type (defined in the registry).
To display a list of currently checked out documents:
• Users click Collaboration > Checked Out Documents (ID_NET_CHECKEDOUT_DOC-UMENTS_MY), which lists the documents checked out by the current user.
• Administrators click Administration > Manage Checked Out Documents(ID_NET_CHECKEDOUT_DOCUMENTS_ALL), which lists all currently checked outdocuments of all users.
In both cases the result list displays the Process Tracking records (T3) that havebeen created on checking out documents (T3.Documents and T3.Documents.Admin).
• In addition, the navigation pane item (Checked Out Documents) is displayedas long as at least one document is checked out. (The navigation pane item andpopup is controlled by the plug-in and can not be customized.) The popup liststhe documents checked out by the current user in a popup. When a new sessionis star ted, a system message containing a link to ID_NET_CHECKEDOUT_DOCUMENTS_MYis displayed instead of the Checked Out Documents menu item.
A document can be checked in/a check out can be undone as follows:
• upon closing the application in which the document is opened.
• selecting Upload & Check-In (A_Document_CheckIn) or Undo Check Out (D_Un-doCheckout) from the context menu (M_Documents_Edited) in thepopup,see M_Documents_Edited.
• selecting Undo Check Out (D_UndoCheckout) from the context menus for D1, D2,D3 and from the checked out documents lists.
• upon logging out and selecting the option Continue logout and undo check out.
The administrator can undo the check out for all checked out documents. The re-spective user is informed by a message.
832AUREA CONFIDENTIAL
Chapter 4: Other Programs and Functions

The Document.AutoUpload Web Configuration parameter defines whether users areprompted for automatically uploading a non-MS Office document (e.g. PDF, TXTetc.) after editing or need to manually upload such documents, see Document.AutoU-pload.
Context Menus and Menu ActionsLearn about document related context menus and menu actions.
The following document-related context menus and menu actions are available inUPDATE_DEFAULT.
M_Documents
The context menu used for the document info areas (D1, D2). For D3 the M_Ex-pandLinked_Delete context menu is used instead.
M_Documents contains the following menu actions:
• A_Expand
• D_Document_Edit
• D_UndoCheckout
• A_DeleteDocumentEx
• A_Document_Open
M_NewDocumentLink
The context menu that is used in D3 sub-list headers, i.e. for the Document Linkstab in the Related Data area of e.g. FI. M_NewDocumentLink is also configured e.g.as sub-menu of M_Appointments.
It contains the following menu actions:
• A_NewDocumentLink_Local: Allows users to upload one or more local documentslinked to the current record. For fur ther details, see Uploading Documents onpage 830.
• A_NewDocumentLink_Existing: Allows users to link one or more existing documentsto the current record.
Note: Uploading/creating multiple files is enabled in the Configuration info area(MC) (Documents category, Allow multiple file uploads / drag&drop option).
M_SelectDocument
The context menu that is displayed when clicking on the record selector icon dis-played next to a document field, >> Document fields on page 831.
It contains the following menu actions:
• A_SelectDocumentOpen: Opens a document saved in the Aurea CRM.Web databasewithout check out.
• A_SelectDocumentRecord: Adds an existing D1 document to the document field.
833AUREA CONFIDENTIAL
Documents

• D_SelectCustomerDocumentRecord: Adds an existing D2 document to the documentfield. This menu action is only active if the record has a KP or FI record as parent.It is not available when in New mode since no parent record is available at thattime.
• A_SelectDocumentUpload: Uploads a local document to the Aurea CRM.Webdatabase.
M_Documents_CheckedOut
The context menu used for the T3 records used to list checked out documents. Forfur ther details, see Document Check-Out/-In on page 832.
M_Documents_CheckedOut contains the following menu actions:
• D_UndoCheckout
• A_FromT3ToDocument: Navigates to document record of the checked out document.
If more than one T3 record is selected, the M_Documents_CheckedOut.MultiSelectmenu is used. It only contains D_UndoCheckout.
M_Documents_Edited
The context menu used for the Checked Out Documents popup.
It contains the following menu actions:
• A_Document_CheckIn
• D_UndoCheckout
D_Document_Edit
Checks out the selected document (D1, D2, D3) and opens it in it's default applica-tion. For fur ther details, see Document Check-Out/-In on page 832.
The application used for opening documents is determined by the Edit associationof the file type (defined in the registry).
D_UndoCheckout
Unlocks the document without uploading a new version.
A_DeleteDocumentEx
This is the standard menu action for deleting documents (D1,D2) and documentlinks (D3) as defined in UPDATE_DEFAULT: It provides assistance to users whenthey are about to delete documents still used in other places.
A_Document_Open
Opens the document without check out.
A_Document_CheckIn
Checks in a new version of the document and removes the lock.
834AUREA CONFIDENTIAL
Chapter 4: Other Programs and Functions
emailsLearn how to send email from Aurea CRM.Web.
Users can send emails from within Aurea CRM.Web:
• by clicking on a field containing an email address (View mode) or on the Sendemail icon beside it (Edit mode). For fur ther details, see Mail on page 225.
• In the Activity info area the button (Send as email) allows usersto send Activity records via email. For fur ther details, see Send As email on page835.
• The Notify Rep menu item allows users to send the current record via email. Forfur ther details, see Notify Rep on page 837.
• reply to activities of type "email". For fur ther details, see email Reply on page839.
For information about configuring the sending of emails from within Aurea CRM referto the mail server in Aurea CRM.Web Installation Guide and SMTP settings inCRM.Core Administrator Guide.
For a description of all email-related Web Configuration parameters, see Email Pa-rameters on page 107.
When sending an email from within Aurea CRM, all email fields (i.e. fields with theproperty "email" in the data model) are taken into consideration: The first email fieldthat is not empty is actually used. The fields are checked in the order of their uniquefield IDs (star ting with the lowest ID).
Note: To send an email in a language other than the default languages, you shoulduse UTF-16 encoding for the template document. For example, to send an email inCyrillic, encode the template document in UTF-16. You can use any text editor thatsupports UTF-16, to encode the template document.
Send As emailLearn how Send As email works.
The OpenAppointmentEmail button in the MA Expand header in UP-DATE_DEFAULT allows users to send a Activity record as an email.
835AUREA CONFIDENTIAL
emails

Send as email works as follows:
• You can configure which internal recipients (reps) are added to the email. Forfur ther details, see Internal Recipients.
• You can configure which external recipients (companies, persons) are added tothe email. For fur ther details, see External Recipients. On the emails recipientslist external recipients are always listed before the internal ones ("customer first").
• The content of the Subject field (MA/103 in the BTB version) is automaticallyentered as the subject of the email.
• The content of the Text field (MA/23 in the BTB version) is automatically enteredas the text of the email. To specify another field, use the Web Configurationparameter EMail.BodyFieldID.
To send HTML-formatted emails, create an HTML field in MA and specify it asEMail.BodyFieldID (server-side sending only). For fur ther details, see HTMLFields on page 219.
Client-side emails do no support HTML-formatted text. For fur ther details,see EMail.SendingMethod.
• All documents linked to the record are offered as attachments for the server-sidesending of emails. (For client-side emails no attachments can be addedautomatically.)
To limit the attachments offered for Send as email to cer tain content types and/ordocument classes use the Web Configuration parameters EMail.AttachmentsEx-cludedContentTypes and EMail.AttachmentsExcludedDocumentClasses. For fur therdetails, see EMail.AttachmentsExcludedContentTypes and EMail.AttachmentsEx-cludedDocumentClasses.
836AUREA CONFIDENTIAL
Chapter 4: Other Programs and Functions

Internal Recipients
The internal recipients for appointments (MA) sent as emails are determined asfollows:
• If a field group called MA.EmailReps exists for MA, the internal recipients aredetermined using the fields contained in the Details control of this field group:
• Only rep fields and participant fields (i.e. fields with type="uid" in the datamodel) from the current info area may be added to the Details control. All otherfields are ignored.
• No internal reps are offered if the Details control is empty.
• All reps that were determined using MA.EmailReps are added to the email in theTo: field. Participants are divided into To:, CC: and BCC: according to theirpar ticipation type.
• If the field group MA.EmailReps exists but is empty, no reps are used as recipientsin the email (i.e. it is only addressed to the person or company of the appointment).For fur ther details, see External Recipients.
• If the field group MA.EmailReps does not exist, internal recipients are determinedusing the participant fields (if available). Rep fields are not taken into account.
The user can define in his settings if he (i.e. the currently logged on user) shouldbe added to the internal recipients or if he should be ignored: The Web Configurationparameter EMail.ExcludeCurrentUser, which is included in the UserConfig in UP-DATE_DEFAULT, controls whether the current user is included when sending emails.
Default = not checked.
For fur ther details, see EMail.ExcludeCurrentUser.
External Recipients
External recipients are determined from the Activity Participant info area (MB).External recipients are always listed before internal ones in the recipient list of theemail ("customer first").
The Web Configuration parameter EMail.FallbackToCompany determines if thecompany's email address is used as a fallback when a person's email is empty. Forfur ther details, see EMail.FallbackToCompany.
Notify RepThe Notify Rep menu item (A_NotifyRep) allows users to send the current recordvia email.
This functionality is mainly intended to notify co-workers about records where theiraction is required.
Notify Rep is configured in the context menus of Activities, Offers and To-Dos inUPDATE_DEFAULT (BTB version).
837AUREA CONFIDENTIAL
emails

Notify Rep works as follows:
• You can configure which internal recipients (reps) are added to the email. Forfur ther details, see Internal Recipients.
• You can configure which external recipients (e.g. companies, persons) are addedto the email. For fur ther details, see External Recipients. On the emails recipientslist external recipients are always listed before the internal ones ("customer first").
• The subject of the email is automatically entered if a field with the XML name"Subject" exists in the respective info area. If no such field is available, the defaulttable caption is used instead.
• The body text of the email is automatically entered if a field with the XML name"Text" exists in the respective info area.
To use another field for the email body text, specify the field in the EMail.Noti-fyRep.BodyFieldIDs Web Configuration parameter, e.g enter "PR:OffText" to usethe Text field from the Offer info area. For fur ther details, see EMail.Noti-fyRep.BodyFieldIDs. One field per info area is supported.
• If a signature is defined for a user (in the Rep info area), an Insert Signaturebutton is available, allowing the user to inser t his signature into the Body field.
• All documents linked to the record are offered as attachment for server-sidesending of emails. For client-side emails no attachments can be added. For fur therdetails, see EMail.SendingMethod.
• Set the useHtmlInput argument to true to enable rich text content in the emailmessage editor.
• To limit the attachments offered for Notify Rep to cer tain content types and/ordocument classes use the Web Configuration parameters EMail.AttachmentsEx-cludedContentTypes and EMail.AttachmentsExcludedDocumentClasses. For fur therdetails, see EMail.AttachmentsExcludedContentTypes and EMail.AttachmentsEx-cludedDocumentClasses.
838AUREA CONFIDENTIAL
Chapter 4: Other Programs and Functions

Internal Recipients
The internal recipients for mails sent via Notify Rep are determined as follows:
• If a field group called <InfoAreaId>.NotifyReps exists for the respective infoarea, the internal recipients are determined using the fields contained in theDetails control of this field group:
• Only rep fields and participant fields (type "uid" in the data model) from thecurrent info area may be added to the Details control. All other fields areignored.
• No internal reps are offered if the Details control is empty.
• All reps that were determined using <InfoAreaId>.NotifyReps are added to theemail in the To: field. Participants are divided into To:, CC: and BCC: accordingto their par ticipation type.
• If the field group <InfoAreaId>.NotifyReps does not exist for an info area, internalrecipients are determined using the participant fields (if available). Rep fields arenot taken into account.
The user can define in his settings if he (i.e. the currently logged on user) shouldbe added to the internal recipients or if he should be ignored: The Web Configurationparameter EMail.ExcludeCurrentUser controls whether the current user is includedwhen sending emails (default = not checked). For fur ther details, see EMail.Exclude-CurrentUser.
Internal reps are checked by default in the Notify Rep dialog.
External Recipients
When sending Activity records, external recipients are determined from the Activ-ity Participant info area (MB).
External recipients are always listed before internal ones in the recipient list of theemail ("customer first").
The Notify Rep dialog also offers external recipients for info areas containing emailaddresses (e.g. Company, Person, and Additional Address).
By default, the Email recipients are unchecked in the Notify Rep dialog, specify{activateEmailFieldsRecipients: true} in the CommandArguments ofEmail/SendRecordNotification command menioned under A_NotifyRep menu actionwill mark recipients from e-mail fields as active.
To exclude external recipients from the notify rep functionality (e.g. if Notify Rep isused solely for company-internal communication), specify {excludeExternalRecipi-ents: true} in the CommandArguments of the A_NotifyRep menu action.
email ReplyLearn how to reply to email from Aurea CRM.Web.
The EmailReply button allows users to reply to email activities from within AureaCRM.Web. For fur ther details, see EmailReply on page 310.
839AUREA CONFIDENTIAL
emails

By clicking the EmailReply button or pressing Ctrl+R a new email activity is created.
Users can write the email and then send it by using the button. Forfur ther details, see Send As email on page 835.
When replying to an email activity the following fields are copied from the initialemail activity to the new one:
• Subject and Text
Text no. 33 ("RE: ") of the Text Group email_text is inser ted before the Subject,text no. 35 ("{1}---------- Original Message {0} ----------{1}") is inser ted before Text.Text no. 35 supports special placeholders: {0} for the current date, {1} for a linebreak.
• Activity Type, Purpose, Priority and Private
• for each activity par ticipant (internal par ticipants (i.e. reps), companies andpersons) a new Activity Participant record (MB) is created and linked to the newactivity record:
• The following fields are copied to the new MB records: Co.Gr., Co.No., Pe.Grp.,Pe.No. and Part. Type keeping the same participation types (required, optionaland for information).
• The Part. Status field is reset to "open".
Starts on and Starts at are set to the current date and time, the Rep field is set tothe currently logged in user.
The new activity is linked to same parent record (Company or Person) as theoriginal activity. The original activity is linked to the new activity via the Previ-ous/Main Activity field.
The fields copied to the new MA and/or MB records can be extended by defining aDetails control for a MA.ReplyFields and/or MB.ReplyFields field group. All fieldscontained in the(se) control(s) are copied to the new records.
External Address CheckThe external address check allows users to validate addresses against addressdata provided by an external system.
To activate the external address check:
• Define the required entries in the Configuration info area (MC).
• Create and define the Expand.AddressCheck.InfoAreas Web Configurationparameter to determine for which info areas the address check should beperformed, see Expand.AddressCheck.InfoAreas.
840AUREA CONFIDENTIAL
Chapter 4: Other Programs and Functions

The address check is called when creating new records and when editing a fielddefined as upfields in the Configuration info area (MC) (External Address cate-gory, Parameters option).
The address check is called from both Expand and List views.
When saving a record, a popup dialog displays the address entered by the user anda list of addresses suggested by the external system (sor ted by score):
The fields displayed on the Address Check dialog are configured by the specialfield group <InfoAreaId>.AddressCheck (Details and List control). If no <In-foAreaId>.AddressCheck is defined, the upfields defined in the MC entry (ExternalAddress category, Parameters option) are used as a fallback. If no upfields aredefined, the fields actually updated in the record are displayed.
If the external address check returns only one result with a score above the definedthreshold (MC, External Address category, Threshold option), the record is auto-matically updated with this address, and no Address Check dialog is displayed.The user receives a notification that the address data was checked and corrected.
If Threshold is defined, and multiple results are returned, the address with thehighest score is automatically used.
Clicking Cancel saves the user's original values. Clicking OK updates the recordwith the currently selected address. (If the match-up is activated as well, the match-up dialog is displayed after the address check dialog.)
All values returned by the external address check are written to the record. Emptyvalues overwrite existing values.
Note: You can not return empty values for Boolean fields (e.g. <FreeL1></FreeL1>);Boolean fields must have a value.
Address suggestions containing a catalog value that does not exist in the databaseare displayed in gray (= invalid). If the user selects an address containing an invalidvalue, a warning is displayed.
For information on calling the external address check via add-on programming, seethe ar ticle “How to configure the address check” at https://support.aurea.com.
841AUREA CONFIDENTIAL
External Address Check

The color-coding of the results is defined in the addresscheck.css file (.u8-ad-dresscheck-cell-identical etc.) located in ..\styles\update\crm\widgets.
FavoritesLearn to configure info areas where records can be added as favourite.
To configure the info areas for which users can add records as favorites:
1. Add the info area to the Favorites.InfoAreas Web Configuration parameter,see Favorites.InfoAreas.
2. Add the menu action D_Favorites (Add to favorites) to the info area's menu (e.g.M_Company in UPDATE_DEFAULT), see Configuring a Menu on page 292.
3. To display the favorites as Quick Links in the application menu, enter the infoarea's ID as QuickLink Context (e.g. ID_NET_COMPANY_SEARCH inUPDATE_DEFAULT), see Menu Actions on page 295.
In the Favorites popup the SimpleList header (displaying "{INFOAREAIMAGE} {INFOS}"
by default) is used for the section headers, see SimpleList.
For the favorite records, the respective info area's default table caption is used.
For the Quick Links you can define special table captions <InfoAreaId>QuickLinks.If undefined, the info area's default table caption is used.
842AUREA CONFIDENTIAL
Chapter 4: Other Programs and Functions

Letters & Mail MergeLearn to send single mail or create mass mailing in Aurea CRM Web.
You can create single letters and mass mailings in Aurea CRM.Web:
• Single letters can be sent based on any record that matches the settings in theWord Processor format. For fur ther details, see Mail Merge Configuration on page844
• Mass mailings ("Serial letters") can be used for both quick campaigns andmarketing activities. For fur ther details, see Quick Campaigns on page 845 andMail Merge Letters Based on Marketing Activities on page 849.
Prerequisites for creating letters and mass mailings in Aurea CRM.Web:
• Define the required formats: Word Processor formats in Aurea CRM win. Forfur ther details, see Defining Transfer Formats in the Aurea CRM win User Manual(https://help.aurea.com/crm/crm-win-admin-guide/crm.win.admin.guide/#top-ics/c_win_adm-1_1-Intoduction_crm.html).
These formats contain the following information:
• the name of the document template
• a read engine format (or query) that defines the available fields as placeholders
• a label format containing the letterhead and salutation
• settings for creating, saving and signing the resulting letter
Note: Word Processor formats using queries cannot be used for the creation ofsingle and serial letters in Aurea CRM win.
Note: Queries used for Word Processor formats must not contain parameters($parValue), i.e. may not require user input.
• Define the required document templates as Microsoft Word documents.
Note: The document templates must be owned by the administrator.
• Microsoft Word must be installed on the clients. For information on supportedversions of Microsoft Word, >> System Requirements available from https://sup-port.aurea.com.
• Select the option "Used by Mail Merge" to make the query appear on the templatedocument used for Mail merge.
843AUREA CONFIDENTIAL
Letters & Mail Merge

Mail Merge ConfigurationThis topic describes how to configure the mail merge functionality for creating lettersfrom single records in Aurea CRM.Web.
When the user selects the menu action A_MailMerge, Aurea CRM.Web connects toMicrosoft Word to display a document template from the Aurea CRM database. Datafrom the current record is merged with the document template according to the WordProcessor format definition.
The mail merge is executed by a plug-in. For fur ther details, see CRM.launcher(En-terprise) on page 793.
The user can modify the letter and then upload it to the Aurea CRM database as aD1 document linked to the current record via a document link (D3).
To configure the single letter functionality:
1. Create menu entries/buttons using the A_MailMerge menu action for the info areasyou want your users to be able to create letters from (e.g. MA, PR).
This calls the MailMerge action template. For fur ther details, see MailMerge onpage 430.
2. Define any additional settings (e.g. for filtering the available formats) as argumentsin the MailMerge action template. For fur ther details, see MailMerge Action Pa-rameters on page 430.
Clicking the menu item/button results in the creation of a letter. If your configurationof the MailMerge action template results in multiple Word Processor/transfer formats,a dialog is displayed where the user can select a format.
Note: The single letter feature first tries to load the format with the given nameand the logged-in user as owner, and - if it does not find such a format - it loadsthe administrator format with that name.
When the letter is created, its default name is generated as letter_{tablecap-tion}_{rep}{extension} (e.g. letter_Aurea Software_Joe Smith.docx).
You can define customized file names using variables (Save document as field inthe word processor format). For fur ther details, see File Name Variables on page850.
Characters that are not valid in file names (*,' etc.) are automatically replaced with"_".
If the document name does not already contain a valid file extension, an extensionis added automatically. Valid extensions are those that are registered on the webserver (via Windows registry or settings.xml). For fur ther details, see ConfiguringMIME Types on page 830.
844AUREA CONFIDENTIAL
Chapter 4: Other Programs and Functions

The file extension (e.g. ".pdf") is determined by the MIME type (e.g. "applica-tion/pdf") of the document. If no mime type is defined, the extension of the documenttemplate is used. If the document template has no extension, ".docx" is used as afallback.
Quick CampaignsA quick campaign allows the user to select several records from a list and createmail merge letters for the associated persons or companies.
In addition, users can carry out a quick campaign for queries that are either explic-itly called using the Queries menu item, embedded in a form (e.g. a star t page) orcarried out using a QueryRun action.
Quick campaigns can be launched
• from any list that supports selecting multiple records: Companies, persons andrecords that have either a person or a company as parent.
Note: If a quick campaign is configured for an info area linked to multiplecompanies and/or persons (e.g. KM), the company/person with the first link (i.e.the default link) is used as the addressee of the letter.
• from query results (but not query snapshots)
845AUREA CONFIDENTIAL
Letters & Mail Merge

Result rows containing multiple uids (FI/KP/CP/PE records) are handled as follows:
• The last FI/KP/CP/PE uid in the result set row is used.
Note: This has nothing to do with the order of the output fields; the "last" uidis the last one determined by the query statement.
• If no such uid exist, the last uid whose info area contains a default link to a FI,KP, CP or PE is used to find a parent: The first actually existing parent uid (inthe order KP/CP/PE/FI) is used.
Note: For quick campaigns launched from a query only fields from FI/KP/CP/PErecords are supported, i.e. you can not create a mail merge letter containing e.g.data from a linked offer in this context.
In UPDATE_DEFAULT the quick campaign functionality is available as follows:
• The Quick Campaign button is configured in the FI.SearchResults,FITree.SearchResults, PE.SearchResults, KP.SearchResults and KPTree.SearchRe-sults headers. It is active as soon as at least one record is selected from thelist.
• the Quick Campaign Query button is configured in the QueryResult header. Itis always active. Therefore, when executing a quick campaign for a query withoutselecting any result rows, the quick campaign is executed for all records foundin the database that match the query criteria.
If the query result exceeds 1000 result records, a warning is displayed allowingthe user to cancel creating the quick campaign.
If one or more result row(s) are selected, the quick campaign is executed forthese records.
• The menu action A_QuickCampaign_Selection (in the menu M_QuickCampaigns) isconfigured in the M_Company.MultiSelect and M_Person.MultiSelect menus.
It is available as soon as the user selects more than one record from a search orquery result list that contains FI, KP or PE records.
846AUREA CONFIDENTIAL
Chapter 4: Other Programs and Functions

When selecting a Quick Campaign button/menu entry, the Format selection dialogdisplays the available Word Processor formats. For fur ther details, see Specifyinga Word Processor Format section below. Selecting a format creates a Word documentcontaining the letters for the quick campaign. All relevant records for the quickcampaign are created automatically, see Quick Campaign Records.
Note: Make sure all users working with quick campaigns have Microsoft Wordinstalled. If a quick campaign is executed on a client without Microsoft Word beinginstalled, an error message is displayed. However, the quick campaign records arestill created in this case.
To offer quick campaigns for other info areas (that have either company or personas parent):
1. Create a context menu named XXX.Multiselect (XXX being the name of the contextmenu used for the Search&List configuration of that info area, e.g. M_Company.Mul-tiselect). The easiest way is to inherit the new menu from M_MultiSelect.
This context menu is then used for multi-selection of the respective info area.
2. Add the M_QuickCampaigns menu to XXX.Multiselect.
Quick Campaign Records
The following records are automatically created when running a quick campaign:
• Campaign (CM)
• Marketing Activity (AK) linked to the campaign
• Depending on the Web Configuration parameter Marketing.QuickCampaign.Record-sType Mailings (BR) or Activities (MA) linked to the marketing activity. For fur therdetails, see Marketing.QuickCampaign.RecordsType.
• Document (D1) linked via D3 to the marketing activity
The following fields are automatically entered during a quick campaign:
ValueField NameFieldNo.
InfoArea
catalog filled according to text nr. 50 of text groupnet_campaign_mgmt
Campaign Type2CM
text nr. 48 of text group net_campaign_mgmt
Default: Quick Campaign '<name of document>'
Name3CM
current repResponsibleRep ID
4CM
set to "completed"Campaign Sta-tus
9CM
847AUREA CONFIDENTIAL
Letters & Mail Merge
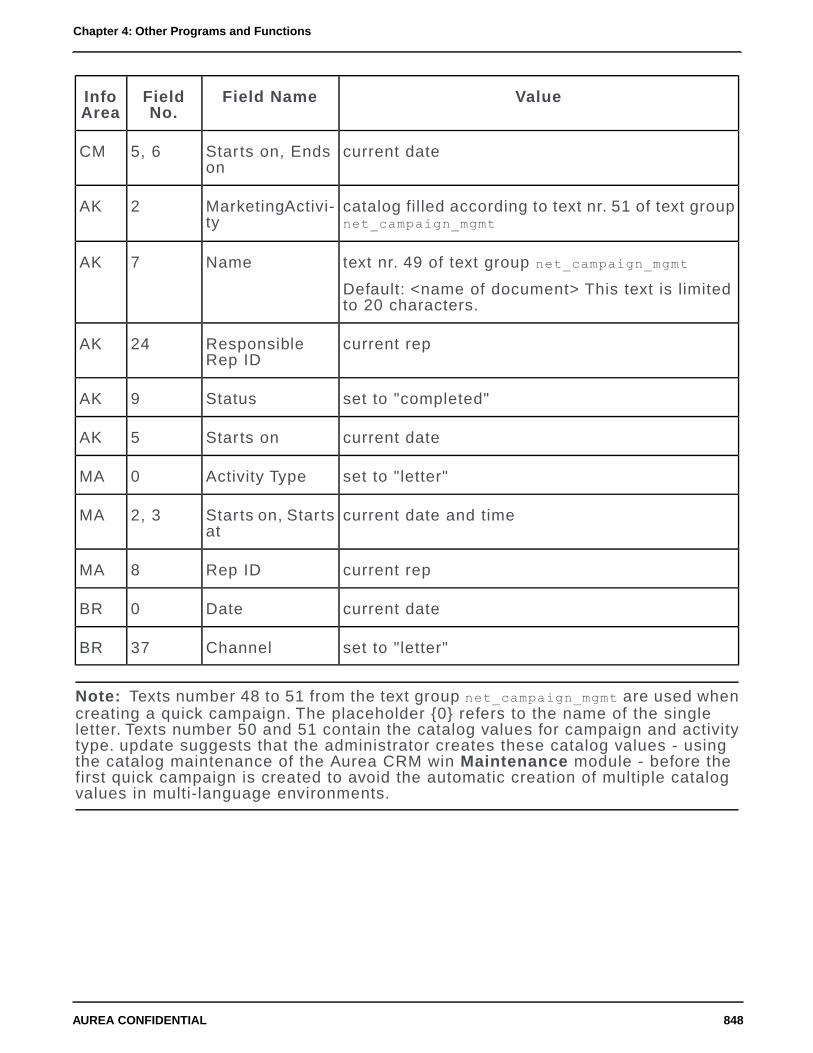
ValueField NameFieldNo.
InfoArea
current dateStar ts on, Endson
5, 6CM
catalog filled according to text nr. 51 of text groupnet_campaign_mgmt
Marketing Activi-ty
2AK
text nr. 49 of text group net_campaign_mgmt
Default: <name of document> This text is limitedto 20 characters.
Name7AK
current repResponsibleRep ID
24AK
set to "completed"Status9AK
current dateStar ts on5AK
set to "letter"Activity Type0MA
current date and timeStar ts on, Star tsat
2, 3MA
current repRep ID8MA
current dateDate0BR
set to "letter"Channel37BR
Note: Texts number 48 to 51 from the text group net_campaign_mgmt are used whencreating a quick campaign. The placeholder {0} refers to the name of the singleletter. Texts number 50 and 51 contain the catalog values for campaign and activitytype. update suggests that the administrator creates these catalog values - usingthe catalog maintenance of the Aurea CRM win Maintenance module - before thefirst quick campaign is created to avoid the automatic creation of multiple catalogvalues in multi-language environments.
848AUREA CONFIDENTIAL
Chapter 4: Other Programs and Functions

Specifying a Word Processor Format
To restrict the selection of document templates in a cer tain context, you can configuremenu items for specific Word Processor formats:
1. Configure a XXX.Multiselect menu (e.g. for the Offer info area).
2. Create a menu action with the following parameters:
• Action: Command
• Command: CampaignManagement.CreateQuickCampaign
• RecordSet: selected
• FormatName: <Name of desired the Word Processor format>
When selecting the menu action, the quick campaign is launched and the serialletter is created using the specified format.
Mail Merge Letters Based on Marketing ActivitiesLearn to configure mail merge letters based on marketing activities.
For information on configuring and generating marketing activities, see MarketingActivities in the Web Business Logic User Guide.
To create mail merge letters from within a marketing activity, the target group's ad-dresses etc. need to be merged with the document template. The recipients of themail merge letter are determined based on the control file created by CRM.serverwhen generating the marketing activity. The control file is a D1 document, linked tothe activity execution (AD).
To configure this functionality in Aurea CRM.Web, you need to define a button (orcontext menu action) with action template Command for the Marketing Activity infoarea (AK), e.g. in the Expand header of header group AK:
849AUREA CONFIDENTIAL
Letters & Mail Merge

This button executes the command CampaignManagement.MailMergeActivity for thecurrent marketing activity (Record). It merges the document template stored in thefield Letter: Template Document (AD/78) and the control file (Brief.txt) linkedto the activity execution thus creating the mail merge letter in Microsoft Word.
Note: If more documents are linked to the AD record, the first file is used. Thetemplate document is filtered automatically.
Note: To send an email in a language other than the default languages, you shoulduse UTF-16 encoding for the template document. For example, to send an email inCyrillic, encode the template document in UTF-16. You can use any text editor thatsupports UTF-16, to encode the template document.
File Name VariablesYou can define variable document names using placeholders enclosed in {}.
These placeholders are replaced with the actual values when creating the letter.
The following placeholders are available:
DescriptionPlaceholder
The document class as defined in the word processor format.documentclass
The extension (e.g. ".pdf") for the MIME type (e.g. "applica-tion/pdf") of the document. If no mime type is defined theextension of the document template is used. If the documenttemplate has no extension ".docx" is used as a fallback.
The placeholder {extension} includes a leading ".".
extension
The name of the word processor format.formatname
850AUREA CONFIDENTIAL
Chapter 4: Other Programs and Functions

DescriptionPlaceholder
The info area ID of the record the letter is created for.infoareaid
The keyword as defined in the word processor format.keyword
The current time (HHMMSS).now
The record ID of the record the letter is created for.recordid
The rep name of the current user.rep
The rep ID of the current user.repid
The table caption of the record the letter is created for.
Optionally the name of a custom table caption can be speci-fied (separated by a colon): tablecaption:<TableCap-tion_Name>
Note: This placeholder is supported in Aurea CRM.Web only.
tablecaption[:name]
The file name of the template document (without extension).template
The current date (YYYYMMDD).today
The login name of the current user.user
Examples:
ResultDefinition
Invitation_Mr. JohnDoe.pdf
{template}_{tablecaption}{extension}
Offer100026.docx{formatname}{repid}
order_20120531.docxorder_{today}
851AUREA CONFIDENTIAL
Letters & Mail Merge

Document Caching & Performance ConsiderationsTo improve performance, Aurea CRM.Web allows web browsers to cache thedocuments they download.
By default, browsers are allowed to cache documents for 10 seconds. You canchange this duration by setting entry <DocumentCacheDurationInSeconds /> in thesettings.xml file.
Note: Setting <DocumentCacheDurationInSeconds/> to a value <= 0 disables thecache. This has a serious impact on performance and might also facilitate a DoS(Denials of Service) attack. Disabling the cache is therefore not recommended forproductive environments.
Furthermore Aurea CRM.Web caches template documents for mail merge letters inthe file system. This cache is updated automatically based on the last modificationdate of the document record. Although not recommended, you can disable this cacheby unchecking the Document.MailMergeCache Web Configuration parameter. Forfur ther details, see Document.MailMergeCache.
The location of this cache is defined by the <MailMergeDownloadPath/> entry in thesettings.xml file.
Merging Companies and PersonsTwo company or person records can be merged into a single record in AureaCRM.Web to remove duplicates.
The merge process (MergeRecords,see Processes on page 547) is called using themenu actions A_WebMerge_Companies and A_WebMerge_Persons (and D_WebMerge_Mul-tiple_Companies und D_WebMerge_Multiple_Persons for multi-select).
852AUREA CONFIDENTIAL
Chapter 4: Other Programs and Functions

The process can be star ted from a single source record (the user then selects thetarget record in the 1st step) or with both records in that case, the user star ts withthe conflict resolution step. If more than two records are selected, the menu actionis disabled.
The MergeRecords process supports the following parameters which you can specifyas input arguments for the menu action:
• fixedFilterName: "<InfoAreaId>.<FilterName>" adds a fixed filter for the search.
• copyFields: <field names or numbers> defines the fields to copy from the sourcerecord into the search.
• mergeOptions:["userDecides","sourceWins","targetWins","mostRecentWins"]
array defining which conflict resolution options are displayed beneath the mergeoverview under Merge method.
• defaultMergeOption sets the default merge option.
• showEqualValues: <true|false> defines whether fields with identical contentshould be displayed in the merge overview in case of a conflict. (It some case itmay be helpful to display fields with identical content, because e.g. the correctpostal code is hard to judge if you do not see the corresponding city; on the otherhand that means that users sees a lot of fields, including system fields and fieldswhich they probably haven’t seen before.)
• useTransaction: <true|false> If true (default), the merge is executed usingtransactions. For fur ther details, see Support for Database Transactions on page855.
• listParams: <Name>,<Value>;<Name>,<Value>;... defines listParams for thesearch results list. For fur ther details, see ListParams on page 374.
The merge overview (of source and target record) uses the Field Group FIMer-geOverview / KPMergeOverview / PEMergeOverview / CPMergeOverview. (The Detailscontrols in these Field Groups only support one column.)
The actual merge process may take some time depending on the amount of childrecords.
The merge is performed with the rights of the currently logged-in user. Thereforeconflicts may occur during the merge process which the user cannot solve due tohis rights definition (e.g. because he cannot access this data). Since merging recordswhere the user cannot see the contents makes little sense and can lead to inconsis-tencies, the merge process is stopped in this case. The merge then has to be per-formed by a person with adequate rights (e.g. an administrator).
Note: Since the source record is deleted during the merge process, users need"Delete" rights to be able to merge records.To prevent users from deleting records,but enable them to perform a merge: Grant the users "Delete" rights, but hide allDelete options from the user interface using the Hide button/Visible check boxes
853AUREA CONFIDENTIAL
Merging Companies and Persons

of the corresponding buttons and menu actions, see Configuring a Button on page305 and Menu Actions on page 295.
Merging Properties (BTB only)Learn about merging properties available for BTB customers.
Analogous to the company and person merge, the BTB version allows users to mergeproperty records (OJ) using the same MergeRecords process. For fur ther details,see Merging Companies and Persons on page 852.
When merging properties, linked Property Competitor (OM) records are mergedas well (match-up by Competitor, Product Group and Product). For more informa-tion on Properties, see BTB Web Business Logic BTB User Guide.
The MergeRecords process is called by the following menu actions:
• A_WebMerge_Properties
• D_WebMerge_Multiple_Properties
These menu items are assigned to CRM process 1.2.3.2.9. "Merge Properties" (CRMprocess ID 70000290).
Refreshing Data after C(R)UD EventsLearn how data is refreshed after CRUD events.
Aurea CRM.Web's CRUD service takes care of automatically refreshing data in lists,query results, details views and headers as well as in the calendar, daily & weeklyplanning, resource view, dispatching dashboard and in timelines. When the usercreates, updates or deletes data on another tab or in a popup, these changes arereflected in the other open tabs once the user switches back to them.
Note: This behavior only applies to changes the user made in his current browsersession. Changes to data on the server e.g. by another user are not immediatelyreflected on the client.
Note: Due to performance issues query results are only refreshed on QueryRunpages, i.e. not in the Query Designer.
All CRUD events are handled in the ResultSet model, which has a Boolean propertyautoRefresh that activates the monitoring of the CRUD events. When displayinglists and query results, this property is automatically set to true.
854AUREA CONFIDENTIAL
Chapter 4: Other Programs and Functions

CRUD events are handled as follows:
• create: The result set is re-loaded. The newly created record(s) are only visibleif the sor t order/filter is set in a way that the new record(s) appear on the currentpage.
• update: Only the values in those rows that contain the updated record are updated.The result set is not reloaded entirely.
• delete: The rows containing the deleted record are marked as deleted anddisplayed in a disabled state (grayed out). If the currently selected row is disabled,the row below this row becomes the new selected row. If there is no row belowthe selected row, no row is selected.
Support for Database TransactionsData integrity is insured during database transactions.
To ensure data integrity Aurea CRM.Web automatically uses transactions when:
• creating/updating records in Expand view
• updating records List view
• editing multiple records
• merging records (companies, persons).
Although not recommended, transactions can be deactivated (via the useTransactioninput argument) when merging records. For fur ther details, see Merging Companiesand Persons on page 852.
Note: If records were created or changed with the option AddNewCatalogValues =
true, new catalog values are created by design even if the transaction is rolledback.
Sometimes when saving records, a failed inser t operation might roll back the entiretransaction. To prevent such situations you might want to disable the databasetransaction mode. To prevent a save operation in an expand page, from being intransaction scope set the url parameter disableTransaction=true and append it toan expand url. This prevents rollback on a database save operations in case of anyfailures. See the following example:crm/expand?uid=FI%3Bx0000000100000001&mode=Show&infoAreaId=FI&_action=A_Expand&disableTransaction=true
In addition, methods for server-side add-on programming (BeginTransaction, Com-mitTransaction, RollbackTransaction and IsActive) are available.
855AUREA CONFIDENTIAL
Support for Database Transactions

Tuning the Performance of the Notification EngineCRM.Web server administrators can limit the number of concurrent database sessionsstar ted by the Notification engine.
This helps improve the performance of the Notification engine when a number ofusers are working with CRM.Web at the same time.
The following configuration parameters can be set in the settings.xml file underthe NHibernateSettings node of the update.NotificationEngine plugin configurationin the update.server section:
• SessionPoolLimit (default value is 16) - set the maximum number of NHibernatesessions in the Notification Engine. Increasing this value does allow NotificationEngine to perform faster when many users are working with CRM.web at the sametime. The minimum valid value is 1.
• SessionTimeout (default value is 30000 milliseconds) - set the time for which theNHibernate session can be idle.
The following sample configuration shows the concurrency settings for the Notificationengine in the settings.xml file:<!-- settings of update.server --><update.server>
<!--PlugIns:A list plugin assembly that will be loaded by update.sever.The order of this list matters!--><PlugIns>
<... skipped ...><PlugIn type="update.Web.NotificationsEnginePlugIn,update.Web" ><... skipped ...>
<NHibernateSettings><SessionPoolLimit>10</SessionPoolLimit><SessionTimeout>30000</SessionTimeout>
</NHibernateSettings></PlugIn>
</PlugIns></update.server>
XML Exports & ReportingThis topic explains how reports are generated in update.CRM web.
Aurea CRM features a newly built general-purpose reporting engine. It operates onXML data, but by using output transformations it can generate PDF or HTML reports.
The Aurea CRM reporting engine operates on XML data. By using output transfor-mations it can generate e.g. PDF or HTML reports. For details, see the ar ticle “Re-ports” at https://support.aurea.com.
856AUREA CONFIDENTIAL
Chapter 4: Other Programs and Functions

Aurea CRM.Web knows three different types of XML exports each with its own XMLschema:
• List: A list of records usually the result of a search or a query
• Expand: Details about a single record based on a field group
• Tree: A hierarchy containing the table captions for a set of linked records basedon a TreeView configuration
Lists can be exported using two different XML schemata:
• Aurea CRM.Web schema (default)
• Aurea CRM win schema
Exports and reports are executed via buttons. For fur ther details, see Export/ReportButtons on page 310.
For information on executing reports via JavaScript, see the “How to Execute aReport from Script” at https://support.aurea.com.
For information on customizing PDF reports using Aurea CRM's reporting plug-in,see the ar ticle “How to use the reporting PDF plug-in” at https://support.aurea.com.
Use the SDK page to explore the reporting functionality and test your reports: SDK> Reporting.
For tips on how to improve report performance, see “How to Improve Report Perfor-mance” at https://support.aurea.com.
XML OutputThis topic explanins XML output.
For detailed information on the XML output, see Reports in the Aurea CRM win UserManual.
The tag <LocaleVersion/> at the beginning of the XML output contains the currentregional settings (like date format, decimal separator, time zone etc.) to make pro-cessing and formatting of values easier.
The values of date, time, Boolean, short, long and float fields are output in invariantformat (in the attribute value) as well as in display format.
If EmitNativeFormat is specified, date fields do not contain a time portion, time fieldsdo not contain a date portion, and Boolean fields are output as "t" and "f" insteadof "true" and "false" .
Empty fields are output as <field…/>.
Catalog fields contain the numerical value (in the catval attribute) as well as thetext value e.g. <field tableshort="FI" fieldno="5" fid="5" catval="20">Aus-
tria</field>
857AUREA CONFIDENTIAL
XML Exports & Reporting

Export OptionsYou can specify export options to customize the XML output.
Export options are specified as CommandArguments (report parameter) for Export/Re-port buttons and in the reportName argument for QueryReport actions. For informationon the syntax.
The following matrix shows which export options are available (Y) for the variousexport types:
EmitLinks
EmitCondi-tions
EmitCata-logs
EmitInvari-antFor-mat
EmitNativeFormat
EmitConfig-ura-tion
Encod-ing
Fat ClientCompatible
YYYYYYYFALSEList
YNYYYYYFALSEDetails
NNNNNYYFALSETree
YYYYYYYTRUEList
NNNNNNNTRUEDetails
NNNNNNNTRUETree
Note: Not every combination of the options listed here is actually meaningful, e.g.exporting catalogs for a tree view does not make sense, because a tree exportcontains table captions only and no catalog fields.
Export.ContentDisposition
inline … the browser tries to display the report results in the current browser window
attachment (default) … the browser asks the user to save the report results or openthem in a separate window.
Export.EmitRepNames
Determines what is exported from rep ID fields in queries and lists:
true (default) ... rep names are exported.
false ... rep IDs are exported.
858AUREA CONFIDENTIAL
Chapter 4: Other Programs and Functions

Export.Encoding
UTF-8 … the export is encoded using UTF-8.
UTF-16 … the export is encoded using UTF-16.
Export.Xml.EmitCatalogs
true … the XML elements <Catalogues/> and <Languages /> are included in theXML export. <Catalogues> contains all values of all catalogs used in the exporteddata. The catalog values are included in two languages: the user's language andthe catalog base language. The core catalog IDs are also output.
Information about the fixed catalogs used in a report is output to an XML nodeanalogous to variable catalogs (with the difference that values of fixed catalogs areoutput only in the current language).
false (default) … no catalogs are included with the XML export.
Export.Xml.EmitConditions
true … when exporting query results, this option exports the conditions (=filters)used when executing the query. The filters are output to the XML element <Condi-tions/>. Variable conditions like $curDay, $curRep etc. are replaced with their actualvalue.
false (default) … no conditions are included with the XML export.
Export.Xml.EmitConfiguration
true … the XML element <Configuration/> containing the configuration (e.g. of thefield group or the tree view) is included in the XML export. This allows you to formata report's output e.g. based on field attributes.
false (default) … no configuration data is included in the XML export.
Export.Xml.EmitBaseFieldIds
true … an attribute fidcore (short notation: fic) containing the base field numberis output for the <row/> and <fields/> tags. The base catalog IDs are output aswell. The base info area shortcuts tableshortcore are also output to allow the cre-ation of base reports.
Export.Xml.EmitInvariantFormat
true … all exported field values are formatted using Aurea CRM's internal cultureinvariant representation:
FormattingField type
YYYYMMDDDate
HHMMTime
859AUREA CONFIDENTIAL
XML Exports & Reporting

HHMMSSTime (with seconds)
HHMMSSTTTTime (with milliseconds)
1 or 0Boolean
No special formatting is applied.Other field types
false (default) … all exported field values are formatted according to the users localesettings stored as Web Configuration parameters in the users configuration. Forfur ther details, see Locale Parameters on page 125.
Export.Xml.EmitLineBreaks
true (default)...Line breaks are exported.
false...Line breaks are removed from the XML output.
Export.Xml.EmitLinks
true … for every record, a hyperlink and a title for this link is included in the XMLexport. The titles are formatted using the default table caption of the record's infoarea, e.g.<field_link tableshort="FI">http://.../ </field_link> <field_ref ta-bleshort="FI">Aurea Software</field_ref>
false (default)… no hyperlinks are included in the XML export.
Export.Xml.EmitLocaleSettings
true (default) ... the XML element <LocaleSettings/> containing the users localesettings is included in the XML export.
false ... no locale setting data is included with the XML export.
Export.Xml.EmitNativeFormat
true … all exported field values are formatted using an XML-compliant format:
FormattingField type
YYYY-MM-DDDate
HH:MMTime
HH:MM:SSTime (with seconds)
HH:MM:SS.TTTTime (with milliseconds)
860AUREA CONFIDENTIAL
Chapter 4: Other Programs and Functions

t or fBoolean
No special formatting is applied.Other field types
false (default) … all exported field values are formatted according to the users localesettings (stored as Web Configuration parameters in the user's configuration). Forfur ther details, see Locale Parameters on page 125.
Export.Xml.EmitOnlyBaseFields
true … only fields having a base ID are included in the XML output. The base infoarea shortcuts tableshortcore are also output to allow the creation of base reports.
Export.Xml.EmitVariables
true … the XML element <Variables/> is included in the XML export. <Variables>contains all the variables that are valid for the currently logged-in user.
false (default) … no variables are included in the XML export.
Export.Xml.ExportPhysicalInfoAreaIds
Relevant when using vir tual info areas. For fur ther details, see Vir tual Info Areason page 275.
true … the exported XML always contains the physical info area ID.
false (default) … the exported XML contains the actual info area ID, i.e. the vir tualinfo area ID, if applicable.
Example:<field tableshort="VDOC" tablename="Doctor" fieldno="2" fieldname="Company"…><field tableshort="FI" tablename="Company" fieldno="2" fieldname="Company"…>
Export.Xml.FatClientCompatible
true … XML Export uses a Aurea CRM win-compatible schema.
false (default) … XML Export uses the Aurea CRM.Web schema.
Export.Xml.NamesOption
Short … the XML output contains shorter XML attribute and tag names. If your reportsare very large, this options helps to reduce the file size (but has the disadvantagethat the XML is much less readable).
ShortName
Default NameShortName
Default NameShortName
Default Name
rirecidfnfieldnoccatalog
861AUREA CONFIDENTIAL
XML Exports & Reporting

snsortnrfphfieldplacehold-er
cscatalogs
ttablefsfieldscncatNo
tctableCaptionftfieldtypecnccatNoCore
tlbtablelabelflfield_linkcvcatval
tntablenamefrfield_refeextKey
tstablesfcsfixedCata-logues
fidfid
tsrtableshortlilangidficfidcore
tsrctableshort-core
mnrmnrffield
tytypenmnameflbfieldlabel
vvaluepcnparCatNoflfieldlength
varVariablepcvparCatValfmtfieldmandato-ry
varsVariablespprefixfnmfieldname
Every other value than Short results in the default names being used.
XSL TransformationsLearn about XSL transformation for CRM.Web.
XSL transformation scripts and document functions should be enabled for CRM.Webto be able to use them. Set the EnableScript and EnableDocumentFunction optionsto true, under the XSLTransformation section in the settings.xml file. See thesample below:<update.lib>
<XslTransformation><EnableScript>FALSE</EnableScript><EnableDocumentFunction>FALSE</EnableDocumentFunction>
</XslTransformation></update.lib>
Attention: Enabling XSL transformations exposes a severe security threat,potentially revealing the remote code execution path to an attacker. You should
862AUREA CONFIDENTIAL
Chapter 4: Other Programs and Functions

ensure that people with potential malicious intent do not have access to the system.if you enable these options.
By default, the XSL transformations used by Aurea CRM.Web are stored in ..\da-ta\reports\xslt.
To use another than the default location, add the following elements to the set-tings.xml file:<update.web>
...<mmReports>
<XSLTPath>Data/Reports/XSLT</XSLTPath></mmReports>
By default, the XSL transformations are loaded on first use and cached thereafter.While developing new XSL transformations this can become cumbersome, becauseAurea CRM.Web has to be restar ted for each change to the XSL transformation.For information on disabling the caching of XSL transformations and debugging re-ports, see the ar ticle “How to Debug Reports” at https://support.aurea.com.
There are no constraints on the XSL transformations you create for XSL reporting,as long as they are valid transformations according to the W3C XSL Transformations(XSLT) Version 1.0 recommendation located at http://www.w3.org/TR/xslt.
However, you should add a media-type attribute to your <xsl:output> element.
Aurea CRM.Web looks for this attribute and modifies the content-type of the HTTP-Stream sent to the client (browser). Without setting the media-type the OS on theclient computer cannot determine the correct application for opening the report.<xsl:output method="xml" encoding="UTF-8" media-type="application/msword" />
Note: The media-type is also used to alter the file extension of the file nametransferred to the client. For security reasons the client application (browser) usesthe file extension rather than the HTTP content-type to determine the applicationused to open a file. As a result all content-types and file extensions must be knownto your Aurea CRM.Web server, i.e. defined in the registry.
Creating Aurea CRM win Reports in Aurea CRM.WebThis topic explains how to create reports on Aurea CRM Win.
In Aurea CRM.Web you can create reports based on report formats defined in AureaCRM win by using the ExecuteReport action. For fur ther details, see ExecuteReporton page 423.
For information on Aurea CRM win reports, see Defining Report Formats in the AureaCRM win User Manual.
863AUREA CONFIDENTIAL
XML Exports & Reporting
The corresponding XML is generated by the core, but all transformations with stylesheets are done by Aurea CRM.Web. Therefore it is necessary that all required files(xslt, css and images) are available in the respective directories on the web server(i.e. you need to manually copy the required files to these locations):
..\data\reports\crm\xslt
..\data\reports\crm\xslt\images
The report format to be used is specified by the name parameter of the ExecuteReportaction. The uid parameter can be used to pass the uid of a linked record for thereport. The parameters parameter allows you to specify additional settings (asJSON):
• XSL transformations: Enter {XslTransformation: "<transformation name>"} toapply an additional transformation at the end (i.e. after a transformation definedin the format was performed).
• target and contentDisposition settings, e.g. {target: "CreateNewTab"} or{target: 'myIFrame', contentDisposition: 'inline'}
For more information on these parameters, see targetFrame and contentDisposi-tion.
Note: The parameters parameter does not support any other export options likeExport.Encoding, Export.Xml.EmitConditions etc. You need to set them directlyin the format definition in Aurea CRM win.
• The parameters listed below as defaults, e.g. {stylesheet: " myreport.css "}
By default, the following parameters are passed from Aurea CRM.Web to the XSL:
• style: name of the style to be used, e.g. "update"
• stylesheet: file name or path (URL or UNC) to the CSS file, e.g. " update.css" or "http://myweb.com/styles/custom.theme/report.css"
Note: The CSS file must be located as defined in the XSLT file. Aurea CRM.Webuses ../styles/update/report.css as default.
• imagepath: relative or full path (URL or UNC) to Aurea CRM.Web's images, e.g." ../images/update/ " or "http://myweb.com/images/update/"
• imagefolder: full path to the ..\xslt\images folder, e.g. " c:\my_web_instal-lation\web\data\reports\crm\xslt\images "
Note: These defaults cannot be modified directly in the XSL, but can be overriddenby the format definition or by parameters of the action definition, e.g. by {stylesheet:"<style sheet name>"}.
864AUREA CONFIDENTIAL
Chapter 4: Other Programs and Functions

Note: In order to be able to override these defaults via the action definition (param-eters parameter), the corresponding parameters need to be defined as param in theXSLT file, i.e. you cannot use e.g. imagefolder if the XLST only contains imagepath.
Note: Settings provided via the action definition always take precedence overparameters defined in the XSL or in the format definition.
If the report format has the Output Link option checked, make sure you have con-figured the web URL entry in the Configuration info area (MC, category Link). Forfur ther details, see Configuration Info Area in the CRM.Core Administrator Guide.
The following restrictions apply to Aurea CRM win reports executed in AureaCRM.Web:
• The XSLT files must be located in ..\data\reports\crm\xslt.
• If the XslTransformation parameter is set in the action definition, the providedtransformation is always applied last.
• The placeholders $userdir and $installDir cannot be used.
• You cannot use variable conditions in the transfer field format.
• The Save as file option is not supported: Reports in Aurea CRM.Web are alwaysexecuted synchronously and then displayed.
• The Save first/second transformation to file options are not supported.
• The Transfer to spreadsheet option is not supported.
• The creation of PDF reports as described in the Aurea CRM win User manual(chapter PDF Reports) is not supported.
Use the Export.WinReportAlwaysInMemory and Export.WinReportMemoryThresholdWeb Configuration parameters to control whether a report is generated as a file (inweb.data\session\report.xml) or only in the memory:
If Export.WinReportAlwaysInMemory is checked, the report is created in-memory(instead of as a file).
Export.WinReportMemoryThreshold defines the max. file size (in KB) used for in-memory creation (default: 256 KB)
If Export.WinReportAlwaysInMemory is checked and the defined Export.WinReport-MemoryThreshold is exceeded, the report creation is aborted with an error message.
Customer Admin ModeLearn about acessing customer admin mode on web.
This feature is primarily intended for customer administrators in an SaaS environmentbut can also be used e.g. for country admins in large in-house projects.
865AUREA CONFIDENTIAL
Customer Admin Mode

You can set up a special "customer admin mode" enabling (administrative) usersto access CRM.Designer from Aurea CRM.Web and customize field controls using
the (Adjust Layout & Fields) button.
To set up customer admin mode:
1. Enable authentication for CRM.Designer, i.e. disable anonymous access. Forfur ther details, see Settings on page 750.
All users with the *SelfAdmin configuration (s. below) in their configuration hier-archy are able to access CRM.Designer. The respective CRM.Designer loginsare automatically created (s. below).
2. Set up the connection between Aurea CRM.Web and CRM.Designer.
Note: Aurea CRM.Web and CRM.Designer need to run on the same server.
3. Create the required configuration hierarchy with a *SelfAdmin and *SelfAdminDevconfiguration between a common parent and the users. For fur ther details,see Creating SelfAdmin Configurations on page 868. This ensures thatconfigurations delivered and maintained by update (or a par tner) can not bechanged by customer admins.
The customer admin customizes field controls in the *SelfAdminDev configurationand then publishes the finalized customization to the *SelfAdmin configuration,thus making it available to all users.
Other CRM.Designer pages and other configurations are not accessible.
4. Define a dedicated customer admin role and assign it to the *SelfAdminDevconfiguration and to the users that should perform the customizations.
Customer admins must log on to Aurea CRM.Web with this role.
5. Configure the EditDetailsControl button in the desired Expand headers. For fur therdetails, see EditDetailsControl on page 871.
Note: The EditDetailsControl button is available for the SU and users who haveaccess to the CRM process 1.5.1.3.106 "Edit Mask" (CRM process ID M_173).This CRM process is enabled by default.Make sure you disable this CRM processfor all roles except the customer admin's role.
866AUREA CONFIDENTIAL
Chapter 4: Other Programs and Functions

If a user who has the *SelfAdmin configuration in his configuration hierarchy logs
on to Aurea CRM.Web with the customer admin role and clicks on (Adjust Layout& Fields) the following happens:
• CRM.Designer is opened in a new browser window.
• When logging on for the first time a CRM.Designer login "crm:<update.CRM loginname>" is automatically created:
The login is created in User Group "Customer" and for the *SelfAdminDev Con-figuration only. This login is then automatically used every time the user clicks
on (Adjust Layout & Fields).
• Changes to field controls are saved in the *SelfAdminDev configuration.
• The administrative user can publish these changes to the *SelfAdmin configuration,thus making it available to all users.
Note: The customer admin mode feature is intended to be used only in theproductive environment. There is no (automatic) transport back to a development(or testing) environment. You would have to use CRM.bulkloader to transport the*SelfAdmin configuration to your development environment.
Note: Use the Compare Field Controls page in CRM.Designer to compare changesmade by a customer with a parent configuration as provided by update or a par tnerto determine possible additions for the next release of your parent configuration.For fur ther details, see Compare Field Controls on page 746.
Note: No automatic merge of field control definitions is supported.
867AUREA CONFIDENTIAL
Customer Admin Mode

Creating SelfAdmin ConfigurationsThis topic explains creation of SelfAdmin configurations.
For customer admin mode to work you need to inser t "SelfAdmin" configurationsbetween the lowest configuration maintained and deployed by Aurea or par tnersand the customer's user configurations. This SelfAdmin configuration can then bemaintained by the customer; changes in this configuration apply to all users.
Note: It is strongly recommended to back up the CRM.Designer database beforecreating Selfadmin configurations.
Note: The SelfAdmin configurations are identified by their suffixes: *_SelfAdminand *_SelfAdminDev. Do not use these names in any other context.
To create/adapt the required configuration hierarchy:
1. Switch to the configuration below which you want to inser t the SelfAdminconfiguration:
a. Click Users | Configurations.
b. Select View > Configurations, see Configurations View on page 83.
c. Beside the desired configuration (CU_Customer in this example) click on (Edit).
2. Click on Insert Self-Admin Configurations.
868AUREA CONFIDENTIAL
Chapter 4: Other Programs and Functions

A popup displays which configurations is added and which child configurationsis affected by the change. (Uncheck Update child configurations with newparent configuration if you do not want to change the configuration hierarchyfor existing child configurations. In that case the child configurations does notsee any changes done by the customer admin.)
Note: If the IDs required for inser ting the new configurations are not available,a message is displayed asking you to click on Change ID instead to free up therequired IDs, see Changing Configuration IDs on page 85.
3. Click on OK.
Two new configurations are inser ted according to your settings: <parent_con-fig>_SelfAdmin and <parent_config>_SelfAdminDev.
The *SelfAdmin configuration is the new parent of your user (and user group) con-figurations.
Assign the *SelfAdmin configuration to the DefaultUser to make sure new AureaCRM.Web users get this new parent configuration. For fur ther details, see Automat-ically Creating User Configurations on page 82.
The *SelfAdminDev configuration is the configuration that is edited by the customeradmins when using the EditDetailsControl button.
Assign the customer admin role to the *SelfAdminDev configuration. For fur therdetails, see Defining and Assigning a Customer Admin Role on page 870
Multiple SelfAdmin Configurations
869AUREA CONFIDENTIAL
Customer Admin Mode

In such a scenario the customer admin needs to log on to Aurea CRM.Web with e.g.the "Marketing" role and the "SelfAdmin" role to access the CU_Marketing_SelfAd-minDev configuration.
Defining and Assigning a Customer Admin RoleLearn to configure Customer admins and assign role to them.
Customer admin mode requires a dedicated customer admin role:
1. Define a login role, e.g. "Customer Admin", see Login Roles in the CRM.CoreAdministrator Guide.
Make sure the CRM process 1.5.1.3.106 "Edit Mask" (CRM process ID M_173)is enabled in this role's CRM process configuration. This CRM process determinesthe availability of the EditDetailsControl button.
2. Assign the role to the *SelfAdminDev configuration, see Editing Configurationson page 84 and Dynamic Configuration Assignment Based on Roles.
870AUREA CONFIDENTIAL
Chapter 4: Other Programs and Functions

3. Assign the role to the rep records of those users that should perform thecustomizations, see Role-Based Access.
If a user logs on to Aurea CRM.Web with this role, the *SelfAdminDev configurationis loaded as his parent configuration. If he logs on without the role the *SelfAdminconfiguration is used.
EditDetailsControlLearn to customize fields control using EditDetailsControl button.
The EditDetailsControl button (Adjust Layout & Fields) allows (administrative)users to customize field controls.
Note: The EditDetailsControl button is available for the SU and users who haveaccess to the CRM process 1.5.1.3.106 "Edit Mask" (CRM process ID M_173). This
871AUREA CONFIDENTIAL
Customer Admin Mode

CRM process is enabled by default.Make sure you disable this CRM process for allroles except the customer admin's role.
You can configure the EditDetailsControl button into Expand headers.
Clicking on the EditDetailsControl button opens CRM.Designer in a new browserwindow displaying the Details control of the current info area. Users can customize(copy/edit/delete) the Details control. In addition, they can access all available fieldgroups (via the star t page) and thus customize field controls for other info areas aswell (Details, Search, List, MiniDetails controls). Other CRM.Designer pages arenot accessible.
Note: If Aurea CRM.Web was star ted in debug mode, clicking the EditDetailsCon-trol button star ts CRM.Designer in debug mode as well.
Field Control Editor
The Field Control Editor displays only a sub-set of the available attributes and set-tings that require no or little training and no knowledge of JSON and JavaScript.Hidden attributes are retained if a field is removed from a control and re-insertedat later time.
Publish to Parent
Changes are immediately displayed in Aurea CRM.Web after saving, i.e. it is notnecessary to invalidate the cache. Changes are saved to the *SelfAdminDev config-uration. Clicking on Publish to Parent Configuration copies the changed configu-ration units from the *SelfAdminDev configuration to the *SelfAdmin configuration;this makes changed field control(s) available for all users having the *SelfAdminconfiguration in their configuration hierarchy. For fur ther details, see CreatingSelfAdmin Configurations on page 868.
872AUREA CONFIDENTIAL
Chapter 4: Other Programs and Functions

Note: The Publish to Parent Configuration button is only available for*SelfAdminDev configurations.
Texts and Text Groups
When defining new labels (for fields or panels) the texts are saved in a SelfAd-min_FieldControl text group that is automatically created as soon as the first textis defined. The text group is automatically moved to the *SelfAdmin configurationwhen clicking on Publish to Parent Configuration.
Users can select texts from existing text groups but can not change exisiting textsor define new texts for any text group other than the SelfAdmin_FieldControl textgroup.
Note: The SelfAdmin_FieldControl text group must not be used by any other thanthe *SelfAdminDev configuration.
Deleting Field Controls
If a field control is deleted while in customer admin mode, a Remote Deletion entryis automatically created. For fur ther details, see Remote Deletion.
Base CustomizingThis feature is only relevant for Aurea software and for par tners who want to createa designer Base configuration for multiple ver ticals.
The goal of this feature is that processes of a similar type involving "base" info areasshould only need to be configured once when developing a template. These config-urations can then be distributed using the individual ver tical templates where theycan be integrated in the specific configuration for the target industry. Defining BaseInfoarea designer units is, of course, only possible for info areas, fields and catalogsthat are common to all (or at least two) ver ticals. In addition, designer units indepen-dent of info areas (like some menu actions, forms etc.) can also be customized as"base".
See the CRM.Core Administrator Guide for details concerning the data model (e.g.which info areas, fields,and other designer units are "base") and customization inAurea CRM win.
The Base ver tical in CRM.Designer contains a data model that consists of "base"info areas and their fields, ver tical info areas if they have "base" fields only thesefields are visible, and "base" catalogs.
873AUREA CONFIDENTIAL
Base Customizing
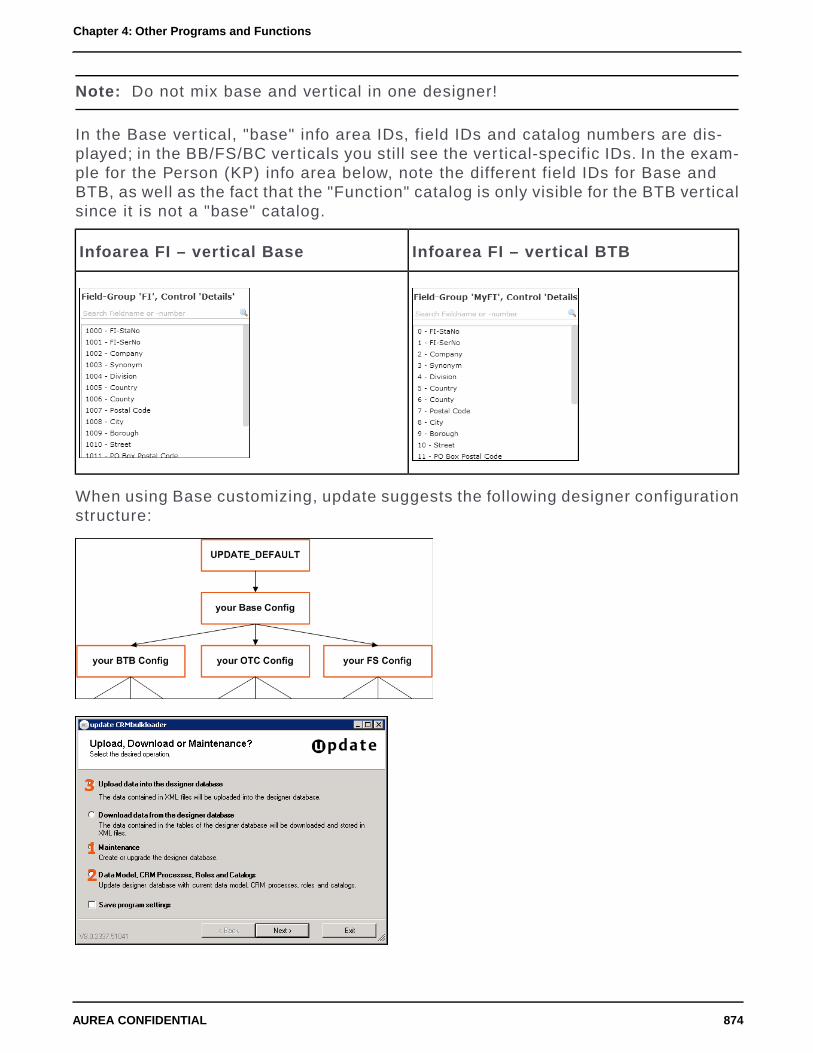
Note: Do not mix base and ver tical in one designer!
In the Base ver tical, "base" info area IDs, field IDs and catalog numbers are dis-played; in the BB/FS/BC verticals you still see the ver tical-specific IDs. In the exam-ple for the Person (KP) info area below, note the different field IDs for Base andBTB, as well as the fact that the "Function" catalog is only visible for the BTB verticalsince it is not a "base" catalog.
Infoarea FI – vertical BTBInfoarea FI – vertical Base
When using Base customizing, update suggests the following designer configurationstructure:
874AUREA CONFIDENTIAL
Chapter 4: Other Programs and Functions

Note: To be able to see the Base ver tical in CRM.Designer, the <EnableVerticalBase/> entry must be active (i.e. not commented out) in the settings.xml file ofCRM.Designer.
Extending Field/Header Groups Defined in BaseLearn to extend header groups configured in base.
Header groups are used to organize different types of headers - predefined, standardheaders (e.g. Search, Expand, Tree) and custom special headers. When a headeris referenced, a header group is configured in which it should be searched for. First,a suitable group is found in the hierarchy of the designer configurations and ver ticals.Then, a header with the matching name / type is searched for in that group.
In Aurea.CRM a new feature was implemented that allows an on-demand extensionof header groups in child configurations.
This has been possible before in the same vertical, it is now even possible to switchfrom Base to a different ver tical. Below is the detailed explanation of this logic:
• If a header group A is defined in the Base ver tical of some configuration X, it isnot possible to extend it in a specific ver tical. One can make a copy of it in aspecific ver tical, however this copy is fully independent from the Base's A andwon't inherit the headers. There are technical reasons for it in the way update.CRMweb handles configurations and ver ticals - once a header group is found in aparticular ver tical, Base is no longer looked at, so one can not extend ithorizontally.
• In a sub-configuration Y of X, in the Base ver tical, one can add/override headersto the header group A, thereby logically extending it. These headers are still apart of the original header group A but is only visible in the configuration Y.
• Additionally, one can add/override headers to the header group A in thesub-configuration Y in another (e.g. BB) ver tical. As soon as he does that, anextension of the group A is created in the BB vertical. An extension is a headergroup with a special flag (called extendsparent in the DB table) that can be usedto define ver tical-specific headers while still inheriting those from the X's Base.As a result, in the ver tical BB of Y, headers defined both in X's Base and Y's Baseis available in addition to those created specifically for Y's BB. This is alsoreflected in the copy operation - if one decides to copy the header group into Y'sBB, all the inherited headers is merged and cloned so that the copy can be workedwith independently. Such a copy no longer inherits anything.
• An important property of the extension is that it extends the parent configuration(although it is used for extending a header group in Base), so if we were to createa copy of A in the X's BB, this takes precedence and the extension created in Y'sBB only inherits headers from that one. In general, an extension always refers toa header group found in the nearest parent configuration, where first the currentand then the Base ver tical is searched through. Similarly, to the on-demand
875AUREA CONFIDENTIAL
Base Customizing

extension done when the first header is created that requires the extension, theextension is deleted automatically as soon as all the headers it contained (exceptfor those that are inherited, of course) are deleted. Thus, the extension only livesuntil it becomes superfluous.
Virtual Info Areas & Core CustomizingThis topic concerns the development of product templates and deriving multiplesolutions from a single Base template.
Vir tual Info Areas & Core Customizing is solely directed at internal update usersand partners.
By default vir tual info areas inherit the properties concerning Base info areas andfields from their physical info area. This may lead to problems e.g. if multiple ver ticalsuse FI to create a vir tual info area called "VFI1". All these vir tual info areas wouldbe defined as "Base", because their physical reference (FI) is Base. Therefore theBase configuration would contain multiple VFI1 info areas.
To prevent that scenario, set the coreMode attribute to "ver tical" (or "false") in thesettings.xml. This defines the vir tual info area and its fields as ver tical-specificindependent of the Base info area.
<VirtualSchema>
<InfoArea infoAreaId='VHOS' physicalInfoAreaId='FI' fieldId='28'fieldType='K' value='Spital' name='Hospital/Clinic' coreMode='base'/>
<InfoArea infoAreaId='VDOC' physicalInfoAreaId='FI' fieldId='28'fieldType='K' value='Arzt' name='Doctor' coreMode='vertical'/>
<InfoArea infoAreaId='VPHA' physicalInfoAreaId='FI' fieldId='28'fieldType='K' value='Apotheke' name='Pharmacy' coreMode='vertical'/>
</VirtualSchema>
Note: If a vir tual info area has been defined as "Base", you cannot revert it to"ver tical" at any later time.
876AUREA CONFIDENTIAL
Chapter 4: Other Programs and Functions
AData Types in Aurea CRMIn some dialog boxes, the field type is also displayed along with the field name andnumber.
The following data types are available:
• B = Boolean (logical)
• C = Character string
• D = Date
• F = Floating point number
• K = Variable catalog
• L = Long integer
• S = Short integer
• T = Time
• X = Fixed catalog
• Z = Decoded field. Values in these fields are automatically entered by the businesslogic. Z-fields do not exist in the database. (Examples: reference fields, fieldsthat contain links to other records, rep fields, rep group fields, 2nd currency fields,external match-up fields etc.).
Z-fields cannot be added as search fields or used for defining filters and queries.
The content of a Z-field is not updated in lists if the target record is updated byanother process. Workaround: Instead of the Z-field add a linked field of the targetrecord to the list. Example: Instead of using the Company field (MA:76), add theCompany field from FI as linked field to the MA List control.
877AUREA CONFIDENTIAL

BEffectiveness of Rights and ConfigurationChangesFor changes made using the Aurea CRM win Rights or Maintenance modules totake effect, it depends on the type of change whether it is applied immediately, afterthe refresh cycle (i.e. after the time when rights, catalog values etc. cached for acertain time period are read again from the Aurea CRM database), after reloadingAurea CRM.Web (F5) or after recycling the application pool.
The refresh cycle is determined by the Cat. refresh frq. and Format refresh frq.settings in the Station Configuration (T0) info area (default: 30 minutes), >> Stationon page 32 on page 13.
The following list gives an overview when which changes are effective:
Change effectivefor newly logged-in
user
Change effective forcurrently logged-in
user
ActionGroup
application pool recy-cling
application pool recy-cling
Data model changesMaintenance
refresh cycle expired*
refresh cycle expiredStation right NEWRights
refresh cycle expired*
refresh cycle expiredChanges to stationright
Rights
refresh cycle expired*
refresh cycle expiredRemove station rightRights
refresh cycle expired*
refresh cycle expiredGroup right NEWRights
refresh cycle expired*
refresh cycle expiredChanges to groupright
Rights
refresh cycle expired*
refresh cycle expiredUser right NEWRights
refresh cycle expired*
refresh cycle expiredChanges to user rightRights
refresh cycle expired*
refresh cycle expiredRemove user rightRights
878AUREA CONFIDENTIAL
Appendix B: Effectiveness of Rights and Configuration Changes

Change effectivefor newly logged-in
user
Change effective forcurrently logged-in
user
ActionGroup
refresh cycle expired*
refresh cycle expiredChanges to defaultvalue triggers
Rights
refresh cycle expired*
refresh cycle expiredConditional fieldrights
Rights
immediatelyrefresh cycle expired+ logout/login
Assign to/remove fora user
Roles
immediatelyevery 60 sec.Add, update, deletea role
Roles
refresh cycle expiredrefresh cycle expired+ logout/login or F5
Changes to catalogvalues
Catalogs
immediatelyrefresh cycle expired+ logout/login or F5
Creation of new cata-log values
Catalogs
application pool recy-cling
application pool recy-cling
Changes to fixed cat-alog values
Catalogs
application pool recy-cling
application pool recy-cling
Creation of new fixedcatalog values
Catalogs
refresh cycle expiredrefresh cycle expired+ logout/login or F5
New repRep
application pool recy-cling
application pool recy-cling
Minimum passwordlength
Password Poli-cy
application pool recy-cling
application pool recy-cling
Password must con-tain numbers, letters
Password Poli-cy
immediatelyrefresh cycle expired+ logout/login or F5
Set system lockSystem Lock
refresh cycle expiredrefresh cycle expiredRemove system lockSystem Lock
immediatelyimmediatelyAssign a company toa new tenant
Tenants
application pool recy-cling
application pool recy-cling
Assign a user to anew tenant
Tenants
refresh cycle expiredrefresh cycle expiredActivate web traceLogging
refresh cycle expiredrefresh cycle expiredDeactivate web traceLogging
application pool recy-cling
application pool recy-cling
Change log level insettings.xml
Logging
879AUREA CONFIDENTIAL

Change effectivefor newly logged-in
user
Change effective forcurrently logged-in
user
ActionGroup
refresh cycle expiredrefresh cycle expired+ logout/login or F5
Activate sessiontracking
Tracking
refresh cycle expiredrefresh cycle expired+ logout/login or F5
Deactivate sessiontracking
Tracking
application pool recy-cling
application pool recy-cling
Activate write proto-col
Protocol
application pool recy-cling
application pool recy-cling
Deactivate write pro-tocol
Protocol
application pool recy-cling
application pool recy-cling
Change write proto-col
Protocol
refresh cycle expiredrefresh cycle expiredChange configurationentries
Configuration(MC)
Note: For the rows marked with * the following applies:
• If e.g. "Deny Update" is set and the user logs on after the refresh cycle, the fieldsare inactive in Expand view. If the user was already logged on, he can still modifythese fields, but when he tries to save the record a corresponding message isdisplayed.
• If a rights definition is removed which resulted in fields being displayed as inactive,the user must log off and log on again after the refresh cycle (otherwise the fieldsremain inactive).
880AUREA CONFIDENTIAL
Appendix B: Effectiveness of Rights and Configuration Changes

CAQL – Aurea Query LanguageSimilar to SQL which queries relational databases for records, AQL can be used toquery the Aurea CRM database.
Use the Query Editor in Aurea CRM.Web to define and test your AQL statements:
Important: A field with an AQL statement containing multiple conditions and usingthe same operator AND is interpreted as OR. Similarly, a multiple condition statementusing only OR is interpreted as AND. This is the default behaviour of AQL in thecontext of a single field and applies only for a single field having multiple conditionsdefined with the same operator. The AND and OR operators behave as expected inall other cases.
For example, consider the following multiconditions on a fields and how they areinterpreted:
1. F1 = 1 AND F1 = 2 AND F1 = 3 was interpreted before as F1 = 1 OR F1 =2 OR
F1 = 3 F1 IN(1,2,3).
2. F1 != 1 OR F1 != 2 OR F1 != 3 was interpreted before as F1 !=1 AND F1 != 2
AND F1 != 3 F1 NOT IN (1,2,3).
881AUREA CONFIDENTIAL
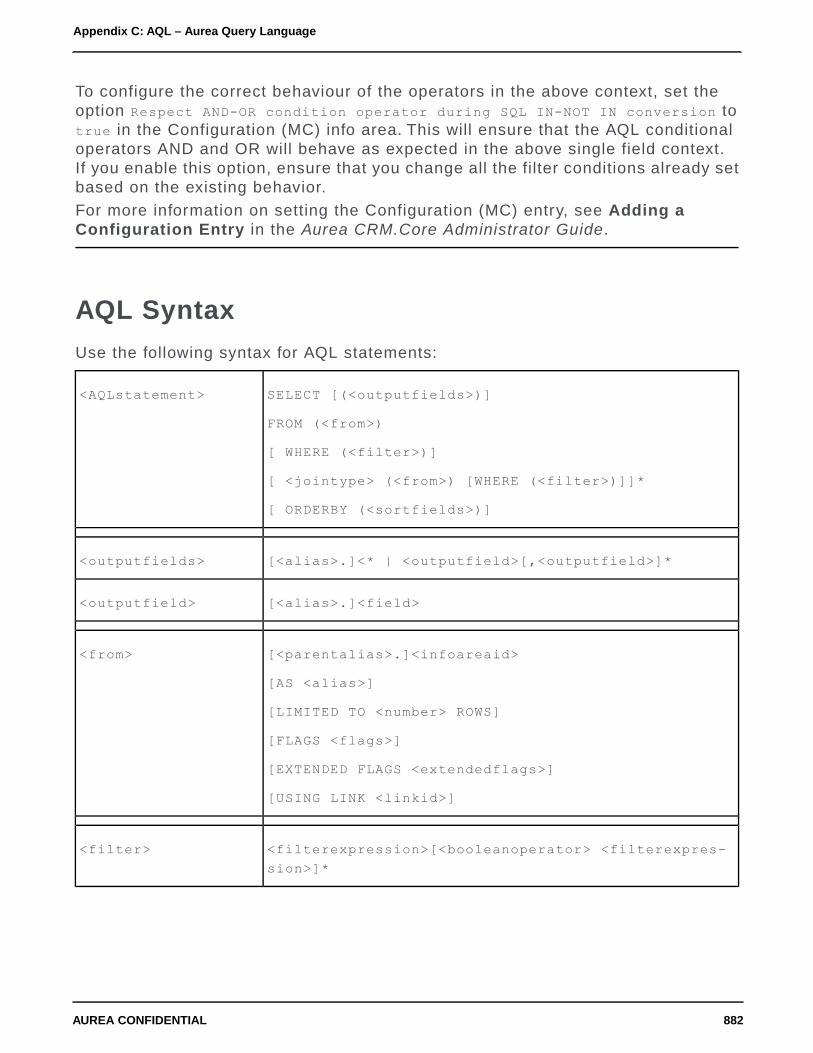
To configure the correct behaviour of the operators in the above context, set theoption Respect AND-OR condition operator during SQL IN-NOT IN conversion totrue in the Configuration (MC) info area. This will ensure that the AQL conditionaloperators AND and OR will behave as expected in the above single field context.If you enable this option, ensure that you change all the filter conditions already setbased on the existing behavior.
For more information on setting the Configuration (MC) entry, see Adding aConfiguration Entry in the Aurea CRM.Core Administrator Guide.
AQL SyntaxUse the following syntax for AQL statements:
SELECT [(<outputfields>)]
FROM (<from>)
[ WHERE (<filter>)]
[ <jointype> (<from>) [WHERE (<filter>)]]*
[ ORDERBY (<sortfields>)]
<AQLstatement>
[<alias>.]<* | <outputfield>[,<outputfield>]*<outputfields>
[<alias>.]<field><outputfield>
[<parentalias>.]<infoareaid>
[AS <alias>]
[LIMITED TO <number> ROWS]
[FLAGS <flags>]
[EXTENDED FLAGS <extendedflags>]
[USING LINK <linkid>]
<from>
<filterexpression>[<booleanoperator> <filterexpres-
sion>]*
<filter>
882AUREA CONFIDENTIAL
Appendix C: AQL – Aurea Query Language

<filterfield> <comparisonoperator> < filterfield >
| < filterfield > <comparisonoperator> <filtervalue>
| (<filterexpression>)
<filterexpression>
F<fieldid> | <fieldname><filterfield>
<quotedstring> (for more information see below)<filtervalue>
AND | OR<booleanoperator>
= | < | <= | <> | >= | ><comparisonoperator>
<sortfield>[,<sortfield>]<sortfields>
[<alias>.][<field>][ <sortorder>][ FLAGS <sortflags>]<sortfield>
ascending|descending<sortorder>
WITH | WITHOUT | PLUS | WITHSUMMED | PLUSSUMMED |
WITHOPTIONAL | WITHOUTOPTIONAL | WITHSUMMEDOPTIONAL
| HAVING | HAVINGOPTIONAL
<jointype>
<fieldname>|<fieldid><field>
<string> (the XML name)<fieldname>
<number> (the unique field ID)<fieldid>
<string> (The info area ID in double quotes: "FI", "KP",etc.)
<infoareaid>
<string> (for more information see below)<alias>
<alias> (The alias of the parent info area, for joins only)<parentalias>
<number> (The link ID from the data model)<linkid>
"<string>"<quotedstring>
883AUREA CONFIDENTIAL
AQL Syntax

<string> | <number> (for internal use ONLY)<flags>
<string> | <number> (for internal use ONLY)<extendedflags>
<string> | <number> (for internal use ONLY)<sortflags>
<alias> uniquely identifies an info area within the query. By default the alias andthe info area ID ("FI", "KP", etc.) are the same. If an info area is used multiple timeswithin a query, aliases can be defined using "AS <alias>" to keep those instancesapart, >> Example Example on page 884 Example on page 519.
<filtervalue> has to be formatted as usual (hence with all other query APIs). Usethe following prefixes:
• # for catalog codes, >> Filtering by Catalog Values on page 885 on page 519
• $par for parameters, >> Dynamic Filters on page 509 on page 320
• $cur for variable expressions, >> Using Variable Expressions on page 505 on page318.
<sortflags> can currently not be saved in the CRM.Designer database.
Note: Notes: Line feeds in queries are for readability only, they have no semanticmeaning.
Note: Keywords (SELECT, FROM, etc.) are case insensitive.
ExampleSELECT (KM.ProblemDescription,FI.Company,KP1.LastName,KP2.LastName)
FROM (KM) WHERE (Priority > "#1")
WITH (KM.FI) WHERE (Revenue > "100000")
PLUS (KM.KP AS KP1 USING LINK 1)
PLUS (KM.KP AS KP2 USING LINK 2)
Query Result: Tickets with Priority "High" for Companies with Revenue > 100000
Output fields: Problem Description, Company, End Customer Person and ContactPerson
884AUREA CONFIDENTIAL
Appendix C: AQL – Aurea Query Language

Filtering by Catalog ValuesYou have the following possibilities when specifying variable catalog values as<filtervalue>:
• Search for code: #<catalog code>
Example: select from (FI) where (Country=' #29 ')
For hierarchical catalogs a valid filter value consists of the child and the parentcode, separated by "~": #<child>~#<parent>
Example: select from (AR) where (Product='#3~#1' OR Product='#3~#4')
• Search for (par t of) the catalog text: <text>
<text> may contain wildcards (*).
Note: Note: You can use literal character values of ‘*‘ and ‘?’ using the escapesequences ‘\*’ and ‘\?’.
Examples:
Country=' Deutschland '
Country=' *land '
• Search for (par t of) a description: #desc:<search string>
<search string> may contain wildcards (*).
Example: select from (FI) where (Country=' #desc:my* ')
• Search for external key: #xk*:<external key>
<external key> may contain wildcards (*).
Examples:
Country=' #xk:100* ' searches for records with an external key star ting with "100"
Country=' #xk*:100_2_28 ' searches for exactly this external key.
• For description and external key you can specify the language to be searched:
Country=' #desc,2:my*' searches for description "my*" only in language no. 2.
Country=' #xk,1*:100_2_28 '
Note: Note: Only the specified language is searched, i.e. no parent languagesare searched.
885AUREA CONFIDENTIAL
Filtering by Catalog Values

Note: Note: You cannot use an external key filter inside a hierarchical catalogfilter.
Notes on filtering by fixed catalog values:
• Search by code or text:
select from (FI) where (LeadStatus='#1')
or
select from (FI) where (LeadStatus='Interest')
• Specifying no value (e.g. select from (FI) where (LeadStatus='')) results inthe value with code '0' ("Cold" in this example).
886AUREA CONFIDENTIAL
Appendix C: AQL – Aurea Query Language

DURL ParametersYou can pass various settings via URL parameters when star ting Aurea CRM.Webor CRM.Designer.
Make sure to use URL encoding ("percent-encoding") for special characters.
Use & to specify more than one URL parameter: http://<my web ad-
dress>/crm/start?lang=ger&user=myloginname
Aurea CRM.Web
The following URL parameters are available for Aurea CRM.Web:
• debug: Star ts Aurea CRM.Web in debug mode displaying the client log in a popupwindow, >> Client Log on page 22 on page 7.
• user: Specify the user's login name:
password: Specify the user's password.http://<my web address>/crm/start?user=<myloginname>&password=<mypwd>
• language: Specify the login language (3-character code or language no.):http://<my web address>/crm/start?language=gerhttp://<my web address>/crm/start?language=6
• phoneProfile: Specify the phone profile to be loaded when the user logs on.http://<my web address>/crm/start?phoneProfile=abroad
If the specified phone profile does not exist, the default profile is used instead.
• touch: Use this parameter to load CRM.Web in touch enabled layout (touch=true)or standard layout (touch=false) mode. For example:https://www.abc.com/crm.web/start?touch=false
Note: Sometimes the Aurea Web application may respond incorrectly to inputsfrom pointer devices (for example, a mouse pointer). This is because your browserfor some reason might be assuming that you have touch devices (for example,touch screen) installed on your laptop or computer. In such cases, you can enforcethe presentation of Aurea CRM.Web application in the standard mode, add theflag “touch=false” to the login page URL, of the CRM.Web application. See theexample above.
Note: You can also enforce the default layout for all users to touch or standardby setting the DefaultLayout parameter in the CRM.Designer. For moreinformation, see DefaultLayout.
887AUREA CONFIDENTIAL

• roles: Specify one or more roles to be loaded when the user logs on. Separatemultiple roles by comma.http://<my web address>/crm/start?roles=Admin,Sales
For language, phoneProfile and roles you can use * to allow users to choosethe language/phone profile/role after login.
Example:http://<my web address>/crm/start?user=<myloginname>&password=<mypwd>&language=*
Note: The respective <CanChange*> tag in the settings.xml must be set to truefor * to work, >> settings.xml (Aurea CRM.Web) in the Aurea CRM.Web InstallationGuide.
• theme: Specify the theme (CSS) to be loaded when the user logs on to a devicesupporting both mouse and touch gestures, >> Customizing Styles on page 15on page 3.http://<my web address>/crm/start?theme=update.touchable
CRM.Designer
The following URL parameters are available for CRM.Designer:
• debug: Star ts CRM.Designer in debug mode displaying the client log in a popupwindow, >> Client Log on page 22 on page 7. In debug mode the CRM.Designermain page displays an additional legacy column containing deprecatedconfiguration units. Use legacy items for reference only!
• configurationid: Specify the numeric ID of the configuration for which to star tCRM.Designer:http://<my web address>/designer/designer.aspx?verticalid=1&ConfigId=1004
• verticalid: Specify the ver tical for which to star t CRM.Designer:http://<my web address>/designer/designer.aspx?verticalid=1
Valid values: 0 (Base) | 1 (BTB) | 2 (FS) | 3 (OTC)
888AUREA CONFIDENTIAL
Appendix D: URL Parameters