Symantec Data Insight Administrator's Guide: Microsoft Windows
59
Symantec Data Insight Administrator's Guide Microsoft Windows 1.0 Symantec Proprietary and Confidential
-
Upload
khangminh22 -
Category
Documents
-
view
1 -
download
0
Transcript of Symantec Data Insight Administrator's Guide: Microsoft Windows
Symantec Data InsightAdministrator's Guide
Microsoft Windows
1.0
Symantec Proprietary and Confidential
Symantec Data InsightThe software described in this book is furnished under a license agreement andmay be usedonly in accordance with the terms of the agreement.
Documentation version: 1.0
Legal NoticeCopyright © 2010 Symantec Corporation. All rights reserved.
Symantec and the Symantec Logo are trademarks or registered trademarks of SymantecCorporation or its affiliates in theU.S. and other countries. Other namesmaybe trademarksof their respective owners.
This Symantec product may contain third party software for which Symantec is requiredto provide attribution to the third party (“Third Party Programs”). Some of the Third PartyPrograms are available under open source or free software licenses. The LicenseAgreementaccompanying the Software does not alter any rights or obligations you may have underthose open source or free software licenses. Please see theThird Party LegalNoticeAppendixto this Documentation or TPIP ReadMe File accompanying this Symantec product for moreinformation on the Third Party Programs.
The product described in this document is distributed under licenses restricting its use,copying, distribution, and decompilation/reverse engineering. No part of this documentmay be reproduced in any form by any means without prior written authorization ofSymantec Corporation and its licensors, if any.
THEDOCUMENTATIONISPROVIDED"ASIS"ANDALLEXPRESSORIMPLIEDCONDITIONS,REPRESENTATIONS AND WARRANTIES, INCLUDING ANY IMPLIED WARRANTY OFMERCHANTABILITY, FITNESS FOR A PARTICULAR PURPOSE OR NON-INFRINGEMENT,ARE DISCLAIMED, EXCEPT TO THE EXTENT THAT SUCH DISCLAIMERS ARE HELD TOBELEGALLYINVALID.SYMANTECCORPORATIONSHALLNOTBELIABLEFORINCIDENTALOR CONSEQUENTIAL DAMAGES IN CONNECTION WITH THE FURNISHING,PERFORMANCE, OR USE OF THIS DOCUMENTATION. THE INFORMATION CONTAINEDIN THIS DOCUMENTATION IS SUBJECT TO CHANGE WITHOUT NOTICE.
The Licensed Software andDocumentation are deemed to be commercial computer softwareas defined in FAR12.212 and subject to restricted rights as defined in FARSection 52.227-19"Commercial Computer Software - Restricted Rights" and DFARS 227.7202, "Rights inCommercial Computer Software or Commercial Computer Software Documentation", asapplicable, and any successor regulations. Any use, modification, reproduction release,performance, display or disclosure of the Licensed Software andDocumentation by theU.S.Government shall be solely in accordance with the terms of this Agreement.
Symantec Proprietary and Confidential
Symantec Corporation350 Ellis StreetMountain View, CA 94043
http://www.symantec.com
Symantec Proprietary and Confidential
Technical SupportSymantec Technical Support maintains support centers globally. TechnicalSupport’s primary role is to respond to specific queries about product featuresand functionality. TheTechnical Support group also creates content for our onlineKnowledge Base. The Technical Support group works collaboratively with theother functional areas within Symantec to answer your questions in a timelyfashion. For example, theTechnical Support groupworkswithProductEngineeringand Symantec Security Response to provide alerting services and virus definitionupdates.
Symantec’s support offerings include the following:
■ A range of support options that give you the flexibility to select the rightamount of service for any size organization
■ Telephone and/or web-based support that provides rapid response andup-to-the-minute information
■ Upgrade assurance that delivers software upgrades
■ Global support purchased on a regional business hours or 24 hours a day, 7days a week basis
■ Premium service offerings that include Account Management Services
For information about Symantec’s support offerings, you can visit our web siteat the following URL:
www.symantec.com/business/support/
All support services will be delivered in accordance with your support agreementand the then-current enterprise technical support policy.
Contacting Technical SupportCustomers with a current support agreement may access Technical Supportinformation at the following URL:
www.symantec.com/business/support/
Before contacting Technical Support, make sure you have satisfied the systemrequirements that are listed in your product documentation. Also, you should beat the computer onwhich the problemoccurred, in case it is necessary to replicatethe problem.
When you contact Technical Support, please have the following informationavailable:
■ Product release level
Symantec Proprietary and Confidential
■ Hardware information
■ Available memory, disk space, and NIC information
■ Operating system
■ Version and patch level
■ Network topology
■ Router, gateway, and IP address information
■ Problem description:
■ Error messages and log files
■ Troubleshooting that was performed before contacting Symantec
■ Recent software configuration changes and network changes
Licensing and registrationIf yourSymantecproduct requires registrationor a licensekey, access our technicalsupport web page at the following URL:
www.symantec.com/business/support/
Customer serviceCustomer service information is available at the following URL:
www.symantec.com/business/support/
Customer Service is available to assist with non-technical questions, such as thefollowing types of issues:
■ Questions regarding product licensing or serialization
■ Product registration updates, such as address or name changes
■ General product information (features, language availability, local dealers)
■ Latest information about product updates and upgrades
■ Information about upgrade assurance and support contracts
■ Information about the Symantec Buying Programs
■ Advice about Symantec's technical support options
■ Nontechnical presales questions
■ Issues that are related to CD-ROMs or manuals
Symantec Proprietary and Confidential
Support agreement resourcesIf youwant to contact Symantec regarding an existing support agreement, pleasecontact the support agreement administration team for your region as follows:
[email protected] and Japan
[email protected], Middle-East, and Africa
[email protected] America and Latin America
Additional enterprise servicesSymantec offers a comprehensive set of services that allow you tomaximize yourinvestment in Symantec products and to develop your knowledge, expertise, andglobal insight, which enable you to manage your business risks proactively.
Enterprise services that are available include the following:
Managed Services remove the burden of managing and monitoring securitydevices and events, ensuring rapid response to real threats.
Managed Services
Symantec Consulting Services provide on-site technical expertise fromSymantec and its trustedpartners. SymantecConsultingServices offer a varietyof prepackaged and customizable options that include assessment, design,implementation,monitoring, andmanagement capabilities. Each is focused onestablishing andmaintaining the integrity and availability of your IT resources.
Consulting Services
EducationServices provide a full array of technical training, security education,security certification, and awareness communication programs.
Education Services
To access more information about enterprise services, please visit our web siteat the following URL:
www.symantec.com/business/services/
Select your country or language from the site index.
Symantec Proprietary and Confidential
Technical Support . . . . . . . . . . . . . . . . . . . . . . . . . . . . . . . . . . . . . . . . . . . . . . . . . . . . . . . . . . . . . . . . . . . . . . . . . . . . . . . . . . . . . . . . . . . . . . . 4
Chapter 1 Getting started with Symantec Data Insightadministration . . . . . . . . . . . . . . . . . . . . . . . . . . . . . . . . . . . . . . . . . . . . . . . . . . . . . . . . . . . . . . . 49
About Symantec Data Insight administration .... . . . . . . . . . . . . . . . . . . . . . . . . . . . . . . . . . 9Credentials required by Symantec Data Insight ... . . . . . . . . . . . . . . . . . . . . . . . . . . . . . . 10
Chapter 2 Configuring global settings . . . . . . . . . . . . . . . . . . . . . . . . . . . . . . . . . . . . . . . . . . . . . . . 49
Configuring SMTP server settings .... . . . . . . . . . . . . . . . . . . . . . . . . . . . . . . . . . . . . . . . . . . . . . . 13About filtering certain accounts, IP addresses, and paths .... . . . . . . . . . . . . . . . . 14
Adding exclude rules to Symantec Data Insight ... . . . . . . . . . . . . . . . . . . . . . . . . 14Managing Data Insight licenses .... . . . . . . . . . . . . . . . . . . . . . . . . . . . . . . . . . . . . . . . . . . . . . . . . . . 15About saved credentials ... . . . . . . . . . . . . . . . . . . . . . . . . . . . . . . . . . . . . . . . . . . . . . . . . . . . . . . . . . . . . . 15
Managing saved credentials ... . . . . . . . . . . . . . . . . . . . . . . . . . . . . . . . . . . . . . . . . . . . . . . . . . 16
Chapter 3 Configuring Active Directory domains . . . . . . . . . . . . . . . . . . . . . . . . . . . 49
About Active Directory domain scans .... . . . . . . . . . . . . . . . . . . . . . . . . . . . . . . . . . . . . . . . . . . 19Adding/Editing Active Directory domains to Symantec Data Insight
... . . . . . . . . . . . . . . . . . . . . . . . . . . . . . . . . . . . . . . . . . . . . . . . . . . . . . . . . . . . . . . . . . . . . . . . . . . . . . . . . . . . . . . . . 20Add/Edit Active Directory dialog box .... . . . . . . . . . . . . . . . . . . . . . . . . . . . . . . . . . . . . . 20
Managing Active Directory servers ... . . . . . . . . . . . . . . . . . . . . . . . . . . . . . . . . . . . . . . . . . . . . . . 21Configuring Management Server machine's domain .... . . . . . . . . . . . . . . . . . . . . . . . 22Scheduling scans .... . . . . . . . . . . . . . . . . . . . . . . . . . . . . . . . . . . . . . . . . . . . . . . . . . . . . . . . . . . . . . . . . . . . . . 22Configuring business unit mappings .... . . . . . . . . . . . . . . . . . . . . . . . . . . . . . . . . . . . . . . . . . . . . 23
Chapter 4 Configuring filers . . . . . . . . . . . . . . . . . . . . . . . . . . . . . . . . . . . . . . . . . . . . . . . . . . . . . . . . . . . . . . . 49
About configuring filers ... . . . . . . . . . . . . . . . . . . . . . . . . . . . . . . . . . . . . . . . . . . . . . . . . . . . . . . . . . . . . 25Supported file servers ... . . . . . . . . . . . . . . . . . . . . . . . . . . . . . . . . . . . . . . . . . . . . . . . . . . . . . . . . . . . . . . . . 26Configuring NetApp filers ... . . . . . . . . . . . . . . . . . . . . . . . . . . . . . . . . . . . . . . . . . . . . . . . . . . . . . . . . . . . 26
About Fpolicy .... . . . . . . . . . . . . . . . . . . . . . . . . . . . . . . . . . . . . . . . . . . . . . . . . . . . . . . . . . . . . . . . . . . . . 27Preparing Symantec Data Insight for Fpolicy .... . . . . . . . . . . . . . . . . . . . . . . . . . . 27Preparing the NetApp filer for Fpolicy .... . . . . . . . . . . . . . . . . . . . . . . . . . . . . . . . . . . . 28Preparing the NetApp vfiler for Fpolicy .... . . . . . . . . . . . . . . . . . . . . . . . . . . . . . . . . . . 30
Configuring EMC Celerra filers ... . . . . . . . . . . . . . . . . . . . . . . . . . . . . . . . . . . . . . . . . . . . . . . . . . . . . 32
Contents
Symantec Proprietary and Confidential
About EMC Celerra Event Enabler (CEE) ... . . . . . . . . . . . . . . . . . . . . . . . . . . . . . . . . . . 32Preparing the EMC Celerra filer for CEPA .... . . . . . . . . . . . . . . . . . . . . . . . . . . . . . . . 33Preparing Symantec Data Insight to receive event
notification .... . . . . . . . . . . . . . . . . . . . . . . . . . . . . . . . . . . . . . . . . . . . . . . . . . . . . . . . . . . . . . . . . . 34Adding filers ... . . . . . . . . . . . . . . . . . . . . . . . . . . . . . . . . . . . . . . . . . . . . . . . . . . . . . . . . . . . . . . . . . . . . . . . . . . . 35
Add Filer dialog box .... . . . . . . . . . . . . . . . . . . . . . . . . . . . . . . . . . . . . . . . . . . . . . . . . . . . . . . . . . . . . 36Editing filer configuration .... . . . . . . . . . . . . . . . . . . . . . . . . . . . . . . . . . . . . . . . . . . . . . . . . . . . . . . . . . 39Deleting filers ... . . . . . . . . . . . . . . . . . . . . . . . . . . . . . . . . . . . . . . . . . . . . . . . . . . . . . . . . . . . . . . . . . . . . . . . . . . 40Adding shares ... . . . . . . . . . . . . . . . . . . . . . . . . . . . . . . . . . . . . . . . . . . . . . . . . . . . . . . . . . . . . . . . . . . . . . . . . . . 40
New Share dialog box .... . . . . . . . . . . . . . . . . . . . . . . . . . . . . . . . . . . . . . . . . . . . . . . . . . . . . . . . . . . 40Editing share configuration .... . . . . . . . . . . . . . . . . . . . . . . . . . . . . . . . . . . . . . . . . . . . . . . . . . . . . . . . 41Deleting shares ... . . . . . . . . . . . . . . . . . . . . . . . . . . . . . . . . . . . . . . . . . . . . . . . . . . . . . . . . . . . . . . . . . . . . . . . . 41About configuring a DFS target ... . . . . . . . . . . . . . . . . . . . . . . . . . . . . . . . . . . . . . . . . . . . . . . . . . . . . 42
Configuring a DFS target ... . . . . . . . . . . . . . . . . . . . . . . . . . . . . . . . . . . . . . . . . . . . . . . . . . . . . . . 42
Chapter 5 Configuring product users . . . . . . . . . . . . . . . . . . . . . . . . . . . . . . . . . . . . . . . . . . . . . . . 49
About product users and roles ... . . . . . . . . . . . . . . . . . . . . . . . . . . . . . . . . . . . . . . . . . . . . . . . . . . . . . 45Reviewing current users and privileges ... . . . . . . . . . . . . . . . . . . . . . . . . . . . . . . . . . . . . . . . . 46Adding users ... . . . . . . . . . . . . . . . . . . . . . . . . . . . . . . . . . . . . . . . . . . . . . . . . . . . . . . . . . . . . . . . . . . . . . . . . . . . 46
Configure new product user /Edit product user dialog .... . . . . . . . . . . . . . . . 47Editing users ... . . . . . . . . . . . . . . . . . . . . . . . . . . . . . . . . . . . . . . . . . . . . . . . . . . . . . . . . . . . . . . . . . . . . . . . . . . . 47Deleting users ... . . . . . . . . . . . . . . . . . . . . . . . . . . . . . . . . . . . . . . . . . . . . . . . . . . . . . . . . . . . . . . . . . . . . . . . . . . 48Configuring authorization for Symantec Data Loss Prevention
users ... . . . . . . . . . . . . . . . . . . . . . . . . . . . . . . . . . . . . . . . . . . . . . . . . . . . . . . . . . . . . . . . . . . . . . . . . . . . . . . . . . 48
Chapter 6 Events and Notifications . . . . . . . . . . . . . . . . . . . . . . . . . . . . . . . . . . . . . . . . . . . . . . . . . . . . 49
Configuring email notifications .... . . . . . . . . . . . . . . . . . . . . . . . . . . . . . . . . . . . . . . . . . . . . . . . . . . 49Enabling Windows event logging .... . . . . . . . . . . . . . . . . . . . . . . . . . . . . . . . . . . . . . . . . . . . . . . . . 50Viewing events ... . . . . . . . . . . . . . . . . . . . . . . . . . . . . . . . . . . . . . . . . . . . . . . . . . . . . . . . . . . . . . . . . . . . . . . . . 50
Appendix A Configuring a NetApp filer - an example . . . . . . . . . . . . . . . . . . . . . . . . 51
Prerequisites ... . . . . . . . . . . . . . . . . . . . . . . . . . . . . . . . . . . . . . . . . . . . . . . . . . . . . . . . . . . . . . . . . . . . . . . . . . . . . 51Adding a machine to a Domain Controller ... . . . . . . . . . . . . . . . . . . . . . . . . . . . . . . . . . . . . . . 52Configuring a NetApp filer ... . . . . . . . . . . . . . . . . . . . . . . . . . . . . . . . . . . . . . . . . . . . . . . . . . . . . . . . . . . 52Verifying Fpolicy configuration .... . . . . . . . . . . . . . . . . . . . . . . . . . . . . . . . . . . . . . . . . . . . . . . . . . . 56
Index . . . . . . . . . . . . . . . . . . . . . . . . . . . . . . . . . . . . . . . . . . . . . . . . . . . . . . . . . . . . . . . . . . . . . . . . . . . . . . . . . . . . . . . . . . . . . . . . . . . . . . . . . . . . . . . . . . . . 59
Contents8
Symantec Proprietary and Confidential
Getting started withSymantec Data Insightadministration
This chapter includes the following topics:
■ About Symantec Data Insight administration
■ Credentials required by Symantec Data Insight
About Symantec Data Insight administrationYou administer the Symantec Data Insight system through the ManagementConsole. The console has components for system administration, viewing dataaccess information, and generating reports, which are accessible from the tabslocated on the header panel. Navigate to the Settings tab on the console to carryout the various Data Insight administration tasks.
The Console is automatically installed with the Management Server. You accessthe Console through a Web browser that has a network connection to theManagement Server. By default, the Management Server runs on HTTPS port443. To access it, in the Web browser's address field, type https://ms-host/.
The Server Administrator user can see and access all parts of the administrationconsole. Other users can see only the parts towhich their roles grant themaccess.The user account under which you are currently logged on appears at the footerof the Management Console screen.
Before you start with Data Insight administration, verify the following in case ofNetApp filers:
1Chapter
Symantec Proprietary and Confidential
■ The filer is accessible from the collector node using the short name or IPaddress you plan to use when adding the filer.
■ There is connectivity to the collector node from the filer using the short nameor the Fully Qualified Host Name (FQHN) of the Collector node.
■ The DNS lookup and reverse-lookup for hostname of the Collector node fromthe filer is working fine.
■ The standard RPC ports are open in n the firewall.
■ The http port on the filer is open for the Collector node.
■ On Windows 2008 machines which are used as collector nodes, clickAdministrative tools > Local Security Policy > Local Policies > Securityoptions and change following settings:
■ Network access: Named Pipes that can be accessed anonymously - AddNTAPVSRQ to the list.
■ Network access: Let Everyone permissions apply to anonymous users -Enabled
■ Network access: Do not allow anonymous enumeration of SAM accounts -Disabled
■ Network access: Restrict anonymous access toNamedPipes and Shares setto Disabled
You must restart the machine after making these changes.
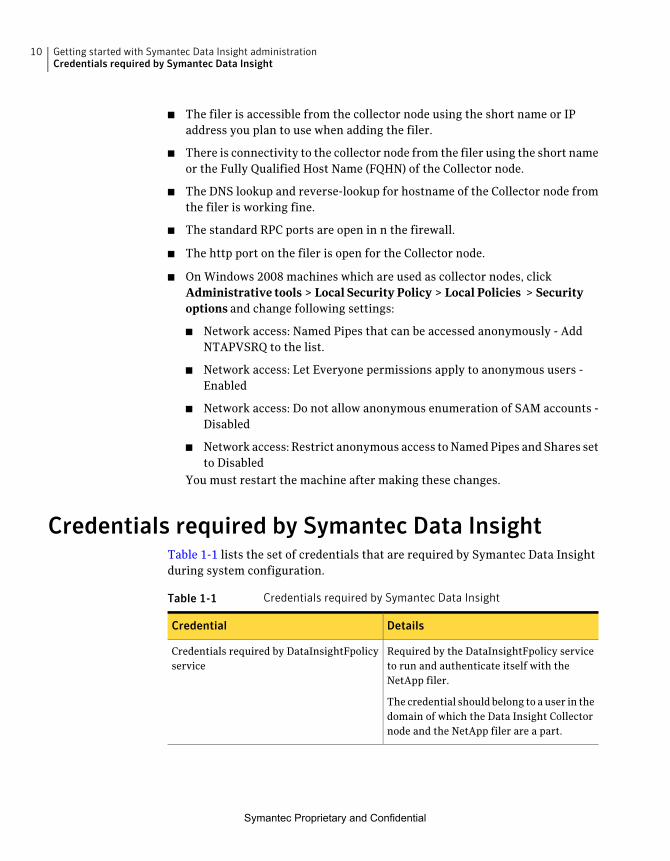
Credentials required by Symantec Data InsightTable 1-1 lists the set of credentials that are required by Symantec Data Insightduring system configuration.
Table 1-1 Credentials required by Symantec Data Insight
DetailsCredential
Required by the DataInsightFpolicy serviceto run and authenticate itself with theNetApp filer.
The credential should belong to a user in thedomain of which the Data Insight Collectornode and the NetApp filer are a part.
Credentials required by DataInsightFpolicyservice
Getting started with Symantec Data Insight administrationCredentials required by Symantec Data Insight
10
Symantec Proprietary and Confidential
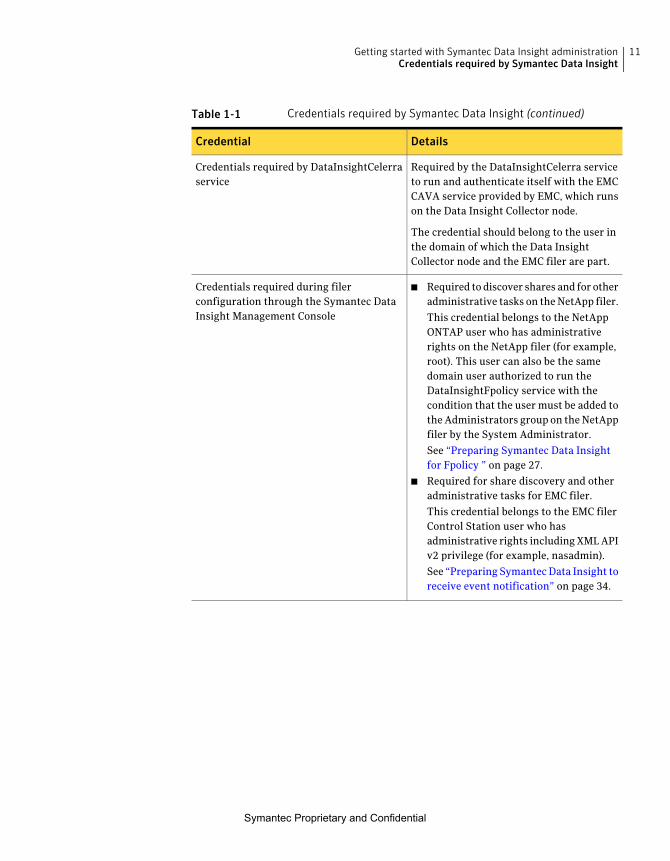
Table 1-1 Credentials required by Symantec Data Insight (continued)
DetailsCredential
Required by the DataInsightCelerra serviceto run and authenticate itself with the EMCCAVA service provided by EMC, which runson the Data Insight Collector node.
The credential should belong to the user inthe domain of which the Data InsightCollector node and the EMC filer are part.
Credentials required by DataInsightCelerraservice
■ Required to discover shares and for otheradministrative tasks on theNetApp filer.
This credential belongs to the NetAppONTAP user who has administrativerights on the NetApp filer (for example,root). This user can also be the samedomain user authorized to run theDataInsightFpolicy service with thecondition that the user must be added totheAdministrators group on theNetAppfiler by the System Administrator.
See “Preparing Symantec Data Insightfor Fpolicy ” on page 27.
■ Required for share discovery and otheradministrative tasks for EMC filer.
This credential belongs to the EMC filerControl Station user who hasadministrative rights includingXMLAPIv2 privilege (for example, nasadmin).
See “Preparing SymantecData Insight toreceive event notification” on page 34.
Credentials required during filerconfiguration through the Symantec DataInsight Management Console
11Getting started with Symantec Data Insight administrationCredentials required by Symantec Data Insight
Symantec Proprietary and Confidential

Table 1-1 Credentials required by Symantec Data Insight (continued)
DetailsCredential
■ Required for scanning of shares from theNetApp filer.
This credential belongs to the user in thedomain ofwhich theNetApp filer and theSymantecData InsightCollectornode area part. This user can also be the samedomain user authorized to run theDataInsightFpolicy service and mustbelong to the BackupOperators group onthe Netapp filer.
See “Preparing SymantecData Insight toreceive event notification” on page 34.
■ Required for scanning of shares from theEMC filer.
This credential belongs to the user in thedomain of which the EMC filer and theData Insight Collector node are a part.
See “Configuring EMC Celerra filers”on page 32.
Credentials required for scanning of shares
Getting started with Symantec Data Insight administrationCredentials required by Symantec Data Insight
12
Symantec Proprietary and Confidential
Configuring global settings
This chapter includes the following topics:
■ Configuring SMTP server settings
■ About filtering certain accounts, IP addresses, and paths
■ Managing Data Insight licenses
■ About saved credentials
Configuring SMTP server settingsBefore Data Insight can send email notifications for events and reports, youmustconfigure SMTP server details.
To edit the SMTP settings
1 In the Management Console, click Settings > SMTP Settings.
2 On the SMTP settings page, click Edit SMTP Settings.
3 Enter the following details:
■ A valid SMTP server hostname or IP address.
■ Theport number for theSMTPmail serverused to sendemail notifications.The default is 25.
■ The username for the email server (optional).
■ The password for the email server (optional).
■ The address from which emails are sent (optional).
2Chapter
Symantec Proprietary and Confidential
■ Maximum attachment size. This information is used when Data Insightsends report notifications. Data Insight will not send reports asattachments, if the size of the report is over the specified limit.
4 Click Save.
About filtering certain accounts, IP addresses, andpaths
You can configure Symantec Data Insight to filter data accesses by specific users,IP addresses and filesystempaths. You can combine these criteria together or usethem individually to create a filter. Currently, you can apply a filter for accessevents only.
Filters for account names or SIDs are used to mask service accounts fromregistering data accesses into Symantec Data Insight. For example if an antivirussoftware performs scans on a mounted share using a specific user account, youcan add that user account to a filter. Data Insight omits all records from the serviceuser account.
Filters for IP addresses are used to filter data accesses from specific IP addresses.Such filters are useful if you have filesystem scanners configured on certainmachines in your environment, whose accesses you want to ignore.
Filters for path names are of two types, file extension based and path based. Thefile extension based filter specifies the file extensions to be filtered. The pathbased filter specifies the path of a folder and filters out all events which have thatpath prefix. For path-based filtering, youmust specify a fully qualified path prefix.For example, \\filer\share\foo.
Adding exclude rules to Symantec Data InsightYou must create a rule for every filter you want to add to Symantec Data Insight.The rule must contain a value for at least one criterion that you want to exclude.
To add a exclude rule:
1 In the Console, double-click Settings > Exclude Rules .
2 In theAddNewExcludeRule dialog, add one ormore of the following excludecriteria:
■ Exclude usernames or SIDs
Configuring global settingsAbout filtering certain accounts, IP addresses, and paths
14
Symantec Proprietary and Confidential
Note: The usernames must be present in the Data Insight users database,before they can be added to a exclude rule.
■ Exclude IP addresses
■ Exclude patternsIn the Exclude Patterns field, enter the file extensions or paths that youwant to exclude. Path must be fully qualified paths in the format,\\filer\share\path.
Use the logical operator OR to create a rule with multiple values of the samedimension and the logical operatorAND to combine values across dimensionsin a rule. For example, if you create a rule to ignore user_foo1, user_foo2, andIP_10.209.10.20, it means that all accesses from IP_10.209.10.20 AND(user_foo1 OR user_foo2) will be ignored.
3 Select PREFIX or EXTENSION from the Pattern Type drop-down.
4 Click Save.
This rule applies to the Collector.
Managing Data Insight licensesWhen you purchase Symantec Data Insight you must install the Data Insightlicense file. License files have names in the format name.slf.
If you do not have a valid license, Data Insight displays a warning in red in thefooter of the Management Console screen.
To install a license
1 Obtain the new license file.
2 In the Management Console, click Settings > Licensing.
3 On the Licensing page, click Add/Update License.
4 On the Add new license page, browse to the new Data Insight file that youhave downloaded, and click Upload.
About saved credentialsAn authentication credential can be stored as a saved credential in a centralcredential store. It can be defined once, and then referenced by any number offilers, shares, and Active Directory servers. Passwords are encrypted before theyare stored.
15Configuring global settingsManaging Data Insight licenses
Symantec Proprietary and Confidential
The saved credential store simplifies management of user name and passwordchanges.
You can add, delete, or edit stored credentials.
See “Managing saved credentials ” on page 16.
Managing saved credentialsYou can add new credentials to the credential store. These credentials can laterbe referenced with the credential name.
To add a saved credential
1 In the Management Console, click Settings > Saved Credentials, and clickCreate Saved Credentials.
2 Enter the following information:
Enter yourname for this stored credential.
The credential name must be uniquewithin the credential store. The name isused only to identify the credential.
Saved Credential Name
Enter the user name for authentication.Access Username
Enter the password for authentication.Access Password
Re-enter the password.Confirm Password
Enter the name of the domain to whichthe user belongs.
Domain
3 Click Save.
4 You can later edit or delete credentials from the credential store.
You can delete or edit a saved credential.
To delete a saved credential
1 In the Management Console, click Settings > Saved Credentials.
2 Locate the name of the stored credential that you want to remove.
3 Click the Delete to the right of the name.
A credential can be deleted only if it is not currently used for filers, shares,Active Directory, Fpolicy service or the EMC Celerra service.
Configuring global settingsAbout saved credentials
16
Symantec Proprietary and Confidential
To edit a saved credential
1 Locate the name of the saved credential that you want to edit.
2 Click the Edit to the right of the name.
3 Update the user name or password.
4 If you change the password for a given credential, the new password is usedfor all subsequent scans that use that credential.
5 Click Save.
For the purpose of access control, only a user assigned the role of ServerAdministrator can add, edit, and view all saved credentials. A user assigned theProduct Administrator role can add new saved credentials, but can only view andedit those credentials which the user has created.
17Configuring global settingsAbout saved credentials
Symantec Proprietary and Confidential

Configuring global settingsAbout saved credentials
18
Symantec Proprietary and Confidential

Configuring Active Directorydomains
This chapter includes the following topics:
■ About Active Directory domain scans
■ Adding/Editing Active Directory domains to Symantec Data Insight
■ Managing Active Directory servers
■ Configuring Management Server machine's domain
■ Scheduling scans
■ Configuring business unit mappings
About Active Directory domain scansSymantecData Insight periodically scans the configuredActiveDirectory domainsin your organization to fetch information about users and user groups. DataInsight correlates this information with file and folder access logs to provideaccess and usage reports. This information is stored on the Management Serverin the user database. Symantec recommends that you add each such domain toData Insight whose users access filesystem resources of your organization. Thetime it takes to scan an Active Directory domain depends on the number of usersand groups in the domain.
If the Management Server machine is part of the domain you wish to scan, DataInsight can scan it using serverless binding. To scan additional domains, youmustspecify the address of the correspondingdomain controllers andvalid credentialsto connect to those domain controllers.
3Chapter
Symantec Proprietary and Confidential
Adding/EditingActiveDirectory domains toSymantecData Insight
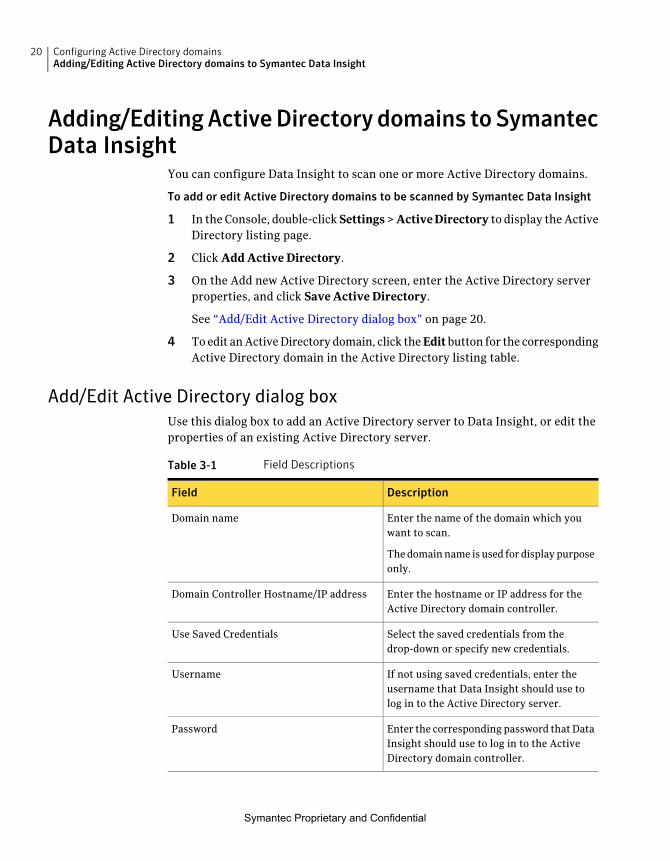
You can configure Data Insight to scan one or more Active Directory domains.
To add or edit Active Directory domains to be scanned by Symantec Data Insight
1 In the Console, double-click Settings>ActiveDirectory to display theActiveDirectory listing page.
2 Click Add Active Directory.
3 On the Add new Active Directory screen, enter the Active Directory serverproperties, and click Save Active Directory.
See “Add/Edit Active Directory dialog box” on page 20.
4 Toedit anActiveDirectorydomain, click theEditbutton for the correspondingActive Directory domain in the Active Directory listing table.
Add/Edit Active Directory dialog boxUse this dialog box to add an Active Directory server to Data Insight, or edit theproperties of an existing Active Directory server.
Table 3-1 Field Descriptions
DescriptionField
Enter the name of the domain which youwant to scan.
Thedomainname isused for displaypurposeonly.
Domain name
Enter the hostname or IP address for theActive Directory domain controller.
Domain Controller Hostname/IP address
Select the saved credentials from thedrop-down or specify new credentials.
Use Saved Credentials
If not using saved credentials, enter theusername that Data Insight should use tolog in to the Active Directory server.
Username
Enter the corresponding password thatDataInsight should use to log in to the ActiveDirectory domain controller.
Password
Configuring Active Directory domainsAdding/Editing Active Directory domains to Symantec Data Insight
20
Symantec Proprietary and Confidential
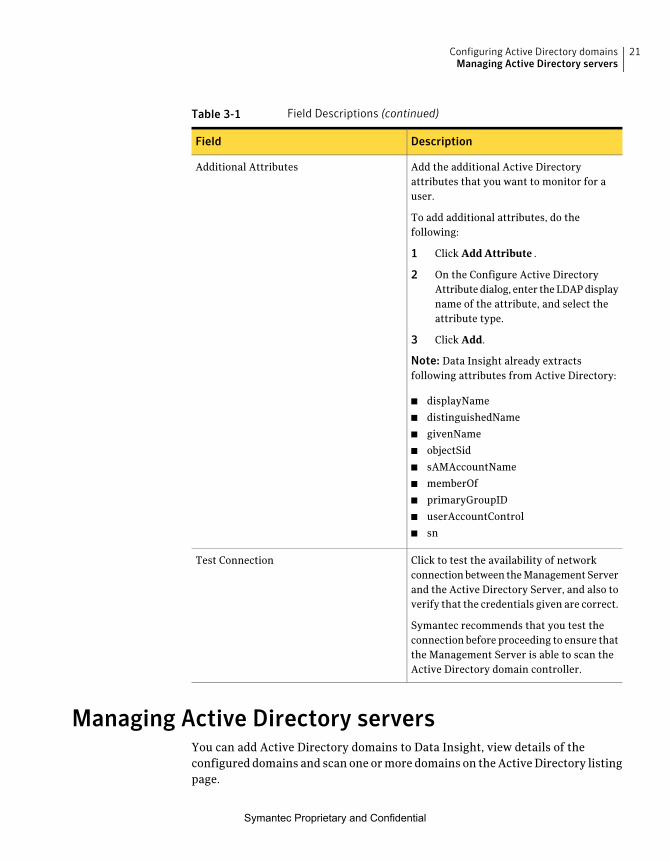
Table 3-1 Field Descriptions (continued)
DescriptionField
Add the additional Active Directoryattributes that you want to monitor for auser.
To add additional attributes, do thefollowing:
1 Click Add Attribute .
2 On the Configure Active DirectoryAttributedialog, enter theLDAPdisplayname of the attribute, and select theattribute type.
3 Click Add.
Note: Data Insight already extractsfollowing attributes from Active Directory:
■ displayName
■ distinguishedName
■ givenName
■ objectSid
■ sAMAccountName
■ memberOf
■ primaryGroupID
■ userAccountControl
■ sn
Additional Attributes
Click to test the availability of networkconnectionbetween theManagementServerand the Active Directory Server, and also toverify that the credentials given are correct.
Symantec recommends that you test theconnection before proceeding to ensure thatthe Management Server is able to scan theActive Directory domain controller.
Test Connection
Managing Active Directory serversYou can add Active Directory domains to Data Insight, view details of theconfigured domains and scan one ormore domains on theActiveDirectory listingpage.
21Configuring Active Directory domainsManaging Active Directory servers
Symantec Proprietary and Confidential
To manage Active Directory servers
1 In the Console, double-click Settings>ActiveDirectory to display theActiveDirectory details page.
2 The list of configured Active Directory servers appears.
3 To re-scan all domains, click Rescan now.
Note: Data Insight scans all domains together because dependencies mightexist between different domains.
4 To edit the scan schedule for the configured Active Directory domains, clickEdit Schedule.
5 On the Configure Active Directory Scanning Schedule dialog, change theschedule, and click Update Schedule.
Theupdated schedule is used for all subsequent scans of the configuredActiveDirectory domains.
Configuring Management Server machine's domainIf the Management Server is part of the domain you want to scan, Data Insightscans the domain using the serverless binding mode. In this mode, Data Insightdoes not need any more input and it automatically scans the domain using thesystem credentials.
The option to scan the Active Directory domain, which the Management Serveris a part of, must be selected at the time of installation. This option is disabled ifthe Management Server is not part of any Active Directory domain. For moreinformation, see the Symantec Data Insight Installation Guide. At this time, youcan not change the serverless binding setting post-installation.
Scheduling scansSymantec Data Insight scans configured domains everyday at 3 a.m, by default.You can, however, configure the scanning schedule, as needed.
See “Managing Active Directory servers ” on page 21.
Configuring Active Directory domainsConfiguring Management Server machine's domain
22
Symantec Proprietary and Confidential
Configuring business unit mappingsSymantec Data Insight allows you to associate a business unit name and businessunit owner with each user imported from Active Directory. This information islater included in the report outputs and also used by Symantec Data LossPrevention as a part of ownership information.
To import business unit mappings
1 Create a .csv file, bucsv.csv, in the Data Insight data directory. By default,the data directory on the Management Server is located atC:\DataInsight\data\users.
The CSV file must contain the following information:
■ The name of the user in the format, user@domain name.
■ The name of the business unit.
■ The name of the business unit owner.
For example, [email protected],Sales,Greg Smith
2 To import thesemappings to theusers database, run the following command:
adcli.exe -mode importbu
Note:The domain name given in the .csv filemust be among the domains scannedby Data Insight.
A limitation in the software erases themappings on a subsequentActiveDirectoryscan.
Towork around this limitation, use theWindows scheduler to schedule the importright after the completion of each Active Directory scan. For example, if yourActive Directory scan starts at 3:00 am and completes in about 30 minutes,schedule the import at 3:45 am.
23Configuring Active Directory domainsConfiguring business unit mappings
Symantec Proprietary and Confidential

Configuring Active Directory domainsConfiguring business unit mappings
24
Symantec Proprietary and Confidential
Configuring filers
This chapter includes the following topics:
■ About configuring filers
■ Supported file servers
■ Configuring NetApp filers
■ Configuring EMC Celerra filers
■ Adding filers
■ Editing filer configuration
■ Deleting filers
■ Adding shares
■ Editing share configuration
■ Deleting shares
■ About configuring a DFS target
About configuring filersSymantec Data Insight collects and stores access events from NAS devices toservice queries on user activity and data accesses. Before Data Insight can startcollecting events, you must ensure that auditing is configured properly on thestorage device. Data Insight collects access events using asynchronous APIs,namely, Fpolicy for NetApp filers and the CEE framework for EMC Celerra filers.
You can view the details of the configured Data Insight servers on the ProductServers details page. Depending on the type of filer, you can also view the stateof the Fpolicy or EMC Celerra services on this page.
4Chapter
Symantec Proprietary and Confidential
To view the details of a configured filer
1 In theConsole, clickSettings>ProductServers to expand theProduct Serversnode.
This displays the list of configured servers.
2 Double-click a configured server to open the details page.
3 To register the server with the NetApp or EMC Celerra filer to receive auditinformation, click Enable.
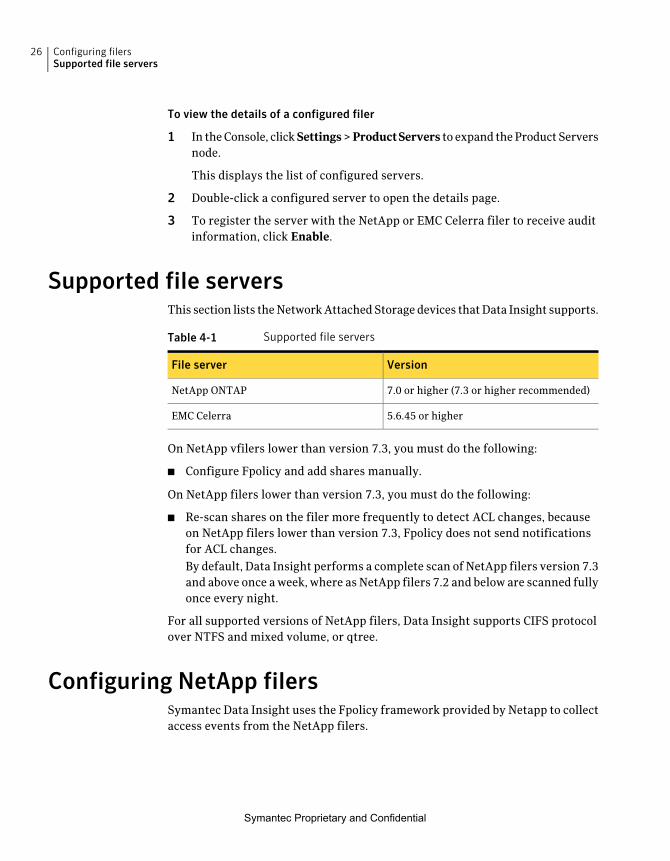
Supported file serversThis section lists theNetworkAttachedStoragedevices thatData Insight supports.
Table 4-1 Supported file servers
VersionFile server
7.0 or higher (7.3 or higher recommended)NetApp ONTAP
5.6.45 or higherEMC Celerra
On NetApp vfilers lower than version 7.3, you must do the following:
■ Configure Fpolicy and add shares manually.
On NetApp filers lower than version 7.3, you must do the following:
■ Re-scan shares on the filer more frequently to detect ACL changes, becauseon NetApp filers lower than version 7.3, Fpolicy does not send notificationsfor ACL changes.By default, Data Insight performs a complete scan of NetApp filers version 7.3and above once aweek, where asNetApp filers 7.2 and below are scanned fullyonce every night.
For all supported versions of NetApp filers, Data Insight supports CIFS protocolover NTFS and mixed volume, or qtree.
Configuring NetApp filersSymantec Data Insight uses the Fpolicy framework provided by Netapp to collectaccess events from the NetApp filers.
Configuring filersSupported file servers
26
Symantec Proprietary and Confidential
About FpolicyNetApp provides an interface called Fpolicy which allows external applicationsto receive file access notifications from the NetApp Storage subsystem. Fpolicyallowspartner applications toperform tasks like file access screening andauditing.TheFpolicy interface usesRemoteProcedureCalls (RPC) and external applicationscan use these tools to register with the NetApp Filer as Fpolicy servers. Fpolicysupports both CIFS and NFS, but the current Data Insight release only supportsCIFS.
The unit of Fpolicy configuration on the NetApp filer is called a policy, which isidentified by a user specified name. You can configure a policy to monitor all ora list of volumes on the NetApp filer along with a specified set of operations. Themonitored operations are open, close, read, write, create, delete, and rename. Assoon as a file operation is performed on a file or folder on the filer which is beingmonitored, a notification is sent to the registered Fpolicy server asynchronously.Note that SymantecData Insight does not block the file operation, but just recordsthe notification.
Preparing Symantec Data Insight for FpolicyThe Symantec Data Insight Fpolicy server can reside on the Management Serverand/or on each Collector worker node. The Management Server and/or theCollector worker node must register with the NetApp filer to receive auditinformation. Before you assign a Data Insight server as a collector for a NetAppfiler, you must configure the Fpolicy server on that server.
Note: If you have filers in multiple domains, you must have one Collector workernode per domain.
To set up the environment for Symantec Data Insight Fpolicy Server
1 Provision aWindows2003or 2008 server in the sameActiveDirectorydomainas the filers youwish tomonitor using Fpolicy. Thismachinehosts the Fpolicyserver.
2 Install theData InsightCollectorworkernodeor theData InsightManagementServer on this server.
3 Login to the Data Insight Management Console.
4 In the Console, double-click Settings > Product Servers > server_name toopen the details page for the server.
5 Navigate to the Fpolicy Service configuration section, and click Enable.
27Configuring filersConfiguring NetApp filers
Symantec Proprietary and Confidential
6 Under Credentials, enter the credentials that the service needs to run as. Thespecified credentials must be that of a domain user, who also belongs to theAdministrators group of the filer. If the domain user is not part of theAdministrators group fo the filer, Data Insight adds that user to theAdministrators group.
Alternatively, you canuse the saved credentials, create new saved credentials.
7 Select Use saved credentials, to use saved credentials or create new savedcredentials.
8 In the Policy Name field, enter the policy name used to create a policy oneach filer, for which this node acts as collector. The default name ismatpol.
9 Click Configure to apply these settings to the server and start the Fpolicyservice.
Preparing the NetApp filer for FpolicyThe Symantec Data Insight Fpolicy server registers with the NetApp filer andreceives file access events from it. Fpolicy has to be enabled and configured onthat NetApp filer. Symantec recommends that you automatically enable auditingwhen adding filers.
See “Adding filers ” on page 35.
Note:Auditingmust bemanually enabled on virtual filer versions lower than 7.3.
However if you want more control on the shares you want to monitor use themanual steps. The manual steps are valid for Netapp ONTAP version 7.0 andhigher.
Note: The steps below assume that the name of the policy ismatpol.
To configure the Fpolicy on the NetApp filer using manual steps
1 Launch a Telnet session with the filer and run the following commands, asappropriate:
■ To create a policy:
fpolicy create matpol screen
■ To enable a policy:
Configuring filersConfiguring NetApp filers
28
Symantec Proprietary and Confidential
fpolicy enable matpol -f
2 Use the following optional commands for monitoring:
■ To set the Fpolicy for CIFS to monitor specific events:
fpolicy mon add matpol -p cifs -f read,write,
open,close,delete,rename,create
■ To monitor specific events on NetApp filer versions 7.3 or higher:
■ Enable set attributes operation:
fpolicy options cifs_setattr on
■ Add events to be monitored:
fpolicy mon add matpol -p cifs -f read,write,
open,close,delete,rename,create,setattr
■ To see details of a configured policy:
fpolicy show matpol
■ To disable monitoring of specific events:
fpolicy mon remove matpol -p cifs -f read,write,
open,close,delete,rename,create
■ To disable use of a policy:
fpolicy disable matpol
■ To delete a policy:
fpolicy destroy matpol
29Configuring filersConfiguring NetApp filers
Symantec Proprietary and Confidential
3 To add a domain user to the administrator's group:
useradmin domainuser add domain-username
-g Administrators
Note:The domain user is the userwho is configured to run the Fpolicy serviceon the collector. See “Preparing the NetApp filer for Fpolicy” on page 28.
4 To display a list of users who are already configured:
useradmin domainuser list -g Administrators
A list with the SIDs of the configured domain users appears. To resolve theSIDs, run the following command:
cifs lookup SID
Preparing the NetApp vfiler for FpolicyThe SymantecData Insight Fpolicy server can registerwith theNetApp vfiler andreceive file access events from it. Fpolicy has to be enabled and configured on thatNetApp vfiler manually for NetApp filer versions lower than 7.3.
To configure the Fpolicy on the NetApp vfiler using manual steps
1 Launch a Telnet session with the filer and run the following commands, asappropriate:
■ To get the vfiler name:
vfiler status
Choose the nameof the vfiler that youwant to configure and thenperformthe following operations for that vfiler. Ignore the name, vfiler0, whichis the default name given to the physical filer by NetApp.
Note:Consult your systemadministrator to get the IP address of the vfiler.Youwill need this IP addresswhile adding the vfiler from theManagementConsole.
See “Adding filers ” on page 35.
■ To create a policy:
vfiler run vfilername fpolicy create matpol screen
Configuring filersConfiguring NetApp filers
30
Symantec Proprietary and Confidential
■ To enable a policy:
vfiler run vfilername fpolicy enable matpol -f
2 Use the following optional commands for monitoring:
■ To set the Fpolicy for CIFS to monitor specific events:
vfiler run vfilername fpolicy mon add matpol -p cifs
-f read,write,open,close,delete,rename,create
■ To set the Fpolicy for CIFS to monitor specific events on NetApp filerversions 7.3 or higher:
■ Enable set attributes operation:
vfiler run vfilername fpolicy options cifs_setattr on
■ Add events to be monitored:
vfiler run vfilername fpolicy mon add matpol -p cifs
-f read,write,open,close,delete,rename,create,setattr
■ To see details of a configured policy:
vfiler run vfilername fpolicy show matpol
■ To disable monitoring of specific events:
vfiler run vfilername fpolicy mon remove matpol -p cifs
-f read, write,open,close,delete,rename,create
■ To disable use of a policy:
vfiler run vfilername fpolicy disable matpol
■ To delete a policy:
vfiler run vfilername fpolicy destroy matpol
where, vfilername is the name of the vfiler you want to configure.
31Configuring filersConfiguring NetApp filers
Symantec Proprietary and Confidential
3 To add a domain user to the administrator's group:
vfiler run vfilername useradmin domainuser
add domain-username -g Administrators
Note:The domain user is the userwho is configured to run the Fpolicy serviceon the collector. See “Preparing the NetApp filer for Fpolicy” on page 28.
4 To display a list of users who are already configured:
vfiler run vfilername useradmin domainuser list
-g Administrators
A list with the SIDs of the configured domain users appears. To resolve theSIDs, run the following command:
cifs lookup SID
Configuring EMC Celerra filersSymantec Data Insight uses the EMC Celerra Event Enabler (CEE) framework tocollect access logs from the EMC Celerra filers.
As a prerequisite, you must download and install the CEE framework from theEMC Website.
About EMC Celerra Event Enabler (CEE)The EMC Celerra Event Enabler (CEE) framework is used to provide a workingenvironment for the following mechanisms:
■ EMC Celerra AntiVirus Agent (CAVA)
■ EMC Celerra Event Publishing Agent (CEPA)
Symantec Data Insight uses the CEPA functionality of the CEE framework toreceive event notifications. The EMC Celerra® Event Publishing Agent (CEPA) isa mechanism that enables Data Insight to register with the EMC Celerra filer toreceive event notifications from the filer. You can specify filters for the eventtype, the CIFS server, and the shares that youwant tomonitor during registrationwith the CEPA facility in the CEE framework. CEPA then sends notificationsregarding the registered events to Data Insight.
Configuring filersConfiguring EMC Celerra filers
32
Symantec Proprietary and Confidential
Preparing the EMC Celerra filer for CEPAThe Symantec Data Insight server registers with the EMC Celerra filer throughthe CEE framework to receive notifications of file access events from it.
See “About EMC Celerra Event Enabler (CEE)” on page 32.
To configure the EMC Celerra filer to send event information to Symantec DataInsight
1 Create a cepp.config file on the EMC Celerra filer. The following is a sampleof the code that the cepp.conf file must contain:
surveytime=90
pool name=matrixpool \
servers=IP Address/Hostname of Windows server running the EMC CAVAservice
postevents=* \
option=ignore \
reqtimeout=500 \
retrytimeout=50
Note: If the server pool contains more than one server, each of the serverentry should be separated by a "|".
2 Copy the cepp.conf file to the root directory of the Data Mover. Run thefollowing command: server_file <datamover_name> -put cepp.conf
cepp.conf
Forexample,server_file server_2 -put /tmp/CEPA/cepp.conf cepp.conf
3 Start the CEPP service on the filer. Run the following command:
server_cepp <datamover_name> -service -start
Ensure that the service has started by running the following command:
server_cepp name of data mover -service -status
Note: For detailed information about configuring CEPA, refer to the EMCdocumentation.
33Configuring filersConfiguring EMC Celerra filers
Symantec Proprietary and Confidential
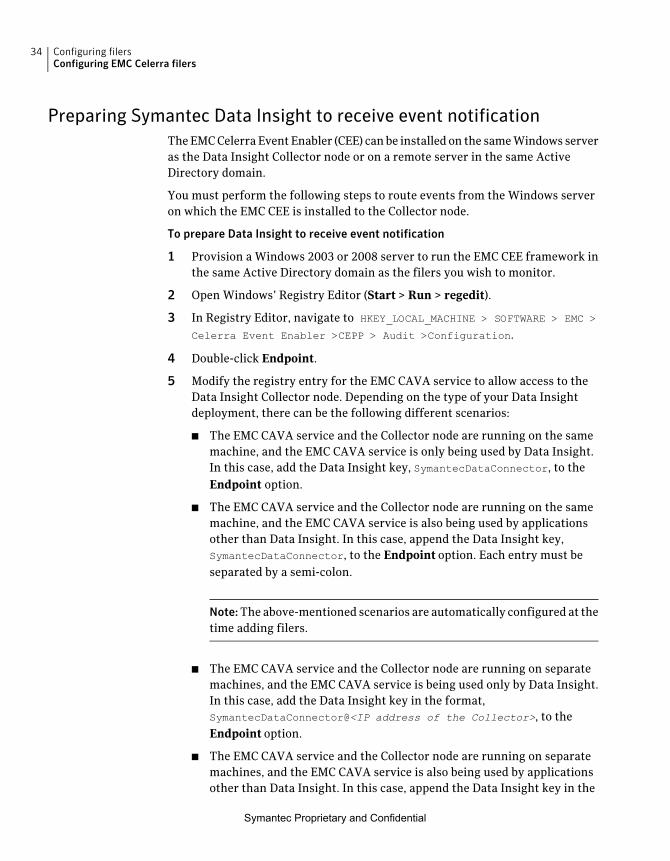
Preparing Symantec Data Insight to receive event notificationTheEMCCelerra Event Enabler (CEE) can be installed on the sameWindows serveras the Data Insight Collector node or on a remote server in the same ActiveDirectory domain.
You must perform the following steps to route events from the Windows serveron which the EMC CEE is installed to the Collector node.
To prepare Data Insight to receive event notification
1 Provision a Windows 2003 or 2008 server to run the EMC CEE framework inthe same Active Directory domain as the filers you wish to monitor.
2 Open Windows’ Registry Editor (Start > Run > regedit).
3 In Registry Editor, navigate to HKEY_LOCAL_MACHINE > SOFTWARE > EMC >
Celerra Event Enabler >CEPP > Audit >Configuration.
4 Double-click Endpoint.
5 Modify the registry entry for the EMC CAVA service to allow access to theData Insight Collector node. Depending on the type of your Data Insightdeployment, there can be the following different scenarios:
■ The EMC CAVA service and the Collector node are running on the samemachine, and the EMC CAVA service is only being used by Data Insight.In this case, add the Data Insight key, SymantecDataConnector, to theEndpoint option.
■ The EMC CAVA service and the Collector node are running on the samemachine, and the EMC CAVA service is also being used by applicationsother than Data Insight. In this case, append the Data Insight key,SymantecDataConnector, to the Endpoint option. Each entry must beseparated by a semi-colon.
Note:The above-mentioned scenarios are automatically configured at thetime adding filers.
■ The EMC CAVA service and the Collector node are running on separatemachines, and the EMC CAVA service is being used only by Data Insight.In this case, add the Data Insight key in the format,SymantecDataConnector@<IP address of the Collector>, to theEndpoint option.
■ The EMC CAVA service and the Collector node are running on separatemachines, and the EMC CAVA service is also being used by applicationsother than Data Insight. In this case, append the Data Insight key in the
Configuring filersConfiguring EMC Celerra filers
34
Symantec Proprietary and Confidential
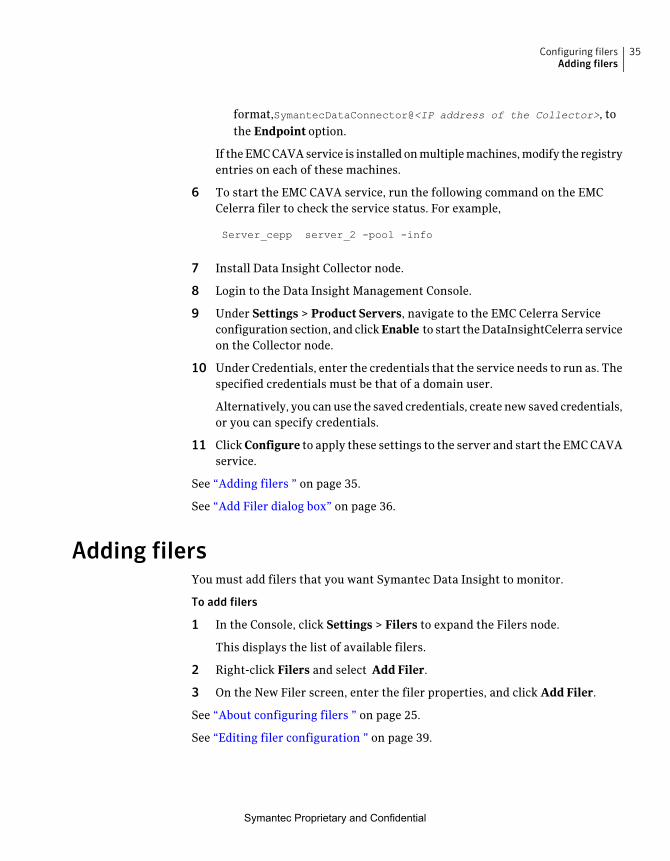
format,SymantecDataConnector@<IP address of the Collector>, tothe Endpoint option.
If theEMCCAVAservice is installed onmultiplemachines,modify the registryentries on each of these machines.
6 To start the EMC CAVA service, run the following command on the EMCCelerra filer to check the service status. For example,
Server_cepp server_2 -pool -info
7 Install Data Insight Collector node.
8 Login to the Data Insight Management Console.
9 Under Settings > Product Servers, navigate to the EMC Celerra Serviceconfiguration section, and clickEnable to start theDataInsightCelerra serviceon the Collector node.
10 Under Credentials, enter the credentials that the service needs to run as. Thespecified credentials must be that of a domain user.
Alternatively, you canuse the saved credentials, create new saved credentials,or you can specify credentials.
11 ClickConfigure to apply these settings to the server and start the EMCCAVAservice.
See “Adding filers ” on page 35.
See “Add Filer dialog box” on page 36.
Adding filersYou must add filers that you want Symantec Data Insight to monitor.
To add filers
1 In the Console, click Settings > Filers to expand the Filers node.
This displays the list of available filers.
2 Right-click Filers and select Add Filer.
3 On the New Filer screen, enter the filer properties, and click Add Filer.
See “About configuring filers ” on page 25.
See “Editing filer configuration ” on page 39.
35Configuring filersAdding filers
Symantec Proprietary and Confidential
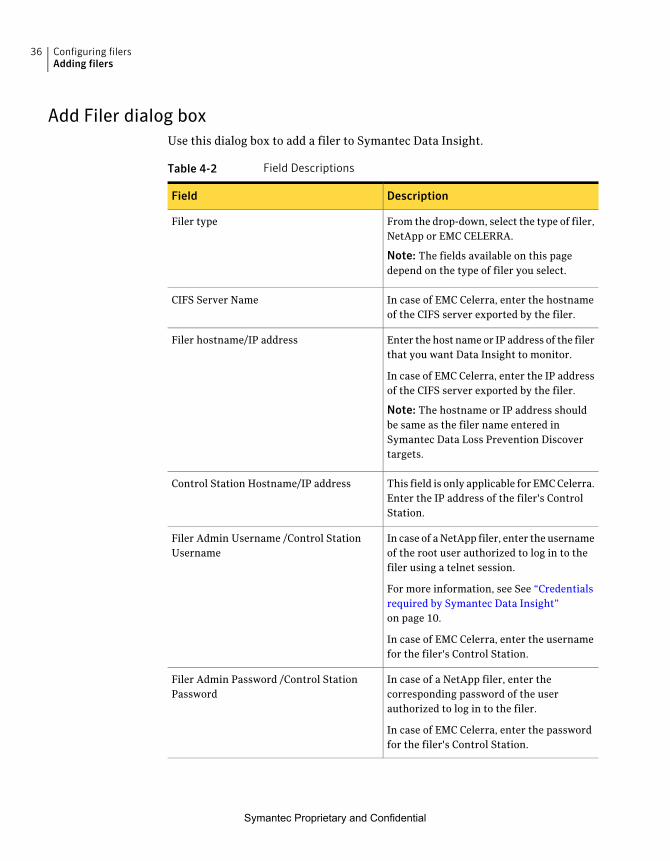
Add Filer dialog boxUse this dialog box to add a filer to Symantec Data Insight.
Table 4-2 Field Descriptions
DescriptionField
From the drop-down, select the type of filer,NetApp or EMC CELERRA.
Note: The fields available on this pagedepend on the type of filer you select.
Filer type
In case of EMC Celerra, enter the hostnameof the CIFS server exported by the filer.
CIFS Server Name
Enter the host nameor IP address of the filerthat you want Data Insight to monitor.
In case of EMC Celerra, enter the IP addressof the CIFS server exported by the filer.
Note: The hostname or IP address shouldbe same as the filer name entered inSymantec Data Loss Prevention Discovertargets.
Filer hostname/IP address
This field is only applicable for EMCCelerra.Enter the IP address of the filer's ControlStation.
Control Station Hostname/IP address
In case of aNetApp filer, enter the usernameof the root user authorized to log in to thefiler using a telnet session.
For more information, see See “Credentialsrequired by Symantec Data Insight”on page 10.
In case of EMC Celerra, enter the usernamefor the filer's Control Station.
Filer Admin Username /Control StationUsername
In case of a NetApp filer, enter thecorresponding password of the userauthorized to log in to the filer.
In case of EMC Celerra, enter the passwordfor the filer's Control Station.
Filer Admin Password /Control StationPassword
Configuring filersAdding filers
36
Symantec Proprietary and Confidential
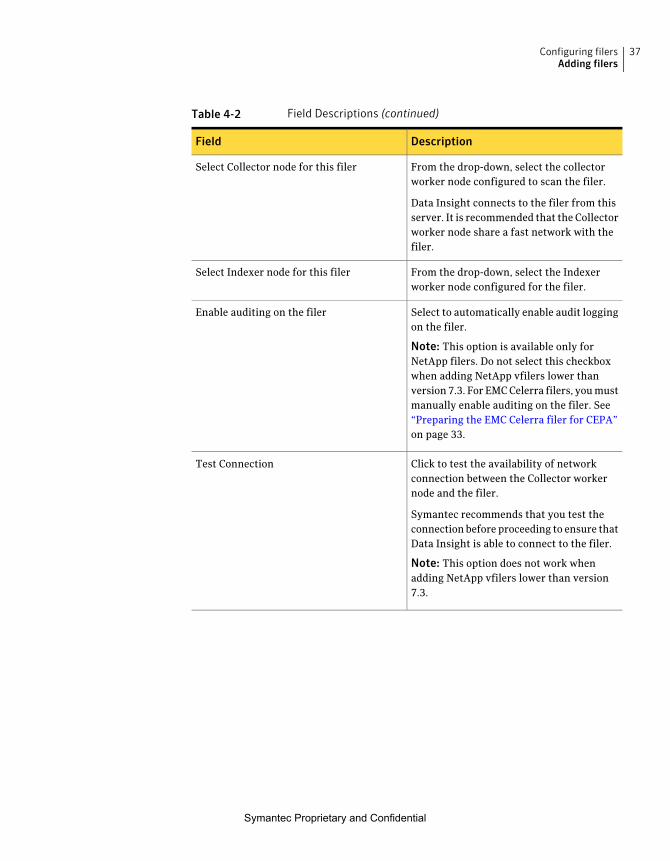
Table 4-2 Field Descriptions (continued)
DescriptionField
From the drop-down, select the collectorworker node configured to scan the filer.
Data Insight connects to the filer from thisserver. It is recommended that the Collectorworker node share a fast network with thefiler.
Select Collector node for this filer
From the drop-down, select the Indexerworker node configured for the filer.
Select Indexer node for this filer
Select to automatically enable audit loggingon the filer.
Note: This option is available only forNetApp filers. Do not select this checkboxwhen adding NetApp vfilers lower thanversion 7.3. For EMCCelerra filers, youmustmanually enable auditing on the filer. See“Preparing the EMC Celerra filer for CEPA”on page 33.
Enable auditing on the filer
Click to test the availability of networkconnection between the Collector workernode and the filer.
Symantec recommends that you test theconnection before proceeding to ensure thatData Insight is able to connect to the filer.
Note: This option does not work whenadding NetApp vfilers lower than version7.3.
Test Connection
37Configuring filersAdding filers
Symantec Proprietary and Confidential
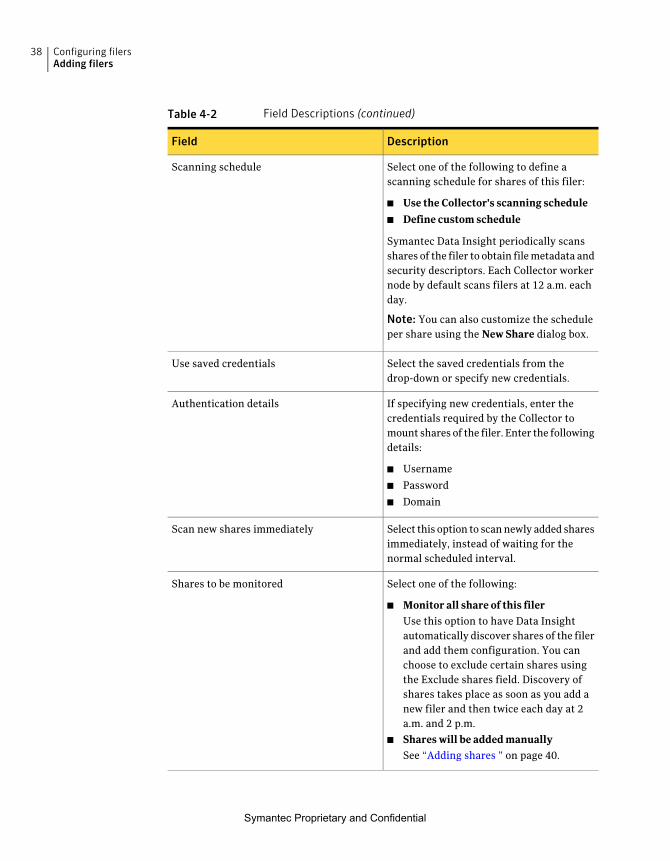
Table 4-2 Field Descriptions (continued)
DescriptionField
Select one of the following to define ascanning schedule for shares of this filer:
■ Use the Collector's scanning schedule■ Define custom schedule
Symantec Data Insight periodically scansshares of the filer to obtain filemetadata andsecurity descriptors. Each Collector workernode by default scans filers at 12 a.m. eachday.
Note: You can also customize the scheduleper share using the New Share dialog box.
Scanning schedule
Select the saved credentials from thedrop-down or specify new credentials.
Use saved credentials
If specifying new credentials, enter thecredentials required by the Collector tomount shares of the filer. Enter the followingdetails:
■ Username
■ Password
■ Domain
Authentication details
Select this option to scannewly added sharesimmediately, instead of waiting for thenormal scheduled interval.
Scan new shares immediately
Select one of the following:
■ Monitor all share of this filerUse this option to have Data Insightautomatically discover shares of the filerand add them configuration. You canchoose to exclude certain shares usingthe Exclude shares field. Discovery ofshares takes place as soon as you add anew filer and then twice each day at 2a.m. and 2 p.m.
■ Shares will be added manuallySee “Adding shares ” on page 40.
Shares to be monitored
Configuring filersAdding filers
38
Symantec Proprietary and Confidential
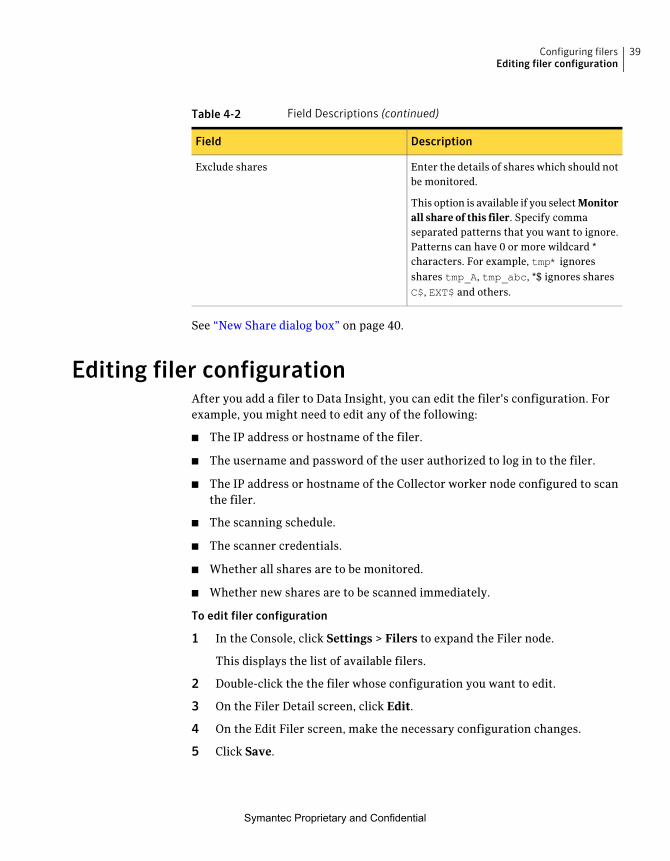
Table 4-2 Field Descriptions (continued)
DescriptionField
Enter the details of shares which should notbe monitored.
This option is available if you selectMonitorall share of this filer. Specify commaseparated patterns that you want to ignore.Patterns can have 0 or more wildcard *characters. For example, tmp* ignoresshares tmp_A, tmp_abc, *$ ignores sharesC$, EXT$ and others.
Exclude shares
See “New Share dialog box” on page 40.
Editing filer configurationAfter you add a filer to Data Insight, you can edit the filer's configuration. Forexample, you might need to edit any of the following:
■ The IP address or hostname of the filer.
■ The username and password of the user authorized to log in to the filer.
■ The IP address or hostname of the Collector worker node configured to scanthe filer.
■ The scanning schedule.
■ The scanner credentials.
■ Whether all shares are to be monitored.
■ Whether new shares are to be scanned immediately.
To edit filer configuration
1 In the Console, click Settings > Filers to expand the Filer node.
This displays the list of available filers.
2 Double-click the the filer whose configuration you want to edit.
3 On the Filer Detail screen, click Edit.
4 On the Edit Filer screen, make the necessary configuration changes.
5 Click Save.
39Configuring filersEditing filer configuration
Symantec Proprietary and Confidential
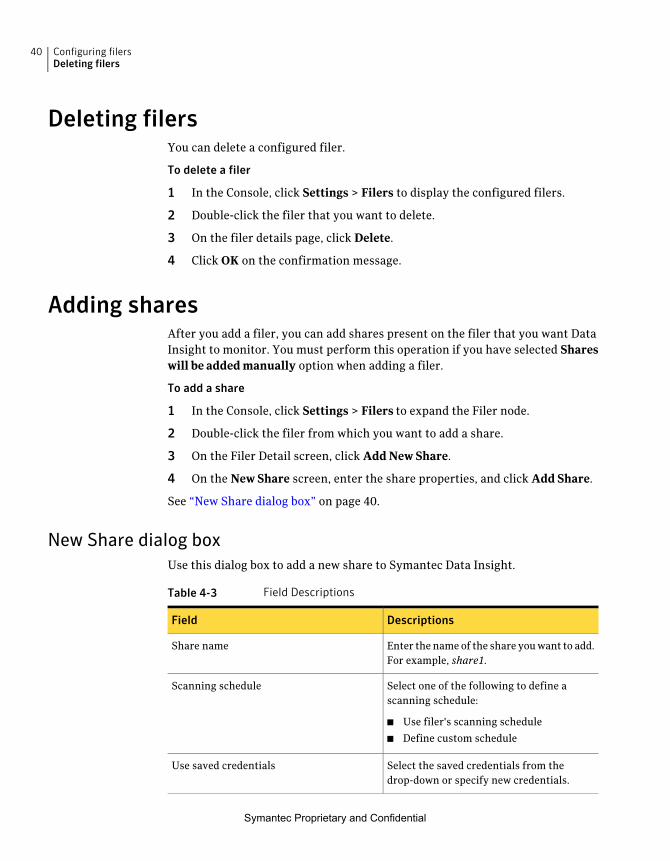
Deleting filersYou can delete a configured filer.
To delete a filer
1 In the Console, click Settings > Filers to display the configured filers.
2 Double-click the filer that you want to delete.
3 On the filer details page, click Delete.
4 Click OK on the confirmation message.
Adding sharesAfter you add a filer, you can add shares present on the filer that you want DataInsight to monitor. You must perform this operation if you have selected Shareswill be added manually option when adding a filer.
To add a share
1 In the Console, click Settings > Filers to expand the Filer node.
2 Double-click the filer from which you want to add a share.
3 On the Filer Detail screen, click Add New Share.
4 On the New Share screen, enter the share properties, and click Add Share.
See “New Share dialog box” on page 40.
New Share dialog boxUse this dialog box to add a new share to Symantec Data Insight.
Table 4-3 Field Descriptions
DescriptionsField
Enter the nameof the share youwant to add.For example, share1.
Share name
Select one of the following to define ascanning schedule:
■ Use filer's scanning schedule
■ Define custom schedule
Scanning schedule
Select the saved credentials from thedrop-down or specify new credentials.
Use saved credentials
Configuring filersDeleting filers
40
Symantec Proprietary and Confidential
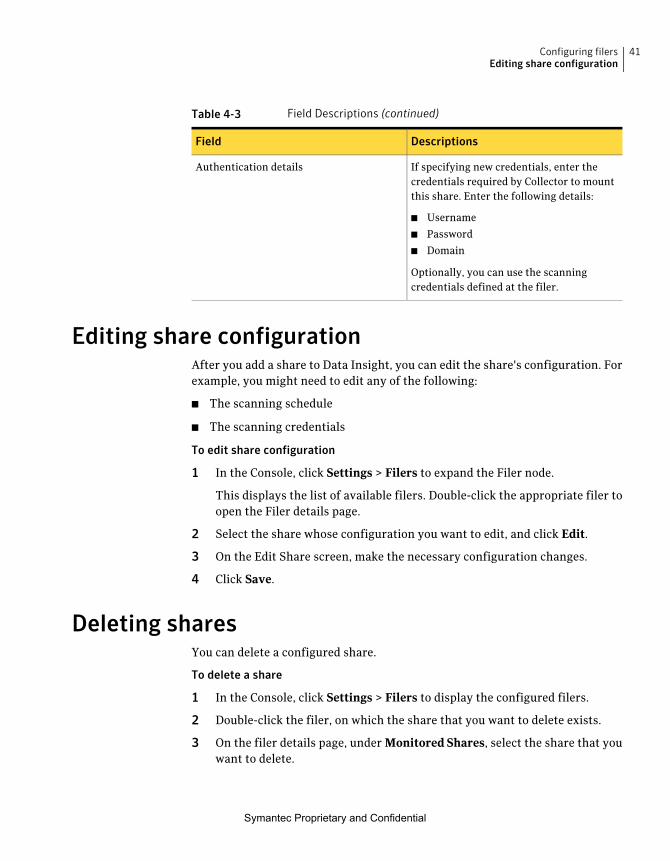
Table 4-3 Field Descriptions (continued)
DescriptionsField
If specifying new credentials, enter thecredentials required by Collector to mountthis share. Enter the following details:
■ Username
■ Password
■ Domain
Optionally, you can use the scanningcredentials defined at the filer.
Authentication details
Editing share configurationAfter you add a share to Data Insight, you can edit the share's configuration. Forexample, you might need to edit any of the following:
■ The scanning schedule
■ The scanning credentials
To edit share configuration
1 In the Console, click Settings > Filers to expand the Filer node.
This displays the list of available filers. Double-click the appropriate filer toopen the Filer details page.
2 Select the share whose configuration you want to edit, and click Edit.
3 On the Edit Share screen, make the necessary configuration changes.
4 Click Save.
Deleting sharesYou can delete a configured share.
To delete a share
1 In the Console, click Settings > Filers to display the configured filers.
2 Double-click the filer, on which the share that you want to delete exists.
3 On the filer details page, under Monitored Shares, select the share that youwant to delete.
41Configuring filersEditing share configuration
Symantec Proprietary and Confidential
4 Click Delete.
5 Click OK on the confirmation message.
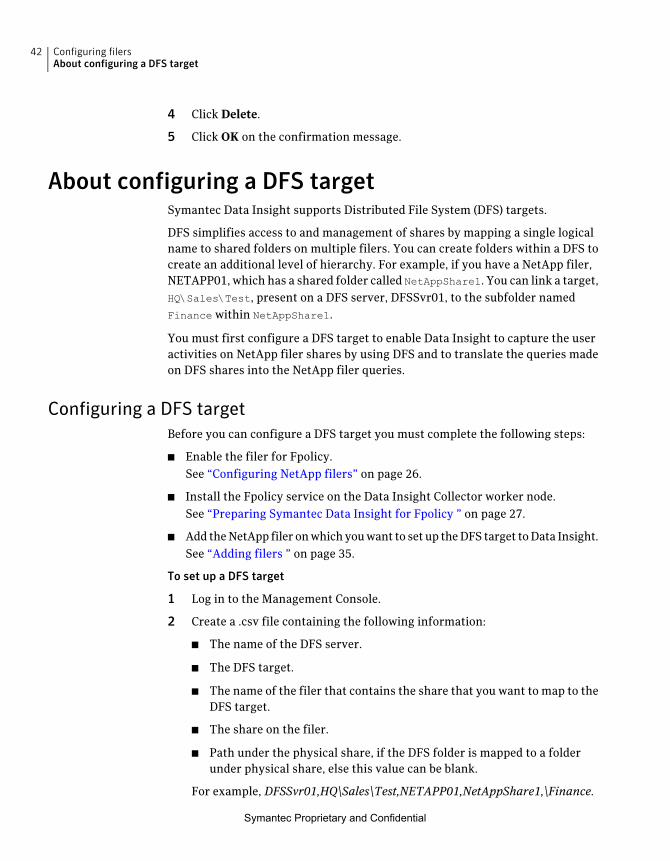
About configuring a DFS targetSymantec Data Insight supports Distributed File System (DFS) targets.
DFS simplifies access to and management of shares by mapping a single logicalname to shared folders on multiple filers. You can create folders within a DFS tocreate an additional level of hierarchy. For example, if you have a NetApp filer,NETAPP01, which has a shared folder called NetAppShare1. You can link a target,HQ\Sales\Test, present on a DFS server, DFSSvr01, to the subfolder namedFinance within NetAppShare1.
You must first configure a DFS target to enable Data Insight to capture the useractivities on NetApp filer shares by using DFS and to translate the queries madeon DFS shares into the NetApp filer queries.
Configuring a DFS targetBefore you can configure a DFS target you must complete the following steps:
■ Enable the filer for Fpolicy.See “Configuring NetApp filers” on page 26.
■ Install the Fpolicy service on the Data Insight Collector worker node.See “Preparing Symantec Data Insight for Fpolicy ” on page 27.
■ Add theNetApp filer onwhichyouwant to set up theDFS target toData Insight.See “Adding filers ” on page 35.
To set up a DFS target
1 Log in to the Management Console.
2 Create a .csv file containing the following information:
■ The name of the DFS server.
■ The DFS target.
■ The name of the filer that contains the share that you want to map to theDFS target.
■ The share on the filer.
■ Path under the physical share, if the DFS folder is mapped to a folderunder physical share, else this value can be blank.
For example, DFSSvr01,HQ\Sales\Test,NETAPP01,NetAppShare1,\Finance.
Configuring filersAbout configuring a DFS target
42
Symantec Proprietary and Confidential
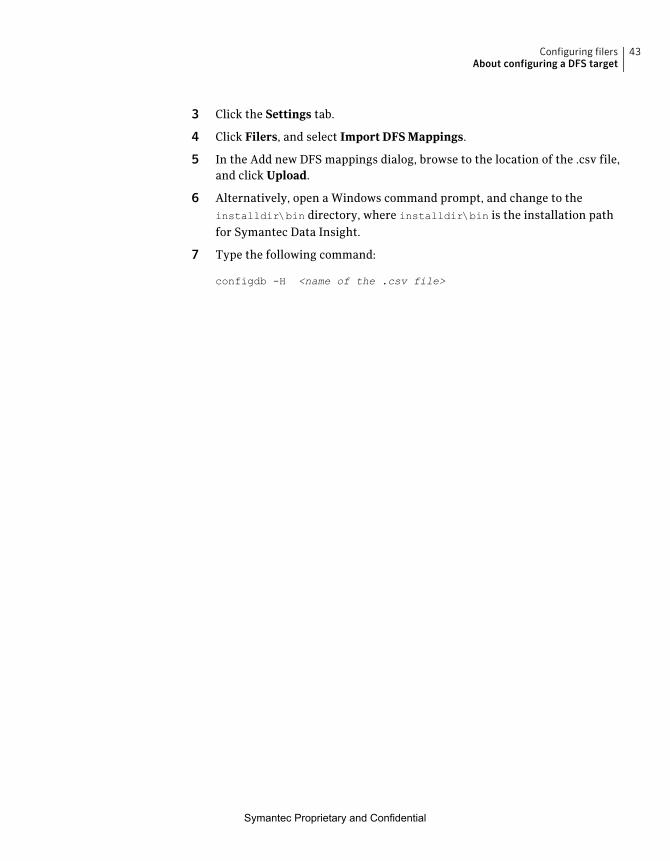
3 Click the Settings tab.
4 Click Filers, and select Import DFS Mappings.
5 In the Add new DFS mappings dialog, browse to the location of the .csv file,and click Upload.
6 Alternatively, open a Windows command prompt, and change to theinstalldir\bin directory, where installdir\bin is the installation pathfor Symantec Data Insight.
7 Type the following command:
configdb -H <name of the .csv file>
43Configuring filersAbout configuring a DFS target
Symantec Proprietary and Confidential

Configuring filersAbout configuring a DFS target
44
Symantec Proprietary and Confidential
Configuring product users
This chapter includes the following topics:
■ About product users and roles
■ Reviewing current users and privileges
■ Adding users
■ Editing users
■ Deleting users
■ Configuring authorization for Symantec Data Loss Prevention users
About product users and rolesBefore a user can log in to Symantec Data Insight, you must add an account forthat user. The user can then use that account to log in to the Console. The useraccount can be any account that is valid on the Management Server system. Thisincludes local system accounts as well as users belonging to the domain whichthe Management Server is a part of.
When you create an user account, a role (set of access privileges) is associatedwith the account. Roles specify access privileges to the Symantec Data Insightsystem. For example, a rolemight let users view access and permissions data, butprevent them fromadding or deleting filers. Data Insight role-based access controlgoverns access to product features and functionality. Roles consist of the userprivileges that determinewhat a user can see and do in theManagement Console.
The Data Insight administrator (a user mapped to the predefined ProductAdministrator role) assigns roles to users. Users can be mapped to one role only.Data Insight ships with predefined roles that you can assign to user accounts.
Table 5-1 summarizes the various Data Insight roles.
5Chapter
Symantec Proprietary and Confidential
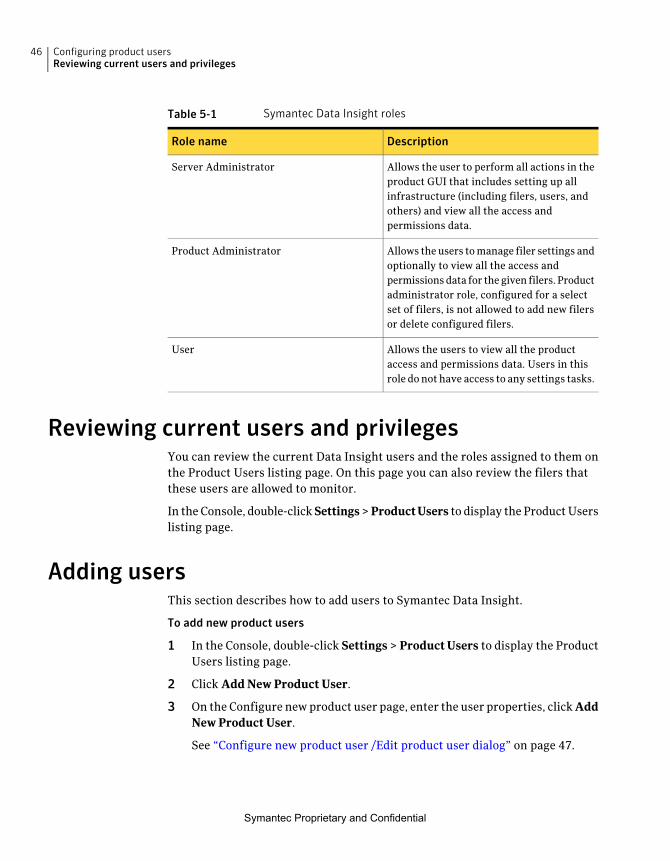
Table 5-1 Symantec Data Insight roles
DescriptionRole name
Allows the user to perform all actions in theproduct GUI that includes setting up allinfrastructure (including filers, users, andothers) and view all the access andpermissions data.
Server Administrator
Allows the users tomanage filer settings andoptionally to view all the access andpermissionsdata for the given filers. Productadministrator role, configured for a selectset of filers, is not allowed to add new filersor delete configured filers.
Product Administrator
Allows the users to view all the productaccess and permissions data. Users in thisrole donot have access to any settings tasks.
User
Reviewing current users and privilegesYou can review the current Data Insight users and the roles assigned to them onthe Product Users listing page. On this page you can also review the filers thatthese users are allowed to monitor.
In theConsole, double-clickSettings>ProductUsers to display the ProductUserslisting page.
Adding usersThis section describes how to add users to Symantec Data Insight.
To add new product users
1 In the Console, double-click Settings > ProductUsers to display the ProductUsers listing page.
2 Click Add New Product User.
3 On the Configure newproduct user page, enter the user properties, clickAddNew Product User.
See “Configure new product user /Edit product user dialog” on page 47.
Configuring product usersReviewing current users and privileges
46
Symantec Proprietary and Confidential
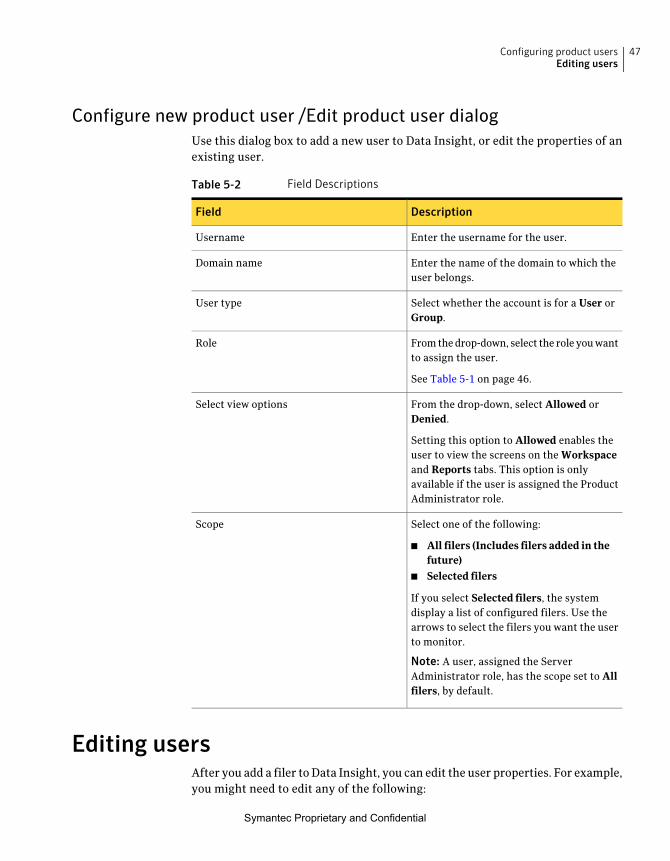
Configure new product user /Edit product user dialogUse this dialog box to add a new user to Data Insight, or edit the properties of anexisting user.
Table 5-2 Field Descriptions
DescriptionField
Enter the username for the user.Username
Enter the name of the domain to which theuser belongs.
Domain name
Select whether the account is for a User orGroup.
User type
Fromthedrop-down, select the role youwantto assign the user.
See Table 5-1 on page 46.
Role
From the drop-down, select Allowed orDenied.
Setting this option to Allowed enables theuser to view the screens on the Workspaceand Reports tabs. This option is onlyavailable if the user is assigned the ProductAdministrator role.
Select view options
Select one of the following:
■ All filers (Includes filers added in thefuture)
■ Selected filers
If you select Selected filers, the systemdisplay a list of configured filers. Use thearrows to select the filers you want the userto monitor.
Note: A user, assigned the ServerAdministrator role, has the scope set to Allfilers, by default.
Scope
Editing usersAfter you add a filer toData Insight, you can edit the user properties. For example,you might need to edit any of the following:
47Configuring product usersEditing users
Symantec Proprietary and Confidential
■ The username
■ The domain name
■ The role assigned to the user
■ The view option for the user
■ The filers that the user is allowed to monitor
To edit the properties of a user
1 In the Console, double-click Settings > ProductUsers to display the ProductUsers listing page.
2 Click the Edit button for the corresponding user.
3 On the Edit product user page, make changes. as necessary, and click Save.
See “Configure new product user /Edit product user dialog” on page 47.
Deleting usersYou can delete Data Insight users.
To delete an user
1 In the Console, double-click Settings > ProductUsers to display the ProductUsers listing page.
2 Select the user, and click Delete.
3 Click OK on the confirmation message.
Configuring authorization for Symantec Data LossPrevention users
Symantec Data Loss Preventions makes Web Services calls into Data Insight toobtain ownership information for sensitive files and folders. However, you mustfirst provision a Data Insight account for Symantec Data Loss Prevention in DataInsight.
You can provision a Active Directory service account OR a local system accountand assign it the Server Administrator privilege. Symantec Data Loss Preventioncan use this account to access Data Insight data.
Configuring product usersDeleting users
48
Symantec Proprietary and Confidential
Events and Notifications
This chapter includes the following topics:
■ Configuring email notifications
■ Enabling Windows event logging
■ Viewing events
Configuring email notificationsData Insight provides email notifications for important events happening in theproduct. For example, CIFS scan failure or an Active Directory scan failure.Notifications are sent out every 15 minutes, if new events are available. Emailnotifications are not enabled by default.
Note: Before you enable email notifications, youmust enable configure the SMTPsettings.
See “Configuring SMTP server settings ” on page 13.
To configure email notifications
1 In the Management Console, click Settings > Event Notifications.
2 On the EventNotifications page, selectEnableeventnotifications checkbox.
3 In the Email recipients field, enter a comma separated list of email addressesto be notified.
4 Select the severity of events for which the email notifications must be sent.
5 Click Save.
6Chapter
Symantec Proprietary and Confidential
Enabling Windows event loggingSymantec Data Insight can publish event to the Windows Event log. Events arepublished on the samemachinewhere they originate. Event logging is not enabledby default.
To configure Windows event logging
1 In the Management Console, click Settings > Event Notifications.
2 Select the Enable Windows logging checkbox.
3 Select the severity of events for which you want to enable Windows logging.
4 Click Save.
Viewing eventsYou canmonitor SymantecData Insight recent systemevents on theEventspage.The report displays entries for all system events. These events include thefollowing information about an event:
■ Time
■ Severity
■ Event summary
■ Symantec Data Insight server where the event originated.
■ User - The user if any performing the action.
■ Object - The object for which the event originated.
To view system events
1 In the Management Console, click Settings > Events.
A list of recent system events appears.
2 You can choose to filter the events further using one or all of the followingcriteria:
■ By time
■ By any text appearing in the event summary
■ By severity
■ By the product serverEnter the filter criteria in the relevant fields and click Go.
Events and NotificationsEnabling Windows event logging
50
Symantec Proprietary and Confidential
Configuring a NetApp filer- an example
This appendix includes the following topics:
■ Prerequisites
■ Adding a machine to a Domain Controller
■ Configuring a NetApp filer
■ Verifying Fpolicy configuration
PrerequisitesBefore you can configure Fpolicy on the NetApp filer, you must ensure that thefollowing setup is available:
■ A user account in Active Directory that has either Administrator or BackupOperator privileges on the filer.
■ A server machine running Windows 2003 Server operating system – 64 bitversion. Symantec Data Insight is installed on this machine. For detailedinstallation procedure see the Symantec Data Insight Installation Guide.
Note: The machine on which Data Insight is installed is added to a DomainController. See “Adding a machine to a Domain Controller” on page 52.
■ A NetApp filer running DATA OnTap version 7.0 or higher. CIFS license isinstalled on this filer.
■ One or more client machines to test the product.
AAppendix
Symantec Proprietary and Confidential
Adding a machine to a Domain ControllerBefore you install Symantec Data Insight, ensure that the machine is added to aDomain Controller. For the purpose of this procedure, we use the domain nameHALDOMAIN.LOCAL.
To add a machine to a Domain Controller
1 Right-click on My Computer and select Properties.
2 On the System Properties window, select the Computer Name tab.
3 Under To rename this computer or join a domain, click Change.
4 On the Computer Name Changes window, under Member of, select Domainand enter HALDOMAIN.LOCAL.
5 Click OK.
6 When prompted to enter the username and password, use an account that iseither part of theAdministrators or BackOperator group. For example, ccuser.
7 Restart the machine for the changes to take effect.
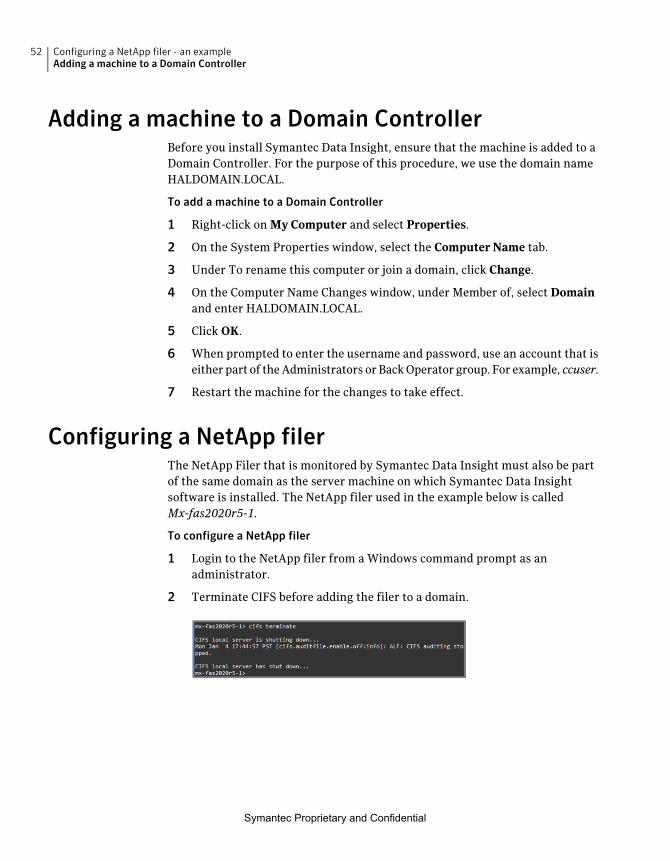
Configuring a NetApp filerThe NetApp Filer that is monitored by Symantec Data Insight must also be partof the same domain as the server machine on which Symantec Data Insightsoftware is installed. The NetApp filer used in the example below is calledMx-fas2020r5-1.
To configure a NetApp filer
1 Login to the NetApp filer from a Windows command prompt as anadministrator.
2 Terminate CIFS before adding the filer to a domain.
Configuring a NetApp filer - an exampleAdding a machine to a Domain Controller
52
Symantec Proprietary and Confidential
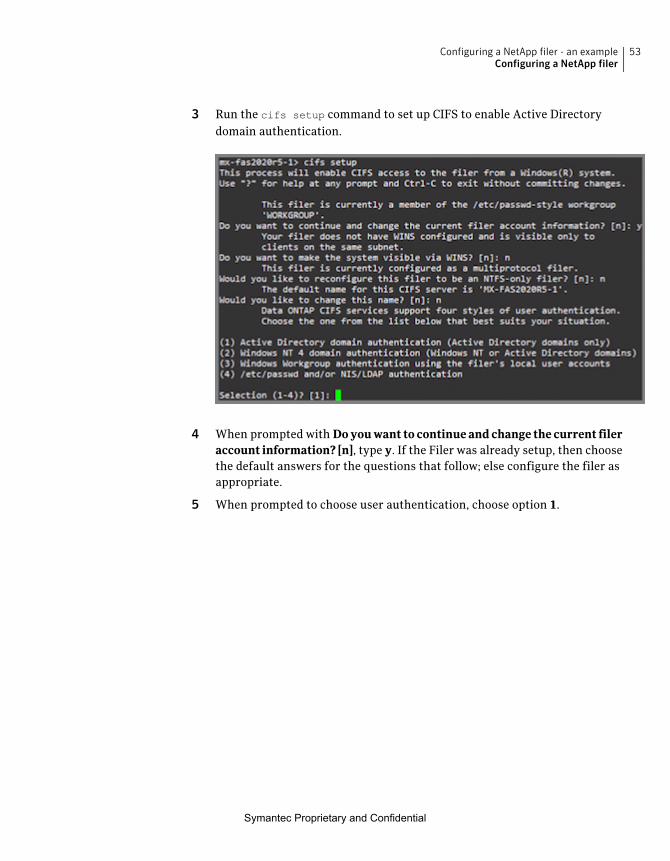
3 Run the cifs setup command to set up CIFS to enable Active Directorydomain authentication.
4 When prompted with Do you want to continue and change the current fileraccount information? [n], type y. If the Filer was already setup, then choosethe default answers for the questions that follow; else configure the filer asappropriate.
5 When prompted to choose user authentication, choose option 1.
53Configuring a NetApp filer - an exampleConfiguring a NetApp filer
Symantec Proprietary and Confidential
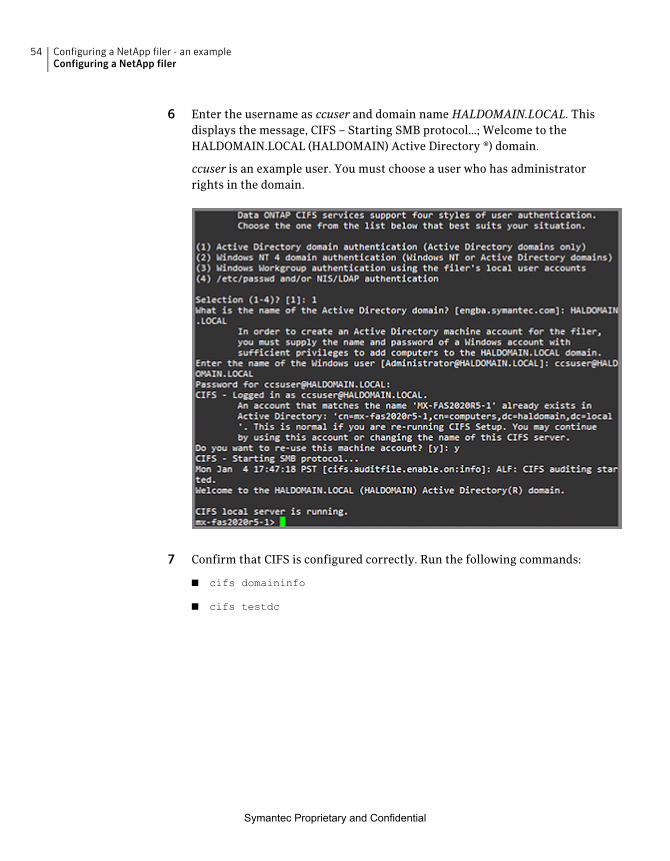
6 Enter the username as ccuser and domain name HALDOMAIN.LOCAL. Thisdisplays the message, CIFS – Starting SMB protocol…; Welcome to theHALDOMAIN.LOCAL (HALDOMAIN) Active Directory ®) domain.
ccuser is an example user. You must choose a user who has administratorrights in the domain.
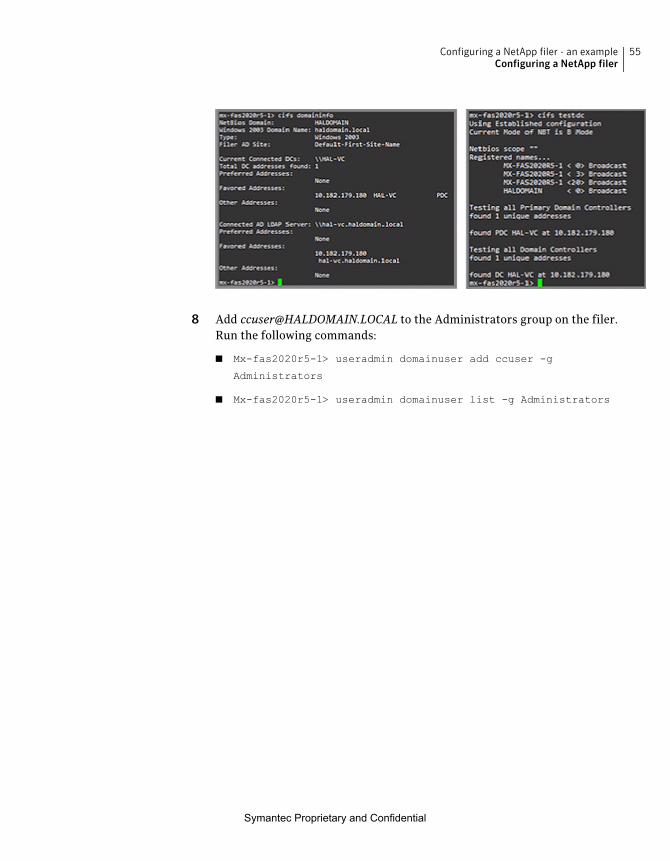
7 Confirm that CIFS is configured correctly. Run the following commands:
■ cifs domaininfo
■ cifs testdc
Configuring a NetApp filer - an exampleConfiguring a NetApp filer
54
Symantec Proprietary and Confidential
8 Add [email protected] to the Administrators group on the filer.Run the following commands:
■ Mx-fas2020r5-1> useradmin domainuser add ccuser -g
Administrators
■ Mx-fas2020r5-1> useradmin domainuser list -g Administrators
55Configuring a NetApp filer - an exampleConfiguring a NetApp filer
Symantec Proprietary and Confidential
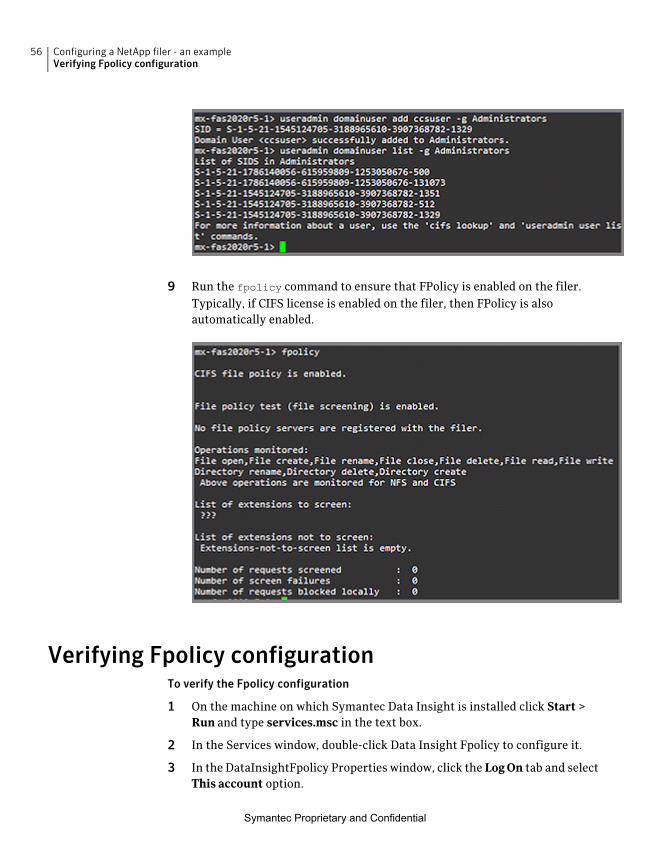
9 Run the fpolicy command to ensure that FPolicy is enabled on the filer.Typically, if CIFS license is enabled on the filer, then FPolicy is alsoautomatically enabled.
Verifying Fpolicy configurationTo verify the Fpolicy configuration
1 On the machine on which Symantec Data Insight is installed click Start >Run and type services.msc in the text box.
2 In the Services window, double-click Data Insight Fpolicy to configure it.
3 In the DataInsightFpolicy Properties window, click the LogOn tab and selectThis account option.
Configuring a NetApp filer - an exampleVerifying Fpolicy configuration
56
Symantec Proprietary and Confidential
4 Enter the user credentials that were used to configure CIFS on the NetAppfiler.
5 Select the General tab and click Start.
6 From the Symantec Data Insight Management Console do the following:
■ Add the NetApp filermx-fas2020r5-1. See “Adding filers ” on page 35.
■ Add a share onmx-fas2020r5-1 that you want Data Insight to monitor.See “Adding shares ” on page 40.
7 Log into the filer.
8 Run the command fpolicy servers show matpol to verify that the servermachine onwhich Symantec Data Insight is installed is configured to handleFPolicy events.
57Configuring a NetApp filer - an exampleVerifying Fpolicy configuration
Symantec Proprietary and Confidential
Configuring a NetApp filer - an exampleVerifying Fpolicy configuration
58
Symantec Proprietary and Confidential
AActive Directory domain
add/edit dialog box 20adding 20
Active Directory domain scansoverview 19scheduling 22
adding exclude rules 14adding users 46administering Symantec Data Insight
overview 9
Cconfiguring DFS target 42
overview 42configuring filers
overview 25configuring product users
adding users 46deleting users 48editing users 47new user /edit user dialog box 47reviewing current users and privileges 46Symantec Data Loss Prevention users 48
current users and privilegesreviewing 46
Ddeleting users 48
Eediting users 47email notifications
configuring 49
Ffilers
add dialog box 36adding 35editing configuration 39
filtering accounts, IP addresses, and pathsoverview 14
Fpolicyoverview 27preparing NetApp filer 28preparing Symantec Data Insight 27verifying configuration 56
MManagement Server machine's domain
configuring 22
NNetApp filer
configuring 26configuring example 52
adding machine to domain controller 52prerequisites 51verifying Fpolicy configuration 56
Pproduct users and roles
overview 45
Sshares
adding 40editing configuration 41new dialog box 40
Symantec Data Insightadding exclude rules 14administration 9
Symantec Data Loss Prevention usersconfiguring authorization 48
Index
Symantec Proprietary and Confidential