Symantec™ Control Compliance Suite
404
Symantec™ Control Compliance Suite Security Compliance Guide Version: 12.5
-
Upload
khangminh22 -
Category
Documents
-
view
3 -
download
0
Transcript of Symantec™ Control Compliance Suite

Symantec™ ControlCompliance Suite
Security Compliance Guide
Version: 12.5

Symantec™ Control Compliance Suite SecurityCompliance Guide
Documentation version: 1.0
Legal NoticeCopyright © 2019 Symantec Corporation. All rights reserved.
Symantec, the Symantec Logo, the Checkmark Logo and are trademarks or registered trademarks ofSymantec Corporation or its affiliates in the U.S. and other countries. Other names may be trademarksof their respective owners.
This Symantec product may contain third party software for which Symantec is required to provide attributionto the third party (“Third Party Programs”). Some of the Third Party Programs are available under opensource or free software licenses. The License Agreement accompanying the Software does not alter anyrights or obligations you may have under those open source or free software licenses. Please see theThird Party Legal Notice Appendix to this Documentation or TPIP ReadMe File accompanying this Symantecproduct for more information on the Third Party Programs.
The product described in this document is distributed under licenses restricting its use, copying, distribution,and decompilation/reverse engineering. No part of this document may be reproduced in any form by anymeans without prior written authorization of Symantec Corporation and its licensors, if any.
THE DOCUMENTATION IS PROVIDED "AS IS" AND ALL EXPRESS OR IMPLIED CONDITIONS,REPRESENTATIONS AND WARRANTIES, INCLUDING ANY IMPLIED WARRANTY OFMERCHANTABILITY, FITNESS FOR A PARTICULAR PURPOSE OR NON-INFRINGEMENT, AREDISCLAIMED, EXCEPT TO THE EXTENT THAT SUCH DISCLAIMERS ARE HELD TO BE LEGALLYINVALID. SYMANTECCORPORATIONSHALLNOTBELIABLEFOR INCIDENTALORCONSEQUENTIALDAMAGES IN CONNECTION WITH THE FURNISHING, PERFORMANCE, OR USE OF THISDOCUMENTATION. THE INFORMATION CONTAINED IN THIS DOCUMENTATION IS SUBJECT TOCHANGE WITHOUT NOTICE.
The Licensed Software and Documentation are deemed to be commercial computer software as definedin FAR 12.212 and subject to restricted rights as defined in FAR Section 52.227-19 "Commercial ComputerSoftware - Restricted Rights" and DFARS 227.7202, et seq. "Commercial Computer Software andCommercial Computer Software Documentation," as applicable, and any successor regulations, whetherdelivered by Symantec as on premises or hosted services. Any use, modification, reproduction release,performance, display or disclosure of the Licensed Software and Documentation by the U.S. Governmentshall be solely in accordance with the terms of this Agreement.

Symantec Corporation350 Ellis StreetMountain View, CA 94043
https://www.symantec.com

Symantec SupportAll support services will be delivered in accordance with your support agreement and thethen-current Enterprise Technical Support policy.
Knowledge Base Articles and Symantec ConnectBefore you contact Technical Support, you can find free content in our online Knowledge Base,which includes troubleshooting articles, how-to articles, alerts, and product manuals. In thesearch box of the following URL, type the name of your product:
https://support.symantec.com
Access our blogs and online forums to engage with other customers, partners, and Symantecemployees on a wide range of topics at the following URL:
https://www.symantec.com/connect
Technical Support and Enterprise Customer SupportSymantec Support maintains support centers globally 24 hours a day, 7 days a week. TechnicalSupport’s primary role is to respond to specific queries about product features and functionality.Enterprise Customer Support assists with non-technical questions, such as license activation,software version upgrades, product access, and renewals.
For Symantec Support terms, conditions, policies, and other support information, see:
https://entced.symantec.com/default/ent/supportref
To contact Symantec Support, see:
https://support.symantec.com/en_US/contact-support.html

Symantec Support .............................................................................................. 4
Chapter 1 New features in Control Compliance Suite12.5.1 .............................................................................. 16
About offline data collection for Windows in Control Compliance Suite12.5.1 .................................................................................. 16Workflow for offline data collection from Windows agent ................. 17Registering Windows agent for offline data collection ..................... 19Creating offline data collection job (for Windows agent) .................. 20Copying the queries file from Control Compliance Suite Manager
to Windows agent ............................................................ 21Copying results file from Windows agent to Control Compliance
Suite Manager ................................................................. 21About fetching agent logs ............................................................... 22
Collecting log files from Agent ................................................... 22What is per asset time-out for data collection? .................................... 24
Why do I need per asset time-out for data collection? .................... 25How do I set per asset time-out for data collection? ....................... 26How do I decide how much asset timeout I need to set? ................. 26Is domain cache build time calculated in per asset time-out? ........... 27
Exporting asset evaluation result details in Excel or CSV fileformats ................................................................................. 27
Chapter 2 New Features in Control Compliance Suite12.5 .................................................................................. 31
About offline data collection in Control Compliance Suite 12.5 ............... 31Registering Linux agent for offline data collection .......................... 32Workflow for offline data collection ............................................. 33Supported operating systems for offline data collection .................. 34Prerequisites for using the offline data collection ........................... 34Creating offline data collection job (for Linux agent) ....................... 34Copying the queries file from CCS Manager to Linux agent ............. 35Query execution for offline data collection job .............................. 36Copying the results file from agent computer to CCS
Manager ........................................................................ 36
Contents

Symantec Control Compliance Suite (CCS) RESTful APIs .................... 37Frequently Asked Questions (FAQs) about CCSBot ............................. 37
What is CCSBot? ................................................................... 38Where do I find CCSBot on the Control Compliance Suite
Console? ........................................................................ 38How can an Administrator enable settings for CCSBot? ................. 38Do I need an Internet connection to use CCSBot? ........................ 39Which additional licenses do I need to buy to use CCSBot? ............ 39How can CCSBot help me? ...................................................... 40Which languages does CCSBot support? .................................... 40Can I chat with CCSBot the way I speak, or do I have to follow
any grammar and syntax? .................................................. 40Which questions can I ask to the bot? ........................................ 41Does CCSBot preserve my chat history? .................................... 41Is CCSBot secure? ................................................................. 42Can I open multiple sessions of CCSBot? ................................... 42On which web browsers is CCSBot supported? ............................ 42How does CCSBot work? ........................................................ 43Does CCSBot use any third-party application? ............................. 43
About Active Directory attribute support for custom queries ................... 43Creating query using Raw Directory Attributes ............................. 44
About ad-hoc query support for Security: File System (Effective)entity ................................................................................... 45Creating query using Group Members descriptor options ................ 45
About remediation context details and remediation verificationdetails .................................................................................. 47About remediation context details as attachment .......................... 48About remediation verification details as attachment ...................... 49Configuring Control Compliance Suite remediation ticket
settings .......................................................................... 50Creating Control Compliance Suite Ticket ................................... 52
Chapter 3 Understanding Security Compliance .............................. 54
What is Security Compliance? ......................................................... 54Achieving the Security Compliance use-case ..................................... 55About assets ............................................................................... 55
Site as scope in asset import .................................................... 56Asset folder hierarchy ............................................................. 57Predefined platforms ............................................................... 57
Asset tagging .............................................................................. 58Asset groups ............................................................................. 130
Asset groups with assets based on criteria .................................. 58
6Contents

Asset groups with specific assets .............................................. 59Asset types ................................................................................. 59
Predefined asset types ............................................................ 60Probable asset types .............................................................. 61Custom asset types ................................................................ 62About types of business assets ................................................. 65
About the management of business assets ...................................... 142About business assets ........................................................... 139About types of business assets ................................................. 65
Active assets ............................................................................... 66About standards ........................................................................... 66About Jobs ................................................................................ 303About reports and dashboards ...................................................... 339
Chapter 4 Importing Assets into CCS ................................................ 69
Reconciliation rules and rule types ................................................... 69Predefined reconciliation rules .................................................. 71Manual review ....................................................................... 75Asset reconciliation ................................................................ 76Pre rule ................................................................................ 77Add rule ............................................................................... 80Update rule ........................................................................... 83Post rule .............................................................................. 88About conditions .................................................................... 92About actions ...................................................................... 100Creating reconciliation rules without manual review ..................... 104Creating reconciliation rules using the manual review .................. 105
Importing assets ......................................................................... 106About the first time asset import .............................................. 108Importing the assets for the first time ........................................ 109Scenarios for asset import ...................................................... 112
Working with asset import scenarios ............................................... 114Importing assets from a CSV file ................................................... 115
Creating a CSV file for custom application ................................. 115Creating a CSV file for predefined asset types ............................ 116About the list field format in CSV file ......................................... 117
Importing assets from an ODBC database table ................................ 118Format to create ODBC compliant database tables ..................... 118Creating an ODBC database table for custom application ............. 121About the list field format in ODBC database table ...................... 122
Reviewing the assets manually ...................................................... 122Viewing the manual review records .......................................... 123
7Contents

Reconciling the manual review records ..................................... 123Discovering Networks .................................................................. 124
Editing a network asset group ................................................. 125Adding a network asset group ................................................. 126Deleting a network asset group ............................................... 127Renaming a network asset group ............................................. 127
Discovering Assets ..................................................................... 127Discovering VMware vCenter Server assets on the network ......... 129
Asset groups ............................................................................. 130Creating an asset group with assets based on criteria .................. 130Creating an asset group with specific assets .............................. 133Deleting inactive assets using the asset groups .......................... 134Operators (, ), AND, OR ......................................................... 135
Performing the tasks in the Assets workspace .................................. 136Creating the asset folders ...................................................... 136Adding assets ...................................................................... 137Adding multiple assets ........................................................... 138About business assets ........................................................... 139About types of business assets ............................................... 139Creating business assets ....................................................... 140Creating multiple business assets ............................................ 141About the management of business assets ................................ 142Editing business assets ......................................................... 144Deleting business assets ....................................................... 144About associations with business assets ................................... 145Associating parent business assets with child assets ................... 146Associating child assets with parent business assets ................... 147Removing the association with a business asset ......................... 147Assigning permissions on business assets ................................ 148Removing permissions from a business asset ............................ 149About business assets view .................................................... 149Displaying business assets in Business Asset View ..................... 150Selecting business assets for Business Asset View ..................... 150Hiding business asset nodes .................................................. 151Hiding business assets from Business Asset View ...................... 151Business assets and asset groups: Differences .......................... 152
Performing the asset group tasks ................................................... 153Editing an asset group ........................................................... 153
Performing the global tasks ........................................................... 154Requesting an exception for assets on checks ........................... 154Applying exception using evidence filter on a standard
check ........................................................................... 156Setting up a data collection job from the Asset System view .......... 156
8Contents

Running an evaluation job from the Asset System view ................ 159Configuring asset credentials .................................................. 161
Performing the asset tasks ........................................................... 162Editing assets ...................................................................... 163Moving an asset ................................................................... 163Removing a tag from the asset ................................................ 164
Exporting CSV headers ................................................................ 164Remediation .............................................................................. 164
About automatic remediation .................................................. 165About manual remediation ...................................................... 166Remediating the assets manually from the evaluation
results .......................................................................... 166Remediating the assets automatically ....................................... 168About closed-loop verification ................................................. 170
Chapter 5 Configuring Credentials ................................................... 171
Credentials ............................................................................... 171RBAC for managing credentials ............................................... 186Configuring credentials for asset import and data collection ........... 172Scenarios for using UNIX credentials ........................................ 177Configuring credentials on agents ............................................ 178About assigning credentials to assets ....................................... 182
About managing the credentials ..................................................... 179About the Credentials workspace ............................................. 180About managing credentials for agent-based targets .................... 181About assigning credentials to assets ....................................... 182Adding asset credential ......................................................... 183Adding common credential ..................................................... 184Editing common credential ..................................................... 184Deleting credential ................................................................ 184Editing asset credential .......................................................... 185Removing assets from the common credential ............................ 185RBAC for managing credentials ............................................... 186
About the CCS integration with CyberArk™ Enterprise PasswordVault® ................................................................................ 187Integrating CCS with CyberArk EPV ......................................... 188Mapping the CyberArk policies to the CCS platforms ................... 191Mapping the CCS asset attributes to CyberArk credential
attributes ...................................................................... 193
9Contents

Chapter 6 Working with Standards .................................................. 196
Working with standards ................................................................ 197Creating a new standard ........................................................ 197Renaming a standard ............................................................ 198Copying and pasting a standard .............................................. 198Moving a standard ................................................................ 199Importing a standard ............................................................. 200Exporting a standard ............................................................. 201Deleting a standard ............................................................... 202
Working with sections .................................................................. 202Creating a new section .......................................................... 203Copying and pasting a section ................................................ 203Renaming a section .............................................................. 204Moving a section .................................................................. 204Deleting a section ................................................................. 205
About checks ............................................................................. 205Working with checks ............................................................. 205About script based check ....................................................... 215About script tab .................................................................... 218About Commands data source for UNIX .................................... 223Check expression ................................................................. 227Field expression ................................................................... 228Check formula ..................................................................... 229Data Items filter ................................................................... 229Check Advanced Settings ...................................................... 230Multiple data items ................................................................ 233Missing data items ................................................................ 233About operators ................................................................... 234
Specifying or editing the description ............................................... 238Adding the CVE information .......................................................... 238
Editing the CVE information .................................................... 239Adding reference information ........................................................ 239
Editing reference information .................................................. 239Deleting reference information ................................................ 240
Specifying or editing the check attributes ......................................... 240Specifying or editing the remediation information ............................... 241Specifying or editing the check issue .............................................. 241Viewing the evidence details ......................................................... 241About exporting the evaluation results ............................................. 242Exporting the evaluation results ..................................................... 243Requesting an exception using the Evaluation Result Details dialog
box .................................................................................... 244
10Contents

About risk score ......................................................................... 244About risk score calculation .................................................... 245Base score calculation ........................................................... 246Adjusted base score calculation .............................................. 246Average risk score calculation ................................................. 247
Working with SCAP content .......................................................... 247SCAP Content ........................................................................... 248
About SCAP content ............................................................. 248About supported SCAP 1.2 capabilities in CCS ........................... 249About supported SCAP 1.0 capabilities in CCS ........................... 250About supported SCAP specifications in CCS ............................ 250About usage of XCCDF in CCS ............................................... 252About usage of CCE in CCS ................................................... 253About usage of CVE in CCS ................................................... 253About usage of CVSS in CCS ................................................. 254About usage of OVAL in CCS ................................................. 254About usage of CPE in CCS ................................................... 255About the supported OVAL objects in CCS ................................ 256
Working with SCAP benchmarks .................................................... 258About roles and permissions for SCAP benchmarks .................... 258About import of SCAP 1.2 data streams into CCS ....................... 259About import of SCAP 1.0 and SCAP 1.1 benchmarks into
CCS ............................................................................ 260Importing SCAP data stream into CCS ...................................... 262Importing CCE list into CCS .................................................... 263Importing CVE-CVSS list into CCS ........................................... 263Importing OVAL definitions ..................................................... 264Deleting the imported SCAP content ........................................ 265Viewing the imported SCAP benchmarks in CCS ........................ 265Evaluating assets against the SCAP benchmarks ....................... 266Evaluating assets against OVAL definitions ................................ 267Viewing the SCAP benchmarks evaluation results ....................... 267Searching for CCE or CVE IDs in SCAP evaluation results ........... 268Viewing the OVAL definitions evaluation results .......................... 269Requesting an exception for assets on SCAP benchmarks
rules ............................................................................ 270Approving an exception for assets on SCAP benchmarks
rules ............................................................................ 272Exporting the evaluation results for SCAP content and OVAL
definitions ..................................................................... 273Viewing the CVSS base scores and vector strings for a CVE
ID ................................................................................ 274Generating reports of the SCAP evaluated results ....................... 274
11Contents

Accessing dashboards of SCAP benchmarks ............................. 275About risk and compliance score calculation for SCAP assets .............. 275
About compliance score calculation for SCAP assets ................... 276About risk score calculation for SCAP assets ............................. 278About adjusted base score calculation for SCAP assets ............... 279About the composite risk score calculation for SCAP assets .......... 280
Running a compliance scan using a command-line utility .................... 280About the Control Compliance Suite Scanning Utility ................... 281Prerequisites ....................................................................... 281Authorization requirements ..................................................... 282Running the CCS Scanning utility ............................................ 282Parameters in the Parameters.xml file ..................................... 282Command-line parameters ..................................................... 284Usage syntax ...................................................................... 286Application configuration ........................................................ 286Workflow ............................................................................ 286Best practices and recommendations ....................................... 288Troubleshooting .................................................................. 289
About automated closed-loop remediation ....................................... 291Workflow for closed-loop remediation ....................................... 292Types of deployment for closed-loop remediation ........................ 293Configuring ServiceNow remediation ticket settings ..................... 293Creating a ServiceNow ticket manually ..................................... 298Using the manifest file provided by CCS for patch
remediation ................................................................... 298Monitoring the status of ServiceNow tickets in CCS ..................... 299Monitoring the Remediation Verification job ................................ 299Configuring the remediation settings for optimal
performance .................................................................. 300Troubleshooting remediation scenarios for CCS - ServiceNow
integration ..................................................................... 301
Chapter 7 Using Jobs to manage tasks in Control ComplianceSuite ............................................................................... 303
About Jobs ................................................................................ 303About Queries job ................................................................. 304About Asset Import job .......................................................... 305About Asset Discovery Job ..................................................... 305About Automatic Updates Installation job ................................... 306About Network Discovery Job ................................................. 306About Baseline job ................................................................ 306About External Data Integration job .......................................... 307
12Contents

About Import Assets and Agents job ......................................... 307About Global Metrics and Trend Computation job ........................ 308About Remediation Verification job ........................................... 308About Report Data Purge job .................................................. 309About Report Data Synchronization job ..................................... 309About Production Data Purge job ............................................. 310About Report Generation job .................................................. 310About SCAP Evaluation job .................................................... 311About SCAP OVAL Evaluation job ........................................... 311About Download Live Updates job ........................................... 311About Tiered Dashboard Update job ......................................... 312About Queries Baseline job .................................................... 312About Agent Product Update job .............................................. 312About evaluation jobs ............................................................ 313About data collection jobs ...................................................... 316About Collection-Evaluation-Reporting (CER) job ........................ 319About Agent Content Update job ............................................. 322
Managing jobs ........................................................................... 324Creating jobs ....................................................................... 325Editing a job ........................................................................ 326Scheduling jobs ................................................................... 326Deleting jobs ....................................................................... 327Running a job now ................................................................ 328Canceling a job run ............................................................... 330Searching for a job ............................................................... 329
Managing job runs ...................................................................... 330Canceling a job run ............................................................... 330Deleting a job run ................................................................. 331
About the Jobs workspace ............................................................ 331About job filters .................................................................... 334About secondary job filters ..................................................... 335About job information display .................................................. 335
Viewing jobs information in the Jobs Property Tabs View .................... 336Jobs Property Tabs View - General tab ..................................... 336Jobs Property Tabs View - Schedule tab ................................... 337Jobs Property Tabs View - Job run summary tab ......................... 337Jobs Property Tabs View - Messages tab .................................. 337Jobs Property Tabs View - Template tab .................................... 338Jobs Property Tabs View - Job configuration tab ......................... 338
13Contents

Chapter 8 Viewing Reports and Dashboards in ControlCompliance Suite ........................................................ 339
About reports and dashboards ...................................................... 339About data synchronization .................................................... 340About creating user-defined templates ...................................... 340About predefined report templates ........................................... 341About the prerequisites for user-defined report templates ............. 341About the Report Management jobs ......................................... 343About the Reports Templates view ........................................... 344About the My Reports view ..................................................... 345About the View My Reports filter option ..................................... 346About CyberScope and LASR ................................................. 347
Working with reports ................................................................... 348Scheduling a report .............................................................. 349Copying a report template ...................................................... 350Customizing a report in report viewer ........................................ 350Customizing a report template ................................................. 351Editing a report generation job ................................................ 352Exporting a report ................................................................. 352Exporting a report template .................................................... 353Moving a report template ....................................................... 354Printing a report ................................................................... 354Refreshing a report ............................................................... 354Removing a report ................................................................ 355Viewing a report ................................................................... 355
Working with dashboards ............................................................. 356Creating a dashboard ............................................................ 356Adding a panel to a dashboard ................................................ 357Setting a dashboard refresh interval ........................................ 358Applying filters to a dashboard ................................................ 358Editing a dashboard .............................................................. 359Printing a dashboard ............................................................. 360Publishing a dashboard ......................................................... 360Emailing a dashboard URL ..................................................... 361Deleting a dashboard ............................................................ 361Changing the default Dashboard page ...................................... 361
Working with panels .................................................................... 362Creating a panel ................................................................... 362About chart types ................................................................. 363Viewing properties of a panel .................................................. 367Editing a panel ..................................................................... 367Copying a panel ................................................................... 368
14Contents

Printing a panel .................................................................... 369Publishing a panel ................................................................ 369Extracting a panel to Excel ..................................................... 370Unpublishing a panel ............................................................. 370Deleting a panel ................................................................... 371Applying filters to a panel in a dashboard .................................. 371Maximizing a panel in a dashboard .......................................... 372Examples of panel options ..................................................... 372
Working with tiered dashboards ..................................................... 376Managing tiered dashboards ................................................... 377About roles and permissions in tiered dashboard ........................ 386About threshold settings in tiered dashboard .............................. 390
Configuring tiered dashboards ....................................................... 393About the types of evaluation nodes ......................................... 394Assigning roles and permissions to the users of tiered
dashboard .................................................................... 394Adding an evaluation node ..................................................... 395Editing an evaluation node ..................................................... 396Deleting an evaluation node ................................................... 397Copying and pasting an evaluation section ................................ 397Copying and pasting an evaluation node ................................... 398Configuring an email notification alert for tiered dashboards .......... 398
About trends configuration ............................................................ 399About configuring trends for evaluation nodes ........................... 400Calculation of time interval - Example 1 ..................................... 400Calculation of time interval - Example 2 ..................................... 401Viewing the dashboard trends report ........................................ 402
Viewing the tiered dashboard reports .............................................. 402Viewing the dashboard details report ....................................... 403
About the Details tab view ............................................................ 403
15Contents

New features in ControlCompliance Suite 12.5.1
This chapter includes the following topics:
■ About offline data collection for Windows in Control Compliance Suite 12.5.1
■ About fetching agent logs
■ What is per asset time-out for data collection?
■ Exporting asset evaluation result details in Excel or CSV file formats
About offline data collection for Windows in ControlCompliance Suite 12.5.1
From Control Compliance Suite 12.5.1 onwards, offline data collection support for a Windowsagent is available. With this feature, you can choose to collect data from a Windows agentthat does not have connectivity with a Control Compliance Suite Manager or any other ControlCompliance Suite component.
You may have several use-cases where some Control Compliance Suite agents do not haveconnectivity with any other Control Compliance Suite components due to network outage. Butyou still need to assess the asset compliance. In a DMZ (demilitarized zone) setup, which isalmost never accessible, the endpoints within that setup may still need to be assessed. Youneed to collect data from such agent-based servers and endpoints to demonstrate complianceto your auditors. Offline data collection support for Control Compliance Suite agents helps youachieve these use-cases.
1Chapter

Workflow for offline data collection from Windows agentThe workflow for offline data collection from Windows agents is similar to the workflow foroffline data collection from RHEL agents except some additional manual steps. The steps thatcomprise this workflow are listed in the following table:
DetailsTypeStep
You can use your Control Compliance Suite Windows agent in both onlineand offline modes of data collection. Whether an agent is online or offlinedepends on its connectivity with a Manager or any other Control ComplianceSuite component. So, for the agent that is used for offline data collection,installation steps remain unchanged.
See Installing Control Compliance Suite agent on Windows
ManualInstallingagent
Registration of a Control Compliance Suite Agent with a Control ComplianceSuite Manager establishes secured communication between an agent anda manager. You can register each agent to one manager or multiplemanagers.
On the Configure CCS Agent dialog box of the Agent Configuration Utility,click the Register for offline data collection box.
Note: The Register for offline data collection box is available on theRegistration screen of the Configure CCS Agent dialog box of the AgentConfiguration Utility.
See Registering offline agent with Manager.
ManualRegisteringagent withManager
After you register Windows agent to a Manager, an .xml file, which containsagent registration information, is generated on each agent at the followinglocation:
<agent installation directory>\ Symantec\Enterprise SecurityManager\ESM\system\<agent host name>\tmp
Copy this file to the following location on the Control Compliance SuiteManager in Data Collector role:
<CCS installation directory>\Symantec\CCS\Reporting andAnalytics\ESM\assets
ManualCopyingagentregistrationfile (.xml)from agenttoManagerin DataCollectorrole
Run the Import Assets and Agents job to import the Windows agents thatyou register with the Manager and the assets associated with these agentsto the Control Compliance Suite asset system.
See About Import Assets and Agents job
ManualRunningImportAssets andAgents job
17New features in Control Compliance Suite 12.5.1About offline data collection for Windows in Control Compliance Suite 12.5.1

DetailsTypeStep
Create an offline data collection job and select agents and Windowsstandards that you want to include in the job.
See Creating offline data collection job
ManualCreatingoffline datacollectionjob
Run the job in the Generate Query mode. In the Generate Query phase ofthe Offline Data Collection job, based on the scope of the job, data collectionqueries are generated in an encrypted zip file (.ezf) on each Manager in theData Collector role. Copy this .ezf file from the Manager to each Windowsagent that is in the scope of the job. By default, the .ezf file is generated atthe following location on the Manager in the Data Collector role:
<CCS Installation Directory>\ Symantec\CCS\Reporting andAnalytics\DPS\OfflineDataCollection\<job_name>\<agent_name>
ManualGeneratingquery
The domain cache file is present at the following location on the ControlCompliance Suite Manager in Data Collector role:
<CCS installation directory>\Symantec\CCS\Reporting andAnalytics\DPS\control\Windows\Cache
Copy this file to the following location on the offline Windows agent:
<agent installation directory>\Symantec\Enterprise SecurityManager\ESM\bin\dcmodules\Control\Windows\Cache
ManualCopyingdomaincache filefromManager inDataCollectorrole toWindowsagent
Copy the .ezf file to the following location on each Windows agent: <agentinstallation directory>\Symantec\Enterprise SecurityManager\ESM\system\<agent host name>\offline
See Copying queries file from Manager to agent
ManualCopyingqueries filetoWindowsagent
The zip file is extracted, queries are executed, and data is collected fromthe agent computer. An .oef file, which contains query results, is created atthe following location on the agent:
<agent installation directory>\Symantec\Enterprise SecurityManager\ESM\system\<agent host name>\tmp
Note: After you copy the .ezf file to the offline Windows agent, if .oef file isnot created in the next two to three minutes, check whether the SymantecCCS Agent service is down. If the service is down, restart the service.
AutomaticExecutingquery
18New features in Control Compliance Suite 12.5.1About offline data collection for Windows in Control Compliance Suite 12.5.1

DetailsTypeStep
Copy the .oef file from the agent to the CCS Manager Data Collector at thesame location where the .ezf file is created:
<<CCS Installation Directory>>\Symantec\CCS\Reporting andAnalytics\DPS\OfflineDataCollection\<<job_name>>\<<agent_name>>
See Copying results file from agent to Manager
ManualCopyingresults filetoManager
Run the Offline Data Collection job in theCollect Result phase. The collecteddata is imported on the CCSManager and stored in the Production database.The results may not be processed all together. You can run the job in theCollect Result phase until the results from all the agents are processed.
ManualCollectingresult
After you collect results for all the assets included in the scope of the job,mark the job as complete. Marking the job as complete signifies that onecycle of Offline Data Collection job is complete. If you want to run the jobafter this phase, it starts a fresh cycle of the job in the Generate Query phase.
ManualMarkingthe jobComplete
To view the reports about the evaluation results, run the following jobs oneafter the other:
■ Evaluation job■ Report Data Synchronization job■ Report Generation job
ManualGeneratingreports
Registering Windows agent for offline data collectionYou can register a Windows agent for offline data collection with a Control Compliance Suitemanager in the following ways:
■ By using the Agent Configuration utility
■ By using command prompt
To register a Control Compliance Suite Agent by using AgentConfiguration utility1. Log on as administrator or use a role that is equivalent to an administrator.
2. To register the agent, start the Agent Configuration Utility. You can start this utility fromthe CCS Agent Installer. Alternatively, you can locate the utility from the Start menu.
3. In the Configure CCS Agent dialog box, in the left pane, click Registration.
4. In the Agent Information section, click one of the following options for the agent name:
■ Host name
■ FQDN
19New features in Control Compliance Suite 12.5.1About offline data collection for Windows in Control Compliance Suite 12.5.1

■ Alias/IP
The FQDN (Fully Qualified Domain Name) option is selected by default.
5. In the Manager Information section of the CCS Agent Registration panel, do the following:
■ In the Manager Name box, type the host name of the Control Compliance SuiteManager to which you want to register the agent.
■ In the Port box, type the port number for the CCS Manager.Computers that run Symantecmanagers and agentsmust use the same communicationport to register the agents.
6. To use the agent also for offline data collection, click the Register for offline datacollection box.
Note: After you click the Register for offline data collection box, the options related tomessage-based content are disabled, because the offline data collection is supportedonly for raw-data collection. The Verify manager to agent communication option is alsodisabled because no such verification is possible in case of an offline agent.
7. Click Register.
8. To register the agent to more than one manager, perform steps 5 to 7 for each manager.
9. Click Close.
To register aControl ComplianceSuiteAgent byusing commandprompt1. On the agent computer, go to the following location:
<agent installation directory>\Symantec\Enterprise Security Manager\ESM\bin\<Windowsoperating system-architecture type folder>
2. Use the following command to execute the Register.exe at the command prompt:
register.exe -r -O -m <Manager host name> -N <Agent IP>
Creating offline data collection job (for Windows agent)After you register Windows agent, copy the agent information XML file to CCS Manager DataCollector, and run the Import Assets and Agents job, the agent is added to the ControlCompliance Suite asset system. At this stage, you must create an offline data collection job.
To create an offline data collection job1. On the Control Compliance Suite console, go to the Jobs workspace.
2. Right-click and select Set up offline data collection.
20New features in Control Compliance Suite 12.5.1About offline data collection for Windows in Control Compliance Suite 12.5.1

3. Select aWindows standard or multiple Windows standards that are supported and hence,listed on the Predefined Technical Standards page. You can also create and use a customstandard for Windows assets.
4. Select a Windows agent from the asset list.
5. Click Generate Queries and click Next.
6. If you do not click Generate Queries, the job is created; but job run is not triggeredimmediately. To run the job at a later stage, you can right-click the job and selectGenerateQueries.
7. Click Finish. The offline data collection job is triggered to run in the Generate Query mode.An .ezf file is created with queries based on the job scope.
See “Workflow for offline data collection from Windows agent” on page 17.
Copying the queries file from Control Compliance Suite Manager toWindows agent
On the Manager in the Data Collector role, a separate .ezf file, which contains queries basedon the scope of the offline data collection job, is created for each offline agent. By default, the.ezf file is generated at the following location on the Manager:
<<CCS Installation Directory>>\Symantec\CCS\Reporting andAnalytics\DPS\OfflineDataCollection\<<job_name>>\<<agent_name>>
Here, <<job_name>> is the name of your offline data collection job and <<agent_name>> isthe name of the offline Windows agent.
To copy the queries zip file to agent1. Go to the Jobs workspace and click the offline data collection job.
2. On the Jobs - Details page, click the Messages tab.
3. The Details column provides the filename and the path of the .ezf file.
4. Copy the .ezf file from the agent-specific folder on the CCS Manager Data Collector.
5. Paste the .ezf file to the following location on the offline Windows agent:
<agent installation directory>\Symantec\ Enterprise Security Manager\ESM\system\<agentname>\offline
Copying results file fromWindows agent to Control Compliance SuiteManager
Because of lack of connectivity between Control Compliance Suite Manager and Windowsagent, you must copy the .oef results file that is created on the agent computer to the CCS
21New features in Control Compliance Suite 12.5.1About offline data collection for Windows in Control Compliance Suite 12.5.1

Manager (in Data Collector role), on which the queries file is generated. By default, the .oeffile is created at the following location on the agent:
<agent installation directory>\Symantec\CCS\Reporting and Analytics\ESM\system\<agenthost name>\tmp
Here, <agent_host name> is the name of the offline Windows agent.
To copy the results zip file to Manager1. Copy the results (.oef) file from the following location on the agent computer:
<agent installation directory>\Symantec\ Enterprise Security Manager\ESM\system\<agenthost name>\tmp
2. Paste the corresponding .oef file to the following location on the Manager:
<<CCS Installation Directory>>\Symantec\CCS\Reporting andAnalytics\DPS\OfflineDataCollection\<<job_name>>\<<agent_name>>
Here, <<job_name>> is the name of your offline data collection job and <<agent_hostname>> is the name of the offline Windows agent.
About fetching agent logsThe Get Agent Logs feature enables you to collect logs from Control Compliance Suite agents.This feature is introduced to quickly retrieve logs from an agent and facilitate management ofControl Compliance Suite agents. Earlier, you had to manually raise a request to retrieve agentlog files, which had to pass through an approval system depending upon an organization'spolicy. As a result, the log retrieval from an agent was delayed and the information in the logfiles would become stale by the time you received the log files. You would then have to raisea new request for receiving fresh logs.
With the introduction of the Get Agent Logs feature, the process of retrieving logs from anagent has now significantly improved. The logs can now be retrieved without any manualintervention and the log files that assist debugging have more relevant data.
The Get Agent Logs feature enables collecting logs of a single agent at a time. You must logon to the Control Compliance Suite console to retrieve the log files. You must specify a directorywhere you want to save the agent log files.
See “Collecting log files from Agent” on page 22.
Collecting log files from AgentYou can retrieve the log files of an agent from the Agents workspace. You can get agent logsfor Control Compliance Suite Agents with version 12.50.10100.0000 and later. The agent logsare fetched in a zip file.
22New features in Control Compliance Suite 12.5.1About fetching agent logs

The following log files are retrieved when you run the Get Agent Logs task.
Table 1-1
Log FilesOS
■ esmagent.log■ DCInfra/*.*■ DCModule.log■ backups
Windows
■ esmd.log/err■ esmagtd.log/err■ esmmodd.log/err■ esmupdd.log/err■ DCModule.log■ backups
UNIX
Log files under the APU directoryWindows APU
Additionally, the log files with the following extensions will be retrieved - *.log, *.Bak, *.err,*.status, *.input, *.result, *.config.
To collect logs from Agent
Note: Make sure the version of the selected agent is 12.50.10100.0000 or later. If the agentversion is lower than 12.50.10100.0000, theGet Agent Logs option is disabled for that agent.
1 On the CCS console, hover over the Asset System menu, and click Agents.
2 In the Agents workspace, do one of the following:
■ Right-click an agent in the agent list pane and select Get Agent Logs. A message isdisplayed asking you to confirm if you want to proceed with collecting the log files.
Note: You can collect agent logs for one agent at a time. If you select multiple agents,the Get Agent Logs option is disabled.
Note: If you select Get Agent Logs and another instance is already running, then themessage Another instance of the Get Agent Logs task is in progress. Try againafter it is complete is displayed in a pop-up message window and the messageAnother agent management task is in progress. Try again after it is complete isdisplayed in the Management Task Status column.
23New features in Control Compliance Suite 12.5.1About fetching agent logs

■ Select an agent in the Agent List pane for which you want to collect logs and underAgent Tasks, select Get Agent Logs.
Note: If you select multiple agents in the agent list pane, and select Get Agent Logs,the message, You can fetch agent logs for one agent at a time. Ensure that ControlCompliance Suite agent version is 12.5.1 or later is displayed.
You can collect agent logs for one agent at a time. If you select multiple agents, the GetAgent Logs option is disabled. Make sure the version of the selected agent is 12.5.1 orlater.
3 Click Yes.
4 In the Browse For Folder box, select the folder where you want to save the log files andclick OK. To create a new folder, click Make New Folder.
Note: Ensure that the logged-on user has access to the folder selected for saving the logfiles.
The get agent logs activity starts after you select the folder. The get agent logs task runsin the background allowing you to use the CCS console to perform other tasks.
After the Get Agent Logs activity is complete, the status appears in the ManagementTask Status column in the agent list pane.
Note: If you fetch the logs by logging on as a non Control Compliance Suite admin, youcan access the agent log files from the selected folder after the time out duration iscomplete.
A zip file that contains agent logs is created in the directory selected or created in step 3.
An agent can be registered with a CCS manager either with IP address, or Host Name,or FQDN. The naming convention of the agent logs zip file is "<IPAddress/Hostname/FQDN>_DDMMYYYY_HHMMSS". For example,rhel6x86new_19062019_215149. Here the zip is created as per the host name in theControl Compliance Suite console.
What is per asset time-out for data collection?From Control Compliance Suite 12.5.1 onwards, while creating an agentless data collectionjob or an agentless collection-evaluation-reporting job, you can define the maximum time limitwithin which the job must complete data collection on each asset that is within the scope of
24New features in Control Compliance Suite 12.5.1What is per asset time-out for data collection?

the job. We call it Per asset time-out for data collection. If data is not collected within thespecified time limit, data collection for that asset is terminated, and data collection for the nextasset within the scope of the job starts. This feature is supported for the agentless data collectionon Windows assets. In Control Compliance Suite 12.0, Control Compliance Suite 12.0.1, andControl Compliance Suite 12.5, this support is already available for agent-based data collection.
The setting to specify time limit for the data collection activity in a collection-evaluation-reportingjob is already available in CCS. We call it Limit collection duration. Now, additionally, in acollection-evaluation-reporting job, you can also define per asset time-out for data collection.However, these settings are not interdependent. You can use them independently.
Why do I need per asset time-out for data collection?
How do I set per asset time-out for data collection?
How do I decide how much asset timeout I need to set?
Is domain cache build time calculated in per asset time-out?
Why do I need per asset time-out for data collection?You expect a data collection job that you run on the assets in your environment to completeas quickly as possible. In a typical enterprise production environment, you may need to collectdata from thousands of assets. Time required for data collection on each asset varies. Onsome assets, data collection may happen quickly, while on others, it may take longer tocomplete. Hence, you can specify the duration for which you want to run the data collectionjob; you can specify per asset time-out and collect data for assets on which data collectionhappens within that specified time limit. Then, you can identify assets that take longer thanthe specified time-out limit for data collection and run a separate data collection job for suchassets.
The reasons why an asset may take extra time for data collection include but are not limitedto the following:
■ Sometimes, an asset may not be reachable due to network issues. In this case, if you donot specify data collection duration and per asset time-out, the data collection job keepson running unnecessarily only for the asset that is not reachable.
■ If the amount of data that is collected on an asset is huge, data collection takes longer thanexpected.
■ If the machine performance is impaired due to hardware problems, data collection on thatmachine takes longer than expected.
■ If API services that are required for collecting data on an asset do not respond, datacollection job keeps on running if data collection duration is not specified.
25New features in Control Compliance Suite 12.5.1What is per asset time-out for data collection?

Hence, in addition to the sizing guidelines recommended by Symantec and data collectionduration, you must also specify per asset time-out for data collection.
How do I set per asset time-out for data collection?This setting is for data collection on each asset. So, it is available on the following screens:
■ In theCreate or Edit Collection Evaluation Reporting Jobwizard, on the Schedule Jobscreen.
■ In the Create or Edit Data Collection Job wizard, on the Schedule Job screen
In the Per asset time-out for data collection box, type or select the time value in minutes.
How do I decide how much asset timeout I need to set?To help you take an informed decision, from Control Compliance Suite 12.5.1 onwards, weprovide the following information:
■ For a data collection job or a collection-evaluation-reporting job, which is completed, in theData Collection Status window, the Longest Execution Time column and the Entitycolumn are added to the per-asset data collection status records. When you run a collectionor a collection-evaluation-reporting job, internally a set of several queries is run on variousentities (or data sources) for the relevant platform. In the Longest Execution Time column,the longest time consumed for a query execution during the job run is displayed, and inthe Entity column, the name of the entity for which that query is targeted is displayed.
Note: This functionality is supported on all platforms.
See Data Collection Status for more information.
■ On the Job Details screen, on the Messages tab, the name of asset that consumes thelongest execution time during a job run is displayed. The entity that takes the longest timefor query execution on that asset is also displayed. Also, the time that is consumed for thislongest query execution is displayed in the hh:mm:ss format.
Note: This functionality is supported on all platforms.
Based on this information, you can set the per asset time-out for agentless data collection forWindows assets.
26New features in Control Compliance Suite 12.5.1What is per asset time-out for data collection?

Is domain cache build time calculated in per asset time-out?No. Time taken to build domain cache on an asset is not considered in the asset time-out thatyou specify. At first, cache file is created for an asset and then, the data collection time starts.So, until domain cache file is created, the data collection job is pending. To avoid confusionabout time taken to build domain cache and time taken for data collection, you can run a datacollection job on one asset only to build domain cache. This cache file will be valid for datacollection on other assets depending on the domain cache refresh interval, which is 72 hoursby default.
See Frequently asked questions aboutWindows domain cache credentials for more information.
Exporting asset evaluation result details in Excel orCSV file formats
In Control Compliance Suite 12.5.1, a new report template called Asset Evaluation ResultDetails is added to the Report Templates workspace. You can export this report as a MicrosoftExcel spreadsheet or as a .csv file. By generating a report by using this template, you canview complete information about an asset along with the details of checks that are used forits evaluation, and the compliance results. The Asset Evaluation Result Details report containsevaluation records of every asset in the asset group or the asset folder that you select forgenerating the report. The records comprise the following:
Table 1-2 Contents of Asset Evaluation Result Details report
DescriptionComponent
Name of the asset as displayed in the Control Compliance Suite assetsystem.
Asset Name
Name of the check of the predefined technical standard or the customstandard against which an asset is evaluated.
Check Name
Numerical presentation of the outcome of the asset evaluation for the check.The following is the meaning of each number that is displayed in this column:
■ 1: Pass■ 2: Fail■ 3: Unknown■ 4: Not Applicable
Check Outcome
The risk score of the asset that is evaluated.Asset Risk Score
Asset type category under which asset is added or imported to the ControlCompliance Suite asset system.
Asset Type Name
27New features in Control Compliance Suite 12.5.1Exporting asset evaluation result details in Excel or CSV file formats

Table 1-2 Contents of Asset Evaluation Result Details report (continued)
DescriptionComponent
Asset owner as mentioned in the asset-type properties in the ControlCompliance Suite asset system.
Owner
Asset custodian as mentioned in the asset-type properties in the ControlCompliance Suite asset system.
Custodian
Department to which the asset belongs, as mentioned in the asset-typeproperties in the Control Compliance Suite asset system.
Department
Asset location as mentioned in the asset-type properties in the ControlCompliance Suite asset system.
Location
Site to which the asset belongs.Site
Confidentiality Score
Integrity Score
Availability Score
Folder in which the asset is grouped in the Control Compliance Suite assetsystem.
Asset Folder
Date on which the asset is added to the Control Compliance Suite assetsystem.
Created Date
Date on which the asset was modified last.Modified Date
Consolidated Risk Score
Consolidated ComplianceScore
Check description as mentioned on the Check Details page of the TechnicalStandards workspace of Control Compliance Suite.
Description
Remediation details for the check as mentioned in theRemediation sectionon the Check Details page of the Technical Standards workspace ofControl Compliance Suite.
Fix Details
CIA Score
Exempt
Name of the standard to which the check belongs.Standard
Name of the section of the standard to which the check belongsSection Name
28New features in Control Compliance Suite 12.5.1Exporting asset evaluation result details in Excel or CSV file formats

Table 1-2 Contents of Asset Evaluation Result Details report (continued)
DescriptionComponent
Tags that are assigned to the asset, as displayed in the Tags section onthe Asset Details page of the Assets workspace of Control ComplianceSuite.
Tag List
Asset groups to which the asset belongs.Asset Group List
The report that is generated by using the Asset Evaluation Result Details template can beuseful in the following ways:
■ The report provides a holistic view of the evaluation results of the compliance assessmentof the assets that you select for report generation. As listed in the Contents of AssetEvaluation Result Details report table, the report provides evaluation result details at agranular level. These details help you in informed decision making.
■ • You can choose to export this report as a Microsoft Excel spreadsheet or as a .csv file.In both the file formats, you can easily view and effectively manage exhaustive report data.To narrow down the scope of your data search in the report, you can use the filtering optionsprovided by Microsoft Excel or any other program that stores data in tabular format.By using data filters, you can achieve the use cases which include but are not limited tothe following:
■ View the list of all the assets that belong to a particular asset group or all the assets inthe asset system, and on how many assets data collection has been performed till aspecific date or within a specific duration
■ Monitor addition of assets to the asset system on a periodic basis
■ Categorize assets based on their evaluation results and take effective measures toimprove the score of unhealthy assets
■ Calculate average compliance score of assets per predefined or custom technicalstandard
■ View checks against which maximum assets fail during monthly, quarterly, or annualaudits and take informed decisions to improve asset compliance
■ You can create pivot tables based on the extensive data provided in this report. This helpsyou draw viewer’s attention to the useful information. You may want to present the summaryof the asset evaluation result details to your top executives. In this case, this pivoting-friendlyreport helps.
29New features in Control Compliance Suite 12.5.1Exporting asset evaluation result details in Excel or CSV file formats

■ You can use this report as an input file, an .xls or a .csv file, for any data visualization andreporting tool outside of Control Compliance Suite.
To generate the Asset Evaluation Result Details report, you must schedule it from the ReportTemplates workspace. The procedure to schedule this report is same as any other reporttemplate available in the Report Templates workspace.
See Scheduling a report
See Working with reports
Generating Asset Evaluation Result Details report with or withoutevidence informationYou may not be interested in the evidence information in the Asset Evaluation Result Detailsreport. Evidence information can be repetitive and hence, redundant. To avoid filling the reportwith unnecessary information, you may choose to generate this report without evidence details.
To generate the Asset Evaluation Result Details report without evidence information, turn offthe Show Evidence Information on Report setting on the Select Report Details screen ofthe Schedule Report wizard. If you choose to generate this report without evidence details,it can accommodate around a million evaluation records. Thus, you can scale up the capacityof the report by excluding evidence details from report generation. For sizing guidelines forthis reporting job, see the Sizing guidelines for the Asset Evaluation Result Details reportsection in the Help.
Exporting asset evaluation result details in Excel or CSV file formatsYou can export the Asset Evaluation Result Details report as a Microsoft Excel spreadsheetor as a .csv file. To export the Asset Evaluation Result Details report, do the following:
1 In the Schedule Report wizard, complete the procedure till specifying email notificationrecipients, and then click Next.
2 On the Specify Export Details screen, click the Export Report box. The Export Format listis available for selection.
3 Specify the path where you want to save the exported report file on your computer.
4 In the Export Format list, click EXCEL or CSV as per your requirement.
5 Generate the report immediately or schedule the report generation job.
The report file is saved to the specified location on your computer immediately or as per yourjob schedule.
30New features in Control Compliance Suite 12.5.1Exporting asset evaluation result details in Excel or CSV file formats

New Features in ControlCompliance Suite 12.5
This chapter includes the following topics:
■ About offline data collection in Control Compliance Suite 12.5
■ Symantec Control Compliance Suite (CCS) RESTful APIs
■ Frequently Asked Questions (FAQs) about CCSBot
■ About Active Directory attribute support for custom queries
■ About ad-hoc query support for Security: File System (Effective) entity
■ About remediation context details and remediation verification details
About offline data collection in Control ComplianceSuite 12.5
Control Compliance Suite 12.5 introduces the offline data collection feature on Red HatEnterprise Linux agents. This means that you can collect data from an agent that does nothave connectivity with a Control Compliance Suite Manager or any other Control ComplianceSuite component.
Let us consider a use-case where some Control Compliance Suite agents do not haveconnectivity with any other Control Compliance Suite components due to a network outage.You need to assess the assets for compliance. Another use-case is a DMZ (demilitarized zone)setup which is almost never accessible, but the endpoints within that setup still need to beassessed. You need to collect data from such agent-based servers and endpoints todemonstrate compliance to the auditors.
2Chapter

In such use-cases, you can use the offline data collection feature of Control Compliance Suite12.5 to achieve your objective.
The end-to-end workflow for offline data collection involves several steps, some of which mustbe performed manually. For information about the workflow, See “Workflow for offline datacollection” on page 33. or refer to the video at the following location:
Offline Data Collection for Control Compliance Suite 12.5
Registering Linux agent for offline data collectionAn important step before you get started with the offline data collection process, is agentregistration. Although the agents cannot communicate with any CCS Manager, you mustregister your agents in order to import them into the CCS asset system.
Note: If you have a freshly installed or upgraded CCS 12.5 agent that is previously registeredwith a CCS Manager, but has currently lost communication with the CCS Manager due to anetwork outage, you can skip the agent registration step and directly perform offline datacollection for such agents.
To register the Linux agents, use the register command. A new switch -O is introduced forregistering an agent for offline data collection.
Registering an agent for offline data collection
1 Log on to root directory on the agent computer.
2 Go to the following directory:
/esm/bin/<Linux folder>
Example: Your Linux folder may be lnx-x64
3 Run the following command:
./register -O -r -m <Manager Hostname> -N <Agent IP address>
Note: You must specify the hostname of the CCS Manager and not the IP address.
4 After the agent is registered successfully, an XML file is created and the location of the fileis specified. You must copy the .XML file on the CCS Manager.
Example of output of register command:
Agent registration on XML created at '/esm/system/<<Linux machine>>/tmp/BniCkJcI-ZxEL-86BG-18DS-C3MXUhcniCTp.xml
32New Features in Control Compliance Suite 12.5About offline data collection in Control Compliance Suite 12.5

Copying the XML file to CCS ManagerSince there is no Agent to Manager communication, the XML file that is created on the agentcomputer must be copied manually, at the following location on the CCS Manager:
<<CCS Installation Directory>>/ESM/Assets folder.
Next Step: Refresh the agents to fetch the registered agent into the CCS Asset system.
See Running the Fetch Registered Agents job to import the agents into the CCS Asset system.
Next Step: Create an offline data collection job.
See “Creating offline data collection job (for Linux agent)” on page 34.
Workflow for offline data collectionTable 2-1 lists the manual and automatic steps of the offline data collection process.
Table 2-1 Workflow for offline data collection of agents
DetailsTypeStep
Create an offline data collection job and define the jobscope - assets (agents) and standards.
See “Creating offline data collection job (for Linuxagent)” on page 34.
ManualCreate an offline datacollection job
In the Generate Query phase, based on the job scopedata collection queries are generated and an encryptedzip file (.ezf) is created on each agent. The .ezf filemust be copied from the CCS Manager to therespective CCS agent.
AutomaticGenerate Query
Manually copy the .ezf file from the CCS Manager tothe respective CCS agent.
See “Copying the queries file from CCS Manager toLinux agent” on page 35.
ManualCopy queries file to CCSagent
The zip file is extracted, queries are executed, anddata is collected from the agent computer. A resultsfile with .oef extension is created on the agent.
See “Query execution for offline data collection job”on page 36.
AutomaticExecute Query
33New Features in Control Compliance Suite 12.5About offline data collection in Control Compliance Suite 12.5

Table 2-1 Workflow for offline data collection of agents (continued)
DetailsTypeStep
Copy the .oef file created on the CCS agent, back tothe same CCS Manager on which the queries aregenerated.
See “Copying the results file from agent computer toCCS Manager” on page 36.
ManualCopy the results file to theCCS Manager
In the Collect Result phase , the collected data isimported on the CCS Manager and stored in theProduction database. The results may not beprocessed all together. The job can be run in theCollect Result phase several times, until the resultsfrom all the agents are processed.
ManualCollect Result
Once you have collected the results for all the assetsincluded in the scope of the job, you must mark thejob as complete.
Marking an offline data collection job as complete
ManualMark Complete
Supported operating systems for offline data collectionThe offline data collection feature is supported for agent-based assets on the following operatingsystems:
■ RHEL 6.x - x86, x64, & PPC64
■ RHEL 7.x - x86, x64, & PPC64
See “Prerequisites for using the offline data collection” on page 34.
Prerequisites for using the offline data collectionThe prerequisites to enable offline data collection on agent-based assets, are as follows:
■ CCS 12.5
■ SCU 2018-3
See “Supported operating systems for offline data collection” on page 34.
Creating offline data collection job (for Linux agent)After the Linux agent is registered and fetched into the CCS Asset system, you must createan offline data collection job.
34New Features in Control Compliance Suite 12.5About offline data collection in Control Compliance Suite 12.5

To create an offline data collection job
1 On the CCS console, navigate to the Jobs workspace.
2 Right-click and select Set up offline data collection.
3 Select any of the following standards:
■ CIS Red Hat Enterprise Linux 6.x Benchmark v1.2.0
■ CIS Red Hat Enterprise Linux 7.x Benchmark v2.1.1
Note: You can also use a custom standard that you have created for RHEL 6 or 7.
4 Select a Linux agent from the asset list.
5 Click Generate Queries and click Next.
Note: If you do not check Generate Queries, then the job is created but job run is nottriggered immediately. To run the job at a later stage, you can right-click the job and selectGenerate Query.
6 Click Finish. The offline data collection job is triggered to run in the Generate Query mode.A .ezf file is created with queries based on the job scope.
7 Double-click the job and view the job details. Click theMessages tab to view the locationof the queries file. The default location of the .ezf file is:
<<CCS Installation Directory>>\Reporting andAnalytics\DPS\OfflineDataCollection\<<job_name>>\<<agent_name>>
Next Step: Manually copy the queries file with .ezf extension from the CCS Manager to theagent machine.
See “Copying the queries file from CCS Manager to Linux agent” on page 35.
Copying the queries file from CCS Manager to Linux agentThe .ezf queries file is created with queries based on the scope of the offline data collectionjob. One file is created for each offline agent. The file is stored on the CCS Manager loadbalancer at the following location:
<<CCS Installation Directory>>\Reporting and Analytics\DPS\Offline Data Collection\<ODCJob name>\<Agent name>
■ ODC Job name is the name of the offline data collection job.
■ Agent name is the name of the agent on which offline data collection is to be performed.
35New Features in Control Compliance Suite 12.5About offline data collection in Control Compliance Suite 12.5

To manually copy the queries zip file
1 Navigate to the Jobs workspace and click the offline data collection job.
2 On the Jobs - Details page, click the Messages tab.
3 The Details column provides the filename and the path of the .ezf file.
4 Copy the .ezf file from the agent-specific folder on the CCS Manager Load Balancer.
5 Using a suitable FTP client, copy the .ezf file to the following location on the CCS agentcomputer:
/<root>/esm/system/<agent_name>/tmp
See “Query execution for offline data collection job” on page 36.
Next Step: Copying the results file from CCS agent to the CCS Manager.
See “Copying the results file from agent computer to CCS Manager” on page 36.
Query execution for offline data collection jobYou must manually copy the .ezf to a specific location on the CCS agent. The agent polls forthe .ezf file every 60 seconds and when it detects the file, it extracts the zip and executes thedata collection queries to collect data. The .ezf file is replaced with a .oef results file.
Note: After the .ezf file is manually copied on the offline agent, if the .oef results are notgenerated in the next two to three minutes, then you must check if the Symantec CCS Agentservice is down, and restart the service.
Copying the results file from agent computer to CCS ManagerThe .oef results file that is created on the agent computer must be manually copied to thesame CCS Manager (in load balancer role), on which the queries file is generated.
To copy the results file to the CCS Manager
1 Use WinSCP or a similar FTP client to connect to the agent computer.
2 Navigate to the following location:
/<root>/esm/system/<job_name>/tmp
3 Copy the corresponding .oef file to the following location on the CCS Manager:
<CCS Installation Directory>\Reporting and Analytics\DPS\OfflineDataCollection\<jobname>\
36New Features in Control Compliance Suite 12.5About offline data collection in Control Compliance Suite 12.5

Marking an offline data collection job as completeAfter you finish collecting results for all the agents that are part of the job scope, you mustmark the offline data collection job as complete.
To mark the job as complete, right-click the offline data collection job and clickMark Complete.
This signifies the end of the entire cycle of the offline data collection job.
Note:After you mark the job asMark Complete, if you run the offline data collection job again,it is initiated to run in the Generate Query mode.
If you want to view the evaluation results or reports for the offline data collection job, you mustrun the following jobs in the specified sequence:
1. Evaluation job
2. Report Data Synchronization job
3. Report Generation job
About job types
Symantec Control Compliance Suite (CCS) RESTfulAPIs
Symantec Control Compliance Suite (CCS) RESTful APIs enable you to seamlessly integrateyour applications with CCS and customize your code to best suit your requirements. You canalso use these APIs to automate and optimize the CCS workflow. Token-based authenticationis used to grant access to integrating applications to view and execute CCS RESTful APIs.These APIs use standard HTTPS features, and standard HTTPS response status codes toindicate whether a specific HTTPS request is successfully completed. The APIs return datain JSON and XML file formats.
For information about each REST API, see Symantec™ Control Compliance Suite REST APIGuide (version 1.0)
Frequently Asked Questions (FAQs) about CCSBotCCSBot is a chatbot, which is designed to have an automated interactive conversation withyou. CCSBot responds to your chats; provides you the required information about the product;and performs the Control Compliance Suite tasks on your behalf. CCSBot is available fromControl Compliance Suite 12.5 onwards.
To get started with CCSBot, watch CCSBot for Control Compliance Suite 12.5
37New Features in Control Compliance Suite 12.5Symantec Control Compliance Suite (CCS) RESTful APIs

■ See “ What is CCSBot?” on page 38.
■ See “Where do I find CCSBot on the Control Compliance Suite Console?” on page 38.
■ See “How can an Administrator enable settings for CCSBot?” on page 38.
■ See “Do I need an Internet connection to use CCSBot?” on page 39.
■ See “Which additional licenses do I need to buy to use CCSBot?” on page 39.
■ See “How can CCSBot help me?” on page 40.
■ See “ Which languages does CCSBot support?” on page 40.
■ See “Can I chat with CCSBot the way I speak, or do I have to follow any grammar andsyntax?” on page 40.
■ See “Which questions can I ask to the bot?” on page 41.
■ See “Does CCSBot preserve my chat history?” on page 41.
■ See “ Is CCSBot secure?” on page 42.
■ See “Can I open multiple sessions of CCSBot?” on page 42.
■ See “ On which web browsers is CCSBot supported?” on page 42.
■ See “ How does CCSBot work?” on page 43.
■ See “ Does CCSBot use any third-party application?” on page 43.
What is CCSBot?CCSBot is a chatbot, a messenger bot. It is designed to have an automated interactiveconversation with you, a Control Compliance Suite user. CCSBot responds to your chats;provides you the required information about the product; and performs the Control ComplianceSuite tasks on your behalf. So, CCSBot is your personal assistant, virtual assistant, or aconversational agent.
Where do I find CCSBot on the Control Compliance Suite Console?CCSBot is available on the Control Compliance Suite 12.5 web console only. Log on to theweb console, click the CCSBot icon, and start chatting with CCSBot in the chat window thatopens. But wait, the CCSBot chat window opens only after your Control Compliance SuiteAdministrator enables settings for it.
How can an Administrator enable settings for CCSBot?As an Administrator, do the following:
• Select the Enable CCSBot for Web Portal box.
38New Features in Control Compliance Suite 12.5Frequently Asked Questions (FAQs) about CCSBot

To achieve this, do the following:
1. On the Control Compliance Suite thick console, go to Settings > Application Settingsand expand the Application Configuration settings.
2. Click ChatBot.
3. In the right pane, click the Enable CCSBot for Web Portal box.
If you do not enable this CCSBot setting, the following error message is displayed afterthe user clicks the CCSBot icon:
You haven’t enabled CCSBot assistance yet. Contact administrator.
4. Select the AWS region from where the Control Compliance Suite Application Server mustuse the bot service from.
• Select Soap API and enable HTTP settings.
To achieve this, do the following:
1. On the Control Compliance Suite thick console, go to Settings > Deployment View.
2. Right click the Application Server icon in the Core deployment, and then clickEdit Settings.
3. In the Edit Settings dialog box, in the right pane, expand the Application Sever settingslist.
4. Click Integration Services.
5. In the Integration Services Endpoint Configuration section, select SOAP API from thelist of API types.
6. Click the HTTP tab, and then select the Enabled box.
Note: You must restart the Application Server service after you enable this setting.
Do I need an Internet connection to use CCSBot?The Control Compliance Suite Application Server service needs to connect with the Amazonbot services. For this, the computer on which an Application Server is installed must have anInternet connection. However, if you are in the same network as the Application Server, youcan use CCSBot in the intranet environment.
Which additional licenses do I need to buy to use CCSBot?You do not need any additional licenses. CCSBot is available with all the existing licenses thatyou have bought for various Control Compliance Suite modules.
39New Features in Control Compliance Suite 12.5Frequently Asked Questions (FAQs) about CCSBot

How can CCSBot help me?Type your questions in the CCSBot chat window, and CCSBot responds to your questions.After you ask CCSBot the meaning of basic or advanced concepts in Control ComplianceSuite, CCSBot looks for the most relevant content in its repository. The bot then responds toyour question, provides a URL to the relevant Help topic, or a link to a useful video. You canalso command CCSBot to perform a task on your behalf. If you have the required role andpermissions to perform that task, CCSBot completes it on your behalf. If you do not have therequired roles and permissions, you must contact the Administrator. CCSBot can performtasks such as (but not limited to) the following:
■ Create and run a job
■ Schedule a job
■ Edit a job
■ Get information about running jobs
■ Get count of running jobs
■ Abort a job execution
■ Get information about the licensed features in Control Compliance Suite
■ Get information about a specific product update or Security Content Update (SCU) or aPatch Assessment Content Update (PACU)
Which languages does CCSBot support?Currently, CCSBot supports the English language. Please note, CCSBot is a messenger botand not a voice chatbot. Hence, voice recognition support is not available in CCSBot.
Can I chat with CCSBot the way I speak, or do I have to follow anygrammar and syntax?
CCSBot understands your English, the way you speak. It works on the principles of NaturalLanguage Processing (NLP). This means CCSBot can comprehend, interpret, process, andanalyze your natural language.
However, CCSBot is still learning to handle all types of queries a user may ask. We recommendthat you chat with CCSBot considering the following points:
■ Use short sentences and simple English.
■ Avoid using slang.
■ Avoid using abbreviations of words. For example, do not type ‘Wht r d l8est SCU updates?’Type ‘What are the latest SCU updates?’ instead.
40New Features in Control Compliance Suite 12.5Frequently Asked Questions (FAQs) about CCSBot

Which questions can I ask to the bot?You can ask questions similar to the following (The list is not exhaustive):
■ What is an asset?
■ What is an asset group?
■ What is a standard?
■ What is a job?
■ What are tags?
■ What is a routing rule?
■ What is external data integration?
■ What is risk?
■ What is risk management?
■ What are dynamic dashboards?
■ What are licenses?
■ What is exception?
■ What is custom schema?
■ What is Controls Studio?
■ What is a CCS mind map?
■ How to install CCS?
■ How can I install CCS Content?
■ How to install a standalone CCS Manager?
■ How to create a job?
■ How to run an evaluation job?
■ How to schedule a job?
■ How can I edit a job?
Does CCSBot preserve my chat history?After you close the session by closing the CCSBot window, the session history of is lost. Duringan active session, you can use Up Arrow and Down Arrow keys to see previous and laterquestions in the history.
41New Features in Control Compliance Suite 12.5Frequently Asked Questions (FAQs) about CCSBot

Is CCSBot secure?Yes. CCSBot is secure in the following ways:
■ Role-based access controlCCSBot gives you the role-based access control. This means, you must have the requiredroles and permissions in Control Compliance Suite before you ask the bot to perform atask on your behalf.
■ Secure communication between AWS and Control Compliance SuiteThe Control Compliance Suite Application Server uses the Amazon bot services for CCSBot.The communication between the AWS account for Control Compliance Suite and Amazonis secured by using API-based credentials only. Even if any malicious attacker gets accessto the API credentials for the Symantec AWS account, they cannot log on to the SymantecAWS account unless they have access to Control Compliance Suite Web console.Moreover, AWS Lambda function responds to a request coming only from CCSBot. Noother requests are entertained.
■ No access to APIsAn end user of CCSBot does not have access to any APIs used in CCSBot. So, denial ofservice is not practically possible for a malicious attacker.
■ Compliance to GDPRCCSBot does not store any personally identifiable information or share it with AWS.
Can I open multiple sessions of CCSBot?Multiple sessions in the same browser are not supported, and ideally, you won’t require that.But, you can open different instances of CCSBot simultaneously by logging in to the ControlCompliance Suite web console in different browsers. If you try to open another instance ofCCSBot in the same browser, the following error message is displayed:
I am already helping you in another window. I cannot talk to you in two different windows.Please continue using the previous one.
On which web browsers is CCSBot supported?CCSBot is tested on the following web browsers:
■ Mozilla Firefox
■ Google Chrome
■ Internet Explorer
■ Apple Safari
42New Features in Control Compliance Suite 12.5Frequently Asked Questions (FAQs) about CCSBot

How does CCSBot work?CCSBot transmits your text message to the CCS Application server. To respond to yourquestion or command, CCS first interprets the intent of the message by leveraging AWSservices and based on the intent, either responds with the request piece of information, or withan action, or a follow-up query.
Does CCSBot use any third-party application?No.
About Active Directory attribute support for customqueries
In Control Compliance Suite 12.5, data collection support for ad-hoc queries created forWindows platform is further enhanced. Now, you can create queries to collect Active Directoryattribute values for various data types from domain controller target computers. This supportis available for agentless data collection.
An active directory attribute is represented by a descriptor field. A specific value of the descriptorfield defines the attribute that it represents. In the Create or Edit Query wizard, on the SelectEntity & Fields screen, descriptor fields are listed in the Raw Directory Attributes category.Based on data types, the following descriptor fields are available:
■ Boolean
■ String
■ Date
■ Numeric
■ String list
After you select an Active Directory descriptor field, you must define the field by providing theRaw Directory Attribute name for each field that you select. To provide the Raw DirectoryAttribute name, you can do any of the following on the Select Entity & Fields screen:
■ Double click the field.
■ Click a field, and then click the > button.
The Group and the Users entities for the Windows platform support data collection for ActiveDirectory attributes.
If you use Active Directory attributes in a query, you can create query with any of the followingscopes:
43New Features in Control Compliance Suite 12.5About Active Directory attribute support for custom queries

■ Windows Machine: In this scope, only domain controller target computers are displayedin the asset list for query formation.
■ Windows Domain: In this query scope, all users in a domain are included.
See “Creating query using Raw Directory Attributes” on page 44.
Creating query using Raw Directory AttributesTo create an ad-hoc query by using Raw Directory Attributes, refer to the following procedure:
1 On the CCS console, navigate to Standards and Policiesworkspace, and clickQueries.
2 To open the Create or Edit Query wizard, do one of the following:
■ In the Query tasks drop-down list, click Create.
■ Click the ellipsis (…) in the upper right corner of the Queries workspace, and clickCreate.
3 On the Specify Query Details screen, type the name and description, and select thefolder to which you want to save the query.
4 On the Select Entity and Fields screen, select the platform and entity. In the Availablefields pane, expand theRawDirectory Attributes folder, and double-click a field to selectit.
5 Type the Raw Directory Attribute Name in the corresponding field, and then click Save.
Note:Make sure that you enter the correct attribute name against the selected descriptorfield. If you specify an incorrect attribute, the query results show the Not Set or the NoRead Permission error.
6 On the Select Assets screen, select the assets to include in the query scope.
7 On the Specify Result Filter screen, you can configure filters for a query to get only therequired data records.
See Configuring query result filters
8 On the Specify Result Sort Order screen, you can specify the sort order to organize therecords of query results.
See Configuring sort order for query results
9 On the Schedule Job screen, select one of the following:
■ For an immediate job run, click Run Now.
■ For a scheduled run, select Run on and specify the date and time.
44New Features in Control Compliance Suite 12.5About Active Directory attribute support for custom queries

■ For a recurring job run, select Recurrence, and set the recurring schedule.
10 On the Specify Notification & Result Format screen, you can specify the formats inwhich you want to export the query results and the email notifications to be sent on successor failure or query runs.
See Configuring the export of query results
About ad-hoc query support for Security: File System(Effective) entity
In Control Compliance Suite 12.5, you can create ad-hoc queries to collect data about thegroup members. The Group members <list> field is added in the Security: File System(Effective) entity. This support is available for agentless data collection.
See “Creating query using Group Members descriptor options” on page 45.
Creating query using Group Members descriptor optionsTo create an ad-hoc query by using Group Members descriptor options, refer to the followingprocedure:
1 On the CCS console, navigate to Standards and Policiesworkspace, and clickQueries.
2 To open the Create or Edit Query wizard, do one of the following:
■ In the Query tasks drop-down list, click Create.
■ Click the ellipsis (…) in the upper right corner of the Queries workspace, and clickCreate.
3 On the Specify Query Details screen, type the name and description, and select thefolder to which you want to save the query.
4 On the Select Entity and Fields screen, select the following options:
■ Platform: Windows
■ Entity: Security: File System (Effective)
■ Field - Group Members <List>
45New Features in Control Compliance Suite 12.5About ad-hoc query support for Security: File System (Effective) entity

5 Double-click the Group Members <List> field. In the Select Group Member Optionsdialog box, select the appropriate options for the following parameters:
DescriptionOptionsParameter
Retrieves list of direct members only.Direct members onlyMembership Type
Retrieves list of effective members afterresolving the group.
Effective members
Format for account nameDomain/Account (first name)format
Account Name Format
Distinguished name format
Canonical name format
Retrieves no additional information.No additional informationAdditional AccountInformation
Retrieves the full name of the account.Account full name
Retrieves the display name of theaccount.
Account display name
Retrieves only list of groups withoutresolving the group.
Do not expand groupsspecified in Analysis optionsinto members
Expansion of Groups
Retrieves list of members after resolvingthe groups.
Expand all groups intomembers
6 Click Save.
Note: To delete Group member list from the Selected fields list, double-click it.
7 On the Select Assets screen, select the assets to include in the query scope.
8 On the Specify Result Filter screen, you can configure filters for a query to get only therequired data records.
See Configuring query result filters
9 On the Specify Result Sort Order screen, you can specify the sort order to organize therecords of query results.
See Configuring sort order for query results
10 On the Schedule Job screen, select one of the following:
■ For an immediate job run, click Run Now.
46New Features in Control Compliance Suite 12.5About ad-hoc query support for Security: File System (Effective) entity

■ For a scheduled run, select Run on and specify the date and time.
■ For a recurring job run, select Recurrence, and set the recurring schedule.
11 On the Specify Notification & Result Format screen, you can specify the formats inwhich you want to export the query results and the email notifications to be sent on successor failure or query runs.
See Configuring the export of query results
About remediation context details and remediationverification details
Earlier, when you created a SERVICENOW® remediation ticket, the scope or context forremediation was displayed in theActivity field on a SERVICENOW® incident page. Moreover,after the Remediation Verification job was completed, the remediation verification details werealso available in the Activity field on the same SERVICENOW® incident page.
In a typical enterprise environment, thousands of assets are targeted for data collection andevaluation. Remediation context details and remediation verification details for these assetsin the Activity field on a SERVICENOW® incident page would make the incident pagecontent-heavy and make the user scroll through the page to view the details. The requirementwas to make these details available in a separate attachment.
In Control Compliance Suite 12.5, you can choose to attach remediation context details andremediation verification details to a SERVICENOW® remediation ticket. Then, these detailsare not visible in theActivity field of the incident. Instead, only the ticket summary is displayedin this field.
Moreover, earlier, the name of the standard to which the failed checks belonged was notdisplayed in the remediation ticket summary. Now, it is added to the summary.
Remediation context details and remediation verification details are attached in a ZIP file tothe ticket incident. Date and time stamp is also appended to the file name for your convenience.Attachments contain the details in the following file formats:
You can use this file as a ready reference and share with stakeholders for further action.PDF
You can use this file as a code reference and for automation tasks in SERVICENOW®.XML
Refer to the following sections to know more about both the enhancements:
■ About remediation context details as attachment
■ About remediation verification details as attachment
■ Configuring Control Compliance Suite remediation ticket settings
47New Features in Control Compliance Suite 12.5About remediation context details and remediation verification details

■ Creating Control Compliance Suite Ticket
About remediation context details as attachmentRemediation context details provide the scope for remediation, which helps you take informeddecisions to improve the compliance posture of your IT infrastructure. Remediation contextcomprises details about failed checks in a security standard and assets on which checks fail.Earlier, these details were available in the Activity field on a SERVICENOW® incident page.
In Control Compliance Suite 12.5, you can choose to attach the remediation context detailsto the SERVICENOW® ticket. To enable this option, you must select the Attach remediationcontext details (PDF and XML) box on the ServiceNow Ticket tab in the RemediationSettings pane on the Control Compliance Suite console.
See Configuring SERVICENOW® remediation ticket settings
After you choose to remediate assets automatically in an evaluation job or a CER job by usingSERVICENOW® remediation ticketing system, and after you choose to attach the remediationcontext details to a SERVICENOW® ticket, remediation context details are attached to theticket in XML and PDF formats when the ticket is in the in-progress state. You view theremediation context summary in the Activity field on a SERVICENOW® incident page. Thesummary provides the following information:
Table 2-2 Remediation context summary items
DescriptionSummary content
Name of the standard that is used for data collection and evaluation isdisplayed.
Standard Name
Version of the standard is displayed.Standard version
Total number of checks in the standard against which assets are evaluatedfor compliance is displayed.
Total checks in thestandard
Number of failed checks that are considered in a single SERVICENOW®ticket is displayed. SERVICENOW® tickets are created based on the ticketsplitting options that you select on the ServiceNow Ticket tab in theRemediation Settings pane on the CCS console.
See Remediation ticket splitting logic
Failed checks covered inthis ticket
Contents of remediation context details attachmentA remediation context details attachment contains the following information:
48New Features in Control Compliance Suite 12.5About remediation context details and remediation verification details

Table 2-3 Contents of remediation context details attachment
DescriptionSummary content
See Table 2-2Remediation ticketsummary
This is the name of the check against which data collection and evaluationfail on an asset.
Check name
This is the GUID of the check.Check ID
This is the version of the check.Check version
These are the remediation guidelines, which help you take the necessaryaction and achieve the compliance with the failed check.
Remediation details
This is the list of Control Compliance Suite assets on which the check fails.The assets are listed with their respective GUIDs.
Details of assets on whichcheck failed
See About remediation verification details as attachment
About remediation verification details as attachmentAfter the remediation ticket is resolved, the Remediation Verification job is triggered in ControlCompliance Suite, and the ticket is marked as Closed. If the remediation ticket fails duringthis reevaluation of asset data, remediation verification details are generated. These detailsprovide you the necessary guidance to complete the remediation action. Remediation verificationdetails comprise the details about checks that fail even after remediation, security standardused for data collection and evaluation, and assets on which checks fail. Earlier, these detailswere available in the Activity field on a SERVICENOW® incident page.
In Control Compliance Suite 12.5, you can choose to attach the remediation verification detailsto the SERVICENOW® ticket. To enable this option, you must select the Attach remediationcontext details (PDF and XML) box ServiceNow Ticket tab in the Remediation Settingspane on the Control Compliance Suite console.
See Configuring SERVICENOW® remediation ticket settings
After you choose to attach the remediation verification details to the SERVICENOW® ticket,you view the remediation ticket verification summary in theActivity field on a SERVICENOW®incident page. The summary provides the following information:
49New Features in Control Compliance Suite 12.5About remediation context details and remediation verification details

Table 2-4 Remediation ticket verification summary items
DescriptionSummary content
Name of the standard that is used for data collection and evaluation isdisplayed.
Standard Name
Version of the standard is displayed.Standard version
Total number of checks in the standard against which assets are evaluatedfor compliance is displayed.
Total checks in thestandard
Number of checks that fail during reevaluation is displayed.Checks failed duringverification
Contents of remediation verification details attachmentA remediation verification details attachment contains the following information:
Table 2-5 Contents of remediation verification details attachment
DescriptionSummary content
See Table 2-4Remediation ticketsummary
This is the name of the check against which data collection and evaluationfail on an asset.
Check name
This is the GUID of the check.Check ID
This is the version of the check.Check version
This is the list of Control Compliance Suite assets on which the check fails.The assets are listed with their respective GUIDs.
Details of assets on whichcheck failed
See About remediation context details as attachment
Configuring Control Compliance Suite remediation ticket settingsIn Control Compliance Suite 12.5, you can create a remediation ticket locally in theRemediationworkspace. You can use this ticket as a reference in the remediation workflow of your servicedesk. Control Compliance Suite also provides REST APIs that enable you to retrieve andupdate the Control Compliance Suite ticket details. These REST APIs help you integrate thenative ticket details with any third-party ticketing system that you use in your remediationworkflow. Before you create a ticket, you must configure the Control Compliance Suiteremediation ticket settings on the Remediation Settings page.
50New Features in Control Compliance Suite 12.5About remediation context details and remediation verification details

To configure remediation ticket settings
1 On the console, navigate to Settings > Application Settings.
2 In the Application Settings workspace, in the Navigation View pane, click ApplicationConfiguration > Remediation Settings.
3 In the Remediation Settings pane, click the Control Compliance Suite Ticket tab, andprovide the following information:
DetailsField
Select this box if you want the Control Compliance Suite tickets tobe split based on the priority of the ticket.
Split tickets based on the priority ofthe ticket
This field denotes the maximum number of assets that you wantto combine in a single ticket. This number may vary depending onthe severity of the remediation steps, the priority of the ticket, andyour organizational policies.
Note: If you select multiple standards in a CER job and if the Splittickets based on the priority of the ticket box is clear, the ticketcontains checks from multiple standards. Tickets are split basedon the Maximum assets per ticket field only.
Maximum assets per ticket
This field denotes the details of the person who is responsible forremediation action. The value in the field must match one of thefollowing values configured in Control Compliance Suite:
■ User ID■ Email ID■ User name
Ticket assigned to
This field denotes the details of the person who creates theremediation ticket in Control Compliance Suite. The value in thefield must match one of the following values configured in ControlCompliance Suite:
■ User ID■ Email ID■ User name
Ticket created by (Caller ID)
This field denotes the interval (in minutes) after which ControlCompliance Suite checks the change in ticket status and theRemediation Verification job is executed. Default value is 720minutes.
Note: Remediation Verification job is executed only if the ticketstatus is Remediation Performed.
Poll interval (in minutes)
51New Features in Control Compliance Suite 12.5About remediation context details and remediation verification details

See “About remediation context details and remediation verification details” on page 47.
Creating Control Compliance Suite TicketFrom Control Compliance Suite 12.5 onwards, you can create a remediation ticket in ControlCompliance Suite Remediation workspace, and integrate it with any ticketing system tocomplete the closed-loop remediation workflow.
The Control Compliance Suite remediation ticket workflow involves the following steps:
1. User configures remediation settings for Control Compliance Suite Ticket.
2. User does one of the following:
■ Runs one of the following jobs:
■ Collection-Evaluation-Reporting Job
■ Evaluation Job(To create a remediation ticket automatically, you must turn on the Enable AutomaticRemediation Ticketing setting in the Advanced Settings of the job wizard.
■ Creates a remediation ticket manually in the Remediation workspace.
A remediation ticket is created in the Control Compliance Suite production database. Theticket information and the remediation details are stored in the production database inXML format.
3. Any third-party remediation (ticketing) system uses the Get Remediation Ticket Detailsby Ticket Number REST API to extract remediation ticket information from ControlCompliance Suite.
4. User remediates failed checks using the remediation context details from step 3.Remediation is processed by using the third-party remediation system.
5. After remediation is completed, user updates remediation ticket details by using the UpdateRemediation Ticket Details REST API.
6. Control Compliance Suite monitors the ticket status and runs the Remediation Verificationjob only if the status is Remediation Performed. Remediation verification details overwriteremediation context details in the XML file in the production database. Here, it is assumedthat the third-party remediation system enables user to save both the remediation detailsand remediation verification details separately.
7. Based on the remediation verification job results, the ticket is updated in the productiondatabase, and the remediation workflow is completed.
52New Features in Control Compliance Suite 12.5About remediation context details and remediation verification details

Note: Control Compliance Remediation ticket is assigned a unique identifier number inthe ticket table. For example, INCA0000001, INCM0000276, INCX0006734, and so on.The maximum threshold limit of unique ticket identifiers is 260,000,000. This means, theticket after INCZ9999999 will be INCA0000001. Here, it is assumed that the user backsup the required ticket information and remediation context details and purges unwanteddata to avoid duplication.
Control Compliance Suite ticket statusesYou can update the status of a Control Compliance Suite remediation ticket by using theUpdate Remediation Ticket Details REST API . The ticket statuses and their respectivemeanings are listed in the following table:
Table 2-6 Control Compliance Suite ticket statuses
MeaningStatus
Open1
Remediation Performed2
Verified3
Failed4
Not Applicable5
Control Compliance Suite processes remediation tickets only for the ticket statuses mentionedin the earlier table. Status value must be an integer.
Note: The Remediation Verification job is run only after the user updates the ticket status toRemediation Performed.
For more information about updating a ticket status, refer to the following topic:
Update Remediation Ticket Details
See “Configuring Control Compliance Suite remediation ticket settings” on page 50.
53New Features in Control Compliance Suite 12.5About remediation context details and remediation verification details

Understanding SecurityCompliance
This chapter includes the following topics:
■ What is Security Compliance?
■ Achieving the Security Compliance use-case
■ About assets
■ Asset tagging
■ Asset groups
■ Asset types
■ About the management of business assets
■ Active assets
■ About standards
■ About Jobs
■ About reports and dashboards
What is Security Compliance?Organizations are required to comply with federal mandates and regulations, industry standards,and organizational policies. This means there is a continuous need to demonstrate compliance.Symantec™ Control Compliance Suite automates the process of asset discovery, securityassessment across procedural, technical, and third-party controls as also calculating andaggregating risk scores according to defined business thresholds. You can use this informationfor reporting operational and mandate-based compliance, prioritizing remediation and reducing
3Chapter

risk in your data center. Thus CCS consolidates evidence data to provide a complete view ofthe security, compliance, and risk posture.
CCS discovers and identifies misconfigured assets, detects configuration drifts, and evaluatesif systems are secured, configured, and patched according to security standards.
See “Achieving the Security Compliance use-case” on page 55.
Achieving the Security Compliance use-caseThe Security Compliance use-case can be achieved using the automated assessment oftechnical controls and security standards of Control Compliance Suite. It helps you to evaluatethe security posture and compliance status of your enterprise network.
You must complete the following tasks to assess security compliance in your environment:
■ Create asset import reconciliation rules.See “Reconciliation rules and rule types” on page 69.
■ Create asset import job.See “Importing assets” on page 106.
■ Create standards.See “Creating a new standard” on page 197.
■ Configure credentials for imported assets.See “About managing credentials for agent-based targets” on page 181.
■ Set up a data collection job.See “Setting up a data collection job” on page 316.
■ Evaluate the data.See “Running an evaluation job from the Asset System view” on page 159.
■ Schedule and view reports.See “Scheduling a report ” on page 349.See “Viewing a report” on page 355.
About assetsWith reference to Control Compliance Suite, an asset is an object in the organization that hasthe following properties:
■ ValueAn object must have a value in the organization to become an asset. Without a value, theobject is a liability.
■ Owner
55Understanding Security ComplianceAchieving the Security Compliance use-case

The owner of the asset carries the responsibility to secure and maintain the value of theasset.
■ Restricted accessAn asset must also have limited access to safeguard its value. Because an asset has value,some benefit can be derived from its use. Any unlimited access that is granted to assetsimplies zero value.
In a broader perspective, assets fall into the following major non-technical groups:
■ Human capitalPeople assets
■ Financial data■ HR data■ Patent records■ Business plans■ Disaster recovery plans
Information assets
■ Furniture■ Office campus
Physical assets
Control Compliance Suite deals with the technology assets.
Technology assets are important because of the following reasons:
■ They store information.
■ They have role-based access control. People are granted various levels of authority overthese assets.
■ They often control other physical systems.
Primitive technology assets include User accounts, Computers, Printers, Network Infrastructure,and Services. Control Compliance Suite collects data on these primitive assets.
See “Site as scope in asset import” on page 56.
See “Asset folder hierarchy” on page 57.
Site as scope in asset importIn the asset system, the sites are used as scopes to limit the number of assets to be importedinto the asset system. A site is a default scope for asset import for the first time. When youimport the assets for the first time, you must select the Site to which the CCS Manager isassociated, as a scope. The asset import job collects the assets from the configured sites.
56Understanding Security ComplianceAbout assets

Asset folder hierarchyWhen you install Control Compliance Suite, a default hierarchy structure is created to storeobjects in the CCS directory. All objects are stored under the root folder. The root folder holdssubfolders for each object type. With the individual object type folder, you can create ahierarchical structure that best suits your organizational needs to store objects.
In case of the asset system, the objects that are stored in the CCS directory include the assetsand the reconciliation rules.
After installation, the following hierarchical structure is created for storing the assets:
■ Asset System
■ Asset Group templates
After installation, the following hierarchical structure is created for storing the reconciliationrules:
■ Reconciliation Rules
■ Predefined Reconciliation Rules
Predefined platformsControl Compliance Suite lets you collect the asset data in the form of categories that arespecific to the predefined platforms.
Control Compliance Suite supports the data collection, analysis, and reporting on the followingplatforms:
■ Enterprise Security Manager
■ Oracle
■ SQL
■ UNIX
■ Windows
■ Exchange
■ NDS
■ NetWare
■ Cisco
■ VMware
Each predefined platform has certain primary entities. Control Compliance Suite by defaultsupports some of the primary entities of the predefined platforms as asset types. In addition
57Understanding Security ComplianceAbout assets

to the primary entities that the predefined platforms support as asset types, you can createyour own asset types with other primary entities.
The predefined platforms are not extensible.
See “Predefined asset types” on page 60.
See “Probable asset types” on page 61.
Asset taggingControl Compliance Suite provides a mechanism to tag and identify assets for report andscope purposes.
Tagging is a way to define an asset with meta information. Tagging helps you identify assetsin some context that might prove helpful to determine the value of the asset. You can use thetags to filter the assets.
For example, you can create a tag that is called SOX and associate it with a relevant asset.
Asset groupsAn asset group consists of the assets of one or more types. For example, Windows servers,UNIX servers, or Oracle databases can become asset groups.
The asset groups may be created based on various criteria. You can attach the tags to theasset groups and create an asset group that is based on the tags. Similarly, you can createthe asset groups that are based on location, owner, risk rating and so on.
The asset groups are of the following types:
■ Asset groups with assets based on criteriaSee “Asset groups with assets based on criteria” on page 58.
■ Asset groups with specific assetsSee “Asset groups with specific assets” on page 59.
■ Predefined asset group
See “Creating an asset group with assets based on criteria” on page 130.
See “Creating an asset group with specific assets” on page 133.
See “Editing an asset group” on page 153.
Asset groups with assets based on criteriaAn asset group with assets based on criteria is updated with every asset import job if moreassets meet the criteria that is specified in the query. The update to the asset group is done
58Understanding Security ComplianceAsset tagging

on the basis of the criteria of the group. After the import job, the new assets become a part ofthe asset group if they match the dynamic filters of that asset group. At the time of queryexecution, the asset groups are resolved to discrete assets.
The asset groups with assets based on criteria can be created on the basis of the followingcriteria:
■ Common fields of all the asset typesYou can create the asset groups on the basis of the common field values of all the assettypes. The common fields include the asset name, location, department, custodian, owner,tags, and risk rating.
■ Specific fields of the asset type
■ Both
See “Creating an asset group with assets based on criteria” on page 130.
Asset groups with specific assetsYou can create the asset groups with specific assets on the basis of the asset group criteria.
The asset count in these asset groups does not change automatically with the import job. Youmanually add assets to these asset groups.
See “Creating an asset group with specific assets” on page 133.
Asset typesAn asset type is an entity of the platform that the asset system supports for asset import. Forexample, all directories of the Windows platform can be assets. You can categorize assetsinto a single category of an asset type called Windows directory.
By default, the CCS asset system supports certain entities of predefined platforms as assettypes. These asset types are called predefined asset types. You can perform asset importoperation on predefined asset types without any customization.
See “Predefined asset types” on page 60.
The asset system does not support certain entities of the predefined platforms by default. But,the asset system makes these entities available for customization to create custom assettypes. These asset types are called probable asset types.
See “Probable asset types” on page 61.
The asset system lets you create an entirely new platform and define the entity that the newplatform supports. You can use these newly created entity and create a new asset type thatis based on the custom entity. The asset types that are created from the custom platform andcustom entities are custom asset types.
59Understanding Security ComplianceAsset types

See “Custom asset types” on page 62.
Predefined asset typesControl Compliance Suite lets you collect asset data in the form of categories that are specificto the supported platforms. Control Compliance Suite supports the data collection, analysis,and reporting on Windows, UNIX, Oracle, and SQL platforms. To gather platform-specific datafor the purpose of monitoring, Control Compliance Suite lets you select asset types that belongto the supported platforms.
Predefined asset types are based on the entities of predefined platforms.
See “Predefined platforms” on page 57.
In Control Compliance Suite, a platform is defined to be the category to which a group ofentities belong.
A group of fields that define the common functions of the network element form an entity.
Each asset type has some specific primary, mandatory, and optional fields.
The predefined asset types that are associated with the predefined platforms are as follows:
Table 3-1 Predefined asset types
Predefined asset typePlatform
■ ESM AgentEnterprise Security Manager Platform
■ Administrative Groups MS-Exchange■ Exchange Server■ Organization MS-Exchange
Exchange
■ NDS TreeNDS
■ NetWare ServerNetWare
■ Oracle Configured DatabasesOracle Platform
■ SQL Database■ SQL Server
SQL Platform
■ UNIX File■ UNIX Group■ UNIX Machine
UNIX Platform
60Understanding Security ComplianceAsset types

Table 3-1 Predefined asset types (continued)
Predefined asset typePlatform
■ IIS Virtual Directory■ IIS Web Site■ Windows Directory■ Windows Domain■ Windows File■ Windows Group■ Windows Machine■ Windows Share
Windows Platform
■ EndpointGeneral Platform
■ Cisco RoutersCisco Platform
■ VMware ESXi Machines■ VMware vCenter Server
VMware platform
Probable asset typesEntities of predefined platforms that the CCS asset system does not support by default, arecalled as probable asset types. Examples of probable asset types for some platforms are asfollows:
Probable asset typesPlatform
■ Stored Procedure■ Database Users
SQL
UserUNIX
■ Registry■ Service
Windows
In addition to the predefined and probable asset types, Control Compliance Suite lets you usethe Schema Manager view and create your own asset type with the entities that are notsupported by default.
See “Custom asset types” on page 62.
61Understanding Security ComplianceAsset types

Custom asset typesControl Compliance Suite lets you create custom asset types from the custom platforms andcustom entities that you can create from the Schema Manager view.
You can import the assets from the custom asset types in the same way as you import theassets from any other asset type.
Asset types are based on the entities of the platform. In Control Compliance Suite, a platformis defined to be the category to which a group of entities belong. A group of fields that definethe common functions of the network element form an entity.
When you create your own platform and define fields for the platform to create an entity, youcan define an asset type also. The custom asset type imports the data of the fields that aredefined in the custom entity.
About types of business assetsA business asset type represents a group of business assets. A set of shared attributes definesthe type. For example, the asset system provides a new asset type, Business Asset (BA) torepresent all business entities. Types enhance the ease of managing business assets. Forexample, use the type of a business asset to filter business assets or to search for businessassets.
Control Compliance Suite provides the following predefined business asset types:
■ Business Units
■ Business Process
■ Business Application
To manage asset types, you require the following permissions:
■ Permissions of CCS Administrator
■ Privileges that are associated with the Manage Schema task
Use the CCS Administrator role to add user-defined attributes during the creation or edit of abusiness asset type.
System attributes are attributes available to all business assets. A set of predefined attributesdefines every type of business asset. System attributes are also available to custom businessassets.
Control Compliance Suite disallows the following actions on business assets:
■ Remove attributes to edit the business asset type in the asset system.
■ During the edit of a business asset type, mark the user-defined attributes that were addedas mandatory attributes.
62Understanding Security ComplianceAsset types

■ Remove mandatory attributes.
■ Deprecate a custom business asset type as deprecation affects all areas of ControlCompliance Suite.
See “About business assets” on page 139.
See “About the management of business assets” on page 142.
About the management of business assetsUse the asset system in Control Compliance Suite to view and manage business assets.
You manage business assets in the following ways:
■ View business assets.
■ Edit business assets.
■ Delete business assets.
■ Manage associations: Form associations with business or network assets, or removeassociations.Control Compliance Suite makes available the new tasks,Associate Assets andRemoveAssociation.
■ Move business assets.To move a business asset, right-click the business asset in List View, and click MoveAssets.
■ Assign and remove permissions on business assets.
■ Search for business assets.
To view business assets, you require the following permissions:
■ Roles that are associated with the View Asset task
■ Requisite permissions on the business assets
Control Compliance Suite provides you the following view options:
■ View types of business assets.Move your pointer over a business asset in the assets table in List View to see its nameand type.
■ Select an asset group in the assets pane to view the assets in the group in List View.
■ In Asset Management View, select a business asset with associations to view the assetsthat are associated with the selected business asset in List View.
■ Select a folder in Asset Management View to view all assets within the folder in List View.
63Understanding Security ComplianceAbout the management of business assets

■ View the permissions on a business asset.To view the permissions on a business asset, right-click the business asset, and click ViewPermissions or on Common Tasks, click View Permissions.
The Advanced Search functionality of the asset system facilitates the search for a specific setof assets. On the search results, you can perform all those operations that are possible onbusiness assets in the asset system.
The asset system supports the searches that are based on the following criteria:
■ Common attributes like name, owner, department, and location
■ Tags
■ Asset types
■ The properties or attributes that are specific to an asset type as computer name, andapplication name
■ A specific folder or a branch in the directory
See “About business assets” on page 139.
See “About types of business assets” on page 139.
See “Editing business assets” on page 144.
See “Deleting business assets” on page 144.
About business assetsThe asset system in Control Compliance Suite represents the following kinds of assets:
■ Technical and tangible assets as computers and databases.
■ Business assets that are business entities associated with business functions. Businessassets can also be collections of physical assets that represent business entities. Forexample, banks with departments, servers, processes and data centers are businessassets.
Business assets fall into the following categories:
■ Business Units as Investment, Corporate, Consumer, Commercial, or Treasury
■ Departments as Credit Card, Trading, or Retail
■ Business Processes as GRC, Shipment, or Security
The following features characterize business assets:
■ Business assets are unique. The asset system prevents the duplication of a business assetwithin the system.
■ Business assets can be tagged.
64Understanding Security ComplianceAbout the management of business assets

■ A business asset can be available only in one asset folder at a time.
Business assets add value to the organization, and are vulnerable to security threats. Risk isthe possibility of a business incurring loss from security threats. Control Compliance Suiteuses business assets to model risk. Control Compliance Suite associates business assetsand controls to risk objectives. Through associations with policies and questionnaires, businessassets also make the evaluation of compliance possible.
See “About types of business assets” on page 139.
See “About the management of business assets” on page 142.
See “Business assets and asset groups: Differences” on page 152.
About types of business assetsA business asset type represents a group of business assets. A set of shared attributes definesthe type. For example, the asset system provides a new asset type, Business Asset (BA) torepresent all business entities. Types enhance the ease of managing business assets. Forexample, use the type of a business asset to filter business assets or to search for businessassets.
Control Compliance Suite provides the following predefined business asset types:
■ Business Units
■ Business Process
■ Business Application
To manage asset types, you require the following permissions:
■ Permissions of CCS Administrator
■ Privileges that are associated with the Manage Schema task
Use the CCS Administrator role to add user-defined attributes during the creation or edit of abusiness asset type.
System attributes are attributes available to all business assets. A set of predefined attributesdefines every type of business asset. System attributes are also available to custom businessassets.
Control Compliance Suite disallows the following actions on business assets:
■ Remove attributes to edit the business asset type in the asset system.
■ During the edit of a business asset type, mark the user-defined attributes that were addedas mandatory attributes.
■ Remove mandatory attributes.
65Understanding Security ComplianceAbout the management of business assets

■ Deprecate a custom business asset type as deprecation affects all areas of ControlCompliance Suite.
See “About business assets” on page 139.
See “About the management of business assets” on page 142.
Active assetsThe active assets are the assets that are created or updated in the past six months. The AssetSystem view displays the number of active assets in the top right corner of the table pane.
You can configure the period for which the active assets should be displayed. You can specifythe number of days for which the active assets should be displayed in theActiveAssetsConfig.xml. The XML can be found at the <installdir>\CCS\Reporting AndAnalytics\Applications\AssetSystem.
The active assets are displayed only for the following asset types:
■ Windows Machines
■ UNIX Machines
■ ESM Agents
About standardsStandards provide the means for assessing the compliance of an asset. In Control ComplianceSuite, a standard is a hierarchical organizational structure of sections and checks.
Control Compliance Suite makes available a set of predefined standards that are installedalong with the product. These standards are mostly derived from some published guidelinesby established organizations such as CIS or NIST.
The following technical standards are installed along with the base installation:
■ CIS Benchmark v1.1.2 for Red Hat Enterprise Linux 5.0 and 5.1
■ CIS Oracle Database Server 11g Security Benchmark v1.0.1
■ CIS Security Configuration Benchmark For Microsoft Windows Server 2008 and WindowsServer 2008 R2 v1.1.0
■ Security Essentials for Microsoft SQL Server 2008
In addition to the technical standards, you can also install other standards. This standardexecutable is located at: Installset\CCS_Content\Setup.exe..
For a consolidated list of all the predefined CCS standards, click the following click:
http://www.symantec.com/security_response/securityupdates/list.jsp?fid=ccs&pvid=rf#ps
66Understanding Security ComplianceActive assets

You can also create new standards that are based on your specific requirements.
In Control Compliance Suite, the standards hierarchy is explained as follows:
■ A standard contains one or more sections.
■ Each section can further contain other sections or checks.
■ A check is always contained within a section in a standard.
See “About checks” on page 205.
See “Working with standards” on page 197.
About JobsA job is a specified set of operations. Various components of Control Compliance Suite performthese operations sequentially. A job is also called a query with a scope. For example, a querywith a scope in the form of assets in a particular domain is called a job. A job is uniquelydefined.
A job run is a particular instance of any job execution. Expand a job in the Jobs table in BrowseJobs View to see its job run.
Control Compliance Suite provides the following operations on jobs:
■ Create a jobSee “Creating jobs” on page 325.
■ Edit a jobSee “Editing a job” on page 326.
■ Run a job nowSee “Running a job now” on page 328.
■ Schedule a jobSee “Scheduling jobs” on page 326.
■ Delete a jobSee “Deleting jobs” on page 327.
■ Configure desktop notification for a job
■ Refresh the jobs view
■ Cancel a jobSee “Canceling a job run” on page 330.
■ Delete a job runSee “Deleting a job run” on page 331.
67Understanding Security ComplianceAbout Jobs

Select any job and right-click it to see the menu with operations available for the job. Theoptions available are specific to the job type.
Note: To select all the jobs in the jobs list, click the leftmost column header cell below the Myjobs list. To select multiple adjacent jobs in the jobs list, drag across the job rows that you wantto select. To select multiple non-adjacent jobs in the list, hold down Ctrl while selecting thejobs.
The ellipsis (...) icon in the upper-most corner provides the list of common tasks that cab beperformed in the Jobs workspace. Right-clicking a job displays a list of taska that can beperformed on the selected job .
You can even set up a job count. When you set up the job count, you can choose the numberof jobs to be displayed in the Job view. Use Settings > Application Settings > ApplicationCustomizing > Job count to make these changes. Similarly, you can even set up a job runcount.
To expand all the rows of jobs, press Ctrl + Right Arrow.
To collapse all the rows of jobs, press Ctrl + Left Arrow.
Control Compliance Suite does not support the following special characters in a job name:
* ( ) \ / , + " > < ; = #
See “About job filters” on page 334.
About reports and dashboardsControl Compliance Suite (CCS) provides a rich set of presentation-level reports. A report letsyou collect and present the data in a format that conforms to the organizational needs. A reportis a business document that contains a predefined, organized collection of data. A report canbe viewed, printed, or analyzed. You can create and customize reports from the Reportingview. You can schedule the report generation or dashboard update jobs from the Jobs view.You can schedule reports adn dashboard jobs to run at a specified time. If the report supportsthe feature, you can export a report in several formats. Dashboards that are created in theWeb Console are real-time, visual representations of selected key elements for an organization.Dashboards that are created in the Web Console are not scheduled.
Organizations collect vast amounts of information in the course of completing businesstransactions. Management studies the data to make decisions. The Reporting feature givesyou timely information that you need to make informed decisions about the organization.
The reporting database stores the data that is needed for the reports.
See “Working with reports ” on page 348.
68Understanding Security ComplianceAbout reports and dashboards

Importing Assets into CCS
This chapter includes the following topics:
■ Reconciliation rules and rule types
■ Importing assets
■ Working with asset import scenarios
■ Importing assets from a CSV file
■ Importing assets from an ODBC database table
■ Reviewing the assets manually
■ Discovering Networks
■ Discovering Assets
■ Asset groups
■ Performing the tasks in the Assets workspace
■ Performing the asset group tasks
■ Performing the global tasks
■ Performing the asset tasks
■ Exporting CSV headers
■ Remediation
Reconciliation rules and rule typesThe asset reconciliation helps you organize the assets that already exist in the asset store ina logical hierarchy. Reconciliation provides you the flexibility to manage the asset records
4Chapter

conditionally when the records get into the assets system. The reconciliation rule lets theadministrator manage the asset information when imported into the system. A reconciliationrule consists of a condition and an action. A set of actions is executed when the imported assetsatisfies the specified set of conditions.
Reconciliation is based on the priority. A reconciliation rule that is enabled and is at the top inorder, takes highest priority. If the rule is not satisfied, then the second rule takes priority withsucceeding rules, if necessary. If an asset does not satisfy any reconciliation rule, the assetis forwarded to the manual review store. Control Compliance Suite performs the assetreconciliation that is based on some rules. Every rule that you create must be compliant withone of the rule-types that the asset system defines. All the reconciliation rules are displayedin Asset System > Reconciliation Rules view.
Table 4-1 Types of reconciliation rules
Rule descriptionRule type
A Pre rule is executed on the assets that are in the process of import beforethe assets are brought into the assets system.
The Pre rule lets you set a value for a particular asset field. The Pre rulealso lets you discard the asset.
Pre rule
See “Pre rule” on page 77.
An Add rule is executed to add the assets that are in the process of importto the asset system
The Add rule lets you add new assets to the asset system at a specificlocation. The Add rule also lets you add assets to the manual review store.
Add rule
See “Add rule” on page 80.
An Update rule is applied on the existing assets to update their fields withthe values of the assets that in the process of import.
The update rule updates the assets that already exist in the system. Theupdate rule also lets you add assets to the manual review store.
Update rule
See “Update rule” on page 83.
A Post rule is executed at the end in the order of the reconciliation rules.
The Post rule is executed only for the imported asset records for which thereis a corresponding addition or update in the asset system.
Post rule
See “Post rule” on page 88.
Note: Every asset import job must have at least one add or update rule.
In addition to the rules that you can create, Control Compliance Suite also provides predefinedrules. You can use any of the predefined rules to import the assets for the very first time.
See “Predefined reconciliation rules” on page 71.
See “Creating reconciliation rules without manual review” on page 104.
See “Creating reconciliation rules using the manual review” on page 105.
70Importing Assets into CCSReconciliation rules and rule types

Predefined reconciliation rulesTo create an asset import job for the first time, Control Compliance Suite provides predefinedrules. You can use the predefined rules for importing the assets for the first time without creatingcustom reconciliation rules.
See “Asset folder hierarchy” on page 57.
See “Creating the asset folders” on page 136.
Table 4-2 Predefined reconciliation rules
Rule descriptionRule statementRule type
The rule is applicable to all the asset types.
The rule adds all the assets that are beingimported to the asset system if they do notexist already in the system.
The assets are added to the Asset Systemfolder.
IF an asset being imported does not existin the asset system
THEN Add an asset being imported to theAsset System folder
Add Rule
Rule Name: Add asset to theasset system
Add UNIX Machine while importing datafrom Symantec CCS VulnerabilityManager.
IF Device Operating System Subcategoryequals Linux AND UNIX Machine assetdoes not exist where {(Machine Nameequals Device Host Name) OR (IP Addressequals Device IP Address)} THEN CreateUNIX Machine asset using {(MachineName with Device Host Name), (IPAddress with Device IP Address),(Operating System with Device OperatingSystem Type), (Operating Distribution Fieldwith [Undefined]), (Operating SystemVersion with Device Operating SystemVersion)} and place the asset in the AssetSystem folder
Add Rule for VulnerabilityManager
Rule Name: Add UNIXMachine
71Importing Assets into CCSReconciliation rules and rule types

Table 4-2 Predefined reconciliation rules (continued)
Rule descriptionRule statementRule type
Add Windows Machine while importingdata from Symantec CCS VulnerabilityManager.
IF Device Operating System SubcategorycontainsWindows ANDWindowsMachineasset does not exist where {(MachineName equals Device Host Name)OR (HostName (DNS) equals Device Fully QualifiedName)} THEN Create Windows Machineasset using {(Domain/Workgroup Namewith [Undefined]), (Machine Name withDevice Host Name), (OS Major VersionNumber with 0), (OS Minor VersionNumber with 0), (OS Type with DeviceOperating System Type), (Machine IsServer with False), (Machine Is PDC withFalse), (Machine Is BDC with False),(TCP/IP Addresses <LIST> with Device IPAddress), (Host Name (DNS) with DeviceFully Qualified Name)} and place the assetin the Asset System folder
Add Rule for VulnerabilityManager
Rule Name: Add WindowsMachine
The rule is applicable to all the asset types.
The rule checks if the asset that is theprocess of import is in the asset system ornot. If the asset is not in the asset system,it sets the value of the Confidentiality,Integrity, and Availability attributes of theassets to NotDefined.
IF an asset being imported does not existin the asset system
THEN Set the value of the Confidentialityfield as NotDefined
Set the value of the Integrity field asNotDefined
Set the value of the Availability field asNotDefined
Pre Rule
Rule Name: Set CIA valuesbefore adding asset to theasset system.
The rule is applicable to the AdministrativeGroups MS-Exchange asset type only.
The rule checks if the asset that is in theprocess of import is an administrativegroup or not. If the asset is not anadministrative group, the rule discards theasset.
IF object class type does not equalmsExchAdminGroup
THEN discard an asset being imported
Pre Rule for Exchange
Rule Name: Filter ExchangeAdministrative Groups
72Importing Assets into CCSReconciliation rules and rule types

Table 4-2 Predefined reconciliation rules (continued)
Rule descriptionRule statementRule type
The rule is applicable to the ExchangeServer asset type only.
The rule checks if the asset that is in theprocess of import is an Exchange EdgeServer or not. If the asset is an ExchangeServer, the rule discards the asset.
IF object class type does not equalmsExchEdgeServer
THEN discard an asset being imported
Pre Rule for Exchange
Rule Name: Filter ExchangeEdge Servers
The rule is applicable to the UNIX Machineasset type only.
The rule checks if the asset that is in theprocess of import does have specific valueor not. If not then set the value of an assetbeing imported or specified to defaultvalue.
IF the incoming data field does not havevalue
THEN Set the field value of an asset beingimported as specified
Pre Rule for UNIX
Rule Name: Set UNIXmachine SSH port to defaultvalue
The rule is applicable to the UNIX Machineasset type only.
The rule checks if the asset that is in theprocess of import does have specific valueor not. If not then set the value of an assetbeing imported or specified to defaultvalue.
IF the incoming data field does not havevalue
THEN Set the field value of an asset beingimported as specified
Pre Rule for UNIX
Rule Name: Set UNIXmachine SSH version todefault value
The rule is applicable to the OracleConfigured Databases asset type only.
The rule checks if the asset that is in theprocess of import does have specific valueor not. If not then set the value of an assetbeing imported or specified to defaultvalue.
IF the incoming data field does not havevalue
THEN Set the field value of an asset beingimported as specified
Pre Rule for Oracle
Rule Name: Set Oracledatabase connection type todefault value
The rule is applicable to the OracleConfigured Databases asset type only.
The rule checks if the asset that is in theprocess of import does have specific valueor not. If not then set the value of an assetbeing imported or specified to defaultvalue.
IF the incoming data field does not havevalue
THEN Set the field value of an asset beingimported as specified
Pre Rule for Oracle
Rule Name: Set Oracledatabase SSH version todefault value
73Importing Assets into CCSReconciliation rules and rule types

Table 4-2 Predefined reconciliation rules (continued)
Rule descriptionRule statementRule type
The rule is applicable to the OracleConfigured Databases asset type only.
The rule checks if the asset that is in theprocess of import does have specific valueor not. If not then set the value of an assetbeing imported or specified to defaultvalue.
IF the incoming data field does not havevalue
THEN Set the field value of an asset beingimported as specified
Pre Rule for Oracle
Rule Name: Set Oracledatabase port to default value
The rule is applicable to the OracleConfigured Databases asset type only.
The rule checks if the asset that is in theprocess of import does have specific valueor not. If not then set the value of an assetbeing imported or specified to defaultvalue.
IF the incoming data field does not havevalue
THEN Set the field value of an asset beingimported as specified
Pre Rule for Oracle
Rule Name: Set Oracledatabase protocol to defaultvalue
The rule is applicable to the OracleConfigured Databases asset type only.
The rule checks if the asset that is in theprocess of import does have specific valueor not. If not then set the value of an assetbeing imported or specified to defaultvalue.
IF the incoming data field does not havevalue
THEN Set the field value of an asset beingimported as specified
Pre Rule for Oracle
Rule Name: Set Oracledatabase name type todefault value
The rule is applicable to the OracleConfigured Databases asset type only.
The rule checks if the asset that is in theprocess of import does have specific valueor not. If not then set the value of an assetbeing imported or specified to defaultvalue.
IF the incoming data field does not havevalue
THEN Set the field value of an asset beingimported as specified
Pre Rule for Oracle
Rule Name: Set Oracledatabase SSH port to defaultvalue
The rule is applicable to all the asset types.
The rule checks if the asset that in theprocess of import exists in the assetsystem or not. If the asset is in the assetsystem, the rule overwrites the values ofall the existing asset fields with the valuesof the asset being imported.
IF an asset being imported exists in theasset system
THEN update all fields of the existing assetwith the values of the current asset.
Update Rule
Rule Name: Update asset
74Importing Assets into CCSReconciliation rules and rule types

Table 4-2 Predefined reconciliation rules (continued)
Rule descriptionRule statementRule type
The rule is applicable only to the ESMAgent asset type.
The rule checks if the asset that in theprocess of import exists in the assetsystem or not. If the asset exists in theasset system, the rule overwrites thevalues of the fields Host Name, IP Address,and FQDN with the values of the newasset.
The asset records are sent to the manualreview store.
IF an asset being imported exists in theasset system
THEN update only selected fields HostName, IP Address, FQDN of an existingasset with the fields of the asset beingimported. (Manual review enabled)
Update Rule for ESM
Rule Name: Update HostName, IP Address, andFQDN for ESM agents
Update Windows Machine IP Addresswhile importing data from Symantec CCSVulnerability Manager.
IF Windows Machine asset exists where{(Machine Name equals Device HostName)} THEN Update the fields ofWindowsMachine asset with the incomingdata {(TCP/IP Addresses <LIST> withDevice IP Address)}
Update Rule for VulnerabilityManager
Rule Name: UpdateWindowsMachine IP Address
See “Creating reconciliation rules without manual review” on page 104.
See “Creating reconciliation rules using the manual review” on page 105.
Manual reviewControl Compliance Suite lets you review the assets manually before you choose to add theassets to the asset system. The assets that are marked for manual review are added to themanual review store.
The assets form a part of the manual review store in any of the following cases:
■ If you choose to add the assets to the manual review store in the Add Action dialog boxduring the creation of the Add Rule.
■ If you choose to add the assets to the manual review store in the Update Action dialog boxduring the creation of the Update Rule.
■ If the assets do not satisfy any of the reconciliation rules that are associated with the importjob.
■ If you associate more than one Add or Update rule with an asset import job and one of therules marks the assets for manual review.
After the asset is stored in the manual review store, the following actions are possible:
75Importing Assets into CCSReconciliation rules and rule types

■ Edit the import job and add new reconciliation rules.
■ Re-run the reconciliation on the manual review records from the Monitor > Jobs view usingthe Reconcile Records option.
Note:Manual review of assets is not available for the Asset discovery job.
See “Viewing the manual review records” on page 123.
See “Reconciling the manual review records” on page 123.
Asset reconciliationThe asset reconciliation helps you organize the assets that already exist in the asset store ina logical hierarchy. Reconciliation provides you the flexibility to manage the asset recordsconditionally when the records get into the assets system.
A reconciliation rule that you specify in the asset import job decides the action that should betaken on the asset that is being imported.
The reconciliation rules are executed in the following order:
■ Pre ruleSee “Pre rule” on page 77.
■ Add ruleSee “Add rule” on page 80.
■ Update ruleSee “Update rule” on page 83.
■ Post ruleSee “Post rule” on page 88.
The reconciliation process performs the following tasks on the assets that are imported intothe asset system:
■ Perform actions like discarding the asset, setting CIA values before the asset is added tothe asset system.
■ Add the newly discovered assets to the asset store.
■ Update the properties of the assets that already exist.
■ Mark the assets for the manual review that is based on the rule conditions.
See “Reconciliation rules and rule types” on page 69.
See “Creating reconciliation rules without manual review” on page 104.
See “Creating reconciliation rules using the manual review” on page 105.
76Importing Assets into CCSReconciliation rules and rule types

Pre ruleA Pre rule is executed on the assets being imported before the assets are brought into theassets system.
You can select from the following conditions for Pre rule if the rule is created based on theasset type:
Table 4-3 Pre rule conditions based on the asset type
DescriptionPre rule- condition
The specified action is performed on the assets every time.Always
The action is performed only if the asset that is beingimported does not exist already in the asset system.
If an asset being imported does not exist in the assetsystem
The action is performed only if the asset that is beingimported already exists in the asset system.
If an asset being imported exists in the asset system
The action is performed only if the asset field is not set.If the incoming data field does not have value
The action is performed only if the field of the asset thatis being imported has a specified relation with the specifiedvalue
For example, <field> <operator><value>
<Asset Custodian><equals><ABC>
If field of an asset being imported has a relation with aspecified value
You can select from the following conditions for Pre rule if the rule is created based on thedata schema:
Table 4-4 Pre rule conditions based on the data schema
DescriptionPre rule- condition
The specified action is performed on the enity every time.Always
The action is performed only if the asset field is not set.If the incoming data field does not have value
The action is performed only if the field of the asset thatis being imported has a specified relation with the specifiedvalue.
For example, <field> <operator><value>
<Asset ID><equals><ABC>
If field of an asset being imported has a relation with aspecified value
You can select from the following actions for Pre rule if the rule is created based on the assettype:
77Importing Assets into CCSReconciliation rules and rule types

Table 4-5 Pre rule actions based on the asset type
DescriptionPre rule- action
Ignores the asset that is being imported.
The asset is not added to the asset system if no Add Ruleis specified.
Discard an asset being imported
Sets the field value of the asset that is being imported asthe value that you specify.
Lets you select the asset field for which you want to setthe value. You can also specify the value that you want toset.
If you select Asset Tags as the field, you can also selectthe Tag Set Options that work as follows:
■ ClearRemoves all the tags from the asset before the assetis imported to the asset system.
■ AppendAdds the tag to the asset alongwith the existing tagsbefore the asset is imported to the asset system.This option is selected by default. If you do not selectany tag set option, the new tag is appended to theasset.
■ OverwriteReplaces the existing tag with the new tag.
Set the field value of an asset being imported as specified
You can select from the following actions for Pre rule if the rule is created based on the dataschema:
78Importing Assets into CCSReconciliation rules and rule types

Table 4-6 Pre rule actions based on the data schema
DescriptionPre rule- action
Sets the field value of the entity that is being imported asthe value that you specify.
Lets you select the entity field for which you want to setthe value. You can also specify the value that you want toset.
If you select Asset Tags as the field, you can also selectthe Tag Set Options that work as follows:
■ ClearRemoves all the tags from the asset before the assetis imported to the asset system.
■ AppendAdds the tag to the asset alongwith the existing tagsbefore the asset is imported to the asset system.This option is selected by default. If you do not selectany tag set option, the new tag is appended to theasset.
■ OverwriteReplaces the existing tag with the new tag.
Set the field value of an entity being imported as specified
Example for the Pre rule:
If an asset being imported exists in the asset system THEN Set the field value of an assetbeing imported as specified.
This rule condition checks if the asset to be imported exists in the system. If the asset alreadyexists, it sets the value of the selected field for that asset according to the given value.
See “Using a Pre rule to set the values of the common fields” on page 79.
Using a Pre rule to set the values of the common fieldsPre rule is the rule that is executed before the assets are added to the asset system. Use thePre rule to discard the asset before it is added to the asset system or to set the values of thefields before the asset is added. The asset system provides a Predefined rule that sets thevalues of the Confidentiality, Integrity, and Availability fields to NotDefined. The rule is applicableto all the asset types.
Similarly, you can create a Pre Rule to set the values of the common fields.
Consider the following scenario:
Assume, that you want to set the name of the asset owner as xyz before the asset is addedto the asset system.
79Importing Assets into CCSReconciliation rules and rule types

To set the values of the common fields
1 Hover over the Asset System menu, and click Reconciliation Rules.
2 In the Common Tasks list, clickCreate Rule.
3 On the Specify Rule Details screen of the Create or Edit Reconciliation Rule wizard,type the Rule name.
4 In the Rule type drop-down list, click Pre Rule.
5 In the Asset type drop-down list, click the asset type for which you want to create therule.
6 In the Save in box, browse and select the folder where you want to save the rule and clickNext.
7 On the Select Conditions & Actions screen, select Add Condition.
8 In the Condition type list of the Add Condition dialog box, click If an asset beingimported exists in the asset system and click OK.
9 Click Add Action.
10 In the Action type list of the Add Action dialog box, click Set the field value of anexisting asset as specified.
In the Field drop-down list, clickAsset Owner.
Type the Value asxyz and click OK.
11 Click Finish on the Summary screen.
Go to Asset System > Reconciliation Rules. Browse to the folder where you createdthe rule and check if the rule appears in the folder.
See “Using an Add rule to dynamically create asset folders” on page 82.
See “Using an Update rule to update the existing field values” on page 87.
See “Using a Post rule to mark the assets as control points” on page 91.
Add ruleThe Add rule is executed to add the assets being imported to the asset system.
You can select from the following conditions for Add rule if the rule is created based on theasset type:
80Importing Assets into CCSReconciliation rules and rule types

Table 4-7 Add rule condition based on the asset type
DescriptionAdd rule- condition
The action is performed only if the asset that is beingimported does not exist already in the asset system.
If an asset being imported does not exist in the assetsystem
The action is performed only if the field of the asset thatis being imported has a specified relation with the specifiedvalue
For example, <field> <operator><value>
<Asset Custodian><equals><ABC>
If field of an asset being imported has a relation with aspecified value
You can select from the following conditions for Add rule if the rule is created based on thedata schema:
Table 4-8 Add rule condition based on the data schema
DescriptionAdd rule- condition
The action is performed only if the asset that is beingimported does not exist already in the system for the assettype with specified value.
If an asset does not exist
The action is performed only if the field of the entity thatis being imported has a specified relation with the specifiedvalue
For example, <field> <operator><value>
<Asset ID><equals><ABC>
If the incoming data field has a relation with a specifiedvalue
The action is performed only if the asset field is set.If the incoming data field has a value
You can select from the following actions for the Add rule if the rule is created based on theasset type:
Table 4-9 Add rule actions based on the asset type
DescriptionAdd rule- action
Adds the asset that is being imported to the folder that youspecify.
Add an asset being imported to the specified folder
Adds the asset to the manual review store.
See “Manual review” on page 75.
Add to manual review store
81Importing Assets into CCSReconciliation rules and rule types

You can select from the following actions for the Add rule if the rule is created based on thedata schema:
Table 4-10 Add rule actions based on the data schema
DescriptionAdd rule- action
Adds the asset that is being imported to the folder that youspecify.
Create an asset and place the asset in the selected folder
Example for the Add rule:
If field of an asset being imported has a relation with a specified value THEN Add an assetbeing imported to the specified folder.
This rule condition checks the value of the selected field of the asset being imported with theexisting asset. If the value matches the existing asset, it adds the asset to the specified folder.
See “Using an Add rule to dynamically create asset folders” on page 82.
Using an Add rule to dynamically create asset foldersAdd rule is the rule that lets you add the assets to the asset system in a specified folder. TheAdd rule is executed on the assets that are being imported. You can also create foldersdynamically based on the common field values of the assets.
Consider the following scenario:
Assume that you want to categorize the assets of the Oracle Configured Databases based onthe name of the database. The Add rule lets you create the folders dynamically based on thefield value. The assets are then added to the folder that is created based on the field value.
To create asset folders dynamically with an Add rule
1 Hover over the Asset System menu, and click Reconciliation Rules.
2 In the Common Tasks list, clickCreate Rule.
3 On the Specify Rule Details screen of the Create or Edit Reconciliation Rule wizard,type the Rule name.
4 In the Rule type drop-down list, click Add Rule.
5 In the Asset type drop-down list, click Oracle Configured Databases.
6 In the Save in box, browse and select the folder where you want to save the rule and clickNext.
7 On the Select Conditions & Actions screen, select Add Condition.
8 In the Condition type list of the Add Condition dialog box, click If an asset beingimported does not exist in the asset system and click OK.
82Importing Assets into CCSReconciliation rules and rule types

9 Click Add Action.
10 In the Action type list of the Add Action dialog box, click Add an asset being importedto the specified folder.
11 Select a Target folder:
■ Click the Browse (...) button next to the Target folder field, and then in the SelectFolder dialog box, click New.
■ In theCustom Folder dialog box, select Folder based on field value as Folder type.
■ In the Fields list, click Database Name, and then click OK.
ClickOK in the Select Folder dialog box, and then click Next on the Specify Conditions& Actions screen.
12 Click Finish on the Summary screen.
If you add this rule to the asset import job for the Oracle Configured Databases, differentfolders are created with the name of the databases and the assets are added to the properfolders.
Go to Asset System > Reconciliation Rules. Browse to the folder where you createdthe rule and check if the rule appears in the folder.
See “Using a Pre rule to set the values of the common fields” on page 79.
See “Using an Update rule to update the existing field values” on page 87.
See “Using a Post rule to mark the assets as control points” on page 91.
Update ruleUpdate rule is applied on the existing assets to update their fields with the values of the assetsbeing imported.
Table 4-11 Update rule conditions based on the asset type
DescriptionUpdate rule- condition
The action is performed only if the asset that is beingimported already exists in the asset system.
If an asset being imported exists in the asset system
The action is performed if the existing asset field has aspecified relation with the specified value.
For example,<existing asset field> <operator> <value>
If an existing asset field has a relation with a specifiedvalue
The action is performed only if an existing asset field isnot set.
If an existing asset field is not set
83Importing Assets into CCSReconciliation rules and rule types

Table 4-11 Update rule conditions based on the asset type (continued)
DescriptionUpdate rule- condition
The action is performed only if the field of the asset thatis being imported has a specified relation with the specifiedvalue.
For example, <field> <operator><value>
<Asset Custodian><equals><ABC>
If field of an asset being imported has a relation with aspecified value
The action is performed only if the field of an asset that isbeing imported has a specified relation with the field of anexisting asset.
For example, <asset being importedfield><operator><existing asset field>
<Asset Custodian><equals><Asset Owner>
If field of an asset being imported has a relation with anexisting asset field
You can select from the following conditions for the Update rule if the rule is created basedon the data schema:
Table 4-12 Update rule conditions based on the data schema
DescriptionUpdate rule- condition
The action is performed only if the asset that is beingimported already exists in the asset system.
If an asset exists
The action is performed only if the field of the asset thatis being imported has a specified relation with the specifiedvalue.
For example, <field> <operator><value>
<Asset ID><equals><ABC>
If the incoming data field has a relation with a specifiedvalue
84Importing Assets into CCSReconciliation rules and rule types

Table 4-12 Update rule conditions based on the data schema (continued)
DescriptionUpdate rule- condition
The action is performed based on the range values thatyou set.
For example, you can set:
■ Numeric rangeAny valid Integer or decimal (decimal up to 5) value issupported. It also supports negative values.
Note: The value in the From field must be lower thanthe value in the To field.
■ IPv4 Address RangeThe following formats are supported to specify IPaddress ranges:■ IP Address Range
Specify a valid lower and upper range of IPv4Address in the From and To fields, respectively.
■ CIDR NotationClassless Inter-Domain Routing (CIDR) notation isa syntax of specifying IP addresses and theirassociated routing prefix. Specify a CIDR IPaddress.
■ IP Subnet MaskAn IP Subnet mask is a 32-bit number that masksan IP address, and divides the IP address intonetwork address and host address. Specify aSubnet IP and select a Mask.
■ Wildcard NotationYou must specify at least one asterisk (*) as one ofthe octet in the IP address. Only an asterisk (*) issupported as a valid wild card character. Forexample, 10.211.0.* wild card notation getsconverted to 10.211.0.0 and 10.211.0.255 for Fromand To IP addresses, respectively.
If the incoming data field belongs to a specified range
Example of conditions-based Update rule:
IF Windows Machine asset asset exists where {{Asset Location equals Boston}}
ANDMajor Version belongs to specified range where Range type = Numeric, value is between1.0 and 5.0
THEN correlate the incoming data with the asset
85Importing Assets into CCSReconciliation rules and rule types

You can select from the following actions for the Update rule if the rule is created based onthe asset type:
Table 4-13 Update rule actions based on the asset type
DescriptionUpdate rule- action
Sets the field value of an existing asset as that you specify.
Lets you select the asset field for which you want to setthe value. You can also specify the value that you want toset.
If you select Asset Tags as the field, you can also selectthe Tag Set Options that work as follows:
■ ClearRemoves all the tags from the asset before the assetis imported to the asset system.
■ AppendAdds the tag to the asset alongwith the existing tagsbefore the asset is imported to the asset system.This option is selected by default. If you do not selectany tag set option, the new tag is appended to theasset.
■ OverwriteReplaces the existing tag with the new tag.
Set the field value of an existing asset as specified
Replaces the values of the selected fields of an existingasset with the values of the fields of the asset that is beingimported.
Note: This action has a different behavior in case youchoose to update the tags of an asset. This action addsthe new tags of an asset being imported to the tags of theexisting asset. The existing tags remain intact and do notget overwritten.
Update specified fields of an existing asset with the fieldsof the asset being imported
Adds the asset to the manual review store.
See “Manual review” on page 75.
Add to manual review store
You can select from the following actions for the Update rule if the rule is created based onthe data schema:
86Importing Assets into CCSReconciliation rules and rule types

Table 4-14 Update rule actions based on the data schema
DescriptionUpdate rule- action
Correlate means that if there is already an existing assetthat has host name and IP address that is equal to theincoming asset, CCS AM does not add the asset, onlycorrelates the information with the existing asset.
Correlate the incoming data for asset
You can add an action to explicitly set one or more fieldsto a specified value, if the condition it true.
Update the fields of asset with incoming data
See “Using an Update rule to update the existing field values” on page 87.
Using an Update rule to update the existing field valuesThe Update rule lets you update the field values of the existing assets with new values. TheUpdate rule is executed on the existing assets during an asset import job to check the existingfield values.
Consider the following scenario:
Assume that the Operating System of the assets in your enterprise that belongs to the FinanceDepartment, changes from Windows to Linux. You have the asset group based on the tag,Finance Department. The Update rule lets you update the value of the operating system field.
To update the existing field value with an update rule
1 Hover over the Asset System menu, and click Reconciliation Rules.
2 In the Common Tasks list, clickCreate Rule.
3 On the Specify Rule Details screen of the Create or Edit Reconciliation Rule wizard,type the Rule name.
4 In the Rule type drop-down list, click Update Rule.
5 In the Asset type drop-down list, clickWindows Machines.
6 In the Save in box, browse and select the folder where you want to save the rule and clickNext.
7 On the Select Conditions & Actions screen, select Add Condition.
8 In the Condition type list of the Add Condition dialog box, click If an asset beingimported exists in the asset system and click OK.
9 Click Add Action.
87Importing Assets into CCSReconciliation rules and rule types

10 In the Action type list of the Add Action dialog box, click Set the field value of anexisting asset as specified.
In the Field drop-down list, clickOS type.
Type the Value asLinux and click OK.
11 Click Finish on the Summary screen.
Go to Asset System > Reconciliation Rules. Browse to the folder where you createdthe rule and check if the rule appears in the folder.
See “Using a Pre rule to set the values of the common fields” on page 79.
See “Using an Add rule to dynamically create asset folders” on page 82.
See “Using an Update rule to update the existing field values” on page 87.
Post ruleThe Post rule is executed at the end in the order of the reconciliation rules.
You can select from the following conditions for the Post rule if the rule is created based onthe asset type:
Table 4-15 Post rule conditions based on the asset type
DescriptionPost rule- condition
The action is performed only if the asset that is beingimported already exists in the asset system.
If an asset being imported exists in the asset system
The action is performed only if the asset that is beingimported is added in the asset system.
If an asset being imported is added in the asset system
The action is performed only if the asset that is beingimported is updated in the Asset System.
If an asset being imported is updated in the asset system
The action is performed if the field of the existing assethas a specified relation with the specified value.
For example,<existing asset field> <operator> <value>
If an existing asset field has a relation with the specifiedvalue
The action is performed only if an existing asset field isnot set.
If an existing asset field is not set
The action is performed only if the field of the asset thatis being imported has a specified relation with the specifiedvalue.
For example, <field> <operator><value>
<Asset Custodian><equals><ABC>
If field of an asset being imported has a relation with aspecified value
88Importing Assets into CCSReconciliation rules and rule types

Table 4-15 Post rule conditions based on the asset type (continued)
DescriptionPost rule- condition
The action is performed only if the field of an asset that isbeing imported has a specified relation with the field of anexisting asset.
For example, <asset being importedfield><operator><existing asset field>
<Asset Custodian><equals><Asset Owner>
If field of an asset being imported has a relation with anexisting asset field
You can select from the following conditions for the Post rule if the rule is created based onthe data schema:
Table 4-16 Post rule conditions based on the data schema
DescriptionPost rule- condition
The action is performed only if the asset that is beingimported is added/updated in the Asset System.
If asset is resolved
The action is performed only if an existing asset field isnot set.
If the incoming data field does not have value
The action is performed if the field of the existing assethas a specified relation with the specified value.
For example,<existing asset field> <operator> <value>
If the incoming data field has a relation with the specifiedvalue
89Importing Assets into CCSReconciliation rules and rule types

Table 4-16 Post rule conditions based on the data schema (continued)
DescriptionPost rule- condition
The action is performed based on the range values thatyou set.
For example, you can set:
■ Numeric rangeAny valid Integer or decimal (decimal up to 5) value issupported. It also supports negative values.
Note: The value in the From field must be lower thanthe value in the To field.
■ IPv4 Address RangeThe following formats are supported to specify IPaddress ranges:■ IP Address Range
Specify a valid lower and upper range of IPv4Address in the From and To fields, respectively.
■ CIDR NotationClassless Inter-Domain Routing (CIDR) notation isa syntax of specifying IP addresses and theirassociated routing prefix. Specify a CIDR IPaddress.
■ IP Subnet MaskAn IP Subnet mask is a 32-bit number that masksan IP address, and divides the IP address intonetwork address and host address. Specify aSubnet IP and select a Mask.
■ Wildcard NotationYou must specify at least one asterisk (*) as one ofthe octet in the IP address. Only an asterisk (*) issupported as a valid wild card character. Forexample, 10.211.0.* wild card notation getsconverted to 10.211.0.0 and 10.211.0.255 for Fromand To IP addresses, respectively.
If the incoming data field belongs to specified range
Example of conditions-based Post rule:
IF asset is resolved
AND asset type belongs to specified range where Range Type = IPv4 Address, Range Format= IP Address range
AND IP Address is between 10.211.106.100 and 10.211.106.150
THEN associate asset with <business_asset_name> business asset
90Importing Assets into CCSReconciliation rules and rule types

The actions for Post rule are as follows:
You can select from the following actions for the Post rule if the rule is created based on theasset type:
Table 4-17 Post rule actions based on the asset type
DescriptionPost rule- action
Moves the existing asset from its current location to thespecified location in the asset system.
Move an existing asset to the specified folder
Associates an asset with specified business asset.Associate asset with specified business asset
You can select from the following actions for the Post rule if the rule is created based on thedata schema:
Table 4-18 Post rule actions based on data schema
DescriptionCondition
Lets you browse and select a business asset from the assetsystem to associate the asset with.
Associate asset with specified business asset
See “Using a Post rule to mark the assets as control points” on page 91.
Using a Post rule to mark the assets as control pointsThe Post rule lets you move an asset to a specified folder after the asset is added to the assetsystem. The Post rule is executed on the assets that are already a part of the asset system.
Consider the following scenario:
Assume that you have imported the assets for the Oracle Configured Databases. You wantto mark all the assets as control points. You can create a Post rule to mark the assets forOracle Configured Databases as control points.
To create folders dynamically and move assets to the folders
1 Hover over the Asset System menu, and click Reconciliation Rules.
2 In the Common Tasks list, clickCreate Rule.
3 On the Specify Rule Details screen of the Create or Edit Reconciliation Rule wizard,type the Rule name.
4 In the Rule type drop-down list, click Add Rule.
5 In the Asset type drop-down list, click Oracle Configured Databases.
91Importing Assets into CCSReconciliation rules and rule types

6 In the Save in box, browse and select the folder where you want to save the rule and clickNext.
7 On the Select Conditions & Actions screen, select Add Condition.
8 In the Condition type list of the Add Condition dialog box, click If an asset beingimported does not exist in the asset system and click OK.
9 Click Add Action.
10 In theAction type list of theAdd Action dialog box, clickMark an asset being importedas control point for entitlement.
11 Click OK and click Next in the Specify Rule Conditions and Actions panel.
12 Click Finish in the Summary panel.
Go to Asset System > Reconciliation Rules. Browse to the folder where you createdthe rule and check if the rule appears in the folder.
See “Using a Pre rule to set the values of the common fields” on page 79.
See “Using an Add rule to dynamically create asset folders” on page 82.
See “Using an Update rule to update the existing field values” on page 87.
About conditionsWhile creating a reconciliation rule of Pre, Add, Update, or Post type, you select a conditionand a corresponding action. The action that you select is performed on the assets that satisfythe condition.
The conditions and actions for the rules depend on the nature of the rule. The conditions andactions for the rule that is based on the asset type are different than the conditions and actionsfor the rule that is based on the Data schema.
The following tables describe the conditions for the Pre rule created based on asset type andData schema. Pre rule is applied on the assets being imported.
You can select from the following conditions for Pre rule if the rule is created based on theasset type:
Table 4-19 Pre rule conditions based on the asset type
DescriptionPre rule- condition
The specified action is performed on the assetsevery time.
Always
The action is performed only if the asset that isbeing imported does not exist already in the assetsystem.
If an asset being imported does not exist in theasset system
92Importing Assets into CCSReconciliation rules and rule types

Table 4-19 Pre rule conditions based on the asset type (continued)
DescriptionPre rule- condition
The action is performed only if the asset that isbeing imported already exists in the asset system.
If an asset being imported exists in the asset system
The action is performed only if the asset field is notset.
If the incoming data field does not have value
The action is performed only if the field of the assetthat is being imported has a specified relation withthe specified value
For example, <field> <operator><value>
<Asset Custodian><equals><ABC>
If field of an asset being imported has a relation witha specified value
You can select from the following conditions for Pre rule if the rule is created based on thedata schema:
Table 4-20 Pre rule conditions based on the data schema
DescriptionPre rule- condition
The specified action is performed on the enity everytime.
Always
The action is performed only if the asset field is notset.
If the incoming data field does not have value
The action is performed only if the field of the assetthat is being imported has a specified relation withthe specified value
For example, <field> <operator><value>
<Asset ID><equals><ABC>
If the field of an asset being imported has a relationwith a specified value
Add rule is applied on the assets being imported.
You can select from the following conditions for Add rule if the rule is created based on theasset type:
Table 4-21 Add rule condition based on the asset type
DescriptionAdd rule- condition
The action is performed only if the asset that isbeing imported does not exist already in the assetsystem.
If an asset being imported does not exist in theasset system
93Importing Assets into CCSReconciliation rules and rule types

Table 4-21 Add rule condition based on the asset type (continued)
DescriptionAdd rule- condition
The action is performed only if the field of the assetthat is being imported has a specified relation withthe specified value
For example, <field> <operator><value>
<Asset Custodian><equals><ABC>
If field of an asset being imported has a relation witha specified value
You can select from the following conditions for Add rule if the rule is created based on thedata schema:
Table 4-22 Add rule condition based on the data schema
DescriptionAdd rule- condition
The action is performed only if the asset that isbeing imported does not exist already in the systemfor the asset type with specified value.
If an asset does not exist
The action is performed only if the field of the assetthat is being imported has a specified relation withthe specified value
For example, <field> <operator><value>
<Asset ID><equals><ABC>
If the incoming data field has a relation with aspecified value
The action is performed only if the asset field is set.If the incoming data field has a value
The Update rule is applied on the existing assets to update their fields with the values of theassets being imported. Existing assets are the assets that already exist in the asset store.Assets being imported are the assets are the potential assets that could be a part of the assetsystem only after the reconciliation rules are applied on them.
You can select from the following conditions for the Update rule if the rule is created basedon the asset type:
Table 4-23 Update rule conditions based on the asset type
DescriptionUpdate rule- condition
The action is performed only if the asset that isbeing imported already exists in the asset system.
If an asset being imported exists in the asset system
94Importing Assets into CCSReconciliation rules and rule types
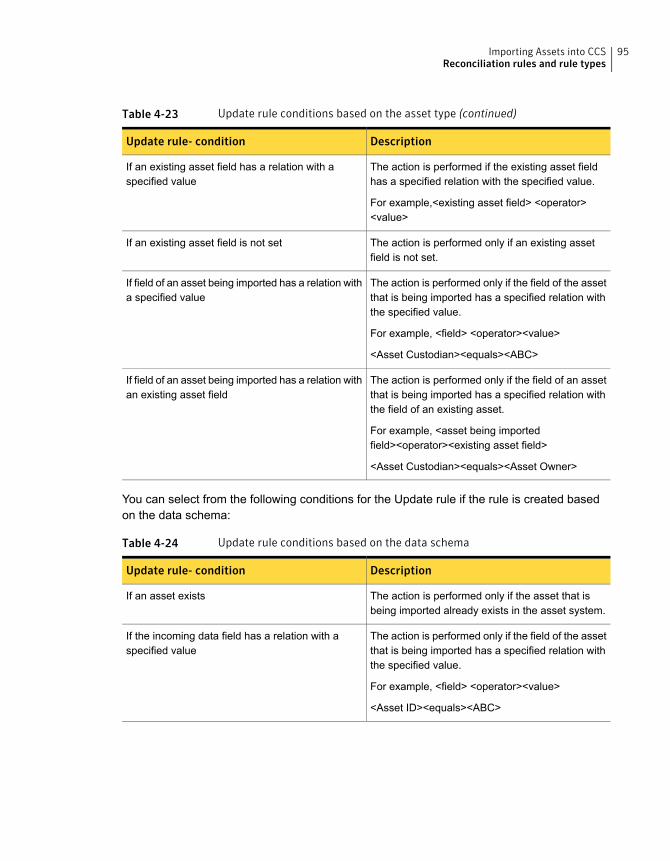
Table 4-23 Update rule conditions based on the asset type (continued)
DescriptionUpdate rule- condition
The action is performed if the existing asset fieldhas a specified relation with the specified value.
For example,<existing asset field> <operator><value>
If an existing asset field has a relation with aspecified value
The action is performed only if an existing assetfield is not set.
If an existing asset field is not set
The action is performed only if the field of the assetthat is being imported has a specified relation withthe specified value.
For example, <field> <operator><value>
<Asset Custodian><equals><ABC>
If field of an asset being imported has a relation witha specified value
The action is performed only if the field of an assetthat is being imported has a specified relation withthe field of an existing asset.
For example, <asset being importedfield><operator><existing asset field>
<Asset Custodian><equals><Asset Owner>
If field of an asset being imported has a relation withan existing asset field
You can select from the following conditions for the Update rule if the rule is created basedon the data schema:
Table 4-24 Update rule conditions based on the data schema
DescriptionUpdate rule- condition
The action is performed only if the asset that isbeing imported already exists in the asset system.
If an asset exists
The action is performed only if the field of the assetthat is being imported has a specified relation withthe specified value.
For example, <field> <operator><value>
<Asset ID><equals><ABC>
If the incoming data field has a relation with aspecified value
95Importing Assets into CCSReconciliation rules and rule types

Table 4-24 Update rule conditions based on the data schema (continued)
DescriptionUpdate rule- condition
The action is performed based on the range valuesthat you set.
For example, you can set:
■ Numeric rangeAny valid Integer or decimal (decimal up to 5)value is supported. It also supports negativevalues.
Note: The value in the From field must be lowerthan the value in the To field.
■ IPv4 Address RangeThe following formats are supported to specifyIP address ranges:■ IP Address Range
Specify a valid lower and upper range of IPv4Address in the From and To fields,respectively.
■ CIDR NotationClassless Inter-Domain Routing (CIDR)notation is a syntax of specifying IPaddresses and their associated routingprefix. Specify a CIDR IP address.
■ IP Subnet MaskAn IP Subnet mask is a 32-bit number thatmasks an IP address, and divides the IPaddress into network address and hostaddress. Specify a Subnet IP and select aMask.
■ Wildcard NotationYou must specify at least one asterisk (*) asone of the octet in the IP address. Only anasterisk (*) is supported as a valid wild cardcharacter. For example, 10.211.0.* wild cardnotation gets converted to 10.211.0.0 and10.211.0.255 for From and To IP addresses,respectively.
If the incoming data field belongs to a specifiedrange
You can select from the following conditions for the Post rule if the rule is created based onthe asset type:
96Importing Assets into CCSReconciliation rules and rule types

Table 4-25 Post rule conditions based on the asset type
DescriptionPost rule- condition
The action is performed only if the asset that isbeing imported already exists in the asset system.
If an asset being imported exists in the asset system
The action is performed only if the asset that isbeing imported is added in the asset system.
If an asset being imported is added in the assetsystem
The action is performed only if the asset that isbeing imported is updated in the Asset System.
If an asset being imported is updated in the assetsystem
The action is performed if the field of the existingasset has a specified relation with the specifiedvalue.
For example,<existing asset field> <operator><value>
If an existing asset field has a relation with thespecified value
The action is performed only if an existing assetfield is not set.
If an existing asset field is not set
The action is performed only if the field of the assetthat is being imported has a specified relation withthe specified value.
For example, <field> <operator><value>
<Asset Custodian><equals><ABC>
If field of an asset being imported has a relation witha specified value
The action is performed only if the field of an assetthat is being imported has a specified relation withthe field of an existing asset.
For example, <asset being importedfield><operator><existing asset field>
<Asset Custodian><equals><Asset Owner>
If field of an asset being imported has a relation withan existing asset field
You can select from the following conditions for the Post rule if the rule is created based onthe data schema:
Table 4-26 Post rule conditions based on the data schema
DescriptionPost rule- condition
The action is performed only if the asset that isbeing imported is added/updated in the AssetSystem.
If asset is resolved
97Importing Assets into CCSReconciliation rules and rule types

Table 4-26 Post rule conditions based on the data schema (continued)
DescriptionPost rule- condition
The action is performed only if an existing assetfield is not set.
If the incoming data field does not have value
The action is performed if the field of the existingasset has a specified relation with the specifiedvalue.
For example,<existing asset field> <operator><value>
If the incoming data field has a relation with thespecified value
98Importing Assets into CCSReconciliation rules and rule types

Table 4-26 Post rule conditions based on the data schema (continued)
DescriptionPost rule- condition
The action is performed based on the range valuesthat you set.
For example, you can set:
■ Numeric rangeAny valid Integer or decimal (decimal up to 5)value is supported. It also supports negativevalues.
Note: The value in the From field must be lowerthan the value in the To field.
■ IPv4 Address RangeThe following formats are supported to specifyIP address ranges:■ IP Address Range
Specify a valid lower and upper range of IPv4Address in the From and To fields,respectively.
■ CIDR NotationClassless Inter-Domain Routing (CIDR)notation is a syntax of specifying IPaddresses and their associated routingprefix. Specify a CIDR IP address.
■ IP Subnet MaskAn IP Subnet mask is a 32-bit number thatmasks an IP address, and divides the IPaddress into network address and hostaddress. Specify a Subnet IP and select aMask.
■ Wildcard NotationYou must specify at least one asterisk (*) asone of the octet in the IP address. Only anasterisk (*) is supported as a valid wild cardcharacter. For example, 10.211.0.* wild cardnotation gets converted to 10.211.0.0 and10.211.0.255 for From and To IP addresses,respectively.
If the incoming data field belongs to specified range
See “Creating reconciliation rules without manual review” on page 104.
See “Creating reconciliation rules using the manual review” on page 105.
See “Viewing the manual review records” on page 123.
99Importing Assets into CCSReconciliation rules and rule types

See “Reconciling the manual review records” on page 123.
About actionsWhile creating a reconciliation rule of Pre, Add, Update, or Post type, you select a conditionand a corresponding action. The action that you select is performed on the assets that satisfythe condition.
Pre rule is applied on the assets being imported.
You can select from the following actions for Pre rule if the rule is created based on the assettype:
Table 4-27 Pre rule actions based on the asset type
DescriptionPre rule- action
Ignores the asset that is being imported.
The asset is not added to the asset system if noAdd Rule is specified.
Discard an asset being imported
Sets the field value of the asset that is beingimported as the value that you specify.
Lets you select the asset field for which you wantto set the value. You can also specify the value thatyou want to set.
If you select Asset Tags as the field, you can alsoselect the Tag Set Options that work as follows:
■ ClearRemoves all the tags from the asset before theasset is imported to the asset system.
■ AppendAdds the tag to the asset alongwith the existingtags before the asset is imported to the assetsystem.This option is selected by default. If you do notselect any tag set option, the new tag isappended to the asset.
■ OverwriteReplaces the existing tag with the new tag.
Set the field value of an asset being imported asspecified
You can select from the following actions for Pre rule if the rule is created based on the dataschema:
100Importing Assets into CCSReconciliation rules and rule types

Table 4-28 Pre rule actions based on the data schema
DescriptionPre rule- action
Sets the field value of the asset that is beingimported as the value that you specify.
Lets you select the asset field for which you wantto set the value. You can also specify the value thatyou want to set.
If you select Asset Tags as the field, you can alsoselect the Tag Set Options that work as follows:
■ ClearRemoves all the tags from the asset before theasset is imported to the asset system.
■ AppendAdds the tag to the asset alongwith the existingtags before the asset is imported to the assetsystem.This option is selected by default. If you do notselect any tag set option, the new tag isappended to the asset.
■ OverwriteReplaces the existing tag with the new tag.
Set the field value of an asset being imported asspecified
The Add rule is applied on the assets being imported.
You can select from the following actions for the Add rule if the rule is created based on theasset type:
Table 4-29 Add rule actions based on the asset type
DescriptionAdd rule- action
Adds the asset that is being imported to the folderthat you specify.
Add an asset being imported to the specified folder
Adds the asset to the manual review store.Add to manual review store
You can select from the following actions for the Add rule if the rule is created based on thedata schema:
101Importing Assets into CCSReconciliation rules and rule types

Table 4-30 Add rule actions based on the data schema
DescriptionAdd rule- action
Adds the asset that is being imported to the folderthat you specify.
Create an asset and place the asset in the selectedfolder
The Update rule is applied on the existing assets to update their fields with the values of theassets being imported. Existing assets are the assets that already exist in the asset store.Assets being imported are the assets are the potential assets that could be a part of the assetsystem only after the reconciliation rules are applied on them.
You can select from the following actions for the Update rule if the rule is created based onthe asset type:
Table 4-31 Update rule actions based on the asset type
DescriptionUpdate rule- action
Sets the field value of an existing asset as that youspecify.
Lets you select the asset field for which you wantto set the value. You can also specify the value thatyou want to set.
If you select Asset Tags as the field, you can alsoselect the Tag Set Options that work as follows:
■ ClearRemoves all the tags from the asset before theasset is imported to the asset system.
■ AppendAdds the tag to the asset alongwith the existingtags before the asset is imported to the assetsystem.This option is selected by default. If you do notselect any tag set option, the new tag isappended to the asset.
■ OverwriteReplaces the existing tag with the new tag.
Set the field value of an existing asset as specified
102Importing Assets into CCSReconciliation rules and rule types

Table 4-31 Update rule actions based on the asset type (continued)
DescriptionUpdate rule- action
Replaces the values of the selected fields of anexisting asset with the values of the fields of theasset that is being imported.
Note: This action has a different behavior in caseyou choose to update the tags of an asset. Thisaction adds the new tags of an asset being importedto the tags of the existing asset. The existing tagsremain intact and do not get overwritten.
Update specified fields of an existing asset with thefields of the asset being imported
Adds the asset to the manual review store.Add to manual review store
You can select from the following actions for the Update rule if the rule is created based onthe data schema:
Table 4-32 Update rule actions based on the data schema
DescriptionUpdate rule- action
Correlate means that if there is already an existingasset that has host name and IP address that isequal to the incoming asset, CCS AM does not addthe asset, only correlates the information with theexisting asset.
Correlate the incoming data for asset
You can add an action to explicitly set one or morefields to a specified value, if the condition it true.
Update the fields of asset with incoming data
You can select from the following actions for the Post rule if the rule is created based on theasset type:
Table 4-33 Post rule actions based on the asset type
DescriptionPost rule- action
Moves the existing asset from its current locationto the specified location in the asset system.
Move an existing asset to the specified folder
Associates an asset with specified business asset.Associate asset with specified business asset
You can select from the following actions for the Post rule if the rule is created based on thedata schema:
103Importing Assets into CCSReconciliation rules and rule types

Table 4-34 Post rule actions based on data schema
DescriptionPost rule -action
Associates an asset with specified business asset.
The Business Asset field lets you browse andselect a business asset from the asset system toassociate the asset with.
Associate asset with specified business asset
Creating reconciliation rules without manual reviewThe creation of reconciliation rules is a crucial step in the asset system workflow. You cancreate the reconciliation rules with the use of the Create or Edit Reconciliation Rules wizard.
To create reconciliation rules
1 Navigate to Asset System > Reconciliation Rules.
2 Click Common Tasks and select Create Rule.
3 In the Specify Rule Details panel of the Create Reconciliation Wizard, type the rulename and select the rule type.
You can select from the following rule types:
■ Pre rule
■ Add rule
■ Update rule
■ Post rulePost rule is not applicable to data schema that you select for external data integration.
4 Select the asset type to associate the rule with.
You can also create the reconciliation rule for all the asset types.
5 Select the data schema to associate the rule with.
You can either select the data schema or the asset type for creating the reconciliationrule.
6 Select the folder to save the reconciliation rule in.
7 Type the description for the reconciliation rule and click Next.
8 In the Select Rule Conditions and Actions panel, click the Add Condition.
9 In the Add Condition dialog box, select a condition from the drop-down list and click OK.
10 In the Select Rule Conditions and Actions panel, click Add Action.
104Importing Assets into CCSReconciliation rules and rule types

11 In the Add Action dialog box, select an action that should be performed on the importedasset when it meets the specified condition and click OK.
12 Click Next in the Select Rule Conditions and Actions panel after you set the conditionand the action.
13 In the Summary panel, review the rule and click Finish.
You can choose to go back and edit the rule any time.
Creating reconciliation rules using the manual reviewManual review is the process of manually reviewing the assets that are imported into thesystem by an import job.
The assets are added into the asset system with the Add Rule. The field values for the newlyimported assets are updated in the asset system with the Update Rule.
The Add and the Update type of reconciliation rules let you mark the assets for manual review.
To create a reconciliation rule using the manual review
1 Navigate to Asset System >Reconciliation Rules.
2 Click Common Tasks and select Create Rule.
3 In the Specify Rule Details panel, type the rule name and select the rule type.
To mark the assets to add to the manual review store, you can select from the followingrule types:
■ Add rule
■ Update rule
4 Select the asset type to associate the rule with.
You can also create the reconciliation rule for all the asset types.
5 Select the folder to save the reconciliation rule in.
6 Type the description for the reconciliation rule and click Next.
7 In the Select Rule Conditions and Actions panel, click the Add Condition icon.
8 In the Add Condition dialog box, select a condition from the drop-down list and click OK.
9 In the Select Rule Conditions and Action panel, click the Add Action icon.
10 In the Add Action dialog box, select Add to manual review store and click OK.
Note:Manual review of assets is not available for the Asset discovery job.
105Importing Assets into CCSReconciliation rules and rule types

11 In the Select Rule Conditions and Actions panel, click Next.
12 In the Summary panel, review the rule and click Finish.
You can choose to go back and edit the rule at any time.
Importing assetsIn the asset system, asset import involves the import of the following data:
■ Data for the asset-specific fieldsAsset-specific fields are the fields that are specific to the asset type that you select to import.See “Predefined asset types” on page 60.
■ Data for the common fieldsCommon fields are the fields that are common across all the asset types.
To import assets, you must select either a default data collector, CSV data collector, or anODBC data collector.
106Importing Assets into CCSImporting assets

Table 4-35 How data collectors work in asset import
How the data collector worksSelected data collector
Asset import from default data collector involves the importfrom the data collection components as well as the CSV datacollector.
■ The default data collector gathers the information about theasset-specific fields from the data collection componentsin the Control Compliance Suite.
Note: The default data collector is not applicable for freshinstallation of CCS.
■ A data collection component is assigned to the import queryinternally, depending on the platform for which the assetimport should be performed. A separate data collector isassigned to each platform for data collection.The data collection components are, Windows datacollector, UNIX data collector, SQL data collector, Oracledata collector, ESM data collector, Exchange data collector,NDS data collector, and NetWare data collector.
Note: For custom platforms, if you select CSV or ODBCdata collector during entity schema creation, then theselected data collector becomes the default data collector.
■ The default data collector gathers information about thecommon fields from the CSV.
■ The data for the common fields is imported from theCommon platform. You must configure the Commonplatformwith a CSV share to import the data for the commonfields of the assets.
Default
■ The CSV data collector gathers the information about theasset-specific fields from a CSV file.
■ The CSV data collector reads from the CSV files that arespecific to platforms. You must create different CSV filesfor different platforms, if you want to import the asset-specificfields data from the CSV file.To know more about configuring the CSV data collector,click on the following link:
■ In addition to the CSV file specific to the platform, you alsoneed the CSV file that is configured for the Commonplatform to import the information about the common fields.
CSV
107Importing Assets into CCSImporting assets
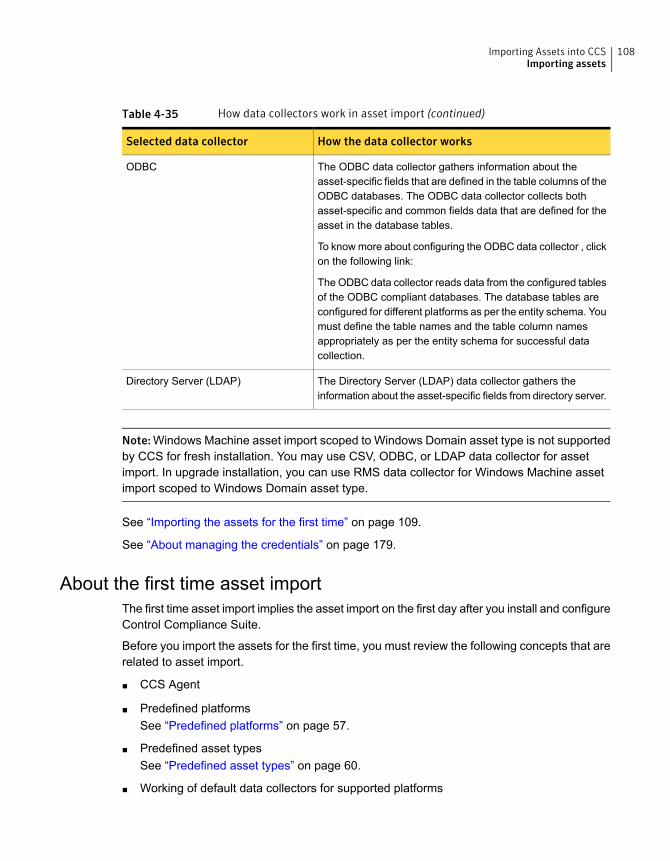
Table 4-35 How data collectors work in asset import (continued)
How the data collector worksSelected data collector
The ODBC data collector gathers information about theasset-specific fields that are defined in the table columns of theODBC databases. The ODBC data collector collects bothasset-specific and common fields data that are defined for theasset in the database tables.
To knowmore about configuring the ODBC data collector , clickon the following link:
The ODBC data collector reads data from the configured tablesof the ODBC compliant databases. The database tables areconfigured for different platforms as per the entity schema. Youmust define the table names and the table column namesappropriately as per the entity schema for successful datacollection.
ODBC
The Directory Server (LDAP) data collector gathers theinformation about the asset-specific fields from directory server.
Directory Server (LDAP)
Note:Windows Machine asset import scoped to Windows Domain asset type is not supportedby CCS for fresh installation. You may use CSV, ODBC, or LDAP data collector for assetimport. In upgrade installation, you can use RMS data collector for Windows Machine assetimport scoped to Windows Domain asset type.
See “Importing the assets for the first time” on page 109.
See “About managing the credentials” on page 179.
About the first time asset importThe first time asset import implies the asset import on the first day after you install and configureControl Compliance Suite.
Before you import the assets for the first time, you must review the following concepts that arerelated to asset import.
■ CCS Agent
■ Predefined platformsSee “Predefined platforms” on page 57.
■ Predefined asset typesSee “Predefined asset types” on page 60.
■ Working of default data collectors for supported platforms
108Importing Assets into CCSImporting assets

Note: The default data collector is not applicable for fresh installation of CCS.
■ Working of CSV data collector in asset import
When you import the assets for the first time, you import the primary assets into the assetsystem.
Note: You might not have the Common platform configured through the CSV settings whenyou import the assets for the first time. In this case, the asset import job does not import thedata for the common fields. You must have at least one data collector configured.
To import the assets for the first time, you can do one of the following:
■ If you are using CCS agent to import the assets, import the CCS agent and assets.
■ If you are not using CCS agent to import the assets, import the assets using the defaultdata sources.See “Importing the assets for the first time” on page 109.
Importing the assets for the first timeWhen you import the assets into the asset system for the first time, the scenario can be asfollows:
■ You have a CCS Manager registered to a site.
■ You have at least one data collector configured.The configuration of the CSV data collector and the configuration of the Common platformthrough CSV settings are optional.
■ You have identified the asset type for which you want to import the assets.
■ You have at least one Add rule created through the reconciliation rule to add the assets ofthe identified asset type in the system.See “Creating reconciliation rules without manual review” on page 104.If you do not have any custom rule, you can use the Add rule from the predefined rules.See “Predefined reconciliation rules” on page 71.
Note: On the first day, if you do not have the CSV data collector configured, the data for thefields that are common across all asset types is not imported. You can set the common fieldsdata later using the reconciliation rules.
See “Using a Pre rule to set the values of the common fields” on page 79.
109Importing Assets into CCSImporting assets

Note: The default data collector is not applicable for fresh installation of CCS.
The asset import involves the following steps:
■ Creating an asset import job
■ Executing the asset import job
To import the assets for the first time
1 Hover over the Assets System menu, and click Assets.
2 In the Asset Tasks drop-down list, click Import Assets.
3 On the Specify Job Details screen, in the Name box, type the name for the import job.
You can optionally type the description for the import job and click Next.
4 On the Define Asset Import Source screen, select the asset type to import the assets,source, and scope of asset import.
Depending upon the asset type and the source that you select, the scope is available asa site or an asset type. For configuring the data source or the assets, click (+) icon andupdate the configurations.
For Directory Server (LDAP), you can only add one data location for a site. If you want toadd another data location for the site then, create another asset import job to import assetsfrom that data location. For example, if you have two data locations ABC and PQR in SiteA, for the current asset import job, you can select data location ABC in Site A. Create anew asset import job to import assets from data location PQR in Site A. If you are upgradingfrom an earlier release to CCS 11.1, the first data location configured in the CCSManagersettings, is considered as the default data location during asset import.
5 In the Add or Edit Configurations dialog box, specify the required information and clickOK.
6 In the Select Asset Import Scope dialog box, select the required assets and click Addand then click OK.
In the Limit Asset Import Scope dialog box, you can select the additional scope fromthe list of the supported scopes and click OK.
Click Next.
7 On the Specify Asset Import Details screen, browse through the assets hierarchy andselect a folder to add the assets from. Click Add to add it as a scope and click Next.
8 On the Specify Asset Import Details screen, you can do the following:
■ Specify folder to import assets
■ Create source hierarchy in asset system
110Importing Assets into CCSImporting assets

■ Perform actions on the decommissioned assets by appending tags to them or bymoving them to a folder
■ In the Select Tags dialog box, select the tag that you want to apply from the list ofthe tags and click Add.
■ In the Select Folder dialog box, select the folder or add a new folder in which youwant to move the assets and click OK.
■ If you want to specify additional rules for asset import, select the Specify additionalasset import rules check box. This displays theSpecify Reconciliation Rules screen.
9 On the Specify Reconciliation Rules screen, you can do one of the following:
■ Use the Add Rule option to add a rule to the import job from the existing rules.The Add Rule option displays the Select Reconciliation Rules dialog box.
■ Use the Delete Rule option to delete the rule that is already added and click Next.
■ Use the Move Up and Move Down options to arrange the rules in an order and clickNext.
10 In the Select Reconciliation Rules dialog box, browse through the Reconciliation Rulesfolder and use the Add option to add the existing reconciliation rules to the import job andclick OK.
11 Click Finish.
12 On the Specify Asset Import Filters screen, you can do one of the following:
■ Use the Edit Selected Statement option to edit the existing filter and click Next.
■ Use the Delete Selected Statement option to delete the existing filter and click Next.
■ Use the Add Statement option to create a new statement.Click the Fields information icon next to the fields drop-down menu to launch theField Information Browser. The Field Information Browser lets you browse throughthe list of fields that are supported in the entity schema for the selected data collector.You can also view the fields and its information to build a meaningful asset field filter.The Add Statement option displays the Create or Edit Filter Statement dialog box.
13 In the Create or Edit Filter Statement dialog box, use the parameter type and theconditions to create a filter statement.
14 In the Schedule panel, click Run now.
15 Click Finish to stop the wizard.
16 In the Specify Notification Details panel, if you want to send the notification of jobcompletion or job failure, do the following:
■ Type the subject and message of the notification mail.
111Importing Assets into CCSImporting assets

■ Type the email ID of the sender and the receiver.
17 Click Finish to stop the wizard.
18 In the Summary panel, review the configurations for the import job and click Finish.
You can go back to the previous panels and edit the configurations any time.
You can go to the Jobs view to monitor the current status of the job.
The asset import job can be in one of the following states:
■ CustomThis state indicates that the state of the asset import job run is Awaiting Manual Review.
■ CompletedThis state indicates that the job is complete.
The asset import job run can be in one of the following states:
■ ExecutingThis state indicates that the job is running.
■ Awaiting manual reviewThis state indicates that the records that are returned by the data collector should bemanually reviewed. The job goes into the Awaiting for manual review status, if thereconciliation rule marks the asset for manual review or if the assets do not satisfy anycondition in the reconciliation rules.See “About the first time asset import” on page 108.
See “About the first time asset import” on page 108.
Scenarios for asset importYou can update existing assets or import secondary assets using the asset import in CCS.
The following table describes different scenarios for asset import to meet your requirements:
112Importing Assets into CCSImporting assets

Table 4-36 Scenarios for asset import
OutputWhat you need to doScenario
Only selected assets getupdated from the givensource.
To achieve this business objective, you needto do the following:
■ Select an asset type■ Select the source from the following list:
■ CSV File■ Database or any other data source
using ODBC connection■ Directory Server■ Network
■ Select assets from the specified source
Updating existing assetsfrom the specified source
Secondary assets getimported.
To achieve this business objective, you needto do the following:
■ Select any of the following asset type:■ IIS Virtual Directory■ IIS Website■ Oracle Configured Database■ SQL Database■ SQL Server■ UNIX File■ UNIX Group■ Windows Directory■ Windows File■ Windows Group■ Windows Share■ Cisco Routers
■ Select Network as the source.■ Select the applicable assets from the
specified source.
Importing secondary assets
Assets get updated fromNetwork. In this case,assets are imported fromDirectory Server (LDAP).For instance, IPaddresses are updatedonly for the scopedassets.
To achieve this business objective, you needto do the following:
■ Select any of Windows machine or UNIXmachine asset type.
■ Select Network as the source.■ Select the applicable assets from the
specified source.
Updating existing assetsfrom the network
113Importing Assets into CCSImporting assets

Working with asset import scenariosAfter you import the primary assets on day zero, you can proceed with the creation of furtherasset import jobs for the secondary assets.
See “About the first time asset import” on page 108.
Table 4-37 Asset import scenarios
Asset import objectiveData collector
The scenarios are as follows:
■ To import the asset-specific fields■ To import the asset-specific and common fields
The import of common fields from the default datacollector involves the configuration of CSV datacollector for Common platform.
Note: The default data collector is not applicable forfresh installation of CCS.
Default data collector
The scenarios are as follows:
■ To import the asset-specific and common fieldsfrom the CSV data collector
■ To import the custom asset-specific fields andcommon fields from the CSV data collector
■ To import only the specific assets manually, onlyonce.
CSV data collector
The scenario is as follows:
■ To import the asset-specific and common fieldsfrom the ODBC data collector
■ To import the custom asset-specific fields andcommon fields from the ODBC data collector.
ODBC data collector
The scenario is as follows:
■ To import the asset-specific and common fieldsfrom the Directory Server
■ To import the custom asset-specific fields andcommon fields from the Directory Server.
Note: The directory server can be configured onlyfor Windows Machine and UNIX Machine assettypes.
Directory Server
114Importing Assets into CCSWorking with asset import scenarios

Importing assets from a CSV fileIn Control Compliance Suite, you can maintain assets in a CSV file, which can be importedinto the infrastructure for data collection. The assets are categorized into various asset types,which are imported into Control Compliance Suite through the Create or Edit Asset Import Jobwizard. The assets of any application can either belong to a predefined asset type or you candefine a new asset type.
See “Predefined asset types” on page 60.
Before performing an asset import operation from a CSV file, you must first export the assetsinto a CSV file. You can use any third-party utility to export the assets into the CSV file. Theassets that are exported into the CSV file must be arranged in a specific format. You mustconfigure the CSV data collector before you import the assets into Control Compliance Suite.
Creating a CSV file for custom applicationA comma-separated value (CSV) file is one of the means to import data into the ControlCompliance Suite. Data is arranged in a specific format in the CSV file for easy interpretationby the infrastructure. A CSV data collector is configured to collect data from the CSV file.Reports of the collected data is generated and displayed in the Control Compliance Suiteconsole. In the CSV file, you must organize data in a comma-separated manner in a specificformat.
For a custom application, you must define an entity, which maps to an asset type. An entity isdefined in the entity schema, which is created using the Create New Entity Schema wizard.The entity schema contains the blueprint of the asset type. The assets that you import caneither belong to any of the predefined asset types or you can create a new asset type. If theassets belong to a predefined asset type, then you must know the details of the fields of thepredefined asset type.
See “Predefined asset types” on page 60.
To create a CSV file
1 Export the data of the custom application into a CSV file.
2 Identify whether the asset type or entity of the custom application belongs to any of thepredefined asset type.
3 If the asset type or entity does not belong to any of the predefined asset type, then identifythe following for the asset type:
■ Platforms
■ Entity
■ Fields
115Importing Assets into CCSImporting assets from a CSV file

4 For a custom application, you must first define an entity schema before creating the CSVfile.
The schema is created using the Create New Entity Schema wizard. In the entity schema,you must specify the primary fields of the entity besides defining the other asset-specificand common fields.
5 Copy the CSV file headers from the Summary panel of the Create New Entity Schemawizard and paste it in the CSV file.
Ensure that the CSV headers are arranged in the supported format. The best practice isto specify the header information of the primary fields as the starting columns in the CSVfile.
For example, you can have a network of servers that are installed with a custom application,DB2 and you want to collect the server name of all the servers. In the entity schema, youcan define the platform as DB2, the entity as Server and the field as Server Name.
The header information for the DB2 application in the CSV file is of the following format:
DB2.Server.ServerName
If the asset type or entity belongs to a predefined asset type or an already defined assettype, then export the CSV headers from the console. The header information of the assettype can be retrieved from the Asset view of the console.
See “Exporting CSV headers” on page 164.
6 Arrange the data of the custom application for the defined CSV headers in the CSV file.
7 Configure the CSV data collector.
See “Creating a CSV file for predefined asset types” on page 116.
Creating a CSV file for predefined asset typesA comma-separated value (CSV) file is one of the means to import data into the ControlCompliance Suite. Data is arranged in a specific format in the CSV file for easy interpretationby the infrastructure. A CSV data collector is configured to collect data from the CSV file.Reports of the collected data is generated and displayed in the Control Compliance Suiteconsole. In the CSV file, you must organize data in a comma-separated manner as per aspecific format.
You can create a CSV file for any custom application or for any of the predefined asset typesof Control Compliance Suite.
See “Creating a CSV file for custom application” on page 115.
116Importing Assets into CCSImporting assets from a CSV file

Note:To import assets of the ESM asset type, Agent, you can use the file, ESMAgentAsset.csv.This file is located in the directory, <install directory>\Symantec\CCS\Reporting andAnalytics\Applications\Data Collectors\ESM.
To create a CSV file
1 Hover over the Asset System menu, and click Assets.
2 On the right-hand side table pane in the Assets workspace, select a predefined assettype from the Display drop-down box.
3 In the Asset Tasks list, click Export CSV Headers.
4 In the Export CSV Headers dialog box, browse and select a location for the CSV file onyour computer, and then click Export Header.
The CSV headers for the selected predefined asset type are exported to a .csv file thatis created instantaneously. The .csv file contains headers for the asset-specific andcommon fields of an asset type.
5 In the CSV file, arrange the assets and the corresponding data of the predefined assettype.
For example, for the predefined asset type, Windows Directory, the data representationof the asset-specific and common fields of the asset type is as follows:
Common.WntDomain.Integrity
Common.WntDomain.Confidentiality
Wnt.Domain.HostName
Wnt.Domain.DomainName
HighHighTest1MachineTestDomain
HighLowTest2MachineTestDomain
6 Import the assets of the predefined asset type through the Create or Edit Asset ImportJob wizard.
See “Predefined asset types” on page 60.
Ensure that you select CSV data collector in theCreate or Edit Asset Import Jobwizard.
About the list field format in CSV fileThe Control Compliance Suite accepts data from the CSV file for data collection only if thedata is specified in a specific format.
If you want to define a string type data, which is an array in the CSV file, then you must ensurethat the data is represented in a specific list field format. Control Compliance Suite does not
117Importing Assets into CCSImporting assets from a CSV file

report on string type array data, which is not specified as per the list field format in the CSVfile.
Control Compliance Suite supports the following list field formats in a CSV file:
■ Multi-line text enclosed in double quotes
■ The format, @:<total number of items in the list>:<char count>:<char text>
For example,@:3:10:TestDomain:7:Domain1:9:ESMDomain
The list field details of the format in the example are as follows:
■ The number, 3 represents the total number of items in the list.The items in the list are, TestDomain, Domain1, and ESMDomain.
■ The number, 10 is the character count of the list item, TestDomain. Similarly, the number,7 is the character count of the list item, Domain1.
■ The character text is the name of the list item such as TestDomain, Domain1, andESMDomain.
Importing assets from an ODBC database tableIn Control Compliance Suite, you can store the asset information in an ODBC database andimport them into the infrastructure for data collection. The assets are categorized into variousasset types and are imported into the infrastructure using the Create or Edit Asset Import Jobwizard. The assets of any application can either belong to a predefined asset type or you candefine a new asset type.
See “Predefined asset types” on page 60.
Before performing an asset import operation from an ODBC database table, ensure that thetable contains the asset information. The database table or view names and the column namesmust be defined in a specific format. The ODBC data collector interprets the database tableor view names to import assets from the tables.
Format to create ODBC compliant database tablesTo import data from the ODBC compliant databases using the ODBC data collector, you mustconfigure the database table as per the defined format. The defined format is easily interpretedby the ODBC data collector for effective data collection. As per the defined format, the tablename or view name and the column names must be mapped with the entity name and thefields, respectively.
The format of the database table naming convention depends on the attributes of the entityschema that you create for an application. Every entity schema is the blue-print for the datacollector to collect data and contains the definition of the platform, entity, and the entity fields.
Configure the ODBC data collector for the custom platform that you define in the entity schema.
118Importing Assets into CCSImporting assets from an ODBC database table

Table 4-38 Mapping between an entity schema attribute and the ODBC database tableelement
DescriptionODBC database elementEntity schema attribute
The database table or view nameis a combination of the platformname and the entity name.
The format of the table or viewname must be in the followingformat:
<platformnameentityname>
Database table or view namePlatform name and entity name
The database table's columnname must be same as the fieldname of the entity.
Database table column nameField name
The format of naming the ODBC database tables are as follows:
■ Format to create database table or view names for all platformsYou manually create the database table or view names based on the attributes of the entityschema. The table or view name is a combination of the platform name and the entityname.The format to create the database table or view names is as follows:platformnameentityname
For example, you want to configure an ODBC data collector for the platform, DB2, whoseentity is Server. As per the defined format, the database table or view name must beDB2Server.
■ Format to create database table or view names for the Common platform onlyThe format to create database table or view names for the Common platform is differentwhen compared to the format for other platforms. The Common platform defines the CIAfield values and by default, is configured for the predefined asset types. Hence, the tableor view name is a combination of the predefined platform name and the entity name.The format to create the database table or view names for the Common platform is asfollows:predefinedplatformnameentityname
For example, you want to configure an ODBC data collector for the Common platform ofa predefined asset type, Windows Machine. For this asset type, the predefined platformis, Wnt and the entity is, Machine. As per the defined format, table or view name for theCommon platform must be WntMachine.
■ Format to create database table column names for all platformsThe fields of an entity that are defined in the entity schema must be the database tablecolumn names.
119Importing Assets into CCSImporting assets from an ODBC database table

For example, you want to configure an ODBC data collector for the platform, UNIX, whoseentity is, Machine. The entity fields are, IPAddress and Hostname for the entity, Machine.As per the defined format, the database table column names must be IPAddress andHostname.
■ Format to create database tables for the predefined platforms and their asset typesYou can create the database tables for the predefined platforms and their asset types usingthe following standard naming convention:predefinedplatformnameentityname
You must use the internal names of the predefined platforms to define the database tablenames or view names. For the predefined platforms, the predefined asset types representthe entities. Hence, you can specify the name of the asset type in place of the entity in thedefined format. For example, for theWindows platform, the internal name is Wnt. The tableor view name for the predefined asset type, Windows Machine is, WntMachine.The predefined platforms and their internal names are as follows:
WntWindows
UnixUNIX
ORCLOracle
DbifSQL
MailadminExchange
NDSNDS
NWNetWare
ESMESM
CiscoCisco
VMwareVMware
You must know the predefined asset types of the predefined platform to define the table nameor view name for the specific asset type.
See “Predefined asset types” on page 60.
If you do not create table name or view name manually as per the entity schema, then youcan use the Entity Table Mapping dialog box. This dialog box lets you map the entities to theexisting database table or view names for the selected platform. You can also map the databasetable column names with the field names of the entities. You use this mapping option only ifthe database table or view names are not compliant with the defined format.
120Importing Assets into CCSImporting assets from an ODBC database table

Creating an ODBC database table for custom applicationThe Control Compliance Suite can import assets of any custom application that are stored inthe ODBC compliant databases. The assets are imported using the configured ODBC datacollector. For example, you can import assets of a custom application such as DB2 using theODBC data collector into the infrastructure. Before you import the assets, you must createasset types for the custom application and store the asset information in the ODBC compliantdatabase.
You must define the asset information of the custom application in a specific format for easyinterpretation by the ODBC data collector.
To create an ODBC database table
1 Export the data of the custom application into the ODBC database tables.
2 Identify whether the asset type or entity of the custom application belongs to any of thepredefined asset type.
See “Predefined asset types” on page 60.
3 If the asset type or entity does not belong to any of the predefined asset type, then identifythe following for the asset type:
■ Platforms
■ Entity
■ Fields
4 For a custom application, you must first define an entity schema before creating thedatabase tables.
The schema is created using theCreate New Entity Schemawizard. In the entity schema,you must specify the primary fields of the entity besides defining the other asset-specificand common fields.
5 Based on the entity that you create, you must create asset types for the custom application.
6 Create tables with table or view names in a specific format combining the platform andthe entity name.
The format is as follows:
<platformnameentityname>
For example, you can have a network of servers that are installed with a custom application,DB2 and you want to collect the server name of all the servers. In the entity schema, youdefine the platform as DB2 and the entity as Server.
One of the table or view name of the ODBC database is as follows:
DB2Server
121Importing Assets into CCSImporting assets from an ODBC database table

7 Arrange the table column names as per the field names that are defined in the entityschema.
For example, you define an entity schema, for platform, DB2, with entity, Server and fields,ServerName, HostName, IPAddress. The database table column names must be sameas the field names.
8 Configure the ODBC data collector.
About the list field format in ODBC database tableThe Control Compliance Suite imports assets and collects data from the ODBC-compliantdatabases, only if the tables and columns are named in a specific format.
If you want to define a string type data, which is an array in the ODBC database table, thenthe data must be represented in a specific list field format. Control Compliance Suite does notreport on string type array data, which is not specified as per the list field format in the ODBCdatabase.
The format of the list fields for the ODBC databases is as follows:
@:<total number of items in the list>:<char count>:<char text>
For example, @:3:10:TestDomain:7:Domain1:9:ESMDomain
The list field details of the format in the example are as follows:
■ The number, 3 represents the total number of items in the list.
■ The items in the list are, TestDomain, Domain1, and ESMDomain.
■ The number, 10 is the character count of the list item, TestDomain. Similarly, the number,7 is the character count of the list item, Domain1.
■ The character text is the name of the list item such as TestDomain, Domain1, andESMDomain.
Reviewing the assets manuallyThe assets that are marked for manual review in the reconciliation rules are added to themanual review store. The assets that do not satisfy any reconciliation rules are also includedin the manual review store.
See “Manual review” on page 75.
See “Creating reconciliation rules using the manual review” on page 105.
You must manually review the records in the manual review store and decide whether therecords should be added to the asset system or not.
The manual review of assets involve the following steps:
122Importing Assets into CCSReviewing the assets manually

■ Viewing the manual review recordsSee “Viewing the manual review records” on page 123.
■ Reconciling the manual review recordsSee “Reconciling the manual review records” on page 123.
Viewing the manual review recordsThe assets that are marked for manual review in the asset import job appear in the Monitor >Jobs view. The status of the job run of the asset import job, that is marked for manual reviewis, Awaiting Manual Review. The parent asset import job, that is marked for manual review is,Custom.
To view the manual review records
1 Access the Jobs workspace.
2 In the table pane, select the asset import job for which you want to view the manual reviewrecords.
3 In the table pane, right-click the job run that displays the status,Awaiting Manual Review.
4 Select Review Records.
View the records in the Review Records - Monitor dialog box.
See “Reconciling the manual review records” on page 123.
Reconciling the manual review recordsAfter viewing the asset records that await the manual review, you can reconcile those assetsagain.
To reconcile the manual review records
1 Access the Jobs workspace.
2 In the table pane, right-click the job run that displays the status Awaiting Manual Review.
123Importing Assets into CCSReviewing the assets manually

3 Select Review Records.
4 In the Review Records - Monitor dialog box, review the records. If you want to executethe add rule or the update rule that is associated with the asset import job on all therecords, click Reconcile Records.
When you reconcile the records, another job run is created in the Jobs view. The statusof the job that was marked as Awaiting Manual Review is not updated. The new job runshows the updated status after the records are reconciled according to the reconciliationrules. You can view the number of job runs in the original job with the status AwaitingManual Review.
When you decide to reconcile the records, the job query ignores the manual review entryin the reconciliation rules. The job query only considers the original rule definition of theadd rule or the update rule. The asset records for manual review are then added to theasset system or the field values are updated depending on the rule.
If you want to add another reconciliation rule to the records that await manual review, youcan edit the parent asset import job. You can then associate a new reconciliation rule withthe job and then reconcile the manual review records.
See “Viewing the manual review records” on page 123.
Discovering NetworksSchedule and run a network discovery job to discover networks in your organization.
To discover a network
1 Hover over the Jobs menu, and click Jobs.
2 In the Jobs workspace, do one of the following:
■ In the Table pane, right-click in the empty space in the grid and select DiscoverNetworks.
■ Click the ellipses icon (...), and in the Tasks list, click Discover Networks.
3 On the Specify Job Details screen, in the Name box, type the name for the discoveryjob.
You can optionally type the description for the discovery job and click Next.
4 On the Specify Network Details screen, specify the network address and subnet maskof the network from which you want to discover the subnets.
Provide the following information on the Specify Network Details screen about thenetwork from which you want to discover the subnets:
■ Network address: Specify the IP address of the network in IPv4 format.You can also specify network address in CIDR notation.
124Importing Assets into CCSDiscovering Networks

For example: 10.216.196.0, 10.216.196.0/24
■ Subnet mask: Specify the subnet mask of the network.
■ Suggest me a CCS Manager: Click to auto select a CCS Manager that is part of thenetwork address range for the specified network.You can also select another CCS Manager from the displayed list.
■ Select CCS Manager: Select a CCS Managers in Data Collection role from thedisplayed list. Ensure that the selected CCSManager can access the specified network.
Click Next.
5 On the Schedule screen, select any one of the following:
■ If you want to run the job after the wizard closes, check Run now.
■ If you want to run the job at a specified interval, check Run periodicallyand enter thefollowing information:
■ In the Start On box, enter the start date and time to run the job.
■ Under Run periodically options, if you want to run the job only one time, select RunOnce. If you want to run the job after specific days, select the number of days inthe Run Every .... Days list box. Click Next.
6 On the Specify Notification Details screen, if you want to send the notification of jobcompletion or job failure, do the following:
■ Type the subject and message of the notification mail.
■ Type the email ID of the sender and the receiver.
7 On the Summary screen, review the configurations for the asset discovery job and clickFinish.
You can go back to the previous screens and edit the configurations any time.
The job is also created if you click Finish. on the Select Network Details screen, theSchedule screen, or theSpecify Notification Details screen.
Go to the Jobs view to monitor the current status of the job.
A Network Asset Group is formed for the networks discovered in a Network Discovery job run.
See “About Network Discovery Job” on page 306.
Editing a network asset groupYou can edit a network asset group that has been automatically created after a NetworkDiscovery job run.
125Importing Assets into CCSDiscovering Networks

To edit a network asset group
1 Hover over the Asset System menu, and click Assets.
2 In theAsset System View pane, clickNetwork Asset Group, and then in the table pane,select a network asset group that you want to edit.
3 Right-click the asset group and select Edit Network Asset Group.
You can also right-click the network asset group from the tree pane and select EditNetwork Asset Group.
The Create or Edit Network Asset Group wizard is dispalyed.
4 On the Specify Network Details screen, edit the selections as you want and completethe wizard.
Note: Only the Subnet mask and the CCS Manager of the network asset group can beedited.
In case the subnet mask of a network asset group is changed, then all assets associatedwith that group are untagged. You must run an asset discovery job on the network againto tag the assets in that network.
Adding a network asset groupNetworks discovered by the Network Discovery job are added to the Network Asset Group.You can also create a network asset group manually from the Asset System workspace.
To add a network asset group
1 Hover over the Asset System menu, and click Assets.
2 In the Asset System View pane, right-click Network Asset Group, and then select AddNetwork.
The Create or Edit Network Asset Group wizard is displayed.
3 On the Specify Network Name screen, provide the name and description for the group.
4 On the Specify Network Details screen, provide the following information:
■ Network address
■ Subnet mask
■ Select CCS Manager
5 View the selections made on the Summary screen and click Finish.
126Importing Assets into CCSDiscovering Networks

Deleting a network asset groupNetwork asset groups that are created by the network discovery job or that are added manuallycan be deleted.
To delete a network asset group
1 Hover over the Asset System menu, and click Assets.
2 In the Asset System View pane, right-click the Network Asset Group that you want todelete.
3 Select Delete Asset Group and click Yes to confirm deletion.
You can also right-click the network asset group from the table pane and select Delete.
See “Editing a network asset group” on page 125.
Renaming a network asset groupYou can rename a network asset group as per your requirement.
To rename a network asset group
1 Hover over the Asset System menu, and click Assets.
2 In the Asset System View pane, right-click the Network Asset Group that you want torename, and select Rename Asset Group
3 In the Rename Asset Group dialog box, type a name as Group name.
4 Click OK.
See “Editing a network asset group” on page 125.
Discovering AssetsTo discover assets from the available networks involves the following steps:
■ Creating an asset discovery job
■ Executing the asset discovery job
To discover the assets
1 Hover over the Asset System menu, and click Assets.
2 Do one of the following to open the Create or Edit Asset Discovery Job wizard.
■ On the taskbar, in the Asset Tasks list, clickDiscover Assets.
■ Right-click in the empty space in the table pane and select Discover Assets.
■ On the Jobs workspace, do one of the following:
127Importing Assets into CCSDiscovering Assets

■ On the taskbar, from Common tasks select Discover Assets.
■ In the table pane, right-click in the empty space in the grid and select DiscoverAssets.
■ On the Tasks menu, select Discover Assets.
3 On the Specify Job Details screen, in the Name box, type the name for the discoveryjob.
You can optionally type the Description for the discovery job and click Next.
4 On the Select Network screen, select the network fromwhich you want to discover assets.
The network address and the subnet mask of all the discovered networks are listed in thispanel. You can also search for a specific network or subnet mask using the Search option.
Click Next.
5 On the Select Asset Import Options screen, you can do the following:
■ Specify folder to import the discovered assets.
■ Perform actions on the decommisioned assets by appending tags to them or by movingthem to a folder:
■ In the Select Tags dialog box, select the tag that you want to apply from the list ofthe tags and click Add.
■ In the Select Folder dialog box, select the folder or add a new folder in which youwant to move the assets and click OK.
■ SelectAuto-populate the Machine Name field with the IP address, in case themachine name is not available check box.Enable auto population of Host Name field with the IP Address of the asset. In casethe host name is not discovered for some reason then you can choose to treat the IPaddress as the host name, by enabling this option.
■ Select the Specify additional asset import rules check box.If you select to specify additional asset import rules, then the Add ReconciliationRules screen is displayed.
6 On the Specify Reconciliation Rules screen, you can do one of the following:
■ Use the Add Rule option to add a rule to the import job from the existing rules.The Add Rule option displays the Select Reconciliation Rules dialog box.
■ Use the Delete Rule option to delete the rule that is already added and click Next.
■ Use the Move Up and Move Down options to arrange the rules in an order and clickNext.
7 On the Schedule Job screen, select any one of the following:
128Importing Assets into CCSDiscovering Assets

■ If you want to run the job after the wizard closes, check Run now.
■ If you want to run the job at a specified interval, check Run periodicallyand enter thefollowing information:
■ In the Start On box, enter the start date and time to run the job.
■ Under Run periodically options, if you want to run the job only one time, select RunOnce. If you want to run the job after specific days, select the number of days inthe Run Every <Number of days> Days list box. Click Next.
8 On the Specify Notification Details screen, if you want to send the notification of jobcompletion or job failure, do the following:
■ Type the subject and message of the notification mail.
■ Type the email ID of the sender and the receiver.
9 In the Summary panel, review the configurations for the asset discovery job and clickFinish..
You can go back to the previous panels and edit the configurations any time.
The job is also created if you click Finish. on the Select Network screen, Schedulescreen, or Specify Notification Details screen.
Go to the Jobs workspace to monitor the current status of the job.
See “About Asset Discovery Job” on page 305.
Discovering VMware vCenter Server assets on the networkYou can specify non-default ports to be scanned to discover VMware vCenter Server assetsthat are present on the network.
Specify any of the following to add the non-default ports:
■ Port Range
■ Port
To discover VMware vCenter Server assets on the network
1 Hover over the Settings menu, and click Application Settings.
2 In the System Configuration panel on the left, under the Application Configurationsection, clickDiscovery.
3 In the Discovery panel displayed on the right, click the VMware vCenter Server PortSettings tab.
4 On the VMware vCenter Server Port Settings tab, select one of the following:
■ Port Range
129Importing Assets into CCSDiscovering Assets

■ Port
5 Provide the port number or the port range as required that needs to be scanned to discoverVMware vCenter Server assets.
Note: Large or arbitrary port ranges may slow down the asset discovery job. Add specificnon-default ports or port ranges to complete the asset discovery job in the optimal duration.
Asset groupsAn asset group consists of the assets of one or more types. For example, Windows servers,UNIX servers, or Oracle databases can become asset groups.
The asset groups may be created based on various criteria. You can attach the tags to theasset groups and create an asset group that is based on the tags. Similarly, you can createthe asset groups that are based on location, owner, risk rating and so on.
The asset groups are of the following types:
■ Asset groups with assets based on criteriaSee “Asset groups with assets based on criteria” on page 58.
■ Asset groups with specific assetsSee “Asset groups with specific assets” on page 59.
■ Predefined asset group
See “Creating an asset group with assets based on criteria” on page 130.
See “Creating an asset group with specific assets” on page 133.
See “Editing an asset group” on page 153.
Creating an asset group with assets based on criteriaYou can create an asset group with assets based on criteria, if you want the assets in a folderto be organized dynamically based on certain properties. This asset group gets updated withevery asset import job if more assets from the relevant asset folder meet the queries.
Note:You can add assets to the asset group only from the folder that contains the asset groupor from the folders in the same hierarchy.
130Importing Assets into CCSAsset groups

To create an asset group with assets based on criteria
1 In the Asset Group Tasks list on the Assets workspace, click Create Asset Group.
2 On the Specify Asset Group Details screen, specify the following:
■ Name of the asset group
■ Description of the asset group
■ Folder path from which to include the assets
3 In the Asset Group Criteria section, select Add assets based on criteria
4 Click Next.
5 On the Select Asset Type screen, select the asset type for which you want to create anasset group and click Next.
131Importing Assets into CCSAsset groups

6 On the Specify Common Filters screen, specify the value for the common asset fieldfilters and click Next.
The Specify Common Filters screen lets you create a filter that is based on the valuesof the common fields. The screen presents a list of common asset fields. You can specifythe values for the selected fields. The asset group is formed based on the values that youspecify on this screen.
The Create Common Asset Field Filters panel presents the following options:
Lets you specify the asset name.Name
Assets with the specified name are included in the assetgroup.
Lets you specify the asset location.Location
Assets that reside at the specified location are includedin the group.
Lets you specify the asset department.Department
Assets that belong to the specified department areincluded in the asset group.
Lets you specify the asset owner.Owner
Assets with the specified owner are included in the assetgroup.
Lets you specify the custodian for the assets.Custodian
Assets with the specified custodian are included in theasset group.
Lets you specify the tag name and the tag category.Tags
Assets that have the specified tag are included in the assetgroup.
Click the Add icon (+) to add tags and click the Deleteicon (X) to remove tags.
If you select Match Any as a filter, the tag expression isformed with an OR. The assets with either of the specifiedtags are included in the asset group. Match Any isselected by default.
If you select Match All as a filter, the tag expression isformed with an AND. The assets with either of thespecified tags are included in the asset group.
132Importing Assets into CCSAsset groups

Lets you specify the risk rating on the basis of the followingcriteria: Risk Rating Level, Confidentiality, Integrity,and Availability.
Assets with the specified risk rating are included in theasset group.
Risk rating
Includes the asset in the asset group if the asset meetsthe criteria that is specified in any of the above filters.
Include assets with any of the abovefilters
7 On the Create Asset Specific Filters screen, select a field from the drop-down list onthe basis of which you want to create the asset group with assets based on criteria.ClickAdd Statement.
The Create Asset Specific Filters screen lets you edit, delete, arrange, and configurethe asset field filters. You can select a field that should be used as a filter for the selectedasset type and create a filter statement. You can use the Add Statement option on thepanel to create a new filter statement.
You can edit or delete the existing filter statement using the Edit Selected Statementicon and the Delete Selected Statement icon.
The asset field that you can select depends on the asset type that you selected.
You can use the AND and OR operators to specify the filter after adding the filterstatements.
See “Operators (, ), AND, OR” on page 135.
8 In the Filter Statement dialog box, select the parameter, the operator and the value forthe field to form a filter statement and click OK.
9 On the Create Asset Specific Filters screen, click Next.
10 Review the configuration information on the Summary screen and click Finish.
See “Creating an asset group with specific assets” on page 133.
Creating an asset group with specific assetsYou can create an asset group with specific assets that do not undergo frequent updates. Theasset count in this asset group remains constant unless you edit the group and manually addmore assets to the group.
Note:You can add assets to the asset group only from the folder that contains the asset groupor from the folders in the same hierarchy.
Consider the following example:
133Importing Assets into CCSAsset groups

■ Under the Asset System folder you have another folder - US-CA.
■ You have an asset group with specific assets, WindowsServer2003 under the folder US-CA.
■ You can add the assets to the asset group WindowsServer2003 from the folder US-CA orfrom the folders under the US-CA folder.
To create an asset group with specific assets
1 In the Asset Group Tasks list on the Assets workspace, select Create Asset Group.
2 On the Specify Asset Group Details screen, specify the following:
■ Name of the asset group
■ Description of the asset group
■ Folder path from which to include the assets
3 In the Asset Group Criteria section, select Add specific assets.
4 Click Next.
5 On the Select Asset Type screen, select the asset type for which you want to create anasset group and click Next.
6 On the Select Assets screen, navigate to the folder in the asset system hierarchy, selectthe assets that you want to add to the asset group and click Add.
This is an optional step.
7 Review the configuration information on the Summary screen and click Finish.
See “Creating an asset group with assets based on criteria” on page 130.
Deleting inactive assets using the asset groupsThe Asset System view displays the number of active assets in the top right corner of the tablepane. The active assets are the assets that are created or updated during the last six months.The active assets are displayed only for the Windows Machines, the UNIX Machines, and theESM Agents.
You might want to delete the inactive assets from the asset system. You can use the assetgroups feature to form an asset group with assets based on criteria that are not modified forthe last six months. You can then delete this group.
To create an asset group based on the last modified date
1 In the Asset Group Tasks list of the Assets workspace, clickCreate Asset Group.
2 On the Specify Asset Group Details screen, specify the following:
■ Name of the asset group
■ Description of the asset group
134Importing Assets into CCSAsset groups

■ Folder path where the asset group should be saved
3 In the Asset Group Criteria section, select Add Assets based on criteria.
4 Click Next.
5 On the Select Asset Types screen, select the asset type for which you want to createan asset group and click Next.
6 On the Specify Common Filters screen, specify the value for the common asset fieldfilters and click Next.
The Specify Common Filters screen lets you create a filter that is based on the valuesof the fields that are common across all the asset types. The panel presents a list ofcommon asset fields. You can specify the values for the selected fields. The asset groupis formed based on the values that you specify in this panel.
7 In theSpecify Asset Specific Filters screen, selectAll Asset Types- Asset last modifieddate and click Add Statement.
You can use the AND and OR operators to specify the filter after adding the filterstatements.
See “Operators (, ), AND, OR” on page 135.
8 In the Create or Edit Filter Statement dialog box, select Specific Value.
Select EqualTo (=) as the operator and from the Specify value drop-down list select adate.
The assets that were modified till the specified date are included in the asset group.
9 Review the configuration information on the Summary screen and click Finish.
The newly created asset group is displayed in assets and asset groups table in the rightpane of the Assets workspace.
10 To delete an inactive asset group, right-click it and click Delete.
Operators (, ), AND, ORIn the asset system you can use the opening and closing parentheses, AND, and OR operatorsto join the filter statements. You need to specify the filters on the basis of which the assetimport job or the asset groups is created.
You can use more than one filter and create a combined filter expression with the operators.
Consider the following example:
■ You create the following filter statements:
■ A Equal To (=) B
■ C Greater Than or Equal To [<=] D
135Importing Assets into CCSAsset groups

■ A Equal To (=) B
■ C Equal To (=) F
■ You can use opening and closing parentheses, AND, OR operators in the following waysto specify the relation among the given filter statements:
■ A Equal To (=) B and C Greater Than or Equal To [<=] DThe AND operator is the default operator that is used to join the two filter statements.
■ A Equal To (=) B or C Greater Than or Equal To [<=] DYou can switch between the AND/OR operators using the same option.
■ (A Equal To (=) B) and © Greater Than or Equal To [<=] D) or (A Equal To (=) B)and © Equal To (=) F)With the opening and closing parentheses, you can create more complex filterexpressions.
Performing the tasks in the Assets workspaceYou can perform the following tasks from the Assets workspace on the Asset Systemmenu:
■ Creation of asset folders in the tree paneSee “Creating the asset folders” on page 136.
■ Asset group tasksSee “Performing the asset group tasks” on page 153.
■ Global tasksSee “Performing the global tasks” on page 154.
■ Asset tasksSee “Performing the asset tasks” on page 162.
■ Common tasks
Creating the asset foldersYou create folders to store new assets. You use folders to organize the business objects in ahierarchical manner. The organization of the assets in a hierarchical manner is the most crucialstep in the asset system. You can model the default hierarchy that is created during theinstallation of Control Compliance Suite, to suit your organizational requirements. Assethierarchy can also be created based on the location, the department, the platform, or any othercriteria.
See “Asset folder hierarchy” on page 57.
You can effectively administer the permissions on the folders and the objects within the folderif the hierarchy is created properly.
136Importing Assets into CCSPerforming the tasks in the Assets workspace

You can use reconciliation rules to help you arrange the assets in a specific hierarchical form.
To create a folder in the tree pane
1 Hover over the Asset System menu, and click Assets.
2 In the Asset workspace, right-click the Asset System folder.
3 Select New Folder.
4 In the Create New Folder dialog box, type the name of the folder.
5 Click OK.
Adding assetsThe Add Assets task on theAsset System menu simplifies and facilitates the addition ofnetwork assets without the requirements of an asset import job and dependent configurations.
To add an asset
1 On the Asset System menu, click Assets .
2 In the Asset System View pane of the Assets workspace, right-click Asset System, andthen click Add Assets .
3 On the Select Creation Option screen of theAddAssetswizard, click the Select Locationbutton next to the Location field.
The Select Folder dialog box is displayed.
4 In the Select Folder dialog box, select the folder where you want to add the assets, andthen click OK.
5 In the Asset type drop-down list, select the type of the asset that you want to add.
6 To add a single asset, select the Add assets classification option, and then in theClassification drop-down list, select the category for the asset that you want to add.
You can also import assets from your local computer by selecting the Import Assetsoption and then clicking Select file.
7 Click Next.
8 On the Specify Asset Details screen, click in the text box under each of the columnsand provide the required details. TheDomain/Workgroup Name and theMachine Namefields are mandatory.
9 Click Finish.
10 On the Progress Details screen, click Finish.
See “Adding multiple assets” on page 138.
See “Setting up a data collection job” on page 316.
137Importing Assets into CCSPerforming the tasks in the Assets workspace

See “Running an evaluation job” on page 313.
See “Running a Collection-Evaluation-Reporting (CER) job from Standards workspace”on page 319.
Adding multiple assetsTo add more than one asset, import a CSV file with assets into Control Compliance Suite.
For the import of assets, select a CSV file that meets the following conditions:
■ The file for the specified asset type is available for import.
■ Columns in the file match the asset fields.
■ No values are missing or extra in the file.
Failure to meet the conditions results in the display of system messages.
To import assets
1 On the Asset System menu, click Assets .
2 In the Asset System View pane of the Assets workspace, right-click Asset System, andthen click Add Assets .
3 On the Provide Asset Information screen of the Add Assets wizard, click the SelectLocation button next to the Location field.
The Select Folder dialog box is displayed.
4 In the Select Folder dialog box, select the folder where you want to add the assets, andthen click OK.
5 In the Asset type drop-down list, select the type of the asset that you want to add.
6 To import more than one asset, select the Import assets option, and then click the Selectfile button next to the Select file field.
7 In the Open dialog box ofWindows Explorer, select the CSV file from which to importthe assets, and click Open.
8 Click Next .
The Preview Asset Details screen is displayed.
9 On thePreview Asset Details screen, review the asset fields of the CSV file that youselected, and click Finish.
The Progress Details screen is displayed.
10 On the Progress Detailsscreen, click Finish to complete the import of assets.
See “Adding assets” on page 137.
See “Setting up a data collection job” on page 316.
138Importing Assets into CCSPerforming the tasks in the Assets workspace

See “Running an evaluation job” on page 313.
See “Running a Collection-Evaluation-Reporting (CER) job from Standards workspace”on page 319.
About business assetsThe asset system in Control Compliance Suite represents the following kinds of assets:
■ Technical and tangible assets as computers and databases.
■ Business assets that are business entities associated with business functions. Businessassets can also be collections of physical assets that represent business entities. Forexample, banks with departments, servers, processes and data centers are businessassets.
Business assets fall into the following categories:
■ Business Units as Investment, Corporate, Consumer, Commercial, or Treasury
■ Departments as Credit Card, Trading, or Retail
■ Business Processes as GRC, Shipment, or Security
The following features characterize business assets:
■ Business assets are unique. The asset system prevents the duplication of a business assetwithin the system.
■ Business assets can be tagged.
■ A business asset can be available only in one asset folder at a time.
Business assets add value to the organization, and are vulnerable to security threats. Risk isthe possibility of a business incurring loss from security threats. Control Compliance Suiteuses business assets to model risk. Control Compliance Suite associates business assetsand controls to risk objectives. Through associations with policies and questionnaires, businessassets also make the evaluation of compliance possible.
See “About types of business assets” on page 139.
See “About the management of business assets” on page 142.
See “Business assets and asset groups: Differences” on page 152.
About types of business assetsA business asset type represents a group of business assets. A set of shared attributes definesthe type. For example, the asset system provides a new asset type, Business Asset (BA) torepresent all business entities. Types enhance the ease of managing business assets. For
139Importing Assets into CCSPerforming the tasks in the Assets workspace

example, use the type of a business asset to filter business assets or to search for businessassets.
Control Compliance Suite provides the following predefined business asset types:
■ Business Units
■ Business Process
■ Business Application
To manage asset types, you require the following permissions:
■ Permissions of CCS Administrator
■ Privileges that are associated with the Manage Schema task
Use the CCS Administrator role to add user-defined attributes during the creation or edit of abusiness asset type.
System attributes are attributes available to all business assets. A set of predefined attributesdefines every type of business asset. System attributes are also available to custom businessassets.
Control Compliance Suite disallows the following actions on business assets:
■ Remove attributes to edit the business asset type in the asset system.
■ During the edit of a business asset type, mark the user-defined attributes that were addedas mandatory attributes.
■ Remove mandatory attributes.
■ Deprecate a custom business asset type as deprecation affects all areas of ControlCompliance Suite.
See “About business assets” on page 139.
Creating business assetsTo create business assets, you require the following permissions:
■ Permissions that are associated with the Manage asset and asset group, and View Assetstasks
■ Requisite permissions on the asset folder
The asset system stalls the duplication of any business asset. If you attempt the duplicationof asset, the system displays a message.
140Importing Assets into CCSPerforming the tasks in the Assets workspace

To create a business asset
1 Hover over the Asset System menu, click Assets .
2 In the Asset System View pane of the Assets workspace, right-click Asset System, andthen click Create Business Assets .
3 On the Select Creation Option screen of the Create Business Assets wizard, click theSelect Location button next to the Location field.
The Select Folder dialog box is displayed.
4 In the Select Folder dialog box, select the folder where you want to add the assets, andthen click OK.
5 If you want to create a single business asset, select the Create a business asset option,and then click Next.
6 In the Name and Type fields of theSpecify Business Asset Detailsscreen, enter thename and the type of the business asset that you want to create.
7 Enter values for the optional attributes of the business asset in the respective fields.
8 Click Finish to get the confirmation that the asset was created.
See “About business assets” on page 139.
See “Creating multiple business assets” on page 141.
See “Setting up a data collection job” on page 316.
See “Running an evaluation job” on page 313.
See “Running a Collection-Evaluation-Reporting (CER) job from Standards workspace”on page 319.
Creating multiple business assetsTo create multiple business assets, import the business assets into Control Compliance Suitefrom a CSV file.
For the import of business assets, select a CSV file that meets the following conditions:
■ Match between the CSV columns and the business asset fields.
■ No extra values or missing values.
■ No mandatory fields are missing or incorrect.
To create multiple business assets
1 Hover over the Asset System menu, click Assets .
2 In the Asset System View pane of the Assets workspace, right-click Asset System, andthen click Create Business Assets .
141Importing Assets into CCSPerforming the tasks in the Assets workspace

3 On the Select Creation Option screen of the Create Business Assets wizard, click theSelect Location button next to the Location field.
The Select Folder dialog box is displayed.
4 In the Select Folder dialog box, select the folder where you want to add the assets, andthen click OK.
5 To create multiple business assets from a CSV file, select the Import business assetsoption.
6 To enter the path to the CSV file in the Select file field, click the Select file button.
7 In the Openscreen of the Windows Explorer, select the appropriate CSV file, and thenclick Open.
8 In the Preview section of the Select Creation Option screen, review the values in thefields to verify the attributes for the assets to be added.
9 Click Finish.
The Progress Details screen is displayed confirming the number of business assets thatwere created and the number of failures.
10 Click Finish.
See “Exporting CSV headers” on page 164.
See “About business assets” on page 139.
See “Creating business assets” on page 140.
See “Setting up a data collection job” on page 316.
See “Running an evaluation job” on page 313.
See “Running a Collection-Evaluation-Reporting (CER) job from Standards workspace”on page 319.
About the management of business assetsUse the asset system in Control Compliance Suite to view and manage business assets.
You manage business assets in the following ways:
■ View business assets.
■ Edit business assets.
■ Delete business assets.
■ Manage associations: Form associations with business or network assets, or removeassociations.
142Importing Assets into CCSPerforming the tasks in the Assets workspace

Control Compliance Suite makes available the new tasks,Associate Assets andRemoveAssociation.
■ Move business assets.To move a business asset, right-click the business asset in List View, and click MoveAssets.
■ Assign and remove permissions on business assets.
■ Search for business assets.
To view business assets, you require the following permissions:
■ Roles that are associated with the View Asset task
■ Requisite permissions on the business assets
Control Compliance Suite provides you the following view options:
■ View types of business assets.Move your pointer over a business asset in the assets table in List View to see its nameand type.
■ Select an asset group in the assets pane to view the assets in the group in List View.
■ In Asset Management View, select a business asset with associations to view the assetsthat are associated with the selected business asset in List View.
■ Select a folder in Asset Management View to view all assets within the folder in List View.
■ View the permissions on a business asset.To view the permissions on a business asset, right-click the business asset, and click ViewPermissions or on Common Tasks, click View Permissions.
The Advanced Search functionality of the asset system facilitates the search for a specific setof assets. On the search results, you can perform all those operations that are possible onbusiness assets in the asset system.
The asset system supports the searches that are based on the following criteria:
■ Common attributes like name, owner, department, and location
■ Tags
■ Asset types
■ The properties or attributes that are specific to an asset type as computer name, andapplication name
■ A specific folder or a branch in the directory
See “About business assets” on page 139.
See “About types of business assets” on page 139.
143Importing Assets into CCSPerforming the tasks in the Assets workspace

See “Editing business assets” on page 144.
See “Deleting business assets” on page 144.
Editing business assetsAdd attributes during the editing of business assets to create new types of business assets.
To edit a business asset
1 Hover over the Asset System menu, click Assets.
2 In the Asset System View pane, and then in List View, select the business asset thatyou want to edit.
3 Right-click the business asset and click Edit.
4 In the Edit dialog box, click theProperties tab to edit attributes such as Confidentiality,Integrity, Availability, Asset Custodian, Asset Department, Asset Location, andAsset Owner.
5 Click theTags tab to add or remove tags.
6 In the Tag Set Options area, select an option that you want from Append, Overwrite,and Clear.
7 Make the required modifications, and click OK.
See “About business assets view” on page 149.
See “Deleting business assets” on page 144.
Deleting business assetsDeletion of a business asset also deletes the associations of the business asset.
To delete a business asset
1 Hover over the Asset System menu, click Assets.
2 In the Asset System View pane, and then in List View, select the business asset thatyou want to delete.
3 Right-click the business asset and click Delete.
4 In theWarningmessage box, clickYes to confirm that you want to proceed with the deletion.
The selected business asset is deleted.
See “About business assets view” on page 149.
See “About the management of business assets” on page 142.
See “Editing business assets” on page 144.
144Importing Assets into CCSPerforming the tasks in the Assets workspace

About associations with business assetsTo form associations with business assets, in the asset system, use the task, Associate withBusiness Asset, under Asset Tasks. Association helps to aggregate the risk scores for allassociated assets.
To form associations, you require the following permissions:
■ View Assets
■ Permissions that are associated with the 'Manage Assets and Asset groups' task
Control Compliance Suite supports the following:
■ Association of business assets with other business assets and network assetsThe maximum number of business or network assets with which a business asset can formassociations is 5000. To associate with more than 5000 business or network assets, abusiness asset needs to expand its association capability. A business asset forms anassociation with another business asset to expand its association capability.
■ Association to evaluate riskEvaluation of risk involves the definition of a risk objective, and the association of thebusiness asset with the risk objective. Effective evaluation of risk also requires theassociation of the business asset with other business assets and physical assets. DynamicDashboards display the aggregated risk of the business asset and all associated businessassets.
■ Association to evaluate complianceThe evaluation of the compliance of a business asset to a policy needs the following: Theaggregation of the compliance of all assets with direct or indirect associations with thatbusiness asset. Compliance involves technical and procedural controls. Technical controlslink policy to control statements, and the control statements to checks, rules, and EDI.Procedural compliance control involves the creation of questionnaires for the businessasset, and the association of the questionnaires with the business assets.
■ Association by means of reconciliation rulesThe asset system provides an action for a Post Rule for the import of network assets aswell as third-party assets: Associate asset with specified business asset.
■ Associations by means of integration servicesInvoke the related API to form the association.
■ Removal of associations with business assetsUse the Remove Association task to remove associations.
Control Compliance Suite support does not extend to the following:
■ Use of reconciliation rules to import network assets and thereby create business assets.
145Importing Assets into CCSPerforming the tasks in the Assets workspace

■ Circular dependency in associations: A can associate with B, and B with C, but C cannotassociate with A to form a ring.
See “Associating parent business assets with child assets” on page 146.
See “Removing the association with a business asset” on page 147.
Associating parent business assets with child assetsAn association is the process of forming a relationship between assets. Assets in associationmay be termed parent or child assets. A parent asset is the business asset with whichassociations are formed. Only business assets can become parents in associations. A childasset is an asset that establishes an association with a parent. Child assets in associationscan either be business assets or other assets. Asscociations can be formed from a parent toa child, or from a child to a parent. A business asset that is a child in one association canbecome a parent in another association.
Select a parent business asset, and then select the child assets for the association. A parentbusiness asset can form associations with multiple child assets.
To associate a parent business asset with one or more child assets
1 Hover over the Asset System menu, and clickAssets.
2 To get the Associate Assets box to configure associations, do one of the following:
■ In the Asset System View pane, right-click a selected business asset, and then clickAssociate Assets.
■ In the Assets View pane, right-click a selected business asset, and then clickAssociate Asset.
■ In the Assets View pane, select a business asset and then in the Asset Tasks list,click Associate Assets.
3 In the Associate Assets dialog box, to select the child asset for association, click Selectchild asset(s) and select the asset or the business asset, and then click Add.
For multiple selections, click Add All.
4 To remove assets from Selected Items, select the asset and click Remove.
To remove multiple assets from Selected Items, select the assets and then clickRemoveAll.
5 Click Associate.
See “About associations with business assets” on page 145.
See “Associating child assets with parent business assets” on page 147.
See “Removing the association with a business asset” on page 147.
146Importing Assets into CCSPerforming the tasks in the Assets workspace

Associating child assets with parent business assetsSelect an asset or a business asset to be the child in the association, and then select its parentbusiness asset. A parent business asset can have multiple child assets.
To associate a child asset with a parent business asset
1 Hover over the Asset System menu, and clickAssets.
2 To get the Associate Assets box to configure associations, do one of the following:
■ In the Asset System View, right-click a selected business asset, and then clickAssociate Assets.
■ InAssets View, right-click a selected business asset, and then clickAssociate Asset.
■ In Assets View, select a business asset and then in the Asset Tasks list, clickAssociate Assets.
3 In the Associate Assets dialog box, to select the child asset for association, click Selectparent business asset(s) and select the asset or the business asset, and then clickAdd.
For multiple selections, click Add All.
4 To remove assets from Selected Items, select the asset and click Remove.
To remove multiple assets from Selected Items, select the assets and then clickRemoveAll.
5 Click Associate.
See “About associations with business assets” on page 145.
See “Associating parent business assets with child assets” on page 146.
See “Removing the association with a business asset” on page 147.
Removing the association with a business assetThe asset system provides the Remove Association task that facilitates the removal ofassociations with business assets.
To remove the association with a business asset
1 Hover over the Asset System menu, and click Assets.
2 Select the assets whose association you want to remove, and then do one of the following:
■ Right-click the asset and click Remove Association.
■ In the Asset Tasks drop-down list, click Remove Association.
See “About associations with business assets” on page 145.
See “Associating parent business assets with child assets” on page 146.
147Importing Assets into CCSPerforming the tasks in the Assets workspace

Assigning permissions on business assetsCCS controls user access to business assets. The asset system restricts actions on businessassets to the roles and permissions that are assigned to users on business assets. A task isan action that a user performs. Many predefined tasks constitute a role. A user that is assigneda role performs the tasks that are associated with the role. Tasks link to privileges orpermissions.
The CCS control of business asset users encompasses the following:
■ CCS Administrator assigns permission on asset folders and business assets.
■ Permissions that are stamped on a business asset pertain to that business asset alone.The permissions do not extend to associated assets.
■ The asset folder and business asset permissions are synced in the reporting database.
■ Any user who has a permission on a business asset, gets the permission to view allassociated network and business assets in Dynamic Dashboards. On drilling down, theuser can view all the associated assets and their risk scores and compliance scores.
■ A business asset inherits the permissions that are assigned to its folder.
Users with the requisite permissions perform the following permissions-related tasks on businessassets:
■ Assign permissions on folders and business assets.
■ Create roles, and assign permissions on business assets.
■ Assign multiple roles to users.
To assign permissions on a business asset
1 Hover over the Adminmenu, and click Roles and assign users or groups to roles for yourbusiness assets.
2 Hover over the Admin menu, and click Permission Management.
3 In the Permission Management view, from the Business Objects folders, select the folderthat you want displayed in the Objects pane.
4 In the Objects pane, select the business asset whose details you want displayed in thePreview pane.
5 On the Users and Groups tab in the Preview pane, click Assign Permissions.
6 In the Assign Permissions dialog box, click Add to display the Select Users/Groupsbox, select the roles, users or groups, and then click OK.
7 In the Assign Permissions dialog box, click OK.
See “Removing permissions from a business asset” on page 149.
148Importing Assets into CCSPerforming the tasks in the Assets workspace

Removing permissions from a business assetThe control of user access on business assets comprises both the granting and removal ofpermissions on business assets.
To view the permissions on a business asset, right-click the business asset, and click ViewPermissions. Alternatively, you can click View Permissions on the upper-left corner of theManage Permissions workspace..
To remove permissions on a business asset
1 Hover over the Admin menu, and click Permission Management.
2 In the Permission Management view, from the Business Objects folders, select the folderthat you want displayed in the Objects pane.
3 In the Objects pane, select the business asset whose details you want displayed in thePreview pane.
4 In the Users and Groups section, select the users or groups whose permissions youwant to remove, and then click Remove Permissions.
5 In the Remove Permissions dialog box, select the roles for the user or group, and clickRemove, and then click Update.
See “Assigning permissions on business assets” on page 148.
About business assets viewThe Asset System View pane provides the node Business Asset View for business assetsin the asset system. The node in the asset system provides a hierarchical view of businessassets and their associated assets. Any operation on a business asset gets dynamicallydisplayed in Business Asset View. However, there is no dynamic display of actions on anasset folder. Actions on business assets in external data resources as the CCS Web consolefail to refresh the view.
The following are salient features of the Business Asset View:
■ Selection of a business asset in the view provides the same display in the assets table andpreview pane as for other assets.
■ Actions on the root of the Business Asset View alone are persisted.
■ The selection of a business asset in the view causes the selection to behave as any otherselection in the asset system.
The following methods are available to view the business assets in Business Asset View:
■ Right-click a selected business asset in the Assets System View pane, and select Showin Business Asset View.
149Importing Assets into CCSPerforming the tasks in the Assets workspace

■ Right-click a selected business asset in theAsset View pane, and selectShow in BusinessAsset View.
■ In the Assets View pane, select a business asset and in the Asset Tasks drop-down list,click Show in Business Asset View.
See “Displaying business assets in Business Asset View” on page 150.
See “Selecting business assets for Business Asset View” on page 150.
See “Hiding business asset nodes” on page 151.
See “Hiding business assets from Business Asset View” on page 151.
Displaying business assets in Business Asset ViewUse the Show in Business Asset View task to create a hierarchy of business assets in theasset system. The Show in Business Asset View task adds a node on Business AssetView for the selected business asset.To display a business asset in Business Asset View
1 Hover over the Asset System menu, and click Assets.
2 To include a business asset in Business Asset View, select the business asset in AssetsView and do one of the following:
■ Right-click the business asset and then select Show in Business Asset View.
■ In the Asset Tasks drop-down list, click Show in Business Asset View.
3 Alternatively, inAsset System View, right-click a selected business asset and then selectShow in Business Asset View.
See “About business assets view” on page 149.
See “Selecting business assets for Business Asset View” on page 150.
See “Hiding business asset nodes” on page 151.
See “Hiding business assets from Business Asset View” on page 151.
Selecting business assets for Business Asset ViewUse the Select Business Asset task to add business assets to the business assets view.Control Compliance Suite displays the added business assets as nodes with their associatedbusiness assets nested under them on Business Asset View.
150Importing Assets into CCSPerforming the tasks in the Assets workspace

To select a business asset for Business Asset View
1 Hover over the Asset System menu, and clickAssets.
2 In the Asset System View pane, right-click Business Asset View, and select SelectBusiness Asset.
3 In the Select Business Asset dialog box, select the business asset to be included inBusiness Asset View and click OK.
See “About business assets view” on page 149.
See “Displaying business assets in Business Asset View” on page 150.
See “Hiding business asset nodes” on page 151.
See “Hiding business assets from Business Asset View” on page 151.
Hiding business asset nodesWhen you add a business asset to Business Asset View, a node for the business asset isadded to the tree. The node nests the associated business assets. To hide the node for abusiness asset from Business Asset View, use the Hide task.
To hide a business asset node
1 Hover over the Asset System menu, and clickAssets.
2 Under theBusiness Asset View node, right-click the business asset that you want hiddenand click Hide.
3 Alternatively, select the node you want to hide and then press Delete on your keyboard.
See “About business assets view” on page 149.
See “Displaying business assets in Business Asset View” on page 150.
See “Selecting business assets for Business Asset View” on page 150.
See “Hiding business assets from Business Asset View” on page 151.
Hiding business assets from Business Asset ViewClear Business Asset View if you want to create a new view of business assets. Use the HideAll task to clear Business Asset View of the business assets on display.
To hide business assets from Business Asset View
1 On the Asset System menu, click Assets.
2 In the Asset System View pane, right-click the Business Asset View node and thenselect Hide All.
See “About business assets view” on page 149.
151Importing Assets into CCSPerforming the tasks in the Assets workspace

See “Displaying business assets in Business Asset View” on page 150.
See “Selecting business assets for Business Asset View” on page 150.
See “Hiding business asset nodes” on page 151.
See “Hiding business assets from Business Asset View” on page 151.
Business assets and asset groups: DifferencesBusiness assets represent logical entities in the business world. For example, a bank withdepartments, servers, and datacenters is a business asset. Asset groups are collections ofassets.
Assets can be grouped in the following ways:
■ Group assets based on asset attributes to form a dynamic asset group.
■ Group a specific set of assets.
Table 4-39 tabulates the differences between business assets and asset groups.
Table 4-39 Differences between business assets and asset groups
Asset groupsBusiness assets
Asset groups have no schema.Business assets are assets with extendableschema.
An asset group has no value in itself.Business assets have value. Business assets alsohave CIA, risk and compliance scores, and owners.
Assets can be grouped into static groups, ordynamic groups that have common attributes.
Business assets cannot form groups on the basisof asset properties. Business assets formassociations with other assets.
Control Compliance Suite makes no provision forthe nesting of asset groups.
Business assets can be nested. For example, thebusiness assets investment banking and retailbanking can be nested under another businessasset, People Bank.
Asset groups fall into the following types:
■ Dynamic asset group: A group of assets basedon asset attribute values
■ Static asset group: A group that is formed by theassets that a user specifies
Business assets can be of different types: process,application, or department.
Asset groups only work in the folders in which theyreside (sub-tree level).
Business assets work unrestricted by any hierarchyor location within the asset system.
152Importing Assets into CCSPerforming the tasks in the Assets workspace

Table 4-39 Differences between business assets and asset groups (continued)
Asset groupsBusiness assets
An asset group inherits the permissions that areassigned to the asset folder.
Business assets can be assigned permissions.Users stamp permissions on business assets.
An asset group is a collection of assets. An assetthat is a part of an asset group can participate (bescoped) in a business process. The asset groupcannot participate in business.
A business asset represents an entity in business.Business assets participate in business processes.For example, an AM assessment can be createdfor a business asset.
Asset groups do not form associations with otherasset groups.
Business assets form associations with otherbusiness assets.
See “About business assets” on page 139.
See “Asset groups” on page 130.
Performing the asset group tasksYou can perform the following asset group tasks from the Asset System view:
■ Create asset group.See “Asset groups” on page 130.
■ Edit asset group.See “Editing an asset group” on page 153.
■ Copy and paste asset group.
■ Rename Asset Group
Editing an asset groupYou can edit the asset groups using the Create or Edit Asset Group wizard.
To edit an asset group
1 On the Asset System menu, click Assets.
2 In the table pane, select an asset group that you want to edit.
3 In the Common Tasks list, click Edit Asset Group.
You can also right-click the asset group, and then click Edit Asset Group.
4 Make changes on the screens that you want and complete the wizard.
153Importing Assets into CCSPerforming the asset group tasks

Performing the global tasksYou can perform the following global tasks from the Asset System view:
■ Request exceptions.See “Requesting an exception for assets on checks” on page 154.
■ Set up data collection.See “Setting up a data collection job from the Asset System view” on page 156.
■ Run evaluation.See “Running an evaluation job from the Asset System view” on page 159.
■ Run collection-evaluation-reporting
Requesting an exception for assets on checksA user with the Exception Requestor role can request an exception on the checks for specificassets in the organization.
To request an exception
1 Hover over the Standards And Policies menu, and click Exceptions.
2 In the Exceptions workspace, do either of the following:
■ On the taskbar, click Request Exception.
■ In the table pane, right-click anywhere in the blank area, and selectRequest Exception.
3 In the Request Exception wizard, on the Specify Exception Details screen, enter thefollowing details:
■ In the Title box, enter the name of the exception.
■ In the Type box, select Standards.In the Template box, the displayed template is Evaluation Exception.
■ In the Description box, type a description for the exception.
■ In the Attachment box, browse to enter the name of the file that you want to attach.
■ In the Exception Validity group box, in the Effective Date box, select the date onwhich the exception becomes applicable. In the Expiration Date box, select the dateon which the exception becomes invalid. Click Next.
4 On theSpecify Exemptions screen, clickAdd to select the standards, sections, or checks.
All the checks within the selected standard or section are displayed.
154Importing Assets into CCSPerforming the global tasks

5 In the Select Standards or Sections or Checks dialog box, expand the Standardsfolder, and select a folder. The checks within the selected folder are displayed in the rightpane. Select a standard, section, or check and click Add.
Click Add All to select all the standards. To remove one or more standards from theSelected Items list, click Remove or Remove All. Click OK.
All the checks within the selected standard or section are displayed in the Select Checksand Assets Panel.
6 On the Specify Exemptions screen, click Add to select the assets. In the Select Assetsor Asset Groups or Folders dialog box, expand the Assets folder and select a folder.The assets within the selected folder are displayed in the right pane. Select an asset andclick Add. Click Add All to select all the assets. To remove one or more assets from theSelected Items list, click Remove or Remove All. Click OK and then click Next.
7 On the Specify Requestor screen, enter the Requestor and the Requestor Group. Typethe Requestor Email ID and Comments.
8 On the Specify Approvers screen, select one or more approvers for the exception thatyou are requesting, and then click Next.
Note: You must select at least one approver for the exception request. CCS does notallow you to select an approver if the approver's email address is not configured in thesystem, if the approver is the requestor too, or if the approver is submitting the requeston another user's behalf.
9 On the Specify Notification Details screen, edit the notification information for thenotification type. Modify the Subject and the Message. Click Next.
10 In the Requested tab, check Attach asset and check details if you want the asset andcheck information for which the exception is requested.
The Attach asset and check details is available for Standards module only.
Two CSV files for assets and checks are sent as an attachment with the notification email.The email notification is sent only when the exception is requested.
11 On the Summary screen, verify the details that you have entered in the wizard. ClickBack to modify any data. Click Finish to exit the wizard.
The exception is created and its state is set to Requested.
Similarly, you can request an exception by launching theRequest Exceptionwizard fromthe Standards view, Assets view, and the Evaluation Results dialog box.
155Importing Assets into CCSPerforming the global tasks

Applying exception using evidence filter on a standard checkYou can launch the Evaluation Result Details dialog box from the Evaluation Results viewto create an exception on evidence for the standard checks.
To create exception on evidence using evidence filter
1 In the Evaluation Result Details dialog box, do one of the following:
■ If you are in the Standard-based view, drill-down to the check in the listed standard,select the check. In the lower-pane, right-click the asset, and select Show DetailedEvidence.
■ If you are in theAsset-based view, select the asset. In the lower pane, select a check,right-click the selection, and select Show Detailed Evidence.
2 In the Evidence Details dialog box, select the evidence for which you want to create anexception, right-click the selection, and select Request Exception.
3 The message, Do you want to edit the filters for the selected evidences to requestan exception is displayed. Click Yes.
If you clickNo, theRequest Exceptionwizard is launched and you can specify the detailsof the exception.
The Evidence Filters dialog is launched.
4 In the Evidence Filters dialog box, you can do the following:
■ Check Use Wildcards if you want to apply wildcards to your filter.
■ Edit the Object Name field.
■ Edit the Current Value field.
■ Use Duplicate option if you want to add a new evidence filter.
■ Use Remove option if you want to delete an existing evidence filter.
■ Click OK to save the settings.
Setting up a data collection job from the Asset System viewYou can run a data collection job from the asset management view. You can use the Createor Edit Data Collection Job wizard to create a job to start the process of collecting data for thespecified standards.
Ensure that you already have some assets in the asset store before you proceed with the datacollection.
156Importing Assets into CCSPerforming the global tasks

To set up a data collection job
1 Hover over the Asset System menu, and click Assets.
2 In the table pane, select the assets or the asset group for which you want to run the datacollection job.
3 In the Global Tasks drop-down list, clickSet up Data Collection.
4 On the Specify Standards screen of the Create or Edit data Collection Job wizard,type the Name and the Description for the data collection job.
5 In the Standards panel, navigate through the Standards and select a standard againstwhich you want to set up a data collection.
The predefined standards or the custom standards that are relevant to the asset typeselected only are available for selection.
6 Click Add to add the standard to the data collection job and click Next.
7 On the Schedule job screen, select any one of the following:
■ If you want to run the job after the wizard closes, select Run now.
■ If you want to run the job on a specific date and time, select Run on and specify thedate and time on which you want to run the job.
■ If you want to run the job at a specified interval, select Recurrence and enter thefollowing information:
■ To schedule recurrent runs, select one of the following options:
The following options are available when youselect Daily:■ Start date
Lets you specify a date to start therecurrence period.
■ Start timeLets you specify a time to start therecurrence period.
■ Run every <Number of> daysLets you specify the number of days afterwhich the job is run.
■ Limit run durationLets you decide the duration of the jobrun daily.
Daily
157Importing Assets into CCSPerforming the global tasks

The following options are available when youselectWeekly:■ Run every
Re-runs the job at regular weekly intervalsbased on the value that you specify. Youmust specify a day of the week on whichyou want the job to run. For example, ifyou enter 2 in the Run every <numberof> weeks field and then select thecolumn namedT for Tuesday, then the jobwill recur on the first Tuesday of everysecond week from the date you specifythe schedule.
Weekly
The following options are available when youselect Monthly:■ Run every <number of> months
Re-runs the job at regular monthlyintervals based on the value that youspecify.
■ EveryLets you specify a day or a week of themonth on which you want the job to run.For example, if you enter 2 in the Runevery <number of> months field andthen select Day in the Every drop-downlist, then the job will recur on everyday ofevery second month from the date youspecify in the schedule.
■ On DaysLets you select the ordinals and specifythe calendar days from the drop-downlists.For example, if you enter 2 in the Runevery <number of> months field, selectfirst and third ordinals, and then selectMonday, then the job will recur every twomonths, on the first and third Mondays.
Note: The Start Date and the Start Time donot signify the date and time of the first dayof recurrence. The Start Date and the StartTime signify the starting point of the recurringschedule that you have initiated. Additionally,an incremental schedule overrides the mainschedule in case of an overlap.
Monthly
158Importing Assets into CCSPerforming the global tasks

8 On the Specify Notification Details screen, select Send notification and type theinformation for sending the notification and click Next.
9 On the Summary screen, review all the selections that you made and click Finish.
You can monitor the status of the job on the Jobs workspace.
See “Running an evaluation job from the Asset System view” on page 159.
Running an evaluation job from the Asset System viewYou run an evaluation job wizard to evaluate the assets in your organizations against specificstandards or checks.
See “About evaluation jobs” on page 313.
To run an evaluation job
1 Hover over the Asset System menu, and click Assets.
2 In the Assets workspace, do one of the following:
■ In the table pane, right-click and select Run CCS standards evaluation.
■ In the Global Tasks list, select Run CCS Standards evaluation.
3 On the Select Standards screen of the Create or Edit Evaluation job wizard, type aJob Name for the evaluation job that you want to create.
4 In the Description box, type a description for the evaluation job, and click Next.
5 In the Standards pane, select a folder. You can further select from the displayed foldercontents.
6 On the Schedule Job screen, select any one of the following:
■ If you want to run the evaluation job after the wizard closes, check Run Now.
■ If you want to run the job on a specific date at a specific time, check Run periodicallyand then enter the date and time.
Note: You must set a password in the System Management > User Preferences > DataCollection Password. If you fail to set the password, a warning message appears whenyou schedule the job. You can click OK in the message box and specify the schedulingdetails. But you must set the password before the scheduled time for running the job.
159Importing Assets into CCSPerforming the global tasks

7 Click Next on the Schedule Job screen to open the Advanced Settings screen. Thisscreen is further divided into threemore screens:Remediation Ticketing,Result Viewers,and Notification Details
For a detailed procedure of configuring the automatic remediation visit the following link:
See “To remediate the assets automatically” on page 160.
8 On the Remediation Ticketing screen,
9 In the Add Result Viewers panel, add the users or the groups that have the permissionsto view the evaluation results and reports.
It is recommended to add the groups as the result viewers.
10 In the Specify Notification Details panel, enter the job completion notification details onthe Job Success tab. Enter the job failure notification details on the Job Failure tab. Boththe tabs on this panel contain the same options. Check Send notification, enter thefollowing information and then click Next:
■ Enter the subject and message of the notification mail.
■ Enter the sender and the receiver email ID.Notification can be sent to multiple recipients.
To remediate the assets automatically
1 In the Select Asset Type for Remediation Ticketing panel, check the Enable AutomaticRemediation Ticketing option to configure the automatic remediation details.
Select the asset types that correspond to the assets that were evaluated and click Next.
2 In the Specify Remediation Ticketing Criteria panel, specify the combination of riskscore and compliance score that you want to use to identify the assets for remediation.
You can select Apply to all standards if you want to apply the specified remediationcriteria to all the standards for remediation.
If you do not select Apply to all standards, you must specify the remediation ticketingcriteria for each standard.
Click Next.
3 In the Select Remediation Ticket Type panel, select one of the following:
■ Create an email notification.This option lets you create an email notification that you want to send for notification.
■ Create a service desk ticket.This action opens a service desk ticket request directly at the end of the evaluationresults for the non-compliant assets.
160Importing Assets into CCSPerforming the global tasks

You can choose the Enable closed-loop verification option. With the closed-loopverification, the non-compliant assets data is re-evaluated after the service desk requestis met.See “About closed-loop verification” on page 170.
Click Next.
4 If you choose to send an email notification as a remediation action, specify the messagethat you want to send as an email notification in the Configure Notification Details forRemediation Ticketing panel. Click Next.
If you select Consolidate multiple assets in a single ticket/email, a single notificationis sent that includes all the non-compliant assets.
You can check Make this the default Email Notification template if you want to usethe same message for all the service desk ticket requests.
5 If you choose to create a service desk ticket as a remediation action, specify the messagethat you want to send as a service desk request in the Configure Service Desk Ticketpanel. Click Next.
If you select Consolidate multiple assets in a single ticket/email, a single service deskticket is generated that includes all the non-compliant assets.
You can check Make this the default Service Desk Ticket template if you want to usethe same message for all the service desk ticket requests.
6 Proceed with the Create or Edit Evaluation Job Wizard till the Summary panel.
Configuring asset credentialsYou can add and view platform and asset credentials from the Assets view.
To add a credential
1 Hover over the Asset System menu, and click Assets.
2 In the Asset System View tree pane, right-click the Asset System folder.
3 Select Add Credential.
See “Adding asset credential” on page 183.
4 On the Specify Credentials Details screen of the Add Asset Credentials wizard, specifywhich Platform you want to configure the credentials for.
You can provide values for the Configure for and Authentication fields whereverapplicable.
5 In the Credential section, provide details about your User name and Password, andthen click Next.
161Importing Assets into CCSPerforming the global tasks

6 On the Select Assets screen, select the assets that you want to add credentials for, andthen click Add.
7 Click Next, and then on the Summary screen, click Finish to add the credentials.
To view configured credentials
1 On the Asset System menu, click Assets.
2 In the table pane, select the asset group of which you want to view the asset credentials.
3 In the Global Tasks list, click View Credential.
The View Credentials - Asset System dialog box lets you view the credentials which areconfigured from the Credentials view. You can customize the view by selecting any of thefollowing options from the Display list:
■ All assets
■ Assets with credentials
■ Assets without credentials
See “RBAC for managing credentials” on page 186.
Performing the asset tasksYou can perform the following asset tasks from the Asset System view:
■ Import assets.See “Importing assets” on page 106.
■ Edit assets.See “Editing assets” on page 163.
■ Move assets.See “Moving an asset” on page 163.
■ Export CSV headers.See “Exporting CSV headers” on page 164.
■ Create Business AssetsSee “Creating business assets” on page 140.See “Creating multiple business assets” on page 141.
■ Associate with Business AssetSee “Associating parent business assets with child assets” on page 146.
■ Remove AssociationSee “Removing the association with a business asset” on page 147.
■ Add Assets
162Importing Assets into CCSPerforming the asset tasks

See “Adding assets” on page 137.See “Adding multiple assets” on page 138.
Editing assetsYou can edit the asset field values using the Edit Assets dialog box.
The Edit Assets dialog box lets you edit the mandatory and the optional field values along withthe common fields for the selected asset. You can also add or remove the tags from the EditAssets dialog box.
Note: You can edit multiple assets of the same asset type collectively if you want to specifycommon field values and tags to all assets.
To edit assets
1 Hover over the Asset System menu, and click Assets.
2 In the table pane, right-click an asset that you want to edit. You can also select multipleassets at a time for editing.
3 Click Edit.You can also click Common Tasks > Edit.
4 In the Edit dialog box, under the Properties tab specify or change the values of the fields.
The Properties tab presents the list of editable fields for the selected asset type. Theeditable fields include the mandatory fields, the optional fields, and the common fields.
The Properties tab presents check boxes for the optional fields that have a string value.You can select the check box if you want to use blank value for the optional field. You donot need to type any value for the optional string field, in case you select the check box.If you select the check box and still type the value in the optional string field, then thevalue that you type takes precedence over the blank value.
The boxes for all the fields are empty by default. The current value is retained if you donot specify any value for a field.
5 On the Tags tab, click Add Tag.
6 In the Select Tags dialog box, select a tag that you want to apply to the asset and clickAdd.
7 Click OK in the Select Tags dialog box.
8 Click OK in the Edit dialog box.
Moving an assetYou can move an asset from one location to another using the Asset System view.
163Importing Assets into CCSPerforming the asset tasks

To move an asset
1 In the table pane of the Assets workspace, right-click an asset that you want to move.
2 Select Move.
3 In theMove dialog box, select the destination folder to which you want to move the asset.
4 Click OK.
Removing a tag from the assetYou can remove the tag that is associated with the asset.
To remove a tag
1 Hover over the Asset System menu, and click Assets.
2 In the table panel, select the asset for which you want to remove the tag.
3 Right-click the asset and select Edit.
4 In the Edit dialog box, under the Tags tab select the tag that you want to remove and clickRemove Tag.
5 Click OK in the Edit dialog box.
Exporting CSV headersYou can export the CSV headers of the asset type for which you want to import the assetsthrough the CSV data collector. With the list of CSV headers, you can create your own CSVfiles with more accuracy to import the assets of a particular asset type.
You can use the CSV headers to create the CSV file that can be used for importing the assetsfrom the CSV data collector.
To export the CSV headers
1 Hover over the Asset System menu, and click Assets.
2 In the Asset Tasks drop-down list, click Export CSV Headers
3 In the Export CSV Headers dialog box, select Asset type that you want.
4 Browse and select the CSV file location where you want to export the CSV file withheaders.
RemediationControl Compliance Suite (CCS) provides a remediation feature that lets you identify the assetsthat are not in compliance. The remediation feature helps you resolve the issues that are
164Importing Assets into CCSExporting CSV headers

caused by the non-compliance by sending the notification to the appropriate personnel.Remediation lets you specify the criteria to identify the non-compliant assets and then lets youchoose the method of notification for the identified assets. You can either notify the appropriatepersonnel with a ServiceDesk ticket or with an email. The appropriate personnel resolves theissue and then closes the ticket.
You must configure the remediation settings to create the ServiceDesk tickets and to sendemail notifications.
Control Compliance Suite provides a closed-loop verification feature where the assets thatwere remediated earlier are reevaluated for compliance. The closed-loop verification featureis available only when you select the ServiceDesk ticket method of notification.
See “About closed-loop verification” on page 170.
You have the option to remediate the assets automatically or to select the assets to remediatemanually.
See “About automatic remediation” on page 165.
See “About manual remediation” on page 166.
About automatic remediationControl Compliance Suite provides a feature to remediate the assets that are non-complaint.You can remediate the assets automatically or manually.
To automatically remediate the assets, you can schedule a specific remediation action as apart of the evaluation job or the collection-evaluation-reporting job. Automatic remediationimmediately triggers a specified remediation action on the non-compliant assets that satisfya specified criteria at the end of the job.
The automatic remediation works in the following way:
■ Create a new evaluation job or a collection-evaluation-reporting job.
■ Specify the evaluation job details.
■ Enable automatic remediation and select the asset types.
■ Specify remediation criteria.
■ Select a remediation action.
■ Schedule the evaluation job or the collection-evaluation-reporting job.
■ Specify the notification details.
You must configure the remediation settings to create ServiceDesk tickets and to send emailnotifications for asset remediation. You can configure the settings from Settings >ApplicationSettings > Application Configuration > Remediation Settings.
See “Remediation” on page 164.
165Importing Assets into CCSRemediation

About manual remediationControl Compliance Suite provides a feature to remediate the assets that are non-complaint.You can remediate the assets automatically or manually.
To manually remediate the assets, you can select specific assets from the Evaluation ResultDetails dialog box and specify the remediation action.
The Evaluation Result Details dialog box can be launched from the Jobs > Evaluation Resultsor from the Evaluations tab in the details pane of the Asset System view.
See “Remediating the assets manually from the evaluation results” on page 166.
The manual remediation works in the following way:
■ Navigate to the evaluation results details dialog box.
■ Select the remediate task.
■ Select the asset types.
■ Specify remediation criteria.
■ Select remediation action.
■ Select the assets to perform the remediation action from the assets that match the criteria.
You must configure the remediation settings to create the ServiceDesk tickets and to sendemail notifications.
See “About automatic remediation” on page 165.
Remediating the assets manually from the evaluation resultsYou can remediate the assets using the Evaluation Result Details dialog box. Manualremediation involves remediating the assets after you obtain the evaluation results.
After you evaluate the assets against standards, you receive the evaluation results and therisk score. You can now specify the criteria to identify the assets that require remediation andthen take action to remediate. You can further choose specific assets from the list of assetsthat match the specified criteria. Remediation occurs only on the selected assets. The criteriacan be the risk score or by compliance score or a combination of both the scores. You canchoose to send email notifications or open service desk tickets for the assets that requireremediation.
To launch the Evaluation Result Details dialog box
1 Hover over the Standards And policies menu, and click Technical Standards.
2 In the table pane of the Technical Standards workspace, select the standard for whichyou want to view the evaluation results.
166Importing Assets into CCSRemediation

3 Click the selected standard to open the Standards Details page.
4 On the Evaluations tab, click the View Evaluation Results Details icon.
You can also go to Jobs > Evaluation Results.
To remediate the assets manually
1 In the Evaluation Result Details dialog box, click Remediation Ticketing.
2 In the Select Asset Type for Remediation Ticketing panel, select the asset types thatcorrespond to the assets that were evaluated and click Next.
3 In the Specify Remediation Ticketing Criteria panel, specify the combination of riskscore and compliance score that you want to use to identify the assets for remediation.
You can select Apply to all standards if you want to apply the specified remediationcriteria to all the standards for remediation.
If you do not select Apply to all standards, you must specify the remediation ticketingcriteria for each standard.
Click Next.
4 In the Select Remediation Ticket Type panel, select one of the following:
■ Create an email notification.This option lets you create an email notification that you want to send for notification.
■ Create a ServiceDesk ticket.This action opens a ServiceDesk ticket request directly at the end of the evaluationresults for the non-compliant assets.You can choose the Enable closed-loop verification option. With the closed-loopverification, the non-compliant assets data is re-evaluated after the ServiceDesk requestis met.See “About closed-loop verification” on page 170.
Click Next.
5 If you choose to send an email notification as a remediation action, specify the messagethat you want to send as an email notification in the Configure Notification Details forRemediation Ticketing panel. Click Next.
If you select Consolidate multiple assets in a single ticket/email, a single notificationis sent that includes all the non-compliant assets.
You can check Make this the default Email Notification template if you want to usethe same message for all the ServiceDesk ticket requests.
167Importing Assets into CCSRemediation

6 If you choose to create a ServiceDesk ticket as a remediation action, specify the messagethat you want to send as a ServiceDesk request in the Configure Service Desk Ticketpanel. Click Next.
If you selectConsolidatemultiple assets in a single ticket/email, a single ServiceDeskticket is generated that includes all the non-compliant assets.
You can check Make this the default Service Desk Ticket template if you want to usethe same message for all the ServiceDesk ticket requests.
7 In the Select Assets for Remediation Ticketing panel, select specific assets from thelist of assets that is displayed in the panel. The list contains the assets that match thespecified remediation criteria. You can further select specific assets from the filteredassets.
Click Next.
8 In theSummary panel, view the details that you specified. ClickBack to make any changesand click Finish to exit the
Remediating the assets automaticallyYou can remediate the assets as a part of the evaluation or the collection-evaluation-reportingjob. Automatic remediation is scheduling the remediation of assets, as a sequential step, inthe evaluation job..
You can configure the remediation details in the Create or Edit Evaluation Job Wizard and inthe Create or Edit Collection-Evaluation-Reporting Job Wizard.
The panels to configure the remediation details in the Create or Edit Evaluation Job wizardappear after the Specify Notification Details panel.
You can also remediate the assets from the Assets view.
See “Running an evaluation job from the Asset System view” on page 159.
To remediate the assets automatically in the Technical Standards workspace
1 Hover over the Standards And Policies menu, and click Technical Standards.
2 Right-click the standard that you want to evaluate and select Run CCS Evaluation orRun Collection-Evaluation-Reporting according to your requirement.
Provide the necessary information until you reach the Select Asset Type for RemediationTicketing panel.
3 On the Select Asset Type for Remediation Ticketing screen, check the EnableAutomatic Remediation Ticketing option to configure the automatic remediation details.
Select the asset types that correspond to the assets that were evaluated and then clickNext.
168Importing Assets into CCSRemediation

4 On the Specify Remediation Ticketing Criteria screen, specify the combination of riskscore and compliance score that you want to use to identify the assets for remediation.
You can select Apply to all standards if you want to apply the specified remediationcriteria to all the standards for remediation.
If you do not select Apply to all standards, you must specify the remediation ticketingcriteria for each standard.
Click Next.
5 On the Select Remediation Ticket Type screen, select one of the following:
■ Create an email notification.This option lets you create an email notification that you want to send for notification.
■ Create a ServiceDesk ticket.This action opens a ServiceDesk ticket request directly at the end of the evaluationresults for the non-compliant assets.You can choose the Enable closed-loop verification option. With the closed-loopverification, the non-compliant assets data is re-evaluated after the ServiceDesk requestis met.See “About closed-loop verification” on page 170.
Click Next.
6 If you choose to send an email notification as a remediation action, specify the messagethat you want to send as an email notification on the Configure Notification Details forRemediation Ticketing screen. Click Next.
If you select Consolidate multiple assets in a single ticket/email, a single notificationis sent that includes all the non-compliant assets.
You can check Make this the default Email Notification template if you want to usethe same message for all the ServiceDesk ticket requests.
7 If you choose to create a ServiceDesk ticket as a remediation action, specify the messagethat you want to send as a ServiceDesk request in the Configure Service Desk Ticketpanel. Click Next.
If you selectConsolidatemultiple assets in a single ticket/email, a single ServiceDeskticket is generated that includes all the non-compliant assets.
You can check Make this the default Service Desk Ticket template if you want to usethe same message for all the ServiceDesk ticket requests.
8 Proceed with the Create or Edit Evaluation Job Wizard or the Create or EditCollection-Evaluation-Reporting Job Wizard.
169Importing Assets into CCSRemediation

About closed-loop verificationThe Control Compliance Suite provides the closed-loop verification feature where the assetsonce remediated are reevaluated for compliance. The closed-loop verification feature isavailable only for the ServiceDesk remediation action. The verification is optional and can beenabled at any time.
When an evaluation job identifies an asset that is out of compliance, a ServiceDesk ticket isopened, and then sent to the appropriate personnel to fix the issue. After the ticket is resolved,Control Compliance Suite recollects and reevaluates the asset data based on the originalevaluation scope.
You must configure the remediation settings to create ServiceDesk tickets and to send emailnotifications for asset remediation. You can configure the settings from Settings >ApplicationSettings > Application Configuration > Remediation Settings.
You can view the remediation verification job status in the Jobsworkspace. You cannot modify,schedule, or delete the job because the job is a system-job.
See “Remediation” on page 164.
See “Remediating the assets manually from the evaluation results” on page 166.
See “Remediating the assets automatically” on page 168.
170Importing Assets into CCSRemediation

Configuring Credentials
This chapter includes the following topics:
■ Credentials
■ About managing the credentials
■ About the CCS integration with CyberArk™ Enterprise Password Vault®
CredentialsCCS lets you manage credentials for agent-less and agent-based targets.
Credentials view can be used for the following objectives:
■ To configure credentials for platforms which comprises asset credential configuration andcommon credential configuration.
■ To save credentials for assets and common platforms
■ To reuse saved credentials during the credential configuration
See “RBAC for managing credentials” on page 186.
See “About the Credentials workspace” on page 180.
See “Configuring credentials for asset import and data collection” on page 172.
RBAC for managing credentialsCCS provides role based access control (RBAC) for managing credentials.
RBAC comprises the roles over the tasks which in turn provide you certain privileges whileaccessing a view. The following tasks are assigned to CCS Administrator and CCS PowerUsers for accessing Credentials view.
■ Manage Credentials
5Chapter
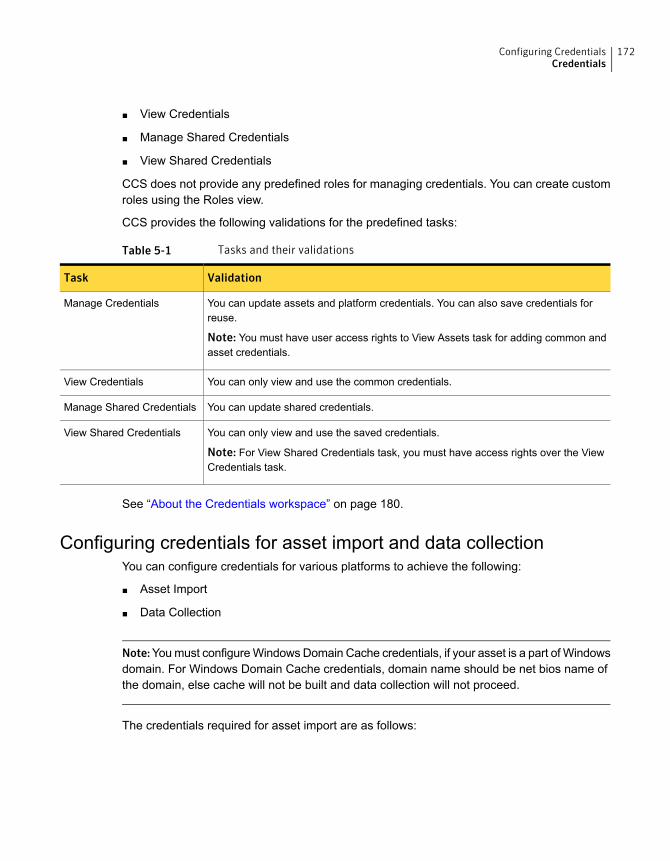
■ View Credentials
■ Manage Shared Credentials
■ View Shared Credentials
CCS does not provide any predefined roles for managing credentials. You can create customroles using the Roles view.
CCS provides the following validations for the predefined tasks:
Table 5-1 Tasks and their validations
ValidationTask
You can update assets and platform credentials. You can also save credentials forreuse.
Note: You must have user access rights to View Assets task for adding common andasset credentials.
Manage Credentials
You can only view and use the common credentials.View Credentials
You can update shared credentials.Manage Shared Credentials
You can only view and use the saved credentials.
Note: For View Shared Credentials task, you must have access rights over the ViewCredentials task.
View Shared Credentials
See “About the Credentials workspace” on page 180.
Configuring credentials for asset import and data collectionYou can configure credentials for various platforms to achieve the following:
■ Asset Import
■ Data Collection
Note:Youmust configureWindows Domain Cache credentials, if your asset is a part of Windowsdomain. For Windows Domain Cache credentials, domain name should be net bios name ofthe domain, else cache will not be built and data collection will not proceed.
The credentials required for asset import are as follows:
172Configuring CredentialsCredentials

Table 5-2 Credentials required for asset import
Credentials requiredScoped toAsset type
You must configure Windows common or Windows assetcredentials first.
See “Adding common credential” on page 184.
See “Adding asset credential” on page 183.
Next, configure Windows Domain Cache credentials.
See “Adding common credential” on page 184.
Windows MachineWindows assets
Windows File, WindowsDirectory, Windows Share,Windows Group, IIS VirtualDirectory, IIS Web Sites
You must configure Windows Domain Cache credentialsfirst.
See “Adding common credential” on page 184.
Next, configure SQL common credentials.
See “Adding common credential” on page 184.
Note:User associated with specified credential should beable to login to SQL Server in Windows Authenticationmode.
Windows MachineSQL Server
You must configure Windows Domain Cache credentials.
See “Adding common credential” on page 184.
Next, configure SQL common and SQL asset credentials.
See “Adding common credential” on page 184.
See “Adding asset credential” on page 183.
Windows MachineSQL Database
You must configure Windows common or Windows assetcredentials.
See “Adding common credential” on page 184.
See “Adding asset credential” on page 183.
Windows MachineOracle ConfiguredDatabase
You must configure UNIX common or UNIX assetcredentials.
See “Adding common credential” on page 184.
See “Adding asset credential” on page 183.
The following both credentials are required for UNIXplatform:
■ Connection credentials■ Data Collection credentials
UNIX MachineOracle ConfiguredDatabase
173Configuring CredentialsCredentials

Table 5-2 Credentials required for asset import (continued)
Credentials requiredScoped toAsset type
You must configure UNIX common or UNIX assetcredentials.
See “Adding common credential” on page 184.
See “Adding asset credential” on page 183.
The following both credentials are required for UNIXplatform:
■ Connection credentials■ Data Collection credentials
UNIX MachineUNIX File, UNIX Group
You must configure Cisco common or Cisco assetcredentials.
See “Adding common credential” on page 184.
See “Adding asset credential” on page 183.
Cisco IOS RouterCisco Routers
You must configure Generic Devices common or assetcredentials.
See “Adding common credential” on page 184.
See “Adding asset credential” on page 183.
Generic DevicesGeneric Devices
The credentials required for data collection are as follows:
Table 5-3 Credentials required for data collection
Credentials requiredPlatform type
You must configure Windows common or Windows asset credentials first.
See “Adding common credential” on page 184.
See “Adding asset credential” on page 183.
Next, configure Windows Domain Cache credentials.
See “Adding common credential” on page 184.
Windows
174Configuring CredentialsCredentials

Table 5-3 Credentials required for data collection (continued)
Credentials requiredPlatform type
Youmust configureWindows common orWindows asset andWindows Domain Cachecredentials first.
See “Adding common credential” on page 184.
See “Adding asset credential” on page 183.
Next, configure SQL common or SQL asset credentials.
See “Adding common credential” on page 184.
See “Adding asset credential” on page 183.
Note: For reporting on SQL servers, youmay also requireWindows platform credentialsas applicable. For instance, if you want to report on SQL server file permissions, youwill require Windows platform credentials.
SQL Server
Youmust configureWindows common, or Windows asset andWindows Domain Cachecredentials first.
See “Adding common credential” on page 184.
See “Adding asset credential” on page 183.
Next, configure Oracle common or Oracle asset credentials.
See “Adding common credential” on page 184.
See “Adding asset credential” on page 183.
Note: For reporting on Oracle Databases, you may also require Windows platformcredentials as applicable. For instance, if you want to report on Oracle file permissions,you will require Windows platform credentials.
Oracle Database onWindows
You must configure UNIX common or UNIX asset credentials.
See “Adding common credential” on page 184.
See “Adding asset credential” on page 183.
The following both credentials are required for UNIX platform:
■ Connection credentials■ Data Collection credentials
Note: For reporting on Oracle Databases, you may also require UNIX platformcredentials as applicable. For instance, if you want to report on Oracle file permissions,you will require UNIX platform credentials.
Oracle Database on UNIX
175Configuring CredentialsCredentials

Table 5-3 Credentials required for data collection (continued)
Credentials requiredPlatform type
You must configure UNIX common or UNIX asset credentials.
See “Adding common credential” on page 184.
See “Adding asset credential” on page 183.
The following both credentials are required for UNIX platform:
■ Connection credentials■ Data Collection credentials
UNIX
You must configure Cisco common or Cisco asset credentials.
See “Adding common credential” on page 184.
See “Adding asset credential” on page 183.
Cisco Routers
You must configure Generic Devices common or asset credentials.
See “Adding common credential” on page 184.
See “Adding asset credential” on page 183.
Generic Devices
Note: For the data collection job, the CCS Application Server passes on the credentials to theCCS Manager in an encrypted form. Encryption is done using the particular CCS Manager’scertificate. Therefore, if the data collection job is sent to any other CCS Manager than the onefor which the encryption is done using the certificate, the job will not get executed becausethe credentials will not get decrypted. The CCSManager then performs data collection for thatjob, without storing the credentials locally.
For agent-less asset import and data collection mode, you can manage credentials centrally.
For agent-based asset import and data collection mode, you can manage credentials locallyon the agents. See “Configuring credentials on agents” on page 178.
CCS requires certain minimum privileges in order to query target computers for data collection.
Privileges for WindowsTo query targets onWindows, CCS requires local administrator privileges on target computersfor some Windows APIs which are built into the product.
For information on minimum required privileges to query Windows targets, seehttp://www.symantec.com/docs/HOWTO83950
Privileges for SQLTo query targets on SQL, CCS requires the following kinds of privileges:
176Configuring CredentialsCredentials

■ Privileges to import SQL server assets into CCS
■ Common privileges to query all data sources
■ Privileges to collect data from specific data sources
For information on minimum required privileges to query an SQL Server database, seehttp://www.symantec.com/docs/HOWTO83942
Privileges for OracleTo query targets on Oracle, CCS requires the following kinds of privileges:
■ Privileges for database-related queries
■ Privileges for platform-specific queries
■ Privileges on views to query database-related data sources
Though CCS requires only minimum privileges for data collection, in some cases you mayrequire to query targets using higher privileges. The Sudo functionality permits you to executea command on the target computer, as a super user, or another user. For agent-less raw datacollection on Oracle UNIX targets, you can use the Oracle sudo (superuser do) functionalityto run queries in the context of a super user.
For information on minimum required privileges to query an Oracle database, seehttp://www.symantec.com/docs/HOWTO83943
Privileges for UNIXTo query or perform data collection on UNIX computers, ensure that root has sufficient privilegesto access the home directory of the data collection user. This privilege is independent of theuser profile existing on the NFS mount or the local computer.
Scenarios for using UNIX credentialsYou can use common credentials, asset credentials, or both credentials for UNIX platform forestablishing a connection and for performing data collection.
The different scenarios for using UNIX credentials to meet your business objectives are asfollows:
■ Use asset credentials for establishing a connection and for performing data collection
■ Use asset credentials for establishing a connection and use common credentials forpeforming data collection
■ Use common credentials for establishing a connection and asset credentials for performingdata collection
■ Use common credentials for establishing a connection and for performing data collection
177Configuring CredentialsCredentials

To achieve your specific business objective, See “Adding common credential” on page 184.and See “Adding asset credential” on page 183.
Note: You must configure any two sets of UNIX credentials, one for data connection and theother for data collection, else CCS displays the error, credentials not specified, except whena Certificate is used for connection. In that case data collection also uses the same certificate.
Configuring credentials on agentsYou can use the following command line utilities for configuring credentials on agents:
■ WinCredConfig.exeIt is located at <InstallDir>\ESM\bin\dcmodules\Control\Windows
■ UnixCredConfig.exeIt is located at <InstallDir>\esm\bin\dcmodules\Linux\UNIX\binFor example, <agent-install-root>/bin/dcmodules/<platform>/UNIX/bin/
■ SQLCredConfig.exeIt is located at <InstallDir>\ESM\bin\dcmodules\Control\SQLServer>SQLCredConfig.exe
For configuring credentials on agent using the utilities, you can select the following commandoptions for the required platform on the CLI:
■ (0) ExitThis option is used for exiting from the utility.
■ (1) Configure Credentials for Platform Windows, UNIX, or SQLThis option is used for creating the credentials.
Note: You must enter the user name and the password for the specified platform.
■ (2) Delete Credential file for Platform Windows, UNIX, or SQLThis option is used for deleting the configured credentials.
■ (3) Display Configured CredentialsThis option is used for viewing credentials after configuration.
See “About managing credentials for agent-based targets” on page 181.
About assigning credentials to assetsCCS supports assigning credentials at asset level and at folder level. For most of the platformsthe saved credentials are available for reuse.
For example, for SQL you can configure credentials as follows:
178Configuring CredentialsCredentials

■ SQL Server level CredentialYou can select required SQL servers and assign the credentials.
■ Domain level CredentialIf there is a single domain account which has access to all the SQL Servers then you neednot configure the credentials at server level. Instead you can specify the domain name andthe credentials. In this case all the SQL Servers in that domain uses the configuredcredentials. During query execution if you do not find server level credentials for a SQLserver, then credentials configured for its domain can be used. So server level credentialscan take over domain level credentials.
■ Common CredentialIf there is an account which can be used across all domains in an enterprise, then you canconfigure that credentials which can be used for all SQL Server instances in the query.During query execution if there are no server level credentials as well as domain levelcredentials, then credentials configured for General Query can be used.
Note: Asset credential for SQL requires SQL or Windows authentication while commoncredential for SQL requires only Windows authentication.
See “Adding asset credential” on page 183.
See “Editing asset credential” on page 185.
See “Removing assets from the common credential” on page 185.
About managing the credentialsYou require credentials to collect information from the selected platforms. A single commoncredential can be used for multiple operations. You also require asset credentials for datacollection in CCS.
Managing credentials involves the following steps:
■ Navigate to the Credentials workplace under the Admin menu.
■ Configure common and asset credentialsUsing common credential inWindows, SQL, UNIX, and Oracle you can use a single accountcredentials for asset system. You need credentials mainly for accessing the network assetsand secondary assets. For instance, Windows machine, Windows file. However, you haveto configure the credentials which can be used to collect information for the assets.
■ Save the specified common and asset credentials as credentials and reuse themYou can save the credential by assigning a user name and a passwords to it. If savedcredentials are available then you can reuse them instead of entering the user name and
179Configuring CredentialsAbout managing the credentials

the password again. Hence instead of providing the credentials at multiple places, you canuse the saved credentials seamlessly.
See “Adding common credential” on page 184.
See “Editing common credential” on page 184.
See “Deleting credential” on page 184.
See “About the Credentials workspace” on page 180.
About the Credentials workspaceThe Credentialsworkspace lets you manage the credentials in the Control Compliance Suite.
The Credentials workspace displays the common credentials, the assets that are applied tothe credentials, and the common platforms. You can access the Credentials workspace byhovering over the Admin menu, and then clicking Credentials.
The Credential Filter View pane displays the following platforms:
■ Windows Domain Cache
■ SQL
■ Oracle
■ UNIX
■ Windows
You can add or remove assets for a common credential in the Credential Preview Pane Viewpane.
You can screen platform wise credentials using the Filters.
Note: In the Assets pane, you can click Add Assets to add assets to the selected commoncredential and you can click Remove Assets to remove assets from the selected commoncredential.
See “About managing credentials for agent-based targets” on page 181.
See “About assigning credentials to assets” on page 182.
See “Adding common credential” on page 184.
See “Editing common credential” on page 184.
See “Deleting credential” on page 184.
See “Adding asset credential” on page 183.
See “Editing asset credential” on page 185.
180Configuring CredentialsAbout managing the credentials

See “Removing assets from the common credential” on page 185.
See “RBAC for managing credentials” on page 186.
About managing credentials for agent-based targetsFor a given asset the credentials are required for one of the following objectives:
■ For querying the information of the target computer
■ For querying the information of the applications such as SQL on the target computer
For agent-based assets, you can do the following:
■ Use centralized credentials:You can use credentials saved in CCS credential database using the Credentials view. Iflocal credentials are not configured, data collection job attempts to resolve credentials forthe target at CCS Manager. If configured local credentials are available, they passed onto the agent along with the job for reuse.CCS Manager fetches information from Application Server.Besides the above-mentioned options, for Windows fallback option can be used to collectdata.
■ Configure credentials locally on the target:CCS provides a utility for each platform which lets you configure credentials on the targetcomputer. You can select type of credentials for configuration, specify username andpassword. After you configure the credentials using the given utility, the tag Use LocalCredentials is set on the target and all data collection jobs for that particular platform startusing local credentials.For agent-based assets, you can either use agent side credential for a platform, use CCSside credential, or do not use credentials at all. The agent-based credential support isavailable only for UNIX and Windows platform.To configure local credentials on agents for raw data collection, you can use the followingutilities per platform:
■ Windows = WinCredConfig.exe
■ SQL = SQLCredConfig.exe
■ UNIX = UnixCredConfig.exeTo configure local credentials on agents for message based data collection, you can referto ESM platform information.
■ Use Agent Service Context for data collection, which can be configured forRBC_USE_PROCESS_CONTEXT in the agent.conf file at<InstallDir>\Symc_Enzo\ESM\config.To perform raw data collection, specify the context as follows:
RBC_USE_PROCESS_CONTEXT= 0
181Configuring CredentialsAbout managing the credentials

■ 0 stands for Always use credentials, ignore process context.
■ 1 stands for Use credentials if configured or else fallback to process context (DEFAULT).
■ 2 stands for Always use process context, ignore credentials.
Note: For importing SQL agent based targets ensure that common credentials for SQL areadded using the CCS credentials view.
See “Configuring credentials on agents” on page 178.
See “About the Credentials workspace” on page 180.
About assigning credentials to assetsCCS supports assigning credentials at asset level and at folder level. For most of the platformsthe saved credentials are available for reuse.
For example, for SQL you can configure credentials as follows:
■ SQL Server level CredentialYou can select required SQL servers and assign the credentials.
■ Domain level CredentialIf there is a single domain account which has access to all the SQL Servers then you neednot configure the credentials at server level. Instead you can specify the domain name andthe credentials. In this case all the SQL Servers in that domain uses the configuredcredentials. During query execution if you do not find server level credentials for a SQLserver, then credentials configured for its domain can be used. So server level credentialscan take over domain level credentials.
■ Common CredentialIf there is an account which can be used across all domains in an enterprise, then you canconfigure that credentials which can be used for all SQL Server instances in the query.During query execution if there are no server level credentials as well as domain levelcredentials, then credentials configured for General Query can be used.
Note: Asset credential for SQL requires SQL or Windows authentication while commoncredential for SQL requires only Windows authentication.
See “Adding asset credential” on page 183.
See “Editing asset credential” on page 185.
See “Removing assets from the common credential” on page 185.
182Configuring CredentialsAbout managing the credentials

Adding asset credentialYou can add asset credentials using the Add Asset Credential wizard.
Note: You must have user access rights to View Assets task for adding asset credentials.
To add asset credential
1 Hover over the Admin menu, and click Credentials.
2 On the taskbar, click Add Asset Credential.
3 On the Specify Credential Details screen of the Add Asset Credential wizard, enterthe required information and then click Next.
Note: If Oracle is hosted on an UNIX platform, you must configure query as well asconnection credentials for data collection jobs to work properly.
4 For UNIX platform, on the Credential Usage screen, select from the following optionsand then click Next:
■ Establish connection
■ Perform data collection
Note: For UNIX platform, you need to configure query as well as connection credentialsfor data collection jobs to work properly except when a Certificate is used for connection.In that case data collection also uses the same certificate.
See “Scenarios for using UNIX credentials” on page 177.
5 On the Select Assets screen, select and add assets, and then click Next. You can selectone or more specific assets of the selected asset type as the asset scope. You can alsoadd asset credential to the asset container level from Assets view.
6 If a credential conflict occurs for the selected assets, select the required option on theResolve Credential Conflict screen and then click Next.
7 On the Summary screen, click Finish. You can use the Back option to go back andchange the configurations.
Note: For reporting on Oracle database or SQL servers, you may also require Windows orUNIX credentials as applicable.
183Configuring CredentialsAbout managing the credentials

Note: You can save credential or you can browse credential by clicking the arrow button.
See “Editing asset credential” on page 185.
See “Removing assets from the common credential” on page 185.
Adding common credentialYou can add common platform credentials using the Add Common Credential option.
To add common credential
1 Hover over the Admin menu, and click Credentials.
2 On the taskbar, click Add Common Credential.
3 In the Add Common Credential dialog box, enter relevant information in the requiredfields and then click OK.
Note: For reporting on Oracle database or SQL servers, you may also require Windows orUNIX credentials as applicable.
See “Editing common credential” on page 184.
See “Deleting credential” on page 184.
Editing common credentialYou can edit common platform credentials using the Edit Common Credential dialog box.
To edit common credential
1 Hover over the Admin menu, and click Credentials.
2 In the Credential List View pane, select the common credential which you want edit, andthen on the taskbar, click Edit Credential.
You can also right-click the credential and click Edit Credential.
3 In the Edit Common Credentials dialog box, modify relevant information in the requiredfields, and then click Ok.
See “Adding common credential” on page 184.
See “Deleting credential” on page 184.
Deleting credentialYou can delete platform credentials using the Delete Platform Credential panel.
184Configuring CredentialsAbout managing the credentials

To delete platform credential
1 Hover over the Admin menu, and click Credentials.
2 In the Credential List View pane, select the credential which you want edit, and then onthe taskbar, click Delete Credential.
3 In theWarning box, click Yes.
See “Adding common credential” on page 184.
See “Editing common credential” on page 184.
Editing asset credentialYou can edit asset credentials using the Edit Credential wizard.
To edit asset credential
1 Hover over the Admin menu, and click Credentials.
2 In the Assets pane, select the assets which you want edit.
3 On the taskbar, click Edit Credential.
4 On the Edit Asset Credential screen, enter the required information and then click Next.
5 For UNIX platform, on the Specify Credential Details screen, select the required optionsand then click Next
See “Scenarios for using UNIX credentials” on page 177.
6 On the Select Assets screen, add or remove assets for the association and then clickNext. You can select one or more specific assets of the selected asset type as the assetscope.
7 If credential conflict occurs for the selected assets, on the Resolve Credential Conflictscreen, select the required option and then click Next.
8 On the Summary screen, click Finish. You can use theBack option to go back and changethe configurations.
Note: You can save credential or you can browse credential by clicking the arrow button.
See “Adding asset credential” on page 183.
See “Removing assets from the common credential” on page 185.
Removing assets from the common credentialYou can remove assets which are applied to the common credentials from theApplied Assetspane.
185Configuring CredentialsAbout managing the credentials

To remove asset
1 Hover over the Admin menu, and click Credentials.
2 On the Assets tab of the Credential Preview Pane View pane, select the assets whichyou want remove.
3 Click Remove Assets.
The selected assets are removed from the Assets pane.
See “Adding asset credential” on page 183.
See “Editing asset credential” on page 185.
RBAC for managing credentialsCCS provides role based access control (RBAC) for managing credentials.
RBAC comprises the roles over the tasks which in turn provide you certain privileges whileaccessing a view. The following tasks are assigned to CCS Administrator and CCS PowerUsers for accessing Credentials view.
■ Manage Credentials
■ View Credentials
■ Manage Shared Credentials
■ View Shared Credentials
CCS does not provide any predefined roles for managing credentials. You can create customroles using the Roles view.
CCS provides the following validations for the predefined tasks:
Table 5-4 Tasks and their validations
ValidationTask
You can update assets and platform credentials. You can also save credentials forreuse.
Note: You must have user access rights to View Assets task for adding common andasset credentials.
Manage Credentials
You can only view and use the common credentials.View Credentials
You can update shared credentials.Manage Shared Credentials
You can only view and use the saved credentials.
Note: For View Shared Credentials task, you must have access rights over the ViewCredentials task.
View Shared Credentials
186Configuring CredentialsAbout managing the credentials

See “About the Credentials workspace” on page 180.
About theCCS integrationwith CyberArk™EnterprisePassword Vault®
PU 2015-2 offers you the option to integrate with CyberArk™Enterprise Password Vault (EPV).CCS users no longer have to save privileged user account passwords in CCS. Users canreuse the privileged accounts that are stored in CyberArk EPV within CCS.
Previously, whenever a password was changed or reset, users had to manually change theasset credentials in CCS for the password changes to be reflected. This was an overhead tomanage large number of updates that may occur frequently. With this integration, no manualintervention is required to manage password changes in CCS.
After you integrate with CyberArk EPV, the credentials are fetched from EPV during thesubsequent data collection. You can fetch credentials from CyberArk EPV for all platformsthat are supported by CCS.
The CCS Application Server connects to the CyberArk EPV through the PIM provider by usingthe CyberArk Application SDK and fetches the passwords. The PIM Provider is a CyberArkcomponent, which you must install on the CCS Application Server.
At any given point, CCS supports integration with only one instance of CyberArk EPV.
Note: Symantec has validated the CCS integration with CyberArk EPV v8.5 and PIM Providerv7.2. However, as per the backward compatibility guidelines of CyberArk, the integration workswith older and newer versions as well.
CCS supports CyberArk integration on the following platform credentials:
■ Oracle
■ SQL
■ UNIX
■ CISCO
■ Windows
■ VMware
■ Windows domain cache
Note:The CyberArk integration is optional as CCS also supports native storage of credentials.
Table 5-5 includes the steps that you must perform to integrate with CyberArk EPV:
187Configuring CredentialsAbout the CCS integration with CyberArk™ Enterprise Password Vault®

Table 5-5 Steps to integrate with CyberArk EPV
DescriptionStep
Install the PIM Provider on the computer that hasthe CCS Application Server installed. The CyberArkApplication SDK gets installed automatically whenyou install the PIM Provider. During the installation,provide the necessary information for the PIMProvider to connect to the EPV server. CCS fetchesthe passwords from the EPV server that you specifyhere.
Step 1: Install the PIM Provider
You do this on the CCSApplication Server computer
Register the CCS application with the CyberArkEPV server from which you want to fetch thepasswords.
Step 2: Register CCS as an application with theCyberArk EPV server
You do this on the CyberArk EPV side
Assign the necessary permissions to CCS and PIMProvider on the required Safes from which you wantto fetch passwords. The Safes contain thepasswords that will be fetched.
Step 3: Assign permissions to CCS and PIMProvider on the required Safes from which you wantto fetch passwords
You do this on the CyberArk EPV side
Configure the CyberArk EPV integration settings byusing the General Settings tab on the CCSConsole.
For more information, see [Unresolved xref]
Step 4: Provide CyberArk EPV integration settingsfrom CCS Console
You do this on the CCS side
Integrating CCS with CyberArk EPVCCS integration with CyberArk EPV involves the following two procedures:
■ Configuring the integration settingsUse theGeneral Settings tab of the CCSConsole to configure the CyberArk EPV settings.This is an administrative activity to configure the integration.Only the CCS Administrator role and the user roles with the following tasks can configurethe CyberArk EPV integration:
■ Manage Configuration Settings
■ View Configuration SettingsSee “To configure the integration settings from the CCS Console” on page 189.
■ Specifying the password object detailsUse the Add Asset Credential wizard or the Add Common Credential wizard to providethe password object details depending on one of the following options that you use:
■ Provide the exact path of the password object
188Configuring CredentialsAbout the CCS integration with CyberArk™ Enterprise Password Vault®

Lets you fetch the specific password object.For example, enter <CyberArk Safe name>\<parent folder of the passwordobject>\<subfolder that contains the password object> and name of the password object.
■ Resolve password from specified attributesLets you search the Safe for the password object with the specified attributes, such asusername, policy name, and asset attributes.
See “To configure credentials to use password from CyberArk EPV” on page 190.
To configure the integration settings from the CCS Console
1 On the CCS Console, go to Settings > General and then click CyberArk Integrationunder the Application Configuration section.
2 In the CyberArk Integration workspace, in the CyberArk Integration Settings area, dothe following:
■ In the Application ID text box, enter the application ID that was specified for CCS inthe CyberArk password vault. Re-enter the application ID in the Confirm ApplicationID text box.
3 In the CyberArk SDK folder path text box, specify the local path of the CyberArk SDKfolder on the CCS application server.
For example, C:\Program Files (x86)\CyberArk\ApplicationPasswordSdk
The CyberArk SDK folder must be on the same computer as the CCS Application Server.
4 In the Connection port text box, enter the port number that CyberArk PIM Provider uses.
CCS Application Server connects to the PIM Provider on the specified port. The defaultport number is 18923.
5 In the Connection timeout text box, specify the duration, in seconds, for which you wantthe PIM Provider to try to retrieve a password from the CyberArk password vault. Thedefault value is 30 seconds.
6 In the Maximum concurrent requests text box, specify the maximum number ofconcurrent requests that the PIM provider can handle. The default value is 30 and themaximum you can enter is 60.
Note: The value you enter here must not be more than the maximum concurrent requeststhat PIM Provider can support.
7 Click Save.
189Configuring CredentialsAbout the CCS integration with CyberArk™ Enterprise Password Vault®

To configure credentials to use password from CyberArk EPV
1 In the CCS Console, go to Settings > Credentials.
2 Right-click on the Platform Credentials workspace and then select Add CommonCredentials or Add Asset Credential.
3 In the wizard that launches, do the following and then click Next:
■ In the Platform drop-down list, select a platform for the CCS asset.You use this file also to map the CyberArk policies with the CCS platforms.
■ In the Credential section, enter the user name and then check Use password fromCyberArk Enterprise Password Vault.
■ If you want to specify the exact path of the password object, click Specify exact pathand then do the following:
■ In the Folder path text box, specify the absolute path for the CyberArk passwordobject.The credential path must follow the following format:<CyberArk Safe name>\<parent folder of the password object>\<subfolder thatcontains the password object>The password object may reside in the root folder or subfolders. You must specifythe full path of the password object.
■ In the Password Object text box, type the name of the password object.
■ If you want to fetch the passwords by resolving the passwords from specified attributes,click Resolve passwords from attributes and then do the following:
■ In the Folder path text box, specify the location the CyberArk Safe or the folderpath that contains the password object.You must specify the Safe name that contains the password object. However,providing the folder path is optional.
■ In theCyberArk Policy drop-down list, select the CyberArk policy that is associatedwith the password object.The Policy drop-down list populated automatically based on the mappings thatyou have created in the CyberArkPolicyMappingMetadata.xml.
Note: The CyberArk Policy drop-down list displays "None" if the XML is invalid orif the policies are not configured for the selected platform.
■ Check Match CCS asset attributes with CyberArk account attributes if youwant the search parameters to include the asset attributes that are specified forthe selected platform.
190Configuring CredentialsAbout the CCS integration with CyberArk™ Enterprise Password Vault®

When you choose to use asset attributes for password resolution, the searchparameters include the asset attributes that are specified for relevant platforms inCyberArkAttributeMapping.xml. If you uncheck Match CCS asset attributes withCyberArk account attributes, the asset attributes are not included in the CyberArkEPV password search query. In such a case, the search includes the following attributesfor the assets in its scope:
■ User name
■ Folder path
■ CyberArk policy
Mapping the CyberArk policies to the CCS platformsYou use the CyberArkPolicyMappingMetadata.xml file to map the CyberArk policies withthe CCS platforms. The CyberArkPolicyMappingMetadata.xml file resides on the CCSApplication Server computer.
You can change the display names of the CyberArk policies in theCyberArk Policy drop-downlist by changing the "DisplayName" value in the XML. You can add more policies in the XMLif required. However, you must not remove any policy from the XML file. You can map morethan one policy to a CCS platform. The default policy is displayed in the CyberArk Policydrop-down list if you have multiple policies mapped to a single platform.
Note:TheCyberArk Policy drop-down list displays "None" if the XML is invalid or if the policiesare not configured for the selected platform.
Table 5-6 lists the required values in the CyberArkPolicyMappingMetadata.xml and theirmappings.
Table 5-6 Required values in the CyberArkPolicyMappingMetadata.xml and their mappings
DescriptionValueField
The CyberArk policy drop-downlist displays the values as per yourmappings that you specify here.
Name of the CyberArk policyCyberArkPolicy DisplayName
The value for policy ID is mappedto the policy name.
ID of the CyberArk policyPolicy ID
191Configuring CredentialsAbout the CCS integration with CyberArk™ Enterprise Password Vault®

Table 5-6 Required values in the CyberArkPolicyMappingMetadata.xml and their mappings(continued)
DescriptionValueField
The default value as "True" setsthe specified policy as the defaultselection in the CyberArk policydrop-down list.
You must add only one policy asdefault, which is selected bydefault in the drop-down list.
"True"Default
For platforms that have multipleauthentication types, theAuthentication drop-down listdisplays the policies that aremapped for each authenticationtype. Each authentication type hasseparate policies that you canmap to.
The authentication types for thespecified platforms
CyberArkPolicyMapAuthentication
The platforms that have multipletarget groups, the Configure fordrop-down list displays thepolicies that are mapped for eachtarget group
Type the target groups for thespecified platforms
CyberArkPolicyMap TargetGroup
Table 5-7 contains information on the CyberArk policy to CCS platform mappings.
Table 5-7 CCS platform to CyberArk policy mapping
CyberArk PoliciesCredential configurationCCS platform
Windows Domain AccountWindows
Windows Desktop Local Account
Windows Server Local Accounts
Windows Domain AccountWindows Domain Cache
Windows Desktop Local Account
Windows Server Local Accounts
UNIX via SSHUNIX
192Configuring CredentialsAbout the CCS integration with CyberArk™ Enterprise Password Vault®

Table 5-7 CCS platform to CyberArk policy mapping (continued)
CyberArk PoliciesCredential configurationCCS platform
Microsoft SQL ServerSQL AuthenticationSQL
Windows Domain AccountWindows Authentication
WindowsDesktop Local Accounts
Windows Server Local Account
Oracle DatabasesOracle
Cisco router via SSHCisco
VMWare ESX AccountVmware ESXi machinesVMWare
Windows Desktop Local Account
Windows Domain Account
Windows Server Local Accounts
VMWare vCenter SharedAccounts
VMWare vCenter Servers
Windows Desktop Local Account
Windows Domain Account
Windows Server Local Accounts
Note: You can map multiple CyberArk policies to a CCS platform. In Table 5-7, the entries inbold are the policies are selected by default for the relevant platform.
Mapping the CCS asset attributes to CyberArk credential attributesWhen you choose to use asset attributes for password resolution, the search parametersinclude the asset attributes that are specified for relevant platforms inCyberArkAttributeMapping.xml. This will essentially form a different query for each assetin scope and the resultant password is associated to the asset.
You use the CyberArkAttributeMapping.xml file to map the CyberArk password objectattributes to the CCS asset attributes. The CyberArkAttributeMapping.xml file resides onthe CCS Application Server computer.
Table 5-8 lists the CCS asset attributes that you map to the CyberArk credential attribute.
193Configuring CredentialsAbout the CCS integration with CyberArk™ Enterprise Password Vault®

Table 5-8 Required values in the CyberArkAttributeMapping.xml and their mappings
CyberArk password objectAttribute
CCS asset attributeCCS platform
Address[Domain/WorkgroupName]\[Machine Name]
Windows
AddressMachine Name
AddressFQDN
AddressMachine nameUNIX
AddressIP Address
Address[Domain/Workgroup Name]\[HostName (Node)]
SQL
AddressHost Name (Node)
AddressServer Name (Instance)
AddressFQDN
AddressFQDNOracle - UNIX
AddressServer NETBIOS Name
AddressWindows domain name or UNIXIP Address
DatabaseDatabase Name
AddressFQDNOracle - Windows
AddressServer NETBIOS Name
Address[Windows domain name orUNIX IP Address]\ [ServerNETBIOS Name]
DatabaseDatabase Name
AddressIP AddressCisco
AddressvCenter Server IP AddressVMware - vCenter Server
AddressMachine NameVmware - ESXi Machines
AddressIP Address
194Configuring CredentialsAbout the CCS integration with CyberArk™ Enterprise Password Vault®

Note: You can map a CyberArk password object attribute to one CCS attribute at a time. InTable 5-8, the entries in bold are the default active mappings inCyberArkAttributeMapping.xml.
After you create the mappings as specified in Table 5-8, the relevant asset attributes aredisplayed as a tooltip when you check Match CCS asset attributes with CyberArk EPVPassword object or account attributes on the Specify Asset Credential panel. The XMLhas certain asset-attribute combinations uncommented by default. You can modify the XMLas per your requirement. At any given point in time, you must uncomment only oneasset-attribute combination per CyberArk password object attribute in theCyberArkAttributeMapping.xml for each platform.
User can choose to use Windows and SQL Assets’ FQDN attribute to map with CyberArkpassword object’s Address attribute. FQDN is non-mandatory attribute and can be blank. IfFQDN attribute is configured to use as address and it is blank for relevant asset, CCS will inferFQDN by using host name property of the asset and the FQDN property of the correspondingdomain cache credentials in the format <hostname> .<domain cache FQDN> and use thesame for mapping. This is default behavior and can be turned off by making FQDNResolutionEnabled="false" in CyberArkAttributeMapping.xml.
195Configuring CredentialsAbout the CCS integration with CyberArk™ Enterprise Password Vault®

Working with Standards
This chapter includes the following topics:
■ Working with standards
■ Working with sections
■ About checks
■ Specifying or editing the description
■ Adding the CVE information
■ Adding reference information
■ Specifying or editing the check attributes
■ Specifying or editing the remediation information
■ Specifying or editing the check issue
■ Viewing the evidence details
■ About exporting the evaluation results
■ Exporting the evaluation results
■ Requesting an exception using the Evaluation Result Details dialog box
■ About risk score
■ Working with SCAP content
■ SCAP Content
■ Working with SCAP benchmarks
■ About risk and compliance score calculation for SCAP assets
6Chapter

■ Running a compliance scan using a command-line utility
■ About automated closed-loop remediation
Working with standardsYou can perform the following tasks on standards:
■ Create a new standard.See “Creating a new standard” on page 197.
■ Copy and paste a standard.See “Copying and pasting a standard” on page 198.
■ Move a standard.See “Moving a standard” on page 199.
■ Import a standard.See “Importing a standard” on page 200.
■ Export a standard.See “Exporting a standard” on page 201.
■ Rename a standard.See “Renaming a standard” on page 198.
■ Delete a standard.See “Deleting a standard” on page 202.
■ Evaluate an asset against a standard.See “Running an evaluation job” on page 313.
■ Create a chained job.See “Running a Collection-Evaluation-Reporting (CER) job from Standards workspace”on page 319.
Creating a new standardYou can create a new standard in the Technical Standards workspace.
To create a new standard
1 Hover over the Standards and Policies menu, and click Technical Standards.
2 In the Technical Standards workspace, in the tree pane, select the folder in which youwant to create the new standard.
3 Do one of the following:
■ Click the Tasks icon (...) and in the list, click Create Standard.
197Working with StandardsWorking with standards

■ In the table pane, right-click on an empty grid and select Create Standard.
4 In the Create Standard dialog box, in the Name box, type the name of the new standard.
5 In the Description box, enter the description information.
6 Click OK.
After you click OK, the Edit Standard dialog box is displayed. This dialog box lets youcreate a new section or a new check within the recently created standard. You can chooseto close the dialog box and create a section or a check later.
See “Creating a new section” on page 203.
See “Creating a new check” on page 208.
Renaming a standardYou can change the standard name through the General tab of the Details pane.
To rename a standard
1 Hover over the Standards and Policies menu, and select Technical Standards.
2 In the table pane of the Technical Standards workspace, select the standard that youwant to rename.
3 On the General tab of the Standards Details page, type the new name in the StandardName text box.
4 Click the Save icon.
Copying and pasting a standardYou can perform the copy-paste operation on predefined standards, user-defined standards,and standards having the sections that use script-based checks. You can copy multiplestandards at a time to any folder except the predefined folder.
You must have the CCS Administrator role assigned to be able to copy and paste standardshaving script-based checks. When you perform the copy-paste operation, then the script fileassociated with the check is also copied.
198Working with StandardsWorking with standards

To copy and paste a standard using the context menu
1 Hover over the Standards and Policies menu, and click Technical Standards.
2 In the table pane of the Technical Standards workspace, right-click the standard thatyou want to copy and select Copy.
3 In the tree view, select the folder where you want to paste the copied standard. In thetable pane, right-click in the empty space in the grid and select Paste.
You can paste a standard only within a folder. The Paste option is disabled when you tryto paste a standard within a section, or a check.
After you paste a standard, a Progress Status bar is displayed. This bar shows theprogress of the paste operation. A message appears when the paste operation issuccessful.
To copy and paste a standard using the menu bar
1 Hover over the Standards and Policies menu, and click Technical Standards.
2 In the table pane of the Technical Standards workspace, right-click the standard thatyou want to copy and select Copy.
3 Right-click in the table pane where you want to place the copied standard, and selectpaste.
See “Moving a standard” on page 199.
See “Copying and pasting a section” on page 203.
See “Copying and pasting a check” on page 206.
Moving a standardYou can move the user-defined standards to any location except the predefined folder. Thepredefined standards cannot be moved.
To move a standard
1 Hover over the Standards and Policies menu, and click Technical Standards.
2 In the table pane of the Technical Standards workspace, Right-click the standard thatyou want to move and select Move.
3 In the Move dialog box, select the destination folder to which you want to move thestandard, and then click OK.
See “Working with standards” on page 197.
199Working with StandardsWorking with standards

Importing a standardYou can import a standard that is compliant with the Control Compliance Suite to any folderexcept the predefined folder.
When you import a standard with a script-based check, the details of the script are importedfrom a separate xml file. The xml file of the script must be at the same location as that of thestandard xml file. You must have the CCS Administrator role assigned, to be able to import astandard that uses script-based checks.
While importing a standard, if a standard with the same name or same name with differentversion already exists, then you are prompted to rename the standard. Along with the standardyou can also import the Control Statement Mappings for that standard.
Note:When a standard is imported, the version of the standard is taken into consideration.Therefore, changing the name of the standard in the XML does not lead to creation of a newstandard.
To import a standard
1 Hover over the Standards and Policies menu, and click Technical Standards.
2 In the Navigation View pane on the left, right-click the Standards folder, and selectImport Standard.
3 To import control statement mappings along with the standard, click Yes in the Questionbox that appears.
4 In the Import Standard dialog box, provide the following information:
■ In the Standard Check Mapping File Path, type or browse to the standard file thatyou want to import.
■ In theControl Statement Mapping File Path, type or browse to the statement controlmapping file of the standard that you want to import.
■ In the Overwrite if the custom target types exist check box, click to overwrite ifcustom target types exist.
Note: The custom target types that are defined in the Standard XML get created whilethe standard is imported. If the custom target types already exist then they areoverwritten if this check box is checked.
■ In the Container Folder area, select the destination folder of the imported standard.
200Working with StandardsWorking with standards

■ Select the Overwrite if the custom target types exists check box, if you want tooverwrite the existing custom target types.
5 Click OK.
See “Working with standards” on page 197.
Exporting a standardYou can export a standard from CCS onto the local file system on a computer where the CCSConsole is running or to a remote shared folder on a network drive. You can export the controlstatement mappings for that standard along with the standard to a file. When you can exporta standard with a script-based check, the details of the script-based check are exported in aseparate xml file. The xml file is stored in the same folder as that of the exported standard.
Note: You must have the CCS Administrator role assigned, to be able to export a standardthat uses script-based checks.
Exporting a standard can assist you in creating a backup of the standard and the controlstatement mappings for that standard. You cannot export a section or a check.
To export a standard
1 Hover over the Standards and Policies menu, and click Technical Standards.
2 In the table pane of the Technical Standards workspace, right-click the standard thatyou want to export and select Export Standard.
You can choose to export the control statement mappings for the standard that you wantto export.
3 To export the control statement mappings click OK when prompted.
4 In the Export Standard dialog box, provide the following information:
■ In the Standard Check Mapping File Name enter the name of the file to which youwant to export the standard.
Note:When you export a standard that uses a script-based check, then the file that iscreated with the script details is appended with _script.xml. For example:<standardname>_script.xml.
■ In the Control Statement Mapping File Name enter the name of the file to which youwant to export the control statements mappings of that standard.
201Working with StandardsWorking with standards

Note: By default, the control statement mapping file name is appended with Control
Statement Mapping. For example, <standardname>_Control Statement
Mapping.xml.
■ In Folder Path, type or browse the location where you want to save the files.
5 Click OK.
See “Working with standards” on page 197.
Deleting a standardYou can delete only the user-defined standards. The predefined standards cannot be deleted.
To delete a standard
1 Hover over the Standards and Policies menu, and click Technical Standards.
2 In the table pane of the Technical Standards workspace, right-click the standard thatyou want to delete, and then select Delete.
3 In the Question box, select Yes to delete the selected standard.
See “Working with standards” on page 197.
Working with sectionsYou can perform the following tasks on sections:
■ View section information in the details pane
■ Create a new section.See “Creating a new section” on page 203.
■ Copy and paste a section.See “Copying and pasting a section” on page 203.
■ Move a section.See “Moving a section” on page 204.
■ Rename a section.See “Renaming a section” on page 204.
■ Delete a section.See “Deleting a section” on page 205.
202Working with StandardsWorking with sections

Creating a new sectionYou can create a new section only with reference to a standard or another section. Therefore,before you create a new section, you identify the standard or the section to which you want toadd the new section.
To add a new section to a standard or to another section
1 Hover over the Standards and Policies menu, and select Technical Standards.
2 In the Technical Standards workspace, right-click the standard or the section to whichyou want to add the new section and select Create Section.
3 In the Section Name dialog box, enter the name of the new section. Click OK.
The new section is added to the standard. You can enter further information for the sectionsuch as description and references through the Details pane.
See “Working with sections” on page 202.
Copying and pasting a sectionYou can perform the copy-paste operation on predefined sections, user-defined sections, andsections using script-based checks to custom standards. You can copy one or more sectionsat a time to any folder except the predefined folder.
You must have the CCS Administrator role assigned, to be able to copy and paste sectionshaving script-based checks. When you perform the copy-paste operation, then the script fileassociated with the check is also copied.
In the Confirm Check Replace dialog box, you can perform the following actions:
■ Copy and Replace: If you copy the same section again in the same standard, the sectionoverwrites the previously copied section.
■ Copy without replace: If you copy the same section again in the same standard, a newcopy of the section is created. The section does not overwrite the previously copied section.You can copy a section under the same standard multiple times.
■ Don’t copy: Lets you cancel the current action.
■ Cancel: Lets you cancel the whole operation.
To select the same operation for all the conflicts, select the Do this for all conflicts checkbox.
Note:When you copy a section for the first time, the Confirm Check Replace dialog box isnot displayed. However, after you have created a copy of the same section, the dialog box isdisplayed for the consecutive copying action.
203Working with StandardsWorking with sections

To copy and paste a section using the context menu
1 Hover over the Standards and Policies menu, and click Technical Standards.
2 In the table pane of the Technical Standards workspace, right-click the section that youwant to copy and select Copy.
This step lets you copy the selected section. However, to view the copied section, youmust perform the paste operation as explained in the next step.
3 Place the cursor under the standard or the section where you want to paste the copiedsection. Right-click the mouse and select Paste.
The Progress Status bar is displayed. This bar shows the progress of the paste operation.A message appears when the section is pasted.
To copy and paste a section using the menu bar
1 Hover over the Standards and Policies menu, and click Technical Standards.
2 In the table pane of the Technical Standards workspace, right-click the section that youwant to copy and on the menu bar, click Edit and then Copy.
3 Put the cursor where you want to place the copied section. On the Menu bar, click Editand then paste.
See “Working with sections” on page 202.
Renaming a sectionYou can change the section name through the General tab of the Details pane.
To rename a section
1 Hover over the Standards and Policies menu, and click Technical Standards.
2 In the table pane of the Technical Standardsworkspace, select the section that you wantto rename.
3 On the General tab of the Standards Details page, type the new name in the SectionName text box.
4 Click the Save icon.
Moving a sectionYou can move the user-defined sections to any location except the predefined folder. Youcannot move the predefined sections.
204Working with StandardsWorking with sections

To move a section
1 Hover over the Standards and Policies menu, and click Technical Standards.
2 In the table pane of the Technical Standards workspace, right-click the section that youwant to move and select Move.
3 In the Move dialog box, select the destination folder to which you want to move thesection. Click OK.
See “Working with sections” on page 202.
Deleting a sectionYou can delete only the user-defined sections. You cannot delete the predefined sections.
To delete a section
1 Hover over to Standards and Policies menu, and select Technical Standards.
2 In the table pane of the Technical Standards workspace, do one of the following:
■ Right-click the section that you want to delete and select Delete.
■ Select the section that you want to delete and on the taskbar, click Common Tasks> Delete.
■ Select the section that you want to delete and on the Tasks menu, select Delete.
3 In the Manage Standards box, select Yes to delete the selected section.
About checksA check is a test that is performed against one or more assets to determine a pass or a failstatus.
A check is composed of one or more check expressions. Multiple check expressions can bejoined through operators to form a check formula.
See “About standards” on page 66.
See “Working with checks” on page 205.
See “About operators” on page 234.
Working with checksYou can perform a number of tasks with checks. You can cut, copy, paste, create, and deletechecks. You can also create new check expressions to customize the checks.
You can perform the following tasks on checks:
205Working with StandardsAbout checks

■ Create a new check.See “Creating a new check” on page 208.
■ Copy and paste a check.See “Copying and pasting a check” on page 206.
■ Move a check.See “Moving a check” on page 207.
■ Rename a check.See “Renaming a check” on page 207.
■ Delete a check.See “Deleting a check” on page 208.
■ Modify a check.See “Editing a check” on page 210.
Copying and pasting a checkYou can perform the copy-paste operation on predefined checks, user-defined checks, andscript-based checks. You can copy and paste one or more checks at a time to any folder exceptthe predefined folder.
You must have the CCS Administrator role assigned, to be able to copy and paste script-basedchecks. When you perform the copy-paste operation, then the script file associated with thecheck is also copied.
In the Confirm Check Replace dialog box, you can perform the following actions:
■ Copy and Replace: If you copy the same check again in the same section, the checkoverwrites the previously copied check.
■ Copy without replace: If you copy the same check again in the same section, a new copyof the check is created. The check does not overwrite the previously copied check. Youcan copy a check under the same section multiple times.
■ Don’t copy: Lets you cancel the current action.
■ Cancel: Lets you cancel the whole operation.
To select the same operation for all the conflicts, select the Do this for all conflicts checkbox.
Note:When you copy a check for the first time, the Confirm Check Replace dialog box is notdisplayed. However, after you have created a copy of the same check, the dialog box isdisplayed for the consecutive copying action.
206Working with StandardsAbout checks

To copy and paste a check using the context menu
1 Hover over to Standards and Policies menu, and select Technical Standards.
2 In the table pane of the Technical Standards workspace, right-click the check that youwant to copy and select Copy.
This step lets you copy the selected check. But to view the copied check, you must performthe paste operation as explained in the next step.
3 Place the cursor under the section where you want to paste the copied check. Right-clickthe mouse and select Paste.
The Progress Status bar is displayed. This bar shows the progress of the paste operation.A message appears when the check is pasted.
To copy and paste a check using the menu bar
1 Hover over to Standards and Policies menu, and select Technical Standards.
2 In the table pane of the Technical Standards workspace, right-click the check that youwant to copy and on the menu bar, click Edit and then Copy.
3 Place the cursor where you want to locate the copied check. On the Menu bar, click Editand then paste.
Moving a checkYou can move the user-defined checks to any location except the predefined folder. Thepredefined checks cannot be moved.
To move a check
1 Hover over to Standards and Policies menu, and select Technical Standards.
2 In the table pane of the Technical Standards workspace, do one of the following:
■ Right-click the check that you want to move and select Move.
■ Select the check that you want to move and on the taskbar, click Common Tasks >Move.
■ Select the check that you want to move and on the Tasks menu, select Move.
3 In the Move Standard - Manage dialog box, select the destination folder to which youwant to move the check. Click OK.
Renaming a checkYou can change the check name through the General tab of the Details pane.
207Working with StandardsAbout checks

To rename a check
1 Hover over the Standards and Policies menu, and click Technical Standards.
2 In the table pane of the Technical Standards workspace, select the check that you wantto rename.
3 On the General tab of the Check Details page, type the new name in the Check Nametext box.
4 Click the Save icon.
Deleting a checkYou can delete only the user-defined checks. You cannot delete the predefined checks.
To delete a check
1 Hover over the Standards and Policies menu, and click Technical Standards.
2 In the table pane of the Technical Standards workspace, right-click the check that youwant to delete and select Delete.
3 In the Question box, click Yes to delete the selected check.
See “Working with checks” on page 205.
Creating a new checkYou must use the Create Check wizard to create a new check.
The Create Check wizard provides you the following options to create a new check:
This option lets you create a check that does not include apre-condition.
Quick Check Builder
This option lets you create a check that includes a pre-condition.Advanced Check Builder
To create a new check
1 Hover over the Standards and Policies menu, and click Technical Standards.
2 In the table pane of the Technical Standardsworkspace, navigate to the section to whichyou want to add the new check. Right-click the section and select Create Check.
3 On the Select Target Types screen, enter the following information:
■ In the Name text box, type the name of the new check.
■ In the Description text box, type a description for the new check. This information isoptional.
208Working with StandardsAbout checks

■ In the Target Type(s) drop-down list, select the target types that must be mapped tothe check.You can also create custom target types to evaluate specific standards against atargeted set of assets.
■ Select either theQuick Check Builder option or theAdvanced Check Builder option.The Quick Check Builder option lets you create a check without a precondition.The Advanced Check Builder option lets you add a precondition to the new check.
4 Click Next.
To proceed with check creation using the Quick Check Builder option
1 On theSpecify Expressions screen, enter the following information to create an evaluationcondition.
■ In the Category list box, select the category of the field.
■ In the Field list box, select the name of the field.
■ In the Operator list box, select the operator.
■ In the Value text box, specify a value for the field.To specify values for a LIST field, you must enclose all the values in a curly bracketand use a comma to separate each value. For example, {sam, ram, mac}.
2 Click the icon in the upper-right corner of the Value box to launch the Platform Browser.The Platform Browser lets you browse through the list of fields that are supported in theentity schema for the selected data collector. You can also view the fields and itsinformation to build a meaningful check expression.
3 Click the Add (+) sign to add the recently created field expression to the Expression(s)list.
The new expression is added to the Formula box by default. If a check includes only asingle expression, then the check formula is the same as the expression.
4 Repeat step 1 and step 3 to create any number of expressions.
5 In the Formula text box, you can use the check formula operators to connect the variousexpressions.
By default, the new expressions are connected using the AND operator.
6 Click the Validate Formula icon to validate the check formula that you have created. ClickNext.
7 On the Check Summary screen, you can view the information that you have entered. ClickBack to make any changes and click Finish to exit the wizard.
209Working with StandardsAbout checks

To proceed with check creation using the Advanced Check Builder option
1 On the Specify Precondition screen, enter the following information to create anevaluation condition.
■ In the Category list box, select the category of the field.
■ In the Field list box, select the name of the field.
■ In the Operator list box, select the operator.See “About operators” on page 234.
■ In the Value text box, specify a value for the field.To specify values for a LIST field, you must use a comma to separate the multiplevalues and enclose all the values in a curly bracket. For example, {sam, ram, mac}.
2 Click the Add (+) icon in the upper-right corner of the Value box to launch the PlatformBrowser. The Platform Browser lets you browse through the list of entities that aresupported in the entity schema for all the data collectors. You can also view the entity andits information to build a meaningful check expression.
3 Click the plus (+) sign to add the recently created field expression to the Expression(s)list.
The new expression is added to the Formula box by default. If a check includes only asingle expression then the check formula is the same as the expression.
4 Repeat steps 1 and 2 to create any number of expressions.
5 In the Formula text box, you can use the check formula operators to connect the variousexpressions.
By default, the new expressions are connected using the AND operator.
6 Click the Validate Formula icon to validate the check formula that you have created. ClickNext.
7 On the Specify Expressions screen, enter the information in the same manner as insteps 1 to 6. Click Next.
8 On the Specify Check Content screen, enter the optional information such as risk rating,remediation, issue, CVE, and references. Click Next.
See “Editing a check” on page 210.
9 In the Check Summary panel, you can view the information that you have entered. ClickBack to make any changes and click Finish to exit the wizard.
Editing a checkYou can make changes to an existing check.
The following features of a check can be edited:
210Working with StandardsAbout checks

■ Name and risk attributesYou can change the name, target type, and the risk rating values of the check from theGeneral tab of the details pane.See “Renaming a check” on page 207.See “Specifying or editing the check attributes” on page 240.
■ DescriptionYou can change the description of the check from the Description tab of the details pane.See “Specifying or editing the description ” on page 238.
■ Remediation, issue, and referencesYou can change the remediation, issue, and references information from the respectivetabs on the details pane.See “Specifying or editing the remediation information” on page 241.See “Specifying or editing the check issue ” on page 241.See “Editing reference information” on page 239.
■ Pre-condition and Check formulaYou can change the pre-condition and the check formula from the Edit Check wizard.
Note: You cannot edit the checks that contain a “proc:”call in the precondition of the checkalgorithm. Also, you cannot edit the pre-condition and the check formula of a custom check.
To change the precondition and the check formula
1 In the table pane of the Technical Standards workspace, do either of the following:
■ Right-click the check that you want to modify and select Edit.
■ Select the check that you want to modify and on the Expressions tab of the detailspane, click Edit.
■ Click the Expression tab in the Check Details page.
2 On the Specify Precondition screen of the Edit Check wizard, enter the followinginformation to create a field expression:
■ In the Category list box, select the category of the field.
■ In the Field list box, select the name of the field.
■ In the Operator list box, select the operator.
■ In the Value text box, specify a value for the field.
211Working with StandardsAbout checks

3 Click the Add (+) icon to add the recently created field expression to the Expression(s)list.
The new expression is added to the Formula box by default. If a check includes only asingle expression then the check formula is the same as the expression.
4 Repeat step 2 and step 3 to create any number of expressions.
5 In the Formula text box, you can use the check formula operators to connect the variousexpressions.
By default, the new expressions are connected using the AND operator.
6 Click Validate Formula to validate the check formula that you have created.
7 On the Specify Expressions screen, enter the information in the same manner as insteps 1 to 5.
8 On the Summary screen, you can view the information that you have entered. Click Backto make any changes and click Finish to exit the wizard.
See “Working with checks” on page 205.
See “Creating a new check” on page ?.
About using complex checkConsider the following examples:
■ Consider that you have indexed parameters such as "Permission0," "Permission1," and"Permission2. You remove the index parameter "Permission1." The parameter"Permissions2" is renamed to "Permissions1."
■ The permissions algorithms parameters for the Windows platform are more complex thanthose of other complex algorithms.The Permissions algorithms for Windows use parameter sets as follows:
■ Accounts
■ Permissions that the account is allowed to use
■ Scope to which the permissions are applied
■ The complex checks on the user rights behave in a specific way. The complex checks onthe user rights are used when some accounts must be assigned the user right for a checkto pass. The other accounts can optionally be assigned the user right. If all accounts areeither mandatory or optional, then you can use a generic check.You can use two types of checks with different parameters. The usage of the complexalgorithms is based on whether a user gets more privileges on the Windows system whenassigned with the user right.
212Working with StandardsAbout checks

■ The user gets more privileges on the Windows system if you grant any of the followingrights:
■ Increase a process working set
■ Modify an object label
■ Create symbolic links
■ Access Credential Manager as a trusted caller
■ Change the time zone
■ Replace a process level token
■ Generate security audits
■ Back up files and directories
■ Log on as a batch job
■ Bypass traverse checking
■ Create a pagefile
■ Create permanent shared objects
■ Create a token object
■ Debug programs
■ Enable computer and user accounts to be trusted for delegation
■ Increase scheduling priority
■ Adjust memory quotas for a process
■ Log on locally
■ Load and unload device drivers
■ Lock pages in memory
■ Add workstations to domain
■ Perform volume maintenance tasks
■ Access this computer from the network
■ Profile single process
■ Allow logon through Terminal Services
■ Force shutdown from a remote systems
■ Restore files and directories
■ Manage auditing and security log
213Working with StandardsAbout checks

■ Log on as a service
■ Shut down the system
■ Synchronize directory service data
■ Modify firmware environment values
■ Profile system performance
■ Change the system time
■ Take ownership of files or other objects
■ Act as part of the operating system
■ Remove computer from docking station
■ Impersonate a client after authentication
■ Create global objects
■ The checks that determine if a user right is assigned appropriately use the followingparameters:
■ RequiredAccountSIDsA comma-separated list of account SIDs. The accounts in this list must be assignedthe user right for the check to pass
■ OptionalAccountSIDsA comma-separated list of account SIDs. The accounts in this list may be assignedthe user right optionally. In case, an account is not assigned the right, the checkpasses.
■ UserRightThe name of the user right. It is the name of the Symantec bv-Control for Windowsfield that reports the user rights assignment by security identifier (SID).
■ OutcomeForExtraAccountThe parameter can take the values- Pass and Fail. In case, the accounts other thanthose specified in the parameters, RequiredAccountSIDs and OptionalAccountSIDsare assigned the user right and the value of this parameter is Fail, then the checkFails.In case the value of this parameter is Pass, then check does not fail if the accountsother than those specified in the parameters, RequiredAccountSIDs andOptionalAccountSIDs are assigned the user right.
■ The user gets lesser privileges on the Windows system if you grant any of the followingrights:
■ Deny logon as a batch job
214Working with StandardsAbout checks

■ Deny logon locally
■ Deny access to this computer from the network
■ Deny logon through Terminal Services
■ Deny logon as a service
■ The checks that determine if a user right is assigned appropriately, use the followingparameters:
■ RequiredAccountSIDsA comma-separated list of account SIDs. The accounts in this list must be assignedthe user right for the check to pass
■ OptionalAccountSIDsA comma-separated list of account SIDs. The accounts in this list may be assigned theuser right optionally. In case, an account is not assigned the right, the check passes.
■ UserRightThe name of the user right. It is the name of the Symantec bv-Control for Windows fieldthat reports the user rights assignment by security identifier (SID).
■ OutcomeForExtraAccountThe parameter can take the values- Pass and Fail. In case, the accounts other thanthose specified in the parameters, RequiredAccountSIDs and OptionalAccountSIDsare assigned the user right and the value of this parameter is Fail, then the check Fails.In case the value of this parameter is Pass, then check does not fail if the accountsother than those specified in the parameters, RequiredAccountSIDs andOptionalAccountSIDs are assigned the user right.
About script based checkScript based check feature allows you to utilize a pre-existing script to perform data collection.You can specify a custom script that needs to be executed during data collection for this check.The script file should exist on the CCS agent. You can define this check with the checkexpressions, based on the return code, standard output and standard error which are generatedwhen the script is executed.
Creating script-based checksYou can create a script-based check using the Create Check wizard.
To create a script-based check
1 Hover over to Standards and Policiesmenu, and select Technical Standards.
2 In the table pane of the Standards view, go to the section to which you want to add thenew check. Right-click the section and select Create Check.
215Working with StandardsAbout checks

3 In the Specify Name and Target Type panel, enter the following information:
■ In the Name text box, type the name of the script-based check.
■ In the Description text box, type a description for the new script-based check. Thisinformation is optional.
■ In the Target Type drop-down list, select the target types that must be mapped to thescript-based check.
Note: Script-based check feature is available only on UNIX platforms.
■ Select either theQuick Check Builder option or theAdvanced Check Builder option.The Quick Check Builder option lets you create a script-based check without aprecondition.
TheAdvanced Check Builder option lets you add a precondition to the new script-basedcheck.
4 Click Next.
To create Check expressions
◆ Enter the following information to create an evaluation condition.
■ Under Category, select Scripts as the category which is listed under UNIX platformcategory of the field.
■ In the Field list box, select the name of the field. You can define a script-based checkon the evaluation condition (Precondition or Check Expression) using the followingfields:
■ Return CodeThis is the return code that is generated upon script execution. This parameter willreturn the value of the script-based check that needs to be executed.
■ Standard OutputThis is standard output that is obtained upon script execution. It will define theoutput of the script-based check that is executed.
■ Standard ErrorThis is standard error generated upon script execution.
■ Select the appropriate Operator.
■ In the Value text box, specify a value for the field.
The new expression is added to the Formula box by default. If a check includes only asingle expression, then the check formula is the same as the expression.
216Working with StandardsAbout checks

You can define the inputs for script-based check execution through data filters, for an expressionby launching Advanced Settings window using the following steps:
To Advanced Settings window perform the following steps:
1 In the Category list box, select script as the category of the field.
2 In the Field list box, you can define the inputs for script execution. The following fieldsare available for script-based check:
■ Script file Name: In this field you need to specify the name of the script file alreadyexisting on CCS Agents under ‘ESM\Scripts’ folder.
Note: Script parameter field is optional.
■ Script parameters: In this field you need to specify the parameters that need to bepassed to the script file during execution.
Note: Data Items filter is common for all the evaluation condition that you defined inAdvance Settings in a check.
Note:When you select script as the category in the Evaluation Condition field, the Categoryfield in the data item filter is grayed out and displays the same category specified in theEvaluation Condition field.
About auditing data collection job with Standards having script-basedchecksWhen you run the data collection job or collection-evaluation-reporting job with a standard thathas script-based checks, then the audit logs are generated. You can generate the audit reportof these logs from the CCS System Auditing report template by selecting the component typeas Standards.
Following information is included in the audit logs
■ Standard name and version.
■ Check name and version.
■ Script file name
■ Parameters specified: (Yes/No)
■ Standard output considered as multiple records (Yes/No)
217Working with StandardsAbout checks

Configuring details of the script through the Script tabYou can specify the name, description, and the other details of the script that is used to createa script-based check from the Script tab of the Preview pane of the Technical Standardsworkspace.
1 Hover over to Standards and Policies menu, and select Technical Standards.
2 Select a script-based check to see the Script tab in the Preview pane.
3 In the Name box, type the name of the script.
4 In the Description box, you can type the description of the script. This field is optional.
5 Under the Script Details section, depending on whether you want to use an existing scriptor custom script, do one of the following:
■ Check Use existing script to use an existing script on the agent.
■ UncheckUse existing script. This enables the Script File field with aBrowse button.Browse to the location of the required custom script file and select it.
Note: You must enable the Integrated Command Engine (ICE) settings on the agentmachine. This lets the registered CCS Manager to push and execute custom scriptson the agent. To do this on a Windows agent, run the Agent Configuration utility;click ICE Settings in the left pane of the Configure CCS Agent dialog box; and thenselect the Enable Integrated Command Engine box. On a UNIX agent, run esmsetupin the /esm folder, enter the option 4 for post-installation configuration options andthen enter the option 7 to allow the ICE module scripts to be copied to the agent.
6 If you are using an existing script, type the name of the script in the Script file box.
7 In the Script Parameters box, specify the parameters that need to be passed to the scriptfile during execution. This field is optional.
8 Check Consider standard output of the script as multiple records if you want eachline of the output file to be considered as a separate record.
About script tabYou can configure the details of the script used to create a script-based check, under theScript tab in the Preview Pane of the Standards and Policies workspace. You can select anexisting script on an agent machine or specify a new script. You must have the privileges ofa CCS administrator to add and view the script details in the script tab.
If you use a custom script, you can also configure whether the script should be deleted afterexecution or stored in the .. /esm/scripts folder on the agent machine.
218Working with StandardsAbout checks

The default size limit of the script file is 1MB. You can change the file size limit to a maximumof 5MB.
Configuring details of the script through the Script tabYou can specify the name, description, and the other details of the script that is used to createa script-based check from the Script tab of the Preview pane of the Technical Standardsworkspace.
1 Hover over to Standards and Policies menu, and select Technical Standards.
2 Select a script-based check to see the Script tab in the Preview pane.
3 In the Name box, type the name of the script.
4 In the Description box, you can type the description of the script. This field is optional.
5 Under the Script Details section, depending on whether you want to use an existing scriptor custom script, do one of the following:
■ Check Use existing script to use an existing script on the agent.
■ UncheckUse existing script. This enables the Script File field with aBrowse button.Browse to the location of the required custom script file and select it.
Note: You must enable the Integrated Command Engine (ICE) settings on the agentmachine. This lets the registered CCS Manager to push and execute custom scriptson the agent. To do this on a Windows agent, run the Agent Configuration utility;click ICE Settings in the left pane of the Configure CCS Agent dialog box; and thenselect the Enable Integrated Command Engine box. On a UNIX agent, run esmsetupin the /esm folder, enter the option 4 for post-installation configuration options andthen enter the option 7 to allow the ICE module scripts to be copied to the agent.
6 If you are using an existing script, type the name of the script in the Script file box.
7 In the Script Parameters box, specify the parameters that need to be passed to the scriptfile during execution. This field is optional.
8 Check Consider standard output of the script as multiple records if you want eachline of the output file to be considered as a separate record.
Deleting a custom script on the agent machine after executionWhen you use a custom script to create a script-based check, you can specify whether youwant the script to be deleted after execution or stored in the <Installation Directory>/ESM/scriptsfolder on the CCS Windows agent or in the .. /esm/scripts folder on the UNIX agent machine.The DeleteCustomScriptAfterExecution key in the <appSettings> section of theAppserverService.exe.config file is set to True by default. If you want to store the script in
219Working with StandardsAbout checks

the .. /esm/scripts folder, you must set the DeleteCustomScriptAfterExecution key to False.The AppserverService.exe.config is present at the following location:
<Installation Directory>\Symantec\CCS\Reporting and Analytics\Application Server
You must stop the Symantec Application Server service before you make any changes to theconfiguration. You must restart this service after you make the changes to the configuration.
About auditing the changes made to the script tabWhen you make changes to the script tab which is associated with a check, all the parametersget audited and you can view these auditing changes in the CCS System Auditing report.
Following information will be included in the audit logs
■ Script created/modified
■ Standard name and version
■ Check name and version
■ Script name
■ If the script is an existing script on the agent (Yes/No)
■ Script file name
■ If the script parameters are specified (Yes/No)
■ If the overwrite script option is selected (Yes/No)
■ Use existing script (Yes/No)
■ Standard output considered as multiple records (Yes/No)
■ Delete script after execution (Yes/No)
Note: The Delete script after execution option is visible only if you uncheck the Useexisting script option.
See “About script tab” on page 218.
About script-based check version incrementWhen the attributes of a script-based check are modified by the user through the Script Tabof the Preview Pane, then the check version and thereby the Section and Standard version towhich the check belongs is incremented. The incremented Check version can be viewed inthe Preview Pane > General Tab > Version.
Modification of any of the following fields in Preview Pane > Script Tab causes the versionof a script-based check, Section, or Standard to be incremented:
220Working with StandardsAbout checks

■ Script File
■ Parameters
■ Use existing script
■ Consider standard output as multiple records
Changing the size of a script file used in script-based checksYou can specify the limit of the size of a script file used to create a script-based check, byadding the CustomScriptFileSizeLimit key in the <appSettings> section of theAppserverService.exe. config file. If the key is not present in the configuration file, thenthe file size limit is set to 1MB (1048576 bytes). When the key is added, you can specify filesize in bytes in the range of 1KB to 5MB . If you enter a value exceeding 5MB, the size is setto 5MB.If you try to upload a script file exceeding 5MB, an error message is displayed, andthe file is not uploaded.
Note:When you increase the size of the script file you may experience a slight performancedegradation.
To change the size of a script file
1 Stop the Symantec Application Server service if it is running.
2 Do one of the following:
■ If the CustomScriptFileSizeLimit key is not present, then add the key in the<appSettings> section of the AppserverService.exe configuration file, located at:<Installation Directory>\Symantec\CCS\Reporting and Analytics\Application ServerSet the file size as in the sample key as follows:<add key="CustomScriptFileSizeLimit" value="1572864" />
■ If the key is present in the configuration file, then specify the file size by adding the filesize value to the CustomScriptFileSizeLimit key in the <appSettings> section of theAppserverService.exe configuration file. The configuration file is located at:<Installation Directory>\Symantec\CCS\Reporting and Analytics\Application ServerSample key to change the file size to 1.5 MB:<add key="CustomScriptFileSizeLimit" value="1572864" />
3 Take a backup and edit attributes of the ScriptService_NetTcpBinding binding underconfiguration>system.serviceModel>bindings>netTcpBinding in theApplicationsBinding.config file located at:
<Installation Directory>\Symantec\CCS\Reporting and Analytics\Application Server
Change the following attribute:
221Working with StandardsAbout checks

■ maxArrayLengthExample to change the file size to 1.5MB:maxArrayLength="1572864"
4 Take a backup and edit the attributes of the netTCPCertConfig binding under/configuration/system.serviceModel/bindings/netTcpBinding in theAppserverService.exe.config file located at:
C:\Program Files (x86)\Symantec\CCS\Reporting and Analytics\Application Server
Change the following attributes:
■ maxBufferSizeExample to change the file size to 1.5MB:maxBufferSize="1572864"
■ maxReceivedMessageSizeExample to change the file size to 1.5MB:maxReceivedMessageSize="1572864"
■ maxArrayLengthExample to change the file size to 1.5MB:maxArrayLength="1572864"
5 Start the Symantec Application Server Service.
6 Stop the Symantec Encryption Management Service if it is running.
7 Take a backup and edit the attributes of the NetTCPCertConfig binding under/configuration/system.serviceModel/bindings/netTcpBinding in theSymantec.CSM.EncryptionManagement.Service.exe.config file located at:
<Installation Directory>\Symantec\CCS\Reporting andAnalytics\EncryptionManagementService
Change the following attributes:
■ maxBufferSizeExample to change the file size to 1.5 MB:maxBufferSize="1572864"
■ maxReceivedMessageSizeExample to change the file size to 1.5 MB: maxReceivedMessageSize="1572864"
■ maxArrayLengthExample to change the file size to 1.5 MB:maxArrayLength="1572864"
8 Start the Symantec Encryption Management Service.
222Working with StandardsAbout checks

About Commands data source for UNIXYou can use the Commands data source for UNIX to collect data and assess the securityconfiguration of middleware and third-party applications. You can collect data using both theagent-based and agentless methods to assess the security configuration of applications thatare currently not supported out-of-the-box by CCS. The feature consumes a server license,similar to other data sources.
Prerequisites for using Commands data source for UNIXThe prerequisites for using the Commands data source for UNIX are as follows:
■ Install CCS 11.5.2
■ Install SCU 2017-1
■ Install CCS Agent of version 11.5 or later
■ Run an Agent Content Update job
■ Procure a CCS Server license
■ Have a user in CCS Administrator role to whitelist commands and add commands to thechecks.
Aboutwhitelisting commands added in checks usedbyCommandsdatasource for UNIXWhen you create a custom standard with checks using commands for the Commands datasource for UNIX, you must whitelist the commands.
The various derivatives of the UNIX operating system are handled in the configuration file witha separate section for each derivative. You must add commands to the specific section towhich they apply. The UNIX section is applicable to assets that have any of the following UNIXderivatives as the Operating System attribute:
■ Linux
■ SunOS
■ AIX
■ HP-UX
You can create a separate section dedicated to a specific UNIX derivative to get the exactmatch between the section name and the Operating System attribute of the asset. For example,if you create a section RedHat Enterprise Linux in the configuration file, the commands fromthat section are considered for all the assets that have RedHat Enterprise Linux in the OperatingSystem attribute.
223Working with StandardsAbout checks

You can add commands that do not fit into any of the above categories to the default sectionof the configuration file.
Note: If you add commands specific to a UNIX derivative into the default section, then youmust comment out or delete that particular derivative from the configuration file.
To whitelist commands used by checks in a standard for Commands data source for UNIX
1 On the CCS console, navigate to Settings > System Topology and click Common Taks> Configure Platform Settings.
2 On the Platform Settings page, click UNIX in the left pane.
3 Click CommandWhitelist.ini from the list of files and click Download. You can save thefile at a specified location.
4 Open CommandWhitelist.ini file in a text editor.
5 Add the commands that you want to whitelist, and save the file.
6 Click Upload and browse to the location of the file. The CommandWhitelist.ini file isupdated on all the CCS Managers in your deployment.
Workflow for using Commands data source for UNIXThe workflow for using the Commands data source for UNIX includes the following steps:
■ Importing assets into the CCS Asset system.
■ Configuring credentials for asset import and data collection.
■ Creating a standard, adding a section, and creating checks for Commands data source forUNIX.The standard created for the Commands data source for UNIX comprises of checks thatare executed using commands. You add the commands in the Command tab of theStandards workspace.
■ Whitelisting the commands that are used by the standard for Commands data source forUNIX.
■ Running a collection-evaluation-reporting job or a data collection job.
Note: The Commands data source for UNIX does not support custom queries for datacollection.
■ Viewing and analyzing evaluation results and creating dashboard panels.
224Working with StandardsAbout checks
Creating a standard for Commands data source for UNIXThe process to create a standard and checks with commands for Commands data source forUNIX involves the following high-level steps:
■ Creating a standard and section
■ Creating a check with commands for Commands data source for UNIX
■ Adding commands to the check created for Commands data source for UNIX
Creating a check for Commands data source for UNIXYou must have the Standards Administrator role or CCS Administrator role to create checksfor the standard for Commands data source for UNIX.
To create a check for Commands data source for UNIX
1 In the CCS Console, navigate to Standards And Policies > Technical Standards.
2 In the Technical Standards workspace, right click the section of the standard in whichyou want to add a check; and click Create Check.
3 In the Select Target Type panel of the Create Check wizard, do the following:
DescriptionField
Enter the name of the check.Name
Enter the description of the check. This field is optional.Description
Select any target type from UNIX Platform.Target Type
Select one of the options.■ Quick Check Builder■ Advanced Check Builder
Click Next.
4 In the Specify Expression(s) panel, use appropriate operators for the fields used in thecheck expression.
Select one of the following options under Category:
■ CommandsSelect the appropriate options for the evaluation condition from the following table:
225Working with StandardsAbout checks

OperatorField
■ Equal To■ Not Equal To■ Is Null■ Is Not Null■ Matches Pattern■ Doesn't Match Pattern■ Like■ Not Like
Command Standard Error
■ Equal To■ Not Equal To■ Is Null■ Is Not Null■ Greater Than■ Less Than■ Less or Equal To■ Greater or Equal To
Command Return Code
■ Equal To■ Not Equal To■ Is Null■ Is Not Null■ Matches Pattern■ Doesn't Match Pattern■ Like■ Not Like
Command Standard Output
Click + to add the expression. and click Next.
5 On the Check Summary page review the check information and do one of the following:
■ Click Back if you want to make any changes to the check expression(s).
■ Click Finish to exit the Create Check wizard. Your check is created, you can now adda command to the check.
Adding a command to the check created for Commands data sourcefor UNIXYou must have the CCS Administrator role to add commands to the checks created forCommands data source for UNIX.
226Working with StandardsAbout checks

To add a command to the check created for Commands data source for UNIX
1 In the CCS console, navigate to Standards And Policies > Technical Standards.
2 In the Technical Standards workspace, click the check to which you want to add thecommand.
3 On the Check Details page, under the Command tab, enter the following information:
Enter the command name.Name
Enter the command description.Description
In the Command textbox, enter the command text. The permissible lengthof the command that you use for a check for Commands data source forUNIX is 512 characters. As you enter the command, the number ofavailable characters from the total of 512 characters is displayed. Youcan use this information to make changes to the command as required.
Command Details
If you want the standard output of the command to be considered as multiple records, then selectConsider standard output of the command as multiple records check box.
4 Click Save.
Permissible command length for the Commands data source for UNIXThe Commands data source for UNIX allows a maximum of 512 characters to be consumedby the command that you add to the check. Symantec supports the SUDO command for theCommands data source for UNIX. However for enhanced security, Symantec recommendsthat you use the '_>#SuDo#<_' token in place of SUDO command. The token expands into acommand string that consumes characters in the range of 80 -130 approximately . As youenter the command in the command text box, you are provided with information about theavailable number of characters.
If your command exceeds the limit of 512 characters, an error message is displayed.
To avoid the error message, you can change the value of the CustomCommandTextLengthLimitparameter in the AppserverService.exe.config configuration file.
Note: For Commands data source for UNIX apart from the SUDO command, CCS does notsupport any other features that are currently supported for UNIX platform.
Check expressionA check expression compares a property of an asset against a data value that a user specifies.The result of the comparison is a pass, a fail, or an unknown value.
227Working with StandardsAbout checks

A check expression is composed of the following:
■ Field expression (mandatory)See “Field expression” on page 228.
■ Data Items filter (optional)See “Data Items filter ” on page 229.
See “About checks” on page 205.
See “Creating a new check” on page 208.
Field expressionIn a field expression, an operator is used to compare a field with a particular value that a userspecifies.
A field expression is composed of the following:
■ FieldName of the field whose value you want to compare.
■ ValueThe value against which you want to compare a specified field. This value is also knownas a field value.
■ OperatorThe operator specifies the action that must be performed. For example, if you want to obtaina field A that has the exact value of 100, you must use the equal (=) operator. Every fieldvalue has a defined set of operators. You can only select an operator from the range ofoperators that are defined for the selected field value.See “Field expression operators” on page 234.
The syntax for a field expression is as follows:
<Field><Operator><Value>
The following table lists some examples of a field expression:
Table 6-1 Examples of field expressions
Field expressionValueOperatorField
Domain Name=SOUTHREGION
SOUTH REGION=Domain Name
Auditing Enabled!=YesYes!=Auditing Enabled
See “About checks” on page 205.
See “Check expression” on page 227.
228Working with StandardsAbout checks

See “Creating a new check” on page 208.
See “Check Advanced Settings” on page 230.
Check formulaA check formula is created by using check expressions.
A check formula is composed of either of the following:
■ A single check expressionSee “Field expression” on page 228.
■ Multiple check expressions that are connected by the use of check formula operators.See “Check formula operators” on page 236.
When a check formula is composed of only one check expression, then the check formula andthe check expression are the same. Hence, their outcome is the same.
See “About checks” on page 205.
See “Check Advanced Settings” on page 230.
See “Creating a new check” on page 208.
Data Items filterA data items filter lets you filter the data against which the field expression is evaluated in acheck.
A data items filter is composed of one or more filter statement. Each filter statement is a fieldexpression.
See “Field expression” on page 228.
You can specify a data items filter in the Advanced Settings dialog box when you create oredit a check.
See “Check Advanced Settings” on page 230.
If you specify multiple filter statements, then the final data for evaluation is determined by thefollowing options:
■ Return only the data that matches all of the filter statements.The AND operator is applied on the result of each filter statement to determine the finaldata for evaluation purpose.
■ Return only the data that matches any one of the filter statements.The OR operator is applied on the result of each data item to determine the final data forevaluation purpose.
See “About checks” on page 205.
229Working with StandardsAbout checks

See “Creating a new check” on page 208.
Check Advanced SettingsThe check fundamentals such as evaluation condition, data items filters, and multiple dataitems are important concepts to understand the process of creating a check. You can set thesevalues in the Advanced Settings dialog box when you create a check.
For example, assume that a table exists in the database with the name EXAMPLE. You cantreat this table equivalent to a category in an evaluation condition.
Table 6-2 contains the following fields and values:
Table 6-2 EXAMPLE
DCBA
50PX9
60QY10
70RZ11
CASE I: The following evaluation condition is set and no filter is applied on the evaluationcondition:
In the table EXAMPLE, the value of the field Ashould be greater than 9.
Evaluation Condition
A > 9Equivalent field expression for the evaluationcondition
–Data items filter
For the field A, three data values (9, 10, and 11) are present in the table. Each data value istested against the specified evaluation condition and the following results are obtained:
Result = FAILA = 9
Result = PASSA = 10
Result = PASSA = 11
To calculate the final result for the tested data, you must specify the action that should betaken for multiple data items.
You can select either of the following options to specify the action for multiple data items:
■ All must meet the evaluation condition.
230Working with StandardsAbout checks

The AND operator is applied on the individual results of each data item.
■ At least one must meet the evaluation condition.The OR operator is applied on the individual results of each data item.
If the AND operator is applied for the sample check, then the final result is as follows:
FAIL
(FAIL AND PASS AND PASS)
Final test result
(Applying the All must meet the evaluation conditionoption)
CASE II: The same evaluation condition is set and a data items filter that consist of a singlefilter statement is applied:
In the table EXAMPLE, the value of the field Ashould be greater than 9.
Evaluation Condition
A > 9Equivalent field expression for the evaluationcondition
D > 50Evaluation condition filter
On applying the filter statement, only those values of the field A are tested that match the filterstatement. In the example, now only the values 10 and 11 are checked against the evaluationcondition.
The individual results for the tested data values are as follows:
Result = PASSA = 10
Result = PASSA = 11
If you now specify the action for multiple data items as "All must meet the evaluation condition",then the final result is as follows:
PASS
(PASS AND PASS)
Final test result
(Applying the All must meet the evaluation conditionoption)
CASE III: The same evaluation condition is set and two filter statements are specified in thedata items filter as follows:
In the table EXAMPLE, the value of the field Ashould be greater than 9.
Evaluation Condition
231Working with StandardsAbout checks

A > 9Equivalent field expression for the evaluationcondition
D > 50Filter statement 1
C = PFilter statement 2
In the CASE III, the following values are returned on applying each filter statement:
The following values are returned:
A = 10
A = 11
D > 50
The following values are returned:
A = 9
C = P
When you apply more than one filter statement on the evaluation condition, you must specifythe behavior for multiple filter statements. This behavior is used to determine the data itemsthat would be considered for evaluation purpose.
You can select either of the following options to specify the behavior for multiple filter statements:
■ Return only the data that matches all of the filter statements.The AND operator is applied on each data item.
■ Return only the data that matches any one of the filter statements.The OR operator is applied on each data item.
If you consider only the data items that match any one of the filter statements, then the finaldata values are obtained as follows:
All the three data values are available for testing.
A=9
A=10
A=11
Applying OR operator as follows:
(A = 10) OR (A = 11) OR (A = 9)
You can then proceed to test each data item against the evaluation condition.
See “About checks” on page 205.
See “Creating a new check” on page 208.
232Working with StandardsAbout checks

Multiple data itemsAn evaluation condition consists of a field expression.When you specify an evaluation condition,all data items of the specified field are matched against the condition.
The result of each tested data item is one of the following:
■ Pass
■ Fail
■ Unknown
To calculate the final result for all the tested data items, you must specify the action to takefor multiple data items. You can specify this action in the Advanced Settings dialog box ofthe Create Check wizard.
See “Check Advanced Settings” on page 230.
In the Advanced Settings dialog box, you can select either of the following options to specifythe action for multiple data items:
■ All must meet the evaluation condition.The AND operator is applied on the individual results of each data item.
■ At least one must meet the evaluation condition.The OR operator is applied on the individual results of each data item.
See “Operators AND and OR” on page 236.
See “About checks” on page 205.
See “Creating a new check” on page 208.
Missing data itemsData items are termed as 'missing' in the following situations:
■ No value for the field is present.
■ Application of an evaluation condition filter returns no data values.
You must specify the outcome for missing data in the evaluation results. You can set this valuewhen you create a check in the Advanced Settings dialog box of the Create Check wizard.You can also modify the Outcome for missing data items value after the check is created.
See “Check Advanced Settings” on page 230.
You can set the following values as the outcome for missing data items:
■ Pass
■ Fail
■ Unknown
233Working with StandardsAbout checks

The default value for a missing data outcome is Unknown.
See “About checks” on page 205.
See “Creating a new check” on page 208.
About operatorsAn operator is used to indicate an action that is performed on one or more elements. Anoperator can be a symbol or a word that signifies a particular action.
In the Standards module, the following operators are used:
■ Field expression operatorsSee “Field expression operators” on page 234.
■ Check formula operatorsSee “Check formula operators” on page 236.
Field expression operatorsThe operators that are allowed in a field expression are known as the field expression operators.These operators are used to make a comparison between two given values.
Table 6-3 lists the descriptions of the available field expression operators.
Table 6-3 Field expression operators
DescriptionExpression using samplevalues A, B, and theoperator
Operator NameOperator
A must be equal to BA = BThe equality operator=
A must not be equal to BA!=BThe inequality operator!= or <>
A must be less than BA < BThe less than operator<
A must be less than or equal to BA <= BThe less than or equaloperator
<=
A must be greater than BA > BThe greater than operator>
A must be greater than or equal to BA >= BThe greater than or equaloperator
>=
The SQL like operator (same syntax andsemantics).
A Like BThe like operatorLike
234Working with StandardsAbout checks

Table 6-3 Field expression operators (continued)
DescriptionExpression using samplevalues A, B, and theoperator
Operator NameOperator
The SQL not like operator. Note the spacebetween not and like. Any amount of whitespace (blanks, tabs, new lines, or carriagereturns) is allowed here. The white space isnot strictly required, but it is best not to omitit.
A Not Like BThe not like operatorNot Like
The regular expression matching operator.A=~BThe match operator=~
The negative of the expression matchingoperator.
A!~BThe no match operator.!~
The SQL is null operator. A field expressionemploying this operator must not have avalue specified. At least one white-spacecharacter is required between is and null.
A is nullThe is null operatoris null
The negative of is null. The white spacebetween not and null is not strictly required,but it is best not to omit it.
A is not nullThe is not null operatoris not null
Forces case-sensitive string comparison.The exact operatorExact
Forces case-insensitive string comparison.The inexact operatorInexact
In case of a single valued field, value onRHS has to be partially or completelymatching with LHS. In case of a multi valuedfield, every value on RHS has to be presenton the LHS.
A%BContains operator%
The negative of the Contains operator.A!%BThe Not Contains operator!%
In case of a single valued field, the regularexpression on RHS should match field valueon LHS. In case of a multi valued field, everyregular expression on RHS should match atleast one element on LHS.
A%~BThe Contains Match operator%~
The negative of the Contains Matchoperator.
A!%~BThe Not Contains Matchoperator
!%~
See “About operators” on page 234.
235Working with StandardsAbout checks

Check formula operatorsThe operators that are allowed to be used in a check formula are known as the check formulaoperators.
The check formula operators are as follows:
■ AND
■ OR
■ NOT
■ IF
■ THEN
■ ELSE
See “Operators AND and OR” on page 236.
See “Operator NOT” on page 237.
See “Operators IF, THEN, ELSE” on page 237.
When you create a check, you can specify the operators in the Create Expression(s) panel ofthe Create Check wizard. By default, the AND operator is used to connect two or moreexpressions. You can specify the operators in the Formula box by either typing or selectingthe displayed operators.
See “About operators” on page 234.
Operators AND and ORThe AND and OR operators are used to connect two or more check expressions in a checkformula.
Table 6-4 defines the outcome of the check formula when AND and OR operators are usedto define logical combinations of check expressions. In the table, A and B represent checkexpressions.
Table 6-4 Use of AND and OR operators
Then A OR B equalsThen A AND B equalsIf B equalsIf A equals
PASSPASSPASSPASS
PASSFAILFAILPASS
PASSMANUAL REVIEWMANUAL REVIEWPASS
PASSFAILPASSFAIL
236Working with StandardsAbout checks

Table 6-4 Use of AND and OR operators (continued)
Then A OR B equalsThen A AND B equalsIf B equalsIf A equals
FAILFAILFAILFAIL
MANUAL REVIEWFAILMANUAL REVIEWFAIL
MANUAL REVIEWMANUAL REVIEWPASSMANUAL REVIEW
MANUAL REVIEWFAILFAILMANUAL REVIEW
MANUAL REVIEWMANUAL REVIEWMANUAL REVIEWMANUAL REVIEW
See “Check formula operators” on page 236.
See “About operators” on page 234.
Operator NOTThe NOT operator can be used in a check formula.
Table 6-5 defines the outcome of the check formula when the NOT operator is used to definelogical combinations of check expressions. In the table, A represents a check expression.
Table 6-5 Usage of NOT operator
Then NOT A equalsIf A equals
FAILPASS
PASSFAIL
MANUAL REVIEWMANUAL REVIEW
See “Check formula operators” on page 236.
See “About operators” on page 234.
Operators IF, THEN, ELSEAn IF, THEN, ELSE operator is defined as follows:
If (condition)
Then (true expression)
Else (false expression)
The value is obtained in the following way when you use this operator:
■ The value is unknown if the condition evaluates to unknown.
237Working with StandardsAbout checks

■ The value is true if the condition evaluates to true.
■ The value is false if the condition evaluates to false.
See “About operators” on page 234.
Specifying or editing the descriptionYou can specify the description when you create a standard, section, or check. You can alsoenter the description from the details pane after creating a standard, section, or check. Youcan edit the description only through the details pane.
To specify or edit the description using the details pane
1 Hover over the Standards and Policies menu, and select Technical Standards.
2 In the Technical Standards workspace, click the standard, section, or check which youwant to edit the description for.
3 On the Description tab of the Details page for the selected standard, section, or check,click the Switch between Edit and Read-only view icon.
This icon lets you switch between the Read-only and the Edit view.
4 Enter a description or modify the existing description.
You can use the Bold, Insert List Item, and the Insert Web Link icons on the taskbarto format the text.
5 Click the Save icon.
Adding the CVE informationYou can add the CVE information for a check through the details page. You can also enterthe CVE information at the time of creating a check.
To add the CVE information using the details pane
1 Hover over the Standards And Policies menu and click Technical Standards.
2 In the table pane, navigate to the check for which you want to edit the CVE information,and click it.
3 On the CVE tab of the Check Details page, click the add (+) icon.
4 In the Add CVE dialog box, enter the text that you want to add in the CVE Text box.
5 Click Add.
6 Click the Save icon.
238Working with StandardsSpecifying or editing the description

Editing the CVE informationYou can edit the CVE information for a check through the details page.
To edit the CVE information
1 Hover over the Standards And Policies menu, and click Technical Standards.
2 In the table pane, navigate to the check for which you want to edit the CVE information.Double-click the check.
3 Select the CVE text that you want to edit and click the edit icon.
4 In the Edit CVE dialog box, enter the CVE text and click Update. Click the Save icon.
Adding reference informationYou can add reference information through the Reference tab in the Details pane.
To add the reference information
1 Hover over the Standards and Policies menu, and click Technical Standards.
2 In the Technical Standards workspace, select the standard, section, or check for whichyou want to add the reference information.
3 On the References tab of the Details page, click the Add (+) icon.
4 In the Link Texttext box of the Add References box, type the name for the referencetext.
5 In the Link text box, type the URL path.
6 Click Add in the Add References box.
The reference link information is added on the Reference tab.
7 Click the Save icon.
Editing reference informationYou can edit the reference information through the Reference tab in the Details pane.
To edit the reference information
1 Hover over the Standards and Policies menu, and click Technical Standards.
2 In the Technical Standards workspace, select the standard, section, or check for whichyou want to edit the reference information.
3 On the References tab of the Details page, select the reference that you want to edit.
4 Click the Edit icon.
239Working with StandardsAdding reference information

5 On the Link Text text box of the Edit References dialog box, edit the name for thereference text.
6 In the Link text box, edit the URL path.
7 Click Update.
The reference is updated with the new information.
8 Click the Save icon.
Deleting reference informationYou can delete the reference information through the Reference tab in the Details pane.
To delete the reference information
1 Hover over the Standards and Policies menu, and click Technical Standards.
2 In the Technical Standards workspace, select the standard, section, or check for whichyou want to add the reference information.
3 On the References tab of the Details page, select the reference that you want to delete.
4 Click the Delete icon.
5 Click the Save icon.
Specifying or editing the check attributesYou can specify or edit the risk attributes of a check through the details pane.
To specify or edit the risk attributes
1 Hover over the Standards And Policies menu, and click Technical Standards.
2 In the table pane, navigate to the check for which you want to edit the risk attributes andclick it.
3 On the General tab of the Check Details page, edit the values for the following:
■ Confidentiality
■ Integrity
■ Availability
■ Access Vector
■ Access Complexity
■ Authentication
4 Click the Save icon.
240Working with StandardsSpecifying or editing the check attributes

Specifying or editing the remediation informationYou can specify or edit the remediation information for a check through the details page.
To edit the remediation information
1 Hover over the Standards and Policies menu, and select Technical Standards.
2 In the table pane, navigate to the check for which you want to edit the issue information.Click the check.
3 On the Remediation tab of the Check Details page, click the Switch between Edit andRead-only view icon.
This icon lets you switch between the Read-only and the Edit view.
4 Enter the issue or edit the existing issue.
You can use the Bold, Insert List Item, and the Insert Web Link icons on the taskbarto format the text.
5 Click the Save icon.
Specifying or editing the check issueYou can enter or edit the issue information for a check through the details pane. You can alsoenter the check issue at the time of creating a check.
To specify or edit the issue information using the details pane
1 Hover over the Standards and Policies menu, and select Technical Standards.
2 In the table pane, navigate to the check for which you want to edit the issue information.Click the check.
3 On the Issue tab of the Check Details page, click the Switch between Edit andRead-only view icon.
This icon lets you switch between the Read-only and the Edit view.
4 Enter the issue or edit the existing issue.
You can use the Bold, Insert List Item, and the Insert Web Link icons on the taskbarto format the text.
5 Click the Save icon.
Viewing the evidence detailsYou can view the evidence details for a check that has failed as well as the check that haspassed, an error, or an unknown outcome.
241Working with StandardsSpecifying or editing the remediation information

To view the evidence details
1 In the Evaluation Result Details dialog box, select Asset-based view.
2 Select an asset and then select the check for which you want to view the evidence.
3 Right-click the check and select Show Detailed Evidence.
About exporting the evaluation resultsYou can export the evaluation results that are available in the Evaluation Result Detailsdialog box.
The Evaluation Result Detail dialog box consists of three panes.
The upper-left pane lets you select the view that you want to display. Based on the view thatyou select, the relevant information is displayed in the other two panes.
The upper-right pane displays the summary of the evaluation results in the form of a pie chart.
The lower pane displays the evaluation results in the form of data columns.
You can export the evaluation result details that are available in the lower pane in either of thefollowing ways:
■ Export results using the File menuYou can use the File menu to export the evaluation result details that pertain to both theStandard-based view and the Asset-based view.However, for the Asset-based view, you can export the results for only one asset at a timeusing the menu bar option. Also, you cannot export the evidence details information throughthis option.You can export the evaluation results in the following formats:
■ Export results using the contextual menuYou can use the contextual menu that is available when you right-click a particular assetto export all check information. This information includes the evidence details.Using the contextual menu options, you can export the evaluation results of multiple assetsat a time, but you can export only in the Excel format.
Note:Youmust haveMS Excel installed on your computer to be able to export the evaluationresults using the context menu.
The generated report layout is different for both the discussed options.
See “Exporting the evaluation results” on page 243.
242Working with StandardsAbout exporting the evaluation results

Exporting the evaluation resultsYou can export the evaluation results that are available in the Evaluation Result Detailsdialog box.
To open the Evaluation Result Details dialog box
1 Hover over the Standards and Policies menu, and click Technical Standards.
2 In the table pane of the Technical Standard workspace, select the standard for whichyou want to view the evaluation results.
3 On the Evaluations tab of the Standard Details page, click the View Detail icon.
The Evaluation Result Details dialog box is displayed.
To export the evaluation results using the menu bar for asset-based view
1 In the Evaluation Results dialog box, select Asset-based view.
2 Select the asset for which you want to export the result.
3 On the Filemenu, select Export to and then select the format in which you want to export.
4 In the Export to dialog box, in the file name box, specify the name of the file where youwant to save the evaluation results. Click Save.
To export the evaluation results using the menu bar for standard-based view
1 In the Evaluation Results dialog box, select Standard-based view.
2 Select the standard for which you want to export the result.
3 On the Filemenu, select Export to and then select the format in which you want to export.
4 In the file name box of the Export to dialog box, specify the name of the file where youwant to save the evaluation results, and then click Save.
To export the evaluation results using the context menu
1 In the Evaluation Results dialog box, select Asset-based view.
2 Select the assets for which you want to export the result, right-click it, and select eitherof the following options as required:.
■ Export Results to Xls
■ Export Results to Csv
3 In the Save result as dialog box, in the file name box, specify the name of the file whereyou want to save the evaluation results, and then click Save.
See “About exporting the evaluation results” on page 242.
243Working with StandardsExporting the evaluation results

Requesting an exception using the Evaluation ResultDetails dialog box
You can request an exception through the Evaluation Result Details dialog box.
To launch the Evaluation Result Details dialog box
1 Hover over theStandards and Policies menu, and click Technical Standards.
2 In the table pane of the Technical Standard workspace, select the standard for whichyou want to view the evaluation results.
3 On the Evaluations tab of the Standards Details page, click the View Detail icon.
The Evaluation Result Details dialog box is displayed.
To request an exception from the standard-based view
1 In the Evaluation Result Details dialog box, do either of the following.
■ Select Standard-based view.
■ Select Asset-based view. Go to step 3.
2 In the left pane, select a standard or a check. In the lower pane, select the assets thatyou want to exempt from the selected standard or check. Right-click the selected assetsand select Request Exception. Go to step 4.
3 In the left pane, select an asset. In the lower pane, select the checks for which you wantto exempt the selected asset. Right-click the selected checks and select RequestException.
4 In theRequest Exceptionwizard, in the Specify Exception Details panel, enter the title,description, and any attachment for the exception.
5 Enter the effective date and the expiration date. Click Next.
6 In the Select Checks and Assets panel, view the selected checks and assets. ClickNext.
7 In the Specify Requestor Information panel, browse to enter the requestor and therequestor group information. Also, enter the requestor email ID and any comments.
8 In the Summary panel, view the details that you have specified. Click Back to make anychanges and click Finish to exit the wizard.
About risk scoreIn Control Compliance Suite, a risk score is used to quantify the risk that is associated withan asset in your organization.
244Working with StandardsRequesting an exception using the Evaluation Result Details dialog box

The risk score is calculated on the basis of the CIA values for an asset and the risk attributesof a check. You should give due consideration before you specify these values in the product.
You can specify the asset CIA values through the assets details pane or with the pre rules inthe asset view.
See “Using a Pre rule to set the values of the common fields” on page 79.
You can specify the check risk attributes through the checks details pane or at the time ofcheck creation.
See “Specifying or editing the check attributes” on page 240.
The risk calculations are based on the Common Vulnerabilities Scoring System version 2.
See “About risk score calculation” on page 245.
About risk score calculationThe Control Compliance Suite follows the Common Vulnerabilities Scoring System (CVSS)version 2 to calculate the risk that is associated with a particular asset.
The risk score term is applicable to an asset as well as to a standard.
For a given standard, the risk score of an asset is defined as the average of the adjusted basescore of every failed check in the standard for the specific asset.
Risk score = (Total adjusted base score for all failed checks in the standard) / (Total numberof failed checks)
See “Adjusted base score calculation” on page 246.
For example, consider an asset A and a standard S that contains five checks (C1, C2, C3,C4, and C5). When the asset A is evaluated against the standard S, only checks C4 and C5are passed. The checks C1, C2, and C3 are failed.
To determine the risk score of asset A, calculate the adjusted base score of every failed checkin the standard S with respect to asset A.
Assume that the following values are obtained:
Adjusted base score for check C1 with reference to asset A = 1
Adjusted base score for check C2 with reference to asset A = 2
Adjusted base score for check C3 with reference to asset A = 3
The average of the adjusted base score = (1 + 2 +3) / 3 = 2
This average adjusted base score value is the Risk score of the asset A with reference to astandard S.
Control Compliance Suite performs the following calculations in the scoring process:
■ Base score calculations
245Working with StandardsAbout risk score

See “Base score calculation” on page 246.
■ Adjusted base score calculationsSee “Adjusted base score calculation” on page 246.
■ Average risk score calculationsSee “Average risk score calculation” on page 247.
Base score calculationThe base score is calculated using the following attributes that are assigned to each check:
■ Confidentiality Impact ©)
■ Integrity Impact (I)
■ Availability Impact (A)
■ Access Vector (Av)
■ Access Complexity (Ac)
■ Authentication (Au)
The formula that is used to calculate the base score is as follows:
Base score = round_to_1_decimal (((0.6*Impact) + (0.4*Exploitability) – 1.5) * f(Impact))
The Impact, Exploitability, and the f(Impact) values in the base score formula are calculatedfrom the check attributes as follows:
Impact = 10.41 * (1- (1-Confidentiality Impact) * (1-Integrity Impact) * (1-Availability Impact))
Exploitability = 20 * (Access Vector) * (Access Complexity) * (Authentication)
f(impact) = 0 if Impact = 0, f(impact) = 1.176 if Impact is not equal to 0.
The range of the base score values is from 0.0-10.0.
See “About risk score calculation” on page 245.
Adjusted base score calculationThe Adjusted base score is calculated for an asset and a check pair. This score is calculatedusing the attributes of the asset and the check.
The following formula is used to calculate the adjusted base score:
Adjusted base score = round_to_1_decimal (((0.6*Adjusted Impact) + (0.4*Exploitability) –1.5) * f (Adjusted Impact))
The Adjusted Impact, Exploitability, and the f(Adjusted Impact) values in the Adjusted basescore formula are calculated as follows:
246Working with StandardsAbout risk score

Adjusted Impact = min(10,10.41 * (1- (1- Confidentiality Impact * Confidentiality Required) *(1-Integrity Impact * Integrity Required) * (1- Availability Impact * Availability Required)))
Exploitability = 20 * Access Vector * Access Complexity * Authentication
f(Adjusted impact) = 0 if Adjusted Impact = 0, f(impact) = 1.176 if Impact is not equal to 0.
The Adjusted base score values range from 0.0-10.0
See “About risk score calculation” on page 245.
Average risk score calculationThe Average risk score of an asset is calculated for all the standards against which the assetis evaluated. This score is the average of the individual risk scores of the asset for each of thestandards against which the asset is evaluated.
Average risk score = (Total risk score for all standards) / (Total number of standards)
For example, consider an asset A that is evaluated against standards S1 and S2. Assumethat the risk score of asset A for standard S1 is 3, and the risk score of asset A for standardS2 is 5.
The Average risk score = (3 + 5) / 2 = 4
See “About risk score calculation” on page 245.
Working with SCAP contentYou can understand and perform the following tasks on SCAP benchmarks:
■ About the SCAP Benchmarks view
■ About OVAL definitions view
■ About roles and permissions for SCAP benchmarks
■ About import of SCAP benchmarks into CCS
■ Importing SCAP data stream into CCS
■ Importing CCE list into CCS
■ Importing CVE-CVSS standards into CCS
■ Importing OVAL definitions
■ Importing the workgroup computers to report on SCAP content
■ Deleting the imported SCAP content
■ Viewing the imported SCAP benchmarks in CCS
247Working with StandardsWorking with SCAP content

■ Evaluating assets against the SCAP Benchmarks
■ Evaluating assets against OVAL definitions
SCAP ContentBefore you work with SCAP Content, that includes SCAP benchmarks and OVAL definitions,you must read through SCAP-related concepts.
The SCAP-related concepts are covered in the following topics:
■ About SCAP content
■ About supported SCAP specifications in CCS
■ About supported SCAP 1.2 capabilities in CCS
■ About supported SCAP 1.0 capabilities in CCS
■ About usage of XCCDF in CCS
■ About usage of CCE in CCS
■ About usage of CVE-CVSS in CCS
■ About usage of CVSS in CCS
■ About usage of CPE in CCS
■ About usage of OVAL in CCS
■ About the supported OVAL objects in CCS
About SCAP contentCCS adopts the Security Content Automation Protocol (SCAP) suite of specifications, whichis a validation program defined by National Institute of Standards and Technology (NIST). TheSCAP standards are used to enable automated vulnerability management, measurement, andpolicy compliance evaluation of the enterprise organization.
SCAP is established by NIST to standardize the format and nomenclature by which securitysoftware products communicate software flaws and security configuration information. Adoptionof SCAP facilitates an organization’s automation of security monitoring, vulnerabilitymanagement, and security policy compliance evaluation and reporting.
For more details on SCAP, refer to http://scap.nist.gov/
CCS supports implementation of SCAP 1.2, SCAP 1.1, and SCAP 1.0 specification.
The SCAP 1.2 specification comprises the following component specifications:
■ Extensible Configuration Checklist Description Format (XCCDF) 1.2
248Working with StandardsSCAP Content

■ Open Vulnerability and Assessment Language (OVAL®) 5.10.1
■ Common Configuration Enumeration (CCE™) 5
■ Common Platform Enumeration (CPE™) 2.3
■ Common Vulnerabilities and Exposures (CVE®)
■ Common Vulnerability Scoring System (CVSS) 2.0
■ Asset Identification 1.1
■ Asset Reporting Format (ARF) 1.1
Note: SCAP version 1.2 supersedes SCAP version 1.0 and SCAP version 1.1.
The SCAP 1.0 specification comprises the following six component specifications:
■ Extensible Configuration Checklist Description Format (XCCDF) v1.1.4
■ Open Vulnerability and Assessment Language (OVAL) v5.3
■ Common Platform Enumeration (CPE) v2.2
■ Common Configuration Enumeration (CCE) v5
■ Common Vulnerabilities and Exposures (CVE)
■ Common Vulnerability Scoring System (CVSS) v2
CCS facilitates import of valid SCAP 1.2, SCAP 1.1, and SCAP 1.0 content including thecontent published officially by NIST, from the following location:
http://web.nvd.nist.gov/view/ncp/repository.
The SCAP content that is imported in CCS cannot be edited. The in-built functionalities of CCSare leveraged to execute the SCAP evaluation job that collects data from assets and evaluatesthem against the SCAP content. The CCS Manager that is configured as a Windows datacollector performs the task of data collection and evaluation of SCAP content.
To know more about CCS Manager Collector, refer to About the CCS Manager Collector topicin the CCS SymHelp.
The SCAP evaluation results can be viewed in the Evaluation Results Viewer or the reportgeneration feature of CCS can be used to generate the Asset Details report. The evaluateddata is also rendered on CCS Dashboards such as, Compliance Administration - SCAP profilebenchmark.
About supported SCAP 1.2 capabilities in CCSCCS supports the following SCAP 1.2 capabilities that are defined by NIST.
249Working with StandardsSCAP Content

■ Authenticated Configuration ScannerThe capability to audit and assess a target computer to determine its compliance with adefined set of configuration requirements using the logon privileges.
■ Common Vulnerabilities and Exposures (CVE)CVE is a dictionary of names for publicly known security-related software flaws
CCS also has the capability to collect and evaluate data from the target computers that haveremote registry service disabled or unavailable.
About supported SCAP 1.0 capabilities in CCSIn CCS the following SCAP 1.0 and SCAP 1.1 capabilities that are defined by NIST.
■ FDCC ScannerThe capability to audit and assess a target computer to determine its compliance with theFDCC requirements.
■ Authenticated Configuration ScannerThe capability to audit and assess a target computer to determine its compliance with adefined set of configuration requirements using the logon privileges.
■ Authenticated Vulnerability and Patch ScannerThe capability to scan a target computer to locate and identify the presence of knownvulnerabilities and evaluate the software patch status. The patch status is evaluated todetermine the compliance with a defined patch policy using the target computer's logonprivileges.
CCS also has the capability to collect and evaluate data from the target computers that haveremote registry service disabled or unavailable.
About supported SCAP specifications in CCSCCS adheres to the SCAP 1.0/1.1 and SCAP 1.2 specification to govern the risk and thecompliance posture of the enterprise network.
Standards of SCAP 1.2 specification and their descriptions are as follows:
DescriptionStandard
AnExtensibleMarkup Language (XML) specificationfor structured collections of security configurationrules used by operating system (OS) and applicationplatform.
Extensible Configuration Checklist DescriptionFormat (XCCDF) 1.2
250Working with StandardsSCAP Content

DescriptionStandard
An XML specification for exchanging technicaldetails on how to check systems for security-relatedsoftware flaws, configuration issues, and softwarepatches.
Open Vulnerability and Assessment Language(OVAL®) 5.10.1
A dictionary of names for software securityconfiguration issues (e.g., access control settings,password policy settings)
Common Configuration Enumeration (CCE™) 5
A naming convention for hardware, OS, andapplication products.
Common Platform Enumeration (CPE™) 2.3
A dictionary of names for publicly knownsecurity-related software flaws.
Common Vulnerabilities and Exposures (CVE®)
A method for classifying characteristics of softwareflaws and assigning severity scores based on thesecharacteristics.
Common Vulnerability Scoring System (CVSS) 2.0
A format for uniquely identifying assets based onknown identifiers and/or known information aboutthe assets.
Asset Identification 1.1
A format for expressing the transport format ofinformation about assets and the relationshipsbetween assets and reports.
Asset Reporting Format (ARF) 1.1
Note: CCS allows import of data streams that include OCIL rules along with other definitions,however the OCIL rules are ignored as OCIL evaluation is not supported in CCS. In the exportedevaluation results, the OCIL rules are marked as Not Checked. If a data stream contains onlyOCIL content then the data stream is not imported in CCS.
Refer to the Web site, http://scap.nist.gov/revision/index.html for details about the SCAPspecification.
Standards of SCAP 1.0 specification and their descriptions are as follows:
DescriptionStandard
AnExtensibleMarkup Language (XML) specificationfor the structured collections of securityconfiguration rules. The operating system (OS) andthe application platforms uses these rules.
Extensible Configuration Checklist DescriptionFormat (XCCDF 1.1.4)
251Working with StandardsSCAP Content

DescriptionStandard
An XML specification for exchanging the technicaldetails on how to check systems for security-relatedsoftware flaws, configuration issues, and patches.
Open Vulnerability and Assessment Language(OVAL - 5.3)
A dictionary of names for software securityconfiguration issues such as access control settingsand password policy settings.
Common Configuration Enumeration (CCE - 5.0)
A naming convention for hardware, operatingsystem, and application products
Common Platform Enumeration (CPE - 2.2)
A method for classifying characteristics of softwareflaws and assigning severity scores that are basedon these characteristics.
Common Vulnerability Scoring System (CVSS - 2.0)
A dictionary of names for the security-relatedsoftware flaws.
Common Vulnerabilities and Exposures (CVE - noversion)
About usage of XCCDF in CCSThe eXtensible Configuration Checklist Description Format (XCCDF v1.2) is an XMLspecification and language that provides a common framework for developing security checklistsand benchmarks. The National Institute of Standards and Technology (NIST) hosts andmaintains the XCCDF specification and language.
For more details about XCCDF, refer to http://scap.nist.gov/specifications/xccdf
The SCAP v1.0/1.1 or SCAP v1.2 specification requires an SCAP benchmark to use an XCCDFdocument to define the checklist or benchmark of an SCAP data stream.
CCS supports XCCDF as part of an SCAP v1.0/1.1 or SCAP v1.2 data stream. During importof the SCAP data stream, CCS validates the XCCDF document against the official XCCDFschema. If an XCCDF benchmark contains multiple profiles, then CCS imports all the profiles.
CCS uses XCCDF specification in the following manner:
■ Imports XCCDF v1.2 as part of the SCAP data stream
■ Evaluates the assets against the XCCDF benchmarks through the SCAP evaluation jobexecution.
■ Displays the evaluation results in the Evaluation Results view of the console.
■ Exporting the evaluation results in the following formats:
SCAP 1.2SCAP 1.0/1.1
XCCDFXCCDF
252Working with StandardsSCAP Content

SCAP 1.2SCAP 1.0/1.1
OVAL ThinFDCC XCCDF
OVAL Full (with system characteristics)OVAL Thin
OVAL Full (without system characteristics)OVAL Full
ARFFDCC Human readable
ARF
About usage of CCE in CCSCommonConfiguration Enumeration v5 (CCE) is a standard that defines a common identificationfor computer security configuration issues and exposures. The Mitre Corporation, whose Website, http://cce.mitre.org, hosts and maintains the CCE standard. The standard is officiallymaintained as a CCE list, which in the XML format. The CCE list provides all currently identifiedCCE identifiers (IDs), a description, and references for more information.
CCS lets you import the CCE v5 XML list and store them in the database. CCS also providesthe CCE IDs, which the SCAP content or OVAL content references in the evaluation resultdetails of the SCAP or OVAL content. The CCS SCAP evaluation details let you search assetor evaluation results for specific CCE IDs.
CCS uses CCE standard in the following manner:
■ Allows import of the CCE list independent of the SCAP data stream and OVAL definitions.
■ Displays the CCE IDs in the evaluation results.
■ Exports the evaluation results that also contain the CCE ID details.
About usage of CVE in CCSCommon Vulnerabilities and Exposures (CVE) is a standard that defines a common identificationand dictionary for computer and information security vulnerabilities. The Mitre Corporation,whose Web site is http://cve.mitre.org, hosts and maintains the CVE standard.
The National Vulnerability Database (NVD) publishes the vulnerability summaries that providedetailed information for most known computer and information security vulnerabilities. Thesevulnerability summaries can be accessed using the CVE identifier (IDs) for a given vulnerability.
CCS lets you import the CVE 2.0 list and store them in the database. CCS also provides theCVE IDs, which the SCAP or OVAL content references in the evaluation result details of theSCAP or OVAL content. The evaluation result details provide link to the NVD vulnerabilitysummaries for the CVE IDs. You can also use the Search option of the SCAP EvaluationResult Details dialog box to search the CVE IDs in the generated evaluation results.
253Working with StandardsSCAP Content

CCS uses CVE standard in the following manner:
■ Imports the CVE list independent of the SCAP data stream.
■ Displays the CVE IDs in the evaluation results.
■ Exports the evaluation results that also contains the CVE ID details.
About usage of CVSS in CCSCVSS v2 (Common Vulnerability Scoring System) is a standard that is defined by the Forumof Incident Response and Security Teams (FIRST). FIRST, whose Web site ishttp://www.first.org/cvss, defines methods for scoring and rating the computer vulnerabilities.The National Vulnerability Database (NVD) defines and publishes the CVSS base scores andvector strings for the most known vulnerabilities.
NVD publishes the vulnerability summaries that provide detailed information, which includesthe CVSS base score and vector strings. These vulnerability summaries can be accessedusing the CVE (Common Vulnerabilities and Exposures) identifier (ID) for a given vulnerability.
CCS lets you import the CVE 2.0 and store the CVSS base scores and vector string data inthe database. Links to the NVD vulnerability summaries through the CVE IDs are displayedfor the SCAP evaluation result details.
CCS uses the CVE-CVSS standard in the following manner:
■ Imports the CVE list independent of the SCAP data stream.
■ Displays the evaluation results in the Evaluation Results view of the console.
■ Exports the evaluation results.
About usage of OVAL in CCSOpen Vulnerability and Assessment Language (OVAL®) v5.3 to v5.10.1 is used to expressstandardized, machine-readable rules that can be used to assess the state of a system. OVALis commonly used to determine the presence of vulnerabilities and insecure configurations. Aset of instructions used to check for a security problem, such as an incorrect minimum passwordlength setting, is known as an OVAL Definition. A file containing one or more OVAL Definitions(often hundreds or even thousands) is known as an OVAL Definition file. The Mitre Corporation,whose Web site is http://cpe.mitre.org hosts and maintains OVAL.
The SCAP v1.2 specification requires that an SCAP benchmark use OVAL for both compliancedefinitions and for inventory checks within a CPE OVAL file. An SCAP benchmark can alsocontain an OVAL patch file that evaluates an asset for patch compliance. OVAL files can alsobe used to evaluate an asset independently without the need for an SCAP data stream. CCSsupports both OVAL as part of an SCAP v1.2 data stream, as well as stand-alone OVALdefinition evaluations.
254Working with StandardsSCAP Content

CCS provides full support for OVAL definitions on the following platforms:
■ Microsoft Windows XP Professional with Service Pack 3
■ Microsoft Windows Vista with Service Pack 2
■ Microsoft Windows 7, 32-bit edition
■ Microsoft Windows 7, 64-bit edition
■ Microsoft Windows 2008 R2
During import of the SCAP data streams or stand-alone OVAL definition files, the OVALdefinition files are validated against the official OVAL schema and schematrons. If validationerrors result during validation of the OVAL definitions, then import fails.
Even if warnings are displayed during validation of OVAL schema and schematrons you canstill proceed with the import of content.
After you execute an SCAP evaluation job or an SCAP OVAL evaluation job, CCS lets youexport the OVAL results. The OVAL results can be exported as OVAL Thin, OVAL Full (withsystem characteristics), or OVAL Full (without system characteristics) results.
CCS uses stand-alone OVAL in the following manner:
■ Allows import of the OVAL definition file.
■ Allows evaluation of the assets against OVAL.
■ Displays the evaluation results in the Evaluation Results view of the console.
■ Exporting the evaluation results.
About usage of CPE in CCSCommon Platform Enumeration v2.3 (CPE) is a combination of schemas and formats that aredesigned to provide a common naming scheme for network devices and software. The MitreCorporation, whose Web site is http://cpe.mitre.org, hosts and maintains the CPE.
SCAP v1.2 specification supports CPE v2.3. For CPE v2.3 to work as expected, it must beused in combination with CPE v2.2.
The SCAP v1.2 specification requires that an SCAP compliance configuration benchmarkcontain reference to the applicable CPE names in the XCCDF benchmark. References to theCPE dictionary file, which supports the referenced CPE names that contains the OVALdefinitions are also required.
CCS includes support for CPE as part of an SCAP data stream. CCS supports the CPE namingscheme within the SCAP data streams that you import. As per the CPE naming scheme, CCSidentifies the assets that are applicable to SCAP. CCS uses the SCAP provided CPE OVALdefinitions to evaluate the assets. You can view the CPE names for the SCAP benchmarksand profiles that you select in the SCAP Benchmarks view.
255Working with StandardsSCAP Content

About the supported OVAL objects in CCSCCS supports the following OVAL objects for SCAP 1.2 and SCAP 1.0/1.1 and stand-aloneOVAL evaluation.
Note:While importing content if the content includes some OVAL objects that are not supportedin CCS, then an error is displayed. The import is allowed to proceed however evaluation ofthe unsupported objects result in an error.
Table 6-6 OVAL objects supported in SCAP 1.2 and SCAP 1.0/1.1
SCAP 1.0/1.1SCAP 1.2OVAL object
YesYesaccesstoken_object
YesYesactivedirectory_object
YesYesauditeventpolicy_object
YesYesauditeventpolicysubcategories_object
YesYesenvironmentvariable_object
NoYesenvironmentvariable58_object
NoYescmdlet_file_object
NoYesfamily _object
YesNofile_object
YesYesfilemd5_object
YesYesfilehash_object
YesYesfileauditedpermissions53_object
YesYesfileauditedpermissions_object
YesYesfileeffectiverights53_object
YesYesfileeffectiverights_object
YesYesgroup_object
YesYesinterface_object
YesYeslockoutpolicy_object
YesYesmetabase_object
256Working with StandardsSCAP Content

Table 6-6 OVAL objects supported in SCAP 1.2 and SCAP 1.0/1.1 (continued)
SCAP 1.0/1.1SCAP 1.2OVAL object
YesYespasswordpolicy_object
YesYesprintereffectiverights_object
YesYesprocess_object
NoYesprocess58_object
YesYesregistry_object
YesYesregkeyauditedpermissions_object
YesYesregkeyauditedpermissions53_object
YesYesregkeyeffectiverights_object
YesYesregkeyeffectiverights53_object
YesYessharedresource_object
YesYessid_object
NoYessid_sid_object
YesYestextfilecontent_object
NoYestextfilecontent54_object
YesYesuac_object
YesYesunknown_object
YesYesuser_object
NoYesuser_sid_object
NoYesuser_sid55_object
YesYesvariable_object
YesYesvolume_object
YesYeswmi_object
NoYeswmi57_object
NoYeswuaupdatesearcher_object
NoYesWinsysinfo_object
257Working with StandardsSCAP Content

Table 6-6 OVAL objects supported in SCAP 1.2 and SCAP 1.0/1.1 (continued)
SCAP 1.0/1.1SCAP 1.2OVAL object
YesYesxmlfilecontent_object
The service_object that is used in the OVAL Inventory Definitions across versions 5.8, 5.10,and 5.10.1 is not supported in CCS. During import of OVAL content that includes service_object,a warning is displayed that contains aMOSError. The content is imported successfully, howeverthe evaluation of OVAL tests that refer to the service_object result in error.
Working with SCAP benchmarksSCAP is a suite of specifications that standardize the format and nomenclature by whichsecurity software products communicate software flaws and security configuration information.Adoption of SCAP facilitates an organization’s automation of security monitoring, vulnerabilitymanagement, and security policy compliance evaluation and reporting.
About roles and permissions for SCAP benchmarksCCS defines specific roles and permissions to manage the SCAP benchmarks and OVALdefinitions of the SCAP Content system. CCS defines the roles, which are associated withspecific tasks that you can perform. When you are assigned a role, you can perform thosetasks for which you have the required permissions. You can perform the tasks if you havepermission on the SCAP Benchmarks business object folder in the Settings > PermissionManagement view of the console.
For the SCAP evaluation jobs, the roles that are defined can perform both the data collectionand data evaluation tasks.
Note: The name of the roles that are defined for the SCAP Content system are same as thatare defined for the CCS Standards system. The tasks that are associated with these roles forthe SCAP Content system are specific to SCAP benchmarks.
The roles that are defined for the SCAP benchmarks and the corresponding tasks are asfollows:
258Working with StandardsWorking with SCAP benchmarks

Table 6-7 SCAP benchmarks roles and their related tasks
DescriptionRole
The tasks that a user of this role can perform for SCAP Content system are as follows:
■ View standardsThis task lets you view the details of the SCAP benchmarks, profiles, and rules.
■ View evaluation resultsThis task lets you view the evaluation results of the SCAP benchmarks and OVALdefinitions.
■ Manage standardsThis task lets you create, update, and delete the SCAP benchmarks, profiles, andrules.
■ Evaluate standardsThis task lets you evaluate the assets against the SCAP benchmarks and the OVALdefinitions.
Standards Administrator
The tasks that a user of this role can perform for SCAP Content system are as follows:
■ View standardsThis task lets you view the details of the SCAP benchmarks, profiles, and rules.
■ View evaluation resultsThis task lets you view the evaluation results of the SCAP benchmarks and OVALdefinitions.
■ Manage standardsThis task lets you create, update, and delete the SCAP benchmarks, profiles, andrules.
■ Evaluate standardsThis task lets you evaluate the assets against the SCAP benchmarks and the OVALdefinitions.
Standards Evaluator
About import of SCAP 1.2 data streams into CCSCCS lets you import the SCAP 1.2 data streams through the SCAP Benchmarks view of theconsole. The data streams like the United States Government Configuration Baseline (USGCB)standards, are used to assess and report on the system configurations of computers. Theassets are evaluated against the imported SCAP 1.2 data streams, which you must downloadfrom the following Web site:
http://web.nvd.nist.gov/view/ncp/repository
CCS supports evaluation of SCAP or OVAL content for Windows platform. If the importedSCAP or OVAL content contains rules or definitions for platforms other than Windows thenevaluation is not supported.
259Working with StandardsWorking with SCAP benchmarks

A data stream ID and version represent every SCAP data stream that you import. The datastream ID and version are displayed in the SCAP Benchmarks view of the console.
CCS supports valid TIER IV SCAP 1.2 content including the following content that is publishedby NIST in the National Checklist Program (NCP) repository:
■ USGCB Internet Explorer 7 (2.0.x.0)
■ USGCB Internet Explorer 8 (1.2.x.0)
■ USGCB Windows 7 (1.2.x.0)
■ USGCB Windows 7 Firewall (1.2.x.0)
■ USGCB Windows Vista (2.0.x.0)
■ USGCB Windows Vista Firewall (2.0.x.0)
■ USGCB Windows XP Firewall (2.0.x.0)
■ USGCB Windows XP (2.0.x.0)
If the data stream already exists in CCS, then you can choose to overwrite the existingdefinitions. If the existing data stream is already evaluated then the overwrite operation doesnot affect the evaluation results. The SCAP evaluation job evaluates against the new datastream in the subsequent job runs.
The following classes of OVAL definitions (5.3 to 5.10.1) are supported in CCS:
■ Compliance
■ Inventory
■ Patch
■ Vulnerability
The SCAP data stream adheres to various specifications that CCS supports. You must importthese specifications into CCS that are implicitly applied to the imported SCAP data stream.
About import of SCAP 1.0 and SCAP 1.1 benchmarks into CCSCCS lets you import the SCAP-expressed data streams through the SCAP Benchmarks viewof the console. The data streams like the Federal Desktop Core Configuration (FDCC)standards, are used to assess and report on the system configurations of computers. Theassets are evaluated against the imported SCAP-expressed data streams, which you mustdownload from the following Web site:
http://web.nvd.nist.gov/view/ncp/repository
CCS validates the SCAP-expressed data streams during import to verify if the content isspecific to the Windows operating system. Appropriate error messages are displayed if youimport invalid benchmarks that CCS does not support. A benchmark ID and version represent
260Working with StandardsWorking with SCAP benchmarks

every SCAP-expressed data stream that you import. The benchmark ID and version aredisplayed in the SCAP Benchmarks view of the console.
CCS supports the following content for SCAP 1.0/1.1:
■ FDCC Windows XP
■ FDCC Windows Vista
■ FDCC Windows XP Firewall
■ FDCC Windows Vista Firewall
■ FDCC IE 7
■ USGCB Windows XP
■ USGCB Windows XP Firewall
■ USGCB Windows Vista
■ USGCB Windows Vista Firewall
■ USGCB Windows 7
■ USGCB Windows 7 Firewall
■ USGCB IE 7
■ USGCB IE 8
If the data stream already exists in CCS, then you are prompted to overwrite the existing datastream. If the existing data stream is already evaluated then the overwrite operation does notaffect the evaluation results. The SCAP evaluation job evaluates against the new data streamin the subsequent job runs.
Beside the FDCC content, CCS supports import and evaluation of the SCAP 1.0 - expresseddata stream and OVAL 5.3 definitions.
The SCAP-expressed data stream adheres to various specifications that CCS supports. Youmust import these specifications into CCS that are implicitly applied to the importedSCAP-expressed data stream.
The specifications that you must import into CCS are as follows:
■ Open Vulnerability and Assessment Language (OVAL - 5.3)
■ Common Platform Enumeration (CPE - 2.2)
■ Common Configuration Enumeration (CCE - 5.0)
■ Common Vulnerabilities and Exposures (CVE)
■ Common Vulnerability Scoring System (CVSS - 2.0)
261Working with StandardsWorking with SCAP benchmarks

Importing SCAP data stream into CCSYou import the SCAP- expressed benchmarks or data stream through theSCAPBenchmarksview of the console. The SCAP data stream must be downloaded from the Web site,http://web.nvd.nist.gov/view/ncp/repository before you import them into CCS. On theWeb site,ensure that you select the link, SCAP Content - OVAL 5.3 to OVAL 5.10.1 download. Thedownloaded data stream is a set of XML files that are usually stored in a compressed format.However, CCS does not support import of data stream in a zipped format.
You download the SCAP 1.2 data stream from the Web site,http://web.nvd.nist.gov/view/ncp/repository. On the Web site, when you select SCAP Contentto download, you can select any version from OVAL 5.3 to OVAL 5.10.1 to download alongwith the SCAP content. If the data stream already exists in CCS, then you can choose tooverwrite the existing definitions.
CCS lets you import the SCAP benchmarks that contain at least one non-abstract profile.SCAP benchmarks with all abstract profiles or with no profiles, are not imported into CCS.During import, if the SCAP benchmark is invalid then a validation error is displayed.
CCS supports import of signed and unsigned SCAP content.
Note: The import of SCAP data stream fails if any rule of the benchmark contains complexchecks. For example, if an XCCDF rule contains the element, <xccdf:complex-check>, thenyou cannot import the benchmark into the SCAP Content system.
To import the SCAP data stream
1 Navigate to the Standards And Policies > SCAP Benchmark view of the console.
2 In the List View, select SCAP Benchmarks.
3 Click SCAP Content Tasks and select Import Data stream.
4 In the Import Data stream dialog box, select one of the following options and clickBrowse:
■ SCAP 1.2
■ SCAP 1.0/1.1
5 In theBrowse for folder dialog box, navigate to the directory where the SCAP data streamis located and click OK.
■ For SCAP 1.2, the data stream is a single xml file which is imported.
■ For SCAP 1.0/1.1. the data stream is a folder that contains the benchmark files whichare imported.
Note: The maximum allowed file size for the SCAP content import by CCS is 100 MB.
262Working with StandardsWorking with SCAP benchmarks

Importing CCE list into CCSYou import the Common Configuration Enumeration (CCE) list through the SCAP Contentview of the console. Although, the CCE identifiers (ID) are contained in the SCAP data streamwhen imported, the CCE ID descriptions are not contained in the data stream. You mustdownload and import the CCE list independently into CCS. You can download the CCE listfrom the Web site, http://cce.mitre.org/lists/cce_list.html
An independent import of the CCE list lets you import the corresponding descriptions of theCCE IDs. The CCE IDs and their descriptions are displayed for the SCAP or OVAL evaluationjob results in the Monitor > Evaluation Results view of the console.
Note: The maximum allowed size of the file that contains the CCE list for import by CCS is 2GB.
To import the CCE list
1 Navigate to the Standards And Policies > SCAP Benchmark view of the console.
2 In the List View , select either of the following content types:
■ SCAP Benchmarks
■ OVAL Definitions
3 In the taskbar, click Import CCE.
4 In the Import CCE dialog box, for the Select CCE data file to import option, clickBrowse.
Navigate to the folder where the CCE list file is located on the computer to import.
5 In the Select CCE File dialog box, select the CCE list file and click OK.
Import the CCE list into CCS.
Importing CVE-CVSS list into CCSYou import the Common Vulnerability and Exposures (CVE) list and Common VulnerabilityScoring System (CVSS) standard through the SCAP Content view of the console. The CVEidentifiers (ID) represent the software flaws that are defined by the CVE dictionary. The CVSSare used for the risk score calculation of the assets that are evaluated against the SCAPbenchmarks or the OVAL definitions.
The SCAP benchmarks or the OVAL definitions that you import does not contain the CVSSbase score attributes. You must download and import the CVE-CVSS list into CCSindependently. You can download the CVE-CVSS list from the Web site,http://nvd.nist.gov/download.cfm#CVE_FEED.
263Working with StandardsWorking with SCAP benchmarks

The CVE IDs are displayed for the evaluation results of the SCAP or OVAL evaluation jobresults. The results are displayed in the Monitor > Evaluation Results view of the console.
Note: The maximum allowed size of the file that contains the CVE list for import by CCS is 2GB.
To import the CVE-CVSS list
1 Navigate to the Standards And Policies > SCAP Benchmark view of the console.
2 In the List View, select either of the following content types:
■ SCAP Benchmarks
■ OVAL Definitions
3 Click SCAP Content Tasks and select Import CVE-CVSS.
4 In the Import CVE-CVSS dialog box, for the Select CVE-CVSS data file to import option,click Browse.
Navigate to the directory where the CVE-CVSS file is located on the computer to import.
5 In the Select CVE File dialog box, select the CVE-CVSS file and click OK.
Import the CVE-CVSS list into CCS.
Importing OVAL definitionsYou can import the standalone OVAL definitions into CCS through the SCAP Content viewof the CCS console.
Note: The maximum allowed file size for the OVAL definition import by CCS is 100 MB.
To import the OVAL definitions
1 Go to the Standards And Policies > SCAP Benchmark view of the console.
2 In the List View, select OVAL Definitions.
3 Click SCAP Content Tasks and select Import OVAL Definitions.
4 In the Import OVAL Definitions dialog box, click Browse for the Select OVAL file toimport text field.
5 In the Select OVAL file dialog box, select the OVAL definition file and click OK.
264Working with StandardsWorking with SCAP benchmarks

6 In the same Import OVAL Definitions dialog box, click Browse for the Select externalvariables file to import text field.
7 In the Select external variables file dialog box, select the OVAL external variable fileand click OK.
Deleting the imported SCAP contentDelete the SCAP benchmarks and the OVAL definitions that you import into CCS through theSCAP Benchmarks view or the OVAL Definitions view. All the data that are related to theimported SCAP content are deleted from the database by the purge system job. The purgejob deletes the stale data from the CCS databases.
Any evaluation results that are generated for the deleted SCAP content are not removed fromthe database.
To delete an SCAP benchmark or an OVAL definition
1 Navigate to the Standards And Policies > SCAP Benchmark view of the console.
2 In the List View, select either of the following content types:
■ SCAP Benchmarks
■ OVAL Definitions
3 In the display pane of the view, select the SCAP content type that you want to delete andclick Delete.
4 In the Delete dialog box, review the number of content that you want to delete and clickYes.
Viewing the imported SCAP benchmarks in CCSAfter you import the SCAP data stream into CCS, the details of the benchmark, profiles, andrules are displayed in the SCAP Benchmarks view. A flat list of rules is displayed for a profileof an SCAP benchmark. CCS does not display any abstract rules and rules that are extendedfrom other rules. The SCAPBenchmarks view also let you review the rules that are effectivelyselected for evaluation. The details of a benchmark, profile, or rule are displayed at the bottompane of the view.
To view the imported SCAP data stream
1 Navigate to the Standards And Policies > SCAP Benchmark view of the console.
2 In the List View, select SCAP Benchmarks.
3 From the list of SCAP benchmark, select an SCAP benchmark, a profile, or a rule as peryour requirement
4 In the bottom pane, view the details of the selected benchmark, profile, or rule.
265Working with StandardsWorking with SCAP benchmarks

Evaluating assets against the SCAP benchmarksIn CCS, you create the SCAP evaluation job to evaluate the assets against the SCAPbenchmarks by selecting a profile. Before you evaluate, youmust import the SCAP benchmarksinto CCS.
Note: OVAL definitions that are deprecated, are not skipped for evaluation by the SCAPevaluation job.
After the SCAP evaluation job is executed, the evaluation results are displayed in theMonitor> Evaluation Results view of the console.
Note:Scope an SCAP evaluation job to the asset group or container that contains 500 assets.Create multiple jobs with this scope to span across more than 500 assets.
To evaluate the assets against the SCAP Benchmarks
1 Navigate to Standards And Policies > SCAP Benchmark view of the console.
2 In the List View, select SCAP Benchmarks.
3 In the SCAP Benchmarks view, select the profile of the benchmark against which youwant to evaluate the asset.
4 Right-click on the profile and select Run Evaluation.
5 In the Specify Job Name and Description panel of theCreate or Edit SCAP EvaluationJob wizard, specify the SCAP evaluation job name and the description and click Next.
6 In the Select Targets panel of the wizard, select the assets that you want to evaluateagainst the SCAP Benchmarks and then click Next.
7 In the Schedule Job panel of the wizard, assign a schedule for the SCAP evaluation joband then click Next.
8 In the Add Results Viewers panel of the wizard, add the user names who can view theevaluation results of the SCAP evaluation job that you execute.
9 In the Specify Notification Details panel of the wizard, specify the notification details toalert when the SCAP evaluation job succeeds or fails and then click Next.
10 In the Summary panel of the wizard, review the summary details of the SCAP evaluationjob and then click Finish.
266Working with StandardsWorking with SCAP benchmarks

Evaluating assets against OVAL definitionsIn CCS, you create the SCAP OVAL evaluation job to evaluate the assets against the OVALdefinitions. The OVAL definitions must be imported into CCS before you evaluate the assetsagainst them.
Note:OVAL definitions that are deprecated, are not skipped for evaluation by the SCAP OVALevaluation job.
After the SCAP OVAL evaluation job is executed, the evaluation results are displayed in theMonitor > Evaluation Results view of the console.
To evaluate the assets against the OVAL definitions
1 Navigate to Standards And Policies > SCAP Benchmark view of the console.
2 In the List View, select OVAL Definitions.
3 In the OVAL Definitions view, select the OVAL file against which you want to evaluatethe asset.
4 Right-click on the file and select Run Evaluation.
5 In the Specify Job Name and Description panel of theCreate or Edit SCAP EvaluationJob wizard, specify the SCAP OVAL evaluation job name and the description and clickNext.
6 In the Select Targets panel of the wizard, select the assets that you want to evaluateagainst the OVAL definitions and then click Next.
7 In the Schedule Job panel of the wizard, assign a schedule for the SCAPOVAL evaluationjob and then click Next.
8 In the Add Results Viewers panel, add the users who can view the evaluation results ofthe SCAP OVAL evaluation job that you execute.
9 In the Specify Notification Details panel, specify the notification details to alert whetherthe SCAP OVAL evaluation job succeeds or fails and click Next.
10 In the Summary panel of the wizard, review the summary details of the SCAP OVALevaluation job and then click Finish.
Viewing the SCAP benchmarks evaluation resultsYou can view the evaluation results of the assets that are evaluated against the SCAPbenchmarks through the SCAP Evaluation Result Details dialog box.
267Working with StandardsWorking with SCAP benchmarks

The evaluation results for the SCAP benchmarks can be accessed from the following viewsof the CCS console:
■ Asset System
■ SCAP Content
■ Evaluation Results
To view the evaluation results from the Asset System
1 Navigate to the Asset System > Assets view of the CCS console.
2 In the table pane of the view, select an asset.
3 In the details pane, click the Evaluation tab.
4 In the Evaluation tab view, review the details of the evaluations and then click ViewEvaluation Results icon.
The SCAP Evaluation Result Details dialog box displays the evaluation results of theSCAP benchmarks.
To view the evaluation results from the SCAP Content view
1 Go to the Standards And Policies > SCAP Benchmark view of the CCS console.
2 In the List View, select SCAP Benchmarks.
3 Select a benchmark profile and then click the Evaluations tab in the details pane.
4 In the details pane, double-click a result entry.
The SCAP Evaluation Result Details dialog box displays the evaluation results of theSCAP benchmarks.
To view the evaluation results from the Evaluation Results view
1 Navigate to the Jobs > Evaluation Results view of the CCS console.
2 In the view, select an SCAP evaluation job run that is listed in the table pane, right-click,and select Evaluation Details.
The SCAP Evaluation Result Details dialog box displays the evaluation results of theSCAP benchmarks.
Searching for CCE or CVE IDs in SCAP evaluation resultsCCS lets you search for the CCE identifiers (IDs) in the SCAP evaluation results. The SCAPevaluation results are displayed in the Monitor > Evaluation Results view of the console.
268Working with StandardsWorking with SCAP benchmarks

To search for the CCE IDs
1 Navigate to Jobs > Evaluation Results view of the console.
2 Select an SCAP evaluation job run that is listed in the table pane of the view anddouble-click it.
You can also right-click on the job run and select Evaluation Details.
3 In the SCAP Evaluation Result Details dialog box, select the Asset-based view option.
4 In the details pane of the dialog box, in the Search text field, type the CCE ID or CVE IDthat you want to search.
The CCE ID or CVE ID that is listed for a rule is displayed.
Viewing the OVAL definitions evaluation resultsYou view the evaluation results of the assets that are evaluated against the OVAL definitionsfile through the OVAL Evaluation Result Details dialog box.
The evaluation results for the OVAL definitions can be accessed from the following views ofthe CCS console:
■ Asset System
■ SCAP Content
■ Evaluation Results
To view the evaluation results from the Asset System
1 Navigate to the Asset System > Assets view of the CCS console.
2 In the table pane of the view, select an asset.
3 In the details pane, click the Evaluations tab.
4 In the Evaluations tab view, select an OVAL evaluation result and then click ViewEvaluation Results icon.
The OVAL Evaluation Result Details dialog box displays the evaluation results of theOVAL definition file.
To view the evaluation results from the SCAP Content view
1 Navigate to the Standards And Policies > SCAP Benchmark view of the CCS console.
2 In the List View, select OVAL Definitions.
269Working with StandardsWorking with SCAP benchmarks

3 In the view, select an OVAL definition file and then click the Evaluations tab in the detailspane.
4 In the details pane, double-click an evaluation result entry.
The OVAL Evaluation Result Details dialog box displays the evaluation results of theOVAL definition file.
To view the evaluation results from the Evaluation Results view
1 Navigate to the Jobs > Evaluation Results view of the CCS console.
2 In the Evaluation List View, select an OVAL evaluation job run that is listed in the tablepane, right-click, and select Evaluation Details.
The OVAL Evaluation Result Details dialog box displays the evaluation results of theOVAL definition file.
For more information about the result statuses refer to the OVAL website.
http://oval.mitre.org/
Requesting an exception for assets on SCAP benchmarks rulesCCS lets you override the evaluation results of specific assets against the specific rules of anSCAP benchmark. This means, after an asset is evaluated against a rule, you set a new valueto the evaluation result, which overrides the actual evaluation result. In CCS, such override ofevaluation results is performed through the request exception methodology. Every requestexception requires an approval from the approving authority.
For SCAP, you can select one or more profiles to create exemption for the rules that arecontained in them. By default, all the rules of the selected profile are selected for exemptionuntil you configure them through theRequest Exceptionwizard. As per the request exceptionmethod, you can set new evaluation result values for the rules against which you requestexception. The newly set result values override the old evaluation result values for the assetsthat you select to exempt. After an exception is approved, the assets when re-evaluated againstthe same rules have the new evaluation result values that you set.
Request exceptions can be created either before you initiate an SCAP evaluation job or afterthe job is executed. After the SCAP evaluation job is executed, you can request an exceptionfrom the SCAP Evaluation Result Details dialog box.
Before the SCAP evaluation job is executed, create a request exception from the followingviews of the CCS console:
■ Standards And Policies > SCAP Benchmarks view.
■ Asset System > Assets view.
■ Jobs > Evaluation Results view.
270Working with StandardsWorking with SCAP benchmarks

To request an exception for assets on SCAP benchmark rules
1 Navigate to Standards and Policies > Exceptions view of the console.
2 In the Exceptions view, do either of the following:
■ On the taskbar, click Request Exception.
■ In the table pane, right-click anywhere on the grid and select Request Exception.
3 In the Request Exception wizard, in the Specify Exception Details panel, enter thefollowing details and click Next:
■ In the Title box, enter the name of the exception.
■ In the Type box, select SCAP.In the Template box, the displayed template is SCAP Exception.
■ In the Description box, type a description for the exception that you request.The FDCC XCCDF category mandates you to provide description for every exceptionthat justifies the request.
■ In the Attachment box, browse to enter the name of the file that you want to attach.
■ In the Exception Validity group box, in the Effective Date box, select the date onwhich the exception becomes applicable. In the Expiration Date box, select the dateon which the exception becomes invalid. Click Next.
4 In the Specify Exemptions panel, perform the following and click Next.
■ Click Add against the Selected Rules section of the panel.
■ Select the SCAP new rule result value from the drop-down list,NewRule result value.
■ Click Add against the Selected Assets section of the panel.
5 In the Specify Requestor panel, type or browse to enter the requestor and the requestorgroup. Enter the Requestor Email ID and Comments.
6 In the Select Approvers panel, select one or more approvers for the exception you arerequesting and click Next.
Note: You must select at least one approver for the request. CCS does not allow you toselect an approver if: The approver's email address is not configured in the system, theapprover is the requestor too, or the approver is submitting the request on another user'sbehalf.
271Working with StandardsWorking with SCAP benchmarks

7 In the Specify Notification Details panel, specify the notification details.
8 In the Summary panel, verify the details that you have entered in the wizard. Click Backto modify any data. Click Finish to exit the wizard.
The exception is created and its state is set to Requested.
Approving an exception for assets on SCAP benchmarks rulesAn approver can approve an exception request for the rules of an SCAP benchmark for specificassets of an organization.
To approve an exception
1 Navigate to Standards And Policies > Exceptions.
2 In the table pane of the Exceptions view, select the exception that you want to approveand select Approve Exception on the taskbar.
3 In the Verify Exception Details panel, verify the exception information that the requestorhas entered. Click Next.
4 In the View or Select Rules and Assets panel, view or select the rules and assets thatare to be exempted. All the objects (rules and assets) may not be visible in case of eitherof the following situations:
■ The requestor has not entered the object information.In this case, clickAdd to specify the objects for which the exception must be approved.
■ You do not have the required permissions to view all the objects that the requestorhas selected. In this case, ensure that you get the required permissions.
5 Click Next.
6 In the Specify Comments panel, in the Comments box, enter your comments.
7 In the View the Notification Information panel, read the notification information. Selectthe tab to view the notification of a particular notification type. After reading the information,click Next.
8 In the Summary panel, verify the details that you have entered in the wizard. Click Backto modify any data. Click Finish to exit the wizard.
The state of the exception is set to Approved. In the table pane, the exception is presentunder the Approved list.
272Working with StandardsWorking with SCAP benchmarks

Exporting the evaluation results for SCAP content and OVALdefinitions
The evaluation results of the assets that are evaluated against the SCAP benchmarks or OVALdefinitions are displayed in the Monitor > Evaluation Results view. CCS lets you export theevaluation results into various supported formats.
You can export the evaluation results of the SCAP 1.2 data streams to any of the followingsupported formats:
■ OVAL Thin
■ OVAL Full (with system characteristics)
■ OVAL Full (without system characteristics)
■ XCCDF
■ ARF
You can export the evaluation results of the SCAP 1.0 and SCAP 1.1 benchmarks to any ofthe following supported formats:
■ OVAL Thin
■ OVAL full
■ FDCC Human-readable
■ XCCDF
■ FDCC XCCDF
■ ARF
You can export the evaluation results of the OVAL definitions to any of the following supportedformats:
■ OVAL Thin
■ OVAL Full (with system characteristics)
■ OVAL Full (without system characteristics)
To export the evaluation results
1 Navigate to Jobs > Evaluation Results view of the console.
2 In the display pane, double-click the SCAP evaluation job run or the SCAPOVAL evaluationjob run, whose evaluation result details you want to view.
3 For an SCAP benchmark evaluation, in the SCAP Evaluation Result Details dialog box,review the evaluation results of the job run that you selected.
For an OVAL definition evaluation, in the OVAL Evaluation Result Details dialog box,review the details of the job run that you selected.
273Working with StandardsWorking with SCAP benchmarks

4 At the bottom pane of the Evaluation Result Details dialog box, right-click the evaluationresults and select any of the supported export formats.
The Export Results dialog box lets you browse to the location where you want to exportthe evaluation results for the supported formats.
Viewing the CVSS base scores and vector strings for a CVE IDThe CVSS base scores and vector strings of a CVE ID are displayed for the SCAP evaluationresults. The SCAP evaluation results are displayed in theMonitor > Evaluation Results viewof the console.
To view the CVSS base scores and vector strings
1 Navigate to the Jobs > Evaluation Results view of the console.
2 In the view, double-click the selected SCAP evaluation job run.
3 In the SCAP Evaluation Result Details dialog box, select the Asset-based view.
4 In the bottom pane of the view, select a rule, expand it, and right-click on a CVE ID, andselect Show CVE Details.
In the SCAP CVE-CVSS Details dialog box, review the details of the CVSS base scoresand the vector strings.
Generating reports of the SCAP evaluated resultsYou use the predefined report template, Asset Details to generate reports of the SCAPevaluated results. The report template reports the evaluated results for those assets that arealready evaluated against the SCAP benchmarks. You select the assets when scheduling thereport template, for which you want to view the details report. The report template details aboutthe SCAP rules and exceptions information for the selected assets.
To generate report for the SCAP evaluated results
1 Navigate to the Reports > Report Templates view of the console.
2 In the Report Templates view, select the Asset Details report and right-click to selectSchedule Report.
Review the scheduled report generation job in the Jobs workspace to ensure that the jobruns successfully.
3 Navigate to the Reports > My Reports view of the console.
4 In theMy Reports view, select the generated Asset Details report, right-click and selectView.
274Working with StandardsWorking with SCAP benchmarks

Accessing dashboards of SCAP benchmarksCCS lets you access the predefined dashboard, Compliance Administration - SCAP profilebenchmark, which renders the evaluation results of an SCAP evaluation job that you execute.For the SCAP content system, the predefined dashboard is specific only for the SCAPBenchmarks content type. The predefined dashboard contains panels that you access forthe SCAP benchmark.
The predefined panels of the Compliance Administration - SCAP profile benchmarkdashboard are as follows:
■ Compliance score for SCAP profile (Benchmark)
■ Rule status by assets for SCAP profile (Benchmark)
■ Top 10 Risk Score by assets for SCAP profile (Benchmark)
CCS also lets you access the panel, Top 10 Risk Score by assets for SCAP profile (Benchmark)through the the existing predefined dashboard, Compliance Administration - Assets.
To access a dashboard for an SCAP benchmark
1 Launch the CCS Web Console using the following URL:
http://<machine name or FQDN name of Application Server>/CCS_Web
2 In the Web Console, in the menu bar, click Dashboards.
3 In the Dashboards view, select the Compliance Administration - SCAP Benchmarkdashboard.
About risk and compliance score calculation for SCAPassets
CCS uses the evaluation results of the assets against the SCAP benchmarks to calculate thecompliance score and risk score for the assets. The compliance score of the assets determinethe compliance adherence level of the assets with the SCAP benchmarks. The risk score ofthe assets determine the vulnerability or risk of those assets that have failed in the evaluationsagainst the SCAP benchmarks.
The National Institute of Standards and Technology (NIST) defines the XCCDF's compliancescoring model that CCS implements. As per the recommendation from XCCDF, CCS uses theDefault scoring model to calculate the weighted compliance scores of the assets.
CCS uses the Common Vulnerability Scoring System (CVSS) base scores to calculate therisk scores of the assets. The CVSS base scores let you prioritize the remediation of the knownsecurity-related software flaws in the assets. Whenever a new vulnerability is announced, anew CVE ID is created for the vulnerability. The software applications that are affected due to
275Working with StandardsAbout risk and compliance score calculation for SCAP assets

the vulnerability are identified using the CPE values. The CVSS base measures and scoresare computed and added to the National Vulnerability Database (NVD).
About compliance score calculation for SCAP assetsCCS uses the XCCDF's Default scoring model to calculate the weighted compliance scoresfor the profiles that are evaluated against the assets. The Default scoringmodel that is supportedin XCCDF 1.0 lets you calculate the weighted compliance scores for every benchmark profile.The Default scoring model is indicated implicitly for all the SCAP benchmarks. Weights areassigned to every rule of a profile that are used for calculating the weighted compliance score.If a specific rule is not selected, then the weight of that rule is not considered for the compliancescore calculation of the profile. Ensure that you provide weights appropriately to the rules forcorrect computation of the weighted compliance score using the Default scoring model.
CCS defines the following attributes to calculate the compliance scores of the rules:
■ CountThis attribute is set to either 1 or 0 based on the evaluation result values. The value 1 isset for the result value, Pass, Fail, Error, and Unknown. The value 0 is set for the resultvalues, NotApplicable, NotChecked, NotSelected, Informational, and Fixed.The evaluation result values of the SCAP benchmark rules and their contribution to thecompliance score calculation are as follows:
■ PassThis means that the asset has satisfied all the conditions of the rule. A pass resultcontributes to the weighted score and maximum possible compliance score.
■ FailThis means that the asset did not satisfy all the conditions of the rule. A fail resultcontributes to the maximum possible compliance score.
■ ErrorThis means that the CCS has encountered a system error and is not able to completethe evaluation. Hence, the status of the asset's compliance with the rule is uncertain.For example, if CCS runs with insufficient privileges on the asset, then an error canoccur.
■ UnknownThis means that CCS has encountered some problem and the result is unknown. Forexample, if CCS was unable to interpret the output of the evaluation.
■ Not ApplicableThis means that the rule is not applicable for the asset that is evaluated. For example,if a rule is specific to an operating system version to which the asset does not belong,then the evaluation result is not applicable. Such kind of evaluation result values do notcontribute to the compliance score.
276Working with StandardsAbout risk and compliance score calculation for SCAP assets

■ Not CheckedThis means that the rule is not evaluated by CCS. Such a result value is designed forthe rules that have a role as, unchecked and for the rules that have no properties. Suchtype of evaluation result values do not contribute to the benchmark compliance score.
■ Not SelectedThis means that the rule is not selected in the benchmark. Such type of evaluation resultvalues do not contribute to the benchmark compliance score.
■ InformationalThis means that the rule's result value is simple information that an auditor oradministrator uses. Such result is the default value for rules that have a role as, unscored.This result value is designed for rules that can extract information from the asset. Thiskind of evaluation result values do not contribute to the benchmark compliance score.
■ FixedThis means that the rule has failed, but is fixed. Such kind of evaluation result valuesmust contribute to the compliance score similar to the result value, pass.
■ ScoreThis attribute is set to 100 or 0 based on the evaluation result values. For all the resultvalues whose count is 1, the score is set. No score is set for the result values whose countis 0.
■ AccumulatorThis attribute value is the sum total of weights of the rules.
CCS calculates the compliance score for the rules based on the weights that you assign tothe rules. CCS also lets you compute the scores for the group to which the rule belongs.
The formula that CCS uses to calculate the compliance score for a rule and group againstwhich an asset is evaluated is as follows
■ Rulecompliance score of a rule = (score of a rule) * (weight of the rule)
■ GroupThe normalized score of a group = (Sum of the scores of the rules or groups under thegroup) / (sum of the weights of the rule or groups under the group)Compliance score of a group = (Normalized score)* (Weight of the group)
Note:Even when the data is not available for an asset, the CCS still considers the compliancescore(that is zero) for the non-available asset. This is so that the user is informed of the probablerisk that might be involved due to the unavailability of the asset.
The formula that CCS uses to calculate the weighted compliance score of a profile is as follows:
277Working with StandardsAbout risk and compliance score calculation for SCAP assets

■ Weighted compliance score of a profile for a single assetWeighted compliance score of a profile = (compliance score of the rules) / (sum ofweights of the rules)
■ Weighted compliance score of a profile for multiple assetsWeighted compliance score of the profile = (sum total of the compliance scores ofthe profiles evaluated against every asset) / (total number of assets)
■ Weighted compliance score of a profile using weights of the group in which the rule existsWeighted compliance score of the profile = (Sum of the scores of the rules or groupsunder the profile) / (sum of the weights of the rule or groups under the profile)
Note: If no weight attribute is set for a rule or group, then the weight is considered as 1. Noweight is assigned to a profile.
For example, you calculate the compliance scores (CS) of every asset, A1, A1, A3 againstwhich you evaluate the profile P1. The weighted compliance score that you derive for theassets is as follows:
CS(P1A1)+CS(P1A2)+CS(P1A3)/3
About risk score calculation for SCAP assetsCCS uses the scoring guidelines published by Common Vulnerability Scoring System (CVSS2.0) to calculate the risk scores for the assets that failed when evaluated against theSCAP-expressed data stream. You must ensure that you import the CVSS values for thecorresponding CVE IDs to calculate the risk scores for the assets.
As per the recommendation of NIST, CCS must use the CVSS base scores to prioritize theremediation of known security-related software flaws. When a new vulnerability is publiclyannounced, a new CVE ID is created and the CVSS base scores are computed for thevulnerability. The CVSS base scores are then added to the National Vulnerability Database(NVD).
CCS uses the base metrics model of CVSS to calculate the risk scores for the assets.
A rule that represents a software flaw has references to the CVE IDs. As a single rule canpoint to multiple CVE IDs, the base score of all such CVE IDs are picked up from the CVSS.The Confidentiality (C), Integrity (I) and Availability (A) values of the CVSS entry with thehighest base score are used to calculate the adjusted risk score for the assets.
CCS lets you calculate the adjusted base score for a pair of rule and an asset.
You can also derive the composite risk score for a single or multiple assets that are evaluatedagainst an SCAP benchmark.
278Working with StandardsAbout risk and compliance score calculation for SCAP assets

About adjusted base score calculation for SCAP assetsThe adjusted base score is calculated for a pair of rule and asset. The score is calculatedusing the 6 risk attributes of a rule and 3 attributes of an asset.
The adjusted base score calculation depends on the following 6 attributes of a rule:
■ Confidentiality
■ Integrity
■ Availability
■ Access Vector
■ Access Complexity
■ Authentication
The 3 attributes of an asset are as follows:
■ Confidentiality
■ Integrity
■ Availability
Note: Ensure that all the 6 values of the rule are defined. If any of the value is Not Definedthen the risk score is Not Applicable. It is not compulsory to define the 3 values of the assetbecause even if not defined then the default value that is considered for the risk score calculationis, Medium.
The following metrics maps to the CVSS values and their respective weightage:
AccessVectorWeightage = { Undefined = -1.0, Local Access = 0.395, Adjacent networkaccessible = 0.646, Network accessible = 1.0 };
AccessComplexityWeightage = { Undefined = -1.0, Low = 0.71, Medium = 0.61, High = 0.35};
AuthenticationWeightage = {Undefined = -1.0, Multiple Instance = 0.45, Single Instance = 0.56,No authentication = 0.704 };
CheckCIAWeightage = { undefined = -1.0,none = 0.0, partial = 0.275, complete = 0.660 }
AssetCIAWeightage = { Not Defined = 1.0, Low = 0.5, Medium = 1.0, High = 1.51 }
The following formulae are used to calculate the exploitability, adjusted impact, and fimpact:
Exploitability = 20 * ruleAccessVector * ruleAccessComplexity * ruleAuthentication;
AdjustedImpact = Min(10, 10.41 * (1 - (1 - ruleConfidentiality * assetConfidentiality) * (1– ruleIntegrity * assetIntegrity) * (1 - ruleAvailability * assetAvailability)));
279Working with StandardsAbout risk and compliance score calculation for SCAP assets

fImpact = (AdjustedImpact == 0) ? 0 : 1.176;
The following formula is used to calculate the adjusted base score for the rule and asset:
adjustedBase = (((0.6 * AdjustedImpact) + (0.4 * Exploitability) - 1.5) * fImpact);
About the composite risk score calculation for SCAP assetsThe composite risk score is calculated for one or more assets against the SCAP benchmarks.
The composite risk scores for a single asset against a single benchmark is calculated in thefollowing manner:
■ All rules that have failed for an asset. In such case, all the rules have risk scores rangingfrom 0-10. You can ignore the rules whose result value is Not Applicable.
■ All rules that have passed but have the risk scores ranging from 0-10.These rules have passed because they are exempted.
■ Calculate average of the risk scores for all the rules.
Note: Exclude the risk score that has the result value as Not Applicable for the failed rules
The composite risk scores for multiple assets against a single benchmark is calculated in thefollowing manner:
■ Calculate the risk score of the benchmark for every single asset.
■ Take average of the risk scores.If there are multiple runs of a benchmark against an asset then consider the latest run
Running a compliance scan using a command-lineutility
For running a compliance scan on your assets, you navigate through the various workspacesof the CCS product, as you go through the workflow. An alternate method to run a compliancescan is using the CCS Scanning Utility, which is a command-line utility. You provide the requiredinformation of assets and standards in the form of CSV files and some parameters that optimizethe behaviour of the utility. You import assets, run a collection-evaluation-reporting job andview the evaluation results using the utility.
See “Running the CCS Scanning utility” on page 282.
280Working with StandardsRunning a compliance scan using a command-line utility

About the Control Compliance Suite Scanning UtilityThe Control Compliance Suite (CCS) Scanning Utility is a command-line utility that providesyou with an end-to-end workflow to run a compliance scan on specified CCS assets andstandards. Currently this utility is compatible with the following Windows platforms:
■ Windows 7
■ Windows 2008
■ Windows 2008 R2
■ Windows 2012
■ Windows 2012 R2
See “Prerequisites” on page 281.
See “Authorization requirements” on page 282.
PrerequisitesFollowing are the prerequisites for the CCS Scanning Utility to run successfully:
■ Quick Fix 10018To enable the reporting capability of the CCS Scanning Utility, you must apply the QuickFix 10018 on the application server.
■ Microsoft .NET 4.0 framework installed on the client server
■ http and/or https service end pointsThe utility consumes ISS APIs hosted by the application server. You must enable the httpand/or the https service end points on the application server for the utility to function.
■ Microsoft Excel installed on the application server
■ Desktop directoryFor the Application Server Service to use the Microsoft Excel application, you must createa Desktop directory at the following locations depending on the type of your operatingsystem:
■ For 64-bit operating system%WINDIR%\SysWow64\Config\SystemProfile
■ For 32-bit operating system%WINDIR%\System32\Config\SystemProfile
■ Credentials for the assets being scanned must be configured in CCS.
See “Running the CCS Scanning utility” on page 282.
281Working with StandardsRunning a compliance scan using a command-line utility

Authorization requirementsYou must have permissions to the following CCS tasks to use the CCS Scanning utility:
■ View Assets
■ View Standards
■ Manage jobs
■ Collect Data
■ View evaluation results
You must have permissions on the following folders to use the utility:
■ Asset System
■ Standards
Note: A user in a CCS role that is authorized for the tasks and permissions mentioned abovecan use the CCS Scanning utility. You can also create an equivalent custom role to authorizethe user to use the utility. For information about how to create a custom role in CCS, refer tothe Creating a custom role section in the Symantec™ Control Compliance Suite 11.1 UserGuide
See “Prerequisites” on page 281.
Running the CCS Scanning utilityYou can run the CCSScanningUtility.exe from the following location:
<CCS Installation Directory>\Reporting and Analytics\Utilities\CCSScanningUtility
The settings configured in the Parameters .xml file and the command-line parameters areused by the utility to execute the workflow accordingly. The names and values of the [Unresolvedxref] and the [Unresolved xref] are not case-sensitive. The utility supports the specification offiles (for example, asset list csv, standards list csv, log file, report file) by using UNC Pathsand Mapped Network Paths.
Parameters in the Parameters.xml fileYou must configure the following parameters in the Parameters.xml file:
282Working with StandardsRunning a compliance scan using a command-line utility

DescriptionParameter
Set this value to 'True' if you want the utility tocontinue and run a compliance scan on the assetsthat are validated, in case all the assets in the listare not validated.
ContinueWithPartialResolution
Type a prefix for the Collection-Evaluation job thatthe utility will create. The job is displayed in theJobs workspace while the compliance scan runs.If no prefix is specified, a default value ‘CER’ isused.
CollectionEvaluationJobNamePrefix
Type the email addresses of the users who areexpected to receive an email notification upon thesuccessful completion of the CER job. The jobsuccess notifications for CER jobs are sent by theapplication server even when the CER jobs havecompleted with errors or exceptions (for example,job completed with 2 errors/exceptions).
SuccessNotificationList
Type the email addresses of the users who areexpected to receive an email notification if the CERjob fails.
FailureNotificationList
■ Enable: Type "True" if you want to export thereport
■ Path: Type the path where you want the reportto be exported.
ExportReport
■ Enable: Type "True" if you want to email thereport.
■ RecipientList: Type the email addresses of theexpected email recipients.
EmailReport
Type the email address of a user whose accountwill be used in the "From" field of the emailnotifications.
FromEmailAddress
An absolute or a relative path where the utilitycreates a log file. If the value of this parameter isnot specified, the log file path will default to thecurrent directory. The utility user must have writepermissions on the logfile folder.
LogFilePath
The default value of this parameter is Fetchregistered agents. User can specify any alreadycreated custom job for fetching registered agents.
FetchRegisteredAgentJobName
283Working with StandardsRunning a compliance scan using a command-line utility

See “Command-line parameters” on page 284.
Command-line parametersThe following command-line options are supported by the CCS Scanning Utility. These areoptional parameters.
Table 6-8 Command-line parameters
DescriptionOption
<filepath> is an absolute path or a relative path tothe CSV file that contains the asset names. If thisparameter is not specified, the utility reads the'assetslist.csv' file from the current directory. If the'assetslist.csv' file is not found, an error messageis displayed and the utility exits.
-assetslist <filepath>
<filepath> is an absolute path or a relative path tothe CSV file that contains the standard names. Ifthis parameter is not specified, the utility reads the'standardslist.csv' file from the current directory. Ifthe 'standardslist.csv' file is not found, an errormessage is displayed and the utility exits.
-standardslist <filepath>
If the value of this parameter is set to true, the utilitycreates a log file at <LogFilePath> that is mentionedin the ‘parameters.xml’ file. If the value of thisparameter is true and <LogFilePath> is notmentioned, the log file is created in current directory.If the value of the ‘-logging’ parameter is false or ifthe parameter is not mentioned, log file is notcreated even if the value for <LogFilePath> isspecified.
-logging
This parameter displays command-line help.-help or /?
The utility returns an exit code zero upon successful completion and a non-zero numberotherwise.
The following table contains some examples of how to use the command-line parameters:
Table 6-9 Command-line parameter examples
DescriptionOption usage
This invokes help for the utility.CCSScanningUtility –help
284Working with StandardsRunning a compliance scan using a command-line utility

Table 6-9 Command-line parameter examples (continued)
DescriptionOption usage
This invokes help for the utility.CCSScanningUtility /?
This invokes the utility with default values forstandards list file parameters and assets list fileparameters as explained in the Table 6-8 table. Inthis case the logging option is disabled.
CCSScanningUtility
This invokes the utility with the specified standardsand assets list files. This generates logs under thepath mentioned in the log file path. (For moreinformation, refer to the Table 6-8 table.)
CCSScanningUtility –logging true –standardslist“C:\standardfiles\standards.csv” –assetslist“C:\assetfiles\assets.csv”
Asset list CSV syntax
The following syntax is used in the assetslist.csv file.
■ For operating system<domain|workgroup>\<host> (for Windows)<host>:<ip> (for UNIX)
■ For databases<instance name> , <database type> , <host/node name><host/node name> is the Asset Name property in the CCS Asset System for the underlyinghost or node server asset.
The following table contains sample CSV entires for the assetlist.csv file:
Table 6-10 Sample CSV entries
CSV linePlatform
mydomain\myassetnameWindows
myassetname,symc-csm-AssetSystem-Asset-Dbif-server,mydomain\myassetname
SQL Server (default instance)
WS1214SQLDB2\WS1214DB2 ,symc-csm-AssetSystem-Asset-Dbif-server ,sqlcluster\WS1214N1
SQL Cluster
rhel6-u5:192.168.1.2UNIX
285Working with StandardsRunning a compliance scan using a command-line utility

Note: The CSV entries for assets of other databases such as Oracle, Sybase, and DB2 canbe created with the corresponding database type mentioned in the following list:
■ DB2 Server : symc-csm-AssetSystem-Asset-DB2-DB
■ Oracle : symc-csm-AssetSystem-Asset-ORCL-CONFIGUREDDATABASES
■ Sybase : symc-csm-AssetSystem-Asset-SYBASE-SV
See “Usage syntax” on page 286.
Usage syntaxThe following usage syntax is used in the CCS Scanning Utility:
CCSScanningUtility.exe -logging<true|false> -assetslist <assetslist.csv> -standardslist<standardslist.csv>
Application configurationThe utility is shipped with configuration files for usage of http and https service endpoints. Thedefault configuration file that gets utilized is CCSScanninUtility.exe.config. The followingmodifications must be applied to the CCSScanninUtility.exe.config file.
■ Configure the application server name and the port as per your deployment
■ Configure the ServicePrincipleName (SPN) as per your deployment
See “Running the CCS Scanning utility” on page 282.
WorkflowThe CCS Scanning Utility typically goes through the following workflow:
■ The utility reads the assets list and the standards list from the specified files and validatesthat they exist in CCS.
■ Multiple assets and multiple standards can be specified in the assets list and the standardslist CSV files by following the appropriate syntax.
■ The utility exits if none of the specified standards exists in CCS.
■ If one or more specified assets do not exist in CCS, the utility imports the missing assetsby running the job specified by the FetchRegisteredAgentJob parameter in theParameters.xml file. Upon completion of the job, the utility resolves the assets to validatetheir presence in CCS.
286Working with StandardsRunning a compliance scan using a command-line utility

■ If at least one of the specified assets is not resolved and the value of theContinueWithPartialResolution parameter is false, the utility exits with appropriate message.Otherwise, it continues to next steps.
■ For database assets, the utility imports the underlying OS asset if it is missing in CCS.Then to import the database asset, a Network Asset Import job, which is scoped to the OSasset is created and executed. This job imports all the instances of the specified databasetype. However, compliance scans are triggered only for the specified instances.A Network Asset Import job that is created to import database assets is named in thefollowing format: ImpDBSvr<space><database name><space><processed><space><dateand time>, for example, ImpDBSvr SR-W2K8-CCS11-2 27122015_09_29_09_45_12_778.xls
■ A Collection-Evaluation-Reporting (CER) Job is created and executed on the resolvedassets to run a compliance scan on them.A CER job is named in the following format: <job prefix fromparameters.xml>_HOSTNAME_<OS/DB>_<process-id>_<date and time>, for example,jaimin__SR-INCUBE_OS_3392_2015.09.29.09.29.47.407.xls
Note: The job is displayed on the console only during the time while the datacollection-evaluation job is executed.
■ Upon completion of the compliance scan, the utility generates a separate evaluation reportfor each asset and for each standard.If you have enabled the ExportReport parameter in the Parameters.xml file, the report isexported to the specified path. The exported report is named in the following format:EvaluationResultExport_<report-count>_<date and time>, for example,EvaluationResultExport_0_2015.09.29.09.32.09.089.xlsIf you have enabled the EmailReport parameter in the Parameters.xml file, the generatedreport is emailed to the specified recipients. The report includes information on checks thatreflect the Passed, Failed, and Error statuses. The emailed report is named in the followingformat:EvaluationResultExport<space><date><space><time><space><InternalThreadNumber>,for example, EvaluationResultExport 10_1_2015 6_20_49 PM 13.xls
■ The data collection-evaluation job is deleted after the compliance scan is completed. TheNetwork Asset Import jobs that are created by the utility are not automatically deleted toassist with troubleshooting if needed.
See “Prerequisites” on page 281.
See “Authorization requirements” on page 282.
See “Running the CCS Scanning utility” on page 282.
See “Application configuration” on page 286.
287Working with StandardsRunning a compliance scan using a command-line utility

See “Best practices and recommendations” on page 288.
Best practices and recommendationsFollowing are the best practices and configuration settings recommended by Symantec foreffective compliance scan by the CCS Scanning Utility:
Configuration settings on the application serverTo support higher concurrent usage of the ISS APIs, you can configure WCF throttling in theCCS Application Server configuration file (AppServerService.config) as explained in thefollowing steps:
1 Create the following <behavior> node under the <serviceBehaviors> node:
<behavior name="SMReportingServiceConfig">
<serviceThrottling
maxConcurrentCalls="200"
maxConcurrentInstances="200"
maxConcurrentSessions="200"/>
</behavior>
2 Create following <service> node under the <services> node:
<service name="Symatec.CCS.Standards.Bridge.SMReportingService"behaviorConfiguration="SMReportingServiceConfig"/>
Data Size and Time-out Settings:
To set both Data Size and Time-out settings for HTTPS/HTTP WCF channel, create thefollowing entry in the in the CCS Application Server Binding file (ApplicationBinding.config).
<binding name="SMReportingService_WSHttpBinding" closeTimeout="00:01:00"openTimeout="00:01:00" receiveTimeout="00:59:00" sendTimeout="00:59:00"bypassProxyOnLocal="false" transactionFlow="false"hostNameComparisonMode="StrongWildcard" maxBufferPoolSize="1073741824"maxReceivedMessageSize="1073741824" messageEncoding="Mtom" textEncoding="utf-8"useDefaultWebProxy="true" allowCookies="false"> <readerQuotas maxDepth="32"maxStringContentLength="262144" maxArrayLength="16384" maxBytesPerRead="4096"maxNameTableCharCount="16384" />
</binding>
If the API is to be used with the CCS nettcp bindings, a similar configuration is needed forWCF TCP channel.
288Working with StandardsRunning a compliance scan using a command-line utility

Configuration settings on the utility clientData Size Setting
It is recommended to set the following WCF parameters in the configuration file on the utilityclient to higher values to accommodate the large file streams returned by API calls. Therecommended value is 1073741824.
■ maxBufferPoolSize
■ maxReceivedMessageSize
Timeout Setting
Configure the ‘receiveTimeout’ and ‘sendTimeout’ to higher values depending on the load andconcurrency on the CCS application server .
Note: Similar configuration settings may need to be applied for other service endpoints forhigher concurrency.
Generating reports on Windows 2012 and Windows 2012 R2When you use the CCS scanning utility to run a collection-evaluation-reporting job on theWindows 2012 or Windows 2012 R2 platforms, the reports may not get generated. You mustmake changes o the DCOM configuration to generate the reports successfully.
To configure DCOM settings for generating reports
1 At the command prompt, enter the following:
C:\WINDOWS\SysWOW64>mmc comexp.msc /32
2 Go to Component Services > Computers > My Computer > DCOM Config.
3 Search for Microsoft Excel Application and right-click it.
4 On the Identity tab, select option This user, and provide the CCS service account details.
5 Click OK and close Component Services panel.
Note: After the report is generated when you try to open the Excel file, you may see anerror - Object linking and Embedding failed. Click OK to open the excel file.
See “Workflow” on page 286.
TroubleshootingThe following table contains the issues that you might encounter while using the CCS ScanningUtility along with their respective resolutions:
289Working with StandardsRunning a compliance scan using a command-line utility

Table 6-11 Errors and resolutions
Description/ResolutionIssue
If Microsoft Excel is not installed on the applicationserver, such an error message is displayed.
An error message similar to the following isdisplayed:
Encountered following problem while generatingreport for : rhel6-u5:10.211. 67.85 10/1/2015 6:10:05PM : Unable to create Excel automation object.Make sure that the minimum require d version ofMicrosoft Excel has been installed on this computer.Refer to the server log files for error details.
This issue might be observed in either of thefollowing conditions:
■ The Collection-Evaluation-Reporting job hasfailed. If no evaluation data is available for anasset for which report is being generated, suchan error message is displayed. In this case,troubleshoot the job failure.
■ Desktop folder is not created on the applicationserver. For more information, refer to thePrerequisites section.
An error message similar to the following isdisplayed:
Encountered following problem while generatingreport for : mydomain\myassetname! Error inexporting results Refer to the server log files forerror details. System.ServiceModel.FaultException`1[CCSScanningUtility.SMReportingSvcRef.EvalResultsForStandardError]:Error in exporting results Refer to the server logfiles for error details. (Fault Detail is equal toCCSScanningUtility.SMReportingSvcRef.EvalResultsForStandardError).
If a user does not meet the authorizationrequirements for the CCS Scanning Utility, such anerror message is displayed.
An error message similar to the following isdisplayed:
You are not authorized to perform this task. Accessis denied.
When a log file path is invalid because the drive isinvalid, such an error message is displayed.
An error message similar to the following isdisplayed:
Encountered following problem while creating logfile. The device is not ready.
When SMTP server settings for email notificationsare not configured on the application server by usingCCS Manager Console, such an error message isdisplayed.
An error message similar to the following isdisplayed:
Encountered following problem while generatingreport fo r : mydomain\myassetname ! 9/21/20151:27:39 PM : The process cannot access the filebecause it is being u sed by another process. Referto the server log files for error details.
290Working with StandardsRunning a compliance scan using a command-line utility

Table 6-11 Errors and resolutions (continued)
Description/ResolutionIssue
Unlike the CCS Console UI which can matchstandards against platforms during job creation, theAPI does not validate the applicability of standardsagainst the specified assets. Make sure theapplicability of the assets and standards that youspecify.
A CER job created by the utility fails with thefollowing error message:
An error occurred in Data Collection activity: unableto retrieve list of assets from ADAM...
About automated closed-loop remediationControl Compliance Suite 12.0 (or later) provides automated closed-loop remediation that letsyou identify the assets that are non-compliant or require patchmanagement. Control ComplianceSuite integrates with a ticketing system, which in turn integrates with a patch deployment toolto complete the workflow and provide an end-to-end remediation solution. Control ComplianceSuite scans assets for non-compliance or missing patches. Based on the evaluation resultsand remediation settings it logs tickets in the ticketing system. The patch deployment tool picksthe remediation information from the tickets and deploys the missing patches. CCS monitorsand displays the status of tickets. After the patches are applied to fix the non-compliance, andthe ticket status is updated to resolved state, Control Compliance Suite triggers asset scansfor verification of the applied patches, thus completing the workflow.
The closed-loop remediation workflow includes the following high-level steps:
■ Control Compliance Suite collects and evaluates data by scanning the assets. Based onthe collected data and remediation settings, it logs tickets in the ticketing system.
■ The ticketing system integrates with the patch deployment tool for remediation. It alsomonitors and displays the status of the tickets appropriately.
■ Control Compliance Suite continuously monitors and displays the current status of thetickets.
■ The Patch Deployment tool deploys the patches or security updates on the assets to fixthe non-compliance issues.
■ Control Compliance Suite monitors the ticket status and once the status changes toResolved, it triggers a Remediation Verification job. The job scans the assets to confirmthat the patches are applied.
See “Workflow for closed-loop remediation” on page 292.
291Working with StandardsAbout automated closed-loop remediation

Workflow for closed-loop remediationThe automated closed-loop remediation process includes creating remediation tickets for failedchecks, fixing themis-configuration, monitoring the tickets, and running a remediation verificationjob to confirm that missing patches are applied. Table 6-12 lists the steps involved in theworkflow. Some steps of the workflow are completed automatically or can be carried outmanually.
Table 6-12 Workflow for closed-loop remediation
DescriptionStep
Remediation settings are configured in CCS to decide the threshold that triggersthe remediation process and ticket priority.
Step 1
Collection-evaluation-reporting (CER) job is created in CCS and run on assets toscan them for missing patches or mis-configuration.
Step 2
Tickets are created in the ticketing system for mis-configuration or missing patches.
■ Automatically by CCS■ Manually by the users
Step 3
Remediation process is initiated:
■ Automatically by integrating with the patch deployment tool once the ticket statuschanges to Ready for Remediation.
■ Manually by monitoring ticket status in the ticketing system.
Step 4
Patches are applied:
■ Automatically using the patch deployment tool and change the ticket status toResolved in CCS.
■ Manually using the manifest file which contains the information for patchremediation.
Step 5
Remediation verification job is triggered automatically to scan assets to confirmthat patches are applied:
■ When CCS detects tickets in Resolved state.■ When the ticket status is changedmanually to a status that maps to the Resolved
status in CCS.
Step 6
Ticket status is updated to Verified or Failed depending on the results of theremediation verification job.
Step 7
292Working with StandardsAbout automated closed-loop remediation

Types of deployment for closed-loop remediationYou can have different types of deployment for the closed-loop remediation feature, dependingon the type of product integration that you use.
Table 6-13 Types of deployment for closed-loop remediation
TasksRemediationaction
DescriptionDeployment
Configure the remediationsettings.
AutomatedIn this type of deployment, youuse CCS for compliancereporting, ServiceNow forticketing, and ITMS for patchdeployment.
CCS+ServiceNow+ ITMS
Configure the remediationsettings.
Use the TicketManifest.Jsonfile for the patch remediationinformation. This informationcan be consumed by any patchdeployment tool.
AutomatedIn this type of deployment, youuse CCS for compliancereporting, ServiceNow forticketing and any third-partypatch deployment tool.
CCS +ServiceNow+ any PatchDeployment Tool
Configure the remediationsettings.
Use the TicketManifest.Jsonfile for manual remediationwhich includes patchremediation information. TheServiceNow ticket descriptioncontains the non-patchremediation text.
Update the ServiceNow ticketstatus manually to trigger thepost remediation verificationprocess in CCS.
ManualIn this type of deployment, youuse CCS for compliancereporting, ServiceNow forticketing, and carry out manualremediation.
CCS+ServiceNow+ manualremediation
Configuring ServiceNow remediation ticket settingsYou can configure the ServieNow remediation ticketing system on the Remediation Settingspage.
293Working with StandardsAbout automated closed-loop remediation

To configure remediation settings
1 On the CCS console, navigate to Settings > General.
2 In theNavigation View pane, clickApplication Configuration >Remediation Settings.
3 In the Remediation Settings pane, click the ServiceNow Ticket tab, and provide thefollowing information:
DetailsField
Specify the ServiceNow instance URL that you want to use forticketing in Control Compliance Suite.
ServiceNow Instance URL
■ UsernameThe user created for the ServiceNow instance.
■ PasswordPassword for the user created for the ServiceNow instance.
Note: Click Validate Connection to test the ServiceNowconnection.
Credentials
Select this box if you want the remediation context details andremediation verification details to be attached to the ServiceNowticket.
The details are attached in the following file formats:
■ PDF■ XML
See “About remediation context details and remediation verificationdetails” on page 47.
Attach remediation contextdetails (PDF and XML)
Note: This box is visible inControl Compliance Suite 12.5and later.
Select this box if you want the ServiceNow tickets to be split basedon the ticket priority.
Split tickets based on thepriority of the ticket
The maximum number of assets that you want to combine in asingle ServiceNow ticket.
Note: If a CER job hasmultiple standards selected, then a separateticket will be created per standard.
Maximum assets per ticket
The value in the field should match one of the following valuesconfigured in ServiceNow:
■ User ID■ Email ID■ Username
Ticket assigned to
294Working with StandardsAbout automated closed-loop remediation

DetailsField
The value in the field should match one of the following valuesconfigured in ServiceNow:
■ User ID■ Email ID■ Username
Ticket created by (Caller ID)
The interval after which CCS polls ServiceNow for a change inticket status.
Default value is 720 minutes.
Poll interval (in minutes)
CCS Status and ServiceNow status
Select a CCS status and a corresponding ServiceNow status formapping.
Note: After mapping a CCS status to ServiceNow status, if themapped status is deleted from ServiceNow, the mapping in CCSis set to none or blank. You must change the Servicenow mappingfor that particular CCS status.
See “Mapping of ServiceNow ticket status with CCS ticket status”on page 297.
Ticket Status mapping
Remediation ticket splitting logicYou can set the CIA attributes for an asset and CIAAAA attributes for a check which decidethe risk score.
CCS uses the CIA (confidentiality, integrity, and accessibility) attributes of an asset to decidethe impact and CIAAAA (confidentiality, integrity, accessibility, authentication, authorization,and accounting) value of checks to decide the urgency. The priority of remediation tickets isderived from the impact and urgency.
Based on the values of impact and urgency, the priority of the tickets is calculated. Acombination of impact and urgency that decides the priority is listed in the following table.
PriorityUrgencyImpact
1- Critical1-High1-High
2-High2-Medium1-High
3-Moderate3-Low1-High
2-High1-High2-Medium
295Working with StandardsAbout automated closed-loop remediation

PriorityUrgencyImpact
3-Moderate2-Medium2-Medium
4-Low3-Low2-Medium
3-Moderate1-High3-Low
4-Low2-Medium3-Low
5-Planning3-Low3-Low
The remediation settings page also lets you set the following options:
■ Split tickets based on priority of the ticket
■ Maximum assets per ticket
The remediation ticket splitting logic is based on the ticket priority and the options in theremediation settings. Let us take an example. Suppose you have 10 assets and the maximumnumber of assets per ticket is set to 5. Consider that you have 4 tickets with High priority and6 tickets with Critical priority. The ticket splitting will happen as seen in the following table:
Table 6-14 Example of ticket splitting based on ticket priority
Assets per ticketPriorityTicket
5 assets of the total 6 with criticalpriority.
CriticalTicket 1
Remaining 1 asset of the total 6assets with critical priority.
CriticalTicket 2
4 assets with high priority.HighTicket 3
In the above example 3 tickets will be created for the 10 assets with the mentioned priority.
Note: If you do not set the CIA value of assets and CIAAAA value of checks, then by defaultthe ticket priority is set to Medium.
Table 6-15 Logic for splitting of remediation tickets
Ticket splitting logicMaximum number ofassets per tickets
Split ticketsbased on priorityof tickets
CIA and AAA values
Ticket splitting is based onpriority and "n".
nYesYes
296Working with StandardsAbout automated closed-loop remediation

Table 6-15 Logic for splitting of remediation tickets (continued)
Ticket splitting logicMaximum number ofassets per tickets
Split ticketsbased on priorityof tickets
CIA and AAA values
Ticket splitting is based on"n" only.
nNoYes
Ticket splitting is based onpriority and "n".
Note:When CIA and AAAvalues are not set, then thepriority is set to Medium bydefault.
nYesNo
Ticket splitting is based on"n" and priority=medium.
nNoNo
Mapping of ServiceNow ticket status with CCS ticket statusYou can map the CCS remediation ticket status to the ServiceNow ticket status as per yourrequirements. You must map each of the CCS status - Open, Resolved, Verified, and Failedto one or multiple ServiceNow statuses. Table 6-16 shows the different CCS states and howmany ServiceNow states it can be mapped to.
Table 6-16 CCS states and mapping to ServiceNow states
Number of ServiceNow statesthat can be mapped
DescriptionCCS states
SingleNew ServiceNow ticket is opened.Open
SeveralThe ServiceNow ticket is resolved.Resolved
SingleCCS has scanned the assets and verifiedthat the failed checks have now passed.
Verified
SingleThe failed checks have not been fixed.Failed
Note: After mapping a CCS status to ServiceNow status, if the mapped status is deleted fromServiceNow, then the mapping in CCS is set to none or blank. Youmust change the Servicenowmapping for that particular CCS status.
See “Configuring ServiceNow remediation ticket settings” on page 293.
297Working with StandardsAbout automated closed-loop remediation

Creating a ServiceNow ticket manuallyYou can create a ServiceNow ticket manually from the Remediation Tickets workspace. Youcan select between an asset-based or standard-based view to filter the assets and checksthat you want to include into the remediation ticket.
To create a ServiceNow ticket manually
1 On the CCS console, click Remediation.
2 In the Tickets View, right-click anywhere in the grid and click Create ServiceNow Ticket.
3 In the Create ServiceNow Ticket wizard, on the Select view page, select one of thefollowing options and click Next.
■ Standard-based view
■ Asset-based view
4 On the Select assets page, select the failed assets for which you want to create aremediation ticket. Click Add and click Next.
5 On the Select checks page, select the failed checks that you want to include in theremediation ticket. Click Add and click Next.
6 The Summary page displays the asset and check details that you have selected for creatingthe remediation ticket. Do one of the following:
■ Click Back if you want to make any changes to the selected assets or checks.
■ Click Finish to complete the steps of creating a remediation ticket manually.
Using the manifest file provided by CCS for patch remediationIf you are using CCS for compliance reporting, ServiceNow for ticketing and some other patchdeployment tool for patch management, then CCS provides a manifest file with the requireddetails of patch remediation. The TicketManifest.Json file is attached to the ServiceNow ticketthat provides the following information:
Note: For non-patch remediation, the ticket description contains the text information.
Table 6-17 Content and description of the TicketManifest file
DescriptionParameter
Unique update number to identify the bulletin, which contains thevulnerability and patch details.
Bulletin ID
Reference for the security bulletin published by Microsoft.msreference
298Working with StandardsAbout automated closed-loop remediation

Table 6-17 Content and description of the TicketManifest file (continued)
DescriptionParameter
■ Domain or workgroup name■ Host name■ IP address■ Endpoint ID (CCS asset identifier)
Endpoint
Monitoring the status of ServiceNow tickets in CCSYou can monitor the status of the ServiceNow tickets created for closed-loop remediation fromthe Remediation workspace of CCS. The workspace consists of Advanced Search pane,Preview pane and Tickets View pane. The Advanced Search pane lets you filter the data inthe grid on the ticket parameters. CCS monitors the status of the ServiceNow tickets and theTicket grid displays the latest status of the ServiceNow tickets.
To monitor ServiceNow tickets
1 In the CCS console, click Remediation.
2 You can monitor the data in the Tickets View for the following parameters:
Ticket ID generated by ServiceNowTicket number
Ticket creation dateCreated on
Ticket assigned toAssigned to
Ticket modification dateModified on
Ticket priorityPriority
Ticket statusStatus
3 You can search for a ticket based on any field by entering the ticket details in theAdvancedSearch pane.
Monitoring the Remediation Verification jobAfter the remediation ticket status changes to Resolved, CCS triggers a RemediationVerification job automatically. This is a system job which scans the assets for which theremediation ticket is resolved, to verify the remediation. You can monitor the job from theMonitor > Jobs workspace. The evaluation results of the remediation verification job confirmthat the vulnerabilities are fixed.
299Working with StandardsAbout automated closed-loop remediation

To monitor the Remediation Verification job
1 In the CCS console, click Jobs.
2 Check the status of the Remediation Verification job.
Configuring the remediation settings for optimal performanceCCS lets you configure the remediation settings to achieve optimum performance and avoidsystem overload or performance degradation during the remediation workflow. You canconfigure keys in the Application Server configuration file to the following recommended values.
Table 6-18 Application configuration keys for remediation settings
DescriptionKey
Indicates whether ticket monitoringis enabled or disabled.
Default value=True
EnableRemediationTicketMonitoring
Indicates the batch size forremediation ticket monitoring.
Default value=500
RemediationTicketMonitoringBatchSize
Indicates how many remediationverification jobs can run in parallel.
Default value=10
RemediationVerificationJobParallelInstanceCount
Indicates the time required (inminutes) for a single remediationverification job to complete.
Default value=5
RemediationVerificationJobCompletionExpectedInterval
Indicates the number of ServiceNowtickets that are created in parallel.
Default value=30
RemediationTicketCreationBatchSize
Indicates whether the remediationverification results are synchronizedwith the Reporting database.
Default value=False
RemediationVerificationReportingSyncEnabled
300Working with StandardsAbout automated closed-loop remediation

To update the Application Server configuration keys
1 Navigate to the following location:
<CCS Installation Directory>\Reporting and Analytics\Application Server
2 Open the ApplicationserverService.exe.config file in a text editor.
3 In the appSettings section, update the values of keys that you want to configure.
4 Save the file and restart the Application Server service.
Troubleshooting remediation scenarios for CCS - ServiceNowintegration
The closed-loop remediation feature is a workflow in which multiple products integrate witheach other. Given the complexity, it is possible that the workflow may fail in certain situations.The troubleshooting section lists down some scenarios that can occur with a workaround thatyou can try, even before you contact the Symantec Technical Support team.
Table 6-19 Troubleshooting remediation scenarios
WorkaroundCauseIssue
Go to the settings page andupdate the password.
See “Configuring ServiceNowremediation ticket settings”on page 293.
The ServiceNow password mayhave expired.
Remediation tickets are notcreated, although you haveconfigured the settings correctly.
Ensure that the ServiceNowinstance is running or valid.
The ServiceNow instance may bedown or invalid.
Ticket status is not updated in theRemediation Tickets page in CCS,although you have refreshed thepage.
You must have the followingServiceNow REST API roles:
■ rest_service■ web_service_admin
For related information aboutServiceNow REST API roles,refer to the followinglink:ServiceNow wiki
The required ServiceNowREST APIroles may not have been applied.
You see a ServiceNow RESTunauthorized exception.
301Working with StandardsAbout automated closed-loop remediation

Table 6-19 Troubleshooting remediation scenarios (continued)
WorkaroundCauseIssue
Try creating the ServiceNowtickets again after a few hours.
There could be a firewall or antivirusthat is restricting access to the webservice.
ServiceNow tickets fail to getcreated with the following error:System.Net.WebException: Theremote name could not beresolved: 'xxyyzz.service-now.com
302Working with StandardsAbout automated closed-loop remediation

Using Jobs to manage tasksin Control Compliance Suite
This chapter includes the following topics:
■ About Jobs
■ Managing jobs
■ Managing job runs
■ About the Jobs workspace
■ Viewing jobs information in the Jobs Property Tabs View
About JobsA job is a specified set of operations. Various components of Control Compliance Suite performthese operations sequentially. A job is also called a query with a scope. For example, a querywith a scope in the form of assets in a particular domain is called a job. A job is uniquelydefined.
A job run is a particular instance of any job execution. Expand a job in the Jobs table in BrowseJobs View to see its job run.
Control Compliance Suite provides the following operations on jobs:
■ Create a jobSee “Creating jobs” on page 325.
■ Edit a jobSee “Editing a job” on page 326.
■ Run a job nowSee “Running a job now” on page 328.
7Chapter

■ Schedule a jobSee “Scheduling jobs” on page 326.
■ Delete a jobSee “Deleting jobs” on page 327.
■ Configure desktop notification for a job
■ Refresh the jobs view
■ Cancel a jobSee “Canceling a job run” on page 330.
■ Delete a job runSee “Deleting a job run” on page 331.
Select any job and right-click it to see the menu with operations available for the job. Theoptions available are specific to the job type.
Note: To select all the jobs in the jobs list, click the leftmost column header cell below the Myjobs list. To select multiple adjacent jobs in the jobs list, drag across the job rows that you wantto select. To select multiple non-adjacent jobs in the list, hold down Ctrl while selecting thejobs.
The ellipsis (...) icon in the upper-most corner provides the list of common tasks that cab beperformed in the Jobs workspace. Right-clicking a job displays a list of taska that can beperformed on the selected job .
You can even set up a job count. When you set up the job count, you can choose the numberof jobs to be displayed in the Job view. Use Settings > Application Settings > ApplicationCustomizing > Job count to make these changes. Similarly, you can even set up a job runcount.
To expand all the rows of jobs, press Ctrl + Right Arrow.
To collapse all the rows of jobs, press Ctrl + Left Arrow.
Control Compliance Suite does not support the following special characters in a job name:
* ( ) \ / , + " > < ; = #
See “About job filters” on page 334.
About Queries jobThe Queries job is executed to collect data about the managed objects in your network. Thequeries collect the data for the parameters that you configure. You can run predefined samplequeries or create custom queries and run them.
304Using Jobs to manage tasks in Control Compliance SuiteAbout Jobs

You can run this job immediately, or schedule the run at a specified date and time. You canconfigure the Notification setting to notify users about success or failure of the job run.
See “About Queries job” on page 304.
See “Managing jobs” on page 324.
About Asset Import jobThe Asset Import job is a user-defined job that is run to import a specific set of assets.
The Asset Import job can import various types of assets from various platforms. Data for theselected asset type is imported using either a CSV data collector, or an ODBC data collector,or a manual asset source. For data collection, the Asset Import job must be executed first, toknow whether there are any updates or additions to the assets.
The Asset Import job is run to import new assets as well as update the imported assets, ifrequired.
You can run the Asset Import job immediately, or schedule the run at a specified date andtime. While scheduling, you can also specify a time-out duration for the job. The time-outduration, in minutes, is applicable to agent-based assets and specifies the duration up to whichthe data collection job can run for every asset in that job. When the job exceeds the specifiedtime-out duration for an asset, the job is aborted and the partial results are discarded. Thetime taken by the job depends on various factors, such as, the number of entities or datasources included in the query, network latency, and performance of the agent host, amongothers. The default value of 0 indicates no time-out.
You can configure the Notification setting to notify users about success or failure of the jobrun. On successful completion of the Asset Import job, a summary report of the number ofimported assets is generated.
About Asset Discovery JobThe Asset Discovery job is a user-defined job that is run to discover all assets in the selectednetwork.
The Asset Discovery job scans the network that is selected during the job creation. Assetsdiscovered from the specified networks are then added to the Asset system by the AssetDiscovery job. The discovered assets are tagged with the discovery tag for that network.
The discovery tag for a network has the following naming convention:
<ip_address>_<subnet_mask>
The discovered assets are added as Windows Machines, UNIX Machines, or Endpoint assetsinto the Asset system.
305Using Jobs to manage tasks in Control Compliance SuiteAbout Jobs

You can run this job immediately or schedule the run at a specified date and time. You canconfigure the Notification setting to notify users about the success or failure of the job run.On successful completion of this job, the number of discovered assets is displayed in the jobsummary.
About Automatic Updates Installation jobThe Automatic Updates Installation job is a system job. It automatically installs the applicableCCS updates on the CCS components after the updates are downloaded to the CCS stagingarea.
You must make sure that no other job is running when you schedule the Automatic UpdatesInstallation job. If any other job is in the running state after the Automatic Updates Installationjob starts, the other job is aborted. After the Automatic Updates Installation job starts, youcannot cancel it.
You can run the Automatic Updates Installation job immediately, or you can schedule the runat a specified date and time. You can configure the Notification setting to notify users aboutsuccess or failure of the job run.
See “Managing jobs” on page 324.
See “About Download Live Updates job” on page 311.
About Network Discovery JobThe Network Discovery job uses the network address and subnet mask of a network to discoverthe subnets within a network. A CCS Manager in Data Collection role is used to discoversubnets in the network. The selected CCSManager must have access to the specified network.
You can run the Network Discovery job immediately or schedule the run at a specified dateand time. You can configure the Notification setting to notify users about success or failureof the job run. On successful completion of this job, a summary report of the number ofdiscovered subnets is generated.
See “Managing jobs” on page 324.
About Baseline jobThe Baseline job is executed for the following purposes:
■ To mark the job or an asset as a baseline
■ To compare the records with the previous baselines
The Baseline job supports the following types of baselines to compare the assets:
■ Asset-based baseline
306Using Jobs to manage tasks in Control Compliance SuiteAbout Jobs

The baseline job lets you collect the data for an asset and use that data as a baseline tocompare with other assets.
■ Job-based baselineThe baseline job lets you collect the entire result data of the baseline job and use that datato compare with other assets.
When you execute this job, the records in the newer dataset are compared against records inthe older data set. You can execute the Baseline job only for those assets whose data collectionand evaluation is completed.
You can configure the Baseline job to follow a schedule to either run it immediately or at aspecified date and time. You can configure the ‘Notification’ setting to notify the user about itssuccess or failure.
About External Data Integration jobTo create an External Data Integration job, you must first add an external data system toControl Compliance Suite and create a data connection. Every such external data connectioncreates an External Data Integration job. You run this job to integrate data from an externalapplication to CCS. This data from an external application is represented as a data schemain Control Compliance Suite.
The External Data Integration job can import data using a new data schema or an existingdata schema . This job integrates data from the following predefined systems with CCS:
■ Symantec Data Loss Prevention incident data
■ Symantec CCS Assessment Manager data
■ Symantec CCS Vulnerability Manager data
However, a user may integrate any other system as well.
You can run the External Data Integration job immediately or schedule the run at a specifieddate and time. You can also configure the Notification setting to notify users about successor failure of the job run.
See “Managing jobs” on page 324.
About Import Assets and Agents jobThe Import Assets and Agents job is a system job. It is executed to import the agents that areregistered with the CCS Manager and the assets associated with these agents. To import anagent, it needs to be registered with the CCS Manager, which is done by using the agentregistration utility.
The Import Assets and Agents job provides an option to import assets either from registeredESM agents or from ESM Data Collector. You can import assets and agents using ESM Data
307Using Jobs to manage tasks in Control Compliance SuiteAbout Jobs

Collector only if you have pre-configured ESM Managers. If you do not choose to use ESMData Collector, the import job by default uses the registered agents to import assets.
You can run the Import Assets and Agents job immediately or schedule the run at a specifieddate and time. You can also configure the Notification setting to notify users about successor failure of the job run. On successful completion of the job, a summary report is generatedthat specifies the number of imported agents and associated assets.
See “Managing jobs” on page 324.
About Global Metrics and Trend Computation jobThe Global Metrics and Trend Computation job is a system job. It is run to compute metricsfor technical standards, policies and mandates, and risk modules to be able to view complianceand risk data in reports, panels, and dynamic dashboards. The job computes these metricsat a frequency specified by the user.
After computing the metrics, the Global Metrics and Trend Computation job runs the UpdateStatistics maintenance task on the CCS Production and Reporting databases in order tooptimize CCS performance.
Note:Any failure in running the Update Statistics maintenance task does not affect the metricscomputation.
You can run this job immediately or schedule the run at a specified date and time. You canconfigure the Notification setting to notify users about success or failure of the job run.
Note: If the controls hierarchy changes, run the database maintenance plan to avoid anydegradation in performance of the Global Metrics and Trend Computation job. Refer theSymantec™Control Compliance Suite Planning and Deployment Guide for more details aboutdatabase maintenance plan.
See “Managing jobs” on page 324.
About Remediation Verification jobThe Remediation Verification job is a system job. This job is executed to verify the remediationstatus for assets that you have set for remediation in the evaluation job, as they arenon-compliant with the CCS compliance criteria.
The Remediation Verification job appears only if you enable the closed-loop verification. Theclosed-loop verification feature of CCS lets you reevaluate the remediated assets forcompliance. The closed-loop verification feature is available for the ServiceDesk and theServiceNow remediation action.
308Using Jobs to manage tasks in Control Compliance SuiteAbout Jobs

You must configure the remediation settings to create ServiceDesk tickets and to send emailnotifications for asset remediation.
You cannot modify, schedule or delete the Remediation verification job.
See “About automatic remediation” on page 165.
See “About manual remediation” on page 166.
See “About closed-loop verification” on page 170.
See “Managing jobs” on page 324.
About Report Data Purge jobThe Report Data Purge job is executed to erase and remove unwanted historical and summarydata from the reporting database. To execute the Report Data Purge job, you must specifythe global and individual purge settings.
You can run this job immediately or schedule the run at a specified date and time. You canalso configure the Notification setting to notify users about the success or failure of the jobrun.
See “Managing jobs” on page 324.
About Report Data Synchronization jobThe Report Data Synchronization job synchronizes data from different applications such asStandards, Assets, and Policies, among others from production database to reporting database.The Report Data Synchronization job operates in the following modes:
■ AutomaticThe Automatic mode lets you configure the execution of this job on completion of selectedjobs.
■ ScheduledThe Scheduled mode lets you schedule the job to start immediately or at a specific dateand time.
You must execute the Report Data Synchronization job before you schedule a report forgeneration. Only administrators can run the Report data synchronization job. You can configurethe ‘Notification’ setting to notify the user about its success or failure.
See “About data synchronization” on page 340.
See “Managing jobs” on page 324.
309Using Jobs to manage tasks in Control Compliance SuiteAbout Jobs

About Production Data Purge jobThe Production Data Purge job is executed to erase and remove unwanted data from theproduction database and ADAM. The Production Data Purge job removes stale data relatedto queries, reporting, entitlements, exceptions, user store, asset system, standards, SCAP,policies, audit, query baseline, and health status. The Production Data Purge job purges dataaccording to the settings that you specify on the CCS Console at Settings > ApplicationSettings > Data Purge > Purge Settings.
You can run this job immediately or schedule the run at a specified date and time. You canalso configure the Notification setting to notify users about the success or failure of the jobrun.
See “Managing jobs” on page 324.
About Report Generation jobThe Report Generation job is a user-defined job that is run to generate reports using data fromthe reporting database. To generate reports, the data in the production database must besynchronized with the reporting database using the Report Data Synchronization job. However,the Report Generation job generates a blank report in case the data in the production databaseis not synchronized with the reporting database. Hence, you must execute the ReportSynchronization job first in order to run the Report Generation job. If the CCSManager assignedfor report synchronization is busy in a subsequent automatic or scheduled run of the ReportSynchronization job, the Report generation job is directed to other CCS Managers assignedwith the Reporter role.
The Report generation job generates the following types of reports:
■ Asset reports
■ Standard reports
■ Policy reports
■ Audit reports
CCS provides predefined report templates to generate reports. You can customize some ofthe report templates based on your requirement.
You can configure the Report Generation job to add or remove viewers for the generatedreports. You can also configure the job to send an email of job completion information toselected users when the report is ready. Further, you can also export the reports in variousformats.
You can schedule the generation of reports from the appropriate templates either immediatelyor at a specified date and time. You can also configure the ‘Notification’ setting to notify theuser about its success or failure.
See “Working with reports ” on page 348.
310Using Jobs to manage tasks in Control Compliance SuiteAbout Jobs

See “Editing a report generation job” on page 352.
See “Managing jobs” on page 324.
About SCAP Evaluation jobThe SCAP Evaluation job collects data from assets and evaluates them against the SCAPcontent. You create the SCAP evaluation job to evaluate the assets against the SCAPbenchmarks by selecting a profile. Before you evaluate, youmust import the SCAP benchmarksto CCS. The CCS Manager performs data collection and evaluation of SCAP content.
You can run this job immediately or schedule the run at a specified date and time. You canconfigure the Notification setting to notify users about success or failure of the job run.
See “Evaluating assets against the SCAP benchmarks” on page 266.
See “Managing jobs” on page 324.
About SCAP OVAL Evaluation jobThe SCAP OVAL Evaluation job is executed to evaluate assets against the OVAL definitions.Before you evaluate, you must import the OVAL definitions to CCS.
You can run this job immediately or schedule the run at a specified date and time. You canconfigure the Notification setting to notify users about success or failure of the job run.
See “Managing jobs” on page 324.
About Download Live Updates jobThe Download Live Updates job is a system job. This job downloads the available updatesfrom the Symantec LiveUpdate server to the CCS staging area. You can edit this job, butcannot delete it. You can select the available updates to download. The following types ofupdates are downloaded as available and applicable:
■ Product Update
■ Agent Product Update
■ Security Content Update
■ Patch Assessment Content Update
You can run this job immediately or periodically. By default, the job is run once in every 24hours, which is a recommended practice. You can edit these settings.
When you run the Download Live Updates job, the parameters that are mentioned in theLUConfig.xml file are used to connect to the Symantec LiveUpdate server. This file is presentat the following location:
311Using Jobs to manage tasks in Control Compliance SuiteAbout Jobs

<CCS Installation Directory>\Symantec\CCS\Reporting and Analytics\Application Server
You can modify the parameters in this file as per your requirements.
See “About Automatic Updates Installation job” on page 306.
About Tiered Dashboard Update jobYou execute a Tiered Dashboard Update job to edit or update the created Tiered dashboards.A Tiered dashboard is a hierarchical representation of roll-up data, where roll-up data is asummary of the evaluation results of the standard's checks and the BV-Control query results.A hierarchy refers to the creation of sections and nodes which are scopes that represent eithera geographical location or a business unit.
Before you run the Tiered dashboard update job, youmust synchronize the data in the Reportingdatabase by running the Reporting database synchronization job.
You can configure the Tiered dashboard update job to follow a schedule to either run itimmediately or at a specified date and time. You can also configure the ‘Notification’ settingto notify the user about its success or failure.
See “Managing jobs” on page 324.
About Queries Baseline jobThe Queries Baseline job is executed to compare the results of two selected query runs. Thecomparison of results is done using a ‘Baseline’, that is a standard for comparing query results.The older run acts as a baseline for the comparison.
You can create baselines for query runs if you have permissions that are associated with theView Query task.
You can configure the Queries Baseline job to:
■ Run the query immediately, or schedule a one-time run, or recurrent runs
■ Send the baseline run results as an email attachment
■ Export query results in PDF, Comma-separated values, Excel, Word, and XML formats
You can configure the Notification setting to notify users about success or failure of the jobrun.
See “Managing jobs” on page 324.
About Agent Product Update jobThe Agent Product Update feature lets you update the CCS agents with the latest infrastructureupdates and fixes related to the agent infrastructure.
312Using Jobs to manage tasks in Control Compliance SuiteAbout Jobs

The latest product updates are available in the CCS staging area.
See “About Download Live Updates job” on page 311.
Note:Only one instance of either the Agent Product Update or Agent Content Update job canrun at a time. For example, if you are running the Agent Content Update job and the AgentProduct Update job is triggered, the Agent Product Update job gets terminated.
All other jobs that are running on the agents are automatically blocked if there is an AgentProduct Update job running.
About evaluation jobsYou create an evaluation job to evaluate the assets in your organization against various securityconfiguration assessment standards.
The information that you specify during the evaluation process is saved in the evaluation job.Hence, an evaluation job lets you perform the evaluation process repeatedly without havingto specify the evaluation criteria again. Evaluation jobs can be scheduled to run at predefinedintervals. You can modify and delete the evaluation jobs.
You can create or edit an evaluation job through the Create or Edit Evaluation Job wizard.
Note: Before you run an evaluation job, you must run a data collection job to obtain accurateevaluation results.
You can create an evaluation job from the following workspaces:
■ Standards
■ Assets
■ Jobs
You can edit or delete an evaluation job only from the Jobs workspace.
You can run this job immediately or schedule the run at a specified date and time. You canconfigure the Notification setting to notify users about success or failure of the job run.
See “Running an evaluation job” on page 313.
Running an evaluation jobYou can set up an evaluation job from the standards management view to evaluate assetsagainst specific standards. Before you set up an evaluation job, you must configure datacollectors based on the data collection model that you choose.
313Using Jobs to manage tasks in Control Compliance SuiteAbout Jobs

To run an evaluation job
1 Hover over the Standards And Policies menu, and clickTechnical Standards.
2 In the Technical Standardsworkspace, right-click the standard that you want to evaluateand select Run CCS standards Evaluation.
3 On the Select Assets screen of theCreate or Edit Evaluation Jobwizard, , type a namefor the evaluation job that you want to create in the Job Name box.
4 In the Description box, type a description for the evaluation job and click Next.
5 Navigate through the Assets System folder and its subfolders, and select one or moreassets for which you want to set up a data collection.
6 Click Add to add the selected assets to the data collection job and click Next.
7 On the Schedule Job screen, select any one of the following:
■ If you want to run the evaluation job after the wizard closes, select Run Now.
■ If you want to run the job at a specified interval, select Run Periodically and enterthe following information.In the Start On box, enter the start date and time to run the job.Under the Run periodically options, if you want to run the job only one time, selectRun Once. If you want to run the job after specific days, select the number of days inthe Run every Day list box. Click Next.
You must set a password using the Admin > Scheduled Job Credentials page. If youfail to set the password, a warning message appears when you schedule the job. Youcan click OK in the message box and specify the scheduling details. However, you mustset the password before the scheduled time for running the job.
8 After this step, you can configure automatic remediation.
If you do not want to configure remediation, you can skip the Remediation Ticketingscreen under Advanced Settings and click Next to display the Result Viewers screen.
For a detailed procedure of configuring, See “To remediate the assets automatically”on page 315.
9 On the Result Viewers screen, add the users or the groups that have the permissions toview the evaluation results and reports.
It is recommended to add the groups as the result viewers.
10 On the Notification Details screen, enter the job completion notification details in theJob Success Notification section. Enter the job failure notification details on the JobFailure Notification section. Both the section contain the same options. Enable Sendnotification, enter the following information and then click Next:
■ Enter the subject and message of the notification mail.
314Using Jobs to manage tasks in Control Compliance SuiteAbout Jobs

■ Enter the sender and the receiver email ID.Notification can be sent to multiple recipients.
11 On the Job Summary screen, review the information that you have entered. Click Backto make any changes, else click Next.
12 Click Finish to exit the wizard.
To monitor the current status of the job, go to theJobs workspace.
To remediate the assets automatically
1 On the Remediation Ticketing screen, enable the Enable Automatic RemediationTicketing option to configure the automatic remediation details.
Select the asset types that correspond to the assets that were evaluated and click Next.
2 Click Next.
3 In the Select Ticket Type section, select one of the followingRemediation Ticket Types:
■ Email notificationThis option lets you create an email notification that you want to send for notification.
■ Service Desk open-loop remediation
■ Service Desk closed-loop remediationThis action opens a ServiceDesk ticket request directly at the end of the evaluationresults for the non-compliant assets.You can choose the Enable closed-loop verification option. With the closed-loopverification, the non-compliant assets data is re-evaluated after the ServiceDesk requestis met.See “About closed-loop verification” on page 170.
■ ServiceNow closed-loop remediationSee “Configuring ServiceNow remediation ticket settings” on page 293.
■ If you enableConsolidatemultiple assets in a single ticket/email, a single notificationis sent that includes all the non-compliant assets.You can enable Make this the default Email Notification template if you want touse the same message for all the ServiceDesk ticket requests.
4 If you choose to send an email notification as a remediation action, specify the messagethat you want to send as an email notification in the Select Ticket Type section.
5 If you choose to create a ServiceDesk ticket as a remediation action, specify the messagethat you want to send as a ServiceDesk request.
6 In the Select Asset Types section, select the check boxes for the assets that you wantto include in the remediation ticket.
315Using Jobs to manage tasks in Control Compliance SuiteAbout Jobs

7 In the Select Ticketing Criteria section, specify the combination of Risk Score andCompliance Score that you want to use to identify the assets for remediation.
You can select Apply to all standards if you want to apply the specified remediationcriteria to all the standards for remediation.
If you do not select Apply to all standards, you must specify the remediation ticketingcriteria for each standard.
8 Proceed with the Create or Edit Evaluation Job Wizard till the Summary panel.
About data collection jobsYou create a data collection job to collect data from the assets for various security configurationassessment standards.
The information that you specify during the data collection process is saved in the data collectionjob. Hence, you do not need to specify the collection criteria every time you perform thecollection process. You can schedule the data collection jobs to run at predefined intervals.While scheduling, you can also specify a time out duration for the job. The time-out duration,in minutes, is applicable to agent-based assets and specifies the duration up to which the datacollection job can run for every asset in that job. When the job exceeds the specified time-outduration for an asset, the job is aborted and the partial results are discarded. The time takenby the job depends on various factors such as, number of entities or data sources included inthe query, network latency, and performance of the agent host, among others. The defaultvalue 0 indicates no time-out. The jobs can also be modified and deleted.
You can create or edit a data collection job through the Create or Edit Data Collection Jobwizard.
You can create an evaluation job from the following workspaces:
■ Standards
■ Assets
■ Jobs
You can modify, delete, or track the status of a data collection job only from the Jobsworkspace.
See “Setting up a data collection job” on page 316.
Setting up a data collection jobBefore you set up a data collection job, you must perform the following tasks in the given order:
■ Configure the data collectors based on your model of data collection.
■ For raw-data based collection, review the following section and ensure that you haveconfigured at least one of the listed data collectors:
316Using Jobs to manage tasks in Control Compliance SuiteAbout Jobs

If you want to use CCS agents to import assets and collect data, you must first register theCCS Agents with CCS Manager
■ For message-based data collection, review the following section and ensure that you havethe required configurations ready:
■ Import assetsSee “Importing assets” on page 106.
For collecting data on different platforms, the following configurations are required:
■ Configure data collection on UNIX platform
■ Configure data collection on Windows platform
■ Install Oracle Instant Client for data collection on Oracle
You can run a data collection job from the Standards and Policies menu.
To set up a data collection job
1 Hover over the Standards and Policies menu and click Technical Standards.
2 In the table pane, right-click the standards which you want to run for the data collectionjob, and then click Setup Data Collection.
3 On the Select Assets screen of the Create or Edit Data Collection Job wizard,, typethe name of the data collection job in the Name field
4 In the Description box, type a description for the evaluation job and click Next.
5 Navigate through the Assets System folder and its subfolders and select one or moreassets for which you want to set up a data collection.
6 Click Add to add the selected assets to the data collection job and click Next.
7 On the Schedule job screen, select any one of the following:
■ If you want to run the job after the wizard closes, select Run now.
■ If you want to run the job on a specific date and time, select Run on and specify thedate and time on which you want to run the job.
■ If you want to run the job at a specified interval, select Recurrence and enter thefollowing information:
■ To schedule recurrent runs, select one of the following options:
317Using Jobs to manage tasks in Control Compliance SuiteAbout Jobs

The following options are available when you select Daily:■ Start date
Lets you specify a date to start the recurrence period.■ Start time
Lets you specify a time to start the recurrence period.■ Run every <Number of> days
Lets you specify the number of days after which the job is run.■ Limit run duration
Lets you decide the duration of the job run daily.
Daily
The following options are available when you selectWeekly:■ Run every
Re-runs the job at regular weekly intervals based on the value thatyou specify. You must specify a day of the week on which youwant the job to run. For example, if you enter 2 in the Run every<number of> weeks field and then select the column namedT forTuesday, then the job will recur on the first Tuesday of everysecond week from the date you specify the schedule.
Weekly
The following options are available when you select Monthly:■ Run every <number of> months
Re-runs the job at regular monthly intervals based on the valuethat you specify.
■ EveryLets you specify a day or a week of the month on which you wantthe job to run.For example, if you enter 2 in theRun every <number of>monthsfield and then select Day in the Every drop-down list, then the jobwill recur on everyday of every second month from the date youspecify in the schedule.
■ On DaysLets you select the ordinals and specify the calendar days fromthe drop-down lists.For example, if you enter 2 in theRun every <number of>monthsfield, select first and third ordinals, and then select Monday, thenthe job will recur every two months, on the first and third Mondays.
Note: The Start Date and the Start Time do not signify the date andtime of the first day of recurrence. The Start Date and the Start Timesignify the starting point of the recurring schedule that you haveinitiated. Additionally, an incremental schedule overrides the mainschedule in case of an overlap.
Monthly
318Using Jobs to manage tasks in Control Compliance SuiteAbout Jobs

8 On the Specify Notification Details screen, select Send notification and type theinformation for sending the notification and click Next.
9 On the Job Summary screen, review all the selections that you made and click Finish.
You can monitor the status of the job in the Jobs workspace.
About Collection-Evaluation-Reporting (CER) jobThe Collection-Evaluation-Reporting (CER) job enables you to create a common job to scheduledata collection, evaluation, and report generation. While scheduling, you can also specify atime-out duration for the job. The time-out duration is applicable to agent-based assets andspecifies the duration up to which a CER job can run for every asset in that job. When the jobexceeds the specified time-out duration for an asset, the job is aborted and the partial resultsare discarded. The time taken by the job depends on various factors such as, the number ofentities or data sources included in the query, network latency, and performance of the agenthost, among others. The default value 0 indicates no time-out.
Control Compliance Suite provides different jobs for data collection, evaluation, and reportgeneration tasks. In case of environments where thousands of such jobs are scheduled, aCER job makes it easy to manage all the tasks from a single wizard.
See “Running a Collection-Evaluation-Reporting (CER) job from Standards workspace”on page 319.
See “About evaluation jobs” on page 313.
Running a Collection-Evaluation-Reporting (CER) job from StandardsworkspaceThe collection-evaluation-reporting job lets you create a common job to schedule data collection,evaluation, and report generation. While scheduling, you can also specify a time out durationfor the job. The time out duration, in minutes, is applicable to the agent-based assets andspecifies the duration up to which the data collection job can run for every asset in that job.When the job exceeds the specified time out duration for an asset, the job is aborted and thepartial results are discarded. The time taken by the job depends on various factors such as,the number of entities or data sources included in the query, network latency, performance ofthe agent host and so on. The default value of 0 indicates no time out.
To run a collection-evaluation-reporting job
1 On the CCS console, hover over the Standards and Policiesmenu, and click Standards.
2 In the Standards workspace, select the standard that you want to include in your CERjob, right-click the standard, and then click Run Collection-Evaluation-Reporting fromthe context menu.
319Using Jobs to manage tasks in Control Compliance SuiteAbout Jobs

3 In theCreate or Edit Collection-Evaluation-Reporting Jobwizard, on the Select Assetsscreen, type a mandatory job name and an optional job description.
4 From the asset hierarchy, select the assets that you want to evaluate in a CER job. Youcan select an asset, an asset group, or an asset folder.
5 Click Add or Add All depending on your selection, and then click Next.
6 On the Schedule Job screen, you can choose to run the job immediately after you createit, or schedule the run at specific date and time, or specify the frequency and schedulethis as a recurring job.
You can also limit the job run duration. This is the duration up to which a CER job can runfor every asset in that job.
7 On the Schedule Job screen, you can also configure the following More Options:
■ For incomplete execution, rerun everySet the frequency to rerun the job if it is not completed.
■ Collect data if it is older thanChoose to collect data again only if the available data is older than the specified numberof days.
■ Limit Collection DurationSpecify the duration up to which data collection can happen on an asset.
■ Per asset time out for agent based data collectionSpecify the duration after which you want data collection of non responsive agentbased assets to time outYou can still end the job while the job is running and the time out duration is set. Whilespecifying the time out duration, consider the scope of the job and the networkbandwidth.
8 Click Next.
9 On the Select Report Templates screen, choose whether you want to synchronize theevaluation results of the CER job with the reporting database. The setting is enabled bydefault. If you turn it off, the evaluation results are not available in reports and dashboards.
10 If you want to generate a report or multiple reports for the evaluation results of this CERjob, select one or more report templates, define the template scope, and add the template.
At this step, you can click Finish or you can click Next to configure the AdvancedSettings. These are optional settings.
Advanced features for data collectionYou can use options provided with the data collection jobs to optimize the data collectionactivity or optimally use the data collected from assets for evaluation and reporting.
320Using Jobs to manage tasks in Control Compliance SuiteAbout Jobs

Data collection activity timeoutTypically for a collection-evaluation-reporting (CER) job, the major part of the job duration isconsumed by the data collection activity. When the CER job exceeds the timeout durationspecified for the job, the job is aborted and the data that was collected from some of the assetsin scope, is discarded. This data collected from assets on which data collection is complete isnot used for evaluation and reporting. When the CER job is initiated again, data is collectedfrom all assets, including those on which data collection was complete in the previous runtoo.Limit Collection Duration parameter is now added to CER jobs to set the limit on thecollection activity of a CER job. This ensures that the data collected from assets before thejob is timed out, is not discarded and is used for evaluation and reporting.
Sizing guidelines for Collection-Evaluation-Reporting jobThe Collection-Evaluation-Reporting job supports only a certain report templates. The reportsthat are available for the Collection-Evaluation-Reporting job are divided into two groups. Thereports that are resource intensive and contain a large amount of data may overload the CrystalReport API during report generation. These reports are classified as heavy-weight reports.The reports that contain less data may not overload the Crystal Report API during reportgeneration. These reports are classified as light-weight reports.
The heavy-weight reports are as follows:
■ Compliance by Asset
■ Compliance by Technical Check
The light-weight reports are as follows:
■ Compliance Summary
■ Asset Risk Summary
■ Asset Evaluation Result Change
■ Assets at Highest Risk
■ Asset Group Compliance
■ Evaluation Results Asset View
■ Evaluation Results Standard View
■ Remediation Asset View
■ Remediation Standard View
A heavy-weight report always fails to generate when the number of assets are above the 200assets data point. The collection-evaluation-reporting job may succeed, but the report is notgenerated.
321Using Jobs to manage tasks in Control Compliance SuiteAbout Jobs

A light-weight report can handle between 200 and 500 assets. The Asset Evaluation ResultChange report fails above the 500 asset data point.
See “Running a Collection-Evaluation-Reporting (CER) job from Standards workspace”on page 319.
About Agent Content Update jobThe Agent Content Update job remotely installs the latest security content on CCS agents.
You can create an Agent Content Update job from the following workspaces:
■ Agents
■ Jobs
■ LiveUpdate
You can monitor the status of the agent content update jobs from the Jobs workspace.
See “About blocking data collection jobs during Agent Content Update” on page 324.
Running the Agent Content Update jobThe Agent Content Update job remotely installs the latest security content on CCS agents.
You can create and run an Agent Content Update job from the following workspaces in CCS:
■ Agents
■ Jobs
■ LiveUpdate
Symantec recommends that you create Agent Content Update job that is scoped to maximum3000 agents. Hence, it is recommended that you keep 200 GB disk space on the drive whereCCS Manager is installed.
If you execute Agent Content Update job that is scoped to 3000 agents, it creates a temporaryfile on load balancer computer at the following location for each asset that is scoped:<InstallDir>\Symantec\CCS\Reporting and Analytics\DPS\temp
The file size of the temporary file depends on the content to be deployed on agent. However,all the temporary files get deleted automatically after completion of the job.
To run an Agent Content Update job
1 Launch the Agent Content Update wizard in one of the following ways:
■ In the Jobs workspace of the CCS console, click the + icon in the upper-right corner,and then click Agent Content Update.
■ Hover over theAsset Systemmenu, clickAgents, and then in theAgentsworkspace,do one of the following:
322Using Jobs to manage tasks in Control Compliance SuiteAbout Jobs

■ In the Agent List pane, select the agent that you want to upgrade, right-click theagent, and then click Agent Content Update.
■ Click the + icon in the upper-right corner to select Agent Content Update.
Note: You cannot select Windows and UNIX agents for the same job; however, youcan select AIX, HP-UX, or Solaris agents, which are different flavors of UNIX for thesame job.
■ Hover over theAdminmenu, click LiveUpdate, and then in the LiveUpdateworkspace,from the Common Tasks list, click Agent Content Update
2 In the Create or Edit Remote Agent Content Upgrade Job wizard, do the following:
■ In the Specify Job Name and Description panel, do the following:
■ Enter the name for the Agent Content Update job.
■ Enter the description for the Agent Content Update job.
■ In the Select Platform/Server and Type panel, do the following:
■ Select a platform or a server.
■ Expand the platform or server and select its type.
■ In the Select Agents panel, select the agents or agent folders whose content youwant to remotely upgrade.
■ In the Schedule panel, do one of the following:
■ Check Run now to run the job immediately.
■ Check Run Periodically to run the job on a specified interval.
■ In the Specify Notification Details panel, select Send notification and type theinformation for sending the notification, and click Next.
■ In the Summary panel, review all the selections that you made and click Finish.
Note: If an Agent Content Update job is already running and you execute another AgentContent Update job that has a common agent scope with the job that is already in therunning state, the second job filters the common agents and runs on the remainder agents.A warningmessage about the filtered agents is displayed in theMessage tab. For example,you create and run job 1 that has agents 1, 2, 3 and you create another job that has agents3, 4, 5. Since agent 3 is common to both the jobs, in the second job agent 3 is filtered outand the job is run on the remaining agents.
323Using Jobs to manage tasks in Control Compliance SuiteAbout Jobs

See “About blocking data collection jobs during Agent Content Update” on page 324.
About blocking data collection jobs during Agent Content UpdateBy default, a key, AgentContentUpdateJobsPrecedeDataCollectionJobs value=true, isadded in the configuration file of the Application Server. The value of this key determineswhether an Agent Content Update job takes precedence over other data collection jobs.
■ If the value is set to true, all the data collection jobs that are running and have a commonasset scope with the Agent Content Update job are canceled. New data collection jobswith a common asset scope are blocked.
■ If the value is set to false, the Agent Content Update job that has a common asset scopewith the other data collection jobs is automatically blocked.
The configuration file is present at the following location:
<Install Directory>\Application Server\AppserverService.exe.config.
The following data collection jobs are affected because of blocking data collection jobs duringAgent Content Update:
■ Asset importSee “About Asset Import job” on page 305.
■ Data collectionSee “About data collection jobs” on page 316.
■ QueriesSee “About Queries job” on page 304.
■ SCAP evaluationSee “About SCAP Evaluation job” on page 311.
See “About Agent Content Update job” on page 322.
Managing jobsYou can perform the following operations in the Jobs workspace:
■ Create jobsSee “Creating jobs” on page 325.
■ Edit a jobSee “Editing a job” on page 326.
■ Run a job nowSee “Running a job now” on page 328.
■ Schedule a job
324Using Jobs to manage tasks in Control Compliance SuiteManaging jobs

See “Scheduling jobs” on page 326.
■ Delete a jobSee “Deleting jobs” on page 327.
■ Refresh the jobs view
■ Search for a jobSee “Searching for a job” on page 329.
Creating jobsYou can create a job using the Jobs workspace in the CCS console.
You can create the following jobs from the Jobs page:
■ Evaluation job
■ Data collection job
■ Entitlements import job
■ Import assets job
■ Discover networks jobSee “Discovering Networks” on page 124.
■ Discover assets jobSee “Discovering Assets” on page 127.
To create a job
1 In the Jobs workspace, click the + icon in the upper-right corner.
A list of types of jobs is displayed.
2 Select the type of job that you want to create.
A wizard that is associated with the respective job is displayed.
3 Complete the steps in the wizard to create the job.
See “Editing a job” on page 326.
See “Scheduling jobs” on page 326.
See “Deleting jobs” on page 327.
See “Canceling a job run” on page 330.
See “Searching for a job” on page 329.
See “Deleting a job run” on page 331.
325Using Jobs to manage tasks in Control Compliance SuiteManaging jobs

Editing a jobYou can modify a job using the Jobs workspace in the CCS Console.
You can edit only one job at a time. Every job type has unique edit options. Only user-definedjobs are editable.
The following users can edit jobs:
■ Users who have created the jobs
■ CCS administrators
To edit jobs
1 Hover over the Jobs menu, and click Jobs.
2 Right-click the job that you want to edit, and then click Edit job.
3 In the wizard displayed for the selected job, modify the steps wherever required on thewizard screens. The job is edited.
See “Scheduling jobs” on page 326.
See “Deleting jobs” on page 327.
See “Running a job now” on page 328.
See “Canceling a job run” on page 330.
See “Searching for a job” on page 329.
See “Deleting a job run” on page 331.
See “Creating jobs” on page 325.
Scheduling jobsYou can schedule a job using the Jobs workspace in the CCS console.
To schedule a job
1 Hover over the Jobs menu, click Jobs, and select the job that you want to schedule.
2 Right-click the job and then click Schedule job.
3 In the Schedule dialog box, select either or both of the following:
■ Run now: if you want a one-time run of the job
■ Run periodically : if you want recurrent runs of the job
4 In the Run Periodically Options box, select either of the following options:
■ Run once: if you want to run the job only one time.
326Using Jobs to manage tasks in Control Compliance SuiteManaging jobs

■ Run every _ days: if you want to configure runs at regular intervals after a specificperiod, enter the value for daily recurrence in the field. You must specify the start dateand the start time.
5 Click the drop-down arrow for the Start on field and select the date and time that youwant the scheduled job to run on.
6 Click OK.
Note: If the Application Server Service is down, a scheduled job run is skipped. Irrespectiveof the job schedule, the skipped job is run immediately after the Symantec Application ServerService starts again. If you select the Run Only on Next Schedule box in the ScheduleManagement section on the Scheduled Job Management page, the job runs only on thenext scheduled date and time when the Symantec Application Server Service is running. TheRun Only on Next Schedule option is applicable only to custom jobs. The skipped systemjob is run immediately after the Application Server Service starts again.
See “Editing a job” on page 326.
See “Deleting jobs” on page 327.
See “Running a job now” on page 328.
See “Canceling a job run” on page 330.
See “Searching for a job” on page 329.
See “Deleting a job run” on page 331.
See “Creating jobs” on page 325.
Deleting jobsYou can delete a job using the Jobs workspace in the CCS Console.
You can delete multiple jobs. However, you can deleteonly user-defined jobs.
To delete a job
1 Hover over the Jobsmenu, and click Jobs, and then select the job that you want to delete.
2 Right-click the job and click Delete job. In the confirmation message box, click Yes andthe job is deleted.
See “Editing a job” on page 326.
See “Scheduling jobs” on page 326.
See “Running a job now” on page 328.
See “Canceling a job run” on page 330.
327Using Jobs to manage tasks in Control Compliance SuiteManaging jobs

See “Searching for a job” on page 329.
See “Deleting a job run” on page 331.
See “Creating jobs” on page 325.
Running a job nowYou can run a job using the Jobs workspace in the CCS Console. You can right-click a joband use the option to run jobs from the menu.
To run a job now
1 Hover over the Jobs menu, and click Jobs, and then select the job that you want to run.
2 Right-click the job and click Run job now. A corresponding job run is created and the jobstarts to run. A drop-down arrow icon appears at the beginning of the job that is run. Clickthe icon to view the details of the job run. The following information is displayed:
■ Job Start Time : displays the date and timestamp when the job run started .
■ Job End Time: displays the date and timestamp when the job run ended.
■ Run Duration: displays the duration for which the job run.
■ Status: displays the current status of the job.
■ Status Details: displays the detailed status of the job.
See “Editing a job” on page 326.
See “Scheduling jobs” on page 326.
See “Deleting jobs” on page 327.
See “Canceling a job run” on page 330.
See “Searching for a job” on page 329.
See “Deleting a job run” on page 331.
See “Creating jobs” on page 325.
Canceling a job runYou can cancel running a job using the Cancel job option in the Jobs workspace.
You can simultaneously cancel job runs of the same type of jobs. Job runs of the same typethat belong to different jobs can also be canceled.
For example, if you select two asset import job runs, the cancel option is enabled. If you selectasset import job run and data collection job run for cancelation, then the cancel option isdisabled. These job runs are not canceled because the jobs are not of the same type.
328Using Jobs to manage tasks in Control Compliance SuiteManaging jobs

You can cancel job runs only when it is in the Executing state.
You cannot cancel job runs in the following states:
■ Aborted
■ Complete
■ Failed
To cancel a job run
1 Hover over the Jobs menu, and clickJobs.
2 Select the job run which is in the Executing state, and right-click it.
3 Click Cancel job. The job run is canceled.
See “Editing a job” on page 326.
See “Scheduling jobs” on page 326.
See “Deleting jobs” on page 327.
See “Running a job now” on page 328.
See “Searching for a job” on page 329.
See “Deleting a job run” on page 331.
See “Creating jobs” on page 325.
Searching for a jobYou can search for a job using the Search option. You can also use the information providedunder the columns to search for jobs. For example, type Failed in the Search box to see thejob runs with the Failed status.
You can also use the filters in the Show Filters list to filter jobs. You can filter the jobs byselecting the Type, Last Run, and Status filters. You can also use these filters in combinationwith each other. Control Compliance Suite performs a search only on the records availableon the user interface.
To search for a job
1 Hover over the Jobs menu, and click Jobs.
2 In the Search box, type the name, type, user account, or status of the job by which youwant to search for the job, and then press Enter.
The search results are displayed in the same pane.
See “Editing a job” on page 326.
See “Scheduling jobs” on page 326.
329Using Jobs to manage tasks in Control Compliance SuiteManaging jobs

See “Deleting jobs” on page 327.
See “Running a job now” on page 328.
See “Canceling a job run” on page 330.
See “Deleting a job run” on page 331.
See “Creating jobs” on page 325.
Managing job runsYou can perform the following operations on job runs:
■ Cancel a job runSee “Canceling a job run” on page 330.
■ Delete a job runSee “Deleting a job run” on page 331.
Canceling a job runYou can cancel running a job using the Cancel job option in the Jobs workspace.
You can simultaneously cancel job runs of the same type of jobs. Job runs of the same typethat belong to different jobs can also be canceled.
For example, if you select two asset import job runs, the cancel option is enabled. If you selectasset import job run and data collection job run for cancelation, then the cancel option isdisabled. These job runs are not canceled because the jobs are not of the same type.
You can cancel job runs only when it is in the Executing state.
You cannot cancel job runs in the following states:
■ Aborted
■ Complete
■ Failed
To cancel a job run
1 Hover over the Jobs menu, and clickJobs.
2 Select the job run which is in the Executing state, and right-click it.
3 Click Cancel job. The job run is canceled.
See “Editing a job” on page 326.
See “Scheduling jobs” on page 326.
See “Deleting jobs” on page 327.
330Using Jobs to manage tasks in Control Compliance SuiteManaging job runs

See “Running a job now” on page 328.
See “Searching for a job” on page 329.
See “Deleting a job run” on page 331.
See “Creating jobs” on page 325.
Deleting a job runYou can delete a job run using the Jobs workspace in the CCS Console. You can delete onlythose job runs that have the Completed, Aborted, or Faulted status.
To delete a job run
1 Hover over the Jobs menu, and click Jobs, and then select the job run that you want todelete.
2 Right-click the job and click Delete job run. The job run is deleted.
See “Editing a job” on page 326.
See “Scheduling jobs” on page 326.
See “Deleting jobs” on page 327.
See “Running a job now” on page 328.
See “Canceling a job run” on page 330.
See “Searching for a job” on page 329.
See “Creating jobs” on page 325.
About the Jobs workspaceThe Jobs workspace is used to view all jobs that are created in Control Compliance Suite.Along with viewing the job status, you can also perform some tasks related to a job on theshortcut menu.
You can access the Jobs workspace from Jobs > Jobs view.
You need the following permissions to navigate to the Jobs view.
■ Manage Jobs
■ View all Jobs
You can accomplish the following tasks from the Jobs workspace.
331Using Jobs to manage tasks in Control Compliance SuiteAbout the Jobs workspace

Table 7-1 Jobs workspace
How to accomplish the taskTask
Click the down-arrow to selectAll jobs or System jobs. The default settingis My jobs, that displays jobs created by you. The number of jobs that aredisplayed in the grid can be configured.
Viewing jobs in the grid
Click Show Filters to display the filter options. When you set the filters andclick Apply, the jobs grid displays the filtered list of jobs. Click Revert torevert the filter options.
Filtering the jobs displayedin the grid
Type a job name to search for a specific job.Searching for a specific job
Right-click a particular job to view the list of tasks that can be accomplishedas follows:
■ Associate Assets■ Remove Associates■ Show in Business Asset View■ Request Exceptions■ Evaluate Routing Rules■ View Credentials■ Create Query■ Set up data collection■ Set up offline data collection■ Run CCS Standards evaluation■
Performing tasks using theshortcut menu
332Using Jobs to manage tasks in Control Compliance SuiteAbout the Jobs workspace

Table 7-1 Jobs workspace (continued)
How to accomplish the taskTask
Click the Ellipsis (...) to view the list of tasks that can be accomplishedusing the respective wizards.
■ Import assetsSee “Importing assets” on page 106.
■ Discover assetsSee “About Asset Discovery Job” on page 305.
■ Discover networksSee “About Network Discovery Job” on page 306.
■ Run SCAP evaluationSee “About SCAP Evaluation job” on page 311.
■ Run SCAP OVAL evaluationSee “About SCAP OVAL Evaluation job” on page 311.
■ Import assets and agentsSee “About Import Assets and Agents job” on page 307.
■ Agent content updateSee “About Agent Content Update job” on page 322.
■ Agent Management■ Agent product update■ Run CCS standards evaluation■ Run collection-evaluation-reporting
See “About Collection-Evaluation-Reporting (CER) job” on page 319.■ Set up data collection■ Configure desktop notification
Completing various tasksusing wizards
The Jobs grid displays the list of jobs and related details as follows:
■ Click
to view the details of last run jobs. The number of job runs displayed,depends on the Job count setting.
■ Click
to view the creation and modification dates for the job.■ The column chooser at the right-corner of the title bar of the grid, lets
you choose the required columns to be displayed in the grid.
For information about the job status column,
Viewing job details in thegrid
333Using Jobs to manage tasks in Control Compliance SuiteAbout the Jobs workspace

About job filtersThe Show Filters pane in the Jobs workspace displays the primary filters. Use these filtersto determine the display of the required jobs. If you select no job type, then the pane displaysall job types.
Control Compliance Suite provides the following default primary filters to filter jobs:
Lets you filter the jobs according to the type of the job.
The following types of jobs can be filtered:
■ Agent Content Update■ Agent Product Update■ Asset import■ Asset discovery■ Automatic updates installation■ Collection-Evaluation-Reporting■ Data collection■ Evaluation■ External data integration■ Import assets and agents■ Metrics and trend computation■ Network discovery■ Production data purge■ Queries■ Queries baseline■ Report generation■ Report data synchronization■ Report data purge■ Remediation verification■ SCAP evaluation■ SCAP OVAL evaluation■ Tiered dashboard update
Type
Lets you filter the jobs according to the last completed job run date or time.
You can select one of the following options:
■ All■ Before■ After■ Between
Last Run
334Using Jobs to manage tasks in Control Compliance SuiteAbout the Jobs workspace

Lets you filter the jobs according to their status.
You can select one of the following options:
■ All■ Aborted■ Completed■ Executing■ Failed■ None
Job Status
Select a filter and click the Apply icon to view the filtered jobs in the table pane.
Click the All check box in the pane to simultaneously select all job types. Clear the All checkbox to remove the selection of all the job types.
After you use the primary filters for the jobs you want displayed, use the secondary filters torefine the jobs display.
See “About secondary job filters” on page 335.
About secondary job filtersBrowse Jobs View of the Jobs page provides the View jobs field with the following optionsfor secondary job filters:
Displays the jobs that you have created, the jobsthat you can view, and the system jobs that you canview
All jobs
Displays the jobs that you have createdMy jobs
Displays the system jobs that you can view
Note: The View jobs field displays the Systemjobs option only if the job type that you selected inthe Jobs Filter View pane contains system jobs.The jobs display for all filters is restricted to thosejobs that you can view.
System jobs
About job information displayYou can manage the display of jobs in the jobs table of Browse Jobs View.
Use the following options to manage the display of job information:
■ Use Column Chooser to select the columns for inclusion in the jobs table.
335Using Jobs to manage tasks in Control Compliance SuiteAbout the Jobs workspace

Click the Column Chooser icon, and check the header boxes of the columns that youwant included in the jobs table.ColumnChooser displays the following column headers for Job details: Creator, Duration,End date, Next run date, Start date, Status, Status details, and Type.Column Chooser displays the following column headers for Job run details: Duration, Enddate, Status, and Status details.
■ Isolate the information in one table column for viewing.Drag the table header of a column above the jobs table. This action isolates the jobinformation in one column of the jobs table for better viewing.
■ On Settings, set the number of jobs and job runs that the table pane displays.
Viewing jobs information in the Jobs Property TabsView
You can view jobs information in the Jobs Property Tabs View of the Jobs view.
The details pane displays all information about the selected job or the job run under the followingtabs:
■ General tab
■ Schedule tab
■ Job Run Summary tab
■ Messages tab
■ Job Configuration tab
To view jobs information
1 In the Monitor > Jobs view, select the job or the job run in the table pane for which youwant to view the information.
2 View the information for the selected job or the job run in the Jobs Property Tabs View.
Jobs Property Tabs View - General tabThe General tab of the Jobs Property Tabs View provides general information about theselected job. The information in this tab is read-only.
The General tab provides the following details about the jobs:
Displays the job typeJob type
Displays the identity of who has created the jobCreated by
336Using Jobs to manage tasks in Control Compliance SuiteViewing jobs information in the Jobs Property Tabs View

Displays the date and the time when the job runs nextNext run date
Displays the date and the time when the job was createdCreated on
Displays the status of the latest job runLast run status
Displays the last completed job run date and timeLast run date
Displays the date and the time when the job was last modifiedLast modified on
See “Scheduling jobs” on page 326.
Jobs Property Tabs View - Schedule tabThe Schedule tab of the Jobs Property Tabs View provides information about the schedulingof the selected job. The information under this tab is read-only.
The Schedule tab provides the following details about jobs:
Displays the date and time for the next job runNext run
Displays the interval between two scheduled runsRun every
Jobs Property Tabs View - Job run summary tabThe Job run summary tab provides details about the selected job run. The information thatis displayed in the tab pertains to the type of the job. The information in this tab is read-only.
Jobs Property Tabs View - Messages tabThe Messages tab provides information about the errors, warnings, and information of theselected job run. The information in this tab is read-only.
Click the Open in new window icon launches the Messages window that displays themessages. The Messages window provides information about the data collector messagesof the selected job run. The information in this window is read-only.
You can export the list of messages by clicking Export or Export All links.
The list of messages may span multiple pages. Click the Export link to export the list ofmessages in the current page to various formats such as .xls, .pdf, .doc, .xml, or .csv. TheExport link allows you to select specific columns from the grid to export.
Click the Export All link to export the list of messages from all pages to a .csv file. The ExportAll links exports all columns from the grid. If there are more than a hundred thousand messagesto be exported, separate .csv files will be created for every one hundred thousand messages.
337Using Jobs to manage tasks in Control Compliance SuiteViewing jobs information in the Jobs Property Tabs View

Note: The Export All link is available only if the list of messages span to more than one page.
See “Scheduling jobs” on page 326.
Jobs Property Tabs View - Template tabThe Template tab of the Jobs Property Tabs View specifies the template that is used forcreating the report. The information in this tab is read-only.
The Template tab provides the following information about the report:
Displays the name of the reportReport title
Displays the type of the reportReport type
Displays the description of the reportDescription
Displays the name of the author of the reportAuthor
Displays the version of the reportVersion
Jobs Property Tabs View - Job configuration tabThis tab shows the configuration details of the job. The job type determines the nature of thedata that the tab displays.
338Using Jobs to manage tasks in Control Compliance SuiteViewing jobs information in the Jobs Property Tabs View

Viewing Reports andDashboards in ControlCompliance Suite
This chapter includes the following topics:
■ About reports and dashboards
■ Working with reports
■ Working with dashboards
■ Working with panels
■ Working with tiered dashboards
■ Configuring tiered dashboards
■ About trends configuration
■ Viewing the tiered dashboard reports
■ About the Details tab view
About reports and dashboardsControl Compliance Suite (CCS) provides a rich set of presentation-level reports. A report letsyou collect and present the data in a format that conforms to the organizational needs. A reportis a business document that contains a predefined, organized collection of data. A report canbe viewed, printed, or analyzed. You can create and customize reports from the Reportingview. You can schedule the report generation or dashboard update jobs from the Jobs view.You can schedule reports adn dashboard jobs to run at a specified time. If the report supports
8Chapter

the feature, you can export a report in several formats. Dashboards that are created in theWeb Console are real-time, visual representations of selected key elements for an organization.Dashboards that are created in the Web Console are not scheduled.
Organizations collect vast amounts of information in the course of completing businesstransactions. Management studies the data to make decisions. The Reporting feature givesyou timely information that you need to make informed decisions about the organization.
The reporting database stores the data that is needed for the reports.
See “Working with reports ” on page 348.
About data synchronizationReports and dashboards use the data that is stored in the reporting database. The data thatis required for reports and dashboards is synchronized with the production database usingthe synchronization job. The reporting database synchronization job is located in the JobManagement view.
The synchronization job operates in the following modes:
■ Automatic
■ Scheduled
The automatic mode synchronizes data between the production and reporting databases afterthe completion of selected jobs. You can select the jobs in the Settings > General > SystemConfiguration > Reporting Synchronization.
The synchronization job can be set to start at a specific time. You can request an administratorto schedule a synchronization job to run immediately. Only administrators run thesynchronization job. You must run a synchronization job before you schedule a report ordashboard.
See “About the Report Management jobs” on page 343.
About creating user-defined templatesYou can create a template with Crystal Reports 2010 and then add the template into ControlCompliance Suite. You can also update an existing template by exporting the template toCrystal Reports 2010. To add or update a template, you must be a Report Administrator.
An installation of the Crystal Reports 2010 is required. Crystal Reports 2010 is not a componentof the Symantec Control Compliance Suite installation.
You can find more information on developing your reports at:
http://www.symantec.com/business/support/overview.jsp?pid=53741
See “About the prerequisites for user-defined report templates” on page 341.
340Viewing Reports and Dashboards in Control Compliance SuiteAbout reports and dashboards

About predefined report templatesThe predefined report templates are installed with the Control Compliance Suite. The predefinedreport templates are in the Predefined folder in the tree pane of the Report Template view.You can schedule a report template. You can customize a template, if the template supportsthe feature. You can customize a report template in the predefined node or copy the reporttemplate to a user-defined folder in the Report Templates view.
You can export the template as an RPT file and then open the file with Crystal ReportsDeveloper 2010. You can modify the RPT file and add the file as a user-defined report template.
You cannot delete a predefined report template.
See “Scheduling a report ” on page 349.
See “Copying a report template” on page 350.
See “Customizing a report template” on page 351.
About the prerequisites for user-defined report templatesYou can register user-defined reports. User-defined reports are reports created with CrystalReports 2010. To create a user-defined report, you must have access to the reporting database.
You must have the following permissions:
■ Access to the SQL Server instance
■ Read-only access to the Reporting database
■ An installation of the Crystal Reports 2010 is required. Crystal Reports 2010 is not acomponent of the Symantec Control Compliance Suite installation.
If you create a report that combines business objects, you must add all of the requiredparameters. The report template is validated based on the type of business objects. Forexample, if you create a report template for assets and standards, then you must add therequired asset parameters and the required standards parameters to the report template. Youdo not add a required parameter twice. The ReportRunBy parameter and the ReportRunDateparameter must appear only once in the report.
If you create a report that needs information from RMS, the legacy default RMS databasename is ComplianceManager.
To create a new asset or asset group report template in Crystal Reports 2010, you must havethe following parameters:
The unique identifier joins related tables to the ReportJob table in theCSM_Reports database.
AssetJobID
The unique identifier of the asset group present in the report scope.AssetGroup
341Viewing Reports and Dashboards in Control Compliance SuiteAbout reports and dashboards

The unique identifier of the asset system folder within the report scope.Folders
The user who executes the reporting job for the report.ReportRunBy
The date for the reporting jobReportRunDate
To create a new standards report template in Crystal Reports 2010, you must have the followingparameters:
The unique identifier joins related tables to theReportStandardJob table in the CSM_Reportsdatabase.
StandardJobID
The user who executes the reporting job for thereport.
ReportRunBy
The date for the reporting jobReportRunDate
To create a new entitlements control points report template in Crystal Reports 2010, you musthave the following parameters:
The display name of the control point type.ControlPointType
The control point statusStatus
The control point ownerDataOwner
The tags that are associated with the control pointTags
The unique identifier joins related tables to theReportJob table in the CSM_Reports database. Theparameter is a part of the filter set definition XML.The definition filters control point types.
EntitlementControlPointJobID
The user who executes the reporting job for thereport.
ReportRunBy
The date for the reporting jobReportRunDate
The unique identifier of the asset group present inthe report scope.
AssetGroup
The unique identifier of the asset system folderwithin the report scope.
Folders
To create a new entitlements review cycles report template in Crystal Reports 2010, you musthave the following parameters:
342Viewing Reports and Dashboards in Control Compliance SuiteAbout reports and dashboards

The parameter determines if the report scopecontains current review cycles or snapshot reviewcycles
CurrentOrSnapshotted
The status of the review cycleStatus
The unique identifier of the review cycleReviewCycleID
The display name of the control point type.ControlPointType
The control point ownerDataOwner
The tags that are associated with the control pointTags
The unique identifier joins related tables to theReportJob table in the CSM_Reports database. Theparameter is a part of the filter set definition XML.The definition filters control point types.
EntitlementsReviewCycleJobID
The user who executes the reporting job for thereport.
ReportRunBy
The date for the reporting jobReportRunDate
The unique identifier of the asset group present inthe report scope.
AssetGroup
The unique identifier of the asset system folderwithin the report scope.
Folders
To create a new policy report template in Crystal Reports 2010, you must have the followingparameters:
The unique identifier joins related tables to thePM_PolicyUser table in the CSM_Reports database.
PolicyJobID
The user who executes the reporting job for thereport.
ReportRunBy
The date for the reporting job.ReportRunDate
See “About creating user-defined templates” on page 340.
About the Report Management jobsIn the Monitor > Jobs view, you can view the run status and details for the Report Managementjobs.
The Report Management jobs are the following:
343Viewing Reports and Dashboards in Control Compliance SuiteAbout reports and dashboards

The job schedules a report.Report generation
The job schedules a dashboard.Dashboard update
The job purges historical and summary data fromthe reporting database.
Scheduled Reporting Database Purge
The job synchronizes the data from the productiondatabase into the reporting database.
Reporting Database Synchronization
See “Scheduling a report ” on page 349.
See “Viewing a report” on page 355.
About the Reports Templates viewThe Reports Templates view lists the report templates that you can access. The Reports folderhas the Predefined subfolder. You can create a user-defined subfolder to store the customizedreport templates. You can copy the predefined templates to the user-defined folder. If thereport template supports the feature, you can customize the predefined report template.
The Report Templates view has the following panes:
■ Folder
■ Filter by
■ Table
■ Details
In the folder pane, you can do the following:
■ Add user-defined subfolders
■ Select a folder to view the report templates in the table pane
In the Filter by pane, you can do the following:
■ Create a report type filter.
■ Create a tag filter.
In the table pane, you can do the following:
■ Schedule a selected template
■ Copy and paste a predefined template to the user-defined folder
■ Customize a report template, if the report template supports the feature
■ Export a report template to a Crystal Reports Developer 2010 file
■ Add a report template that is created in Crystal Reports Developer 2010
344Viewing Reports and Dashboards in Control Compliance SuiteAbout reports and dashboards

■ Update a report template that is created in Crystal Reports Developer 2010
■ Apply a filter to the template list
■ View the name, description, and version number of each report template
■ Verify if a report supports customization and can be generated using the chained job
■ In a user-defined folder, you can delete a report template
■ In a user-defined folder, you can move a report template to another user-defined folder
■ Add or update a report template
■ Export a report template
■ Move a report template
In the details pane > General tab, you can view the following information about a selectedreport template:
■ Report title
■ Report type
■ Description
■ Author
■ Version
In the details pane > Tags tab, you can add a tag to a report.
■ Add a tag.
■ Remove a tag.
See “Copying a report template” on page 350.
See “Customizing a report template” on page 351.
See “Exporting a report template” on page 353.
See “Moving a report template” on page 354.
About the My Reports viewThe My Reports view lists the successful report runs that you can access. The view displaysonly the successful report runs. These reports are only accessible by the user who createdthe report. The Report Viewer role can only see reports in the My Reports view.
Members of the CCS Administrators role cannot remove a report. If you are assigned as aviewer for the report, you can remove the report from the My Reports view.
The My Reports view has the following panes:
345Viewing Reports and Dashboards in Control Compliance SuiteAbout reports and dashboards

■ Filter by
■ Table
In the Filter by pane, you can filter the reports by the following: by using a last run date andthe selected type of report.
■ Last run date
■ Report type
The last run date can be one of the following:
■ Any date
■ Before a selected date
■ After a selected date
■ Within a specific date range
The report type can be one of the following:
■ Assets
■ Standards
■ Policy
■ Audit
■ Mandate
You can do the following in the table pane:
■ View a selected report.
■ Remove a report.
■ Apply a filter to the report list.You can base the filter on the report template type or date run.
When you view a report, you can export the report to a supported format.
About the View My Reports filter optionIf the report supports the filter option, you can filter a report in the ViewMy Report - Reporting.A report may not support the filter option. The types of filter that you can apply to a report aredifferent and based on the report.
See “About the My Reports view” on page 345.
346Viewing Reports and Dashboards in Control Compliance SuiteAbout reports and dashboards

About CyberScope and LASRUsing CCS you can export summary of SCAP evaluation results to LASR (Lightweight AssetSummary Results Schema) report using PowerShell cmdlets for CyberScope reporting.
The Department of Homeland Security in association with the Department of Justice developedan application, CyberScope, to handle manual and automated inputs of agency data for FISMAreporting. NIST has been collaborating with the CyberScope effort to provide data models thatuse the underlying SCAP primitives (CVE, CCE, CPE) to produce data feeds directly fromsecurity management tools that can be submitted to the CyberScope application.
CyberScope is a web-based application that collects data from each federal agency, to assessIT security. This represents a major shift, as IT reporting was previously done through paperworkreports. CyberScope relies on live data feeds and data entry by agency staff. It is designedas a central repository, accessible by agencies through a standard interface and format. Usingthis interface, agencies provide data to the OMB (Office of Management and Budget, USGovernment), which then compiles and generates reports to other agencies, as required bythe FISMA.
CyberScope is based on automation; users login using a secure PIV (personal identityverification) car and PIN (personal identification number). CyberScope supports its 600 agencyusers in various information collection processes. This more automated and frequent methodimproves the monitoring and evaluation of IT security performance over time. FISMA reportingthrough CyberScope involves direct data feeds from security management tools, direct reportingfrom continuous monitoring programs, and security management tools which is required bythe OMB. The OMB has defined a set of elements, which includes: inventory; systems andservices; hardware; software; external connections; security training; and identity managementand access.
Lightweight Asset Summary Results Schema (LASR) is a resource that supports implementationof the reporting data model. Agencies need to be able to continuously monitor security-relatedinformation across the enterprise in a manageable and actionable way. Chief InformationOfficers (CIOs), Chief Information Security Officers (CISOs) and other agency management,all need to have different levels of this information presented to them in the ways that enabletimely decision making. To do this, agencies need to automate security related activities, tothe extent possible, and acquire tools that correlate and analyze security-related information.Agencies need to develop automated risk management models and apply them to thevulnerabilities and threats identified by security management tools. A key component of thesestandards, CyberScope, is an interactive information collection tool designed to help agenciesfulfill their IT security reporting requirements.
Note: Only CCS Administrator can generate LASR report.
LASR report contains details about the subject of the report and the report results which includethe source of the report data and the report payload.
347Viewing Reports and Dashboards in Control Compliance SuiteAbout reports and dashboards

The following information is displayed in the LASR report:
■ Organization hierarchy
■ Report time and report generator tool description
■ Number of violations and exceptions per CCE ID
■ Number of hosts that are affected per CVE ID
■ Distribution of assets per platform
Note: LASR report contains the data for SCAP evaluation job run only after Upgrade. To havecorrect data in LASR, run the SCAP evaluation job after you upgrade CCS to CCS v11.1 alongwith latest Product Update.
Working with reportsYou can do the following with a report template:
■ Schedule a report template to create a reportSee “Scheduling a report ” on page 349.
■ View a reportSee “Viewing a report” on page 355.
■ Copy a report templateSee “Copying a report template” on page 350.
■ Customize a user-defined report templateSee “Customizing a report template” on page 351.
■ Customize a report in the report viewerSee “Customizing a report in report viewer” on page 350.
■ Refresh a report in the report viewerSee “Refreshing a report” on page 354.
■ Export a report in the report viewerSee “Exporting a report” on page 352.
■ Print a report in the report viewerSee “Printing a report” on page 354.
■ Delete a user-defined report template
■ Add a user-defined report template
■ Export a user-defined report templateSee “Exporting a report template” on page 353.
348Viewing Reports and Dashboards in Control Compliance SuiteWorking with reports

■ Update a user-defined report template
■ Move a report templateSee “Moving a report template” on page 354.
■ Remove a reportSee “Removing a report” on page 355.
Scheduling a reportThe Schedule Report wizard generates a report by creating a report generation job. A reportis generated on the current data in the reporting database. The reports are generated only onthe evaluated assets and standards. After you have created the job, you can view the currentjob status in Jobs > Jobs view. You can view the report in the Reports menu.
You must run the Reporting Database Synchronization job before you schedule the report.The synchronization job populates the database with the data in the production database. Thesynchronization job is an existing job and is in the Jobs menu. If you create the report beforethe synchronization job completes its run, you may see a blank report.
If you attach a report, the report displays the date and time of the operating system where theApplication Server is installed. In a remote console, the report displays the date and time ofthe operating system where the Application Server is installed.
Each report has different scalability limitations. For example, the remediation report is designedto handle large result sets. For most of the predefined reports, you should be sure that yourreport fits within the limitation. A report may fail or cause a system slowdown if the limitationis exceeded.
If you have changed the locale or the time zone on the Application Server, you must restartthe Application Server. After you have restarted the service, you should launch the ControlCompliance Suite. You should run the Reporting Database Synchronization job and then runyour report generation jobs.
The report generation job may send an email to selected users when the report is ready. Reportnotification must be implemented as a part of the reporting job workflow. The report notificationhas SMTP requirements.
Each schedule report wizard has a different sequence of panels. The panels that you completedepend on the business logic of the report.
Note: As a prerequisite for the CCS System Auditing report, you must enable auditing fromthe Settings > Application Settings > System Configuration.
See “Running a job now” on page 328.
See “Viewing a report” on page 355.
349Viewing Reports and Dashboards in Control Compliance SuiteWorking with reports

To schedule a report
1 Hover over the Reports menu, click Report Templates. In the Report Templates view,click Predefined. In the Report Templates grid, select a report template.
2 Right-click and select Schedule Report.
The wizard that is associated with that report is launched.
3 Complete the wizard to create the report generation job.
4 You can monitor the status in the Jobs view.
Copying a report templateYou can copy a report template to a user-defined folder. If the report template supportscustomization, you can customize a predefined report template or a user-defined reporttemplate.
See “Working with reports ” on page 348.
See “Customizing a report template” on page 351.
To copy a report template
1 Hover over the Reports menu, click Report Templates. In the Report Templates view,click Predefined.
2 In the Report Templates grid, select a template.
3 Right-click the report template and select Copy.
4 Navigate to a user-defined folder.
5 Right-click in the table panel, and select Paste to add the template to the folder.
Customizing a report in report viewerYou can customize certain reports in the My Reports view in Reporting . You can find whichreports support customization in the Predefined report and dashboard descriptions section.Every report does not support customization. Using the viewer, you may be able to interactwith the report by drilling down into charts and table summaries.
When a report is customized in the report viewer, a report is not generated. The selected reportis updated with the customized settings. This process is known as Post Customization. If youwant to save the settings that you have customized, you must export the report. If you closeand relaunch the report, the customized settings are not saved.
To customize a report in report viewer
1 Hover over the Reports menu, click My Reports.
2 In the My Reports view, select a report.
350Viewing Reports and Dashboards in Control Compliance SuiteWorking with reports

3 Right-click and select View.
4 In the report viewer, click Customize.
5 In the Specify Report Title, Description, and Logo page, provide a name for the report.
You can add a company name and logo, if they are available in the Settings > Generalview.
6 In the Specify Report Content page, you select the fields for the report. Click Add toadd fields.
7 In the Add Fields message box, select a maximum of 10 fields to add to the report.
8 Click OK.
9 Click Next
In the Specify Grouping of Information page, and then select the groups that shouldbe displayed.
10 In the Summary page, click Finish.
Customizing a report templateYou can customize a report in the user-defined folder or predefined folder. Only certain reporttemplates support customization.
Based on your permission level, you can customize the following report templates in thepredefined folder:
■ Asset Evaluation Result Change
■ Compliance by Technical Check
■ Assets at Highest Risk
■ Asset Exceptions Status
■ Asset Risk Summary
■ Compliance by Asset
■ CCS System Auditing
■ Asset Group Compliance
■ Top Failed Technical Checks
To customize a report template
1 Hover over the Reports menu, click Report Templates. In the Report Templates view,click Predefined. In the Report Templates grid, select a report template.
2 Right-click and select Customize.
351Viewing Reports and Dashboards in Control Compliance SuiteWorking with reports

3 In the Specify Report Title, Company Name, and Logo panel, provide a report title forthe report. Click Next.
You can add a company name and logo, if they are available in the Settings > Generalview.
4 In the Specify Report Content panel, you can add or remove the fields from the report.You can reorder the fields.
5 Click Add Fields to add fields to the report.
The report template must support the feature.
6 In the Add Fields dialog box, select the fields. Click OK.
You can add a maximum of 10 fields.
7 Click Next.
8 In the Specify Report Group By Information panel, select the fields that are used togroup the displayed results. Click Next.
9 In the Select the Location for the Saved Report panel, navigate to the folder where youwant to save the report. Click Next.
10 In the Summary panel, click Finish.
Editing a report generation jobYou can edit a report generation job in the Job view. The job can have only one scheduledrun in a 24 hour period. Any changes to the schedule overwrite the existing schedule. If youselect the Run now option, the option does not affect the scheduled job run. By default, theschedules begin on the current date and the current time.
The Report type determines which steps are available.
To edit a report generation job
1 Hover over the Jobs menu and click Jobs. Select a report generation job from the .
2 Select a report generation job, right-click and select Edit job. The wizard that is associatedwith that report is launched.
3 Complete the wizard to edit the report generation job.
See “Scheduling a report ” on page 349.
Exporting a reportAfter a report generation job run has completed, you can export a report.
You can export the report in the following formats:
352Viewing Reports and Dashboards in Control Compliance SuiteWorking with reports

.rptCrystal Reports
.pdfAdobe Reader
.xlsMicrosoft Excel 97 - 2003
.xlsMicrosoft Excel 97 - 2003 Data-Only
.docMicrosoft Word 97 - 2003
.rtfMicrosoft Word 97 - 2003 Editable
.rtfRich Text
.xmlXML
See “Viewing a report” on page 355.
See “Printing a report” on page 354.
See “About the My Reports view” on page 345.
To export a report
1 Hover over the Reports menu and click My Reports.
2 Select a report, right-click and select View.
3 In the report viewer, click the Export Report icon.
4 In the Export Report dialog box, browse to a folder, if needed.
5 Select a format, if needed.
6 Click Save.
Exporting a report templateYou can export a report template to an RPT file. You can open the file in Crystal Reports 2010to modify the file. You can export either user-defined templates or predefined templates.
An installation of the Crystal Reports 2016 is required to view the exported file. Crystal Reports2016 is not a component of the Symantec Control Compliance Suite installation.
To export a report template
1 Hover over the Reports menu and click Report Templates.
2 Select a report template, right-click and select Export Report Template.
3 In the Save As dialog box, select the destination and provide a file name.
4 Click Save.
See “About creating user-defined templates” on page 340.
353Viewing Reports and Dashboards in Control Compliance SuiteWorking with reports

Moving a report templateYou can move a user-defined report template from one location to another location. You canmove a user-defined template from one user-defined folder to another user-defined folder.
To move a report template
1 In the table pane, right-click a report template.
2 Hover over the Reports menu and click Report Templates.
3 Select a report template, right-click and selectMove. In theMove Report Template dialogbox, select the destination folder.
4 Click OK.
5 In the Reporting message box, click OK.
See “About creating user-defined templates” on page 340.
Printing a reportYou print a report in View My Report - Reporting dialog.
To print a report
1 Hover over the Reports menu and click My Reports.
2 Select a report in the grid pane, right-click and select View.
3 In the report viewer, click the Print Report icon.
4 In the Print dialog, select the options and click OK.
See “Viewing a report” on page 355.
See “Refreshing a report” on page 354.
See “About the My Reports view” on page 345.
Refreshing a reportYou refresh a report in the report viewer. The report must support the refresh option.
To refresh a report
1 Hover over the Reports menu and click Report Templates.
2 Select a report, right-click and select View.
3 In the report viewer, click Refresh.
4 In the Enter Parameter Values dialog box, provide the required information.
5 Select OK.
354Viewing Reports and Dashboards in Control Compliance SuiteWorking with reports

See “Viewing a report” on page 355.
See “Printing a report” on page 354.
See “About the My Reports view” on page 345.
Removing a reportYou can remove a report from the My Reports view.
Members of the CCS Administrators role cannot remove a report. If you are assigned as aviewer for the report, you can remove the report from the My Reports view.
To remove a report
1 Hover over the Reports menu and click My Reports.
2 In the grid pane of My Reports, select a report, right-click and select Remove.
3 In the Confirm message box, click Yes.
See “Working with reports ” on page 348.
Viewing a reportAfter a successful report generation job run, the report is listed in My Reports view. The resultof a report may vary based on your permission level.
You must synchronize data in the reporting database by running the sync report job beforeyou run the report. The sync report job is in the Jobs > Monitor view.
The report process takes several minutes to generate a view if the selected report has largenumbers of the following:
■ Assets
■ Checks
■ Policies
You must have sufficient disk space available in the user temp folder on the computer thatruns the CCS console in the following conditions:
■ You select a report that has a large number of assets, checks, or policies
■ You select multiple reports simultaneously
See “Working with reports ” on page 348.
See “About the My Reports view” on page 345.
355Viewing Reports and Dashboards in Control Compliance SuiteWorking with reports

To view a report
1 Hover over the Reports menu and click My Reports.
2 Select a report in the grid pane, right-click and select View.
The selected report opens in the viewer.
Working with dashboardsYou can do the following with dashboards:
■ Create a dashboard.See “Creating a dashboard” on page 356.
■ Add a panel to a dashboard.See “Adding a panel to a dashboard” on page 357.
■ Change the setting of the dashboard refresh interval.See “Setting a dashboard refresh interval ” on page 358.
■ Apply filters to a dashboard.See “Applying filters to a dashboard” on page 358.
■ Edit a dashboard.See “Editing a dashboard” on page 359.
■ Print a dashboard.See “Printing a dashboard” on page 360.
■ Publish a dashboard.See “Publishing a dashboard” on page 360.
■ Emailing a dashboard URL.See “Emailing a dashboard URL” on page 361.
■ Delete a dashboard.See “Deleting a dashboard” on page 361.
Creating a dashboardThe following are some important points when creating a dashboard:
■ You create a dashboard in the Web Console.
■ The created dashboard must have a unique name.
■ The created dashboard is listed under the category you select while creating the dashboard.
■ The new dashboard in the list has the Private icon next to it.
356Viewing Reports and Dashboards in Control Compliance SuiteWorking with dashboards

■ A dashboard contains at least one panel.
■ The dashboard can have a mix of Published Panels and Private Panels.
■ You can modify the dashboard's layout to emphasize the results.
■ You can choose to Preview Panel to view the dashboard results.
■ A CCS Administrator or the dashboard creator can access a private dashboard.
■ Publish the private dashboard to let other users view the content. Other users must havethe appropriate permissions to view the information.
To create a dashboard
1 Go to theWeb Console home page using the following URL address:
http://<servername>/CCS_Web
2 In theWeb console > Dashboards > click the Create a new Dashboard icon in theDashboard header.
3 In the Create Dashboard page enter a unique name in the Name field.
4 Select a category from the Category dropdown.
You can add a new category by clicking the Add Category icon. Enter the new categoryname and click Create. Click Cancel to close the Add Category popup.
5 From the sidebar, select a panel from the Published Panels, Private Panels, or RecentPanels categories. Drag and drop the panel in the dashboard layout.
6 You can move and resize the panel in the dashboard
7 To remove a panel from the dashboard click the Remove icon on the panel.
8 Repeat step 5 until you have selected all of the panels for the dashboard.
9 Review the layout of the dashboard. Use Preview Panel to see real time information inthe panels.
10 Click Save. Click Cancel if you do not want to create the dashboard.
See “Editing a dashboard” on page 359.
See “Publishing a dashboard” on page 360.
See “Creating a panel” on page 362.
Adding a panel to a dashboardYou can add panels to a user-defined dashboard. You can add private and published panelsto a dashboard.
357Viewing Reports and Dashboards in Control Compliance SuiteWorking with dashboards

To add a panel to a dashboard
1 Go to theWeb Console home page using the following URL address:
http://<servername>/CCS_Web
2 In theWebConsole >Dashboards >Dashboards tab > select a user-defined dashboard.
3 Click the Edit the dashboard icon on the Dashboard header.
4 Select a panel from the sidebar and then drag it onto the dashboard layout.
5 Click Save when you have finished.
See “Creating a dashboard” on page 356.
See “Editing a dashboard” on page 359.
Setting a dashboard refresh intervalYou do not see any changes that are made to the dashboard in real time. In order to view anyupdates to the dashboard you need to refresh the dashboard.
The following are some important points when you change the dashboards refresh interval:
■ The interval is measured in minutes.
■ You can change the interval for the current dashboard or set the interval for all yourdashboards.
■ You must use an integer.
To set the dashboard refresh interval
1 Go to theWeb Console home page using the following URL address:
http://<servername>/CCS_Web
2 In theWeb Console > Dashboards > Dashboards view, select a dashboard.
3 From the dashboard header click the Refresh icon on the far right/
4 In the Set Dashboard Refresh Interval dialog box, set the interval in minutes.
5 Click Use this refresh interval for all of Dashboards, if necessary.
6 Click Apply. Click Cancel if you do not want to set the interval.
Applying filters to a dashboardDashboard filters are the combination of all the filters of the panels in the dashboard. The filtersrefine the information displayed in the panel of the dashboard.
For example, you can apply a filter for the following:
■ To show the information in a specific time range.
358Viewing Reports and Dashboards in Control Compliance SuiteWorking with dashboards

■ To display the information from only one location.
■ To display the information from a specific division of the organization.
To apply filters to a dashboard
1 Go to theWeb Console home page using the following URL address:
http://<servername>/CCS_Web
2 InWeb Console > Dashboards > Dashboards sidebar > select a dashboard.
3 Click the Filter icon at the far right of the dashboard header.
4 In Select Filters - <browser name> dialog box, select an available filter.
5 Click Apply.
Editing a dashboardIn the Web Console you can edit a dashboard that you have created.
Note:You cannot edit a predefined dashboard. In order for you to edit a predefined dashboardyou make a copy and then edit the copy.
Some important points before editing a dashboard:
■ You can edit a published dashboard or panel you created.
■ The CCS Administrator or dashboard creator can edit a private dashboard.
The following list shows what you can edit in a dashboard:
■ Change the name of the dashboard.
■ Change the category of the dashboard.
■ You can add a new category by clicking the Add Category icon.
■ Drag a panel from the sidebar.
■ Change the layout.
■ Click the red "X" in the panel header to remove a panel.
To edit a dashboard
1 Go to theWeb Console home page using the following URL address:
http://<servername>/CCS_Web
2 In theWeb Console > Dashboards > Dashboards sidebar > select a dashboard
3 Click the Edit the Dashboard icon in the Dashboard header.
359Viewing Reports and Dashboards in Control Compliance SuiteWorking with dashboards

4 In the Edit Dashboard page make the changes.
5 Review the layout of the dashboard. Click Preview Panel to see real time information inthe panels.
6 Click Save and continue editing the dashboard. In the Save Dashboard message, clickOK.
7 Click Close when you finish editing the dashboard. Modifications made to the dashboardare not saved if you close the Edit Dashboard page. Click Cancel if you do not want toedit the dashboard.
Printing a dashboardWith the appropriate permissions, you can print either a dashboard. You can select a dashboardor print the home page.
To print a dashboard
1 Go to theWeb Console home page using the following URL address:
http://<servername>/CCS_Web
2 InWeb Console > Dashboards > select the Dashboards tab in the sidebar
3 You can select a dashboard from the All, My Private, My Published, or All Published filter.
4 Click Print in the Web console header section.
Publishing a dashboardPublishing a dashboard allows other users to view your dashboard. In order to publish yourdashboard you must either be the CCS Administrator or dashboard creator.
Some points to consider before publishing your dashboard:
■ It should contain at least one published panel.
■ It should contain only published panels.
If you choose to publish a dashboard containing private panels then you can publish the panelsalong with the dashboard. If you choose not to publish the panels, then you cannot publishthe dashboard.
To publish a dashboard
1 InWeb Console > Dashboards > Dashboards sidebar > select the My Private filter inthe sidebar.
2 Select the dashboard and then click the Publish the Dashboard icon in the Dashboardsheader.
360Viewing Reports and Dashboards in Control Compliance SuiteWorking with dashboards

3 If there are any private panels in the dashboard then Publish Dashboard message boxwill list which panels are unpublished.
4 In the Publish Dashboard confirmation message, click Yes.
5 In the Publish Dashboard information message, click OK.
Emailing a dashboard URLYou can email the dashboard URL to another user. When you select a dashboard for email,your email editor opens a blank email with the dashboard URL in the body of the email. Therecipient can see any assets that they have permissions for.
To email a dashboard URL
1 Go to theWeb Console home page using the following URL address:
http://<servername>/CCS_Web
2 In theWeb Console > Dashboards > Dashboards sidebar > select the dashboard.
3 From the dashboard header click the Email Dashboard icon.
4 Use the email editor to complete the message.
Deleting a dashboardYou can delete any private or published dashboard that you have created. When you deletethe dashboard the panels within the dashboard remain available. You cannot retrieve a deleteddashboard.
To delete a dashboard
1 In theWeb Console > Dashboards > Dashboards sidebar > select a dashboard.
2 Click the Delete the Dashboard icon in the Dashboard header.
3 In the Delete Dashboard message box, click Yes.
Changing the default Dashboard pageYou can change the default Dashboard page by taking the following steps:
1 Check Do not show this page again. The Default Dashboard dropdown will appear.
2 From the Default Dashboard dropdown select the dashboard you want as the default.
3 Click Apply to set the page as the default dashboard.
361Viewing Reports and Dashboards in Control Compliance SuiteWorking with dashboards

Working with panelsYou can do the following with dashboards:
■ Create a panel.See “Creating a panel” on page 362.
■ Edit a panel.See “Editing a panel” on page 367.
■ Add a panel to a dashboard.See “Adding a panel to a dashboard” on page 357.
■ Publish a panel.See “Publishing a panel” on page 369.
■ Apply filters to a panel in a dashboard.See “Applying filters to a panel in a dashboard” on page 371.
■ Maximizing a panel in a dashboard.See “Maximizing a panel in a dashboard” on page 372.
■ Viewing properties of a panel.See “Viewing properties of a panel” on page 367.
■ Extracting a panel to Excel.See “Extracting a panel to Excel” on page 370.
■ Delete a panel.See “Deleting a panel” on page 371.
Creating a panelThe following are some important points when creating a panel:
■ You create a panel in the Web Console.
■ The created panel should have a unique name.
■ The created panel is listed under the category you select while creating the panel.
■ The new panel in the list has the Private icon next to it.
■ Only the CCS Administrator or the panel creator can view a private panel.
■ Publish the private panel to let other users to view the content. Other users must have theappropriate permissions to view the information.
■ You can select to link a drilldown panel.For more information on drilldown and drill through:
362Viewing Reports and Dashboards in Control Compliance SuiteWorking with panels

Note: Linking a drilldown panel is applicable to the Risk panels.
When creating a trend panel, you must select for Dimension (X-axis) one of the following:
■ Trend by Week
■ Trend by Month
■ Trend by Quarter
■ Trend by Year
If you do not select a date, the drilldown grid will fail to load when you select the Grid tab.When the dimension is set to a date, the Grid tab is disabled.
To create a panel
1 In theWeb Console > Dashboards > Panels page > select the Create a Panel icon inthe Panels header.
2 In the General tab select the appropriate options and fill in the mandatory fields.
The selection of the appropriate options and filling in the mandatory fields on the Grid tabenables the fields in the other tabs. The fields in the Display, Grid, and the Actions tabsare automatically populated based on the choices made in the General tab.
See “Examples of panel options” on page 372.
■ In the Display tab select the appropriate options and fill in the mandatory fields.
■ In the Grid tab select the appropriate options and fill in the mandatory fields.
■ In the Actions tab select the appropriate options and fill in the mandatory fields.
3 ClickOK. Click Apply save your selections and continue creating the panel. Click Cancelif you do not want to create the panel.
Note: If you have created a new standard, asset, or policy, you should run the ReportingDatabase Synchronization job in the Control Compliance Suite CCS Console. The job is inthe Monitor > Jobs view. The data may not display correctly if the job has not been run.
About chart typesControl Compliance Suite supports many kinds of charts to help you display your informationin a meaningful way for your audience. You can easily select the type of chart that you wantto use when you create a panel.
The chart types are as the following:
363Viewing Reports and Dashboards in Control Compliance SuiteWorking with panels

Table 8-1 Chart type descriptions
Number of seriesNumber of Y values perpoint
DescriptionName
OneOneDisplays how the proportions of the data that isdisplayed as pie-shaped pieces, contribute to the dataas a whole.
Pie
OneOneSimilar to the pie chart, except that the chart has ahole in the center.
Doughnut
One or moreOneShows a sequence of columns that compare valuesacross categories.
Column
One or more
Multiple series arestacked.
OneDisplays multiple series of data as stacked columns.
The stacked column chart is useful when youmeasuremultiple series as a proportion against time.
Stackedcolumn
One or moreOneA column chart that uses cylinder-shape items todisplay data.
The chart type does not display any additional data,but the shape may display your data better visually.
Cylinder
Two or moreOneDisplays multiple series of data as stackedcylinder-shaped items.
Stackedcylinder
One or moreOneDisplays the comparisons among individual items.Categories are organized horizontally while the valuesthat are measured are displayed vertically. Thisorganization may add emphasis to comparing valuesand less emphasis on time.
Bar
One or more
Multiple series arestacked.
OneDisplays multiple series of data as stacked bars.Stackedbar
One or moreOneDisplays the trends in data with the passing of time.Line
One or moreOneSimilar to a line chart that plots a fitted curve througheach data point in a series.
Spline
One or moreOneDisplays the degree of change over time. The chartalso displays the relationship of the parts to a whole.
Area
One or moreOneAn area chart that plots a fitted curve through eachdata point in a series.
Splinearea
364Viewing Reports and Dashboards in Control Compliance SuiteWorking with panels

Table 8-1 Chart type descriptions (continued)
Number of seriesNumber of Y values perpoint
DescriptionName
OneOne or Two (“Actual” and“Target”). “Target” isoptional.
This chart displays gauge chart
For example, Y-axis is Risk Score and the X-axis isa Risk Objective. The gauge shows what the value ofthe Risk Score is for a selected Risk Objective.
Gauge
OneTwo (“Actual” and“Target”).
The chart contains a bar graph, where the thresholdvalue is represented by red dot, and the actual valueis represented by a blue triangle within the bar.
Pareto
TwoOneThe chart displays a graphical representation of datawhere the values taken by a variable in atwo-dimensional table are represented as colors.
Heatmap
Not yet supportedNot yet supportedThe chart displays each plotted entity as defined interms of three distinct numeric parameters.
Bubble
NANAThe chart displays a list of the alerts and notifications.Alert
The 2D charts can have one of the following options:
Table 8-2 Options for the 2D charts
OptionsName
ConcavePie
ConcaveDoughnut
ConvexPie
ConvexDoughnut
DefaultPie
DefaultDoughnut
EmbossColumn
EmbossStacked Column
DefaultColumn
DefaultStacked Column
EmbossBar
365Viewing Reports and Dashboards in Control Compliance SuiteWorking with panels

Table 8-2 Options for the 2D charts (continued)
OptionsName
EmbossStacked Bar
DefaultBar
DefaultStacked Bar
DefaultGauge
DefaultPareto
DefaultHeatmap
DefaultAlert
The 3D charts can have one of the following options:
Table 8-3 Options for the 3D charts
OptionsName
EmbossColumn
EmbossStacked Column
DefaultColumn
DefaultStacked Column
EmbossBar
EmbossStacked Bar
DefaultBar
DefaultStacked Bar
DefaultGauge
DefaultPareto
DefaultHeatmap
DefaultAlert
366Viewing Reports and Dashboards in Control Compliance SuiteWorking with panels

Viewing properties of a panelYou can view the properties of a panel. The properties of the panel lets you know what arethe general properties, the display properties, and the grid properties.
To view a panel summary
1 Go to theWeb Console home page using the following URL address:
http://<servername>/CCS_Web
2 InWeb Console > Dashboards > Panel sidebar > select a panel.
You can also select a panel from a dashboard.
3 Click the Properties icon at the top right of the panel header.
4 Once you are done reviewing the panel property information click Close at the bottom ofthe browser window.
See “Applying filters to a panel in a dashboard” on page 371.
See “Maximizing a panel in a dashboard” on page 372.
See “Creating a panel” on page 362.
Editing a panelIn the Web Console you edit a panel that you have created.
Note:You cannot edit a predefined panel. In order for you to edit a predefined panel you makea copy and then edit the copy.
Some important points before editing a panel:
■ You can edit a published panel or a panel you have created.
■ The CCS Administrator or panel creator can edit a private panel.
The following list shows what you can edit in a panel:
■ You can change the name of the panel.
■ You can change the category of the panel.
■ You can change the panel options.
■ You can change the measure or dimension.
■ You can add additional dimensions.
■ If the panel contains two dimensions you can remove the second dimension.
■ You can change the Summary display type of the panel.
367Viewing Reports and Dashboards in Control Compliance SuiteWorking with panels

■ You can change the chart type.
When editing a trend panel, you must select for Dimension (X-axis) one of the following:
■ Trend by Week
■ Trend by Month
■ Trend by Quarter
■ Trend by Year
If you do not select a date, the drill through grid will fail to load when you select the Grid tab.When the dimension is set to a date, the Grid tab is disabled.
To edit a panel
1 In theWeb Console > Dashboards > Panels sidebar > select a panel.
2 Click Edit the Panel icon in the Panel header.
3 In the Edit Panel page make the changes.
4 Click OK to save and close the Edit Panel page. Click Apply to save your modificationsand continue editing the panel. Click Cancel if you do not want to edit the panel.
See “Creating a panel” on page 362.
See “Publishing a panel” on page 369.
See “Deleting a panel” on page 371.
See “About chart types” on page 363.
Copying a panelYou can make a copy of any panel. The copied panel is added to the same category. It is aprivate panel.
The copied panel has the following text at the beginning of the panel name:
Copy of <panel name>
If you make a copy of the same panel then the following is added to the beginning of the name:
Copy (X) of <panel name>
The (X) is the number of times that the panel has been copied.
To copy a panel
1 Go to theWeb Console home page using the following URL address:
http://<servername>/CCS_Web
2 InWeb Console > Dashboards > Panels sidebar > select a panel.
368Viewing Reports and Dashboards in Control Compliance SuiteWorking with panels

3 Click Copy the panel.
4 In the Copy Panel message, click Yes.
5 In the Copy Panel confirmation message, click OK.
See “Editing a panel” on page 367.
Printing a panelWith the appropriate permissions, you can print a panel. You can select a panel, or print thehome page.
To print a Dashboard or Panel
1 Go to theWeb Console home page using the following URL address:
http://<servername>/CCS_Web
2 InWeb Console > Dashboards > select the Panels tab in the sidebar
3 You can select a panel under the All, My Private, My Published, or All Published filter.
4 Click Print in the Web console header section.
See “Creating a dashboard” on page 356.
See “Creating a panel” on page 362.
See “Working with dashboards” on page 356.
Publishing a panelPublishing a panel allows other users to view your panel. In order to publish your panel youmust either be the CCS Administrator or the panel creator.
To publish a panel
1 Go to theWeb Console home page using the following URL address:
http://<servername>/CCS_Web
2 InWeb Console > Dashboards > Panels sidebar > select the panel.
3 Select a panel and then click Publish a Panel in the Dashboard header.
4 In the Publish Dashboard confirmation message, click Yes.
5 In the Publish Dashboard information message, click OK.
See “Creating a panel” on page 362.
See “Editing a dashboard” on page 359.
See “Deleting a panel” on page 371.
369Viewing Reports and Dashboards in Control Compliance SuiteWorking with panels

Extracting a panel to ExcelIf the panel supports it, you can extract the drill through information from a dashboard to anExcel file. Panels that display trends do not support a drill through page.
See “Editing a panel” on page 367.
See “Publishing a dashboard” on page 360.
See “Adding a panel to a dashboard” on page 357.
To extract a panel to Excel
1 Go to theWeb Console home page using the following URL address:
http://<servername>/CCS_Web
2 In theWeb Console > Dashboards > Panels sidebar > select a panel in the sidebar.
3 Click anywhere on the panel to open the drill through page.
4 Click Export to Excel.
5 Choose to open the file, save the file, or cancel the export
Unpublishing a panelA published panel can be unpublished to make it unavailable to other users. Unpublishing apanel can be done by either a CCS Administrator or the panel creator. Unpublishing a panelhas the following effects:
■ The panel moves from the My Published filter to the My Private filter.
■ The icon next to the panel in the sidebar changes from the Public icon to the Private icon.
■ Only a CCS Administrator or the panel creator can view the contents.
Note: You cannot unpublish predefined panels.
To unpublish a panel
1 InWeb Console > Dashboards > Panels sidebar > select a panel in the Panels >Published sidebar.
2 Click Unpublish the panel in the Panels sidebar header section.
3 In the Unpublish Panel confirmation message, click Yes.
4 In the Unpublish Panel information message, click OK.
See “Publishing a panel” on page 369.
370Viewing Reports and Dashboards in Control Compliance SuiteWorking with panels

Deleting a panelYou can delete any private or published panel that you have created. You cannot retrieve adeleted panel.
If the deleted panel is part of a dashboard, you must remove the panel from the dashboard.If the panel is not removed from the dashboard then you see the following:
■ The panel's title is changed "Untitled".
■ The content of the panel is replaced with a message stating that the panel has been deleted.
To delete a panel
1 InWeb Console > Dashboards > Panels sidebar > select the panel.
2 Click Delete the Panel icon in the Panel header.
3 In the Delete Panel message box, click Yes.
See “Creating a panel” on page 362.
See “Editing a panel” on page 367.
Applying filters to a panel in a dashboardPanel filters refine the types of data that you display in your panel. Filters help you find andfocus on specific information. For example, you can apply a filter to show the data from oneparticular time period to another time period. You can apply a filter to display data from onlyone location or division of the organization.
After you have applied a filter, the filter is listed beneath the panel header. If you do not seethe listing, click the arrow icon on the far right on the panel.
To apply filters to a panel
1 Go to theWeb Console home page using the following URL address:
http://<servername>/CCS_Web
2 InWeb Console > Dashboards > Dashboards view, select a dashboard.
3 Select a panel and then click the Filter icon at the far right of the panel header.
4 In Select Filters - Webpage Dialog dialog box, select an available filter.
5 Click Apply.
6 Click Close.
See “Creating a panel” on page 362.
See “Editing a dashboard” on page 359.
371Viewing Reports and Dashboards in Control Compliance SuiteWorking with panels

Maximizing a panel in a dashboardYou can maximize any panel in a dashboard to better view the information in the panel.
Some important points when you maximize a panel in a dashboard:
■ The panel temporarily expands to fill the dashboard.
■ Other panels in the dashboard are hidden while the selected panel is maximized.
■ Upon restoring the panel to the design size the other panels will be seen in the dashboard.
To resize a panel in a dashboard
1 Go to theWeb Console home page using the following URL address:
http://<servername>/CCS_Web
2 In theWeb Console > Dashboards > Dashboards sidebar > select a dashboard.
3 Select a panel and then click the Maximize icon on the panel header.
4 Click the Restore icon on the panel header to restore the panel to the design size.
See “Applying filters to a panel in a dashboard” on page 371.
See “Viewing properties of a panel” on page 367.
See “Creating a panel” on page 362.
Examples of panel optionsThe following procedure demonstrates how choose options in the panel options to create apanel.
Choosing the panel options to create a panel
1 Go to theWeb Console home page using the following URL address:
http://<servername>/CCS_Web
2 In theWeb Console > Dashboards.
3 Select New Panel from the Dashboard Taskbar.
4 Choose Check from the Area of interest.
5 By default, the Summary display type is set to Chart. You can choose another option.
6 Choose Result Summary from the Measure (Y axis).
7 By default, the Show measure as automatically populates with Sum.
8 Choose Result Name and from the Dimension (X axis).
9 Click the Add Dimension icon and choose Standard name from the new field.
10 Select the Standard name in the Axis label.
372Viewing Reports and Dashboards in Control Compliance SuiteWorking with panels

11 In the Panel name enter Check Status for Standards as the panel name.
12 From the Filters select the following:
■ Attribute = Results Name.
■ Operator = is equal to.
■ Values = Check Asset Fail, Check Asset Not Applicable, Check Asset Pass.Press Control to select multiple individual values.
■ Click the Addtion filter icon.
■ Attribute = Results Summary.
■ Operator = is not equal to.
■ Values = 0.
Note: The values chosen in theGeneral tab enable the Display andGrid tabs. The fieldsin the Display and Grid tabs populate automatically.
13 Under the Display tab the following fields are automatically populated:
■ Selected Chart Type = 2D Pie Chart. Change this to the 2D Column Chart.
■ X axis title = Standard name.
■ Y axis title = Count of Checks per Asset.
14 Under the Grid tab the select the following for the Column names:
■ Show in grid checked for Check Type and Check Name.
■ Use as filter = Check Type and Standard Name.
15 Click Apply to apply your selections. Click OK to create the panel.
The following are examples of a Standards panel, a Policies panel, and a third-party panelwith the options selected. Each of the examples demonstrates the choices that you can maketo create your own dashboards.
An example of a Standards panel is Check Status for Standards in the Panels view.
Table 8-4 Standards panel option selections
SelectionPropertyTab
Check - Standard compliance managementArea of InterestGeneral Properties
Result SummaryMeasureGeneral Properties
SumShow measure asGeneral Properties
373Viewing Reports and Dashboards in Control Compliance SuiteWorking with panels

Table 8-4 Standards panel option selections (continued)
SelectionPropertyTab
Result name
Standard name
DimensionGeneral Properties
Standard nameAxis labelGeneral Properties
NoShow Top [X] matchingresults
General Properties
ChartSummary display typeGeneral Properties
Check Status for StandardsPanel nameGeneral Properties
Attribute = Summary result name
Operator = is equal to
Values = Check Asset Fail, Check Asset Not Applicable,Check Asset Pass
Attribute = Results Summary
Operator = is not equal to
Values = 0
FiltersGeneral Properties
2D Column ChartSelected Chart TypeDisplay Properties
Standard nameX axis titleDisplay Properties
Count of Checks per AssetY axis titleDisplay Properties
Show in grid checked for Check Type, Check Name
Use as filter = Check Type, Standard Name
Column namesGrid Properties
An example of a Polices panel is Control Status for Policies in the Panels view.
Table 8-5 Policies panel option selections
SelectionPropertyTab
Policy Control Compliance for Mandate and Policy compliancemanagement
Area of InterestGeneral Properties
Asset Count for Control StatusMeasureGeneral Properties
SumShow measure asGeneral Properties
374Viewing Reports and Dashboards in Control Compliance SuiteWorking with panels

Table 8-5 Policies panel option selections (continued)
SelectionPropertyTab
Policy Name
Result Name
DimensionGeneral Properties
Policy NameAxis labelGeneral Properties
NoneShow Top [X] matchingresults
General Properties
ChartSummary display typeGeneral Properties
Control Status for PoliciesPanel nameGeneral Properties
Attribute = Result name
Operator = is equal to
Values = Policy Control Asset Error, Policy Control Asset Fail,Policy Control Asset Not Applicable
SubjectGeneral Properties
2D Stacked Column ChartSelected Chart TypeDisplay Properties
Policy NameHorizontal axis titleDisplay Properties
InstancesVertical axis titleDisplay Properties
Show in grid = Policy Tag Name, Control Name, ControlType
Use as filter = Policy Name, Policy Tag Name
Column namesGrid Properties
An example of a third-party panel is Response to Data Loss Prevention Incidents in thePanels view.
Table 8-6 Third-party panel option selections
SelectionPropertyTab
DLP incident response for Data Loss PreventionArea of InterestGeneral Properties
DLP Action IDMeasureGeneral Properties
CountShow measure asGeneral Properties
DLP ActionDimensionGeneral Properties
N/A
Axis label is not visible if there is one dimension.
Axis labelGeneral Properties
375Viewing Reports and Dashboards in Control Compliance SuiteWorking with panels

Table 8-6 Third-party panel option selections (continued)
SelectionPropertyTab
NoneShow Top [X] matchingresults
General Properties
ChartSummary display typeGeneral Properties
Response to Data Loss Prevention IncidentsPanel nameGeneral Properties
NoneSubjectGeneral Properties
3D Pie ChartSelected Chart TypeDisplay Properties
Not applicableHorizontal axis titleDisplay Properties
Not applicableVertical axis titleDisplay Properties
Show in grid = Detection Date, Incident ID, Incident Type,Policy, Severity, Status
Use as filter = None
Column namesGrid Properties
See “Creating a panel” on page 362.
See “Working with dashboards” on page 356.
Working with tiered dashboardsDashboards are a visual analysis that provides a summary of your organization's compliance.Dashboards provide the capability to view the security posture and assessment trends at aglance. You can also drilldown through the hierarchy that represents your organization to seethe compliance percentage of each level.
You can also create the dashboards that contain roll-up data, which is a summary result ofthe standards' checks and the bv-Control query results. Dashboards consume the summarydata from the bv-Control XML export format and the evaluation results of the standards. Thedashboard jobs that are created from the roll-up data are known as tiered dashboards.
Note: Tiered dashboards do not summarize results of ESM message data for display.
In the My Dashboards view, you can view the dashboards. In the Monitor > Jobs view, youcan edit a dashboard update job.
■ Viewing a dashboardSee “Viewing a tiered dashboard” on page 378.
376Viewing Reports and Dashboards in Control Compliance SuiteWorking with tiered dashboards

■ Editing a dashboardSee “Editing a tiered dashboard” on page 382.
■ Importing a dashboardSee “Importing a tiered dashboard” on page 385.
■ Exporting a dashboardSee “Exporting a tiered dashboard” on page 385.
■ Renaming a dashboardSee “Renaming a tiered dashboard” on page 384.
Managing tiered dashboardsTiered dashboard is the hierarchical representation of roll-up data. The roll-up data is a summaryof the evaluation results of the Standards checks and the bv-Control query results. Hierarchyin tiered dashboards refers to the creation of sections and nodes, which are scopes representingeither a geographical location or a business unit. A tiered dashboard consumes the summarydata from the bv-Control reports that are in XML format and the Standards evaluation results.
You can configure multiple dashboards to define the hierarchy that logically represents yourorganization in different ways. For example, you can configure the dashboards that are basedon your corporate network topology, department structures, or geographical locations.
See “Viewing a tiered dashboard” on page 378.
See “Creating a tiered dashboard” on page 382.
See “Editing a tiered dashboard” on page 382.
Getting started with tiered dashboardsTiered dashboard collects data from either an evaluation result of the Standards module orfrom an export file of the bv-Control snap-in.
Before you create a tiered dashboard, you must have either of the following completed:
■ Evaluation results of assets that are evaluated against a standard
■ Query results of any bv-Control snap-in
All users of dashboards must be assigned a role before they can use the application
Use the following table to get you started quickly with dashboards:
Table 8-7
DescriptionTask
Assign appropriate roles and permission to the users of dashboards.
See “About roles and permissions in tiered dashboard” on page 386.
Assigning roles
377Viewing Reports and Dashboards in Control Compliance SuiteWorking with tiered dashboards

Table 8-7 (continued)
DescriptionTask
Do one of the following:
■ For bv-Control query results data that are exported to an XML file, you need to setup a data location where the file is stored. The data location must be a networkshare path of the computer from where the export file is accessed by the dashboard.
■ For the Standards module evaluation data, create and run a scheduled evaluationjob. Dashboard update jobs that are scheduled for evaluation nodes of standardsmodule evaluate the assets based on the selected standard at run time. Theevaluation results are used for data collection by the dashboard.
Collecting data
Create a new dashboard. When you create a dashboard you first configure the settingsfor the dashboard that define the evaluation criteria for the assessment.
See “Creating a tiered dashboard” on page 382.
Creating dashboard
Configuration settings for an evaluation node include selecting the following:
■ Select the evaluation results for the Standards Evaluation Results node or the exportfile for the bv-Control Query Results node.
■ Set the thresholds for the evaluation node.■ Schedule the collection of summary results for assessment.
See “Adding an evaluation node” on page 395.
Configuring an evaluationnode
After the data is collected and is available to the dashboard, you can begin to view,assess, and analyze the information.
See “Viewing a tiered dashboard” on page 378.
Assessing and analyzing
See “About trends configuration” on page 399.
See “Viewing the tiered dashboard reports” on page 402.
Viewing a tiered dashboardAll the tiered dashboards that you create are listed in theMy Dashboards view. You can viewthe status and details of the dashboard sections provided you have the requisite viewpermissions.
You must synchronize data in the reporting database by running the Reporting DatabaseSynchronization Job before you run the dashboard. The job is in the Jobs > Jobs view.
378Viewing Reports and Dashboards in Control Compliance SuiteWorking with tiered dashboards

To view a tiered dashboard
1 Hover over the Reports menu and click My Dashboards.
2 In the My Dashboards view, select a tiered dashboard from the list, right-click it, andselect View.
3 In the ViewDashboard- Reportingwindow, you can find the following tabs for the selectedtiered dashboard:
■ Status
■ Details
■ Evaluation ResultsThis tab is displayed only when you select a Standards Evaluation Results evaluationnode.
See “About the Status tab view” on page 379.
See “About the Details tab view” on page 403.
About the Status tab viewThe Status tab of the View Dashboard - Reporting window captures the essence of thesecurity assessment information. You can view the current roll-up of the security assessmentstatus in the graphical form for a specific dashboard.
The status of the evaluation node is automatically updated at the time the Standards moduleevaluation job completes its execution. The status is also updated when the bv-Control scheduleis completed.
The dashboard and the section status are also updated if the data collected crosses anythreshold values. The last evaluated date-time stamp is displayed for an evaluation node.
When you select a dashboard or an evaluation section on the left pane of the window, theStatus tab displays the following information:
■ Current Overall Status
■ Status Trend
■ Current Evaluations by Status
■ Evaluations Trend
When you select an evaluation node in the left-side pane of the window, the Status tab displaysthe following information:
■ Trend Window
■ Node Details
■ Data
379Viewing Reports and Dashboards in Control Compliance SuiteWorking with tiered dashboards

■ Custom Thresholds
■ Status Trend
■ Summary Result Trends
The various trends that are displayed in the Trend window are as follows:
■ All Data
■ Last Week
■ Last Month
■ Last Quarter
■ Last Year
■ Last 7 days
■ Last 30 days
■ Last 90 days
■ Last 365 days
■ This Week
■ This Month
■ This Quarter
■ This Year
■ Custom
The various time scale options and their descriptions are as follows:
■ Daily
■ Weekly
■ Monthly
■ Quarterly
■ Yearly
See “About the Details tab view” on page 403.
About the Evaluation Results tab viewThe Evaluation Results tab displays the evaluation results of a standard that is evaluated onan asset. The tab displays the details of the number of assets that are evaluated and theproperties of the checks that are executed on the assets. The tab also contains a graphicalrepresentation of the risk score, compliance score, and the result summary of the assets.
380Viewing Reports and Dashboards in Control Compliance SuiteWorking with tiered dashboards

The various fields of the tab and their descriptions are as follows:
Name of the standard that evaluated the asset.Standard Evaluated
Name of the asset.Asset Name
Date when data is collected from the assets for the selected standard.Data CollectionDate
Date when evaluation of the collected data for the selected standard is performed.Evaluation Date
Lets you select the properties of the checks to display at the bottom pane of theview.
You can right-click a check and select Export to export the check details to a file.
Click the column chooser icon to display the dialog box.
Column Chooser
About the Details tab viewThe Details tab displays the evaluation results of the Standards and the bv-Control queryresults. You can print or export the grid information to a file.
When you select a dashboard or an evaluation section on the left pane of the View Dashboard- Reporting window, the Details tab displays the following:
■ The roll-up of the evaluation results from all the nodes or sections in the dashboard orevaluation section.
■ The evaluation node name, hierarchical path, and the time when the evaluation node waslast updated.
■ The results that are grouped based on the security assessment status. You can regroupthe evaluation nodes based on the status or the type of evaluation node. You can drag thecolumns to group the evaluation nodes in the window.
When you select an evaluation node on the left pane of the window, the tab displays the assetsin the evaluation results. The predefined assigned attributes and values of the assets are alsodisplayed for the evaluation node. If you add new attributes to an asset, then the details of thenew fields are also listed for the evaluation node.
You can click on the column chooser icon to select or unselect the attribute columns.
Note: You can view the data of only those assets for which you have the requisite permission.
See “About the Status tab view” on page 379.
See “Viewing a tiered dashboard” on page 378.
381Viewing Reports and Dashboards in Control Compliance SuiteWorking with tiered dashboards

Creating a tiered dashboardA tiered dashboard can be created and listed in the Reports menu of the My Dashboardsworkspace. A tiered dashboard is executed as a tiered dashboard update job from the MyDashboards or from the Jobs > Jobs view of the console.
Note:Youmust synchronize data in the reporting database by running theReporting DatabaseSynchronization Job before you run the tiered dashboard update job. The job is in theMonitor> Jobs view.
To create a tiered dashboard
1 Hover over the Reports menu and click My Dashboards.
2 In the My Dashboards view, from the task bar click Manage Tiered Dashboards andselect Create Tiered Dashboard.
3 In the Specify Name and Description panel of the Create Tiered Dashboard wizard,enter the name and description and then click Next.
The Description is optional.
4 In the Create Dashboard Nodes panel, you can do the following and then click Next.
■ Create a section.
■ Create and edit node.
■ Add and manage a trustee.
■ Set up a notification for the dashboard.
■ Copy, paste, rename, and delete a dashboard.
5 In the Job Schedule panel, select an option of scheduling the dashboard job that youcreate and then click Next.
6 In the Job Notification panel, setup the notification for the success or failure of thescheduled dashboard job and then click Next.
7 In the Summary panel, review the details of the dashboard job that you create and thenclick Finish.
See “Editing a tiered dashboard” on page 382.
See “Configuring an email notification alert for tiered dashboards” on page 398.
Editing a tiered dashboardYou can edit a tiered dashboard from the My Dashboards view of the console.
382Viewing Reports and Dashboards in Control Compliance SuiteWorking with tiered dashboards

To edit a tiered dashboard
1 Hover over to the Reports menu and click My Dashboards.
2 In the My Dashboards view, do one of the following:
■ Right-click on the selected tiered dashboard and select Edit.
■ Click Manage Tiered Dashboards > Edit.
3 In the Edit Dashboard dialog box you can edit any of the following and then click OK.
■ Create and edit an evaluation node.
■ Add and manage a trustee.
■ Set up a notification for the dashboard.
■ Copy, paste, and delete a dashboard.
See “Creating a tiered dashboard” on page 382.
See “Viewing a tiered dashboard” on page 378.
Copying and pasting a tiered dashboardYou can create a copy of an existing tiered dashboard that is displayed in theMy Dashboardsview. When you copy and paste a dashboard, all the permissions assigned to the user arealso copied.
Note: On copying a tiered dashboard, the permissions stamped on the dashboard are alsocopied.
To copy a tiered dashboard
1 Hover over the Reports menu and click My Dashboards.
2 In the My Dashboards view select a tiered dashboard.
3 In the My Dashboards view, do one of the following:
■ Right-click on the selected tiered dashboard and select Copy.
■ Click Manage Tiered Dashboards > Copy
4 On the same My Dashboards view do one of the following to paste the copied dashboard:
■ Right-click on the workspace and select Paste Tiered Dashboard
■ Click Manage Tiered Dashboards > Paste Tiered Dashboard
See “Copying and pasting an evaluation section” on page 397.
See “Copying and pasting an evaluation node” on page 398.
383Viewing Reports and Dashboards in Control Compliance SuiteWorking with tiered dashboards

Renaming a tiered dashboardYou can change the current name of a tiered dashboard by renaming it in theMy Dashboardsview.
To rename a tiered dashboard
1 Hover over the Reports menu and click My Dashboards.
2 In the My Dashboards view, do one of the following:
■ Select a tiered dashboard to rename and click Rename
■ Click Manage Tiered Dashboards > Rename
3 In the Rename Dashboard dialog box, provide the new name.
See “Managing tiered dashboards” on page 377.
Editing a tiered dashboard job scheduleYou can edit the job schedule of a tiered dashboard from the My Dashboards view of theconsole. Initially, you can schedule the dashboard update job when creating it using theCreateTiered Dashboards wizard.
To edit a tiered dashboard job schedule
1 Hover over the Reports menu and click My Dashboards.
2 In the My Dashboards view, do one of the following:
■ Select a tiered dashboard and then click Edit Schedule
■ Click Manage Tiered Dashboards > Edit Schedule
3 In the Schedule Dashboard dialog box, edit the job schedule options, and then clickOK.
See “Creating a tiered dashboard” on page 382.
Editing a tiered dashboard job notificationYou can edit the job notification of a tiered dashboard from the My Dashboards view of theconsole. Initially, you can set the dashboard update job notification when creating it using theCreate Tiered Dashboards wizard. Control Compliance Suite sends an email notificationwhenever a dashboard job succeeds or fails.
To edit a tiered dashboard job notification
1 Hover over the Reports menu and click My Dashboards.
2 In the My Dashboards view, do one of the following:
■ Select a tiered dashboard and then click Edit Dashboard Job Notification
384Viewing Reports and Dashboards in Control Compliance SuiteWorking with tiered dashboards

■ Click Manage Tiered Dashboards > Edit Dashboard Job Notification
3 In the Job Notification dialog box, edit the job notification for the Success and the Failuretabs, and click OK.
See “Creating a tiered dashboard” on page 382.
Importing a tiered dashboardYou can import a tiered dashboard from an XML file into the My Dashboards view. The XMLfile must adhere to a specific schema. A new dashboard is created after you import an XMLfile provided that no dashboard of the same name already exists.
You can import multiple XML files to create multiple dashboards. An hour glass icon appearsduring the import operation of the selected dashboard. A status dialog box appears when theimport operation completes.
Note: Depending on the type of XML editor, the threshold operators, < or > might appear inthe exported XML file as < or >, respectively. You must retain the operators as, < or >in the XML file during dashboard import.
To import a tiered dashboard
1 Hover over the Reports menu and click My Dashboards.
2 In the My Dashboards view, do one of the following:
■ Right-click on the table pane and select Import Tiered Dashboard.
■ Click Manage Tiered Dashboards> Import Tiered Dashboard.
3 In the Select File to Import dialog box, select the xml file, and then click Open.
See “Exporting a tiered dashboard” on page 385.
Exporting a tiered dashboardYou can export a tiered dashboard to an XML file. You can use an XML editor to read and editthe file later. The exported dashboard XML file contains all the required and mandatoryinformation to recreate a dashboard. The XML file contains comments for each element foryou to edit the XML file. Youmust have the appropriate permissions to export specific evaluationsections of a dashboard.
An XML file is saved in the location that you select. An hour glass appears while the exportoperation is in progress. A status dialog box appears when the export operation completes.
385Viewing Reports and Dashboards in Control Compliance SuiteWorking with tiered dashboards

Note: Depending on the type of XML editor, the threshold operators, < or > might appear inthe exported XML file as, < or > respectively. You must retain the operators as < or >in the XML file during dashboard export.
The exported XML file contains the following information:
■ Dashboard attributes
■ Event notification
■ View permissions
■ Evaluation node and evaluation section attributes
To export a tiered dashboard
1 Hover over the Reports menu and click My Dashboards.
2 In the My Dashboards view, do one of the following:
■ Click Manage Tiered Dashboards > Export.
■ right-click a dashboard and select Export
3 Save the dashboard as an XML file when the File Save dialog box opens.
See “Importing a tiered dashboard” on page 385.
Editing a tiered dashboard update jobYou can edit a tiered dashboard update job from the Jobs > Jobs view.
To edit a tiered dashboard update job
1 Go to Jobs > Jobs view of the console.
2 In the Jobs view, right-click a dashboard update job and select Edit Job.
3 In the Edit Tiered Dashboards wizard, edit the properties of the job and reschedule it.
See “Creating a tiered dashboard” on page 382.
See “About Jobs” on page 303.
About roles and permissions in tiered dashboardControl Compliance Suite can restrict permission for any user or group to any specific networkdata. This restriction of permission is leveraged in tiered dashboards through roles that aredefined with permission to perform specific tasks.
The following default roles are defined for the tiered dashboard:
■ Report Result Viewer
386Viewing Reports and Dashboards in Control Compliance SuiteWorking with tiered dashboards

■ Reporting Administrator
■ CCS Administrator
Using the role-based access control feature, permissions can be given at the dashboard levelor at the section level of a dashboard.
By default, view permissions over dashboards and sections are assigned to all users whobelong to any of the default roles. Dashboard trustees are created to assign permissions tofew selected users to view a dashboard or a dashboard section. The Manage Trustees optionof the Edit Dashboard dialog box creates the dashboard trustee for the tiered dashboard.
Users with the following roles can modify the View permissions:
■ CCS Administrator role
■ Report Result Viewer role
■ Reporting Administrator role
See “About the predefined roles in tiered dashboards” on page 387.
See “About view permissions for users in Report Result Viewer role” on page 388.
About the predefined roles in tiered dashboardsThe tiered dashboards provide predefined roles that you can use to delegate permissions foryour users.
The tiered dashboards related tasks that a user of a specific role can perform are as follows:
User who is added in the Report Result Viewer role can do the following at thedashboard and section level:
■ View the tiered dashboard■ View the dashboard details report■ View the dashboard trends report■ View the jobs, the job runs, and the details of a job in the Job Management
view of the console.
Report Result Viewer
387Viewing Reports and Dashboards in Control Compliance SuiteWorking with tiered dashboards

User who is added in the Reporting Administrator role and is the creator of adashboard can do the following at the dashboard and section level:
■ Create a dashboard■ Edit a dashboard■ Rename a dashboard■ Copy and paste a dashboard■ Edit the dashboard job notification■ Import and export a dashboard■ Setup a dashboard status notification■ View the dashboard details and trends report■ View the dashboard■ Assign permission to another user to manage the dashboard■ Run and schedule the tiered dashboard update job
User who is added in the Reporting Administrator role and assigned permissionon a dashboard or a section can do the following:
■ Create a dashboard■ Edit a dashboard or a section■ View the dashboard
You can view the section of the dashboard for which you have the permission.■ View the dashboard details and trends report
You can view the reports for the section of the dashboard for which you havethe permission.
■ Import and export a dashboard■ Run a tiered dashboard update job
ReportingAdministrator
About view permissions for users in Report Result Viewer roleA CCS Administrator or a Reporting Administrator user can edit the view permission of a userthat belongs to the Report Result Viewer role. You can edit the view permission of a tiereddashboard user using the Manage Trustees option of the Edit Dashboard dialog box.
The user with view permission at the dashboard level can do the following:
■ View the dashboard details report and the dashboard trends report for a tiered dashboard.The dashboard details and trends report are accessed for a Tiered dashboard that isselected in the My Dashboards view.
■ Require requisite permission to view the assets and standards for a Standards EvaluationResults node in the View Dashboard - Reporting window.The user must have read permission on assets and standards to view the Details and theEvaluation Results tabs of the Standard Evaluation Results node.
■ Status tab
388Viewing Reports and Dashboards in Control Compliance SuiteWorking with tiered dashboards

■ Details tab
■ Evaluation Results tab
The user with view permission at the section level of a dashboard can do the following:
■ View the section and its evaluation nodes in the View Dashboard-Reporting window. Thechild sections can also be viewed.The user cannot view the evaluation nodes of the parent dashboard or the parent section.
■ The user must have read permission on assets and standards to view the Details and theEvaluation Results tabs of the Standard Evaluation Results node.
See “About manage permission for users in Reporting Administrator role” on page 389.
See “About the predefined roles in tiered dashboards” on page 387.
About manage permission for users in Reporting Administrator roleA CCS Administrator or a Reporting Administrator user can assign permission to users tomanage a tiered dashboard. You can assign permission to a user using the Manage Trusteesoption of the Create or Edit Tiered Dashboards wizard.
The following points apply to the user with permission to manage a tiered dashboard:
■ Create a new dashboard and have permission on all the tasks that are related to thedashboard and the dashboard update job.
■ The following tasks cannot be performed by the user who is not a creator of the dashboardbut is assigned permission to manage the tiered dashboard:
■ Edit Dashboard Job Notification
■ Edit Schedule
■ Delete
■ Rename
■ Set up notification
The following points apply to the user with permission to manage at the section level of adashboard:
■ Create a new dashboard and have permission on all the tasks that are related to thedashboard and the dashboard update job.
■ The following tasks cannot be performed by the user who is not a creator of the dashboardbut is assigned permission to manage the section of a tiered dashboard:
■ Edit Dashboard Job Notification
■ Edit Schedule
389Viewing Reports and Dashboards in Control Compliance SuiteWorking with tiered dashboards

■ Delete a dashboard
■ Rename a dashboard
■ Setup dashboard notification
■ Any tasks that are to be performed for the parent section or dashboard
See “About view permissions for users in Report Result Viewer role” on page 388.
See “About the predefined roles in tiered dashboards” on page 387.
About threshold settings in tiered dashboardYou can define thresholds for all the security assessment status levels of a Tiered dashboard'sevaluation node. If the set threshold condition for an evaluation node does not evaluate totrue, then the node's security assessment status is Normal. If the set threshold condition foran evaluation node evaluates to true, then the associated status level is the security assessmentstatus of the evaluation node.
Configuring the threshold for a status level involves defining the check fields, relational operator,and the check reference value. The check fields vary depending on whether you have selecteda Standards Evaluation Results node or a bv-Control Query Results node. The check fieldvalues are derived from the evaluation results of the Standards module and the summaryresults' data fields of the bv-Control queries.
We recommend that you use the same check field for the different status levels that are definedfor the evaluation node. Also, define thresholds in such a way that one of them always evaluatesto true.
See “About the threshold types ” on page 390.
See “About status calculation” on page 392.
About the threshold typesThreshold conditions are configured for the evaluation nodes to generate customized dashboardreports and information about the dashboard status. The types of thresholds that can beconfigured for an evaluation node are Global Threshold, Custom Threshold and No Thresholds(Information only node). All the threshold types can be set and associated with the evaluationnodes when you create the nodes through the Create Tiered Dashboards wizard.
The types of thresholds and their descriptions are as follows:
390Viewing Reports and Dashboards in Control Compliance SuiteWorking with tiered dashboards

Use this threshold type to set conditions and apply them to all the evaluationnodes of the same type.
You can set the global thresholds from the General view of the console.You can access the option, Settings > General > Tiered Dashboards >Global Thresholds Settings to configure the global thresholds.
Global Threshold
Use this threshold type to set the threshold conditions specific to anevaluation node. You can set the threshold conditions for the evaluationnode through the Create Tiered Dashboards wizard.
Custom Threshold
Use this threshold type when you want to retrieve summary data ofevaluation nodes for which no threshold conditions are set.
No Thresholds(Information only node)
See “About the threshold check fields” on page 391.
See “About status calculation” on page 392.
About the threshold check fieldsCheck fields are threshold parameters for which the threshold values are set for a node.
The following check fields are available for the Standards Evaluation Results node:
■ Compliance Score (%)
■ Total Checks
■ Checks Passed
■ Checks Failed
■ Checks Unknown
■ Risk Score
The following check fields are available for the bv-Control Query Results node:
■ Objects in Scope
■ Objects Found
■ Objects Not Found
■ Found Percent
■ Not Found Percent
See “About the relational operators” on page 391.
About the relational operatorsThe dashboard evaluation node configuration supports the following relational operators forcomparing the check field values and the reference:
391Viewing Reports and Dashboards in Control Compliance SuiteWorking with tiered dashboards

Values that are smaller than the user-selected value.< (Less Than)
Values that exceed the user-selected value> (Greater Than)
Values that are smaller than or are equal to the user-selected value.<= (Less Than or EqualTo)
Values that match the user-selected value.= (Equal To)
Values that exceed or are equal to the user-selected value.>= (Greater Than orEqual To)
See “About status calculation” on page 392.
About status calculationThe summary data collected by an evaluation node is evaluated against the reference valuesas configured in the threshold settings. If a threshold condition does not evaluate to true, thenthe evaluation node's security assessment status is Normal. If a threshold condition evaluatesto true, then the associated status level is the security assessment status of the evaluationnode.
See “Example of status calculation for Standards Evaluation Results node” on page 392.
See “Example of status calculation for bv-Control Query Results node” on page 393.
Example of status calculation for Standards Evaluation Results nodeYou can set the criticality of your environment in different ways. For example, you can definethe criticality for your environment, based on a percentage of compliance.
To set the status condition that is based on 85% compliance, you can use the Standardsevaluation results
Table 8-8 Criticality status based on compliance percentage
ValueOperatorConditionStatus
50.00<Compliance Score (%)Critical
70.00<Compliance Score (%)Danger
85.00<Compliance Score (%)Warning
85.00>=Compliance Score (%)Normal
To set the status condition that is based on the total number of checks that are passed, youcan use the Standards evaluation results.
392Viewing Reports and Dashboards in Control Compliance SuiteWorking with tiered dashboards

Table 8-9 Criticality status based on the total number of checks passed
ValueOperatorConditionStatus
50.00<Compliance Score (%)Critical
50.00>=Checks FailedDanger
20.00>=Check UnknownWarning
50.00>=Checks PassedNormal
See “Managing tiered dashboards” on page 377.
Example of status calculation for bv-Control Query Results nodeYou can use bv-Control query results to set the status condition that is based on 85% of foundobjects.
Table 8-10 bv-Control query configuration
ValueOperatorConditionStatus
15.00<Objects FoundCritical
not usednot usednot usedDanger
not usednot usednot usedWarning
85.00>=Objects FoundNormal
See “Managing tiered dashboards” on page 377.
Configuring tiered dashboardsDashboard configuration involves tasks that are related to creating and modifying the sectionsand nodes of the dashboard.
Dashboard configuration includes the following:
■ Adding a nodeSee “Adding an evaluation node” on page 395.
■ Editing a nodeSee “Editing an evaluation node” on page 396.
■ Deleting a nodeSee “Deleting an evaluation node” on page 397.
393Viewing Reports and Dashboards in Control Compliance SuiteConfiguring tiered dashboards

■ Copying and pasting an evaluation sectionSee “Copying and pasting an evaluation section” on page 397.
■ Copying and pasting an evaluation nodeSee “Copying and pasting an evaluation node” on page 398.
■ Configuring the email alertsSee “Configuring an email notification alert for tiered dashboards” on page 398.
See “Managing tiered dashboards” on page 377.
About the types of evaluation nodesAn evaluation node represents a scope of assets or query reports, which are to be assessedby Control Compliance Suite.
A Standards Evaluation Results node represents a scope of assets that are evaluated againsta specific standard.
The bv-Control Query Results node and the Query Results node represent a scope of queryreports. For a bv-Control Query Results node, you can specify an XML as the scope. For theQuery Results node, you can specify a query as the scope. The query reports are exportedinto the XML files after executing the bv-Control queries on the assets.
The bv-Control Query Results node does not display by default in the Create DashboardNodes panel of the Create Tiered Dashboards wizard. For the bv-Control Query Resultsnode to display, you must add the following key in the AppserverService.exe.config file:
<add key="ShowBVNodeForTieredDashboard" value="true" />
The AppserverService.exe.config file is present at the following location:
<install directory> > <symantec> > <CCS> > <Reporting and Analytics> > <ApplicationServer>
Note: After you add the key in the AppserverService.exe.config file, you must restart theApplication Server and launch the CCS console again.
See “Adding an evaluation node” on page 395.
Assigning roles and permissions to the users of tiered dashboardYou can associate a user or group with any predefined role that is specific to dashboard andassign permissions. The predefined roles that are specific to dashboard are Report Resultviewer and Reporting Administrator. You can assign or revoke permission to a user or a groupusing the Manage Trustee option of the Create Tiered Dashboards wizard. You can edit thepermissions in the Edit Dashboard dialog box.
394Viewing Reports and Dashboards in Control Compliance SuiteConfiguring tiered dashboards

To revoke permission completely for a user, you must remove the user from the dashboardspecific role in the Roles view of the console.
To assign permission to users or groups on a specific dashboard or an evaluation section
1 Go to Admin > Roles view of the console.
2 In the Roles view, right-click any of the dashboard related roles and then selectAdd Usersand Groups and add a user or group.
3 Hover over the Reports menu of the console and click My Dashboards.
4 In the My Dashboards view, right-click a dashboard and select Edit.
5 In the Edit Dashboard dialog box select the dashboard or section and then clickManageTrustees.
6 In the Manage Trustees dialog box, click Add Users and Groups to assign a user orgroup to a role.
In the Manage Trustees dialog box, you can view the list of users and groups that areassociated with a role.
7 In the Select Users or Groups dialog box, select a role name and associate the usersor groups that are configured for the role and click, Update Users and Groups.
8 In the Manage Trustees dialog box, click Update Permissions.
9 In the Edit Dashboard dialog box, click OK.
To revoke permission for a user or group from a specific dashboard or an evaluation section
1 Hover over the Reports menu and click My Dashboards.
2 In the My Dashboards view, right-click a dashboard and select Edit.
3 In the Edit Dashboard dialog box select the dashboard or section for which you want torevoke permission and click Manage Trustees.
4 In the Manage Trustees dialog box, select the user name or group name and thecorresponding role name and click Remove.
5 In the Manage Trustees dialog box, click Update Permissions.
6 In the Edit Dashboard dialog box, click OK.
Adding an evaluation nodeYou can use the Edit Dashboard dialog box to add evaluation nodes to an existing tiereddashboard. You can also use the Create Tiered Dashboards wizard to add a new evaluationnode to the tiered dashboard.
A tiered dashboard can contain evaluation nodes of the following types:
395Viewing Reports and Dashboards in Control Compliance SuiteConfiguring tiered dashboards

■ Standards Evaluation Results
■ Query Results
■ bv-Control Query Results
The bv-Control Query Results node does not display by default in the Create DashboardNodes panel of the Create Tiered Dashboards wizard. For the bv-Control Query Resultsnode to display, you must add the following key in the AppserverService.exe.config file:
<add key="ShowBVNodeForTieredDashboard" value="true" />
The AppserverService.exe.config file is present at the following location:
<install directory> > <symantec> > <CCS> > <Reporting and Analytics> > <ApplicationServer>
Note: After you add the key in the AppserverService.exe.config file, you must restart theApplication Server and launch the CCS console again.
To add an evaluation node
1 Hover over the Reports menu and click My Dashboards.
2 In the My Dashboards view, right-click a dashboard and select Edit.
3 In the Edit Dashboard wizard, select the type of node from the drop-down box, and clickAdd Node.
You can select either bv-Control Query Results node or Standards Evaluation Resultsnode from the drop-down box.
4 In the displayed dialog box, enter the required values to create the following nodes:
■ For a Standards Evaluation Results node, enter the required values in the dialog box.
■ For a bv-Control Query Results node, enter the required values in the dialog box.
See “Editing an evaluation node” on page 396.
Editing an evaluation nodeYou can edit either the bv-Control Query Results node or the Standards Evaluation Resultsnode of a tiered dashboard.
To edit an evaluation node
1 Hover over the Reports menu and click My Dashboards.
2 In the My Dashboards view, right-click a dashboard, and select Edit.
396Viewing Reports and Dashboards in Control Compliance SuiteConfiguring tiered dashboards

3 In the Edit Dashboard dialog box, select and expand the dashboard to the level of theevaluation node.
4 Select the evaluation node and click Edit Node.
A dialog box corresponding to the selected node type is displayed.
5 In the displayed dialog box, edit the required values for the following evaluation nodes:
■ For a Standards Evaluation Results node, enter the required values in the dialog box.
■ For a bv-Control Query Results evaluation node, enter the required values in the dialogbox.
See “Adding an evaluation node” on page 395.
See “Deleting an evaluation node” on page 397.
Deleting an evaluation nodeYou can delete an evaluation node that is added to a tiered dashboard. When creating a tiereddashboard, you can delete an evaluation node from the Create Tiered Dashboards wizard.You can also delete an existing evaluation node through the Edit Dashboard dialog box.
Note: Data of the evaluation node is deleted once you delete the evaluation node.
To delete an evaluation node
1 Hover over the Reports menu and click My Dashboards.
2 In the My Dashboards view, right-click a dashboard and select Edit .
3 In the Edit Dashboard dialog box, select and expand the dashboard to the level of theevaluation node.
4 Select the evaluation node and click Delete.
See “Editing an evaluation node” on page 396.
Copying and pasting an evaluation sectionYou can copy and paste an evaluation section when creating a tiered dashboard using theCreate Tiered Dashboards wizard. You can also copy and paste a section when editing thetiered dashboard using the Edit option from the Manage Tiered Dashboards menu.
Note: On copying a section of the dashboard, all the permissions that are stamped on thesection are also copied.
397Viewing Reports and Dashboards in Control Compliance SuiteConfiguring tiered dashboards

To copy and paste an evaluation section
1 Hover over the Reports menu and click My Dashboards.
2 In the My Dashboards view, do one of the following:.
■ Click Create Tiered Dashboards to create a dashboard.
■ Right-click a dashboard and select Edit to edit a dashboard.
3 In the wizard or the Edit Dashboard dialog box, select the section of a dashboard thatyou want to copy and click Copy.
4 Navigate to the level of a dashboard and then click Paste.
See “Copying and pasting an evaluation node” on page 398.
Copying and pasting an evaluation nodeYou can copy and paste an evaluation node of a tiered dashboard through the Create TieredDashboard wizard and the Edit option from the Manage Tiered Dashboards menu.
To copy and paste an evaluation node
1 Hover over the Reports menu and click My Dashboards.
2 In the My Dashboards view, right-click a dashboard and then select Edit.
3 In the Edit Dashboard dialog box, select a section of a dashboard and navigate to thenode that you want to copy and click Copy.
4 Navigate to the level of a section and then click Paste.
See “Copying and pasting an evaluation section” on page 397.
Configuring an email notification alert for tiered dashboardsYou can configure an email notification alert for the tiered dashboards.
You can configure an email notification for the following tasks:
■ Status change of a tiered dashboard update jobThe status of the tiered dashboard update job can change to either success or failure.
■ Status change of a dashboard.A dashboard's status can change if the status of a section or an evaluation nodes changes.
398Viewing Reports and Dashboards in Control Compliance SuiteConfiguring tiered dashboards

To configure email notification for a tiered dashboard job
1 Hover over the Reports menu and click My Dashboards.
2 In the My Dashboards view, right-click a dashboard and select Edit Dashboard JobNotification.
3 In the Job Notification dialog box, enter the values for the required fields.
To configure email notification for a tiered dashboard
1 Go to Reporting > My Dashboards in the console.
2 In the My Dashboards view, select Manage Tiered Dashboards > Create TieredDashboards or Manage Tiered Dashboards > Edit .
3 In the Create Tiered Dashboards wizard or Edit Dashboard dialog box navigate to theCreate Dashboards Node panel and click Setup Notification.
4 In the Setup Notification dialog box, enter the values of the fields for setting an emailnotification.
See “Configuring tiered dashboards” on page 393.
About trends configurationThe tiered dashboard lets you view the trends in the security assessment posture of yourorganization over a period of time. To view the trends, you must add an evaluation node andschedule data collection for a tiered dashboard.
See “Adding an evaluation node” on page 395.
Trends define the amount of historical data that is displayed for an evaluation node. You canset the default trends for an evaluation node when creating it using the Create TieredDashboards wizard. The trends are displayed based on the time scale that is set for theevaluation node. The time-scale setting defines the frequency of display of the data. You canconfigure various types of trends and time-scale for an evaluation node.
By default, in the tiered dashboard's reporting view, all data that you collect from the dashboard'screation date to the current date are displayed. You can view the status trends of the evaluationnode for the selected time scale in the Status tab of the View Dashboard- Reporting window.
Dashboard details and trends reports can also be generated and viewed for the configuredtrends.
See “About configuring trends for evaluation nodes ” on page 400.
See “Calculation of time interval - Example 1” on page 400.
See “Calculation of time interval - Example 2” on page 401.
399Viewing Reports and Dashboards in Control Compliance SuiteAbout trends configuration

About configuring trends for evaluation nodesEvaluation node trends are the latest evaluation data that is collected by the evaluation node.For example, if you want to view the trends for the last week on a daily basis, then the latestdata that is collected in the week is displayed.
You can configure trends for an evaluation node of the tiered dashboard in the following ways:
■ Set the default trends and time scale for the evaluation nodes when creating it through theCreate Tiered Dashboards wizard.You can set the default trend and time scale in the Create Dashboard Nodes panel of thewizard. Data is collected for the evaluation node based on this default trends and time-scaleconfiguration.
■ Set the trends for the evaluation nodes when viewing it in the ViewDashboard- Reportingwindow.You can modify the status trends of the evaluation node when viewing the dashboard inthe View Dashboard- Reporting window. In the View Dashboard - Reporting window,the view at the dashboard or section level displays the status trends of the latest updatedevaluation node.
■ Set the trends and time scale of the evaluation nodes in the Dashboard Details and Trendsreport.The Dashboard Details and Trends reports updates and displays the report instantly asper the configured trends.
See “Viewing the tiered dashboard reports” on page 402.
See “Calculation of time interval - Example 1” on page 400.
See “Calculation of time interval - Example 2” on page 401.
Calculation of time interval - Example 1The Trend Window is given as the Last Month, with the Current Date given as the date ofentry, in this example 3/1/2007. The Trend Start Date would then be 2/1/2007 and the TrendEnd Date would be 2/28/2007.
If the Time Scale value is Weekly, the time intervals are based on the days in the week. Forcalculation purposes, Weekly starts on Sunday and ends on Saturday. The first date is theTrend Start Date, which is as per this example is 2/1/2007(Thursday). The last date is TrendEnd Date, which as per this example is 2/28/2007 (Wednesday). The complete calendar weeksbetween the first and the last date start on Sundays and end on Saturdays.
Based on the example the five time intervals and their display dates are as follows:
Displays as 2/3/20072/1/2007 (Thursday) - 2/3/2007 (Saturday)
400Viewing Reports and Dashboards in Control Compliance SuiteAbout trends configuration

Displays as 2/10/20072/4/2007 (Sunday ) - 2/10/2007 (Saturday)
Displays as 2/17/20072/11/2007 (Sunday ) - 2/17/2007(Saturday)
Displays as 2/24/20072/18/2007 (Sunday ) - 2/24/2007(Saturday)
Displays as 3/03/20072/25/2007 (Sunday ) - 2/28/2007(Wednesday)
The time interval shows the time period in the Trend Window for which data is grouped andthe trends are calculated. The display value is the value shown as X-axis labels.
If the Time scale value is Daily, then the time intervals are based on the days in the month.
The 28 time intervals and their display dates are the following:
Displays as 2/1/20072/1/2007
Displays as 2/2/20072/2/2007
Displays as 2/3/20072/3/2007
Displays as 2/4/20072/4/2007
Displays as 2/5/20072/5/2007
.....
.....
Displays as 2/27/20072/27/2007
Displays as 2/28/20072/28/2007
The time interval shows the time period in the Trend Window for which data is grouped andthe trends are calculated. The display value is the value shown as X-axis labels.
See “Managing tiered dashboards” on page 377.
Calculation of time interval - Example 2The Trend Window is given as Last 30 Days, with the Current Date given as the date of entry,in this case 3/1/2007. The Trend Start Date would then be 1/31/2007 and the Trend End Datewould be 3/1/2007.
If the time scale value is Monthly, the three time intervals and their display dates are as follows:
401Viewing Reports and Dashboards in Control Compliance SuiteAbout trends configuration

Displays as Jan 20071/31/2007 - 1/31/2007
Displays as Feb 20072/1/2007 - 2/28/2007
Displays as Mar 20073/1/2007 - 3/1/2007
The time interval shows the time period in the Trend Window for which data is grouped andthe trends are calculated. The display value is the value shown as X-axis labels.
See “Managing tiered dashboards” on page 377.
Viewing the dashboard trends reportYou can view the dashboard trends report for a tiered dashboard from the My Dashboardsview.
The trends report is displayed in the Dashboard Trends Report window in which you canview the following details of the dashboard:
■ Status trendsThe status trends are displayed for the dashboard, section, and the evaluation node levels.
■ Evaluation trendsThe evaluation trends are displayed for the dashboard and the section level only.
To view the dashboard trends report
1 Hover over the Reports menu and click My Dashboards.
2 In the My Dashboards view, select a tiered dashboard and right-click to select ViewTrends Report.
3 In the Dashboard Trends Report window select the following options and click Apply
■ Set the trend of the data collection from the Trend window drop-down box.
■ Set the frequency scale of displaying the data in the Time scale drop-down box.
See “Viewing the dashboard trends report” on page 402.
See “Viewing the dashboard details report ” on page 403.
Viewing the tiered dashboard reportsTiered dashboard reports show the trends and the summary details of the evaluation nodes.The dashboard reports are displayed in a new window. You can export the details and thetrends report to any format such as a PDF, XLS, RTF.
The following are the types of tiered dashboards reports:
402Viewing Reports and Dashboards in Control Compliance SuiteViewing the tiered dashboard reports

Displays the details of the evaluation node, the summary results data and theassessment status for the node. The information is in a graphical format.
Dashboard Detailsreport
Displays the graphical view of the security assessment posture of yourorganization for the specified time period.
Prints the Status Trend and the Evaluations Trends for all the levels of thedashboard.
Dashboard Trendsreport
See “Viewing the dashboard details report ” on page 403.
See “Viewing the dashboard trends report” on page 402.
Viewing the dashboard details reportYou can view the dashboard details report for a tiered dashboard from the My Dashboardsview.
The details report is displayed in the Dashboard Details Report window.
You can view the following details in the window:
■ Current overall status
■ Status trends
■ Current evaluation by status
■ Evaluation trends
To view the dashboard details report
1 Hover over the Reports menu and click My Dashboards.
2 In theMy Dashboards view, select a tiered dashboard and then right-click to select ViewDetails Report.
3 In the Dashboard Details Report view, select the following options and check ShowDetails.
■ Set the trend of the data collection from the Trend window drop-down box.
■ Set the frequency scale of displaying the data in the Time scale drop-down box.
4 Click Apply.
See “Viewing the dashboard trends report” on page 402.
About the Details tab viewThe Details tab displays the evaluation results of the Standards and the bv-Control queryresults. You can print or export the grid information to a file.
403Viewing Reports and Dashboards in Control Compliance SuiteAbout the Details tab view

When you select a dashboard or an evaluation section on the left pane of the View Dashboard- Reporting window, the Details tab displays the following:
■ The roll-up of the evaluation results from all the nodes or sections in the dashboard orevaluation section.
■ The evaluation node name, hierarchical path, and the time when the evaluation node waslast updated.
■ The results that are grouped based on the security assessment status. You can regroupthe evaluation nodes based on the status or the type of evaluation node. You can drag thecolumns to group the evaluation nodes in the window.
When you select an evaluation node on the left pane of the window, the tab displays the assetsin the evaluation results. The predefined assigned attributes and values of the assets are alsodisplayed for the evaluation node. If you add new attributes to an asset, then the details of thenew fields are also listed for the evaluation node.
You can click on the column chooser icon to select or unselect the attribute columns.
Note: You can view the data of only those assets for which you have the requisite permission.
See “About the Status tab view” on page 379.
See “Viewing a tiered dashboard” on page 378.
404Viewing Reports and Dashboards in Control Compliance SuiteAbout the Details tab view