Democracy Suite Use Procedures - CA.gov
516
Democracy Suite ® Use Procedures Version: 5.10-CA::11 January 15, 2020
-
Upload
khangminh22 -
Category
Documents
-
view
12 -
download
0
Transcript of Democracy Suite Use Procedures - CA.gov
Democracy Suite® Use ProceduresVersion: 5.10-CA::11
January 15, 2020
Table of Contents
1/15/2020 i Version: 5.10-CA::11
Chapter 1: Introduction . . . . . . . . . . . . . . . . . . . . . . . . 11.1 System Description and Components . . . . . . . . . . . . . . . . . . . . . . . . . . . . . . . 1
1.1.1 ImageCast® Evolution (ICE) . . . . . . . . . . . . . . . . . . . . . . . . . . . . . . . . . . . 1
1.1.2 ImageCast® Central (ICC) . . . . . . . . . . . . . . . . . . . . . . . . . . . . . . . . . . . . 3
1.1.3 ImageCast® Precinct 2 . . . . . . . . . . . . . . . . . . . . . . . . . . . . . . . . . . . . . . . . 5
1.1.4 Election Management System (EMS) . . . . . . . . . . . . . . . . . . . . . . . . . . . . 6
1.1.5 ImageCast® X (ICX) . . . . . . . . . . . . . . . . . . . . . . . . . . . . . . . . . . . . . . . . . 7
1.2 Terms and Definitions . . . . . . . . . . . . . . . . . . . . . . . . . . . . . . . . . . . . . . . . . . . 9
1.3 Use Procedure Summary . . . . . . . . . . . . . . . . . . . . . . . . . . . . . . . . . . . . . . . . 18
Chapter 2: Ballot Definition . . . . . . . . . . . . . . . . . . . 212.1 Overview . . . . . . . . . . . . . . . . . . . . . . . . . . . . . . . . . . . . . . . . . . . . . . . . . . . . . 21
2.2 Ballot Artwork Source Files . . . . . . . . . . . . . . . . . . . . . . . . . . . . . . . . . . . . . . 21
2.3 Paper and Printing Specifications . . . . . . . . . . . . . . . . . . . . . . . . . . . . . . . . 21
2.4 ImageCast®Ballot Stock Selection . . . . . . . . . . . . . . . . . . . . . . . . . . . . . . . 22
2.5 Approved Ballot Paper Stocks . . . . . . . . . . . . . . . . . . . . . . . . . . . . . . . . . . . 23
Chapter 3: System Installation and configuration 253.1 Hardware Requirements and Specifications . . . . . . . . . . . . . . . . . . . . . . . . 25
3.1.1 Election Management System Hardware Requirements . . . . . . . . . . . 25
3.1.2 ImageCast® Central Hardware Requirements . . . . . . . . . . . . . . . . . . . 25
3.1.3 ImageCast® Evolution Hardware Requirements . . . . . . . . . . . . . . . . 26
3.1.4 ImageCast® Precinct 2 Hardware Requirements . . . . . . . . . . . . . . . . 26
3.2 Hardware and Network Set-up and Configuration . . . . . . . . . . . . . . . . . 26
3.2.1 Air-gap Configuration . . . . . . . . . . . . . . . . . . . . . . . . . . . . . . . . . . . . . . 28
3.2.1.1 Air-gap Configuration Details . . . . . . . . . . . . . . . . . . . . . . . . . . . . . 29
3.2.1.2 Backup . . . . . . . . . . . . . . . . . . . . . . . . . . . . . . . . . . . . . . . . . . . . . . . . 29
3.2.1.3 DBAN New Equipment . . . . . . . . . . . . . . . . . . . . . . . . . . . . . . . . . . 30
3.2.1.4 Connect Equipment . . . . . . . . . . . . . . . . . . . . . . . . . . . . . . . . . . . . . 30
3.2.1.5 Record Service Tags . . . . . . . . . . . . . . . . . . . . . . . . . . . . . . . . . . . . . 30
3.2.1.6 RAID and BIOS Settings . . . . . . . . . . . . . . . . . . . . . . . . . . . . . . . . . 30
3.2.2 Deploying Images . . . . . . . . . . . . . . . . . . . . . . . . . . . . . . . . . . . . . . . . . . 34
3.2.2.1 Deploy Image (EMS Server Workstation): . . . . . . . . . . . . . . . . . . 34
3.2.2.2 Deploying the County Release Image . . . . . . . . . . . . . . . . . . . . . . . 35

1/15/2020 ii Version: 5.10-CA::11
Table of Contents
3.2.2.3 Post Imaging Procedures . . . . . . . . . . . . . . . . . . . . . . . . . . . . . . . . 36
3.2.2.4 Connect Computers to the Network Switch (EMS Client, ADJ Client, ICC): . . . . . . . . . . . . . . . . . . . . . . . . . . . . . . . . . . . . . . . . . . . . . . . . . . . . . . . . . 37
3.2.2.5 Enabling ImageCast® Central Elevated Permissions . . . . . . . . . 38
3.2.2.6 Set Adobe Reader Path in EED (EMS Client) . . . . . . . . . . . . . . . . 39
3.2.2.7 Security Procedures . . . . . . . . . . . . . . . . . . . . . . . . . . . . . . . . . . . . . 40
3.3 Software Installation and Configuration . . . . . . . . . . . . . . . . . . . . . . . . . . 42
3.3.1 EMS Configuration . . . . . . . . . . . . . . . . . . . . . . . . . . . . . . . . . . . . . . . . . 43
3.3.1.1 Election Project Configuration in EED . . . . . . . . . . . . . . . . . . . . . . 43
3.3.1.2 Configuring EED for Additional Language Packs . . . . . . . . . . . . . 44
3.3.1.3 Configuring EED for Additional ICE and ICP2 Language Packs 44
3.3.1.4 Configuring EED for Additional ICX Language Packs . . . . . . . . . . 45
3.3.2 Adjudication Configuration . . . . . . . . . . . . . . . . . . . . . . . . . . . . . . . . . . 45
3.3.3 RTR Configuration . . . . . . . . . . . . . . . . . . . . . . . . . . . . . . . . . . . . . . . . . 46
3.3.4 ImageCast® Central System Configuration . . . . . . . . . . . . . . . . . . . . 49
3.3.4.1 InterScan HiPro Scanner Hardware Configuration . . . . . . . . . . . . 51
3.3.5 ImageCast® Evolution Configuration . . . . . . . . . . . . . . . . . . . . . . . . . . 52
3.3.5.1 CF0 Card Data Partitioning . . . . . . . . . . . . . . . . . . . . . . . . . . . . . . . . 52
3.3.5.2 ImageCast® Precinct 2 Configuration . . . . . . . . . . . . . . . . . . . . . . . 56
3.3.6 ImageCast® X Configuration . . . . . . . . . . . . . . . . . . . . . . . . . . . . . . . . . 57
3.4 Acceptance Testing . . . . . . . . . . . . . . . . . . . . . . . . . . . . . . . . . . . . . . . . . . . . . 57
3.4.1 Election Management System Acceptance Testing . . . . . . . . . . . . . . . 58
3.4.2 ImageCast® Evolution Acceptance Testing . . . . . . . . . . . . . . . . . . . . 60
3.4.3 ImageCast® Central Acceptance Testing . . . . . . . . . . . . . . . . . . . . . . . 61
3.4.4 ImageCast® Precinct 2 Acceptance Testing . . . . . . . . . . . . . . . . . . . . 62
3.4.5 ImageCast® X Acceptance Testing . . . . . . . . . . . . . . . . . . . . . . . . . . . . 63
Chapter 4: Election Set-up and Definition . . . . . . 654.1 EMS Programming and Configuration . . . . . . . . . . . . . . . . . . . . . . . . . . . . . 65
4.2 Tabulator Programming and Configuration . . . . . . . . . . . . . . . . . . . . . . . 66
4.2.1 Performing the Pre-Voting Phase Readiness Test . . . . . . . . . . . . . . . 66
4.2.2 Performing the Voting Phase Readiness Test . . . . . . . . . . . . . . . . . . . 68
4.2.2.1 Voting Phase Readiness Testing ImageCast® Evolution . . . . . . . 68

Democracy Suite® Use Procedures
Version: 5.10-CA::11 iii 1/15/2020
4.2.2.2 Voting Phase Readiness Testing ImageCast® Central . . . . . . . . . 69
4.2.2.3 ImageCast® Precinct 2 . . . . . . . . . . . . . . . . . . . . . . . . . . . . . . . . . . . 71
4.2.3 Voting Phase Readiness Testing ImageCast® X . . . . . . . . . . . . . . . . . . 72
4.2.4 Performing the Post-Voting Election Day Phase Readiness Test . . . . 73
4.3 System Diagnostics Testing Procedures . . . . . . . . . . . . . . . . . . . . . . . . . . . 74
4.3.1 ImageCast® Central System Diagnostics Testing Procedures . . . . . . . 75
4.3.2 ImageCast® Evolution System Diagnostic Testing Procedures . . . . . 75
4.3.3 ImageCast® Precinct 2 Diagnostic Procedures . . . . . . . . . . . . . . . . . . 77
4.3.4 ImageCast® X Diagnostic Procedures . . . . . . . . . . . . . . . . . . . . . . . . . . 77
4.4 System Proofing . . . . . . . . . . . . . . . . . . . . . . . . . . . . . . . . . . . . . . . . . . . . . . . 77
4.5 Logic and Accuracy Testing of System and Components . . . . . . . . . . . . . . 97
4.5.1 Pre-Conditions for Performance of Tests . . . . . . . . . . . . . . . . . . . . . . . . 97
4.5.1.1 Restore Election Project . . . . . . . . . . . . . . . . . . . . . . . . . . . . . . . . . . . 97
4.5.1.2 Opening an Election Project . . . . . . . . . . . . . . . . . . . . . . . . . . . . . . 98
4.5.1.3 Pre-Testing of the Scanning setting with Official election ballots from the certified ballot printer . . . . . . . . . . . . . . . . . . . . . . . . . . . . . . . . . . . . . . 98
4.5.1.4 Test Decks Required for Logic and Accuracy Testing . . . . . . . . . 99
4.5.1.5 Cleaning the USB Device . . . . . . . . . . . . . . . . . . . . . . . . . . . . . . . . . 99
4.5.1.6 Backup of Election Project . . . . . . . . . . . . . . . . . . . . . . . . . . . . . . . 100
4.5.2 Logic and Accuracy Test Procedures . . . . . . . . . . . . . . . . . . . . . . . . . 100
4.5.2.1 ImageCast® Central Logic & Accuracy Testing Procedure . . . . . 101
4.5.2.2 ImageCast® Evolution Logic and Accuracy Test Procedures . . . 104
4.5.2.3 ImageCast® Precinct 2 Logic and Accuracy Test Procedures . . . 106
4.5.2.4 ImageCast® X Logic and Accuracy Test Procedures . . . . . . . . . 108
4.5.2.5 ImageCast X Vote Simulator . . . . . . . . . . . . . . . . . . . . . . . . . . . . . . 109
4.5.2.6 Mobile Ballot Production Logic and Accuracy Test Procedures . 112
4.5.2.7 Adjudication and Post-Election Processing Logic and Accuracy Test Procedures . . . . . . . . . . . . . . . . . . . . . . . . . . . . . . . . . . . . . . . . . . . . . . . . . . . 115
4.5.3 Logic and Accuracy System Test Acceptance Criteria and Completeness 116
4.5.4 Backing up the Logic and Accuracy Test Results . . . . . . . . . . . . . . . . 117
4.5.4.1 Stopping Adjudication After Logic and Accuracy Testing . . . . . . 117
4.5.4.2 Retention and Documentation of Test Materials . . . . . . . . . . . . . 118

1/15/2020 iv Version: 5.10-CA::11
Table of Contents
4.5.5 Clearing Logic and Accuracy Test Results . . . . . . . . . . . . . . . . . . . . . . 118
4.5.6 Re-zeroing the ICC . . . . . . . . . . . . . . . . . . . . . . . . . . . . . . . . . . . . . . . . . 118
4.5.7 Re-zeroing the ICE . . . . . . . . . . . . . . . . . . . . . . . . . . . . . . . . . . . . . . . . . 119
4.5.8 Re-zeroing the ICP2 . . . . . . . . . . . . . . . . . . . . . . . . . . . . . . . . . . . . . . . . 120
4.5.9 Re-zeroing the ICX . . . . . . . . . . . . . . . . . . . . . . . . . . . . . . . . . . . . . . . . . 121
4.6 Election Observer Panel . . . . . . . . . . . . . . . . . . . . . . . . . . . . . . . . . . . . . . . 122
4.7 Hardware Maintenance and Preparation for Use . . . . . . . . . . . . . . . . . . . 122
4.7.1 ImageCast® Evolution Preparation . . . . . . . . . . . . . . . . . . . . . . . . . . . 122
4.7.1.1 Internal Battery Recharging . . . . . . . . . . . . . . . . . . . . . . . . . . . . . . 122
4.7.2 ImageCast® Central Maintenance and Preparation . . . . . . . . . . . . . 122
4.7.3 ImageCast® Precinct 2 Preparation . . . . . . . . . . . . . . . . . . . . . . . . . . . 123
4.7.3.1 Internal Battery Recharging . . . . . . . . . . . . . . . . . . . . . . . . . . . . . . 123
4.7.4 ImageCast® X Maintenance and Preparation . . . . . . . . . . . . . . . . . . 124
4.7.4.1 BMD printer cartridge removal/replacement/storage . . . . . . . . . 125
4.7.4.2 ICX Internal Battery Recharging . . . . . . . . . . . . . . . . . . . . . . . . . . 125
4.8 Physical Security of Equipment . . . . . . . . . . . . . . . . . . . . . . . . . . . . . . . . . 125
Chapter 5: Early Voting Procedures . . . . . . . . . . . 1275.1 ImageCast® Evolution . . . . . . . . . . . . . . . . . . . . . . . . . . . . . . . . . . . . . . . . . 127
5.2 ImageCast® Precinct 2 . . . . . . . . . . . . . . . . . . . . . . . . . . . . . . . . . . . . . . . . 129
5.3 ImageCast® X Early Voting . . . . . . . . . . . . . . . . . . . . . . . . . . . . . . . . . . . . 130
Chapter 6: Polling Place Procedures . . . . . . . . . . . 1316.1 Precinct Supplies, Delivery and Inspection . . . . . . . . . . . . . . . . . . . . . . . . 131
6.1.1 Precinct Supplies . . . . . . . . . . . . . . . . . . . . . . . . . . . . . . . . . . . . . . . . . . . 131
6.1.2 ImageCast® Evolution and Related Equipment . . . . . . . . . . . . . . . . . 132
6.1.2.1 Delivery of Equipment . . . . . . . . . . . . . . . . . . . . . . . . . . . . . . . . . . . 134
6.1.2.2 Proper Handling and Moving Procedures . . . . . . . . . . . . . . . . . . . 135
6.1.3 ImageCast® Precinct 2 and Related Equipment . . . . . . . . . . . . . . . . . 135
6.1.4 ImageCast® X and Related Equipment . . . . . . . . . . . . . . . . . . . . . . . . 137
6.2 Inspection and Polling Place Setup . . . . . . . . . . . . . . . . . . . . . . . . . . . . . . 138
6.2.1 ICE Equipment Setup . . . . . . . . . . . . . . . . . . . . . . . . . . . . . . . . . . . . . . 139
6.2.1.1 Opening the Monitor . . . . . . . . . . . . . . . . . . . . . . . . . . . . . . . . . . . . 139
6.2.1.2 Election Memory Cards . . . . . . . . . . . . . . . . . . . . . . . . . . . . . . . . . . 139

Democracy Suite® Use Procedures
Version: 5.10-CA::11 v 1/15/2020
6.2.1.3 Attaching the Audio Tactile Interface . . . . . . . . . . . . . . . . . . . . . . 140
6.2.1.4 Setting up the Voting Booth . . . . . . . . . . . . . . . . . . . . . . . . . . . . . . 140
6.2.2 ICP2 Equipment Setup . . . . . . . . . . . . . . . . . . . . . . . . . . . . . . . . . . . . . 141
6.2.2.1 Inserting the SD Memory Cards . . . . . . . . . . . . . . . . . . . . . . . . . . . 141
6.2.2.2 Setting up the Tabulator on the Ballot Box . . . . . . . . . . . . . . . . . . 141
6.2.2.3 Replacing the Thermal Printer Paper Roll . . . . . . . . . . . . . . . . . . 144
6.2.2.4 Powering Up the Tabulator . . . . . . . . . . . . . . . . . . . . . . . . . . . . . . . 144
6.2.2.5 Applying Security Seals . . . . . . . . . . . . . . . . . . . . . . . . . . . . . . . . . . 145
6.2.2.6 Sealing Memory Card Access Ports . . . . . . . . . . . . . . . . . . . . . . . . 146
6.2.2.7 Sealing the Thermal Report Printer Door . . . . . . . . . . . . . . . . . . . 146
6.2.2.8 Sealing the Modem Port . . . . . . . . . . . . . . . . . . . . . . . . . . . . . . . . . 147
6.2.2.9 Ballot Review . . . . . . . . . . . . . . . . . . . . . . . . . . . . . . . . . . . . . . . . . . 147
6.2.3 ICX Equipment Setup . . . . . . . . . . . . . . . . . . . . . . . . . . . . . . . . . . . . . . 149
6.2.3.1 Unpacking the Equipment . . . . . . . . . . . . . . . . . . . . . . . . . . . . . . . 149
6.2.3.2 Setting up the Equipment . . . . . . . . . . . . . . . . . . . . . . . . . . . . . . . . 149
6.2.3.3 Voting Booth Set Up . . . . . . . . . . . . . . . . . . . . . . . . . . . . . . . . . . . . 150
6.3 Opening the Polls . . . . . . . . . . . . . . . . . . . . . . . . . . . . . . . . . . . . . . . . . . . . . 150
6.3.1 Opening the Polls on the ICX . . . . . . . . . . . . . . . . . . . . . . . . . . . . . . . . 150
6.3.2 Opening the Polls on the ICE . . . . . . . . . . . . . . . . . . . . . . . . . . . . . . . . 151
6.3.3 Opening the Polls on ICP2 . . . . . . . . . . . . . . . . . . . . . . . . . . . . . . . . . . 160
6.3.3.1 Viewing Tabulator Info on the LCD Screen . . . . . . . . . . . . . . . . . . 163
6.4 Polling Place Procedures . . . . . . . . . . . . . . . . . . . . . . . . . . . . . . . . . . . . . . . 165
6.4.1 ImageCast® Evolution . . . . . . . . . . . . . . . . . . . . . . . . . . . . . . . . . . . . . . 167
6.4.1.1 Standard Voting Session . . . . . . . . . . . . . . . . . . . . . . . . . . . . . . . . . 167
6.4.1.2 Write In (Ballot Review Disabled) . . . . . . . . . . . . . . . . . . . . . . . . . 171
6.4.1.3 Overvote (Ballot Review Enabled) . . . . . . . . . . . . . . . . . . . . . . . . . 171
6.4.1.4 Overvote (Ballot Review Disabled) . . . . . . . . . . . . . . . . . . . . . . . . . 172
6.4.1.5 Undervotes . . . . . . . . . . . . . . . . . . . . . . . . . . . . . . . . . . . . . . . . . . . . 173
6.4.1.6 Ambiguous Marks (Ballot Review Enabled) . . . . . . . . . . . . . . . . . 173
6.4.1.7 Ambiguous Marks (Ballot Review Disabled) . . . . . . . . . . . . . . . . . 174
6.4.1.8 Correctly Marked Ballot with No Write Ins . . . . . . . . . . . . . . . . . . 174
6.4.1.9 Operating the ImageCast® Evolution on Battery . . . . . . . . . . . . . 175

1/15/2020 vi Version: 5.10-CA::11
Table of Contents
6.4.1.10 Changing the Printer Paper Tape . . . . . . . . . . . . . . . . . . . . . . . . . 175
6.4.1.11 Thermal Paper Installation . . . . . . . . . . . . . . . . . . . . . . . . . . . . . . 176
6.4.2 Standard Voting Session On ICP2 . . . . . . . . . . . . . . . . . . . . . . . . . . . . 177
6.4.2.1 ImageCast® Precinct 2 . . . . . . . . . . . . . . . . . . . . . . . . . . . . . . . . . 180
6.4.2.2 Handling Non-typical Voting Scenarios . . . . . . . . . . . . . . . . . . . . 181
6.4.2.3 Second Chance Voting Scenarios . . . . . . . . . . . . . . . . . . . . . . . . . . 182
6.4.2.4 Overvoted Ballots . . . . . . . . . . . . . . . . . . . . . . . . . . . . . . . . . . . . . . . 183
6.4.2.5 RCV Voting Scenarios . . . . . . . . . . . . . . . . . . . . . . . . . . . . . . . . . . . 186
6.4.3 Standard Voting on ICX . . . . . . . . . . . . . . . . . . . . . . . . . . . . . . . . . . . 188
6.4.3.1 Voting Interface . . . . . . . . . . . . . . . . . . . . . . . . . . . . . . . . . . . . . . . . 189
6.4.3.2 ImageCast® X Early Voting . . . . . . . . . . . . . . . . . . . . . . . . . . . . . . 191
6.5 Special Needs Voter Procedures . . . . . . . . . . . . . . . . . . . . . . . . . . . . . . . . . 195
6.5.1 ICE . . . . . . . . . . . . . . . . . . . . . . . . . . . . . . . . . . . . . . . . . . . . . . . . . . . . . . 195
6.5.1.1 Accessible Voting Session . . . . . . . . . . . . . . . . . . . . . . . . . . . . . . . . 195
6.5.2 Accessible Voting on ICX . . . . . . . . . . . . . . . . . . . . . . . . . . . . . . . . . . . 212
6.6 Provisional Voters . . . . . . . . . . . . . . . . . . . . . . . . . . . . . . . . . . . . . . . . . . . . 219
6.6.1 Provisional Voting on ICE . . . . . . . . . . . . . . . . . . . . . . . . . . . . . . . . . . 220
6.6.1.1 Provisional Voting Using the Accessible Voting Features of the Im-ageCast® Evolution . . . . . . . . . . . . . . . . . . . . . . . . . . . . . . . . . . . . . . . . . . 220
6.6.1.2 In Precinct . . . . . . . . . . . . . . . . . . . . . . . . . . . . . . . . . . . . . . . . . . . . . 221
6.6.1.3 Out of Precinct . . . . . . . . . . . . . . . . . . . . . . . . . . . . . . . . . . . . . . . . . 221
6.6.2 Provisional Voting on ICX . . . . . . . . . . . . . . . . . . . . . . . . . . . . . . . . . . . 221
6.7 Closing the Polls and Vote Reporting . . . . . . . . . . . . . . . . . . . . . . . . . . . . 222
6.7.1 Closing the Polls on ICE . . . . . . . . . . . . . . . . . . . . . . . . . . . . . . . . . . . . 222
6.7.2 Closing the polls on ICP2 . . . . . . . . . . . . . . . . . . . . . . . . . . . . . . . . . . 228
6.7.2.1 Powering Down the Tabulator . . . . . . . . . . . . . . . . . . . . . . . . . . . 235
6.7.3 Closing the Polls on ICX . . . . . . . . . . . . . . . . . . . . . . . . . . . . . . . . . . . . 237
6.8 Securing Audit Logs and Backup Records . . . . . . . . . . . . . . . . . . . . . . . . . 237
6.9 Troubleshooting . . . . . . . . . . . . . . . . . . . . . . . . . . . . . . . . . . . . . . . . . . . . . 238
6.9.1 Operating the ImageCast® Precinct 2 on Battery . . . . . . . . . . . . . . . 238
6.9.2 Operating the ICX on Battery . . . . . . . . . . . . . . . . . . . . . . . . . . . . . . . 238
Chapter 7: Absentee and Mail Procedures . . . . . 239

Democracy Suite® Use Procedures
Version: 5.10-CA::11 vii 1/15/2020
7.1 Preparing Absentee/Vote by Mail Ballots for Tally . . . . . . . . . . . . . . . . . 239
7.2 Setting up the ImageCast® Central Workstation and Scanner . . . . . . . 239
7.2.1 Setting up the Scanner . . . . . . . . . . . . . . . . . . . . . . . . . . . . . . . . . . . . . 240
7.3 Loading an Election to the ImageCast® Central System . . . . . . . . . . . . 240
7.4 Opening ImageCast® Central Application . . . . . . . . . . . . . . . . . . . . . . . . 241
7.5 Configuring the Local and Remote Path for Saving Results . . . . . . . . . 243
7.6 Accessing Supervisor Mode . . . . . . . . . . . . . . . . . . . . . . . . . . . . . . . . . . . . 245
7.6.1 Setting Supervisor Options . . . . . . . . . . . . . . . . . . . . . . . . . . . . . . . . . 246
7.6.2 Canon and HiPro Scanner Imprinters . . . . . . . . . . . . . . . . . . . . . . . . 248
7.6.2.1 Canon DR-G1130 and DR-G2140 Scanner Imprinters . . . . . . . . 248
7.6.2.2 HiPro Scanner Imprinters . . . . . . . . . . . . . . . . . . . . . . . . . . . . . . . . 251
7.6.3 Configuring Scan Options . . . . . . . . . . . . . . . . . . . . . . . . . . . . . . . . . . 253
7.7 Producing a Zero Report . . . . . . . . . . . . . . . . . . . . . . . . . . . . . . . . . . . . . . 253
7.8 Scanning Mode . . . . . . . . . . . . . . . . . . . . . . . . . . . . . . . . . . . . . . . . . . . . . . 253
7.8.1 Scanning and Accepting Batches . . . . . . . . . . . . . . . . . . . . . . . . . . . . . 255
7.8.2 Scanning and Discarding Batches . . . . . . . . . . . . . . . . . . . . . . . . . . . . 257
7.8.3 Spoiling a Batch . . . . . . . . . . . . . . . . . . . . . . . . . . . . . . . . . . . . . . . . . . . 257
7.9 Batch Management . . . . . . . . . . . . . . . . . . . . . . . . . . . . . . . . . . . . . . . . . . 258
7.9.1 Batch Start Cards . . . . . . . . . . . . . . . . . . . . . . . . . . . . . . . . . . . . . . . . . 258
7.9.1.1 Specifying Poll ID Ranges . . . . . . . . . . . . . . . . . . . . . . . . . . . . . . . 259
7.9.1.2 Specifying Tabulator ID . . . . . . . . . . . . . . . . . . . . . . . . . . . . . . . . . 260
7.9.1.3 Printing Batch Start Cards . . . . . . . . . . . . . . . . . . . . . . . . . . . . . . . 260
7.9.1.4 Scanning Batch Start Cards in ICC . . . . . . . . . . . . . . . . . . . . . . . . 260
7.9.2 Batch Summary Reports . . . . . . . . . . . . . . . . . . . . . . . . . . . . . . . . . . . 262
7.10 Adjudication . . . . . . . . . . . . . . . . . . . . . . . . . . . . . . . . . . . . . . . . . . . . . . . 263
7.10.1 Adjudication Overview . . . . . . . . . . . . . . . . . . . . . . . . . . . . . . . . . . . . 263
7.10.2 Configure and Start Adjudication . . . . . . . . . . . . . . . . . . . . . . . . . . . 263
7.10.3 Ballot Navigation as an Administrator . . . . . . . . . . . . . . . . . . . . . . . 264
7.10.3.1 Starting or Stopping Receipt of Ballots . . . . . . . . . . . . . . . . . . . 264
7.10.3.2 Turning the Ballot Overlay On/Off . . . . . . . . . . . . . . . . . . . . . . 265
7.10.3.3 Ballot Information Section . . . . . . . . . . . . . . . . . . . . . . . . . . . . . 266
7.10.3.4 Ballot Face Navigation . . . . . . . . . . . . . . . . . . . . . . . . . . . . . . . . . 267
1/15/2020 viii Version: 5.10-CA::11
Table of Contents
7.10.3.5 Viewing the Audit Mark with Split View . . . . . . . . . . . . . . . . . . 269
7.10.4 Ballot Navigation as a General User . . . . . . . . . . . . . . . . . . . . . . . . . 269
7.10.4.1 Turning the Ballot Overlay On or Off . . . . . . . . . . . . . . . . . . . . . 270
7.10.4.2 Ballot Information as a General User . . . . . . . . . . . . . . . . . . . . 270
7.10.4.3 Ballot Face Navigation as a General User . . . . . . . . . . . . . . . . . 270
7.10.4.4 Viewing the Audit Mark with Split View as a General User . . 270
7.10.5 Contest Information . . . . . . . . . . . . . . . . . . . . . . . . . . . . . . . . . . . . . . . 271
7.10.6 Adjudicate a Contest . . . . . . . . . . . . . . . . . . . . . . . . . . . . . . . . . . . . . . 272
7.10.6.1 Adjudicate Write-ins . . . . . . . . . . . . . . . . . . . . . . . . . . . . . . . . . . . 273
7.10.6.2 Filtered Contests . . . . . . . . . . . . . . . . . . . . . . . . . . . . . . . . . . . . . 276
7.11 Adjudication Process - ICX Marked Ballots . . . . . . . . . . . . . . . . . . . . . . . 277
7.11.1 ImageCast® ICX Marked Ballot Adjudication Overview . . . . . . . . . 277
7.11.1.1 Turning the Ballot Overlay On and Off - ICX Marked Ballots . . 277
7.11.2 Resolving a Write-in . . . . . . . . . . . . . . . . . . . . . . . . . . . . . . . . . . . . . . 278
7.11.2.1 Resolving a Write-in to a Qualified Write-in Name or Ballot Candi-date . . . . . . . . . . . . . . . . . . . . . . . . . . . . . . . . . . . . . . . . . . . . . . . . . . . . . . . . 279
7.11.2.2 Accepting a Write-in As-is on an ICX Marked Ballot: . . . . . . . 279
7.11.2.3 Rejecting a Write-in - ICX Marked Ballots . . . . . . . . . . . . . . . . 280
7.12 Post-Tabulation Report and Closing Procedures . . . . . . . . . . . . . . . . . 280
7.12.1 Closing the ICC Tabulator . . . . . . . . . . . . . . . . . . . . . . . . . . . . . . . . . 280
7.12.2 Producing Reports from the ImageCast® Central System . . . . . . . 282
7.13 Loading Election Files for a New Tabulator . . . . . . . . . . . . . . . . . . . . . . 283
Chapter 8: Semi-Official Canvass Tabulation and Reporting . . . . . . . . . . . . . . . . . . . . . . . . . . . . . . . . 285
8.1 System Start-up and Pre-tabulation Report Procedures . . . . . . . . . . . . 285
8.1.1 Start EMS RTR . . . . . . . . . . . . . . . . . . . . . . . . . . . . . . . . . . . . . . . . . . . 285
8.1.2 Run Zero Report . . . . . . . . . . . . . . . . . . . . . . . . . . . . . . . . . . . . . . . . . . 285
8.2 Processing Vote Reports . . . . . . . . . . . . . . . . . . . . . . . . . . . . . . . . . . . . . . 286
8.2.1 Open Project . . . . . . . . . . . . . . . . . . . . . . . . . . . . . . . . . . . . . . . . . . . . . 287
8.2.2 Enable Automatic Results Loading to RTR . . . . . . . . . . . . . . . . . . . . 288
8.2.3 Loading Results from Card Management . . . . . . . . . . . . . . . . . . . . . 288
8.2.4 Load Results from Directory . . . . . . . . . . . . . . . . . . . . . . . . . . . . . . . . 293
Democracy Suite® Use Procedures
Version: 5.10-CA::11 ix 1/15/2020
8.2.5 Validate and Publish Results . . . . . . . . . . . . . . . . . . . . . . . . . . . . . . . 293
8.2.6 Election Night Summary Report - Election Day Report . . . . . . . . . 294
8.2.7 Central Tabulation . . . . . . . . . . . . . . . . . . . . . . . . . . . . . . . . . . . . . . . . 294
8.2.7.1 Early Vote ImageCast® Evolution and ImageCast® Precinct 2 295
8.2.8 Precinct Tabulation (ICE and ICP2) . . . . . . . . . . . . . . . . . . . . . . . . . 296
8.2.9 Precinct Tabulation (ImageCast® X) . . . . . . . . . . . . . . . . . . . . . . . . . 297
8.3 Integration with County Systems and Calvoter/VoteCal . . . . . . . . . . . . 297
Chapter 9: Adjudication . . . . . . . . . . . . . . . . . . . . 2999.1 Adjudication Process . . . . . . . . . . . . . . . . . . . . . . . . . . . . . . . . . . . . . . . . . 299
9.1.1 Adjudication Overview . . . . . . . . . . . . . . . . . . . . . . . . . . . . . . . . . . . . . 299
9.1.2 Configure and Start Adjudication . . . . . . . . . . . . . . . . . . . . . . . . . . . . 299
9.1.3 Ballot Navigation as an Administrator . . . . . . . . . . . . . . . . . . . . . . . . 300
9.1.3.1 Starting or Stopping Receipt of Ballots . . . . . . . . . . . . . . . . . . . . 300
9.1.3.2 Turning the Ballot Overlay On/Off . . . . . . . . . . . . . . . . . . . . . . . . . 301
9.1.3.3 Ballot Information Section . . . . . . . . . . . . . . . . . . . . . . . . . . . . . . 302
9.1.3.4 Ballot Face Navigation . . . . . . . . . . . . . . . . . . . . . . . . . . . . . . . . . . 303
9.1.3.5 Viewing the Audit Mark with Split View . . . . . . . . . . . . . . . . . . . 305
9.1.4 Ballot Navigation as a General User . . . . . . . . . . . . . . . . . . . . . . . . . . 305
9.1.4.1 Turning the Ballot Overlay On or Off . . . . . . . . . . . . . . . . . . . . . . 306
9.1.4.2 Ballot Information as a General User . . . . . . . . . . . . . . . . . . . . . . 306
9.1.4.3 Ballot Face Navigation as a General User . . . . . . . . . . . . . . . . . . 306
9.1.4.4 Viewing the Audit Mark with Split View as a General User . . . 306
9.1.5 Contest Information . . . . . . . . . . . . . . . . . . . . . . . . . . . . . . . . . . . . . . . 307
9.1.6 Adjudicate a Contest . . . . . . . . . . . . . . . . . . . . . . . . . . . . . . . . . . . . . . 308
9.1.6.1 Adjudicate Write-ins . . . . . . . . . . . . . . . . . . . . . . . . . . . . . . . . . . . . 309
9.1.6.2 Filtered Contests . . . . . . . . . . . . . . . . . . . . . . . . . . . . . . . . . . . . . . . . 312
9.2 Adjudication Process - ICX Marked Ballots . . . . . . . . . . . . . . . . . . . . . . . 313
9.2.1 ImageCast® ICX Marked Ballot Adjudication Overview . . . . . . . . . . 313
9.2.1.1 Turning the Ballot Overlay On and Off - ICX Marked Ballots . . . 313
9.2.2 Resolving a Write-in . . . . . . . . . . . . . . . . . . . . . . . . . . . . . . . . . . . . . . . 314
9.2.2.1 Resolving a Write-in to a Qualified Write-in Name or Ballot Candi-date . . . . . . . . . . . . . . . . . . . . . . . . . . . . . . . . . . . . . . . . . . . . . . . . . . . . . . . . . 315
1/15/2020 x Version: 5.10-CA::11
Table of Contents
9.2.2.2 Accepting a Write-in As-is on an ICX Marked Ballot: . . . . . . . . . 315
9.2.2.3 Rejecting a Write-in - ICX Marked Ballots . . . . . . . . . . . . . . . . . . 316
Chapter 10: Official Canvass and Post-Election Procedures . . . . . . . . . . . . . . . . . . . . . . . . . . . . . . . . 317
10.1 Election Observer Panel . . . . . . . . . . . . . . . . . . . . . . . . . . . . . . . . . . . . . . . 318
10.2 Canvassing Precinct Returns . . . . . . . . . . . . . . . . . . . . . . . . . . . . . . . . . . . 319
10.3 Canvassing Absentee Ballots . . . . . . . . . . . . . . . . . . . . . . . . . . . . . . . . . . 320
10.4 Canvassing Provisional Ballots . . . . . . . . . . . . . . . . . . . . . . . . . . . . . . . . 323
10.5 Canvassing Write-in Votes . . . . . . . . . . . . . . . . . . . . . . . . . . . . . . . . . . . 323
10.6 1% Manual Recount Procedures . . . . . . . . . . . . . . . . . . . . . . . . . . . . . . . 323
10.7 Handling Ballot Exceptions . . . . . . . . . . . . . . . . . . . . . . . . . . . . . . . . . . . 324
10.8 Post-Election Logic and Accuracy Testing . . . . . . . . . . . . . . . . . . . . . . 324
10.9 Final Reporting of Official Canvass . . . . . . . . . . . . . . . . . . . . . . . . . . . . 325
10.10 Backup and Retention of Election Material . . . . . . . . . . . . . . . . . . . . . 325
10.10.1 General Procedures . . . . . . . . . . . . . . . . . . . . . . . . . . . . . . . . . . . . . 325
10.10.2 Security of Materials Following Ballot Tally . . . . . . . . . . . . . . . . . 325
Chapter 11: Recount Procedures . . . . . . . . . . . . . 32711.1 Request for a Recount . . . . . . . . . . . . . . . . . . . . . . . . . . . . . . . . . . . . . . . . . 327
11.2 Conducting an Electronic Recount . . . . . . . . . . . . . . . . . . . . . . . . . . . . . . 327
11.2.1 Creating Recount Election Projects . . . . . . . . . . . . . . . . . . . . . . . . . . . 327
11.2.2 Recounting the Ballots . . . . . . . . . . . . . . . . . . . . . . . . . . . . . . . . . . . . 328
11.2.3 Consolidating Recounted Results . . . . . . . . . . . . . . . . . . . . . . . . . . . 329
Chapter 12: EMS Administrator's Role in Managing System Security and Integrity . . . . . . . . . . . . . . . 330
12.1 Physical Security of System and Components . . . . . . . . . . . . . . . . . . . . 330
12.1.1 Essential and Non-Essential Services and Ports . . . . . . . . . . . . . . . 332
12.1.2 Anti-Virus Protection . . . . . . . . . . . . . . . . . . . . . . . . . . . . . . . . . . . . . 332
12.1.3 Procedures for Verifying, Checking, and Installing Essential Updates and Changes . . . . . . . . . . . . . . . . . . . . . . . . . . . . . . . . . . . . . . . . . . . . . . . . . . 333
12.1.4 Audit Records for Changes . . . . . . . . . . . . . . . . . . . . . . . . . . . . . . . . 333
12.1.5 Acceptance Testing After the Installation . . . . . . . . . . . . . . . . . . . . 334
12.2 Administrative Control of the Backup and Restore of an Election Project

Democracy Suite® Use Procedures
Version: 5.10-CA::11 xi 1/15/2020
334
12.2.1 Backup of Election Project . . . . . . . . . . . . . . . . . . . . . . . . . . . . . . . . . 334
12.2.2 Restore of Election Project . . . . . . . . . . . . . . . . . . . . . . . . . . . . . . . . 335
12.2.3 Configure Network Parameters . . . . . . . . . . . . . . . . . . . . . . . . . . . . 336
12.2.4 Setting up Project for Additional Audio Languages . . . . . . . . . . . . 336
12.2.5 Creation of RTR User in Election Event Designer . . . . . . . . . . . . . . 337
12.2.6 Initializing Reporting Services . . . . . . . . . . . . . . . . . . . . . . . . . . . . . . 337
12.3 Disabling and Enabling Adjudication in EMS RTR . . . . . . . . . . . . . . . 338
12.4 Preparing ImageCast® Central Election Files for the ImageCast® Central Workstation . . . . . . . . . . . . . . . . . . . . . . . . . . . . . . . . . . . . . . . . . . . . . . . . . . . . 338
12.5 Managing ImageCast® Central Tabulator Folders . . . . . . . . . . . . . . . . 340
12.5.1 Backup ImageCast® Central Tabulator Folders . . . . . . . . . . . . . . . 340
12.5.2 Restore ImageCast® Central Tabulator Folders . . . . . . . . . . . . . . . 340
12.6 Adjudication Administration . . . . . . . . . . . . . . . . . . . . . . . . . . . . . . . . . . 341
12.6.1 Starting ImageCast® Adjudication . . . . . . . . . . . . . . . . . . . . . . . . . . . 341
12.6.2 Project Setup Wizard . . . . . . . . . . . . . . . . . . . . . . . . . . . . . . . . . . . . . . 341
12.6.2.1 Choosing a New Election Project . . . . . . . . . . . . . . . . . . . . . . . . . 341
12.6.2.2 Choosing an Election Project with an Existing Session . . . . . . 343
12.6.2.3 Taking Control of Setup . . . . . . . . . . . . . . . . . . . . . . . . . . . . . . . . 344
12.6.2.4 Security Key Setup . . . . . . . . . . . . . . . . . . . . . . . . . . . . . . . . . . . . 345
12.6.2.5 Install Key from an Existing File . . . . . . . . . . . . . . . . . . . . . . . . . 347
12.6.2.6 Use the Currently Installed Key . . . . . . . . . . . . . . . . . . . . . . . . . 348
12.6.2.7 Security Key Validation . . . . . . . . . . . . . . . . . . . . . . . . . . . . . . . . 349
12.6.2.8 Ballot Filtering . . . . . . . . . . . . . . . . . . . . . . . . . . . . . . . . . . . . . . . 350
12.6.2.9 Contest Highlighting . . . . . . . . . . . . . . . . . . . . . . . . . . . . . . . . . . 354
12.6.2.10 Contest Filtering . . . . . . . . . . . . . . . . . . . . . . . . . . . . . . . . . . . . . . 355
12.6.2.11 Other Options . . . . . . . . . . . . . . . . . . . . . . . . . . . . . . . . . . . . . . . 356
12.6.2.12 Summary Screen . . . . . . . . . . . . . . . . . . . . . . . . . . . . . . . . . . . . . . 357
12.6.3 Administrator Roles . . . . . . . . . . . . . . . . . . . . . . . . . . . . . . . . . . . . . . 358
12.6.3.1 Administrative Screens . . . . . . . . . . . . . . . . . . . . . . . . . . . . . . . . 358
12.6.3.2 Stopping Adjudication . . . . . . . . . . . . . . . . . . . . . . . . . . . . . . . . . . 373
12.6.3.3 Backing up and Restoring Adjudication . . . . . . . . . . . . . . . . . . . 375
12.7 Purging Election Results . . . . . . . . . . . . . . . . . . . . . . . . . . . . . . . . . . . . . . 377
1/15/2020 xii Version: 5.10-CA::11
Table of Contents
12.7.1 Purging Election Results from RTR . . . . . . . . . . . . . . . . . . . . . . . . . . 377
12.8 Security Procedures for Central Processing . . . . . . . . . . . . . . . . . . . . . . 377
12.9 Security Procedures for Polling Places . . . . . . . . . . . . . . . . . . . . . . . . . . . 377
12.9.1 Polling Place Physical Security . . . . . . . . . . . . . . . . . . . . . . . . . . . . . 378
12.10 Audit Trails . . . . . . . . . . . . . . . . . . . . . . . . . . . . . . . . . . . . . . . . . . . . . . . 378
12.10.1 ImageCast® Evolution Audit Trail Files . . . . . . . . . . . . . . . . . . . . . 378
12.10.1.1 ImageCast® Evolution Audit Log File . . . . . . . . . . . . . . . . . . . 378
12.10.2 ImageCast® Precinct 2 Audit Trail Files . . . . . . . . . . . . . . . . . . . . . 379
12.10.2.1 ImageCast® Precinct 2 Audit Log File . . . . . . . . . . . . . . . . . . . . 379
12.10.3 ImageCast® Central Audit Trail Files . . . . . . . . . . . . . . . . . . . . . . . 379
12.10.3.1 Verifying the Number of Votes at Each Polling Station . . . . . . 379
12.10.3.2 ImageCast® Central Audit Log File . . . . . . . . . . . . . . . . . . . . . . 379
12.10.3.3 Audit Mark Images . . . . . . . . . . . . . . . . . . . . . . . . . . . . . . . . . . . 380
12.10.3.4 Audit Trail Files . . . . . . . . . . . . . . . . . . . . . . . . . . . . . . . . . . . . . 380
12.10.4 ImageCast® X Audit Trails . . . . . . . . . . . . . . . . . . . . . . . . . . . . . . . . 381
12.10.5 EMS Audit Trail File . . . . . . . . . . . . . . . . . . . . . . . . . . . . . . . . . . . . . 382
12.10.5.1 EMS Audit Log . . . . . . . . . . . . . . . . . . . . . . . . . . . . . . . . . . . . . . 382
12.10.5.2 Unauthorized Access to the Access Control Capabilities of the Sys-tem . . . . . . . . . . . . . . . . . . . . . . . . . . . . . . . . . . . . . . . . . . . . . . . . . . . . . . . . 382
12.10.5.3 Reports . . . . . . . . . . . . . . . . . . . . . . . . . . . . . . . . . . . . . . . . . . . . . 382
12.10.5.4 Create, Preview and Delete Reports . . . . . . . . . . . . . . . . . . . . . 383
12.10.5.5 How to Download Reports from the NAS Server . . . . . . . . . . 383
12.10.5.6 How to View System Level Logs . . . . . . . . . . . . . . . . . . . . . . . . 384
12.10.5.7 Results Auditing . . . . . . . . . . . . . . . . . . . . . . . . . . . . . . . . . . . . . 384
12.10.5.8 ImageCast® Adjudication Audit Trail . . . . . . . . . . . . . . . . . . . 384
12.10.5.9 Lookup . . . . . . . . . . . . . . . . . . . . . . . . . . . . . . . . . . . . . . . . . . . . . 385
12.10.5.10 EMS Data Center Physical Security . . . . . . . . . . . . . . . . . . . . 386
12.10.5.11 Operational and Maintenance Procedures . . . . . . . . . . . . . . . 386
Chapter 13: Biennial Hardware Certification and Notification . . . . . . . . . . . . . . . . . . . . . . . . . . . . . . . 388
13.1 Notification of Equipment . . . . . . . . . . . . . . . . . . . . . . . . . . . . . . . . . . . . 388

Democracy Suite® Use Procedures
Version: 5.10-CA::11 xiii 1/15/2020
Appendix A: ImageCast® Central Device Configuration Files . . . . . . . . . . . . . . . . . . . . . . . . 389Appendix B: ImageCast® Evolution and ImageCast® Precinct 2 Machine Behavioral Settings . . . . . . . . . . . . . . . . . . . . . . . . . . . . . . . . . . 390
B.1 Polling Place Tabulators . . . . . . . . . . . . . . . . . . . . . . . . . . . . . . . . . . . . . . . 391
B.2 Early Voting Tabulators . . . . . . . . . . . . . . . . . . . . . . . . . . . . . . . . . . . . . . . 391
Appendix C: ImageCast® X Configuration Files . 398C.1 Election Day ICX Configuration . . . . . . . . . . . . . . . . . . . . . . . . . . . . . . . . 399
C.2 Early Vote ICX Configuration . . . . . . . . . . . . . . . . . . . . . . . . . . . . . . . . . . 399
Appendix D: Election Event Designer Supplemental Setup Instructions . . . . . . . . . . . . 400
D.1 Jurisdictions Serviced by Dominion Voting . . . . . . . . . . . . . . . . . . . . . . 400
D.2 Jurisdictions Programming Their Own Elections . . . . . . . . . . . . . . . . . 400
D.2.1 Creating Election Project . . . . . . . . . . . . . . . . . . . . . . . . . . . . . . . . . . 400
D.2.1.1 Set Ballot Consolidation . . . . . . . . . . . . . . . . . . . . . . . . . . . . . . . . 400
D.2.1.2 Setting Header Watermark . . . . . . . . . . . . . . . . . . . . . . . . . . . . . . . 401
D.2.1.3 Maximum Number of Precincts to Associate to an ImageCast® Evo-lution or ImageCast® Precinct 2 . . . . . . . . . . . . . . . . . . . . . . . . . . . . . . . . . 401
D.2.1.4 Defining Counting Group . . . . . . . . . . . . . . . . . . . . . . . . . . . . . . . 403
D.2.1.5 Defining Polling Places . . . . . . . . . . . . . . . . . . . . . . . . . . . . . . . . . 403
D.2.1.6 Defining Tabulators . . . . . . . . . . . . . . . . . . . . . . . . . . . . . . . . . . . . 403
D.2.2 Creating Tabulators in the Ready for Elections Phase . . . . . . . . . . 404
D.2.3 Fonts, Languages and Ligatures . . . . . . . . . . . . . . . . . . . . . . . . . . . . 404
D.2.4 Audio Studio Instructions . . . . . . . . . . . . . . . . . . . . . . . . . . . . . . . . . 405
D.2.5 Creating Additional Audio Files for an Election Project . . . . . . . . . 405
D.2.6 Tabulator Threshold Settings . . . . . . . . . . . . . . . . . . . . . . . . . . . . . . . 405
D.2.7 Programming of Election Files and Security Devices . . . . . . . . . . . 406
D.2.7.1 Programming of CF/SD Cards . . . . . . . . . . . . . . . . . . . . . . . . . . . 406
D.2.7.2 Programming of iButton Security Key . . . . . . . . . . . . . . . . . . . . 406
D.2.7.3 Programming Tech Advisor Smart Cards . . . . . . . . . . . . . . . . . . 407
D.2.7.4 Program USB flash drive for Election File programming group . . .

1/15/2020 xiv Version: 5.10-CA::11
Table of Contents
408
D.2.8 Programming of poll worker Smart Card . . . . . . . . . . . . . . . . . . . . . 409
D.3 Exporting of Voter Activation Codes from EED . . . . . . . . . . . . . . . . . . . . 411
D.4 Importing Activation Codes to the ImageCast® Voter Activation Application . . . . . . . . . . . . . . . . . . . . . . . . . . . . . . . . . . . . . . . . . . . . . . . . . . . . . 414
D.5 Programming of Voter Activation Smart Card . . . . . . . . . . . . . . . . . . . . . 416
D.6 Smart Card Security Recommendations . . . . . . . . . . . . . . . . . . . . . . . . . 424
Appendix E: InterScan HiPro Scanner Handling Checklist . . . . . . . . . . . . . . . . . . . . . . . . . . . . . . . . . 426Appendix F: Troubleshooting and Problem Resolution . . . . . . . . . . . . . . . . . . . . . . . . . . . . . . . . 428
F.1 Installation and Configuration Troubleshooting . . . . . . . . . . . . . . . . . . 428
F.1.1 Hardening Script Verification . . . . . . . . . . . . . . . . . . . . . . . . . . . . . . . 428
F.2 ImageCast® Evolution Troubleshooting . . . . . . . . . . . . . . . . . . . . . . . . . 429
F.2.1 Replacing a Machine . . . . . . . . . . . . . . . . . . . . . . . . . . . . . . . . . . . . . . 429
F.2.2 Paper Jams . . . . . . . . . . . . . . . . . . . . . . . . . . . . . . . . . . . . . . . . . . . . . . 430
F.2.2.1 Paper Jam in Scanner Path . . . . . . . . . . . . . . . . . . . . . . . . . . . . . . 430
F.2.3 Power Failures . . . . . . . . . . . . . . . . . . . . . . . . . . . . . . . . . . . . . . . . . . . . 431
F.2.3.1 Faulty Main's Power Source . . . . . . . . . . . . . . . . . . . . . . . . . . . . . . 431
F.2.3.2 Faulty or Disconnected Power Adapter . . . . . . . . . . . . . . . . . . . . 432
F.2.4 Thermal Printer . . . . . . . . . . . . . . . . . . . . . . . . . . . . . . . . . . . . . . . . . . 432
F.2.4.1 No Print on Thermal Paper or Printer Fails to Print . . . . . . . . . 432
F.2.4.2 Thermal Printer Prints Invalid Characters . . . . . . . . . . . . . . . . . 433
F.2.5 Touchscreen Failures . . . . . . . . . . . . . . . . . . . . . . . . . . . . . . . . . . . . . . 433
F.3 ImageCast® Central Troubleshooting . . . . . . . . . . . . . . . . . . . . . . . . . . . 433
F.3.1 Ballot Scanning Errors . . . . . . . . . . . . . . . . . . . . . . . . . . . . . . . . . . . . . 433
F.3.1.1 Ambiguous Errors . . . . . . . . . . . . . . . . . . . . . . . . . . . . . . . . . . . . . . 433
F.3.1.2 Invalid Ballot Errors . . . . . . . . . . . . . . . . . . . . . . . . . . . . . . . . . . . 434
F.3.1.3 InterScan HiPro Scanning Errors . . . . . . . . . . . . . . . . . . . . . . . . . 434
F.3.2 Scanner Paper Jam Errors . . . . . . . . . . . . . . . . . . . . . . . . . . . . . . . . . . 437
F.3.2.1 HiPro Scanner Paper Jam Error . . . . . . . . . . . . . . . . . . . . . . . . . . . 437
F.3.2.2 HiPro Scanner Double Feed when Accepting a Batch . . . . . . . . . 437

Democracy Suite® Use Procedures
Version: 5.10-CA::11 xv 1/15/2020
F.3.2.3 HiPro Scanner Double Feed when Discarding a Batch . . . . . . . 439
F.3.3 ICC Error Messages . . . . . . . . . . . . . . . . . . . . . . . . . . . . . . . . . . . . . . . 440
F.4 Adjudication Troubleshooting . . . . . . . . . . . . . . . . . . . . . . . . . . . . . . . . . 442
F.4.1 Communication with the Adjudication Service . . . . . . . . . . . . . . . . 442
F.5 EMS Troubleshooting . . . . . . . . . . . . . . . . . . . . . . . . . . . . . . . . . . . . . . . . 442
F.5.1 Submission and Publishing of Batches . . . . . . . . . . . . . . . . . . . . . . . 443
F.6 ImageCast® X Troubleshooting . . . . . . . . . . . . . . . . . . . . . . . . . . . . . . . . 444
F.6.1 Power failure . . . . . . . . . . . . . . . . . . . . . . . . . . . . . . . . . . . . . . . . . . . . . 444
F.6.2 Printer paper jam . . . . . . . . . . . . . . . . . . . . . . . . . . . . . . . . . . . . . . . . . 444
F.6.2.1 Low Toner . . . . . . . . . . . . . . . . . . . . . . . . . . . . . . . . . . . . . . . . . . . . 444
F.6.3 Replacing BMD printer . . . . . . . . . . . . . . . . . . . . . . . . . . . . . . . . . . . . 445
F.6.4 Replacing ICX device . . . . . . . . . . . . . . . . . . . . . . . . . . . . . . . . . . . . . . 445
F.7 ImageCast® Precinct 2 Troubleshooting . . . . . . . . . . . . . . . . . . . . . . . . 446
F.7.1 Power-up/Set-up Issues . . . . . . . . . . . . . . . . . . . . . . . . . . . . . . . . . . . . 446
F.7.1.1 Tabulator Does not Power-up . . . . . . . . . . . . . . . . . . . . . . . . . . . . 446
F.7.1.2 Security Key (iButton) Error . . . . . . . . . . . . . . . . . . . . . . . . . . . . . 446
F.7.2 Report Printer (Thermal Printer) Issues . . . . . . . . . . . . . . . . . . . . . . 447
F.7.2.1 Thermal Tape Printer Error - Loose Pressure Roller . . . . . . . . . 447
F.7.2.2 Thermal Tape Printer Error - No Paper Loaded . . . . . . . . . . . . . 447
F.7.2.3 Report Tape not Printing on Thermal Paper . . . . . . . . . . . . . . . 447
F.7.3 Scanner (Tabulator) Issues . . . . . . . . . . . . . . . . . . . . . . . . . . . . . . . . . 448
F.7.3.1 Scanner (Tabulator) Does not Accept Ballots . . . . . . . . . . . . . . . 448
F.7.3.2 Scanner (Tabulator) Paper Jam . . . . . . . . . . . . . . . . . . . . . . . . . . 448
Appendix G: Threat Register . . . . . . . . . . . . . . . . 452Appendix H: Physical Security of Democracy Suite® System and Components . . . . . . . . . . . . . . 460
H.1 Re-Zero Results Using the Advanced Admin Option . . . . . . . . . . . . . . 460
H.2 Physical Security . . . . . . . . . . . . . . . . . . . . . . . . . . . . . . . . . . . . . . . . . . . . 462
H.3 Plastic Ballot Box Physical Security . . . . . . . . . . . . . . . . . . . . . . . . . . . . 463
H.4 ImageCast® Evolution Physical Security . . . . . . . . . . . . . . . . . . . . . . . . 467
H.5 ImageCast® Central Physical Security . . . . . . . . . . . . . . . . . . . . . . . . . . 469
H.6 ImageCast® Precinct 2 Physical Security . . . . . . . . . . . . . . . . . . . . . . . . 470

1/15/2020 xvi Version: 5.10-CA::11
Table of Contents
H.6.1 Sealing Administrator and Poll Worker Memory Card Access Ports . . . 471
H.6.2 Sealing the Thermal Report Printer Door . . . . . . . . . . . . . . . . . . . . 472
H.6.3 Sealing the Modem Port . . . . . . . . . . . . . . . . . . . . . . . . . . . . . . . . . . . . 473
H.7 Re-zeroing the ICP2 . . . . . . . . . . . . . . . . . . . . . . . . . . . . . . . . . . . . . . . . . . 473
H.8 EMS Server and Workstation Physical Security . . . . . . . . . . . . . . . . . . . 473
H.9 ImageCast® X Physical Security . . . . . . . . . . . . . . . . . . . . . . . . . . . . . . . . 477
H.10 Reset the Number of Printed Ballots on ImageCast® X . . . . . . . . . . . 480
H.11 Clear All Election Data on ImageCast® X . . . . . . . . . . . . . . . . . . . . . . . 480
Appendix I: Permanent Printed Reports . . . . . . 482I.1 Diagnostics Report . . . . . . . . . . . . . . . . . . . . . . . . . . . . . . . . . . . . . . . . . . . 482
I.2 Zero Report . . . . . . . . . . . . . . . . . . . . . . . . . . . . . . . . . . . . . . . . . . . . . . . . . 482
I.3 Interrupt Report . . . . . . . . . . . . . . . . . . . . . . . . . . . . . . . . . . . . . . . . . . . . . 482
I.4 Results Report . . . . . . . . . . . . . . . . . . . . . . . . . . . . . . . . . . . . . . . . . . . . . . . 483
I.5 Status Report . . . . . . . . . . . . . . . . . . . . . . . . . . . . . . . . . . . . . . . . . . . . . . . . 483
Revision History . . . . . . . . . . . . . . . . . . . . . . . . . . . . . . . . . . . . . . . . . . . . . . . . . . . 485
List of Figures . . . . . . . . . . . . . . . . . . . . . . . . . . . . . . . . . . . . . . . . . . . . . . . . . . . . . 486
List of Tables . . . . . . . . . . . . . . . . . . . . . . . . . . . . . . . . . . . . . . . . . . . . . . . . . . . . . . 495
Index . . . . . . . . . . . . . . . . . . . . . . . . . . . . . . . . . . . . . . . . . . . . . . . . . . . . . . . . . . . . 496

Version: 5.10-CA::11 1 1/15/2020
Democracy Suite® Use Procedures
CHAPTER 1: INTRODUCTION
This document describes Dominion Voting Systems’ Democracy Suite® 5.10 platform as outlined in the Voting System Use Procedures for California Template.
1.1 System Description and ComponentsThis section defines the system description and components as specified by section 1.1 of the System Use Procedures for California Template.
1.1.1 ImageCast® Evolution (ICE)
Figure 1-1: ImageCast® Evolution
ImageCast® Evolution Ballot Counter is a precinct-based optical scan ballot tabulator that is used in conjunction with ImageCast®-compatible ballot boxes. The system is designed to scan marked paper ballots, interpret voter marks on the paper ballot, and safely store and tabulate each vote made on the ballot. As well, the ImageCast® Evolution supports enhanced accessibility voting through optional accessories that are connected to the unit and via the 18.5" LCD touchscreen.
1/15/2020 2 Version: 5.10-CA::11
Chapter 1 - Introduction
Once an accessible voting session has been activated, the Voter inserts a blank ballot and makes their selections using the Audio Tactile Interface (ATI), Paddles, or Sip 'n' Puff devices. When the accessible voting session has been completed, the ImageCast® Evolution will mark the ballot according to the selections made in a manner that renders it indistinguishable from normally printed and hand-marked ballots. This ballot is then scanned back into the ImageCast® Evolution for tabulation, which is then deposited into the secured ImageCast® ballot box.
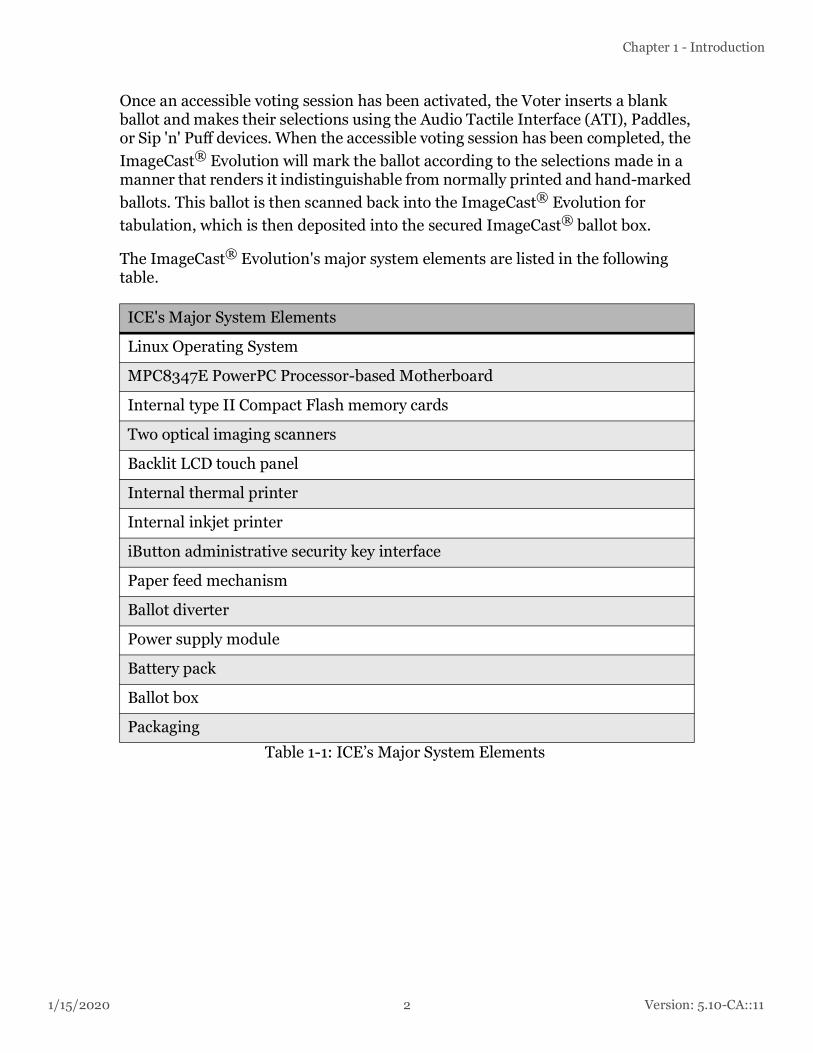
The ImageCast® Evolution's major system elements are listed in the following table.
ICE's Major System Elements
Linux Operating System
MPC8347E PowerPC Processor-based Motherboard
Internal type II Compact Flash memory cards
Two optical imaging scanners
Backlit LCD touch panel
Internal thermal printer
Internal inkjet printer
iButton administrative security key interface
Paper feed mechanism
Ballot diverter
Power supply module
Battery pack
Ballot box
Packaging
Table 1-1: ICE’s Major System Elements
Version: 5.10-CA::11 3 1/15/2020
Democracy Suite® Use Procedures
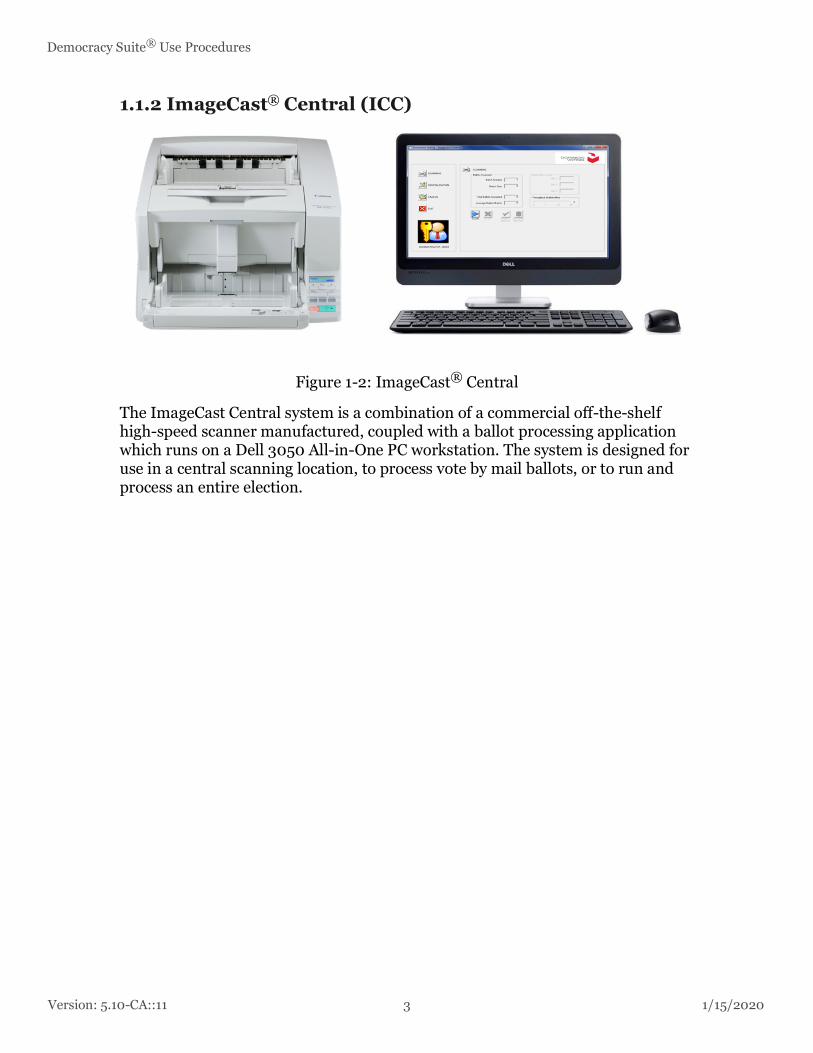
1.1.2 ImageCast® Central (ICC)
Figure 1-2: ImageCast® Central
The ImageCast Central system is a combination of a commercial off-the-shelf high-speed scanner manufactured, coupled with a ballot processing application which runs on a Dell 3050 All-in-One PC workstation. The system is designed for use in a central scanning location, to process vote by mail ballots, or to run and process an entire election.

1/15/2020 4 Version: 5.10-CA::11
Chapter 1 - Introduction
The ImageCast® Central's major system elements are listed in the following table.
ICC's Major System Elements
Windows 10 Pro, version 1803 64-bit operating system
All-In-One Computer:
• IntelCore i7 processor (Quad Core, 8 MB, 8 T, 3.4 GHz, 65 W)
• 8 GB RAM
• 500 GB hard disk
• CDROM/DVD ROM reader
• Ethernet port for uploading results files
• Dedicated USB port for:
• 1-wire iButton Reader
• Compact Flash card reader
• Scanner
Tower:
• Intel Core i7-8700T (6 Cores/12MB/12T/up to 4.0GHz/35W)
• 16 GB
• 256 GB SSD
• CDROM/DVD ROM reader
• Ethernet port for uploading results files
• Dedicated USB port for:
• 1-wire iButton Reader
• Compact Flash card reader
• Scanner
Touch screen monitor
Scanner:
• Canon DR-G1130
• Canon DR-G2140
• Canon DR-X10C
• InterScan HiPro
Table 1-2: ICC's Major System Elements

Version: 5.10-CA::11 5 1/15/2020
Democracy Suite® Use Procedures
1.1.3 ImageCast® Precinct 2
Figure 1-3: ImageCast® Precinct 2
The ImageCast® Precinct 2 (ICP2) is a precinct optical scan ballot tabulator designed to scan marked paper ballots, interpret voter marks on the paper ballot, communicate these interpretations back to the voter, and upon acceptance by the voter, deposit the ballots into the secure ballot box.
The ICP2’s major system elements are listed in the following table.
ICP2’s Major System Elements
Linux Operating System
NXP i.MX6 Dual Core Processor-based Motherboard
Internal SD memory cards
Two optical imaging scanners
5.7” LCD touch panel
Internal thermal printer
iButton administrative security key interface
Paper feed mechanism
Ballot diverter
Table 1-3: ICP2’s Major System Elements

1/15/2020 6 Version: 5.10-CA::11
Chapter 1 - Introduction
1.1.4 Election Management System (EMS)
Figure 1-4: EMS Workstation and EMS Server
The Democracy Suite® Election Management System (EMS) is a set of applications used for defining and managing elections. EMS runs on a Dell Precision T3430 workstation and Dell R640 server. The complete EMS software platform consists of client and server applications as follows:
Applications:
• Democracy Suite® EMS Audio Studio: A supplementary client application used to record audio files for an election project. As such, it is used during the pre-voting phase of the election cycle.
• Democracy Suite® EMS Election Data Translator: A supplementary client application used to import, edit, and export template election project data into, and out of, Election Event Designer.
• Democracy Suite® EMS File System Service : A standalone service that runs on client machines for the partitioning of Compact Flash cards.
• Democracy Suite® EMS Data Center Manager: A system level configuration application used in the EMS back-end data center configuration.
Battery pack
Ballot box
Packaging
ICP2’s Major System Elements
Table 1-3: ICP2’s Major System Elements (Continued)

Version: 5.10-CA::11 7 1/15/2020
Democracy Suite® Use Procedures
• Democracy Suite® EMS ApplicationServer: A server-side application responsible for executing long running processes such as rendering ballots, generating audio and election files, etc.
• Democracy Suite® EMS Election Event Designer: Provides election definition functionality and represents a main pre-voting phase end-user application.
• Democracy Suite® EMS Results Tally & Reporting: Provides election results acquisition, validation, tabulation, reporting, and publishing capabilities, and represents a main post-voting phase enduser application.
• Democracy Suite® ImageCast® Adjudication: A set of server-side services and a client-side application that provide adjudication of ImageCast® Central ballot images.
Data Repositories:
• Democracy Suite® EMS Network Attached Storage (NAS) Server: A server-side file repository of the election project file-based artifacts, such as ballots, audio files, reports, log files, election files, etc.
• Democracy Suite® EMS Database Server: A server-side RDBMS repository of the election project database that holds all pre-voting and post-voting election project data.
1.1.5 ImageCast® X (ICX)
Figure 1-5: ImageCast® X

1/15/2020 8 Version: 5.10-CA::11
Chapter 1 - Introduction
ImageCast® X is a ballot marking device, which includes a commercial off-the-shelf Android device and compatible printer. The Android device is running a BMD application in KIOSK mode.The system is designed for use on a polling location, to produce marked ballots that can be scanned using an ICC, ICE or ICP2 tabulator.
The ImageCast® X 's major system elements are listed in the following table.
ICX's Major System Elements
Android 8.1
Intel(R)Atom(TM)CPU Z3735F @ 1.33 GHz
2 GB RAM
32 GB solid state disk
ACOS Smart Card Reader
Printer:
• HP LaserJet Pro 402dne
Dedicated USB port for:
• USB stick with election files
• Smart Card Reader
• Printer
• AVS device
Battery and UPS for standalone operation
Table 1-4: ICX's Major System Elements
Version: 5.10-CA::11 9 1/15/2020
Democracy Suite® Use Procedures
1.2 Terms and Definitions• Absentee Ballot: (EAC 2005 definition) Ballot cast by a Voter who is
unable to vote in person at their Polling Place on Election Day.
• Accessible Voting Session (AVS): A method of voting for voters who are unable to easily mark their paper ballot. Audio, visual, and tactile interfaces are used in any voter-preferred combination to navigate and mark a ballot.
• Accuracy Test: Consists of tabulating a known number of ballots, with a known pattern of voted positions, into the Election Management System to ensure its accuracy. This test is used to verify that the election project set-up, the production of the ballots, and the vote tallying hardware are operating correctly.
• Adjudication: The process of examining voted ballots to determine, and, in the judicial sense, adjudicate voter intent. The application used for this purpose is primarily ImageCast® Adjudication.
• Application Server (APPS): A server-side application responsible for executing long-running processes such as rendering ballots, generating audio and election files, etc.
• Audio Studio (AS): A supplementary pre-voting user application used to review, record and import audio files for an election project.
• Audio Tactile Interface (ATI): A hand-held controller that allows a voter, who is unable, to mark their paper ballot, to navigate and make selections to a ballot that is presented in audio and visual form during an Accessible Voting Session.
• Audit Trail: (EAC 2005 definition) Recorded information that allows Election Officials to review the activities that occurred on the voting equipment, to verify or reconstruct the steps followed without compromising the ballot or Voter secrecy.
• Backup: Equipment and procedures available in the event of failure of the voting system.
• Ballot: (EAC 2005 definition) The official presentation of all of the contests to be decided in a particular election.
• Ballot Box: A secure ballot storage container where tabulated ballots are automatically deposited once scanned through an ImageCast® tabulator.
• Ballot Counter: (EAC 2005 definition) Process in a voting device that counts the votes cast in an election.
• Ballot Definition: (EAC 2005 definition) Information that describes to a voting machine the content and appearance of the ballots to be used in an election.

1/15/2020 10 Version: 5.10-CA::11
Chapter 1 - Introduction
• Ballot Definition Subsystem: Includes all hardware, software, and manual procedures required to accomplish the following:
• Administrative Activities
• Candidate and Contest Definition
• Voter Registration Databases Management
• Ballot Generation
• Election Programming
• Ballot Printing/Display
• Ballot Validation
• Ballot Image: (EAC 2005 definition) An electronically produced record of all votes cast by a single Voter.
• Ballot Layout: The ballot configuration unique to each precinct or split precinct that encompasses all candidates, including any rotation of candidate names, and ballot measures.
• Ballot Style: (EAC 2005 definition) A particular set of contests to appear on the ballot for a particular election district, their order, the list of ballot positions for each contest, and the binding of candidate names to ballot positions.
• Ballot Subset: Portion of a ballot that a particular Voter is eligible to vote on.
• Ballot Tabulation: Process of totaling, or tallying votes.
• Ballot Write-In Voting Position: For selected offices on the ballot, space is available for the voter to write-in the name of a candidate not listed on the ballot and mark its voting position.
• Blank Ballot: A ballot on which there are no voting position marks that can be read by the voting system.
• Candidate: (EAC 2005 definition) Person contending in a contest for office. A candidate may be explicitly presented as one of the choices on the ballot or a write-in candidate.
• Canvass: (EAC 2005 definition) Compilation of election returns and validation of the outcome that forms the basis of the official results by the political subdivision.
• Central Count System: (EAC 2005 definition) A voting system that tabulates ballots from multiple precincts at a central location. Voted ballots are placed into secure storage at the polling place. Stored ballots are transported/transmitted to a central counting place which produces the vote count report.

Version: 5.10-CA::11 11 1/15/2020
Democracy Suite® Use Procedures
• Central Counting Location: The place where the following operations occur:
• Tabulate ballots or accumulate the results of previously tabulated ballots at one or more Central Counting Locations.
• Merge the voting data produced by dissimilar voting systems.
• Program or reprogram ballot-tabulating devices after Opening the Polls.
• Edit Vote Tally programs or voting data.
• Certification Message: A message, followed by signature lines, which may be printed on reports attesting that the statistics and results are true to the best of the Precinct Board's/Central Count Operator's knowledge.
• Contest: (EAC 2005 definition) Decision to be made within an election, which may be a contest for office or a referendum, propositions and/or questions. A single ballot may contain one or more contests.
• Contest Headers: Space on the displayed ballot image where the contest name is shown.
• CPU (Central Processing Unit): Commonly used abbreviation to describe the central processing unit of a computer or computer system as distinguished from other peripheral devices or components.
• Cumulative Voting: (EAC 2005 definition) A method of voting exclusive to multi-member district election (e.g. county board) in which each voter may cast as many votes as there are seats to be filled and may cast two or more of those votes for a single candidate.
• Demonstration Ballot: A ballot used for demonstration purposes, which displays a mock election. Such ballots may be used and re-used for demonstrations from election to election.
• Device Configuration File (DCF): The file that holds configuration parameters as defined by EMS applications and passed onto the ICC tabulator during an election.
• Diagnostic Messages: Appropriate message printed by the election log, under certain conditions, which indicates a problem or condition, as well as the recovery procedure. Such messages are tracking toints in the audit trail.
• Election: (EAC 2005 definition) A formal process of selecting a person for public office or of accepting/rejecting a political proposition by voting.
• Election Coding: (EAC 2005 definition) Process by which election officials or their designees using voting system software to logically define the ballot for a specific election.
• Election Cycle: Represents all activity required to conduct an election. Comprised of the following election phases:

1/15/2020 12 Version: 5.10-CA::11
Chapter 1 - Introduction
• Pre-election: Includes all preparation activities occurring before opening the polls.
• Election: Includes all activities occurring during the election, including opening the polls or vote centers, conducting the election, and closing the polls or vote centers.
• Post-Election: Includes all activities occurring after closing the polls.
• Election Database: Database created for each election that defines the appropriate election parameters, attributes and other election-specific information.
• Election: The phase of the election, which allows for official ballots to be cast, during the official election. Includes all activities occurring during the following sub-phases:
• Opening the polls or vote centers
• Election
• Closing the polls or vote centers
• Election Definition Cycle: The step-by-step processes used to program and prepare an election using the Democracy Suite® Election Management System's set of applications.
• Election Definition Files: A term used to collectively describe both device configuration and voter information files, which are stored on Compact Flash cards within the ImageCast® series of tabulators.
• Election Event Designer (EED): The primary pre-voting end user application used to define, design, and program an election event.
• Election Management System (EMS): A set of applications for all pre-voting and post-voting activities accomplished in the process of defining and managing an election. These applications include Election Event Designer, Results Tally & Reporting, Audio Studio, Election Data Translator, Results Transfer Manager, Adjudication, Application Server Manager and Data Center Manager.
• Election Official (EO): Applies to the county clerk, the county registrar of voters, the city clerk, or any other person who has been properly and legally charged with the responsibility of conducting the election. They may deputize others to perform functions.
• Election Programming: (EAC 2005 definition) Process by which election officials or their designees use voting system software to logically define the ballot for a specific election.
• Election Stage: Individual operational activity, which occurs within an election phase. Several election stages make up an election phase. Some election stages are required, others are optional.

Version: 5.10-CA::11 13 1/15/2020
Democracy Suite® Use Procedures
• Electronic Mobile Ballot (EMB): A ballot produced by the Ballot Marking Device (BMD).
• 'Famous Names' Ballot: A mock election ballot with historic figures running for fictitious offices. This ballot is intended for both demonstrations, and Accuracy Tests.
• ImageCast® Adjudication: The application that is used to examine and adjudicate ballots scanned, predominantly, by the ICC.
• ImageCast® Central (ICC): A central ballot scan tabulator coupled with a ballot processing application, which is primarily used to process absentee ballots.
• ImageCast® Evolution (ICE): A precinct voter-fed paper ballot tabulator with an integrated inkjet ballot marking device and touchscreen.
• ImageCast® Precinct 2 (ICP2): A precinct voter-fed paper ballot tabulator with a touchscreen.
• ImageCast® X (ICX): A precinct ballot marking device.
• iButton Security Key: A computer chip enclosed in a 16mm-thick stainless steel capsule, used as an administrative security key for accessing secured menus within the Democracy Suite® set of products and applications.
• Initialization: Process of returning a computer to its original state when the program was first to run, by returning all counters to zero or their starting values.
• Local Election Official (LEO): The individual or officer of a local governmental unit responsible for certifying candidates and issues to be placed on the ballot.
• Logic and Accuracy Test (LAT): Tests which must be run before processing official ballots for an election. The logic test group of ballots has predetermined totals for all contests on the ballot.
• Machine Behavior Settings (MBS): The settings that hold configuration parameters as defined by EMS applications and passed onto the ICE and ICP2. These settings define and determine the behavior of the ICE and ICP2 during an election.
• Maintenance Diagnostics: Series of software and hardware tests and system utilities that allow for troubleshooting and setting system parameters.
• Network: An interconnected system of transmission lines that allows the following to communicate with each other:
• Computers

1/15/2020 14 Version: 5.10-CA::11
Chapter 1 - Introduction
• Terminals
• Peripheral Devices
• Similar types of equipment
• Network Attached Storage (NAS): A server-side repository used for storing files and data related to the election cycle.
• Non-Partisan Offices: (EAC 2005 definition) Elected offices for which candidates run without political party affiliation.
• Official Canvass: Consists of the post-election processing of all valid Vote-By-Mail (VBM), write-in, and provisional ballots, an audit of the counting process, and reporting of final results to the secretary of state (SOS).
• Official Election: Election sub-phase, when voters cast official ballots for their candidate choices.
• Open Primary: (EAC 2005 definition) Primary election in which any voters, regardless of political affiliation, may participate. Some states require voters to publicly declare their choice of party ballot at the polling place, after which the poll worker provides/activates the appropriate ballot. Other states allow the voters to make their choice of party ballot within the privacy of the voting booth.
• Opening the Polls: Election fay sub-phase, which allows for opening the polls, for the official election sub- phase.
• Overvote: (EAC 2005 definition) Voting for more than the maximum number of selections allowed in a contest.
• Overvoted Ballot: A ballot where the voter has voted for more than the allotted number of candidates for one or more offices being contested.
• Paddles: Hand or foot-operated switches attached to the ATI. Paddles are used to navigate and make selections to the ballot during an accessible voting session.
• Partisan Offices: (EAC 2005 definition) Elected offices for which candidates run as representatives of a political party.
• Post-Election: Election phase, which includes all activities occurring after closing the polls.
• Post-Election LAT (Logic and Accuracy Tests): Optional post-election function, which includes post-election logic and accuracy tests, for ballot verification and public oversight of ballot integrity.
• Pre-Election: An election phase, which includes all activities occurring before opening the polls.

Version: 5.10-CA::11 15 1/15/2020
Democracy Suite® Use Procedures
• Pre-Election LAT (Logic and Accuracy Tests): Pre-Election function, which includes mandatory logic and accuracy tests, which are performed during pre-election, for electronic verification and public oversight of ballot integrity.
• Precinct Count System: (EAC 2005 definition) A voting system that tabulates ballots at the polling place. These systems typically tabulate ballots as they are cast and print the results after the close of polling. For DREs, and for some paper-based systems, these systems provide electronic storage of the vote count and may transmit results to a central location over public telecommunications networks.
• Printer (thermal): System component that is used to produce reports of the vote tally.
• Protective Counter: A function of the ballot tabulator, which includes a counter that records the number of all of the ballots tabulated since the device was built.
• Provisional Ballot: (EAC 2005 definition) Ballot provided to individuals who claim they are eligible to vote but whose eligibility cannot be verified when they present themselves to vote. Once voted, such ballots are not included in the tabulation until after the voter's eligibility is confirmed.
• Provisional Voting: (EAC 2005 definition) Ballot provided to individuals who claim they are eligible to vote but whose eligibility cannot be confirmed when they present themselves to vote. Once voted, such ballots are not included in the tabulation until after the Voter's eligibility is confirmed. In some jurisdictions called an Affidavit Ballot.
• Public Counter: (FEC 2002 definition) Counter in a voting system that counts the ballots cast in a single election or election test.
• Recall Voting: (EAC 2005 definition) Process that allows voters to remove their elected representatives from office prior to the expiration of their term of office. The recall may involve not only the question of whether a particular officer should be removed but also the question of naming a successor in the event that there is an affirmative vote for the recall.
• Results Tally & Reporting (RTR): The primary post-voting user application that integrates election results acquisition, validation, tabulation, reporting, and publishing capabilities.
• Rotation: (EAC 2005 definition) Process of varying the order of the candidate names within a given contest.
• Secrecy Sleeve: An envelope or folder of such design and dimensions used to hide the voted ballot to ensure voter's privacy.

1/15/2020 16 Version: 5.10-CA::11
Chapter 1 - Introduction
• Semi-official Canvass: The process of collecting processing, and tabulating ballots on election night. This may include reporting results to the Secretary of State. The semi-official canvass may include some or all of the absentee vote totals. The semi-official canvass is contrasted with the official canvass which begins no later than the first Thursday following the election and, for statewide elections, must result in final certification 28 days following the election.
• Sip & Puff: A pneumatic breath-operated switch attached to the ATI and used to navigate, and make selections on a ballot during an accessible voting session.
• Split Precinct: (EAC 2005 definition) A precinct that contains an election district subdivision, e.g., a water district or school board district, requiring an additional ballot configuration.
• Spoiled Ballot: (EAC 2005 definition) Ballot that has been voted but will not be cast.
• System Proofing: Procedure which verifies that all materials, files, and programs for an election are correctly prepared. This proofing is normally done in approximately two (2) weeks, during the period consisting of 40 days to approximately 14 days prior to election day. Logic and accuracy tests are included in system proofing.
• Test Deck: A pre-marked stack of ballots which will generate a predictable pattern of results, when scanned into a tabulator programmed for that election project. This deck would be used for accuracy testing.
• Undervote: (EAC 2005 definition) Occurs when:
• The number of choices selected by a voter in a contest is less than the maximum number allowed for that contest.
• No selection is made for a single choice contest.
• Undervoted Ballot: A ballot where the voter has voted for less than the total number of election contests listed on the ballot, or less than the number of positions to be filled for a single office.
• Virtual Outstack: A function within the ImageCast® Central application where ballots containing voter exceptions (e.g. misread, an overvote, undervote, blank, ambiguously marked ballots), will halt the scanning process and notify the operator which ballot in the batch contains the voter exception.
• Vote By Mail Ballots: See absentee ballots.
• Vote For: (EAC 2005 definition) A ballot choice in which voters are allowed to:
• Vote for a specified number (N) of candidates
• Vote in a multi-seat (M) contest

Version: 5.10-CA::11 17 1/15/2020
Democracy Suite® Use Procedures
• Voted Ballot: (EAC 2005 definition) Ballot that contains all of a voter's selections and has been cast.
• Voter Information Files (VIFs): Election information including, but not limited to, ballot layouts, contests, and candidate names, that are stored on the CompactFlash cards within the tabulator.
• Write-In: (EAC 2005 definition) To make a selection of an individual not listed on the ballot. In some jurisdictions, voters may do this by:
• Using a marking device to physically write their choice on the ballot
• Using a keypad, touchscreen, or other electronic means to enter the name.
• Write-In Ballot: A ballot where a vote has been cast in a race for a candidate whose name does not appear on the ballot.
• Write-In Candidate: Optional candidate type used to provide a means for the voter to write the name of a candidate whose name does not appear on the ballot.

1/15/2020 18 Version: 5.10-CA::11
Chapter 1 - Introduction
1.3 Use Procedure SummaryIn the period prior to the election, it is necessary to perform several levels of tests, each having a different role in the period leading to the election. This includes:
1. Acceptance Testing: This is a test executed upon receiving the hardware equipment in order to verify that the equipment is in good working order.
2. System Readiness Testing Procedures: This test is run after installing and configuring the whole Democracy Suite® system. The goal is to verify that products are configured to run as an integrated system. This test does not require a specific election project (file) and is usually performed on a single ImageCast® Evolution, ImageCast® Precinct 2 and/or ImageCast® Central tabulator.
3. Logic and Accuracy Test: This test is a rehearsal run prior to an election to confirm everything runs and operates as intended, including the very election project that is programmed for that specific election. Therefore, this test is run with actual election files that are going to be used during the election. If successful, the results are backed up and archived, and then that same system, equipment and files are used in an actual election (including CF Cards, applicable Smart Cards, iButtons, ballots etc.). In this test, every tabulator defined in the election project must be tested.
In addition to the tests listed above, this document describes the election day (period) use procedures for running an actual election on the Democracy Suite® platform. These steps are similar to the logic and accuracy test procedure, with differences in equipment preparation and handling, and backup/restore tasks. The procedure related to the election period assume that the logic and accuracy test was completed and starts from the chapter Post-L&A Preparation for Election Day.
All tests mentioned above are described in detail in the following chapters. Prior to executing the logic and accuracy test, ensure that the system is configured as specified in chapter 3 “System Installation and configuration”. The procedure suggested in this document is based on the following set of assumptions:
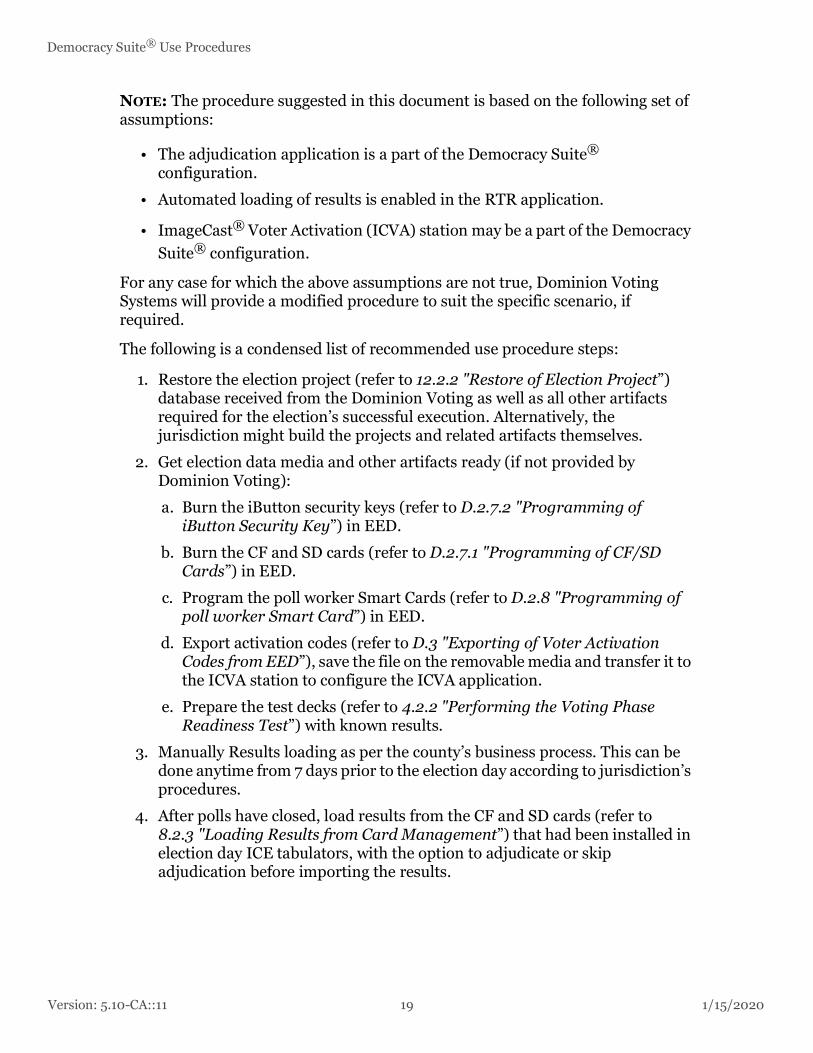
Version: 5.10-CA::11 19 1/15/2020
Democracy Suite® Use Procedures
NOTE: The procedure suggested in this document is based on the following set of assumptions:
• The adjudication application is a part of the Democracy Suite® configuration.
• Automated loading of results is enabled in the RTR application.
• ImageCast® Voter Activation (ICVA) station may be a part of the Democracy Suite® configuration.
For any case for which the above assumptions are not true, Dominion Voting Systems will provide a modified procedure to suit the specific scenario, if required.
The following is a condensed list of recommended use procedure steps:
1. Restore the election project (refer to 12.2.2 "Restore of Election Project”) database received from the Dominion Voting as well as all other artifacts required for the election’s successful execution. Alternatively, the jurisdiction might build the projects and related artifacts themselves.
2. Get election data media and other artifacts ready (if not provided by Dominion Voting):
a. Burn the iButton security keys (refer to D.2.7.2 "Programming of iButton Security Key”) in EED.
b. Burn the CF and SD cards (refer to D.2.7.1 "Programming of CF/SD Cards”) in EED.
c. Program the poll worker Smart Cards (refer to D.2.8 "Programming of poll worker Smart Card”) in EED.
d. Export activation codes (refer to D.3 "Exporting of Voter Activation Codes from EED”), save the file on the removable media and transfer it to the ICVA station to configure the ICVA application.
e. Prepare the test decks (refer to 4.2.2 "Performing the Voting Phase Readiness Test”) with known results.
3. Manually Results loading as per the county’s business process. This can be done anytime from 7 days prior to the election day according to jurisdiction’s procedures.
4. After polls have closed, load results from the CF and SD cards (refer to 8.2.3 "Loading Results from Card Management”) that had been installed in election day ICE tabulators, with the option to adjudicate or skip adjudication before importing the results.

1/15/2020 20 Version: 5.10-CA::11
Chapter 1 - Introduction
5. Load results from the CF/SD cards (refer to 8.2.3 "Loading Results from Card Management”) that had been installed in early vote ICE and ICP2 tabulators - (refer to 8.2.7.1 "Early Vote ImageCast® Evolution and ImageCast® Precinct 2”), with the option to skip adjudication or adjudicate.
6. Validate and publish all results (refer to 8.2.5 "Validate and Publish Results”).
7. Run the election night summary report (refer to 8.2.6 "Election Night Summary Report - Election Day Report”). This report is run on election night and contains a mix of adjudicated and un-adjudicated result files.
8. In the period beginning the day after the election:
a. Select all result files in “Skipped Adjudication” status and click Reject.This will change the status from “Published” to “Rejected”.
b. Then, select those same result files and click "Reset" - this action will change the state of those result files from "Rejected" to "Initial".
c. Finally, click “Allow Adjudication” for all those result files that will result in their adjudication state being transformed from “Skipped” to “Pending Adjudication”.
9. Adjudicate remaining result files, resolving write-ins in the process (see Adjudication Process 9.1 “Adjudication Process” and Adjudication Process - Digital Ballots 9.2 “Adjudication Process - ICX Marked Ballots”).
10. Handle any provisional ballots and any ballots that need to be remade.
11. Once completed, validate and publish all result files and run Statement of Votes Cast reports.
12. If the procedure is done during the L&A testing ,then:
a. Back up all results (see 12.2.1 “Backup of Election Project”, backup ImageCast® Central Tabulator Folders1 and back up of the adjudication databases (refer to 12.6 "Adjudication Administration”)).
b. Purge results (refer to 12.7 "Purging Election Results”) from the system.
c. Prepare equipment for the election (refer to 3.2 "Hardware and Network Set-up and Configuration”).
13. All results should be backed up as per jurisdictional procedures and as described in chapter 10.10 “Backup and Retention of Election Material”.

Version: 5.10-CA::11 21 1/15/2020
Democracy Suite® Use Procedures
CHAPTER 2: BALLOT DEFINITION
2.1 Overview
Ballot layout for all Democracy Suite® products is accomplished in the Election Management System Election Event Designer application during the election definition process. Ballots are generated as tabulator-ready PDF ballot artwork files.
2.2 Ballot Artwork Source Files
Dominion’s Democracy Suite® Election Management System (EMS) creates tabulator-ready PDF ballot artwork files. Ballot artwork files are created as complete ballot images, without trim lines or crop marks, and are designed to directly print on digital 4-color sheet-fed xerographic or other electrophotographic printers (most B-sized laser printers). Ballot artwork is generated in industry-standard PDF Version 1.3 and CMYK color space.
Ballot artwork files are full-sized press-ready ballots containing all required ballot elements and the unique ballot ID barcode that distinguishes each ballot style. Each file contains one or two ballot images: a front image (if the ballot is single-sided) or paired front and back ballot images. All fonts used in the ballot artwork are embedded in the PDF file. Ballot artwork files are digitally-signed (X.509) and tied to the election project files produced by Democracy Suite® EMS to allow for authentication and revision control. The file naming scheme used for the ballot artwork files is set in Democracy Suite® EMS and is controlled by the election administrator. Typical file names might be as simple as “1.pdf ” or can be as descriptive as “ballot 4324 A01 B EP 20100912 0.pdf ”. An election administrator will provide a list of the ballot artwork file names and usage.
Pre-press imposition of ImageCast® ballot artwork to add crop or alignment marks, jurisdiction-mandated background screens, stub artwork, or other printing, may be required. No modifications, post-processing, or image conversion of the original ballot artwork files is allowed.
2.3 Paper and Printing Specifications
ImageCast® ballots can be easily printed by a range of modern printing technologies.

1/15/2020 22 Version: 5.10-CA::11
Chapter 2 - Ballot Definition
• Small quantities of tabulator-ready ballots can be printed with a conventional B-size laser printer (600 dpi min., pre-calibrated), directly onto pre-cut blank ballot stock. ImageCast® ballot artwork files are pre- configured for this use. In-house laser printing of ImageCast® proofing and test ballots allows a jurisdiction to quickly and easily test the Democracy Suite® EMS election project setup and tabulation options.
• Most jurisdictions choose a Dominion-certified print vendor to produce the ballots that will be used for their election. ImageCast® ballots are often produced by conventional web or sheet-fed offset lithographic presses.
• High-speed digital xerographic or other electrophotographic presses (both web and sheet-fed) have also been used to produce ImageCast® ballots.
• Inkjet printers, from small desktop units to high-speed web print engines, have produced millions of ImageCast® ballots.
2.4 ImageCast®Ballot Stock Selection
ImageCast® ballots are printed on high-quality, dimensionally stable, opaque text and cover paper from selected manufacturers. As a result of the high precision required in ballot scanning and vote tabulation, Dominion only recommends ballot stock that has been tested to have a low dirt content and low numbers of imageable defects for ImageCast® ballot production. Approved paper stocks are still subject to additional inspection on a lot-by-lot basis for dirt and other defects in the paper that may be imaged by our tabulators. A range of paper weights (basis weight or grammage) can be used, depending upon the type of ballot being printed and the ImageCast® tabulator used. Ballots marked by voters at the polls and hand-fed into tabulators are usually printed on heavier weight cover or text stocks. Ballots designed for mail distribution are often printed on lighter weight stocks. The election administrator may indicate a preference for varying the weight of the stock for the different types of ballots, or the entire election may be printed on a single weight of paper. Multiple paper weights do not pose problems for the tabulator so long as the weight is an approved ImageCast® commercial ballot paper.
Ballot stock is available in both rolls and sheets, and comes in a variety of sizes to accommodate the different ballot printing technologies and presses. If the selected presses or finishing equipment are limited to certain paper stocks, please inform the election administrator before bidding. Most ImageCast® ballots are printed on approved #100 opaque text or #65 opaque cover stocks. This yields a dimensionally-stable ballot card that is durable, easy to print, and widely accepted by voters.

Version: 5.10-CA::11 23 1/15/2020
Democracy Suite® Use Procedures
2.5 Approved Ballot Paper StocksThe text and cover paper stocks that have been tested and approved for manufacturing ImageCast® ballots are listed in the table below.
All approved ballot stock is white, bright white, or natural colored paper and has a smooth finish. Color-coding ballots is normally achieved in the ballot artwork by printing screened area(s) of color as a background as required by California Elections Code section 13002 – not by ordering colored ballot stock.
Recycled Pulp
Manufacturer Type Weight Color / Finish Recommended Paper
Cascades Fine Paper
Rolland Opaque 50
80# and 100# Text
Bright White, Smooth Finish
50% Post consumer fiber, EcoLogo, FCS MixedSources
Cascades Fine Paper
Rolland Opaque 50
65# Cover Bright White, Smooth Finish
50% Post consumer fiber, EcoLogo, FCS MixedSources
Virgin Wood Pulp
Manufacturer Type Weight Color / Finish Recommended Paper
International Paper
Accent Opaque
100# Text
Smooth FCS Forest Management
International Paper
Accent Opaque
65# Cover
Smooth FCS Forest Management
Table 2-1: Text and Paper Stocks Approved for ImageCast® Ballots

1/15/2020 24 Version: 5.10-CA::11
Chapter 2 - Ballot Definition
Manufacturer Print Method Weight Color / Finish
Recommended Paper
Rolland Enterprises Inc
Toner Based Ballot Production
100# Text
Bright White, Smooth
VoteSecure SL
Rolland Enterprises Inc
Inkjet Ballot Production
100# Text
Bright White, Smooth
VoteSecure IJ
Rolland Enterprises Inc
Offset Ballot Production
100# Text
Bright White, Smooth
VoteSecure SD
Table 2-2: Text and paper stocks approved for ImageCast® X

Version: 5.10-CA::11 25 1/15/2020
Democracy Suite® Use Procedures
CHAPTER 3: SYSTEM INSTALLATION AND CONFIGURATION
3.1 Hardware Requirements and SpecificationsThis section includes information about the hardware components required for your election. The following sections list the components at a high-level only. For detailed information regarding the hardware components and configuration, please see the 3.11 Democracy Suite® Configuration Audits document.
3.1.1 Election Management System Hardware Requirements• Server - R630
• Server - R640
• Workstation - Dell Precision T3420
• Laptop - DELL LATITUDE E3470
• Laptop - DELL LATITUDE 3490
• Monitor (2) - 24”
• Printer - OKI C931E HD
• Printer - OKI C712DN HD
• Printer - OKI C332DN HD
• Printer - OKI C331DN HD
• Ethernet Switch
• UPS
• Mini Server Rack
3.1.2 ImageCast® Central Hardware Requirements• Canon DR--X10C
• Canon DR-G1130
• HiPro 821
• Canon DR-G2140
• Single ibutton programmer with USB adapter
• Touchscreen monitor, 24"
• Dell 7440
• Dell Optiplex 3050
• Dell Optiplex 7050

1/15/2020 26 Version: 5.10-CA::11
Chapter 3 - System Installation and configuration
• Dell Optiplex 7060
• USB 3.0 flash drive, 8 GB
• DS1963 iButton 4kbit read/write data carrier
• Single ibutton touch and hold reader / programmer
3.1.3 ImageCast® Evolution Hardware Requirements• ImageCast Evolution tabulator (PCOS-410A)
• Compact Flash memory card, 8 GB
• Compact Flash memory card, 16 GB
• Battery, PCOS-410A, lithium ion, 14.8v, 8.8ah with LED display and plastic case
• Audio tactile interface unit (ATI)
• Headphones, stereo soft foam ear pad with adjustable plastic headband
• Tube style sip and puff device
• DS1963 iButton 4kbit read/write data carrier
3.1.4 ImageCast® Precinct 2 Hardware Requirements• ImageCast Precinct 2 tabulator (PCOS-330A)
• SDHC memory card, 8GB
3.2 Hardware and Network Set-up and Configuration
Democracy Suite® system installation and configuration procedures are described in Democracy Suite® EMS Standard System Installation and Configuration Procedure.
The Democracy Suite® EMS platform consists of multiple components, including Election Management System, ImageCast® Central, ImageCast® Evolution and ImageCast® Precinct 2. They are configured in a EMS Standard Hardware Configuration.
The EMS Standard hardware configuration provides a client-server local LAN deployment environment. This hardware configuration separates client and server system components by utilizing a single physical server device to run all EMS server components. Client PC computers running EMS client applications are interconnected with the back-end server component through the gigabit LAN network which utilizes the smart network switch. The clients include adjudication workstations, EMS workstations and ICC workstations as shown in the image below.

Version: 5.10-CA::11 27 1/15/2020
Democracy Suite® Use Procedures
Democracy Suite® system is capable of being deployed in a segregated dual-installation architecture to protect against propagation of viruses. The architecture allows elections officials to use one or more, permanent server(s) to program the elections and create memory cards prior to the election and to use another, physically separate “sacrificial” server and set of voting devices after the election to tabulate results and generate reports. This is achieved by installing and configuring the Election Management System onto the two physically separate machines, by following the procedure as set out in the Democracy Suite® EMS Standard System Installation and Configuration Procedure document. One installation is then to be used as a primary/permanent server for creating the election project, ballot art work and producing the election files for programming the central and precinct voting machines/ devices to be used in the election. Then, after the election project is complete (in "Ready for Election" status) and logic and accuracy tests have been successfully completed, the project is then backed up and transferred to the sacrificial server using a write-once medium, such as a CD-R. Once the project is restored on the sacrificial server, it is used for tabulating results and generating election and audit reports. The two systems are on their own isolated networks, thereby, preserving their physical separation and ensuring that data cannot flow between installations/networks.
Prior to attempting to execute the use procedure as defined in this document, the system must be configured as defined in this chapter. The configuration of each of the system components is related to specific functionality which needs to be executed, enabled, configured and/or set in a particular manner that enables the use procedure workflow as defined in this document to be executed on the Democracy Suite® system.
Figure 3-1: EMS/RTR Air-gap Network Configuration
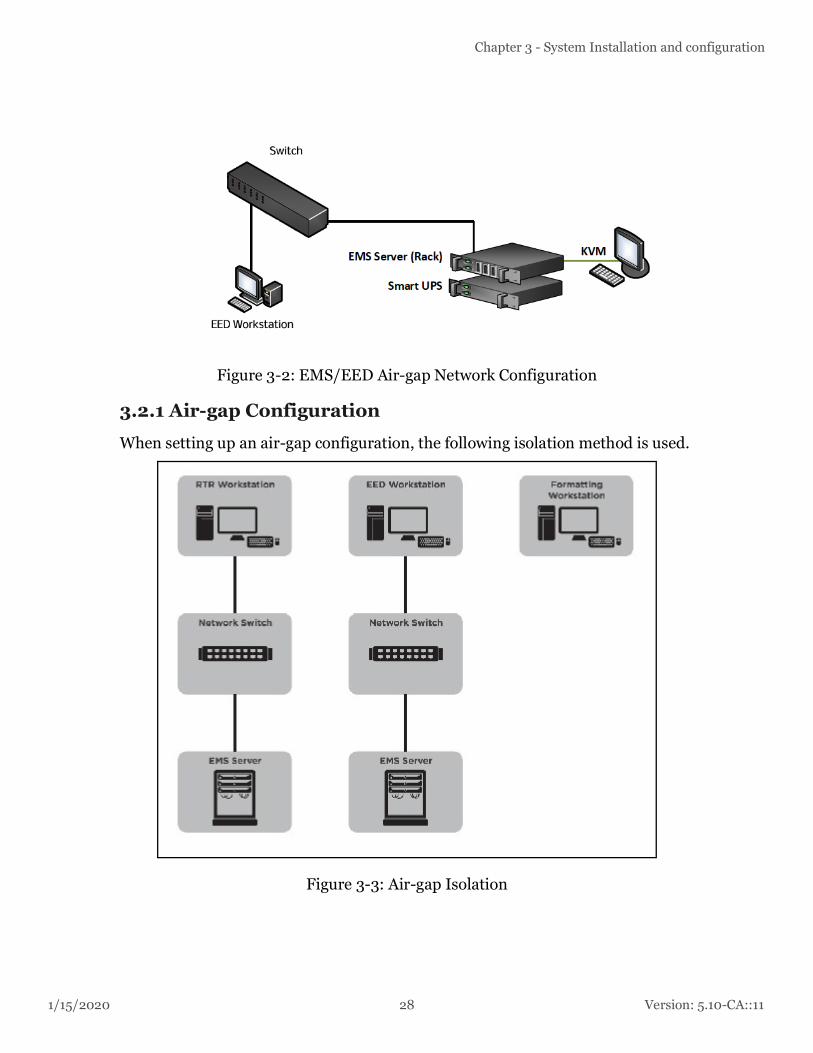
1/15/2020 28 Version: 5.10-CA::11
Chapter 3 - System Installation and configuration
Figure 3-2: EMS/EED Air-gap Network Configuration
3.2.1 Air-gap Configuration
When setting up an air-gap configuration, the following isolation method is used.
Figure 3-3: Air-gap Isolation
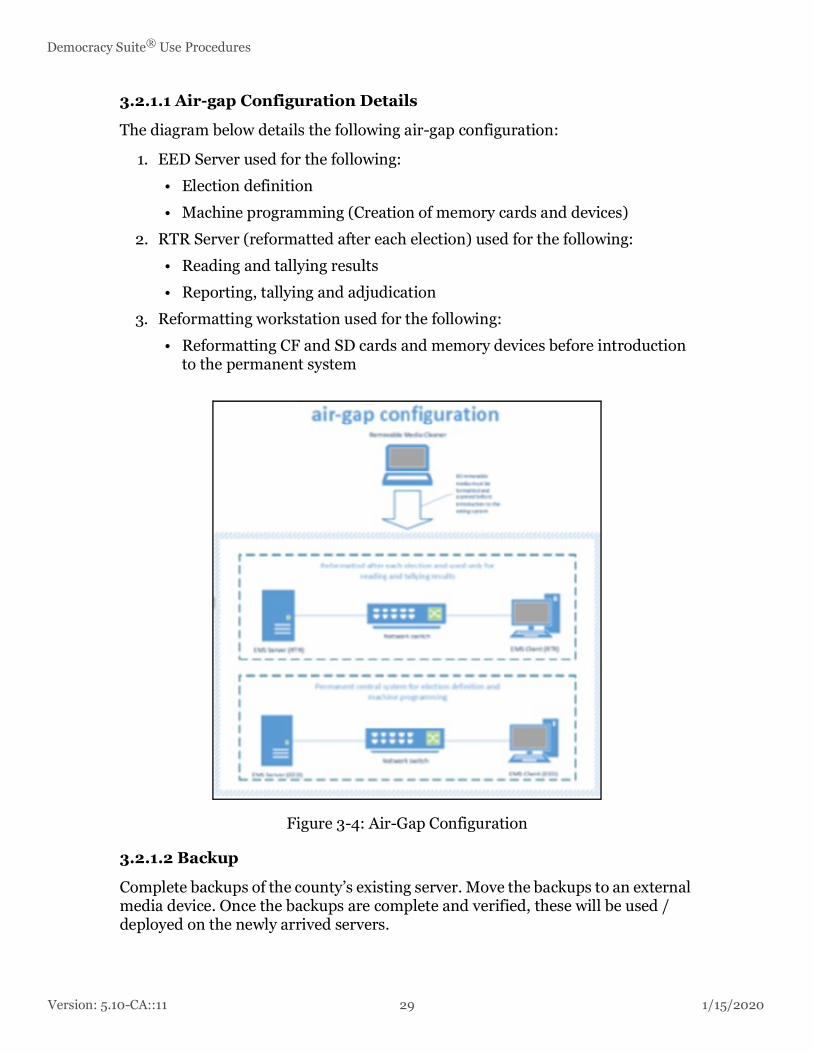
Version: 5.10-CA::11 29 1/15/2020
Democracy Suite® Use Procedures
3.2.1.1 Air-gap Configuration Details
The diagram below details the following air-gap configuration:
1. EED Server used for the following:
• Election definition
• Machine programming (Creation of memory cards and devices)
2. RTR Server (reformatted after each election) used for the following:
• Reading and tallying results
• Reporting, tallying and adjudication
3. Reformatting workstation used for the following:
• Reformatting CF and SD cards and memory devices before introduction to the permanent system
Figure 3-4: Air-Gap Configuration
3.2.1.2 Backup
Complete backups of the county’s existing server. Move the backups to an external media device. Once the backups are complete and verified, these will be used / deployed on the newly arrived servers.

1/15/2020 30 Version: 5.10-CA::11
Chapter 3 - System Installation and configuration
3.2.1.3 DBAN New Equipment
After setting up the new equipment, run DBAN on each of the computers to permanently remove any data stored on the devices. To perform a DBAN:
1. Insert the DBAN CD and restart the computer.
2. Enter into the Boot Menu by pressing the corresponding key during the boot sequence (typically F12) .
3. Enter the boot manager by pressing the corresponding key (typically F11). .Boot manager menu opens.
4. Select One-shot BIOS boot menu.
5. Select Boot from *Embedded SATA Port Optical Drive: PLDS DVD +/- RW. Server boots from the DVD drive.Darik’s Boot and Nuke screen appears.
NOTE: In the command line enter autonuke.DBAN will start automatically. If the DBAN takes a long time to complete, you may terminate the process. You must then reboot the computer to validate that the hard drive is no longer functional.
3.2.1.4 Connect Equipment
• Connect all computers, printers, scanners and network switch to power sources.
• Connect all keyboards, mice and iButton readers, and scanners to rear USB ports. Leave the front/side ports clear for thumb drives, etc.
• Connect the monitor to the server using the VGA cable.
• Connect the monitor to EMS client and ADJ clients using the DisplayPort cable.
3.2.1.5 Record Service Tags
Record the service tags for the Dell equipment (server(s), computers, switch(es) and monitors) and serial numbers of the ImageCast® Central scanners in the county installation worksheet.
Email the serial numbers to the customer relations manager.
3.2.1.6 RAID and BIOS Settings
This section outlines the configuration of Self-Encrypting Drives (SED) and RAID Virtual Disks (servers).
To configure/reconfigure the self-encrypting drives and create the RAID1 and RAID10 virtual disks.

Version: 5.10-CA::11 31 1/15/2020
Democracy Suite® Use Procedures
Hardware Configuration (RAID):
To boot into BIOS configuration Utility:
1. Power on the server.
2. As the host system is booting up, when the BIOS screen appears, press the corresponding keys to open Virtual Disk Management (typically CTRL + R).The Virtual Disk Management screen appears.
NOTE: If a previous RAID configuration exist, please delete any pre-existing RAID configurations and reconfigure the RAID.
Deleting RAID Configurations:
1. Depending on the type of server in your configuration, highlight the PERC H730 mini and press F2.
2. Arrow down to Clear Config and press Enter.
3. The Server will open a warning menu and once confirmed, click Yes and press Enter.
4. Verify the physical disks are not configured.
Configure RAID Virtual Disks:
1. Highlight the PERC 730 mini (Bus 0x03, Dev 0x000) and press F2.
2. Arrow down to Create New VD and press Enter.Create New VD screen appears
3. RAID 1 Configurations:
a. Press TAB to RAID level and select RAID 1 and press Enter.
b. Press TAB to physical disk and select the top two drives.
c. PressTAB to VD Name and enter OS.
d. Press TAB to Advanced and press Enter.A Create Virtual Disk-Advanced menu opens.
e. Press TAB to Initialize, press Space to select, and press Enter to confirm.
4. RAID 10 Configurations:
a. Press TAB to physical disk and select the remaining four present drives.
b. Press TAB to VD Name and enter NAS.
c. Press TAB to Advanced and press Enter.A Create Virtual Disk - Advanced menu opens.
d. Press TAB down to initialize, then press space. To confirm press Enter.
Create Secure-Encrypting Drive (SED):
1. Highlight the PERC 730 mini (Bus 0x03, Dev 0x0000) and press F2.

1/15/2020 32 Version: 5.10-CA::11
Chapter 3 - System Installation and configuration
2. Navigate to Security Key Management.A menu dialog will opens.
3. Select Create Key.The Create Security Key screen displays. The cursor is located in the Security Key Identifier section.
4. To enter an identifier for your security key, press <TAB> and enter a pass phrase.Follow the requirements in order to create a correct passphrase.
NOTE: You must remember the passphrase, as there is no backup option when creating the security key.
5. After the correct passphrase is entered and confirmed, press the TAB button to highlight the OK option. Press Enter to accept the settings and exit the menu.A Security Warning opens.
6. Highlight YES and press Enter.
Configure BIOS and iDRAC (EMS Server):
The BIOS settings may already be set, but they should be reset to default and reconfigured to ensure they are correct and consistent. The EMS Server should already have their RAID virtual disks configured correctly. This configuration should be verified and reconfigured only if necessary. Counties should have previously set a BIOS password (Setup password). This password will need to be entered when attempting to change BIOS settings and when booting from the Acronis DVD.
1. During boot, press F2 when the prompts appear at top of the screen.When the F2– System Setup option is highlighted, the system will enter the System Setup menu after devices have been initialized.
2. Enter the BIOS password (Setup password) when prompted.
3. In the System Setup menu, click System BIOS.
4. In the System BIOS Settings menu, click Default.
a. Click Yes, then click OK.
5. Under Boot Settings, verify/set the following settings:
a. Boot Mode set to BIOS.
b. Boot Option Settings: Clear Integrated NIC
6. Under Integrated Devices, set USB 3.0 to Enabled.
7. Under Miscellaneous Settings, set the system date and time.
8. Click Finish.

Version: 5.10-CA::11 33 1/15/2020
Democracy Suite® Use Procedures
a. Click Yes to save changes, if prompted.You are returned to the System Setup menu.
9. In the System Setup menu, click iDRAC Settings.
10. In the iDRAC Settings menu, click Network.
a. Set Enable NIC to Disabled.
b. Click Back.
11. Click Finish.
a. Click Yes to save changes, if prompted.You are returned to the System Setup menu.
12. In the System Setup menu, click Finish.
a. Click Yes to confirm exit and reboot.
Configure BIOS (Client Computers running Windows 10):
BIOS settings may already be set, but they should be reset to default and reconfigured to ensure they are correct and consistent. The Election Definition & Results, and Tabulation servers should already have their RAID virtual disks configured correctly. This configuration should be verified and reconfigured only if necessary. Counties should have previously set a BIOS password (Setup password). This password will need to be entered when attempting to change BIOS settings and when booting from the Acronis DVD.
1. During boot, press F2 when the prompts appear at top of the screen. When the F2– System Setup option is highlighted in blue, the system will enter the System Setup menu after devices have been initialized.
2. Enter the BIOS password (Setup password) when prompted.
3. In the System Setup menu, click System BIOS.
4. In the System BIOS Settings menu, click Default.
a. Click Yes
b. Click OK.
5. Under Boot Settings, verify/set the following settings:
a. Set Boot Mode to BIOS.
b. Boot Option Settings: Clear Integrated NIC.
6. Under Integrated Devices, set USB 3.0 to Enabled.
7. Under Miscellaneous Settings, set the system date and time
8. Click Finish.
a. Click Yes to save changes if prompted.You are returned to the System Setup menu.

1/15/2020 34 Version: 5.10-CA::11
Chapter 3 - System Installation and configuration
9. In the System Setup menu, click iDRAC Settings.
10. In the iDRAC Settings menu, click Network.
a. Set Enable NIC to Disabled.
b. Click Back.
11. Click Finish.
a. Click Yes to save changes, if prompted.You are returned to the System Setup menu.
12. In the System Setup menu, click Finish.
a. Click Yes to confirm exit and reboot.
3.2.2 Deploying Images
3.2.2.1 Deploy Image (EMS Server Workstation):
Required: Acronis 12.5 UEFI USB device, SSD with County Release images.
1. Insert the Acronis USB device.
2. Restart the computer.
3. Press F11 when the Dell logo appears.
4. Select One-shot boot menu.
5. Under the UEFI boot options, select the USB drive.Acronis launches in UEFI mode
6. On the Acronis Bootable Agent screen, select Manage this computer locally.
7. Remove the Acronis USB and insert the Images SSD.
8. Select Recover.
9. Under What to Recover, click Select Data.
10. Click Browse.
11. Expand Local folders SSD > DS_5.10 > IMAGES > computer type.
12. Click OK.
13. Under Backup contents, select Disks.
14. Check the two disks that appear.
15. Click OK.
16. Under Where to recover, click Clear all.
17. Click Recover ‘Disk X’ to...
18. Select the appropriate disks for OS and NAS (unavailable disks are grayed out, two disks should be available).
Version: 5.10-CA::11 35 1/15/2020
Democracy Suite® Use Procedures
19. Click OK to begin the restore process.
20. When the restore process is finished, click Close when complete, execution state is Idle and Status is OK.
21. Close the application.
22. On the Acronis Bootable Agent screen, click Turn off.
23. Once the computer has shut down, disconnect the SSD.
24. Power on the computer.
25. Eject the Acronis DVD from the DVD drive.
3.2.2.2 Deploying the County Release Image
The County Release image must be deployed on all client workstations, including the following:
• EMS (EED and RTR)
• ICC
• ADJ
• ICVA
• MBP
Required: Acronis 12.5 device (USB), SSD with County Release images.
To Deploy the County Release image:
1. Start with computer powered off.
2. Connect the Acronis (USB) to any USB port.
3. Connect the SSD to a USB3 port.
4. Power on the computer.
5. Press F12 when the Dell logo appears until the One-time Boot Menu launches.
6. Verify the following settings: Boot Mode:UEFI. Secure Boot: ON.
a. If boot mode is incorrect, select Change boot mode settings from the menu and set to the correct boot mode.
7. Under the UEFI boot options, select the USB drive.Acronis launches in UEFI mode
8. Press 1 to launch Acronis True Image (64-bit).
9. Select Recover.
10. Select Browse for backup.
11. Select the SSD > DS_5.10 > IMAGES > computer type.

1/15/2020 36 Version: 5.10-CA::11
Chapter 3 - System Installation and configuration
12. Click OK.
13. Right-click on the backup file and click Recover.
14. Select Recover whole disks and partitions.
15. Click Next.
16. Under What to recover, check the one disk that opens.
17. Click Next.
18. Under Where to recover, select the available disk.
19. Click Next.
20. Click OK on the message.
21. Click Proceed to begin the restore process.
22. When the restore process is finished, click OK.
23. Close the application.
24. Once the computer has shut down, disconnect the USB boot disk and the SSD.
25. Power on the computer.
3.2.2.3 Post Imaging Procedures
Set the Correct Screen Resolution on the EMS Server:
1. On the The Election Definition & Reporting server, right click on the Windows icon in the lower-left corner of the screen.
2. Click Control Panel.
3. Under Appearance and Personalization select Adjust Screen Resolution.
4. Set the resolution to the maximum (or the best appearance for the screen, if different).
NOTE: The maximum available resolution may not be supported by the monitor (for example, 1600 x 1200). In this case, choose the next highest resolution supported by the monitor (for example, 1280 x 1024).
5. Repeat steps 1 to 4 on the Tabulation server.
Verify Time Zone, Date and Time (All Computers):
Required: smartphone (or other trusted time source)
1. Click on the Windows icon and enter Time.
2. Click Change Date and Time.
3. Ensure that Set time automatically and Set time zone automatically are switched OFF.

Version: 5.10-CA::11 37 1/15/2020
Democracy Suite® Use Procedures
4. Verify that the time zone is correct (UTC-08:00, Pacific Time, US & Canada).
a. Adjust the time zone, if necessary, by selecting it from the drop-down menu.
5. Ensure auto-adjustment for daylight saving time is switched ON.
6. Verify that the current date and time are correct.
a. Adjust the date/time, if necessary, by clicking Change.
b. Adjust the date/time and click Change.
7. Close the Settings window.
3.2.2.4 Connect Computers to the Network Switch (EMS Client, ADJ Client, ICC):
After computers have been renamed and rebooted, connect them to the network switch.
If your configuration uses multiple workstations, where the same image is being deployed, the Adjudication client workstations have the MSMQ turned off and then turned on again to correctly receive ballots from the EMS database.
To disable MSMQ:
1. Click Start and type Windows features.
2. Click Turn Windows features on or off.
3. Find Microsoft Message Queue (MSMQ) and clear the check box.
Figure 3-5: Turn Windows Features On or Off 1
4. To turn off MSMQ, click OK.
5. When complete, click Close.
To re-enable MSMQ:
1. Click Start and type Windows features.
2. Click Turn Windows features on or off.

1/15/2020 38 Version: 5.10-CA::11
Chapter 3 - System Installation and configuration
3. Find Microsoft Message Queue (MSMQ) and select the check box.
Figure 3-6: Turn Windows Features On or Off 2
4. To turn on MSMQ, click OK.
5. When complete, click Close.
6. Restart the computer for MSMQ to be reinstalled.
3.2.2.5 Enabling ImageCast® Central Elevated Permissions
To access the ICC Application with a Windows account with user privilege, the Administrator should provide an override. The following settings should be performed on ICC workstation for Windows Operating System to prompt for an Administrative override to use ICC application.
To change the local policy:
1. Login to ICC workstation with an Administrative user account.
2. Click Start (Windows icon).
3. Type Local Security Policy.
4. Click Yes if UAC screen appears.
5. In the left pane, select Security Settings Local Policies Security Options.
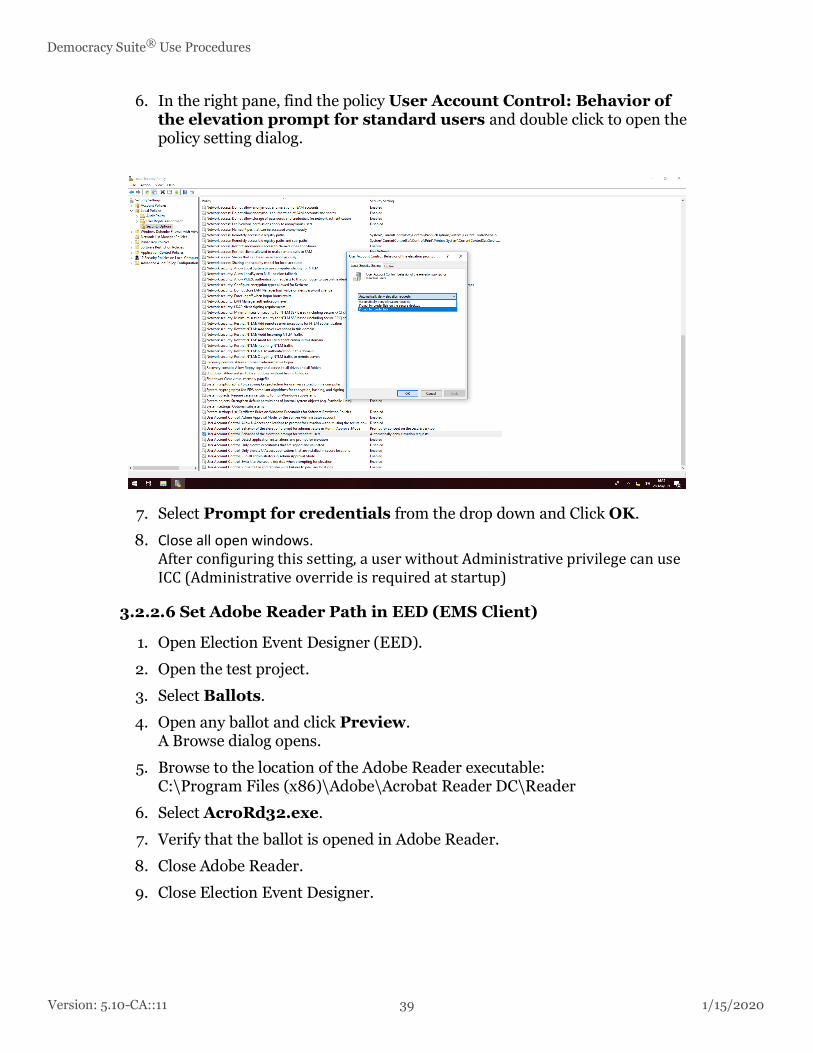
Version: 5.10-CA::11 39 1/15/2020
Democracy Suite® Use Procedures
6. In the right pane, find the policy User Account Control: Behavior of the elevation prompt for standard users and double click to open the policy setting dialog.
7. Select Prompt for credentials from the drop down and Click OK.
8. Close all open windows.After configuring this setting, a user without Administrative privilege can use ICC (Administrative override is required at startup)
3.2.2.6 Set Adobe Reader Path in EED (EMS Client)
1. Open Election Event Designer (EED).
2. Open the test project.
3. Select Ballots.
4. Open any ballot and click Preview.A Browse dialog opens.
5. Browse to the location of the Adobe Reader executable:C:\Program Files (x86)\Adobe\Acrobat Reader DC\Reader
6. Select AcroRd32.exe.
7. Verify that the ballot is opened in Adobe Reader.
8. Close Adobe Reader.
9. Close Election Event Designer.

1/15/2020 40 Version: 5.10-CA::11
Chapter 3 - System Installation and configuration
3.2.2.7 Security Procedures
Update Anti-virus Definitions:
• Run the anti-virus definitions offline updater.
Change Windows Passwords (All Computers):
The passwords for numbered emsadmin, emsuser and iccadmin accounts must match on the workstation and the server. The passwords for adjadmin and adjuser accounts do not need to match.
For login accounts on each computer (All Computers):
1. Log in as the user.
2. Press Ctrl+Alt+Delete.
3. Select Change a Password…
4. Enter the old and new passwords.
5. Click the arrow.
For server authentication accounts (EMS Server):
1. On the Election Definition and Results server, right-click on the Windows icon and select Computer Management.
2. Expand Local Users and Groups.
3. Select Users.
4. Right-click on the user account and select Set Password…
5. Click Proceed.
6. Set the new password
7. Click OK.
8. Repeat steps 1 to 7 on the Tabulation server.
Configure BIOS (Setup) password (EMS Server):
NOTE: The county’s computers should already have a BIOS (admin) password set. Only perform the steps if the password is not set, or if the county wants to change their password.
1. Turn on the Election Definition & Reporting server (or reboot, if already powered on).
2. During boot, press F2 when the prompts appear at top of the screen. When the F2– System Setup option is highlighted, the system will enter the System Setup menu after devices have been initialized.
3. Enter the BIOS password (setup password) when prompted.
4. In the System Setup menu, click System BIOS.

Version: 5.10-CA::11 41 1/15/2020
Democracy Suite® Use Procedures
5. In the System BIOS Settings menu, click System Security.
6. The county will enter the setup password (not the system password).Recommendation is at least 8 characters with a combination of uppercase and lowercase letters and at least one number and one special character. Note that only certain special characters are supported on the server. Confirm the password.
7. Ensure that the password has been recorded and kept in a safe place.
8. Click Back.
9. Click Finish.
10. Click Finish again to exit and reboot.
11. Repeat steps 1 to 10 on the Tabulation server.
Disable boot from USB (Windows 10 Computers):
1. Turn on the computer (or reboot, if already powered on).
2. During boot, press F2 to enter the Setup menu.
3. In the Setup menu, click Unlock.
4. Enter the admin password.
5. Expand the System Configuration Menu.
6. Select USB Configuration.
7. Clear the Enable Boot Support checkbox.
8. Click Apply.
9. Proceed to the next section to set the BIOS (admin) password.
Configure BIOS (Admin) password (Windows 10 Computers):
NOTE: The county’s computers should already have a BIOS (admin) password set. Only perform the steps if the password is not set, or if the county wants to change their password.
1. While in the BIOS setup screen, expand the Security sub-menu.
2. Select Admin Password (not system password).
3. Set a password (defined by the county).Recommendation is at least 8 characters with a combination of uppercase and lowercase letters and at least one number and one special character.
4. Click OK.
5. Ensure that the password has been recorded and kept in a safe place.
6. Click Exit to reboot the computer.
1/15/2020 42 Version: 5.10-CA::11
Chapter 3 - System Installation and configuration
3.3 Software Installation and ConfigurationSoftware installation is completed through image deployment. However, once images are deployed to the client workstations, additional configuration may be required. This section includes configuration procedures for all components.
NOTE: For detailed installation and configuration instructions, please see the Democracy Suite® EMS Client Workstation Installation and Configuration Procedure document.
Version: 5.10-CA::11 43 1/15/2020
Democracy Suite® Use Procedures
3.3.1 EMS Configuration
The EMS system consists of different components that work together to cover the pre-voting and post-voting activity workflows. The configuration of EMS components has to do with the following:
1. Specifics of how to define and configure an Election Project in the EED application, MBS/DCF/MCF configuration and access to RTR application (see 3.3.1.1 “Election Project Configuration in EED”).
2. Configuration of the Adjudication application (see 3.3.2 “Adjudication Configuration” and publish the batch once they have been adjudicated and submitted (see 3.3.3 “RTR Configuration”).
3.3.1.1 Election Project Configuration in EED
If your project is programmed by the Dominion Voting, then the project you receive will already be created and configured as specified in this use procedure. However, if you are programming your own elections, then ensure that the following are true:
1. The names of all ImageCast® Central tabulators are prefixed with the word "ICC" (see D.2.1.6 “Defining Tabulators”).
2. There is a separate ICC tabulator (or more than one as needed) for handling write-in ballots (see Defining Tabulators for instructions on what tabulators are typically required in an election (project).
3. The MBS and DCF files are set to agreed values if values other than the default are required (see appendix A “ImageCast® Central Device Configuration Files” and appendix B “ImageCast® Evolution and ImageCast® Precinct 2 Machine Behavioral Settings”).
4. Ensure that ‘naming template’ in EED is set in the way that ballot types can be easily distinguished between each other when loaded to the ICVA application.
5. If the project has more languages than those automatically provided by the EMS system, the audio folders for such languages need to be manually created on the Election Definition Workstation by the EMS administrator (see 12.2.4 “Setting up Project for Additional Audio Languages”).
6. Create and activate the RTR Administrative user in EMS EED. Note the User Name and Password for the RTR Administrator (see 12.2.5 “Creation of RTR User in Election Event Designer”).

1/15/2020 44 Version: 5.10-CA::11
Chapter 3 - System Installation and configuration
3.3.1.2 Configuring EED for Additional Language Packs
EED can be configured to use additional languages for static display information and audio files when creating ICE, ICP2 and ICX election projects.
3.3.1.3 Configuring EED for Additional ICE and ICP2 Language Packs
This procedure requires access to the following:
• {LanguageName}.qm file(s)
• Static audio files (.spx)
• AudioFiles.xml
To configure EED to use additional ICE and ICP2 language packs:
1. At the EMS Standard Server, save the.qm translation source files to:D:\NAS\Common\Resources\Imagecast_Evolution\enc\Translations
• Example:D:\NAS\ Common\Resources\Imagecast_Evolution\enc\Translations\Arabic.qm
Figure 3-7: Adding a language pack
2. Save the folder containing static audio files (*.spx) to:D:\NAS\Common\Resources\Imagecast_Evolution\sig\Audio\static\
• Example:D:\NAS\Common\Resources\Imagecast_Evolution\sig\Audio\static\Arabic
3. Save the folder containing the Audio configuration file (AudioFiles.xml) to:D:\NAS\Common\Resources\Imagecast_Evolution\enc\Configuration\Arabic
In EED, a new ICE or ICP2 election project can now be created and configured with language copied in the above steps. ICE and ICP2 static display information and audio files for respective language(s) will take effect.
Version: 5.10-CA::11 45 1/15/2020
Democracy Suite® Use Procedures
NOTE: If the project is already in the Ready for Elections stage, roll back the project to the Ballots Generated stage and move forward to Ready for Elections.
ICE/ICP2 cards programmed with EED will have the resources in the directories specified below.
NOTE: ‘X’ denotes the drive letter assigned by Windows Operating System to SD/CF card inserted.
• .qm files: X:\resources\Translations
• Static Audio files: X:\resources\Audio\Static\
• Audio configuration: X:\resources\Configuration
NOTE: Enable corresponding voter languages in the ICE and ICP2 MBS for the new language to appear in.
3.3.1.4 Configuring EED for Additional ICX Language Packs
This procedure requires access to the following:
• Localization JSON file
• Static audio files. (Folder with Language abbreviation containing all static audio instructions)
• Language Name recording. (Language name recording file)
To configure EED to use additional ICX language packs:
1. On the EMS Standard Server, save the JSON file to: D:\NAS\Common\Resources\ImageCast_X\localizations
• Example:D:\NAS\Common\Resources\ImageCast_X\localizations\yue_12_localizations.json
Ignore the.dsfx file if not available.
3.3.2 Adjudication Configuration
Set adjudication outstack conditions and perform adjudication on the batches sent to the application (see 12.6 “Adjudication Administration” section for more details).

1/15/2020 46 Version: 5.10-CA::11
Chapter 3 - System Installation and configuration
3.3.3 RTR Configuration
The RTR application should be configured to automatically receive results from adjudication (see 8.2.1 “Open Project”, 8.2.1 “Open Project” and 8.2.2 “Enable Automatic Results Loading to RTR”).
Figure 3-8: Adding Localization File
2. Repeat Step 1 for all applicable localization files.
3. Save the folder with the language abbreviation containing Static audio files to:D:\NAS\Common\Resources\ImageCast_X\staticaudio\
• Example:D:\NAS\Common\Resources\ImageCast_X\staticaudio\yue
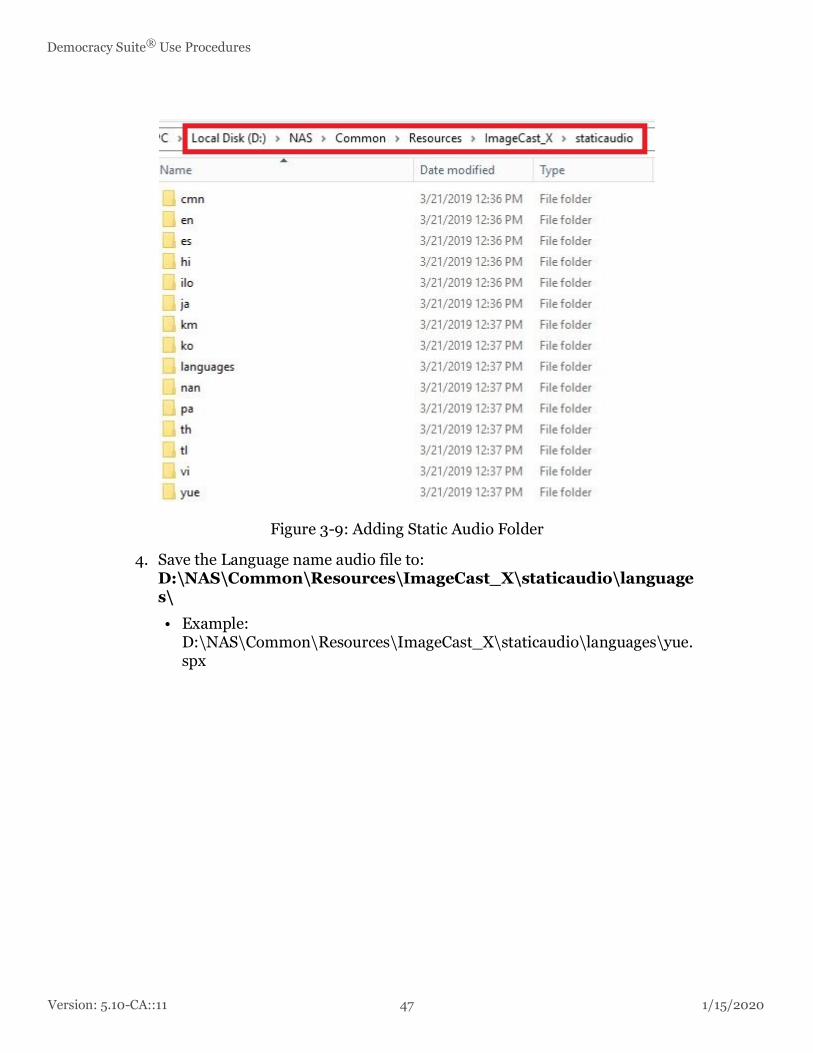
Version: 5.10-CA::11 47 1/15/2020
Democracy Suite® Use Procedures
Figure 3-9: Adding Static Audio Folder
4. Save the Language name audio file to:D:\NAS\Common\Resources\ImageCast_X\staticaudio\languages\
• Example:D:\NAS\Common\Resources\ImageCast_X\staticaudio\languages\yue.spx

1/15/2020 48 Version: 5.10-CA::11
Chapter 3 - System Installation and configuration
Figure 3-10: Adding Language Audio File
5. Repeat Step 3 and 4. for all applicable Static audio folder and language files
NOTE: If the election project being configured has no AVS support, step 3 and 4 can be skipped.
In EED, new ICX election projects can now be created and configured with language(s) copied in the above steps. ICX static display information and audio files for respective language(s) will take effect.
NOTE: If the project is already in the Ready for Elections stage, roll back the project to the Ballots Generated stage and move forward to Ready for Elections.
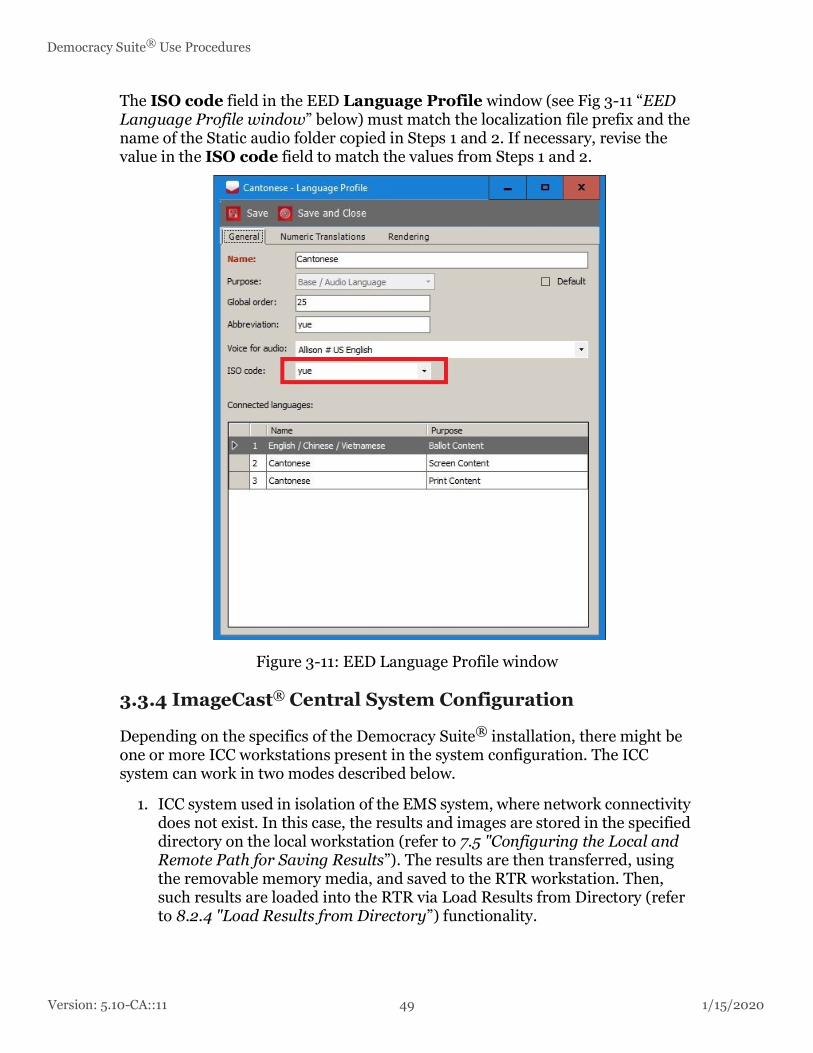
Version: 5.10-CA::11 49 1/15/2020
Democracy Suite® Use Procedures
The ISO code field in the EED Language Profile window (see Fig 3-11 “EED Language Profile window” below) must match the localization file prefix and the name of the Static audio folder copied in Steps 1 and 2. If necessary, revise the value in the ISO code field to match the values from Steps 1 and 2.
Figure 3-11: EED Language Profile window
3.3.4 ImageCast® Central System Configuration
Depending on the specifics of the Democracy Suite® installation, there might be one or more ICC workstations present in the system configuration. The ICC system can work in two modes described below.
1. ICC system used in isolation of the EMS system, where network connectivity does not exist. In this case, the results and images are stored in the specified directory on the local workstation (refer to 7.5 "Configuring the Local and Remote Path for Saving Results”). The results are then transferred, using the removable memory media, and saved to the RTR workstation. Then, such results are loaded into the RTR via Load Results from Directory (refer to 8.2.4 "Load Results from Directory”) functionality.

1/15/2020 50 Version: 5.10-CA::11
Chapter 3 - System Installation and configuration
2. ICC system used in a networked configuration, where one or more ICC workstations are connected to the EMS Server via a network switch. In this scenario, the ICC system can be configured to save the copy of results and images directly to the Results folder on the NAS drive on the EMS Server (see 7.5 “Configuring the Local and Remote Path for Saving Results”). If it is required for RTR to automatically reload results, then see Configuring the Local and Remote Path for Saving Results (refer to 7.5 "Configuring the Local and Remote Path for Saving Results”) is necessary. If automatic loading of results is not required, or local only saving of results is preferred, then the Secondary Path can be left undefined.
Figure 3-12: ICC Configuration
It is recommended that:
1. The ICC tabulator(s) used for scanning ballots that do not contain write-in votes, should have a secondary path configured to the location for automatic result loading to RTR. This same tabulator(s) should be configured to stop on write-in, in order to catch ballots with write-in votes that might have been missed during the manual sorting of ballots.

Version: 5.10-CA::11 51 1/15/2020
Democracy Suite® Use Procedures
2. If an ICC tabulator will be used for scanning ballots with write-in votes, it should have the secondary path undefined so that the results and images are saved locally to prevent them from being automatically adjudicated and loaded into RTR. In the case where adjudication of write-ins is allowed prior to the election day, then this step can be skipped and all ballots can be automatically loaded into RTR and adjudicated, as is the case in step one above.
3.3.4.1 InterScan HiPro Scanner Hardware Configuration
The following table provides a checklist to be used to confirm the ICC’s HiPro scanner hardware configuration.
Scanner Hardware
Input Tray Input tray extension (19”) with angle to be used for ballots longer 14”.
Hexagonal Pre-Input Roller to be equipped with green riffled linings
Separation Roller with higher resistance (10.3 Ncm) to be used with default white linings.
The pressure of the separation roller should be increased by 4 turns of the knob
The pressure of the Pre-Input roller should be set to a middle position initially.In case of basic feed-in issues the pressure can be increased.
Output Tray The High-Speed Stacker Arm must to be equipped with the jam sensor extension.
The front plate should be tightened with a M3x6mm screw together with a washer DIN9021 to prevent movement of the extension arm.
Use Distance Sensor instead of the Hopper Plate Sensor.
If double feeds are ejected to the Rear Output, a longer tray must be equipped for longer ballots to prevent rear output jams or the use of a large box to collect ballots.
Ensure ballots are collected for rescan after every batch.
Table 3-1: Scanner Hardware

1/15/2020 52 Version: 5.10-CA::11
Chapter 3 - System Installation and configuration
3.3.5 ImageCast® Evolution Configuration
Democracy Suite® EMS allows for the programming of specific ImageCast® Evolution tabulators for use in office early voting or in vote centers. Ballot tabulation for a specific precinct, a range of precincts, or all of the precincts in the election may be programmed.
Depending on the consolidation type selected in the election project, the number of ballots that is created for an election could be very large. This number will depend on a number of factors, including: number of precincts, number of languages and number of elector group combinations. For the early vote ICE tabulators, care needs to be taken with regards to how many precincts are assigned to each of those tabulators, in case when the number of ballots is very large. It is recommended that early vote ICE tabulators be assigned no more than 4000 ballot styles, and no more than 1000 precincts.
3.3.5.1 CF0 Card Data Partitioning
As part of the ICE election verification process at start-up, the data is copied from the CF1 card to the CF0 card. If your election project is 800 MB or greater, the project may be too large for the tabulator’s CF0 card.
Performing this procedure will increase the size of the CF0 card’s available data partition to 4 GB. The vhd image (GApplication.vhd) is used to re-image the CF0 card resulting in the increase of available data partition on the CF0 card.
For this process, you complete the following:
• Identify the CF0 Card’s Current Data Partition Size
• Increase the CF0 Card’s Date Partition Size
Identifying the CF0 Card’s Current Data Partition Size
To determine whether the partition increase is necessary, you should identify the CF0 card’s current partition size.
NOTE: This procedure assumes the tabulator’s firmware version is 5.10
Calibrations White Calibration should be done once between installing/cleaning the scanner unit and the starting of a tabulation process.
Area Stop This should be set to inches with a value of 11.8.
Scanner Hardware
Table 3-1: Scanner Hardware (Continued)
Version: 5.10-CA::11 53 1/15/2020
Democracy Suite® Use Procedures
To identify the CF0 card’s current partition size:
1. Power up the tabulator.Once tabulator boots up, various messages regarding unexpected conditions detected might be displayed.
2. Press Next to view each message.
3. Press OK at the final message.
4. When the message “Startup error” appears, disregard.
5. Log into the Technician Menu:
a. Apply the ICE Technician Key.
b. Enter the credentials.
6. From the Technician Menu, press Diagnostics.
7. From the Diagnostics screen. press System Status.
8. From the System Status screen, go to the CF Status section.
9. Review the value in the System card data partition field.
NOTE: The System card data partition value refers to the CF0 card’s partition size. If the partition size (including the free space) is 1 GB or less, re-image the CF0 card using the procedure described in Increase the CF0 Card’s Partition Size. However, if the partition size is over 3000 MB, there is no need to continue with this procedure.
Increasing the CF0 Card’s Partition Size
If the CF0 card’s data partition size is 1 GB or less, re-image the card to increase the partition size.
NOTE: This procedure assumes the following:
• Tabulator’s firmware version is 1.0
• Access to a PC with Internet connection
To increase the CF0 card’s data partition size, you will need to complete the following:
• Remove the CF0 Card from the Tabulator
• Prepare the PC
• Reimage the CF0 Card
• Reinstall the CF0 Card into the Tabulator
• Confirm the CF0 Card’s New Data Partition Size

1/15/2020 54 Version: 5.10-CA::11
Chapter 3 - System Installation and configuration
To Remove the CF0 Card from the Tabulator:
1. If the tabulator is on, power it down.
2. On the right side of the tabulator, open the CF1 and CF2 doors.
3. Using a T20 Security Bit screwdriver, remove the two screws from the metal plate covering the CF0 card slot.
4. To eject the CF0 card, push the button to the right of the card.
5. Remove the card from the tabulator’s slot.
To Prepare the PC:
1. At a PC with an internet connection, go to http://www.winimage.com/download.htm.
2. Download winima90.exe.WinImage is installed.
3. Go to the ICE 1.0 release folder on the DVD provided by DVS and copy the GApplication 7.zip to the PC with the winima90.exe file.
4. Extract all files to the PC’s local folder.
5. Connect the CF reader/writer to the same PC.
6. Insert the CF0 card recently removed from the tabulator, into the CF reader/writer.
To Re-image the CF0 Card:
1. Open WinImage.
2. From Winimage, click Disk.
3. From the menu that appears, click Restore Virtual Hard Disk image on physical drive…
4. From the Restore Virtual Hard Disk image on physical drive… window, click CF disk from the physical drive list offered, and then click OK.
5. In the Windows browser window navigate to the folder where the GApplication 7zip contents were extracted and locate the GApplication.vhd file.
6. Right-click the GApplication.vhd file, and then click Open.A warning message appears confirming which physical drive you are about to restore the image.
7. Ensure that the CF card drive is selected and not the PC’s hard disk.
8. Click Yes.The image restoration begins. and the progress window appears.

Version: 5.10-CA::11 55 1/15/2020
Democracy Suite® Use Procedures
9. If a disk writing error appears:
a. Click OK to close the error message.
b. Close all windows that are open on the PC, including the WinImage application.
c. Open the Windows browser window.
d. Locate the CF card drive
e. Right-click the card and click Eject.
f. Remove the CF card from the reader/writer and then re-insert it.
g. Return to Step 1 and repeat the procedure.
10. When the restoration completes successfully:
a. Locate the CF card drive.
b. Right-click the card and click Eject.
c. Remove the CF card from the reader/writer.
To Re-install the CF0 Card into the Tabulator:
1. Reinstall the CF0 card back into the tabulator’s CF0 slot.
2. Replace the metal plate over the CF0 card slot and secure it with the screws.
To Confirm the CF0 Card’s New Data Partition Size:
1. Power up the tabulator.Once tabulator boots up, various messages regarding unexpected conditions detected might be displayed.
2. Press Next to view each message.
3. Press OK at the final message.
4. When the message “Startup error” appears, disregard.
5. Log into the Technician Menu:
a. Apply the ICE Technician Key.
b. Enter the credentials.
6. From the Technician Menu, press Diagnostics.
7. From the Diagnostics screen. click System Status.
8. From the System Status screen, go to the CF Status section.
9. Review the value in the System card data partition field.
10. Verify that the partition size (including the free space) is over 3000 MB.The CF0’s data partition size is increased.

1/15/2020 56 Version: 5.10-CA::11
Chapter 3 - System Installation and configuration
3.3.5.2 ImageCast® Precinct 2 Configuration
The ImageCast® Precinct 2 Ballot Counter device is a precinct optical scan ballot counter (also commonly referred to as a tabulator in the election industry) (see Figure 2.3). It is designed to provide two major functionalities:
• Ballot scanning and tabulation
• Ballot review and second chance voting
Figure 3-13: ImageCast® Precinct 2 Ballot Counter
Before any of these functions can take place, the tabulator first goes through a startup procedure that initializes all hardware and all software modules, authenticating the firmware and all external election files.
1. The startup process of the tabulator consists of the following steps:
a. The processor loads the boot loader from the onboard flash memory.
b. The boot loader loads the uClinux operating system from the onboard flash memory.
c. The operating system initializes the hardware and subsystems. (SDRAM, serial devices, buses, interrupts lines, driver modules, file system, system time, etc.)
d. The operating system verifies and starts the election application from the onboard flash memory.
Version: 5.10-CA::11 57 1/15/2020
Democracy Suite® Use Procedures
2. The startup procedure of the election application consists of the following steps:
a. Initialize all hardware devices and run diagnostics.
b. Initialize all software modules.
3. Once the system startup phase is completed, the main processor cycles through an event loop while it waits for key events to take place. These events include:
a. Paper sensor triggered to inform the application that a ballot has been inserted.
b. An Administrative iButton Security Key inserted to inform the application that the administrator needs to activate certain administrative actions (print log report, enable test ballot state, close the poll, shutdown the system, etc.).
c. Check the battery signal interrupt.
d. Check for critical events (compact flash ejected, memory failure, etc.)
3.3.6 ImageCast® X Configuration
ImageCast® X can be used as a ballot marking device (BMD) for either, election day, or early voting. The resulting ballots can be scanned on the ImageCast® Evolution, ImageCast® Precinct 2 tabulator or the ImageCast® Central tabulator.
The ImageCast® X-BMD configuration can also be utilized for curb-side voting, by installing all necessary components onto a cart.
3.4 Acceptance TestingAcceptance testing serves the purpose of confirming that the equipment received is in good working order. For this purpose, there is no specific election project, settings or configurations. Usually, jurisdictions will choose to use the default test project, such as Famous Names project to run the acceptance test.
• Election Management System Acceptance Testing
• ImageCast® Evolution Acceptance Testing
• ImageCast® Central Acceptance Testing
• ImageCast® Precinct 2 Acceptance Testing
• ImageCast® X Acceptance Testing

1/15/2020 58 Version: 5.10-CA::11
Chapter 3 - System Installation and configuration
3.4.1 Election Management System Acceptance Testing
To perform acceptance testing on the Election Management System, the supervisory election official or designee must complete the following steps:
1. Restore Election Project (refer to 12.2.2 "Restore of Election Project”).
NOTE: If you are opening an EMS application (EED, RTR, Audio Studio, etc.) for the first time, you must set the network parameters. Enter all data required.
• EMS Application Server Host (IP Address or Name): Enter in the name of the EMS application server host.
• TCP Communication Port: 80.
• EMS Application Server Name: emsapplicationserver.
• Once all data is entered, click the Test button. If the settings are correct, you will receive confirmation in the grey dialog box. If you do not receive a confirmation, correct your settings or contact your IT personnel for the proper credentials. Click the OK button to continue.
2. Open EED and then open the restored project by navigating to Election Project > Open Project.
3. In the 'Open Project' window, select your project from the list of available election projects and click OK.
4. A login dialog appears.Enter the credentials you created when creating the Election Project.
NOTE: The username and password fields are case sensitive.
5. Upon successful login, if a dialog appears indicating that the ballot style has not been set, click OK, and inspect the project to verify that the data is present.
6. In order to log in to EMS RTR and verify that you can open and inspect the project, first, you will need to assign a user to the RTR Administrative role. Select the Administration > Application Users option.
7. In the middle window pane, from the Application drop-down list, select EMS RTR and then click Create New.
8. On the Application User dialog, enter the following information:
a. Enter a username.
b. From the Role drop-down menu, select the role that the new user will be assigned.
c. Choose whether or not you wish to create a password manually or click the Generate Password button. If you choose manually, enter a case sensitive password in the enabled fields.

Version: 5.10-CA::11 59 1/15/2020
Democracy Suite® Use Procedures
d. Add the relevant contact information on the right side of the dialog. The new credential's status should set from 'Initial' to 'Active'
e. Click Save and Close.
NOTE: Password Security Requirements:
• Default password type: Minimum length is 8 characters which must include at least one number and one letter from the alphabet.
• Strong password type: Minimum length should be 10 characters which must include at least one number, one special character and one letter from the alphabet.
• Weak password type: minimum six characters.
9. Open RTR application.
10. Click Election Project > Open Project.
NOTE: If you are opening the application for the first time you must set the network parameters. Enter all data required.
11. Once all data is entered, click Test. If the settings are correct, you will receive a confirmation message. If you do not receive a confirmation, correct your settings, or contact your IT personnel for the proper credentials. Click OK.'The Open Project' screen appears. Click on the desired project to select it, and click OK.
NOTE: Only projects in “Ready for Elections” state can be accessed in RTR. If the desired project is not seen in the “Open Project” window, then election files have not been generated for that project yet.
12. In the election project Login window, enter the credentials for the Results Tally & Reporting administrator and click OK. If you do not have the credentials, contact your supervisor.After successfully logging into RTR, the application expands to include new menu items and the status bar is updated to contain project and user details.
Once the acceptance testing of EMS has been completed, proceed to the next section of this document.

1/15/2020 60 Version: 5.10-CA::11
Chapter 3 - System Installation and configuration
3.4.2 ImageCast® Evolution Acceptance Testing
Acceptance testing for the ImageCast® Evolution (ICE) tabulator unit is simply a matter of confirming that the physical and electro-mechanical components are functioning properly and have not been damaged during transport, and that certain internal parameters have been programmed correctly. Performing this testing will ensure the integrity of the installed firmware within the voting machines. It should be performed prior to each election.
To perform acceptance testing, the supervisory election official or designee must complete the following steps:
1. Unpack the ICE unit and place it on an assembled ballot box.
2. Insert the test CompactFlash cards provided with the ICE unit.
3. Connect the ATI to the ICE using the RJ-45 cable provided.
4. Plug the power supply into a suitable 120 volt AC power source, and connect the power supply to the ICE.
5. Lift the LCD monitor into the upright position.
6. Turn on the main power switch under the thermal printer door.The ICE unit will begin the power-up sequence, and the LCD will display a number of messages at each stage of the sequence.
7. Once the ICE has powered up, when prompted, press the iButton security key firmly to the iButton receptacle, and hold it in place until the login screen appears on the touchscreen.
8. On the authorization screen, enter the username and password specific for to project and press the OK button. In the event that the username and password are incorrect, the screen will clear the text and provide a new opportunity to enter the correct username and password.
9. On the LCD screen check whether the battery icon indicates that the AC power supply is present.
10. Ensure the internal battery is fully charged. There are two ways to do so:
a. The LCD display is used to display the internal battery status in the same manner as cell phones. There are six different indications that can be shown on the screen:
• No battery (system on AC/DC power)
• Almost empty
• 25% full
• 50% full
• 75% full
• 100% full

Version: 5.10-CA::11 61 1/15/2020
Democracy Suite® Use Procedures
b. Check the externally visible LEDs on the right side of the unit to ensure that the AC power is connected and to determine the status of the internal battery.
c. When the ImageCast® Evolution is powered down, using the tip of a pen or paper-clip, press the recessed battery level button to the right of the LEDs.The LEDs will light up to show the battery's current charge.
11. Ensure the security icon (in shape of a padlock) is white. When security has been compromised, the icon will turn red.
12. Ensure the system health icon is white. When the system health has been compromised, the icon will turn red. For example, if the ATI is missing, the icon will turn red.
13. In addition to the steps described above, the ICE unit has multiple procedures available for polling place verification:
a. The election's identification data is available via printed report and on-screen.
a. Identification of the unit is only available on-screen.
b. Identification of all ballot formats is available on a printed report.
c. The vote totals for each active candidate and measure on all storage locations (showing that they contain only zeros, i.e. zero tape) are available on a printed report.
d. A list of all ballot fields that can be used to invoke special voting options are available on a printed report.
More extensive diagnostic tests and procedures are contained within the Technician menu and can be conducted by authorized vendor technical staff.
3.4.3 ImageCast® Central Acceptance Testing
Acceptance testing for the ImageCast® Central (ICC) scanner is simply a matter of confirming that the physical and electro- mechanical components are functioning properly and have not been damaged during transport, and that certain internal parameters have been programmed correctly. Performing this test will ensure the integrity of the installed firmware within the voting machines. It should be performed prior to each election and initially for customer acceptance testing.
To perform acceptance testing, the supervisory election official or designee must complete the following steps:
1. Unpack the ICC scanner and place it on the desired workstation surface next to the PC workstation.
2. Attach the USB cable from the scanner to the PC workstation.

1/15/2020 62 Version: 5.10-CA::11
Chapter 3 - System Installation and configuration
3. Plug the scanner and the PC workstation into a suitable 120V AC power source.
4. Power up the scanner and PC workstation.
5. Copy and unzip (if necessary) the election configuration files received from EMS. Two directories from EMS, “dcf” and “election”, should be copied into the “\Project\config” folder corresponding to the appropriate tabulator. For more information, (refer to 12.2 “Installing Election Definition Files” in the Democracy Suite® ImageCast® Central Installation and Configuration Procedures document.
6. Log onto the computer.
7. On the PC, run the ImageCast® Central application.
8. Insert the iButton security key and enter the passcode. The application will verify the iButton Security Key against the election files. Errors at this point indicate that the iButton security key has not be programmed correctly, and a replacement key may need to be ordered. Otherwise, the application will commence internal diagnostics testing before going into user's mode.
9. If the ICC profile has been provided, and the settings match, then there is no need to re-create or re-save the profile. Simply use the one provided.
3.4.4 ImageCast® Precinct 2 Acceptance Testing
Acceptance testing for the ImageCast® Precinct 2 tabulator unit is a matter of confirming that the physical and electromechanical components are functioning properly and have not been damaged during transport, and that certain internal parameters have been programmed correctly. Performing this testing will ensure the integrity of the installed firmware within the voting machines. It should be performed prior to each election. To perform acceptance testing, the supervisory election official or designee must complete the following steps:
1. Unpack the ImageCast® Precinct 2 tabulator unit and place it on an assembled ballot box.
2. Insert the test SD cards provided with the ImageCast® Precinct 2 tabulator unit.
3. Plug the power supply into a suitable 120 volt AC power source, and connect the power supply to the ImageCast® Precinct 2 device.
4. The ImageCast® Precinct 2 will begin the power-up sequence, and the LCD will display a number of messages at each stage of the sequence.

Version: 5.10-CA::11 63 1/15/2020
Democracy Suite® Use Procedures
5. Once the start-up sequence is complete, the ImageCast® Precinct 2 will alert the attendant using a series of audible beeps, and a message on the LCD screen will prompt him/her to insert the security key into the iButton Security Key and enter their password.
6. As soon as the election files are authenticated, the ImageCast® Precinct 2 will start up in Administration Mode, and will show the Main menu on the LCD screen.
3.4.5 ImageCast® X Acceptance Testing
Acceptance testing for the ImageCast® X tabulator unit (ICX) is simply a matter of confirming that the physical and electro-mechanical components are functioning properly and have not been damaged during transport and that certain internal parameters have been programmed correctly. Performing this testing will ensure the integrity of the installed firmware within the voting machines. It should be performed prior to each election.
To perform acceptance testing, the supervisory election official or designee must complete the following steps:
1. Unpack the ICX and place it on a table.
2. Unpack the printer and place it next to the ICX.
3. Insert the USB drive with test election data provided with the ICX.
4. Connect the ATI to the ICX using the USB to RJ-45 adapter provided.
5. Connect the power supply into a suitable 120 volt AC power source, and connect the power supply to the ICX.
6. Open the bottom security door on the rear of the device and press and hold the power button until it lights up green.The ICX will begin the power-up sequence, and the LCD will display a number of messages at each stage of the sequence.
7. If the ICX application is not open by default after power up, select the ICX icon from the desktop.The ICX application will prompt for the smart card to be applied to the smart card reader.
8. Insert the technician Smart Card (refer to D.2.7.3 "Programming Tech Advisor Smart Cards”) into the smart card reader. Wait for the login screen to appear.
9. On the Authorization screen, enter a valid PIN.
NOTE: In the event that the PIN is incorrect, the screen will clear the text and provide a new opportunity to enter the correct PIN. After 8 attempts, the smart card will lock and you will have to obtain a new smart card.The user is presented with Technical Administration screen.

1/15/2020 64 Version: 5.10-CA::11
Chapter 3 - System Installation and configuration
10. Once logged in, confirm or modify the date and time.
11. Connect the USB drive containing the election data (refer to D.2.7.3 "Programming Tech Advisor Smart Cards”).
12. Select the Load Settings button on the Technical Administration page.
13. Copy the election files (.dat) onto the device. Wait until the election files are copied.
14. Eject the USB drive.
15. Navigate to Android Settings > Select Battery.
16. Ensure that the battery is 100% full and that it is connected to AC power.
17. Remove the technician Smart Card.
18. Insert the poll worker Smart Card (refer to D.2.7.3 "Programming Tech Advisor Smart Cards”) into the smart card reader. Wait for the login screen appears on the touchscreen.
19. On the Authorization screen, enter a valid PIN in order to log in.
NOTE: In the event that the PIN is incorrect, the screen will clear the text and provide a new opportunity to enter the correct PIN. After 8 attempts, the smart card will lock and you will have to obtain a new smart card.
20. Wait for the election files to decrypt.
21. Ensure the required tabulator is present in the tabulator list.
22. In addition to the steps described above, the ICX unit has multiple procedures available for polling place verification:
a. The election's identification data is available on-screen.
• The information is available as part of the Ballot Information screen shown to every voter after successful ballot activation.
b. Identification of the unit is available on-screen only.
• Log in as technician (see steps 10 and 11 from the Settings section), select the Hardware Details button.ICX device details are shown as part of the "ICX Device" section.
• To exit the menu, click OK.
• Remove the technician Smart Card.
NOTE: More extensive diagnostic tests and procedures are found in the technician menu and can be conducted by authorized vendor technical staff.
Version: 5.10-CA::11 65 1/15/2020
Democracy Suite® Use Procedures
CHAPTER 4: ELECTION SET-UP AND DEFINITION
This chapter describes the procedures used to verify proper functioning of the equipment and Democracy Suite® system as a whole. This test is run after installing and configuring the whole Democracy Suite® system. The goal is to verify that products are configured to run as an integrated system. This test does not require a specific election project (files) and is usually performed on a single ImageCast® Evolution, ImageCast® Precinct 2, ImageCast® X and/or ImageCast® Central tabulator.
Prior to running any system level tests, a trained service technician performs a series of diagnostic tests in order to identify any existing or potential issues with the ImageCast® Evolution and ImageCast® Central tabulators. Once the diagnostic tests are completed, the readiness testing will be executed to determine that the system has been configured properly and that the equipment functions correctly.
Finally, logic and accuracy testing is run prior to the election to ensure that the election project has been programmed and configured correctly. Every device is to be retested prior to every election in order to validate each ROM prior to the start of elections operations.
The election project database will be provided by Dominion Voting. The administrator must restore the election project (see section 12.2.2 “Restore of Election Project”) on the EMS Server. Once the project is restored, return here and proceed to run diagnostic tests (see section 4.3 “System Diagnostics Testing Procedures”).
4.1 EMS Programming and ConfigurationDefining and configuring an election is accomplished through the Election Event Designer (EED) application and consists of the following steps.
1. Create a new project
2. Define District types
3. Define districts
4. Define precincts
5. Define district rotations
6. Rotate contests
7. Define ballots structure
8. Preview ballots
9. Run proofing reports

1/15/2020 66 Version: 5.10-CA::11
Chapter 4 - Election Set-up and Definition
10. Generate proofing ballots
For detailed information and how to use EED, please see the Democracy Suite® EMS Election Event Designer User Guide.
4.2 Tabulator Programming and ConfigurationSystem readiness testing consists of an end to end system test that helps to ensure that the system has been configured properly and that all parts of it function correctly. The test consists of pre-voting, voting and post-voting phases.
• Pre-voting phase testing consists of restoring and, if necessary, modifying the election project to be used for readiness testing as well as preparing all other necessary material for testing such as iButtons, security keys, test decks etc.
• The voting phase consists of scanning the test decks on all physical tabulators.
• The post-voting phase involves loading results and analyzing the reports.
Each of the following subsections addresses one of these phases.
4.2.1 Performing the Pre-Voting Phase Readiness Test
Tabulator pre-voting readiness tests can be performed with any suitable Democracy Suite® election project and ballots. Dominion Voting Systems will provide state-specific demonstration and/or acceptance test election projects for this purpose, or the jurisdiction can develop their own. In addition, the voter Activation XML file will be provided for importing into the ImageCast® Voter Activation application. Importing the voter activation XML file will configure the ImageCast® Voter Activation application to function correctly with that specific election project, and enable the application to be used to program voter smart cards. For detailed information on how to export the voter activation codes from EED, please see section D.3 “Exporting of Voter Activation Codes from EED”.
Jurisdictions that have their elections programmed by Dominion Voting should proceed to section 12.2.2 “Restore of Election Project” to restore the test election database and then return here to continue. Jurisdictions that program their own elections will create their projects according to the custom use procedure document created for them by Dominion Voting Systems, which they will receive after purchasing the system. In addition, specific procedures and tips for creating election projects in EED are contained in the section D.2.1 “Creating Election Project”.
Version: 5.10-CA::11 67 1/15/2020
Democracy Suite® Use Procedures
Get the media and other artifacts ready (if not provided by Dominion Voting):
• Burn the iButton security keys D.2.7.2 “Programming of iButton Security Key” in EED.
• Burn the CF cards (see section D.2.7.1 “Programming of CF/SD Cards”) in EED. In the case of an Administrator managing multiple ICC tabulators, they will copy election files for ICC tabulators (see section 12.4 “Preparing ImageCast® Central Election Files for the ImageCast® Central Workstation”) onto USB drives from the EMS server, and load the data onto each ICC workstation. Refer to D.2.7.1 “Programming of CF/SD Cards”, 12.5 “Managing ImageCast® Central Tabulator Folders” and 12.4 “Preparing ImageCast® Central Election Files for the ImageCast® Central Workstation”.
• Burn the ImageCast® Precinct 2 SD cards (see section D.2.7.1 “Programming of CF/SD Cards”).
• Program the poll worker smart cards D.2.8 “Programming of poll worker Smart Card” in EED.
• Export Activation Codes (see section D.3 “Exporting of Voter Activation Codes from EED”), save the file on the removable media and transfer it to the ICVA station to configure the ICVA application. Once the election project is restored, if the voter activation codes have not been provided, they need to be exported from EED and stored on removable media so that they can be transferred to the ImageCast® Voter Activation workstation. Activation codes should then be imported into the ImageCast® Voter Activation (see section D.4 “Importing Activation Codes to the ImageCast® Voter Activation Application”) application. In addition, even though ballot adjudication will not be performed in the election readiness testing phase, the correct configuration and setup of the adjudication system should be performed at this time.
• Prepare the test decks (see section 4.5.1.4 “Test Decks Required for Logic and Accuracy Testing”) with known results.
NOTE: Depending on the expiration date set on the adjudication certificate, your administrator might need to create a new certificate and install (see section 12.6.2.4 “Security Key Setup”) it on the EMS Server as well as the remote adjudication client workstations.
Once this step is complete, the voting phase readiness test can begin.
1/15/2020 68 Version: 5.10-CA::11
Chapter 4 - Election Set-up and Definition
4.2.2 Performing the Voting Phase Readiness Test
Voting phase readiness test is performed on all ImageCast® tabulators. It involves scanning a pre-marked test deck of ballots (with a known set of results) for the specific election.
4.2.2.1 Voting Phase Readiness Testing ImageCast® Evolution
This section describes the readiness testing procedure for the ImageCast® Evolution tabulators. The procedure consists of loading CF cards containing election files on each ImageCast® Evolution tabulator and testing it by scanning test decks and verifying the results reports.
NOTE: Make sure to test every physical ImageCast® Evolution tabulator that might be used for early voting or election day.
1. On the ICE tabulator, insert the memory card containing the election project into the CF1 card slot, and the initialized backup memory card into the CF2 card slot.
2. Power up the ICE tabulator by lifting the LCD monitor into the operating position (note that the main power switch under the thermal printer door needs to be switched on). For instructions on the power on procedure, see section 4.5.2.2 “ImageCast® Evolution Logic and Accuracy Test Procedures”.
3. When prompted by the LCD screen, insert the iButton Security Key and enter the appropriate password. For more details, see section 4.5.2.2 “ImageCast® Evolution Logic and Accuracy Test Procedures”.
4. Visually confirm that the date and time are correct by looking at the lower left section of the ICE LCD screen (if date and/or time need to be changed, please consult with designated ICE level 1 technician).
5. Open the polls (see section 6.3.2 “Opening the Polls on the ICE”).
6. Tabulate the pre-marked test deck of readiness testing ballots into the ICE tabulator by feeding the test deck, and then continue with next steps below.
7. Start an accessible voting session (see section 6.5.1.1 “Accessible Voting Session”) vote a predefined voting pattern.
8. After all ballots have been tabulated and accessible voting sessions have been completed, insert the iButton security key and close the polls (see section 6.7.1 “Closing the Polls on ICE”).
9. Allow at least one result tape to print and confirm that you do not need another copy.
10. Power down the unit by tapping the Shut Down icon at the top right corner of the screen.

Version: 5.10-CA::11 69 1/15/2020
Democracy Suite® Use Procedures
11. On the right side of the ICE open the CF1 and CF2 card slot doors and remove both cards from the tabulator. Place both cards in the envelope provided. These cards will be used for tally in the Results Tally & Reporting application.
12. For each tabulator tested, confirm that the tabulator-level result reports match the expected results from the pre-marked test deck.
13. Repeat this test procedure for each physical ICE tabulator.
4.2.2.2 Voting Phase Readiness Testing ImageCast® Central
This section describes the readiness testing procedure for the ImageCast® Central tabulators. The procedure consists of loading of ICC election files onto the ICC workstation and testing each of the ICC tabulators by scanning test decks and verifying the results reports.
Before you begin:
If there are any other files or folders present in "C:\DVS", delete them before proceeding. Perform the steps outlined in the section12.4 “Preparing ImageCast® Central Election Files for the ImageCast® Central Workstation”.
Copy the contents of the "ICC Election Files" folder prepared in the previous step into the "C:\DVS". If you will be using multiple projects on one ICC workstation, then you might want to create subfolders with project names in order to differentiate between them.
Before continuing, ensure that the ImageCast® Central workstation and scanner are powered on and ready to load election files (see section 7.2 “Setting up the ImageCast® Central Workstation and Scanner”). If the ICC workstation is already set up, continue with the next step.
1. Open ICC application (see section 7.4 “Opening ImageCast® Central Application”)
2. Load the desired tabulator files using project management (see section 7.13 “Loading Election Files for a New Tabulator”) functionality.
3. Generate the Zero report (see section 7.12.2 “Producing Reports from the ImageCast® Central System”) by selecting the Status icon.
4. Configure the server path (see section 7.5 “Configuring the Local and Remote Path for Saving Results”).
5. In the ICC application, access Supervisor mode (see section 7.6 “Accessing Supervisor Mode”).
6. Set Scanner Properties (see section 7.6.1 “Setting Supervisor Options”) and ICC Scan Options (see section 7.6.3 “Configuring Scan Options”).
1/15/2020 70 Version: 5.10-CA::11
Chapter 4 - Election Set-up and Definition
7. If this is the first tabulator tested, the multi-feed settings need to be verified. However, this verification can be skipped for every next tabulator under test.
8. Tabulate and process (see section 7.8 “Scanning Mode”) the pre-marked test deck of ballots into the ICC for that precinct.
9. Close the poll (see section 7.12.1 “Closing the ICC Tabulator”).
10. Generate results report (see section 7.12.2 “Producing Reports from the ImageCast® Central System”).
11. Repeat steps 3 through to 11 for each ICC physical tabulator. For instructions on how to switch between different ICC tabulators within the ICC Application, please see section 7.13 “Loading Election Files for a New Tabulator”.
12. For each tabulator tested, confirm that the tabulator-level result reports match the expected results from the pre-marked test deck.
13. Exit the ICC application by clicking the EXIT button. The confirmation dialog will appear.Click YES to exit the application.
14. When all tabulators have been tested, proceed to the next section.

Version: 5.10-CA::11 71 1/15/2020
Democracy Suite® Use Procedures
4.2.2.3 ImageCast® Precinct 2
This section describes the readiness testing procedure for the ImageCast® Precinct 2 tabulators. The procedure consists of loading SD cards containing election files on each ICP2 tabulator and testing it by scanning test decks and verifying the results reports.
NOTE: Make sure to test every physical ICP2 tabulator that might be used for early voting or election day.
1. On the ICP2 tabulator, insert the memory card containing the election project into the SD1 card slot, and the initialized backup memory card into the SD2 card slot.
2. Power up the ICP2 tabulator. (see section 6.2.2.4 “Powering Up the Tabulator”)
3. When prompted by the LCD screen, insert the iButton Security Key and enter the appropriate password.
4. Open the polls.(see section 6.3.3 “Opening the Polls on ICP2”)
5. Tabulate the pre-marked test deck of readiness testing ballots into the ICP2 tabulator by feeding the test deck, and then continue with next steps below.
6. After all ballots have been tabulated, insert the iButton security key and close the polls (see section 6.9.1 “Operating the ImageCast® Precinct 2 on Battery”).
7. Allow at least one result tape to print and confirm that you do not need another copy.
8. Power down the unit. (see section 6.7.2.1 “Powering Down the Tabulator”)
9. Open the SD1 and SD2 card slot doors and remove both cards from the tabulator. Place both cards in the envelope provided. These cards will be used for tally in the Results Tally & Reporting application.
10. For each tabulator tested, confirm that the tabulator-level result reports match the expected results from the pre-marked test deck.
11. Repeat this test procedure for each physical ICP2 tabulator.

1/15/2020 72 Version: 5.10-CA::11
Chapter 4 - Election Set-up and Definition
4.2.3 Voting Phase Readiness Testing ImageCast® X
The procedure consists of inserting USB sticks, containing election files, on each ImageCast® X tabulator and testing the by scanning Vote sim (Test deck) files and verifying the results reports.
NOTE: Make sure to test every physical ImageCast® X tabulator that might be used for early voting or election day.
1. On the ICX tabulator, connect the USB stick containing the election project into the top USB slot.
2. Power up the ICX tabulator by pressing the power button on the back side. For more instructions, see 3.4.5 “ImageCast® X Acceptance Testing”.
3. When prompted, insert the technician smart card and enter the appropriate password. For more instructions, see 3.4.5 “ImageCast® X Acceptance Testing”.
4. Confirm or modify the date and time.
5. Press the Clear Working Directory icon.On the Warning dialog, press Yes to confirm.Enter Technician credentials and press Confirm.Click OK on the Info dialog.
6. Press the Clear All Election Data icon.On the Warning dialog, press Yes to confirm.Enter Technician credentials and press Confirm.Click OK on the Info dialog.
7. Load the election files by completing the following:
• Press Load Election Data
• Select ICX.dat
• On the Confirm dialog, press ConfirmThe Status dialog displays during copy.
• On the Confirm dialog, press Copy.
8. Remove the technician smart card.
9. Insert the poll worker smart card and log in. For more instructions, see 3.4.5 “ImageCast® X Acceptance Testing”.
10. Wait for the election files to decrypt.
11. Select the appropriate tabulator from the tabulator drop down list.
12. Open the polls (see section 6.4.3 “Standard Voting on ICX”).
13. Remove the poll worker smart card.

Version: 5.10-CA::11 73 1/15/2020
Democracy Suite® Use Procedures
14. Use the voter activation smart card to activate the voting session (see section 6.4.3 “Standard Voting on ICX”).
15. Mark the ballots as indicated in the pre-marked test deck of readiness testing ballots and then return here to continue with next steps below.
16. Start an accessible voting session (see section 6.5.2 “Accessible Voting on ICX”) and vote a predefined voting pattern.
17. After all ballots have been tabulated and AVS have been completed, insert the poll worker smart card, login and close the polls (see section 6.7.3 “Closing the Polls on ICX”).
18. Power down the unit by pressing the Power Off icon at the bottom right corner of the screen. For more details see (see section 6.7.3 “Closing the Polls on ICX”).
19. Repeat this test procedure for each physical ICX tabulator.
20. Feed the marked ballots either to ICE tabulator (see section 4.2.2 “Performing the Voting Phase Readiness Test”) or ICC central tabulator (see section 4.2.2.2 “Voting Phase Readiness Testing ImageCast® Central”).
4.2.4 Performing the Post-Voting Election Day Phase Readiness Test
This section provides instructions on how to tally and report results from the ImageCast® Evolution and ImageCast® Central tabulators. Additional instructions can be found in the Help menu within the EMS Results Tally & Reporting application (RTR).
1. Open the RTR application. If the project was created by the Dominion Voting, the RTR username and password will be provided to the jurisdiction. Jurisdictions programming their own elections will have to have their administrator create an RTR user account and activate it in EED (see section 12.2.5 “Creation of RTR User in Election Event Designer”).
2. Open the appropriate election project (see section 8.2.1 “Open Project”) and enter your login credentials.
3. Load the results files, audit log files and result images (if enabled and required) from the ICE (see section 8.2.3 “Loading Results from Card Management”), and the ICC tabulators (see section 8.2.4 “Load Results from Directory”) into the RTR application. Once all result files are uploaded, return here and continue with the next step.
4. Validate and publish (see section 8.2.5 “Validate and Publish Results”) results files in the RTR application.
5. Create the Election Summary Report (see section 8.2.6 “Election Night Summary Report - Election Day Report”).
1/15/2020 74 Version: 5.10-CA::11
Chapter 4 - Election Set-up and Definition
6. Confirm that the results from the election summary report from RTR matches the tabulator summary reports and the expected test deck results.
7. Review a subset of Audit Marked images in order to confirm that ballot image files are clear and readable and to verify that the system is interpreting the individual ballots accurately.
4.3 System Diagnostics Testing ProceduresThis section defines the system diagnostic testing procedures, which are performed by a trained service technician in order to identify any existing or potential issues with the ImageCast® series of tabulators/units. If any device fails diagnostic testing or a component of diagnostic testing, please refer to Troubleshooting and Problem Resolution (refer to F “Troubleshooting and Problem Resolution”) section.

Version: 5.10-CA::11 75 1/15/2020
Democracy Suite® Use Procedures
4.3.1 ImageCast® Central System Diagnostics Testing Procedures
• In order to perform diagnostic testing on the ICC, the election files (or an election project) need to be installed on the workstation.
• For instructions on how to program an ICC workstation and set it up for scanning (necessary to perform diagnostic testing), please 12.4 “Preparing ImageCast® Central Election Files for the ImageCast® Central Workstation”, or program a single tabulator (see section D.2.7.1 “Programming of CF/SD Cards”) and copying the files to the ICC workstation.
• Ensure that the iButton security key for the same project has been programmed (see section D.2.7.2 “Programming of iButton Security Key”) and connected to the same ICC workstation.
• Open the ImageCast® Central application and the scanning device will automatically perform a set of diagnostic tests. The tests are run after every power cycle. The system generates a report at the end of the diagnostics testing procedure that outlines the status of the system.
• To display this report navigate to the administrator's Status menu and press the Show Log button in the ImageCast® Central application.
4.3.2 ImageCast® Evolution System Diagnostic Testing Procedures
Prior to running pre-election diagnostic tests on the ImageCast® Evolution, a trained service technician must first login as technician in order to access the diagnostics options in the Technician menu. The trained service technician must have an iButton technician security key, username, and password before performing the following:
• Automated tests.
• Functional Tests
Automated Tests Functional Tests
Memory Audio
Compact Flash Video
EEPROM Scanner
Table 4-1: List of Functional Tests

1/15/2020 76 Version: 5.10-CA::11
Chapter 4 - Election Set-up and Definition
A diagnostics report can be printed via the ImageCast® Evolution thermal printer and retained for auditing purposes.
1. Power up the ICE by pressing the main power switch located under the thermal printer door.
2. When prompted by the touchscreen, touch the technician iButton security key to the security key receptacle, and enter the technician username and password. If you are unsure of the password, contact your elections supervisor for assistance.The Technician menu will appear.
3. Under the Technician main menu, press the Diagnostics button.
4. Ensure the paper roll is installed in the thermal printer.
5. Ensure the printer inkjet cartridge is installed.
6. Ensure the ATI and headphones are connected.
Thermal Printer Printer
Ballot Marking Printer ATI
Video Sip and Puff or Paddle
ATI Virtual Keyboard
Audio Voting Buttons
Internal Clock System Test
Power Communication Test
Scanner
Power On Self Tests (POST)
Automated Tests Functional Tests
Table 4-1: List of Functional Tests

Version: 5.10-CA::11 77 1/15/2020
Democracy Suite® Use Procedures
4.3.3 ImageCast® Precinct 2 Diagnostic Procedures
ImageCast® Precinct 2 does not require diagnostic procedures. During the tabulator’s boot-up, ICP2 verifies all system components.
4.3.4 ImageCast® X Diagnostic Procedures
Prior to running pre-election diagnostic tests on the ImageCast® X, a trained service technician must first login as technician in order to access the diagnostics options in the Technician menu. The trained service technician must have a technician smart card and a valid PIN for the card before performing the following:
• Automated Tests
• Automated tests (POST - Power-On Self-Test) are performed at the system start. The system will not initialize if any of the tests fail. The tests include:
• Power
• Memory
• CPU
• Video subsystem
• Audio subsystem
• Hardware Tests:
• ATI
• Paddles
• Sip & puff
• Printer
• LED Lamp
• Touchscreen
4.4 System ProofingCheckpoint 1: Jurisdictional Report Proofing
Proofing report list:
• Districts Report – Lists each district in the election project and its associated precincts. If there are any split precincts active in the election, that information will be reflected in this report.

1/15/2020 78 Version: 5.10-CA::11
Chapter 4 - Election Set-up and Definition
• Precincts Report – Lists each precinct in the election project and its associated districts. If there are any split precincts active in the election, this report will indicate that a precinct has splits but split precinct detail will not be reflected in this report.
• Tabulators Report – Lists each tabulator in the election project, the polling location the tabulator is assigned to, the tabulator type, the assigned counting group, and the precincts assigned to the tabulator.
• Ballot Types Report – Lists each ballot type in the election project and its associated contests and precincts. If a contest rotates the candidate position is identified.
• Contests Report – Lists each contest in the election, the associated district, the candidate(s)/choice(s), and the associated elector group. The elector group will only be a factor in a primary election where a contest is associated with a party for the purpose of creating separate partisan ballots.
Districts Report
This report is used to verify that the districts that are active in the election are present and associated with the proper precinct(s).
Generating the Districts Report:
1. Open EED
2. Log into the election project
3. From the left navigation pane, expand the Reports subsection.
4. Select the Divisioning report group
5. From the Report Name drop-down menu, select the Districts Report.

Version: 5.10-CA::11 79 1/15/2020
Democracy Suite® Use Procedures
6. Select Create New to create a new report.
7. Select the desired output (PDF, Excel, Word). Select or clear any desired output fields, as necessary.
8. Click Create.
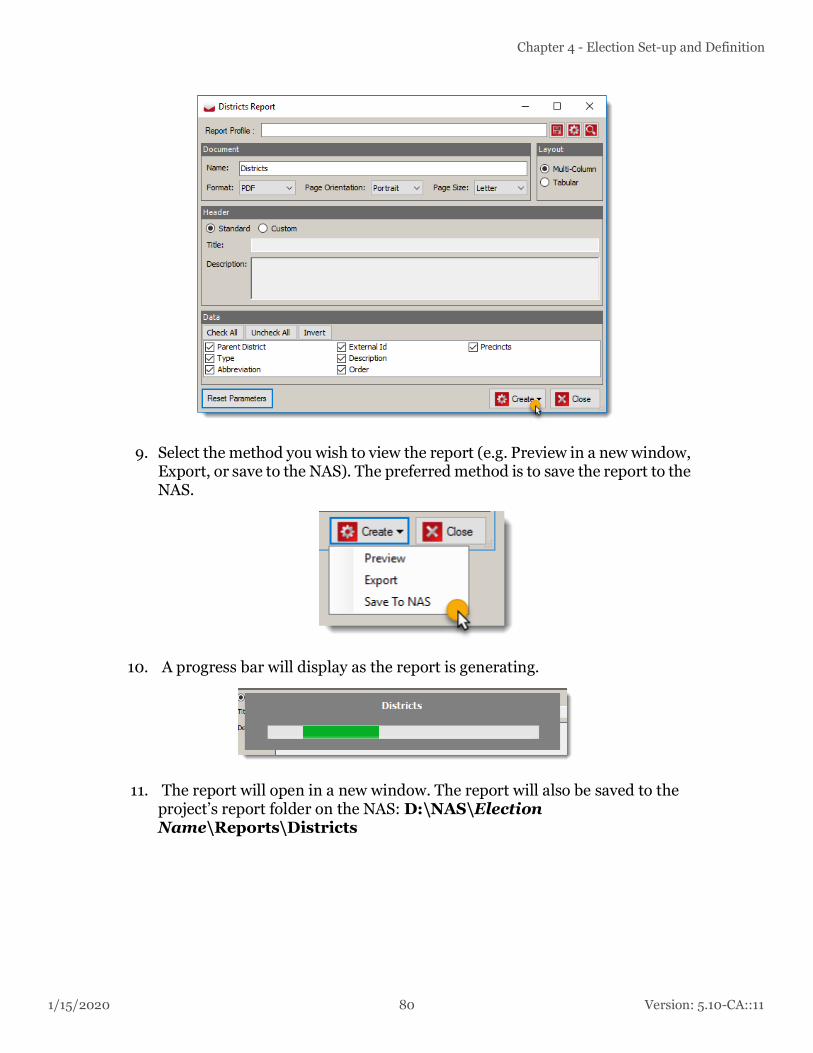
1/15/2020 80 Version: 5.10-CA::11
Chapter 4 - Election Set-up and Definition
9. Select the method you wish to view the report (e.g. Preview in a new window, Export, or save to the NAS). The preferred method is to save the report to the NAS.
10. A progress bar will display as the report is generating.
11. The report will open in a new window. The report will also be saved to the project’s report folder on the NAS: D:\NAS\Election Name\Reports\Districts

Version: 5.10-CA::11 81 1/15/2020
Democracy Suite® Use Procedures
Once the report has generated, the report should be proofed for the following details:
• Verify that every district that should be in the election project is listed.
For each district:
• Verify that every precinct that belongs in the district is listed
Precincts Report
This report is used to verify that each precinct included in the election is present.
Generating the Precincts Report
1. Open EED
2. Log into the election project
3. From the left navigation pane, expand the ‘Reports’ subsection.
4. Select the Divisioning report group
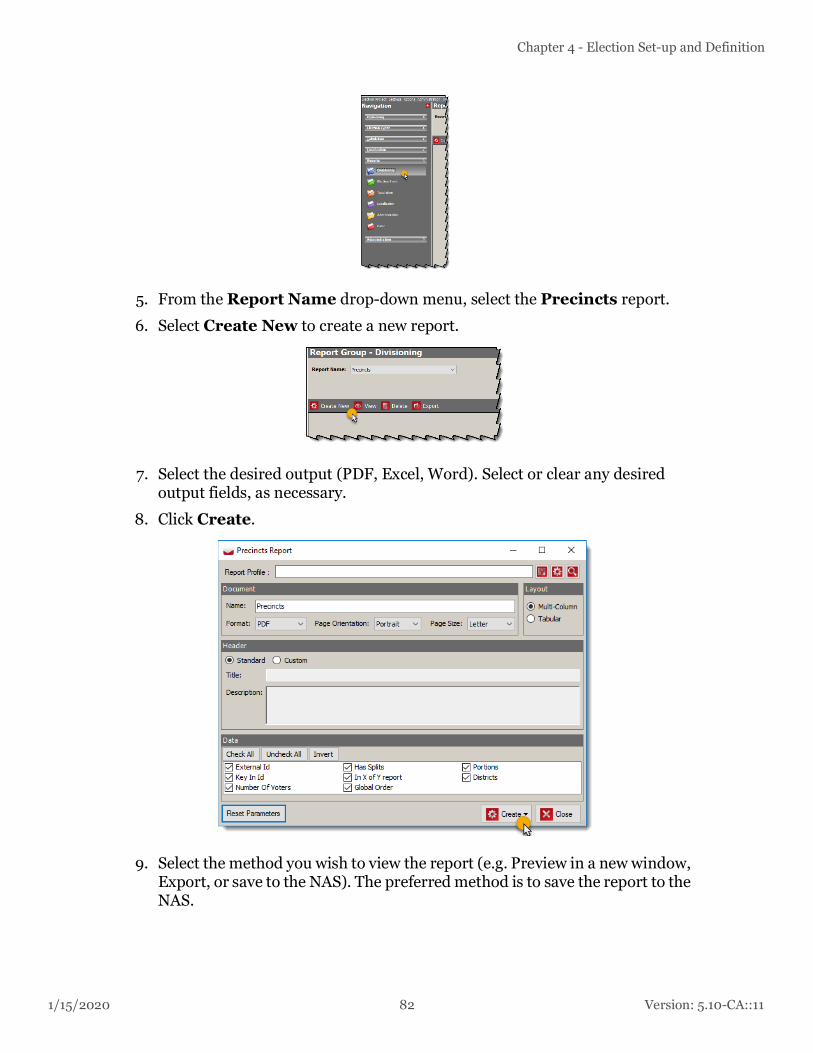
1/15/2020 82 Version: 5.10-CA::11
Chapter 4 - Election Set-up and Definition
5. From the Report Name drop-down menu, select the Precincts report.
6. Select Create New to create a new report.
7. Select the desired output (PDF, Excel, Word). Select or clear any desired output fields, as necessary.
8. Click Create.
9. Select the method you wish to view the report (e.g. Preview in a new window, Export, or save to the NAS). The preferred method is to save the report to the NAS.

Version: 5.10-CA::11 83 1/15/2020
Democracy Suite® Use Procedures
A progress bar will display as the report is generating.
10. The report will open in a new window. The report will also be saved to the project’s report folder on the NAS: D:\NAS\Election Name\Reports\Precincts
Once the report has generated, the report should be proofed for the following details:
• Verify that every precinct that should be in the election project is listed
For each precinct:

1/15/2020 84 Version: 5.10-CA::11
Chapter 4 - Election Set-up and Definition
• Verify that every district that is associated with the precinct in the current election is listed
Tabulators Report
This report is used to verify that every tabulator being used in the election is present and that each one is associated with the proper polling place, counting group, and precinct(s).
Generating the Tabulators Report
1. Open EED
2. Log into the election project
3. From the left navigation pane, expand the‘Reports subsection.
4. Select the Tabulation report group
5. From the Report Name drop-down menu, select the Tabulators report.
6. Select Create New to create a new report.
7. Select the desired output (PDF, Excel, Word). Select or clear any desired output fields, as necessary.
8. Click Create.

Version: 5.10-CA::11 85 1/15/2020
Democracy Suite® Use Procedures
9. Select the method you wish to view the report (e.g. Preview in a new window, Export, or save to the NAS). The preferred method is to save the report to the NAS.
10. A progress bar will display as the report is generating.
11. The report will open in a new window. The report will also be saved to the project’s report folder on the NAS: D:\NAS\Election Name\Reports\Tabulators
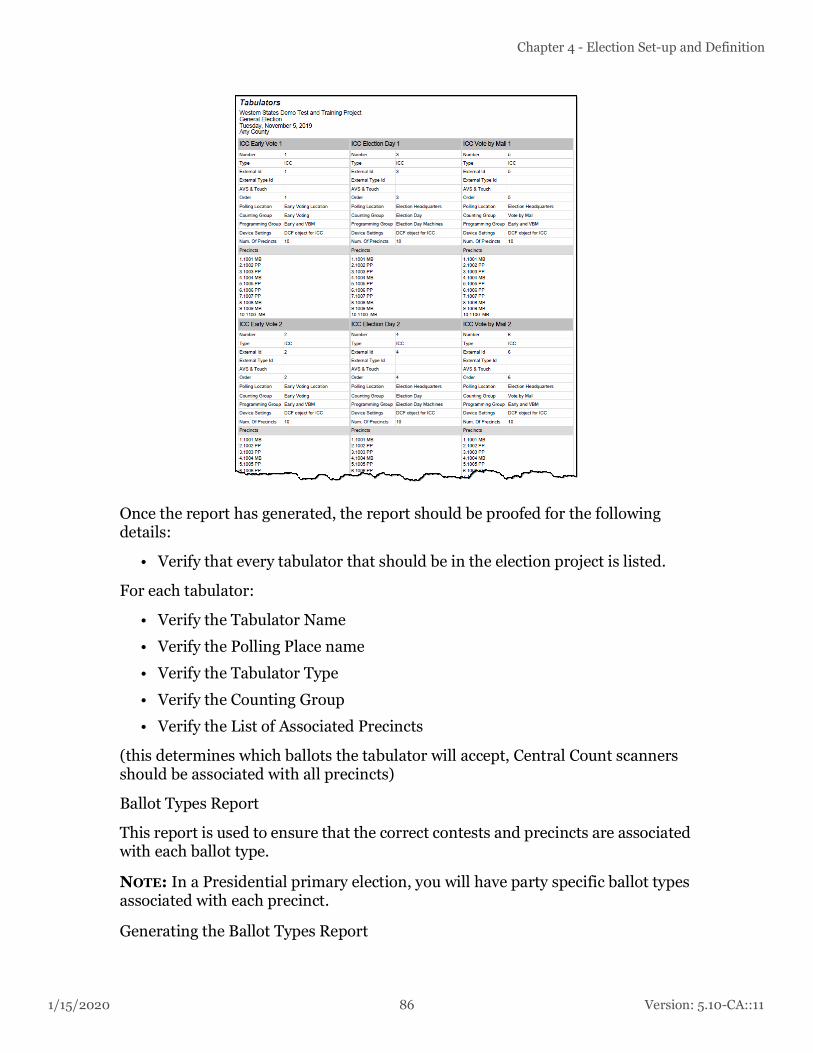
1/15/2020 86 Version: 5.10-CA::11
Chapter 4 - Election Set-up and Definition
Once the report has generated, the report should be proofed for the following details:
• Verify that every tabulator that should be in the election project is listed.
For each tabulator:
• Verify the Tabulator Name
• Verify the Polling Place name
• Verify the Tabulator Type
• Verify the Counting Group
• Verify the List of Associated Precincts
(this determines which ballots the tabulator will accept, Central Count scanners should be associated with all precincts)
Ballot Types Report
This report is used to ensure that the correct contests and precincts are associated with each ballot type.
NOTE: In a Presidential primary election, you will have party specific ballot types associated with each precinct.
Generating the Ballot Types Report
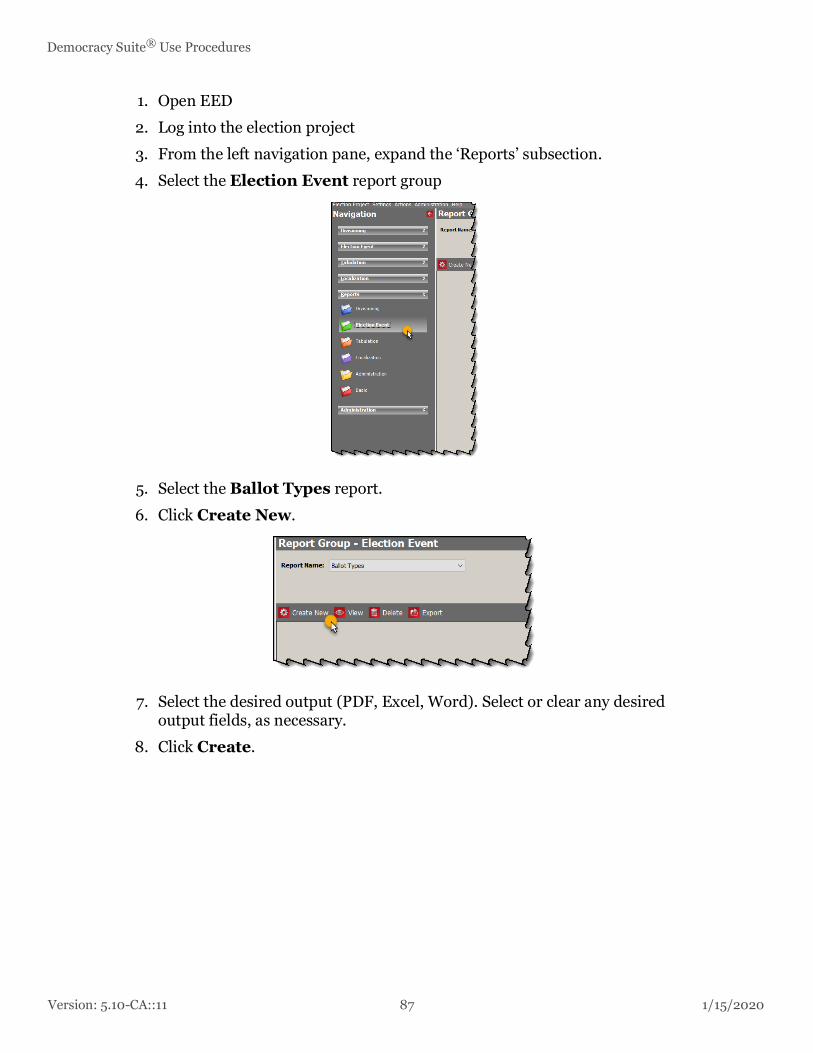
Version: 5.10-CA::11 87 1/15/2020
Democracy Suite® Use Procedures
1. Open EED
2. Log into the election project
3. From the left navigation pane, expand the ‘Reports’ subsection.
4. Select the Election Event report group
5. Select the Ballot Types report.
6. Click Create New.
7. Select the desired output (PDF, Excel, Word). Select or clear any desired output fields, as necessary.
8. Click Create.

1/15/2020 88 Version: 5.10-CA::11
Chapter 4 - Election Set-up and Definition
9. Select the method you wish to view the report (e.g. Preview in a new window, Export, or save to the NAS). The preferred method is to save the report to the NAS.
10. The report will open in a new window. The report will also be saved to the project’s report folder on the NAS: D:\NAS\Election Name\Reports\Ballot Types

Version: 5.10-CA::11 89 1/15/2020
Democracy Suite® Use Procedures
Once the report has generated, verify that each ballot type in the election project is listed and that the correct contests and precincts are associated with it.
Contests Report
This report is used to verify that each contest and its associated candidates are present.
Generating the Contests Report
1. Open EED
2. Log into the election project
3. From the left navigation pane, expand the ‘Reports’ subsection.
4. Select the Election Event report group
5. Select the Contests report.
6. Click Create New.

1/15/2020 90 Version: 5.10-CA::11
Chapter 4 - Election Set-up and Definition
7. Select the desired output (PDF, Excel, Word). Select or clear any desired output fields, as necessary.
8. Click Create.
9. Select the method you wish to view the report (e.g. Preview in a new window, Export, or save to the NAS). The preferred method is to save the report to the NAS.
10. The report will open in a new window. The report will also be saved to the project’s report folder on the NAS: D:\NAS\Election Name\Reports\Contests

Version: 5.10-CA::11 91 1/15/2020
Democracy Suite® Use Procedures
Once the report has generated, the following details should be proofed:
• Verify that every contest in the election is present
• Verify that every contest appears only once
For each contest:
• Verify the contest name is correct
NOTE: This is the name of the Contest as it will appear on ALL reports (including the Election Summary Report). The name of the contest as it appears on the ballot may be different.
• Verify that the “Number of Positions” equals the proper number to vote for
• Verify that the district name is correct
1/15/2020 92 Version: 5.10-CA::11
Chapter 4 - Election Set-up and Definition
• Verify the choices for each contest are listed
Checkpoint 2: Visual Ballot Proofing
Ballot Type Confirmation
Looking at the ballots, confirm the following pieces of information about the ballot type information:
• Verify that every expected ballot type is present.
Ballot Header/Footer
Confirm the following pieces of information about the Ballot Header and Footer information:
• Verify that the official ballot header is present at the top of the ballot, and the text order is consistent and contains the following in all languages:
• The title of election
• The date and of the election
• The county name
• In Presidential primary elections, verify that the party is correct
• Voting instructions
• Ballot ID and precinct presented in the proper format
Contest Information
All of the contest information is imported into EED to create the ballot(s).
• Confirm the following about the Contest header information:
• Verify the correct contests appear on the ballot, in the correct sequence
• Verify each contest appears only once on the ballot
• Verify that the contest heading and spelling are correct and consistent
• Verify that the correct "Vote For" appears for each contest
• In Presidential primary elections, verify that only the appropriate contests are listed on the appropriate party's ballot
• Confirm the following about Candidates:
• Verify that the correct candidates appear in each contest
• Verify that each candidate appears only once on the ballot
• Verify that the candidate names and designations are spelled correctly including punctuation
• Verify that the candidates are listed in the correct order that they should appear on the ballot

Version: 5.10-CA::11 93 1/15/2020
Democracy Suite® Use Procedures
• Verify that the candidate names appear to be of a uniform font size for a given contest
• If there are write-in candidates, verify number of write-in(s) spaces in the appropriate contest(s) match the “Vote For” number
• Confirm the following about Proposals:
• Verify that all title and text is correct for every proposal
Checkpoint 3: Audio Ballot Proofing
Your Election Proofing Package will include the Audio Studio Library Package for the purpose of proofing the audio used during audio voting sessions on the ICX, ICP, and ICE. Using this method will simplify the audio ballot proofing process
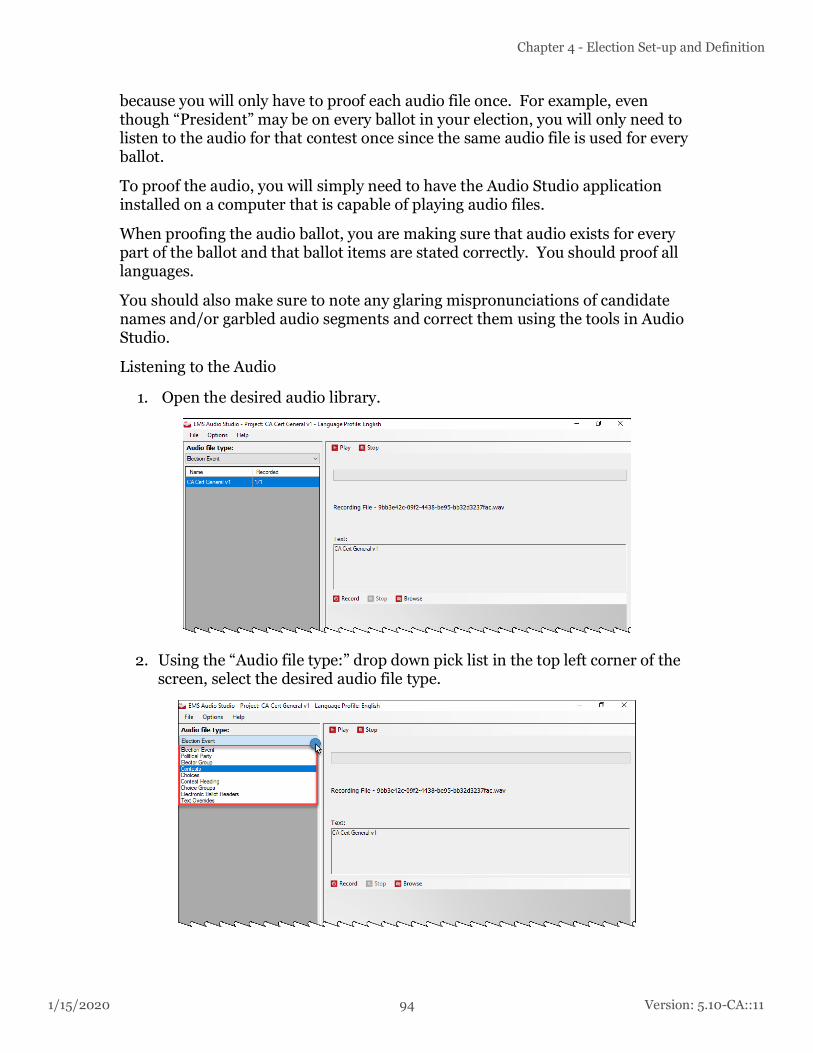
1/15/2020 94 Version: 5.10-CA::11
Chapter 4 - Election Set-up and Definition
because you will only have to proof each audio file once. For example, even though “President” may be on every ballot in your election, you will only need to listen to the audio for that contest once since the same audio file is used for every ballot.
To proof the audio, you will simply need to have the Audio Studio application installed on a computer that is capable of playing audio files.
When proofing the audio ballot, you are making sure that audio exists for every part of the ballot and that ballot items are stated correctly. You should proof all languages.
You should also make sure to note any glaring mispronunciations of candidate names and/or garbled audio segments and correct them using the tools in Audio Studio.
Listening to the Audio
1. Open the desired audio library.
2. Using the “Audio file type:” drop down pick list in the top left corner of the screen, select the desired audio file type.

Version: 5.10-CA::11 95 1/15/2020
Democracy Suite® Use Procedures
3. Highlight one of the audio files listed by clicking on it. (the corresponding text for the audio file selected will display in the center of the screen under the label “Text:”)
4. Click the Play button to hear the existing audio.
5. Repeat steps 3 and 4 to listen to each audio file listed for the currently selected audio file type.
6. Repeat steps 2 through 5 for each audio file type listed in the “Audio file type:” drop down pick list.
NOTE: Make sure that you listen to each audio file, in each audio file type, for all languages used in the election.
Checkpoint 4: Screen Ballot Content Proofing
1. To restore a project:
a. In EED, in the top toolbar menu, click Administration.
b. Select Restore EMS Database.
c. Click Browse and navigate to the external media where the project resides
d. Select the project package .zip folder, and click Open
e. Click Restore. This process will take a few minutes—please be patient.
2. Open the Project
a. Click Election Project in the top toolbar menu, and then select Open Project.
b. Select the project you want to open, and then click OK.
c. Enter your Username and Password, and then click OK.

1/15/2020 96 Version: 5.10-CA::11
Chapter 4 - Election Set-up and Definition
3. Program Tech and Pollworker Cards in EED
To program technician cards:
a. Log into a project in EED.
b. Expand the Settings menu, then select Project Parameters.
c. Select the Smart Card tab.
d. Click the Program Smart Card button.
e. A confirmation will display when the card has burned successfully. Click OK.
To program Pollworker cards:
a. Log into the project in EED.
b. Expand the Tabulation section on the left navigation pane.
c. Select Tabulators.
d. Click Search to view the list of tabulators in the project.
e. Double-click on an ICX from the list.
f. Click on the Users tab.
g. Select the Admin user.
h. Click Program Smart Card.
i. A prompt will display. Insert the smart card and click OK.
j. A progress bar will appear as the card is burned.
k. When the card has burned successfully, a confirmation message will appear. Click OK.
4. Program a USB flashdrive with election files
a. Log into the project in EED
b. Expand the Tabulation section on the left navigation pane.
c. Select Programming Groups
d. Select the default programming group by double-clicking on it.
e. Select Program USB.
f. Insert a blank USB flashdrive
5. Load Election Files onto an ICX.
a. Insert the USB flashdrive that contains the election files into the USB port located behind the top access panel.
b. Insert a Technician card into the ICX and input the Technician PIN

Version: 5.10-CA::11 97 1/15/2020
Democracy Suite® Use Procedures
c. Tap Load Settings and select the ‘PG_ICX.dat” file. Do not select the ‘WPSSettings.dat file.
d. The files will begin to load automatically. After the election files have loaded, tap OK and remove the Technician card.
6. Preview ballot types manually
a. After the election files have been loaded, insert the Pollworker card into the card reader and input the Pollworker pin
b. Confirm the date/time, if prompted.
c. Select the appropriate tabulator from the list. The verification process will start automatically.
d. When the verification process is complete, two checkboxes will display. If any error displays, notify a technician.
e. In the settings section, select Manual Activation
f. Type in an Activation code for each unique ballot type in the election.
4.5 Logic and Accuracy Testing of System and ComponentsFormal logic and accuracy testing is required to be conducted in accordance with the elections code to ensure that the system has been configured correctly for an election.
This testing is performed using the election project that is to be used in the real election and a set of ballots for which the correct results are known ahead of time. Such a test set, also called a test deck, is run through the system to ensure that the results shown by the tabulator are aligned with those expected.
After logic & accuracy testing has been completed, the system must be reset in order to remove the test results. The system can then be locked away in a secure location until actual election ballots are ready to be scanned. Notify the election supervisor immediately if there are any problems or irregularities during logic & accuracy testing. If at any time during the testing the system fails or produces incorrect results that cannot be attributed to human error, notify the election supervisor immediately.
4.5.1 Pre-Conditions for Performance of Tests
Get the media and other artifacts ready (if not provided by Dominion Voting), same as was done in the readiness testing. See 4.2.1 “Performing the Pre-Voting Phase Readiness Test” for more details.
4.5.1.1 Restore Election Project
1/15/2020 98 Version: 5.10-CA::11
Chapter 4 - Election Set-up and Definition
Prior to beginning an L&A testing, the administrator needs to restore the election project (see section 12.2.2 “Restore of Election Project”).
4.5.1.2 Opening an Election Project
1. In the EED navigation, click Election Project.
2. Click Open Project
3. On the Open Project dialog, select your election project and click OK.
4. On the Login dialog, enter the username and password.The dialogs close and the project opens.
4.5.1.3 Pre-Testing of the Scanning setting with Official election ballots from the certified ballot printer
Pretesting the Scanning setting with the actual election ballots, as delivered by the certified ballot printer, must be performed. When the first printed official ballots and/or test decks are received by the jurisdiction (prior to logic and accuracy testing), they should be tested on the ImageCast® Central system with the election project to confirm that the tabulator scanning parameter settings and the VRS settings will work with the ballots as printed. With the variety of print methods used to print ballots, and the substantial variation in the types of printing presses, a small batch of ballots, numbering between 50 and 100 ballots (sampled throughout the ballot types and styles) should be tabulated with one of the ImageCast® Central tabulators that have been defined in the elections project (usually the absentee tabulation unit). These ballots will not be marked (although they can be if they are test deck ballots) to confirm that they will not misread and that un-voted voting positions do not read as ambiguous marks.
To run this test, perform the following steps:
1. Setup, load, and prepare your ICC tabulator for use as per the procedures outlined below.
a. On the Configuration menu, click the Scan Options button.
b. With the Scan Options dialog box displayed, select the option to "Stop Scan on" on ambiguous marks.
2. Return to the Scanning menu and start scanning ballots.
a. In order for the test to pass, there should not be stoppages due to ambiguous marks.
b. If the scanner is stopping due to the ambiguous marks, troubleshoot the scanner (see section F.3.1.1 “Ambiguous Errors”)
For detailed instructions, see section (see section 4.5.2.1 “ImageCast® Central Logic & Accuracy Testing Procedure”)

Version: 5.10-CA::11 99 1/15/2020
Democracy Suite® Use Procedures
4.5.1.4 Test Decks Required for Logic and Accuracy Testing
Test decks are generated either manually from unmarked ballots, automatically using the Democracy Suite® test deck generator utility, or by a combination of the two methods. Ensure you test for the handling and reporting of exception ballots (blank, over-voted, write-in, error, etc.) as required by the elections code. While test decks can be created at the jurisdiction on the EMS ballot printer, actual Official Ballots produced by the CA-certified ballot printer should also be included in the test. A control sheet should be created that summarizes the total results for the test decks prior to beginning the logic & accuracy testing. Pre-marked test decks should be supplied by the jurisdiction's selected certified ballot printer. This ensures that the exact paper, ink, and print process for use on election day are being tested.
There are two distinct levels of test decks: “Ballot Level” and “Tabulator Level”. The meanings of the different levels of test decks will become clear when executing the procedures below.
1. Establish Ballot-Level test decks and VoteSims for each ballot style:Each ballot style will have its own test deck, called a “Ballot Level” test deck. For a given ballot style, each and every voting space on that ballot style must be tested. Therefore, the number of ballots in the “Ballot Level” test deck will depend on the number of candidates that appear on that particular ballot style. Once the “Ballot Level” test decks have been created for each of the ballot styles, conduct tabulator and manual counts in order to determine the results for each “Ballot Level” test deck.
2. Establish “Tabulator Level” test decks and VoteSims for each tabulator: Each tabulator will also have its own test deck called a “Tabulator Level” test deck. The test deck for a given tabulator will simply be the combination of the “Ballot Level” test decks for each of the ballot faces that the tabulator is programmed to accept. If applicable, the “Tabulator Level” test deck for a given tabulator should include ballot styles that the tabulator is programmed to reject in order to ensure that it has been correctly programmed to do so. For example, if the tabulator is programmed to read Ballot Style 1 of 80, another style (of the 80) should be scanned to verify that the machine is programmed to reject them. The results for each of the “Tabulator Level” test decks can be determined by manually adding together the results from each of the “Ballot Level” test decks that comprise the particular “Tabulator Level” test deck.
4.5.1.5 Cleaning the USB Device
To clean a USB device:
1. On the Cleaner workstation, insert the USB device into the USB port.
2. On the Windows Explorer dialog, in the left-hand pane, navigate to the USB device, right-click and then select Scan with Windows Defender.

1/15/2020 100 Version: 5.10-CA::11
Chapter 4 - Election Set-up and Definition
3. On the Windows Defender Security Center dialog, choose Custom scan, and then click Scan now.
4. Safely remove the USB device.
5. Close any open dialogs.
4.5.1.6 Backup of Election Project
Ensure that the EMS Administrator has backed up Election Project (see section 12.2.1 “Backup of Election Project”) prior to starting the logic & accuracy Test. The project package created during this back up procedure must be manually copied and saved to a dedicated and safe location. The folder where the project is saved should be named distinctly in order to differentiate it in the future.
NOTE: Do not rename the project backup package.
4.5.2 Logic and Accuracy Test Procedures
Once the system has been fully configured, and as soon as possible after receipt of the first set of official election ballots from the printer, the jurisdiction must conduct formal logic & accuracy testing in order to confirm that the system has been correctly configured, and that all components are functioning properly. The process of logic & accuracy testing is described generally, and then more specifically in the sections to follow.
NOTE: The detailed Logic & Accuracy testing procedures may vary from one jurisdiction to the next. The procedures presented in this document are suggestions only, and the applicable laws and regulations of the jurisdiction must ultimately determine the specific testing process to be followed. This testing should be performed prior to every election.
• Logic & accuracy testing should include the same steps as if running a real election.
• If any vote discrepancies or errors are encountered during this process, the ballots and the procedure must be reviewed as human error is the most likely the cause. Otherwise, the administrator is informed immediately. Once the problem has been corrected, repeat the entire logic & accuracy testing procedure for the selected tabulator(s).
• If there are no errors or discrepancies, sign and date the forms certifying that the logic & accuracy testing has been conducted successfully. These forms should be retained, along with the test decks, as part of the test documentation records for the election.
• The administrator must backup all results following the successful logic & accuracy test.

Version: 5.10-CA::11 101 1/15/2020
Democracy Suite® Use Procedures
• Finally, each of the tabulators are re-zeroed and the results database is purged in order to delete the logic & accuracy results from the system prior to the actual election.
• Once the logic & accuracy testing is complete and the system has been re-zeroed, all components of the system must be stored in a secure location until the election (or until the first early voting opportunity) in order to ensure that they cannot be accessed or tampered with.
NOTE: The example of logic & accuracy testing is described in the subsections below. This procedure assumes that write-in adjudication is not allowed prior to the election day and that EMS Adjudication application is a part of the Democracy Suite® configuration and workflow. The process starts with detailed procedure for ImageCast® Evolution then ImageCast® Central tabulators, post-election processing and adjudication, and it ends with detailed procedure for results processing in RTR application.
4.5.2.1 ImageCast® Central Logic & Accuracy Testing Procedure
This section describes the logic & accuracy testing procedure for the ImageCast® Central tabulators. The procedure consists of loading each set of ICC election files and testing these election files by scanning test decks and verifying the results reports. The election files for each ICC tabulator are loaded, test decks scanned, adjudicated and the results uploaded to EMS RTR. The testing procedure is repeated for each of the ICC tabulators defined in the project. After testing is complete, the test results are archived.
NOTE: Make sure to test every tabulator that is defined in the election project (including any spare tabulators defined, that might be used for election day replacement).
1. Before you begin, ensure that the ICC workstation and scanner are powered on and ready (see section 7.2 “Setting up the ImageCast® Central Workstation and Scanner”) to load election files. If the ICC workstation is already set up, continue with the next step.
2. The election administrator will need to copy sets of ICC election files from the EMS server to the ICC workstations (see section 12.4 “Preparing ImageCast® Central Election Files for the ImageCast® Central Workstation”) and prepare each set of election files to be loaded on ICC workstations.
NOTE: If the election project has been prepared by the Dominion Voting Systems, the prepared ICC election files will be provided along with the election project. The only step that must be performed is copying the files to the ICC workstation. After the ICC election files have been copied over, continue to the next step.
1/15/2020 102 Version: 5.10-CA::11
Chapter 4 - Election Set-up and Definition
3. Ensure that the administrator is in possession of a labeled iButton (see section D.2.7.2 “Programming of iButton Security Key”) that corresponds to each set of ICC election files.
4. The election administrator will need to deploy election files to be tested, by copying the contents of the prepared files in section 12.4 “Preparing ImageCast® Central Election Files for the ImageCast® Central Workstation” to "C:\DVS" (if you are installing multiple projects on one ICC workstation, then subfolders, named by project, should be created within the DVS folder to differentiate between the projects, and election files copied into corresponding project folders).
5. Open ICC application (see section 7.4 “Opening ImageCast® Central Application”)
6. Generate the Zero report (see section 7.12.2 “Producing Reports from the ImageCast® Central System”) selecting Show Results under the Status icon.
7. Configure the server path (see section 7.5 “Configuring the Local and Remote Path for Saving Results”) the ICC tabulator to enable the automatic loading of results into RTR. Set the secondary path to the appropriate EMS NAS location (EMSSERVER\NAS\PROJECT_NAME) and enable automatic loading of results in the RTR (see section 8.2.2 “Enable Automatic Results Loading to RTR”) application. Once the ICC starts scanning ballots, it will automatically create the Results folder within that location to store the results. Within this Results folder, there will be separate folders for tabulators and then batches.However, if setting the secondary path for an ICC tabulator handling ballots with write-ins, then set the path to a local folder (see section 7.5 “Configuring the Local and Remote Path for Saving Results”) marked as write-in tabulator folder.
8. In the ICC application, access Supervisor mode (see section 7.6 “Accessing Supervisor Mode”).
9. Set Scanner Properties (see section 7.6.1 “Setting Supervisor Options”) and ICC Scan Options (see section 7.6.3 “Configuring Scan Options”).
10. If this is the first tabulator tested, the multi-feed settings need to be verified. However, this verification can be skipped for every next tabulator undergoing testing. For more information, please see Democracy Suite® ImageCast® Central Installation and Configuration Procedure, section 12.3 Running the ImageCast® Central Application.
11. Tabulate and process (see section 7.8 “Scanning Mode”) the pre-marked test deck of ballots into the ICC for that precinct.
12. To switch between ICC tabulators deployed on a single ICC workstation, use the Project Management utility (see section 7.13 “Loading Election Files for a New Tabulator”) within the ICC Application.

Version: 5.10-CA::11 103 1/15/2020
Democracy Suite® Use Procedures
13. Close the tabulator (see section 7.12.1 “Closing the ICC Tabulator”).
14. Generate results report (see section 7.12.2 “Producing Reports from the ImageCast® Central System”).
15. Exit the ICC application by clicking the EXIT button. The confirmation dialog will appear. Click YES to exit the application.
16. Have the administrator back up the entire DVS directory (see section 12.5 “Managing ImageCast® Central Tabulator Folders”).
17. Ensure to complete the test for each ICC tabulator.
18. For each tabulator tested confirm that the tabulator-level result reports match the expected results from the pre-marked test deck.
19. Open the RTR application. If the project was created by the Dominion Voting, the RTR username and password will be provided to the jurisdiction. Jurisdictions programming their own elections will have to have their Administrator create an RTR user account and activate (see section 12.2.5 “Creation of RTR User in Election Event Designer”) it in EED.
20. Open the appropriate Election Project (see section 8.2.1 “Open Project”) and enter your login credentials.
21. Load the results files (see section 8.2.3 “Loading Results from Card Management”), audit log files and result images (if enabled and required) from the ICC tabulators into the RTR application.
The results for tabulators that have the secondary path set to the EMS server, and automatic loading of results enabled in the RTR application, the results will automatically be loaded into RTR. However, for tabulators that have only load path set, such as the case might be for the ICC tabulators handling write-ins, the results will need to be loaded manually. When loading results from the ICC tabulator handling ballots with write-ins, ensure that the Skip Adjudication check box is selected. Once all result files are uploaded, return here and continue with the next step.
22. Validate and publish results (see section 8.2.5 “Validate and Publish Results”) files in the RTR application.
23. Create the Election Summary Report (see section 8.2.6 “Election Night Summary Report - Election Day Report”).
24. Confirm that the results from the election summary report from RTR match the tabulator summary reports and the expected test deck results.

1/15/2020 104 Version: 5.10-CA::11
Chapter 4 - Election Set-up and Definition
25. Review a subset of Audit Marked images in order to confirm that ballot image files are clear and readable and to verify that the system is interpreting the individual ballots correctly. If using adjudication, then after completing the logic & accuracy test for both ICE and ICC (explained in the following section), results will be adjudicated and verified. If not using adjudication, then write-in can be resolved directly in RTR (See Democracy Suite® EMS Results Tally & Reporting User Guide, Section 9.1 Result files review and write-in resolution).
4.5.2.2 ImageCast® Evolution Logic and Accuracy Test Procedures
NOTE: Make sure to test every tabulator that is defined in the election project (including any spare tabulators defined, that might be used for election day replacement).
This section describes the logic & accuracy testing procedure for the ImageCast® Evolution tabulators. The procedure consists of loading election files to an ICE tabulator and testing of these election files by scanning ballots and verifying the reports in RTR. This procedure is repeated for each ICE tabulator programmed in the election project.
NOTE: Initially, the results will be loaded into RTR with Skipped Adjudication option selected and the election summary report will be run (simulating election night reporting). Then, if using adjudication, the originally imported results for such tabulators will be reset in RTR. The ballots will then be adjudicated and canvass reports will be produced. After testing is complete, the CF cards used will be re-zeroed and stored for later use in official ballot processing.
1. In EED, create the CF cards (see section D.2.7.1 “Programming of CF/SD Cards”) and corresponding iButton (see section D.2.7.2 “Programming of iButton Security Key”) for ICE to be tested.
2. Insert the memory card containing the election project into the CF1 card slot of the ICE tabulator, and the initialized backup memory card into the CF2 card slot on the tabulator. For more details on how to do this, please see step 2 in section 3.4.2 “ImageCast® Evolution Acceptance Testing”.
3. Power up the ICE tabulator by lifting the LCD monitor into the operating position. For instructions on the power on procedure, see steps 3 through to 7 in section 3.4.2 “ImageCast® Evolution Acceptance Testing”.
4. When prompted by the LCD screen, insert the iButton Security Key and enter the appropriate password. For more details, see step 8 and 9 in section 3.4.2 “ImageCast® Evolution Acceptance Testing”.
5. Confirm that the date and time are displayed correctly on the lower left section of the ICE LCD screen.
6. Open the polls (see section 6.3 “Opening the Polls”).

Version: 5.10-CA::11 105 1/15/2020
Democracy Suite® Use Procedures
7. Tabulate the pre-marked test deck of logic & accuracy testing ballots into the ICE tabulator by feeding the test deck and then return here to continue with next steps below.
NOTE: Please note and confirm the tabulators' handling of any exception ballots per DCF/MBS that were set according to jurisdiction's procedures.
8. Start an accessible voting session (see section 6.6.1.1 “Provisional Voting Using the Accessible Voting Features of the ImageCast® Evolution”) and vote a predefined voting pattern for every language defined in the election project. Test every candidate position at least once, and verify that the audio message matches the visual ballot display.
9. After all ballots have been tabulated and an accessible voting session has been completed, insert the iButton security key and close the polls.
10. Allow the two result tapes to print and confirm that you do not need another copy.
11. Power down the unit by pressing the Shut Down icon at the top-right corner of the screen.
12. On the right side of the ICE, open the CF1 and the CF2 card slot doors, and remove both cards from the tabulator. Place both cards in the envelope provided. These cards will be used for tally in RTR.
13. For each tabulator tested, confirm that the tabulator-level result reports match the expected results from the pre-marked test deck.
14. Open the RTR application. If the project was created by the Dominion Voting, the RTR username and password will be provided to the jurisdiction. Jurisdictions programming their own elections will have to have their Administrator create an RTR user account and activate (see section 12.2.5 “Creation of RTR User in Election Event Designer”) in EED.
15. Open the appropriate election project (see section 8.2.1 “Open Project”) and enter your login credentials.
16. Load the results files (see section 8.2.3 “Loading Results from Card Management”), audit log files and result images (if enabled and required) from ICE tabulators, ensuring that adjudication is skipped. Once all result files are uploaded, return here and continue with the next step.
17. Validate and publish (see section 8.2.5 “Validate and Publish Results”) results files in the RTR application.
18. Create the Election Summary Report (see section 8.2.6 “Election Night Summary Report - Election Day Report”).
19. Confirm that the results from the election summary report from RTR matches the tabulator summary reports and the expected test deck results.

1/15/2020 106 Version: 5.10-CA::11
Chapter 4 - Election Set-up and Definition
20. Review a subset of Audit Marked images in order to confirm that ballot image files are clear and readable and to verify that the system is interpreting the individual ballots correctly.
4.5.2.3 ImageCast® Precinct 2 Logic and Accuracy Test Procedures
NOTE: Make sure to test every tabulator that is defined in the election project (including any spare tabulators defined, that might be used for election day replacement).
This section describes the logic & accuracy testing procedure for the ImageCast® Precinct 2 tabulators. The procedure consists of loading election files to an ICP2 tabulator and testing of these election files by scanning ballots and verifying the reports in RTR. This procedure is repeated for each ICP2 tabulator programmed in the election project.
NOTE: Initially, the results will be loaded into RTR with Skipped Adjudication option selected and the election summary report will be run (simulating election night reporting). Then, if using adjudication, the originally imported results for such tabulators will be reset in RTR. The ballots will then be adjudicated and canvass reports will be produced. After testing is complete, the SD cards used will be re-zeroed and stored for later use in official ballot processing.
1. In EED, create the SD cards (see section D.2.7.1 “Programming of CF/SD Cards”) and corresponding iButton (see section D.2.7.2 “Programming of iButton Security Key”) for ICP2 to be tested.
2. Insert the memory card containing the election project into the SD1 card slot of the ICP2 tabulator, and the initialized backup memory card into the SD2 card slot on the tabulator.
3. Power up the ICP2 tabulator. (see section 6.2.2.4 “Powering Up the Tabulator”)
4. When prompted by the LCD screen, insert the iButton Security Key and enter the appropriate password. Confirm that the date and time are displayed correctly on the lower left section of the ICP2 LCD screen.
5. Open the polls. (see section 6.2.2.9 “Ballot Review”)
6. Prepare the ICP2 for scanning by activating the Standard Voting session
7. Tabulate the pre-marked test deck of logic & accuracy testing ballots into the ICP2 tabulator by feeding the test deck and then return here to continue with next steps below.
NOTE: Please note and confirm the tabulators' handling of any exception ballots per DSD/MBS that were set according to jurisdiction's procedures.

Version: 5.10-CA::11 107 1/15/2020
Democracy Suite® Use Procedures
8. After all ballots have been tabulated insert the iButton security key and close the polls (see section 6.9.1 “Operating the ImageCast® Precinct 2 on Battery”).
9. Allow the two result tapes to print and confirm that you do not need another copy.
10. Power down the unit. (see section 6.7.2.1 “Powering Down the Tabulator”)
11. Open the SD1 and the SD2 card slot doors, and remove both cards from the tabulator. Place both cards in the envelope provided. These cards will be used for tally in RTR.
12. For each tabulator tested, confirm that the tabulator-level result reports match the expected results from the pre-marked test deck.
13. Open the RTR application. If the project was created by the Dominion Voting's Service Bureau, the RTR username and password will be provided to the jurisdiction. Jurisdictions programming their own elections will have to have their Administrator create an RTR user account and activate (see section 12.2.5 “Creation of RTR User in Election Event Designer”) in EED.
14. Open the appropriate election project (see section 8.2.1 “Open Project”) and enter your login credentials.
15. Load the results files (see section 8.2.3 “Loading Results from Card Management”), audit log files and result images (if enabled and required) from ICP2 tabulators, ensuring that adjudication is skipped. Once all result files are uploaded, return here and continue with the next step.
16. Validate and publish (see section 8.2.5 “Validate and Publish Results”) results files in the RTR application.
17. Create the Election Summary Report (see section 8.2.6 “Election Night Summary Report - Election Day Report”).
18. Confirm that the results from the election summary report from RTR matches the tabulator summary reports and the expected test deck results.
19. Review a subset of Audit Marked images in order to confirm that ballot image files are clear and readable and to verify that the system is interpreting the individual ballots correctly.

1/15/2020 108 Version: 5.10-CA::11
Chapter 4 - Election Set-up and Definition
4.5.2.4 ImageCast® X Logic and Accuracy Test Procedures
NOTE: Make sure to test every ImageCast® X tabulator that is defined in the election project (including any spare ImageCast® X tabulators defined, that might be used for election day replacement).
This section describes the logic and accuracy testing procedure for the ICX tabulators. The procedure consists of loading election files to an ICX tabulator and testing them (election files) by scanning the printed ballots in ICC, ICE or ICP2and verifying the reports in RTR. This procedure is repeated for each ICX tabulator programmed in the election project under Tabulators
1. Program the USB drives and corresponding Smart Cards for the ICX to be tested.
2. Burn the technician Smart Card for accessing the technician menus.
3. Burn the poll worker Smart Card (see section D.2.7.4 “Program USB flash drive for Election File programming group”) for logging into ICVA application and accessing the poll worker menus in the ICX.
4. Power up the ICX by pressing the power button. For more details on how to do this, please see step 5 and 6 in section 3.4.5 “ImageCast® X Acceptance Testing”.
5. Insert the technician smart card and log in. For more details on how to do this, please see step 8 and 9 in section 3.4.5 “ImageCast® X Acceptance Testing”.
6. Confirm or modify the date and time. For more details on how to do this, please see step 10 in section 3.4.5 “ImageCast® X Acceptance Testing”.
7. Insert the USB stick containing the election project into the available USB slot card slot of the ICX tabulator and load election files. For more details on how to do this, please see steps 11 and 12 in section 3.4.5 “ImageCast® X Acceptance Testing”.
8. Open the polls (see section 6.4.3 “Standard Voting on ICX”)
9. Log into the ImageCast® Voter Activation (ICVA) application on the ICVA workstation and import activation codes (see section D.4 “Importing Activation Codes to the ImageCast® Voter Activation Application”) (if not done already).
10. Program a voter activation Smart Card (see section D.5 “Programming of Voter Activation Smart Card”) for activating the voting session for the tabulator tested.
11. Use the voter activation Smart Card to produce marked ballots according to the predefined pattern for logic & accuracy testing. Repeat the process as many times as there are ballots to be marked.
Version: 5.10-CA::11 109 1/15/2020
Democracy Suite® Use Procedures
NOTE: Please note and confirm the tabulators' handling of any exception ballots per MCF that were set according to jurisdiction's procedures.
12. Program a voter activation Smart Card (see section D.5 “Programming of Voter Activation Smart Card”) with Accessible Voting Session enabled and vote a predefined voting pattern for every language defined in the Election Project. Test every candidate position at least once, and verify that the audio message matches the visual ballot display.
13. Close the poll (7.12.1 “Closing the ICC Tabulator”) and power down the unit by selecting "Power Off" option at the bottom right of the poll worker or Technician menus.
14. Feed all of the printed Electronic Mobile Ballots to either ImageCast® Evolution (4.2.2.1 “Voting Phase Readiness Testing ImageCast® Evolution”) or ImageCast® Central (4.2.2.2 “Voting Phase Readiness Testing ImageCast® Central”) scanners/tabulators.
15. Continue the procedure for the appropriate scanning/tabulation device. (
4.5.2.5 ImageCast X Vote Simulator
The Vote Simulator is a Logic and Accuracy test created with the purpose of verifying that the pre-defined patterns are read and tabulated correctly.
In order to run the Vote Simulator a valid test pattern file is required.
The Vote Simulator is to be run before the ImageCast® X machine is put in production on the day of the election.
The simulation is performed by loading an XML file and ImageCast® X election files provided by Dominion Voting. Should there be a requirement for personalized data, the XML file can be edited manually.
The following steps need to be taken in order for the Vote Simulator to perform a valid test:
1. Turn on the ImageCast® X.
2. Insert the USB stick provided by Dominion Voting.
3. To copy the necessary files from the USB stick, Log in as a Technician by inserting the Technician card.The Administrator Login screen displays allowing the technician to enter their PIN.
4. In The election configuration files on USB drive dialog the Technician chooses the needed file and copies the data to the ImageCast® X device.

1/15/2020 110 Version: 5.10-CA::11
Chapter 4 - Election Set-up and Definition
a. Press Select.
Figure 4-1: USB Drive containing Election Files and the Copy/Cancel Election Files Dialog
b. On the Confirm dialog, press Copy.
5. In the Mapping Result Locations dialog, set the location where the test information will be saved to and press Apply.
6. To confirm the choice, in the Apply changes dialog, press Apply.
Having completed this portion, decrypt the election files.
To decrypt the election files:
1. Enter the Poll Worker card and enter the PIN.The election file decryption begins and, when completed, the Poll Administration panel is accessible to the Poll worker.
2. Select the appropriate Tabulator.Only one Tabulator should be chosen.
3. Once the Tabulator validation is completed, press Open Poll.
4. To confirm the selection, on the Info dialog, press Yes.

Version: 5.10-CA::11 111 1/15/2020
Democracy Suite® Use Procedures
Once the Poll is Open, the Poll worker will be prompted to Print the Zero report in order to confirm that the ImageCast® X device is prepared for the Vote Simulation, and that no redundant files remain on the device.
To print the zero report:
1. On the Poll Administration screen, press Print zero report.The Print zero report dialog appears.
2. Remove the Poll worker card and insert the Technician card and PIN.After the Technician Administration screen is presented, a Warning dialog displays advising the user that the Administrative menu is unavailable while the Poll is open.NOTE: In order to proceed the Poll MUST remain OPEN.
All options except Hardware Details, Brightness, the Hardware Test and the Vote Simulator are grayed out and cannot be selected.
3. Press Vote Simulator.The Voting Test screen displays.
On the Voting Test screen, the user has the following options to choose from:
• Print votes on the VVPAT - ON/OFF - default OFF
• Animations enabled - ON/OFF - default OFF
• View ballots being marked - ON/OFF - default OFF
NOTE: The available options are enabled depending on the Automated Test Deck file provided for the testing.
If the View ballots being marked box is checked, the ballots will be marked on-screen, if the Test Deck file supports it.
If the View ballots being marked box is unchecked, a Progress bar displays.
NOTE: Be advised that the settings available on the Vote Simulator start screen are independent from the MCF, so any settings for the Vote Simulator can be manipulated from the Vote Simulator start screen exclusively.
To start the Vote Simulator Test:
1. Press the Load Test Pattern.
2. In The test configuration files in USB drive dialog, navigate to the XML file needed.The XML files are copied over to the ImageCast® X.The XML files are then validated, and the Technician can proceed to set the Test parameters as needed.
NOTE: "Number of repetitions" refers to the whole pattern.

1/15/2020 112 Version: 5.10-CA::11
Chapter 4 - Election Set-up and Definition
3. Remove the Technician card and insert the Voter card.
The Vote Simulation Test can commence.
NOTE: The Voter card has to remain inserted through the duration of the entire test. If you decide to end the test, prior to completion, simply remove the Voter card.The Vote Simulator Superman is available for both the DRE and BMD modes of operation.Should an issue occur while printing the BMD Paper Ballot, the User will receive the following error: "Check the printer. If the ballot has been printed, please discard it, otherwise, press Cancel on the printer control panel."If the ballot does not exit the printer once this error message is shown, the user is advised to check for potential paper jams, and to resolve the issue accordingly.
4.5.2.6 Mobile Ballot Production Logic and Accuracy Test Procedures
Loading Election Files
The ballot definition data will be exported from Election Event Designer to a USB device and then transferred to a Mobile Ballot Production (MBP) workstation.
To export a project data file:
1. Insert a clean USB device into a USB port.
2. On the EMS Client Workstation, Open the Election Even Designer (EED) application.
3. Expand the Election Project menu on the top toolbar, click Export, and then select Mobile Ballot Production Project.The Export MBP Data dialog opens.
NOTE: If an External ID warning dialog opens, click OK.
4. On the Export MBP Data dialog, complete the following:
• Ensure the Include ballots in the archive and Include ballots with stubs checkboxes are selected
• Select the Protect the archive with a password checkbox
• Enter a password and re-enter the same password
• Click Continue.
• On the MBP Export Completed dialog, click OK.
5. Open Windows Explorer and complete the following:
• Navigate to \\emsserver\NAS\<current project>\MBP Exports folder.
• Copy the folder This folder contains a .zip and .checksum file.

Version: 5.10-CA::11 113 1/15/2020
Democracy Suite® Use Procedures
• Paste the folder into the USB location.
6. Safely remove the USB device from the EMS Client Workstation.
To copy the project data file:
1. On the MBP Client Workstation, insert the USB device (from EMS Client Workstation) into a USB port.
2. Open the MBP application.
3. From the Main Menu screen, click File and then select Import.
4. If prompted for a password, enter the password and click OK.
5. On the Set up a new project dialog, complete the following:
• In the Ballots info archive field, click Browse, navigate to the USB folder location and select the .zip file (exported from EED), and then click Open.
• In the Archive password field, enter the password (created in the Export MBP Data dialog)
• In the Project destination path, click Browse and select an empty folder, and then click OK.
• In the Create new election project with name field, enter a name for your election project, and then click Load.This could be the same project name as saved in EED.
6. On the Import Result dialog, click OK.The election files are loaded and the project opens.
Configuring the Printer
This section will specify the location to store Ballot artwork, select the default printer and configure the printer settings.
To specify the ballot artwork location:
1. From the Open project screen, click File, and then BallotSource.
2. On the Ballot Source Location dialog, navigate to the file location and click OK.
To specify the default printer:
1. From the main menu, click File and then select Default Printer.
2. On the Default Printer dialog, select the printer from the drop-down and click OK.
3. If the default printer is changed, click OK.
To configure the printer settings:

1/15/2020 114 Version: 5.10-CA::11
Chapter 4 - Election Set-up and Definition
1. On the main menu, click File and then select Printing Configuration.
2. On the Printing Configuration dialog, complete the following:
• If you want to include a sample ballot watermark on the print-out, select the Sample Ballot checkbox.
• Specify the number of copies to print for the selected ballot.
3. On the Printing Configuration dialogClick Save to save printing settings.
Printing Ballots
When the project is created and configured, the application is ready to print ballots. The main screen will list all ballots that are available for printing. The list contains a column which indicates the number of times a particular ballot has been printed.
To print ballots:
1. From the main menu, select a ballot from the list, and then click Print.
2. On the Print Settings dialog, complete the following:
• Verify that the Document Height value is black.
• Click Preferences and complete the following on the Printer Preferences dialog:
• If the Document Height value is red, select the correct ballot paper size from the size drop-down.If the correct paper size is not available, refer to the Printer User Manual for detailed instructions on creating a custom size.
• Set double-sided printing to Long Edge.
• Click OK
• On Print Settings dialog, click Print.If multi-card ballots are being printed, you must click Print on each open Print Settings dialog.
Generating Reports
The Print report, Audit report and Invalid Files report can be stored in various formats or printed using the controls shown immediately above the report itself.
To view Print Report:
1. From the main menu, click Print Report.
2. On the Print Report dialog, select Precinct information and click View Report.

Version: 5.10-CA::11 115 1/15/2020
Democracy Suite® Use Procedures
3. To save the report, click the Export icon, and select the file type, select the location where the report is saved, and then click OK.
To view the Audit Report:
1. From the main menu, click Audit Report.
2. On the Audit Report dialog, select the date range, Action information, and then click View Report.
3. To save the report, click the Export icon, and select the file type, select the location where the report is saved, and then click OK.
4.5.2.7 Adjudication and Post-Election Processing Logic and Accuracy Test Procedures
Up to this point, the L&A procedure covered testing of Pre-election and Election Day period activities. This section describes the procedure for testing the Post-Election Day period activities. In this period the adjudication of Absentee/All Mail and Early Vote, Election Day ImageCast® Evolution and ImageCast® Precinct 2 ballots takes place.
1. Open the RTR application. If the project was created by the Dominion Voting, the RTR username and password will be provided to the jurisdiction. Jurisdictions programming their own elections will have to have their Administrator create an RTR user account and activate it in EED (12.2.5 “Creation of RTR User in Election Event Designer”)
2. Open the appropriate Election Project (8.2.1 “Open Project”) and enter your login credentials.
3. Display a list of loaded results, by clicking on the Result Files option in the Activities Navigation Panel (General group).
4. In the Result Files main activity screen omit the search criteria and click on the Search button to list all result files.
5. Use the Sort functionality to identify result files that are in status “Skipped Adjudication”.
6. Select/highlight all result files and click Reject.
7. Click Reset.
8. Click Allow Adjudication, which will enable adjudication to be performed on those result files.This step require that images are already loaded
9. The Adjudication Administrator should log into the EMS Server, open and configure the Adjudication application (see Adjudication Administration (12.6 “Adjudication Administration”) section for more details) and then start adjudication.

1/15/2020 116 Version: 5.10-CA::11
Chapter 4 - Election Set-up and Definition
10. The General Adjudication User(s) should log into the remote client workstation(s) and adjudicate ballots (see sections Adjudication Process (9.1 “Adjudication Process”) and/or Adjudication Process - Digital Ballots (9.2 “Adjudication Process - ICX Marked Ballots”). This step in the procedure can be done in parallel with the next step or they can be executed sequentially as listed.
11. The Adjudication Administrator performs administrative tasks, such as managing batches, running reports and submitting batches to RTR for tallying (see Adjudication Administration (12.6 “Adjudication Administration”) for more information).
12. Adjudicate all ballots according to preset out-stacking condition and adjudicate write-ins (see Adjudicate Write-ins (see section 9.1.6.1 “Adjudicate Write-ins”) and/or Resolving a Write-in (see section 9.2.2 “Resolving a Write-in”).
13. Validate and publish (see section 8.2.5 “Validate and Publish Results”) all adjudicated results.
14. Run the Statement of Votes Cast report in RTR.
15. Compare and verify that the Statement of Votes Cast report matches the expected results.
4.5.3 Logic and Accuracy System Test Acceptance Criteria and Completeness
Logic and Accuracy testing is only complete when all results are accurate. Any errors found should be corrected, and the appropriate tests should be repeated until accurate results are achieved.
To verify the completeness of the System Logic & Accuracy Test, confirm the following:
• the tabulator-level result reports match the expected results from the pre-marked test decks.
• exception ballots are properly handled by the tabulator per the DCF/MBS settings.
• the individual tabulator reports from RTR match the tabulator level result reports.
• the summary report for each counting group defined in the Election Project matches the sum of all individual tabulator level reports for that group.
• the Statement of Votes Cast report after adjudication of ballots matches the expected results.
• the ballot image files are clear and readable from both ImageCast® Central and ImageCast® Evolution.

Version: 5.10-CA::11 117 1/15/2020
Democracy Suite® Use Procedures
• the tabulator “Counting Groups” are configured correctly and according to jurisdiction's preference with regards to separating the ImageCast® Central count results from Precinct results.
Verifying items above is imperative for obtaining the correct X of Y values in percentage of precincts reported.
4.5.4 Backing up the Logic and Accuracy Test Results
Before resetting the system for election day, make sure that the EMS Administrator has backed up the results from the entire system. This includes the following:
1. A backup of the Election Project (see section 12.2.1 “Backup of Election Project”) containing the results from the executed L&A System Test. The project package created during this back up procedure must be manually copied and saved to a dedicated folder on the EMS Server. Name this folder distinctly so it can be identified in the future.
NOTE: Do not rename the project package.
2. A backup of the ImageCast® Evolution by storing the labeled CF cards in a safe place.ICE results that were imported into RTR during the L&A test will be preserved within the backed up Election Project package. The CF cards need to be clearly labeled so that they can be safely returned to their respective ICE units during the preparation for Election Day.
3. A backup of the entire Adjudication folder from the D:\drive and databases on the EMS server.
4. A backup of all ICC election files (see section 12.5.2 “Restore ImageCast® Central Tabulator Folders”) containing results from the L&A test by moving the entire C:\ICC Election Files folder to a safe place. After backing up, make sure that the Administrator deploys the master copy of ICC Election Files to the C: drive of ICC workstations so that the system is ready for Election Day.
4.5.4.1 Stopping Adjudication After Logic and Accuracy Testing
Once L&A is complete, the Adjudication Administrator should log into the EMS server and stop adjudication.
1/15/2020 118 Version: 5.10-CA::11
Chapter 4 - Election Set-up and Definition
4.5.4.2 Retention and Documentation of Test Materials
Reports generated by products within the Democracy Suite® product line during logic and accuracy testing should be retained along with test decks, and any supplementary testing materials, for the retention period required by California law. Place all documentation in envelopes and/or boxes. Seal, initial, and date the envelopes and/or boxes, as required by California law. This retention period should take place in a secured location with access restricted to those designated by the jurisdiction. If the Democracy Suite® system is used in a federal election, testing materials must be retained for a period of 22 months as required by federal regulation. A listing of the available reports on ImageCast® Evolution can be found in Permanent Printed Reports (refer to I “Permanent Printed Reports”). A description of available reports on ImageCast® Central is available in Section Producing Reports from the ImageCast® Central System (see section 7.12.2 “Producing Reports from the ImageCast® Central System”).
4.5.5 Clearing Logic and Accuracy Test Results
Once Logic and Accuracy testing is complete, each tabulator is re-zeroed and the results database is purged to delete the logic and accuracy results from the system prior to the actual election
4.5.6 Re-zeroing the ICC
Re-zeroing the tabulator clears the scanned ballots' results and the tabulator's history. This process cannot be undone.
To re-zero the tabulator:
1. Click Configuration in the ICC application screen.The Configuration pane appears.
2. In the Configuration pane, click Rezero. and do one of the following:
• If there are no un-cast ballots, the message “This action will remove all processed batches!” appears. Click OK.
• If there are un-cast ballots, you are given the option to delete the un-cast ballot images. If applicable, select the Also delete un-cast ballot images check box, then click OK.The Security Passcode window appears.
• Type the Supervisor passcode and click OK.The message “Tabulator State Reset” appears.
• Click OK.

Version: 5.10-CA::11 119 1/15/2020
Democracy Suite® Use Procedures
4.5.7 Re-zeroing the ICE
If the election cards have been used for testing prior to the election day (during Logic and Accuracy testing procedure) then all the recorded results need to be set to zero.
1. On the poll worker Menu screen, press the Advanced Admin option.
Depending on the configuration set in the MBS file, you may be asked to provide a username and password, or password only when entering the Advanced Admin menu. In addition, the MBS gives an option to omit the authentication.
• When prompted, enter the credentials (the poll worker's credentials are set in EMS EED client application).
• Press OK.
2. On the Advanced Admin screen, press the Re-zero button.
3. On the right-hand pane, press Re-zero.

1/15/2020 120 Version: 5.10-CA::11
Chapter 4 - Election Set-up and Definition
4. On the Confirmation required screen, press OK to proceed.
Figure 4-2: Re-zero Results Confirmation
4.5.8 Re-zeroing the ICP2
Re-zeroing the tabulator resets the ballot counter to zero.
When instructed to do so, re-zero the tabulator:
1. From the Main Menu screen, tap Poll Management.
Figure 4-3: Main Menu screen

Version: 5.10-CA::11 121 1/15/2020
Democracy Suite® Use Procedures
The Please Enter Password screen appears.
2. Enter your password and tap Enter.The Poll Management screen appears.
Figure 4-4: Poll Management screen
3. From the Poll Management screen, tap Re-Zero Tabulator.The Please Enter Password screen appears.
4. Enter your password and tap EnterThe Re-Zero Results Confirmation screen appears.
Figure 4-5: Re-zero Confirmation screen
From the Re-Zero Results Confirmation screen, tap Confirm.The Ballot Counter field at the bottom left resets to zero and you are returned to the Main Menu screen.
4.5.9 Re-zeroing the ICX
1. Ensure the device is on.
2. Log in Using a poll worker Smart Card.
3. Ensure the poll is closed.If the poll is not closed, select Close Poll.

1/15/2020 122 Version: 5.10-CA::11
Chapter 4 - Election Set-up and Definition
4. Next to Public Counter, select ReZero.
4.6 Election Observer PanelDuring the various phases of the election setup process, ranging from:
• Central Count equipment programming and configuration
• Central Count equipment logic and accuracy testing
• Tabulation and ballot marking device programming and configuration
• Tabulation and ballot marking device logic and accuracy testing
An Election observer panel may be present for activities. This panel may include:
• Representatives from qualified political parties
• Representatives from legitimate citizens or media organizations
The county elections officials may limit the number of observers, as needed.
4.7 Hardware Maintenance and Preparation for UseAfter successful completion of a Logic and Accuracy test, election equipment must be properly prepared for an election day. After the preparation, the equipment is then securely stored, as per jurisdictional procedures. This chapter provides instructions on how to prepare the Democracy Suite® equipment for an election.
4.7.1 ImageCast® Evolution Preparation
Load the CF cards into the tabulator and store the tabulator.
4.7.1.1 Internal Battery Recharging
In order to obtain maximum battery life, periodic maintenance of the internal back-up battery is important. It is therefore recommended that the internal back-up battery be charged for at least 12 hours every eight months when the unit is in power-off mode/storage. It is equally important to ensure that the internal battery is fully charged before the unit is deployed on Election Day. The Battery Status is indicated using visual indicators on the ICE side panel.
To charge the battery, connect the unit to a standard 120V, 60Hz AC Power Supply and ensure that the Touchscreen LCD is in its horizontal position and the Service Switch in the ON position.
4.7.2 ImageCast® Central Maintenance and Preparation
Maintenance procedures for the ImageCast® Central scanner configurations can be found in the commercial, off-the-shelf product documentation.

Version: 5.10-CA::11 123 1/15/2020
Democracy Suite® Use Procedures
4.7.3 ImageCast® Precinct 2 Preparation
Load the cards into the tabulator and store the tabulator.
4.7.3.1 Internal Battery Recharging
All lithium-ion rechargeable batteries have a limited life and gradually lose their capacity to hold a charge over time, whether used or unused. In order to obtain maximum battery life, periodic maintenance of the ImageCast® Precinct 2 ’s internal backup battery is highly recommended. If the battery is not periodically charged as recommended, the battery cells will fully discharge over time, possibly causing irreparable damage to the battery and its capacity to hold a full charge.
To obtain maximum battery life from the ImageCast® Precinct 2 internal lithium-ion battery, it is recommended that:
• The batteries are charged for at least 6 hours, to full capacity, before placing the units in storage.
• The batteries are charged for at least 6 hours, to full capacity, every four (4) months while the unit is in power-off mode or storage. The units may remain connected to AC power at all times, if desired. This should not damage the battery or reduce its lifespan.
• The storage and operating temperature is as cool as possible. Lithium-ion batteries degrade faster if stored or used at higher temperatures. Maintaining a storage temperature below 68 F/20 C will maximize the recoverable capacity of the battery. The operating temperature of the ICP2 should not exceed 104 F/40 C.
• For tracking and to maintain a recharging schedule, please note on the unit the date charged.
To charge the battery, plug the tabulator into a standard 3-prong 115/120 VAC 50/60Hz wall outlet via the supplied 20VAC Power Adapter. The unit can be charged while powered down. Battery levels can be checked by pressing and quickly

1/15/2020 124 Version: 5.10-CA::11
Chapter 4 - Election Set-up and Definition
releasing (less than a second) the Power ON/OFF pushbutton at the rear of the tabulator. The Power Status LEDs at the front of the tabulator will flicker/blink in one of the following patterns:
4.7.4 ImageCast® X Maintenance and Preparation
The ImageCast® X does not require any software or preventative periodic maintenance tasks such as database performance analysis, software backup, or database tuning. However, it is recommended to periodically execute each of the following:
• BMD printer cartridge removal/replacement/storage (refer to 4.7.4.1 “BMD printer cartridge removal/replacement/storage”)
System power, combination of green and amber:
Running from external power, battery present
Solid green
Running form the battery
Solid amber
Running from external power,
NO battery present
Flashing green / amber
Table 4-2: System Power
Battery status, orange:
Fullycharged(ticklecharge mode)
Lit all the time
Charge state <25% One flash and a pause
Charge state 25% to <50% Two flashes and a pause
Charge state 50% to <75% Three flashes and a pause
Charge state 75% to <100%
Four flashes and a pause
Power alarm Fast flashing
Table 4-3: Battery status

Version: 5.10-CA::11 125 1/15/2020
Democracy Suite® Use Procedures
• ICX Internal Battery Recharging (refer to 4.7.4.2 “ICX Internal Battery Recharging”)
For more details, please refer to the SID-21V-Z37-A1R User Guide.
4.7.4.1 BMD printer cartridge removal/replacement/storage
For proper printer cartridge removal, replacement and storage, please consult the manufacturer user guide for the corresponding printer.
• HP LaserJet Pro M402dne - http://h10032.www1.hp.com/ctg/Manual/c04639074
4.7.4.2 ICX Internal Battery Recharging
In order to obtain maximum battery life, periodic maintenance of the internal back-up battery is important. It is therefore recommended that the internal back-up battery is charged for at least 12 hours every eight months when the unit is in power-off mode/storage. It is equally important to ensure that the internal battery is fully charged before the unit is deployed on Election Day. The Battery Status is indicated using visual indicators once the ICX is powered up.
To charge the battery, connect the unit to a standard 120V, 60Hz AC Power Supply and wait for the device to power up. Insert Technician Smart Card and enter the corresponding PIN. Once the Technician menu is available, select “Power off” and wait for the device to power down.
4.8 Physical Security of Equipment
Once the system has been purged of L&A results and the ImageCast® Evolution, and ImageCast® X maintenance and preparation has been completed, all equipment needs to be physically secured in final preparation for the Election Day, (refer to H.2 “Physical Security”) for these procedures.

1/15/2020 126 Version: 5.10-CA::11
Chapter 4 - Election Set-up and Definition

Version: 5.10-CA::11 127 1/15/2020
Democracy Suite® Use Procedures
CHAPTER 5: EARLY VOTING PROCEDURES
5.1 ImageCast® Evolution
Democracy Suite® EMS allows for the programming of specific ImageCast® Evolution tabulators for use “in-office” in Early Voting or in Vote Centers. Ballot tabulation for a specific precinct, a range of precincts, or all of the precincts in the election may be programmed. The setup and use of an Early Vote ImageCast® Evolution tabulator is the same as use of an Election Day ImageCast® Evolution tabulator as described in Chapter 9, with the exception that the tabulation will take place for a period longer than one day.
NOTE: When powering up the Early Vote ImageCast® Evolution for the first time, the Zero Report tape is printed. An Early Vote ImageCast® Evolution is connected to many or all precincts and, therefore, may contain a very large number of Ballot IDs that would require many rolls of thermal printer paper in order to print the full report. You may be provided with an option to cancel/disable the printing of the report (see below for steps on how to use this functionality to avoid printing of the zero tape). An alternative to the printed report tape is accessing the Report on LCD screen through the Utility option from the Administrative Menu.
To turn off tape printing, do the following:
1. When powering up Early Voting ICE, apply the iButton Security Key when prompted to do so.
2. Enter the Administrator user name and password and once logged in.The Poll-worker Menu opens.
3. To open the Poll Management screen, press Open Poll. The following three options are available:
• Poll Status
• Print Zero Tape
• Number of Copies to Print
4. To change the Print Zero Tape option from Print to Don’t Print, press Change. Pressing Change a second time will change the option back to Print.

1/15/2020 128 Version: 5.10-CA::11
Chapter 5 - Early Voting Procedures
Depending on the size of the election and the number of ballot styles an Early Vote ImageCast® Evolution is handling, it may be impractical to close the polls and power down the Early Vote tabulator after the end of each Early Voting day due to the length of time it takes to load election files on the tabulator during the power up process. If this is the case, the Poll should be closed at the end of the day, however, the ImageCast® Evolution tabulator should stay turned on.
After the Poll has been closed (refer to 6.7.1 “Closing the Polls on ICE”), the Administrator should physically secure the ImageCast® Evolution tabulator as per jurisdiction’s procedure, until the start of the next day, when the tabulator is taken out of the secured area and the Poll is re-opened on the tabulator to continue with the operation. In case your Early Voting ImageCast® Evolution tabulator is handling the number of ballot styles which allows the tabulator to load the election in a reasonable amount of time, then the procedure for operating an Early Vote ImageCast® Evolution is to suspend voting by shutting down the tabulator at the end of the day and restart the tabulator when voting resumes.
To suspend voting:
1. Apply the iButton Security Key to access the Administrative Menu.
2. Enter the Administrative user name and password.
3. In the Administrative Menu, press the circular power button icon in the top right corner of the screen and press Shut Down.
4. This will initiate the countdown until the machine has fully powered down.
5. Close the privacy screen flaps, and place the LCD monitor in the horizontal storage position.
6. Replace the ballot box cover onto the ballot box, and then lock it and seal it until the next day.
To resume voting:
1. Remove the seals, unlock, and remove the ballot box cover.
2. Lift up the LCD monitor into the vertical position and the unit will begin to power up.
3. Open the privacy screen flaps and insert the iButton Security Key when prompted to do so.
4. Enter the Administrative user name and password to get to the Administrative Menu screen.
5. In the Administrative menu, press Open Poll.

Version: 5.10-CA::11 129 1/15/2020
Democracy Suite® Use Procedures
6. A warning message alerts that the poll was already opened and that the results are not zero. Press OK.The tabulator will start printing a status report.Cancel the printing of the status tape if your election has a large number of Ballot IDs.
7. Confirm the Cancel option and the poll will be reopened.
8. In Administrative Menu, press Standard Voting and then press Start.
9. To confirm that the ImageCast® Evolution is ready to resume scanning, press OK.
Voting on the Early Vote ImageCast® Evolution continues until the jurisdiction-defined Cut off time. At this point, the Administrator closes the poll (refer to 6.7.1 “Closing the Polls on ICE”) on an Early Vote ImageCast® Evolution.The Administrator will remove the CF cards from the Early Voting ImageCast® Evolution tabulator and securely store them in a labeled and sealed transport container.
The Election Official will then remove all of the ballots from both the Secondary and Main ballot box chambers of the ballot box and safely store them in clearly labeled bins/boxes. The ballots and the CF cards will be sent to the central location for processing if not located there in the first place. The results from Early Vote ICE tabulators will be imported, validated and published in RTR on Election Day.
5.2 ImageCast® Precinct 2
Democracy Suite® EMS allows for the programming of specific ImageCast® Precinct 2 tabulators for use “in-office” in Early Voting or in Vote Centers. Ballot tabulation for a specific precinct, a range of precincts, or all of the precincts in the election may be programmed. The setup and use of an Early Vote ImageCast® Precinct 2 tabulator is the same as use of an Election Day ImageCast® Precinct 2 tabulator, with the exception that the tabulation will take place for a period longer than one day (refer to 6.4 “Polling Place Procedures”).
Depending on the size of the election and the number of ballot styles an Early Vote ImageCast® Precinct 2 is handling, it may be impractical to close the polls and power down the Early Vote tabulator after the end of each Early Voting day due to the length of time it takes to load election files on the tabulator during the power up process. If this is the case, the Poll should be closed at the end of the day, however, the ImageCast® Precinct 2 tabulator should stay turned on. After the Poll has been closed, the Administrator should physically secure the ImageCast®
1/15/2020 130 Version: 5.10-CA::11
Chapter 5 - Early Voting Procedures
Evolution tabulator as per jurisdiction’s procedure, until the start of the next day, when the tabulator is taken out of the secured area and the Poll is re-opened on the tabulator to continue with the operation.
In case your Early Voting ImageCast® Precinct 2 tabulator is handling the number of ballot styles which allows the tabulator to load the election in a reasonable amount of time, then the procedure for operating an Early Vote ImageCast® Precinct 2 is to suspend voting by shutting down the tabulator at the end of the day and restart the tabulator when voting resumes.
To suspend voting:
1. Apply the iButton Security Key to get to the Administrative Menu screen.
2. Press Shut Down.This will initiate the countdown until the machine has fully powered down.
3. Replace the ballot box cover onto the ballot box, and then lock it and seal it until the next day.
To resume voting:
1. Remove the seals, unlock, and remove the ballot box cover.
2. Enter the Administrative user name and password to get to the Administrative Menu screen.
3. In the Administrative Menu, press Open Poll.A warning message alerts that the poll was already opened and that the results are not zero. Press OK.
Voting on the Early Vote ImageCast® Precinct 2 continues until the jurisdiction-defined ‘Cut off’ time. At this point, the Administrator closes the poll on an Early Vote ImageCast® Evolution.The Administrator will remove the SD cards from the Early Voting ImageCast® Precinct 2 tabulator and securely store them in a labeled and sealed transport container.
The Election Official will then remove all of the ballots from both the Secondary and Main ballot box chambers of the ballot box and safely store them in clearly labeled bins/boxes. The ballots and the SD cards will be sent to the central location for processing if not located there in the first place. The results from Early Vote ICP2 tabulators will be imported, validated and published in RTR on Election Day.
5.3 ImageCast® X Early Voting
Since ImageCast® X is a Ballot Marking Device, the procedure is the same as for ImageCast® X Election Day procedure (refer to 6.4 “Polling Place Procedures”).

Version: 5.10-CA::11 131 1/15/2020
Democracy Suite® Use Procedures
CHAPTER 6: POLLING PLACE PROCEDURES
6.1 Precinct Supplies, Delivery and InspectionTabulator delivery and Election Day poll worker procedures should follow jurisdiction's practices in conformance with State Election Code. Sections starting from 6.1.1 “Precinct Supplies” through to 6.2 “Inspection and Polling Place Setup” provide some general information about delivery, supplies and handling procedures for ImageCast® Evolution. Election Day procedures for the ImageCast® Evolution begin on section 6.3.2 “Opening the Polls on the ICE” and for the ICP2, See “Ballot Review” on page 147.
6.1.1 Precinct Supplies
Prior to Election Day, the Precinct Board ensures the precincts have the correct supplies, and ensures that each Polling Place is ready for operation by performing the following tasks:
• Checking all pads of paper ballots to ensure that ballot style identification numbers and precinct numbers (if used) printed on the paper ballots are correct.
• Reporting any problems to the Election Official responsible for the election.
• Having supplies necessary for the conduct of elections that shall be delivered as follows at Polling Places:
• Paper ballots shall be in the quantity and manner required by the California Elections Code, as well as demonstrator ballots marked for demonstration use only.
• Demonstration or voting instruction placards.
• General purpose precinct supplies as provided in the California Elections Code.
• Secrecy sleeves or envelopes, if ballots are printed on two sides
• Marking devices: Sharpie Fine Point Permanent Marker (Black), Staedtler Lumocolor Dry Safe Marker.
• A certificate of packaging and sealing, in duplicate, together with a postage paid self addressed stamped business reply envelope, or postcard addressed to the responsible Election Official.
• Sample ballots of each ballot style as required by the California Elections Code.
• Seals and any other supplies and forms deemed necessary.
• Tables.
• Power cords.

1/15/2020 132 Version: 5.10-CA::11
Chapter 6 - Polling Place Procedures
• Machine/seal log.
• Voter instructions.
• Machine stickers.
• Machine File Folders for Official Pre-LAT tapes.
• For the HiPro scanner, a second set of Input Roller Assembly with hexagonal Pre-Input Roller and Separation Roller with higher resistance must be available for a quick change while scanning. This gives more flexibility to clean the roller set by another operator.
6.1.2 ImageCast® Evolution and Related Equipment
The following facilities, furnishings, fixtures, and utilities are required at the polling place for the operation of the ImageCast® Evolution:
ImageCast® Evolution Equipment
ImageCast® Evolution and power supply
ImageCast® Plastic Ballot Box
ImageCast® Ballots
Compact Flash Memory Cards
iButton Security Keys
Sharpie Fine Point Permanent Markers
Table 6-1: ImageCast® Evolution Equipment

Version: 5.10-CA::11 133 1/15/2020
Democracy Suite® Use Procedures
Thermal Printer Paper Rolls
Replacement Ink Cartridge
Color-Coded Plastic Security Seals
Audio Tactile Interface (ATI)
L-R Paddles (Optional)
Sip and Puff (Optional)
Headphones
Keys for Ballot Box
120V AC Power Wall Outlet
ImageCast® Evolution Equipment
Table 6-1: ImageCast® Evolution Equipment
1/15/2020 134 Version: 5.10-CA::11
Chapter 6 - Polling Place Procedures
6.1.2.1 Delivery of Equipment
The Warehouse Technician must perform a Pre-Election procedure for preparing the tabulators prior to shipment.
Summary of these activities include, but may not be limited to, the following:
1. Completing the final inspection sheet (provided by the jurisdiction).
2. Entering the equipment serial number and software version of the Operating System in the daily log.
3. Placing keys (iButton Security Key and ballot box key) in an envelope with the final inspection sheet.
4. Removing the memory cards that were used for testing, then inserting the Memory Cards for the official election and securing as required by jurisdiction.
NOTE: Verifying the Memory card is installed and coded for the specific location.
5. Checking the printer paper (replacing if needed).
6. Closing the ImageCast® units, gathering the envelope containing final inspection sheet and keys.
7. Securing the ImageCast® units for delivery to polling places or storage.
Extension Cord (Optional)
Election tape and Signage, as required
Voting booths, as required
ImageCast® Evolution Equipment
Table 6-1: ImageCast® Evolution Equipment
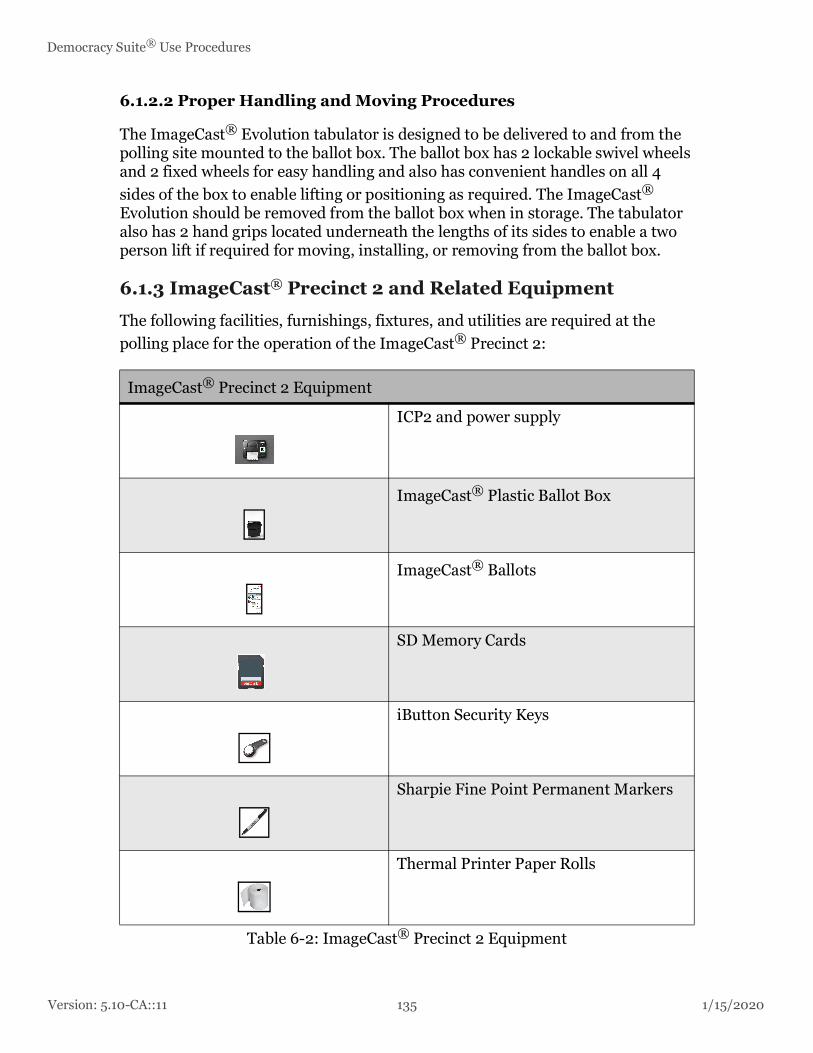
Version: 5.10-CA::11 135 1/15/2020
Democracy Suite® Use Procedures
6.1.2.2 Proper Handling and Moving Procedures
The ImageCast® Evolution tabulator is designed to be delivered to and from the polling site mounted to the ballot box. The ballot box has 2 lockable swivel wheels and 2 fixed wheels for easy handling and also has convenient handles on all 4 sides of the box to enable lifting or positioning as required. The ImageCast® Evolution should be removed from the ballot box when in storage. The tabulator also has 2 hand grips located underneath the lengths of its sides to enable a two person lift if required for moving, installing, or removing from the ballot box.
6.1.3 ImageCast® Precinct 2 and Related Equipment
The following facilities, furnishings, fixtures, and utilities are required at the polling place for the operation of the ImageCast® Precinct 2:
ImageCast® Precinct 2 Equipment
ICP2 and power supply
ImageCast® Plastic Ballot Box
ImageCast® Ballots
SD Memory Cards
iButton Security Keys
Sharpie Fine Point Permanent Markers
Thermal Printer Paper Rolls
Table 6-2: ImageCast® Precinct 2 Equipment
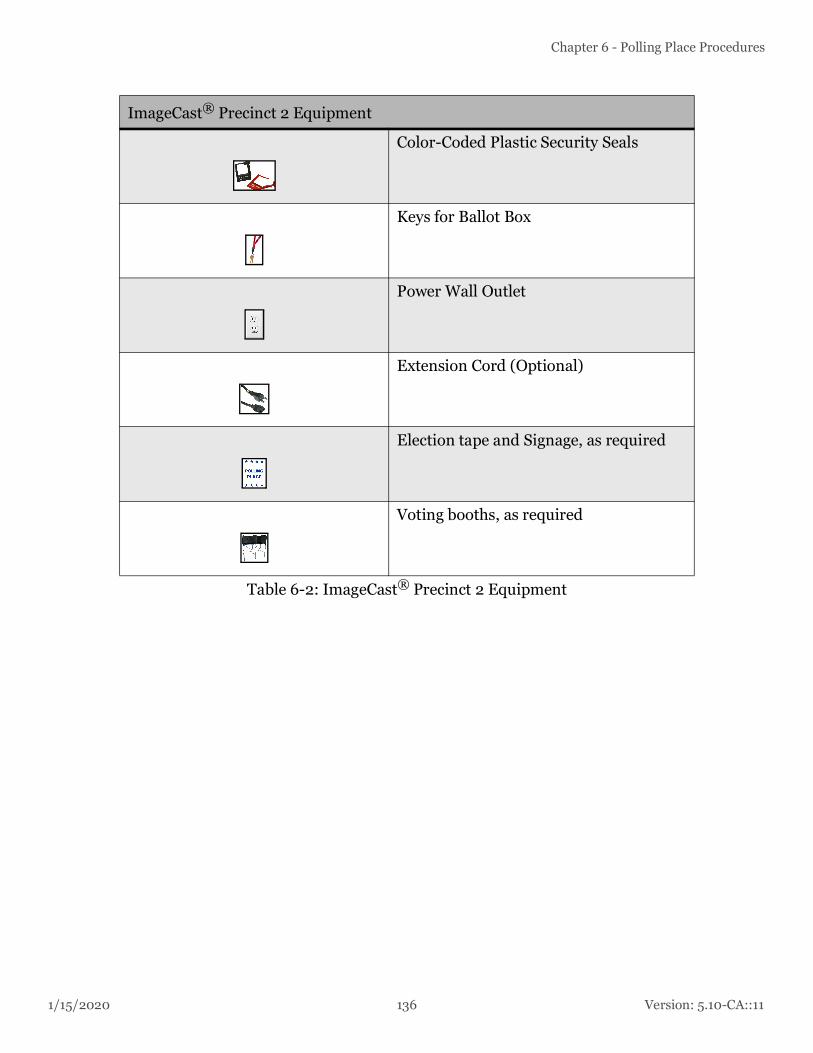
1/15/2020 136 Version: 5.10-CA::11
Chapter 6 - Polling Place Procedures
Color-Coded Plastic Security Seals
Keys for Ballot Box
Power Wall Outlet
Extension Cord (Optional)
Election tape and Signage, as required
Voting booths, as required
ImageCast® Precinct 2 Equipment
Table 6-2: ImageCast® Precinct 2 Equipment
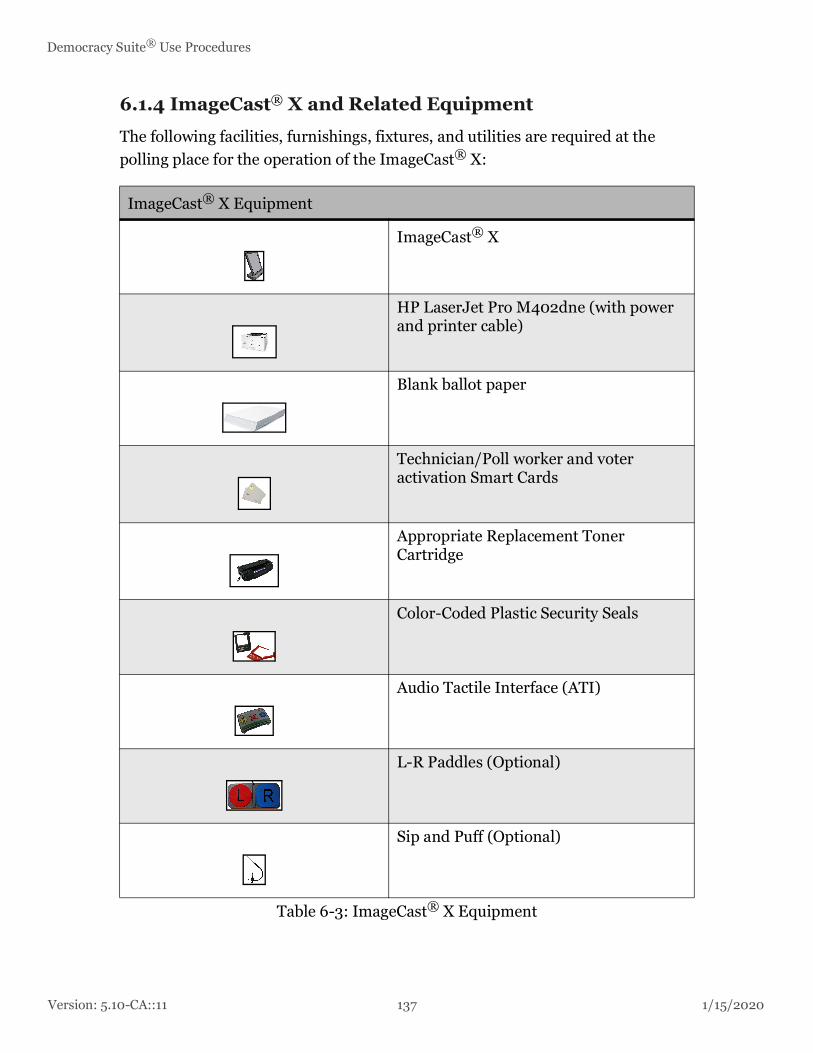
Version: 5.10-CA::11 137 1/15/2020
Democracy Suite® Use Procedures
6.1.4 ImageCast® X and Related Equipment
The following facilities, furnishings, fixtures, and utilities are required at the polling place for the operation of the ImageCast® X:
ImageCast® X Equipment
ImageCast® X
HP LaserJet Pro M402dne (with power and printer cable)
Blank ballot paper
Technician/Poll worker and voter activation Smart Cards
Appropriate Replacement Toner Cartridge
Color-Coded Plastic Security Seals
Audio Tactile Interface (ATI)
L-R Paddles (Optional)
Sip and Puff (Optional)
Table 6-3: ImageCast® X Equipment

1/15/2020 138 Version: 5.10-CA::11
Chapter 6 - Polling Place Procedures
6.2 Inspection and Polling Place SetupAfter the units have been delivered to the polling place, the Poll workers will perform the following inspections:
• Position the ballot box/tabulator in the appropriate location for use making sure that there is access to the AC power plug.
• Inspect and record all seals are intact as per jurisdictional procedure.
Specific Polling Place Setup Procedures will be provided to or by each respective jurisdiction. However, it is recommended that a two-person team be available for setting-up the ImageCast® Evolution.
The programmed Memory Cards will have been inserted into the units in advance by the elections department with all security seals in place prior to shipment to the polling place.
Headphones
120V AC Power Wall Outlet
Extension Cord (Optional)
Election tape and Signage, as required
Voting booths, as required
ImageCast® X Equipment
Table 6-3: ImageCast® X Equipment
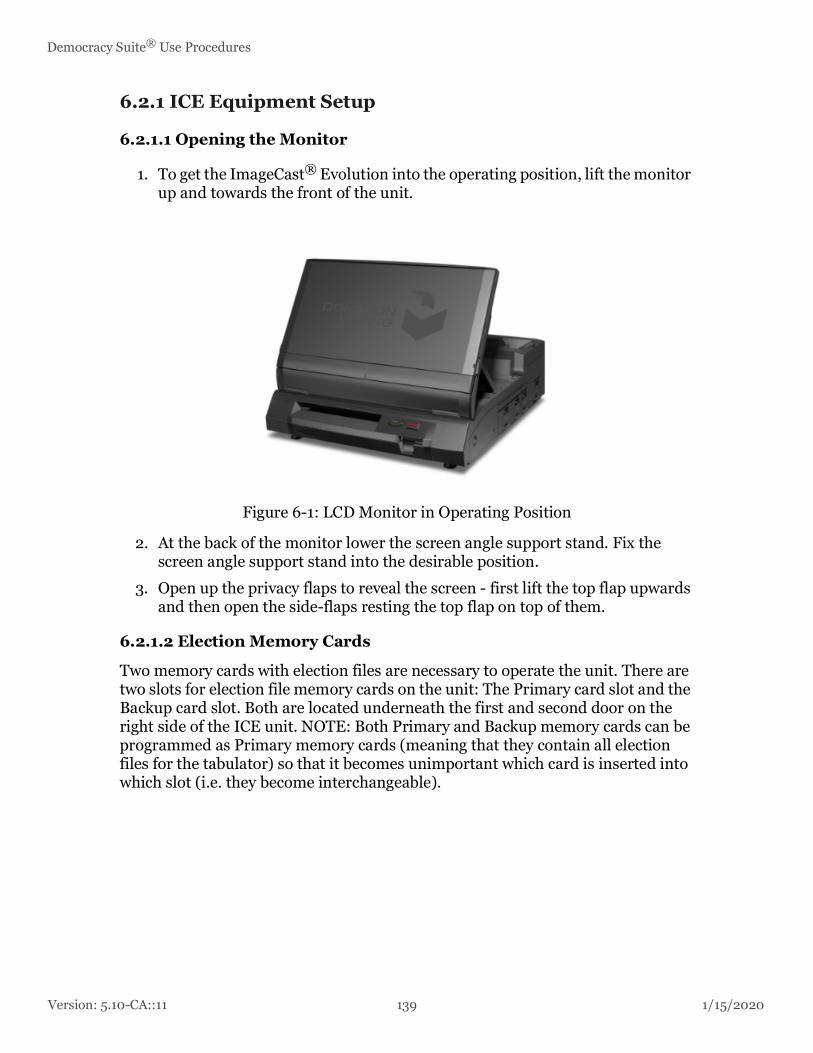
Version: 5.10-CA::11 139 1/15/2020
Democracy Suite® Use Procedures
6.2.1 ICE Equipment Setup
6.2.1.1 Opening the Monitor
1. To get the ImageCast® Evolution into the operating position, lift the monitor up and towards the front of the unit.
Figure 6-1: LCD Monitor in Operating Position
2. At the back of the monitor lower the screen angle support stand. Fix the screen angle support stand into the desirable position.
3. Open up the privacy flaps to reveal the screen - first lift the top flap upwards and then open the side-flaps resting the top flap on top of them.
6.2.1.2 Election Memory Cards
Two memory cards with election files are necessary to operate the unit. There are two slots for election file memory cards on the unit: The Primary card slot and the Backup card slot. Both are located underneath the first and second door on the right side of the ICE unit. NOTE: Both Primary and Backup memory cards can be programmed as Primary memory cards (meaning that they contain all election files for the tabulator) so that it becomes unimportant which card is inserted into which slot (i.e. they become interchangeable).

1/15/2020 140 Version: 5.10-CA::11
Chapter 6 - Polling Place Procedures
6.2.1.3 Attaching the Audio Tactile Interface
1. The A.T.I. device needs to be plugged in before powering up the unit. Open and lift up the fourth (4th) door on the right side of the ICE to expose the A.T.I. port.
2. Plug in the A.T.I. cable into the A.T.I. port.
3. Connect the headphones to the headphone jack on the bottom right of the ATI.
Connecting the Paddles and Sip/Puff
1. Paddles can be connected to the ATI via the 3.5 mm Sip/Puff jack located on the unit.
6.2.1.4 Setting up the Voting Booth
When the ImageCast R Evolution is placed in working position, the monitor is up and towards the front of the unit. At the back of the monitor, the support stand is lowered into desirable angle position. The privacy flaps are opened up to reveal the screen. The top flap is lifted first and upwards while the side-flaps resting the top flap on top of them.
When external monitor is used for accessible voting, tethered to the ImageCast® Evolution , to enable voter’s privacy, the voting booth should be positioned behind the ImageCast® Evolution ballot Box with the open side of the privacy surround facing a wall without a window and the area between the wall and the open side of the privacy surround are vacant while the voter is using this accessible voting station. The qualified monitor must be positioned within the rear half of the designated accessible voting booths horizontal work area so that the monitor stand is unfolded and the monitor is resting on its bottom edge and the stand with the monitor screen facing the open side of the privacy surround. The ATI must be positioned within the front half of the designated accessible voting booths horizontal work area so that the ATI buttons are facing up. The cables for both devices can be routed through a cable access hole or space at the rear area of the designated accessible voting booth.

Version: 5.10-CA::11 141 1/15/2020
Democracy Suite® Use Procedures
6.2.2 ICP2 Equipment Setup
The following sections discuss setting up the ICP2 and makes the following assumptions:
• Tabulator is unpacked
• Applicable SD memory cards are accessible
6.2.2.1 Inserting the SD Memory Cards
Follow jurisdictional procedures from the Election Office to determine when to insert and remove SD memory cards.
Open the Administrator and Poll Worker memory card access port doors by gently squeezing the door.
1. Carefully push the labeled SD memory card into the applicable memory port with the label facing up.
2. The card makes an audible click sound when completely inserted.
3. Close the door on each access port.
The tabulator can now be set onto the ballot box.
6.2.2.2 Setting up the Tabulator on the Ballot Box
To set up the tabulator on its ballot box, perform the following:
1. Assemble the ballot box delivered to your polling location.
2. In the presence of Election Officials, verify that there are no ballots or other materials present in the ballot box.
NOTE: Be sure to check all three sections of the ballot box:
• Main compartment
• Secondary compartment
• Auxiliary compartment
NOTE: It is recommended that the ballot box be secured after verifying it contains no ballots.
3. Place the tabulator and the ballot box in the polling room close to a power outlet, and where voters will have easy access to the tabulator.
4. Position the tabulator on top of the ballot box by placing it on the platform as shown in the figure below.

1/15/2020 142 Version: 5.10-CA::11
Chapter 6 - Polling Place Procedures
Figure 6-2: Position the tabulator on top of the ballot box
5. Connect the round end of the AC to DC power adapter into the power port located at the rear of the tabulator. .
Figure 6-3: Connect the round end of the AC to DC power adapter
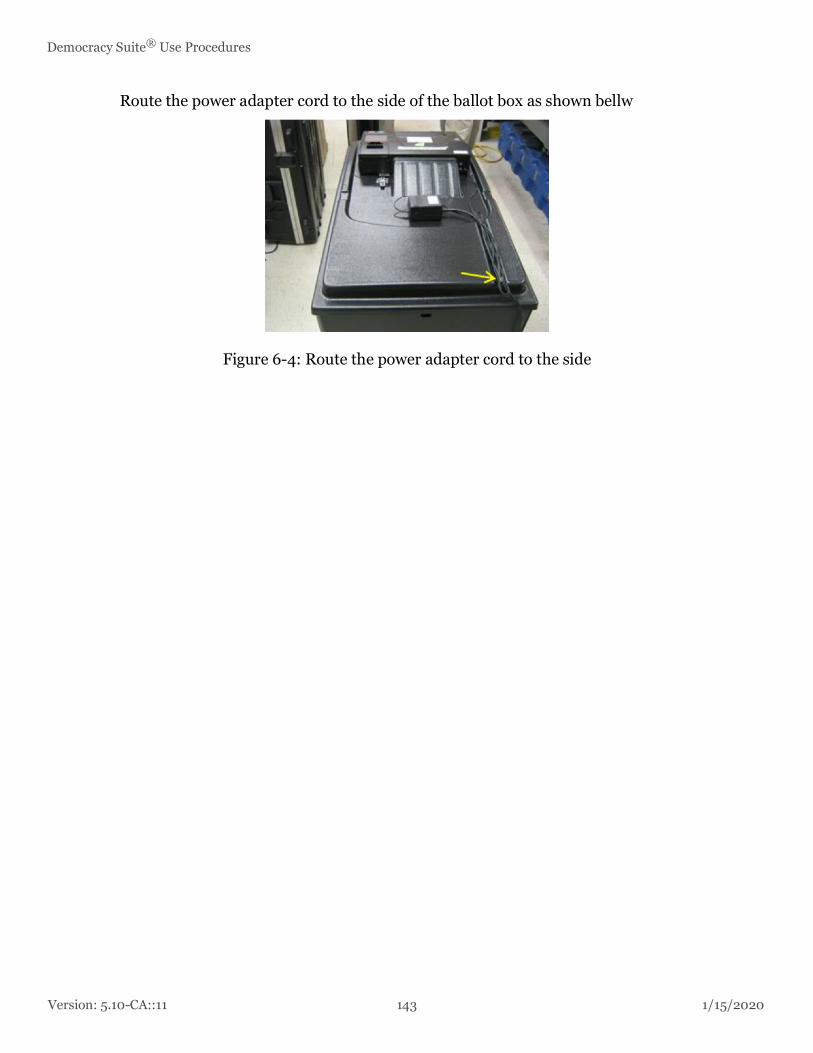
Version: 5.10-CA::11 143 1/15/2020
Democracy Suite® Use Procedures
Route the power adapter cord to the side of the ballot box as shown bellw
Figure 6-4: Route the power adapter cord to the side

1/15/2020 144 Version: 5.10-CA::11
Chapter 6 - Polling Place Procedures
Ensure the power cords do not present a tripping hazard to voters. Tape the power cords down to the floor and to the ballot box, if necessary.
NOTE: Do not plug the tabulator's power cord into the DC power outlet.
The thermal printer paper roll can now be replaced, if needed.
6.2.2.3 Replacing the Thermal Printer Paper Roll
When the existing paper roll in the unit is running out, the paper display pink colored markings to warn officials that the roll is nearing completion. To remove the existing roll and replace it with a new one, perform the following:
1. Press in on the printer cover door release tab.
2. Lift the printer cover door.
3. Remove the plater pressure roller from the roller holders by pulling up it on.
4. Remove the used printer paper roll from the roll holder.
5. Insert into the roll holder a new printer paper roll.
6. Ensure the roll is feeding from the bottom and towards you.
7. Pull the paper towards you so that it passes over the plater pressure roller baseplate
8. With the paper beneath it, push the plater pressure roller back into position above the roller holders.
9. Ensure the end of the plater pressure roller with the white cog is to the left. The plater pressure roller snaps into place.
10. Lower the printer cover door while inserting the end of the printer paper roll through the printer cover door opening.
11. Close the printer cover door.
12. Tear off the surplus paper.
The tabulator can now be powered up.
6.2.2.4 Powering Up the Tabulator
To power up the tabulator:
1. Ensure the tabulator is positioned on top of the ballot box with one end of the power adapter connected to the power port on the back of the unit.
2. Insert the plug of the power adapter cord into the DC outlet (or extension power cord attached to the outlet).
3. Ensure the cord does not present a tripping hazard.
4. Press in on the Administrator port door tab and lower the door.

Version: 5.10-CA::11 145 1/15/2020
Democracy Suite® Use Procedures
5. To the left of the Administrator SD memory card slot, set the power switch to on (downward position).
The red power light turns on.
6. To the left of the three LED lights next to the Administrator port door, using a pen, press in the reset button, and hold for 2 - 3 seconds.
The tabulator emits a single long beep.
The message "Verifying Configuration Files" appears on the LCD screen.
After the files are verified, the Ready screen appears.
Figure 6-5: Ready screen
The security seals can now be applied.
6.2.2.5 Applying Security Seals
Physical controls incorporate tamper evident seals that limit and detect unauthorized access to the ImageCast Precinct 2 tabulator. Election officials are free to use any tamper evident label or tamper evident tie wrap supplier. There are three (3) locations on the ImageCast Precinct 2 tabulator where security seals may be placed:
• Memory card access ports (see Sealing Administrator and Poll Worker Memory Card Access Ports
• Thermal report printer door (see Sealing the Thermal Report Printer Door
• Modem port (see Sealing the Modem Port
Follow instructions provided by the Election Office for handling security seals.
For securing the ballot box, apply tamper seals between the ballot box and tabulator.

1/15/2020 146 Version: 5.10-CA::11
Chapter 6 - Polling Place Procedures
6.2.2.6 Sealing Memory Card Access Ports
Place a lock, tamper evident label, or tamper evident tie wrap on the Administrator and Poll Work doors' lock loop as seen in the figure below. The doors remain locked during the entire deployment and through Election Day and night. The seals are broken only by administrators.
Figure 6-6: Sealing Administrator and Poll Worker Memory Card Access Ports
6.2.2.7 Sealing the Thermal Report Printer Door
Apply a seal to the thermal printer compartment as seen in the figure below. This protects against unauthorized access to this compartment.
Figure 6-7: Sealing the Thermal Report Printer Door

Version: 5.10-CA::11 147 1/15/2020
Democracy Suite® Use Procedures
6.2.2.8 Sealing the Modem Port
Apply a seal to the access cover protecting the modem port as seen in the figure below. This protects against unauthorized access to modem components. The access cover remains sealed during deployment and during Election Day. Only poll workers are authorized to break this seal prior to transmit election results.
Figure 6-8: Sealing the Modem Port
The poll can now be opened.
6.2.2.9 Ballot Review
To review a ballot with voting issues detected during ballot scanning:
The Ballot Review screen appears upon detection of issues. The screen displays all contents on the scanned ballots with issues and a description of the issue.
Figure 6-9: Ballot Review screen

1/15/2020 148 Version: 5.10-CA::11
Chapter 6 - Polling Place Procedures
7. Tap the up and down arrows to review the issues with the voter.
Figure 6-10: Ballot Review screen
8. When all issues have been reviewed with the voter, tap the green check mark. The Review Complete screen appears.
Figure 6-11: Review Complete screen
9. Determine how the voter wants to proceed:
• If the voter wants to cast the ballot as-is, at the tabulator, press Cast.
• If the voter wants to make changes to the ballot before it is cast, at the tabulator, press Return.
Version: 5.10-CA::11 149 1/15/2020
Democracy Suite® Use Procedures
6.2.3 ICX Equipment Setup
6.2.3.1 Unpacking the Equipment
The following steps are to be performed by an Election Official:
1. Remove the ImageCast® X devices from the Ballot Security Unit.
2. Remove the printers from the grey steel supply boxes labeled “ImageCast® X Printers”.
3. Remove the following from the grey steel supply box labeled “ImageCast® X Peripherals”:
• 4-Directional switch (for ADA).
• Headphones (for ADA).
• LavaLink Adapter (Samsung only).
• Tecla Shield or ATI device.
• The smart card(s).
6.2.3.2 Setting up the Equipment
The following steps are to be performed by an Election Official:
1. Set up the booth according to the site layout map in the Supervisors Notebook.
2. Plug both the printer and the ImageCast® X device into the UPS.
3. Plug the headphones into the headphone jack.
4. Plug the USB printer cable into printer and into a free USB port.
5. If the ICX device is to be used to support ADA voters then the appropriate ADA device (Tecla Shield or ATI) should be plugged into a free USB port.
NOTE: The tablet(s) that should have the accessibility features enabled have to be tagged with a blue disability sticker.

1/15/2020 150 Version: 5.10-CA::11
Chapter 6 - Polling Place Procedures
6.2.3.3 Voting Booth Set Up
When the ICX is placed in working position, to enable voter’s privacy, the voting booth should be positioned behind the ICX with the open side of the privacy surround facing a wall without a window and the area between the wall and the open side of the privacy surround are vacant while the voter is using this accessible voting station.
The immediate surface area must be available for the voter’s unobstructed use with accessibility device (i.e. Tecla Shield and/or Bjoy, Sip-and-Puff or paddles).
The assistive device must be positioned within the front half of the designated accessible voting area, on a horizontal surface with buttons facing up.
The cables for accessible devices can be routed through a cable access hole or space at the rear area of the designated accessible voting booth.
The accessible voting station should provide a clear floor space of 30 inches (760 mm) minimum by 48 inches (1220 mm) minimum for a stationary mobility aid.
The clear floor space shall be level with no slope exceeding 1:48 and positioned for a forward or a parallel approach.
6.3 Opening the Polls
6.3.1 Opening the Polls on the ICX
Election files must be present on the device prior to opening the poll. For more details on how to load election files onto the device, see section 4.5.2.4 “ImageCast® X Logic and Accuracy Test Procedures”.
1. Power on the ICX by completing the following:
• Open the security door.
• Press and hold the power button on the right of the unit until it lights up, then release the button.
• Close the bottom security door.

Version: 5.10-CA::11 151 1/15/2020
Democracy Suite® Use Procedures
• Secure the bottom security door using a security seal.
2. Power on the printer by pressing the ON button.
3. Wait for the ICX device to finish booting.
4. Log into the ImageCast® X application using the poll worker Smart Card.
5. Make sure the date and time are correct.
6. In the drop-down menu select a tabulator from the provided list.When clicking on the drop-down Tabulators menu, a keyboard pops up to type in the desired tabulator.The application starts verifying the election files, and when that's finished a dialog displays with information of the integrity of the election files.
NOTE: If the list of tabulator is empty, that means that the HMAC key on the poll worker's smart card is different from the HMAC keys of the tabulators in the database, and a warning message displays: “Loading tabulator failed. Election data contains tabulator with HASH different from one on smart card data”.
7. In the Info dialog, press OK.The Tabulator is now selected.
8. Press Open Poll.An Info dialog displays, with two options.
9. Press Yes.The poll is now open.
10. The device is ready for marking ballots.
6.3.2 Opening the Polls on the ICE
In general, the precinct board or poll workers would perform the following items when opening the polling place:
1. Complete Oath of Office and Declaration of Intention forms pursuant to the California Elections Code.
2. Assemble voting booths, and in each booth display a copy of materials required by the California Elections Code.
3. Provide a pad of demonstration ballots, markers, and have suitable demonstration materials available.
Dominion Voting Systems' plastic ballot box provides 8 hasp-type seal points for security seals. The figures below depict where and how to apply security ties to the plastic ballot box.

1/15/2020 152 Version: 5.10-CA::11
Chapter 6 - Polling Place Procedures
1. Break the seals on the Ballot Box in order to remove the ballot box lid and access the ImageCast® Evolution.
Figure 6-12: Green Ballot Box Seals
2. Position the ballot box, with the ImageCast® Evolution sitting on top, so that an AC Main socket outlet is available to the unit. An extension cord can be used if needed.
3. Verify that all security seals are intact on the required locations.
4. Remove the three seals from the power cord compartment. The poll worker should inspect each of the ballot compartments main, secondary and auxiliary to ensure that there are no ballots present. Each compartment should then be sealed with one of the yellow padlock seals, and the seal

Version: 5.10-CA::11 153 1/15/2020
Democracy Suite® Use Procedures
number recorded.
Figure 6-13: ImageCast® Evolution Seals
5. Plug the unit in the available AC Mains socket outlet.
Figure 6-14: ImageCast® Evolution Power Source
6. Power up the unit by lifting up the monitor to its operating position. You can adjust the angle of the screen if needed and open up the privacy flaps to
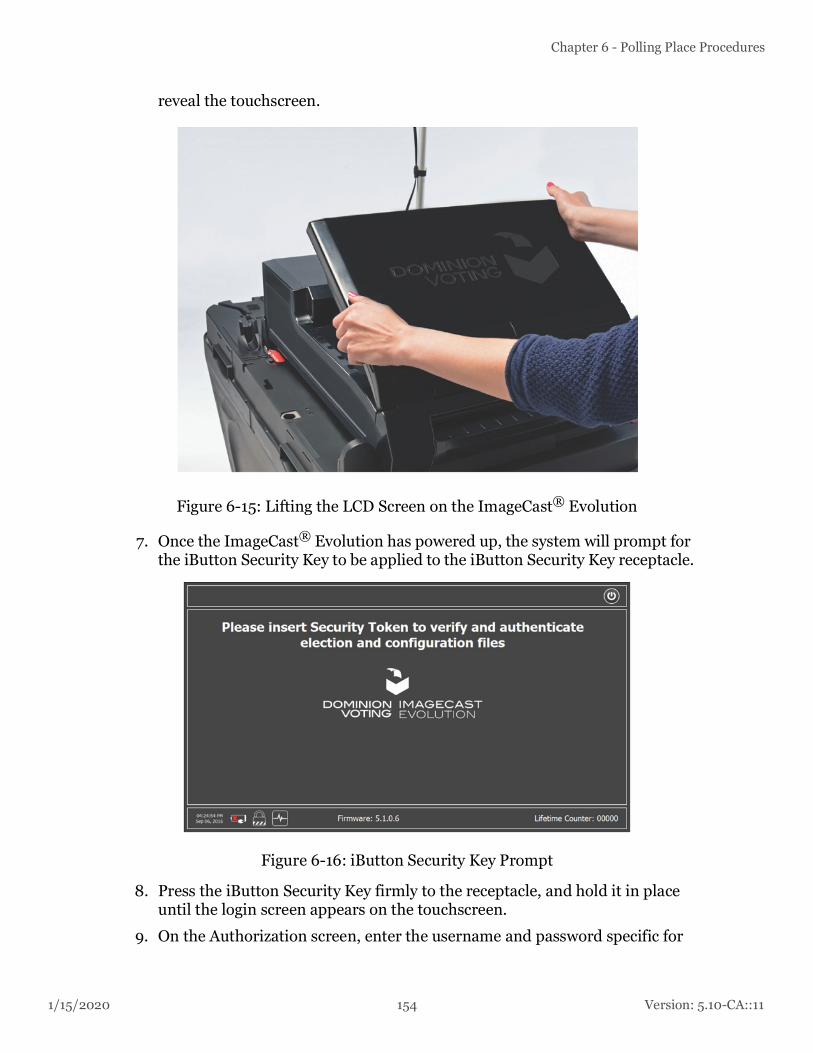
1/15/2020 154 Version: 5.10-CA::11
Chapter 6 - Polling Place Procedures
reveal the touchscreen.
Figure 6-15: Lifting the LCD Screen on the ImageCast® Evolution
7. Once the ImageCast® Evolution has powered up, the system will prompt for the iButton Security Key to be applied to the iButton Security Key receptacle.
Figure 6-16: iButton Security Key Prompt
8. Press the iButton Security Key firmly to the receptacle, and hold it in place until the login screen appears on the touchscreen.
9. On the Authorization screen, enter the username and password specific for

Version: 5.10-CA::11 155 1/15/2020
Democracy Suite® Use Procedures
the project and press OK. In the event that the username and password are incorrect, the screen will clear the text and provide a new opportunity to enter the correct username and password.
10. Once logged in, the Poll Worker menu will appear.
11. Press 'Open Poll' to open the Poll Management screen. You will be presented with the following three options:
a. Poll Status
b. Print Zero Tape
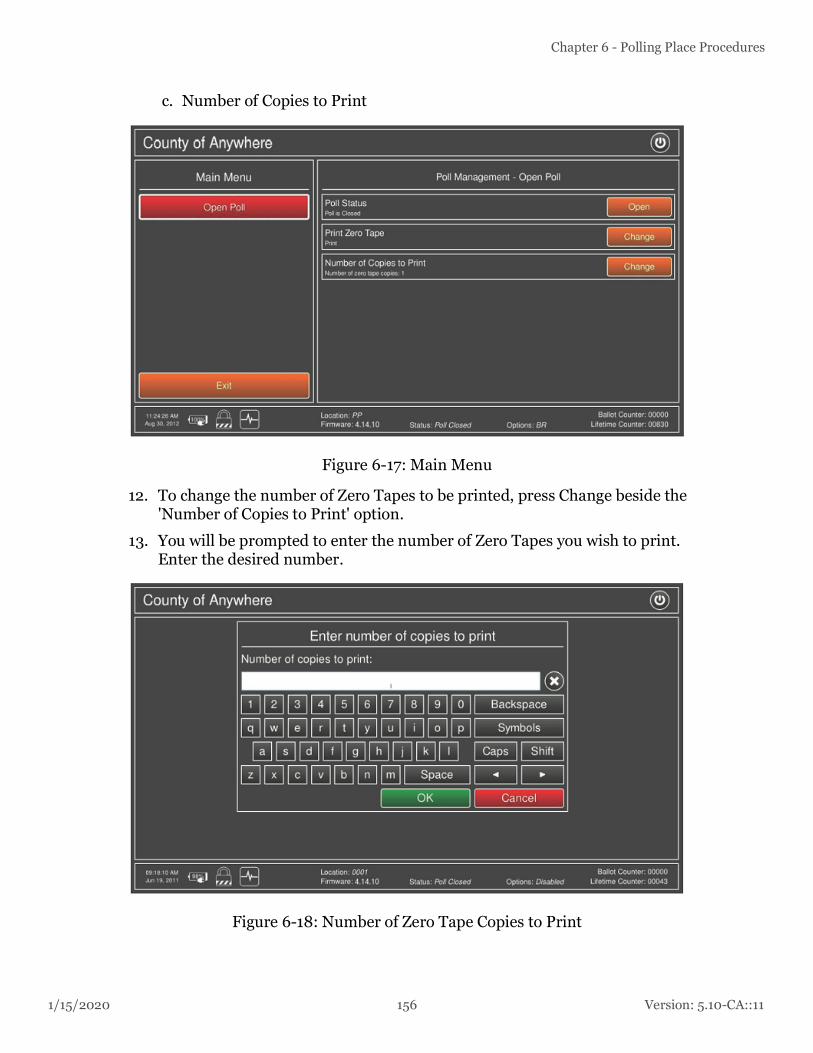
1/15/2020 156 Version: 5.10-CA::11
Chapter 6 - Polling Place Procedures
c. Number of Copies to Print
Figure 6-17: Main Menu
12. To change the number of Zero Tapes to be printed, press Change beside the 'Number of Copies to Print' option.
13. You will be prompted to enter the number of Zero Tapes you wish to print. Enter the desired number.
Figure 6-18: Number of Zero Tape Copies to Print

Version: 5.10-CA::11 157 1/15/2020
Democracy Suite® Use Procedures
14. Press OK to return to the Poll Management screen.
15. Press the Open button beside the 'Poll Status' option.
Figure 6-19: Open button in the Main Menu
16. A confirmation screen will appear Press OK to continue.
17. If the Zero Tape setting was set to “Print” the Zero Tape will begin printing and the Printing in progress screen will appear. Pressing the Cancel button will stop the printing of the tape.
Figure 6-20: Printing of Zero Tapes in Progress

1/15/2020 158 Version: 5.10-CA::11
Chapter 6 - Polling Place Procedures
18. Once the Zero Tape has been printed, the Printing completed screen will appear. To print more copies of the Zero Tape press Yes, otherwise press No.
Figure 6-21: Printing of Zero Tape Completed
19. The Administrative Menu screen appears with the poll open and ready for operation.
Figure 6-22: Poll Ready for Operation
20. Place a sample ballot in a location that is visible to voters. The following two sections give some general procedural information related to the polling

Version: 5.10-CA::11 159 1/15/2020
Democracy Suite® Use Procedures
place.
Figure 6-23: Sample Ballot

1/15/2020 160 Version: 5.10-CA::11
Chapter 6 - Polling Place Procedures
6.3.3 Opening the Polls on ICP2
When advised to do so, open the poll.
To open the poll:
1. Contact the Security Key to the Security Key receptacle.
2. While maintaining contact, the Please Enter Password screen appears.
Figure 6-24: Enter password
3. Remove the security token from its receptacle and enter the provided password and tap Enter.The message "Password Correct" appears and the election project is verified.
Figure 6-25: Password correct

Version: 5.10-CA::11 161 1/15/2020
Democracy Suite® Use Procedures
The Main Menu screen appears.
Figure 6-26: Main menu screen
4. From the Main Menu screen, tap Poll Management The Poll Management screen appears.
Figure 6-27: Poll Management screen
5. From the Poll Management screen, tap Open Polls. The Please Enter Password screen appears.
6. Enter your password and tap Enter.
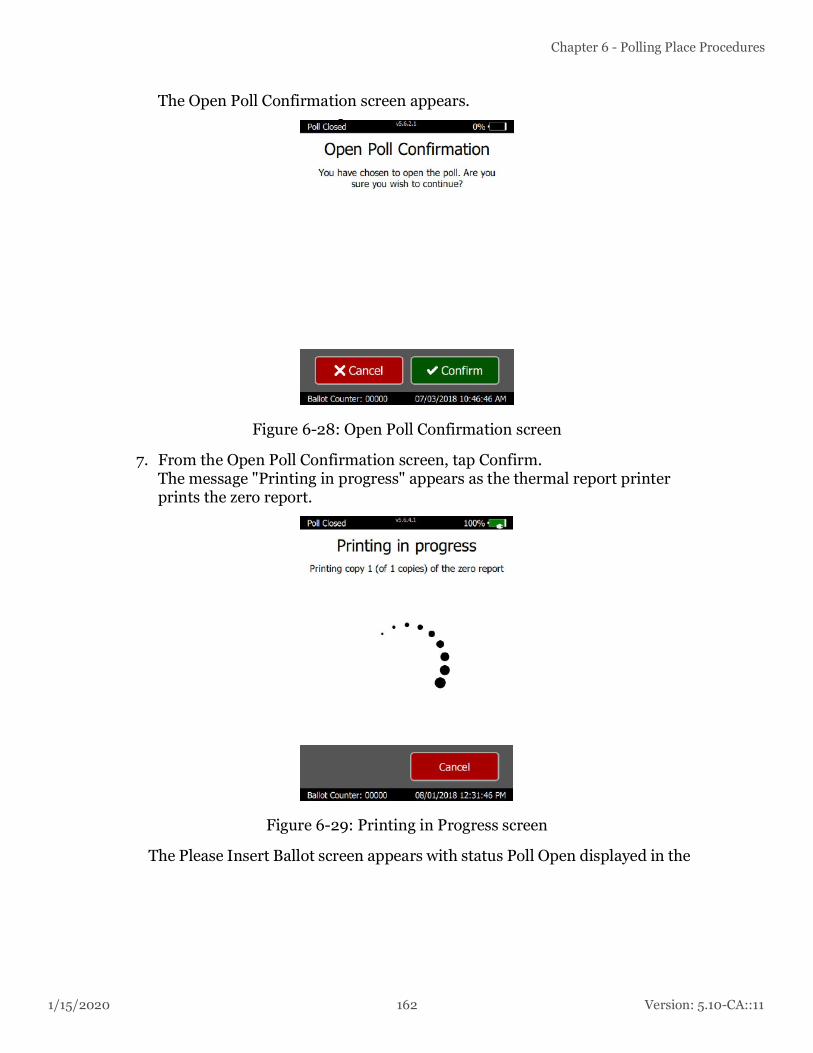
1/15/2020 162 Version: 5.10-CA::11
Chapter 6 - Polling Place Procedures
The Open Poll Confirmation screen appears.
Figure 6-28: Open Poll Confirmation screen
7. From the Open Poll Confirmation screen, tap Confirm.The message "Printing in progress" appears as the thermal report printer prints the zero report.
Figure 6-29: Printing in Progress screen
The Please Insert Ballot screen appears with status Poll Open displayed in the

Version: 5.10-CA::11 163 1/15/2020
Democracy Suite® Use Procedures
top left-hand corner.
Figure 6-30: Please Insert Ballot screen
8. Confirm the following zero report content:
• Report header displays the correct:
• Precinct
• Voting Location name and/or Electoral District number
• Serial number matches the tabulator's serial number, located on the right-hand side
• Total Scanned is zero and Total Voters is zero
NOTE: If any of this information is incorrect, contact your Election Office immediately.
9. Process the zero report as specified by your jurisdiction.
10. From the lower left-hand corner of the Please Insert Ballot screen, ensure the Ballot Counter field displays 00000.
NOTE: If this field is incorrect, contact your Election Office immediately.
6.3.3.1 Viewing Tabulator Info on the LCD Screen
In addition to tabulator information displayed on the zero report, information specific to the tabulator can be viewed on the Tabulator's LCD screen.
To view the tabulator information:
1. At the Please Insert Ballot screen, contact the Security Key to the Security Key receptacle.

1/15/2020 164 Version: 5.10-CA::11
Chapter 6 - Polling Place Procedures
The Main Menu screen appears.
Figure 6-31: Main Menu sscreen
2. From the Main Menu screen, tap Utilities. The Utilities screen appears.
Figure 6-32: Utilities screen
3. From the Utilities screen, tab Tabulator Info.

Version: 5.10-CA::11 165 1/15/2020
Democracy Suite® Use Procedures
The first Tabulator Info screen appears.
Figure 6-33: Tabulator Info screen
4. From the bottom of the LCD screen, tap the white circle. The second Tabulator Info screen appears.
Figure 6-34: Tabulator Info screen
5. When done viewing the tabulator information, tap OK > Back > Exit The Please Insert Ballot screen appears.
The tabulator is ready to scan ballots.
6.4 Polling Place Procedures
1/15/2020 166 Version: 5.10-CA::11
Chapter 6 - Polling Place Procedures
In general, the precinct board will perform the following tasks at each polling location on Election Day:
1. At least every hour, inspect each booth to ensure there are no electioneering materials present, and that the booth/voting machine is otherwise suitable for voting. As far as possible, defacement conditions shall be corrected according to the jurisdiction's practices and in conformance with California Election code.
2. Offer to instruct each voter in the proper method of voting, including further instruction and practice time, if necessary, and as applicable.The poll worker would be responsible for the following type of assistance when the voter enters the polling place:
NOTE: No poll worker, or any other person, may record the time at which, or the order in which, voters vote in the polling place.
1. Provide the voter with a ballot, secrecy envelope, and proper marking device to complete the ballot; be sure to include any instructions per jurisdiction or local statute, if required. To ensure a smooth election process, Dominion suggests:
a. Checking each ballot before giving it to the voter to ensure there are no torn or faulty edges. Looking for abnormally light printing and improper registration of trim marks. The trim marks show the edges on which the ballot should be cut, or trimmed.
2. If requested by the voter, use the demonstration ballot to show the voter:
a. How to fill the oval adjacent to the voter's selected candidate name or proposition.
b. The different ImageCast® Evolution screen views. This may include explaining the meaning of various messages that may appear on the LCD screen and ensuring that the voter understands all aspects of the voting process.
3. After the voter has completed the ballot, instruct the voter to insert the ballot into the entry slot of the ImageCast® Evolution tabulator unit, releasing the ballot after insertion. The ballot will be drawn automatically into the unit.
4. Ask the voter to remain at the unit until the ballot is fully processed and deposited into the ballot box.
5. The voter may wish to ensure that the ballot count has increased by one, indicating that the ballot has been accepted.
NOTE: If the ballot is returned, the count will not increment.
6. If any of the second-chance voting scenarios occur (i.e. blank ballot, overvote, undervote), explain to the voter that the ballot has not yet been counted, and explain the reason for the warning message.
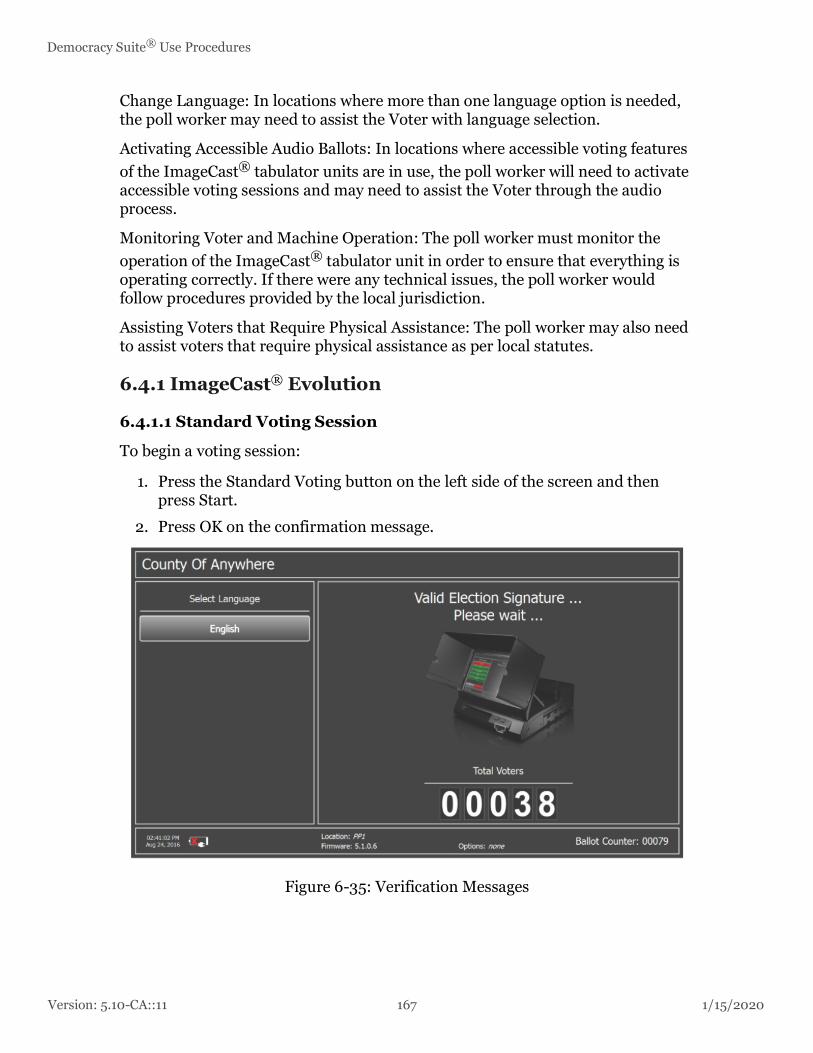
Version: 5.10-CA::11 167 1/15/2020
Democracy Suite® Use Procedures
Change Language: In locations where more than one language option is needed, the poll worker may need to assist the Voter with language selection.
Activating Accessible Audio Ballots: In locations where accessible voting features of the ImageCast® tabulator units are in use, the poll worker will need to activate accessible voting sessions and may need to assist the Voter through the audio process.
Monitoring Voter and Machine Operation: The poll worker must monitor the operation of the ImageCast® tabulator unit in order to ensure that everything is operating correctly. If there were any technical issues, the poll worker would follow procedures provided by the local jurisdiction.
Assisting Voters that Require Physical Assistance: The poll worker may also need to assist voters that require physical assistance as per local statutes.
6.4.1 ImageCast® Evolution
6.4.1.1 Standard Voting Session
To begin a voting session:
1. Press the Standard Voting button on the left side of the screen and then press Start.
2. Press OK on the confirmation message.
Figure 6-35: Verification Messages

1/15/2020 168 Version: 5.10-CA::11
Chapter 6 - Polling Place Procedures
3. After successful verification, a paper ballot needs to be inserted into ballot entry slot. The system will wait a few seconds for the ballot.
4. In case verification fails, the system will inform you what has gone wrong.
Figure 6-36: Time out for Inserting Ballot
5. You can review your marks. If you want to cast your ballot, press Cast. If not, press Return. In this case, the paper will be returned for your correction.
Figure 6-37: Ballot Review
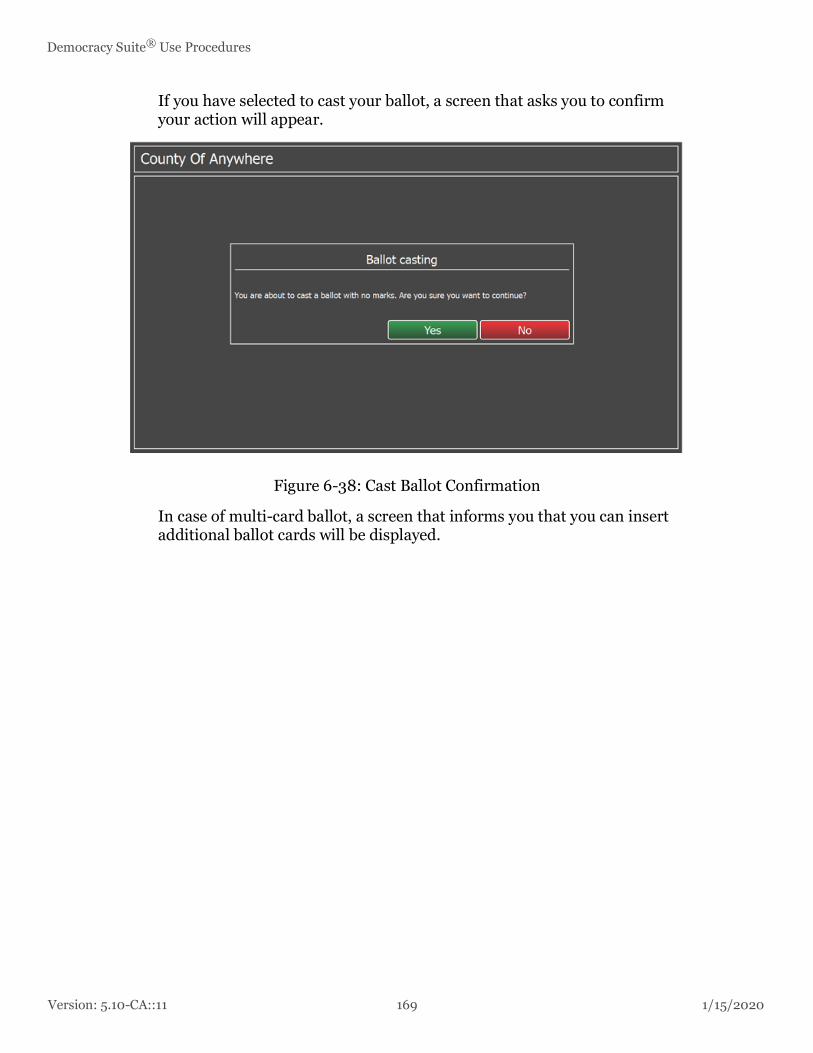
Version: 5.10-CA::11 169 1/15/2020
Democracy Suite® Use Procedures
If you have selected to cast your ballot, a screen that asks you to confirm your action will appear.
Figure 6-38: Cast Ballot Confirmation
In case of multi-card ballot, a screen that informs you that you can insert additional ballot cards will be displayed.

1/15/2020 170 Version: 5.10-CA::11
Chapter 6 - Polling Place Procedures
6. If you want to continue, press Continue button. To finish the session, press Cancel.
Figure 6-39: Multi-card Session Continuation
You will be notified that the session is complete. Following that, a new welcome screen will be displayed, and a new voting session can begin.
Figure 6-40: Session is Complete

Version: 5.10-CA::11 171 1/15/2020
Democracy Suite® Use Procedures
In case a used ballot is inserted, an error message will inform you that the inserted ballot has already been used and that it cannot be inserted again.
Figure 6-41: Ballot Already Inserted
6.4.1.2 Write In (Ballot Review Disabled)
If the Ballot Review is “Disabled”, the correctly marked ballot will automatically be cast and the ballot will be dropped into the main ballot box chamber.
6.4.1.3 Overvote (Ballot Review Enabled)
Insert the ballot with an overvoted contest.
Figure 6-42: Standard Voting - System Ready Screen.

1/15/2020 172 Version: 5.10-CA::11
Chapter 6 - Polling Place Procedures
The screen will display a ballot review and mark the overvoted contest as shown in the figure A.87. The ballot will remain in the scanner until the voter presses the RETURN button. There is no option to CAST the ballot
NOTE: Jurisdictions can configure the MBS whether to accept overvoted ballots. If the configuration is such that accepts overvoted ballots, they could be cast but the voted would not count towards the result totals.
Figure 6-43: Overvote Ballot Review Screen.
6.4.1.4 Overvote (Ballot Review Disabled)
Insert the ballot with an overvoted contest. The error screen will appear indicating which contests were overvoted. The ballot will immediately be returned back to the voter and will hang on the insert slot of the tabulator until the voter removes the ballot.
Figure 6-44: Overvote Error Screen.

Version: 5.10-CA::11 173 1/15/2020
Democracy Suite® Use Procedures
If the voter presses the OK button the screen will change and instruct the voter to remove the ballot.
Figure 6-45: Remove Ballot from the Device Screen.
6.4.1.5 Undervotes
Starting from the Standard Voting screen, insert the ballot with a blank/undervoted contest. If the Ballot Review has been enabled, then the ballot review screen will appear indicating which contest has been undervoted. Depending on the configuration set in the MBS file, the ballot may, or may not be, cast. If the Return Ballot Immediately Option has been set, the screen similar to Figure A.89 appears.
Figure 6-46: Undervote Ballot Review Screen.
6.4.1.6 Ambiguous Marks (Ballot Review Enabled)
Starting from the Standard Voting screen, insert the ballot with an ambiguous mark. Mark the ballot so that one choice has only two small dots in the bottom right corner of the voting box. When an ambiguous mark is detected the ballot review screen appears and indicates which contest/s the ambiguous mark was detected. Depending on the MBS configuration, the ballot may or may not be

1/15/2020 174 Version: 5.10-CA::11
Chapter 6 - Polling Place Procedures
allowed to be cast. The ballot review screen identifies the ambiguous mark on the specific choice where it happened. The ballot is returned and hangs in the throat of the insert slot of the scanner. The voter can either pull the ballot out or select RETURN.
Figure 6-47: Ambiguous Mark Ballot Review Screen.
6.4.1.7 Ambiguous Marks (Ballot Review Disabled)
Starting from the Standard Voting screen insert the ballot with an ambiguous mark. The error screen will appear indicating where the ambiguous mark was detected. The ballot is immediately returned and hangs off from the insert slot of the scanner. The voter can either pull the ballot out, which will return them to the Standard Voting screen, or press the OK button, which will display a screen instructing the voter to pull the ballot out.
Figure 6-48: Ambiguous Mark Error Screen.
6.4.1.8 Correctly Marked Ballot with No Write Ins
Starting from the Standard Voting screen, insert the correctly marked ballot. The ballot review screen will appear showing the selected choices. Voter can CAST or

Version: 5.10-CA::11 175 1/15/2020
Democracy Suite® Use Procedures
RETURN the ballot. If the voter casts the ballot, the ballot is dropped into the main counter goes up by one.
Figure 6-49: Valid Ballot Review Screen.
6.4.1.9 Operating the ImageCast® Evolution on Battery
A battery power source is provided in the event that the main electric supply is disrupted. The battery power source operates the system and allows for the casting of votes for a period of two hours under normal operating conditions (100 voters per hour, and two AVS voters per hour).
The system will shut down and preserve the integrity of votes cast prior to the power failure, and resumes functionality when power is provided or restored without significant or intrusive power-up procedures. In the event of a power failure, the equipment will continue to operate and indicate the battery life on the LCD monitor and side panel LED lights.
The switch from battery power to AC power (or vice versa) takes place automatically. If the AC power is disconnected or unavailable, the unit will continue to operate on battery power as long as a sufficient charge remains in the battery. When AC power is reconnected or otherwise resumes, the ImageCast® Evolution automatically returns to AC power mode.
6.4.1.10 Changing the Printer Paper Tape
Thermal Paper Removal
Lift the thermal printer door upward to access the printer module. On the left side of the thermal printer module, press the green release lever into an angled position.

1/15/2020 176 Version: 5.10-CA::11
Chapter 6 - Polling Place Procedures
This releases the thermal head from the platen roller to allow the paper to be removed or fed in smoothly.
Figure 6-50: Lever in Head Up/Down Position
Remove the old partial paper roll (if any) out from the printer compartment. Slide the roll shaft out of the paper roll.
6.4.1.11 Thermal Paper Installation
Thermal Paper installation can be performed even while the system is powered on although it is recommended that the user read the tabulator handling notes prior to performing any maintenance routine on the machine.
1. Remove the end-holding tape from a new paper roll to free the roll end. Unwind the paper roll past any glue residue from the tape.
2. Cut the edge of a new paper roll relatively straight.
3. Feed the roll shaft through the new paper roll.
4. Place the new roll into position on the paper roll tray such that the paper unreels from underneath the roll and upwards.
NOTE: Thermal Paper is chemically coated usually only on a single side of the roll. Heat from the thermal printer will therefore print only on that side of the paper. A fingernail swiped quickly across either side of the paper can generate enough heat from friction to produce a mark and thus identify the coated side of the paper roll. This is the side that needs to be placed against the thermal printer head.
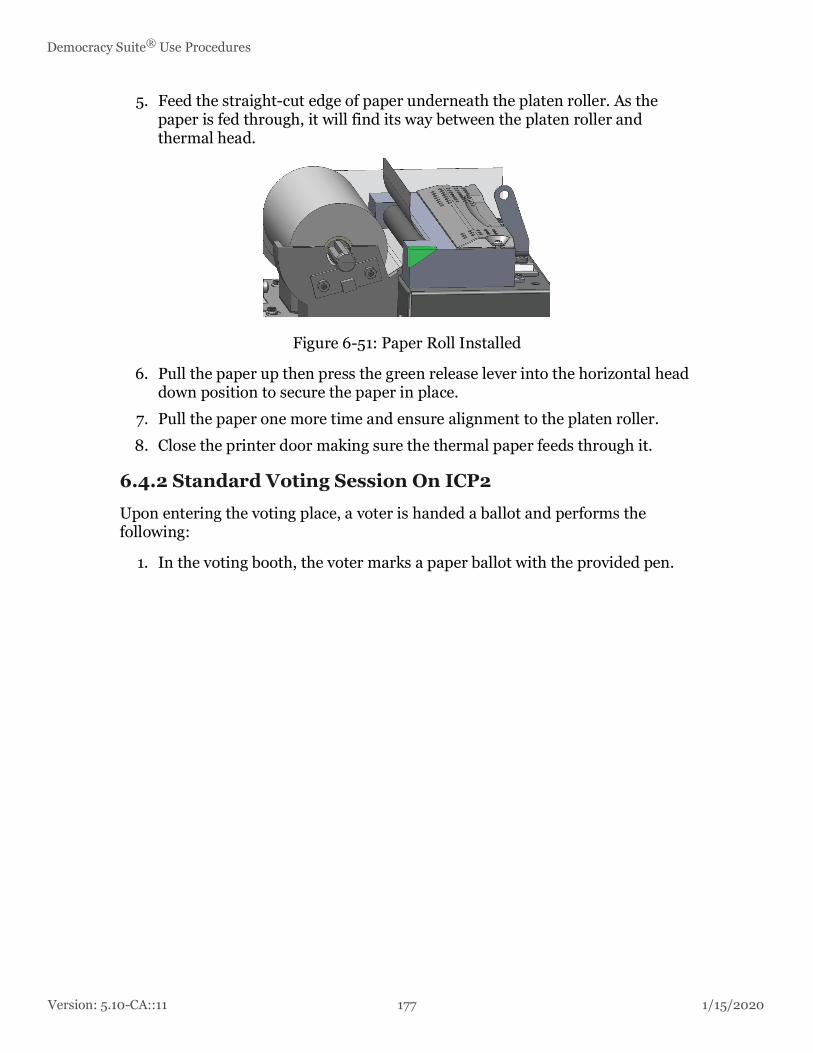
Version: 5.10-CA::11 177 1/15/2020
Democracy Suite® Use Procedures
5. Feed the straight-cut edge of paper underneath the platen roller. As the paper is fed through, it will find its way between the platen roller and thermal head.
Figure 6-51: Paper Roll Installed
6. Pull the paper up then press the green release lever into the horizontal head down position to secure the paper in place.
7. Pull the paper one more time and ensure alignment to the platen roller.
8. Close the printer door making sure the thermal paper feeds through it.
6.4.2 Standard Voting Session On ICP2
Upon entering the voting place, a voter is handed a ballot and performs the following:
1. In the voting booth, the voter marks a paper ballot with the provided pen.

1/15/2020 178 Version: 5.10-CA::11
Chapter 6 - Polling Place Procedures
2. Voter insert the ballot into a secrecy folder.
3. Once the ballot is concealed, the voter leaves the voting booth and approaches the tabulator.
At the tabulator:
1. The voter hands secrecy folder to a poll worker.
2. The poll worker instructs the voter to wait for the ballot to be successfully cast.
3. The poll worker feeds the ballot into the ballot input slot on the front of the tabulator, ensuring that the ballot is face-down to protect confidentiality.The tabulator pulls the ballot from the secrecy folder and scans the content.The message "Scanning Ballot, please wait" appears.
Figure 6-52: Scanning Ballot screen
If no issues are found with the ballot, the message "Ballot Successfully Cast" appears and the ballot is tabulated.

Version: 5.10-CA::11 179 1/15/2020
Democracy Suite® Use Procedures
Figure 6-53: Ballot Successfully Cast screen
The ballot exits the tabulator from the rear exit slot and drops into the ballot box. The voter is free to leave the voting place.
NOTE: When inserting marked ballots into the ballot entry slot, non-typical scenarios may arise. These depend on how the voter marked their ballot, and how the tabulator is configured (MBS) to respond.It is very important that the voter remain at the tabulator while the ballot is cast, so that if a nontypical scenario occurs, they have the opportunity to respond.
If the tabulator detects certain non-typical voting scenarios a warning message may be displayed on the screen giving the option to the voter to cast the ballot as-is or return the ballot for correction.
NOTE: Standard Ballot Review must be set to Enabled for non-typical voting scenario warning messages to be displayed.Non-typical voting scenarios include:
• One or more undervoted contest(s)
• One or more overvoted contest(s)
• Combination of undervoted and overvoted contests
• Blank ballot
• Misread ballot
• Invalid ballot

1/15/2020 180 Version: 5.10-CA::11
Chapter 6 - Polling Place Procedures
• Ambiguous marks
• Missing election official signature
Please refer to Handling Non-typical Voting Scenarios for details on how to handle these various voting scenario
6.4.2.1 ImageCast® Precinct 2
Democracy Suite® EMS allows for the programming of specific ImageCast® Precinct 2 tabulators for use “in-office” in Early Voting or in Vote Centers. Ballot tabulation for a specific precinct, a range of precincts, or all of the precincts in the election may be programmed. The setup and use of an Early Vote ImageCast® Precinct 2 tabulator is the same as use of an Election Day ImageCast® Precinct 2 tabulator as described in, with the exception that the tabulation will take place for a period longer than one day.
Depending on the size of the election and the number of ballot styles an Early Vote ImageCast® Precinct 2 is handling, it may be impractical to close the polls and power down the Early Vote tabulator after the end of each Early Voting day due to the length of time it takes to load election files on the tabulator during the power up process. If this is the case, the Poll should be closed at the end of the day, however, the ImageCast® Precinct 2 tabulator should stay turned on. After the Poll has been closed, the Administrator should physically secure the ImageCast® Evolution tabulator as per jurisdiction’s procedure, until the start of the next day, when the tabulator is taken out of the secured area and the Poll is re-opened on the tabulator to continue with the operation.
In case your Early Voting ImageCast® Precinct 2 tabulator is handling the number of ballot styles which allows the tabulator to load the election in a reasonable amount of time, then the procedure for operating an Early Vote ImageCast® Precinct 2 is as follows:

Version: 5.10-CA::11 181 1/15/2020
Democracy Suite® Use Procedures
1. Apply the iButton Security Key to get to the Administrative Menu screen.
2. Select the option to Shut Down the unit.
3. This will initiate the countdown until the machine has fully powered down.
4. Replace the ballot box cover onto the ballot box, and then lock it and seal it until the next day.
5. Next day, remove the seals, unlock and remove the ballot box cover.
6. Enter the Administrative user name and password to get to the Administrative Menu screen.
7. Press the Open Poll from the Administrative Menu and the message will appear warning that the poll was already opened and that the results are not zero. Confirm by pressing OK.
Voting on the Early Vote ImageCast® Precinct 2 continues until the jurisdiction-defined ‘Cut off’ time. At this point, the Administrator closes the poll on an Early Vote ImageCast® Evolution.The Administrator will remove theSD cards from the Early Voting ImageCast® Precinct 2 tabulator and securely store them in a labeled and sealed transport container.
The Election Official will then remove all of the ballots from both the Secondary and Main ballot box chambers of the ballot box and safely store them in clearly labeled bins/boxes. The ballots and the SD cards will be sent to the central location for processing if not located there in the first place. The results from Early Vote ICP2 tabulators will be imported, validated and published in RTR on Election Day.
6.4.2.2 Handling Non-typical Voting Scenarios
Upon inserting ballots into the ICP2's ballot entry slot, there are a few scenarios that may arise. These various ballot scenarios depend on the manner in which the voter has marked the ballot, as well as the configuration of the tabulator. The tabulators Machine Behavior Settings (MBS) are configured prior to the election to detect for particular ballot scenarios and elicit various responses based on the type of ballot scenario detected.
Voting scenarios can include the following:
• One or more undervoted contest(s)

1/15/2020 182 Version: 5.10-CA::11
Chapter 6 - Polling Place Procedures
• One or more overvoted contest(s)
• Combination of undervoted and overvoted contests
• Blank ballot
• Ambiguous marks detected
• Invalid or defective ballot
The following are four possible tabulator responses for each scenario; the tabulator's MBS determines which one is applied.
• Automatically accept ballot
• Automatically reverse ballot
• Prompt voter
• Prompt Voter with a confirmation
The user cases for all the voting scenarios are similar, and dependent on the MBS options above. The following will show the use cases for each of the above MBS options for overvoted, undervoted, and/or blank ballots. The use cases for defective ballots, invalid ballots, and ambiguous marks can be found in Second Chance Voting Scenarios.
6.4.2.3 Second Chance Voting Scenarios
The following scenarios discuss possible non-typical voting issues and how they are to be handled.
Blank Ballots
A blank ballot is a ballot that contain no voting position marks readable by the tabulator. It may be truly blank in all voting positions, or it may have marks in these positions which the tabulator cannot read because they are of insufficient density. The tabulator will prompt a Return to Voter message.
1. In the most common configuration, the ICP2 will display a warning message on the LCD screen explaining that a blank ballot has been detected.
2. As part of the Return to Voter message, the voter is given the option to cast the ballot as-is by pressing the CAST button or to return the ballot for correction by pressing the RETURN button.
3. According to the jurisdictional procedures in place, the following actions are also available:
• Try Ballot Again: If a voter does not mark their ballot properly by filling in the voting position, the ballot is returned to the voter. In this case the ballot can be pulled out and the voter is instructed on the proper manner of marking candidate votes and can even use the same ballot.

Version: 5.10-CA::11 183 1/15/2020
Democracy Suite® Use Procedures
• Issue New Ballot: If a voter fills in the voting position but uses a non-standard marking device, the unit may not be able to read the vote marks. In this case, the voter should be issued a new ballot. The problem ballot is placed in a spoiled ballot envelope.
• Auxiliary Bin: Pull the ballot out of the ballot slot and place it in the auxiliary bin for review after closing the polls.
6.4.2.4 Overvoted Ballots
A ballot is overvoted when the voter has voted for more than the allotted number of candidates for the office being contested. If the voter has made detectable marks in more voting spaces than the maximum allowed for a given contest, this is called an overvote. The tabulator will prompt a Return to Voter message.
• In the most common configuration, the ICP2 displays a message is the Ballot Review screen indicating overvated contest.
• In the Review Complete screen, the voter is given the option to cast the ballot as-is by pressing Cast or to return the ballot for correction by pressing Return
• According to the jurisdictional procedures, the following actions are also available:
• Issue New Ballot: If the option is to pull the ballot out, the voter can be issued a new ballot and instructed on the proper number of votes allowed per office. Note that the title of the overvoted office is printed as part of this Return to Voter message in order to allow the Poll worker to specifically instruct the Voter in regard to the number of votes allowed for that specific office. The problem ballot is placed in a spoiled ballot envelope.
• Use Auxiliary Bin: Pull the ballot out of the ballot slot, and place it in the auxiliary bin for review after closing the polls.
1/15/2020 184 Version: 5.10-CA::11
Chapter 6 - Polling Place Procedures
Undervoted Ballots
A ballot is undervoted when the Voter has voted for less than the total number of election contests listed on the ballot, or less than the number of positions to be filled for a single office. If the voter has made detectable marks in fewer voting spaces than the maximum allowable for a given contest, this is called an undervote.
The ImageCast Precinct 2 tabulator can be configured to behave in any of four different ways when this occurs:
• Tabulator forwards the ballot into the ballot box with no voter interaction message
• Tabulator displays a message is the Ballot Review screen indicating the undervoted contest(s).
• In the Review Complete screen, the voter is given the option to cast the ballot as-is by pressing Cast or to return the ballot for correction by pressing Return
• If the voter presses Cast, the ballot is accepted and placed in the ballot box, and all valid votes are recorded. If the voter presses Return, the ballot is returned to the voter for correction.
Write-in Ballots
A Write-in ballot is a ballot where a vote has been cast in a race for a candidate whose name does not appear on the ballot.
Ballots containing write-in selections are diverted into the secondary compartment of the ballot box for future adjudication by the appropriate election officials, after closing the polls.
Damaged/Error Ballots (Misread Ballots)
A misread warning indicates that the ICP2 has not recognized all of the features on the ballot or that certain essential ballot identification markings cannot be found. This usually occurs if the ballot is physically damaged (i.e. torn or folded) or there are stray markings that were inadvertently made on the ballot. These markings may obstruct certain important identifiers along the sides or the bottom of the ballot.
The tabulator is usually configured to automatically return the ballot, and display a Misread warning message on the LCD screen. Explain to the voter that the ballot was not counted by the tabulator and needs to be re-inserted. Re-insert the ballot into the tabulator. If the ballot is repeatedly rejected, instruct the voter to obtain and mark a new ballot. Make sure that the voter understands how to properly mark the ballot.

Version: 5.10-CA::11 185 1/15/2020
Democracy Suite® Use Procedures
Misread errors can also be caused by:
• Smudged ink within the paper path, if an incorrect pen was used and the ink did not dry on the ballot before insertion into the tabulator;
• Dirt/dust build-up over time within the Tabulator Paper Path system (this is unlikely).
The election jurisdiction has tested the voting unit with samples of the actual ballots. However, either ballot printing or ballot trimming problems could have occurred with the batch of ballots in the Precinct 2 which could cause ballots to be returned to Voter with error messages. In addition, while the ICP2 is a very robust industrial strength unit, the possibility always exists for an electro-mechanical failure to occur which would cause false ballot error messages to occur.
The following choices are available:
• Try Ballot again: If the ballot is not visibly damaged, insert the ballot in a different orientation to see if the error repeats itself.
• Issue New Ballot: If the ballot is physically damaged, pull the ballot out of the unit, the Voter can be issued a new ballot and instructed on the proper number of votes allowed per office. The problem ballot is placed in a spoiled ballot envelope
• Use Auxiliary Bin: If there are persistent misreads, pull the ballot out of the Ballot Slot, and place it in the Auxiliary Bin for review after closing the polls. Contact Election Technical support.
Invalid Ballots (Un-processable Ballots)
An Invalid Ballot is one that the tabulator identifies as an official ballot, but it was not configured to accept (e.g. a ballot that was meant for another district, delivered in error).
The tabulator is usually configured to automatically return the ballot, displaying an Invalid Ballot warning message on the LCD screen for five seconds, and emitting an audible beeping sound. After this time, the screen will return to System Ready mode.
An unprocessable ballot cannot be processed because of an invalid Security ID header code, etc. The unprocessable ballot is returned to the voter. The following choices are available:
• Try Ballot Again: The ballot may be tried again
• Issue New Ballot: A new ballot may be issued to the voter. The problem ballot is placed in a spoiled ballot envelope.
• Use Auxiliary Bin: Pull the ballot out of the ballot slot, and place it in the auxiliary bin for review after closing the polls.

1/15/2020 186 Version: 5.10-CA::11
Chapter 6 - Polling Place Procedures
Ambiguous Marks
The ICP2 assesses voter intent based on the number of pixels detected in each voting box. The thresholds used when making this determination are configured prior to the election.
If the tabulator detects a voter mark that is not large enough or dark enough to clearly show the voters intent, the tabulator is configured to automatically return the ballot, displaying the Ambiguous Marks warning.
Explain to the voter that the ballot was not counted by the tabulator. The poll worker can try changing the orientation of the ballot and re-feeding it into the tabulator to see if it is accepted. This should be repeated up to three times. If the ballot is still not accepted by the tabulator after 3 attempts and the warning message continues to be Ambiguous Marks, the poll worker should ask the voter to review the ballot, to ensure that it is clearly marked in the voting areas provided, and that there are no stray marks. If needed, instruct the voter to return to the voting booth to re-mark their ballot, ensuring that they completely fill in the voting target. Confirm that the voter understands how to mark the ballot.
Use the following procedure:
1. User feeds ballot into the unit, and the ballot is imaged and interpreted. The following message appears on the LCD operator interface: Warning! One or more ambiguous marks detected on the ballot. Please correct all ambiguous marks and refeed the ballot
2. The machine will automatically return the ballot
3. Explain to the voter that the ballot cannot be processed because one or more ambiguous marks were detected and the machine cannot be certain of the voters intent
4. Ask the voter to review the ballot to ensure that it is clearly marked in the spaces provided and that there are no stray marks
5. Allow the voter to return to the voting booth, and make sure the voter understands how to mark a ballot.
6. If the machine continues to reject the ballot, have the voter return the ballot and obtain a new one.
6.4.2.5 RCV Voting Scenarios
The following sections describe RCV (Rank Choice Voting) scenarios and how they are handled by the ICP2 tabulator.
Duplicated Candidate
A consecutive sequence of rankings for the same candidate.

Version: 5.10-CA::11 187 1/15/2020
Democracy Suite® Use Procedures
The tabulator is configured to:
• Prompt the voter with a detailed warning description and Cast/Return option and not ask for a confirmation when the ballot is cast
Inconsistent Ordering
A candidate is ranked both above and below another candidate.
The tabulator is configured to:
• Prompt the voter with a detailed warning description and Cast/Return option and not ask for a confirmation when the ballot is cast
Skipped Ranking
A higher ranked choice is missing while a lower ranked choice has been made.
The tabulator is configured to:
• Automatically cast the ballot
Overvoted Ranking
A ranking exists that has more than one candidate marked.
The tabulator is configured to:
• Prompt the voter with a detailed warning description and Cast/Return option and not ask for a confirmation when the ballot is cast
Unvoted Contest
No candidates were ranked.
The tabulator is configured to:
• Automatically cast the ballot
Unused Ranking
Additional rankings at the end are left empty by the voter.
The tabulator is configured to:
• Automatically cast the ballot
The following scenarios apply when the Major Office option is selected in EED. For more information, please refer to Democracy Suite® EMS Election Event Designer User Guide, Section Defining Office.
Major Duplicated Candidate
A consecutive sequence of rankings for the same candidate.

1/15/2020 188 Version: 5.10-CA::11
Chapter 6 - Polling Place Procedures
The tabulator is configured to:
• Prompt the voter with a detailed warning description and Cast/Return option and not ask for a confirmation when the ballot is cast
Major Inconsistent Ordering
A candidate is ranked both above and below another candidate.
The tabulator is configured to:
• Prompt the voter with a detailed warning description and Cast/Return option and not ask for a confirmation when the ballot is cast
Major Skipped Ranking
A higher ranked choice is missing while a lower ranked choice has been made.
The tabulator is configured to:
• Automatically cast the ballot
Major Overvoted Ranking
A ranking exists that has more than one candidate marked.
The tabulator is configured to:
• Prompt the voter with a detailed warning description and Cast/Return option and not ask for a confirmation when the ballot is cast
Major Unvoted Contest
No candidates were ranked.
The tabulator is configured to:
• Automatically cast the ballot
Major Unused Ranking
Additional rankings at the end are left empty by the voter.
The tabulator is configured to:
• Automatically cast the ballot
6.4.3 Standard Voting on ICX
The Voting Session is activated by inserting ICVA programmed Voter Activation Card into the Smart Card Reader.
NOTE: If the voter card is removed before the voting session is complete, the voting session is terminated and selections are not stored.

Version: 5.10-CA::11 189 1/15/2020
Democracy Suite® Use Procedures
Upon inserting a card, the voter is asked to select the language that he/she prefers to perform the voting session in.
Once the voting language is selected, the voter is presented with the voting interface.
6.4.3.1 Voting Interface
During the active voting session, there are several menus and bars intended for adjusting the voting interface as desired and navigating through the ballot.
At the top of the screen, an Action bar is placed containing buttons for changing various graphic and audio settings.
These settings can be changed at any point in the voting session and are consistent throughout the whole session.
Figure 6-54: Action Bar
• The “Language” button opens a pop-up menu with all the languages defined for current elections. The voter can change the language by pressing a checkbox with the desired language.
• Text size can be changed by choosing one of the options displayed by pressing a “Text Size” button.
• The “Audio” button is active only in an AVS session. For details refer to AVS (Accessible Voting Session) Voting Interface section in the Democracy Suite® ImageCast® X User Guide.
• The “View” button allows changing the visual theme of the voting interface.
• The “More” button allows the voter to cancel the current voting session by tapping the “Cancel Activation” in the pop-up menu, or display the information about the ICX device and software by pressing the “About” button.
Figure 6-55: Contest Bar
The Contest bar is located right under the Action bar and is used for navigation between the contests on the ballot. By tapping on the desired button, the corresponding contest will be displayed on the screen.

1/15/2020 190 Version: 5.10-CA::11
Chapter 6 - Polling Place Procedures
Figure 6-56: Stripe
The Stripe is located right under the Contest bar and is used to indicate the number of the page the voter is on during an active voting session as well as the voters chosen Party.
Both options can be enabled or disabled through the Edit Configuration option in the Technician Menu, or through the MCF in EED during project creation.
NOTE: The following applies depending on the type of election:For open primary elections the party name shown is the selected party name. It is already present on the screen per design for open primary elections. Setting “Show party name” to true will duplicate this information on the screen.
For closed primary elections the party name is not present per design, so it's only visible if configured.For general elections, the party name is not present on the screen ignoring the configuration.
Figure 6-57: Navigation Bar
Beside the Contest bar, the voter can navigate between the contests by using the Navigation bar at the bottom of the screen. Pressing the “Previous” and “Next” buttons will display the previous/next contest listed in the Contest bar.
Selecting the “Review” button will advance the voter to the Review screen that contains all contests and choices marked by the voter.
The Review screen will also display notifications about any errors or warnings if the ballot is not valid or incomplete.
The voter can navigate through all of their choices by pressing “Scroll Down” / “Scroll Up” buttons at the bottom/top of the contest list.
In case the voter wants to change the choices for a specific contest, selecting (tapping) that contest in the review list will return the voter to that specific contest screen.
The same functionality is provided by pressing the “Back to Ballot” button in the bottom left corner of the Review screen.

Version: 5.10-CA::11 191 1/15/2020
Democracy Suite® Use Procedures
In BMD mode, the ballot is printed by selecting the “Print Ballot” button in the right bottom corner. Pressing this button prompts a final dialog that, again, displays any warnings for the ballot and provides the options to confirm the ballot printing or to return to the Review screen. Marked ballot is printed by selecting the “Cast your ballot” button in the dialog.
Figure 6-58: Electronic Mobile Ballot
After the voting session is complete, a screen is presented informing the voter of the result of the action. At this point, the voter can safely remove the Smart Card.
6.4.3.2 ImageCast® X Early Voting
Since ImageCast® X is a Ballot Marking Device, the procedure is the same as for ImageCast® X Election Day procedure.
Democracy Suite® EMS allows for the programming of specific ImageCast® Evolution tabulators for use “in-office” in Early Voting or in Vote Centers. Ballot tabulation for a specific precinct, a range of precincts, or all of the precincts in the election may be programmed. The setup and use of an Early Vote ImageCast®

1/15/2020 192 Version: 5.10-CA::11
Chapter 6 - Polling Place Procedures
Evolution tabulator is the same as use of an Election Day ImageCast® Evolution tabulator as described in Chapter 9, with the exception that the tabulation will take place for a period longer than one day.
NOTE: When powering up the Early Vote ImageCast® Evolution for the first time, the Zero Report tape is printed. An Early Vote ImageCast® Evolution is connected to many or all precincts and, therefore, may contain a very large number of Ballot IDs that would require many rolls of thermal printer paper in order to print the full report. You may be provided with an option to cancel/disable the printing of the report (see below for steps on how to use this functionality to avoid printing of the zero tape). An alternative to the printed report tape is accessing the Report on LCD screen through the Utility option from the Administrative Menu.
To turn off tape printing, do the following:
1. When powering up Early Voting ICE, apply the iButton Security Key when prompted to do so.
2. Enter the Administrator user name and password and once logged in, the Poll-worker Menu will appear.
3. Press Open Poll to open the Poll Management screen. You will be presented with the following three options:
a. Poll Status
b. Print Zero Tape
c. Number of Copies to Print
4. To change the option on ‘Print Zero Tape’ from ‘Print’ to ‘Don’t Print’, press the Change button.
5. Pressing ‘Change’ a second time will change it back to ‘Print’.
Version: 5.10-CA::11 193 1/15/2020
Democracy Suite® Use Procedures
Depending on the size of the election and the number of ballot styles an Early Vote ImageCast® Evolution is handling, it may be impractical to close the polls and power down the Early Vote tabulator after the end of each Early Voting day due to the length of time it takes to load election files on the tabulator during the power up process. If this is the case, the Poll should be closed at the end of the day, however, the ImageCast® Evolution tabulator should stay turned on.
After the Poll has been closed (refer to 6.7.1 “Closing the Polls on ICE”), the Administrator should physically secure the ImageCast® Evolution tabulator as per jurisdiction’s procedure, until the start of the next day, when the tabulator is taken out of the secured area and the Poll is re-opened on the tabulator to continue with the operation. In case your Early Voting ImageCast® Evolution tabulator is handling the number of ballot styles which allows the tabulator to load the election in a reasonable amount of time, then the procedure for operating an Early Vote ImageCast® Evolution is as follows:

1/15/2020 194 Version: 5.10-CA::11
Chapter 6 - Polling Place Procedures
1. Apply the iButton Security Key to get to the Administrative Menu screen.
2. In the Administrative Menu, press the circular power button icon in the top right corner of the screen and select the option to Shut Down the unit.
3. This will initiate the countdown until the machine has fully powered down.
4. Close the privacy screen flaps, and place the LCD monitor in the horizontal storage position.
5. Replace the ballot box cover onto the ballot box, and then lock it and seal it until the next day.
6. Next day, remove the seals, unlock and remove the ballot box cover.
7. Lift up the LCD monitor into the vertical position and the unit will begin to power up.
8. Open the privacy screen flaps and insert the iButton Security Key when prompted to do so.
9. Enter the Administrative user name and password to get to the Administrative Menu screen.
10. Press the Open Poll from the Administrative Menu and the message will appear warning that the poll was already opened and that the results are not zero. Confirm by pressing ‘OK’.
11. The tabulator will start printing a status report.Cancel the printing of the status tape if your election has a large number of Ballot IDs.
12. Confirm the Cancel option and the poll will be reopened.
13. In Administrative Menu, press on the ‘Standard Voting’ option and then press Start button.
14. Press OK to confirm and ImageCast® Evolution is ready to resume scanning.
Voting on the Early Vote ImageCast® Evolution continues until the jurisdiction-defined ‘Cut off’ time. At this point, the Administrator closes the poll (refer to 6.7.1 “Closing the Polls on ICE”) on an Early Vote ImageCast® Evolution.The Administrator will remove the CF cards from the Early Voting ImageCast® Evolution tabulator and securely store them in a labeled and sealed transport container.
The Election Official will then remove all of the ballots from both the Secondary and Main ballot box chambers of the ballot box and safely store them in clearly labeled bins/boxes. The ballots and the CF cards will be sent to the central location for processing if not located there in the first place. The results from Early Vote ICE tabulators will be imported, validated and published in RTR on Election Day.

Version: 5.10-CA::11 195 1/15/2020
Democracy Suite® Use Procedures
6.5 Special Needs Voter Procedures
6.5.1 ICE
6.5.1.1 Accessible Voting Session
NOTE: If the AVS voting session consists of a multi-card ballot, a Poll Worker is required to manually reactivate the AVS session after each card of the multi-card ballot is scanned.
Audio Only Voting using the Audio Tactile Interface
If the voter decides to turn the display off during their voting session, and commence an audio session only, the voter must press the blue down arrow when presented with the option to do so. Audio instructions explain to the voter how they will navigate and make selections to their ballot. The ImageCast® Evolution's LCD screen will read 'An audio voting session is in progress'. The ATI will operate in the same manner as it does in the Audio and Visual voting session.
Accessible Voting Session
To start an Accessibility Voting Session:
NOTE: For more information on how to define the Contest by Contest voting, please refer to Democracy Suite® EMS Election Event Designer User Guide.

1/15/2020 196 Version: 5.10-CA::11
Chapter 6 - Polling Place Procedures
1. On the poll worker Menu, select the Accessible Voting option.
Figure 6-59: poll worker Menu Screen
2. Press the Start button next to the AV Session in the Poll Management - Accessible Voting Session screen. Below, the user can see the options that are set for Ballot Review. By pressing the Change option, additional ballot review options will appear.
3. On the Start AV Session Confirmation screen, press OK to continue with AV session (in the activity status bar, 'Option' will clearly indicate which option has been set).
Note: Depending on the MBS settings, the Authorization screen can vary. It could be set to prompt for the user name and password or password only. In addition, the MBS can be configured not to prompt for credentials upon

Version: 5.10-CA::11 197 1/15/2020
Democracy Suite® Use Procedures
starting the AV session. In case when the user is asked for credentials, they needs to enter the correct credentials and on the confirmation screen, press OK to continue.
Figure 6-60: Poll Management - Accessible Voting Session
ImageCast® Evolution will perform variety of verification steps. Next, the Accessible Voting screen (“System ready to initiate AV session Please insert a blank ballot”) is displayed, prompting the user to insert a blank ballot. Audio with the same instructions will be heard over the headphones.
4. Insert a blank ballot to initiate the session.

1/15/2020 198 Version: 5.10-CA::11
Chapter 6 - Polling Place Procedures
Figure 6-61: Welcome to Your Voting Session
After the ballot has been successfully accepted, the language selection will appear. Selection may need to be done with the help of a poll worker.
5. Select the language and press Confirm button.
Figure 6-62: AVS - Language Selection
6. Help a voter to choose an accessible device. Select ATI option.

Version: 5.10-CA::11 199 1/15/2020
Democracy Suite® Use Procedures
NOTE: From this moment, language, text size and color can be changed. These options are available in menu, in top right corner of the screen. Audio/Video option enables you to vote with audio without using an accessible device. Voter will have audio instructions available, however, a headset needs to be connected to the ATI device.
Figure 6-63: AVS - Device Selection Screen

1/15/2020 200 Version: 5.10-CA::11
Chapter 6 - Polling Place Procedures
From this point forward, a voter can vote independently, without any poll worker's assistance. The ATI Instructions screen displays a labeled diagram of the ATI indicating what action each button performs. All instructions are followed by audio.
7. To change language, text size, audio, or color options, press blue up arrow on the ATI to navigate to the Settings menu.
8. To move between options within the settings menu, press the yellow left or right buttons on the ATI.
9. To navigate to OK, got it, press the blue down arrow button on the ATI.
10. Once you have completed selecting settings, press the X-shaped select button.
Figure 6-64: AVS - ATI Instructions Screen
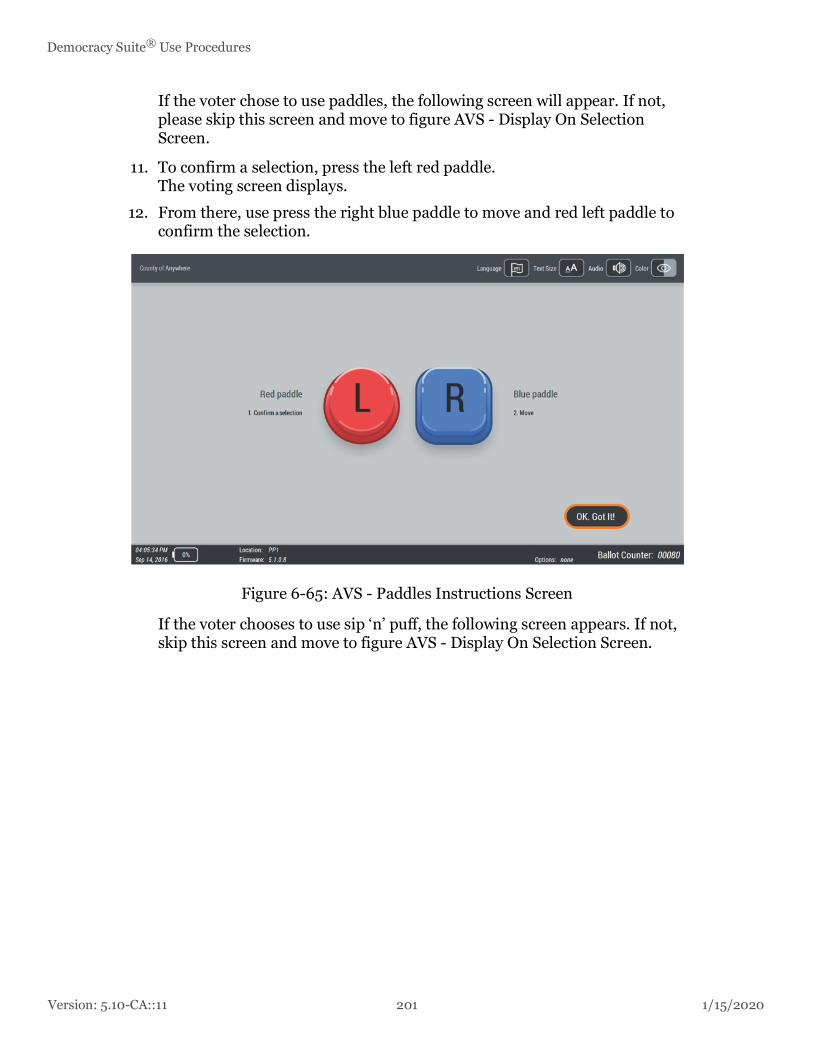
Version: 5.10-CA::11 201 1/15/2020
Democracy Suite® Use Procedures
If the voter chose to use paddles, the following screen will appear. If not, please skip this screen and move to figure AVS - Display On Selection Screen.
11. To confirm a selection, press the left red paddle. The voting screen displays.
12. From there, use press the right blue paddle to move and red left paddle to confirm the selection.
Figure 6-65: AVS - Paddles Instructions Screen
If the voter chooses to use sip ‘n’ puff, the following screen appears. If not, skip this screen and move to figure AVS - Display On Selection Screen.

1/15/2020 202 Version: 5.10-CA::11
Chapter 6 - Polling Place Procedures
To confirm a selection, sip, the voting screen displays.
13. From there, puff to move to the next item on the screen and sip to confirm the selection.
Figure 6-66: AVS - Sip-and-Puff Instructions Screen
14. Next, the voter chooses if the voting session will be presented on the screen or via audio only.
Figure 6-67: AVS - Display On Selection Screen

Version: 5.10-CA::11 203 1/15/2020
Democracy Suite® Use Procedures
15. To display the ballot on the screen, select Display on by pressing the red X-shaped select button.
16. To activate the AVS with screen content covered by the privacy mask, select Audio only by pressing the blue down arrow button to highlight the Audio Only option, then press the red X-shaped select button.
Figure 6-68: AVS - Audio Only Selection Screen
In Audio Only session, the privacy mask will appear on the screen, covering the content. To show the privacy mask is active, a closed eye icon appears in the upper-right corner of the screen. Audio instruction will guide the voter through the voting session.

1/15/2020 204 Version: 5.10-CA::11
Chapter 6 - Polling Place Procedures
During an audio-only session, at any time the voter can choose to deactivate the privacy mask by selecting the closed eye icon.
17. A poll worker may need to assist the voter with this action. To notify the poll worker they need assistance, the voter can press the green Help button on the bottom of the ATI. When the Help button on the ATI is pressed, a screen as displayed in figure AVS - Audio Only Selection Screen appears and the poll worker's light turns red. When the privacy mask is deactivated, the voter is informed over audio that screen content is visible to others. Press the red X-shaped select button to move to next screen.
Figure 6-69: AVS - Audio Only Screen
The next screen leads the voter to the voting session.The screen is divided into the following areas:
• User Options/Settings (options or Display on/Audio Only sessions, Language, Text Size, Audio, Color)
• Contest List (list of available contests)
• Contest Description area (vote for information or ballot status: if a ballot is undervoted, overvoted, blank, etc.)
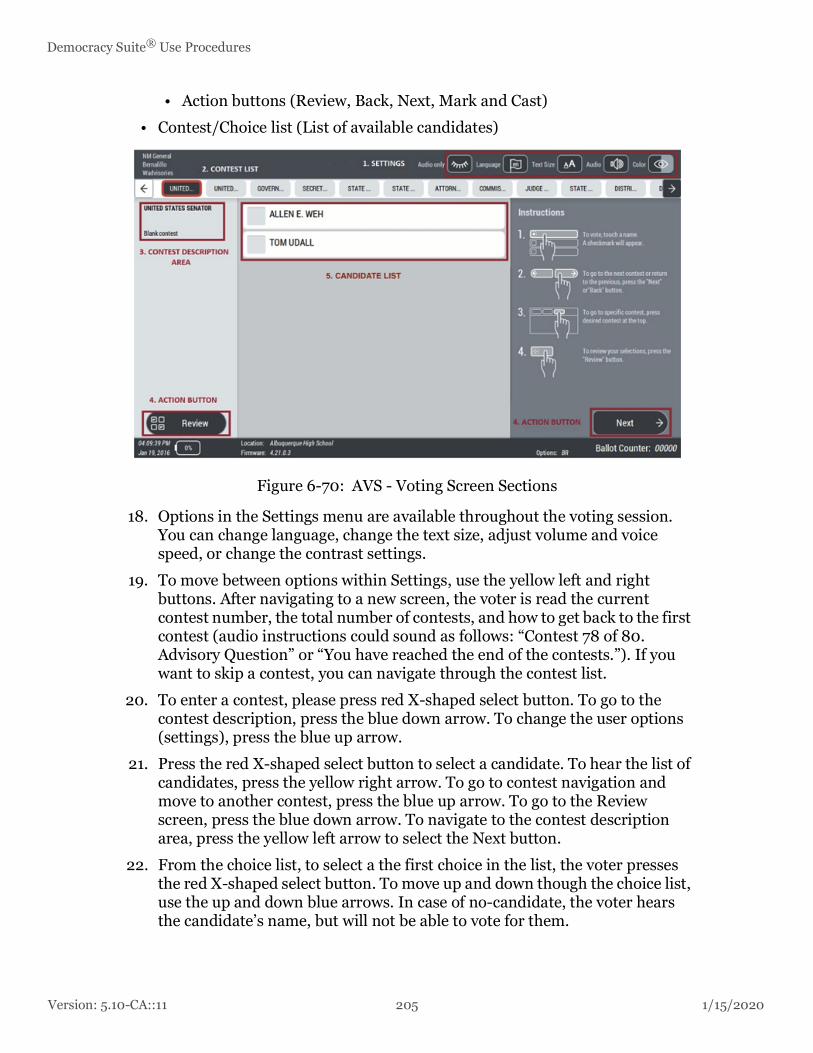
Version: 5.10-CA::11 205 1/15/2020
Democracy Suite® Use Procedures
• Action buttons (Review, Back, Next, Mark and Cast)
• Contest/Choice list (List of available candidates)
Figure 6-70: AVS - Voting Screen Sections
18. Options in the Settings menu are available throughout the voting session. You can change language, change the text size, adjust volume and voice speed, or change the contrast settings.
19. To move between options within Settings, use the yellow left and right buttons. After navigating to a new screen, the voter is read the current contest number, the total number of contests, and how to get back to the first contest (audio instructions could sound as follows: “Contest 78 of 80. Advisory Question” or “You have reached the end of the contests.”). If you want to skip a contest, you can navigate through the contest list.
20. To enter a contest, please press red X-shaped select button. To go to the contest description, press the blue down arrow. To change the user options (settings), press the blue up arrow.
21. Press the red X-shaped select button to select a candidate. To hear the list of candidates, press the yellow right arrow. To go to contest navigation and move to another contest, press the blue up arrow. To go to the Review screen, press the blue down arrow. To navigate to the contest description area, press the yellow left arrow to select the Next button.
22. From the choice list, to select a the first choice in the list, the voter presses the red X-shaped select button. To move up and down though the choice list, use the up and down blue arrows. In case of no-candidate, the voter hears the candidate’s name, but will not be able to vote for them.

1/15/2020 206 Version: 5.10-CA::11
Chapter 6 - Polling Place Procedures
23. In case of write-in choices, select the write-in choice, and an accessible Write-In session is presented. Initially, the voter hears instructions to navigate and voting. The write-in session screen has keyboard for entering candidate names, Clear All, and Delete buttons, as well as options to Cancel and Accept selections. To move up, press the blue up arrow on the ATI. To move down, press the blue down arrow button. To move left and right, use the yellow left and right buttons. To confirm selection, press red X-shaped select button.
NOTE: “Review” option is available at any point during voting.
Figure 6-71: AVS - Voting Screen

Version: 5.10-CA::11 207 1/15/2020
Democracy Suite® Use Procedures
.
Figure 6-72: AVS - Write In Screen
24. After the voter makes all selections and reaches the end of a ballot, they may review their selections. (The “Next” button becomes “Review”).On this screen the voter is informed if there are any warnings on their ballot.
25. To change user option/settings, press blue up arrow. To navigate to the first contest and review it, press the yellow right arrow. The voter hears their current selection. To change the selection, press the red X-shaped select button.
26. After completing their review, voters can press the yellow right button on the ATI to select the Mark button. This moves the voting session into the ballot marking phase. Press red X-shaped select button to accept the selection. To move to the Back button, press the yellow left button.
27. After marking, there is a second review phase. During the second review you will not be able to make changes, since your selections are marked and

1/15/2020 208 Version: 5.10-CA::11
Chapter 6 - Polling Place Procedures
printed on the ballot.
Figure 6-73: AVS - Ballot Review

Version: 5.10-CA::11 209 1/15/2020
Democracy Suite® Use Procedures
Figure 6-74: AVS - Ballot Printing in Progress
28. Then, the voter has the opportunity to review the selections printed on the ballot. To move to contest list, press the yellow left button. From there, to cast the ballot, navigate to the Cast button by pressing the yellow left button. To cast the ballot, press the red X-shaped select button. To return to contest list, press the blue up arrow. When on the last contest of the list, press the blue down arrow to move to the Cast button. Press the red X-shaped select button to confirm selections (cast a ballot into the ballot box).
29. To return the ballot without casting, press the yellow left button. Then confirm by pressing the red X-shaped select button. The ballot is returned to the voter. The ballot will have printed selections, however, the ballot is not cast.
30. If voting rules violations are detected, depending on MBS options, the voter may have the option to confirm or reject casting a ballot. A pop up message shows the Cast and Reject options. For example: “You are about to cast a ballot with no marks. Are you sure you want to continue?” Available options
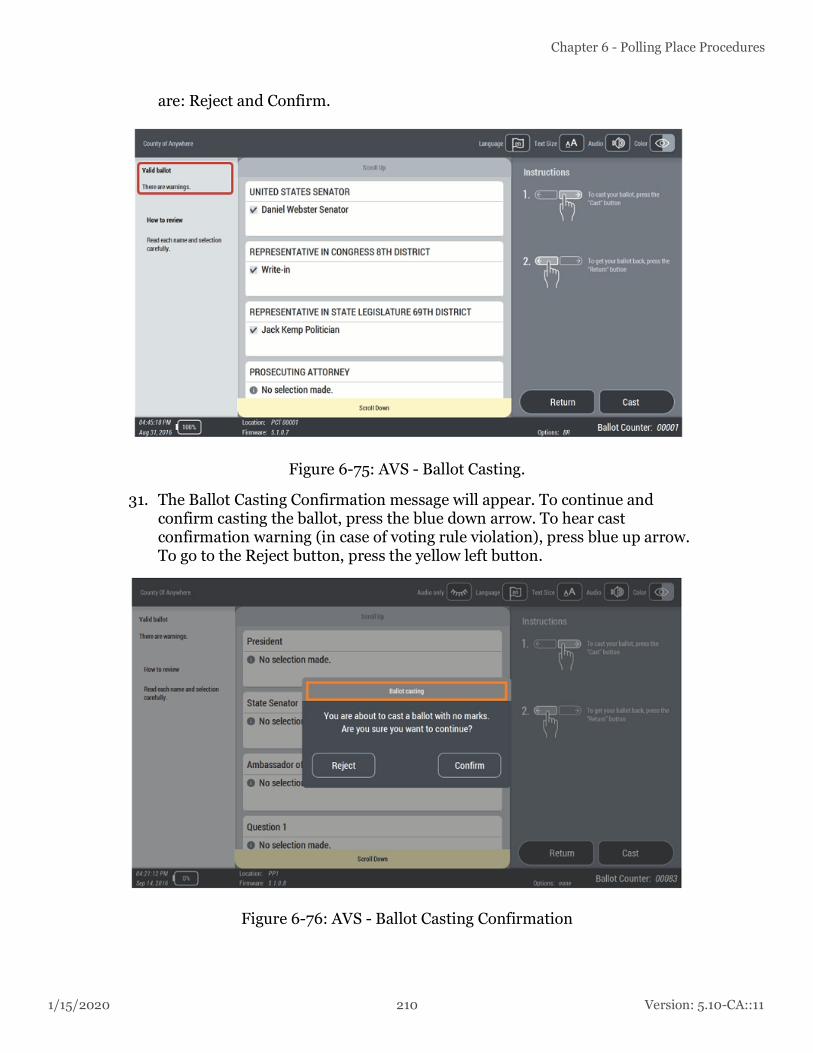
1/15/2020 210 Version: 5.10-CA::11
Chapter 6 - Polling Place Procedures
are: Reject and Confirm.
Figure 6-75: AVS - Ballot Casting.
31. The Ballot Casting Confirmation message will appear. To continue and confirm casting the ballot, press the blue down arrow. To hear cast confirmation warning (in case of voting rule violation), press blue up arrow. To go to the Reject button, press the yellow left button.
Figure 6-76: AVS - Ballot Casting Confirmation
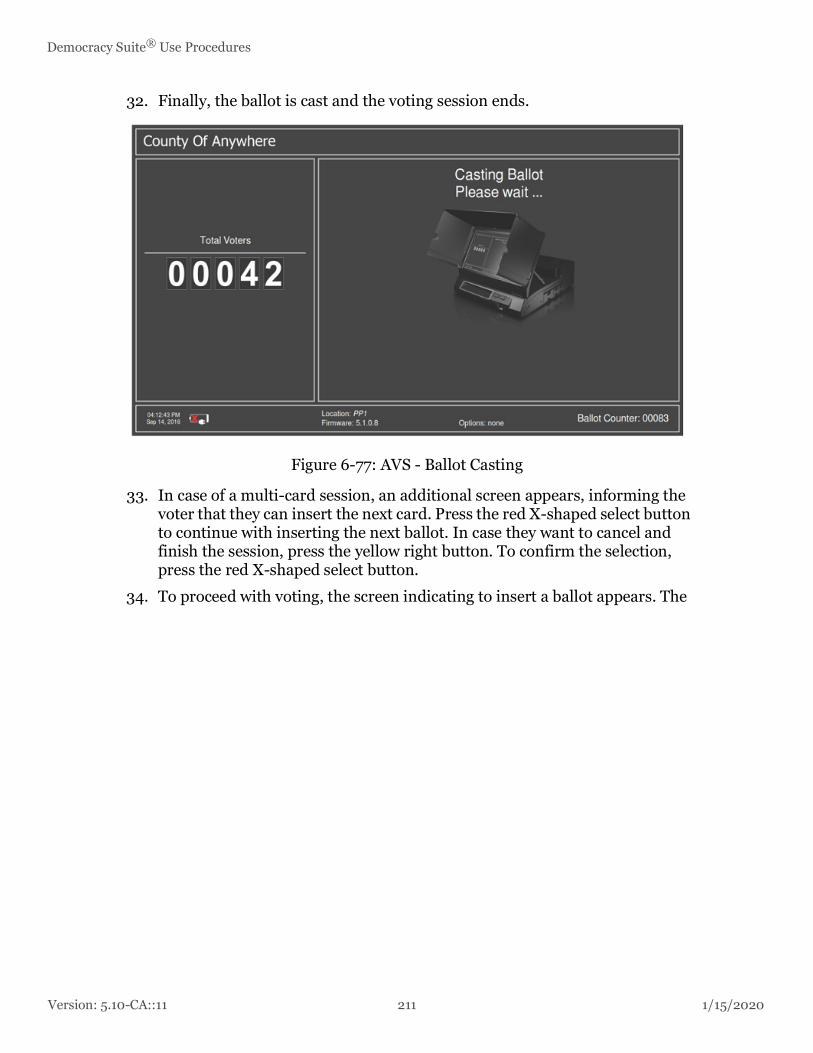
Version: 5.10-CA::11 211 1/15/2020
Democracy Suite® Use Procedures
32. Finally, the ballot is cast and the voting session ends.
Figure 6-77: AVS - Ballot Casting
33. In case of a multi-card session, an additional screen appears, informing the voter that they can insert the next card. Press the red X-shaped select button to continue with inserting the next ballot. In case they want to cancel and finish the session, press the yellow right button. To confirm the selection, press the red X-shaped select button.
34. To proceed with voting, the screen indicating to insert a ballot appears. The

1/15/2020 212 Version: 5.10-CA::11
Chapter 6 - Polling Place Procedures
same instructions will occur as for previous ballot cards.
Figure 6-78: AVS- Session Continuation
6.5.2 Accessible Voting on ICX
The prerequisites for an Accessible Voting Session (AVS) are:
1. Poll worker has configured ICX tabulator to use an ATI.
2. The ATI is properly connected to ICX tabulator and fully operational.
3. Either of:
a. Voter starts voting session with Smart Card configured for AVS voting.
b. Manual session activation is enabled, and a poll worker activates the voting session by entering the activation code, then selects the “Enable AVS Controller” checkbox during ballot activation and then “Activate”.

Version: 5.10-CA::11 213 1/15/2020
Democracy Suite® Use Procedures
After executing session activation steps as described in Voting section and selecting language, the application presents the screen where a voter can choose one of accessible voting devices (AVS voter). Depending on which accessible voting device is configured by the poll worker, a voter is presented with options to select preferred device.
Figure 6-79: AVS Voter Device Screen
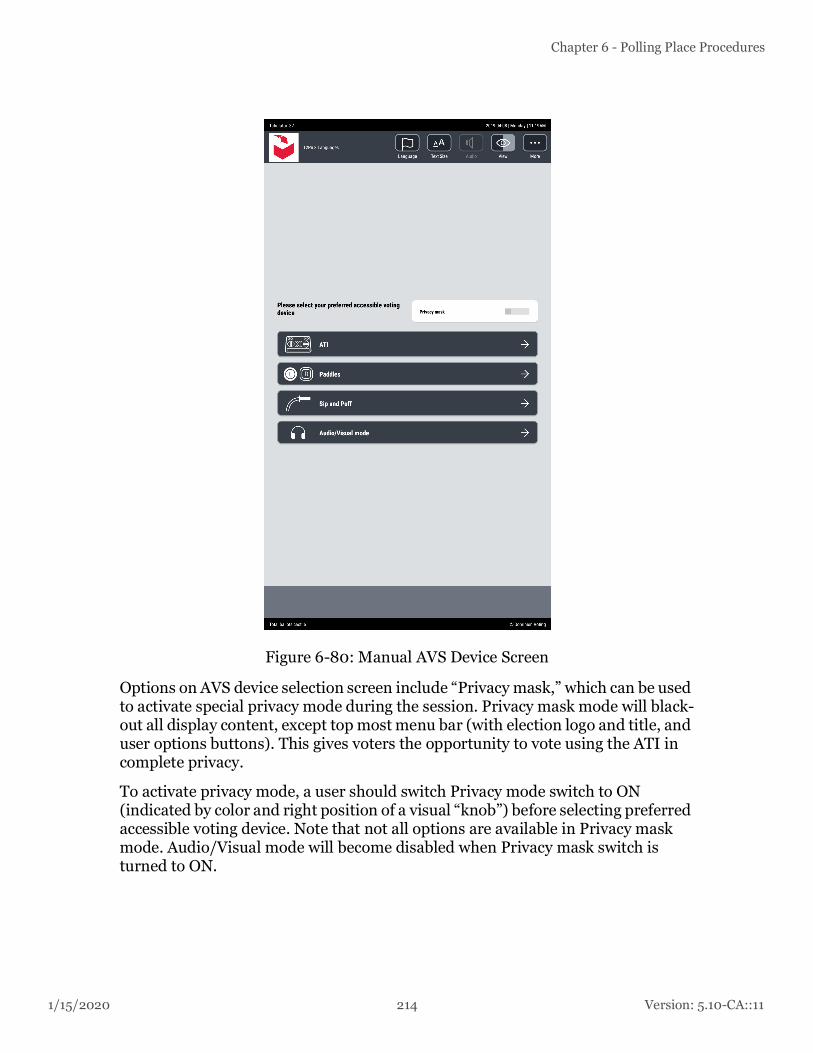
1/15/2020 214 Version: 5.10-CA::11
Chapter 6 - Polling Place Procedures
Figure 6-80: Manual AVS Device Screen
Options on AVS device selection screen include “Privacy mask,” which can be used to activate special privacy mode during the session. Privacy mask mode will black-out all display content, except top most menu bar (with election logo and title, and user options buttons). This gives voters the opportunity to vote using the ATI in complete privacy.
To activate privacy mode, a user should switch Privacy mode switch to ON (indicated by color and right position of a visual “knob”) before selecting preferred accessible voting device. Note that not all options are available in Privacy mask mode. Audio/Visual mode will become disabled when Privacy mask switch is turned to ON.

Version: 5.10-CA::11 215 1/15/2020
Democracy Suite® Use Procedures
The voter can select from the following accessibility device options:
• ATI (Audio Tactile Interface)
• Paddles
• Sip ‘n’ Puff
• Audio/Visual mode (only available if Privacy mask option is turned off)
After selecting preferred device, the application will show ballot to the voter. At this point, AVS device is activated, and a voter can independently use ICX with attached AVS device to vote and cast the ballot, with no help from other persons.
Optionally, if the voter selected ATI, the first screen that will be shown to a voter is “ATI Help and instructions to use.” This instructional screen describes all the functions of the ATI device and can be accessed by a voter at any time during the voting session.
The "Help" dialog can be closed by pressing the Select button on the ATI device.
Figure 6-81: ATI Usage Instructions

1/15/2020 216 Version: 5.10-CA::11
Chapter 6 - Polling Place Procedures
During AVS voting, all interaction with ICX tabulator is done by controlling ICX without the touch screen, using only selected AVS device. Voice is enabled, and content of ballot is spoken through attached headphones.
When AVS voting is activated, headphones volume is set to configured default value. Audio volume and tempo (speed) can be adjusted by a voter at any time during the voting session by selecting the Audio button at the top of the screen. Alternatively, if the voter is using the ATI, they can adjust the audio volume and tempo (speed) by pressing two set of buttons on the ATI controller itself. The layout of buttons on ATI controller and their functions are described on-screen and spoken.
Figure 6-82: Audio options menu
During AVS voting, the ballot is marked and cast by a voter, using selected AVS device.
Instructions are spoken on any user interaction with the device through the headphones. According to selected device, appropriate instructions are spoken, and a voter can navigate through ballot contests and choices, as well as

Version: 5.10-CA::11 217 1/15/2020
Democracy Suite® Use Procedures
configurable options for selecting language, text size, audio volume and tempo, screen colors. Also, a voter can end the voting session by choosing to cancel activation in “More” options menu.
The "More" menu, located in the top right corner of the ImageCast® X Voting interface, also offers AVS voters the following:
• During a MANUALLY activated voting session:
• Cancel Activation
• Go to next Contest (this option allows the voter to skip a contest they do not wish to vote on)
• Review your ballot (this option allows the user to proceed directly to the Review screen)
• Once at the review screen, the Voter will have the following options to choose from:
• Cancel Activation
• Go to navigation bar (this option will lead the Voter to the screen navigation bar where they can choose to either Print their ballot or to go back to the ballot)
Figure 6-83: Manually Activated AVS Session (Left) and More Menu Options (Right)
• Once a voting session has been activated using a VOTER CARD:
• Go to next Contest (this option allows the voter to skip a contest they do not wish to vote on).
• Review your ballot (this option allows the user to proceed directly to the Review screen). At the review screen, the Voter has the following option:

1/15/2020 218 Version: 5.10-CA::11
Chapter 6 - Polling Place Procedures
• Go to navigation bar (this option will lead the Voter to the screen navigation bar where they can choose to either Print their ballot or to go back to the ballot).
Figure 6-84: Voter Card Activated AVS Session (Left) and More Menu Options (Right)

Version: 5.10-CA::11 219 1/15/2020
Democracy Suite® Use Procedures
The ballot is presented in the following order during AVS voting:
• Initially, the election title information is spoken. Voter can hear instruction on how to use selected AVS device to vote for the first contest or to navigate to any other contest.
• If a voter chooses to enter the first contest, contest description and instructions on how to hear choices will be spoken.
• If a voter chooses to vote for selected contest and listen to the list of choices, first choice and instructions on how to mark a choice or navigate to next choice will be spoken.
• Voter repeats their decision to vote or hear the next choice until all choices of selected contest are presented.
• After hearing/selecting all available choices in a selected contest, a voter can easily navigate to a contest navigation buttons and choose to select next contest and repeat the procedure to vote for each contest.
• When last contest is reached, after selecting all available choices, next screen is “Ballot review.” Ballot review screen can be navigated to at any time by using dedicated navigation button on the bottom of the screen, or by navigating through available screen action buttons as instructed by voice instructions for selected AVS device.
• In ballot review screen first summary ballot validation status is spoken and instruction is given to voter how to hear and review all contests, and when voter reaches last contest, an instruction is given how to cast the ballot.
• When a user activates command to cast the ballot, a confirmation dialog is presented, and the voter has options to accept casting ballot or to review choices by returning to review screen.
• When voter accepts casting ballot, the application shows operation information status screen and speaks success (or in case if something went wrong, warning) message.
• When a voter has finished hearing the message, by navigating to and selecting 'Continue' button, a voting session is finished, and application is redirected to login voter screen, ready for next voter to start voting.
6.6 Provisional VotersCounties should follow their jurisdiction’s guidelines for issuing and tracking provisional ballots. Provisional ballots marked at polling places will not be scanned or tabulated by ImageCast Evolution or ImageCast Precinct tabulators, instead – provisional ballots will be placed into a provisional ballot envelope and placed into the tabulator’s auxiliary bin. They will then be transported to the central elections office and tabulated there. Specific procedures may differ by jurisdiction.

1/15/2020 220 Version: 5.10-CA::11
Chapter 6 - Polling Place Procedures
6.6.1 Provisional Voting on ICE
Provisional voters can mark and review their ballots on ImageCast® Evolution. They will be provided with second chance voting if they make any mistakes that will be displayed on the Ballot Review screen of ImageCast® Evolution when voting in the Provisional mode. The ballot will be returned to the voter and it will be placed in a marked envelope for processing in the central location after Election Day (see Chapter 12). If a provisional voter wishes to verify how the ICE will interpret their ballot, the ICE operator can activate 'Provisional Vote' mode for the next ballot. 'Provisional Vote' mode is identical to 'Ballot Review' mode except that the 'Cast' button is disabled so that the only option is to return the ballot to the voter when the review is complete:
1. Press the iButton Security Key to the security key receptacle in order to access the poll worker Mode menu.
2. Select “Provisional Vote” option from the menu. This will allow the voter to insert a ballot and review their selections on the Ballot Review screen. The 'Cast' button is disabled so that the ImageCast® Evolution will always return the ballot to the voter to ensure that no votes are registered. In addition, depending on configuration, the provisional mode can be enabled only on next ballot or continuously.
3. To resume normal 'Election Run' mode, the attendant must press the security key to the security key receptacle to access the poll worker Mode menu, and then select either the “Standard Voting” or “Accessible Voting” option.
4. ICX
6.6.1.1 Provisional Voting Using the Accessible Voting Features of the ImageCast® Evolution
If a voter requires both an Accessible Voting Session, and a provisional ballot, the following steps should be undertaken by the poll worker:
1. Guide the voter to the ImageCast® Evolution , and log into the poll worker menu by pressing the iButton Security Key to the receptacle, and entering in the appropriate credentials.
2. Press Utilities on the left side of the screen.
3. Press Provisional Voting under the Utilities menu.
4. Press the Change until 'Enabled on Next Ballot' is listed as the Provisional Voting preference.
5. Activate an Accessible Voting Session, as outlined in Section Accessible Voting Session - Contest by Contest Mode.

Version: 5.10-CA::11 221 1/15/2020
Democracy Suite® Use Procedures
At this point, the voter can begin making selections to his or her ballot. Once finished, the ballot will be returned to them at the front of the unit. It is advised that the poll worker remain in the vicinity of the voter during their Accessible Voting Session so that the ballot can promptly be placed in a Provisional Voting envelope once it has been returned.
Figure 6-85: Enabling Provisional Voting
6.6.1.2 In Precinct
Provisional ballots tabulated on the appropriate precinct ballot may be tabulated once their validity is verified.
6.6.1.3 Out of Precinct
Provisional ballots tabulated on the incorrect precinct ballot may need to be duplicated onto the correct precinct ballot once their validity is verified.
6.6.2 Provisional Voting on ICX
In order to activate the provisional voting session, the election official must select provisional voting in ICVA before programming the voter card. All other aspects of voting are the same as for Standard voting session on ICX (refer to 6.4.3 “Standard Voting on ICX”).

1/15/2020 222 Version: 5.10-CA::11
Chapter 6 - Polling Place Procedures
6.7 Closing the Polls and Vote Reporting
6.7.1 Closing the Polls on ICE
1. If there are ballots deposited in the auxiliary bin, insert them one-at-a-time into the ImageCast® Evolution for tabulation.
2. Press the iButton security key against the security key reader on the ICE, then log in as a poll worker.
3. Press the Close Poll button on the Main Menu.
Figure 6-86: Poll Worker Menu
4. On the Poll Management screen, press Close.
5. Enter your password and press OK.

Version: 5.10-CA::11 223 1/15/2020
Democracy Suite® Use Procedures
A Close Poll confirmation screen will appear.
Figure 6-87: Close Poll - Authorization Screen
6. Press OK to continue.
Figure 6-88: Close Poll Confirmation Screen
7. Press OK to continue.The results tape will begin to print. You will receive confirmation that the tape has printed successfully, and you will be asked whether you wish to

1/15/2020 224 Version: 5.10-CA::11
Chapter 6 - Polling Place Procedures
print additional copies.
Figure 6-89: Auxiliary Bin Prompt
8. Tear off the results tape and return it to the Election Board, complete with the signatures of Election Official. This is the Official Election Results tape.
9. Print out additional copies by pressing Yes. The required quantity of tapes is based on your jurisdiction's requirements.
Figure 6-90: Printing of Result Tape Completed

Version: 5.10-CA::11 225 1/15/2020
Democracy Suite® Use Procedures
The ImageCast® Evolution's poll has now been closed.
Figure 6-91: Poll-Worker Menu once Polls have been Closed
10. Press the power button in the top right corner of the screen. Select the Shut Down option to power down the unit. This action will prompt a countdown until the machine has fully powered down. Close the privacy screen flaps, and place the LCD monitor in the horizontal storage position.

1/15/2020 226 Version: 5.10-CA::11
Chapter 6 - Polling Place Procedures
NOTE: If the monitor is not placed in the horizontal storage position the system will remain in the 'stand by' mode, which expends the battery power.
Figure 6-92: Power Down Request
11. Break the seal on the Ballot Box door, and unlock it using the provided key.
Figure 6-93: Breaking the Ballot Box Seal
12. Remove all ballots from the Ballot Box bins. Empty the Main bin first, then remove the seal and empty the Secondary bin. Ensure that the ballots from the Main and Secondary bins (containing write-in votes) are kept separate for further, post-election day, processing at the central location.
13. Place the ballots from the two bins into separate envelopes and label them clearly, noting all necessary detail including, but not limited to, the polling location, tabulator and Ballot Box bin origin.

Version: 5.10-CA::11 227 1/15/2020
Democracy Suite® Use Procedures
14. Close the return container and seal it with a tamper-proof seal.
Figure 6-94: Removing Ballots from the Ballot Box
15. Break the seal on the ImageCast® Evolution 's CF1 door and remove the Compact Flash card. Should you wish to remove the CF2 card, do so at this time. The CF card(s) should be placed in a secure transport envelope/ case/bag for transport to the central location.
16. This card containing the vote totals, together with all envelopes containing ballots removed from the ballot box, are transported to the Central Counting Location for accumulation and reporting of vote total results for all precincts.
Figure 6-95: Removing the CF1 Card
The step-by-step procedure for the Election night processing continues in chapter 8 “Semi-Official Canvass Tabulation and Reporting”.

1/15/2020 228 Version: 5.10-CA::11
Chapter 6 - Polling Place Procedures
6.7.2 Closing the polls on ICP2
After the close of voting, the poll is closed. This procedure consists of the following:
• If applicable, scan ballots from auxiliary bin
• Closing the poll on the tabulator
• Printing the Results report
• Printing the Write-in report (if applicable)
This procedure assumes the following:
• Access to the Administrator Security Key
When instructed to do so, use the following procedure to close the poll.
1. If ballots were deposited in the auxiliary bin, insert the ballots one-at-a-time into the ICP2 for tabulation.
2. Contact the Administrator Key to the Security Key receptacle and enter the password.The Main Menu screen appears.
Figure 6-96: Main Menu screen
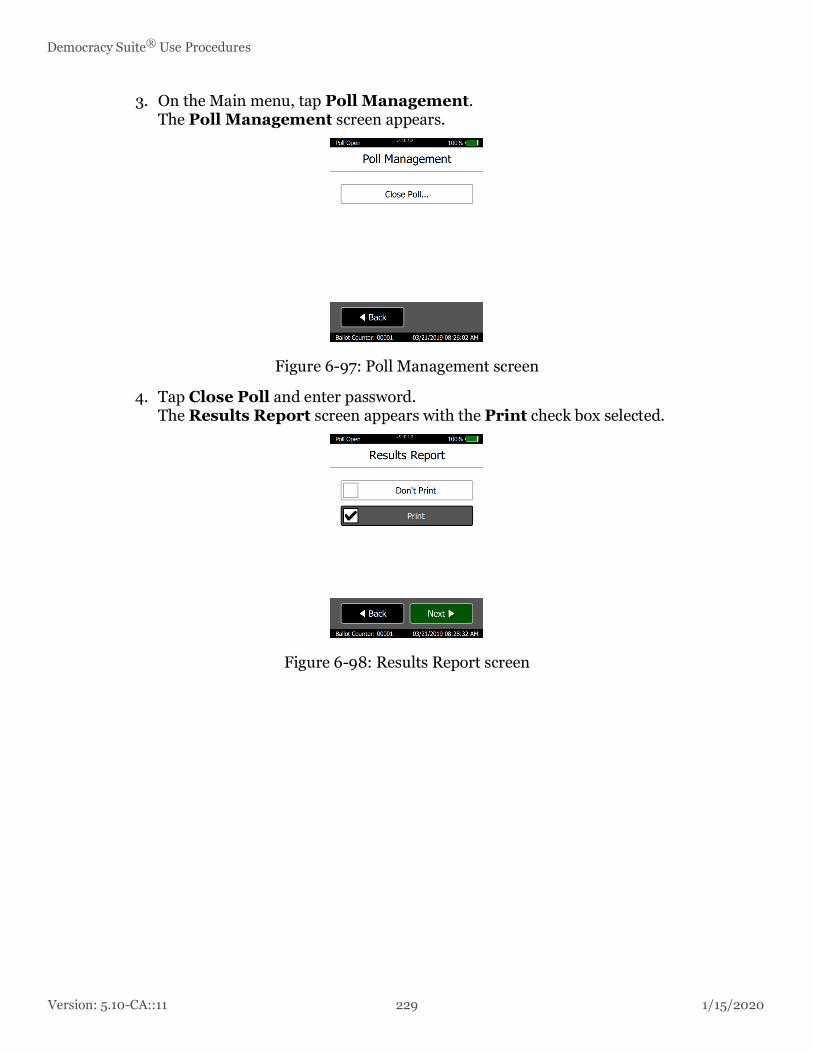
Version: 5.10-CA::11 229 1/15/2020
Democracy Suite® Use Procedures
3. On the Main menu, tap Poll Management.The Poll Management screen appears.
Figure 6-97: Poll Management screen
4. Tap Close Poll and enter password.The Results Report screen appears with the Print check box selected.
Figure 6-98: Results Report screen
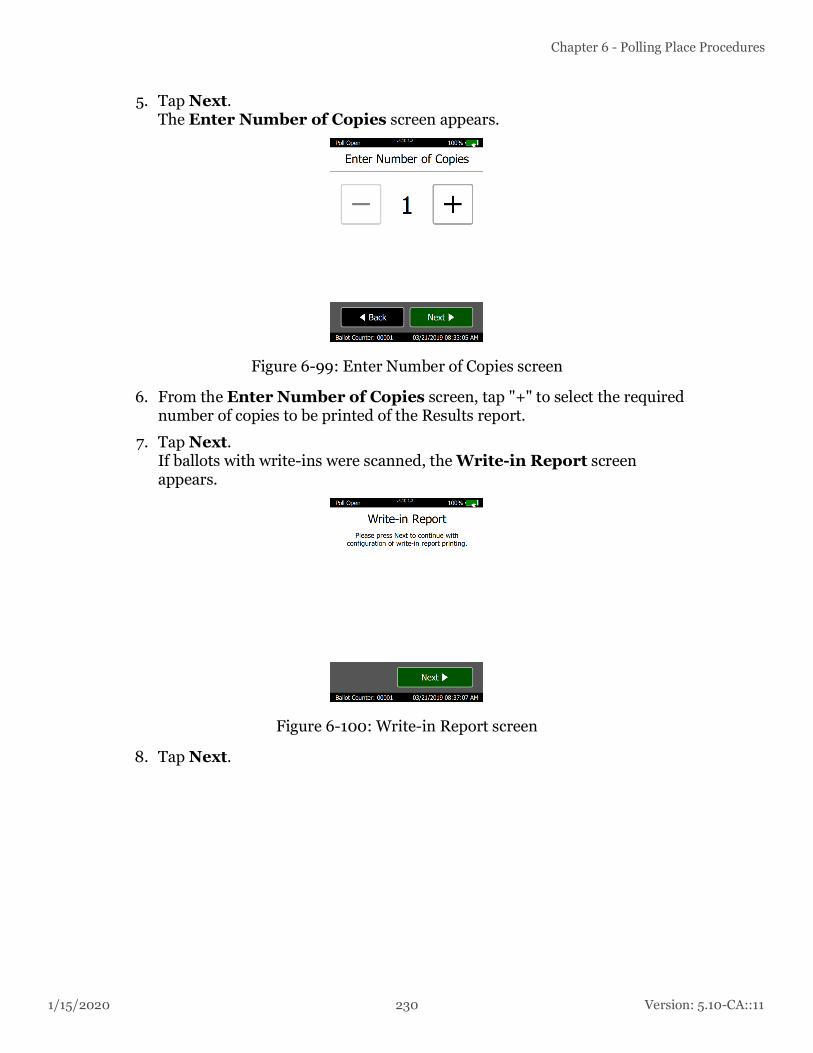
1/15/2020 230 Version: 5.10-CA::11
Chapter 6 - Polling Place Procedures
5. Tap Next.The Enter Number of Copies screen appears.
Figure 6-99: Enter Number of Copies screen
6. From the Enter Number of Copies screen, tap "+" to select the required number of copies to be printed of the Results report.
7. Tap Next.If ballots with write-ins were scanned, the Write-in Report screen appears.
Figure 6-100: Write-in Report screen
8. Tap Next.

Version: 5.10-CA::11 231 1/15/2020
Democracy Suite® Use Procedures
9. Decide if the Write-in report is to be printed and tap Next.
Figure 6-101: Write-in Report screen
10. If Print was selected, tap "+" to select the required number of copies to be printed of the Write-in report on the Enter Number of Copies screen and tap Next.
Figure 6-102: Enter Number of Copies screen
11. On the Close Poll Confirmation screen, tap Confirm.
Figure 6-103: Close Poll Confirmation screen
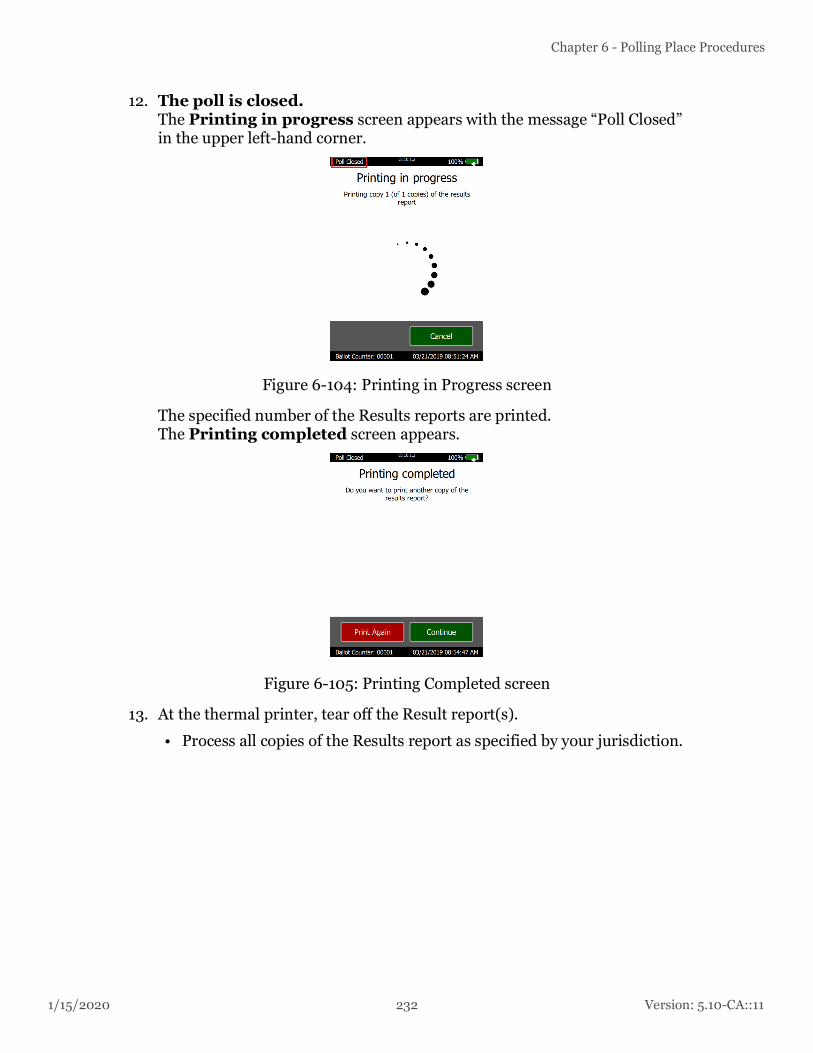
1/15/2020 232 Version: 5.10-CA::11
Chapter 6 - Polling Place Procedures
12. The poll is closed.The Printing in progress screen appears with the message “Poll Closed” in the upper left-hand corner.
Figure 6-104: Printing in Progress screen
The specified number of the Results reports are printed.The Printing completed screen appears.
Figure 6-105: Printing Completed screen
13. At the thermal printer, tear off the Result report(s).
• Process all copies of the Results report as specified by your jurisdiction.
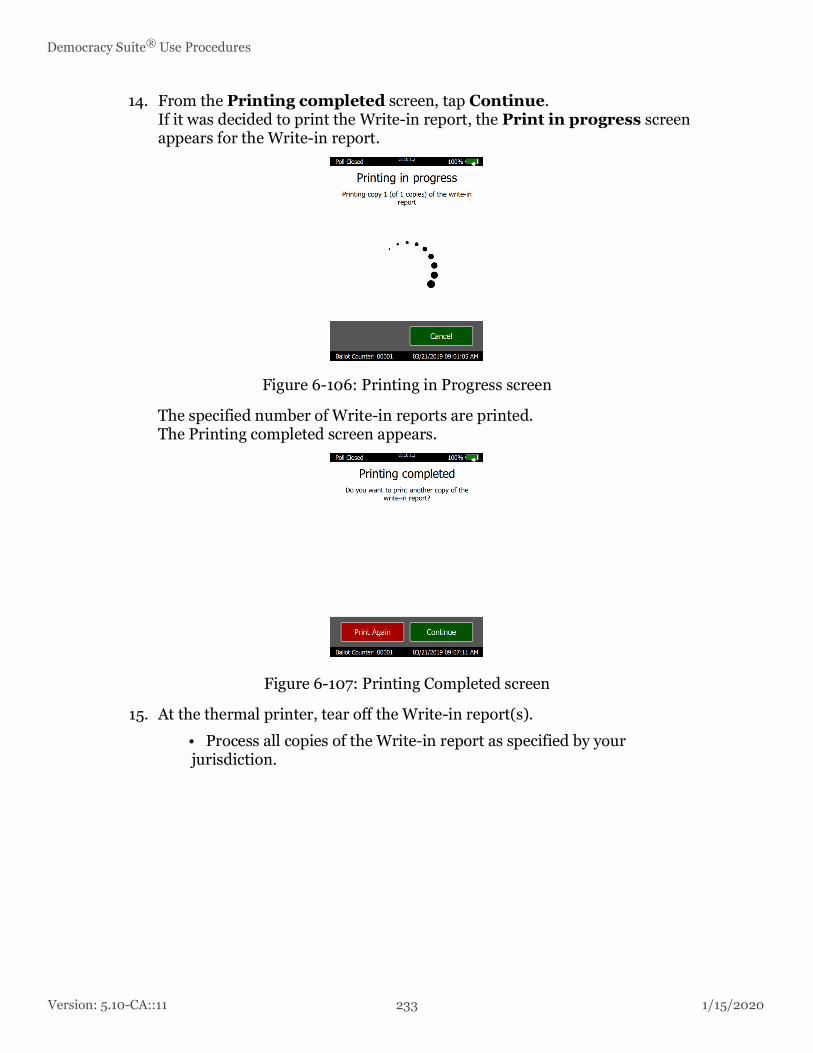
Version: 5.10-CA::11 233 1/15/2020
Democracy Suite® Use Procedures
14. From the Printing completed screen, tap Continue.If it was decided to print the Write-in report, the Print in progress screen appears for the Write-in report.
Figure 6-106: Printing in Progress screen
The specified number of Write-in reports are printed.The Printing completed screen appears.
Figure 6-107: Printing Completed screen
15. At the thermal printer, tear off the Write-in report(s).
• Process all copies of the Write-in report as specified by your jurisdiction.
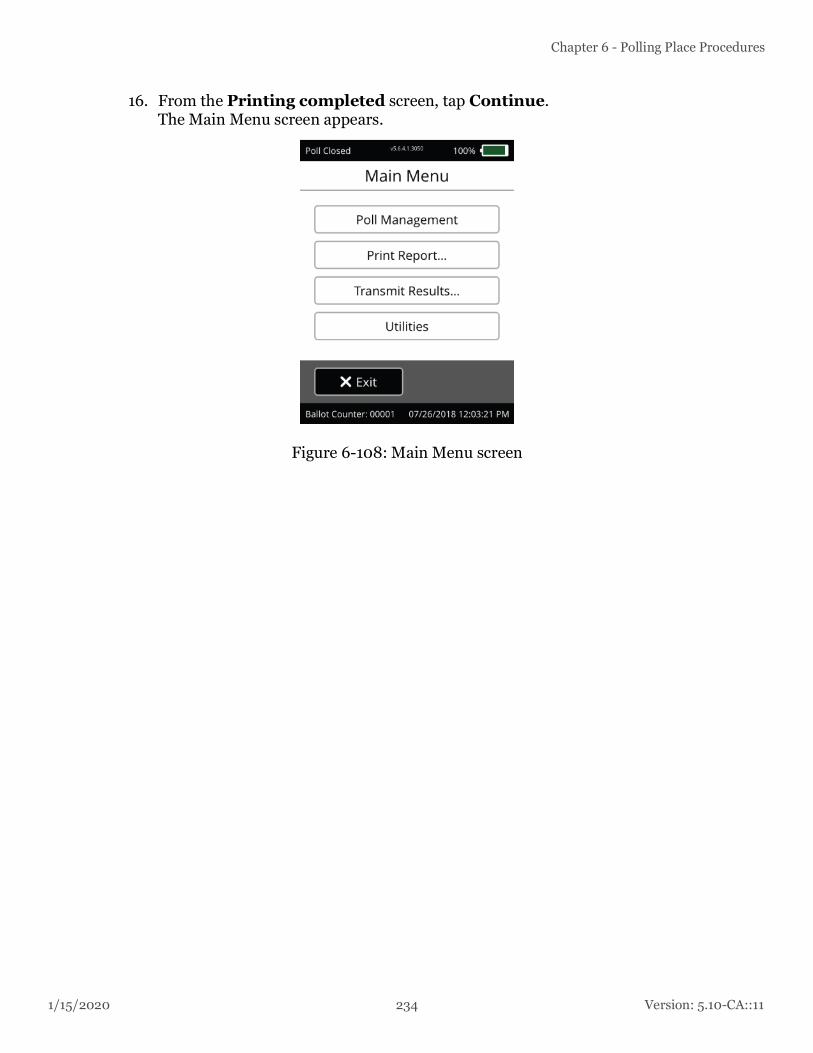
1/15/2020 234 Version: 5.10-CA::11
Chapter 6 - Polling Place Procedures
16. From the Printing completed screen, tap Continue.The Main Menu screen appears.
Figure 6-108: Main Menu screen

Version: 5.10-CA::11 235 1/15/2020
Democracy Suite® Use Procedures
6.7.2.1 Powering Down the Tabulator
To power down the tabulator:
1. From the Administrator Main Menu screen, tap Utilities.
2. From the Utilities screen, tap Power Options. The Power Options screen appears.
Figure 6-109: Power Options screen
3. From the Power Options screen, tap Power Down.A message appears asking to confirm powering down.
Figure 6-110: Power Down screen
From the message screen, click Confirm. The tabulator power downs.The tabulator is now ready for equipment take-down.

1/15/2020 236 Version: 5.10-CA::11
Chapter 6 - Polling Place Procedures
Break the seal on the Ballot Box door, and unlock it using the provided key.
Figure 6-111: Breaking the Ballot Box Seal
Remove all ballots from the Ballot Box bins. Empty the Main bin first, then remove the seal and empty the Secondary bin. Ensure that the ballots from the Main and Secondary bins (containing write-in votes) are kept separate for further, post-election day, processing at the central location.
Place the ballots from the two bins into separate envelopes and label them clearly, noting all necessary detail including, but not limited to, the polling location, tabulator and Ballot Box bin origin.
Close the return container and seal it with a tamper-proof seal.
Figure 6-112: Removing Ballots from the Ballot Box
Break the seal on the SD1 card door and remove the SD1 card. Should you wish to remove the SD2 card, do so at this time. The SD card(s) should be placed in a secure transport envelope/ case/bag for transport to the central location.
This card containing the vote totals, together with all envelopes containing ballots removed from the ballot box, are transported to the Central Counting Location for accumulation and reporting of vote total results for all precincts.

Version: 5.10-CA::11 237 1/15/2020
Democracy Suite® Use Procedures
The step-by-step procedure for the Election night processing continues in chapter 8 “Semi-Official Canvass Tabulation and Reporting”.
6.7.3 Closing the Polls on ICX
If you want to shut down the ImageCast® X device during voting, please be aware that the Technician is required to unlock the side panels of the device in which the On/Off button is located.
• To turn off the device, complete the following:
• hold the Power button (located in a side panel, depending on the orientation of the device) until a dialog displays on the upper right corner of the screen.
• Press the Power Off option.The device powers off immediately
NOTE: The poll is now closed and the device will no longer accept voter cards.
6.8 Securing Audit Logs and Backup RecordsElection audit trails provide the supporting documentation for verifying the accuracy of reported election results. They present an archival record of all system activity that is related to the vote tally. All thermal printer reports should be retained as part of the election record.
The integrity of voting and audit data is kept on nonvolatile data storage mediums. For the Democracy Suite® EMS, data is kept on hard drives. The ImageCast® voting devices and audit data are kept on the compact flash memory cards. Both hard drives and compact flash memory cards, can be removed from the system/devices and transported to another location for readout and report generation. All tabulators maintains a real-time log of its operation, including error and audit log events. The election software application has an integrated logging service, meaning it is active from the moment the device becomes operational. The system also has a battery-supported real-time clock (RTC), and an intrusion detection micro-controller which allows system events (such as intrusions) to be monitored and recorded off-line. The system integrates an audit log mechanism that records who did what and when on the device, as well as other system level event information.

1/15/2020 238 Version: 5.10-CA::11
Chapter 6 - Polling Place Procedures
6.9 Troubleshooting
6.9.1 Operating the ImageCast® Precinct 2 on Battery
The ICP2 is designed to host an internal Lithium Ion rechargeable back-up battery pack that allows the tabulator to run for over two hours in case of a power outage. When the tabulator runs only on battery, the battery icon on the LCD screen flashes.
The system will shut down and preserve the integrity of votes cast prior to the power failure, and resumes functionality when power is provided or restored without significant or intrusive power-up procedures. In the event of a power failure, the equipment will continue to operate and indicate the battery life on the LCD monitor and side panel LED lights.
The switch from battery power to AC power (or vice versa) takes place automatically. If the AC power is disconnected or unavailable, the unit will continue to operate on battery power as long as a sufficient charge remains in the battery. When AC power is reconnected or otherwise resumes, the ICP2 returns to AC power mode.
6.9.2 Operating the ICX on Battery
In the case of power failure, the device is equipped with a backup battery and a UPS. The battery and a UPS allow the ICX device to operate for a period of two hours under normal operating conditions (100 voters per hour, and two AVS voters per hour). The switch to battery power is immediate as is the switch back to AC, once the power is restored, no special action is required. Both internal and UPS battery status is visible on ICX screen.
NOTE: In case the power is lost and the machine turns off, please remove all smart cards from the smart card reader. When the machine is fully powered on, the smart cards can be inserted in the smart card reader.

Version: 5.10-CA::11 239 1/15/2020
Democracy Suite® Use Procedures
CHAPTER 7: ABSENTEE AND MAIL PROCEDURES
7.1 Preparing Absentee/Vote by Mail Ballots for TallyAbsentee ballots must be properly prepared for ballot tally. Absentee ballots improperly prepared can cause ballot jams resulting in damaged ballots. Perform the following steps to properly inspect Absentee ballots and to ensure proper functioning of the ImageCast® Central:
• Ballots must be inspected for foreign objects such as staples, tape or paper clips. All foreign objects must be removed from the ballots. If the ballots have stubs, these should also be removed.
• Folded ballots must be unfolded, oriented with folds in the same direction, and re-folded in the opposite direction, against the crease, to flatten the ballot.
• Ballots must be inspected for damage, such as torn or frayed edges or cuts from opening the envelope. The readability of the ballot may be questioned if the ballot markers or voting areas on the ballot have non- acceptable marks. For example:
• Bad or illegible printing on the ballot.
• Voter marking in the ballot ID, or ballot marker areas of a ballot.
• Damaged ballot.
• Wrong marking pen used (e.g. red ink or highlighters).
• Greasy fingerprints, spots, or other contamination.
• Incorrect ballot trimming.
• All damaged or unreadable ballots should be dealt with according to respective jurisdiction's procedures.
7.2 Setting up the ImageCast® Central Workstation and Scanner
Setting up the ImageCast® Central workstation and scanner was performed during the installation of the system as per Dominion Voting Systems Democracy Suite® Installation Procedures.
The following steps should have been executed during that process and are repeated here for completeness. If your ImageCast® Central system has been set up, go to section 7.3 “Loading an Election to the ImageCast® Central System”.
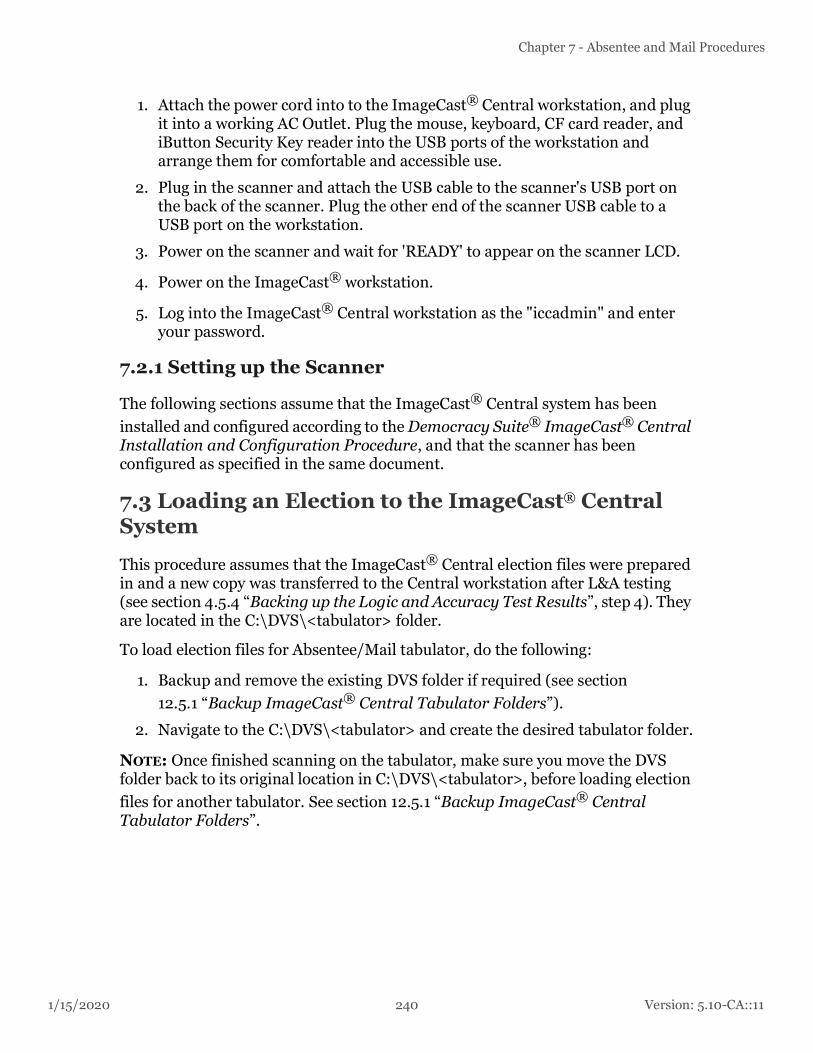
1/15/2020 240 Version: 5.10-CA::11
Chapter 7 - Absentee and Mail Procedures
1. Attach the power cord into to the ImageCast® Central workstation, and plug it into a working AC Outlet. Plug the mouse, keyboard, CF card reader, and iButton Security Key reader into the USB ports of the workstation and arrange them for comfortable and accessible use.
2. Plug in the scanner and attach the USB cable to the scanner's USB port on the back of the scanner. Plug the other end of the scanner USB cable to a USB port on the workstation.
3. Power on the scanner and wait for 'READY' to appear on the scanner LCD.
4. Power on the ImageCast® workstation.
5. Log into the ImageCast® Central workstation as the "iccadmin" and enter your password.
7.2.1 Setting up the Scanner
The following sections assume that the ImageCast® Central system has been installed and configured according to the Democracy Suite® ImageCast® Central Installation and Configuration Procedure, and that the scanner has been configured as specified in the same document.
7.3 Loading an Election to the ImageCast® Central System
This procedure assumes that the ImageCast® Central election files were prepared in and a new copy was transferred to the Central workstation after L&A testing (see section 4.5.4 “Backing up the Logic and Accuracy Test Results”, step 4). They are located in the C:\DVS\<tabulator> folder.
To load election files for Absentee/Mail tabulator, do the following:
1. Backup and remove the existing DVS folder if required (see section 12.5.1 “Backup ImageCast® Central Tabulator Folders”).
2. Navigate to the C:\DVS\<tabulator> and create the desired tabulator folder.
NOTE: Once finished scanning on the tabulator, make sure you move the DVS folder back to its original location in C:\DVS\<tabulator>, before loading election files for another tabulator. See section 12.5.1 “Backup ImageCast® Central Tabulator Folders”.

Version: 5.10-CA::11 241 1/15/2020
Democracy Suite® Use Procedures
7.4 Opening ImageCast® Central ApplicationThe "Administrator Security Key" (aka iButton) should be programmed by EMS to match the installed election files. An accompanying passcode is required in order to use the iButton Security Key and unlock the election files at ICC startup.
1. Run the ICC application by clicking on the icon pinned to the Window's Taskbar.
2. Accept the User Account Control confirmation dialog by clicking Yes.Preliminary initialization will occur.
3. Once complete, you will be asked to select a tabulator to load. Click the Import button.
4. Browse to the folder containing the desired tabulator information. This should be a folder that contains a project subfolder. Then click Select Folder.
5. A prompt will appear to apply the iButton security key to the 1-Wire Reader. When prompted, enter the passcode it was delivered with and click OK.
6. Finally, enter a name that will help easily identify that specific tabulator in the list and click OK.
7. Repeat the last 4 steps until all necessary tabulators have been imported.
8. To begin, select a tabulator from the newly populated list, and click Load.
9. A prompt may appear to apply the iButton security key to the 1-Wire Reader. When prompted, enter the passcode it was delivered with.
10. On the Select Scanner dialog, select the scanner and click OK.
11. If this is the first time you are using the ImageCast® central a dialog box may appear asking for the Local Configuration Path. Enter C:\DVS\ into the Local Path dialog or browse to that location. Once entered, the dialog box will disappear, and the ImageCast® will begin running its power-on diagnostic tests.
12. Apply the iButton Security Key when prompted by the application during the initial execution. This action will decrypt the election files.
13. On the Cannot Write to Secondary Path warning dialog, click OK.
14. On the ICC Configuration screen, in the Paths section, click Browse for Secondary Path location, enter \\emsserver and click Enter.
15. On the Windows Security dialog, enter the ICC User account credentials, select the Remember my credentials checkbox, and click OK.
16. Double-click the NAS folder, highlight the current project and click Select Folder.The Secondary Path has been updated with this network location.

1/15/2020 242 Version: 5.10-CA::11
Chapter 7 - Absentee and Mail Procedures
NOTE: The application will not continue if an incorrect security key has been applied. Errors encountered here indicate that the iButton Security Key needs to be re-programmed in EMS EED with the correct coding associated with the election files you wish to load. For instructions on how to program the iButton Security Key, please see section D.2.7 “Programming of Election Files and Security Devices”.
17. Once the passcode is correctly entered, the ImageCast® Central application enters Administrator Mode and presents the Scanning menu as depicted in the image. This menu provides information on the number of ballots scanned, the batch number and size, and the amount of ballots accepted. The application remains in Administrator Mode unless the iButton Security Key is removed. If removed, the ImageCast® Central application enters User or Poll-Worker Mode.
Figure 7-1: The Scanning Menu (Administration Mode)
18. On the left-hand side of the screen, click the Configuration icon.

Version: 5.10-CA::11 243 1/15/2020
Democracy Suite® Use Procedures
7.5 Configuring the Local and Remote Path for Saving Results
1. Click the Configuration icon found on the left side of the application screen. The 'Paths' area depicts both the Local and Server Paths. Set Local Path reflects the path to the tabulator folder within the "C:\DVS" that has been loaded to the ICC Application (see step 8 in previous section).
If your network configuration prevents automatic loading of results and images to the database, the results should be copied to the removable media and load them to the RTR from the directory “Loading Results from Card Management” on page 288.
2. For automatic loading of results and images to the database and to pass the images off to the Adjudication application, set the Secondary Path to the location on the EMS server by:
• Click Browse and navigate to \\EMSServer\NAS\Project Name into the text area labeled 'Secondary Path,' where 'Project Name' is the name of your Election Project.
3. Click the Scanning icon.
4. On the confirmation dialog, click Yes.
NOTE: If you cannot navigate to the EMS NAS location, it is likely that the problem is in the network setup, where the ICC workstation cannot access the server. Please refer to the Democracy Suite® ImageCast® Central Installation and Configuration Procedures 2.3 Network Environment, 3.3 Network Planning, 7.8 Network and File Sharing and Section 7.11 Mapping the EMS NAS Folder.

1/15/2020 244 Version: 5.10-CA::11
Chapter 7 - Absentee and Mail Procedures
Click on the 'SCANNING' icon and the dialog box asking for confirmation of the server path change might appear. Click Yes to confirm the change.
Figure 7-2: Setting Local and Remote Result Paths

Version: 5.10-CA::11 245 1/15/2020
Democracy Suite® Use Procedures
7.6 Accessing Supervisor ModeTo obtain Supervisor access, the presiding election official must connect the iButton Security Key to the reader, enter the Administrator passcode and click on the OK button.
On the Configuration menu, click on the Administrator Mode icon (the little bald man). This will prompt a Security Password dialog to appear. Enter the supervisor passcode and click on the OK button. The Configuration menu will change into a Supervisor Mode (the icon will change into a man with brown hair).
Figure 7-3: Administrator Mode
To return to the Administrator Mode, simply click on the Supervisor Mode icon. The Administrator Mode icon will take its place, indicating that the application has returned to Administrator Mode.

1/15/2020 246 Version: 5.10-CA::11
Chapter 7 - Absentee and Mail Procedures
7.6.1 Setting Supervisor Options
1. Click CONFIGURATION to display the Configuration Menu.
NOTE: If this button is greyed out, you are in the Configuration Menu already.
Figure 7-4: Entering Configuration Mode
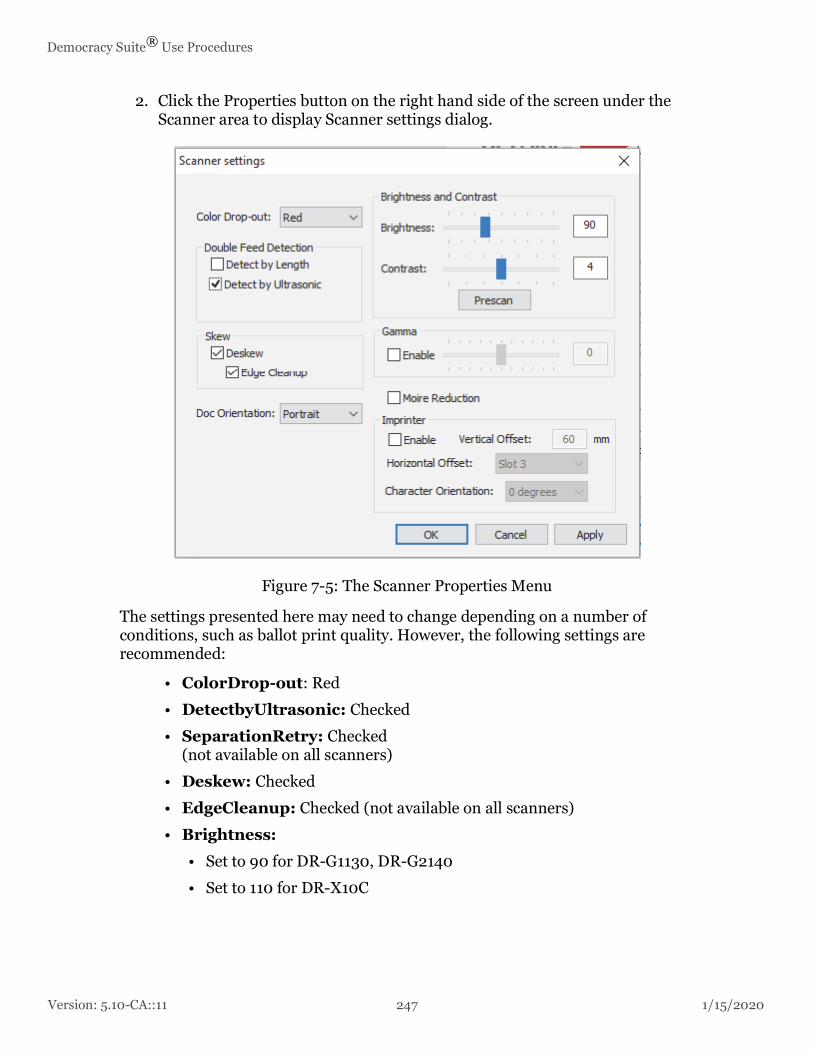
Version: 5.10-CA::11 247 1/15/2020
Democracy Suite® Use Procedures
2. Click the Properties button on the right hand side of the screen under the Scanner area to display Scanner settings dialog.
Figure 7-5: The Scanner Properties Menu
The settings presented here may need to change depending on a number of conditions, such as ballot print quality. However, the following settings are recommended:
• ColorDrop-out: Red
• DetectbyUltrasonic: Checked
• SeparationRetry: Checked(not available on all scanners)
• Deskew: Checked
• EdgeCleanup: Checked (not available on all scanners)
• Brightness:
• Set to 90 for DR-G1130, DR-G2140
• Set to 110 for DR-X10C
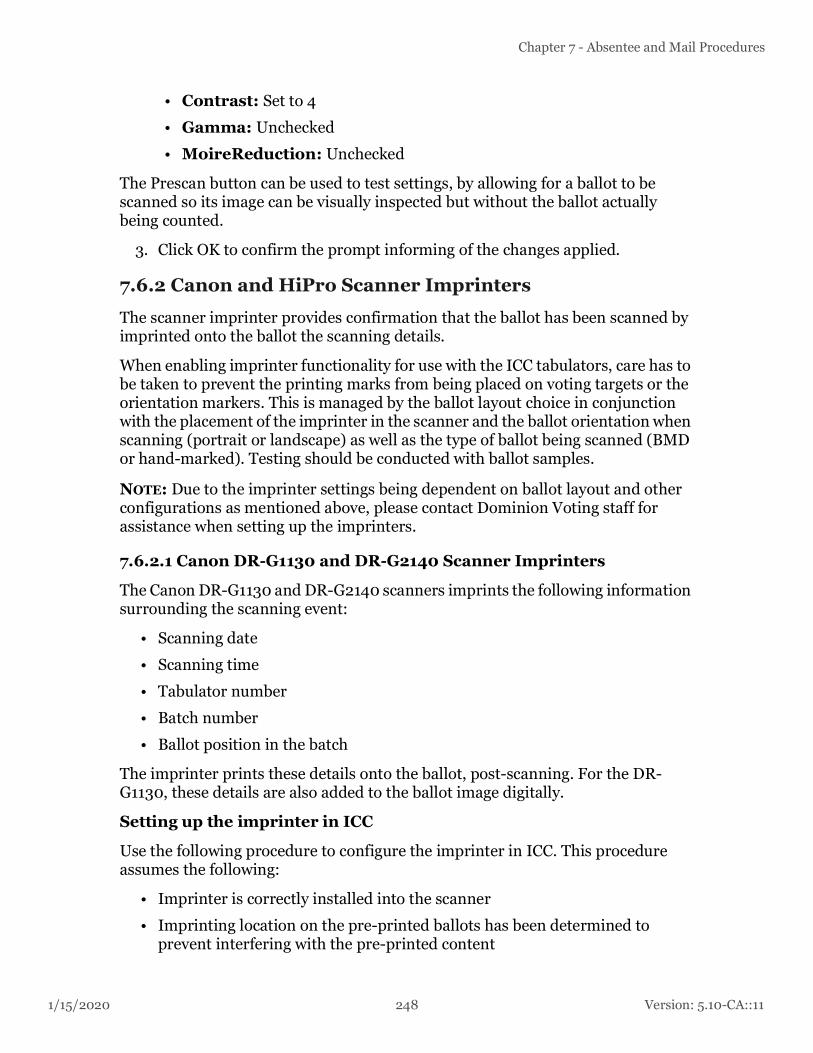
1/15/2020 248 Version: 5.10-CA::11
Chapter 7 - Absentee and Mail Procedures
• Contrast: Set to 4
• Gamma: Unchecked
• MoireReduction: Unchecked
The Prescan button can be used to test settings, by allowing for a ballot to be scanned so its image can be visually inspected but without the ballot actually being counted.
3. Click OK to confirm the prompt informing of the changes applied.
7.6.2 Canon and HiPro Scanner Imprinters
The scanner imprinter provides confirmation that the ballot has been scanned by imprinted onto the ballot the scanning details.
When enabling imprinter functionality for use with the ICC tabulators, care has to be taken to prevent the printing marks from being placed on voting targets or the orientation markers. This is managed by the ballot layout choice in conjunction with the placement of the imprinter in the scanner and the ballot orientation when scanning (portrait or landscape) as well as the type of ballot being scanned (BMD or hand-marked). Testing should be conducted with ballot samples.
NOTE: Due to the imprinter settings being dependent on ballot layout and other configurations as mentioned above, please contact Dominion Voting staff for assistance when setting up the imprinters.
7.6.2.1 Canon DR-G1130 and DR-G2140 Scanner Imprinters
The Canon DR-G1130 and DR-G2140 scanners imprints the following information surrounding the scanning event:
• Scanning date
• Scanning time
• Tabulator number
• Batch number
• Ballot position in the batch
The imprinter prints these details onto the ballot, post-scanning. For the DR-G1130, these details are also added to the ballot image digitally.
Setting up the imprinter in ICC
Use the following procedure to configure the imprinter in ICC. This procedure assumes the following:
• Imprinter is correctly installed into the scanner
• Imprinting location on the pre-printed ballots has been determined to prevent interfering with the pre-printed content

Version: 5.10-CA::11 249 1/15/2020
Democracy Suite® Use Procedures
• Imprinter is manually set to the necessary horizontal slot in the scannerTo setup the imprinter:
1. Once the application has loaded the appropriate election and with the Administration key applied, enter the Supervisor credentials to access Supervisor mode.
2. In Supervisor mode, click Configuration.
3. In the Configuration pane, click Properties, within the Scanner panel.The Scanner Settings window appears.
Figure 7-6: Scanner Settings
4. Select the Enable check box to activate the imprinter.
5. In the Vertical Offset field, enter a value in millimeters (mm) for where the imprinter is to print on the ballot’s vertical plane and in the ballot’s digital image.
6. From the Horizontal Offset drop-down, select the slot the imprinter is physically set to.This determines where the printing occurs on the ballot’s horizontal plane and in the ballot’s digital image.
• If using the DR-G2140, ensure Slot 1 is selected.

1/15/2020 250 Version: 5.10-CA::11
Chapter 7 - Absentee and Mail Procedures
7. From the Character Orientation drop-down, select the orientation the imprinter will print on the ballot and in the ballot’s digital image.
8. Click OK.
Imprinting Format
The following is the imprinting format used when capturing the scanning details on the ballot and added to the ballot image digitally:
MMM DD/YYHH:MM:SS TTTT – B – PPPP
• MMM DD/YY: Date stamp when the ballot was scanned
• HH:MM:SS: Timestamp when the ballot was scanned
• TTTT: Tabulator number the ballot was scanned on
• B: Batch number the ballot is located in
• PPPP: Ballot’s position in the batch
Example: MAR 16/1810:55:025501 – 1 – 0001
Handling Misreads
When a misread occurs, the following message appears
Figure 7-7: Misread Error Message
1. Click OK.
2. Using the imprinter details in the message, locate the misread ballot in the scanner’s output tray.
3. Remove the misread ballot and all proceeding ballots from the output tray.
4. Manually indicate on the misread ballot and all proceeding ballots that the imprinted content is invalid.

Version: 5.10-CA::11 251 1/15/2020
Democracy Suite® Use Procedures
5. Reorient the misread ballot and all proceeding ballots so that the imprinting does not reoccur in the same location, and return them to the input try.
6. Continue scanning.
7.6.2.2 HiPro Scanner Imprinters
The HiPro pre-scan and post-scan imprint user-specified details onto the ballot before and after it is scanned. These details are also digitally added to the ballot’s scanned image.
Setting Up the Pre-scan and Post-scan Imprinters
Prior to use, configure how the imprinters will perform. This setup is done from the HiPro’s control panel. You will be presented with the following configurable options:
• Print Start at: Event that will trigger the scanner to begin imprinting the ballots
• Print Stop at: Event that will trigger the scanner to stop imprinting the ballots
• Print Start Once at: Event that will trigger the scanner to imprint a single ballot
• Print Stop Once at: Event that will trigger the scanner to stop imprinting a single ballot
• Print Text: Variables that will be imprinted onto the ballot such as date and time
• Print Margin: Where the imprint will appear on the ballot
This procedure assumes the following:
• Pre-scan and post-scan imprinters are correctly installed
• ICC has loaded the appropriate election files
NOTE: Do not tap the Default option found at the bottom of the control panel. This resets the scanner to the default factory settings causing all Dominion pre-set settings to be lost.

1/15/2020 252 Version: 5.10-CA::11
Chapter 7 - Absentee and Mail Procedures
To set up the imprinters:
1. From the ICC workstation:
a. With the Administration iButton applied, enter the Supervisor login credentials.
b. In Supervisor mode, click Configuration.
c. From the Scanner section of the Configuration pane, click Properties.A message displays stating configuring the scanner is performed at the scanner control panel.The Profile Menu displays on the HiPro’s control panel.
d. Close the message window.
2. From the HiPro’s Profile Menu, tap the Annotations ellipsis..
3. From the Annotations screen, tap the PreScan Print ellipsis.
4. From the Prescan Print screen, populate the following fields, where necessary:
• Print Start at
• Print Stop at
• Print Start Once at
• Print Stop Once at
• Print Text
• Print Margin: This field is set to millimeters (mm). To use inches, tap [mm].
5. Tap Save.
6. From the top menu bar, tap PreScan Print.
7. From the drop-down that appears, tap PostScan Print.
8. From the Postscan Print screen, populate the following fields, where necessary:
• Print Start at
• Print Stop at
• Print Start Once at
• Print Stop Once at
• Print Text
• Print Margin: This field is set to millimeters (mm). To use inches, tap [mm].
9. Tap Save.The pre-scan and post-scan imprinters are now set up.

Version: 5.10-CA::11 253 1/15/2020
Democracy Suite® Use Procedures
7.6.3 Configuring Scan Options
The ImageCast® Central can be configured to stop scanning on various types of voting errors. These errors include misreads and defective ballots. The user must have Administrator or Supervisor privileges to configure scan options.
When the Adjudication application is used, there is no need to stop on any conditions since these can all be handled by Adjudication. Therefore, the supervisor needs to turn off any such condition.
To turn off “Stop On” conditions in the ImageCast® Central application perform the following:
1. Click the CONFIGURATION icon located on the left side of the ImageCast® Central application screen.
2. The CONFIGURATION screen appears.
3. Click Scan Options to display the Scan Options dialog and then click on Scanner Properties button.
4. Unselect any stop on conditions checked in the "Stop Scan on.." section of the dialog.
NOTE: If write in resolution is not allowed, then check the box "Stop on Write In"
5. Confirm that the 'Continuous Scan' and 'Only one scan per batch' options are checked.
6. Click OK to exit.
7. Return to Administrator Mode by clicking the Supervisor Mode icon. No passcode will be required.
7.7 Producing a Zero ReportTo produce a Zero report, see section 7.12.2 “Producing Reports from the ImageCast® Central System”.
7.8 Scanning ModeScanning Mode is the basic operator mode. In this mode, ballots can be scanned, batches can be either accepted or discarded, and the status menu can be accessed. Note that all scanner settings must be configured by either authorized Administrators or Supervisors prior to scanning ballots.
User privileges are limited to protect the integrity of the election process. Once the Administrator removes the iButton Security Key from the iButton Security Key reader, the security level defaults to Scanning or User Mode.

1/15/2020 254 Version: 5.10-CA::11
Chapter 7 - Absentee and Mail Procedures
NOTE: Following sections assume that the Automatic Loading of results/images (see section 8.2.2 “Enable Automatic Results Loading to RTR”) has been set in the RTR application. Thus, all scanned images from ImageCast® Central tabulators (apart from, if required, ImageCast® Central that handles write ins only) would be automatically loaded to the database and passed on to the Adjudication application.
Figure 7-8: The Scanning Mode shows basic status and scanning functions

Version: 5.10-CA::11 255 1/15/2020
Democracy Suite® Use Procedures
7.8.1 Scanning and Accepting Batches
NOTE: The scanner should be cleaned prior to beginning scanning and after every 2000 ballots scanned.
The scanning process for the Absentee and All Mail ballots may start 7 days prior to Election Day and is continued until the jurisdiction-defined 'Cut Off' period, at which time the results scanned up to that point are reported on Election Day. All incoming Absentee and All Mail ballots are scanned on the Absentee/All Mail ImageCast® Central tabulator(s) that are connected to all precincts.
To begin scanning, navigate to the Scanning menu by clicking the SCANNING button on the left side of the screen.If the SCANNING button is greyed out, then the tabulator is closed and needs to be reopened in order to continue. If this is the case, perform the steps 1 through to 6 below. If the SCANNING button is not greyed out, and the tabulator is open, proceed to step 6 to start scanning ballots.
Figure 7-9: The Configuration Menu in Administrator Mode after the Tabulator is Closed
1. Click CONFIGURATION on the left side of the application screen.
2. Click RE-OPEN TABULATOR the bottom right of the Configuration menu.The confirmation prompt, will appear.

1/15/2020 256 Version: 5.10-CA::11
Chapter 7 - Absentee and Mail Procedures
3. Click OK if you wish to re-open the tabulator. If not, click Cancel.
4. Click on the Supervisor icon to change to Administrator Mode.
5. Load a stack of ballots, approximately 1 to 1.5 inch thick, into the scanner feed tray and click SCAN.
6. The scanner will begin to scan the ballots the user has loaded into the scanner while the ImageCast® Central application counts the ballots in real-time. This information can be tracked in the 'Ballots Scanned' field within the Scanning menu.
NOTE: If the tabulator displays an 'Invalid Ballot' error (see section F.3.1 “Ballot Scanning Errors”) this means that one or more ballots scanned belong to a precinct that is not handled by that tabulator. If this is the case, check that the ballots in the batch belong to the precinct which the tabulator being used is handling.
7. Once all of the ballots loaded into the scanner have been scanned, the user has the option to either click ACCEPT BATCH or DISCARD BATCH on the Scanning menu. Accepting the batch saves the results and ballot images in two separate folders on the locations specified in primary and secondary paths (see section 7.5 “Configuring the Local and Remote Path for Saving Results”). Each batch will be numbered in the order it was scanned and processed.
8. To accept a batch, click ACCEPT BATCH at the bottom of the Scanning menu. Put all of the scanned ballots from the output tray of the scanner into the pre-labeled completed batch envelope, and put it into the box of counted batches.
9. A prompt will appear asking the user to confirm that they wish to accept the scanned batch. Click OK to confirm, or Cancel to return to the Scanning menu.
10. To discard a batch, see instructions in section Scanning and Discarding Batches.

Version: 5.10-CA::11 257 1/15/2020
Democracy Suite® Use Procedures
7.8.2 Scanning and Discarding Batches
In some cases, a user may want to discard a batch. An example of such a situation is when a batch is accidentally scanned twice or when the tabulation of the batch is brought into question. To discard a batch:
1. Once a batch has been fully scanned, click DISCARD BATCH located at the bottom of the Scanning menu.
2. A prompt appears.Click Yes to confirm or No to return to the Scanningmenu.ClickingYes excludes the batch from the results totals and requires the batch to be re-scanned.
3. If 'single scan per batch' is selected (in scan options), SCAN button will be greyed out until either 'accept' or 'discard' is selected.
7.8.3 Spoiling a Batch
Sometimes an ICC operator may mistakenly accept a batch. This batch may have been incomplete, contained ballots from the wrong Counting Group, contained ballots that have already been counted or some other reason.
1. If the batch has been scanned, but not yet accepted, discard the batch as explained in section 7.8.2 “Scanning and Discarding Batches”.
2. If a batch was incorrectly accepted and needs to be excluded from tally, the steps for fixing that will depend on whether that batch has already been submitted in Adjudication or not. Stop scanning and inform the ICC Administrator of the error immediately.
NOTE: Do not re-zero the tabulator. Do not attempt to manually delete the batch.
3. The ICC Administrator will record the number of the batch to be spoiled, using the procedures established by the jurisdiction.
4. Once the ICC Administrator has verified the current batch number and recorded the batch number to be spoiled, they may give approval to continue scanning batches.
5. The ICC Administrator will inform the Adjudication Administrator of the offending batch number(s) for each tabulator.
6. The Adjudication Administrator should work with the RTR/EMS Administrator to fix the problem by following instructions in the sections F.5.1 “Submission and Publishing of Batches” and 10.1 “Election Observer Panel”.
7. After scanning has been completed for all ICC tabulators, the Election Administrator will reconcile the number of batches and ballots tabulated.

1/15/2020 258 Version: 5.10-CA::11
Chapter 7 - Absentee and Mail Procedures
NOTE: If a large number of batches, or all batches from a tabulator, must be spoiled, please contact your Dominion Voting technical representative for assistance in resolving the issue.
7.9 Batch ManagementThis chapter describes ICC's options for managing scanned batches.
Batch Start cards can be printed ahead of scanning from EED and one is placed as the leading card of each batch to be scanned. Their purpose is to reduce the user’s need to interact with ICC screen. Batch Start cards most typically will specify the batch’s Poll ID, so the user doesn’t have to enter it manually.
7.9.1 Batch Start Cards
Batch Start cards can be printed on or before election day from the ICC application. The primary content of the card is a QR code, which encapsulates up to three fields of information about the upcoming batch:
• Poll ID
• Batch Number
• Tabulator ID
Some, All or None of these fields may be included in the Batch Start card. Those fields that are included are also printed in human readable form on the card. Below are examples of Some, All and None of the fields
Figure 7-10: Some of the fields

Version: 5.10-CA::11 259 1/15/2020
Democracy Suite® Use Procedures
Figure 7-11: All of the fields
Figure 7-12: None of the fields
7.9.1.1 Specifying Poll ID Ranges
The user can manually enter any number of Poll ID values in the box at the top right corner. They can also choose ‘All’ known Poll IDs by using the button of that name (or undo such via the ‘None’ button).
Poll IDs can be entered individually, or as ranges (e.g. 10,11,13, 100-109, 150-169, 200-299). The user can even enter Poll IDs that are not known to the current ICC configuration. The ICC will warn them of this fact before printing, but will still allow the process (in case the human knows better than the machine).

1/15/2020 260 Version: 5.10-CA::11
Chapter 7 - Absentee and Mail Procedures
If the Batch Number field is already filled in with a value, then the user will only be able to specify a single Poll ID value. This is because the ICC cannot assign multiple Poll IDs to a single batch.
Note that the standalone application cannot list the known Poll ID ranges and so does not display this field nor the ‘All’ and ‘None’ buttons. However, it will still allow the user to enter a series of Poll IDs in the box to the right.
If the Batch Start card contains a Poll ID value, then the newly created batch will be assigned that Poll ID.
If the Poll ID field is left blank, then the new batch will be given the same Poll ID as the previous batch.
7.9.1.2 Specifying Tabulator ID
When the dialog is presented from the ICC application, the Tabulator ID field is prefilled with the ICC’s tabulator ID. The user can remove this value if not desired.
If the Batch Start card contains a Tabulator ID, then only the ICC with the specified tabulator ID will accept the batch. If the Tabulator ID field is left blank, then the Batch Start card will be accepted by any ICC tabulator.
7.9.1.3 Printing Batch Start Cards
Precinct batch cards are generated from the EED:
• Click Actions -> Tabulation-> Create Precinct Batch Cards.
Batch cards will be generated for all existing precincts in the project and stored on:
$NAS\{Project Name}\Precinct Batch Cards.
7.9.1.4 Scanning Batch Start Cards in ICC
To make use of the Batch Start cards in the ICC application, the feature must be enabled. From the

Version: 5.10-CA::11 261 1/15/2020
Democracy Suite® Use Procedures
Configuration Dialog, select the Scan Options button, then check the “Use Batch Start Cards” check-box:
Figure 7-13: Scanning Batch Start Cards

1/15/2020 262 Version: 5.10-CA::11
Chapter 7 - Absentee and Mail Procedures
7.9.2 Batch Summary ReportsBatch Summaries can be printed each time the ICC accepts a Batch (either manually or by reading a Batch Start card). The ICC must have a compatible printer connected (either directly or over the local network). The summary sheet printed will list:
• Tabulator ID number
• Batch Number
• Poll ID (if in use)
• Date and Time batch was accepted
• Number of Ballots in the batch
Figure 7-14: Batch Summary Report
The user can enable this feature from the ICC Status pane by selecting the Print Batch Summary on Accept check box.
Each time the feature is enabled, a Printer dialog is presented which allows the user to select the printer and number of copies to be printed.

Version: 5.10-CA::11 263 1/15/2020
Democracy Suite® Use Procedures
7.10 AdjudicationAdjudication eliminates the need to physically rescan ballots, which can potentially damage the originals and cause the chain-of-custody concerns. While ballot adjudication is in progress, all clients receive ballots to adjudicate based on the filtering conditions set up by the administrator in the Project Setup Wizard. Ballots are automatically served to each client when available. Both Adjudication Administrators and general Adjudication Users may adjudicate ballots.
7.10.1 Adjudication Overview
To adjudicate a ballot, a user clicks and drags on the ballot viewing area with the mouse. The mouse wheel can be used to zoom in and out of the ballot image. Additionally, some actions are available via keyboard shortcuts.
The following is a listing of available shortcut keys:
7.10.2 Configure and Start Adjudication
At the beginning of the Official Canvass period, Adjudication may be configured and started by following the procedures in Adjudication Administration (see section 12.6 “Adjudication Administration”).
Shortcut Key Action
Ctrl + / Ctrl − Allows the user to zoom in and out of the ballot
F Shows the front side of the ballot image
B Shows the back side of the image
A Shows the audit mark
Left arrow Previous highlighted contest
Right arrow Next highlighted contest
R Refocus current contest
Enter Finish current ballot
O Toggle overlays (show/hide on navigation bar)
Table 7-1: Shortcut Keys

1/15/2020 264 Version: 5.10-CA::11
Chapter 7 - Absentee and Mail Procedures
7.10.3 Ballot Navigation as an Administrator
When opening the application after adjudication is started, Administrators are presented with the ballot adjudication screen that all users are presented with, however, receiving of ballots is paused by default, so administrators will not see a ballot automatically like general users will.
The Ballot Navigation menu on the right side of the user interface provides a toggle switch to start or stop receiving ballots, and another switch to turn target overlays and highlights on/off. In addition, there is a description of the ballot being adjudicated, thumbnails that switch between ballot faces when clicked, and buttons to complete adjudication and view the Audit Mark.
Figure 7-15: Ballot Navigation
7.10.3.1 Starting or Stopping Receipt of Ballots
The first toggle switch on the Ballot Navigation menu allows Administrators to decide whether they receive ballots for adjudication or not. If the Administrator decides to stop receiving ballots after a ballot is received, the ballot is taken away and distributed to another adjudication user. If the administrator reopens an adjudicated ballot (see subsection “Re-opening Ballots” in section 12.6.3.1 “Administrative Screens”), no other ballot will be served, even with this toggle switch on, until after the administrator finishes reviewing the reopened ballot.

Version: 5.10-CA::11 265 1/15/2020
Democracy Suite® Use Procedures
To stop or start receiving ballots:
1. On the Ballot Navigation menu, click Stop to stop receiving ballots for adjudication.
2. To begin receiving ballots for adjudication click Start.
Figure 7-16: Start/Stop receiving ballots toggle button
7.10.3.2 Turning the Ballot Overlay On/Off
The second toggle switch on the Ballot Navigation menu controls the overlays shown over the ballot image, such as contest coloring and checkmarks over the target areas. If you are unsure of a mark made by a voter and want to see the ballot without these overlays, turn this toggle switch off (so it reads Show). When this is off, clicking on the image to adjudicate is unavailable. To be able to adjudicate again, the target overlay switch must be turned on (that is, so it reads Hide).
To turn the ballot overlay on/off:
1. On the Ballot Navigation menu, click Hide to remove checkmarks and overlays.

1/15/2020 266 Version: 5.10-CA::11
Chapter 7 - Absentee and Mail Procedures
2. To view the checkmarks and overlays again, click Show.
Figure 7-17: Show/Hide Overlay
7.10.3.3 Ballot Information Section
Ballot information is shown below the toggle switches. This includes the ballot number as it is in the sequence of the batch, and the tabulator and batch number to which it belongs.
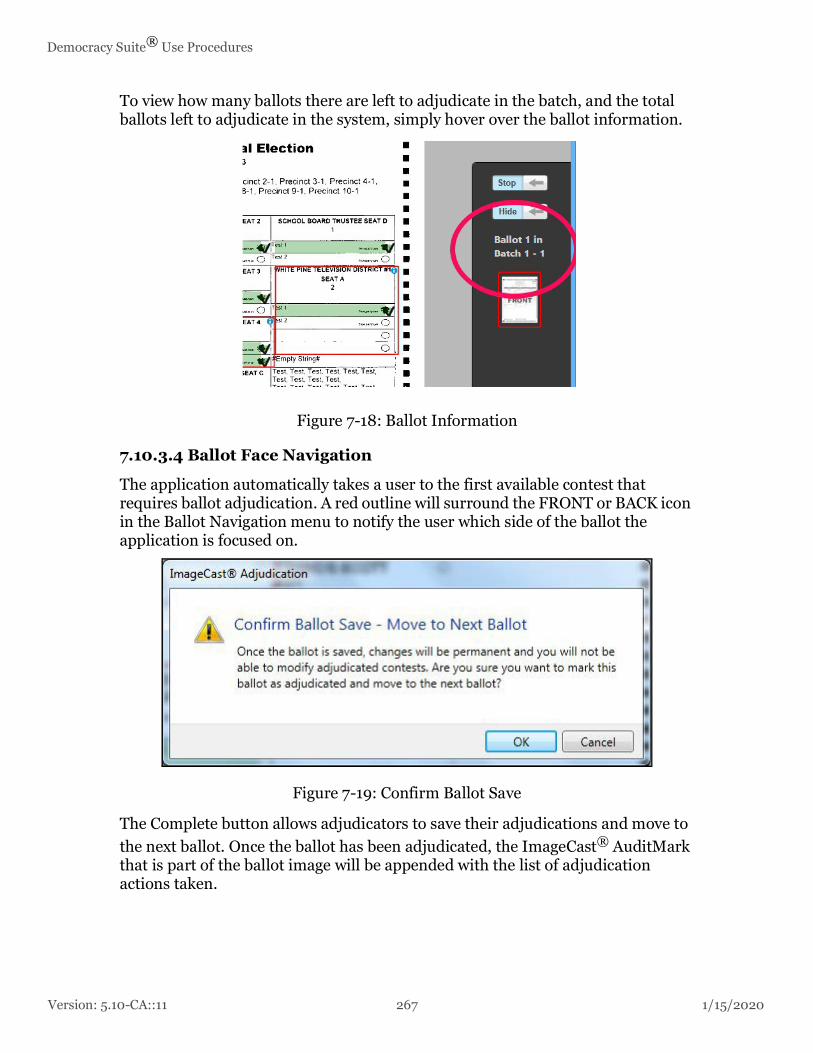
Version: 5.10-CA::11 267 1/15/2020
Democracy Suite® Use Procedures
To view how many ballots there are left to adjudicate in the batch, and the total ballots left to adjudicate in the system, simply hover over the ballot information.
Figure 7-18: Ballot Information
7.10.3.4 Ballot Face Navigation
The application automatically takes a user to the first available contest that requires ballot adjudication. A red outline will surround the FRONT or BACK icon in the Ballot Navigation menu to notify the user which side of the ballot the application is focused on.
Figure 7-19: Confirm Ballot Save
The Complete button allows adjudicators to save their adjudications and move to the next ballot. Once the ballot has been adjudicated, the ImageCast® AuditMark that is part of the ballot image will be appended with the list of adjudication actions taken.

1/15/2020 268 Version: 5.10-CA::11
Chapter 7 - Absentee and Mail Procedures
While Administrators can make changes to adjudicated ballots by reopening them, the ImageCast® Audit Mark cannot be changed and will always reflect all previous and current adjudication actions taken on a ballot.
The View Audit Mark button allows the adjudicator to review the ImageCast® Audit Mark. Note that initially, the Audit Mark will only show the tabulator's original interpretation of the ballot. Additionally, the Audit Mark is not appended until after the ballot is completed. To view the appended Audit Mark, an Administrator can reopen the ballot, see subsection “Re-opening Ballots” in section 12.6.3.1 “Administrative Screens”.
Figure 7-20: Audit Mark

Version: 5.10-CA::11 269 1/15/2020
Democracy Suite® Use Procedures
7.10.3.5 Viewing the Audit Mark with Split View
The ballot viewing area can be split into two panes in order to show the ImageCast® Audit Mark along with the ballot face, which enables the adjudicator to inspect both at the same time. A splitter bar at the bottom of the ballot viewing area can be used to adjust this split view.
Figure 7-21: Split View Splitter
To show or adjust the size of the split view, simply click and drag the splitter bar with the mouse. To toggle between showing the split pane at the bottom or to the side of the main pane, double-click the splitter. The Audit Mark image in the split pane can be moved around and zoomed to in the same way that the ballot image in the main pane can be.
7.10.4 Ballot Navigation as a General User
When opening the application, general users are presented with the ballot adjudication screen. If adjudication is started and a ballot is available for adjudication, the application will automatically load it and present it to the user.

1/15/2020 270 Version: 5.10-CA::11
Chapter 7 - Absentee and Mail Procedures
The Ballot Navigation menu on the right side of the user interface provides a toggle switch to turn target overlays and highlights on/off. In addition, there is a description of the ballot being adjudicated, thumbnails that switch between ballot faces when clicked, and buttons to complete adjudication and view the Audit Mark.
Figure 7-22: Ballot Navigation
7.10.4.1 Turning the Ballot Overlay On or Off
See section 7.10.3.2 “Turning the Ballot Overlay On/Off”.
7.10.4.2 Ballot Information as a General User
See section 7.10.3.3 “Ballot Information Section”.
7.10.4.3 Ballot Face Navigation as a General User
See section 7.10.3.4 “Ballot Face Navigation”.
7.10.4.4 Viewing the Audit Mark with Split View as a General User
See section 7.10.3.5 “Viewing the Audit Mark with Split View”.

Version: 5.10-CA::11 271 1/15/2020
Democracy Suite® Use Procedures
7.10.5 Contest Information
Ballot images are presented to users with overlays representing whether or not the vote was originally counted by the tabulator and the confidence percentage of each mark. The system will highlight each choice that contains a detected mark in its area:
• Green: Counted marks, that show marks counted by the system.
• Yellow: Marginal marks, that are not counted by the system.
For counted marks, the system overlays a green target indicator with a check mark icon in the target area. Overlays for both choices and contests may be toggled on and off by the user to allow unobstructed viewing of the target area, see section 7.10.3.2 “Turning the Ballot Overlay On/Off”.
Figure 7-23: Marginal mark confidence
Additionally, an informational icon is overlaid on the top right corner of each contest. When hovered over, this provides information about detected outstack conditions for the contest, if any. Finally, choices which are detected as marginal marks (mark confidence between the lower and upper thresholds defined for the tabulator) will display a confidence percentage when the mouse is hovered over the choice's target.

1/15/2020 272 Version: 5.10-CA::11
Chapter 7 - Absentee and Mail Procedures
Figure 7-24: Overlays with contest information
7.10.6 Adjudicate a Contest
To adjudicate a contest, a user clicks on the target area of the ballot to toggle its vote status. If the choice was previously counted as a vote, clicking on it will remove the vote and a red overlay with an X icon will appear over the target. If the choice was not previously counted (including if it was detected as a marginal mark), clicking the target will add a vote for that choice and a green overlay with a check mark icon will appear. If the choice is disabled, clicking on the target will display an error message.

Version: 5.10-CA::11 273 1/15/2020
Democracy Suite® Use Procedures
Figure 7-25: Vote removed
Figure 7-26: Vote Added
7.10.6.1 Adjudicate Write-ins
For write-in contests, a pop-up dialog is shown that allows the user to resolve the write-in to a qualified write-in name, reject the write-in vote as invalid with a listed rejection reason, or accept a write-in as-is. If the write-in is resolved to a qualified write-in name, the overlay will appear green with a check mark icon.
Note that the qualified write-ins that appear in this pop-up are obtained from the election definition information in EMS, which means that they must be defined in Election Event Designer (EED). See the EED user manual for information on how to add qualified write-ins for a contest.

1/15/2020 274 Version: 5.10-CA::11
Chapter 7 - Absentee and Mail Procedures
Qualified write-in names may only be used once per contest. For example, in a vote for two contest, a single qualified write-in name may only be applied to one of each write-in choice. Once a candidate name is selected and assigned to a choice, it is no longer available for subsequent name resolution within that ballot.
Resolving a Write-in to a Qualified Write-in Name:
1. Select the write-in target to open the pop-up.
2. Select the write-in from the list of qualified write-ins.
3. Click Accept. A user notification appears and displays for whom a write-in was accepted.
Figure 7-27: Write-in notification
Accepting a Write-in As-is:
1. Select the write-in target to open the pop-up.
2. Select Accept As-Is. A user notification message appears stating that a write-in was accepted as-is.
In the case where a write-in was added by a voter who wrote a name in the write area, but did not fill in the write-in target, the adjudicator can still accept that mark as-is, which casts a vote for the general write-in option, or accept it to a qualified write-in if one exists. The other option is to leave the write-in as an undervote. To remove a write-in accepted as-is, click Remove Mark.
NOTE: Accept As-Is function does not apply to QR ballots.
Removing a Write-in Mark:
NOTE: An adjudicator must first have accepted the write-in as-is in order for the Remove Mark button to be active.
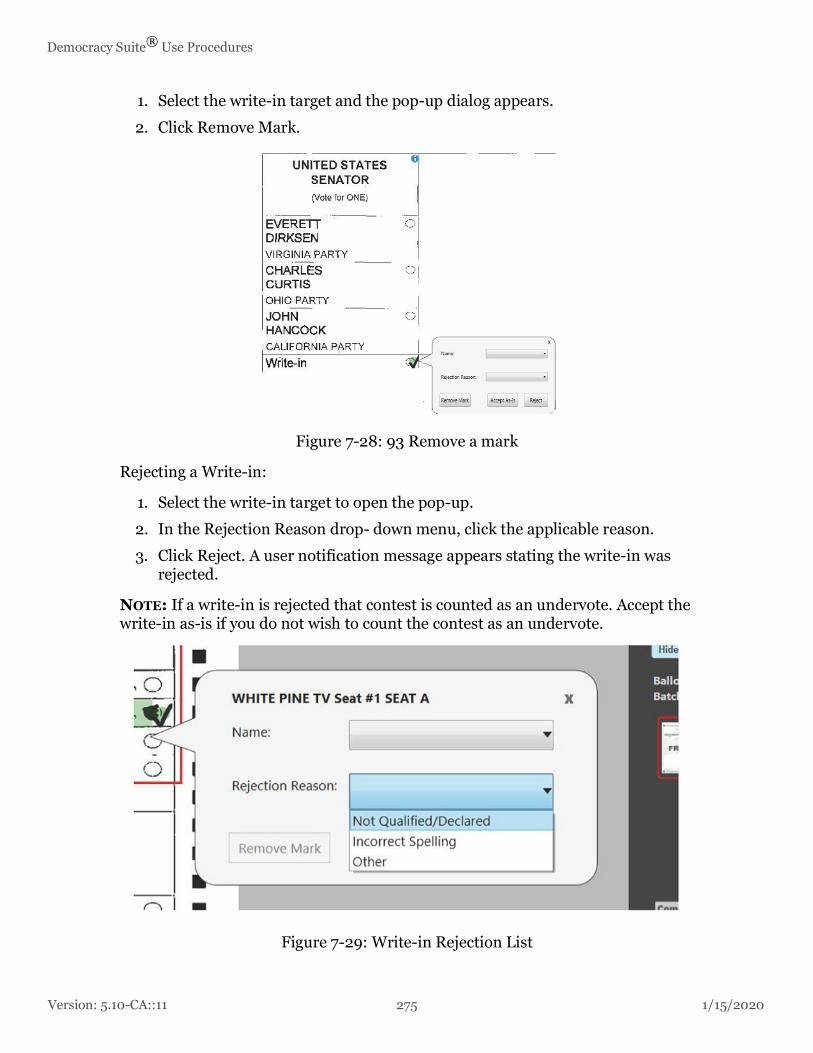
Version: 5.10-CA::11 275 1/15/2020
Democracy Suite® Use Procedures
1. Select the write-in target and the pop-up dialog appears.
2. Click Remove Mark.
Figure 7-28: 93 Remove a mark
Rejecting a Write-in:
1. Select the write-in target to open the pop-up.
2. In the Rejection Reason drop- down menu, click the applicable reason.
3. Click Reject. A user notification message appears stating the write-in was rejected.
NOTE: If a write-in is rejected that contest is counted as an undervote. Accept the write-in as-is if you do not wish to count the contest as an undervote.
Figure 7-29: Write-in Rejection List

1/15/2020 276 Version: 5.10-CA::11
Chapter 7 - Absentee and Mail Procedures
Exiting the Write-in Pop-up Dialog:
1. Select the write-in target and the pop-up dialog will appear.
2. Select the X in the upper right corner.
7.10.6.2 Filtered Contests
If only one or some contests were chosen in the Contest Filtering step of the Project Setup Wizard, as opposed to all contests, only ballots that contain the chosen contest or contests will be shown to adjudicators. Additionally, when a ballot is shown, adjudicators will only be able to make changes to the selected contest or contests, as all other contests will appear grayed-out.
Contest and candidate highlighting, including the contest information icon will only appear for contests that may be adjudicated. Other contests will not have this highlighting regardless of whether they have outstack conditions or not.
Figure 7-30: Adjudicating With Contest Filtering
Version: 5.10-CA::11 277 1/15/2020
Democracy Suite® Use Procedures
If an adjudicator tries to make a change on a contest that cannot be adjudicated, they are notified that the action is not allowed due to the contest filtering constraint and no adjudication occurs.
7.11 Adjudication Process - ICX Marked BallotsAdjudication includes the ability to process digital ballots such as those produced by the Ballot Marking Device (BMD). Ballots printed by the BMD contain cast vote data as a barcode that is machine-readable by the ImageCast® Central scanner, as well as plain text that is readable by a voter or election official.
ICX Marked ballots are contrasted to standard ballots, which are scans of the physical paper ballot on which voters mark their choices. With ICX marked ballots, the only outstack conditions that need adjudication are write-ins, as the originating device does not allow other outstack conditions to occur. Apart from the special user interface that is shown for digital ballots, all other adjudication functionality is identical to that described in section 9.1 “Adjudication Process”.
7.11.1 ImageCast® ICX Marked Ballot Adjudication Overview
As with a standard ballot, to adjudicate a digital ballot the user is presented with a ballot image, which may be the actual scan of a barcode ballot. The user can move and zoom the image as with a standard ballot image. Keyboard shortcuts may be used as well, though some may not be applicable to a digital ballot. See section 9.1 “Adjudication Process” for more information on shortcut keys.
The main difference in the ballot viewing area for digital ballots, when compared to standard ballots, is the presence of the Write-in Resolution Panel on the left side of the screen. The panel displays the names of contests on the ballot that have a write-in choice. Beneath each contest name there is a Resolve write-in button that allows adjudicating each contest.
Unlike standard ballots, digital ballots have no contest boxes or voting targets that can be clicked on or highlighted. For this reason, no colored overlays are shown on top of the image for these ballots, and there are no areas that can be clicked on to adjudicate; the Write-in Resolution Panel is the only way to adjudicate digital ballots.
7.11.1.1 Turning the Ballot Overlay On and Off - ICX Marked Ballots
In the case of an ICX marked ballot, the ballot overlay switch on the Ballot Navigation menu is used to show or hide the Write-in Resolution Panel. If a user finds that the panel is obstructing their view of the ballot, toggling this hides the panel and frees up space on the screen. To do this:
1. On the Ballot Navigation menu, click Hide to remove the Write-in Resolution Panel.
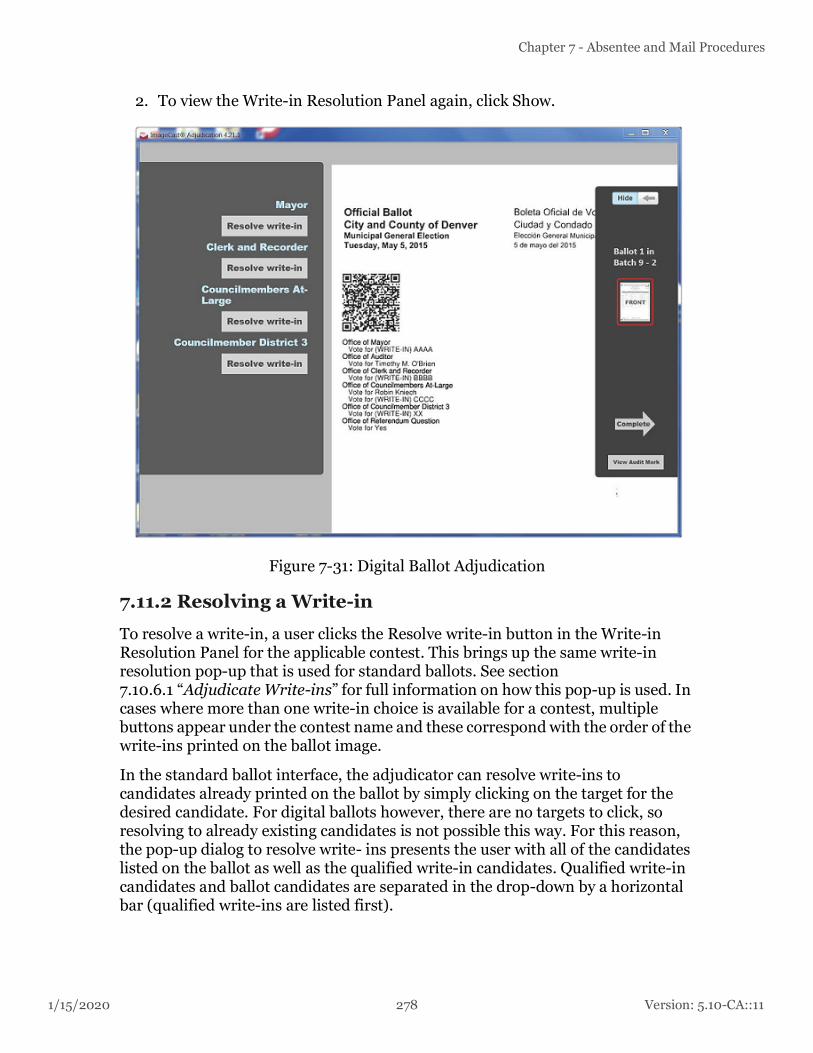
1/15/2020 278 Version: 5.10-CA::11
Chapter 7 - Absentee and Mail Procedures
2. To view the Write-in Resolution Panel again, click Show.
Figure 7-31: Digital Ballot Adjudication
7.11.2 Resolving a Write-in
To resolve a write-in, a user clicks the Resolve write-in button in the Write-in Resolution Panel for the applicable contest. This brings up the same write-in resolution pop-up that is used for standard ballots. See section 7.10.6.1 “Adjudicate Write-ins” for full information on how this pop-up is used. In cases where more than one write-in choice is available for a contest, multiple buttons appear under the contest name and these correspond with the order of the write-ins printed on the ballot image.
In the standard ballot interface, the adjudicator can resolve write-ins to candidates already printed on the ballot by simply clicking on the target for the desired candidate. For digital ballots however, there are no targets to click, so resolving to already existing candidates is not possible this way. For this reason, the pop-up dialog to resolve write- ins presents the user with all of the candidates listed on the ballot as well as the qualified write-in candidates. Qualified write-in candidates and ballot candidates are separated in the drop-down by a horizontal bar (qualified write-ins are listed first).

Version: 5.10-CA::11 279 1/15/2020
Democracy Suite® Use Procedures
NOTE: Note that once a write-in has been adjudicated, the Resolve write-in button changes to show whether the choice was resolved (resolved to a qualified write-in or accepted as-is) or rejected. However, this can always be clicked again to bring up the pop-up and change the previous resolution.
7.11.2.1 Resolving a Write-in to a Qualified Write-in Name or Ballot Candidate
1. Find the contest name to adjudicate in the Write-in Resolution Panel to the left of the screen. If there are many contests with qualified write-ins, it may be necessary to scroll down.
2. Click Resolve write-in for the applicable choice (For more than one write-in for a given contest, first button for the first choice, second button for the second choice, etc.). The resolution pop-up will appear.
3. Select a name from the list of candidate names; both qualified write-in candidates and the ballot candidates are shown.
4. Click Accept. A green notification appears and displays that the write-in was accepted.
Figure 7-32: List of Qualified Write ins
7.11.2.2 Accepting a Write-in As-is on an ICX Marked Ballot:
NOTE: On ICX marked ballots, this button may be used to return a previously rejected write-in to its original state. For example, an adjudicator accidentally rejects a write-in for a given contest/choice. The adjudicator may either go back and resolve the write-in to a qualified write-in name or click Accept As-Is to return it to a non-resolved but still counted write-in.

1/15/2020 280 Version: 5.10-CA::11
Chapter 7 - Absentee and Mail Procedures
1. Find the contest name to adjudicate in the Write-in Resolution Panel to the left of the screen. If there are many contests with qualified write-ins, it may be necessary to scroll down.
2. Click Resolve write-in for the applicable choice (first button for the first choice, second button for the second choice, etc.). The resolution pop-up will appear.
3. Click Accept As-Is. A green notification appears displaying that the write-in was accepted as-is.
7.11.2.3 Rejecting a Write-in - ICX Marked Ballots
1. Find the contest name to adjudicate in the Write-in Resolution Panel to the left of the screen.If there are many contests with qualified write-ins, it may be necessary to scroll down.
2. Click Resolve write-in for the applicable choice (for more than one write-in for a given contest, first button for the first choice, second button for the second choice, etc.). The resolution pop-up will appear.
3. Select a rejection reason from the provided list.
4. Click Reject. A red user-notification appears displaying that the write-in was rejected.
Figure 7-33: Rejecting Write in
7.12 Post-Tabulation Report and Closing Procedures
7.12.1 Closing the ICC Tabulator

Version: 5.10-CA::11 281 1/15/2020
Democracy Suite® Use Procedures
1. Once all scanning is completed on the tabulator, it can be closed. To close the tabulator, apply the iButton and type in the password to enter the Administrator or Supervisor mode.
2. Navigate to the Configuration menu by clicking CONFIGURATION on the left side of the application's screen.
3. Click CLOSE TABULATOR on the bottom of the Configuration menu.
4. You will receive a message prompting you to confirm your decision to Close the Tabulator. Click OK.

1/15/2020 282 Version: 5.10-CA::11
Chapter 7 - Absentee and Mail Procedures
7.12.2 Producing Reports from the ImageCast® Central System
1. Close the tabulator using the CLOSE TABULATOR button on the Configuration screen. A window will open confirming the tabulation closure, click OK.
2. Navigate to the Status menu by clicking on the STATUS icon.
Figure 7-34: The Status Menu in Administrator Mode
3. Click SHOW RESULTS located at the bottom of the "Ballots Scanned" section. The 'Display Batch Results' dialog appears in a new window.
a. If you are producing a Zero Report, verify that the 'Display all ballot IDs and Precincts (even those with no ballots scanned) option is selected and click OK.
b. If you are producing a Results Report, select the Batch, Results, and Contest display options desired, and then click OK.The result data will be shown in Notepad.

Version: 5.10-CA::11 283 1/15/2020
Democracy Suite® Use Procedures
4. Save this file as Zero report if produced prior to running an election to prove that no results are present on the ImageCast® Central system, and print a copy for auditing purposes. If the result report is produced after running an election and closing the poll, save the report, and name it accordingly.
7.13 Loading Election Files for a New Tabulator1. In the SUPERVISOR mode, click on the Project Management button.
The Project Management dialog will appear.
Figure 7-35: The Status Menu in Administrator Mode
2. Click Import, browse to the "C:\DVS", select the specific tabulator folder you wish to load, and then click OK.

1/15/2020 284 Version: 5.10-CA::11
Chapter 7 - Absentee and Mail Procedures
3. In the Active Project list, select the tabulator name and click Load. The new election files will be loaded.
Figure 7-36:
NOTE: If loading the election files for the ICC tabulator assigned to handle write-ins, ensure to change the Secondary path to a folder other than the folder assigned for automatic loading into the RTR.

Version: 5.10-CA::11 285 1/15/2020
Democracy Suite® Use Procedures
CHAPTER 8: SEMI-OFFICIAL CANVASS TABULATION AND REPORTING
This chapter contains suggested procedures that will be a part of a jurisdiction’s Election Night standard operating procedures.
If you have at least one contest of Rank Choice Voting (RCV), you will ne
8.1 System Start-up and Pre-tabulation Report Procedures
8.1.1 Start EMS RTR
1. Double-click on the Results Tally & Reporting icon on the desktop. If this is the first time opening Results Tally & Reporting, the Localization Settings dialog will appear.
2. Select Default as the language option, and click OK. The EMS Results Tally & Reporting application opens.
8.1.2 Run Zero Report
In order to verify that there are no published results in the database:
1. Expand the Reports menu and click Results Reporting.
2. In the Report Group field, choose Election Day Reports.
3. In the Report Name field, choose Summary Report (2 column).
4. Apply the following settings:
• In the Contest Statistics group box, check all items except Double Votes.
• Clear the Cross endorsed totals only checkbox.
• On the Percents option, select Votes Cast.
• On the Write-ins option, select Split.
• Sort Candidates per Global order.
• In the Contest Filter section, choose Select All.
• Choose the Districts radio button, and choose Select All.
• In the Polling location section, choose Select All.
• In the Tabulator section, choose Select All.
• Check all counting groups.
5. Click Create Report. Wait until the report is created and verify that there are no results in the database.

1/15/2020 286 Version: 5.10-CA::11
Chapter 8 - Semi-Official Canvass Tabulation and Reporting
If reporting engine returns an error:
1. Initialize reporting services (refer to 12.2.6 “Initializing Reporting Services”).
2. Once reporting services are successfully configured, click Create Report and verify that there are no results in the database.
3. Click Export and choose your preferred file type.
4. Save the file.
NOTE: If the Zero report is showing any results, notify the Administrator immediately.
8.2 Processing Vote ReportsThe following procedures assume the following:
1. That the RTR User has been created and activated (refer to 12.2.5 “Creation of RTR User in Election Event Designer”) in EED application. If you have received the project from the Dominion Voting, this would have already been set up in the Election Project and the RTR user name and password details would have been provided to the jurisdiction together with the Election Project package. If the jurisdiction is programming their own election project, the EMS Administrator will set up the RTR user (refer to 12.2.5 “Creation of RTR User in Election Event Designer”).
2. Network parameters have been configured (refer to 12.2.3 “Configure Network Parameters”). This should have been set up during the Installation, Readiness and L&A procedures.
3. Reporting services are initialized as would be done during the installation procedure (refer to 12.2.6 “Initializing Reporting Services”).
4. Any pre-existing results (such as results generated during the L&A procedures) must be purged by the Administrator (refer to 4.5.5 “Clearing Logic and Accuracy Test Results”).

Version: 5.10-CA::11 287 1/15/2020
Democracy Suite® Use Procedures
8.2.1 Open Project
To open your Election Project in Results Tally & Reporting:
1. Open the EMS Results Tally & Reporting application.
2. Expand the Election Project item from the Main Menu and click Open Project.
Figure 8-1: EMS Application Server Settings Screen
NOTE: If you are opening the project for the first time you must set the network parameters. Enter all data required.EMS Application Server Host (IP Address or Name): Enter the name of the EMS application server host. If using EMS Express, enter localhost.TCP Communication Port: 80 is the default TCP communication port.EMS Application Server Name: Enter emsapplicationserver
3. Once all data is entered, click Test. If the settings are correct, you will receive confirmation in the gray dialog box. If you do not receive a confirmation, correct your settings, or contact your IT personnel for the proper credentials. Click the OK button to continue the Open Project screen appears. Click on the desired project to select it, and click on the OK button.
NOTE: Only election projects with a Ready for Election status can be opened in the Results Tally & Reporting application. If an election project is not in the Ready for Election status, the election files have not yet been created for that project, and election result files cannot be processed for that project.
NOTE: The EMS Results Tally & Reporting Application User’s status must be activated in the EMS Election Event Designer application.

1/15/2020 288 Version: 5.10-CA::11
Chapter 8 - Semi-Official Canvass Tabulation and Reporting
4. In the election project Login dialog window, type in the credentials for the Results Tally & Reporting Administrator and click OK. If you do not have the credentials, contact your supervisor.
Figure 8-2: Login Screen
5. After successfully logging into the EMS Results Tally & Reporting application, the application expands to include new menu items and the status bar is updated to contain project and user details.
8.2.2 Enable Automatic Results Loading to RTR
1. On the EMS Client Workstation, open the RTR application.
2. On the toolbar, click Actions and then select Automatic Results Loading.
3. On the Automatic Results Loading dialog, click Start.
4. Close the Automatic Results Loading dialog.
8.2.3 Loading Results from Card Management
NOTE: In order to load results, make sure to install File System Service (please see the Democracy Suite EMS Results Tally & Reporting User Guide).
1. Connect the card reader/writer to the EMS Results Tally & Reporting workstation. For more information, see the Connecting the Removable Medium section.
2. Expand the Actions menu, then click Removable Media Management.

Version: 5.10-CA::11 289 1/15/2020
Democracy Suite® Use Procedures
The Load Results dialog appears.
Figure 8-3: Load Results Dialog
NOTE: If the Use test results option was checked in the Project Settings - Project Parameters dialog, header will contain a post fix " - Testing Mode" to indicate that only TEST result files can be loaded. See Project Settings - Project Parameters section.
3. Select one of the following options from the Actions field:
• Load Results file
• Load Ballot Images
• Load Log File
4. If you do not want loaded results to be available for Adjudication, select Skip Adjudication.
5. Click Start Loading to import selected type of file. Insert the Removable Medium into card reader.

1/15/2020 290 Version: 5.10-CA::11
Chapter 8 - Semi-Official Canvass Tabulation and Reporting
Figure 8-4: Load Results dialog
6. The Process window tracks the loading progress for the selected file type. The Load Result dialog contains a record of the completed action. If results are successfully loaded, you may eject the memory card.
Figure 8-5: Load Results dialog
7. It is possible to load the result files, ballot images, and log files separately. For instance, If you want to load ballot images, you need to enable Load Ballot Images and make sure that other checkboxes under Actions are cleared.
8. This procedure is the same for Load Results File and Load Log File.
9. Insert the memory card into card reader.

Version: 5.10-CA::11 291 1/15/2020
Democracy Suite® Use Procedures
10. The Load Result dialog contains a record of the completed action.
Figure 8-6: Load Results dialog
11. This process should be repeated until all results will be loaded.
12. The Load Results dialog contains all relevant information. Possible results include:
• If the results file has already been loaded into the EMS Results Tally & Reporting application, the Load Result dialog contains error information.
Figure 8-7: Load Results Dialog
• If Ballot images or log file you are trying to load have already been loaded into the EMS Results Tally & Reporting application, the Load Result

1/15/2020 292 Version: 5.10-CA::11
Chapter 8 - Semi-Official Canvass Tabulation and Reporting
dialog contains information that Loading is skipped.
Figure 8-8: Load Results Dialog
• If you want to overwrite ballot images, enable Overwrite Ballot Images. Repeat steps if you want to Overwrite Log File.
• If you want to load new result files for the same tabulator, delete the previous result fileThis can be accomplished in two ways as described in the Manage Result Files chapter of this document: Delete Result Files and Purge Results.
• If the removable medium was dismounted during loading, the following error message will appear:
Figure 8-9: Load Results dialog
Version: 5.10-CA::11 293 1/15/2020
Democracy Suite® Use Procedures
• Re-insert the Removable Medium into card reader.
13. ‘When complete, close the dialog.
8.2.4 Load Results from Directory
1. Click Actions and choose Load Results From Directory.The Load dialog appears.
2. Click Browse to browse to the source directory.
3. Expand Computer and browse to the local folder where the results are saved (for example Z:\Project Name\Results\Tabulator x x x x x\Results folder).
4. Click OK.
5. Leave file types as Results.If the results to be loaded are NOT to be adjudicated, select the Skip Adjudication checkbox. If the results to be loaded are allowed to proceed into adjudication, then leave the checkbox unchecked.
6. Select the files you wish to load and click Load.
NOTE: When you select the tabulator folder to load results from, make sure that the “Show Loaded Files” checkbox is selected. The result files that were already loaded will be listed in the window with a “Load” column checked. Select only the result files that have not been loaded and click “OK”. If you try to upload result files that have already been loaded, the message will be displayed notifying you that results already exist in the database.
7. Once all result files have been loaded, click OK.
8. Repeat steps 2 through 7 to import results for each tabulator, taking care to select the Results folder within the desired tabulator folder in step 3 above.
9. Click Close to close the dialog.
8.2.5 Validate and Publish Results
Results must be in a Published state in order to report them.
If your election contains at least one Rank Choice Voting (RCV) contest, please follow these procedures:
1. Create RCV profile
2. Tabulate the RCV contest
3. Generate RCV report
For detailed information on performing these steps, please refer to chapter 12 “Rank Choice Voting” in the Democracy Suite® EMS Results Tally & Reporting Guide.

1/15/2020 294 Version: 5.10-CA::11
Chapter 8 - Semi-Official Canvass Tabulation and Reporting
To publish a selection of result files (that are in Initial state):
1. Select Result Files in the left hand menu bar. The Result Files main activity screen appears.
2. Tabulator, Tabulator Type, and Result State drop down menus may be used to filter the search results.
3. Click Search to list results.
4. Select all results that you wish to include in the reports and click Validate & Publish.
5. Click Yes to confirm your action in the Question dialog that appears.
6. Click Close in the Information dialog that appears once the process is complete.
8.2.6 Election Night Summary Report - Election Day Report
To create Election Summary Report, do the following:
1. Expand the Reports menu and click Results Reporting.
2. In the Report Group field, choose Election Day Reports
3. In the Report Name field, choose Summary Report (2 column).
4. Select the desired criteria in ‘Parameters’ and ‘Filters’ sections of the ‘Election Summary Report’ context sensitive screen and click on the Create Report to generate the report. This may take a while, depending on the size of election.
5. The report will be displayed on the right side of the screen.
6. To export and save the report, click on the Save icon in the shape of the floppy disc (located on the top right tool bar above the report). Select the format in which you wish to save the report.
7. The Windows browse dialog window will appear. Navigate to the location where you want to save the report, enter the name and click on the Save button.
8.2.7 Central Tabulation
Report preliminary Absentee and All Mail ballot results that were scanned on the Absentee/All Mail ICC, up until the jurisdiction’s reporting ‘cutoff ’ point.
Version: 5.10-CA::11 295 1/15/2020
Democracy Suite® Use Procedures
1. Open the EMS Results Tally & Reporting (RTR) application (refer to 8.2.1 “Open Project”). If the project was created by Dominion Voting, the RTR user name and password will be provided to the jurisdiction. Jurisdictions programming their own elections will have to have their Administrator create an RTR user (refer to 12.2.5 “Creation of RTR User in Election Event Designer”) in EED application.
2. Open the appropriate Election Project (refer to 8.2.1 “Open Project”) and enter your login credentials.
3. Run the Zero Report from the RTR (refer to 8.2.3 “Loading Results from Card Management”).
NOTE: If automatic loading of results is used and Adjudication is a part of the workflow, then the RTR will already contain adjudicated results.The results will automatically be loaded into RTR and updated after Adjudication.
4. If automatic results loading is not used, then load the results files, audit log files and result images (refer to 8.2.4 “Load Results from Directory”) (if enabled and required) from the ICC tabulators that are not automatically loaded into the RTR application.
NOTE: When loading results from any ICC tabulator on election night, ensure that the Skip Adjudication check box is selected. On Election Day, only the Results files should be loaded into RTR, since images can prolong the loading process.Once all result files are uploaded, return here and continue with the next step.
5. Validate and publish results files (refer to 8.2.5 “Validate and Publish Results”) in the RTR application.
6. After the Closing of Polls, and after the Early Vote and Election Day ICE and ICP2 results have been loaded (refer to 8.2.4 “Load Results from Directory”) to the RTR application, run the Election Day Reports.
8.2.7.1 Early Vote ImageCast® Evolution and ImageCast® Precinct 2
Report preliminary Early Vote ballot tally results that were scanned up until the jurisdiction-defined ‘Cut Off’ point in time as previously mentioned in sections 6.4.1 “ImageCast® Evolution” and 6.4.2.1 “ImageCast® Precinct 2”:
1. Unpack the CF and SD cards from the Early Vote tabulators and identify the CF or SD1 card for that tabulator to be uploaded.
2. Open the EMS Results Tally & Reporting 8.2.1 “Open Project” application. If the project was created by Dominion Voting, the RTR user name and password will be provided to the jurisdiction. Jurisdictions programming their own elections will have to have their Administrator create an RTR user account and activate (refer to 12.2.5 “Creation of RTR User in Election Event Designer”) it in EED.
3. Open the appropriate Election Project (refer to 8.2.1 “Open Project”) and

1/15/2020 296 Version: 5.10-CA::11
Chapter 8 - Semi-Official Canvass Tabulation and Reporting
enter your login credentials.
4. Load the results files , audit log files and result images (if enabled and required) from all early voting ImageCast® Evolution tabulators into the RTR application.
NOTE: When loading results from any Early Vote tabulator, ensure that the Skip Adjudication check box is selected. Once all result files are uploaded, return here and continue with the next step. On Election Day, only the Results files should be loaded into the RTR, since images can prolong the loading process.
5. Validate and publish (refer to 8.2.5 “Validate and Publish Results”) results files in the RTR application.
6. After the Closing of Polls, and after the Election Day ImageCast® Evolution and ICC results have been loaded to the RTR, run the Election Summary Report (refer to 8.2.6 “Election Night Summary Report - Election Day Report”).
8.2.8 Precinct Tabulation (ICE and ICP2)
After closing of polls on Election Day, the results from precinct ICE and ICP2 tabulators are loaded into RTR as they start arriving to the central processing location.
1. Unpack the CF and SD cards from the Election Day precinct tabulators and locate the CF1 or SD1 cards for the tabulator to be uploaded.
2. Open the EMS Results Tally & Reporting (refer to 8.2.1 “Open Project”) application (referred to here as RTR). If the project was created by Dominion Voting, the RTR user name and password will be provided to the jurisdiction. Jurisdictions programming their own elections will have to have their Administrator create an RTR user account and activate it in EED as described in Creation of RTR User in Election Event Designer (refer to 12.2.5 “Creation of RTR User in Election Event Designer”).
3. Open (refer to 8.2.1 “Open Project”) the appropriate Election Project and enter your login credentials. Load the results files, audit log files and result images “Loading Results from Card Management” on page 288 (if enabled and required) from Election Day ICE and ICP2 tabulators into the RTR application.
NOTE: When loading results from any Election Day tabulator, ensure that the Skip Adjudication check box is selected. Once all result files are uploaded, return here and continue with the next step. On Election Day, only the Results files should be loaded into RTR, since images can prolong the loading process.
4. Continue loading the results as the CF and SD cards arrive until pre-determined points in time are reached, at which result files loaded until that point are published and reported on.

Version: 5.10-CA::11 297 1/15/2020
Democracy Suite® Use Procedures
5. Validate and Publish (refer to 8.2.5 “Validate and Publish Results”) those results.
6. To find out how many precincts have been reported on, as opposed to how many are still due to be loaded into the RTR, run the ‘Tabulator Status’ report:
a. Under the Reports menu click Results Reporting. In the Results Reporting, under Basic group you can find Tabulator Status report.
b. In the ‘Report Name’ drop-down, select the ‘Tabulator Status’ and click on the Create Report button.
c. The success dialog window will appear when the report is complete.
d. Click OK and then click Search to list reports.
e. Double-click on the newly created report to open it to inspect the ‘Load Status’ and ‘Total Ballots Cast’ columns to determine which precincts are missing from the report.
7. Continue the process of loading, publishing and reporting of the results from the Election Day ICE and ICP2 tabulators in the regular intervals until all are loaded.
8. After all results from Election Day ImageCast® Evolution, Election Day ImageCast® Precinct 2 and ICC tabulators have been uploaded, run the Election Summary Report (refer to 8.2.6 “Election Night Summary Report - Election Day Report”) again to obtain the Final Election Night Summary Report.
8.2.9 Precinct Tabulation (ImageCast® X)
ImageCast® X produced ballots need to be run through ImageCast® Evolution, ImageCast® Precinct 2 or ImageCast® Central tabulator in order to be counted. Once the ballot is scanned, the results are tabulated and indistinguishable from pre-printed, hand-marked ballot results.
See section 8.2 “Processing Vote Reports” or 8.2.8 “Precinct Tabulation (ICE and ICP2)” for more information on tabulation.
8.3 Integration with County Systems and Calvoter/VoteCalNOTE: VoteCal has replaced Calvoter
There is no direct results report integration with VoteCal. Results are transferred to the VoteCal system through reports generated through RTR. Reports are generated as text file reports and must match the template provided by California State Election Office. The generated report file is used to auto-report on election night.

1/15/2020 298 Version: 5.10-CA::11
Chapter 8 - Semi-Official Canvass Tabulation and Reporting
NOTE: the text file is same format as used by calvoter and used in new system.
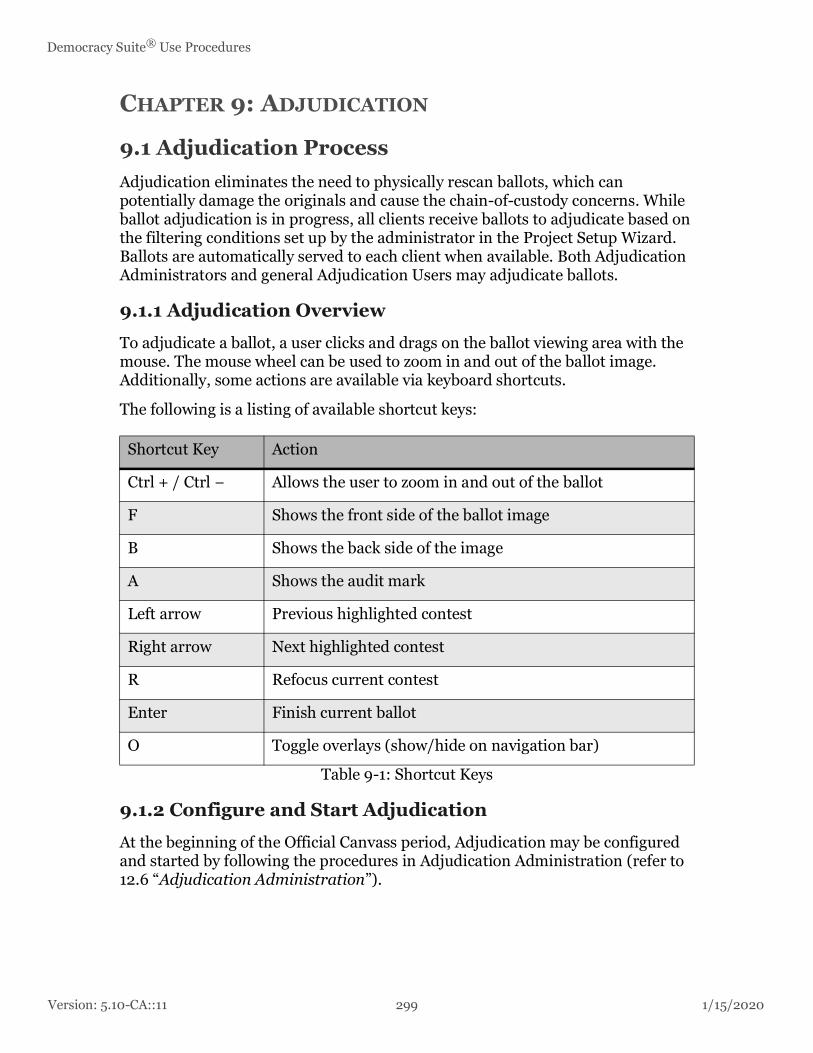
Version: 5.10-CA::11 299 1/15/2020
Democracy Suite® Use Procedures
CHAPTER 9: ADJUDICATION
9.1 Adjudication ProcessAdjudication eliminates the need to physically rescan ballots, which can potentially damage the originals and cause the chain-of-custody concerns. While ballot adjudication is in progress, all clients receive ballots to adjudicate based on the filtering conditions set up by the administrator in the Project Setup Wizard. Ballots are automatically served to each client when available. Both Adjudication Administrators and general Adjudication Users may adjudicate ballots.
9.1.1 Adjudication Overview
To adjudicate a ballot, a user clicks and drags on the ballot viewing area with the mouse. The mouse wheel can be used to zoom in and out of the ballot image. Additionally, some actions are available via keyboard shortcuts.
The following is a listing of available shortcut keys:
9.1.2 Configure and Start Adjudication
At the beginning of the Official Canvass period, Adjudication may be configured and started by following the procedures in Adjudication Administration (refer to 12.6 “Adjudication Administration”).
Shortcut Key Action
Ctrl + / Ctrl − Allows the user to zoom in and out of the ballot
F Shows the front side of the ballot image
B Shows the back side of the image
A Shows the audit mark
Left arrow Previous highlighted contest
Right arrow Next highlighted contest
R Refocus current contest
Enter Finish current ballot
O Toggle overlays (show/hide on navigation bar)
Table 9-1: Shortcut Keys

1/15/2020 300 Version: 5.10-CA::11
Chapter 9 - Adjudication
9.1.3 Ballot Navigation as an Administrator
When opening the application after adjudication is started, Administrators are presented with the ballot adjudication screen that all users are presented with, however, receiving of ballots is paused by default, so administrators will not see a ballot automatically like general users will.
The Ballot Navigation menu on the right side of the user interface provides a toggle switch to start or stop receiving ballots, and another switch to turn target overlays and highlights on/off. In addition, there is a description of the ballot being adjudicated, thumbnails that switch between ballot faces when clicked, and buttons to complete adjudication and view the Audit Mark.
Figure 9-1: Ballot Navigation
9.1.3.1 Starting or Stopping Receipt of Ballots
The first toggle switch on the Ballot Navigation menu allows Administrators to decide whether they receive ballots for adjudication or not. If the Administrator decides to stop receiving ballots after a ballot is received, the ballot is taken away and distributed to another adjudication user. If the administrator reopens an adjudicated ballot (see subsection “Re-opening Ballots” in section 12.6.3.1 “Administrative Screens”), no other ballot will be served, even with this toggle switch on, until after the administrator finishes reviewing the reopened ballot.

Version: 5.10-CA::11 301 1/15/2020
Democracy Suite® Use Procedures
To stop or start receiving ballots:
1. On the Ballot Navigation menu, click Stop to stop receiving ballots for adjudication.
2. To begin receiving ballots for adjudication click Start.
Figure 9-2: Start/Stop receiving ballots toggle button
9.1.3.2 Turning the Ballot Overlay On/Off
The second toggle switch on the Ballot Navigation menu controls the overlays shown over the ballot image, such as contest coloring and checkmarks over the target areas. If you are unsure of a mark made by a voter and want to see the ballot without these overlays, turn this toggle switch off (so it reads Show). When this is off, clicking on the image to adjudicate is unavailable. To be able to adjudicate again, the target overlay switch must be turned on (that is, so it reads Hide).
To turn the ballot overlay on/off:
1. On the Ballot Navigation menu, click Hide to remove checkmarks and overlays.
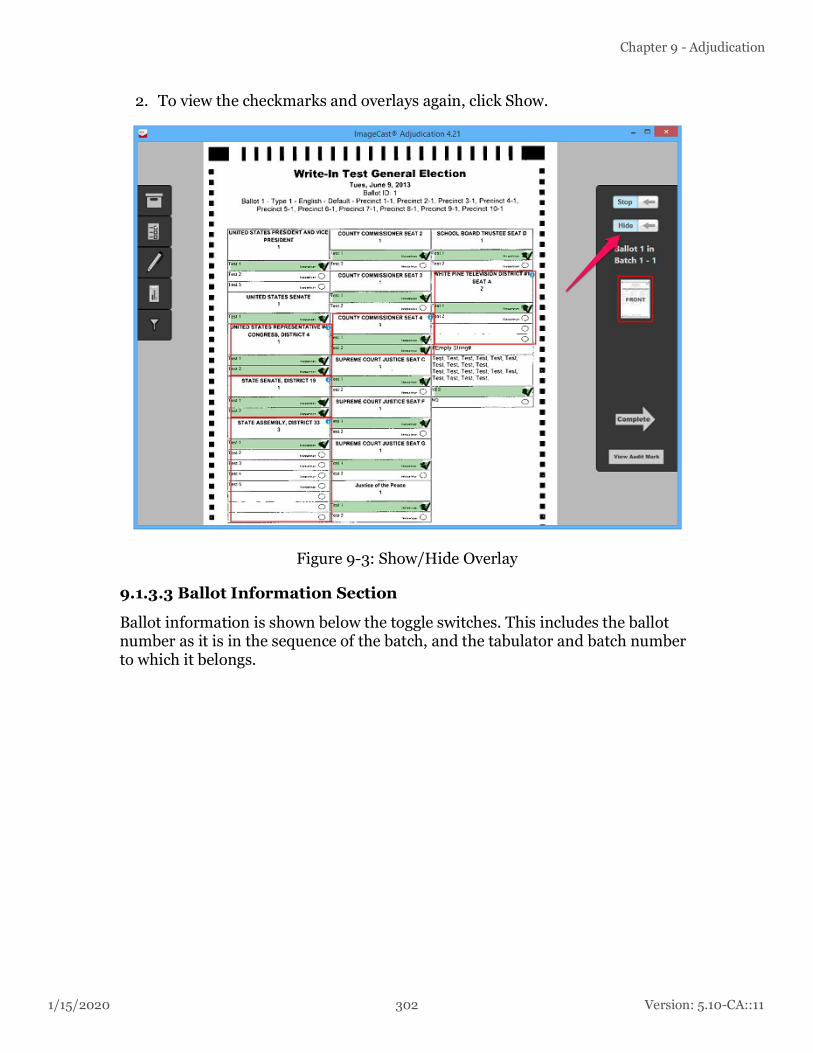
1/15/2020 302 Version: 5.10-CA::11
Chapter 9 - Adjudication
2. To view the checkmarks and overlays again, click Show.
Figure 9-3: Show/Hide Overlay
9.1.3.3 Ballot Information Section
Ballot information is shown below the toggle switches. This includes the ballot number as it is in the sequence of the batch, and the tabulator and batch number to which it belongs.

Version: 5.10-CA::11 303 1/15/2020
Democracy Suite® Use Procedures
To view how many ballots there are left to adjudicate in the batch, and the total ballots left to adjudicate in the system, simply hover over the ballot information.
Figure 9-4: Ballot Information
9.1.3.4 Ballot Face Navigation
The application automatically takes a user to the first available contest that requires ballot adjudication. A red outline will surround the FRONT or BACK icon in the Ballot Navigation menu to notify the user which side of the ballot the application is focused on.
Figure 9-5: Confirm Ballot Save
The Complete button allows adjudicators to save their adjudications and move to the next ballot. Once the ballot has been adjudicated, the ImageCast® AuditMark that is part of the ballot image will be appended with the list of adjudication actions taken.
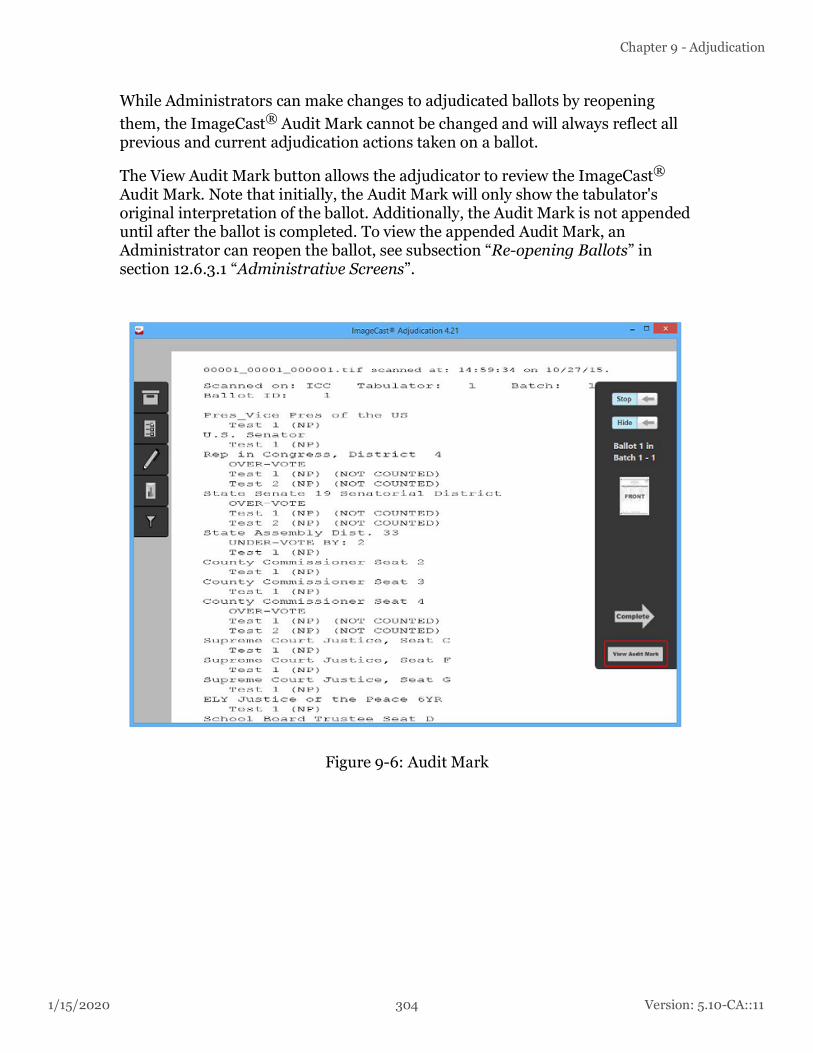
1/15/2020 304 Version: 5.10-CA::11
Chapter 9 - Adjudication
While Administrators can make changes to adjudicated ballots by reopening them, the ImageCast® Audit Mark cannot be changed and will always reflect all previous and current adjudication actions taken on a ballot.
The View Audit Mark button allows the adjudicator to review the ImageCast® Audit Mark. Note that initially, the Audit Mark will only show the tabulator's original interpretation of the ballot. Additionally, the Audit Mark is not appended until after the ballot is completed. To view the appended Audit Mark, an Administrator can reopen the ballot, see subsection “Re-opening Ballots” in section 12.6.3.1 “Administrative Screens”.
Figure 9-6: Audit Mark

Version: 5.10-CA::11 305 1/15/2020
Democracy Suite® Use Procedures
9.1.3.5 Viewing the Audit Mark with Split View
The ballot viewing area can be split into two panes in order to show the ImageCast® Audit Mark along with the ballot face, which enables the adjudicator to inspect both at the same time. A splitter bar at the bottom of the ballot viewing area can be used to adjust this split view.
Figure 9-7: Split View Splitter
To show or adjust the size of the split view, simply click and drag the splitter bar with the mouse. To toggle between showing the split pane at the bottom or to the side of the main pane, double-click the splitter. The Audit Mark image in the split pane can be moved around and zoomed to in the same way that the ballot image in the main pane can be.
9.1.4 Ballot Navigation as a General User
When opening the application, general users are presented with the ballot adjudication screen. If adjudication is started and a ballot is available for adjudication, the application will automatically load it and present it to the user.

1/15/2020 306 Version: 5.10-CA::11
Chapter 9 - Adjudication
The Ballot Navigation menu on the right side of the user interface provides a toggle switch to turn target overlays and highlights on/off. In addition, there is a description of the ballot being adjudicated, thumbnails that switch between ballot faces when clicked, and buttons to complete adjudication and view the Audit Mark.
Figure 9-8: Ballot Navigation
9.1.4.1 Turning the Ballot Overlay On or Off
See section 9.1.3.2 “Turning the Ballot Overlay On/Off”.
9.1.4.2 Ballot Information as a General User
See section 9.1.3.3 “Ballot Information Section”.
9.1.4.3 Ballot Face Navigation as a General User
See section 9.1.3.4 “Ballot Face Navigation”.
9.1.4.4 Viewing the Audit Mark with Split View as a General User
See section 9.1.3.5 “Viewing the Audit Mark with Split View”.
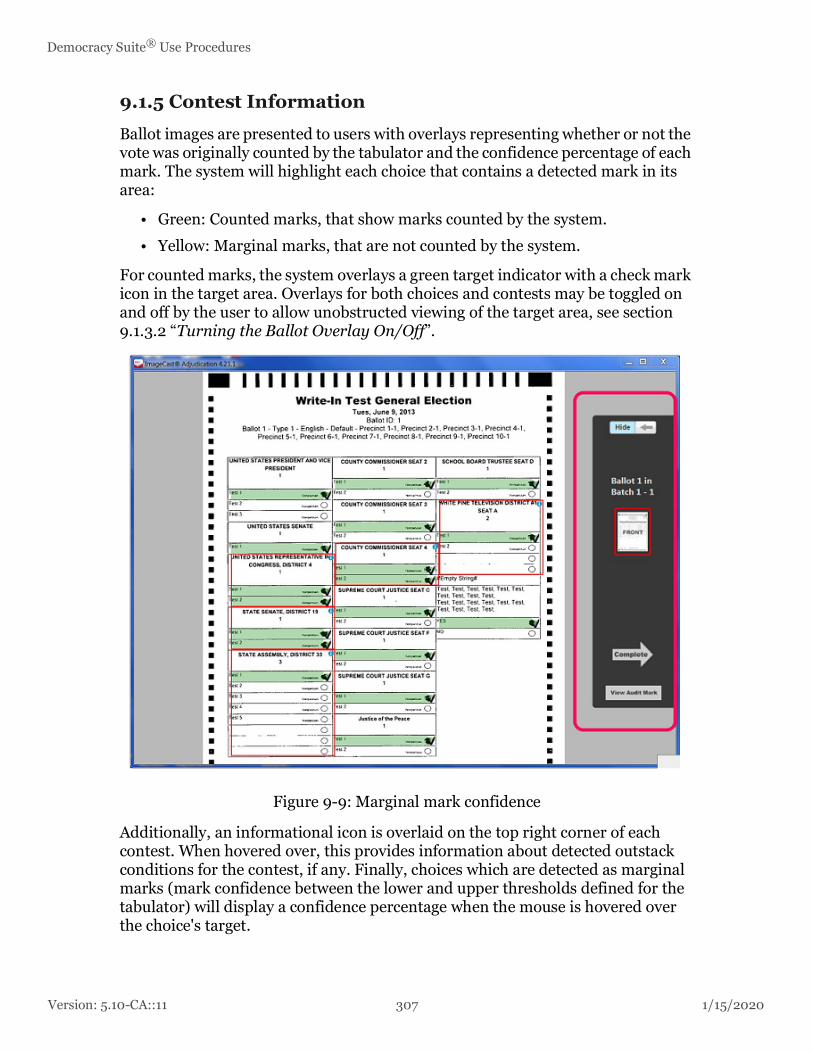
Version: 5.10-CA::11 307 1/15/2020
Democracy Suite® Use Procedures
9.1.5 Contest Information
Ballot images are presented to users with overlays representing whether or not the vote was originally counted by the tabulator and the confidence percentage of each mark. The system will highlight each choice that contains a detected mark in its area:
• Green: Counted marks, that show marks counted by the system.
• Yellow: Marginal marks, that are not counted by the system.
For counted marks, the system overlays a green target indicator with a check mark icon in the target area. Overlays for both choices and contests may be toggled on and off by the user to allow unobstructed viewing of the target area, see section 9.1.3.2 “Turning the Ballot Overlay On/Off”.
Figure 9-9: Marginal mark confidence
Additionally, an informational icon is overlaid on the top right corner of each contest. When hovered over, this provides information about detected outstack conditions for the contest, if any. Finally, choices which are detected as marginal marks (mark confidence between the lower and upper thresholds defined for the tabulator) will display a confidence percentage when the mouse is hovered over the choice's target.
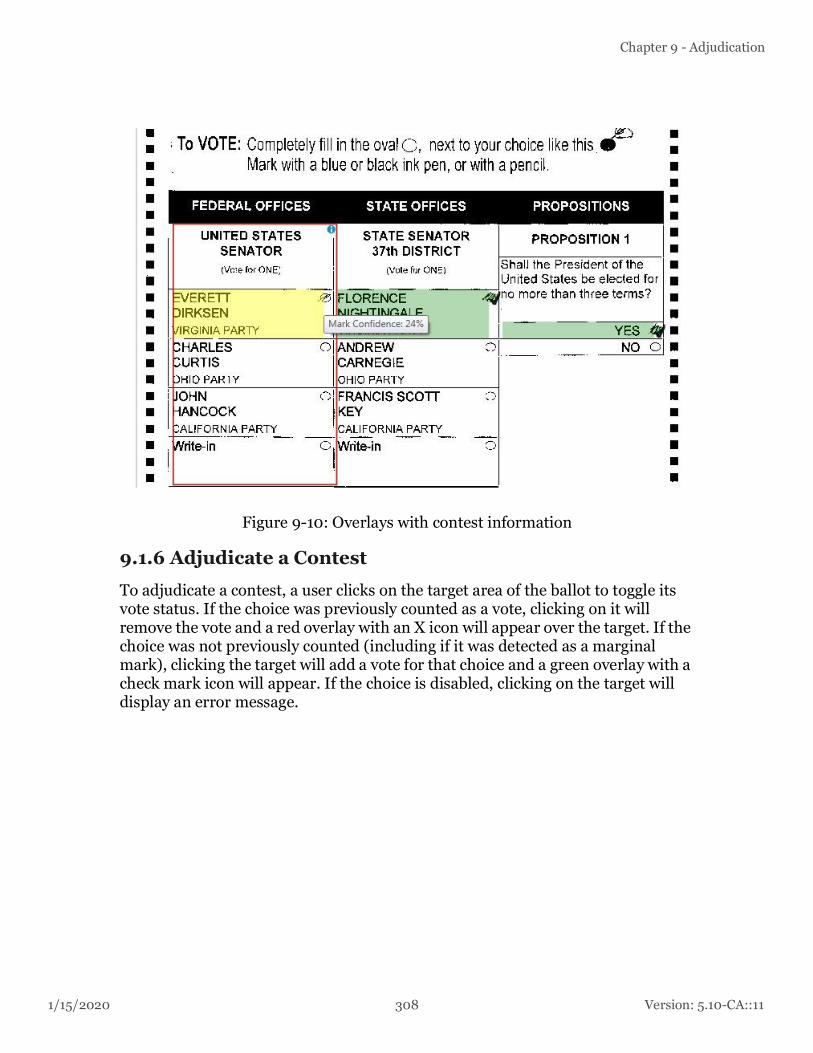
1/15/2020 308 Version: 5.10-CA::11
Chapter 9 - Adjudication
Figure 9-10: Overlays with contest information
9.1.6 Adjudicate a Contest
To adjudicate a contest, a user clicks on the target area of the ballot to toggle its vote status. If the choice was previously counted as a vote, clicking on it will remove the vote and a red overlay with an X icon will appear over the target. If the choice was not previously counted (including if it was detected as a marginal mark), clicking the target will add a vote for that choice and a green overlay with a check mark icon will appear. If the choice is disabled, clicking on the target will display an error message.

Version: 5.10-CA::11 309 1/15/2020
Democracy Suite® Use Procedures
Figure 9-11: Vote removed
Figure 9-12: Vote Added
9.1.6.1 Adjudicate Write-ins
For write-in contests, a pop-up dialog is shown that allows the user to resolve the write-in to a qualified write-in name, reject the write-in vote as invalid with a listed rejection reason, or accept a write-in as-is. If the write-in is resolved to a qualified write-in name, the overlay will appear green with a check mark icon.
Note that the qualified write-ins that appear in this pop-up are obtained from the election definition information in EMS, which means that they must be defined in Election Event Designer (EED). See the EED user manual for information on how to add qualified write-ins for a contest.

1/15/2020 310 Version: 5.10-CA::11
Chapter 9 - Adjudication
Qualified write-in names may only be used once per contest. For example, in a vote for two contest, a single qualified write-in name may only be applied to one of each write-in choice. Once a candidate name is selected and assigned to a choice, it is no longer available for subsequent name resolution within that ballot.
Resolving a Write-in to a Qualified Write-in Name:
1. Select the write-in target to open the pop-up.
2. Select the write-in from the list of qualified write-ins.
3. Click Accept. A user notification appears and displays for whom a write-in was accepted.
Figure 9-13: Write-in notification
Accepting a Write-in As-is:
1. Select the write-in target to open the pop-up.
2. Select Accept As-Is. A user notification message appears stating that a write-in was accepted as-is.
In the case where a write-in was added by a voter who wrote a name in the write area, but did not fill in the write-in target, the adjudicator can still accept that mark as-is, which casts a vote for the general write-in option, or accept it to a qualified write-in if one exists. The other option is to leave the write-in as an undervote. To remove a write-in accepted as-is, click Remove Mark.
NOTE: Accept As-Is function does not apply to QR ballots.
Removing a Write-in Mark:
NOTE: An adjudicator must first have accepted the write-in as-is in order for the Remove Mark button to be active.

Version: 5.10-CA::11 311 1/15/2020
Democracy Suite® Use Procedures
1. Select the write-in target and the pop-up dialog appears.
2. Click Remove Mark.
Figure 9-14: 93 Remove a mark
Rejecting a Write-in:
1. Select the write-in target to open the pop-up.
2. In the Rejection Reason drop- down menu, click the applicable reason.
3. Click Reject. A user notification message appears stating the write-in was rejected.
NOTE: If a write-in is rejected that contest is counted as an undervote. Accept the write-in as-is if you do not wish to count the contest as an undervote.
Figure 9-15: Write-in Rejection List

1/15/2020 312 Version: 5.10-CA::11
Chapter 9 - Adjudication
Exiting the Write-in Pop-up Dialog:
1. Select the write-in target and the pop-up dialog will appear.
2. Select the X in the upper right corner.
9.1.6.2 Filtered Contests
If only one or some contests were chosen in the Contest Filtering step of the Project Setup Wizard, as opposed to all contests, only ballots that contain the chosen contest or contests will be shown to adjudicators. Additionally, when a ballot is shown, adjudicators will only be able to make changes to the selected contest or contests, as all other contests will appear grayed-out.
Contest and candidate highlighting, including the contest information icon will only appear for contests that may be adjudicated. Other contests will not have this highlighting regardless of whether they have outstack conditions or not.
Figure 9-16: Adjudicating With Contest Filtering

Version: 5.10-CA::11 313 1/15/2020
Democracy Suite® Use Procedures
If an adjudicator tries to make a change on a contest that cannot be adjudicated, they are notified that the action is not allowed due to the contest filtering constraint and no adjudication occurs.
9.2 Adjudication Process - ICX Marked BallotsAdjudication includes the ability to process digital ballots such as those produced by the Ballot Marking Device (BMD). Ballots printed by the BMD contain cast vote data as a barcode that is machine-readable by the ImageCast® Central scanner, as well as plain text that is readable by a voter or election official.
ICX Marked ballots are contrasted to standard ballots, which are scans of the physical paper ballot on which voters mark their choices. With ICX marked ballots, the only outstack conditions that need adjudication are write-ins, as the originating device does not allow other outstack conditions to occur. Apart from the special user interface that is shown for digital ballots, all other adjudication functionality is identical to that described in section 9.1 “Adjudication Process”.
9.2.1 ImageCast® ICX Marked Ballot Adjudication Overview
As with a standard ballot, to adjudicate a digital ballot the user is presented with a ballot image, which may be the actual scan of a barcode ballot. The user can move and zoom the image as with a standard ballot image. Keyboard shortcuts may be used as well, though some may not be applicable to a digital ballot. See section 9.1 “Adjudication Process” for more information on shortcut keys.
The main difference in the ballot viewing area for digital ballots, when compared to standard ballots, is the presence of the Write-in Resolution Panel on the left side of the screen. The panel displays the names of contests on the ballot that have a write-in choice. Beneath each contest name there is a Resolve write-in button that allows adjudicating each contest.
Unlike standard ballots, digital ballots have no contest boxes or voting targets that can be clicked on or highlighted. For this reason, no colored overlays are shown on top of the image for these ballots, and there are no areas that can be clicked on to adjudicate; the Write-in Resolution Panel is the only way to adjudicate digital ballots.
9.2.1.1 Turning the Ballot Overlay On and Off - ICX Marked Ballots
In the case of an ICX marked ballot, the ballot overlay switch on the Ballot Navigation menu is used to show or hide the Write-in Resolution Panel. If a user finds that the panel is obstructing their view of the ballot, toggling this hides the panel and frees up space on the screen. To do this:
1. On the Ballot Navigation menu, click Hide to remove the Write-in Resolution Panel.

1/15/2020 314 Version: 5.10-CA::11
Chapter 9 - Adjudication
2. To view the Write-in Resolution Panel again, click Show.
Figure 9-17: Digital Ballot Adjudication
9.2.2 Resolving a Write-in
To resolve a write-in, a user clicks the Resolve write-in button in the Write-in Resolution Panel for the applicable contest. This brings up the same write-in resolution pop-up that is used for standard ballots. See section 9.1.6.1 “Adjudicate Write-ins” for full information on how this pop-up is used. In cases where more than one write-in choice is available for a contest, multiple buttons appear under the contest name and these correspond with the order of the write-ins printed on the ballot image.
In the standard ballot interface, the adjudicator can resolve write-ins to candidates already printed on the ballot by simply clicking on the target for the desired candidate. For digital ballots however, there are no targets to click, so resolving to already existing candidates is not possible this way. For this reason, the pop-up dialog to resolve write- ins presents the user with all of the candidates listed on the ballot as well as the qualified write-in candidates. Qualified write-in candidates and ballot candidates are separated in the drop-down by a horizontal bar (qualified write-ins are listed first).

Version: 5.10-CA::11 315 1/15/2020
Democracy Suite® Use Procedures
NOTE: Note that once a write-in has been adjudicated, the Resolve write-in button changes to show whether the choice was resolved (resolved to a qualified write-in or accepted as-is) or rejected. However, this can always be clicked again to bring up the pop-up and change the previous resolution.
9.2.2.1 Resolving a Write-in to a Qualified Write-in Name or Ballot Candidate
1. Find the contest name to adjudicate in the Write-in Resolution Panel to the left of the screen. If there are many contests with qualified write-ins, it may be necessary to scroll down.
2. Click Resolve write-in for the applicable choice (For more than one write-in for a given contest, first button for the first choice, second button for the second choice, etc.). The resolution pop-up will appear.
3. Select a name from the list of candidate names; both qualified write-in candidates and the ballot candidates are shown.
4. Click Accept. A green notification appears and displays that the write-in was accepted.
Figure 9-18: List of Qualified Write ins
9.2.2.2 Accepting a Write-in As-is on an ICX Marked Ballot:
NOTE: On ICX marked ballots, this button may be used to return a previously rejected write-in to its original state. For example, an adjudicator accidentally rejects a write-in for a given contest/choice. The adjudicator may either go back and resolve the write-in to a qualified write-in name or click Accept As-Is to return it to a non-resolved but still counted write-in.

1/15/2020 316 Version: 5.10-CA::11
Chapter 9 - Adjudication
1. Find the contest name to adjudicate in the Write-in Resolution Panel to the left of the screen. If there are many contests with qualified write-ins, it may be necessary to scroll down.
2. Click Resolve write-in for the applicable choice (first button for the first choice, second button for the second choice, etc.). The resolution pop-up will appear.
3. Click Accept As-Is. A green notification appears displaying that the write-in was accepted as-is.
9.2.2.3 Rejecting a Write-in - ICX Marked Ballots
1. Find the contest name to adjudicate in the Write-in Resolution Panel to the left of the screen.If there are many contests with qualified write-ins, it may be necessary to scroll down.
2. Click Resolve write-in for the applicable choice (for more than one write-in for a given contest, first button for the first choice, second button for the second choice, etc.). The resolution pop-up will appear.
3. Select a rejection reason from the provided list.
4. Click Reject. A red user-notification appears displaying that the write-in was rejected.
Figure 9-19: Rejecting Write in

Version: 5.10-CA::11 317 1/15/2020
Democracy Suite® Use Procedures
CHAPTER 10: OFFICIAL CANVASS AND POST-ELECTION PROCEDURES
In the post-election period, the jurisdiction will continue to process Absentee/Mail ballots as well as Early Voting, Provisional and any exception ballots. This process involves:
1. Remaking of damaged and other ballots unreadable by the scanner.
2. Configure (refer to 12.6.2 “Project Setup Wizard”) and Start Adjudication (refer to 12.6.3.2 “Stopping Adjudication”). General Adjudication users may start (see section 9.1 “Adjudication Process” or 9.2 “Adjudication Process - ICX Marked Ballots”).
3. Load election files (see section 8.2.3 “Loading Results from Card Management”) for the ‘Absentee/Mail ICC’ tabulator handling all precincts to scan the ballots.
4. Put the Absentee/Mail ballots into a batch.
5. Scan the batch of Absentee/Mail ballots (refer to 7.8.1 “Scanning and Accepting Batches”) on the tabulator.
6. Clearly label the batch just scanned and store in designated container.
7. Repeat steps to complete scanning of all batches.
8. Complete the adjudication of all ballots with outstack conditions (see section 9.1 “Adjudication Process” or 9.2 “Adjudication Process - ICX Marked Ballots”).
Ballot adjudication may be done in parallel with scanning on ICC. This section assumes that the Adjudication Administrator has configured and started adjudication (refer to 10.1 “Election Observer Panel”) on the EMS server. Procedures for adjudicating ballots are described in detail in sections 9.1 “Adjudication Process” and 9.2 “Adjudication Process - ICX Marked Ballots”, and will not be repeated in this section.
9. Get the Adjudication Administrator to submit all adjudicated batches (refer to F.5.1 “Submission and Publishing of Batches”).
• Scan and process the Provisional (refer to 6.6.2 “Provisional Voting on ICX”) ballots.
• Scan the remade ballots on appropriate ImageCast® Central tabulators.
• Resetting result files to allow for adjudication for all results imported on election night with “Skip Adjudication” option selected:
• Display a list of loaded results, by clicking on the Result Files option in the Activities Navigation Panel (General group).
1/15/2020 318 Version: 5.10-CA::11
Chapter 10 - Official Canvass and Post-Election Procedures
• In the Result Files main activity screen omit the search criteria and click on the Search button to list all result files.
• Use the Sort functionality to identify result files that are in status “Skipped Adjudication”.
• Select all result files in status “Skipped Adjudication” and click on the Reject button - this will change the status of those result files from “Published” to “Rejected” state.
• Then, select those same result files and click “Reset” - this action will change the state of those result files from “Rejected” to “Initial”.
• Finally, click “Allow Adjudication” for all those result files that will result in their adjudication state being transformed from “Skipped” to “Pending Adjudication”.
• Complete adjudication for ballots scanned and rescanned as described in this section (see section 9.1 “Adjudication Process” or 9.2 “Adjudication Process - ICX Marked Ballots”).
• Validate and publish (refer to 8.2.5 “Validate and Publish Results”) all remaining results into RTR. Run the Statement of Votes Cast report in the RTR.
• Back up election project data and results (refer to 10.10 “Backup and Retention of Election Material”) on the EMS Server.
• Stop adjudication (refer to 12.6.3.2 “Stopping Adjudication”) on the EMS Server.
• Perform post-election system back up.
10.1 Election Observer PanelDuring the various phases of the election setup process, ranging from:
• Central Count equipment programming and configuration
• Central Count equipment logic and accuracy testing
• Tabulation and ballot marking device programming and configuration
• Tabulation and ballot marking device logic and accuracy testing
An Election observer panel may be present for activities. This panel may include:
• Representatives from qualified political parties
• Representatives from legitimate citizens or media organizations
The county elections officials may limit the number of observers, as needed.

Version: 5.10-CA::11 319 1/15/2020
Democracy Suite® Use Procedures
10.2 Canvassing Precinct ReturnsCounties should canvass their ballots returned, by precinct. In the canvass of precinct returns, counties should reconcile the following:
• Ballots tabulated in the voting systemagainst
• Ballots spoiled, damaged, or duplicated&
• Ballots issued in the poll book / roster
Some helpful precinct canvass reports:
Precinct Canvass Report
To run the precinct canvass report:
1. Open the RTR Application.
2. Log into the Election Project.
3. From the left navigation pane, expand the Reports submenu.
4. Select the Results Reporting option.
5. From the Report Group drop-down menu, select Basic.
6. From the Report Name drop-down menu, select Canvass.
7. Select the Output Type (Excel or HTML).
8. Click Create Report.

1/15/2020 320 Version: 5.10-CA::11
Chapter 10 - Official Canvass and Post-Election Procedures
9. The report will generate in a new window.
10.3 Canvassing Absentee BallotsCounties should canvass their ballots returned, by precinct. In the canvass of precinct returns, counties should reconcile the following:
• Ballots tabulated in the voting systemagainst
• Ballots spoiled, damaged, or duplicated&
• Ballots issued in the poll book / roster
Some helpful precinct canvass reports:
Precinct Canvass Report
To run the precinct canvass report:
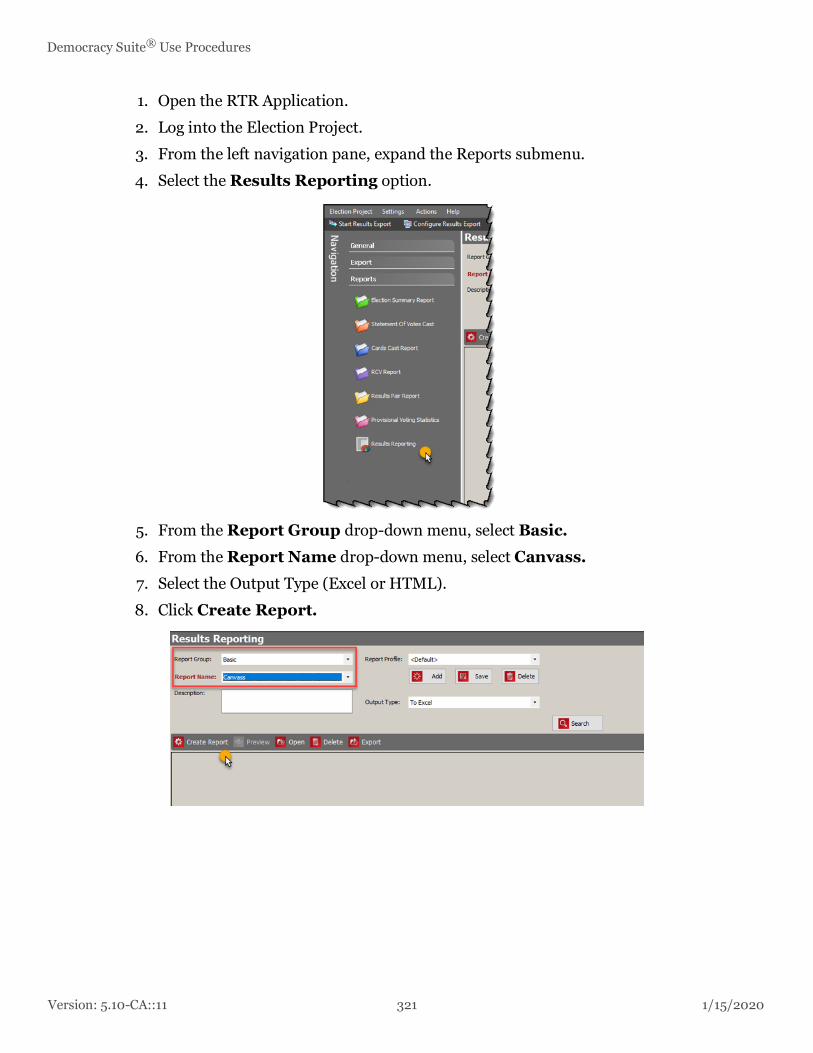
Version: 5.10-CA::11 321 1/15/2020
Democracy Suite® Use Procedures
1. Open the RTR Application.
2. Log into the Election Project.
3. From the left navigation pane, expand the Reports submenu.
4. Select the Results Reporting option.
5. From the Report Group drop-down menu, select Basic.
6. From the Report Name drop-down menu, select Canvass.
7. Select the Output Type (Excel or HTML).
8. Click Create Report.

1/15/2020 322 Version: 5.10-CA::11
Chapter 10 - Official Canvass and Post-Election Procedures
9. The report will generate in a new window.
10.4 Canvassing Provisional BallotsProvisional ballots will be handled according to the county’s business procedure. Counties may decide to tabulate their provisional ballots in a selected batch or counting group. These totals for these batches or counting group(s) can be reconciled against the total number of provisional ballots verified as valid ballots.
10.5 Canvassing Write-in VotesWrite-in Votes will be tallied into the following categories:
• Accepted – resolved to a qualified write-in candidate
• Accepted As-Is – if the write-in is part of an overvote condition
• Rejected
The jurisdiction can produce reports detailing the total number(s) of write-ins tallied.

Version: 5.10-CA::11 323 1/15/2020
Democracy Suite® Use Procedures
10.6 1% Manual Recount ProceduresIn order to prepare for the 1% manual recount, ballots scanned centrally should be prepared in batches of the same or similar size. Additional batches of ballots can be added to the same ImageCast Central batch. The recommended number of ballots to feed into the scanner’s input tray at a given time is:
• Canon DR-G1130: apx. 100 ballots
• Canon DR-X10C: apx 100 ballots
• Interscan HiPro: apx. 100 ballots loaded into each input tray
1. Batch labels/wrapper sheets to track:
a. Date scanned
b. Tabulator number
c. Operator
d. Batch number
e. Total ballots scanned in batch
2. Optional: Batch logs to track:
a. Date Scanned
b. Tabulator number
c. Operator
d. Batch number
A robust batch management procedure will facilitate the easy location of ballots during the 1% manual recount.
Conducting the recount
County election officials will draw randomly:
a. PrecinctsAnd/or
b. Batches
Then, county officials should locate and isolate ballots to be recounted, and manually tally those batches, in accordance with jurisdictional procedures.
During the recount, it is important for officials to accounting for digital adjudication activities. This can be done via the Adjudication Activity Log, and the AuditMark. To compare the results of the manual tally against the identified ballots, counties may use the Cast Vote Record export, or the Election Summary report, filtered by batch or precinct.

1/15/2020 324 Version: 5.10-CA::11
Chapter 10 - Official Canvass and Post-Election Procedures
10.7 Handling Ballot Exceptions(definition of vote, determining voter intent) How to handle various incorrect markings. Guidelines on determining voter intent.
Most ballot exceptions will be handled by the Adjudication application. This may include:
• Overvotes – when definitive marks are detected in a higher number of voting targets than that contests’ vote for total
• Undervotes – when less than the number of a contests’ vote for total are marked in a given contest
• Blank contests – when no marks are detected for a given contests voting targets
• Blank ballots – when no marks are detected for a given ballots voting targets
The Adjudication application will not handle actually damaged ballots. These must be duplicated.
10.8 Post-Election Logic and Accuracy TestingAlthough not required by California law, this Post-Election L&A can be used to verify that the tabulators logic and the ability to tally ballots accurately has not been compromised since the Pre-Election L&A. The Post-Election L&A can be executed following the instructions in section.
10.9 Final Reporting of Official CanvassWhen jurisdictions are ready to complete their official canvass reporting, they should verify the following:
• All CF/SD Cards from tabulators have been completely loaded and adjudicated (if applicable)
• Results
• Images
• Logs
• All VBM (and other central count) ballots have been tabulated and adjudicated
• All adjudicated batches have been reviewed and submitted
• All results files / batches have been validated & published.
Counties may find the following reports useful:
• Statement of Votes Cast (broken down by District or Precinct)
• Precinct Canvass

Version: 5.10-CA::11 325 1/15/2020
Democracy Suite® Use Procedures
• District Canvass
• District Total Canvass
Cast Vote Record export
10.10 Backup and Retention of Election Material
10.10.1 General Procedures
Upon the certification of the election results, the California Elections Code applies to the handling, security and disposal of elections materials. The retention period for related election materials is six months for all non-federal elections. The federal election retention period is 22 months. Retention periods may be extended in the event of a court challenge.
10.10.2 Security of Materials Following Ballot Tally• Either on Election night during vote tally, or following vote tally, all of the
event log, ballot images and summary totals from each cartridge used in the election shall be backed up to the tabulation database.
• The local Election Official shall provide for retention and storage of the database containing the cartridge information and of any other data processing materials related to the vote tally in accordance with statutory retention requirements.
• After vote tally, all of these materials shall be placed in locked storage in a secure location, and shall remain there until the expiration of the period for challenging elections and for as long as required by law, unless a court orders their release.
• During the period of storage, the local Election Official or the Secretary of State may order the release of the materials for purposes of a manual recount or for election verification. After this process, they shall be returned to storage.

1/15/2020 326 Version: 5.10-CA::11
Chapter 10 - Official Canvass and Post-Election Procedures

Version: 5.10-CA::11 327 1/15/2020
Democracy Suite® Use Procedures
CHAPTER 11: RECOUNT PROCEDURES
11.1 Request for a RecountA request for a Recount and the conduct of the Recount shall be made in accordance with the California Elections Code Division 15, Chapter 9, Articles 1 through 5, and California Administrative Code Title 2, Division 7, Chapter 8.1.
11.2 Conducting an Electronic Recount
11.2.1 Creating Recount Election Projects
1. From the live election project, create a duplicate copy to be used for the recount by navigating to the Election Project menu in the EMS Election Event Designer client application.
2. Click Save As. Ensure that your duplicate copy is given a unique name by including the word 'Recount', or similar, in the title for clarity.
3. Close the live election project by clicking Election Project in the top toolbar, and selecting Close Project.
4. Open the duplicate project from the Election Project top toolbar by selecting Open Project, using the same credentials used in the original project.
5. Once you have opened your Election Project, navigate to the Settings menu item on the top toolbar and click Election Event Properties. Roll the election project back to the 'Ballots Generated' stage by selecting the Ballots Generated option from the Election Project Status field.
6. If required, create or modify your Device Configuration settings for the tabulator(s) to be used in the recount. Note that you must configure your settings to sort or return overvoted and undervoted ballots so that they can be forwarded to the Manual Recount Election Officials.
7. In the Navigation Menu on the right of EED, choose a single contest to be recounted and disable all other contests by selecting Contest. Double-click the contests you want disabled, then select the Disabled checkbox. At this point, there are two possible options:
• Use the same tabulators for the recount as were used in the original election.
• Use ImageCast® Central high speed scanners if your county has this option available.
8. If you wish to use the same tabulators for the recount as were used in the original election, create new election files by expanding the Action menu and clicking Create Election Files. Proceed to section 11.2.2 “Recounting the Ballots”.

1/15/2020 328 Version: 5.10-CA::11
Chapter 11 - Recount Procedures
9. If you opt to use ImageCast® Central high speed scanners to conduct the recount, add new ICC tabulators to your project by performing the following:
a. Expand the Tabulation item from the Navigation menu and select Tabulators to open the Tabulation - Tabulators context sensitive screen.
b. Click Search to populate the list of existing tabulators.
c. Select all existing tabulators and click Delete.
d. Click Yes in the confirmation dialog that appears.
e. To create a new tabulator for use in the recount, click Create New. A Tabulator dialog appears.
f. Enter the tabulator's name and number in the specified fields. Select a polling place from the Polling Place drop down.
g. Select the ImageCast® Central from the Tabulator Type drop down. You can also select the programming group from the Programming Group drop down.
h. Select the appropriate DCF configuration from the Device Settings drop down. You may need to create a new DCF configuration to meet your needs for the recount.
i. To connect this tabulator to the desired precinct(s), click the Precincts tab and click Connect. The Tabulated Precincts dialog appears.
j. Click Search to populate the list of available precincts.
k. Select the desired precinct(s) and click Assign and Close. The precinct(s) now appear in the Precincts tab of the Tabulator dialog.
l. Click Save and Close.
m. Repeat the steps above for each tabulator you wish to create for the recount.
n. Create new election files by expanding the Action menu item in the top toolbar, and selecting Create Election Files.
11.2.2 Recounting the Ballots
Using your newly-created election files, program the Compact Flash memory card(s) and iButton Security Key(s) for the tabulator(s) to be used in your recount, and scan the ballots to be recounted through the tabulator(s). Ballots containing overvotes and undervotes will be sorted by the tabulators during this process either by returning the ballots if using the ImageCast® Evolution, or, if using the ImageCast® Central, by stopping the batch. Forward the overvoted and undervoted ballots to the manual recount officials.

Version: 5.10-CA::11 329 1/15/2020
Democracy Suite® Use Procedures
11.2.3 Consolidating Recounted Results
1. When all scanning is complete, generate results reports from your tabulators. These will contain the results for all paper ballots that do not contain overvoted or undervoted contests. Because all other contests have been disabled in the database, the tabulator results reports only contain results for the contest of interest.
2. Load all of your results files and ballot images into the Results Tally & Reporting application.
3. When the manual recount results are complete, input them into the EMS Results Tally & Reporting application using the manual entry feature.
4. When all results have been entered into the database, validate and publish all of them.
5. Generate results reports as required using Results Tally & Reporting standard reporting functionality.
1/15/2020 330 Version: 5.10-CA::11
Chapter 12 - EMS Administrator's Role in Managing System Security and Integrity
CHAPTER 12: EMS ADMINISTRATOR'S ROLE IN MANAGING SYSTEM SECURITY AND INTEGRITY
The Democracy Suite® platform, and all of its related project and development processes, closely follows the practices and principles embodied in the ISO 27000 series of recommendations (ISO 27001 and ISO27002). The security mechanisms applied from system design through deployment are based on extensive risk analysis and subsequent risk mitigation decisions.
It is important to state that appropriate processes must be defined and followed by all business stakeholders within the system, including election staff members of the jurisdiction and Dominion Voting as the vendor, in order to ensure the system’s proper security and protection. To this end, Democracy Suite® provides the enabling techniques to allow jurisdictions to follow best security practices and maintain compliance with local law. The Democracy Suite® Threat Register is outlined in appendix G “Threat Register”.
12.1 Physical Security of System and ComponentsElection Event Designer has the ability to perform the following logical input activities:
• Restore the election project from the previously-defined election project backup file, packed in the compressed ZIP archive:
• Import election definition data from a third party entity in the form of an XML election definition file.
• Import recorded dynamic audio files produced by the EMS Audio Studio client application from the EMS workstation.
• Import recorded static audio files in the form of SPX/OGG speech-optimized audio files.
• Import political party symbols/logos.
• Import templates (contest, choice, instructions) for ballot styling in Rich Text Format. The templates are defined as XML files with a .tco file extension.
• Import ImageCast® Central Device Configuration Files
• ImageCast® Evolution and ImageCast® Precinct 2 Machine Behavioral Settings in XML file format.
• Import EMS system permission rule sets in XML file format.
Election Event Designer (EED) provides the following logical output interfaces:
Version: 5.10-CA::11 331 1/15/2020
Democracy Suite® Use Procedures
• Ballot images in PDF print-ready format (PDF 1X-a) for use by the ImageCast® devices.
• Audio files in SPX format for ICX
• Audio files in SPX/OGG format and ballot images in PNG format for ImageCast® Evolution and ImageCast® Precinct 2 functionality.
• Election definition files in a proprietary binary file format to be used by the ImageCast® Central tabulators.
• Credential authentication data used to program iButton Security Keys to be used by the ImageCast® tabulators.
• Device Configuration Files in proprietary binary format to be used by the ImageCast® Central tabulators.
• Machine Behavior Settings files in XML format to be used by the ImageCast® Evolution tabulators.
• A variety of system level reports in XML or PDF format to be used by human or electronic stakeholders.
• Audio library definition files in XML format, which define the content to be recorded using the EMS Audio Studio client application.
• Election programming station definition file in XML format, which defines the relationship between election files, ImageCast® tabulators, and iButton Security Keys to be used by the EMS Election Data Exchange Station, where applicable, in the programming of compact flash memory cards.
• A ballot on demand definition file which maps polling subdivisions to ballot IDs and allows users to perform polling place ballot-on-demand printing.
EED also exposes/provides the following logical input/output interfaces:
• The EMS Data Layer Transactions (serialized binary data) toward the EMS Database Server.
• The EMS Data Layer Transactions (serialized binary data) toward the EMS Application Server for optional mixed local intranet and remote Internet configuration.
The EMS Database Server exposes/provides the following logical input/output interfaces:
• The Microsoft SQL Database Engine (serialized binary data) for operation in Election Event Designer and Results Tally & Reporting.
• The Microsoft SQL Database Engine (serialized binary data) for use in the EMS Application Server for optional mixed local intranet and remote Internet configuration.

1/15/2020 332 Version: 5.10-CA::11
Chapter 12 - EMS Administrator's Role in Managing System Security and Integrity
The EMS Application Server exposes the following logical input/output interfaces:
• The serialized binary communication channel for use in the remote Election Event Designer and Results Tally & Reporting client applications.
• The serialized binary communication channel for operation in the EMS Database Server.
Results Tally & Reporting (RTR) allows for the following logical inputs:
• User input.
• Result files in proprietary binary file format collected from the ImageCast® Central tabulators.
• Result files in XML format collected from the ImageCast® Evolution tabulators.
• Imported ImageCast® ballot counters.
• Imported scanned ballot images from the ImageCast® Evolution, and Central ballot counters.
• Imported XSLT (XML Stylesheet Transformation Templates) used to define election result reports.
Results Tally & Reporting provides the following logical output interfaces:
• Result reports in XML, PDF, HTML or Excel format used by EMS human and electronic stake-holders The type of exported data depends on the XSLT transformations.
12.1.1 Essential and Non-Essential Services and Ports
To further secure election servers, place a self-adhesive, tape-style tamper evident seal over any unused USB, Ethernet, or other port on the server and client workstations for EMS and ImageCast® installations.
12.1.2 Anti-Virus Protection
Dominion Voting requires the installation of Avast Professional antivirus protection for server computers.These virus and spyware prevention/detection packages must be present on all server and client machines of the Democracy Suite® EMS environment. These virus prevention/detection packages must have heuristic virus checking activated, and should be only temporarily disabled when restoring, creating, or configuring an Election Project on a client workstation.
Any resident prevention/detection features must be active. The virus prevention/detection packages must be updated to the latest version of the application and virus/spyware definition databases every week. Such updates will have to be introduced via a mobile storage device, as no external access to the network is

Version: 5.10-CA::11 333 1/15/2020
Democracy Suite® Use Procedures
permitted. These virus/spyware prevention/detection packages must be automatically run at set times every 24 hours. The set times should be chosen to minimize operational impact (during the night). Scans must be run on all attached storage devices and logs from these scans must be inspected and archived. If a virus’ or spyware’s binaries are detected, immediate action must be taken to isolate and remove it, in accordance with the virus prevention/detection package supplier’s recommendations. This may simply involve quarantining and deleting the offending program, or in some circumstances a special removal tool may have to be used.
If virus/spyware infection is observed, additional measures must be taken including, but not limited to:
• Temporarily removing all machines from the network.
• Turning off System Restore and running both virus scanners.
• Formatting the hard drives of all infected machines and re-installing the operating environment from a clean installation source. Some malware overwrites the boot record of a computer is not removed, even with reformatting.
One day prior to Election Day, both virus prevention/detection packages must be manually run or the scheduled scan manually verified. On Election Day/Night, the automatic running of the virus prevention/detection packages must be suspended to ensure that there is no potential conflict or performance impact while results are processing. If necessary, run a manual scan so that within 24 hours of the tally, it can be confirmed that the anti-virus software showed no infection on the computer during Election Day and Election Night operations.
Installation procedures are listed in Dominion Voting Systems Democracy Suite® Installation Procedures.
12.1.3 Procedures for Verifying, Checking, and Installing Essential Updates and Changes
Unless authorized or required by the Secretary of State, no software or operating system updates should be installed on a Democracy Suite® installation. Installing updates of any kind will violate the certified configuration of the voting system. If an update is authorized by the California Secretary of State, Dominion Voting Systems will then provide specific instructions on how to successfully perform a software update that conforms to the certification requirements and regulations set forth by the State of California.
12.1.4 Audit Records for Changes
Windows event logs show the antivirus updates as they are installed.

1/15/2020 334 Version: 5.10-CA::11
Chapter 12 - EMS Administrator's Role in Managing System Security and Integrity
12.1.5 Acceptance Testing After the Installation
Unless authorized or required by the Secretary of State, antivirus software updates are the only updates allowed to be performed on the voting system. The EMS server is operational during an antivirus software update. If the update fails, Avast! notifies the user. If further testing is desired, the operator can start the Election Event Designer client application and select a few benign functions as a high level test to ensure that the antivirus update caused no obvious issues with system performance.
12.2 Administrative Control of the Backup and Restore of an Election Project
12.2.1 Backup of Election Project
To do a backup of an election project, do the following:
1. Open EED by double-clicking the EED shortcut on the desktop. Select ‘Election Project’ and click on ‘Open Project’. In the ‘Open Project’ select the project form the list and click OK.
2. Log into the project by entering Administrator user name and password.
3. Once the election project is open in EED, click ‘Election Project’ and select ‘Create Backup’ option from the drop down menu.
4. The dialog window will open where you will choose the the full back up (which is the second option in the dialog) and click on the Continue button.
5. Once the procedure is complete, the Information dialog window will appear notifying that the back up was successfully done.
6. The project package will be saved at the following location on the NAS:D:\NAS\[NAME OF ELECTION PROJECT]\Project PackageCopy the Project backup ZIP file to the safe location.
A project package backup can also be created during the Restore database process, if the project being restored already exists on the EMS NAS:
• To do a backup of an Election Project, after selecting the Project Package in the Restore dialog window, and it loads (this may take some time) you will be able to see information concerning the package contents displayed in the dialog window.
NOTE: If the election project does not exist on the EMS server, you will be presented with the text that project does not exist on the EMS Database server. If you wish to continue, click “OK”.
• On the next screen the “Warning” dialog will appear.

Version: 5.10-CA::11 335 1/15/2020
Democracy Suite® Use Procedures
• To create a backup file from this point, select the “Create Election Project Package File” checkbox.
• Click “Browse” and navigate to the location on the server where you want to save the election project package. Put the backup into a folder with a descriptive, recognizable name.
• Once complete, select the “Create” option to create the election project package file.
• When the process has successfully completed, click “OK” to proceed.
• Click on the “OK” button to continue.
• To initiate the restore process, click the “Restore” button.
• After the restore process has successfully completed, click “OK”.
A minimum of four complete project package backups should be made during a typical election cycle:
1. Initial - the project package as supplied by Dominion Voting or produced by the jurisdiction. The election project has been fully completed, and is in the “Ready for Elections” state.
2. Logic & Accuracy test results - a backup of the election project after the L&A test has been successfully completed. This backup contains all of the scanned results, images, and logs of the L&A test as well as any of the pre-defined results reports that were produced.
3. Semi-Official canvass (Election night) results - a backup of the election project at the end of Election night tabulation and reporting has been successfully completed. This backup contains all of the scanned results, images, reports and logs of the Semi-Official results reporting.
4. Official canvass (Final) results - a backup of the election project at the end of the canvass period with all ballots tabulated. This backup contains all of the scanned results, images, reports and logs for the entire election.
12.2.2 Restore of Election Project
To restore an EMS database:
1. Expand the Administration menu and click Restore EMS Database.Restore Election Project Package screen appears.
2. There are two options of restoring project: Local Path on the Server and Local Path on the Client.
3. Now select whether the backup you are restoring is on the Client or the Server and browse to the backup zip file, then select Open.

1/15/2020 336 Version: 5.10-CA::11
Chapter 12 - EMS Administrator's Role in Managing System Security and Integrity
4. After you have selected the zip file you will see that projects information fills the two windows in the Restore Election Project Package box, if you want to continue with the restoration, select OK.
5. The next screen warns you that, if you are restoring a current project all associated files will be deleted from the Database and NAS Servers. If you would like to create an Election Project Package File at this point, select Browse to select a file location and then select Create to create the Election Project Package file. If not, you can proceed with the restoring process.
6. Select OK to acknowledge the warning, and to proceed with the restoring process.
7. To initiate the restore process, click the Restore button.
8. After the restore process has successfully completed, click OK.
9. Open the election project.
NOTE: If you restore your election project package on an EMS workstation with a hard drive sector size that differs from the workstation that the project was created on, you will receive an Operation Cancellation error if you attempt to create a backup of your project. In order to circumvent this error, delete the old backup file (.bak) from the \NAS\<PROJECT NAME>\DB\Backup folder.
12.2.3 Configure Network Parameters
1. If this is the first time opening EMS EED application, you need to set the network parameters.These parameters can be changed later on. Expand the Administration menu and click the EMS Application Server Settings option.
2. The Network Settings dialog appears. Type “EMSServer” in the IP Address or Name of the EMS Application Server host.
3. Type “emsapplicationserver” in the EMS Application Server Name field.
4. Press Test to confirm the correct settings have been entered.
5. Once confirmed, click OK.
6. If the connection fails, check the entered parameters. If the connection continues to fail, check if EMS Application server host is online and contact our technical support.
12.2.4 Setting up Project for Additional Audio Languages
If the Election Project is intended to support audio for languages other then those automatically provided for by EMS system, the audio folders for such languages need to be created manually on the EMS server by the Administrator. On the EMS server, navigate to D:\NAS\Common\Audio folder. Once inside the Audio folder, right-click and select to create New Folder. Name the language folder with the name that exactly matches (case sensitive) name used to define that same

Version: 5.10-CA::11 337 1/15/2020
Democracy Suite® Use Procedures
language in EED when creating languages. This folder should contain audio files for all static files in that language. Repeat the process until all desired languages have been added.
12.2.5 Creation of RTR User in Election Event Designer
In order to open an election project in Results Tally & Reporting, you need to create and activate an RTR user.
1. Open your election project in Election Event Designer. Expand the Administration menu and click the Application Users menu item. The Administration - Application User screen opens. Click Search to list all available users. Next, perform the following:
2. In the Application drop down menu, select EMS RTR.
3. Click Create New. The Application User dialog appears.Enter the following information: Enter an appropriate username.
4. From the Role drop down menu, select the RTR Administrator role.
5. Select Manually create password. Enter a case sensitive password in the enabled fields.
NOTE: Default password type – Minimum length is 8 characters which must include at least one number and one letter from the alphabet.Strong password type – Minimum length should be 10 characters which must include at least one number, one special character and one letter from the alphabet.Weak password type – minimum six characters.
NOTE: Optional: Add the relevant contact information on the right side of the dialog.
6. Click Save and Close to close the dialog and return to the Administration - Application User screen.
7. Open the newly created RTR user.
8. Change Status from Initial to Active. Press Save and Close again.
12.2.6 Initializing Reporting Services
On the EMS Server:
1. Open the EMS Application Server Manager by clicking Start, All Programs, DVS, Application Server Manager, and choosing Application Server Manager.
2. Click Yes to accept the UAC prompt and continue.
3. On the Database Settings tab, click Test to verify that the connection to the database was correctly established.

1/15/2020 338 Version: 5.10-CA::11
Chapter 12 - EMS Administrator's Role in Managing System Security and Integrity
4. Click the Reporting Service Settings tab.
5. Click Initialize Service and wait for the “SQL Reporting Service initialized!” message in the bottom text box.
6. Press Test and wait for the “Connection successful! Folder ‘EMS Application Server Reports’ already exists!” message.
7. Click Save Settings and then Close.
12.3 Disabling and Enabling Adjudication in EMS RTR
1. Expand the Settings menu and click on the Project Properties menu item. The Project Settings dialog appears.
2. Uncheck the Enable Adjudication option. Unchecking this item will ensure that the Adjudication process is not included in the workflow when managing result files.
3. Click Apply and then OK to close.
12.4 Preparing ImageCast® Central Election Files for the ImageCast® Central WorkstationThe following procedure will create a master set of folders containing copies of the ImageCast® Central application and election files for each ICC tabulator in the election project. After preparing the folders, one copy of this master set will be created and used for L&A testing. A second copy will be created for scanning official ballots. Once L&A testing has been completed, all folders will be backed up and archived and then a new copy of the election files will be deployed on ICC workstations for election day.
NOTE: If the election project has been prepared by Dominion Voting, the prepared ImageCast® Central election files will be provided along with the election project. The only step that must be performed is to copy the files to the ImageCast® Central workstations.The prepared ImageCast® Central election files should be evenly distributed across the number of available ImageCast® Central workstations. The Administrator should then copy the ranges of ImageCast® Central folders to destination workstations according to the predetermined schema, while keeping a detailed record of which files were copied to which workstation.This procedure assumes that all ImageCast® Central tabulators have been created with an “ICC” prefix in their name.The election files can be burned onto the CF card via EED as described in section D.2.7.1 “Programming of CF/SD Cards”. Alternatively, the Administrator can use

Version: 5.10-CA::11 339 1/15/2020
Democracy Suite® Use Procedures
an USB stick to copy all or multiple ICC election files (i.e. more than one tabulator) from the EMS server and transfer to ICC workstations. Below, is the procedure for the later option.
1. Insert an empty USB stick, with enough space to hold all of the ICC election files, into the USB port of the EMS server.
2. Navigate to D:\NAS\‘Project Name’\Tabulator folder.
3. Type “ICC” into the Search field located at the top right corner of the browse window. After the search is complete, only the ICC tabulator folders will be listed.
4. Select all ICC tabulator folders and copy them to the USB stick.
5. Once the copy process is complete, safely eject the USB stick from the EMS server.
6. Insert the USB stick into the USB port of the ICC workstation.
7. Under “C:\DVS”, open each ImageCast® Central tabulator folder and perform the following steps:
• Create a folder called 'project' and inside of it, create folder named ‘config’.
• Open the contents of the USB stick in Windows Explorer and copy all contents into the existing “DVS\<tabulator>\project\config” folder on the C: drive.
The Election directory contains Voting Information Files (VIF) which describe the Election, Ballots, Contests, and Candidates of the particular election. The DCF directory contains Device Configuration Files (DCFs) which define nuances in the way the particular ICC tabulator processes and reports the ballots scanned. respectively.
8. After repeating the same for each ICC tabulator folder, the Administrator will have a complete set of DVS folders with election files prepared for the ImageCast® Central in the “C:\DVS” folder.
NOTE: Create a master copy of this folder containing the election files by copying it to a USB stick and storing it in a safe place. The administrator may wish to store multiple copies of the master set of prepared election files. This master copy will be used to setup ICC workstations prior to Election Day. To illustrate - if you had three tabulators in your project named ICC Absentee 1, ICC Absentee 2 and ICC Election Day, then in the “C:\DVS”, there would be the following folders and subfolders: “ICC Absentee 1\Project\config” “ICC Absentee 2\Project\config” “ICC Election Day\Project\config”

1/15/2020 340 Version: 5.10-CA::11
Chapter 12 - EMS Administrator's Role in Managing System Security and Integrity
For more information about configuring individual folders, please refer to the Democracy Suite® ImageCast® Central Installation and Configuration Procedure, 10.1 Installing the ImageCast® Central Application, 12.2 Installing Election Definition Files and 13.1 Securing Tabulator Folders.
12.5 Managing ImageCast® Central Tabulator Folders
When using the ICC application to scan ballots, only one set of ImageCast® Central tabulator election files is being used by the application. In order to set up the files for scanning:
1. Copy the content of “C:\DVS” into the “C:\DVS”.
2. From the ICC application, set the local path to the desired tabulator’s folder within “C:\DVS”.
The administrator will manage the files between Logic and Accuracy testing and live election, by restoring and backing up folders between “C:\DVS” and “C:\DVS” as needed. For more detail, see 12.5 “Managing ImageCast® Central Tabulator Folders”.
12.5.1 Backup ImageCast® Central Tabulator Folders
After Logic and Accuracy testing, the contents of the “C:\DVS” needs to be backed up and archived. This folder will be later used to restore the tabulator structure on the ICC workstation for live use (i.e.during an election) once Logic and Accuracy test has been completed and its results backed up.
12.5.2 Restore ImageCast® Central Tabulator Folders
Ensure that the Logic and Accuracy results have been backed up, as described in section 12.5.1 “Backup ImageCast® Central Tabulator Folders”. Restore the contents of “C:\DVS” that was backed up after the initial setup, as described in section 12.4 “Preparing ImageCast® Central Election Files for the ImageCast® Central Workstation”, by copying them into back into “C:\DVS”.

Version: 5.10-CA::11 341 1/15/2020
Democracy Suite® Use Procedures
12.6 Adjudication Administration
12.6.1 Starting ImageCast® Adjudication
To start Adjudication the administrator clicks Start Adjudication in the Summary screen of the Project Setup Wizard. For more information see section 12.6.2.12 “Summary Screen”.
Once adjudication is started, the Adjudication services request results from the Democracy Suite® Election Management System (EMS), which are typically loaded through Results Tally & Reporting (RTR). The Adjudication services read cast vote records from tabulator batches and transfers them into the Adjudication system.
NOTE: After starting adjudication the Administrator cannot make changes to what was selected in the setup wizard. If changes must be made adjudication needs to be stopped, which brings the administrator back to the setup wizard so they can setup the project again and start adjudication anew. Note that when doing this, any ballots that were adjudicated in the previous session will retain the appended audit mark.
Ballots will begin to be served to adjudicators soon after adjudication is started. If no ballots are served, use RTR to ensure that loaded batches are in an 'Initial' or 'Validated' state and check the DVS Adjudication and EMS System event logs for errors. For more information, see the Troubleshooting section in the Democracy Suite® Adjudication System Operation Procedures document.
12.6.2 Project Setup Wizard
The Adjudication Project Setup Wizard is the application's default state once it is installed. While in this state adjudication administrators can:
• Choose the election project to adjudicate.
• Configure adjudication options, such as ballot and contest filtering.
• Start adjudication on the selected election.
NOTE: Regular, non-administrator users will not see the Setup Wizard. Instead, they are taken to the main adjudication screen, to wait for an administrator to start adjudication.
12.6.2.1 Choosing a New Election Project
The Choose election project menu lists all Election Event Designer projects that are available for adjudication. To select a project to adjudicate:
1. Click the applicable project name.
2. Click Next.

1/15/2020 342 Version: 5.10-CA::11
Chapter 12 - EMS Administrator's Role in Managing System Security and Integrity
3. The wizard will advance to the Security Key Setup page.
Figure 12-1: Project Selection

Version: 5.10-CA::11 343 1/15/2020
Democracy Suite® Use Procedures
12.6.2.2 Choosing an Election Project with an Existing Session
An election project on which setup or adjudication was previously started is said to have an existing adjudication session created for it. The Election Project screen highlights these projects in green and allows resuming setup, or adjudication, on them.
Figure 12-2: Existing Session Setup
If a project is highlighted because setup was previously started on it (that is, some setup steps were completed but adjudication was not started), and the user selects the project, the application simply allows the user to continue setting up.

1/15/2020 344 Version: 5.10-CA::11
Chapter 12 - EMS Administrator's Role in Managing System Security and Integrity
If, on the other hand, the election is highlighted because adjudication was previously started on it, then the user is given the option to either resume adjudication for the project where it left off, or to start adjudication again from the beginning.
Figure 12-3: Start New or Resume Adjudication Session
• Choose Start New to start adjudication from the beginning.
• Choose Resume to resume adjudication for the election project.
If you select Resume, the wizard will skip to the Summary screen, and, instead of a Start Adjudication, there will be a Resume Adjudication button.
If you select Start New, then the wizard will advance to the first setup step, to begin setting up the project for adjudication.
NOTE: The existing session will be discarded, meaning that any adjudications made on batches not yet submitted, as well as configuration and reporting data will no longer be accessible.
12.6.2.3 Taking Control of Setup
Once an election project is selected by an administrator, that administrator is assigned exclusive control of the setup process (or, more accurately, of the adjudication session) for that election. This helps prevent multiple administrators from accidentally setting up an election at the same time.

Version: 5.10-CA::11 345 1/15/2020
Democracy Suite® Use Procedures
Figure 12-4: Session Setup Denied
If necessary, a second administrator may take control away from the original administrator to complete setup. This can be done by using the Take Control button shown in figure 12-4 “Session Setup Denied”.
NOTE: Whenever possible, the original administrator should be aware that another administrator is taking control, and should exit the wizard beforehand. Taking control while the original administrator is still in the wizard trying to make changes will result in errors and prevent the original administrator from saving changes.
To take control of a setup session:
1. Select the election project on which you want to take control and click Next.
2. When the “Session Access Denied” message appears, select Take Control.
3. On the confirmation message that appears, choose Yes to confirm that no other user will be making changes to the same session. The application will then let you enter setup.
12.6.2.4 Security Key Setup
The Security Key Setup screen allows the user to set up security key in the wizard. The user can use the currently installed key, create and install a new key or install key from an existing file. The following section describes the procedure for each of the options.
To create and install a new key:
1. Select Create and Install a New Key then click the Install Key button below.
2. Select Yes in the Windows User Account Control box.

1/15/2020 346 Version: 5.10-CA::11
Chapter 12 - EMS Administrator's Role in Managing System Security and Integrity
3. In the next box, select the location path for the key, enter and confirm a password.
4. Click the Install button.
Figure 12-5: Create and Install a New Key
NOTE: While we advise that the security key file be saved to a USB key to be subsequently used to add the key to the remote client machines and then for safe keeping, if the key file is saved to a directory with limited permissions (such as C an additional file may be created with a .rnd extension that the system cannot clean up after the key is created. This additional .rnd file may be safely deleted by the user.Also, you will need to restart your computer to have access to the new key. The application will shut down automatically if you click OK.
A confirmation message stating “Key Installation Successful” appears. Click OK.
Figure 12-6: Key Installation Successful

Version: 5.10-CA::11 347 1/15/2020
Democracy Suite® Use Procedures
12.6.2.5 Install Key from an Existing File
If you already have a trusted existing key on the drive, you may select this option to install that existing key.
1. Select the Create and Install Key from an existing file radio button, then select the Install Key button below.
2. Select Yes in the Windows User Account Control box.
3. In the next box, select the location of the key and enter the key password and select Install.
Figure 12-7: Key Installation Successful
You will need to restart your computer to have access to the new key. The application will shut down automatically if you click OK.
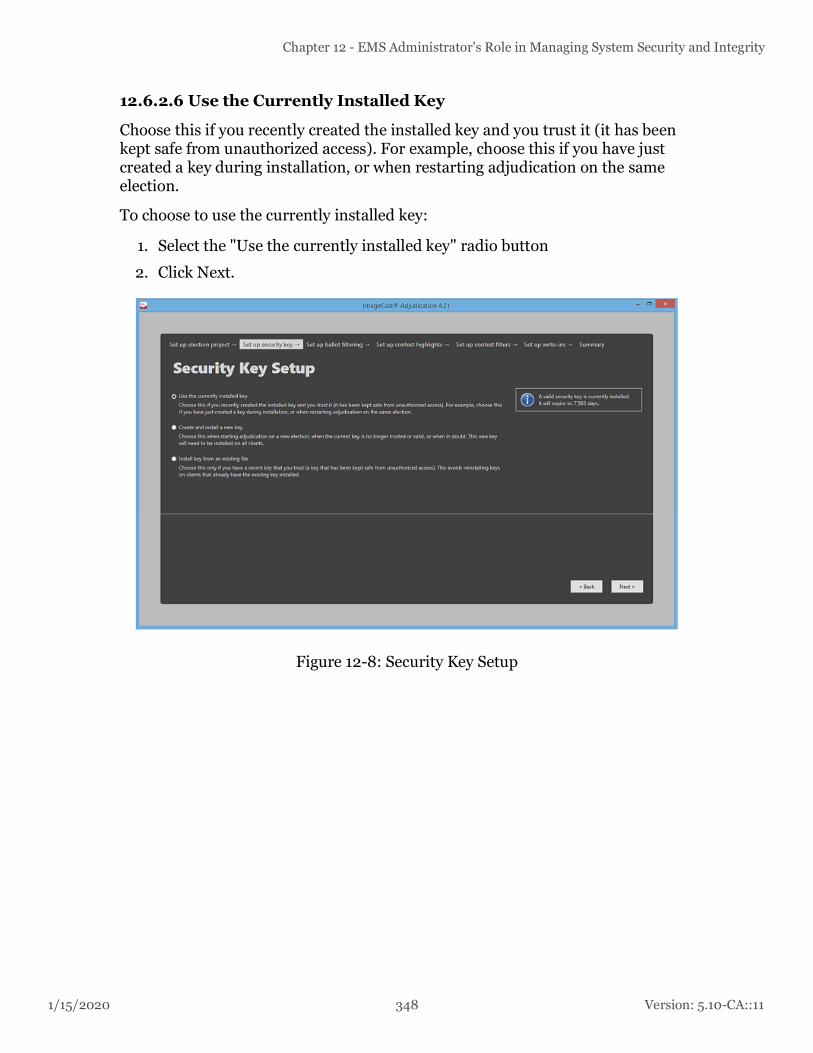
1/15/2020 348 Version: 5.10-CA::11
Chapter 12 - EMS Administrator's Role in Managing System Security and Integrity
12.6.2.6 Use the Currently Installed Key
Choose this if you recently created the installed key and you trust it (it has been kept safe from unauthorized access). For example, choose this if you have just created a key during installation, or when restarting adjudication on the same election.
To choose to use the currently installed key:
1. Select the "Use the currently installed key" radio button
2. Click Next.
Figure 12-8: Security Key Setup
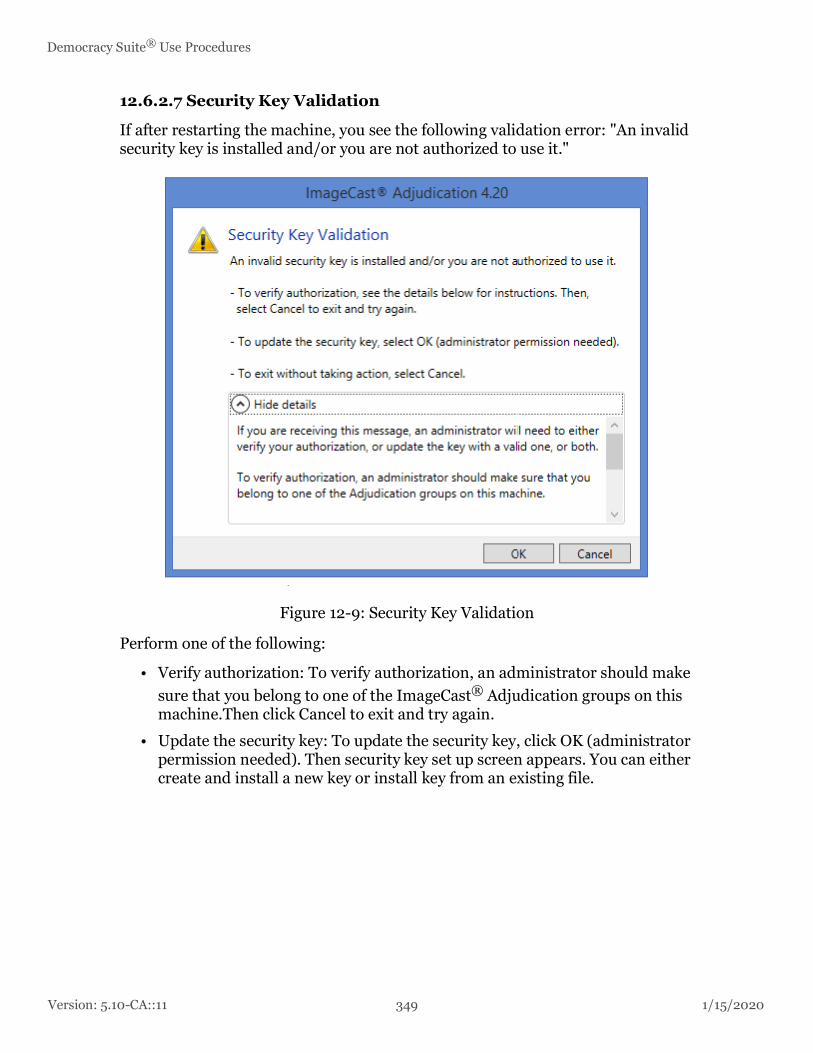
Version: 5.10-CA::11 349 1/15/2020
Democracy Suite® Use Procedures
12.6.2.7 Security Key Validation
If after restarting the machine, you see the following validation error: "An invalid security key is installed and/or you are not authorized to use it."
Figure 12-9: Security Key Validation
Perform one of the following:
• Verify authorization: To verify authorization, an administrator should make sure that you belong to one of the ImageCast® Adjudication groups on this machine.Then click Cancel to exit and try again.
• Update the security key: To update the security key, click OK (administrator permission needed). Then security key set up screen appears. You can either create and install a new key or install key from an existing file.

1/15/2020 350 Version: 5.10-CA::11
Chapter 12 - EMS Administrator's Role in Managing System Security and Integrity
• Exit without taking action: To exit without taking action, click Cancel.
Figure 12-10: Update the security key
12.6.2.8 Ballot Filtering
The Ballot Filtering screen allows the user to select the outstack conditions to adjudicate. Out- stack conditions are used to filter ballots that must be served to users for adjudication. These filters assist in streamlining the workflow by reducing the amount of review required during ballot adjudication.
This step offers the option to Adjudicate all ballots. This option means that all ballots are available for adjudication whether or not outstack conditions exist on the ballots. When this option is selected, the next wizard step allows selecting which contests to highlight, to help users more easily determine problems on a ballot. When done making selections, select Next to move to the next screen in the wizard. Note that you must either select conditions or select the Adjudicate all ballots option before continuing.

Version: 5.10-CA::11 351 1/15/2020
Democracy Suite® Use Procedures
The available outstack conditions will depend on the election configuration and contest types within the selected election project. For a description of the outstack conditions listed please see section Filtering Selections below.
Figure 12-11: Adjudicate all ballots
To select outstack conditions:
1. Click the desired outstack conditions. The selections appear in the Selected outstack conditions list on the right of the Ballot Filtering screen.
2. Click Next to move to the next screen in the wizard.
Figure 12-12: Select Outstack Conditions
1/15/2020 352 Version: 5.10-CA::11
Chapter 12 - EMS Administrator's Role in Managing System Security and Integrity
Filtering Selections
Adjudication uses outstack conditions to virtually separate and categorize ballots based on pre-determined characteristics and criteria. For instance, if you wish to adjudicate write-in contests only, you may filter out all ballots without write-in contests to reduce the overall number of ballots to review.
The following describes the different outstack conditions that may be present on a ballot (note that a ballot may have multiple conditions at the same time):
• Outstack condition: OvervoteA ballot contains one or more overvoted contests. This condition is applied at the contest level.
• Outstack condition: UndervoteA ballot contains one or more undervoted contests. This condition is applied at the contest level.
• Outstack condition: Write-inA ballot contains one or more contests with write-in marks. This condition is applied at the contest level.
• Outstack condition: Write-in (Qualified)A ballot contains one or more contests with qualified write-ins and write-in marks. This condition is applied at the contest level.
• Outstack condition: Blank ballotA ballot contains no valid votes. A ballot containing one or more marginal marks may qualify for this condition. This condition is applied at the ballot level.
• Outstack condition: Blank contestA ballot contains one or more contests where no votes were detected. If a contest contains only marginal marks, this condition will exist. This condition is applied at the contest level.
• Outstack condition: Marginal/Ambiguous markA ballot contains one or more choices that were detected as marginal marks. This condition is applied at the contest level.
The following outstack conditions may occur when a ranked-choice vote (RCV) contest is defined in the election project. Each is applied at the contest level.
• Outstack condition: Duplicate rankingA ballot contains an RCV contest where a candidate is marked in more than one ranking.
• Outstack condition: Inconsistent orderingA ballot contains an RCV contest where a candidate is ranked both above and below another candidate.
• Outstack condition: Overvoted rankA ballot contains an RCV contest where a ranking has been overvoted.

Version: 5.10-CA::11 353 1/15/2020
Democracy Suite® Use Procedures
• Outstack condition: Skipped rankingA ballot contains an RCV contest where a ranking was skipped.
• Outstack condition: Unvoted contestA ballot contains an RCV contest that is not voted.
• Outstack condition: Unused rankingA ballot contains an RCV contest with an unused ranking at the end of the contest.
Additional outstack conditions may occur depending on the election project configuration and the types of contests defined in the election:
• Outstack condition: CrossoverA cross-overrule violation was detected on the ballot. This occurs when the voter votes in mutually- exclusive contests, for example, voting in different partisan contests on an open primary ballot. This condition is applied at the ballot level.
• Outstack condition: 'No Preference' choice overriddenIn jurisdictions that include a 'No Preference' choice this condition indicates that a vote for 'No Preference' was overridden because it would result in an overvote. This condition is applied at the contest level.
• Outstack condition: Overridden by write-inA vote for a regular candidate was overridden by a vote for a write-in candidate to prevent an overvote in jurisdictions where this rule applies. This condition is applied at the contest level.
• Outstack condition: Party preferenceA party preference rule violation was detected on the ballot. This occurs when the voter votes for one party in a party preference contest and then votes for a candidate in a different party. This condition is applied at the ballot level.
• Outstack condition: Removed cross-endorsed markA ballot contains a contest where the voter voted twice for a candidate affiliated with multiple parties. Only the top mark is counted. This condition is applied at the contest level.
• Outstack condition: Strict Inclusive overvoteA ballot contains a contest where an overvote occurred through the combination of explicit votes and implicit votes from a straight-party contest. This condition is applied at the contest level.
• Outstack condition: Strict vote forIn jurisdictions with contests where the voter is required to vote for a particular number of candidates, this condition indicates a contest where the voter marked a number of candidates different than the contest “vote for”. This condition is applied at the contest level.

1/15/2020 354 Version: 5.10-CA::11
Chapter 12 - EMS Administrator's Role in Managing System Security and Integrity
12.6.2.9 Contest Highlighting
The Contest Highlighting screen allows users to select outstack conditions that will make a contest be outlined in red on the ballot, to help users find contests that need adjudication.
However, note that this option is only available when the option to Adjudicate all ballots is selected on the Ballot Filtering screen. Otherwise, this screen will simply list the conditions selected for filtering (if they apply to contests) and will not allow editing them, as the application will automatically highlight contests based on filtering conditions.
To change highlight options when the Adjudicate all ballots checkbox is selected in the Ballot Filtering screen:
Figure 12-13: Contest Highlighting
1. Clear the Highlight all contests with an outstack condition.
2. Choose the outstack conditions you wish to highlight from the menu.The selections appear in the Selected outstack conditions list to the right.
3. Click Next.

Version: 5.10-CA::11 355 1/15/2020
Democracy Suite® Use Procedures
12.6.2.10 Contest Filtering
The Contest Filtering screen allows users to select specific contests to be adjudicated. This option is specifically for recount situations where the focus is only on individual contests. Only ballots with the selected contest(s) will be shown in adjudication and only the selected contest(s) will be allowed to be adjudicated.
If the user chose to adjudicate all ballots in the Ballot Filtering step, all ballots that contain the selected contest(s) will be available. If the user selected one or more outstack conditions in that step, only ballots where the selected contest(s) have the selected outstack conditions will be available for adjudication.
By default, all contests are selected to be adjudicated. To select specific contests:
1. Clear the Adjudicate all contests check box.
2. Select one or more contests. Selected contests appear in the Selected contests list on the right of the Contest Filtering screen.
3. Click Next to move to the next screen in the wizard
Re-selecting the Adjudicate all contests check box will again select all contests to be adjudicated.
Figure 12-14: Select Contest Filters

1/15/2020 356 Version: 5.10-CA::11
Chapter 12 - EMS Administrator's Role in Managing System Security and Integrity
12.6.2.11 Other Options
The Other Options screen allows users to select miscellaneous adjudication options. Selecting these options usually depends on specific jurisdiction requirements.
The following describes the options on this screen:
• Require Write-in Resolution: Select this option to require adjudicators to resolve write-in contests to a qualified write-in, as opposed to allowing them to leave write-ins unresolved.
• Write-in Resolution Not Required with Overvote: This option allows an exception to the Require Write-in Resolution option, and does not apply unless both are selected. When checked, this option will not force adjudicators to resolve write-ins if the contest is overvoted.
Figure 12-15: Other Options
To continue, select any desired options and click Next.

Version: 5.10-CA::11 357 1/15/2020
Democracy Suite® Use Procedures
12.6.2.12 Summary Screen
The Summary screen allows you to review:
• Selected election project
• Ballots that will be shown
• Contest highlighting
• Contests to be adjudicated
• Other adjudication options
To change any of the items shown in the Summary screen, click Back. Once all items have been reviewed, the Administrator can click Start Adjudication to begin ballot adjudication. The application will advance to the main ballot adjudication screen once the Adjudication Services are ready to start processing for the selected election.
If an existing adjudication session was resumed in the Election Project screen, this screen will have a Resume Adjudication button, and the Administrator can press this button in order to resume adjudicating the election.As with starting adjudication, adjudication will continue once the Adjudication Services are ready to start processing.
Figure 12-16: Summary of Project Selections

1/15/2020 358 Version: 5.10-CA::11
Chapter 12 - EMS Administrator's Role in Managing System Security and Integrity
12.6.3 Administrator Roles
The Adjudication system distinguishes between general Adjudication Users, which can only adjudicate ballots, and Adjudication Administrators, which have access to the Project Setup Wizard, and to management operations, such as reporting, re-opening of ballots, and the ability to start and stop adjudication. This chapter will describe the administrative functions that are available after running through the setup wizard.
12.6.3.1 Administrative Screens
The following screens are accessible during adjudication to Adjudication Administrators:
• Batches
• Adjudicate
• Write-ins
• Reports
• Filtering
These screens are discussed in further detail below.

Version: 5.10-CA::11 359 1/15/2020
Democracy Suite® Use Procedures
Batches
The Batches screen contains a list of ballot batches. Although the tabulator name is also visible, ballots are not organized hierarchically under tabulators but under batches. Batches are also the entity under which results may be accumulated, reported on, and submitted to RTR. The application attempts to serve all ballots within a batch before proceeding with another batch.
Figure 12-17: Batches Screen
Batches move through six states:
1. In-Progress
2. Read Error
3. Review
4. Pending Submission
5. Submitted
6. Submission Error
In-Progress batches are batches that have been acquired by the system and have ballots being served to clients. If errors occur while loading ballots for a batch into the system, the batch will be marked as being in Read Error. When a batch is

1/15/2020 360 Version: 5.10-CA::11
Chapter 12 - EMS Administrator's Role in Managing System Security and Integrity
completed, that is, all its ballots have been adjudicated, its status changes to Review. Additionally, if ballot filters were setup in a way that causes no ballots in a batch to require adjudication, the batch will automatically move over to Review as well. A batch in review is available to be re-opened and adjudicated, and for reporting and submission for tallying.
After a batch is submitted, the batch status changes temporarily to Pending Submission while the system processes the submission. When the system confirms that a batch has been successfully sent to tally, its status changes to Submitted. However, if submission is unsuccessful, the status changes to Submission Error.
The Batch Management screen displays batches in three different panes. Batches that are in progress or could not be read due to an error are shown in the In-Progress pane. The Review pane shows batches that are completed or that could not be submitted due to an error, while the Submitted pane shows batches pending submission and batches successfully submitted.
Batches in the In-Progress and Review panes include a tree node that can be expanded to show adjudicated ballots in the batch. When a batch is expanded, adjudicated ballots are displayed. The administrator can double-click on a ballot to review and re-adjudicate it (see subsection “Re-opening Ballots” below).

Version: 5.10-CA::11 361 1/15/2020
Democracy Suite® Use Procedures
Batch Status
In order to view batch status, the Adjudication Administrator has the ability to select a batch, which will highlight the batch, and show a notification bar at the top of the screen. This notification appears for a certain amount of time and shows how many ballots have been processed or are in progress for the batch.
At the top of the screen there is a Ballots Remaining counter. This counter displays how many ballots are left to adjudicate based on the filtering options selected and batches loaded. This number will update as batches are loaded and ballots are adjudicated.The Refresh button in the lower right corner can be utilized to ensure that the current batch status and Ballots Remaining counter is current.
Figure 12-18: Batch Status
Re-opening Ballots
Batches in the In-Progress and Review panes include a tree node that can be expanded to show adjudicated ballots in the batch. The administrator can double-click on a ballot, to review an adjudicated ballot.
When this is done, the ballot is displayed in the Ballot Viewer screen, and the administrator can re-adjudicate it if desired. If another ballot was already displayed in the viewer, the administrator has the option to save changes for the current ballot, discard changes, or cancel to keep the current ballot and cancel the

1/15/2020 362 Version: 5.10-CA::11
Chapter 12 - EMS Administrator's Role in Managing System Security and Integrity
reopened ballot. When finished with a reopened ballot, the administrator has the option to save the reopened ballot, or to close it without saving. In the latter case, the administrator has just viewed the ballot, and nothing has changed.
Figure 12-19: Batch Management Tree View
To reopen a ballot for review or for re-adjudication:
NOTE: Let other administrators know when you are reopening ballots from the Review pane. This is to ensure that other administrators do not submit the batch while you're working on it.
1. In the In-Progress pane or the Review pane, select the arrow to the left of the batch.
2. Double-click the ballot that requires review or re-adjudication.
3. Review or re-adjudicate the ballot.
4. When done, click the Revert button to discard any changes made, or the Overwrite button to save changes, essentially re-adjudicating the ballot.

Version: 5.10-CA::11 363 1/15/2020
Democracy Suite® Use Procedures
5. On the confirmation message that appears, click OK to confirm your choice.
Figure 12-20: Confirmation message when re-adjudicating a ballot
Batch in Progress
In some instances, a batch may remain in the In-Progress state when it seems as if all ballots for the batch have been adjudicated. This indicates that one or more ballots within the batch have not been served.
To ensure all ballots in a batch are served to adjudicators:
1. Confirm that the ballot is not open in any clients, including administrator clients (it's easy to miss an open ballot if the client is on an administrative screen such as Batch Management).
2. In the In-Progress pane, highlight the batch that has not processed.

1/15/2020 364 Version: 5.10-CA::11
Chapter 12 - EMS Administrator's Role in Managing System Security and Integrity
3. Right-click the batch and select Reset in-progress ballots.
Figure 12-21: Resetting In-Progress Ballots
Submit a Batch to Results Tally & Reporting (RTR)
Adjudication Administrators can submit batches for tallying once they are completed and appear in the Review pane.
NOTE: Before submitting batches, make sure other administrators know about, and agree on, the batches to submit. This ensures that no other administrators attempt to submit the same batches at the same time, preventing errors.
Additionally, you should make sure that no ballots from the batches to be submitted are being reviewed. Any work on ballots being reviewed will be lost if the batch they belong to is submitted before the ballot is saved (a warning will be logged by the services whenever this occurs).
To submit a batch to RTR:
1. In the Review pane, select one or more batches. You can use the Shift and Ctrl keys as you click to select multiple batches. Additionally, you can use Ctrl-A to select all batches.
2. Drag the selected batches to the Submitted pane.

Version: 5.10-CA::11 365 1/15/2020
Democracy Suite® Use Procedures
3. The batches will appear as pending until the system confirms that they have been successfully submitted. Once this is done, cast vote records for all adjudicated ballots in the submitted batches will be updated and will appear as synchronized in RTR.
If an error occurs while the system processes a submitted batch, the batch will move back to the Review pane with an error status. In addition, there are circumstances where a batch may remain in the pending state indefinitely (in the Submitted pane).
In such cases, an administrator should check for errors on the server. After doing that and resolving any issues, batches may be resubmitted, as follows.
To resubmit a batch that is pending:
1. Make sure to Refresh beforehand to ensure the correct status is being shown for the batch.
2. In the Submitted pane, select the affected batch.
3. Right-click the batch and select Resubmit.
To resubmit a batch that has a submission error:
1. In the Review pane, select the affected batches.
2. Drag the selected batches to the Submitted pane.
Adjudicate
All clients will receive a set of ballots to adjudicate based on the filtering options set by the administrator during project setup. Ballots are automatically served to each client, including Adjudication Administrators (although they have the option to stop receiving ballots). To review the adjudication process, please see section 9.1 “Adjudication Process”.
Write-ins
Adjudication Administrators can view the list of write-in contests in the Write-in screen.
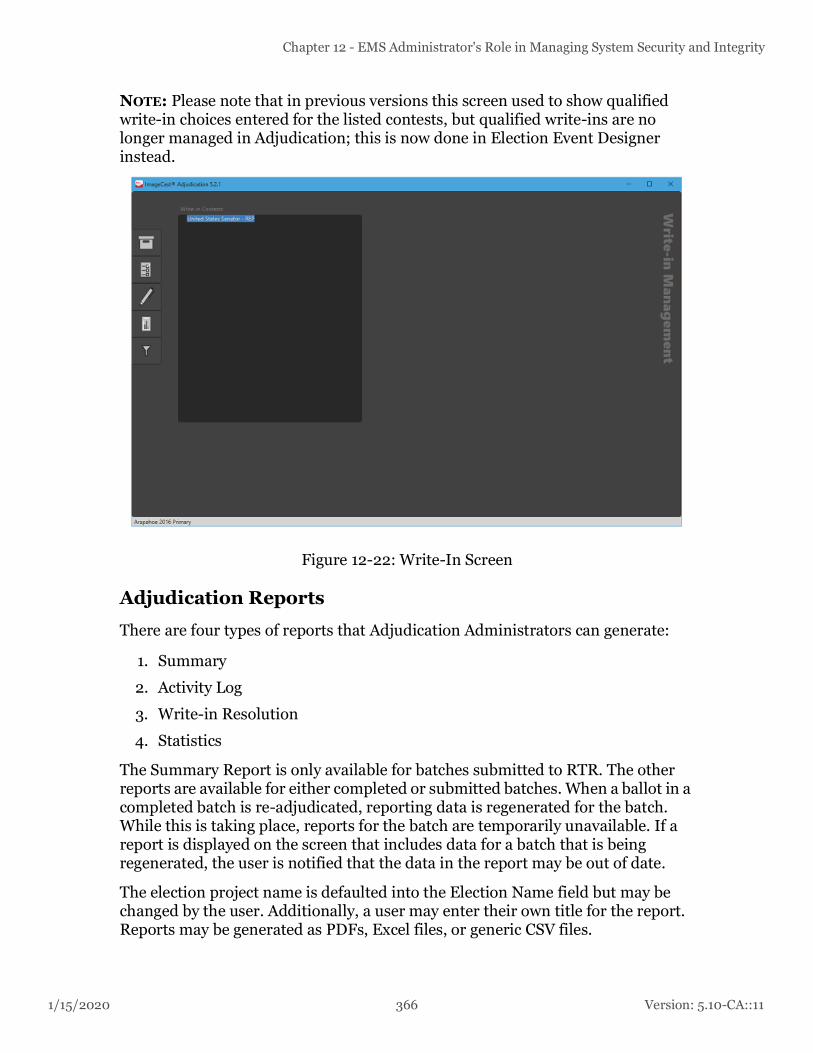
1/15/2020 366 Version: 5.10-CA::11
Chapter 12 - EMS Administrator's Role in Managing System Security and Integrity
NOTE: Please note that in previous versions this screen used to show qualified write-in choices entered for the listed contests, but qualified write-ins are no longer managed in Adjudication; this is now done in Election Event Designer instead.
Figure 12-22: Write-In Screen
Adjudication Reports
There are four types of reports that Adjudication Administrators can generate:
1. Summary
2. Activity Log
3. Write-in Resolution
4. Statistics
The Summary Report is only available for batches submitted to RTR. The other reports are available for either completed or submitted batches. When a ballot in a completed batch is re-adjudicated, reporting data is regenerated for the batch. While this is taking place, reports for the batch are temporarily unavailable. If a report is displayed on the screen that includes data for a batch that is being regenerated, the user is notified that the data in the report may be out of date.
The election project name is defaulted into the Election Name field but may be changed by the user. Additionally, a user may enter their own title for the report. Reports may be generated as PDFs, Excel files, or generic CSV files.
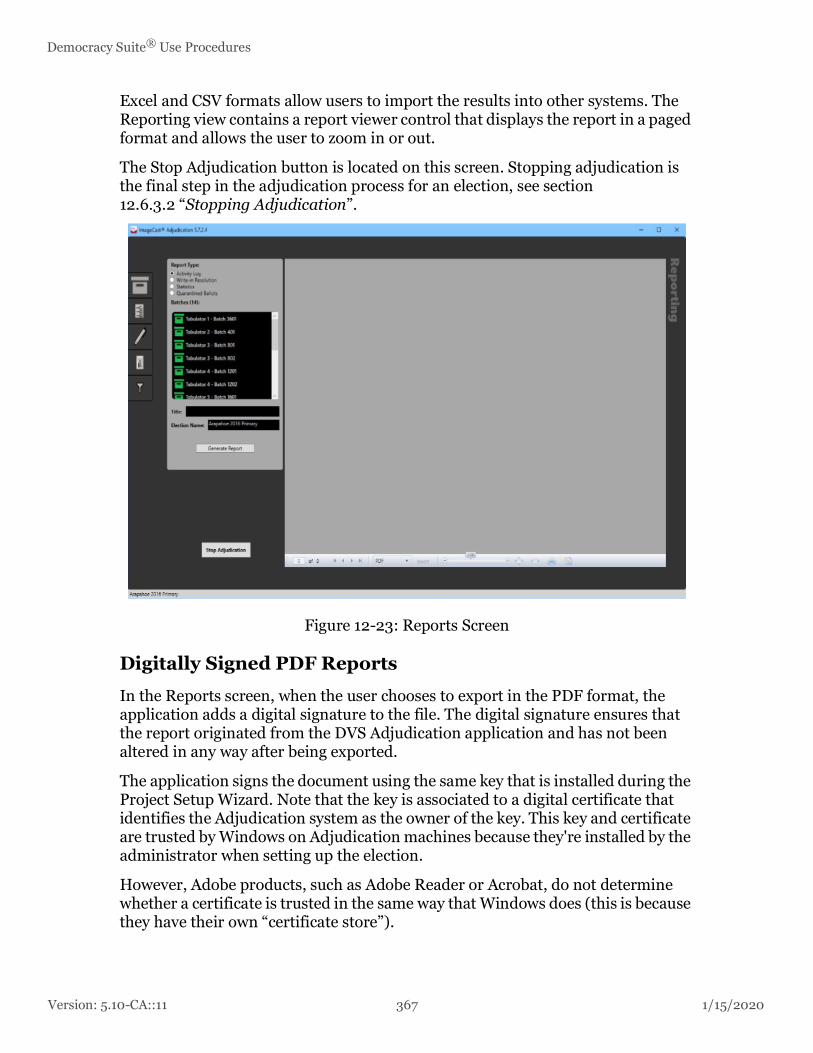
Version: 5.10-CA::11 367 1/15/2020
Democracy Suite® Use Procedures
Excel and CSV formats allow users to import the results into other systems. The Reporting view contains a report viewer control that displays the report in a paged format and allows the user to zoom in or out.
The Stop Adjudication button is located on this screen. Stopping adjudication is the final step in the adjudication process for an election, see section 12.6.3.2 “Stopping Adjudication”.
Figure 12-23: Reports Screen
Digitally Signed PDF Reports
In the Reports screen, when the user chooses to export in the PDF format, the application adds a digital signature to the file. The digital signature ensures that the report originated from the DVS Adjudication application and has not been altered in any way after being exported.
The application signs the document using the same key that is installed during the Project Setup Wizard. Note that the key is associated to a digital certificate that identifies the Adjudication system as the owner of the key. This key and certificate are trusted by Windows on Adjudication machines because they're installed by the administrator when setting up the election.
However, Adobe products, such as Adobe Reader or Acrobat, do not determine whether a certificate is trusted in the same way that Windows does (this is because they have their own “certificate store”).

1/15/2020 368 Version: 5.10-CA::11
Chapter 12 - EMS Administrator's Role in Managing System Security and Integrity
Thus, when using Adobe products to view signed Adjudication reports for the first time on a machine, the user will need to manually trust the certificate in order to avoid a warning about the validity of the document signature. To do this:
1. Expand the certificate in the Signature Panel in Adobe.
2. Expand Signature Details and select Certificate Details. The Certificate Viewer window will appear.
3. Click the Trust tab and highlight the root certificate in the left panel.
4. Click Add to Trusted Certificates. When the report is closed and reopened, Adobe verifies that the certificate is now trusted.
Figure 12-24: Signature view
The export process initially saves a version of the file that is unsigned, signs it, producing a second file, and then deletes the original file. The signed file is saved with a “signed.pdf” extension. For example, if the user chooses to save the file with the name Summary Report, the exported file name will be SummaryReport.signed.pdf.
NOTE: In case the system cannot clean up the original, unsigned file (i.e., SummaryReport.pdf ), the user will be informed and directed to manually remove the file.

Version: 5.10-CA::11 369 1/15/2020
Democracy Suite® Use Procedures
Summary Report
Summary reports accumulate all adjudicated results by tabulator and batch and show summary totals by contest. Batches and ballots that were filtered in the adjudication project setup step will have their totals reflected here and contribute to overall turnout numbers. Summary reports may be generated for one or more batches.
To generate the summary report:
1. Select the Summary report type.
2. Select one or more batches that you want to view.
3. In the Title, field enter a title or nothing as needed.
4. In the Election Name field, enter or modify the election name.
5. Select Generate Report.
Figure 12-25: Summary Report
Activity Log Report
Activity reports show adjudication actions taken against each ballot and are grouped by tabulator and batch. Each action shows the user name of the logged-in adjudication user along with the date/time of the action. The following actions are

1/15/2020 370 Version: 5.10-CA::11
Chapter 12 - EMS Administrator's Role in Managing System Security and Integrity
listed: Mark added, mark removed, write-in accepted, write-in rejected (with reason). Ballots which were filtered out of adjudication are labeled appropriately in the report.
To generate the activity report:
1. Select the Activity Log report type.
2. Select one or more batches that you want to view.
3. In the Title field, enter a title or nothing as needed.
4. In the Election Name field, enter or modify the election name.
5. Select Generate Report.
Figure 12-26: Activity Report
Write-in Resolution Report
The Write-In Resolution report shows a breakdown of adjudication actions made specifically to resolve write-in choices. The report breaks down the actions into the number of choices accepted as-is, the number of choices that were resolved to a qualified write-in candidate and what candidate they were resolved to, and the number of choices that were rejected and for what reason they were rejected.
To generate the write-in resolution report:
1. Select the Write-in Resolution report type.

Version: 5.10-CA::11 371 1/15/2020
Democracy Suite® Use Procedures
2. Select one or more batches that you want to view.
3. In the Title field, enter a title or nothing as needed.
4. In the Election Name field, enter or modify the election name.
5. Select Generate Report.
Figure 12-27: 151 Write-in Resolution Report
Statistics Report
The Statistics report shows a breakdown of the total number of ballots adjudicated compared to the total number of ballots in the selected batch or batches, as well as a breakdown of the number of ballots that were adjudicated per outstack condition. Because ballots may match more than one outstack condition, the condition totals may be more than the total number of ballots in the batch or batches.
The first bold section of the report shows the totals for all batches selected for the report. A batch-by-batch breakdown follows with totals for each respective batch.
To generate the statistics report:
1. Select the Statistics report type.
2. Select one or more batches that you want to view.
3. In the Title field, enter a title or nothing as needed.

1/15/2020 372 Version: 5.10-CA::11
Chapter 12 - EMS Administrator's Role in Managing System Security and Integrity
4. In the Election Name: field, enter or modify the election name.
5. Select Generate Report.
Figure 12-28: Statistics Report
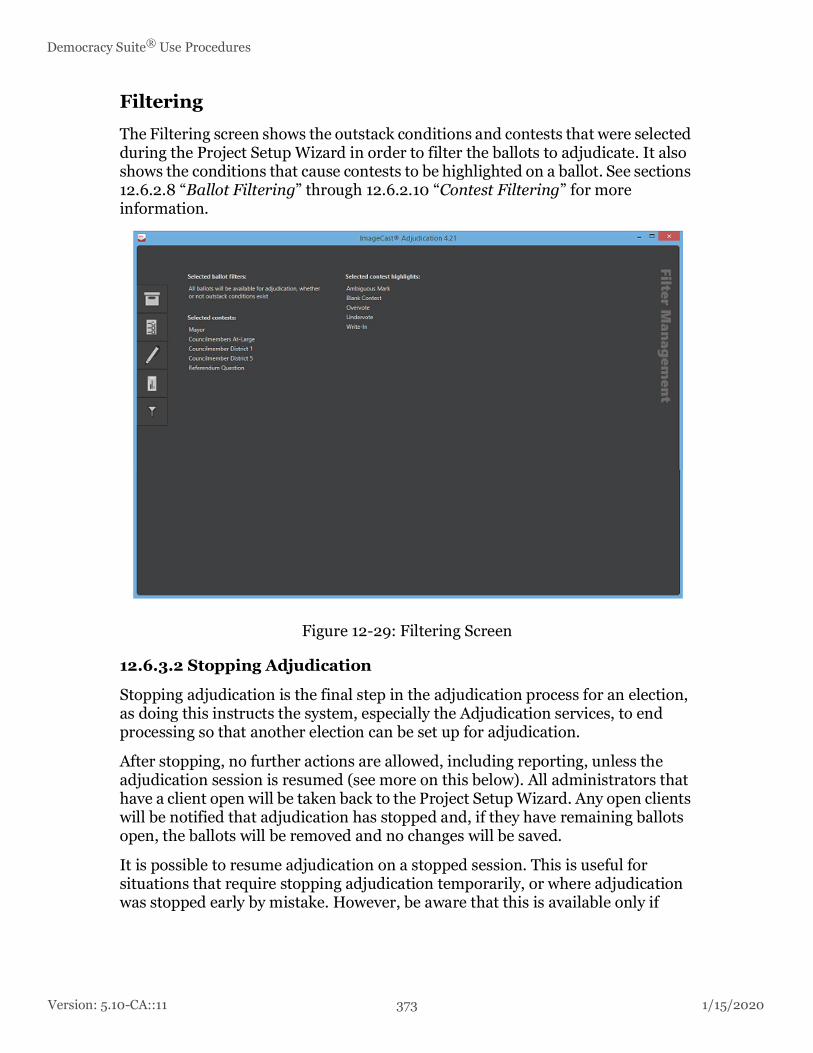
Version: 5.10-CA::11 373 1/15/2020
Democracy Suite® Use Procedures
Filtering
The Filtering screen shows the outstack conditions and contests that were selected during the Project Setup Wizard in order to filter the ballots to adjudicate. It also shows the conditions that cause contests to be highlighted on a ballot. See sections 12.6.2.8 “Ballot Filtering” through 12.6.2.10 “Contest Filtering” for more information.
Figure 12-29: Filtering Screen
12.6.3.2 Stopping Adjudication
Stopping adjudication is the final step in the adjudication process for an election, as doing this instructs the system, especially the Adjudication services, to end processing so that another election can be set up for adjudication.
After stopping, no further actions are allowed, including reporting, unless the adjudication session is resumed (see more on this below). All administrators that have a client open will be taken back to the Project Setup Wizard. Any open clients will be notified that adjudication has stopped and, if they have remaining ballots open, the ballots will be removed and no changes will be saved.
It is possible to resume adjudication on a stopped session. This is useful for situations that require stopping adjudication temporarily, or where adjudication was stopped early by mistake. However, be aware that this is available only if
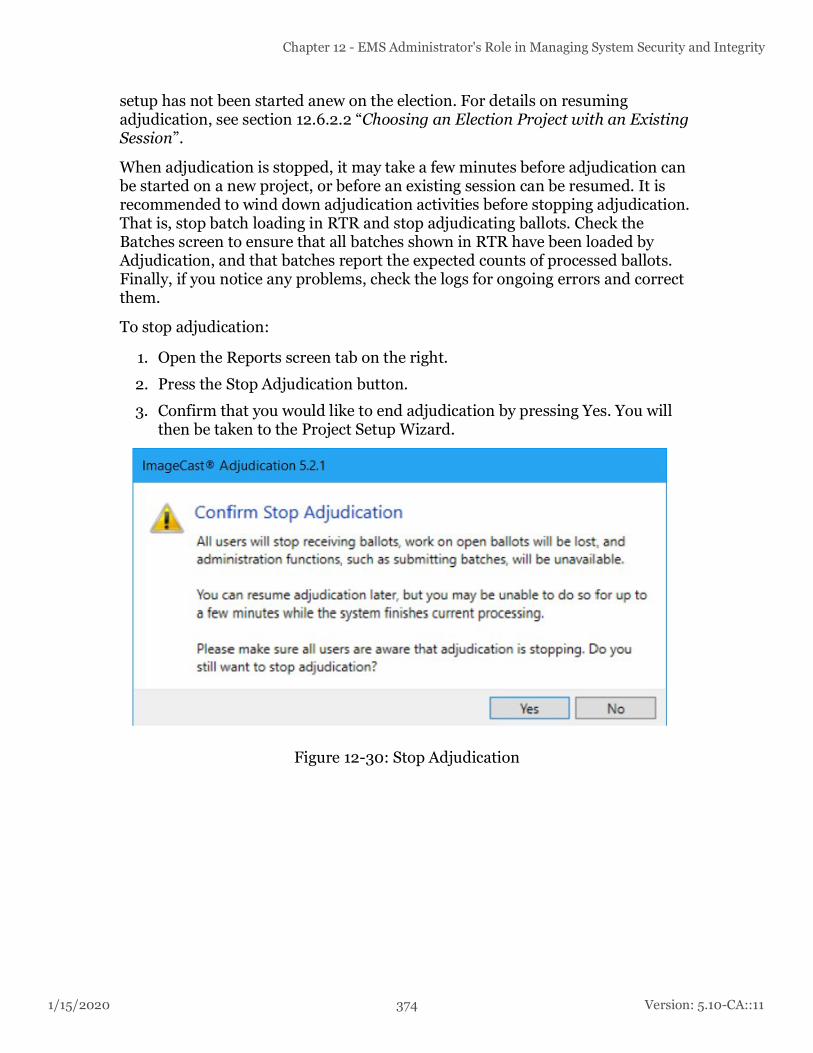
1/15/2020 374 Version: 5.10-CA::11
Chapter 12 - EMS Administrator's Role in Managing System Security and Integrity
setup has not been started anew on the election. For details on resuming adjudication, see section 12.6.2.2 “Choosing an Election Project with an Existing Session”.
When adjudication is stopped, it may take a few minutes before adjudication can be started on a new project, or before an existing session can be resumed. It is recommended to wind down adjudication activities before stopping adjudication. That is, stop batch loading in RTR and stop adjudicating ballots. Check the Batches screen to ensure that all batches shown in RTR have been loaded by Adjudication, and that batches report the expected counts of processed ballots. Finally, if you notice any problems, check the logs for ongoing errors and correct them.
To stop adjudication:
1. Open the Reports screen tab on the right.
2. Press the Stop Adjudication button.
3. Confirm that you would like to end adjudication by pressing Yes. You will then be taken to the Project Setup Wizard.
Figure 12-30: Stop Adjudication

Version: 5.10-CA::11 375 1/15/2020
Democracy Suite® Use Procedures
12.6.3.3 Backing up and Restoring Adjudication
The adjudication application uses three SQL Server databases: the Election Store, a Tabulation Store, and an Adjudicable Ballot Store. The Tabulation and Adjudicable Ballot stores are specific to the election being processed, which means that a new database is created for those stores each time an election is set up for adjudication.
The Tabulation store is named as follows:
TabulationStore_Electionname_Date/time stamp
The Adjudicable Ballot store is named as follows:
AdjudicableBallotStore_Electionname_Date/time stamp
To make a backup of the Adjudication application a backup must be made of the three databases. It is recommended that the backups of EED and RTR also be done, according to their respective User Guides.
Backing up the Adjudication Databases
1. As the Administrator, from the Start menu, open SQL Server Management Studio.
2. In the Connect to Server window, click Connect.
3. In the Object Explorer pane, click the Databases folder.
4. Right-click Election Store and click Tasks > Backup.
5. In the “Backup set” Name section enter additional details to the name as needed, change the backup destination as needed and click OK. A success message appears, click OK again.
6. Repeat the above instructions for the Tabulation Store and the Adjudicable Ballot Store databases.
7. Once complete, please exit out of the application.
Restoring Previously Archived Databases
1. From the Start menu, right-click Computer and click Manage.The Computer Management window appears.
2. Expand Services and Applications and click Services.
3. In the Services pane, scroll down to the services whose names start with DVS. The application has 10 services:
• DVS Adjudicable Ballot Service
• DVS Adjudication Data Service
• DVS Ballot Completion Service
• DVS Ballot Preparation Service
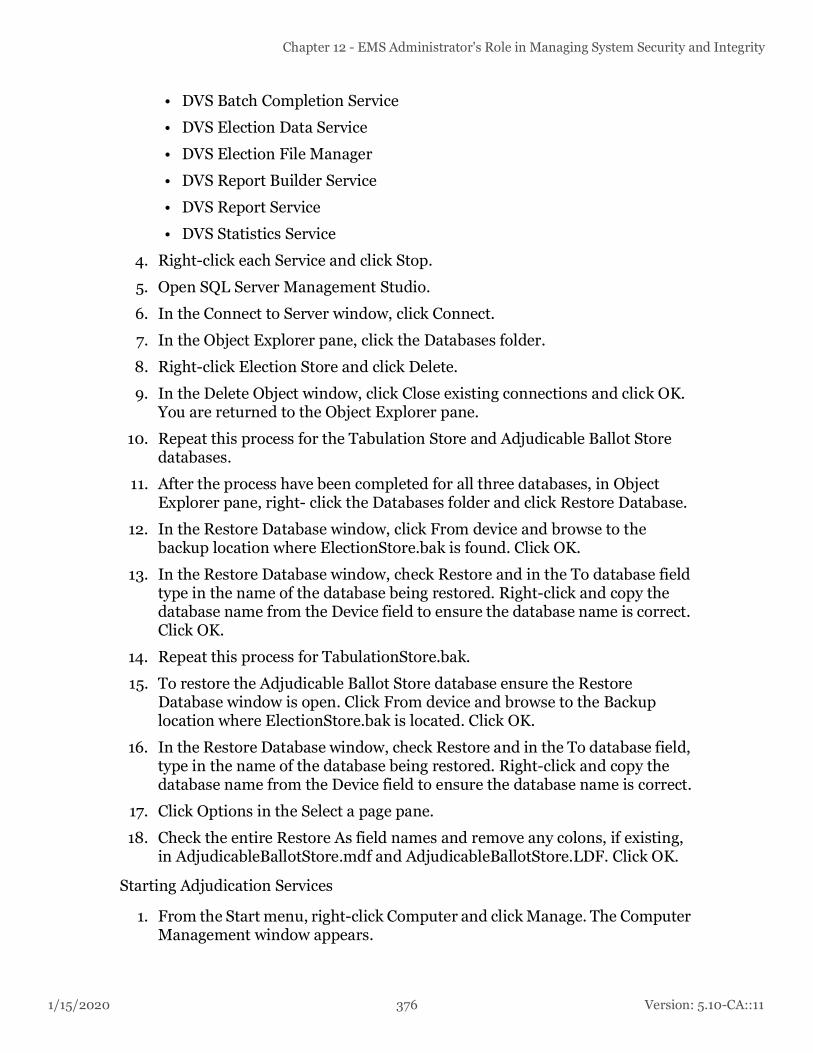
1/15/2020 376 Version: 5.10-CA::11
Chapter 12 - EMS Administrator's Role in Managing System Security and Integrity
• DVS Batch Completion Service
• DVS Election Data Service
• DVS Election File Manager
• DVS Report Builder Service
• DVS Report Service
• DVS Statistics Service
4. Right-click each Service and click Stop.
5. Open SQL Server Management Studio.
6. In the Connect to Server window, click Connect.
7. In the Object Explorer pane, click the Databases folder.
8. Right-click Election Store and click Delete.
9. In the Delete Object window, click Close existing connections and click OK. You are returned to the Object Explorer pane.
10. Repeat this process for the Tabulation Store and Adjudicable Ballot Store databases.
11. After the process have been completed for all three databases, in Object Explorer pane, right- click the Databases folder and click Restore Database.
12. In the Restore Database window, click From device and browse to the backup location where ElectionStore.bak is found. Click OK.
13. In the Restore Database window, check Restore and in the To database field type in the name of the database being restored. Right-click and copy the database name from the Device field to ensure the database name is correct. Click OK.
14. Repeat this process for TabulationStore.bak.
15. To restore the Adjudicable Ballot Store database ensure the Restore Database window is open. Click From device and browse to the Backup location where ElectionStore.bak is located. Click OK.
16. In the Restore Database window, check Restore and in the To database field, type in the name of the database being restored. Right-click and copy the database name from the Device field to ensure the database name is correct.
17. Click Options in the Select a page pane.
18. Check the entire Restore As field names and remove any colons, if existing, in AdjudicableBallotStore.mdf and AdjudicableBallotStore.LDF. Click OK.
Starting Adjudication Services
1. From the Start menu, right-click Computer and click Manage. The Computer Management window appears.

Version: 5.10-CA::11 377 1/15/2020
Democracy Suite® Use Procedures
2. Display the Services and Applications menu and click Services.
3. In the Services pane, scroll down to the list of services stopped in the previous section.
4. Right-click each service and click Start.
12.7 Purging Election Results
12.7.1 Purging Election Results from RTR
The purpose of purging election results from RTR is to clear results from a previous election before starting a new election.
1. In the Main Menu, click on Actions, Results and then click on the Purge Results option.The Confirm Purging dialog window will open.
2. In the Confirm Purging window, enter the text sequence that appears on the screen and click on the OK button to confirm purging.
12.8 Security Procedures for Central ProcessingThe official environment of the central count location is under the control of the jurisdiction, which determines its own physical security requirements for their central count facility. The jurisdiction is also responsible for handling and storing ballots both before and after they have been scanned.
The following is a suggested high-level ballot handling procedure for central processing:
Ballot boxes are typically stored on racks until they have been scanned and should remain on these racks until this point. Before the scanning process, a ballot handler is assigned to a specific scanner and is responsible for retrieving boxes of ballots from the racks for this scanner.
Once the scanner count records are compared and matched to the poll record, and every total has been balanced, the ballots are ready to be re-boxed. A post-scanning ballot handler reclaims the scanned ballots from the scanning tables and packs them into boxes. Ballots should remain in the order they have been scanned in order to facilitate easier tracking, if needed, in the future. The poll record is also repacked.
Before the box is sealed, the handler obtains the ‘follower’ from the system. This document details the scanning and accounting process. The ‘follower’ is also placed inside the ballot box. The box is sealed with a clear, tamperproof and traceable envelope. Each box is placed in storage at a pre-determined location for traceability.
12.9 Security Procedures for Polling Places

1/15/2020 378 Version: 5.10-CA::11
Chapter 12 - EMS Administrator's Role in Managing System Security and Integrity
12.9.1 Polling Place Physical Security
The following physical security mechanisms are integrated within the ImageCast® devices:
• Tamper-proof screws are used for all external fixtures.
• Each device door is secured with an appropriate locking mechanism (hasp-type for either physical locks or tamper seals and security screws).
• The ballot box has its own locks for each of the ballot box compartments.
As per jurisdiction’s regulations, poll workers should perform an orderly shut down of the tabulator to protect the units in the event of vandalism or civil disobedience. If the poll worker determines that a shutdown is required, given the severity of the disruption in the polling place, the following actions should be taken:
1. Document the public counter
2. Power down the tabulator
3. Cover the machines with available covers or move them to a safe place
4. Remove laptops or other computing devices out of the polling place
12.10 Audit Trails
12.10.1 ImageCast® Evolution Audit Trail Files
This section describes the context and purpose of voting system audits and related, specific functionality requirements. Election audit trails provide the supporting documentation for verifying the accuracy of reported election results. They present a concrete archival record of all system activity that is related to the vote tally. As such, election audit trails are essential records that provide public confidence in the accuracy of the tally, information in the event of a recount, and evidence in the event of criminal or civil litigation.
12.10.1.1 ImageCast® Evolution Audit Log File
Every action, event, and operation that occurs on an ImageCast® Evolution will be permanently logged to the audit log file that exists on both memory cards. This file is encrypted and digitally signed to protect its integrity.
Authorized users can use the LCD touchscreen to print this Audit Log report on the ImageCast® Evolution ’s internal printer. This LCD on-board Audit Log report only reports on a maximum of forty audit events (i.e. the last forty audit events to have occurred. If users use the LCD screen to request a report of more than forty audit events, the system will still only report the maximum forty audit events).
This printing procedure meets the following:

Version: 5.10-CA::11 379 1/15/2020
Democracy Suite® Use Procedures
• The generation of audit trail records does not interfere with the production of output reports.
• The entries can be identified so as to facilitate their recognition, segregation, and retention.
• The audit record entries are kept physically secure.
12.10.2 ImageCast® Precinct 2 Audit Trail Files
12.10.2.1 ImageCast® Precinct 2 Audit Log File
Every action, event, and operation that occurs on an ICP2 is be permanently logged to the audit log file that exists on the SD1 card. This file is encrypted and digitally signed to protect its integrity. This file can be uploaded to EMS RTR.
12.10.3 ImageCast® Central Audit Trail Files
12.10.3.1 Verifying the Number of Votes at Each Polling Station
Every action, event, and operation that occurs on an ImageCast® Evolution will be permanently logged to the audit log file that exists on both memory cards. This file is encrypted and digitally signed to protect its integrity.
Authorized users can use the LCD touchscreen to print this Audit Log report on the ImageCast® Evolution’s internal printer. This LCD on-board Audit Log report only reports on a maximum of forty audit events (i.e. the last forty audit events to have occurred. If users use the LCD screen to request a report of more than forty audit events, the system will still only report the maximum forty audit events).
This printing procedure meets the following:
• The generation of audit trail records does not interfere with the production of output reports.
• The entries can be identified so as to facilitate their recognition, segregation, and retention.
• The audit record entries are kept physically secure.
12.10.3.2 ImageCast® Central Audit Log File
Every action, event, and operation that occurs on the ImageCast® Central is permanently logged to an audit file that exists on the host workstation and the host results server. The report.txt is generated to display ICC election reports/statistics. The slog.txt records all activities and can be found at C:/dvs/project/config/log/slog.txt.
This printing procedure meets the following:

1/15/2020 380 Version: 5.10-CA::11
Chapter 12 - EMS Administrator's Role in Managing System Security and Integrity
• The generation of audit trail records does not interfere with the production of output reports.
• The entries can be identified to facilitate their recognition, segregation, and retention.
• The audit record entries are kept physically secure.
12.10.3.3 Audit Mark Images
For each ballot that is scanned, interpreted, and accepted into the unit, a corresponding ballot image with Audit Mark is created and stored for auditing purposes. The system uses these images to audit the unit’s interpretation of each individual ballot.
The ballot image with Audit Mark on ImageCast® Evolution consists of two parts:
1. The top part of the image contains a scanned image of the ballot (the voter markings are of particular importance).
2. The bottom portion consists of the AuditMark, a machine-generated analysis summary showing each mark that the unit interpreted for that particular ballot.
The ballot image with AuditMark on ImageCast® Central consists of three parts:
• 1st page - Ballot front side
• 2nd page - Ballot back side
• 3rd page - AuditMark
12.10.3.4 Audit Trail Files
The Audit trail file on ImageCast® Evolution is stored in memory and contains a chronological list of all messages generated by the ImageCast® software. This includes:
• System startup messages (recorded by the Application Loader)
• System self-diagnostic test messages (memory test, module initializations)
• All administrator operations (messages include the “access key” id number)
• Source and disposition of system interrupts resulting in entry into exception handling routines
• All messages generated by exception handlers’ notification of system login or access errors, file access errors, and physical violations of security as they occur, and a summary record of these events after processing
• Non-critical status messages that are generated by the machine’s data quality monitor or by software and hardware condition monitors
• All scanned ballots

Version: 5.10-CA::11 381 1/15/2020
Democracy Suite® Use Procedures
• All system errors (paper jams, power failures, hardware failures, data errors etc.)
To ensure the integrity of the Audit log, all records added to the file are encrypted using AES-128 and the common key value and the entire file is signed using a SHA-256 hash and the tabulator’s unique key value.
On ImageCast® Central, every action, event, and operation that occurs on a ImageCast® Central is permanently logged to an audit file that exists on the host workstation and the host results server. This file can be found in C:/dvs/Temp/. All audit record entries include a time-and-date stamp. The generation of audit record entries is terminated or altered by program control, or by the intervention of any person. The physical security and integrity of the records are maintained at all times.
The Audit Log can be printed using the EMS Results Tally & Reporting system. Dominion recommends that this log, once printed, be kept in a physically secure location for a period of at least 22 months. As per VVSG Vol. 1 requirements, this printing procedure meets the following:
• The generation of audit trail records does not interfere with the production of output reports.
• The entries can be identified to facilitate their recognition, segregation, and retention.
• The audit record entries are kept physically secure.
12.10.4 ImageCast® X Audit Trails
Every action, event, and operation that occurs on an ImageCast® X will be permanently logged to the audit log file that exists on both memory cards. This file is digitally signed to protect its integrity.
Authorized users can see the Audit Log report on the screen. Audit Log can be exported onto a USB stick. The export procedure meets the following:
• The generation of audit trail records does not interfere with the production of output reports.
• The entries can be identified so as to facilitate their recognition, segregation, and retention.
• The audit record entries are kept physically secure.

1/15/2020 382 Version: 5.10-CA::11
Chapter 12 - EMS Administrator's Role in Managing System Security and Integrity
12.10.5 EMS Audit Trail File
12.10.5.1 EMS Audit Log
From the moment the project is created in EMS to the moment the project becomes deactivated, the EMS system keeps an activity log within the EMS Database. This activity log stores every action performed by any user within the system, and thus functions as a detailed audit log that can be analyzed and printed in the form of an audit report. The audit information cannot be modified or permanently deleted from the EMS client applications. However, the report should be exported for archiving purposes as part of the record retention policy. Keeping in mind that audit logs can contain a significant amount of information, it is the responsibility of the administrative user to regularly archive log information. Doing so will clear the log and create more space for new records.
The auditing activity displays this auditing report in EED. The reports found in the Audit Log Report Group are associated with the usernames that have been created within EED (e.g. Admin and Techadvisor). That is to say, the produced reports will log each action that a specific user performed at a certain period of time. These reports show details such as “User Name”, “Report for Time Period”, “Time” and “Action”. The report is generated in simple text format and can be exported into PDF, HTML or MS Excel format. The created report is stored on the NAS and signed using the election project key. Reports are created with the assigned date, and multiple reports can be generated.
12.10.5.2 Unauthorized Access to the Access Control Capabilities of the System
EMS application user accounts (including roles, permissions and user credentials) are stored within the EMS Database. Access to this database can only be achieved by using the EED and RTR client applications. No other components of Democracy Suite® have access to this database repository. Direct access to the database platform (server and underlying database engine) requires special administrative privileges and cannot be performed from any of the client applications. This means that to access the EMS Database directly, the user has to first establish prerequisite infrastructure equipment, bypass physical security measures, pass the Windows Server authentication, and then pass SQL Server authentication.
12.10.5.3 Reports
Election Event Designer contains seven groups of reports presenting a variety of application activities. The convenience of the report tool is that it can be easily previewed, formatted, and filtered. Additionally, the user can obtain the custom prepared reports that modifies, deletes, or adds new sets of reports. The report tool contains XSLT, otherwise known as XSL transformations, that converts XML files into HTML, PDF, or XML with the ability to be opened in Excel. The default XSLT is imported into the election project when a new project is created.

Version: 5.10-CA::11 383 1/15/2020
Democracy Suite® Use Procedures
12.10.5.4 Create, Preview and Delete Reports
The report navigation group consists of the election project, divisioning, election event, tabulation, system report, audit log, and ballot reports groups. The procedure for creating reports is the same for all. To create a report, perform the following steps:
1. Expand the Reports navigation group and select one of the report items.
2. Select the option from the Report Name drop down menu. The drop down menu contains a list of available reports for the selected Reports Group.
3. Select the Transformation Name you can choose between one of the presented options.
4. Click Create Report.
5. The creation of the report will take a few seconds. While the system collects all of the data needed to create the report, the progress bar will appear. The report viewer will open upon completion.
6. Each report spreadsheet contains the election project and report name.
XML files can be converted into HTML, PDF or Excel by applying a chosen report transformation.
1. Select the XML report from the list of created reports.
2. Choose the Transformation Name option from the drop down menu.
3. Click Apply to apply the chosen transformed report.
To preview the created report, navigate to the Report Group main activity. Select the Report Name and click Search. One or more reports matching your search criteria appears in the main activity screen. Select the reports from the list and click Open.
To delete one or more reports, perform the following steps:
1. List the reports.
2. Select the reports.
3. Click Delete to delete them from the NAS repository.
12.10.5.5 How to Download Reports from the NAS Server
All created reports are stored on the EMS NAS servers. The created report can be opened and previewed by using the Document Management window. If you wish to print the report, you must first download it from the NAS server and save it to your local drive.
1. Open Document Management and expand the Actions menu.

1/15/2020 384 Version: 5.10-CA::11
Chapter 12 - EMS Administrator's Role in Managing System Security and Integrity
2. Select the Open Document Management submenu to open the Document Management window.
3. Select the target folders: on one pane select the EMS NAS server, and on the other select where you would like to save the report on your local drive.
4. To navigate to the reports, double-click on the Reports folder.
5. Double-click on the desired Report Group. Depending on the chosen report transformation, the reports will be presented in XML, PDF and Excel format. Additionally, the system will create a SHA file for each report.
6. Drag the report from the EMS NAS server and drop the file to your desired local location.
12.10.5.6 How to View System Level Logs
EMS system level logs for the EMS can be found in the Application and Service logs on the computer running the application. To access these logs:
1. Right-click the Computer icon and click Event Viewer.
2. Expand Event Viewer, and Applications and Services Logs select EMS System.
NOTE: Additional logs for individual EMS application machine/server components can be found in the program files where the application was installed. For example to view logs from the Election Event Designer view C:\Program Files\Dominion Voting Systems\Election Event Designer \Log
12.10.5.7 Results Auditing
After processing election results, there is a need to inspect the system operation in a more detailed manner. As a result, RTR client application has the ability to produce a detailed audit report on how ballots were marked and how they were interpreted by tabulator devices. In addition, EMS RTR collects and copies all relevant ballot scans to be visually inspected. Furthermore, all ImageCast® log files are visible through the RTR application.
For full details on the ImageCast® system’s audit functions, please refer to the following user guides:
• Democracy Suite® EMS Election Event Designer User Guide
• Democracy Suite® EMS Results Tally & Reporting User Guide
12.10.5.8 ImageCast® Adjudication Audit Trail
The ImageCast® Adjudication system keeps track of all adjudication actions taken on a ballot, including user name and time of the action, and stores this information in the database. To obtain this information, an Adjudication

Version: 5.10-CA::11 385 1/15/2020
Democracy Suite® Use Procedures
Administrator can create an Activity Report (see subsection “Activity Log Report” in 12.6.3.1 “Administrative Screens”) in PDF format is also cryptographically signed so that modification of the document is evident.
Additionally, adjudicated ballot images are appended with audit information in the same manner that the ImageCast® Central appends (see section 12.10.3 “ImageCast® Central Audit Trail Files”) interpretation information.The appended Audit Mark forms a permanent record of adjudication actions taken on a ballot and can be easily inspected at any time by opening the image with a standard image viewer.
System-level logs also record information about system operation and errors. This is stored in the Windows Event Log on the EMS server, as well as in each Adjudication workstation.
To access the ImageCast® Adjudication logs:
• From the Start Menu, right-click Computer and select “Manage”. This will open Server Manager on the EMS server, or Computer Management on a workstation.
• On the left pane, expand “Diagnostics” if on the EMS server, or “System Tools” if on a workstation.
• Expand Event Viewer.
• Select the “DVS Adjudication” log under “Applications and Services Logs”.
• To ensure all information listed is up to date, select the Refresh button in the Actions pane on the right.
• On the center pane, you will see entries logged by Adjudication components. The Source column will identify the exact component (e.g., one of the services, or the client application).
12.10.5.9 Lookup
After determining a truly random sample size (usually from amongst the precincts in an election) and elements to review within that sample (paper ballots, ballot images, log files, chain of custody, etc.), the first step when performing an audit is to lookup the list of scanned ballot images and log files based on specific criteria. The generation of audit record entries will not be terminated or altered by program control, or by the intervention of any person. The physical security and integrity of the record are maintained at all times. The user can export audit images for a subset of result files, for a single contest or for all contests. For each export a separate subfolder will be created. Inside the subfolder maximum two subfolders can be created:
• published: Folder containing all images belonging to published results.
1/15/2020 386 Version: 5.10-CA::11
Chapter 12 - EMS Administrator's Role in Managing System Security and Integrity
• notpublished: Folder containing all images belonging to non-published results.
If no contest was selected the following subfolders will be created inside these folders:
• BlankBallot: No contest was marked on the ballot.
• Blank: At least one contest did not have any votes on the ballot.
• UndervotedNotBlank: At least one contest was undervoted on the ballot.
• Overvoted: At least one contest was overvoted on the ballot.
• Regular: Each contest was fully voted on the ballot.
• Writein: Write-ins were marked on the ballot.
A similar approach is available for log files produced by the ImageCast® filtering can be performed based on tabulator instance.EMS Data Center Physical Security
12.10.5.10 EMS Data Center Physical Security
The Democracy Suite® EMS environment must be physically secured in a locked area with security access controls in place. No access to this area should be permitted to unauthorized personnel. Dominion Voting requires that an access control system is utilized that will automatically log and record each individual’s access to the EMS Data Center environment.
Such systems include the use of electronic passes or biometrics to gain entry into the secure area. In addition, if cameras and/or a card-key system are not in use, all personnel must be required to sign in and out when accessing the secure Democracy Suite® EMS environment area. The access log must include: name, organization, purpose of access, date, time in, time out, and signature.
Buildings and rooms within those buildings which contain EMS and ICC installations must be secured. Security for these can include traditional methods such as keys and locks, card-keys, and surveillance cameras. Each jurisdiction and building is different; thus an exhaustive discussion of election system building security is not possible in this Guide. Consult with your jurisdictions law enforcement or other security related agency for assistance in securing the voting system installation.
12.10.5.11 Operational and Maintenance Procedures
As with any information and communication technology system, the Democracy Suite® EMS platform requires some regular operational and maintenance procedures. These procedures ensure the reliability, availability and security of the overall system. These procedures are usually scheduled for off-election periods, either before or after the election event. Some of the operational procedures, however, should be performed regularly (daily) throughout its use.

Version: 5.10-CA::11 387 1/15/2020
Democracy Suite® Use Procedures
Operational procedures to be performed in regular intervals (daily while the system is in use) are:
• Review of the log files for each of the system components (including EMS server components, EMS client components, networking switch equipment, etc.).
• Review of the EMS-specific audit log files.
• Review of the back-up procedures and execution of additional back-up procedures (if needed).
• Review of anti-virus and any other security software event logs.
•

1/15/2020 388 Version: 5.10-CA::11
Chapter 13 - Biennial Hardware Certification and Notification
CHAPTER 13: BIENNIAL HARDWARE CERTIFICATION AND NOTIFICATION
California Elections Code requires jurisdictions to inspect voting systems, and certify their accuracy on a biennial basis (once every two years).
All tabulators, scanners, elections management software, and supplementary equipment must be certified by California’s Secretary of State prior to their use in any election taking place in California.
All specialized tally equipment must be certified for use in elections by the Secretary of State prior to use in any election.
13.1 Notification of EquipmentFor each statewide election, the responsible county Election Official shall cause to be prepared a list, including quantities, of all equipment to be used to tabulate votes during the semi-official and official canvass.
Seven days before each statewide election, the Election Official shall certify to the Secretary of State the results of the logic tests as well as the accurate functioning of all ballot tally equipment. This certification shall also affirm the use of the same equipment for the Pre-Election Logic and Accuracy test, and for semi-official and official vote canvasses. In the event of a change to the ballot tally program after certification, an amended certificate shall be submitted no later than the day before the election.
In the event any equipment is repaired, altered or replaced following the certification specified in this section, and prior to completion of the official canvass of the vote, an amended certification of Logic and Accuracy testing and a revised list of equipment used must be submitted to the Secretary of State no later than submission official canvass.

Appendix A - ImageCast® Central Device Configuration Files
1/15/2020 389 Version: 5.10-CA::11
APPENDIX A: IMAGECAST® CENTRAL DEVICE CONFIGURATION FILES
The ICC uses a default DCF as provided with the EMS release and imported into EED project during the programming of the election project. The settings should not be changed. However, if you require further information about the default settings in the DCF file, please refer to the Democracy Suite® ImageCast® Device Configuration Files document.

Appendix B - ImageCast® Evolution and ImageCast® Precinct 2 Machine Behavioral Settings
1/15/2020 390 Version: 5.10-CA::11
APPENDIX B: IMAGECAST® EVOLUTION AND IMAGECAST® PRECINCT 2 MACHINE BEHAVIORAL SETTINGS
ImageCast® Evolution (ICE) and ImageCast® Precinct 2 (ICP2) Machine Behavior Settings are configuration files used in conjunction with the ICE and ICP2 to configure the tabulator’s behavior during an election. The Machine Behavior Settings file is imported into the Election Event Designer application for configuration and customization. Once imported, the file can then be modified by selecting either numerical values or options for each of the tabulator’s functions. The tables in this Appendix describe each configurable function of the ICE and ICP2, and the numerical values and options that can be altered in order for the machine to behave in ways that adhere to the State of California’s election requirements. The two sets of tables describe the appropriate MBS settings for “Polling Place” and “Early Voting” tabulators.
The MBS file structure for the ICE and ICP2 tabulators is divided into the following categories:
• Security
• Results Files
• Standard Voting
• Accessible Voting
• Touch Voting
• Vote Verification
• Smart Card
• Early Voting
• Voter Languages
• Image Processing
• Write-ins
• Thermal Printer
• Write-in Report
• Provisional/Challenge Voting
• Advance Administration
• Results Transfer
• Shoe Shine
• HW Settings

Version: 5.10-CA::11 391 1/15/2020
Democracy Suite® Use Procedures
• Intrusion Detection
• Voting Rules
Each category contains its own set of MBS options that can be configured to adhere to election requirements
B.1 Polling Place TabulatorsThe default MBS file that is provided with the EMS release and imported into the project, is the file that should be used for the polling place (Election Day) ICE and ICP2 tabulators.
B.2 Early Voting TabulatorsThe Early Vote MBS differs from the default MBS (which is provided with the EMS release) in that some of the Thermal Printer Tape settings are changed.
Early Voting tabulators are typically programmed for many precincts and if the number of Ballot Types and Precincts programmed on a tabulator is very large, the zero and especially the report tape can be extremely long. To avoid that, some settings are changed in the MBS to shorten the length of the report tape.

1/15/2020 392 Version: 5.10-CA::11
Appendix B - ImageCast® Evolution and ImageCast® Precinct 2 Machine Behavioral Settings
The following is a list of MBS setting optimal for Early Voting tabulators:
Name Drop-down List Options/Description
Number of zero tape copies Number of zero tapes to be printed
Show zero tape copies menu item
0 – Hide Number of Copies menu item for zero tape report
1 – Show Number of Copies menu item for zero tape report (default)
Allow print/don’t print option alternation for the zero tape
1 – Allow
1 – Allow (default)
Interrupt Tape Alternative Selector
- Print (default)
- Don’t Print
Number of tape copies Number of interrupt or zero tapes to be printed (when poll is reopened)
Show interrupt tape copies menu item
0 – Hide Number of Copies menu item for interrupt tape report
1 – Show Number of Copies menu item for interrupt tape report (default)
Allow print/don’t print option alternation for the interrupt tape
1 – Allow
1 – Allow (default)
Results Tape Alternative Selector
- Print (default)
- Don’t Print
Number of result tape copies Number of result tapes to be printed
Show result tape copies menu item
0 – Hide Number of Copies menu item for results tape report
1 – Show Number of Copies menu item for results tape report (default)
Allow print/don’t print option alternation for the results tape
1 – Allow
1 – Allow (default)
Table B-1: Early Vote MBS settings

Version: 5.10-CA::11 393 1/15/2020
Democracy Suite® Use Procedures
Thermal printer continue allowed
0 – Continue printing on new thermal printer tape not allowed
1 - Continue printing on new thermal printer tape allowed (default)
Cancelation of printing on open poll allowed
1 – Cancel allowed
1 – Cancel allowed (default)
Cancelation of printing on reopen poll allowed
1 – Cancel allowed
1 – Cancel allowed (default)
Cancelation of printing on close poll allowed
1 – Cancel allowed
1 – Cancel allowed (default)
Zero tape template 1 – Report per Contests on CF0
1 – Report per Contests on CF0 (default)
2 – Report per precincts and contests on CF0
Any other suffix for templates on CF1
Interrupt tape template empty string – Default interrupt tape report on CF0 (default)
Any other suffix for templates on CF1
Result tape template 1 – Report per Contests on CF0
1 – Report per Contests on CF0 (default)
2 – Report per precincts and contests on CF0
Any other suffix for templates on CF1
Statistics tape template empty string – Default statistic tape report on CF0 (default)
Any other suffix for templates on CF1
Name Drop-down List Options/Description
Table B-1: Early Vote MBS settings

1/15/2020 394 Version: 5.10-CA::11
Appendix B - ImageCast® Evolution and ImageCast® Precinct 2 Machine Behavioral Settings
Zero view template empty string – Report per ballot manifestations and contests on CF0
1 – Report per contests on CF0 (default)
2 – Report per precincts and contests on CF0
Any other suffix for templates on CF1
Interrupt view template empty string – Default interrupt view report on CF0 (default)
Any other suffix for templates on CF1
Result view template empty string – Report per ballot manifestations and contests on CF0
1 – Report per Contests on CF0 (default)
2 – Report per precincts and contests on CF0
Any other suffix for templates on CF1
Statistics view template empty string – Default statistics view report on CF0 (default)
Any other suffix for templates on CF1
Number of signature lines on report tapes
Number of signature lines. Range: 0 - 100
Zero tape certification text
Results tape certification text
Keep ballot order of choices whiten precinct
0 – Use global order for choices in reports per precinct (default)
1 – Use ballot order for choices in reports per precinct
Report left margin Report margin. Range: 0 - 5
Report right margin Report margin. Range: 0 - 5
Show Overvotes on the Reports
- Hide on the Reports (default)
- Show on the Reports
Name Drop-down List Options/Description
Table B-1: Early Vote MBS settings

Version: 5.10-CA::11 395 1/15/2020
Democracy Suite® Use Procedures
Show Undervotes on the Reports
- Hide on the Reports (default)
- Show on the Reports
Show Double-Votes on the Reports (NY/NJ)
- Hide on the Reports (default)
- Show on the Reports
Show Overvotes for RCV contests on the Reports
- Hide on the Reports (default)
- Show on the Reports
Show Undervotes for RCV contests on the Reports
- Hide on the Reports (default)
- Show on the Reports
Show Combinations for RCV contests on theReports (for QA purpose)
- Hide on the Reports (default)
- Show on the Reports
Number of rank levels to report in RCV contests
Show Write-in Precedence on the Reports
- Hide on the Reports (default)
- Show on the Reports
Show Number of Voted Contests on the Reports
- Hide on the Reports (default)
- Show on the Reports
Show Number of Blank Contests on the Reports
- Hide on the Reports (default)
- Show on the Reports
Show Ballot Cast on the Reports
- Hide on the Reports (default)
- Show on the Reports
Show Certification Text and Signature Lines after each precinct on the Reports
- Hide on the Reports (default)
- Show on the Reports
Show Elector Groups on the Reports
- Hide on the Reports
- Show on the Reports (default)
Show Non Partisan Elector Group Title on the Reports
- Hide on the Reports
- Show on the Reports (default)
Name Drop-down List Options/Description
Table B-1: Early Vote MBS settings

1/15/2020 396 Version: 5.10-CA::11
Appendix B - ImageCast® Evolution and ImageCast® Precinct 2 Machine Behavioral Settings
Name for non-partisan contests group
Name of non-partisan contests group when contests are grouped by elector groups (open primary)
Name for party preference contest group
Name of party preference contests group when contests are grouped by elector groups (open primary)
Show Elector Groups Summary on the Reports
- Hide on the Reports (default)
- Show on the Reports
Number of ballots warning limit
A border line number of ballots assigned to tabulator that warns users that tape report might be too long.
1 to enable warning
Number of polling districts warning limit
A border line number of polling districts assigned to tabulator that warns users that tape report might be too long.
1 to enable warning
Name Drop-down List Options/Description
Table B-1: Early Vote MBS settings

Version: 5.10-CA::11 397 1/15/2020
Democracy Suite® Use Procedures

Appendix C - ImageCast® X Configuration Files
1/15/2020 398 Version: 5.10-CA::11
APPENDIX C: IMAGECAST® X CONFIGURATION FILES
ImageCast® X Machine Configuration File (MCF) is a configuration file used in conjunction with the ImageCast® X in order to configure the device’s behavior. The Machine Configuration File is imported into the EMS Election Event Designer application for further configuration and customization. Once imported, the file can then be modified by changing values or options for each of the tabulator’s functions.
The MCF file structure for the ImageCast® X tabulators is divided into the following categories:
• Main Settings
• Admin settings
• Voter card settings
• Ballot screen layout
• Voting Rules
• Report printer type
• VVPAT option
• Print of election information
• QR codes
• Electronic mobile ballot
• AVS
• Audible Tone
• Timeouts
• Battery
• Write-in
• Report
• Report labels
• Report header
• Report body
• Report footer
• LED indicator light - configurable option
• MCF version

Version: 5.10-CA::11 399 1/15/2020
Democracy Suite® Use Procedures
Each category contains its own set of MCF options that can be configured to adhere to election requirements.
C.1 Election Day ICX ConfigurationThe default MCF file that is provided with the EMS release and imported into the project, is the file that should be used for the polling place (Election Day) ICX tabulators.
C.2 Early Vote ICX ConfigurationThe default MCF file that is provided with the EMS release and imported into the project, is the file that should be used for the early vote ICX tabulators.

Appendix D - Election Event Designer Supplemental Setup Instructions
1/15/2020 400 Version: 5.10-CA::11
APPENDIX D: ELECTION EVENT DESIGNER SUPPLEMENTAL SETUP INSTRUCTIONS
D.1 Jurisdictions Serviced by Dominion VotingMost of the jurisdictions will have their elections programmed by Dominion Voting. In these cases, the jurisdiction will receive the election database which they will then restore (refer to section 12.2.2 “Restore of Election Project”) on their Democracy Suite® System.
D.2 Jurisdictions Programming Their Own ElectionsSpecific procedures on how to create their election project will be provided to each jurisdiction programming their own election via Democracy Suite® System, after purchasing the system. Included in those specific procedures will be some specific steps that those jurisdictions will need to complete to ensure a successful programming of the election. Some of those specific procedures and tips are described in this chapter.
D.2.1 Creating Election Project
In the process of creating a new project in EED, the name of the project is defined. The name is not changeable after the project has been created, so the jurisdictions are advised to have the final name of the project defined in advance.
D.2.1.1 Set Ballot Consolidation
In an election project, ballots can be consolidated on different levels. Ballot Consolidation determines the number of ballots created in the project. Consolidation can be set for the lead card and for tail cards as desired. Ensure that you understand different types of consolidation and choose the most appropriate one for your jurisdiction's needs. Ballot Consolidation is set in the ‘Project Parameters’ dialog window needs to be addressed during the Election Project Definition phase. For more information on consolidation types, and how to set it for your project, please refer to Democracy Suite® EMS Election Event Designer User Guide, Section 4.7.3.1 “Ballot Generation Options”.
NOTE: If you are unsure of which option to choose, please contact your Dominion Voting representative.
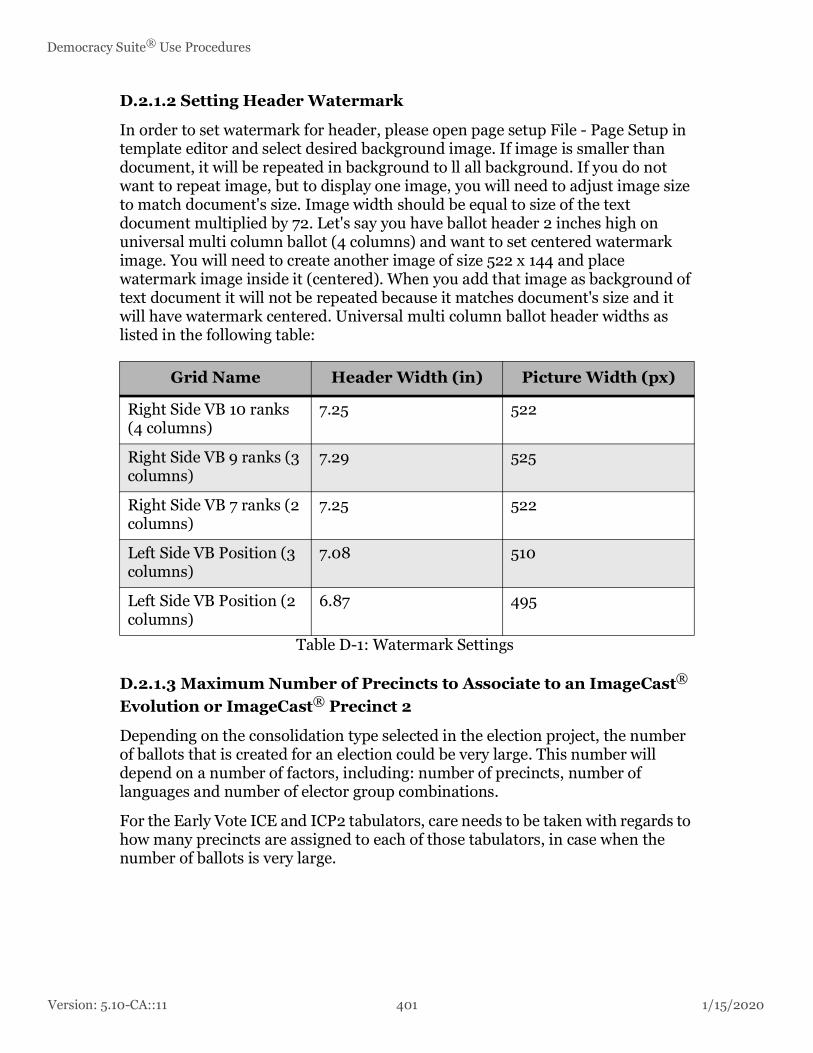
Version: 5.10-CA::11 401 1/15/2020
Democracy Suite® Use Procedures
D.2.1.2 Setting Header Watermark
In order to set watermark for header, please open page setup File - Page Setup in template editor and select desired background image. If image is smaller than document, it will be repeated in background to ll all background. If you do not want to repeat image, but to display one image, you will need to adjust image size to match document's size. Image width should be equal to size of the text document multiplied by 72. Let's say you have ballot header 2 inches high on universal multi column ballot (4 columns) and want to set centered watermark image. You will need to create another image of size 522 x 144 and place watermark image inside it (centered). When you add that image as background of text document it will not be repeated because it matches document's size and it will have watermark centered. Universal multi column ballot header widths as listed in the following table:
D.2.1.3 Maximum Number of Precincts to Associate to an ImageCast® Evolution or ImageCast® Precinct 2
Depending on the consolidation type selected in the election project, the number of ballots that is created for an election could be very large. This number will depend on a number of factors, including: number of precincts, number of languages and number of elector group combinations.
For the Early Vote ICE and ICP2 tabulators, care needs to be taken with regards to how many precincts are assigned to each of those tabulators, in case when the number of ballots is very large.
Grid Name Header Width (in) Picture Width (px)
Right Side VB 10 ranks (4 columns)
7.25 522
Right Side VB 9 ranks (3 columns)
7.29 525
Right Side VB 7 ranks (2 columns)
7.25 522
Left Side VB Position (3 columns)
7.08 510
Left Side VB Position (2 columns)
6.87 495
Table D-1: Watermark Settings

1/15/2020 402 Version: 5.10-CA::11
Appendix D - Election Event Designer Supplemental Setup Instructions
If the Early Vote ICE is configured to support accessible voting, ensure that ICE MBS is configured to Contest by Contest presentation of the ballot in the accessible voting session. For more information on the MBS and this option please refer to chapter B “ImageCast® Evolution and ImageCast® Precinct 2 Machine Behavioral Settings”.

Version: 5.10-CA::11 403 1/15/2020
Democracy Suite® Use Procedures
D.2.1.4 Defining Counting Group
Counting Groups are used to sort ballots from different groups of voters in EMS Results Tally & Reporting. These typically include Early Voting, Absentee\Mail (Vote By Mail) voters, and Election Day voters. Counting Groups are attached to tabulators and each tabulator can only be part of one Counting Group. The ‘Election Day’ Counting Group exists by default. For more information on Counting Groups and how to set them in your project, please refer to Democracy Suite® EMS Election Event Designer User Guide, Section 6.4 Defining Counting Groups.
D.2.1.5 Defining Polling Places
This section describes how to create polling places (voting locations) with the exception of Election Day voting locations which will be automatically created in the later steps during tabulator creation. In this example we will create polling locations to represent the Election Headquarters and Early Vote Centers. More polling places can be created if needed. For more information on how to create Polling Places, please refer to Democracy Suite® EMS Election Event Designer User Guide, Section 6.7 Defining Polling Places.
D.2.1.6 Defining Tabulators
For a typical election, a jurisdiction will need to create the following tabulators:
• “Election Day ICE” - these tabulators will be used to process election day ballots at voting locations. Typically, you create one Election Day ICE per precinct, however, it is possible to connect more than one precinct to any ICE.
• “Write In ICC” - this tabulator is used for scanning Absentee/Mail ballots containing write in votes.
• “Election Day ICC” - this tabulator will be used for processing Provisional Election Day ballots. One tabulator that handles all precincts and will be used for handling Provisional ballots.
• “Absentee\Mail ICC” - this tabulator will be used for processing Absentee and Mail ballots. Create one tabulator which handles all precincts.
• “Early Vote ICE” - this tabulator will be used for processing early vote ballots before Election Day.
• “Election Day ICX BMD” - these tabulators will be used to process election day votes at voting locations. Typically, you create one or more Election Day ICX per precinct, however, it is possible to connect more than one precinct to any ICX.
• “Early Vote ICX BMD” - this tabulator will be used for processing early votes before Election Day.

1/15/2020 404 Version: 5.10-CA::11
Appendix D - Election Event Designer Supplemental Setup Instructions
• “Duplication ICX BMD” - This tabulator will be used for “duplication” of provisional ballots.
For more details, please see Democracy Suite® EMS Election Event Designer User Guide, Section 6.5 Defining Tabulators and 6.6 Defining Tabulators in Batches
D.2.2 Creating Tabulators in the Ready for Elections Phase
In certain situations, it may be necessary to create additional tabulators in the Ready for Elections phase, after election files have been already created. For example, if a tabulator was forgotten during the initial setup or an additional tabulator must be deployed at a polling place.
1. Any number of tabulators may be created in Ready for Elections.
2. After creating the tabulators, election files must be manually generated. Select the newly created tabulators and click the Generate Election Files button.
D.2.3 Fonts, Languages and Ligatures
Certain languages are scripted with ligatures put very simply, each character changes appearance depending on its position in the word, and the adjacent characters. Examples of such languages are Arabic, Bengali and Hindi, amongst others. To ensure such text is correctly displayed on the ballots, special steps must be performed in EED.
In order to display language properly on the ballot headers and other templates in the project, an appropriate font must be selected for each of the languages. The following are examples of the most commonly used languages and their fonts:
• English, Spanish, Tagalog: Arial Narrow
• Chinese: MingLiu
• Vietnamese: Arial
• Khmer: Khmer
• Punjabi: Raavi
• Korean: Arial Unicode MS

Version: 5.10-CA::11 405 1/15/2020
Democracy Suite® Use Procedures
If you are unsure which font to use for a particular language, or have any other questions regarding language and related topics, please refer to Democracy Suite® EMS Election Event Designer User Guide, Chapter 5 Styling an Election Project or contact your Dominion Voting representative.
For more information see Democracy Suite® EMS Election Event Designer User Guide, Appendix F - Rendering Text with Ligatures.
D.2.4 Audio Studio Instructions
If Audio Studio is used to produce an Audio Studio export file, import it into EED. Please refer to Democracy Suite® Audio Studio User Guide, chapter 5 Defining an Audio Library.
D.2.5 Creating Additional Audio Files for an Election Project
At times it may become necessary to manually use the Cepstral audio synthesizer to create an audio file for an election project.Additional audio files can be created using the built-in front-end application (Swift Talker) that is packaged with Cepstral synthesizer used by EED. By selecting the same voices used for each language in the EED project being built, the additional audio material will be consistent with the audio that has already been created. Any missing audio content can be generated by copying & pasting the text for the missing audio string into the Swift Talker main screen, selecting the option to Export Audio file (File, Export Audio File) and saving the audio string as a WAV file(16 bit,11KHz,Mono option).The saved audio file can then be imported directly into the election project in EED or indirectly through an Audio Studio exportpackage.CepstralSwifttalker will be installed on the EMS workstation and optionally on other trusted computers.
D.2.6 Tabulator Threshold Settings
It is advisable to check the scanner threshold settings are correct for each of the tabulators. To do this, the Tech Advisor needs to log into EED project and navigate to Administrator menu item, System Settings option and click on “Scanner Configuration”.Default scanner settings might need to change depending on the ballot design or print method used to produce ballots.

1/15/2020 406 Version: 5.10-CA::11
Appendix D - Election Event Designer Supplemental Setup Instructions
D.2.7 Programming of Election Files and Security Devices
D.2.7.1 Programming of CF/SD Cards
1. Expand the ‘Tabulation’ Navigation menu and select the ‘Tabulators’ activity. Click ‘Search’ on the Tabulation - Tabulators context sensitive screen to populate a list of all available tabulators. Note that each tabulator on this list will need to have memory cards programmed for it.
2. Double-click on a tabulator to open the ‘Tabulator’ dialog window.
3. Click the ‘Create Primary’ button.
4. Insert the CF/SD card into the card reader.If the CF/SD card is already inserted, remove the card and re-insert.
5. After initialization, the Election Event Designer will being copying the files to CF card.
6. Once the card is programmed, you will be notified with a dialog. Click ‘OK’ to confirm and remove the card from the Compact Flash card reader. Be sure to label it. There is no need to remove it safely from the drive as you would a USB stick.
7. After creating the Primary memory card, you will create a blank backup memory card.
8. Click the ‘Create Backup’ button and repeat steps 4 - 6.You will receive notification once the process is complete.
9. Repeat each step for every tabulator requiring memory cards.
For more information, please refer to Democracy Suite® Election Event Designer User Guide, Section 7.2.1 Programming Memory Cards.
D.2.7.2 Programming of iButton Security Key
1. Expand the ‘Tabulation’ Navigation menu and select the ‘Tabulators’ activity. Click ‘Search’ on the Tabulation - Tabulators context sensitive screen to populate a list of all available tabulators.
2. Double-click on a tabulator to open the ‘Tabulator’ dialog.
3. Click on the ‘Users’ tab and select the ‘Admin’ user from the list of available users. Select 'Program Security Key' button.
4. A dialog will appear asking you to insert an iButton Security Key into the reader. Do so and click ‘OK’.
5. You will receive confirmation that the iButton Security Key has been programmed successfully. Click ‘OK’.
6. Repeat these steps for each iButton Security Key you need to program.

Version: 5.10-CA::11 407 1/15/2020
Democracy Suite® Use Procedures
For more information, please refer to Democracy Suite® EMS Election Event Designer User Guide, Section 7.2.2.1 Programming iButton Security keys.
D.2.7.3 Programming Tech Advisor Smart Cards
1. Ensure you have opened your election project in EED as a user with an Administrator or Tech Advisor role.
2. Go to Settings - Project Parameters - Smart Card tab.
Figure D-1:
3. Click View / Update for the Tech Advisor SC pin field. The Smart Card Pin dialog will appear.
4. In the User Password field, enter the password used for opening the election project, and click Verify.
5. In the Pin field, enter the pin for the Tech Advisor Smart Card you wish to program, and click Update Pin.
NOTE: The Pin can only contain numerals, and must be at least 4 digits and at most 8 digits.
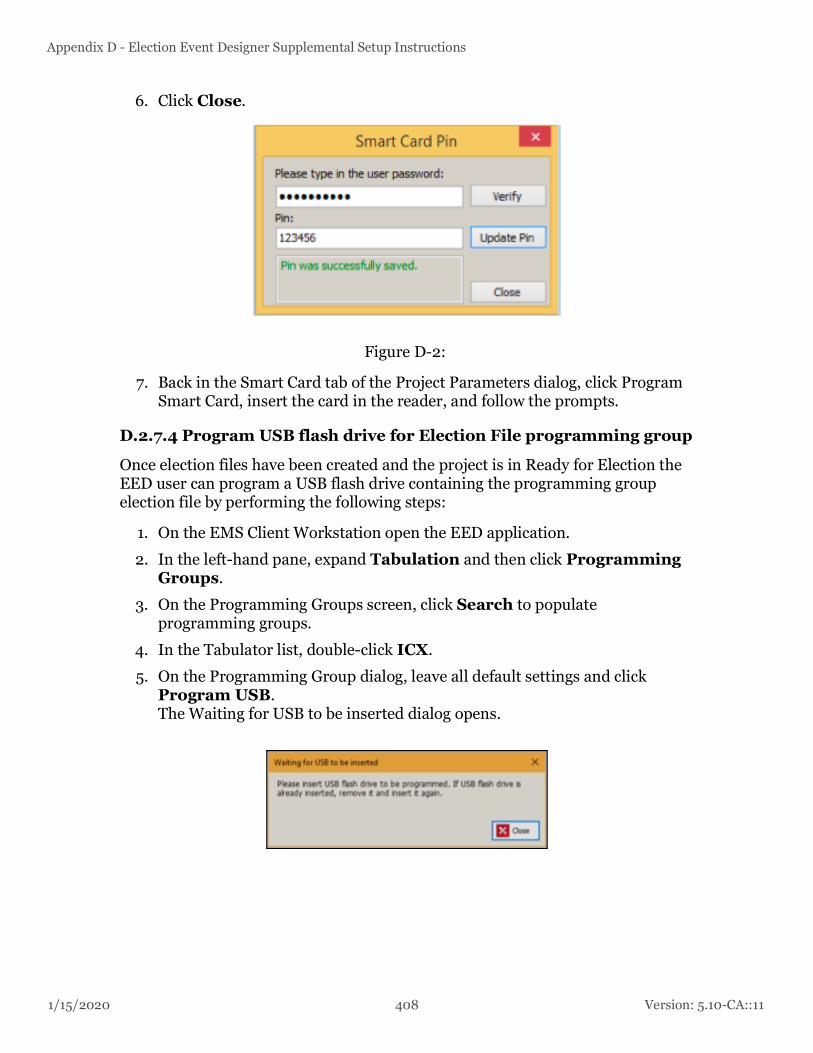
1/15/2020 408 Version: 5.10-CA::11
Appendix D - Election Event Designer Supplemental Setup Instructions
6. Click Close.
Figure D-2:
7. Back in the Smart Card tab of the Project Parameters dialog, click Program Smart Card, insert the card in the reader, and follow the prompts.
D.2.7.4 Program USB flash drive for Election File programming group
Once election files have been created and the project is in Ready for Election the EED user can program a USB flash drive containing the programming group election file by performing the following steps:
1. On the EMS Client Workstation open the EED application.
2. In the left-hand pane, expand Tabulation and then click Programming Groups.
3. On the Programming Groups screen, click Search to populate programming groups.
4. In the Tabulator list, double-click ICX.
5. On the Programming Group dialog, leave all default settings and click Program USB.The Waiting for USB to be inserted dialog opens.
Version: 5.10-CA::11 409 1/15/2020
Democracy Suite® Use Procedures
6. The system will present a dialog asking the user to insert a USB flash drive.Once inserted, EED will copy the data file to the USB device and inform the user that the data is finished copying
7. On the Information dialog, click OK..
Figure D-3:
8. The action can be repeated for any Election File programming groups.
D.2.8 Programming of poll worker Smart Card
In order to log into the ImageCast® Voter Activation application and, from it, program Voter Activation Smart Cards, you will need to program the poll worker card in EED application. Prior to programming your smart card, ensure that you have a smart card reader connected to your EMS workstation and the necessary amount of Smart Cards. In addition to that the appropriate smart card driver must be installed (this should come with your qualified smart card reader device), and the Smart Card Helper Service must also be installed as per the Democracy Suite® EMS System Installation and Configuration Procedure document. Ensure you have opened your election project in EED as a user with an Administrator or Tech Advisor role. The following steps describe how to program Tech Advisor and poll worker smart cards
1. On the EMS Client Workstation, open the EED application.
2. On the left-hand pane, expand Tabulation and select the Tabulators activity. Click Search on the Tabulation - Tabulators context sensitive screen to populate a list of all available tabulators.
3. Double-click on a tabulator to open the Tabulator screen.
4. Click on the Users tab and select the Admin user from the list of available users.
NOTE: If you need to view the Admin PIN, double-click Admin. On the Taulator User dialog, click Show PIN and close the dialog.
5. Click Program Smart Card.
6. A screen appears asking you to insert a Smart Card into the reader. Insert the Smart Card and click OK.

1/15/2020 410 Version: 5.10-CA::11
Appendix D - Election Event Designer Supplemental Setup Instructions
7. You will receive confirmation that the Smart Card has been programmed successfully or error message if programming failed. Click OK.
8. Repeat these steps for each Smart Card you need to program.
Figure D-4: Program Smart Card screen
Programming of smart cards is explained in detail in the Democracy Suite® EMS Election Event Designer User Guide, 7.2.2.2 Programming Smart Cards through 7.2.2.4 Programming poll worker Smart Cards.

Version: 5.10-CA::11 411 1/15/2020
Democracy Suite® Use Procedures
D.3 Exporting of Voter Activation Codes from EED
Activation codes are used by the system when activating ImageCast® Evolution voter sessions at a polling location. The EED application generates activation codes during the Ballot Content Generation process, which takes place during the transition from the Election Project Definition phase to the Election Project Styling phase. Codes are generated for any combination of Precinct Portion and Ballot Group in the election project.
Activation Codes and relevant detail can be viewed and managed in the Activation Codes section, accessed from the Election Event menu in the left-hand navigation of the EED application. The screen displays the code, its description, as well as the associated Polling District, Ballot Type, Ballot Group and Cycle.
Figure D-5: Activation Code screen
1. The user can edit the code and the description for each item in the list by either selecting it and clicking the Edit icon in the toolbar, or double-clicking the item. The Activation Code dialog will appear.

1/15/2020 412 Version: 5.10-CA::11
Appendix D - Election Event Designer Supplemental Setup Instructions
2. After ensuring that the new code is unique and the changes are made, click Save and Close to apply the changes.
Figure D-6: Editing Activation Codes
3. If you have already created this file in EED and imported in ICVA, skip this step. Otherwise, open the election project in EED on your EMS workstation, and perform the next two steps:
4. In the Election Project menu, select the Export menu item and click the Activation Configuration item.
Figure D-7: Exporting the Activation Code Configuration File

Version: 5.10-CA::11 413 1/15/2020
Democracy Suite® Use Procedures
5. In the Save As dialog, navigate to the location where the file should be saved, and click Save. This file must be transported to the polling location computer where ICVA is running.
Figure D-8: Saving the Activation Code Configuration File

1/15/2020 414 Version: 5.10-CA::11
Appendix D - Election Event Designer Supplemental Setup Instructions
D.4 Importing Activation Codes to the ImageCast® Voter Activation ApplicationWhen the ICVA application is successfully installed, the next step is to run the application and perform some basic configuration steps.
Figure D-9: Insert poll worker Smart Card
1. To start the application, double-click the ICVA shortcut located on the desktop.
2. When the application starts, the user will be prompted to insert the poll worker smart card, in order to authenticate the user.
Figure D-10: Enter poll worker Pin
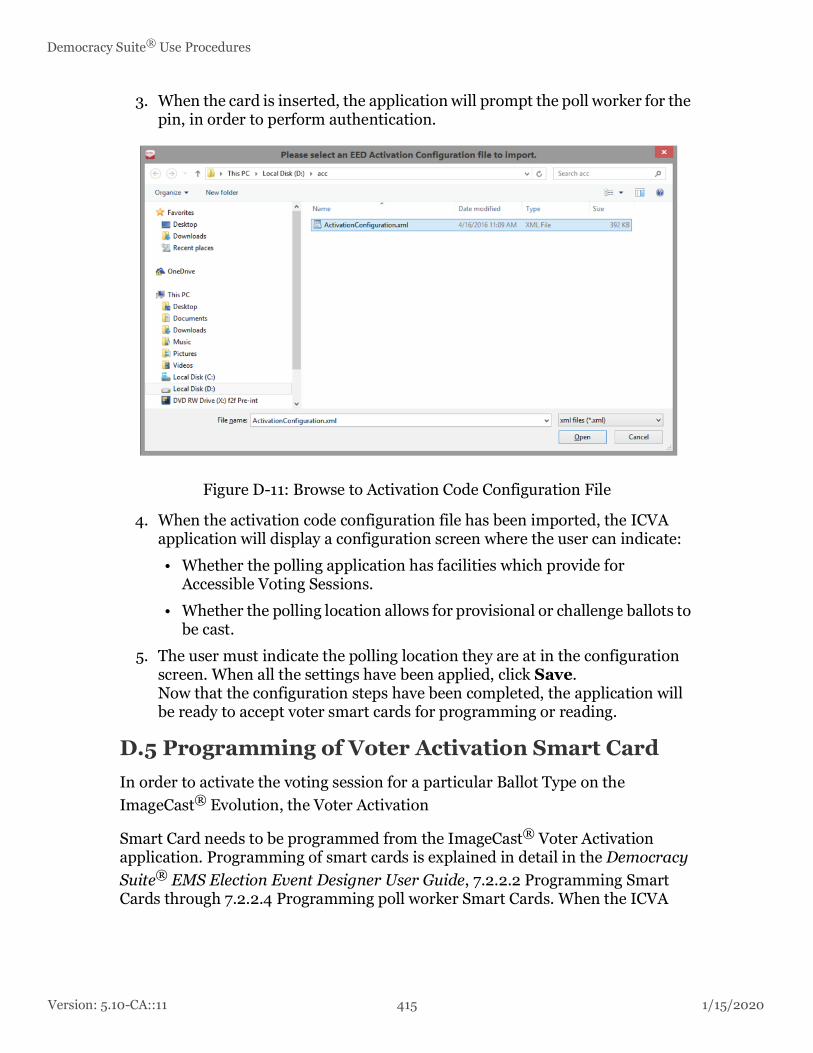
Version: 5.10-CA::11 415 1/15/2020
Democracy Suite® Use Procedures
3. When the card is inserted, the application will prompt the poll worker for the pin, in order to perform authentication.
Figure D-11: Browse to Activation Code Configuration File
4. When the activation code configuration file has been imported, the ICVA application will display a configuration screen where the user can indicate:
• Whether the polling application has facilities which provide for Accessible Voting Sessions.
• Whether the polling location allows for provisional or challenge ballots to be cast.
5. The user must indicate the polling location they are at in the configuration screen. When all the settings have been applied, click Save.Now that the configuration steps have been completed, the application will be ready to accept voter smart cards for programming or reading.
D.5 Programming of Voter Activation Smart CardIn order to activate the voting session for a particular Ballot Type on the ImageCast® Evolution, the Voter Activation
Smart Card needs to be programmed from the ImageCast® Voter Activation application. Programming of smart cards is explained in detail in the Democracy Suite® EMS Election Event Designer User Guide, 7.2.2.2 Programming Smart Cards through 7.2.2.4 Programming poll worker Smart Cards. When the ICVA

1/15/2020 416 Version: 5.10-CA::11
Appendix D - Election Event Designer Supplemental Setup Instructions
application has been started and configured properly, it will be waiting for the first Voter smart card to be inserted for programming. The following steps describe the typical card activation and reading cycle.
• A prompt will be displayed to the poll worker, asking for a voter smart card to be inserted.
Figure D-12: Insert Voter Smart Card
• Select a Voter Session Activation Code. Otherwise, the poll worker can also click Exit if they wish not to proceed with activating the currently inserted card (next step).
Figure D-13: Contents of the inserted Smart Card

Version: 5.10-CA::11 417 1/15/2020
Democracy Suite® Use Procedures
• On selecting Exit, the application will prompt the user to remove the smart card. Once it is removed, the poll worker will be presented with the situation in step 1 - the application will be waiting for a voter card to be inserted.The poll worker will be presented with a list of applicable activation codes and their descriptions for the polling location where ICVA is running.
Figure D-14: Remove Ejected Card
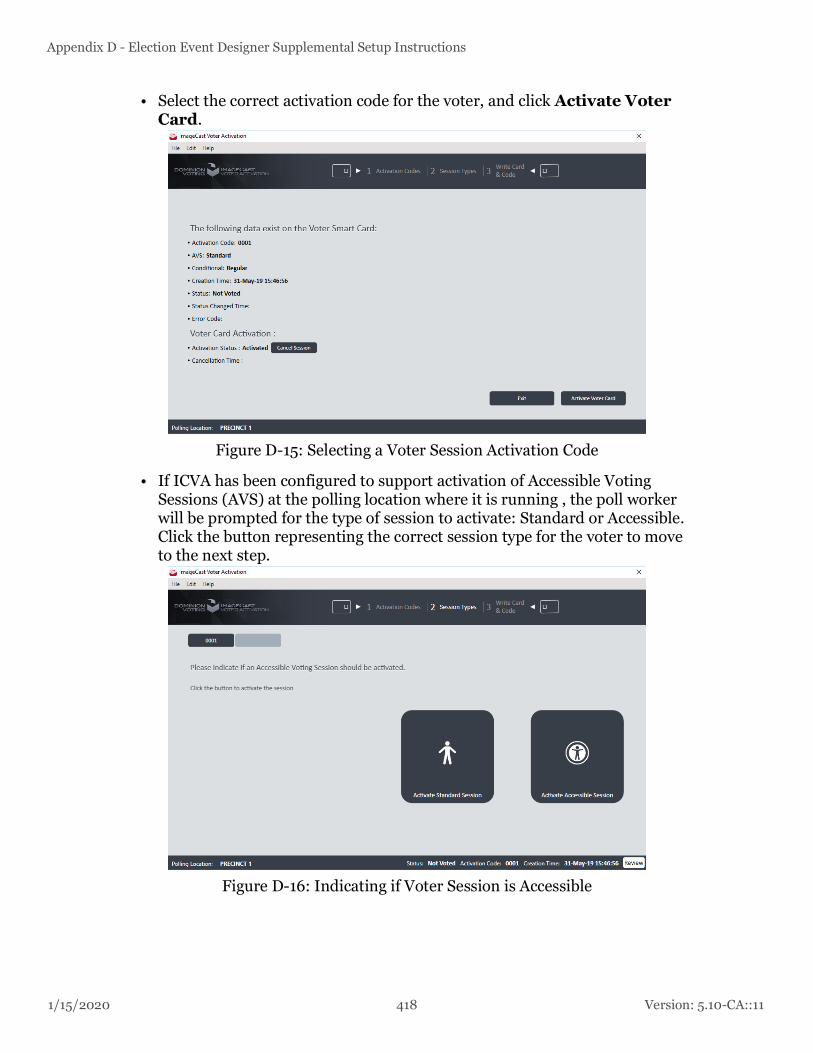
1/15/2020 418 Version: 5.10-CA::11
Appendix D - Election Event Designer Supplemental Setup Instructions
• Select the correct activation code for the voter, and click Activate Voter Card.
Figure D-15: Selecting a Voter Session Activation Code
• If ICVA has been configured to support activation of Accessible Voting Sessions (AVS) at the polling location where it is running , the poll worker will be prompted for the type of session to activate: Standard or Accessible. Click the button representing the correct session type for the voter to move to the next step.
Figure D-16: Indicating if Voter Session is Accessible

Version: 5.10-CA::11 419 1/15/2020
Democracy Suite® Use Procedures
• If ICVA has been configured to support challenged voting at the polling location where it is running the poll worker will be prompted for the type of session to activate: Regular, or Challenged. Click the button representing the correct session type for the voter to move to the next step.
Figure D-17: Indicating if Voter Session is Challenged

1/15/2020 420 Version: 5.10-CA::11
Appendix D - Election Event Designer Supplemental Setup Instructions
• The application will indicate that the selections are currently being written to the voter card, and the user will be instructed not to remove the smart card
Figure D-18: Programming Voter Card
• The application will inform the user that the card has been successfully programmed.
Figure D-19: Card Successfully Written

Version: 5.10-CA::11 421 1/15/2020
Democracy Suite® Use Procedures
• The application will prompt the user to remove the smart card. Once it is removed, the poll worker will be presented with the situation in step 1 - the application will be waiting for a voter card to be inserted.
Figure D-20: Remove Written Card
D.6 Smart Card Security Recommendations
The ImageCast® Evolution and ImageCast® X systems utilize smart cards for voter activation with the ImageCast® X system additionally using specific smart cards to enable poll worker and technician functionality. The contents of these cards are encrypted and are usable only for the election for which they were programmed. Accessing poll worker or technician functionality on the ImageCast® X system requires the physical smart card programmed for the election loaded on the machine as well as an election-specific password.
Overall system security can be enhanced by creating procedures that implement the following security recommendations:
• Label all smart cards with a unique serial number
• When not in use, secure all smart cards from unauthorized access.
• Consider attaching poll worker and technician cards to retractable lanyards that can be worn by authorized personnel while at the polling location. This help maintain positive control of the cards and guard against unauthorized access.
• Regularly inventory poll worker and technician cards throughout the day during their use in the polling location. If a card is not accounted for during inventory, immediately notify election officials.
• Check in and out voter activation cards before and after use by a voter.

1/15/2020 422 Version: 5.10-CA::11
Appendix D - Election Event Designer Supplemental Setup Instructions
What to do with a card that was not accounted for during a regular inventory but is later located:
• Voter activation cards may be reused after they are inserted into the ImageCast® Voter Activation station and activated for a new voter. The ImageCast® Voter Activation station deletes the smart card's contents as part of its activation procedure.
• Poll worker or technician cards should be taken out of use, if practical, until they can be reprogrammed using EMS Election Event Designer. Reprogramming a poll worker or technician card erases the card's contents before writing the necessary information back to the card.

Version: 5.10-CA::11 423 1/15/2020
Democracy Suite® Use Procedures

1/15/2020 424 Version: 5.10-CA::11
Appendix D - Election Event Designer Supplemental Setup Instructions

Version: 5.10-CA::11 425 1/15/2020
Democracy Suite® Use Procedures

Appendix E - InterScan HiPro Scanner Handling Checklist
1/15/2020 426 Version: 5.10-CA::11
APPENDIX E: INTERSCAN HIPRO SCANNER HANDLING CHECKLIST
The following table provides a checklist for scanner handling guidelines.
Scanner Handling
Preparation Folded Ballots are to be flattened as much as possible to improve feeding speed and reduce potential issues.
Input Tray Ballots stacks should not be higher than the paper guides in the input trays.
The Paper Guide Extensions, for higher stacks, should not be used
Folded ballots have to be placed to the input tray with the front edge upwards (first fold downwards). This improves feeding and output stacking
If the number of double feeds or feed-in issues increases, the set of input/separation rollers should be changed and cleaned
Double Feed See “InterScan HiPro Scanning Errors” on page 434.
Paper Jam Use of error handling on scanner. (See Troubleshooting section)
Table E-1: Scanner Handling

Version: 5.10-CA::11 427 1/15/2020
Democracy Suite® Use Procedures

Appendix F - Troubleshooting and Problem Resolution
1/15/2020 428 Version: 5.10-CA::11
APPENDIX F: TROUBLESHOOTING AND PROBLEM RESOLUTION
F.1 Installation and Configuration Troubleshooting
F.1.1 Hardening Script Verification
During installation, the hardening script is applied. However, if the script was not run as Administrator, the following error is displayed.
Figure F-1: ImageCast Central Application - Security Warning
You can verify the settings through the Certificate Path Validation dialog and if needed, apply the necessary settings to resolve the issue.

Version: 5.10-CA::11 429 1/15/2020
Democracy Suite® Use Procedures
Figure F-2: Certificate Path Validation
To Check the Certificate Settings:
1. Click Start, and then click Search.
2. Enter Edit Group Policy in the search bar, and then press Enter.
3. In the Local Group Policy Editor, expand Computer Configuration, Windows Settings and Security Settings, and then click Public Key Polices.
4. In the right-side panel, right-click on Certificate Path Validation Settings, and then click Properties.
5. In the Certificate Path Validation Settings Properties dialog, click the Revocation tab and make sure the following check boxes are selected:
• Define these policy settings
• Allow CRL and OCSP responses to be valid longer than their lifetime
6. In the Time the validity period can be extended (in hours) field, enter 1000000 or more.
7. Click Apply and then click OK.
F.2 ImageCast® Evolution TroubleshootingNOTE: Any troubleshooting procedures required to be performed on Election Day MUST be performed in the presence and with permission of the Election Staff on duty.
F.2.1 Replacing a Machine
To replace a machine during an active election, follow the steps described below in presence of an authorized poll official:
1. Record the number of ballots displayed in the Ballot Counter.
2. Navigate to the Poll Worker menu.
3. Turn off the machine by pressing the Power Down icon on the top right corner of the Touchscreen LCD followed by the Shut Down tab. Otherwise, this step can be disregarded.
4. Lay down the Touchscreen LCD into its storage position then press the Service ON/OFF switch into the OFF position in order to completely shut down the unit.
5. Ask the voting official to remove the two (2) Election memory cards from the poll worker port and the administrative port.
6. Lift the machine off from the ballot box and record it for diagnosis.

1/15/2020 430 Version: 5.10-CA::11
Appendix F - Troubleshooting and Problem Resolution
7. Place the two (2) memory cards into their respective ports of the replacement unit.
8. Place the replacement unit on the Ballot Box.
9. Lock the tabulator in place.
10. Lift the Touchscreen LCD of the replacement unit into its operating position then press the Service ON/OFF switch onto the ON position to power it up.
11. On the Insert Security Token Screen prompt, place a valid administrative key on the Security Keypad.
12. Type in the correct credentials to access the Election Application Main Menu.
13. Select the Open Poll tab (in the Main Menu), followed by selecting Open under Poll Status (in the ICE Poll-Worker menu).
14. Enter the correct credentials to Open the Polls in the new machine. The system will display a Warning message indicating that the ballot results already exist. Press the OK button to proceed to the ICE Poll- Worker Menu.
15. In the Main Menu, select the Utilities button followed by Report in order to print an Interrupt Report. Verify that the Total Voters Count on the Interrupt Report matches the “Ballot Counter” number you recorded in Step 1.
16. Remove the paper printout from the original machine and hand it to the Poll Official for the permanent record.
17. Ensure that the Poll Official places security seals on the CF1 Door and CF2 Door as required by their jurisdiction.
18. The replacement unit is ready for operation. To proceed, select the desired option on the main menu. Follow standard close poll procedures at the end of voting.
F.2.2 Paper Jams
In the event of a paper jam, the system runs a self un-jam routine to eject the paper and return it to the user for re- feed. An error message is displayed if the un-jam routine fails to clear the paper jam.
The paper jam can occur either in the Scanner path or the Printer path. Visually, identify the location of the Paper Jam then refer to the appropriate section below to resolve the issue.
F.2.2.1 Paper Jam in Scanner Path
• If the ballot is visible from either the front ballot entry slot, or any of the two diverter slots on the bottom of the unit:

Version: 5.10-CA::11 431 1/15/2020
Democracy Suite® Use Procedures
• Gently pull the ballot out. Ensure that the ballot does rip or tear in the process.
• If you removed the unit from the ballot box to access the jammed ballot, place the unit back onto the ballot box.
• Be sure to properly account for the jammed ballot, placing it in the ballot box if it has already been cast (this is unlikely) or placing in the ballot entry slot so that it can be tabulated.
• Replace the unit if the jam reoccurs.
• If the ballot is stuck within the machine and is not visible from any of the accessible slots:
• Place the iButton Security Key on the Security Keypad and insert the appropriate credentials.
• The machine will automatically run the unjam procedure to clear the ballot jam.
• If this fails to resolve the issue, replace the unit.
Figure F-3: The Ballot Path (Scanning)
F.2.3 Power Failures
In the event of a power failure, the unit automatically switches to its internal battery. If the machine fails to turn on, or if the battery drains, check the connectivity and/or charge capacity of the battery. If this fails to resolve the issue, perform any of the procedures outlined below.
F.2.3.1 Faulty Main's Power Source
To identify whether the wall outlet is functional:
• Plug in any other electrical product into the outlet and check if it powers up.
• If the other electrical product fails to power up, plug the ICE unit to another wall outlet and confirm power up.

1/15/2020 432 Version: 5.10-CA::11
Appendix F - Troubleshooting and Problem Resolution
• If the other electrical product powers up, refer to section F.2.3.2 “Faulty or Disconnected Power Adapter”.
F.2.3.2 Faulty or Disconnected Power Adapter
Obtain permission from an authorized Election Official to gain access to the Ballot Box in order to inspect the power adapter.
• Check cable connectivity
• If cables are connected, measure the voltage (at the 2.5mm power pin), which should read 20V DC. If this is not the case, replace the power adapter.
• If this fails to resolve the issue, replace the unit.
F.2.4 Thermal Printer
Issues related to this printer are very minimal. The primary causes of concern are discussed below.
F.2.4.1 No Print on Thermal Paper or Printer Fails to Print
In order to resolve this issue, follow the check sequence below:
• Verify that the thermal paper is seated in the correct orientation in the Printer compartment. Because thermal paper can only be printed on one side, it is important that the paper roll sits such that it rolls along the Printer Compartment base surface and protrudes upwards and through the slot on the compartment door as indicated by the arrow in the figure below.
• Verify that the Thermal Printer is receiving power by checking for a green LED on the Printer mechanism. If the green LED is off, ensure that the cables are properly plugged into the printer mechanism.

Version: 5.10-CA::11 433 1/15/2020
Democracy Suite® Use Procedures
• If this fails to resolve the issue, replace the unit.
Figure F-4: Thermal Printer X-section View
F.2.4.2 Thermal Printer Prints Invalid Characters
To resolve this issue, check to ensure that the cables are plugged in properly into the printer mechanism. If this fails to resolve the issue, replace the ICE unit.
F.2.5 Touchscreen Failures
Touchscreen failures are associated with loss of calibration on the touchscreen. Common symptoms include:
• Wrong button selected when attempting to press a particular button.
• No response at screen touch.
F.3 ImageCast® Central Troubleshooting
F.3.1 Ballot Scanning Errors
F.3.1.1 Ambiguous Errors
NOTE: All ballots that cause any of the ballot scanning errors listed below are saved in C:\DVS\Project\NotCastImages as images for further examination.
The information message indicating that 'Ambiguous' may display during scanning. It informs the user that an ambiguous mark has been detected and the number of ballots that have not been counted as a result of the ambiguous mark.
If this occurs do the following steps:

1/15/2020 434 Version: 5.10-CA::11
Appendix F - Troubleshooting and Problem Resolution
1. Close the ImageCast® Central application.
2. Turn off the scanner.
3. Wait 1 minute.
4. Turn the scanner back on.
5. Open the ImageCast® Central application again and resume scanning.
6. If the problem persists, please contact your Dominion Voting Representative.
F.3.1.2 Invalid Ballot Errors
Figure F-5: “Exception found on the one ballot scanner” Message.
This message indicates that the User has inserted a ballot not programmed to scan in the machine. Ensure that the ballot is printed on valid ballot paper and is in the correct batch.
F.3.1.3 InterScan HiPro Scanning Errors
If the InterScan HiPro scanner encounters an error while scanning the ballots, an error message stating “Sheets inside” appears on the scanner's LCD screen. Next to the “Sheets inside” statement are a green number and a red number:
• Green number: Indicates the number of ballots successfully scanned and sent to the ICC application. These ballots do not need to be rescanned.
• Red number: Indicates the number of ballots inside the scanner (scanned or not scanned) but not sent to the ICC application. These ballots need to be rescanned.
An example of a scanning error message appears below.

Version: 5.10-CA::11 435 1/15/2020
Democracy Suite® Use Procedures
NOTE: Please note, the error description will vary depending on the nature of the scanning error but will always contain the statement “Sheets inside” along with the two numbers.
Figure F-6: Example Error
Use the following applicable procedures to resolve the issue.
Scanner Error Handling by Error Sheet Count
Use this procedure if you are not using the scanner's Post-Imprinter.
1. Make note of the green and red numbers on the error message screen.
2. From the scanner's error message screen, tap Transport.The problem ballots are automatically moved from inside the scanner into the output tray.
3. Count the ballots as they are moved into the output tray until the number equals the green number stated on the error message screen.These ballots remain in the output tray.
4. Remove from the output tray all proceeding ballots.The total count of these ballots equals the red number on the error message screen.
5. Return these ballots to the input tray.
6. Rescan the ballots.
Error Handling by Post-Imprinted Ballots
Use this procedure if you are using the scanner's Post-Imprinter.

1/15/2020 436 Version: 5.10-CA::11
Appendix F - Troubleshooting and Problem Resolution
1. From the Scanning screen in ICC, determine the batch size.
Figure F-7: ICC Batch Size Value
2. From the scanner's error message screen, tap Transport.The problem ballots are automatically moved from inside the scanner into the output tray.
3. Review the ballots numbers in the Post-Imprinter messages (last 4 digits) on the ballots moved into the output tray.
4. Identify the ballot that matches the ICC batch size.
Figure F-8: This ballot and all preceding ballots remain in the output tray.
5. Remove from the output tray all proceeding ballots.
6. Reorient the removed ballots.
7. Return the removed ballots to the input tray.
8. Rescan the ballots.

Version: 5.10-CA::11 437 1/15/2020
Democracy Suite® Use Procedures
F.3.2 Scanner Paper Jam Errors
F.3.2.1 HiPro Scanner Paper Jam Error
The following warning appears when a paper jam occurs when using the HiPro scanner.
Figure F-9: HiPro Scanner Paper Jam Warning
To resolve the issue:
1. Click OK.
2. Clear the scanner path.
3. Continue scanning the batch.
F.3.2.2 HiPro Scanner Double Feed when Accepting a Batch
The following warning appears when attempting to accept a batch after a double feed occurred on a HiPro scanner.

1/15/2020 438 Version: 5.10-CA::11
Appendix F - Troubleshooting and Problem Resolution
Figure F-10: HiPro Double Feed Warning when Accepting a Batch
To resolve the issue by not accepting the batch:
1. Click Cancel to clear the message.
2. At the rear of the scanner, remove the ballots from output tray.
3. Re-scan the ballots.
4. Accept the batch again.

Version: 5.10-CA::11 439 1/15/2020
Democracy Suite® Use Procedures
To resolve issue by accepting the batch:
1. Click Continue to clear the message.A confirmation message appears.
Figure F-11: Confirmation Message
2. Click OK.
F.3.2.3 HiPro Scanner Double Feed when Discarding a Batch
The following warning appears when attempting to discard a batch after a double feed occurred on a HiPro scanner.
Figure F-12: HiPro Double Feed Warning when Discarding a Batch

1/15/2020 440 Version: 5.10-CA::11
Appendix F - Troubleshooting and Problem Resolution
To resolve the issue:
1. Click OK.A confirmation message appears,
Figure F-13: Confirmation Message
2. Click Yes.
F.3.3 ICC Error Messages
If the following message appears, either a project has not previously been loaded or the data.meta file is corrupt or missing.
Figure F-14: No Tabulators Imported Message.

Version: 5.10-CA::11 441 1/15/2020
Democracy Suite® Use Procedures
If the following message appears, you may have entered an incorrect passcode and should check with an election official to make sure you have received the right code.
If the error persists after checking the passcode, the wrong iButton Security Key may have been inserted. Please ensure that you are using the correct iButton Security Key for your device.
If the error message continues to appear, there may be a problem with your iButton Security Key and it may need to be replaced. Contact an election official or the Dominion support helpline for further information.
Figure F-15: Passcode Error Dialog.
The following message will display when you try to scan ballots before they have been loaded into the scanner. Click OK, load the ballots into the tray, and click SCAN.
Figure F-16: Insert Ballots Message.

1/15/2020 442 Version: 5.10-CA::11
Appendix F - Troubleshooting and Problem Resolution
F.4 Adjudication Troubleshooting
F.4.1 Communication with the Adjudication Service
Certain network connectivity events may prevent the Adjudication application from receiving ballots. When this occurs, communication can be restored as follows:
1. Verify that both the server and the client machine in question have a network connection. Hover over the network icon on the notification area of the Windows taskbar. This should display the message “No Internet access” below the name of the network. If this is not the case, check that the network cable is plugged in on both ends, and ask an administrator to verify that the network is functioning correctly.
2. Close and reopen the Adjudication application.
3. Verify that ballots can be received (this might take a few minutes).
4. If problems persist, restart the workstations and the server as follows:
a. Power down the Adjudication workstations.
b. Restart the EMS server.
c. Wait for the EMS server to start.After successful login to the server, wait two to five minutes for the Adjudication services to start.
d. Power up the Adjudication workstations.
F.5 EMS TroubleshootingIf any issues are encountered while configuring the EMS Application Server (EMS APPS) using DCM, please try the following troubleshooting procedure:
1. Start SQL Server Configuration Manager console.
2. Change 'log on as user' to Local System and click Apply.
3. Restart SQL Server Service.
4. Start SQL Server Agent service if it is available.
5. Start Computer Management console and navigate to 'Local Users and Groups'.
6. Delete the following user accounts:
• emssqluser
• emsdbusers group
7. Reboot the computer.
8. Run DCM again.
9. If the problem persists, please contact Dominion Technical Support.
Version: 5.10-CA::11 443 1/15/2020
Democracy Suite® Use Procedures
If the EMS system becomes unresponsive during any interaction with the operator, please follow the steps below to recover from that state:
• Make sure that all servers you are using are switched on and working, and that all network equipment (if any) is switched on and working.
• Make sure that all client computers you are using are switched on and working.
• For any problems encountered during installation, make sure you followed the installation and configuration manual for both the server and the client computers.
• Try to log in to the server you are using with the default administrator account. Open Task Manager (press Ctrl+Alt+Delete and click on the Start Task Manager button). Under the Process tab, make sure that no process that begins with the name "DVS" occupies 0% of CPU usage. If so, select that process and click on the End Process button at the bottom. Repeat the process, if necessary.
• Try to log in to each client computer you are using with the default administrator account.
• Open EED client application. Ensure that the entered EMS database and network settings, as well as the application user accounts, are correct. Check to see if the election event properties have been entered correctly. Create and then ensure the System and Audio Log reports are correct.
• Open RTR client application. Ensure that the entered EMS database and network settings are correct. Ensure the transfer point parameters are correct. Reboot the server and try again.
• Reboot the defective client computer(s) and try again.
• If the problem persists, please contact Dominion Technical Support.
F.5.1 Submission and Publishing of Batches
This workaround explains how to recover from an instance where the submitted batches in Adjudication show “Submission Error”. When this happens, the batches will remain in the “Review” pane of the Adjudication application, with a “Submission Error” note next to the name of the batch.
The submission error problem will usually affect multiple batches of consecutive batch numbers. Note the starting and the last affected batch number.
Open the project in the RTR application and list all batches for the affected tabulator (you can find the tabulator name in the batch name in the Adjudication application). Highlight all the affected batches using the batch numbers noted in the previous step. Once the affected batches are highlighted, click on the Reject button.

1/15/2020 444 Version: 5.10-CA::11
Appendix F - Troubleshooting and Problem Resolution
Go back to the Adjudication application and re-submit those same batches by dragging and dropping them into the Submitted pane of the Adjudication application.
Go back to the RTR application and verify that the newly submitted batches are in Published/Adjudicated state.
F.6 ImageCast® X TroubleshootingNOTE: Any troubleshooting procedures required to be performed on Election Day MUST be performed in the presence and with permission of the Election Staff on duty.
F.6.1 Power failure
In the event of a power failure, the unit automatically switches to its internal battery. Additionally, the device is equipped with a UPS that can power the unit and the BMD printer.
F.6.2 Printer paper jam
In the case of printer paper jam, consult the printer user guide.
• HP LaserJet Pro M402dne - http://h10032.www1.hp.com/ctg/Manual/c04639074
F.6.2.1 Low Toner
If the printer is low on toner, printing functionality is suspended and an error message is displayed to the voter. The voter is prompted to contact the poll worker to resolve the issue and resume printing.
To Replace the Toner Cartridge:
• Insert the poll worker card and enter the access code.
• The ICX Warning dialog displays the Print Status error "Cartridge toner is low".
• Replace the toner cartridge.For detailed instructions, please the Remove and replace the toner cartridge section, on page 29, of the HP "LaserJet Pro M402, M403" user guide.
• Printing can resume when the control panel's Ready light is green. "Ready" will also be visible in the control panel display.
• On the ICX screen, press Reprint.
• Remove the poll worker smart card.

Version: 5.10-CA::11 445 1/15/2020
Democracy Suite® Use Procedures
F.6.3 Replacing BMD printer
To replace a BMD printer on Election Day, follow the steps described below in presence of an authorized Poll Official:
1. Power off the printer.
2. Disconnect the USB and power cable from the printer.
3. Remove the printer.
4. Place the replacement printer into the same location.
5. Reconnect the USB and power cable to the replacement printer.
6. Log in using a Technician Smart Card.
7. Select Hardware Information to verify the printer is present. If an error occurs, start the procedure from the beginning.
8. Select Hardware Test and then Printer test.
9. Print a test page to confirm the printer is working. If an error occurs, start the procedure from the beginning.
10. Remove the Technician Smart Card.
11. The device is ready to receive Voter Smart Cards.
F.6.4 Replacing ICX device
To replace ICX device on Election Day, follow the steps described below in presence of an authorized Poll Official:
1. Record the number of ballots displayed in the Ballot Counter.
2. If you are in the “Poll-Worker Menu” or “Tech Menu”, turn off the machine by pressing the Power Down icon on the bottom right corner of the menu and then selecting option Yes. Otherwise, this step can be disregarded.
3. Disconnect the power cable, printer cable, and ATI device, if it's connected.
4. Once you have checked there are no more obstacles, remove the device from the table.
5. Place the replacement unit on the table.
6. Attach the printer cable and the ATI cable, if ATI was connected previously.
7. Plug the power cable into the device.
8. Wait for the device to power up.
9. Insert the Technician Smart Card and log in.
10. Confirm or modify the date and time.
11. Make sure the device has valid election files loaded, if not, load valid election files from a USB stick.

1/15/2020 446 Version: 5.10-CA::11
Appendix F - Troubleshooting and Problem Resolution
12. Remove the Technician Smart Card.
13. Make sure no USB sticks are in the device.
14. Close the trap doors and place the seals at the security latches.
15. Insert the poll worker Smart Card and Select the desired tabulator from drop down list.
16. Select the Open Poll option (in the Main Menu), and confirm the poll opening.
17. Remove the poll worker Smart Card.
The replacement unit is ready for operation. To proceed, insert a valid Voter Smart Card. Follow standard close poll procedures at the end of voting.
F.7 ImageCast® Precinct 2 TroubleshootingThe following sections discuss handling common tabulator hardware issues.
F.7.1 Power-up/Set-up Issues
F.7.1.1 Tabulator Does not Power-up
1. If the ICP2 tabulator does not power-up upon pushing and holding the reset button, perform the following:
2. Check the back of the tabulator to ensure that the DC power adaptor is plugged into the tabulator's power port.
3. Confirm the power socket is functional.
4. Confirm the ICP2 service switch, behind the Administrator SD door is switched to the on (down_ position).
5. If the ICP2 still does not power-up when the reset button is pressed and held, contact election technical support for assistance.
F.7.1.2 Security Key (iButton) Error
If you receive the message "Error Reading Admin Key":
1. Firmly press the security key to the receptacle again, ensuring complete contact.
2. If the error message continues, contact election technical support for assistance.

Version: 5.10-CA::11 447 1/15/2020
Democracy Suite® Use Procedures
F.7.2 Report Printer (Thermal Printer) Issues
F.7.2.1 Thermal Tape Printer Error - Loose Pressure Roller
1. When the pressure roller is loose or installed incorrectly, the message "Make sure paper is loaded and everything is OK" appears.
2. If necessary, remove the thermal report printer door security seal.
3. Open the thermal report printer door.
4. Remove and reinstall the platen pressure roller over the paper tape.
5. Ensure you hear the pressure roller click into place.
6. Close the printer door.
7. Attempt to reprint the report.
8. Reseal the door.
F.7.2.2 Thermal Tape Printer Error - No Paper Loaded
When the printer runs out of paper, the message "Make sure paper is loaded and everything is OK" appears.
1. If necessary, remove the thermal report printer door security seal.
2. Open the report paper access door on the tabulator.
3. Pull up on the platen pressure roller to remove it.
4. Replace the paper and then re-insert the platen pressure roller on top of the paper.
5. At the LCD screen, press OK. The message "Printer is recovering! Please Wait" appears.
6. Wait long enough to let the printer recover and press OK.
7. Replace the security seal.
8. If the problem still exists, contact election technical support.
F.7.2.3 Report Tape not Printing on Thermal Paper
Confirm the paper is installed correctly. Follow the instructions in Replacing the Thermal Printer Paper Roll to correctly install the printer paper.
Check to ensure that there is paper loaded into the thermal printer. Refer to Replacing the Thermal Printer Paper Roll for instructions detailing how to install printer paper.
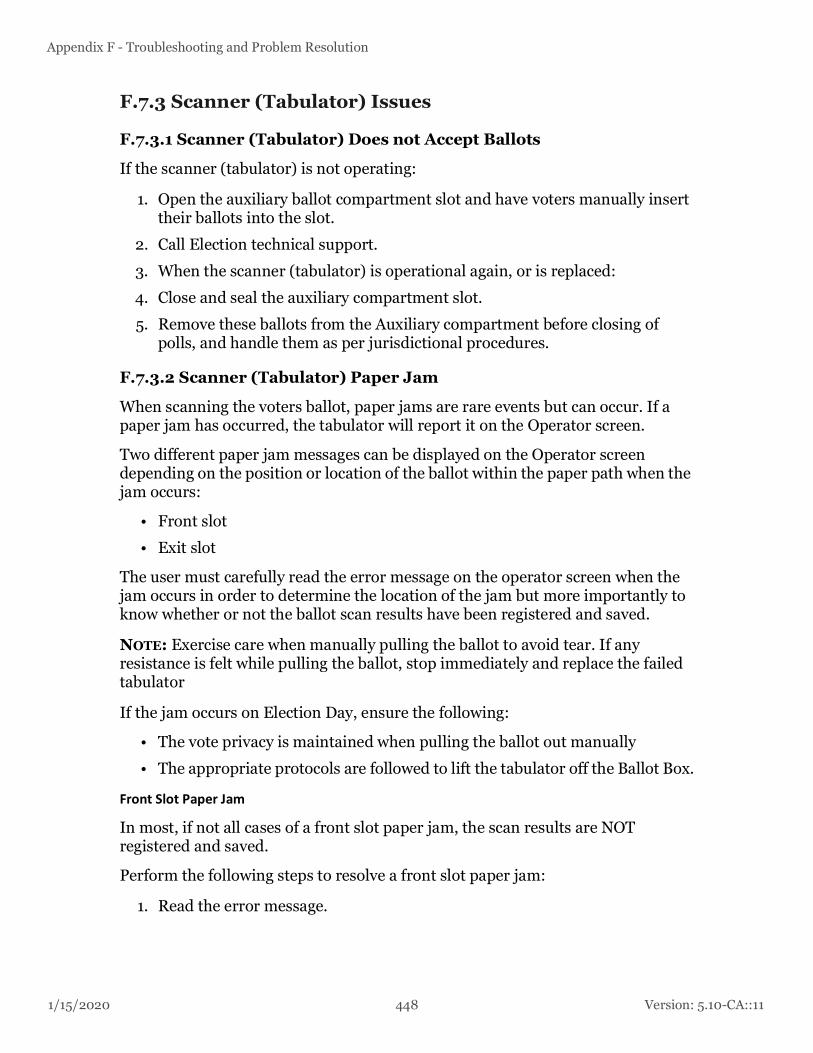
1/15/2020 448 Version: 5.10-CA::11
Appendix F - Troubleshooting and Problem Resolution
F.7.3 Scanner (Tabulator) Issues
F.7.3.1 Scanner (Tabulator) Does not Accept Ballots
If the scanner (tabulator) is not operating:
1. Open the auxiliary ballot compartment slot and have voters manually insert their ballots into the slot.
2. Call Election technical support.
3. When the scanner (tabulator) is operational again, or is replaced:
4. Close and seal the auxiliary compartment slot.
5. Remove these ballots from the Auxiliary compartment before closing of polls, and handle them as per jurisdictional procedures.
F.7.3.2 Scanner (Tabulator) Paper Jam
When scanning the voters ballot, paper jams are rare events but can occur. If a paper jam has occurred, the tabulator will report it on the Operator screen.
Two different paper jam messages can be displayed on the Operator screen depending on the position or location of the ballot within the paper path when the jam occurs:
• Front slot
• Exit slot
The user must carefully read the error message on the operator screen when the jam occurs in order to determine the location of the jam but more importantly to know whether or not the ballot scan results have been registered and saved.
NOTE: Exercise care when manually pulling the ballot to avoid tear. If any resistance is felt while pulling the ballot, stop immediately and replace the failed tabulator
If the jam occurs on Election Day, ensure the following:
• The vote privacy is maintained when pulling the ballot out manually
• The appropriate protocols are followed to lift the tabulator off the Ballot Box.
Front Slot Paper Jam
In most, if not all cases of a front slot paper jam, the scan results are NOT registered and saved.
Perform the following steps to resolve a front slot paper jam:
1. Read the error message.

Version: 5.10-CA::11 449 1/15/2020
Democracy Suite® Use Procedures
2. If the paper/ballot is accessible from the front, gently pull it out. If cleared, proceed to Step 4.
3. If the paper/ballot is not accessible from the front, lift the tabulator from the Ballot Box and pull the ballot out from the rear, wherever it may be easily accessible from.
4. Press CLEARED on the Operator screen. The System Ready screen will be displayed.
5. If the System Ready screen does not appear even after clearing the jammed ballot and pressing the CLEARED button, contact Election Technical Support.If the paper/ballot edges are not visibly damaged, the ballot can be re-inserted into the tabulator. Otherwise a new ballot must be issued.
6. If the problem persists, contact Election Technical Support.
7. If the paper/ballot is not accessible from either of the slots, contact Election Technical Support.
Exit Slot Paper Jam
In most cases, if not all cases of an exit slot paper jam, the scan results have been registered and saved.
Perform the following steps to resolve an exit slot paper jam error:
1. Read the message.
2. If the paper/ballot is not accessible from the front of the tabulator, lift the tabulator from the Ballot Box and pull the ballot out from the rear, wherever it may be easily accessible from.
3. Exercise care when manually pulling the ballot to avoid tear.
4. Since the ballot scan results have been registered, drop the ballot into the appropriate compartment of the ballot box depending on where it was pulled out from.
5. If the ballot was pulled out from the rear/exit slot, drop it into the main compartment of the Ballot Box.
6. If the ballot was pulled out from the bottom/exit slot, drop it into the secondary compartment (write-in compartment)
7. Press the CLEARED button on the Operator screen.The System Ready screen will then be displayed.
8. If the System Ready screen does not appear even after clearing the jammed ballot and pressing the CLEARED button, contact Election Technical Support.

1/15/2020 450 Version: 5.10-CA::11
Appendix F - Troubleshooting and Problem Resolution
9. To verify on Election Day if the issue is resolved, wait for the next voter to cast their ballot.
10. If the issue repeats, contact Election Technical Support.
11. If the paper/ballot is not accessible from either of the slots, contact Election Technical Support.

Version: 5.10-CA::11 451 1/15/2020
Democracy Suite® Use Procedures

Appendix G - Threat Register
1/15/2020 452 Version: 5.10-CA::11
APPENDIX G: THREAT REGISTER
The following list outlines potential threats and vulnerabilities that relate to critical information assets (i.e. digital records). Only information assets that have their communication vulnerability attribute set to ‘Yes’ are considered for possible vulnerability exploitation.
Tampering with Election Definition
• Description: In addition to the EMS Database which stores election project definition in the form of a relational database, election definition is contained within the election definition files. These files are generated by the EMS platform and communicated with the target PCOS/ICC devices using memory cards. Each memory card is unique to the target PCOS/ICC instance.
• Threat: A malicious user decrypts, discovers, and modifies election definition files/database between file creation and ballot counting.
• Impact: By changing the election definition files or database, the malicious user (technician, poll worker) can make the voting system inaccurate or inoperable. Confidentiality of election data is of less concern in this case, considering that election definition data is usually publicly available information.
• Impacted Security Pillars: Integrity and availability.
• Risk Rating: High.
• Mitigation: Implement proper process (access control) for memory card handling and unit storage. Cryptographic and digital signing controls mitigate data tampering. This tampering would be evident to operators and voters.
Tampering with Device Configuration
• Description: In addition to election definition files, the EMS platform provides PCOS/ICC devices with DCFs (Device Configuration Files) in case of ICC, and MBS (Machine Behavioral Settings) files in case of ICE and ICP2. These files do not carry any election project related logic, however, they are important for proper functioning of the devices.
• Threat: A malicious user decrypts, discovers, and modifies DCF or MBS files.
• Impact: By changing DCF/MBS files, a malicious user (technician, poll worker) can make a PCOS/ICC device inoperable.
• Impacted Security Pillars: Integrity and availability.
• Risk Rating: High.
Version: 5.10-CA::11 453 1/15/2020
Democracy Suite® Use Procedures
• Mitigation: Implement proper process (access control) for memory card handling and unit storage. Cryptographic and digital signing controls mitigate data tampering. The DCF and MBS files are paired with corresponding .SHA files that are created at the time the DCF/MBS files are created.The .SHA file includes a SHA-256 value that is seeded with a Dominion private input vector.When Election Event Designer imports the DCF/MBS files into an election project, it verifies the integrity of the DCF or MBS file against its .SHA file. EED generates a SHA-256 value with the Dominion private input vector and compares that against the .SHA file. If the verification fails, Election Event Designer will refuse to import the DCF/MBS file and will display an appropriate error message indicating that the verification was not successful.As such, this tampering would be evident to operators and voters.
Tampering with Ballot Representation
• Description: In addition to election definition, election database, device configuration files and machine/ device behavioral settings, the EMS platform provides PCOS devices (except ICC) with ballot representation files. These files represent electronic versions of paper ballots and include PNG (electronic image of the paper ballot for display presentation) and XML (coordinates of the ballot elements) files. Ballots in PDF format are not used by devices, but represent ballot format data for the mass printing of ballots.Finally, there is an audio representation of the ballot content, which is provided to the ballot counting or marking device. It is important to note that these ballot presentations are used only when PCOS devices provide AVS capabilities.
• Threat: A malicious user decrypts, discovers, and modifies ballot representation files.
• Impact: By changing ballot representation files, a malicious user (technician, poll worker) can make a PCOS/ ICC device inaccurate. Confidentiality of election data is of less concern since election definition data is usually publicly available information.
• Impacted Security Pillars: Integrity.
• Risk Rating: Medium.
• Mitigation: Implement proper access control measures for memory card handling and unit storage. Cryptographic and digital signing controls mitigate data tampering. This tampering would be evident to voters
1/15/2020 454 Version: 5.10-CA::11
Appendix G - Threat Register
Tampering with iButton Security Keys
• Description: iButton Security Keys represent secure electronic tokens used to activate administrative functions of the voting device (open poll, close poll, diagnostics, start accessible vote session, etc.). The iButton Security Keys carry electronic representation of the administrative poll worker password.
• Threat: A malicious user decrypts, discovers, and uses iButton Security Key content.
• Impact: By discovering the content of the iButton Security Key, a malicious user (technician, poll worker) can activate administrative operations on the device. The likelihood of this action is low because the malicious user would also have to know the password to access the iButton Security Key content.
• Impacted Security Pillars: Integrity, Availability.
• Risk Rating: High.
• Mitigation: Implement proper process (access control) for iButton Security Key handling and storage. Cryptographic and digital signing controls mitigate data tampering. This tampering would be evident to operators and voters.
Tampering with Device Audit and Log Reports
• Description: During the voting session, PCOS/ICC devices constantly keep and update audit and log reports. These reports are important for the analysis of the system functions and also for the audit process.
• Threat: A malicious user decrypts, discovers, and modifies the content of the audit and log reports.
• Impact: This threat is more likely to occur in combination with some other threats (like voting results tampering) with the main goal to cover up any malicious actions.
• Impacted Security Pillars: Confidentiality and integrity.
• Risk Rating: Medium.
• Mitigation: Implement proper process (access control) for memory card handling and unit storage. Cryptographic and digital signing controls mitigate data tampering. This tampering would be revealed during auditing.
Tampering with Scanned Ballot Images
• Description: During the voting session, PCOS/ICC devices constantly record images of the scanned paper ballots. It is important to state that in paper based voting systems, such as PCOS/ICC platforms, a paper trail of the ballots always exists in the form of the original paper ballots.

Version: 5.10-CA::11 455 1/15/2020
Democracy Suite® Use Procedures
• Threat: A malicious user decrypts, discovers, and modifies scanned ballot images.
• Impact: This threat is more likely to occur in combination with some other threats (like vote results tampering) with the main goal to cover up any malicious actions.
• Impacted Security Pillars: Confidentiality and integrity.
• Risk Rating: Medium.
• Mitigation: Implement proper process (access control) for memory card handling and unit storage. Cryptographic and digital signing controls mitigate data tampering. This tampering would be evident to operators.
Tampering with Election Result Files
• Description: Election result files hold the up-to-date raw and tabulated (per voting device) voting results and it is imperative to protect their content.
• Threat: A malicious user decrypts, discovers, and modifies election result files, and, within the proper chain of custody, replaces the valid memory card with a tampered card produced by the ballot counting device.
• Impact: By changing these files, a malicious user would jeopardize the whole election event.
• Impacted Security Pillars: Confidentiality and integrity.
• Risk Rating: High.
• Mitigation: Implement proper process (access control) for memory card handling and unit storage. Chain of custody for memory cards with results as well as cryptographic and digital signing controls mitigate data tampering. This form of tampering is immediately evident when the voting machine paper record (printout) is compared to the memory card results.
Tampering with Transmitted Election Result Files
• Description: Election result files hold the up-to-date raw and tabulated (per voting device) voting results and it is imperative to protect their content.
• Threat: A malicious user decrypts, discovers, and modifies election result files, before, during, or after transmission, and, within the proper chain of custody, replaces the valid results with those that have been tampered with.
• Impact: By changing these files, a malicious user would jeopardize the whole election event.
• Impacted Security Pillars: Confidentiality and integrity.
• Risk Rating: High.

1/15/2020 456 Version: 5.10-CA::11
Appendix G - Threat Register
• Mitigation: Implement proper cryptographic signing controls to detect tampering. This form of tampering is immediately evident when the voting machine paper record (printout) is compared to the tampered results.
Tampering with EMS Data Center Environment
• Description: Physical or logical destruction of the EMS Data Center equipment.
• Threat: Due to unexpected or intentional activities, prior or after the election night (i.e. during election preparation or during the results tally), EMS Data Center equipment could become inoperable.
• Impact: Postponing the election event preparation and/or result processing and reporting.
• Impacted Security Pillars: System availability.
• Risk Rating: Medium.
• Mitigation: Proper redundancy and backup procedures for hardware, software and data should be in place to mitigate the risk from intentional or unexpected destruction of the EMS Data Center equipment.
Tampering with Election Database
• Description: Logical destruction and/or alteration of EMS Database content or structure.
• Threat: A malicious attacker can try to infiltrate the EMS Database system to perform the destruction or alteration of the election data prior, during or after voting. This can be done remotely or internally if attacker has help from an insider.In this case, the validity of the election event becomes questionable.
• Impact: Invalidation of the election event.
• Impacted Security Pillars: Data integrity, data confidentiality, access control.
• Risk Rating: Medium.
• Mitigation: Proper design of the underlying election software and hardware shall prevent or detect this type of attack. In case of Democracy Suite, all in-transit data is encrypted and signed, while the database platform implements per-record signing of data using atomic triggers with every transaction. Coupled with auditing mechanisms, this approach prevents and detects any attempt to break into the database.
Producing Incorrect Vote Counts
• Description: Attacker gains access to the results acquisition and tally computing platform, and changes the voting results.

Version: 5.10-CA::11 457 1/15/2020
Democracy Suite® Use Procedures
• Threat: Depending on the skill set and level, the attacker can try to break into the result acquisition and tally system directly or remotely and change the votes. This can happen after the results have been imported into the system but before persisting the results into the election results database.
• Impact: A successful attack of this type would produce erroneous and invalid election results and invalidate the whole election event.An attack of this type would require a high level of computing skills and usually involves internal jurisdiction personnel or a vendor technical team.
• Impacted Security Pillars: Access Control, Data Integrity and Data Confidentiality.
• Risk Rating: High.
• Mitigation: As stated earlier, this type of attack would require that the attacker has significant level of technical skills and knowledge of the system. In addition, if all the access control and data security measures were followed together with the system hardening procedures, this type of attack would require that attacker has helpers either within the jurisdiction or from vendor technical team.Therefore, to mitigate this type of attack it is important to follow the best security practices including access security, physical security, IT system security and auditing (including monitoring), data integrity and confidentiality.
Tampering with EMS System Availability
• Description: Make EMS Data Center and its computing components unusable for either pre-voting or post-voting activities.
• Threat: In this case the attacker performs a destructive action either by direct manipulation of the EMS Data Center system components or by installing malicious software components that will make EMS Data Center components inoperable.
• Impact: If the EMS Data Center components are not operational or not capable of performing their set of predefined activities, the jurisdiction either will not be able to organize the election event or to tally and report election results.
• Impacted Security Pillars: System availability.
• Risk Rating: Medium.
• Mitigation: Proper access control and physical security shall prevent physical and logical destruction of the EMS Data Center system.Proper availability and disaster mitigation and operation continuation procedures shall be implemented. Primary, redundancy from hardware and data backup from software/data point of view must be in place.

1/15/2020 458 Version: 5.10-CA::11
Appendix G - Threat Register
Tampering with Tabulator System Availability
• Description: Prior or during the voting phase, voting devices become inoperable or not capable of processing ballots.
• Threat: The attacker can either perform physical destruction (in a warehouse or in transit) or logical destruction (install malicious software on the machine) of the device causing a denial of service type of an attack. Logical destruction of the device could not only cause the alteration of election data including votes), but could also cause a slow down of the system operation.
• Impact: System becomes unavailable for voting.
• Impacted Security Pillars: Data integrity, access control, availability.
• Risk Rating: Medium.
• Mitigation: Proper physical security controls prevent the physical destruction of the voting equipment, while the proper software security measures (code signing, data signing and encryption) prevent the attacker from breaking into the device and making it inoperable for election event.
Tampering with Ballot Secrecy
• Description: Attacker influences how voters will vote by breaking the ballot secrecy.
• Threat: The attacker is usually unable to influence voting directly, but might still be able to determine how individuals or groups voted. The attacker might engage in either vote buying or information gathering.In a vote buying attack, the attacker pays or threatens individual voters to vote in a specific way. In order for this attack to be successful, the attacker needs to be able to verify how the voter voted.
NOTE: The attacker does not need to be absolutely certain how the voter voted they must only make the voter believe that the voters vote has a good chance of being verified.
• Impact: Attacker can achieve a limited success and influence on the election results.
• Impacted Security Pillars: Privacy, Confidentiality.
• Risk Rating: Medium.
• Mitigation: By implementing advanced ballot security mechanisms and by following the best information security practices, including the education of personnel and voters, the scope of this type of an attack can be drastically minimized. If voters and jurisdiction have sufficient knowledge about the system as well as trust in the security controls implemented into the system, an attacker will have a difficult task to influence how voters vote. If the external enclosures of the servers you receive allow for tamper-evident

Version: 5.10-CA::11 459 1/15/2020
Democracy Suite® Use Procedures
sealing via a hasp, utilize a “redwire” or lock style tamper-evident seal to provide tamper evidence over intrusion into the workstation chassis. A lock is another possibility when the server has hasps.If no hasps are present, examine the server’s enclosure and chassis to determine places where these separate when the server is opened. Apply two or more tamper evident seals, prefer ably at points opposite to one another on the workstation chassis to provide tamper evidence of the workstation being opened.

Appendix H - Physical Security of Democracy Suite® System and Components
1/15/2020 460 Version: 5.10-CA::11
APPENDIX H: PHYSICAL SECURITY OF DEMOCRACY SUITE® SYSTEM AND COMPONENTS
The Democracy Suite® System and all of its components must be physically secured in a locked area with security access controls in place. No access to this area should be permitted to unauthorized personnel. The jurisdiction must provide a secure physical and procedural environment for the storage, handling, preparation, and transportation of the system hardware. Procedural and physical controls for ballot boxes and ballot handling in a central scanning application scenario should be done in accordance with jurisdiction's and State requirements.
H.1 Re-Zero Results Using the Advanced Admin Option
Figure H-1: Re-zero Results
1. If the election cards have been used for testing prior to the election day (during Logic and Accuracy testing procedure) then all the recorded results need to be set to zero.
2. On the poll worker Menu screen, press the Advanced Admin option. Re-zero Results menu will appear in the right-side of the screen.
3. Depending on the configuration set in the MBS file, you may be asked to provide a username and password, password only when entering the Advanced Admin menu. In addition, the MBS gives an option to omit the authentication. Next, Re-zero Results menu appears. Press Re-zero button.
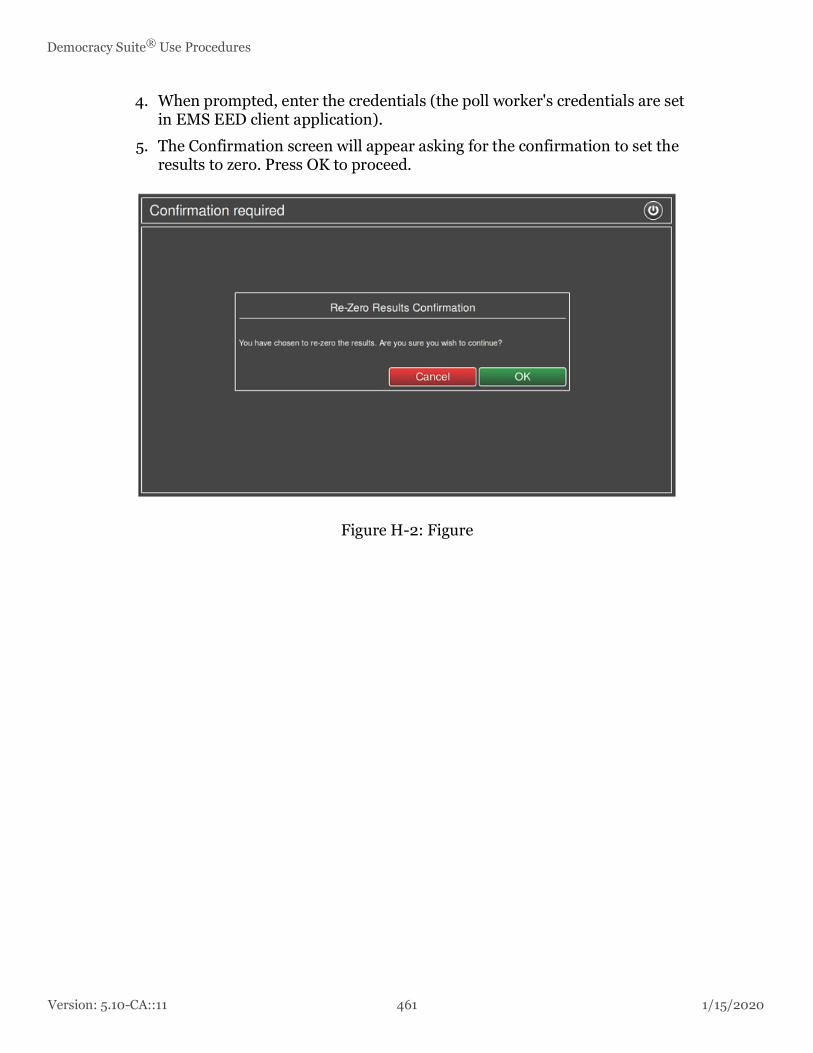
Version: 5.10-CA::11 461 1/15/2020
Democracy Suite® Use Procedures
4. When prompted, enter the credentials (the poll worker's credentials are set in EMS EED client application).
5. The Confirmation screen will appear asking for the confirmation to set the results to zero. Press OK to proceed.
Figure H-2: Figure
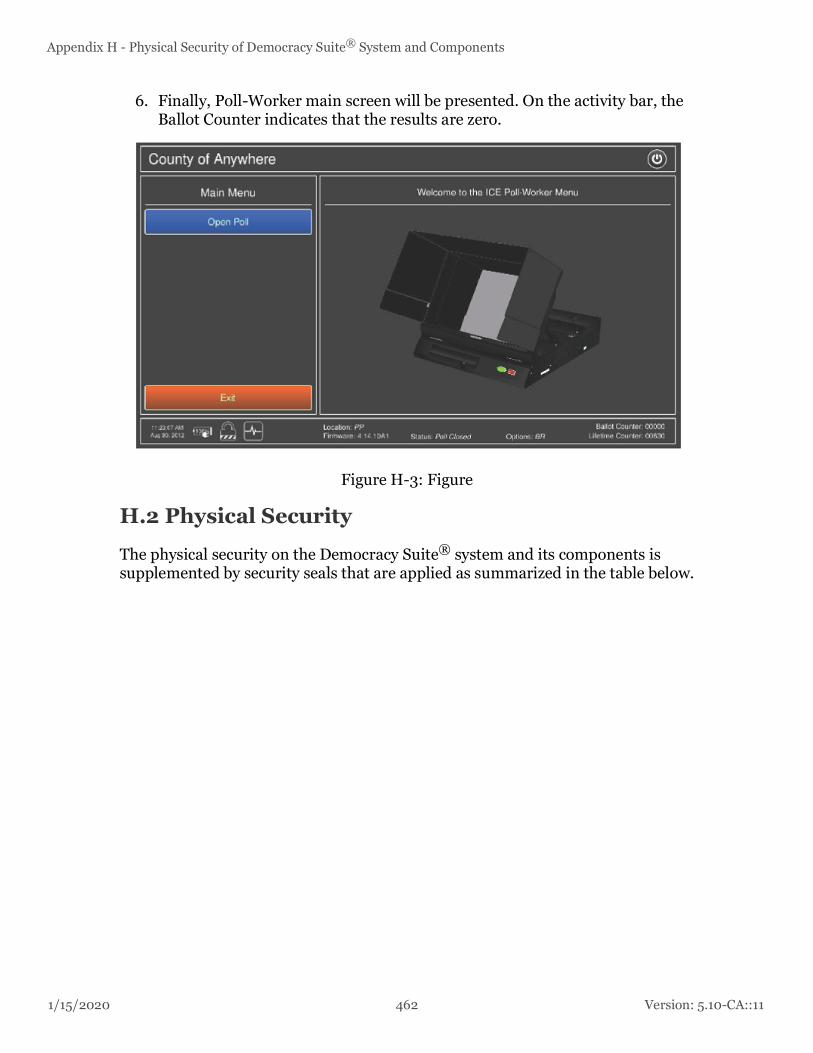
1/15/2020 462 Version: 5.10-CA::11
Appendix H - Physical Security of Democracy Suite® System and Components
6. Finally, Poll-Worker main screen will be presented. On the activity bar, the Ballot Counter indicates that the results are zero.
Figure H-3: Figure
H.2 Physical Security
The physical security on the Democracy Suite® system and its components is supplemented by security seals that are applied as summarized in the table below.
Version: 5.10-CA::11 463 1/15/2020
Democracy Suite® Use Procedures
NOTE: The brand, type, and color of all seals may vary. Seals should be evaluated for functionality prior to deployment.
H.3 Plastic Ballot Box Physical SecurityThe plastic ballot box is physically secured by seven color-coded security seals, and five locks.
Color Purpose
White self-adhesive enclosure seals Applied on the ImageCast® Evolution 's CF0 door in the warehouse and left intact by the poll worker. Also used on workstations.
White or Red wire seals on the ballot box
Two are applied on the ImageCast® Evolution latch, and two on the ballot box lid latch. Semi-permanent/not broken.
Red padlock seal To remain on the system and components throughout the election cycle.
Yellow padlock seal To be removed by the poll worker once the polls are closed, or as required, in order to remove CF cards.
Green padlock seal To be removed by the poll worker to remove the ballot box cover.
Table H-1: Physical Security — Types of Seals
Ballot Box Security Seals
Quantity Color Location
3 Yellow Primary Compartment Door, Secondary Compartment Door, Auxiliary Compartment Slot
2 Green Front of the ballot box lid, back of the ballot box lid
2 Red/White Tabulator latches
Table H-2: Physical Security — Ballot Box Security Seals

1/15/2020 464 Version: 5.10-CA::11
Appendix H - Physical Security of Democracy Suite® System and Components
Ballot Box Security Locks
Quantity Location
2 Each side of the ballot box lid
1 Auxiliary Compartment Slot
1 Primary Compartment Door
1 Secondary Compartment Door
Table H-3: Physical Security — Ballot Box Security Locks

Version: 5.10-CA::11 465 1/15/2020
Democracy Suite® Use Procedures
The following figures shows the location of the Green security seal on the front of the ballot box lid, the Yellow security seal on the Primary Compartment Door, and the locations of two locks – one on the side of the Ballot Box Lid, and one on the Primary Compartment Door.
Figure H-4: Figure

1/15/2020 466 Version: 5.10-CA::11
Appendix H - Physical Security of Democracy Suite® System and Components
Next figure illustrates Security Seals applied on the inside of the auxiliary bin.
Figure H-5: Figure
In addition, two white wire seals are applied to the ballot box lid latches.
The following figures illustrates the location of the white wire seals that are applied to the internal latches that lock the lid of the ballot box to the ballot box
Ballot Box Lid Latches
Quantity Color Location
2 White wire seals Ballot box lid latch
Table H-4: Physical Security — Ballot Box Lid Latches

Version: 5.10-CA::11 467 1/15/2020
Democracy Suite® Use Procedures
bin.
Figure H-6: Figure
H.4 ImageCast® Evolution Physical SecurityThe following figure shows the location of the Yellow security seals on the CF1 Door and Thermal Printer Compartment Door, and the Red security seals on the CF2 Door, Ports Door, Internal Printer Door.
Figure H-7: The ImageCast® Evolution is physically secured by five color-coded

1/15/2020 468 Version: 5.10-CA::11
Appendix H - Physical Security of Democracy Suite® System and Components
security seals.
ImageCast® Evolution Security Seals
Quantity Color Location
2 Yellow CF1 Door, Thermal Printer Compartment Door
3 Red CF2 Door, Ports Door, Internal Printer Door
Table H-5: Physical Security — ImageCast® Evolution Security Seals

Version: 5.10-CA::11 469 1/15/2020
Democracy Suite® Use Procedures
NOTE: Some jurisdictions may wish to remove the CF2 card from the CF2 door upon close of polls. In this case, the CF2 Door should be tagged in yellow.
The following image (ImageCast® Evolution and Security Seals) depicts the location of the white self-adhesive seal that is applied over top of the CF0 door. The CF0 door is located behind security plating and below the CF1 and CF2 doors. This seal is applied once in the warehouse after the initial firmware installation and is not removed.
All gaps between the ImageCast® Evolution's doors and main shell are minimized to prevent access.
Each CF card door audibly clicks into place to confirm that it has been fully closed. To open the door, a thumb clasp is actuated on the left edge of the door. Locking mechanisms deploy hasp-type mechanisms. The metal loop is mounted to an internal metal component.When the door closes, loop provides a location to attach the security seals.
Figure H-8: Figure
H.5 ImageCast® Central Physical SecurityProcedural and physical controls for ballot boxes and ballot handling in a central scanning application scenario must be done in accordance with jurisdiction's and State requirements.
ImageCast® Evolution Security Seals
Quantity Color Location
1 White self-adhesive seal CF0 Door
Table H-6: Physical Security — ImageCast® Evolution Security Seals

1/15/2020 470 Version: 5.10-CA::11
Appendix H - Physical Security of Democracy Suite® System and Components
Seal the external enclosures of the ImageCast® Central All-in-One workstation with tamper evident self-adhesive security seals, as seen in the following image.
Figure H-9: Figure
Examine the workstation's enclosure and chassis to determine places where these separate when the workstation is opened. Apply two or more tamper evident seals, preferably at points opposite to one another on the All-in-One to provide tamper evidence of the workstation being opened.
H.6 ImageCast® Precinct 2 Physical SecurityPhysical controls incorporate tamper evident seals that limit and detect unauthorized access to the ImageCast Precinct 2 tabulator. Election officials are free to use any tamper evident label or tamper evident tie wrap supplier. There are three (3) locations on the ImageCast Precinct 2 tabulator where security seals are placed:
• Memory card access ports
• Thermal report printer door (see Sealing the Thermal Report Printer Door (see page 15))

Version: 5.10-CA::11 471 1/15/2020
Democracy Suite® Use Procedures
• Modem port
For securing the ballot box, apply tamper seals between the ballot box and tabulator.
H.6.1 Sealing Administrator and Poll Worker Memory Card Access PortsPlace a security seal on the Administrator and Poll Work doors' lock loop as seen in the figure below. In this example, a red security seal is used. The doors remain locked during the entire deployment and through Election Day and night..
Figure H-10: Sealing the memory card access doors

1/15/2020 472 Version: 5.10-CA::11
Appendix H - Physical Security of Democracy Suite® System and Components
H.6.2 Sealing the Thermal Report Printer DoorApply a security seal to the thermal printer compartment as seen in the figure below. In this example, a red seal is used. This protects against unauthorized access to this compartment.
Figure H-11: Sealing the thermal report printer door

Version: 5.10-CA::11 473 1/15/2020
Democracy Suite® Use Procedures
H.6.3 Sealing the Modem PortApply a security seal to the access cover protecting the modem port as seen in the figure below. In this example, a red security seal is used.This protects against unauthorized access to modem components. The access cover remains sealed during deployment and during Election Day. Only poll workers are authorized to break this seal prior to transmit election results.
Figure H-12: Sealing the modem port
All gaps between the ImageCast® Precinct 2’s doors and main shell are minimized to prevent access.
Each SD card door audibly clicks into place to confirm that it has been fully closed. To open the door, a thumb clasp is actuated on the left edge of the door. Locking mechanisms deploy hasp-type mechanisms. The metal loop is mounted to an internal metal component.When the door closes, loop provides a location to attach the security seals.
H.7 Re-zeroing the ICP2For details on re-zeroing the ICP2, refer to 4.5.8 “Re-zeroing the ICP2”.
H.8 EMS Server and Workstation Physical Security
The Democracy Suite® EMS environment must be physically secured in a locked area with security access controls in place. No access to this area should be permitted to unauthorized personnel. Your State Election Authority may require that an access control system is utilized that will automatically log and record each individual's access to the EMS Data center environment. Such systems include the use of electronic passes or biometrics to gain entry into the secure area. In addition, if cameras and/or card-key system are not in use, all personnel must be required to sign in and out when accessing the secure Democracy Suite® EMS environment area. The access log should, at a minimum, include such items as:
• Name
• Organization

1/15/2020 474 Version: 5.10-CA::11
Appendix H - Physical Security of Democracy Suite® System and Components
• Purpose of access
• Date
• Time in
• Time out
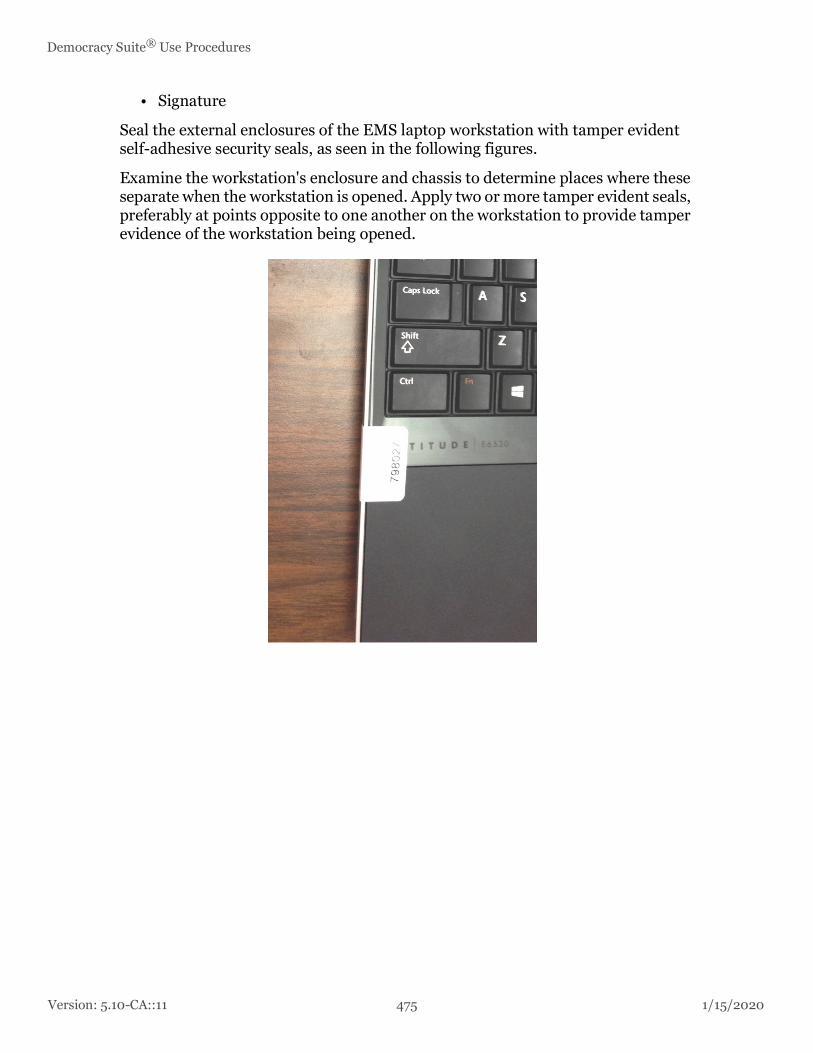
Version: 5.10-CA::11 475 1/15/2020
Democracy Suite® Use Procedures
• Signature
Seal the external enclosures of the EMS laptop workstation with tamper evident self-adhesive security seals, as seen in the following figures.
Examine the workstation's enclosure and chassis to determine places where these separate when the workstation is opened. Apply two or more tamper evident seals, preferably at points opposite to one another on the workstation to provide tamper evidence of the workstation being opened.

1/15/2020 476 Version: 5.10-CA::11
Appendix H - Physical Security of Democracy Suite® System and Components
Figure H-13: Figure
Figure H-14: Figure
All server components of the EMS Data center back-end system have built-in intrusion detection systems. On one side, the server chassis has an intrusion switch, which is connected to a motherboard intrusion jumper (two-wire interface). The intrusion alarm is activated if the chassis cover is open and recorded by the supported server monitoring application.

Version: 5.10-CA::11 477 1/15/2020
Democracy Suite® Use Procedures
NOTE: If the laptop is equipped with laptop lock functionality, you may use third party locks to secure the workstation to a desk. It is recommended that locks are evaluated for functionality prior to deployment.
Figure H-15: Figure
H.9 ImageCast® X Physical Security
ImageCast® X is equipped with two security latches that must be secured using plastic security seals in addition to adhesive anti-tamper seals. Use seals (color of your choice - in this example we are using blue seals) for sealing top and bottom trap doors.
In the case of the ImageCast® X Prime device, 4 Plastic pull-up/pull tight seals are used to fasten the 4 doors on the back sides of the device enclosure.
NOTE: Ensure all wires required are plugged in properly before sealing.

1/15/2020 478 Version: 5.10-CA::11
Appendix H - Physical Security of Democracy Suite® System and Components
Figure H-16: Top security latch plastic sea

Version: 5.10-CA::11 479 1/15/2020
Democracy Suite® Use Procedures
l
Figure H-17: Bottom security latch plastic seal
Figure H-18: Evidence of tampering adhesive seal

1/15/2020 480 Version: 5.10-CA::11
Appendix H - Physical Security of Democracy Suite® System and Components
H.10 Reset the Number of Printed Ballots on ImageCast® X
1. Ensure the device is on.
2. Log in Using a poll worker Smart Card.
3. Ensure the poll is closed.If the poll is not closed, select Close Poll.
4. Next to Public Counter select ReZero.
H.11 Clear All Election Data on ImageCast® XThis option removes all election data from the machine. Returns the machine to factory default settings making it ready for the next election.
To clear the election data:
1. Insert the Technician smart card and appropriate PIN.
2. Press Clear All Election Data.The following is removed:
• Result files from all defined locations, if they exist. If not all locations are accessible, an appropriate message will be presented.
• Audit log files from all result locations, but the last ten audit logs on the device remain, so that there is evidence of clearing election data.
• Report file, if it exists.
• Election file (.DAT file).
• Vote sim (Test deck file).

Version: 5.10-CA::11 481 1/15/2020
Democracy Suite® Use Procedures

Appendix I - Permanent Printed Reports
1/15/2020 482 Version: 5.10-CA::11
APPENDIX I: PERMANENT PRINTED REPORTS
The following sections outline the reports generated on the ImageCast® Evolution thermal printer.
I.1 Diagnostics ReportDuring diagnostics, the printer produces a record of each test performed by the user. It also provides the ability to produce multiple records.
I.2 Zero ReportThe zero report is a results report that shows that there are no ballots yet cast in the election. The report:
• Lists the name and details of the election,
• Lists the date and time when the report was generated,
• Lists all of the candidates and their vote totals, by contest, ballot, or by precinct.
The LCD offers the option to print additional copies of the report to ensure that the user receives a successful copy. Please note that the default number of precincts on a zero report is set to twenty five. However, this value can be decreased within the DCF or MBS file should the election content breach the length of a roll of thermal printer paper. Should the printer roll deplete during printing:
1. Change the printer roll.
2. Press Resume on the LCD screen.The printer will:
• Print a line indicating that the printer was interrupted.
• Re-print the Zero Report's header.
• Print a line indicating that the report is continuing on a new 'Tape Section'.
Resume printing the report from approximately two lines prior to the previous roll’s depletion.
I.3 Interrupt ReportIf any sort of failure occurs (such as power or other errors), the device can be returned to the same operating condition that existed immediately prior to the error or failure without loss or corruption to the voting data stored in the device. The interrupt report is generated when the unit is powered up successfully with processed ballots.The report:

Version: 5.10-CA::11 483 1/15/2020
Democracy Suite® Use Procedures
• Lists the name and details of the election
• Lists the date and time when the report was generated
• Total number of ballots processed
There is no information reported about any contest as the poll has not yet been closed. The LCD offers the option to print additional copies of the report to ensure that the user receives a successful copy.
I.4 Results ReportThe results report is generated when the 'Poll Close' action is selected. The report contains:
• Name and details of the election.
• Date and time of when the report was generated.
• The order of candidates as they appear on the results tape, which is set in the DCF or MBS options via EMS. Candidates listed on the reports can either be listed by the number of votes for each candidate in each contest, by precinct, or by the ballot order (i.e. in the same order as they appear on the ballot).
• Election totals
Should the printer roll deplete during printing:
1. Change the printer roll by following the steps outlined in section Changing the Printer Paper Tape (refer to “6.4.1.10 Changing the Printer Paper Tape”).
2. Press Resume on the LCD screen.
3. The printer will:
• Print a line indicating that the printer was interrupted.
• Re-print the Result Report's header.
• Print a line indicating that the report is continuing on a new 'Tape Section'.
• Resume printing the report from approximately two lines prior to the previous roll’s depletion.
• The LCD offers the option to print additional copies of the report to ensure that the user receives a successful copy.
I.5 Status ReportThe election statistics report contains the following:
• Tabulator Name
• Tabulator ID

1/15/2020 484 Version: 5.10-CA::11
Appendix I - Permanent Printed Reports
• Voting Location
• Precinct Number
• Total Ballots Scanned
• Total Voters
• Unit Model
• Unit Serial Number
• Software Version
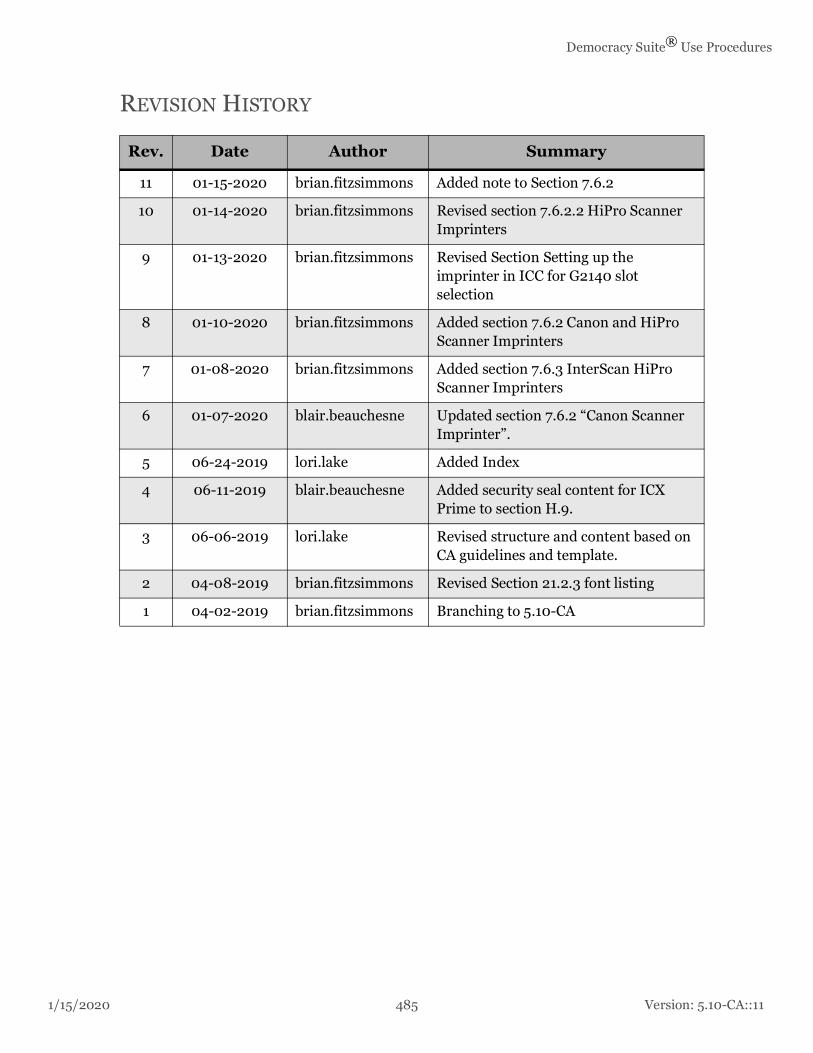
Democracy Suite® Use Procedures
1/15/2020 485 Version: 5.10-CA::11
REVISION HISTORY
Rev. Date Author Summary
11 01-15-2020 brian.fitzsimmons Added note to Section 7.6.2
10 01-14-2020 brian.fitzsimmons Revised section 7.6.2.2 HiPro Scanner Imprinters
9 01-13-2020 brian.fitzsimmons Revised Secti0n Setting up the imprinter in ICC for G2140 slot selection
8 01-10-2020 brian.fitzsimmons Added section 7.6.2 Canon and HiPro Scanner Imprinters
7 01-08-2020 brian.fitzsimmons Added section 7.6.3 InterScan HiPro Scanner Imprinters
6 01-07-2020 blair.beauchesne Updated section 7.6.2 “Canon Scanner Imprinter”.
5 06-24-2019 lori.lake Added Index
4 06-11-2019 blair.beauchesne Added security seal content for ICX Prime to section H.9.
3 06-06-2019 lori.lake Revised structure and content based on CA guidelines and template.
2 04-08-2019 brian.fitzsimmons Revised Section 21.2.3 font listing
1 04-02-2019 brian.fitzsimmons Branching to 5.10-CA

Democracy Suite® Use Procedures
1/15/2020 486 Version: 5.10-CA::11
LIST OF FIGURES
Figure 1-1: ImageCast® Evolution. . . . . . . . . . . . . . . . . . . . . . . . . . . . . . . . . . 1
Figure 1-2: ImageCast® Central. . . . . . . . . . . . . . . . . . . . . . . . . . . . . . . . . . . . 3
Figure 1-3: ImageCast® Precinct 2 . . . . . . . . . . . . . . . . . . . . . . . . . . . . . . . . . 5
Figure 1-4: EMS Workstation and EMS Server . . . . . . . . . . . . . . . . . . . . . . . . 6
Figure 1-5: ImageCast® X . . . . . . . . . . . . . . . . . . . . . . . . . . . . . . . . . . . . . . . . 7
Figure 3-1: EMS/RTR Air-gap Network Configuration. . . . . . . . . . . . . . . . . 27
Figure 3-2: EMS/EED Air-gap Network Configuration. . . . . . . . . . . . . . . . . 28
Figure 3-3: Air-gap Isolation . . . . . . . . . . . . . . . . . . . . . . . . . . . . . . . . . . . . . 28
Figure 3-4: Air-Gap Configuration. . . . . . . . . . . . . . . . . . . . . . . . . . . . . . . . . 29
Turn Windows Features On or Off 1 37
Turn Windows Features On or Off 2 38
Figure 3-7: Adding a language pack. . . . . . . . . . . . . . . . . . . . . . . . . . . . . . . . 44
Figure 3-8: Adding Localization File . . . . . . . . . . . . . . . . . . . . . . . . . . . . . . . 46
Figure 3-9: Adding Static Audio Folder . . . . . . . . . . . . . . . . . . . . . . . . . . . . . 47
Figure 3-10: Adding Language Audio File. . . . . . . . . . . . . . . . . . . . . . . . . . . 48
Figure 3-11: EED Language Profile window . . . . . . . . . . . . . . . . . . . . . . . . . 49
Figure 3-12: ICC Configuration . . . . . . . . . . . . . . . . . . . . . . . . . . . . . . . . . . . 50
Figure 3-13: ImageCast® Precinct 2 Ballot Counter . . . . . . . . . . . . . . . . . . . 56
Figure 4-1: USB Drive containing Election Files and the Copy/Cancel Election Files Dia-log . . . . . . . . . . . . . . . . . . . . . . . . . . . . . . . . . . . . . . . . . . . . . . . . . . . . . . . . . 110
Figure 4-2: Re-zero Results Confirmation . . . . . . . . . . . . . . . . . . . . . . . . . . . . . . . . . . . . . . . 120
Figure 4-3: Main Menu screen . . . . . . . . . . . . . . . . . . . . . . . . . . . . . . . . . . . 120
Figure 4-4: Poll Management screen . . . . . . . . . . . . . . . . . . . . . . . . . . . . . . 121
Figure 4-5: Re-zero Confirmation screen . . . . . . . . . . . . . . . . . . . . . . . . . . . 121
Figure 6-1: LCD Monitor in Operating Position . . . . . . . . . . . . . . . . . . . . . 139
Figure 6-2: Position the tabulator on top of the ballot box. . . . . . . . . . . . . . 142
Figure 6-3: Connect the round end of the AC to DC power adapter . . . . . . 142
Figure 6-4: Route the power adapter cord to the side. . . . . . . . . . . . . . . . . . 143
Figure 6-5: Ready screen . . . . . . . . . . . . . . . . . . . . . . . . . . . . . . . . . . . . . . . 145
Figure 6-6: Sealing Administrator and Poll Worker Memory Card Access Ports146
Figure 6-7: Sealing the Thermal Report Printer Door . . . . . . . . . . . . . . . . . 146

Democracy Suite® Use Procedures
1/15/2020 487 Version: 5.10-CA::11
Figure 6-8: Sealing the Modem Port. . . . . . . . . . . . . . . . . . . . . . . . . . . . . . . 147
Figure 6-9: Ballot Review screen . . . . . . . . . . . . . . . . . . . . . . . . . . . . . . . . . 147
Figure 6-10: Ballot Review screen . . . . . . . . . . . . . . . . . . . . . . . . . . . . . . . . 148
Figure 6-11: Review Complete screen . . . . . . . . . . . . . . . . . . . . . . . . . . . . . 148
Figure 6-12: Green Ballot Box Seals . . . . . . . . . . . . . . . . . . . . . . . . . . . . . . 152
Figure 6-13: ImageCast® Evolution Seals . . . . . . . . . . . . . . . . . . . . . . . . . . 153
Figure 6-14: ImageCast® Evolution Power Source . . . . . . . . . . . . . . . . . . . 153
Figure 6-15: Lifting the LCD Screen on the ImageCast® Evolution. . . . . . 154
Figure 6-16: iButton Security Key Prompt. . . . . . . . . . . . . . . . . . . . . . . . . . 154
Figure 6-17: Main Menu. . . . . . . . . . . . . . . . . . . . . . . . . . . . . . . . . . . . . . . . 156
Figure 6-18: Number of Zero Tape Copies to Print . . . . . . . . . . . . . . . . . . . 156
Figure 6-19: Open button in the Main Menu . . . . . . . . . . . . . . . . . . . . . . . . 157
Figure 6-20: Printing of Zero Tapes in Progress . . . . . . . . . . . . . . . . . . . . . 157
Figure 6-21: Printing of Zero Tape Completed . . . . . . . . . . . . . . . . . . . . . . 158
Figure 6-22: Poll Ready for Operation . . . . . . . . . . . . . . . . . . . . . . . . . . . . . 158
Figure 6-23: Sample Ballot . . . . . . . . . . . . . . . . . . . . . . . . . . . . . . . . . . . . . . 159
Figure 6-24: Enter password. . . . . . . . . . . . . . . . . . . . . . . . . . . . . . . . . . . . . 160
Figure 6-25: Password correct . . . . . . . . . . . . . . . . . . . . . . . . . . . . . . . . . . . 160
Figure 6-26: Main menu screen . . . . . . . . . . . . . . . . . . . . . . . . . . . . . . . . . . 161
Figure 6-27: Poll Management screen . . . . . . . . . . . . . . . . . . . . . . . . . . . . . 161
Figure 6-28: Open Poll Confirmation screen . . . . . . . . . . . . . . . . . . . . . . . . 162
Figure 6-29: Printing in Progress screen. . . . . . . . . . . . . . . . . . . . . . . . . . . . 162
Figure 6-30: Please Insert Ballot screen . . . . . . . . . . . . . . . . . . . . . . . . . . . . 163
Figure 6-31: Main Menu sscreen . . . . . . . . . . . . . . . . . . . . . . . . . . . . . . . . . 164
Figure 6-32: Utilities screen . . . . . . . . . . . . . . . . . . . . . . . . . . . . . . . . . . . . . 164
Figure 6-33: Tabulator Info screen . . . . . . . . . . . . . . . . . . . . . . . . . . . . . . . . 165
Figure 6-34: Tabulator Info screen . . . . . . . . . . . . . . . . . . . . . . . . . . . . . . . . 165
Figure 6-35: Verification Messages . . . . . . . . . . . . . . . . . . . . . . . . . . . . . . . 167
Figure 6-36: Time out for Inserting Ballot . . . . . . . . . . . . . . . . . . . . . . . . . . 168
Figure 6-37: Ballot Review. . . . . . . . . . . . . . . . . . . . . . . . . . . . . . . . . . . . . . 168
Figure 6-38: Cast Ballot Confirmation . . . . . . . . . . . . . . . . . . . . . . . . . . . . . 169
Figure 6-39: Multi-card Session Continuation . . . . . . . . . . . . . . . . . . . . . . . 170

Version: 5.10-CA::11 488 1/15/2020
List of Figures
Figure 6-40: Session is Complete . . . . . . . . . . . . . . . . . . . . . . . . . . . . . . . . . 170
Figure 6-41: Ballot Already Inserted . . . . . . . . . . . . . . . . . . . . . . . . . . . . . . 171
Figure 6-42: Standard Voting - System Ready Screen. . . . . . . . . . . . . . . . . 171
Figure 6-43: Overvote Ballot Review Screen. . . . . . . . . . . . . . . . . . . . . . . . 172
Figure 6-44: Overvote Error Screen. . . . . . . . . . . . . . . . . . . . . . . . . . . . . . . 172
Figure 6-45: Remove Ballot from the Device Screen. . . . . . . . . . . . . . . . . . 173
Figure 6-46: Undervote Ballot Review Screen. . . . . . . . . . . . . . . . . . . . . . . 173
Figure 6-47: Ambiguous Mark Ballot Review Screen. . . . . . . . . . . . . . . . . 174
Figure 6-48: Ambiguous Mark Error Screen. . . . . . . . . . . . . . . . . . . . . . . . . 174
Figure 6-49: Valid Ballot Review Screen. . . . . . . . . . . . . . . . . . . . . . . . . . . 175
Figure 6-50: Lever in Head Up/Down Position . . . . . . . . . . . . . . . . . . . . . . 176
Figure 6-51: Paper Roll Installed . . . . . . . . . . . . . . . . . . . . . . . . . . . . . . . . . 177
Figure 6-52: Scanning Ballot screen. . . . . . . . . . . . . . . . . . . . . . . . . . . . . . . 178
Figure 6-53: Ballot Successfully Cast screen . . . . . . . . . . . . . . . . . . . . . . . . 179
Figure 6-54: Action Bar . . . . . . . . . . . . . . . . . . . . . . . . . . . . . . . . . . . . . . . . 189
Figure 6-55: Contest Bar. . . . . . . . . . . . . . . . . . . . . . . . . . . . . . . . . . . . . . . . 189
Figure 6-56: Stripe . . . . . . . . . . . . . . . . . . . . . . . . . . . . . . . . . . . . . . . . . . . . 190
Figure 6-57: Navigation Bar . . . . . . . . . . . . . . . . . . . . . . . . . . . . . . . . . . . . . 190
Figure 6-58: Electronic Mobile Ballot . . . . . . . . . . . . . . . . . . . . . . . . . . . . . 191
Figure 6-59: poll worker Menu Screen. . . . . . . . . . . . . . . . . . . . . . . . . . . . . 196
Figure 6-60: Poll Management - Accessible Voting Session . . . . . . . . . . . . 197
Figure 6-61: Welcome to Your Voting Session . . . . . . . . . . . . . . . . . . . . . . 198
Figure 6-62: AVS - Language Selection. . . . . . . . . . . . . . . . . . . . . . . . . . . . 198
Figure 6-63: AVS - Device Selection Screen . . . . . . . . . . . . . . . . . . . . . . . . 199
Figure 6-64: AVS - ATI Instructions Screen . . . . . . . . . . . . . . . . . . . . . . . . 200
Figure 6-65: AVS - Paddles Instructions Screen . . . . . . . . . . . . . . . . . . . . . 201
Figure 6-66: AVS - Sip-and-Puff Instructions Screen . . . . . . . . . . . . . . . . . 202
Figure 6-67: AVS - Display On Selection Screen . . . . . . . . . . . . . . . . . . . . 202
Figure 6-68: AVS - Audio Only Selection Screen . . . . . . . . . . . . . . . . . . . . 203
Figure 6-69: AVS - Audio Only Screen . . . . . . . . . . . . . . . . . . . . . . . . . . . . 204
Figure 6-70: AVS - Voting Screen Sections . . . . . . . . . . . . . . . . . . . . . . . . 205
Figure 6-71: AVS - Voting Screen . . . . . . . . . . . . . . . . . . . . . . . . . . . . . . . . 206

Democracy Suite® Use Procedures
1/15/2020 489 Version: 5.10-CA::11
Figure 6-72: AVS - Write In Screen . . . . . . . . . . . . . . . . . . . . . . . . . . . . . . . 207
Figure 6-73: AVS - Ballot Review . . . . . . . . . . . . . . . . . . . . . . . . . . . . . . . . 208
Figure 6-74: AVS - Ballot Printing in Progress . . . . . . . . . . . . . . . . . . . . . . 209
Figure 6-75: AVS - Ballot Casting. . . . . . . . . . . . . . . . . . . . . . . . . . . . . . . . 210
Figure 6-76: AVS - Ballot Casting Confirmation. . . . . . . . . . . . . . . . . . . . . 210
Figure 6-77: AVS - Ballot Casting . . . . . . . . . . . . . . . . . . . . . . . . . . . . . . . . 211
Figure 6-78: AVS- Session Continuation . . . . . . . . . . . . . . . . . . . . . . . . . . . 212
Figure 6-79: AVS Voter Device Screen . . . . . . . . . . . . . . . . . . . . . . . . . . . . 213
Figure 6-80: Manual AVS Device Screen . . . . . . . . . . . . . . . . . . . . . . . . . . 214
Figure 6-81: ATI Usage Instructions . . . . . . . . . . . . . . . . . . . . . . . . . . . . . . 215
Figure 6-82: Audio options menu. . . . . . . . . . . . . . . . . . . . . . . . . . . . . . . . . 216
Figure 6-83: Manually Activated AVS Session (Left) and More Menu Options (Right)217
Figure 6-84: Voter Card Activated AVS Session (Left) and More Menu Options (Right)218
Figure 6-85: Enabling Provisional Voting . . . . . . . . . . . . . . . . . . . . . . . . . . 221
Figure 6-86: Poll Worker Menu . . . . . . . . . . . . . . . . . . . . . . . . . . . . . . . . . . 222
Figure 6-87: Close Poll - Authorization Screen . . . . . . . . . . . . . . . . . . . . . . 223
Figure 6-88: Close Poll Confirmation Screen. . . . . . . . . . . . . . . . . . . . . . . . 223
Figure 6-89: Auxiliary Bin Prompt . . . . . . . . . . . . . . . . . . . . . . . . . . . . . . . 224
Figure 6-90: Printing of Result Tape Completed . . . . . . . . . . . . . . . . . . . . . 224
Figure 6-91: Poll-Worker Menu once Polls have been Closed . . . . . . . . . . 225
Figure 6-92: Power Down Request. . . . . . . . . . . . . . . . . . . . . . . . . . . . . . . . 226
Figure 6-93: Breaking the Ballot Box Seal. . . . . . . . . . . . . . . . . . . . . . . . . . 226
Figure 6-94: Removing Ballots from the Ballot Box . . . . . . . . . . . . . . . . . . 227
Figure 6-95: Removing the CF1 Card . . . . . . . . . . . . . . . . . . . . . . . . . . . . . 227
Figure 6-96: Main Menu screen . . . . . . . . . . . . . . . . . . . . . . . . . . . . . . . . . . 228
Figure 6-97: Poll Management screen . . . . . . . . . . . . . . . . . . . . . . . . . . . . . 229
Figure 6-98: Results Report screen. . . . . . . . . . . . . . . . . . . . . . . . . . . . . . . . 229
Figure 6-99: Enter Number of Copies screen . . . . . . . . . . . . . . . . . . . . . . . . 230
Figure 6-100: Write-in Report screen . . . . . . . . . . . . . . . . . . . . . . . . . . . . . . 230
Figure 6-101: Write-in Report screen . . . . . . . . . . . . . . . . . . . . . . . . . . . . . . 231
Figure 6-102: Enter Number of Copies screen . . . . . . . . . . . . . . . . . . . . . . . 231

Version: 5.10-CA::11 490 1/15/2020
List of Figures
Figure 6-103: Close Poll Confirmation screen . . . . . . . . . . . . . . . . . . . . . . . 231
Figure 6-104: Printing in Progress screen. . . . . . . . . . . . . . . . . . . . . . . . . . . 232
Figure 6-105: Printing Completed screen . . . . . . . . . . . . . . . . . . . . . . . . . . . 232
Figure 6-106: Printing in Progress screen. . . . . . . . . . . . . . . . . . . . . . . . . . . 233
Figure 6-107: Printing Completed screen . . . . . . . . . . . . . . . . . . . . . . . . . . . 233
Figure 6-108: Main Menu screen . . . . . . . . . . . . . . . . . . . . . . . . . . . . . . . . . 234
Figure 6-109: Power Options screen . . . . . . . . . . . . . . . . . . . . . . . . . . . . . . 235
Figure 6-110: Power Down screen . . . . . . . . . . . . . . . . . . . . . . . . . . . . . . . . 235
Figure 6-111: Breaking the Ballot Box Seal. . . . . . . . . . . . . . . . . . . . . . . . . 236
Figure 6-112: Removing Ballots from the Ballot Box . . . . . . . . . . . . . . . . . 236
Figure 7-1: The Scanning Menu (Administration Mode) . . . . . . . . . . . . . . . 242
Figure 7-2: Setting Local and Remote Result Paths . . . . . . . . . . . . . . . . . . . 244
Figure 7-3: Administrator Mode. . . . . . . . . . . . . . . . . . . . . . . . . . . . . . . . . . 245
Figure 7-4: Entering Configuration Mode . . . . . . . . . . . . . . . . . . . . . . . . . . 246
Figure 7-5: The Scanner Properties Menu . . . . . . . . . . . . . . . . . . . . . . . . . . 247
Figure 7-6: Scanner Settings. . . . . . . . . . . . . . . . . . . . . . . . . . . . . . . . . . . . . 249
Figure 7-7: Misread Error Message . . . . . . . . . . . . . . . . . . . . . . . . . . . . . . . 250
Figure 7-8: The Scanning Mode shows basic status and scanning functions 254
Figure 7-9: The Configuration Menu in Administrator Mode after the Tabulator is Closed255
Figure 7-10: Some of the fields . . . . . . . . . . . . . . . . . . . . . . . . . . . . . . . . . . 258
Figure 7-11: All of the fields . . . . . . . . . . . . . . . . . . . . . . . . . . . . . . . . . . . . 259
Figure 7-12: None of the fields. . . . . . . . . . . . . . . . . . . . . . . . . . . . . . . . . . . 259
Figure 7-13: Scanning Batch Start Cards . . . . . . . . . . . . . . . . . . . . . . . . . . . 261
Figure 7-14: Batch Summary Report . . . . . . . . . . . . . . . . . . . . . . . . . . . . . . 262
Figure 7-15: Ballot Navigation . . . . . . . . . . . . . . . . . . . . . . . . . . . . . . . . . . . 264
Figure 7-16: Start/Stop receiving ballots toggle button . . . . . . . . . . . . . . . . 265
Figure 7-17: Show/Hide Overlay . . . . . . . . . . . . . . . . . . . . . . . . . . . . . . . . . 266
Figure 7-18: Ballot Information . . . . . . . . . . . . . . . . . . . . . . . . . . . . . . . . . . 267
Figure 7-19: Confirm Ballot Save . . . . . . . . . . . . . . . . . . . . . . . . . . . . . . . . 267
Figure 7-20: Audit Mark. . . . . . . . . . . . . . . . . . . . . . . . . . . . . . . . . . . . . . . . 268
Figure 7-21: Split View Splitter . . . . . . . . . . . . . . . . . . . . . . . . . . . . . . . . . . 269
Figure 7-22: Ballot Navigation . . . . . . . . . . . . . . . . . . . . . . . . . . . . . . . . . . . 270
Democracy Suite® Use Procedures
1/15/2020 491 Version: 5.10-CA::11
Figure 7-23: Marginal mark confidence . . . . . . . . . . . . . . . . . . . . . . . . . . . . 271
Figure 7-24: Overlays with contest information. . . . . . . . . . . . . . . . . . . . . . 272
Figure 7-25: Vote removed. . . . . . . . . . . . . . . . . . . . . . . . . . . . . . . . . . . . . . 273
Figure 7-26: Vote Added . . . . . . . . . . . . . . . . . . . . . . . . . . . . . . . . . . . . . . . 273
Figure 7-27: Write-in notification. . . . . . . . . . . . . . . . . . . . . . . . . . . . . . . . . 274
Figure 7-28: 93 Remove a mark . . . . . . . . . . . . . . . . . . . . . . . . . . . . . . . . . . 275
Figure 7-29: Write-in Rejection List . . . . . . . . . . . . . . . . . . . . . . . . . . . . . . 275
Figure 7-30: Adjudicating With Contest Filtering . . . . . . . . . . . . . . . . . . . . 276
Figure 7-31: Digital Ballot Adjudication . . . . . . . . . . . . . . . . . . . . . . . . . . . 278
Figure 7-32: List of Qualified Write ins . . . . . . . . . . . . . . . . . . . . . . . . . . . . 279
Figure 7-33: Rejecting Write in . . . . . . . . . . . . . . . . . . . . . . . . . . . . . . . . . . 280
Figure 7-34: The Status Menu in Administrator Mode . . . . . . . . . . . . . . . . 282
Figure 7-35: The Status Menu in Administrator Mode . . . . . . . . . . . . . . . . 283
Figure 7-36: . . . . . . . . . . . . . . . . . . . . . . . . . . . . . . . . . . . . . . . . . . . . . . . . . 284
Figure 8-1: EMS Application Server Settings Screen . . . . . . . . . . . . . . . . . 287
Figure 8-2: Login Screen . . . . . . . . . . . . . . . . . . . . . . . . . . . . . . . . . . . . . . . 288
Figure 8-3: Load Results Dialog. . . . . . . . . . . . . . . . . . . . . . . . . . . . . . . . . . 289
Figure 8-4: Load Results dialog . . . . . . . . . . . . . . . . . . . . . . . . . . . . . . . . . . 290
Figure 8-5: Load Results dialog . . . . . . . . . . . . . . . . . . . . . . . . . . . . . . . . . . 290
Figure 8-6: Load Results dialog . . . . . . . . . . . . . . . . . . . . . . . . . . . . . . . . . . 291
Figure 8-7: Load Results Dialog. . . . . . . . . . . . . . . . . . . . . . . . . . . . . . . . . . 291
Figure 8-8: Load Results Dialog. . . . . . . . . . . . . . . . . . . . . . . . . . . . . . . . . . 292
Figure 8-9: Load Results dialog . . . . . . . . . . . . . . . . . . . . . . . . . . . . . . . . . . 292
Figure 9-1: Ballot Navigation . . . . . . . . . . . . . . . . . . . . . . . . . . . . . . . . . . . . 300
Figure 9-2: Start/Stop receiving ballots toggle button . . . . . . . . . . . . . . . . . 301
Figure 9-3: Show/Hide Overlay . . . . . . . . . . . . . . . . . . . . . . . . . . . . . . . . . . 302
Figure 9-4: Ballot Information . . . . . . . . . . . . . . . . . . . . . . . . . . . . . . . . . . . 303
Figure 9-5: Confirm Ballot Save . . . . . . . . . . . . . . . . . . . . . . . . . . . . . . . . . 303
Figure 9-6: Audit Mark. . . . . . . . . . . . . . . . . . . . . . . . . . . . . . . . . . . . . . . . . 304
Figure 9-7: Split View Splitter . . . . . . . . . . . . . . . . . . . . . . . . . . . . . . . . . . . 305
Figure 9-8: Ballot Navigation . . . . . . . . . . . . . . . . . . . . . . . . . . . . . . . . . . . . 306
Figure 9-9: Marginal mark confidence . . . . . . . . . . . . . . . . . . . . . . . . . . . . . 307
Version: 5.10-CA::11 492 1/15/2020
List of Figures
Figure 9-10: Overlays with contest information. . . . . . . . . . . . . . . . . . . . . . 308
Figure 9-11: Vote removed. . . . . . . . . . . . . . . . . . . . . . . . . . . . . . . . . . . . . . 309
Figure 9-12: Vote Added . . . . . . . . . . . . . . . . . . . . . . . . . . . . . . . . . . . . . . . 309
Figure 9-13: Write-in notification. . . . . . . . . . . . . . . . . . . . . . . . . . . . . . . . . 310
Figure 9-14: 93 Remove a mark . . . . . . . . . . . . . . . . . . . . . . . . . . . . . . . . . . 311
Figure 9-15: Write-in Rejection List . . . . . . . . . . . . . . . . . . . . . . . . . . . . . . 311
Figure 9-16: Adjudicating With Contest Filtering . . . . . . . . . . . . . . . . . . . . 312
Figure 9-17: Digital Ballot Adjudication . . . . . . . . . . . . . . . . . . . . . . . . . . . 314
Figure 9-18: List of Qualified Write ins . . . . . . . . . . . . . . . . . . . . . . . . . . . . 315
Figure 9-19: Rejecting Write in . . . . . . . . . . . . . . . . . . . . . . . . . . . . . . . . . . 316
Figure 12-1: Project Selection . . . . . . . . . . . . . . . . . . . . . . . . . . . . . . . . . . . 342
Figure 12-2: Existing Session Setup . . . . . . . . . . . . . . . . . . . . . . . . . . . . . . . 343
Figure 12-3: Start New or Resume Adjudication Session . . . . . . . . . . . . . . 344
Figure 12-4: Session Setup Denied. . . . . . . . . . . . . . . . . . . . . . . . . . . . . . . . 345
Figure 12-5: Create and Install a New Key . . . . . . . . . . . . . . . . . . . . . . . . . 346
Figure 12-6: Key Installation Successful . . . . . . . . . . . . . . . . . . . . . . . . . . . 346
Figure 12-7: Key Installation Successful . . . . . . . . . . . . . . . . . . . . . . . . . . . 347
Figure 12-8: Security Key Setup . . . . . . . . . . . . . . . . . . . . . . . . . . . . . . . . . 348
Figure 12-9: Security Key Validation. . . . . . . . . . . . . . . . . . . . . . . . . . . . . . 349
Figure 12-10: Update the security key . . . . . . . . . . . . . . . . . . . . . . . . . . . . . 350
Figure 12-11: Adjudicate all ballots . . . . . . . . . . . . . . . . . . . . . . . . . . . . . . . 351
Figure 12-12: Select Outstack Conditions . . . . . . . . . . . . . . . . . . . . . . . . . . 351
Figure 12-13: Contest Highlighting . . . . . . . . . . . . . . . . . . . . . . . . . . . . . . . 354
Figure 12-14: Select Contest Filters . . . . . . . . . . . . . . . . . . . . . . . . . . . . . . . 355
Figure 12-15: Other Options. . . . . . . . . . . . . . . . . . . . . . . . . . . . . . . . . . . . . 356
Figure 12-16: Summary of Project Selections . . . . . . . . . . . . . . . . . . . . . . . 357
Figure 12-17: Batches Screen . . . . . . . . . . . . . . . . . . . . . . . . . . . . . . . . . . . . 359
Figure 12-18: Batch Status . . . . . . . . . . . . . . . . . . . . . . . . . . . . . . . . . . . . . . 361
Figure 12-19: Batch Management Tree View . . . . . . . . . . . . . . . . . . . . . . . 362
Figure 12-20: Confirmation message when re-adjudicating a ballot . . . . . . 363
Figure 12-21: Resetting In-Progress Ballots. . . . . . . . . . . . . . . . . . . . . . . . . 364
Figure 12-22: Write-In Screen . . . . . . . . . . . . . . . . . . . . . . . . . . . . . . . . . . . 366
Democracy Suite® Use Procedures
1/15/2020 493 Version: 5.10-CA::11
Figure 12-23: Reports Screen . . . . . . . . . . . . . . . . . . . . . . . . . . . . . . . . . . . . 367
Figure 12-24: Signature view . . . . . . . . . . . . . . . . . . . . . . . . . . . . . . . . . . . . 368
Figure 12-25: Summary Report . . . . . . . . . . . . . . . . . . . . . . . . . . . . . . . . . . 369
Figure 12-26: Activity Report. . . . . . . . . . . . . . . . . . . . . . . . . . . . . . . . . . . . 370
Figure 12-27: 151 Write-in Resolution Report. . . . . . . . . . . . . . . . . . . . . . . 371
Figure 12-28: Statistics Report . . . . . . . . . . . . . . . . . . . . . . . . . . . . . . . . . . . 372
Figure 12-29: Filtering Screen . . . . . . . . . . . . . . . . . . . . . . . . . . . . . . . . . . . 373
Figure 12-30: Stop Adjudication . . . . . . . . . . . . . . . . . . . . . . . . . . . . . . . . . 374
Figure D-1: . . . . . . . . . . . . . . . . . . . . . . . . . . . . . . . . . . . . . . . . . . . . . . . . . . 407
Figure D-2: . . . . . . . . . . . . . . . . . . . . . . . . . . . . . . . . . . . . . . . . . . . . . . . . . . 408
Figure D-3: . . . . . . . . . . . . . . . . . . . . . . . . . . . . . . . . . . . . . . . . . . . . . . . . . . 409
Figure D-4: Program Smart Card screen . . . . . . . . . . . . . . . . . . . . . . . . . . . 410
Figure D-5: Activation Code screen . . . . . . . . . . . . . . . . . . . . . . . . . . . . . . . 411
Figure D-6: Editing Activation Codes . . . . . . . . . . . . . . . . . . . . . . . . . . . . . 412
Figure D-7: Exporting the Activation Code Configuration File. . . . . . . . . . 412
Figure D-8: Saving the Activation Code Configuration File . . . . . . . . . . . . 413
Figure D-9: Insert poll worker Smart Card. . . . . . . . . . . . . . . . . . . . . . . . . . 414
Figure D-10: Enter poll worker Pin . . . . . . . . . . . . . . . . . . . . . . . . . . . . . . . 415
Figure D-11: Browse to Activation Code Configuration File . . . . . . . . . . . 415
Figure D-12: Insert Voter Smart Card . . . . . . . . . . . . . . . . . . . . . . . . . . . . . 417
Figure D-13: Contents of the inserted Smart Card . . . . . . . . . . . . . . . . . . . . 417
Figure D-14: Remove Ejected Card . . . . . . . . . . . . . . . . . . . . . . . . . . . . . . . 418
Figure D-15: Selecting a Voter Session Activation Code . . . . . . . . . . . . . . 419
Figure D-16: Indicating if Voter Session is Accessible . . . . . . . . . . . . . . . . 420
Figure D-17: Indicating if Voter Session is Challenged. . . . . . . . . . . . . . . . 421
Figure D-18: Programming Voter Card . . . . . . . . . . . . . . . . . . . . . . . . . . . . 422
Figure D-19: Card Successfully Written . . . . . . . . . . . . . . . . . . . . . . . . . . . 423
Figure D-20: Remove Written Card . . . . . . . . . . . . . . . . . . . . . . . . . . . . . . . 424
Figure F-1: ImageCast Central Application - Security Warning . . . . . . . . . 428
Certificate Path Validation 429
Figure F-3: The Ballot Path (Scanning) . . . . . . . . . . . . . . . . . . . . . . . . . . . . 431
Figure F-4: Thermal Printer X-section View . . . . . . . . . . . . . . . . . . . . . . . . 433

Version: 5.10-CA::11 494 1/15/2020
List of Figures
Figure F-5: “Exception found on the one ballot scanner” Message. . . . . . . 434
Figure F-6: Example Error . . . . . . . . . . . . . . . . . . . . . . . . . . . . . . . . . . . . . . 435
Figure F-7: ICC Batch Size Value . . . . . . . . . . . . . . . . . . . . . . . . . . . . . . . . 436
Figure F-8: This ballot and all preceding ballots remain in the output tray. 436
Figure F-9: HiPro Scanner Paper Jam Warning . . . . . . . . . . . . . . . . . . . . . . 437
Figure F-10: HiPro Double Feed Warning when Accepting a Batch . . . . . . 438
Figure F-11: Confirmation Message. . . . . . . . . . . . . . . . . . . . . . . . . . . . . . . 439
Figure F-12: HiPro Double Feed Warning when Discarding a Batch . . . . . 439
Figure F-13: Confirmation Message. . . . . . . . . . . . . . . . . . . . . . . . . . . . . . . 440
Figure F-14: No Tabulators Imported Message.. . . . . . . . . . . . . . . . . . . . . . 440
Figure F-15: Passcode Error Dialog. . . . . . . . . . . . . . . . . . . . . . . . . . . . . . . 441
Figure F-16: Insert Ballots Message. . . . . . . . . . . . . . . . . . . . . . . . . . . . . . . 441
Figure H-1: Re-zero Results . . . . . . . . . . . . . . . . . . . . . . . . . . . . . . . . . . . . . 460
Figure H-2: Figure . . . . . . . . . . . . . . . . . . . . . . . . . . . . . . . . . . . . . . . . . . . . . . . . . . . . . . . . . .461
Figure H-3: Figure . . . . . . . . . . . . . . . . . . . . . . . . . . . . . . . . . . . . . . . . . . . . . . . . . . . . . . . . . .462
Figure H-4: Figure . . . . . . . . . . . . . . . . . . . . . . . . . . . . . . . . . . . . . . . . . . . . 465
Figure H-5: Figure . . . . . . . . . . . . . . . . . . . . . . . . . . . . . . . . . . . . . . . . . . . . 466
Figure H-6: Figure . . . . . . . . . . . . . . . . . . . . . . . . . . . . . . . . . . . . . . . . . . . . 467
Figure H-7: The ImageCast® Evolution is physically secured by five color-coded security seals. . . . . . . . . . . . . . . . . . . . . . . . . . . . . . . . . . . . . . . . . . . . . . . . . . . . . . . . 467
Figure H-8: Figure . . . . . . . . . . . . . . . . . . . . . . . . . . . . . . . . . . . . . . . . . . . . 469
Figure H-9: Figure . . . . . . . . . . . . . . . . . . . . . . . . . . . . . . . . . . . . . . . . . . . . 470
Figure H-10: Sealing the memory card access doors . . . . . . . . . . . . . . . . . . 471
Figure H-11: Sealing the thermal report printer door . . . . . . . . . . . . . . . . . . 472
Figure H-12: Sealing the modem port . . . . . . . . . . . . . . . . . . . . . . . . . . . . . 473
Figure H-13: Figure . . . . . . . . . . . . . . . . . . . . . . . . . . . . . . . . . . . . . . . . . . . 476
Figure H-14: Figure . . . . . . . . . . . . . . . . . . . . . . . . . . . . . . . . . . . . . . . . . . . 476
Figure H-15: Figure . . . . . . . . . . . . . . . . . . . . . . . . . . . . . . . . . . . . . . . . . . . 477
Figure H-16: Top security latch plastic sea . . . . . . . . . . . . . . . . . . . . . . . . . 478
Figure H-17: Bottom security latch plastic seal . . . . . . . . . . . . . . . . . . . . . . 479
Figure H-18: Evidence of tampering adhesive seal . . . . . . . . . . . . . . . . . . . 479
Democracy Suite® Use Procedures
1/15/2020 495 Version: 5.10-CA::11
LIST OF TABLES
Table 1-1: ICE’s Major System Elements . . . . . . . . . . . . . . . . . . . . . . . . . . . . . . . . . . 2
Table 1-2: ICC's Major System Elements . . . . . . . . . . . . . . . . . . . . . . . . . . . . . . . . . . 4
Table 1-3: ICP2’s Major System Elements . . . . . . . . . . . . . . . . . . . . . . . . . . . . . . . . . 5
Table 1-4: ICX's Major System Elements . . . . . . . . . . . . . . . . . . . . . . . . . . . . . . . . . . 8
Table 2-1: Text and Paper Stocks Approved for ImageCast® Ballots . . . . . . . . . . 23
Table 2-2: Text and paper stocks approved for ImageCast® X . . . . . . . . . . . . . . . 24
Table 3-1: Scanner Hardware. . . . . . . . . . . . . . . . . . . . . . . . . . . . . . . . . . . . . . . . . . . 51
Table 4-1: List of Functional Tests. . . . . . . . . . . . . . . . . . . . . . . . . . . . . . . . . . . . . . . 75
Table 4-2: System Power . . . . . . . . . . . . . . . . . . . . . . . . . . . . . . . . . . . . . . . . . . . . . 124
Table 4-3: Battery status. . . . . . . . . . . . . . . . . . . . . . . . . . . . . . . . . . . . . . . . . . . . . . 124
Table 6-1: ImageCast® Evolution Equipment . . . . . . . . . . . . . . . . . . . . . . . . . . . . 132
Table 6-2: ImageCast® Precinct 2 Equipment. . . . . . . . . . . . . . . . . . . . . . . . . . . . 135
Table 6-3: ImageCast® X Equipment . . . . . . . . . . . . . . . . . . . . . . . . . . . . . . . . . . . 137
Table 7-1: Shortcut Keys . . . . . . . . . . . . . . . . . . . . . . . . . . . . . . . . . . . . . . . . . . . . . . 263
Table 9-1: Shortcut Keys . . . . . . . . . . . . . . . . . . . . . . . . . . . . . . . . . . . . . . . . . . . . . . 299
Table B-1: Early Vote MBS settings. . . . . . . . . . . . . . . . . . . . . . . . . . . . . . . . . . . . . 392
Table D-1: Watermark Settings . . . . . . . . . . . . . . . . . . . . . . . . . . . . . . . . . . . . . . . . 401
Table E-1: Scanner Handling . . . . . . . . . . . . . . . . . . . . . . . . . . . . . . . . . . . . . . . . . . 426
Table H-1: Physical Security — Types of Seals . . . . . . . . . . . . . . . . . . . . . . . . . . . . 463
Table H-2: Physical Security — Ballot Box Security Seals . . . . . . . . . . . . . . . . . . 463
Table H-3: Physical Security — Ballot Box Security Locks . . . . . . . . . . . . . . . . . . 464
Table H-4: Physical Security — Ballot Box Lid Latches . . . . . . . . . . . . . . . . . . . . 466
Table H-5: Physical Security — ImageCast® Evolution Security Seals . . . . . . . . 468
Table H-6: Physical Security — ImageCast® Evolution Security Seals. . . . . . . . 469

Index
1/15/2020 496 Version: 5.10-CA::11
INDEX
AAccessible Voting
ICE ......................................................................................................................195ICX ......................................................................................................................212
Activation CodesExporting from EED ...........................................................................................411Importing to ICVA ..............................................................................................414
Air-gap ConfigurationAir-gap Isolation ...................................................................................................28EMS/EED Network Configuration .......................................................................28Network Configuration .........................................................................................27
BBallot Paper
Scanner Recommendations ...................................................................................23Tabulator Recommendations ................................................................................24
CCF/SD
Programming the Cards ......................................................................................406Closing the Polls
ICE ......................................................................................................................222ICP2 ....................................................................................................................228ICX ......................................................................................................................237
EElection Project
Backing Up .........................................................................................................334Opening .................................................................................................................98Restoring ...............................................................................................................95
IiButton
Programming the Security Key ...........................................................................406ICE
Accessible Voting ...............................................................................................195Changing the Printer Tape ..................................................................................175Closing the Polls .................................................................................................222Early Voting ........................................................................................................127Polling Place Equipment .....................................................................................132Provisional Voting ..............................................................................................220Setting up the Equipment ....................................................................................139Voting Session Procedures .................................................................................167
ICP2Closing the Polls .................................................................................................228Early Voting ........................................................................................................129Opening the Polls ................................................................................................160Polling Place Equipment .....................................................................................135

Democracy Suite® Use Procedures
Version: 5.10-CA::11 497 1/15/2020
Setting up the Equipment ....................................................................................141Voting Session Procedures .................................................................................177
ICXAccessible Voting ...............................................................................................212Closing the Polls .................................................................................................237Early Voting ........................................................................................................130Opening the Polls ................................................................................................150Polling Place Equipment .....................................................................................137Provisional Voting ..............................................................................................221Setting up the Equipment ....................................................................................149Voting Session Procedures .................................................................................188
OOpening the Polls
ICP2 ....................................................................................................................160ICX ......................................................................................................................150
PPoll Worker Card
Programming the Card ........................................................................................409Programming Cards
CF/SD .................................................................................................................406Poll Worker ...................................................................................................96, 409Tech Advisor .......................................................................................................407Voter Activation Smart Card ..............................................................................416
Provisional VotingICE ......................................................................................................................220ICX ......................................................................................................................221
TTech Advisor
PIN Parameters ...................................................................................................407Programming the Cards ......................................................................................407
UUSB
Cleaning ................................................................................................................99Configuration for Election File Programming Group .........................................407Election File Programming Group Configuration ..............................................408
VVoter Activation Card
Programming the Card ........................................................................................416

Democracy Suite® Use Procedures
1/15/2020 498 Version: 5.10-CA::11
End of DocumentEnd of Document