Symantec™ Client Management Suite 8.0 powered by Altiris ...
88
Symantec™ Client Management Suite 8.0 powered by Altiris™ technology User Guide
-
Upload
khangminh22 -
Category
Documents
-
view
3 -
download
0
Transcript of Symantec™ Client Management Suite 8.0 powered by Altiris ...

Symantec™ ClientManagement Suite 8.0powered by Altiris™technology User Guide

Symantec™ Client Management Suite 8.0 poweredby Altiris™ technology User Guide
Documentation version: 8.0
Legal NoticeCopyright © 2016 Symantec Corporation. All rights reserved.
Symantec, the Symantec Logo, the Checkmark Logo and Altiris, and any Altiris or Symantectrademarks used in the product are trademarks or registered trademarks of SymantecCorporation or its affiliates in the U.S. and other countries. Other names may be trademarksof their respective owners.
The product described in this document is distributed under licenses restricting its use, copying,distribution, and decompilation/reverse engineering. No part of this document may bereproduced in any form by any means without prior written authorization of SymantecCorporation and its licensors, if any.
THE DOCUMENTATION IS PROVIDED "AS IS" AND ALL EXPRESS OR IMPLIEDCONDITIONS, REPRESENTATIONS AND WARRANTIES, INCLUDING ANY IMPLIEDWARRANTY OF MERCHANTABILITY, FITNESS FOR A PARTICULAR PURPOSE ORNON-INFRINGEMENT, ARE DISCLAIMED, EXCEPT TO THE EXTENT THAT SUCHDISCLAIMERSAREHELD TOBE LEGALLY INVALID. SYMANTECCORPORATIONSHALLNOT BE LIABLE FOR INCIDENTAL OR CONSEQUENTIAL DAMAGES IN CONNECTIONWITH THE FURNISHING, PERFORMANCE, OR USE OF THIS DOCUMENTATION. THEINFORMATION CONTAINED IN THIS DOCUMENTATION IS SUBJECT TO CHANGEWITHOUT NOTICE.
The Licensed Software and Documentation are deemed to be commercial computer softwareas defined in FAR 12.212 and subject to restricted rights as defined in FAR Section 52.227-19"Commercial Computer Software - Restricted Rights" and DFARS 227.7202, et seq."Commercial Computer Software and Commercial Computer Software Documentation," asapplicable, and any successor regulations, whether delivered by Symantec as on premisesor hosted services. Any use, modification, reproduction release, performance, display ordisclosure of the Licensed Software and Documentation by the U.S. Government shall besolely in accordance with the terms of this Agreement.

Symantec Corporation350 Ellis StreetMountain View, CA 94043
http://www.symantec.com

Technical SupportSymantec Technical Support maintains support centers globally. Technical Support’sprimary role is to respond to specific queries about product features and functionality.The Technical Support group also creates content for our online Knowledge Base.The Technical Support group works collaboratively with the other functional areaswithin Symantec to answer your questions in a timely fashion. For example, theTechnical Support group works with Product Engineering and Symantec SecurityResponse to provide alerting services and virus definition updates.
Symantec’s support offerings include the following:
■ A range of support options that give you the flexibility to select the right amountof service for any size organization
■ Telephone and/or Web-based support that provides rapid response andup-to-the-minute information
■ Upgrade assurance that delivers software upgrades
■ Global support purchased on a regional business hours or 24 hours a day, 7days a week basis
■ Premium service offerings that include Account Management Services
For information about Symantec’s support offerings, you can visit our website atthe following URL:
support.symantec.com
All support services will be delivered in accordance with your support agreementand the then-current enterprise technical support policy.
Contacting Technical SupportCustomers with a current support agreement may access Technical Supportinformation at the following URL:
www.symantec.com/business/support/
Before contacting Technical Support, make sure you have satisfied the systemrequirements that are listed in your product documentation. Also, you should be atthe computer on which the problem occurred, in case it is necessary to replicatethe problem.
When you contact Technical Support, please have the following informationavailable:
■ Product release level
■ Hardware information

■ Available memory, disk space, and NIC information
■ Operating system
■ Version and patch level
■ Network topology
■ Router, gateway, and IP address information
■ Problem description:
■ Error messages and log files
■ Troubleshooting that was performed before contacting Symantec
■ Recent software configuration changes and network changes
Licensing and registrationIf your Symantec product requires registration or a license key, access our technicalsupport Web page at the following URL:
www.symantec.com/business/support/
Customer serviceCustomer service information is available at the following URL:
www.symantec.com/business/support/
Customer Service is available to assist with non-technical questions, such as thefollowing types of issues:
■ Questions regarding product licensing or serialization
■ Product registration updates, such as address or name changes
■ General product information (features, language availability, local dealers)
■ Latest information about product updates and upgrades
■ Information about upgrade assurance and support contracts
■ Information about the Symantec Buying Programs
■ Advice about Symantec's technical support options
■ Nontechnical presales questions
■ Issues that are related to CD-ROMs, DVDs, or manuals

Support agreement resourcesIf you want to contact Symantec regarding an existing support agreement, pleasecontact the support agreement administration team for your region as follows:
[email protected] and Japan
[email protected], Middle-East, and Africa
[email protected] America and Latin America

Technical Support ............................................................................................... 4
Chapter 1 Introducing Client Management Suite ............................ 10
About Client Management Suite ...................................................... 10Components of Client Management Suite ......................................... 11Where to get more information ........................................................ 14
Chapter 2 Getting started with Client Management Suite ............ 17
About installing Client Management Suite .......................................... 17Preparing managed computers for evaluating Client Management
Suite .................................................................................... 17Symantec Management Agent for Windows installation
prerequisites ................................................................... 19Installing the Symantec Management Agent for Windows with a
manual push ................................................................... 20Configuring the Symantec Management Agent settings for
evaluation use ................................................................. 22Installing the Inventory and Application Metering plug-ins ............... 23Upgrading the Inventory and Application Metering plug-ins ............. 25Installing or upgrading the Software Management Solution
plug-in ........................................................................... 26
Chapter 3 Metering application usage and creating customreports ............................................................................. 29
Metering application usage and creating custom reports ....................... 29Gathering inventory with predefined inventory policies ......................... 31Enabling application usage metering for Adobe applications .................. 32Creating a custom audit report for Adobe using plain-text SQL ............... 34Creating a custom audit report for Adobe using Query Builder ............... 37Creating a drill-down computer report ............................................... 45Other methods of viewing software usage data ................................... 50
Contents

Chapter 4 Managing software licenses in ITMS ManagementViews ................................................................................ 53
Managing licensed software in ITMS Management Views ..................... 53Manually creating the managed software products .............................. 56Tracking usage of the managed software products .............................. 57Tracking the software license compliance .......................................... 59Creating a task to uninstall software ................................................. 60Removing unused software from client computers ............................... 61Creating a custom license usage report for multiple software
products ............................................................................... 62Customizing a license report ........................................................... 63
Chapter 5 Delivering a new version of software using SoftwareWorkspace Virtualization ............................................ 64
Delivering a new version of software using Software WorkspaceVirtualization ......................................................................... 64
About Workspace Virtualization ....................................................... 66Installing the Workspace Virtualization Agent .................................... 67Delivering Mozilla Firefox 11 software into a virtual layer ....................... 68Creating a task that toggles layers ................................................... 71Delivering Firefox 12 and toggling the layers ...................................... 72Viewing delivery reports ................................................................. 74
Chapter 6 Managing power scheme settings ................................... 75
About managing power scheme settings ........................................... 75Preparing target computers for power scheme management ................. 77Installing the Power Scheme Task Plug-in ......................................... 77Upgrading the Power Scheme Task Plug-in ....................................... 78Uninstalling the Power Scheme Task Plug-in ...................................... 78Collecting power scheme inventory data ........................................... 79Creating a Power Scheme Task ....................................................... 79Editing and deploying power scheme settings .................................... 80Viewing power scheme inventory data .............................................. 81
Chapter 7 Symantec Remote Access Connector .............................. 82
About Symantec Remote Access Connector ...................................... 82Symantec Remote Access Connector configuration file ........................ 83Creating the Remote Access Connector configuration file
template ............................................................................... 84Importing the Remote Access Connector configuration file .................... 85
8Contents

Enabling right-click menu to use the Remote Access Connectoroptions ................................................................................. 86
Index .................................................................................................................... 87
9Contents

Introducing ClientManagement Suite
This chapter includes the following topics:
■ About Client Management Suite
■ Components of Client Management Suite
■ Where to get more information
About Client Management SuiteClient Management Suite combines the tools that help you deploy, manage, secure,and troubleshoot your desktop and laptop client computers.
Client Management Suite is a collection of solutions that run on the SymantecManagement Platform. The platform and solutions of the Client Management Suiteprovide the following key features:
■ Discovery and inventoryThe suite lets you gather inventory of all hardware and software on your clientcomputers.
■ Imaging and deploymentThe suite lets you deploy standardized and hardware-independent images onyour client computers.
■ Software distribution and patch managementThe suite lets you control the software configurations of your client computers.The automated policies for software and patch management help you distributethe latest software and operating system updates. You can ensure that therequired software remains installed, is in a working state, and is correctlyconfigured on the client computers.
1Chapter

■ Remote Management
See “Components of Client Management Suite ” on page 11.
See “Where to get more information” on page 14.
Components of Client Management SuiteClient Management Suite is a collection of solutions that run on the SymantecManagement Platform. The following table lists all the solutions in ClientManagement Suite and also provides a short description of each.
See “About Client Management Suite” on page 10.
Table 1-1 Components of Client Management Suite
Link to User GuideDescriptionComponent
DOC8632Symantec Management Platform provides a set of services thatIT-related solutions can leverage. By leveraging these services,the solutions that are built on the platform can focus on their uniquetasks. They also can take advantage of the more general servicesthat the platform provides. The platform services also provide ahigh degree of consistency between the solutions, so that usersdo not need to learn multiple product interfaces.
Symantec Management Platform provides the following services:
■ Role-based security■ Client communications and management■ Execution of scheduled or event-triggered tasks and policies■ Package deployment and installation■ Reporting■ Centralized management through a single, common interface
Symantec Management Platform includes the followingcomponents:
■ Configuration Management Database (CMDB)■ Notification Server■ Symantec Management Console■ Symantec Management Agent for Windows■ Symantec Management Agent for UNIX, Linux, and Mac■ Network Discovery■ Software Management Framework
SymantecManagementPlatform
11Introducing Client Management SuiteComponents of Client Management Suite

Table 1-1 Components of Client Management Suite (continued)
Link to User GuideDescriptionComponent
DOC8654Deployment Solution helps to reduce the cost of deploying andmanaging servers, desktops, and notebooks from a centralizedlocation in your environment. It offers operating systemdeployment, configuration, personality migration of computers,and software deployment across different hardware platforms andoperating systems.
Deployment Solution provides integrated provisioning, diskimaging, and personality migration from the SymantecManagement Console. Using Symantec Ghost™, you can performinitial computer deployment using standard images and migrateuser data and application settings to new computers.
You can download and install the Deployment Solution componentseparately. Go to the pagehttps://www4.symantec.com/Vrt/offer?a_id=55149, accept theexport restrictions, and then log on with your Symantec accountcredentials. After you ensure that your profile information is correct,all of the available versions of Deployment Solution are listed onthe Software Download: Deployment Solution page. Choose theversion that you want to download, and then clickDownload Now.You can then complete the installation process.
For the Deployment Solution 8.0 release notes, see the link at thefollowing URL:
http://www.symantec.com/docs/DOC8653
DeploymentSolution
DOC8636Inventory Solution lets you gather inventory data about thecomputers, users, operating systems, and installed softwareapplications in your environment. You can collect inventory datafrom the computers that run Windows, UNIX, Linux, and Mac.
After you gather inventory data, you can analyze it using predefinedor custom reports.
Inventory Solution
DOC8635Inventory for Network Devices gathers inventory data from thedevices that are not managed through the Symantec ManagementAgent.
You can gather inventory on the devices that are alreadydiscovered and exist as resources in the CMDB.
Inventory forNetwork Devices
12Introducing Client Management SuiteComponents of Client Management Suite
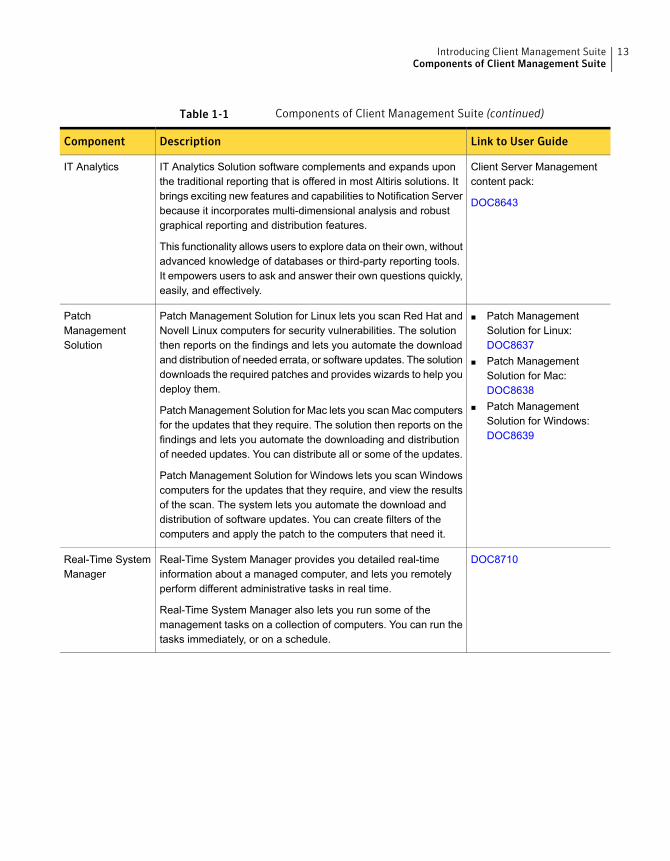
Table 1-1 Components of Client Management Suite (continued)
Link to User GuideDescriptionComponent
Client Server Managementcontent pack:
DOC8643
IT Analytics Solution software complements and expands uponthe traditional reporting that is offered in most Altiris solutions. Itbrings exciting new features and capabilities to Notification Serverbecause it incorporates multi-dimensional analysis and robustgraphical reporting and distribution features.
This functionality allows users to explore data on their own, withoutadvanced knowledge of databases or third-party reporting tools.It empowers users to ask and answer their own questions quickly,easily, and effectively.
IT Analytics
■ Patch ManagementSolution for Linux:DOC8637
■ Patch ManagementSolution for Mac:DOC8638
■ Patch ManagementSolution for Windows:DOC8639
Patch Management Solution for Linux lets you scan Red Hat andNovell Linux computers for security vulnerabilities. The solutionthen reports on the findings and lets you automate the downloadand distribution of needed errata, or software updates. The solutiondownloads the required patches and provides wizards to help youdeploy them.
Patch Management Solution for Mac lets you scanMac computersfor the updates that they require. The solution then reports on thefindings and lets you automate the downloading and distributionof needed updates. You can distribute all or some of the updates.
Patch Management Solution for Windows lets you scan Windowscomputers for the updates that they require, and view the resultsof the scan. The system lets you automate the download anddistribution of software updates. You can create filters of thecomputers and apply the patch to the computers that need it.
PatchManagementSolution
DOC8710Real-Time System Manager provides you detailed real-timeinformation about a managed computer, and lets you remotelyperform different administrative tasks in real time.
Real-Time System Manager also lets you run some of themanagement tasks on a collection of computers. You can run thetasks immediately, or on a schedule.
Real-Time SystemManager
13Introducing Client Management SuiteComponents of Client Management Suite

Table 1-1 Components of Client Management Suite (continued)
Link to User GuideDescriptionComponent
DOC8705Software Management Solution provides intelligent andbandwidth-sensitive distribution andmanagement of software froma central Web console. It leverages the Software Catalog andSoftware Library to ensure that the required software gets installed,remains installed, and runs without interference from othersoftware.
Software Management Solution supports software virtualizationtechnology, which lets you install software into a virtual layer onthe client computer.
Software Management Solution also lets users directly downloadand install approved software or request other software.
SoftwareManagementSolution
DOC8698SymantecWorkflow is a security process development frameworkthat you can use to create both automated business processesand security processes. These processes provide for increasedrepeatability, control, and accountability while reducing overallworkload.
The SymantecWorkflow framework also lets you createWorkflowprocesses that integrate Symantec tools into your organization'sunique business processes. Once deployed, Workflow processescan respond automatically to environmental variables. Workflowprocesses can also allow for human interface points when aprocess calls for someone to make a decision with accountability.
For the Workflow Solution release notes, see the link at thefollowing URL:
http://www.symantec.com/docs/DOC8699
Workflow Solution
Where to get more informationUse the following documentation resources to learn about and use this product.
14Introducing Client Management SuiteWhere to get more information

Table 1-2 Documentation resources
LocationDescriptionDocument
The Supported Products A-Z page, which is available atthe following URL:
https://www.symantec.com/products/products-az
Open your product's support page, and then underCommonTopics, click Release Notes.
Information about newfeatures and importantissues.
Release Notes
■ The Documentation Library, which is available in theSymantec Management Console on the Help menu.
■ The Supported Products A-Z page, which is availableat the following URL:https://www.symantec.com/products/products-azOpen your product's support page, and then underCommon Topics, click Documentation.
Information about how touse this product,including detailedtechnical information andinstructions forperforming commontasks.
User Guide
The Documentation Library, which is available in theSymantec Management Console on the Help menu.
Context-sensitive help is available for most screens in theSymantec Management Console.
You can open context-sensitive help in the following ways:
■ Click the page and then press the F1 key.■ Use the Context command, which is available in the
Symantec Management Console on the Help menu.
Information about how touse this product,including detailedtechnical information andinstructions forperforming commontasks.
Help is available at thesolution level and at thesuite level.
This information isavailable in HTML helpformat.
Help
In addition to the product documentation, you can use the following resources tolearn about Symantec products.
Table 1-3 Symantec product information resources
LocationDescriptionResource
Knowledge BaseArticles, incidents, andissues about Symantecproducts.
SymWISE SupportKnowledgebase
15Introducing Client Management SuiteWhere to get more information

Table 1-3 Symantec product information resources (continued)
LocationDescriptionResource
Unified Help SystemAll available ITManagement Suite andsolution guides areaccessible from thisSymantec Unified HelpSystem that is launchedon cloud.
Cloud Unified Help System
The links to various groups on Connect are as follows:
■ Deployment and Imaging■ Discovery and Inventory■ ITMS Administrator■ Mac Management■ Monitor Solution and Server Health■ Patch Management■ Reporting■ ServiceDesk and Workflow■ Software Management■ Server Management■ Workspace Virtualization and Streaming
An online resource thatcontains forums, articles,blogs, downloads,events, videos, groups,and ideas for users ofSymantec products.
Symantec Connect
16Introducing Client Management SuiteWhere to get more information

Getting started with ClientManagement Suite
This chapter includes the following topics:
■ About installing Client Management Suite
■ Preparing managed computers for evaluating Client Management Suite
About installing Client Management SuiteTo install Client Management Suite, you use Symantec Installation Manager. Youcan download the installation files directly to your server or you can create offlineinstallation packages.
For more information, see the Installing IT Management Suite chapter in the ITManagement Suite 8.0 Planning for Implementation Guide at the following URL:
http://www.symantec.com/docs/DOC8631
After you install the Suite, refer to the individual solution documentation forinformation on how to configure and use it.
See “Components of Client Management Suite ” on page 11.
Preparing managed computers for evaluating ClientManagement Suite
The following is the process to prepare the computers in your environment forevaluating Client Management Suite.
Symantec recommends that you evaluate Client Management Suite on an isolatedgroup of computers in a lab environment.
2Chapter

Table 2-1 Process for preparing target computers for evaluating ClientManagement Suite
DescriptionActionStep
You can discover the computers that are not yet managed bySymantec Management Agent. If you know the host names or theIP addresses of the computers on which you want to evaluateClient Management Suite, the discovery is optional.
For more information about discovering computers, see the ITManagement Suite Administration Guide at the following URL:
http://www.symantec.com/docs/DOC8632
(Optional) Discover computers inyour environment.
Step 1
You can configure computers manually for evaluation. You canalso use a group policy to configure the firewall and other settingson all or a group of computers in your network.
See “Symantec Management Agent for Windows installationprerequisites” on page 19.
Configure your Windowscomputers to allow SymantecManagement Agent to pushinstallation.
Step 2
SymantecManagement Agent establishes communication betweenNotification Server and the computers in your network. NotificationServer interacts with Symantec Management Agent and lets youmonitor and manage each computer from the SymantecManagement Console.
See “Installing the Symantec Management Agent for Windowswith a manual push” on page 20.
http://www.symantec.com/docs/DOC8632
For evaluation, you can also use another method of installingSymantec Management Agent, such as pull install.
For more information on the methods of installing the SymantecManagement Agent, see the IT Management Suite AdministrationGuide at the following URL:
http://www.symantec.com/docs/DOC8632
Install Symantec ManagementAgent
Step 3
To ease the configuration and evaluation of Client ManagementSuite, make Symantec Management Agent request theconfiguration from Notification Server more frequently.
See “Configuring the Symantec Management Agent settings forevaluation use” on page 22.
(Optional) Configure the SymantecManagement Agent settings forevaluation use.
Step 4
18Getting started with Client Management SuitePreparing managed computers for evaluating Client Management Suite
Table 2-1 Process for preparing target computers for evaluating ClientManagement Suite (continued)
DescriptionActionStep
In the Symantec Management Console, on the Actions menu,click Agents/Plug-ins > Rollout Agents/Plug-ins.
In the left pane, under Agents/Plug-ins, locate and turn on theinstallation or upgrade policies for the plug-ins, according to yourneeds.
See “Installing the Inventory and Application Metering plug-ins”on page 23.
See “Upgrading the Inventory and Application Metering plug-ins”on page 25.
See “Installing or upgrading the Software Management Solutionplug-in” on page 26.
Install or upgrade the plug-ins.Step 5
After you prepare the client computers, you can do the following:
■ Collect application usage data and create custom reports to view the collecteddata.See “Metering application usage and creating custom reports” on page 29.
■ Enable software usage tracking, and then uninstall the software from themanaged computers that do not use it.
■ Install software into a virtual layer with the Software Workspace Virtualizationtechnology.See “Delivering a new version of software using Software WorkspaceVirtualization” on page 64.
■ Deploy the required plug-ins, and then run tasks to collect inventory informationand change power scheme settings on the managed computers.See “About managing power scheme settings” on page 75.
Symantec Management Agent for Windows installation prerequisitesBefore you can install Symantec Management Agent, you need to configure thecomputers and verify that they meet the installation prerequisites.
This task is a step in the processes for installing Symantec Management Agentmanually on Windows computers.
19Getting started with Client Management SuitePreparing managed computers for evaluating Client Management Suite

Table 2-2 Symantec Management Agent for Windows installation prerequisites
DescriptionPrerequisite
SymantecManagement Platform and Altiris Solutions SupportMatrix
Operating system
60 MB minimumHard disk space
64 MB minimum (128 MB recommended)RAM
Version 6.0 or laterInternet Explorer
Local administrator rightsAccess rights
The computer must be able to communicate with SymantecManagement Platform through the computer’s firewall.
Perform any of the following:
■ Enable File and Printer Sharing in the firewall settings.■ Add port UDP 138, TCP 445, TCP 80 (or TCP 443 for
HTTPS) and ICMP type 8 as inbound port exceptions.You can add the ports by using a group policy.
■ Turn off the firewall.
Firewall
For non-domain client computers running Windows XP, youmust also disableUse simple file sharing in Folder Optionsin Windows XP.
Simple file sharing (WindowsXP in non-domain only)
For non-domain client computers running Windows Vista orWindows 7, you must also turn off the User Access Control(UAC).
UAC (Windows Vista andWindows 7 in non-domainonly)
Installing the Symantec Management Agent for Windows with amanual push
You can push Symantec Management Agent to any Windows computers. Beforeyou can manually install or uninstall Symantec Management Agent from theSymantec Management Agent Install page, you need to choose the targetcomputers. You can enter the computer names manually, choose the computersthat have been discovered with resource discovery, or import the computers froma CSV file. The CSV file is a comma-delimited text file. The file includes the DNSnames or the IP addresses of the client computers on which you want to installSymantec Management Agent. For Windows computers, the CSV file is a list ofcomputer names or IP addresses that are imported into theSymantecManagementAgent Install page. Items are interpreted as the names of computers or the IP
20Getting started with Client Management SuitePreparing managed computers for evaluating Client Management Suite

addresses of computers (for the entries that are in the appropriate format). Nospaces are allowed: any item that contains a space is ignored.
Note:You canmanually install Symantec Management Agent only on the computersthat were discovered using Domain Resource Discovery or Network Discovery.
This task is a step in the processes for installing the Symantec Management Agenton Windows computers.
To install the Symantec Management Agent for Windows with a manual push
1 In the Symantec Management Console, on the Actions menu, clickAgents/Plug-ins > Push Symantec Management Agent.
2 On the Symantec Management Agent Install page, on the Install Agent tab,underRollout Agent to Computers, choose the computers on which to installSymantec Management Agent, and then click Install.
In the text box, type the IP Address, FQDN, name, orname@domain of the computer, and then click Add.
When you type name@domain, the system splits thename into two and tries to match the existing resourceby both fields. If the full match is not found, the rest ofthe fields are not populated for this entry.
To manually add a computer.
1 Click Select Computers.
2 In the Select Computers dialog box, add theappropriate computers from the Availablecomputers list to the Selected computers list,and then click OK.
To choose from the availablecomputers.
1 Under Rollout Agent to Computers, on thetoolbar, click the Import computers from aselected file symbol.
2 In the Select file to import dialog box, choose theappropriate CSV file, and then click Open.
To import computers from aCSV file.
21Getting started with Client Management SuitePreparing managed computers for evaluating Client Management Suite

3 (Optional) UnderRoll out Agent to Computers, using the icons on the toolbar,you can do the following:
Select the computer in the list and click the Edit icon.
In the Edit entry dialog box, the fields under the Entryfields section are editable and let you update the datain the AgentPushData table.
The fields under the Resolved fields section areautomatically filled with the data of a matched entry indatabase. These fields are not editable.
View or edit a selected entry.
Select the computers in the list, and then click theRediscover selected computer details icon.
Rediscovering lets you search for additional informationabout the selected computers. For example, domain,operating system details, etc.
Rediscover the selectedentries.
In the View drop-down list, click the selection that youwant to view.
You can view the computers that are manually added,the computers that are automatically added when theScheduled Push to Computers is enabled, or both.
View different selections ofentries in the grid.
4 In the Symantec Management Agent Installation Options dialog box,configure the installation settings according to your needs, and then clickProceed With Install.
For more information, click the page and then press F1.
On the Symantec Management Agent Install page, under Rollout Agent toComputers, in the computer list, the Status column shows the success orfailure of the installation on each computer. Note that the newly installedSymantec Management Agent reports its status back to the originatingNotification Server, even if it is going to be managed by another NotificationServer.
Configuring the Symantec Management Agent settings for evaluationuse
(Optional)
By default, Symantec Management Agent requests new configuration fromNotification Server once per hour. This means that it can take up to one hour for arollout policy to reach the target computer.
22Getting started with Client Management SuitePreparing managed computers for evaluating Client Management Suite

If you are evaluating this solution in a lab environment, you can change theconfiguration request interval to speed up the evaluation process.
The next time Symantec Management Agent downloads configuration information,these settings take effect. If you used the default agent configuration settings beforethe change, updates can take up to one hour before these changes are effective.
To configure the Symantec Management Agent for evaluation use
1 In the Symantec Management Console, on the Settings menu, clickAgents/Plug-ins > Targeted Agent Settings.
2 In the left pane, under Policy Name, click the policy that you want to configure.
3 In the right pane, on the General tab, in the Download new configurationevery box, change the value to 5 minutes.
This forces the agent to check for changes more frequently.
4 In the Upload basic inventory every box, change the value to 15 minutes.
This forces inventory data to be sent more frequently.
5 Click Save changes.
Installing the Inventory and Application Metering plug-insTo gather inventory data on managed computers, you must install Inventory Plug-inon them.
To meter applications on managed computers, you must install Application MeteringPlug-in. These plug-ins work with Symantec Management Agent to perform taskson the managed computers and communicate with Notification Server.
If you have Inventory Pack for Servers, you can also use the Inventory Pack forServers Plug-in.
Note: Software-based usage tracking and application metering are Windows-onlyfeatures and are supported on Windows XP and above managed computers only.Software-based usage tracking and application metering are not supported onWindows servers.
To install a plug-in, you configure the policy that installs the plug-in on managedcomputers. You choose the group of computers on which the policy runs, and whenit runs. If you choose a group that contains a computer that already has the plug-ininstalled, the task is ignored on that computer. When you turn on the policy, theplug-in is automatically installed on any new computer that is a member of the targetgroup.
23Getting started with Client Management SuitePreparing managed computers for evaluating Client Management Suite

By default, no plug-in installation policies are turned on. If you install InventorySolution for the first time, you must manually turn on the policies to install theInventory and Application Metering plug-ins.
You can install Inventory plug-in and Application Metering plug-in separately.However, if only Application Metering plug-in is installed on the client computer,but the Inventory plug-in is not, there are the following limitations:
■ You cannot gather information about installed software and files using Inventorypolicies and tasks.
■ For MSI-based software, the dynamic association of files and components doesnot work properly until the information about file properties is gathered.
■ The Underutilized Software report only shows the information about clientcomputers on which metered software has been recognized as installed.
Before you perform this task, you must install Symantec Management Agent ontarget computers.
This task is a step in the process for preparing managed computers for inventoryand metering.
To install the Inventory or Application Metering plug-ins
1 In the Symantec Management Console, on the Actions menu, clickAgents/Plug-ins > Rollout Agents/Plug-ins.
2 In the left pane, under Agents/Plug-ins, expand Discovery and Inventory >Windows/UNIX/Linux/Mac, and then click the policy for the plug-in that youwant to install.
3 In the right pane, on the toolbar, click Apply to to choose the computers onwhich you want to install the plug-in.
For more information, see the topics about specifying the targets of a policyand specifying filtering rules in the IT Management Suite 8.0 AdministrationGuide at the following URL:
http://www.symantec.com/docs/DOC8632
4 Under Schedule, on the toolbar, click Schedule, and then schedule the policyto run on managed computers.
5 On the plug-in install page, turn on the policy.
At the upper right of the page, click the colored circle, and then click On.
6 Click Save changes.
The next step is to gather inventory on your client computers.
See “Gathering inventory with predefined inventory policies” on page 31.
24Getting started with Client Management SuitePreparing managed computers for evaluating Client Management Suite
Upgrading the Inventory and Application Metering plug-insIf you upgrade from a previous version of Inventory Solution, and you previouslyinstalled the Inventory or Application Metering plug-ins, you must upgrade theplug-ins on client computers.
To upgrade a plug-in, you turn on an upgrade policy that is located with the plug-ininstallation policy.
This task is a step in the process for preparing managed computers for inventoryand metering.
To upgrade the Inventory or Application Metering plug-ins
1 In the Symantec Management Console, on the Actions menu, clickAgents/Plug-ins > Rollout Agents/Plug-ins.
2 In the left pane, expand Discovery and Inventory >Windows/UNIX/Linux/Mac, and then click the policy for the plug-in that youwant to upgrade.
The upgrade policy for x64 plug-in is received by 64-bit client computers. Thex86 plug-in policy is received by 32-bit computers. You cannot install a 32-bitplug-in on a 64-bit client computer.
Note: The cloned policies that you have created with Inventory Solution 7.5SP1 and earlier still attempt to install or upgrade 32-bit plug-ins on 64-bit clientcomputers. These policies fail due to the change introduced in InventorySolution 7.6.
3 On the plug-in upgrade page, turn on the policy.
At the upper right of the page, click the colored circle, and then click On.
4 Click Apply to to select the computers on which you want to upgrade theplug-in.
For more information, see the topics about specifying the targets of a policyand specifying filtering rules in the IT Management Suite 8.0 AdministrationGuide at the following URL:
http://www.symantec.com/docs/DOC8632
25Getting started with Client Management SuitePreparing managed computers for evaluating Client Management Suite

5 Schedule the policy to run on managed computers.
For more information, see the topic about adding a schedule to a policy, task,or job in the IT Management Suite 8.0 Administration Guide at the followingURL:
http://www.symantec.com/docs/DOC8632
6 Click Save changes.
Installing or upgrading the Software Management Solution plug-inBefore you can deliver or manage software on client computers with SoftwareManagement Solution, you must install the Software Management Solution plug-inon those computers.
If you upgraded from a 7.x version of Software Management Solution, you mustupgrade the Software Management Solution plug-in that is installed on the managedcomputers.
Upgrade from a 6.x version of Software Management Solution plug-in is notsupported. You must upgrade Symantec Management Agent first, and then usethe Software Management Solution Plug-in Install policy to install the plug-in.
For more information about upgrade and data migration, see the IT ManagementSuite 8.0 Installation and Upgrade Guide at the following URL:
http://www.symantec.com/docs/DOC8650
You install the SoftwareManagement Solution plug-in toWindows and non-Windowscomputers using the Software Management Solution Plug-in Install policy.
This task is a step in the process for implementing Software Management Solution.
To install or upgrade the Software Management Solution plug-in
1 In the Symantec Management Console, on the Settings menu, clickAgents/Plug-ins > All Agents/Plug-ins.
2 In the left pane, under Agents/Plug-ins, expand Software > SoftwareManagement, and then click one of the following policies:
■ Software Management Solution Plug-in InstallClick if it is a new installation or if you upgraded from the 6.x version of theproduct.
■ Software Management Solution Plug-in UpgradeClick if you upgraded from the 7.x version of the product.
26Getting started with Client Management SuitePreparing managed computers for evaluating Client Management Suite
3 In the right pane, check or uncheck Enable Verbose Reporting of StatusEvents according to your needs.
This option records the detailed events that are related to the installation andposts them to the Notification Server computer.
4 Under Applied to, on the toolbar, click Apply to, and then choose where toinstall the agent.
For more information, see the IT Management Suite 8.0 Administration Guideatthe following URL:
http://www.symantec.com/docs/DOC8632
5 Under Schedule, on the toolbar, click Schedule, and then configure theschedule for the policy.
Note that if you turn off and then turn on the policy, it cannot run on the samecomputer again. To run a policy on the same computer again, you mustconfigure it to run on a schedule.
27Getting started with Client Management SuitePreparing managed computers for evaluating Client Management Suite

6 (Optional) Under Extra schedule options, configure following options:
Lets you run the policy as soon as possible, and only once.
Note that if you turn off and then turn on the policy, it cannot run onthe same computer again. To run a policy on the same computeragain, you must configure it to run on a schedule.
RunonceASAP
Allows the user on the client computer to run the policy manually.User can run
Displays a message to notify the user that new software is available.When the user clicks the message, the New Software is Availabledialog box opens. The user can start, dismiss, or defer the policy. Ifyou do not choose to prompt the user, the New Software isAvailable dialog box does not appear.
The New Software is Available dialog box appears only if Showpopup notifications is checked.
This option does not apply to UNIX and Linux.
Notify userwhen the taskis available
Displays the Starting Task dialog box to notifiy the user before thepolicy runs.
Unless you let the user defer the policy, the policy starts 60 secondsafter the Starting Task dialog box appears. A progress bar showsthe amount of time that remains. The user can dismiss the StartingTask dialog box but cannot cancel the policy unless you checkedUser can run.
The Starting Task dialog box appears only if the Show popupnotifications is checked in the client computer’s SymantecManagement Agent settings.
This option does not apply to UNIX or Linux.
Warn beforerunning
7 Turn on the policy.
At the upper right of the page, click the colored circle and then click On.
8 Click Save changes.
28Getting started with Client Management SuitePreparing managed computers for evaluating Client Management Suite

Metering application usageand creating customreports
This chapter includes the following topics:
■ Metering application usage and creating custom reports
■ Gathering inventory with predefined inventory policies
■ Enabling application usage metering for Adobe applications
■ Creating a custom audit report for Adobe using plain-text SQL
■ Creating a custom audit report for Adobe using Query Builder
■ Creating a drill-down computer report
■ Other methods of viewing software usage data
Metering application usage and creating customreports
Client Management Suite lets you collect various data from themanaged computers,store the data in the Configuration Management Database (CMDB), and then createcustom reports that display that data.
Below is a sample process for creating a custom report that displays the collectedAdobe software inventory and usage data. You can use this report for a softwareaudit or to determine the computers on which the software in not used. You can
3Chapter

then use Software Management Solution to uninstall the software from thesecomputers and reclaim licenses.
In the following example, you use Inventory Solution to collect data about installedAdobe software, and then track the software usage with the application meteringfeature of Inventory Solution.
Note: Application metering is supported for Windows only. The software usageinformation is limited to Windows XP and above.
Table 3-1 Process for application usage metering and creating custom reports
DescriptionActionStep
You must have Symantec Management Agent installed on theclient computers.
See “Preparing managed computers for evaluating ClientManagement Suite” on page 17.
Meet the prerequisites.Step 1
See “Installing the Inventory and Application Metering plug-ins”on page 23.
For more detailed information, see the Preparing managedcomputers for inventory and metering topic in the InventorySolution User Guide at the following URL:
http://www.symantec.com/docs/DOC8636
Note that you use policies to install the plug-ins on the clientcomputers. If you use default settings, it can take up to one hourfor Symantec Management Agent to request the configurationupdate, receive the policy and install the plug-in. You can requestconfiguration manually from the Symantec Management AgentGUI, or by running the Update Client Configuration client task
Install the Inventory andApplication Metering plug-ins.
Step 2
The predefined inventory policies are enabled by default andconfigured to run ASAP on every computer with the Inventoryplug-in installed. Then, policies run daily , weekly or monthly tosend the updated inventory information to Notification Server.
For example, the Collect Full Inventory policy is set by defaultto run once on every computer ASAP, and then every Monday at18:00.
You can configure the policy schedule according to your needs.
See “Gathering inventory with predefined inventory policies”on page 31.
Collect full inventory.Step 3
30Metering application usage and creating custom reportsMetering application usage and creating custom reports

Table 3-1 Process for application usage metering and creating custom reports(continued)
DescriptionActionStep
The application metering policy records application start and stopevents, and sends the application usage data to Notification Server.
See “Enabling application usagemetering for Adobe applications”on page 32.
Create an application meteringpolicy for the software.
Step 4
You create a report that displays data about the number of softwarecomponents that are installed on the client computers and thenumber of times the software has been used.
You can use the following methods to create a custom report:
■ Plain text SQLSee “Creating a custom audit report for Adobe using plain-textSQL” on page 34.
■ The Symantec Management Console Query BuilderSee “Creating a custom audit report for Adobe using QueryBuilder” on page 37.
Using plain text SQL gives you more flexibility, but if you don'thave extensive SQL language knowledge, you can use QueryBuilder to build a custom report. However, using Query Builderrequires the knowledge of the CMDB tables and the data that theycontain.
Create a custom audit report andview inventory data.
Step 5
You can create a drill-down report. For example, you can createreports that show the list of computers on which a particularsoftware product is installed.
See “Creating a drill-down computer report” on page 45.
(Optional) Create a drill-downreport.
Step 6
Client Management Suite provides reports and dashboards thatlet you view software inventory, application metering data, andother types of data.
See “Other methods of viewing software usage data” on page 50.
(Optional) Use other methods toview software inventory andapplication metering data.
Step 7
Gathering inventory with predefined inventorypolicies
You can gather inventory data from managed computers with predefined inventorypolicies. You can also configure the predefined policies to meet your needs. If youwant to configure a predefined policy, Symantec recommends that you clone it, andthen configure the copy.
31Metering application usage and creating custom reportsGathering inventory with predefined inventory policies

Note: You can manually run an original or modified predefined inventory policy onthe managed Windows computers. You can do it after the policy automatically runson the computer at least once.
Before you perform these steps, ensure that you have prepared the managedcomputers for inventory.
To turn on predefined inventory policies
1 In the SymantecManagement Console, on theManagemenu, click Policies.
2 In the left pane, expand Discovery and Inventory > Inventory, and then clickthe predefined inventory policy that you want to use.
3 On the inventory policy page, turn on the policy.
At the upper right of the page, click the colored circle, and then click On.
4 Click Save changes.
To clone and configure predefined inventory policies
1 In the Symantec Management Console, browse to the predefined inventorypolicy that you want to clone.
2 Right-click the policy, and then click Clone.
3 Give the cloned policy a unique name, and then click OK.
4 On the inventory policy page, configure the policy options according to yourneeds.
For more information about the options, click the page, and then press the F1key.
5 On the inventory policy page, turn on the policy.
At the upper right of the page, click the colored circle, and then click On.
6 Click Save changes.
The next step is to wait for the client computers to receive the new policy and reportthe inventory results, and then view the data that is stored in the ConfigurationManagement Database (CMDB).
Enabling application usage metering for Adobeapplications
To meter application usage, you create an application metering policy. On the policypage, you create application definitions for the software that you want to meter. For
32Metering application usage and creating custom reportsEnabling application usage metering for Adobe applications

each metering policy, you can define one or more software components. Applicationmetering functionality is a component of the Client Management Suite.
Inventory Solution also lets you track software usage on the software product level.
In the example below, you create an application metering policy that monitors startevents for the executables with the file properties containing "Adobe".
Note: Depending on how you configure the application metering policy, it can takesome time for the application usage data to arrive to Notification Server and bestored in the Configuration Management Database (CMDB).
To enable usage metering for Adobe applications
1 In the Symantec Management Console, on the Manage menu, click Policies.
2 In the left pane, expand Software, right-click Application metering, and thenclick New > Application metering policy.
3 On theNewApplicationmetering policy page, give the policy a unique nameand description.
4 On the policy page, on the Software tab, on the toolbar, click Add > Rule.
5 In the Add Application Rule dialog box, in the Definition name box, typeAdobe. In the Product name box, type *Adobe*, and then click OK.
6 On theOptions tab, check Record usage events, and then, in the drop-downlists on the right, click Start and Daily.
These settings instruct the policy to record application startup events and sendthe summary data to Notification Server daily.
7 Click Save changes.
The following is the procedure for testing the application metering rule.
To test the application metering rule
1 On client computer that belongs to theWindowsComputers with ApplicationMetering Plug-in targets, open the Symantec Management Agent GUI.
For example, double-click the Symantec Management Agent icon on thetaskbar.
2 In the Symantec Management Agent GUI, on the toolbar, click Settings, andthen click Update Configuration to request configuration policies fromNotification Server.
33Metering application usage and creating custom reportsEnabling application usage metering for Adobe applications

3 Verify that the new application metering policy has arrived to the client computer.
If the policy arrived, you can see the name of the policy in the clientconfiguration policy XML file at the following location: C:\ProgramFiles\Altiris\Altiris Agent\Client Policies.
In this example, look for Adobe.
4 Run an Adobe application.
5 The application usage information is sent to the Notification Server computeraccording to the interval that you specified for the Record usage events option.
In this example, the data is sent to the Notification Server daily.
Creating a custom audit report for Adobe usingplain-text SQL
After you enable application metering, you can create a custom report using aplain-text SQL query. You can also add parameters to an SQL query-based report.
You can use the Symantec Management Console Query Builder to create customreports.
See “Creating a custom audit report for Adobe using Query Builder” on page 37.
Note: Symantec recommends that you save the report regularly while makingchanges to the report. This reduces the chances of the Symantec ManagementConsole timing out and losing your changes. To save the changes you made to thereport, you can click either Save Changes or Apply. To return to the report, clickEdit.
The query that you use in this example is as follows:
SELECT
ifd.DisplayName,
ifd.Publisher,
COUNT(DISTINCT ifd._ResourceGuid) AS 'Installed',
COUNT(DISTINCT cm.Metered) AS 'Metered',
COUNT(DISTINCT eas._ResourceGuid) AS 'Used'
FROM ( SELECT DISTINCT _ResourceGuid, DisplayName, Publisher,
ParentResourceGuid, ChildResourceGuid FROM Inv_AddRemoveProgram iarp
34Metering application usage and creating custom reportsCreating a custom audit report for Adobe using plain-text SQL

JOIN ResourceAssociation ra ON iarp._SoftwareComponentGuid =
ra.ParentResourceGuid WHERE Publisher LIKE '%Adobe%' ) ifd
LEFT JOIN ( SELECT DISTINCT ResourceGuid AS Metered FROM
CollectionMembership WHERE CollectionGuid =
'f5758af1-eb77-436f-b63f-e75473cf3c09' ) cm ON cm.Metered =
ifd._ResourceGuid
LEFT JOIN ( SELECT DISTINCT _ResourceGuid, FileResourceGuid FROM
Evt_Application_Start ) eas ON eas.FileResourceGuid =
ifd.ChildResourceGuid AND eas._ResourceGuid = ifd._ResourceGuid
GROUP BY
ifd.Publisher,
ifd.DisplayName
ORDER BY
Used DESC,
Publisher ASC
This query selects all software resources that display Adobe as the publisher in theWindows Add/Remove Program dialog box (WHERE Publisher LIKE '%Adobe%).The count of computers with this software will be displayed in the Installed column.You will replace the %Adobe% substring with a report parameter later in the process.
In the LEFT JOIN statement that follows, the query gets the count of computers thatcan be metered. Inventory Solution can collect inventory from both server andworkstation operating systems, but application metering is available for workstationsonly. When you run the report, the count of workstations with this software isdisplayed in the Metered column. This particular example uses the collection thatis used by the default application metering policy. Note that if you use a non-defaulttarget to meter Adobe software, the data in theMetered column will be inaccurate.If the data is inaccurate, you can further customize the report.
The last LEFT JOIN statement gets the count of computers on which an applicationfrom Adobe was executed and displays it as Used.
Note: This is a simplified query and it does not let you specify a time interval forwhich to display metering data. You can add these parameters later.
35Metering application usage and creating custom reportsCreating a custom audit report for Adobe using plain-text SQL

To create a custom audit report for Adobe using plain-text SQL
1 In the Symantec Management Console, on the Reports menu, click AllReports.
2 In the left pane, underReports, expandDiscovery and Inventory > Inventory> Cross-platform > Software/Applications.
3 Under Software/Applications, right-click the Software folder, and then clickNew > Report > SQL Report.
4 On New SQL Report page, rename the report.
For example, rename the report to Adobe audit (SQL).
5 Click the Parameterised Query tab, and then, in the text box, delete all thedefault query text.
6 Copy the SQL query that is provided in this topic and paste it into the text box.
7 Click Save Changes.
To add a parameter to the plain-text SQL report
1 On the report page, click the Report Parameters tab.
2 On the toolbar, click Add > New Parameter.
3 In the Editing Parameter dialog box, configure the following settings:
Type Publisher.Name
Type Publisher.Description
Type %.Default Value
Type %Adobe%.Test Value
4 Under Value Provider, in the Name drop-down list, click Basic ParameterValue Edit Control, and then, under Configuration, in the Label Text box,type Publisher.
5 Click OK.
6 On the report page, click the Data Source tab, and then click the QueryParameters tab.
7 On the toolbar, click Add > Publisher.
8 Click the Parameterised Query tab.
36Metering application usage and creating custom reportsCreating a custom audit report for Adobe using plain-text SQL

9 In the text box, before the query, add the following lines:
DECLARE @v3_Publisher nvarchar(max)
SET @v3_Publisher = N'%Publisher%'
10 In the SQL query, locate the following string:
LIKE '%Adobe%'
and replace it with the following:
LIKE @v3_Publisher
11 Click Save Changes.
To test the report, you can type%oracle% in the Publisher box. Then refreshthe report, and see if it displays the list of Oracle software that is discoveredby Inventory Solution.
See “Creating a drill-down computer report” on page 45.
Creating a customaudit report for Adobe usingQueryBuilder
After you enable application metering, you can use Query Builder to create a customreport in the Symantec Management Console.
You can also build a custom report using a plain-text SQL query.
See “Creating a custom audit report for Adobe using plain-text SQL” on page 34.
For more information, see the topics about creating custom Notification Serverreports in the IT Management Suite Administration Guide.
Note: Symantec recommends that you save the report regularly while makingchanges to the report. This reduces the chances of the Symantec ManagementConsole timing out and losing your changes. To save the changes you made to thereport, you can click either Save Changes or Apply. To return to the report, clickEdit.
To create a new report and add tables and associations
1 In the Symantec Management Console, on the Reports menu, click AllReports.
2 In the left pane, expand Discovery and Inventory > Inventory >Cross-platform > Software/Applications.
37Metering application usage and creating custom reportsCreating a custom audit report for Adobe using Query Builder

3 Under Software/Applications, right-click Software, and then click New >Report > Computer Report.
4 On the New Computer Report page, type a new name for this report.
For example, type Adobe audit (Query Builder).
5 On the Query tab, click Base Query, and then, on the right, in the BaseResource Type drop-down list, click Software Component.
When a dialog box opens, click OK.
6 On the Query tab, under Base Query, click Software Component, and then,under Actions, click Create Joins.
7 In the Joins dialog box, create a table join as follows:
Inner join Inv_AddRemoveProgram on [Software Component].[Guid] =_SoftwareComponentGuid.
Click OK.
8 On the Query tab, under Base Query, click Software Component, and then,on the right, under Actions, click Use Resource Type Associations.
9 In the Resource Type Associations dialog box, in the drop-down list, click[Software Component Contains File] to [File], and then click OK.
10 On theQuery tab, under Software Component Contains, click File, and then,on the right, under Actions, click Create Joins.
38Metering application usage and creating custom reportsCreating a custom audit report for Adobe using Query Builder

11 In the Joins dialog box, create a table join as follows:
Left Outer join Inv_Monthly_summary on [File].[Guid] = FileResourceGuid.
Click OK.
12 On theQuery tab, under Software Component Contains, click File, and then,on the right, under Actions, click Create Joins.
13 In the Joins dialog box, create a table join as follows:
LeftOuter join Inv_Software_Execution on [File].[Guid] = _ResourceGuid.
Click OK.
14 Click Save Changes.
Next, add the third table, which will be used to get the count of computers that canbemetered. Youmust then add a filter expression that lets you exclude the operatingsystems that are not supported by the Application Metering Plug-in.
In this example, you filter the results by GUIDf5758af1-eb77-436f-b63f-e75473cf3c09, which is a GUID of theWindowsComputers with Application Metering plug-in.
39Metering application usage and creating custom reportsCreating a custom audit report for Adobe using Query Builder

To join the CollectionMembership table and add a filter expression
1 On the Query tab, under Base Query, click Inv_AddRemoveProgram, andthen, in the right pane, under Actions, click Create Joins.
2 In the Joins dialog box, create a table join as follows:
Left Outer join CollectionMembership on[Inv_AddRemoveProgram].[_ResourceGuid] = ResourceGuid.
Click OK.
3 On the Filter Expressions tab, click Switch to Advanced Mode.
4 In the left pane, click [CollectionMembership] Join Filters.
5 In the right pane, in the drop-down list, click Equals.
When a dialog box opens, click OK.
40Metering application usage and creating custom reportsCreating a custom audit report for Adobe using Query Builder

6 For the first filter operand, under Filter Expression Operands, in the {0}::drop-down list, click Field, and then, in the right drop-down list, click[CollectionMembership].[CollectionGuid].
For the second operand, under Filter Expression Operands, in the {1}::drop-down list, click Text, and then, to the text box on the right, paste thefollowing GUID:
f5758af1-eb77-436f-b63f-e75473cf3c09
7 In the left pane, click [Inv_Software_Execution] Join Filters.
8 In the right pane, in the drop-down list, click Equals.
When a dialog box opens, click OK.
9 For the first filter operand, under Filter Expression Operands, in the {0}:drop-down list, click Field, and then, in the right drop-down list, click[Inv_Software_Execution].[IsMetered].
41Metering application usage and creating custom reportsCreating a custom audit report for Adobe using Query Builder

10 For the second operand, under Filter Expression Operands, in the {1}:drop-down list, click Integer, and then, to the text box on the right, type 1.
11 Click Save changes.
In the next step, you choose the table fields that will appear in the report. You alsoaggregate data and choose the sort order.
The following list shows the fields that you must add to the report when you performthe next procedure.
Displays the software name, as shown in theWindows Add/Remove Programs window.
In the Alias box, type Name.
[Inv_AddRemoveProgram].[DisplayName]
Displays the software publisher, as shown intheWindowsAdd/RemoveProgramswindow.
In the Alias box, type Publisher.
[Inv_AddRemoveProgram].[Publisher]
Displays the count of computers (both serversand workstations) with this software installed.
In the Alias box, type Installed. In theAggregate drop-down list, click CountDistinct.
[Inv_AddRemoveProgram].[_ResourceGuid]
Displays the count of workstations with thissoftware installed.
In the Alias box, type IsMetered.
In theAggregate drop-down list, clickCountDistinct.
[Inv_Software_Execution].[IsMetered]
42Metering application usage and creating custom reportsCreating a custom audit report for Adobe using Query Builder

Displays the count of workstations on whichthe software has been run.
In the Alias box, type Used.
In theAggregate drop-down list, clickCountDistinct.
(Optional) In the Sort Direction drop-downlist, click Descending.
[Inv_Monthly_Summary].[_ResourceGuid]
To add fields to the report
1 Open the report that you want to edit, and then click the Fields tab.
2 On the Fields tab, on the toolbar, click theAdd symbol, and then add the fieldsthat are shown in the left column in the table on the Fields tab.
Note: You can add fields one by one. You can also check Select MultipleFields, and then add multiple fields from the drop-down list.
After you add the fields, you can configure them as shown in the table below.
3 On the Fields tab, remove all other fields except for[CollectionMembership].[CollectionGuid] that are not part of this list. Clicka row, and then, on the toolbar, click the Delete symbol.
4 Click Save changes.
Note: [CollectionMembership].[CollectionGuid] is a required hidden field in thisexample, and it cannot be removed.
You can add a parameter to the report that lets you filter the results by the softwarepublisher. First, you add a new parameter text box to the report, and then youconfigure the report query.
43Metering application usage and creating custom reportsCreating a custom audit report for Adobe using Query Builder

To add a parameter using Query Builder
1 Open the report you want to edit, and then click the Report Parameters tab.
2 On the Report Parameters tab, on the toolbar, click Add > New Parameter.
3 In the Editing Parameter dialog box, fill in the following text boxes:
Type Publisher.Name
Type Publisher.Descrpiption
Type %.Default Value
Type %Adobe%.Test Value
4 Under Value Provider, in the Name drop-down list, click Basic ParameterValue Edit Control, and then, in the Label Text box, type Publisher.
5 Click OK.
6 Click the Data Source tab, and then click the Query Parameters tab.
7 On the Query Parameters tab, on the toolbar, click Add > Publisher.
8 On the Filter Expressions tab, in the left pane, click[Inv_AddRemoveProgram] Join Filters.
9 In the right pane, in the drop-down list, click Like.
When a dialog box opens, click OK to confirm.
44Metering application usage and creating custom reportsCreating a custom audit report for Adobe using Query Builder
10 For the first filter operand, in the {0}: drop-down list, click Field and then, inthe right drop-down list, click [Publisher].
For the second operand, in the {1}: drop-down list, click Parameter, and then,in the right drop-down list, click Publisher.
11 Click Save changes.
See “Creating a drill-down computer report” on page 45.
Creating a drill-down computer reportYou can create a custom drill-down report and add it as a right-click menu actionto the audit report that you created.
The following is an example of how to create a drill-down report that shows the listof computers that have the software installed. You can create any other reportaccording to your needs.
To create a drill-down computer report
1 In the Symantec Management Platform, on the Reports menu, click AllReports.
2 In the left pane, underReports, expandDiscovery and Inventory > Inventory> Cross-platform > Software /Applications, right-click Software, and thenclick New > Report > Computer Report.
3 On the New Computer Report page, click the report name and type a newname.
For example, type Drilldown: Installed.
4 On the Query tab, under Base Query, click Computer, and then, in the leftpane, under Actions, click Create Joins.
45Metering application usage and creating custom reportsCreating a drill-down computer report

5 In the Joins dialog box, create a table join as follows:
■ In the Join drop-down list, click Inner.
■ In the middle drop-down list, click Inv_AddRemoveProgram.
■ In the bottom drop-down lists, click the following:On [Computer].[Guid] = _ResourceGuid.
■ Click OK.
6 On the Fields tab, on the toolbar, click theAdd symbol, and then add the fieldsthat are shown below.
Configure the fields as shown.
7 On the Report Parameters tab, on the toolbar, click Add > New Paramater,and then, in the Editing Parameter dialog box, configure the parameter asfollows:
■ In the Name box, type SWguid.
■ In the Description box, type Software Guid.
■ In the Type drop-down list, click Basic GUID Parameter.
■ Check Parameter Required.
46Metering application usage and creating custom reportsCreating a drill-down computer report

■ Under Value Provider, in the Name drop-down list, click Basic ParameterValue Edit Control.
■ In the Label Text box, type Software Resource Guid.
■ Click OK.
8 On the Data Source tab, click the Query Parameters tab, and then, on thetoolbar, click Add > Software Guid.
9 On the Filter Expressions tab, click Switch to Advanced Mode, and thenclick [Inv_AddRemoveProgram] Join Filters.
10 In the right pane, do the following:
■ In the top drop-down list, click Equals.When a dialog box opens, click OK.
47Metering application usage and creating custom reportsCreating a drill-down computer report

■ Under Filter Expression Operands, for the first filter operand, in the {0}:drop-down list, click Field and then, in the right drop-down list, click[swguid].
■ For the second filter operand, in the {1}: drop-down list, click Parameter,and then, in the right drop-down list, click SWguid.
11 Click Save Changes.
To create a right-click drill-down menu
1 Open the report that you created with Query Builder.
2 Add a new [Inv_AddRemoveProgram].[_SoftwareComponentGuid] field tothe report, and make it invisible.
3 On theDrilldowns tab, clickRemove to remove the defaultShowContextMenudrilldown.
4 Click Add.
5 In the Name box, type Show Installed.
6 In the Performs drop-down list, click Drilldown To Report.
7 Under Action Configuration, click No report selected, and then search forand select the drill-down report that you created.
8 Under Passing Parameter, click the Add symbol.
48Metering application usage and creating custom reportsCreating a drill-down computer report

9 In the Pass Drilldown Parameter dialog box, configure the fields as follows:
Click Data field, and then, in thedrop-down list below, click_SoftwareComponentGuid.
Pass from source
Type SWguid.
This string must match the input parametername of the drill-down report.
Name at destination
Click Basic GUID Parameter.Transform to type
10 Click OK.
11 Click Add.
12 Create a new drill-down as follows:
Type ContextMenu.Name
Click DefaultDataView.Available On
Click Right-click.Event
Click Show context menu.Performs
Skip and do not configure.Action Configuration
Skip and do not configure.Passing Parameters
13 Click Save changes.
The right-click action that you created is not available in the right-click menu bydefault. You must edit the source of the report manually, as follows:
To enable the custom right-click menu
1 In the left pane, right-click the Adobe audit (Query Builder) report, clickExport, and then save the file.
2 Open the saved XML file in a text editor.
3 In the XML file, under <viewingControl>, in the <link> element with thename="ContextMenu" attribute, locate the following string:
<action id="ContextMenu" />
49Metering application usage and creating custom reportsCreating a drill-down computer report

4 Replace this string with the following text:
<action id="ContextMenu">
<arguments>
<argument name="MenuFactories" list="true">
<value>LinkMenu</value>
</argument>
</arguments>
</action>
Also, add the visible="false" attribute to the link element.
5 Save and close the file.
6 In the Symantec Management Console, right-click the folder in which yourreport is located (in this example, Software), click Import, then and import thereport back into the CMDB.
The right-click menu is now available. Test the report. To go back to the parentreport, use the breadcrumb bar above of the right pane.
7 (Optional) To hide the drill-down report from the left pane, in the XML, replace<itemAttributes>Normal</itemAttributes> with<itemAttributes>Hidden</itemAttributes>.
Other methods of viewing software usage dataThe software usage data appears in reports and views after you collect full inventory,enable usage tracking or create application metering policies, and after the usageinformation is sent to Notification Server by the Application Metering plug-in.
50Metering application usage and creating custom reportsOther methods of viewing software usage data

To access the Software view, in the Symantec Management Console,on the Manage menu, click Software.
In the left pane, under Metered Software, click Usage Tracking. Thenview the usage data in the right pane.
This data can be displayed only for the software that is defined in theSoftware Catalog and is added to the list of managed software products.You must also enable tracking for the software that you want to appearin this view.
For more information about Software Catalog and managed software,see the Software Management Solution User Guide at the following URL:
http://www.symantec.com/docs/DOC8705
Software view
To view application metering reports, in the Symantec ManagementConsole, on the Reports menu, click All Reports, and then, in the leftpane, under Reports, expand Software > Application Metering.
The following reports and several others are available for file-levelapplication metering:
■ Executable Usage
For more information about application metering, see the InventorySolution User Guide at the following URL:
http://www.symantec.com/docs/DOC8636
The following reports are available for software product-level usagetracking:
■ Underutilized Software
For more information about tracking software usage, see the InventorySolution User Guide at the following URL:
http://www.symantec.com/docs/DOC8636
Applicationmetering reports
51Metering application usage and creating custom reportsOther methods of viewing software usage data

To view the installed software reports, in the Symantec ManagementConsole, on the Reports menu, click All Reports, and then, in the leftpane, under Reports, expand Discovery and Inventory > Inventory> Cross-platform > Software/Applications.
The following reports and several others are available:
■ Audit Software Search report■ Installed Software■ Disk Usage by File Extension
For more information about viewing inventory data in reports, see theInventory Solution User Guide at the following URL:
http://www.symantec.com/docs/DOC8636
Installed softwarereports
Resource Manager lets you view information and perform numeroustasks on a Configuration Management Database (CMDB) resource. ACMDB resource can be a computer, software, network device, and soon.
You can access Resource Manager if you double-click a resource in theSymantec Management Console.
For more information about viewing inventory data in Resource Manager,see the Inventory Solution User Guide at the following URL:
http://www.symantec.com/docs/DOC8636
ResourceManager
52Metering application usage and creating custom reportsOther methods of viewing software usage data

Managing software licensesin ITMS Management Views
This chapter includes the following topics:
■ Managing licensed software in ITMS Management Views
■ Manually creating the managed software products
■ Tracking usage of the managed software products
■ Tracking the software license compliance
■ Creating a task to uninstall software
■ Removing unused software from client computers
■ Creating a custom license usage report for multiple software products
■ Customizing a license report
Managing licensed software in ITMS ManagementViews
In IT Management Views 8.0, you can see detailed reports about software andlicense usage on your client computers. For example, you can see how manylicenses there are, if they are under- or overutilized and if any of them are usedwithout authorization. You can then uninstall the unused software products andreclaim licenses.
Software and license usage information is collected during Inventory scan of theclient computers on which software usage metering and tracking is enabled.
4Chapter

You use the features of Asset Management Suite to add and manage purchasedsoftware licenses. Asset Management Suite combines licensing data with softwareusage tracking data.
Before you can manage the licenses, you need to set up your environment andgather the information about software usage from your client computers.
Table 4-1 Process for managing licensed software in ITMS Management Views
DescriptionActionStep
The following components must be installed on the client computers:
■ Symantec Management Agent 8.0 (or a later version).■ Asset Management Suite 8.0 (or a later version).
If you install IT Management Suite 8.0, the Asset Management Suite isautomatically installed with it.
See “Preparingmanaged computers for evaluating Client Management Suite”on page 17.
Meet the prerequisites.Step 1
Software Management Solution lets you deliver and manage software.
See “Installing or upgrading the Software Management Solution plug-in”on page 26.
Install SoftwareManagement Solutionplug-in.
Step 2
Inventory Solution lets you gather inventory data on your client computers.To collect information about your software and licenses, you need to installApplication Metering plug-in.
Note that it can take up to one hour for Symantec Management Agent toreceive the installation policy and install the plug-ins.
See “Installing the Inventory and Application Metering plug-ins” on page 23.
The predefined Inventory policies are enabled by default and configured torun ASAP on every computer with the Inventory plug-in installed. You canconfigure the policy settings and schedule according to your needs.
See “Gathering inventory with predefined inventory policies” on page 31.
Install Inventory andApplication Meteringplug-in and gathersoftware inventory.
Step 3
54Managing software licenses in ITMS Management ViewsManaging licensed software in ITMS Management Views

Table 4-1 Process for managing licensed software in ITMS Management Views(continued)
DescriptionActionStep
To track the usage of a software product, do the following:
■ Associate at least one software component with the product.After that, the product becomes managed and its usage can be tracked.See “Manually creating the managed software products” on page 56.
■ Enable the software-based usage tracking option for the managedsoftware product.See “Tracking usage of the managed software products” on page 57.
Before you move on to the next step, you need to wait for 24 hours.
Note: The software usage tracking is only supported for Windows operatingsystems.
Manage your softwareproducts and enablesoftware usage tracking.
Step 4
You use the Asset Management Suite to add and configure software licenses.
For more information, see Asset Management Suite User Guide:
http://www.symantec.com/docs/DOC8696
To open the software license editor from ITMS Management Views, on theSoftware View page, in the Software Product Summary flipbook, click theLicense type. In the Software Product dialog box that opens, on theLicenses tab, click Add license.
Add licenses to thesoftware products.
Step 5
After you add and configure licenses, you can see the software usage andlicense utilization information on the color-coded charts on the Softwareview page.
View the licenseinformation report.
Step 7
Based on the information for the charts, you can, for example, removesoftware from client computers, create a custom report or customize anexisting license utilization report to get specific information.
In this example, the following scenarios are described:
■ Removing unused software from client computers.See “Removing unused software from client computers” on page 61.
■ Creating a custom license usage report for multiple software products.See “Creating a custom license usage report for multiple softwareproducts” on page 62.
■ Customizing the license report to gather additional information.See “Customizing a license report” on page 63.
Manage software,licenses and reports.
Step 8
55Managing software licenses in ITMS Management ViewsManaging licensed software in ITMS Management Views

Manually creating the managed software productsSoftware management is only available on Windows computers.
You can track usage of a software product only if the software product is managedin the Software Catalog. Inventory Solution provides the list of predefined softwareproducts. If discovered software component matches software product from thelist, the taskNS.Nightly schedule to associate Software component to softwareproduct automatically associates software component with the relevant predefinedsoftware product so you may manage it.
If the software component that you want to track does not match filtering rules ofany predefined software product, you can manually create a managed softwareproduct for this software component.
This task is a step in the process for tracking usage of the managed softwareproducts.
To manually create the managed software products
1 In theSymantecManagement Console, on theManagemenu, clickSoftware.
2 In the Software pane, under Software Filters, click Favorites > DiscoveredUnreviewed Software.
3 In the content pane, select the software component for which you want to createa software product.
4 In the right pane, click Create Software Product.
5 In the Software Product dialog box, view or edit the name, company, andversion of the software product.
6 (Optional) On the Identify inventory tab, perform the following actions:
■ To edit filtering inventory rules, enter new criteria in the Software name,Company, or Version filters.The filtering inventory rules define the software product and the softwarecomponents that can be associated to it. The filtering inventory rules aredynamic. Any software component that comes into your environment andmatches these rules is automatically associated to this software product.For example, you can change the Software name from Adobe Reader toAdobe, and the details in the Identify inventory tab change to displaysoftware components for all Adobe products.Note that when using the Company filter, you must first enter criteria in theSoftware name filter. Otherwise, the Company filter does not work.
■ To include the software components that are associated with other softwareproducts, check Include components associated with other products.
56Managing software licenses in ITMS Management ViewsManually creating the managed software products

The components that are associated with other software products arehighlighted yellow.
7 Click OK.
The next step is to track the usage of the managed software products.
See “Tracking usage of the managed software products” on page 57.
Tracking usage of the managed software productsSoftware usage tracking is only available on Windows computers.
Inventory Solution provides the software-based usage tracking option to help youtrack application usage and prepare for managing software licenses.
You enable the software-based usage tracking option for the managed softwareproducts and view gathered usage tracking data in the Symantec ManagementConsole Software views.
You can track usage of a managed software product only if at least one softwarecomponent in the software product has the association with one or more key programfiles. Otherwise, when you try to enable the software-based usage tracking optionby checking Turn on metering / usage tracking for this software product in theSoftware Product dialog box, you get the following error message:
"Associate at least one program to meter / track usage."
The key program files that are installed with an MSI-based installer get automaticallyassociated with the relevant software components.
For the following program files, you create associations manually when you enablethe software-based usage tracking option in the Software Product dialog box:
■ The program files that are installed with non-MSI-based installers.
■ The program files that are not determined as key program files and have nocomponent-to-file association.
■ The program files that do not match any key program files that are alreadyassociated with the software component of a metered software product.
When you associate key program files to software components of the softwareproduct, the best practice is to use a more granular approach to usage tracking.To use this method, each software component must be associated with the correctkey program file. The version of the associated key program file should correspondto the version of the relevant software component. As a result, you can view theusage of all components and versions of the metered software product.
57Managing software licenses in ITMS Management ViewsTracking usage of the managed software products

For example, in the software product Adobe Reader 9, you add the program fileAcroRd32.exewith the version 9.5.0.270 to the software componentAdobe Reader9.5.0 English with the version 9.5.0. You add the program file AcroRd32.exe withthe version 9.0.0.2008061200. to the software componentAdobe Reader 9 Englishwith the version 9.0.0.
This task is a step in the process for tracking usage of the managed softwareproducts.
Before you perform this step, ensure that the managed software product that youwant to track has the software components that are associated to it.
See “Manually creating the managed software products” on page 56.
To track usage of the managed software products
1 In theSymantecManagement Console, on theManagemenu, clickSoftware.
2 In the Software pane, in the Favorites folder, click Installed Products.
3 In the Installed Products pane, double-click the software product that youwant to track.
4 In the Software Product dialog box, click the Meter / track usage tab.
5 On the Meter / track usage tab, perform one or both of the following actions:
■ To add a key program file to the software component with no associationsto any program files, click Add Program next to the relevant softwarecomponent.
■ To add a new key program file to the software component that already hasassociations to program files, click any associated program file next to therelevant software component.
6 In the Add Program dialog box, under Available programs, type the nameof the program file that you want to track to filter the results.
7 In the Available programs list, select the program file that you want to track,click the arrow to move the selected program file to the Associated programslist, and then click OK.
8 On the Meter / track usage tab, in the Count software as used if run in thelast ... days box, type the number of days.
9 Check Turn on metering / usage tracking for this software product.
10 Click OK.
The next step is to wait for the client computers to report the specified softwareusage, and then view the data that is stored in the Configuration ManagementDatabase (CMDB).
58Managing software licenses in ITMS Management ViewsTracking usage of the managed software products

Tracking the software license complianceAfter you insert all necessary data and create the associations, you can track thesoftware license compliance in your environment.
Note:Software products are linked to one or more software resources. The purposeand benefit of a software product is not fully realized until Asset Management Suiteis installed. Installation of Asset Management Suite is a pre-requisite for creatinga licensed software product.
You can use the Software view or Resource Manager to check the software licensecompliance of a single software. In the Licensing ReportsWeb Part, on theSoftware Product Licensing Compliance tab, you can view the software licensecompliance report for all your software.
To see the most accurate data in Resource Manager and in the Software Licensingportal, the Software Product Licensing Recalculation Operation Taskmust run.By default, this task is scheduled to run during off-peak hours. You can access thetask on the Jobs / Tasks page, under Jobs and Tasks > System Jobs and Tasks> Service and Asset Management > Contract Management.
This task is a step in the process for managing your software license complianceusing the Software view.
You can also track the software license compliance by location using the SoftwareProduct Licensing Compliance By Location report. To view the report, ensurethat the installation location is associated with the software purchase and thecomputers. Ensure that you run the Software Product Licensing RecalculationOperation Task before generating the report to get the updated data.
To track your software license compliance in the Software view
1 In the Symantec Management Console, on theManagemenu, click Software.
2 In the navigation pane, under Licensed Software, click Licensed, and thenselect a software product in the list pane.
3 In the software details pane, you can view the information about software usageand software licenses.
For more information, click the page and then press F1.
Note that the software license compliance graphic does not includenon-inventoried, borrowed, or upgraded licenses. It only shows the count ofpurchased licenses as compared to the count of software product installsdetected in the environment.
59Managing software licenses in ITMS Management ViewsTracking the software license compliance

To track your software license compliance in Resource Manager
1 In the Symantec Management Console, on theHomemenu, click Service andAsset Management > Software Licensing.
2 In the left pane, click Software Product.
3 In the Software Product list, right-click the software product, and then clickResource Manager.
4 In Resource Manager, on the Summaries menu, click Software ProductLicensing Summary.
To track your software license compliance in the Software Licensing portal
1 In the Symantec Management Console, on theHomemenu, click Service andAsset Management > Software Licensing.
2 In the right pane, in the Licensing ReportsWeb Part, click the SoftwareProduct Licensing Compliance tab.
To track your software license compliance by location in the Software Licensingportal
1 In the SymantecManagement Console, on theReportsmenu, clickAll reports.
2 In the Reports pane on the left, click Service and Asset Management >Contract Management > Software Licensing > Software Product LicensingCompliance By Location to view the software license compliance by locationreport.
Alternatively, on the Home menu, click Service and Asset Management >Software Licensing. In the left pane, click Service and Asset ManagementReports > Contract Management > Software Licensing > Software ProductLicensing Compliance By Location.
Alternatively, on the Home menu, click Service and Asset Management >Manage Configuration Items. In the left pane, click Service and AssetManagement Reports > Contract Management > Software Licensing >Software Product Licensing Compliance By Location.
Creating a task to uninstall softwareTo uninstall software, you can create a custom Run Script task.
60Managing software licenses in ITMS Management ViewsCreating a task to uninstall software

To create a task to uninstall software
1 In the Symantec Management Console, on theManagemenu, click Jobs andTasks.
2 In the left pane, navigate to the folder in which you want to create a new task.
For example, click System Jobs and Tasks > Software.
3 Right-click Quick Delivery, and then click New > Task.
4 In the Create New Task dialog box, in the left pane, click Run Script.
5 In the right pane, type a new task name.
Under Script Details, type a script or a command line that uninstalls thesoftware product.
Configure other options according to your needs, and then click OK.
Removing unused software from client computersIn ITMSManagement Views, you can view the software usage and license utilizationreport. According to the report results, you can uninstall the unused softwareproducts from your client computers.
To remove unused software from client computers
1 In the Symantec Management platform, on theManagemenu, click Software.
2 In the left pane, under Software Filters, click a filter, and then, in the contentpane, click the software that you want to view the license report for.
3 On the right, in the Software Product Summary flipbook, under Details, youcan see the number ofUnused licenses (licenses belonging to unused softwareproducts that were discovered during software inventory).
4 Under License Usage, click Unused, or click the corresponding section in thepie chart. The Computers with software installed list below is updated toshow the client computers with this license state.
5 Under Computers with software installed, on the toolbar, click the Saveresults as filter symbol.
6 In the Save Filter as dialog box, type the name of the new filter, choose whereto save it, and then click OK.
7 Open the Computers view and, under Filters, navigate to the filter that youhave created.
Right-click the filter, and then click Create Target from Filter.
In the dialog box that opens, type the name for the new target and click OK.
61Managing software licenses in ITMS Management ViewsRemoving unused software from client computers

8 Under Targets, right-click the target that you have created, and then clickAssign to > Task.
9 In the Assign Target to Task dialog box, click the custom task for uninstallingthe software, and then click OK.
See “Creating a task to uninstall software” on page 60.
10 In the New Schedule dialog box, configure the schedule for the task, and thenclick Schedule.
Creating a custom license usage report for multiplesoftware products
In ITMS Management Views, you can create a custom license usage report basedon a software filter that includes multiple software items.
To create a custom license usage report for multiple software products
1 In the Symantec Management platform, on theManagemenu, click Software.
2 In the left pane, under Software Filters, click a filter, and then, in the contentpane, click a software filter.
Add filter criteria.
For example, in the Add Filter Criteria drop-down list, click Manufacturer,and then, in the text box, type Microsoft.
3 Click Update.
4 Click Save Filter as.
In the dialog box that opens, type a new name for the filter, choose where tosave the filter, and then click OK.
5 Open the filter that you have created and click the View filter results reportsymbol.
6 In the Filter Results Report dialog box, using Data Classes and Views,configure the report parameters according to your needs.
For example, under Data Classes, click License Calculation Results, andthen check the Active and Consumed boxes.
62Managing software licenses in ITMS Management ViewsCreating a custom license usage report for multiple software products

7 (Optional) To save the reports as a CSV file, click Export.
In the dialog box that opens, type the file name, choose where to save thereport, and then click Save.
8 Click Save as Report.
In the dialog box that opens, type the report name, choose where to save it,and then click OK.
This report is automatically updated according to the state of your software.
Customizing a license reportIn ITMS Management Views, you can customize a report to gather additionalinformation about the software and license usage. For example, you can create adynamic report that shows the unused licenses for a software product.
To customize a license report
1 In the Symantec Management Platform, on theManagemenu, click Software.
2 Under Software Filters, click a filter, and then, in the content pane, click asoftware product.
3 On the Software Product Summary flipbook page, under License Usage,click a license usage parameter.
For example, click Unused.
4 (Optional) To add or remove filter parameters, underComputers with softwareinstalled, click Filter by Usage, and then check the boxes to gather theinformation that you need.
5 On the toolbar, click the Save result as report symbol.
6 In the Save as Report dialog box, choose where to save the new report, typethe name of the report, and then click OK.
This report is automatically updated according to the state of your software.
63Managing software licenses in ITMS Management ViewsCustomizing a license report

Delivering a new version ofsoftware using SoftwareWorkspace Virtualization
This chapter includes the following topics:
■ Delivering a new version of software using Software Workspace Virtualization
■ About Workspace Virtualization
■ Installing the Workspace Virtualization Agent
■ Delivering Mozilla Firefox 11 software into a virtual layer
■ Creating a task that toggles layers
■ Delivering Firefox 12 and toggling the layers
■ Viewing delivery reports
Delivering a new version of software using SoftwareWorkspace Virtualization
Client Management Suite lets you remotely deliver software into virtual layers. Youcan achieve this by using the functionality that is provided by Software ManagementSolution and the Symantec Workspace Virtualization software.
Software Management Solution provides intelligent and bandwidth-sensitivedistribution and management of software from a central Web console. SoftwareManagement Solution lets you make sure that the correct software gets installed,remains installed, and runs without interference from other software.
5Chapter
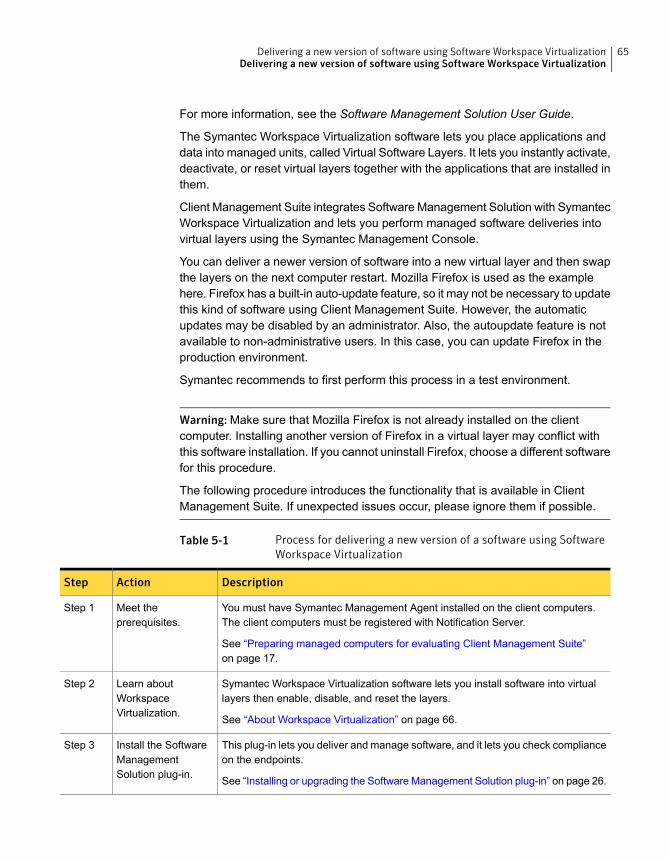
For more information, see the Software Management Solution User Guide.
The Symantec Workspace Virtualization software lets you place applications anddata into managed units, called Virtual Software Layers. It lets you instantly activate,deactivate, or reset virtual layers together with the applications that are installed inthem.
Client Management Suite integrates Software Management Solution with SymantecWorkspace Virtualization and lets you perform managed software deliveries intovirtual layers using the Symantec Management Console.
You can deliver a newer version of software into a new virtual layer and then swapthe layers on the next computer restart. Mozilla Firefox is used as the examplehere. Firefox has a built-in auto-update feature, so it may not be necessary to updatethis kind of software using Client Management Suite. However, the automaticupdates may be disabled by an administrator. Also, the autoupdate feature is notavailable to non-administrative users. In this case, you can update Firefox in theproduction environment.
Symantec recommends to first perform this process in a test environment.
Warning:Make sure that Mozilla Firefox is not already installed on the clientcomputer. Installing another version of Firefox in a virtual layer may conflict withthis software installation. If you cannot uninstall Firefox, choose a different softwarefor this procedure.
The following procedure introduces the functionality that is available in ClientManagement Suite. If unexpected issues occur, please ignore them if possible.
Table 5-1 Process for delivering a new version of a software using SoftwareWorkspace Virtualization
DescriptionActionStep
You must have Symantec Management Agent installed on the client computers.The client computers must be registered with Notification Server.
See “Preparing managed computers for evaluating Client Management Suite”on page 17.
Meet theprerequisites.
Step 1
Symantec Workspace Virtualization software lets you install software into virtuallayers then enable, disable, and reset the layers.
See “About Workspace Virtualization” on page 66.
Learn aboutWorkspaceVirtualization.
Step 2
This plug-in lets you deliver and manage software, and it lets you check complianceon the endpoints.
See “Installing or upgrading the Software Management Solution plug-in” on page 26.
Install the SoftwareManagementSolution plug-in.
Step 3
65Delivering a new version of software using Software Workspace VirtualizationDelivering a new version of software using Software Workspace Virtualization

Table 5-1 Process for delivering a new version of a software using SoftwareWorkspace Virtualization (continued)
DescriptionActionStep
This agent lets you create and manage virtual layers.
See “Installing the Workspace Virtualization Agent ” on page 67.
Install the SymantecWorkspaceVirtualization Agent.
Step 4
For example, deliver Mozilla Firefox 11 to your test computers. After that, youupgrade this software with a newer version.
See “Delivering Mozilla Firefox 11 software into a virtual layer” on page 68.
Deliver Firefox 11.Step 5
You can use the SVSCmd.exe command-line tool to manage virtual layers. Createa command script task that uses this tool to toggle virtual layers.
See “Creating a task that toggles layers” on page 71.
Create a task thattoggles the layers.
Step 6
Use managed delivery policy to deliver a newer version of Firefox into a new virtuallayer and then toggle the layers on next computer restart.
See “Delivering Firefox 12 and toggling the layers” on page 72.
Deliver Firefox 12and toggle the layers.
Step 7
Software Management Solution provides reports that let you view the managedsoftware delivery results.
See “Viewing delivery reports” on page 74.
View delivery reports.Step 8
About Workspace VirtualizationWorkspace Virtualization places applications and data into managed units, calledVirtual Software Layers. This lets you activate, deactivate, or reset applications.You can also completely avoid conflicts between applications without altering thebase Windows installation.
Symantec's application virtualization technologies integrate virtualized applicationsto preserve the user experience. Virtualized applications act like normal applications,ensuring normal behavior and full functionality.
Workspace Virtualization also lets you do the following:
■ Reset the damaged applications to a known state and instantly repair them.
■ Run two versions of the same program side by side.
■ Add and remove software with zero impact on the underlying operating system.
■ Turn applications on and off instantly.
Workspace Virtualization is based on Symantec's patented core technology,Symantec WorkspaceVirtualization (SWV) File System Filter driver. An application
66Delivering a new version of software using Software Workspace VirtualizationAbout Workspace Virtualization

or set of data is virtualized by using a capture process that creates a Virtual SoftwarePackage (VSP). A VSP contains all the files and registry settings of the applicationor data. It can be used on a client computer that has the Workspace VirtualizationAgent. After the VSP is activated through the Workspace Virtualization Agent, theapplication becomes visible along with its files, folders, and settings.
Installing the Workspace Virtualization AgentTo virtualize software on the endpoints, you install the Symantec WorkspaceVirtualization Agent. By default, only the command-line tool is installed. Symantecrecommends that you also install the Admin tool on the client computers. The Admintool lets you view andmanage layers using the GUI program, and verify the changesthat you make to the layers. You can install the Admin tool in the following ways:
■ In the Symantec Management Console, modify the command line in the InstallSWV agents managed delivery policy before you install the WorkspaceVirtualization Agent.
■ Install additional components using the Programs and Features dialog box onthe Control Panel on the client computer. For example, you can use this methodif the Workspace Virtualization Agent is already installed on a client computer.
■ Install the SWV agent manually, and choose to install Admin tool in the Wizard.For more information on this method, see theSymantecWorkspace VirtualizationUser Guide.
This task is a step in the process for installing software into a virtual layer.
See “Delivering a new version of software using SoftwareWorkspace Virtualization”on page 64.
To install the Workspace Virtualization Agent using the Symantec ManagementConsole
1 In the Symantec Management Console, on the Actions menu, clickAgents/Plug-ins > Rollout Agents/Plug-ins.
2 In the left pane, expand Software > Software Management > WorkspaceVirtualization, and then click Install SWV agents.
3 (Optional) In the right pane, configure the settings according to your needs.
For example, under Schedule, you can modify the compliance check scheduleso that the agent is deployed sooner; and under Applied to, you can changethe target so that the agent is deployed only to the computers in your testenvironment or a pilot group.
67Delivering a new version of software using Software Workspace VirtualizationInstalling the Workspace Virtualization Agent

4 Turn on the policy.
At the upper right of the page, click the colored circle, and then click On.
5 Click Save changes.
Note: If you are using Client Management Suite earlier than 7.6, you can use themanaged software delivery process to upgrade the Symantec WorkspaceVirtualization Agent.
For more information, refer to the following article:
http://www.symantec.com/docs/HOWTO107267
For Client Management Suite 7.6 or later, you can use the existing SoftwareManagement Solution agent upgrade policies.
Delivering Mozilla Firefox 11 software into a virtuallayer
The following is an example of how to deliver Mozilla Firefox 11 to the clientcomputers and install this software into a virtual layer. First, you create a newsoftware resource in the Software Catalog, and then you use Software ManagementSolution to create a managed delivery policy for this software resource. SoftwareManagement Solution is a component of Client Management Suite.
This is an optional step in the production environment if you already have thesoftware that you want to update installed on the endpoints.
Before performing this task, download the Mozilla Firefox 11 setup file (FirefoxSetup 11.0.exe) from the following URL:
ftp://ftp.mozilla.org/pub/firefox/releases/11.0/win32/en-US/
This task is a step in the process for installing software into a virtual layer.
See “Delivering a new version of software using SoftwareWorkspace Virtualization”on page 64.
To create a new software resource for Mozilla Firefox 11
1 In the Symantec Management Console, on theManagemenu, click SoftwareCatalog.
2 In the Software Catalog dialog box, on the toolbar, click Import.
68Delivering a new version of software using Software Workspace VirtualizationDelivering Mozilla Firefox 11 software into a virtual layer
3 In the Import Software: Specify Software dialog box, in the Software typedrop-down list, click Software release, and then use one of the four availablemethods to import the software.
For more information on the methods, click the dialog box and then press F1.
If more than one file is in the package source, make sure that you set theinstallation file. The installation file is highlighted with bold font. To do this, clickthe file, and then, on the toolbar, click Set installation file.
4 Click Next.
5 In the Import Software: Software Details dialog box, choose to create a newsoftware resource for Firefox 11.
6 Click OK.
7 In the dialog box that opens, on the Package tab, under Command lines,double-click Install.
8 In the Add or Edit Command Line dialog box, in the Command line box,replace
"Firefox_Setup_11.0.exe"
with
"Firefox_Setup_11.0.exe" -ms
The -ms switch lets you install Firefox so that the installation wizard will not bedisplayed on the client computer at the time of installation.
9 (Optional) In a production environment, configure a detection rule on theRulestab. The detection rule ensures that the managed delivery policy does not runon the computers where the software is already installed.
For example, create a smart Static File Expression detection rule that checksif the mozilla firefox\firefox.exe file version equals or is larger than 11.
10 Click OK.
11 Click OK.
12 Click Close.
To deliver Mozilla Firefox 11 into a virtual layer
1 In the Symantec Management Console, on theManagemenu, click Software.
2 Under Deliverable Software, click Software Releases.
3 In the middle pane, right-click Firefox 11, and then click Actions > ManagedSoftware Delivery.
69Delivering a new version of software using Software Workspace VirtualizationDelivering Mozilla Firefox 11 software into a virtual layer

4 In the Managed Software DeliveryWizard, on the Select software page,under Additional delivery options, check Install this policy's software intoa virtual layer.
5 In the Layer Name box, type firefox11.
6 Click Next.
7 On the Select destinations page, specify the computers to which you wantto deliver Firefox 11.
Symantec recommends that you first perform this task in a test environment.You can choose one of the existing targets or groups, or you can build a newresource target. For help, click the page on which you want to get moreinformation, and then press F1.
8 Click Next.
9 On the Schedule delivery page, under Choose when to check thecompliance, on the toolbar, click Add schedule > Scheduled time, and thenconfigure a schedule. For example, set a schedule 10 minutes ahead of currenttime.
Note that by default, Symantec Management Agent requests new configurationfrom Notification Server once every hour. If you set a schedule only 10 minutesahead of the current time, youmust then use the Symantec Management AgentGUI on the client computer to request configuration soon after you completethis wizard. You can also run the managed delivery policy manually from theSymantec Management Agent GUI.
10 Click Next, and then, on the Specify dependencies and updates page, clickDeliver software.
You can view and edit the managed delivery policy that you just created atManage > Policies > Software > Managed Software Delivery.
To verify that Firefox 11 is installed in a virtual layer
1 On the client computer to which you want to deliver the software, open theSymantec Management Agent GUI.
You can use the Start button to launch this program.
2 Ensure the Firefox 11 - Install managed delivery policy has arrived to theclient computert and has run successfully.
If necessary, update the configuration manually. You can run the manageddelivery policy manually from the Symantec Management Agent GUI.
3 (Optional) If installed, run the Symantec Workspace Virtualization admin toolusing Start > All Programs > Symantec > Workspace > Virtualization >Symantec Workspace Virtualization Admin.
70Delivering a new version of software using Software Workspace VirtualizationDelivering Mozilla Firefox 11 software into a virtual layer

4 Make sure that the firefox11 layer appears in the Symantec WorkspaceVirtualization admin tool.
If necessary, click View > Refresh to refresh the window.
5 (Optional) In the Symantec Workspace Virtualization admin window, clickfirefox11, and then click Layer > Activate on system startup.
Creating a task that toggles layersAfter you install a newer version of Firefox, you must disable the old layer andactivate the new one. To toggle layers at the next computer restart, you must changethe Activate on system startup option. To do this remotely from the SymantecManagement Console, create a new Run script task with the followingcommand-line script:
SET exitcode=0
cd "%programfiles%\Symantec\Workspace Virtualization"
:: Check if layer is already activated
SVSCmd.exe firefox12 P -v | findstr /R /c:"Active on start:.*No"
goto %errorlevel%
:0
echo not active
:: Deactivate new layer until next startup
SVSCmd.exe firefox12 D
:: Turn off autostart for old layer
SVSCmd.exe firefox11 AUTO -N
:: Turn on autostart for new layer
SVSCmd.exe firefox12 AUTO -Y
SET exitcode=%errorlevel%
:1
echo active
:: For testing purposes sleep 10 seconds before closing the command
window
ping 1.1.1.1 -n 1 -w 10000 > nul
:: Exit
71Delivering a new version of software using Software Workspace VirtualizationCreating a task that toggles layers

exit /b %exitcode%
This script uses the SVSCmd.exe command-line utility to modify settings. First, thisscript checks if the new layer exists and is already configured to activate on startup.The follow-up tasks in managed delivery policies always run, regardless of thecompliance check results. This check is required to make sure the script does notrun in case the managed delivery policy is executed again by mistake.
Then the script disables the autostart option for the firefox11 layer and enables itfor the new firefox12 layer. When the computer is restarted, the firefox12 layer isactivated.
For more information on the SVSCmd.exe command line parameters, see theSymantecWorkspace Virtualization User Guide or run the SVSCmd.exe utility fromthe command-line prompt.
Do not run the Run script task after you create it. Instead, run it as part of themanaged delivery policy in the next step of this tutorial.
This task is a step in the process for installing software into a virtual layer.
See “Delivering a new version of software using SoftwareWorkspace Virtualization”on page 64.
To create a task that toggles layers
1 In the Symantec Management Console, on theManagemenu, click Jobs andTasks.
2 In the left pane, right-click any folder, and then click New > Task.
For example, right-click System Jobs and Tasks.
3 In the Create New Task dialog box, in the left pane, click Run Script.
4 In the right pane, type a name for the task.
For example, type Toggle layers.
5 Under Script Details, in the Script type drop-down list, clickCommand Script,and then copy and paste the script sample from this topic into the text box.
6 Click OK.
Delivering Firefox 12 and toggling the layersYou can deliver Mozilla Firefox 12 to the client computers and install this softwareinto a new virtual layer. You create a new software resource in the Software Catalogfor Mozilla Firefox 12. Then, you use Software Management Solution to create amanaged delivery policy that delivers the software and then runs the Toggle layerstask that you created earlier.
72Delivering a new version of software using Software Workspace VirtualizationDelivering Firefox 12 and toggling the layers

Before performing this task, download the Mozilla Firefox 12 setup file (FirefoxSetup 12.0.exe) from the following URL:
ftp://ftp.mozilla.org/pub/firefox/releases/12.0/win32/en-US/
This task is a step in the process for installing software into a virtual layer.
See “Delivering a new version of software using SoftwareWorkspace Virtualization”on page 64.
To deliver Firefox 12 and toggle layers
1 Create a new software resource for Mozilla Firefox 12.
Use the instructions that are provided for Firefox 11, but type 12 instead of 11where appropriate.
See “Delivering Mozilla Firefox 11 software into a virtual layer” on page 68.
2 In the Symantec Management Console, on theManagemenu, click Software.
3 In the left pane, under Deliverable Software, click Software Releases.
4 In the middle pane, right-click Firefox 12, and then click Actions > ManagedSoftware Delivery.
5 In the Managed Software DeliveryWizard, on the Select software page,under Additional delivery options, check Install this policy's software intoa virtual layer.
6 In the Layer Name box, type firefox12, and then click Next.
7 On the Select destinations page, specify the computers to which you wantto deliver Firefox 12, and then click Next.
Symantec recommends that you first perform this task in a test environment.You can choose one of the existing targets or groups, or you can build a newresource target. For help, click the page on which you want to get moreinformation, and then press F1.
8 On the Schedule delivery page, specify when to check for compliance.
For example, click Add schedule > Scheduled time, and then specify aschedule. You can specify a schedule 10 minutes ahead of the current time.
Click Next.
Note that by default, Symantec Management Agent requests a newconfiguration from Notification Server once every hour. If you set a scheduleonly 10 minutes ahead of the current time, you must then use the SymantecManagement Agent GUI on the client computer to request configuration soonafter you complete this Wizard. You can also run the managed delivery policymanually.
73Delivering a new version of software using Software Workspace VirtualizationDelivering Firefox 12 and toggling the layers

9 On the Specify dependencies and updates page, configure the settingsaccording to your needs, and then click Deliver software.
10 In the Symantec Management Console, on the Manage menu, click Policies.
11 In the left pane, click Software > Managed Software Delivery > Firefox 12- Install.
12 On the Firefox 12 - Install page, on the Software tab, on the toolbar, clickAdd > Task.
13 In the Select Task dialog box, click the Toggle layers task that you createdearlier.
14 Click OK.
After the managed delivery policy runs, and you restart the client computer,you should see that firefox11 is disabled and firefox12 is enabled. Verify thatwhen you launch Firefox from the Startmenu, browser version 12 is launched.
Viewing delivery reportsYou can view themanaged delivery policies compliance and remediation informationin the Software Management Solution compliance reports.
This task is a step in the process for installing software into a virtual layer.
See “Delivering a new version of software using SoftwareWorkspace Virtualization”on page 64.
To view delivery reports
1 In the Symantec Management Console, on the Reports menu, click AllReports.
2 In the left pane, expand Software > Compliance.
3 Click a report.
74Delivering a new version of software using Software Workspace VirtualizationViewing delivery reports

Managing power schemesettings
This chapter includes the following topics:
■ About managing power scheme settings
■ Preparing target computers for power scheme management
■ Installing the Power Scheme Task Plug-in
■ Upgrading the Power Scheme Task Plug-in
■ Uninstalling the Power Scheme Task Plug-in
■ Collecting power scheme inventory data
■ Creating a Power Scheme Task
■ Editing and deploying power scheme settings
■ Viewing power scheme inventory data
About managing power scheme settingsPower scheme is a collection of settings that manage the power usage of thecomputer. The settings define after what period of inactivity to turn off the computerdisplay and hard drives to save power, put the computer to standby, in hibernation,or shut the computer down.
The Altiris Power Scheme Task component helps you discover and remotelyconfigure the power scheme settings of your Windows computers. The PowerScheme Task component is installed when you choose to install Client Management
6Chapter

Suite in the Symantec Installation Manager. It is not installed if you install individualsolutions.
The Power Scheme Task component includes a Power Scheme Inventory taskand a collection of predefined tasks with different power scheme settings. Accordingto your requirements, you can configure the settings of the predefined tasksaccording to your needs or create custom power scheme management tasks.
The Power Scheme Task that you run does not change the power schemes thatWindows or other applications install. It creates and activates the Altiris PowerScheme with the power scheme settings that you specify.
See “Preparing target computers for power scheme management” on page 77.
Table 6-1 Power Scheme Task features
DescriptionFeature
You can edit and deploy different predefined powerschemes.
See “Editing and deploying power scheme settings”on page 80.
The Power Scheme Task that you run does notchange the power schemes that Windows or otherapplications install. It creates the Altiris PowerScheme with the power scheme settings that youspecify.
Edit and deploy power schemes.
You can create custom power schememanagement tasks, and you can specify the powerscheme settings according to your requirements.
See “Creating a Power Scheme Task” on page 79.
Create power scheme managementtasks.
You can collect information about the powerscheme settings that are currently active on yourWindows computers.
See “Collecting power scheme inventory data”on page 79.
Inventory power schemes on clientcomputers.
You can use a predefined report to see the powerscheme settings that are currently active on yourWindows computers.
See “Viewing power scheme inventory data”on page 81.
View power schemes data.
76Managing power scheme settingsAbout managing power scheme settings

Preparing target computers for power schememanagement
To run the power schememanagement tasks, you must install or upgrade the PowerScheme Task Plug-in on the target computers.
See “Installing the Power Scheme Task Plug-in” on page 77.
See “Upgrading the Power Scheme Task Plug-in” on page 78.
The Power Scheme Task Plug-in works with Symantec Management Agent toperform the power scheme management tasks. The Power Scheme Task Plug-inlets you configure the power scheme settings on your managedWindows computers.The Power Scheme Task Plug-in also lets you collect information about the powerscheme settings that are currently in use on the managed computers.
See “About managing power scheme settings” on page 75.
Installing the Power Scheme Task Plug-inThe Power Scheme Task Plug-in lets you configure the power scheme settings onyour managed Windows computers. The agent installation process can take sometime to start, depending on the update intervals that you set for SymantecManagement Agent.
To install the Power Scheme Task Plug-in
1 In the Symantec Management Console, on the Actions menu, clickAgents/Plug-ins > Rollout Agents/Plug-ins.
2 In the left pane, under Agents/Plug-ins, click Power Scheme > PowerScheme Task Plug-in Install.
3 In the right pane, configure the installation policy according to your needs.
For more information about policy configuration options, click the page andthen press F1.
4 Turn on the policy.
At the upper right of the page, click the colored circle, and then click On.
5 Click Save changes.
See “About managing power scheme settings” on page 75.
77Managing power scheme settingsPreparing target computers for power scheme management

Upgrading the Power Scheme Task Plug-inIf you upgrade from a previous version of the Client Management Suite, you mustalso upgrade the Power Scheme Task Plug-in to the latest version. To upgrade thePower Scheme Task Plug-in, you must turn on the upgrade policy.
To upgrade the Power Scheme Task Plug-in
1 In the Symantec Management Console, on the Actions menu, clickAgents/Plug-ins > Rollout Agents/Plug-ins.
2 In the left pane, under Agents/Plug-ins, click Power Scheme > PowerScheme Task Plug-in Upgrade.
3 In the right pane, configure the upgrade policy according to your needs.
For more information about policy configuration options, click the page andthen press F1.
4 Turn on the policy.
At the upper right of the page, click the colored circle, and then click On.
5 Click Save changes.
See “About managing power scheme settings” on page 75.
Uninstalling the Power Scheme Task Plug-inIf you do not perform the power scheme management tasks on your computersover an extended period of time, you can uninstall the Power Scheme to lessenthe unnecessary network traffic. To uninstall the Power Scheme Task Plug-in, youmust turn on the uninstall policy.
Note: Before you uninstall the Power Scheme Task Plug-in, make sure that youturn off the Power Scheme Task Plug-in Install policy.
See “Installing the Power Scheme Task Plug-in” on page 77.
To uninstall the Power Scheme Task Plug-in
1 In the Symantec Management Console, on the Actions menu, clickAgents/Plug-ins > Rollout Agents/Plug-ins.
2 In the left pane, under Agents/Plug-ins, click Power Scheme > PowerScheme Task Plug-in Uninstall.
78Managing power scheme settingsUpgrading the Power Scheme Task Plug-in
3 In the right pane, configure the uninstall policy according to your needs.
For more information about policy configuration options, click the page andthen press F1.
4 Turn on the policy.
At the upper right of the page, click the colored circle, and then click On.
5 Click Save changes.
See “About managing power scheme settings” on page 75.
Collecting power scheme inventory dataThePower Scheme Inventory task lets you collect power scheme settings inventoryfrom managed computers.
To perform this task, you must install the Power Scheme Task Plug-in on the targetcomputers.
See “Preparing target computers for power scheme management” on page 77.
After you run the inventory task, you can view the collected power scheme settingsdata in a predefined report.
See “Viewing power scheme inventory data” on page 81.
To collect power scheme inventory data
1 In the Symantec Management Console, on theManagemenu, click Jobs andTasks.
2 In the left pane, under Jobs and Tasks, click System Jobs and Tasks >Power Scheme Tasks > Power Scheme Inventory.
3 On the Power Scheme Inventory page, configure the task according to yourneeds.
See “About managing power scheme settings” on page 75.
Creating a Power Scheme TaskYou can create custom power scheme management tasks and specify the powerscheme settings according to your requirements.
For more information, see the topic about creating a task in the IT ManagementSuite Administration Guide.
79Managing power scheme settingsCollecting power scheme inventory data

To create a Power Scheme Task
1 In the Symantec Management Console, on theManagemenu, click Jobs andTasks.
2 In the left pane, under Jobs and Tasks, click System Jobs and Tasks,right-click Power Scheme Tasks, and then click New > Task.
3 In the Create New Task dialog box, in the left pane, click Power SchemeSettings Task.
4 In the right pane, configure the task according to your needs.
5 Click Ok.
See “About managing power scheme settings” on page 75.
Editing and deploying power scheme settingsPower Scheme Tasks let you create and activate different power scheme settingson your managed Windows computers.
To perform the power scheme management tasks, you must install the PowerScheme Task Plug-in on target computers.
See “Preparing target computers for power scheme management” on page 77.
Note that only one power scheme can be active on a computer at a time. Whenyou run more than one Power Scheme Task on a target computer, the task thatruns last sets the active power scheme. For example, you may run the Always OnPower Scheme task on all your computers. Later, you can run the Portable/LaptopPower Scheme task on your notebook computers.
Note: The power scheme that the specified Power Scheme Task creates andactivates, is always named Altiris Power Scheme on the target computers. Forexample, when you runAlways On Power Scheme task, the created and activatedpower scheme is named Altiris Power Scheme on the target computers.
To edit and deploy power scheme settings
1 In the Symantec Management Console, on theManagemenu, click Jobs andTasks.
2 In the left pane, under Jobs and Tasks, click System Jobs and Tasks >Power Scheme Tasks.
80Managing power scheme settingsEditing and deploying power scheme settings

3 In the right pane, click a Power Scheme Task that you want to run and configurethe task settings according to your needs.
4 Click Save changes.
See “About managing power scheme settings” on page 75.
Viewing power scheme inventory dataYou can use a predefined report to view the power scheme inventory data. Thereport lets you see the power scheme settings that are active on the clientcomputers.
To collect the power scheme inventory data, you must run the Power SchemeInventory task on target computers.
See “Collecting power scheme inventory data” on page 79.
To view power scheme inventory data
1 In the Symantec Management Console, on the Reports menu, click AllReports.
2 In the left pane, under Reports, click Power Scheme > Power SchemeSettings.
See “About managing power scheme settings” on page 75.
81Managing power scheme settingsViewing power scheme inventory data

Symantec Remote AccessConnector
This chapter includes the following topics:
■ About Symantec Remote Access Connector
■ Symantec Remote Access Connector configuration file
■ Creating the Remote Access Connector configuration file template
■ Importing the Remote Access Connector configuration file
■ Enabling right-click menu to use the Remote Access Connector options
About Symantec Remote Access ConnectorThe Remote Access Connector tool has the following highlights:
■ You do not require a license to use the Remote Access Connector tool. However,you do require a license for the third-party remote connection tool that you wantto integrate with IT Management Suite.
■ You can integrate more than one remote connection tool. The multiple tools canbe accessed from the right-click option in Symantec Management Console.See “Enabling right-click menu to use the Remote Access Connector options”on page 86.
■ You can install Remote Access Connector individually or as a part of ClientManagement Suite.
For the first-time userAs a first-time user, you must perform the following actions to use the RemoteAccess Connector:
7Chapter

Table 7-1 Options for the first-time Remote Access Connector user
TopicsActions
1 See “Symantec Remote Access Connectorconfiguration file” on page 83.
2 See “Creating the Remote Access Connectorconfiguration file template” on page 84.
Create a configuration file based on the suggestedtemplate or modify the default file as per yourrequirements.
1 See “Importing the Remote Access Connectorconfiguration file” on page 85.
2 See “Enabling right-click menu to use the RemoteAccess Connector options” on page 86.
Import the updated configuration file to enable theright-click menu options in the Symantec ManagementConsole.
See “Symantec Remote Access Connector configuration file” on page 83.
See “Creating the Remote Access Connector configuration file template” on page 84.
See “Importing the Remote Access Connector configuration file” on page 85.
See “Enabling right-click menu to use the Remote Access Connector options”on page 86.
Symantec Remote Access Connector configurationfile
The Symantec Remote Access Connector configuration file lets you add or modifythe configuration details to enable the use of a third-party remote connection tool.
Table 7-2 The following table lists the tags used in the configuration file
DescriptionAttributes
You can provide a short name of the remote tool. The short name is seen in theright-click menu option when you try to access the remote tool from the SymantecManagement Console.
Warning: If this attribute is not present or the value is empty, the system will not importthe configuration file and display an error.
remoteTool Name
83Symantec Remote Access ConnectorSymantec Remote Access Connector configuration file
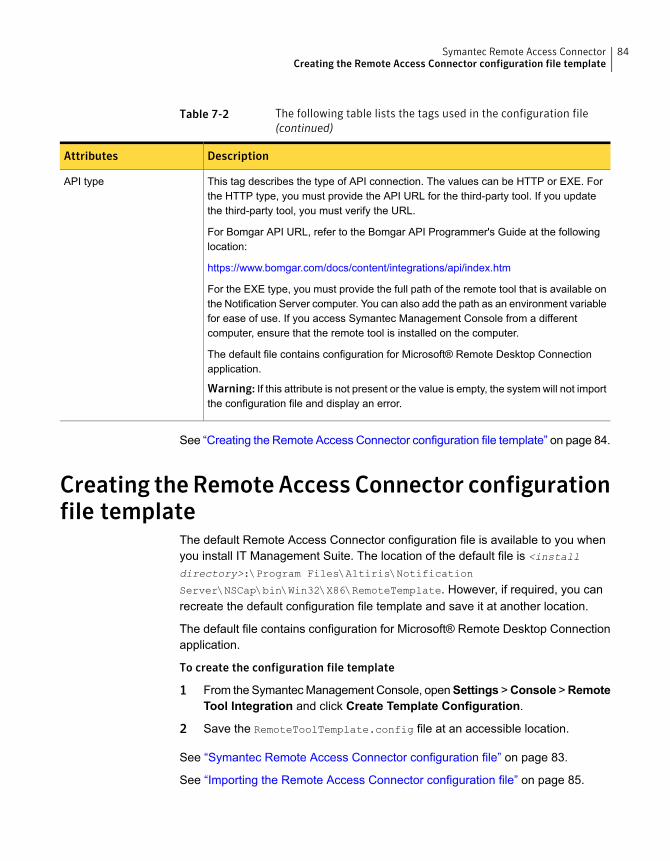
Table 7-2 The following table lists the tags used in the configuration file(continued)
DescriptionAttributes
This tag describes the type of API connection. The values can be HTTP or EXE. Forthe HTTP type, you must provide the API URL for the third-party tool. If you updatethe third-party tool, you must verify the URL.
For Bomgar API URL, refer to the Bomgar API Programmer's Guide at the followinglocation:
https://www.bomgar.com/docs/content/integrations/api/index.htm
For the EXE type, you must provide the full path of the remote tool that is available onthe Notification Server computer. You can also add the path as an environment variablefor ease of use. If you access Symantec Management Console from a differentcomputer, ensure that the remote tool is installed on the computer.
The default file contains configuration for Microsoft® Remote Desktop Connectionapplication.
Warning: If this attribute is not present or the value is empty, the system will not importthe configuration file and display an error.
API type
See “Creating the Remote Access Connector configuration file template” on page 84.
Creating the Remote Access Connector configurationfile template
The default Remote Access Connector configuration file is available to you whenyou install IT Management Suite. The location of the default file is <installdirectory>:\Program Files\Altiris\Notification
Server\NSCap\bin\Win32\X86\RemoteTemplate. However, if required, you canrecreate the default configuration file template and save it at another location.
The default file contains configuration for Microsoft® Remote Desktop Connectionapplication.
To create the configuration file template
1 From the SymantecManagement Console, openSettings >Console >RemoteTool Integration and click Create Template Configuration.
2 Save the RemoteToolTemplate.config file at an accessible location.
See “Symantec Remote Access Connector configuration file” on page 83.
See “Importing the Remote Access Connector configuration file” on page 85.
84Symantec Remote Access ConnectorCreating the Remote Access Connector configuration file template

Importing theRemoteAccessConnector configurationfile
You can customize the default configuration file template if required and import themodified file to access the third-party remote connection tool.
To import the remote access connector configuration file
1 From the SymantecManagement Console, openSettings >Console >RemoteTool Integration and click Import Configuration.
2 In the Import configuration of remote tool dialog box, click Choose File,select and open the modified .config file, and then click Import.
Warning: If the configuration file size exceeds 4 MB, then the applicationdisplays an error.
XML validation checks while importing the fileSymantec Remote Access Connector does the following validation checks whileimporting the configuration file:
■ The <remoteTools> and <remoteTool> nodes are present.
■ The <remoteTool> attribute Name is present and the value is not empty.
■ The <API> node is present.
■ The <API> attribute <type> is present and the value is either HTTP or EXE.
■ If the <API> attribute <type> is HTTP, then the child node <URL> is present andthe value is not empty.
■ If the <API> attribute <type> is EXE, then the child node <exeFullPath> ispresent and the value is not empty.
■ If the <API> attribute <type> is EXE, then the second child node is<parameteres>.
See “About Symantec Remote Access Connector” on page 82.
See “Symantec Remote Access Connector configuration file” on page 83.
See “Enabling right-click menu to use the Remote Access Connector options”on page 86.
85Symantec Remote Access ConnectorImporting the Remote Access Connector configuration file

Enabling right-click menu to use the Remote AccessConnector options
When you install IT Management Suite and Symantec Remote Access Connector,you must import the configuration file to enable the right-click menu in the SymantecManagement Console for remote access.
To use a remote connection tool from Symantec Management Console
1 Click Manage > Computers.
2 To launch a remote session with a computer, right-click the computer andselect Remote Access and then the tool of your choice. For example, selectMS RDP or Bomgar.
3 For using Microsoft Remote Desktop, save the file on Notification Server tostart using the remote connection tool.
This .bat file contains the information that Notification Server requires to accessthe third-party remote tool.
For other third-party remote connection tools, you can directly start theapplication.
See “Importing the Remote Access Connector configuration file” on page 85.
86Symantec Remote Access ConnectorEnabling right-click menu to use the Remote Access Connector options

AApplication Metering Plug-in
installing 23upgrading 25
CClient Management Suite
about 10components 11Release Notes 11User Guides 11
computerprerequisites for installing SymantecManagementAgent 19
pushing Symantec Management Agent 20selecting for Symantec Management Agentinstallation 20
configuringSymantec Management Agent 22
context-sensitive help 14CSV file
importing computers 20
Ddocumentation 14
Hhelp
context-sensitive 14
Iinstalling
Software management solution plug-in 26Inventory Plug-in
installing 23upgrading 25
inventory policiespredefined 31
Mmanaged software
metering and usage tracking 57managed software installed with a non-MSI-basedinstallermetering and usage tracking 57
managed software productscreating manually 56
meteringmanaged software products 57
Ppower scheme management
preparing managed computers 77power scheme settings
deploying 80editing 80inventory 79inventory data 81report 81
Power Scheme Taskabout 75creating 79features 75Power Scheme Task Plug-in 77settings 80
Power Scheme Task Plug-ininstalling 77uninstalling 78upgrading 78
predefined inventory policiescloning 31using 31
prerequisitesSymantec Management Agent installation 19
RRelease Notes 14
Index

Ssoftware components to software products
associating 56software license compliance
tracking 59software licenses
tracking 59Software management solution plug-in
installing 26upgrading 26
Symantec Management Agentconfiguration request interval 22configuring 22importing computers from CSV file 20installation requirements 19installing on selected Windows computers 20prerequisites 19pushing to Windows computers 20selecting computers for installation 20
Symantec Management Agent for Windowsimporting computers from CSV file 20selecting computers for installation 20
Symantec Management Agent manual installationselecting computers 20
Ttracking usage
of managed software products 57of managed software products installed with anon-MSI-based installer 57
Uupgrading
Software management solution plug-in 26usage tracking
component and version level 57software-based 57
88Index