Oracle® Communications ASAP - System Administrator's Guide
140
Oracle® Communications ASAP System Administrator's Guide Release 7.4 F40775-01 April 2022
-
Upload
khangminh22 -
Category
Documents
-
view
1 -
download
0
Transcript of Oracle® Communications ASAP - System Administrator's Guide
Oracle® Communications ASAPSystem Administrator's Guide
Release 7.4F40775-01April 2022
Oracle Communications ASAP System Administrator's Guide, Release 7.4
F40775-01
Copyright © 2012, 2022, Oracle and/or its affiliates.
This software and related documentation are provided under a license agreement containing restrictions onuse and disclosure and are protected by intellectual property laws. Except as expressly permitted in yourlicense agreement or allowed by law, you may not use, copy, reproduce, translate, broadcast, modify, license,transmit, distribute, exhibit, perform, publish, or display any part, in any form, or by any means. Reverseengineering, disassembly, or decompilation of this software, unless required by law for interoperability, isprohibited.
The information contained herein is subject to change without notice and is not warranted to be error-free. Ifyou find any errors, please report them to us in writing.
If this is software or related documentation that is delivered to the U.S. Government or anyone licensing it onbehalf of the U.S. Government, then the following notice is applicable:
U.S. GOVERNMENT END USERS: Oracle programs (including any operating system, integrated software,any programs embedded, installed or activated on delivered hardware, and modifications of such programs)and Oracle computer documentation or other Oracle data delivered to or accessed by U.S. Government endusers are "commercial computer software" or "commercial computer software documentation" pursuant to theapplicable Federal Acquisition Regulation and agency-specific supplemental regulations. As such, the use,reproduction, duplication, release, display, disclosure, modification, preparation of derivative works, and/oradaptation of i) Oracle programs (including any operating system, integrated software, any programsembedded, installed or activated on delivered hardware, and modifications of such programs), ii) Oraclecomputer documentation and/or iii) other Oracle data, is subject to the rights and limitations specified in thelicense contained in the applicable contract. The terms governing the U.S. Government’s use of Oracle cloudservices are defined by the applicable contract for such services. No other rights are granted to the U.S.Government.
This software or hardware is developed for general use in a variety of information management applications.It is not developed or intended for use in any inherently dangerous applications, including applications thatmay create a risk of personal injury. If you use this software or hardware in dangerous applications, then youshall be responsible to take all appropriate fail-safe, backup, redundancy, and other measures to ensure itssafe use. Oracle Corporation and its affiliates disclaim any liability for any damages caused by use of thissoftware or hardware in dangerous applications.
Oracle, Java, and MySQL are registered trademarks of Oracle and/or its affiliates. Other names may betrademarks of their respective owners.
Intel and Intel Inside are trademarks or registered trademarks of Intel Corporation. All SPARC trademarks areused under license and are trademarks or registered trademarks of SPARC International, Inc. AMD, Epyc,and the AMD logo are trademarks or registered trademarks of Advanced Micro Devices. UNIX is a registeredtrademark of The Open Group.
This software or hardware and documentation may provide access to or information about content, products,and services from third parties. Oracle Corporation and its affiliates are not responsible for and expresslydisclaim all warranties of any kind with respect to third-party content, products, and services unless otherwiseset forth in an applicable agreement between you and Oracle. Oracle Corporation and its affiliates will not beresponsible for any loss, costs, or damages incurred due to your access to or use of third-party content,products, or services, except as set forth in an applicable agreement between you and Oracle.

Contents
Preface
Audience ix
Documentation Accessibility ix
Diversity and Inclusion ix
1 Starting and Stopping ASAP
Starting ASAP 1-1
Starting All ASAP Servers 1-2
Starting the Control Server 1-4
Starting the ASAP Daemon 1-4
Starting ASAP Daemon Using a Start Command 1-5
Starting ASAP Daemon Using a Wrapping Script 1-5
Confirming that ASAP Started Successfully 1-6
Stopping ASAP 1-6
2 Setting Up and Managing ASAP Security
Overview of Setting Up ASAP Security Features 2-1
Configuring WebLogic Server Security 2-1
About ASAP WebLogic Users, Groups, Roles, and Methods 2-1
Understanding OCA Client Group Permissions 2-3
Configuring Virtual Network Operator Authorization for OCA Users 2-5
Configuring Authentication Providers for ASAP 2-6
Configuring an External Lightweight Directory Access Protocol Server 2-6
Configuring a Primary Authentication Provider in WebLogic Server 2-7
Managing WebLogic Server ASAP User Security 2-8
Configuring the WebLogic Server Change Password Utility Page 2-9
Setting WebLogic Server ASAP Password Policies 2-10
Changing WebLogic Server ASAP User Passwords 2-12
Disabling the Change Password Feature in the OCA Client 2-13
Managing Locked-out User Accounts 2-14
Updating Methods Role Assigned to a Group or User in WebLogic Server 2-15
iii
Configuring ASAP Server and Database Credential Security 2-16
About Credential Store Factory Wallet Secure Data Management 2-16
Setting up and Maintaining Secure Data Storage 2-16
Data Encryption 2-16
Using the Credential Store Factory Wallet with ASAP Utilities and Scripts 2-17
Changing Database Passwords in the Credential Store Factory Wallet 2-18
Configuring Security for Network Elements Communication 2-18
Understanding the Custom Secure Data Structure 2-18
Managing Custom Secure Data 2-19
Setting up and Maintaining Secure Data Storage 2-20
Encrypting Data During Network Element Provisioning 2-20
Understanding Key Distribution for Custom Secure Data 2-21
Caching Secure Data on Local Servers 2-21
Securing Network Element Credentials with the Security Administration Tool 2-21
Additional Security Considerations 2-23
Setting Secure Diagnostic Levels 2-23
Setting the Network Element Dialog Diagnostic Configuration Parameter 2-24
Setting Work Order Information Diagnostic Levels 2-24
Securing Java or State Table NEP or JNEP to NE Connection Implementations 2-25
Setting SRP or JSRP to SARM Security Properties 2-25
Setting Security Between Servers 2-26
Enabling Schema Validation for the JSRP JMS Interface 2-26
3 Monitoring and Managing ASAP
Overview of Monitoring and Managing ASAP 3-1
Configuring System Events and Alarms Using Stored Procedures 3-2
Configuring Alarm Centers for Alarm Notification and Escalation 3-3
Configuring System Alarms 3-3
Configuring System Events 3-5
Defining System Events 3-6
Setting Database Thresholds 3-6
Sample Alarm Program - admin.sh 3-6
Sample Alarm Output 3-8
Sample Alarm Program - POTS Cartridge Sample Code 3-8
Understanding Default System Events 3-9
API System Events 3-9
SARM System Events 3-10
Control Server Events 3-10
NEP System Events 3-11
Configuring and Reading Log and Diagnostic Files 3-12
iv
About Log Files 3-13
About Diagnostic Files 3-14
Using ASAP Diagnostic Tools 3-14
Configuring and Reading WebLogic Server Log and Diagnostic Files 3-14
Defining Severity Levels 3-15
Configuring the Severity Levels 3-16
Configuring the log4j.xml File 3-16
Using the log4jAdmin Web Page 3-18
Checking the Current Logging Levels 3-18
Enabling Stored Procedure Error Messages 3-19
Managing ASAP Metrics 3-20
Configuring Prometheus for ASAP Metrics 3-20
Viewing ASAP Metrics Without Using Prometheus 3-21
Viewing ASAP Metrics in Grafana 3-21
Exposed ASAP Metrics 3-21
4 Improving ASAP Performance
About Improving ASAP Performance 4-1
Tuning ASAP Performance with Pre-tuned ASAP Configuration Files 4-1
About Pre-tuned ASAP Configurations 4-1
Installing a Pre-tuned Configuration 4-1
Using a Pre-tuned Configuration with a New ASAP Installation 4-2
Generating Pre-tuned Configuration Files 4-2
Merging Pre-tuned File Settings into an Existing Installation 4-2
Example Pre-tuned Configuration Performance 4-2
Troubleshooting and Monitoring ASAP Performance 4-4
Understanding Sysmon Output Files 4-4
Troubleshooting the Connection Pool 4-4
Troubleshooting the Message Queue 4-6
Manually Tuning ASAP Performance 4-7
Tuning Guidelines 4-7
Setting System Limits 4-8
Determining the Size of Your System 4-9
Tuning Message Queue Guidelines 4-9
Tuning ASAP Server Message Queues 4-10
Tuning JSRP and SRP Message Queues 4-11
Tips for Tuning the SRP 4-12
Tuning SARM Message Queues 4-13
Tips for Tuning the SARM 4-17
Tuning NEP Message Queues 4-17
v
Tips for Tuning NEP 4-20
Other Performance Issues 4-20
Local Versus NFS-mounted File Systems for Diagnostic Files 4-20
Server Diagnostic Levels 4-20
Diagnostic Messages Output 4-21
Query Optimization 4-21
5 Backing Up and Restoring ASAP Files and Data
About Backing Up and Restoring Files and Data 5-1
ASAP System Backup and Restore 5-1
Database Backup and Recovery 5-1
Database Backup Strategy 5-2
Database Backup in a Distributed Environment 5-2
ASAP WebLogic Server Domain Back Up 5-2
6 Setting Up ASAP for High Availability
Overview of Setting Up ASAP for High Availability 6-1
About Order Balancer 6-2
Connecting Order Balancer with Multiple ASAP Instances to a Remote Application 6-3
Planning Your Installation 6-4
Installing Order Balancer 6-5
About Order Balancer Queues 6-9
About Member Instance States 6-10
Managing Member Instances 6-10
Importing ASAP Order Data into Order Balancer 6-13
Purging Order Balancer Data 6-15
Managing Order Balancer Logs 6-15
Changing Logger Levels 6-15
Accessing and Updating Order Balancer using REST APIs 6-15
Modifying Properties 6-18
Uninstalling Order Balancer 6-18
Updating and Redeploying Order Balancer 6-19
Troubleshooting 6-20
7 Managing the Database and File System
Overview of Managing the Database and File System 7-1
Configuring Kernel and Database Initialization Parameters 7-1
About Monitoring Database Segment and File System Size 7-2
Configuring File System Thresholds 7-3
vi
Configuring Database Thresholds 7-4
Database Management and Tuning Recommendations 7-5
Statspack 7-6
Enabling Automated ASAP Database Administration Options 7-6
Purging the Database and File System 7-6
Purging the Database 7-7
Sample Database Purge Script 7-8
Sample Cron Script for Clearing Alarms, Events, and Process Information 7-10
Purging Test Systems 7-12
Purging the SARM Database 7-13
Usage 7-13
Configuration Parameters 7-13
Logging and Diagnostics 7-15
Scheduling Purge Jobs 7-15
Purge Conflict Resolution 7-15
Customization 7-15
Using the Purge Application 7-15
8 Troubleshooting ASAP
Overview of Troubleshooting ASAP 8-1
Troubleshooting Checklist 8-1
Using Error Logs to Troubleshoot ASAP 8-2
Understanding Error-Message Syntax 8-2
Collecting Diagnostic Information 8-2
Common ASAP Problems and Solutions 8-2
Problem: ASAP Servers Do Not Start - Database Tablespaces Used Up 8-3
Problem: ASAP Servers Do Not Start - Interfaces File Empty or Missing 8-3
Problem: ASAP Servers Do Not Start - No Information In Interfaces File 8-3
Problem: ASAP Servers Do Not Start - Wrong ASAP User Owner and Permissions 8-4
Problem: ASAP Servers Processes Do Not Start - Database Server Processes Used 8-4
Problem: ASAP Servers Processes Do Not Start - Database Server Sessions Used 8-4
Problem: ASAP Servers Do Not Start - Insufficient Server User Connections Defined 8-4
Problem: ASAP Servers Do Not Start - Insufficient Number of Threads 8-5
Problem: Control Server Crashes - No Free Messages 8-5
Problem: JNEP Server Does Not Start - Wrong Database Connection Information 8-6
Problem: JNEP Server Does Not Start - Invalid Server Port Numbers 8-6
Problem: NEP Server Does Not Start - Problem with JNEP Java Process Start Script 8-6
Problem: WebLogic Server Fails to Detect Passive RAC Database During Failover 8-7
Component Failure Scenarios 8-7
WebLogic Administration and Managed Server Failure and Recovery Scenarios 8-7
vii
SRP Failure Scenario 8-7
SARM Failure Scenario 8-8
NEP Failure Scenario 8-8
Control Server Failure Scenario 8-8
Database Failure Scenario 8-8
NE Unavailability Scenario 8-8
SRP and SARM Failure Scenario 8-9
SARM and NEP Failure Scenario 8-9
Getting Help with ASAP Problems 8-9
Before You Contact Global Support 8-9
Reporting Problems 8-9
A ASAP Directory Structure
ASAP Directory Structure and Contents A-1
B Sticky and Non-Sticky Requests Supported by Order Balancer
viii
Preface
This document describes how to start and stop Oracle Communications ASAP, configuresecurity for ASAP, and manage and monitor ASAP. It also includes information aboutimproving ASAP performance, managing the database and file system, backing up andrestoring ASAP, and troubleshooting ASAP.
AudienceThis document is intended for system administrators, system integrators, and otherindividuals who need to maintain and work with ASAP.
Documentation AccessibilityFor information about Oracle's commitment to accessibility, visit the Oracle AccessibilityProgram website at http://www.oracle.com/pls/topic/lookup?ctx=acc&id=docacc.
Access to Oracle Support
Oracle customers that have purchased support have access to electronic support through MyOracle Support. For information, visit http://www.oracle.com/pls/topic/lookup?ctx=acc&id=infoor visit http://www.oracle.com/pls/topic/lookup?ctx=acc&id=trs if you are hearing impaired.
Diversity and InclusionOracle is fully committed to diversity and inclusion. Oracle respects and values having adiverse workforce that increases thought leadership and innovation. As part of our initiative tobuild a more inclusive culture that positively impacts our employees, customers, andpartners, we are working to remove insensitive terms from our products and documentation.We are also mindful of the necessity to maintain compatibility with our customers' existingtechnologies and the need to ensure continuity of service as Oracle's offerings and industrystandards evolve. Because of these technical constraints, our effort to remove insensitiveterms is ongoing and will take time and external cooperation.
ix

1Starting and Stopping ASAP
This chapter describes how to start and stop Oracle Communications ASAP.
Starting ASAPThe Control server creates a list of ASAP processes for each ASAP territory and system. Thelist enables the components of all ASAP systems in a territory to be specified and maintainedin a single database.
In a particular ASAP implementation, there can be many territories. A territory is thegeographical area served by the ASAP system. A Control server manages all applicationsand processes within the territory. Territories are generally mutually exclusive because thereis no communication between ASAP systems in different territories.
The Control server determines each application's details from the static database tabletbl_appl_proc. This table specifies whether each application is a client or a server andspecifies whether each application process should start automatically or manually, thesequence in which applications are to be started, and the diagnostic details of the process.
When ASAP is started, the Control servers on each machine in the network are started first.The primary Control server then either starts each ASAP application process individually (orsequentially) on its local machine, or instructs one of the secondary Control servers to startthe application process on its machine. Every Control server determines the applicationdetails from a static database configuration table.
To shut down an ASAP application, you must submit a request to the Control server thatmanages the shutdown.
Using the Control server for all startup and shutdown activities provides a consistentapproach to starting and stopping the system, and provides the ability to start ASAPprocesses on remote machines when ASAP is in a distributed environment.
Oracle recommends that you restart ASAP when:
• adding, updating, or deleting configuration information
• adding, updating, or deleting service definitions
• loading database schemas
• rolling back the system clock (for example, to adjust for daylight savings time).
Scripts are provided to start up and shut down an entire ASAP instance or individualsapplication components.
When the Control server is requested to start an ASAP application, the Control serverperforms the following steps:
• If the local Control server is not the same as the Control server for the application asdefined in the application process table (that is, this application server should be startedby a remote Control server), the local Control server opens a network connection to theremote Control server. The remote Control server then starts the application on theremote machine before returning a successful indication back to the requesting client.
1-1
• If the application server's Control server is the local Control server, this localControl server first verifies that the UNIX program executable file for theapplication server is located in the $PROGRAMS directory and is executable. If itis executable, the Control server then instructs the fork agent process to spawn achild process which in turn overlays itself with the application executable. At thispoint, the application process starts up and the fork agent returns details of theapplication back to the Control server.
If the spawned application is a server, the parent Control server process goes into aretry loop and attempts to open a network connection to the newly created applicationprocess. If the connection to the application process is not established, a system eventis issued and the Control server terminates the application server.
Note:
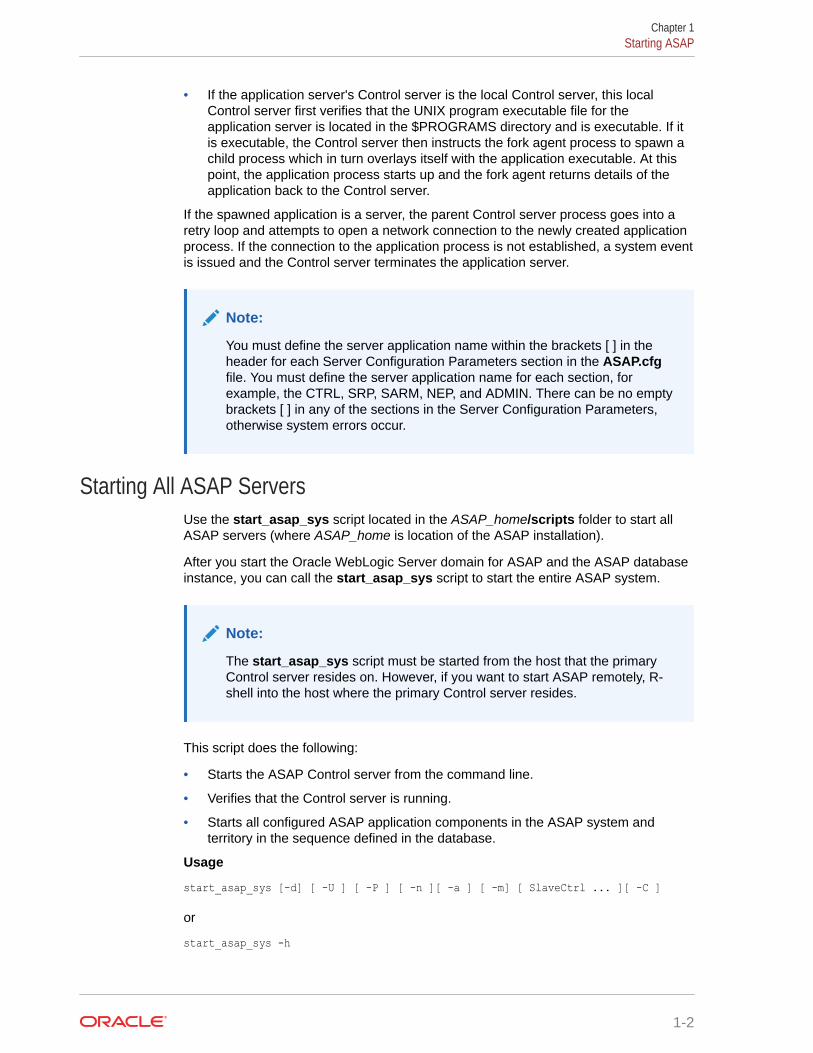
You must define the server application name within the brackets [ ] in theheader for each Server Configuration Parameters section in the ASAP.cfgfile. You must define the server application name for each section, forexample, the CTRL, SRP, SARM, NEP, and ADMIN. There can be no emptybrackets [ ] in any of the sections in the Server Configuration Parameters,otherwise system errors occur.
Starting All ASAP ServersUse the start_asap_sys script located in the ASAP_home/scripts folder to start allASAP servers (where ASAP_home is location of the ASAP installation).
After you start the Oracle WebLogic Server domain for ASAP and the ASAP databaseinstance, you can call the start_asap_sys script to start the entire ASAP system.
Note:
The start_asap_sys script must be started from the host that the primaryControl server resides on. However, if you want to start ASAP remotely, R-shell into the host where the primary Control server resides.
This script does the following:
• Starts the ASAP Control server from the command line.
• Verifies that the Control server is running.
• Starts all configured ASAP application components in the ASAP system andterritory in the sequence defined in the database.
Usage
start_asap_sys [-d] [ -U ] [ -P ] [ -n ][ -a ] [ -m] [ SlaveCtrl ... ][ -C ]
or
start_asap_sys -h
Chapter 1Starting ASAP
1-2

Table 1-1 lists and describes the arguments for the start_asap_sys script.
Table 1-1 start_asap_sys Arguments
Argument Description
-d Development mode. If used, do not specify -U or -P options.
- U The control database user ID.
- P The password for the user ID.
- n Indicates that no Control server should be started as a result of running this script,however, any other lapsed server should restart.
- a An ASAP profile to be sourced before starting up remote Control servers.
- m The SARM server. This option is specified with -m. The -p option can be used to specifycompatibility with a previous version of this script.
SlaveCtrl The remote Control server(s) to start.
- C Starts ASAP services concurrently, rather than sequentially.
-h Displays command help.
When you start the ASAP servers, you must observe the following logic:
• If you do not specify the SARM server in the command, the script obtains the SARMserver specification from the environment variable $MASTER_CONTROL. You specifythe SARM server in the command line using the -m option otherwise the script usesthe $MASTER _CONTROL environment variable.
• If you do not specify a Control server name, the remote Control servers identified in theenvironment variable $SLAVE_CONTROL_ SERVERS arestarted. $SLAVE_CONTROL_SERVERS should provide the real names of the remoteControl servers as follows:
SLAVE_CONTROL_SERVERS="SlaveCtrl1[:Host1] ... SlaveCtrlN[:hostN]" export SLAVE_CONTROL_SERVERS
If $SLAVE_CONTROL_SERVERS is not set, only the SARM server is started.
For example:
SLAVE_CONTROL_SERVERS="CTRLSVR1:192.168.10.251CTRLSVR1:192.168.10.252"
• If the host is not specified with a remote Control server, the interfaces file $SYBASE/interfaces is searched to find the host for that server.
• If the host for a remote server is not given or cannot be determined by looking in theinterfaces file, the Control server is not started.
• If an ASAP profile is specified in the command line, it is sourced before starting theremote Control servers.
• If no ASAP profile is specified, the profile specified in the environment variableEnvironment_Profile is sourced before starting the Control servers.
• If Environment_Profile is not set, remote Control servers are not started.
• To start a Control server on a host, the ASAP user must have permission to use rsh tothe host from the current host.
Chapter 1Starting ASAP
1-3

Starting the Control ServerUse the start_control_sys script located in the ASAP_home/scripts folder to start theASAP Control server (where ASAP_home is location of the ASAP installation).
This script observes the same logic as start_asap_sys.
After you start the WebLogic Server domain for ASAP and the Oracle database, youcan call the start_control_sys script to start the ASAP Control server(s). Applicationservers are not started with this script.
The start_control_sys script does the following:
• Starts the ASAP Control server. The standard input, output, and error from thisstartup are sent to the ASAP.Console file. The ASAP.Console file containsstandard input, standard output, and errors that are sent to a console screen. TheASAP.Console file records any startup errors.
• Verifies that the Control server is running.
Usage
start_control_sys [-d] [ -U ] [ -P ] [ -a ] [ -m ] [ SlaveCtrl ... ]
Table 1-2 lists and describes the arguments for the start_control_sys script.
Table 1-2 start_control_sys Arguments
Argument Description
-U The control database user ID.
-P The password for the user ID.
-d Development mode. If used, do not specify -U or -P options.
-a An ASAP profile to be sourced before starting up remote Control servers.
-m The SARM server. This option is specified with “-m"; “-p" can be used tospecify compatibility with a previous version of this script.
SlaveCtrl The remote Control server(s) to start.
Starting the ASAP DaemonWhen using an ASAP application that interfaces with the WebLogic Server (such asthe Java SRP, SACT, or SADT), you must start the WebLogic Server first, and thenstart the ASAP Daemon prior to starting the specified ASAP applications.
Note:
The start_asap_sys script also starts the ASAP Daemon.
When you use an application that uses the WebLogic Server, and that application callsan IO operation against the ASAP instance, the WebLogic Server sends a remote file
Chapter 1Starting ASAP
1-4
request or a remote command to the ASAP daemon. All WebLogic Server IO operationsagainst the ASAP instance are handled by the daemon server process.
You can start the ASAP daemon through using a start server command, or through awrapping script. If starting the ASAP daemon using the start server command, start ASAPfirst.
Starting ASAP Daemon Using a Start CommandOracle recommends that you start the ASAP daemon using the following command.
After you have started ASAP, type:
startc -d $DAEM
The ASAP daemon is started.
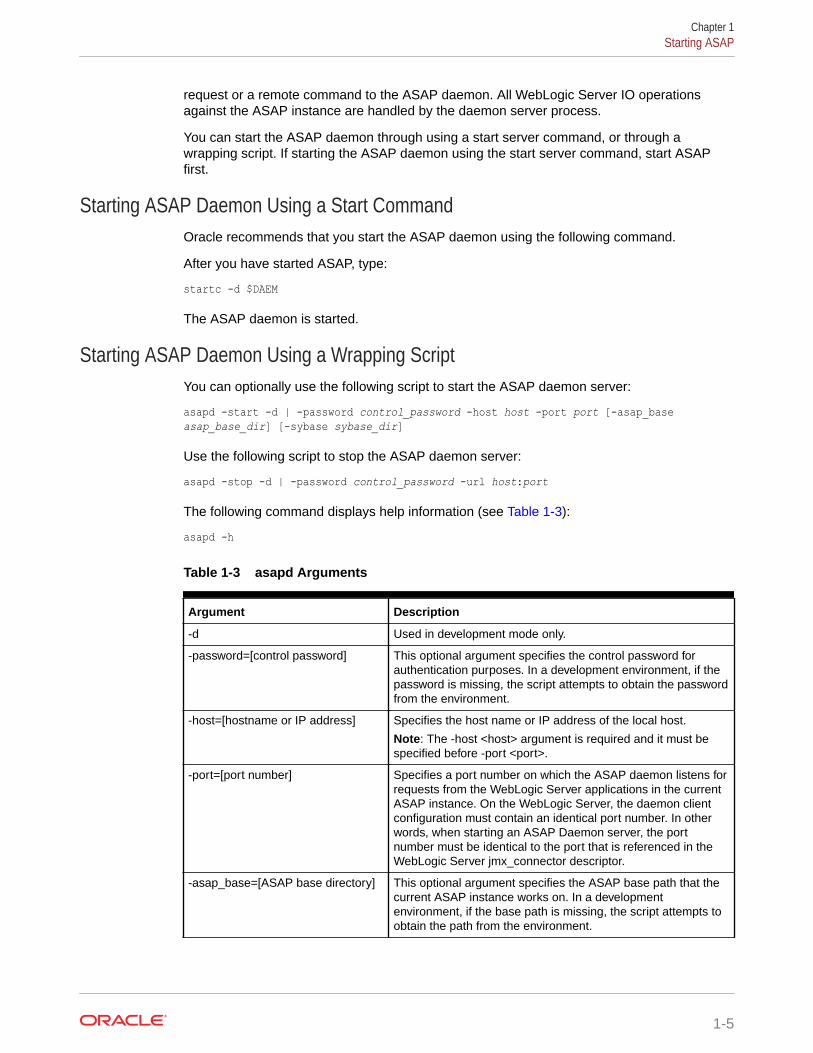
Starting ASAP Daemon Using a Wrapping ScriptYou can optionally use the following script to start the ASAP daemon server:
asapd -start -d | -password control_password -host host -port port [-asap_base asap_base_dir] [-sybase sybase_dir]
Use the following script to stop the ASAP daemon server:
asapd -stop -d | -password control_password -url host:port
The following command displays help information (see Table 1-3):
asapd -h
Table 1-3 asapd Arguments
Argument Description
-d Used in development mode only.
-password=[control password] This optional argument specifies the control password forauthentication purposes. In a development environment, if thepassword is missing, the script attempts to obtain the passwordfrom the environment.
-host=[hostname or IP address] Specifies the host name or IP address of the local host.
Note: The -host <host> argument is required and it must bespecified before -port <port>.
-port=[port number] Specifies a port number on which the ASAP daemon listens forrequests from the WebLogic Server applications in the currentASAP instance. On the WebLogic Server, the daemon clientconfiguration must contain an identical port number. In otherwords, when starting an ASAP Daemon server, the portnumber must be identical to the port that is referenced in theWebLogic Server jmx_connector descriptor.
-asap_base=[ASAP base directory] This optional argument specifies the ASAP base path that thecurrent ASAP instance works on. In a developmentenvironment, if the base path is missing, the script attempts toobtain the path from the environment.
Chapter 1Starting ASAP
1-5
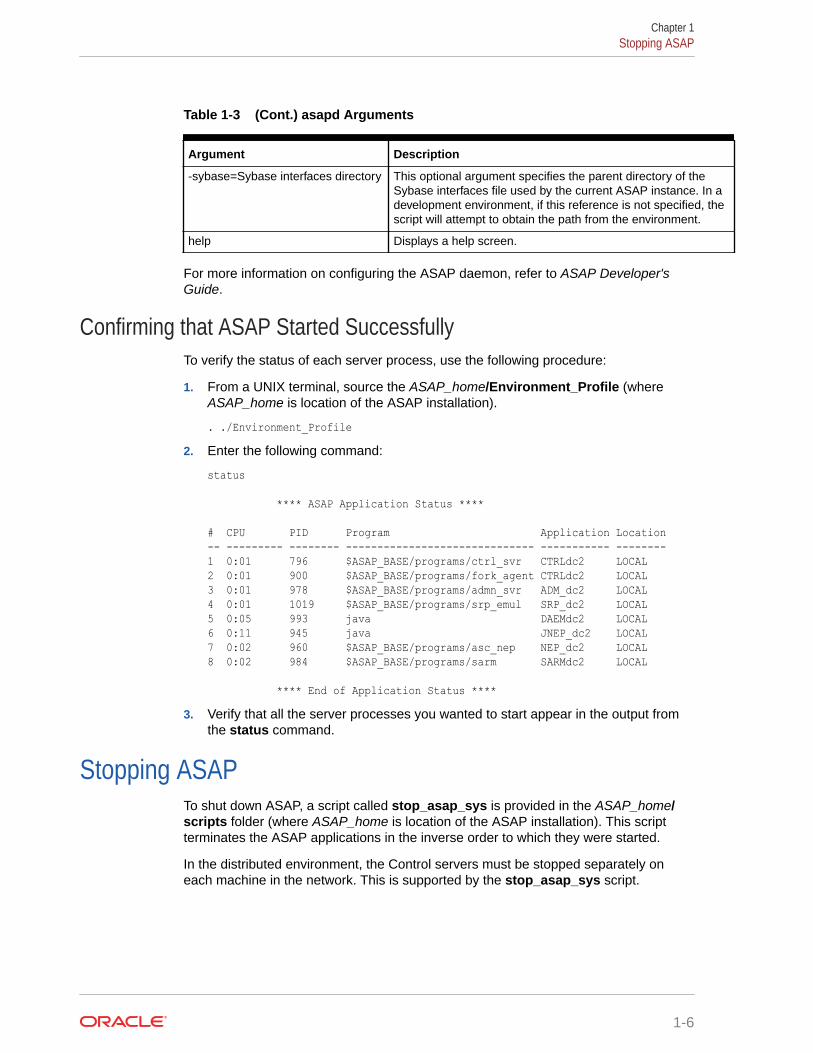
Table 1-3 (Cont.) asapd Arguments
Argument Description
-sybase=Sybase interfaces directory This optional argument specifies the parent directory of theSybase interfaces file used by the current ASAP instance. In adevelopment environment, if this reference is not specified, thescript will attempt to obtain the path from the environment.
help Displays a help screen.
For more information on configuring the ASAP daemon, refer to ASAP Developer'sGuide.
Confirming that ASAP Started SuccessfullyTo verify the status of each server process, use the following procedure:
1. From a UNIX terminal, source the ASAP_home/Environment_Profile (whereASAP_home is location of the ASAP installation).
. ./Environment_Profile2. Enter the following command:
status
**** ASAP Application Status **** # CPU PID Program Application Location-- --------- -------- ------------------------------ ----------- --------1 0:01 796 $ASAP_BASE/programs/ctrl_svr CTRLdc2 LOCAL2 0:01 900 $ASAP_BASE/programs/fork_agent CTRLdc2 LOCAL3 0:01 978 $ASAP_BASE/programs/admn_svr ADM_dc2 LOCAL4 0:01 1019 $ASAP_BASE/programs/srp_emul SRP_dc2 LOCAL5 0:05 993 java DAEMdc2 LOCAL6 0:11 945 java JNEP_dc2 LOCAL7 0:02 960 $ASAP_BASE/programs/asc_nep NEP_dc2 LOCAL8 0:02 984 $ASAP_BASE/programs/sarm SARMdc2 LOCAL **** End of Application Status ****
3. Verify that all the server processes you wanted to start appear in the output fromthe status command.
Stopping ASAPTo shut down ASAP, a script called stop_asap_sys is provided in the ASAP_home/scripts folder (where ASAP_home is location of the ASAP installation). This scriptterminates the ASAP applications in the inverse order to which they were started.
In the distributed environment, the Control servers must be stopped separately oneach machine in the network. This is supported by the stop_asap_sys script.
Chapter 1Stopping ASAP
1-6

2Setting Up and Managing ASAP Security
This chapter describes the security features for Oracle Communications ASAP.
Overview of Setting Up ASAP Security FeaturesASAP security is designed to provide maximum confidentiality and data integrity, whileensuring on-demand access to services for authorized users. ASAP security is designed forthree essential functions: managing ASAP users in Oracle WebLogic Server, securing data,and protecting diagnostics files.
ASAP provides these security functions in the following locations:
• WebLogic Server security
WebLogic Server contains default users, groups, and roles that support the variousWebLogic-based ASAP functions, like the Order Control Application (OCA) clients, theService Activation Configuration Tool (SACT), the Service Activation Deployment Tool(SADT). Java Service Request Processor (JSRP) clients also need WebLogic Servercredentials to connect to the JSRP interfaces.
• ASAP server and database credential security
The ASAP environment contains a credential store factory (CSF) wallet that stores theASAP schema user names and passwords, and the WebLogic Server user name andpassword. These credentials are called class A secure data. Each ASAP server can usethis wallet to obtain these credentials. The CSF wallet provides both secure storage andencryption for these credentials.
• Network Element (NE) credential security for Network Element Processor (NEP) to NEcommunication
The ASAP Control database stores credentials required for NEPs to access NEs. Thesecredentials are called class B secure data. You can use a security tool to add, change, ordelete credential information, and also to enable encryption.
• ASAP system configuration parameters
Some ASAP system configuration parameters can have a significant impact on security.Parameters settings, such as diagnostic levels and server security attributes should beconfigured correctly to ensure data security.
Configuring WebLogic Server SecurityASAP uses the embedded Lightweight Directory Access Protocol (LDAP) server includedwith the WebLogic Server software to manage default ASAP users, groups, roles, andmethods. For more information on this embedded LDAP sever, see the WebLogic Serverdocumentation.
About ASAP WebLogic Users, Groups, Roles, and MethodsUser security is managed with the WebLogic Server. For more information, see
2-1
http://docs.oracle.com/middleware/1213/wls/wls-secure.htmWebLogic Server provides the following features:
• ASAP OCA client users can change their passwords. For more information, referto the ASAP Order Control Application User's Guide.
• ASAP Administrators can use the WebLogic Server Administration Console toadd, delete, or edit users or user groups.
• ASAP Administrators can use the WebLogic Server Administration Console toassign or unassign permissions to users or user groups.
The administrator uses security roles, method names, and principal names toconfigure permissions using the WebLogic Server Administration Console.
For information on migrating security from a previous version of ASAP, refer to theASAP Installation Guide.
You can create, delete, and modify ASAP users and groups in WebLogic Server. Formore information, see
http://docs.oracle.com/middleware/1213/wls/wls-secure.htm
Note:
ASAP requires that WebLogic user passwords have eight characters ormore.
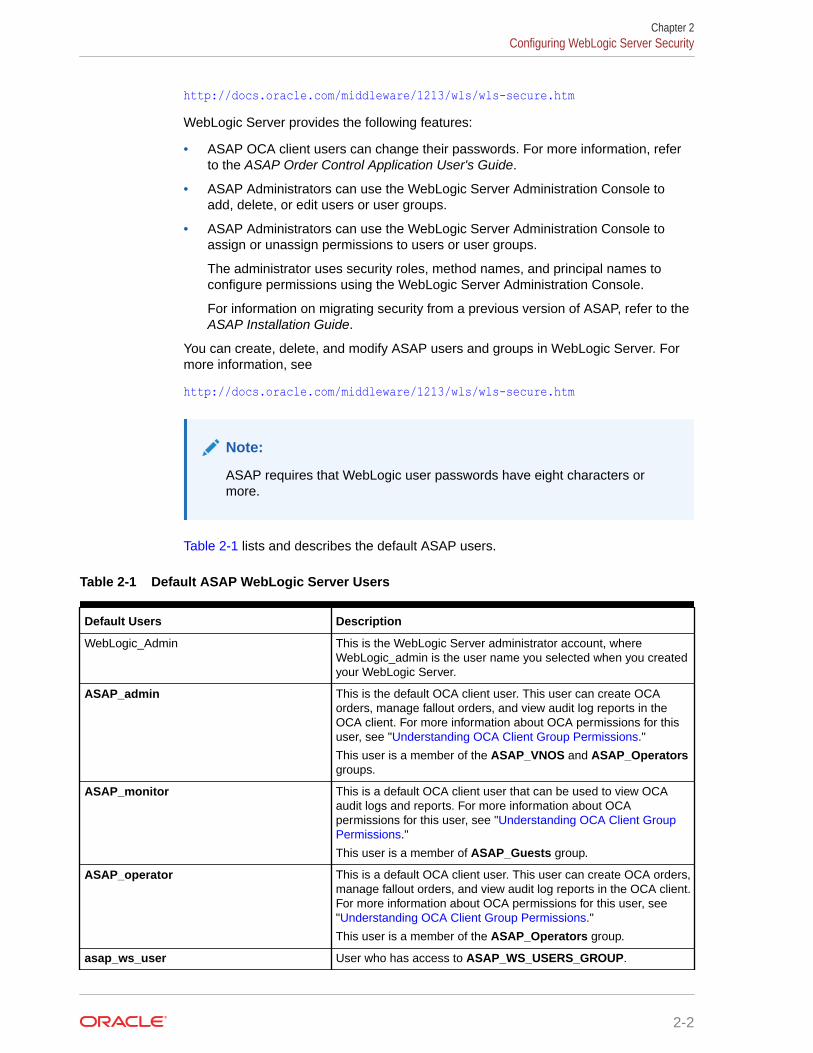
Table 2-1 lists and describes the default ASAP users.
Table 2-1 Default ASAP WebLogic Server Users
Default Users Description
WebLogic_Admin This is the WebLogic Server administrator account, whereWebLogic_admin is the user name you selected when you createdyour WebLogic Server.
ASAP_admin This is the default OCA client user. This user can create OCAorders, manage fallout orders, and view audit log reports in theOCA client. For more information about OCA permissions for thisuser, see "Understanding OCA Client Group Permissions."
This user is a member of the ASAP_VNOS and ASAP_Operatorsgroups.
ASAP_monitor This is a default OCA client user that can be used to view OCAaudit logs and reports. For more information about OCApermissions for this user, see "Understanding OCA Client GroupPermissions."
This user is a member of ASAP_Guests group.
ASAP_operator This is a default OCA client user. This user can create OCA orders,manage fallout orders, and view audit log reports in the OCA client.For more information about OCA permissions for this user, see"Understanding OCA Client Group Permissions."
This user is a member of the ASAP_Operators group.
asap_ws_user User who has access to ASAP_WS_USERS_GROUP.
Chapter 2Configuring WebLogic Server Security
2-2
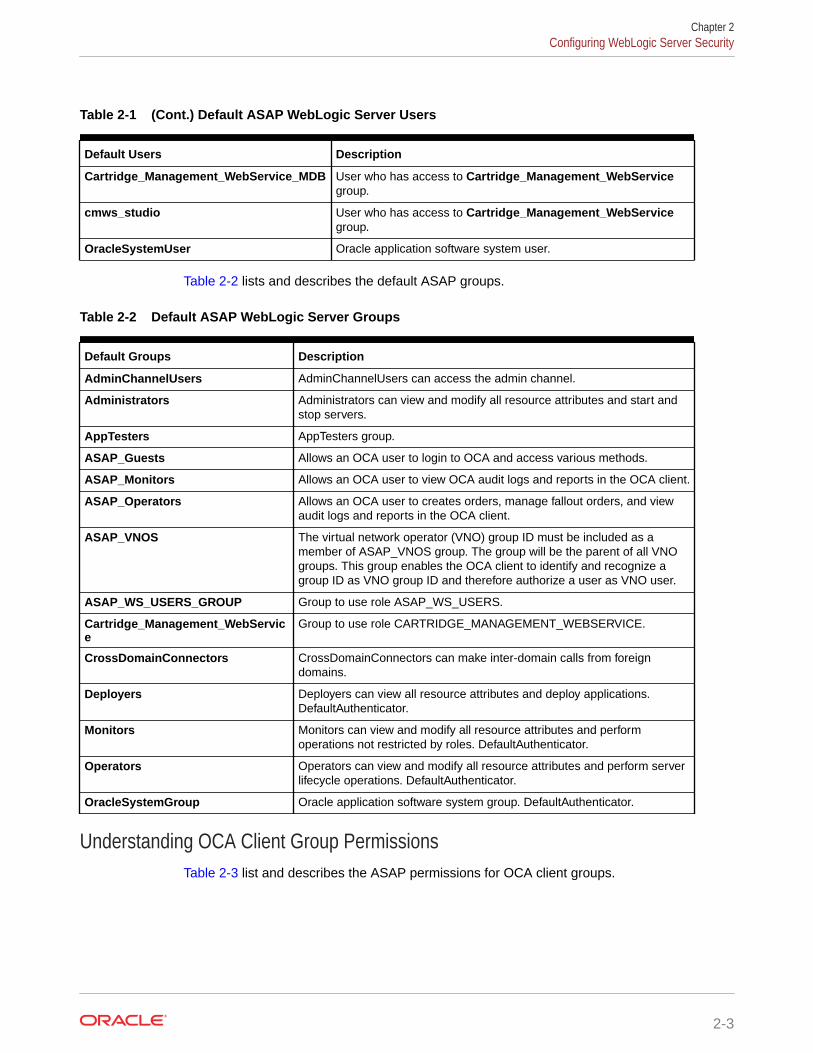
Table 2-1 (Cont.) Default ASAP WebLogic Server Users
Default Users Description
Cartridge_Management_WebService_MDB User who has access to Cartridge_Management_WebServicegroup.
cmws_studio User who has access to Cartridge_Management_WebServicegroup.
OracleSystemUser Oracle application software system user.
Table 2-2 lists and describes the default ASAP groups.
Table 2-2 Default ASAP WebLogic Server Groups
Default Groups Description
AdminChannelUsers AdminChannelUsers can access the admin channel.
Administrators Administrators can view and modify all resource attributes and start andstop servers.
AppTesters AppTesters group.
ASAP_Guests Allows an OCA user to login to OCA and access various methods.
ASAP_Monitors Allows an OCA user to view OCA audit logs and reports in the OCA client.
ASAP_Operators Allows an OCA user to creates orders, manage fallout orders, and viewaudit logs and reports in the OCA client.
ASAP_VNOS The virtual network operator (VNO) group ID must be included as amember of ASAP_VNOS group. The group will be the parent of all VNOgroups. This group enables the OCA client to identify and recognize agroup ID as VNO group ID and therefore authorize a user as VNO user.
ASAP_WS_USERS_GROUP Group to use role ASAP_WS_USERS.
Cartridge_Management_WebService
Group to use role CARTRIDGE_MANAGEMENT_WEBSERVICE.
CrossDomainConnectors CrossDomainConnectors can make inter-domain calls from foreigndomains.
Deployers Deployers can view all resource attributes and deploy applications.DefaultAuthenticator.
Monitors Monitors can view and modify all resource attributes and performoperations not restricted by roles. DefaultAuthenticator.
Operators Operators can view and modify all resource attributes and perform serverlifecycle operations. DefaultAuthenticator.
OracleSystemGroup Oracle application software system group. DefaultAuthenticator.
Understanding OCA Client Group PermissionsTable 2-3 list and describes the ASAP permissions for OCA client groups.
Chapter 2Configuring WebLogic Server Security
2-3
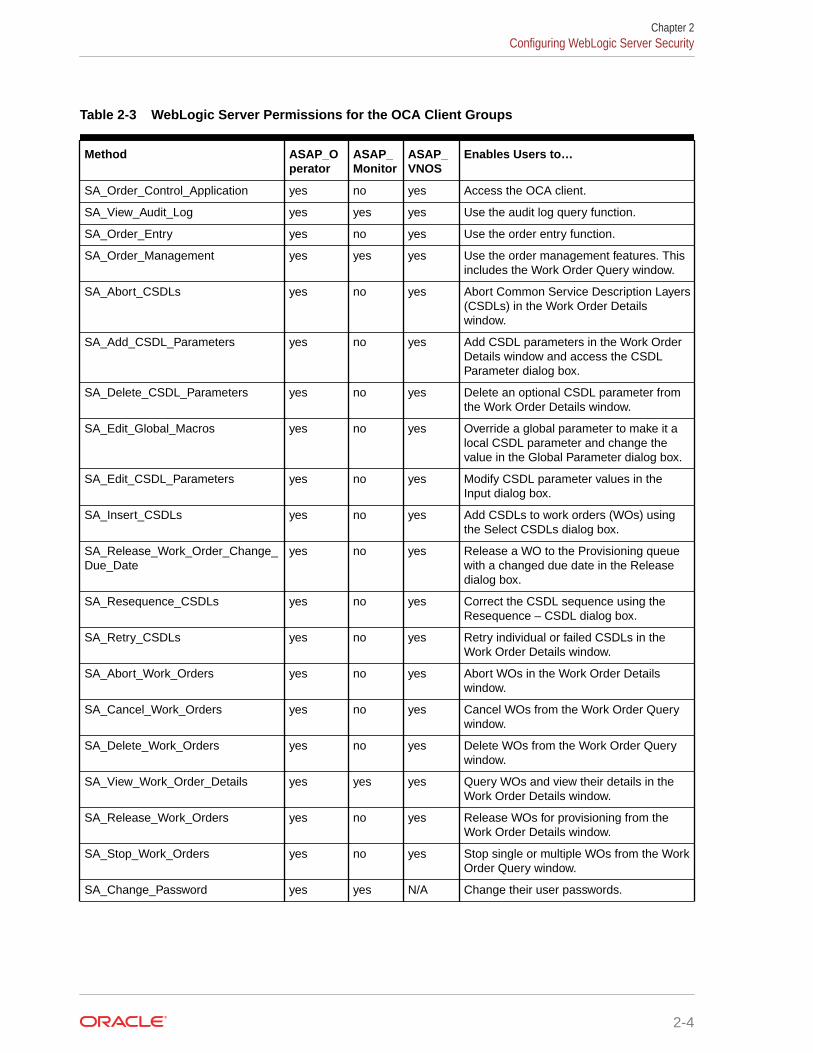
Table 2-3 WebLogic Server Permissions for the OCA Client Groups
Method ASAP_Operator
ASAP_Monitor
ASAP_VNOS
Enables Users to…
SA_Order_Control_Application yes no yes Access the OCA client.
SA_View_Audit_Log yes yes yes Use the audit log query function.
SA_Order_Entry yes no yes Use the order entry function.
SA_Order_Management yes yes yes Use the order management features. Thisincludes the Work Order Query window.
SA_Abort_CSDLs yes no yes Abort Common Service Description Layers(CSDLs) in the Work Order Detailswindow.
SA_Add_CSDL_Parameters yes no yes Add CSDL parameters in the Work OrderDetails window and access the CSDLParameter dialog box.
SA_Delete_CSDL_Parameters yes no yes Delete an optional CSDL parameter fromthe Work Order Details window.
SA_Edit_Global_Macros yes no yes Override a global parameter to make it alocal CSDL parameter and change thevalue in the Global Parameter dialog box.
SA_Edit_CSDL_Parameters yes no yes Modify CSDL parameter values in theInput dialog box.
SA_Insert_CSDLs yes no yes Add CSDLs to work orders (WOs) usingthe Select CSDLs dialog box.
SA_Release_Work_Order_Change_Due_Date
yes no yes Release a WO to the Provisioning queuewith a changed due date in the Releasedialog box.
SA_Resequence_CSDLs yes no yes Correct the CSDL sequence using theResequence – CSDL dialog box.
SA_Retry_CSDLs yes no yes Retry individual or failed CSDLs in theWork Order Details window.
SA_Abort_Work_Orders yes no yes Abort WOs in the Work Order Detailswindow.
SA_Cancel_Work_Orders yes no yes Cancel WOs from the Work Order Querywindow.
SA_Delete_Work_Orders yes no yes Delete WOs from the Work Order Querywindow.
SA_View_Work_Order_Details yes yes yes Query WOs and view their details in theWork Order Details window.
SA_Release_Work_Orders yes no yes Release WOs for provisioning from theWork Order Details window.
SA_Stop_Work_Orders yes no yes Stop single or multiple WOs from the WorkOrder Query window.
SA_Change_Password yes yes N/A Change their user passwords.
Chapter 2Configuring WebLogic Server Security
2-4
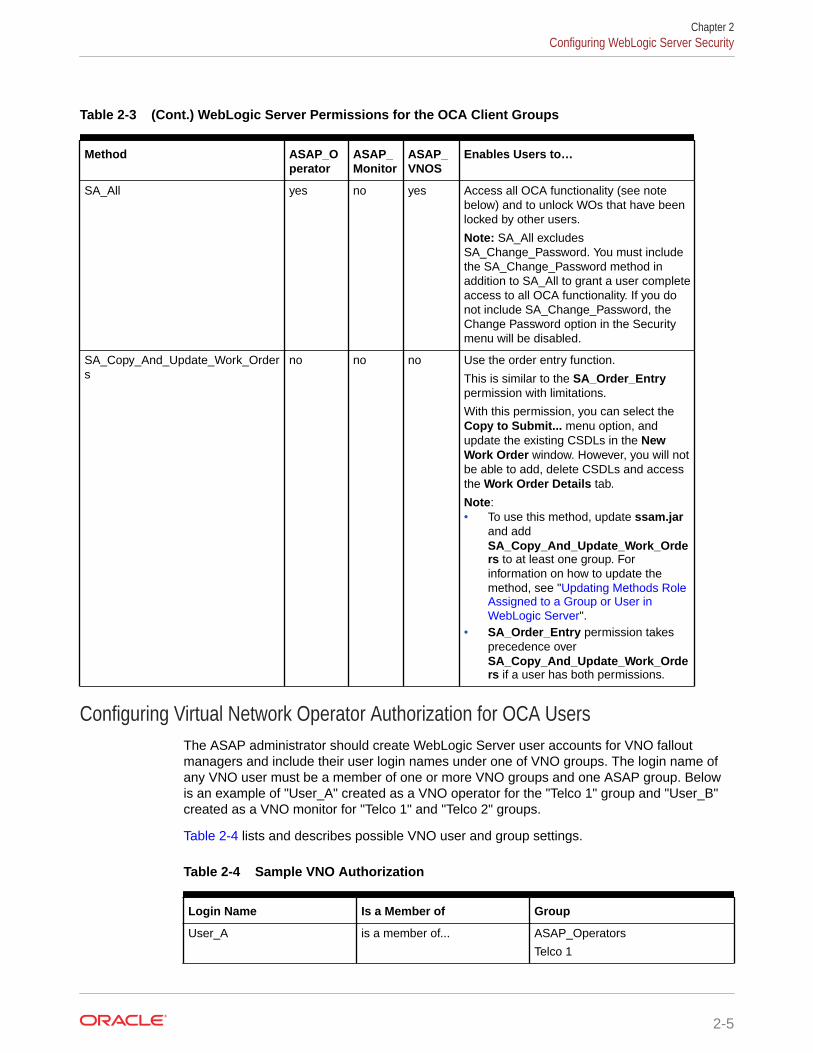
Table 2-3 (Cont.) WebLogic Server Permissions for the OCA Client Groups
Method ASAP_Operator
ASAP_Monitor
ASAP_VNOS
Enables Users to…
SA_All yes no yes Access all OCA functionality (see notebelow) and to unlock WOs that have beenlocked by other users.
Note: SA_All excludesSA_Change_Password. You must includethe SA_Change_Password method inaddition to SA_All to grant a user completeaccess to all OCA functionality. If you donot include SA_Change_Password, theChange Password option in the Securitymenu will be disabled.
SA_Copy_And_Update_Work_Orders
no no no Use the order entry function.
This is similar to the SA_Order_Entrypermission with limitations.
With this permission, you can select theCopy to Submit... menu option, andupdate the existing CSDLs in the NewWork Order window. However, you will notbe able to add, delete CSDLs and accessthe Work Order Details tab.
Note:• To use this method, update ssam.jar
and addSA_Copy_And_Update_Work_Orders to at least one group. Forinformation on how to update themethod, see "Updating Methods RoleAssigned to a Group or User inWebLogic Server".
• SA_Order_Entry permission takesprecedence overSA_Copy_And_Update_Work_Orders if a user has both permissions.
Configuring Virtual Network Operator Authorization for OCA UsersThe ASAP administrator should create WebLogic Server user accounts for VNO falloutmanagers and include their user login names under one of VNO groups. The login name ofany VNO user must be a member of one or more VNO groups and one ASAP group. Belowis an example of "User_A" created as a VNO operator for the "Telco 1" group and "User_B"created as a VNO monitor for "Telco 1" and "Telco 2" groups.
Table 2-4 lists and describes possible VNO user and group settings.
Table 2-4 Sample VNO Authorization
Login Name Is a Member of Group
User_A is a member of... ASAP_Operators
Telco 1
Chapter 2Configuring WebLogic Server Security
2-5
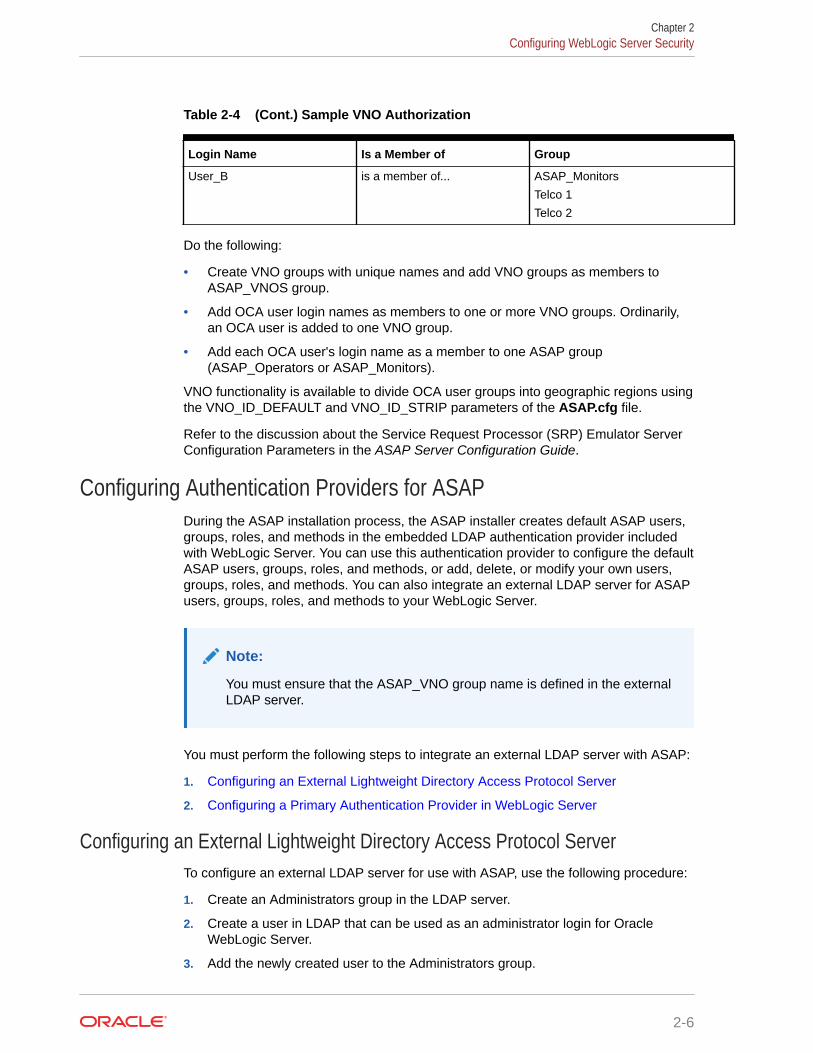
Table 2-4 (Cont.) Sample VNO Authorization
Login Name Is a Member of Group
User_B is a member of... ASAP_Monitors
Telco 1
Telco 2
Do the following:
• Create VNO groups with unique names and add VNO groups as members toASAP_VNOS group.
• Add OCA user login names as members to one or more VNO groups. Ordinarily,an OCA user is added to one VNO group.
• Add each OCA user's login name as a member to one ASAP group(ASAP_Operators or ASAP_Monitors).
VNO functionality is available to divide OCA user groups into geographic regions usingthe VNO_ID_DEFAULT and VNO_ID_STRIP parameters of the ASAP.cfg file.
Refer to the discussion about the Service Request Processor (SRP) Emulator ServerConfiguration Parameters in the ASAP Server Configuration Guide.
Configuring Authentication Providers for ASAPDuring the ASAP installation process, the ASAP installer creates default ASAP users,groups, roles, and methods in the embedded LDAP authentication provider includedwith WebLogic Server. You can use this authentication provider to configure the defaultASAP users, groups, roles, and methods, or add, delete, or modify your own users,groups, roles, and methods. You can also integrate an external LDAP server for ASAPusers, groups, roles, and methods to your WebLogic Server.
Note:
You must ensure that the ASAP_VNO group name is defined in the externalLDAP server.
You must perform the following steps to integrate an external LDAP server with ASAP:
1. Configuring an External Lightweight Directory Access Protocol Server
2. Configuring a Primary Authentication Provider in WebLogic Server
Configuring an External Lightweight Directory Access Protocol ServerTo configure an external LDAP server for use with ASAP, use the following procedure:
1. Create an Administrators group in the LDAP server.
2. Create a user in LDAP that can be used as an administrator login for OracleWebLogic Server.
3. Add the newly created user to the Administrators group.
Chapter 2Configuring WebLogic Server Security
2-6
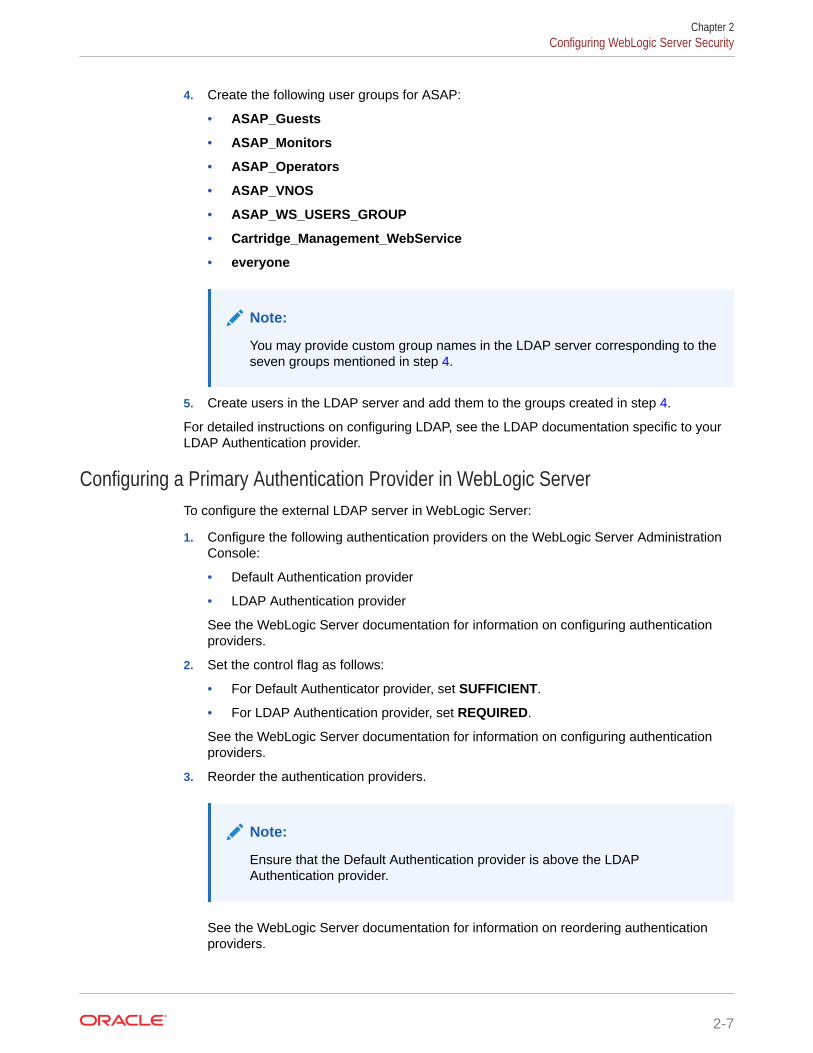
4. Create the following user groups for ASAP:
• ASAP_Guests
• ASAP_Monitors
• ASAP_Operators
• ASAP_VNOS
• ASAP_WS_USERS_GROUP
• Cartridge_Management_WebService
• everyone
Note:
You may provide custom group names in the LDAP server corresponding to theseven groups mentioned in step 4.
5. Create users in the LDAP server and add them to the groups created in step 4.
For detailed instructions on configuring LDAP, see the LDAP documentation specific to yourLDAP Authentication provider.
Configuring a Primary Authentication Provider in WebLogic ServerTo configure the external LDAP server in WebLogic Server:
1. Configure the following authentication providers on the WebLogic Server AdministrationConsole:
• Default Authentication provider
• LDAP Authentication provider
See the WebLogic Server documentation for information on configuring authenticationproviders.
2. Set the control flag as follows:
• For Default Authenticator provider, set SUFFICIENT.
• For LDAP Authentication provider, set REQUIRED.
See the WebLogic Server documentation for information on configuring authenticationproviders.
3. Reorder the authentication providers.
Note:
Ensure that the Default Authentication provider is above the LDAPAuthentication provider.
See the WebLogic Server documentation for information on reordering authenticationproviders.
Chapter 2Configuring WebLogic Server Security
2-7

Managing WebLogic Server ASAP User SecurityThese procedures apply to user security that is maintained using WebLogic Serverand ASAP, and assume that myrealm is the only active security realm. Theseprocedures do not support other realms supported by WebLogic Server, such as theLDAP realm. When an administrator configures WebLogic Server with security realmsother than myrealm, all features described in this section are disabled, including thechange password menu in the OCA client.
ASAP administrators can configure user password policies through the WebLogicServer Administration Console and the Password Policy Utility page. Passwordpolicies defined in the WebLogic Server Administration Console include:
• Minimum password length
• Lockout enabled
• Lockout duration
• Reset duration
• Lockout cache
Password policies defined in the Password Policy Utility page include:
• Password aging
• Password expiration warning period
• Enabling/disabling password policies
If your ASAP installation includes the OCA client, observe the restrictions described in Table 2-5.
Table 2-5 ASAP Client Password Restrictions
Feature OCA Client Description
Password change Supported If the administrator has enabled password policies, usersmust change passwords in the OCA client.
Password change atfirst login
Supported If the administrator has enabled password policies, usersmust change passwords in the OCA client.
Password length Supported Passwords must be between 6 and 21 characters inlength.
Password aging Supported If the administrator has enabled password policies, usersmust change passwords in the OCA client.
Password syntax Supported Password syntax.
Reuse of previously-used passwords
Supported Enforced when the user specifies a new password in theOCA client.
Lockout features Supported Lockout features.
The procedure for changing end user passwords is contained in the ASAP OrderControl Application User's Guide.
Chapter 2Configuring WebLogic Server Security
2-8

Configuring the WebLogic Server Change Password Utility PageSecure Shell (SSH) must be enabled on the WebLogic Server in order for the PasswordPolicy and Change Password Utility Java server pages (JSPs) to be reachable.
To enable SSH on the WebLogic Server:
1. Log in to the WebLogic Server Administration Console.
2. Click Lock & Edit if not already selected. See the WebLogic Server online Help for moreinformation.
3. In the Domain Structure, click on the domain.
4. On the Control tab, select Servers.
5. In the Servers table, click the name of the server to be configured.
6. Select the SSL Listen Port Enabled checkbox.
7. Provide an appropriate SSL listen port number in the SSL Listen Port field (that isBEA_SSL_PORT from the Installation Values in the ASAP Installation Guide). Ensurethat this is not the same as the server listen port (that is BEA_PORT).
8. Click Release Configuration.
9. Restart your WebLogic Server.
The Password Policy page and Change Password Utility page are JSPs accessedthrough a web browser at the following URLs:
• https://hostname:BEA_SSL_PORT/security/PasswordPolicy.jsp
• https://hostname:BEA_SSL_PORT/security/ChangePassword.jsp
Note that the SSL Listen Port (configured above) is used, not the BEA_PORT value.
Note:
You must configure the BEA_WLS_HOST and BEA_WLS_PORT variables ofthese JSPs in ASAP.cfg. The ASAP installer populates these variablesautomatically during the installation process.
Chapter 2Configuring WebLogic Server Security
2-9
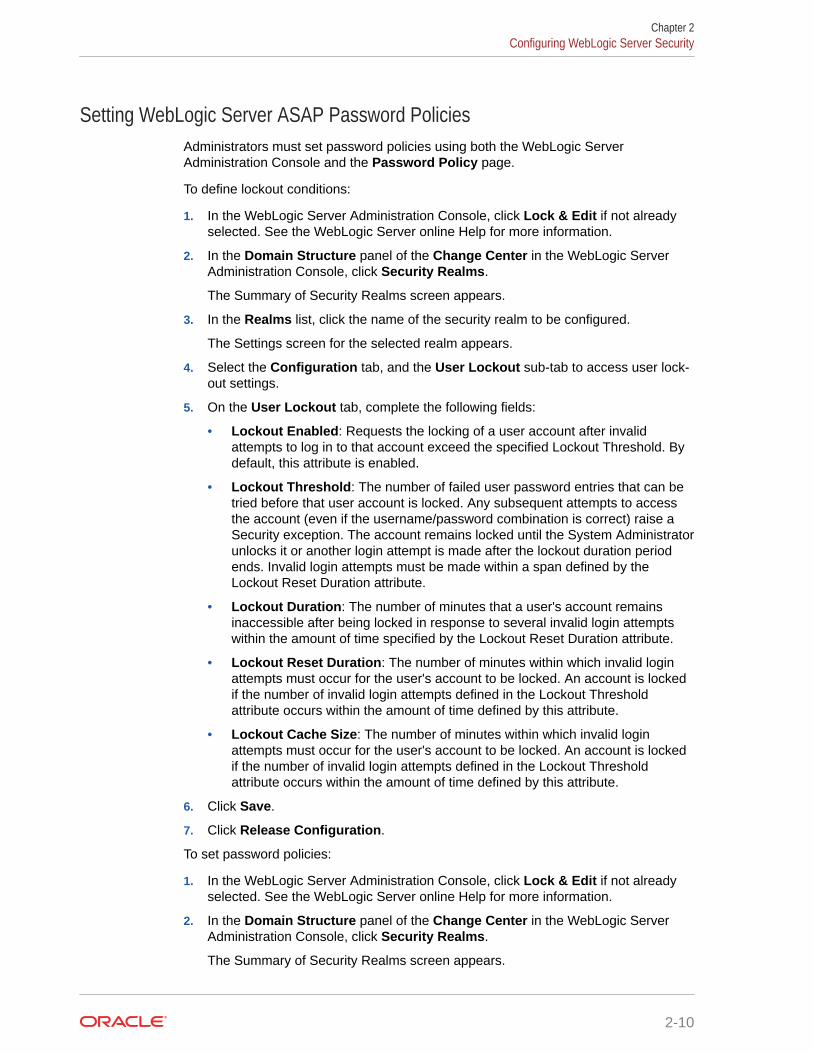
Setting WebLogic Server ASAP Password PoliciesAdministrators must set password policies using both the WebLogic ServerAdministration Console and the Password Policy page.
To define lockout conditions:
1. In the WebLogic Server Administration Console, click Lock & Edit if not alreadyselected. See the WebLogic Server online Help for more information.
2. In the Domain Structure panel of the Change Center in the WebLogic ServerAdministration Console, click Security Realms.
The Summary of Security Realms screen appears.
3. In the Realms list, click the name of the security realm to be configured.
The Settings screen for the selected realm appears.
4. Select the Configuration tab, and the User Lockout sub-tab to access user lock-out settings.
5. On the User Lockout tab, complete the following fields:
• Lockout Enabled: Requests the locking of a user account after invalidattempts to log in to that account exceed the specified Lockout Threshold. Bydefault, this attribute is enabled.
• Lockout Threshold: The number of failed user password entries that can betried before that user account is locked. Any subsequent attempts to accessthe account (even if the username/password combination is correct) raise aSecurity exception. The account remains locked until the System Administratorunlocks it or another login attempt is made after the lockout duration periodends. Invalid login attempts must be made within a span defined by theLockout Reset Duration attribute.
• Lockout Duration: The number of minutes that a user's account remainsinaccessible after being locked in response to several invalid login attemptswithin the amount of time specified by the Lockout Reset Duration attribute.
• Lockout Reset Duration: The number of minutes within which invalid loginattempts must occur for the user's account to be locked. An account is lockedif the number of invalid login attempts defined in the Lockout Thresholdattribute occurs within the amount of time defined by this attribute.
• Lockout Cache Size: The number of minutes within which invalid loginattempts must occur for the user's account to be locked. An account is lockedif the number of invalid login attempts defined in the Lockout Thresholdattribute occurs within the amount of time defined by this attribute.
6. Click Save.
7. Click Release Configuration.
To set password policies:
1. In the WebLogic Server Administration Console, click Lock & Edit if not alreadyselected. See the WebLogic Server online Help for more information.
2. In the Domain Structure panel of the Change Center in the WebLogic ServerAdministration Console, click Security Realms.
The Summary of Security Realms screen appears.
Chapter 2Configuring WebLogic Server Security
2-10

3. In the Realms list, click the name of the security realm to be configured.
The Settings screen for the selected realm appears.
4. Select the Providers tab and then the Authentication subtab.
5. In the Authentication Providers list, select DefaultAuthenticator. (The WebLogicAuthentication provider is configured in the default security realm with the nameDefaultAuthenticator. If you have configured a different authentication provider, select itinstead.)
The Settings for DefaultAuthenticator screen appears.
6. Make any required configuration on the Configuration tab, including MinimumPassword Length.
7. Click Save.
8. Click Release Configuration.
9. Access the Password Policy Utility page by entering the following URL in your webbrowser:
https://WebLogic_Host:BEA_SSL_PORT/security/PasswordPolicy.jsp) to access.
The Enter Network Password dialog appears.
10. Enter the WebLogic administrator username and password and click OK.
The Password Policy Utility screen appears.
11. Complete the following fields:
• PasswordPolicyEnabled: Enables or disables the following password securityfeatures:
– Password change, including password change upon first login, passwords beingchanged to a previously-used password
– Password aging
Chapter 2Configuring WebLogic Server Security
2-11
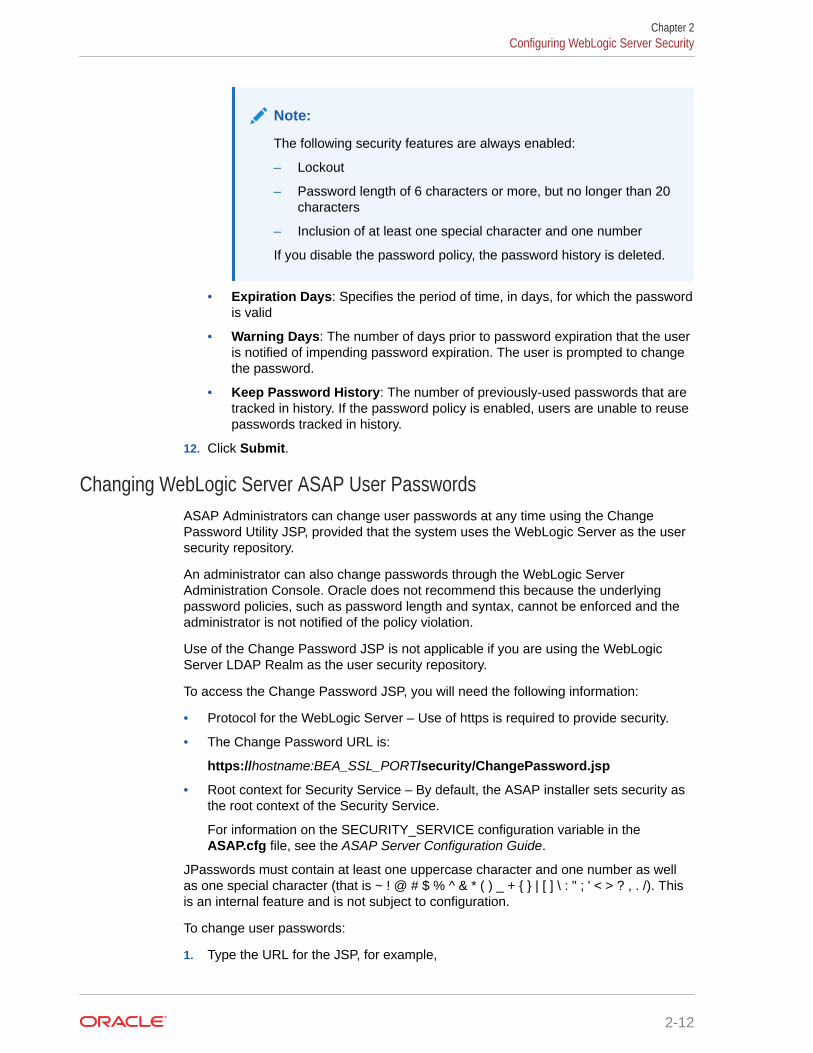
Note:
The following security features are always enabled:
– Lockout
– Password length of 6 characters or more, but no longer than 20characters
– Inclusion of at least one special character and one number
If you disable the password policy, the password history is deleted.
• Expiration Days: Specifies the period of time, in days, for which the passwordis valid
• Warning Days: The number of days prior to password expiration that the useris notified of impending password expiration. The user is prompted to changethe password.
• Keep Password History: The number of previously-used passwords that aretracked in history. If the password policy is enabled, users are unable to reusepasswords tracked in history.
12. Click Submit.
Changing WebLogic Server ASAP User PasswordsASAP Administrators can change user passwords at any time using the ChangePassword Utility JSP, provided that the system uses the WebLogic Server as the usersecurity repository.
An administrator can also change passwords through the WebLogic ServerAdministration Console. Oracle does not recommend this because the underlyingpassword policies, such as password length and syntax, cannot be enforced and theadministrator is not notified of the policy violation.
Use of the Change Password JSP is not applicable if you are using the WebLogicServer LDAP Realm as the user security repository.
To access the Change Password JSP, you will need the following information:
• Protocol for the WebLogic Server – Use of https is required to provide security.
• The Change Password URL is:
https://hostname:BEA_SSL_PORT/security/ChangePassword.jsp
• Root context for Security Service – By default, the ASAP installer sets security asthe root context of the Security Service.
For information on the SECURITY_SERVICE configuration variable in theASAP.cfg file, see the ASAP Server Configuration Guide.
JPasswords must contain at least one uppercase character and one number as wellas one special character (that is ~ ! @ # $ % ^ & * ( ) _ + { } | [ ] \ : " ; ' < > ? , . /). Thisis an internal feature and is not subject to configuration.
To change user passwords:
1. Type the URL for the JSP, for example,
Chapter 2Configuring WebLogic Server Security
2-12
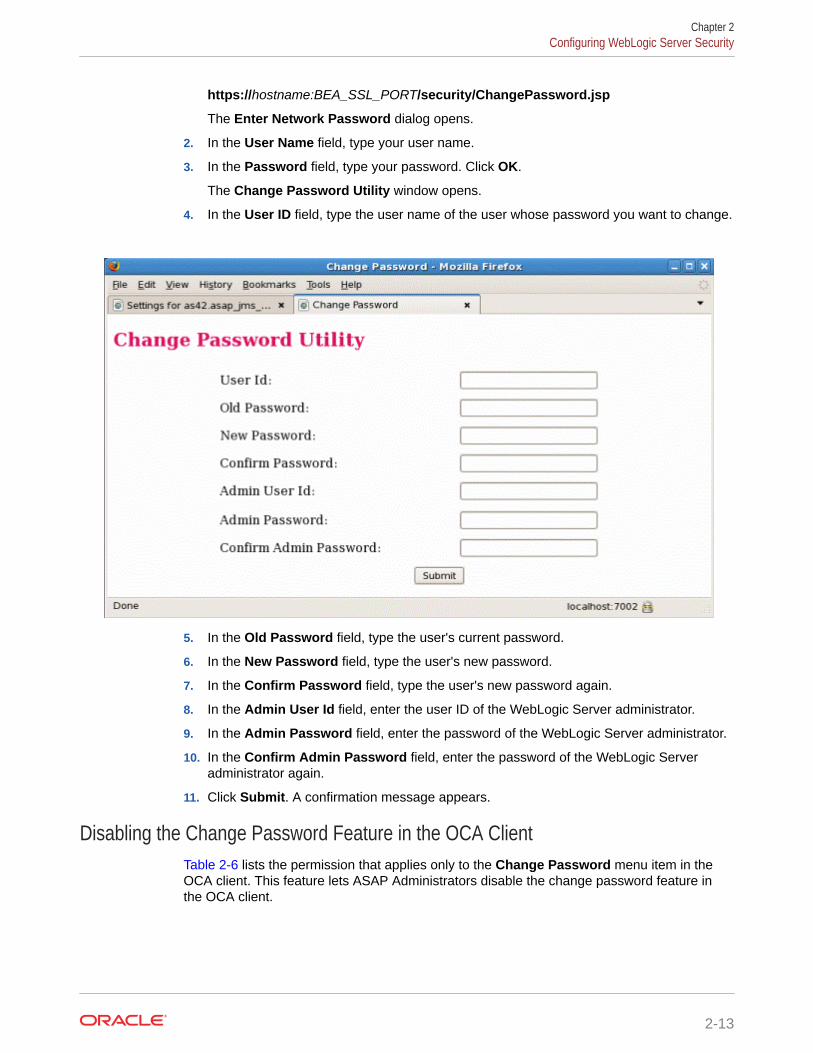
https://hostname:BEA_SSL_PORT/security/ChangePassword.jsp
The Enter Network Password dialog opens.
2. In the User Name field, type your user name.
3. In the Password field, type your password. Click OK.
The Change Password Utility window opens.
4. In the User ID field, type the user name of the user whose password you want to change.
5. In the Old Password field, type the user's current password.
6. In the New Password field, type the user's new password.
7. In the Confirm Password field, type the user's new password again.
8. In the Admin User Id field, enter the user ID of the WebLogic Server administrator.
9. In the Admin Password field, enter the password of the WebLogic Server administrator.
10. In the Confirm Admin Password field, enter the password of the WebLogic Serveradministrator again.
11. Click Submit. A confirmation message appears.
Disabling the Change Password Feature in the OCA ClientTable 2-6 lists the permission that applies only to the Change Password menu item in theOCA client. This feature lets ASAP Administrators disable the change password feature inthe OCA client.
Chapter 2Configuring WebLogic Server Security
2-13
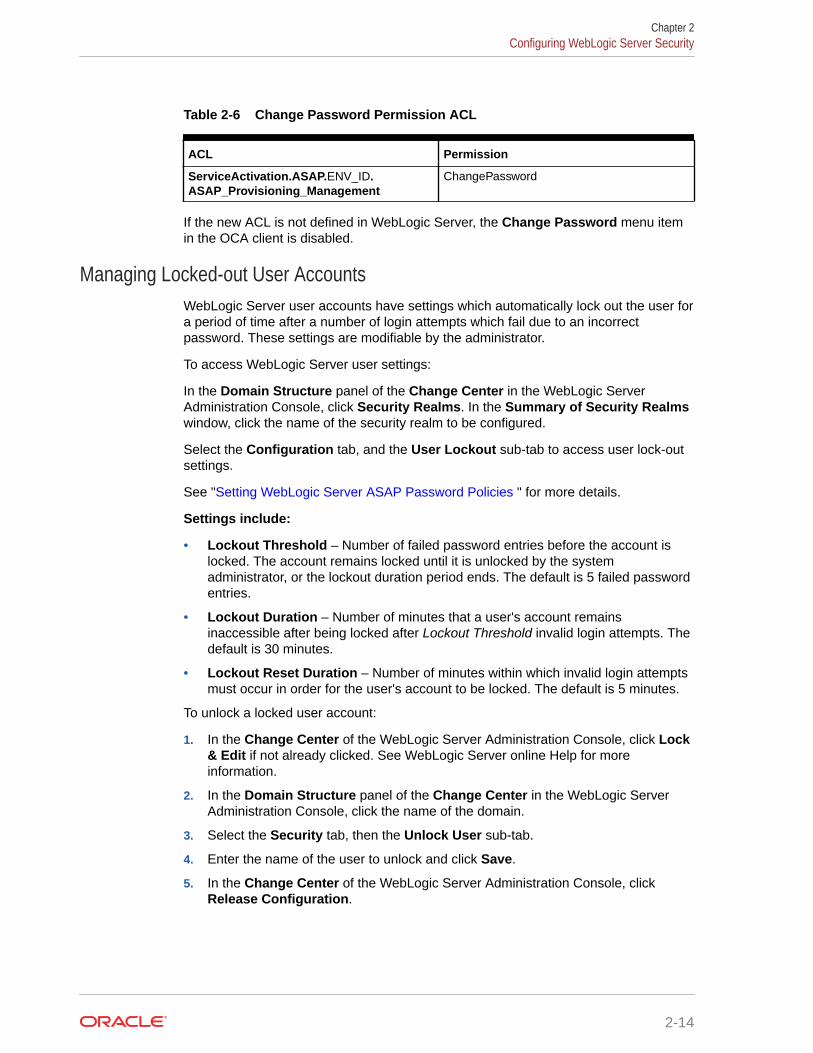
Table 2-6 Change Password Permission ACL
ACL Permission
ServiceActivation.ASAP.ENV_ID.ASAP_Provisioning_Management
ChangePassword
If the new ACL is not defined in WebLogic Server, the Change Password menu itemin the OCA client is disabled.
Managing Locked-out User AccountsWebLogic Server user accounts have settings which automatically lock out the user fora period of time after a number of login attempts which fail due to an incorrectpassword. These settings are modifiable by the administrator.
To access WebLogic Server user settings:
In the Domain Structure panel of the Change Center in the WebLogic ServerAdministration Console, click Security Realms. In the Summary of Security Realmswindow, click the name of the security realm to be configured.
Select the Configuration tab, and the User Lockout sub-tab to access user lock-outsettings.
See "Setting WebLogic Server ASAP Password Policies " for more details.
Settings include:
• Lockout Threshold – Number of failed password entries before the account islocked. The account remains locked until it is unlocked by the systemadministrator, or the lockout duration period ends. The default is 5 failed passwordentries.
• Lockout Duration – Number of minutes that a user's account remainsinaccessible after being locked after Lockout Threshold invalid login attempts. Thedefault is 30 minutes.
• Lockout Reset Duration – Number of minutes within which invalid login attemptsmust occur in order for the user's account to be locked. The default is 5 minutes.
To unlock a locked user account:
1. In the Change Center of the WebLogic Server Administration Console, click Lock& Edit if not already clicked. See WebLogic Server online Help for moreinformation.
2. In the Domain Structure panel of the Change Center in the WebLogic ServerAdministration Console, click the name of the domain.
3. Select the Security tab, then the Unlock User sub-tab.
4. Enter the name of the user to unlock and click Save.
5. In the Change Center of the WebLogic Server Administration Console, clickRelease Configuration.
Chapter 2Configuring WebLogic Server Security
2-14
Note:
On a Managed Server, you cannot unlock a locked account through theWebLogic Server Administration Console. The unlock information is propagatedthrough a multicast message which is only configured in a cluster environment.Instead, use the following command:
java weblogic.Admin -url url -username adminuser -password adminuserpassword -type weblogic.management.security.authentication.UserLockoutManager-method clearLockout lockedusername
Alternatively, wait until the Lockout Duration time has passed.
Updating Methods Role Assigned to a Group or User in WebLogic ServerThis section provides information on how to update methods in an ASAP role assigned to agroup or a user in WebLogic Server. You can use the information defined in deploymentdescriptors to grant security roles and define security policies.
You can update the deployment descriptors by using WebLogic Workshop (Eclipsecomponent) or by editing the ejb-jar.xml and weblogic-ejb-jar.xml files manually.
To edit the XML files manually:
1. Navigate to WebLogic_domain/servers/WebLogic_server/upload/asapENV_ID/app(where the WebLogic_domain is the installation directory for your WebLogic Serverdomain, WebLogic_server is the name of your WebLogic Server domain, and ENV_ID isthe ASAP environment ID.
2. Do the following:
jar xvf asapENV_ID.ear ssam.jar jar xvf ssam.jar META-INF/ejb-jar.xml jar xvf ssam.jar META-INF/weblogic-ejb-jar.xml
3. Edit ejb-jar.xml and weblogic-ejb-jar.xml to add, remove, or modify roles to users orgroups.
For example, you may remove the following three methods from the Monitor Role in ejb-jar.xml file:
<method> <ejb-name>ASAPSecurityServices</ejb-name> <method-name>SA_Aborted_Work_Order_Report</method-name> </method> <method> <ejb-name>ASAPSecurityServices</ejb-name> <method-name>SA_Activity_Report</method-name> </method> <method> <ejb-name>ASAPSecurityServices</ejb-name> <method-name>SA_ASDL_Report</method-name> </method>
4. Do the following:
jar uvf ssam.jar META-INF/ejb-jar.xml jar uvf ssam.jar META-INF/weblogic-ejb-jar.xml jar uvf asapENV_ID.ear ssam.jar
Chapter 2Configuring WebLogic Server Security
2-15

5. Redeploy the asapENV_ID.ear file.
Configuring ASAP Server and Database Credential SecuritySecure data must be stored in a secure location and distributed to authorized users.The ASAP security system governs how secure data is managed and the ASAPdiagnostics files are secured:
• Secure Data Storage
The ASAP security administrator pre-defines the nature and accessibility of securedata for each ASAP server. Class A secure data is stored in the CSF wallet duringthe initial ASAP installation procedures (see the ASAP Installation Guide for moreinformation). The ASAP installer distributes this wallet to each server during theASAP installation.
• Secure Data Encryption
The CSF wallet encrypts all data contained in it and obtained from it. In addition,the CSF wallet file (cwallet.sso) has restricted access permissions.
Many ASAP utilities and scripts use the passwords contained in the CSF wallet. Formore information about how these utilities and scripts use the CSF wallet securityfeature, see "Using the Credential Store Factory Wallet with ASAP Utilities andScripts."
Your ASAP security administrator creates the class A secure data while installingASAP. Your administrator can also modify ASAP Server passwords using theModifyPasswords script (see "Changing Database Passwords in the Credential StoreFactory Wallet").
About Credential Store Factory Wallet Secure Data ManagementSecure data management in ASAP involves:
• Setting up and maintaining secure data storage
• Encrypting secure data during provisioning
Setting up and Maintaining Secure Data StorageDuring the ASAP installation procedure, your ASAP security administrator must entera predefined user name and password for each ASAP server. The administrator mustalso enter the WebLogic Server, and Oracle database user names and passwords.ASAP stores these user names and passwords in the CSF wallet (class A securedata).
Data EncryptionThe CSF wallet provides transparent encryption features that protect all credentials itstores and transmits.
Chapter 2Configuring ASAP Server and Database Credential Security
2-16
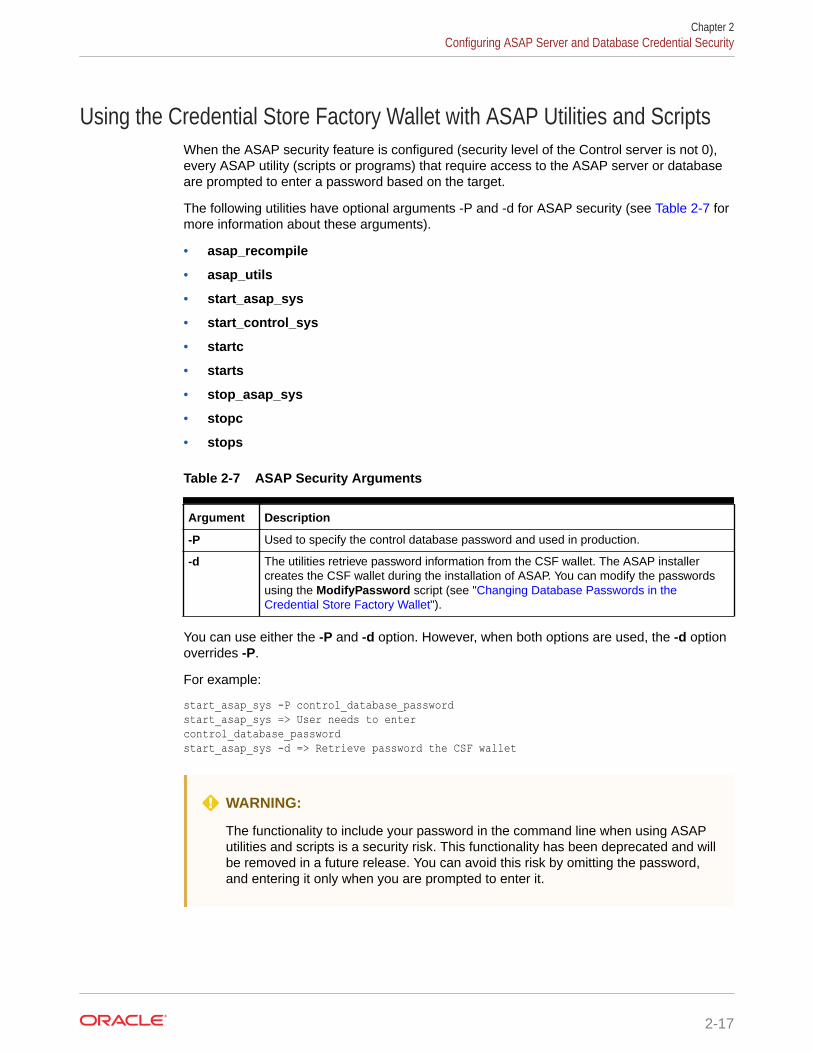
Using the Credential Store Factory Wallet with ASAP Utilities and ScriptsWhen the ASAP security feature is configured (security level of the Control server is not 0),every ASAP utility (scripts or programs) that require access to the ASAP server or databaseare prompted to enter a password based on the target.
The following utilities have optional arguments -P and -d for ASAP security (see Table 2-7 formore information about these arguments).
• asap_recompile
• asap_utils
• start_asap_sys
• start_control_sys
• startc
• starts
• stop_asap_sys
• stopc
• stops
Table 2-7 ASAP Security Arguments
Argument Description
-P Used to specify the control database password and used in production.
-d The utilities retrieve password information from the CSF wallet. The ASAP installercreates the CSF wallet during the installation of ASAP. You can modify the passwordsusing the ModifyPassword script (see "Changing Database Passwords in theCredential Store Factory Wallet").
You can use either the -P and -d option. However, when both options are used, the -d optionoverrides -P.
For example:
start_asap_sys -P control_database_passwordstart_asap_sys => User needs to entercontrol_database_passwordstart_asap_sys -d => Retrieve password the CSF wallet
WARNING:
The functionality to include your password in the command line when using ASAPutilities and scripts is a security risk. This functionality has been deprecated and willbe removed in a future release. You can avoid this risk by omitting the password,and entering it only when you are prompted to enter it.
Chapter 2Configuring ASAP Server and Database Credential Security
2-17
Changing Database Passwords in the Credential Store Factory WalletThe cwallet.sso file is found in the ASAP_Home/install directory. This file containssecurity information for installation purposes and includes the ASAP database schemauser names and passwords, the Oracle DBA user name and password, and theWebLogic Server domain user name and password. The ASAP installer creates thisfile during the installation process.
To change the CSF Wallet passwords, use the following procedure:
1. Source the Environment_Profile located in the ASAP_Home/ directory.
2. Set the TNS_ADMIN UNIX variable to the location of your tnsname.ora file.
export TNS_ADMIN=/home/examplelocation/3. From ASAP_Home/scripts directory run the ModifyPassword tool.
4. Enter the DBA user name and password.
5. Enter and modify the ASAP database user names and passwords as required.
Configuring Security for Network Elements CommunicationNE credentials (also called custom secure class B data) used primarily by NEPs toestablish network connections to NEs must be stored in a secure location anddistributed to authorized users.
The ASAP security tool supports the following features to protect NE credentials:
• Secure Data Storage
An administrator can use the ASAP security tool to create NE credentials andstore these credentials in a central repository on the Control server. The Controlserver distributes these credentials to SRPs, JSRPs, NEP, or Java-enabled NEPs(JNEPs).
ASAP stores NE credentials in the Control server in the tbl_classB_secudatabase table.
• Secure Data Encryption
The Control server uses a symmetric secret key encryption method to achievedata confidentiality for custom secure data.
• Key Distribution
The Control server acts as a key distribution server, and distributes custom securedata to every ASAP server during provisioning. To acquire the custom secure data,ASAP server has a pre-defined key distribution protocol.
Understanding the Custom Secure Data StructureYour ASAP security administrator can define class B custom secure data throughapplication programming interfaces (APIs) or action functions used by the customizedSRP, JSRPs, NEP, and JNEPs. Your ASAP security administrator can also set up yourcustom secure data using the ASAP security tool.
The class B custom secure data typically includes the user names and password forthe NEs and should only be used by custom NEPs, JNEPs, SRPs, or JSRPs.
Chapter 2Configuring Security for Network Elements Communication
2-18
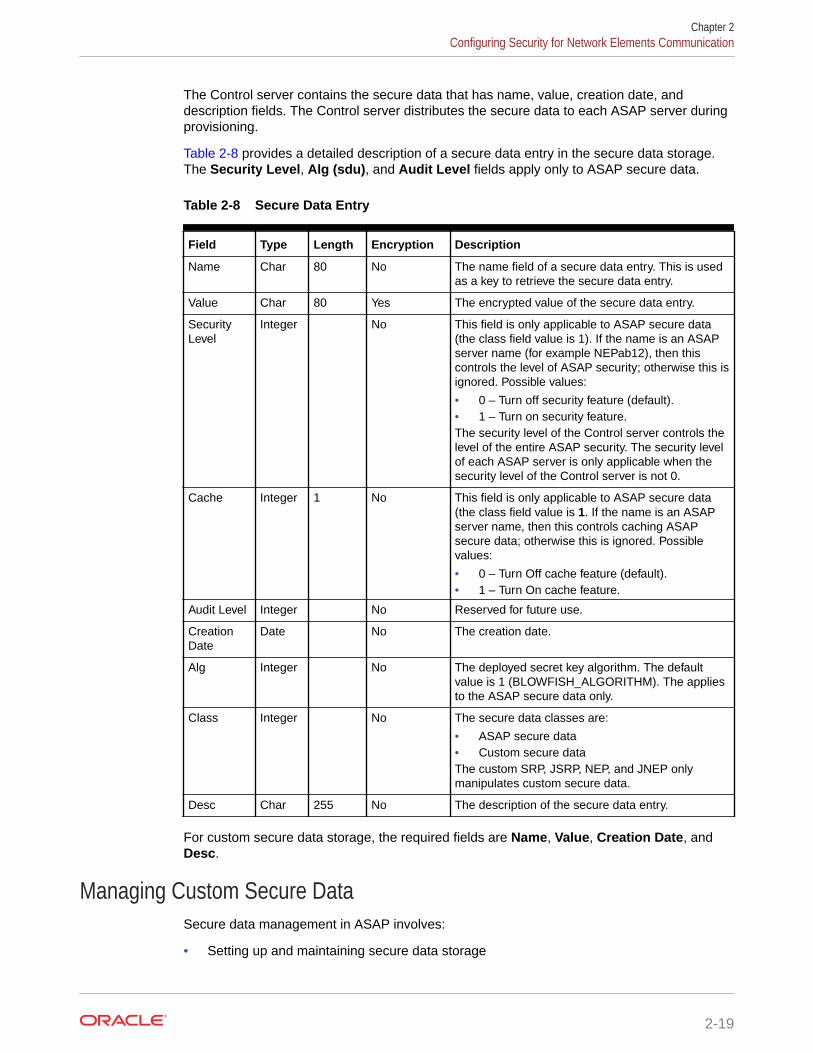
The Control server contains the secure data that has name, value, creation date, anddescription fields. The Control server distributes the secure data to each ASAP server duringprovisioning.
Table 2-8 provides a detailed description of a secure data entry in the secure data storage.The Security Level, Alg (sdu), and Audit Level fields apply only to ASAP secure data.
Table 2-8 Secure Data Entry
Field Type Length Encryption Description
Name Char 80 No The name field of a secure data entry. This is usedas a key to retrieve the secure data entry.
Value Char 80 Yes The encrypted value of the secure data entry.
SecurityLevel
Integer No This field is only applicable to ASAP secure data(the class field value is 1). If the name is an ASAPserver name (for example NEPab12), then thiscontrols the level of ASAP security; otherwise this isignored. Possible values:
• 0 – Turn off security feature (default).• 1 – Turn on security feature.The security level of the Control server controls thelevel of the entire ASAP security. The security levelof each ASAP server is only applicable when thesecurity level of the Control server is not 0.
Cache Integer 1 No This field is only applicable to ASAP secure data(the class field value is 1. If the name is an ASAPserver name, then this controls caching ASAPsecure data; otherwise this is ignored. Possiblevalues:
• 0 – Turn Off cache feature (default).• 1 – Turn On cache feature.
Audit Level Integer No Reserved for future use.
CreationDate
Date No The creation date.
Alg Integer No The deployed secret key algorithm. The defaultvalue is 1 (BLOWFISH_ALGORITHM). The appliesto the ASAP secure data only.
Class Integer No The secure data classes are:
• ASAP secure data• Custom secure dataThe custom SRP, JSRP, NEP, and JNEP onlymanipulates custom secure data.
Desc Char 255 No The description of the secure data entry.
For custom secure data storage, the required fields are Name, Value, Creation Date, andDesc.
Managing Custom Secure DataSecure data management in ASAP involves:
• Setting up and maintaining secure data storage
Chapter 2Configuring Security for Network Elements Communication
2-19
• Encrypting secure data during provisioning
• Key distribution (for custom secure data)
• Local caching of custom secure data, for improved system performance
Setting up and Maintaining Secure Data StorageYour administrator can set up the initial custom secure data storage repository and canpredefine this custom secure data. ASAP stores this data in a central repository: theControl server.
Encrypting Data During Network Element ProvisioningTo protect custom secure data during provisioning, symmetric or secret key encryptionis used. You can use the ASAP APIs and action functions to:
• Retrieve ASAP secure data and custom secure data
• Update or add custom secure data
To control the security-sensitive messages that come from state table action functions,use the ACT_FUNC_SEC state table variable.
The following example shows how to use ACT_FUNC_SEC.
BEGIN TEST_PROG110 CONCAT 'ACT_FUNC_SEC = 1'110 DMS_LEN '%FORMAT_LEN = %MCLI:%NXX:%LEN'120 CONCAT 'ACT_FUNC_SEC = 0'130 CONCAT '%MY_LEN = %LEN'END TEST_PROG
The NEP diagnostic file does not show the CSDL parameter values of NXX, LEN, andMCLI from 110 because ACT_FUNC_SEC is set to 1. The value of MY_LEN (forexample, 6742727 from CSDL parameter LEN) appears in the NEP diagnostic sinceACT_FUNC_SEC is set to 0 on line 120.
Any State Table action function can be placed between two CONCAT statements, butonly the following action functions support the security feature:
• CONCAT
• DMS_FEATS
• DMS_LEN
• EXEC
• EXEC_RPC
• GET
• GET_INCPT
• GET_LTG
• SEND
• SENDECHO
• SUBSTR
Chapter 2Configuring Security for Network Elements Communication
2-20
Understanding Key Distribution for Custom Secure DataThe Control server provides key distribution to every ASAP server to ensure the securetransmission of custom secure data. To acquire the secure data, the ASAP server must followthe pre-defined key distribution protocol. The Control server does the following:
• Ensures that the implementation details of the secure data storage, such as the physicalmedia, file location, and content, are transparent to ASAP server. By following pre-defined key distribution protocol set up by your ASAP security administrator, each ASAPserver can acquire the necessary secure data.
• Ensures that the secure data is accessible only to authorized users. Before requestingsecure data from the key distribution server, each ASAP server authenticates itself usingthe session ID given by the Control server.
• Provides a central location for secure data storage.
The Control server uses a one-time password named as a session ID to authenticate therequester. The session ID is the unique integer value per instance of the Control server.
Caching Secure Data on Local ServersBy default, each ASAP server retrieves the secure data from the Control server. In addition,to provide better performance in retrieving secure data, you can configure a cache thatcontains recently-used secure data in the local ASAP server. In this case, the ASAP serverchecks the local cache first, then follows the key distribution protocol. A cache provides betterperformance in retrieving secure data, but it can reveal secure data to unauthorized users.For example, the attacker may kill the process to generate core file and retrieve secure datafrom the core file.
Securing Network Element Credentials with the Security AdministrationTool
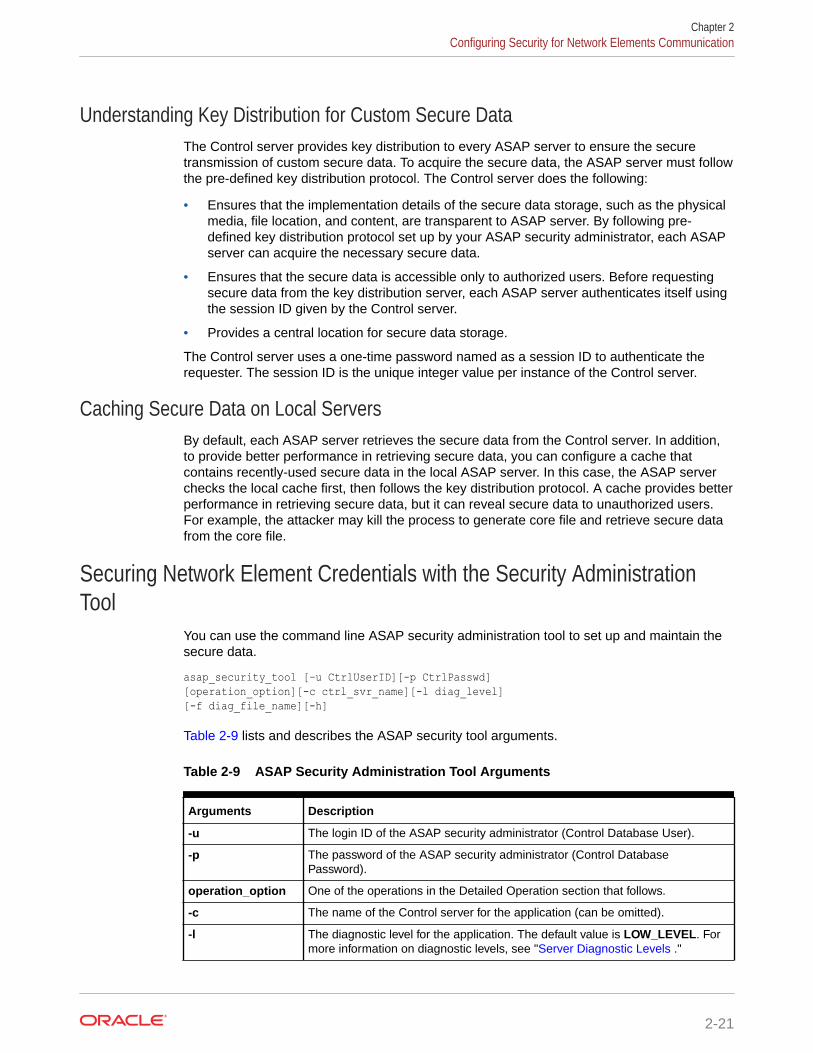
You can use the command line ASAP security administration tool to set up and maintain thesecure data.
asap_security_tool [–u CtrlUserID][-p CtrlPasswd][operation_option][-c ctrl_svr_name][-l diag_level][-f diag_file_name][-h]
Table 2-9 lists and describes the ASAP security tool arguments.
Table 2-9 ASAP Security Administration Tool Arguments
Arguments Description
-u The login ID of the ASAP security administrator (Control Database User).
-p The password of the ASAP security administrator (Control DatabasePassword).
operation_option One of the operations in the Detailed Operation section that follows.
-c The name of the Control server for the application (can be omitted).
-l The diagnostic level for the application. The default value is LOW_LEVEL. Formore information on diagnostic levels, see "Server Diagnostic Levels ."
Chapter 2Configuring Security for Network Elements Communication
2-21
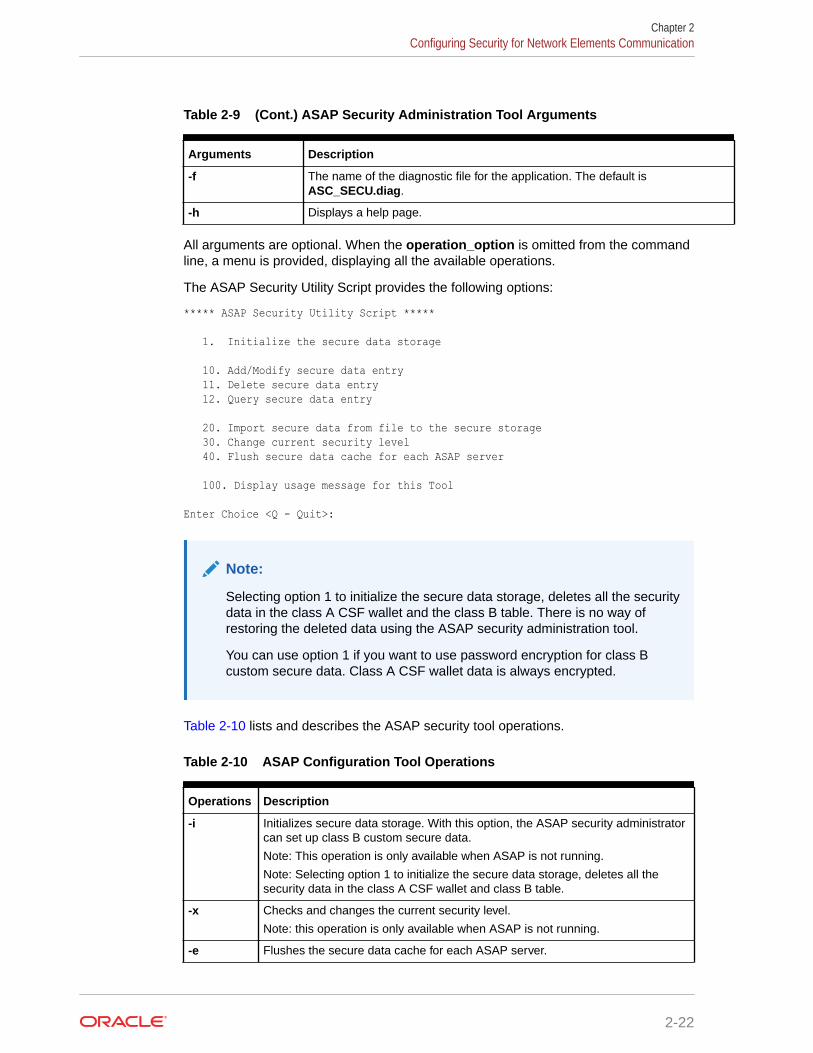
Table 2-9 (Cont.) ASAP Security Administration Tool Arguments
Arguments Description
-f The name of the diagnostic file for the application. The default isASC_SECU.diag.
-h Displays a help page.
All arguments are optional. When the operation_option is omitted from the commandline, a menu is provided, displaying all the available operations.
The ASAP Security Utility Script provides the following options:
***** ASAP Security Utility Script *****
1. Initialize the secure data storage
10. Add/Modify secure data entry 11. Delete secure data entry 12. Query secure data entry
20. Import secure data from file to the secure storage 30. Change current security level 40. Flush secure data cache for each ASAP server
100. Display usage message for this Tool
Enter Choice <Q - Quit>:
Note:
Selecting option 1 to initialize the secure data storage, deletes all the securitydata in the class A CSF wallet and the class B table. There is no way ofrestoring the deleted data using the ASAP security administration tool.
You can use option 1 if you want to use password encryption for class Bcustom secure data. Class A CSF wallet data is always encrypted.
Table 2-10 lists and describes the ASAP security tool operations.
Table 2-10 ASAP Configuration Tool Operations
Operations Description
-i Initializes secure data storage. With this option, the ASAP security administratorcan set up class B custom secure data.
Note: This operation is only available when ASAP is not running.
Note: Selecting option 1 to initialize the secure data storage, deletes all thesecurity data in the class A CSF wallet and class B table.
-x Checks and changes the current security level.
Note: this operation is only available when ASAP is not running.
-e Flushes the secure data cache for each ASAP server.
Chapter 2Configuring Security for Network Elements Communication
2-22
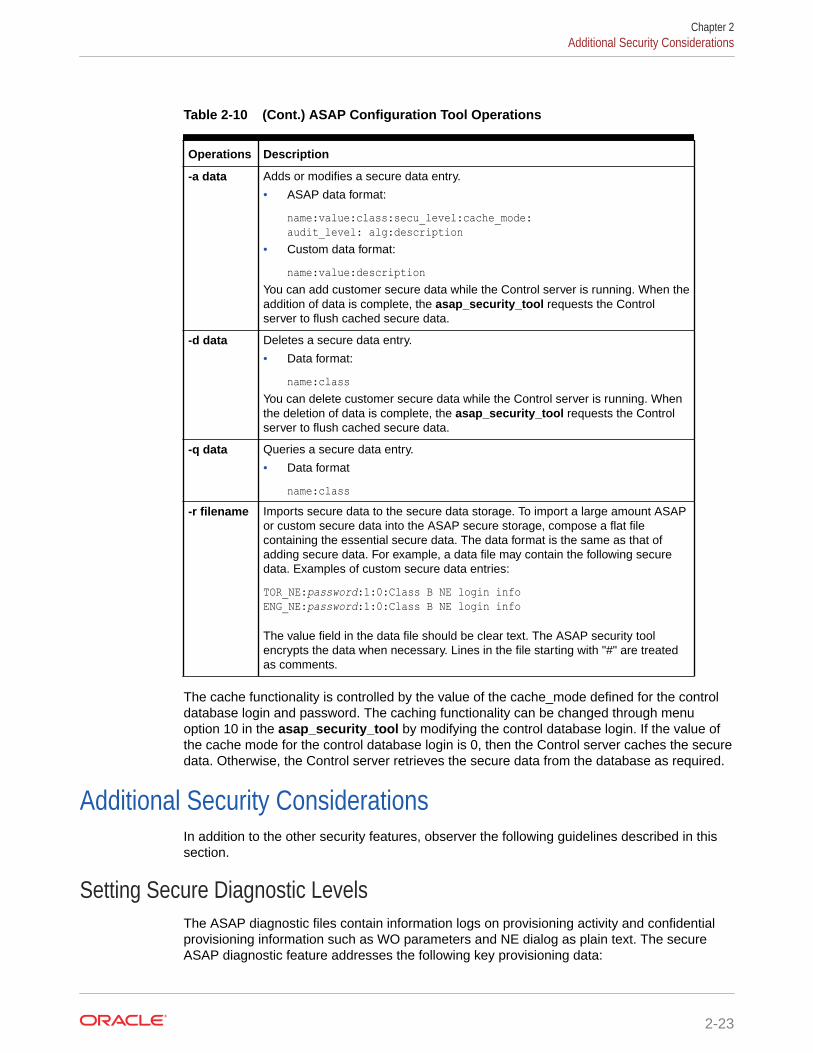
Table 2-10 (Cont.) ASAP Configuration Tool Operations
Operations Description
-a data Adds or modifies a secure data entry.
• ASAP data format:
name:value:class:secu_level:cache_mode:audit_level: alg:description
• Custom data format:
name:value:descriptionYou can add customer secure data while the Control server is running. When theaddition of data is complete, the asap_security_tool requests the Controlserver to flush cached secure data.
-d data Deletes a secure data entry.
• Data format:
name:classYou can delete customer secure data while the Control server is running. Whenthe deletion of data is complete, the asap_security_tool requests the Controlserver to flush cached secure data.
-q data Queries a secure data entry.
• Data format
name:class-r filename Imports secure data to the secure data storage. To import a large amount ASAP
or custom secure data into the ASAP secure storage, compose a flat filecontaining the essential secure data. The data format is the same as that ofadding secure data. For example, a data file may contain the following securedata. Examples of custom secure data entries:
TOR_NE:password:1:0:Class B NE login infoENG_NE:password:1:0:Class B NE login info
The value field in the data file should be clear text. The ASAP security toolencrypts the data when necessary. Lines in the file starting with "#" are treatedas comments.
The cache functionality is controlled by the value of the cache_mode defined for the controldatabase login and password. The caching functionality can be changed through menuoption 10 in the asap_security_tool by modifying the control database login. If the value ofthe cache mode for the control database login is 0, then the Control server caches the securedata. Otherwise, the Control server retrieves the secure data from the database as required.
Additional Security ConsiderationsIn addition to the other security features, observer the following guidelines described in thissection.
Setting Secure Diagnostic LevelsThe ASAP diagnostic files contain information logs on provisioning activity and confidentialprovisioning information such as WO parameters and NE dialog as plain text. The secureASAP diagnostic feature addresses the following key provisioning data:
Chapter 2Additional Security Considerations
2-23

• NE dialog to control the content of diagnostic file
• WO parameter
Setting the Network Element Dialog Diagnostic Configuration ParameterThe ASAP NEP diagnostic file contains switch-sensitive information sent and receivedfrom the NE. In production environments, Oracle recommends that the audit level isset to SANE so that switch-sensitive information is not included in diagnostics files.Oracle also recommends that you delete old archives and/or store archives in a securemanner.
In addition to setting the audit level to SANE, you can also enable or disable theconfigurable variable, NE_DIALOG_OFF, in ASAP.cfg. This variable controls thesource code to print out all NE dialog messages from NEP diagnostic file. All theoutput NE dialog in the NEP application checks against the value ofNE_DIALOG_OFF, and cuts off the message if the NE_DIALOG_OFF is set to 1.
Table 2-11 lists and describes the NE_DIALOG_OFF option.
Table 2-11 NE_DIALOG_OFF Configuration Variable
ASAP ConfigurationVariable
Default Description
NE_DIALOG_OFF 0 Controls the NE dialog message in the diagnostic file.Possible values are:
• 0 – NE dialog messages appear in the diagnosticfile.
• 1 – Secure the NE dialog. No NE dialog messagesappear in the diagnostic file.
Although the NE dialog from the state table action function can be controlled by theaction statement, some NE dialogs are not related to any action function, and in thiscase the NE_DIALOG_OFF is used to hide NE information.
Setting Work Order Information Diagnostic LevelsWork orders typically contain business sensitive information. The WO is processed byseveral components, like Service Request Processor (SRP), Service ActivationRequest Manager (SARM), OCA; consequently, the WO information is exposed todifferent diagnostic files. For this reason, Oracle recommends that the diagnostic levelbe set to SANE in productions environments to avoid unnecessarily exposing sensitiveinformation. As well, any archival diagnostics files should be stored in a securemanner. For more information on diagnostic levels, see "Server Diagnostic Levels ."
In addition to setting the audit level to SANE, you can also enable or disable theconfigurable variable, WO_SECURITY_PROP, in the ASAP WO. This variablecontrols the source code to print out the information messages from all ASAPdiagnostic files for a particular WO.
Table 2-12 lists and describes the WO_SECURITY_PROP option.
Chapter 2Additional Security Considerations
2-24
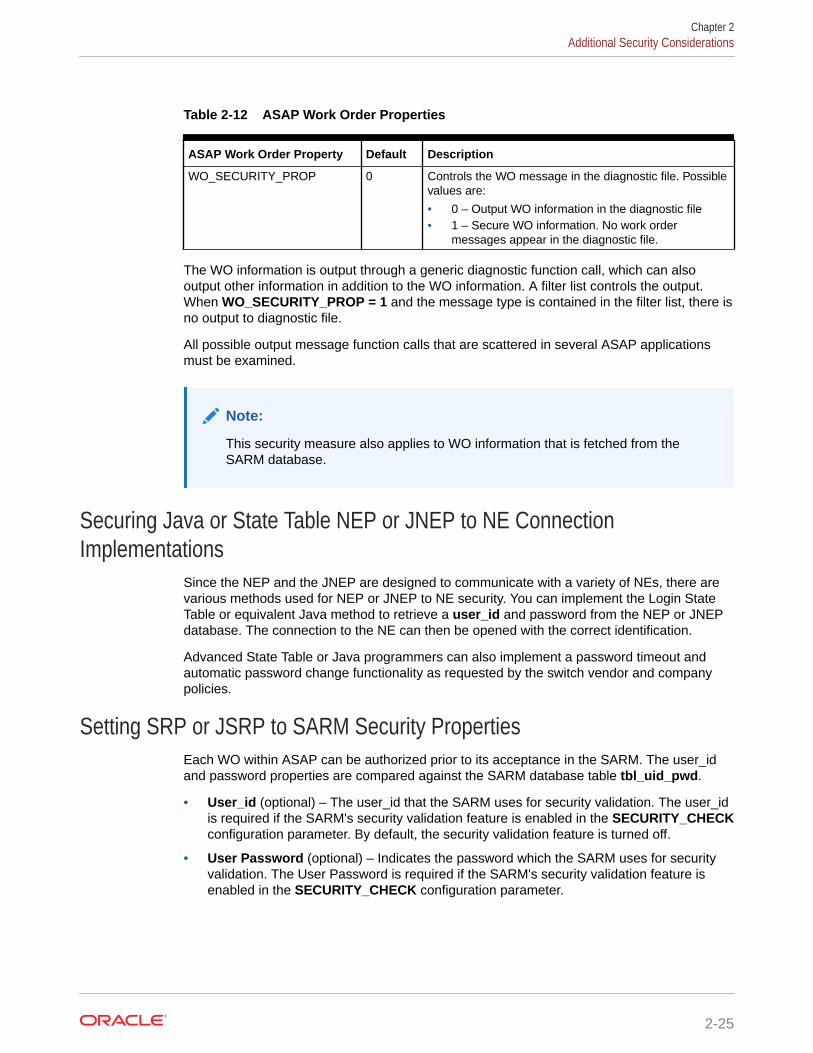
Table 2-12 ASAP Work Order Properties
ASAP Work Order Property Default Description
WO_SECURITY_PROP 0 Controls the WO message in the diagnostic file. Possiblevalues are:
• 0 – Output WO information in the diagnostic file• 1 – Secure WO information. No work order
messages appear in the diagnostic file.
The WO information is output through a generic diagnostic function call, which can alsooutput other information in addition to the WO information. A filter list controls the output.When WO_SECURITY_PROP = 1 and the message type is contained in the filter list, there isno output to diagnostic file.
All possible output message function calls that are scattered in several ASAP applicationsmust be examined.
Note:
This security measure also applies to WO information that is fetched from theSARM database.
Securing Java or State Table NEP or JNEP to NE ConnectionImplementations
Since the NEP and the JNEP are designed to communicate with a variety of NEs, there arevarious methods used for NEP or JNEP to NE security. You can implement the Login StateTable or equivalent Java method to retrieve a user_id and password from the NEP or JNEPdatabase. The connection to the NE can then be opened with the correct identification.
Advanced State Table or Java programmers can also implement a password timeout andautomatic password change functionality as requested by the switch vendor and companypolicies.
Setting SRP or JSRP to SARM Security PropertiesEach WO within ASAP can be authorized prior to its acceptance in the SARM. The user_idand password properties are compared against the SARM database table tbl_uid_pwd.
• User_id (optional) – The user_id that the SARM uses for security validation. The user_idis required if the SARM's security validation feature is enabled in the SECURITY_CHECKconfiguration parameter. By default, the security validation feature is turned off.
• User Password (optional) – Indicates the password which the SARM uses for securityvalidation. The User Password is required if the SARM's security validation feature isenabled in the SECURITY_CHECK configuration parameter.
Chapter 2Additional Security Considerations
2-25
Setting Security Between ServersTo increase security between Open Servers, the configuration variableCLIENT_SECURITY_ON determines whether to authorize every connection made tothe Open Server. When a client (or another server) establishes a connection to aserver, the user_id and password used by that connection is employed to open aconnection to the SQL server. If the connection to the SQL server is successful, thenthe connection is accepted; otherwise it is rejected.
Enabling Schema Validation for the JSRP JMS InterfaceYou can enable the JSRP to validate incoming Java Message Service (JMS) XMLmessages at the JSRP JMS interface against the ASAP schemas that enforces xmlWO message formation. Enabling schema validation helps to secure the JSRP JMSinterface against invalid XML messages, but also incurs a performance impact.
To enable schema validation, set the VALIDATION_ENABLED parameter to True inthe ejb-jar.xml file from srp.jar file of Domain_home/servers/server_name/upload/asapenvid.ear deployment (where server_name is the name of your WebLogic Serverinstance, and envid is the environment ID for your ASAP instance.
Chapter 2Additional Security Considerations
2-26
3Monitoring and Managing ASAP
This chapter describes monitoring and managing Oracle Communications ASAP.
Overview of Monitoring and Managing ASAPASAP provides the following management and monitoring capabilities:
• ASAP process monitoring – The ASAP Control server starts, stops, and monitors allprocesses in ASAP. Upon startup, each ASAP application (client or server) establishes aconnection to the Control server. The Control server immediately installs a disconnectionhandler on that connection. When the connection is lost, a callback function is triggeredin the Control server, indicating an abnormal termination of the process. A controlledshutdown of ASAP applications does not trigger this callback. When the processtermination is detected, the Control server immediately attempts to restart the process (ifconfigured).
• ASAP database monitoring – The ASAP Control server periodically monitors the use ofdatabase tables and database devices. The frequency of this database monitoring task isdefined using the DB_MONITOR_TIME attribute in the ASAP.cfg configuration file (see"About Monitoring Database Segment and File System Size" for more information on thisattribute). The Control server reads a configuration table that lists the database usethreshold values and issues a system event if a particular threshold is exceeded. Acustom routine can then be called to perform clean-up tasks and notify the systemadministrators. For more information on configuring these thresholds and system events,see "Configuring System Events."
• ASAP file system monitoring – ASAP periodically monitors the use of UNIX filesystems. The frequency of this monitoring task is defined using the FS_MONITOR_TIMEattribute in the ASAP.cfg configuration file (see "About Monitoring Database Segmentand File System Size" for more information on this attribute). The Control servercompares the file system usage against the configuration table, and issues a systemevent if any threshold value exceeds. A custom routine can then be called to performclean-up tasks and notify the system administrators. For more information on configuringsystem events, see "Configuring System Events." For more information on configuringthis thresholds, see the ASAP Developer's Guide.
• ASAP process information – Each ASAP application server logs process performanceinformation (for example, CPU utilization, memory usage) and periodically stores it in thedatabase. This data can then be used to determine periods of low activity suitable formaintenance. For more information, see the chapter about the ASAP utility in the ASAPServer Configuration Guide.
• ASAP database admin process – Each ASAP server can perform administration taskswithin its application database. At a user-configured time, the server administrationthread connects to its primary database to perform database archiving, purging, andintegrity checks. This thread is also responsible for executing database administrationcommands to optimize all query plans for the database procedures. This activity ensuresthat ASAP database performance is not affected by large changes in data volumes. See"Managing the Database and File System" for more information.
3-1

• ASAP diagnostic and system events – ASAP is equipped with diagnostic calland system activity events that monitor its internal health. ASAP events can bemapped to various alarm categories to generate alarms viewable through a user-defined management console. For more information, see "Configuring SystemEvents and Alarms Using Stored Procedures."
Configuring System Events and Alarms Using StoredProcedures
System events range from informational events to critical error events. When an ASAPclient or server generates a system event, the event is transmitted to the Controlserver which then saves the event. The Control server determines if the event requiresan alarm to be triggered. The Control server determines the alarm centers that aremapped to the alarm and the alarm program to call. This alarm program can be a shellscript, a UNIX executable, or a Linux executable to send the alarm to email or print.
Figure 3-1 Alarm Process
The Control server also monitors each application process within ASAP. If anapplication process terminates, the Control server issues an Abnormal ProcessTermination event that is mapped to a user-defined alarm program. Abnormal ProcessTermination events are written to both the application diagnostic file and the database.
Each event can be configured to enable or disable a system alarm. Every alarm hasan associated alarm level (such as MAJOR, MINOR, or CRITICAL) and Auto Clear
Chapter 3Configuring System Events and Alarms Using Stored Procedures
3-2
flag. The Auto Clear flag specifies that the alarm should be automatically cleared upongeneration. If the alarm is configured as non-auto clearing, it is generated every five minutesuntil you reset it using the asap_utils administrative remote procedure call (RPC) interface(function 60). If configured as auto-clearing, the alarm is generated only once.
For more information on asap_utils, see ASAP Server Configuration Guide.
An alarm can map to up to five alarm centers which trigger alarm programs to alert users ofthe system alarm. Typically, such alarms can email an administrator, print reports to an alarmcenter, page a particular individual, or communicate with a network management system.
Configuring Alarm Centers for Alarm Notification and EscalationAlarm centers can be pagers, email accounts, printers, network management systems, andso forth. Alarm centers are notified of alarms by means of a UNIX program, or shell script.
To create an alarm center, specify the UNIX program, or shell script that ASAP runs when thealarm is generated. For example, assume there are two alarm centers: a general ADMINcenter, which receives messages on a printer, and another center called ADMINPGR, whichreceives pager notifications. To notify these alarm centers, you must develop two shell scriptsor programs.
Alarm center information is contained in tbl_alarm_center. Alarm centers are later mappedto system alarms in tbl_system_alarm. If you are defining a system event that does not mapto an alarm, proceed to "Configuring System Events."
Use the following stored procedures to define, list, or delete alarm centers:
• CSP_new_center – Defines an alarm center to which alarm notifications must be sent bythe Control server.
• CSP_list_center – Lists an alarm center definition from the control database.
• CSP_del_center – Deletes an alarm center definition from the control database.
For more information on these stored procedures and tbl_alarm_center, refer to the ASAPDeveloper's Guide.
Configuring System AlarmsSystem alarms identify system events, such as component malfunction. System events canbe mapped to operations which enable, disable, or log alarms.
Alarms in ASAP can be routed to multiple alarm centers, based on the time of day.
The types of alarms that can be configured in ASAP are:
• Continuous alarm – The continuous alarm is issued periodically until your systemadministrator manually disables it or ASAP issues a system event to disable the alarm.
• Single initiation alarm – The single initiation alarm is generated once each time thesystem event is issued.
Table 3-1 lists and describes alarms and what action is required in response to the alarm.
Chapter 3Configuring System Events and Alarms Using Stored Procedures
3-3
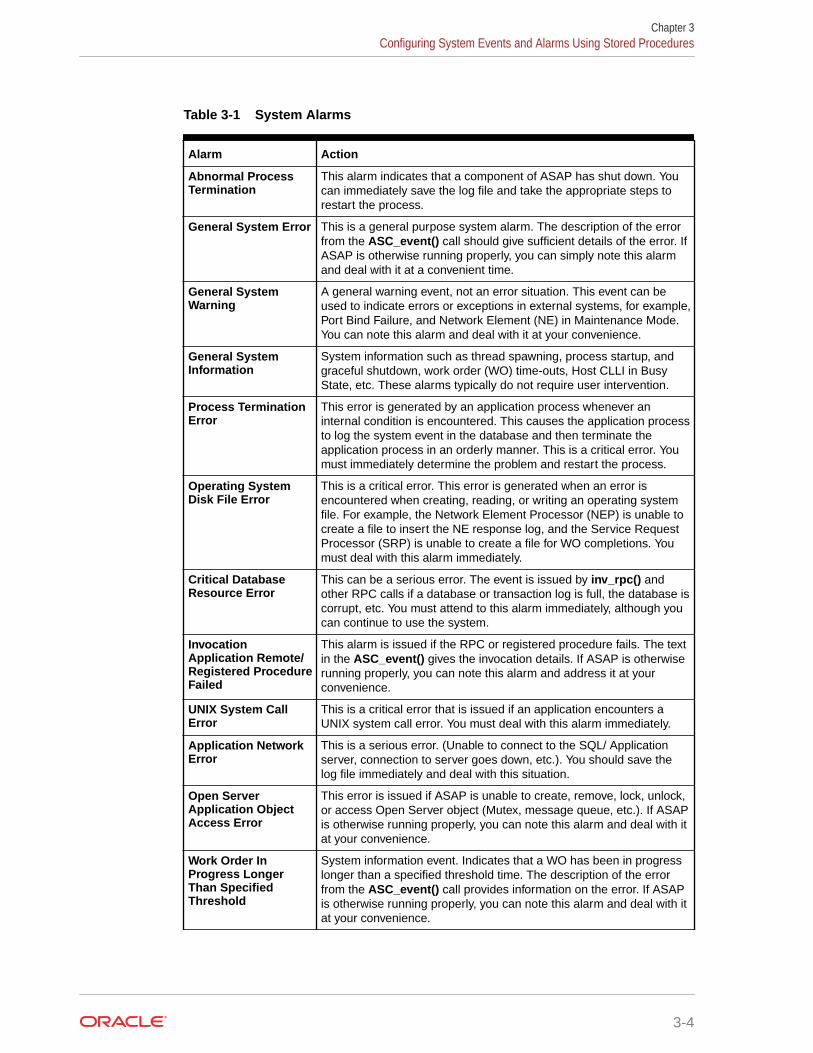
Table 3-1 System Alarms
Alarm Action
Abnormal ProcessTermination
This alarm indicates that a component of ASAP has shut down. Youcan immediately save the log file and take the appropriate steps torestart the process.
General System Error This is a general purpose system alarm. The description of the errorfrom the ASC_event() call should give sufficient details of the error. IfASAP is otherwise running properly, you can simply note this alarmand deal with it at a convenient time.
General SystemWarning
A general warning event, not an error situation. This event can beused to indicate errors or exceptions in external systems, for example,Port Bind Failure, and Network Element (NE) in Maintenance Mode.You can note this alarm and deal with it at your convenience.
General SystemInformation
System information such as thread spawning, process startup, andgraceful shutdown, work order (WO) time-outs, Host CLLI in BusyState, etc. These alarms typically do not require user intervention.
Process TerminationError
This error is generated by an application process whenever aninternal condition is encountered. This causes the application processto log the system event in the database and then terminate theapplication process in an orderly manner. This is a critical error. Youmust immediately determine the problem and restart the process.
Operating SystemDisk File Error
This is a critical error. This error is generated when an error isencountered when creating, reading, or writing an operating systemfile. For example, the Network Element Processor (NEP) is unable tocreate a file to insert the NE response log, and the Service RequestProcessor (SRP) is unable to create a file for WO completions. Youmust deal with this alarm immediately.
Critical DatabaseResource Error
This can be a serious error. The event is issued by inv_rpc() andother RPC calls if a database or transaction log is full, the database iscorrupt, etc. You must attend to this alarm immediately, although youcan continue to use the system.
InvocationApplication Remote/Registered ProcedureFailed
This alarm is issued if the RPC or registered procedure fails. The textin the ASC_event() gives the invocation details. If ASAP is otherwiserunning properly, you can note this alarm and address it at yourconvenience.
UNIX System CallError
This is a critical error that is issued if an application encounters aUNIX system call error. You must deal with this alarm immediately.
Application NetworkError
This is a serious error. (Unable to connect to the SQL/ Applicationserver, connection to server goes down, etc.). You should save thelog file immediately and deal with this situation.
Open ServerApplication ObjectAccess Error
This error is issued if ASAP is unable to create, remove, lock, unlock,or access Open Server object (Mutex, message queue, etc.). If ASAPis otherwise running properly, you can note this alarm and deal with itat your convenience.
Work Order InProgress LongerThan SpecifiedThreshold
System information event. Indicates that a WO has been in progresslonger than a specified threshold time. The description of the errorfrom the ASC_event() call provides information on the error. If ASAPis otherwise running properly, you can note this alarm and deal with itat your convenience.
Chapter 3Configuring System Events and Alarms Using Stored Procedures
3-4

Table 3-1 (Cont.) System Alarms
Alarm Action
Work Order RoutingError
This error is generated when the Service Action Request Manager(SARM) is unable to correctly determine the Host NE to which a WOshould be routed. The description of the error from the ASC_event()call provides the routing data (Directory Number (DN) or MCLI ).Updates to the routing tables are required.
Network Element HasGone IntoMaintenance Mode
An informational alarm. This alarm is generated when an NE entersmaintenance mode. If the alarm persists, investigate the reason.
Each system event can be optionally mapped to a system alarm in tbl_system_alarm.
You can specify the system alarm level: MINOR, MAJOR, or CRITICAL. Each alarm is eitherself auto-clearing or non-auto-clearing, and may or may not define one or more alarm centersto which the alarm is to be transmitted.
If the alarm is configured as non auto-clearing, it is generated every five minutes until youreset the alarm. If the alarm is configured as an auto-clearing alarm, it is only generatedonce.
After you have defined the alarm centers for the system, you can define the alarms. An alarmcode is used to identify uniquely each alarm in ASAP. You can configure an alarm level foreach alarm and up to five different alarm routes. The alarm routes are used to specify dailytime intervals for an alarm to be generated at up to five alarm centers and to specify the timeperiod in minutes between a regeneration of the alarm.
Use the following stored procedures to define, list, or delete system alarms:
• CSP_new_alarm – Defines an alarm within ASAP, and optionally, the associated “alarmcode" that may be associated with the event.
• CSP_list_alarm – Lists system alarm codes and their definitions.
• CSP_del_alarm – Deletes a system alarm code.
For more information on these stored procedures and tbl_system_alarm, refer to the ASAPDeveloper's Guide.
Configuring System EventsIn ASAP, each application can generate system events from within the application code. Inaddition, you can configure system events to generate an alarm in certain circumstances [forexample, Common Service Description Layer (CSDL) failure, SARM to SRP notifications,database, and file system thresholds being exceeded, and so on] using certain static tableswithin ASAP.
Each system event is configured in the control database and can be mapped to a particularsystem alarm. Each alarm can, in turn, be mapped to one or more alarm centers. Each alarmcenter can then run a user-supplied alarm program to perform the relevant user-determinedalarm notification.
Chapter 3Configuring System Events and Alarms Using Stored Procedures
3-5
Note:
You can define system events in custom code. The system events you definedo not have to be mapped to core system events. To generate alarms,ensure that the event you have defined is mapped to an alarm in the Event/Alarm Configuration function.
Defining System EventsCore and customer-specific subsystems can generate system events. System eventsare defined in the control database table tbl_event_type.
Events can be associated with an alarm code. In addition, the event can enable ordisable the alarm.
Use the following stored procedures to define, list, or delete system events:
• CSP_new_event – Defines an event type within ASAP, and optionally, theassociated “alarm code" that may be associated with the event.
• CSP_list_event – Lists database threshold definitions.
• CSP_del_event – Deletes a database threshold definition.
For more information on these stored procedures and tbl_event_type, refer to theASAP Developer's Guide.
Setting Database ThresholdsThe Control server monitors database and transaction log sizes during normaloperation. You must configure the database and transaction log thresholds for eachdatabase and ASAP environment and the system events that trigger an alarm. Whenthe threshold is exceeded, ASAP can issue the system event to trigger an alarm.
Use the following stored procedures to define, list, or delete database thresholds:
• CSP_new_db_thresh – Defines database and/or transaction log thresholds to beused by the Control server.
• CSP_list_db_thresh – Lists database threshold definitions.
• CSP_del_db_thresh – Deletes a database threshold definition.
Database thresholds are defined in tbl_db_threshold.
For more information on these stored procedures and tbl_db_threshold, refer to theASAP Developer's Guide.
Sample Alarm Program - admin.shThe ASAP_Home/scripts/admin.sh sample script is a UNIX shell script. In thisexample, the admin.sh and adminp.sh scripts are linked copies of each other. Alarmscripts can also be a UNIX executable program. You must copy this script from theASAP_Hhome/scripts folder to the ASAP_Home/programs folder in order for acontrol server alarm center to use it.
Chapter 3Configuring System Events and Alarms Using Stored Procedures
3-6

System events can be issued for critical, major, and minor system errors, system warnings,and system information.
## SCCS Id: @(#) admin.sh 1.1@(#)## Script to perform alarm notification.# ## Note that this script should be placed in the $PROGRAMS directory in order# for the Control Server to pick it up.#TMPFILE=/tmp/alarm.$$PERMFILE=$LOGDIR/ASAP_Alarm_logUSR=oper1DEVICE=consolewhile getopts i:n:e:E:d:f:l:a:s: cdocase $c ini) event_id=$OPTARG;;n) alarm_name=$OPTARG;;e) event_code=$OPTARG;;E) event_desc=$OPTARG;;d) event_text=$OPTARG;;f) source_file=$OPTARG;;l) source_line=$OPTARG;;a) level=$OPTARG;;s) application=$OPTARG;;\?) ;;esacdoneshift `expr $OPTIND - 1`echo "\n\*************************************************************************\n\ASAP Alarm Issued @ `date` \n\Alarm Program = $0\n\*************************************************************************\n\\n\Arguments:\n\Event Id = $event_id\n\Alarm Name = $alarm_name\n\Event Code = $event_code\n\Event Desc = $event_desc\n\Event Text = $event_text\n\Source File = $source_file\n\Source Line = $source_line\n\Alarm Level = $level\n\Application = $application\n\\n\Additional Parameters = $*\n\n\** End of Alarm **\n" > $TMPFILEcase `basename $0` in "admin.sh") cat $TMPFILE >> $PERMFILEbreak;;"adminp.sh") cat $TMPFILE | mail $USRcat $TMPFILE | write $USR $DEVICEcat $TMPFILE >> $PERMFILEbreak;;esacrm -f $TMPFILEexit 0
Chapter 3Configuring System Events and Alarms Using Stored Procedures
3-7
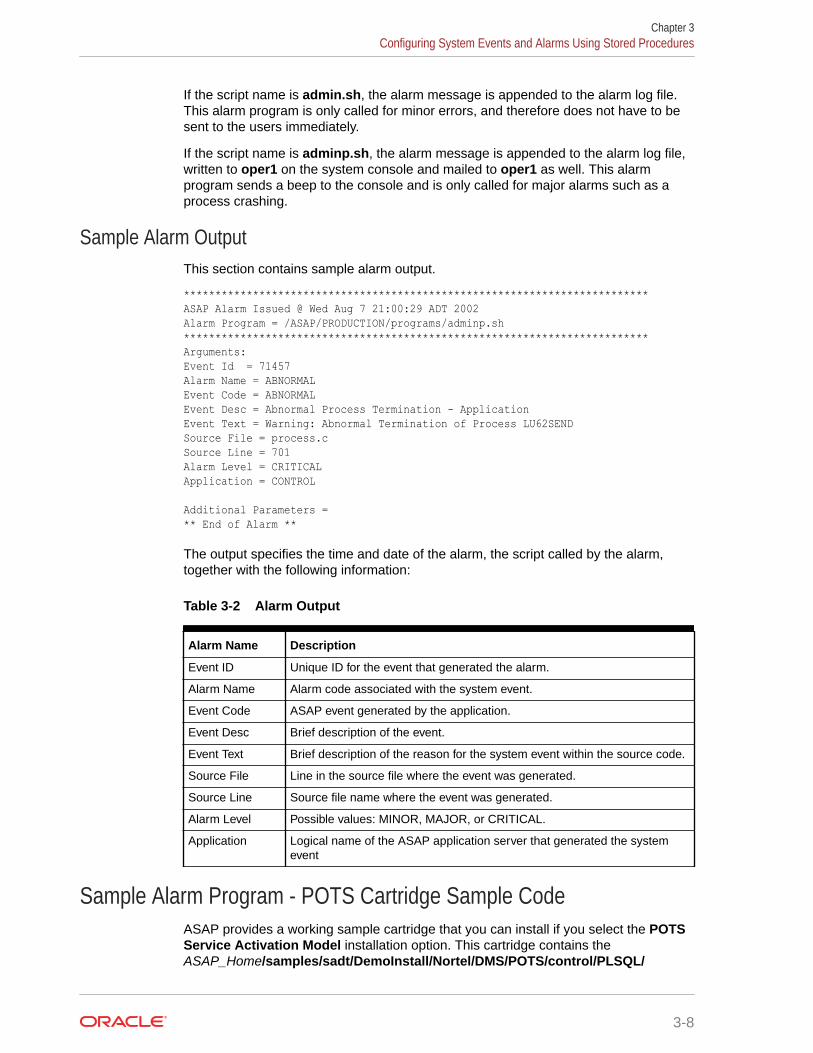
If the script name is admin.sh, the alarm message is appended to the alarm log file.This alarm program is only called for minor errors, and therefore does not have to besent to the users immediately.
If the script name is adminp.sh, the alarm message is appended to the alarm log file,written to oper1 on the system console and mailed to oper1 as well. This alarmprogram sends a beep to the console and is only called for major alarms such as aprocess crashing.
Sample Alarm OutputThis section contains sample alarm output.
**************************************************************************ASAP Alarm Issued @ Wed Aug 7 21:00:29 ADT 2002 Alarm Program = /ASAP/PRODUCTION/programs/adminp.sh**************************************************************************Arguments:Event Id = 71457Alarm Name = ABNORMALEvent Code = ABNORMALEvent Desc = Abnormal Process Termination - ApplicationEvent Text = Warning: Abnormal Termination of Process LU62SENDSource File = process.cSource Line = 701Alarm Level = CRITICALApplication = CONTROL
Additional Parameters = ** End of Alarm **
The output specifies the time and date of the alarm, the script called by the alarm,together with the following information:
Table 3-2 Alarm Output
Alarm Name Description
Event ID Unique ID for the event that generated the alarm.
Alarm Name Alarm code associated with the system event.
Event Code ASAP event generated by the application.
Event Desc Brief description of the event.
Event Text Brief description of the reason for the system event within the source code.
Source File Line in the source file where the event was generated.
Source Line Source file name where the event was generated.
Alarm Level Possible values: MINOR, MAJOR, or CRITICAL.
Application Logical name of the ASAP application server that generated the systemevent
Sample Alarm Program - POTS Cartridge Sample CodeASAP provides a working sample cartridge that you can install if you select the POTSService Activation Model installation option. This cartridge contains theASAP_Home/samples/sadt/DemoInstall/Nortel/DMS/POTS/control/PLSQL/
Chapter 3Configuring System Events and Alarms Using Stored Procedures
3-8
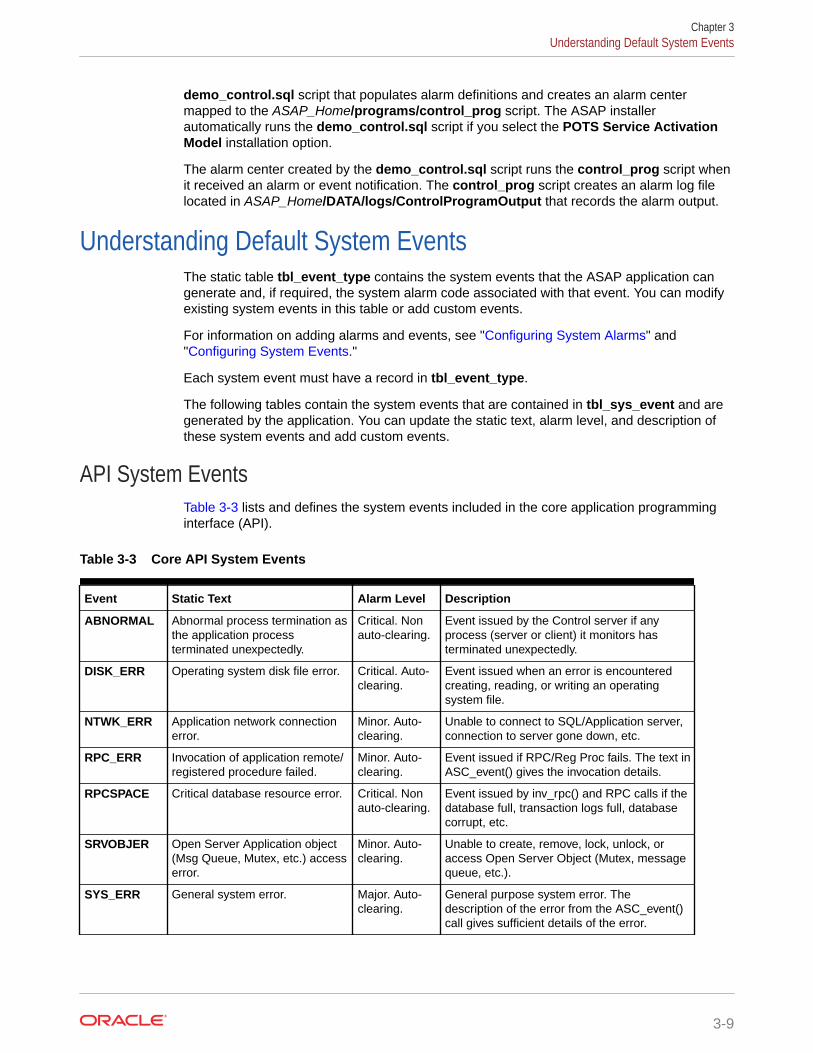
demo_control.sql script that populates alarm definitions and creates an alarm centermapped to the ASAP_Home/programs/control_prog script. The ASAP installerautomatically runs the demo_control.sql script if you select the POTS Service ActivationModel installation option.
The alarm center created by the demo_control.sql script runs the control_prog script whenit received an alarm or event notification. The control_prog script creates an alarm log filelocated in ASAP_Home/DATA/logs/ControlProgramOutput that records the alarm output.
Understanding Default System EventsThe static table tbl_event_type contains the system events that the ASAP application cangenerate and, if required, the system alarm code associated with that event. You can modifyexisting system events in this table or add custom events.
For information on adding alarms and events, see "Configuring System Alarms" and"Configuring System Events."
Each system event must have a record in tbl_event_type.
The following tables contain the system events that are contained in tbl_sys_event and aregenerated by the application. You can update the static text, alarm level, and description ofthese system events and add custom events.
API System EventsTable 3-3 lists and defines the system events included in the core application programminginterface (API).
Table 3-3 Core API System Events
Event Static Text Alarm Level Description
ABNORMAL Abnormal process termination asthe application processterminated unexpectedly.
Critical. Nonauto-clearing.
Event issued by the Control server if anyprocess (server or client) it monitors hasterminated unexpectedly.
DISK_ERR Operating system disk file error. Critical. Auto-clearing.
Event issued when an error is encounteredcreating, reading, or writing an operatingsystem file.
NTWK_ERR Application network connectionerror.
Minor. Auto-clearing.
Unable to connect to SQL/Application server,connection to server gone down, etc.
RPC_ERR Invocation of application remote/registered procedure failed.
Minor. Auto-clearing.
Event issued if RPC/Reg Proc fails. The text inASC_event() gives the invocation details.
RPCSPACE Critical database resource error. Critical. Nonauto-clearing.
Event issued by inv_rpc() and RPC calls if thedatabase full, transaction logs full, databasecorrupt, etc.
SRVOBJER Open Server Application object(Msg Queue, Mutex, etc.) accesserror.
Minor. Auto-clearing.
Unable to create, remove, lock, unlock, oraccess Open Server Object (Mutex, messagequeue, etc.).
SYS_ERR General system error. Major. Auto-clearing.
General purpose system error. Thedescription of the error from the ASC_event()call gives sufficient details of the error.
Chapter 3Understanding Default System Events
3-9

Table 3-3 (Cont.) Core API System Events
Event Static Text Alarm Level Description
SYS_INFO General system informationnotification.
None. System information such as thread spawning,process startup, and graceful shutdown, WOTimeouts, Host CLLI in Busy State, andadministrative flushing of data from memory.
SYS_TERM Process termination event. Critical. Auto-clearing.
This event is called by an application processwhen an internal condition is encountered.The event causes the application process tolog the system event in the database and thenterminate the application process in an orderlymanner.
SYS_WARN General system warning. Minor. Auto-clearing.
Warning event, not an error situation. Thisevent can be used to indicate errors orexceptions in external systems, for example,Port Bind Failure, Host LU6.1/LU6.2 BridgeDown, and NE in Maintenance Mode.
UNIX_ERR UNIX system call error. Minor. Auto-clearing.
Event issued if application encounters UNIXsystem call error. For example, the NEP isunable to create a file to insert the NEresponse log or the SRP is unable to create afile for WO completions
SARM System EventsTable 3-4 lists and describes the events that the SARM can issue.
Table 3-4 SARM System Events
Event Static Text Alarm Level Description
ROUT_ERR WO routing error. Major. Auto-clearing.
Notifies when the SARM process is unableto determine the correct NE to which aparticular WO should be routed. The routingdata (MCLI or DN) is included in the eventtext.
WOINPROC WOs in progress longer thanspecified threshold.
Informational.Determined byindividual customer.
Informs when one or more WOs are inprogress for more than the specifiedthreshold time.
Control Server EventsTable 3-5 lists and describes the events that the Control server can issue.
Table 3-5 Control Server Events
Event Description
APP_ERR ASAP application start-up error.
APP_STRT ASAP application local or remote start-up.
Chapter 3Understanding Default System Events
3-10
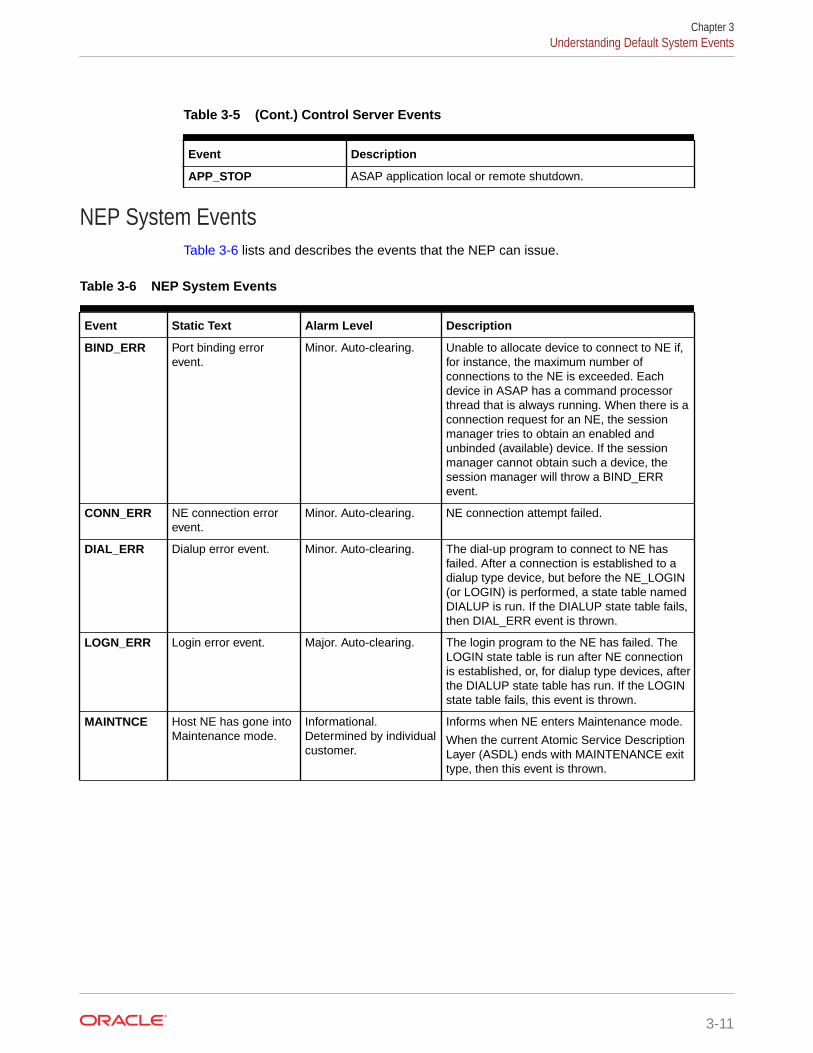
Table 3-5 (Cont.) Control Server Events
Event Description
APP_STOP ASAP application local or remote shutdown.
NEP System EventsTable 3-6 lists and describes the events that the NEP can issue.
Table 3-6 NEP System Events
Event Static Text Alarm Level Description
BIND_ERR Port binding errorevent.
Minor. Auto-clearing. Unable to allocate device to connect to NE if,for instance, the maximum number ofconnections to the NE is exceeded. Eachdevice in ASAP has a command processorthread that is always running. When there is aconnection request for an NE, the sessionmanager tries to obtain an enabled andunbinded (available) device. If the sessionmanager cannot obtain such a device, thesession manager will throw a BIND_ERRevent.
CONN_ERR NE connection errorevent.
Minor. Auto-clearing. NE connection attempt failed.
DIAL_ERR Dialup error event. Minor. Auto-clearing. The dial-up program to connect to NE hasfailed. After a connection is established to adialup type device, but before the NE_LOGIN(or LOGIN) is performed, a state table namedDIALUP is run. If the DIALUP state table fails,then DIAL_ERR event is thrown.
LOGN_ERR Login error event. Major. Auto-clearing. The login program to the NE has failed. TheLOGIN state table is run after NE connectionis established, or, for dialup type devices, afterthe DIALUP state table has run. If the LOGINstate table fails, this event is thrown.
MAINTNCE Host NE has gone intoMaintenance mode.
Informational.Determined by individualcustomer.
Informs when NE enters Maintenance mode.
When the current Atomic Service DescriptionLayer (ASDL) ends with MAINTENANCE exittype, then this event is thrown.
Chapter 3Understanding Default System Events
3-11
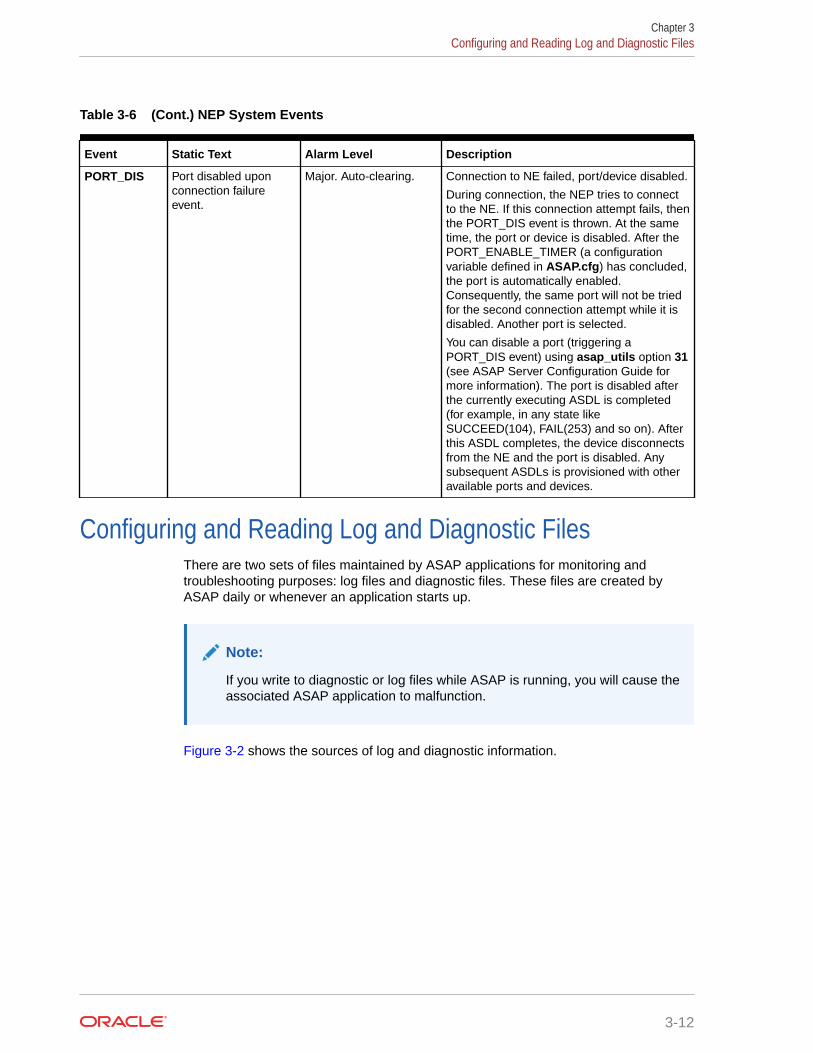
Table 3-6 (Cont.) NEP System Events
Event Static Text Alarm Level Description
PORT_DIS Port disabled uponconnection failureevent.
Major. Auto-clearing. Connection to NE failed, port/device disabled.
During connection, the NEP tries to connectto the NE. If this connection attempt fails, thenthe PORT_DIS event is thrown. At the sametime, the port or device is disabled. After thePORT_ENABLE_TIMER (a configurationvariable defined in ASAP.cfg) has concluded,the port is automatically enabled.Consequently, the same port will not be triedfor the second connection attempt while it isdisabled. Another port is selected.
You can disable a port (triggering aPORT_DIS event) using asap_utils option 31(see ASAP Server Configuration Guide formore information). The port is disabled afterthe currently executing ASDL is completed(for example, in any state likeSUCCEED(104), FAIL(253) and so on). Afterthis ASDL completes, the device disconnectsfrom the NE and the port is disabled. Anysubsequent ASDLs is provisioned with otheravailable ports and devices.
Configuring and Reading Log and Diagnostic FilesThere are two sets of files maintained by ASAP applications for monitoring andtroubleshooting purposes: log files and diagnostic files. These files are created byASAP daily or whenever an application starts up.
Note:
If you write to diagnostic or log files while ASAP is running, you will cause theassociated ASAP application to malfunction.
Figure 3-2 shows the sources of log and diagnostic information.
Chapter 3Configuring and Reading Log and Diagnostic Files
3-12

Figure 3-2 Source of Diagnostic Information
About Log FilesLog files contain high-level error messages. These files are created by ASAP daily orwhenever a server starts up. Log files are located in the directory $LOGDIR (where $LOGDIRis $ASAP_BASE/DATA/logs) under appl_name.log, where appl_name is the appropriateclient or server application.
Every diagnostic call made in ASAP has an associated diagnostic level denoting theimportance of the diagnostic message. A specific diagnostic level is also applied to everyapplication process so that only messages with a level greater than, or equal to, theconfigured level are written to the diagnostic file. This arrangement facilitates theconfiguration of the diagnostic logging without recompiling the application. For moreinformation on diagnostic levels, see "Server Diagnostic Levels ."
Every application runs with the diagnostic level specified in the Application Process Table.The diagnostic level of an application server can be modified dynamically while the server isrunning by means of an administrative RPC sent using the asap_utils RPC interface.
Chapter 3Configuring and Reading Log and Diagnostic Files
3-13
About Diagnostic FilesDiagnostic files include all low-level activities for each application. These files arecreated by ASAP daily or whenever a server starts up. Diagnostic files are located inthe directory $LOGDIR/yyyymmdd under the name appl_name.diag. where yymmddis the date for which you want to view the diagnostics and appl_name is theappropriate client or server application.
The diagnostic file rolls over to a new file whenever the maximum diagnostic file size isreached. This file size is configurable using the MAX_DIAG_FILE configurationparameter. You can also configure the number of diagnostic files to be created. Thisfield, together with the maximum file size, limits the amount of disk space that may beused by diagnostic files. When the file limit is reached, the API closes the existing fileand opens a new one.
The value of the MAX_DIAG_FILE parameter may depend on the level of diagnosticmessages written by the application and the available disk space.
Using ASAP Diagnostic ToolsThe diag_filt and diag_filt1 scripts are diagnostic tools contained in the $SCRIPTSdirectory allow you to view the diagnostic files to filter out the diagnostic messagesfrom a particular thread. You can use this feature to follow the operation of just onethread. Usually, however, it is the interaction of multiple threads with each other that isof most interest to programmers.
diag_filt diagnostic_file thread_number [thread_number ...] > output_file
where:
diagnostic_file is the name of the diagnostic file.
thread_number is the thread number
output_file is the name of an output file
For example, to filter out the diagnostic messages of thread number 7 and 21 from theSARM.diag file and insert the result into the 7_21.out file, enter the following:
diag_filt SARM.diag 7 21 > 7_21.out
Configuring and Reading WebLogic Server Log andDiagnostic Files
ASAP uses log4j to generate and manage the log messages from ASAP's WebLogicServer components. It does not affect any logs generated by ASAP's C-based (SARM,NEP, Control (CTRL) server) components. The generated log messages are stored inthe asap.log file located in WebLogic_domain.
Through the use of log4j, you can develop and maintain a logging strategy thatminimizes the overall impact of logging operations on the application's resources. log4jdoes this by letting you control the volume of log messages generated.
You also have the ability, when necessary, to dynamically change the level and detailof the logged messages. This feature helps you to, for example, increase the level and
Chapter 3Configuring and Reading WebLogic Server Log and Diagnostic Files
3-14
detail of logged messages to help analyze performance problems within a productionenvironment.
To read more about log4j, refer to the Apache website:
http://logging.apache.org/log4j
Defining Severity LevelsTo control the volume of log messages generated and written to the output destinations (theconsole and the WebLogic server log file, which are referred to as Appenders by log4j), youassign severity levels to the various areas of the application that generate their own, discreetmessages (these areas are referred to as Categories by log4j. If an event occurs inside agiven category that triggers a message below the severity level assigned to the category (thatis, less severe than the assigned level), log4j does not generate the message.
Example
If you assigned the severity level Warning to a given category, log4j does not generate anymessages for that category that are flagged in the ASAP code as Debug or Info levelmessages. log4j will, however, generate all messages that are flagged as Warning, Error, andFatal.
You can further control the number of messages written to the output destinations, orAppenders, by also assigning a severity level to them. When you assign a severity level to anAppender, it rejects messages below that severity level, even if log4j passes the message toit.
Example
If you configure the console to the Warning severity level, and one of the Categories isconfigured with the Info level, the console will not display the Info message, even thoughlog4j generates the message and passes it on to the console, because the message'sseverity level falls below the threshold for which the Appender is configured. If, however, thatsame Category later generates an Error level message, the console will accept and displaythe message, because it carries a severity level equal to or higher than the console'sthreshold.
By default, the console and the WebLogic Server log file accept all error messages, from theleast severe to the most severe.
The Levels
The following is an ascending list of the severity levels, starting with the least severe:
• Debug – (Least severe) Designates fine-grained informational events that are most usefulto debug an application
• Info – Designates informational messages that highlight the progress of the application atcoarse-grained level
• Warning – Designates potentially harmful situations
• Error – Designates error events that might still allow the application to continue running
• Fatal – (Most severe) Designates very severe error events that will presumably lead theapplication to terminate
Chapter 3Configuring and Reading WebLogic Server Log and Diagnostic Files
3-15
Configuring the Severity LevelsThere are two methods by which you can configure the severity levels:
• log4j.xml – The log4j.xml file is located in asap$ENV_ID.ear:APP-INF/lib/asaplibcommon.jar. This method allows you to modify the log4j configuration(like log message format, name of the log file, volume of the log files, how manyare saved, and so on) and requires you to stop, then restart the servers before thechanges will to take effect. For more information, see "Configuring the log4j.xmlFile."
• log4jAdmin – The log4jAdmin web page lets you to dynamically change theseverity levels while the servers are running. The changes take effect immediately.As the changes are persisted to the database the severity levels remain at the newlevel when you restart the server. For more information, see "Using the log4jAdminWeb Page."
The logging levels configured in the database take precedence; all other configurationis controlled by the log4j.xml configuration file embedded insideasap$ENV_ID.ear:APP-INF/lib/asaplibcommon.jar.
Configuring the log4j.xml FileUse this method to modify the log4j configuration as described in "Configuring theSeverity Levels." To change the log4j configurations later, you must stop the server,modify the log4j.xml file, then restart the server. In most cases, therefore, if you needto modify the logging levels, you should use the log4jAdmin web page, as described in"Using the log4jAdmin Web Page."
There are two sections of the log4j.xml file that you need to look at when configuringthis file:
• Appenders – This section defines the output destination for the messages. Atinstallation, the Appenders section contains two entries:
– Console – From this entry, you control the level of messages that theWebLogic Server Administration Console accepts.
– WebLogic – From this entry, you control the level of messages that theWebLogic Server log file accepts.
• Categories – This section contains references to all of the ASAP categories thatgenerate messages and gives you the ability to control the level of messages theygenerate.
To configure the log4j.xml file:
1. Unpack the asap.ear or the srt.ear file, depending on the application for whichyou are configuring logging parameters.
• The asap.ear file is found in the $ASAP_BASE/lib directory. After the .ear fileis unpacked, unpack APP-INF/lib/asaplibcommon.jar. The log4j.xml file islocated in the root directory.
• The srt.ear files is found in the $ASAP_BASE/SRT/lib directory. After the .earfile is unpacked, unpack APP-INF/lib/asaplibcommon.jar. The log4j.xml fileis located in the root directory.
Chapter 3Configuring and Reading WebLogic Server Log and Diagnostic Files
3-16
2. In the Appenders section of the log4.xml file, search for the following string, whichappears at the top of the Appenders section:
<!-- Append messages to the console -->
The Console entry governs what level of messages are written to the console.
3. If necessary, change the threshold level. By default, it is configured to DEBUG, allowingthe console to display all messages sent to it. If you want to restrict the number ofmessages displayed, change the threshold entry to the severity level appropriate for yourinstallation (see "Severity levels" above, for a description of the severity levels).
In the example below, the level is changed from DEBUG to INFO.
Before
<param name="Threshold" value="DEBUG"/>
After
<param name="Threshold" value="INFO"/>4. In the Appenders section, search for the following string:
<!-- Append messages to the weblogic's log file-->
The WebLogic Server log file entry governs what level of messages are written to theWebLogic Server log file.
5. If necessary, change the threshold level as described in Step 3.
6. Go to top of the file and search for the following string:
category name
This takes you to the first category entry in the file.
7. Review each of the categories in this section, changing the severity level wherenecessary. In the example below, the level is changed from INFO to WARNING.
Before
<category name="com.mslv.system"> <priority value="info"/> </category>
After
<category name="com.mslv.system"> <priority value="warning"/> </category>8. When you finish updating the categories, save and close the log4j.xml file.
9. Repack the .ear file.
10. Redeploy the .ear file:
• For Java Service Request Processor (JSRP):
In $ASAP_BASE/lib, run the following commands:
ModDeployDescriptor -u <WebLogic Admin Id>java weblogic.Deployer -adminurl http://$WLS_HOST:$WLS_PORT-user $WLS_USER -password $WLS_PASSWORD -name asap$ENV_ID -removejava weblogic.Deployer -adminurl http://$WLS_HOST:$WLS_PORT -user $WLS_USER -password $WLS_PASSWORD -upload -source $ASAP_BASE/lib/asap$ENV_ID.ear -name asap$ENV_ID -targets $TARGET_WLS_SERVER -activate
• For SRT:
Chapter 3Configuring and Reading WebLogic Server Log and Diagnostic Files
3-17
In $ASAP_BASE/SRT run the following commands:
ant -f install.xml undeployant -f install.xml deploy
Using the log4jAdmin Web PageUse log4jAdmin web page to check the current logging levels or to change the logginglevels dynamically.
Note:
You can only use this method to change the severity levels of the Categories.To change the Appender's levels, you must reconfigure the log4j.xml file.See "Configuring the log4j.xml File" for an explanation of the Categories, theAppenders, and how to configure the XML file.
The changes you make to the logging severity levels using this method are persistedto the database in the table tbl_code_list on the Control server.
Note:
Because log4jAdmin is bundled with the core, it shares the core sessiontimeout configuration.
Checking the Current Logging LevelsYou can use the Filter Loggers feature at the top of the page to check the logging levelof specific categories or subcomponents. If you know the name of the category orsubcomponent that you want to check, you can use the filter to display only thatcategory, or related, categories.
To check logging levels:
1. Open the log4jAdmin web page by entering the following path in the browser'saddress line (the URLs are case sensitive):
• JSRP:
http://BEA_HOST:BEA_PORT/ASAP_ENVID/log4jAdmin.jsp
or
https://BEA_HOST:BEA_SSL_PORT/ASAP_ENVID/log4jAdmin.jsp• SRT:
http://BEA_HOST:BEA_PORT/ASAP_ENVID/SRT/log4jAdmin.jsp
or
https://BEA_HOST:BEA_SSL_PORT/ASAP_ENVID/SRT/log4jAdmin.jsp2. In the Filter Loggers field, enter the beginning of the name or a part of the name.
Chapter 3Configuring and Reading WebLogic Server Log and Diagnostic Files
3-18
3. Do one of the following:
• Click Begins With to filter on the beginning of the name.
• Click Contains to filter on part of the name.
The list displays the categories and subcategories that match the entry in the FilterLoggers field.
• (Optional) To change the logging level do the following:
a. Scan the entries in the left-hand column and find the category or sub-componentwhich you want to change.
b. Scan across the row to the severity levels. The level that currently is selected ishighlighted in a different color from the other levels and appears in the EffectiveLevel column.
c. Click the logging level which you want to change:
To change an entire category, click the category name.
To change the subcomponent, click the sub-component name.
The change takes place immediately.
d. When you finish making the changes, close the page.
Enabling Stored Procedure Error MessagesTo enable stored procedure error messages for a sqlplus session, use the followingprocedure:
1. From a UNIX terminal, source your ASAP ASAP_home/Environment_Profile.
. ./Environment_Profile2. Log into your sqlplus session for the database you want to run stored procedures on. For
example:
sqlplus $CTRLEnter password: password
Where password is the password for your ASAP server database schema.
3. Run the following command to enable stored procedure error messages.
set serveroutput on;
For an error message example, see the following error message in bold:
var retval number; exec :retval := SSP_new_comm_param('T', 'TEL_HOST','COMMON_DEVICE_CFG','HOST_USERID','asapXXX','userid'); Host TEL_HOST For Device Type T And Parameter HOST_USERID Does Not Exist, No Comm Param Inserted. . PL/SQL procedure successfully completed. . SQL> print retval; . RETVAL ---------- 0
Chapter 3Enabling Stored Procedure Error Messages
3-19

Managing ASAP MetricsASAP provides a sample Grafana dashboard that can be used to visualize ASAPmetrics available from a Prometheus data source. ASAP relies on Prometheus toscrape and expose these metrics.
See the following topics for further details:
• Configuring Prometheus for ASAP Metrics
• Viewing ASAP Metrics Without Using Prometheus
• Viewing ASAP Metrics in Grafana
• Exposed ASAP Metrics
Configuring Prometheus for ASAP MetricsConfigure the scrape job in Prometheus by updating the prometheus.yml file asfollows:
scrape_configs: - job_name: 'asapmetrics' scrape_interval: 120s scrape_timeout: 60s metrics_path: /ENV_ID/OrderMetrics scheme: http/https basic_auth: username: WebLogic user name password: WebLogic password static_configs: - targets: ['hostname:port number'] tls_config: insecure_skip_verify: true params: query: [all]
Where
• WebLogic user name is the user name of WebLogic Server
• WebLogic password is the password of WebLogic Server
• hostname is the name of the machine on which ASAP is installed
• port number is the port number or SSL port number on which WebLogic islistening
Chapter 3Managing ASAP Metrics
3-20
Note:
The filter options are: all, today, and total.
If you use filter, update query: [filter] in the above yml file.
If you do not use filter, comment out params: query: [filter] in the above ymlfile.
Viewing ASAP Metrics Without Using PrometheusThe ASAP metrics can be viewed at:
http://hostname:port/ENVID/OrderMetrics
This only provides metrics of the server that is serving the request. It does not provide theconsolidated metrics for the entire cluster. Only Prometheus Query and Grafana dashboardscan provide the consolidated metrics.
Viewing ASAP Metrics in GrafanaASAP metrics scraped by Prometheus can be made available for further processing andvisualization. ASAP comes with sample Grafana dashboards to get you started withvisualizations.
Import the dashboard JSON files from $ASAP_CNTK/samples/grafana into your Grafanaenvironment. See ASAP Cloud Native Deployment Guide for more information.
The sample dashboard displays the following:
• Work order count by order state
• Completed work order count in a configured interval
Exposed ASAP MetricsASAP provides the following metrics for monitoring based on the work order status:
• Completed
• Completed in last interval
• Loading Work Orders
• Failed
• Cancelled
• In progress
Work order metrics can be queried with different parameter values. Use the following URL toquery the work order metrics:
http://host:port/env_id/OrderMetrics?query=parameter
The supported parameter values are:
Chapter 3Managing ASAP Metrics
3-21
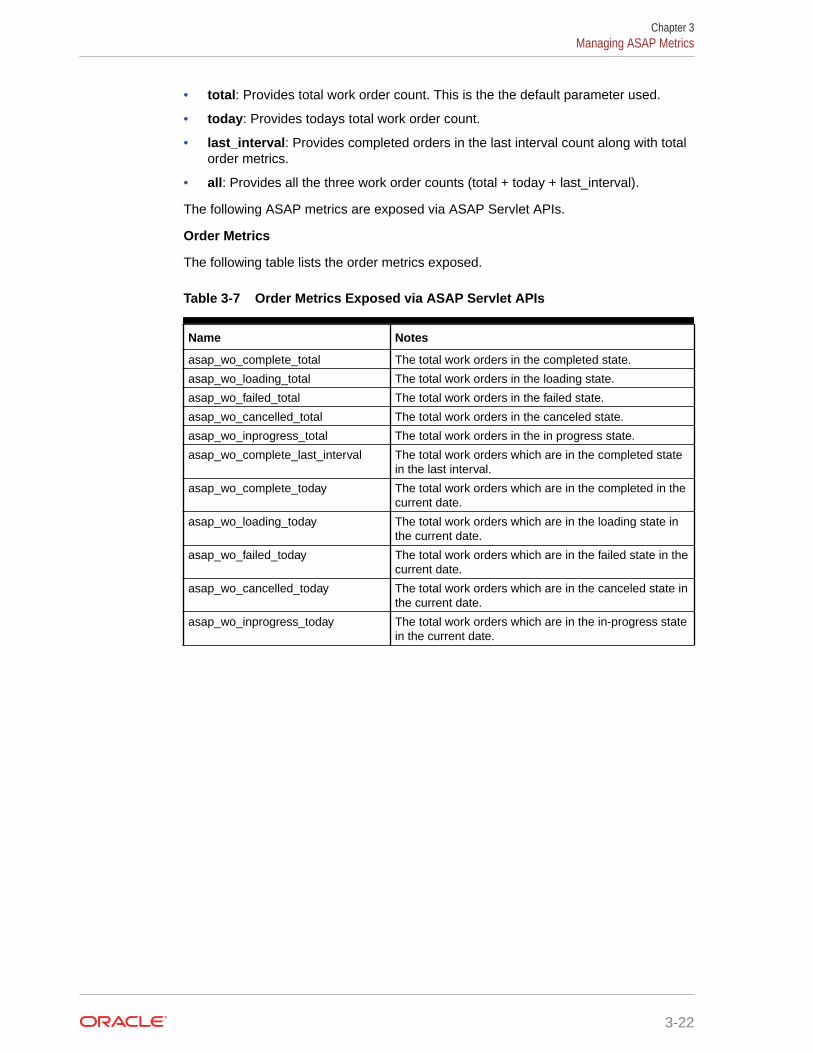
• total: Provides total work order count. This is the the default parameter used.
• today: Provides todays total work order count.
• last_interval: Provides completed orders in the last interval count along with totalorder metrics.
• all: Provides all the three work order counts (total + today + last_interval).
The following ASAP metrics are exposed via ASAP Servlet APIs.
Order Metrics
The following table lists the order metrics exposed.
Table 3-7 Order Metrics Exposed via ASAP Servlet APIs
Name Notes
asap_wo_complete_total The total work orders in the completed state.
asap_wo_loading_total The total work orders in the loading state.
asap_wo_failed_total The total work orders in the failed state.
asap_wo_cancelled_total The total work orders in the canceled state.
asap_wo_inprogress_total The total work orders in the in progress state.
asap_wo_complete_last_interval The total work orders which are in the completed statein the last interval.
asap_wo_complete_today The total work orders which are in the completed in thecurrent date.
asap_wo_loading_today The total work orders which are in the loading state inthe current date.
asap_wo_failed_today The total work orders which are in the failed state in thecurrent date.
asap_wo_cancelled_today The total work orders which are in the canceled state inthe current date.
asap_wo_inprogress_today The total work orders which are in the in-progress statein the current date.
Chapter 3Managing ASAP Metrics
3-22
4Improving ASAP Performance
This chapter describes ways to improve Oracle Communications ASAP performance.
About Improving ASAP PerformanceThis chapter is intended to aid those who have prior knowledge of the ASAP configurationand UNIX operating systems. Before starting the tuning exercises described in this chapter,you should be familiar with the following items:
• Location of ASAP diagnostic files and the UNIX utilities that are used to view andmanipulate them such as grep, tail, pg, top, vmstat, sar, prstat, glance (on HP), and soon.
• Location of the ASAP configuration files (ASAP.cfg, ASAP.properties,Environment_Profile, NEP.jinterpreter, config.xml, startWebLogic.sh), how to use aneditor such as vi, how to modify the configuration files, the layout of configuration files, forexample, server specific versus global variables.
• How to use UNIX utilities, such as top and sar to monitor the resources being used byASAP.
For more information, consult your system's online documentation about UNIX utilities or theASAP documentation.
Tuning ASAP Performance with Pre-tuned ASAP ConfigurationFiles
Stock configuration files are shipped with the product for varying sizes of ASAP installations.You can choose to use one of these versions of the ASAP.cfg file as-is, or as a starting pointfor additional changes.
This section provides you with tools and guidelines to properly select a default configuration.
About Pre-tuned ASAP ConfigurationsASAP ships with pre-tuned configurations for small, medium and large installations.(Definitions of small, medium and large configurations in this chapter are consistent withthose in the planning chapter of the ASAP Installation Guide.)
Details are given below for these stock configurations, with sample performance figures. Yourresults will vary depending on your hardware and other configuration choices you may haveimplemented.
Installing a Pre-tuned ConfigurationThe pre-tuned configuration files are generated by a script which is run as part of theinstallation process for new installs only. The files are placed in ASAP_Home/samples/sample_configs, where ASAP_Home is the directory in which ASAP is installed.
4-1
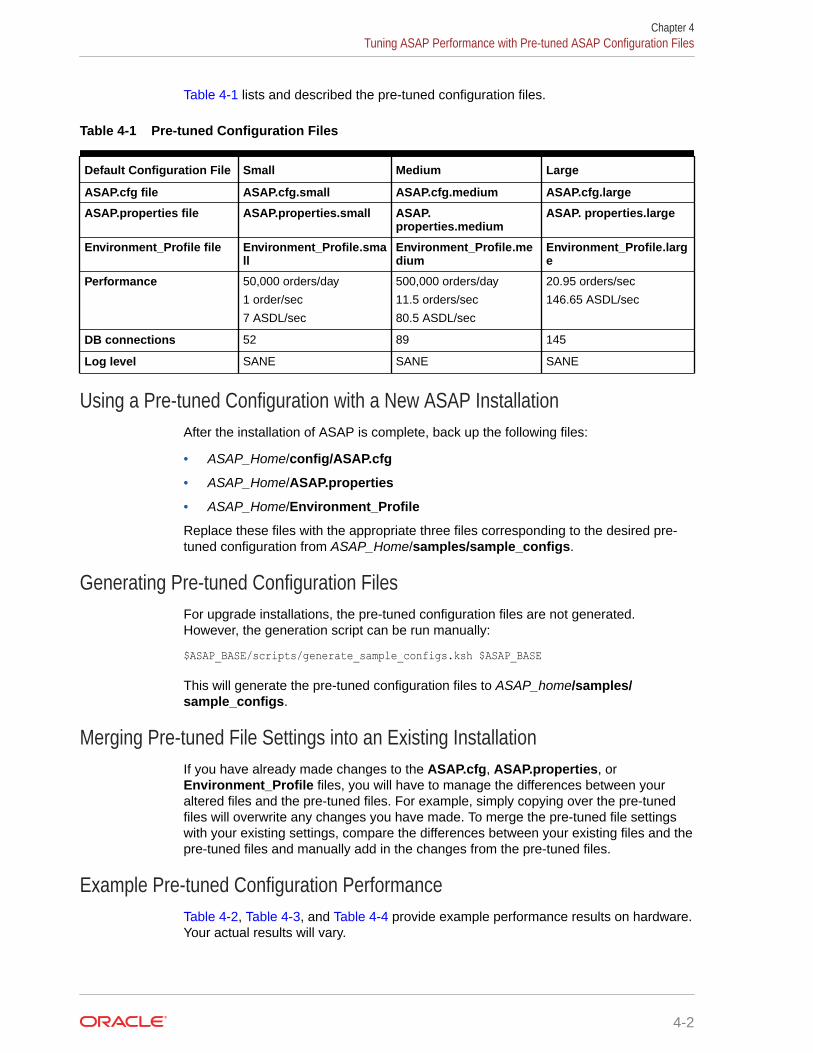
Table 4-1 lists and described the pre-tuned configuration files.
Table 4-1 Pre-tuned Configuration Files
Default Configuration File Small Medium Large
ASAP.cfg file ASAP.cfg.small ASAP.cfg.medium ASAP.cfg.large
ASAP.properties file ASAP.properties.small ASAP.properties.medium
ASAP. properties.large
Environment_Profile file Environment_Profile.small
Environment_Profile.medium
Environment_Profile.large
Performance 50,000 orders/day
1 order/sec
7 ASDL/sec
500,000 orders/day
11.5 orders/sec
80.5 ASDL/sec
20.95 orders/sec
146.65 ASDL/sec
DB connections 52 89 145
Log level SANE SANE SANE
Using a Pre-tuned Configuration with a New ASAP InstallationAfter the installation of ASAP is complete, back up the following files:
• ASAP_Home/config/ASAP.cfg
• ASAP_Home/ASAP.properties
• ASAP_Home/Environment_Profile
Replace these files with the appropriate three files corresponding to the desired pre-tuned configuration from ASAP_Home/samples/sample_configs.
Generating Pre-tuned Configuration FilesFor upgrade installations, the pre-tuned configuration files are not generated.However, the generation script can be run manually:
$ASAP_BASE/scripts/generate_sample_configs.ksh $ASAP_BASE
This will generate the pre-tuned configuration files to ASAP_home/samples/sample_configs.
Merging Pre-tuned File Settings into an Existing InstallationIf you have already made changes to the ASAP.cfg, ASAP.properties, orEnvironment_Profile files, you will have to manage the differences between youraltered files and the pre-tuned files. For example, simply copying over the pre-tunedfiles will overwrite any changes you have made. To merge the pre-tuned file settingswith your existing settings, compare the differences between your existing files and thepre-tuned files and manually add in the changes from the pre-tuned files.
Example Pre-tuned Configuration PerformanceTable 4-2, Table 4-3, and Table 4-4 provide example performance results on hardware.Your actual results will vary.
Chapter 4Tuning ASAP Performance with Pre-tuned ASAP Configuration Files
4-2

Table 4-2 Small Installation Pre-tuned Configuration Performance
- - CPU, % of server CPU, % of 1 proc RAM, MB
V880 Service Activation RequestManager (SARM)
0.79 3.16 43
V880 Network Element Processor(NEP)
1.39 5.56 37
V880 JENEP 0.64 2.56 181
sclust01 WebLogic Server 4.73 9.46 261
Compaq Oracle 1.65 13.2 N/A
N/A Total ASAP (SARM, NEP,JENEP, etc.) memory
N/A N/A 350
N/A WebLogic Server memory N/A N/A 261
N/A N/A N/A Total 611
Table 4-3 Medium Installation Pre-tuned Configuration Performance
- - CPU, % of server CPU, % of 1 proc RAM, MB
V880 SARM 12.86 51.44 52
V880 NEP 15.63 62.52 44
V880 JENEP 7.49 29.96 376
sclust01 WebLogic Server 24.23 48.46 750
Compaq Oracle 10.14 81.12 N/A
N/A Total ASAP (SARM, NEP,JENEP etc.) memory
N/A N/A 550
N/A WebLogic Server memory N/A N/A 750
N/A N/A N/A Total 1300
Table 4-4 Large Installation Pre-tuned Configuration Performance
- - CPU, % of server CPU, % of 1 proc RAM, MB
V880 SARM 28.71 114.84 64
V880 NEP1 13.04 52.16 41
V880 JENEP1 9.22 36.88 374
N/A NEP2 18.03 72.12 43
N/A JENEP2 13.73 54.92 375
sclust01 WebLogic Server 51.54 103.08 750
Compaq Oracle 18.74 147.76 N/A
N/A Total ASAP (SARM, NEP,JENEP, etc.) memory
N/A N/A 1050
N/A WebLogic Server memory N/A N/A 750
N/A N/A N/A Total 1800
Chapter 4Tuning ASAP Performance with Pre-tuned ASAP Configuration Files
4-3
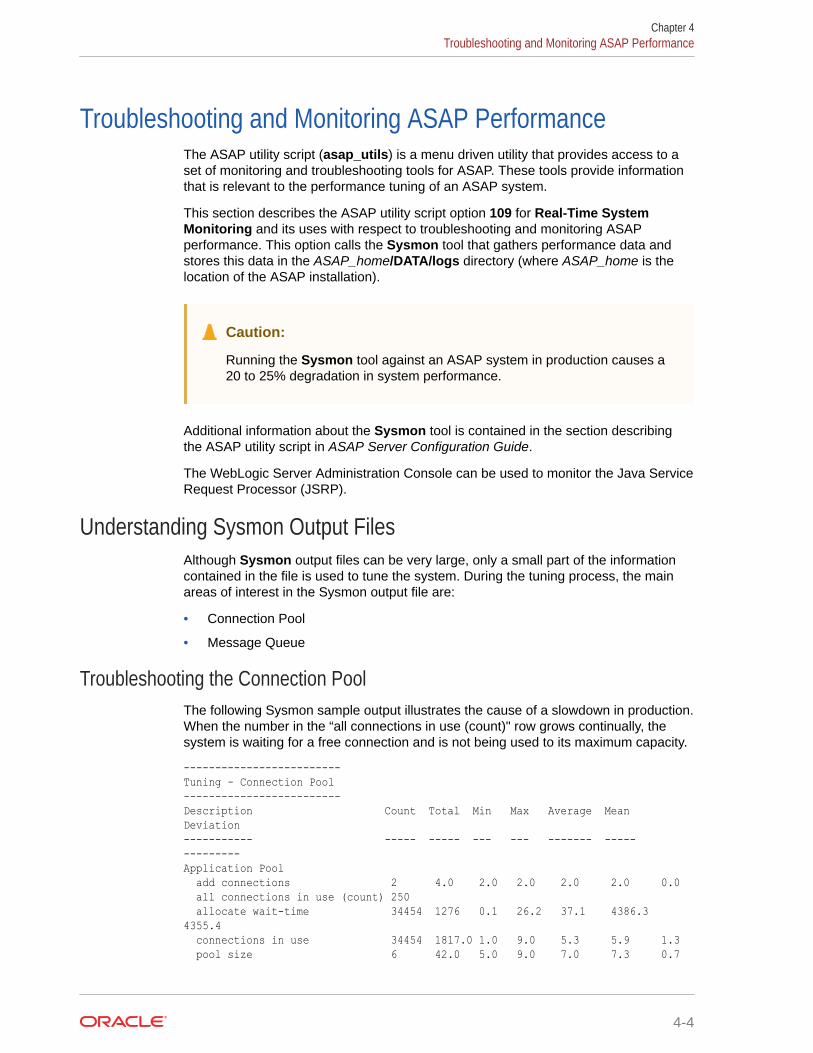
Troubleshooting and Monitoring ASAP PerformanceThe ASAP utility script (asap_utils) is a menu driven utility that provides access to aset of monitoring and troubleshooting tools for ASAP. These tools provide informationthat is relevant to the performance tuning of an ASAP system.
This section describes the ASAP utility script option 109 for Real-Time SystemMonitoring and its uses with respect to troubleshooting and monitoring ASAPperformance. This option calls the Sysmon tool that gathers performance data andstores this data in the ASAP_home/DATA/logs directory (where ASAP_home is thelocation of the ASAP installation).
Caution:
Running the Sysmon tool against an ASAP system in production causes a20 to 25% degradation in system performance.
Additional information about the Sysmon tool is contained in the section describingthe ASAP utility script in ASAP Server Configuration Guide.
The WebLogic Server Administration Console can be used to monitor the Java ServiceRequest Processor (JSRP).
Understanding Sysmon Output FilesAlthough Sysmon output files can be very large, only a small part of the informationcontained in the file is used to tune the system. During the tuning process, the mainareas of interest in the Sysmon output file are:
• Connection Pool
• Message Queue
Troubleshooting the Connection PoolThe following Sysmon sample output illustrates the cause of a slowdown in production.When the number in the “all connections in use (count)" row grows continually, thesystem is waiting for a free connection and is not being used to its maximum capacity.
-------------------------Tuning - Connection Pool-------------------------Description Count Total Min Max Average Mean Deviation----------- ----- ----- --- --- ------- ----- ---------Application Pool add connections 2 4.0 2.0 2.0 2.0 2.0 0.0 all connections in use (count) 250 allocate wait-time 34454 1276 0.1 26.2 37.1 4386.3 4355.4 connections in use 34454 1817.0 1.0 9.0 5.3 5.9 1.3 pool size 6 42.0 5.0 9.0 7.0 7.3 0.7
Chapter 4Troubleshooting and Monitoring ASAP Performance
4-4
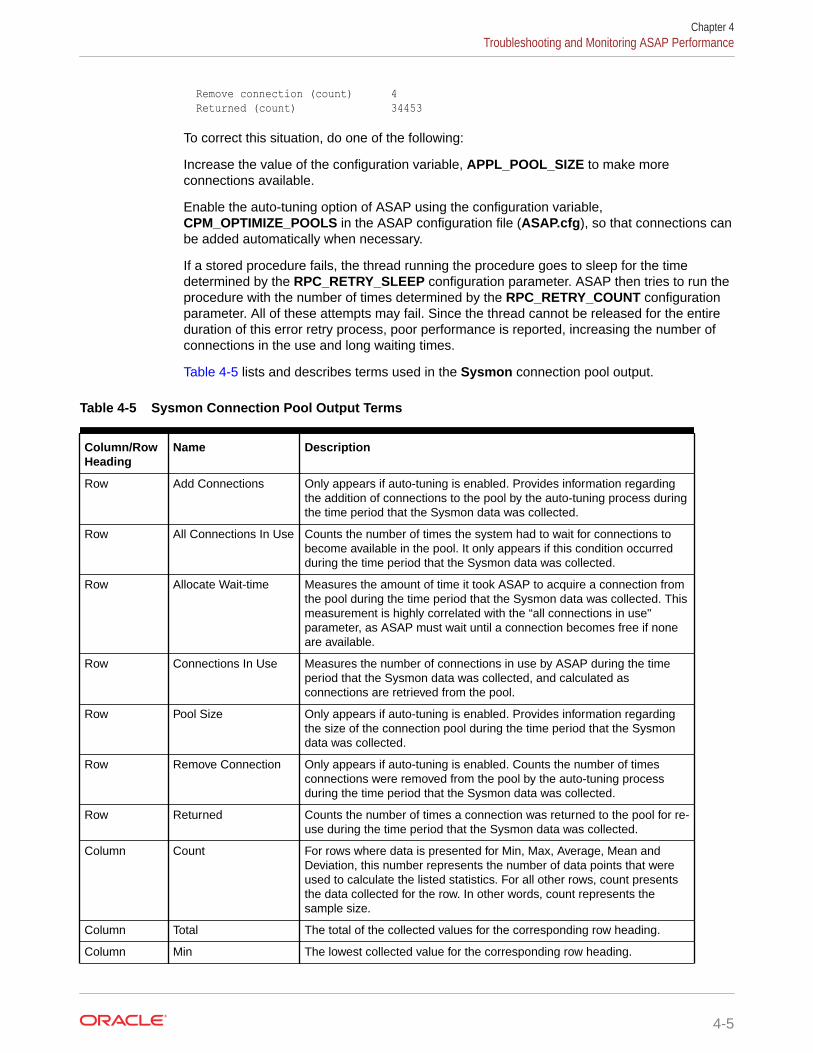
Remove connection (count) 4 Returned (count) 34453
To correct this situation, do one of the following:
Increase the value of the configuration variable, APPL_POOL_SIZE to make moreconnections available.
Enable the auto-tuning option of ASAP using the configuration variable,CPM_OPTIMIZE_POOLS in the ASAP configuration file (ASAP.cfg), so that connections canbe added automatically when necessary.
If a stored procedure fails, the thread running the procedure goes to sleep for the timedetermined by the RPC_RETRY_SLEEP configuration parameter. ASAP then tries to run theprocedure with the number of times determined by the RPC_RETRY_COUNT configurationparameter. All of these attempts may fail. Since the thread cannot be released for the entireduration of this error retry process, poor performance is reported, increasing the number ofconnections in the use and long waiting times.
Table 4-5 lists and describes terms used in the Sysmon connection pool output.
Table 4-5 Sysmon Connection Pool Output Terms
Column/RowHeading
Name Description
Row Add Connections Only appears if auto-tuning is enabled. Provides information regardingthe addition of connections to the pool by the auto-tuning process duringthe time period that the Sysmon data was collected.
Row All Connections In Use Counts the number of times the system had to wait for connections tobecome available in the pool. It only appears if this condition occurredduring the time period that the Sysmon data was collected.
Row Allocate Wait-time Measures the amount of time it took ASAP to acquire a connection fromthe pool during the time period that the Sysmon data was collected. Thismeasurement is highly correlated with the “all connections in use"parameter, as ASAP must wait until a connection becomes free if noneare available.
Row Connections In Use Measures the number of connections in use by ASAP during the timeperiod that the Sysmon data was collected, and calculated asconnections are retrieved from the pool.
Row Pool Size Only appears if auto-tuning is enabled. Provides information regardingthe size of the connection pool during the time period that the Sysmondata was collected.
Row Remove Connection Only appears if auto-tuning is enabled. Counts the number of timesconnections were removed from the pool by the auto-tuning processduring the time period that the Sysmon data was collected.
Row Returned Counts the number of times a connection was returned to the pool for re-use during the time period that the Sysmon data was collected.
Column Count For rows where data is presented for Min, Max, Average, Mean andDeviation, this number represents the number of data points that wereused to calculate the listed statistics. For all other rows, count presentsthe data collected for the row. In other words, count represents thesample size.
Column Total The total of the collected values for the corresponding row heading.
Column Min The lowest collected value for the corresponding row heading.
Chapter 4Troubleshooting and Monitoring ASAP Performance
4-5
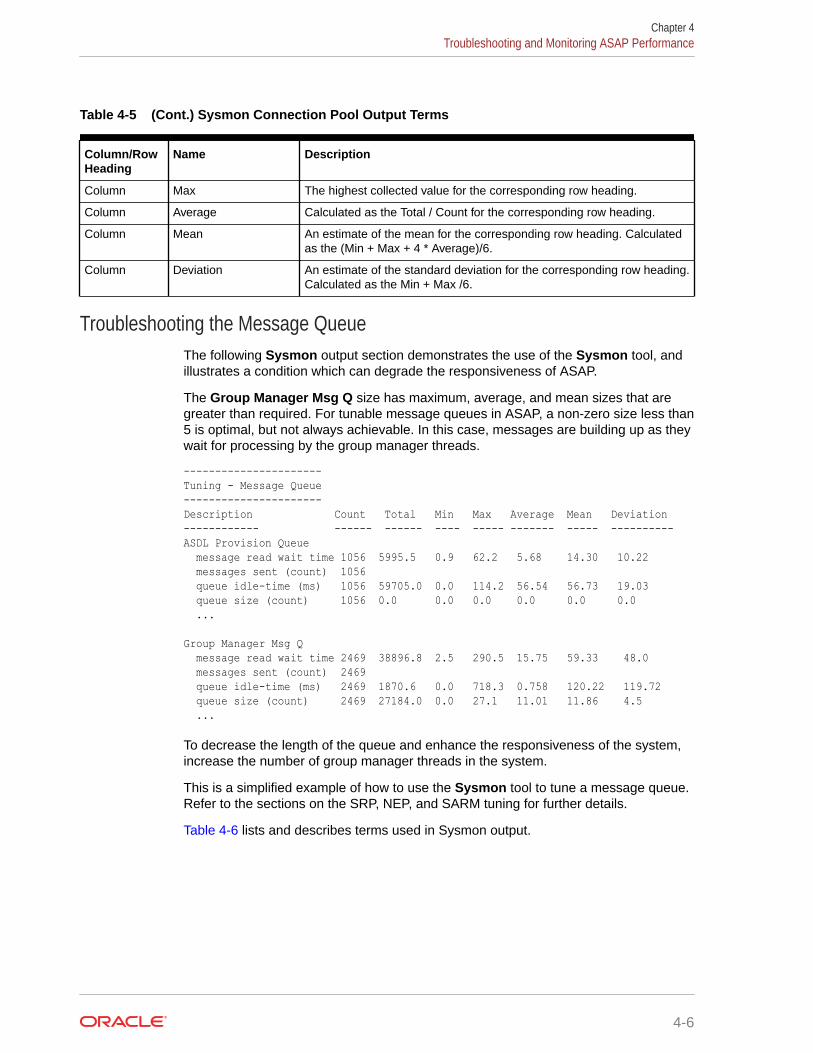
Table 4-5 (Cont.) Sysmon Connection Pool Output Terms
Column/RowHeading
Name Description
Column Max The highest collected value for the corresponding row heading.
Column Average Calculated as the Total / Count for the corresponding row heading.
Column Mean An estimate of the mean for the corresponding row heading. Calculatedas the (Min + Max + 4 * Average)/6.
Column Deviation An estimate of the standard deviation for the corresponding row heading.Calculated as the Min + Max /6.
Troubleshooting the Message QueueThe following Sysmon output section demonstrates the use of the Sysmon tool, andillustrates a condition which can degrade the responsiveness of ASAP.
The Group Manager Msg Q size has maximum, average, and mean sizes that aregreater than required. For tunable message queues in ASAP, a non-zero size less than5 is optimal, but not always achievable. In this case, messages are building up as theywait for processing by the group manager threads.
----------------------Tuning - Message Queue----------------------Description Count Total Min Max Average Mean Deviation------------ ------ ------ ---- ----- ------- ----- ----------ASDL Provision Queue message read wait time 1056 5995.5 0.9 62.2 5.68 14.30 10.22 messages sent (count) 1056 queue idle-time (ms) 1056 59705.0 0.0 114.2 56.54 56.73 19.03 queue size (count) 1056 0.0 0.0 0.0 0.0 0.0 0.0 ...
Group Manager Msg Q message read wait time 2469 38896.8 2.5 290.5 15.75 59.33 48.0 messages sent (count) 2469 queue idle-time (ms) 2469 1870.6 0.0 718.3 0.758 120.22 119.72 queue size (count) 2469 27184.0 0.0 27.1 11.01 11.86 4.5 ...
To decrease the length of the queue and enhance the responsiveness of the system,increase the number of group manager threads in the system.
This is a simplified example of how to use the Sysmon tool to tune a message queue.Refer to the sections on the SRP, NEP, and SARM tuning for further details.
Table 4-6 lists and describes terms used in Sysmon output.
Chapter 4Troubleshooting and Monitoring ASAP Performance
4-6
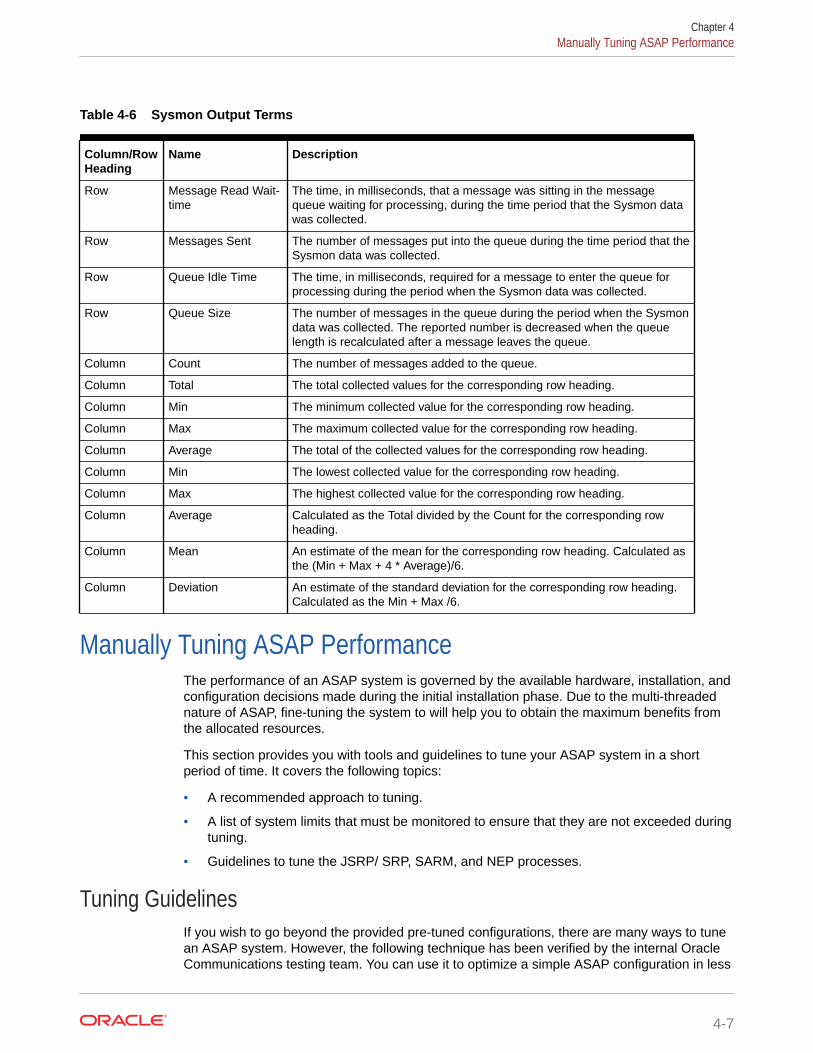
Table 4-6 Sysmon Output Terms
Column/RowHeading
Name Description
Row Message Read Wait-time
The time, in milliseconds, that a message was sitting in the messagequeue waiting for processing, during the time period that the Sysmon datawas collected.
Row Messages Sent The number of messages put into the queue during the time period that theSysmon data was collected.
Row Queue Idle Time The time, in milliseconds, required for a message to enter the queue forprocessing during the period when the Sysmon data was collected.
Row Queue Size The number of messages in the queue during the period when the Sysmondata was collected. The reported number is decreased when the queuelength is recalculated after a message leaves the queue.
Column Count The number of messages added to the queue.
Column Total The total collected values for the corresponding row heading.
Column Min The minimum collected value for the corresponding row heading.
Column Max The maximum collected value for the corresponding row heading.
Column Average The total of the collected values for the corresponding row heading.
Column Min The lowest collected value for the corresponding row heading.
Column Max The highest collected value for the corresponding row heading.
Column Average Calculated as the Total divided by the Count for the corresponding rowheading.
Column Mean An estimate of the mean for the corresponding row heading. Calculated asthe (Min + Max + 4 * Average)/6.
Column Deviation An estimate of the standard deviation for the corresponding row heading.Calculated as the Min + Max /6.
Manually Tuning ASAP PerformanceThe performance of an ASAP system is governed by the available hardware, installation, andconfiguration decisions made during the initial installation phase. Due to the multi-threadednature of ASAP, fine-tuning the system to will help you to obtain the maximum benefits fromthe allocated resources.
This section provides you with tools and guidelines to tune your ASAP system in a shortperiod of time. It covers the following topics:
• A recommended approach to tuning.
• A list of system limits that must be monitored to ensure that they are not exceeded duringtuning.
• Guidelines to tune the JSRP/ SRP, SARM, and NEP processes.
Tuning GuidelinesIf you wish to go beyond the provided pre-tuned configurations, there are many ways to tunean ASAP system. However, the following technique has been verified by the internal OracleCommunications testing team. You can use it to optimize a simple ASAP configuration in less
Chapter 4Manually Tuning ASAP Performance
4-7

than half a day. A simple configuration consists of all ASAP components residing in thesame system with small numbers of individual components, for example, fewer thanfive NEPs and one or two SRPs.
The following steps are the order in which the tuning process is carried out:
1. Setting a Target
Select a performance target that is based on realistic throughput (work orders (WOs)per second) or resource consumption early in the process. Without a goal, an iterativeprocess, such as tuning, could continue indefinitely.
2. Using Simple Work Orders
To achieve consistent results, use simple familiar WOs during the tuning process. Usea repeatable test and pick a scenario such as batches, or workflows. Once tuning iscomplete, verify the performance with realistic data.
3. Starting with Minimum Configuration Values
Start with minimum configuration values because it is easier to detect and correctbottlenecks than it is to determine where excess resources are being consumed.
4. Following Work Order Flow
The tuning process follows the same flow that WOs take through the system. Tuningstarts at the SRP (that is CSRP or JSRP depending on your implementation) proceedsthrough to the SARM and then to the NEP (that is CNEP or Java-enabled NEP (JNEP)depending on your implementation) and on to the NE, then it returns back through thesame steps.
5. Checking for Bottlenecks
Bottlenecks that can develop as resources are shifted among the components whichmake up an ASAP system. Bottlenecks may occur in areas that were previouslyoptimized. When you move to a new area of the system, you should review theservers that have already been tuned to ensure that their configurations haveremained optimal. For example, if you tune the NEP after the SRP and SARM havebeen optimized, review the SRP and SARM after you have finished tuning the NEP toensure that they have remained optimized.
Setting System LimitsDuring the tuning process, you must change configuration variable settings to levelsthat are higher than their defaults. These increases have two direct effects which youmust monitor during the tuning process:
• Increased demands are placed on the hardware allocated to the ASAP system.You must use a utility, such as top to continually monitor the ASAP system inorder to ensure that it is not consuming more resources than planned.
• If system limits are exceeded, increased ASAP resource consumption may causeerrors to be reported in the systems diagnostic files. Monitor the diagnostic filesclosely during the tuning process so that these limits can be altered to highervalues when required.
This section details errors which may appear in the diagnostic files and theconfiguration variables used to control system limits. Configuration variables arelocated in the ASAP.cfg file. The following are the configuration variables used fortuning.
Chapter 4Manually Tuning ASAP Performance
4-8
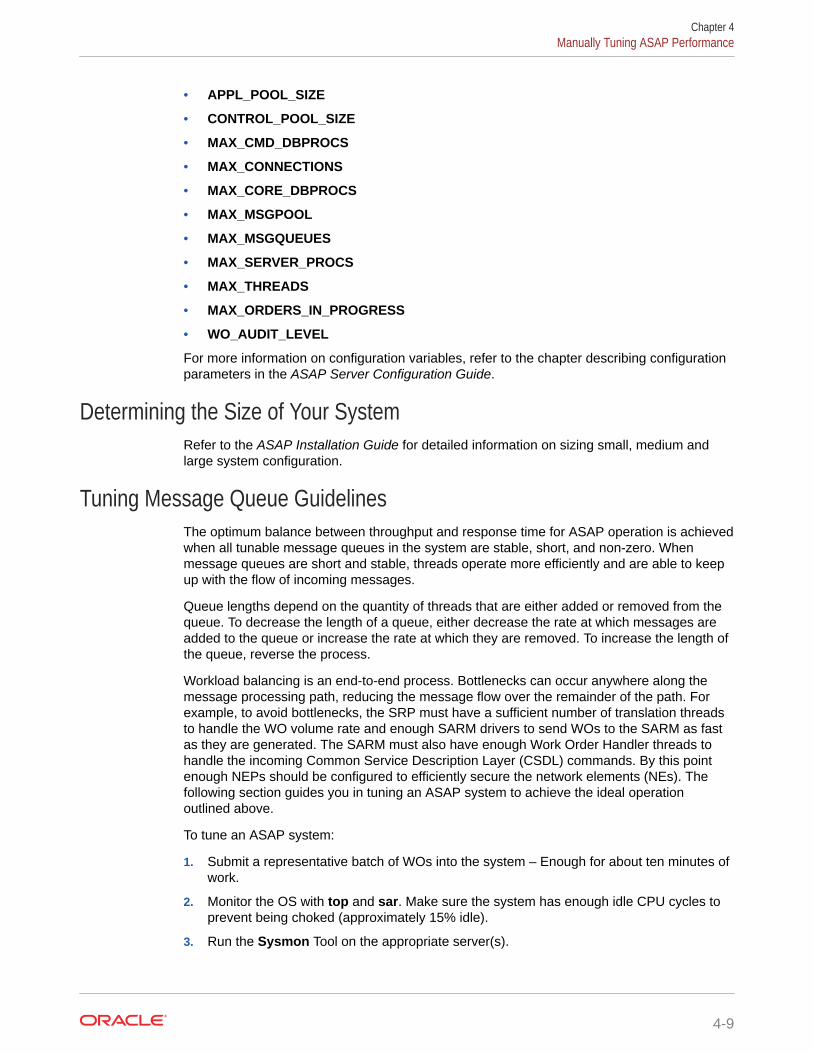
• APPL_POOL_SIZE
• CONTROL_POOL_SIZE
• MAX_CMD_DBPROCS
• MAX_CONNECTIONS
• MAX_CORE_DBPROCS
• MAX_MSGPOOL
• MAX_MSGQUEUES
• MAX_SERVER_PROCS
• MAX_THREADS
• MAX_ORDERS_IN_PROGRESS
• WO_AUDIT_LEVEL
For more information on configuration variables, refer to the chapter describing configurationparameters in the ASAP Server Configuration Guide.
Determining the Size of Your SystemRefer to the ASAP Installation Guide for detailed information on sizing small, medium andlarge system configuration.
Tuning Message Queue GuidelinesThe optimum balance between throughput and response time for ASAP operation is achievedwhen all tunable message queues in the system are stable, short, and non-zero. Whenmessage queues are short and stable, threads operate more efficiently and are able to keepup with the flow of incoming messages.
Queue lengths depend on the quantity of threads that are either added or removed from thequeue. To decrease the length of a queue, either decrease the rate at which messages areadded to the queue or increase the rate at which they are removed. To increase the length ofthe queue, reverse the process.
Workload balancing is an end-to-end process. Bottlenecks can occur anywhere along themessage processing path, reducing the message flow over the remainder of the path. Forexample, to avoid bottlenecks, the SRP must have a sufficient number of translation threadsto handle the WO volume rate and enough SARM drivers to send WOs to the SARM as fastas they are generated. The SARM must also have enough Work Order Handler threads tohandle the incoming Common Service Description Layer (CSDL) commands. By this pointenough NEPs should be configured to efficiently secure the network elements (NEs). Thefollowing section guides you in tuning an ASAP system to achieve the ideal operationoutlined above.
To tune an ASAP system:
1. Submit a representative batch of WOs into the system – Enough for about ten minutes ofwork.
2. Monitor the OS with top and sar. Make sure the system has enough idle CPU cycles toprevent being choked (approximately 15% idle).
3. Run the Sysmon Tool on the appropriate server(s).
Chapter 4Manually Tuning ASAP Performance
4-9
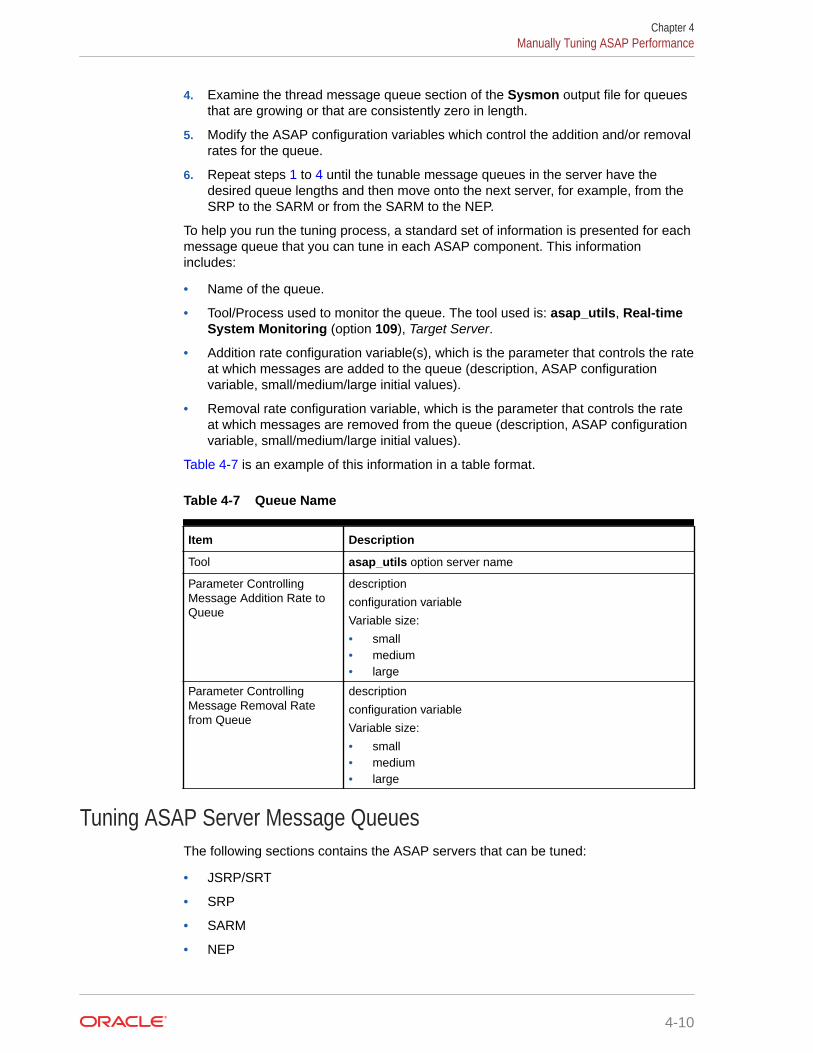
4. Examine the thread message queue section of the Sysmon output file for queuesthat are growing or that are consistently zero in length.
5. Modify the ASAP configuration variables which control the addition and/or removalrates for the queue.
6. Repeat steps 1 to 4 until the tunable message queues in the server have thedesired queue lengths and then move onto the next server, for example, from theSRP to the SARM or from the SARM to the NEP.
To help you run the tuning process, a standard set of information is presented for eachmessage queue that you can tune in each ASAP component. This informationincludes:
• Name of the queue.
• Tool/Process used to monitor the queue. The tool used is: asap_utils, Real-timeSystem Monitoring (option 109), Target Server.
• Addition rate configuration variable(s), which is the parameter that controls the rateat which messages are added to the queue (description, ASAP configurationvariable, small/medium/large initial values).
• Removal rate configuration variable, which is the parameter that controls the rateat which messages are removed from the queue (description, ASAP configurationvariable, small/medium/large initial values).
Table 4-7 is an example of this information in a table format.
Table 4-7 Queue Name
Item Description
Tool asap_utils option server name
Parameter ControllingMessage Addition Rate toQueue
description
configuration variable
Variable size:
• small• medium• large
Parameter ControllingMessage Removal Ratefrom Queue
description
configuration variable
Variable size:
• small• medium• large
Tuning ASAP Server Message QueuesThe following sections contains the ASAP servers that can be tuned:
• JSRP/SRT
• SRP
• SARM
• NEP
Chapter 4Manually Tuning ASAP Performance
4-10
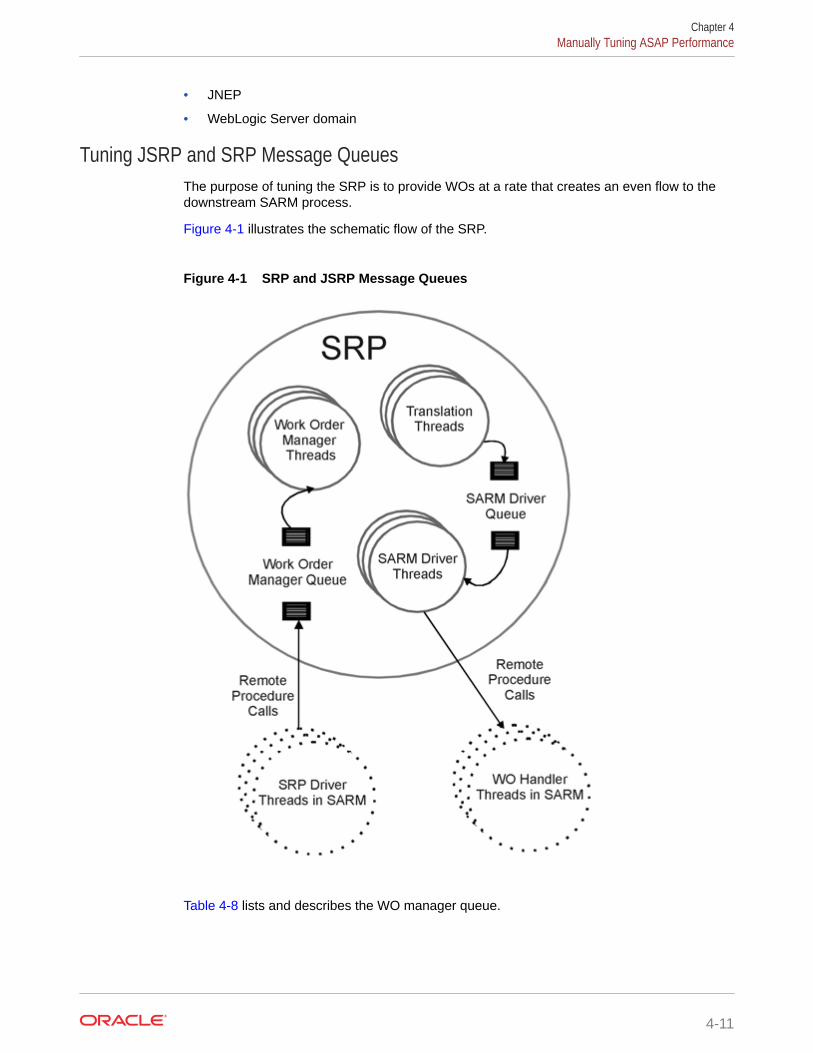
• JNEP
• WebLogic Server domain
Tuning JSRP and SRP Message QueuesThe purpose of tuning the SRP is to provide WOs at a rate that creates an even flow to thedownstream SARM process.
Figure 4-1 illustrates the schematic flow of the SRP.
Figure 4-1 SRP and JSRP Message Queues
Table 4-8 lists and describes the WO manager queue.
Chapter 4Manually Tuning ASAP Performance
4-11
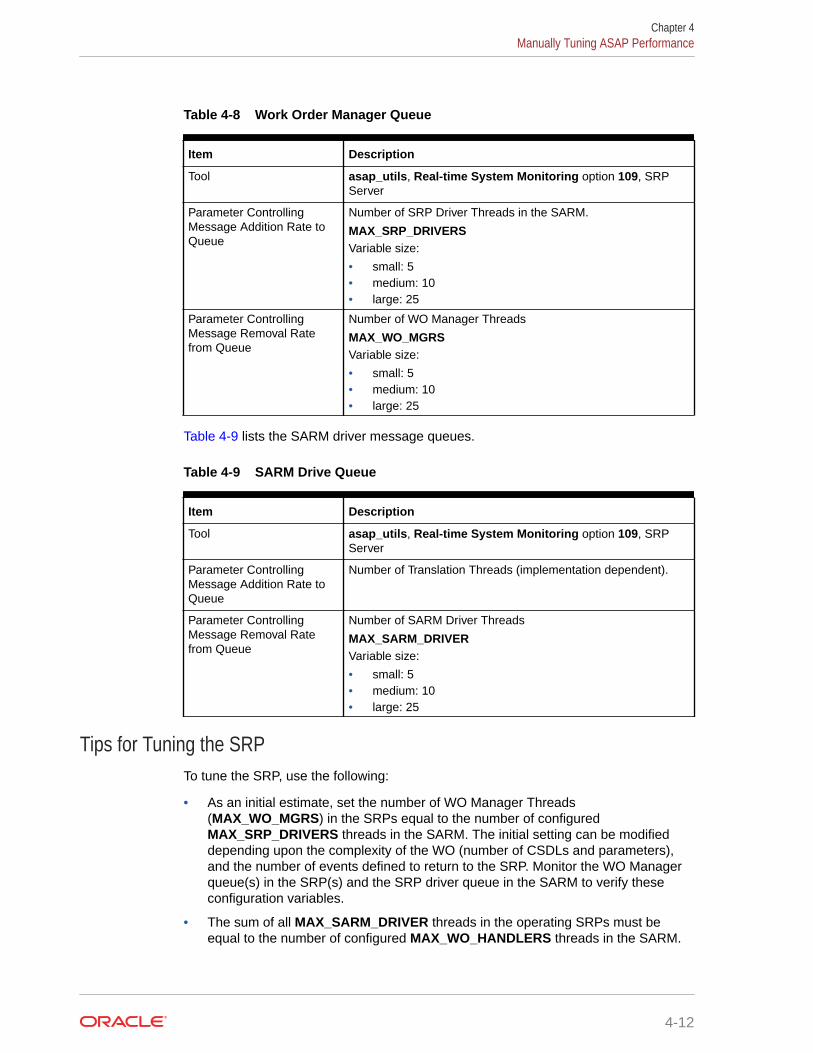
Table 4-8 Work Order Manager Queue
Item Description
Tool asap_utils, Real-time System Monitoring option 109, SRPServer
Parameter ControllingMessage Addition Rate toQueue
Number of SRP Driver Threads in the SARM.
MAX_SRP_DRIVERSVariable size:
• small: 5• medium: 10• large: 25
Parameter ControllingMessage Removal Ratefrom Queue
Number of WO Manager Threads
MAX_WO_MGRSVariable size:
• small: 5• medium: 10• large: 25
Table 4-9 lists the SARM driver message queues.
Table 4-9 SARM Drive Queue
Item Description
Tool asap_utils, Real-time System Monitoring option 109, SRPServer
Parameter ControllingMessage Addition Rate toQueue
Number of Translation Threads (implementation dependent).
Parameter ControllingMessage Removal Ratefrom Queue
Number of SARM Driver Threads
MAX_SARM_DRIVERVariable size:
• small: 5• medium: 10• large: 25
Tips for Tuning the SRPTo tune the SRP, use the following:
• As an initial estimate, set the number of WO Manager Threads(MAX_WO_MGRS) in the SRPs equal to the number of configuredMAX_SRP_DRIVERS threads in the SARM. The initial setting can be modifieddepending upon the complexity of the WO (number of CSDLs and parameters),and the number of events defined to return to the SRP. Monitor the WO Managerqueue(s) in the SRP(s) and the SRP driver queue in the SARM to verify theseconfiguration variables.
• The sum of all MAX_SARM_DRIVER threads in the operating SRPs must beequal to the number of configured MAX_WO_HANDLERS threads in the SARM.
Chapter 4Manually Tuning ASAP Performance
4-12
• The number or existence of translation threads is entirely dependent upon thecustomized implementation of the SRP at your site. If multiple translation threads areavailable and the SARM Driver queue is consistently empty, consider increasing thenumber of translation threads. However, increasing these threads may have a negativeaffect on the downstream process. You must examine the system for downstreambottlenecks.
• You must disable all unnecessary notifications being sent to the SRP by updatingtbl_asap_srp in the SARM database.
• During production, you can use sanity level diagnostics.
• If the save and dump WO features, which are enabled by using configuration variablesSAVE_SARM_DATA and DUMP_WO_FLAG, are not needed, disable them.
Tuning SARM Message QueuesThe purpose of tuning the SARM is to:
• Provide the Atomic Service Description Layer (ASDL) commands to the NEPs.
• Send event notices back to the SRPs at an even rate to both the upstream anddownstream processes.
Since only one SARM process exists in an ASAP system, the performance of the SARMcannot be enhanced by spreading the load across multiple Central Processing Units (CPUs)or systems. Therefore, the SARM must be well tuned to get high performance from ASAP.
Figure 4-2 illustrates the flow of messages through the SARM.
Chapter 4Manually Tuning ASAP Performance
4-13
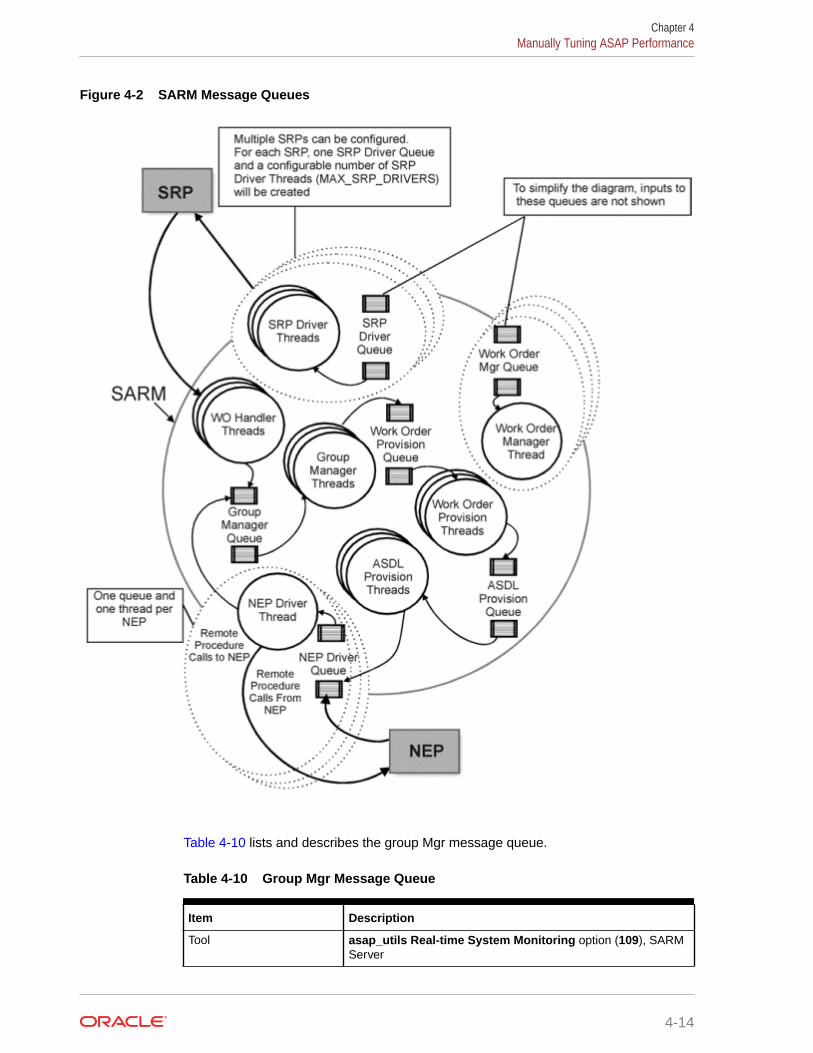
Figure 4-2 SARM Message Queues
Table 4-10 lists and describes the group Mgr message queue.
Table 4-10 Group Mgr Message Queue
Item Description
Tool asap_utils Real-time System Monitoring option (109), SARMServer
Chapter 4Manually Tuning ASAP Performance
4-14
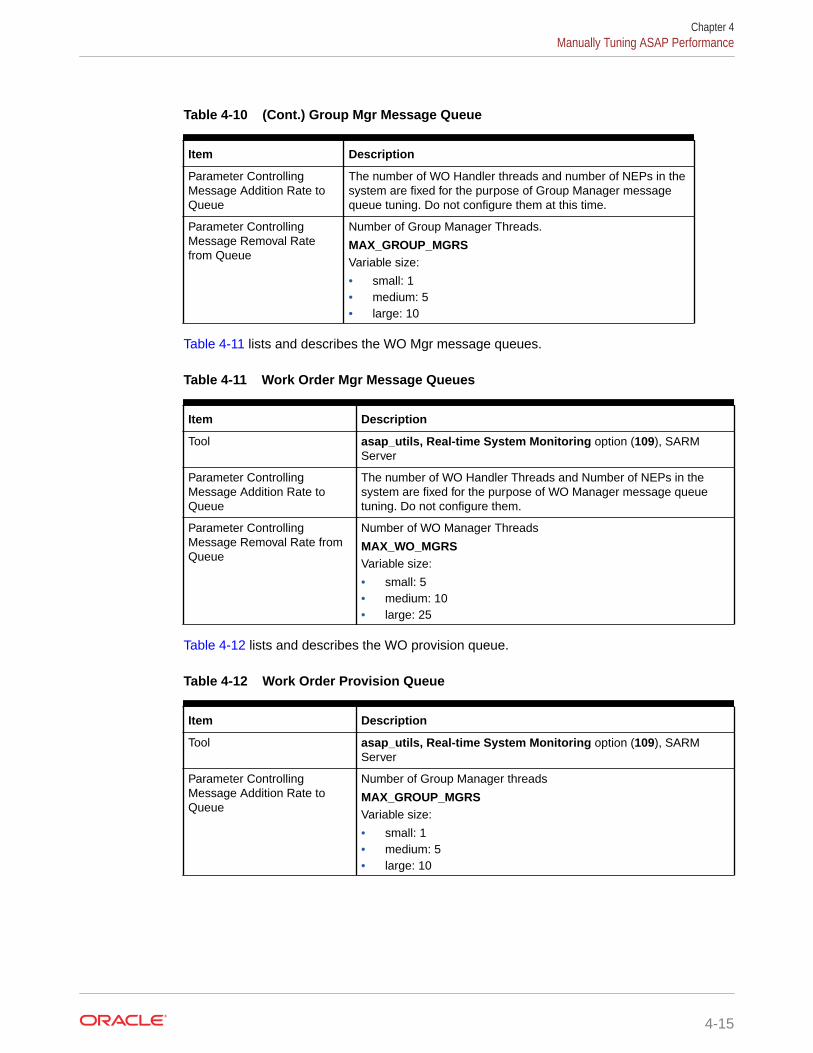
Table 4-10 (Cont.) Group Mgr Message Queue
Item Description
Parameter ControllingMessage Addition Rate toQueue
The number of WO Handler threads and number of NEPs in thesystem are fixed for the purpose of Group Manager messagequeue tuning. Do not configure them at this time.
Parameter ControllingMessage Removal Ratefrom Queue
Number of Group Manager Threads.
MAX_GROUP_MGRSVariable size:
• small: 1• medium: 5• large: 10
Table 4-11 lists and describes the WO Mgr message queues.
Table 4-11 Work Order Mgr Message Queues
Item Description
Tool asap_utils, Real-time System Monitoring option (109), SARMServer
Parameter ControllingMessage Addition Rate toQueue
The number of WO Handler Threads and Number of NEPs in thesystem are fixed for the purpose of WO Manager message queuetuning. Do not configure them.
Parameter ControllingMessage Removal Rate fromQueue
Number of WO Manager Threads
MAX_WO_MGRSVariable size:
• small: 5• medium: 10• large: 25
Table 4-12 lists and describes the WO provision queue.
Table 4-12 Work Order Provision Queue
Item Description
Tool asap_utils, Real-time System Monitoring option (109), SARMServer
Parameter ControllingMessage Addition Rate toQueue
Number of Group Manager threads
MAX_GROUP_MGRSVariable size:
• small: 1• medium: 5• large: 10
Chapter 4Manually Tuning ASAP Performance
4-15
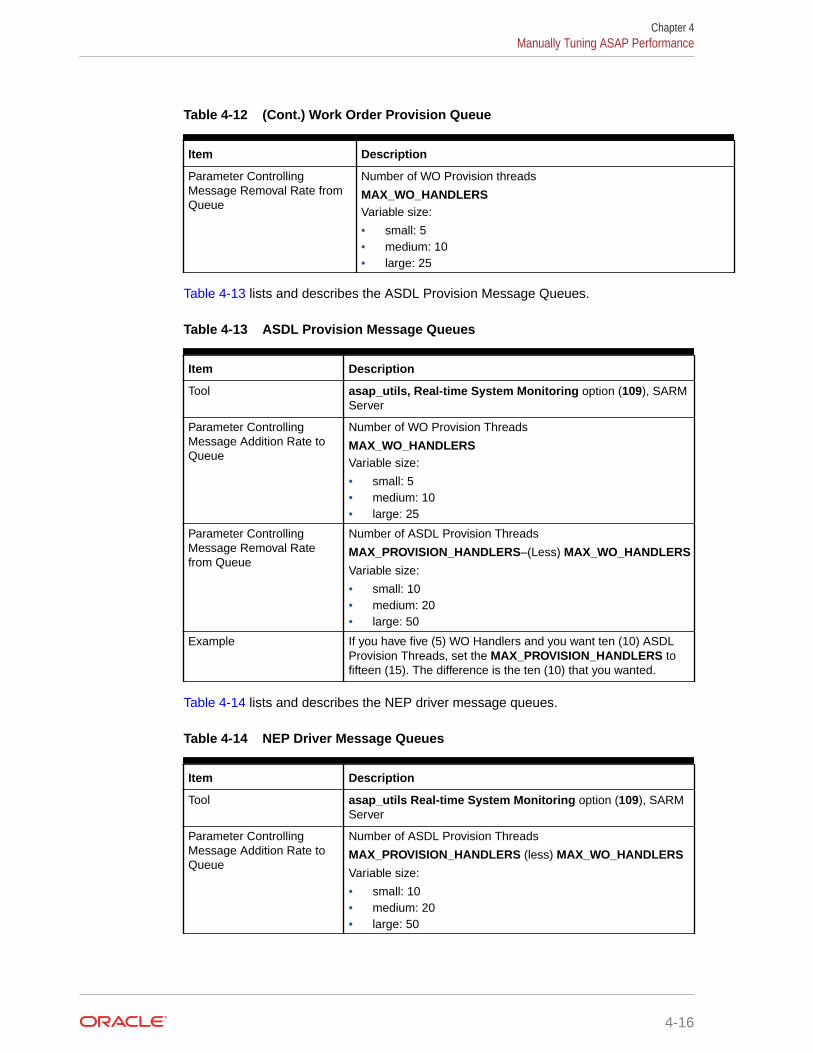
Table 4-12 (Cont.) Work Order Provision Queue
Item Description
Parameter ControllingMessage Removal Rate fromQueue
Number of WO Provision threads
MAX_WO_HANDLERSVariable size:
• small: 5• medium: 10• large: 25
Table 4-13 lists and describes the ASDL Provision Message Queues.
Table 4-13 ASDL Provision Message Queues
Item Description
Tool asap_utils, Real-time System Monitoring option (109), SARMServer
Parameter ControllingMessage Addition Rate toQueue
Number of WO Provision Threads
MAX_WO_HANDLERSVariable size:
• small: 5• medium: 10• large: 25
Parameter ControllingMessage Removal Ratefrom Queue
Number of ASDL Provision Threads
MAX_PROVISION_HANDLERS–(Less) MAX_WO_HANDLERS
Variable size:
• small: 10• medium: 20• large: 50
Example If you have five (5) WO Handlers and you want ten (10) ASDLProvision Threads, set the MAX_PROVISION_HANDLERS tofifteen (15). The difference is the ten (10) that you wanted.
Table 4-14 lists and describes the NEP driver message queues.
Table 4-14 NEP Driver Message Queues
Item Description
Tool asap_utils Real-time System Monitoring option (109), SARMServer
Parameter ControllingMessage Addition Rate toQueue
Number of ASDL Provision Threads
MAX_PROVISION_HANDLERS (less) MAX_WO_HANDLERS
Variable size:
• small: 10• medium: 20• large: 50
Chapter 4Manually Tuning ASAP Performance
4-16

Table 4-14 (Cont.) NEP Driver Message Queues
Item Description
Parameter ControllingMessage Removal Ratefrom Queue
Number of NEPs in the system (dependent on throughputrequirements and machine resources).
There is one NEP Driver Queue for each NEP in the system.
Table 4-15 lists and describes the SRP driver message queues.
Table 4-15 SRP Driver Message Queues
Item Description
Tool asap_utils, Real-time System Monitoring option (109), SARMServer
Parameter ControllingMessage Addition Rate toQueue
Nearly every thread in the SARM can add messages to this queue.Therefore, it is not possible to control the number of messages thatare added.
Parameter ControllingMessage Removal Rate fromQueue
Number of SRP Driver Threads.
MAX_SRP_DRIVERSVariable size:
• small: 5• medium: 10• large: 25
There is one SRP Drive Queue for each SRP in the system.
Tips for Tuning the SARMTo tune the SARM, use the following:
• The number of WO threads (MAX_WO_HANDLERS) in the SARM must be equal to thesum of all SARM Driver Threads (MAX_SARM_DRIVER) in all of the SRPs.
• The total number of configured handler threads (MAX_WO_MGRS) in all SRPs must beequal to the driver threads (MAX_SRP_DRIVERS) in the SARM.
• All event notifications not used by any customized SRP implementation must be turnedoff.
• Sanity level diagnostics during production should be used.
• The configured number of provision handlers (ASDL and WO) must be no less than thesum of the number of handler threads (MAX_WO_HANDLERS) and the number ofoperating NEP servers. Start tuning with a ratio of 1:3 of WO Manager Threads toprovision handlers (ASDL and WO).
Tuning NEP Message QueuesThe purpose of tuning a NEP is to provide:
• ASDLs to the NEs
Chapter 4Manually Tuning ASAP Performance
4-17
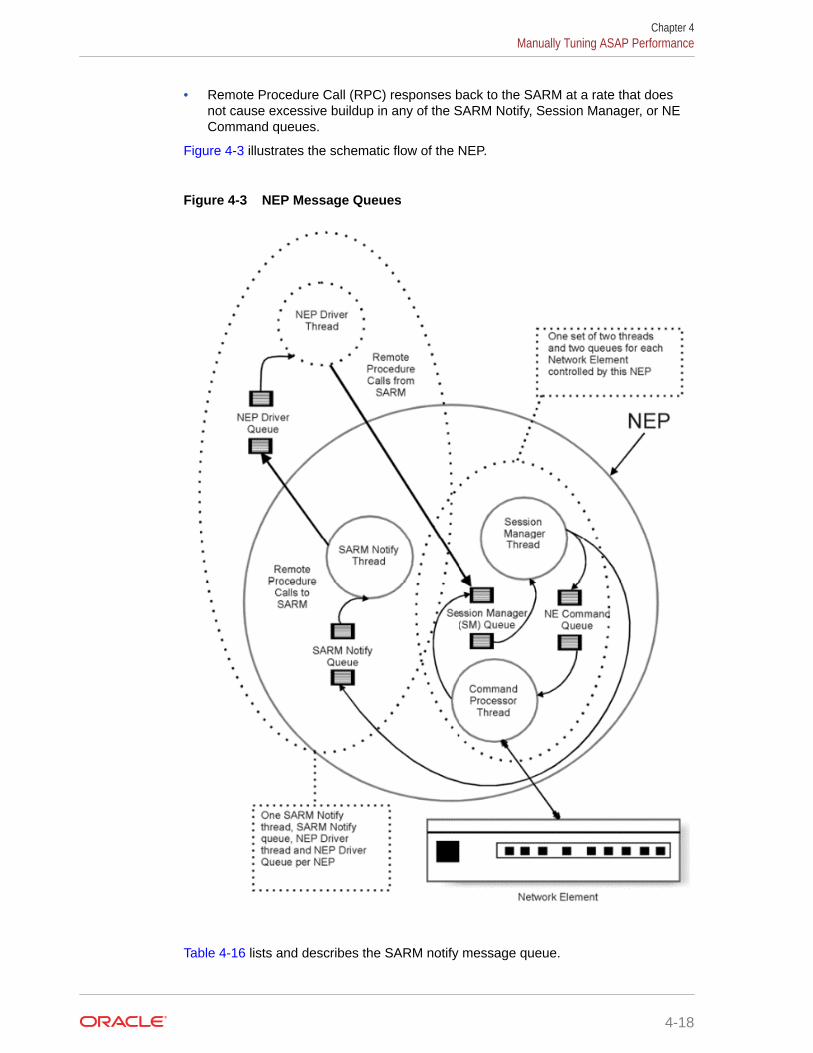
• Remote Procedure Call (RPC) responses back to the SARM at a rate that doesnot cause excessive buildup in any of the SARM Notify, Session Manager, or NECommand queues.
Figure 4-3 illustrates the schematic flow of the NEP.
Figure 4-3 NEP Message Queues
Table 4-16 lists and describes the SARM notify message queue.
Chapter 4Manually Tuning ASAP Performance
4-18
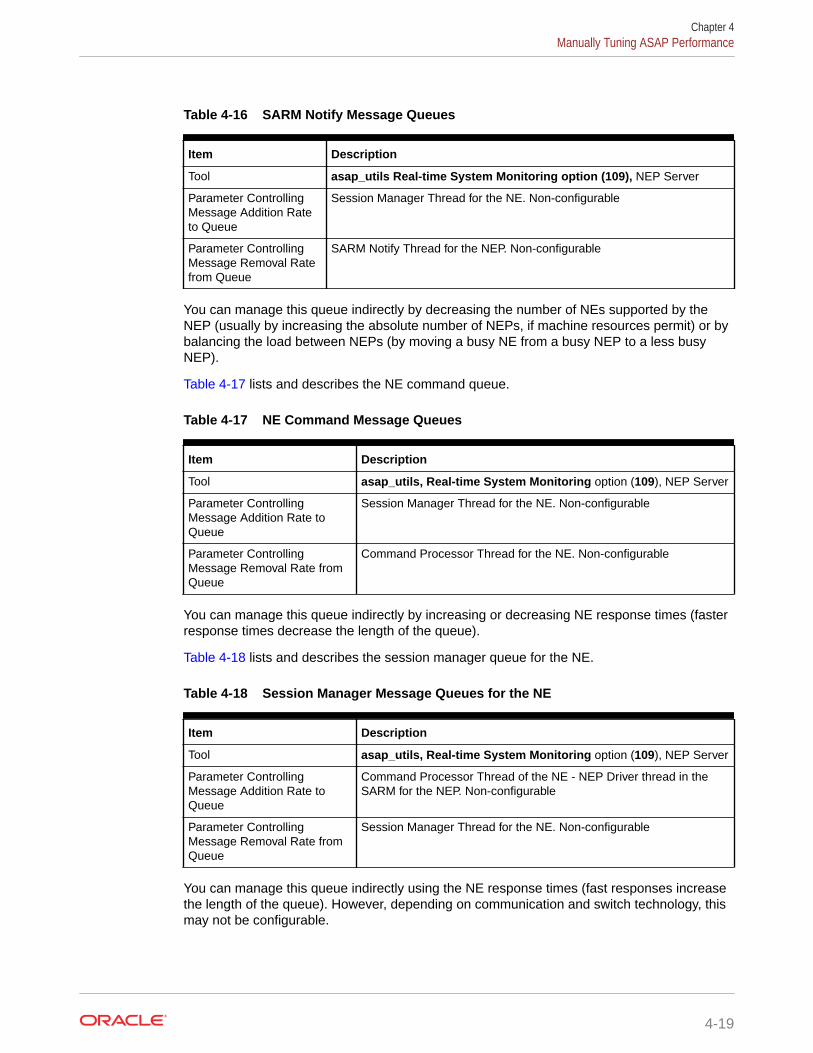
Table 4-16 SARM Notify Message Queues
Item Description
Tool asap_utils Real-time System Monitoring option (109), NEP Server
Parameter ControllingMessage Addition Rateto Queue
Session Manager Thread for the NE. Non-configurable
Parameter ControllingMessage Removal Ratefrom Queue
SARM Notify Thread for the NEP. Non-configurable
You can manage this queue indirectly by decreasing the number of NEs supported by theNEP (usually by increasing the absolute number of NEPs, if machine resources permit) or bybalancing the load between NEPs (by moving a busy NE from a busy NEP to a less busyNEP).
Table 4-17 lists and describes the NE command queue.
Table 4-17 NE Command Message Queues
Item Description
Tool asap_utils, Real-time System Monitoring option (109), NEP Server
Parameter ControllingMessage Addition Rate toQueue
Session Manager Thread for the NE. Non-configurable
Parameter ControllingMessage Removal Rate fromQueue
Command Processor Thread for the NE. Non-configurable
You can manage this queue indirectly by increasing or decreasing NE response times (fasterresponse times decrease the length of the queue).
Table 4-18 lists and describes the session manager queue for the NE.
Table 4-18 Session Manager Message Queues for the NE
Item Description
Tool asap_utils, Real-time System Monitoring option (109), NEP Server
Parameter ControllingMessage Addition Rate toQueue
Command Processor Thread of the NE - NEP Driver thread in theSARM for the NEP. Non-configurable
Parameter ControllingMessage Removal Rate fromQueue
Session Manager Thread for the NE. Non-configurable
You can manage this queue indirectly using the NE response times (fast responses increasethe length of the queue). However, depending on communication and switch technology, thismay not be configurable.
Chapter 4Manually Tuning ASAP Performance
4-19
Tips for Tuning NEPTo tune the NEP, use the following:
• Unless machine resources are limited, target for a ratio of 50 NEs per NEP.
• If possible, group similar NE technologies and switch software loads on a singleNEP. This reduces the number of ASDL programs held in memory because eachNEP caches its own copy of every ASDL command that it has been asked toperform.
• Balance the load on each NEP by distributing your busy NEs across severalNEPs. You must determine the expected load based on both the number andcomplexity of the ASDL commands being serviced.
Other Performance IssuesYou must take into consideration other factors that can affect performance. Thissection covers the diagnostic levels and query optimization that you need in the tuningprocess.
The topics in this section include:
• Local versus NFS-Mounted File Systems for Diagnostic Files
• Server Diagnostic Levels
• Diagnostic Messages Output
• Query Optimization
• Table Partitioning
Local Versus NFS-mounted File Systems for Diagnostic FilesASAP diagnostic files on NFS-mounted file systems increase network traffic and slowdown disk I/O. For production systems, the log directories should be local, not NFSmounted.
Server Diagnostic LevelsLow-level server diagnostic levels increase disk I/O. Oracle recommends that you setthe diagnostic level for the production system at either PROGRAM_LEVEL orSANITY_LEVEL.
In the Control server database table tbl_appl_proc, set the diagnostics level (columndiag_level) to SANE.
Diagnostic levels set in the tbl_appl_proc are persistent through reboots. For moreinformation on tbl_appl_proc, see ASAP Developer's Guide.
To set a diagnostic level temporarily, use asap_utils parameter 107. See the ASAPServer Configuration Guide for more information.
Diagnostic levels are defined as follows in the common.h file. Both diagnostics andC/C++ code values are provided.
Chapter 4Manually Tuning ASAP Performance
4-20
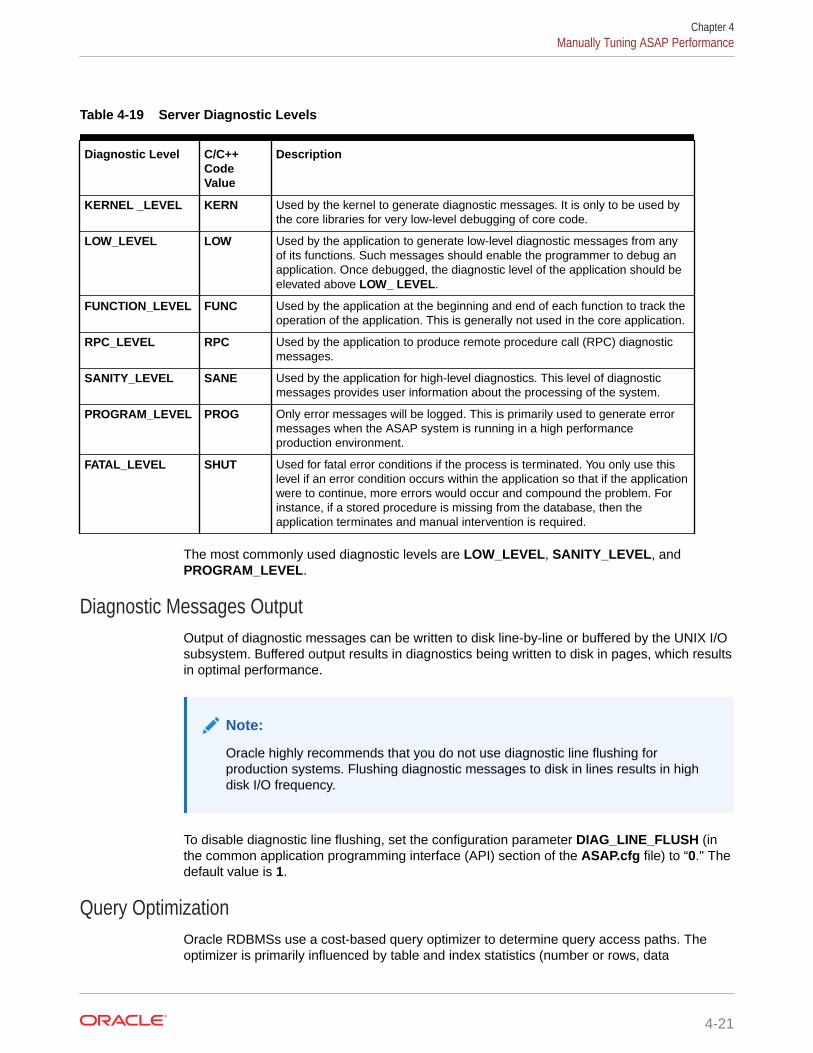
Table 4-19 Server Diagnostic Levels
Diagnostic Level C/C++CodeValue
Description
KERNEL _LEVEL KERN Used by the kernel to generate diagnostic messages. It is only to be used bythe core libraries for very low-level debugging of core code.
LOW_LEVEL LOW Used by the application to generate low-level diagnostic messages from anyof its functions. Such messages should enable the programmer to debug anapplication. Once debugged, the diagnostic level of the application should beelevated above LOW_ LEVEL.
FUNCTION_LEVEL FUNC Used by the application at the beginning and end of each function to track theoperation of the application. This is generally not used in the core application.
RPC_LEVEL RPC Used by the application to produce remote procedure call (RPC) diagnosticmessages.
SANITY_LEVEL SANE Used by the application for high-level diagnostics. This level of diagnosticmessages provides user information about the processing of the system.
PROGRAM_LEVEL PROG Only error messages will be logged. This is primarily used to generate errormessages when the ASAP system is running in a high performanceproduction environment.
FATAL_LEVEL SHUT Used for fatal error conditions if the process is terminated. You only use thislevel if an error condition occurs within the application so that if the applicationwere to continue, more errors would occur and compound the problem. Forinstance, if a stored procedure is missing from the database, then theapplication terminates and manual intervention is required.
The most commonly used diagnostic levels are LOW_LEVEL, SANITY_LEVEL, andPROGRAM_LEVEL.
Diagnostic Messages OutputOutput of diagnostic messages can be written to disk line-by-line or buffered by the UNIX I/Osubsystem. Buffered output results in diagnostics being written to disk in pages, which resultsin optimal performance.
Note:
Oracle highly recommends that you do not use diagnostic line flushing forproduction systems. Flushing diagnostic messages to disk in lines results in highdisk I/O frequency.
To disable diagnostic line flushing, set the configuration parameter DIAG_LINE_FLUSH (inthe common application programming interface (API) section of the ASAP.cfg file) to “0." Thedefault value is 1.
Query OptimizationOracle RDBMSs use a cost-based query optimizer to determine query access paths. Theoptimizer is primarily influenced by table and index statistics (number or rows, data
Chapter 4Manually Tuning ASAP Performance
4-21

distribution, etc.) available to it in the system catalogue tables. These statistics can beupdated manually (usually when the amount and distribution of data in a table changessignificantly) using utilities provided by the RDBMS. Keeping these statistics current isextremely important since the optimizer will make default assumptions in the absenceof these statistics. The quality of the database optimizer decisions depends on theaccuracy of these statistics, and hence, directly affects the performance of the ASAPapplication.
Updating the statistics on large tables (over 1 million rows) can take a long time. Thiscan affect your online response time or induce rollover to small error messages.
Note:
When the Oracle statistics are collected on the SARM schema, you shouldalso collect the histograms on the TBL_WKR_ORD.WO_STAT column.
Chapter 4Manually Tuning ASAP Performance
4-22

5Backing Up and Restoring ASAP Files andData
This chapter describes Oracle Communications ASAP backup and restore strategies for thefile system and the database.
About Backing Up and Restoring Files and DataAs an ASAP system administrator, you should observer the following guidelines for backingup and restoring your ASAP system and databases:
• ASAP System Backup and Restore
• Database Backup and Recovery
ASAP System Backup and RestoreBackup the ASAP environment, Oracle WebLogic Server, and Oracle database schemas inthe following situations:
• After you successfully install ASAP
• Before you upgrade ASAP in case you need to rollback your upgrade
• After you successfully upgrade ASAP
See the ASAP Installation Guide for procedures to backup your ASAP system.
In addition to these ASAP system backup scenarios, you should also follow the databasebackup schedule and procedures described in "Database Backup and Recovery."
See the section about rolling back your ASAP system in the ASAP Installation Guide torestore your ASAP system. These roll back procedures described in the ASAP InstallationGuide will return your ASAP system to the initial installation state and post or pre upgradestate. To recover lost data, restore your database backups described in "Database Backupand Recovery."
Database Backup and RecoveryASAP application databases must be protected in the event of corruption or failure.
The Service Activation Request Manager (SARM) and Service Request Processor (SRP)databases should be backed up daily. The Control and Network Element Processor (NEP)databases can be backed up less often since they contain only static and monitoring data.The schedule of transaction dumps is dictated by the amount of space available for thetransaction logs.
The Administrative database does not need to be backed up because it only containsperformance statistics.
5-1
Note:
Backup in a distributed environment is no different than in a non-distributedenvironment, except that tapes have to be placed in numerous machines.
Database Backup StrategyBackup procedures must be performed periodically and should be fully automated bythe System Administrator and Database Administrator. Cron scripts can be writtenwhich will dump the ASAP application databases, and associated transaction logs todisk and then to tape. In the case of Oracle, these cron scripts should backup to tapeall data files, the control file, and archive logs to tape. For Oracle databases theDatabase Administrator should first decide whether to employ hot backups of thetablespaces or a full cold backup. It is recommended that a cold backup be done atleast once a week in addition to a full database export. The backup strategy youchoose will be determined primarily by the amount of data loss that can be tolerated inthe event of failure.
The ASAP databases are as follows:
• Control – Can be recreated from the data on the switches, but may be backed upif required.
• SRP – Should be backed up daily.
• SARM – Should be backed up daily.
• NEP – Can be recreated from the data on the switches, but may be backed up ifrequired.
• Admin – Not necessary to back up because it contains only performancestatistics.
Database Backup in a Distributed EnvironmentBackup in a distributed environment should be no different than a non-distributedenvironment, except that tapes may have to be placed in numerous machines.
ASAP WebLogic Server Domain Back UpYou can archive domain configurations:
• Automatically to other media (such as tapes or disks)
• Manually by copying files to another directory, and preferably, other machines
You should regularly back up the following:
• Configuration data
• Security data
• Deployed applications
Configuration Data
Back up configuration data, including the config.xml file and the config.xml.bootedfile from the Domain_home/config/ directory. The config.xml.booted file is created
Chapter 5About Backing Up and Restoring Files and Data
5-2
when you successfully start the administration server and can serve as backup in the eventthat the config.xml file becomes unusable. You can overwrite the config.xml file with theconfig.xml.booted file to restore the domain to the last successful startup configuration.
Security Data
Back up the Administration Server security data for a domain. The security data that youshould archive includes:
• Security Configuration Data
• WebLogic LDAP Repository
• SerializedSystemIni.dat and Security Certificates
For more information on administering domains, refer to
http://docs.oracle.com/middleware/1213/wls/wls-administer.htm
Chapter 5About Backing Up and Restoring Files and Data
5-3
6Setting Up ASAP for High Availability
Learn how to set up ASAP for high availability.
This chapter describes how to set up and manage ASAP for high availability.
This chapter includes the following sections:
• Overview of Setting Up ASAP for High Availability
• About Order Balancer
• Connecting Order Balancer with Multiple ASAP Instances to a Remote Application
• Planning Your Installation
• Installing Order Balancer
• About Order Balancer Queues
• About Member Instance States
• Managing Member Instances
• Importing ASAP Order Data into Order Balancer
• Purging Order Balancer Data
• Managing Order Balancer Logs
• Accessing and Updating Order Balancer using REST APIs
• Modifying Properties
• Uninstalling Order Balancer
• Updating and Redeploying Order Balancer
• Troubleshooting
Overview of Setting Up ASAP for High AvailabilityYou can set up multiple instances of ASAP for high availability and upgrade them insuccession with zero down-time. With multiple independent ASAP instances, you candistribute and balance the load. You can also deploy new ASAP instances with newcartridges in the same environment without down time.
You can set up your highly available ASAP environment using virtual machines. Thedatabase could be centrally located, with independent table spaces for each ASAP instance.
When you set up multiple ASAP instances, when an instance goes down, the incomingorders are routed to the other available running instances in the environment. Tasks such asrouting the requests to the corresponding ASAP instance queue and monitoring the ASAPinstance states are performed by Order Balancer. Order Balancer stores the Order ID-to-instance mapping information in its database. Based on the work order ID, a change order ora rollback order would be routed to the instance that initially processed that order.
6-1
Note:
Order Balancer does not generate IDs for orders. Order Balancer requiresOrder IDs for incoming orders.
Order Balancer enables you to set up a highly available ASAP environment with thefollowing functionality:
• Uninterrupted service: If an ASAP member instance goes down, new incomingorders are routed to the other available instances. The processing of the orders onthe instance that is down would resume when the instance is restored.
• Zero-downtime for patching and deployment: You can install patches anddeploy cartridges on one ASAP member instance while the other availableinstances in the environment process the incoming orders.
• Horizontal scaling: You can add additional ASAP member instances, whichincreases the throughput of the system.
• Server affinity: The follow-up requests (for example, cancel request and queryorder) for a previously submitted order are sent automatically to the sameinstance that initially processed them.
About Order BalancerOrder Balancer primarily consists of Order Balancer Queue, a queue where therequests from upstream systems are sent to. Order Balancer routes the requests tothe registered ASAP instances and monitors the status of the instances.
The requests that Order Balancer receives and processes are categorized as follows:
• Non-Sticky: These are requests that are server-independent. For example,createOrderByValue is a non-sticky request.
• Sticky: These are requests that are server-dependent. For example,suspendOrderByKey is a sticky request.
For list of supported sticky and non-sticky requests, see "Sticky and Non-StickyRequests Supported by Order Balancer".
Order Balancer performs the following order management functions:
• Even distribution of create type orders (non-sticky) among the member instances.Order Balancer distributes orders to ASAP instances in a round-robin fashion.
• Zero order loss: When sending an order to a member instance fails, OrderBalancer marks the member instance as down and attempts to send the sameorder to a member instance that is available.
• Order dependency: Order Balancer saves the details of the Order ID of an orderand the instance that processed the order in the database. It caches these detailslocally on the server and to a database. The modify or rollback orders (stickyorders) are sent to the member instance fetched from the database for the currentOrder ID.
Order Balancer performs the following ASAP member instance managementfunctions:
Chapter 6About Order Balancer
6-2
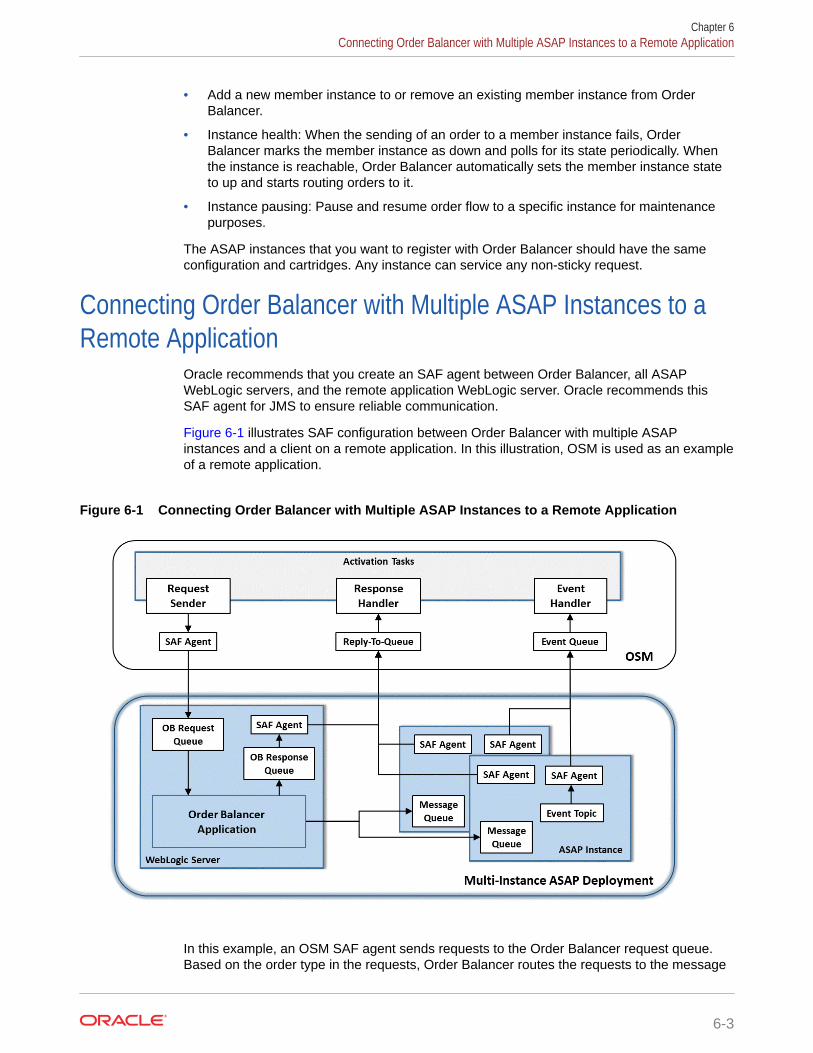
• Add a new member instance to or remove an existing member instance from OrderBalancer.
• Instance health: When the sending of an order to a member instance fails, OrderBalancer marks the member instance as down and polls for its state periodically. Whenthe instance is reachable, Order Balancer automatically sets the member instance stateto up and starts routing orders to it.
• Instance pausing: Pause and resume order flow to a specific instance for maintenancepurposes.
The ASAP instances that you want to register with Order Balancer should have the sameconfiguration and cartridges. Any instance can service any non-sticky request.
Connecting Order Balancer with Multiple ASAP Instances to aRemote Application
Oracle recommends that you create an SAF agent between Order Balancer, all ASAPWebLogic servers, and the remote application WebLogic server. Oracle recommends thisSAF agent for JMS to ensure reliable communication.
Figure 6-1 illustrates SAF configuration between Order Balancer with multiple ASAPinstances and a client on a remote application. In this illustration, OSM is used as an exampleof a remote application.
Figure 6-1 Connecting Order Balancer with Multiple ASAP Instances to a Remote Application
In this example, an OSM SAF agent sends requests to the Order Balancer request queue.Based on the order type in the requests, Order Balancer routes the requests to the message
Chapter 6Connecting Order Balancer with Multiple ASAP Instances to a Remote Application
6-3
queue of the corresponding ASAP member instance. The ASAP instance processesthe requests and returns responses through the ASAP SAF agent to the OSM reply-toqueue. In case of exceptions in Order Balancer, such as ASAP server is down, andinvalid order sent in the request, Order Balancer sends the error responses fromResponse Queue with an SAF agent to OSM reply-to-queue. Each ASAP memberinstance sends work order state changes from their respective JSRP XVTEventTopicthrough a JMS bridge with an SAF agent to the OSM event queue.
For detailed instructions on creating SAF and JMS bridges between ASAP and OSM,see the Configuring WebLogic Resources for OSM Integration With ASAP And UIMOn Different Domains (Doc ID 1431235.1) knowledge article on My Oracle Support.This article is applicable to any remote application that uses a WebLogic JMS server tosend and receive web service messages or JMS messages.
Note:
Order Balancer supports the OSS/J JMS interface only. Other interfacessuch as Custom SRP, JVT (RMI), and web services are not supported.
Planning Your InstallationYou can plan your installation based on the available resources and your businessrequirements.
WebLogic Server
You can install Order Balancer on an existing ASAP WebLogic server or on a separateWebLogic server. If you choose to install Order Balancer on an existing ASAPWebLogic server, install it in a separate domain. If you choose to use a separateWebLogic server, install WebLogic server and create a domain for Order Balancer.
Database User
You can use the same database as the ASAP database or a different database. Inboth the cases, create a separate tablespace and a user.
For example:
create tablespace "OBDATA_TS" logging datafile '/u01/app/oracle/oradata/ASAP72/OBDATA_TS1.dbf' size 31999M reuse autoextend on next 5120K maxsize unlimited default storage (initial 256K next 256K minextents 1 maxextents 2147483645 pctincrease 0);
CREATE USER "OB_SYS_USR" PROFILE "DEFAULT" IDENTIFIED BY "OB_SYS_USR" DEFAULT TABLESPACE "OBDATA_TS" TEMPORARY TABLESPACE "TEMP" ACCOUNT UNLOCK;
GRANT UNLIMITED TABLESPACE TO "OB_SYS_USR" WITH ADMIN OPTION; GRANT "CONNECT" TO "OB_SYS_USR" WITH ADMIN OPTION; GRANT "RESOURCE" TO "OB_SYS_USR" WITH ADMIN OPTION; GRANT CREATE VIEW TO "OB_SYS_USR" WITH ADMIN OPTION; GRANT EXECUTE ON SYS.UTL_FILE TO "OB_SYS_USR" WITH GRANT OPTION;
Chapter 6Planning Your Installation
6-4

GRANT CREATE PROCEDURE TO "OB_SYS_USR" WITH ADMIN OPTION; GRANT CREATE TRIGGER TO "OB_SYS_USR" WITH ADMIN OPTION; GRANT CREATE TABLE TO "OB_SYS_USR" WITH ADMIN OPTION; GRANT CREATE TYPE TO "OB_SYS_USR" WITH ADMIN OPTION; GRANT CREATE SEQUENCE TO "OB_SYS_USR" WITH ADMIN OPTION;GRANT CREATE SESSION TO "OB_SYS_USR" WITH ADMIN OPTION;
For more details about creating tablespaces, users, and granting permissions, see "CreatingOracle Database Tablespaces, Tablespace User, and Granting Permissions".
Installing Order BalancerYou install Order Balancer by running the Order Balancer installer. The installer is acommand line interface tool, which connects and deploys the Order Balancer application(ASAPOrderBalancer.ear) to the WebLogic server and creates the required componentssuch as a JMS server, JDBC resources, and wallet files. You run the installer in silent mode.
Before running the installer, set the following environment variables :
• JAVA_HOME: Java home path
• WEBLOGIC_HOME: WebLogic server home path
To install Order Balancer:
1. Go to Oracle Software Delivery Cloud website:https://edelivery.oracle.com
2. Download the ASAP.R7_4_0.BXX.ob.tar file.
3. Copy the ASAP.R7_4_0.BXX.ob.tar file to the machine where the WebLogic server, intowhich Order Balancer needs to be deployed, is running.
4. Run the following command, which extracts the .tar file:
tar -xvf ASAP.R7_4_0.BXX.ob.tar
The components in the installer are extracted to the ob directory.
5. In the ob directory, update the sampleConfig.properties file with the values required forthe installation and save it as config.properties. For more details about the properties,see Table 6-1.
Note:
• You can save the properties file with any name. In this chapter,config.properties is used as an example.
• To change the default configuration of Order Balancer application, add ormodify variables in the OBPlan.xml deployment plan present in theob_installer/plan directory before installing Order Balancer. For moreinformation, see "Sample Variable Update XML Snippets".
Chapter 6Installing Order Balancer
6-5
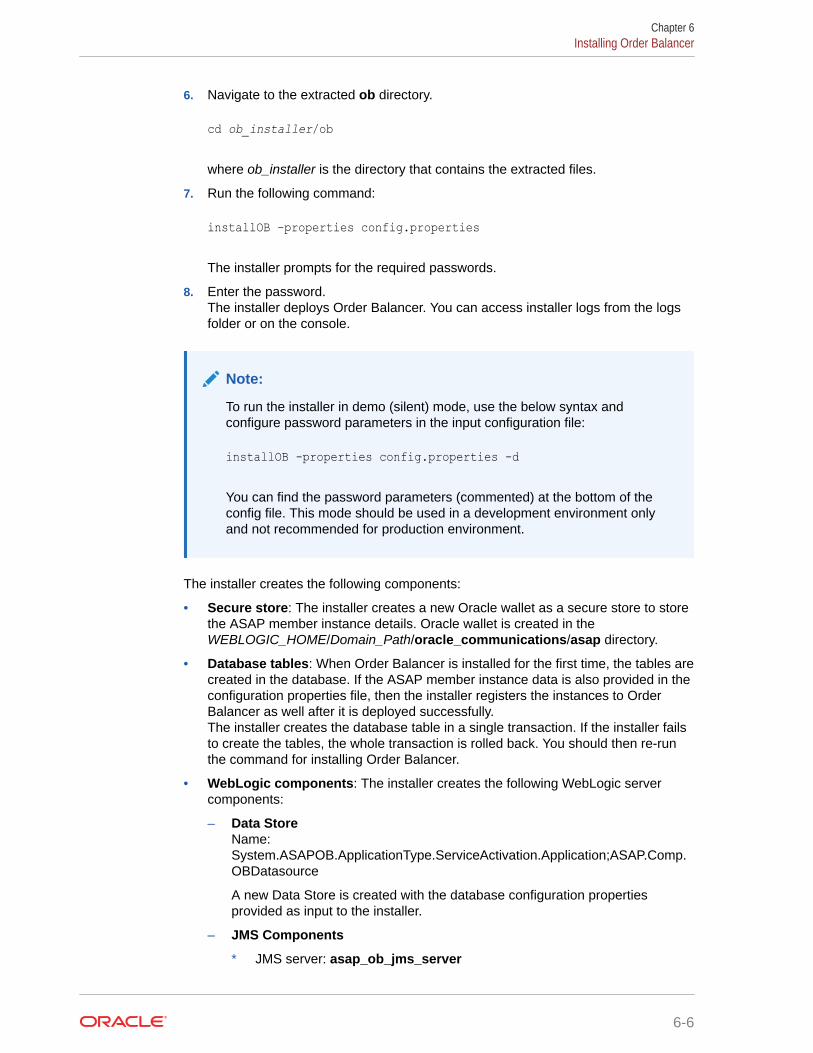
6. Navigate to the extracted ob directory.
cd ob_installer/ob
where ob_installer is the directory that contains the extracted files.
7. Run the following command:
installOB –properties config.properties
The installer prompts for the required passwords.
8. Enter the password.The installer deploys Order Balancer. You can access installer logs from the logsfolder or on the console.
Note:
To run the installer in demo (silent) mode, use the below syntax andconfigure password parameters in the input configuration file:
installOB -properties config.properties -d
You can find the password parameters (commented) at the bottom of theconfig file. This mode should be used in a development environment onlyand not recommended for production environment.
The installer creates the following components:
• Secure store: The installer creates a new Oracle wallet as a secure store to storethe ASAP member instance details. Oracle wallet is created in theWEBLOGIC_HOME/Domain_Path/oracle_communications/asap directory.
• Database tables: When Order Balancer is installed for the first time, the tables arecreated in the database. If the ASAP member instance data is also provided in theconfiguration properties file, then the installer registers the instances to OrderBalancer as well after it is deployed successfully.The installer creates the database table in a single transaction. If the installer failsto create the tables, the whole transaction is rolled back. You should then re-runthe command for installing Order Balancer.
• WebLogic components: The installer creates the following WebLogic servercomponents:
– Data StoreName:System.ASAPOB.ApplicationType.ServiceActivation.Application;ASAP.Comp.OBDatasource
A new Data Store is created with the database configuration propertiesprovided as input to the installer.
– JMS Components
* JMS server: asap_ob_jms_server
Chapter 6Installing Order Balancer
6-6

* JMS module: asap_ob_jms_module
* JMS queues. For details about the queues, see "About Order Balancer Queues".
– User groupsThe following user groups are created as part of the default security realm. Thegroups are mapped to security roles. Order Balancer creates roles to restrict accessto its members.
* ASAP_OB_USERS_GROUP: Members of this group can access the OrderBalancer JMS queues. These members can send requests to Order Balancer.These members can also use scripts to add and remove instances and updateinstance states.
* ASAP_OB_REST_GROUP: Members of this group can access the OrderBalancer RESTful API.
The installer adds the configured OB_USER user to both the above groups. You canalso add more users to the corresponding groups.
Note:
On successful installation, installer saves some properties from input configurationproperties at ob/scripts/OB.properties. These properties are used by instancemanagement scripts as described in "Managing Member Instances".
Table 6-1 lists the configuration properties that you should specify in thesampleConfig.properties file for installing Order Balancer.
Table 6-1 Configuration Properties
Parameter Description
WLS_PROTOCOL WebLogic Server protocol for Order Balancer.For example, WLS_PROTOCOL=t3s.
WLS_HOST The host name or IP address of the WebLogic Serverwhere you want to deploy Order Balancer.
WLS_PORT The port of the WebLogic Server.
WLS_USERNAME The username to log in to WebLogic Server
WLS_TARGET_SERVER The name of the server where you want to deploy OrderBalancer. For example, AdminServer or ManagedServer1.
WLS_SSL_ENABLED Set this parameter to true if SSL is enabled on OrderBalancer WebLogic Server.
WLS_ALLOW_CRYPTO_JDEFAULT_PRNG
Set the JVM propertyweblogic.security.allowCryptoJDefaultPRNG to connect toOrder Balancer WebLogic server.For example,WLS_ALLOW_CRYPTO_JDEFAULT_PRNG=true.
WLS_IGNORE_HOSTNAME_VERIFICATION
Set the JVM propertyweblogic.security.SSL.ignoreHostnameVerification toconnect to Order Balancer WebLogic Server.For example,WLS_IGNORE_HOSTNAME_VERIFICATION=true.
Chapter 6Installing Order Balancer
6-7
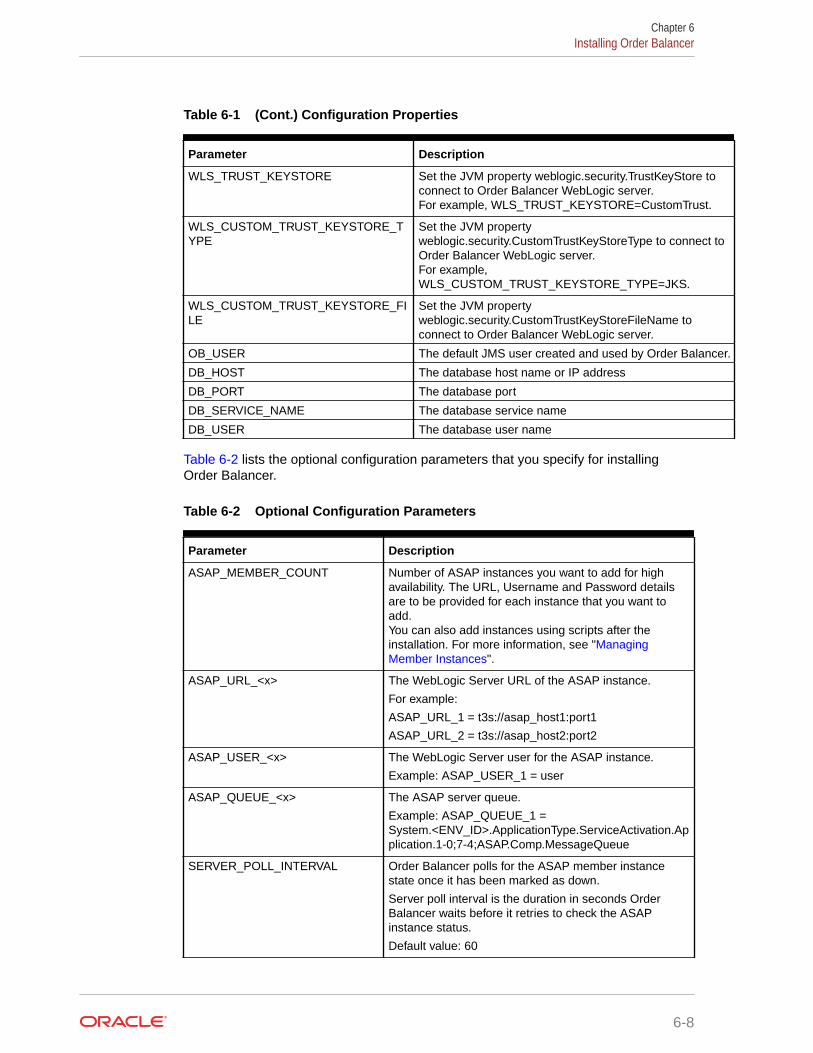
Table 6-1 (Cont.) Configuration Properties
Parameter Description
WLS_TRUST_KEYSTORE Set the JVM property weblogic.security.TrustKeyStore toconnect to Order Balancer WebLogic server.For example, WLS_TRUST_KEYSTORE=CustomTrust.
WLS_CUSTOM_TRUST_KEYSTORE_TYPE
Set the JVM propertyweblogic.security.CustomTrustKeyStoreType to connect toOrder Balancer WebLogic server.For example,WLS_CUSTOM_TRUST_KEYSTORE_TYPE=JKS.
WLS_CUSTOM_TRUST_KEYSTORE_FILE
Set the JVM propertyweblogic.security.CustomTrustKeyStoreFileName toconnect to Order Balancer WebLogic server.
OB_USER The default JMS user created and used by Order Balancer.
DB_HOST The database host name or IP address
DB_PORT The database port
DB_SERVICE_NAME The database service name
DB_USER The database user name
Table 6-2 lists the optional configuration parameters that you specify for installingOrder Balancer.
Table 6-2 Optional Configuration Parameters
Parameter Description
ASAP_MEMBER_COUNT Number of ASAP instances you want to add for highavailability. The URL, Username and Password detailsare to be provided for each instance that you want toadd.You can also add instances using scripts after theinstallation. For more information, see "ManagingMember Instances".
ASAP_URL_<x> The WebLogic Server URL of the ASAP instance.
For example:
ASAP_URL_1 = t3s://asap_host1:port1
ASAP_URL_2 = t3s://asap_host2:port2
ASAP_USER_<x> The WebLogic Server user for the ASAP instance.
Example: ASAP_USER_1 = user
ASAP_QUEUE_<x> The ASAP server queue.
Example: ASAP_QUEUE_1 =System.<ENV_ID>.ApplicationType.ServiceActivation.Application.1-0;7-4;ASAP.Comp.MessageQueue
SERVER_POLL_INTERVAL Order Balancer polls for the ASAP member instancestate once it has been marked as down.
Server poll interval is the duration in seconds OrderBalancer waits before it retries to check the ASAPinstance status.
Default value: 60
Chapter 6Installing Order Balancer
6-8

Table 6-2 (Cont.) Optional Configuration Parameters
Parameter Description
SERVER_DOWN_RETRY_INTERVAL
Duration in seconds Order Balancer waits before re-attempting to route the order to the same instance. If there-attempt fails, the instance is marked as down.
Default value: 2
ALL_SERVERS_DOWN_WAIT_INTERVAL
Duration in seconds Order Balancer waits before puttingthe request back to queue when all the ASAP instancesare down.
Default value: 3600
ALL_SERVERS_DOWN_RETRY_INTERVAL
Duration in seconds Order Balancer waits before retryingto connect to fetch for an active ASAP member instancewhile waiting when all servers are down.
Default value: 120
LOGGER_LEVEL The log level for initializing the Order Balancerapplication root logger.
The options are:• SEVERE• WARNING• INFO• FINE• FINEST• ALL
About Order Balancer QueuesOrder Balancer queues enable you to route the requests from upstream systems to OrderBalancer, which distributes the requests among the ASAP instances for high availability. Table 6-3 describes the Order Balancer queues that the installer configures automatically.
Table 6-3 Order Balancer Queues
JMS Resource Queue Description
Request Queue System.ASAPOB.ApplicationType.ServiceActivation.Application;ASAP.Comp.OBRequestQueue
The input Queue to send ASAP ordersto Order Balancer.
ConnectionFactory
System.ASAPOB.ApplicationType.ServiceActivation.Application;ASAP.Comp.TopicConnectionFactory
This is the Order Balancer connectionfactory.
Response Topic System.ASAPOB.ApplicationType.ServiceActivation.Application;ASAP.Comp.ASAP.OBResponseTopic
In case of exceptions in Order Balancerand if the replyTo queue is not set inthe incoming message, the exceptionresponses are sent to this queue.
Error Queue System.ASAPOB.ApplicationType.ServiceActivation.Application;ASAP.Comp.OBErrorQueue
If the message delivery on requestqueue exceeds the queue's re-deliverylimit, the message gets redirected tothis queue.
Chapter 6About Order Balancer Queues
6-9
About Member Instance StatesWhen routing a request to an ASAP member instance queue, Order Balancer attemptsto connect to the instance queue using the connection factory details. If the connectionattempt fails in the first attempt, Order Balancer reattempts the connection after theconfigured time interval. If the connection attempt fails again, Order Balancer marksthe instance as down and sets the instance status to DOWN. If the request is a non-server dependent request, Order Balancer attempts to route the request to the nextavailable instance.
Once an instance is marked as down, Order Balancer polls the instance for its statusat the configured interval. After Order Balancer makes a successful connection to themember instance, the instance status is set to UP.
When a member instance is marked as down, no further requests are routed to it untilit is marked back to UP. When a sticky type of request comes in, but thecorresponding instance is down, then an error response with serverDownExceptiontype is sent to the Order Balancer's response queue after two attempts. When all theinstances are down, all the requests are blocked by Order Balancer until at least oneinstance becomes available or till time-out. An instance becomes available (state setto UP) when Order Balancer successfully makes a connection in its periodicalattempts.
Use the ALL_SERVERS_DOWN_WAIT_INTERVAL parameter to configure theduration of the time out interval. In case of time-out before at least one memberinstance becomes available, the request is forwarded to the error queue.
Managing Member InstancesYou can add a new member instance to Order Balancer or remove an existing memberinstance from Order Balancer. When you add a member instance to Order Balancer,the instance is registered to Order Balancer. Upon successful addition, Order Balancerwill start routing subsequent orders to the ASAP member instance.
The scripts for managing member instance are located in installer_location/ob/scriptsdirectory.
For all the scripts mentioned below, the common Order Balancer WebLogic Serverproperties are taken from the ob/scripts/OB.properties file saved by the installer aftersuccessful installation.
Add ASAPServer
To add a new member instance to Order Balancer, run the addASAPServer script.
Usage:
addASAPServer -asapSrvName asap_Srv_Name -asapSrvURL asap_Srv_URL -asapSrvUser asap_Srv_User -asapSrvRequestQueue "asap_Srv_Request_Queue"
where:
• asap_Srv_Name is the name of the ASAP instance that you want to register toOrder Balancer. For example, use MY_ASAP1.
Chapter 6About Member Instance States
6-10
• asap_Srv_URL is the ASAP instance URL. For example, t3s://ASAP_HOST:ASAP_PORT.
• asap_Srv_User is the ASAP instance user name.
• asap_Srv_Request_Queue is the ASAP instance input JMS queue name. For example,for ASAP 7.4 with ENV ID A12, the queue name will beSystem.A12.ApplicationType.ServiceActivation.Application.1-0;7-4;ASAP.Comp.MessageQueue.
Change ASAPServer States
On the registered ASAP instances, for maintenance or for any other reason, you can performactions such as pausing new requests, pausing all requests, and resuming the processing ofrequests to a given ASAP instance.
You can perform the following tasks using scripts provided with Order Balancer:
• Pause routing any new non-sticky orders to the given instance. The Sticky orders are stillrouted to the instance. Order Balancer changes the order state to PAUSE-NEW. Aninstance can be paused for new orders even when it is down. New non-sticky Orders arenot sent to this instance by Order Balancer until a further action of resume is performed.Use the pauseNewForASAPServer script to do this.Usage:
pauseNewForASAPServer -asapSrvName asap_Srv_Name
where:
– asap_Srv_Name is the name of the ASAP instance that you want to register to OrderBalancer. For example, use MY_ASAP1.
• Pause routing any new order (both sticky and non-sticky) to the given instance. OrderBalancer changes the order state to PAUSE-ALL. Orders are not sent to this instance byOrder Balancer until a further action of resume is performed. An instance can be pausedfor all orders only if it is paused for new non-sticky orders first. Use thepauseAllForASAPServer script to do this.Usage:
pauseAllForASAPServer -asapSrvName asap_Srv_Name
where:
– asap_Srv_Name is the name of the ASAP instance that you want to register to OrderBalancer. For example, use MY_ASAP1.
• Resume routing any new order (both sticky and non-sticky) to the given instance. OrderBalancer changes the order state to UP. An instance can be resumed for all orders only ifit is paused for new non-sticky orders or paused for all orders first. An instance can besuccessfully resumed even if it down but it will be marked as down if Order Balancer failsto send orders to the instance after resuming it. Use the resumeASAPServer script to dothis.Usage:
resumeASAPServer -asapSrvName asap_Srv_Name
where:
Chapter 6Managing Member Instances
6-11
– asap_Srv_Name is the name of the ASAP instance that you want to register toOrder Balancer. For example, use MY_ASAP1.
Remove ASAPServer
To remove a running instance from Order Balancer, run the removeASAPServerscript. The instance should be in PAUSE-ALL state to remove it.
Note:
When you want to remove or upgrade a member instance, it isrecommended that you first run the pauseNewForASAPServer script andthen run the pauseAllForASAPServer script to gracefully bring down amember instance.
Usage:
removeASAPServer -asapSrvName asap_Srv_Name
where:
• asap_Srv_Name is the name of the ASAP instance that you want to register toOrder Balancer. For example, use MY_ASAP1.
Migrate ASAPServer to New URL
You can modify ASAP instance URL along with other parameters. This script is used tomigrate a registered ASAP instance to point to a different server URL. This does notchange the instance state or the ASAP instance name. The database is updated withthe new URL for all the orders served by the migrated server. Use themigrateASAPServer script to do this.
Note:
The ASAP instance should be in PAUSE-ALL state to run the migrate script.After successful migration, Order Balancer will route sticky orders to newASAP instance whose dependent orders where previously processed by theold ASAP instance.
Usage:
migrateASAPServer -migrateFromSrvName migrate_From_Srv_Name -migrateToSrvURL migrate_To_Srv_URL [-migrateToSrvUser migrate_To_Srv_User] [-migrateToSrvRequestQueue migrate_To_Srv_Request_Queue]
where:
• migrate_From_Srv_Name is the registered name of the ASAP instance whichneeds to be migrated.
Chapter 6Managing Member Instances
6-12

• migrate_To_Srv_URL is the ASAP instance URL to migrate to. For example, t3s://ASAP_HOST:ASAP_PORT.
• migrate_To_Srv_User (optional) is the ASAP instance user name to migrate to. If notgiven, existing credentials are used to connect to the new URL.
• migrate_To_Srv_Request_Queue (optional) is the ASAP instance Queue name tomigrate to. If not given, existing queue name is used to connect to the new URL.
Order Balancer periodically checks the status of all the member instances that are down.Once a member instance is found to be up, Order Balancer adds it back to the round-robindistribution.
When you run the script for resuming an instance, the instance does not resume if theinstance is marked as Pause_down. Order Balancer marks an instance as Pause_down ifthe instance is down. Order Balancer does not route requests to this instance until it isresumed, but it polls for the instance state. When the instance is restored, Order Balancerchanges the state to previous state PAUSE-NEW. You can then resume the instance.
Importing ASAP Order Data into Order BalancerOrder Balancer saves order details in its database table for every ASAP instance that isregistered. When Order Balancer receives a sticky order, it checks the saved data todetermine the correct ASAP instance to route the order to. For a green-field ASAP instance(ASAP instance that did not process any order before), Order Balancer has all the orderrelated data corresponding to the ASAP instance.
For a non-green field ASAP instance, ASAP contains order data in its database tables. Whenan instance is added to Order Balancer, Order Balancer will not have any ASAP datacorresponding to the previous orders sent to ASAP. If a sticky order dependent on theprevious orders is sent to ASAP directly, Order Balancer cannot route it to the correspondingASAP instance unless the ASAP order data is copied to Order Balancer. All the orders shouldbe copied from the ASAP database to the Order Balancer database when it is added to OrderBalancer.
After adding an ASAP instance to Order Balancer, orders could be sent to Order Balancerand Order Balancer routes the orders accordingly. In some unpredicted cases, orders couldalso be sent to ASAP directly while it is still registered with Order Balancer, resulting inmismatched data between ASAP and Order Balancer. The data in the ASAP database andOrder Balancer must be in sync when they are found to be out-of-sync after some orders areprocessed by Order Balancer and some by ASAP directly. Only those orders that are notpresent in Order Balancer need to be copied from ASAP to Order Balancer.
Prerequisites for Importing Order Data
To import order data from the ASAP database to Order Balancer, ensure that the ASAPinstance that is registered with Order Balancer is in the PAUSE-ALL state.
Running the Script to Import Order Data in ASAP to Order Balancer
To import order data in ASAP to Order Balancer, run the following script:
importASAPData -properties <import.properties>
A sample import configuration properties file sampleImport.properties is provided with theinstaller in the ob directory. You can edit the properties file to add the required values.
Chapter 6Importing ASAP Order Data into Order Balancer
6-13

Note:
When you run the script, the script promts for the Order Balancer databasepassword (DB_PASSWORD) and the ASAP SARM database password(ASAP_DB_PWD).
Table 6-4 Configuration Properties
Property Description
DB_HOST Order Balancer database host name or IPaddress.
DB_PORT Order Balancer database port.
DB_SERVICE_NAME Order Balancer database service name.
DB_USER Order Balancer database user name (asconfigured while installing Order Balancer).
ASAP_DB_HOST ASAP SARM database host name or IPaddress.
ASAP_DB_PORT ASAP SARM database port.
ASAP_DB_SERVICE_NAME ASAP SARM database service name.
ASAP_DB_USER ASAP SARM database user name.
ASAP_NAME Name of the ASAP instance as configuredwhile adding to Order Balancer.
ASAP_FROM_DATE
ASAP_TO_DATE
These are optional data filters.
Orders between the configured dates areselected from ASAP database table andimported to Order Balancer.
Both dates should be configured to filter datato import. If no dates are configured, all theorders from ASAP server DB are imported.
Date Format: dd-MM-yyyy
Example: 01-05-2021
ASAP_FROM_DATE: ASAP orders whoseUPDATE_DTS is later than or equal toASAP_FROM_DATE are selected to import.
ASAP_TO_DATE: ASAP orders whoseUPDATE_DTS is before or equal toASAP_TO_DATE are selected to import.
You import data any time after adding an ASAP instance to Order Balancer. It isrecommended to import ASAP data right after it is added to Order Balancer using theaddASAPServer script.
To import ASAP data while registering the ASAP instance to Order Balancer:
1. Register the ASAP instance to Order Balancer by running the addASAPServerscript.
2. Verify that the state of the registerd ASAP instance is in the UP state.
3. Run the pauseNewForASAPServer script to set the status of the instance to thePAUSE-NEW state.
Chapter 6Importing ASAP Order Data into Order Balancer
6-14
4. Run the pauseAllForASAPServer script to set the state to the PAUSE-ALL state.
5. Run the importASAPData script to import data.
6. Run the resumeASAPServer script to set the state back to the UP state.
In case of errors during the import operation, the import process stops. You can run it again.The script ignores the data that is successfully imported in the failed run and imports only theremaining orders.
Purging Order Balancer DataYou can purge Order Balancer routing data from the database. You can purge all the orderdata with order date before a specific date.
To purge data from the database, run the installer_location/ob/scripts/purgeDbData script.
purgeDbData -dbHost DBHost -dbPort DBPort -dbServiceName ServiceName -purgeAllBeforeDate DD-MM-YYYY
where:
• DBHost: Order Balancer database host
• DBPort: Order Balancer database port
• ServiceName: Order Balancer database service name
• DD-MM-YYYY: Purge all the order data with order date before the given date. Dateformat: DD-MM-YYYY
Managing Order Balancer LogsThe Order Balancer installer logs are stored in the logs directory in the installer location. Youcan change the installer logging level by modifying the config/logging.properties file.
The Order Balancer application logs are added to the WebLogic server log file. The logs arealso added to an additional Order Balancer log file Domain_Root/ASAP_OB/logs.
Changing Logger LevelsOrder Balancer uses java.util.logging for logging. By default, the logger levels areconfigured with the INFO option. You can change the default logger level before deployingOrder Balancer by modifying the LOGGER_LEVEL property in the config.properties file.
To change the logger levels at runtime, use WebLogic Server Administration Console. Formore information, see https://docs.oracle.com/middleware/12213/wls/WLACH/taskhelp/logging/ConfigureJavaLoggingLevels.html
Accessing and Updating Order Balancer using REST APIsYou can use REST APIs to view and update data about the ASAP member instances inOrder Balancer.
You use the following services to access and update Order Balancer:
• Member Instance Data Service
Chapter 6Purging Order Balancer Data
6-15
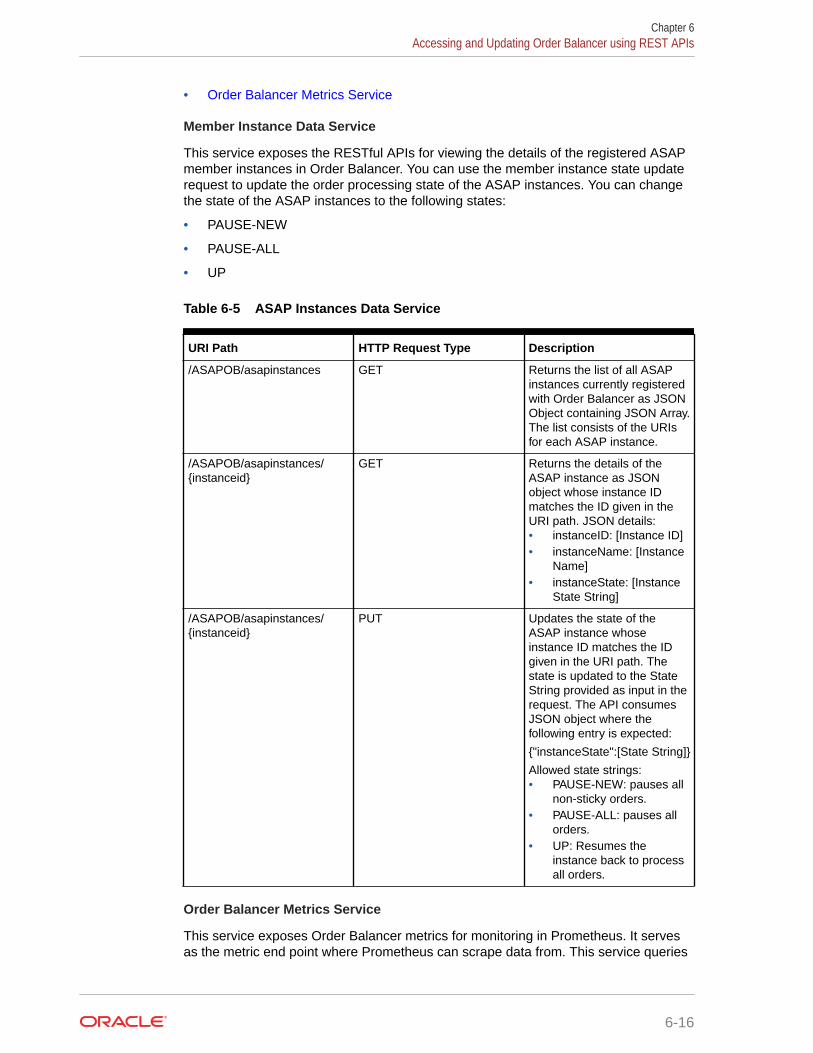
• Order Balancer Metrics Service
Member Instance Data Service
This service exposes the RESTful APIs for viewing the details of the registered ASAPmember instances in Order Balancer. You can use the member instance state updaterequest to update the order processing state of the ASAP instances. You can changethe state of the ASAP instances to the following states:
• PAUSE-NEW
• PAUSE-ALL
• UP
Table 6-5 ASAP Instances Data Service
URI Path HTTP Request Type Description
/ASAPOB/asapinstances GET Returns the list of all ASAPinstances currently registeredwith Order Balancer as JSONObject containing JSON Array.The list consists of the URIsfor each ASAP instance.
/ASAPOB/asapinstances/{instanceid}
GET Returns the details of theASAP instance as JSONobject whose instance IDmatches the ID given in theURI path. JSON details:• instanceID: [Instance ID]• instanceName: [Instance
Name]• instanceState: [Instance
State String]
/ASAPOB/asapinstances/{instanceid}
PUT Updates the state of theASAP instance whoseinstance ID matches the IDgiven in the URI path. Thestate is updated to the StateString provided as input in therequest. The API consumesJSON object where thefollowing entry is expected:
{"instanceState":[State String]}
Allowed state strings:• PAUSE-NEW: pauses all
non-sticky orders.• PAUSE-ALL: pauses all
orders.• UP: Resumes the
instance back to processall orders.
Order Balancer Metrics Service
This service exposes Order Balancer metrics for monitoring in Prometheus. It servesas the metric end point where Prometheus can scrape data from. This service queries
Chapter 6Accessing and Updating Order Balancer using REST APIs
6-16

order metrics using ASAPOrderBalancer EntityManager which is injected into the currentservice.
The Order Balancer request queue metrics are queried from the Weblogic ManagementMBeans.
Table 6-6 lists metrics that the HTTP GET operation on the URI /ASAPOB/metrics provides.
Table 6-6 Order Balancer Metrics
Metric Name Label Description
ob_orders_routed to_asap This metric is provided for eachASAP instance registered withOrder Balancer. The metricrepresents the total number oforders routed by Order Balancerto the ASAP instance identifiedby the label to_asap. The label'svalue contains the name of theASAP instance.
ob_asap_state asap This metric is provided for eachASAP instance registered withOrder Balancer. The metricrepresents the state of the ASAPinstance identified by the labelasap. The label's value containsthe name of the ASAP instance.ASAP instance state metricrepresentation is as follows:• 1: UP• 2: PAUSE-NEW• 3: PAUSED_DOWN• 4: PAUSE-ALL• 5: DOWN
ob_orders_received This metric represents the totalnumber of messages receivedby the Order Balancer JMSqueue OBRequestQueue. Thismetric is read from the attributeMessagesReceivedCount ofthe JMS queue.
About Order Balancer RESTful Web Services Security
All the Order Balancer RESTful web services are secured using Basic authentication. Theusers that comply with the security-role asap_ob_rest_role can access the services. Thesecurity role asap_ob_rest_role is mapped to user groups ASAP_OB_REST_GROUP andAdministrators. So users who are part of these groups can access the REST APIs. TheASAP_OB_REST_GROUP group is created by the installer when the Order Balancerapplication is installed.
About the Default User
A default user is created when Order Balancer is deployed which is added as a member ofboth ASAP_OB_USERS_GROUP and ASAP_OB_REST_GROUP. This user is configurablein the installation properties file. Being part of ASAP_OB_USERS_GROUP, the default user
Chapter 6Accessing and Updating Order Balancer using REST APIs
6-17
complies with the role condition for asap_ob_jms_role. This role protects the OB JMSmodule. Clients can send messages to the Order Balancer request queue using thisuser. By default, the same user is also added to the ASAP_OB_REST_GROUP groupduring Order Balancer installation. This enables the default user to also access theOrder Balancer RESTful services. You can create different users later on for eachpurpose by adding them to the corresponding group.
Accessing the Order Balancer REST APIs over SSL
The REST services should be accessed over an SSL (HTTPS) connection to theOrder Balancer server. The users are authenticated using BASIC authentication. Toprotect the user credential data communicated between the client and the server overSSL, additional data constraint is added to Order Balancer REST services with user-data-constraint set to CONFIDENTIAL in the deployment descriptor web.xml file.
Note:
In testing environments, to access the REST services with-out SSL, theconstraint value can be changed to NONE. A sample variable update xmlsnippet (commented for non-SSL access) is provided with the default OrderBalancer deployment plan, which is provided at Domain_Home/servers/AdminServer/upload/ASAPOrderBalancer/7.4.0.0.0/plan/, uponsuccessful installation of Order Balancer. The snippet can be un-commentedand Order Balancer can be redeployed to achieve non-SSL access.
Modifying PropertiesWhen you deploy Order Balancer using the configuration properties file, a subset ofproperties are copied to the obConfig.properties file. Order Balancer uses theseproperties during runtime. On the successful deployment of Order Balancer, theobConfig.properties file is copied to the Domain_Home/servers/AdminServer/upload/ASAPOrderBalancer/7.4.0.0.0/plan/AppFileOverrides/ASAPOrderBalancer directory. Order Balancer reads this file using the generic fileloading overrides. For more information about the overrides, see "Generic File LoadingOverrides" in Oracle Fusion Middleware Deploying Applications to Oracle WebLogicServer.
To change the behavior of Order Balancer, you can modify the properties in theobConfig.properties file. After modifying the properties, redeploy Order Balancer foryour changes to take effect. For example, to increase the time interval between theinstance health polls, in the obConfig.properties file, increase the value ofSERVER_POLL_INTERVAL and redeploy or restart the Order Balancer application.
Uninstalling Order BalancerTo uninstall Order Balancer:
1. Navigate to the ob directory on the machine where Order Balancer is installed.
2. Run the following command:
uninstallOB –properties config.properties
Chapter 6Modifying Properties
6-18
The configuration parameters are loaded from the config.properties file. Order Balanceris undeployed and the WebLogic server components such as MessageQueue, JMSmodule, JMS server, and Data Source are removed.
Note:
If the deletion of the WebLogic component fails, an exception is raised.
Updating and Redeploying Order BalancerTo update the Order Balancer application to a new version, unzip the new installer andperform the steps described in "Installing Order Balancer". Before reinstalling Order Balancer,it is recommended to pause submitting orders to Order Balancer untill the update completes.When reinstalling, the installer first undeploys the Order Balancer application from theWebLogic server. It then checks if the required components such as database tables, Oraclewallet, and WebLogic components exist and skips creating them if they already exist. Theinstaller then deploys the new Order Balancer application EAR. The updated Order Balancerautomatically detects and adds the already registered ASAP member (if any) from thedatabase. The ASAP instances are added in the same state as they were before update.
You can also perform the following tasks related to
• Migrating Order Balancer to a Different Domain or a Machine
• Changing Order Balancer Application Configuration with Deployment Plan
Migrating Order Balancer to a Different Domain or a Machine
You can migrate a running Order Balancer application, with the same database user, to adifferent domain on the same machine or a different virtual machine.
To migrate a running Order Balancer:
1. Pause submitting orders to Order Balancer by running the appropriate script.
2. Uninstall Order Balancer from the existing domain as described in "Uninstalling OrderBalancer".
3. Copy the wallet files from the previous domain to the new domain.
• Wallet Files: cwallet.sso and cwallet.sso.lck
• Location: DOMAIN_HOME/oracle_communications/asap
4. If you are installing Order Balancer on a different machine, copy and unzip the OrderBalancer installer to the new server.
5. Update the Installer config.properties with details about the new domain.
6. Install Order Balancer on the new domain as described in "Installing Order Balancer".
Note:
If Order Balancer is uninstalled from a WebLogic domain but needs to be reinstalledto the same domain with a different database user (new), then the domain needs tobe cleaned up by deleting the wallet files before reinstalling.
Chapter 6Updating and Redeploying Order Balancer
6-19
Changing Order Balancer Application Configuration with Deployment Plan
To change the Order Balancer application configuration using a deployment plan, youcan use Order Balancer installer or WebLogic console.
Using Order Balancer Installer to Change the Configuration
The Order Balancer Installer includes a default deployment plan OBPlan.xml file inthe ob/plan directory. To change the Order Balancer application configuration, updatethe OBPlan.xml file with the required variables and values and then reinstall theapplication as described in "Updating and Redeploying Order Balancer".
Using WebLogic Console to Change the Configuration
When Order Balancer is successfully installed, the installer copies the Order Balancerapplication EAR and the deployment plan to DOMAIN_HOME/servers/AdminServer/upload/ASAPOrderBalancer/7.4.0.0.0.
To update the Order Balancer application configuration using WebLogic console:
1. Update the OBPlan.xml deployment plan with the required values.
2. In the WebLogic console, select deployments and then select ASAPOrderbalancerapplication.
3. Select Update and then select the updated deployment plan and finish the update.
Sample Variable Update XML Snippets
Order Balancer deployment plan in installer provides two sample variable update xmlsnippets (commented out by default).
• Sample 1: To increase the number of concurrent threads or consumers listeningon the Order Balancer input JMS queue, uncomment the variable assignmentsnippet provided under uncomment below variable assignments to increaseconcurrent threads for OB MDB section in the deployment plan and deploy orredeploy Order Balancer.
• Sample 2: For testing purposes, to achieve non-SSL access to Order BalancerRESTful APIs, uncomment the variable update xml snippet provided underuncomment below variable assignment for non-SSL section in the deploymentplan and deploy or redeploy Order Balancer.
TroubleshootingIssue: Error while saving order details to the database.
While Order Balancer attempts to save order processing details to the database, it ispossible that some orders return errors and are not saved to the database.
Resolution: Order Balancer saves the details of the failed entries to theASAPOB_DB_Fallbackxxx.log file located in the OB_Domain/oracle_communications/asap/ directory. This log file contains details of the failedentries, which you can use for correction.
Chapter 6Troubleshooting
6-20
The failed entries are saved to the log file in the following format:
SEVERE: Database persist failed for entry : OrderID,InstanceID,TimeStamp
Issue: Invalid Message Type
Order Balancer does not validate the incoming request message XML, but only parses andfetches the Order ID and the request type. Order Balancer extracts the request type from themessage and compares it with the expected types. In case of an unknown or unsupportedrequest type, Order Balancer sends a response with an exception to the replyTo queue thatis configured in the request.
The exception that Order Balancer sends is: Exception: RemoteException
The message that Order Balancer displays is: Message: "Unsupported order request:…"
Chapter 6Troubleshooting
6-21
7Managing the Database and File System
This chapter provides information about managing your Oracle Communications ASAPdatabase and file system.
Overview of Managing the Database and File SystemThe Oracle database and file system management tasks include:
• Configuring the operating system kernel and Oracle database initialization parameters foroptimal system performance.
• Monitoring database segment and file system size by defining maximum thresholds forboth.
• Using Oracle database management tools to maintain and tune your database.
• Enabling automated ASAP database administration features.
• Using scripts to purge the Oracle database tables, clear system events, alarms, andprocess information, and, in a test environment, to periodically purge all data.
Configuring Kernel and Database Initialization ParametersThis sections outline some important issues for implementing ASAP. These issues are listedin point form for easy scanning. For a complete reference on the subjects, refer to theappropriate Oracle documentation.
• Before installing the Oracle instance ensure that the default values for kernel andresource settings for the server are set to provide enough shared memory andsemaphores. Specifically, check the project.max-shm-memory resource.
See the Oracle Installation Guide for more details.
• You can change the Oracle Server configuration parameters from their default values tosuit the requirements of ASAP. To view the Oracle Server parameters, select from theV$PARAMETER table or look in the INITsid.ora file for the server. Most of the changes tothe parameters must be accompanied by shutting down the server and restarting it, inorder for the change to take effect.
• Oracle works best with ASAP when given sufficient resources. There are four parametersthat are extremely important to configure correctly: DB_BLOCK_SIZE,DB_BLOCK_BUFFERS, SHARED_POOL_SIZE, and SESSIONS.
1. DB_BLOCK_SIZE
Set the DB_BLOCK_SIZE – 8K is the default. ASAP benefits from a larger block size. Thismust be done during database creation and cannot be changed.
2. DB_BLOCK_BUFFERS
DB_BLOCK_BUFFERS is the area of the SGA that is used for the storage and processing ofdata in memory. As users request information, the information is put into memory. If theDB_BLOCK_BUFFERS parameter is set too low, the least recently used data will be flushed
7-1

from memory. Set this value between 3000 to 5000 depending on the memorylimitations of your machine. A value of 5000 with a block size of 8K usesapproximately 40MB of memory.
3. SHARED_POOL_SIZE
SHARED_POOL_SIZE is used to process the procedures, packages, and triggers, aswell as the library and data dictionary cache. If the SHARED_POOL_SIZE is set toolow, you will not get the full advantage of your DB_BLOCK_BUFFERS. Set this valuebetween 90MB to 150MB. For most installations this should be sufficient. Again thisvalue should be adjusted depending on the memory limitations of your machine.Setting the SHARED_POOL_SIZE too high can cause your system to swapexcessively.
4. SESSIONS
SESSIONS determines the number of user connections that ASAP can establish.Configure 150-200 sessions for each ASAP environment, more if you are runningmultiple Service Request Processor (SRP) and Network Element Processors (NEPs).Be sure to allocate enough semaphores at the UNIX level to accommodate theamount of sessions.
In all the cases above, the values given as examples only. The appropriate value foryour installation will depend on the machine characteristics and limitations.
• Oracle, like all databases, benefits significantly by spreading the I/O among it'sdata files across multiple controllers and drives. You must place your SYSTEM,TEMP, and ROLLBACK tablespaces on separate drives and controllers from yourDATA and INDEX. SARM_DATA and SARM_INDEX will benefit the most from I/Ooptimization since a lot of activity occurs on these files. In addition, employingoptimal striping and data placement of hot files will greatly enhance your databaseperformance. Since minimizing I/O is the primary goal of most database tuning,this point cannot be emphasized enough.
About Monitoring Database Segment and File System SizeThe Control server has a background thread that monitors database table and logsegment sizes. This thread reads a static configuration database table to determinedatabase size thresholds. Should a particular threshold be exceeded, the threadissues the system event specified in the static table tbl_db_threshold in the Controldatabase. This feature provides a warning to the operations center should thethreshold be exceeded.
In addition, the Control server has a background thread that monitors operatingsystem file sizes. This thread reads a static configuration database table to determinefile system size thresholds. Should a particular threshold be exceeded, the threadissues the system event specified in the static table tbl_fs_threshold in the Controldatabase. This feature allows ASAP to warn the operations center whenever the freedisk space drops below the minimum threshold set by you.
The monitoring thresholds function is used to specify thresholds for ASAP databasesand transactions affecting it. When these thresholds are defined, an ASAP Controlserver can monitor the specified database data and transaction log sizes at intervalsspecified in the ASAP environment variable DB_MONITOR_TIME. If any of thethresholds are exceeded, the Control server issues the system event defined by theuser. The event can trigger an alarm or be logged.
Chapter 7About Monitoring Database Segment and File System Size
7-2
See "Configuring System Events and Alarms Using Stored Procedures" for more informationon configuring alarms.
An ASAP environment can be partitioned on various machines, and each machine can bemonitored by its respective Control server. Typically, one ASAP installation has multipledatabases and the ASAP environment can be distributed on one machine or multiplemachines. The database and transaction log threshold need to be specified for eachdatabase to be monitored.
You can use the DB_MONITOR_TIME and FS_MONITOR_TIME parameters to configure theControl server database and file system monitoring capabilities. For more information aboutthese parameters, see the chapter about the ASAP parameter configuration file (ASAP.cfg)in the ASAP Server Configuration Guide.
Configuring File System ThresholdsTo configure file system thresholds:
1. Open a UNIX terminal to your ASAP environment.
2. Using a text editor, set the FS_MONITOR_TIME parameter in ASAP_home/config/ASAP.cfg to a time interval in seconds. For example 120 seconds.
3. Using sqlplus, connect to the Control server.
sqlplus CTRL$/password
Where password is the password for your Control server.
4. Populate the Control server tbl_fs_threshold database table. The syntax is:
INSERT INTO "TEST"."TBL_FS_THRESHOLD" (ASAP_SYS, FILE_SYSTEM, FULL_THRESHOLD, FULL_EVENT) VALUES ('envID', 'fs_path', 'fs_threshold', 'event_type');COMMIT;
Where the values for the tbl_fs_threshold columns are:
• envid: The ASAP environment ID. The Control server only reads records from thetable with values of asap_sys equal to the currently defined ASAP_SYS environmentvariable.
• fs_path: The name of the file system.
• fs_threshold: The threshold above which the system event is issued (in percentage0-100).
• event_type: Specifies the system event you want to trigger. Enter an event listed inthe the Control server tbl_event_type table (see the ASAP Developer Guide).
5. Populate the Control server tbl_component database table. The syntax is:
INSERT INTO "TEST"."TBL_COMPONENT" (TERRITORY, SYSTEM, COMPONENT) VALUES ('envID', 'territory', 'path');COMMIT;
Where the values for the tbl_component columns are:
• envid: The ASAP environment ID.
• territory: Usually the same name as the ASAP environment ID.
• fs_path: The path to the file system you want to monitor.
6. Restart ASAP for the changes to take effect.
Chapter 7About Monitoring Database Segment and File System Size
7-3
Note:
When a file system size goes beyond the threshold specifies intbl_fs_threshold, ASAP triggers an event and logs a diagnosticmessage in the Control server diagnostic file.
Configuring Database ThresholdsTo configure database thresholds:
1. Open a UNIX terminal to your ASAP environment.
2. Using a text editor, set the DB_MONITOR_TIME parameter in ASAP_home/config/ASAP.cfg to a time interval in seconds. For example 120 seconds.
3. Using sqlplus, connect to the Control server.
sqlplus CTRL$/password
Where password is the password for your Control server.
4. Populate the Control server tbl_db_threshold database table. The syntax is:
INSERT INTO "TEST"."TBL_DB_THRESHOLD" (ASAP_SYS, DB_NAME, DATA_THRESHOLD, DATA_EVENT) VALUES ('envID', 'DB_server', 'data_threshold', 'data_event_type')COMMIT;
Where the values for the tbl_db_threshold columns are:
• envid: The ASAP environment ID. The Control server only reads records fromthe table with values of asap_sys equal to the currently defined ASAP_SYSenvironment variable.
• DB_server: The name of the database server tablespace.
• data_threshold: The data threshold above which the system event is issued (inpercentage 0-100).
• data_event_type: Specifies the system event you want to trigger as a result ofcrossing the data threshold. Enter an event listed in the Control servertbl_event_type table (see the ASAP Developer Guide).
5. Populate the Control server tbl_component database table. The syntax is:
INSERT INTO "TEST"."TBL_COMPONENT" (TERRITORY, SYSTEM, COMPONENT) VALUES ('envID', 'territory', 'tablespace');COMMIT;
Where the values for the tbl_component columns are:
• envid: The ASAP environment ID.
• territory: Usually the same name as the ASAP environment ID.
• tablespace: The tablespace want to monitor.
6. Restart ASAP for the changes to take effect.
Chapter 7About Monitoring Database Segment and File System Size
7-4
Note:
When a tablespace size goes beyond the threshold specifies intbl_db_threshold, ASAP triggers an event and logs a diagnostic message inthe Control server diagnostic file.
Database Management and Tuning Recommendations• Oracle can run in two modes ARCHIVELOG or NOARCHIVELOG mode. It is very
important to run your production database in the ARCHIVELOG mode. This ensures thatyou are able to recover up to the minute in case of failure. Oracle uses logs to recordtransaction information in order to recover from instance and data file failures. Be sure tomulti-plex these redo log data files and place them on separate disks and controllers.
• Oracle offers both online and offline database backup choices. Which one you choosewill depend on how much downtime your ASAP installation can tolerate. Online backupsinvolve backing up at the tablespace level and require more planning and consideration.Offline backup involves shutting down the database and backing up the data files, controlfile, and archive log files to tape. While this is occurring, ASAP is down.
• Monitor your tablespaces for index and block fragmentation on a regular basis. Indexfragmentation occurs due to the deletion and updating of table rows. Rebuilding the indexusing the ALTER INDEX name REBUILD (where name is the name of the index) canresolve this problem. Block fragmentation can occur due to PCTFREE and PCTUSEDparameters set inappropriately. This results in migrated and chained rows which affectdatabase I/O performance.
• Update your table and index statistics on a regular basis for those tables whose datadistributions change dynamically. As mentioned in a previous section, the query optimizeris primarily influenced by these statistics. If a query or transaction that was running fineappears to suddenly slowdown or stop responding, chances are the table and indexstatistics need to be updated.
• Tune any custom SQL statements you introduce to your ASAP installation, since theyinvolve both your application and database. To analyze your SQL statements you willneed to:
1. Add the line to your initsid.ora file: timed_statistics=true
2. Restart your database.
3. Start the sql tracing for your session using the ALTER SESSION SETSQL_TRACE=TRUE.
4. Run your application
5. Run tkprof against the tracefile created by your application: tkprof tracefile outputfileEXPLAIN=username/passwd
6. Look at the formatted output of the trace command and make sure that your SQLstatements are using indexes correctly. You must run explains on the SQLstatements to determine the access path they are using.
Refer to the Oracle Tuning Guide for more detailed information on tuning SQL statements.
• Use the UTLBSTAT and UTLESTAT scripts provided by Oracle to monitor your Oracleinstance, and diagnose performance problems. These scripts are located in theOracle_Home/rdbms/admin directory in a UNIX environment. These scripts create a
Chapter 7Database Management and Tuning Recommendations
7-5
report file report.txt which shows differences in the statistics from the timeUTLBSTAT was submitted, until the time that UTLESTAT was submitted. Toobtain time-based statistics from UTLBSTAT and UTLESTAT, theTIMED_STATISTICS parameter must be set to TRUE.
StatspackStatspack is an alternative to the UTLBSTAT/UTLESTAT tuning scripts. Statspackcollects more information, storing performance statistics data permanently in thedatabase for later use in analysis and reporting. The data collected can be analyzedusing the report provided, which includes an instance health and load summary page,high resource SQL statements, as well as the traditional wait events and initializationparameters.
For more information, see Oracle 11g Database Performance Tuning Guide andReference Guide.
Enabling Automated ASAP Database AdministrationOptions
The Control application programming interface (API) provides a background threadthat performs database administration tasks within ASAP. At a user-configured time ofday, every application server process connects to its primary database and calls auser-defined function that performs the following tasks:
• Gathers customer-defined statistics related to ASAP processing.
• Archives data about to be purged from the database, if required.
• Purges data older than a date and time specified by the user.
• Performs an “orphan" purge of orphaned records to confirm the database'sintegrity.
The ASAP configuration variable, DB_ADMIN_ON, enables and disables the databaseadministration procedures. This feature is of value to users who may have manyapplication servers defaulting to the same database and do not want them performingdatabase administration procedures independently on it.
For more information on the Control API, refer to the ASAP Developer's Guide.
Purging the Database and File SystemTo keep disk usage at an acceptable level the ASAP administrator should regularlypurge the diagnostic and log files generated by ASAP, as well as the work orders(WOs) received from the service order system. Database purging is controlled bydatabase administrator stored procedures that are automatically run daily.
The diagnostic files are located in the directory ASAP_home/DATA/logs (whereASAP_home is the ASAP installation directory). The flat files of service orders areusually located in the ASAP_home/DATA directory in a dated file.
Chapter 7Enabling Automated ASAP Database Administration Options
7-6

Purging the DatabaseDatabase purging can be performed for the SRP, Service Activation Request Manager(SARM), and control databases, but is most commonly performed in the SARM as this iswhere the majority of the WO information is stored. The SRP and SARM databases maintaina history of all WOs received, while the ASAP control database maintains a history of alarms,events, performance, and process information.
The purging of the SRP and SARM is based on WO age. The purge age is usuallydetermined by the amount of available disk space. Usually, only orders that have beencompleted for a certain amount of time are purged.
Database purging is controlled by database administration functions that automatically runaccording to the following parameters that you can configure in ASAP.cfg:
• DB_ADMIN_ON – Boolean flag. If set, it enables the database administration threadoperation in the application server. This can be disabled in particular servers in situationswhere multiple servers share the same application database (for example, multipleNEPs) and then only one server is required to perform this database administration.Default = 0.
Note:
If you are using purgeOrders script for purging the SARM database, set thisparameter to 0. For more information, see "Purging the SARM Database".
• DB_ADMIN_TIME – The number of minutes after midnight when the databaseadministration tasks are to be performed. This is usually performed at a time of lowsystem activity. Default = 300.
• DB_ADMIN_PROC – The function the database administration thread calls at a specifiedtime in the day. This function can be configured to perform multiple tasks, includingarchiving and purging dynamic data. Default = SSP_db_admin.
• DB_ADMIN_PROC_PARAM – The integer parameter passed to the databaseadministration function. For example, this can specify a purge interval for a particulardatabase. Default = 100.
• GATHER_STATS –Enables the gathering of statistics for tables and indexes. Default = 0.
• GATHER_STATS_PROC – Indicates the procedure to use to gather statistics on theSARM database. Default = SSP_gather_asap_stat.
• DB_PCT_ANALYZE – Percentage of table to analyze when gathering stats. Default = 20.
• DB_PCT_ANALYZE_IDX – Percentage of index to analyze when gathering stats. Default= 40.
• GATHER_DEGREE – Degree of parallelism to use when gathering stats. Default = 1.
Chapter 7Purging the Database and File System
7-7
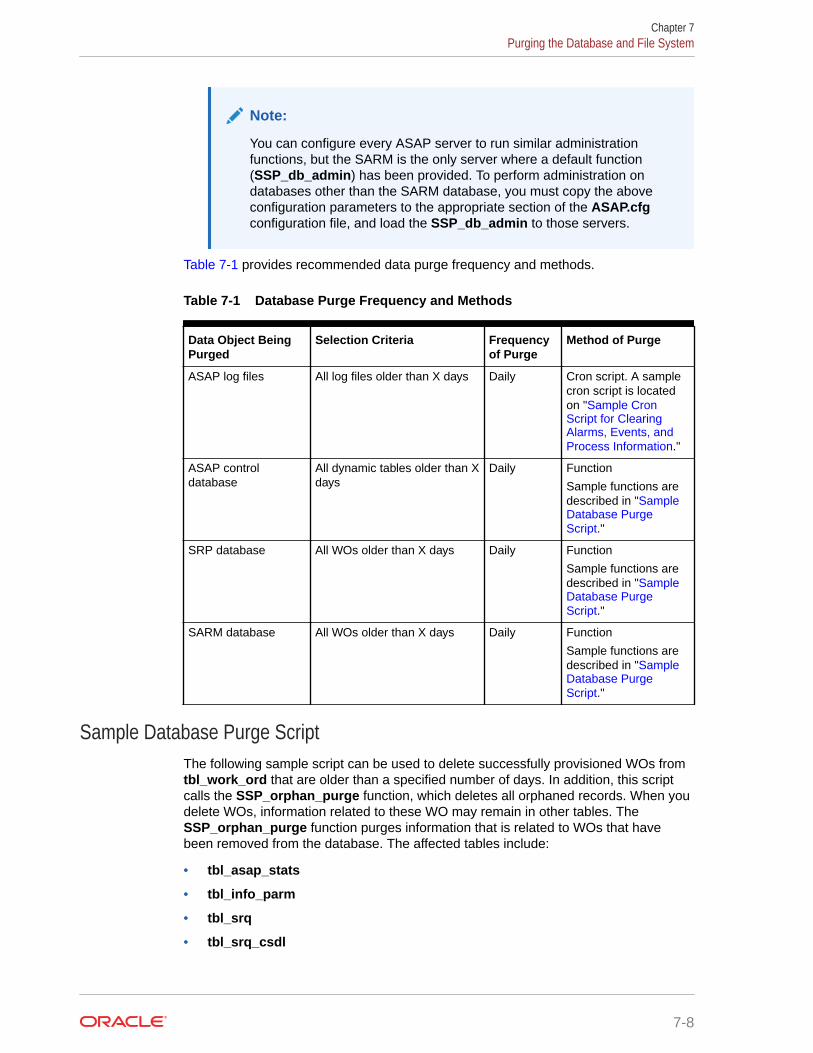
Note:
You can configure every ASAP server to run similar administrationfunctions, but the SARM is the only server where a default function(SSP_db_admin) has been provided. To perform administration ondatabases other than the SARM database, you must copy the aboveconfiguration parameters to the appropriate section of the ASAP.cfgconfiguration file, and load the SSP_db_admin to those servers.
Table 7-1 provides recommended data purge frequency and methods.
Table 7-1 Database Purge Frequency and Methods
Data Object BeingPurged
Selection Criteria Frequencyof Purge
Method of Purge
ASAP log files All log files older than X days Daily Cron script. A samplecron script is locatedon "Sample CronScript for ClearingAlarms, Events, andProcess Information."
ASAP controldatabase
All dynamic tables older than Xdays
Daily Function
Sample functions aredescribed in "SampleDatabase PurgeScript."
SRP database All WOs older than X days Daily Function
Sample functions aredescribed in "SampleDatabase PurgeScript."
SARM database All WOs older than X days Daily Function
Sample functions aredescribed in "SampleDatabase PurgeScript."
Sample Database Purge ScriptThe following sample script can be used to delete successfully provisioned WOs fromtbl_work_ord that are older than a specified number of days. In addition, this scriptcalls the SSP_orphan_purge function, which deletes all orphaned records. When youdelete WOs, information related to these WO may remain in other tables. TheSSP_orphan_purge function purges information that is related to WOs that havebeen removed from the database. The affected tables include:
• tbl_asap_stats
• tbl_info_parm
• tbl_srq
• tbl_srq_csdl
Chapter 7Purging the Database and File System
7-8

• tbl_srq_log
• tbl_asdl_log
• tbl_srq_parm
• tbl_srq_asdl_parm
• tbl_wo_event_queue
• tbl_wo_audit
• tbl_usr_wo_prop
• tbl_aux_wo_prop
Note:
The SSP_orphan_purge function is time-consuming and requires considerablesystem resources. Therefore, it should not run during peak hours.
create proc SSP_db_admin @days intasbegin declare @cutoff_dts datetime if (@days is not null and @days > 0) begin select @cutoff_dts = dateadd(day, -@days, getdate()) delete tbl_wrk_ord where comp_dts < @cutoff_dts and wo_stat = 104 end exec SSP_orphan_purgeend
You can customize this script in a variety of ways (for example, you can delete WOs thathave successfully completed (104) or orders that have completed and failed due to timeout).When ASAP triggers the DB_admin procedure, ASAP also performs other optimization, suchas recompiling stored procedures for optimal database access, and so forth.
In the following example, after the function has deleted each set of 1000 orders, the functionperforms a commit and the rollback segment is flushed. This prevents the Oracle rollbacksegment from being exceeded. This example also employs the SSP_orphan_purge functiondescribed for the previous example.
CREATE OR REPLACE FUNCTION SSP_db_admin(days INTEGER )RETURN INTEGERASStoO_selcnt INTEGER;StoO_error INTEGER;StoO_rowcnt INTEGER;StoO_errmsg VARCHAR2(255);cutoff_dts DATE;retval integer;BEGINIF (SSP_db_admin.days IS NOT NULL AND SSP_db_admin.days > 0) THENBEGINSSP_db_admin.cutoff_dts := SYSDATE-SSP_db_admin.days;BEGINStoO_error := 0;
Chapter 7Purging the Database and File System
7-9
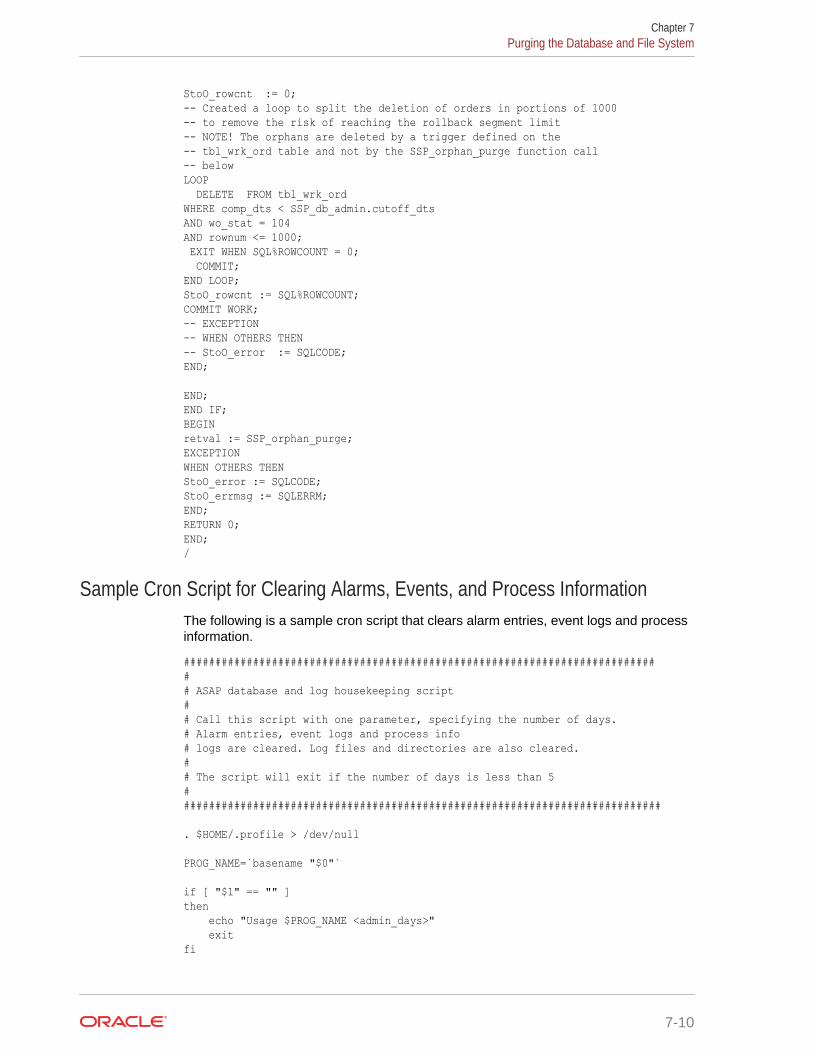
StoO_rowcnt := 0;-- Created a loop to split the deletion of orders in portions of 1000-- to remove the risk of reaching the rollback segment limit-- NOTE! The orphans are deleted by a trigger defined on the-- tbl_wrk_ord table and not by the SSP_orphan_purge function call-- belowLOOP DELETE FROM tbl_wrk_ordWHERE comp_dts < SSP_db_admin.cutoff_dtsAND wo_stat = 104AND rownum <= 1000; EXIT WHEN SQL%ROWCOUNT = 0; COMMIT;END LOOP;StoO_rowcnt := SQL%ROWCOUNT;COMMIT WORK;-- EXCEPTION-- WHEN OTHERS THEN-- StoO_error := SQLCODE;END;
END;END IF;BEGINretval := SSP_orphan_purge;EXCEPTIONWHEN OTHERS THENStoO_error := SQLCODE;StoO_errmsg := SQLERRM;END;RETURN 0;END;/
Sample Cron Script for Clearing Alarms, Events, and Process InformationThe following is a sample cron script that clears alarm entries, event logs and processinformation.
############################################################################# ASAP database and log housekeeping script## Call this script with one parameter, specifying the number of days. # Alarm entries, event logs and process info# logs are cleared. Log files and directories are also cleared.## The script will exit if the number of days is less than 5#############################################################################
. $HOME/.profile > /dev/null
PROG_NAME=`basename "$0"`
if [ "$1" == "" ]then echo "Usage $PROG_NAME <admin_days>" exitfi
Chapter 7Purging the Database and File System
7-10
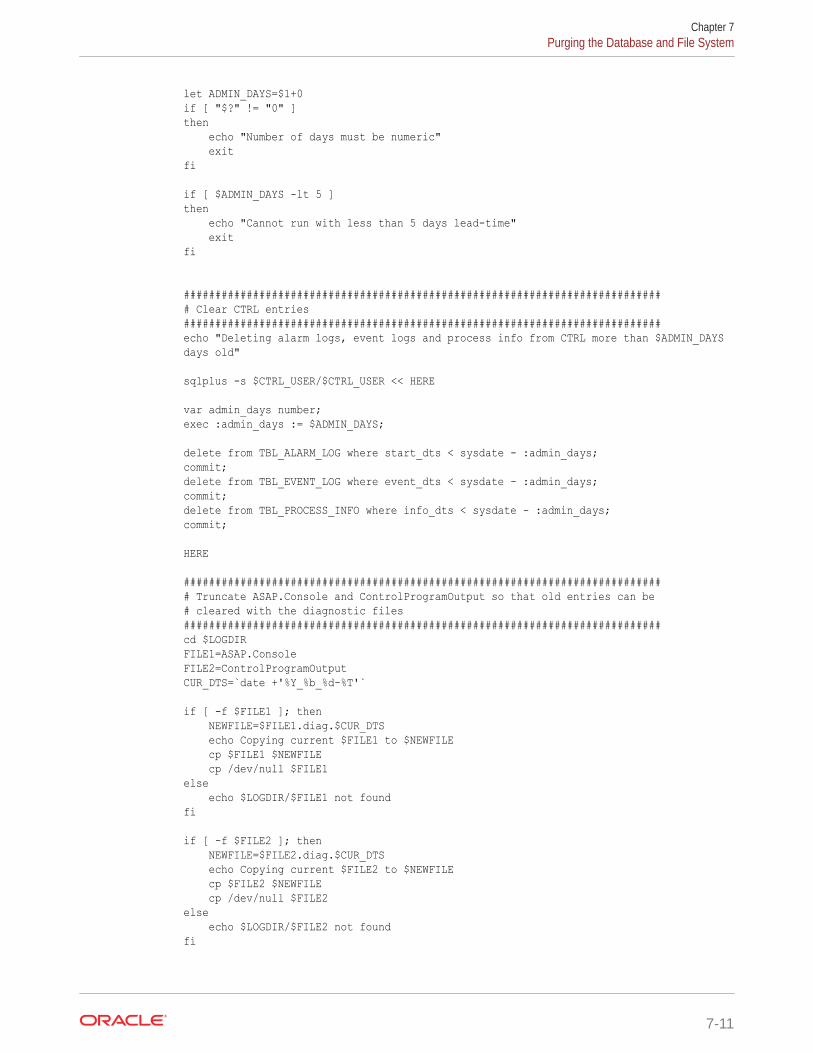
let ADMIN_DAYS=$1+0if [ "$?" != "0" ]then echo "Number of days must be numeric" exitfi
if [ $ADMIN_DAYS -lt 5 ]then echo "Cannot run with less than 5 days lead-time" exitfi
############################################################################# Clear CTRL entries############################################################################echo "Deleting alarm logs, event logs and process info from CTRL more than $ADMIN_DAYS days old"
sqlplus -s $CTRL_USER/$CTRL_USER << HERE
var admin_days number;exec :admin_days := $ADMIN_DAYS;
delete from TBL_ALARM_LOG where start_dts < sysdate - :admin_days;commit;delete from TBL_EVENT_LOG where event_dts < sysdate - :admin_days;commit;delete from TBL_PROCESS_INFO where info_dts < sysdate - :admin_days;commit;
HERE
############################################################################# Truncate ASAP.Console and ControlProgramOutput so that old entries can be# cleared with the diagnostic files############################################################################cd $LOGDIRFILE1=ASAP.ConsoleFILE2=ControlProgramOutputCUR_DTS=`date +'%Y_%b_%d-%T'`
if [ -f $FILE1 ]; then NEWFILE=$FILE1.diag.$CUR_DTS echo Copying current $FILE1 to $NEWFILE cp $FILE1 $NEWFILE cp /dev/null $FILE1else echo $LOGDIR/$FILE1 not foundfi
if [ -f $FILE2 ]; then NEWFILE=$FILE2.diag.$CUR_DTS echo Copying current $FILE2 to $NEWFILE cp $FILE2 $NEWFILE cp /dev/null $FILE2else echo $LOGDIR/$FILE2 not foundfi
Chapter 7Purging the Database and File System
7-11
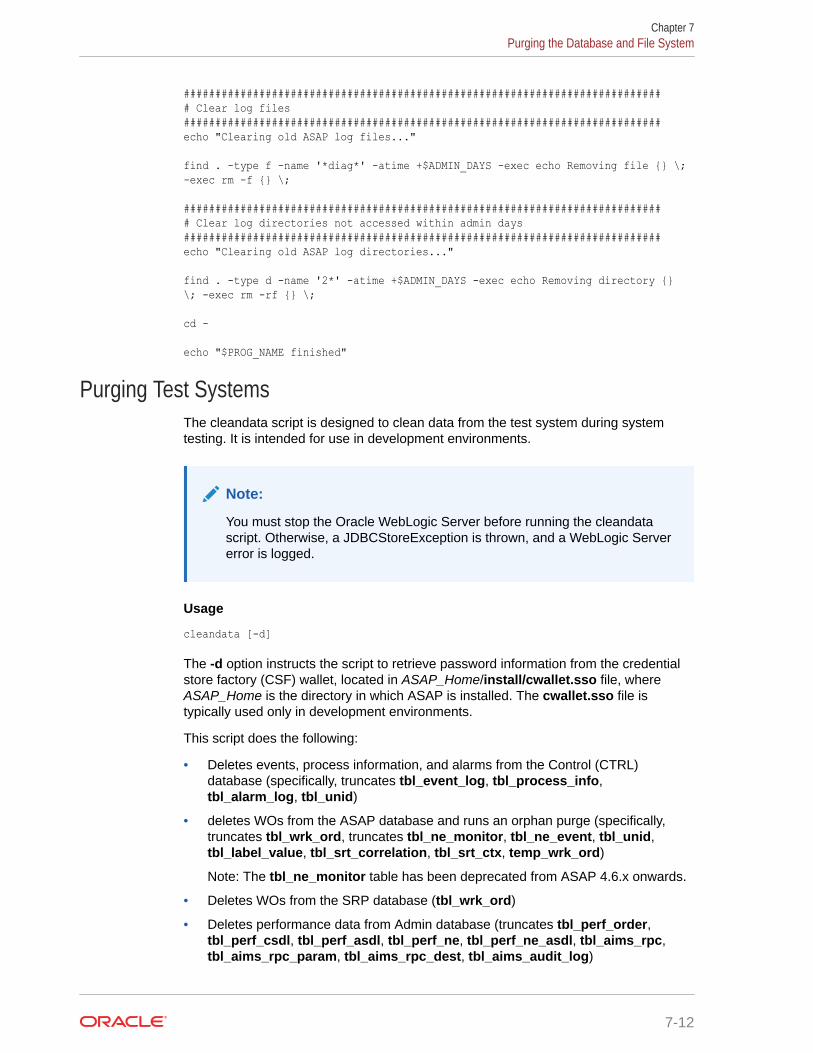
############################################################################# Clear log files############################################################################echo "Clearing old ASAP log files..."
find . -type f -name '*diag*' -atime +$ADMIN_DAYS -exec echo Removing file {} \; -exec rm -f {} \;
############################################################################# Clear log directories not accessed within admin days############################################################################echo "Clearing old ASAP log directories..."
find . -type d -name '2*' -atime +$ADMIN_DAYS -exec echo Removing directory {} \; -exec rm -rf {} \;
cd -
echo "$PROG_NAME finished"
Purging Test SystemsThe cleandata script is designed to clean data from the test system during systemtesting. It is intended for use in development environments.
Note:
You must stop the Oracle WebLogic Server before running the cleandatascript. Otherwise, a JDBCStoreException is thrown, and a WebLogic Servererror is logged.
Usage
cleandata [-d]
The -d option instructs the script to retrieve password information from the credentialstore factory (CSF) wallet, located in ASAP_Home/install/cwallet.sso file, whereASAP_Home is the directory in which ASAP is installed. The cwallet.sso file istypically used only in development environments.
This script does the following:
• Deletes events, process information, and alarms from the Control (CTRL)database (specifically, truncates tbl_event_log, tbl_process_info,tbl_alarm_log, tbl_unid)
• deletes WOs from the ASAP database and runs an orphan purge (specifically,truncates tbl_wrk_ord, truncates tbl_ne_monitor, tbl_ne_event, tbl_unid,tbl_label_value, tbl_srt_correlation, tbl_srt_ctx, temp_wrk_ord)
Note: The tbl_ne_monitor table has been deprecated from ASAP 4.6.x onwards.
• Deletes WOs from the SRP database (tbl_wrk_ord)
• Deletes performance data from Admin database (truncates tbl_perf_order,tbl_perf_csdl, tbl_perf_asdl, tbl_perf_ne, tbl_perf_ne_asdl, tbl_aims_rpc,tbl_aims_rpc_param, tbl_aims_rpc_dest, tbl_aims_audit_log)
Chapter 7Purging the Database and File System
7-12
• Deletes Java Message Service (JMS) messages from the Admin database
• Deletes diagnostic and log files
Note:
Restart the WebLogic Server for the domain after running the cleandata script.
Purging the SARM DatabaseTo purge the SARM database, you can also use the purgeOrders script. This script calls amultithreaded Java application which makes purging faster. This application purges theSARM database only.
UsageYou run the purge application by running the purgeOrders script. This script is located inthe $ASAP_BASE/scripts directory. You must source the ASAP Environment_Profile beforerunning this script.
The command-line syntax of the purgeOrders script is:
purgeOrders [-t <number of threads>] [-l <diag_level>] [-f] [-h]
where:
-t <number of threads> (optional) is the number of threads. If specified, it overrides the valueof DB_PURGE_THREADS in ASAP.cfg file.
-l <diag_level> (optional) specifies the diagnostic level (KERN, LOW, SANE, or PROG). Thedefault is SANE.
-f forces the script to run in non-interactive mode. Without this option, the script displays aninteractive prompt to confirm running the purge application.
-h prints the usage information.
Configuration ParametersThe purge application reads the following configuration parameters from the SARM section ofthe ASAP.cfg file.
• DB_PURGE_DAYS : Number of days to keep completed orders. Completed orders olderthan this number of days will be purged. Orders are not purged if the value is 0.
Valid Range: >=0
Default = 100
• DB_PURGE_THREADS: Number of threads to use. The purge application spawns thisnumber of threads and runs the purge stored procedure in each thread. This allows youto run the purge procedure at different times of the day using different levels ofparallelism.
Valid Range: 1 to 50
Chapter 7Purging the Database and File System
7-13
Default: 10
Note:
The -t parameter in the command line overrides this value specified inASAP.cfg.
• DB_PURGE_COMMIT_ROWS: Number of rows to be deleted before a COMMITis issued.
Valid Range: >=1
Default: 1000
• DB_PURGE_ORPHANS_ENABLED: Enable or disable the SSO_orphan_purgeprocedure which removes orphaned data definitions in the SARM database.
Valid Range: 0 or 1
Default: 0
• DB_PURGE_MAX_TIME: Maximum purge time. The maximum amount of time inminutes that the purge operation is allowed to run. If this parameter is set to 0, thepurge operation is run without a time limit.
Valid Range: >=0
Default: 0
• DB_PURGE_GET_RANGE_PROC: The stored procedure that the purgeapplication should call to get the SRQ_ID range (MIN, MAX) of the orders to bepurged.
The signature of the stored procedure is as follows:
FUNCTION SSP_get_srqid_purge_range( days IN INTEGER, min_srqid OUT INTEGER, max_srqid OUT INTEGER) RETURN INTEGER
Valid Range: N/A
Default: SSP_get_srqid_purge_range
• DB_PURGE_RANGE_PROC: The stored procedure that each thread should callto purge the work orders in a SRQ_ID range.
The signature of the procedure is as follows:
FUNCTION SSP_purge_wo_in_srqid_range( days IN INTEGER, commit_rows IN INTEGER, start_id IN INTEGER, end_id IN INTEGER, max_time IN INTEGER, rows_deleted OUT INTEGER)RETURN INTEGER.
Valid Range: N/A
Default: SSP_purge_wo_in_srqid_range
Chapter 7Purging the Database and File System
7-14

• DB_PURGE_LOG_INTERVAL: The interval, in minutes, to log messages about theprogress of the purge operation.
Valid Range: >=1
Default: 5
Logging and DiagnosticsThe purge application logs diagnostic messages to the $ASAP_BASE/DATA/logs/<date>/SARM<ENV_ID>_PURGE.diag file.
The purge application logs progress messages to the diagnostic file while the purge threadsare running, and after all threads are finished. The diagnostic messages show the elapsedtime, number of orders deleted, and the purging rate.
Scheduling Purge JobsSince the purge application is a Java application that runs outside of the SARM server, youneed to schedule the new purge application to be run outside of SARM. This is done usingthe UNIX or Linux cron utility. When you run the purge application from cron, you should usethe -f command line option so that the purgeOrders script runs in non-interactive mode.
Purge Conflict ResolutionIf there is another instance of the purge application running against the same SARMdatabase, the purgeOrders script prints the following error message and stops:
Error: There is another AsapParallelPurge job running for SARM<ENV_ID>. Exiting ...
If the old purging mechanism is enabled, by setting DB_ADMIN_ON to 1 in the SARM sectionof ASAP.cfg, the new purge application logs the following warning message to the diagnosticfile and continues to run.
WARNING: The SARM database administration thread is enabled (DB_ADMIN_ON=1 in ASAP.cfg). This may result in multiple purge jobs being run concurrently.
CustomizationYou can provide your own stored procedures for determining the SRQ ID range of the workorders and purging the work orders. You do this by specifying the names of your storedprocedures in the DB_PURGE_GET_RANGE_PROC and DB_PURGE_RANGE_PROCparameters in the ASAP.cfg.
Using the Purge ApplicationTo use the purge application:
1. Disable the existing SARM database purge operation by setting DB_ADMIN_ON to 0 inthe SARM section of the ASAP.cfg file.
2. In the SARM section of the ASAP.cfg file, review the default settings of the DB_PURGE*parameters and change them if necessary. For example:
• Change DB_PURGE_DAYS to comply with your company's data-retention policy.
• Change DB_PURGE_THREADS to increase or decrease the level of parallelism.
• Change DB_PURGE_MAX_TIME if you want to specify a time limit for purging.
Chapter 7Purging the Database and File System
7-15

• Change DB_PURGE_GET_RANGE_PROC andDB_PURGE_RANGE_PROC if you need to use your own stored procedures.
3. Schedule the purgeOrders script to be run regularly using an external schedulingtool.
Chapter 7Purging the Database and File System
7-16
8Troubleshooting ASAP
This chapter provides troubleshooting information for Oracle Communications ASAP.
Overview of Troubleshooting ASAPAs an ASAP system administrator, you can perform the following tasks:
Troubleshooting ChecklistWhen any problems occur, it is best to do some troubleshooting before you contact OracleGlobal Support:
• You know your installation better than Oracle Global Support does. You know if anythingin the system has been changed, so you are more likely to know where to look first.
• Troubleshooting skills are important. Relying on Global Support to research and solve allof your problems prevents you from being in full control of your system.
If you have a problem with your Product system, ask yourself these questions first, becauseOracle Global Support will ask them of you:
• What exactly is the problem? Can you isolate it? For example, if it is a problem with anapplication, does it occur on one instance of the application, or all instances?
• Oracle Global Support needs a clear and concise description of the problem, includingwhen it began to occur.
• What do the log files say?
• This is the first thing that Oracle Global Support asks for. Check the error log for theProduct component you're having problems with.
• Have you read the documentation?
• Look through the list of common problems and their solutions in Diagnosing somecommon problems with Product.
• Has anything changed in the system? Did you install any new hardware or new software?Did the network change in any way?
• Have you read the Release Notes?
• The Release Notes include information about known problems and runarounds.
• Does the problem resemble another one you had previously?
• Has your system usage recently jumped significantly?
• Is the system otherwise operating normally?
• Has response time or the level of system resources changed?
• Are users complaining about additional or different problems?
• Can you run clients successfully?
8-1

• Are any other processes on the system hardware functioning normally?
If you still can't resolve the problem, contact Oracle Global Support as described in"Getting Help with ASAP Problems."
Using Error Logs to Troubleshoot ASAPASAP error log files provide detailed information about system problems. If you'rehaving a problem with ASAP, look in the log files.
Log files include errors that need to be managed, as well as errors that do not needimmediate attention (for example, invalid login attempts). To manage log files, youshould make a list of the important errors for your system, as opposed to errors that donot need immediate attention.
Understanding Error-Message SyntaxFor more information about error message syntax, see "About Log Files."
Collecting Diagnostic InformationFor more information about collecting diagnostic information, see "About DiagnosticFiles."
Common ASAP Problems and SolutionsThis section describes the following problems, and how to resolve them:
• Problem: ASAP Servers Do Not Start - Database Tablespaces Used Up
• Problem: ASAP Servers Do Not Start - Interfaces File Empty or Missing
• Problem: ASAP Servers Do Not Start - No Information In Interfaces File
• Problem: ASAP Servers Do Not Start - Wrong ASAP User Owner and Permissions
• Problem: ASAP Servers Processes Do Not Start - Database Server ProcessesUsed
• Problem: ASAP Servers Processes Do Not Start - Database Server SessionsUsed
• Problem: ASAP Servers Do Not Start - Insufficient Server User ConnectionsDefined
• Problem: ASAP Servers Do Not Start - Insufficient Number of Threads
• Problem: Control Server Crashes - No Free Messages
• Problem: JNEP Server Does Not Start - Wrong Database Connection Information
• Problem: JNEP Server Does Not Start - Invalid Server Port Numbers
• Problem: NEP Server Does Not Start - Problem with JNEP Java Process StartScript
• Problem: WebLogic Server Fails to Detect Passive RAC Database During Failover
Chapter 8Using Error Logs to Troubleshoot ASAP
8-2
Problem: ASAP Servers Do Not Start - Database Tablespaces Used UpNone or some of the ASAP servers can start as the database tablespace used by the serveris used up and there is no free space. Error messages like the following are generated toindicate that writing to the database failed:
Error: RPC 'CSP_system_event' Failed
To resolve this issue increase the tablespace sizes. You may also set autoextend for thetablespaces.
Problem: ASAP Servers Do Not Start - Interfaces File Empty or MissingASAP servers are configured properly in database tables but information for all servers ismissing in the file $SYBASE/interfaces file. If Control server information is missing, then noprocess will start when ASAP is restarted.
The following messages are generated:
• at the UNIX console
"Failed to start Master Control Server CTRLH730"• in UTILITY.diag file:
'ct_connect(): directory service layer: internal directory control layer error: Requested server name not found.'
• in ASAP.Console file:
CTRLH730 Server: Fatal Server Error:Open Server Error # [16013] Severity [20] State [0] Error Text [Could not find server name 'CTRLH730' in interfaces file]CTRLH730: srv_run() Failed
Make sure that $SYBASE/interfaces file exists and contains correct information for all ASAPservers configured.
Problem: ASAP Servers Do Not Start - No Information In Interfaces File$SYBASE/interfaces file has only Control server information, but none of the other servers.However all servers are defined in the server configuration tables in Control server database(tables tbl_appl_proc, tbl_component, etc.).
The Control server will start successfully. For example:
Starting Master Control Server CTRLH730...Successful Startup of Master Control CTRLH730
The following messages are generated:
• at the UNIX console
Error : ASAP server is already running, or can not start one of ASAP server• in UTILITY.diag file, messages are logged for each server that had no info in interfaces
file For example:
"Local Startup Error: Can't Startup Server NEP_H730 ...'• in ASAP.Console file:
Chapter 8Common ASAP Problems and Solutions
8-3
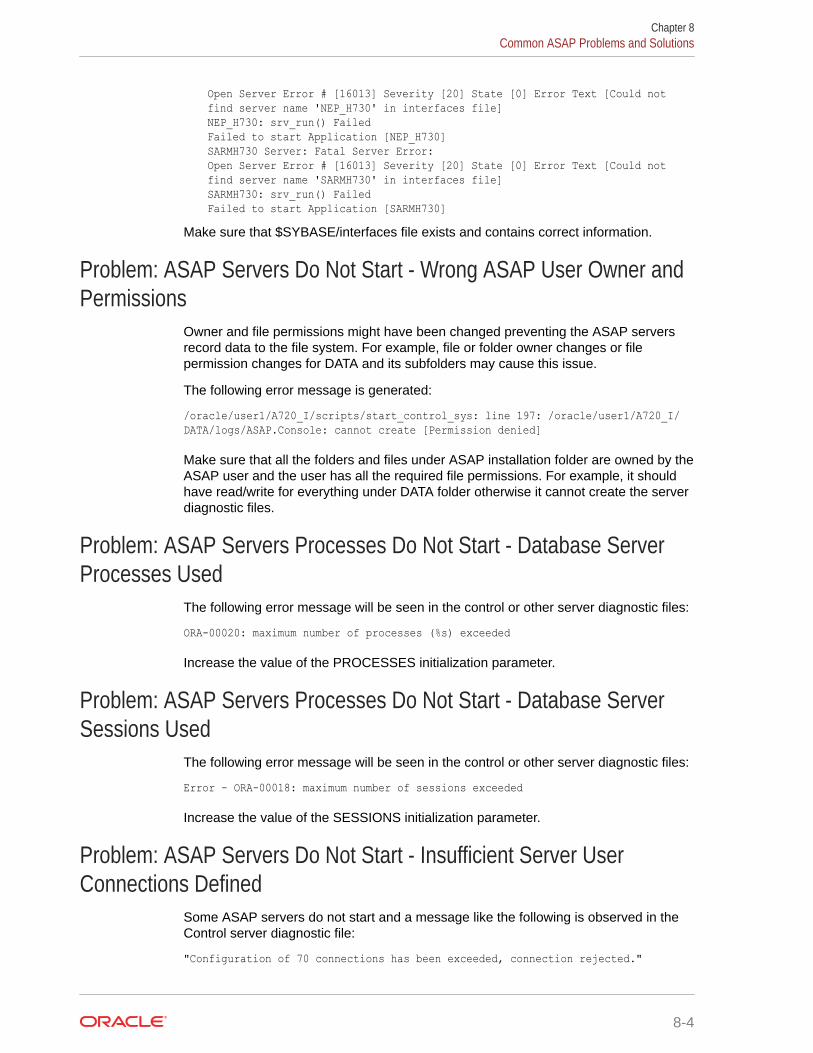
Open Server Error # [16013] Severity [20] State [0] Error Text [Could not find server name 'NEP_H730' in interfaces file]NEP_H730: srv_run() FailedFailed to start Application [NEP_H730]SARMH730 Server: Fatal Server Error:Open Server Error # [16013] Severity [20] State [0] Error Text [Could not find server name 'SARMH730' in interfaces file]SARMH730: srv_run() FailedFailed to start Application [SARMH730]
Make sure that $SYBASE/interfaces file exists and contains correct information.
Problem: ASAP Servers Do Not Start - Wrong ASAP User Owner andPermissions
Owner and file permissions might have been changed preventing the ASAP serversrecord data to the file system. For example, file or folder owner changes or filepermission changes for DATA and its subfolders may cause this issue.
The following error message is generated:
/oracle/user1/A720_I/scripts/start_control_sys: line 197: /oracle/user1/A720_I/DATA/logs/ASAP.Console: cannot create [Permission denied]
Make sure that all the folders and files under ASAP installation folder are owned by theASAP user and the user has all the required file permissions. For example, it shouldhave read/write for everything under DATA folder otherwise it cannot create the serverdiagnostic files.
Problem: ASAP Servers Processes Do Not Start - Database ServerProcesses Used
The following error message will be seen in the control or other server diagnostic files:
ORA-00020: maximum number of processes (%s) exceeded
Increase the value of the PROCESSES initialization parameter.
Problem: ASAP Servers Processes Do Not Start - Database ServerSessions Used
The following error message will be seen in the control or other server diagnostic files:
Error - ORA-00018: maximum number of sessions exceeded
Increase the value of the SESSIONS initialization parameter.
Problem: ASAP Servers Do Not Start - Insufficient Server UserConnections Defined
Some ASAP servers do not start and a message like the following is observed in theControl server diagnostic file:
"Configuration of 70 connections has been exceeded, connection rejected."
Chapter 8Common ASAP Problems and Solutions
8-4
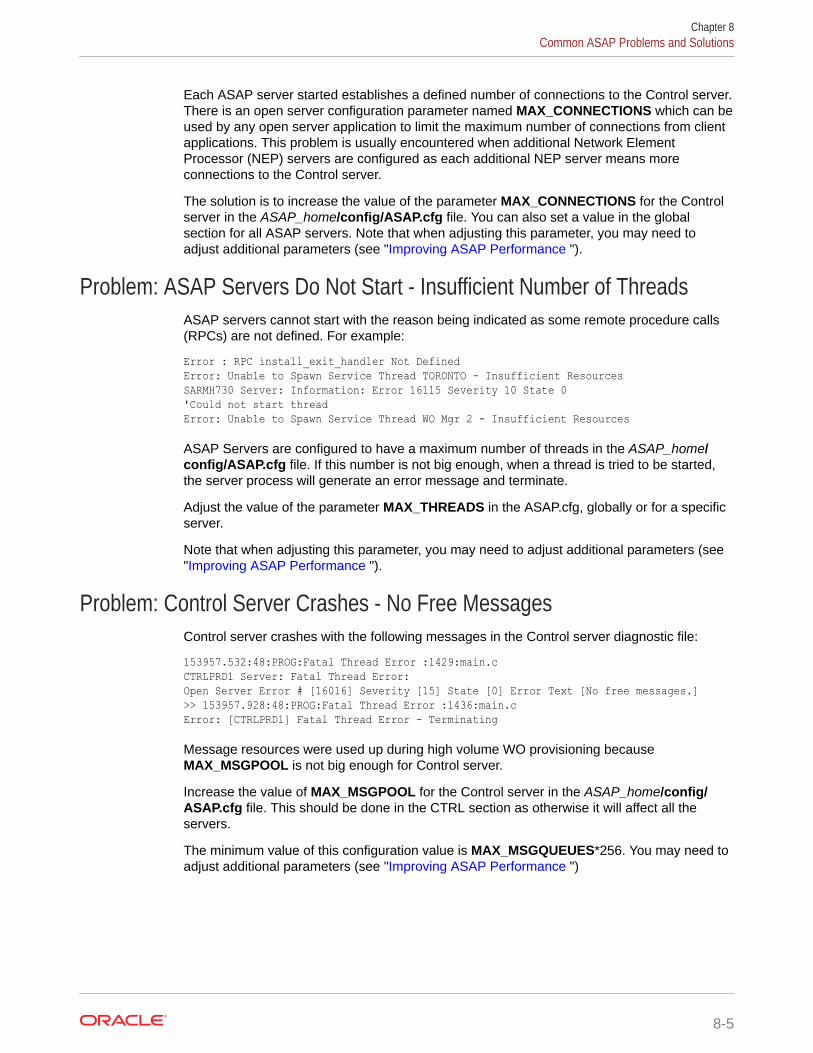
Each ASAP server started establishes a defined number of connections to the Control server.There is an open server configuration parameter named MAX_CONNECTIONS which can beused by any open server application to limit the maximum number of connections from clientapplications. This problem is usually encountered when additional Network ElementProcessor (NEP) servers are configured as each additional NEP server means moreconnections to the Control server.
The solution is to increase the value of the parameter MAX_CONNECTIONS for the Controlserver in the ASAP_home/config/ASAP.cfg file. You can also set a value in the globalsection for all ASAP servers. Note that when adjusting this parameter, you may need toadjust additional parameters (see "Improving ASAP Performance ").
Problem: ASAP Servers Do Not Start - Insufficient Number of ThreadsASAP servers cannot start with the reason being indicated as some remote procedure calls(RPCs) are not defined. For example:
Error : RPC install_exit_handler Not DefinedError: Unable to Spawn Service Thread TORONTO - Insufficient ResourcesSARMH730 Server: Information: Error 16115 Severity 10 State 0'Could not start threadError: Unable to Spawn Service Thread WO Mgr 2 - Insufficient Resources
ASAP Servers are configured to have a maximum number of threads in the ASAP_home/config/ASAP.cfg file. If this number is not big enough, when a thread is tried to be started,the server process will generate an error message and terminate.
Adjust the value of the parameter MAX_THREADS in the ASAP.cfg, globally or for a specificserver.
Note that when adjusting this parameter, you may need to adjust additional parameters (see"Improving ASAP Performance ").
Problem: Control Server Crashes - No Free MessagesControl server crashes with the following messages in the Control server diagnostic file:
153957.532:48:PROG:Fatal Thread Error :1429:main.cCTRLPRD1 Server: Fatal Thread Error:Open Server Error # [16016] Severity [15] State [0] Error Text [No free messages.]>> 153957.928:48:PROG:Fatal Thread Error :1436:main.cError: [CTRLPRD1] Fatal Thread Error - Terminating
Message resources were used up during high volume WO provisioning becauseMAX_MSGPOOL is not big enough for Control server.
Increase the value of MAX_MSGPOOL for the Control server in the ASAP_home/config/ASAP.cfg file. This should be done in the CTRL section as otherwise it will affect all theservers.
The minimum value of this configuration value is MAX_MSGQUEUES*256. You may need toadjust additional parameters (see "Improving ASAP Performance ")
Chapter 8Common ASAP Problems and Solutions
8-5
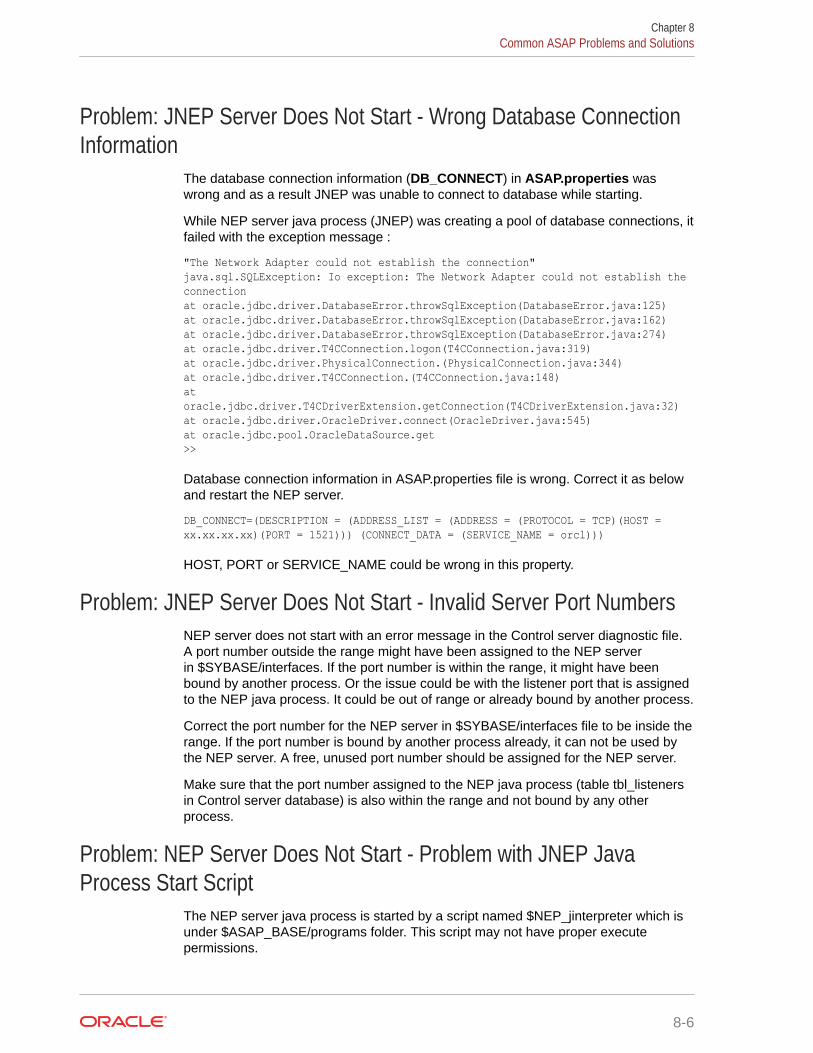
Problem: JNEP Server Does Not Start - Wrong Database ConnectionInformation
The database connection information (DB_CONNECT) in ASAP.properties waswrong and as a result JNEP was unable to connect to database while starting.
While NEP server java process (JNEP) was creating a pool of database connections, itfailed with the exception message :
"The Network Adapter could not establish the connection"java.sql.SQLException: Io exception: The Network Adapter could not establish the connectionat oracle.jdbc.driver.DatabaseError.throwSqlException(DatabaseError.java:125)at oracle.jdbc.driver.DatabaseError.throwSqlException(DatabaseError.java:162)at oracle.jdbc.driver.DatabaseError.throwSqlException(DatabaseError.java:274)at oracle.jdbc.driver.T4CConnection.logon(T4CConnection.java:319)at oracle.jdbc.driver.PhysicalConnection.(PhysicalConnection.java:344)at oracle.jdbc.driver.T4CConnection.(T4CConnection.java:148)at oracle.jdbc.driver.T4CDriverExtension.getConnection(T4CDriverExtension.java:32)at oracle.jdbc.driver.OracleDriver.connect(OracleDriver.java:545)at oracle.jdbc.pool.OracleDataSource.get>>
Database connection information in ASAP.properties file is wrong. Correct it as belowand restart the NEP server.
DB_CONNECT=(DESCRIPTION = (ADDRESS_LIST = (ADDRESS = (PROTOCOL = TCP)(HOST = xx.xx.xx.xx)(PORT = 1521))) (CONNECT_DATA = (SERVICE_NAME = orcl)))
HOST, PORT or SERVICE_NAME could be wrong in this property.
Problem: JNEP Server Does Not Start - Invalid Server Port NumbersNEP server does not start with an error message in the Control server diagnostic file.A port number outside the range might have been assigned to the NEP serverin $SYBASE/interfaces. If the port number is within the range, it might have beenbound by another process. Or the issue could be with the listener port that is assignedto the NEP java process. It could be out of range or already bound by another process.
Correct the port number for the NEP server in $SYBASE/interfaces file to be inside therange. If the port number is bound by another process already, it can not be used bythe NEP server. A free, unused port number should be assigned for the NEP server.
Make sure that the port number assigned to the NEP java process (table tbl_listenersin Control server database) is also within the range and not bound by any otherprocess.
Problem: NEP Server Does Not Start - Problem with JNEP JavaProcess Start Script
The NEP server java process is started by a script named $NEP_jinterpreter which isunder $ASAP_BASE/programs folder. This script may not have proper executepermissions.
Chapter 8Common ASAP Problems and Solutions
8-6

Give the proper execution permission for the script.
Problem: WebLogic Server Fails to Detect Passive RAC Database DuringFailover
In a development environment, when testing Oracle RAC failover capabilities, it is possible toexperience the following WebLogic error:
weblogic.jms.common.JMSException: weblogic.messaging.kernel.KernelException: Error persisting message
The starting point for this scenario involves the following configuration:
• A running ASAP server environment and active WebLogic server instance (ASAPEnvironment).
• A running active Oracle RAC database (RAC1).
• A passive Oracle RAC database that is shutdown (RAC2).
To achieve the error message listed above, you must complete the following steps:
1. Manually startup RAC2.
2. Manually shutdown RAC1 within four minutes of starting RAC2.
The ASAP Weblogic server instance requires up to four minute to detect RAC2. Shuttingdown RAC1 within this time period will prevent ASAP from failing over to RAC2 becausethe ASAP WebLogic server has not had enough time to detect the presence of RAC2.
This error message is possible in a specific scenario that is unlikely to happen in a productionenvironment.
Component Failure ScenariosThis section describes the behavior of ASAP in the event of component failure.
WebLogic Administration and Managed Server Failure and RecoveryScenarios
If the administration server shuts down while the managed server is running, theadministration server regains control of the domain upon restart without having to restart themanaged server.
If the administration server cannot be restarted following a failure, you must restore theadministration server on another machine.
Restarting the WebLogic Managed Server
If the administration server is running, the managed server retrieves configuration data fromthe administration server. If the administration server is unavailable, the managed serverretrieves its configuration and security information from the filesystem.
SRP Failure ScenarioIf the Service Request Processor (SRP) fails, the Service Activation Request Manager(SARM) and NEP provision all orders that are saved in the database and are awaiting
Chapter 8Component Failure Scenarios
8-7
provisioning. The SARM saves the order notification RPCs in the SARM database. Itthen sends periodic “heartbeat" messages to the failed SRP to check for availability.When the SRP starts again, the SARM retrieves and processes all order notificationRPCs saved on disk before processing new orders.
SARM Failure ScenarioIf the SARM fails, the SRP can neither send orders to the SARM nor receivenotifications from the SARM, although the SRP is running and receiving orders fromthe upstream. Therefore, the SRP cannot process orders and remains idle until theSARM is restarted.
NEPs complete the processing of Atomic Service Description Layer (ASDL) requestscurrently in progress, and then it becomes idle.
The SRP and NEPs send periodic “heartbeat" messages to determine when the failedSARM becomes available.
NEP Failure ScenarioIn the event of NEP failure, the SRP continues to translate and send orders to theSARM, which continues to provision ASDLs scheduled to be provisioned by anyoperational NEP. All ASDLs to be provisioned by NEs managed by the failed NEP areadded to SARM Provisioning Pending Queue. The SARM sends periodic “heartbeat"messages to determine when the failed NEP becomes available.
Control Server Failure ScenarioIf the Control server is shut down, all other ASAP applications controlled by it are alsoshut down.
Database Failure ScenarioIf the SRP database fails, the SRP is shut down if it relies on the SRP database. Forexample, the C SRP server. Similarly, the SARM and NEP servers shut downwhenever their respective databases fail. If the Control database fails, the Controlserver is shut down, taking down all other ASAP applications controlled by it. In adistributed environment, if the primary Control server goes down, the secondaryControl servers detect this and shut down.
If the SQL Server is down, all databases fail and the entire system is shut down.
NE Unavailability ScenarioIf an NE becomes unavailable, all ASDLs to the unavailable NE queue up in theSARM. The SARM will not take new work orders (WOs).
If the asdl_timeout parameter is set for an ASDL, and the timeout parameter exceedsasdl_retry_number parameter, the WO to which the ASDL belongs fails and rolls back.
If the request_timeout parameter (an NE timeout parameter) is set for the WO to whichan ASDL belongs, and the request_retry_number (an NE timeout parameter) exceeds,the WO fails and rolls back.
Chapter 8Component Failure Scenarios
8-8
If neither ASDL nor NE timeout parameters are set, and the WO timeout parameters exceed,all orders with ASDLs going to the unavailable NE fail due to timeout.
SRP and SARM Failure ScenarioIf both the SRP and SARM fail, each NEP completes its processing of ASDL requestscurrently in progress. The NEP then closes all connections to NEs and then remains idle.
SARM and NEP Failure ScenarioIf the SARM and NEP fail, the SRP cannot send orders or receive notifications from theSARM. No order provisioning is possible.
Getting Help with ASAP ProblemsIf you can't resolve your ASAP problem, contact Oracle Global Support.
Before You Contact Global SupportProblems can often be fixed by shutting down ASAP and restarting the computer that theASAP system runs on. To shut down and restart ASAP, see "Starting and Stopping ASAP."
If that doesn't solve the problem, the first troubleshooting step is to look at the error log for theapplication or process that reported the problem. See "Using Error Logs to TroubleshootASAP." Be sure to observe the checklist for resolving problems with ASAP before reportingthe problem to Oracle Global Support. See "Troubleshooting Checklist."
Reporting ProblemsIf the checklist for resolving problems with ASAP does not help you to resolve the problem,write down the pertinent information:
• A clear and concise description of the problem, including when it began to occur.
• Relevant portions of the relevant log files.
• Relevant configuration files.
• Recent changes in your system, even if you don't think they are relevant.
• List of all ASAP components and patches installed on your system.
When you are ready, report the problem to Oracle Global Support.
Chapter 8Getting Help with ASAP Problems
8-9
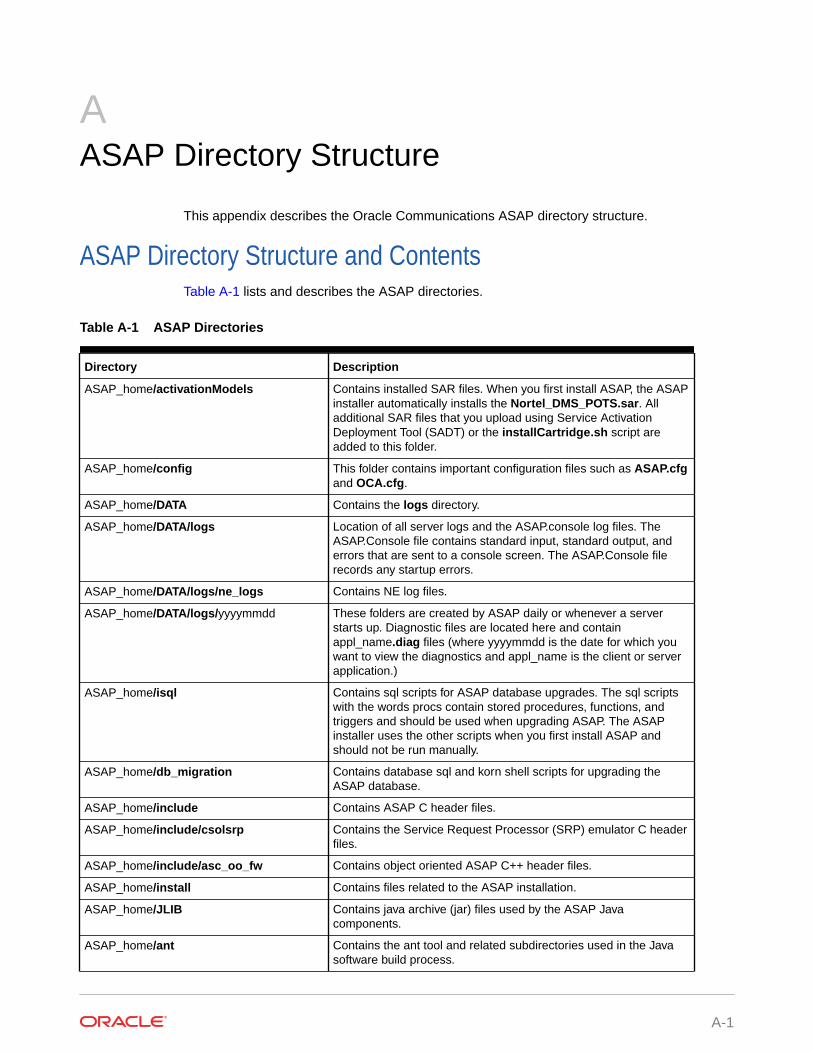
AASAP Directory Structure
This appendix describes the Oracle Communications ASAP directory structure.
ASAP Directory Structure and ContentsTable A-1 lists and describes the ASAP directories.
Table A-1 ASAP Directories
Directory Description
ASAP_home/activationModels Contains installed SAR files. When you first install ASAP, the ASAPinstaller automatically installs the Nortel_DMS_POTS.sar. Alladditional SAR files that you upload using Service ActivationDeployment Tool (SADT) or the installCartridge.sh script areadded to this folder.
ASAP_home/config This folder contains important configuration files such as ASAP.cfgand OCA.cfg.
ASAP_home/DATA Contains the logs directory.
ASAP_home/DATA/logs Location of all server logs and the ASAP.console log files. TheASAP.Console file contains standard input, standard output, anderrors that are sent to a console screen. The ASAP.Console filerecords any startup errors.
ASAP_home/DATA/logs/ne_logs Contains NE log files.
ASAP_home/DATA/logs/yyyymmdd These folders are created by ASAP daily or whenever a serverstarts up. Diagnostic files are located here and containappl_name.diag files (where yyyymmdd is the date for which youwant to view the diagnostics and appl_name is the client or serverapplication.)
ASAP_home/isql Contains sql scripts for ASAP database upgrades. The sql scriptswith the words procs contain stored procedures, functions, andtriggers and should be used when upgrading ASAP. The ASAPinstaller uses the other scripts when you first install ASAP andshould not be run manually.
ASAP_home/db_migration Contains database sql and korn shell scripts for upgrading theASAP database.
ASAP_home/include Contains ASAP C header files.
ASAP_home/include/csolsrp Contains the Service Request Processor (SRP) emulator C headerfiles.
ASAP_home/include/asc_oo_fw Contains object oriented ASAP C++ header files.
ASAP_home/install Contains files related to the ASAP installation.
ASAP_home/JLIB Contains java archive (jar) files used by the ASAP Javacomponents.
ASAP_home/ant Contains the ant tool and related subdirectories used in the Javasoftware build process.
A-1
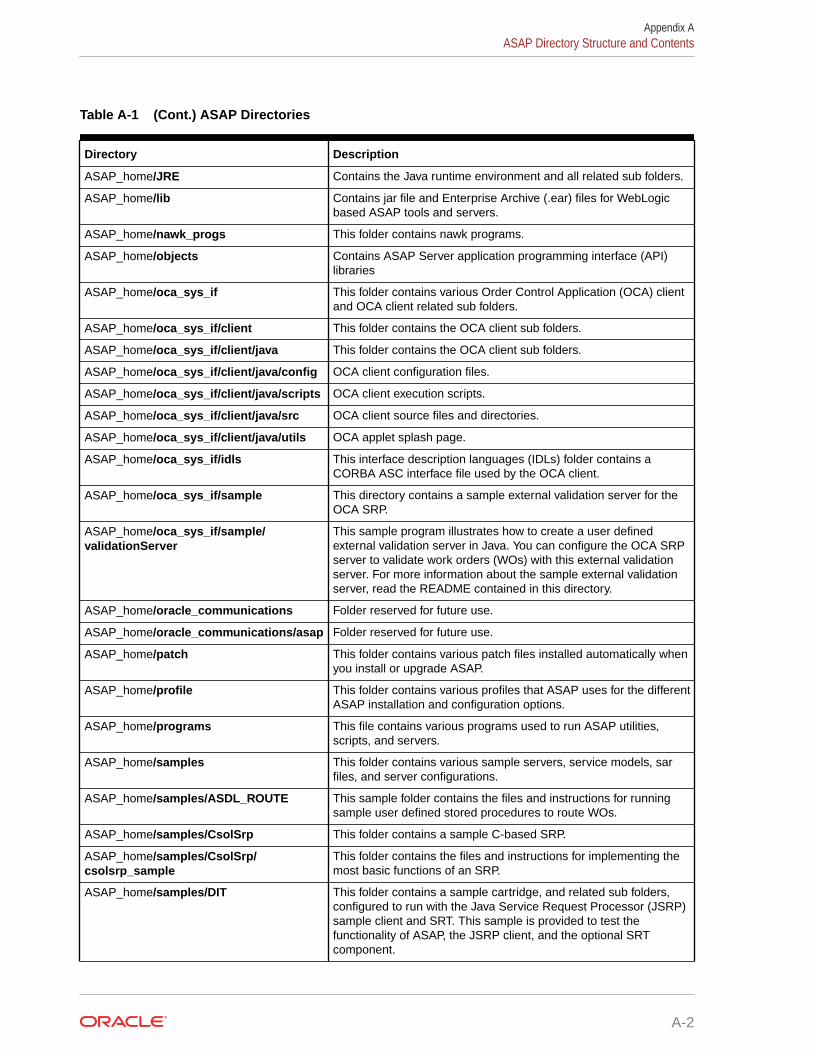
Table A-1 (Cont.) ASAP Directories
Directory Description
ASAP_home/JRE Contains the Java runtime environment and all related sub folders.
ASAP_home/lib Contains jar file and Enterprise Archive (.ear) files for WebLogicbased ASAP tools and servers.
ASAP_home/nawk_progs This folder contains nawk programs.
ASAP_home/objects Contains ASAP Server application programming interface (API)libraries
ASAP_home/oca_sys_if This folder contains various Order Control Application (OCA) clientand OCA client related sub folders.
ASAP_home/oca_sys_if/client This folder contains the OCA client sub folders.
ASAP_home/oca_sys_if/client/java This folder contains the OCA client sub folders.
ASAP_home/oca_sys_if/client/java/config OCA client configuration files.
ASAP_home/oca_sys_if/client/java/scripts OCA client execution scripts.
ASAP_home/oca_sys_if/client/java/src OCA client source files and directories.
ASAP_home/oca_sys_if/client/java/utils OCA applet splash page.
ASAP_home/oca_sys_if/idls This interface description languages (IDLs) folder contains aCORBA ASC interface file used by the OCA client.
ASAP_home/oca_sys_if/sample This directory contains a sample external validation server for theOCA SRP.
ASAP_home/oca_sys_if/sample/validationServer
This sample program illustrates how to create a user definedexternal validation server in Java. You can configure the OCA SRPserver to validate work orders (WOs) with this external validationserver. For more information about the sample external validationserver, read the README contained in this directory.
ASAP_home/oracle_communications Folder reserved for future use.
ASAP_home/oracle_communications/asap Folder reserved for future use.
ASAP_home/patch This folder contains various patch files installed automatically whenyou install or upgrade ASAP.
ASAP_home/profile This folder contains various profiles that ASAP uses for the differentASAP installation and configuration options.
ASAP_home/programs This file contains various programs used to run ASAP utilities,scripts, and servers.
ASAP_home/samples This folder contains various sample servers, service models, sarfiles, and server configurations.
ASAP_home/samples/ASDL_ROUTE This sample folder contains the files and instructions for runningsample user defined stored procedures to route WOs.
ASAP_home/samples/CsolSrp This folder contains a sample C-based SRP.
ASAP_home/samples/CsolSrp/csolsrp_sample
This folder contains the files and instructions for implementing themost basic functions of an SRP.
ASAP_home/samples/DIT This folder contains a sample cartridge, and related sub folders,configured to run with the Java Service Request Processor (JSRP)sample client and SRT. This sample is provided to test thefunctionality of ASAP, the JSRP client, and the optional SRTcomponent.
Appendix AASAP Directory Structure and Contents
A-2
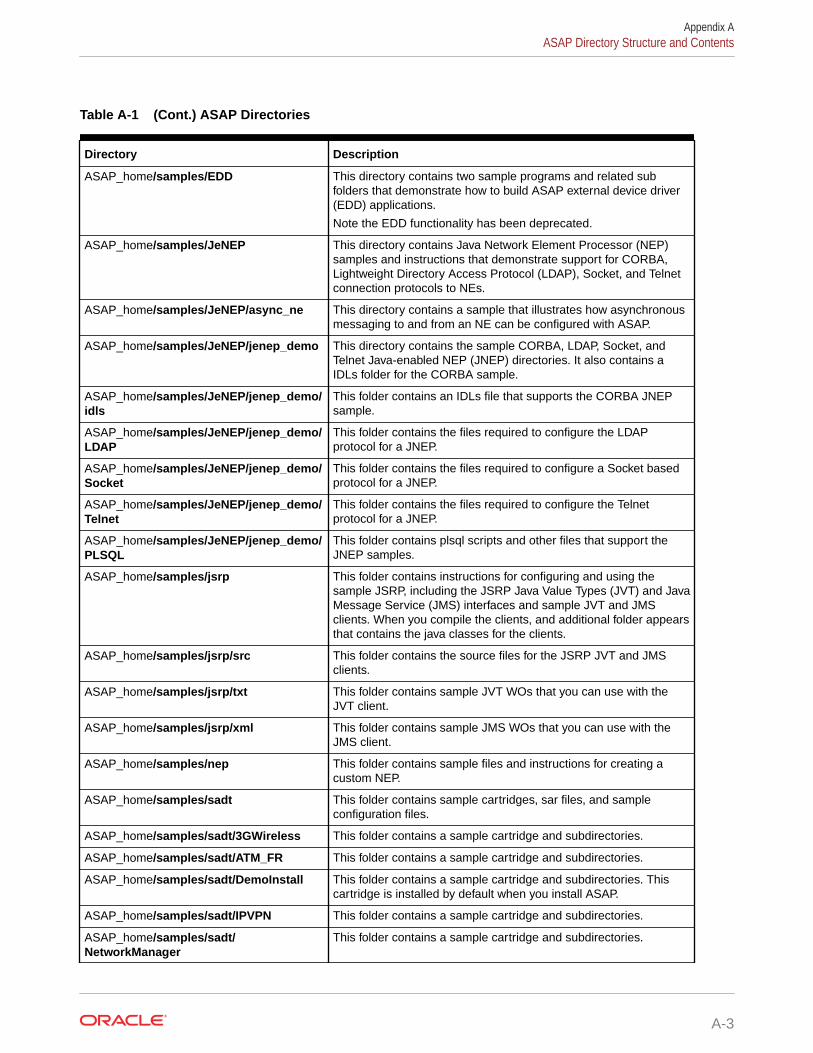
Table A-1 (Cont.) ASAP Directories
Directory Description
ASAP_home/samples/EDD This directory contains two sample programs and related subfolders that demonstrate how to build ASAP external device driver(EDD) applications.
Note the EDD functionality has been deprecated.
ASAP_home/samples/JeNEP This directory contains Java Network Element Processor (NEP)samples and instructions that demonstrate support for CORBA,Lightweight Directory Access Protocol (LDAP), Socket, and Telnetconnection protocols to NEs.
ASAP_home/samples/JeNEP/async_ne This directory contains a sample that illustrates how asynchronousmessaging to and from an NE can be configured with ASAP.
ASAP_home/samples/JeNEP/jenep_demo This directory contains the sample CORBA, LDAP, Socket, andTelnet Java-enabled NEP (JNEP) directories. It also contains aIDLs folder for the CORBA sample.
ASAP_home/samples/JeNEP/jenep_demo/idls
This folder contains an IDLs file that supports the CORBA JNEPsample.
ASAP_home/samples/JeNEP/jenep_demo/LDAP
This folder contains the files required to configure the LDAPprotocol for a JNEP.
ASAP_home/samples/JeNEP/jenep_demo/Socket
This folder contains the files required to configure a Socket basedprotocol for a JNEP.
ASAP_home/samples/JeNEP/jenep_demo/Telnet
This folder contains the files required to configure the Telnetprotocol for a JNEP.
ASAP_home/samples/JeNEP/jenep_demo/PLSQL
This folder contains plsql scripts and other files that support theJNEP samples.
ASAP_home/samples/jsrp This folder contains instructions for configuring and using thesample JSRP, including the JSRP Java Value Types (JVT) and JavaMessage Service (JMS) interfaces and sample JVT and JMSclients. When you compile the clients, and additional folder appearsthat contains the java classes for the clients.
ASAP_home/samples/jsrp/src This folder contains the source files for the JSRP JVT and JMSclients.
ASAP_home/samples/jsrp/txt This folder contains sample JVT WOs that you can use with theJVT client.
ASAP_home/samples/jsrp/xml This folder contains sample JMS WOs that you can use with theJMS client.
ASAP_home/samples/nep This folder contains sample files and instructions for creating acustom NEP.
ASAP_home/samples/sadt This folder contains sample cartridges, sar files, and sampleconfiguration files.
ASAP_home/samples/sadt/3GWireless This folder contains a sample cartridge and subdirectories.
ASAP_home/samples/sadt/ATM_FR This folder contains a sample cartridge and subdirectories.
ASAP_home/samples/sadt/DemoInstall This folder contains a sample cartridge and subdirectories. Thiscartridge is installed by default when you install ASAP.
ASAP_home/samples/sadt/IPVPN This folder contains a sample cartridge and subdirectories.
ASAP_home/samples/sadt/NetworkManager
This folder contains a sample cartridge and subdirectories.
Appendix AASAP Directory Structure and Contents
A-3
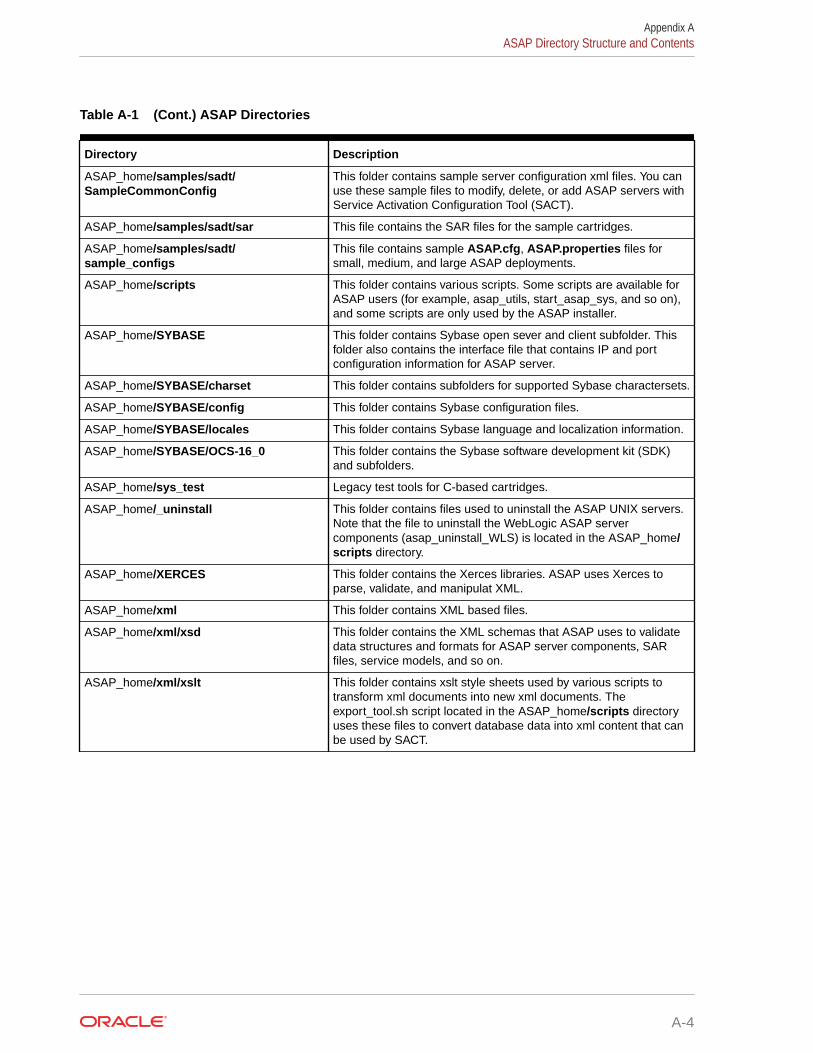
Table A-1 (Cont.) ASAP Directories
Directory Description
ASAP_home/samples/sadt/SampleCommonConfig
This folder contains sample server configuration xml files. You canuse these sample files to modify, delete, or add ASAP servers withService Activation Configuration Tool (SACT).
ASAP_home/samples/sadt/sar This file contains the SAR files for the sample cartridges.
ASAP_home/samples/sadt/sample_configs
This file contains sample ASAP.cfg, ASAP.properties files forsmall, medium, and large ASAP deployments.
ASAP_home/scripts This folder contains various scripts. Some scripts are available forASAP users (for example, asap_utils, start_asap_sys, and so on),and some scripts are only used by the ASAP installer.
ASAP_home/SYBASE This folder contains Sybase open sever and client subfolder. Thisfolder also contains the interface file that contains IP and portconfiguration information for ASAP server.
ASAP_home/SYBASE/charset This folder contains subfolders for supported Sybase charactersets.
ASAP_home/SYBASE/config This folder contains Sybase configuration files.
ASAP_home/SYBASE/locales This folder contains Sybase language and localization information.
ASAP_home/SYBASE/OCS-16_0 This folder contains the Sybase software development kit (SDK)and subfolders.
ASAP_home/sys_test Legacy test tools for C-based cartridges.
ASAP_home/_uninstall This folder contains files used to uninstall the ASAP UNIX servers.Note that the file to uninstall the WebLogic ASAP servercomponents (asap_uninstall_WLS) is located in the ASAP_home/scripts directory.
ASAP_home/XERCES This folder contains the Xerces libraries. ASAP uses Xerces toparse, validate, and manipulat XML.
ASAP_home/xml This folder contains XML based files.
ASAP_home/xml/xsd This folder contains the XML schemas that ASAP uses to validatedata structures and formats for ASAP server components, SARfiles, service models, and so on.
ASAP_home/xml/xslt This folder contains xslt style sheets used by various scripts totransform xml documents into new xml documents. Theexport_tool.sh script located in the ASAP_home/scripts directoryuses these files to convert database data into xml content that canbe used by SACT.
Appendix AASAP Directory Structure and Contents
A-4

BSticky and Non-Sticky Requests Supported byOrder Balancer
This appendix provides the list of sticky and non-sticky requests supported by OrderBalancer.
The following is a list of Non-Sticky requests:
• createorderbyvaluerequest
• getordertypesrequest
• getquerytypesrequest
• getservicetypesrequest
• getsupportedoptionaloperationsrequest
• trycreateordersbyvaluesrequest
The following is a list of Sticky requests:
• abortorderbykeyrequest
• abortservicerequest
• addextendedorderpropertyrequest
• addorderparameterrequest
• addserviceparameterrequest
• addservicerequest
• cancelorderbykeyrequest
• deleteservicerequest
• getinitorderbykeyrequest
• getorderbykeyrequest
• lockorderrequest
• removeextendedorderpropertyrequest
• removeorderbykeyrequest
• removeorderparameterrequest
• removeserviceparameterrequest
• resubmitorderbykeyrequest
• resumeorderbykeyrequest
• retryservicerequest
• setextendedorderpropertyrequest
• setorderparameterrequest
• setserviceparameterrequest
B-1

• startorderbykeyrequest
• stoporderbykeyrequest
• suspendorderbykeyrequest
• unlockorderrequest
• validateorderoperationrequest
• validateserviceoperationrequest
Appendix B
B-2